 33 |
34 |
35 |
36 | ## Redis的缓存策略
37 |
38 | ### 1. 旁路缓存
39 |
40 | 读策略步骤:
41 |
42 | - 如果读取的数据命中了缓存,则直接返回数据;
43 | - 如果读取的数据没有命中缓存,则从数据库读取数据,然后将数据写入到缓存,并且返回给用户。
44 |
45 | 写策略步骤:
46 |
47 | - 先更新数据库中的数据,再删除缓存中的数据
48 |
49 | 实践场景:
50 |
51 | 旁路缓存多应用于读多写少的的场景,例如**实时数据更新**,**登录状态和用户身份验证**等等。
52 |
53 |
54 |
55 | ### 2. 读写穿透
56 |
57 | 读策略步骤:
58 |
59 | - 先查询缓存中数据是否存在,如果存在则直接返回,如果不存在,则由缓存组件负责从数据库查询数据,并将结果写入到缓存组件,最后缓存组件将数据返回给应用。
60 |
61 | 写策略步骤:
62 |
63 | 当有数据更新的时候,先查询要写入的数据在缓存中是否已经存在:
64 |
65 | - 如果缓存中数据已经存在,则更新缓存中的数据,并且由缓存组件同步更新到数据库中,然后缓存组件告知应用程序更新完成。
66 | - 如果缓存中数据不存在,直接更新数据库,然后返回;
67 |
68 | 实践场景:
69 |
70 | 在日常开发中比较少见,因为该策略是直接将 Cache 视为一个服务节点,由 Cache 服务负责数据的读取和 db 写入,减轻应用程序的职责。
71 |
72 |
73 |
74 | ### 3. 写回策略
75 |
76 | 写回策略和读写穿透策略比较相似,但是不同于写回策略是异步将缓存的数据更新到数据库中,在实际场景中比较适用于 文章的阅读量,点赞量这类对数据安全度不高,但是需要读写效率比较高的场景。
77 |
--------------------------------------------------------------------------------
/src/components/content/ProseCode.vue:
--------------------------------------------------------------------------------
1 |
2 |
33 |
34 |
35 |
36 | ## Redis的缓存策略
37 |
38 | ### 1. 旁路缓存
39 |
40 | 读策略步骤:
41 |
42 | - 如果读取的数据命中了缓存,则直接返回数据;
43 | - 如果读取的数据没有命中缓存,则从数据库读取数据,然后将数据写入到缓存,并且返回给用户。
44 |
45 | 写策略步骤:
46 |
47 | - 先更新数据库中的数据,再删除缓存中的数据
48 |
49 | 实践场景:
50 |
51 | 旁路缓存多应用于读多写少的的场景,例如**实时数据更新**,**登录状态和用户身份验证**等等。
52 |
53 |
54 |
55 | ### 2. 读写穿透
56 |
57 | 读策略步骤:
58 |
59 | - 先查询缓存中数据是否存在,如果存在则直接返回,如果不存在,则由缓存组件负责从数据库查询数据,并将结果写入到缓存组件,最后缓存组件将数据返回给应用。
60 |
61 | 写策略步骤:
62 |
63 | 当有数据更新的时候,先查询要写入的数据在缓存中是否已经存在:
64 |
65 | - 如果缓存中数据已经存在,则更新缓存中的数据,并且由缓存组件同步更新到数据库中,然后缓存组件告知应用程序更新完成。
66 | - 如果缓存中数据不存在,直接更新数据库,然后返回;
67 |
68 | 实践场景:
69 |
70 | 在日常开发中比较少见,因为该策略是直接将 Cache 视为一个服务节点,由 Cache 服务负责数据的读取和 db 写入,减轻应用程序的职责。
71 |
72 |
73 |
74 | ### 3. 写回策略
75 |
76 | 写回策略和读写穿透策略比较相似,但是不同于写回策略是异步将缓存的数据更新到数据库中,在实际场景中比较适用于 文章的阅读量,点赞量这类对数据安全度不高,但是需要读写效率比较高的场景。
77 |
--------------------------------------------------------------------------------
/src/components/content/ProseCode.vue:
--------------------------------------------------------------------------------
1 |
2 |
5 |
22 |
23 |
24 |
41 |
42 |
68 |
--------------------------------------------------------------------------------
/src/content/_articles/Nuxt3生成对SEO友好的slug.md:
--------------------------------------------------------------------------------
1 | ---
2 | title: Nuxt3生成对SEO友好的slug
3 | slug: nuxt3-generate-seo-friendly-slug
4 | description: 使用nodejs中的pinyin包将中文标题转换为slug
5 | keywords: nuxt3,seo,slug,nodejs
6 | date: 2023-08-17 13:48
7 | ---
8 |
9 | ## 想法
10 |
11 | 首先 slug 和文章是需要有关联的,我的想法是将标题转换为拼音,然后通过 `-` 符号进行连接。
12 |
13 | 例如标题:`使用Java开发`,那么转换为拼音就是 `shi yong Java kai fa`,那么我再使用横杠符号进行连接那么就会得到一个可读的slug,`shi-yong-Java-kai-fa`。
14 |
15 | ## 开发
16 |
17 | 安装 `pinyin` 包
18 |
19 | ```shell
20 | pnpm install pinyin
21 | ```
22 |
23 | 在utils目录下创建 `slugUtils.ts` 工具类,用于转换标题,获取 slug。
24 |
25 | ```ts
26 | import pinyin from 'pinyin'
27 |
28 | /**
29 | * 中文转拼音
30 | * @param cnStr 中文字符串
31 | * @returns
32 | */
33 | const toPinyin = (cnStr: string) => {
34 | return pinyin(cnStr, {style: pinyin.STYLE_NORMAL,});
35 | }
36 |
37 | /**
38 | * 扁平化拼音数组
39 | * @param pinyinArr 拼音数组
40 | */
41 | const flattenPinyin = (pinyinArr: string[][]) => {
42 | return pinyinArr.map((item) => item[0])
43 | }
44 |
45 | export function getSlug(cnStr: string) {
46 | const pinyinArr = toPinyin(cnStr)
47 | const flattenArr = flattenPinyin(pinyinArr)
48 | return flattenArr.join('-')
49 | }
50 |
51 | ```
52 |
53 | 在发布文章的组件中引入该工具类,并在提交的时候进行 slug 获取。
54 |
55 | ```ts
56 | import { getSlug } from "~/utils/slugUtils"
57 |
58 | const articleData = {
59 | title: title.value,
60 | content: content.value,
61 | slug: getSlug(title.value),
62 | wordCount: wordCountComputed.value,
63 | };
64 | ```
65 |
66 | ## 效果
67 |
68 | 发布一篇测试文章,标题为 `测试使用slug`,如果能够正常转换的话,那么得到的 slug 为 `ce-shi-shi-yong-slug`。
69 |
70 | 
71 |
72 | 那么是可以正常进行转换,得到 slug的。那么通过 slug 为文章链接,对 SEO 会更加友好。
73 |
74 | 
75 |
--------------------------------------------------------------------------------
/src/components/article/Item.vue:
--------------------------------------------------------------------------------
1 |
2 |
8 |
20 |
9 | {{ language }}
10 |
11 |
12 |
19 |
5 |
37 |
38 |
39 |
57 |
--------------------------------------------------------------------------------
/src/content/_articles/构建可同步低费用的个人知识文档库.md:
--------------------------------------------------------------------------------
1 | ---
2 | title: 如何搭建一个可同步且低费用的个人文档库环境
3 | description: 使用 Github + Typero 搭建个人文档库
4 | slug: build-a-synchronized-and-low-cost-personal-document
5 | keywords: github,typecho,个人文档库,可同步,低费用
6 | date: 2023-02-18T19:07:08Z
7 | ---
8 |
9 | # 如何搭建一个可同步且低费用的个人文档库环境
10 |
11 | ## 简介
12 |
13 | 在以前我曾经尝试过很多种方式建立我的个人知识库,包括建立个人博客网站,使用 `Typecho` 来搭建动态博客或是使用 `Hexo + Github Pages` 来搭建静态博客,同时也使用过类如 `Wiki` 等开源知识库,也使用过 `语雀` 等知识管理软件。
14 |
15 | 但以上通通都有或多或少的缺点:
16 |
17 | 1. 博客网站上传文章颇为复杂,并不需要网站自带的标签板块功能,网站查看 md 文档样式需要依靠主题,而主题修改门槛较高。
18 | 2. Wiki 等开源知识库需要服务器部署,费用较大,且样式调整门槛高。
19 | 3. 语雀知识库功能较多,其实也可以作为一种平替选择,且手机端,网页端和电脑端均可同步查看,如果觉得免费额度足够使用的话,不失为一种更好的方式。
20 |
21 | 我相信很多人编写 md 文档都是使用 `Typero` 这款软件或是 `Vscode` ,在这里我所教学的搭建方式正是使用 `Typero` 。
22 |
23 |
24 |
25 | ## 过程
26 |
27 | ### 1. 创建一个Git仓库
28 |
29 | 首先我们先创建一个 Git 仓库,这里推荐首选 Github ,如果因网络原因那么可以选择 Gitee ,那么我这里先以 Github 为例子,我们创建一个仓库,并设置它的访问权限为私有,这里根据你的文档私密性来选择,如果你想分享给其他人,那么可以选择为公开,填写好其他信息后就可以创建了。
30 |
31 |
6 |
7 |
8 |
14 |
15 |
16 |
36 | 11 | {{ article.title }} 12 |
13 |
17 |
18 |
35 | 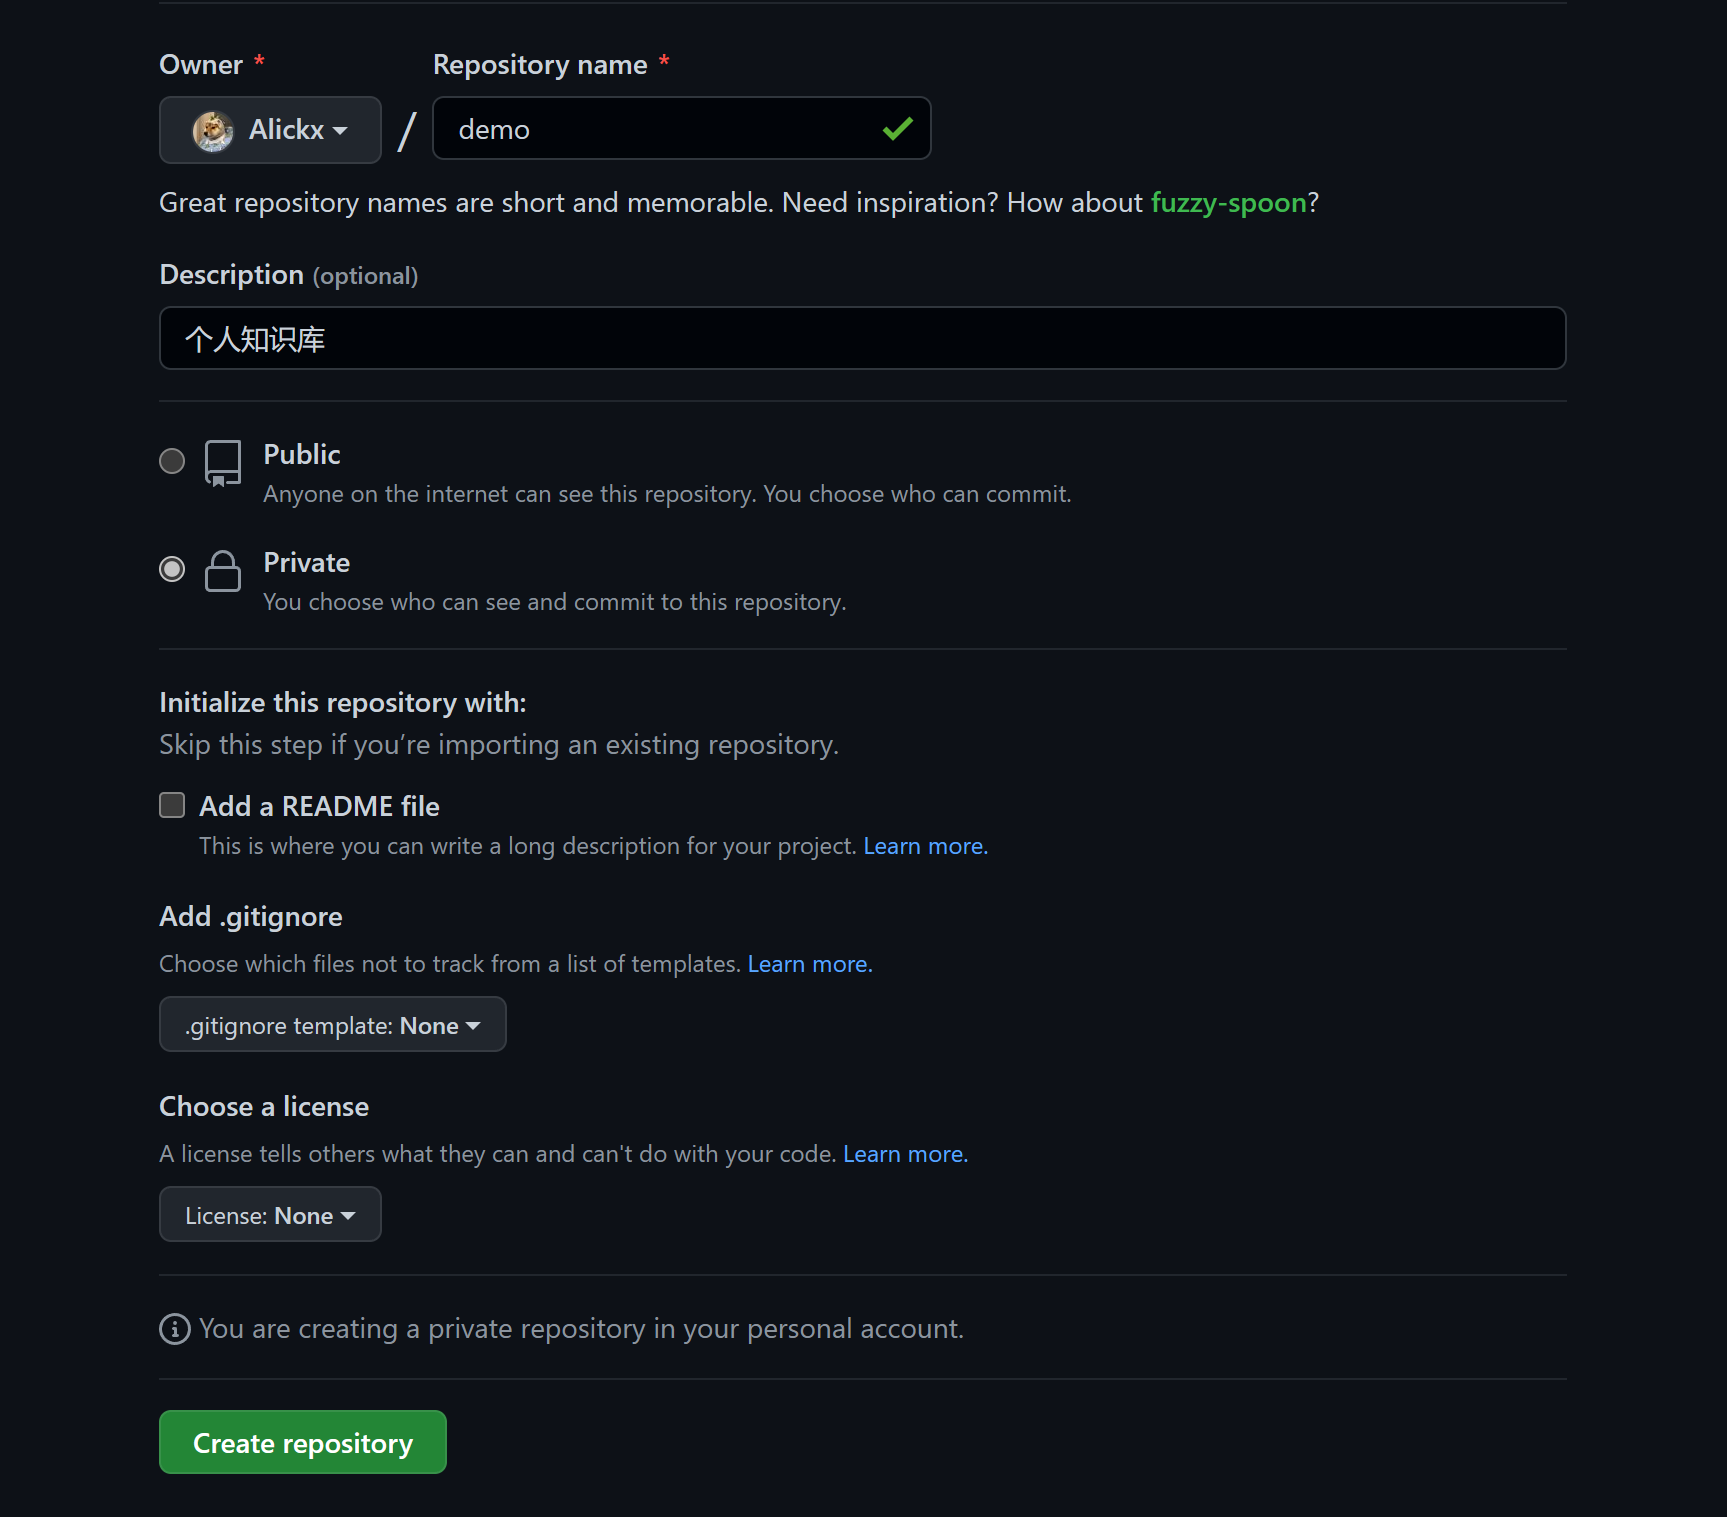 32 |
33 | 创建好后,我们给 Github 账户增加可以访问的 Token ,用于后面克隆仓库和上传使用,如果你已经对该部分较为熟悉,那么可以跳过第二节。
34 |
35 | ### 2. 创建Token和克隆仓库
36 |
37 | 创建 Token 的步骤可以到网上查询一下,这里给出一张图,我们只需要给这个Token开放的权限为 repo 的全部权限即可,同时需要打开记事本将这个 Token 保存下来,因为它是一次性生成,关闭后就无法查看了。
38 |
39 | 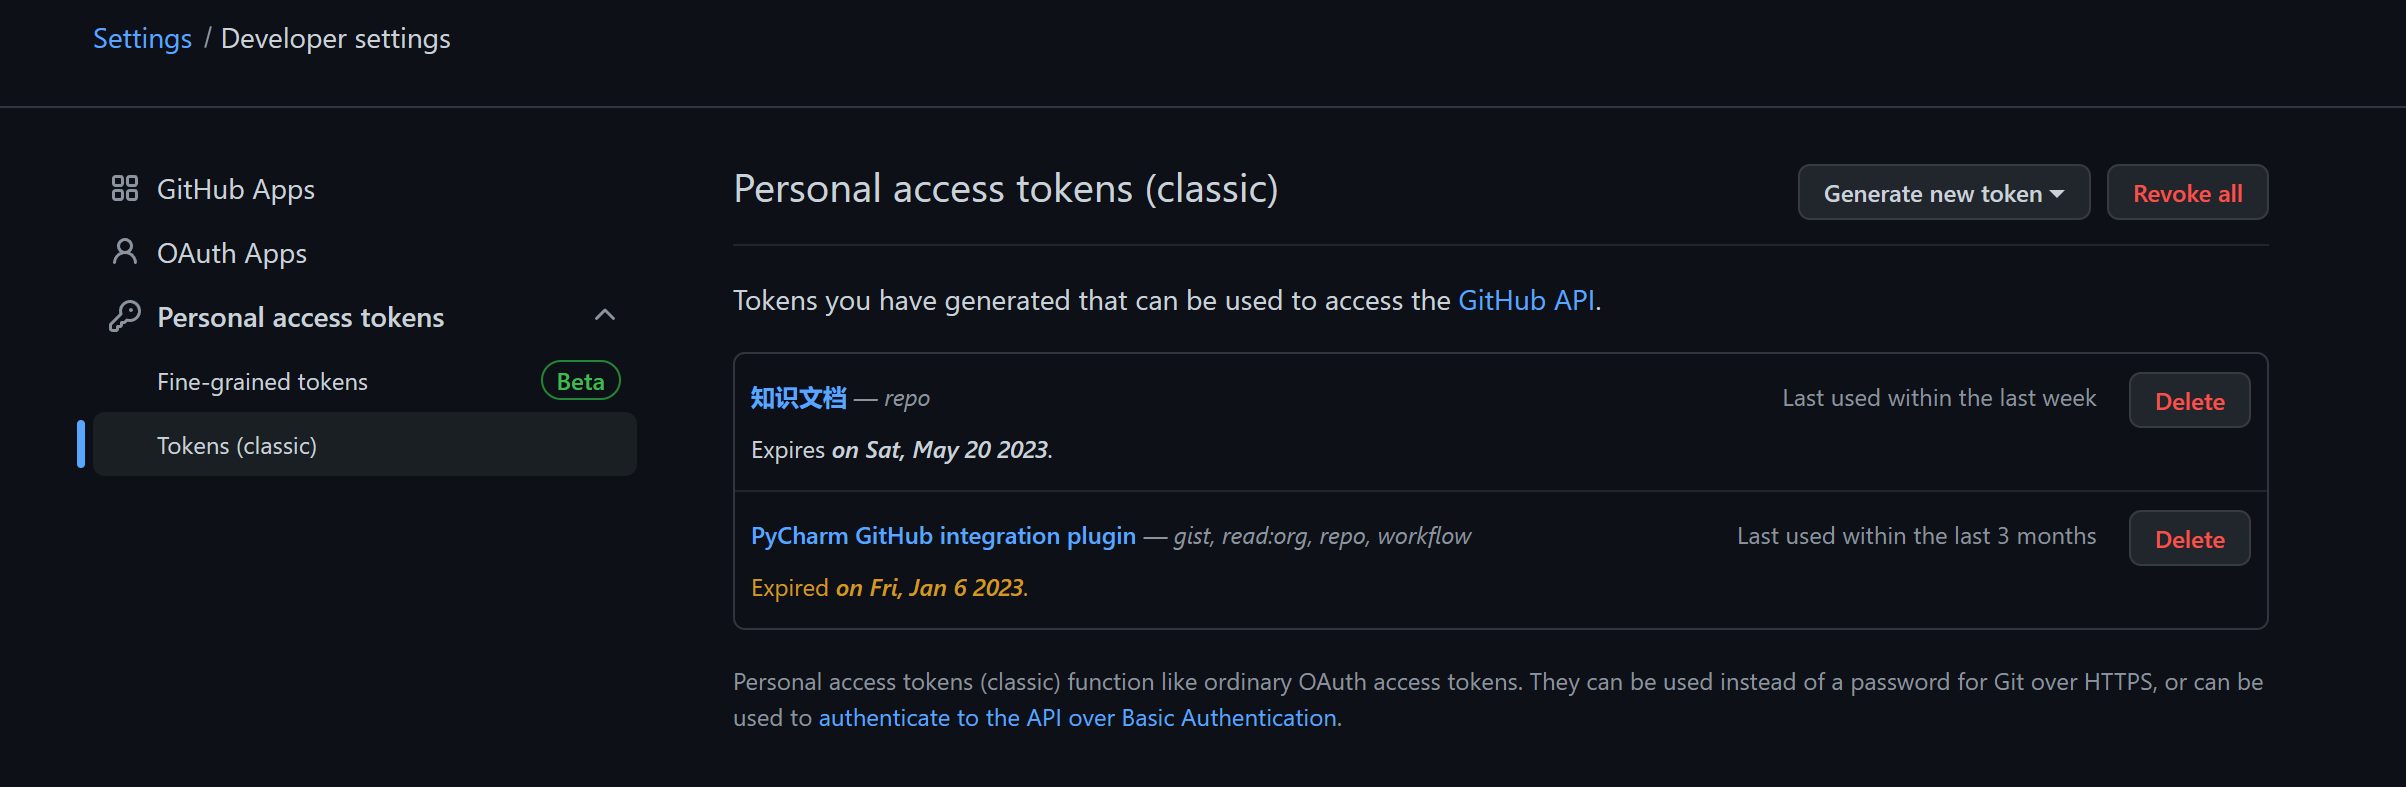
40 |
41 | 然后我们打开命令行,打开到克隆仓库所在的盘中,输入命令
42 |
43 | ```shell
44 | git clone xxxx
45 | ```
46 |
47 | 这里的 xxxx 为你的仓库地址,同时他会要求你填入 Github 的账号名和密码,这里要注意的是密码不要是登录的密码,而是刚才我们创建好的 Token 。
48 |
49 | 如果没有意外,这个时候仓库已经是 clone 下来了,那么我们就可以在该仓库中创建和编写文档。
50 |
51 |
52 |
53 | ### 3. 文档中图片的上传
54 |
55 | 我这里使用的 md 编辑器为 Typero ,它内置了一个图像选项,可以自动地使用 `PicGo` 来进行图片的上传,我们的图床可以选择为 七牛云,腾讯云,阿里云等,根据我们的需要来选择。七牛云需要你拥有一个已备案的域名,且每天有流量额度,不过对于个人来说绰绰有余了,腾讯云和阿里云就差不多一样了,其他那些免费图床就不推荐了,稳定性较差。
56 |
57 |
58 |
59 | ### 4. 文档同步
60 |
61 | 文档同步的话我们只需要每次编写好新的文档后及时地将文档 push 回仓库即可,后续其他设备需要同步文档也只需要将该仓库克隆下来即可,非常方便。
62 |
63 |
64 |
65 | ## 总结
66 |
67 | 1. 这套方案唯一需要费用的地方是图床,如果网络条件允许且对私密度要求不高的话,可以选择 Github 作为我们的图床,那么这套方案就是 0 成本了。
68 | 2. 优点是安全性和稳定性非常足,且环境搭建步骤不难,使用 Typero 来进行 md 文档编写非常地快捷方便。
69 | 3. 缺点是移动设备端无法快捷地查看文档,这个后续优化一下方案,不过这肯定意味着搭建步骤会变得相对繁琐。
70 |
--------------------------------------------------------------------------------
/src/content/_articles/使用pt-archiver进行Mysql表归档.md:
--------------------------------------------------------------------------------
1 | ---
2 |
3 | title: 使用 pt-archiver 进行 MySQL 表归档
4 | slug: pt-archiver-mysql
5 | summary: 本文介绍了如何使用 pt-archiver 工具对 MySQL 表进行归档操作
6 | description: 本文介绍了如何使用 pt-archiver 工具对 MySQL 表进行归档操作
7 | keywords: Mysql, pt-archiver, 数据库, 归档, MySQL, 数据管理
8 | date: 2025-03-31 10:50
9 | ---
10 |
11 | ## 简介
12 |
13 | 我们在业务中肯定会遇到的一个情况是单表数据量过大,导致出现表性能下降以及存储空间过大等问题。
14 | 对于这个情况,就会延生出分表甚至分库的操作,但是这篇文章先不讨论这个分表分库,我们来讨论一下使用 pt-archiver 工具来对
15 | 某个大表进行归档处理的操作。
16 |
17 | ## 什么是 pt-archiver
18 |
19 | pt-archiver 是 Percona-Toolkit 工具集中的一个组件,是一个对 Mysql 表数据进行归档和清理的工具,
20 | Percona-Toolkit 是一个开源的数据库管理工具集,其包含了数据归档,表校验和查询分析等实用工具,
21 | 而 pt-archiver 全称是 ** Percona Toolkit Archiver **
22 |
23 | ### 常见用途:
24 |
25 | 1. 数据清理:删除或归档不再需要的旧数据,例如过期的日志或历史记录。
26 | 2. 性能优化:通过减少表的大小来提升查询性能。
27 | 3. 数据迁移:将数据从一个表移动到另一个表,或者导出到文件。
28 |
29 | ### 工作原理
30 |
31 | - pt-archiver 会以小批量的方式处理数据,避免锁表或对数据库造成过大压力。
32 | - 它支持条件过滤(比如 WHERE 子句),可以选择性地归档特定数据。
33 | - 数据可以被归档到另一个表、文件,或者直接删除(如果指定了 --purge 选项)。
34 |
35 | ## 实践环节
36 |
37 | 我们在内网机器上安装完 pt-archiver 后,可以调用命令来进行归档
38 |
39 | ```powershell
40 | pt-archiver
41 | --source h=HOST,P=PORT,u=USER,p=PASSWORD,D=DB,t=TABLE,A=utf8mb4,i=idx_create_time
42 | --dest h=HOST,P=PORT,u=USER,p=PASSWORD,D=DB,t=TABLE,A=utf8mb4
43 | --where "create_time >= '2024-10-10 00:00:00' AND create_time <= '2024-10-31 23:59:59'"
44 | --limit 20000
45 | --txn-size 3000
46 | --charset 'utf8mb4'
47 | --bulk-delete
48 | --bulk-insert
49 | --purge
50 | --progress 10000
51 | --statistics
52 | ```
53 |
54 | 这里的参数就不逐一解释了,可以直接复制询问 ai,但是有几个参数需要着重注意,分别是
55 |
56 | 1. i ,这个参数在 --source 中,作用是指定分批查询的时候使用的索引,我们一般会对 create_time 或者某些业务时间字段进行归档筛选
57 | 如果我们不指定索引的话,pt-archiver 有时候会直接 force index primary 使用主键索引,而不是时间字段的索引,导致 db 会一直卡在
58 | send data 阶段
59 | 2. charset ,这个参数是指定使用什么字符格式,如果不指定的话,归档操作可能会错误
60 | 3. limit 和 txn-size 这两个的作用可以详细询问 ai,这两个值的调整将会影响归档时 db 的性能
61 |
62 | 
63 | 可以看到归档完后,日志会给出每个 action 的耗时
64 |
65 | ### 归档完后的操作
66 |
67 | 我们在归档完后就会发现,源表虽然删除了数据,数据空间是减少了,但是索引空间仍然没有释放。那这里就涉及到我们面试涉及到的一个八股文了,为什么在 Mysql 中删除了表数据,但是空间仍然很大
68 | 那这里就给出 ai 的回答
69 |
70 | > 如果使用的是 InnoDB 存储引擎(MySQL 的默认引擎),删除数据后,表空间和索引空间并不会立即释放。
71 | InnoDB 使用 B+ 树来维护索引,删除记录时只是标记为“已删除”,空间仍然被占用,直到后续的表空间整理或优化。
72 | 如果使用的是 MyISAM 存储引擎,情况类似,索引文件(如 .MYI 文件)也不会自动收缩。
73 |
74 | 所以我们还需要对表执行优化
75 |
76 | ```sql
77 | OPTIMIZE TABLE tb_name
78 | ```
79 |
80 | 注意!该操作会造成短暂的锁表,需要看 Mysql 的版本是否支持 online ddl 操作;执行耗时也视表大小
81 |
82 | 如果数据库引擎不支持 OPTIMIZE TABLE 操作,那么可以分别执行以下两个 sql
83 |
84 | ```sql
85 | alter table tb_name
86 | ENGINE = 'InnoDB';
87 | analyze table tb_name;
88 | ```
89 |
90 | 作用和 OPTIMIZE TABLE 一样
91 |
92 | 执行完后再检查表空间就会发现索引空间已经释放了
93 |
--------------------------------------------------------------------------------
/nuxt.config.ts:
--------------------------------------------------------------------------------
1 | import { siteConfig } from "./src/config/site";
2 |
3 | export default defineNuxtConfig({
4 | modules: [
5 | "@unocss/nuxt",
6 | "@vueuse/nuxt",
7 | "dayjs-nuxt",
8 | "@nuxt/content",
9 | "@nuxtjs/algolia",
10 | "@nuxt/icon",
11 | ],
12 |
13 | css: [
14 | "@/assets/styles/normalize.css",
15 | "@/assets/styles/jetBrains-mono.scss",
16 | "@/assets/styles/markdown.scss",
17 | ],
18 |
19 | routeRules: {
20 | "/": { prerender: true },
21 | "/weekly": { prerender: true },
22 | "/articles/**": { isr: true },
23 | "/about": { prerender: true },
24 | "/interaction": { prerender: true },
25 | },
26 |
27 | nitro: {
28 | prerender: {
29 | routes: ["/sitemap.xml"],
30 | },
31 | },
32 |
33 | app: {
34 | head: {
35 | link: [{ rel: "icon", type: "image/x-icon", href: "/favicon.png" }],
36 | script: [
37 | { src: "/darkModelVerify.js" },
38 | { src: "//busuanzi.ibruce.info/busuanzi/2.3/busuanzi.pure.mini.js", async: true }
39 | ],
40 | meta: [
41 | {
42 | name: "viewport",
43 | content:
44 | "width=device-width, initial-scale=1.0, maximum-scale=1.0, user-scalable=no",
45 | },
46 | {
47 | name: "keywords",
48 | content: siteConfig.seo.meta.keywords,
49 | },
50 | {
51 | name: "description",
52 | content: siteConfig.seo.meta.description,
53 | },
54 | ],
55 | title: siteConfig.title,
56 | },
57 | },
58 |
59 | dayjs: {
60 | locales: ["zh-cn"],
61 | plugins: ["relativeTime", "utc", "timezone"],
62 | defaultLocale: "zh-cn",
63 | defaultTimezone: "Asia/Shanghai",
64 | },
65 |
66 | srcDir: "src/",
67 |
68 | content: {
69 | highlight: {
70 | theme: {
71 | default: "github-light",
72 | dark: "github-dark",
73 | sepia: "monokai",
74 | },
75 | preload: [
76 | "java",
77 | "vue",
78 | "vue-html",
79 | "shell",
80 | "sql",
81 | "javascript",
82 | "typescript",
83 | ],
84 | },
85 | markdown: {
86 | anchorLinks: false,
87 | remarkPlugins: ["remark-reading-time"],
88 | },
89 | },
90 |
91 | algolia: {
92 | apiKey: siteConfig.algolia.apiKey,
93 | applicationId: siteConfig.algolia.applicationId,
94 | docSearch: {
95 | indexName: siteConfig.algolia.indexName,
96 | lang: siteConfig.algolia.lang,
97 | },
98 | },
99 |
100 | compatibilityDate: "2024-10-13",
101 | });
102 |
--------------------------------------------------------------------------------
/src/content/_articles/Mysql 数据库MDL锁的排查和解决.md:
--------------------------------------------------------------------------------
1 | ---
2 | title: 解决 Mysql 数据库 MDL 锁问题
3 | slug: solving-mysql-database-mdl-lock-issue
4 | description: 本文记录了在对MySQL数据库表增加字段时遇到的 MDL 锁问题及其解决方法,包括问题原因分析、排查过程和解决方案。
5 | keywords: Mysql, MDL 锁, TDSQL-C MySQL, 数据库, alter table, 长事务, metadata lock
6 | date: 2024-07-06 10:25
7 | ---
8 |
9 | ## 简介
10 | 在本周工作中遇到一个关于 Mysql 数据库MDL锁的问题,因为在之前学习和工作中没有遇到过,所以借此来简单的记录一下这个问题以及相应的解决方法。本文章对部分问题不作深入的研究,有兴趣的可以去网上搜索。
11 |
12 | ## 前提
13 | 这周由于一个需求,需要对一个表增加字段,这里说一下数据库的具体情况,公司的数据库是使用腾讯云的 `TDSQL-C MySQL 版` ,版本是 5.7.18,内核小版本是 2.1.9。增加的表是一张记录表, 总数据量总共 13w,读写并不频繁。
14 |
15 | 增加字段的 ddl 语句为
16 |
17 | ```sql
18 | alter table `xxxx`
19 | add column a INT NULL,
20 | ALGORITHM = inplace,
21 | LOCK = NONE;
22 | ```
23 |
24 | 这里ALGORITHM和 LOCK 参数具体可以去网上搜索,这里不作具体说明。在执行这条语句后,出现了以下几种情况
25 |
26 | 1. alter table 语句迟迟执行未完成
27 | 2. 该表的读写都被阻塞了
28 | 3. 从腾讯云的数据库管家界面查看,alter 语句和 select 语句的状态都是 **waiting for table metadata lock**
29 |
30 | 在执行时间超过 5 分钟后,相关的查询线程堆积,导致数据库 cpu 上升较多,对 alter 语句进行 cancel 后,阻塞消失。
31 |
32 |
33 |
34 | ## 解决
35 | 先直接说这个问题的结论,这是因为在执行 alter 语句前,有一个事务对该表开启,那么当执行alter 语句时,数据库会获取该表的 MDL 锁,同时后续的查询,更新和删除操作都需要等待这个 MDL 锁,直到该事务结束。
36 |
37 | 我遇到这个问题原因是同事有一个 python 脚本对该表进行查询,但是他脚本里面的查询语句加了事务,并且没有作 commit 处理,导致会有一个**状态为 Sleep 的长事务存在**。由于该事务一直没有关闭,也就导致我这边 alter 一直在 waiting metadata lock 了。
38 |
39 | 后续在找到这个长事务的线程 id后,直接 Kill 掉,alter 操作就完成了。
40 |
41 | ## 排查过程
42 | 这里说一下如何排查出这个问题,首先使用一个有权限的 Mysql 账号,使用SQL
43 |
44 | ```sql
45 | select t.*, to_seconds(now()) - to_seconds(t.trx_started) idle_time
46 | from INFORMATION_SCHEMA.INNODB_TRX t;
47 | ```
48 |
49 | 这里查询出来的是当前数据库存在的事务,并且 `idle_time` 为该事务的存在时间,基本超过几十秒以上都可以认为是长事务了。
50 |
51 | 通过这个 SQL 我们可以获取到 **thread_id** 也就是线程 id 了,在 Mysql 中,我们的每个连接都会算一个线程,也就是每个连接都会有一个唯一的线程 id,我们通过线程 id 就可以直接使用 kill thread_id命令来 kill 掉这个会话。
52 |
53 | 但是这个治标不治本,因为只要这个长事务问题不解决,那么后面还是会出问题的,那么我们可以使用 SQL
54 |
55 | ```sql
56 | SELECT * FROM information_schema.PROCESSLIST WHERE ID = 123
57 | ```
58 |
59 | 这里 123 就是刚刚你查询出来的长事务的 thread_id,这里可以获取到连接的 user,操作的 db,当前连接的状态,以及最重要的 HOST
60 |
61 | 通过 db 和 user 我们大概率就可以锁定是哪些应用导致了,如果说还不能确定,那么可以通过 HOST 的 ip 和端口,去指定 ip 的机器上,使用相关命令查询出该端口是什么应用,就可以排查出来了。
62 |
63 |
64 |
65 | ## MDL锁
66 | 上面已经说了问题和解决方式了,这里简单看一下这个 mdl 锁是如何造成的,这里就直接画个图吧。
67 |
68 | 
69 |
70 | 画的比较丑,会话 a,b,c 顺序执行
71 |
72 | 2025-03-06 更新执行图
73 | 
74 |
75 | ## 题外话
76 | 如果使用 mysql8 版本,alter 语句可以这样子
77 |
78 | ```sql
79 | alter table `xxxx`
80 | add column a INT NULL,
81 | ALGORITHM = instant;
82 | ```
83 |
84 | ALGORITHM参数使用 **instant** 算法,可以实现只更改元数据,而不需要更改源表。这样子 alter 操作会非常非常快。
85 |
86 | 如果说你mysql 版本是 5.7,但是是使用腾讯云 `TDSQL-C MySQL` 版本的话,可以查看一下你的小内核版本是否支持 instant 特性,官方的 5.7 内核小版本 2.1.3 以上是支持 instant 的,只不过有诸多限制,具体可以看
87 |
88 | [TDSQL-C MySQL 版 Instant DDL-自研内核-文档中心-腾讯云 (tencent.com)](https://cloud.tencent.com/document/product/1003/61539)
89 |
90 |
--------------------------------------------------------------------------------
/src/config/site.ts:
--------------------------------------------------------------------------------
1 | export interface SiteConfig {
2 | // 网站基本信息
3 | name: string;
4 | title: string;
5 | description: string;
6 | author: string;
7 | // 博客创建时间
8 | createdAt: string;
9 |
10 | // 社交媒体链接
11 | social: {
12 | github?: string;
13 | bilibili?: string;
14 | music163?: string;
15 | steam?: string;
16 | [key: string]: string | undefined;
17 | };
18 |
19 | // 头部导航配置
20 | nav: {
21 | name: string;
22 | path: string;
23 | }[];
24 |
25 | // 底部链接配置
26 | footerLinks: {
27 | title: string;
28 | links: {
29 | name: string;
30 | url: string;
31 | }[];
32 | }[];
33 |
34 | // SEO配置
35 | seo: {
36 | // Meta标签配置
37 | meta: {
38 | keywords: string;
39 | description: string;
40 | };
41 | };
42 |
43 | // Algolia搜索配置
44 | algolia: {
45 | apiKey: string;
46 | applicationId: string;
47 | indexName: string;
48 | lang: string;
49 | };
50 | }
51 |
52 | // 默认网站配置
53 | export const siteConfig: SiteConfig = {
54 | name: "Alickx' Blog",
55 | title: "Alickx' Blog - 个人技术博客",
56 | description: "一个基于Nuxt3的技术博客",
57 | author: "Alickx",
58 | createdAt: "2023-04-26",
59 |
60 | social: {
61 | github: "https://github.com/Alickx",
62 | bilibili: "https://space.bilibili.com/302185707",
63 | music163: "https://music.163.com/#/user/home?id=115930869",
64 | steam: "https://steamcommunity.com/id/11923/",
65 | },
66 |
67 | nav: [
68 | {
69 | name: "首页",
70 | path: "/",
71 | },
72 | {
73 | name: "日常",
74 | path: "/daily",
75 | },
76 | {
77 | name: "互动交流",
78 | path: "/interaction",
79 | },
80 | {
81 | name: "关于",
82 | path: "/about",
83 | },
84 | ],
85 |
86 | footerLinks: [
87 | {
88 | title: "社交媒体",
89 | links: [
90 | { name: "Github", url: "https://github.com/Alickx" },
91 | { name: "BiliBili", url: "https://space.bilibili.com/302185707" },
92 | {
93 | name: "网易云音乐",
94 | url: "https://music.163.com/#/user/home?id=115930869",
95 | },
96 | { name: "Steam", url: "https://steamcommunity.com/id/11923/" },
97 | ],
98 | },
99 | {
100 | title: "友情链接",
101 | links: [{ name: "aliveseven", url: "https://www.aliveseven.top/" }],
102 | },
103 | {
104 | title: "学习论坛",
105 | links: [
106 | { name: "B站大学", url: "https://www.bilibili.com/" },
107 | { name: "开源中国", url: "https://www.oschina.net/" },
108 | { name: "掘金论坛", url: "https://juejin.cn/" },
109 | { name: "思否", url: "https://segmentfault.com/" },
110 | ],
111 | },
112 | ],
113 |
114 | // SEO配置
115 | seo: {
116 | meta: {
117 | keywords: "alickx,alickx.top,alickx blog,alickx's blog",
118 | description: "alickx's blog,记录代码,生活的博客",
119 | },
120 | },
121 |
122 | // Algolia搜索配置
123 | algolia: {
124 | apiKey: "c9fa4df5a01399fadc7b839a73e52a08",
125 | applicationId: "S761Z3RFQ3",
126 | indexName: "alickx",
127 | lang: " ",
128 | },
129 | };
130 |
--------------------------------------------------------------------------------
/src/components/Footer.vue:
--------------------------------------------------------------------------------
1 |
2 |
67 |
68 |
69 |
77 |
78 |
93 |
--------------------------------------------------------------------------------
/src/pages/articles/[slug].vue:
--------------------------------------------------------------------------------
1 |
2 |
32 |
33 | 创建好后,我们给 Github 账户增加可以访问的 Token ,用于后面克隆仓库和上传使用,如果你已经对该部分较为熟悉,那么可以跳过第二节。
34 |
35 | ### 2. 创建Token和克隆仓库
36 |
37 | 创建 Token 的步骤可以到网上查询一下,这里给出一张图,我们只需要给这个Token开放的权限为 repo 的全部权限即可,同时需要打开记事本将这个 Token 保存下来,因为它是一次性生成,关闭后就无法查看了。
38 |
39 | 
40 |
41 | 然后我们打开命令行,打开到克隆仓库所在的盘中,输入命令
42 |
43 | ```shell
44 | git clone xxxx
45 | ```
46 |
47 | 这里的 xxxx 为你的仓库地址,同时他会要求你填入 Github 的账号名和密码,这里要注意的是密码不要是登录的密码,而是刚才我们创建好的 Token 。
48 |
49 | 如果没有意外,这个时候仓库已经是 clone 下来了,那么我们就可以在该仓库中创建和编写文档。
50 |
51 |
52 |
53 | ### 3. 文档中图片的上传
54 |
55 | 我这里使用的 md 编辑器为 Typero ,它内置了一个图像选项,可以自动地使用 `PicGo` 来进行图片的上传,我们的图床可以选择为 七牛云,腾讯云,阿里云等,根据我们的需要来选择。七牛云需要你拥有一个已备案的域名,且每天有流量额度,不过对于个人来说绰绰有余了,腾讯云和阿里云就差不多一样了,其他那些免费图床就不推荐了,稳定性较差。
56 |
57 |
58 |
59 | ### 4. 文档同步
60 |
61 | 文档同步的话我们只需要每次编写好新的文档后及时地将文档 push 回仓库即可,后续其他设备需要同步文档也只需要将该仓库克隆下来即可,非常方便。
62 |
63 |
64 |
65 | ## 总结
66 |
67 | 1. 这套方案唯一需要费用的地方是图床,如果网络条件允许且对私密度要求不高的话,可以选择 Github 作为我们的图床,那么这套方案就是 0 成本了。
68 | 2. 优点是安全性和稳定性非常足,且环境搭建步骤不难,使用 Typero 来进行 md 文档编写非常地快捷方便。
69 | 3. 缺点是移动设备端无法快捷地查看文档,这个后续优化一下方案,不过这肯定意味着搭建步骤会变得相对繁琐。
70 |
--------------------------------------------------------------------------------
/src/content/_articles/使用pt-archiver进行Mysql表归档.md:
--------------------------------------------------------------------------------
1 | ---
2 |
3 | title: 使用 pt-archiver 进行 MySQL 表归档
4 | slug: pt-archiver-mysql
5 | summary: 本文介绍了如何使用 pt-archiver 工具对 MySQL 表进行归档操作
6 | description: 本文介绍了如何使用 pt-archiver 工具对 MySQL 表进行归档操作
7 | keywords: Mysql, pt-archiver, 数据库, 归档, MySQL, 数据管理
8 | date: 2025-03-31 10:50
9 | ---
10 |
11 | ## 简介
12 |
13 | 我们在业务中肯定会遇到的一个情况是单表数据量过大,导致出现表性能下降以及存储空间过大等问题。
14 | 对于这个情况,就会延生出分表甚至分库的操作,但是这篇文章先不讨论这个分表分库,我们来讨论一下使用 pt-archiver 工具来对
15 | 某个大表进行归档处理的操作。
16 |
17 | ## 什么是 pt-archiver
18 |
19 | pt-archiver 是 Percona-Toolkit 工具集中的一个组件,是一个对 Mysql 表数据进行归档和清理的工具,
20 | Percona-Toolkit 是一个开源的数据库管理工具集,其包含了数据归档,表校验和查询分析等实用工具,
21 | 而 pt-archiver 全称是 ** Percona Toolkit Archiver **
22 |
23 | ### 常见用途:
24 |
25 | 1. 数据清理:删除或归档不再需要的旧数据,例如过期的日志或历史记录。
26 | 2. 性能优化:通过减少表的大小来提升查询性能。
27 | 3. 数据迁移:将数据从一个表移动到另一个表,或者导出到文件。
28 |
29 | ### 工作原理
30 |
31 | - pt-archiver 会以小批量的方式处理数据,避免锁表或对数据库造成过大压力。
32 | - 它支持条件过滤(比如 WHERE 子句),可以选择性地归档特定数据。
33 | - 数据可以被归档到另一个表、文件,或者直接删除(如果指定了 --purge 选项)。
34 |
35 | ## 实践环节
36 |
37 | 我们在内网机器上安装完 pt-archiver 后,可以调用命令来进行归档
38 |
39 | ```powershell
40 | pt-archiver
41 | --source h=HOST,P=PORT,u=USER,p=PASSWORD,D=DB,t=TABLE,A=utf8mb4,i=idx_create_time
42 | --dest h=HOST,P=PORT,u=USER,p=PASSWORD,D=DB,t=TABLE,A=utf8mb4
43 | --where "create_time >= '2024-10-10 00:00:00' AND create_time <= '2024-10-31 23:59:59'"
44 | --limit 20000
45 | --txn-size 3000
46 | --charset 'utf8mb4'
47 | --bulk-delete
48 | --bulk-insert
49 | --purge
50 | --progress 10000
51 | --statistics
52 | ```
53 |
54 | 这里的参数就不逐一解释了,可以直接复制询问 ai,但是有几个参数需要着重注意,分别是
55 |
56 | 1. i ,这个参数在 --source 中,作用是指定分批查询的时候使用的索引,我们一般会对 create_time 或者某些业务时间字段进行归档筛选
57 | 如果我们不指定索引的话,pt-archiver 有时候会直接 force index primary 使用主键索引,而不是时间字段的索引,导致 db 会一直卡在
58 | send data 阶段
59 | 2. charset ,这个参数是指定使用什么字符格式,如果不指定的话,归档操作可能会错误
60 | 3. limit 和 txn-size 这两个的作用可以详细询问 ai,这两个值的调整将会影响归档时 db 的性能
61 |
62 | 
63 | 可以看到归档完后,日志会给出每个 action 的耗时
64 |
65 | ### 归档完后的操作
66 |
67 | 我们在归档完后就会发现,源表虽然删除了数据,数据空间是减少了,但是索引空间仍然没有释放。那这里就涉及到我们面试涉及到的一个八股文了,为什么在 Mysql 中删除了表数据,但是空间仍然很大
68 | 那这里就给出 ai 的回答
69 |
70 | > 如果使用的是 InnoDB 存储引擎(MySQL 的默认引擎),删除数据后,表空间和索引空间并不会立即释放。
71 | InnoDB 使用 B+ 树来维护索引,删除记录时只是标记为“已删除”,空间仍然被占用,直到后续的表空间整理或优化。
72 | 如果使用的是 MyISAM 存储引擎,情况类似,索引文件(如 .MYI 文件)也不会自动收缩。
73 |
74 | 所以我们还需要对表执行优化
75 |
76 | ```sql
77 | OPTIMIZE TABLE tb_name
78 | ```
79 |
80 | 注意!该操作会造成短暂的锁表,需要看 Mysql 的版本是否支持 online ddl 操作;执行耗时也视表大小
81 |
82 | 如果数据库引擎不支持 OPTIMIZE TABLE 操作,那么可以分别执行以下两个 sql
83 |
84 | ```sql
85 | alter table tb_name
86 | ENGINE = 'InnoDB';
87 | analyze table tb_name;
88 | ```
89 |
90 | 作用和 OPTIMIZE TABLE 一样
91 |
92 | 执行完后再检查表空间就会发现索引空间已经释放了
93 |
--------------------------------------------------------------------------------
/nuxt.config.ts:
--------------------------------------------------------------------------------
1 | import { siteConfig } from "./src/config/site";
2 |
3 | export default defineNuxtConfig({
4 | modules: [
5 | "@unocss/nuxt",
6 | "@vueuse/nuxt",
7 | "dayjs-nuxt",
8 | "@nuxt/content",
9 | "@nuxtjs/algolia",
10 | "@nuxt/icon",
11 | ],
12 |
13 | css: [
14 | "@/assets/styles/normalize.css",
15 | "@/assets/styles/jetBrains-mono.scss",
16 | "@/assets/styles/markdown.scss",
17 | ],
18 |
19 | routeRules: {
20 | "/": { prerender: true },
21 | "/weekly": { prerender: true },
22 | "/articles/**": { isr: true },
23 | "/about": { prerender: true },
24 | "/interaction": { prerender: true },
25 | },
26 |
27 | nitro: {
28 | prerender: {
29 | routes: ["/sitemap.xml"],
30 | },
31 | },
32 |
33 | app: {
34 | head: {
35 | link: [{ rel: "icon", type: "image/x-icon", href: "/favicon.png" }],
36 | script: [
37 | { src: "/darkModelVerify.js" },
38 | { src: "//busuanzi.ibruce.info/busuanzi/2.3/busuanzi.pure.mini.js", async: true }
39 | ],
40 | meta: [
41 | {
42 | name: "viewport",
43 | content:
44 | "width=device-width, initial-scale=1.0, maximum-scale=1.0, user-scalable=no",
45 | },
46 | {
47 | name: "keywords",
48 | content: siteConfig.seo.meta.keywords,
49 | },
50 | {
51 | name: "description",
52 | content: siteConfig.seo.meta.description,
53 | },
54 | ],
55 | title: siteConfig.title,
56 | },
57 | },
58 |
59 | dayjs: {
60 | locales: ["zh-cn"],
61 | plugins: ["relativeTime", "utc", "timezone"],
62 | defaultLocale: "zh-cn",
63 | defaultTimezone: "Asia/Shanghai",
64 | },
65 |
66 | srcDir: "src/",
67 |
68 | content: {
69 | highlight: {
70 | theme: {
71 | default: "github-light",
72 | dark: "github-dark",
73 | sepia: "monokai",
74 | },
75 | preload: [
76 | "java",
77 | "vue",
78 | "vue-html",
79 | "shell",
80 | "sql",
81 | "javascript",
82 | "typescript",
83 | ],
84 | },
85 | markdown: {
86 | anchorLinks: false,
87 | remarkPlugins: ["remark-reading-time"],
88 | },
89 | },
90 |
91 | algolia: {
92 | apiKey: siteConfig.algolia.apiKey,
93 | applicationId: siteConfig.algolia.applicationId,
94 | docSearch: {
95 | indexName: siteConfig.algolia.indexName,
96 | lang: siteConfig.algolia.lang,
97 | },
98 | },
99 |
100 | compatibilityDate: "2024-10-13",
101 | });
102 |
--------------------------------------------------------------------------------
/src/content/_articles/Mysql 数据库MDL锁的排查和解决.md:
--------------------------------------------------------------------------------
1 | ---
2 | title: 解决 Mysql 数据库 MDL 锁问题
3 | slug: solving-mysql-database-mdl-lock-issue
4 | description: 本文记录了在对MySQL数据库表增加字段时遇到的 MDL 锁问题及其解决方法,包括问题原因分析、排查过程和解决方案。
5 | keywords: Mysql, MDL 锁, TDSQL-C MySQL, 数据库, alter table, 长事务, metadata lock
6 | date: 2024-07-06 10:25
7 | ---
8 |
9 | ## 简介
10 | 在本周工作中遇到一个关于 Mysql 数据库MDL锁的问题,因为在之前学习和工作中没有遇到过,所以借此来简单的记录一下这个问题以及相应的解决方法。本文章对部分问题不作深入的研究,有兴趣的可以去网上搜索。
11 |
12 | ## 前提
13 | 这周由于一个需求,需要对一个表增加字段,这里说一下数据库的具体情况,公司的数据库是使用腾讯云的 `TDSQL-C MySQL 版` ,版本是 5.7.18,内核小版本是 2.1.9。增加的表是一张记录表, 总数据量总共 13w,读写并不频繁。
14 |
15 | 增加字段的 ddl 语句为
16 |
17 | ```sql
18 | alter table `xxxx`
19 | add column a INT NULL,
20 | ALGORITHM = inplace,
21 | LOCK = NONE;
22 | ```
23 |
24 | 这里ALGORITHM和 LOCK 参数具体可以去网上搜索,这里不作具体说明。在执行这条语句后,出现了以下几种情况
25 |
26 | 1. alter table 语句迟迟执行未完成
27 | 2. 该表的读写都被阻塞了
28 | 3. 从腾讯云的数据库管家界面查看,alter 语句和 select 语句的状态都是 **waiting for table metadata lock**
29 |
30 | 在执行时间超过 5 分钟后,相关的查询线程堆积,导致数据库 cpu 上升较多,对 alter 语句进行 cancel 后,阻塞消失。
31 |
32 |
33 |
34 | ## 解决
35 | 先直接说这个问题的结论,这是因为在执行 alter 语句前,有一个事务对该表开启,那么当执行alter 语句时,数据库会获取该表的 MDL 锁,同时后续的查询,更新和删除操作都需要等待这个 MDL 锁,直到该事务结束。
36 |
37 | 我遇到这个问题原因是同事有一个 python 脚本对该表进行查询,但是他脚本里面的查询语句加了事务,并且没有作 commit 处理,导致会有一个**状态为 Sleep 的长事务存在**。由于该事务一直没有关闭,也就导致我这边 alter 一直在 waiting metadata lock 了。
38 |
39 | 后续在找到这个长事务的线程 id后,直接 Kill 掉,alter 操作就完成了。
40 |
41 | ## 排查过程
42 | 这里说一下如何排查出这个问题,首先使用一个有权限的 Mysql 账号,使用SQL
43 |
44 | ```sql
45 | select t.*, to_seconds(now()) - to_seconds(t.trx_started) idle_time
46 | from INFORMATION_SCHEMA.INNODB_TRX t;
47 | ```
48 |
49 | 这里查询出来的是当前数据库存在的事务,并且 `idle_time` 为该事务的存在时间,基本超过几十秒以上都可以认为是长事务了。
50 |
51 | 通过这个 SQL 我们可以获取到 **thread_id** 也就是线程 id 了,在 Mysql 中,我们的每个连接都会算一个线程,也就是每个连接都会有一个唯一的线程 id,我们通过线程 id 就可以直接使用 kill thread_id命令来 kill 掉这个会话。
52 |
53 | 但是这个治标不治本,因为只要这个长事务问题不解决,那么后面还是会出问题的,那么我们可以使用 SQL
54 |
55 | ```sql
56 | SELECT * FROM information_schema.PROCESSLIST WHERE ID = 123
57 | ```
58 |
59 | 这里 123 就是刚刚你查询出来的长事务的 thread_id,这里可以获取到连接的 user,操作的 db,当前连接的状态,以及最重要的 HOST
60 |
61 | 通过 db 和 user 我们大概率就可以锁定是哪些应用导致了,如果说还不能确定,那么可以通过 HOST 的 ip 和端口,去指定 ip 的机器上,使用相关命令查询出该端口是什么应用,就可以排查出来了。
62 |
63 |
64 |
65 | ## MDL锁
66 | 上面已经说了问题和解决方式了,这里简单看一下这个 mdl 锁是如何造成的,这里就直接画个图吧。
67 |
68 | 
69 |
70 | 画的比较丑,会话 a,b,c 顺序执行
71 |
72 | 2025-03-06 更新执行图
73 | 
74 |
75 | ## 题外话
76 | 如果使用 mysql8 版本,alter 语句可以这样子
77 |
78 | ```sql
79 | alter table `xxxx`
80 | add column a INT NULL,
81 | ALGORITHM = instant;
82 | ```
83 |
84 | ALGORITHM参数使用 **instant** 算法,可以实现只更改元数据,而不需要更改源表。这样子 alter 操作会非常非常快。
85 |
86 | 如果说你mysql 版本是 5.7,但是是使用腾讯云 `TDSQL-C MySQL` 版本的话,可以查看一下你的小内核版本是否支持 instant 特性,官方的 5.7 内核小版本 2.1.3 以上是支持 instant 的,只不过有诸多限制,具体可以看
87 |
88 | [TDSQL-C MySQL 版 Instant DDL-自研内核-文档中心-腾讯云 (tencent.com)](https://cloud.tencent.com/document/product/1003/61539)
89 |
90 |
--------------------------------------------------------------------------------
/src/config/site.ts:
--------------------------------------------------------------------------------
1 | export interface SiteConfig {
2 | // 网站基本信息
3 | name: string;
4 | title: string;
5 | description: string;
6 | author: string;
7 | // 博客创建时间
8 | createdAt: string;
9 |
10 | // 社交媒体链接
11 | social: {
12 | github?: string;
13 | bilibili?: string;
14 | music163?: string;
15 | steam?: string;
16 | [key: string]: string | undefined;
17 | };
18 |
19 | // 头部导航配置
20 | nav: {
21 | name: string;
22 | path: string;
23 | }[];
24 |
25 | // 底部链接配置
26 | footerLinks: {
27 | title: string;
28 | links: {
29 | name: string;
30 | url: string;
31 | }[];
32 | }[];
33 |
34 | // SEO配置
35 | seo: {
36 | // Meta标签配置
37 | meta: {
38 | keywords: string;
39 | description: string;
40 | };
41 | };
42 |
43 | // Algolia搜索配置
44 | algolia: {
45 | apiKey: string;
46 | applicationId: string;
47 | indexName: string;
48 | lang: string;
49 | };
50 | }
51 |
52 | // 默认网站配置
53 | export const siteConfig: SiteConfig = {
54 | name: "Alickx' Blog",
55 | title: "Alickx' Blog - 个人技术博客",
56 | description: "一个基于Nuxt3的技术博客",
57 | author: "Alickx",
58 | createdAt: "2023-04-26",
59 |
60 | social: {
61 | github: "https://github.com/Alickx",
62 | bilibili: "https://space.bilibili.com/302185707",
63 | music163: "https://music.163.com/#/user/home?id=115930869",
64 | steam: "https://steamcommunity.com/id/11923/",
65 | },
66 |
67 | nav: [
68 | {
69 | name: "首页",
70 | path: "/",
71 | },
72 | {
73 | name: "日常",
74 | path: "/daily",
75 | },
76 | {
77 | name: "互动交流",
78 | path: "/interaction",
79 | },
80 | {
81 | name: "关于",
82 | path: "/about",
83 | },
84 | ],
85 |
86 | footerLinks: [
87 | {
88 | title: "社交媒体",
89 | links: [
90 | { name: "Github", url: "https://github.com/Alickx" },
91 | { name: "BiliBili", url: "https://space.bilibili.com/302185707" },
92 | {
93 | name: "网易云音乐",
94 | url: "https://music.163.com/#/user/home?id=115930869",
95 | },
96 | { name: "Steam", url: "https://steamcommunity.com/id/11923/" },
97 | ],
98 | },
99 | {
100 | title: "友情链接",
101 | links: [{ name: "aliveseven", url: "https://www.aliveseven.top/" }],
102 | },
103 | {
104 | title: "学习论坛",
105 | links: [
106 | { name: "B站大学", url: "https://www.bilibili.com/" },
107 | { name: "开源中国", url: "https://www.oschina.net/" },
108 | { name: "掘金论坛", url: "https://juejin.cn/" },
109 | { name: "思否", url: "https://segmentfault.com/" },
110 | ],
111 | },
112 | ],
113 |
114 | // SEO配置
115 | seo: {
116 | meta: {
117 | keywords: "alickx,alickx.top,alickx blog,alickx's blog",
118 | description: "alickx's blog,记录代码,生活的博客",
119 | },
120 | },
121 |
122 | // Algolia搜索配置
123 | algolia: {
124 | apiKey: "c9fa4df5a01399fadc7b839a73e52a08",
125 | applicationId: "S761Z3RFQ3",
126 | indexName: "alickx",
127 | lang: " ",
128 | },
129 | };
130 |
--------------------------------------------------------------------------------
/src/components/Footer.vue:
--------------------------------------------------------------------------------
1 |
2 |
67 |
68 |
69 |
77 |
78 |
93 |
--------------------------------------------------------------------------------
/src/pages/articles/[slug].vue:
--------------------------------------------------------------------------------
1 |
2 |
3 |
26 |
27 |
28 |
118 |
119 |
120 |
--------------------------------------------------------------------------------
/src/content/_articles/Jdk21虚拟线程体验.md:
--------------------------------------------------------------------------------
1 | ---
2 | title: jdk21虚拟线程体验
3 | slug: jdk21-virtual-thread-experience
4 | date: 2023-09-24
5 | ---
6 |
7 | ## 虚拟线程是什么?
8 |
9 | 网上已经有很多关于虚拟线程的介绍了,这里我就不复制粘贴过来,有兴趣可以去看看大佬们的介绍,我就说一下我认为的虚拟线程吧。
10 |
11 | 首先我们在背八股文的时候都背过**进程和线程的区别**,进程是操作系统中的一个独立执行单位,而线程则是进程内的一个执行单位,进程之间是相互独立的,而同一进程的线程则可以通过共享内存空间来实现通信。
12 |
13 | 而比较关键的一点则是 进程和线程相比,线程创建,切换和销毁的代价较低,占用的系统资源较少。
14 |
15 | 同时我们在程序开发上就经常使用到线程这种东西,例如我们想在不阻塞主线程执行的情况下去执行其他的一些操作,例如发送消息,上传文件等等,我们就可以创建一个新线程去进行操作。
16 |
17 | 但就算是线程,我们如果频繁的创建,销毁,它的一个性能影响依旧是很大的,这里又涉及到一些关于操作系统的知识了,总之频繁的创建和销毁线程相比于操作进程而言是一个轻量的操作,但依旧对性能有影响。
18 |
19 | 所以在 Java 中,我们通常会创建一个线程池来进行线程的操作,也就是池化技术,通过这种技术来最大限度减少线程操作的损耗,例如 Tomcat 的连接池,Mysql 的连接池。
20 |
21 | 我们在开发一些 IO 耗时较长的逻辑的时候,也会使用线程池来有效增加这个吞吐量。但是这里终究有个问题,就是线程池中的线程始终是有限的,它并不是 Jdk 来实现线程的操作逻辑,而是会调用系统接口来创建一个真实的线程。
22 |
23 | 而我们看一个 Go 语言中相比于 Java 出色的一点就是 Go 拥有**协程**。
24 |
25 | > Go语言的协程(Goroutine)是一种轻量级的线程,由Go语言的运行时系统管理。协程是Go语言并发编程的重要组成部分,它们允许你在程序中并发执行代码,而不需要显式地创建线程和管理线程的生命周期。协程是Go语言中并发的基本单元,它们相比传统的线程更加高效,因为它们可以在少量的内存上运行,而且创建和销毁协程的开销很小。
26 | >
27 | > Go语言的协程与传统线程的主要区别在于:
28 | >
29 | > 1. 轻量级:Go协程使用的内存远比传统线程少,因此可以创建成千上万个协程而不会导致系统资源耗尽。
30 | > 2. 并发性:Go协程使得并发编程变得容易,你可以轻松创建和管理协程,而不需要担心线程同步和锁定等复杂问题。
31 | > 3. 通信:Go协程之间可以通过通道(Channel)进行通信,这是一种用于在协程之间传递数据的机制。通道可以安全地传递数据,避免了共享内存导致的竞态条件和死锁问题。
32 |
33 | 从这段简介就知道,Go的协程它跟线程的作用是一样的,但是它却是依赖于 Go 语言本身来实现,并不是系统级别。它可以很轻易地创建成百上千万个协程来操作,并且资源消耗极低,这种在 Jdk 虚拟线程出来之前是根本实现不了的。
34 |
35 | 这也是为什么这么多音视频,网盘和高 IO 并发等等应用程序选择使用 Go 来实现的原因,因为实现并发操作极其简单,性能又好。
36 |
37 | 但是在 Jdk21 后,Java 拥有了虚拟线程,这意味着 Java 也能做到这些了。
38 |
39 |
40 |
41 | ## 虚拟线程的性能
42 |
43 | 我们可以拿一个很小的 Demo 来看一下虚拟线程性能,先来看一下这个 Demo。
44 |
45 | ```java
46 | public class VirtualThreadDemo {
47 | public static void main(String[] args) {
48 | var a = new AtomicInteger(0);
49 | // 创建一个固定200个线程的线程池
50 | try (var vs = Executors.newFixedThreadPool(200)) {
51 | List
6 |
24 |
7 |
11 |
13 |
14 |
23 |  78 |
79 | 这样子分出一个独立 model 模块,其他服务模块如果使用到该服务的话,就可以直接引用该模块。
80 |
81 | 但假如要求微服务隔离性要比较高的话,那么也只能在目标微服务上构建实体类来进行接收了。
82 |
83 | ### 4. 新增加的module层
84 |
85 | 但是我们往往不会将服务分得太细,我们只会将主要的服务分离成微服务,这些主要的服务中有可能也会包含着很多服务,例如说文章服务中我并没有将评论服务和点赞服务分离出去。
86 |
87 | 首先微服务架构所要解决的一个问题是单体服务耦合度很大,当其中一个服务出现问题时,其他服务可能也会因此受到波及。然后就是分离成单独服务模块的话,它也会因此获得独立的资源来处理服务逻辑,获得更好的性能。
88 |
89 | 但是当一个服务的使用量暂时并没有特别突出的时候,我们一般不会将其分离出来。具体微服务的划分后面可能会单独出一个文档来说明。
90 |
91 | 但是如果到后期某一天,评论系统扛不住了,需要急切地独立出来做成一个微服务,那么我们有必要新增一个module层来管理各个子系统。
92 |
93 |
78 |
79 | 这样子分出一个独立 model 模块,其他服务模块如果使用到该服务的话,就可以直接引用该模块。
80 |
81 | 但假如要求微服务隔离性要比较高的话,那么也只能在目标微服务上构建实体类来进行接收了。
82 |
83 | ### 4. 新增加的module层
84 |
85 | 但是我们往往不会将服务分得太细,我们只会将主要的服务分离成微服务,这些主要的服务中有可能也会包含着很多服务,例如说文章服务中我并没有将评论服务和点赞服务分离出去。
86 |
87 | 首先微服务架构所要解决的一个问题是单体服务耦合度很大,当其中一个服务出现问题时,其他服务可能也会因此受到波及。然后就是分离成单独服务模块的话,它也会因此获得独立的资源来处理服务逻辑,获得更好的性能。
88 |
89 | 但是当一个服务的使用量暂时并没有特别突出的时候,我们一般不会将其分离出来。具体微服务的划分后面可能会单独出一个文档来说明。
90 |
91 | 但是如果到后期某一天,评论系统扛不住了,需要急切地独立出来做成一个微服务,那么我们有必要新增一个module层来管理各个子系统。
92 |
93 |  94 |
95 | 我们将每一个子系统独立成一个软件包来管理,那么到后面某个子系统需要成为一个微服务的时候,我们就可以快速地构建起这个微服务。
96 |
97 |
98 |
99 | ## 总结
100 |
101 | 以前项目结构只是目前我所了解到的常用的项目结构,我们可以发现,从简单地分成 Controller,Service 和 Mapper 层到后面成为微服务架构后分成每一个子系统,复杂性不断地在提高,互相通信变得困难,但这是为了应对越来越复杂的场景而改变的。
102 |
103 | 其实有时候会觉得编程思想之间会比较矛盾,我们为了解除耦合,不断地进行分离,尽量不依赖于其他逻辑,可是为了进行代码复用,减少无效增加,我们不断地对通用方法进行分离复用,但是这个通用方法就会变得如同无人敢碰的堡垒一样,因为我们不知道优化了什么,修改了什么将会发生什么,牵一处而动全身。
104 |
--------------------------------------------------------------------------------
/README_zh-CN.md:
--------------------------------------------------------------------------------
1 |
94 |
95 | 我们将每一个子系统独立成一个软件包来管理,那么到后面某个子系统需要成为一个微服务的时候,我们就可以快速地构建起这个微服务。
96 |
97 |
98 |
99 | ## 总结
100 |
101 | 以前项目结构只是目前我所了解到的常用的项目结构,我们可以发现,从简单地分成 Controller,Service 和 Mapper 层到后面成为微服务架构后分成每一个子系统,复杂性不断地在提高,互相通信变得困难,但这是为了应对越来越复杂的场景而改变的。
102 |
103 | 其实有时候会觉得编程思想之间会比较矛盾,我们为了解除耦合,不断地进行分离,尽量不依赖于其他逻辑,可是为了进行代码复用,减少无效增加,我们不断地对通用方法进行分离复用,但是这个通用方法就会变得如同无人敢碰的堡垒一样,因为我们不知道优化了什么,修改了什么将会发生什么,牵一处而动全身。
104 |
--------------------------------------------------------------------------------
/README_zh-CN.md:
--------------------------------------------------------------------------------
1 |
2 | English | 简体中文
3 |
4 |
5 | Nuxt3-Blog
6 | 7 | ## 📖 项目介绍 8 | 9 | 这是一个基于 Nuxt3 + TypeScript + UnoCSS 构建的个人博客网站,用于展示文章、记录生活,以及分享个人日常。项目采用现代前端技术栈,具有响应式布局和深色模式支持,专注于良好的用户体验和性能优化。 10 | 11 | ## 🛠️ 技术栈 12 | 13 | - **Nuxt3**: Vue 的服务端渲染框架,提供优秀的 SEO 支持和性能 14 | - **TypeScript**: 增强代码可维护性和类型安全 15 | - **UnoCSS**: 原子化 CSS 引擎,提高样式开发效率 16 | - **Vite**: 现代前端构建工具,提供极速的开发体验 17 | - **@nuxt/content**: 强大的内容管理系统,方便博客文章的管理 18 | - **Waline**: 轻量级评论系统 19 | - **Algolia**: 高效的站内搜索解决方案 20 | - **Pnpm**: 高性能的包管理工具 21 | 22 | ## ✨ 主要功能 23 | 24 | - ✅ **文章展示**: 支持 Markdown 格式,代码高亮,阅读时间估计 25 | - ✅ **文章搜索**: 集成 Algolia,提供高效的全站搜索体验 26 | - ✅ **响应式布局**: 适配各种设备,从手机到桌面平台 27 | - ✅ **深色模式**: 支持浅色/深色主题切换,保护用户视力 28 | - ✅ **文章评论**: 集成 Waline 评论系统,支持匿名评论 29 | - ✅ **网站 SEO**: 针对搜索引擎优化,提高网站可见性 30 | - ✅ **站点地图**: 自动生成 sitemap.xml,有助于搜索引擎收录 31 | - ✅ **配置系统**: 通过配置文件轻松自定义博客名称、头部导航、底部链接等内容 32 | 33 | ## 🚀 快速开始 34 | 35 | ### 环境要求 36 | 37 | - Node.js 16.x 或更高版本 38 | - pnpm 7.x 或更高版本 39 | 40 | ### 安装与运行 41 | 42 | ```bash 43 | # 克隆仓库 44 | git clone https://github.com/alickx/nuxt3-blog.git 45 | cd nuxt3-blog 46 | 47 | # 安装依赖 48 | pnpm install 49 | 50 | # 开发模式运行 51 | pnpm dev 52 | 53 | # 构建项目 54 | pnpm build 55 | 56 | # 预览构建结果 57 | pnpm preview 58 | ``` 59 | 60 | ## 📝 内容创作 61 | 62 | 博客文章存放在 `src/content/_articles` 目录下,使用 Markdown 格式编写。每篇文章需要包含 frontmatter 元数据,例如: 63 | 64 | ```markdown 65 | --- 66 | title: '文章标题' 67 | description: '文章描述' 68 | date: '2023-01-01' 69 | tags: ['标签1', '标签2'] 70 | --- 71 | 72 | 文章内容... 73 | ``` 74 | 75 | Frontmatter 字段书写建议: 76 | 77 | - `title`:保持标题简短有力,并自然融入核心关键词,便于搜索引擎和内容订阅正确判别,同时吸引读者点击。 78 | - `description`:用 1-2 句话概括文章价值和主要结论;该字段会用于 SEO 元描述以及社交分享摘要,决定读者是否继续阅读。 79 | - `date`:统一使用 ISO 8601 格式(`YYYY-MM-DD`),确保文章在站内归档、时间轴和自动化部署中都能准确排序。 80 | - `tags`:挑选 3-5 个准确反映主题的标签;一致的标签体系能将相关文章聚合,并提升站内搜索与筛选的相关性。 81 | 82 | ## ⚙️ 个性化定制 83 | 84 | 博客可以通过位于 `src/config/site.ts` 的配置文件进行轻松自定义。这允许您修改: 85 | 86 | - 博客名称和基本信息 87 | - 头部导航菜单项 88 | - 底部链接和分区 89 | - 社交媒体链接 90 | - SEO元数据和网站图标 91 | - Algolia搜索配置 92 | 93 | 配置示例: 94 | 95 | ```typescript 96 | // src/config/site.ts 97 | export const siteConfig = { 98 | name: "您的博客名称", 99 | title: "您的博客标题", 100 | description: "您的博客描述", 101 | author: "您的名字", 102 | 103 | // 导航菜单 104 | nav: [ 105 | { name: "首页", path: "/" }, 106 | { name: "关于", path: "/about" }, 107 | // 添加更多菜单项 108 | ], 109 | 110 | // 按分区组织的底部链接 111 | footerLinks: [ 112 | { 113 | title: "社交媒体", 114 | links: [ 115 | { name: "Github", url: "https://github.com/您的用户名" }, 116 | // 添加更多链接 117 | ] 118 | }, 119 | // 添加更多分区 120 | ], 121 | 122 | // SEO配置 123 | seo: { 124 | meta: { 125 | keywords: "关键词1,关键词2", 126 | description: "网站描述" 127 | } 128 | }, 129 | 130 | // Algolia搜索配置 131 | algolia: { 132 | apiKey: "您的API密钥", 133 | applicationId: "您的应用ID", 134 | indexName: "您的索引名称", 135 | lang: "zh-cn" 136 | } 137 | } 138 | ``` 139 | 140 | ## 🌐 部署方案 141 | 142 | 项目采用 Vercel + Cloudflare 的部署方式: 143 | 144 | 1. **Vercel**: 提供持续集成和部署服务,每次推送代码或添加文章后,会自动触发部署 145 | 2. **Cloudflare**: 通过设置 CNAME 记录和 Cloudflare 的 CDN,实现国内无备案域名的访问加速 146 | 147 | ### 部署步骤 148 | 149 | 1. 在 Vercel 上导入 GitHub 仓库 150 | 2. 配置构建命令 `pnpm build` 151 | 3. 设置环境变量(如需要) 152 | 4. 设置自定义域名 153 | 5. 在 Cloudflare 添加域名并设置 CNAME 记录指向 Vercel 提供的域名 154 | 155 | ## 🤝 贡献指南 156 | 157 | 欢迎对本项目做出贡献!无论是提交 bug、改进文档还是添加新功能,您的参与都将使这个项目变得更好。 158 | 159 | 1. Fork 本仓库 160 | 2. 创建您的特性分支: `git checkout -b feature/amazing-feature` 161 | 3. 提交您的更改: `git commit -m 'Add some amazing feature'` 162 | 4. 推送到分支: `git push origin feature/amazing-feature` 163 | 5. 提交 Pull Request 164 | 165 | ## 📄 许可证 166 | 167 | 本项目基于 [LICENSE](LICENSE) 开源许可证进行分发和使用。 168 | 169 | --- 170 | 171 |Made with ❤️ by alickx
172 | -------------------------------------------------------------------------------- /src/content/_articles/给博客加上图片懒加载.md: -------------------------------------------------------------------------------- 1 | --- 2 | title: Vue 图片懒加载实现 3 | slug: blog-img-lazy-load 4 | description: 本文介绍了使用 IntersectionObserver API 实现图片懒加载的方法,以及如何使用 Vueuse 的 useIntersectionObserver 工具简化代码,有效优化网站性能和用户体验。 5 | keywords: Vue,图片懒加载,IntersectionObserver,Vueuse,性能优化 6 | date: 2023-09-02 11:36 7 | --- 8 | 9 | ## 目的 10 | 11 | 今天继续优化一下博客,首先虽然说我的博文中图片数量比较少,但是如果有个别一两个博文图片数量多,并且图片的大小比较大,那么对用户的流量来说不太友好,那么今天主要是给博文的图片加上懒加载功能。 12 | 13 | 懒加载也就是以下几个方面: 14 | 15 | 1. 当用户浏览窗口看不到图片的时候,图片不进行加载 16 | 2. 当用户能够浏览到图片时再进行加载 17 | 18 | 这样做有几个优点: 19 | 20 | 1. 减少用户加载的流量 21 | 2. 优化页面加载速度 22 | 23 | ## 过程 24 | 25 | 首先要实现该功能就需要实时地监听用户的浏览窗口,也就是当用户的可视区域有图片的时候,图片才进行加载。那么就需要用到一个极其重要的原生 api:**IntersectionObserver**。 26 | 27 | > **`IntersectionObserver`** 接口(从属于 [Intersection Observer API](https://developer.mozilla.org/zh-CN/docs/Web/API/Intersection_Observer_API))提供了一种异步观察目标元素与其祖先元素或顶级文档[视口](https://developer.mozilla.org/zh-CN/docs/Glossary/Viewport)(viewport)交叉状态的方法。其祖先元素或视口被称为根(root)。 28 | > 29 | > 当一个 `IntersectionObserver` 对象被创建时,其被配置为监听根中一段给定比例的可见区域。一旦 `IntersectionObserver` 被创建,则无法更改其配置,所以一个给定的观察者对象只能用来监听可见区域的特定变化值;然而,你可以在同一个观察者对象中配置监听多个目标元素。 30 | 31 | MDN文档的地址: https://developer.mozilla.org/zh-CN/docs/Web/API/IntersectionObserver 32 | 33 | 那么实现起来就超级简单了,使用该 api 对图片元素进行监听,当图片进入可视区域的时候再对图片的 src 属性进行赋值,那么浏览器就会自动进行加载了。 34 | 35 | 同时我的博客使用到了 vueuse 的框架,在 vueuse 中同样提供了该 api 的工具: **useIntersectionObserver** 36 | 37 | 这里附上 vueuse 文档的地址: https://vueuse.org/core/useIntersectionObserver/#useintersectionobserver 38 | 39 | 那么我在代码里面是这样实现的: 40 | 41 | ```vue 42 | 43 | 127 |
128 | 可以看到在下滑的过程中,图片是懒加载的,当出现在可视区域中才会进行请求。
129 |
130 |
131 |
132 | ## 总结
133 |
134 | 懒加载是前端开发中常用的开发手段,其中又分为图片懒加载,数据懒加载和组件懒加载。通过懒加载可以有效提高我们页面的性能,优化流量和提高用户体验。
135 |
136 | 通过 **IntersectionObserver** 可以很轻松地做到这些功能,同时附上该 api 的兼容图。
137 |
138 | 
139 |
140 |
--------------------------------------------------------------------------------
/src/content/_articles/工作中常用的设计模式-策略模式.md:
--------------------------------------------------------------------------------
1 | ---
2 | title: 工作中常用的设计模式-策略模式
3 | slug: strategy-pattern-explained
4 | description: 本文详细介绍了策略模式的原理和实践应用,帮助读者更好地理解并运用该设计模式。
5 | keywords: 设计模式,策略模式,Java
6 | date: 2024-03-31 22:33
7 | ---
8 |
9 | # 工作中常用的设计模式-策略模式
10 |
11 | ## 策略模式
12 |
13 | 在我们的工作中,经常会遇到这样的情况:虽然输入的数据结构是一致的,但根据不同的条件需要执行不同的处理逻辑。
14 |
15 | 比如说,我们要开发一个简单的消息推送模块,需要将消息推送到飞书、钉钉、企业微信等不同的平台,而根据消息的 type 属性来区分平台。
16 |
17 | 最直接最简单的方法是使用 if else 来进行条件判断。
18 |
19 | 首先,我们定义一个推送平台的枚举:
20 |
21 | ```java
22 | enum PlatformEnum {
23 | LARK(1, "飞书"),
24 | DINGTALK(2, "钉钉"),
25 | WECOM(3, "企业微信");
26 |
27 | private final Integer code;
28 | private final String desc;
29 |
30 | // 构造函数、getter方法略...
31 | }
32 | ```
33 |
34 | 这个枚举列举了三个平台:飞书、钉钉和企业微信。
35 |
36 | 接着,我们定义一个消息实体:
37 |
38 | ```java
39 | class Message {
40 | private Integer type; // 推送平台类型
41 | private String content; // 推送消息
42 | private String webhook; // 推送 webhook 地址
43 |
44 | // 构造函数、getter和setter方法略...
45 | }
46 | ```
47 |
48 | 在这个实体中,我们简单地定义了三个属性:推送平台类型、消息文本和 webhook 地址。
49 |
50 | 然后,我们可以编写推送方法如下:
51 |
52 | ```java
53 | class StrategyDemo1 {
54 |
55 | public static void main(String[] args) {
56 | Message message = new Message();
57 | message.setType(PlatformEnum.LARK.getCode());
58 | message.setContent("这是一条消息");
59 | message.setWebhook("https://test.com");
60 | push(message);
61 | }
62 |
63 | public static void push(Message message) {
64 | if (message.getType().equals(PlatformEnum.LARK.getCode())) {
65 | System.out.println("构建body,发送到飞书");
66 | } else if (message.getType().equals(PlatformEnum.DINGTALK.getCode())) {
67 | System.out.println("构建body,发送到钉钉");
68 | } else if (message.getType().equals(PlatformEnum.WECOM.getCode())) {
69 | System.out.println("构建body,发送到企业微信");
70 | }
71 | }
72 | }
73 | ```
74 |
75 | 运行结果为:构建body,发送到飞书
76 |
77 | 通过这简单的几行代码,我们实现了根据平台类型进行推送的功能。但是,如果我们需要新增推送平台,应该怎么做呢?
78 |
79 | 通常的做法是在枚举类中添加新的平台,然后修改 push 方法并添加新的 else if 分支。
80 |
81 | 然而,这种方式有一个问题,就是随着平台数量的增加,代码会变得越来越庞大且难以维护。
82 |
83 | **有没有一种方法可以在增加新平台时不影响到现有代码逻辑呢?** 答案是肯定的!这就是策略模式的用武之地。
84 |
85 | 下面我们来看看如何用策略模式重构这段代码。
86 |
87 | 首先,我们需要创建一个接口,所有的推送策略类都必须实现该接口:
88 |
89 | ```java
90 | interface MessagePush {
91 | void push(Message message);
92 | }
93 | ```
94 |
95 | 我们可以将这个接口看作是推送消息的标准格式,只要调用 push 方法就能推送消息。
96 |
97 | 然后,我们创建三个具体的推送策略类:LarkMessagePush、DingTalkMessagePush 和 WeComMessagePush,分别对应飞书、钉钉和企业微信的推送逻辑:
98 |
99 | ```java
100 | class LarkMessagePush implements MessagePush {
101 | @Override
102 | public void push(Message message) {
103 | System.out.println("LarkMessagePush 推送消息:" + message.getContent());
104 | }
105 | }
106 |
107 | // DingTalkMessagePush 和 WeComMessagePush 类似,此处省略...
108 | ```
109 |
110 | 接着,我们需要存储 type 参数和对应的策略类的映射关系,可以使用一个 map 来实现:
111 |
112 | ```java
113 | class StrategyDemo1 {
114 | private static Map
127 |
128 | 可以看到在下滑的过程中,图片是懒加载的,当出现在可视区域中才会进行请求。
129 |
130 |
131 |
132 | ## 总结
133 |
134 | 懒加载是前端开发中常用的开发手段,其中又分为图片懒加载,数据懒加载和组件懒加载。通过懒加载可以有效提高我们页面的性能,优化流量和提高用户体验。
135 |
136 | 通过 **IntersectionObserver** 可以很轻松地做到这些功能,同时附上该 api 的兼容图。
137 |
138 | 
139 |
140 |
--------------------------------------------------------------------------------
/src/content/_articles/工作中常用的设计模式-策略模式.md:
--------------------------------------------------------------------------------
1 | ---
2 | title: 工作中常用的设计模式-策略模式
3 | slug: strategy-pattern-explained
4 | description: 本文详细介绍了策略模式的原理和实践应用,帮助读者更好地理解并运用该设计模式。
5 | keywords: 设计模式,策略模式,Java
6 | date: 2024-03-31 22:33
7 | ---
8 |
9 | # 工作中常用的设计模式-策略模式
10 |
11 | ## 策略模式
12 |
13 | 在我们的工作中,经常会遇到这样的情况:虽然输入的数据结构是一致的,但根据不同的条件需要执行不同的处理逻辑。
14 |
15 | 比如说,我们要开发一个简单的消息推送模块,需要将消息推送到飞书、钉钉、企业微信等不同的平台,而根据消息的 type 属性来区分平台。
16 |
17 | 最直接最简单的方法是使用 if else 来进行条件判断。
18 |
19 | 首先,我们定义一个推送平台的枚举:
20 |
21 | ```java
22 | enum PlatformEnum {
23 | LARK(1, "飞书"),
24 | DINGTALK(2, "钉钉"),
25 | WECOM(3, "企业微信");
26 |
27 | private final Integer code;
28 | private final String desc;
29 |
30 | // 构造函数、getter方法略...
31 | }
32 | ```
33 |
34 | 这个枚举列举了三个平台:飞书、钉钉和企业微信。
35 |
36 | 接着,我们定义一个消息实体:
37 |
38 | ```java
39 | class Message {
40 | private Integer type; // 推送平台类型
41 | private String content; // 推送消息
42 | private String webhook; // 推送 webhook 地址
43 |
44 | // 构造函数、getter和setter方法略...
45 | }
46 | ```
47 |
48 | 在这个实体中,我们简单地定义了三个属性:推送平台类型、消息文本和 webhook 地址。
49 |
50 | 然后,我们可以编写推送方法如下:
51 |
52 | ```java
53 | class StrategyDemo1 {
54 |
55 | public static void main(String[] args) {
56 | Message message = new Message();
57 | message.setType(PlatformEnum.LARK.getCode());
58 | message.setContent("这是一条消息");
59 | message.setWebhook("https://test.com");
60 | push(message);
61 | }
62 |
63 | public static void push(Message message) {
64 | if (message.getType().equals(PlatformEnum.LARK.getCode())) {
65 | System.out.println("构建body,发送到飞书");
66 | } else if (message.getType().equals(PlatformEnum.DINGTALK.getCode())) {
67 | System.out.println("构建body,发送到钉钉");
68 | } else if (message.getType().equals(PlatformEnum.WECOM.getCode())) {
69 | System.out.println("构建body,发送到企业微信");
70 | }
71 | }
72 | }
73 | ```
74 |
75 | 运行结果为:构建body,发送到飞书
76 |
77 | 通过这简单的几行代码,我们实现了根据平台类型进行推送的功能。但是,如果我们需要新增推送平台,应该怎么做呢?
78 |
79 | 通常的做法是在枚举类中添加新的平台,然后修改 push 方法并添加新的 else if 分支。
80 |
81 | 然而,这种方式有一个问题,就是随着平台数量的增加,代码会变得越来越庞大且难以维护。
82 |
83 | **有没有一种方法可以在增加新平台时不影响到现有代码逻辑呢?** 答案是肯定的!这就是策略模式的用武之地。
84 |
85 | 下面我们来看看如何用策略模式重构这段代码。
86 |
87 | 首先,我们需要创建一个接口,所有的推送策略类都必须实现该接口:
88 |
89 | ```java
90 | interface MessagePush {
91 | void push(Message message);
92 | }
93 | ```
94 |
95 | 我们可以将这个接口看作是推送消息的标准格式,只要调用 push 方法就能推送消息。
96 |
97 | 然后,我们创建三个具体的推送策略类:LarkMessagePush、DingTalkMessagePush 和 WeComMessagePush,分别对应飞书、钉钉和企业微信的推送逻辑:
98 |
99 | ```java
100 | class LarkMessagePush implements MessagePush {
101 | @Override
102 | public void push(Message message) {
103 | System.out.println("LarkMessagePush 推送消息:" + message.getContent());
104 | }
105 | }
106 |
107 | // DingTalkMessagePush 和 WeComMessagePush 类似,此处省略...
108 | ```
109 |
110 | 接着,我们需要存储 type 参数和对应的策略类的映射关系,可以使用一个 map 来实现:
111 |
112 | ```java
113 | class StrategyDemo1 {
114 | private static Map
3 |
47 |
48 |
49 |
158 |
159 |
183 |
--------------------------------------------------------------------------------
/src/content/_articles/给博客加上algolia搜索能力.md:
--------------------------------------------------------------------------------
1 | ---
2 | title: 给博客加上Algolia搜索能力
3 | date: 2023-09-16 08:41
4 | slug: blog-add-algolia
5 | description: 通过申请algolia为博客增加搜索能力
6 | ---
7 |
8 | ## 优化目的
9 |
10 | 今天来给博客增加文章搜索能力,首先博客没有部署任何的数据库软件,博文是以本地存储的形式保存在代码中的,那么如果想要实现搜索效果的话,我们可以使用 Nuxt/Content 去进行搜索,但是这种方法受限于服务器的响应速度。
11 |
12 | 大家可能在很多博客和一些文档网站上看到过这个搜索框
13 |
14 | 
15 |
16 | 
17 |
18 | 我们点击搜索框会发现搜索框底部有这么一个栏目。
19 |
20 | 
21 |
22 | 也就是这些文档网站是由 algolia 提供搜索能力的,那咱们博客网站也能用上。
23 |
24 | 下面附上 chatgpt 的解释。
25 |
26 | 
27 |
28 |
29 |
30 | ## 申请algolia
31 |
32 | 首先咱们先申请这个 algolia 的 `Doc search` ,申请成功后它将会帮助我们爬取你博客的文章的。申请的规则如下:
33 |
34 | 
35 |
36 | 申请的网站地址是:https://docsearch.algolia.com/apply/
37 |
38 | 申请成功后它将会在邮件上回复你的。
39 |
40 | 
41 |
42 |
43 |
44 | ## 开始实施
45 |
46 | 当你申请成功后 algolia 会发送邮件邀请你申请加入他们网站,当我们注册登录成功后,可以查看我们博客数据的仪表盘。
47 |
48 | 
49 |
50 | 得益于 Nuxt 强大的模块生态,我们可以很轻松地找到可以与 algolia 集成的 Nuxt module。
51 |
52 | 这是该模块的地址:https://algolia.nuxtjs.org/getting-started/quick-start
53 |
54 | **以下内容为该模块文档上的内容**
55 |
56 | 那么我们开始进行集成,首先安装该模块的依赖
57 |
58 | ```shell
59 | pnpm install @nuxtjs/algolia --save
60 | ```
61 |
62 | 然后配置 nuxt.config.ts
63 |
64 | 在 modules 上增加 `"@nuxtjs/algolia"`,同时我们也要安装 docsearch 的依赖
65 |
66 | ```shell
67 | pnpm install @docsearch/js @docsearch/css
68 | ```
69 |
70 | 然后配置该组件依赖
71 |
72 | ```ts
73 | {
74 | algolia: {
75 | apiKey: 'apiKey',
76 | applicationId: 'applicationId',
77 | // DocSearch key is used to configure DocSearch extension.
78 | docSearch: {
79 | indexName: 'indexName',
80 | }
81 | }
82 | }
83 | ```
84 |
85 | 那么就填上我们在 algolia 邮件上获取的这些配置信息。
86 |
87 | 同时在博客的导航栏组件上添加上模块已经集成好的组件,
88 |
89 | ```vue
90 |
4 |
5 |
6 |
45 |
46 |
7 |
24 |
31 |
32 |
11 |
12 |
13 |
14 |
40 |
41 |
43 |
44 | 文章未找到。
42 |
93 |
96 | ```
97 |
98 | 出来的效果:
99 |
100 | 
101 |
102 |
103 |
104 | ## 出现问题并解决
105 |
106 | 可是当我想测试的时候,却发现无论输入什么都没有数据展示,在查看了请求的数据后,发现 algolia 的响应是没有结果。按理说是已经有数据了,但是却没有数据返回。
107 |
108 | 没办法,先按邮件上的方式,单独创建一个静态的 HTML 文件来测试一下,结果是静态的 HTML 文件搜索是正常的。
109 |
110 | 、
111 |
112 | 这样子就证明我们的配置是正确的,那么我们就对比一下两者的请求到底有什么差异,然后我发现在博客项目的 algolia 请求中多携带了一个参数。
113 |
114 | 
115 |
116 | 在查看了该模块的官方文档中,我发现这个参数是由这个设置产生的。
117 |
118 | 
119 |
120 | 尽管我尝试过将他设置为 `zh` ,也就是中文语言,但是没有任何作用,依然返回不了任何数据,那我就将他设置为空字符串来。
121 |
122 | ```ts
123 | algolia: {
124 | apiKey: "*",
125 | applicationId: "*",
126 | docSearch: {
127 | indexName: "alickx",
128 | lang: " ",
129 | },
130 | },
131 | ```
132 |
133 | 最终可以成功返回结果。
134 |
135 | 
136 |
137 |
138 |
139 | ## 深色模式的问题
140 |
141 | 在集成了该组件后,我发现当选择了深色模式后,该搜索组件并不会切换深色模式,在查看了 `@docsearch/css` 这个包后我发现该 css 切换成深色模式是使用 html 中的 data-theme 属性,也就是只有当 data-theme 为 dark 的时候,他才会切换。
142 |
143 | 由于项目中切换颜色模式是使用 vueuse 来进行切换,在看了文档后发现,的确是有设置属性的配置。
144 |
145 | ```ts
146 | import { useColorMode } from '@vueuse/core'
147 |
148 | const mode = useColorMode({
149 | attribute: 'theme',
150 | modes: {
151 | // custom colors
152 | dim: 'dim',
153 | cafe: 'cafe',
154 | },
155 | }) // Ref<'dark' | 'light' | 'dim' | 'cafe'>
156 | ```
157 |
158 | 也就是这个 attribute 属性,但是他有一个问题,那就是当我配置成 data-theme 后,其他组件的深色模式就不管用了,这是因为 unocss 深色模式是以 .dark 来切换的,也就是必须 HTML 的 class 为 dark。
159 |
160 | 同时 useColorMode 中这个 attribute 还只能配置一个,没有多属性配置。
161 |
162 | 那没办法,只能手动来进行添加了,首先是使用 watch 来监听 mode 的切换,然后给 HTML 的节点添加属性,同时由于 watch 是只有触发了 mode 的变化它才会执行的,所以得在 onMount 生命周期上添加一次触发,代码如下。
163 |
164 | ```ts
165 | watch(
166 | () => mode.value,
167 | () => {
168 | document.documentElement.setAttribute("data-theme", mode.value);
169 | },
170 | );
171 |
172 | onMounted(() => {
173 | document.documentElement.setAttribute("data-theme", mode.value);
174 | // ...
175 | });
176 | ```
177 |
178 | 最终的效果
179 |
180 | 
181 |
182 |
183 |
184 | ## 总结
185 |
186 | 给博客添加搜索功能可谓是踩了不少坑,先是模块发送请求时添加了语言限制导致没有搜索结果,然后便是深色模式的坑。同时 algolia 的 api key 不知道为什么有很多个,分别对应不同的功能,导致我对于 apikey 的理解比较混乱。
187 |
188 | 不过最终还是达成了目的,可谓是没白费功夫。
189 |
--------------------------------------------------------------------------------
/src/components/Header.vue:
--------------------------------------------------------------------------------
1 |
2 |
10 |
67 |
11 |
66 |
12 |
65 |
15 |
64 |
16 |
25 |
28 |
29 |
34 |
35 |
44 | 30 | {{ siteInfo.name }} 31 |
32 | {{ siteInfo.name }} 33 |
47 |
63 |
71 |
84 |
85 |
86 |
165 |
166 |
167 |
--------------------------------------------------------------------------------
/src/components/common/Pagination.vue:
--------------------------------------------------------------------------------
1 |
2 | -
74 |
-
75 |
79 | {{ item.name }} 80 | 81 |
82 |
3 |
4 |
11 |
12 |
13 |
20 |
21 |
22 |
81 |
82 |
83 |
107 |
108 |
139 |
--------------------------------------------------------------------------------
/src/assets/styles/markdown.scss:
--------------------------------------------------------------------------------
1 | $line-space: 22px;
2 |
3 | .markdown-body {
4 | word-break: break-word;
5 | line-height: 32.4px;
6 | font-family: "JetBrains Mono", "Microsoft YaHei", "Noto Sans SC",
7 | -apple-system, blinkmacsystemfont, "Segoe UI", roboto, "Helvetica Neue",
8 | arial, "Noto Sans", sans-serif, "Apple Color Emoji", "Segoe UI Emoji",
9 | "Segoe UI Symbol", "Noto Color Emoji";
10 | font-weight: 400;
11 | font-size: 16.56px;
12 | overflow-x: hidden;
13 | max-width: 100%;
14 | color: #444;
15 |
16 | * {
17 | max-width: 100%;
18 | box-sizing: border-box;
19 | }
20 |
21 | pre {
22 | overflow-x: auto;
23 | max-width: 100%;
24 | white-space: pre-wrap;
25 | word-wrap: break-word;
26 | }
27 |
28 | code {
29 | word-break: break-word;
30 | white-space: pre-wrap;
31 | max-width: 100%;
32 | }
33 |
34 | h1,
35 | h2,
36 | h3,
37 | h4,
38 | h5,
39 | h6 {
40 | color: #217c91;
41 | line-height: 32.4px;
42 | margin-top: 35px;
43 | margin-bottom: 10px;
44 | padding-bottom: 5px;
45 | .dark & {
46 | color: #e5e7ea;
47 | }
48 | }
49 |
50 | h1 {
51 | font-size: 24px;
52 | margin-bottom: 5px;
53 | }
54 |
55 | h2,
56 | h3,
57 | h4,
58 | h5,
59 | h6 {
60 | font-size: 20px;
61 | }
62 |
63 | h2 {
64 | padding-bottom: 12px;
65 | border-bottom: 1px solid #ececec;
66 | }
67 |
68 | h3 {
69 | font-size: 18px;
70 | padding-bottom: 0;
71 | }
72 |
73 | h6 {
74 | margin-top: 5px;
75 | }
76 |
77 | p {
78 | line-height: 32.4px;
79 | margin-top: $line-space;
80 | margin-bottom: $line-space;
81 | }
82 |
83 | img {
84 | max-width: 100%;
85 | border-radius: 8px;
86 | border: 1px solid #eaeaea;
87 | box-shadow: 0 4px 10px rgba(0, 0, 0, 0.1);
88 | margin: 10px 0;
89 |
90 | .dark & {
91 | border-color: #3a3a3a;
92 | box-shadow: 0 4px 10px rgba(0, 0, 0, 0.3);
93 | }
94 | }
95 |
96 | hr {
97 | border-top: 1px solid #ddd;
98 | border-bottom: none;
99 | border-left: none;
100 | border-right: none;
101 | margin-top: 32px;
102 | margin-bottom: 32px;
103 | }
104 |
105 | p > code {
106 | font-family: "JetBrains Mono", self;
107 | word-break: break-word;
108 | border-radius: 2px;
109 | overflow-x: auto;
110 | background-color: #fff;
111 | border: 1px solid #ddd;
112 | color: #ff502c;
113 | font-size: 0.87em;
114 | padding: 0.065em 0.4em;
115 | text-decoration: underline;
116 | text-decoration-color: #000;
117 |
118 | .dark & {
119 | background-color: transparent;
120 | text-decoration: none;
121 | }
122 | }
123 |
124 | a {
125 | text-decoration: none;
126 | color: #0269c8;
127 | border-bottom: 1px solid #d1e9ff;
128 |
129 | &:hover,
130 | &:active {
131 | color: #275b8c;
132 | }
133 | }
134 |
135 | table {
136 | display: block !important;
137 | font-size: 12px;
138 | width: 100%;
139 | max-width: 100%;
140 | overflow-x: auto;
141 | border-collapse: separate;
142 | border-spacing: 0;
143 | border-top: 1px solid #f6f6f6;
144 | border-left: 1px solid #f6f6f6;
145 | }
146 |
147 | thead {
148 | background: #f6f6f6;
149 | color: #000;
150 | text-align: left;
151 | .dark & {
152 | background: #000;
153 | color: #f6f6f6;
154 | }
155 | }
156 |
157 | tr:nth-child(2n) {
158 | background-color: #fcfcfc;
159 | .dark & {
160 | background-color: #212526;
161 | }
162 | }
163 |
164 | th,
165 | td {
166 | padding: 12px 7px;
167 | line-height: 24px;
168 | border-right: 1px solid #f6f6f6;
169 | border-bottom: 1px solid #f6f6f6;
170 | }
171 |
172 | td {
173 | min-width: 120px;
174 | }
175 |
176 | blockquote:before {
177 | display: block;
178 | position: absolute;
179 | content: "";
180 | width: 4px;
181 | left: 0;
182 | top: 0;
183 | height: 100%;
184 | background-color: #e95f59;
185 | border-radius: 2px;
186 | .dark & {
187 | background-color: #8393ad;
188 | }
189 | }
190 |
191 | blockquote {
192 | margin: 0;
193 | color: #333333;
194 | border-radius: 2px;
195 | padding: 10px 16px;
196 | background-color: #fdefee;
197 | position: relative;
198 | border-left: none;
199 | .dark & {
200 | background-color: #2a2f3b;
201 | color: #fcfcfc;
202 | }
203 | }
204 |
205 | ol,
206 | ul {
207 | padding-left: 28px;
208 |
209 | li {
210 | margin-bottom: 0;
211 | list-style: inherit;
212 |
213 | & .task-list-item {
214 | list-style: none;
215 |
216 | ul,
217 | ol {
218 | margin-top: 0;
219 | }
220 | }
221 | }
222 |
223 | ul,
224 | ol {
225 | margin-top: 3px;
226 | }
227 | }
228 |
229 | ol li {
230 | padding-left: 6px;
231 | }
232 |
233 | .contains-task-list {
234 | padding-left: 0;
235 | }
236 |
237 | .task-list-item {
238 | list-style: none;
239 | }
240 |
241 | @media (max-width: 720px) {
242 | h1 {
243 | font-size: 24px;
244 | }
245 | h2 {
246 | font-size: 20px;
247 | }
248 | h3 {
249 | font-size: 18px;
250 | }
251 |
252 | overflow-wrap: break-word;
253 | word-wrap: break-word;
254 |
255 | pre {
256 | white-space: pre-wrap;
257 | word-wrap: break-word;
258 | overflow-x: auto;
259 | max-width: 100%;
260 | }
261 |
262 | img,
263 | video,
264 | iframe {
265 | max-width: 100%;
266 | height: auto;
267 | }
268 | }
269 | }
270 |
--------------------------------------------------------------------------------
/.gitattributes:
--------------------------------------------------------------------------------
1 | ## GITATTRIBUTES FOR WEB PROJECTS
2 | #
3 | # These settings are for any web project.
4 | #
5 | # Details per file setting:
6 | # text These files should be normalized (i.e. convert CRLF to LF).
7 | # binary These files are binary and should be left untouched.
8 | #
9 | # Note that binary is a macro for -text -diff.
10 | ######################################################################
11 |
12 | # Auto detect
13 | ## Handle line endings automatically for files detected as
14 | ## text and leave all files detected as binary untouched.
15 | ## This will handle all files NOT defined below.
16 | * text=auto
17 |
18 | # Source code
19 | *.bash text eol=lf
20 | *.bat text eol=crlf
21 | *.cmd text eol=crlf
22 | *.coffee text
23 | *.css text diff=css
24 | *.htm text diff=html
25 | *.html text diff=html
26 | *.inc text
27 | *.ini text
28 | *.js text
29 | *.json text
30 | *.jsx text
31 | *.less text
32 | *.ls text
33 | *.map text -diff
34 | *.od text
35 | *.onlydata text
36 | *.php text diff=php
37 | *.pl text
38 | *.ps1 text eol=crlf
39 | *.py text diff=python
40 | *.rb text diff=ruby
41 | *.sass text
42 | *.scm text
43 | *.scss text diff=css
44 | *.sh text eol=lf
45 | .husky/* text eol=lf
46 | *.sql text
47 | *.styl text
48 | *.tag text
49 | *.ts text
50 | *.tsx text
51 | *.xml text
52 | *.xhtml text diff=html
53 |
54 | # Docker
55 | Dockerfile text
56 |
57 | # Documentation
58 | *.ipynb text eol=lf
59 | *.markdown text diff=markdown
60 | *.md text diff=markdown
61 | *.mdwn text diff=markdown
62 | *.mdown text diff=markdown
63 | *.mkd text diff=markdown
64 | *.mkdn text diff=markdown
65 | *.mdtxt text
66 | *.mdtext text
67 | *.txt text
68 | AUTHORS text
69 | CHANGELOG text
70 | CHANGES text
71 | CONTRIBUTING text
72 | COPYING text
73 | copyright text
74 | *COPYRIGHT* text
75 | INSTALL text
76 | license text
77 | LICENSE text
78 | NEWS text
79 | readme text
80 | *README* text
81 | TODO text
82 |
83 | # Templates
84 | *.dot text
85 | *.ejs text
86 | *.erb text
87 | *.haml text
88 | *.handlebars text
89 | *.hbs text
90 | *.hbt text
91 | *.jade text
92 | *.latte text
93 | *.mustache text
94 | *.njk text
95 | *.phtml text
96 | *.svelte text
97 | *.tmpl text
98 | *.tpl text
99 | *.twig text
100 | *.vue text
101 |
102 | # Configs
103 | *.cnf text
104 | *.conf text
105 | *.config text
106 | .editorconfig text
107 | .env text
108 | .gitattributes text
109 | .gitconfig text
110 | .htaccess text
111 | *.lock text -diff
112 | package.json text eol=lf
113 | package-lock.json text eol=lf -diff
114 | pnpm-lock.yaml text eol=lf -diff
115 | .prettierrc text
116 | yarn.lock text -diff
117 | *.toml text
118 | *.yaml text
119 | *.yml text
120 | browserslist text
121 | Makefile text
122 | makefile text
123 |
124 | # Heroku
125 | Procfile text
126 |
127 | # Graphics
128 | *.ai binary
129 | *.bmp binary
130 | *.eps binary
131 | *.gif binary
132 | *.gifv binary
133 | *.ico binary
134 | *.jng binary
135 | *.jp2 binary
136 | *.jpg binary
137 | *.jpeg binary
138 | *.jpx binary
139 | *.jxr binary
140 | *.pdf binary
141 | *.png binary
142 | *.psb binary
143 | *.psd binary
144 | # SVG treated as an asset (binary) by default.
145 | *.svg text
146 | # If you want to treat it as binary,
147 | # use the following line instead.
148 | # *.svg binary
149 | *.svgz binary
150 | *.tif binary
151 | *.tiff binary
152 | *.wbmp binary
153 | *.webp binary
154 |
155 | # Audio
156 | *.kar binary
157 | *.m4a binary
158 | *.mid binary
159 | *.midi binary
160 | *.mp3 binary
161 | *.ogg binary
162 | *.ra binary
163 |
164 | # Video
165 | *.3gpp binary
166 | *.3gp binary
167 | *.as binary
168 | *.asf binary
169 | *.asx binary
170 | *.avi binary
171 | *.fla binary
172 | *.flv binary
173 | *.m4v binary
174 | *.mng binary
175 | *.mov binary
176 | *.mp4 binary
177 | *.mpeg binary
178 | *.mpg binary
179 | *.ogv binary
180 | *.swc binary
181 | *.swf binary
182 | *.webm binary
183 |
184 | # Archives
185 | *.7z binary
186 | *.gz binary
187 | *.jar binary
188 | *.rar binary
189 | *.tar binary
190 | *.zip binary
191 |
192 | # Fonts
193 | *.ttf binary
194 | *.eot binary
195 | *.otf binary
196 | *.woff binary
197 | *.woff2 binary
198 |
199 | # Executables
200 | *.exe binary
201 | *.pyc binary
202 |
203 | # RC files (like .babelrc or .eslintrc)
204 | *.*rc text
205 |
206 | # Ignore files (like .npmignore or .gitignore)
207 | *.*ignore text
208 |
--------------------------------------------------------------------------------
/src/content/_articles/在Vercel下优化博客速度.md:
--------------------------------------------------------------------------------
1 | ---
2 | title: 在 Vercel 下优化博客的访问速度
3 | slug: optimize-blog-access-speed
4 | date: 2023-09-04 00:36
5 | description: 通过了解CSR,SSR,SSG各个渲染模式,最后使用ISR优化博客访问速度,并且使用对象存储优化博客字体文件
6 | ---
7 |
8 |
9 |
10 | ## 优化目的
11 |
12 | 今天主要优化的是博客首页和文章详情页的加载速度,首先有几个大前提条件
13 |
14 | 1. 博客的代码托管在 Github,部署使用 Vercel 进行部署
15 | 2. 博客的域名是在国外域名商进行购买,未在国内备案,所以无法使用国内服务器或者CDN
16 |
17 | 那么国内连接 Vercel 的速度,以我广东佛山为例,ping 的延迟为 150ms 左右,也就是最快的加载速度也要 150ms,但是目前博客无论是首页还是文章的详情页的加载速度都大大高于这一延迟,那么就需要对此进行优化。
18 |
19 |
20 |
21 | ## 渲染模式
22 |
23 | 首先 Nuxt 有下面这几大渲染模式:
24 |
25 | 1. 客户端渲染(CSR)
26 | 2. 服务端渲染(SSR)
27 | 3. 混合渲染
28 |
29 | **客户端渲染**:我们在开发后台管理平台的时候,页面首先会给出固定的页面框架模板,然后客户端请求接口获取数据,浏览器再把数据填充进去,从而获得完整的网页,这就是客户端渲染。
30 |
31 | **服务端渲染**:在我们请求页面的时候,服务器会请求数据,将数据填充到 HTML 中,最终直接返回给我们一个完整的页面。
32 |
33 | **混合渲染**:Nuxt3 中的渲染模式,不算是新的渲染模式,其实就是通过设置路由规则,来灵活决定使用哪种渲染模式。
34 |
35 | **静态站点生成(SSG)**:网站在构建的时候就直接生成静态的 HTML 文件。
36 |
37 | 下面是这几大渲染模式的优点和缺点
38 |
39 | | 名称 | 优点 | 缺点 |
40 | | ------------ | ------------------------------------------------------------ | ------------------------------------------------------------ |
41 | | 客户端渲染 | 1.更好的交互性能,用户无需进行页面刷新即可与页面交互
23 |
24 |
37 |
38 |
39 |
40 |
41 |
48 | ...
49 |
50 |
51 |
52 |
62 |
63 |
64 |
71 |
72 |
73 |
80 | 2.对于复杂的交互和动态效果的支持较好 | 1.首屏渲染速度较慢
2.对于 SEO 的支持较弱,因为部分搜索引擎爬虫无法执行 JavaScript 代码 | 42 | | 服务端渲染 | 1.更快的首屏渲染速度
2.更好的 SEO 优化,因为搜索引擎可以直接看到渲染好的页面 HTML
3.对于客户端的 JavaScript 代码的依赖较小 | 1.对于服务端的压力较大
2.对于复杂的交互和动态效果的支持相对较弱 | 43 | | 静态站点生成 | 1.极快的页面加载速度
2.对于 SEO 的支持非常好
3.可以在静态页面中实现动态数据的渲染 | 1.对于频繁更新数据的网站不太适合
2.对于复杂的交互和动态效果的支持有限 | 44 | 45 | 基于以上渲染模式,各大托管网站 Vercel和Netlify 都有推出他们的优化渲染模式,例如 IWR 和 SWR等等。 46 | 47 | 48 | 49 | ## 选择方案 50 | 51 | 我们的网站是属于个人博客网站,网站的总页面顶多上天也不会超过百页,页面的组成由静态 Markdown 组成,而且我们还对SEO有强烈的需求,所以最先否定 CSR 也就是客户端渲染。那么就剩下 SSR 和 SSG 两个选择了。 52 | 53 | 如果说网站只做静态文档的展示,不和用户做交互的话,那么 SSG 足矣,可是我还想保留跟用户交互的需求,所以 SSR 渲染模式是咱们的优选。 54 | 55 | 使用 Nuxt 来做 SSR 渲染是极其方便和简单的,通过 **useAsyncData** 就可以很简单的做到。 56 | 57 | ```ts 58 | const { data } = await useAsyncData("article", () => { 59 | return queryContent("/_articles").where({ slug: route.params.slug }).findOne(); 60 | }); 61 | ``` 62 | 63 | 这个代码的作用是在服务端异步获取本地 Markdown 文章的数据,也就是最终返回给我们的页面中是包含文章信息的。 64 | 65 | 我们查看网页是 CSR 渲染还是 SSR 渲染,可以用一个操作来检查,我们直接右击网页,查看源代码,如果是 CSR 渲染的话,源代码上是不会带有网页的数据,反之 SSR 渲染的话,则会带有,这也是为啥 SSR 会比 CSR 的 SEO 要好的原因,因为 CSR 的话爬虫是获取不到网页数据的。 66 | 67 |  68 | 69 | 但是尽管是服务端渲染,由于 Vercel 的连接速度还是太慢了,导致获取文章的时候速度不高。 70 | 71 | 首页加载速度 2s 左右,这还不是首次加载。 72 | 73 |
 74 |
75 | 其中文章详情页也是如此
76 |
77 | 
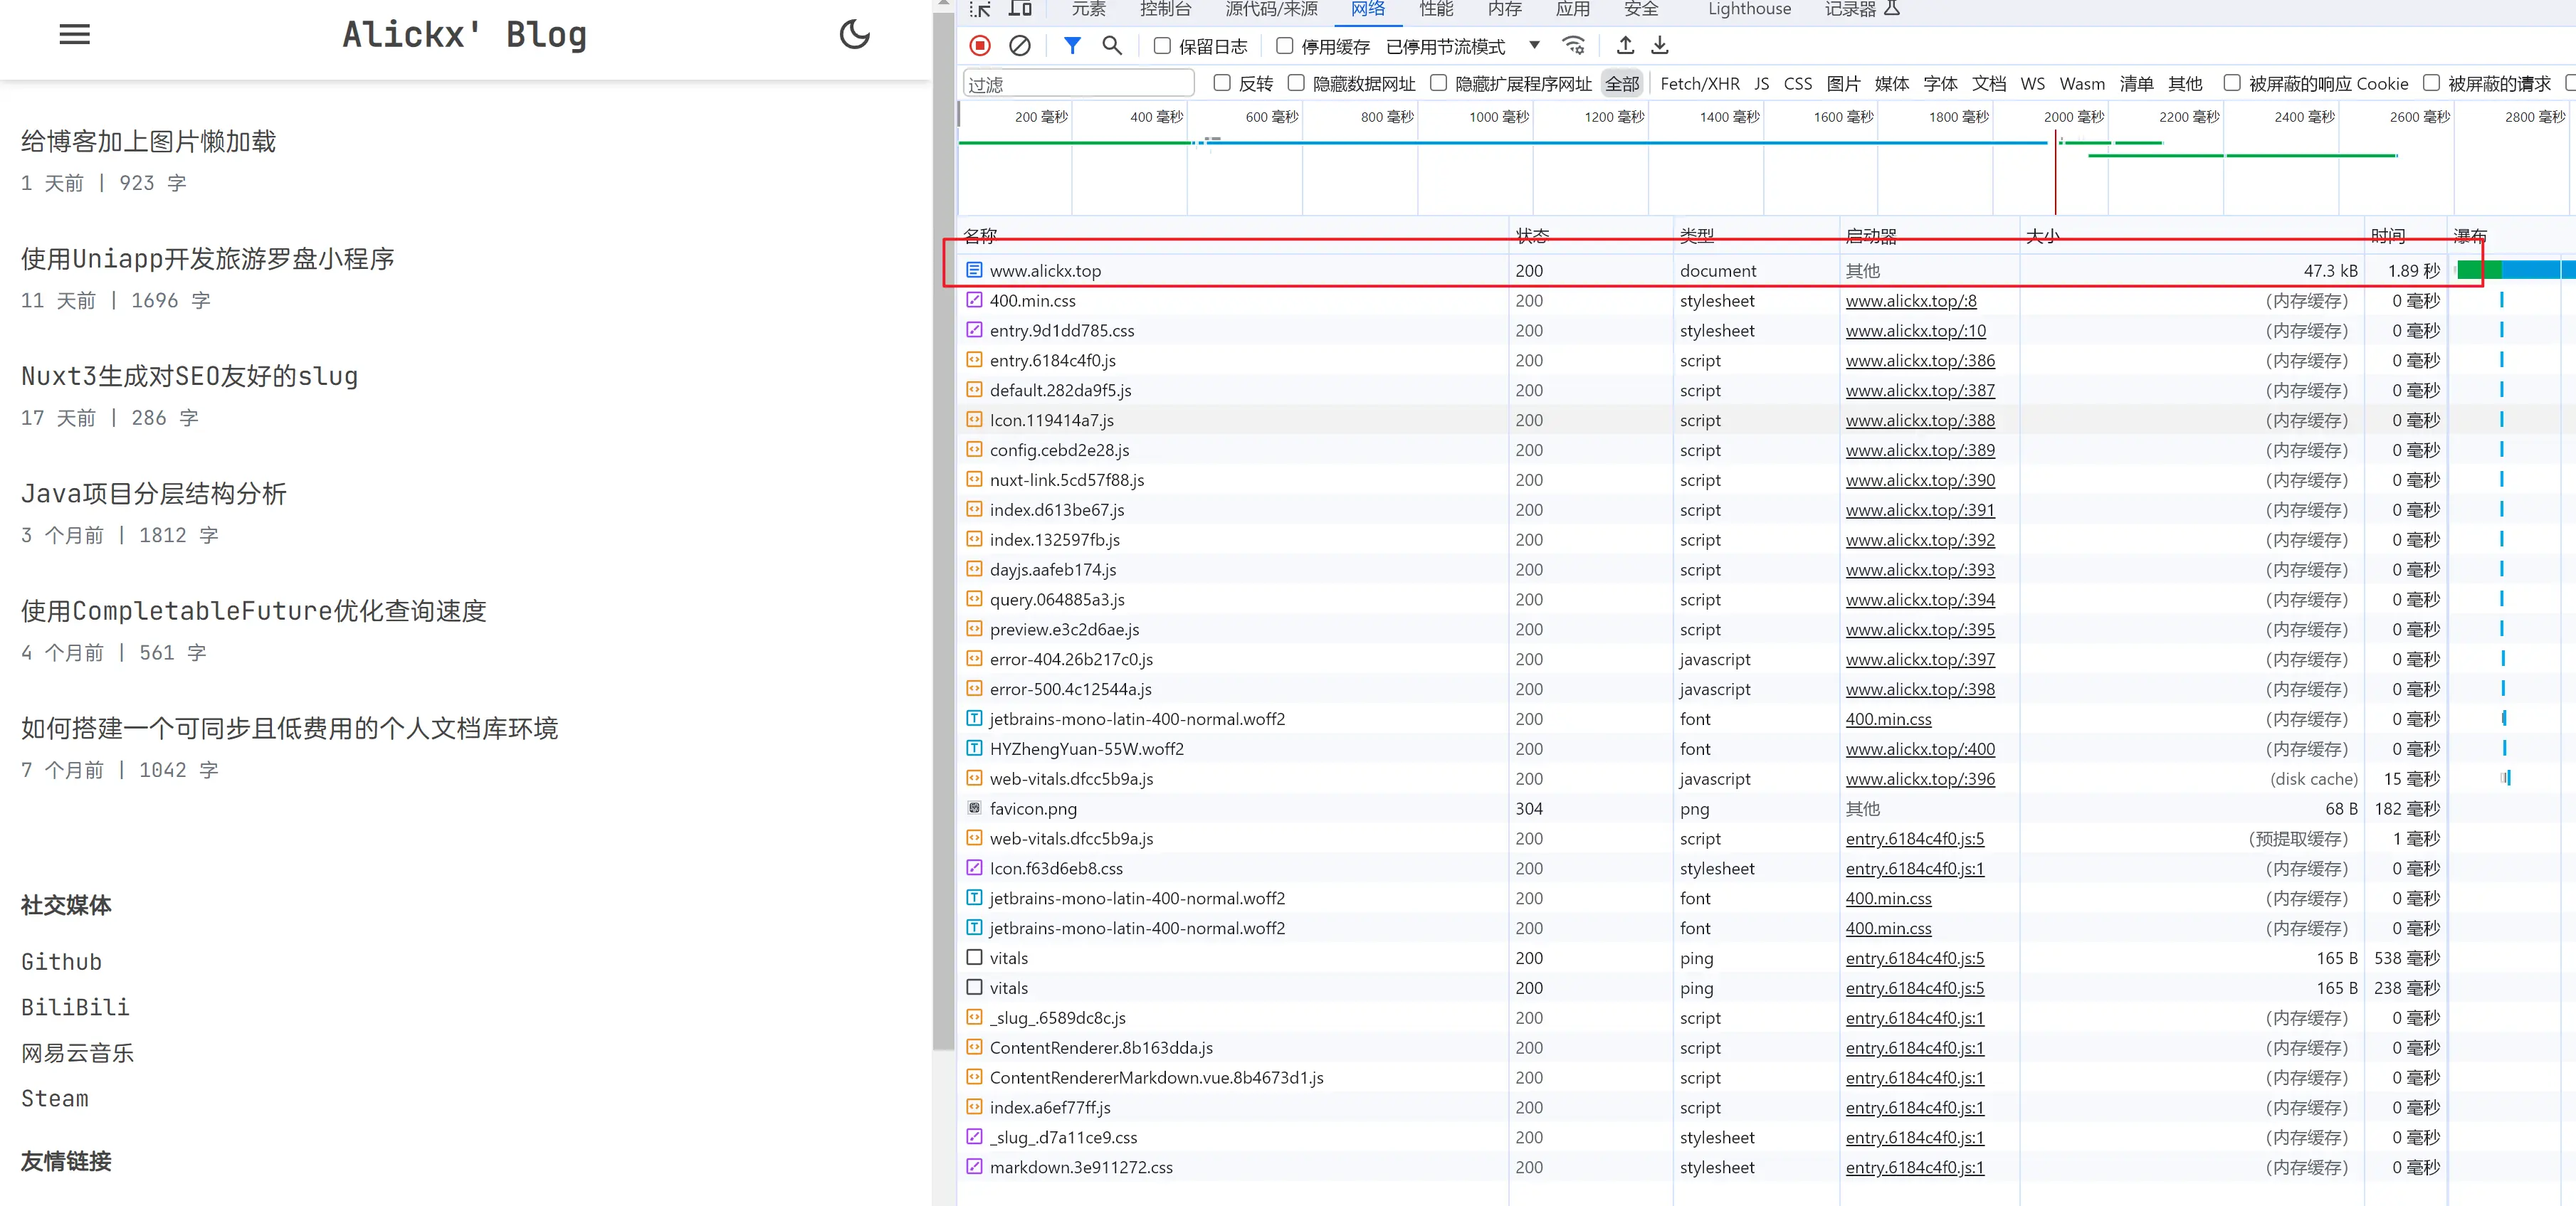
78 |
79 | 我们查看一下耗时是花在哪里了,等待服务端响应1.10s,下载内容353ms,可以看到其实主要瓶颈还是在等待服务端响应上。
80 |
81 | 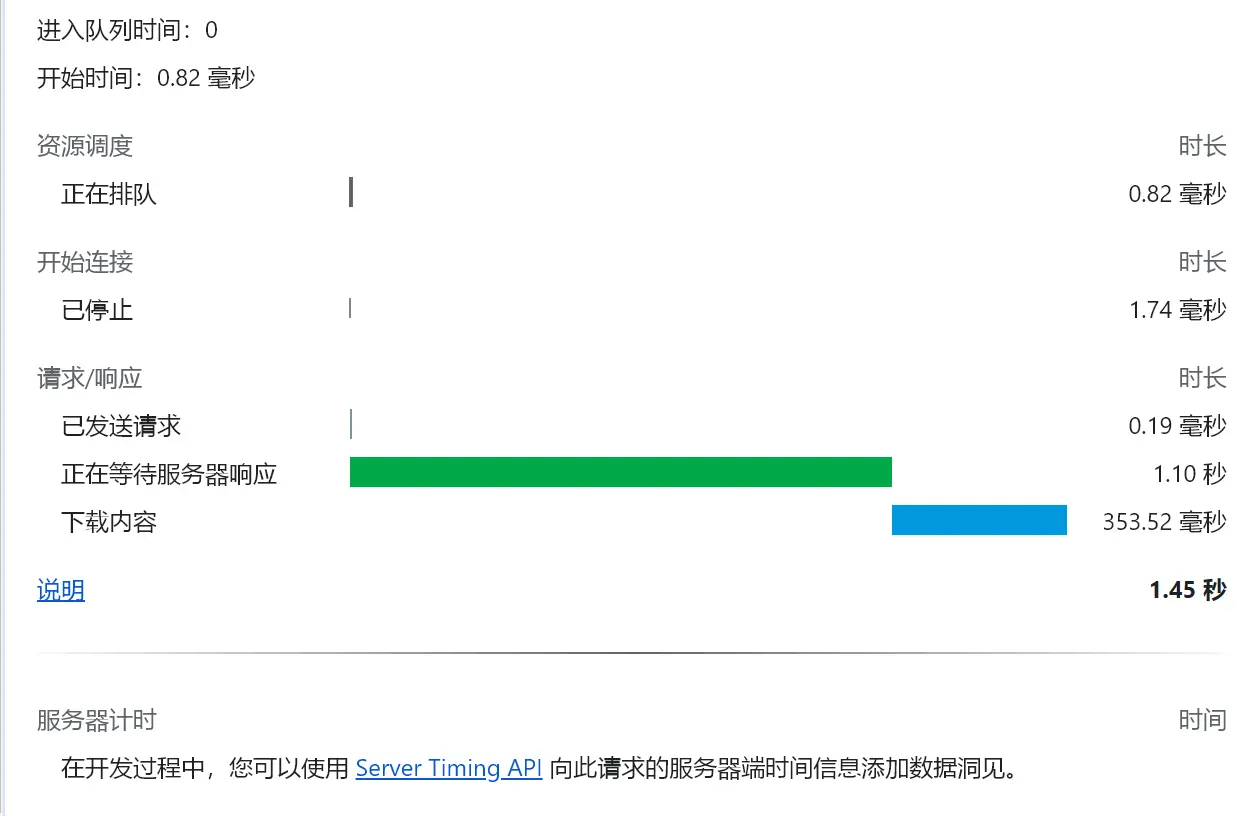
82 |
83 | 那么问题就变成了如何解决客户端连接 Vercel 服务端的速度过慢的问题了。
84 |
85 |
86 |
87 | ## 使用 ISR
88 |
89 | 一开始是想使用 `instant.page` 来解决这个问题的,instant.page 是什么? 有什么用?
90 |
91 | > ### 在桌面上
92 | >
93 | > **在用户单击链接之前,他们会将鼠标悬停**在该链接上。当用户悬停 65 毫秒时,他们有二分之一的机会点击该链接,因此 instant.page 此时开始预加载,平均**为页面预加载留下超过 300 毫秒的时间**。
94 | >
95 | > **另一种选择是在用户开始按下鼠标时**加载页面而不进行预加载。这使得**未使用的请求为零**,同时仍然将页面加载平均**提高了 80 毫秒。**
96 | >
97 | > 您还可以在悬停时或链接可见时进行预加载,并在用户开始按下鼠标时触发点击,从而使您的页面成为世界上最快的页面。
98 | >
99 | > ### 在移动
100 | >
101 | > 用户**在释放之前开始触摸显示屏**,平均留出**90 毫秒的时间来预加载页面**。
102 | >
103 | > 另一种选择是在链接可见时立即预加载链接。
104 |
105 | 通俗点就是,该组件利用在悬停连接时,使用预加载这个机制,对目标页面进行预加载,从而在真正打开的时候可以有效利用预读取缓存,不得不说该组件的思路很好,如果能用上的话也算是另寻蹊径了。
106 |
107 | 但是很可惜,该组件在 Nuxt 下无法正常使用,查阅了一下 Github 的 issuse 貌似是 Nuxt 的 NuxtLink组件已经自带了预加载,并且是在可视区域里面就直接预加载了,可是不知道为啥没有作用,这部分不是重点就不做深入探究了,既然这路行不通,那就走其他路。
108 |
109 | 然后我就在 Github,Google 上搜啊搜,一开始搜索的方向是如何让国内连接 Vercel 能够快一点,可是在查看了各种答案后放弃了,如果能做到这一点的话,那么国内也没必要做什么备案了,大多数人其实费劲麻烦备案还是想要得到那个速度而已。
110 |
111 | 既然不能让国内连接的快,那么能不能对 Vercel 做某些操作,让它的响应快一点。
112 |
113 | 很快我就搜出了一个比较神奇的东西,Github 仓库地址:https://github.com/danielroe/nuxt-vercel-isr
114 |
115 | 
116 |
117 | 结合 Vercel 官方的文档 https://vercel.com/docs/frameworks/nuxt#incremental-static-regeneration-isr
118 |
119 | > 总而言之,在 Vercel 上使用 ISR 和 Nuxt 可以提供:
120 | >
121 | > - 通过我们的全球[边缘网络获得更好的性能](https://vercel.com/docs/edge-network/overview)
122 | > - 零停机时间推出到以前静态生成的页面
123 | > - 全球内容300ms更新
124 | > - 生成的页面会被缓存并持久保存到持久存储中
125 |
126 | 也就是我们可以通过设定指定的路由路径,通过这个 ISR ,可以让 Vercel 那边缓存我们的页面,一直持续到我们下一次部署,并且还能够使用到 Vercel 的边缘网络,虽然不太了解这个边缘网络的具体,但是可以知道的是,通过这样子设置,网站的速度应该可以提高。
127 |
128 | 那么在 nuxt.config.ts 文件上添加了以下几个路由
129 |
130 | ```ts
131 | routeRules: {
132 | "/": { prerender: true },
133 | "/articles/**": { isr: true },
134 | "/about": { isr: true },
135 | },
136 | ```
137 |
138 | 部署上去后,以下是优化效果
139 |
140 | 优化后:
141 |
142 | 首页加载时间(非首次加载):
143 |
144 | 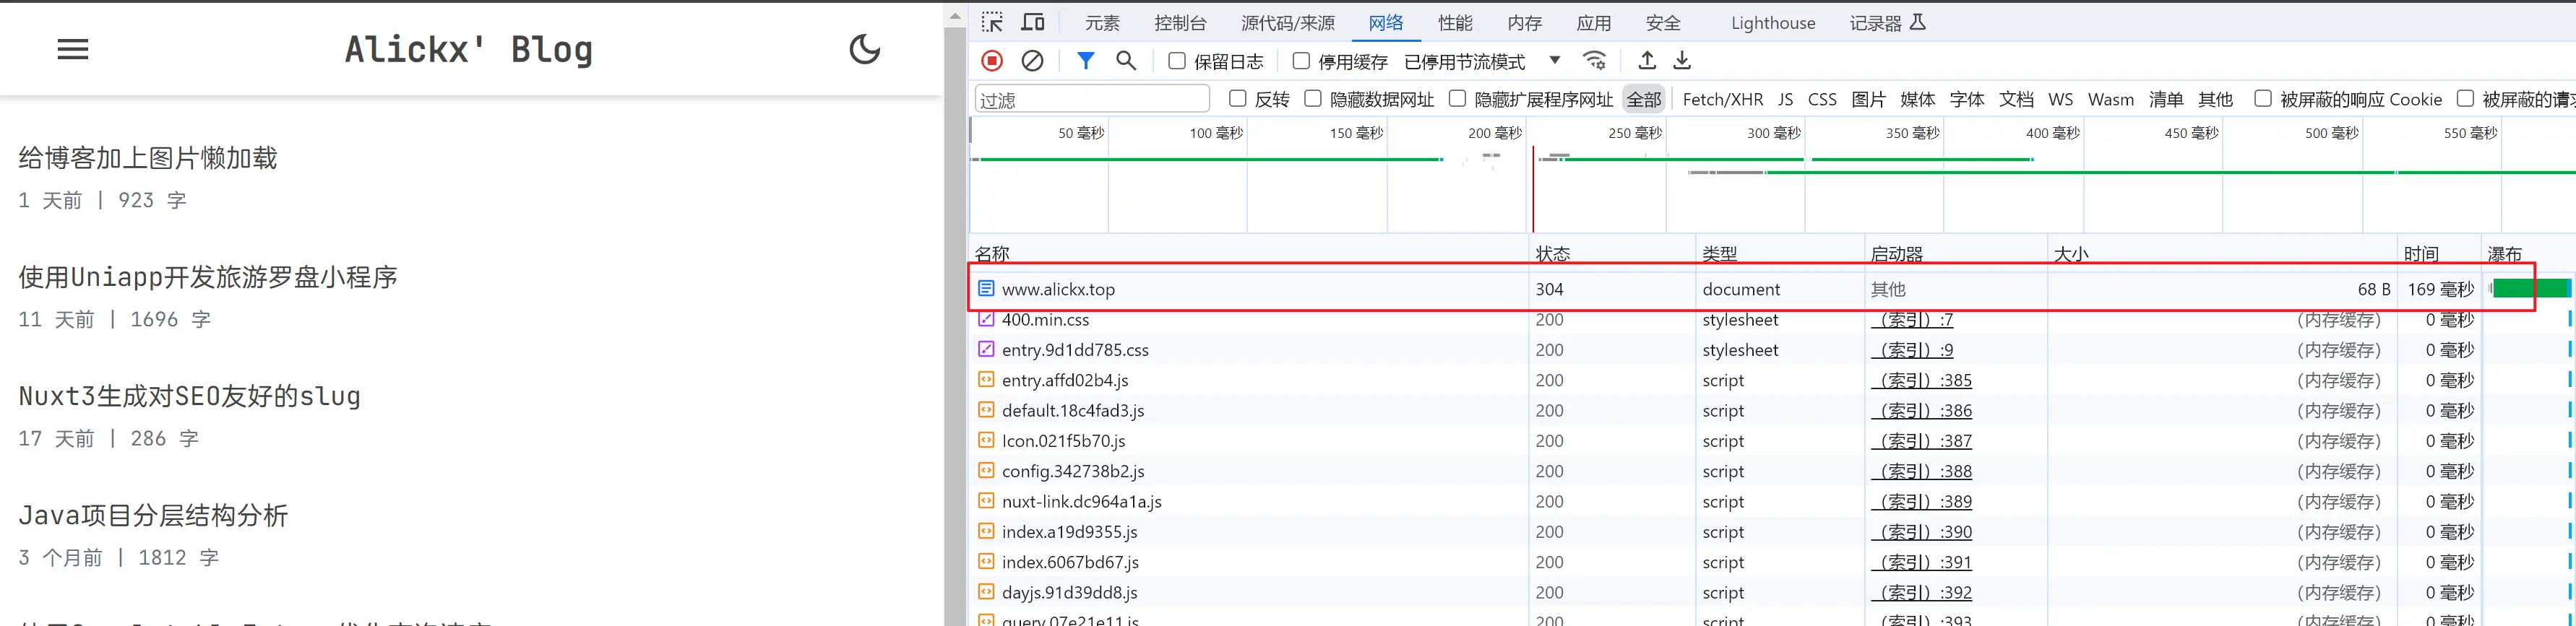
145 |
146 | 文章详情页加载速度(非首次加载):
147 |
148 | 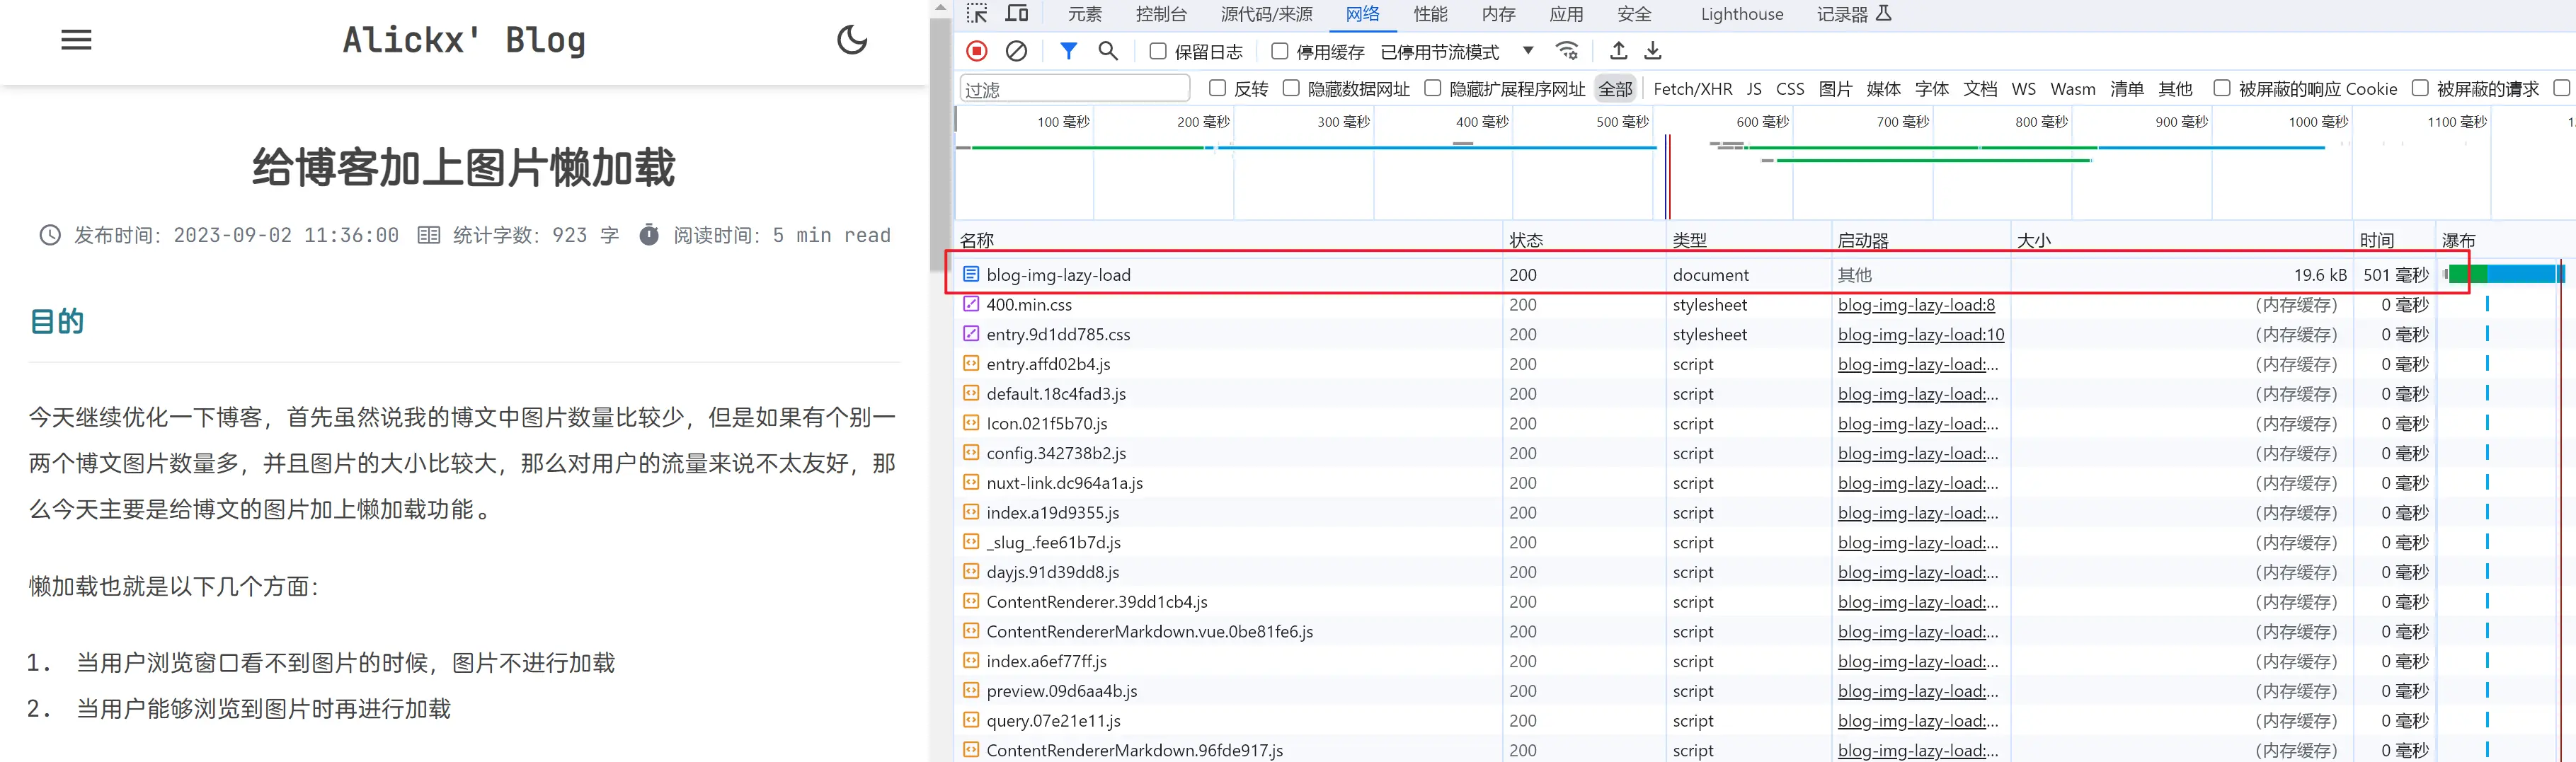
149 |
150 | 时间消耗:
151 |
152 | 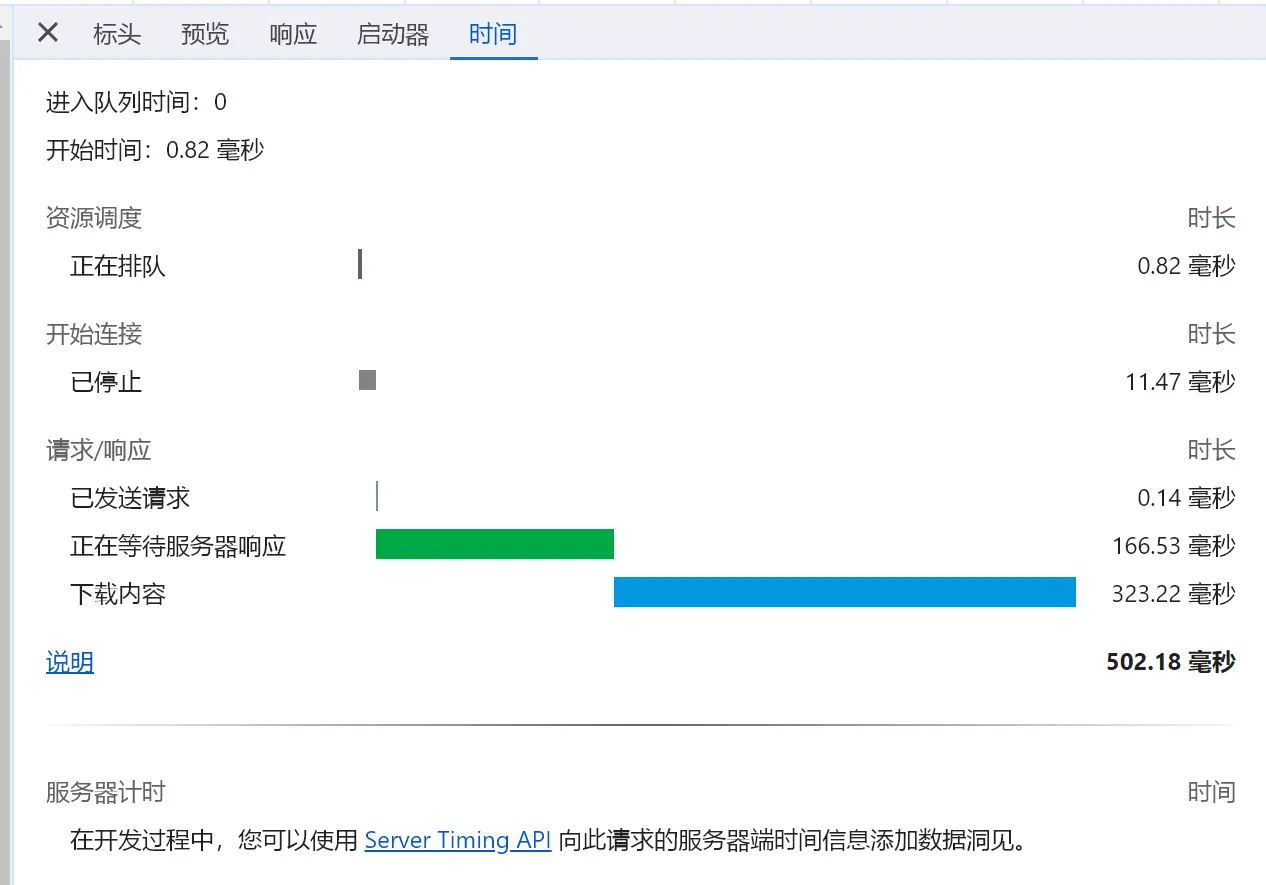
153 |
154 | 可以看到在使用了 Vercel 的 ISR 后,博客首页以及相关的文章详情页加载速度得到了较大的提升,虽然说首次加载的时间仍然不够理想,但是优化效果到了,那目的也算是达成了。
155 |
156 |
157 |
158 | ## 优化字体文件
159 |
160 | 除了 Vercel 的响应速度优化外,博客使用到的字体文件也是需要优化的。
161 |
162 | 在之前博客使用的英文字体分别是 jetBrains-mono 以及 Fira-code,但是这两者都是从 jsdelivr 中引入,由于 jsdelivr 已经被国内的 DNS 污染了,所以导致加载速度也是很慢,特别是首次加载。在首次加载中,由于字体加载过慢,导致页面大部分时间都处于白屏状态,用户体验非常差。
163 |
164 | 所以优化字体文件的请求速度也是提高博客速度的关键之一,**在这里我直接将字体文件上传到腾讯云COS上**,通过国内服务商的对象存储来优化加载速度。
165 |
166 | 或许你会问,你放到 COS 上不怕别人刷流量吗?
167 |
168 | 我的回答是 怕,但是也不算太怕,首先我这个是个人技术博客,来我的博客都是懂技术的,不会做这么无聊的事情,然后就算是人比较多,但是字体文件浏览器会做一个缓存,后续也不会继续请求,所以其实耗费的流量是比较少的。
169 |
170 |
171 |
172 | ## 总结
173 |
174 | 今天通过初步了解各个渲染模式,然后再根据实际情况转变优化方向,最后使用 Vercel 的 ISR 优化了博客的访问速度,然后再通过对象存储优化博客的字体文件,最终得到优化的目的。
175 |
176 | 后续可能还会探索是否有其他更牛逼,更快的优化方式,毕竟 access speed 这个东西肯定是越快越好的。
--------------------------------------------------------------------------------
/README.md:
--------------------------------------------------------------------------------
1 |
74 |
75 | 其中文章详情页也是如此
76 |
77 | 
78 |
79 | 我们查看一下耗时是花在哪里了,等待服务端响应1.10s,下载内容353ms,可以看到其实主要瓶颈还是在等待服务端响应上。
80 |
81 | 
82 |
83 | 那么问题就变成了如何解决客户端连接 Vercel 服务端的速度过慢的问题了。
84 |
85 |
86 |
87 | ## 使用 ISR
88 |
89 | 一开始是想使用 `instant.page` 来解决这个问题的,instant.page 是什么? 有什么用?
90 |
91 | > ### 在桌面上
92 | >
93 | > **在用户单击链接之前,他们会将鼠标悬停**在该链接上。当用户悬停 65 毫秒时,他们有二分之一的机会点击该链接,因此 instant.page 此时开始预加载,平均**为页面预加载留下超过 300 毫秒的时间**。
94 | >
95 | > **另一种选择是在用户开始按下鼠标时**加载页面而不进行预加载。这使得**未使用的请求为零**,同时仍然将页面加载平均**提高了 80 毫秒。**
96 | >
97 | > 您还可以在悬停时或链接可见时进行预加载,并在用户开始按下鼠标时触发点击,从而使您的页面成为世界上最快的页面。
98 | >
99 | > ### 在移动
100 | >
101 | > 用户**在释放之前开始触摸显示屏**,平均留出**90 毫秒的时间来预加载页面**。
102 | >
103 | > 另一种选择是在链接可见时立即预加载链接。
104 |
105 | 通俗点就是,该组件利用在悬停连接时,使用预加载这个机制,对目标页面进行预加载,从而在真正打开的时候可以有效利用预读取缓存,不得不说该组件的思路很好,如果能用上的话也算是另寻蹊径了。
106 |
107 | 但是很可惜,该组件在 Nuxt 下无法正常使用,查阅了一下 Github 的 issuse 貌似是 Nuxt 的 NuxtLink组件已经自带了预加载,并且是在可视区域里面就直接预加载了,可是不知道为啥没有作用,这部分不是重点就不做深入探究了,既然这路行不通,那就走其他路。
108 |
109 | 然后我就在 Github,Google 上搜啊搜,一开始搜索的方向是如何让国内连接 Vercel 能够快一点,可是在查看了各种答案后放弃了,如果能做到这一点的话,那么国内也没必要做什么备案了,大多数人其实费劲麻烦备案还是想要得到那个速度而已。
110 |
111 | 既然不能让国内连接的快,那么能不能对 Vercel 做某些操作,让它的响应快一点。
112 |
113 | 很快我就搜出了一个比较神奇的东西,Github 仓库地址:https://github.com/danielroe/nuxt-vercel-isr
114 |
115 | 
116 |
117 | 结合 Vercel 官方的文档 https://vercel.com/docs/frameworks/nuxt#incremental-static-regeneration-isr
118 |
119 | > 总而言之,在 Vercel 上使用 ISR 和 Nuxt 可以提供:
120 | >
121 | > - 通过我们的全球[边缘网络获得更好的性能](https://vercel.com/docs/edge-network/overview)
122 | > - 零停机时间推出到以前静态生成的页面
123 | > - 全球内容300ms更新
124 | > - 生成的页面会被缓存并持久保存到持久存储中
125 |
126 | 也就是我们可以通过设定指定的路由路径,通过这个 ISR ,可以让 Vercel 那边缓存我们的页面,一直持续到我们下一次部署,并且还能够使用到 Vercel 的边缘网络,虽然不太了解这个边缘网络的具体,但是可以知道的是,通过这样子设置,网站的速度应该可以提高。
127 |
128 | 那么在 nuxt.config.ts 文件上添加了以下几个路由
129 |
130 | ```ts
131 | routeRules: {
132 | "/": { prerender: true },
133 | "/articles/**": { isr: true },
134 | "/about": { isr: true },
135 | },
136 | ```
137 |
138 | 部署上去后,以下是优化效果
139 |
140 | 优化后:
141 |
142 | 首页加载时间(非首次加载):
143 |
144 | 
145 |
146 | 文章详情页加载速度(非首次加载):
147 |
148 | 
149 |
150 | 时间消耗:
151 |
152 | 
153 |
154 | 可以看到在使用了 Vercel 的 ISR 后,博客首页以及相关的文章详情页加载速度得到了较大的提升,虽然说首次加载的时间仍然不够理想,但是优化效果到了,那目的也算是达成了。
155 |
156 |
157 |
158 | ## 优化字体文件
159 |
160 | 除了 Vercel 的响应速度优化外,博客使用到的字体文件也是需要优化的。
161 |
162 | 在之前博客使用的英文字体分别是 jetBrains-mono 以及 Fira-code,但是这两者都是从 jsdelivr 中引入,由于 jsdelivr 已经被国内的 DNS 污染了,所以导致加载速度也是很慢,特别是首次加载。在首次加载中,由于字体加载过慢,导致页面大部分时间都处于白屏状态,用户体验非常差。
163 |
164 | 所以优化字体文件的请求速度也是提高博客速度的关键之一,**在这里我直接将字体文件上传到腾讯云COS上**,通过国内服务商的对象存储来优化加载速度。
165 |
166 | 或许你会问,你放到 COS 上不怕别人刷流量吗?
167 |
168 | 我的回答是 怕,但是也不算太怕,首先我这个是个人技术博客,来我的博客都是懂技术的,不会做这么无聊的事情,然后就算是人比较多,但是字体文件浏览器会做一个缓存,后续也不会继续请求,所以其实耗费的流量是比较少的。
169 |
170 |
171 |
172 | ## 总结
173 |
174 | 今天通过初步了解各个渲染模式,然后再根据实际情况转变优化方向,最后使用 Vercel 的 ISR 优化了博客的访问速度,然后再通过对象存储优化博客的字体文件,最终得到优化的目的。
175 |
176 | 后续可能还会探索是否有其他更牛逼,更快的优化方式,毕竟 access speed 这个东西肯定是越快越好的。
--------------------------------------------------------------------------------
/README.md:
--------------------------------------------------------------------------------
1 |
2 | English | 简体中文
3 |
4 |
5 | Nuxt3-Blog
6 | 7 | ## 📖 Project Introduction 8 | 9 | This is a personal blog website built with Nuxt3 + TypeScript + UnoCSS, designed for displaying articles, recording life, and sharing personal moments. The project utilizes a modern front-end technology stack, features responsive layout and dark mode support, focusing on excellent user experience and performance optimization. 10 | 11 | ## 🛠️ Technology Stack 12 | 13 | - **Nuxt3**: Vue's server-side rendering framework, providing excellent SEO support and performance 14 | - **TypeScript**: Enhances code maintainability and type safety 15 | - **UnoCSS**: Atomic CSS engine, improving style development efficiency 16 | - **Vite**: Modern front-end build tool, providing an extremely fast development experience 17 | - **@nuxt/content**: Powerful content management system, making blog article management convenient 18 | - **Waline**: Lightweight commenting system 19 | - **Algolia**: Efficient site-wide search solution 20 | - **Pnpm**: High-performance package manager 21 | 22 | ## ✨ Key Features 23 | 24 | - ✅ **Article Display**: Supports Markdown format, code highlighting, reading time estimation 25 | - ✅ **Article Search**: Integrates Algolia, providing an efficient full-site search experience 26 | - ✅ **Responsive Layout**: Adapts to various devices, from mobile to desktop platforms 27 | - ✅ **Dark Mode**: Supports light/dark theme switching, protecting users' eyesight 28 | - ✅ **Article Comments**: Integrates the Waline comment system, supporting anonymous comments 29 | - ✅ **Website SEO**: Optimized for search engines, improving website visibility 30 | - ✅ **Sitemap**: Automatically generates sitemap.xml, helping with search engine indexing 31 | - ✅ **Configuration System**: Easily customize blog name, header navigation, footer links, and more through configuration files 32 | 33 | ## 🚀 Quick Start 34 | 35 | ### Requirements 36 | 37 | - Node.js 16.x or higher 38 | - pnpm 7.x or higher 39 | 40 | ### Installation and Running 41 | 42 | ```bash 43 | # Clone repository 44 | git clone https://github.com/alickx/nuxt3-blog.git 45 | cd nuxt3-blog 46 | 47 | # Install dependencies 48 | pnpm install 49 | 50 | # Run in development mode 51 | pnpm dev 52 | 53 | # Build project 54 | pnpm build 55 | 56 | # Preview build result 57 | pnpm preview 58 | ``` 59 | 60 | ## 📝 Content Creation 61 | 62 | Blog articles are stored in the `src/content/_articles` directory, written in Markdown format. Each article needs to include frontmatter metadata, for example: 63 | 64 | ```markdown 65 | --- 66 | title: 'Article Title' 67 | description: 'Article Description' 68 | date: '2023-01-01' 69 | tags: ['tag1', 'tag2'] 70 | --- 71 | 72 | Article content... 73 | ``` 74 | 75 | Recommended guidance for each frontmatter field: 76 | 77 | - `title`: Write a concise, engaging headline that includes primary keywords so search engines and feeds surface the article accurately while enticing readers to click. 78 | - `description`: Provide a one- or two-sentence summary highlighting the article's main takeaway; this powers SEO meta descriptions and helps social previews communicate value quickly. 79 | - `date`: Use the ISO 8601 format (`YYYY-MM-DD`) to keep chronological sorting predictable across the site, archives, and any automated deployments. 80 | - `tags`: Choose 3–5 specific topical labels that reflect the article's themes; consistent tagging keeps related posts grouped and improves search and filter relevance. 81 | 82 | ## ⚙️ Customization 83 | 84 | The blog can be easily customized through the configuration file located at `src/config/site.ts`. This allows you to modify: 85 | 86 | - Blog name and basic information 87 | - Header navigation menu items 88 | - Footer links and sections 89 | - Social media links 90 | - SEO metadata and favicon 91 | - Algolia search configuration 92 | 93 | Example configuration: 94 | 95 | ```typescript 96 | // src/config/site.ts 97 | export const siteConfig = { 98 | name: "Your Blog Name", 99 | title: "Your Blog Title", 100 | description: "Your blog description", 101 | author: "Your Name", 102 | 103 | // Navigation menu 104 | nav: [ 105 | { name: "Home", path: "/" }, 106 | { name: "About", path: "/about" }, 107 | // Add more menu items 108 | ], 109 | 110 | // Footer links by section 111 | footerLinks: [ 112 | { 113 | title: "Social Media", 114 | links: [ 115 | { name: "Github", url: "https://github.com/yourusername" }, 116 | // Add more links 117 | ] 118 | }, 119 | // Add more sections 120 | ], 121 | 122 | // SEO configuration 123 | seo: { 124 | meta: { 125 | keywords: "keyword1,keyword2", 126 | description: "Site description" 127 | } 128 | }, 129 | 130 | // Algolia search configuration 131 | algolia: { 132 | apiKey: "your-api-key", 133 | applicationId: "your-application-id", 134 | indexName: "your-index-name", 135 | lang: "en" 136 | } 137 | } 138 | ``` 139 | 140 | ## 🌐 Deployment Strategy 141 | 142 | The project uses a Vercel + Cloudflare deployment approach: 143 | 144 | 1. **Vercel**: Provides continuous integration and deployment services; each time code is pushed or an article is added, deployment is automatically triggered 145 | 2. **Cloudflare**: Through setting up CNAME records and Cloudflare's CDN, enables access acceleration for domains without ICP filing in China 146 | 147 | ### Deployment Steps 148 | 149 | 1. Import GitHub repository on Vercel 150 | 2. Configure build command `pnpm build` 151 | 3. Set environment variables (if needed) 152 | 4. Set up custom domain 153 | 5. Add domain in Cloudflare and set CNAME record pointing to the domain provided by Vercel 154 | 155 | ## 🤝 Contribution Guidelines 156 | 157 | Contributions to this project are welcome! Whether submitting bugs, improving documentation, or adding new features, your participation will make this project better. 158 | 159 | 1. Fork this repository 160 | 2. Create your feature branch: `git checkout -b feature/amazing-feature` 161 | 3. Commit your changes: `git commit -m 'Add some amazing feature'` 162 | 4. Push to the branch: `git push origin feature/amazing-feature` 163 | 5. Submit a Pull Request 164 | 165 | ## 📄 License 166 | 167 | This project is distributed and used under the [LICENSE](LICENSE) open source license. 168 | 169 | --- 170 | 171 |Made with ❤️ by alickx
172 | -------------------------------------------------------------------------------- /src/components/article/info/MarkdownToc.vue: -------------------------------------------------------------------------------- 1 | 2 |
3 |
15 |
64 |
65 |
66 |
67 |
191 |
192 |
235 |
--------------------------------------------------------------------------------
/src/content/_articles/使用Uniapp开发旅游罗盘小程序.md:
--------------------------------------------------------------------------------
1 | ---
2 | title: 使用Uniapp开发旅游罗盘小程序
3 | slug: use-uniapp-to-develop-travel-compass-mini-program
4 | description: 使用Uniapp开发旅游罗盘小程序
5 | keywords: uniapp,miniprogram,wechat
6 | date: 2023-08-24 01:30
7 | ---
8 |
9 | ## 想法
10 |
11 | 之前在抖音刷到过一个视频,就是视频主使用一款 App,这个 App 可以随机获取国内的城市,并且可以进行筛选。然后博主就通过这个 App,去拍旅游视频。
12 |
13 |
6 | 目录
7 |
14 | -
19 |
20 |
- 28 | 32 | {{ item.text }} 37 | 38 | 39 | 40 |
- 50 | 54 | {{ child.text }} 59 | 60 | 61 | 62 |
 14 |
15 | 然后我想着好像还蛮有意思,想做一个出来玩一下。那么安卓应用我虽然说还不太了解开发,然后微信小程序我还是懂一点的嘛。然后我就打算以微信小程序为平台做一个出来耍耍。
16 |
17 | ## 选择
18 |
19 | 要做微信小程序的话,可以选择使用官方的开发方式来做,也可以使用 Uniapp 来做,那么为了后续有可能会使用到数据库等处理,我选择使用 Uniapp 来写,毕竟它提供了一个免费云函数和云数据库。而且只要你学会 Vue3,那么无论是微信小程序还是 Uniapp 其实都一样。
20 |
21 | Uniapp 的优点有以下:
22 |
23 | 1. 可以白嫖云函数和数据库。
24 | 2. 可以使用Vue3以及相关的库,例如 Pinia,Unocss等,生态做得好,可以无缝切换。
25 | 3. 多端开发,如果后续有 app 需求,可以随时进行转换。
26 |
27 | 所以我选择了使用 Uniapp 来进行开发。
28 |
29 | ## 过程
30 |
31 | 我这里是直接使用官方的 Cli 来进行开发,这里既可以直接使用官方的 Hbuilder 来创建项目,也可以使用命令行来,使用 Cli 的话,项目的目录结构更符合我们平时 Node 开发的项目结构。
32 |
33 | 创建项目的命令这里我就直接贴官方的链接了。[创建命令](https://zh.uniapp.dcloud.io/quickstart-cli.html)
34 |
35 | 接着就是安装 Unocss,这里是安装配置。 [安装配置](https://github.com/MellowCo/unocss-preset-weapp/tree/main/examples/uniapp_vue3)
36 |
37 | 通过视频可以得知操作逻辑是点击转盘中间的按钮,转盘则会开始转动,同时上方的城市名称会不停变化,最终停留在随机获取的城市上。
38 |
39 | 首先是如何开发这个转盘,最重要的是这个城市数据,这个数据必须要有省,二级城市的相关数据,然后在 Github 搜索一番就可以获得。[省份数据](https://xiangyuecn.gitee.io/areacity-jsspider-statsgov/)
40 |
41 | 
42 |
43 | 获取到的省份数据还不能够使用,必须先把省和二级城市单独区分出来,这个使用 Python 可以很简单地做到。最终数据呈现这样子。
44 |
45 |
14 |
15 | 然后我想着好像还蛮有意思,想做一个出来玩一下。那么安卓应用我虽然说还不太了解开发,然后微信小程序我还是懂一点的嘛。然后我就打算以微信小程序为平台做一个出来耍耍。
16 |
17 | ## 选择
18 |
19 | 要做微信小程序的话,可以选择使用官方的开发方式来做,也可以使用 Uniapp 来做,那么为了后续有可能会使用到数据库等处理,我选择使用 Uniapp 来写,毕竟它提供了一个免费云函数和云数据库。而且只要你学会 Vue3,那么无论是微信小程序还是 Uniapp 其实都一样。
20 |
21 | Uniapp 的优点有以下:
22 |
23 | 1. 可以白嫖云函数和数据库。
24 | 2. 可以使用Vue3以及相关的库,例如 Pinia,Unocss等,生态做得好,可以无缝切换。
25 | 3. 多端开发,如果后续有 app 需求,可以随时进行转换。
26 |
27 | 所以我选择了使用 Uniapp 来进行开发。
28 |
29 | ## 过程
30 |
31 | 我这里是直接使用官方的 Cli 来进行开发,这里既可以直接使用官方的 Hbuilder 来创建项目,也可以使用命令行来,使用 Cli 的话,项目的目录结构更符合我们平时 Node 开发的项目结构。
32 |
33 | 创建项目的命令这里我就直接贴官方的链接了。[创建命令](https://zh.uniapp.dcloud.io/quickstart-cli.html)
34 |
35 | 接着就是安装 Unocss,这里是安装配置。 [安装配置](https://github.com/MellowCo/unocss-preset-weapp/tree/main/examples/uniapp_vue3)
36 |
37 | 通过视频可以得知操作逻辑是点击转盘中间的按钮,转盘则会开始转动,同时上方的城市名称会不停变化,最终停留在随机获取的城市上。
38 |
39 | 首先是如何开发这个转盘,最重要的是这个城市数据,这个数据必须要有省,二级城市的相关数据,然后在 Github 搜索一番就可以获得。[省份数据](https://xiangyuecn.gitee.io/areacity-jsspider-statsgov/)
40 |
41 | 
42 |
43 | 获取到的省份数据还不能够使用,必须先把省和二级城市单独区分出来,这个使用 Python 可以很简单地做到。最终数据呈现这样子。
44 |
45 |  46 |
47 | 上面是城市数据,而省份数据则是这样。
48 |
49 |
46 |
47 | 上面是城市数据,而省份数据则是这样。
48 |
49 |  50 |
51 | 既然有了数据,那么就可以开发转盘了。一开始想的是这个转盘其实就是城市的名字,围着一个圆而已,但是网上大多都是围着一个边来。
52 |
53 |
50 |
51 | 既然有了数据,那么就可以开发转盘了。一开始想的是这个转盘其实就是城市的名字,围着一个圆而已,但是网上大多都是围着一个边来。
52 |
53 |  54 |
55 | 这样子并不能满足需求,然后我就接着搜,最后找到了一个相似的 demo。[文字绕圆demo链接](https://blog.csdn.net/qq_33769914/article/details/120240867)
56 |
57 |
54 |
55 | 这样子并不能满足需求,然后我就接着搜,最后找到了一个相似的 demo。[文字绕圆demo链接](https://blog.csdn.net/qq_33769914/article/details/120240867)
56 |
57 |  58 |
59 | 但是这样子还不行,可以看到视频上文字自身也是带角度的,每个文字都是指向外边,而不是横着来,那么问题就来到了如何让文本竖着来。结果刚好有一个 css 属性可以做到这样子。
60 |
61 | ```css
62 | writing-mode:vertical-lr;
63 | ```
64 |
65 | 顺便放上 MDN 的链接 [MDN属性说明](https://developer.mozilla.org/en-US/docs/Web/CSS/writing-mode)
66 |
67 | ok,这样子就可以做出来了。
68 |
58 |
59 | 但是这样子还不行,可以看到视频上文字自身也是带角度的,每个文字都是指向外边,而不是横着来,那么问题就来到了如何让文本竖着来。结果刚好有一个 css 属性可以做到这样子。
60 |
61 | ```css
62 | writing-mode:vertical-lr;
63 | ```
64 |
65 | 顺便放上 MDN 的链接 [MDN属性说明](https://developer.mozilla.org/en-US/docs/Web/CSS/writing-mode)
66 |
67 | ok,这样子就可以做出来了。
68 |  69 |
70 | **其实如果不是小程序的话,还有一种方式更简单实现,那就是使用 SVG 的 textpath,但是很可惜,在小程序中 svg标签并不能使用。**
71 |
72 | 那好,盘是做出来了,但是怎么转呢?这个问题刚好官方就有一个 api 可以解决。
73 |
74 | ```js
75 | const animation = wx.createAnimation({
76 | duration: 6000,
77 | timingFunction: 'ease',
78 | delay: 0
79 | })
80 | ```
81 |
82 | 具体的属性这里放上链接。[微信官方文档](https://developers.weixin.qq.com/miniprogram/dev/api/ui/animation/wx.createAnimation.html)
83 |
84 | duration 设置为6000,也就是6秒,然后动画的效果是 ease,也就是官方所说的 ` 动画以低速开始,然后加快,在结束前变慢`。
85 |
86 | 然后这里我让它旋转360度。
87 |
88 | ```js
89 | animationData.value = animation.rotate(360).step().export()
90 | ```
91 |
92 | 这里是实现的效果
93 |
94 |
69 |
70 | **其实如果不是小程序的话,还有一种方式更简单实现,那就是使用 SVG 的 textpath,但是很可惜,在小程序中 svg标签并不能使用。**
71 |
72 | 那好,盘是做出来了,但是怎么转呢?这个问题刚好官方就有一个 api 可以解决。
73 |
74 | ```js
75 | const animation = wx.createAnimation({
76 | duration: 6000,
77 | timingFunction: 'ease',
78 | delay: 0
79 | })
80 | ```
81 |
82 | 具体的属性这里放上链接。[微信官方文档](https://developers.weixin.qq.com/miniprogram/dev/api/ui/animation/wx.createAnimation.html)
83 |
84 | duration 设置为6000,也就是6秒,然后动画的效果是 ease,也就是官方所说的 ` 动画以低速开始,然后加快,在结束前变慢`。
85 |
86 | 然后这里我让它旋转360度。
87 |
88 | ```js
89 | animationData.value = animation.rotate(360).step().export()
90 | ```
91 |
92 | 这里是实现的效果
93 |
94 |  95 |
96 | 然后接下来就是上方的城市展示,这里我做了一个工具类来获取所有的城市。
97 |
98 | ```js
99 | import areaJson from "@/constant/city.json";
100 | import province from "@/constant/province.json";
101 |
102 | /**
103 | * 随机获取旅游城市
104 | * @param {Array} exclude - 要排除的城市 ID 数组
105 | * @returns 返回城市信息
106 | */
107 | export const randomGetArea = (exclude = []) => {
108 | // 读取 constant 中的 json
109 | const area = areaJson;
110 | // 随机获取城市
111 | const city = area[Math.floor(Math.random() * area.length)];
112 | // 如果城市在排除列表中,则重新获取
113 | if (exclude.includes(city.cityId)) {
114 | return randomGetArea(exclude);
115 | }
116 | return city;
117 | };
118 |
119 | export const randomGetAreaExclude = (
120 | excludeCityId = [],
121 | excludeProvinceId = [],
122 | ) => {
123 | const area = areaJson;
124 | const citys = area.filter(
125 | (item) =>
126 | !excludeProvinceId.includes(String(item.pid)) &&
127 | !excludeCityId.includes(item.id),
128 | );
129 | // 随机获取城市
130 | const city = citys[Math.floor(Math.random() * citys.length)];
131 | return city;
132 | };
133 | ```
134 |
135 | 读取城市数据的 JSON 文件,然后随机获取。在动画执行的时候通过不断随机获取来达到视频的那种效果。下面是这个随机展示城市的方法。
136 |
137 | ```js
138 | const animationHandle = () => {
139 | if (city.value !== '点击转盘开始') {
140 | return;
141 | }
142 | // 旋转360度
143 | animationData.value = animation.rotate(360).step().export()
144 | // 获取城市集合
145 | const list = listCityExclude([], excludeProvinceId.value || []);
146 | let index = 0;
147 | // 定时器获取
148 | animationHandleInterval.value = setInterval(() => {
149 | if (index >= 60) {
150 | clearInterval(animationHandleInterval.value);
151 | return;
152 | }
153 | city.value = list[Math.floor(Math.random() * list.length)].name;
154 | index++;
155 | }, 100);
156 | animationHandleTimeOut.value = setTimeout(() => {
157 | clearInterval(animationHandleInterval.value);
158 | }, 6000);
159 | };
160 | ```
161 |
162 | 这样子就实现了转盘上随机展示城市的功能了,那么不管是随机展示,还是转盘动画转动,都需要一个最终确认的城市,同时这个城市还得在动画结束后最终展示。其实这个可以利用 刚才微信的动画 api 来解决。
163 |
164 | 
165 |
166 | 官方有一个事件,那么只要通过这个事件回调,就能做到确定最终城市了。
167 |
168 | 那么核心功能都已完成,现在就剩下样式和一些布局了。这部分就没啥好说了。在后续迭代中我还加上了省份筛选功能,这部分就运用到了 `Pinia` 这个状态处理库,还有这个状态持久化的库 `pinia-plugin-unistorage`。
169 |
170 | ```js
171 | import { defineStore } from "pinia";
172 |
173 | export const useAreaStore = defineStore(
174 | "area",
175 | () => {
176 | const excludeCityId = ref([]);
177 | const excludeProvinceId = ref([]);
178 |
179 | const setExcludeCityId = (id) => {
180 | excludeCityId.value.push(id);
181 | };
182 |
183 | const setExcludeProvinceId = (id) => {
184 | excludeProvinceId.value.push(id);
185 | };
186 |
187 | const removeExcludeCityId = (id) => {
188 | excludeCityId.value = excludeCityId.value.filter((item) => item !== id);
189 | };
190 |
191 | const removeExcludeProvinceId = (id) => {
192 | excludeProvinceId.value = excludeProvinceId.value.filter(
193 | (item) => item !== id,
194 | );
195 | };
196 |
197 | return {
198 | excludeCityId,
199 | excludeProvinceId,
200 | setExcludeCityId,
201 | setExcludeProvinceId,
202 | removeExcludeCityId,
203 | removeExcludeProvinceId,
204 | };
205 | },
206 | {
207 | unistorage: true,
208 | },
209 | );
210 | ```
211 |
212 | 通过记录用户的筛选,并持久化,来达到目标功能。
213 |
214 |
95 |
96 | 然后接下来就是上方的城市展示,这里我做了一个工具类来获取所有的城市。
97 |
98 | ```js
99 | import areaJson from "@/constant/city.json";
100 | import province from "@/constant/province.json";
101 |
102 | /**
103 | * 随机获取旅游城市
104 | * @param {Array} exclude - 要排除的城市 ID 数组
105 | * @returns 返回城市信息
106 | */
107 | export const randomGetArea = (exclude = []) => {
108 | // 读取 constant 中的 json
109 | const area = areaJson;
110 | // 随机获取城市
111 | const city = area[Math.floor(Math.random() * area.length)];
112 | // 如果城市在排除列表中,则重新获取
113 | if (exclude.includes(city.cityId)) {
114 | return randomGetArea(exclude);
115 | }
116 | return city;
117 | };
118 |
119 | export const randomGetAreaExclude = (
120 | excludeCityId = [],
121 | excludeProvinceId = [],
122 | ) => {
123 | const area = areaJson;
124 | const citys = area.filter(
125 | (item) =>
126 | !excludeProvinceId.includes(String(item.pid)) &&
127 | !excludeCityId.includes(item.id),
128 | );
129 | // 随机获取城市
130 | const city = citys[Math.floor(Math.random() * citys.length)];
131 | return city;
132 | };
133 | ```
134 |
135 | 读取城市数据的 JSON 文件,然后随机获取。在动画执行的时候通过不断随机获取来达到视频的那种效果。下面是这个随机展示城市的方法。
136 |
137 | ```js
138 | const animationHandle = () => {
139 | if (city.value !== '点击转盘开始') {
140 | return;
141 | }
142 | // 旋转360度
143 | animationData.value = animation.rotate(360).step().export()
144 | // 获取城市集合
145 | const list = listCityExclude([], excludeProvinceId.value || []);
146 | let index = 0;
147 | // 定时器获取
148 | animationHandleInterval.value = setInterval(() => {
149 | if (index >= 60) {
150 | clearInterval(animationHandleInterval.value);
151 | return;
152 | }
153 | city.value = list[Math.floor(Math.random() * list.length)].name;
154 | index++;
155 | }, 100);
156 | animationHandleTimeOut.value = setTimeout(() => {
157 | clearInterval(animationHandleInterval.value);
158 | }, 6000);
159 | };
160 | ```
161 |
162 | 这样子就实现了转盘上随机展示城市的功能了,那么不管是随机展示,还是转盘动画转动,都需要一个最终确认的城市,同时这个城市还得在动画结束后最终展示。其实这个可以利用 刚才微信的动画 api 来解决。
163 |
164 | 
165 |
166 | 官方有一个事件,那么只要通过这个事件回调,就能做到确定最终城市了。
167 |
168 | 那么核心功能都已完成,现在就剩下样式和一些布局了。这部分就没啥好说了。在后续迭代中我还加上了省份筛选功能,这部分就运用到了 `Pinia` 这个状态处理库,还有这个状态持久化的库 `pinia-plugin-unistorage`。
169 |
170 | ```js
171 | import { defineStore } from "pinia";
172 |
173 | export const useAreaStore = defineStore(
174 | "area",
175 | () => {
176 | const excludeCityId = ref([]);
177 | const excludeProvinceId = ref([]);
178 |
179 | const setExcludeCityId = (id) => {
180 | excludeCityId.value.push(id);
181 | };
182 |
183 | const setExcludeProvinceId = (id) => {
184 | excludeProvinceId.value.push(id);
185 | };
186 |
187 | const removeExcludeCityId = (id) => {
188 | excludeCityId.value = excludeCityId.value.filter((item) => item !== id);
189 | };
190 |
191 | const removeExcludeProvinceId = (id) => {
192 | excludeProvinceId.value = excludeProvinceId.value.filter(
193 | (item) => item !== id,
194 | );
195 | };
196 |
197 | return {
198 | excludeCityId,
199 | excludeProvinceId,
200 | setExcludeCityId,
201 | setExcludeProvinceId,
202 | removeExcludeCityId,
203 | removeExcludeProvinceId,
204 | };
205 | },
206 | {
207 | unistorage: true,
208 | },
209 | );
210 | ```
211 |
212 | 通过记录用户的筛选,并持久化,来达到目标功能。
213 |
214 |  215 |
216 | 这里的界面做得潦草一点,不过还有搜索功能,也算是麻雀虽小,五脏俱全了。
217 |
218 | ## 总结
219 |
220 | 后续还有很大的迭代空间,例如用户功能,用户转盘结果记录,通过AI来进行旅游地推荐等等。最终成为一个合格的小程序。
221 |
222 | 同时我也通过这次开发得到了许多关于 css 的知识,以及关于 Uniapp 的开发经验。后续迭代的功能,我将会记录在博客上。
223 |
--------------------------------------------------------------------------------
/src/assets/styles/normalize.css:
--------------------------------------------------------------------------------
1 | /*! normalize.css v8.0.1 | MIT License | github.com/necolas/normalize.css */
2 |
3 | /* Document
4 | ========================================================================== */
5 |
6 | /**
7 | * 1. Correct the line height in all browsers.
8 | * 2. Prevent adjustments of font size after orientation changes in iOS.
9 | */
10 |
11 | html {
12 | line-height: 1.15; /* 1 */
13 | -webkit-text-size-adjust: 100%; /* 2 */
14 | }
15 |
16 | /* Sections
17 | ========================================================================== */
18 |
19 | /**
20 | * Remove the margin in all browsers.
21 | */
22 |
23 | body {
24 | margin: 0;
25 | }
26 |
27 | /**
28 | * Render the `main` element consistently in IE.
29 | */
30 |
31 | main {
32 | display: block;
33 | }
34 |
35 | /**
36 | * Correct the font size and margin on `h1` elements within `section` and
37 | * `article` contexts in Chrome, Firefox, and Safari.
38 | */
39 |
40 | h1 {
41 | font-size: 2em;
42 | margin: 0.67em 0;
43 | }
44 |
45 | /* Grouping content
46 | ========================================================================== */
47 |
48 | /**
49 | * 1. Add the correct box sizing in Firefox.
50 | * 2. Show the overflow in Edge and IE.
51 | */
52 |
53 | hr {
54 | box-sizing: content-box; /* 1 */
55 | height: 0; /* 1 */
56 | overflow: visible; /* 2 */
57 | }
58 |
59 | /**
60 | * 1. Correct the inheritance and scaling of font size in all browsers.
61 | * 2. Correct the odd `em` font sizing in all browsers.
62 | */
63 |
64 | pre {
65 | font-family: monospace, monospace; /* 1 */
66 | font-size: 1em; /* 2 */
67 | }
68 |
69 | /* Text-level semantics
70 | ========================================================================== */
71 |
72 | /**
73 | * Remove the gray background on active links in IE 10.
74 | */
75 |
76 | a {
77 | background-color: transparent;
78 | }
79 |
80 | /**
81 | * 1. Remove the bottom border in Chrome 57-
82 | * 2. Add the correct text decoration in Chrome, Edge, IE, Opera, and Safari.
83 | */
84 |
85 | abbr[title] {
86 | border-bottom: none; /* 1 */
87 | text-decoration: underline; /* 2 */
88 | text-decoration: underline dotted; /* 2 */
89 | }
90 |
91 | /**
92 | * Add the correct font weight in Chrome, Edge, and Safari.
93 | */
94 |
95 | b,
96 | strong {
97 | font-weight: bolder;
98 | }
99 |
100 | /**
101 | * 1. Correct the inheritance and scaling of font size in all browsers.
102 | * 2. Correct the odd `em` font sizing in all browsers.
103 | */
104 |
105 | code,
106 | kbd,
107 | samp {
108 | font-family: monospace, monospace; /* 1 */
109 | font-size: 1em; /* 2 */
110 | }
111 |
112 | /**
113 | * Add the correct font size in all browsers.
114 | */
115 |
116 | small {
117 | font-size: 80%;
118 | }
119 |
120 | /**
121 | * Prevent `sub` and `sup` elements from affecting the line height in
122 | * all browsers.
123 | */
124 |
125 | sub,
126 | sup {
127 | font-size: 75%;
128 | line-height: 0;
129 | position: relative;
130 | vertical-align: baseline;
131 | }
132 |
133 | sub {
134 | bottom: -0.25em;
135 | }
136 |
137 | sup {
138 | top: -0.5em;
139 | }
140 |
141 | /* Embedded content
142 | ========================================================================== */
143 |
144 | /**
145 | * Remove the border on images inside links in IE 10.
146 | */
147 |
148 | img {
149 | border-style: none;
150 | }
151 |
152 | /* Forms
153 | ========================================================================== */
154 |
155 | /**
156 | * 1. Change the font styles in all browsers.
157 | * 2. Remove the margin in Firefox and Safari.
158 | */
159 |
160 | button,
161 | input,
162 | optgroup,
163 | select,
164 | textarea {
165 | font-family: inherit; /* 1 */
166 | font-size: 100%; /* 1 */
167 | line-height: 1.15; /* 1 */
168 | margin: 0; /* 2 */
169 | }
170 |
171 | /**
172 | * Show the overflow in IE.
173 | * 1. Show the overflow in Edge.
174 | */
175 |
176 | button,
177 | input {
178 | /* 1 */
179 | overflow: visible;
180 | }
181 |
182 | /**
183 | * Remove the inheritance of text transform in Edge, Firefox, and IE.
184 | * 1. Remove the inheritance of text transform in Firefox.
185 | */
186 |
187 | button,
188 | select {
189 | /* 1 */
190 | text-transform: none;
191 | }
192 |
193 | /**
194 | * Correct the inability to style clickable types in iOS and Safari.
195 | */
196 |
197 | button,
198 | [type="button"],
199 | [type="reset"],
200 | [type="submit"] {
201 | -webkit-appearance: button;
202 | }
203 |
204 | /**
205 | * Remove the inner border and padding in Firefox.
206 | */
207 |
208 | button::-moz-focus-inner,
209 | [type="button"]::-moz-focus-inner,
210 | [type="reset"]::-moz-focus-inner,
211 | [type="submit"]::-moz-focus-inner {
212 | border-style: none;
213 | padding: 0;
214 | }
215 |
216 | /**
217 | * Restore the focus styles unset by the previous rule.
218 | */
219 |
220 | button:-moz-focusring,
221 | [type="button"]:-moz-focusring,
222 | [type="reset"]:-moz-focusring,
223 | [type="submit"]:-moz-focusring {
224 | outline: 1px dotted ButtonText;
225 | }
226 |
227 | /**
228 | * Correct the padding in Firefox.
229 | */
230 |
231 | fieldset {
232 | padding: 0.35em 0.75em 0.625em;
233 | }
234 |
235 | /**
236 | * 1. Correct the text wrapping in Edge and IE.
237 | * 2. Correct the color inheritance from `fieldset` elements in IE.
238 | * 3. Remove the padding so developers are not caught out when they zero out
239 | * `fieldset` elements in all browsers.
240 | */
241 |
242 | legend {
243 | box-sizing: border-box; /* 1 */
244 | color: inherit; /* 2 */
245 | display: table; /* 1 */
246 | max-width: 100%; /* 1 */
247 | padding: 0; /* 3 */
248 | white-space: normal; /* 1 */
249 | }
250 |
251 | /**
252 | * Add the correct vertical alignment in Chrome, Firefox, and Opera.
253 | */
254 |
255 | progress {
256 | vertical-align: baseline;
257 | }
258 |
259 | /**
260 | * Remove the default vertical scrollbar in IE 10+.
261 | */
262 |
263 | textarea {
264 | overflow: auto;
265 | }
266 |
267 | /**
268 | * 1. Add the correct box sizing in IE 10.
269 | * 2. Remove the padding in IE 10.
270 | */
271 |
272 | [type="checkbox"],
273 | [type="radio"] {
274 | box-sizing: border-box; /* 1 */
275 | padding: 0; /* 2 */
276 | }
277 |
278 | /**
279 | * Correct the cursor style of increment and decrement buttons in Chrome.
280 | */
281 |
282 | [type="number"]::-webkit-inner-spin-button,
283 | [type="number"]::-webkit-outer-spin-button {
284 | height: auto;
285 | }
286 |
287 | /**
288 | * 1. Correct the odd appearance in Chrome and Safari.
289 | * 2. Correct the outline style in Safari.
290 | */
291 |
292 | [type="search"] {
293 | -webkit-appearance: textfield; /* 1 */
294 | outline-offset: -2px; /* 2 */
295 | }
296 |
297 | /**
298 | * Remove the inner padding in Chrome and Safari on macOS.
299 | */
300 |
301 | [type="search"]::-webkit-search-decoration {
302 | -webkit-appearance: none;
303 | }
304 |
305 | /**
306 | * 1. Correct the inability to style clickable types in iOS and Safari.
307 | * 2. Change font properties to `inherit` in Safari.
308 | */
309 |
310 | ::-webkit-file-upload-button {
311 | -webkit-appearance: button; /* 1 */
312 | font: inherit; /* 2 */
313 | }
314 |
315 | /* Interactive
316 | ========================================================================== */
317 |
318 | /*
319 | * Add the correct display in Edge, IE 10+, and Firefox.
320 | */
321 |
322 | details {
323 | display: block;
324 | }
325 |
326 | /*
327 | * Add the correct display in all browsers.
328 | */
329 |
330 | summary {
331 | display: list-item;
332 | }
333 |
334 | /* Misc
335 | ========================================================================== */
336 |
337 | /**
338 | * Add the correct display in IE 10+.
339 | */
340 |
341 | template {
342 | display: none;
343 | }
344 |
345 | /**
346 | * Add the correct display in IE 10.
347 | */
348 |
349 | [hidden] {
350 | display: none;
351 | }
352 |
353 | p {
354 | margin: 0;
355 | padding: 0;
356 | }
357 |
358 | a {
359 | text-decoration: none;
360 | color: inherit;
361 | }
362 |
363 | ul {
364 | margin: 0;
365 | padding: 0;
366 | }
367 |
368 | body {
369 | font-family: "JetBrains Mono", "Microsoft YaHei", "Noto Sans SC",
370 | -apple-system, blinkmacsystemfont, "Segoe UI", roboto, "Helvetica Neue",
371 | arial, "Noto Sans", sans-serif, "Apple Color Emoji", "Segoe UI Emoji",
372 | "Segoe UI Symbol", "Noto Color Emoji";
373 | font-display: swap;
374 | font-style: normal;
375 | }
376 |
377 | * {
378 | margin: 0;
379 | margin-block-start: 0;
380 | margin-block-end: 0;
381 | margin-inline-start: 0;
382 | margin-inline-end: 0;
383 | padding-block-start: 0;
384 | padding-block-end: 0;
385 | padding-inline-start: 0;
386 | padding-inline-end: 0;
387 | max-width: 100%;
388 | box-sizing: border-box;
389 | }
390 |
391 | html,
392 | body {
393 | overflow-x: hidden;
394 | width: 100%;
395 | position: relative;
396 | }
397 |
398 | img,
399 | video,
400 | iframe,
401 | table,
402 | pre,
403 | code {
404 | max-width: 100%;
405 | }
406 |
407 | pre,
408 | code {
409 | white-space: pre-wrap;
410 | word-wrap: break-word;
411 | }
412 |
413 | /* 改善粘性定位行为 */
414 | .sticky-container {
415 | position: sticky;
416 | top: 0;
417 | height: fit-content;
418 | align-self: flex-start;
419 | z-index: 10;
420 | }
421 |
--------------------------------------------------------------------------------
/src/pages/index.vue:
--------------------------------------------------------------------------------
1 |
2 |
215 |
216 | 这里的界面做得潦草一点,不过还有搜索功能,也算是麻雀虽小,五脏俱全了。
217 |
218 | ## 总结
219 |
220 | 后续还有很大的迭代空间,例如用户功能,用户转盘结果记录,通过AI来进行旅游地推荐等等。最终成为一个合格的小程序。
221 |
222 | 同时我也通过这次开发得到了许多关于 css 的知识,以及关于 Uniapp 的开发经验。后续迭代的功能,我将会记录在博客上。
223 |
--------------------------------------------------------------------------------
/src/assets/styles/normalize.css:
--------------------------------------------------------------------------------
1 | /*! normalize.css v8.0.1 | MIT License | github.com/necolas/normalize.css */
2 |
3 | /* Document
4 | ========================================================================== */
5 |
6 | /**
7 | * 1. Correct the line height in all browsers.
8 | * 2. Prevent adjustments of font size after orientation changes in iOS.
9 | */
10 |
11 | html {
12 | line-height: 1.15; /* 1 */
13 | -webkit-text-size-adjust: 100%; /* 2 */
14 | }
15 |
16 | /* Sections
17 | ========================================================================== */
18 |
19 | /**
20 | * Remove the margin in all browsers.
21 | */
22 |
23 | body {
24 | margin: 0;
25 | }
26 |
27 | /**
28 | * Render the `main` element consistently in IE.
29 | */
30 |
31 | main {
32 | display: block;
33 | }
34 |
35 | /**
36 | * Correct the font size and margin on `h1` elements within `section` and
37 | * `article` contexts in Chrome, Firefox, and Safari.
38 | */
39 |
40 | h1 {
41 | font-size: 2em;
42 | margin: 0.67em 0;
43 | }
44 |
45 | /* Grouping content
46 | ========================================================================== */
47 |
48 | /**
49 | * 1. Add the correct box sizing in Firefox.
50 | * 2. Show the overflow in Edge and IE.
51 | */
52 |
53 | hr {
54 | box-sizing: content-box; /* 1 */
55 | height: 0; /* 1 */
56 | overflow: visible; /* 2 */
57 | }
58 |
59 | /**
60 | * 1. Correct the inheritance and scaling of font size in all browsers.
61 | * 2. Correct the odd `em` font sizing in all browsers.
62 | */
63 |
64 | pre {
65 | font-family: monospace, monospace; /* 1 */
66 | font-size: 1em; /* 2 */
67 | }
68 |
69 | /* Text-level semantics
70 | ========================================================================== */
71 |
72 | /**
73 | * Remove the gray background on active links in IE 10.
74 | */
75 |
76 | a {
77 | background-color: transparent;
78 | }
79 |
80 | /**
81 | * 1. Remove the bottom border in Chrome 57-
82 | * 2. Add the correct text decoration in Chrome, Edge, IE, Opera, and Safari.
83 | */
84 |
85 | abbr[title] {
86 | border-bottom: none; /* 1 */
87 | text-decoration: underline; /* 2 */
88 | text-decoration: underline dotted; /* 2 */
89 | }
90 |
91 | /**
92 | * Add the correct font weight in Chrome, Edge, and Safari.
93 | */
94 |
95 | b,
96 | strong {
97 | font-weight: bolder;
98 | }
99 |
100 | /**
101 | * 1. Correct the inheritance and scaling of font size in all browsers.
102 | * 2. Correct the odd `em` font sizing in all browsers.
103 | */
104 |
105 | code,
106 | kbd,
107 | samp {
108 | font-family: monospace, monospace; /* 1 */
109 | font-size: 1em; /* 2 */
110 | }
111 |
112 | /**
113 | * Add the correct font size in all browsers.
114 | */
115 |
116 | small {
117 | font-size: 80%;
118 | }
119 |
120 | /**
121 | * Prevent `sub` and `sup` elements from affecting the line height in
122 | * all browsers.
123 | */
124 |
125 | sub,
126 | sup {
127 | font-size: 75%;
128 | line-height: 0;
129 | position: relative;
130 | vertical-align: baseline;
131 | }
132 |
133 | sub {
134 | bottom: -0.25em;
135 | }
136 |
137 | sup {
138 | top: -0.5em;
139 | }
140 |
141 | /* Embedded content
142 | ========================================================================== */
143 |
144 | /**
145 | * Remove the border on images inside links in IE 10.
146 | */
147 |
148 | img {
149 | border-style: none;
150 | }
151 |
152 | /* Forms
153 | ========================================================================== */
154 |
155 | /**
156 | * 1. Change the font styles in all browsers.
157 | * 2. Remove the margin in Firefox and Safari.
158 | */
159 |
160 | button,
161 | input,
162 | optgroup,
163 | select,
164 | textarea {
165 | font-family: inherit; /* 1 */
166 | font-size: 100%; /* 1 */
167 | line-height: 1.15; /* 1 */
168 | margin: 0; /* 2 */
169 | }
170 |
171 | /**
172 | * Show the overflow in IE.
173 | * 1. Show the overflow in Edge.
174 | */
175 |
176 | button,
177 | input {
178 | /* 1 */
179 | overflow: visible;
180 | }
181 |
182 | /**
183 | * Remove the inheritance of text transform in Edge, Firefox, and IE.
184 | * 1. Remove the inheritance of text transform in Firefox.
185 | */
186 |
187 | button,
188 | select {
189 | /* 1 */
190 | text-transform: none;
191 | }
192 |
193 | /**
194 | * Correct the inability to style clickable types in iOS and Safari.
195 | */
196 |
197 | button,
198 | [type="button"],
199 | [type="reset"],
200 | [type="submit"] {
201 | -webkit-appearance: button;
202 | }
203 |
204 | /**
205 | * Remove the inner border and padding in Firefox.
206 | */
207 |
208 | button::-moz-focus-inner,
209 | [type="button"]::-moz-focus-inner,
210 | [type="reset"]::-moz-focus-inner,
211 | [type="submit"]::-moz-focus-inner {
212 | border-style: none;
213 | padding: 0;
214 | }
215 |
216 | /**
217 | * Restore the focus styles unset by the previous rule.
218 | */
219 |
220 | button:-moz-focusring,
221 | [type="button"]:-moz-focusring,
222 | [type="reset"]:-moz-focusring,
223 | [type="submit"]:-moz-focusring {
224 | outline: 1px dotted ButtonText;
225 | }
226 |
227 | /**
228 | * Correct the padding in Firefox.
229 | */
230 |
231 | fieldset {
232 | padding: 0.35em 0.75em 0.625em;
233 | }
234 |
235 | /**
236 | * 1. Correct the text wrapping in Edge and IE.
237 | * 2. Correct the color inheritance from `fieldset` elements in IE.
238 | * 3. Remove the padding so developers are not caught out when they zero out
239 | * `fieldset` elements in all browsers.
240 | */
241 |
242 | legend {
243 | box-sizing: border-box; /* 1 */
244 | color: inherit; /* 2 */
245 | display: table; /* 1 */
246 | max-width: 100%; /* 1 */
247 | padding: 0; /* 3 */
248 | white-space: normal; /* 1 */
249 | }
250 |
251 | /**
252 | * Add the correct vertical alignment in Chrome, Firefox, and Opera.
253 | */
254 |
255 | progress {
256 | vertical-align: baseline;
257 | }
258 |
259 | /**
260 | * Remove the default vertical scrollbar in IE 10+.
261 | */
262 |
263 | textarea {
264 | overflow: auto;
265 | }
266 |
267 | /**
268 | * 1. Add the correct box sizing in IE 10.
269 | * 2. Remove the padding in IE 10.
270 | */
271 |
272 | [type="checkbox"],
273 | [type="radio"] {
274 | box-sizing: border-box; /* 1 */
275 | padding: 0; /* 2 */
276 | }
277 |
278 | /**
279 | * Correct the cursor style of increment and decrement buttons in Chrome.
280 | */
281 |
282 | [type="number"]::-webkit-inner-spin-button,
283 | [type="number"]::-webkit-outer-spin-button {
284 | height: auto;
285 | }
286 |
287 | /**
288 | * 1. Correct the odd appearance in Chrome and Safari.
289 | * 2. Correct the outline style in Safari.
290 | */
291 |
292 | [type="search"] {
293 | -webkit-appearance: textfield; /* 1 */
294 | outline-offset: -2px; /* 2 */
295 | }
296 |
297 | /**
298 | * Remove the inner padding in Chrome and Safari on macOS.
299 | */
300 |
301 | [type="search"]::-webkit-search-decoration {
302 | -webkit-appearance: none;
303 | }
304 |
305 | /**
306 | * 1. Correct the inability to style clickable types in iOS and Safari.
307 | * 2. Change font properties to `inherit` in Safari.
308 | */
309 |
310 | ::-webkit-file-upload-button {
311 | -webkit-appearance: button; /* 1 */
312 | font: inherit; /* 2 */
313 | }
314 |
315 | /* Interactive
316 | ========================================================================== */
317 |
318 | /*
319 | * Add the correct display in Edge, IE 10+, and Firefox.
320 | */
321 |
322 | details {
323 | display: block;
324 | }
325 |
326 | /*
327 | * Add the correct display in all browsers.
328 | */
329 |
330 | summary {
331 | display: list-item;
332 | }
333 |
334 | /* Misc
335 | ========================================================================== */
336 |
337 | /**
338 | * Add the correct display in IE 10+.
339 | */
340 |
341 | template {
342 | display: none;
343 | }
344 |
345 | /**
346 | * Add the correct display in IE 10.
347 | */
348 |
349 | [hidden] {
350 | display: none;
351 | }
352 |
353 | p {
354 | margin: 0;
355 | padding: 0;
356 | }
357 |
358 | a {
359 | text-decoration: none;
360 | color: inherit;
361 | }
362 |
363 | ul {
364 | margin: 0;
365 | padding: 0;
366 | }
367 |
368 | body {
369 | font-family: "JetBrains Mono", "Microsoft YaHei", "Noto Sans SC",
370 | -apple-system, blinkmacsystemfont, "Segoe UI", roboto, "Helvetica Neue",
371 | arial, "Noto Sans", sans-serif, "Apple Color Emoji", "Segoe UI Emoji",
372 | "Segoe UI Symbol", "Noto Color Emoji";
373 | font-display: swap;
374 | font-style: normal;
375 | }
376 |
377 | * {
378 | margin: 0;
379 | margin-block-start: 0;
380 | margin-block-end: 0;
381 | margin-inline-start: 0;
382 | margin-inline-end: 0;
383 | padding-block-start: 0;
384 | padding-block-end: 0;
385 | padding-inline-start: 0;
386 | padding-inline-end: 0;
387 | max-width: 100%;
388 | box-sizing: border-box;
389 | }
390 |
391 | html,
392 | body {
393 | overflow-x: hidden;
394 | width: 100%;
395 | position: relative;
396 | }
397 |
398 | img,
399 | video,
400 | iframe,
401 | table,
402 | pre,
403 | code {
404 | max-width: 100%;
405 | }
406 |
407 | pre,
408 | code {
409 | white-space: pre-wrap;
410 | word-wrap: break-word;
411 | }
412 |
413 | /* 改善粘性定位行为 */
414 | .sticky-container {
415 | position: sticky;
416 | top: 0;
417 | height: fit-content;
418 | align-self: flex-start;
419 | z-index: 10;
420 | }
421 |
--------------------------------------------------------------------------------
/src/pages/index.vue:
--------------------------------------------------------------------------------
1 |
2 |
3 |
4 |
150 |
151 |
152 |
244 |
245 |
252 |
--------------------------------------------------------------------------------
5 |
148 |
6 |
7 |
147 |
8 |
12 |
13 |
14 |
9 |
11 |
15 |
146 |
16 |
17 |
145 |
18 |
43 |
44 |
45 | 19 | 关于我 20 |
21 |
22 |
42 |
28 |
37 |
29 |  35 |
35 |
36 | Alickx
38 |39 | 热爱技术,专注于前端开发和全栈技术分享 40 |
41 |
46 |
84 |
85 |
86 | 47 | 博客统计 48 |
49 |
50 |
83 |
51 |
52 |
57 |
58 |
59 |
66 |
67 |
68 |
73 |
74 |
75 |
82 |
87 |
111 |
112 |
113 | 88 | 热门标签 89 |
90 |
91 |
92 | Vue.js
93 |
94 |
95 | Nuxt.js
96 |
97 |
98 | TypeScript
99 |
100 |
101 | JavaScript
102 |
103 |
104 | 前端开发
105 |
106 |
107 | 全栈开发
108 |
109 |
110 |
114 |
144 | 115 | 技术栈 116 |
117 |
118 |
143 |
119 |
124 |
120 | N
121 |
122 | Nuxt.js
123 |
125 |
130 |
126 | V
127 |
128 | Vue.js
129 |
131 |
136 |
132 | TS
133 |
134 | TypeScript
135 |
137 |
142 |
138 | TW
139 |
140 | Tailwind
141 |