 ](https://join.slack.com/t/firstcontributors/shared_invite/enQtNjkxNzQwNzA2MTMwLTVhMWJjNjg2ODRlNWZhNjIzYjgwNDIyZWYwZjhjYTQ4OTBjMWM0MmFhZDUxNzBiYzczMGNiYzcxNjkzZDZlMDM)
3 | [](https://opensource.org/licenses/MIT)
4 | [](https://www.codetriage.com/roshanjossey/first-contributions)
5 |
6 |
7 | # First Contributions
8 |
9 | |
](https://join.slack.com/t/firstcontributors/shared_invite/enQtNjkxNzQwNzA2MTMwLTVhMWJjNjg2ODRlNWZhNjIzYjgwNDIyZWYwZjhjYTQ4OTBjMWM0MmFhZDUxNzBiYzczMGNiYzcxNjkzZDZlMDM)
3 | [](https://opensource.org/licenses/MIT)
4 | [](https://www.codetriage.com/roshanjossey/first-contributions)
5 |
6 |
7 | # First Contributions
8 |
9 | | 17 |
18 | If you don't have GitHub Desktop on your machine, [install it](https://desktop.github.com/).
19 |
20 | ## Fork this repository
21 |
22 | Fork this repo by clicking on the fork button on the top of this page.
23 | This will create of copy of this repository in your account.
24 |
25 | ## Clone the repository
26 |
27 | Now clone this repo to your machine.
28 |
29 | Open the GitHub Desktop app and click on the `+` on the top left.
30 |
31 |
17 |
18 | If you don't have GitHub Desktop on your machine, [install it](https://desktop.github.com/).
19 |
20 | ## Fork this repository
21 |
22 | Fork this repo by clicking on the fork button on the top of this page.
23 | This will create of copy of this repository in your account.
24 |
25 | ## Clone the repository
26 |
27 | Now clone this repo to your machine.
28 |
29 | Open the GitHub Desktop app and click on the `+` on the top left.
30 |
31 | 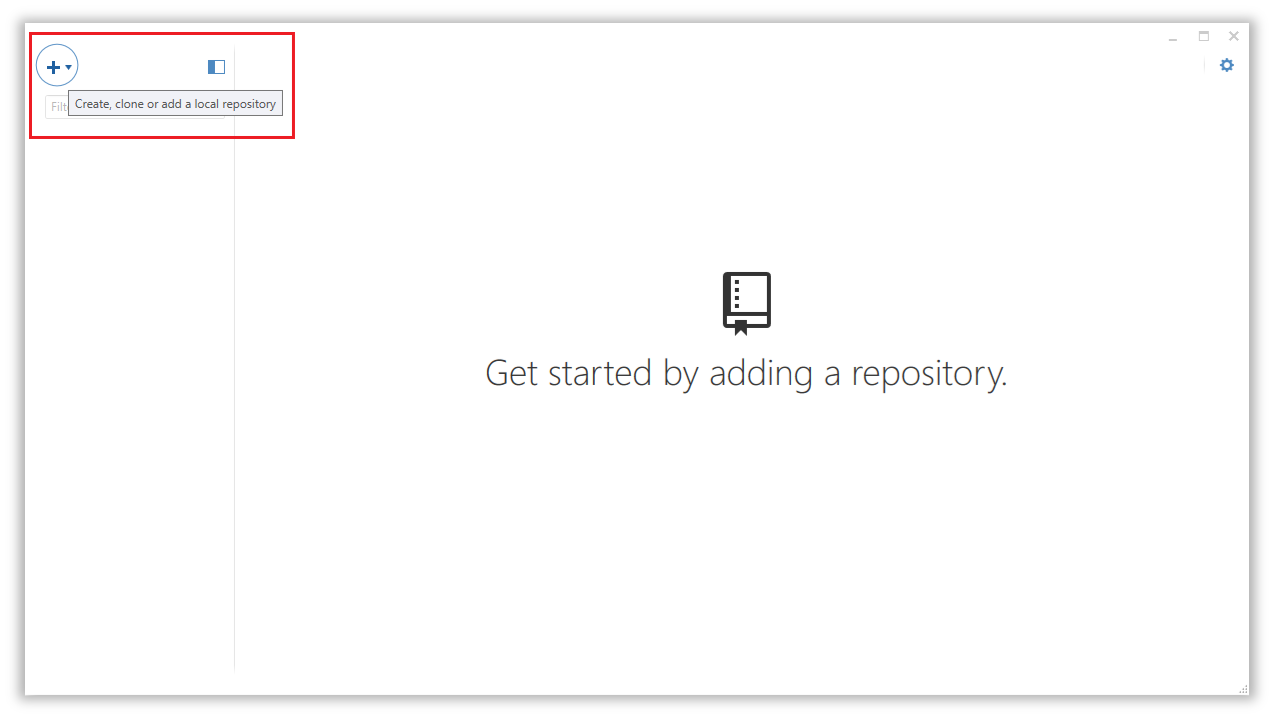 32 |
33 | If it is not already selected, click on `Clone`. Then choose first-contributions and then click on `Clone first-contributions`
34 |
35 |
32 |
33 | If it is not already selected, click on `Clone`. Then choose first-contributions and then click on `Clone first-contributions`
34 |
35 | 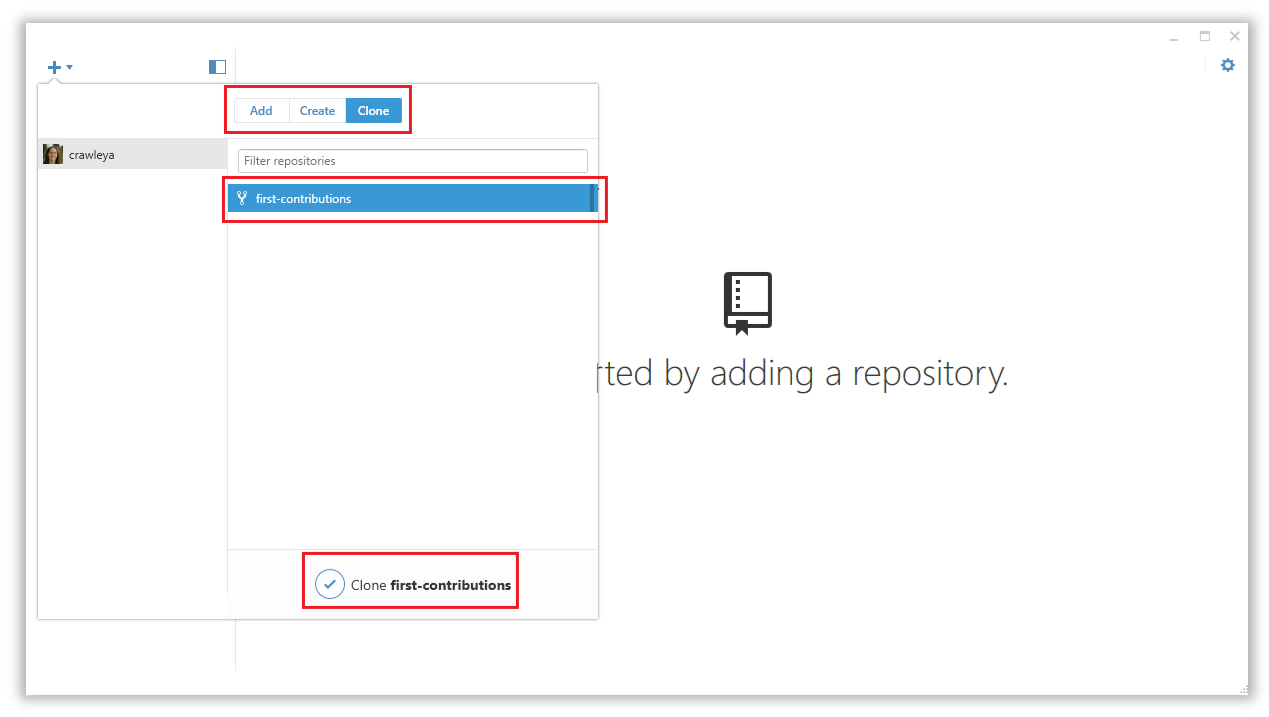 36 |
37 | Choose the directory on your machine you would like to clone first-contributions into
38 |
39 |
36 |
37 | Choose the directory on your machine you would like to clone first-contributions into
38 |
39 | 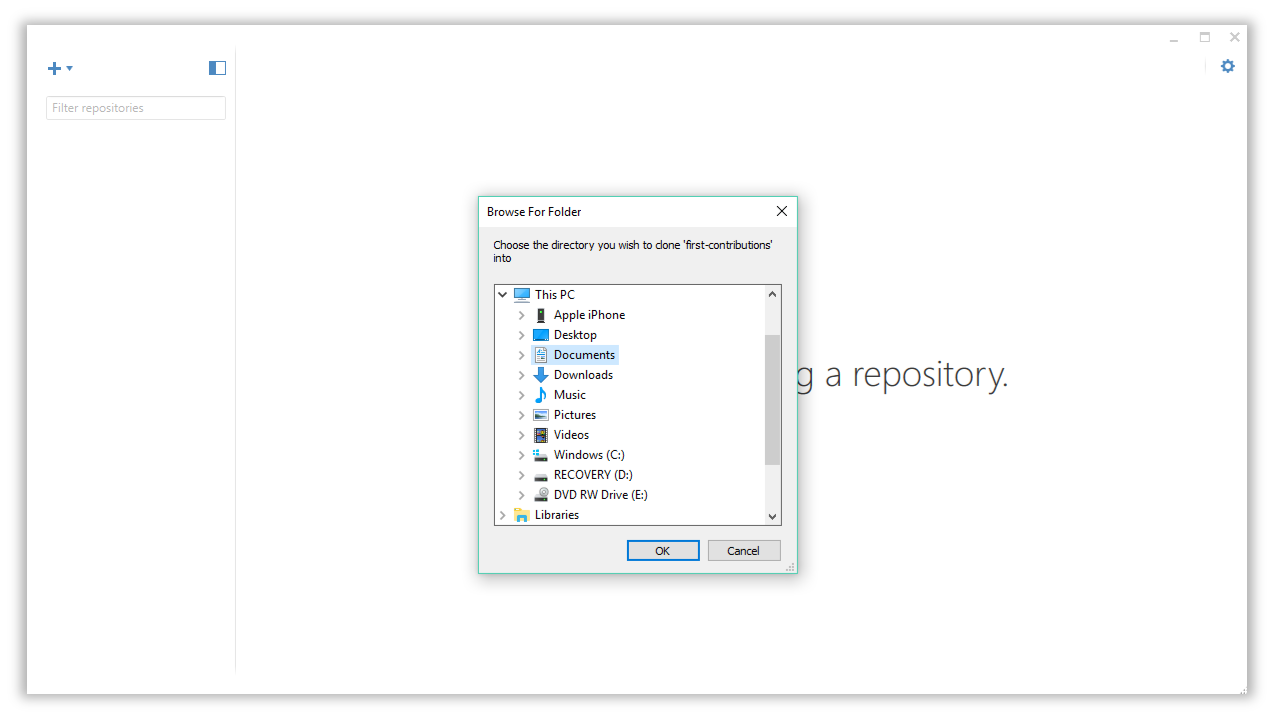 40 |
41 | Now you have copied the contents of the first-contributions repository in github to your computer.
42 |
43 | ## Create a branch
44 |
45 | Now create a branch by clicking on the branch icon at the top left:
46 |
47 |
40 |
41 | Now you have copied the contents of the first-contributions repository in github to your computer.
42 |
43 | ## Create a branch
44 |
45 | Now create a branch by clicking on the branch icon at the top left:
46 |
47 | 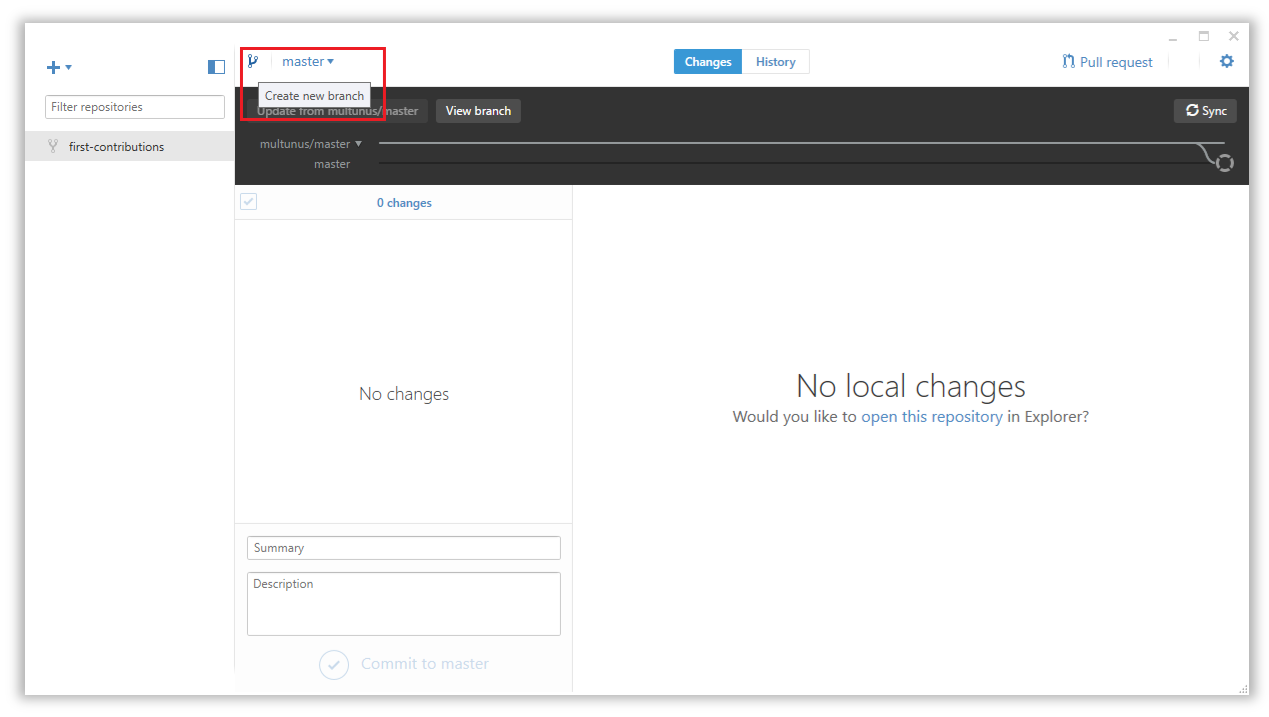 48 |
49 | Name your branch add-your-name. For example, add-crawleya
50 |
51 | Click on `Create new branch`
52 |
53 |
48 |
49 | Name your branch add-your-name. For example, add-crawleya
50 |
51 | Click on `Create new branch`
52 |
53 | 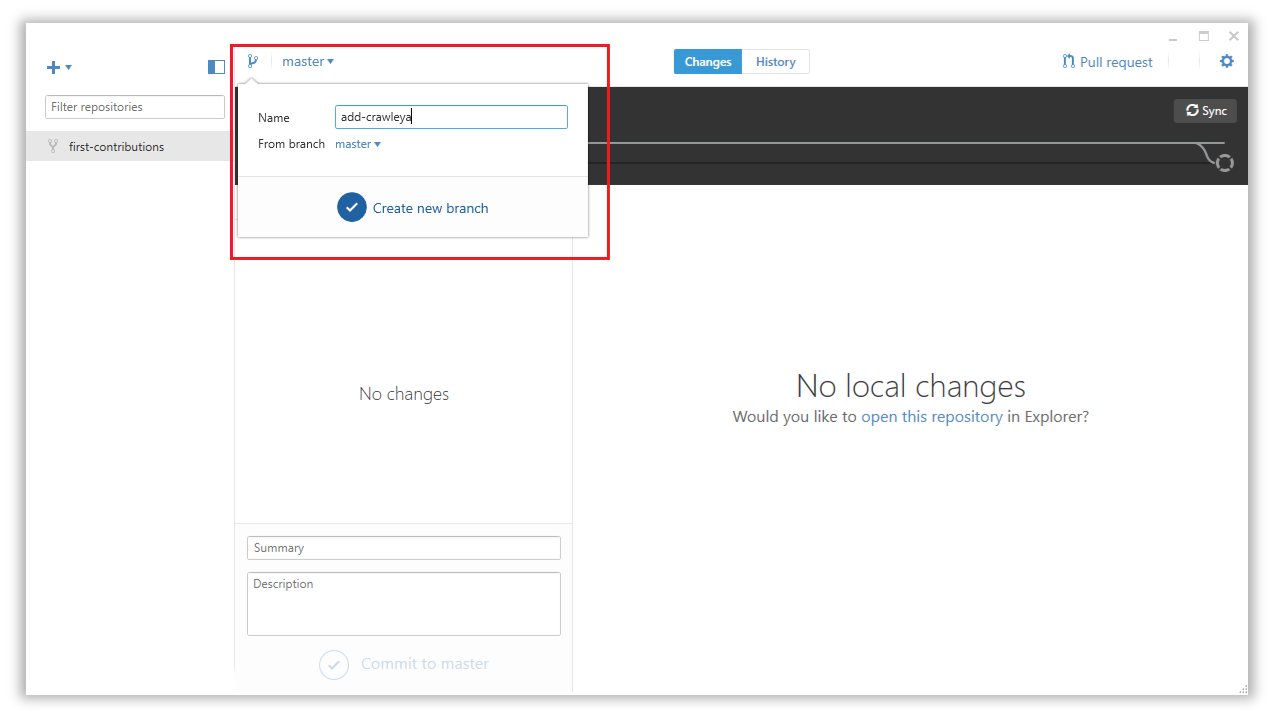 54 |
55 | ## Make necessary changes and commit those changes
56 |
57 | Now open `Contributors.md` file in a text editor and add your name to it, then save the file.
58 |
59 | You can see that there are changes to Contributors.md and they have been added.
60 |
61 |
54 |
55 | ## Make necessary changes and commit those changes
56 |
57 | Now open `Contributors.md` file in a text editor and add your name to it, then save the file.
58 |
59 | You can see that there are changes to Contributors.md and they have been added.
60 |
61 | 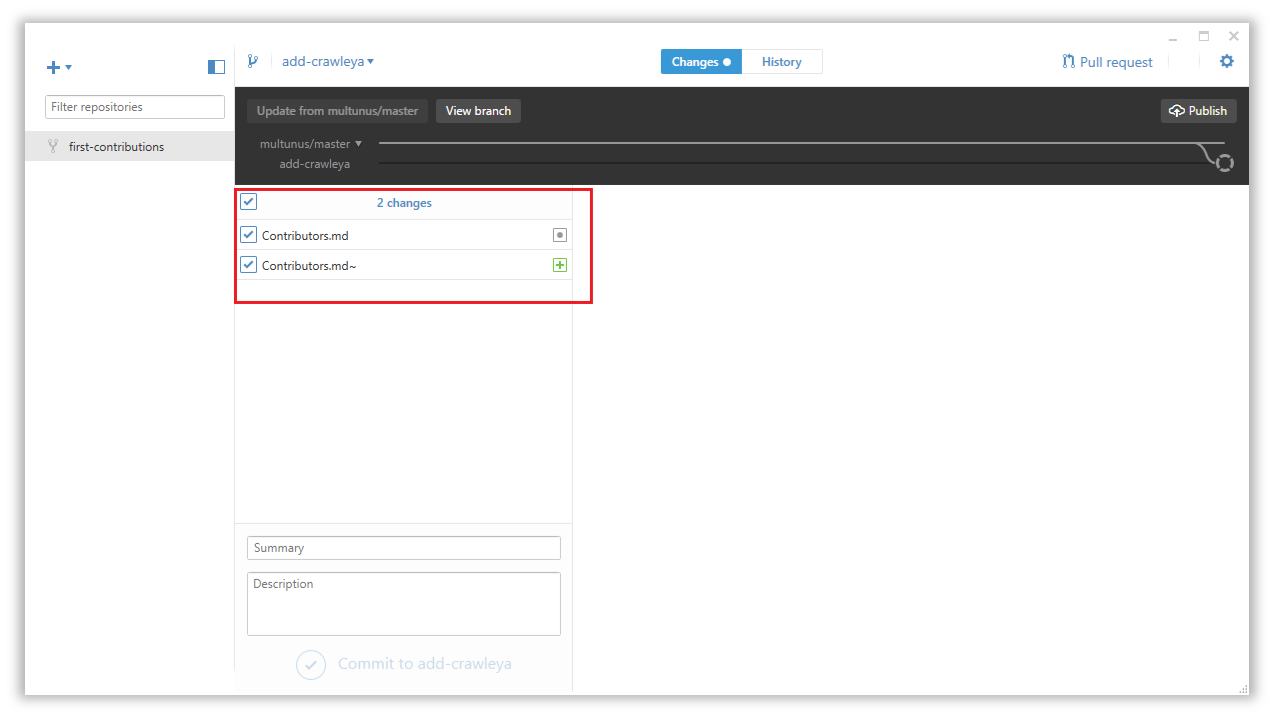 62 |
63 | Now commit those changes:
64 |
65 | Write the message "Add `
62 |
63 | Now commit those changes:
64 |
65 | Write the message "Add `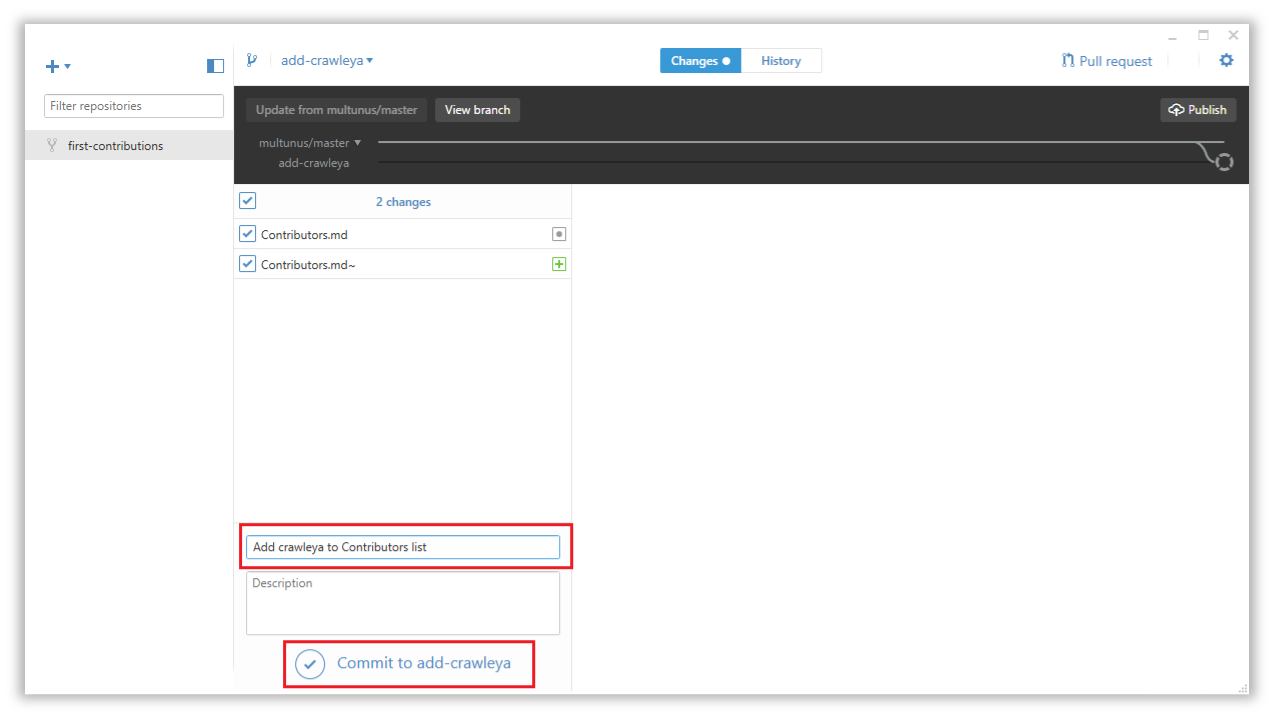 72 |
73 | At the bottom, you can see that the commit has been created.
74 |
75 |
72 |
73 | At the bottom, you can see that the commit has been created.
74 |
75 | 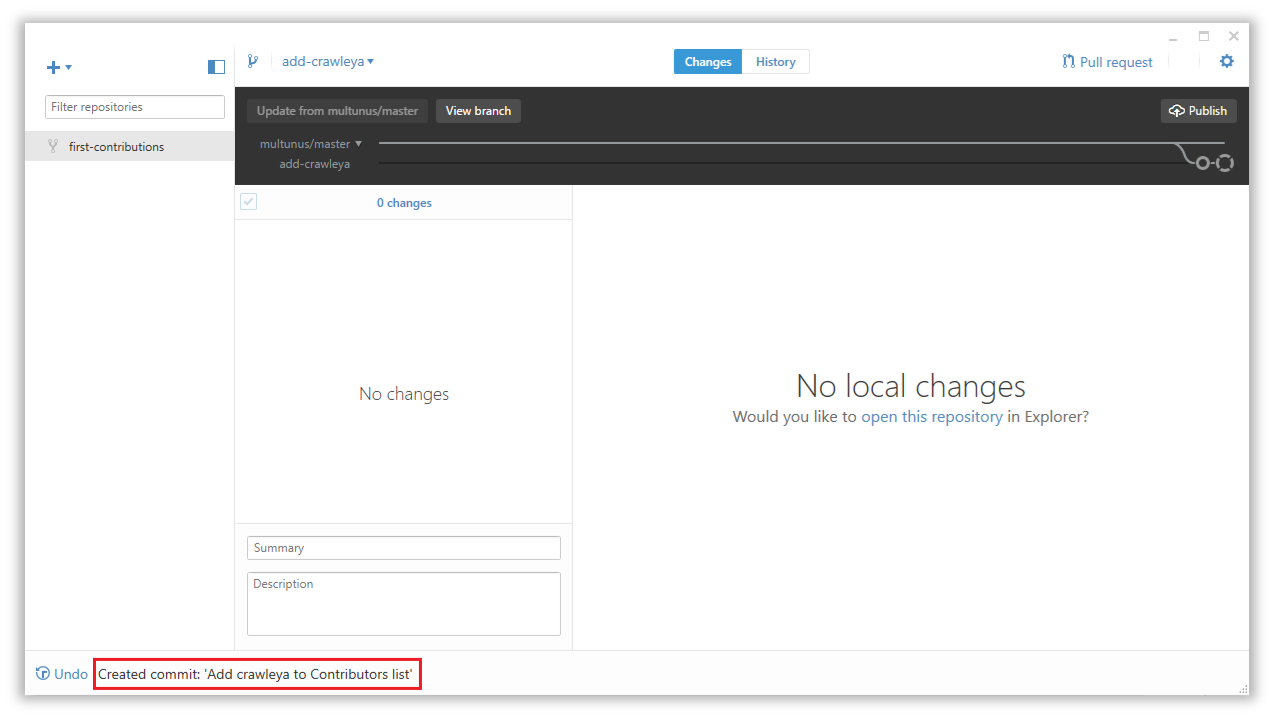 76 |
77 | ## Push changes to github
78 |
79 | Click the `Publish` button on the top right.
80 |
81 |
76 |
77 | ## Push changes to github
78 |
79 | Click the `Publish` button on the top right.
80 |
81 | 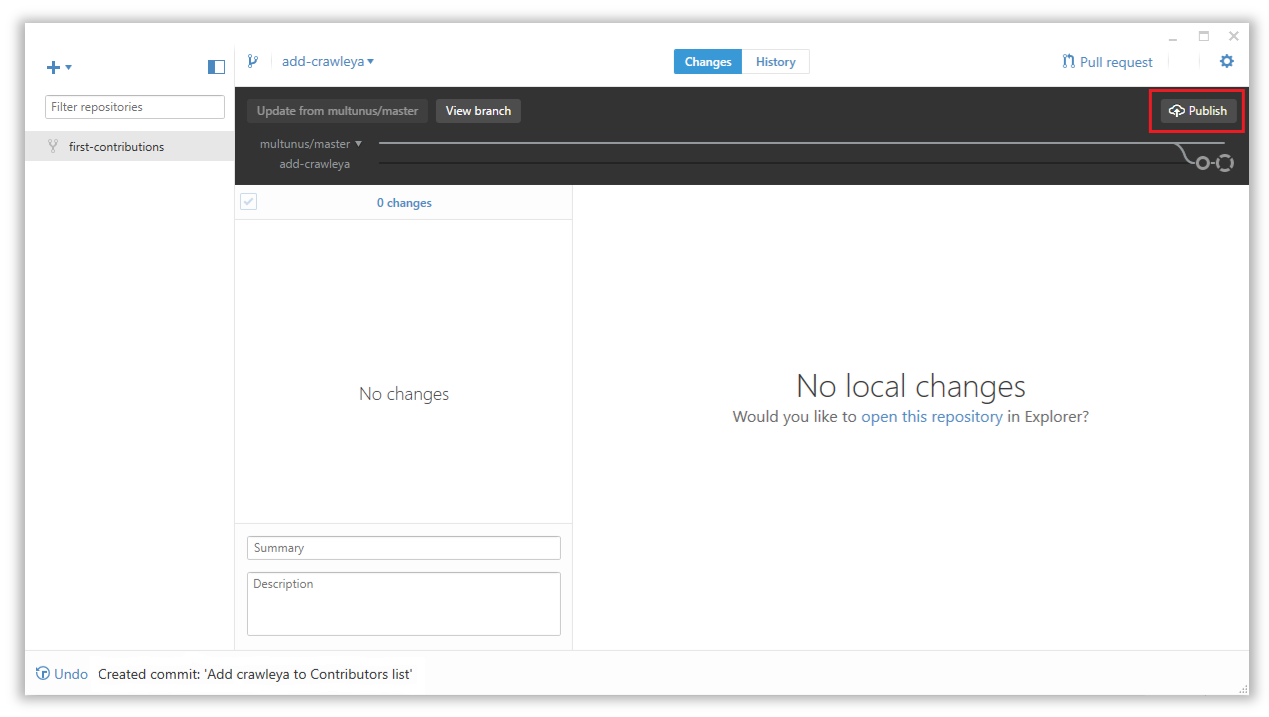 82 |
83 | ## Submit your changes for review
84 |
85 | If you go to your repository on github, you'll see `Compare & pull request` button. click on that button.
86 |
87 |
82 |
83 | ## Submit your changes for review
84 |
85 | If you go to your repository on github, you'll see `Compare & pull request` button. click on that button.
86 |
87 |  88 |
89 | Now submit the pull request.
90 |
91 |
88 |
89 | Now submit the pull request.
90 |
91 |  92 |
93 | Soon I'll be merging all your changes into the master branch of this project. You will get a notification email once the changes have been merged.
94 |
95 | ## Where to go from here?
96 |
97 | Congrats! You just completed the standard _fork -> clone -> edit -> PR_ workflow that you'll encounter often as a contributor!
98 |
99 | Celebrate your contribution and share it with your friends and followers by going to [web app](https://firstcontributions.github.io#social-share).
100 |
101 | You could join our slack team in case you need any help or have any questions. [Join slack team](https://join.slack.com/t/firstcontributors/shared_invite/enQtMzE1MTYwNzI3ODQ0LTZiMDA2OGI2NTYyNjM1MTFiNTc4YTRhZTg4OWZjMzA0ZWZmY2UxYzVkMzI1ZmVmOWI4ODdkZWQwNTM2NDVmNjY).
102 |
103 |
104 | ### [Additional material](../additional-material/git_workflow_senarios/additional-material.md)
105 |
106 |
107 | ## Tutorials Using Other Tools
108 | [Back to main page](https://github.com/firstcontributions/first-contributions#tutorials-using-other-tools)
109 |
--------------------------------------------------------------------------------
/gui-tool-tutorials/sublime-merge-tutorial.md:
--------------------------------------------------------------------------------
1 | [](https://github.com/ellerbrock/open-source-badges/)
2 | [
92 |
93 | Soon I'll be merging all your changes into the master branch of this project. You will get a notification email once the changes have been merged.
94 |
95 | ## Where to go from here?
96 |
97 | Congrats! You just completed the standard _fork -> clone -> edit -> PR_ workflow that you'll encounter often as a contributor!
98 |
99 | Celebrate your contribution and share it with your friends and followers by going to [web app](https://firstcontributions.github.io#social-share).
100 |
101 | You could join our slack team in case you need any help or have any questions. [Join slack team](https://join.slack.com/t/firstcontributors/shared_invite/enQtMzE1MTYwNzI3ODQ0LTZiMDA2OGI2NTYyNjM1MTFiNTc4YTRhZTg4OWZjMzA0ZWZmY2UxYzVkMzI1ZmVmOWI4ODdkZWQwNTM2NDVmNjY).
102 |
103 |
104 | ### [Additional material](../additional-material/git_workflow_senarios/additional-material.md)
105 |
106 |
107 | ## Tutorials Using Other Tools
108 | [Back to main page](https://github.com/firstcontributions/first-contributions#tutorials-using-other-tools)
109 |
--------------------------------------------------------------------------------
/gui-tool-tutorials/sublime-merge-tutorial.md:
--------------------------------------------------------------------------------
1 | [](https://github.com/ellerbrock/open-source-badges/)
2 | [ ](https://join.slack.com/t/firstcontributors/shared_invite/enQtNjkxNzQwNzA2MTMwLTVhMWJjNjg2ODRlNWZhNjIzYjgwNDIyZWYwZjhjYTQ4OTBjMWM0MmFhZDUxNzBiYzczMGNiYzcxNjkzZDZlMDM)
3 | [](https://opensource.org/licenses/MIT)
4 | [](https://www.codetriage.com/roshanjossey/first-contributions)
5 |
6 |
7 | # First Contributions
8 |
9 | |
](https://join.slack.com/t/firstcontributors/shared_invite/enQtNjkxNzQwNzA2MTMwLTVhMWJjNjg2ODRlNWZhNjIzYjgwNDIyZWYwZjhjYTQ4OTBjMWM0MmFhZDUxNzBiYzczMGNiYzcxNjkzZDZlMDM)
3 | [](https://opensource.org/licenses/MIT)
4 | [](https://www.codetriage.com/roshanjossey/first-contributions)
5 |
6 |
7 | # First Contributions
8 |
9 | | |Sublime Merge Git Client|
10 | |---|---|
11 |
12 | It's hard. It's always hard, when you do something for the first time. Especially when you are collaborating, making mistakes isn't a comfortable thing. But open source is all about collaboration & working together. We wanted to simplify the way new open-source contributors learn & contribute for the first time.
13 |
14 | Reading articles & watching tutorials can help, but what comes better than actually doing the stuff without messing up anything. This project aims at providing guidance & simplifying the way rookies make their first contribution. Remember the more relaxed you are, the better you learn. If you are looking for making your first contribution just follow the simple steps below. We promise you, it will be fun.
15 |
16 |
17 | ## Sublime Merge
18 |
19 | Download [Sublime Merge](https://www.sublimemerge.com/), Install and open it.
20 |
21 | ## Fork this repository
22 |
23 | Fork this repo by clicking on the fork button on the top of this page.
24 |
|Sublime Merge Git Client|
10 | |---|---|
11 |
12 | It's hard. It's always hard, when you do something for the first time. Especially when you are collaborating, making mistakes isn't a comfortable thing. But open source is all about collaboration & working together. We wanted to simplify the way new open-source contributors learn & contribute for the first time.
13 |
14 | Reading articles & watching tutorials can help, but what comes better than actually doing the stuff without messing up anything. This project aims at providing guidance & simplifying the way rookies make their first contribution. Remember the more relaxed you are, the better you learn. If you are looking for making your first contribution just follow the simple steps below. We promise you, it will be fun.
15 |
16 |
17 | ## Sublime Merge
18 |
19 | Download [Sublime Merge](https://www.sublimemerge.com/), Install and open it.
20 |
21 | ## Fork this repository
22 |
23 | Fork this repo by clicking on the fork button on the top of this page.
24 |  25 | This will create of copy of this repository in your account.
26 |
27 |
28 | ## Clone the repository
29 |
30 |
25 | This will create of copy of this repository in your account.
26 |
27 |
28 | ## Clone the repository
29 |
30 |  31 |
32 | In Sublime Merge, go to File -> Clone Repository.
33 |
34 |
35 |
31 |
32 | In Sublime Merge, go to File -> Clone Repository.
33 |
34 |
35 | 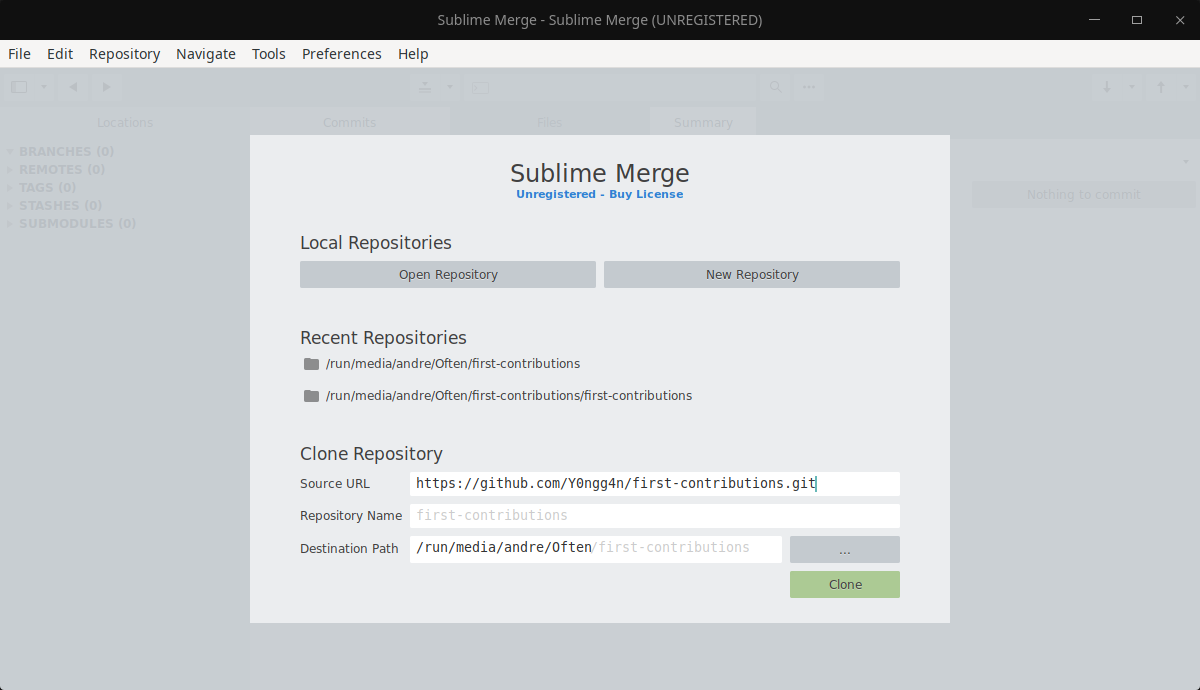 36 |
37 | The next step is to clone your repo down to your machine so you can begin making changes. Sublime Merge needs the URL of your repo, so click the "clone" button and then click the "copy to clipboard" icon.
38 |
39 | **CAREFUL:** One mistake that new contributors often make is to clone the repo you forked _from_ rather than cloning your repo. Check your browser's address bar and make sure you are cloning your repo.
40 |
41 |
42 | Enter the URL of the repo in Sublime Merge, give it a repository name (or leave it blank) and set your directory where to save the repository.
43 |
44 | Once you're satisfied with the path, click "Clone".
45 |
46 |
47 | ## Create a branch
48 |
49 | Right click Branches -> Create Branch
50 | or
51 | Navigate to Repository -> Create Branch
52 |
53 | Name your branch "add-your-name", for example: "add-william-sutton"
54 |
55 |
36 |
37 | The next step is to clone your repo down to your machine so you can begin making changes. Sublime Merge needs the URL of your repo, so click the "clone" button and then click the "copy to clipboard" icon.
38 |
39 | **CAREFUL:** One mistake that new contributors often make is to clone the repo you forked _from_ rather than cloning your repo. Check your browser's address bar and make sure you are cloning your repo.
40 |
41 |
42 | Enter the URL of the repo in Sublime Merge, give it a repository name (or leave it blank) and set your directory where to save the repository.
43 |
44 | Once you're satisfied with the path, click "Clone".
45 |
46 |
47 | ## Create a branch
48 |
49 | Right click Branches -> Create Branch
50 | or
51 | Navigate to Repository -> Create Branch
52 |
53 | Name your branch "add-your-name", for example: "add-william-sutton"
54 |
55 |  56 |
57 |
58 | ## Make necessary changes and commit those changes
59 |
60 | Now open `Contributors.md` file in a text editor and add your name to it, then save the file.
61 |
62 | If you have the repo open in Sublime Merge you'll see there are changes.
63 | Select the newest commit at the top, named "x unstaged files"
64 | Review the files that have been changed and decide what you would like to stage.
65 | Give the commit a commit message ("Add
56 |
57 |
58 | ## Make necessary changes and commit those changes
59 |
60 | Now open `Contributors.md` file in a text editor and add your name to it, then save the file.
61 |
62 | If you have the repo open in Sublime Merge you'll see there are changes.
63 | Select the newest commit at the top, named "x unstaged files"
64 | Review the files that have been changed and decide what you would like to stage.
65 | Give the commit a commit message ("Add 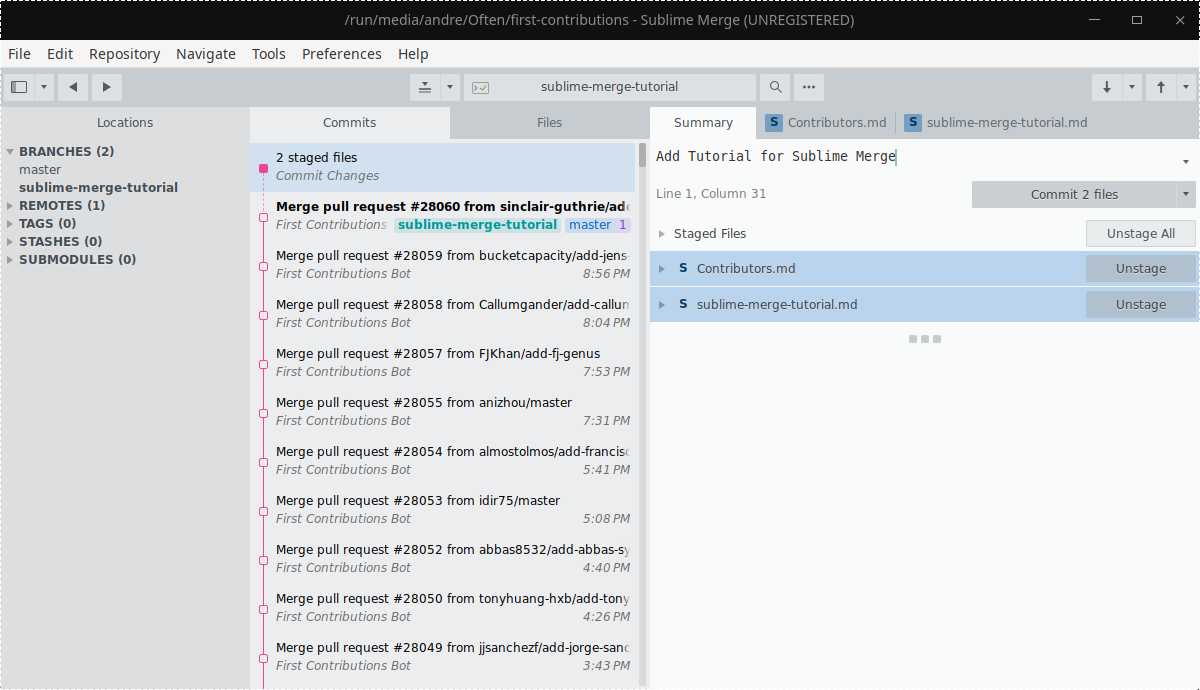 69 |
70 | If you change your mind, you can unstage those changes, or you can discard them all together.
71 | WARNING: As the word discard implies, this is a destructive operation. Do this only if you don't want any change(s) from whatever repository you're in.
72 |
73 | Hit commit and enter your username and email address and press Update.
74 |
75 | Hit commit again.
76 |
77 | Congratulations, you've committed all the changes to your local copy of your branch of your fork of first-contributions. Onward!
78 |
79 |
80 | ## Push changes to GitHub
81 |
82 | Navigate to Repository -> Push
83 | or hit the small arrow in upward direction in the right hand corner.
84 |
85 |
69 |
70 | If you change your mind, you can unstage those changes, or you can discard them all together.
71 | WARNING: As the word discard implies, this is a destructive operation. Do this only if you don't want any change(s) from whatever repository you're in.
72 |
73 | Hit commit and enter your username and email address and press Update.
74 |
75 | Hit commit again.
76 |
77 | Congratulations, you've committed all the changes to your local copy of your branch of your fork of first-contributions. Onward!
78 |
79 |
80 | ## Push changes to GitHub
81 |
82 | Navigate to Repository -> Push
83 | or hit the small arrow in upward direction in the right hand corner.
84 |
85 |  86 |
87 | Login to your Github Account with your username and password
88 |
89 | Submit changes on the origin branch if you want the changes to reflect in the master branch directly, else select the appropriate branch you want to push.
90 |
91 |
92 | ## Submit your changes for review
93 |
94 | If you go to your repository on github, you'll see `Compare & pull request` button. Click on that button.
95 |
96 |
86 |
87 | Login to your Github Account with your username and password
88 |
89 | Submit changes on the origin branch if you want the changes to reflect in the master branch directly, else select the appropriate branch you want to push.
90 |
91 |
92 | ## Submit your changes for review
93 |
94 | If you go to your repository on github, you'll see `Compare & pull request` button. Click on that button.
95 |
96 |  97 |
98 | Now submit the pull request.
99 |
100 |
97 |
98 | Now submit the pull request.
99 |
100 |  101 |
102 | Soon I'll be merging all your changes into the master branch of this project. You will get a notification email once the changes have been merged.
103 |
104 | ## Where to go from here?
105 |
106 | Congrats! You have just completed the standard _fork -> clone -> edit -> PR_ workflow that you'll encounter often as a contributor!
107 |
108 | Celebrate your contribution and share it with your friends and followers by going to [web app](https://firstcontributions.github.io#social-share).
109 |
110 | You could join our slack team in case you need any help or have any questions. [Join slack team](https://join.slack.com/t/firstcontributors/shared_invite/enQtMzE1MTYwNzI3ODQ0LTZiMDA2OGI2NTYyNjM1MTFiNTc4YTRhZTg4OWZjMzA0ZWZmY2UxYzVkMzI1ZmVmOWI4ODdkZWQwNTM2NDVmNjY).
111 |
112 |
113 | ### [Additional material](../additional-material/git_workflow_senarios/additional-material.md)
114 |
115 |
116 | ## Tutorials Using Other Tools
117 | [Back to main page](https://github.com/firstcontributions/first-contributions#tutorials-using-other-tools)
118 |
--------------------------------------------------------------------------------
/gui-tool-tutorials/github-desktop-tutorial.md:
--------------------------------------------------------------------------------
1 | [](https://github.com/ellerbrock/open-source-badges/)
2 | [
101 |
102 | Soon I'll be merging all your changes into the master branch of this project. You will get a notification email once the changes have been merged.
103 |
104 | ## Where to go from here?
105 |
106 | Congrats! You have just completed the standard _fork -> clone -> edit -> PR_ workflow that you'll encounter often as a contributor!
107 |
108 | Celebrate your contribution and share it with your friends and followers by going to [web app](https://firstcontributions.github.io#social-share).
109 |
110 | You could join our slack team in case you need any help or have any questions. [Join slack team](https://join.slack.com/t/firstcontributors/shared_invite/enQtMzE1MTYwNzI3ODQ0LTZiMDA2OGI2NTYyNjM1MTFiNTc4YTRhZTg4OWZjMzA0ZWZmY2UxYzVkMzI1ZmVmOWI4ODdkZWQwNTM2NDVmNjY).
111 |
112 |
113 | ### [Additional material](../additional-material/git_workflow_senarios/additional-material.md)
114 |
115 |
116 | ## Tutorials Using Other Tools
117 | [Back to main page](https://github.com/firstcontributions/first-contributions#tutorials-using-other-tools)
118 |
--------------------------------------------------------------------------------
/gui-tool-tutorials/github-desktop-tutorial.md:
--------------------------------------------------------------------------------
1 | [](https://github.com/ellerbrock/open-source-badges/)
2 | [ ](https://join.slack.com/t/firstcontributors/shared_invite/enQtNjkxNzQwNzA2MTMwLTVhMWJjNjg2ODRlNWZhNjIzYjgwNDIyZWYwZjhjYTQ4OTBjMWM0MmFhZDUxNzBiYzczMGNiYzcxNjkzZDZlMDM)
3 | [](https://opensource.org/licenses/MIT)
4 | [](https://www.codetriage.com/roshanjossey/first-contributions)
5 |
6 |
7 | # First Contribution
8 |
9 | |
](https://join.slack.com/t/firstcontributors/shared_invite/enQtNjkxNzQwNzA2MTMwLTVhMWJjNjg2ODRlNWZhNjIzYjgwNDIyZWYwZjhjYTQ4OTBjMWM0MmFhZDUxNzBiYzczMGNiYzcxNjkzZDZlMDM)
3 | [](https://opensource.org/licenses/MIT)
4 | [](https://www.codetriage.com/roshanjossey/first-contributions)
5 |
6 |
7 | # First Contribution
8 |
9 | | 21 |
22 | ## Fork this repository
23 |
24 | Fork this repo by clicking on the fork button on the top right of this page.
25 | This will create of copy of this repository in your account.
26 |
27 | ## Clone the repository
28 |
29 | Now clone this repo to your device.
30 |
31 | IMPORTANT: DO NOT CLONE THE ORIGINAL REPO. Go to your forked repo and clone it.
32 |
33 | To clone the repo, click on "Clone or Download" and then click on "Open in Desktop".
34 |
35 |
21 |
22 | ## Fork this repository
23 |
24 | Fork this repo by clicking on the fork button on the top right of this page.
25 | This will create of copy of this repository in your account.
26 |
27 | ## Clone the repository
28 |
29 | Now clone this repo to your device.
30 |
31 | IMPORTANT: DO NOT CLONE THE ORIGINAL REPO. Go to your forked repo and clone it.
32 |
33 | To clone the repo, click on "Clone or Download" and then click on "Open in Desktop".
34 |
35 | 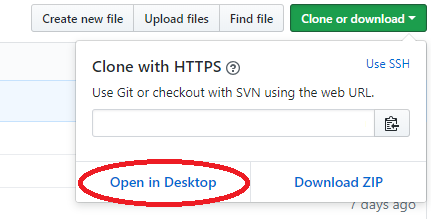 36 |
37 | A pop up window will open. Click on "Open GitHubDesktop.exe".
38 |
39 |
36 |
37 | A pop up window will open. Click on "Open GitHubDesktop.exe".
38 |
39 |  40 |
41 | After you click on "Open GitHubDesktop.exe" the contents will be downloaded to your computer.
42 |
43 |
40 |
41 | After you click on "Open GitHubDesktop.exe" the contents will be downloaded to your computer.
42 |
43 | 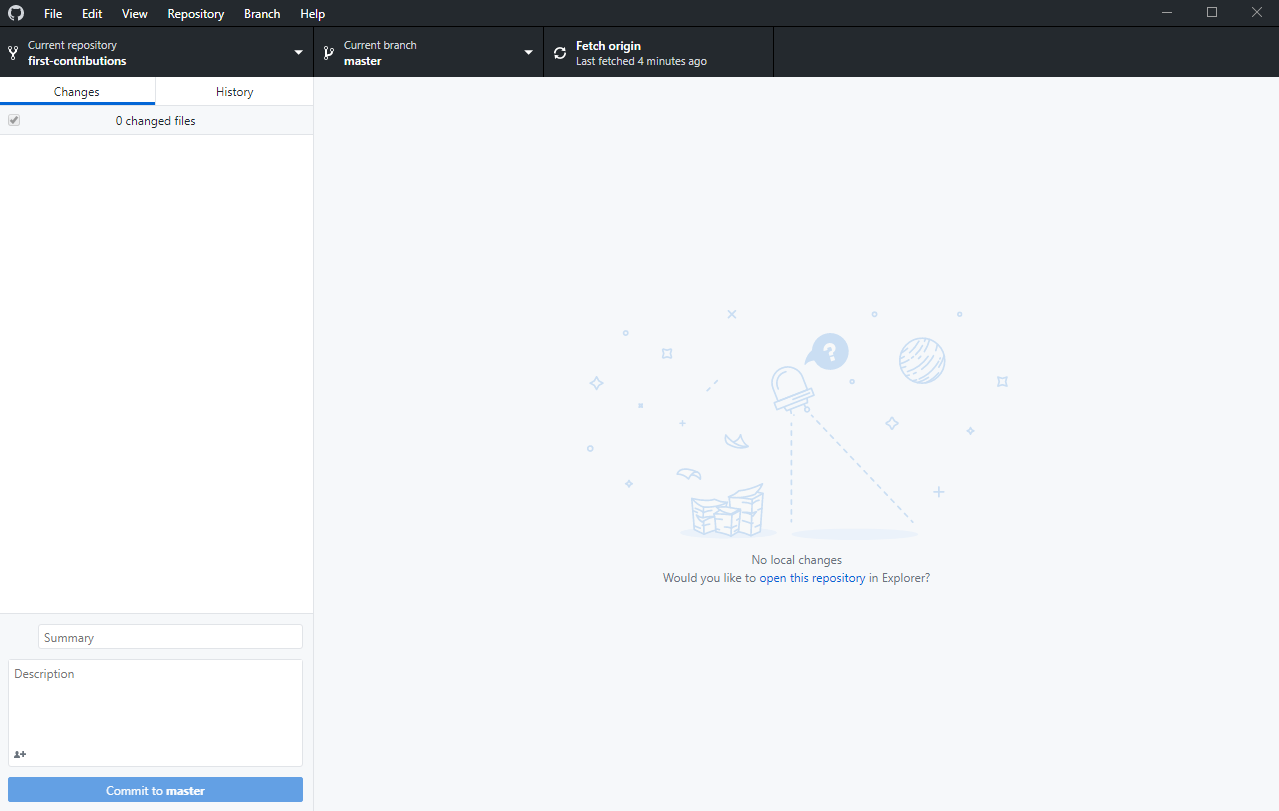 44 |
45 | Now you have copied the contents of the first-contributions repository in github to your computer.
46 |
47 | ## Create a branch
48 |
49 | Now create a branch by clicking on the "Current branch" icon at the top and then click on "New branch":
50 |
51 |
44 |
45 | Now you have copied the contents of the first-contributions repository in github to your computer.
46 |
47 | ## Create a branch
48 |
49 | Now create a branch by clicking on the "Current branch" icon at the top and then click on "New branch":
50 |
51 |  52 |
53 | Name your branch
52 |
53 | Name your branch 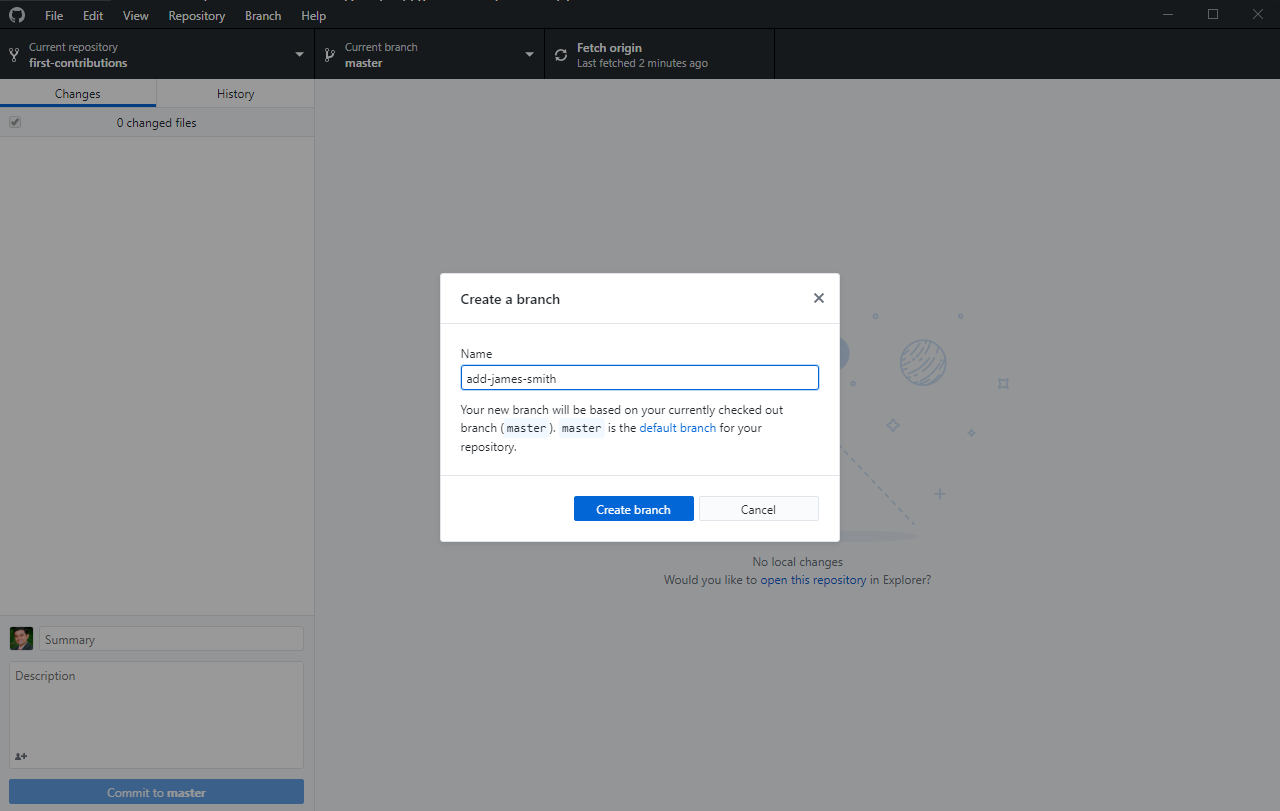 56 |
57 | Click on `Create branch`
58 |
59 | ## Make necessary changes and commit those changes
60 |
61 | Now open `Contributors.md` file in a text editor, scroll to the bottom of the page and add your name to it, then save the file.
62 |
63 | Example: If your name is James Smith, It should look like this.
64 |
65 | \[James Smith](https://github.com/jamessmith)
66 |
67 | You can see that there are changes to Contributors.md and they have been added to the Github Desktop.
68 |
69 |
56 |
57 | Click on `Create branch`
58 |
59 | ## Make necessary changes and commit those changes
60 |
61 | Now open `Contributors.md` file in a text editor, scroll to the bottom of the page and add your name to it, then save the file.
62 |
63 | Example: If your name is James Smith, It should look like this.
64 |
65 | \[James Smith](https://github.com/jamessmith)
66 |
67 | You can see that there are changes to Contributors.md and they have been added to the Github Desktop.
68 |
69 | 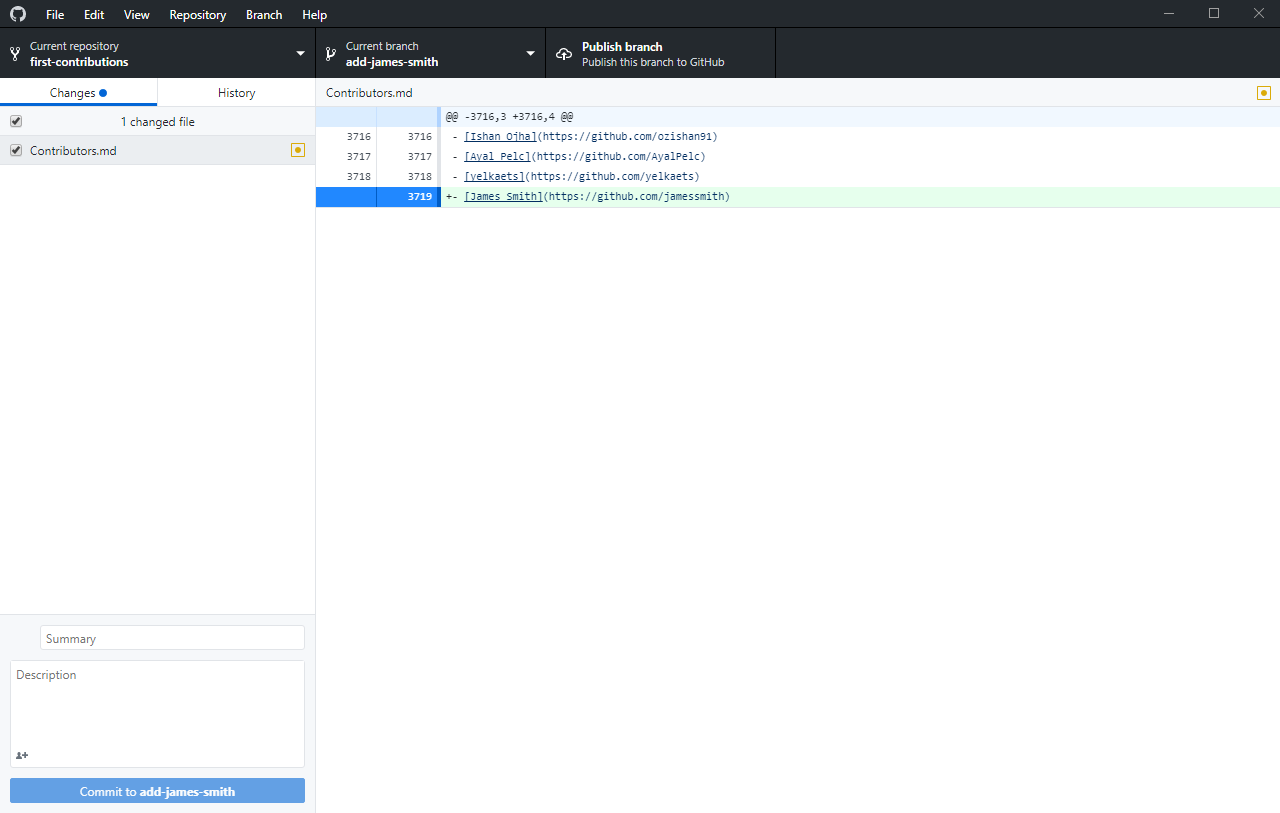 70 |
71 | Now commit those changes:
72 |
73 | Write the message "Add `
70 |
71 | Now commit those changes:
72 |
73 | Write the message "Add `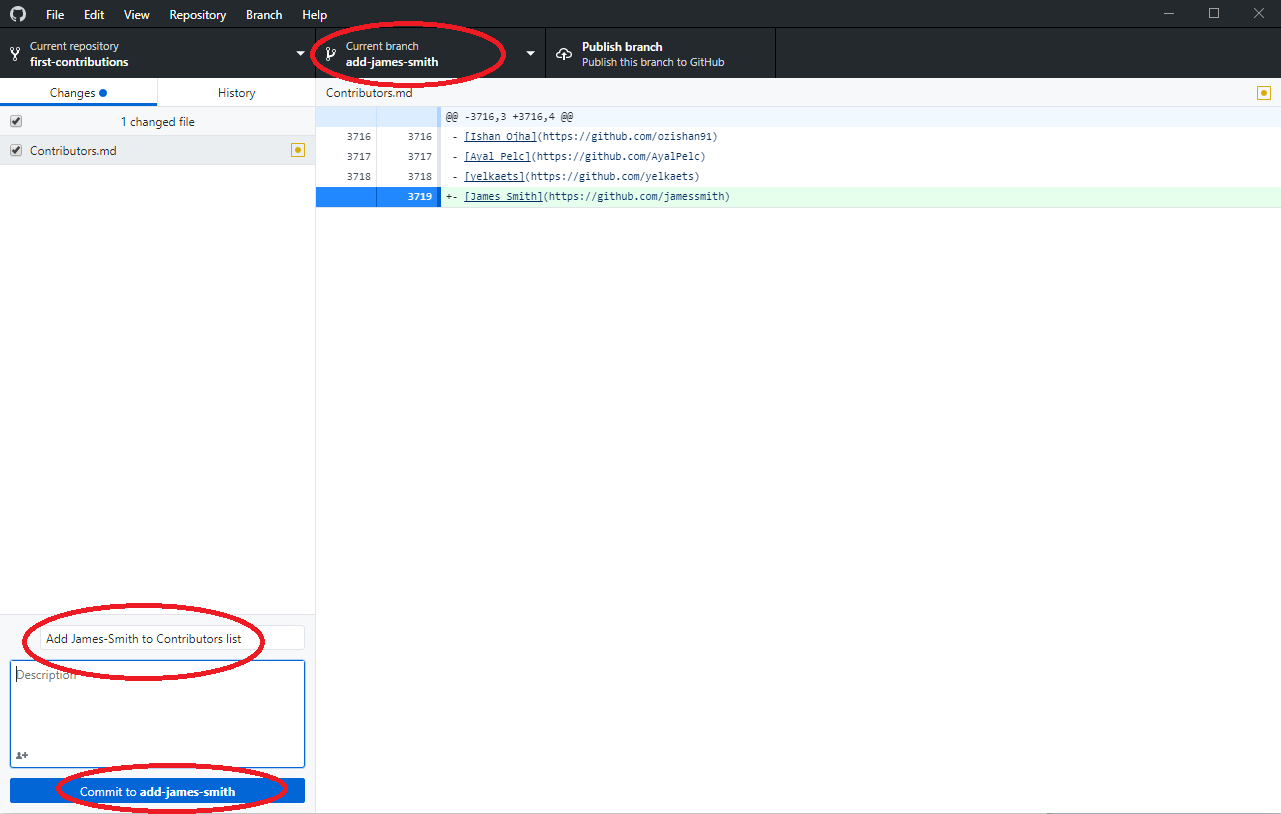 80 |
81 | At the bottom, you can see that the commit has been created.
82 |
83 |
80 |
81 | At the bottom, you can see that the commit has been created.
82 |
83 | 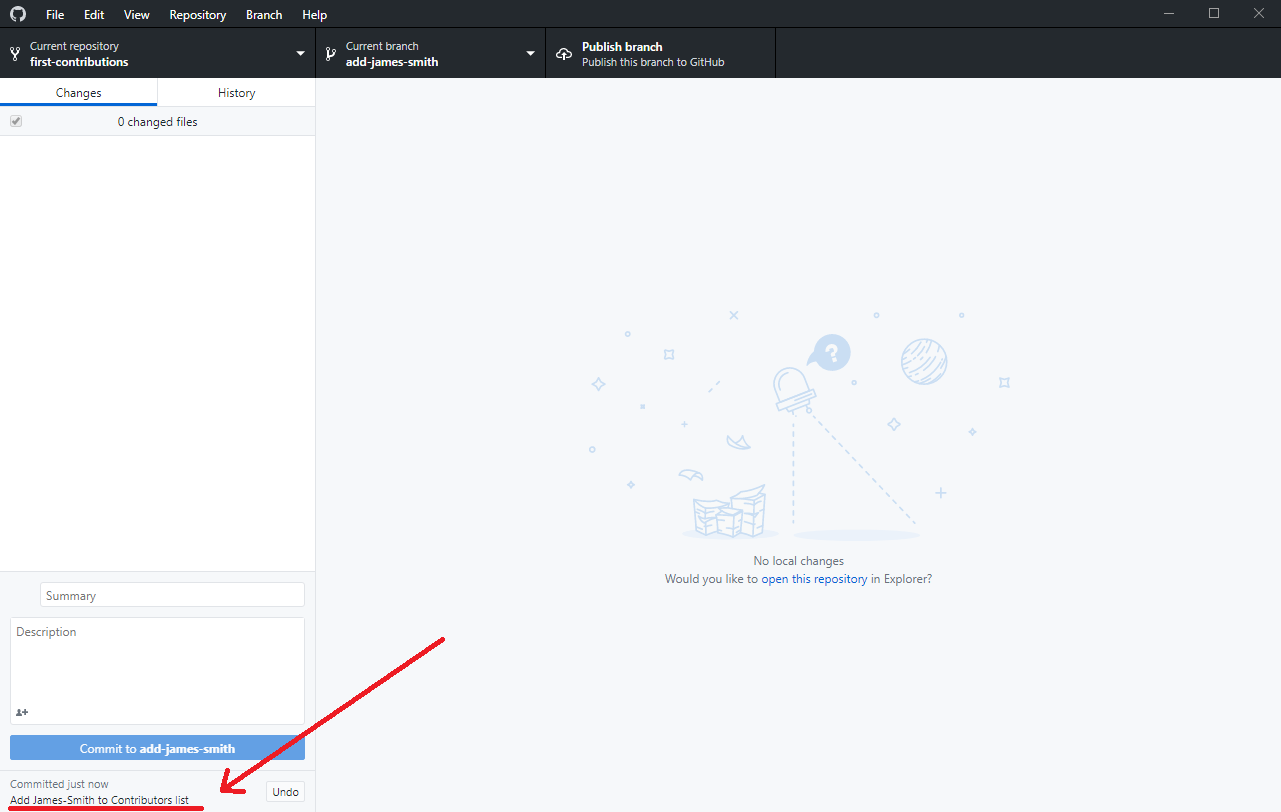 84 |
85 | ## Push changes to github
86 |
87 | Click on File->Options and sign-in to Github.com. Type in your Github username and password.
88 |
89 |
84 |
85 | ## Push changes to github
86 |
87 | Click on File->Options and sign-in to Github.com. Type in your Github username and password.
88 |
89 | 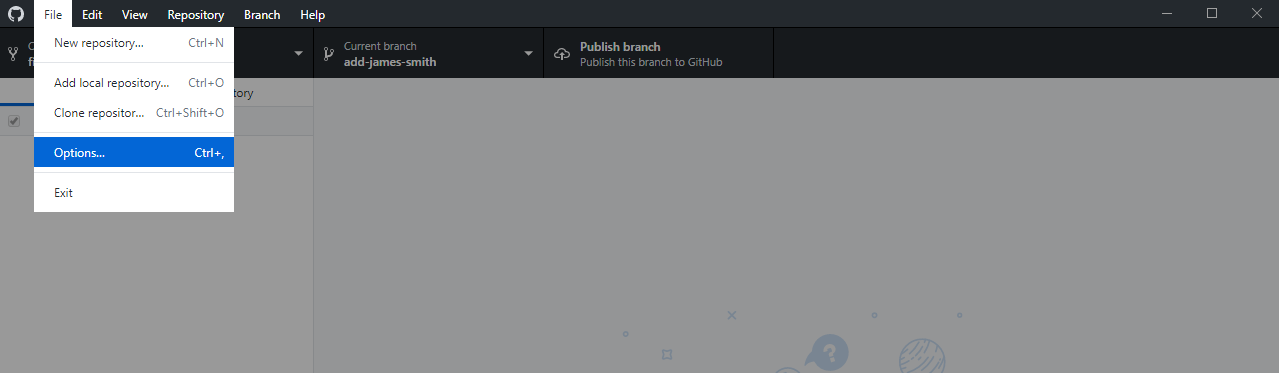 90 |
91 | Click the `Publish` button on the top right.
92 |
93 |
90 |
91 | Click the `Publish` button on the top right.
92 |
93 | 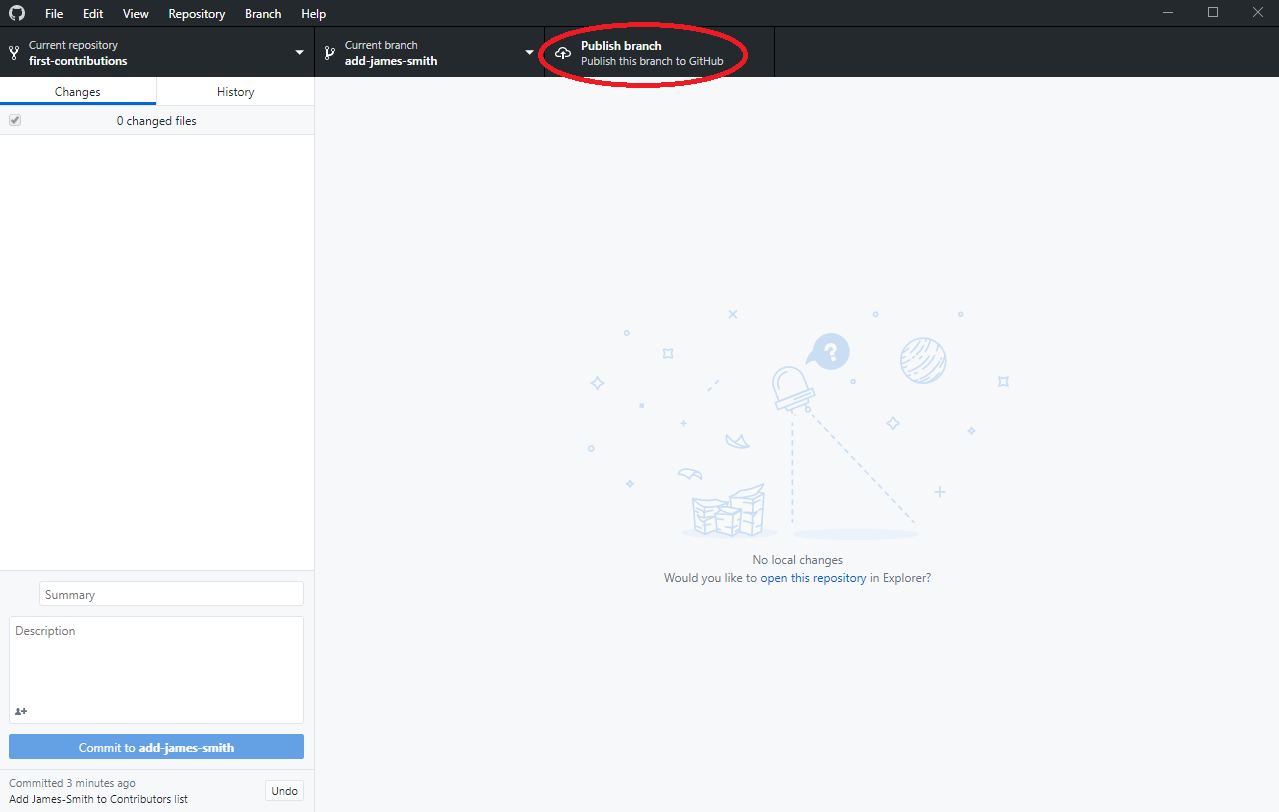 94 |
95 | ## Submit your changes for review
96 |
97 | If you go to your repository on github, you'll see `Compare & pull request` button. click on that button.
98 |
99 |
94 |
95 | ## Submit your changes for review
96 |
97 | If you go to your repository on github, you'll see `Compare & pull request` button. click on that button.
98 |
99 |  100 |
101 | Now submit the pull request.
102 |
103 |
100 |
101 | Now submit the pull request.
102 |
103 |  104 |
105 | Soon I'll be merging all your changes into the master branch of this project. You will get a notification email once the changes have been merged.
106 |
107 | ## Where to go from here?
108 |
109 | Congrats! You just completed the standard _fork -> clone -> edit -> PR_ workflow that you'll encounter often as a contributor!
110 |
111 | Celebrate your contribution and share it with your friends and followers by going to [web app](https://firstcontributions.github.io#social-share).
112 |
113 | You can join our slack team in case you need any help or have any questions. [Join slack team](https://join.slack.com/t/firstcontributors/shared_invite/enQtMzE1MTYwNzI3ODQ0LTZiMDA2OGI2NTYyNjM1MTFiNTc4YTRhZTg4OWZjMzA0ZWZmY2UxYzVkMzI1ZmVmOWI4ODdkZWQwNTM2NDVmNjY).
114 |
115 |
116 | ### [Additional material](../additional-material/git_workflow_scenarios/additional-material.md)
117 |
118 | ## Tutorials Using Other Tools
119 | [Back to main page](https://github.com/firstcontributions/first-contributions#tutorials-using-other-tools)
120 |
--------------------------------------------------------------------------------
/gui-tool-tutorials/github-desktop-tutorial-ptBR.md:
--------------------------------------------------------------------------------
1 | [](https://github.com/ellerbrock/open-source-badges/)
2 | [](https://join.slack.com/t/firstcontributors/shared_invite/enQtNjkxNzQwNzA2MTMwLTVhMWJjNjg2ODRlNWZhNjIzYjgwNDIyZWYwZjhjYTQ4OTBjMWM0MmFhZDUxNzBiYzczMGNiYzcxNjkzZDZlMDM)
3 | [](https://opensource.org/licenses/MIT)
4 | [](https://www.codetriage.com/roshanjossey/first-contributions)
5 |
6 |
7 | # First Contributions
8 |
9 | |
21 |
22 | ## Fork este repositório
23 |
24 | Fork este repositório clicando no botão fork na parte superior direita dessa página.
25 | Isso vai criar uma cópia desse repositório na sua conta.
26 |
27 | ## Clone este repositório
28 |
29 | Agora clone esse repositório na sua máquina.
30 |
31 | IMPORTANTE: NÃO CLONE O REPOSITÓRIO ORIGINAL. Vá para o seu fork e clone.
32 |
33 | Para clonar esse repositório, clique em "Clone or Download" e então clique em "Open in Desktop".
34 |
35 |
36 |
37 | Uma janela pop up vai aparecer. Clique em "Open GitHubDesktop.exe".
38 |
39 |
40 |
41 | Depois de clicar em "Open GitHubDesktop.exe" os arquivos serão baixados para o seu computador.
42 |
43 |
44 |
45 | Agora você copiou os arquivos do repositório first-contributions no github para o seu computador.
46 |
47 | ## Criando uma branch (ramo)
48 |
49 | Agora crie uma branch clicando na aba "Current branch" que fica no topo, depois clique em "New branch":
50 |
51 |
52 |
53 | Nomeie sua branch como
56 |
57 | Clique em `Create branch`
58 |
59 | ## Faça as mudanças necessárias e commit essas mudanças
60 |
61 | Agora abra o arquivo `Contributors.md` em um editor de texto, vá para o final do arquivo e adicione seu nome, depois salve o arquivo.
62 |
63 | Exemplo: Se o seu nome for James Smith, Deve ficar parecido com isso.
64 |
65 | \[James Smith](https://github.com/jamessmith)
66 |
67 | Você pode ver as alterações feitas em Contributors.md no Github Desktop.
68 |
69 |
70 |
71 | Agora faça commit dessas alterações:
72 |
73 | Escreva a mensagem "Add `
80 |
81 | Na parte inferior, você pode ver que o commit foi criado com sucesso.
82 |
83 |
84 |
85 | ## Faça o push das mudanças no github
86 |
87 | Clique em File->Options e depois em sign-in to Github.com. Digite seu username e senha do Github.
88 |
89 |
90 |
91 | Clique no botão `Publish` na parte superior direita.
92 |
93 |
94 |
95 | ## Envie suas alterações para review
96 |
97 | Se você for até seu repositório no github, verá o botão `Compare & pull request`. Clique nesse botão
98 |
99 |
100 |
101 | Agora envie o pull request.
102 |
103 |
104 |
105 | Em breve estarei mesclando todas as suas alterações na branch Master do projeto. Você vai receber um email de notificação assim que as alterações forem integradas.
106 |
107 | ## Qual o próximo passo?
108 |
109 | Parabéns! Você acabou de completar o fluxo _fork -> clone -> edit -> PR_ que encontrará diversas vezes como contribuidor!
110 |
111 | Comemore sua contribuição e compartilhe com seus amigos e seguidores acessando o [web app](https://firstcontributions.github.io#social-share).
112 |
113 | Você pode entrar na nossa equipe no Slack caso precise de alguma ajuda ou tenha alguma dúvida. [Entre no Slack](https://join.slack.com/t/firstcontributors/shared_invite/enQtMzE1MTYwNzI3ODQ0LTZiMDA2OGI2NTYyNjM1MTFiNTc4YTRhZTg4OWZjMzA0ZWZmY2UxYzVkMzI1ZmVmOWI4ODdkZWQwNTM2NDVmNjY).
114 |
115 |
116 | ### [Material adicional](../additional-material/git_workflow_senarios/additional-material.md)
117 |
118 | ## Tutoriais usando outras ferramentas
119 | [Voltar a página principal](https://github.com/firstcontributions/first-contributions#tutorials-using-other-tools)
120 |
--------------------------------------------------------------------------------
/gui-tool-tutorials/gitkraken-tutorial.md:
--------------------------------------------------------------------------------
1 | [](https://github.com/ellerbrock/open-source-badges/)
2 | [
104 |
105 | Soon I'll be merging all your changes into the master branch of this project. You will get a notification email once the changes have been merged.
106 |
107 | ## Where to go from here?
108 |
109 | Congrats! You just completed the standard _fork -> clone -> edit -> PR_ workflow that you'll encounter often as a contributor!
110 |
111 | Celebrate your contribution and share it with your friends and followers by going to [web app](https://firstcontributions.github.io#social-share).
112 |
113 | You can join our slack team in case you need any help or have any questions. [Join slack team](https://join.slack.com/t/firstcontributors/shared_invite/enQtMzE1MTYwNzI3ODQ0LTZiMDA2OGI2NTYyNjM1MTFiNTc4YTRhZTg4OWZjMzA0ZWZmY2UxYzVkMzI1ZmVmOWI4ODdkZWQwNTM2NDVmNjY).
114 |
115 |
116 | ### [Additional material](../additional-material/git_workflow_scenarios/additional-material.md)
117 |
118 | ## Tutorials Using Other Tools
119 | [Back to main page](https://github.com/firstcontributions/first-contributions#tutorials-using-other-tools)
120 |
--------------------------------------------------------------------------------
/gui-tool-tutorials/github-desktop-tutorial-ptBR.md:
--------------------------------------------------------------------------------
1 | [](https://github.com/ellerbrock/open-source-badges/)
2 | [](https://join.slack.com/t/firstcontributors/shared_invite/enQtNjkxNzQwNzA2MTMwLTVhMWJjNjg2ODRlNWZhNjIzYjgwNDIyZWYwZjhjYTQ4OTBjMWM0MmFhZDUxNzBiYzczMGNiYzcxNjkzZDZlMDM)
3 | [](https://opensource.org/licenses/MIT)
4 | [](https://www.codetriage.com/roshanjossey/first-contributions)
5 |
6 |
7 | # First Contributions
8 |
9 | |
21 |
22 | ## Fork este repositório
23 |
24 | Fork este repositório clicando no botão fork na parte superior direita dessa página.
25 | Isso vai criar uma cópia desse repositório na sua conta.
26 |
27 | ## Clone este repositório
28 |
29 | Agora clone esse repositório na sua máquina.
30 |
31 | IMPORTANTE: NÃO CLONE O REPOSITÓRIO ORIGINAL. Vá para o seu fork e clone.
32 |
33 | Para clonar esse repositório, clique em "Clone or Download" e então clique em "Open in Desktop".
34 |
35 |
36 |
37 | Uma janela pop up vai aparecer. Clique em "Open GitHubDesktop.exe".
38 |
39 |
40 |
41 | Depois de clicar em "Open GitHubDesktop.exe" os arquivos serão baixados para o seu computador.
42 |
43 |
44 |
45 | Agora você copiou os arquivos do repositório first-contributions no github para o seu computador.
46 |
47 | ## Criando uma branch (ramo)
48 |
49 | Agora crie uma branch clicando na aba "Current branch" que fica no topo, depois clique em "New branch":
50 |
51 |
52 |
53 | Nomeie sua branch como
56 |
57 | Clique em `Create branch`
58 |
59 | ## Faça as mudanças necessárias e commit essas mudanças
60 |
61 | Agora abra o arquivo `Contributors.md` em um editor de texto, vá para o final do arquivo e adicione seu nome, depois salve o arquivo.
62 |
63 | Exemplo: Se o seu nome for James Smith, Deve ficar parecido com isso.
64 |
65 | \[James Smith](https://github.com/jamessmith)
66 |
67 | Você pode ver as alterações feitas em Contributors.md no Github Desktop.
68 |
69 |
70 |
71 | Agora faça commit dessas alterações:
72 |
73 | Escreva a mensagem "Add `
80 |
81 | Na parte inferior, você pode ver que o commit foi criado com sucesso.
82 |
83 |
84 |
85 | ## Faça o push das mudanças no github
86 |
87 | Clique em File->Options e depois em sign-in to Github.com. Digite seu username e senha do Github.
88 |
89 |
90 |
91 | Clique no botão `Publish` na parte superior direita.
92 |
93 |
94 |
95 | ## Envie suas alterações para review
96 |
97 | Se você for até seu repositório no github, verá o botão `Compare & pull request`. Clique nesse botão
98 |
99 |
100 |
101 | Agora envie o pull request.
102 |
103 |
104 |
105 | Em breve estarei mesclando todas as suas alterações na branch Master do projeto. Você vai receber um email de notificação assim que as alterações forem integradas.
106 |
107 | ## Qual o próximo passo?
108 |
109 | Parabéns! Você acabou de completar o fluxo _fork -> clone -> edit -> PR_ que encontrará diversas vezes como contribuidor!
110 |
111 | Comemore sua contribuição e compartilhe com seus amigos e seguidores acessando o [web app](https://firstcontributions.github.io#social-share).
112 |
113 | Você pode entrar na nossa equipe no Slack caso precise de alguma ajuda ou tenha alguma dúvida. [Entre no Slack](https://join.slack.com/t/firstcontributors/shared_invite/enQtMzE1MTYwNzI3ODQ0LTZiMDA2OGI2NTYyNjM1MTFiNTc4YTRhZTg4OWZjMzA0ZWZmY2UxYzVkMzI1ZmVmOWI4ODdkZWQwNTM2NDVmNjY).
114 |
115 |
116 | ### [Material adicional](../additional-material/git_workflow_senarios/additional-material.md)
117 |
118 | ## Tutoriais usando outras ferramentas
119 | [Voltar a página principal](https://github.com/firstcontributions/first-contributions#tutorials-using-other-tools)
120 |
--------------------------------------------------------------------------------
/gui-tool-tutorials/gitkraken-tutorial.md:
--------------------------------------------------------------------------------
1 | [](https://github.com/ellerbrock/open-source-badges/)
2 | [ ](https://join.slack.com/t/firstcontributors/shared_invite/enQtNjkxNzQwNzA2MTMwLTVhMWJjNjg2ODRlNWZhNjIzYjgwNDIyZWYwZjhjYTQ4OTBjMWM0MmFhZDUxNzBiYzczMGNiYzcxNjkzZDZlMDM)
3 | [](https://opensource.org/licenses/MIT)
4 | [](https://www.codetriage.com/roshanjossey/first-contributions)
5 |
6 |
7 | # First Contributions
8 |
9 | |
](https://join.slack.com/t/firstcontributors/shared_invite/enQtNjkxNzQwNzA2MTMwLTVhMWJjNjg2ODRlNWZhNjIzYjgwNDIyZWYwZjhjYTQ4OTBjMWM0MmFhZDUxNzBiYzczMGNiYzcxNjkzZDZlMDM)
3 | [](https://opensource.org/licenses/MIT)
4 | [](https://www.codetriage.com/roshanjossey/first-contributions)
5 |
6 |
7 | # First Contributions
8 |
9 | | 26 |
27 | (optional) Go to File -> Preferences and set your project directory to the root of your local repositories.
28 |
29 |
30 | ## Fork this repository
31 |
32 | Fork this repo by clicking on the fork button on the top of this page.
33 |
26 |
27 | (optional) Go to File -> Preferences and set your project directory to the root of your local repositories.
28 |
29 |
30 | ## Fork this repository
31 |
32 | Fork this repo by clicking on the fork button on the top of this page.
33 |  34 | This will create of copy of this repository in your account.
35 |
36 |
37 | ## Clone the repository
38 |
39 | In GitKraken, go to File -> Clone Repo.
40 |
41 |
42 |
34 | This will create of copy of this repository in your account.
35 |
36 |
37 | ## Clone the repository
38 |
39 | In GitKraken, go to File -> Clone Repo.
40 |
41 |
42 | 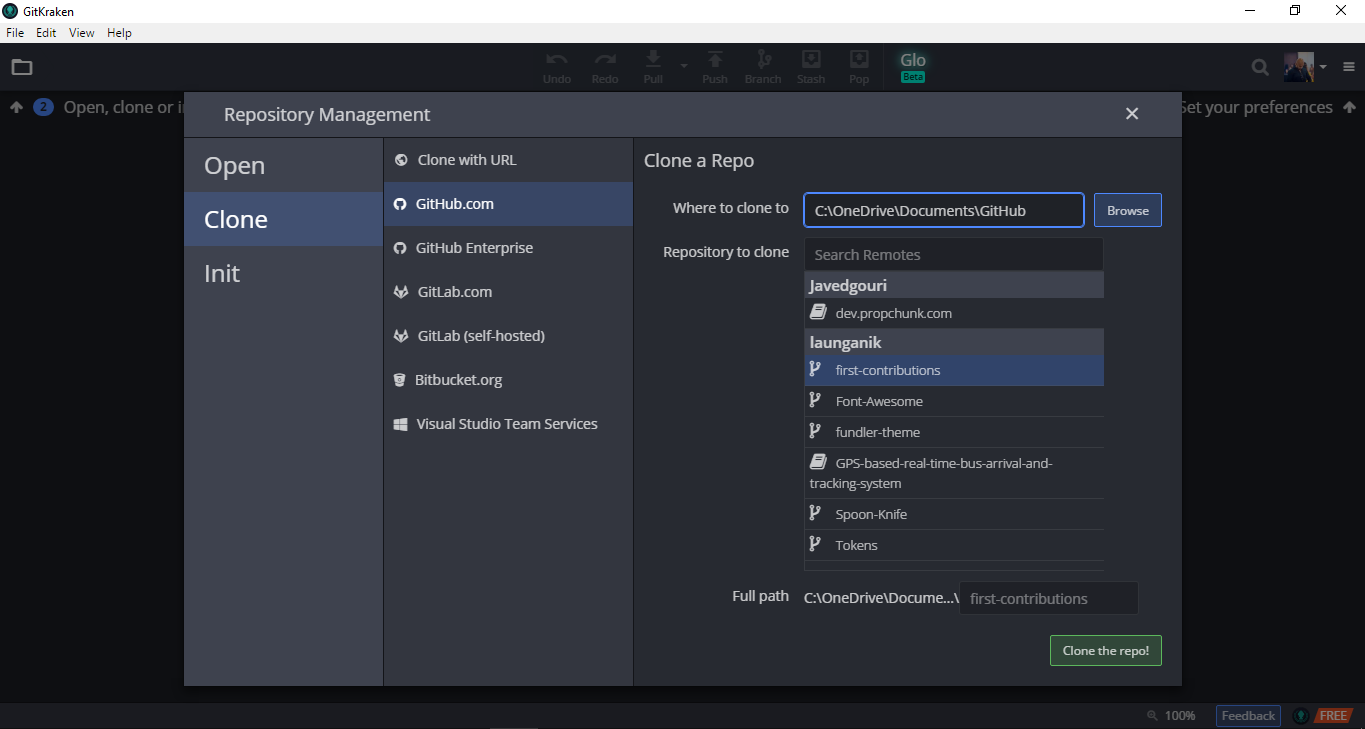 43 |
44 |
45 | Select GitHub.com in the right pane. Under your username, you should see first-contributions. Click that repository and check the full path shown at the bottom of this pane.
46 |
47 | Once you're satisfied with the path, click "Clone the repo!".
48 |
49 |
50 | ## Create a branch
51 |
52 | Click the branch button on the toolbar.
53 |
54 | Name your branch "add-your-name", for example: "add-william-sutton"
55 |
56 |
43 |
44 |
45 | Select GitHub.com in the right pane. Under your username, you should see first-contributions. Click that repository and check the full path shown at the bottom of this pane.
46 |
47 | Once you're satisfied with the path, click "Clone the repo!".
48 |
49 |
50 | ## Create a branch
51 |
52 | Click the branch button on the toolbar.
53 |
54 | Name your branch "add-your-name", for example: "add-william-sutton"
55 |
56 | 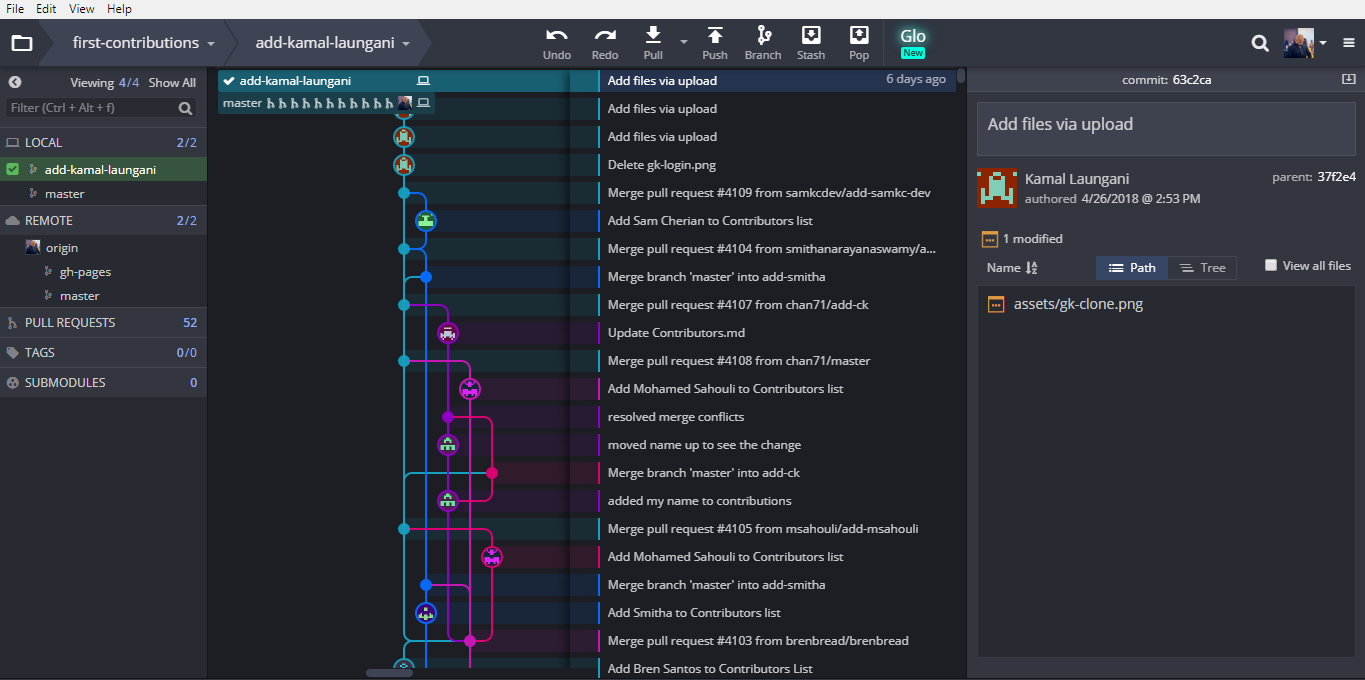 57 |
58 |
59 | ## Make necessary changes and commit those changes
60 |
61 | Now open `Contributors.md` file in a text editor and add your name to it, then save the file.
62 |
63 | If you have the repo open in GitKraken you'll see there are changes. Review and stage those changes by selecting the newest commit marked with "// WIP" and the number of files changed and the type of change.
64 |
65 |
57 |
58 |
59 | ## Make necessary changes and commit those changes
60 |
61 | Now open `Contributors.md` file in a text editor and add your name to it, then save the file.
62 |
63 | If you have the repo open in GitKraken you'll see there are changes. Review and stage those changes by selecting the newest commit marked with "// WIP" and the number of files changed and the type of change.
64 |
65 | 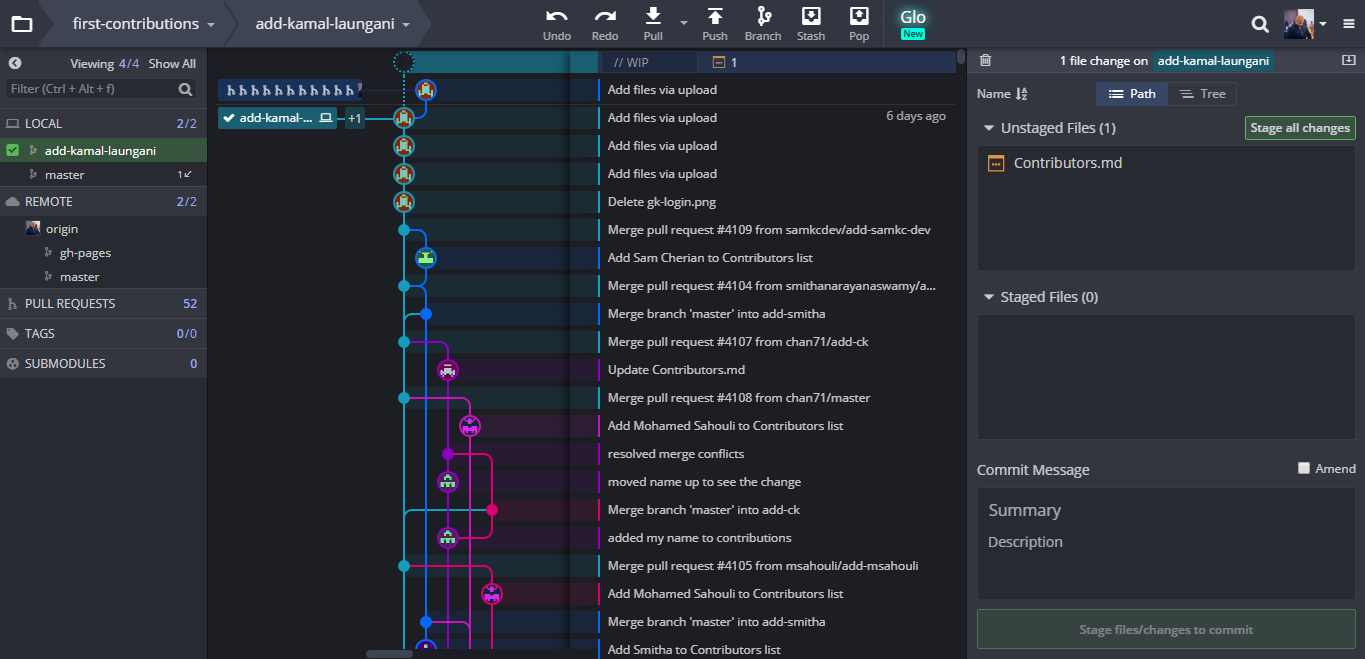 66 |
67 | Review the files that have been changed and decide what you would like to stage. Staging is important to tell git exactly what file changes you want associated with this commit.
68 |
69 |
70 |
66 |
67 | Review the files that have been changed and decide what you would like to stage. Staging is important to tell git exactly what file changes you want associated with this commit.
68 |
69 |
70 | 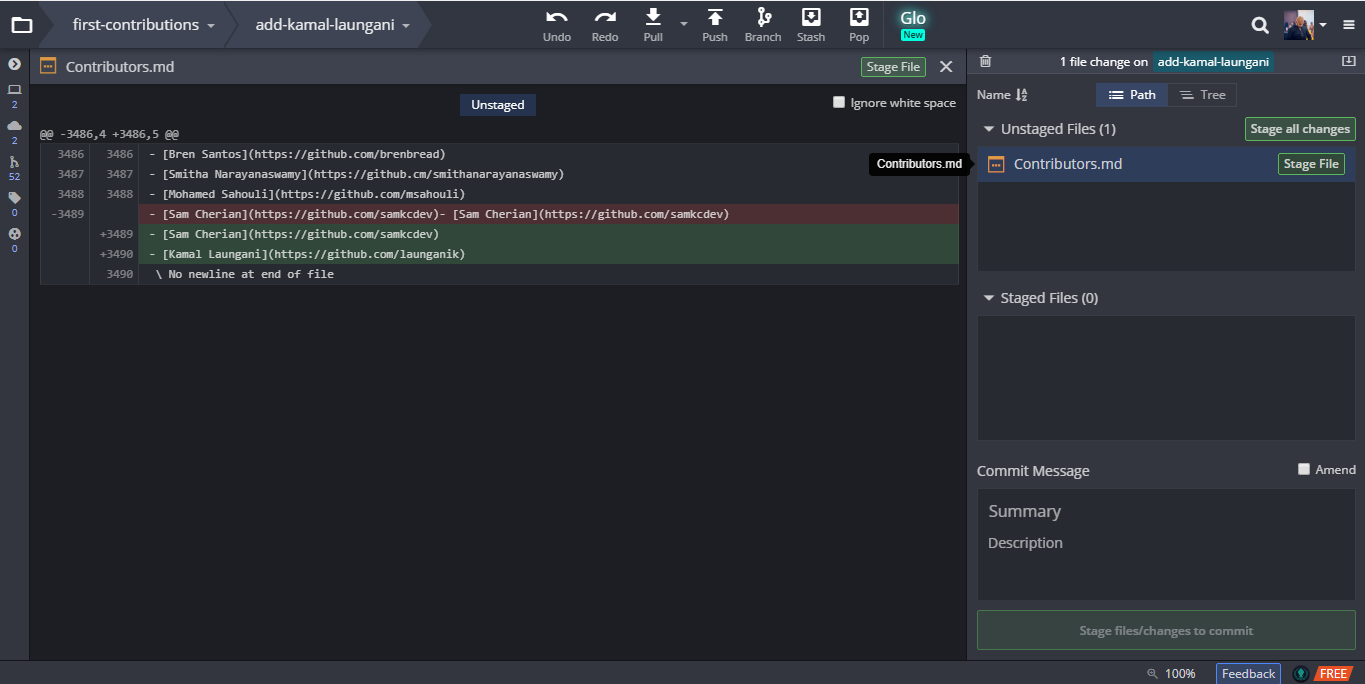 71 |
72 |
73 | Once you have a good commit message ("Add
71 |
72 |
73 | Once you have a good commit message ("Add 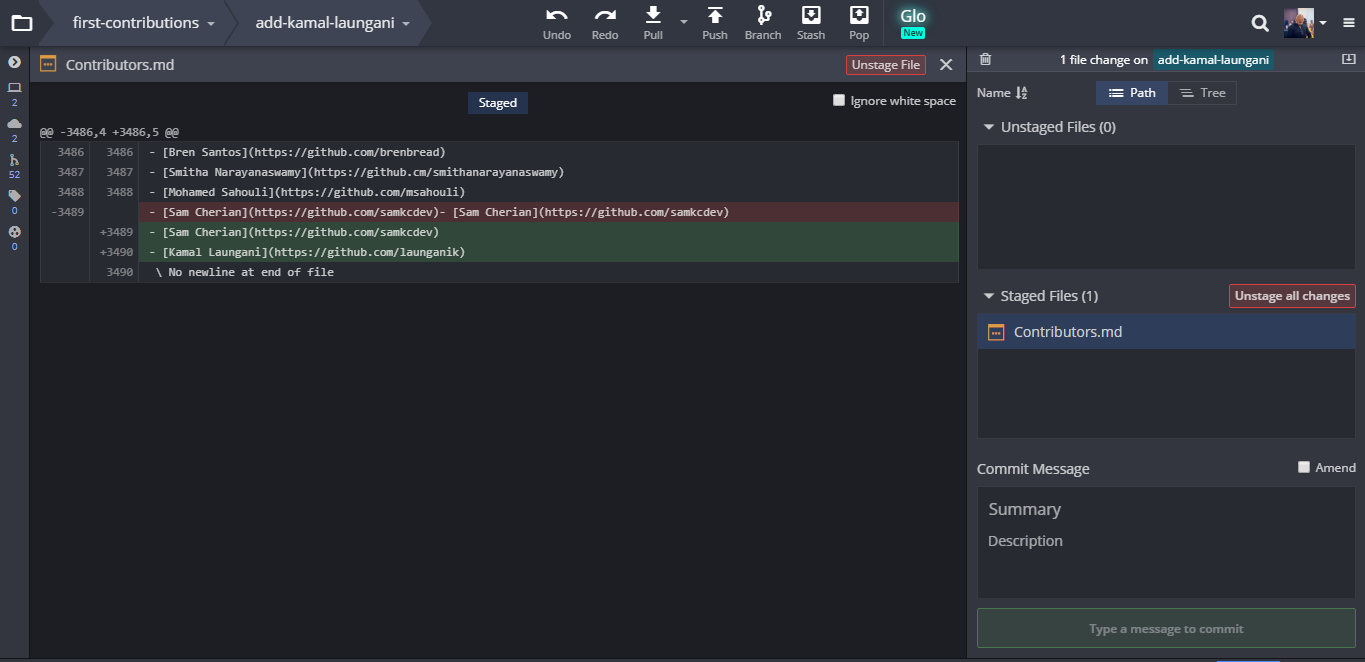 77 |
78 |
79 | If you change your mind, you can unstage those changes, or you can discard them all together.
80 | WARNING: As the word discard implies, this is a destructive operation. Do this only if you don't want any change(s) from whatever repository you're in.
81 |
82 | Hit commit.
83 |
84 | Congratulations, you've committed all the changes to your local copy of your branch of your fork of first-contributions. Onward!
85 |
86 |
87 | ## Push changes to GitHub
88 |
89 |
77 |
78 |
79 | If you change your mind, you can unstage those changes, or you can discard them all together.
80 | WARNING: As the word discard implies, this is a destructive operation. Do this only if you don't want any change(s) from whatever repository you're in.
81 |
82 | Hit commit.
83 |
84 | Congratulations, you've committed all the changes to your local copy of your branch of your fork of first-contributions. Onward!
85 |
86 |
87 | ## Push changes to GitHub
88 |
89 | 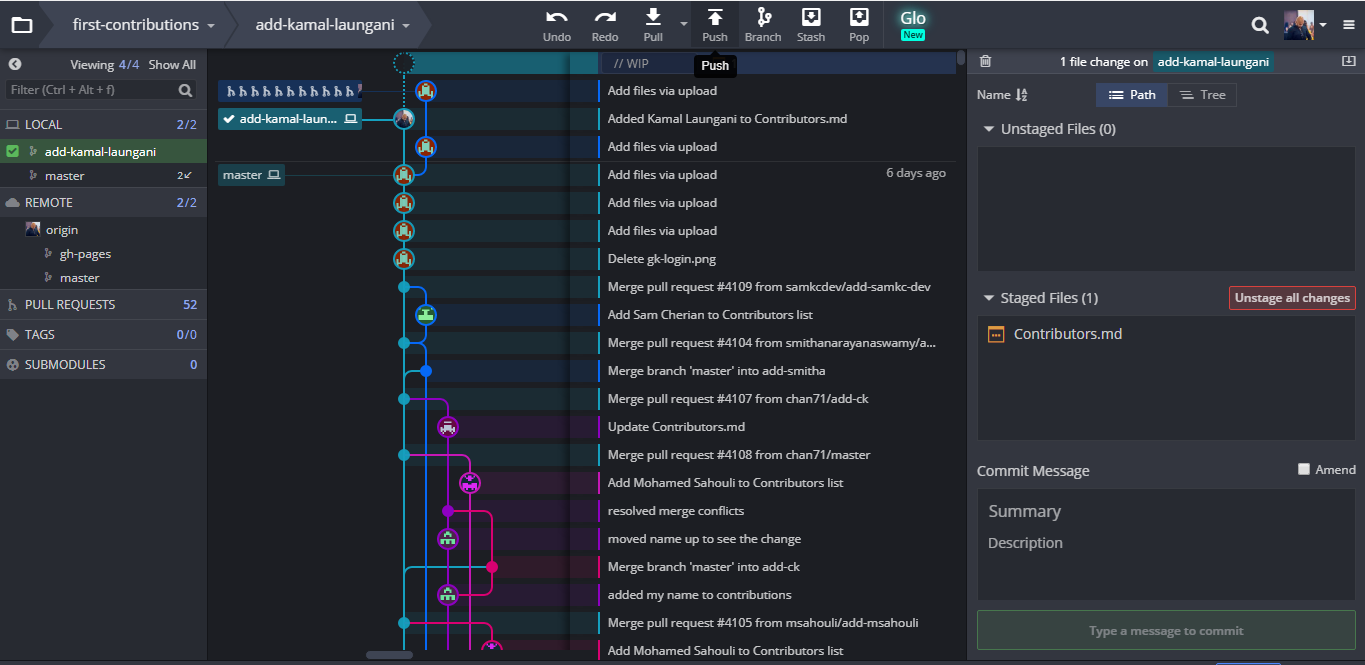 90 |
91 | Click the Push button on the toolbar.
92 |
93 |
90 |
91 | Click the Push button on the toolbar.
92 |
93 |  94 |
95 | Submit changes on the origin branch if you want the changes to reflect in the master branch directly, else select the appropriate branch you want to push.
96 |
97 |
98 | ## Submit your changes for review
99 |
100 | If you go to your repository on github, you'll see `Compare & pull request` button. Click on that button.
101 |
102 |
94 |
95 | Submit changes on the origin branch if you want the changes to reflect in the master branch directly, else select the appropriate branch you want to push.
96 |
97 |
98 | ## Submit your changes for review
99 |
100 | If you go to your repository on github, you'll see `Compare & pull request` button. Click on that button.
101 |
102 |  103 |
104 | Now submit the pull request.
105 |
106 |
103 |
104 | Now submit the pull request.
105 |
106 |  107 |
108 | Soon I'll be merging all your changes into the master branch of this project. You will get a notification email once the changes have been merged.
109 |
110 | ## Where to go from here?
111 |
112 | Congrats! You have just completed the standard _fork -> clone -> edit -> PR_ workflow that you'll encounter often as a contributor!
113 |
114 | Celebrate your contribution and share it with your friends and followers by going to [web app](https://firstcontributions.github.io/#social-share).
115 |
116 | You could join our slack team in case you need any help or have any questions. [Join slack team](https://join.slack.com/t/firstcontributors/shared_invite/enQtMzE1MTYwNzI3ODQ0LTZiMDA2OGI2NTYyNjM1MTFiNTc4YTRhZTg4OWZjMzA0ZWZmY2UxYzVkMzI1ZmVmOWI4ODdkZWQwNTM2NDVmNjY).
117 |
118 |
119 | ### [Additional material](../additional-material/git_workflow_scenarios/additional-material.md)
120 |
121 |
122 | ## Tutorials Using Other Tools
123 | [Back to main page](https://github.com/firstcontributions/first-contributions#tutorials-using-other-tools)
124 |
--------------------------------------------------------------------------------
/README.md:
--------------------------------------------------------------------------------
1 |
2 |
107 |
108 | Soon I'll be merging all your changes into the master branch of this project. You will get a notification email once the changes have been merged.
109 |
110 | ## Where to go from here?
111 |
112 | Congrats! You have just completed the standard _fork -> clone -> edit -> PR_ workflow that you'll encounter often as a contributor!
113 |
114 | Celebrate your contribution and share it with your friends and followers by going to [web app](https://firstcontributions.github.io/#social-share).
115 |
116 | You could join our slack team in case you need any help or have any questions. [Join slack team](https://join.slack.com/t/firstcontributors/shared_invite/enQtMzE1MTYwNzI3ODQ0LTZiMDA2OGI2NTYyNjM1MTFiNTc4YTRhZTg4OWZjMzA0ZWZmY2UxYzVkMzI1ZmVmOWI4ODdkZWQwNTM2NDVmNjY).
117 |
118 |
119 | ### [Additional material](../additional-material/git_workflow_scenarios/additional-material.md)
120 |
121 |
122 | ## Tutorials Using Other Tools
123 | [Back to main page](https://github.com/firstcontributions/first-contributions#tutorials-using-other-tools)
124 |
--------------------------------------------------------------------------------
/README.md:
--------------------------------------------------------------------------------
1 |
2 |
3 |
4 |  5 |
5 |  6 |
6 |  7 |
7 |  8 |
9 |
10 |
11 | # Here-Contributions-Begins💻
12 |
13 | ># Hi, If you are a beginner then this is for you...by this tutorial you are going to make your First PR for sure
14 |
15 |
22 |
23 |
24 |
25 | ## ⭐ STAR THIS REPOSITORY THIS WILL PAY OF MY WORK
26 |
27 |
8 |
9 |
10 |
11 | # Here-Contributions-Begins💻
12 |
13 | ># Hi, If you are a beginner then this is for you...by this tutorial you are going to make your First PR for sure
14 |
15 |
22 |
23 |
24 |
25 | ## ⭐ STAR THIS REPOSITORY THIS WILL PAY OF MY WORK
26 |
27 |
28 | 29 | This project aims to simplify and guide the way beginners make their first contribution. If you are looking to make your first contribution, follow the steps below. 30 | 31 | > _If you're not comfortable with command line_ There are tutorials using GUI tools like **VS-Code** check out in bottom 32 | 33 | 34 |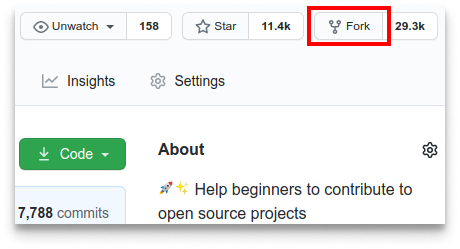 35 |
36 | #### If you don't have git on your machine, [install it](https://help.github.com/articles/set-up-git/).
37 |
38 | ## Fork this repository
39 |
40 | Fork this repository by clicking on the fork button on the top of this page.
41 | This will create a copy of this repository in your account
42 |
43 | ## Clone the repository
44 |
45 |
35 |
36 | #### If you don't have git on your machine, [install it](https://help.github.com/articles/set-up-git/).
37 |
38 | ## Fork this repository
39 |
40 | Fork this repository by clicking on the fork button on the top of this page.
41 | This will create a copy of this repository in your account
42 |
43 | ## Clone the repository
44 |
45 |  46 |
47 | Now clone the forked repository to your machine. Go to your GitHub account, open the forked repository, click on the code button and then click the _copy to clipboard_ icon.
48 |
49 | Open a terminal and run the following git command:
50 |
51 | ```
52 | git clone "url you just copied"
53 | ```
54 |
55 | where "url you just copied" (without the quotation marks) is the url to this repository (your fork of this project). See the previous steps to obtain the url.
56 |
57 |
46 |
47 | Now clone the forked repository to your machine. Go to your GitHub account, open the forked repository, click on the code button and then click the _copy to clipboard_ icon.
48 |
49 | Open a terminal and run the following git command:
50 |
51 | ```
52 | git clone "url you just copied"
53 | ```
54 |
55 | where "url you just copied" (without the quotation marks) is the url to this repository (your fork of this project). See the previous steps to obtain the url.
56 |
57 |  58 |
59 | For example:
60 |
61 | ```
62 | git clone https://github.com/this-is-you/first-contributions.git
63 | ```
64 |
65 | where `this-is-you` is your GitHub username. Here you're copying the contents of the first-contributions repository on GitHub to your computer.
66 |
67 | ## Create a branch
68 |
69 | Change to the repository directory on your computer (if you are not already there):
70 |
71 | ```
72 | cd Here-Contributions-Begins
73 | ```
74 |
75 | Now create a branch using the `git checkout` command:
76 |
77 | ```
78 | git checkout -b your-new-branch-name
79 | ```
80 |
81 | For example:
82 |
83 | ```
84 | git checkout -b add-alonzo-church
85 | ```
86 |
87 | (The name of the branch does not need to have the word _add_ in it, but it's a reasonable thing to include because the purpose of this branch is to add your name to a list.)
88 |
89 | ## Make necessary changes and commit those changes
90 |
91 | Now open `Contributors.md` file in a text editor, add your name to it. Don't add it at the beginning or end of the file. Put it anywhere in between. Now, save the file.
92 |
93 |
58 |
59 | For example:
60 |
61 | ```
62 | git clone https://github.com/this-is-you/first-contributions.git
63 | ```
64 |
65 | where `this-is-you` is your GitHub username. Here you're copying the contents of the first-contributions repository on GitHub to your computer.
66 |
67 | ## Create a branch
68 |
69 | Change to the repository directory on your computer (if you are not already there):
70 |
71 | ```
72 | cd Here-Contributions-Begins
73 | ```
74 |
75 | Now create a branch using the `git checkout` command:
76 |
77 | ```
78 | git checkout -b your-new-branch-name
79 | ```
80 |
81 | For example:
82 |
83 | ```
84 | git checkout -b add-alonzo-church
85 | ```
86 |
87 | (The name of the branch does not need to have the word _add_ in it, but it's a reasonable thing to include because the purpose of this branch is to add your name to a list.)
88 |
89 | ## Make necessary changes and commit those changes
90 |
91 | Now open `Contributors.md` file in a text editor, add your name to it. Don't add it at the beginning or end of the file. Put it anywhere in between. Now, save the file.
92 |
93 |  94 |
95 | If you go to the project directory and execute the command `git status`, you'll see there are changes.
96 |
97 | Add those changes to the branch you just created using the `git add` command:
98 |
99 | ```
100 | git add Contributors.md
101 | ```
102 |
103 | Now commit those changes using the `git commit` command:
104 |
105 | ```
106 | git commit -m "Add
94 |
95 | If you go to the project directory and execute the command `git status`, you'll see there are changes.
96 |
97 | Add those changes to the branch you just created using the `git add` command:
98 |
99 | ```
100 | git add Contributors.md
101 | ```
102 |
103 | Now commit those changes using the `git commit` command:
104 |
105 | ```
106 | git commit -m "Add to Contributors list"
107 | ```
108 |
109 | replacing `` with your name.
110 |
111 | ## Push changes to GitHub
112 |
113 | Push your changes using the command `git push`:
114 |
115 | ```
116 | git push origin
117 | ```
118 |
119 | replacing `` with the name of the branch you created earlier.
120 |
121 | ## Submit your changes for review
122 |
123 | If you go to your repository on GitHub, you'll see a `Compare & pull request` button. Click on that button.
124 |
125 | 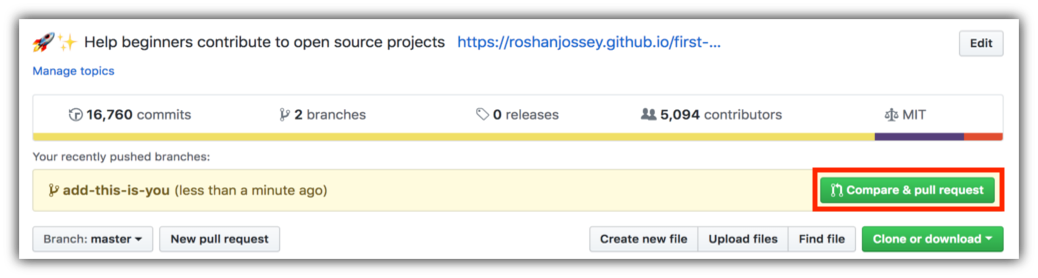 126 |
127 | Now submit the pull request.
128 |
129 |
126 |
127 | Now submit the pull request.
128 |
129 |  130 |
131 | **voila** ! You have done it , Soon I'll be merging all your changes into the master branch of this project. You will get a notification email once the changes have been merged.
132 |
133 | ## Where to go from here?
134 |
135 | Congrats! You just completed the standard _fork -> clone -> edit -> pull request_ workflow that you'll encounter often as a contributor!
136 |
137 | Celebrate⭐ your contribution and share it with your friends and followers.
138 |
139 | You could join our discord team in case you need any help or have any questions. [Join discord team](https://discord.gg/XMuEPgCj6y).
140 |
141 |
142 |
143 |
130 |
131 | **voila** ! You have done it , Soon I'll be merging all your changes into the master branch of this project. You will get a notification email once the changes have been merged.
132 |
133 | ## Where to go from here?
134 |
135 | Congrats! You just completed the standard _fork -> clone -> edit -> pull request_ workflow that you'll encounter often as a contributor!
136 |
137 | Celebrate⭐ your contribution and share it with your friends and followers.
138 |
139 | You could join our discord team in case you need any help or have any questions. [Join discord team](https://discord.gg/XMuEPgCj6y).
140 |
141 |
142 |
143 |
144 | 145 | ### [Additional material](additional-material/git_workflow_scenarios/additional-material.md) 146 | 147 | ## Tutorials Using VS-CODE ... 148 | 149 | 150 |
151 | [Visual Studio Code](gui-tool-tutorials/github-windows-vs-code-tutorial.md)
152 |
153 |
150 |
151 | [Visual Studio Code](gui-tool-tutorials/github-windows-vs-code-tutorial.md)
152 |
153 |
154 |
155 |
156 |
5 |
6 |
7 |
8 |
9 |
10 |
11 | # Here-Contributions-Begins💻
12 |
13 | ># Hi, If you are a beginner then this is for you...by this tutorial you are going to make your First PR for sure
14 |
15 |
22 |
23 |
24 |
25 | ## ⭐ STAR THIS REPOSITORY THIS WILL PAY OF MY WORK
26 |
27 | 28 | 29 | This project aims to simplify and guide the way beginners make their first contribution. If you are looking to make your first contribution, follow the steps below. 30 | 31 | > _If you're not comfortable with command line_ There are tutorials using GUI tools like **VS-Code** check out in bottom 32 | 33 | 34 |
35 |
36 | #### If you don't have git on your machine, [install it](https://help.github.com/articles/set-up-git/).
37 |
38 | ## Fork this repository
39 |
40 | Fork this repository by clicking on the fork button on the top of this page.
41 | This will create a copy of this repository in your account
42 |
43 | ## Clone the repository
44 |
45 |
46 |
47 | Now clone the forked repository to your machine. Go to your GitHub account, open the forked repository, click on the code button and then click the _copy to clipboard_ icon.
48 |
49 | Open a terminal and run the following git command:
50 |
51 | ```
52 | git clone "url you just copied"
53 | ```
54 |
55 | where "url you just copied" (without the quotation marks) is the url to this repository (your fork of this project). See the previous steps to obtain the url.
56 |
57 |
58 |
59 | For example:
60 |
61 | ```
62 | git clone https://github.com/this-is-you/first-contributions.git
63 | ```
64 |
65 | where `this-is-you` is your GitHub username. Here you're copying the contents of the first-contributions repository on GitHub to your computer.
66 |
67 | ## Create a branch
68 |
69 | Change to the repository directory on your computer (if you are not already there):
70 |
71 | ```
72 | cd Here-Contributions-Begins
73 | ```
74 |
75 | Now create a branch using the `git checkout` command:
76 |
77 | ```
78 | git checkout -b your-new-branch-name
79 | ```
80 |
81 | For example:
82 |
83 | ```
84 | git checkout -b add-alonzo-church
85 | ```
86 |
87 | (The name of the branch does not need to have the word _add_ in it, but it's a reasonable thing to include because the purpose of this branch is to add your name to a list.)
88 |
89 | ## Make necessary changes and commit those changes
90 |
91 | Now open `Contributors.md` file in a text editor, add your name to it. Don't add it at the beginning or end of the file. Put it anywhere in between. Now, save the file.
92 |
93 |
94 |
95 | If you go to the project directory and execute the command `git status`, you'll see there are changes.
96 |
97 | Add those changes to the branch you just created using the `git add` command:
98 |
99 | ```
100 | git add Contributors.md
101 | ```
102 |
103 | Now commit those changes using the `git commit` command:
104 |
105 | ```
106 | git commit -m "Add
126 |
127 | Now submit the pull request.
128 |
129 |
130 |
131 | **voila** ! You have done it , Soon I'll be merging all your changes into the master branch of this project. You will get a notification email once the changes have been merged.
132 |
133 | ## Where to go from here?
134 |
135 | Congrats! You just completed the standard _fork -> clone -> edit -> pull request_ workflow that you'll encounter often as a contributor!
136 |
137 | Celebrate⭐ your contribution and share it with your friends and followers.
138 |
139 | You could join our discord team in case you need any help or have any questions. [Join discord team](https://discord.gg/XMuEPgCj6y).
140 |
141 |
142 |
143 | 144 | 145 | ### [Additional material](additional-material/git_workflow_scenarios/additional-material.md) 146 | 147 | ## Tutorials Using VS-CODE ... 148 | 149 |
154 |
155 |
156 |
📫 Reach out to me on
157 | 158 | 159 |project Admin ❤️
160 | 161 | 162 |
163 |
164 |
173 |
174 |
175 | 176 | > Do share and Star ⭐ this repositatory :)) 177 | 178 | -------------------------------------------------------------------------------- /gui-tool-tutorials/github-windows-intellij-tutorial.md: -------------------------------------------------------------------------------- 1 | [](https://github.com/ellerbrock/open-source-badges/) 2 | [](https://join.slack.com/t/firstcontributors/shared_invite/enQtNjkxNzQwNzA2MTMwLTVhMWJjNjg2ODRlNWZhNjIzYjgwNDIyZWYwZjhjYTQ4OTBjMWM0MmFhZDUxNzBiYzczMGNiYzcxNjkzZDZlMDM)
3 | [](https://opensource.org/licenses/MIT)
4 | [](https://www.codetriage.com/roshanjossey/first-contributions)
5 |
6 | # First Contributions
7 |
8 | |  | IntelliJ IDEA |
9 | | ------------------------------------------------------------------------------------------------------------------------------------ | ------------------ |
10 |
11 |
12 | It's hard. It's always hard the first time you do something. Especially when you are collaborating, making mistakes isn't a comfortable thing. But open source is all about collaboration & working together. We wanted to simplify the way new open-source contributors learn & contribute for the first time.
13 |
14 | Reading articles & watching tutorials can help, but what comes better than actually doing the stuff without messing up anything. This project aims at providing guidance & simplifying the way rookies make their first contribution. Remember the more relaxed you are, the better you learn. If you are looking for making your first contribution, just follow the simple steps below. We promise you, it will be fun.
15 |
16 | If you don't have IntelliJ IDEA on your machine, [install it](https://www.jetbrains.com/idea/download/#section=windows).
17 |
18 | **Notice:** This tutorial was made using IntelliJ IDEA (Version 2019.3.2) on a Windows 10 machine. Later in this tutorial we will make use of some keyboard shortcuts. These may differ on other operating systems (macOS/Linux).
19 |
20 | ## Fork this repository
21 |
22 |
23 |
24 | Fork this repo by clicking on the fork button on the top right of this page. This will create a copy of this repository in your GitHub account.
25 |
26 | GitHub keeps track of the relationship between your repo and the one you have forked it from. You can think of your repo as a working copy.
27 |
28 | Most top-level GitHub Repos (i.e. ones not forked from any other repo) have a small core team of people who can directly commit changes. All other contributors must fork the repo and make changes in the fork, then create a Pull Request to request to merge back their changes into the top-level repo. If the top-level repo administrator approves the changes they will be merged, and you will gain instant fame and fortune! More on how to do that later.
29 |
30 | ## Clone your repository
31 |
32 |
33 |
34 | The next step is to clone your repo down to your machine so you can begin making changes. IntelliJ IDEA needs the URL of your repo, so click the "clone" button and then click the "copy to clipboard" icon.
35 |
36 | **CAREFUL:** One mistake that new contributors often make is to clone the repo you forked _from_ rather than cloning your repo. Check your browser's address bar and make sure you are cloning your repo.
37 |
38 | Now open up IntelliJ IDEA.
39 |
40 | IntelliJ IDEA allows you to check out (in Git terms clone) an existing repository and create a new project based on the data you've downloaded.
41 |
42 | From the main menu, choose VCS | Get from Version Control, or, if no project is currently opened, click Get from Version Control on the Welcome screen.
43 |
44 | In the Get from Version Control dialog, specify the URL of the remote repository you want to clone (you can click Test to make sure that connection to the remote can be established) or select one of the VCS hosting services on the left. If you are already logged in to the selected hosting service, completion will suggest the list of available repositories that you can clone.
45 |
46 | Click Clone. If you want to create an IntelliJ IDEA project based on the sources you have cloned, click Yes in the confirmation dialog. Git root mapping will be automatically set to the project root directory.
47 |
48 | If your project contains submodules, they will also be cloned and automatically registered as project roots.
49 |
50 | **Important**: Make sure it is the forked repository and not the original one, otherwise it won't work.
51 |
52 | ## Create a branch
53 |
54 | In Git, branching is a powerful mechanism that allows you to diverge from the main development line, for example, when you need to work on a feature or freeze a certain state of a codebase for a release, and so on.
55 |
56 | In IntelliJ IDEA, all operations with branches are performed in the Git Branches popup. To invoke it, click the Git widget in the Status bar or press Ctrl+Shift+`.
57 |
58 | The name of the branch that is currently checked out is displayed in the Git widget in the Status bar.
59 |
60 | In the Branches popup, choose New Branch.
61 |
62 | In the dialog that opens, specify the branch name, and make sure the Checkout branch option is selected if you want to switch to that branch.
63 |
64 | The new branch will start from the current HEAD. If you want to start a branch from a previous commit instead of the current branch HEAD, select this commit in the Log tab of the Version Control tool window Alt+9 and choose New Branch from the context menu.
65 |
66 | ## Make necessary changes
67 |
68 | Open `Contributors.md` and add your name anywhere in the file. This file contains GFM (GitHub Flavored Markdown) which is a proprietary flavor of the markdown syntax.
69 |
70 | Copy one of the other contributors' lines and modify it with your name to make sure you get the syntax right - it can be picky.
71 |
72 | ## Commit & Push changes to GitHub
73 |
74 | Select the files you want to commit or an entire changelist in the Local Changes tab of the Version Control tool window Alt+9 and press Ctrl+K or click Commit Commit button on the toolbar.
75 |
76 | The Commit Changes dialog that opens lists all files that have been modified since the last commit, as well as all newly added unversioned files.
77 |
78 | Enter a meaningful commit message.
79 |
80 | You can click Commit Message history Commit Message history Ctrl+M to choose from the list of recent commit messages.
81 |
82 | You can also edit the commit message later before you've pushed the commit.
83 |
84 | Press Ctrl+Shift+K or choose VCS | Git | Push from the main menu. The Push Commits dialog opens showing all Git repositories (for multi-repository projects) and listing all commits made in the current branch in each repository since the last push.
85 |
86 | ## Submit your changes for review
87 |
88 | At this point you have completed your change but it still only resides in your repo. This step will show you how to submit a request to the administrator of the top-level repo to merge your change.
89 |
90 | In your repo on GitHub you'll see the `Compare & pull request` button next to the new branch notification. Click on that button.
91 |
92 |
93 |
94 | Now submit the pull request.
95 |
96 |
97 |
98 | Soon I'll be merging all your changes into the master branch of this project. You will get a notification email once the changes have been merged.
99 |
100 | ## Where to go from here?
101 |
102 | Congrats! You have just completed the standard _fork -> clone -> edit -> PR_ workflow that you'll encounter often as a contributor!
103 |
104 | Celebrate your contribution and share it with your friends and followers by going to [web app](https://firstcontributions.github.io#social-share).
105 |
106 | You can join our slack team in case you need any help or have any questions. [Join slack team](https://join.slack.com/t/firstcontributors/shared_invite/enQtMzE1MTYwNzI3ODQ0LTZiMDA2OGI2NTYyNjM1MTFiNTc4YTRhZTg4OWZjMzA0ZWZmY2UxYzVkMzI1ZmVmOWI4ODdkZWQwNTM2NDVmNjY).
107 |
108 |
109 | ### [Additional material](../additional-material/git_workflow_scenarios/additional-material.md)
110 |
111 | ## Tutorials Using Other Tools
112 | [Back to main page](https://github.com/firstcontributions/first-contributions#tutorials-using-other-tools)
113 |
--------------------------------------------------------------------------------
/gui-tool-tutorials/sourcetree-macos-tutorial.md:
--------------------------------------------------------------------------------
1 | [](https://github.com/ellerbrock/open-source-badges/)
2 | [
| IntelliJ IDEA |
9 | | ------------------------------------------------------------------------------------------------------------------------------------ | ------------------ |
10 |
11 |
12 | It's hard. It's always hard the first time you do something. Especially when you are collaborating, making mistakes isn't a comfortable thing. But open source is all about collaboration & working together. We wanted to simplify the way new open-source contributors learn & contribute for the first time.
13 |
14 | Reading articles & watching tutorials can help, but what comes better than actually doing the stuff without messing up anything. This project aims at providing guidance & simplifying the way rookies make their first contribution. Remember the more relaxed you are, the better you learn. If you are looking for making your first contribution, just follow the simple steps below. We promise you, it will be fun.
15 |
16 | If you don't have IntelliJ IDEA on your machine, [install it](https://www.jetbrains.com/idea/download/#section=windows).
17 |
18 | **Notice:** This tutorial was made using IntelliJ IDEA (Version 2019.3.2) on a Windows 10 machine. Later in this tutorial we will make use of some keyboard shortcuts. These may differ on other operating systems (macOS/Linux).
19 |
20 | ## Fork this repository
21 |
22 |
23 |
24 | Fork this repo by clicking on the fork button on the top right of this page. This will create a copy of this repository in your GitHub account.
25 |
26 | GitHub keeps track of the relationship between your repo and the one you have forked it from. You can think of your repo as a working copy.
27 |
28 | Most top-level GitHub Repos (i.e. ones not forked from any other repo) have a small core team of people who can directly commit changes. All other contributors must fork the repo and make changes in the fork, then create a Pull Request to request to merge back their changes into the top-level repo. If the top-level repo administrator approves the changes they will be merged, and you will gain instant fame and fortune! More on how to do that later.
29 |
30 | ## Clone your repository
31 |
32 |
33 |
34 | The next step is to clone your repo down to your machine so you can begin making changes. IntelliJ IDEA needs the URL of your repo, so click the "clone" button and then click the "copy to clipboard" icon.
35 |
36 | **CAREFUL:** One mistake that new contributors often make is to clone the repo you forked _from_ rather than cloning your repo. Check your browser's address bar and make sure you are cloning your repo.
37 |
38 | Now open up IntelliJ IDEA.
39 |
40 | IntelliJ IDEA allows you to check out (in Git terms clone) an existing repository and create a new project based on the data you've downloaded.
41 |
42 | From the main menu, choose VCS | Get from Version Control, or, if no project is currently opened, click Get from Version Control on the Welcome screen.
43 |
44 | In the Get from Version Control dialog, specify the URL of the remote repository you want to clone (you can click Test to make sure that connection to the remote can be established) or select one of the VCS hosting services on the left. If you are already logged in to the selected hosting service, completion will suggest the list of available repositories that you can clone.
45 |
46 | Click Clone. If you want to create an IntelliJ IDEA project based on the sources you have cloned, click Yes in the confirmation dialog. Git root mapping will be automatically set to the project root directory.
47 |
48 | If your project contains submodules, they will also be cloned and automatically registered as project roots.
49 |
50 | **Important**: Make sure it is the forked repository and not the original one, otherwise it won't work.
51 |
52 | ## Create a branch
53 |
54 | In Git, branching is a powerful mechanism that allows you to diverge from the main development line, for example, when you need to work on a feature or freeze a certain state of a codebase for a release, and so on.
55 |
56 | In IntelliJ IDEA, all operations with branches are performed in the Git Branches popup. To invoke it, click the Git widget in the Status bar or press Ctrl+Shift+`.
57 |
58 | The name of the branch that is currently checked out is displayed in the Git widget in the Status bar.
59 |
60 | In the Branches popup, choose New Branch.
61 |
62 | In the dialog that opens, specify the branch name, and make sure the Checkout branch option is selected if you want to switch to that branch.
63 |
64 | The new branch will start from the current HEAD. If you want to start a branch from a previous commit instead of the current branch HEAD, select this commit in the Log tab of the Version Control tool window Alt+9 and choose New Branch from the context menu.
65 |
66 | ## Make necessary changes
67 |
68 | Open `Contributors.md` and add your name anywhere in the file. This file contains GFM (GitHub Flavored Markdown) which is a proprietary flavor of the markdown syntax.
69 |
70 | Copy one of the other contributors' lines and modify it with your name to make sure you get the syntax right - it can be picky.
71 |
72 | ## Commit & Push changes to GitHub
73 |
74 | Select the files you want to commit or an entire changelist in the Local Changes tab of the Version Control tool window Alt+9 and press Ctrl+K or click Commit Commit button on the toolbar.
75 |
76 | The Commit Changes dialog that opens lists all files that have been modified since the last commit, as well as all newly added unversioned files.
77 |
78 | Enter a meaningful commit message.
79 |
80 | You can click Commit Message history Commit Message history Ctrl+M to choose from the list of recent commit messages.
81 |
82 | You can also edit the commit message later before you've pushed the commit.
83 |
84 | Press Ctrl+Shift+K or choose VCS | Git | Push from the main menu. The Push Commits dialog opens showing all Git repositories (for multi-repository projects) and listing all commits made in the current branch in each repository since the last push.
85 |
86 | ## Submit your changes for review
87 |
88 | At this point you have completed your change but it still only resides in your repo. This step will show you how to submit a request to the administrator of the top-level repo to merge your change.
89 |
90 | In your repo on GitHub you'll see the `Compare & pull request` button next to the new branch notification. Click on that button.
91 |
92 |
93 |
94 | Now submit the pull request.
95 |
96 |
97 |
98 | Soon I'll be merging all your changes into the master branch of this project. You will get a notification email once the changes have been merged.
99 |
100 | ## Where to go from here?
101 |
102 | Congrats! You have just completed the standard _fork -> clone -> edit -> PR_ workflow that you'll encounter often as a contributor!
103 |
104 | Celebrate your contribution and share it with your friends and followers by going to [web app](https://firstcontributions.github.io#social-share).
105 |
106 | You can join our slack team in case you need any help or have any questions. [Join slack team](https://join.slack.com/t/firstcontributors/shared_invite/enQtMzE1MTYwNzI3ODQ0LTZiMDA2OGI2NTYyNjM1MTFiNTc4YTRhZTg4OWZjMzA0ZWZmY2UxYzVkMzI1ZmVmOWI4ODdkZWQwNTM2NDVmNjY).
107 |
108 |
109 | ### [Additional material](../additional-material/git_workflow_scenarios/additional-material.md)
110 |
111 | ## Tutorials Using Other Tools
112 | [Back to main page](https://github.com/firstcontributions/first-contributions#tutorials-using-other-tools)
113 |
--------------------------------------------------------------------------------
/gui-tool-tutorials/sourcetree-macos-tutorial.md:
--------------------------------------------------------------------------------
1 | [](https://github.com/ellerbrock/open-source-badges/)
2 | [ ](https://join.slack.com/t/firstcontributors/shared_invite/enQtMzE1MTYwNzI3ODQ0LTZiMDA2OGI2NTYyNjM1MTFiNTc4YTRhZTg4OWZjMzA0ZWZmY2UxYzVkMzI1ZmVmOWI4ODdkZWQwNTM2NDVmNjY)
3 | [](https://opensource.org/licenses/MIT)
4 | [](https://www.codetriage.com/roshanjossey/first-contributions)
5 |
6 |
7 | # First Contributions
8 |
9 | |
](https://join.slack.com/t/firstcontributors/shared_invite/enQtMzE1MTYwNzI3ODQ0LTZiMDA2OGI2NTYyNjM1MTFiNTc4YTRhZTg4OWZjMzA0ZWZmY2UxYzVkMzI1ZmVmOWI4ODdkZWQwNTM2NDVmNjY)
3 | [](https://opensource.org/licenses/MIT)
4 | [](https://www.codetriage.com/roshanjossey/first-contributions)
5 |
6 |
7 | # First Contributions
8 |
9 | | |Atlassian Sourcetree|
10 | |---|---|
11 |
12 | It's hard. It's always hard, when you do something for the first time. Especially when you are collaborating, making mistakes isn't a comfortable thing. But open source is all about collaboration & working together. We wanted to simplify the way new open-source contributors learn & contribute for the first time.
13 |
14 | Reading articles & watching tutorials can help, but what comes better than actually doing the stuff without messing up anything. This project aims at providing guidance & simplifying the way rookies make their first contribution. Remember the more relaxed you are, the better you learn. If you are looking for making your first contribution just follow the simple steps below. We promise you, it will be fun.
15 |
16 |
17 | ## Sourcetree
18 |
19 | Please note, this tutorial is for MacOS. It is similar with Sourcetree on Windows but some things may look different.
20 |
27 |
28 | Download [Sourcetree](https://www.sourcetreeapp.com), Install and open it.
29 |
30 | You should see the "Sourcetree" modal dialog.
31 |
32 |
|Atlassian Sourcetree|
10 | |---|---|
11 |
12 | It's hard. It's always hard, when you do something for the first time. Especially when you are collaborating, making mistakes isn't a comfortable thing. But open source is all about collaboration & working together. We wanted to simplify the way new open-source contributors learn & contribute for the first time.
13 |
14 | Reading articles & watching tutorials can help, but what comes better than actually doing the stuff without messing up anything. This project aims at providing guidance & simplifying the way rookies make their first contribution. Remember the more relaxed you are, the better you learn. If you are looking for making your first contribution just follow the simple steps below. We promise you, it will be fun.
15 |
16 |
17 | ## Sourcetree
18 |
19 | Please note, this tutorial is for MacOS. It is similar with Sourcetree on Windows but some things may look different.
20 |
27 |
28 | Download [Sourcetree](https://www.sourcetreeapp.com), Install and open it.
29 |
30 | You should see the "Sourcetree" modal dialog.
31 |
32 |  33 |
34 | From here, you want to click on Remote. If this is the first installation, then you likely haven't connected your GitHub account yet. Do so by clicking the "Connect Button".
35 |
36 |
33 |
34 | From here, you want to click on Remote. If this is the first installation, then you likely haven't connected your GitHub account yet. Do so by clicking the "Connect Button".
35 |
36 | 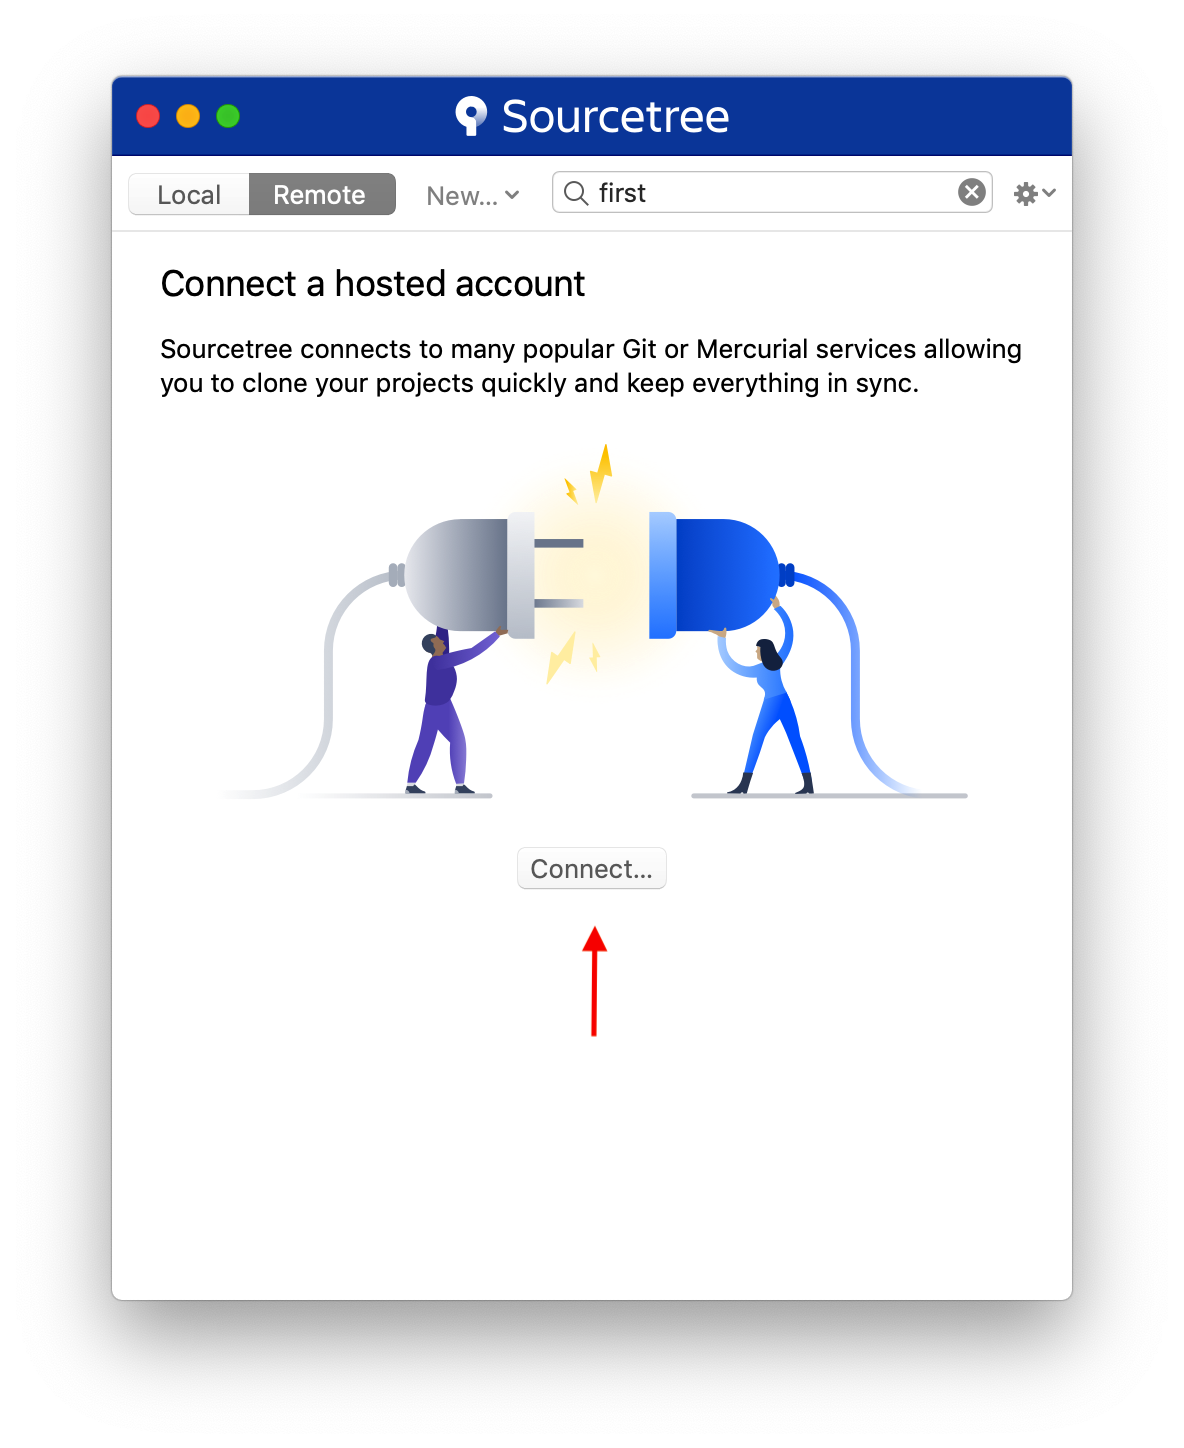 37 |
38 | The *Accounts* dialog will appear. Click "Add" in the lower left hand corner. Then select the appropriate settings to add GitHub (or any other account you want) to the client. After you selected your settings for GitHub, click "Connect Account."
39 |
40 |
37 |
38 | The *Accounts* dialog will appear. Click "Add" in the lower left hand corner. Then select the appropriate settings to add GitHub (or any other account you want) to the client. After you selected your settings for GitHub, click "Connect Account."
39 |
40 | 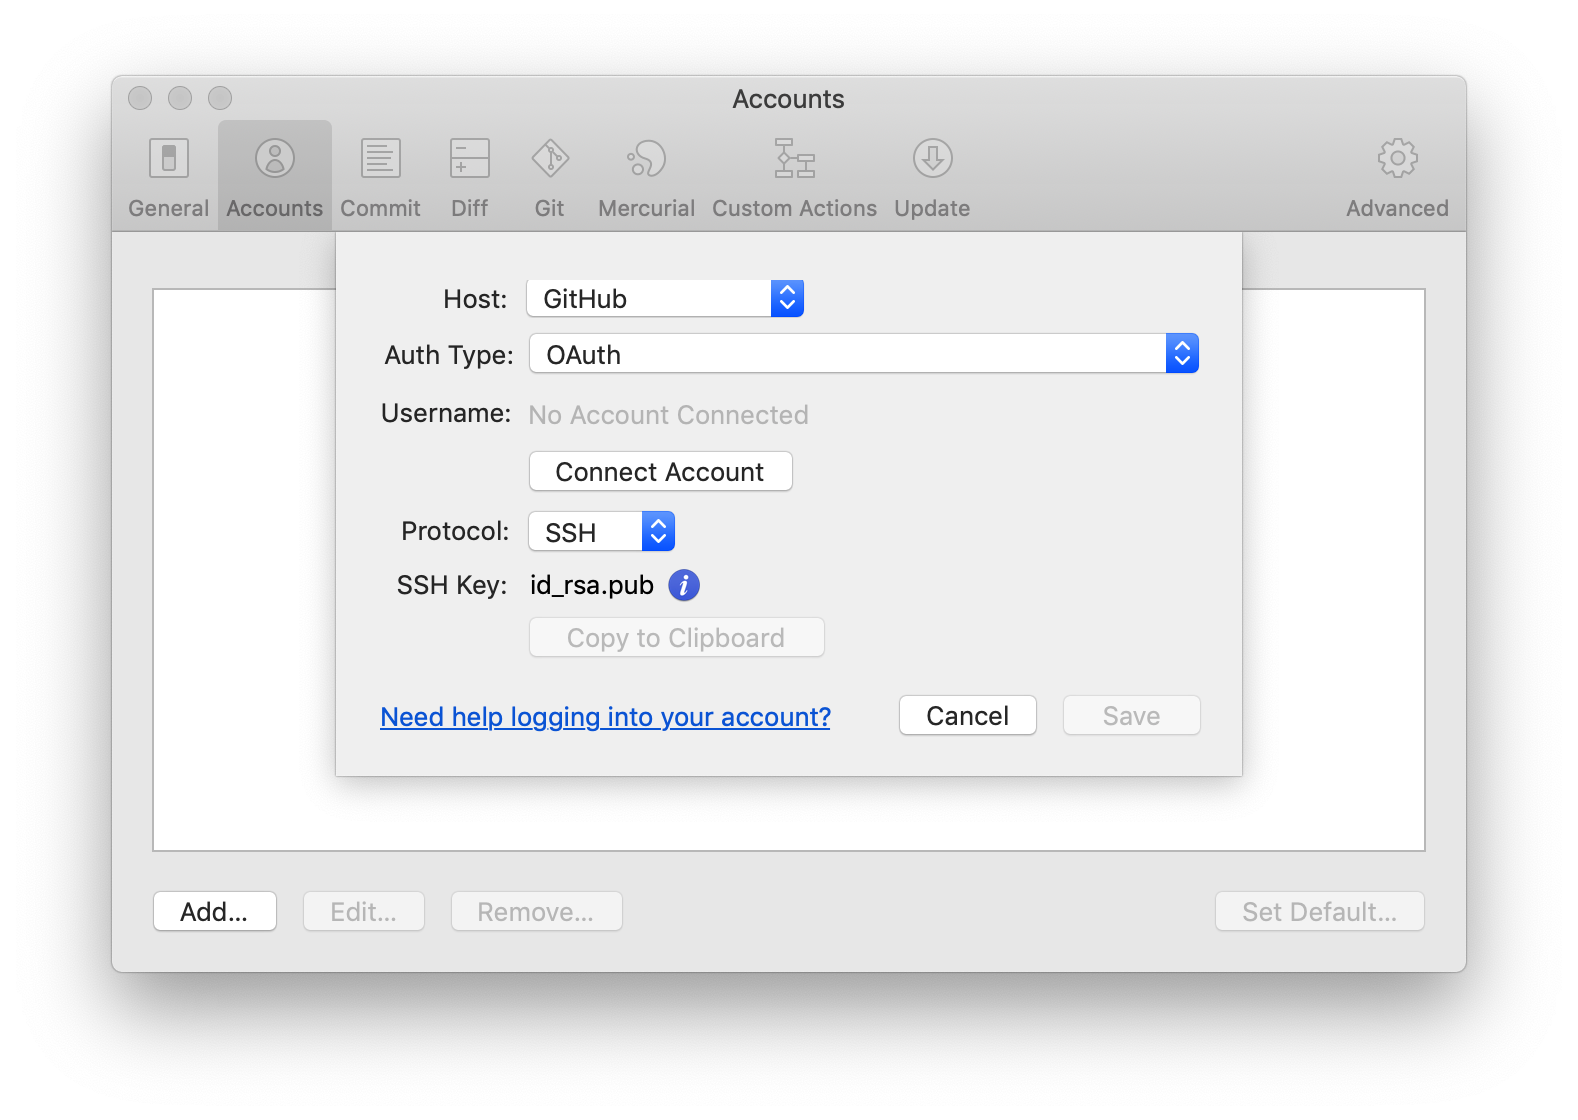 41 |
42 | This will open a page in your web browswer. Follow the steps given to authorize your account.
43 |
44 | ## Fork this repository
45 |
46 | Fork this repo by clicking on the fork button on the top of this page.
47 |
41 |
42 | This will open a page in your web browswer. Follow the steps given to authorize your account.
43 |
44 | ## Fork this repository
45 |
46 | Fork this repo by clicking on the fork button on the top of this page.
47 |  48 | This will create of copy of this repository in your account.
49 |
50 |
51 | ## Clone the repository
52 |
53 | In Sourcetree, Click on the "Remote" button. This should load all of your GitHub repos which are listed on GitHub.
54 |
55 |
48 | This will create of copy of this repository in your account.
49 |
50 |
51 | ## Clone the repository
52 |
53 | In Sourcetree, Click on the "Remote" button. This should load all of your GitHub repos which are listed on GitHub.
54 |
55 | 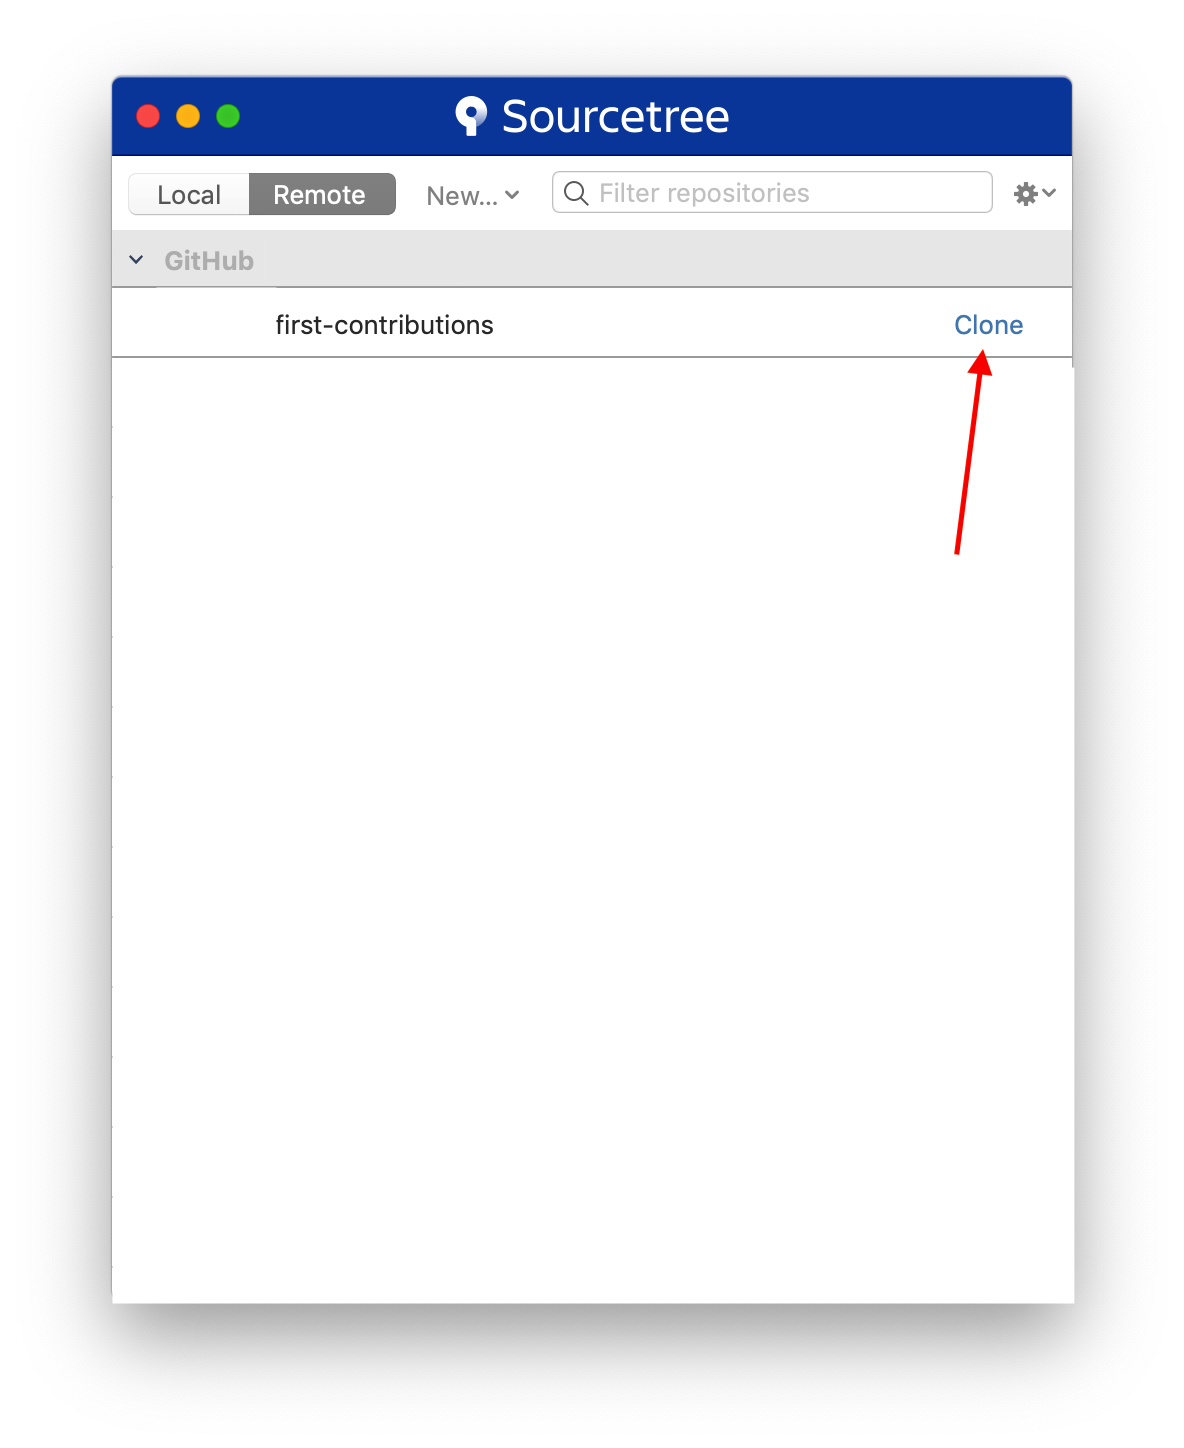 56 |
57 | Once you click the "Clone" button, you will be presented with another view to define several different things.
58 |
59 |
56 |
57 | Once you click the "Clone" button, you will be presented with another view to define several different things.
58 |
59 | 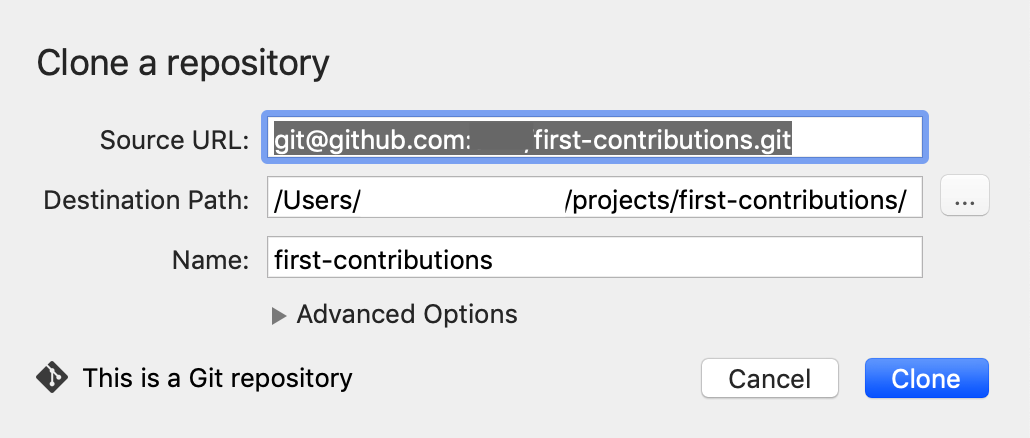 60 |
61 | 1) **Source URL:** This is automatically filled and you dont need to change it. It is the URL from where your GitHub project resides.
62 |
63 | 2) **Destination Path:** This is the physical location on your computer where this project will be saved
64 |
65 | 3) **Name:** This is a "Bookmark" to how Sourcetree will reference your project. Think of it like a shortcut.
66 |
67 | *Note: Normally the defaults in these fields are fine.*
68 |
69 | **Once you are satisfied, click "Clone"**
70 |
71 | This will bring up the main repo browser for your repository!
72 |
73 | ## Create a branch
74 |
75 | Click the branch button on the toolbar.
76 |
77 | Name your branch "add-your-name-to-contribution", for example: "add-sally-to-contribution".
78 |
79 | To do this, click **Branch (1)** which launches the naming dialog. Then **Add your name (2)** as just described. Finally click **Create Branch**. This will create the branch for what you just named.
80 |
81 |
60 |
61 | 1) **Source URL:** This is automatically filled and you dont need to change it. It is the URL from where your GitHub project resides.
62 |
63 | 2) **Destination Path:** This is the physical location on your computer where this project will be saved
64 |
65 | 3) **Name:** This is a "Bookmark" to how Sourcetree will reference your project. Think of it like a shortcut.
66 |
67 | *Note: Normally the defaults in these fields are fine.*
68 |
69 | **Once you are satisfied, click "Clone"**
70 |
71 | This will bring up the main repo browser for your repository!
72 |
73 | ## Create a branch
74 |
75 | Click the branch button on the toolbar.
76 |
77 | Name your branch "add-your-name-to-contribution", for example: "add-sally-to-contribution".
78 |
79 | To do this, click **Branch (1)** which launches the naming dialog. Then **Add your name (2)** as just described. Finally click **Create Branch**. This will create the branch for what you just named.
80 |
81 | 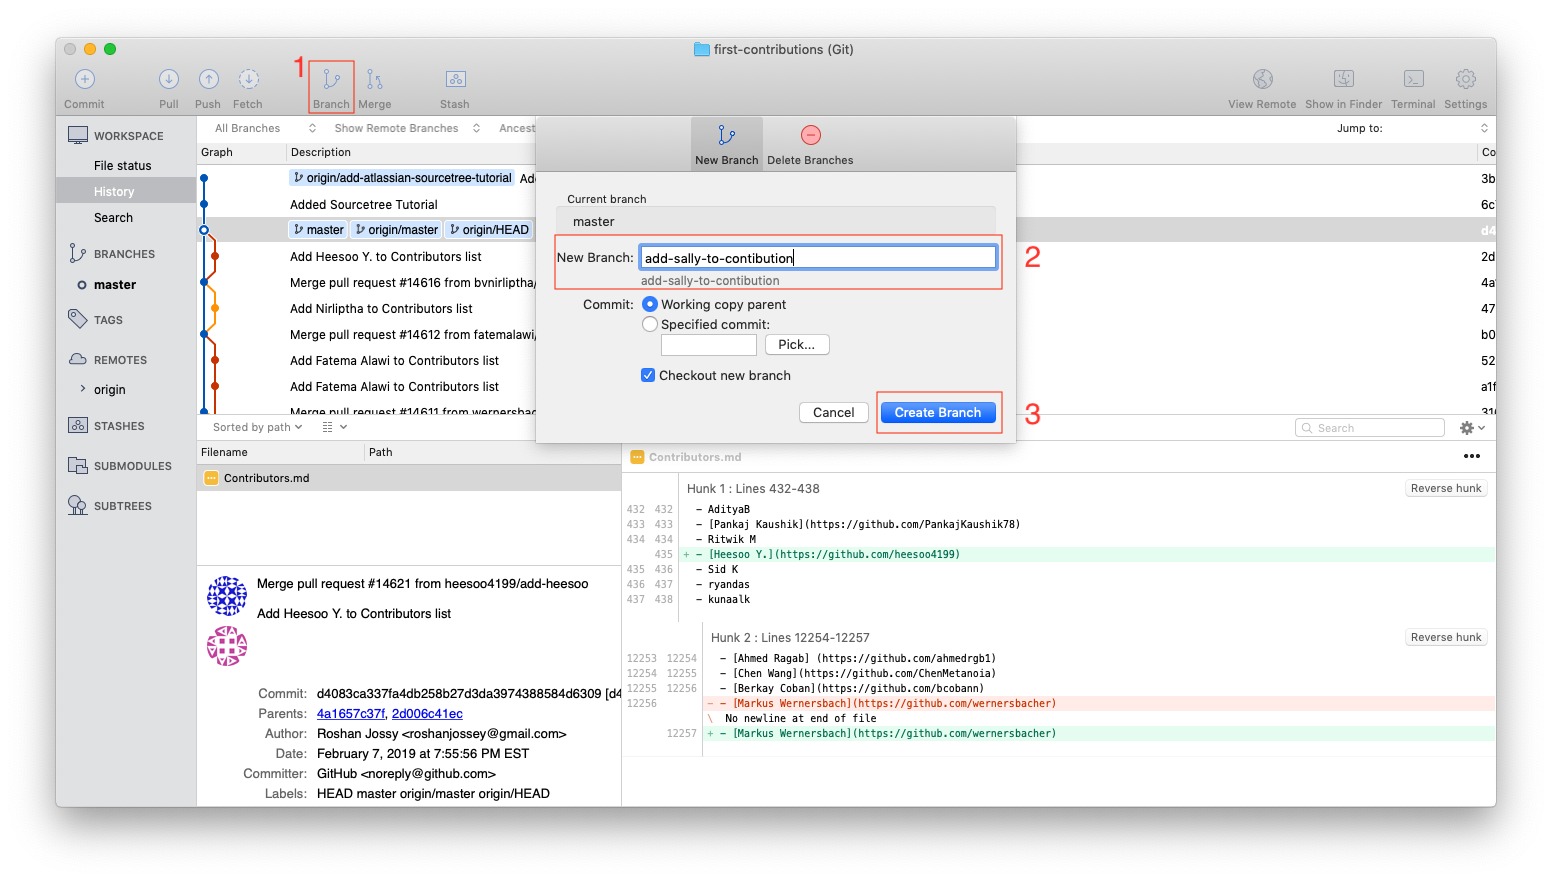 82 |
83 |
84 | ## Make necessary changes and commit those changes
85 |
86 | Now open `Contributors.md` file in a text editor and add your name to it, with your Github URL link, then save the file.
87 |
88 | You should be able to see and review the file that have been changed and decide what you would like to stage. Staging is important to tell git exactly what file changes you want associated with this commit.
89 |
90 | *Note: If you do not see the file's diff, click **Uncommitted Files** at the top of your dialog*
91 |
92 |
82 |
83 |
84 | ## Make necessary changes and commit those changes
85 |
86 | Now open `Contributors.md` file in a text editor and add your name to it, with your Github URL link, then save the file.
87 |
88 | You should be able to see and review the file that have been changed and decide what you would like to stage. Staging is important to tell git exactly what file changes you want associated with this commit.
89 |
90 | *Note: If you do not see the file's diff, click **Uncommitted Files** at the top of your dialog*
91 |
92 | 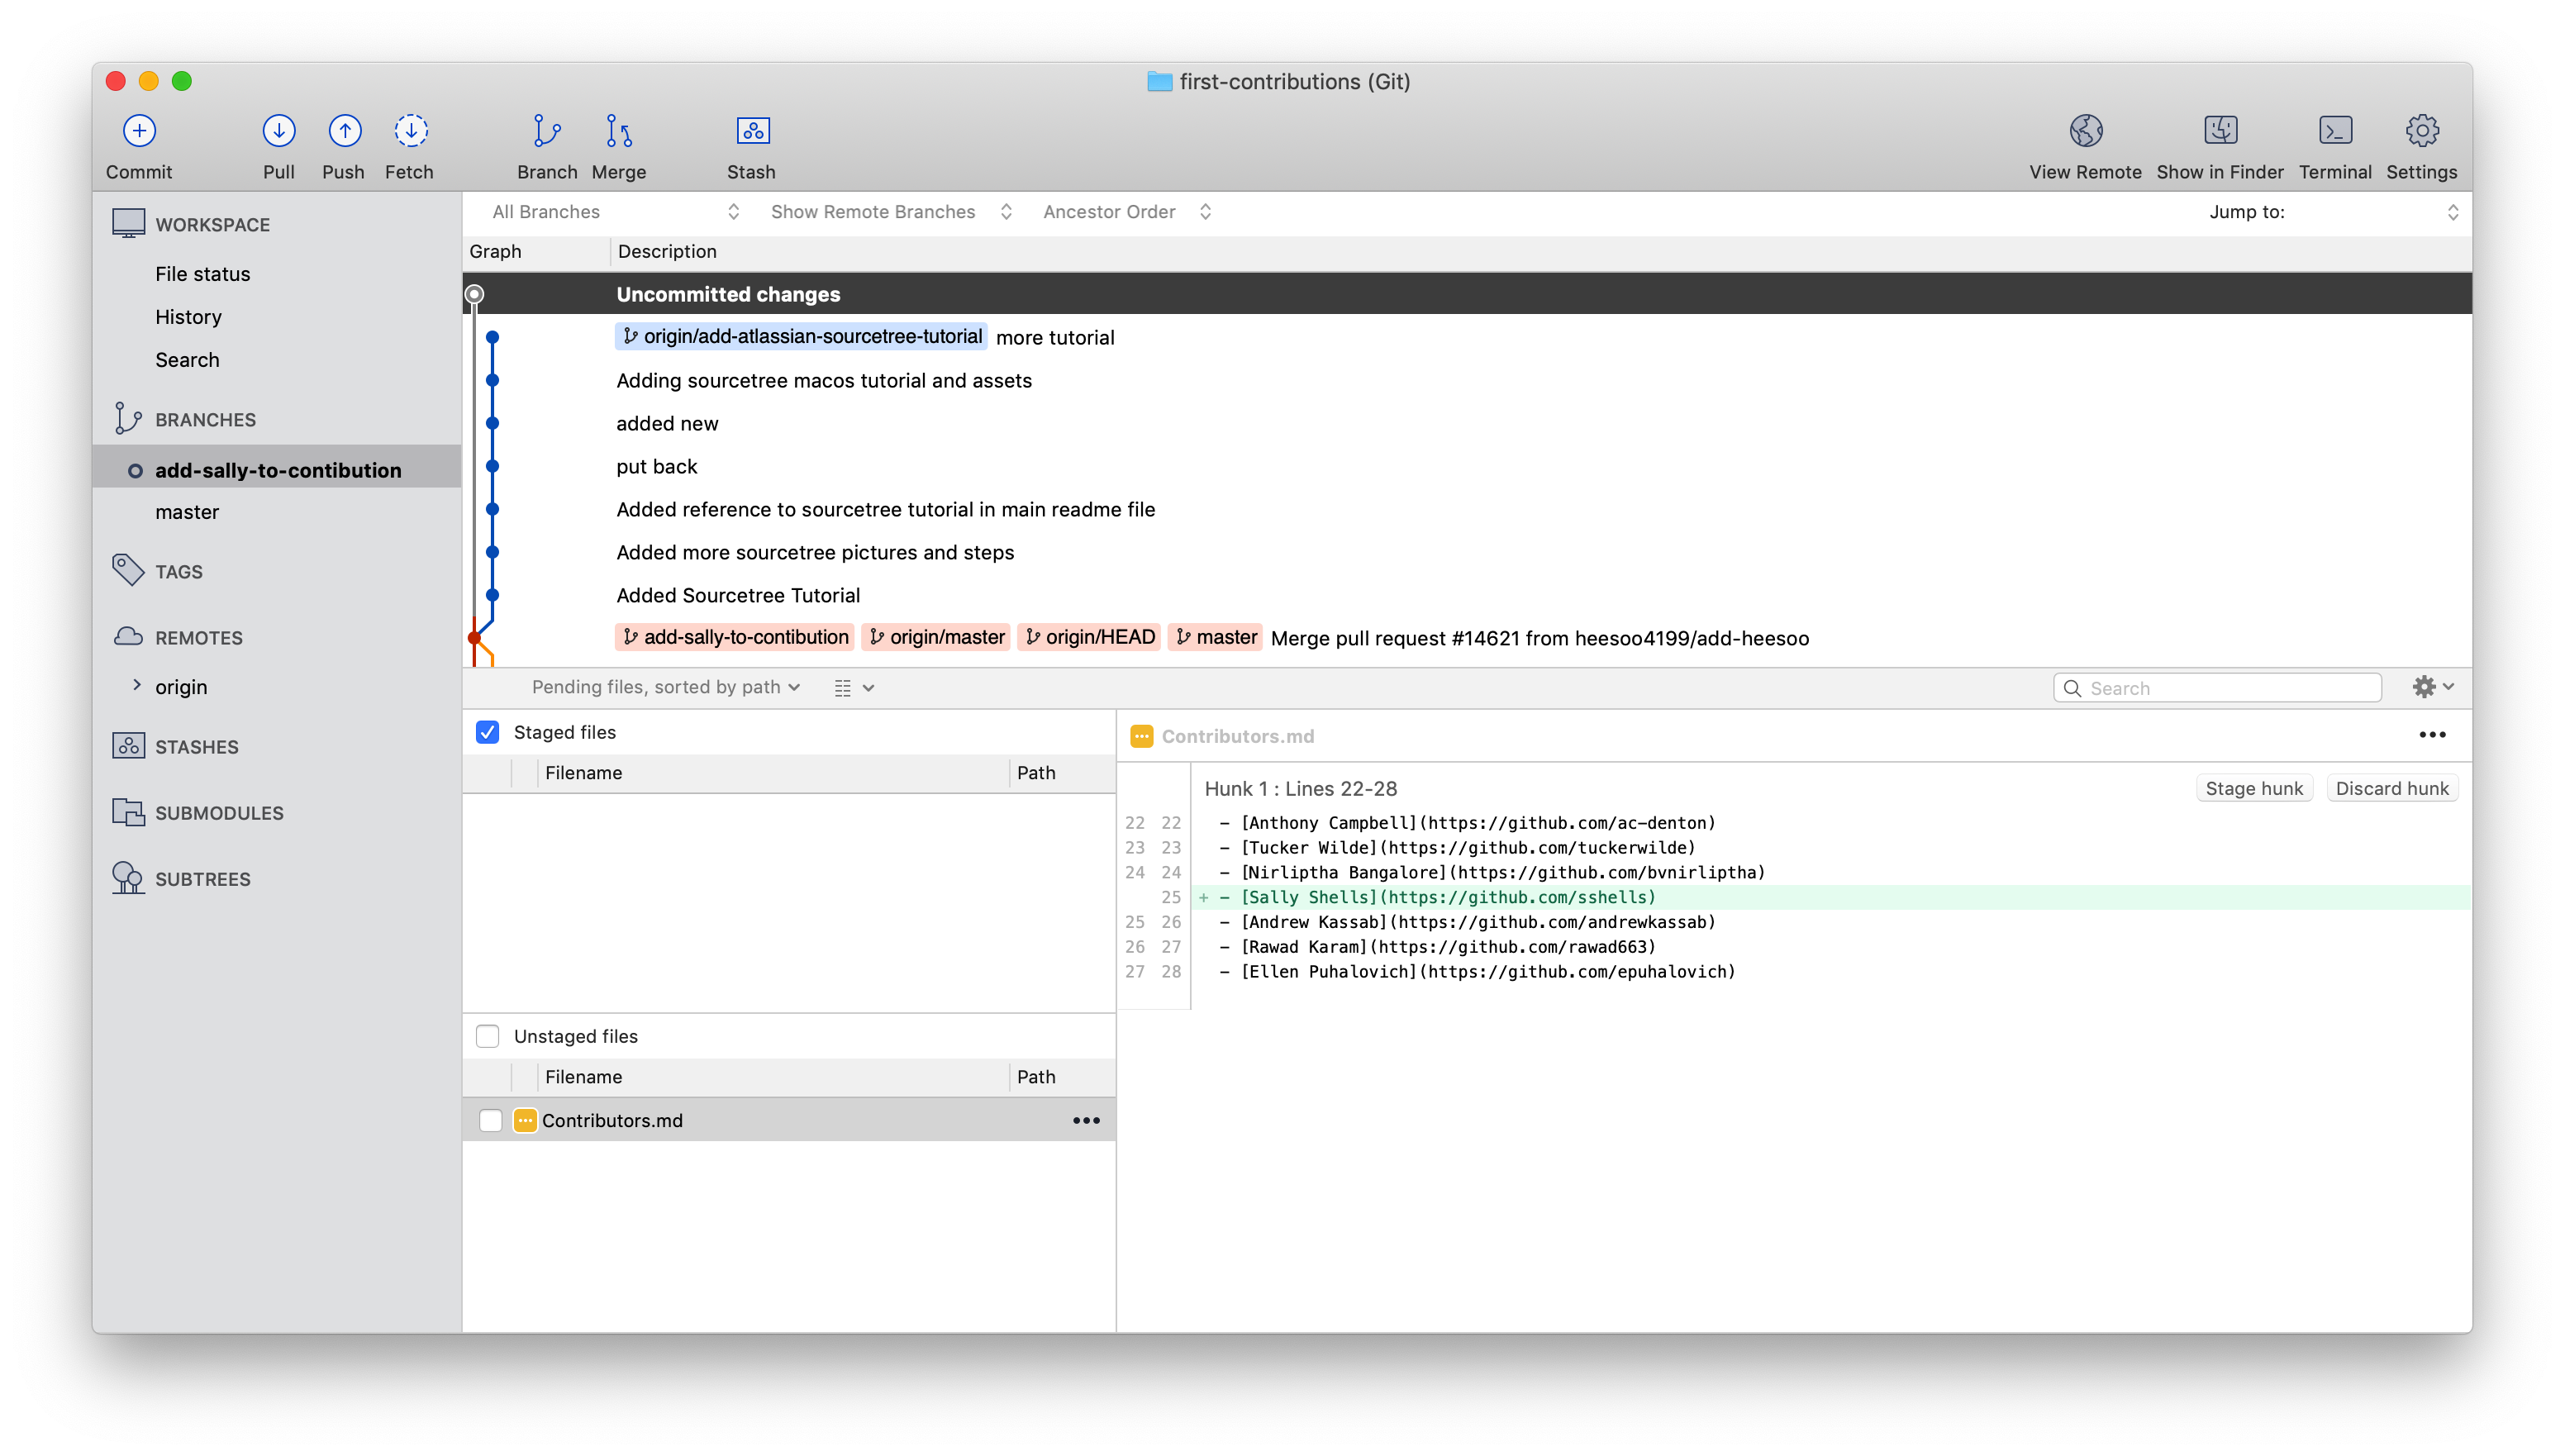 93 |
94 | Next click the **Commit** button on the top left of the dialog. This will show you your staging area.
95 |
96 | Click the *Checkbox* to **add** the file to the stagging area. Then enter a commit message.
97 |
98 | *Note: You can also select files (both in the stagging and unstaged areas) and add/remove files from the respective areas by using the spacebar*
99 |
100 |
93 |
94 | Next click the **Commit** button on the top left of the dialog. This will show you your staging area.
95 |
96 | Click the *Checkbox* to **add** the file to the stagging area. Then enter a commit message.
97 |
98 | *Note: You can also select files (both in the stagging and unstaged areas) and add/remove files from the respective areas by using the spacebar*
99 |
100 | 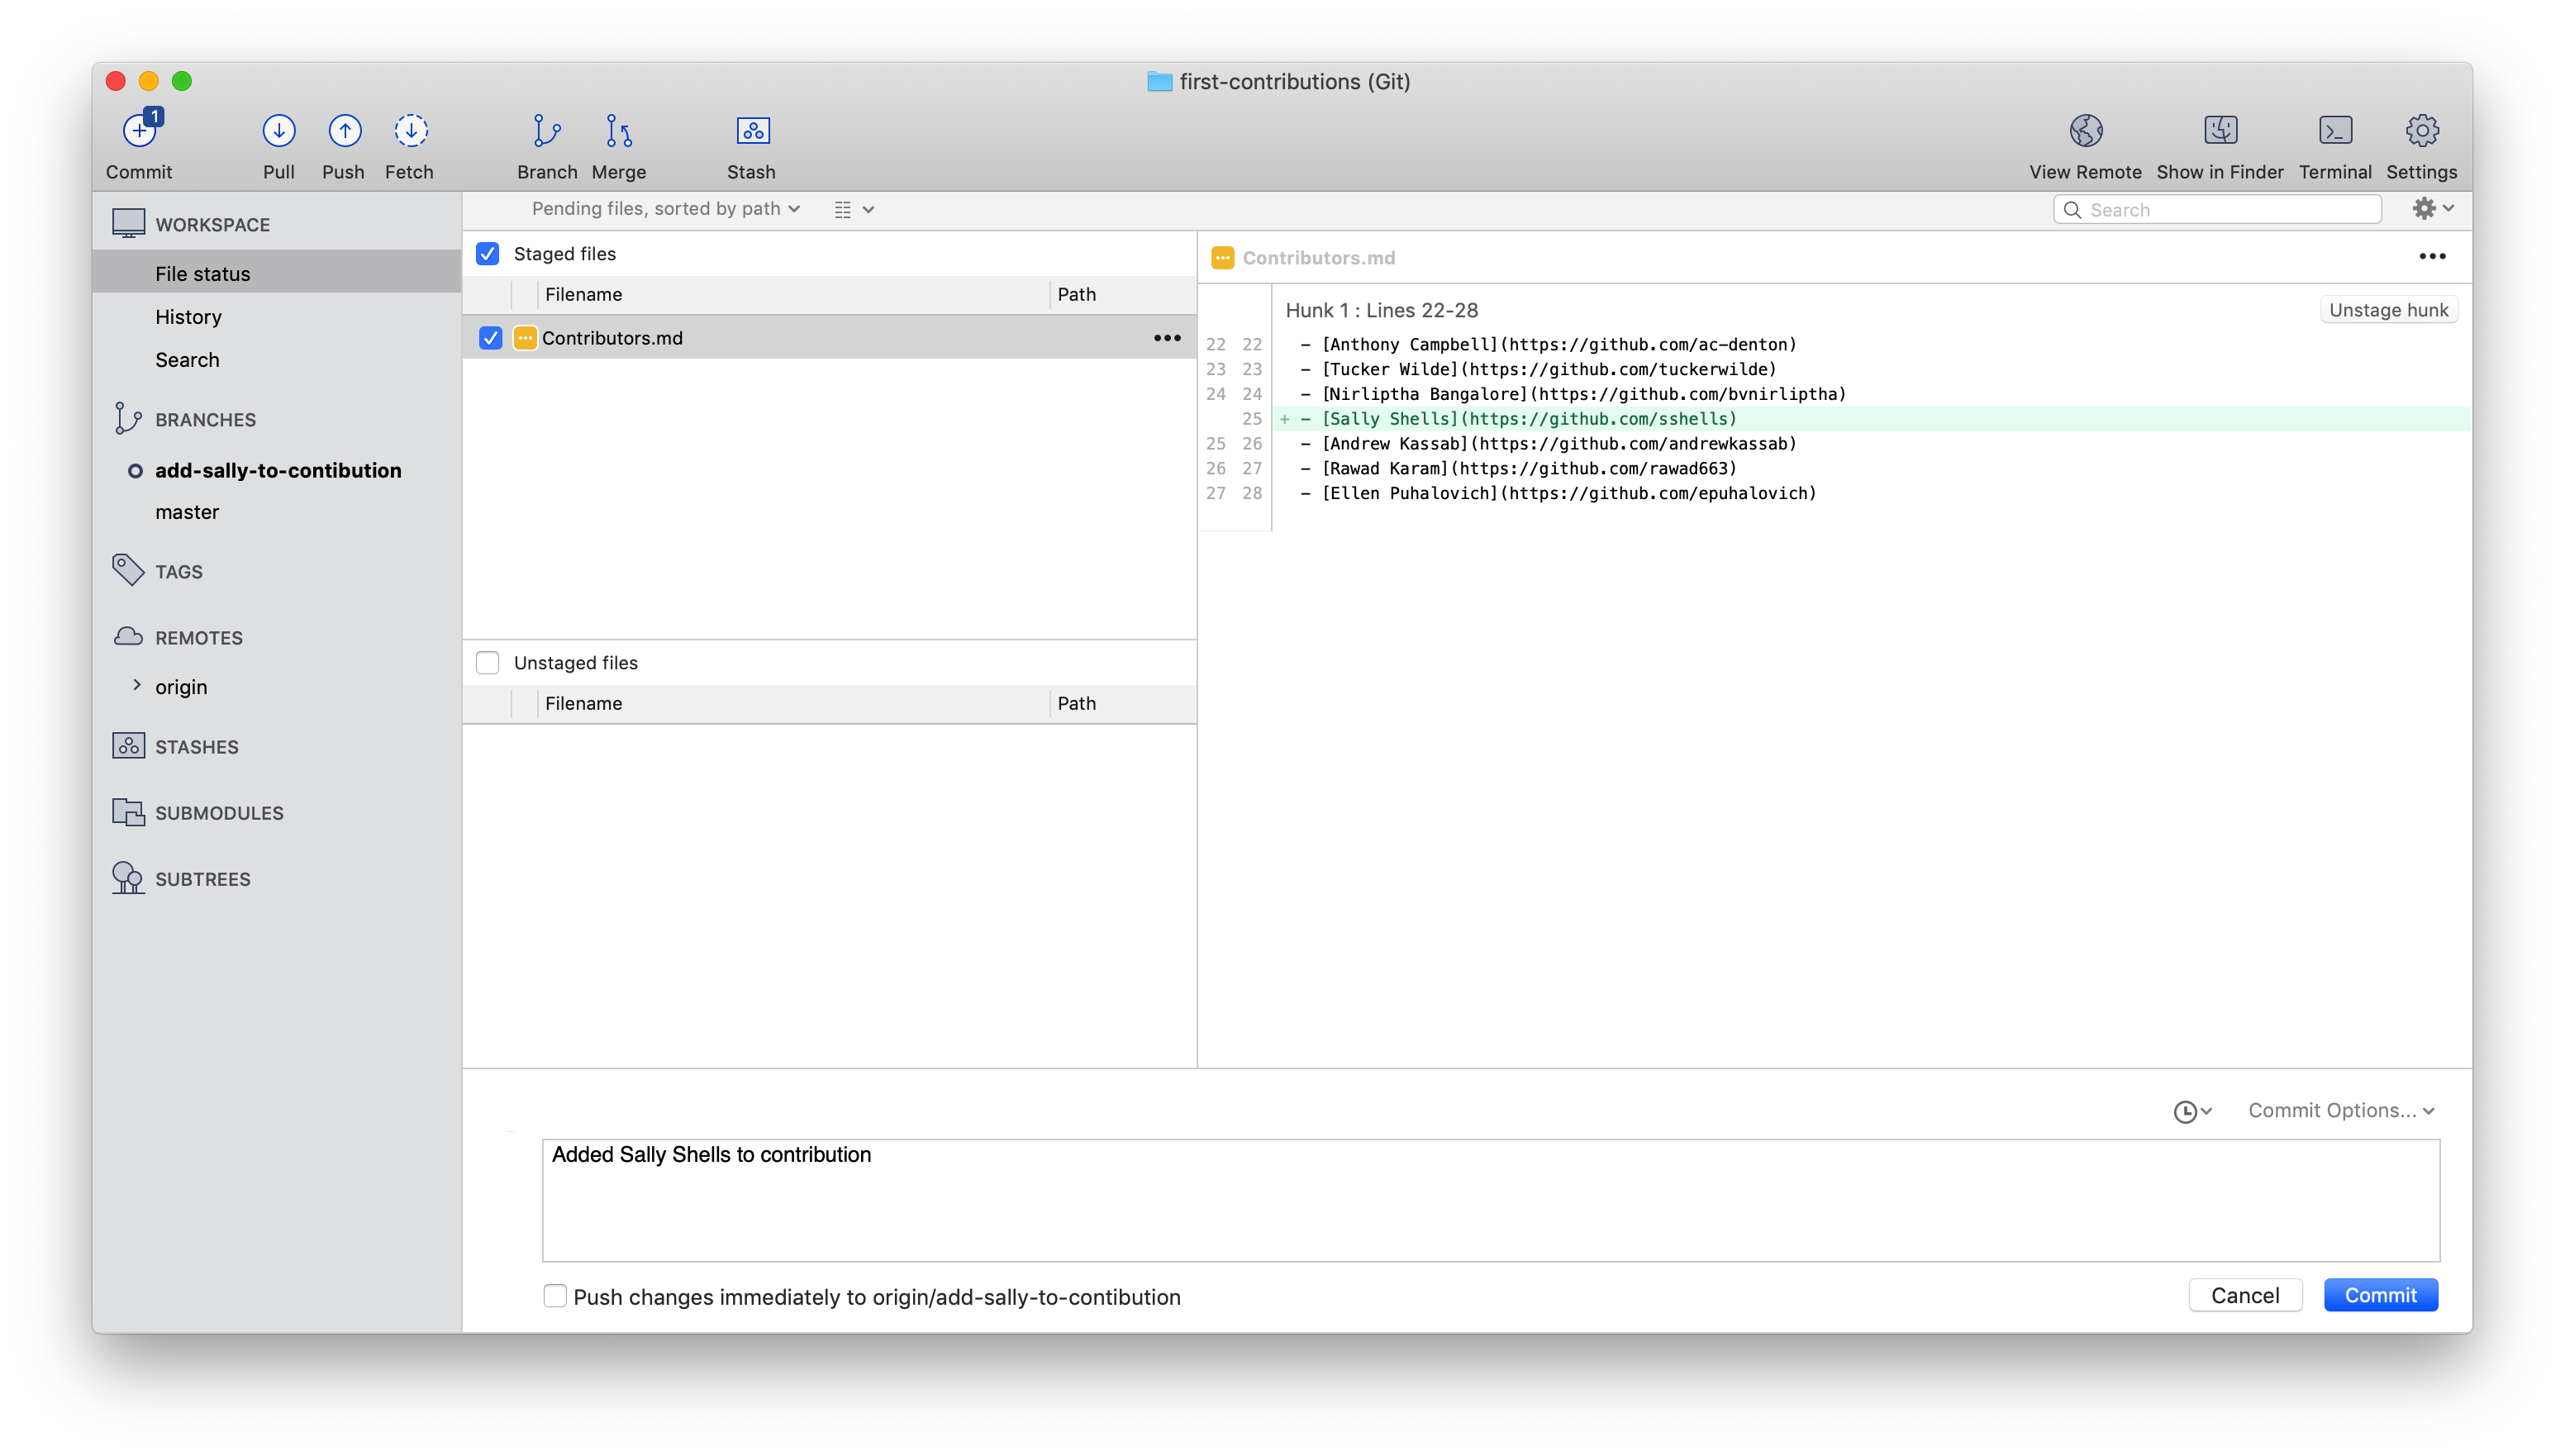 101 |
102 |
103 | Once you have added your changes and added a commit message, you can press the **Commit** button to finally make the commit.
104 |
105 | Congratulations, you've committed all the changes to your local copy of your branch of your fork of first-contributions. Onward!
106 |
107 |
108 | ## Push changes to GitHub
109 |
110 | Now you are ready to push your changes to github. This will be pushing it to your own, forked, copy of the project. Follow the steps to push your branch up. First, click **Push (1)**, this will show the remote/push dialog. **Click (2)** the checkbox of your branch you want to push. Select **OK (3)** and this will push your commit up to Github.
111 |
112 |
101 |
102 |
103 | Once you have added your changes and added a commit message, you can press the **Commit** button to finally make the commit.
104 |
105 | Congratulations, you've committed all the changes to your local copy of your branch of your fork of first-contributions. Onward!
106 |
107 |
108 | ## Push changes to GitHub
109 |
110 | Now you are ready to push your changes to github. This will be pushing it to your own, forked, copy of the project. Follow the steps to push your branch up. First, click **Push (1)**, this will show the remote/push dialog. **Click (2)** the checkbox of your branch you want to push. Select **OK (3)** and this will push your commit up to Github.
111 |
112 | 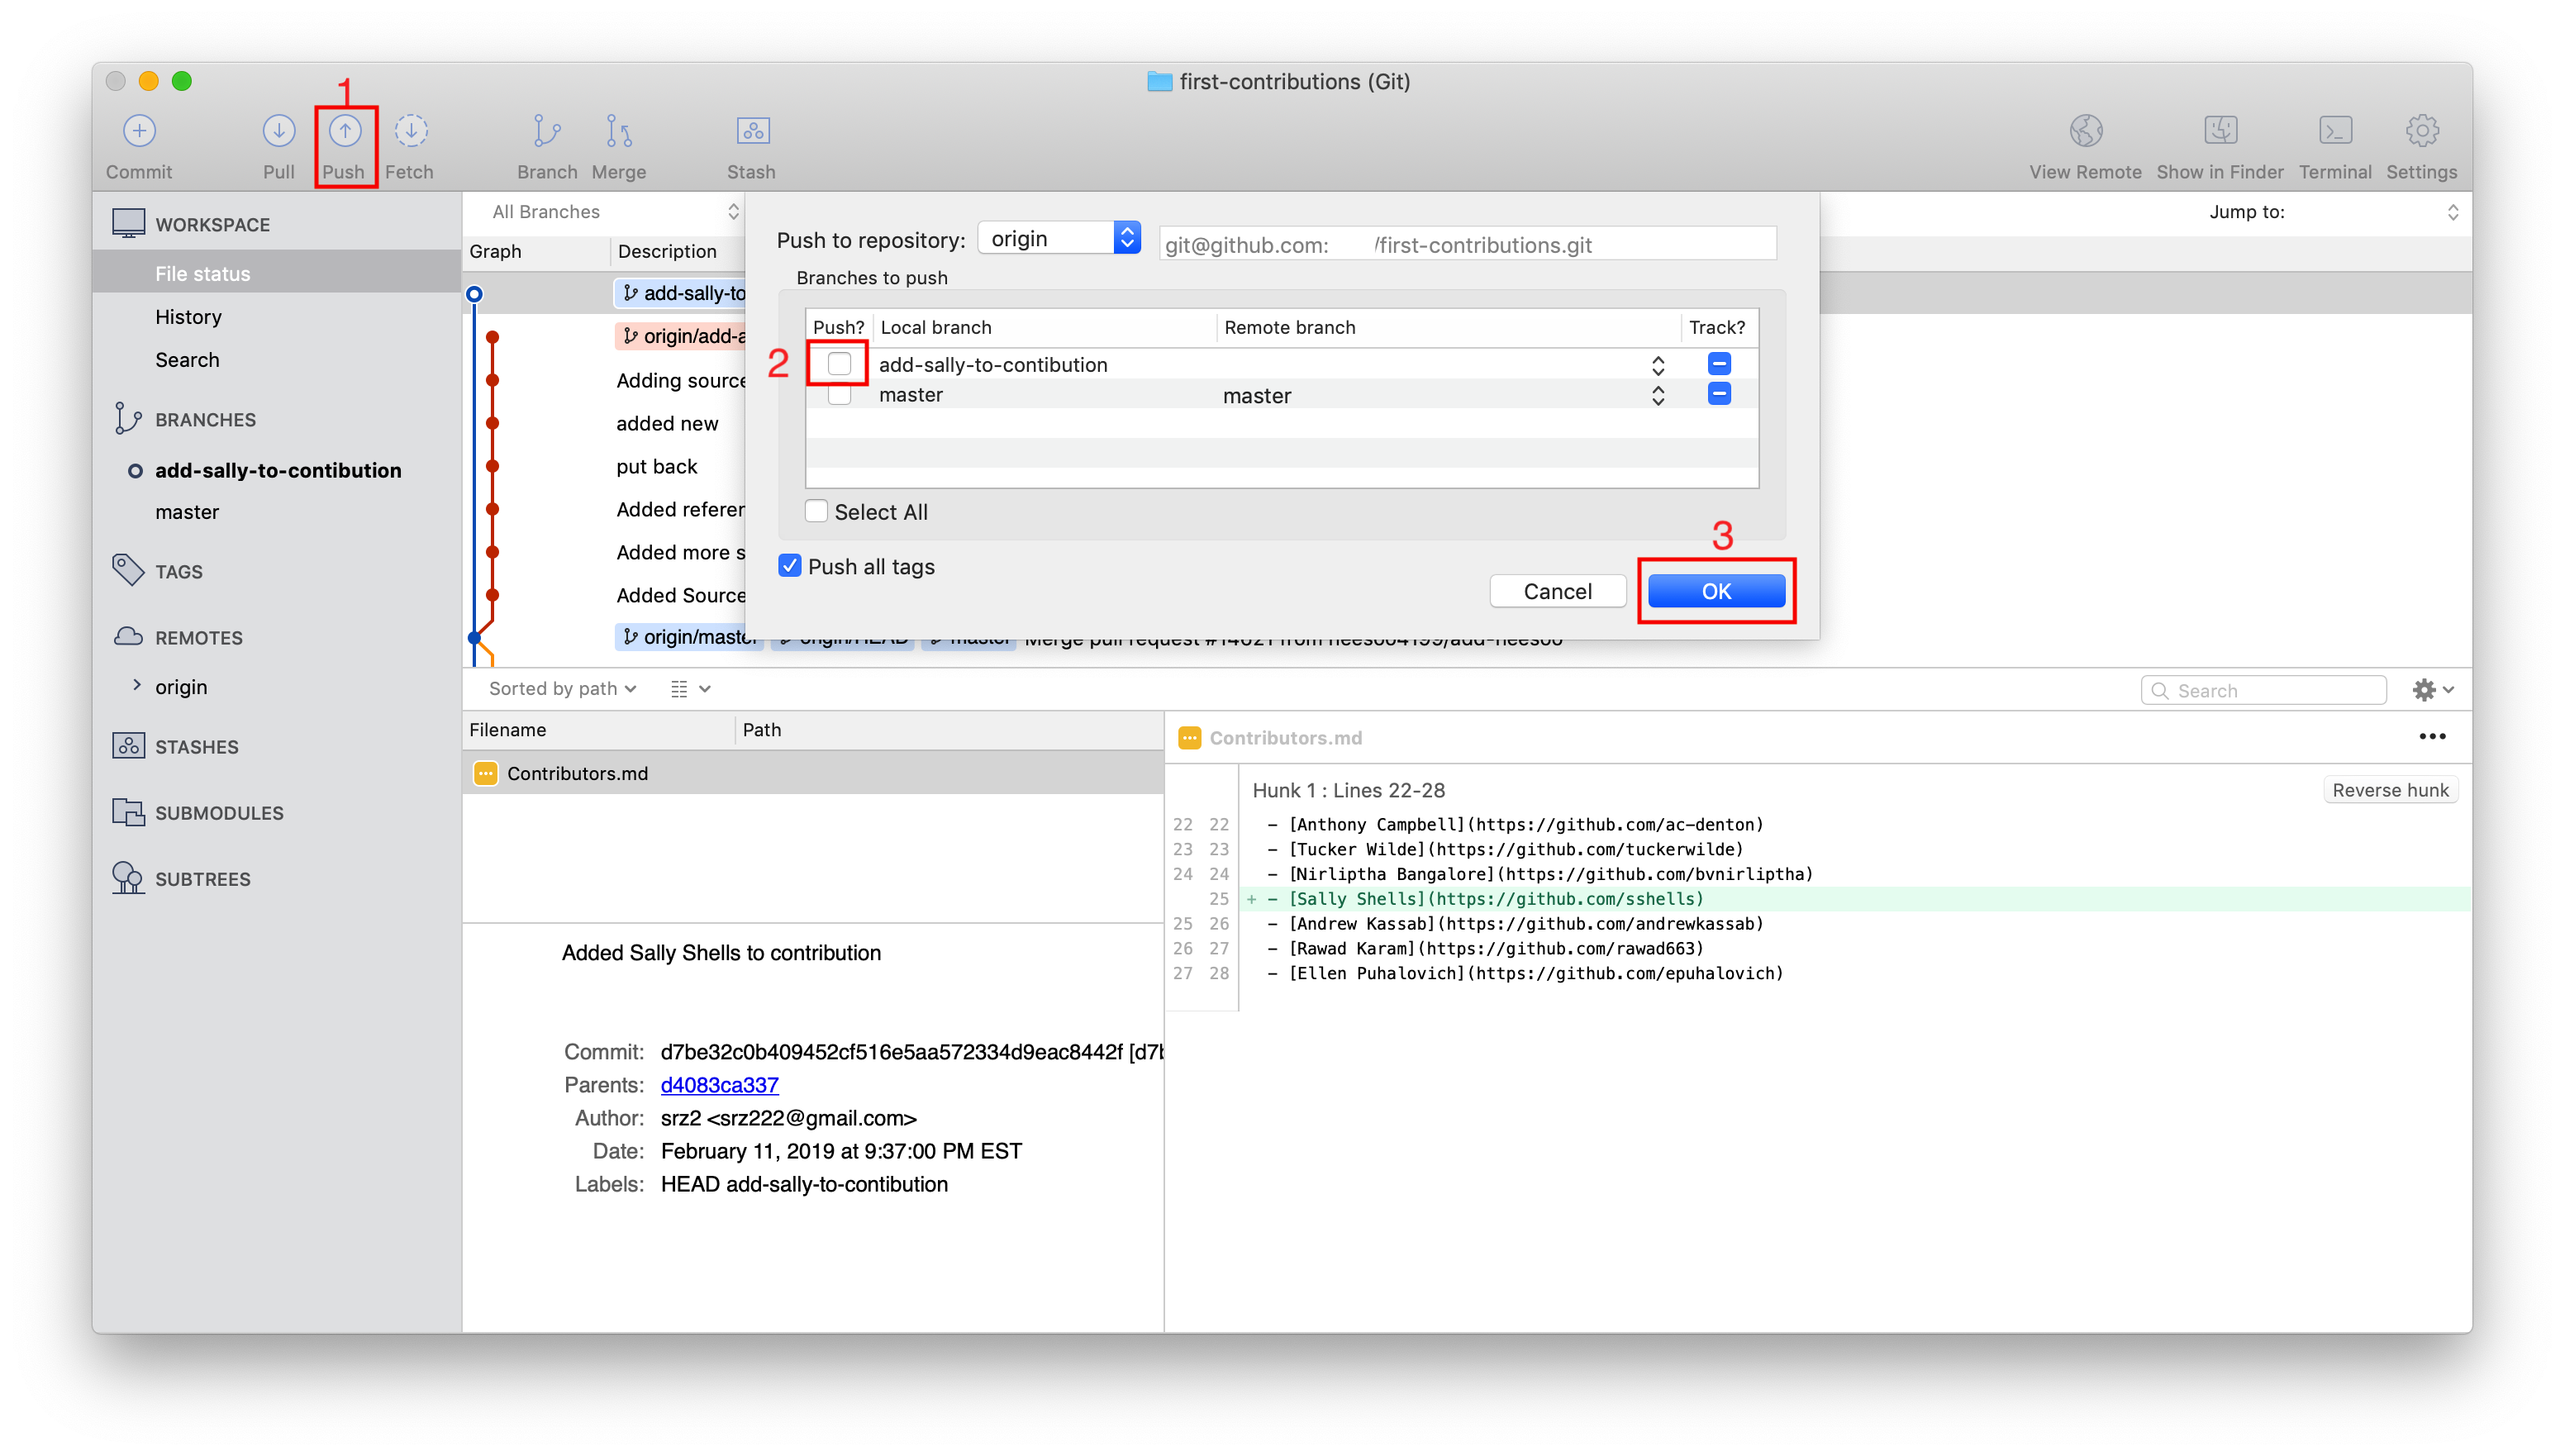 113 |
114 | ## Submit your changes for review
115 |
116 | If you go to your repository on github, you'll see `Compare & pull request` button. Click on that button.
117 |
118 |
113 |
114 | ## Submit your changes for review
115 |
116 | If you go to your repository on github, you'll see `Compare & pull request` button. Click on that button.
117 |
118 |  119 |
120 | Now submit the pull request.
121 |
122 |
119 |
120 | Now submit the pull request.
121 |
122 |  123 |
124 | Soon I'll be merging all your changes into the master branch of this project. You will get a notification email once the changes have been merged.
125 |
126 | ## Where to go from here?
127 |
128 | Congrats! You have just completed the standard _fork -> clone -> edit -> PR_ workflow that you'll encounter often as a contributor!
129 |
130 | Celebrate your contribution and share it with your friends and followers by going to [web app](https://firstcontributions.github.io/#social-share).
131 |
132 | You could join our slack team in case you need any help or have any questions. [Join slack team](https://join.slack.com/t/firstcontributors/shared_invite/enQtMzE1MTYwNzI3ODQ0LTZiMDA2OGI2NTYyNjM1MTFiNTc4YTRhZTg4OWZjMzA0ZWZmY2UxYzVkMzI1ZmVmOWI4ODdkZWQwNTM2NDVmNjY).
133 |
134 |
135 | ### [Additional material](../additional-material/git_workflow_scenarios/additional-material.md)
136 |
137 |
138 | ## Tutorials Using Other Tools
139 | [Back to main page](https://github.com/firstcontributions/first-contributions#tutorials-using-other-tools)
140 |
--------------------------------------------------------------------------------
/gui-tool-tutorials/github-windows-vs-code-tutorial.md:
--------------------------------------------------------------------------------
1 |
2 |
123 |
124 | Soon I'll be merging all your changes into the master branch of this project. You will get a notification email once the changes have been merged.
125 |
126 | ## Where to go from here?
127 |
128 | Congrats! You have just completed the standard _fork -> clone -> edit -> PR_ workflow that you'll encounter often as a contributor!
129 |
130 | Celebrate your contribution and share it with your friends and followers by going to [web app](https://firstcontributions.github.io/#social-share).
131 |
132 | You could join our slack team in case you need any help or have any questions. [Join slack team](https://join.slack.com/t/firstcontributors/shared_invite/enQtMzE1MTYwNzI3ODQ0LTZiMDA2OGI2NTYyNjM1MTFiNTc4YTRhZTg4OWZjMzA0ZWZmY2UxYzVkMzI1ZmVmOWI4ODdkZWQwNTM2NDVmNjY).
133 |
134 |
135 | ### [Additional material](../additional-material/git_workflow_scenarios/additional-material.md)
136 |
137 |
138 | ## Tutorials Using Other Tools
139 | [Back to main page](https://github.com/firstcontributions/first-contributions#tutorials-using-other-tools)
140 |
--------------------------------------------------------------------------------
/gui-tool-tutorials/github-windows-vs-code-tutorial.md:
--------------------------------------------------------------------------------
1 |
2 |
 Ayan Gupta167 | |
175 | 176 | > Do share and Star ⭐ this repositatory :)) 177 | 178 | -------------------------------------------------------------------------------- /gui-tool-tutorials/github-windows-intellij-tutorial.md: -------------------------------------------------------------------------------- 1 | [](https://github.com/ellerbrock/open-source-badges/) 2 | [
](https://join.slack.com/t/firstcontributors/shared_invite/enQtNjkxNzQwNzA2MTMwLTVhMWJjNjg2ODRlNWZhNjIzYjgwNDIyZWYwZjhjYTQ4OTBjMWM0MmFhZDUxNzBiYzczMGNiYzcxNjkzZDZlMDM)
3 | [](https://opensource.org/licenses/MIT)
4 | [](https://www.codetriage.com/roshanjossey/first-contributions)
5 |
6 | # First Contributions
7 |
8 | |
23 |
24 | Fork this repo by clicking on the fork button on the top right of this page. This will create a copy of this repository in your GitHub account.
25 |
26 | GitHub keeps track of the relationship between your repo and the one you have forked it from. You can think of your repo as a working copy.
27 |
28 | Most top-level GitHub Repos (i.e. ones not forked from any other repo) have a small core team of people who can directly commit changes. All other contributors must fork the repo and make changes in the fork, then create a Pull Request to request to merge back their changes into the top-level repo. If the top-level repo administrator approves the changes they will be merged, and you will gain instant fame and fortune! More on how to do that later.
29 |
30 | ## Clone your repository
31 |
32 |
33 |
34 | The next step is to clone your repo down to your machine so you can begin making changes. IntelliJ IDEA needs the URL of your repo, so click the "clone" button and then click the "copy to clipboard" icon.
35 |
36 | **CAREFUL:** One mistake that new contributors often make is to clone the repo you forked _from_ rather than cloning your repo. Check your browser's address bar and make sure you are cloning your repo.
37 |
38 | Now open up IntelliJ IDEA.
39 |
40 | IntelliJ IDEA allows you to check out (in Git terms clone) an existing repository and create a new project based on the data you've downloaded.
41 |
42 | From the main menu, choose VCS | Get from Version Control, or, if no project is currently opened, click Get from Version Control on the Welcome screen.
43 |
44 | In the Get from Version Control dialog, specify the URL of the remote repository you want to clone (you can click Test to make sure that connection to the remote can be established) or select one of the VCS hosting services on the left. If you are already logged in to the selected hosting service, completion will suggest the list of available repositories that you can clone.
45 |
46 | Click Clone. If you want to create an IntelliJ IDEA project based on the sources you have cloned, click Yes in the confirmation dialog. Git root mapping will be automatically set to the project root directory.
47 |
48 | If your project contains submodules, they will also be cloned and automatically registered as project roots.
49 |
50 | **Important**: Make sure it is the forked repository and not the original one, otherwise it won't work.
51 |
52 | ## Create a branch
53 |
54 | In Git, branching is a powerful mechanism that allows you to diverge from the main development line, for example, when you need to work on a feature or freeze a certain state of a codebase for a release, and so on.
55 |
56 | In IntelliJ IDEA, all operations with branches are performed in the Git Branches popup. To invoke it, click the Git widget in the Status bar or press Ctrl+Shift+`.
57 |
58 | The name of the branch that is currently checked out is displayed in the Git widget in the Status bar.
59 |
60 | In the Branches popup, choose New Branch.
61 |
62 | In the dialog that opens, specify the branch name, and make sure the Checkout branch option is selected if you want to switch to that branch.
63 |
64 | The new branch will start from the current HEAD. If you want to start a branch from a previous commit instead of the current branch HEAD, select this commit in the Log tab of the Version Control tool window Alt+9 and choose New Branch from the context menu.
65 |
66 | ## Make necessary changes
67 |
68 | Open `Contributors.md` and add your name anywhere in the file. This file contains GFM (GitHub Flavored Markdown) which is a proprietary flavor of the markdown syntax.
69 |
70 | Copy one of the other contributors' lines and modify it with your name to make sure you get the syntax right - it can be picky.
71 |
72 | ## Commit & Push changes to GitHub
73 |
74 | Select the files you want to commit or an entire changelist in the Local Changes tab of the Version Control tool window Alt+9 and press Ctrl+K or click Commit Commit button on the toolbar.
75 |
76 | The Commit Changes dialog that opens lists all files that have been modified since the last commit, as well as all newly added unversioned files.
77 |
78 | Enter a meaningful commit message.
79 |
80 | You can click Commit Message history Commit Message history Ctrl+M to choose from the list of recent commit messages.
81 |
82 | You can also edit the commit message later before you've pushed the commit.
83 |
84 | Press Ctrl+Shift+K or choose VCS | Git | Push from the main menu. The Push Commits dialog opens showing all Git repositories (for multi-repository projects) and listing all commits made in the current branch in each repository since the last push.
85 |
86 | ## Submit your changes for review
87 |
88 | At this point you have completed your change but it still only resides in your repo. This step will show you how to submit a request to the administrator of the top-level repo to merge your change.
89 |
90 | In your repo on GitHub you'll see the `Compare & pull request` button next to the new branch notification. Click on that button.
91 |
92 |
93 |
94 | Now submit the pull request.
95 |
96 |
97 |
98 | Soon I'll be merging all your changes into the master branch of this project. You will get a notification email once the changes have been merged.
99 |
100 | ## Where to go from here?
101 |
102 | Congrats! You have just completed the standard _fork -> clone -> edit -> PR_ workflow that you'll encounter often as a contributor!
103 |
104 | Celebrate your contribution and share it with your friends and followers by going to [web app](https://firstcontributions.github.io#social-share).
105 |
106 | You can join our slack team in case you need any help or have any questions. [Join slack team](https://join.slack.com/t/firstcontributors/shared_invite/enQtMzE1MTYwNzI3ODQ0LTZiMDA2OGI2NTYyNjM1MTFiNTc4YTRhZTg4OWZjMzA0ZWZmY2UxYzVkMzI1ZmVmOWI4ODdkZWQwNTM2NDVmNjY).
107 |
108 |
109 | ### [Additional material](../additional-material/git_workflow_scenarios/additional-material.md)
110 |
111 | ## Tutorials Using Other Tools
112 | [Back to main page](https://github.com/firstcontributions/first-contributions#tutorials-using-other-tools)
113 |
--------------------------------------------------------------------------------
/gui-tool-tutorials/sourcetree-macos-tutorial.md:
--------------------------------------------------------------------------------
1 | [](https://github.com/ellerbrock/open-source-badges/)
2 | [](https://join.slack.com/t/firstcontributors/shared_invite/enQtMzE1MTYwNzI3ODQ0LTZiMDA2OGI2NTYyNjM1MTFiNTc4YTRhZTg4OWZjMzA0ZWZmY2UxYzVkMzI1ZmVmOWI4ODdkZWQwNTM2NDVmNjY)
3 | [](https://opensource.org/licenses/MIT)
4 | [](https://www.codetriage.com/roshanjossey/first-contributions)
5 |
6 |
7 | # First Contributions
8 |
9 | |
33 |
34 | From here, you want to click on Remote. If this is the first installation, then you likely haven't connected your GitHub account yet. Do so by clicking the "Connect Button".
35 |
36 |
37 |
38 | The *Accounts* dialog will appear. Click "Add" in the lower left hand corner. Then select the appropriate settings to add GitHub (or any other account you want) to the client. After you selected your settings for GitHub, click "Connect Account."
39 |
40 |
41 |
42 | This will open a page in your web browswer. Follow the steps given to authorize your account.
43 |
44 | ## Fork this repository
45 |
46 | Fork this repo by clicking on the fork button on the top of this page.
47 |
48 | This will create of copy of this repository in your account.
49 |
50 |
51 | ## Clone the repository
52 |
53 | In Sourcetree, Click on the "Remote" button. This should load all of your GitHub repos which are listed on GitHub.
54 |
55 |
56 |
57 | Once you click the "Clone" button, you will be presented with another view to define several different things.
58 |
59 |
60 |
61 | 1) **Source URL:** This is automatically filled and you dont need to change it. It is the URL from where your GitHub project resides.
62 |
63 | 2) **Destination Path:** This is the physical location on your computer where this project will be saved
64 |
65 | 3) **Name:** This is a "Bookmark" to how Sourcetree will reference your project. Think of it like a shortcut.
66 |
67 | *Note: Normally the defaults in these fields are fine.*
68 |
69 | **Once you are satisfied, click "Clone"**
70 |
71 | This will bring up the main repo browser for your repository!
72 |
73 | ## Create a branch
74 |
75 | Click the branch button on the toolbar.
76 |
77 | Name your branch "add-your-name-to-contribution", for example: "add-sally-to-contribution".
78 |
79 | To do this, click **Branch (1)** which launches the naming dialog. Then **Add your name (2)** as just described. Finally click **Create Branch**. This will create the branch for what you just named.
80 |
81 |
82 |
83 |
84 | ## Make necessary changes and commit those changes
85 |
86 | Now open `Contributors.md` file in a text editor and add your name to it, with your Github URL link, then save the file.
87 |
88 | You should be able to see and review the file that have been changed and decide what you would like to stage. Staging is important to tell git exactly what file changes you want associated with this commit.
89 |
90 | *Note: If you do not see the file's diff, click **Uncommitted Files** at the top of your dialog*
91 |
92 |
93 |
94 | Next click the **Commit** button on the top left of the dialog. This will show you your staging area.
95 |
96 | Click the *Checkbox* to **add** the file to the stagging area. Then enter a commit message.
97 |
98 | *Note: You can also select files (both in the stagging and unstaged areas) and add/remove files from the respective areas by using the spacebar*
99 |
100 |
101 |
102 |
103 | Once you have added your changes and added a commit message, you can press the **Commit** button to finally make the commit.
104 |
105 | Congratulations, you've committed all the changes to your local copy of your branch of your fork of first-contributions. Onward!
106 |
107 |
108 | ## Push changes to GitHub
109 |
110 | Now you are ready to push your changes to github. This will be pushing it to your own, forked, copy of the project. Follow the steps to push your branch up. First, click **Push (1)**, this will show the remote/push dialog. **Click (2)** the checkbox of your branch you want to push. Select **OK (3)** and this will push your commit up to Github.
111 |
112 |
113 |
114 | ## Submit your changes for review
115 |
116 | If you go to your repository on github, you'll see `Compare & pull request` button. Click on that button.
117 |
118 |
119 |
120 | Now submit the pull request.
121 |
122 |
123 |
124 | Soon I'll be merging all your changes into the master branch of this project. You will get a notification email once the changes have been merged.
125 |
126 | ## Where to go from here?
127 |
128 | Congrats! You have just completed the standard _fork -> clone -> edit -> PR_ workflow that you'll encounter often as a contributor!
129 |
130 | Celebrate your contribution and share it with your friends and followers by going to [web app](https://firstcontributions.github.io/#social-share).
131 |
132 | You could join our slack team in case you need any help or have any questions. [Join slack team](https://join.slack.com/t/firstcontributors/shared_invite/enQtMzE1MTYwNzI3ODQ0LTZiMDA2OGI2NTYyNjM1MTFiNTc4YTRhZTg4OWZjMzA0ZWZmY2UxYzVkMzI1ZmVmOWI4ODdkZWQwNTM2NDVmNjY).
133 |
134 |
135 | ### [Additional material](../additional-material/git_workflow_scenarios/additional-material.md)
136 |
137 |
138 | ## Tutorials Using Other Tools
139 | [Back to main page](https://github.com/firstcontributions/first-contributions#tutorials-using-other-tools)
140 |
--------------------------------------------------------------------------------
/gui-tool-tutorials/github-windows-vs-code-tutorial.md:
--------------------------------------------------------------------------------
1 |
2 |
3 |
4 |
5 |
6 |
7 |
8 |
9 |
10 | # Here-contributions-Begins
11 |
12 | | | Visual Studio Code |
13 | | ------------------------------------------------------------------------------------------------------------------------------------ | ------------------ |
14 |
29 |
30 | Fork this repo by clicking on the fork button on the top right of this page. This will create of copy of this repository in your GitHub account.
31 |
32 | GitHub keeps track of the relationship between your repo and the one you have forked it from. You can think of your repo as a working copy.
33 |
34 | Most top-level GitHub repos (i.e. ones not forked from any other repo) have a small core team of people who can directly commit changes. All other contributors must fork the repo and make changes in the fork, then create a Pull Request to ask for their changes to be merged back into the top-level repo. If the top-level repo administrator likes the changes they will be merged and you will gain instant fame and fortune! More on how to do that later.
35 |
36 | ## Clone your repository
37 |
38 |
39 |
40 | The next step is to clone your repo down to your machine so you can begin making changes. VS Code needs the URL of your repo, so click the "clone" button and then click the "copy to clipboard" icon.
41 |
42 | **CAREFUL:** One mistake that new contributors often make is to clone the repo you forked _from_ rather than cloning your repo. Check your browser's address bar and make sure you are cloning your repo.
43 |
44 | Now open up Visual Studio Code. The welcome page of VS Code will pop up. From there press `F1` to open up the bar shown below. Notice that there is already a `>` (greater than) sign in the text field. You can also get to the input prompt by pressing `CTRL-P` and then type the `>` character.
45 |
46 | 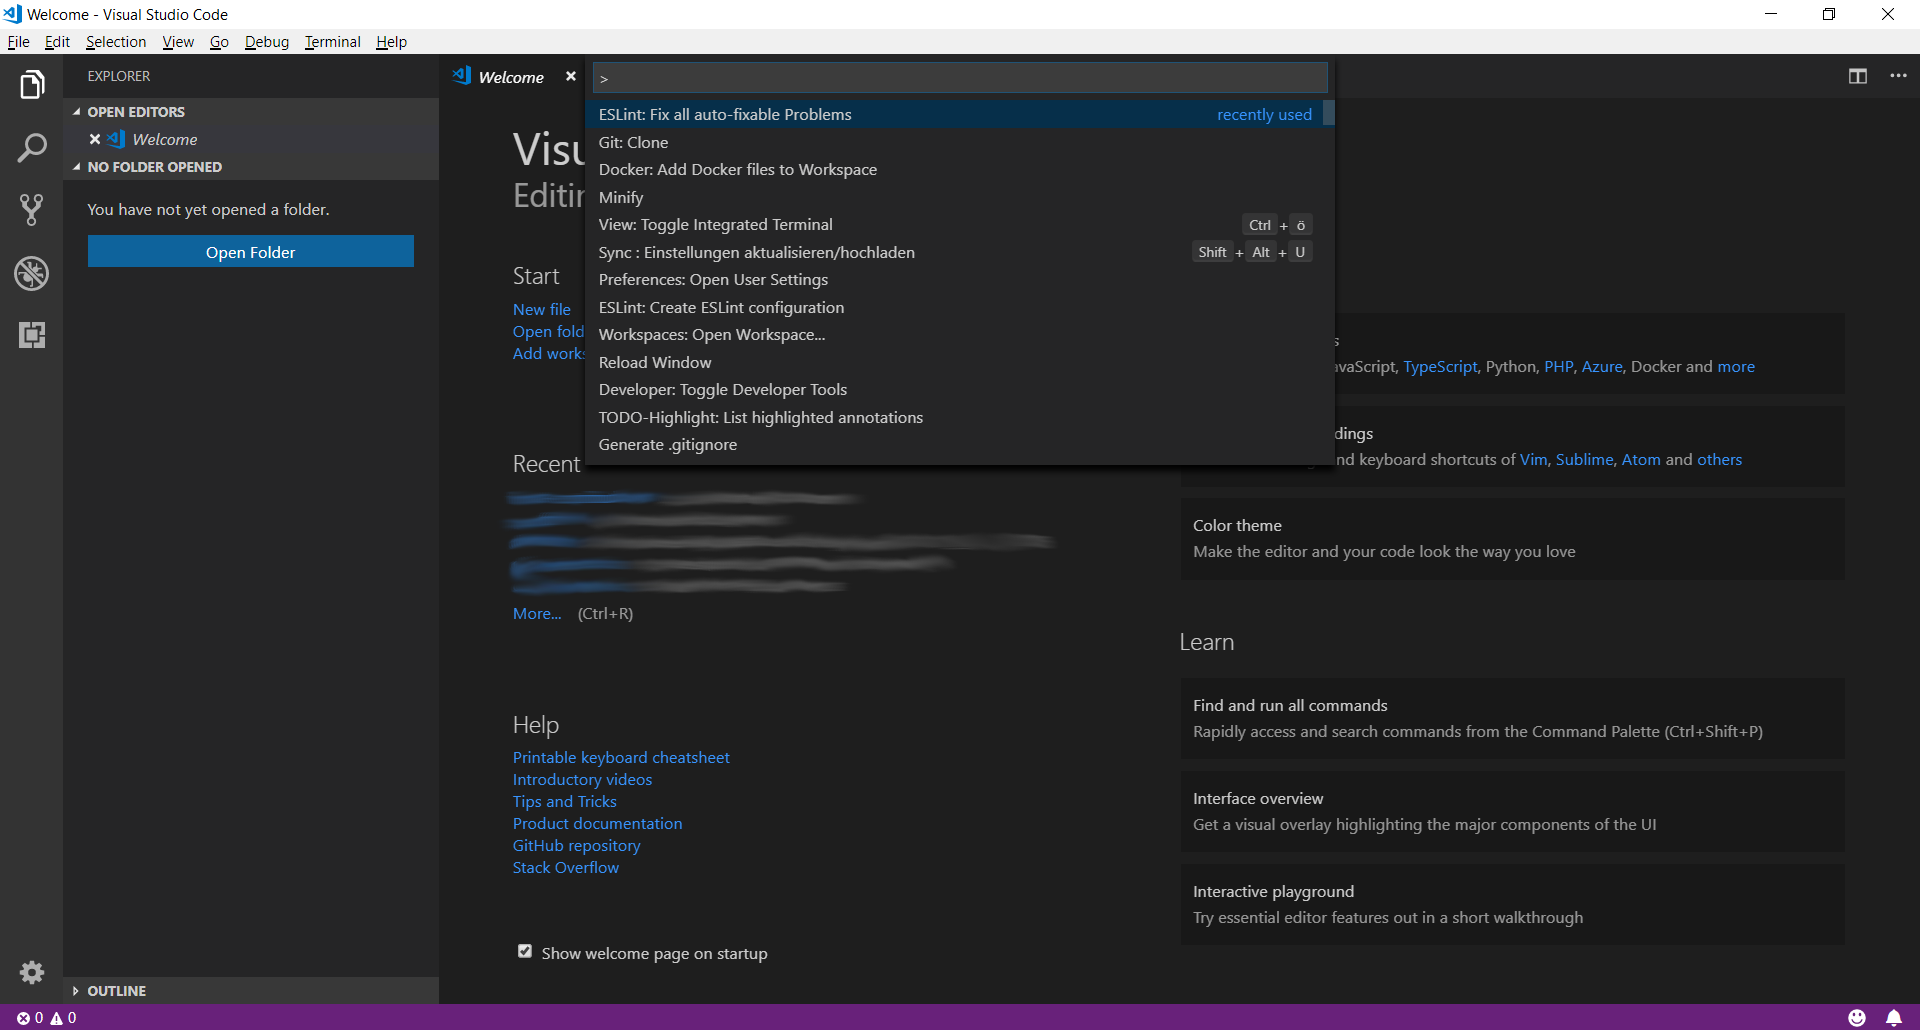 47 |
48 | You may notice that there are already some obscure commands listed below. Those are my recently used commands. So just don't care about them.
49 |
50 |
47 |
48 | You may notice that there are already some obscure commands listed below. Those are my recently used commands. So just don't care about them.
49 |
50 | 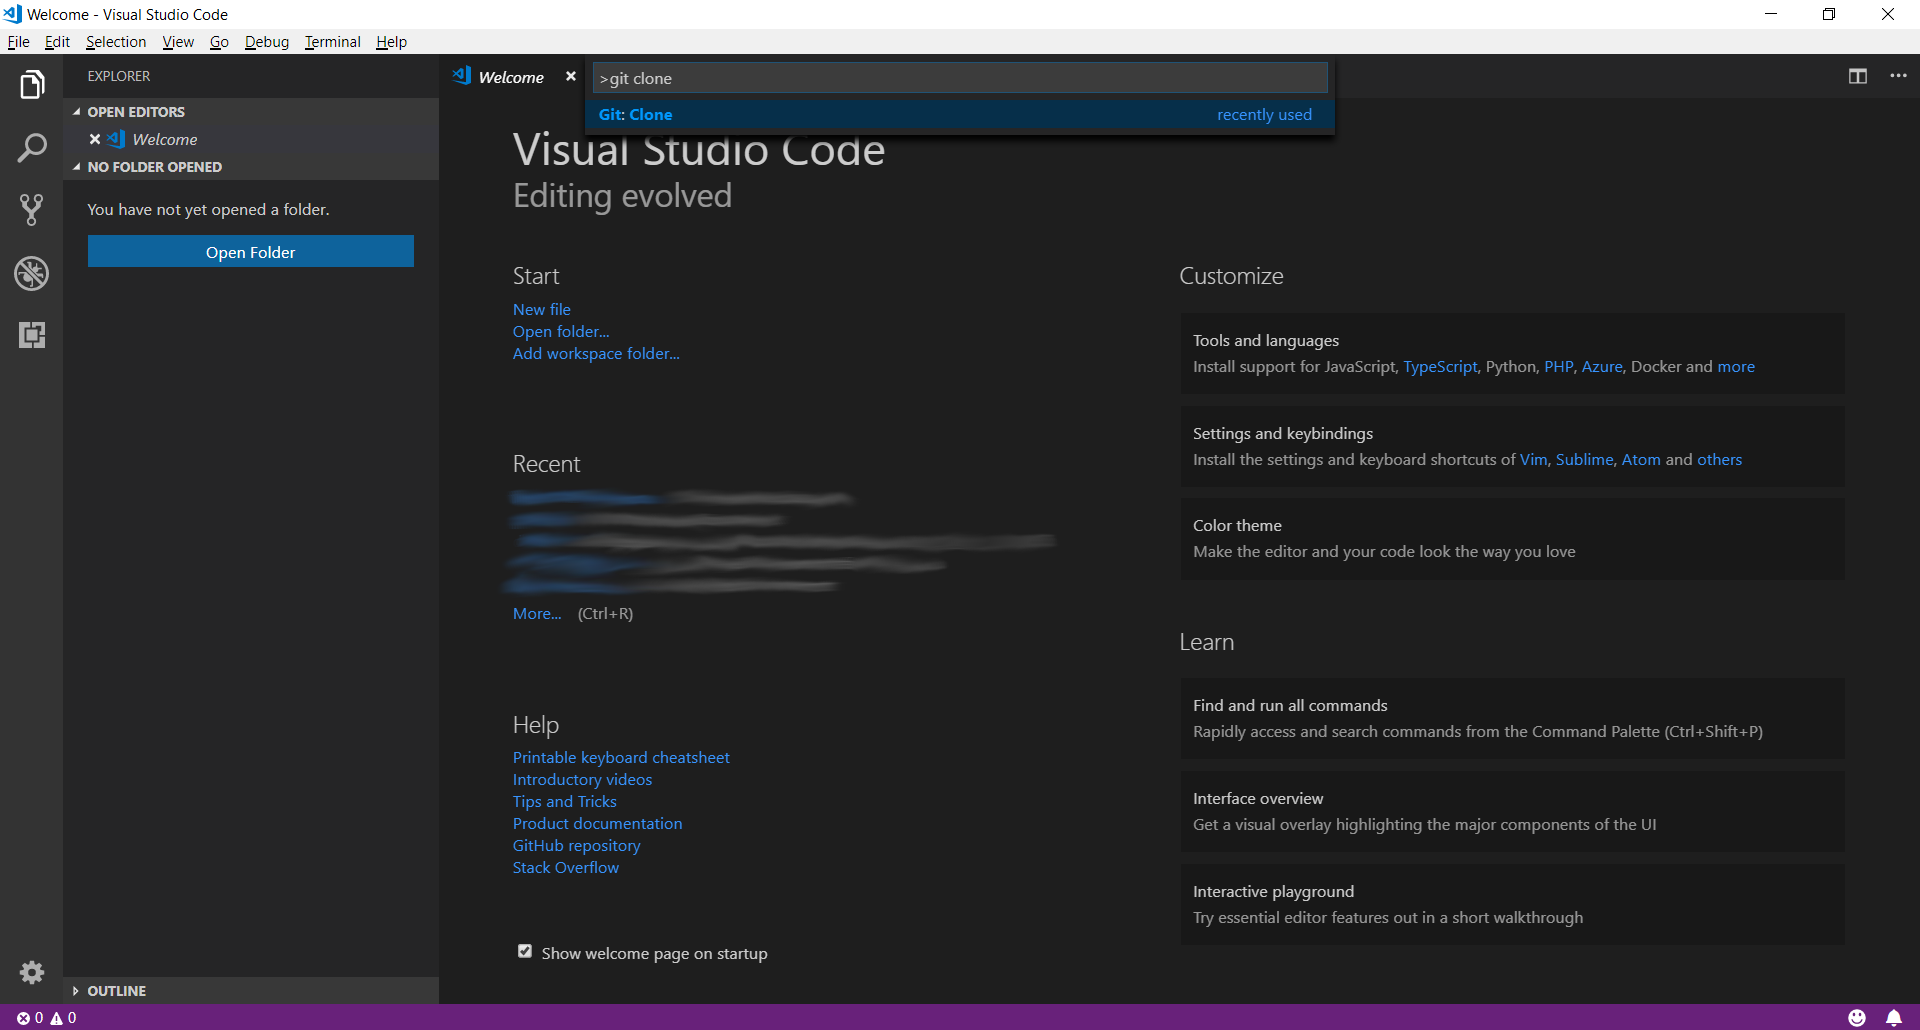 51 |
52 | Now type in `git clone`, only `git` or `clone` (it works like a search).
53 | Select the Entry `Git: Clone` and press `Enter`
54 |
55 |
51 |
52 | Now type in `git clone`, only `git` or `clone` (it works like a search).
53 | Select the Entry `Git: Clone` and press `Enter`
54 |
55 | 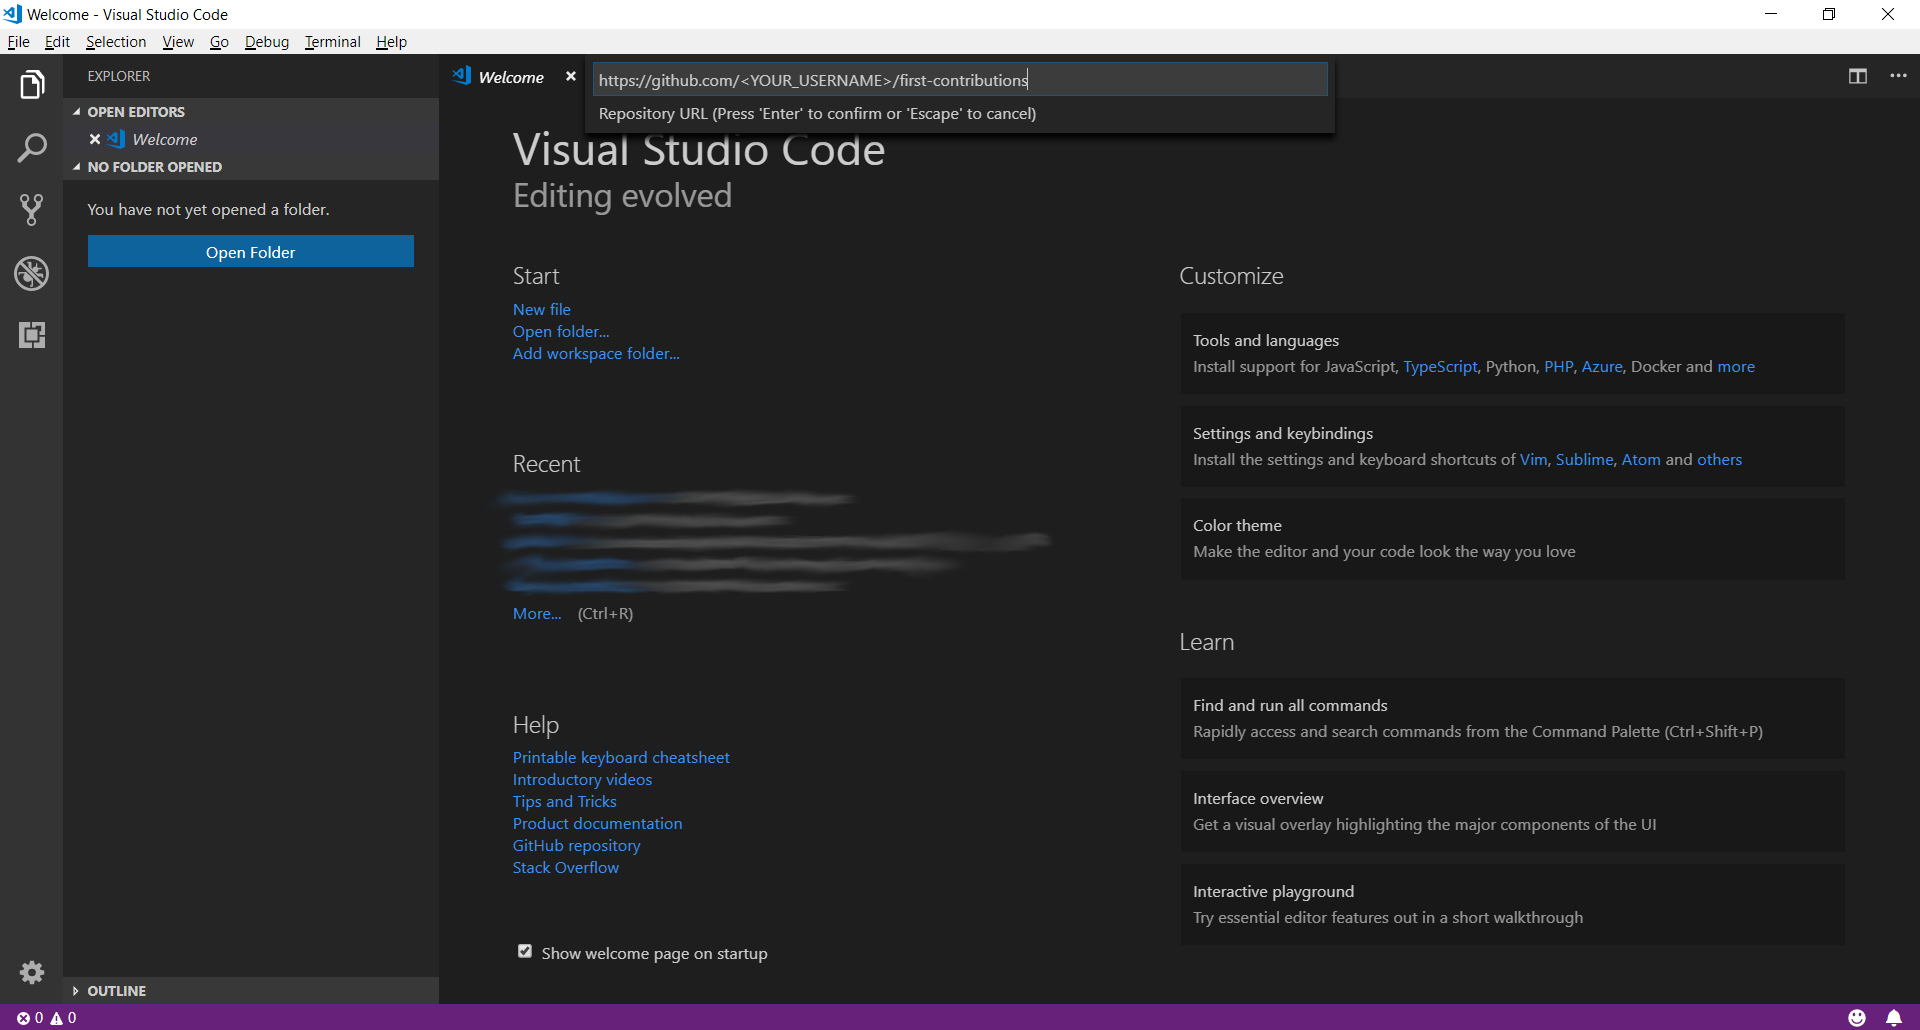 56 |
57 | Paste the URL of your repository and press `Enter`. This will open up a File Explorer where you can then choose where the Git repository should be stored.
58 |
59 | **Important**: Make sure it is the forked repository and not the original one, otherwise it won't work.
60 |
61 |
56 |
57 | Paste the URL of your repository and press `Enter`. This will open up a File Explorer where you can then choose where the Git repository should be stored.
58 |
59 | **Important**: Make sure it is the forked repository and not the original one, otherwise it won't work.
60 |
61 | 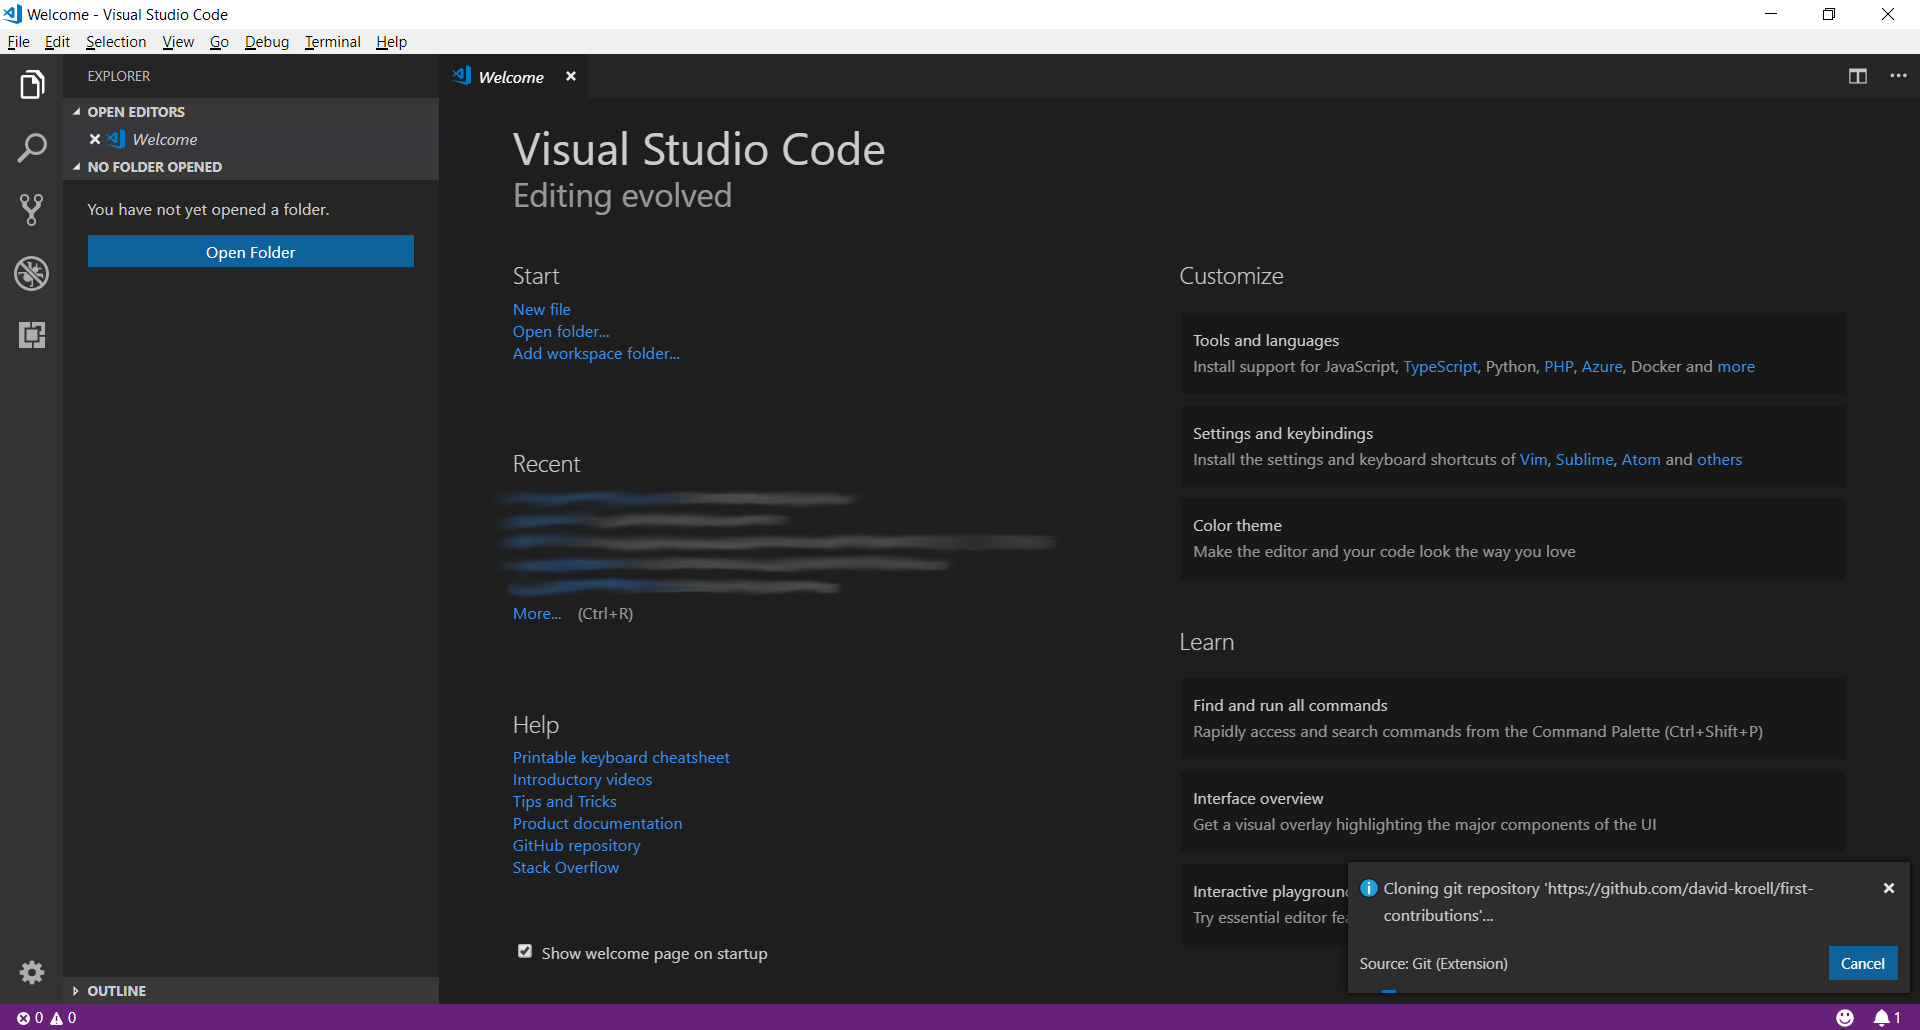 62 |
63 | You should see a status popup on the bottom right of Visual Studio Code. After it has finished, you can open up the cloned repository (now a folder on your machine) using the buttons in the dialog.
64 |
65 | ## Create a branch
66 |
67 | Open up the command palette again by pressing `F1`. Type in `branch` and select the `create branch` command from there. In the next step type in the name of your new branch, for example `add-david-kroell`. Press enter and the branch will be created. The branch is also already checked out. [What does checkout mean?](https://www.git-scm.com/docs/git-checkout)
68 |
69 |
62 |
63 | You should see a status popup on the bottom right of Visual Studio Code. After it has finished, you can open up the cloned repository (now a folder on your machine) using the buttons in the dialog.
64 |
65 | ## Create a branch
66 |
67 | Open up the command palette again by pressing `F1`. Type in `branch` and select the `create branch` command from there. In the next step type in the name of your new branch, for example `add-david-kroell`. Press enter and the branch will be created. The branch is also already checked out. [What does checkout mean?](https://www.git-scm.com/docs/git-checkout)
68 |
69 | 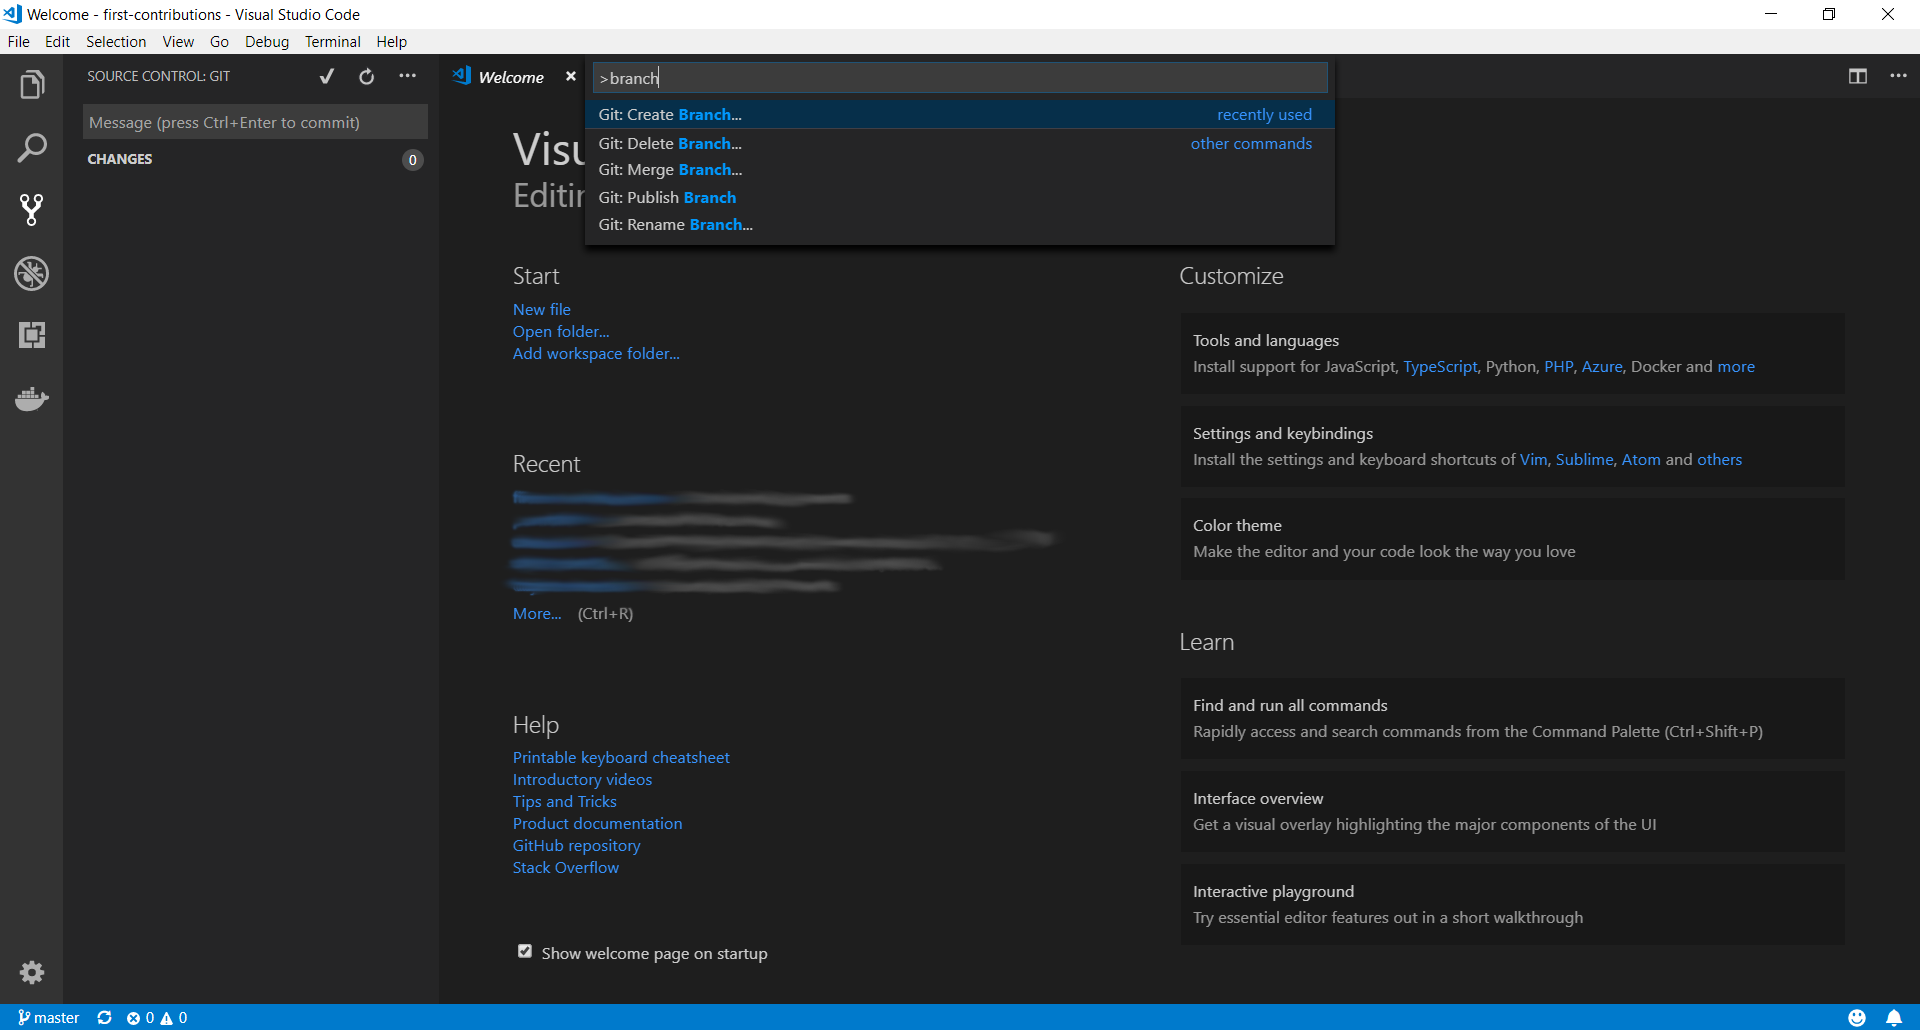 70 |
71 | ## Make necessary changes
72 |
73 | Open `Contributors.md` and add your name anywhere in the file. This file contains GFM (GitHub Flavored Markdown) which is a proprietary flavor of the markdown syntax.
74 |
75 | Copy one of the other contributors' lines and modify it with your name to make sure you get the syntax right - it can be picky.
76 |
77 |
70 |
71 | ## Make necessary changes
72 |
73 | Open `Contributors.md` and add your name anywhere in the file. This file contains GFM (GitHub Flavored Markdown) which is a proprietary flavor of the markdown syntax.
74 |
75 | Copy one of the other contributors' lines and modify it with your name to make sure you get the syntax right - it can be picky.
76 |
77 | 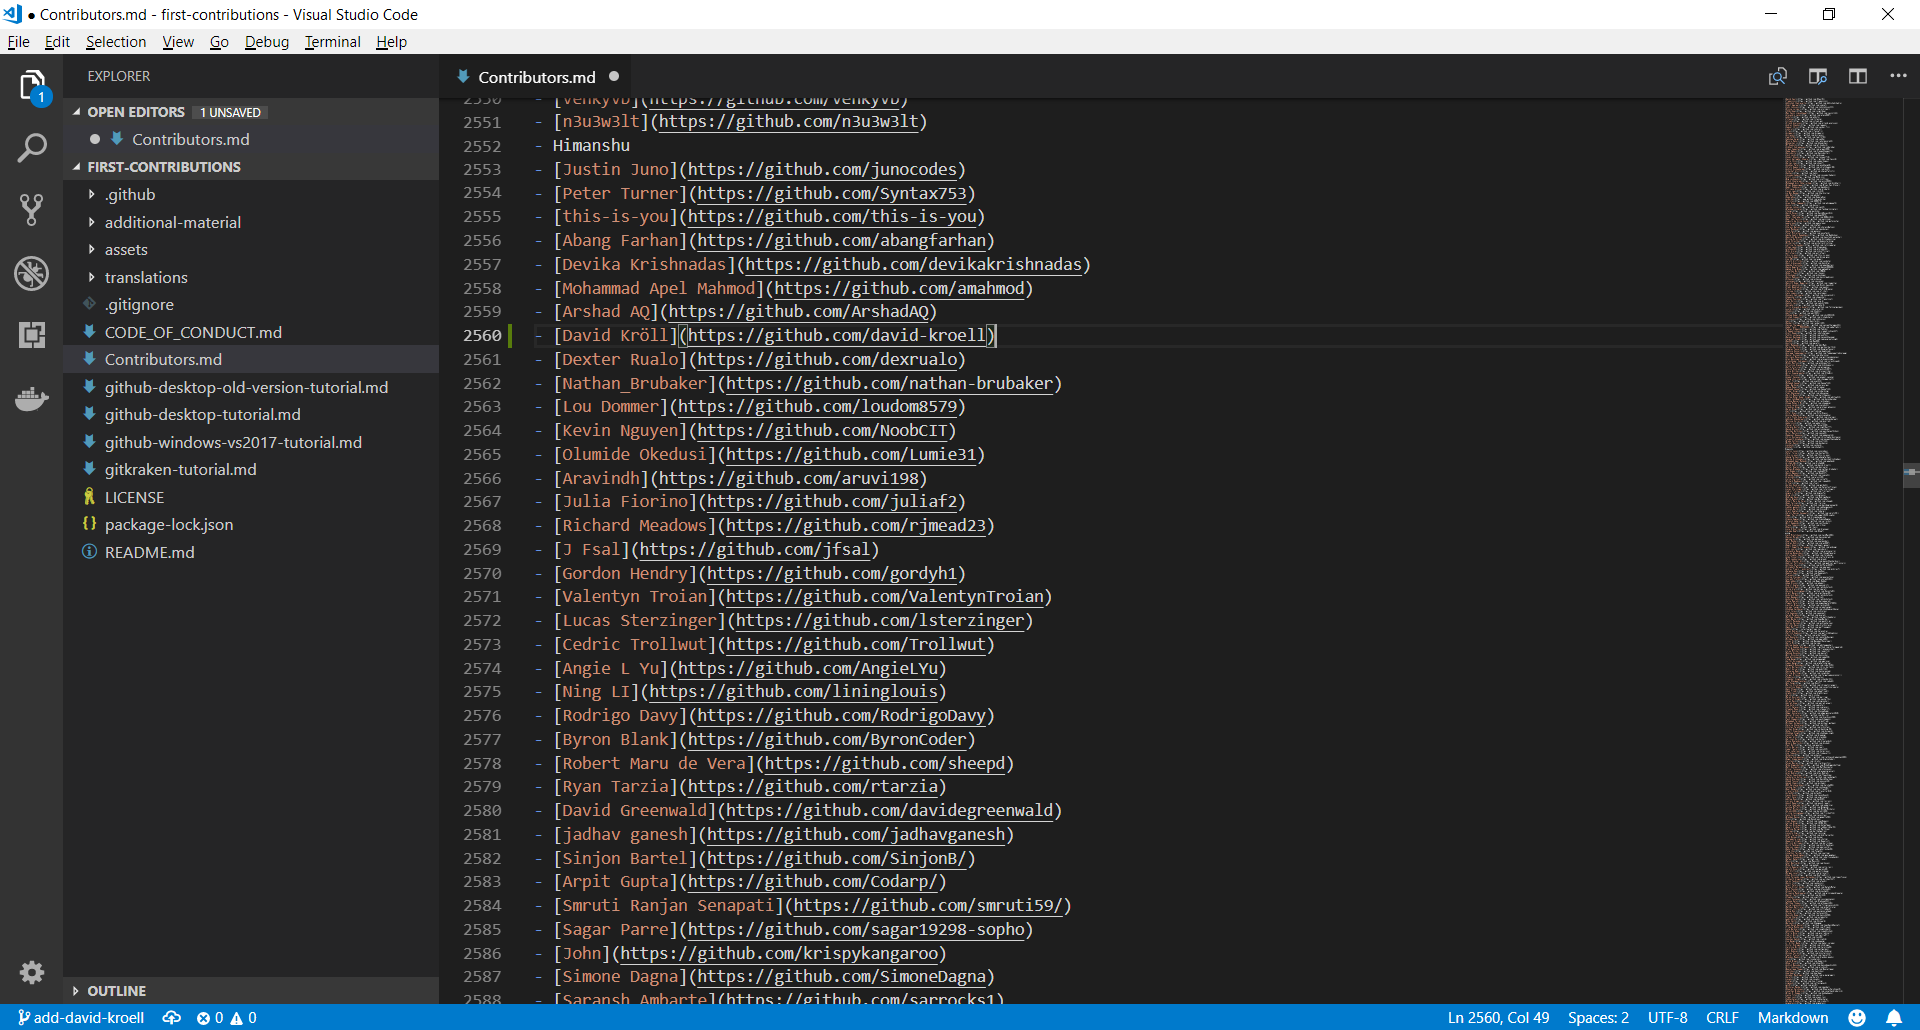 78 |
79 | ## Commit & Push changes to GitHub
80 |
81 | On the left side of VS Code is a menu with 5 icons displayed. Select the version control/Source Control icon.
82 | (Shortcut : Ctrl + Shift + G)
83 |
84 |
78 |
79 | ## Commit & Push changes to GitHub
80 |
81 | On the left side of VS Code is a menu with 5 icons displayed. Select the version control/Source Control icon.
82 | (Shortcut : Ctrl + Shift + G)
83 |
84 | 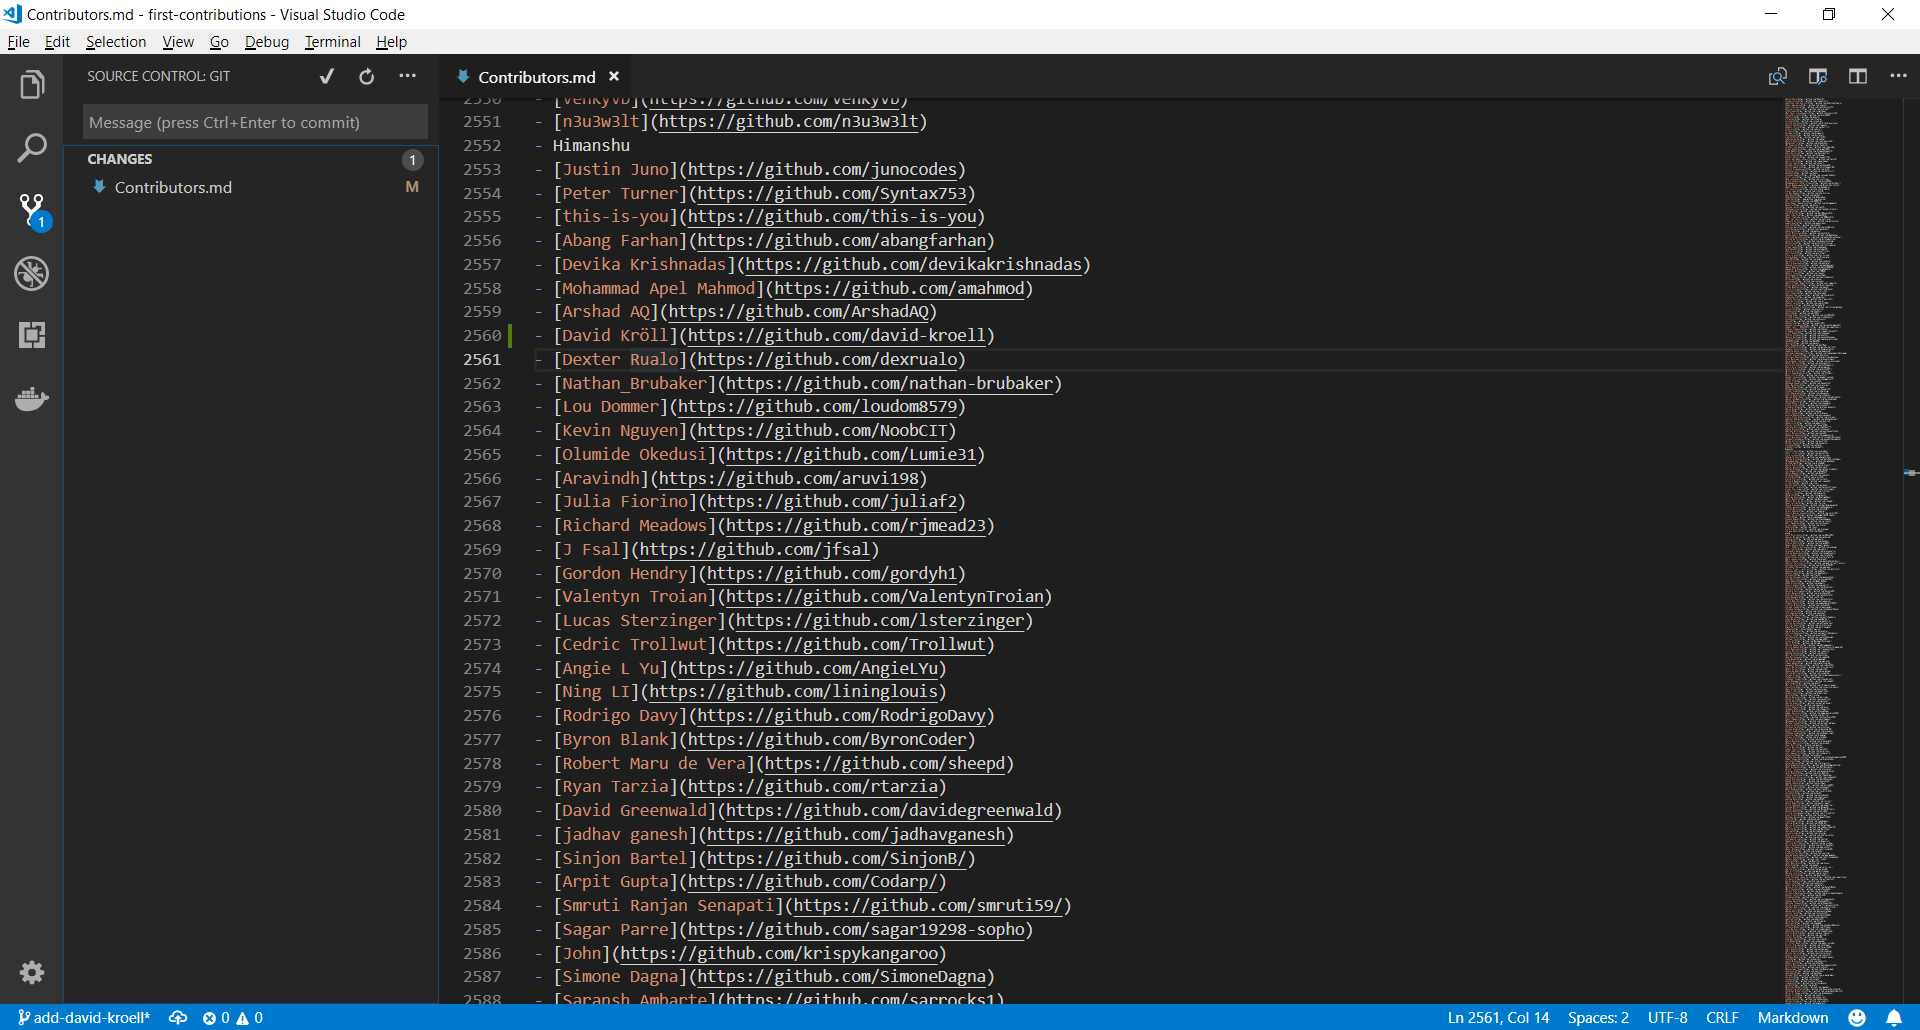 85 |
86 | The file explorer displays all files which were changed after the last commit. By hovering the files and clicking the `+` (plus) the files are staged.
87 |
88 |
85 |
86 | The file explorer displays all files which were changed after the last commit. By hovering the files and clicking the `+` (plus) the files are staged.
87 |
88 | 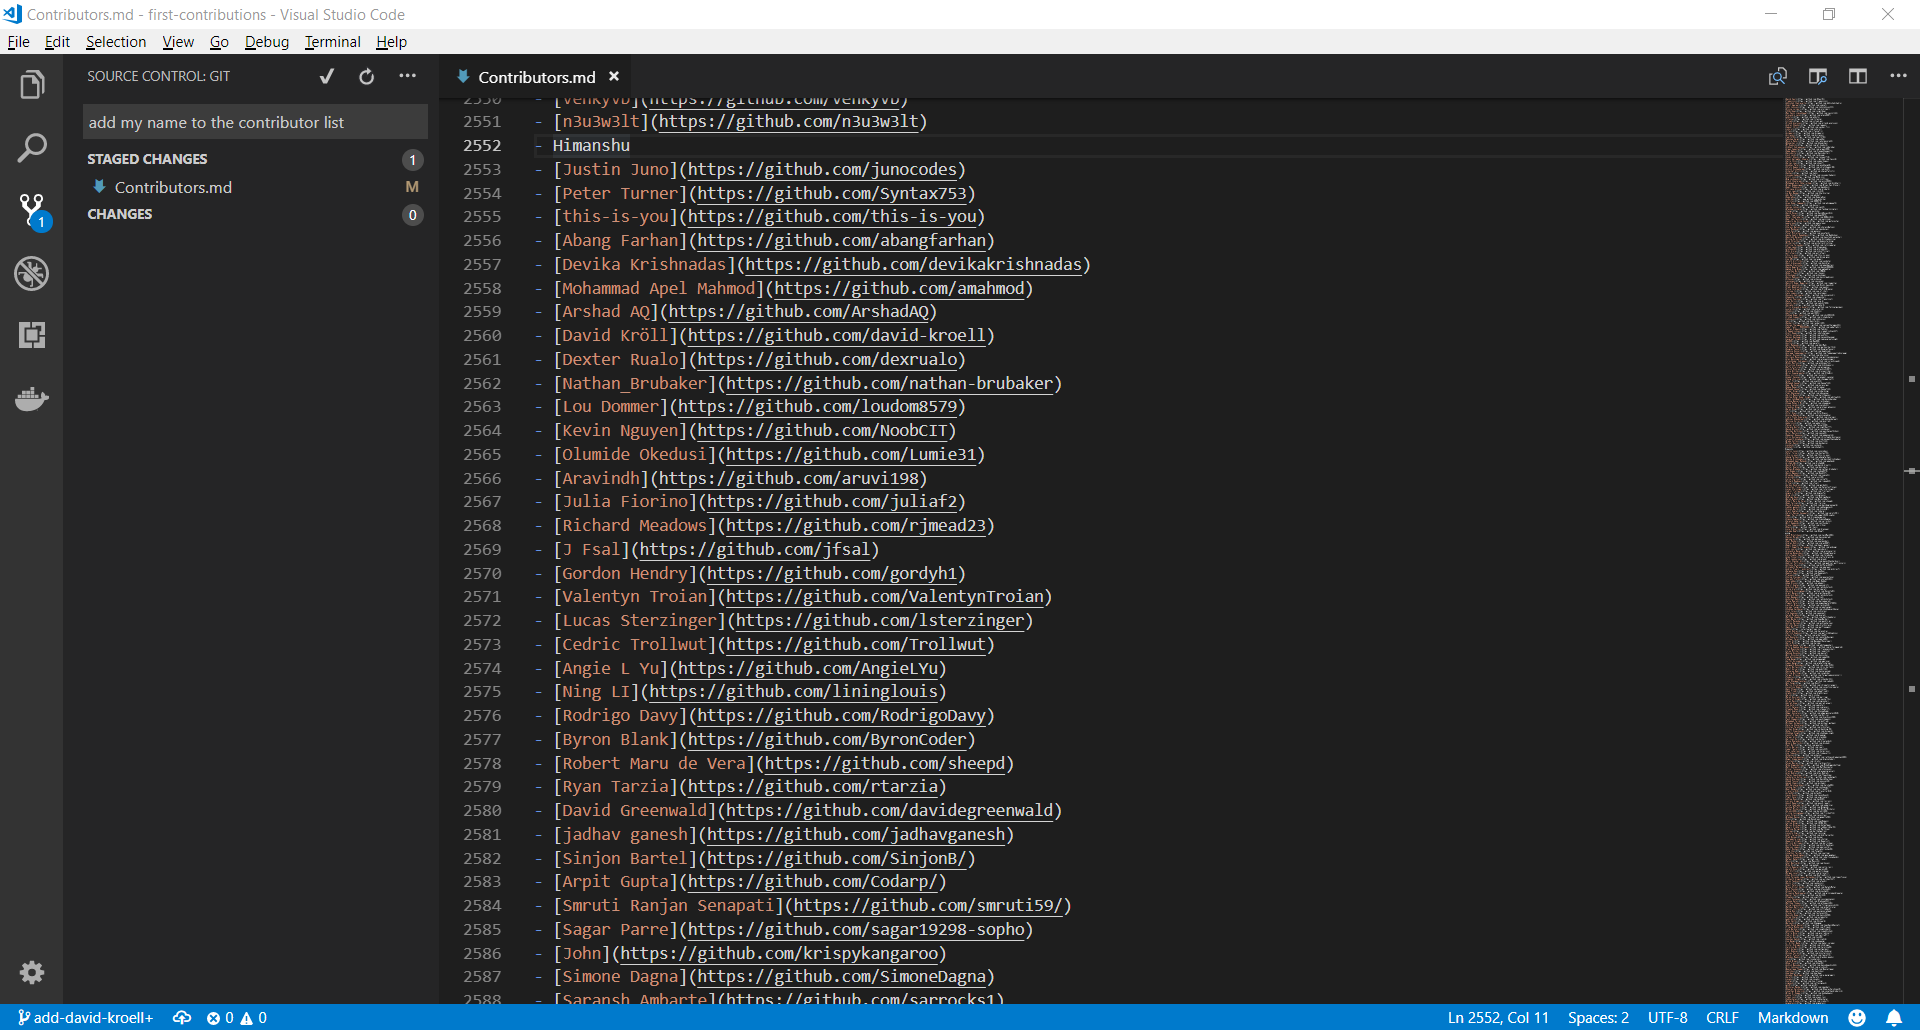 89 |
90 | Type something in the line on top of the explorer and press the checkmark. The changes are now committed to your local copy. Now the changes have to be pushed back to GitHub.
91 |
92 |
89 |
90 | Type something in the line on top of the explorer and press the checkmark. The changes are now committed to your local copy. Now the changes have to be pushed back to GitHub.
91 |
92 | 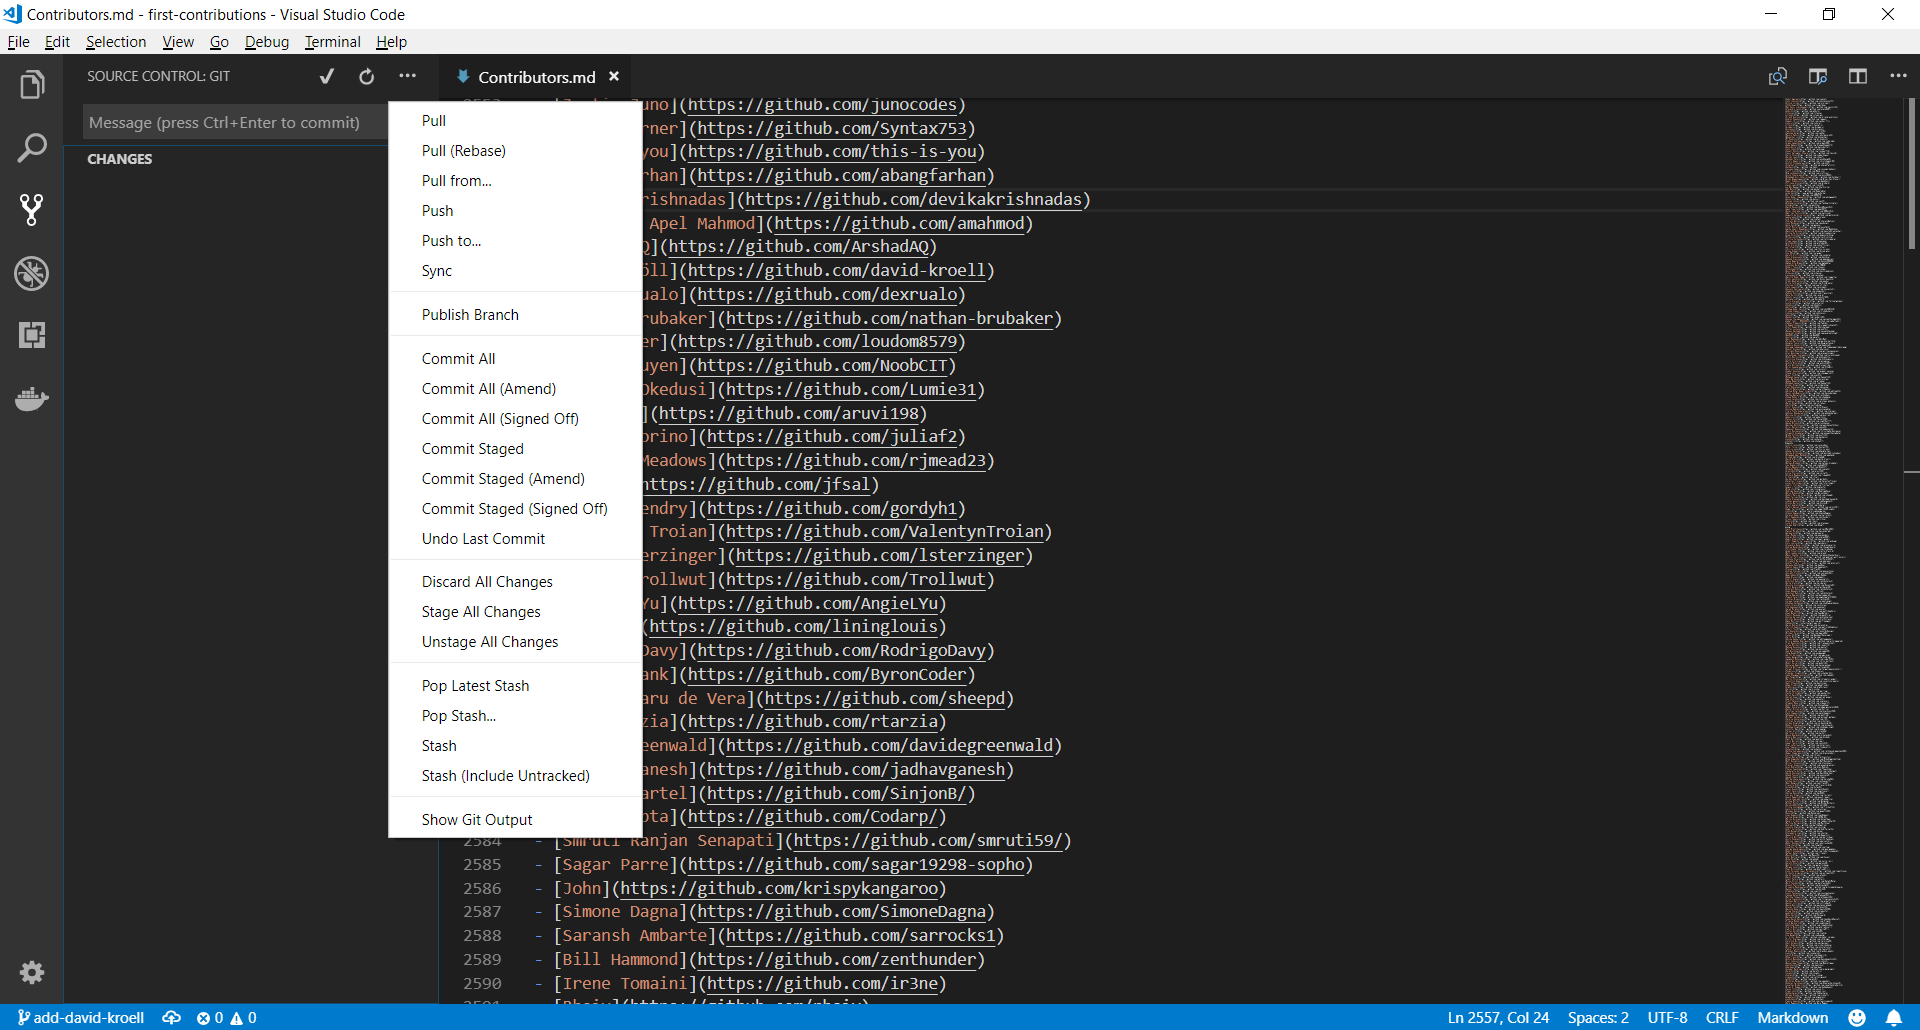 93 |
94 | Use the three-dot icon to open up the menu where you select the `Publish Branch` option. This should open up a dialog to put your GitHub credentials in.
95 |
96 |
93 |
94 | Use the three-dot icon to open up the menu where you select the `Publish Branch` option. This should open up a dialog to put your GitHub credentials in.
95 |
96 | 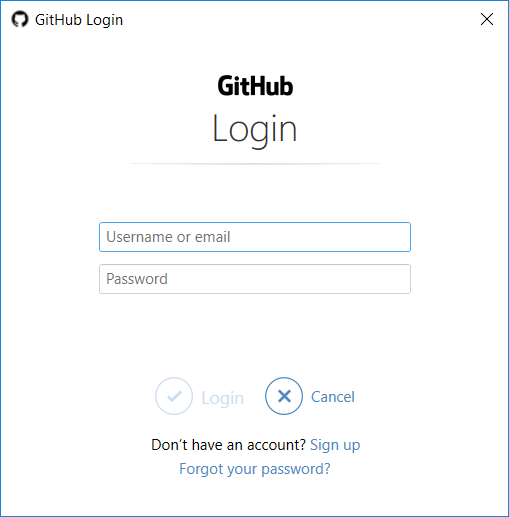 97 |
98 | ## Submit your changes for review
99 |
100 | At this point you have completed your change but it still only resides in your repo. This step will show you how to submit a request to the administrator of the top-level repo to merge your change.
101 |
102 | In your repo on GitHub you'll see the `Compare & pull request` button next to the new branch notification. Click on that button.
103 |
104 |
105 |
106 | Now submit the pull request.
107 |
108 |
109 |
110 | Soon I'll be merging all your changes into the master branch of this project. You will get a notification email once the changes have been merged.
111 |
112 | ## Where to go from here?
113 |
114 | Congrats!! You have just completed the standard _fork -> clone -> edit -> PR_ workflow that you'll encounter often as a contributor!
115 |
116 |
117 |
118 | You can join our discord team in case you need any help or have any questions. [Join discord team]( https://discord.gg/FZusE7FH4q).
119 |
120 |
121 |
122 |
123 | ## star this repositary
124 |
--------------------------------------------------------------------------------
/gui-tool-tutorials/translations/github-windows-intellij-tutorial.pt_br.md:
--------------------------------------------------------------------------------
1 | [](https://github.com/ellerbrock/open-source-badges/)
2 | [
97 |
98 | ## Submit your changes for review
99 |
100 | At this point you have completed your change but it still only resides in your repo. This step will show you how to submit a request to the administrator of the top-level repo to merge your change.
101 |
102 | In your repo on GitHub you'll see the `Compare & pull request` button next to the new branch notification. Click on that button.
103 |
104 |
105 |
106 | Now submit the pull request.
107 |
108 |
109 |
110 | Soon I'll be merging all your changes into the master branch of this project. You will get a notification email once the changes have been merged.
111 |
112 | ## Where to go from here?
113 |
114 | Congrats!! You have just completed the standard _fork -> clone -> edit -> PR_ workflow that you'll encounter often as a contributor!
115 |
116 |
117 |
118 | You can join our discord team in case you need any help or have any questions. [Join discord team]( https://discord.gg/FZusE7FH4q).
119 |
120 |
121 |
122 |
123 | ## star this repositary
124 |
--------------------------------------------------------------------------------
/gui-tool-tutorials/translations/github-windows-intellij-tutorial.pt_br.md:
--------------------------------------------------------------------------------
1 | [](https://github.com/ellerbrock/open-source-badges/)
2 | [ ](https://join.slack.com/t/firstcontributors/shared_invite/enQtNjkxNzQwNzA2MTMwLTVhMWJjNjg2ODRlNWZhNjIzYjgwNDIyZWYwZjhjYTQ4OTBjMWM0MmFhZDUxNzBiYzczMGNiYzcxNjkzZDZlMDM)
3 | [](https://opensource.org/licenses/MIT)
4 | [](https://www.codetriage.com/roshanjossey/first-contributions)
5 |
6 | # Primeiras Contribuições
7 |
8 | | | IntelliJ IDEA |
9 | | ------------------------------------------------------------------------------------------------------------------------------------ | ------------------ |
10 |
11 |
12 | É difícil, sempre é difícil quando fazemos alguma coisa pela primeira vez. Especialmente quando você está colaborando, cometendo erros, não é nada confortável. No entanto, o open source é totalmente sobre colaboração & trabalho em equipe. Por isso, nós queremos simplificar a maneira como os novos colaboradores de código aberto aprendem & contribuem pela primeira vez.
13 |
14 | Ler artigos & assistir a tutoriais até podem ajudar, mas o que é melhor do que fazer as coisas sem bagunçar nada. Este projeto tem como objetivo orientar & simplificar a forma como os iniciantes fazem a sua primeira contribuição. Lembre-se que você aprende melhor quando está relaxado. Se você deseja fazer sua primeira contribuição, basta seguir os passos abaixo. Nós prometemos a você que será divertido!
15 |
16 | Se você ainda não tem o IntelliJ IDEA no seu computador, [instale-o](https://www.jetbrains.com/idea/download/#section=windows)
17 |
18 | **Observação:** Este tutorial foi feito usando o IntelliJ IDEA (versão 2019.3.2) em um computador rodando Windows 10. Posteriormente neste tutorial, faremos uso de algumas teclas de atalho, que podem ser diferentes em outros sistemas operacionais (macOS / Linux).
19 |
20 |
21 | ## Faça o Fork deste repositório
22 |
23 |
](https://join.slack.com/t/firstcontributors/shared_invite/enQtNjkxNzQwNzA2MTMwLTVhMWJjNjg2ODRlNWZhNjIzYjgwNDIyZWYwZjhjYTQ4OTBjMWM0MmFhZDUxNzBiYzczMGNiYzcxNjkzZDZlMDM)
3 | [](https://opensource.org/licenses/MIT)
4 | [](https://www.codetriage.com/roshanjossey/first-contributions)
5 |
6 | # Primeiras Contribuições
7 |
8 | | | IntelliJ IDEA |
9 | | ------------------------------------------------------------------------------------------------------------------------------------ | ------------------ |
10 |
11 |
12 | É difícil, sempre é difícil quando fazemos alguma coisa pela primeira vez. Especialmente quando você está colaborando, cometendo erros, não é nada confortável. No entanto, o open source é totalmente sobre colaboração & trabalho em equipe. Por isso, nós queremos simplificar a maneira como os novos colaboradores de código aberto aprendem & contribuem pela primeira vez.
13 |
14 | Ler artigos & assistir a tutoriais até podem ajudar, mas o que é melhor do que fazer as coisas sem bagunçar nada. Este projeto tem como objetivo orientar & simplificar a forma como os iniciantes fazem a sua primeira contribuição. Lembre-se que você aprende melhor quando está relaxado. Se você deseja fazer sua primeira contribuição, basta seguir os passos abaixo. Nós prometemos a você que será divertido!
15 |
16 | Se você ainda não tem o IntelliJ IDEA no seu computador, [instale-o](https://www.jetbrains.com/idea/download/#section=windows)
17 |
18 | **Observação:** Este tutorial foi feito usando o IntelliJ IDEA (versão 2019.3.2) em um computador rodando Windows 10. Posteriormente neste tutorial, faremos uso de algumas teclas de atalho, que podem ser diferentes em outros sistemas operacionais (macOS / Linux).
19 |
20 |
21 | ## Faça o Fork deste repositório
22 |
23 |  24 |
25 | Fork este repo clicando no botão fork(bifurcar) no canto superior direito desta página. Isso criará uma cópia deste repositório em sua conta do GitHub.
26 |
27 | O GitHub rastreia a relação entre seu repo e o original, você pode pensar em seu repo como uma cópia de trabalho.
28 | Muitos dos repositórios matrizes do GitHub (ou seja, aqueles que não são Fork de nenhum outro repo) têm um pequeno grupo de pessoas que podem fazer commits de modificações diretamente. Todos os outros contribuidores devem forkear o repo e fazer alterações no fork, em seguida, devem criar um Pull Request para solicitar um Merge(mescla) das modificações feitas no repositório original.
29 |
30 |
31 | ## Clone seu Repositório
32 |
33 |
24 |
25 | Fork este repo clicando no botão fork(bifurcar) no canto superior direito desta página. Isso criará uma cópia deste repositório em sua conta do GitHub.
26 |
27 | O GitHub rastreia a relação entre seu repo e o original, você pode pensar em seu repo como uma cópia de trabalho.
28 | Muitos dos repositórios matrizes do GitHub (ou seja, aqueles que não são Fork de nenhum outro repo) têm um pequeno grupo de pessoas que podem fazer commits de modificações diretamente. Todos os outros contribuidores devem forkear o repo e fazer alterações no fork, em seguida, devem criar um Pull Request para solicitar um Merge(mescla) das modificações feitas no repositório original.
29 |
30 |
31 | ## Clone seu Repositório
32 |
33 |  34 |
35 | O próximo passo será clonar seu repo em sua máquina para que você possa modificá-lo. O IntelliJ IDEA precisa da URL do seu repo, portanto clique no botão "clone" e então clique no ícone "copy to clipboard".
36 |
37 | **CUIDADO**: Um erro que os novatos costumam cometer é clonar o repo do qual você fez o fork, em vez de clonar seu repo. Verifique a barra de endereços do seu navegador e certifique-se de que você está clonando o seu repositório.
38 |
39 | Agora abra o IntelliJ IDEA.
40 |
41 | O IntelliJ IDEA permite que você fassa um check out (em termos do Git clone) de um repositório existente e crie um novo projeto com base nos dados que você baixou.
42 |
43 | No menu principal, escolha VCS | Get from Version Control ou, se nenhum projeto estiver aberto no momento, clique em Get from Version Control na tela inicial.
44 |
45 | Na caixa de diálogo Get from Version Control dialog, especifique a URL do repositório remoto que deseja clonar (você pode clicar em Test para certificar-se de que a conexão com o repositório remoto pode ser estabelecida) ou selecione um dos serviços de hospedagem VCS à esquerda. Se você já estiver conectado ao serviço de hospedagem selecionado, a completion irá sugerir a lista de repositórios disponíveis que você pode clonar.
46 |
47 | Clique em Clone. Se quiser criar um projeto IntelliJ IDEA com base nas fontes que você clonou, clique em Sim na caixa de diálogo de confirmação. O mapeamento de raiz do Git será automaticamente definido para o diretório raiz do projeto.
48 |
49 | Se o seu projeto tiver submodelos, eles também serão clonados e automaticamente registrados como raízes do projeto.
50 |
51 | **Importante**: certifique-se de que é o repositório é o fork e não o original, caso contrário, o procedimento não funcionará.
52 |
53 |
54 | ## Crie um branch
55 |
56 | No Git, o processo de branching (ramificação) é um mecanismo poderoso que permite divergir da linha principal de desenvolvimento, por exemplo, quando você precisa trabalhar em um recurso ou congelar um determinado estado de uma base de código para um release e assim por diante.
57 |
58 | No IntelliJ IDEA, todas as operações com branches são realizadas no pop-up Git Branches. Para ativá-lo, clique no widget Git na barra de status ou pressione Ctrl + Shift + `.
59 |
60 | O nome do branch atual é exibido no widget do Git na barra de status.
61 |
62 | No pop-up branch, escolha Novo branch.
63 |
64 | Na caixa de diálogo que é aberta, especifique o nome do branch e certifique-se de que a opção Checkout branch esteja selecionada se você quiser alternar para esse branch.
65 |
66 | A nova ramificação começará a partir do HEAD atual. Se você deseja iniciar um branch de um commit anterior ao invés do branch atual HEAD, selecione este commit na aba Log da janela da ferramenta de Controle de Versão Alt + 9 e escolha New Branch no menu de contexto.
67 |
68 |
69 | ## Faça as alterações necessárias
70 | Abra ``Contributors.md`` e adicione seu nome em qualquer lugar do arquivo. Este arquivo contém GFM (GitHub Flavored Markdown), que é um tipo proprietário da sintaxe de [markdown](https://pt.wikipedia.org/wiki/Markdown).
71 |
72 | Copie uma das linhas de outros contribuidores e modifique-a com seu nome para ter certeza que você obteve a sintaxe correta.
73 |
74 |
75 | ## Commit & Push modificações para o GitHub
76 |
77 | Selecione os arquivos que deseja commitar ou uma lista de alterações inteira na guia Local Changes da janela da ferramenta de controle de versão Alt + 9 e pressione Ctrl + K ou clique no botão Commit na barra de ferramentas.
78 |
79 | A caixa de diálogo Commit Changes abrira e listara todos os arquivos que foram modificados desde o último commit, bem como todos os arquivos não versionados recém-adicionados.
80 |
81 | Insira uma mensagem de commit que faça sentido.
82 |
83 | Você pode clicar em Commit Message history (Confirmar histórico de mensagens) Ctrl + M para escolher na lista de mensagens de commits recentes.
84 |
85 | Você também pode editar a mensagem de commit mais tarde, antes de enviar o commit.
86 |
87 | Pressione Ctrl + Shift + K ou escolha VCS | Git | Push from the main menu. A caixa de diálogo Push Commits é aberta, mostrando todos os repositórios Git (para projetos de vários repositórios) e listando todos os commits feitos no branch atual em cada repositório desde o último push.
88 |
89 |
90 | ## Envie suas alterações para revisão
91 |
92 | Neste ponto, você concluiu a alteração, mas ela ainda está apenas no seu repo. Esta etapa mostrará como enviar uma solicitação ao administrador do repo matriz para mesclar sua alteração.
93 |
94 | Em seu repo no GitHub, você verá o botão `Compare & pull request` ao lado da notificação do novo branch, clique nesse botão.
95 |
96 |
97 |
34 |
35 | O próximo passo será clonar seu repo em sua máquina para que você possa modificá-lo. O IntelliJ IDEA precisa da URL do seu repo, portanto clique no botão "clone" e então clique no ícone "copy to clipboard".
36 |
37 | **CUIDADO**: Um erro que os novatos costumam cometer é clonar o repo do qual você fez o fork, em vez de clonar seu repo. Verifique a barra de endereços do seu navegador e certifique-se de que você está clonando o seu repositório.
38 |
39 | Agora abra o IntelliJ IDEA.
40 |
41 | O IntelliJ IDEA permite que você fassa um check out (em termos do Git clone) de um repositório existente e crie um novo projeto com base nos dados que você baixou.
42 |
43 | No menu principal, escolha VCS | Get from Version Control ou, se nenhum projeto estiver aberto no momento, clique em Get from Version Control na tela inicial.
44 |
45 | Na caixa de diálogo Get from Version Control dialog, especifique a URL do repositório remoto que deseja clonar (você pode clicar em Test para certificar-se de que a conexão com o repositório remoto pode ser estabelecida) ou selecione um dos serviços de hospedagem VCS à esquerda. Se você já estiver conectado ao serviço de hospedagem selecionado, a completion irá sugerir a lista de repositórios disponíveis que você pode clonar.
46 |
47 | Clique em Clone. Se quiser criar um projeto IntelliJ IDEA com base nas fontes que você clonou, clique em Sim na caixa de diálogo de confirmação. O mapeamento de raiz do Git será automaticamente definido para o diretório raiz do projeto.
48 |
49 | Se o seu projeto tiver submodelos, eles também serão clonados e automaticamente registrados como raízes do projeto.
50 |
51 | **Importante**: certifique-se de que é o repositório é o fork e não o original, caso contrário, o procedimento não funcionará.
52 |
53 |
54 | ## Crie um branch
55 |
56 | No Git, o processo de branching (ramificação) é um mecanismo poderoso que permite divergir da linha principal de desenvolvimento, por exemplo, quando você precisa trabalhar em um recurso ou congelar um determinado estado de uma base de código para um release e assim por diante.
57 |
58 | No IntelliJ IDEA, todas as operações com branches são realizadas no pop-up Git Branches. Para ativá-lo, clique no widget Git na barra de status ou pressione Ctrl + Shift + `.
59 |
60 | O nome do branch atual é exibido no widget do Git na barra de status.
61 |
62 | No pop-up branch, escolha Novo branch.
63 |
64 | Na caixa de diálogo que é aberta, especifique o nome do branch e certifique-se de que a opção Checkout branch esteja selecionada se você quiser alternar para esse branch.
65 |
66 | A nova ramificação começará a partir do HEAD atual. Se você deseja iniciar um branch de um commit anterior ao invés do branch atual HEAD, selecione este commit na aba Log da janela da ferramenta de Controle de Versão Alt + 9 e escolha New Branch no menu de contexto.
67 |
68 |
69 | ## Faça as alterações necessárias
70 | Abra ``Contributors.md`` e adicione seu nome em qualquer lugar do arquivo. Este arquivo contém GFM (GitHub Flavored Markdown), que é um tipo proprietário da sintaxe de [markdown](https://pt.wikipedia.org/wiki/Markdown).
71 |
72 | Copie uma das linhas de outros contribuidores e modifique-a com seu nome para ter certeza que você obteve a sintaxe correta.
73 |
74 |
75 | ## Commit & Push modificações para o GitHub
76 |
77 | Selecione os arquivos que deseja commitar ou uma lista de alterações inteira na guia Local Changes da janela da ferramenta de controle de versão Alt + 9 e pressione Ctrl + K ou clique no botão Commit na barra de ferramentas.
78 |
79 | A caixa de diálogo Commit Changes abrira e listara todos os arquivos que foram modificados desde o último commit, bem como todos os arquivos não versionados recém-adicionados.
80 |
81 | Insira uma mensagem de commit que faça sentido.
82 |
83 | Você pode clicar em Commit Message history (Confirmar histórico de mensagens) Ctrl + M para escolher na lista de mensagens de commits recentes.
84 |
85 | Você também pode editar a mensagem de commit mais tarde, antes de enviar o commit.
86 |
87 | Pressione Ctrl + Shift + K ou escolha VCS | Git | Push from the main menu. A caixa de diálogo Push Commits é aberta, mostrando todos os repositórios Git (para projetos de vários repositórios) e listando todos os commits feitos no branch atual em cada repositório desde o último push.
88 |
89 |
90 | ## Envie suas alterações para revisão
91 |
92 | Neste ponto, você concluiu a alteração, mas ela ainda está apenas no seu repo. Esta etapa mostrará como enviar uma solicitação ao administrador do repo matriz para mesclar sua alteração.
93 |
94 | Em seu repo no GitHub, você verá o botão `Compare & pull request` ao lado da notificação do novo branch, clique nesse botão.
95 |
96 |
97 |  98 |
99 | Agora submeta o pull request.
100 |
101 |
98 |
99 | Agora submeta o pull request.
100 |
101 |  102 |
103 | Em breve estarei mesclando todas as suas alterações no branch master deste projeto. Você receberá um e-mail de notificação assim que as alterações forem integradas.
104 |
105 | ## Para onde ir agora?
106 |
107 | Parabéns! Você acabou de completar o padrão _fork -> clone -> edit -> PR_ workflow que você encontrará frequentemente como um contribuidor!
108 |
109 | Comemore sua contribuição e compartilhe-a com seus amigos e seguidores acessando o [web app](https://roshanjossey.github.io/first-contributions/#social-share).
110 |
111 | Você pode se juntar a nossa equipe slack caso precise de alguma ajuda ou tenha alguma dúvida. [Junte-se ao time slack](https://join.slack.com/t/firstcontributors/shared_invite/enQtMzE1MTYwNzI3ODQ0LTZiMDA2OGI2NTYyNjM1MTFiNTc4YTRhZTg4OWZjMzA0ZWZmY2UxYzVkMzI1ZmVmOWI4ODdkZWQwNTM2NDVmNjY).
112 |
113 | Agora vamos começar a contribuir para outros projetos, compilamos uma lista de projetos com questões fáceis para você começar. [Confira a lista de projetos no web app](https://roshanjossey.github.io/first-contributions/#project-list).
114 |
115 |
116 |
117 |
118 | ### [Material Adicional](../../additional-material/translations/additional-material.pt_br.md).
119 |
120 | ## Tutoriais usando outras ferramentas
121 | [Voltar a página principal](https://github.com/firstcontributions/first-contributions/blob/master/translations/README.pt_br.md)
122 |
123 | ## Autopromoção
124 |
125 | Se você gostou deste projeto, de star no GitHub. Se você gostou dessa tradução me siga no GitHub [Vitor Matias](https://github.com/VitorCMatias).
126 |
--------------------------------------------------------------------------------
/gui-tool-tutorials/github-windows-vs2017-tutorial.md:
--------------------------------------------------------------------------------
1 | [](https://github.com/ellerbrock/open-source-badges/)
2 | [](https://join.slack.com/t/firstcontributors/shared_invite/enQtNjkxNzQwNzA2MTMwLTVhMWJjNjg2ODRlNWZhNjIzYjgwNDIyZWYwZjhjYTQ4OTBjMWM0MmFhZDUxNzBiYzczMGNiYzcxNjkzZDZlMDM)
3 | [](https://opensource.org/licenses/MIT)
4 | [](https://www.codetriage.com/roshanjossey/first-contributions)
5 |
6 | # First Contributions
7 |
8 | |
102 |
103 | Em breve estarei mesclando todas as suas alterações no branch master deste projeto. Você receberá um e-mail de notificação assim que as alterações forem integradas.
104 |
105 | ## Para onde ir agora?
106 |
107 | Parabéns! Você acabou de completar o padrão _fork -> clone -> edit -> PR_ workflow que você encontrará frequentemente como um contribuidor!
108 |
109 | Comemore sua contribuição e compartilhe-a com seus amigos e seguidores acessando o [web app](https://roshanjossey.github.io/first-contributions/#social-share).
110 |
111 | Você pode se juntar a nossa equipe slack caso precise de alguma ajuda ou tenha alguma dúvida. [Junte-se ao time slack](https://join.slack.com/t/firstcontributors/shared_invite/enQtMzE1MTYwNzI3ODQ0LTZiMDA2OGI2NTYyNjM1MTFiNTc4YTRhZTg4OWZjMzA0ZWZmY2UxYzVkMzI1ZmVmOWI4ODdkZWQwNTM2NDVmNjY).
112 |
113 | Agora vamos começar a contribuir para outros projetos, compilamos uma lista de projetos com questões fáceis para você começar. [Confira a lista de projetos no web app](https://roshanjossey.github.io/first-contributions/#project-list).
114 |
115 |
116 |
117 |
118 | ### [Material Adicional](../../additional-material/translations/additional-material.pt_br.md).
119 |
120 | ## Tutoriais usando outras ferramentas
121 | [Voltar a página principal](https://github.com/firstcontributions/first-contributions/blob/master/translations/README.pt_br.md)
122 |
123 | ## Autopromoção
124 |
125 | Se você gostou deste projeto, de star no GitHub. Se você gostou dessa tradução me siga no GitHub [Vitor Matias](https://github.com/VitorCMatias).
126 |
--------------------------------------------------------------------------------
/gui-tool-tutorials/github-windows-vs2017-tutorial.md:
--------------------------------------------------------------------------------
1 | [](https://github.com/ellerbrock/open-source-badges/)
2 | [](https://join.slack.com/t/firstcontributors/shared_invite/enQtNjkxNzQwNzA2MTMwLTVhMWJjNjg2ODRlNWZhNjIzYjgwNDIyZWYwZjhjYTQ4OTBjMWM0MmFhZDUxNzBiYzczMGNiYzcxNjkzZDZlMDM)
3 | [](https://opensource.org/licenses/MIT)
4 | [](https://www.codetriage.com/roshanjossey/first-contributions)
5 |
6 | # First Contributions
7 |
8 | | |Visual Studio 2017 Edition|
9 | |---|---|
10 |
11 | It's hard. It's always hard the first time you do something. Especially when you are collaborating, making mistakes isn't a comfortable thing. But open source is all about collaboration & working together. We wanted to simplify the way new open-source contributors learn & contribute for the first time.
12 |
13 | Reading articles & watching tutorials can help, but what comes better than actually doing the stuff without messing up anything. This project aims at providing guidance & simplifying the way rookies make their first contribution. Remember the more relaxed you are the better you learn. If you are looking for making your first contribution just follow the simple steps below. We promise you, it will be fun.
14 |
15 | If you don't have Visual Studio 2017 on your machine, [install it](https://www.visualstudio.com/downloads/).
16 |
17 | ## Fork this repository
18 |
19 |
|Visual Studio 2017 Edition|
9 | |---|---|
10 |
11 | It's hard. It's always hard the first time you do something. Especially when you are collaborating, making mistakes isn't a comfortable thing. But open source is all about collaboration & working together. We wanted to simplify the way new open-source contributors learn & contribute for the first time.
12 |
13 | Reading articles & watching tutorials can help, but what comes better than actually doing the stuff without messing up anything. This project aims at providing guidance & simplifying the way rookies make their first contribution. Remember the more relaxed you are the better you learn. If you are looking for making your first contribution just follow the simple steps below. We promise you, it will be fun.
14 |
15 | If you don't have Visual Studio 2017 on your machine, [install it](https://www.visualstudio.com/downloads/).
16 |
17 | ## Fork this repository
18 |
19 | 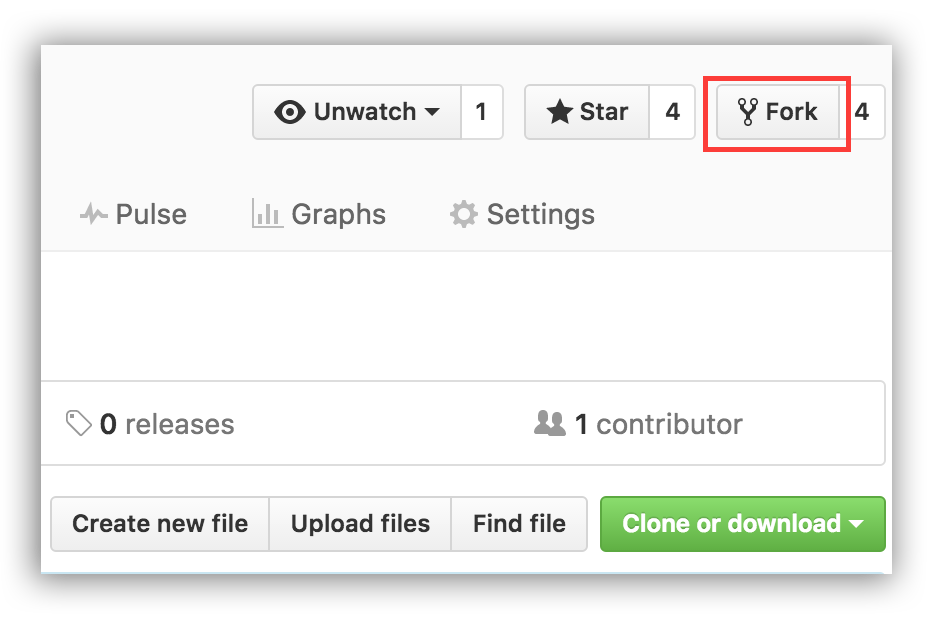 20 |
21 | Fork this repository by clicking on the fork button on the top of this page. This will create of copy of this repository in your GitHub account.
22 |
23 | GitHub keeps track of the relationship between your repo and the one you forked it from. You can think of your repo as a working copy.
24 |
25 | Most top-level GitHub repos (i.e. ones not forked from any other repo) have a small core team of people who can directly commit changes. All other contributors must fork the repo and make changes in the fork, then create a Pull Request to ask for their changes to be merged back into the top-level repo. If the top-level repo administrator likes the changes they will be merged and you will gain instant fame and fortune! More on how to do that later.
26 |
27 | ## Clone your repository
28 |
29 |
20 |
21 | Fork this repository by clicking on the fork button on the top of this page. This will create of copy of this repository in your GitHub account.
22 |
23 | GitHub keeps track of the relationship between your repo and the one you forked it from. You can think of your repo as a working copy.
24 |
25 | Most top-level GitHub repos (i.e. ones not forked from any other repo) have a small core team of people who can directly commit changes. All other contributors must fork the repo and make changes in the fork, then create a Pull Request to ask for their changes to be merged back into the top-level repo. If the top-level repo administrator likes the changes they will be merged and you will gain instant fame and fortune! More on how to do that later.
26 |
27 | ## Clone your repository
28 |
29 | 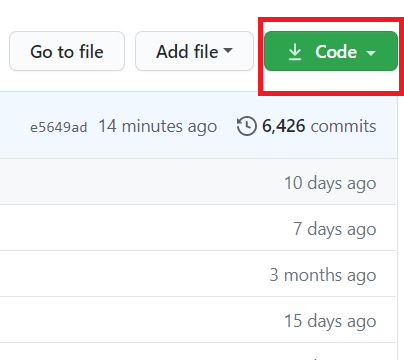 30 |
31 | The next step is to clone your repo down to your machine so you can begin making changes. Visual Studio needs the URL of your repo, so click the "clone" button and then click the "copy to clipboard" icon.
32 |
33 | **CAREFUL:** One mistake that new contributors often make is to clone the repo you forked *from* rather than cloning your repo. Check your browser's address bar and make sure you are cloning your repo.
34 |
35 | It is now time to jump in to Visual Studio 2017! You will be working in the Team Explorer tab for most of this tutorial. If it is not open by default, click `View > Team Explorer` to open it.
36 |
37 |
30 |
31 | The next step is to clone your repo down to your machine so you can begin making changes. Visual Studio needs the URL of your repo, so click the "clone" button and then click the "copy to clipboard" icon.
32 |
33 | **CAREFUL:** One mistake that new contributors often make is to clone the repo you forked *from* rather than cloning your repo. Check your browser's address bar and make sure you are cloning your repo.
34 |
35 | It is now time to jump in to Visual Studio 2017! You will be working in the Team Explorer tab for most of this tutorial. If it is not open by default, click `View > Team Explorer` to open it.
36 |
37 | 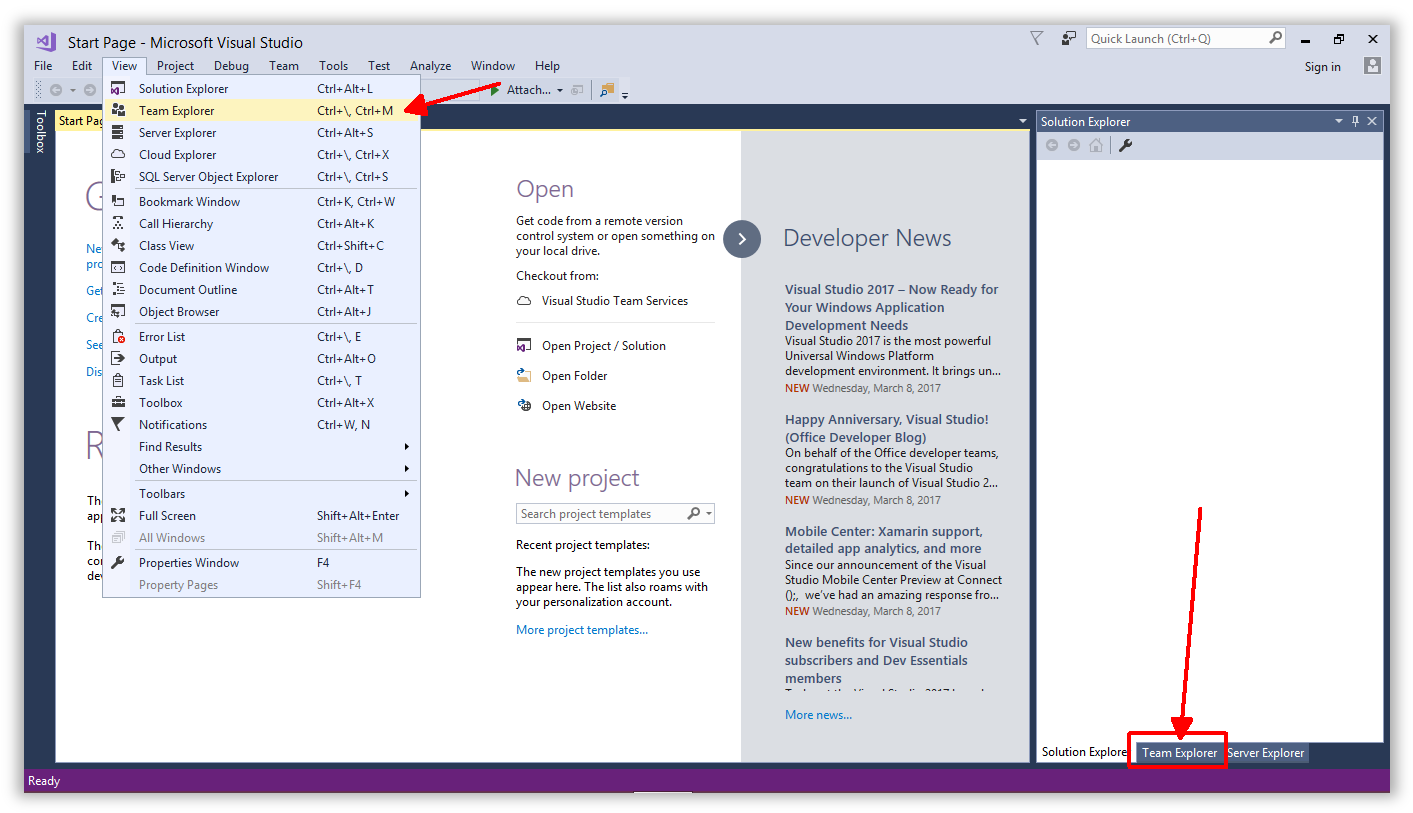 38 |
39 | Team Explorer has many views and there are navigation buttons located at the top to help you find the different areas. To clone a repo, you need to be on the Connect view, which should be the default. If you do not see the 'clone' button, click the green plug at the top.
40 |
41 | Click the `Clone` option under **Local Git Repositories** and paste the URL to your repo in the text box. This should be the URL you copied to your clipboard from GitHub previously.
42 |
43 | Click the `Clone` button to initiate the process.
44 |
45 |
38 |
39 | Team Explorer has many views and there are navigation buttons located at the top to help you find the different areas. To clone a repo, you need to be on the Connect view, which should be the default. If you do not see the 'clone' button, click the green plug at the top.
40 |
41 | Click the `Clone` option under **Local Git Repositories** and paste the URL to your repo in the text box. This should be the URL you copied to your clipboard from GitHub previously.
42 |
43 | Click the `Clone` button to initiate the process.
44 |
45 | 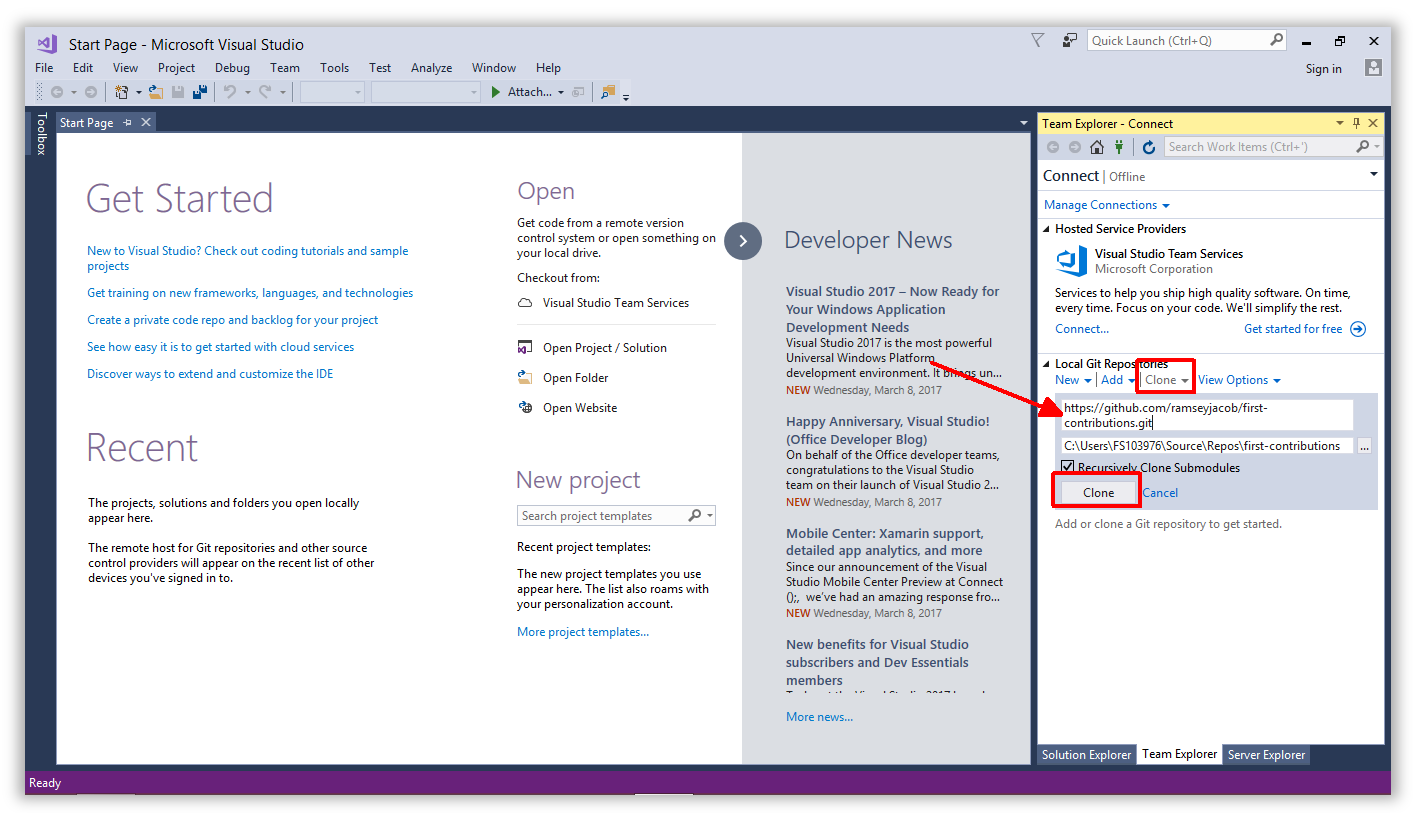 46 |
47 | When the process is complete you will be moved over to the Solution Explorer tab where you can see the contents of your repo. Yours will look different than the screenshot below because things change!
48 |
49 |
46 |
47 | When the process is complete you will be moved over to the Solution Explorer tab where you can see the contents of your repo. Yours will look different than the screenshot below because things change!
48 |
49 | 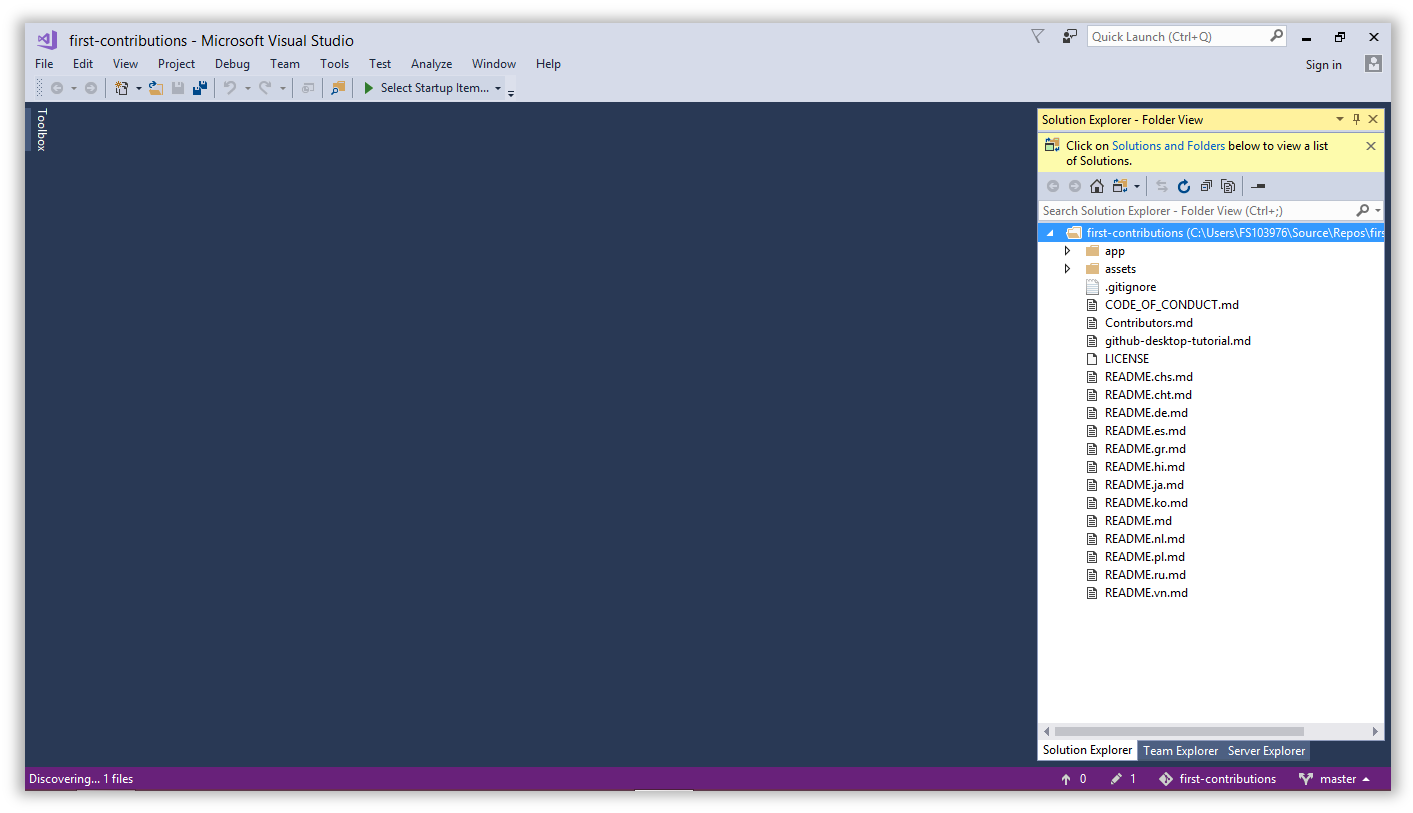 50 |
51 | ## Create a branch
52 |
53 | Click back to the Team Explorer tab and use the main navigation dropdown to open the Branches view.
54 |
55 |
50 |
51 | ## Create a branch
52 |
53 | Click back to the Team Explorer tab and use the main navigation dropdown to open the Branches view.
54 |
55 | 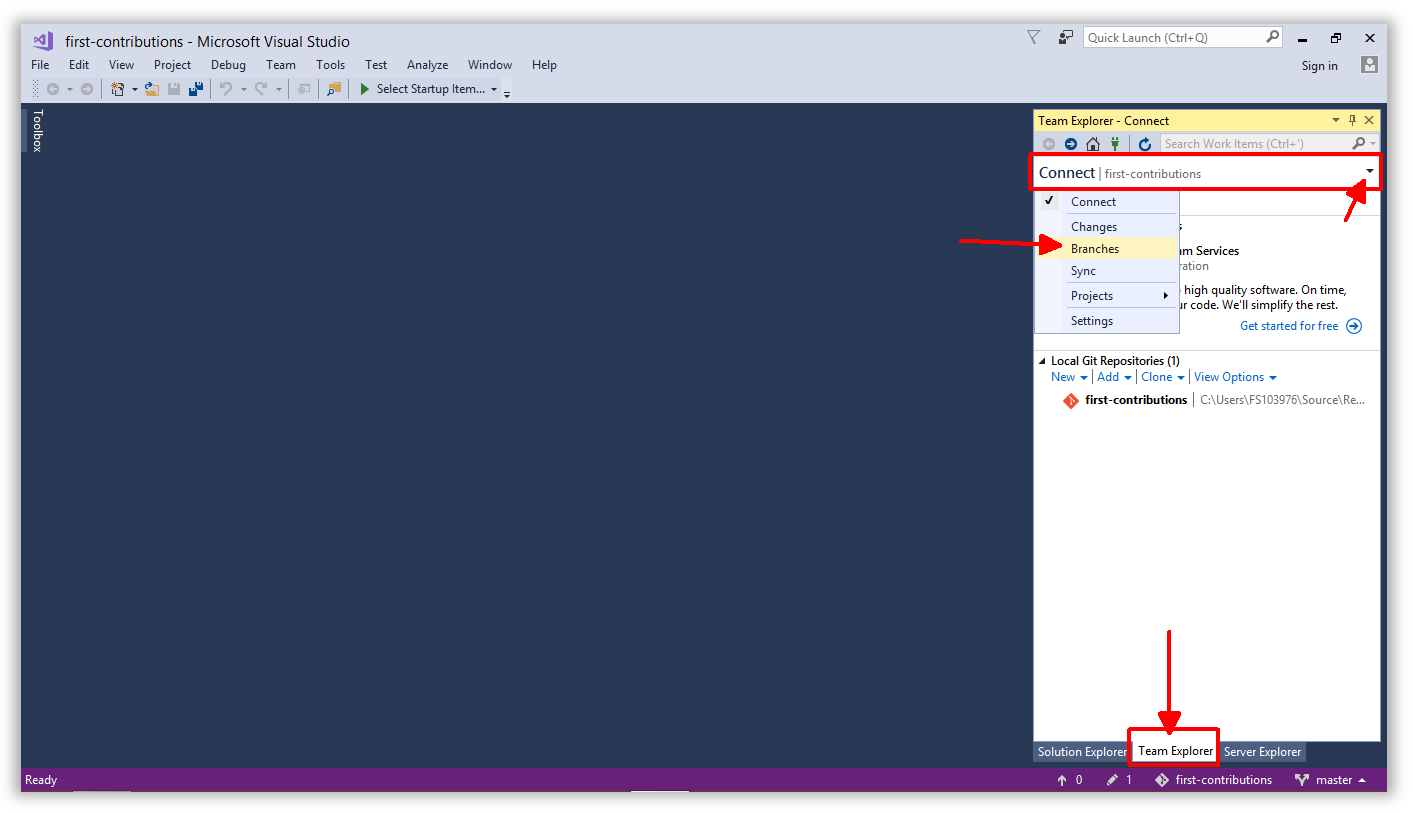 56 |
57 | You should see the **first-contributions** repo and the default branch, which is called `master`. Right-click on `master` and choose `New Local Branch From...`.
58 |
59 |
56 |
57 | You should see the **first-contributions** repo and the default branch, which is called `master`. Right-click on `master` and choose `New Local Branch From...`.
58 |
59 | 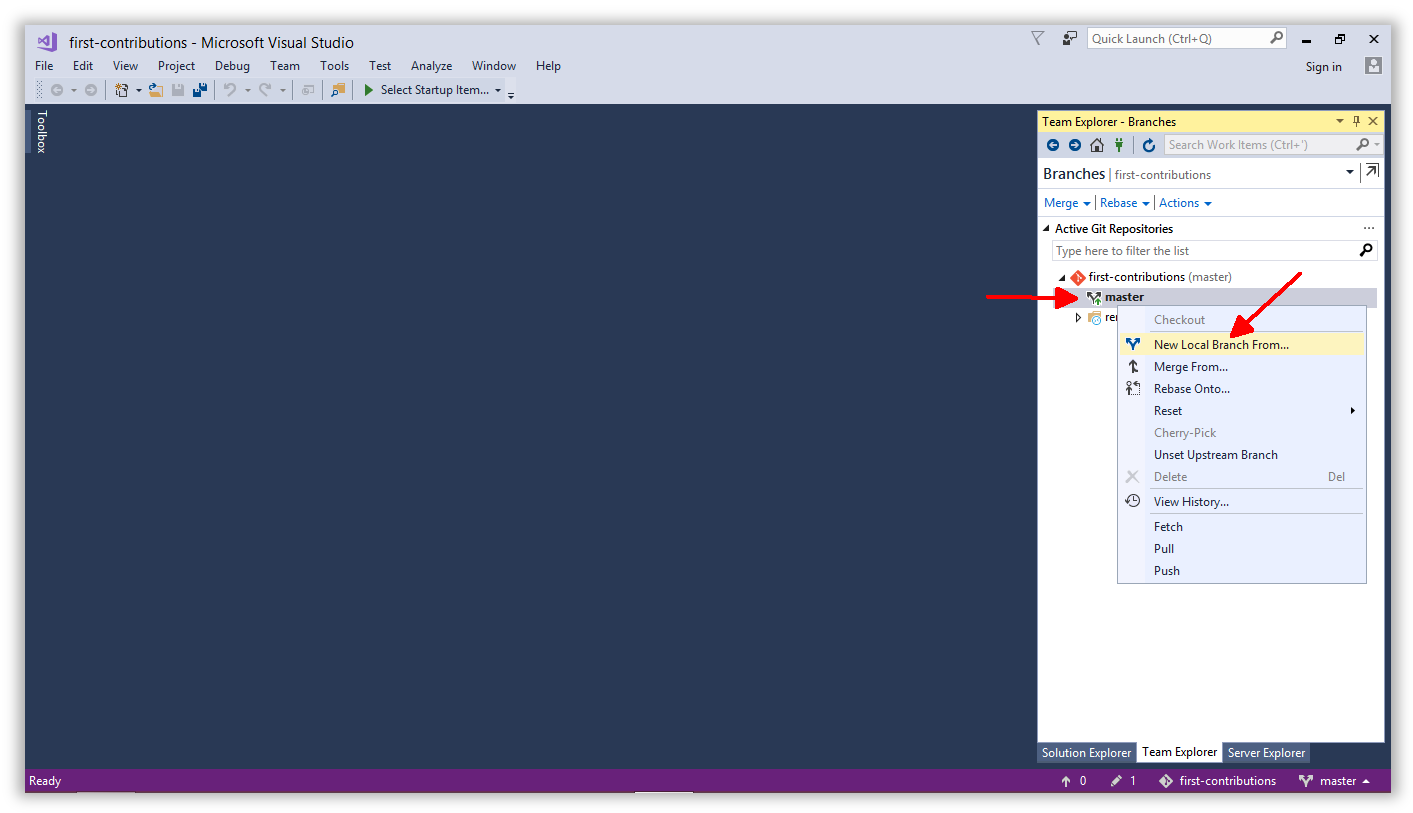 60 |
61 | Give your branch a name like `add-
60 |
61 | Give your branch a name like `add-`, for example: `add-alonzo-church`.
62 |
63 | Leave the `Checkout branch` box checked and click the `Create Branch` button.
64 |
65 | 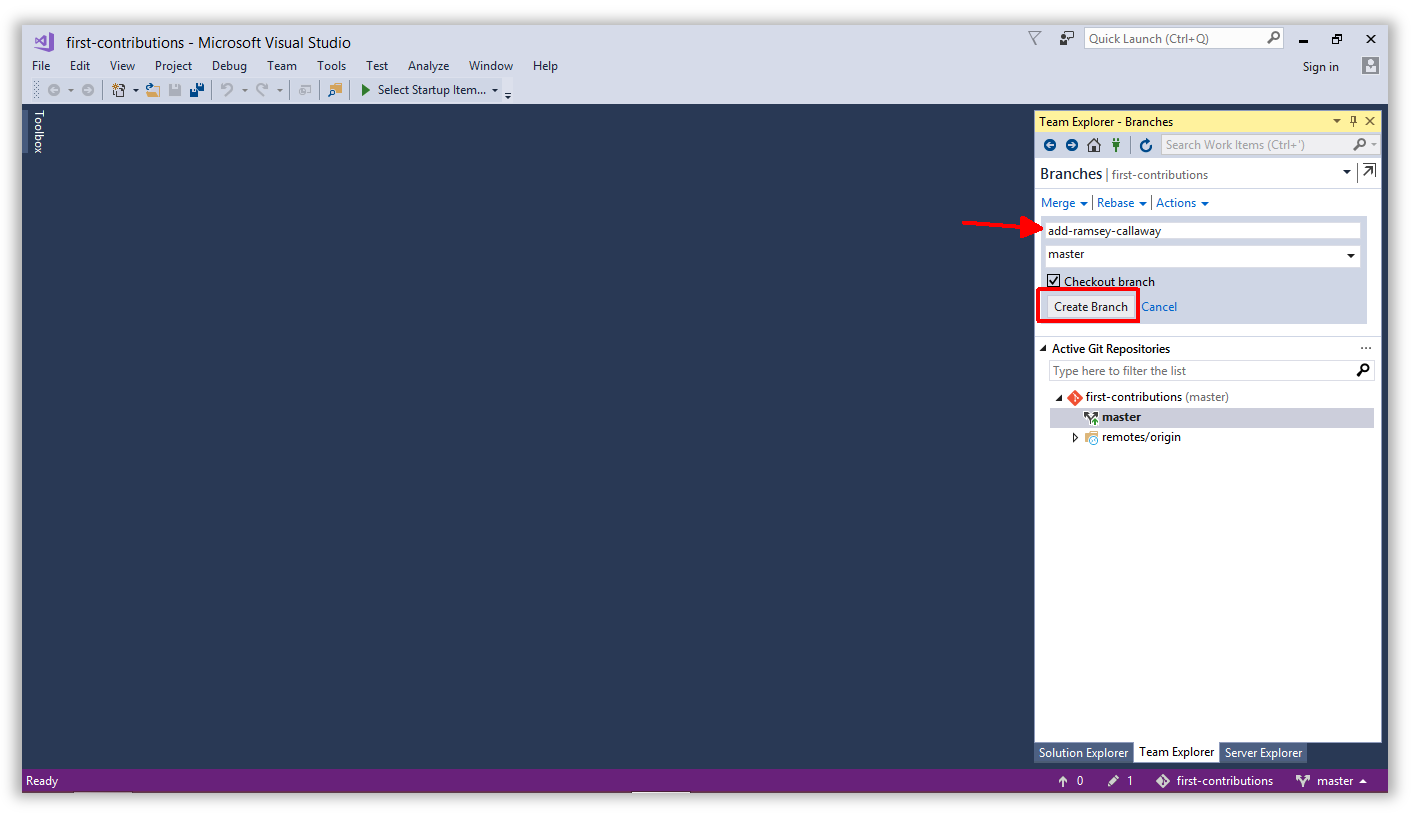 66 |
67 | You should see your new branch in the list.
68 |
69 |
66 |
67 | You should see your new branch in the list.
68 |
69 | 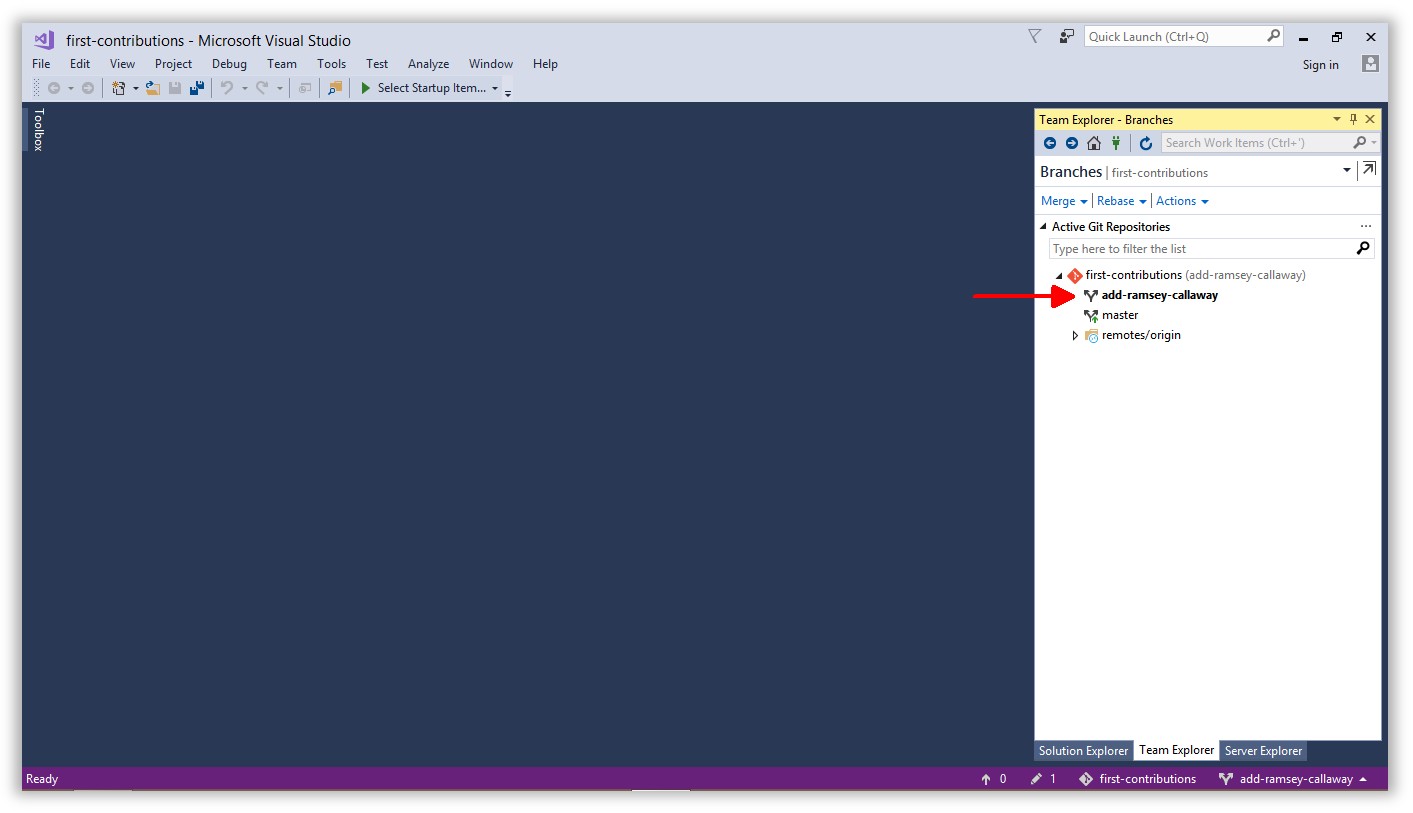 70 |
71 | ## Make necessary changes
72 |
73 | Open `Contributors.md` and add your name to the end of the list. This file contains GFM (GitHub Flavored Markdown) which is a proprietary flavor of the markdown syntax.
74 |
75 | Copy one of the other contributors' lines and modify it with your name to make sure you get the syntax right - it can be picky.
76 |
77 |
70 |
71 | ## Make necessary changes
72 |
73 | Open `Contributors.md` and add your name to the end of the list. This file contains GFM (GitHub Flavored Markdown) which is a proprietary flavor of the markdown syntax.
74 |
75 | Copy one of the other contributors' lines and modify it with your name to make sure you get the syntax right - it can be picky.
76 |
77 | 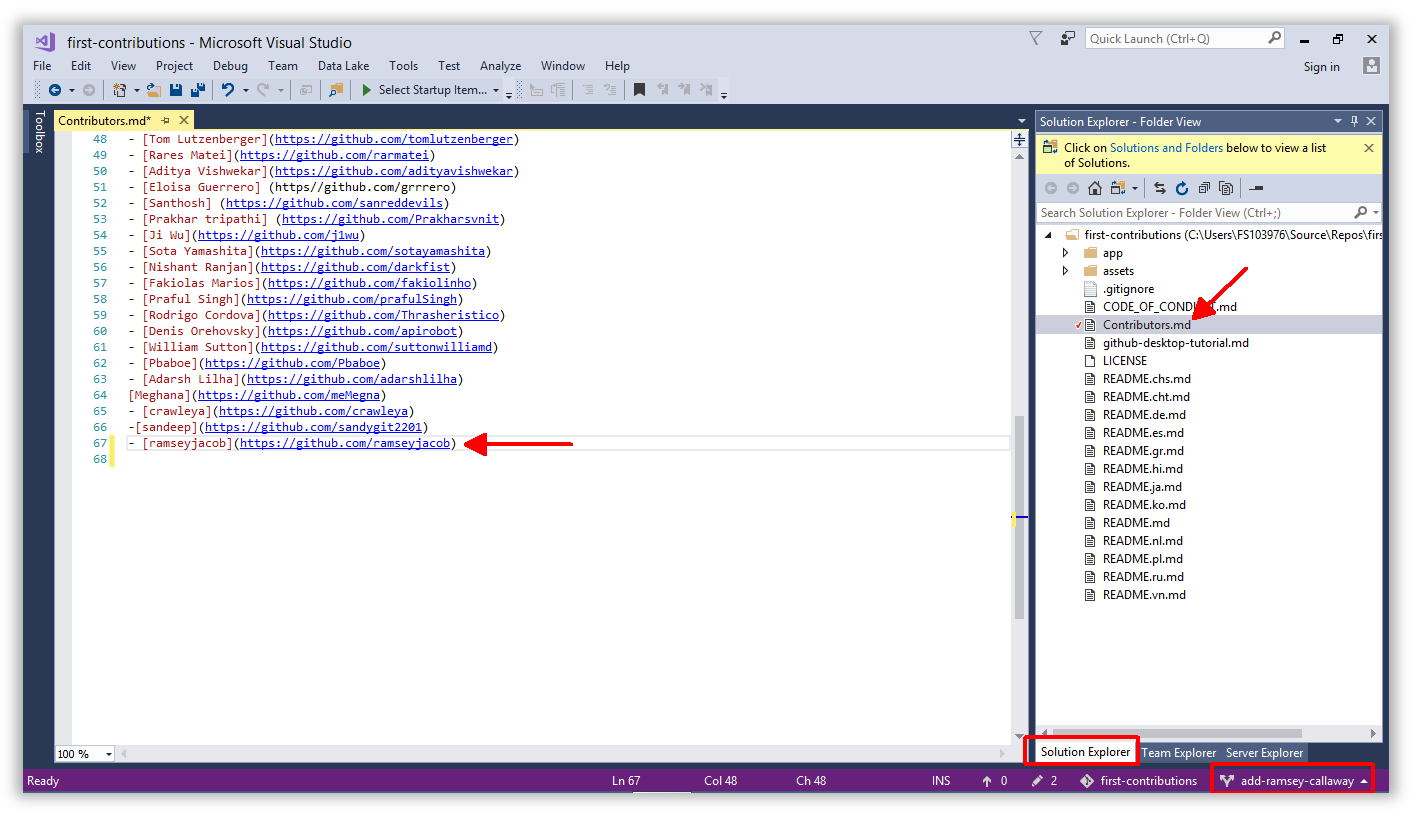 78 |
79 | ## Commit & Push changes to GitHub
80 |
81 | Switch back to Team Explorer and navigate to the Changes view.
82 |
83 |
78 |
79 | ## Commit & Push changes to GitHub
80 |
81 | Switch back to Team Explorer and navigate to the Changes view.
82 |
83 | 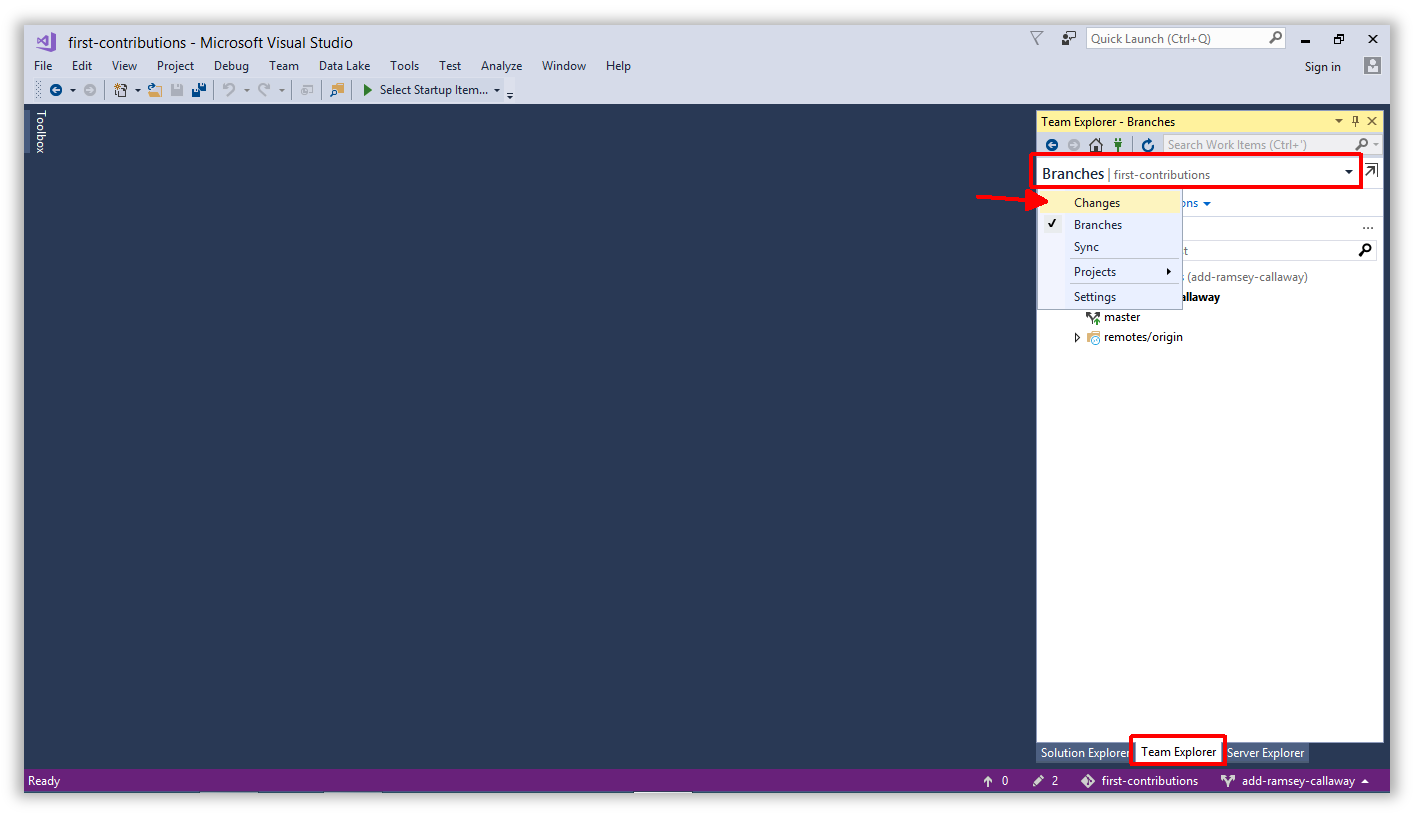 84 |
85 | Enter the information you want to post with your commit and click `Save`. Visual Studio will remember it for future commits.
86 |
87 |
84 |
85 | Enter the information you want to post with your commit and click `Save`. Visual Studio will remember it for future commits.
86 |
87 | 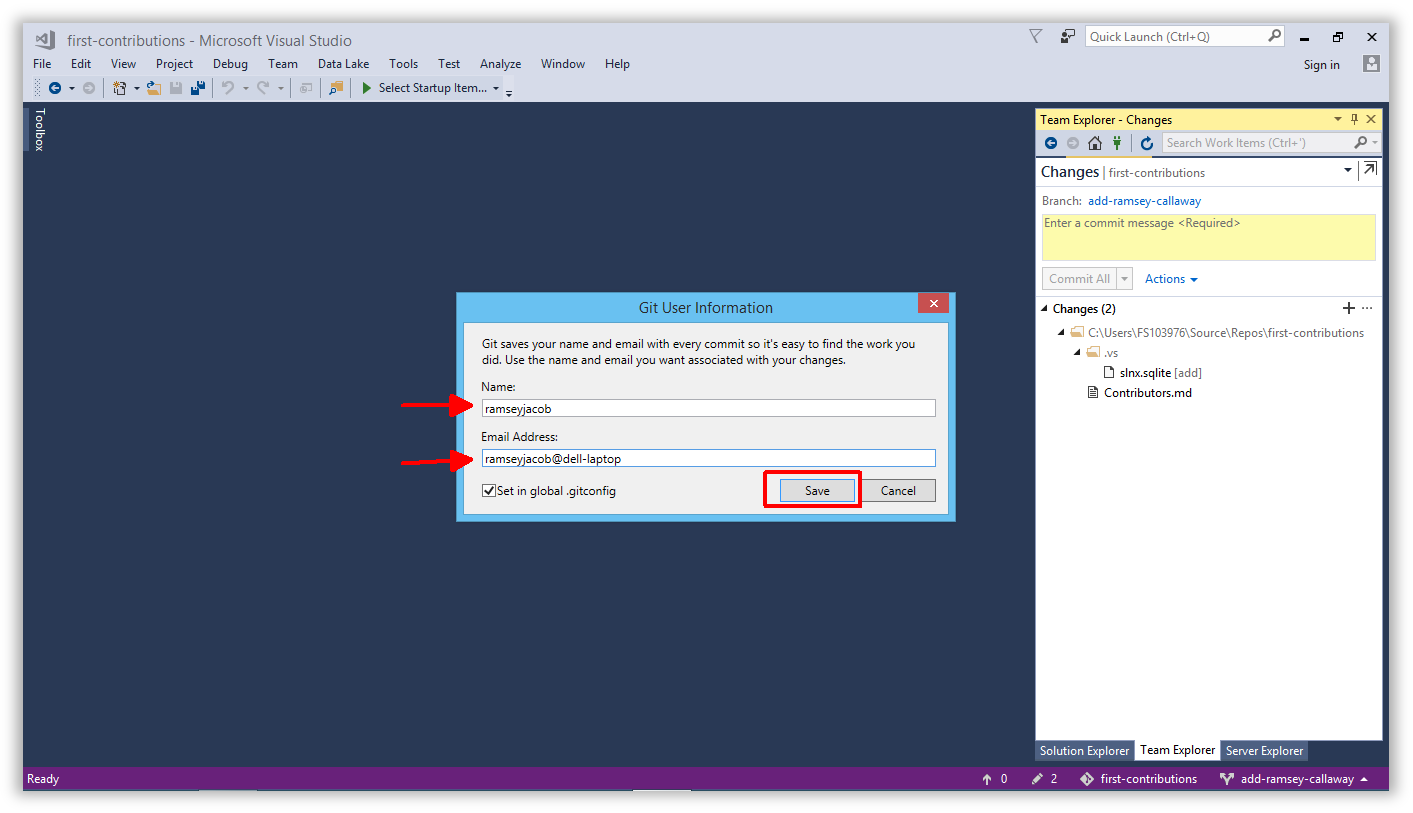 88 |
89 | **NOTE:** Visual Studio uses a hidden folder called `.vs` to store your personal settings and preferences. The contents of this folder **should not be saved in Git**.
90 | If it has not been ignored already, you may need to tell Git to ignore this folder so it does not send it up to the repo.
91 |
92 | This folder has already been ignored in this repo, so you should not have to perform this step...it is just here for your reference for future projects.
93 |
94 |
88 |
89 | **NOTE:** Visual Studio uses a hidden folder called `.vs` to store your personal settings and preferences. The contents of this folder **should not be saved in Git**.
90 | If it has not been ignored already, you may need to tell Git to ignore this folder so it does not send it up to the repo.
91 |
92 | This folder has already been ignored in this repo, so you should not have to perform this step...it is just here for your reference for future projects.
93 |
94 | 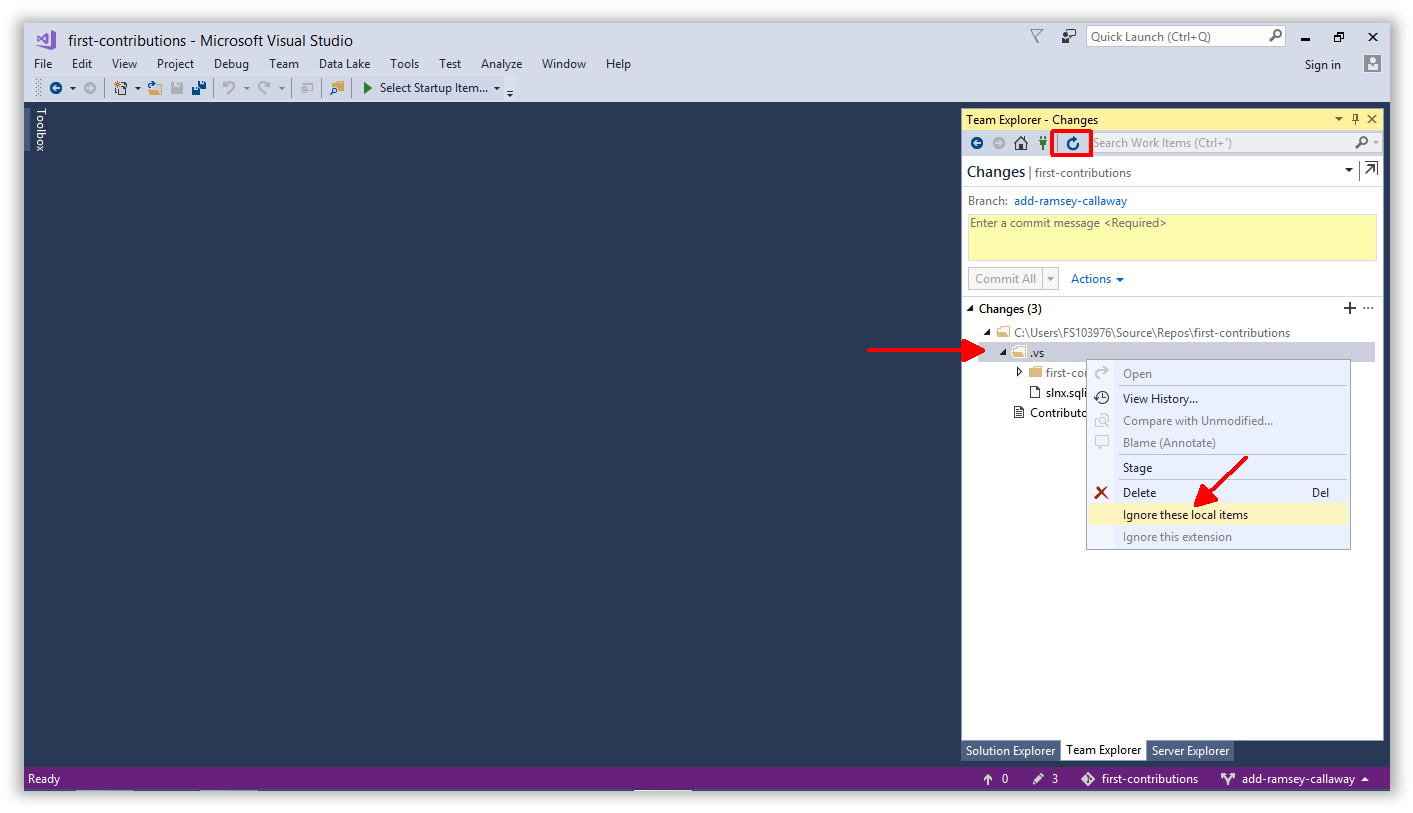 95 |
96 | Now you should see a list of changed files and a textbox to type a commit comment. Comments should be in brief but thorough. There is nothing worse than reading through commit comments and seeing this: `"I updated some stuff"`. Take a few seconds to outline your commit. Your team will thank you later, and you might even thank yourself!
97 |
98 | Click `Commit All and Push` to perform a local commit and push your changes back up to your repo, all in one step.
99 |
100 | **NOTE:** Commit can be performed separately from Push. We do both here for convenience. Commit logs your changes locally but they will not be reflected in your GitHub repo until you Push.
101 |
102 |
95 |
96 | Now you should see a list of changed files and a textbox to type a commit comment. Comments should be in brief but thorough. There is nothing worse than reading through commit comments and seeing this: `"I updated some stuff"`. Take a few seconds to outline your commit. Your team will thank you later, and you might even thank yourself!
97 |
98 | Click `Commit All and Push` to perform a local commit and push your changes back up to your repo, all in one step.
99 |
100 | **NOTE:** Commit can be performed separately from Push. We do both here for convenience. Commit logs your changes locally but they will not be reflected in your GitHub repo until you Push.
101 |
102 | 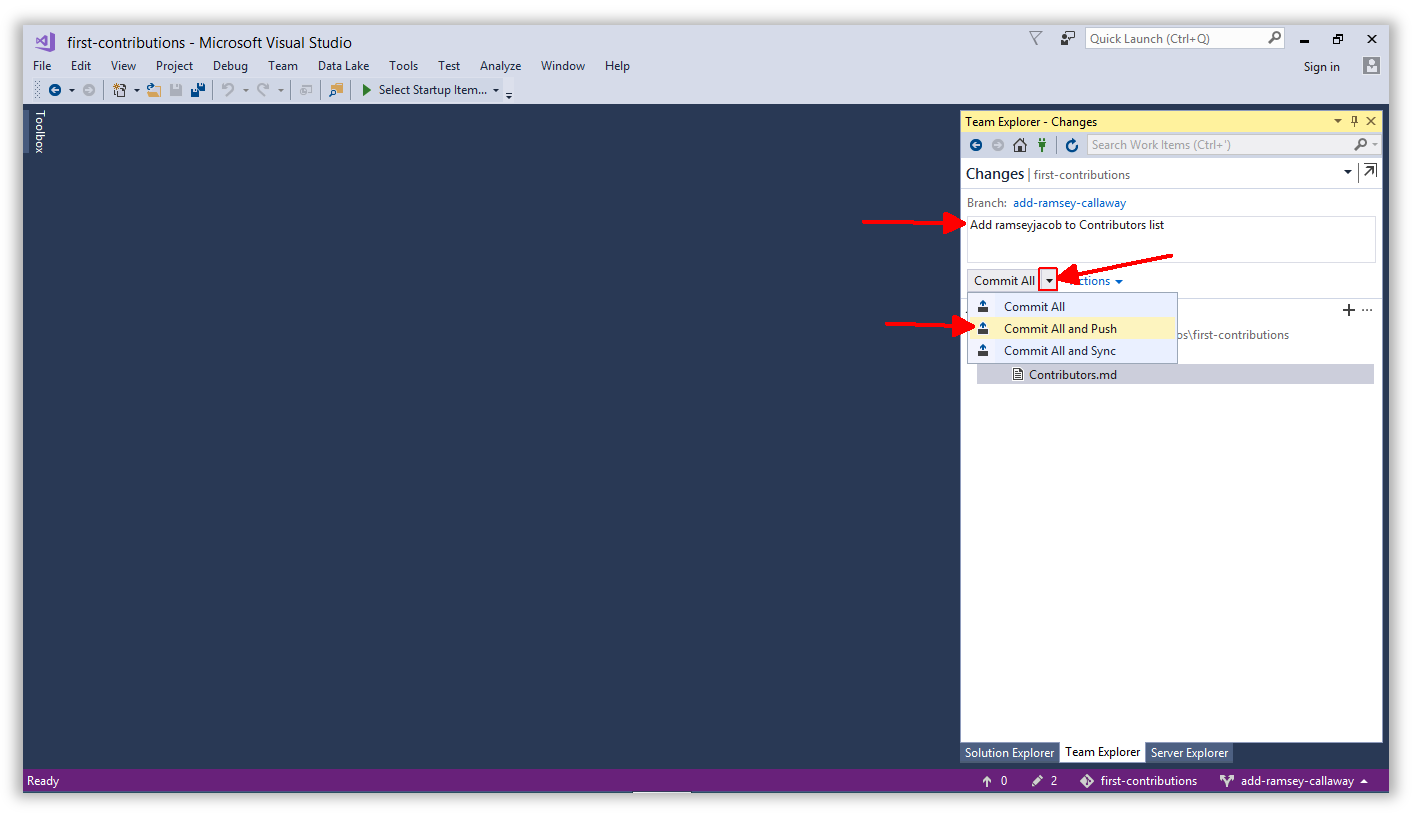 103 |
104 | The first time you Push to GitHub, Visual Studio will ask for your GitHub credentials. They will be cached so you should not see this very often.
105 |
106 |
103 |
104 | The first time you Push to GitHub, Visual Studio will ask for your GitHub credentials. They will be cached so you should not see this very often.
105 |
106 | 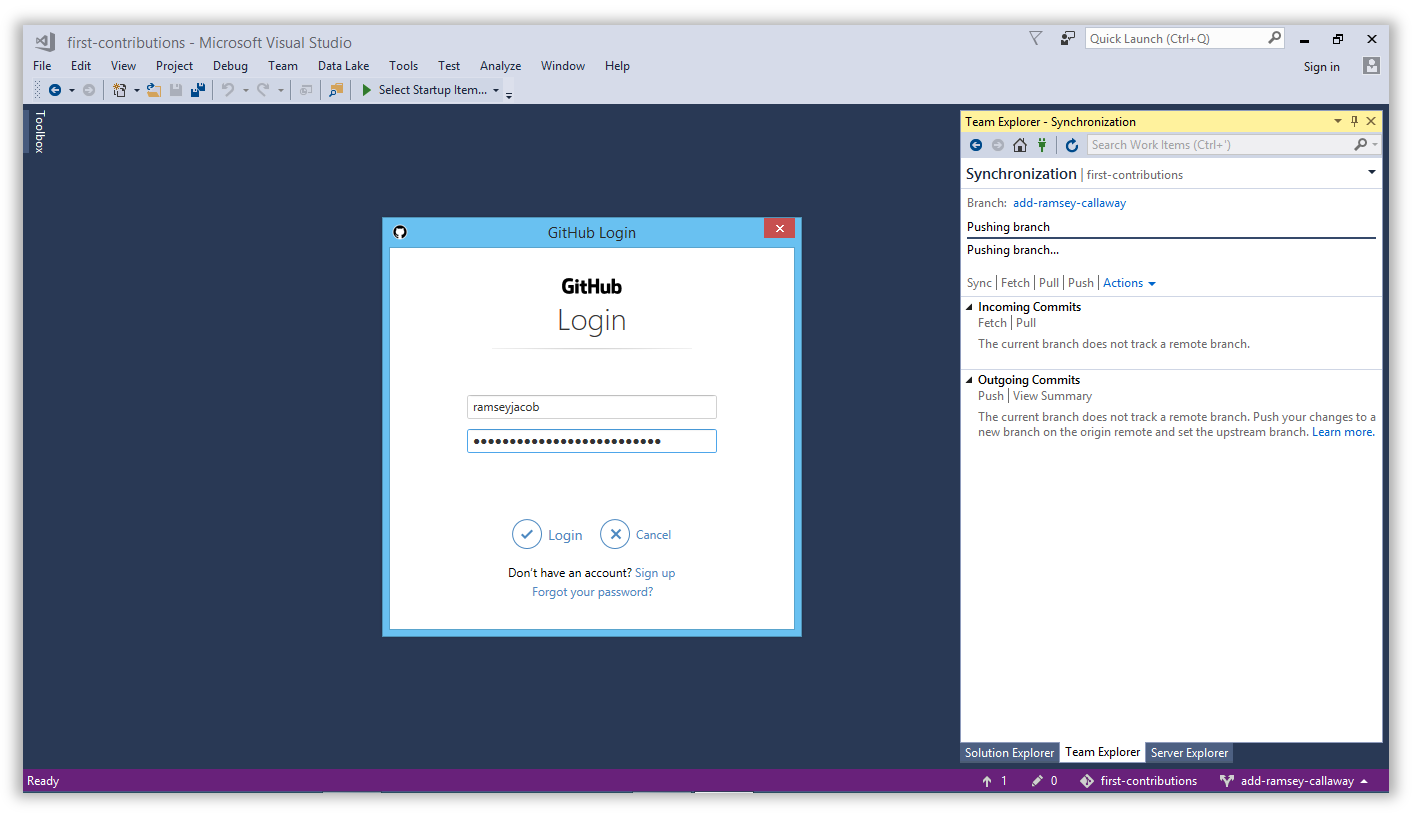 107 |
108 | After the Push operation completes, open your repo in GitHub and you should see a message indicating a recently pushed branch.
109 |
110 | You can view your changes by opening the `Branch: master` dropdown and selecting your new branch. Congratulations, you can share the branch URL with the world to show your progress!
111 |
112 |
107 |
108 | After the Push operation completes, open your repo in GitHub and you should see a message indicating a recently pushed branch.
109 |
110 | You can view your changes by opening the `Branch: master` dropdown and selecting your new branch. Congratulations, you can share the branch URL with the world to show your progress!
111 |
112 | 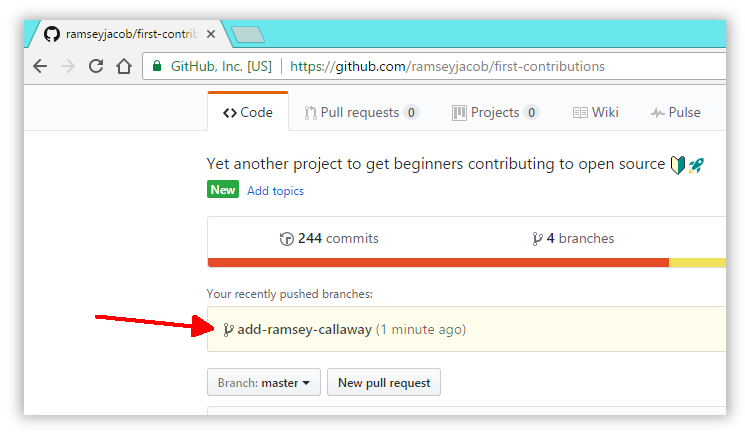 113 |
114 | ## Submit your changes for review
115 |
116 | At this point you have completed your change but it still only resides in your repo. This step will show you how to submit a request to the administrator of the top-level repo to merge your change.
117 |
118 | In your repo on GitHub you'll see the `Compare & pull request` button next to the new branch notification. Click on that button.
119 |
120 |
113 |
114 | ## Submit your changes for review
115 |
116 | At this point you have completed your change but it still only resides in your repo. This step will show you how to submit a request to the administrator of the top-level repo to merge your change.
117 |
118 | In your repo on GitHub you'll see the `Compare & pull request` button next to the new branch notification. Click on that button.
119 |
120 |  121 |
122 | Now submit the pull request.
123 |
124 |
121 |
122 | Now submit the pull request.
123 |
124 | 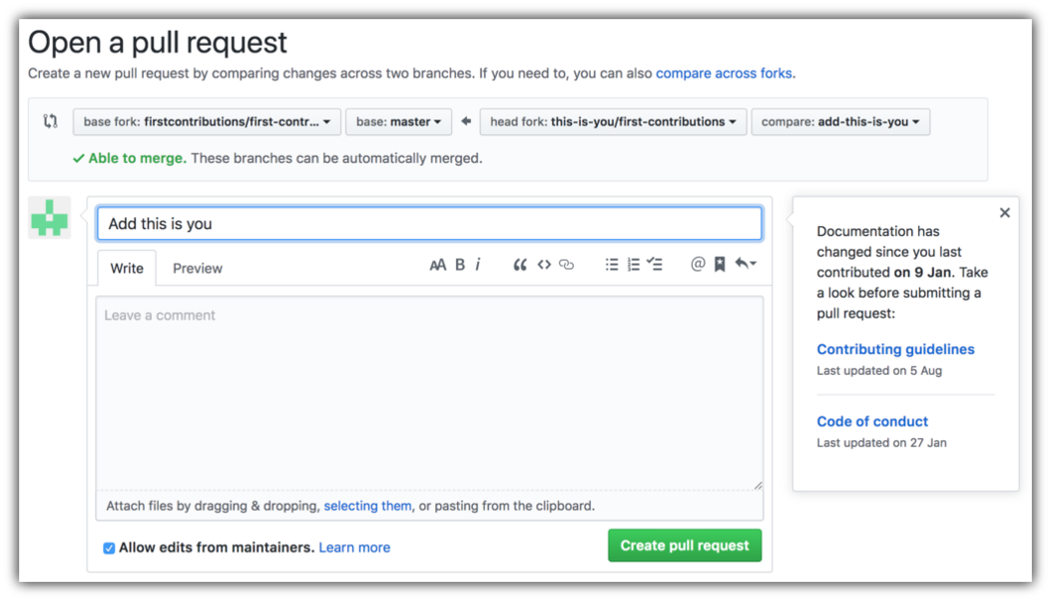 125 |
126 | Soon I'll be merging all your changes into the master branch of this project. You will get a notification email once the changes have been merged.
127 |
128 | ## Where to go from here?
129 |
130 | Congrats! You have just completed the standard _fork -> clone -> edit -> PR_ workflow that you'll encounter often as a contributor!
131 |
132 | Celebrate your contribution and share it with your friends and followers by going to [web app](https://firstcontributions.github.io#social-share).
133 |
134 | You can join our slack team in case you need any help or have any questions. [Join slack team](https://join.slack.com/t/firstcontributors/shared_invite/enQtMzE1MTYwNzI3ODQ0LTZiMDA2OGI2NTYyNjM1MTFiNTc4YTRhZTg4OWZjMzA0ZWZmY2UxYzVkMzI1ZmVmOWI4ODdkZWQwNTM2NDVmNjY).
135 |
136 |
137 | ### [Additional material](../additional-material/git_workflow_scenarios/additional-material.md)
138 |
139 | ## Tutorials Using Other Tools
140 | [Back to main page](https://github.com/firstcontributions/first-contributions#tutorials-using-other-tools)
141 |
--------------------------------------------------------------------------------
125 |
126 | Soon I'll be merging all your changes into the master branch of this project. You will get a notification email once the changes have been merged.
127 |
128 | ## Where to go from here?
129 |
130 | Congrats! You have just completed the standard _fork -> clone -> edit -> PR_ workflow that you'll encounter often as a contributor!
131 |
132 | Celebrate your contribution and share it with your friends and followers by going to [web app](https://firstcontributions.github.io#social-share).
133 |
134 | You can join our slack team in case you need any help or have any questions. [Join slack team](https://join.slack.com/t/firstcontributors/shared_invite/enQtMzE1MTYwNzI3ODQ0LTZiMDA2OGI2NTYyNjM1MTFiNTc4YTRhZTg4OWZjMzA0ZWZmY2UxYzVkMzI1ZmVmOWI4ODdkZWQwNTM2NDVmNjY).
135 |
136 |
137 | ### [Additional material](../additional-material/git_workflow_scenarios/additional-material.md)
138 |
139 | ## Tutorials Using Other Tools
140 | [Back to main page](https://github.com/firstcontributions/first-contributions#tutorials-using-other-tools)
141 |
--------------------------------------------------------------------------------
5 |
6 |
7 |
8 |
9 |
10 | # Here-contributions-Begins
11 |
12 | | 15 | 👋 join our discord community Coders Evoke 16 |
17 | 18 | It's hard. It's always hard the first time you do something. Especially when you are collaborating, making mistakes isn't a comfortable thing. But open source is all about collaboration & working together. We wanted to simplify the way new open-source contributors learn & contribute for the first time. 19 | 20 | Reading articles & watching tutorials can help, but what comes better than actually doing the stuff without messing up anything. This project aims at providing guidance & simplifying the way rookies make their first contribution. Remember the more relaxed you are, the better you learn. If you are looking for making your first contribution, just follow the simple steps below. We promise you, it will be fun. 21 | 22 | If you don't have Visual Studio Code on your machine, [install it](https://code.visualstudio.com/download). 23 | 24 | **Notice:** This tutorial was made using Visual Studio Code (Version 1.27.2) on a Windows 10 machine. Later in this tutorial we will make use of some keyboard shortcuts. These may differ on other operating systems (macOS/Linux). 25 | 26 | ## Fork this repository 27 | 28 |
29 |
30 | Fork this repo by clicking on the fork button on the top right of this page. This will create of copy of this repository in your GitHub account.
31 |
32 | GitHub keeps track of the relationship between your repo and the one you have forked it from. You can think of your repo as a working copy.
33 |
34 | Most top-level GitHub repos (i.e. ones not forked from any other repo) have a small core team of people who can directly commit changes. All other contributors must fork the repo and make changes in the fork, then create a Pull Request to ask for their changes to be merged back into the top-level repo. If the top-level repo administrator likes the changes they will be merged and you will gain instant fame and fortune! More on how to do that later.
35 |
36 | ## Clone your repository
37 |
38 |
39 |
40 | The next step is to clone your repo down to your machine so you can begin making changes. VS Code needs the URL of your repo, so click the "clone" button and then click the "copy to clipboard" icon.
41 |
42 | **CAREFUL:** One mistake that new contributors often make is to clone the repo you forked _from_ rather than cloning your repo. Check your browser's address bar and make sure you are cloning your repo.
43 |
44 | Now open up Visual Studio Code. The welcome page of VS Code will pop up. From there press `F1` to open up the bar shown below. Notice that there is already a `>` (greater than) sign in the text field. You can also get to the input prompt by pressing `CTRL-P` and then type the `>` character.
45 |
46 |
47 |
48 | You may notice that there are already some obscure commands listed below. Those are my recently used commands. So just don't care about them.
49 |
50 |
51 |
52 | Now type in `git clone`, only `git` or `clone` (it works like a search).
53 | Select the Entry `Git: Clone` and press `Enter`
54 |
55 |
56 |
57 | Paste the URL of your repository and press `Enter`. This will open up a File Explorer where you can then choose where the Git repository should be stored.
58 |
59 | **Important**: Make sure it is the forked repository and not the original one, otherwise it won't work.
60 |
61 |
62 |
63 | You should see a status popup on the bottom right of Visual Studio Code. After it has finished, you can open up the cloned repository (now a folder on your machine) using the buttons in the dialog.
64 |
65 | ## Create a branch
66 |
67 | Open up the command palette again by pressing `F1`. Type in `branch` and select the `create branch` command from there. In the next step type in the name of your new branch, for example `add-david-kroell`. Press enter and the branch will be created. The branch is also already checked out. [What does checkout mean?](https://www.git-scm.com/docs/git-checkout)
68 |
69 |
70 |
71 | ## Make necessary changes
72 |
73 | Open `Contributors.md` and add your name anywhere in the file. This file contains GFM (GitHub Flavored Markdown) which is a proprietary flavor of the markdown syntax.
74 |
75 | Copy one of the other contributors' lines and modify it with your name to make sure you get the syntax right - it can be picky.
76 |
77 |
78 |
79 | ## Commit & Push changes to GitHub
80 |
81 | On the left side of VS Code is a menu with 5 icons displayed. Select the version control/Source Control icon.
82 | (Shortcut : Ctrl + Shift + G)
83 |
84 |
85 |
86 | The file explorer displays all files which were changed after the last commit. By hovering the files and clicking the `+` (plus) the files are staged.
87 |
88 |
89 |
90 | Type something in the line on top of the explorer and press the checkmark. The changes are now committed to your local copy. Now the changes have to be pushed back to GitHub.
91 |
92 |
93 |
94 | Use the three-dot icon to open up the menu where you select the `Publish Branch` option. This should open up a dialog to put your GitHub credentials in.
95 |
96 |
97 |
98 | ## Submit your changes for review
99 |
100 | At this point you have completed your change but it still only resides in your repo. This step will show you how to submit a request to the administrator of the top-level repo to merge your change.
101 |
102 | In your repo on GitHub you'll see the `Compare & pull request` button next to the new branch notification. Click on that button.
103 |
104 |
105 |
106 | Now submit the pull request.
107 |
108 |
109 |
110 | Soon I'll be merging all your changes into the master branch of this project. You will get a notification email once the changes have been merged.
111 |
112 | ## Where to go from here?
113 |
114 | Congrats!! You have just completed the standard _fork -> clone -> edit -> PR_ workflow that you'll encounter often as a contributor!
115 |
116 |
117 |
118 | You can join our discord team in case you need any help or have any questions. [Join discord team]( https://discord.gg/FZusE7FH4q).
119 |
120 |
121 |
122 |
123 | ## star this repositary
124 |
--------------------------------------------------------------------------------
/gui-tool-tutorials/translations/github-windows-intellij-tutorial.pt_br.md:
--------------------------------------------------------------------------------
1 | [](https://github.com/ellerbrock/open-source-badges/)
2 | [](https://join.slack.com/t/firstcontributors/shared_invite/enQtNjkxNzQwNzA2MTMwLTVhMWJjNjg2ODRlNWZhNjIzYjgwNDIyZWYwZjhjYTQ4OTBjMWM0MmFhZDUxNzBiYzczMGNiYzcxNjkzZDZlMDM)
3 | [](https://opensource.org/licenses/MIT)
4 | [](https://www.codetriage.com/roshanjossey/first-contributions)
5 |
6 | # Primeiras Contribuições
7 |
8 | |
24 |
25 | Fork este repo clicando no botão fork(bifurcar) no canto superior direito desta página. Isso criará uma cópia deste repositório em sua conta do GitHub.
26 |
27 | O GitHub rastreia a relação entre seu repo e o original, você pode pensar em seu repo como uma cópia de trabalho.
28 | Muitos dos repositórios matrizes do GitHub (ou seja, aqueles que não são Fork de nenhum outro repo) têm um pequeno grupo de pessoas que podem fazer commits de modificações diretamente. Todos os outros contribuidores devem forkear o repo e fazer alterações no fork, em seguida, devem criar um Pull Request para solicitar um Merge(mescla) das modificações feitas no repositório original.
29 |
30 |
31 | ## Clone seu Repositório
32 |
33 |
34 |
35 | O próximo passo será clonar seu repo em sua máquina para que você possa modificá-lo. O IntelliJ IDEA precisa da URL do seu repo, portanto clique no botão "clone" e então clique no ícone "copy to clipboard".
36 |
37 | **CUIDADO**: Um erro que os novatos costumam cometer é clonar o repo do qual você fez o fork, em vez de clonar seu repo. Verifique a barra de endereços do seu navegador e certifique-se de que você está clonando o seu repositório.
38 |
39 | Agora abra o IntelliJ IDEA.
40 |
41 | O IntelliJ IDEA permite que você fassa um check out (em termos do Git clone) de um repositório existente e crie um novo projeto com base nos dados que você baixou.
42 |
43 | No menu principal, escolha VCS | Get from Version Control ou, se nenhum projeto estiver aberto no momento, clique em Get from Version Control na tela inicial.
44 |
45 | Na caixa de diálogo Get from Version Control dialog, especifique a URL do repositório remoto que deseja clonar (você pode clicar em Test para certificar-se de que a conexão com o repositório remoto pode ser estabelecida) ou selecione um dos serviços de hospedagem VCS à esquerda. Se você já estiver conectado ao serviço de hospedagem selecionado, a completion irá sugerir a lista de repositórios disponíveis que você pode clonar.
46 |
47 | Clique em Clone. Se quiser criar um projeto IntelliJ IDEA com base nas fontes que você clonou, clique em Sim na caixa de diálogo de confirmação. O mapeamento de raiz do Git será automaticamente definido para o diretório raiz do projeto.
48 |
49 | Se o seu projeto tiver submodelos, eles também serão clonados e automaticamente registrados como raízes do projeto.
50 |
51 | **Importante**: certifique-se de que é o repositório é o fork e não o original, caso contrário, o procedimento não funcionará.
52 |
53 |
54 | ## Crie um branch
55 |
56 | No Git, o processo de branching (ramificação) é um mecanismo poderoso que permite divergir da linha principal de desenvolvimento, por exemplo, quando você precisa trabalhar em um recurso ou congelar um determinado estado de uma base de código para um release e assim por diante.
57 |
58 | No IntelliJ IDEA, todas as operações com branches são realizadas no pop-up Git Branches. Para ativá-lo, clique no widget Git na barra de status ou pressione Ctrl + Shift + `.
59 |
60 | O nome do branch atual é exibido no widget do Git na barra de status.
61 |
62 | No pop-up branch, escolha Novo branch.
63 |
64 | Na caixa de diálogo que é aberta, especifique o nome do branch e certifique-se de que a opção Checkout branch esteja selecionada se você quiser alternar para esse branch.
65 |
66 | A nova ramificação começará a partir do HEAD atual. Se você deseja iniciar um branch de um commit anterior ao invés do branch atual HEAD, selecione este commit na aba Log da janela da ferramenta de Controle de Versão Alt + 9 e escolha New Branch no menu de contexto.
67 |
68 |
69 | ## Faça as alterações necessárias
70 | Abra ``Contributors.md`` e adicione seu nome em qualquer lugar do arquivo. Este arquivo contém GFM (GitHub Flavored Markdown), que é um tipo proprietário da sintaxe de [markdown](https://pt.wikipedia.org/wiki/Markdown).
71 |
72 | Copie uma das linhas de outros contribuidores e modifique-a com seu nome para ter certeza que você obteve a sintaxe correta.
73 |
74 |
75 | ## Commit & Push modificações para o GitHub
76 |
77 | Selecione os arquivos que deseja commitar ou uma lista de alterações inteira na guia Local Changes da janela da ferramenta de controle de versão Alt + 9 e pressione Ctrl + K ou clique no botão Commit na barra de ferramentas.
78 |
79 | A caixa de diálogo Commit Changes abrira e listara todos os arquivos que foram modificados desde o último commit, bem como todos os arquivos não versionados recém-adicionados.
80 |
81 | Insira uma mensagem de commit que faça sentido.
82 |
83 | Você pode clicar em Commit Message history (Confirmar histórico de mensagens) Ctrl + M para escolher na lista de mensagens de commits recentes.
84 |
85 | Você também pode editar a mensagem de commit mais tarde, antes de enviar o commit.
86 |
87 | Pressione Ctrl + Shift + K ou escolha VCS | Git | Push from the main menu. A caixa de diálogo Push Commits é aberta, mostrando todos os repositórios Git (para projetos de vários repositórios) e listando todos os commits feitos no branch atual em cada repositório desde o último push.
88 |
89 |
90 | ## Envie suas alterações para revisão
91 |
92 | Neste ponto, você concluiu a alteração, mas ela ainda está apenas no seu repo. Esta etapa mostrará como enviar uma solicitação ao administrador do repo matriz para mesclar sua alteração.
93 |
94 | Em seu repo no GitHub, você verá o botão `Compare & pull request` ao lado da notificação do novo branch, clique nesse botão.
95 |
96 |
97 |
98 |
99 | Agora submeta o pull request.
100 |
101 |
102 |
103 | Em breve estarei mesclando todas as suas alterações no branch master deste projeto. Você receberá um e-mail de notificação assim que as alterações forem integradas.
104 |
105 | ## Para onde ir agora?
106 |
107 | Parabéns! Você acabou de completar o padrão _fork -> clone -> edit -> PR_ workflow que você encontrará frequentemente como um contribuidor!
108 |
109 | Comemore sua contribuição e compartilhe-a com seus amigos e seguidores acessando o [web app](https://roshanjossey.github.io/first-contributions/#social-share).
110 |
111 | Você pode se juntar a nossa equipe slack caso precise de alguma ajuda ou tenha alguma dúvida. [Junte-se ao time slack](https://join.slack.com/t/firstcontributors/shared_invite/enQtMzE1MTYwNzI3ODQ0LTZiMDA2OGI2NTYyNjM1MTFiNTc4YTRhZTg4OWZjMzA0ZWZmY2UxYzVkMzI1ZmVmOWI4ODdkZWQwNTM2NDVmNjY).
112 |
113 | Agora vamos começar a contribuir para outros projetos, compilamos uma lista de projetos com questões fáceis para você começar. [Confira a lista de projetos no web app](https://roshanjossey.github.io/first-contributions/#project-list).
114 |
115 |
116 |
117 |
118 | ### [Material Adicional](../../additional-material/translations/additional-material.pt_br.md).
119 |
120 | ## Tutoriais usando outras ferramentas
121 | [Voltar a página principal](https://github.com/firstcontributions/first-contributions/blob/master/translations/README.pt_br.md)
122 |
123 | ## Autopromoção
124 |
125 | Se você gostou deste projeto, de star no GitHub. Se você gostou dessa tradução me siga no GitHub [Vitor Matias](https://github.com/VitorCMatias).
126 |
--------------------------------------------------------------------------------
/gui-tool-tutorials/github-windows-vs2017-tutorial.md:
--------------------------------------------------------------------------------
1 | [](https://github.com/ellerbrock/open-source-badges/)
2 | [](https://join.slack.com/t/firstcontributors/shared_invite/enQtNjkxNzQwNzA2MTMwLTVhMWJjNjg2ODRlNWZhNjIzYjgwNDIyZWYwZjhjYTQ4OTBjMWM0MmFhZDUxNzBiYzczMGNiYzcxNjkzZDZlMDM)
3 | [](https://opensource.org/licenses/MIT)
4 | [](https://www.codetriage.com/roshanjossey/first-contributions)
5 |
6 | # First Contributions
7 |
8 | |
20 |
21 | Fork this repository by clicking on the fork button on the top of this page. This will create of copy of this repository in your GitHub account.
22 |
23 | GitHub keeps track of the relationship between your repo and the one you forked it from. You can think of your repo as a working copy.
24 |
25 | Most top-level GitHub repos (i.e. ones not forked from any other repo) have a small core team of people who can directly commit changes. All other contributors must fork the repo and make changes in the fork, then create a Pull Request to ask for their changes to be merged back into the top-level repo. If the top-level repo administrator likes the changes they will be merged and you will gain instant fame and fortune! More on how to do that later.
26 |
27 | ## Clone your repository
28 |
29 |
30 |
31 | The next step is to clone your repo down to your machine so you can begin making changes. Visual Studio needs the URL of your repo, so click the "clone" button and then click the "copy to clipboard" icon.
32 |
33 | **CAREFUL:** One mistake that new contributors often make is to clone the repo you forked *from* rather than cloning your repo. Check your browser's address bar and make sure you are cloning your repo.
34 |
35 | It is now time to jump in to Visual Studio 2017! You will be working in the Team Explorer tab for most of this tutorial. If it is not open by default, click `View > Team Explorer` to open it.
36 |
37 |
38 |
39 | Team Explorer has many views and there are navigation buttons located at the top to help you find the different areas. To clone a repo, you need to be on the Connect view, which should be the default. If you do not see the 'clone' button, click the green plug at the top.
40 |
41 | Click the `Clone` option under **Local Git Repositories** and paste the URL to your repo in the text box. This should be the URL you copied to your clipboard from GitHub previously.
42 |
43 | Click the `Clone` button to initiate the process.
44 |
45 |
46 |
47 | When the process is complete you will be moved over to the Solution Explorer tab where you can see the contents of your repo. Yours will look different than the screenshot below because things change!
48 |
49 |
50 |
51 | ## Create a branch
52 |
53 | Click back to the Team Explorer tab and use the main navigation dropdown to open the Branches view.
54 |
55 |
56 |
57 | You should see the **first-contributions** repo and the default branch, which is called `master`. Right-click on `master` and choose `New Local Branch From...`.
58 |
59 |
60 |
61 | Give your branch a name like `add-
66 |
67 | You should see your new branch in the list.
68 |
69 |
70 |
71 | ## Make necessary changes
72 |
73 | Open `Contributors.md` and add your name to the end of the list. This file contains GFM (GitHub Flavored Markdown) which is a proprietary flavor of the markdown syntax.
74 |
75 | Copy one of the other contributors' lines and modify it with your name to make sure you get the syntax right - it can be picky.
76 |
77 |
78 |
79 | ## Commit & Push changes to GitHub
80 |
81 | Switch back to Team Explorer and navigate to the Changes view.
82 |
83 |
84 |
85 | Enter the information you want to post with your commit and click `Save`. Visual Studio will remember it for future commits.
86 |
87 |
88 |
89 | **NOTE:** Visual Studio uses a hidden folder called `.vs` to store your personal settings and preferences. The contents of this folder **should not be saved in Git**.
90 | If it has not been ignored already, you may need to tell Git to ignore this folder so it does not send it up to the repo.
91 |
92 | This folder has already been ignored in this repo, so you should not have to perform this step...it is just here for your reference for future projects.
93 |
94 |
95 |
96 | Now you should see a list of changed files and a textbox to type a commit comment. Comments should be in brief but thorough. There is nothing worse than reading through commit comments and seeing this: `"I updated some stuff"`. Take a few seconds to outline your commit. Your team will thank you later, and you might even thank yourself!
97 |
98 | Click `Commit All and Push` to perform a local commit and push your changes back up to your repo, all in one step.
99 |
100 | **NOTE:** Commit can be performed separately from Push. We do both here for convenience. Commit logs your changes locally but they will not be reflected in your GitHub repo until you Push.
101 |
102 |
103 |
104 | The first time you Push to GitHub, Visual Studio will ask for your GitHub credentials. They will be cached so you should not see this very often.
105 |
106 |
107 |
108 | After the Push operation completes, open your repo in GitHub and you should see a message indicating a recently pushed branch.
109 |
110 | You can view your changes by opening the `Branch: master` dropdown and selecting your new branch. Congratulations, you can share the branch URL with the world to show your progress!
111 |
112 |
113 |
114 | ## Submit your changes for review
115 |
116 | At this point you have completed your change but it still only resides in your repo. This step will show you how to submit a request to the administrator of the top-level repo to merge your change.
117 |
118 | In your repo on GitHub you'll see the `Compare & pull request` button next to the new branch notification. Click on that button.
119 |
120 |
121 |
122 | Now submit the pull request.
123 |
124 |
125 |
126 | Soon I'll be merging all your changes into the master branch of this project. You will get a notification email once the changes have been merged.
127 |
128 | ## Where to go from here?
129 |
130 | Congrats! You have just completed the standard _fork -> clone -> edit -> PR_ workflow that you'll encounter often as a contributor!
131 |
132 | Celebrate your contribution and share it with your friends and followers by going to [web app](https://firstcontributions.github.io#social-share).
133 |
134 | You can join our slack team in case you need any help or have any questions. [Join slack team](https://join.slack.com/t/firstcontributors/shared_invite/enQtMzE1MTYwNzI3ODQ0LTZiMDA2OGI2NTYyNjM1MTFiNTc4YTRhZTg4OWZjMzA0ZWZmY2UxYzVkMzI1ZmVmOWI4ODdkZWQwNTM2NDVmNjY).
135 |
136 |
137 | ### [Additional material](../additional-material/git_workflow_scenarios/additional-material.md)
138 |
139 | ## Tutorials Using Other Tools
140 | [Back to main page](https://github.com/firstcontributions/first-contributions#tutorials-using-other-tools)
141 |
--------------------------------------------------------------------------------