├── README.md
├── logo
└── coolify.png
├── images
├── aws-s3
│ ├── 1-iam.jpeg
│ ├── 2-iam.jpeg
│ ├── 3-iam.jpeg
│ ├── 4-iam.jpeg
│ ├── 5-iam.jpeg
│ ├── 6-iam.jpeg
│ ├── 7-iam.jpeg
│ ├── 1-bucket.jpeg
│ ├── 1-policy.jpeg
│ ├── 2-bucket.jpeg
│ ├── 2-policy.jpeg
│ ├── 3-policy.jpeg
│ ├── 1-coolify.jpeg
│ └── 2-coolify.jpeg
├── cloudflare
│ ├── cf-ssl-full.png
│ ├── cf-tunnel-id.png
│ ├── cf-tunnels-ssh.png
│ ├── cf-tunnels-token.png
│ ├── coolify-add-server.png
│ ├── cf-tunnels-connector.png
│ ├── cf-tunnels-notice-me.png
│ ├── coolify-set-cf-token.png
│ ├── coolify-set-domains.png
│ ├── cf-one-public-hostname.png
│ ├── coolify-set-port-mappings.png
│ └── cf-wildcard-public-hostname.png
└── screenshots
│ ├── Screenshot_27-3-2024_20548_staging.coollabs.io.jpeg
│ ├── Screenshot_27-3-2024_20557_staging.coollabs.io.jpeg
│ ├── Screenshot_27-3-2024_20562_staging.coollabs.io.jpeg
│ ├── Screenshot_27-3-2024_20570_staging.coollabs.io.jpeg
│ ├── Screenshot_27-3-2024_205323_staging.coollabs.io.jpeg
│ ├── Screenshot_27-3-2024_205338_staging.coollabs.io.jpeg
│ ├── Screenshot_27-3-2024_205348_staging.coollabs.io.jpeg
│ ├── Screenshot_27-3-2024_205356_staging.coollabs.io.jpeg
│ ├── Screenshot_27-3-2024_205420_staging.coollabs.io.jpeg
│ ├── Screenshot_27-3-2024_205431_staging.coollabs.io.jpeg
│ ├── Screenshot_27-3-2024_205446_staging.coollabs.io.jpeg
│ ├── Screenshot_27-3-2024_205515_staging.coollabs.io.jpeg
│ ├── Screenshot_27-3-2024_205527_staging.coollabs.io.jpeg
│ ├── Screenshot_27-3-2024_205553_staging.coollabs.io.jpeg
│ ├── Screenshot_27-3-2024_205610_staging.coollabs.io.jpeg
│ ├── Screenshot_27-3-2024_205627_staging.coollabs.io.jpeg
│ ├── Screenshot_27-3-2024_205648_staging.coollabs.io.jpeg
│ └── Screenshot_27-3-2024_205712_staging.coollabs.io.jpeg
├── api-reference
├── list-teams.mdx
├── get-team-by-teamid.mdx
├── deploy-webhook.mdx
├── get-current-team.mdx
├── list-team-members.mdx
├── list-current-team-members.mdx
├── introduction.mdx
└── authorization.mdx
├── resources
├── index.mdx
├── services
│ ├── metube.mdx
│ ├── glitchtip.mdx
│ ├── grocy.mdx
│ ├── duplicati.mdx
│ ├── fider.mdx
│ ├── emby-stat.mdx
│ ├── gitea.mdx
│ ├── ghost.mdx
│ ├── minio.mdx
│ ├── activepieces.mdx
│ ├── dashboard.mdx
│ ├── filebrowser.mdx
│ ├── appwrite.mdx
│ ├── classicpress.mdx
│ ├── heimdall.mdx
│ ├── jellyfin.mdx
│ ├── babybuddy.mdx
│ ├── formbricks.mdx
│ ├── budge.mdx
│ ├── emby.mdx
│ ├── code-server.mdx
│ ├── authentik.mdx
│ ├── kuzzle.mdx
│ ├── plausible.mdx
│ ├── firefly-iii.mdx
│ ├── dokuwiki.mdx
│ ├── directus.mdx
│ ├── grafana.mdx
│ ├── metabase.mdx
│ ├── logto.mdx
│ ├── appsmith.mdx
│ ├── index.mdx
│ ├── changedetection.mdx
│ └── meilisearch.mdx
└── applications
│ ├── nextjs.mdx
│ ├── index.mdx
│ ├── rails.mdx
│ ├── django.mdx
│ ├── svelte-kit.mdx
│ ├── jekyll.mdx
│ └── laravel.mdx
├── contact.mdx
├── knowledge-base
├── traefik
│ ├── dynamic-configurations.mdx
│ ├── healthcheck.mdx
│ ├── basic-auth.mdx
│ ├── dashboard.mdx
│ ├── custom-ssl-certs.mdx
│ ├── redirects.mdx
│ ├── load-balancing.mdx
│ └── wildcard-certificates.mdx
├── s3
│ ├── r2.mdx
│ ├── index.mdx
│ └── aws.mdx
├── docker
│ ├── custom-commands.mdx
│ ├── registry.mdx
│ ├── compose.mdx
│ └── swarm.mdx
├── server
│ ├── automated-cleanup.mdx
│ ├── proxies.mdx
│ ├── non-root-user.mdx
│ ├── firewall.mdx
│ ├── oracle-cloud.mdx
│ ├── build-server.mdx
│ ├── multiple-servers.mdx
│ ├── openssh.mdx
│ └── introduction.mdx
├── drain-logs.mdx
├── domains.mdx
├── commands.mdx
├── databases.mdx
├── git
│ ├── github
│ │ ├── github-actions.mdx
│ │ └── integration.mdx
│ ├── gitlab
│ │ └── integration.mdx
│ ├── gitea
│ │ └── integration.mdx
│ └── bitbucket
│ │ └── integration.mdx
├── self-hosted-admin
│ └── delete-user.mdx
├── how-to
│ └── wordpress-multisite.mdx
├── persistent-storage.mdx
├── backups.mdx
├── monitoring.mdx
├── dns-configuration.mdx
├── environment-variables.mdx
├── faq.mdx
├── cloudflare
│ └── tunnels.mdx
└── applications.mdx
├── upgrade.mdx
├── downgrade.mdx
├── videos.mdx
├── screenshots.mdx
├── uninstall.mdx
├── quickstart.mdx
├── introduction.mdx
├── favicon.svg
├── openapi.yaml
└── mint.json
/README.md:
--------------------------------------------------------------------------------
1 | Welcome to Coolify's Documentation
--------------------------------------------------------------------------------
/logo/coolify.png:
--------------------------------------------------------------------------------
https://raw.githubusercontent.com/DarkGhostHunter/documentation-coolify/main/logo/coolify.png
--------------------------------------------------------------------------------
/images/aws-s3/1-iam.jpeg:
--------------------------------------------------------------------------------
https://raw.githubusercontent.com/DarkGhostHunter/documentation-coolify/main/images/aws-s3/1-iam.jpeg
--------------------------------------------------------------------------------
/images/aws-s3/2-iam.jpeg:
--------------------------------------------------------------------------------
https://raw.githubusercontent.com/DarkGhostHunter/documentation-coolify/main/images/aws-s3/2-iam.jpeg
--------------------------------------------------------------------------------
/images/aws-s3/3-iam.jpeg:
--------------------------------------------------------------------------------
https://raw.githubusercontent.com/DarkGhostHunter/documentation-coolify/main/images/aws-s3/3-iam.jpeg
--------------------------------------------------------------------------------
/images/aws-s3/4-iam.jpeg:
--------------------------------------------------------------------------------
https://raw.githubusercontent.com/DarkGhostHunter/documentation-coolify/main/images/aws-s3/4-iam.jpeg
--------------------------------------------------------------------------------
/images/aws-s3/5-iam.jpeg:
--------------------------------------------------------------------------------
https://raw.githubusercontent.com/DarkGhostHunter/documentation-coolify/main/images/aws-s3/5-iam.jpeg
--------------------------------------------------------------------------------
/images/aws-s3/6-iam.jpeg:
--------------------------------------------------------------------------------
https://raw.githubusercontent.com/DarkGhostHunter/documentation-coolify/main/images/aws-s3/6-iam.jpeg
--------------------------------------------------------------------------------
/images/aws-s3/7-iam.jpeg:
--------------------------------------------------------------------------------
https://raw.githubusercontent.com/DarkGhostHunter/documentation-coolify/main/images/aws-s3/7-iam.jpeg
--------------------------------------------------------------------------------
/images/aws-s3/1-bucket.jpeg:
--------------------------------------------------------------------------------
https://raw.githubusercontent.com/DarkGhostHunter/documentation-coolify/main/images/aws-s3/1-bucket.jpeg
--------------------------------------------------------------------------------
/images/aws-s3/1-policy.jpeg:
--------------------------------------------------------------------------------
https://raw.githubusercontent.com/DarkGhostHunter/documentation-coolify/main/images/aws-s3/1-policy.jpeg
--------------------------------------------------------------------------------
/images/aws-s3/2-bucket.jpeg:
--------------------------------------------------------------------------------
https://raw.githubusercontent.com/DarkGhostHunter/documentation-coolify/main/images/aws-s3/2-bucket.jpeg
--------------------------------------------------------------------------------
/images/aws-s3/2-policy.jpeg:
--------------------------------------------------------------------------------
https://raw.githubusercontent.com/DarkGhostHunter/documentation-coolify/main/images/aws-s3/2-policy.jpeg
--------------------------------------------------------------------------------
/images/aws-s3/3-policy.jpeg:
--------------------------------------------------------------------------------
https://raw.githubusercontent.com/DarkGhostHunter/documentation-coolify/main/images/aws-s3/3-policy.jpeg
--------------------------------------------------------------------------------
/images/aws-s3/1-coolify.jpeg:
--------------------------------------------------------------------------------
https://raw.githubusercontent.com/DarkGhostHunter/documentation-coolify/main/images/aws-s3/1-coolify.jpeg
--------------------------------------------------------------------------------
/images/aws-s3/2-coolify.jpeg:
--------------------------------------------------------------------------------
https://raw.githubusercontent.com/DarkGhostHunter/documentation-coolify/main/images/aws-s3/2-coolify.jpeg
--------------------------------------------------------------------------------
/api-reference/list-teams.mdx:
--------------------------------------------------------------------------------
1 | ---
2 | "og:title": "How to get a list of teams through Coolify's API"
3 | openapi: get /teams
4 | ---
5 |
--------------------------------------------------------------------------------
/images/cloudflare/cf-ssl-full.png:
--------------------------------------------------------------------------------
https://raw.githubusercontent.com/DarkGhostHunter/documentation-coolify/main/images/cloudflare/cf-ssl-full.png
--------------------------------------------------------------------------------
/images/cloudflare/cf-tunnel-id.png:
--------------------------------------------------------------------------------
https://raw.githubusercontent.com/DarkGhostHunter/documentation-coolify/main/images/cloudflare/cf-tunnel-id.png
--------------------------------------------------------------------------------
/api-reference/get-team-by-teamid.mdx:
--------------------------------------------------------------------------------
1 | ---
2 | "og:title": "How to get a team by ID through Coolify's API"
3 | openapi: get /team/{teamId}
4 | ---
5 |
--------------------------------------------------------------------------------
/images/cloudflare/cf-tunnels-ssh.png:
--------------------------------------------------------------------------------
https://raw.githubusercontent.com/DarkGhostHunter/documentation-coolify/main/images/cloudflare/cf-tunnels-ssh.png
--------------------------------------------------------------------------------
/images/cloudflare/cf-tunnels-token.png:
--------------------------------------------------------------------------------
https://raw.githubusercontent.com/DarkGhostHunter/documentation-coolify/main/images/cloudflare/cf-tunnels-token.png
--------------------------------------------------------------------------------
/images/cloudflare/coolify-add-server.png:
--------------------------------------------------------------------------------
https://raw.githubusercontent.com/DarkGhostHunter/documentation-coolify/main/images/cloudflare/coolify-add-server.png
--------------------------------------------------------------------------------
/api-reference/deploy-webhook.mdx:
--------------------------------------------------------------------------------
1 | ---
2 | "og:title": "How to deploy resources programmatically through Coolify's API"
3 | openapi: get /deploy
4 | ---
5 |
--------------------------------------------------------------------------------
/images/cloudflare/cf-tunnels-connector.png:
--------------------------------------------------------------------------------
https://raw.githubusercontent.com/DarkGhostHunter/documentation-coolify/main/images/cloudflare/cf-tunnels-connector.png
--------------------------------------------------------------------------------
/images/cloudflare/cf-tunnels-notice-me.png:
--------------------------------------------------------------------------------
https://raw.githubusercontent.com/DarkGhostHunter/documentation-coolify/main/images/cloudflare/cf-tunnels-notice-me.png
--------------------------------------------------------------------------------
/images/cloudflare/coolify-set-cf-token.png:
--------------------------------------------------------------------------------
https://raw.githubusercontent.com/DarkGhostHunter/documentation-coolify/main/images/cloudflare/coolify-set-cf-token.png
--------------------------------------------------------------------------------
/images/cloudflare/coolify-set-domains.png:
--------------------------------------------------------------------------------
https://raw.githubusercontent.com/DarkGhostHunter/documentation-coolify/main/images/cloudflare/coolify-set-domains.png
--------------------------------------------------------------------------------
/images/cloudflare/cf-one-public-hostname.png:
--------------------------------------------------------------------------------
https://raw.githubusercontent.com/DarkGhostHunter/documentation-coolify/main/images/cloudflare/cf-one-public-hostname.png
--------------------------------------------------------------------------------
/api-reference/get-current-team.mdx:
--------------------------------------------------------------------------------
1 | ---
2 | "og:title": "How to get the currently authenticated team through Coolify's API"
3 | openapi: get /team/current
4 | ---
5 |
--------------------------------------------------------------------------------
/images/cloudflare/coolify-set-port-mappings.png:
--------------------------------------------------------------------------------
https://raw.githubusercontent.com/DarkGhostHunter/documentation-coolify/main/images/cloudflare/coolify-set-port-mappings.png
--------------------------------------------------------------------------------
/images/cloudflare/cf-wildcard-public-hostname.png:
--------------------------------------------------------------------------------
https://raw.githubusercontent.com/DarkGhostHunter/documentation-coolify/main/images/cloudflare/cf-wildcard-public-hostname.png
--------------------------------------------------------------------------------
/api-reference/list-team-members.mdx:
--------------------------------------------------------------------------------
1 | ---
2 | "og:title": "How to get a list of team members by teamId through Coolify's API"
3 | openapi: get /team/{teamId}/members
4 | ---
5 |
--------------------------------------------------------------------------------
/api-reference/list-current-team-members.mdx:
--------------------------------------------------------------------------------
1 | ---
2 | "og:title": "How to get the list of members in the currently authenticated team through Coolify's API"
3 | openapi: get /team/current/members
4 | ---
5 |
--------------------------------------------------------------------------------
/images/screenshots/Screenshot_27-3-2024_20548_staging.coollabs.io.jpeg:
--------------------------------------------------------------------------------
https://raw.githubusercontent.com/DarkGhostHunter/documentation-coolify/main/images/screenshots/Screenshot_27-3-2024_20548_staging.coollabs.io.jpeg
--------------------------------------------------------------------------------
/images/screenshots/Screenshot_27-3-2024_20557_staging.coollabs.io.jpeg:
--------------------------------------------------------------------------------
https://raw.githubusercontent.com/DarkGhostHunter/documentation-coolify/main/images/screenshots/Screenshot_27-3-2024_20557_staging.coollabs.io.jpeg
--------------------------------------------------------------------------------
/images/screenshots/Screenshot_27-3-2024_20562_staging.coollabs.io.jpeg:
--------------------------------------------------------------------------------
https://raw.githubusercontent.com/DarkGhostHunter/documentation-coolify/main/images/screenshots/Screenshot_27-3-2024_20562_staging.coollabs.io.jpeg
--------------------------------------------------------------------------------
/images/screenshots/Screenshot_27-3-2024_20570_staging.coollabs.io.jpeg:
--------------------------------------------------------------------------------
https://raw.githubusercontent.com/DarkGhostHunter/documentation-coolify/main/images/screenshots/Screenshot_27-3-2024_20570_staging.coollabs.io.jpeg
--------------------------------------------------------------------------------
/images/screenshots/Screenshot_27-3-2024_205323_staging.coollabs.io.jpeg:
--------------------------------------------------------------------------------
https://raw.githubusercontent.com/DarkGhostHunter/documentation-coolify/main/images/screenshots/Screenshot_27-3-2024_205323_staging.coollabs.io.jpeg
--------------------------------------------------------------------------------
/images/screenshots/Screenshot_27-3-2024_205338_staging.coollabs.io.jpeg:
--------------------------------------------------------------------------------
https://raw.githubusercontent.com/DarkGhostHunter/documentation-coolify/main/images/screenshots/Screenshot_27-3-2024_205338_staging.coollabs.io.jpeg
--------------------------------------------------------------------------------
/images/screenshots/Screenshot_27-3-2024_205348_staging.coollabs.io.jpeg:
--------------------------------------------------------------------------------
https://raw.githubusercontent.com/DarkGhostHunter/documentation-coolify/main/images/screenshots/Screenshot_27-3-2024_205348_staging.coollabs.io.jpeg
--------------------------------------------------------------------------------
/images/screenshots/Screenshot_27-3-2024_205356_staging.coollabs.io.jpeg:
--------------------------------------------------------------------------------
https://raw.githubusercontent.com/DarkGhostHunter/documentation-coolify/main/images/screenshots/Screenshot_27-3-2024_205356_staging.coollabs.io.jpeg
--------------------------------------------------------------------------------
/images/screenshots/Screenshot_27-3-2024_205420_staging.coollabs.io.jpeg:
--------------------------------------------------------------------------------
https://raw.githubusercontent.com/DarkGhostHunter/documentation-coolify/main/images/screenshots/Screenshot_27-3-2024_205420_staging.coollabs.io.jpeg
--------------------------------------------------------------------------------
/images/screenshots/Screenshot_27-3-2024_205431_staging.coollabs.io.jpeg:
--------------------------------------------------------------------------------
https://raw.githubusercontent.com/DarkGhostHunter/documentation-coolify/main/images/screenshots/Screenshot_27-3-2024_205431_staging.coollabs.io.jpeg
--------------------------------------------------------------------------------
/images/screenshots/Screenshot_27-3-2024_205446_staging.coollabs.io.jpeg:
--------------------------------------------------------------------------------
https://raw.githubusercontent.com/DarkGhostHunter/documentation-coolify/main/images/screenshots/Screenshot_27-3-2024_205446_staging.coollabs.io.jpeg
--------------------------------------------------------------------------------
/images/screenshots/Screenshot_27-3-2024_205515_staging.coollabs.io.jpeg:
--------------------------------------------------------------------------------
https://raw.githubusercontent.com/DarkGhostHunter/documentation-coolify/main/images/screenshots/Screenshot_27-3-2024_205515_staging.coollabs.io.jpeg
--------------------------------------------------------------------------------
/images/screenshots/Screenshot_27-3-2024_205527_staging.coollabs.io.jpeg:
--------------------------------------------------------------------------------
https://raw.githubusercontent.com/DarkGhostHunter/documentation-coolify/main/images/screenshots/Screenshot_27-3-2024_205527_staging.coollabs.io.jpeg
--------------------------------------------------------------------------------
/images/screenshots/Screenshot_27-3-2024_205553_staging.coollabs.io.jpeg:
--------------------------------------------------------------------------------
https://raw.githubusercontent.com/DarkGhostHunter/documentation-coolify/main/images/screenshots/Screenshot_27-3-2024_205553_staging.coollabs.io.jpeg
--------------------------------------------------------------------------------
/images/screenshots/Screenshot_27-3-2024_205610_staging.coollabs.io.jpeg:
--------------------------------------------------------------------------------
https://raw.githubusercontent.com/DarkGhostHunter/documentation-coolify/main/images/screenshots/Screenshot_27-3-2024_205610_staging.coollabs.io.jpeg
--------------------------------------------------------------------------------
/images/screenshots/Screenshot_27-3-2024_205627_staging.coollabs.io.jpeg:
--------------------------------------------------------------------------------
https://raw.githubusercontent.com/DarkGhostHunter/documentation-coolify/main/images/screenshots/Screenshot_27-3-2024_205627_staging.coollabs.io.jpeg
--------------------------------------------------------------------------------
/images/screenshots/Screenshot_27-3-2024_205648_staging.coollabs.io.jpeg:
--------------------------------------------------------------------------------
https://raw.githubusercontent.com/DarkGhostHunter/documentation-coolify/main/images/screenshots/Screenshot_27-3-2024_205648_staging.coollabs.io.jpeg
--------------------------------------------------------------------------------
/images/screenshots/Screenshot_27-3-2024_205712_staging.coollabs.io.jpeg:
--------------------------------------------------------------------------------
https://raw.githubusercontent.com/DarkGhostHunter/documentation-coolify/main/images/screenshots/Screenshot_27-3-2024_205712_staging.coollabs.io.jpeg
--------------------------------------------------------------------------------
/api-reference/introduction.mdx:
--------------------------------------------------------------------------------
1 | ---
2 | title: Introduction
3 | "og:title": "Coolify's API Documentation"
4 | description: "Here you can find all the API endpoints for Coolify."
5 | ---
6 |
7 | Check the sidebar for more information.
8 |
--------------------------------------------------------------------------------
/resources/index.mdx:
--------------------------------------------------------------------------------
1 | ---
2 | title: Resources
3 | "og:title": "What kind of resources you can host with Coolify"
4 | description: "Here you can find the main resources that you can host with Coolify."
5 | ---
6 |
7 | There are 3 categories of resources that you can host with Coolify.
8 |
9 | - [Applications](/resources/applications)
10 | - Databases
11 | - [Services](/resources/services)
12 |
--------------------------------------------------------------------------------
/contact.mdx:
--------------------------------------------------------------------------------
1 | ---
2 | title: Contact
3 | "og-title": "Concact us"
4 | description: "Ways to contact us."
5 | ---
6 |
7 | The prefered way to contact us by email at hi@coollabs.io.
8 |
9 | But you can reach us over:
10 |
11 | - Twitter/X: [@heyandras](https://twitter.com/heyandras) or [@coolifyio](https://twitter.com/coolifyio)
12 | - Mastodon: [@andrasbacsai](https://fosstodon.org/@andrasbacsai)
13 | - Telegram: [@andrasbacsai](https://t.me/andrasbacsai)
14 | - Discord: [Invitation](https://coollabs.io/discord)
15 |
--------------------------------------------------------------------------------
/resources/services/metube.mdx:
--------------------------------------------------------------------------------
1 | ---
2 | title: Metube
3 | "og:title": "How to host Metube with Coolify"
4 | description: "Here you can find the documentation for hosting Metube with Coolify."
5 | ---
6 |
7 | One-click setup.
8 |
9 | 
10 |
11 | ## What is Metube?
12 |
13 | Web GUI for youtube-dl (using the yt-dlp fork) with playlist support. Allows you to download videos from YouTube and dozens of other sites.
14 |
15 | ## Links
16 |
17 | - [Github ›](https://github.com/alexta69/metube)
18 |
--------------------------------------------------------------------------------
/resources/services/glitchtip.mdx:
--------------------------------------------------------------------------------
1 | ---
2 | title: Glitchtip
3 | "og:title": "How to host Glitchtip with Coolify"
4 | description: "Here you can find the documentation for hosting Glitchtip with Coolify."
5 | ---
6 |
7 | One-click setup.
8 |
9 | 
10 |
11 | ## What is Glitchtip?
12 |
13 | Track errors, uptime, and performance. An open source reimplementation of Sentry error tracking platform.
14 |
15 | ## Links
16 |
17 | - [The official website ›](https://glitchtip.com/)
18 | - [Github ›](https://gitlab.com/glitchtip)
19 |
--------------------------------------------------------------------------------
/resources/services/grocy.mdx:
--------------------------------------------------------------------------------
1 | ---
2 | title: Grocy
3 | "og:title": "How to host Grocy with Coolify"
4 | description: "Here you can find the documentation for hosting Grocy with Coolify."
5 | ---
6 |
7 | One-click setup.
8 |
9 | 
10 |
11 | ## What is Grocy?
12 |
13 | Grocy is a web-based self-hosted groceries & household management solution for your home
14 |
15 | ## Links
16 |
17 | - [The official website ›](https://grocy.info)
18 | - [Github ›](https://github.com/grocy/grocy)
19 |
--------------------------------------------------------------------------------
/resources/services/duplicati.mdx:
--------------------------------------------------------------------------------
1 | ---
2 | title: Duplicati
3 | "og:title": "How to host Duplicati with Coolify"
4 | description: "Here you can find the documentation for hosting Duplicati with Coolify."
5 | ---
6 |
7 | One-click setup.
8 |
9 | 
10 |
11 | ## What is Duplicati?
12 |
13 | Free backup software to store encrypted backups online for Windows, macOS and Linux.
14 |
15 | ## Links
16 |
17 | - [The official website ›](https://www.duplicati.com/)
18 | - [GitHub ›](https://github.com/duplicati/duplicati)
19 |
--------------------------------------------------------------------------------
/knowledge-base/traefik/dynamic-configurations.mdx:
--------------------------------------------------------------------------------
1 | ---
2 | title: "Dynamic Configurations"
3 | "og:title": "How to make dynamic configurations with Traefik in Coolify"
4 | description: "A guide on how to make dynamic configurations with Traefik in Coolify"
5 | ---
6 |
7 | Dynamic configurations are used to configure Traefik on the fly, without restarting it.
8 |
9 | You can add them by going to the `Server/Proxy` view, and select `Dynamic Configurations` from the sidebar.
10 |
11 |
12 | Some of the dynamic configurations cannot be deleted, as they required for
13 | Coolify itself.
14 |
15 |
--------------------------------------------------------------------------------
/resources/services/fider.mdx:
--------------------------------------------------------------------------------
1 | ---
2 | title: Fider
3 | "og:title": "How to host Fider with Coolify"
4 | description: "Here you can find the documentation for hosting Fider with Coolify."
5 | ---
6 |
7 | One-click setup.
8 |
9 | 
10 |
11 | ## What is Fider?
12 |
13 | Fider is a feedback portal for feature requests and suggestions. Give your customers a voice and let them tell you what they need. Spend less time guessing and more time building the right product.
14 |
15 | ## Links
16 |
17 | - [The official website ›](https://fider.io/)
18 |
--------------------------------------------------------------------------------
/resources/applications/nextjs.mdx:
--------------------------------------------------------------------------------
1 | ---
2 | title: NextJS
3 | "og:title": "How to deploy a NextJS app with Coolify"
4 | description: "A guide on how to deploy a NextJS app with Coolify."
5 | ---
6 |
7 | NextJS is a React framework that enables functionality such as server-side rendering and generating static websites.
8 |
9 | [Example repository.](https://github.com/coollabsio/coolify-examples/tree/main/nextjs)
10 |
11 | ## Server build (NodeJS)
12 |
13 | - Set `Build Pack` to `nixpacks`.
14 |
15 | ## Static build (SPA)
16 |
17 | - Set `Build Pack` to `nixpacks`.
18 | - Enable `Is it a static site?`.
19 | - Set `Output Directory` to `out`.
20 |
--------------------------------------------------------------------------------
/resources/services/emby-stat.mdx:
--------------------------------------------------------------------------------
1 | ---
2 | title: Emby Stat
3 | "og:title": "How to host Emby Stat with Coolify"
4 | description: "Here you can find the documentation for hosting Emby Stat with Coolify."
5 | ---
6 |
7 | One-click setup.
8 |
9 | 
10 |
11 | ## What is Emby Stat?
12 |
13 | EmbyStat is a personal web server that can calculate all kinds of statistics from your (local) Emby or Jellyfin server. Just install this on your server and let him calculate all kinds of fun stuff.
14 |
15 | ## Links
16 |
17 | - [The official website ›](https://github.com/mregni/EmbyStat)
18 |
--------------------------------------------------------------------------------
/resources/applications/index.mdx:
--------------------------------------------------------------------------------
1 | ---
2 | title: Introduction
3 | "og:title": "What kind of applications you can host with Coolify"
4 | description: "Here you can find most of the applications that you can host with Coolify."
5 | ---
6 |
7 |
8 | The list is not complete.
9 |
10 | You can host almost any application that you want, not just the ones listed here.
11 |
12 |
13 |
14 | - [Django](/resources/applications/django)
15 | - [Jekyll](/resources/applications/jekyll)
16 | - [Next.js](/resources/applications/nextjs)
17 | - [Laravel](/resources/applications/laravel)
18 | - [Ruby on Rails](/resources/applications/rails)
19 | - [SvelteKit](/resources/applications/svelte-kit)
20 |
--------------------------------------------------------------------------------
/resources/services/gitea.mdx:
--------------------------------------------------------------------------------
1 | ---
2 | title: Gitea
3 | "og:title": "How to host Gitea with Coolify"
4 | description: "Here you can find the documentation for hosting Gitea with Coolify."
5 | ---
6 |
7 | One-click setup.
8 |
9 | 
10 |
11 | ## What is Gitea?
12 |
13 | Git with a cup of tea! Painless self-hosted all-in-one software development service, including Git hosting, code review, team collaboration, package registry and CI/CD.
14 |
15 | ## Demo
16 |
17 | - [Demo ›](https://try.gitea.io/)
18 |
19 | ## Links
20 |
21 | - [The official website ›](https://gitea.com)
22 | - [Github ›](https://github.com/go-gitea/gitea)
23 |
--------------------------------------------------------------------------------
/resources/applications/rails.mdx:
--------------------------------------------------------------------------------
1 | ---
2 | title: Ruby on Rails
3 | "og:title": "How to deploy Ruby on Rails apps with Coolify"
4 | description: "A guide on how to deploy Ruby on Rails apps with Coolify"
5 | ---
6 |
7 | Ruby on Rails is a web-application framework that includes everything needed to create database-backed web applications according to the Model-View-Controller (MVC) pattern.
8 |
9 | ## Requirements
10 |
11 | If you would like to migrate the database during the deployment with `NIXPACKS` build pack, you need to set the following `Start Command`:
12 |
13 | ```bash
14 | bundle exec rake db:migrate && bundle exec bin/rails server -b 0.0.0.0 -p ${PORT:-3000} -e $RAILS_ENV
15 | ```
16 |
--------------------------------------------------------------------------------
/resources/services/ghost.mdx:
--------------------------------------------------------------------------------
1 | ---
2 | title: Ghost
3 | "og:title": "How to host Ghost with Coolify"
4 | description: "Here you can find the documentation for hosting Ghost with Coolify."
5 | ---
6 |
7 | One-click setup.
8 |
9 | 
10 |
11 | ## What is Ghost?
12 |
13 | Ghost is a powerful app for professional publishers to create, share, and grow a business around their content. It comes with modern tools to build a website, publish content, send newsletters & offer paid subscriptions to members.
14 |
15 | ## Links
16 |
17 | - [The official website ›](https://ghost.org/)
18 | - [Github ›](https://github.com/TryGhost/Ghost)
19 |
--------------------------------------------------------------------------------
/resources/services/minio.mdx:
--------------------------------------------------------------------------------
1 | ---
2 | title: MinIO
3 | "og:title": "How to host MinIO with Coolify"
4 | description: "Here you can find the documentation for hosting MinIO with Coolify."
5 | ---
6 |
7 | One-click setup.
8 |
9 | 
10 |
11 | ## What is MinIO?
12 |
13 | MinIO is a high-performance, distributed object storage system. It is software-defined, runs on industry-standard hardware, and is 100% open source under the AGPL v3.0 license.
14 |
15 | ## Links
16 |
17 | - [The official website ›](https://min.io/)
18 |
19 | ## FAQ
20 |
21 | ### Invalid login credentials
22 |
23 | You need to run MinIO on `https` (not self-signed) to avoid this issue. MinIO doesn't support http based authentication.
24 |
--------------------------------------------------------------------------------
/api-reference/authorization.mdx:
--------------------------------------------------------------------------------
1 | ---
2 | title: Authorization
3 | "og:title": "How to authorize API requests in Coolify"
4 | description: "Learn how to authorize your API requests."
5 | ---
6 |
7 | API request requires a `Bearer` token in `Authorization` header, which could be generated from the UI.
8 |
9 | # Generate a Token
10 |
11 | 1. Go to `Keys & Tokens` / `API tokens`.
12 | 2. Define a name for your token and click `Create New Token`.
13 |
14 |
15 | You will see the token once, so make sure to copy it and store it in a safe
16 | place.
17 |
18 |
19 | # Scope
20 |
21 | The token will only be able to access resources that are owned by the team that the token is scoped to.
22 |
23 | ```php
24 | # Sample token
25 | 3|WaobqX9tJQshKPuQFHsyApxuOOggg4wOfvGc9xa233c376d7
26 | ```
27 |
--------------------------------------------------------------------------------
/knowledge-base/s3/r2.mdx:
--------------------------------------------------------------------------------
1 | ---
2 | title: "Cloudflare R2"
3 | "og:title": "How to configure Cloudflare R2 bucket in Coolify"
4 | description: "Here you can find the documentation for configuring Cloudflare R2 bucket in Coolify."
5 | ---
6 |
7 | Cloudflare R2 is an S3 compatible storage. You can use it with Coolify to store your backups.
8 |
9 | # Configuration
10 |
11 | 1. You need to create a bucket first in the Cloudflare R2 dashboard.
12 | 2. Then you need to create a R2 API token with `Object Read & Write` permission.
13 | 3. You can find the S3 client credentials when the token is created.
14 |
15 | You will need the `Access Key ID`, `Secret Access Key` and the `S3
16 | endpoint` from this view. Save them.
17 |
18 | 4. You can use the details from the previous step to configure Coolify.
19 |
--------------------------------------------------------------------------------
/resources/applications/django.mdx:
--------------------------------------------------------------------------------
1 | ---
2 | title: Django
3 | "og:title": "How to deploy Django application with Coolify"
4 | description: "A guide on how to deploy Django application with Coolify."
5 | ---
6 |
7 | Django is a high-level Python Web framework that encourages rapid development and clean, pragmatic design.
8 |
9 | ## Requirements
10 |
11 | 1. Set the base directory where your `requirements.txt` and `manage.py` files are located.
12 |
13 | > In the example repository, it is `/coolify`.
14 |
15 | 2. Add `gunicorn` to the `requirements.txt` file, [official docs](https://docs.gunicorn.org/en/stable/install.html).
16 | 3. Add `localhost` and your `domain` to `ALLOWED_HOSTS` in `settings.py` file, [ official docs](https://docs.djangoproject.com/en/4.2/ref/settings/#allowed-hosts).
17 |
18 | > `Localhost` is required for health checks to work properly.
19 |
--------------------------------------------------------------------------------
/knowledge-base/s3/index.mdx:
--------------------------------------------------------------------------------
1 | ---
2 | title: "Introduction"
3 | "og:title": "How to configure S3 compatible storage for Coolify"
4 | description: "A guide how to configure S3 compatible storage for Coolify."
5 | ---
6 |
7 | Currently supported S3 compatible storages are:
8 |
9 | - AWS
10 | - DigitalOcean Spaces
11 | - MinIO
12 | - Cloudflare's R2
13 | - Backblaze B2
14 | - Scaleway Object Storage
15 |
16 | Other's could work, but not tested yet. If you test it, please let us know.
17 |
18 | ## S3 Client
19 |
20 | Coolify uses MinIO's client, called [`mc`](https://min.io/docs/minio/linux/reference/minio-mc.html), to copy the backup files to your S3 compatible storage.
21 |
22 | ## Verification
23 |
24 | To be able to use your S3 compatible storage, you need to verify it first. Verification done with `ListObjectsV2` request to your specified bucket.
25 |
26 | So you need to create a bucket first, and then you can verify it.
27 |
28 |
--------------------------------------------------------------------------------
/upgrade.mdx:
--------------------------------------------------------------------------------
1 | ---
2 | title: Upgrade - Self-hosted
3 | "og:title": "How to upgrade the self-hosted version of Coolify"
4 | description: "A guide on how to upgrade the self-hosted version of Coolify."
5 | ---
6 |
7 | There are several ways to upgrade your Coolify instance.
8 |
9 | New versions are checked every 10 minutes.
10 |
11 | 1. **Automatic Upgrade**: Coolify will automatically check for updates and notify you when a new version is available.
12 |
13 | You can disable the auto-update feature in the `Settings` menu.
14 |
15 | 2. **Semi-Automatic Upgrade**: If there is a new version available, you can upgrade your Coolify instance by clicking the `Upgrade` button on the Navigation bar.
16 |
17 | 3. **Manual Upgrade**: If you want to upgrade your Coolify instance manually, you can do so executing the following command in your server's terminal:
18 |
19 | ```bash
20 | curl -fsSL https://cdn.coollabs.io/coolify/install.sh | bash
21 | ```
22 |
--------------------------------------------------------------------------------
/resources/applications/svelte-kit.mdx:
--------------------------------------------------------------------------------
1 | ---
2 | title: SvelteKit
3 | "og:title": "How to deploy SvelteKit app with Coolify"
4 | description: "A guide on how to deploy SvelteKit app with Coolify."
5 | ---
6 |
7 | Svelte Kit is a framework for building web applications of all sizes, with a beautiful development experience and flexible filesystem-based routing.
8 |
9 | ## Static build (`adapter-static`)
10 |
11 | You need to use `@sveltejs/adapter-static` ([docs](https://kit.svelte.dev/docs/adapter-static)) adapter to build a static site.
12 |
13 | 1. Set your site to static `on` (under `Build Pack` section).
14 | 2. Set your `Publish Directory` to `/build`
15 |
16 | ## Node server (`adapter-node`)
17 |
18 | You need to use `@sveltejs/adapter-node` ([docs](https://kit.svelte.dev/docs/adapter-node)) adapter to build a node server based SvelteKit app.
19 |
20 | 1. Set your site to static to `off` (under `Build Pack` section).
21 | 2. Set your `Start Command` to `node build`.
22 |
--------------------------------------------------------------------------------
/resources/services/activepieces.mdx:
--------------------------------------------------------------------------------
1 | ---
2 | title: ActivePieces
3 | "og:title": "How to host ActivePieces with Coolify"
4 | description: "Here you can find the documentation for hosting ActivePieces with Coolify."
5 | ---
6 |
7 | One-click setup.
8 |
9 | 
10 |
11 | ## What is ActivePieces
12 |
13 | Your friendliest open source all-in-one automation tool, designed to be extensible through a type-safe pieces framework written in Typescript.
14 |
15 | ## Screenshots
16 |
17 | 
18 | 
19 |
20 | ## Links
21 |
22 | - [The official website ›](https://www.activepieces.com/)
23 | - [GitHub ›](https://github.com/activepieces/activepieces)
24 |
--------------------------------------------------------------------------------
/resources/services/dashboard.mdx:
--------------------------------------------------------------------------------
1 | ---
2 | title: Dashboard
3 | "og:title": "How to host Dashboard with Coolify"
4 | description: "Here you can find the documentation for hosting Dashboard with Coolify."
5 | ---
6 |
7 | One-click setup.
8 |
9 | 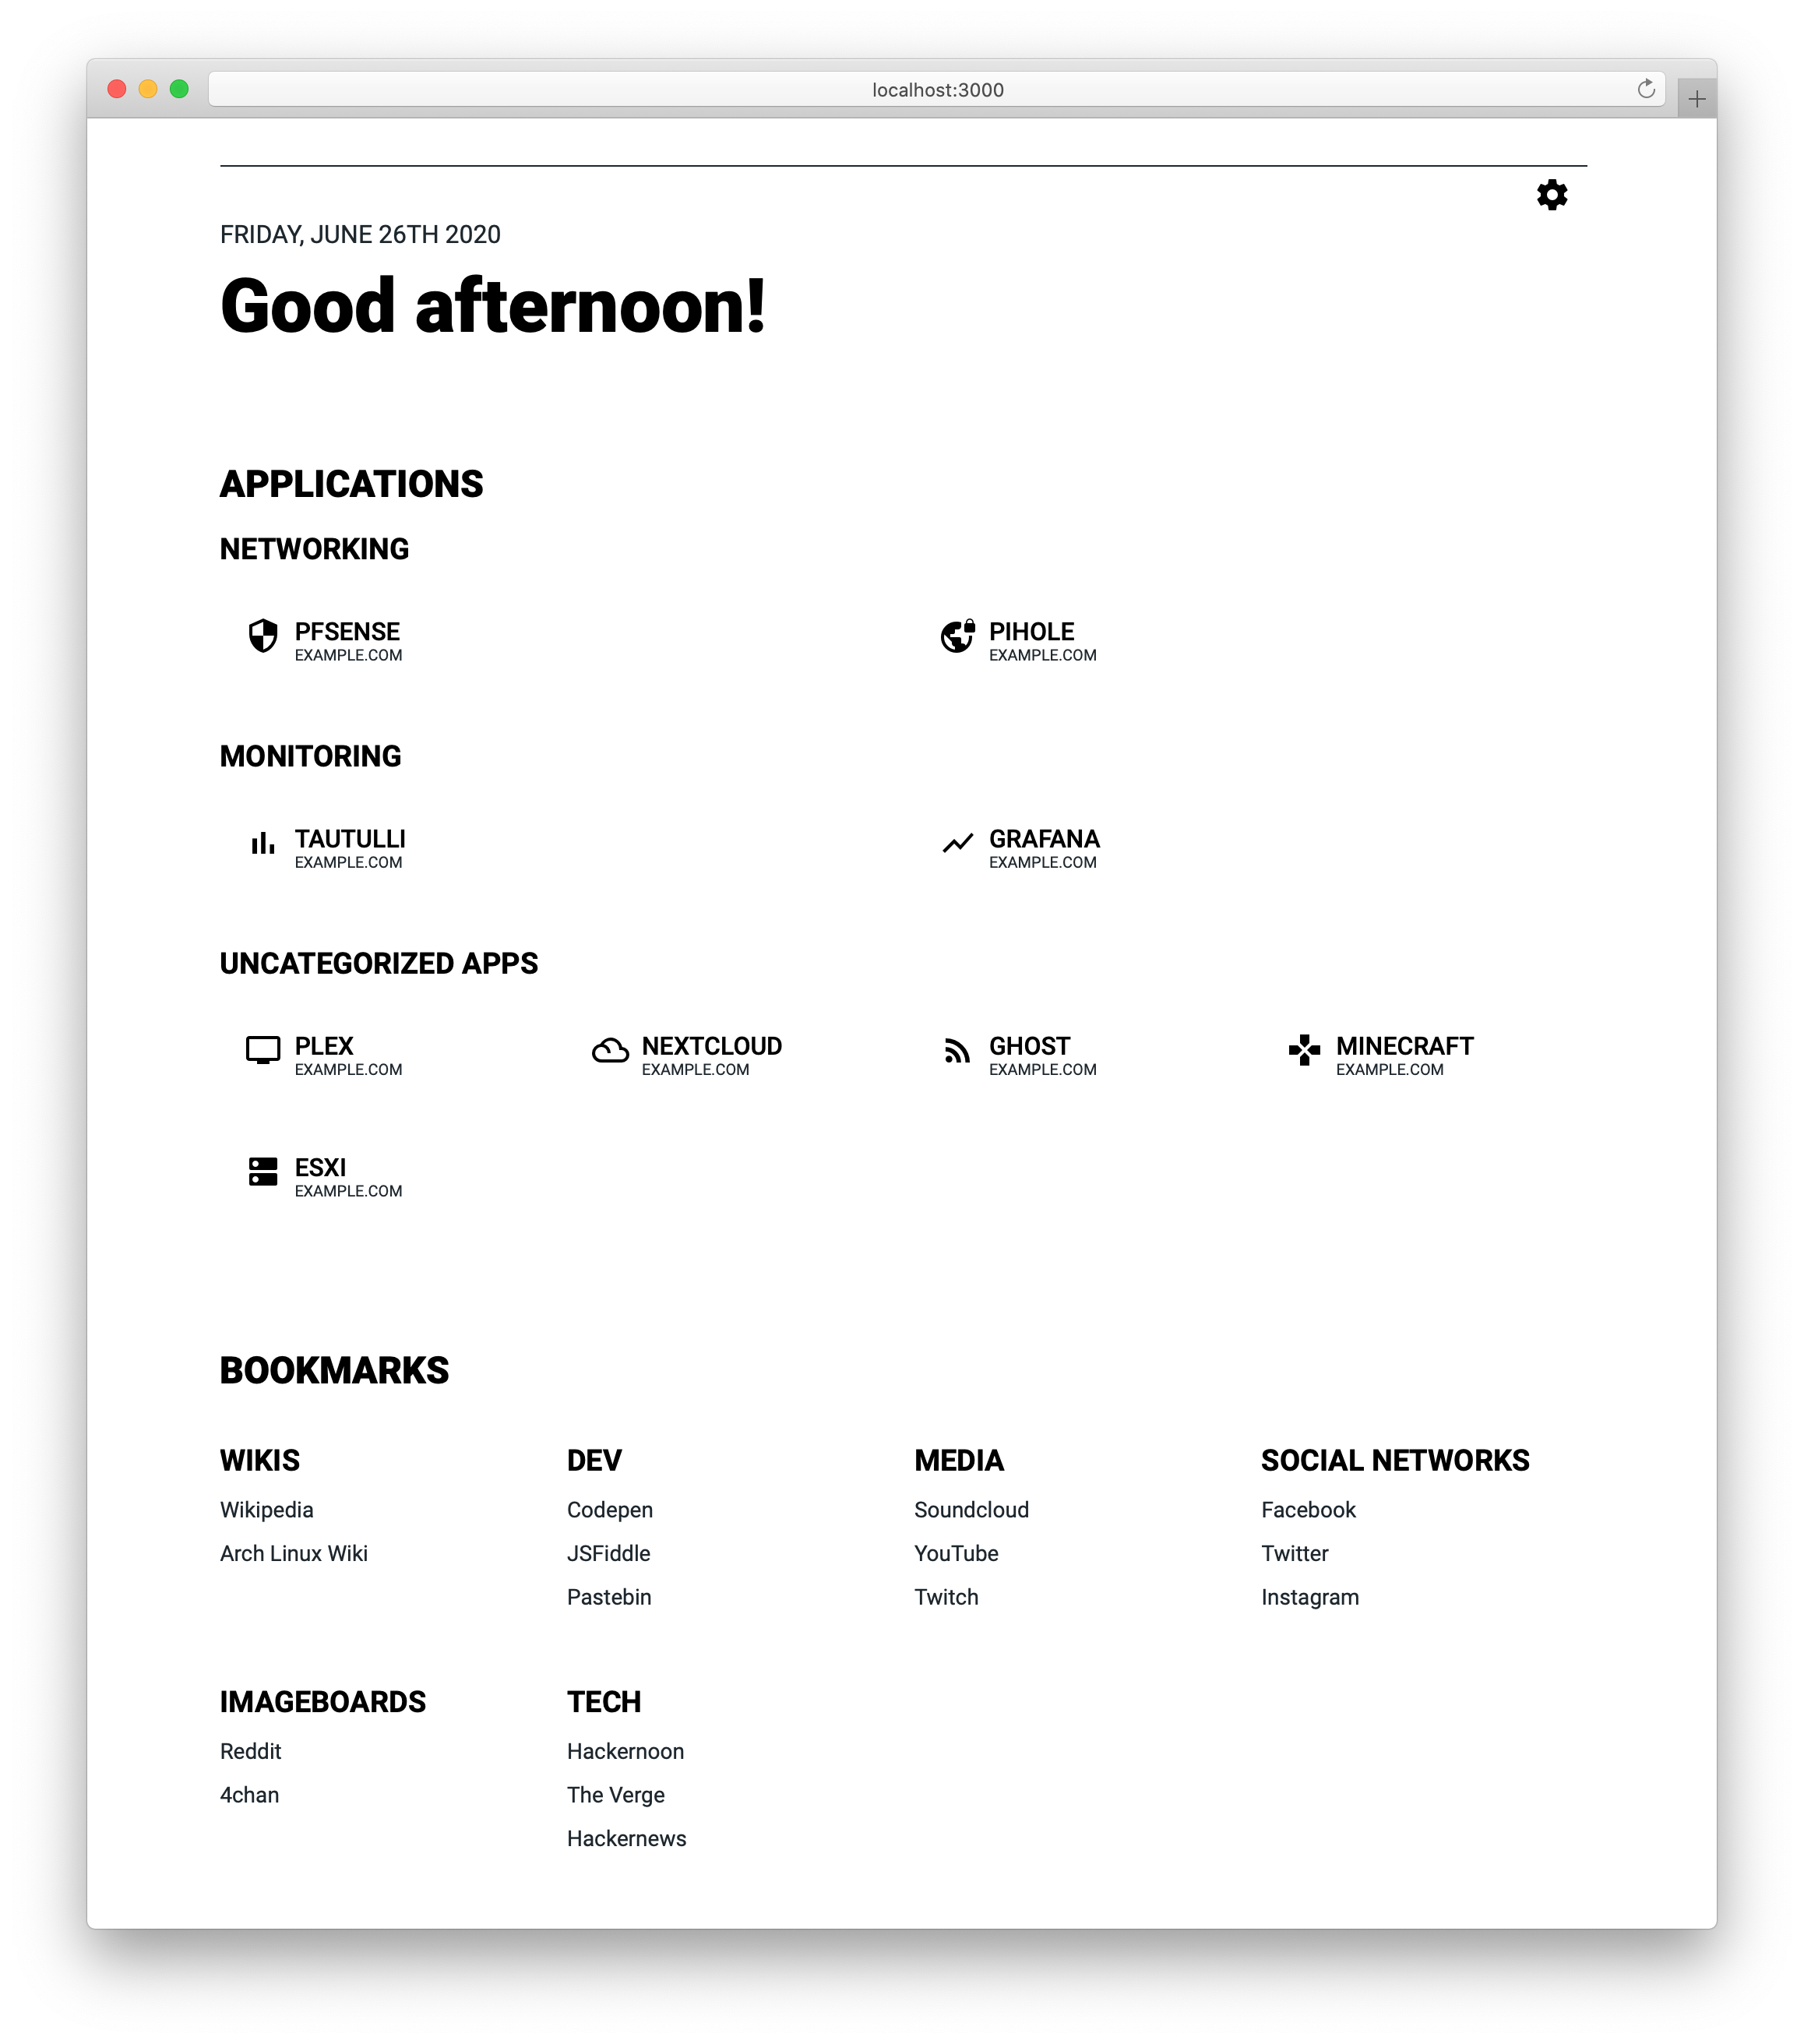
10 |
11 | ## What is Dashboard?
12 |
13 | Dashboard is just that - a dashboard. It's inspired by [SUI](https://github.com/jeroenpardon/sui) and has all the same features as SUI, such as simple customization through JSON-files and a handy search bar to search the internet more efficiently.
14 |
15 | ## Features
16 |
17 | So what makes this project different from (or even better than) SUI?
18 |
19 | - "Display URL" functionality (The URL displayed for apps can differ from the actual URL)
20 | - Categorization for apps
21 | - Themes and search providers can be changed using JSON
22 | - Imprint functionality
23 |
24 | ## Links
25 |
26 | - [GitHub ›](https://github.com/phntxx/dashboard/)
27 |
--------------------------------------------------------------------------------
/knowledge-base/docker/custom-commands.mdx:
--------------------------------------------------------------------------------
1 | ---
2 | title: "Custom Commands"
3 | "og:title": "How to use custom commands for your Docker deployments with Coolify."
4 | description: "A guide on how to use custom commands for your Docker deployments with Coolify."
5 | ---
6 |
7 | For deploying your resources, you can add custom options to the final docker command, which is used to run your container.
8 |
9 |
10 | Some of the docker native options are not supported, because it could break
11 | the Coolify's functionality. If you need any of the unsupported options,
12 | please [contact us](/contact).
13 |
14 |
15 | ## Supported Options
16 |
17 | - `--ip`
18 | - `--ip6`
19 | - `--cap-add`
20 | - `--cap-drop`
21 | - `--security-opt`
22 | - `--sysctl`
23 | - `--device`
24 | - `--ulimit`
25 | - `--init`
26 | - `--ulimit`
27 | - `--privileged`
28 |
29 | ## Usage
30 |
31 | You can simply add the options to the `Custom Docker Options` field on the `General` tab of your resource.
32 |
33 | Example: `--cap-add SYS_ADMIN --privileged`
34 |
--------------------------------------------------------------------------------
/resources/services/filebrowser.mdx:
--------------------------------------------------------------------------------
1 | ---
2 | title: Filebrowser
3 | "og:title": "How to host Filebrowser with Coolify"
4 | description: "Here you can find the documentation for hosting Filebrowser with Coolify."
5 | ---
6 |
7 | One-click setup.
8 |
9 | 
10 |
11 | ## What is Filebrowser?
12 |
13 | Filebrowser provides a file managing interface within a specified directory and it can be used to upload, delete, preview, rename and edit your files. It allows the creation of multiple users and each user can have its own directory. It can be used as a standalone app.
14 |
15 | ## Screenshots
16 |
17 | 
18 |
19 | ## Demo
20 |
21 | Url: https://demo.filebrowser.org/
22 |
23 | Credentials: demo/demo
24 |
25 | ## Links
26 |
27 | - [The official Filebrowser website ›](https://filebrowser.org/)
28 | - [Github ›](https://github.com/filebrowser/filebrowser)
29 |
--------------------------------------------------------------------------------
/knowledge-base/server/automated-cleanup.mdx:
--------------------------------------------------------------------------------
1 | ---
2 | title: "Automated Cleanup"
3 | "og:title": "How automated cleanups work in Coolify"
4 | description: "A guide on how automated cleanups work in Coolify"
5 | ---
6 |
7 | Coolify automatically cleans up your servers to prevent them from running out of disk space. It will remove all the unused Docker images, containers, and volumes.
8 |
9 | ## How it works
10 |
11 | - Coolify will run the cleanup script every 10 minutes.
12 | - If there is an ongoing deployment, the cleanup script will be skipped - to prevent any issues, like deleting the image that is currently being used.
13 | - The cleanup script will remove all the unused Docker images, containers, and volumes with the following commands:
14 |
15 | ```bash
16 | # This will remove all unused Docker images
17 | docker image prune -af
18 | # This will remove all coolify.managed containers that are not running
19 | docker container prune -f --filter "label=coolify.managed=true"
20 | # This will remove all unused Docker build caches
21 | docker builder prune -af
22 | ```
23 |
--------------------------------------------------------------------------------
/resources/services/appwrite.mdx:
--------------------------------------------------------------------------------
1 | ---
2 | title: Appwrite
3 | "og:title": "How to host Appwrite with Coolify"
4 | description: "Here you can find the documentation for hosting Appwrite with Coolify."
5 | ---
6 |
7 | One-click setup.
8 |
9 | 
10 |
11 | ## What is Appwrite?
12 |
13 | Appwrite is an end-to-end backend server for Web, Mobile, Native, or Backend apps packaged as a set of Docker microservices. Appwrite abstracts the complexity and repetitiveness required to build a modern backend API from scratch and allows you to build secure apps faster.
14 |
15 | Using Appwrite, you can easily integrate your app with user authentication and multiple sign-in methods, a database for storing and querying users and team data, storage and
16 | file management, image manipulation, Cloud Functions, and [more services](https://appwrite.io/docs).
17 |
18 | ## Links
19 |
20 | - [The official website ›](https://appwrite.io)
21 | - [GitHub ›](https://github.com/appwrite/appwrite)
22 |
--------------------------------------------------------------------------------
/knowledge-base/server/proxies.mdx:
--------------------------------------------------------------------------------
1 | ---
2 | title: "Supported Proxy"
3 | "og:title": "Supported proxies with Coolify"
4 | description: "A guide for Coolify supported proxies."
5 | ---
6 |
7 | Coolify supports `Traefik` (default) and `Caddy` (experimental) proxies.
8 |
9 | ## Switch between proxies
10 |
11 | Since `beta.237`, we have added support for Caddy and Traefik as proxies. You can switch between them at any time.
12 |
13 | Before you switch proxies and if you have an application that was created before `beta.237`, you need to make sure of the following:
14 |
15 | 1. You must have `caddy_*` or `traefik_*` labels on your resources.
16 |
17 |
18 | If you don't have `caddy_*` or `traefik_*` labels: 1. Automatically: A restart
19 | of your resource will add the missing labels. 2. Manually: - `For
20 | Applications`: click on the `Reset to Coolify Default Labels` button. - `For
21 | Services`: simply save the service - it will automatically add required
22 | labels.
23 |
24 |
25 | 2. You need to restart your service so that the new labels will be applied.
26 |
--------------------------------------------------------------------------------
/resources/services/classicpress.mdx:
--------------------------------------------------------------------------------
1 | ---
2 | title: ClassicPress
3 | "og:title": "How to host ClassicPress with Coolify"
4 | description: "Here you can find the documentation for hosting ClassicPress with Coolify."
5 | ---
6 |
7 | One-click setup.
8 |
9 | 
10 |
11 | ## What is ClassicPress?
12 |
13 | ClassicPress is a community-led open source content management system for creators. It is a fork of WordPress 6.2 that preserves the TinyMCE classic editor as the default option. It is half the size of WordPress, contains less bloat improving performance, and has no block editor (Gutenberg/Full Site Editing).
14 |
15 | For more information, see:
16 |
17 | - [The official website ›](https://www.classicpress.net/)
18 | - [The ClassicPress documentation ›](https://docs.classicpress.net/)
19 | - [The ClassicPress governance ›](https://www.classicpress.net/governance/)
20 | - [Suggest features ›](https://github.com/ClassicPress/ClassicPress/issues/)
21 |
--------------------------------------------------------------------------------
/resources/services/heimdall.mdx:
--------------------------------------------------------------------------------
1 | ---
2 | title: Heimdall
3 | "og:title": "How to host Heimdall with Coolify"
4 | description: "Here you can find the documentation for hosting Heimdall with Coolify."
5 | ---
6 |
7 | One-click setup.
8 |
9 | 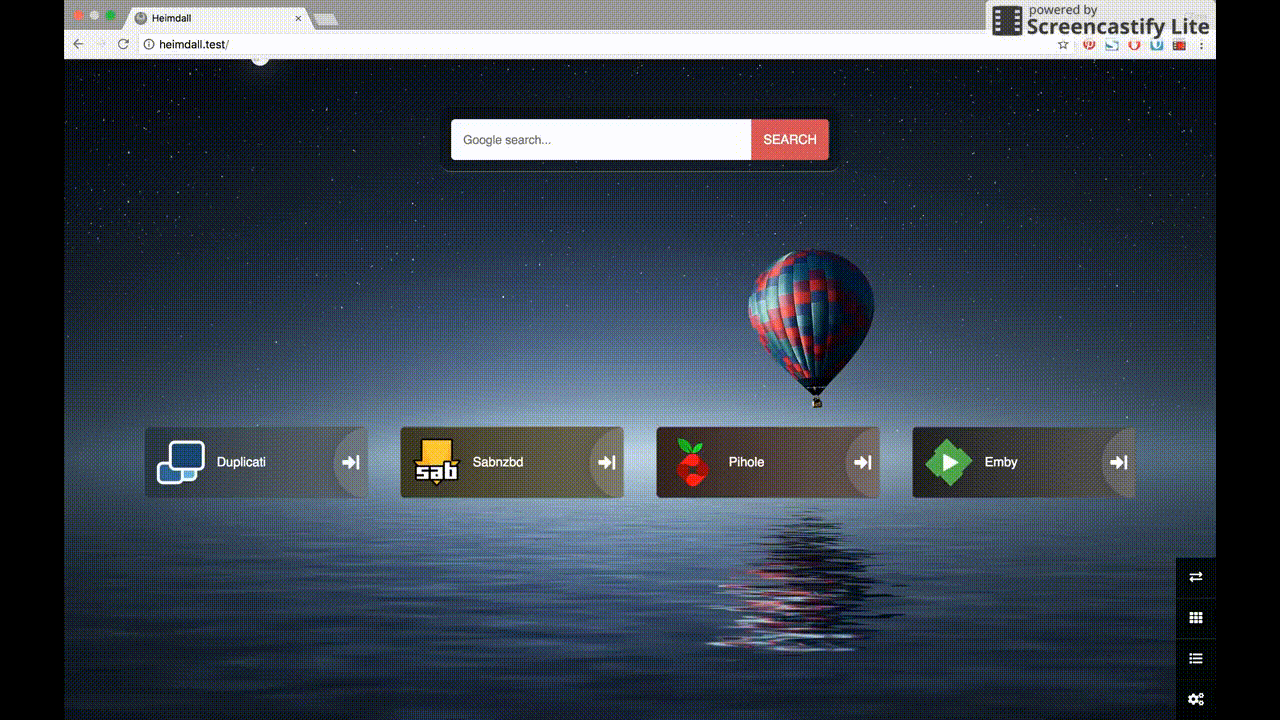
10 |
11 | ## What is Heimdall?
12 |
13 | As the name suggests Heimdall Application Dashboard is a dashboard for all your web applications. It doesn't need to be limited to applications though, you can add links to anything you like.
14 |
15 | Heimdall is an elegant solution to organise all your web applications. It’s dedicated to this purpose so you won’t lose your links in a sea of bookmarks.
16 |
17 | Why not use it as your browser start page? It even has the ability to include a search bar using either Google, Bing or DuckDuckGo.
18 |
19 | ## Links
20 |
21 | - [The official website ›](https://heimdall.site/)
22 | - [Github ›](https://github.com/linuxserver/Heimdall)
23 |
--------------------------------------------------------------------------------
/downgrade.mdx:
--------------------------------------------------------------------------------
1 | ---
2 | title: Downgrade - Self-hosted
3 | "og:title": "How to downgrade the self-hosted version of Coolify"
4 | description: "A guide on how to downgrade the self-hosted version of Coolify."
5 | ---
6 |
7 | If you have any issues with the latest version, you can simple downgrade to the previous version. Here is how you can do it:
8 |
9 |
10 |
11 | Login as the `root` user (or any user that is in the `root` (initial) team),
12 | go to your `Settings` menu and disable the `Auto Update` feature.
13 |
14 |
15 | Login to your server via SSH and execute the following command:
16 | ```bash
17 | curl -fsSL https://cdn.coollabs.io/coolify/install.sh | bash -s 4.0.0-beta.277
18 | ```
19 |
20 | Where `4.0.0-beta.277` is the version you want to downgrade to.
21 |
22 |
23 |
24 |
25 |
26 | Please note that downgrading could cause weird issues, as the database schema
27 | is not backward compatible. Some features might not work as expected.
28 |
29 |
--------------------------------------------------------------------------------
/knowledge-base/drain-logs.mdx:
--------------------------------------------------------------------------------
1 | ---
2 | title: Drain Logs
3 | "og:title": "How to configure drain logs to third-party applications like Axiom or New Relic with Coolify"
4 | description: "A guide how to drain logs to third-party applications like Axiom or New Relic."
5 | ---
6 |
7 | You can drain logs of your deployed services to a third-party applications like [Axiom](https://axiom.co/) or [New Relic](https://newrelic.com).
8 |
9 | We will support more services in the future, like Signoz, HyperDX, etc.
10 |
11 | ## How to enable?
12 |
13 | Go to your `Server` where you want to enable the `Drain Logs` and click on the `Drain Logs` tab.
14 |
15 | ## Axiom
16 |
17 | You need to have a `Dataset` and an `API key` from Axiom. More information [here](https://axiom.co/docs).
18 |
19 | ## New Relic
20 |
21 | You need to have an `License key` from New Relic. More information [here](https://docs.newrelic.com/docs/apis/intro-apis/new-relic-api-keys/#ingest-license-key).
22 |
23 |
24 | Once you enabled at least one of the `Drain Logs`, you need to `Restart` your
25 | service to apply the changes.
26 |
27 |
--------------------------------------------------------------------------------
/knowledge-base/server/non-root-user.mdx:
--------------------------------------------------------------------------------
1 | ---
2 | title: "Non-root user"
3 | "og:title": "How to use a server with a non-root user"
4 | description: "A guide on how to use a server with a non-root user"
5 | ---
6 |
7 | This is an experimental feature.
8 |
9 | You could have a server with a non-root user that will manage your resources instead of the root user.
10 |
11 | For this to work, you need to set up the server correctly.
12 |
13 | ## Requirements
14 |
15 | - The non-root user needs to have the SSH key added to the server.
16 | - Sudos permissions for the non-root user.
17 |
18 | ## Sudo permissions
19 |
20 | You need to add the following lines to the `/etc/sudoers` file:
21 |
22 | ```bash
23 | # Allow the non-root user to run commands as root without a password
24 | non-root-user ALL=(ALL) NOPASSWD: ALL
25 | ```
26 |
27 | This will allow the non-root user to any command as root without a password.
28 |
29 |
30 | This is not the most secure way to set up a non-root user, but we will improve
31 | this in the future, by adding more granular permissions on binaries.
32 |
33 |
--------------------------------------------------------------------------------
/resources/services/jellyfin.mdx:
--------------------------------------------------------------------------------
1 | ---
2 | title: Jellyfin
3 | "og:title": "How to host Jellyfin with Coolify"
4 | description: "Here you can find the documentation for hosting Jellyfin with Coolify."
5 | ---
6 |
7 | One-click setup.
8 |
9 | 
10 |
11 | ## What is Jellyfin?
12 |
13 | Jellyfin is a Free Software Media System that puts you in control of managing and streaming your media. It is an alternative to the proprietary Emby and Plex, to provide media from a dedicated server to end-user devices via multiple apps. Jellyfin is descended from Emby's 3.5.2 release and ported to the .NET Core framework to enable full cross-platform support. There are no strings attached, no premium licenses or features, and no hidden agendas: just a team who want to build something better and work together to achieve it. We welcome anyone who is interested in joining us in our quest!
14 |
15 | ## Links
16 |
17 | - [The official website ›](https://jellyfin.org/)
18 | - [Github ›](https://github.com/jellyfin/jellyfin)
19 |
--------------------------------------------------------------------------------
/knowledge-base/server/firewall.mdx:
--------------------------------------------------------------------------------
1 | ---
2 | title: "Firewall"
3 | "og:title": "What firewall rules are required for Coolify"
4 | description: "A list of ports that need to be open on your firewall for Coolify to work properly."
5 | ---
6 |
7 | ## Self-hosted version
8 |
9 | For self-hosting Coolify, you need to allow some ports on your firewall.
10 |
11 | - For Coolify: `8000` (http), `6001` (websocket) and `22` (SSH, or a custom port) (required)
12 | - Reverse Proxy: `80, 443` (optional)
13 |
14 |
15 | If you are using `Oracle Cloud Free ARM Server`, you need to allow these ports
16 | inside Oracle's Dashboard, otherwise you cannot reach your instance from the
17 | internet after installation.
18 |
19 |
20 | - For GitHub integration, check [this](https://docs.github.com/en/authentication/keeping-your-account-and-data-secure/about-githubs-ip-addresses).
21 |
22 | ## Cloud version
23 |
24 | If you need the public facing IPs to allow inbound connections to your servers, here is an up-to-date list of IPs that you can use to whitelist:
25 |
26 | - https://coolify.io/ipv4.txt
27 | - https://coolify.io/ipv6.txt
28 |
--------------------------------------------------------------------------------
/resources/services/babybuddy.mdx:
--------------------------------------------------------------------------------
1 | ---
2 | title: BabyBuddy
3 | "og:title": "How to host BabyBuddy with Coolify"
4 | description: "Here you can find the documentation for hosting BabyBuddy with Coolify."
5 | ---
6 |
7 | One-click setup.
8 |
9 | 
10 |
11 | ## What is BabyBuddy?
12 |
13 | A buddy for babies! Helps caregivers track sleep, feedings, diaper changes, tummy time and more to learn about and predict baby's needs without (_as much_) guess work.
14 |
15 | ## Screenshots
16 |
17 | 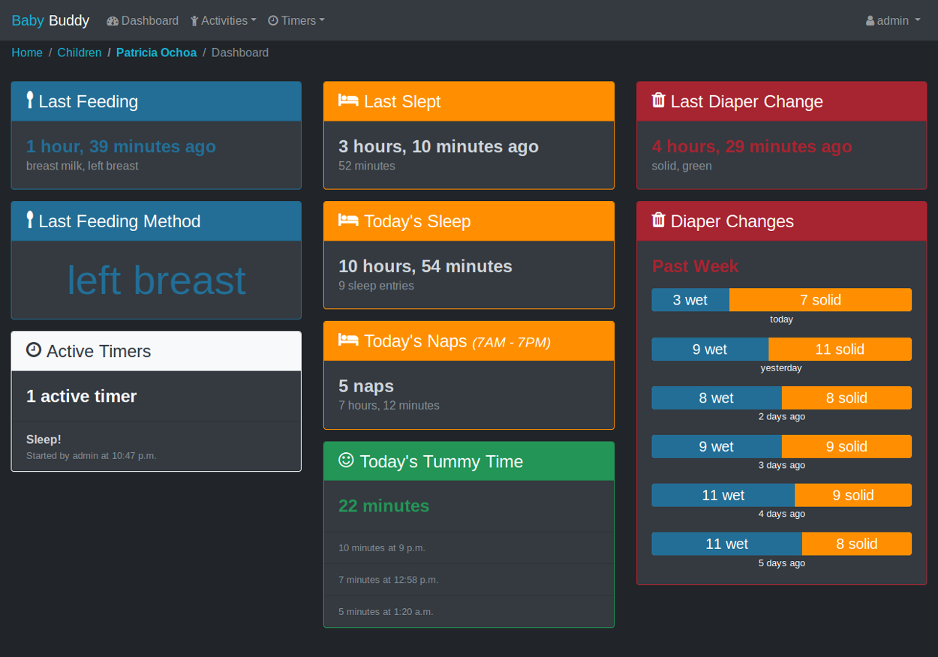
18 | 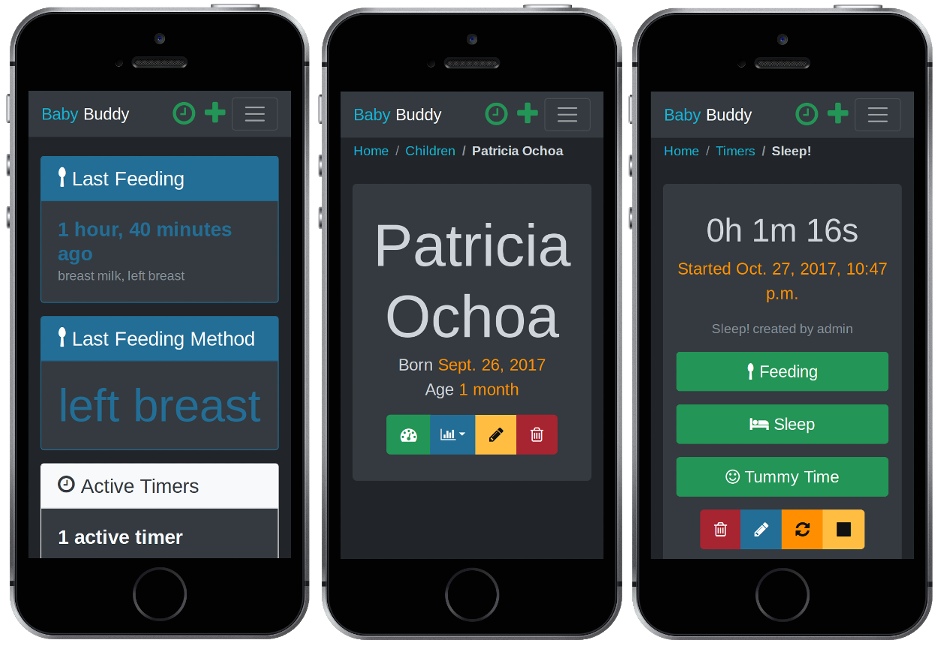
19 |
20 | ## Demo
21 |
22 | A [demo of Baby Buddy](https://demo.baby-buddy.net) is available. The demo instance
23 | resets every hour. Login credentials are:
24 |
25 | - Username: `admin`
26 | - Password: `admin`
27 |
28 | ## Links
29 |
30 | - [The official website ›](https://docs.baby-buddy.net/)
31 | - [GitHub ›](https://github.com/babybuddy/babybuddy)
32 |
--------------------------------------------------------------------------------
/resources/services/formbricks.mdx:
--------------------------------------------------------------------------------
1 | ---
2 | title: Formbricks
3 | "og:title": "How to host Formbricks with Coolify"
4 | description: "Here you can find the documentation for hosting Formbricks with Coolify."
5 | ---
6 |
7 | One-click setup.
8 |
9 | 
10 |
11 | ## What is Formbricks?
12 |
13 | Formbricks provides a free and open source surveying platform. Gather feedback at every point in the user journey with beautiful in-app, website, link and email surveys. Build on top of Formbricks or leverage prebuilt data analysis capabilities.
14 |
15 | ## Screenshots
16 |
17 | 
18 |
19 | ## Links
20 |
21 | - [The official website ›](https://formbricks.com/)
22 | - [Github ›](https://github.com/formbricks/formbricks)
23 |
--------------------------------------------------------------------------------
/knowledge-base/traefik/healthcheck.mdx:
--------------------------------------------------------------------------------
1 | ---
2 | title: "Healthcheck"
3 | "og:title": "How to configure healthchecks with Coolify"
4 | description: "A guide on how to configure healthchecks with Coolify"
5 | ---
6 |
7 | For Traefik to be able to route traffic to your services, it needs to know if they are healthy or not. This is done by using healthchecks.
8 |
9 | ## Enabled
10 |
11 | If your resource has healthchecks enabled, Traefik will only route traffic to it if the healthcheck passes. If the healthcheck fails, Traefik will not route traffic to the resource.
12 |
13 | **It will cause the resource to be 404'd.**
14 |
15 | ## Disabled
16 |
17 | If your resource has healthchecks disabled, Traefik will route traffic to it regardless of the healthcheck status.
18 |
19 | You can disable healthchecks on Coolify's UI in your resource's settings.
20 |
21 | ## Which one should I use?
22 |
23 | It is recommended to enable healthchecks for all your resources. This way, you can ensure that only healthy resources are receiving traffic.
24 |
25 | But if you cannot set up healthchecks for some reason, you can disable them.
26 |
27 | Just be aware that if the resource is unhealthy, it will still receive traffic.
28 |
--------------------------------------------------------------------------------
/knowledge-base/domains.mdx:
--------------------------------------------------------------------------------
1 | ---
2 | title: Domains
3 | "og:title": "How to add domains to Coolify"
4 | description: "A guide on how to add domains to Coolify"
5 | ---
6 |
7 | You can easily add your own domains to Coolify or your resources.
8 |
9 | All domain fields are capable to generate your proxy configurations based on the following rules:
10 |
11 | 1. You need to use FQDN (Fully Qualified Domain Name) format: `https://coolify.io`
12 | 2. You can give multiple domains, separated by comma: `https://coolify.io,https://www.coolify.io`
13 | 3. You can also add a port to the domain, so the proxy will know which port you would like to map to the domain: `https://coolify.io:8080,http://api.coolify.io:3000`
14 |
15 | ## Wildcard Domain
16 |
17 | You can set a wildcard domain (`example: http://example.com`) to your server, so you can easily assign generated domains to all the resources connected to this server. [More details](/knowledge-base/server/introduction#wildcard-domain)
18 |
19 | ## DNS Validation
20 |
21 | Since version `beta.191`, Coolify will validates DNS records for your domains with `1.1.1.1` Cloudflare DNS server.
22 |
23 | If you want to use different DNS server, go to your `Settings` page and change the `DNS Servers` field (comma separated list).
24 |
--------------------------------------------------------------------------------
/resources/services/budge.mdx:
--------------------------------------------------------------------------------
1 | ---
2 | title: BudgE
3 | "og:title": "How to host BudgE with Coolify"
4 | description: "Here you can find the documentation for hosting BudgE with Coolify."
5 | ---
6 |
7 | One-click setup.
8 |
9 | ## What is BudgE?
10 |
11 | BudgE (pronounced "budgie", like the bird) is an open source "budgeting with envelopes" personal finance app, taking inspiration from other tools such as [Aspire Budgeting](https://www.aspirebudget.com/), [budgetzero](https://budgetzero.io/), and [Buckets](https://www.budgetwithbuckets.com/).
12 |
13 | ## Current Features
14 |
15 | - Multi user support
16 | - Envelope budgeting with monthly rollover
17 | - Transaction management for accounts
18 | - Standard bank account management
19 | - Credit card management with payment handling
20 | - Tracking accounts
21 | - Export account transactions
22 | - CSV transaction import
23 |
24 | ## Screenshots
25 |
26 | 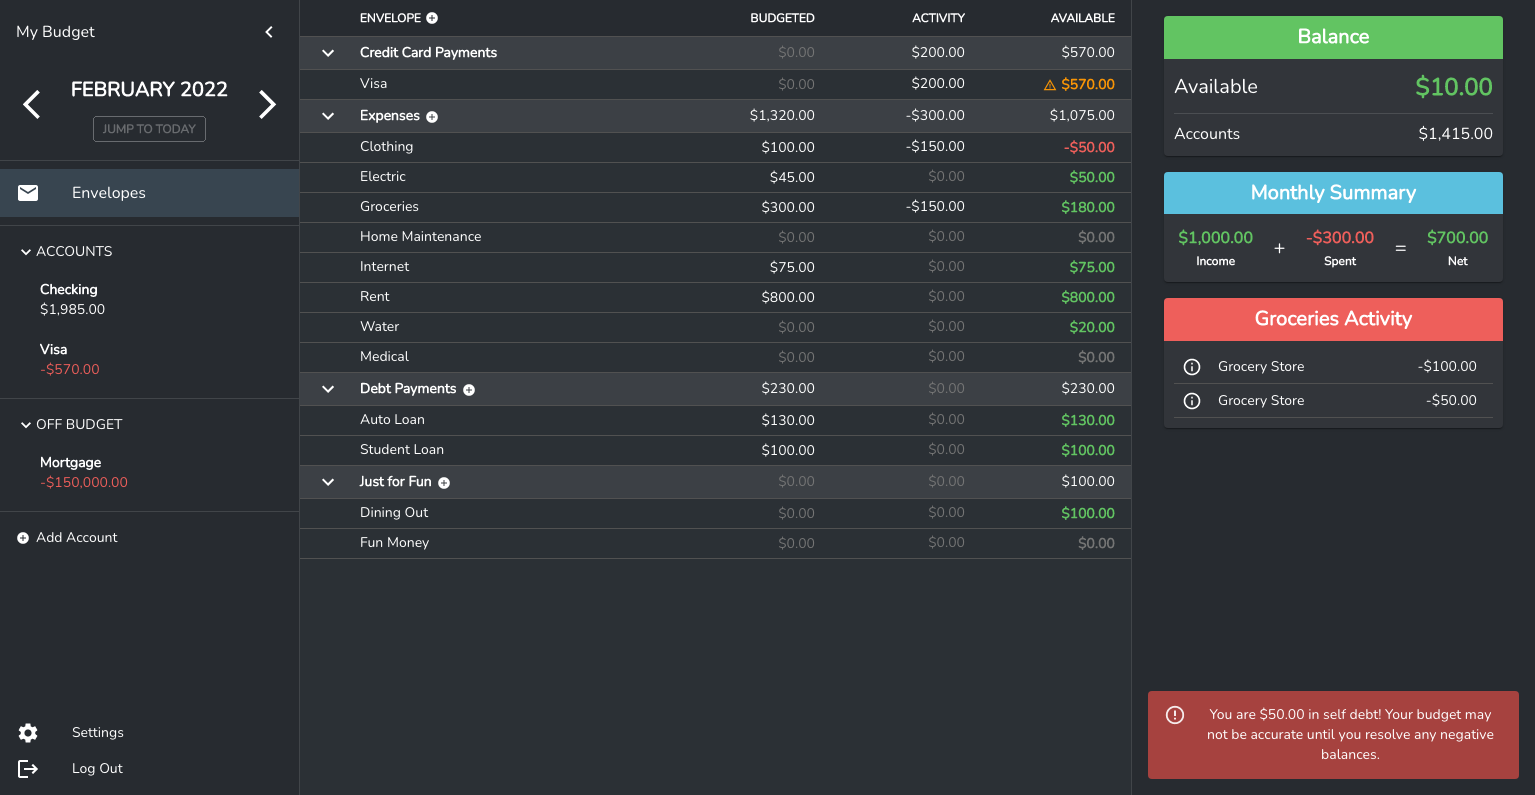
27 | 
28 |
29 | ## Support
30 |
31 | - [Discord](https://discord.gg/hKJWjDqCBz)
32 |
33 | ## Links
34 |
35 | - [GitHub ›](https://github.com/linuxserver/budge)
36 |
--------------------------------------------------------------------------------
/knowledge-base/commands.mdx:
--------------------------------------------------------------------------------
1 | ---
2 | title: Commands
3 | "og:title": "What commands are available to manage my Coolify server"
4 | description: A list of commands that you can use to manage your Coolify server.
5 | ---
6 |
7 |
8 |
9 |
10 | You can use the following method to reset the root user's password, in case you forgot and do not have an SMTP server set, so you cannot request a forgot password.
11 |
12 | Login to your server through SSH and execute the following command:
13 |
14 | ```bash
15 | docker exec -ti coolify bash -c "php artisan root:reset-password"
16 | ```
17 |
18 |
19 |
20 | You can change root user's email.
21 |
22 | Login to your server through SSH and execute the following command:
23 |
24 | ```bash
25 | docker exec -ti coolify bash -c "php artisan root:change-email"
26 | ```
27 |
28 |
29 |
30 | You can easily delete a stucked service.
31 |
32 | Login to your server through SSH and execute the following command:
33 |
34 | ```bash
35 | docker exec -ti coolify bash -c "php artisan services:delete"
36 | ```
37 |
38 |
39 |
40 |
--------------------------------------------------------------------------------
/resources/services/emby.mdx:
--------------------------------------------------------------------------------
1 | ---
2 | title: Emby
3 | "og:title": "How to host Emby with Coolify"
4 | description: "Here you can find the documentation for hosting Emby with Coolify."
5 | ---
6 |
7 | One-click setup.
8 |
9 | 
10 |
11 | ## What is Emby?
12 |
13 | Emby is a free personal media server. It is built with a number of popular open source technologies.
14 |
15 | ## Requirements
16 |
17 | Windows, Mac, Linux, or FreeBSD computer
18 |
19 | ### Minimum Requirements — no transcoding
20 |
21 | - Intel Core 2 Duo processor 1.6 GHz or better
22 | - At least 1GB RAM for Windows/Mac OS X
23 | - At least 512MB RAM for Linux
24 | - Windows: Vista or later
25 | - OS X: MacOS 10.13 or later
26 | - Ubuntu, Debian, Fedora, CentOS or SuSE Linux
27 |
28 | ### Recommended Configuration — transcoding HD Content
29 |
30 | - Intel Core 2 Duo processor 2.4 GHz or better
31 | - If transcoding for multiple devices, a faster CPU may be required
32 | - At least 2GB RAM
33 | - Windows: Vista or later
34 | - OS X: MacOS 10.13 or later
35 | - Ubuntu, Debian, Fedora, CentOS or SuSE Linux
36 |
37 | ## Community
38 |
39 | - [The official website ›](https://emby.media/)
40 | - [The Emby community ›](https://emby.media/community/)
41 |
--------------------------------------------------------------------------------
/knowledge-base/server/oracle-cloud.mdx:
--------------------------------------------------------------------------------
1 | ---
2 | title: "Oracle Cloud"
3 | "og:title": "What is required for Oracle Cloud servers to use in Coolify"
4 | description: "A guide to use Oracle Cloud servers in Coolify"
5 | ---
6 |
7 | If you are using `Oracle Cloud free ARM server`, you need to do a few extra steps to use it in Coolify, as a `Coolify instance` or just a `remote server`.
8 |
9 | ## Normal user
10 | Non-root user is in `experimental` mode and works with `sudo`.
11 | - Make sure the ssh key is added to the user's `~/.ssh/authorized_keys` file.
12 | - All configuration is set for sudo. Details [here](./non-root-user).
13 |
14 | ## Setup Root User
15 |
16 | By default, you can't login as root user. You need to do the following steps to enable root user.
17 |
18 | 1. Switch to root user `sudo su -`
19 | 2. Edit `/etc/ssh/sshd_config` and change `PermitRootLogin` to `without-password`.
20 | 3. Restart ssh service `service sshd restart`
21 | 4. Add a public key to `/root/.ssh/authorized_keys` file which is also defined in your Coolify instance.
22 |
23 | ## Firewall Rules
24 |
25 | This is only required if you self-host Coolify on Oracle ARM server.
26 |
27 | By default, Oracle ARM server has a firewall enabled and you need to allow some ports to use Coolify.
28 |
29 | For more details, check [this](./firewall) page.
30 |
--------------------------------------------------------------------------------
/resources/services/code-server.mdx:
--------------------------------------------------------------------------------
1 | ---
2 | title: Code Server
3 | "og:title": "How to host Code Server with Coolify"
4 | description: "Here you can find the documentation for hosting Code Server with Coolify."
5 | ---
6 |
7 | One-click setup.
8 |
9 | 
10 | 
11 |
12 | ## What is Code Server?
13 |
14 | Run [VS Code](https://github.com/Microsoft/vscode) on any machine anywhere and access it in the browser.
15 |
16 | ## Highlights
17 |
18 | - Code on any device with a consistent development environment
19 | - Use cloud servers to speed up tests, compilations, downloads, and more
20 | - Preserve battery life when you're on the go; all intensive tasks run on your server
21 |
22 | ## Requirements
23 |
24 | See [requirements](https://coder.com/docs/code-server/latest/requirements) for minimum specs
25 |
26 | **TL;DR:** Linux machine with WebSockets enabled, 1 GB RAM, and 2 vCPUs
27 |
28 | ## Questions?
29 |
30 | See answers to [frequently asked questions](https://coder.com/docs/code-server/latest/FAQ).
31 |
32 | ## Links
33 |
34 | - [The official website ›](https://coder.com/docs/code-server/)
35 | - [GitHub ›](https://github.com/coder/code-server)
36 |
--------------------------------------------------------------------------------
/resources/applications/jekyll.mdx:
--------------------------------------------------------------------------------
1 | ---
2 | title: Jekyll
3 | "og:title": "How to deploy Jekyll site with Coolify"
4 | description: "A guide on how to deploy Jekyll site with Coolify"
5 | ---
6 |
7 | Jekyll is a simple, blog-aware, static site generator for personal, project, or organization sites.
8 |
9 | ## Deploy with Nixpacks
10 |
11 | Nixpacks needs a few prerequisites in your source code to deploy your Jekyll application. More info [here](https://nixpacks.com/docs/providers/ruby).
12 |
13 | ## Deploy with Dockerfile
14 |
15 | If you want simplicity, you can use a Dockerfile to deploy your Jekyll application.
16 |
17 | ### Prerequisites
18 |
19 | 1. Set `Ports Exposes` field to `80`.
20 | 2. Create a `Dockerfile` in the root of your project with the following content:
21 |
22 | ```Dockerfile
23 | FROM ruby:3.1.1 AS builder
24 | RUN apt-get update -qq && apt-get install -y build-essential nodejs
25 | WORKDIR /srv/jekyll
26 | COPY Gemfile Gemfile.lock ./
27 | RUN bundle install
28 | COPY . .
29 | RUN chown 1000:1000 -R /srv/jekyll
30 | RUN bundle exec jekyll build -d /srv/jekyll/_site
31 |
32 | FROM nginx:alpine
33 | COPY --from=builder /srv/jekyll/_site /usr/share/nginx/html
34 | EXPOSE 80
35 | CMD ["nginx", "-g", "daemon off;"]
36 | ```
37 |
38 | 3. Make sure you have a `Gemfile` and `Gemfile.lock` in the root of your project.
39 | 4. Set the buildpack to `Dockerfile`.
40 |
--------------------------------------------------------------------------------
/resources/services/authentik.mdx:
--------------------------------------------------------------------------------
1 | ---
2 | title: Authentik
3 | "og:title": "How to host Authentik with Coolify"
4 | description: "Here you can find the documentation for hosting Authentik with Coolify."
5 | ---
6 |
7 | One-click setup.
8 |
9 | 
10 |
11 | ## What is authentik?
12 |
13 | Authentik is an open-source Identity Provider that emphasizes flexibility and versatility. It can be seamlessly integrated into existing environments to support new protocols. authentik is also a great solution for implementing sign-up, recovery, and other similar features in your application, saving you the hassle of dealing with them.
14 |
15 | ## Screenshots
16 |
17 | | Light | Dark |
18 | | ----------------------------------------------------------- | ---------------------------------------------------------- |
19 | |  |  |
20 | |  |  |
21 |
22 | ## Links
23 |
24 | - [The official website ›](https://goauthentik.io)
25 | - [GitHub ›](https://github.com/goauthentik/authentik)
26 |
--------------------------------------------------------------------------------
/resources/services/kuzzle.mdx:
--------------------------------------------------------------------------------
1 | ---
2 | title: Kuzzle
3 | "og:title": "How to host Kuzzle with Coolify"
4 | description: "Here you can find the documentation for hosting Kuzzle with Coolify."
5 | ---
6 |
7 | One-click setup.
8 |
9 | 
10 |
11 | ## What is Kuzzle?
12 |
13 | Kuzzle is a generic backend offering the basic building blocks common to every application.
14 |
15 | Rather than developing the same standard features over and over again each time you create a new application, Kuzzle proposes them off the shelf, allowing you to focus on building high-level, high-value business functionalities.
16 |
17 | ## Features
18 |
19 | Kuzzle enables you to build modern web applications and complex IoT networks in no time.
20 |
21 | - API First: use a standardised multi-protocol API.
22 | - Persisted Data: store your data and perform advanced searches on it.
23 | - Realtime Notifications: use the pub/sub system or subscribe to database notifications.
24 | - User Management: login, logout and security rules are no more a burden.
25 | - Extensible: develop advanced business feature directly with the integrated framework.
26 | - Client SDKs: use our SDKs to accelerate the frontend development.
27 |
28 | ## Links
29 |
30 | - [The official website ›](https://kuzzle.io/)
31 | - [Github ›](https://github.com/kuzzleio/kuzzle)
32 |
--------------------------------------------------------------------------------
/resources/services/plausible.mdx:
--------------------------------------------------------------------------------
1 | ---
2 | title: Plausible Analytics
3 | "og:title": "How to host Plausible Analytics with Coolify"
4 | description: "Here you can find the documentation for hosting Plausible Analytics with Coolify."
5 | ---
6 |
7 | 
8 |
9 | ## What is Plausible Analytics?
10 |
11 | Plausible is intuitive, lightweight and open source web analytics. No cookies and fully compliant with GDPR, CCPA and PECR. Made and hosted in the EU, powered by European-owned cloud infrastructure 🇪🇺
12 |
13 | ## How to deploy Plausible Analytics with Coolify?
14 |
15 | Due to trademark issues, we can't make a fully automated installation for Plausible Analytics. But don't worry, it's still easy to install it.
16 |
17 | ## Installation
18 |
19 | 1. You need to select the `Based on Docker Compose` application type where you can add any docker-compose file you want.
20 | 2. Copy the following [file](https://raw.githubusercontent.com/coollabsio/coolify/main/templates/compose/plausible.yaml) to the input box (with the comments).
21 | 3. Click on the `Save` button.
22 | 4. Go to the `Plausible` service's settings page (gear icon on the right side).
23 | 5. Add your custom domain name to the `FQDN` input box.
24 | 6. Click on the `Save` button.
25 | 7. Click on the `Deploy` button.
26 |
27 | ## Links
28 |
29 | - [The official website ›](https://plausible.io/)
30 | - [GitHub ›](https://github.com/plausible/analytics)
31 |
--------------------------------------------------------------------------------
/knowledge-base/server/build-server.mdx:
--------------------------------------------------------------------------------
1 | ---
2 | title: "Build Server"
3 | "og:title": "How to use a build server with Coolify"
4 | description: "A guide on how to use a build server with Coolify"
5 | ---
6 |
7 | This is an experimental feature.
8 |
9 | You could have a build server to build your projects on instead of building them on the server where you host your resources.
10 |
11 | This keeps the load separated, so it does not affect your application's performance.
12 |
13 | ## Requirements
14 |
15 | - The built images needs to be pushed to a container registry.
16 | - The server needs to be authenticated to the container registry. See [this](../docker/registry) for more information.
17 | - The server needs to have access to the source code.
18 | - The server needs Docker Engine installed.
19 | - The server should be the same architecture as the deployment servers.
20 |
21 | If you have more than one build server, the used server will be chosen randomly.
22 |
23 | ## How to use
24 |
25 | 1. Add a new server to Coolify.
26 | 2. Enable the `Build Server` feature while creating a new resource.
27 |
28 | After this, Coolify will use this server to build your resources, in case you enabled the `Build Server` feature for them.
29 |
30 | ## How to set a build server for a resource
31 |
32 | 1. Create or go to a resource that you want to use a build server for.
33 | 2. Enable the `Build Server` feature on the `General` tab, `Build` section.
34 | 3. Make sure you set up a container registry for the resource.
35 |
--------------------------------------------------------------------------------
/videos.mdx:
--------------------------------------------------------------------------------
1 | ---
2 | title: "Videos"
3 | "og:title": "A few videos of Coolify in action."
4 | description: "A few videos of Coolify in action."
5 | ---
6 |
7 | ## Syntax: 1.5 hours long complete walkthrough
8 |
9 |
18 |
19 | ## WebdevCody: 6 minutes quick overview
20 |
21 |
30 |
31 | ## Fireship video
32 |
33 |
42 |
43 |
44 | ## MelkeyDev video
45 |
46 |
--------------------------------------------------------------------------------
/resources/applications/laravel.mdx:
--------------------------------------------------------------------------------
1 | ---
2 | title: Laravel
3 | "og:title": "How to deploy Laravel with Coolify"
4 | description: "A guide on how to deploy Laravel with Coolify"
5 | ---
6 |
7 | Laravel is a web application framework with expressive, elegant syntax. We believe development must be an enjoyable and creative experience to be truly fulfilling.
8 |
9 | Example repository [here](https://github.com/coollabsio/coolify-examples/tree/main/laravel).
10 |
11 | ## Requirements
12 |
13 | - Set `Build Pack` to `nixpacks`
14 | - Set `APP_KEY`
15 | - Set `Ports Exposes` to `80`
16 |
17 |
18 | If you configured your application before version beta.184 and set the
19 | `NIXPACKS_PHP_ROOT_DIR` and `NIXPACKS_PHP_FALLBACK_PATH` environment
20 | variables, you need to remove them.
21 |
22 |
23 | ### Other components
24 |
25 | If your application needs a database or Redis, you can simply create them beforehand in the Coolify dashboard.
26 |
27 | You will receive the connection strings which you can use in your application and set them as environment variables:
28 |
29 | ```bash
30 | DB_CONNECTION=mysql
31 | DB_HOST=
32 | DB_PORT=3306
33 | DB_DATABASE=laravel
34 | DB_USERNAME=root
35 | DB_PASSWORD=
36 |
37 | REDIS_HOST=
38 | REDIS_PASSWORD=null
39 | REDIS_PORT=6379
40 | ```
41 |
42 |
43 | There is a known limitation with nixpacks and Laravel. You cannot connect to the database without exposing it to the internet. **We are working on a solution.**
44 |
45 | More details [here](https://coolify.io/docs/knowledge-base/faq#database).
46 |
47 |
48 |
--------------------------------------------------------------------------------
/knowledge-base/databases.mdx:
--------------------------------------------------------------------------------
1 | ---
2 | title: Databases
3 | "og:title": "How to configure databases with Coolify"
4 | description: "Here you can find the documentation for databases in Coolify."
5 | ---
6 |
7 | You can configure a database with a simple click. Coolify supports the following databases:
8 |
9 | - PostgreSQL
10 | - MySQL
11 | - MariaDB
12 | - MongoDB
13 | - Redis
14 |
15 | ## Ports Mapping vs Public Port
16 |
17 | ### Ports Mapping
18 |
19 | Ports mapping is using the Docker [port mapping](https://docs.docker.com/network/#published-ports) feature. It is used to map the container port to the host port. For example, if you set the port mapping to `8080:80`, the container port `80` will be mapped to the host port `8080`.
20 |
21 | ### Public Port
22 |
23 | Public port is used to expose the container port to the internet, by starting an Nginx TCP proxy.
24 |
25 | ### Which one should I use?
26 |
27 | - Port mappings makes the connection/port permanent (you need to restart your database to change it).
28 | - The public port makes the connection/port dynamic (you can change it without restarting the database, Coolify will restart the Nginx TCP proxy for you).
29 |
30 | ## Access database during builds
31 |
32 | If you are using `Nixpacks` build pack, you have two ways to access your database during builds:
33 |
34 | 1. Database & your application are `in the same network`: You can reach it using the `internal URL` provided by Coolify.
35 | 2. Database & your application `are not in the same network`: You need to set enable yout database to be `Accessible over the internet` and use the `public URL` provided by Coolify.
36 |
--------------------------------------------------------------------------------
/resources/services/firefly-iii.mdx:
--------------------------------------------------------------------------------
1 | ---
2 | title: Firefly III
3 | "og:title": "How to host Firefly III with Coolify"
4 | description: "Here you can find the documentation for hosting Firefly III with Coolify."
5 | ---
6 |
7 | One-click setup.
8 |
9 | 
10 |
11 | ## What is Firefly III?
12 |
13 | "Firefly III" is a (self-hosted) manager for your personal finances. It can help you keep track of your expenses and income, so you can spend less and save more. Firefly III supports the use of budgets, categories and tags. Using a bunch of external tools, you can import data. It also has many neat financial reports available.
14 |
15 | Firefly III should give you insight into and control over your finances. Money should be useful, not scary. You should be able to see where it is going, to feel your expenses and to... wow, I'm going overboard with this aren't I?
16 |
17 | But you get the idea: this is your money. These are your expenses. Stop them from controlling you. I built this tool because I started to dislike money. Having money, not having money, paying bills with money, you get the idea. But no more. I want to feel "safe", whatever my balance is. And I hope this tool can help you. I know it helps me.
18 |
19 | ## Screenshots
20 |
21 | 
22 |
23 | ## Links
24 |
25 | - [The official website ›](https://firefly-iii.org/)
26 | - [Github ›](https://github.com/firefly-iii/firefly-iii/)
27 |
--------------------------------------------------------------------------------
/resources/services/dokuwiki.mdx:
--------------------------------------------------------------------------------
1 | ---
2 | title: DokuWiki
3 | "og:title": "How to host DokuWiki with Coolify"
4 | description: "Here you can find the documentation for hosting DokuWiki with Coolify."
5 | ---
6 |
7 | One-click setup.
8 |
9 | 
10 |
11 | ## What is DokuWiki?
12 |
13 | DokuWiki is a simple to use and highly versatile Open Source wiki software that doesn't require a database. It is loved by users for its clean and readable syntax. The ease of maintenance, backup and integration makes it an administrator's favorite. Built in access controls and authentication connectors make DokuWiki especially useful in the enterprise context and the large number of plugins contributed by its vibrant community allow for a broad range of use cases beyond a traditional wiki.
14 |
15 | ## Why DokuWiki?
16 |
17 | DokuWiki is a popular choice when choosing a Wiki software and has many advantages over similar software.
18 |
19 | - Easy to install and use
20 | - Low system requirements
21 | - Built-in Access Control Lists
22 | - Large variety of extensions
23 | - Over 50 languages supported
24 | - Device independent
25 | - Open Source
26 |
27 | ## Use Cases
28 |
29 | DokuWiki are quick to update and new pages are easily added. Designed for collaboration while maintaining a history of every change, DokuWiki could be used as:
30 |
31 | - Corporate Knowledge Base
32 | - Private notebook
33 | - Software manual
34 | - Project workspace
35 | - CMS – intranet
36 |
37 | ## Links
38 |
39 | - [The official website ›](https://www.dokuwiki.org)
40 | - [GitHub ›](https://github.com/splitbrain/dokuwiki)
41 |
--------------------------------------------------------------------------------
/knowledge-base/git/github/github-actions.mdx:
--------------------------------------------------------------------------------
1 | ---
2 | title: "Github Actions"
3 | "og:title": "How to use Github Actions with Coolify"
4 | description: "A guide on how to use Github Actions with Coolify to build and deploy your images."
5 | ---
6 |
7 | You can use Github Actions to build your image and deploy it to Coolify.
8 |
9 | Here is an [example repository](https://github.com/andrasbacsai/github-actions-with-coolify) and a [workflow file](https://github.com/andrasbacsai/github-actions-with-coolify/blob/main/.github/workflows/build.yaml) that you can check how it works.
10 |
11 | ## Process Overview
12 |
13 | 1. You need to create a [Github Action workflow](https://github.com/andrasbacsai/github-actions-with-coolify/blob/main/.github/workflows/build.yaml) file in your repository.
14 | 2. You need to build your image and push it to a Docker registry. In the example, I use ghcr.io, but you can use any other registry.
15 | 3. You need to create a [Coolify API Token](../../../api-reference/authorization) and add it to your Github repository secrets.
16 | - `COOLIFY_TOKEN` in the example.
17 | 4. In Coolify, you need to setup your deployment type. It could be a simple Dockerfile, Docker Compose or Docker Image based deployment.
18 | 5. Get the proper webhook endpoint from Coolify (Your resource / `Webhook` menu) and add it to your Github repository secrets.
19 | - `COOLIFY_WEBHOOK` in the example.
20 | 6. Need to send a GET request to that webhook endpoint (authenticated with the token) to trigger the deployment
21 | - Example: `curl --request GET '${{ secrets.COOLIFY_WEBHOOK }}' --header 'Authorization: Bearer ${{ secrets.COOLIFY_TOKEN }}'`
22 | 7. That's it! Now you can push to your repository and the deployment will be triggered automatically.
23 |
--------------------------------------------------------------------------------
/knowledge-base/self-hosted-admin/delete-user.mdx:
--------------------------------------------------------------------------------
1 | ---
2 | title: Delete User
3 | "og:title": "Delete User"
4 | description: "How to delete a user from the self-hosted Coolify instance."
5 | ---
6 |
7 | This guide will show you how to delete a user from the self-hosted Coolify instance.
8 |
9 |
10 | If you delete a user, and Coolify still has connection to the servers, it will
11 | delete all the resources on the servers as well, not just from Coolify's
12 | database.
13 |
14 |
15 | Only users who are in the `root` team can delete users from the UI.
16 |
17 | - Go to the `Team` page.
18 | - Switch to `Admin View` tab.
19 |
20 | Here you can see all the users registered in Coolify. Click on the `Delete` button next to the user you want to delete.
21 |
22 | ## Deletion process
23 |
24 | The root team or root user cannot be deleted.
25 |
26 | Coolify iterate over all the teams of a user and decide of the followings:
27 |
28 | ### The user is alone in the team
29 |
30 | The team and all resources from the server and from Coolify's database are deleted.
31 |
32 | ### The user is not alone in the team
33 |
34 | 1. The user is the owner/admin of the team and no other owners/admins found, but the team **has members**:
35 | - The ownership is transferred to the first user in the team who is not the owner/admin.
36 | - The user is removed from the team. No resources are deleted.
37 |
38 | 2. The user is the owner/admin of the team and no other owners/admins found, but the team has **no members**:
39 | - The team and all resources from the server and from Coolify's database are deleted.
40 |
41 | 3. The user is not the owner/admin of the team:
42 | - The user is removed from the team. No resources are deleted.
43 |
--------------------------------------------------------------------------------
/screenshots.mdx:
--------------------------------------------------------------------------------
1 | ---
2 | title: "Screenshots"
3 | "og:title": "A few screenshots of Coolify in action."
4 | description: "A few screenshots of Coolify in action."
5 | ---
6 |
7 | 
8 | 
9 | 
10 | 
11 | 
12 | 
13 | 
14 | 
15 | 
16 | 
17 | 
18 | 
19 | 
20 | 
21 | 
22 | 
23 | 
24 | 
25 |
--------------------------------------------------------------------------------
/knowledge-base/how-to/wordpress-multisite.mdx:
--------------------------------------------------------------------------------
1 | ---
2 | title: "Using WordPress Multisite with Coolify"
3 | "og:title": "How to configure WordPress Multisite with Coolify"
4 | description: "Here you can find the documentation for configuring WordPress Multisite with Coolify."
5 | ---
6 |
7 | ## Introduction
8 |
9 | ##
10 |
11 |
12 |
13 | Add a Wordpress service with the one-click installation feature in Coolify.
14 |
15 |
16 | Change the following lines in your `docker-compose.yml` file from the UI to persist the Wordpress files on the host machine:
17 |
18 | ```yaml
19 | volumes:
20 | - "wordpress-files:/var/www/html"
21 | ```
22 |
23 | to:
24 |
25 | ```yaml
26 | volumes:
27 | - "./wordpress:/var/www/html"
28 | ```
29 |
30 | This will mount the `wordpress` directory in the default configuration directory (`/data/coolify/services//`) to the `/var/www/html` directory in the container.
31 |
32 | This way, you can edit the files on your host machine and see the changes reflected in the container.
33 |
34 |
35 |
36 | Start the Wordpress service and configure it as you wish.
37 |
38 |
39 | 1. Go to your Wordpress admin panel.
40 | 2. Go to `Plugins` -> `Installed Plugins`.
41 | 3. Select all plugins and choose `Deactivate` from the dropdown menu.
42 |
43 |
44 | 1. Open your `wp-config.php` file on the server and add the following lines:
45 |
46 | ```php
47 | define( 'WP_ALLOW_MULTISITE', true );
48 | ```
49 |
50 | Refresh your WordPress panel in your browser. You should now see a new menu item called `Network Setup` under the `Tools` menu.
51 |
52 |
53 |
54 |
55 |
--------------------------------------------------------------------------------
/uninstall.mdx:
--------------------------------------------------------------------------------
1 | ---
2 | title: Uninstall - Self-hosted
3 | "og:title": "How to uninstall the self-hosted version of Coolify from your server."
4 | description: "A guide on how to uninstall the self-hosted version of Coolify from your server."
5 | ---
6 |
7 | To uninstall the self-hosted version of Coolify from your server, follow these steps:
8 |
9 | 1. **Stop and Remove Containers:**
10 |
11 | Use the following command to stop the Coolify containers with a timeout of 0, ensuring they stop immediately, and then remove them:
12 |
13 | ```bash
14 | sudo docker stop -t 0 coolify coolify-realtime coolify-db coolify-redis coolify-proxy
15 | sudo docker rm coolify coolify-realtime coolify-db coolify-redis coolify-proxy
16 | ```
17 |
18 | 2. **Remove Docker Volumes:**
19 |
20 | Execute the command below to remove the Docker volumes associated with Coolify:
21 |
22 | ```bash
23 | sudo docker volume rm coolify-db coolify-redis
24 | ```
25 |
26 | 3. **Remove Docker Network:**
27 |
28 | Remove the custom Docker network named "coolify":
29 |
30 | ```bash
31 | sudo docker network rm coolify
32 | ```
33 |
34 | 4. **Delete Coolify Data Directory:**
35 |
36 | Delete the directory where Coolify data is stored:
37 |
38 | ```bash
39 | sudo rm -rf /data/coolify
40 | ```
41 |
42 | 5. **Remove Docker Images:**
43 |
44 | Use the following commands to remove the Docker images used by Coolify:
45 |
46 | ```bash
47 | sudo docker rmi ghcr.io/coollabsio/coolify:latest
48 | sudo docker rmi ghcr.io/coollabsio/coolify-helper:latest
49 | sudo docker rmi quay.io/soketi/soketi:1.6-16-alpine
50 | sudo docker rmi postgres:15-alpine
51 | sudo docker rmi redis:alpine
52 | sudo docker rmi traefik:v2.10
53 | ```
54 |
55 | After completing these steps, Coolify will be uninstalled from your server.
56 |
--------------------------------------------------------------------------------
/resources/services/directus.mdx:
--------------------------------------------------------------------------------
1 | ---
2 | title: Directus
3 | "og:title": "How to host Directus with Coolify"
4 | description: "Here you can find the documentation for hosting Directus with Coolify."
5 | ---
6 |
7 | One-click setup.
8 |
9 | 
10 |
11 | ## What is Directus?
12 |
13 | Directus is a real-time API and App dashboard for managing SQL database content.
14 |
15 | - **Open Source.** No artificial limitations, vendor lock-in, or hidden paywalls.
16 | - **REST & GraphQL API.** Instantly layers a blazingly fast Node.js API on top of any SQL database.
17 | - **Manage Pure SQL.** Works with new or existing SQL databases, no migration required.
18 | - **Choose your Database.** Supports PostgreSQL, MySQL, SQLite, OracleDB, CockroachDB, MariaDB, and MS-SQL.
19 | - **On-Prem or Cloud.** Run locally, install on-premises, or use our
20 | [self-service Cloud service](https://directus.io/pricing).
21 | - **Completely Extensible.** Built to white-label, it is easy to customize our modular platform.
22 | - **A Modern Dashboard.** Our no-code Vue.js app is safe and intuitive for non-technical users, no training required.
23 |
24 | ## Community Help
25 |
26 | [The Directus Documentation](https://docs.directus.io) is a great place to start, or explore these other channels:
27 |
28 | - [Discord](https://directus.chat) (Questions, Live Discussions)
29 | - [GitHub Issues](https://github.com/directus/directus/issues) (Report Bugs)
30 | - [GitHub Discussions](https://github.com/directus/directus/discussions) (Feature Requests)
31 | - [Twitter](https://twitter.com/directus) (Latest News)
32 | - [YouTube](https://www.youtube.com/c/DirectusVideos/featured) (Video Tutorials)
33 |
34 | ## Links
35 |
36 | - [The official website ›](https://directus.io)
37 | - [GitHub ›](https://github.com/directus/directus)
38 |
--------------------------------------------------------------------------------
/knowledge-base/traefik/basic-auth.mdx:
--------------------------------------------------------------------------------
1 | ---
2 | title: "Basic Auth"
3 | "og:title": "How to configure basic auth with Traefik in Coolify"
4 | description: "A guide to configure basic auth with Traefik in Coolify"
5 | ---
6 |
7 | The configuration is slightly different for `Standard Applications` and `Docker Compose` based applications/one-click services.
8 |
9 | All you need to do is to set custom labels on your application.
10 |
11 | ## Standard Applications
12 |
13 | ```bash
14 | traefik.http.middlewares..basicauth.users=test:$2y$12$ci.4U63YX83CwkyUrjqxAucnmi2xXOIlEF6T/KdP9824f1Rf1iyNG
15 | traefik.http.routers..middlewares=
16 | ```
17 |
18 |
19 | You most likely have a `traefik.http.middlewares` label already set. In that case, you can append the `` middleware to the existing value.
20 | For example:
21 |
22 | ```bash
23 | traefik.http.routers..middlewares=gzip,
24 | ```
25 |
26 |
27 | In the example above, we are using `test` as username and `test` as password.
28 |
29 | ## Docker Compose based Applications & one-click Services
30 |
31 | You only need to add the basicauth middleware.
32 |
33 | ```yaml
34 | services:
35 | changedetection:
36 | labels:
37 | - 'traefik.http.middlewares..basicauth.users=test:$2y$12$ci.4U63YX83CwkyUrjqxAucnmi2xXOIlEF6T/KdP9824f1Rf1iyNG'
38 | ```
39 |
40 | In the example above, we are using `test` as username and `test` as password.
41 |
42 | Enable `Escape special characters in labels?` when applying basic auth labels.
43 |
44 | ## How to generate user/password?
45 |
46 | You need to set your username and password in the `basicauth.users` label.
47 |
48 | You can generate one with the [htpasswd](https://httpd.apache.org/docs/current/programs/htpasswd.html) command:
49 |
50 | ```bash
51 | htpasswd -nbB test test
52 | ```
53 |
--------------------------------------------------------------------------------
/resources/services/grafana.mdx:
--------------------------------------------------------------------------------
1 | ---
2 | title: Grafana
3 | "og:title": "How to host Grafana with Coolify"
4 | description: "Here you can find the documentation for hosting Grafana with Coolify."
5 | ---
6 |
7 | One-click setup.
8 |
9 | 
10 |
11 | ## What is Grafana?
12 |
13 | The open and composable observability and data visualization platform. Visualize metrics, logs, and traces from multiple sources like Prometheus, Loki, Elasticsearch, InfluxDB, Postgres and many more.
14 |
15 | ## Features
16 |
17 | Grafana allows you to query, visualize, alert on and understand your metrics no matter where they are stored. Create, explore, and share dashboards with your team and foster a data-driven culture:
18 |
19 | - **Visualizations:** Fast and flexible client side graphs with a multitude of options. Panel plugins offer many different ways to visualize metrics and logs.
20 | - **Dynamic Dashboards:** Create dynamic & reusable dashboards with template variables that appear as dropdowns at the top of the dashboard.
21 | - **Explore Metrics:** Explore your data through ad-hoc queries and dynamic drilldown. Split view and compare different time ranges, queries and data sources side by side.
22 | - **Explore Logs:** Experience the magic of switching from metrics to logs with preserved label filters. Quickly search through all your logs or streaming them live.
23 | - **Alerting:** Visually define alert rules for your most important metrics. Grafana will continuously evaluate and send notifications to systems like Slack, PagerDuty, VictorOps, OpsGenie.
24 | - **Mixed Data Sources:** Mix different data sources in the same graph! You can specify a data source on a per-query basis. This works for even custom datasources.
25 |
26 | ## Links
27 |
28 | - [The official website ›](https://grafana.com/)
29 | - [Github ›](https://github.com/grafana/grafana)
30 |
--------------------------------------------------------------------------------
/knowledge-base/persistent-storage.mdx:
--------------------------------------------------------------------------------
1 | ---
2 | title: "Persistent Storage"
3 | "og:title": "How to use persistent storage in Coolify"
4 | description: "A guide how to use persistent storage in Coolify."
5 | ---
6 |
7 | You could add persistent storage to your resources, so you can preserve your data between deployments.
8 |
9 | This persistent storage could be different in different types of Destinations.
10 |
11 | ## Docker Engine
12 |
13 | If you are using Docker Engine, persistent storage could be a `volume` or a `bind mount` (a file/directory from the host system - your server).
14 |
15 | ### Volume
16 |
17 | To create a volume, you need to define:
18 |
19 | - `Name` of the volume.
20 | - `Destination Path` where the volume will be mounted inside the container.
21 |
22 |
23 | The base directory inside the container is `/app`. So if you need to store
24 | your files under `storage` directory, you need to define `/app/storage` as the
25 | destination path.
26 |
27 |
28 |
29 | To prevent storage overlapping between resources, Coolify automatically adds
30 | the resource's UUID to the volume name.
31 |
32 |
33 | ### Bind Mount
34 |
35 | To create a bind mount, you need to define:
36 |
37 | - `Name` of the volume, which will be used as a reference.
38 | - `Source Path` from the host system. **No docker volume created in this case.**
39 | - `Destination Path` where the volume will be mounted inside the container.
40 |
41 |
42 | The base directory inside the container is `/app`. So if you need to store
43 | your files under `storage` directory, you need to define `/app/storage` as the
44 | destination path.
45 |
46 |
47 |
48 | Share file between more than one container? **NOT RECOMMENDED.**
49 |
50 | If you mount the same file to more than one container, you will need to make sure that the proper file locking mechanism is implemented in your resources.
51 |
52 |
53 |
--------------------------------------------------------------------------------
/knowledge-base/traefik/dashboard.mdx:
--------------------------------------------------------------------------------
1 | ---
2 | title: "Enable Dashboard"
3 | "og:title": "How to enable Traefik's dashboard with Coolify"
4 | description: "A guide on how to enable Traefik's dashboard with Coolify"
5 | ---
6 |
7 | By default, the Traefik dashboard is enabled in secure mode, but not configured to be accessible from the internet.
8 |
9 | To enable access from the internet, you need to add a dynamic configuration and secure it with a username and password.
10 |
11 | ## Secure mode (with Dynamic Configuration)
12 |
13 |
14 | How to configure Traefik's dynamic configuration? [Read
15 | more](./dynamic-configurations)
16 |
17 |
18 | You can enable Traefik's dashboard by adding the following dynamic configuration:
19 |
20 | ```yaml{4,12}
21 | http:
22 | routers:
23 | dashboard:
24 | rule: Host(``) && (PathPrefix(`/dashboard`) || PathPrefix(`/api`))
25 | service: api@internal
26 | middlewares:
27 | - auth
28 | middlewares:
29 | auth:
30 | basicAuth:
31 | users:
32 | - ":"
33 | ```
34 |
35 | Replace ``, ``, and `` with your own values.
36 |
37 | You can reach the dashboard by visiting `http:///dashboard/#/`.
38 |
39 | ### How to generate user/password?
40 |
41 | You can generate one with the [htpasswd](https://httpd.apache.org/docs/current/programs/htpasswd.html) command:
42 |
43 | ```bash
44 | htpasswd -nbB test test
45 | ```
46 |
47 | Example output:
48 |
49 | ```bash
50 | test:$apr1$H6uskkkW$IgXLP6ewTrSuBkTrqE8wj/
51 | ```
52 |
53 | ## Insecure Mode (Not Recommended)
54 |
55 | If you want to enable the dashboard in insecure mode (without a password), all you need to do is go to the proxy configurations view and change the `insecure` setting to `true`, then restart the proxy..
56 |
57 | ```yaml{4}
58 | - '--api.insecure=true'
59 | ```
60 |
--------------------------------------------------------------------------------
/resources/services/metabase.mdx:
--------------------------------------------------------------------------------
1 | ---
2 | title: Metabase
3 | "og:title": "How to host Metabase with Coolify"
4 | description: "Here you can find the documentation for hosting Metabase with Coolify."
5 | ---
6 |
7 | One-click setup.
8 |
9 | 
10 |
11 | ## What is Metabase?
12 |
13 | Metabase is the easy, open-source way for everyone in your company to ask questions and learn from data.
14 |
15 | ## Features
16 |
17 | - [Set up in five minutes](https://www.metabase.com/docs/latest/setting-up-metabase.html) (we're not kidding).
18 | - Let anyone on your team [ask questions](https://www.metabase.com/docs/latest/users-guide/04-asking-questions.html) without knowing SQL.
19 | - Use the [SQL editor](https://www.metabase.com/docs/latest/questions/native-editor/writing-sql) for more complex queries.
20 | - Build handsome, interactive [dashboards](https://www.metabase.com/docs/latest/users-guide/07-dashboards.html) with filters, auto-refresh, fullscreen, and custom click behavior.
21 | - Create [models](https://www.metabase.com/learn/getting-started/models) that clean up, annotate, and/or combine raw tables.
22 | - Define canonical [segments and metrics](https://www.metabase.com/docs/latest/administration-guide/07-segments-and-metrics.html) for your team to use.
23 | - Send data to Slack or email on a schedule with [dashboard subscriptions](https://www.metabase.com/docs/latest/users-guide/dashboard-subscriptions).
24 | - Set up [alerts](https://www.metabase.com/docs/latest/users-guide/15-alerts.html) to have Metabase notify you when your data changes.
25 | - [Embed charts and dashboards](https://www.metabase.com/docs/latest/administration-guide/13-embedding.html) in your app, or even [your entire Metabase](https://www.metabase.com/docs/latest/enterprise-guide/full-app-embedding.html).
26 |
27 | ## Links
28 |
29 | - [The official website ›](https://www.meilisearch.com)
30 | - [Github ›](https://github.com/metabase/metabase)
31 |
--------------------------------------------------------------------------------
/knowledge-base/backups.mdx:
--------------------------------------------------------------------------------
1 | ---
2 | title: "Database Backups"
3 | "og:title": "How to configure database backups in Coolify"
4 | description: "A guide how backups work in Coolify."
5 | ---
6 |
7 | Scheduled database backups could be configured for PostgreSQL and for Coolify itself.
8 |
9 | This schedules are based on cron expressions, so you can configure them to run as often as you want.
10 |
11 | You can also use simple cron expressions like:
12 |
13 | ```js
14 | const VALID_CRON_STRINGS = [
15 | 'every_minute' => '* * * * *',
16 | 'hourly' => '0 * * * *',
17 | 'daily' => '0 0 * * *',
18 | 'weekly' => '0 0 * * 0',
19 | 'monthly' => '0 0 1 * *',
20 | 'yearly' => '0 0 1 1 *',
21 | ];
22 | ```
23 |
24 | ## PostgreSQL
25 |
26 | Coolify creates a full backup of your PostgreSQL databases. You can specify which database to backup, with a comma separated list.
27 |
28 | Coolify own database is also backed up using this method.
29 |
30 | ### Backup command
31 |
32 | ```bash
33 | pg_dump --format=custom --no-acl --no-owner --username
34 | ```
35 |
36 | ### Restore command
37 |
38 | The backup has custom format, so you can restore it using the following command (or with any equivalent tool):
39 |
40 | ```bash
41 | pg_restore --verbose --clean -h localhost -U postgres -d postgres pg-dump-postgres-1697207547.dmp
42 | ```
43 |
44 | ## MySQL
45 |
46 | ```bash
47 | mysqldump -u root -p
48 | ```
49 |
50 | ## MariaDB
51 |
52 | ```bash
53 | mariadb-dump -u root -p
54 | ```
55 |
56 | ## MongoDB
57 |
58 | ```bash
59 | mongodump --authenticationDatabase=admin --uri= --gzip --archive=
60 | ```
61 |
62 | Or if you exclude some collections:
63 |
64 | ```bash
65 | mongodump --authenticationDatabase=admin --uri= --gzip --archive= --excludeCollection= --excludeCollection=
66 | ```
67 |
68 | ## S3 Backups
69 |
70 | You can also define your own [S3 compatible](./s3-storages) storage to store your backups.
71 |
--------------------------------------------------------------------------------
/knowledge-base/monitoring.mdx:
--------------------------------------------------------------------------------
1 | ---
2 | title: Monitoring
3 | "og:title": "How the built-in monitoring system works in Coolify"
4 | description: "A guide on how the built-in monitoring system works in Coolify"
5 | ---
6 |
7 | Coolify has a built-in monitoring system, which can be used to monitor your resources and send notifications to your team if something goes wrong.
8 |
9 | Currently Coolify monitors the following resources:
10 |
11 | - Disk usage - If your disk usage is above the configured threshold, it does an automatic cleanup.
12 | - If any of your containers are stopped or restarted.
13 | - Backup status.
14 |
15 | ## Notifications
16 |
17 | You can set up several types of notifications. Each team could have different notification settings.
18 |
19 | ### Email
20 |
21 | Email notifications requires you to set up an SMTP server or supported service (Resend).
22 |
23 | #### System Wide (transactional)
24 |
25 | If you self-host Coolify, you can set up a system-wide SMTP server in the **Settings** menu.
26 |
27 | #### Team Wide
28 |
29 | To setup notifications, go to the **Team** tab and click on **Notifications** and then **Email**.
30 |
31 | If you have a System Wide Email settings, you can enable to use it for the team. Otherwise, you can set up a custom SMTP server/Resend for the team.
32 |
33 | ### Telegram
34 |
35 | You need to create a bot token on Telegram. You can do that by talking to the [BotFather](https://t.me/botfather).
36 |
37 | More information on how to create a bot token can be found [here](https://core.telegram.org/bots/tutorial).
38 |
39 | > You can add your new bot to a group chat, so you can share these notifications with your team.
40 |
41 | ### Discord
42 |
43 | You only need to add a Discord webhook endpoint to receive notifications.
44 |
45 | More information on how to create a webhook can be found [here](https://support.discord.com/hc/en-us/articles/228383668-Intro-to-Webhooks).
46 |
47 | ### Events
48 |
49 | You can subscribe to the following events:
50 |
51 | - Container Status Changed (Stopped, Started, Restarted).
52 | - Application Deployments (Finished, Failed).
53 | - Backup Status (Finished, Failed).
54 |
--------------------------------------------------------------------------------
/resources/services/logto.mdx:
--------------------------------------------------------------------------------
1 | ---
2 | title: Logto
3 | "og:title": "How to host Logto with Coolify"
4 | description: "Here you can find the documentation for hosting Logto with Coolify."
5 | ---
6 |
7 | One-click setup.
8 |
9 | 
10 |
11 | ## What is Logto?
12 |
13 | Logto is an Auth0 alternative designed for modern apps and SaaS products. It offers a seamless developer experience and is well-suited for individuals and growing companies.
14 |
15 | 🧑💻 **Comprehensive frontend-to-backend identity solution**
16 |
17 | - Enables OIDC-based authentication with Logto SDKs.
18 | - Supports passwordless sign-in, along with various options like email, phone number, username, Google, Facebook, and other social sign-in methods.
19 | - Offers beautiful UI components with customizable CSS to suit your business needs.
20 |
21 | 📦 **Out-of-the-box infrastructure**
22 |
23 | - Includes a ready-to-use Management API, serving as your authentication provider, thus eliminating the need for extra implementation.
24 | - Provides SDKs that seamlessly integrate your apps with Logto across multiple platforms and languages, tailored to your development environment.
25 | - Offers flexible connectors that can be scaled with community contributions and customized with SAML, OAuth, and OIDC protocols.
26 |
27 | 💻 **Enterprise-ready solutions**
28 |
29 | - Implements role-based access control (RBAC) for scalable role authorization, catering to a wide range of use cases.
30 | - Facilitates user management and provides audit logs for understanding identity-related user information and maintaining security.
31 | - Enables single sign-on (SSO) and multi-factor authentication (MFA) without extra coding.
32 | - Leverages Logto Organizations to build multi-tenancy apps with ease.
33 |
34 | In a more approachable way, we refer to this solution as "[Customer Identity Access Management (CIAM)](https://en.wikipedia.org/wiki/Customer_identity_access_management)" or simply, the "Customer Identity Solution."
35 |
36 | ## Links
37 |
38 | - [The official website ›](https://logto.io)
39 | - [Github ›](https://github.com/logto-io/logto)
40 |
--------------------------------------------------------------------------------
/knowledge-base/dns-configuration.mdx:
--------------------------------------------------------------------------------
1 | ---
2 | title: "DNS Configuration"
3 | "og:title": "How to configure DNS for your domains with Coolify."
4 | description: "A guide on how to configure DNS for your domains with Coolify."
5 | ---
6 |
7 | In general you need an `A` record for all the domains or subdomains you want to use, pointing to the IP address of your server where you would like to deploy your application.
8 |
9 | Note that you can use the same IP address for multiple domains and subdomains.
10 |
11 | **In the examples, `1.1.1.1` is your server's IP address.**
12 |
13 | ## Single Domain
14 |
15 | Let's say you want deploy your resource to `example.com` with the IP address `1.1.1.1`.
16 |
17 | - You need to set an `A` record for `example.com` pointing to `1.1.1.1`.
18 |
19 |
20 | You can also add `www.example.com` as an `A` record and redirect it inside
21 | Coolify with the chosen reverse proxy.
22 |
23 |
24 | Then you can use `https://example.com` as a FQDN (Fully Qualified Domain Name) for any of your resources, even for your Coolify instance.
25 |
26 | ## Wildcard Domains
27 |
28 | Let's say you want deploy your resource to `*.example.com` with the IP address `1.1.1.1`.
29 |
30 | - You need to set an `A` record for `*.example.com` pointing to `1.1.1.1`.
31 |
32 | This allows you to use any subdomain of `example.com` as a FQDN (Fully Qualified Domain Name) for any of your resources, even for your Coolify instance.
33 |
34 | For example, you can use `https://app.example.com` or `https://api.example.com` as a FQDN.
35 |
36 | ## Autogenerated Domains
37 |
38 | If you set a wildcard domain in your DNS settings, you can also use Coolify to autogenerate domains for your resources.
39 | You just need to go to the `Server` settings and set the `Wildcard Domain` field to your domain, for example `https://example.com`.
40 |
41 | Then if you create a new resource:
42 |
43 | - You will get a random subdomain for your application, for example `https://random.example.com`.
44 | - Also for your Preview Deployments, for example `https://.random.example.com`.
45 |
46 |
47 | The Preview URL template could be modified in the application's page /
48 | `Preview Deployments` tab.
49 |
50 |
51 | ## Instance Domain
52 |
53 | If you self-host Coolify, you can set your Coolify instance a custom domain in the `/settings` page.
54 |
--------------------------------------------------------------------------------
/knowledge-base/environment-variables.mdx:
--------------------------------------------------------------------------------
1 | ---
2 | title: "Environment Variables"
3 | "og:title": "How to use environment variables with Coolify"
4 | description: "A guide how to use environment variables in Coolify."
5 | ---
6 |
7 | You can define environment variables for your resources, and they will be available in your application.
8 |
9 | > Preview Deployments could have different environment variables, so you can test your application as a staging environment for example.
10 |
11 | ## Build Time Variables
12 |
13 | If you would like to set environment variables for the build process, you can do by setting `Build Variable` on the UI.
14 |
15 | ## Shared Variables
16 |
17 | You could have 3 types of shared variables:
18 |
19 | 1. Team Based
20 | 2. Project Based
21 | 3. Environment Based (production, staging, etc.)
22 |
23 | You can set shared variables on their respective pages.
24 |
25 | Then you can use these variables anywhere. For example: You defined `NODE_ENV` to `production`.
26 |
27 | ### Team Based
28 |
29 | You can set them on the `Team` page and use it with `{{team.NODE_ENV}}`.
30 |
31 | ### Project Based
32 |
33 | You can set them on the `Projects` page, under the gear icon and use it with `{{project.NODE_ENV}}`.
34 |
35 | ### Environment Based
36 |
37 | You can set them on the `Environments` page (select a `Project`), under the gear icon and use it with `{{environment.NODE_ENV}}`.
38 |
39 | ## Predefined Variables
40 |
41 | Coolify predefines some variables for you, so you can use them in your application. All you need to do is to add an environment variable like this to your application.
42 |
43 | ```bash
44 | # For example, you can use this variable in your application
45 | MY_VARIABLE=$SOURCE_COMMIT
46 | # You will have the commit hash of the source code in your application as an environment variable in MY_VARIABLE
47 | ```
48 |
49 | ### `COOLIFY_FQDN`
50 |
51 | Fully qualified domain name(s) of the application.
52 |
53 | ### `COOLIFY_URL`
54 |
55 | URL(s) of the application.
56 |
57 | ### `COOLIFY_BRANCH`
58 |
59 | Branch name of the source code.
60 |
61 | ### `COOLIFY_CONTAINER_NAME`
62 |
63 | Name of the container generated by Coolify.
64 |
65 | ### `SOURCE_COMMIT`
66 |
67 | Commit hash of the source code.
68 |
69 | ### `PORT`
70 |
71 | If not set: it is set to the `Port Exposes`'s first port.
72 |
73 | ### `HOST`
74 |
75 | If not set: it is set to `0.0.0.0`.
76 |
--------------------------------------------------------------------------------
/resources/services/appsmith.mdx:
--------------------------------------------------------------------------------
1 | ---
2 | title: Appsmith
3 | "og:title": "How to host Appsmith with Coolify"
4 | description: "Here you can find the documentation for hosting Appsmith with Coolify."
5 | ---
6 |
7 | One-click setup.
8 |
9 | 
10 |
11 | ## What is Appsmith
12 |
13 | Organizations build internal applications such as dashboards, database GUIs, admin panels, approval apps, customer support tools, etc. to help improve their business operations. Appsmith is an open-source developer tool that enables the rapid development of these applications. You can drag and drop pre-built widgets to build UI. Connect securely to your databases & APIs using its datasources. Write business logic to read & write data using queries & JavaScript.
14 |
15 | ## Why Appsmith
16 |
17 | Appsmith makes it easy to build a UI that talks to any datasource. You can create anything from simple CRUD apps to complicated multi-step workflows with a few simple steps:
18 |
19 | - Connect Datasource: Integrate with a database or API. Appsmith supports the most popular databases and REST APIs.
20 | - Build UI: Use built-in widgets to build your app layout.
21 | - Write Logic: Express your business logic using queries and JavaScript anywhere in the editor.
22 | - Collaborate, Deploy, Share: Appsmith supports version control using Git to build apps in collaboration using branches to track and roll back changes. Deploy the app and share it with other users.
23 |
24 | ## Learning Resources
25 |
26 | - [Documentation](https://docs.appsmith.com?utm_source=github&utm_medium=organic&utm_campaign=readme)
27 | - [Tutorials](https://docs.appsmith.com/getting-started/tutorials?utm_source=github&utm_medium=organic&utm_campaign=readme)
28 | - [Videos](https://www.youtube.com/appsmith?utm_source=github&utm_medium=organic&utm_campaign=readme)
29 | - [Templates](https://www.appsmith.com/templates?utm_source=github&utm_medium=organic&utm_campaign=readme&utm_content=support)
30 |
31 | ## Need Help?
32 |
33 | - [Discord](https://discord.gg/rBTTVJp?utm_source=github&utm_medium=organic&utm_campaign=readme)
34 | - [Community Portal](https://community.appsmith.com/?utm_source=github&utm_medium=organic&utm_campaign=readme)
35 | - [support@appsmith.com](mailto:support@appsmith.com)
36 |
37 | ## Links
38 |
39 | - [The official website ›](https://www.appsmith.com)
40 | - [GitHub ›](https://github.com/appsmithorg/appsmith)
41 |
--------------------------------------------------------------------------------
/knowledge-base/traefik/custom-ssl-certs.mdx:
--------------------------------------------------------------------------------
1 | ---
2 | title: "Custom SSL Certificates"
3 | "og:title": "How to configure custom SSL certificates with Traefik in Coolify"
4 | description: "A guide to configure custom SSL certificates with Traefik in Coolify"
5 | ---
6 |
7 | If you want to use custom SSL certificates with Traefik, you can easily do so by following the steps below.
8 |
9 | On each server, `/data/coolify/proxy` is mounted into the Coolify Proxy (Traefik) container.
10 |
11 | You can add your custom SSL certificates in the `/data/coolify/proxy/certs` directory.
12 |
13 |
14 |
15 | Generate or request an SSL certificate for your domain. It can be a
16 | self-signed certificate, a certificate from a public CA, or a certificate
17 | from Let's Encrypt.
18 |
19 | Read more [here](https://certbot.eff.org/instructions) about certbot and Let's Encrypt.
20 |
21 |
22 |
23 | Copy the key and cert files to the server where your resource that will use the certificate is running.
24 | Use `scp` or any other method to copy the files.
25 |
26 | It should be placed under `/data/coolify/proxy` directory, for example:
27 |
28 | ```bash
29 | scp /path/to/your/domain.cert root@your-server-ip:/data/coolify/proxy/certs/domain.cert
30 | scp /path/to/your/domain.key root@your-server-ip:/data/coolify/proxy/certs/domain.key
31 | ```
32 |
33 |
34 | Make sure the directory `/data/coolify/proxy/certs` exists on the server.
35 |
36 |
37 |
38 |
39 | You can configure Traefik to use the custom SSL certificates by adding a dynamic configuration file through Coolify's UI or directly adding it to `/data/coolify/proxy/dynamic`:
40 |
41 | ```yaml
42 | tls:
43 | certificates:
44 | - certFile: /traefik/certs/domain.cert
45 | keyFile: /traefik/certs/domain.key
46 | - certFile: /traefik/certs/domain2.cert
47 | keyFile: /traefik/certs/domain2.key
48 | ```
49 |
50 |
51 | `/traefik` is the directory inside `coolify-proxy` container where
52 | `/data/coolify/proxy` is mounted.
53 |
54 |
55 | Traefik will automatically use this certificate if it matches the domain of the incoming request and the certificate in any of the provided files.
56 |
57 |
58 |
59 |
60 | For more information check Traefik's [official documentation](https://doc.traefik.io/traefik/https/tls/).
61 |
--------------------------------------------------------------------------------
/knowledge-base/server/multiple-servers.mdx:
--------------------------------------------------------------------------------
1 | ---
2 | title: "Multiple Servers"
3 | "og:title": "How to deploy a resource to multiple servers with Coolify"
4 | description: "A guide on how to deploy a resource to multiple servers with Coolify"
5 | ---
6 |
7 | This is an experimental feature.
8 |
9 | With this feature, You could deploy the same application to multiple servers, add a load balancer in front of them and you will get a highly available application.
10 |
11 | ## Requirements
12 |
13 | - Each server should be added to Coolify, validated and reachable.
14 | - Each server (and the optional build server) should be the same architecture (AMD64, ARM).
15 | - You must push the built image to a Docker Registry. Coolify automates the process, you just need to [login to the registry](/knowledge-base/docker/registry#docker-credentials) on the server.
16 |
17 | ## How to use?
18 |
19 | When you configure (or already configured) an application, you selected a server / network where it deploys. This will be your main server.
20 |
21 | Any additional servers must be set in the `Servers` menu, simply by clicking on it.
22 |
23 | Now everytime you redeploy, restart or stop the application, the action will be done on all servers.
24 |
25 | If the deploy needs a build process, it will be executed on the main server (or on the build server if you have on). The deploy process will upload the built image to the Docker Registry and only after all other servers will be notified to pull and deploy this image.
26 |
27 | ## How to configure a loadbalancer?
28 |
29 | At the moment, it is not automated. So you have to manually setup a loadbalancer. There are two ways to use.
30 |
31 | ### Port mapping to host
32 |
33 | If you set `Ports Mappings` for your application, so one port from the docker container will mapped to a port on the host server, all you need to do is to:
34 |
35 | 1. Set all the `IP:PORT` as a destination in your loadbalancer.
36 | 2. Remove any domains from the `Domains` field in Coolify.
37 |
38 | In this case, Coolify Proxy is not used as you can reach the application with IP:PORT
39 |
40 |
41 | This is super simple and effective. But keep in mind, that you need to only
42 | allow incoming connections to the selected `PORT` from the loadbalancer,
43 | otherwise everyone can reach your application directly, without the
44 | loadbalancer.
45 |
46 |
47 | ### Using a domain
48 |
49 | In this case, you need to set the **loadbalancer domain with HTTP, (not HTTPS)** in the `Domains` field, and then set the proper configuration for your loadbalancer, with SSL termination.
50 |
51 | With this configuration, you can use several domains with one loadbalancer.
52 |
--------------------------------------------------------------------------------
/quickstart.mdx:
--------------------------------------------------------------------------------
1 | ---
2 | title: "Quickstart"
3 | "og:title": "How to get started with Coolify"
4 | description: "Start building your infrastructure with ease."
5 | ---
6 |
7 | ## Cloud
8 |
9 | The cloud option is the easiest way to get started with Coolify.
10 |
11 | It is a paid service, where you can bring your own servers to a hosted Coolify instance.
12 |
13 | ### Benefits of the cloud option
14 |
15 | - You do not need to take care of the maintenance of Coolify.
16 | - You get it at the same price as if you host it for yourself.
17 | - You get extra support.
18 | - You get free email notifications.
19 |
20 | Let's get started!
21 |
22 | ## Self-hosted
23 |
24 | You get all the features in the self-hosted version, but you need to take care of the maintenance of Coolify and all related services.
25 |
26 | ### Benefits of the self-hosted option
27 |
28 | - No Hidden Costs. Cloud providers can become costly once you surpass
29 | the free tier. Once you go beyond the free tier, expenses can accumulate rapidly.
30 | There are plenty of
31 | horror stories
32 |
33 | .
34 | - Cost Efficient. You get way more resources for your money and
35 | you can save a lot (thousands of $) every month, like
39 | this
40 | and
44 | this
45 | and
49 | this
50 |
51 | .
52 | - Easier Than You Think. Servers (hardware + software) have changed
53 | a lot since cloud providers emerged. And with software (like Coolify), you can
54 | start hosting in minutes without any maintanence work.
55 | - Data Privacy. Currently, data privacy is a major issue. By self-hosting,
56 | you have complete control over your data and can guarantee that it is not being
57 | misused.
58 | - No Features Behind Paywall. Everything is included in the open-source
59 | software (OSS) version. And will always be.
60 | - No Limitations. You have the freedom to host an unlimited number
61 | of websites on any quantity of servers without any restrictions.
62 | - Nice UI. You get a simple and easy to use UI to manage your servers
63 | and applications.
64 | - Open Source. You can see the source code and contribute to it,
65 | if you want. You can shape the future of the software.
66 |
67 | Let's get started!
68 |
--------------------------------------------------------------------------------
/knowledge-base/docker/registry.mdx:
--------------------------------------------------------------------------------
1 | ---
2 | title: "Docker Registry"
3 | "og:title": "How to configure a Docker Registry with Coolify."
4 | description: "A guide on how to configure a Docker Registry with Coolify."
5 | ---
6 |
7 | You can easily push your built docker images to any docker registries with Coolify.
8 |
9 | You just need to fill the `Docker Registry` fields in your service `General` configurations.
10 |
11 | ## Configuration
12 |
13 | ### Docker Image
14 |
15 | If this field is set, Coolify will automatically push your built docker image to the specified docker registry.
16 |
17 | > If the image is empty, Coolify won't push your built image.
18 |
19 | ### Docker Image Tag
20 |
21 | If this field is set, Coolify will automatically push your built docker image with the specified tag to the specified docker registry + the git commit sha tag.
22 |
23 | > If the tag is empty, Coolify only push your built image with the git commit sha tag.
24 |
25 | ## Docker Credentials
26 |
27 | Docker credentials (from v4.0.0-beta.88) are used to authenticate with Docker registries to pull/push images.
28 |
29 | If you want to authenticate Coolify with a Docker Registry:
30 |
31 |
32 |
33 | Login on the server through SSH with the same user that configured for your server.
34 |
35 |
36 |
37 | Login to the Docker Registry, normally execute `docker login` command.
38 |
39 | > You will be prompted to enter your Docker registry username and password/token - this can be varied depending on the Docker registry you are using.
40 |
41 |
42 | Once you logged in, Coolify will automatically detect your credentials and use them.
43 |
44 | ## Swarm Mode
45 |
46 | If you are deploying to a Swarm cluster, you need to make sure that your Docker Registry is accessible from all nodes in the cluster, workers and managers.
47 |
48 | ## Host your own registry
49 |
50 | You can easily host your own registry, however, it will consume a lot of storages as by default it stores images locally on the server.
51 |
52 | More info on how to set other storage drivers can be found in the [official documentation](https://distribution.github.io/distribution/storage-drivers/).
53 |
54 | You can find the one-click service in Coolify.
55 |
56 | ### Setup
57 |
58 | You need to generate an user / password for the registry.
59 |
60 | You can generate one with the [htpasswd](https://httpd.apache.org/docs/current/programs/htpasswd.html) command:
61 |
62 | ```bash
63 | htpasswd -nbB test test
64 | ```
65 |
66 | Then go to `Storages` menu, and in the `/auth/registry.password` file, simply add the generated user / password. One line per user.
67 |
68 | Do not forget to restart the registry service.
69 |
--------------------------------------------------------------------------------
/knowledge-base/git/gitlab/integration.mdx:
--------------------------------------------------------------------------------
1 | ---
2 | title: "Integration"
3 | "og:title": "How to use Gitlab based Git deployments"
4 | description: "A guide on how to use GitLab based repositories with Coolify."
5 | ---
6 |
7 | ## Public Repositories
8 |
9 | You can use public repositories without any additional setup.
10 |
11 | 1. Select the `Public repository` option in the Coolify when you create a new resource.
12 | 2. Add your repository URL to the input field, for example: `https://gitlab.com/andrasbacsai/coolify-examples`
13 | You can only use the https URL.{" "}
14 | 3. That's it! Coolify will automatically pull the latest version of your repository and deploy it.
15 |
16 | ## Private Repositories
17 |
18 | Private repositories require a few more steps to setup.
19 |
20 | 1. Add a private key (aka `Deploy Keys`) to Coolify and to your GitLab repository in the `Settings` / `Repository` / `Deploy Keys` menu.
21 |
22 |
23 | - You can generate a new key pair with the following command:
24 |
25 | ```bash
26 | ssh-keygen -t rsa -b 4096 -C "deploy_key"
27 | ```
28 |
29 | - Or you can also use Coolify to generate a new key for you in the `Keys & Tokens` menu.
30 |
31 |
32 | 2. Create a new resource and select the `Private Repository (with deploy key)`
33 | 3. Add your repository URL to the input field, for example: `git@gitlab.com:andrasbacsai/coolify-examples.git`
34 |
35 | You need to use the SSH URL, so the one that starts with `git@`.
36 |
37 | 4. That's it! Coolify will automatically pull the latest version of your repository and deploy it.
38 |
39 | ## Automatic commit deployments with webhooks (Optional)
40 |
41 | You can add a custom webhook URL to your GitLab repository to trigger a new deployment when you push to your repository.
42 |
43 | This can be set on either public or private repositories.
44 |
45 | In your resource, there is a `Webhooks` menu. In the `Manual Git Webhooks` section, you can find the URL what you need to set in your GitLab repository.
46 |
47 | 1. Set a secret key in the `GitLab Webhook Secret` input field.
48 | 2. Go to your repository in GitLab and open the `Settings` / `Webhooks` menu.
49 | 3. Add the URL from Coolify to the `URL` input field and the secret token.
50 | 4. Select the `Push events` option.
51 | 5. That's it! Now when you push to your repository, GitLab will send a webhook request to Coolify and it will trigger a new deployment.
52 |
53 | ## Merge request deployments with webhooks (Optional)
54 |
55 | You can add a custom webhook URL to your GitLab repository to trigger a new deployment when you create a new merge request.
56 |
57 | This can be set on either public or private repositories.
58 |
59 | The process is the same as the previous one, but you need to select the `Merge request events` option in the `Settings` / `Webhooks` menu.
60 |
--------------------------------------------------------------------------------
/knowledge-base/traefik/redirects.mdx:
--------------------------------------------------------------------------------
1 | ---
2 | title: "Redirects"
3 | "og:title": "How to configure redirects with Traefik in Coolify"
4 | description: "A guide to configure redirects with Traefik in Coolify"
5 | ---
6 |
7 | # Redirects with Traefik
8 |
9 | This guide will help you to configure redirects in Coolify with Traefik.
10 |
11 | The configuration is slightly different for `Standard Applications` and `Docker Compose` based applications/one-click services.
12 |
13 | ## Standard Applications
14 |
15 | - You need to set both FQDNs for your resource, so for example: `coolify.io,www.coolify.io`
16 | - Add a unique middleware to your resource.
17 |
18 | ### www -> non-www
19 |
20 | ```bash{4,8-10}
21 | # A similar line is already defined.
22 | traefik.http.routers..rule=Host(`www.coolify.io`) && PathPrefix(`/`)
23 |
24 | # You need to add the middleware to the router.
25 | traefik.http.routers..middlewares=example-middleware
26 |
27 | # If you have multiple middlewares, you need to add them comma separated.
28 | # traefik.http.routers..middlewares=gzip,example-middleware
29 | #
30 | traefik.http.middlewares.example-middleware.redirectregex.regex=^(http|https)://www\.(.+)
31 | traefik.http.middlewares.example-middleware.redirectregex.replacement=${1}://${2}
32 | traefik.http.middlewares.example-middleware.redirectregex.permanent=true
33 | ```
34 |
35 | ### non-www -> www
36 |
37 | ```bash{4,8-10}
38 | # A similar line is already defined.
39 | traefik.http.routers..rule=Host(`coolify.io`) && PathPrefix(`/`)
40 |
41 | # You need to add the middleware to the router.
42 | traefik.http.routers..middlewares=example-middleware
43 |
44 | # If you have multiple middlewares, you need to add them comma separated.
45 | # traefik.http.routers..middlewares=gzip,example-middleware
46 | #
47 | traefik.http.middlewares.example-middleware.redirectregex.regex=^(http|https)://(?:www\.)?(.+)
48 | traefik.http.middlewares.example-middleware.redirectregex.replacement=${1}://www.${2}
49 | traefik.http.middlewares.example-middleware.redirectregex.permanent=true
50 | ```
51 |
52 | ## Docker Compose based Applications & one-click Services
53 |
54 | - You need to set both FQDNs for your resource, so for example: `coolify.io,www.coolify.io`
55 | - You only need add the middleware to the router.
56 |
57 | ### www -> non-www
58 |
59 | ```bash
60 | traefik.http.middlewares.example-middleware.redirectregex.regex=^(http|https)://www\.(.+)
61 | traefik.http.middlewares.example-middleware.redirectregex.replacement=${1}://${2}
62 | traefik.http.middlewares.example-middleware.redirectregex.permanent=true
63 | ```
64 |
65 | ### non-www -> www
66 |
67 | ```bash
68 | traefik.http.middlewares.example-middleware.redirectregex.regex=^(http|https)://(?:www\.)?(.+)
69 | traefik.http.middlewares.example-middleware.redirectregex.replacement=${1}://www.${2}
70 | traefik.http.middlewares.example-middleware.redirectregex.permanent=true
71 | ```
72 |
--------------------------------------------------------------------------------
/knowledge-base/git/gitea/integration.mdx:
--------------------------------------------------------------------------------
1 | ---
2 | title: "Integration"
3 | "og:title": "How to configure Gitea based Git deployments with Coolify"
4 | description: "A guide on how to use Gitea based repositories with Coolify."
5 | ---
6 |
7 | This guide will show you how to use Gitea based repositories with Coolify.
8 |
9 | ## Public Repositories
10 |
11 | You can use public repositories without any additional setup.
12 |
13 | 1. Select the `Public repository` option in the Coolify when you create a new resource.
14 | 2. Add your repository URL to the input field, for example: `https://gitea.com/heyandras/coolify-examples`
15 |
16 | You can only use the https URL.
17 |
18 | 1. That's it! Coolify will automatically pull the latest version of your repository and deploy it.
19 |
20 | ## Private Repositories
21 |
22 | Private repositories require a few more steps to setup.
23 |
24 | 1. Add a private key (aka `Deploy Keys`) to Coolify and to your Gitea repository in the `Repository Settings` / `Access Keys` menu.
25 |
26 |
27 | - You can generate a new key pair with the following command:
28 |
29 | ```bash
30 | ssh-keygen -t rsa -b 4096 -C "deploy_key"
31 | ```
32 |
33 | - Or you can also use Coolify to generate a new key for you in the `Keys & Tokens` menu.
34 |
35 |
36 | 2. Create a new resource and select the `Private Repository (with deploy key)`
37 | 3. Add your repository URL to the input field, for example: `git@gitea.com:heyandras/coolify-examples.git`
38 |
39 | You need to use the SSH URL, so the one that starts with `git@`.
40 |
41 | 4. That's it! Coolify will automatically pull the latest version of your repository and deploy it.
42 |
43 | ## Automatic commit deployments with webhooks (Optional)
44 |
45 | You can add a custom webhook URL to your Gitea repository to trigger a new deployment when you push to your repository.
46 |
47 | This can be set on either public or private repositories.
48 |
49 | In your resource, there is a `Webhooks` menu. In the `Manual Git Webhooks` section, you can find the URL what you need to set in your Gitea repository.
50 |
51 | 1. Set a secret key in the `Gitea Webhook Secret` input field.
52 | 2. Go to your repository in Gitea and open the `Repository Settings` / `Webhooks` menu as `Repository hooks`.
53 | 3. Add the URL from Coolify to the `URL` input field and the secret token.
54 | 4. Select the `Push` option.
55 | 5. That's it! Now when you push to your repository, Gitea will send a webhook request to Coolify and it will trigger a new deployment.
56 |
57 | ## Merge request deployments with webhooks (Optional)
58 |
59 | You can add a custom webhook URL to your Gitea repository to trigger a new deployment when you create a new merge request.
60 |
61 | This can be set on either public or private repositories.
62 |
63 | The process is the same as the previous one. In the `Repository Settings` / `Webhooks` menu, you need to select the following events in the `Pull Request` option:
64 |
65 | - `Created`
66 | - `Updated`
67 | - `Merged`
68 | - `Declined`
69 |
--------------------------------------------------------------------------------
/knowledge-base/git/bitbucket/integration.mdx:
--------------------------------------------------------------------------------
1 | ---
2 | title: "Integration"
3 | "og:title": "How to configure Bitbucket based Git deployments with Coolify"
4 | description: "A guide on how to use Bitbucket based repositories with Coolify."
5 | ---
6 |
7 | This guide will show you how to use Bitbucket based repositories with Coolify.
8 |
9 | ## Public Repositories
10 |
11 | You can use public repositories without any additional setup.
12 |
13 | 1. Select the `Public repository` option in the Coolify when you create a new resource.
14 | 2. Add your repository URL to the input field, for example: `https://bitbucket.com/coolify-test2/coolify-examples`
15 |
16 | You can only use the https URL.
17 |
18 | 1. That's it! Coolify will automatically pull the latest version of your repository and deploy it.
19 |
20 | ## Private Repositories
21 |
22 | Private repositories require a few more steps to setup.
23 |
24 | 1. Add a private key (aka `Deploy Keys`) to Coolify and to your Bitbucket repository in the `Repository Settings` / `Access Keys` menu.
25 |
26 |
27 | - You can generate a new key pair with the following command:
28 |
29 | ```bash
30 | ssh-keygen -t rsa -b 4096 -C "deploy_key"
31 | ```
32 |
33 | - Or you can also use Coolify to generate a new key for you in the `Keys & Tokens` menu.
34 |
35 |
36 | 2. Create a new resource and select the `Private Repository (with deploy key)`
37 | 3. Add your repository URL to the input field, for example: `git@bitbucket.org:coolify-test2/coolify-examples.git`
38 |
39 | You need to use the SSH URL, so the one that starts with `git@`.
40 |
41 | 4. That's it! Coolify will automatically pull the latest version of your repository and deploy it.
42 |
43 | ## Automatic commit deployments with webhooks (Optional)
44 |
45 | You can add a custom webhook URL to your Bitbucket repository to trigger a new deployment when you push to your repository.
46 |
47 | This can be set on either public or private repositories.
48 |
49 | In your resource, there is a `Webhooks` menu. In the `Manual Git Webhooks` section, you can find the URL what you need to set in your Bitbucket repository.
50 |
51 | 1. Set a secret key in the `Bitbucket Webhook Secret` input field.
52 | 2. Go to your repository in Bitbucket and open the `Repository Settings` / `Webhooks` menu as `Repository hooks`.
53 | 3. Add the URL from Coolify to the `URL` input field and the secret token.
54 | 4. Select the `Push` option.
55 | 5. That's it! Now when you push to your repository, Bitbucket will send a webhook request to Coolify and it will trigger a new deployment.
56 |
57 | ## Merge request deployments with webhooks (Optional)
58 |
59 | You can add a custom webhook URL to your Bitbucket repository to trigger a new deployment when you create a new merge request.
60 |
61 | This can be set on either public or private repositories.
62 |
63 | The process is the same as the previous one. In the `Repository Settings` / `Webhooks` menu, you need to select the following events in the `Pull Request` option:
64 |
65 | - `Created`
66 | - `Updated`
67 | - `Merged`
68 | - `Declined`
69 |
--------------------------------------------------------------------------------
/knowledge-base/docker/compose.mdx:
--------------------------------------------------------------------------------
1 | ---
2 | title: "Docker Compose"
3 | "og:title": "How to use Docker Compose deployments with Coolify."
4 | description: "A guide on how to use Docker Compose deployments with Coolify."
5 | ---
6 |
7 | If you are using `Docker Compose` based deployments, you need to understand how Docker Compose works with Coolify.
8 |
9 | In all cases the Docker Compose (`docker-compose.y[a]ml`) file is the single source of truth.
10 |
11 | ## Defining environment variables
12 |
13 | You have the following compose file:
14 |
15 | ```yaml
16 | version: "3.8"
17 |
18 | services:
19 | db:
20 | image: adminer
21 | environment:
22 | TEST: ${TEST}
23 | ```
24 |
25 | And you define `TEST` and `ANOTHERTEST` environment variables inside Coolify, only `TEST` will be used, as Coolify cannot determine where to add `ANOTHERTEST` environment variable.
26 |
27 | So if you want to use `ANOTHERTEST` environment variable, you need to add it to the compose file.
28 |
29 | ```yaml
30 | version: "3.8"
31 |
32 | services:
33 | db:
34 | image: adminer
35 | environment:
36 | TEST: ${TEST}
37 | ANOTHERTEST: ${ANOTHERTEST}
38 | ```
39 |
40 | ## Raw Docker Compose Deployment
41 |
42 | You can set with docker compose build pack to deploy your compose file directly without most of Coolify's magic. It is called `Raw Compose Deployment`.
43 |
44 |
45 | This is for advanced users. If you are not familiar with Docker Compose, we do
46 | not recommend this method.
47 |
48 |
49 | ### What is still set?
50 |
51 | Coolify will still add the following labels (if they are not set) to your application:
52 |
53 | ```yaml
54 | labels:
55 | - coolify.managed=true
56 | - coolify.applicationId=5
57 | - coolify.type=application
58 | ```
59 |
60 | ### What to set?
61 |
62 | To use Coolify's Proxy (Traefik), you need to set the following labels to your application:
63 |
64 | ```yaml
65 | labels:
66 | - traefik.enable=true
67 | - "traefik.http.routers..rule=Host(`coolify.io`) && PathPrefix(`/`)"
68 | - traefik.http.routers..entryPoints=http
69 | ```
70 |
71 | ## Connect to Predefined Networks
72 |
73 | By default, each compose stack is deployed to a separate network, with the name of your resource uuid. This will allow to each service in your stack to communicate with each other.
74 |
75 | But in some cases, you would like to communicate with other resources in your account. For example, you would like to connect your application to a database, which is deployed in another stack.
76 |
77 | To do this you need to enable `Connect to Predefined Network` option on your `Service Stack` page, but this will make the internal Docker DNS not work as expected.
78 |
79 | Here is an example. You have a stack with a `postgres` database and a `laravel` application. Coolify will rename your `postgres` stack to `postgres-` and your `laravel` stack to `laravel-` to prevent name collisions.
80 |
81 | If you set `Connect to Predefined Network` option on your `laravel` stack, your `laravel` application will be able to connect to your `postgres` database, but you need to use the `postgres-` as your `DB_HOST` environment variable.
82 |
--------------------------------------------------------------------------------
/resources/services/index.mdx:
--------------------------------------------------------------------------------
1 | ---
2 | title: Introduction
3 | "og:title": "What kind of one-click services could you host with Coolify"
4 | description: "Here you can find all the one-click services that you can host with Coolify."
5 | ---
6 |
7 | All services are open source and self-hostable.
8 |
9 | ## Services
10 |
11 | - [ActivePieces](./activepieces) - Open source no-code business automation.
12 | - [Appsmith](./appsmith) - A low-code application platform for building internal tools.
13 | - [Appwrite](./appwrite) - A backend-as-a-service platform that simplifies the web & mobile app development.
14 | - [Authentik](./authentik) - An open-source Identity Provider, focused on flexibility and versatility.
15 | - [Baby Buddy](./babybuddy) - It helps parents track their baby's daily activities, growth, and health with ease.
16 | - [Budge](./budge) - A budgeting personal finance app.
17 | - [Change Detection](./changedetection) - Website change detection monitor and notifications.
18 | - [ClassicPress](./classicpress) - A business-focused CMS with a strong community.
19 | - [Code Server](./code-server) - Run VS Code on any machine anywhere and access it in the browser.
20 | - [Dashboard](./dashboard) - A simple dashboard for your server.
21 | - [Directus](./directus) - An open-source headless CMS and API for custom databases.
22 | - [Docker Registry](./docker-registry) - A Docker registry to store and manage your Docker images.
23 | - [DocuWiki](./dokuwiki) - A simple to use and highly versatile Open Source wiki software that doesn't require a database.
24 | - [Duplicati](./duplicati) - A free backup client that securely stores encrypted, incremental, compressed backups on cloud storage services and remote file servers.
25 | - [Emby](./emby) - A media server to organize, play, and stream audio and video to a variety of devices.
26 | - [Emby Stat](./emby-stat) - A simple and easy-to-use Emby statistics dashboard.
27 | - [Fider](./fider) - An open platform to collect and organize customer feedback.
28 | - [Filebrowser](./filebrowser) - A file manager for the web.
29 | - [Firefly III](./firefly-iii) - A personal finances manager.
30 | - [Formbricks](./formbricks) - A form builder for static sites.
31 | - [Ghost](./ghost) - A professional publishing platform.
32 | - [Gitea](./gitea) - A painless self-hosted Git service.
33 | - [GlitchTip](./glitchtip) - An open-source error tracking tool.
34 | - [Grafana](./grafana) - The open platform for beautiful analytics and monitoring.
35 | - [Grocy](./grocy) - A self-hosted groceries & household management solution for your home.
36 | - [Heimdall](./heimdall) - An elegant solution to organize all your web applications.
37 | - [Jellyfin](./jellyfin) - The Free Software Media System.
38 | - [Kuzzle](./kuzzle) - A powerful backend that enables you to build modern apps faster.
39 | - [Logto](./logto) - Logto is an Auth0 alternative designed for modern apps and SaaS products.
40 | - [MeiliSearch](./meilisearch) - A powerful, fast, open-source, easy to use, and deploy search engine.
41 | - [Metabase](./metabase) - The simplest, fastest way to share data and analytics inside your company.
42 | - [Metube](./metube) - A self-hosted video sharing platform.
43 | - [Plausible Analytics](./plausible) - Simple and privacy-friendly alternative to Google Analytics.
44 | - [MinIO](./minio) - A high-performance, distributed object storage system.
45 |
--------------------------------------------------------------------------------
/knowledge-base/git/github/integration.mdx:
--------------------------------------------------------------------------------
1 | ---
2 | title: "Integration"
3 | "og:title": "How to use Github based Git deployments."
4 | description: "A guide on how to use GitHub based repositories with Coolify."
5 | ---
6 |
7 | This guide will show you how to use GitHub based repositories with Coolify.
8 |
9 | ## Public Repositories
10 |
11 | You can use public repositories without any additional setup.
12 |
13 | 1. Select the `Public repository` option in the Coolify when you create a new resource.
14 | 2. Add your repository URL to the input field, for example: `https://github.com/coollabsio/coolify-examples`
15 |
16 | You can only use the https URL.
17 |
18 | 3. That's it! Coolify will automatically pull the latest version of your repository and deploy it.
19 |
20 | ## Private Repositories
21 |
22 | ### With GitHub App (Recommended)
23 |
24 | You can use private repositories with the GitHub App integration. You will get full integration with GitHub, like automatic commit deployments and pull request deployments.
25 |
26 | 1. Create a new GitHub App in the `Sources` view.
27 | 2. Create a new resource and select the `Private Repository (with GitHub App)`.
28 | 3. Choose your repository from the list.
29 | 4. That's it!
30 |
31 | ### With Deploy Keys
32 |
33 | 1. Add a private key (aka `Deploy Keys`) to Coolify and to your GitHub repository in the `Settings` / `Deploy Keys` menu.
34 |
35 |
36 | - You can generate a new key pair with the following command:
37 |
38 | ```bash
39 | ssh-keygen -t rsa -b 4096 -C "deploy_key"
40 | ```
41 |
42 | - Or you can also use Coolify to generate a new key for you in the `Keys & Tokens` menu.
43 |
44 |
45 | 2. Create a new resource and select the `Private Repository (with deploy key)`
46 | 3. Add your repository URL to the input field, for example: `git@github.com:coollabsio/coolify-examples.git`
47 |
48 | You need to use the SSH URL, so the one that starts with `git@`.
49 |
50 | 4. That's it!
51 |
52 | ## Automatic commit deployments with webhooks (Optional)
53 |
54 | You can add a custom webhook URL to your GitHub repository to trigger a new deployment when you push to your repository.
55 |
56 |
57 | This can be set on either public or private repositories.
58 |
59 | Not required if you use GitHub App integration.
60 |
61 |
62 |
63 | In your resource, there is a `Webhooks` menu. In the `Manual Git Webhooks` section, you can find the URL what you need to set in your GitHub repository.
64 |
65 | 1. Set a secret key in the `GitHub Webhook Secret` input field.
66 | 2. Go to your repository on GitHub and open the `Settings` / `Webhooks` menu.
67 | 3. Add the URL from Coolify to the `URL` input field and the secret token.
68 | 4. Select the `Push events` option.
69 | 5. That's it! Now when you push to your repository, Github will send a webhook request to Coolify and it will trigger a new deployment.
70 |
71 | ## Pull request deployments with webhooks (Optional)
72 |
73 | You can add a custom webhook URL to your GitHub repository to trigger a new deployment when you create a new merge request.
74 |
75 |
76 | This can be set on either public or private repositories.
77 |
78 | Not required if you use GitHub App integration.
79 |
80 |
81 |
82 | The process is the same as the previous one, but you need to select the `Pull Request` events option in the `Settings` / `Webhooks` menu.
83 |
--------------------------------------------------------------------------------
/resources/services/changedetection.mdx:
--------------------------------------------------------------------------------
1 | ---
2 | title: Change Detection
3 | "og:title": "How to host Change Detection with Coolify"
4 | description: "Here you can find the documentation for hosting Change Detection with Coolify."
5 | ---
6 |
7 | One-click setup.
8 |
9 | 
10 |
11 | ## What is Change Detection?
12 |
13 | Detect website content changes and perform meaningful actions - trigger notifications via Discord, Email, Slack, Telegram, API calls and many more.
14 |
15 | Live your data-life pro-actively.
16 |
17 | ## Example use cases
18 |
19 | - Products and services have a change in pricing
20 | - _Out of stock notification_ and _Back In stock notification_
21 | - Monitor and track PDF file changes, know when a PDF file has text changes.
22 | - Governmental department updates (changes are often only on their websites)
23 | - New software releases, security advisories when you're not on their mailing list.
24 | - Festivals with changes
25 | - Discogs restock alerts and monitoring
26 | - Realestate listing changes
27 | - Know when your favourite whiskey is on sale, or other special deals are announced before anyone else
28 | - COVID related news from government websites
29 | - University/organisation news from their website
30 | - Detect and monitor changes in JSON API responses
31 | - JSON API monitoring and alerting
32 | - Changes in legal and other documents
33 | - Trigger API calls via notifications when text appears on a website
34 | - Glue together APIs using the JSON filter and JSON notifications
35 | - Create RSS feeds based on changes in web content
36 | - Monitor HTML source code for unexpected changes, strengthen your PCI compliance
37 | - You have a very sensitive list of URLs to watch and you do _not_ want to use the paid alternatives. (Remember, _you_ are the product)
38 | - Get notified when certain keywords appear in Twitter search results
39 | - Proactively search for jobs, get notified when companies update their careers page, search job portals for keywords.
40 | - Get alerts when new job positions are open on Bamboo HR and other job platforms
41 | - Website defacement monitoring
42 | - Pokémon Card Restock Tracker / Pokémon TCG Tracker
43 | - RegTech - stay ahead of regulatory changes, regulatory compliance
44 |
45 | ## Key Features
46 |
47 | - Lots of trigger filters, such as "Trigger on text", "Remove text by selector", "Ignore text", "Extract text", also using regular-expressions!
48 | - Target elements with xPath(1.0) and CSS Selectors, Easily monitor complex JSON with JSONPath or jq
49 | - Switch between fast non-JS and Chrome JS based "fetchers"
50 | - Track changes in PDF files (Monitor text changed in the PDF, Also monitor PDF filesize and checksums)
51 | - Easily specify how often a site should be checked
52 | - Execute JS before extracting text (Good for logging in, see examples in the UI!)
53 | - Override Request Headers, Specify `POST` or `GET` and other methods
54 | - Use the "Visual Selector" to help target specific elements
55 | - Configurable [proxy per watch](https://github.com/dgtlmoon/changedetection.io/wiki/Proxy-configuration)
56 | - Send a screenshot with the notification when a change is detected in the web page.
57 |
58 | ## Links
59 |
60 | - [The official website ›](https://changedetection.io)
61 | - [GitHub ›](https://github.com/dgtlmoon/changedetection.io)
62 |
--------------------------------------------------------------------------------
/knowledge-base/faq.mdx:
--------------------------------------------------------------------------------
1 | ---
2 | title: FAQ
3 | "og:title": "Frequently Asked Questions (FAQ) with Coolify"
4 | description: "Here you can find answers to the most common questions, errors and problems."
5 | ---
6 |
7 | ## Server
8 |
9 |
10 |
11 | Error: `Server is not reachable. Reason: root@host.docker.internal: Permission denied (publickey).`
12 |
13 | Your Coolify instance cannot reach the server it is running on. During installation, a public key is generated to `/data/coolify/ssh/keys/id.root@host.docker.internal.pub` and automatically added to `~/.ssh/authorized_keys`.
14 |
15 | If it is not added, you can add it manually by running the following command on your server:
16 |
17 | ```bash
18 | cat /data/coolify/ssh/keys/id.root@host.docker.internal.pub >> ~/.ssh/authorized_keys
19 | ```
20 |
21 |
22 |
23 |
24 | If you would like to use a custom SSH port, you can set it in the `Server` tab of your server.
25 |
26 | If you are self-hosting Coolify, you can simply set it after you installed Coolify on the `localhost` server.
27 |
28 |
29 |
30 | If you would like to increase the number of concurrent builds, you can set it in the `Server` tab of your server.
31 |
32 |
33 | If you need the public facing IPs to allow inbound connections to your servers, here is an up-to-date list of IPs that you can use to whitelist:
34 |
35 | - https://coolify.io/ipv4.txt
36 | - https://coolify.io/ipv6.txt
37 |
38 |
39 |
40 |
41 | ## Cloudflare
42 |
43 |
44 |
45 | You need to set your SSL/TLS configuration to at least `Full` in your Cloudflare dashboard.
46 |
47 | Documentation: https://developers.cloudflare.com/ssl/origin-configuration/ssl-modes/full/
48 |
49 |
50 |
51 | You need to set your SSL/TLS configuration to at least `Full` in your Cloudflare dashboard.
52 |
53 | Documentation: https://developers.cloudflare.com/ssl/origin-configuration/ssl-modes/full/
54 |
55 |
56 |
57 |
58 | ## Applications
59 |
60 |
61 |
62 | If you want to map a port the host system (server), you need to use [Ports
63 | Mappings](/knowledge-base/applications#port-mappings) feature.
64 |
65 |
66 |
67 | ## Database
68 |
69 |
70 |
71 | Some applications / libraries (Prisma) need to connect to the database during the build phase, to run migrations for example.
72 |
73 | ### Nixpacks
74 | To do so, you need to set the database to public. You can do so by going to your database and clicking on `Accessible over the internet`.
75 |
76 | > We are working on a better solution for this.
77 |
78 | ## Other
79 | Other build packs could reach database internally - if they are placed in the same network. You can check this by going to the `Server` tab on both resources and check if they are in the same network and server.
80 |
81 |
82 |
83 |
84 |
--------------------------------------------------------------------------------
/resources/services/meilisearch.mdx:
--------------------------------------------------------------------------------
1 | ---
2 | title: Meilisearch
3 | "og:title": "How to host Meilisearch with Coolify"
4 | description: "Here you can find the documentation for hosting Meilisearch with Coolify."
5 | ---
6 |
7 | One-click setup.
8 |
9 | 
10 |
11 | ## What is Meilisearch?
12 |
13 | A lightning-fast search engine that fits effortlessly into your apps, websites, and workflow
14 |
15 | Meilisearch helps you shape a delightful search experience in a snap, offering features that work out-of-the-box to speed up your workflow.
16 |
17 | ## Screenshot
18 |
19 | 
20 |
21 | ## ✨ Features
22 |
23 | - **Search-as-you-type:** find search results in less than 50 milliseconds
24 | - **[Typo tolerance](https://www.meilisearch.com/docs/learn/configuration/typo_tolerance?utm_campaign=oss&utm_source=github&utm_medium=meilisearch&utm_content=features):** get relevant matches even when queries contain typos and misspellings
25 | - **[Filtering](https://www.meilisearch.com/docs/learn/fine_tuning_results/filtering?utm_campaign=oss&utm_source=github&utm_medium=meilisearch&utm_content=features) and [faceted search](https://www.meilisearch.com/docs/learn/fine_tuning_results/faceted_search?utm_campaign=oss&utm_source=github&utm_medium=meilisearch&utm_content=features):** enhance your users' search experience with custom filters and build a faceted search interface in a few lines of code
26 | - **[Sorting](https://www.meilisearch.com/docs/learn/fine_tuning_results/sorting?utm_campaign=oss&utm_source=github&utm_medium=meilisearch&utm_content=features):** sort results based on price, date, or pretty much anything else your users need
27 | - **[Synonym support](https://www.meilisearch.com/docs/learn/configuration/synonyms?utm_campaign=oss&utm_source=github&utm_medium=meilisearch&utm_content=features):** configure synonyms to include more relevant content in your search results
28 | - **[Geosearch](https://www.meilisearch.com/docs/learn/fine_tuning_results/geosearch?utm_campaign=oss&utm_source=github&utm_medium=meilisearch&utm_content=features):** filter and sort documents based on geographic data
29 | - **[Extensive language support](https://www.meilisearch.com/docs/learn/what_is_meilisearch/language?utm_campaign=oss&utm_source=github&utm_medium=meilisearch&utm_content=features):** search datasets in any language, with optimized support for Chinese, Japanese, Hebrew, and languages using the Latin alphabet
30 | - **[Security management](https://www.meilisearch.com/docs/learn/security/master_api_keys?utm_campaign=oss&utm_source=github&utm_medium=meilisearch&utm_content=features):** control which users can access what data with API keys that allow fine-grained permissions handling
31 | - **[Multi-Tenancy](https://www.meilisearch.com/docs/learn/security/tenant_tokens?utm_campaign=oss&utm_source=github&utm_medium=meilisearch&utm_content=features):** personalize search results for any number of application tenants
32 | - **Highly Customizable:** customize Meilisearch to your specific needs or use our out-of-the-box and hassle-free presets
33 | - **[RESTful API](https://www.meilisearch.com/docs/reference/api/overview?utm_campaign=oss&utm_source=github&utm_medium=meilisearch&utm_content=features):** integrate Meilisearch in your technical stack with our plugins and SDKs
34 | - **Easy to install, deploy, and maintain**
35 |
36 | ## Links
37 |
38 | - [The official website ›](https://www.meilisearch.com)
39 | - [Github ›](https://github.com/meilisearch/meilisearch)
40 |
--------------------------------------------------------------------------------
/introduction.mdx:
--------------------------------------------------------------------------------
1 | ---
2 | title: Introduction
3 | "og:title": "What is exactly Coolify and what are the core features?"
4 | description: "What is Coolify?"
5 | ---
6 |
7 | Coolify is an all-in one PaaS that helps you to self-host your own applications, databases or services (like Wordpress, Plausible Analytics, Ghost) without managing your servers, also known as an **open-source & self-hostable Heroku / Netlify / Vercel alternative**.
8 |
9 | ## Features
10 |
11 |
12 |
13 | Coolify is compatible with a wide range of programming languages and
14 | frameworks, enabling you to launch static websites, APIs, backends,
15 | databases, services, and other types of applications.
16 |
17 |
18 | You can deploy your resources to any server, including your own servers,
19 | VPS, Raspberry Pi, EC2, DigitalOcean, Linode, Hetzner{" "}
20 |
21 | (referral link)
22 |
23 | , and more. All you need is an SSH connection.
24 |
25 |
26 | You can deploy your resources to a single server, multiple servers, or
27 | Docker Swarm clusters according to your requirements.
28 |
29 |
30 | (Support for Kubernetes is on the way!)
31 |
32 |
33 | Nowadays, Git integration is considered the norm. We provide integration
34 | with both hosted and self-hosted platforms like GitHub, GitLab, Bitbucket,
35 | Gitea, and others.
36 |
37 |
38 | Coolify takes care of automatically setting up and renewing Let's Encrypt
39 | SSL certificates for your custom domains, so you can relax and not have to
40 | deal with it.
41 |
42 |
43 | Your data is automatically backed up to any S3 compatible solution, allowing
44 | you to easily restore it with just a few clicks if any problems occur.
45 |
46 |
47 | Integrate into your CI/CD pipelines or create custom integrations using
48 | Github Actions, Gitlab CI, Bitbucket Pipelines, or any other CI/CD tool of
49 | your choice.
50 |
51 |
52 | Coolify offers a robust API that enables you to automate deployments, manage
53 | resources, and integrate with your current tools, providing limitless
54 | possibilities.
55 |
56 |
57 | Share your projects with your team members and work together on them. You
58 | can also control permissions and roles for each member.
59 |
60 |
61 | Automagically deploy new commits and pull requests separately to quickly
62 | review contributions and speed up your teamwork!
63 |
64 |
65 | Once your server is connected, Coolify will handle numerous tasks
66 | automatically, allowing you to concentrate on your code.
67 |
68 |
69 | Coolify will keep an eye on your deployments, servers, disk usage, and other
70 | aspects, and notify you if any issues arise.
71 |
72 |
73 | Coolify will notify you through your chosen channels like Discord, Telegram,
74 | and email in case of any events on your server or with your deployments.
75 |
76 |
77 |
--------------------------------------------------------------------------------
/knowledge-base/server/openssh.mdx:
--------------------------------------------------------------------------------
1 | ---
2 | title: "OpenSSH"
3 | "og:title": "How to configure OpenSSH for Coolify."
4 | description: "A guide to configure OpenSSH for Coolify."
5 | ---
6 |
7 | Coolify uses SSH to connect to your server and deploy your application, even if you are using only the `localhost` server - where Coolify is running on.
8 |
9 | To validate your configuration, make sure the followings are set on your server.
10 |
11 | Some commands may vary based on your Linux distribution.
12 |
13 |
14 | Make sure the SSH key does not have a passphrase. Connection will fail if the
15 | key has a passphrase.
16 |
17 |
18 |
19 |
20 | Make sure SSH is enabled and you can connect to your server with SSH from your local machine with root user.
21 |
22 | ```bash
23 |
24 | # Ubuntu/Debian
25 |
26 | sudo apt install openssh-server
27 | sudo systemctl status sshd
28 |
29 | # CentOS/RHEL
30 |
31 | sudo yum install openssh-server
32 | sudo systemctl status sshd
33 |
34 | # Arch Linux
35 |
36 | sudo pacman -S openssh
37 | sudo systemctl status sshd
38 |
39 | # Alpine Linux
40 |
41 | sudo apk add openssh
42 | sudo rc-service sshd status
43 |
44 | # SLES/openSUSE
45 |
46 | sudo zypper install openssh
47 | sudo systemctl status sshd
48 |
49 | ````
50 |
51 |
52 | Make sure `PermitRootLogin` is set to `yes` or `without-password` or `prohibit-password` in `/etc/ssh/sshd_config` file.
53 |
54 | ```bash
55 | # Check the current value
56 | grep PermitRootLogin /etc/ssh/sshd_config
57 |
58 | # If the value is not `yes` or `without-password` or `prohibit-password`, change it and make sure it is not commented out.
59 | # If it is commented out, remove the `#` character at the beginning of the line.
60 |
61 | sudo vi /etc/ssh/sshd_config
62 |
63 | # You can exit the editor by pressing `Esc` and then `:wq` and then `Enter` keys - thank me later.
64 |
65 | # Restart the SSH service
66 | # Ubuntu/Debian/CentOS/RHEL/Arch Linux/SLES/openSUSE
67 | sudo systemctl restart sshd
68 |
69 | # Alpine Linux
70 | sudo rc-service sshd restart
71 |
72 | ````
73 |
74 |
75 |
76 | Make sure an SSH key is added to the `~/.ssh/authorized_keys` file.
77 | If you installed Coolify with the automated script, you don't need to do anything else.
78 |
79 | If you installed Coolify manually, you need to add an SSH key to the `~/.ssh/authorized_keys` file.
80 |
81 |
82 | Make sure the SSH key does not have a passphrase. Connection will fail if the
83 | key has a passphrase.
84 |
85 |
86 | ```bash
87 | # Create a new SSH key pair ed25519 (recommended) or rsa (legacy) with the following command.
88 |
89 | # The key needs to be created in the `/data/coolify/ssh/keys` directory with,
90 | # id.root@host.docker.internal name,
91 | # no passphrase,
92 | # root@coolify comment.
93 |
94 | ssh-keygen -t ed25519 -a 100 -f /data/coolify/ssh/keys/id.root@host.docker.internal -q -N "" -C root@coolify
95 | chown 9999 /data/coolify/ssh/keys/id.root@host.docker.internal
96 |
97 | # Copy the public key to the `authorized_keys` file
98 | cat /data/coolify/ssh/keys/id.root@host.docker.internal.pub >>~/.ssh/authorized_keys
99 |
100 | # Set the correct permissions
101 | chmod 600 ~/.ssh/authorized_keys
102 | chmod 700 ~/.ssh
103 | ```
104 |
105 |
106 |
107 | Add the private key to Coolify at `Keys & Tokens` menu -> `Private Keys` and set this new key in the localhost server settings.
108 |
109 |
110 |
111 |
--------------------------------------------------------------------------------
/knowledge-base/server/introduction.mdx:
--------------------------------------------------------------------------------
1 | ---
2 | title: "Introduction"
3 | "og:title": "What kind of servers can I connect to Coolify?"
4 | description: "A guide to help you understand what kind of servers you can connect to Coolify."
5 | ---
6 |
7 | No matter what type of server you have (localhost or remote), you need the following requirements.
8 |
9 | - Connectivity
10 |
11 | - SSH connectivity between Coolify and the server with SSH key authentication.
12 |
13 | Your public key should be added to **root** user's `~/.ssh/authorized_keys`.
14 | If you do not have an SSH Key, you can generate on through Coolify with a simple button or you can generate one manually.
15 |
16 |
17 |
18 | - Docker Engine (24+)
19 |
20 | ## Types
21 |
22 | - **Localhost**: the server where Coolify is installed.
23 | - **Remote Server**: could be any remote linux server.
24 |
25 | ## Localhost
26 |
27 | To be able to manage the server where Coolify is running on, the docker container of Coolify should reach the host server through SSH.
28 |
29 | You can use localhost as a server where all your resources are running, but it is not recommended as high server usage could prevent to use Coolify.
30 |
31 |
32 | You can use our [Cloud](https://app.coolify.io) version, so you only need a
33 | server for your resources. You will get a few other things included with the
34 | cloud version, like free email notifications, s3 storage, etc based on your
35 | subscription plan.
36 |
37 |
38 | ## Remote Server
39 |
40 | You can connect any type of servers to Coolify. It could be a VPS, a Raspberry PI or a laptop running Linux.
41 |
42 |
43 | If you don't have a server or server provider yet, we prefer to use Hetzner.
44 |
45 | You can use our [referral link](https://coolify.io/hetzner). It will helps us to keep the project alive.
46 |
47 |
48 |
49 | ### Cloudflare Tunnels
50 |
51 | You can also set to use Cloudflare Tunnels for your servers.
52 |
53 |
54 | Coolify does not install cloudflared on your server, it needs to be done prior.
55 |
56 | All it does is to add the right ProxyCommand (`ProxyCommand access ssh --hostname %h`) to all ssh connections.
57 |
58 |
59 |
60 | ## Features
61 |
62 | ### Disk Cleanup threshold
63 |
64 | You can set a threshold in % for your / filesystem. If this percentage is reached, Coolify tries to cleanup a lot of unnecessary files from your server.
65 |
66 | - Unused Docker Images (`docker image prune -af'`)
67 | - Unused Docker Build Images (`docker builder prune -af`)
68 | - Stopped Docker Containers deployed by Coolify (`docker container prune -f --filter "label=coolify.managed=true"`)
69 |
70 | ### Wildcard Domain
71 |
72 | You can set a wildcard domain (`example: http://example.com`) to your server, so you can easily assign generated domains to all the resources connected to this server.
73 |
74 | Example: Your application UUID is `vgsco4o`.
75 |
76 | If you have the example set, you will get the following FQDN: `http://vgsco4o.example.com`
77 |
78 | If you do not have any wildcard domain set, Coolify will generate a [sslip.io](https://sslip.io) domain, which is free & magical domain that you can use anywhere.
79 |
80 | In this case, it will be: `http://vgsco4o.127.0.0.1.sslip.io`, where `127.0.0.1` is your server's IP.
81 |
82 | ## Proxy
83 |
84 | - **Traefik**: Automatically configure Traefik(v2) based on your deployed resources.
85 | - **Custom/None**: You will configure a proxy manually (only for advanced users).
86 |
87 |
88 | Soon we will support Nginx & Caddy with fully automated configuration.
89 |
90 |
91 | ### Traefik
92 |
93 | Coolify uses Traefik proxy by default to create a reverse proxy for your resources.
94 |
95 |
96 | Traefik only starts when you did not select any proxy for your server and you
97 | have a domain configured for a resource or your Coolify instance itself.
98 |
99 |
100 | #### Dynamic Configuration
101 |
102 | You can always add your own configuration to the proxy settings from Coolify's UI (`/server//proxy`).
103 |
--------------------------------------------------------------------------------
/knowledge-base/s3/aws.mdx:
--------------------------------------------------------------------------------
1 | ---
2 | title: "AWS S3"
3 | "og:title": "How to configure AWS S3 bucket in Coolify"
4 | description: "Here you can find the documentation for configuring AWS S3 bucket in Coolify."
5 | ---
6 |
7 | # TLDR
8 |
9 | 1. Create a bucket in AWS Console
10 | 2. Create a custom policy in AWS Console with the following permissions:
11 |
12 | ```json
13 | {
14 | "Version": "2012-10-17",
15 | "Statement": [
16 | {
17 | "Effect": "Allow",
18 | "Action": [
19 | "s3:ListBucket",
20 | "s3:GetObject",
21 | "s3:DeleteObject",
22 | "s3:GetObjectAcl",
23 | "s3:PutObjectAcl",
24 | "s3:PutObject"
25 | ],
26 | "Resource": [
27 | // rewrite your-bucket-name with your bucket name
28 | "arn:aws:s3:::your-bucket-name",
29 | "arn:aws:s3:::your-bucket-name/*"
30 | ]
31 | }
32 | ]
33 | }
34 | ```
35 |
36 | 3. Create an IAM user in AWS Console & attach the policy from the previous step.
37 | 4. Go to User settings & create an `Access Key` in AWS Console.
38 | 5. Add the `Access Key` and `Secret Key` in Coolify when you create a new S3 source.
39 |
40 | You need to use the S3 HTTP endpoit without the bucket name, for example,
41 | `https://s3.eu-central-1.amazonaws.com`.
42 |
43 |
44 | # Detailed steps
45 |
46 | ### Create a bucket
47 |
48 |
49 |
50 | Go to [AWS Console](https://us-east-1.console.aws.amazon.com/s3/buckets) and
51 | create a new bucket. 
52 |
53 | 
54 |
55 |
56 | ### Create a new policy
57 |
58 |
59 |
60 | Go to [AWS Console](https://us-east-1.console.aws.amazon.com/iam/home) and create a new policy.
61 | 
62 |
63 |
64 | Add the following JSON permissions to your policy (replace `your-bucket-name` with your bucket name):
65 | ```json
66 | {
67 | "Version": "2012-10-17",
68 | "Statement": [
69 | {
70 | "Effect": "Allow",
71 | "Action": [
72 | "s3:ListBucket",
73 | "s3:GetObject",
74 | "s3:DeleteObject",
75 | "s3:GetObjectAcl",
76 | "s3:PutObjectAcl",
77 | "s3:PutObject"
78 | ],
79 | "Resource": [
80 | "arn:aws:s3:::your-bucket-name",
81 | "arn:aws:s3:::your-bucket-name/*"
82 | ]
83 | }
84 | ]
85 | }
86 | ```
87 | 
88 | 
89 |
90 |
91 |
92 | ### Create a new IAM user
93 |
94 |
95 |
96 | Go to [AWS Console](https://us-east-1.console.aws.amazon.com/iam/home) and
97 | create a new user. 
98 |
99 | 
100 |
101 | 
102 |
103 | 
104 |
105 | 
106 |
107 | 
108 |
109 | You will need it to configure this S3 storage in Coolify.
110 | 
111 |
112 |
113 |
114 | ### Configure S3 in Coolify
115 |
116 |
117 |
118 | Go to your Coolify instance and create a new S3 storage.
119 | 
120 |
121 |
122 | Make sure you use the S3 HTTP endpoint without the bucket name. For example,
123 | `https://s3.eu-central-1.amazonaws.com`. 
124 |
125 |
126 |
127 | Well done!
--------------------------------------------------------------------------------
/knowledge-base/docker/swarm.mdx:
--------------------------------------------------------------------------------
1 | ---
2 | title: "Docker Swarm"
3 | "og:title": "How to use Docker Swarm with Coolify."
4 | description: "A guide on how to use Docker Swarm with Coolify."
5 | ---
6 |
7 | This is an experimental feature.
8 |
9 | ## Setup in Coolify
10 |
11 | If you would like to use a Swarm to deploy your resources, you need to add the `Swarm Manager` to Coolify.
12 |
13 | Optionally, you can add the `Swarm Workers` to Coolify. This will allow Coolify to do cleanups and other stuff on the `Swarm Workers`.
14 |
15 | ### Docker Registry
16 |
17 | You need to have an external Docker Registry available to use the a Swarm, as all workers need to be able to pull the images you built with Coolify.
18 |
19 | - The Swarm Manager needs to push the image to the Docker Registry.
20 | - The Swarm Workers need to pull the image from the Docker Registry.
21 |
22 | So set your docker login credentials accordingly. More information [here](./registry).
23 |
24 | ## Install Swarm Cluster
25 |
26 | > WIP
27 | > This is just a brief guide to install a simple Docker Swarm cluster. For more information, please refer to the [official documentation](https://docs.docker.com/engine/swarm/).
28 |
29 | ### Prerequisites
30 |
31 | - I will use [Hetzner](https://coolify.io/hetzner) (referral link) for this guide. You can use any other provider.
32 | - You need at least 3 servers to create a Docker Swarm cluster with the same architecture (ARM or AMD64).
33 | - 1 server for the manager node.
34 | - 2 servers for the worker nodes (you can add more worker nodes if you want).
35 | - Add private networking to all servers if possible.
36 |
37 | ### Install Docker
38 |
39 | Install Docker on all servers. You can follow the [official documentation](https://docs.docker.com/engine/install/) or:
40 |
41 | 1. Install with Rancher script
42 |
43 | ```bash
44 | curl https://releases.rancher.com/install-docker/24.0.sh | sh
45 | ```
46 |
47 | 2. Install with Docker script
48 |
49 | ```bash
50 | curl https://get.docker.com | sh -s -- --version 24.0
51 | ```
52 |
53 | > You only need to use one of the above commands.
54 |
55 | ### Configure Docker
56 |
57 | On `all servers`, run the following command to start Docker.
58 |
59 | ```bash
60 | systemctl start docker
61 | systemctl enable docker
62 | ```
63 |
64 |
65 | Hetzner specific configuration. Hetnzer servers use a MTU of 1450. You need to configure Docker to use the same MTU.
66 |
67 | On the `manager`, run the following command to configure Docker.
68 |
69 | ```bash
70 | mkdir -p /etc/docker
71 | cat < /etc/docker/daemon.json
72 | {
73 | "default-network-opts": {
74 | "overlay": {
75 | "com.docker.network.driver.mtu": "1450"
76 | }
77 | }
78 | }
79 | EOF
80 | systemctl restart docker
81 | ```
82 |
83 |
84 |
85 | ### Create a Swarm cluster
86 |
87 | `On the manager node`, run the following command to create a new cluster.
88 |
89 | ```bash
90 | # MANAGER_IP = IP of the manager node. If you have private networking, use the private IP, like 10.0.0.x.
91 | docker swarm init --advertise-addr
92 |
93 | ```
94 |
95 | This command will output a command to join the cluster on the `worker nodes`.
96 |
97 | It should look like something like this:
98 |
99 | ```bash
100 | # DO NOT RUN THIS COMMAND, IT IS JUST AN EXAMPLE, HELLO!
101 | docker swarm join --token SWMTKN-1-24zvxeydjarchy7z68mdawichvf684qvf8zalx3rmwfgi6pzm3-4ftqn9n8v98kx3phfqjimtkzx 10.0.0.2:2377
102 | ```
103 |
104 | ### Verify the cluster
105 |
106 | Run the following command on the manager node to verify the cluster.
107 |
108 | ```bash
109 | docker node ls
110 | ```
111 |
112 | You should see something like this:
113 |
114 | ```bash
115 | ID HOSTNAME STATUS AVAILABILITY MANAGER STATUS ENGINE VERSION
116 | ua38ijktbid70em257ymxufif * swarm-manager Ready Active Leader 24.0.2
117 | 7rss9rvaqpe9fddt5ol1xucmu swarm-worker Ready Active 24.0.2
118 | 12239rvaqp43gddtgfsdxucm2 swarm-worker Ready Active 24.0.2
119 |
120 | ```
121 |
122 | ## Deploy with persistent storage
123 |
124 | To be able to deploy a service with persistent storage, you need to have a shared volume on the `swarm-workers`. So the Swarm service could move the resources between the `swarm-workers`.
125 |
126 | You can always use services like AWS EFS, NFS, GlusterFS, etc.
127 |
128 | > WIP
129 |
--------------------------------------------------------------------------------
/favicon.svg:
--------------------------------------------------------------------------------
1 |
--------------------------------------------------------------------------------
/openapi.yaml:
--------------------------------------------------------------------------------
1 | openapi: "3.0.2"
2 | info:
3 | title: Coolify API
4 | version: "1.0"
5 | servers:
6 | - url: https://app.coolify.io/v1
7 | description: Coolify Cloud API. Change the host to your own instance if you are self-hosting.
8 | paths:
9 | /deploy:
10 | get:
11 | summary: Deploy Webhook
12 | description: Deploy a resource by UUID or tag.
13 | parameters:
14 | - in: query
15 | name: uuid
16 | required: true
17 | schema:
18 | type: string
19 | description: The resource to deploy by UUID. Could be a comma separated list of UUIDs.
20 | allowReserved: true
21 | style: form
22 | - in: query
23 | name: tag
24 | required: true
25 | schema:
26 | type: string
27 | description: The resource to deploy by tag. Could be a comma separated list of tags.
28 | allowReserved: true
29 | style: form
30 | responses:
31 | "200":
32 | description: OK
33 | /teams:
34 | get:
35 | summary: List Teams
36 | description: Get the list of teams for the currently authenticated user.
37 | responses:
38 | "200":
39 | description: OK
40 | content:
41 | application/json:
42 | schema:
43 | type: array
44 | items:
45 | type: object
46 | properties:
47 | id:
48 | type: string
49 | name:
50 | type: string
51 | description:
52 | type: string
53 | personal_team:
54 | type: boolean
55 | created_at:
56 | type: string
57 | format: date-time
58 | updated_at:
59 | type: string
60 | format: date-time
61 | /team/{teamId}:
62 | get:
63 | summary: Get Team by teamId
64 | description: Get a team by `teamId`.
65 | parameters:
66 | - in: path
67 | name: teamId
68 | required: true
69 | schema:
70 | type: string
71 | description: The team ID.
72 | responses:
73 | "200":
74 | description: OK
75 | content:
76 | application/json:
77 | schema:
78 | type: object
79 | properties:
80 | id:
81 | type: string
82 | name:
83 | type: string
84 | description:
85 | type: string
86 | personal_team:
87 | type: boolean
88 | created_at:
89 | type: string
90 | format: date-time
91 | updated_at:
92 | type: string
93 | format: date-time
94 | /team/{teamId}/members:
95 | get:
96 | summary: List Team Members
97 | description: Get the list of members in a team by `teamId`.
98 | parameters:
99 | - in: path
100 | name: teamId
101 | required: true
102 | schema:
103 | type: string
104 | description: The team ID.
105 | responses:
106 | "200":
107 | description: OK
108 | content:
109 | application/json:
110 | schema:
111 | type: array
112 | items:
113 | type: object
114 | properties:
115 | id:
116 | type: string
117 | name:
118 | type: string
119 | email:
120 | type: string
121 | email_verified_at:
122 | type: string
123 | format: date-time
124 | created_at:
125 | type: string
126 | format: date-time
127 | updated_at:
128 | type: string
129 | format: date-time
130 | /team/current:
131 | get:
132 | summary: Get Current Team
133 | description: Get the currently authenticated team.
134 | responses:
135 | "200":
136 | description: OK
137 | content:
138 | application/json:
139 | schema:
140 | type: object
141 | properties:
142 | id:
143 | type: string
144 | name:
145 | type: string
146 | description:
147 | type: string
148 | personal_team:
149 | type: boolean
150 | created_at:
151 | type: string
152 | format: date-time
153 | updated_at:
154 | type: string
155 | format: date-time
156 | /team/current/members:
157 | get:
158 | summary: List Current Team Members
159 | description: Get the list of members in the currently authenticated team.
160 | responses:
161 | "200":
162 | description: OK
163 | content:
164 | application/json:
165 | schema:
166 | type: array
167 | items:
168 | type: object
169 | properties:
170 | id:
171 | type: string
172 | name:
173 | type: string
174 | email:
175 | type: string
176 | email_verified_at:
177 | type: string
178 | format: date-time
179 | created_at:
180 | type: string
181 | format: date-time
182 | updated_at:
183 | type: string
184 | format: date-time
185 | components:
186 | securitySchemes:
187 | bearerAuth:
188 | type: http
189 | scheme: bearer
190 | bearerFormat: JWT
191 | description: "Go to `Keys & Tokens` / `API tokens` and create a new token. Use the token as the bearer token."
192 | security:
193 | - bearerAuth: []
194 |
--------------------------------------------------------------------------------
/knowledge-base/traefik/load-balancing.mdx:
--------------------------------------------------------------------------------
1 | ---
2 | title: "Load-balancing"
3 | "og:title": "How to configure a load-balancer with Traefik in Coolify"
4 | description: "A guide to configure load-balancing with Traefik in Coolify"
5 | ---
6 |
7 | You can easily use Traefik to loadbalance an application between:
8 |
9 | - 2+ servers
10 | - 2+ containers in one server
11 |
12 | ## 2+ servers
13 |
14 | ### Prerequisites
15 |
16 | 1. Make sure you set the right DNS record for your domain. Your loadbalanced domain should point to the server's IP address where you are setting up the loadbalancer.
17 | 2. You must deploy your application to more than one servers: read more [here](../server/multiple-servers).
18 | 3. Make sure Traefik is running on all servers.
19 | 4. Set your `fqdn` to the fqdn you would like to use to reach your application.
20 | 5. After your application are deployed on all servers, you need to make a dynamic configuration for Traefik to loadbalance between your servers in the `/data/coolify/proxy/dynamic` directory.
21 |
22 | ### Dynamic Configuration
23 |
24 | On your Coolify's UI, you can go the your Server settings / Proxy tab where you can add the dynamic configuration.
25 |
26 | The following configuration is valid if you would like to use https.
27 |
28 | ```yaml{16,26,32,33}
29 | http:
30 | middlewares:
31 | redirect-to-https:
32 | redirectscheme:
33 | scheme: https
34 | gzip:
35 | compress: true
36 | routers:
37 | lb-http:
38 | middlewares:
39 | - redirect-to-https
40 | entryPoints:
41 | - http
42 | service: noop
43 | # Change to your domain, like `example.com` without `https://`
44 | rule: Host(``)
45 | lb-https:
46 | middlewares:
47 | - gzip
48 | entryPoints:
49 | - https
50 | service: lb-https
51 | tls:
52 | certResolver: letsencrypt
53 | # Change to your domain, like `example.com` without `https://`
54 | rule: Host(``)
55 | services:
56 | lb-https:
57 | loadBalancer:
58 | servers:
59 | # Change to your servers IP addresses
60 | - url: 'http://'
61 | - url: 'http://'
62 | # Add any number of servers you want to loadbalance between
63 | noop:
64 | loadBalancer:
65 | servers:
66 | - url: ''
67 | ```
68 |
69 | The following configuration is valid if you would like to use http.
70 |
71 | ```yaml{13,19,20}
72 | http:
73 | middlewares:
74 | gzip:
75 | compress: true
76 | routers:
77 | lb-http:
78 | middlewares:
79 | - gzip
80 | entryPoints:
81 | - http
82 | service: lb-http
83 | # Change to your domain, like `example.com` without `http://`
84 | rule: Host(``)
85 | services:
86 | lb-http:
87 | loadBalancer:
88 | servers:
89 | # Change to your servers IP addresses
90 | - url: 'http://'
91 | - url: 'http://'
92 | # Add any number of servers you want to loadbalance between
93 | ```
94 |
95 | ## 2+ containers in one server
96 |
97 | ### Prerequisites
98 |
99 | 1. Make sure you set the right DNS record for your domain. Your loadbalanced domain should point to the server's IP address where you are setting up the loadbalancer.
100 | 2. You must deploy your application to more than one containers in one server.
101 | 3. Make sure Traefik is running on the server.
102 |
103 | ### Dynamic Configuration
104 |
105 | The following configuration is valid if you would like to use https.
106 |
107 | ```yaml{18,26,34,35}
108 | http:
109 | middlewares:
110 | redirect-to-https:
111 | redirectscheme:
112 | scheme: https
113 | gzip:
114 | compress: true
115 | routers:
116 | lb-https:
117 | tls:
118 | certResolver: letsencrypt
119 | middlewares:
120 | - gzip
121 | entryPoints:
122 | - https
123 | service: lb-https
124 | # Change to your domain, like `example.com` without `http://`
125 | rule: Host(``)
126 | lb-http:
127 | middlewares:
128 | - redirect-to-https
129 | entryPoints:
130 | - http
131 | service: noop
132 | # Change to your domain, like `example.com` without `http://`
133 | rule: Host(``)
134 | services:
135 | lb-https:
136 | loadBalancer:
137 | servers:
138 | # Change : to your containers UUID or host.docker.internal and port
139 | # UUID is when you mapped a port to the host system
140 | # host.docker.internal is when you are not exposed any port to the host system
141 | - url: 'http://:'
142 | - url: 'http://::'
143 | # Add any number of containers you want to loadbalance between
144 | noop:
145 | loadBalancer:
146 | servers:
147 | - url: ''
148 | ```
149 |
150 | The following configuration is valid if you would like to use http.
151 |
152 | ```yaml{13,21,22}
153 | http:
154 | middlewares:
155 | gzip:
156 | compress: true
157 | routers:
158 | lb-http:
159 | middlewares:
160 | - gzip
161 | entryPoints:
162 | - http
163 | service: lb-http
164 | # Change to your domain, like `example.com` without `http://`
165 | rule: Host(``)
166 | services:
167 | lb-http:
168 | loadBalancer:
169 | servers:
170 | # Change : to your containers UUID or host.docker.internal and port
171 | # UUID is when you mapped a port to the host system
172 | # host.docker.internal is when you are not exposed any port to the host system
173 | - url: 'http://:'
174 | - url: 'http://:'
175 | # Add any number of containers you want to loadbalance between
176 | ```
177 |
--------------------------------------------------------------------------------
/knowledge-base/traefik/wildcard-certificates.mdx:
--------------------------------------------------------------------------------
1 | ---
2 | title: "Wildcard SSL Certificates"
3 | "og:title": "How to create wildcard SSL certificates with Traefik in Coolify"
4 | description: "A guide to configure wildcard subdomain redirects (with Traefik wildcard certificates) in Coolify."
5 | ---
6 |
7 | ## Prerequisites
8 |
9 | - You need to have a domain name and a DNS provider that supports wildcard subdomains.
10 | - You need to use [dnsChallenge](https://doc.traefik.io/traefik/https/acme/#dnschallenge) in Traefik to get wildcard certificates from Let's Encrypt.
11 | - You need to use one of the supported DNS [providers](https://doc.traefik.io/traefik/https/acme/#providers).
12 |
13 |
14 | Each provider needs environment variables to be set in the Traefik configuration. You can find the required variables in the [official documentation](https://doc.traefik.io/traefik/https/acme/#providers).
15 |
16 |
17 | If you need fine-grained token, like with [Cloudflare](https://go-acme.github.io/lego/dns/cloudflare/), check the provider configurations.
18 |
19 |
20 |
21 | ## Configuration
22 |
23 | 1. Setup your wildcard subdomain DNS records, `*.coolify.io`.
24 | 2. Go to your Proxy settings (Servers / Proxy menu) and add the following configuration based on your [providers](https://doc.traefik.io/traefik/https/acme/#providers). The example will use `Hetzner` as a provider.
25 |
26 |
27 | ```bash
28 | version: '3.8'
29 | networks:
30 | coolify:
31 | external: true
32 | services:
33 | traefik:
34 | container_name: coolify-proxy
35 | image: 'traefik:v2.10'
36 | restart: unless-stopped
37 | environment:
38 | - HETZNER_API_KEY=
39 | extra_hosts:
40 | - 'host.docker.internal:host-gateway'
41 | networks:
42 | - coolify
43 | ports:
44 | - '80:80'
45 | - '443:443'
46 | - '8080:8080'
47 | healthcheck:
48 | test: 'wget -qO- http://localhost:80/ping || exit 1'
49 | interval: 4s
50 | timeout: 2s
51 | retries: 5
52 | volumes:
53 | - '/var/run/docker.sock:/var/run/docker.sock:ro'
54 | - '/data/coolify/proxy:/traefik'
55 | command:
56 | - '--ping=true'
57 | - '--ping.entrypoint=http'
58 | - '--api.dashboard=true'
59 | - '--api.insecure=false'
60 | - '--entrypoints.http.address=:80'
61 | - '--entrypoints.https.address=:443'
62 | - '--entrypoints.http.http.encodequerysemicolons=true'
63 | - '--entrypoints.https.http.encodequerysemicolons=true'
64 | - '--providers.docker.exposedbydefault=false'
65 | - '--providers.file.directory=/traefik/dynamic/'
66 | - '--providers.file.watch=true'
67 | - '--certificatesresolvers.letsencrypt.acme.httpchallenge=true'
68 | - '--certificatesresolvers.letsencrypt.acme.httpchallenge.entrypoint=http'
69 | - '--certificatesresolvers.letsencrypt.acme.dnschallenge.provider=hetzner'
70 | - '--certificatesresolvers.letsencrypt.acme.dnschallenge.delaybeforecheck=0'
71 | - '--certificatesresolvers.letsencrypt.acme.storage=/traefik/acme.json'
72 | - '--providers.docker=true'
73 | labels:
74 | - traefik.enable=true
75 | - traefik.http.routers.traefik.entrypoints=http
76 | - traefik.http.routers.traefik.middlewares=traefik-basic-auth@file
77 | - traefik.http.routers.traefik.service=api@internal
78 | - traefik.http.routers.traefik.tls.certresolver=letsencrypt
79 | - traefik.http.routers.traefik.tls.domains[0].main=coolify.io
80 | - traefik.http.routers.traefik.tls.domains[0].sans=*.coolify.io
81 | - traefik.http.services.traefik.loadbalancer.server.port=8080
82 | - traefik.http.middlewares.redirect-to-https.redirectscheme.scheme=https
83 | - traefik.http.middlewares.gzip.compress=true
84 | ```
85 |
86 | > You can also set `env_file` instead of `environment` in the example above, but then you need to create a `.env` file with the `HETZNER_API_KEY` variable on the server.
87 |
88 | > Change `--certificatesresolvers.letsencrypt.acme.dnschallenge.provider=hetzner` to your provider.
89 |
90 | Now you have two options to configure your wildcard subdomain for your resources.
91 |
92 | ### Normal
93 |
94 | If you would like to use one (wildcard) certificate for all of your resources, you can use this option.
95 |
96 | It is useful, because Traefik do not need to generate a new certificate for every resource, so new deployments will be available immediately without waiting for the certificate generation.
97 |
98 | - In your application, set your FQDN to a subdomain you would like to use: `https://example.coolify.io`.
99 |
100 | ```bash
101 | traefik.enable=true
102 | traefik.http.routers..rule=Host(`example.coolify.io`) && PathPrefix(`/`)
103 | traefik.http.routers..entryPoints=https
104 | traefik.http.routers..middlewares=gzip
105 | traefik.http.routers..service=
106 | traefik.http.services..loadbalancer.server.port=80
107 | traefik.http.routers..tls=true
108 | traefik.http.routers..tls.certresolver=letsencrypt
109 | traefik.http.routers..rule=Host(`example.coolify.io`) && PathPrefix(`/`)
110 | traefik.http.routers..entryPoints=http
111 | traefik.http.routers..middlewares=redirect-to-https
112 | ```
113 |
114 | ### SaaS
115 |
116 | Redirect all subdomains to one application. You can use this option if you want to use Coolify as a SaaS provider.
117 |
118 | - In your application, leave the FQDN configuration `empty`.
119 | - Add the following custom label configuration:
120 |
121 | ```bash
122 | traefik.enable=true
123 | traefik.http.routers..rule=HostRegexp(`{subdomain:[a-zA-Z0-9-]+}.coolify.io`)
124 | traefik.http.routers..entryPoints=https
125 | traefik.http.routers..middlewares=gzip
126 | traefik.http.routers..service=
127 | traefik.http.services..loadbalancer.server.port=80
128 | traefik.http.routers..tls=true
129 | traefik.http.routers..tls.certresolver=letsencrypt
130 | traefik.http.routers..rule=HostRegexp(`{subdomain:[a-zA-Z0-9-]+}.coolify.io`)
131 | traefik.http.routers..entryPoints=http
132 | traefik.http.routers..middlewares=redirect-to-https
133 | ```
134 |
135 | > `traefik.http.routers..tls.certresolver` should be the same as your `certresolver` name in Traefik proxy configuration, by default `letsencrypt`.
136 |
137 | > `traefik.http.services..loadbalancer.server.port` should be the same as your application listens on. Port 80 if you use a static deployment.
138 |
139 |
140 | You cannot use both configurations (Normal & SaaS) at the same time on one
141 | server.
142 |
143 |
--------------------------------------------------------------------------------
/knowledge-base/cloudflare/tunnels.mdx:
--------------------------------------------------------------------------------
1 | ---
2 | title: "Cloudflare Tunnels"
3 | "og:title": "How to use Cloudflare Tunnels with Coolify."
4 | description: "A guide on how to use Cloudflare Tunnels with Coolify."
5 | ---
6 |
7 | You can run Coolify on your local machine (like old laptop/Raspberry PI) and expose it to the internet without opening any ports on your router with Cloudflare Tunnels.
8 |
9 | > For more details about CF Tunnels, please visit [this page](https://developers.cloudflare.com/cloudflare-one/connections/connect-networks/).
10 |
11 | ## Setup Cloudflared
12 |
13 | You have at least two ways to setup Cloudflare Tunnels with Coolify.
14 |
15 | - [Automated](#automated)
16 | - [Manual](#manual)
17 |
18 | ### Automated
19 |
20 |
21 |
22 | 1. Go to `https://one.dash.cloudflare.com/`.
23 |
24 | 2. Select your account.
25 |
26 | 3. Open `Networks`-> `Tunnels`-> `Create a Tunnel`
27 |
28 | 4. Connector: `Cloudflared`
29 | 
30 |
31 | 5. Choose any name you like.
32 | 
33 |
34 | 6. Copy your `Cloudflare Tunnel Token` from any of the commands.
35 |
36 | The token starts with `eyJ...`.
37 |
38 |
39 | 
40 |
41 | 7. On the `Route Tunnel` tab, add the following tunnels:
42 |
43 |
44 | You can use any domains/subdomains. This will make sure you can reach your server through Cloudflare Tunnels.
45 |
46 |
47 | 
48 |
49 |
50 |
51 | 1. Add a new server with your server's `IP Address` - it will be reconfigured later on.
52 | 
53 |
54 | 2. Validate the server.
55 |
56 | 2. After the server is validated, click on `Configure` in the `Cloudflare Tunnels` section.
57 |
58 | 3. Paste `Cloudflare Tunnel Token` from the previous step and set the `SSH Domain` to the domain you set in the previous step.
59 | 
60 |
61 |
62 |
63 |
64 | ### Manual
65 |
66 | WIP
67 |
68 | ## Setup Resources in Coolify
69 |
70 | You have several options to use Cloudflare Tunnels with Coolify.
71 |
72 | 1. One domain -> One resource.
73 | 2. Wildcard subdomain -> All resources.
74 |
75 | ### One domain -> One resource
76 |
77 | In this case, you need to add a public domain every time you would like to expose a new resource through Cloudflare Tunnels.
78 |
79 |
80 | You can stop `Coolify Proxy` and set it to `None`, it is not needed in this
81 | case.
82 |
83 |
84 | 1. Go to your tunnel settings on Cloudflare. (https://one.dash.cloudflare.com/ -> Networks -> Tunnels -> Select your tunnel)
85 | 2. Switch to `Public Hostname` tab.
86 | 3. Add a new `Public Hostname`.
87 | 
88 | 4. Go to Coolify and to your resource settings: - Remove any `Domains` settings. - Set `Port Mappings` to the same port that you set in the `Public Hostname` settings.
89 |
90 | As an example, I'm deploying a static site, that listens in port `80`
91 | inside the container and I'm mapping it to the port `8888` on the host. So,
92 | I need to set the `Port Mappings` to `8888:80`.
93 | 
94 |
95 | 5. Deploy & enjoy.
96 |
97 | ### Wildcard subdomain -> All resources
98 |
99 | In this case, you only need to setup a wildcard domain once and you can expose all your resources through it.
100 |
101 |
102 | You will need to use `Coolify's Proxy` to route the traffic to the correct
103 | resource.
104 |
105 |
106 | 1. Go to your tunnel settings on Cloudflare. (https://one.dash.cloudflare.com/ -> Networks -> Tunnels -> Select your tunnel)
107 | 2. Switch to `Public Hostname` tab.
108 | 3. Add a new wildcard `Public Hostname`.
109 | 
110 | 4. In Cloudflare go to ` Networks -> Tunnels` and click on your tunnel name. From the sidebar copy the `Tunnel ID`.
111 | 
112 | 5. In Cloudflare go to your `DNS` settings and add a new `CNAME` record with the following settings:
113 | - `Name`: `*`
114 | - `Target`: `.cfargotunnel.com`
115 | - `TTL`: `Auto`
116 | 6. Go to Coolify and to your resource settings.
117 |
118 | Set the `Domains` to any subdomain of the wildcard domain you set in the previous step.
119 |
120 | 
121 |
122 |
123 | You need to use `http://` in the `Domains` settings. Cloudflare will take care of the `https` part.
124 | For this you need to set `SSL/TLS` to `Full` in the `SSL/TLS` menu on Cloudflare.
125 | 
126 |
127 |
128 |
129 | 7. Deploy & enjoy.
130 |
131 |
132 | If you would like to add a new resource, you only need to do point 6 and 7.
133 |
134 |
135 | ## Post Setup
136 |
137 | After everything is setup, you can fully disable direct access to your server by disabling all the ports (except `SSH (port:22 by default)`) on your firewall.
138 |
139 | ## Setup self-hosted Coolify
140 |
141 | You can use the [one domain](#one-domain-one-resource) without `Coolify Proxy` or [wildcard](#wildcard-subdomain-all-resources) setup with `Coolify Proxy` to expose your self-hosted Coolify instance to the internet.
142 |
143 | With the `wildcard` setup, you have nothing to do.
144 |
145 | With the `one domain` setup, you need a bit more setup with Coolify to make it work.
146 |
147 | Let's say you configured the following `Public Hostnames` in Cloudflare:
148 |
149 | - `app.coolify.io` mapped to `localhost:8000`
150 | - `realtime.coolify.io` mapped to `localhost:6001`
151 |
152 | After you installed Coolify, you need to add 3 lines your `.env` file, located in `/data/coolify/source` folder.
153 |
154 | ```bash
155 | APP_ID=
156 | APP_KEY=
157 | APP_NAME=Coolify
158 | DB_PASSWORD=
159 | PUSHER_APP_ID=
160 | PUSHER_APP_KEY=
161 | PUSHER_APP_SECRET=
162 | REDIS_PASSWORD=
163 |
164 | ###########
165 | # Add these lines
166 | PUSHER_HOST=realtime.coolify.io
167 | PUSHER_PORT=443
168 | ###########
169 | ```
170 |
171 | This tells Coolify how to connect to it's realtime server through Cloudflare Tunnels.
172 |
173 | Restart Coolify with the installation script.
174 |
175 | ```bash
176 | curl -fsSL https://cdn.coollabs.io/coolify/install.sh | bash
177 | ```
178 |
179 | > If you have a firewall, you also need to allow the [following ports](../server/firewall).
180 |
181 | ### Verify
182 |
183 | 1. Navigate to your Coolify instance, as in the example: `https://app.coolify.io`.
184 | 2. Login with the root user (the first user you created after installation).
185 | 3. Open another tab/window and navigate to `https://app.coolify.io/realtime`. On the other tab (opened in point 2), you should see a notification about the test event.
186 | 4. If you know what are you doing, you can check the network tab as well. Search for a websocket connection.
187 |
--------------------------------------------------------------------------------
/knowledge-base/applications.mdx:
--------------------------------------------------------------------------------
1 | ---
2 | title: Applications
3 | "og:title": "General Application Configurations with Coolify"
4 | description: "A general guide to configure your application with Coolify."
5 | ---
6 |
7 | Application could be any type of web application. It could be a static site, a NodeJS application, a PHP application, etc.
8 |
9 | For complex applications, you can use Docker Compose based deployments or the one-click services.
10 |
11 | ## General Configuration
12 |
13 | ### Commands
14 |
15 | You can overwrite the default commands by setting a custom value on the UI.
16 |
17 | - Build
18 | - Install
19 | - Start
20 |
21 |
22 | If you leave it empty, Nixpacks will detect which commands to run. For
23 | example, in Nodejs, it will check the lock files and run `npm ci` or `yarn
24 | install` or `pnpm install` accordingly.
25 |
26 |
27 | ### Base Directory
28 |
29 | It is useful for monorepos. You can set the base directory for all the commands that will be executed by Coolify.
30 |
31 | ### Public Directory
32 |
33 | If you are building a static site, it is important to set the public directory, so the builder will know which directory to serve.
34 |
35 | ### Port Exposes
36 |
37 | Port exposes are required for Docker Engine to know which ports to expose. The first port will be the default port for health checks.
38 |
39 | Examples:
40 |
41 | If you have a NodeJS application that listens on port 3000, you can set it like this: `3000`.
42 | If you have a PHP-FPM application that listens on port 9000, you can set it like this: `9000`.
43 | If you have a Nginx server that listens on port 80, you can set it like this: `80`.
44 |
45 | ### Port Mappings
46 |
47 |
48 | You will lose some functionality if you map a port to the host system, like
49 | `Rolling Updates`.
50 |
51 |
52 | If you would like to map a port to the host system (server), you can do it here like this: `8080:80`.
53 |
54 | This will map the port 8080 on the host system to the port 80 inside the container.
55 |
56 |
57 | If you would like to get performance boost and you do not need any domain
58 | (websocket server with VERY high traffic), you can map its port to the host,
59 | so the request will not go through the proxy.
60 |
61 |
62 | ### Advanced
63 |
64 | #### Static Site (Is it a static site?)
65 |
66 | > This feature is only available for Nixpacks buildpacks.
67 |
68 | If you need to serve a static site (SPA, HTML, etc), you can set this to `true`. It will be served by Nginx. `Disabled by default`.
69 |
70 | #### Force HTTPS
71 |
72 | If you would like to force HTTPS, so no HTTP connections allowed, you can set this to `true`. `Enabled by default`.
73 |
74 | #### Auto Deploy
75 |
76 | > This feature is only available for GitHub App based repositories.
77 |
78 | If you would like to deploy automatically when a new commit is pushed to the repository, you can set this to `true`. `Enabled by default`.
79 |
80 | #### Preview Deployments
81 |
82 | Preview deployments are a great way to test your application before merging it into the main branch. Imagine it like a staging environment.
83 |
84 | ##### URL Template
85 |
86 | You can setup your preview URL with a custom template. Default is `{{pr_id}}.{{domain}}`.
87 |
88 | This means that if you open a Pull Request with the ID `123`, and you resource domain is `example.com` the preview URL will be `123.example.com`.
89 |
90 |
91 | If you have several domains for your resource, the first will be used as the{" "}
92 | `{{ domain }}` part.
93 |
94 |
95 | ##### Automated Preview Deployments
96 |
97 | > This feature is only available for GitHub App based repositories.
98 |
99 | If you would like to deploy a preview version of your application (based on a Pull Requests), you can set this to `true`. `Disabled by default`.
100 |
101 | If set to `true`, all PR's that are opened against the resource's configured branch, will be deployed to a unique URL.
102 |
103 | ##### Manually Triggered Preview Deployments
104 |
105 | You can manually deploy a Pull Request to a unique URL by clicking on the `Deploy` button on the Pull Request page.
106 |
107 | #### Git Submodules
108 |
109 | If you are using git submodules, you can set this to `true`. `Enabled by default`.
110 |
111 | #### Git LFS
112 |
113 | If you are using git lfs, you can set this to `true`. `Enabled by default`.
114 |
115 | #### Environment Variables
116 |
117 | [Read here](/knowledge-base/environment-variables)
118 |
119 | ### Persistent Storage
120 |
121 | [Read here](/knowledge-base/persistent-storage)
122 |
123 | ### Health Checks
124 |
125 | By default, all containers are checked for liveness.
126 |
127 |
128 | Traefik Proxy won't work if the container has health check defined, but it is
129 | `unhealthy`. If you do not know how to set up health checks, turn it off.
130 |
131 |
132 | ### Rollbacks
133 |
134 | You can rollback to a previous version of your resource. At the moment, only local images are supported, so you can only rollback to a locally available docker image.
135 |
136 | ### Resource Limits
137 |
138 | By default, the container won't have any resource limits. You can set the limits here. For more details, read the [Docker documentation](https://docs.docker.com/compose/compose-file/compose-file-v2/#cpu_count-cpu_percent-cpu_shares-cpu_period-cpu_quota-cpus-cpuset-domainname-hostname-ipc-mac_address-mem_limit-memswap_limit-mem_swappiness-mem_reservation-oom_kill_disable-oom_score_adj-privileged-read_only-shm_size-stdin_open-tty-user-working_dir).
139 |
140 | ## Deployment Types
141 |
142 | There are several types of application deployments available.
143 |
144 | - Public Git Repository
145 | - Private Git Repository ([GitHub App](https://docs.github.com/en/apps/using-github-apps/about-using-github-apps))
146 | - Private Git Repository ([Deploy Key](https://docs.github.com/en/authentication/connecting-to-github-with-ssh/managing-deploy-keys))
147 | - Based on a Dockerfile
148 | - Based on a Docker Compose
149 | - Based on a Docker Image
150 |
151 | ## Build Packs
152 |
153 | These are the supported build packs:
154 |
155 | - Nixpacks
156 | - Dockerfile
157 | - Docker Image
158 | - Docker Compose
159 |
160 | ### Nixpacks
161 |
162 | Coolify uses [Nixpacks](https://nixpacks.com) as build pack by default. Nixpacks detect what kind of application are you trying to deploy and builds it accordingly.
163 |
164 | But if needed, you can customize it by adding a `nixpacks.toml` file to your repository or setting the right environment variables.
165 |
166 | For example, if you are using a NodeJS application, you can set the `NIXPACKS_NODE_VERSION` to control the NodeJS version.
167 |
168 |
169 | Worth reading their [documentation](https://nixpacks.com/docs) to understand
170 | how it works.
171 |
172 |
173 | ### Dockerfile
174 |
175 | Dockerfile based build packs are useful if you have a custom dockerfile inside your Git repository.
176 |
177 | #### Custom Dockerfile Location
178 |
179 | You can always set your custom dockerfile location. By default, it is set to `/Dockerfile`.
180 |
181 | ### Docker Image
182 |
183 | You can deploy any docker images from any Docker compatible repository. For example, you can deploy images from Docker Hub, GitHub Container Registry, etc.
184 |
185 | ### Docker Compose
186 |
187 | Docker Compose based deployments are useful for complex applications. You can define multiple services in a single `docker-compose.yml` file and deploy them together.
188 |
189 | - [Languages/Frameworks](../resources/applications/)
190 | - [Services](../resources/services/)
191 |
--------------------------------------------------------------------------------
/mint.json:
--------------------------------------------------------------------------------
1 | {
2 | "$schema": "https://mintlify.com/schema.json",
3 | "openapi": [
4 | "/openapi.yaml"
5 | ],
6 | "name": "Coolify Documentation",
7 | "metadata": {
8 | "og:site_name": "Coolify",
9 | "og:description": "Self-hosting with superpowers.",
10 | "og:title": "Coolify Documentation",
11 | "og:url": "https://coolify.io",
12 | "og:locale": "en_US",
13 | "og:image": "https://cdn.coollabs.io/assets/coolify/og-image-docs.png",
14 | "twitter:title": "Coolify Documentation",
15 | "twitter:description": "Self-hosting with superpowers.",
16 | "twitter:url": "https://twitter.com/coolifyio",
17 | "twitter:site": "@coolifyio"
18 | },
19 | "favicon": "/logo/coolify.png",
20 | "colors": {
21 | "primary": "#6B16ED",
22 | "light": "#FCD34D",
23 | "dark": "#6B16ED",
24 | "anchors": {
25 | "from": "#FCD34D",
26 | "to": "#6B16ED"
27 | },
28 | "background": {
29 | "dark": "#181818"
30 | }
31 | },
32 | "topbarLinks": [
33 | {
34 | "name": "Support",
35 | "url": "mailto:hi@coollabs.io"
36 | }
37 | ],
38 | "topbarCtaButton": {
39 | "name": "Cloud",
40 | "url": "https://app.coolify.io"
41 | },
42 | "tabs": [
43 | {
44 | "name": "Knowledge Base",
45 | "url": "knowledge-base"
46 | },
47 | {
48 | "name": "Resources",
49 | "url": "resources"
50 | },
51 | {
52 | "name": "API",
53 | "url": "api-reference"
54 | }
55 | ],
56 | "anchors": [
57 | {
58 | "name": "Community",
59 | "icon": "discord",
60 | "url": "https://coolify.io/discord"
61 | },
62 | {
63 | "name": "Sponsorship",
64 | "icon": "heart-pulse",
65 | "url": "https://coolify.io/sponsorship"
66 | }
67 | ],
68 | "navigation": [
69 | {
70 | "group": "Get Started",
71 | "pages": [
72 | "introduction",
73 | "screenshots",
74 | "videos",
75 | "quickstart",
76 | "installation",
77 | "uninstall",
78 | "upgrade",
79 | "downgrade",
80 | "contact"
81 | ]
82 | },
83 | {
84 | "group": "",
85 | "pages": [
86 | "resources/index"
87 | ]
88 | },
89 | {
90 | "group": "Applications",
91 | "pages": [
92 | "resources/applications/index",
93 | "resources/applications/rails",
94 | "resources/applications/laravel",
95 | "resources/applications/django",
96 | "resources/applications/svelte-kit",
97 | "resources/applications/nextjs",
98 | "resources/applications/jekyll"
99 | ]
100 | },
101 | {
102 | "group": "Services",
103 | "pages": [
104 | "resources/services/index",
105 | "resources/services/appsmith",
106 | "resources/services/appwrite",
107 | "resources/services/activepieces",
108 | "resources/services/authentik",
109 | "resources/services/babybuddy",
110 | "resources/services/budge",
111 | "resources/services/changedetection",
112 | "resources/services/classicpress",
113 | "resources/services/code-server",
114 | "resources/services/dashboard",
115 | "resources/services/directus",
116 | "resources/services/dokuwiki",
117 | "resources/services/duplicati",
118 | "resources/services/emby",
119 | "resources/services/emby-stat",
120 | "resources/services/fider",
121 | "resources/services/filebrowser",
122 | "resources/services/firefly-iii",
123 | "resources/services/formbricks",
124 | "resources/services/ghost",
125 | "resources/services/gitea",
126 | "resources/services/glitchtip",
127 | "resources/services/grafana",
128 | "resources/services/grocy",
129 | "resources/services/heimdall",
130 | "resources/services/jellyfin",
131 | "resources/services/kuzzle",
132 | "resources/services/logto",
133 | "resources/services/meilisearch",
134 | "resources/services/metabase",
135 | "resources/services/metube",
136 | "resources/services/plausible",
137 | "resources/services/minio"
138 | ]
139 | },
140 | {
141 | "group": "General",
142 | "pages": [
143 | "knowledge-base/faq",
144 | "knowledge-base/applications",
145 | "knowledge-base/databases",
146 | "knowledge-base/domains",
147 | "knowledge-base/monitoring",
148 | "knowledge-base/environment-variables",
149 | "knowledge-base/persistent-storage",
150 | "knowledge-base/backups",
151 | "knowledge-base/dns-configuration",
152 | "knowledge-base/drain-logs",
153 | "knowledge-base/commands",
154 | "knowledge-base/add-a-service"
155 | ]
156 | },
157 | {
158 | "group": "How-tos",
159 | "pages": [
160 | "knowledge-base/how-to/hetzner-loadbalancing"
161 | ]
162 | },
163 | {
164 | "group": "Administration (Self-hosted)",
165 | "pages": [
166 | "knowledge-base/self-hosted-admin/delete-user"
167 | ]
168 | },
169 | {
170 | "group": "API Reference",
171 | "pages": [
172 | "api-reference/introduction",
173 | "api-reference/authorization"
174 | ]
175 | },
176 | {
177 | "group": "Deploy",
178 | "pages": [
179 | "api-reference/deploy-webhook"
180 | ]
181 | },
182 | {
183 | "group": "Teams",
184 | "pages": [
185 | "api-reference/list-teams",
186 | "api-reference/list-team-members",
187 | "api-reference/get-current-team",
188 | "api-reference/list-current-team-members",
189 | "api-reference/get-team-by-teamid"
190 | ]
191 | },
192 | {
193 | "group": "Git",
194 | "pages": [
195 | {
196 | "group": "Github",
197 | "pages": [
198 | "knowledge-base/git/github/integration",
199 | "knowledge-base/git/github/github-actions"
200 | ]
201 | },
202 | {
203 | "group": "Gitlab",
204 | "pages": [
205 | "knowledge-base/git/gitlab/integration"
206 | ]
207 | },
208 | {
209 | "group": "Bitbucket",
210 | "pages": [
211 | "knowledge-base/git/bitbucket/integration"
212 | ]
213 | },
214 | {
215 | "group": "Gitea",
216 | "pages": [
217 | "knowledge-base/git/gitea/integration"
218 | ]
219 | }
220 | ]
221 | },
222 | {
223 | "group": "Server",
224 | "pages": [
225 | "knowledge-base/server/introduction",
226 | "knowledge-base/server/firewall",
227 | "knowledge-base/server/build-server",
228 | "knowledge-base/server/multiple-servers",
229 | "knowledge-base/server/openssh",
230 | "knowledge-base/server/oracle-cloud",
231 | "knowledge-base/server/proxies",
232 | "knowledge-base/server/automated-cleanup",
233 | "knowledge-base/server/non-root-user"
234 | ]
235 | },
236 | {
237 | "group": "S3",
238 | "pages": [
239 | "knowledge-base/s3/index",
240 | "knowledge-base/s3/aws",
241 | "knowledge-base/s3/r2"
242 | ]
243 | },
244 | {
245 | "group": "Docker",
246 | "pages": [
247 | "knowledge-base/docker/swarm",
248 | "knowledge-base/docker/registry",
249 | "knowledge-base/docker/compose",
250 | "knowledge-base/docker/custom-commands"
251 | ]
252 | },
253 | {
254 | "group": "Cloudflare",
255 | "pages": [
256 | "knowledge-base/cloudflare/tunnels"
257 | ]
258 | },
259 | {
260 | "group": "Traefik",
261 | "pages": [
262 | "knowledge-base/traefik/healthcheck",
263 | "knowledge-base/traefik/basic-auth",
264 | "knowledge-base/traefik/dashboard",
265 | "knowledge-base/traefik/dynamic-configurations",
266 | "knowledge-base/traefik/custom-ssl-certs",
267 | "knowledge-base/traefik/load-balancing",
268 | "knowledge-base/traefik/redirects",
269 | "knowledge-base/traefik/wildcard-certificates"
270 | ]
271 | }
272 | ],
273 | "footerSocials": {
274 | "twitter": "https://twitter.com/coolifyio",
275 | "github": "https://github.com/coollabsio/coolify"
276 | }
277 | }
--------------------------------------------------------------------------------