├── pdf
├── buttonsizenodev2.dcm
├── ButtonSizeNodeNew.pdf
├── ButtonSizeNodeOld.pdf
├── rfm69_adapter_19_06_18.zip
├── buttonsizenodev2.lib
├── EbayPageReadme.md
└── EbayPageReadmeNoRFM.md
├── pics
├── bs1.jpg
├── bs2.jpg
├── cut.jpg
├── BH1750.jpg
├── NoRFM.jpg
├── Si7021.jpg
├── bttnsz.jpg
├── CWadapter.jpg
├── bttnszH.jpg
├── replceA.jpg
├── FTDIvcc5-3.jpg
├── IDEsettings.jpg
├── buttonsize1.jpg
├── buttonsize2.jpg
├── domotizHrdwr.jpg
├── schematicNew.jpg
├── personalization.jpg
├── personalization1.jpg
├── IMG_20180411_230300.jpg
├── IMG_20180411_230850.jpg
├── IMG_20180411_230931.jpg
├── IMG_20180411_231010.jpg
├── IMG_20180411_231013.jpg
├── IMG_20180411_231150.jpg
├── IMG_20180411_231446.jpg
├── domotizDevicesList.jpg
├── domotizDevicesList1.jpg
├── personalization11.jpg
├── schematicOldVersion.jpg
├── IMG_20180411_231150_cr.jpg
└── IMG_20180411_231446_cr.jpg
├── .gitattributes
├── ODROID_Si1132_notes
├── .gitignore
├── SecurityPersonalizationHowTo.md
├── DomoticzInstallMySensors.md
├── README.md
└── ButtonSizeNode.ino
/pdf/buttonsizenodev2.dcm:
--------------------------------------------------------------------------------
1 | EESchema-DOCLIB Version 2.0
2 | #
3 | #End Doc Library
4 |
--------------------------------------------------------------------------------
/pics/bs1.jpg:
--------------------------------------------------------------------------------
https://raw.githubusercontent.com/EasySensors/ButtonSizeNode/HEAD/pics/bs1.jpg
--------------------------------------------------------------------------------
/pics/bs2.jpg:
--------------------------------------------------------------------------------
https://raw.githubusercontent.com/EasySensors/ButtonSizeNode/HEAD/pics/bs2.jpg
--------------------------------------------------------------------------------
/pics/cut.jpg:
--------------------------------------------------------------------------------
https://raw.githubusercontent.com/EasySensors/ButtonSizeNode/HEAD/pics/cut.jpg
--------------------------------------------------------------------------------
/pics/BH1750.jpg:
--------------------------------------------------------------------------------
https://raw.githubusercontent.com/EasySensors/ButtonSizeNode/HEAD/pics/BH1750.jpg
--------------------------------------------------------------------------------
/pics/NoRFM.jpg:
--------------------------------------------------------------------------------
https://raw.githubusercontent.com/EasySensors/ButtonSizeNode/HEAD/pics/NoRFM.jpg
--------------------------------------------------------------------------------
/pics/Si7021.jpg:
--------------------------------------------------------------------------------
https://raw.githubusercontent.com/EasySensors/ButtonSizeNode/HEAD/pics/Si7021.jpg
--------------------------------------------------------------------------------
/pics/bttnsz.jpg:
--------------------------------------------------------------------------------
https://raw.githubusercontent.com/EasySensors/ButtonSizeNode/HEAD/pics/bttnsz.jpg
--------------------------------------------------------------------------------
/pics/CWadapter.jpg:
--------------------------------------------------------------------------------
https://raw.githubusercontent.com/EasySensors/ButtonSizeNode/HEAD/pics/CWadapter.jpg
--------------------------------------------------------------------------------
/pics/bttnszH.jpg:
--------------------------------------------------------------------------------
https://raw.githubusercontent.com/EasySensors/ButtonSizeNode/HEAD/pics/bttnszH.jpg
--------------------------------------------------------------------------------
/pics/replceA.jpg:
--------------------------------------------------------------------------------
https://raw.githubusercontent.com/EasySensors/ButtonSizeNode/HEAD/pics/replceA.jpg
--------------------------------------------------------------------------------
/pics/FTDIvcc5-3.jpg:
--------------------------------------------------------------------------------
https://raw.githubusercontent.com/EasySensors/ButtonSizeNode/HEAD/pics/FTDIvcc5-3.jpg
--------------------------------------------------------------------------------
/pics/IDEsettings.jpg:
--------------------------------------------------------------------------------
https://raw.githubusercontent.com/EasySensors/ButtonSizeNode/HEAD/pics/IDEsettings.jpg
--------------------------------------------------------------------------------
/pics/buttonsize1.jpg:
--------------------------------------------------------------------------------
https://raw.githubusercontent.com/EasySensors/ButtonSizeNode/HEAD/pics/buttonsize1.jpg
--------------------------------------------------------------------------------
/pics/buttonsize2.jpg:
--------------------------------------------------------------------------------
https://raw.githubusercontent.com/EasySensors/ButtonSizeNode/HEAD/pics/buttonsize2.jpg
--------------------------------------------------------------------------------
/pics/domotizHrdwr.jpg:
--------------------------------------------------------------------------------
https://raw.githubusercontent.com/EasySensors/ButtonSizeNode/HEAD/pics/domotizHrdwr.jpg
--------------------------------------------------------------------------------
/pics/schematicNew.jpg:
--------------------------------------------------------------------------------
https://raw.githubusercontent.com/EasySensors/ButtonSizeNode/HEAD/pics/schematicNew.jpg
--------------------------------------------------------------------------------
/pdf/ButtonSizeNodeNew.pdf:
--------------------------------------------------------------------------------
https://raw.githubusercontent.com/EasySensors/ButtonSizeNode/HEAD/pdf/ButtonSizeNodeNew.pdf
--------------------------------------------------------------------------------
/pdf/ButtonSizeNodeOld.pdf:
--------------------------------------------------------------------------------
https://raw.githubusercontent.com/EasySensors/ButtonSizeNode/HEAD/pdf/ButtonSizeNodeOld.pdf
--------------------------------------------------------------------------------
/pics/personalization.jpg:
--------------------------------------------------------------------------------
https://raw.githubusercontent.com/EasySensors/ButtonSizeNode/HEAD/pics/personalization.jpg
--------------------------------------------------------------------------------
/pics/personalization1.jpg:
--------------------------------------------------------------------------------
https://raw.githubusercontent.com/EasySensors/ButtonSizeNode/HEAD/pics/personalization1.jpg
--------------------------------------------------------------------------------
/pics/IMG_20180411_230300.jpg:
--------------------------------------------------------------------------------
https://raw.githubusercontent.com/EasySensors/ButtonSizeNode/HEAD/pics/IMG_20180411_230300.jpg
--------------------------------------------------------------------------------
/pics/IMG_20180411_230850.jpg:
--------------------------------------------------------------------------------
https://raw.githubusercontent.com/EasySensors/ButtonSizeNode/HEAD/pics/IMG_20180411_230850.jpg
--------------------------------------------------------------------------------
/pics/IMG_20180411_230931.jpg:
--------------------------------------------------------------------------------
https://raw.githubusercontent.com/EasySensors/ButtonSizeNode/HEAD/pics/IMG_20180411_230931.jpg
--------------------------------------------------------------------------------
/pics/IMG_20180411_231010.jpg:
--------------------------------------------------------------------------------
https://raw.githubusercontent.com/EasySensors/ButtonSizeNode/HEAD/pics/IMG_20180411_231010.jpg
--------------------------------------------------------------------------------
/pics/IMG_20180411_231013.jpg:
--------------------------------------------------------------------------------
https://raw.githubusercontent.com/EasySensors/ButtonSizeNode/HEAD/pics/IMG_20180411_231013.jpg
--------------------------------------------------------------------------------
/pics/IMG_20180411_231150.jpg:
--------------------------------------------------------------------------------
https://raw.githubusercontent.com/EasySensors/ButtonSizeNode/HEAD/pics/IMG_20180411_231150.jpg
--------------------------------------------------------------------------------
/pics/IMG_20180411_231446.jpg:
--------------------------------------------------------------------------------
https://raw.githubusercontent.com/EasySensors/ButtonSizeNode/HEAD/pics/IMG_20180411_231446.jpg
--------------------------------------------------------------------------------
/pics/domotizDevicesList.jpg:
--------------------------------------------------------------------------------
https://raw.githubusercontent.com/EasySensors/ButtonSizeNode/HEAD/pics/domotizDevicesList.jpg
--------------------------------------------------------------------------------
/pics/domotizDevicesList1.jpg:
--------------------------------------------------------------------------------
https://raw.githubusercontent.com/EasySensors/ButtonSizeNode/HEAD/pics/domotizDevicesList1.jpg
--------------------------------------------------------------------------------
/pics/personalization11.jpg:
--------------------------------------------------------------------------------
https://raw.githubusercontent.com/EasySensors/ButtonSizeNode/HEAD/pics/personalization11.jpg
--------------------------------------------------------------------------------
/pics/schematicOldVersion.jpg:
--------------------------------------------------------------------------------
https://raw.githubusercontent.com/EasySensors/ButtonSizeNode/HEAD/pics/schematicOldVersion.jpg
--------------------------------------------------------------------------------
/pdf/rfm69_adapter_19_06_18.zip:
--------------------------------------------------------------------------------
https://raw.githubusercontent.com/EasySensors/ButtonSizeNode/HEAD/pdf/rfm69_adapter_19_06_18.zip
--------------------------------------------------------------------------------
/pics/IMG_20180411_231150_cr.jpg:
--------------------------------------------------------------------------------
https://raw.githubusercontent.com/EasySensors/ButtonSizeNode/HEAD/pics/IMG_20180411_231150_cr.jpg
--------------------------------------------------------------------------------
/pics/IMG_20180411_231446_cr.jpg:
--------------------------------------------------------------------------------
https://raw.githubusercontent.com/EasySensors/ButtonSizeNode/HEAD/pics/IMG_20180411_231446_cr.jpg
--------------------------------------------------------------------------------
/.gitattributes:
--------------------------------------------------------------------------------
1 | # Auto detect text files and perform LF normalization
2 | * text=auto
3 |
4 | # Custom for Visual Studio
5 | *.cs diff=csharp
6 |
7 | # Standard to msysgit
8 | *.doc diff=astextplain
9 | *.DOC diff=astextplain
10 | *.docx diff=astextplain
11 | *.DOCX diff=astextplain
12 | *.dot diff=astextplain
13 | *.DOT diff=astextplain
14 | *.pdf diff=astextplain
15 | *.PDF diff=astextplain
16 | *.rtf diff=astextplain
17 | *.RTF diff=astextplain
18 |
--------------------------------------------------------------------------------
/ODROID_Si1132_notes:
--------------------------------------------------------------------------------
1 |
2 | 1. Remove ALS_AUTO command in the initialization code.
3 | 2. Issue ALS_FORCE command every time the host wants to take a measurement
4 | 3. The delay time depends on your configuration and how often the host wants to take a measurement. Normally, 5ms ~ 10ms is more than enough.
5 |
6 | Comment out this line of code as you're using forced mode: write8(Si1132_REG_MEASRATE0, 0xFF). Leave MEASRATE to 0.
7 | Also, you don't need to call write8(Si1132_REG_COMMAND, Si1132_ALS_PAUSE) in forced mode.
8 |
9 |
10 | boolean ODROID_Si1132::begin(void)
11 |
12 | //write8(Si1132_REG_MEASRATE0, 0xFF);
13 | //write8(Si1132_REG_COMMAND, Si1132_ALS_AUTO);
14 |
15 |
16 |
17 | uint16_t ODROID_Si1132::readUV()
18 | {
19 | write8(Si1132_REG_COMMAND, Si1132_ALS_FORCE);
20 | delay(10);
21 | return read16(0x2c);
22 | }
23 |
24 |
--------------------------------------------------------------------------------
/.gitignore:
--------------------------------------------------------------------------------
1 | # Windows image file caches
2 | Thumbs.db
3 | ehthumbs.db
4 |
5 | # Folder config file
6 | Desktop.ini
7 |
8 | # Recycle Bin used on file shares
9 | $RECYCLE.BIN/
10 |
11 | # Windows Installer files
12 | *.cab
13 | *.msi
14 | *.msm
15 | *.msp
16 |
17 | # Windows shortcuts
18 | *.lnk
19 |
20 | # =========================
21 | # Operating System Files
22 | # =========================
23 |
24 | # OSX
25 | # =========================
26 |
27 | .DS_Store
28 | .AppleDouble
29 | .LSOverride
30 |
31 | # Thumbnails
32 | ._*
33 |
34 | # Files that might appear in the root of a volume
35 | .DocumentRevisions-V100
36 | .fseventsd
37 | .Spotlight-V100
38 | .TemporaryItems
39 | .Trashes
40 | .VolumeIcon.icns
41 |
42 | # Directories potentially created on remote AFP share
43 | .AppleDB
44 | .AppleDesktop
45 | Network Trash Folder
46 | Temporary Items
47 | .apdisk
48 |
--------------------------------------------------------------------------------
/pdf/buttonsizenodev2.lib:
--------------------------------------------------------------------------------
1 | EESchema-LIBRARY Version 2.3
2 | #encoding utf-8
3 | #
4 | # buttonSizeNodeV2.0
5 | #
6 | DEF buttonSizeNodeV2.0 U 0 40 Y Y 1 F N
7 | F0 "U" 300 50 60 H V C CNN
8 | F1 "buttonSizeNodeV2.0" -250 50 60 H V C CNN
9 | F2 "" -250 50 60 H I C CNN
10 | F3 "" -250 50 60 H I C CNN
11 | DRAW
12 | S -700 -50 -700 -50 0 1 0 N
13 | S -700 -50 -700 -50 0 1 0 N
14 | S -700 -50 -700 -50 0 1 0 N
15 | S -700 -50 250 -850 0 1 0 N
16 | X A0 ~ -250 -1050 200 U 50 50 1 1 I
17 | X A1 ~ -150 -1050 200 U 50 50 1 1 I
18 | X ant ~ 50 -1050 200 U 50 50 1 1 I
19 | X bat+ ~ 450 -200 200 L 50 50 1 1 I
20 | X bat+ ~ 450 -100 200 L 50 50 1 1 I
21 | X d3 ~ -900 -100 200 R 50 50 1 1 I
22 | X d4 ~ -900 -200 200 R 50 50 1 1 I
23 | X d5 ~ -900 -300 200 R 50 50 1 1 I
24 | X d6 ~ -900 -400 200 R 50 50 1 1 I
25 | X d7 ~ -900 -500 200 R 50 50 1 1 I
26 | X d8 ~ -900 -600 200 R 50 50 1 1 I
27 | X dtr ~ 450 -800 200 L 50 50 1 1 I
28 | X gnd ~ 450 -400 200 L 50 50 1 1 I
29 | X gnd ~ 450 -300 200 L 50 50 1 1 I
30 | X miso ~ -450 -1050 200 U 50 50 1 1 I
31 | X mosi ~ -900 -700 200 R 50 50 1 1 I
32 | X rst ~ -50 -1050 200 U 50 50 1 1 I
33 | X Rx ~ 450 -600 200 L 50 50 1 1 I
34 | X sck ~ -350 -1050 200 U 50 50 1 1 I
35 | X Tx ~ 450 -700 200 L 50 50 1 1 I
36 | X vcc ~ 450 -500 200 L 50 50 1 1 I
37 | ENDDRAW
38 | ENDDEF
39 | #
40 | #End Library
41 |
--------------------------------------------------------------------------------
/SecurityPersonalizationHowTo.md:
--------------------------------------------------------------------------------
1 | Security "personalization" for MySensors SecurityPersonalizer.ino sketch How To
2 | ------------------------------------------------------------------------
3 |
4 |
5 | Very detailed explanation you can find here : [Signing support created by Patrick "Anticimex" Fallberg](https://www.mysensors.org/about/signing)
6 |
7 | If you do not want to dive deep into it, just follow these **3 steps**. Assume you know what is the [Arduiono IDE](https://www.arduino.cc/en/main/software) and the Serial Monitor from the Arduiono IDE:
8 |
9 | **Step 1 - generate random MY_HMAC_KEY**
10 |
11 |
12 | > You can skip **Step 1** by filling some numbers instead of zeroes in SecurityPersonalizer.ino ```#define MY_HMAC_KEY 0x00,0x00,0x00,0x00,0x00,0x00,0x00,0x00,0x00....... ```
13 |
14 |
15 | Open SecurityPersonalizer.ino from MySensors examples.
16 | Comment out lines:
17 | ```c++
18 | //#define USER_KEY
19 | //#define SKIP_UART_CONFIRMATION
20 | ```
21 | Upload sketch to the node and open the serial monitor. Copy from the serial monitor #define MY_HMAC_KEY 0x blah blah blah
22 |
23 | 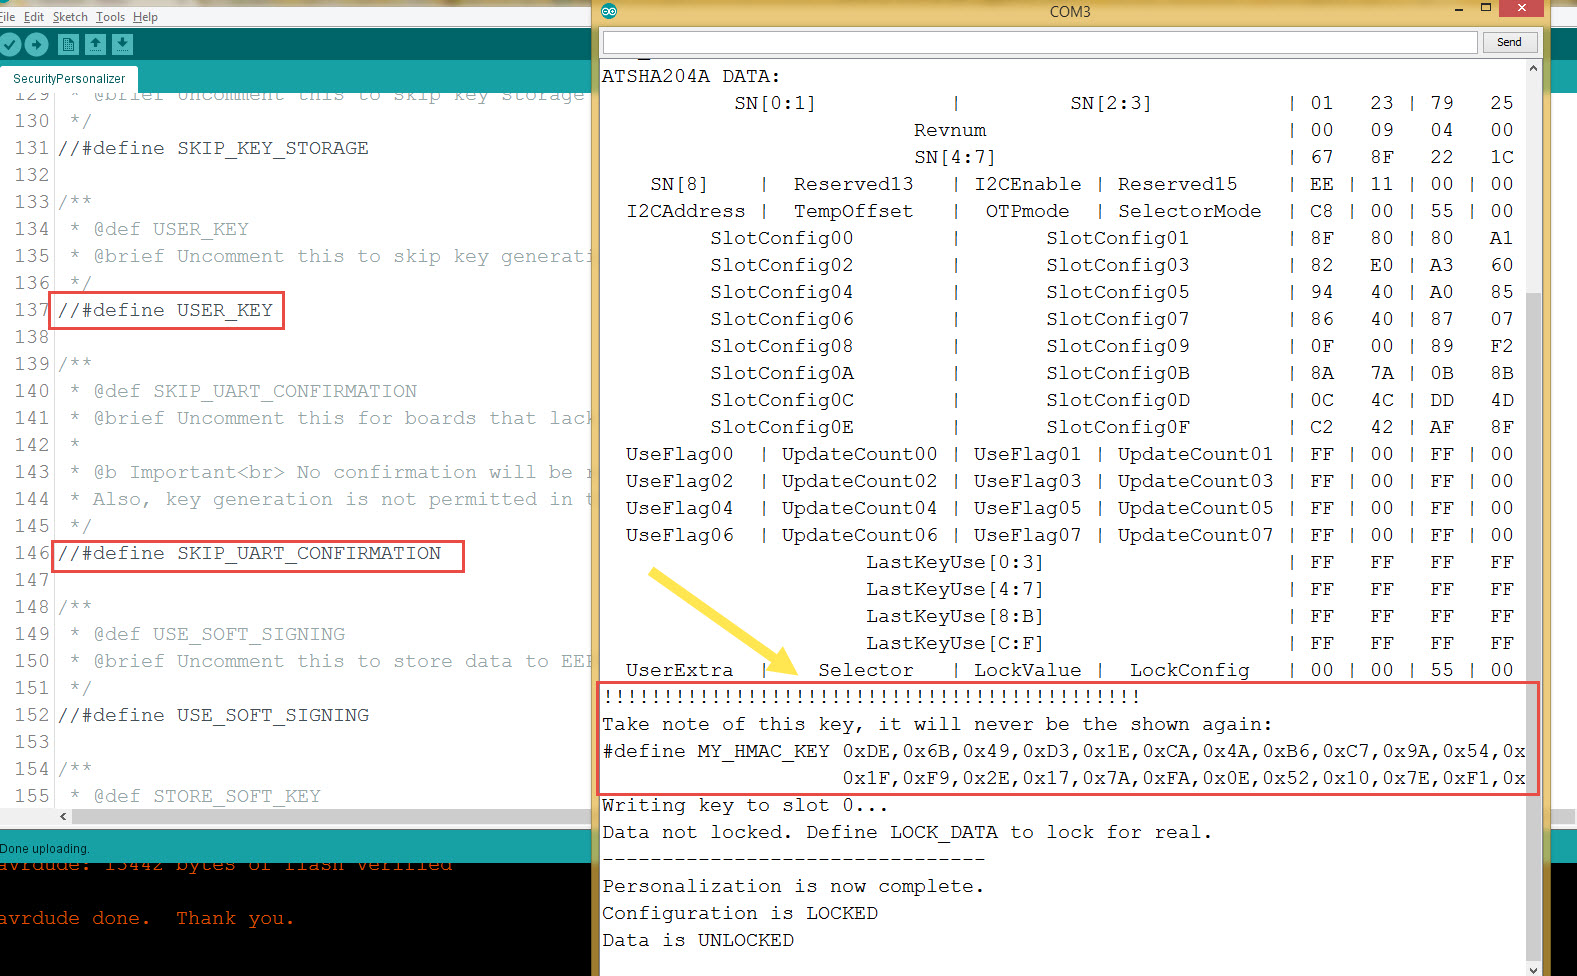
24 |
25 |
26 |
27 | **Step 2 - save MY_HMAC_KEY**
28 |
29 |
30 | Put #define MY_HMAC_KEY into here
31 | 
32 |
33 | **Step 3 - write MY_HMAC_KEY into the Node**
34 |
35 |
36 | Unconment
37 | ```c++
38 | #define LOCK_CONFIGURATION
39 | #define USER_KEY
40 | #define SKIP_UART_CONFIRMATION
41 | ```
42 | Upload sketch into the node
43 |
44 | Now you have CryptoAuthentication key written into Atsha204 chip. You can rewrite another one later if you want to change it.
45 |
46 | **Done!**
47 |
48 | Please note:
49 |
50 | Your **Node sketch** you want to protect should have:
51 | ```c++
52 | #define MY_SIGNING_ATSHA204
53 | #define MY_SIGNING_REQUEST_SIGNATURES
54 | ```
55 | your **Gateway Serial** sketch need basically only this one:
56 | ```c++
57 | #define MY_SIGNING_ATSHA204
58 | ```
59 |
60 |
61 |
62 |
--------------------------------------------------------------------------------
/DomoticzInstallMySensors.md:
--------------------------------------------------------------------------------
1 | ## MySensors Nodes use [Domoticz](https://domoticz.com/) as Controller running Raspberry PI. How To
2 |
3 | Hardware we need:
4 | - 1 Raspberry PI2 or newer.
5 | - 2 Two Arduinos or any clones with Radio (RFM 69 or NRF24) attached . One as Gateway Serial and the other one as some Sensor Node. In this How To I will use [ButtonSizeNode](https://github.com/EasySensors/ButtonSizeNode) for MySensors network.
6 |
7 | **Step 1.**
8 |
9 | Complete **Preparation (for both methods)** and **Domoticz - The easy way** steps from this guide:
10 | [ Installing and running Domoticz on a Raspberry PI](https://www.domoticz.com/wiki/Installing_and_running_Domoticz_on_a_Raspberry_PI)
11 |
12 | It may look a bit complicated but in fact it will be very easy
13 |
14 | **Step 2.**
15 |
16 |
17 | Load GatewaySerial.ino sketch into ButtonSizeNode or any Arduino + radio transiever (RFM69 or NRF24) attached. You can use use this **guide** or this **MySensors guide** in case you are not very famaliar with the matter.
18 | Connect USB FTDI to the Node to turn it into Serial Gateway.
19 |
20 | **Step 3.**
21 |
22 | Connect Gateway Serial into any RaspberryPi USB.
23 |
24 | **Step 4.**
25 |
26 |
27 | Open Domoticz web interface and choose marked 1 through 7 to setup the Gateway Serial as new **hardware device**
28 |
29 |
30 | 
31 |
32 | **Step 5.**
33 |
34 |
35 | Open Device list
36 |
37 | 
38 |
39 |
40 | Power up Sensor Node (Sketch for this node could be [ButtonSizeNode.ino](https://github.com/EasySensors/ButtonSizeNode) ). Find the node addreses in the device list below. Add it to the Domoticz.
41 |
42 |
43 | 
44 |
45 |
46 |
47 | **Done**
48 |
49 | > If you use CryptoAuthentication in your nodes, do not forget to [**“personalize” all the nodes with encryption key**](https://github.com/EasySensors/ButtonSizeNode/blob/master/SecurityPersonalizationHowTo.md) then.
50 |
51 | Use it
52 |
--------------------------------------------------------------------------------
/pdf/EbayPageReadme.md:
--------------------------------------------------------------------------------
1 |
2 |
3 | ### The ButtonSize Node is a low cost wireless Arduino IDE compatible (the Atmel ATMega328P) microcontroller with RFM 69 CW or HW 915, 868 or 433 MHz radio on board and build in Temperature, Humidity and Light sensors. Best suitable for Home Automation, IOT. The board can be used as universal sensor board for radio controlling any DIY project.
4 |
5 | ## Features
6 | - Fully compatible with the Arduino IDE (PRO MINI 8 MG Hz)
7 | - Dimensions 42.2mm x 20.9mm or if you cut sensor part of the board it is just 20.9mm x 20.9mm
8 | - Temperature and humidity sensor Si7021
9 | - Light sensor BH1750, spectral responsibility is approximately human eye response.
10 | - Over the Air, firmware updates (OTA) ready. In combination with preprogrammed Dual Optiboot boot loader and External JDEC EPROM\Flash memory chip on board the Node allows OTA software updates.
11 | - Onboard RFM69-HW (high power version) or CW (low power consumption version) 433 MHz Radio transceiver with wire antenna
12 | - Onboard Atmel ATSHA204A CryptoAuthentication chip makes communication with the Node very secured. ATSHA204A implements secured handshake and if handshake fails the Node will not executing any command sent to it
13 | - Programming header is FTDI, TTL Serial. For programming, you need to have USB TTL Serial – FTDI adaptor
14 | - ENIG Emersion Gold finish
15 | - MySensors compatible. You can use superb set of scripts and libraries from [mysensors.org](http://www.mysensors.org) project and convert the node into reliable network of little home sensors, relays and actuators.
16 | - Battery connector CR2032
17 | - You can cut with scissors, sensors and battery holder part of the board, if you need just controller and radio
18 | - Yes, it is open sourced. Completely
19 |
20 | Comes with Arduino example sketch and guide to IOT, Smart home ideas.
21 |
22 | ## If you plan to use the Node battery powered
23 | You need CW version radio on board. HW version is longer range but will eat battery pretty fast though. Please send me message stating which radio type you need in your order.
24 |
25 | ## Overview
26 | If you are familiar with Arduino boards, the ButtonSize Node is Arduino pro Mini with onboard HopeRF RFM69-CW or HW 433 MHz radio, external EPROM flash and crypto authentication chip. To save some board dimensions the ButtonSize Node does not have onboard USB-Serial converter. You need to buy FTDI Adapter for programming. HopeRF RFM69-HW provide extremely good range. HopeRF RFM69-CW version will have half of that range but still many hundred meters in open area. External Flash chip allows burning Arduino sketch wirelessly. Onboard Atmel ATSHA204A CryptoAuthentication chip secures communication with other controllers. Some IOT ideas based on the ButtonSize node and similar controllers plus complete specs you may find here [my GitHub page](https://github.com/EasySensors/ButtonSizeNode)
27 |
28 |
29 | 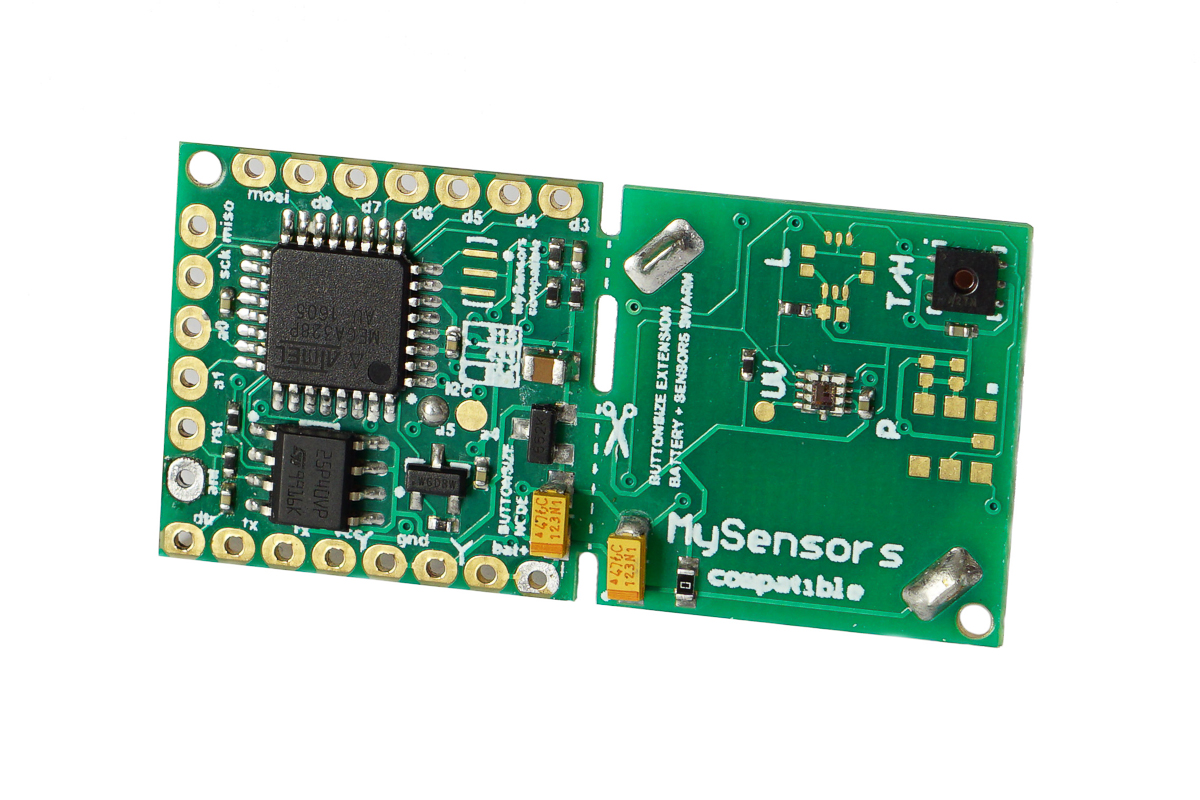
30 | 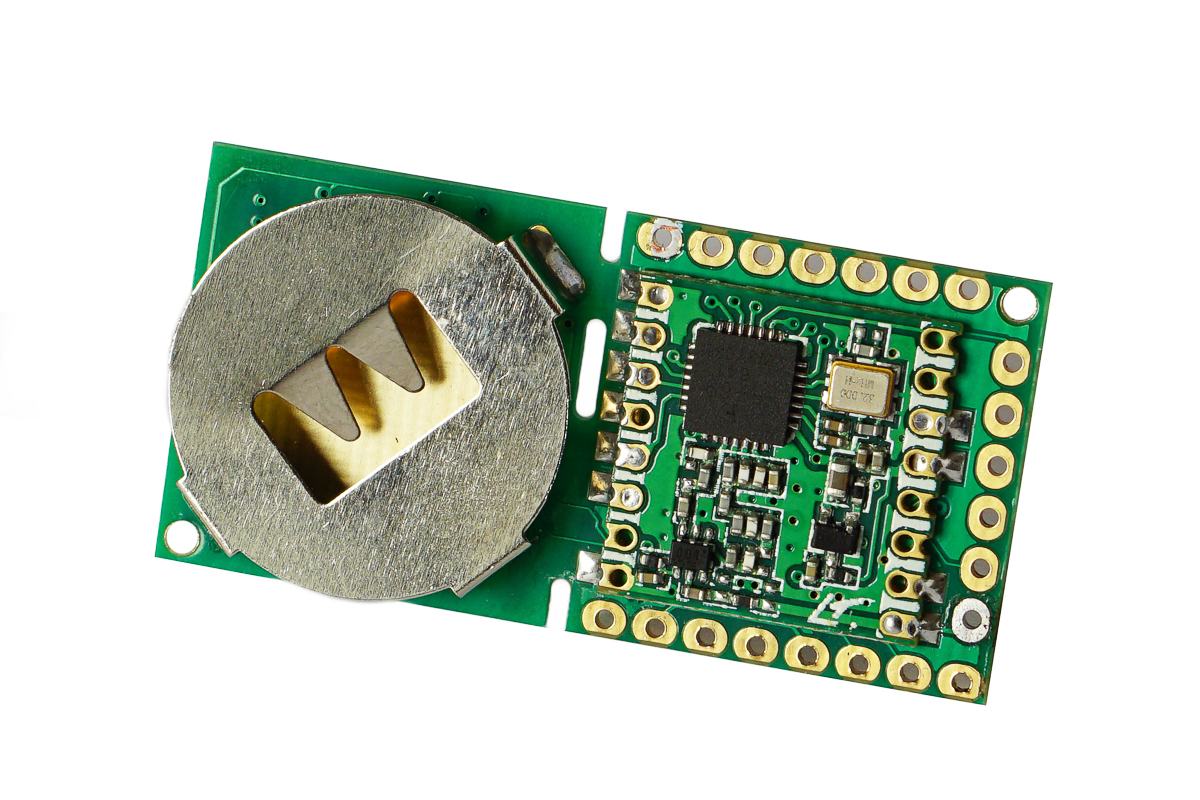
31 |
32 | ## Package Content:
33 | - The Controller board 1 pcs
34 |
35 |
36 |
--------------------------------------------------------------------------------
/pdf/EbayPageReadmeNoRFM.md:
--------------------------------------------------------------------------------
1 | ### The ButtonSize Node is a low cost Arduino IDE compatible (the Atmel ATMega328P) microcontroller. Ready RFM 69 CW or HW radio on board. Build in Temperature, Humidity and Light sensors. Best suitable for Home Automation, IOT. The board can be used as universal sensor board for radio controlling any DIY project.
2 |
3 | ## Features
4 | - Fully compatible with the Arduino IDE (PRO MINI 8 MG Hz)
5 | - Dimensions 42.2mm x 20.9mm or if you cut sensor part of the board it is just 20.9mm x 20.9mm
6 | - Temperature and humidity sensor Si7021
7 | - Light sensor BH1750, spectral responsibility is approximately human eye response.
8 | - Over the Air, firmware updates (OTA) ready. In combination with preprogrammed Dual Optiboot boot loader and External JDEC EPROM\Flash memory chip on board the Node allows OTA software updates.
9 | - Ready for RFM69-HW or CW (via with PCB adapter) Radio transceiver with wire antenna
10 | - Onboard Atmel ATSHA204A CryptoAuthentication chip makes communication with the Node very secured. ATSHA204A implements secured handshake and if handshake fails the Node will not executing any command sent to it
11 | - Programming header is FTDI, TTL Serial. For programming, you need to have USB TTL Serial – FTDI adaptor
12 | - ENIG Emersion Gold finish
13 | - MySensors compatible. You can use superb set of scripts and libraries from [mysensors.org](http://www.mysensors.org) project and convert the node into reliable network of little home sensors, relays and actuators.
14 | - Battery connector CR2032
15 | - You can cut with scissors, sensors and battery holder part of the board, if you need just controller and radio
16 | - Yes, it is open sourced. Completely
17 |
18 | Comes with Arduino example sketch and guide to IOT, Smart home ideas.
19 |
20 | ## If you plan to use the Node battery powered
21 | You need CW version radio on board. HW version is longer range but will eat battery pretty fast though. Please send me message stating which radio type you need in your order.
22 |
23 | ## Overview
24 | If you are familiar with Arduino boards, the ButtonSize Node is Arduino pro Mini ** ready for soldering ** onboard HopeRF RFM69-CW or HW 433 MHz radio, external EPROM flash and crypto authentication chip. To save some board dimensions the ButtonSize Node does not have onboard USB-Serial converter. You need to buy FTDI Adapter for programming. HopeRF RFM69-HW provide extremely good range. HopeRF RFM69-CW version will have half of that range but still many hundred meters in open area. External Flash chip allows burning Arduino sketch wirelessly. Onboard Atmel ATSHA204A CryptoAuthentication chip secures communication with other controllers. Some IOT ideas based on the ButtonSize node and similar controllers plus complete specs you may find here [my GitHub page](https://github.com/EasySensors/ButtonSizeNode)
25 |
26 |
27 | 
28 | 
29 | 
30 |
31 | ## Package Content:
32 | - The Controller board 1 pcs
33 | - RFM CW radio PCB adapter
34 |
35 |
36 |
--------------------------------------------------------------------------------
/README.md:
--------------------------------------------------------------------------------
1 |
2 |
3 | 
4 | 
5 |
6 | **The Button Size Node is a low cost wireless Arduino IDE compatible (the Atmel ATMega328P 8MHz) microcontroller with RFM 69 HW(CW) radio on board and few other nice additions.**
7 | ------------------------------------------------------------------------
8 |
9 | Best sutable for Home Automation, IOT. Could be used as core board for radio controlling any DIY project. You may think of it as Arduino Pro Mini plus all the items in the picture below::
10 |
11 | 
12 |
13 | ## Specification: ##
14 | - Dimensions 42.2mm x 20.9mm
15 | - Sleep current consumption 10 - 12 uA
16 | - Temperature and humidity sensor Si7021
17 | - High Accuracy Temperature Sensor ±0.4 °C (max), –10 to 85 °C
18 | - Precision Relative Humidity Sensor ± 3% RH (max), 0–80% RH
19 | - Light sensor BH1750, spectral responsibility is approximately human eye response.
20 | - Authentication security - Atmel ATSHA204A Crypto Authentication Chip
21 | - External JDEC EPROM
22 | - Dualoptiboot bootloader. Implements over the air (OTA) firmware update ability
23 | - RFM69-HW (high power version) or CW (low power consumption version) 433 MHz Radio transceiver
24 | - Battery voltage sensor (via divider)
25 | - Supply voltage up to 6.5 Volts
26 | - The Digital and Analog pins are 3.3 volts
27 | - Battery connector CR2032 240mAh
28 | - FTDI header for programming
29 | - You can cut with scissors, sensors and battery holder part, if you need just controller and radio
30 |
31 |
32 | **Pin out:**
33 |
34 |
35 | Arduino Pins| Description
36 | ------------|--------------
37 | A0, A1 | Available ARDUINO analog GPIO / DIGITAL GPIO
38 | A6 | Connected to Battery voltage sensor (via divider)
39 | A4 | Connected to si1132 and bh1750 SDA
40 | A5 | Connected to si1132 and bh1750 SCL
41 | A3 | Connected to ATSHA204A
42 | D3, D4, D5, D6,D7, D9 | Available ARDUINO digital GPIO
43 | D8 | Connected to CS FLASH chip (OTA) M25P40
44 | MISO, MOSI, SCK, RST | Connected to ISP header
45 | ANT | RFM69 antenna
46 | Vcc and Bat+ | Unregulated power up to 6.5 Volts
47 | Gnd | Ground
48 | Scissors line | you cat cut with scissors, sensors and battery holder part, if you need just controller and radio
49 |
50 |
51 | **Arduino IDE Settings**
52 |
53 | 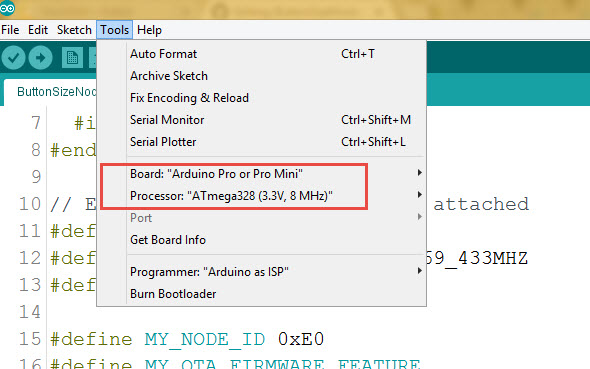
54 |
55 |
56 | **programming FTDI adapter connection**
57 |
58 | 
59 |
60 |
61 | Both 3.3V and 5V power options can be used.
62 |
63 | How to use it as home automation (IOT) node controller
64 | ------------------------------------------------------
65 |
66 |
67 | ButtonSizeNode.ino is the Arduino example sketch using [MySensors](https://www.mysensors.org/) API.
68 |
69 | - **Controller Setup.**
70 | Burn the ButtonSizeNode.ino sketch into the board and it will became one of the MySensors home automation network Sensor's Node reporting Temp, Humidity and Vsial light in Luxes to a smarthome controller.
71 | To create the home automation network you need smarthome controller and at least two Nodes one as a Sensor, a Relay or an Actuator Node and the other one as the “Gateway Serial” connected to a smarthome controller. I personally love [Domoticz](https://domoticz.com/) as a smarthome controller. Please check this [HowTo](https://github.com/EasySensors/ButtonSizeNode/blob/master/DomoticzInstallMySensors.md) to install Domoticz.
72 |
73 | - **No Controller setup.**
74 | However, for no-controller setup, as example, you can use 3 nodes - first node as the “Gateway Serial”, second node as a Relay and last one as a Switch for that Relay. No controller needed then, keep the Switch and the Relay on the same address and the switch will operate the relay.
75 |
76 |
77 | Things worth mentioning about the [MySensors](https://www.mysensors.org/) Arduino sketch:
78 |
79 |
80 | Code | Description
81 | ------------|--------------
82 | Light meter BH1750 Library by Christopher Laws | [MySensorsArduinoExamples BH1750](https://github.com/mysensors/MySensorsArduinoExamples/tree/master/libraries/BH1750)
83 | Temperature and humidity sensor Si7021 SparkFun Library | [SparkFun_Si7021_Breakout_Library](https://github.com/sparkfun/Si7021_Breakout/tree/master/Libraries/Arduino/Si7021/src)
84 | #define MY_RADIO_RFM69
#define MY_RFM69_FREQUENCY RF69_433MHZ
#define MY_IS_RFM69HW| Define which radio we use – here is RFM 69
with frequency 433 MHZ and it is HW
type – one of the most powerful RFM 69 radios.
If your radio is RFM69CW - comment out line
with // #define MY_IS_RFM69HW
85 | #define MY_NODE_ID 0xE0 | Define Node address (0xE0 here). I prefer to use static addresses
and in Hexadecimal since it is easier to identify the node
address in [Domoticz](https://domoticz.com/) devices list after it
will be discovered by controller ( [Domoticz](https://domoticz.com/)).
However, you can use AUTO instead of the hardcoded number
(like 0xE0) though. [Domoticz](https://domoticz.com/) will automatically assign node ID then.
86 | #define MY_OTA_FIRMWARE_FEATURE
#define MY_OTA_FLASH_JDECID 0x2020 | Define OTA feature. OTA stands for “Over The Air firmware updates”.
If your node does not utilize Sleep mode you can send new “firmware”
(compiled sketch binary) by air. [Here is the link on how to do it.](https://www.mysensors.org/about/ota)
Skip to the step "How to upload a new sketch just with OTA" as all initial
steps have been completed in the ButtonSizeNode.
For OTA we use JDEC Flash chip where the node stores
new firmware and once it has been received and checksum (CRC)
is correct it reboots and flashes your new
code into the node controller. 0x2020 "Erase type"
defined here for JDEC Flash chip .
87 | #define MY_SIGNING_ATSHA204
#define MY_SIGNING_REQUEST_SIGNATURES | Define if you like to use Crypto Authentication to secure your nodes
from intruders or interference. After that, you have to “personalize”
all the nodes, which have those, defines enabled.
[**How to “personalize” nodes with encryption key**](https://github.com/EasySensors/ButtonSizeNode/blob/master/SecurityPersonalizationHowTo.md).
You need both defines in the nodes you need to protect.
The Gateway Serial could be with only one of those
defines enabled - #define MY_SIGNING_ATSHA204
88 |
89 | Connect the Node to FTDI USB adaptor, Select Pro Mini 8MHz board in Arduino IDE and upload the ButtonSizeNode.ino sketch.
90 |
91 | **Done**
92 |
93 |
94 | The board is created by [Koresh](https://www.openhardware.io/user/143/projects/Koresh)
95 |
96 | 
97 | 
98 |
99 |
100 | >For schematics lovers:
101 |
102 | 
103 |
104 | [**The board schematics Pdf link**](https://github.com/EasySensors/ButtonSizeNode/blob/master/pdf/ButtonSizeNodeNew.pdf)
105 |
106 |
--------------------------------------------------------------------------------
/ButtonSizeNode.ino:
--------------------------------------------------------------------------------
1 | /**
2 | * The MySensors Arduino library handles the wireless radio link and protocol
3 | * between your home built sensors/actuators and HA controller of choice.
4 | * The sensors forms a self healing radio network with optional repeaters. Each
5 | * repeater and gateway builds a routing tables in EEPROM which keeps track of the
6 | * network topology allowing messages to be routed to nodes.
7 | *
8 | * Created by Henrik Ekblad
9 | * Copyright (C) 2013-2015 Sensnology AB
10 | * Full contributor list: https://github.com/mysensors/Arduino/graphs/contributors
11 | *
12 | * Documentation: http://www.mysensors.org
13 | * Support Forum: http://forum.mysensors.org
14 | *
15 | * This program is free software; you can redistribute it and/or
16 | * modify it under the terms of the GNU General Public License
17 | * version 2 as published by the Free Software Foundation.
18 | *
19 | **/
20 |
21 | // Enable debug prints to serial monitor
22 | #define MY_DEBUG
23 |
24 |
25 | #include
26 | #ifdef __AVR__
27 | #include
28 | #endif
29 |
30 | // Enable and select radio type attached
31 | #define MY_RADIO_RFM69
32 |
33 |
34 | // if you use MySensors 2.0 use this style
35 | //#define MY_RFM69_FREQUENCY RF69_433MHZ
36 | //#define MY_RFM69_FREQUENCY RF69_868MHZ
37 | //#define MY_RFM69_FREQUENCY RF69_915MHZ
38 |
39 |
40 | #define MY_RFM69_FREQUENCY RFM69_433MHZ
41 | //#define MY_RFM69_FREQUENCY RFM69_868MHZ
42 |
43 |
44 | // Comment it out for CW version radio.
45 | //#define MY_IS_RFM69HW
46 |
47 | // Comment it out for Auto Node ID #
48 | #define MY_NODE_ID 0xA9
49 |
50 | // Avoid battery drain if Gateway disconnected and the node sends more than MY_TRANSPORT_STATE_RETRIES times message.
51 | #define MY_TRANSPORT_UPLINK_CHECK_DISABLED
52 | #define MY_PARENT_NODE_IS_STATIC
53 | #define MY_PARENT_NODE_ID 0
54 |
55 |
56 | //Enable OTA feature
57 | #define MY_OTA_FIRMWARE_FEATURE
58 | #define MY_OTA_FLASH_JDECID 0 //0x2020
59 |
60 | //Enable Crypto Authentication to secure the node
61 | //#define MY_SIGNING_ATSHA204
62 | //#define MY_SIGNING_REQUEST_SIGNATURES
63 |
64 | #include
65 |
66 | // Written by Christopher Laws, March, 2013.
67 | // https://github.com/claws/BH1750
68 |
69 | #include
70 | BH1750 lightMeter;
71 |
72 | #include "SparkFun_Si7021_Breakout_Library.h"
73 | //Create Instance of HTU21D or SI7021 temp and humidity sensor and MPL3115A2 barrometric sensor
74 | Weather sensor;
75 |
76 | #include
77 |
78 | // Redefining write codes for JDEC FLASH used in the node
79 | // These two defines should always be after #include declaration
80 | #define SPIFLASH_BLOCKERASE_32K 0xD8
81 | #define SPIFLASH_CHIPERASE 0x60
82 |
83 | #include
84 |
85 |
86 | // Assign numbers for all sensors we will report to gateway\controller (they will be created as child devices)
87 | #define HUM_sensor 2
88 | #define TEMP_sensor 3
89 | #define VIS_sensor 4
90 | #define UV_sensor 5
91 |
92 | // Create MyMessage Instance for sending readins from sensors to gateway\controller (they will be created as child devices)
93 | MyMessage msg_hum(HUM_sensor, V_HUM);
94 | MyMessage msg_temp(TEMP_sensor, V_TEMP);
95 | MyMessage msg_vis(VIS_sensor, V_LIGHT_LEVEL);
96 | //MyMessage msg_uv(UV_sensor, V_UV);
97 |
98 | unsigned long wdiDelay2 = 0;
99 |
100 | int BATTERY_SENSE_PIN = A6; // select the input pin for the battery sense point
101 |
102 | static int32_t oldLux = 0, lux;
103 | static int16_t oldHumdty = 0, humdty;
104 | static int16_t oldTemp = 0, temp;
105 |
106 | void swarm_report()
107 | {
108 | static int oldBatteryPcnt = 0;
109 | char humiditySi7021[10];
110 | char tempSi7021[10];
111 | char visualLight[10];
112 |
113 |
114 | lightMeter.begin(BH1750::ONE_TIME_LOW_RES_MODE); // need for correct wake up
115 | lux = lightMeter.readLightLevel();// Get Lux value
116 | // dtostrf(); converts float into string
117 | long d = (long)(lux - oldLux);
118 | Serial.print("abs(lux - oldLux)="); Serial.print(abs(d)); Serial.print(" lux ="); Serial.print(lux); Serial.print(" oldLux ="); Serial.println(oldLux);
119 | dtostrf(lux,5,0,visualLight);
120 | if ( abs(d) > 50 ) {
121 | send(msg_vis.set(visualLight), true); // Send LIGHT BH1750 sensor readings
122 | oldLux = lux;
123 | }
124 |
125 |
126 | // Measure Relative Humidity from the Si7021
127 | humdty = sensor.getRH();
128 | dtostrf(humdty,0,2,humiditySi7021);
129 | if (humdty != oldHumdty) {
130 | // this wait(); is 2.0 and up RFM69 specific. Hope to get rid of it soon
131 | wait(100);
132 | send(msg_hum.set(humiditySi7021), true); // Send humiditySi7021 sensor readings
133 | oldHumdty = humdty;
134 | }
135 |
136 |
137 | // Measure Temperature from the Si7021
138 | // Temperature is measured every time RH is requested.
139 | // It is faster, therefore, to read it from previous RH
140 | // measurement with getTemp() instead with readTemp()
141 | temp = sensor.getTemp();
142 | dtostrf(temp,0,2,tempSi7021);
143 | <<<<<<< HEAD
144 | if (temp != oldTemp) {
145 | wait(100);
146 | send(msg_temp.set(tempSi7021), true); // Send tempSi7021 temp sensor readings
147 | oldTemp = temp;
148 | }
149 | =======
150 | if (temp != oldTemp) send(msg_temp.set(tempSi7021), true); // Send tempSi7021 temp sensor readings
151 | oldTemp = temp;
152 | sleep(100);
153 | >>>>>>> origin/master
154 |
155 |
156 | // Get the battery Voltage
157 | int sensorValue = analogRead(BATTERY_SENSE_PIN);
158 | // 1M, 470K divider across battery and using internal ADC ref of 1.1V1
159 | // ((1e6+470e3)/470e3)*1.1 = Vmax = 3.44 Volts
160 | /* The MySensors Lib uses internal ADC ref of 1.1V which means analogRead of the pin connected to 470kOhms Battery Devider reaches
161 | * 1023 when voltage on the divider is around 3.44 Volts. 2.5 volts is equal to 750. 2 volts is equal to 600.
162 | * RFM 69 CW works stable up to 2 volts. Assume 2.5 V is 0% and 1023 is 100% battery charge
163 | * RFM 69 HCW works stable up to 2.5 volts (sometimes it can work up to 2.0V). Assume 2.5 V is 0% and 1023 is 100% battery charge
164 | * 3.3V ~ 1023
165 | * 3.0V ~ 900
166 | * 2.5V ~ 750
167 | * 2.0V ~ 600
168 | */
169 |
170 | #ifdef MY_IS_RFM69HW
171 | int batteryPcnt = (sensorValue - 750) / 1.5;
172 | #else
173 | int batteryPcnt = (sensorValue - 600) / 3;
174 | #endif
175 |
176 | batteryPcnt = batteryPcnt > 0 ? batteryPcnt:0; // Cut down negative values. Just in case the battery goes below 2V (2.5V) and the node still working.
177 | batteryPcnt = batteryPcnt < 100 ? batteryPcnt:100; // Cut down more than "100%" values. In case of ADC fluctuations.
178 |
179 | if (oldBatteryPcnt != batteryPcnt ) {
180 | wait(100);
181 | sendBatteryLevel(batteryPcnt);
182 | oldBatteryPcnt = batteryPcnt;
183 | }
184 | }
185 |
186 | void before() {
187 | analogReference(INTERNAL); // using internal ADC ref of 1.1V
188 | //No need watch dog enabled in case of battery power.
189 | //wdt_enable(WDTO_4S);
190 | wdt_disable();
191 | lightMeter.begin(BH1750::ONE_TIME_LOW_RES_MODE);
192 |
193 | /* Send JDEC to sleep
194 | * all of _flash.initialize(); _flash.sleep(); and _flash.wakeup();
195 | * need to be wrapped with noInterrupts(); - interrupts();
196 | */
197 | noInterrupts();
198 | _flash.initialize();
199 | _flash.sleep();
200 | interrupts();
201 |
202 | }
203 |
204 | void setup() {
205 | }
206 |
207 | void presentation()
208 | {
209 | // Send the sketch version information to the gateway and Controller
210 | sendSketchInfo("ButtonSize node", "1.0");
211 |
212 | // Register all sensors to gw (they will be created as child devices)
213 | present(HUM_sensor, S_HUM);
214 | present(TEMP_sensor, S_TEMP);
215 | present(VIS_sensor, S_LIGHT_LEVEL);
216 | }
217 |
218 | unsigned long wdiDelay = 0;
219 |
220 | void loop(){
221 | //No need watch dog in case of battery power.
222 | //wdt_reset();
223 | _flash.wakeup();
224 |
225 | swarm_report();
226 |
227 |
228 | // Go sleep for some milliseconds
229 | _flash.sleep();
230 | sleep(300000);
231 | }
232 |
233 |
--------------------------------------------------------------------------------