├── Android
└── placeholder.txt
├── LICENSE
├── README.md
├── TFLite_detection_image.py
├── TFLite_detection_stream.py
├── TFLite_detection_video.py
├── TFLite_detection_webcam.py
├── Train_TFLite1_Object_Detection_Model.ipynb
├── Train_TFLite2_Object_Detction_Model.ipynb
├── deploy_guides
├── MacOS_TFLite_Guide.md
├── Raspberry_Pi_Guide.md
└── Windows_TFLite_Guide.md
├── doc
├── BSR_demo.gif
├── BSR_directory1.png
├── Coral_and_EdgeTPU2.png
├── MSYS_window.png
├── TFL_download_links.png
├── TFLite-vs-EdgeTPU.gif
├── YouTube_video1.JPG
├── YouTube_video2.png
├── calculate-mAP-demo1.gif
├── camera_enabled.png
├── colab_upload_button.png
├── labeled_image_example2.png
├── labeled_image_examples.png
├── labelmap_example.png
├── local_training_guide.md
├── object_detection_folder.png
├── squirrels!!.png
├── tflite1_folder.png
└── training_in_progress.png
├── examples
├── ChangeCounter.py
└── README.md
├── get_pi_requirements.sh
├── test.mp4
├── test1.jpg
└── util_scripts
├── README.md
├── calculate_map_cartucho.py
├── create_csv.py
├── create_tfrecord.py
├── train_val_test_split.py
└── train_val_test_split_yolo.py
/Android/placeholder.txt:
--------------------------------------------------------------------------------
1 | This is a placeholder... the Android content will come eventually!
2 |
--------------------------------------------------------------------------------
/LICENSE:
--------------------------------------------------------------------------------
1 | Apache License
2 | Version 2.0, January 2004
3 | http://www.apache.org/licenses/
4 |
5 | TERMS AND CONDITIONS FOR USE, REPRODUCTION, AND DISTRIBUTION
6 |
7 | 1. Definitions.
8 |
9 | "License" shall mean the terms and conditions for use, reproduction,
10 | and distribution as defined by Sections 1 through 9 of this document.
11 |
12 | "Licensor" shall mean the copyright owner or entity authorized by
13 | the copyright owner that is granting the License.
14 |
15 | "Legal Entity" shall mean the union of the acting entity and all
16 | other entities that control, are controlled by, or are under common
17 | control with that entity. For the purposes of this definition,
18 | "control" means (i) the power, direct or indirect, to cause the
19 | direction or management of such entity, whether by contract or
20 | otherwise, or (ii) ownership of fifty percent (50%) or more of the
21 | outstanding shares, or (iii) beneficial ownership of such entity.
22 |
23 | "You" (or "Your") shall mean an individual or Legal Entity
24 | exercising permissions granted by this License.
25 |
26 | "Source" form shall mean the preferred form for making modifications,
27 | including but not limited to software source code, documentation
28 | source, and configuration files.
29 |
30 | "Object" form shall mean any form resulting from mechanical
31 | transformation or translation of a Source form, including but
32 | not limited to compiled object code, generated documentation,
33 | and conversions to other media types.
34 |
35 | "Work" shall mean the work of authorship, whether in Source or
36 | Object form, made available under the License, as indicated by a
37 | copyright notice that is included in or attached to the work
38 | (an example is provided in the Appendix below).
39 |
40 | "Derivative Works" shall mean any work, whether in Source or Object
41 | form, that is based on (or derived from) the Work and for which the
42 | editorial revisions, annotations, elaborations, or other modifications
43 | represent, as a whole, an original work of authorship. For the purposes
44 | of this License, Derivative Works shall not include works that remain
45 | separable from, or merely link (or bind by name) to the interfaces of,
46 | the Work and Derivative Works thereof.
47 |
48 | "Contribution" shall mean any work of authorship, including
49 | the original version of the Work and any modifications or additions
50 | to that Work or Derivative Works thereof, that is intentionally
51 | submitted to Licensor for inclusion in the Work by the copyright owner
52 | or by an individual or Legal Entity authorized to submit on behalf of
53 | the copyright owner. For the purposes of this definition, "submitted"
54 | means any form of electronic, verbal, or written communication sent
55 | to the Licensor or its representatives, including but not limited to
56 | communication on electronic mailing lists, source code control systems,
57 | and issue tracking systems that are managed by, or on behalf of, the
58 | Licensor for the purpose of discussing and improving the Work, but
59 | excluding communication that is conspicuously marked or otherwise
60 | designated in writing by the copyright owner as "Not a Contribution."
61 |
62 | "Contributor" shall mean Licensor and any individual or Legal Entity
63 | on behalf of whom a Contribution has been received by Licensor and
64 | subsequently incorporated within the Work.
65 |
66 | 2. Grant of Copyright License. Subject to the terms and conditions of
67 | this License, each Contributor hereby grants to You a perpetual,
68 | worldwide, non-exclusive, no-charge, royalty-free, irrevocable
69 | copyright license to reproduce, prepare Derivative Works of,
70 | publicly display, publicly perform, sublicense, and distribute the
71 | Work and such Derivative Works in Source or Object form.
72 |
73 | 3. Grant of Patent License. Subject to the terms and conditions of
74 | this License, each Contributor hereby grants to You a perpetual,
75 | worldwide, non-exclusive, no-charge, royalty-free, irrevocable
76 | (except as stated in this section) patent license to make, have made,
77 | use, offer to sell, sell, import, and otherwise transfer the Work,
78 | where such license applies only to those patent claims licensable
79 | by such Contributor that are necessarily infringed by their
80 | Contribution(s) alone or by combination of their Contribution(s)
81 | with the Work to which such Contribution(s) was submitted. If You
82 | institute patent litigation against any entity (including a
83 | cross-claim or counterclaim in a lawsuit) alleging that the Work
84 | or a Contribution incorporated within the Work constitutes direct
85 | or contributory patent infringement, then any patent licenses
86 | granted to You under this License for that Work shall terminate
87 | as of the date such litigation is filed.
88 |
89 | 4. Redistribution. You may reproduce and distribute copies of the
90 | Work or Derivative Works thereof in any medium, with or without
91 | modifications, and in Source or Object form, provided that You
92 | meet the following conditions:
93 |
94 | (a) You must give any other recipients of the Work or
95 | Derivative Works a copy of this License; and
96 |
97 | (b) You must cause any modified files to carry prominent notices
98 | stating that You changed the files; and
99 |
100 | (c) You must retain, in the Source form of any Derivative Works
101 | that You distribute, all copyright, patent, trademark, and
102 | attribution notices from the Source form of the Work,
103 | excluding those notices that do not pertain to any part of
104 | the Derivative Works; and
105 |
106 | (d) If the Work includes a "NOTICE" text file as part of its
107 | distribution, then any Derivative Works that You distribute must
108 | include a readable copy of the attribution notices contained
109 | within such NOTICE file, excluding those notices that do not
110 | pertain to any part of the Derivative Works, in at least one
111 | of the following places: within a NOTICE text file distributed
112 | as part of the Derivative Works; within the Source form or
113 | documentation, if provided along with the Derivative Works; or,
114 | within a display generated by the Derivative Works, if and
115 | wherever such third-party notices normally appear. The contents
116 | of the NOTICE file are for informational purposes only and
117 | do not modify the License. You may add Your own attribution
118 | notices within Derivative Works that You distribute, alongside
119 | or as an addendum to the NOTICE text from the Work, provided
120 | that such additional attribution notices cannot be construed
121 | as modifying the License.
122 |
123 | You may add Your own copyright statement to Your modifications and
124 | may provide additional or different license terms and conditions
125 | for use, reproduction, or distribution of Your modifications, or
126 | for any such Derivative Works as a whole, provided Your use,
127 | reproduction, and distribution of the Work otherwise complies with
128 | the conditions stated in this License.
129 |
130 | 5. Submission of Contributions. Unless You explicitly state otherwise,
131 | any Contribution intentionally submitted for inclusion in the Work
132 | by You to the Licensor shall be under the terms and conditions of
133 | this License, without any additional terms or conditions.
134 | Notwithstanding the above, nothing herein shall supersede or modify
135 | the terms of any separate license agreement you may have executed
136 | with Licensor regarding such Contributions.
137 |
138 | 6. Trademarks. This License does not grant permission to use the trade
139 | names, trademarks, service marks, or product names of the Licensor,
140 | except as required for reasonable and customary use in describing the
141 | origin of the Work and reproducing the content of the NOTICE file.
142 |
143 | 7. Disclaimer of Warranty. Unless required by applicable law or
144 | agreed to in writing, Licensor provides the Work (and each
145 | Contributor provides its Contributions) on an "AS IS" BASIS,
146 | WITHOUT WARRANTIES OR CONDITIONS OF ANY KIND, either express or
147 | implied, including, without limitation, any warranties or conditions
148 | of TITLE, NON-INFRINGEMENT, MERCHANTABILITY, or FITNESS FOR A
149 | PARTICULAR PURPOSE. You are solely responsible for determining the
150 | appropriateness of using or redistributing the Work and assume any
151 | risks associated with Your exercise of permissions under this License.
152 |
153 | 8. Limitation of Liability. In no event and under no legal theory,
154 | whether in tort (including negligence), contract, or otherwise,
155 | unless required by applicable law (such as deliberate and grossly
156 | negligent acts) or agreed to in writing, shall any Contributor be
157 | liable to You for damages, including any direct, indirect, special,
158 | incidental, or consequential damages of any character arising as a
159 | result of this License or out of the use or inability to use the
160 | Work (including but not limited to damages for loss of goodwill,
161 | work stoppage, computer failure or malfunction, or any and all
162 | other commercial damages or losses), even if such Contributor
163 | has been advised of the possibility of such damages.
164 |
165 | 9. Accepting Warranty or Additional Liability. While redistributing
166 | the Work or Derivative Works thereof, You may choose to offer,
167 | and charge a fee for, acceptance of support, warranty, indemnity,
168 | or other liability obligations and/or rights consistent with this
169 | License. However, in accepting such obligations, You may act only
170 | on Your own behalf and on Your sole responsibility, not on behalf
171 | of any other Contributor, and only if You agree to indemnify,
172 | defend, and hold each Contributor harmless for any liability
173 | incurred by, or claims asserted against, such Contributor by reason
174 | of your accepting any such warranty or additional liability.
175 |
176 | END OF TERMS AND CONDITIONS
177 |
178 | APPENDIX: How to apply the Apache License to your work.
179 |
180 | To apply the Apache License to your work, attach the following
181 | boilerplate notice, with the fields enclosed by brackets "[]"
182 | replaced with your own identifying information. (Don't include
183 | the brackets!) The text should be enclosed in the appropriate
184 | comment syntax for the file format. We also recommend that a
185 | file or class name and description of purpose be included on the
186 | same "printed page" as the copyright notice for easier
187 | identification within third-party archives.
188 |
189 | Copyright [yyyy] [name of copyright owner]
190 |
191 | Licensed under the Apache License, Version 2.0 (the "License");
192 | you may not use this file except in compliance with the License.
193 | You may obtain a copy of the License at
194 |
195 | http://www.apache.org/licenses/LICENSE-2.0
196 |
197 | Unless required by applicable law or agreed to in writing, software
198 | distributed under the License is distributed on an "AS IS" BASIS,
199 | WITHOUT WARRANTIES OR CONDITIONS OF ANY KIND, either express or implied.
200 | See the License for the specific language governing permissions and
201 | limitations under the License.
202 |
--------------------------------------------------------------------------------
/README.md:
--------------------------------------------------------------------------------
1 | # TensorFlow Lite Object Detection on Android and Raspberry Pi
2 | Train your own TensorFlow Lite object detection models and run them on the Raspberry Pi, Android phones, and other edge devices!
3 |
4 |
5 |  6 |
6 |
7 |
8 | Get started with training on Google Colab by clicking the icon below, or [click here to go straight to the YouTube video that provides step-by-step instructions](https://youtu.be/XZ7FYAMCc4M).
9 |
10 |  11 |
12 | ## Introduction
13 | TensorFlow Lite is an optimized framework for deploying lightweight deep learning models on resource-constrained edge devices. TensorFlow Lite models have faster inference time and require less processing power than regular TensorFlow models, so they can be used to obtain faster performance in realtime applications.
14 |
15 | This guide provides step-by-step instructions for how train a custom TensorFlow Object Detection model, convert it into an optimized format that can be used by TensorFlow Lite, and run it on edge devices like the Raspberry Pi. It also provides Python code for running TensorFlow Lite models to perform detection on images, videos, web streams, or webcam feeds.
16 |
17 | ## Step 1. Train TensorFlow Lite Models
18 | ### Using Google Colab (recommended)
19 |
20 | The easiest way to train, convert, and export a TensorFlow Lite model is using Google Colab. Colab provides you with a free GPU-enabled virtual machine on Google's servers that comes pre-installed with the libraries and packages needed for training.
21 |
22 | I wrote a [Google Colab notebook](./Train_TFLite2_Object_Detction_Model.ipynb) that can be used to train custom TensorFlow Lite models. It goes through the process of preparing data, configuring a model for training, training the model, running it on test images, and exporting it to a downloadable TFLite format so you can deploy it to your own device. It makes training a custom TFLite model as easy as uploading an image dataset and clicking Play on a few blocks of code!
23 |
24 |
25 |
26 | Open the Colab notebook in your browser by clicking the icon above. Work through the instructions in the notebook to start training your own model. Once it's trained and exported, visit the [Setup TFLite Runtime Environment](#step-2-setup-tflite-runtime-environment-on-your-device) section to learn how to deploy it on your PC, Raspberry Pi, Android phone, or other edge devices.
27 |
28 | ### Using a Local PC
29 | The old version of this guide shows how to set up a TensorFlow training environment locally on your PC. Be warned: it's a lot of work, and the guide is outdated. [Here's a link to the local training guide.](doc/local_training_guide.md)
30 |
31 | ## Step 2. Setup TFLite Runtime Environment on Your Device
32 | Once you have a trained `.tflite` model, the next step is to deploy it on a device like a computer, Raspberry Pi, or Android phone. To run the model, you'll need to install the TensorFlow or the TensorFlow Lite Runtime on your device and set up the Python environment and directory structure to run your application in. The [deploy_guides](deploy_guides) folder in this repository has step-by-step guides showing how to set up a TensorFlow environment on several different devices. Links to the guides are given below.
33 |
34 | ### Raspberry Pi
35 | Follow the [Raspberry Pi setup guide](deploy_guides/Raspberry_Pi_Guide.md) to install TFLite Runtime on a Raspberry Pi 3 or 4 and run a TensorFlow Lite model. This guide also shows how to use the Google Coral USB Accelerator to greatly increase the speed of quantized models on the Raspberry Pi.
36 |
37 | ### Windows
38 | Follow the instructions in the [Windows TFLite guide](deploy_guides/Windows_TFLite_Guide.md) to set up TFLite Runtime on your Windows PC using Anaconda!
39 |
40 | ### macOS
41 | Still to come!
42 |
43 | ### Linux
44 | Still to come!
45 |
46 | ### Android
47 | Still to come!
48 |
49 | ### Embedded Devices
50 | Still to come!
51 |
52 | ## Step 3. Run TensorFlow Lite Models!
53 | There are four Python scripts to run the TensorFlow Lite object detection model on an image, video, web stream, or webcam feed. The scripts are based off the label_image.py example given in the [TensorFlow Lite examples GitHub repository](https://github.com/tensorflow/tensorflow/blob/master/tensorflow/lite/examples/python/label_image.py).
54 |
55 | * [TFLite_detection_image.py](TFLite_detection_image.py)
56 | * [TFLite_detection_video.py](TFLite_detection_video.py)
57 | * [TFLite_detection_stream.py](TFLite_detection_stream.py)
58 | * [TFLite_detection_webcam.py](TFLite_detection_webcam.py)
59 |
60 | The following instructions show how to run the scripts. These instructions assume your .tflite model file and labelmap.txt file are in the `TFLite_model` folder in your `tflite1` directory as per the instructions given in the [Setup TFLite Runtime Environment](#step-2-setup-tflite-runtime-environment-on-your-device) guide.
61 |
62 |
11 |
12 | ## Introduction
13 | TensorFlow Lite is an optimized framework for deploying lightweight deep learning models on resource-constrained edge devices. TensorFlow Lite models have faster inference time and require less processing power than regular TensorFlow models, so they can be used to obtain faster performance in realtime applications.
14 |
15 | This guide provides step-by-step instructions for how train a custom TensorFlow Object Detection model, convert it into an optimized format that can be used by TensorFlow Lite, and run it on edge devices like the Raspberry Pi. It also provides Python code for running TensorFlow Lite models to perform detection on images, videos, web streams, or webcam feeds.
16 |
17 | ## Step 1. Train TensorFlow Lite Models
18 | ### Using Google Colab (recommended)
19 |
20 | The easiest way to train, convert, and export a TensorFlow Lite model is using Google Colab. Colab provides you with a free GPU-enabled virtual machine on Google's servers that comes pre-installed with the libraries and packages needed for training.
21 |
22 | I wrote a [Google Colab notebook](./Train_TFLite2_Object_Detction_Model.ipynb) that can be used to train custom TensorFlow Lite models. It goes through the process of preparing data, configuring a model for training, training the model, running it on test images, and exporting it to a downloadable TFLite format so you can deploy it to your own device. It makes training a custom TFLite model as easy as uploading an image dataset and clicking Play on a few blocks of code!
23 |
24 |
25 |
26 | Open the Colab notebook in your browser by clicking the icon above. Work through the instructions in the notebook to start training your own model. Once it's trained and exported, visit the [Setup TFLite Runtime Environment](#step-2-setup-tflite-runtime-environment-on-your-device) section to learn how to deploy it on your PC, Raspberry Pi, Android phone, or other edge devices.
27 |
28 | ### Using a Local PC
29 | The old version of this guide shows how to set up a TensorFlow training environment locally on your PC. Be warned: it's a lot of work, and the guide is outdated. [Here's a link to the local training guide.](doc/local_training_guide.md)
30 |
31 | ## Step 2. Setup TFLite Runtime Environment on Your Device
32 | Once you have a trained `.tflite` model, the next step is to deploy it on a device like a computer, Raspberry Pi, or Android phone. To run the model, you'll need to install the TensorFlow or the TensorFlow Lite Runtime on your device and set up the Python environment and directory structure to run your application in. The [deploy_guides](deploy_guides) folder in this repository has step-by-step guides showing how to set up a TensorFlow environment on several different devices. Links to the guides are given below.
33 |
34 | ### Raspberry Pi
35 | Follow the [Raspberry Pi setup guide](deploy_guides/Raspberry_Pi_Guide.md) to install TFLite Runtime on a Raspberry Pi 3 or 4 and run a TensorFlow Lite model. This guide also shows how to use the Google Coral USB Accelerator to greatly increase the speed of quantized models on the Raspberry Pi.
36 |
37 | ### Windows
38 | Follow the instructions in the [Windows TFLite guide](deploy_guides/Windows_TFLite_Guide.md) to set up TFLite Runtime on your Windows PC using Anaconda!
39 |
40 | ### macOS
41 | Still to come!
42 |
43 | ### Linux
44 | Still to come!
45 |
46 | ### Android
47 | Still to come!
48 |
49 | ### Embedded Devices
50 | Still to come!
51 |
52 | ## Step 3. Run TensorFlow Lite Models!
53 | There are four Python scripts to run the TensorFlow Lite object detection model on an image, video, web stream, or webcam feed. The scripts are based off the label_image.py example given in the [TensorFlow Lite examples GitHub repository](https://github.com/tensorflow/tensorflow/blob/master/tensorflow/lite/examples/python/label_image.py).
54 |
55 | * [TFLite_detection_image.py](TFLite_detection_image.py)
56 | * [TFLite_detection_video.py](TFLite_detection_video.py)
57 | * [TFLite_detection_stream.py](TFLite_detection_stream.py)
58 | * [TFLite_detection_webcam.py](TFLite_detection_webcam.py)
59 |
60 | The following instructions show how to run the scripts. These instructions assume your .tflite model file and labelmap.txt file are in the `TFLite_model` folder in your `tflite1` directory as per the instructions given in the [Setup TFLite Runtime Environment](#step-2-setup-tflite-runtime-environment-on-your-device) guide.
61 |
62 |
63 |  64 |
64 |
65 |
66 | If you’d like try using the sample TFLite object detection model provided by Google, simply download it [here](https://storage.googleapis.com/download.tensorflow.org/models/tflite/coco_ssd_mobilenet_v1_1.0_quant_2018_06_29.zip), unzip it to the `tflite1` folder, and rename it to `TFLite_model`. Then, use `--modeldir=coco_ssd_mobilenet_v1_1.0_quant_2018_06_29` rather than `--modeldir=TFLite_model` when running the script.
67 |
68 |
69 | Webcam
70 | Make sure you have a USB webcam plugged into your computer. If you’re on a laptop with a built-in camera, you don’t need to plug in a USB webcam.
71 |
72 | From the `tflite1` directory, issue:
73 |
74 | ```
75 | python TFLite_detection_webcam.py --modeldir=TFLite_model
76 | ```
77 |
78 | After a few moments of initializing, a window will appear showing the webcam feed. Detected objects will have bounding boxes and labels displayed on them in real time.
79 |
80 |
81 |
82 | Video
83 | To run the video detection script, issue:
84 |
85 | ```
86 | python TFLite_detection_video.py --modeldir=TFLite_model
87 | ```
88 |
89 | A window will appear showing consecutive frames from the video, with each object in the frame labeled. Press 'q' to close the window and end the script. By default, the video detection script will open a video named 'test.mp4'. To open a specific video file, use the `--video` option:
90 |
91 | ```
92 | python TFLite_detection_video.py --modeldir=TFLite_model --video='birdy.mp4'
93 | ```
94 |
95 | Note: Video detection will run at a slower FPS than realtime webcam detection. This is mainly because loading a frame from a video file requires more processor I/O than receiving a frame from a webcam.
96 |
97 |
98 |
99 | Web stream
100 | To run the script to detect images in a video stream (e.g. a remote security camera), issue:
101 |
102 | ```
103 | python TFLite_detection_stream.py --modeldir=TFLite_model --streamurl="http://ipaddress:port/stream/video.mjpeg"
104 | ```
105 |
106 | After a few moments of initializing, a window will appear showing the video stream. Detected objects will have bounding boxes and labels displayed on them in real time.
107 |
108 | Make sure to update the URL parameter to the one that is being used by your security camera. It has to include authentication information in case the stream is secured.
109 |
110 | If the bounding boxes are not matching the detected objects, probably the stream resolution wasn't detected. In this case you can set it explicitly by using the `--resolution` parameter:
111 |
112 | ```
113 | python TFLite_detection_stream.py --modeldir=TFLite_model --streamurl="http://ipaddress:port/stream/video.mjpeg" --resolution=1920x1080
114 | ```
115 |
116 |
117 |
118 | Image
119 | To run the image detection script, issue:
120 |
121 | ```
122 | python TFLite_detection_image.py --modeldir=TFLite_model
123 | ```
124 |
125 | The image will appear with all objects labeled. Press 'q' to close the image and end the script. By default, the image detection script will open an image named 'test1.jpg'. To open a specific image file, use the `--image` option:
126 |
127 | ```
128 | python TFLite_detection_image.py --modeldir=TFLite_model --image=squirrel.jpg
129 | ```
130 |
131 | It can also open an entire folder full of images and perform detection on each image. There can only be images files in the folder, or errors will occur. To specify which folder has images to perform detection on, use the `--imagedir` option:
132 |
133 | ```
134 | python TFLite_detection_image.py --modeldir=TFLite_model --imagedir=squirrels
135 | ```
136 |
137 | Press any key (other than 'q') to advance to the next image. Do not use both the --image option and the --imagedir option when running the script, or it will throw an error.
138 |
139 | To save labeled images and a text file with detection results for each image, use the `--save_results` option. The results will be saved to a folder named `_results`. This works well if you want to check your model's performance on a folder of images and use the results to calculate mAP with the [calculate_map_catchuro.py](./util_scripts) script. For example:
140 |
141 | ```
142 | python TFLite_detection_image.py --modeldir=TFLite_model --imagedir=squirrels --save_results
143 | ```
144 |
145 | The `--noshow_results` option will stop the program from displaying images.
146 |
147 |
148 | **See all command options**
149 |
150 | For more information on options that can be used while running the scripts, use the `-h` option when calling them. For example:
151 |
152 | ```
153 | python TFLite_detection_image.py -h
154 | ```
155 |
156 | If you encounter errors, please check the [FAQ section](https://github.com/EdjeElectronics/TensorFlow-Lite-Object-Detection-on-Android-and-Raspberry-Pi#FAQs) of this guide. It has a list of common errors and their solutions. If you can successfully run the script, but your object isn’t detected, it is most likely because your model isn’t accurate enough. The FAQ has further discussion on how to resolve this.
157 |
158 | ## Examples
159 | (Still to come!) Please see the [examples](examples) folder for examples of how to use your TFLite model in basic vision applications.
160 |
161 | ## FAQs
162 |
163 | What's the difference between the TensorFlow Object Detection API and TFLite Model Maker?
164 |
165 | Google provides a set of Colab notebooks for training TFLite models called [TFLite Model Maker](https://www.tensorflow.org/lite/models/modify/model_maker). While their object detection notebook is straightfoward and easy to follow, using the [TensorFlow Object Detection API](https://github.com/tensorflow/models/tree/master/research/object_detection) for creating models provides several benefits:
166 |
167 | * TFLite Model Maker only supports EfficientDet models, which aren't as fast as SSD-MobileNet models.
168 | * Training models with the Object Detection API generally results in better model accuracy.
169 | * The Object Detection API provides significantly more flexibility in model and training configuration (training steps, learning rate, model depth and resolution, etc).
170 | * Google still [recommends using the Object Detection API](https://www.tensorflow.org/lite/examples/object_detection/overview#fine-tuning_models_on_custom_data) as the formal method for training models with large datasets.
171 |
172 |
173 |
174 | What's the difference between training, transfer learning, and fine-tuning?
175 |
176 | Using correct terminology is important in a complicated field like machine learning. In this notebook, I use the word "training" to describe the process of teaching a model to recognize custom objects, but what we're actually doing is "fine-tuning". The Keras documentation gives a [good example notebook](https://keras.io/guides/transfer_learning/) explaining the difference between each term.
177 |
178 | Here's my attempt at defining the terms:
179 |
180 | * **Training**: The process of taking a full neural network with randomly initialized weights, passing in image data, calculating the resulting loss from its predictions on those images, and using backpropagation to adjust the weights in every node of the network and reduce its loss. In this process, the network learns how to extract features of interest from images and correlate those features to classes. Training a model from scratch typically takes millions of training steps and a large dataset of 100,000+ images (such as ImageNet or COCO). Let's leave actual training to companies like Google and Microsoft!
181 | * **Transfer learning**: Taking a model that has already been trained, unfreezing the last layer of the model (i.e. making it so only the last layer's weights can be modified), and retraining the last layer with a new dataset so it can learn to identify new classes. Transfer learning takes advantage of the feature extraction capabilities that have already been learned in the deep layers of the trained model. It takes the extracted features and recategorizes them to predict new classes.
182 | * **Fine-tuning**: Fine-tuning is similar to transfer learning, except more layers are unfrozen and retrained. Instead of just unfreezing the last layer, a significant amount of layers (such as the last 20% to 50% of layers) are unfrozen. This allows the model to modify some of its feature extraction layers so it can extract features that are more relevant to the classes its trying to identify. This notebook (and the TensorFlow Object Detection API) uses fine-tuning.
183 |
184 | In general, I like to use the word "training" instead of "fine-tuning", because it's more intuitive and understandable to new users.
185 |
186 |
187 |
188 | Should I get a Google Colab Pro subscription?
189 |
190 | If you plan to use Colab frequently for training models, I recommend getting a Colab Pro subscription. It provides several benefits:
191 |
192 | * Idle Colab sessions remain connected for longer before timing out and disconnecting
193 | * Allows for running multiple Colab sessions at once
194 | * Priority access to TPU and GPU-enabled virtual machines
195 | * Virtual machines have more RAM
196 |
197 | Colab keeps track of how much GPU time you use, and cuts you off from using GPU-enabled instances once you reach a certain use time. If you get the message telling you you're cut off from GPU instances, then that's a good indicator that you use Colab enough to justify paying for a Pro subscription.
198 |
199 |
--------------------------------------------------------------------------------
/TFLite_detection_image.py:
--------------------------------------------------------------------------------
1 | ######## Webcam Object Detection Using Tensorflow-trained Classifier #########
2 | #
3 | # Author: Evan Juras
4 | # Date: 11/11/22
5 | # Description:
6 | # This program uses a TensorFlow Lite object detection model to perform object
7 | # detection on an image or a folder full of images. It draws boxes and scores
8 | # around the objects of interest in each image.
9 | #
10 | # This code is based off the TensorFlow Lite image classification example at:
11 | # https://github.com/tensorflow/tensorflow/blob/master/tensorflow/lite/examples/python/label_image.py
12 | #
13 | # I added my own method of drawing boxes and labels using OpenCV.
14 |
15 | # Import packages
16 | import os
17 | import argparse
18 | import cv2
19 | import numpy as np
20 | import sys
21 | import glob
22 | import importlib.util
23 |
24 |
25 | # Define and parse input arguments
26 | parser = argparse.ArgumentParser()
27 | parser.add_argument('--modeldir', help='Folder the .tflite file is located in',
28 | required=True)
29 | parser.add_argument('--graph', help='Name of the .tflite file, if different than detect.tflite',
30 | default='detect.tflite')
31 | parser.add_argument('--labels', help='Name of the labelmap file, if different than labelmap.txt',
32 | default='labelmap.txt')
33 | parser.add_argument('--threshold', help='Minimum confidence threshold for displaying detected objects',
34 | default=0.5)
35 | parser.add_argument('--image', help='Name of the single image to perform detection on. To run detection on multiple images, use --imagedir',
36 | default=None)
37 | parser.add_argument('--imagedir', help='Name of the folder containing images to perform detection on. Folder must contain only images.',
38 | default=None)
39 | parser.add_argument('--save_results', help='Save labeled images and annotation data to a results folder',
40 | action='store_true')
41 | parser.add_argument('--noshow_results', help='Don\'t show result images (only use this if --save_results is enabled)',
42 | action='store_false')
43 | parser.add_argument('--edgetpu', help='Use Coral Edge TPU Accelerator to speed up detection',
44 | action='store_true')
45 |
46 | args = parser.parse_args()
47 |
48 |
49 | # Parse user inputs
50 | MODEL_NAME = args.modeldir
51 | GRAPH_NAME = args.graph
52 | LABELMAP_NAME = args.labels
53 |
54 | min_conf_threshold = float(args.threshold)
55 | use_TPU = args.edgetpu
56 |
57 | save_results = args.save_results # Defaults to False
58 | show_results = args.noshow_results # Defaults to True
59 |
60 | IM_NAME = args.image
61 | IM_DIR = args.imagedir
62 |
63 | # If both an image AND a folder are specified, throw an error
64 | if (IM_NAME and IM_DIR):
65 | print('Error! Please only use the --image argument or the --imagedir argument, not both. Issue "python TFLite_detection_image.py -h" for help.')
66 | sys.exit()
67 |
68 | # If neither an image or a folder are specified, default to using 'test1.jpg' for image name
69 | if (not IM_NAME and not IM_DIR):
70 | IM_NAME = 'test1.jpg'
71 |
72 | # Import TensorFlow libraries
73 | # If tflite_runtime is installed, import interpreter from tflite_runtime, else import from regular tensorflow
74 | # If using Coral Edge TPU, import the load_delegate library
75 | pkg = importlib.util.find_spec('tflite_runtime')
76 | if pkg:
77 | from tflite_runtime.interpreter import Interpreter
78 | if use_TPU:
79 | from tflite_runtime.interpreter import load_delegate
80 | else:
81 | from tensorflow.lite.python.interpreter import Interpreter
82 | if use_TPU:
83 | from tensorflow.lite.python.interpreter import load_delegate
84 |
85 | # If using Edge TPU, assign filename for Edge TPU model
86 | if use_TPU:
87 | # If user has specified the name of the .tflite file, use that name, otherwise use default 'edgetpu.tflite'
88 | if (GRAPH_NAME == 'detect.tflite'):
89 | GRAPH_NAME = 'edgetpu.tflite'
90 |
91 |
92 | # Get path to current working directory
93 | CWD_PATH = os.getcwd()
94 |
95 | # Define path to images and grab all image filenames
96 | if IM_DIR:
97 | PATH_TO_IMAGES = os.path.join(CWD_PATH,IM_DIR)
98 | images = glob.glob(PATH_TO_IMAGES + '/*.jpg') + glob.glob(PATH_TO_IMAGES + '/*.png') + glob.glob(PATH_TO_IMAGES + '/*.bmp')
99 | if save_results:
100 | RESULTS_DIR = IM_DIR + '_results'
101 |
102 | elif IM_NAME:
103 | PATH_TO_IMAGES = os.path.join(CWD_PATH,IM_NAME)
104 | images = glob.glob(PATH_TO_IMAGES)
105 | if save_results:
106 | RESULTS_DIR = 'results'
107 |
108 | # Create results directory if user wants to save results
109 | if save_results:
110 | RESULTS_PATH = os.path.join(CWD_PATH,RESULTS_DIR)
111 | if not os.path.exists(RESULTS_PATH):
112 | os.makedirs(RESULTS_PATH)
113 |
114 | # Path to .tflite file, which contains the model that is used for object detection
115 | PATH_TO_CKPT = os.path.join(CWD_PATH,MODEL_NAME,GRAPH_NAME)
116 |
117 | # Path to label map file
118 | PATH_TO_LABELS = os.path.join(CWD_PATH,MODEL_NAME,LABELMAP_NAME)
119 |
120 | # Load the label map
121 | with open(PATH_TO_LABELS, 'r') as f:
122 | labels = [line.strip() for line in f.readlines()]
123 |
124 | # Have to do a weird fix for label map if using the COCO "starter model" from
125 | # https://www.tensorflow.org/lite/models/object_detection/overview
126 | # First label is '???', which has to be removed.
127 | if labels[0] == '???':
128 | del(labels[0])
129 |
130 | # Load the Tensorflow Lite model.
131 | # If using Edge TPU, use special load_delegate argument
132 | if use_TPU:
133 | interpreter = Interpreter(model_path=PATH_TO_CKPT,
134 | experimental_delegates=[load_delegate('libedgetpu.so.1.0')])
135 | print(PATH_TO_CKPT)
136 | else:
137 | interpreter = Interpreter(model_path=PATH_TO_CKPT)
138 |
139 | interpreter.allocate_tensors()
140 |
141 | # Get model details
142 | input_details = interpreter.get_input_details()
143 | output_details = interpreter.get_output_details()
144 | height = input_details[0]['shape'][1]
145 | width = input_details[0]['shape'][2]
146 |
147 | floating_model = (input_details[0]['dtype'] == np.float32)
148 |
149 | input_mean = 127.5
150 | input_std = 127.5
151 |
152 | # Check output layer name to determine if this model was created with TF2 or TF1,
153 | # because outputs are ordered differently for TF2 and TF1 models
154 | outname = output_details[0]['name']
155 |
156 | if ('StatefulPartitionedCall' in outname): # This is a TF2 model
157 | boxes_idx, classes_idx, scores_idx = 1, 3, 0
158 | else: # This is a TF1 model
159 | boxes_idx, classes_idx, scores_idx = 0, 1, 2
160 |
161 | # Loop over every image and perform detection
162 | for image_path in images:
163 |
164 | # Load image and resize to expected shape [1xHxWx3]
165 | image = cv2.imread(image_path)
166 | image_rgb = cv2.cvtColor(image, cv2.COLOR_BGR2RGB)
167 | imH, imW, _ = image.shape
168 | image_resized = cv2.resize(image_rgb, (width, height))
169 | input_data = np.expand_dims(image_resized, axis=0)
170 |
171 | # Normalize pixel values if using a floating model (i.e. if model is non-quantized)
172 | if floating_model:
173 | input_data = (np.float32(input_data) - input_mean) / input_std
174 |
175 | # Perform the actual detection by running the model with the image as input
176 | interpreter.set_tensor(input_details[0]['index'],input_data)
177 | interpreter.invoke()
178 |
179 | # Retrieve detection results
180 | boxes = interpreter.get_tensor(output_details[boxes_idx]['index'])[0] # Bounding box coordinates of detected objects
181 | classes = interpreter.get_tensor(output_details[classes_idx]['index'])[0] # Class index of detected objects
182 | scores = interpreter.get_tensor(output_details[scores_idx]['index'])[0] # Confidence of detected objects
183 |
184 | detections = []
185 |
186 | # Loop over all detections and draw detection box if confidence is above minimum threshold
187 | for i in range(len(scores)):
188 | if ((scores[i] > min_conf_threshold) and (scores[i] <= 1.0)):
189 |
190 | # Get bounding box coordinates and draw box
191 | # Interpreter can return coordinates that are outside of image dimensions, need to force them to be within image using max() and min()
192 | ymin = int(max(1,(boxes[i][0] * imH)))
193 | xmin = int(max(1,(boxes[i][1] * imW)))
194 | ymax = int(min(imH,(boxes[i][2] * imH)))
195 | xmax = int(min(imW,(boxes[i][3] * imW)))
196 |
197 | cv2.rectangle(image, (xmin,ymin), (xmax,ymax), (10, 255, 0), 2)
198 |
199 | # Draw label
200 | object_name = labels[int(classes[i])] # Look up object name from "labels" array using class index
201 | label = '%s: %d%%' % (object_name, int(scores[i]*100)) # Example: 'person: 72%'
202 | labelSize, baseLine = cv2.getTextSize(label, cv2.FONT_HERSHEY_SIMPLEX, 0.7, 2) # Get font size
203 | label_ymin = max(ymin, labelSize[1] + 10) # Make sure not to draw label too close to top of window
204 | cv2.rectangle(image, (xmin, label_ymin-labelSize[1]-10), (xmin+labelSize[0], label_ymin+baseLine-10), (255, 255, 255), cv2.FILLED) # Draw white box to put label text in
205 | cv2.putText(image, label, (xmin, label_ymin-7), cv2.FONT_HERSHEY_SIMPLEX, 0.7, (0, 0, 0), 2) # Draw label text
206 |
207 | detections.append([object_name, scores[i], xmin, ymin, xmax, ymax])
208 |
209 | # All the results have been drawn on the image, now display the image
210 | if show_results:
211 | cv2.imshow('Object detector', image)
212 |
213 | # Press any key to continue to next image, or press 'q' to quit
214 | if cv2.waitKey(0) == ord('q'):
215 | break
216 |
217 | # Save the labeled image to results folder if desired
218 | if save_results:
219 |
220 | # Get filenames and paths
221 | image_fn = os.path.basename(image_path)
222 | image_savepath = os.path.join(CWD_PATH,RESULTS_DIR,image_fn)
223 |
224 | base_fn, ext = os.path.splitext(image_fn)
225 | txt_result_fn = base_fn +'.txt'
226 | txt_savepath = os.path.join(CWD_PATH,RESULTS_DIR,txt_result_fn)
227 |
228 | # Save image
229 | cv2.imwrite(image_savepath, image)
230 |
231 | # Write results to text file
232 | # (Using format defined by https://github.com/Cartucho/mAP, which will make it easy to calculate mAP)
233 | with open(txt_savepath,'w') as f:
234 | for detection in detections:
235 | f.write('%s %.4f %d %d %d %d\n' % (detection[0], detection[1], detection[2], detection[3], detection[4], detection[5]))
236 |
237 | # Clean up
238 | cv2.destroyAllWindows()
239 |
--------------------------------------------------------------------------------
/TFLite_detection_stream.py:
--------------------------------------------------------------------------------
1 | ######## Video Stream Object Detection Using Tensorflow-trained Classifier #########
2 | #
3 | # Author: Evan Juras (update by JanT)
4 | # Date: 10/27/19 (updated 12/4/2019)
5 | # Description:
6 | # This program uses a TensorFlow Lite model to perform object detection on a live video stream.
7 | # It draws boxes and scores around the objects of interest in each frame from the
8 | # stream. To improve FPS, the webcam object runs in a separate thread from the main program.
9 | # This script will work with codecs supported by CV2 (e.g. MJPEG, RTSP, ...).
10 | #
11 | # This code is based off the TensorFlow Lite image classification example at:
12 | # https://github.com/tensorflow/tensorflow/blob/master/tensorflow/lite/examples/python/label_image.py
13 | #
14 | # I added my own method of drawing boxes and labels using OpenCV.
15 |
16 | # Import packages
17 | import os
18 | import argparse
19 | import cv2
20 | import numpy as np
21 | import sys
22 | import time
23 | from threading import Thread
24 | import importlib.util
25 |
26 | # Define VideoStream class to handle streaming of video from webcam in separate processing thread
27 | # Source - Adrian Rosebrock, PyImageSearch: https://www.pyimagesearch.com/2015/12/28/increasing-raspberry-pi-fps-with-python-and-opencv/
28 | class VideoStream:
29 | """Camera object that controls video streaming"""
30 | def __init__(self,resolution=(640,480),framerate=30):
31 | # Initialize the PiCamera and the camera image stream
32 | self.stream = cv2.VideoCapture(STREAM_URL)
33 | ret = self.stream.set(cv2.CAP_PROP_FOURCC, cv2.VideoWriter_fourcc(*'MJPG'))
34 | ret = self.stream.set(3,resolution[0])
35 | ret = self.stream.set(4,resolution[1])
36 |
37 | # Read first frame from the stream
38 | (self.grabbed, self.frame) = self.stream.read()
39 |
40 | # Variable to control when the camera is stopped
41 | self.stopped = False
42 |
43 | def start(self):
44 | # Start the thread that reads frames from the video stream
45 | Thread(target=self.update,args=()).start()
46 | return self
47 |
48 | def update(self):
49 | # Keep looping indefinitely until the thread is stopped
50 | while True:
51 | # If the camera is stopped, stop the thread
52 | if self.stopped:
53 | # Close camera resources
54 | self.stream.release()
55 | return
56 |
57 | # Otherwise, grab the next frame from the stream
58 | (self.grabbed, self.frame) = self.stream.read()
59 |
60 | def read(self):
61 | # Return the most recent frame
62 | return self.frame
63 |
64 | def stop(self):
65 | # Indicate that the camera and thread should be stopped
66 | self.stopped = True
67 |
68 | # Define and parse input arguments
69 | parser = argparse.ArgumentParser()
70 | parser.add_argument('--modeldir', help='Folder the .tflite file is located in',
71 | required=True)
72 | parser.add_argument('--streamurl', help='The full URL of the video stream e.g. http://ipaddress:port/stream/video.mjpeg',
73 | required=True)
74 | parser.add_argument('--graph', help='Name of the .tflite file, if different than detect.tflite',
75 | default='detect.tflite')
76 | parser.add_argument('--labels', help='Name of the labelmap file, if different than labelmap.txt',
77 | default='labelmap.txt')
78 | parser.add_argument('--threshold', help='Minimum confidence threshold for displaying detected objects',
79 | default=0.5)
80 | parser.add_argument('--resolution', help='Desired webcam resolution in WxH. If the webcam does not support the resolution entered, errors may occur.',
81 | default='1280x720')
82 | parser.add_argument('--edgetpu', help='Use Coral Edge TPU Accelerator to speed up detection',
83 | action='store_true')
84 |
85 | args = parser.parse_args()
86 |
87 | MODEL_NAME = args.modeldir
88 | STREAM_URL = args.streamurl
89 | GRAPH_NAME = args.graph
90 | LABELMAP_NAME = args.labels
91 | min_conf_threshold = float(args.threshold)
92 | resW, resH = args.resolution.split('x')
93 | imW, imH = int(resW), int(resH)
94 | use_TPU = args.edgetpu
95 |
96 | # Import TensorFlow libraries
97 | # If tflite_runtime is installed, import interpreter from tflite_runtime, else import from regular tensorflow
98 | # If using Coral Edge TPU, import the load_delegate library
99 | pkg = importlib.util.find_spec('tflite_runtime')
100 | if pkg:
101 | from tflite_runtime.interpreter import Interpreter
102 | if use_TPU:
103 | from tflite_runtime.interpreter import load_delegate
104 | else:
105 | from tensorflow.lite.python.interpreter import Interpreter
106 | if use_TPU:
107 | from tensorflow.lite.python.interpreter import load_delegate
108 |
109 | # If using Edge TPU, assign filename for Edge TPU model
110 | if use_TPU:
111 | # If user has specified the name of the .tflite file, use that name, otherwise use default 'edgetpu.tflite'
112 | if (GRAPH_NAME == 'detect.tflite'):
113 | GRAPH_NAME = 'edgetpu.tflite'
114 |
115 | # Get path to current working directory
116 | CWD_PATH = os.getcwd()
117 |
118 | # Path to .tflite file, which contains the model that is used for object detection
119 | PATH_TO_CKPT = os.path.join(CWD_PATH,MODEL_NAME,GRAPH_NAME)
120 |
121 | # Path to label map file
122 | PATH_TO_LABELS = os.path.join(CWD_PATH,MODEL_NAME,LABELMAP_NAME)
123 |
124 | # Load the label map
125 | with open(PATH_TO_LABELS, 'r') as f:
126 | labels = [line.strip() for line in f.readlines()]
127 |
128 | # Have to do a weird fix for label map if using the COCO "starter model" from
129 | # https://www.tensorflow.org/lite/models/object_detection/overview
130 | # First label is '???', which has to be removed.
131 | if labels[0] == '???':
132 | del(labels[0])
133 |
134 | # Load the Tensorflow Lite model.
135 | # If using Edge TPU, use special load_delegate argument
136 | if use_TPU:
137 | interpreter = Interpreter(model_path=PATH_TO_CKPT,
138 | experimental_delegates=[load_delegate('libedgetpu.so.1.0')])
139 | print(PATH_TO_CKPT)
140 | else:
141 | interpreter = Interpreter(model_path=PATH_TO_CKPT)
142 |
143 | interpreter.allocate_tensors()
144 |
145 | # Get model details
146 | input_details = interpreter.get_input_details()
147 | output_details = interpreter.get_output_details()
148 | height = input_details[0]['shape'][1]
149 | width = input_details[0]['shape'][2]
150 |
151 | floating_model = (input_details[0]['dtype'] == np.float32)
152 |
153 | input_mean = 127.5
154 | input_std = 127.5
155 |
156 | # Check output layer name to determine if this model was created with TF2 or TF1,
157 | # because outputs are ordered differently for TF2 and TF1 models
158 | outname = output_details[0]['name']
159 |
160 | if ('StatefulPartitionedCall' in outname): # This is a TF2 model
161 | boxes_idx, classes_idx, scores_idx = 1, 3, 0
162 | else: # This is a TF1 model
163 | boxes_idx, classes_idx, scores_idx = 0, 1, 2
164 |
165 | # Initialize frame rate calculation
166 | frame_rate_calc = 1
167 | freq = cv2.getTickFrequency()
168 |
169 | # Initialize video stream
170 | videostream = VideoStream(resolution=(imW,imH),framerate=30).start()
171 | time.sleep(1)
172 |
173 | #for frame1 in camera.capture_continuous(rawCapture, format="bgr",use_video_port=True):
174 | while True:
175 |
176 | # Start timer (for calculating frame rate)
177 | t1 = cv2.getTickCount()
178 |
179 | # Grab frame from video stream
180 | frame1 = videostream.read()
181 |
182 | # Acquire frame and resize to expected shape [1xHxWx3]
183 | frame = frame1.copy()
184 | frame_rgb = cv2.cvtColor(frame, cv2.COLOR_BGR2RGB)
185 | frame_resized = cv2.resize(frame_rgb, (width, height))
186 | input_data = np.expand_dims(frame_resized, axis=0)
187 |
188 | # Normalize pixel values if using a floating model (i.e. if model is non-quantized)
189 | if floating_model:
190 | input_data = (np.float32(input_data) - input_mean) / input_std
191 |
192 | # Perform the actual detection by running the model with the image as input
193 | interpreter.set_tensor(input_details[0]['index'],input_data)
194 | interpreter.invoke()
195 |
196 | # Retrieve detection results
197 | boxes = interpreter.get_tensor(output_details[boxes_idx]['index'])[0] # Bounding box coordinates of detected objects
198 | classes = interpreter.get_tensor(output_details[classes_idx]['index'])[0] # Class index of detected objects
199 | scores = interpreter.get_tensor(output_details[scores_idx]['index'])[0] # Confidence of detected objects
200 |
201 | # Loop over all detections and draw detection box if confidence is above minimum threshold
202 | for i in range(len(scores)):
203 | if ((scores[i] > min_conf_threshold) and (scores[i] <= 1.0)):
204 |
205 | # Get bounding box coordinates and draw box
206 | # Interpreter can return coordinates that are outside of image dimensions, need to force them to be within image using max() and min()
207 | ymin = int(max(1,(boxes[i][0] * imH)))
208 | xmin = int(max(1,(boxes[i][1] * imW)))
209 | ymax = int(min(imH,(boxes[i][2] * imH)))
210 | xmax = int(min(imW,(boxes[i][3] * imW)))
211 |
212 | cv2.rectangle(frame, (xmin,ymin), (xmax,ymax), (10, 255, 0), 2)
213 |
214 | # Draw label
215 | object_name = labels[int(classes[i])] # Look up object name from "labels" array using class index
216 | label = '%s: %d%%' % (object_name, int(scores[i]*100)) # Example: 'person: 72%'
217 | labelSize, baseLine = cv2.getTextSize(label, cv2.FONT_HERSHEY_SIMPLEX, 0.7, 2) # Get font size
218 | label_ymin = max(ymin, labelSize[1] + 10) # Make sure not to draw label too close to top of window
219 | cv2.rectangle(frame, (xmin, label_ymin-labelSize[1]-10), (xmin+labelSize[0], label_ymin+baseLine-10), (255, 255, 255), cv2.FILLED) # Draw white box to put label text in
220 | cv2.putText(frame, label, (xmin, label_ymin-7), cv2.FONT_HERSHEY_SIMPLEX, 0.7, (0, 0, 0), 2) # Draw label text
221 |
222 | # Draw framerate in corner of frame
223 | cv2.putText(frame,'FPS: {0:.2f}'.format(frame_rate_calc),(30,50),cv2.FONT_HERSHEY_SIMPLEX,1,(255,255,0),2,cv2.LINE_AA)
224 |
225 | # All the results have been drawn on the frame, so it's time to display it.
226 | cv2.imshow('Object detector', frame)
227 |
228 | # Calculate framerate
229 | t2 = cv2.getTickCount()
230 | time1 = (t2-t1)/freq
231 | frame_rate_calc= 1/time1
232 |
233 | # Press 'q' to quit
234 | if cv2.waitKey(1) == ord('q'):
235 | break
236 |
237 | # Clean up
238 | cv2.destroyAllWindows()
239 | videostream.stop()
240 |
--------------------------------------------------------------------------------
/TFLite_detection_video.py:
--------------------------------------------------------------------------------
1 | ######## Webcam Object Detection Using Tensorflow-trained Classifier #########
2 | #
3 | # Author: Evan Juras
4 | # Date: 10/2/19
5 | # Description:
6 | # This program uses a TensorFlow Lite model to perform object detection on a
7 | # video. It draws boxes and scores around the objects of interest in each frame
8 | # from the video.
9 | #
10 | # This code is based off the TensorFlow Lite image classification example at:
11 | # https://github.com/tensorflow/tensorflow/blob/master/tensorflow/lite/examples/python/label_image.py
12 | #
13 | # I added my own method of drawing boxes and labels using OpenCV.
14 |
15 | # Import packages
16 | import os
17 | import argparse
18 | import cv2
19 | import numpy as np
20 | import sys
21 | import importlib.util
22 |
23 |
24 |
25 | # Define and parse input arguments
26 | parser = argparse.ArgumentParser()
27 | parser.add_argument('--modeldir', help='Folder the .tflite file is located in',
28 | required=True)
29 | parser.add_argument('--graph', help='Name of the .tflite file, if different than detect.tflite',
30 | default='detect.tflite')
31 | parser.add_argument('--labels', help='Name of the labelmap file, if different than labelmap.txt',
32 | default='labelmap.txt')
33 | parser.add_argument('--threshold', help='Minimum confidence threshold for displaying detected objects',
34 | default=0.5)
35 | parser.add_argument('--video', help='Name of the video file',
36 | default='test.mp4')
37 | parser.add_argument('--edgetpu', help='Use Coral Edge TPU Accelerator to speed up detection',
38 | action='store_true')
39 |
40 | args = parser.parse_args()
41 |
42 | MODEL_NAME = args.modeldir
43 | GRAPH_NAME = args.graph
44 | LABELMAP_NAME = args.labels
45 | VIDEO_NAME = args.video
46 | min_conf_threshold = float(args.threshold)
47 | use_TPU = args.edgetpu
48 |
49 | # Import TensorFlow libraries
50 | # If tflite_runtime is installed, import interpreter from tflite_runtime, else import from regular tensorflow
51 | # If using Coral Edge TPU, import the load_delegate library
52 | pkg = importlib.util.find_spec('tflite_runtime')
53 | if pkg:
54 | from tflite_runtime.interpreter import Interpreter
55 | if use_TPU:
56 | from tflite_runtime.interpreter import load_delegate
57 | else:
58 | from tensorflow.lite.python.interpreter import Interpreter
59 | if use_TPU:
60 | from tensorflow.lite.python.interpreter import load_delegate
61 |
62 | # If using Edge TPU, assign filename for Edge TPU model
63 | if use_TPU:
64 | # If user has specified the name of the .tflite file, use that name, otherwise use default 'edgetpu.tflite'
65 | if (GRAPH_NAME == 'detect.tflite'):
66 | GRAPH_NAME = 'edgetpu.tflite'
67 |
68 | # Get path to current working directory
69 | CWD_PATH = os.getcwd()
70 |
71 | # Path to video file
72 | VIDEO_PATH = os.path.join(CWD_PATH,VIDEO_NAME)
73 |
74 | # Path to .tflite file, which contains the model that is used for object detection
75 | PATH_TO_CKPT = os.path.join(CWD_PATH,MODEL_NAME,GRAPH_NAME)
76 |
77 | # Path to label map file
78 | PATH_TO_LABELS = os.path.join(CWD_PATH,MODEL_NAME,LABELMAP_NAME)
79 |
80 | # Load the label map
81 | with open(PATH_TO_LABELS, 'r') as f:
82 | labels = [line.strip() for line in f.readlines()]
83 |
84 | # Have to do a weird fix for label map if using the COCO "starter model" from
85 | # https://www.tensorflow.org/lite/models/object_detection/overview
86 | # First label is '???', which has to be removed.
87 | if labels[0] == '???':
88 | del(labels[0])
89 |
90 | # Load the Tensorflow Lite model.
91 | # If using Edge TPU, use special load_delegate argument
92 | if use_TPU:
93 | interpreter = Interpreter(model_path=PATH_TO_CKPT,
94 | experimental_delegates=[load_delegate('libedgetpu.so.1.0')])
95 | print(PATH_TO_CKPT)
96 | else:
97 | interpreter = Interpreter(model_path=PATH_TO_CKPT)
98 |
99 | interpreter.allocate_tensors()
100 |
101 | # Get model details
102 | input_details = interpreter.get_input_details()
103 | output_details = interpreter.get_output_details()
104 | height = input_details[0]['shape'][1]
105 | width = input_details[0]['shape'][2]
106 |
107 | floating_model = (input_details[0]['dtype'] == np.float32)
108 |
109 | input_mean = 127.5
110 | input_std = 127.5
111 |
112 | # Check output layer name to determine if this model was created with TF2 or TF1,
113 | # because outputs are ordered differently for TF2 and TF1 models
114 | outname = output_details[0]['name']
115 |
116 | if ('StatefulPartitionedCall' in outname): # This is a TF2 model
117 | boxes_idx, classes_idx, scores_idx = 1, 3, 0
118 | else: # This is a TF1 model
119 | boxes_idx, classes_idx, scores_idx = 0, 1, 2
120 |
121 | # Open video file
122 | video = cv2.VideoCapture(VIDEO_PATH)
123 | imW = video.get(cv2.CAP_PROP_FRAME_WIDTH)
124 | imH = video.get(cv2.CAP_PROP_FRAME_HEIGHT)
125 |
126 | while(video.isOpened()):
127 |
128 | # Acquire frame and resize to expected shape [1xHxWx3]
129 | ret, frame = video.read()
130 | if not ret:
131 | print('Reached the end of the video!')
132 | break
133 | frame_rgb = cv2.cvtColor(frame, cv2.COLOR_BGR2RGB)
134 | frame_resized = cv2.resize(frame_rgb, (width, height))
135 | input_data = np.expand_dims(frame_resized, axis=0)
136 |
137 | # Normalize pixel values if using a floating model (i.e. if model is non-quantized)
138 | if floating_model:
139 | input_data = (np.float32(input_data) - input_mean) / input_std
140 |
141 | # Perform the actual detection by running the model with the image as input
142 | interpreter.set_tensor(input_details[0]['index'],input_data)
143 | interpreter.invoke()
144 |
145 | # Retrieve detection results
146 | boxes = interpreter.get_tensor(output_details[boxes_idx]['index'])[0] # Bounding box coordinates of detected objects
147 | classes = interpreter.get_tensor(output_details[classes_idx]['index'])[0] # Class index of detected objects
148 | scores = interpreter.get_tensor(output_details[scores_idx]['index'])[0] # Confidence of detected objects
149 |
150 | # Loop over all detections and draw detection box if confidence is above minimum threshold
151 | for i in range(len(scores)):
152 | if ((scores[i] > min_conf_threshold) and (scores[i] <= 1.0)):
153 |
154 | # Get bounding box coordinates and draw box
155 | # Interpreter can return coordinates that are outside of image dimensions, need to force them to be within image using max() and min()
156 | ymin = int(max(1,(boxes[i][0] * imH)))
157 | xmin = int(max(1,(boxes[i][1] * imW)))
158 | ymax = int(min(imH,(boxes[i][2] * imH)))
159 | xmax = int(min(imW,(boxes[i][3] * imW)))
160 |
161 | cv2.rectangle(frame, (xmin,ymin), (xmax,ymax), (10, 255, 0), 4)
162 |
163 | # Draw label
164 | object_name = labels[int(classes[i])] # Look up object name from "labels" array using class index
165 | label = '%s: %d%%' % (object_name, int(scores[i]*100)) # Example: 'person: 72%'
166 | labelSize, baseLine = cv2.getTextSize(label, cv2.FONT_HERSHEY_SIMPLEX, 0.7, 2) # Get font size
167 | label_ymin = max(ymin, labelSize[1] + 10) # Make sure not to draw label too close to top of window
168 | cv2.rectangle(frame, (xmin, label_ymin-labelSize[1]-10), (xmin+labelSize[0], label_ymin+baseLine-10), (255, 255, 255), cv2.FILLED) # Draw white box to put label text in
169 | cv2.putText(frame, label, (xmin, label_ymin-7), cv2.FONT_HERSHEY_SIMPLEX, 0.7, (0, 0, 0), 2) # Draw label text
170 |
171 | # All the results have been drawn on the frame, so it's time to display it.
172 | cv2.imshow('Object detector', frame)
173 |
174 | # Press 'q' to quit
175 | if cv2.waitKey(1) == ord('q'):
176 | break
177 |
178 | # Clean up
179 | video.release()
180 | cv2.destroyAllWindows()
181 |
--------------------------------------------------------------------------------
/TFLite_detection_webcam.py:
--------------------------------------------------------------------------------
1 | ######## Webcam Object Detection Using Tensorflow-trained Classifier #########
2 | #
3 | # Author: Evan Juras
4 | # Date: 10/27/19
5 | # Description:
6 | # This program uses a TensorFlow Lite model to perform object detection on a live webcam
7 | # feed. It draws boxes and scores around the objects of interest in each frame from the
8 | # webcam. To improve FPS, the webcam object runs in a separate thread from the main program.
9 | # This script will work with either a Picamera or regular USB webcam.
10 | #
11 | # This code is based off the TensorFlow Lite image classification example at:
12 | # https://github.com/tensorflow/tensorflow/blob/master/tensorflow/lite/examples/python/label_image.py
13 | #
14 | # I added my own method of drawing boxes and labels using OpenCV.
15 |
16 | # Import packages
17 | import os
18 | import argparse
19 | import cv2
20 | import numpy as np
21 | import sys
22 | import time
23 | from threading import Thread
24 | import importlib.util
25 |
26 | # Define VideoStream class to handle streaming of video from webcam in separate processing thread
27 | # Source - Adrian Rosebrock, PyImageSearch: https://www.pyimagesearch.com/2015/12/28/increasing-raspberry-pi-fps-with-python-and-opencv/
28 | class VideoStream:
29 | """Camera object that controls video streaming from the Picamera"""
30 | def __init__(self,resolution=(640,480),framerate=30):
31 | # Initialize the PiCamera and the camera image stream
32 | self.stream = cv2.VideoCapture(0)
33 | ret = self.stream.set(cv2.CAP_PROP_FOURCC, cv2.VideoWriter_fourcc(*'MJPG'))
34 | ret = self.stream.set(3,resolution[0])
35 | ret = self.stream.set(4,resolution[1])
36 |
37 | # Read first frame from the stream
38 | (self.grabbed, self.frame) = self.stream.read()
39 |
40 | # Variable to control when the camera is stopped
41 | self.stopped = False
42 |
43 | def start(self):
44 | # Start the thread that reads frames from the video stream
45 | Thread(target=self.update,args=()).start()
46 | return self
47 |
48 | def update(self):
49 | # Keep looping indefinitely until the thread is stopped
50 | while True:
51 | # If the camera is stopped, stop the thread
52 | if self.stopped:
53 | # Close camera resources
54 | self.stream.release()
55 | return
56 |
57 | # Otherwise, grab the next frame from the stream
58 | (self.grabbed, self.frame) = self.stream.read()
59 |
60 | def read(self):
61 | # Return the most recent frame
62 | return self.frame
63 |
64 | def stop(self):
65 | # Indicate that the camera and thread should be stopped
66 | self.stopped = True
67 |
68 | # Define and parse input arguments
69 | parser = argparse.ArgumentParser()
70 | parser.add_argument('--modeldir', help='Folder the .tflite file is located in',
71 | required=True)
72 | parser.add_argument('--graph', help='Name of the .tflite file, if different than detect.tflite',
73 | default='detect.tflite')
74 | parser.add_argument('--labels', help='Name of the labelmap file, if different than labelmap.txt',
75 | default='labelmap.txt')
76 | parser.add_argument('--threshold', help='Minimum confidence threshold for displaying detected objects',
77 | default=0.5)
78 | parser.add_argument('--resolution', help='Desired webcam resolution in WxH. If the webcam does not support the resolution entered, errors may occur.',
79 | default='1280x720')
80 | parser.add_argument('--edgetpu', help='Use Coral Edge TPU Accelerator to speed up detection',
81 | action='store_true')
82 |
83 | args = parser.parse_args()
84 |
85 | MODEL_NAME = args.modeldir
86 | GRAPH_NAME = args.graph
87 | LABELMAP_NAME = args.labels
88 | min_conf_threshold = float(args.threshold)
89 | resW, resH = args.resolution.split('x')
90 | imW, imH = int(resW), int(resH)
91 | use_TPU = args.edgetpu
92 |
93 | # Import TensorFlow libraries
94 | # If tflite_runtime is installed, import interpreter from tflite_runtime, else import from regular tensorflow
95 | # If using Coral Edge TPU, import the load_delegate library
96 | pkg = importlib.util.find_spec('tflite_runtime')
97 | if pkg:
98 | from tflite_runtime.interpreter import Interpreter
99 | if use_TPU:
100 | from tflite_runtime.interpreter import load_delegate
101 | else:
102 | from tensorflow.lite.python.interpreter import Interpreter
103 | if use_TPU:
104 | from tensorflow.lite.python.interpreter import load_delegate
105 |
106 | # If using Edge TPU, assign filename for Edge TPU model
107 | if use_TPU:
108 | # If user has specified the name of the .tflite file, use that name, otherwise use default 'edgetpu.tflite'
109 | if (GRAPH_NAME == 'detect.tflite'):
110 | GRAPH_NAME = 'edgetpu.tflite'
111 |
112 | # Get path to current working directory
113 | CWD_PATH = os.getcwd()
114 |
115 | # Path to .tflite file, which contains the model that is used for object detection
116 | PATH_TO_CKPT = os.path.join(CWD_PATH,MODEL_NAME,GRAPH_NAME)
117 |
118 | # Path to label map file
119 | PATH_TO_LABELS = os.path.join(CWD_PATH,MODEL_NAME,LABELMAP_NAME)
120 |
121 | # Load the label map
122 | with open(PATH_TO_LABELS, 'r') as f:
123 | labels = [line.strip() for line in f.readlines()]
124 |
125 | # Have to do a weird fix for label map if using the COCO "starter model" from
126 | # https://www.tensorflow.org/lite/models/object_detection/overview
127 | # First label is '???', which has to be removed.
128 | if labels[0] == '???':
129 | del(labels[0])
130 |
131 | # Load the Tensorflow Lite model.
132 | # If using Edge TPU, use special load_delegate argument
133 | if use_TPU:
134 | interpreter = Interpreter(model_path=PATH_TO_CKPT,
135 | experimental_delegates=[load_delegate('libedgetpu.so.1.0')])
136 | print(PATH_TO_CKPT)
137 | else:
138 | interpreter = Interpreter(model_path=PATH_TO_CKPT)
139 |
140 | interpreter.allocate_tensors()
141 |
142 | # Get model details
143 | input_details = interpreter.get_input_details()
144 | output_details = interpreter.get_output_details()
145 | height = input_details[0]['shape'][1]
146 | width = input_details[0]['shape'][2]
147 |
148 | floating_model = (input_details[0]['dtype'] == np.float32)
149 |
150 | input_mean = 127.5
151 | input_std = 127.5
152 |
153 | # Check output layer name to determine if this model was created with TF2 or TF1,
154 | # because outputs are ordered differently for TF2 and TF1 models
155 | outname = output_details[0]['name']
156 |
157 | if ('StatefulPartitionedCall' in outname): # This is a TF2 model
158 | boxes_idx, classes_idx, scores_idx = 1, 3, 0
159 | else: # This is a TF1 model
160 | boxes_idx, classes_idx, scores_idx = 0, 1, 2
161 |
162 | # Initialize frame rate calculation
163 | frame_rate_calc = 1
164 | freq = cv2.getTickFrequency()
165 |
166 | # Initialize video stream
167 | videostream = VideoStream(resolution=(imW,imH),framerate=30).start()
168 | time.sleep(1)
169 |
170 | #for frame1 in camera.capture_continuous(rawCapture, format="bgr",use_video_port=True):
171 | while True:
172 |
173 | # Start timer (for calculating frame rate)
174 | t1 = cv2.getTickCount()
175 |
176 | # Grab frame from video stream
177 | frame1 = videostream.read()
178 |
179 | # Acquire frame and resize to expected shape [1xHxWx3]
180 | frame = frame1.copy()
181 | frame_rgb = cv2.cvtColor(frame, cv2.COLOR_BGR2RGB)
182 | frame_resized = cv2.resize(frame_rgb, (width, height))
183 | input_data = np.expand_dims(frame_resized, axis=0)
184 |
185 | # Normalize pixel values if using a floating model (i.e. if model is non-quantized)
186 | if floating_model:
187 | input_data = (np.float32(input_data) - input_mean) / input_std
188 |
189 | # Perform the actual detection by running the model with the image as input
190 | interpreter.set_tensor(input_details[0]['index'],input_data)
191 | interpreter.invoke()
192 |
193 | # Retrieve detection results
194 | boxes = interpreter.get_tensor(output_details[boxes_idx]['index'])[0] # Bounding box coordinates of detected objects
195 | classes = interpreter.get_tensor(output_details[classes_idx]['index'])[0] # Class index of detected objects
196 | scores = interpreter.get_tensor(output_details[scores_idx]['index'])[0] # Confidence of detected objects
197 |
198 | # Loop over all detections and draw detection box if confidence is above minimum threshold
199 | for i in range(len(scores)):
200 | if ((scores[i] > min_conf_threshold) and (scores[i] <= 1.0)):
201 |
202 | # Get bounding box coordinates and draw box
203 | # Interpreter can return coordinates that are outside of image dimensions, need to force them to be within image using max() and min()
204 | ymin = int(max(1,(boxes[i][0] * imH)))
205 | xmin = int(max(1,(boxes[i][1] * imW)))
206 | ymax = int(min(imH,(boxes[i][2] * imH)))
207 | xmax = int(min(imW,(boxes[i][3] * imW)))
208 |
209 | cv2.rectangle(frame, (xmin,ymin), (xmax,ymax), (10, 255, 0), 2)
210 |
211 | # Draw label
212 | object_name = labels[int(classes[i])] # Look up object name from "labels" array using class index
213 | label = '%s: %d%%' % (object_name, int(scores[i]*100)) # Example: 'person: 72%'
214 | labelSize, baseLine = cv2.getTextSize(label, cv2.FONT_HERSHEY_SIMPLEX, 0.7, 2) # Get font size
215 | label_ymin = max(ymin, labelSize[1] + 10) # Make sure not to draw label too close to top of window
216 | cv2.rectangle(frame, (xmin, label_ymin-labelSize[1]-10), (xmin+labelSize[0], label_ymin+baseLine-10), (255, 255, 255), cv2.FILLED) # Draw white box to put label text in
217 | cv2.putText(frame, label, (xmin, label_ymin-7), cv2.FONT_HERSHEY_SIMPLEX, 0.7, (0, 0, 0), 2) # Draw label text
218 |
219 | # Draw framerate in corner of frame
220 | cv2.putText(frame,'FPS: {0:.2f}'.format(frame_rate_calc),(30,50),cv2.FONT_HERSHEY_SIMPLEX,1,(255,255,0),2,cv2.LINE_AA)
221 |
222 | # All the results have been drawn on the frame, so it's time to display it.
223 | cv2.imshow('Object detector', frame)
224 |
225 | # Calculate framerate
226 | t2 = cv2.getTickCount()
227 | time1 = (t2-t1)/freq
228 | frame_rate_calc= 1/time1
229 |
230 | # Press 'q' to quit
231 | if cv2.waitKey(1) == ord('q'):
232 | break
233 |
234 | # Clean up
235 | cv2.destroyAllWindows()
236 | videostream.stop()
237 |
--------------------------------------------------------------------------------
/Train_TFLite1_Object_Detection_Model.ipynb:
--------------------------------------------------------------------------------
1 | {
2 | "cells": [
3 | {
4 | "cell_type": "markdown",
5 | "metadata": {
6 | "id": "view-in-github",
7 | "colab_type": "text"
8 | },
9 | "source": [
10 | " "
11 | ]
12 | },
13 | {
14 | "cell_type": "markdown",
15 | "metadata": {
16 | "id": "fF8ysCfYKgTP"
17 | },
18 | "source": [
19 | "# TensorFlow Lite v1 Object Detection API in Colab\n",
20 | "**Author:** Evan Juras, [EJ Technology Consultants](https://ejtech.io)\n",
21 | "\n",
22 | "**Last updated:** 10/12/22\n",
23 | "\n",
24 | "**GitHub:** [TensorFlow Lite Object Detection](https://github.com/EdjeElectronics/TensorFlow-Lite-Object-Detection-on-Android-and-Raspberry-Pi)\n",
25 | "\n",
26 | "\n",
27 | "# Introduction\n",
28 | "\n",
29 | "This notebook implements [The TensorFlow Object Detection Library](https://github.com/tensorflow/models/tree/master/research/object_detection) for training an SSD-MobileNet model using your own dataset. Note that this notebook uses TensorFlow 1 rather than TensorFlow 2, because TensorFlow 1 works better for quantizing SSD-MobileNet models. If you want to use TensorFlow 2, [clink this link to go to the TensorFlow 2 version of this notebook](https://colab.research.google.com/github/EdjeElectronics/TensorFlow-Lite-Object-Detection-on-Android-and-Raspberry-Pi/blob/master/Train_TFLite2_Object_Detction_Model.ipynb).\n",
30 | "\n",
31 | "*Note: This notebook is not maintained or updated as frequently as the TF2 notebook.*\n",
32 | "\n",
33 | "I made a YouTube video that walks through the TensorFlow 2 notebook step by step, and the process is very similar for this TensorFlow 1 notebook. Please take a look at the video if you are confused about any steps in this notebook.\n",
34 | "\n",
35 | "*Link to video to be added here*\n",
36 | "\n",
37 | "###Working with Colab\n",
38 | "Simply click the play button on sections of code to execute them. As the code executes, any outputs will be displayed in a block beneath the code. Once they're done executing, a green checkmark will appear next to the section to indicate it's finished running."
39 | ]
40 | },
41 | {
42 | "cell_type": "markdown",
43 | "metadata": {
44 | "id": "l7EOtpvlLeS0"
45 | },
46 | "source": [
47 | "# 1. Install TensorFlow Object Detection Dependencies\n",
48 | "First, we'll install the TensorFlow Object Detection API in this Google Colab instance. This requires cloning the [TensorFlow models repository](https://github.com/tensorflow/models) and running a couple installation commands. Click the play button to run the following sections of code.\n",
49 | "\n"
50 | ]
51 | },
52 | {
53 | "cell_type": "code",
54 | "execution_count": null,
55 | "metadata": {
56 | "id": "QOFtpDlci50l"
57 | },
58 | "outputs": [],
59 | "source": [
60 | "# Install CUDA 10.0 (needed for TF v1.15.3)\n",
61 | "!sudo apt-get update\n",
62 | "!sudo apt-get install cuda-10.0"
63 | ]
64 | },
65 | {
66 | "cell_type": "code",
67 | "execution_count": null,
68 | "metadata": {
69 | "id": "KeoP1s8gi8tL"
70 | },
71 | "outputs": [],
72 | "source": [
73 | "# Install cuDNN 7.6.0 (needed for TF v1.15.3)\n",
74 | "# Download and extract cuDNN files\n",
75 | "!wget https://www.dropbox.com/s/k6xqrje655q4aty/cudnn-10.0-linux-x64-v7.6.0.64.tgz\n",
76 | "!tar -xf cudnn-10.0-linux-x64-v7.6.0.64.tgz\n",
77 | "\n",
78 | "# Copy cuDNN libraries to appropriate folders\n",
79 | "!sudo cp cuda/include/cudnn*.h /usr/local/cuda-10.0/include \n",
80 | "!sudo cp -P cuda/lib64/libcudnn* /usr/local/cuda-10.0/lib64 \n",
81 | "!sudo chmod a+r /usr/local/cuda-10.0/include/cudnn*.h /usr/local/cuda-10.0/lib64/libcudnn*\n",
82 | "!sudo cp -P cuda/lib64/libcudnn* /usr/lib64-nvidia"
83 | ]
84 | },
85 | {
86 | "cell_type": "code",
87 | "execution_count": null,
88 | "metadata": {
89 | "id": "ypWGYdPlLRUN"
90 | },
91 | "outputs": [],
92 | "source": [
93 | "# Clone the tensorflow models repository from GitHub\n",
94 | "!git clone --depth 1 https://github.com/tensorflow/models"
95 | ]
96 | },
97 | {
98 | "cell_type": "code",
99 | "execution_count": null,
100 | "metadata": {
101 | "id": "6QPmVBSlLTzM"
102 | },
103 | "outputs": [],
104 | "source": [
105 | "# Install the Object Detection API\n",
106 | "%%bash\n",
107 | "cd models/research/\n",
108 | "protoc object_detection/protos/*.proto --python_out=.\n",
109 | "cp object_detection/packages/tf1/setup.py .\n",
110 | "python -m pip install --use-feature=2020-resolver ."
111 | ]
112 | },
113 | {
114 | "cell_type": "markdown",
115 | "metadata": {
116 | "id": "kH3fwht2w17a"
117 | },
118 | "source": [
119 | "If you get any errors running the following code block, you can ignore them!"
120 | ]
121 | },
122 | {
123 | "cell_type": "code",
124 | "execution_count": null,
125 | "metadata": {
126 | "id": "kDT0ctlBlXTw"
127 | },
128 | "outputs": [],
129 | "source": [
130 | "# Install TensorFlow\n",
131 | "!pip install tensorflow-gpu==1.15.3\n",
132 | "\n",
133 | "# A couple other packages have to be downgraded to work with the TF1 API\n",
134 | "!pip install numpy==1.17.4\n",
135 | "!pip install pycocotools==2.0.0"
136 | ]
137 | },
138 | {
139 | "cell_type": "code",
140 | "execution_count": null,
141 | "metadata": {
142 | "id": "wh_HPMOqWH9z"
143 | },
144 | "outputs": [],
145 | "source": [
146 | "# Run Model Bulider Test file, just to verify everything's working properly\n",
147 | "!python /content/models/research/object_detection/builders/model_builder_tf1_test.py\n"
148 | ]
149 | },
150 | {
151 | "cell_type": "markdown",
152 | "metadata": {
153 | "id": "IPbU4I7aL9Fl"
154 | },
155 | "source": [
156 | "# 2. Upload Image Dataset and Prepare Training Data\n",
157 | "\n",
158 | "In this section, we'll upload our training images and use TFRecord generation scripts to prepare the training data for TensorFlow. we'll upload our images, split them into train, validation, and test folders, and then run scripts for creating TFRecords from our data.\n",
159 | "\n",
160 | "First, on your local PC, zip all your training images and XML files into a single folder called \"images.zip\". The files should be directly inside the zip folder (wihout any additional nested folders) as shown below:\n",
161 | "```\n",
162 | "images.zip\n",
163 | "-- img1.jpg\n",
164 | "-- img1.xml\n",
165 | "-- img2.jpg\n",
166 | "-- img2.xml\n",
167 | "...\n",
168 | "```\n",
169 | "There are two options for moving the image files to this Colab instance: you can upload them directly, or you can copy them from your Google Drive. If you have a slow internet connection or more than 50MB worth of images, I recommend using Google Drive. Otherwise, you can just upload them through Colab. \n",
170 | "\n",
171 | "#### Option 1. Upload through Google Colab\n",
172 | "Upload the \"images.zip\" file to the Google Colab instance by clicking the \"Files\" icon on the left hand side of the browser, and then the \"Upload to session storage\" icon. Select the zip folder to upload it.\n",
173 | "\n",
174 | "\n",
175 | "\n",
176 | "Once it's uploaded, we'll run a few commands to unzip it and set up our image directories. These directories are created in the /content folder in this instance's filesystem. You can browse the filesystem by clicking the \"Files\" icon on the left.\n"
177 | ]
178 | },
179 | {
180 | "cell_type": "markdown",
181 | "metadata": {
182 | "id": "Wpi58u0-V_jN"
183 | },
184 | "source": [
185 | "#### Option 2. Copy from Google Drive\n",
186 | "You can also upload your images to your personal Google Drive, mount the drive on this Colab session, and copy them over to the Colab filesystem. This option works well if you want to upload the images beforehand so you don't have to wait for them to upload each time you restart this Colab.\n",
187 | "\n",
188 | "First, upload the \"images.zip\" file to your Google Drive, and make note of the folder you uploaded them to. Replace `MyDrive/path/to/images.zip` with the path to your zip file. (For example, I uploaded the zip file to folder called \"cat-toys1\", so I would use `MyDrive/cat-toys1/images.zip` for the path). Then, run the following block of code to mount your Google Drive to this Colab session and copy the folder to this filesystem."
189 | ]
190 | },
191 | {
192 | "cell_type": "code",
193 | "execution_count": null,
194 | "metadata": {
195 | "id": "tLgAPsQsfTLs"
196 | },
197 | "outputs": [],
198 | "source": [
199 | "from google.colab import drive\n",
200 | "drive.mount('/content/gdrive')\n",
201 | "\n",
202 | "!cp /content/gdrive/MyDrive/path/to/images.zip /content"
203 | ]
204 | },
205 | {
206 | "cell_type": "markdown",
207 | "metadata": {
208 | "id": "DLIu4GdjxgWu"
209 | },
210 | "source": [
211 | "#### Option 3. Use my bird, squirrel, raccoon dataset\n",
212 | "I've uploaded a dataset containing 800 labeled images of birds, squirrels, and raccoons. You can use this dataset if you just want to work through the process of training a TFLite model on custom data. Run the following code block to download the dataset."
213 | ]
214 | },
215 | {
216 | "cell_type": "code",
217 | "execution_count": null,
218 | "metadata": {
219 | "id": "bH6huqCBxhFb"
220 | },
221 | "outputs": [],
222 | "source": [
223 | "!wget -O /content/images.zip https://www.dropbox.com/s/en33x280e4z3wbt/BSR2.zip?dl=0"
224 | ]
225 | },
226 | {
227 | "cell_type": "markdown",
228 | "metadata": {
229 | "id": "U-eXEQICx2ug"
230 | },
231 | "source": [
232 | "## Split images into train, validation, and test folders\n",
233 | "At this point, whether you used Option 1, 2, or 3, you should be able to click the folder icon on the left and see your \"images.zip\" file in the list of files. Now that the dataset is uploaded, let's unzip it and create some folders to hold the images. These directories are created in the /content folder in this instance's filesystem. You can browse the filesystem by clicking the \"Files\" icon on the left."
234 | ]
235 | },
236 | {
237 | "cell_type": "code",
238 | "execution_count": null,
239 | "metadata": {
240 | "id": "3n-E68MJbU2I"
241 | },
242 | "outputs": [],
243 | "source": [
244 | "!mkdir /content/images\n",
245 | "!unzip -q images.zip -d /content/images/all\n",
246 | "!mkdir /content/images/train; mkdir /content/images/validation; mkdir /content/images/test\n"
247 | ]
248 | },
249 | {
250 | "cell_type": "markdown",
251 | "metadata": {
252 | "id": "n-6RIcrwbQMh"
253 | },
254 | "source": [
255 | "Next, we'll split the images into train, validation, and test sets. Here's what each set is used for:\n",
256 | "\n",
257 | "\n",
258 | "* **Train**: These are the actual images used to train the model. In each step of training, a batch of images from the \"train\" set is passed into the neural network. The network predicts classes and locations of objects in the images. The training algorithm calculates the loss (i.e. how \"wrong\" the predictions were) and adjusts the network weights through backpropagation.\n",
259 | "\n",
260 | "\n",
261 | "* **Validation**: Images from the \"validation\" set can be used by the training algorithm to check the progress of training and adjust hyperparameters (like learning rate). Unlike \"train\" images, these images are only used periodically during training (i.e. once every certain number of training steps).\n",
262 | "\n",
263 | "\n",
264 | "* **Test**: These images are never seen by the neural network during training. They are intended to be used by a human to perform final testing of the model to check how accurate the model is.\n",
265 | "\n",
266 | "I wrote a Python script to randomly move 80% of the images to the \"train\" folder, 10% to the \"validation\" folder, and 10% to the \"test\" folder. Click play on the following block to download the script and execute it."
267 | ]
268 | },
269 | {
270 | "cell_type": "code",
271 | "execution_count": null,
272 | "metadata": {
273 | "id": "_8V38Uk2yBUZ"
274 | },
275 | "outputs": [],
276 | "source": [
277 | "!wget https://raw.githubusercontent.com/EdjeElectronics/TensorFlow-Lite-Object-Detection-on-Android-and-Raspberry-Pi/master/util_scripts/train_val_test_split.py\n",
278 | "!python train_val_test_split.py"
279 | ]
280 | },
281 | {
282 | "cell_type": "markdown",
283 | "metadata": {
284 | "id": "p--K1PJXEgNo"
285 | },
286 | "source": [
287 | "## Create TFRecords\n",
288 | "Finally, we need to convert the images into a data file format called TFRecords, which are used by TensorFlow for training. We'll use Python scripts to automatically convert the data into TFRecord format. Before running them, we need to define a labelmap for our classes. \n",
289 | "\n",
290 | "The code section below will create a \"labelmap.txt\" file that contains a list of classes. Replace the `class1`, `class2`, `class3` text with your own classes (for example, `bird`, `squirrel`, `raccoon`), adding a new line for each class. Then, click play to execute the code."
291 | ]
292 | },
293 | {
294 | "cell_type": "code",
295 | "execution_count": null,
296 | "metadata": {
297 | "id": "_DE_r4MKY7ln"
298 | },
299 | "outputs": [],
300 | "source": [
301 | "### This creates a a \"labelmap.txt\" file with a list of classes the object detection model will detect.\n",
302 | "%%bash\n",
303 | "cat <> /content/labelmap.txt\n",
304 | "class1\n",
305 | "class2\n",
306 | "class3\n",
307 | "EOF"
308 | ]
309 | },
310 | {
311 | "cell_type": "markdown",
312 | "metadata": {
313 | "id": "5pa2VYhTIT1l"
314 | },
315 | "source": [
316 | "Download and run the data conversion scripts by clicking play on the following two sections of code. They will create TFRecord files for the train and validation datasets, as well as a `labelmap.pbtxt` file which contains the labelmap in a different format."
317 | ]
318 | },
319 | {
320 | "cell_type": "code",
321 | "execution_count": null,
322 | "metadata": {
323 | "id": "v3KHhgrpHved"
324 | },
325 | "outputs": [],
326 | "source": [
327 | "# Download data conversion scripts\n",
328 | "! wget https://raw.githubusercontent.com/EdjeElectronics/TensorFlow-Lite-Object-Detection-on-Android-and-Raspberry-Pi/master/util_scripts/create_csv.py\n",
329 | "! wget https://raw.githubusercontent.com/EdjeElectronics/TensorFlow-Lite-Object-Detection-on-Android-and-Raspberry-Pi/master/util_scripts/create_tfrecord.py"
330 | ]
331 | },
332 | {
333 | "cell_type": "code",
334 | "execution_count": null,
335 | "metadata": {
336 | "id": "5tdDbTmHYwu-"
337 | },
338 | "outputs": [],
339 | "source": [
340 | "# Create CSV data files and TFRecord files\n",
341 | "!python3 create_csv.py\n",
342 | "!python3 create_tfrecord.py --csv_input=images/train_labels.csv --labelmap=labelmap.txt --image_dir=images/train --output_path=train.tfrecord\n",
343 | "!python3 create_tfrecord.py --csv_input=images/validation_labels.csv --labelmap=labelmap.txt --image_dir=images/validation --output_path=val.tfrecord"
344 | ]
345 | },
346 | {
347 | "cell_type": "markdown",
348 | "metadata": {
349 | "id": "1XcSBULRzNZ_"
350 | },
351 | "source": [
352 | "We'll store the locations of the TFRecord and labelmap files as variables so we can reference them later in this Colab session."
353 | ]
354 | },
355 | {
356 | "cell_type": "code",
357 | "execution_count": null,
358 | "metadata": {
359 | "id": "YUd2wtfrqedy"
360 | },
361 | "outputs": [],
362 | "source": [
363 | "train_record_fname = '/content/train.tfrecord'\n",
364 | "val_record_fname = '/content/val.tfrecord'\n",
365 | "label_map_pbtxt_fname = '/content/labelmap.pbtxt'"
366 | ]
367 | },
368 | {
369 | "cell_type": "markdown",
370 | "metadata": {
371 | "id": "I2MAcgJ53STW"
372 | },
373 | "source": [
374 | "# 3. Set Up Training Configuration \n",
375 | "\n",
376 | "In this section, we'll set up an SSD-MobileNet model training configuration. We'll specifiy which pretrained TensorFlow model we want to use from the [TensorFlow 1 Object Detection Model Zoo](https://github.com/tensorflow/models/blob/master/research/object_detection/g3doc/tf1_detection_zoo.md). Each model also comes with a configuration file that points to file locations, sets training parameters (such as learning rate and total number of training steps), and more. We'll modify the configuration file for our custom training job.\n",
377 | "\n",
378 | "The first section of code lists out some models availabe in the TF1 Model Zoo and defines some filenames that will be used later to download the model and config file. This makes it easy to manage which model you're using and to add other models to the list later. \n",
379 | "\n",
380 | "Set the \"chosen_model\" variable to match the name of the model you'd like to train with. It's currently set to use the \"ssd-mobilenet-v1-quantized\" model. Then, click play on the next three sections to specify and download the pretrained model file and configuration file.\n"
381 | ]
382 | },
383 | {
384 | "cell_type": "code",
385 | "execution_count": null,
386 | "metadata": {
387 | "id": "gN0EUEa3e5Un"
388 | },
389 | "outputs": [],
390 | "source": [
391 | "# Change the \"chosen_model\" variable to select one of the models listed below (from the TF1 object detection zoo)\n",
392 | "\n",
393 | "chosen_model = 'ssd-mobilenet-v2-quantized'\n",
394 | "\n",
395 | "MODELS_CONFIG = {\n",
396 | " 'ssd-mobilenet-v1-quantized': {\n",
397 | " 'model_name': 'ssd_mobilenet_v1_quantized_coco',\n",
398 | " 'base_pipeline_file': 'ssd_mobilenet_v1_quantized_300x300_coco14_sync.config',\n",
399 | " 'pretrained_checkpoint': 'ssd_mobilenet_v1_quantized_300x300_coco14_sync_2018_07_18.tar.gz',\n",
400 | " },\n",
401 | " 'ssd-mobilenet-v2-quantized': {\n",
402 | " 'model_name': 'ssd_mobilenet_v2_quantized_coco',\n",
403 | " 'base_pipeline_file': 'ssd_mobilenet_v2_quantized_300x300_coco.config',\n",
404 | " 'pretrained_checkpoint': 'ssd_mobilenet_v2_quantized_300x300_coco_2019_01_03.tar.gz',\n",
405 | " }\n",
406 | "}\n",
407 | "\n",
408 | "model_name = MODELS_CONFIG[chosen_model]['model_name']\n",
409 | "pretrained_checkpoint = MODELS_CONFIG[chosen_model]['pretrained_checkpoint']\n",
410 | "base_pipeline_file = MODELS_CONFIG[chosen_model]['base_pipeline_file']"
411 | ]
412 | },
413 | {
414 | "cell_type": "code",
415 | "execution_count": null,
416 | "metadata": {
417 | "id": "kG4TmJUVrYQ7"
418 | },
419 | "outputs": [],
420 | "source": [
421 | "# Create \"mymodel\" folder for holding pre-trained weights and configuration files\n",
422 | "%mkdir /content/models/mymodel/\n",
423 | "%cd /content/models/mymodel/\n",
424 | "\n",
425 | "# Download pretrained model file from TensorFlow Model Zoo\n",
426 | "import tarfile\n",
427 | "download_tar = 'http://download.tensorflow.org/models/object_detection/' + pretrained_checkpoint\n",
428 | "\n",
429 | "!wget {download_tar}\n",
430 | "tar = tarfile.open(pretrained_checkpoint)\n",
431 | "tar.extractall()\n",
432 | "tar.close()\n",
433 | "\n",
434 | "# Download base training configuration file\n",
435 | "download_config = 'https://raw.githubusercontent.com/tensorflow/models/master/research/object_detection/samples/configs/' + base_pipeline_file\n",
436 | "!wget {download_config}"
437 | ]
438 | },
439 | {
440 | "cell_type": "markdown",
441 | "metadata": {
442 | "id": "3jOYxQ20wXVr"
443 | },
444 | "source": [
445 | "Now that we've downloaded our model and config file, we need to modify the configuration file with some high-level training parameters. The following variables are used to control training steps:\n",
446 | "\n",
447 | "* **num_steps**: The total amount of steps to use for training the model. A good number to start with is 40,000 steps. You can use more steps if you notice the loss metrics are still decreasing by the time training finishes. The more steps, the longer the training. Training can also be stopped early if loss flattens out before reaching the specified number of steps.\n",
448 | "* **batch_size**: The number of images to use per training step. A larger batch size allows a model to be trained in fewer steps, but the size is limited by the GPU memory available for training. For the GPUs used in Colab instances, 16 is typically a good number.\n",
449 | "\n",
450 | "* **quant_delay_steps**: (Only used for quantization-aware training) After this many steps, the training algorithm will insert \"fake\" quantization nodes in the network to simulate the effects of quantization. A good starting point is half the total number of training steps. More information is available [here](https://neuralet.com/article/quantization-of-tensorflow-object-detection-api-models/).\n",
451 | "\n",
452 | "Other training information, like the location of the pretrained model file, the config file, and total number of classes are also assigned in this step.\n"
453 | ]
454 | },
455 | {
456 | "cell_type": "code",
457 | "execution_count": null,
458 | "metadata": {
459 | "id": "IKiXz33QwXyP"
460 | },
461 | "outputs": [],
462 | "source": [
463 | "# Set training parameters for the model\n",
464 | "num_steps = 30000\n",
465 | "batch_size = 16\n",
466 | "quant_delay_steps = 15000"
467 | ]
468 | },
469 | {
470 | "cell_type": "code",
471 | "execution_count": null,
472 | "metadata": {
473 | "id": "b_ki9jOqxn7V"
474 | },
475 | "outputs": [],
476 | "source": [
477 | "# Set file locations and get number of classes for config file\n",
478 | "pipeline_fname = '/content/models/mymodel/' + base_pipeline_file\n",
479 | "fine_tune_checkpoint = '/content/models/mymodel/' + model_name + '/model.ckpt'\n",
480 | "\n",
481 | "def get_num_classes(pbtxt_fname):\n",
482 | " from object_detection.utils import label_map_util\n",
483 | " label_map = label_map_util.load_labelmap(pbtxt_fname)\n",
484 | " categories = label_map_util.convert_label_map_to_categories(\n",
485 | " label_map, max_num_classes=90, use_display_name=True)\n",
486 | " category_index = label_map_util.create_category_index(categories)\n",
487 | " return len(category_index.keys())\n",
488 | "num_classes = get_num_classes(label_map_pbtxt_fname)\n",
489 | "print('Total classes:', num_classes)\n"
490 | ]
491 | },
492 | {
493 | "cell_type": "markdown",
494 | "metadata": {
495 | "id": "xxpOXUTx0E-n"
496 | },
497 | "source": [
498 | "Finally, we'll rewrite the config file to use the training parameters we just specified. The following section of code will automatically replace the necessary parameters in the downloaded .config file and save it as our custom \"pipeline_file.config\" file."
499 | ]
500 | },
501 | {
502 | "cell_type": "code",
503 | "execution_count": null,
504 | "metadata": {
505 | "id": "5eA5ht3_yukT"
506 | },
507 | "outputs": [],
508 | "source": [
509 | "# Write custom configuration file by slotting our dataset, model checkpoint, and training parameters into the base pipeline file\n",
510 | "# TO DO: change that description\n",
511 | "\n",
512 | "import re\n",
513 | "\n",
514 | "%cd /content/models/mymodel\n",
515 | "print('writing custom configuration file')\n",
516 | "\n",
517 | "with open(pipeline_fname) as f:\n",
518 | " s = f.read()\n",
519 | "with open('pipeline_file.config', 'w') as f:\n",
520 | " \n",
521 | " # fine_tune_checkpoint\n",
522 | " s = re.sub('fine_tune_checkpoint: \".*?\"',\n",
523 | " 'fine_tune_checkpoint: \"{}\"'.format(fine_tune_checkpoint), s)\n",
524 | " \n",
525 | " # tfrecord files train and test.\n",
526 | " s = re.sub(\n",
527 | " '(input_path: \".*?)(PATH_TO_BE_CONFIGURED/mscoco_train.*?\")', 'input_path: \"{}\"'.format(train_record_fname), s)\n",
528 | " s = re.sub(\n",
529 | " '(input_path: \".*?)(PATH_TO_BE_CONFIGURED/mscoco_val)(.*?\")', 'input_path: \"{}\"'.format(val_record_fname), s)\n",
530 | "\n",
531 | " # label_map_path\n",
532 | " s = re.sub(\n",
533 | " 'label_map_path: \".*?\"', 'label_map_path: \"{}\"'.format(label_map_pbtxt_fname), s)\n",
534 | "\n",
535 | " # Set training steps, num_steps\n",
536 | " s = re.sub('num_steps: [0-9]+',\n",
537 | " 'num_steps: {}'.format(num_steps), s)\n",
538 | "\n",
539 | " # Set training batch_size.\n",
540 | " s = re.sub('batch_size: [0-9]+',\n",
541 | " 'batch_size: {}'.format(batch_size), s)\n",
542 | " \n",
543 | " # Set number of classes num_classes.\n",
544 | " s = re.sub('num_classes: [0-9]+',\n",
545 | " 'num_classes: {}'.format(num_classes), s)\n",
546 | " \n",
547 | " # Fine-tune checkpoint type\n",
548 | " s = re.sub(\n",
549 | " 'fine_tune_checkpoint_type: \"classification\"', 'fine_tune_checkpoint_type: \"{}\"'.format('detection'), s)\n",
550 | " \n",
551 | " # Quantization delay steps\n",
552 | " s = re.sub(\n",
553 | " 'delay: 48000', 'delay: {}'.format(quant_delay_steps), s)\n",
554 | " \n",
555 | " f.write(s)\n",
556 | "\n",
557 | "%cd /content\n"
558 | ]
559 | },
560 | {
561 | "cell_type": "code",
562 | "execution_count": null,
563 | "metadata": {
564 | "id": "HEsOLOMHzBqF"
565 | },
566 | "outputs": [],
567 | "source": [
568 | "# Display the custom configuration file's contents\n",
569 | "!cat /content/models/mymodel/pipeline_file.config"
570 | ]
571 | },
572 | {
573 | "cell_type": "code",
574 | "execution_count": null,
575 | "metadata": {
576 | "id": "GMlaN3rs3zLe"
577 | },
578 | "outputs": [],
579 | "source": [
580 | "# Set the path to the custom config file, and the directory to store training checkpoints in\n",
581 | "pipeline_file = '/content/models/mymodel/pipeline_file.config'\n",
582 | "model_dir = '/content/training/'"
583 | ]
584 | },
585 | {
586 | "cell_type": "markdown",
587 | "metadata": {
588 | "id": "bLe247WqxPHw"
589 | },
590 | "source": [
591 | "The next block modifies the training script to save checkpoints once every 1000 training steps. Change `num_eval_steps` if you'd like to save checkpoints more or less frequently."
592 | ]
593 | },
594 | {
595 | "cell_type": "code",
596 | "execution_count": null,
597 | "metadata": {
598 | "id": "oi_wWkJOnc-D"
599 | },
600 | "outputs": [],
601 | "source": [
602 | "# Modify model_main.py to set evaluation and checkpoint interval\n",
603 | "num_eval_steps = 1000\n",
604 | "%cd /content/models/research/object_detection\n",
605 | "print('Modifying model_main.py')\n",
606 | "\n",
607 | "\n",
608 | "with open('model_main.py', 'r') as f:\n",
609 | " data = f.read()\n",
610 | "\n",
611 | " # Set eval steps\n",
612 | " data = data.replace('config = tf_estimator.RunConfig(model_dir=FLAGS.model_dir)', \n",
613 | " 'config = tf.estimator.RunConfig(model_dir=FLAGS.model_dir, save_checkpoints_steps={})'.format(num_eval_steps))\n",
614 | " \n",
615 | " f.close()\n",
616 | "\n",
617 | "!rm /content/models/research/object_detection/model_main.py\n",
618 | "\n",
619 | "with open('model_main.py', 'w') as f:\n",
620 | " f.write(data)\n",
621 | "\n",
622 | "%cd /content"
623 | ]
624 | },
625 | {
626 | "cell_type": "code",
627 | "execution_count": null,
628 | "metadata": {
629 | "id": "7wD0tda5oqIR"
630 | },
631 | "outputs": [],
632 | "source": [
633 | "!cat /content/models/research/object_detection/model_main.py"
634 | ]
635 | },
636 | {
637 | "cell_type": "markdown",
638 | "metadata": {
639 | "id": "XxPj_QV43qD5"
640 | },
641 | "source": [
642 | "# Train Custom TF1 Object Detector\n",
643 | "\n",
644 | "We're ready to train our object detection model! Model training is performed using the \"model_main_tf2.py\" script from the TF Object Detection API. We've already defined all the parameters and arguments used by `model_main_tf2.py` in previous sections of this Colab. Training will take anywhere from 2 to 6 hours, depending on the model, batch size, and number of training steps. Just click Play on the following block to begin training!\n",
645 | "\n",
646 | "*Note: It takes a few minutes for the program to display any training messages, because it only displays logs once every 100 steps. If it seems like nothing is happening, just wait a couple minutes.*\n",
647 | "\n",
648 | "*Another note: If you want to stop training early, just click on the code block while it's running and press Ctrl+M to interrupt execution. You might have to press Ctrl+M a couple times and also click the Stop button or right-click and select \"Interrupt Execution\".*\n"
649 | ]
650 | },
651 | {
652 | "cell_type": "code",
653 | "execution_count": null,
654 | "metadata": {
655 | "id": "3mSabQWqvC2R"
656 | },
657 | "outputs": [],
658 | "source": [
659 | "!pip install tensorboard==2.8.0"
660 | ]
661 | },
662 | {
663 | "cell_type": "code",
664 | "execution_count": null,
665 | "metadata": {
666 | "id": "TI9iCCxoNlAL"
667 | },
668 | "outputs": [],
669 | "source": [
670 | "%load_ext tensorboard\n",
671 | "%tensorboard --logdir '/content/training'"
672 | ]
673 | },
674 | {
675 | "cell_type": "code",
676 | "execution_count": null,
677 | "metadata": {
678 | "id": "tQTfZChVzzpZ"
679 | },
680 | "outputs": [],
681 | "source": [
682 | "!python /content/models/research/object_detection/model_main.py \\\n",
683 | " --pipeline_config_path={pipeline_file} \\\n",
684 | " --model_dir={model_dir} \\\n",
685 | " --alsologtostderr \\\n",
686 | " --num_train_steps={num_steps}"
687 | ]
688 | },
689 | {
690 | "cell_type": "markdown",
691 | "metadata": {
692 | "id": "4Vk2146Ogil3"
693 | },
694 | "source": [
695 | "# 5. Export Trained Inference Graph\n",
696 | "In the left sidebar, click the folder icon to view the files in the `/content` folder. Click the `training` folder to expand it, and find the checkpoint with the highest number (e.g. `model.ckpt-29000`). Replace \"XXXX\" in the code section below with that number."
697 | ]
698 | },
699 | {
700 | "cell_type": "code",
701 | "execution_count": null,
702 | "metadata": {
703 | "id": "YnSEZIzl4M10"
704 | },
705 | "outputs": [],
706 | "source": [
707 | "!mkdir /content/fine_tuned_model_lite\n",
708 | "output_directory = '/content/fine_tuned_model_lite'\n",
709 | "\n",
710 | "# Replace \"XXXX\" in the line below with the latest checkpoint in the /content/training directory\n",
711 | "last_model_path = '/content/training/model.ckpt-30000'\n",
712 | "print(last_model_path)\n",
713 | "\n",
714 | "!python /content/models/research/object_detection/export_tflite_ssd_graph.py \\\n",
715 | " --trained_checkpoint_prefix {last_model_path} \\\n",
716 | " --output_directory {output_directory} \\\n",
717 | " --pipeline_config_path {pipeline_file}"
718 | ]
719 | },
720 | {
721 | "cell_type": "markdown",
722 | "metadata": {
723 | "id": "IwoGtqdejiez"
724 | },
725 | "source": [
726 | "# 6. Convert Model to TensorFlow Lite Format"
727 | ]
728 | },
729 | {
730 | "cell_type": "code",
731 | "execution_count": null,
732 | "metadata": {
733 | "id": "PW7TpzLmhTbW"
734 | },
735 | "outputs": [],
736 | "source": [
737 | "localpb = '/content/fine_tuned_model_lite/tflite_graph.pb'\n",
738 | "tflite_file = '/content/fine_tuned_model_lite/detect.tflite'\n",
739 | "\n",
740 | "# Can use Netron app to determine the input size: https://www.electronjs.org/apps/netron \n",
741 | "input_size = [1, 300, 300, 3]\n",
742 | "input_shape = {\"normalized_input_image_tensor\" : input_size}\n",
743 | "\n",
744 | "print(input_shape)"
745 | ]
746 | },
747 | {
748 | "cell_type": "code",
749 | "execution_count": null,
750 | "metadata": {
751 | "id": "Ec8LzJLbr-SR"
752 | },
753 | "outputs": [],
754 | "source": [
755 | "import tensorflow as tf\n",
756 | "\n",
757 | "converter = tf.lite.TFLiteConverter.from_frozen_graph(\n",
758 | " localpb, \n",
759 | " [\"normalized_input_image_tensor\"],\n",
760 | " [\"TFLite_Detection_PostProcess\",\"TFLite_Detection_PostProcess:1\",\"TFLite_Detection_PostProcess:2\",\"TFLite_Detection_PostProcess:3\"],\n",
761 | " input_shape\n",
762 | ")\n",
763 | "\n",
764 | "converter.allow_custom_ops = True\n",
765 | "converter.inference_type = tf.uint8 # Tell converter to create a quantized model\n",
766 | "converter.quantized_input_stats = {'normalized_input_image_tensor': (128, 128)}\n",
767 | "\n",
768 | "tflite_model = converter.convert()\n",
769 | "\n",
770 | "open(tflite_file,'wb').write(tflite_model)\n",
771 | "\n",
772 | "# Test that the conversion was successful - if any errors are generated, something went wrong!\n",
773 | "interpreter = tf.lite.Interpreter(model_content=tflite_model)\n",
774 | "interpreter.allocate_tensors()"
775 | ]
776 | },
777 | {
778 | "cell_type": "code",
779 | "execution_count": null,
780 | "metadata": {
781 | "id": "awZMQGVqMpVL"
782 | },
783 | "outputs": [],
784 | "source": [
785 | "!cp /content/labelmap.txt /content/fine_tuned_model_lite\n",
786 | "!cp /content/labelmap.pbtxt /content/fine_tuned_model_lite\n",
787 | "!zip -r /content/fine_tuned_model_lite.zip /content/fine_tuned_model_lite"
788 | ]
789 | },
790 | {
791 | "cell_type": "markdown",
792 | "metadata": {
793 | "id": "w41-KMn7KV-T"
794 | },
795 | "source": [
796 | "Now, you can download the \"detect.tflite\" and \"labelmap.txt\" files and move them to your Raspberry Pi."
797 | ]
798 | },
799 | {
800 | "cell_type": "markdown",
801 | "metadata": {
802 | "id": "bQyjuMAt1WEL"
803 | },
804 | "source": [
805 | "# (Optional) Test out TensorFlow Lite Model\n",
806 | "Now that we've got our custom detection model trained and converted to TFLite format, let's try it out on some images. We'll use the images from our \"test\" folder. These images weren't seen at all by the model during training, so they'll give a faithful depiction of how accurate the model actually is.\n",
807 | "\n",
808 | "The following code is used to import the TensorFlow Lite runtime, load it into memory, run inferencing on the test images, and display the results."
809 | ]
810 | },
811 | {
812 | "cell_type": "code",
813 | "execution_count": null,
814 | "metadata": {
815 | "id": "v1IBMfrD2GEQ"
816 | },
817 | "outputs": [],
818 | "source": [
819 | "# Copied from my TFLite repository, and stripped unneeded stuff out\n",
820 | "\n",
821 | "# Import packages\n",
822 | "import os\n",
823 | "import cv2\n",
824 | "import numpy as np\n",
825 | "import sys\n",
826 | "import glob\n",
827 | "import importlib.util\n",
828 | "from tensorflow.lite.python.interpreter import Interpreter\n",
829 | "\n",
830 | "import matplotlib\n",
831 | "import matplotlib.pyplot as plt\n",
832 | "\n",
833 | "%matplotlib inline\n",
834 | "\n",
835 | "PATH_TO_IMAGES='/content/images/test'\n",
836 | "PATH_TO_MODEL='/content/fine_tuned_model_lite/detect.tflite'\n",
837 | "PATH_TO_LABELS='/content/labelmap.txt'\n",
838 | "IMAGES_TO_TEST = 10\n",
839 | "min_conf_threshold=0.5\n",
840 | "\n",
841 | "# Grab all image filenames\n",
842 | "images = glob.glob(PATH_TO_IMAGES + '/*.jpg')\n",
843 | "images = images + glob.glob(PATH_TO_IMAGES + '/*.JPG')\n",
844 | "images = images + glob.glob(PATH_TO_IMAGES + '/*.png')\n",
845 | "\n",
846 | "\n",
847 | "# Load the label map into memory\n",
848 | "with open(PATH_TO_LABELS, 'r') as f:\n",
849 | " labels = [line.strip() for line in f.readlines()]\n",
850 | "\n",
851 | "\n",
852 | "# Load the Tensorflow Lite model into memory\n",
853 | "interpreter = Interpreter(model_path=PATH_TO_MODEL)\n",
854 | "interpreter.allocate_tensors()\n",
855 | "\n",
856 | "# Get model details\n",
857 | "input_details = interpreter.get_input_details()\n",
858 | "output_details = interpreter.get_output_details()\n",
859 | "height = input_details[0]['shape'][1]\n",
860 | "width = input_details[0]['shape'][2]\n",
861 | "\n",
862 | "floating_model = (input_details[0]['dtype'] == np.float32)\n",
863 | "\n",
864 | "input_mean = 127.5\n",
865 | "input_std = 127.5\n",
866 | "\n",
867 | "# Loop over every image and perform detection\n",
868 | "for image_path in images[0:IMAGES_TO_TEST]:\n",
869 | "\n",
870 | " # Load image and resize to expected shape [1xHxWx3]\n",
871 | " image = cv2.imread(image_path)\n",
872 | " image_rgb = cv2.cvtColor(image, cv2.COLOR_BGR2RGB)\n",
873 | " imH, imW, _ = image.shape \n",
874 | " image_resized = cv2.resize(image_rgb, (width, height))\n",
875 | " input_data = np.expand_dims(image_resized, axis=0)\n",
876 | "\n",
877 | " # Normalize pixel values if using a floating model (i.e. if model is non-quantized)\n",
878 | " if floating_model:\n",
879 | " input_data = (np.float32(input_data) - input_mean) / input_std\n",
880 | "\n",
881 | " # Perform the actual detection by running the model with the image as input\n",
882 | " interpreter.set_tensor(input_details[0]['index'],input_data)\n",
883 | " interpreter.invoke()\n",
884 | "\n",
885 | " # Retrieve detection results\n",
886 | " boxes = interpreter.get_tensor(output_details[0]['index'])[0] # Bounding box coordinates of detected objects\n",
887 | " classes = interpreter.get_tensor(output_details[1]['index'])[0] # Class index of detected objects\n",
888 | " scores = interpreter.get_tensor(output_details[2]['index'])[0] # Confidence of detected objects\n",
889 | " #num = interpreter.get_tensor(output_details[3]['index']) # Total number of detected objects (inaccurate and not needed)\n",
890 | "\n",
891 | " # Loop over all detections and draw detection box if confidence is above minimum threshold\n",
892 | " for i in range(len(scores)):\n",
893 | " if ((scores[i] > min_conf_threshold) and (scores[i] <= 1.0)):\n",
894 | "\n",
895 | " # Get bounding box coordinates and draw box\n",
896 | " # Interpreter can return coordinates that are outside of image dimensions, need to force them to be within image using max() and min()\n",
897 | " ymin = int(max(1,(boxes[i][0] * imH)))\n",
898 | " xmin = int(max(1,(boxes[i][1] * imW)))\n",
899 | " ymax = int(min(imH,(boxes[i][2] * imH)))\n",
900 | " xmax = int(min(imW,(boxes[i][3] * imW)))\n",
901 | " \n",
902 | " cv2.rectangle(image, (xmin,ymin), (xmax,ymax), (10, 255, 0), 2)\n",
903 | "\n",
904 | " # Draw label\n",
905 | " object_name = labels[int(classes[i])] # Look up object name from \"labels\" array using class index\n",
906 | " label = '%s: %d%%' % (object_name, int(scores[i]*100)) # Example: 'person: 72%'\n",
907 | " labelSize, baseLine = cv2.getTextSize(label, cv2.FONT_HERSHEY_SIMPLEX, 0.7, 2) # Get font size\n",
908 | " label_ymin = max(ymin, labelSize[1] + 10) # Make sure not to draw label too close to top of window\n",
909 | " cv2.rectangle(image, (xmin, label_ymin-labelSize[1]-10), (xmin+labelSize[0], label_ymin+baseLine-10), (255, 255, 255), cv2.FILLED) # Draw white box to put label text in\n",
910 | " cv2.putText(image, label, (xmin, label_ymin-7), cv2.FONT_HERSHEY_SIMPLEX, 0.7, (0, 0, 0), 2) # Draw label text\n",
911 | "\n",
912 | " # All the results have been drawn on the image, now display the image\n",
913 | " image = cv2.cvtColor(image,cv2.COLOR_BGR2RGB)\n",
914 | " plt.figure(figsize=(12,16))\n",
915 | " plt.imshow(image)\n",
916 | " plt.show()"
917 | ]
918 | },
919 | {
920 | "cell_type": "markdown",
921 | "metadata": {
922 | "id": "XFsuasvxFHo8"
923 | },
924 | "source": [
925 | "## (Optional) Compile Model for Edge TPU\n",
926 | "\n",
927 | "Now that the model has been converted to TFLite and quantized, we can compile it to run on Edge TPU devices like the [Coral USB Accelerator](https://coral.ai/products/accelerator/) or the [Coral Dev Board](https://coral.ai/products/dev-board/). This allows the model to run much faster! For more information on the Edge TPU, see my [TensorFlow Lite repository on GitHub](fine_tuned_model_lite).\n",
928 | "\n",
929 | "First, install the Edge TPU Compiler package inside this Colab instance."
930 | ]
931 | },
932 | {
933 | "cell_type": "code",
934 | "execution_count": null,
935 | "metadata": {
936 | "id": "mUd_SNC0JSq0"
937 | },
938 | "outputs": [],
939 | "source": [
940 | "! curl https://packages.cloud.google.com/apt/doc/apt-key.gpg | sudo apt-key add -\n",
941 | "! echo \"deb https://packages.cloud.google.com/apt coral-edgetpu-stable main\" | sudo tee /etc/apt/sources.list.d/coral-edgetpu.list\n",
942 | "! sudo apt-get update\n",
943 | "! sudo apt-get install edgetpu-compiler\t"
944 | ]
945 | },
946 | {
947 | "cell_type": "markdown",
948 | "metadata": {
949 | "id": "usfmdtSiJuuC"
950 | },
951 | "source": [
952 | "Next, compile the model. (If your model has a different filename than \"detect.tflite\", use that instead.)"
953 | ]
954 | },
955 | {
956 | "cell_type": "code",
957 | "execution_count": null,
958 | "metadata": {
959 | "id": "WTboEAWuJ0ku"
960 | },
961 | "outputs": [],
962 | "source": [
963 | "%cd /content/fine_tuned_model_lite\n",
964 | "!edgetpu_compiler detect.tflite\n",
965 | "!mv detect_edgetpu.tflite edgetpu.tflite"
966 | ]
967 | },
968 | {
969 | "cell_type": "markdown",
970 | "metadata": {
971 | "id": "oqGy2FgzKomN"
972 | },
973 | "source": [
974 | "The compiled model will be output in the /content folder as \"detect_edgetpu.tflite\". It gets renamed to \"edgetpu.tflite\" to be consistent with my code. Download this file using the command below. (If your model has a different filename than \"edgetpu.tflite\", use that instead.)"
975 | ]
976 | },
977 | {
978 | "cell_type": "code",
979 | "execution_count": null,
980 | "metadata": {
981 | "id": "GgvZC_y5ESYq"
982 | },
983 | "outputs": [],
984 | "source": [
985 | "%cd /content\n",
986 | "!cp labelmap.txt fine_tuned_model_lite\n",
987 | "!cp labelmap.pbtxt fine_tuned_model_lite\n",
988 | "!zip -r fine_tuned_model_lite.zip fine_tuned_model_lite"
989 | ]
990 | },
991 | {
992 | "cell_type": "code",
993 | "execution_count": null,
994 | "metadata": {
995 | "id": "AmjqvKuuK8ZR"
996 | },
997 | "outputs": [],
998 | "source": [
999 | "from google.colab import files\n",
1000 | "\n",
1001 | "files.download('edgetpu.tflite')"
1002 | ]
1003 | },
1004 | {
1005 | "cell_type": "markdown",
1006 | "metadata": {
1007 | "id": "ptwpBBEWLfuJ"
1008 | },
1009 | "source": [
1010 | "Now you're all set to use the Coral model! For instructions on how to run an object detection model on the Raspberry Pi using the Coral USB Acclerator, please see my video, [\"How to Use the Coral USB Accelerator with the Raspberry Pi\"](https://www.youtube.com/watch?v=qJMwNHQNOVU)."
1011 | ]
1012 | }
1013 | ],
1014 | "metadata": {
1015 | "accelerator": "GPU",
1016 | "colab": {
1017 | "collapsed_sections": [],
1018 | "provenance": [],
1019 | "include_colab_link": true
1020 | },
1021 | "kernelspec": {
1022 | "display_name": "Python 3",
1023 | "name": "python3"
1024 | }
1025 | },
1026 | "nbformat": 4,
1027 | "nbformat_minor": 0
1028 | }
--------------------------------------------------------------------------------
/deploy_guides/MacOS_TFLite_Guide.md:
--------------------------------------------------------------------------------
1 | # How to Run TensorFlow Lite Models on macOS
2 | This guide shows how to set up a TensorFlow Lite Runtime environment on a macOS device. We'll use [Anaconda](https://www.anaconda.com/) to create a Python environment to install the TFLite Runtime in. It's easy!
3 |
4 | Acknowledgement: Thanks goes to [Max Hancock](https://www.linkedin.com/in/maxwell-hancock/) for contributing this guide!
5 |
6 | ## Step 1. Download and Install Anaconda
7 | First, install [Anaconda](https://www.anaconda.com/), which is a Python environment manager that greatly simplifies Python package management and deployment. Anaconda allows you to create Python virtual environments on your Mac without interfering with existing installations of Python. Go to the [Anaconda Downloads page](https://www.anaconda.com/products/distribution) and click the Download button.
8 |
9 | When the download finishes, open the downloaded .exe file and step through the installation wizard. Use the default install options.
10 |
11 | ## Step 2. Set Up Virtual Environment and Directory
12 | First open up the terminal by opening a Finder window, and press 'Command + Shift + U', and then select Terminal. We'll create a folder called `tflite1` directly in the Home folder (under your username) - you can use any other folder location you like, just make sure to modify the commands below to use the correct file paths. Create the folder and move into it by issuing the following commands in the terminal:
13 |
14 | ```
15 | mkdir ~/tflite1
16 | cd ~/tflite1
17 | ```
18 |
19 | Next, create a Python 3.9 virtual environment by issuing:
20 |
21 | ```
22 | conda create --name tflite1-env python=3.9
23 | ```
24 |
25 | Enter "y" then "ENTER" when it asks if you want to proceed. Activate the environment and install the required packages by issuing the commands below. We'll install TensorFlow, OpenCV, and a downgraded version of protobuf. TensorFlow is a pretty big download (about 450MB), so it will take a while.
26 |
27 | ```
28 | conda activate tflite1-env
29 | pip install tensorflow
30 | pip install opencv-python
31 | pip uninstall protobuf
32 | pip install protobuf==3.20.0
33 | ```
34 |
35 | Download the detection scripts from this repository by issuing:
36 |
37 | ```
38 | curl https://raw.githubusercontent.com/EdjeElectronics/TensorFlow-Lite-Object-Detection-on-Android-and-Raspberry-Pi/master/TFLite_detection_image.py --output TFLite_detection_image.py
39 | curl https://raw.githubusercontent.com/EdjeElectronics/TensorFlow-Lite-Object-Detection-on-Android-and-Raspberry-Pi/master/TFLite_detection_video.py --output TFLite_detection_video.py
40 | curl https://raw.githubusercontent.com/EdjeElectronics/TensorFlow-Lite-Object-Detection-on-Android-and-Raspberry-Pi/master/TFLite_detection_webcam.py --output TFLite_detection_webcam.py
41 | curl https://raw.githubusercontent.com/EdjeElectronics/TensorFlow-Lite-Object-Detection-on-Android-and-Raspberry-Pi/master/TFLite_detection_stream.py --output TFLite_detection_stream.py
42 | ```
43 |
44 | ## Step 3. Move TFLite Model into Directory
45 | Next, take the custom TFLite model that was trained and downloaded from the Colab notebook and move it into the {username}\tflite1 directory (replacing {username} with your home directory name). If you downloaded it from Colab, it should be in a file called `custom_model_lite.zip`. (If you haven't trained a model yet and just want to test one out, download my "change counter" model by clicking this [Dropbox link](https://www.dropbox.com/scl/fi/4fk8ls8s03c94g6sb3ngo/custom_model_lite.zip?rlkey=zqda21sowk0hrw6i3f2dgbsyy&dl=0).) Move that file to the {username}\tflite1 directory. Once it's moved, unzip it using:
46 |
47 | ```
48 | tar -xf custom_model_lite.zip
49 | ```
50 |
51 | At this point, you should have a folder at {username}\tflite1\custom_model_lite which contains at least a `detect.tflite` and `labelmap.txt` file.
52 |
53 | ## Step 4. Run TensorFlow Lite Model!
54 | Now, just call one of the detection scripts and point it at your model folder with the `--modeldir` option. For example, to run your `custom_model_lite` model on a webcam, issue:
55 |
56 | ```
57 | python TFLite_detection_webcam.py --modeldir=custom_model_lite
58 | ```
59 |
60 | A window will appear showing detection results drawn on the live webcam feed, make sure to accept the use of webcam. For more information on how to use the detection scripts, like if you want to enter an image, video, or web stream please see [Step 3 in the main README page](https://github.com/EdjeElectronics/TensorFlow-Lite-Object-Detection-on-Android-and-Raspberry-Pi#step-3-run-tensorflow-lite-models).
61 |
62 | Have fun using TensorFlow Lite! Stay tuned for more examples on how to build cool applications around your model.
63 |
--------------------------------------------------------------------------------
/deploy_guides/Raspberry_Pi_Guide.md:
--------------------------------------------------------------------------------
1 | # How to Run TensorFlow Lite Object Detection Models on the Raspberry Pi (with Optional Coral USB Accelerator)
2 |
3 |
"
11 | ]
12 | },
13 | {
14 | "cell_type": "markdown",
15 | "metadata": {
16 | "id": "fF8ysCfYKgTP"
17 | },
18 | "source": [
19 | "# TensorFlow Lite v1 Object Detection API in Colab\n",
20 | "**Author:** Evan Juras, [EJ Technology Consultants](https://ejtech.io)\n",
21 | "\n",
22 | "**Last updated:** 10/12/22\n",
23 | "\n",
24 | "**GitHub:** [TensorFlow Lite Object Detection](https://github.com/EdjeElectronics/TensorFlow-Lite-Object-Detection-on-Android-and-Raspberry-Pi)\n",
25 | "\n",
26 | "\n",
27 | "# Introduction\n",
28 | "\n",
29 | "This notebook implements [The TensorFlow Object Detection Library](https://github.com/tensorflow/models/tree/master/research/object_detection) for training an SSD-MobileNet model using your own dataset. Note that this notebook uses TensorFlow 1 rather than TensorFlow 2, because TensorFlow 1 works better for quantizing SSD-MobileNet models. If you want to use TensorFlow 2, [clink this link to go to the TensorFlow 2 version of this notebook](https://colab.research.google.com/github/EdjeElectronics/TensorFlow-Lite-Object-Detection-on-Android-and-Raspberry-Pi/blob/master/Train_TFLite2_Object_Detction_Model.ipynb).\n",
30 | "\n",
31 | "*Note: This notebook is not maintained or updated as frequently as the TF2 notebook.*\n",
32 | "\n",
33 | "I made a YouTube video that walks through the TensorFlow 2 notebook step by step, and the process is very similar for this TensorFlow 1 notebook. Please take a look at the video if you are confused about any steps in this notebook.\n",
34 | "\n",
35 | "*Link to video to be added here*\n",
36 | "\n",
37 | "###Working with Colab\n",
38 | "Simply click the play button on sections of code to execute them. As the code executes, any outputs will be displayed in a block beneath the code. Once they're done executing, a green checkmark will appear next to the section to indicate it's finished running."
39 | ]
40 | },
41 | {
42 | "cell_type": "markdown",
43 | "metadata": {
44 | "id": "l7EOtpvlLeS0"
45 | },
46 | "source": [
47 | "# 1. Install TensorFlow Object Detection Dependencies\n",
48 | "First, we'll install the TensorFlow Object Detection API in this Google Colab instance. This requires cloning the [TensorFlow models repository](https://github.com/tensorflow/models) and running a couple installation commands. Click the play button to run the following sections of code.\n",
49 | "\n"
50 | ]
51 | },
52 | {
53 | "cell_type": "code",
54 | "execution_count": null,
55 | "metadata": {
56 | "id": "QOFtpDlci50l"
57 | },
58 | "outputs": [],
59 | "source": [
60 | "# Install CUDA 10.0 (needed for TF v1.15.3)\n",
61 | "!sudo apt-get update\n",
62 | "!sudo apt-get install cuda-10.0"
63 | ]
64 | },
65 | {
66 | "cell_type": "code",
67 | "execution_count": null,
68 | "metadata": {
69 | "id": "KeoP1s8gi8tL"
70 | },
71 | "outputs": [],
72 | "source": [
73 | "# Install cuDNN 7.6.0 (needed for TF v1.15.3)\n",
74 | "# Download and extract cuDNN files\n",
75 | "!wget https://www.dropbox.com/s/k6xqrje655q4aty/cudnn-10.0-linux-x64-v7.6.0.64.tgz\n",
76 | "!tar -xf cudnn-10.0-linux-x64-v7.6.0.64.tgz\n",
77 | "\n",
78 | "# Copy cuDNN libraries to appropriate folders\n",
79 | "!sudo cp cuda/include/cudnn*.h /usr/local/cuda-10.0/include \n",
80 | "!sudo cp -P cuda/lib64/libcudnn* /usr/local/cuda-10.0/lib64 \n",
81 | "!sudo chmod a+r /usr/local/cuda-10.0/include/cudnn*.h /usr/local/cuda-10.0/lib64/libcudnn*\n",
82 | "!sudo cp -P cuda/lib64/libcudnn* /usr/lib64-nvidia"
83 | ]
84 | },
85 | {
86 | "cell_type": "code",
87 | "execution_count": null,
88 | "metadata": {
89 | "id": "ypWGYdPlLRUN"
90 | },
91 | "outputs": [],
92 | "source": [
93 | "# Clone the tensorflow models repository from GitHub\n",
94 | "!git clone --depth 1 https://github.com/tensorflow/models"
95 | ]
96 | },
97 | {
98 | "cell_type": "code",
99 | "execution_count": null,
100 | "metadata": {
101 | "id": "6QPmVBSlLTzM"
102 | },
103 | "outputs": [],
104 | "source": [
105 | "# Install the Object Detection API\n",
106 | "%%bash\n",
107 | "cd models/research/\n",
108 | "protoc object_detection/protos/*.proto --python_out=.\n",
109 | "cp object_detection/packages/tf1/setup.py .\n",
110 | "python -m pip install --use-feature=2020-resolver ."
111 | ]
112 | },
113 | {
114 | "cell_type": "markdown",
115 | "metadata": {
116 | "id": "kH3fwht2w17a"
117 | },
118 | "source": [
119 | "If you get any errors running the following code block, you can ignore them!"
120 | ]
121 | },
122 | {
123 | "cell_type": "code",
124 | "execution_count": null,
125 | "metadata": {
126 | "id": "kDT0ctlBlXTw"
127 | },
128 | "outputs": [],
129 | "source": [
130 | "# Install TensorFlow\n",
131 | "!pip install tensorflow-gpu==1.15.3\n",
132 | "\n",
133 | "# A couple other packages have to be downgraded to work with the TF1 API\n",
134 | "!pip install numpy==1.17.4\n",
135 | "!pip install pycocotools==2.0.0"
136 | ]
137 | },
138 | {
139 | "cell_type": "code",
140 | "execution_count": null,
141 | "metadata": {
142 | "id": "wh_HPMOqWH9z"
143 | },
144 | "outputs": [],
145 | "source": [
146 | "# Run Model Bulider Test file, just to verify everything's working properly\n",
147 | "!python /content/models/research/object_detection/builders/model_builder_tf1_test.py\n"
148 | ]
149 | },
150 | {
151 | "cell_type": "markdown",
152 | "metadata": {
153 | "id": "IPbU4I7aL9Fl"
154 | },
155 | "source": [
156 | "# 2. Upload Image Dataset and Prepare Training Data\n",
157 | "\n",
158 | "In this section, we'll upload our training images and use TFRecord generation scripts to prepare the training data for TensorFlow. we'll upload our images, split them into train, validation, and test folders, and then run scripts for creating TFRecords from our data.\n",
159 | "\n",
160 | "First, on your local PC, zip all your training images and XML files into a single folder called \"images.zip\". The files should be directly inside the zip folder (wihout any additional nested folders) as shown below:\n",
161 | "```\n",
162 | "images.zip\n",
163 | "-- img1.jpg\n",
164 | "-- img1.xml\n",
165 | "-- img2.jpg\n",
166 | "-- img2.xml\n",
167 | "...\n",
168 | "```\n",
169 | "There are two options for moving the image files to this Colab instance: you can upload them directly, or you can copy them from your Google Drive. If you have a slow internet connection or more than 50MB worth of images, I recommend using Google Drive. Otherwise, you can just upload them through Colab. \n",
170 | "\n",
171 | "#### Option 1. Upload through Google Colab\n",
172 | "Upload the \"images.zip\" file to the Google Colab instance by clicking the \"Files\" icon on the left hand side of the browser, and then the \"Upload to session storage\" icon. Select the zip folder to upload it.\n",
173 | "\n",
174 | "\n",
175 | "\n",
176 | "Once it's uploaded, we'll run a few commands to unzip it and set up our image directories. These directories are created in the /content folder in this instance's filesystem. You can browse the filesystem by clicking the \"Files\" icon on the left.\n"
177 | ]
178 | },
179 | {
180 | "cell_type": "markdown",
181 | "metadata": {
182 | "id": "Wpi58u0-V_jN"
183 | },
184 | "source": [
185 | "#### Option 2. Copy from Google Drive\n",
186 | "You can also upload your images to your personal Google Drive, mount the drive on this Colab session, and copy them over to the Colab filesystem. This option works well if you want to upload the images beforehand so you don't have to wait for them to upload each time you restart this Colab.\n",
187 | "\n",
188 | "First, upload the \"images.zip\" file to your Google Drive, and make note of the folder you uploaded them to. Replace `MyDrive/path/to/images.zip` with the path to your zip file. (For example, I uploaded the zip file to folder called \"cat-toys1\", so I would use `MyDrive/cat-toys1/images.zip` for the path). Then, run the following block of code to mount your Google Drive to this Colab session and copy the folder to this filesystem."
189 | ]
190 | },
191 | {
192 | "cell_type": "code",
193 | "execution_count": null,
194 | "metadata": {
195 | "id": "tLgAPsQsfTLs"
196 | },
197 | "outputs": [],
198 | "source": [
199 | "from google.colab import drive\n",
200 | "drive.mount('/content/gdrive')\n",
201 | "\n",
202 | "!cp /content/gdrive/MyDrive/path/to/images.zip /content"
203 | ]
204 | },
205 | {
206 | "cell_type": "markdown",
207 | "metadata": {
208 | "id": "DLIu4GdjxgWu"
209 | },
210 | "source": [
211 | "#### Option 3. Use my bird, squirrel, raccoon dataset\n",
212 | "I've uploaded a dataset containing 800 labeled images of birds, squirrels, and raccoons. You can use this dataset if you just want to work through the process of training a TFLite model on custom data. Run the following code block to download the dataset."
213 | ]
214 | },
215 | {
216 | "cell_type": "code",
217 | "execution_count": null,
218 | "metadata": {
219 | "id": "bH6huqCBxhFb"
220 | },
221 | "outputs": [],
222 | "source": [
223 | "!wget -O /content/images.zip https://www.dropbox.com/s/en33x280e4z3wbt/BSR2.zip?dl=0"
224 | ]
225 | },
226 | {
227 | "cell_type": "markdown",
228 | "metadata": {
229 | "id": "U-eXEQICx2ug"
230 | },
231 | "source": [
232 | "## Split images into train, validation, and test folders\n",
233 | "At this point, whether you used Option 1, 2, or 3, you should be able to click the folder icon on the left and see your \"images.zip\" file in the list of files. Now that the dataset is uploaded, let's unzip it and create some folders to hold the images. These directories are created in the /content folder in this instance's filesystem. You can browse the filesystem by clicking the \"Files\" icon on the left."
234 | ]
235 | },
236 | {
237 | "cell_type": "code",
238 | "execution_count": null,
239 | "metadata": {
240 | "id": "3n-E68MJbU2I"
241 | },
242 | "outputs": [],
243 | "source": [
244 | "!mkdir /content/images\n",
245 | "!unzip -q images.zip -d /content/images/all\n",
246 | "!mkdir /content/images/train; mkdir /content/images/validation; mkdir /content/images/test\n"
247 | ]
248 | },
249 | {
250 | "cell_type": "markdown",
251 | "metadata": {
252 | "id": "n-6RIcrwbQMh"
253 | },
254 | "source": [
255 | "Next, we'll split the images into train, validation, and test sets. Here's what each set is used for:\n",
256 | "\n",
257 | "\n",
258 | "* **Train**: These are the actual images used to train the model. In each step of training, a batch of images from the \"train\" set is passed into the neural network. The network predicts classes and locations of objects in the images. The training algorithm calculates the loss (i.e. how \"wrong\" the predictions were) and adjusts the network weights through backpropagation.\n",
259 | "\n",
260 | "\n",
261 | "* **Validation**: Images from the \"validation\" set can be used by the training algorithm to check the progress of training and adjust hyperparameters (like learning rate). Unlike \"train\" images, these images are only used periodically during training (i.e. once every certain number of training steps).\n",
262 | "\n",
263 | "\n",
264 | "* **Test**: These images are never seen by the neural network during training. They are intended to be used by a human to perform final testing of the model to check how accurate the model is.\n",
265 | "\n",
266 | "I wrote a Python script to randomly move 80% of the images to the \"train\" folder, 10% to the \"validation\" folder, and 10% to the \"test\" folder. Click play on the following block to download the script and execute it."
267 | ]
268 | },
269 | {
270 | "cell_type": "code",
271 | "execution_count": null,
272 | "metadata": {
273 | "id": "_8V38Uk2yBUZ"
274 | },
275 | "outputs": [],
276 | "source": [
277 | "!wget https://raw.githubusercontent.com/EdjeElectronics/TensorFlow-Lite-Object-Detection-on-Android-and-Raspberry-Pi/master/util_scripts/train_val_test_split.py\n",
278 | "!python train_val_test_split.py"
279 | ]
280 | },
281 | {
282 | "cell_type": "markdown",
283 | "metadata": {
284 | "id": "p--K1PJXEgNo"
285 | },
286 | "source": [
287 | "## Create TFRecords\n",
288 | "Finally, we need to convert the images into a data file format called TFRecords, which are used by TensorFlow for training. We'll use Python scripts to automatically convert the data into TFRecord format. Before running them, we need to define a labelmap for our classes. \n",
289 | "\n",
290 | "The code section below will create a \"labelmap.txt\" file that contains a list of classes. Replace the `class1`, `class2`, `class3` text with your own classes (for example, `bird`, `squirrel`, `raccoon`), adding a new line for each class. Then, click play to execute the code."
291 | ]
292 | },
293 | {
294 | "cell_type": "code",
295 | "execution_count": null,
296 | "metadata": {
297 | "id": "_DE_r4MKY7ln"
298 | },
299 | "outputs": [],
300 | "source": [
301 | "### This creates a a \"labelmap.txt\" file with a list of classes the object detection model will detect.\n",
302 | "%%bash\n",
303 | "cat <> /content/labelmap.txt\n",
304 | "class1\n",
305 | "class2\n",
306 | "class3\n",
307 | "EOF"
308 | ]
309 | },
310 | {
311 | "cell_type": "markdown",
312 | "metadata": {
313 | "id": "5pa2VYhTIT1l"
314 | },
315 | "source": [
316 | "Download and run the data conversion scripts by clicking play on the following two sections of code. They will create TFRecord files for the train and validation datasets, as well as a `labelmap.pbtxt` file which contains the labelmap in a different format."
317 | ]
318 | },
319 | {
320 | "cell_type": "code",
321 | "execution_count": null,
322 | "metadata": {
323 | "id": "v3KHhgrpHved"
324 | },
325 | "outputs": [],
326 | "source": [
327 | "# Download data conversion scripts\n",
328 | "! wget https://raw.githubusercontent.com/EdjeElectronics/TensorFlow-Lite-Object-Detection-on-Android-and-Raspberry-Pi/master/util_scripts/create_csv.py\n",
329 | "! wget https://raw.githubusercontent.com/EdjeElectronics/TensorFlow-Lite-Object-Detection-on-Android-and-Raspberry-Pi/master/util_scripts/create_tfrecord.py"
330 | ]
331 | },
332 | {
333 | "cell_type": "code",
334 | "execution_count": null,
335 | "metadata": {
336 | "id": "5tdDbTmHYwu-"
337 | },
338 | "outputs": [],
339 | "source": [
340 | "# Create CSV data files and TFRecord files\n",
341 | "!python3 create_csv.py\n",
342 | "!python3 create_tfrecord.py --csv_input=images/train_labels.csv --labelmap=labelmap.txt --image_dir=images/train --output_path=train.tfrecord\n",
343 | "!python3 create_tfrecord.py --csv_input=images/validation_labels.csv --labelmap=labelmap.txt --image_dir=images/validation --output_path=val.tfrecord"
344 | ]
345 | },
346 | {
347 | "cell_type": "markdown",
348 | "metadata": {
349 | "id": "1XcSBULRzNZ_"
350 | },
351 | "source": [
352 | "We'll store the locations of the TFRecord and labelmap files as variables so we can reference them later in this Colab session."
353 | ]
354 | },
355 | {
356 | "cell_type": "code",
357 | "execution_count": null,
358 | "metadata": {
359 | "id": "YUd2wtfrqedy"
360 | },
361 | "outputs": [],
362 | "source": [
363 | "train_record_fname = '/content/train.tfrecord'\n",
364 | "val_record_fname = '/content/val.tfrecord'\n",
365 | "label_map_pbtxt_fname = '/content/labelmap.pbtxt'"
366 | ]
367 | },
368 | {
369 | "cell_type": "markdown",
370 | "metadata": {
371 | "id": "I2MAcgJ53STW"
372 | },
373 | "source": [
374 | "# 3. Set Up Training Configuration \n",
375 | "\n",
376 | "In this section, we'll set up an SSD-MobileNet model training configuration. We'll specifiy which pretrained TensorFlow model we want to use from the [TensorFlow 1 Object Detection Model Zoo](https://github.com/tensorflow/models/blob/master/research/object_detection/g3doc/tf1_detection_zoo.md). Each model also comes with a configuration file that points to file locations, sets training parameters (such as learning rate and total number of training steps), and more. We'll modify the configuration file for our custom training job.\n",
377 | "\n",
378 | "The first section of code lists out some models availabe in the TF1 Model Zoo and defines some filenames that will be used later to download the model and config file. This makes it easy to manage which model you're using and to add other models to the list later. \n",
379 | "\n",
380 | "Set the \"chosen_model\" variable to match the name of the model you'd like to train with. It's currently set to use the \"ssd-mobilenet-v1-quantized\" model. Then, click play on the next three sections to specify and download the pretrained model file and configuration file.\n"
381 | ]
382 | },
383 | {
384 | "cell_type": "code",
385 | "execution_count": null,
386 | "metadata": {
387 | "id": "gN0EUEa3e5Un"
388 | },
389 | "outputs": [],
390 | "source": [
391 | "# Change the \"chosen_model\" variable to select one of the models listed below (from the TF1 object detection zoo)\n",
392 | "\n",
393 | "chosen_model = 'ssd-mobilenet-v2-quantized'\n",
394 | "\n",
395 | "MODELS_CONFIG = {\n",
396 | " 'ssd-mobilenet-v1-quantized': {\n",
397 | " 'model_name': 'ssd_mobilenet_v1_quantized_coco',\n",
398 | " 'base_pipeline_file': 'ssd_mobilenet_v1_quantized_300x300_coco14_sync.config',\n",
399 | " 'pretrained_checkpoint': 'ssd_mobilenet_v1_quantized_300x300_coco14_sync_2018_07_18.tar.gz',\n",
400 | " },\n",
401 | " 'ssd-mobilenet-v2-quantized': {\n",
402 | " 'model_name': 'ssd_mobilenet_v2_quantized_coco',\n",
403 | " 'base_pipeline_file': 'ssd_mobilenet_v2_quantized_300x300_coco.config',\n",
404 | " 'pretrained_checkpoint': 'ssd_mobilenet_v2_quantized_300x300_coco_2019_01_03.tar.gz',\n",
405 | " }\n",
406 | "}\n",
407 | "\n",
408 | "model_name = MODELS_CONFIG[chosen_model]['model_name']\n",
409 | "pretrained_checkpoint = MODELS_CONFIG[chosen_model]['pretrained_checkpoint']\n",
410 | "base_pipeline_file = MODELS_CONFIG[chosen_model]['base_pipeline_file']"
411 | ]
412 | },
413 | {
414 | "cell_type": "code",
415 | "execution_count": null,
416 | "metadata": {
417 | "id": "kG4TmJUVrYQ7"
418 | },
419 | "outputs": [],
420 | "source": [
421 | "# Create \"mymodel\" folder for holding pre-trained weights and configuration files\n",
422 | "%mkdir /content/models/mymodel/\n",
423 | "%cd /content/models/mymodel/\n",
424 | "\n",
425 | "# Download pretrained model file from TensorFlow Model Zoo\n",
426 | "import tarfile\n",
427 | "download_tar = 'http://download.tensorflow.org/models/object_detection/' + pretrained_checkpoint\n",
428 | "\n",
429 | "!wget {download_tar}\n",
430 | "tar = tarfile.open(pretrained_checkpoint)\n",
431 | "tar.extractall()\n",
432 | "tar.close()\n",
433 | "\n",
434 | "# Download base training configuration file\n",
435 | "download_config = 'https://raw.githubusercontent.com/tensorflow/models/master/research/object_detection/samples/configs/' + base_pipeline_file\n",
436 | "!wget {download_config}"
437 | ]
438 | },
439 | {
440 | "cell_type": "markdown",
441 | "metadata": {
442 | "id": "3jOYxQ20wXVr"
443 | },
444 | "source": [
445 | "Now that we've downloaded our model and config file, we need to modify the configuration file with some high-level training parameters. The following variables are used to control training steps:\n",
446 | "\n",
447 | "* **num_steps**: The total amount of steps to use for training the model. A good number to start with is 40,000 steps. You can use more steps if you notice the loss metrics are still decreasing by the time training finishes. The more steps, the longer the training. Training can also be stopped early if loss flattens out before reaching the specified number of steps.\n",
448 | "* **batch_size**: The number of images to use per training step. A larger batch size allows a model to be trained in fewer steps, but the size is limited by the GPU memory available for training. For the GPUs used in Colab instances, 16 is typically a good number.\n",
449 | "\n",
450 | "* **quant_delay_steps**: (Only used for quantization-aware training) After this many steps, the training algorithm will insert \"fake\" quantization nodes in the network to simulate the effects of quantization. A good starting point is half the total number of training steps. More information is available [here](https://neuralet.com/article/quantization-of-tensorflow-object-detection-api-models/).\n",
451 | "\n",
452 | "Other training information, like the location of the pretrained model file, the config file, and total number of classes are also assigned in this step.\n"
453 | ]
454 | },
455 | {
456 | "cell_type": "code",
457 | "execution_count": null,
458 | "metadata": {
459 | "id": "IKiXz33QwXyP"
460 | },
461 | "outputs": [],
462 | "source": [
463 | "# Set training parameters for the model\n",
464 | "num_steps = 30000\n",
465 | "batch_size = 16\n",
466 | "quant_delay_steps = 15000"
467 | ]
468 | },
469 | {
470 | "cell_type": "code",
471 | "execution_count": null,
472 | "metadata": {
473 | "id": "b_ki9jOqxn7V"
474 | },
475 | "outputs": [],
476 | "source": [
477 | "# Set file locations and get number of classes for config file\n",
478 | "pipeline_fname = '/content/models/mymodel/' + base_pipeline_file\n",
479 | "fine_tune_checkpoint = '/content/models/mymodel/' + model_name + '/model.ckpt'\n",
480 | "\n",
481 | "def get_num_classes(pbtxt_fname):\n",
482 | " from object_detection.utils import label_map_util\n",
483 | " label_map = label_map_util.load_labelmap(pbtxt_fname)\n",
484 | " categories = label_map_util.convert_label_map_to_categories(\n",
485 | " label_map, max_num_classes=90, use_display_name=True)\n",
486 | " category_index = label_map_util.create_category_index(categories)\n",
487 | " return len(category_index.keys())\n",
488 | "num_classes = get_num_classes(label_map_pbtxt_fname)\n",
489 | "print('Total classes:', num_classes)\n"
490 | ]
491 | },
492 | {
493 | "cell_type": "markdown",
494 | "metadata": {
495 | "id": "xxpOXUTx0E-n"
496 | },
497 | "source": [
498 | "Finally, we'll rewrite the config file to use the training parameters we just specified. The following section of code will automatically replace the necessary parameters in the downloaded .config file and save it as our custom \"pipeline_file.config\" file."
499 | ]
500 | },
501 | {
502 | "cell_type": "code",
503 | "execution_count": null,
504 | "metadata": {
505 | "id": "5eA5ht3_yukT"
506 | },
507 | "outputs": [],
508 | "source": [
509 | "# Write custom configuration file by slotting our dataset, model checkpoint, and training parameters into the base pipeline file\n",
510 | "# TO DO: change that description\n",
511 | "\n",
512 | "import re\n",
513 | "\n",
514 | "%cd /content/models/mymodel\n",
515 | "print('writing custom configuration file')\n",
516 | "\n",
517 | "with open(pipeline_fname) as f:\n",
518 | " s = f.read()\n",
519 | "with open('pipeline_file.config', 'w') as f:\n",
520 | " \n",
521 | " # fine_tune_checkpoint\n",
522 | " s = re.sub('fine_tune_checkpoint: \".*?\"',\n",
523 | " 'fine_tune_checkpoint: \"{}\"'.format(fine_tune_checkpoint), s)\n",
524 | " \n",
525 | " # tfrecord files train and test.\n",
526 | " s = re.sub(\n",
527 | " '(input_path: \".*?)(PATH_TO_BE_CONFIGURED/mscoco_train.*?\")', 'input_path: \"{}\"'.format(train_record_fname), s)\n",
528 | " s = re.sub(\n",
529 | " '(input_path: \".*?)(PATH_TO_BE_CONFIGURED/mscoco_val)(.*?\")', 'input_path: \"{}\"'.format(val_record_fname), s)\n",
530 | "\n",
531 | " # label_map_path\n",
532 | " s = re.sub(\n",
533 | " 'label_map_path: \".*?\"', 'label_map_path: \"{}\"'.format(label_map_pbtxt_fname), s)\n",
534 | "\n",
535 | " # Set training steps, num_steps\n",
536 | " s = re.sub('num_steps: [0-9]+',\n",
537 | " 'num_steps: {}'.format(num_steps), s)\n",
538 | "\n",
539 | " # Set training batch_size.\n",
540 | " s = re.sub('batch_size: [0-9]+',\n",
541 | " 'batch_size: {}'.format(batch_size), s)\n",
542 | " \n",
543 | " # Set number of classes num_classes.\n",
544 | " s = re.sub('num_classes: [0-9]+',\n",
545 | " 'num_classes: {}'.format(num_classes), s)\n",
546 | " \n",
547 | " # Fine-tune checkpoint type\n",
548 | " s = re.sub(\n",
549 | " 'fine_tune_checkpoint_type: \"classification\"', 'fine_tune_checkpoint_type: \"{}\"'.format('detection'), s)\n",
550 | " \n",
551 | " # Quantization delay steps\n",
552 | " s = re.sub(\n",
553 | " 'delay: 48000', 'delay: {}'.format(quant_delay_steps), s)\n",
554 | " \n",
555 | " f.write(s)\n",
556 | "\n",
557 | "%cd /content\n"
558 | ]
559 | },
560 | {
561 | "cell_type": "code",
562 | "execution_count": null,
563 | "metadata": {
564 | "id": "HEsOLOMHzBqF"
565 | },
566 | "outputs": [],
567 | "source": [
568 | "# Display the custom configuration file's contents\n",
569 | "!cat /content/models/mymodel/pipeline_file.config"
570 | ]
571 | },
572 | {
573 | "cell_type": "code",
574 | "execution_count": null,
575 | "metadata": {
576 | "id": "GMlaN3rs3zLe"
577 | },
578 | "outputs": [],
579 | "source": [
580 | "# Set the path to the custom config file, and the directory to store training checkpoints in\n",
581 | "pipeline_file = '/content/models/mymodel/pipeline_file.config'\n",
582 | "model_dir = '/content/training/'"
583 | ]
584 | },
585 | {
586 | "cell_type": "markdown",
587 | "metadata": {
588 | "id": "bLe247WqxPHw"
589 | },
590 | "source": [
591 | "The next block modifies the training script to save checkpoints once every 1000 training steps. Change `num_eval_steps` if you'd like to save checkpoints more or less frequently."
592 | ]
593 | },
594 | {
595 | "cell_type": "code",
596 | "execution_count": null,
597 | "metadata": {
598 | "id": "oi_wWkJOnc-D"
599 | },
600 | "outputs": [],
601 | "source": [
602 | "# Modify model_main.py to set evaluation and checkpoint interval\n",
603 | "num_eval_steps = 1000\n",
604 | "%cd /content/models/research/object_detection\n",
605 | "print('Modifying model_main.py')\n",
606 | "\n",
607 | "\n",
608 | "with open('model_main.py', 'r') as f:\n",
609 | " data = f.read()\n",
610 | "\n",
611 | " # Set eval steps\n",
612 | " data = data.replace('config = tf_estimator.RunConfig(model_dir=FLAGS.model_dir)', \n",
613 | " 'config = tf.estimator.RunConfig(model_dir=FLAGS.model_dir, save_checkpoints_steps={})'.format(num_eval_steps))\n",
614 | " \n",
615 | " f.close()\n",
616 | "\n",
617 | "!rm /content/models/research/object_detection/model_main.py\n",
618 | "\n",
619 | "with open('model_main.py', 'w') as f:\n",
620 | " f.write(data)\n",
621 | "\n",
622 | "%cd /content"
623 | ]
624 | },
625 | {
626 | "cell_type": "code",
627 | "execution_count": null,
628 | "metadata": {
629 | "id": "7wD0tda5oqIR"
630 | },
631 | "outputs": [],
632 | "source": [
633 | "!cat /content/models/research/object_detection/model_main.py"
634 | ]
635 | },
636 | {
637 | "cell_type": "markdown",
638 | "metadata": {
639 | "id": "XxPj_QV43qD5"
640 | },
641 | "source": [
642 | "# Train Custom TF1 Object Detector\n",
643 | "\n",
644 | "We're ready to train our object detection model! Model training is performed using the \"model_main_tf2.py\" script from the TF Object Detection API. We've already defined all the parameters and arguments used by `model_main_tf2.py` in previous sections of this Colab. Training will take anywhere from 2 to 6 hours, depending on the model, batch size, and number of training steps. Just click Play on the following block to begin training!\n",
645 | "\n",
646 | "*Note: It takes a few minutes for the program to display any training messages, because it only displays logs once every 100 steps. If it seems like nothing is happening, just wait a couple minutes.*\n",
647 | "\n",
648 | "*Another note: If you want to stop training early, just click on the code block while it's running and press Ctrl+M to interrupt execution. You might have to press Ctrl+M a couple times and also click the Stop button or right-click and select \"Interrupt Execution\".*\n"
649 | ]
650 | },
651 | {
652 | "cell_type": "code",
653 | "execution_count": null,
654 | "metadata": {
655 | "id": "3mSabQWqvC2R"
656 | },
657 | "outputs": [],
658 | "source": [
659 | "!pip install tensorboard==2.8.0"
660 | ]
661 | },
662 | {
663 | "cell_type": "code",
664 | "execution_count": null,
665 | "metadata": {
666 | "id": "TI9iCCxoNlAL"
667 | },
668 | "outputs": [],
669 | "source": [
670 | "%load_ext tensorboard\n",
671 | "%tensorboard --logdir '/content/training'"
672 | ]
673 | },
674 | {
675 | "cell_type": "code",
676 | "execution_count": null,
677 | "metadata": {
678 | "id": "tQTfZChVzzpZ"
679 | },
680 | "outputs": [],
681 | "source": [
682 | "!python /content/models/research/object_detection/model_main.py \\\n",
683 | " --pipeline_config_path={pipeline_file} \\\n",
684 | " --model_dir={model_dir} \\\n",
685 | " --alsologtostderr \\\n",
686 | " --num_train_steps={num_steps}"
687 | ]
688 | },
689 | {
690 | "cell_type": "markdown",
691 | "metadata": {
692 | "id": "4Vk2146Ogil3"
693 | },
694 | "source": [
695 | "# 5. Export Trained Inference Graph\n",
696 | "In the left sidebar, click the folder icon to view the files in the `/content` folder. Click the `training` folder to expand it, and find the checkpoint with the highest number (e.g. `model.ckpt-29000`). Replace \"XXXX\" in the code section below with that number."
697 | ]
698 | },
699 | {
700 | "cell_type": "code",
701 | "execution_count": null,
702 | "metadata": {
703 | "id": "YnSEZIzl4M10"
704 | },
705 | "outputs": [],
706 | "source": [
707 | "!mkdir /content/fine_tuned_model_lite\n",
708 | "output_directory = '/content/fine_tuned_model_lite'\n",
709 | "\n",
710 | "# Replace \"XXXX\" in the line below with the latest checkpoint in the /content/training directory\n",
711 | "last_model_path = '/content/training/model.ckpt-30000'\n",
712 | "print(last_model_path)\n",
713 | "\n",
714 | "!python /content/models/research/object_detection/export_tflite_ssd_graph.py \\\n",
715 | " --trained_checkpoint_prefix {last_model_path} \\\n",
716 | " --output_directory {output_directory} \\\n",
717 | " --pipeline_config_path {pipeline_file}"
718 | ]
719 | },
720 | {
721 | "cell_type": "markdown",
722 | "metadata": {
723 | "id": "IwoGtqdejiez"
724 | },
725 | "source": [
726 | "# 6. Convert Model to TensorFlow Lite Format"
727 | ]
728 | },
729 | {
730 | "cell_type": "code",
731 | "execution_count": null,
732 | "metadata": {
733 | "id": "PW7TpzLmhTbW"
734 | },
735 | "outputs": [],
736 | "source": [
737 | "localpb = '/content/fine_tuned_model_lite/tflite_graph.pb'\n",
738 | "tflite_file = '/content/fine_tuned_model_lite/detect.tflite'\n",
739 | "\n",
740 | "# Can use Netron app to determine the input size: https://www.electronjs.org/apps/netron \n",
741 | "input_size = [1, 300, 300, 3]\n",
742 | "input_shape = {\"normalized_input_image_tensor\" : input_size}\n",
743 | "\n",
744 | "print(input_shape)"
745 | ]
746 | },
747 | {
748 | "cell_type": "code",
749 | "execution_count": null,
750 | "metadata": {
751 | "id": "Ec8LzJLbr-SR"
752 | },
753 | "outputs": [],
754 | "source": [
755 | "import tensorflow as tf\n",
756 | "\n",
757 | "converter = tf.lite.TFLiteConverter.from_frozen_graph(\n",
758 | " localpb, \n",
759 | " [\"normalized_input_image_tensor\"],\n",
760 | " [\"TFLite_Detection_PostProcess\",\"TFLite_Detection_PostProcess:1\",\"TFLite_Detection_PostProcess:2\",\"TFLite_Detection_PostProcess:3\"],\n",
761 | " input_shape\n",
762 | ")\n",
763 | "\n",
764 | "converter.allow_custom_ops = True\n",
765 | "converter.inference_type = tf.uint8 # Tell converter to create a quantized model\n",
766 | "converter.quantized_input_stats = {'normalized_input_image_tensor': (128, 128)}\n",
767 | "\n",
768 | "tflite_model = converter.convert()\n",
769 | "\n",
770 | "open(tflite_file,'wb').write(tflite_model)\n",
771 | "\n",
772 | "# Test that the conversion was successful - if any errors are generated, something went wrong!\n",
773 | "interpreter = tf.lite.Interpreter(model_content=tflite_model)\n",
774 | "interpreter.allocate_tensors()"
775 | ]
776 | },
777 | {
778 | "cell_type": "code",
779 | "execution_count": null,
780 | "metadata": {
781 | "id": "awZMQGVqMpVL"
782 | },
783 | "outputs": [],
784 | "source": [
785 | "!cp /content/labelmap.txt /content/fine_tuned_model_lite\n",
786 | "!cp /content/labelmap.pbtxt /content/fine_tuned_model_lite\n",
787 | "!zip -r /content/fine_tuned_model_lite.zip /content/fine_tuned_model_lite"
788 | ]
789 | },
790 | {
791 | "cell_type": "markdown",
792 | "metadata": {
793 | "id": "w41-KMn7KV-T"
794 | },
795 | "source": [
796 | "Now, you can download the \"detect.tflite\" and \"labelmap.txt\" files and move them to your Raspberry Pi."
797 | ]
798 | },
799 | {
800 | "cell_type": "markdown",
801 | "metadata": {
802 | "id": "bQyjuMAt1WEL"
803 | },
804 | "source": [
805 | "# (Optional) Test out TensorFlow Lite Model\n",
806 | "Now that we've got our custom detection model trained and converted to TFLite format, let's try it out on some images. We'll use the images from our \"test\" folder. These images weren't seen at all by the model during training, so they'll give a faithful depiction of how accurate the model actually is.\n",
807 | "\n",
808 | "The following code is used to import the TensorFlow Lite runtime, load it into memory, run inferencing on the test images, and display the results."
809 | ]
810 | },
811 | {
812 | "cell_type": "code",
813 | "execution_count": null,
814 | "metadata": {
815 | "id": "v1IBMfrD2GEQ"
816 | },
817 | "outputs": [],
818 | "source": [
819 | "# Copied from my TFLite repository, and stripped unneeded stuff out\n",
820 | "\n",
821 | "# Import packages\n",
822 | "import os\n",
823 | "import cv2\n",
824 | "import numpy as np\n",
825 | "import sys\n",
826 | "import glob\n",
827 | "import importlib.util\n",
828 | "from tensorflow.lite.python.interpreter import Interpreter\n",
829 | "\n",
830 | "import matplotlib\n",
831 | "import matplotlib.pyplot as plt\n",
832 | "\n",
833 | "%matplotlib inline\n",
834 | "\n",
835 | "PATH_TO_IMAGES='/content/images/test'\n",
836 | "PATH_TO_MODEL='/content/fine_tuned_model_lite/detect.tflite'\n",
837 | "PATH_TO_LABELS='/content/labelmap.txt'\n",
838 | "IMAGES_TO_TEST = 10\n",
839 | "min_conf_threshold=0.5\n",
840 | "\n",
841 | "# Grab all image filenames\n",
842 | "images = glob.glob(PATH_TO_IMAGES + '/*.jpg')\n",
843 | "images = images + glob.glob(PATH_TO_IMAGES + '/*.JPG')\n",
844 | "images = images + glob.glob(PATH_TO_IMAGES + '/*.png')\n",
845 | "\n",
846 | "\n",
847 | "# Load the label map into memory\n",
848 | "with open(PATH_TO_LABELS, 'r') as f:\n",
849 | " labels = [line.strip() for line in f.readlines()]\n",
850 | "\n",
851 | "\n",
852 | "# Load the Tensorflow Lite model into memory\n",
853 | "interpreter = Interpreter(model_path=PATH_TO_MODEL)\n",
854 | "interpreter.allocate_tensors()\n",
855 | "\n",
856 | "# Get model details\n",
857 | "input_details = interpreter.get_input_details()\n",
858 | "output_details = interpreter.get_output_details()\n",
859 | "height = input_details[0]['shape'][1]\n",
860 | "width = input_details[0]['shape'][2]\n",
861 | "\n",
862 | "floating_model = (input_details[0]['dtype'] == np.float32)\n",
863 | "\n",
864 | "input_mean = 127.5\n",
865 | "input_std = 127.5\n",
866 | "\n",
867 | "# Loop over every image and perform detection\n",
868 | "for image_path in images[0:IMAGES_TO_TEST]:\n",
869 | "\n",
870 | " # Load image and resize to expected shape [1xHxWx3]\n",
871 | " image = cv2.imread(image_path)\n",
872 | " image_rgb = cv2.cvtColor(image, cv2.COLOR_BGR2RGB)\n",
873 | " imH, imW, _ = image.shape \n",
874 | " image_resized = cv2.resize(image_rgb, (width, height))\n",
875 | " input_data = np.expand_dims(image_resized, axis=0)\n",
876 | "\n",
877 | " # Normalize pixel values if using a floating model (i.e. if model is non-quantized)\n",
878 | " if floating_model:\n",
879 | " input_data = (np.float32(input_data) - input_mean) / input_std\n",
880 | "\n",
881 | " # Perform the actual detection by running the model with the image as input\n",
882 | " interpreter.set_tensor(input_details[0]['index'],input_data)\n",
883 | " interpreter.invoke()\n",
884 | "\n",
885 | " # Retrieve detection results\n",
886 | " boxes = interpreter.get_tensor(output_details[0]['index'])[0] # Bounding box coordinates of detected objects\n",
887 | " classes = interpreter.get_tensor(output_details[1]['index'])[0] # Class index of detected objects\n",
888 | " scores = interpreter.get_tensor(output_details[2]['index'])[0] # Confidence of detected objects\n",
889 | " #num = interpreter.get_tensor(output_details[3]['index']) # Total number of detected objects (inaccurate and not needed)\n",
890 | "\n",
891 | " # Loop over all detections and draw detection box if confidence is above minimum threshold\n",
892 | " for i in range(len(scores)):\n",
893 | " if ((scores[i] > min_conf_threshold) and (scores[i] <= 1.0)):\n",
894 | "\n",
895 | " # Get bounding box coordinates and draw box\n",
896 | " # Interpreter can return coordinates that are outside of image dimensions, need to force them to be within image using max() and min()\n",
897 | " ymin = int(max(1,(boxes[i][0] * imH)))\n",
898 | " xmin = int(max(1,(boxes[i][1] * imW)))\n",
899 | " ymax = int(min(imH,(boxes[i][2] * imH)))\n",
900 | " xmax = int(min(imW,(boxes[i][3] * imW)))\n",
901 | " \n",
902 | " cv2.rectangle(image, (xmin,ymin), (xmax,ymax), (10, 255, 0), 2)\n",
903 | "\n",
904 | " # Draw label\n",
905 | " object_name = labels[int(classes[i])] # Look up object name from \"labels\" array using class index\n",
906 | " label = '%s: %d%%' % (object_name, int(scores[i]*100)) # Example: 'person: 72%'\n",
907 | " labelSize, baseLine = cv2.getTextSize(label, cv2.FONT_HERSHEY_SIMPLEX, 0.7, 2) # Get font size\n",
908 | " label_ymin = max(ymin, labelSize[1] + 10) # Make sure not to draw label too close to top of window\n",
909 | " cv2.rectangle(image, (xmin, label_ymin-labelSize[1]-10), (xmin+labelSize[0], label_ymin+baseLine-10), (255, 255, 255), cv2.FILLED) # Draw white box to put label text in\n",
910 | " cv2.putText(image, label, (xmin, label_ymin-7), cv2.FONT_HERSHEY_SIMPLEX, 0.7, (0, 0, 0), 2) # Draw label text\n",
911 | "\n",
912 | " # All the results have been drawn on the image, now display the image\n",
913 | " image = cv2.cvtColor(image,cv2.COLOR_BGR2RGB)\n",
914 | " plt.figure(figsize=(12,16))\n",
915 | " plt.imshow(image)\n",
916 | " plt.show()"
917 | ]
918 | },
919 | {
920 | "cell_type": "markdown",
921 | "metadata": {
922 | "id": "XFsuasvxFHo8"
923 | },
924 | "source": [
925 | "## (Optional) Compile Model for Edge TPU\n",
926 | "\n",
927 | "Now that the model has been converted to TFLite and quantized, we can compile it to run on Edge TPU devices like the [Coral USB Accelerator](https://coral.ai/products/accelerator/) or the [Coral Dev Board](https://coral.ai/products/dev-board/). This allows the model to run much faster! For more information on the Edge TPU, see my [TensorFlow Lite repository on GitHub](fine_tuned_model_lite).\n",
928 | "\n",
929 | "First, install the Edge TPU Compiler package inside this Colab instance."
930 | ]
931 | },
932 | {
933 | "cell_type": "code",
934 | "execution_count": null,
935 | "metadata": {
936 | "id": "mUd_SNC0JSq0"
937 | },
938 | "outputs": [],
939 | "source": [
940 | "! curl https://packages.cloud.google.com/apt/doc/apt-key.gpg | sudo apt-key add -\n",
941 | "! echo \"deb https://packages.cloud.google.com/apt coral-edgetpu-stable main\" | sudo tee /etc/apt/sources.list.d/coral-edgetpu.list\n",
942 | "! sudo apt-get update\n",
943 | "! sudo apt-get install edgetpu-compiler\t"
944 | ]
945 | },
946 | {
947 | "cell_type": "markdown",
948 | "metadata": {
949 | "id": "usfmdtSiJuuC"
950 | },
951 | "source": [
952 | "Next, compile the model. (If your model has a different filename than \"detect.tflite\", use that instead.)"
953 | ]
954 | },
955 | {
956 | "cell_type": "code",
957 | "execution_count": null,
958 | "metadata": {
959 | "id": "WTboEAWuJ0ku"
960 | },
961 | "outputs": [],
962 | "source": [
963 | "%cd /content/fine_tuned_model_lite\n",
964 | "!edgetpu_compiler detect.tflite\n",
965 | "!mv detect_edgetpu.tflite edgetpu.tflite"
966 | ]
967 | },
968 | {
969 | "cell_type": "markdown",
970 | "metadata": {
971 | "id": "oqGy2FgzKomN"
972 | },
973 | "source": [
974 | "The compiled model will be output in the /content folder as \"detect_edgetpu.tflite\". It gets renamed to \"edgetpu.tflite\" to be consistent with my code. Download this file using the command below. (If your model has a different filename than \"edgetpu.tflite\", use that instead.)"
975 | ]
976 | },
977 | {
978 | "cell_type": "code",
979 | "execution_count": null,
980 | "metadata": {
981 | "id": "GgvZC_y5ESYq"
982 | },
983 | "outputs": [],
984 | "source": [
985 | "%cd /content\n",
986 | "!cp labelmap.txt fine_tuned_model_lite\n",
987 | "!cp labelmap.pbtxt fine_tuned_model_lite\n",
988 | "!zip -r fine_tuned_model_lite.zip fine_tuned_model_lite"
989 | ]
990 | },
991 | {
992 | "cell_type": "code",
993 | "execution_count": null,
994 | "metadata": {
995 | "id": "AmjqvKuuK8ZR"
996 | },
997 | "outputs": [],
998 | "source": [
999 | "from google.colab import files\n",
1000 | "\n",
1001 | "files.download('edgetpu.tflite')"
1002 | ]
1003 | },
1004 | {
1005 | "cell_type": "markdown",
1006 | "metadata": {
1007 | "id": "ptwpBBEWLfuJ"
1008 | },
1009 | "source": [
1010 | "Now you're all set to use the Coral model! For instructions on how to run an object detection model on the Raspberry Pi using the Coral USB Acclerator, please see my video, [\"How to Use the Coral USB Accelerator with the Raspberry Pi\"](https://www.youtube.com/watch?v=qJMwNHQNOVU)."
1011 | ]
1012 | }
1013 | ],
1014 | "metadata": {
1015 | "accelerator": "GPU",
1016 | "colab": {
1017 | "collapsed_sections": [],
1018 | "provenance": [],
1019 | "include_colab_link": true
1020 | },
1021 | "kernelspec": {
1022 | "display_name": "Python 3",
1023 | "name": "python3"
1024 | }
1025 | },
1026 | "nbformat": 4,
1027 | "nbformat_minor": 0
1028 | }
--------------------------------------------------------------------------------
/deploy_guides/MacOS_TFLite_Guide.md:
--------------------------------------------------------------------------------
1 | # How to Run TensorFlow Lite Models on macOS
2 | This guide shows how to set up a TensorFlow Lite Runtime environment on a macOS device. We'll use [Anaconda](https://www.anaconda.com/) to create a Python environment to install the TFLite Runtime in. It's easy!
3 |
4 | Acknowledgement: Thanks goes to [Max Hancock](https://www.linkedin.com/in/maxwell-hancock/) for contributing this guide!
5 |
6 | ## Step 1. Download and Install Anaconda
7 | First, install [Anaconda](https://www.anaconda.com/), which is a Python environment manager that greatly simplifies Python package management and deployment. Anaconda allows you to create Python virtual environments on your Mac without interfering with existing installations of Python. Go to the [Anaconda Downloads page](https://www.anaconda.com/products/distribution) and click the Download button.
8 |
9 | When the download finishes, open the downloaded .exe file and step through the installation wizard. Use the default install options.
10 |
11 | ## Step 2. Set Up Virtual Environment and Directory
12 | First open up the terminal by opening a Finder window, and press 'Command + Shift + U', and then select Terminal. We'll create a folder called `tflite1` directly in the Home folder (under your username) - you can use any other folder location you like, just make sure to modify the commands below to use the correct file paths. Create the folder and move into it by issuing the following commands in the terminal:
13 |
14 | ```
15 | mkdir ~/tflite1
16 | cd ~/tflite1
17 | ```
18 |
19 | Next, create a Python 3.9 virtual environment by issuing:
20 |
21 | ```
22 | conda create --name tflite1-env python=3.9
23 | ```
24 |
25 | Enter "y" then "ENTER" when it asks if you want to proceed. Activate the environment and install the required packages by issuing the commands below. We'll install TensorFlow, OpenCV, and a downgraded version of protobuf. TensorFlow is a pretty big download (about 450MB), so it will take a while.
26 |
27 | ```
28 | conda activate tflite1-env
29 | pip install tensorflow
30 | pip install opencv-python
31 | pip uninstall protobuf
32 | pip install protobuf==3.20.0
33 | ```
34 |
35 | Download the detection scripts from this repository by issuing:
36 |
37 | ```
38 | curl https://raw.githubusercontent.com/EdjeElectronics/TensorFlow-Lite-Object-Detection-on-Android-and-Raspberry-Pi/master/TFLite_detection_image.py --output TFLite_detection_image.py
39 | curl https://raw.githubusercontent.com/EdjeElectronics/TensorFlow-Lite-Object-Detection-on-Android-and-Raspberry-Pi/master/TFLite_detection_video.py --output TFLite_detection_video.py
40 | curl https://raw.githubusercontent.com/EdjeElectronics/TensorFlow-Lite-Object-Detection-on-Android-and-Raspberry-Pi/master/TFLite_detection_webcam.py --output TFLite_detection_webcam.py
41 | curl https://raw.githubusercontent.com/EdjeElectronics/TensorFlow-Lite-Object-Detection-on-Android-and-Raspberry-Pi/master/TFLite_detection_stream.py --output TFLite_detection_stream.py
42 | ```
43 |
44 | ## Step 3. Move TFLite Model into Directory
45 | Next, take the custom TFLite model that was trained and downloaded from the Colab notebook and move it into the {username}\tflite1 directory (replacing {username} with your home directory name). If you downloaded it from Colab, it should be in a file called `custom_model_lite.zip`. (If you haven't trained a model yet and just want to test one out, download my "change counter" model by clicking this [Dropbox link](https://www.dropbox.com/scl/fi/4fk8ls8s03c94g6sb3ngo/custom_model_lite.zip?rlkey=zqda21sowk0hrw6i3f2dgbsyy&dl=0).) Move that file to the {username}\tflite1 directory. Once it's moved, unzip it using:
46 |
47 | ```
48 | tar -xf custom_model_lite.zip
49 | ```
50 |
51 | At this point, you should have a folder at {username}\tflite1\custom_model_lite which contains at least a `detect.tflite` and `labelmap.txt` file.
52 |
53 | ## Step 4. Run TensorFlow Lite Model!
54 | Now, just call one of the detection scripts and point it at your model folder with the `--modeldir` option. For example, to run your `custom_model_lite` model on a webcam, issue:
55 |
56 | ```
57 | python TFLite_detection_webcam.py --modeldir=custom_model_lite
58 | ```
59 |
60 | A window will appear showing detection results drawn on the live webcam feed, make sure to accept the use of webcam. For more information on how to use the detection scripts, like if you want to enter an image, video, or web stream please see [Step 3 in the main README page](https://github.com/EdjeElectronics/TensorFlow-Lite-Object-Detection-on-Android-and-Raspberry-Pi#step-3-run-tensorflow-lite-models).
61 |
62 | Have fun using TensorFlow Lite! Stay tuned for more examples on how to build cool applications around your model.
63 |
--------------------------------------------------------------------------------
/deploy_guides/Raspberry_Pi_Guide.md:
--------------------------------------------------------------------------------
1 | # How to Run TensorFlow Lite Object Detection Models on the Raspberry Pi (with Optional Coral USB Accelerator)
2 |
3 |
4 |  5 |
5 |
6 |
7 | ## Introduction
8 | This guide provides step-by-step instructions for how to set up TensorFlow Lite on the Raspberry Pi and use it to run object detection models. It also shows how to set up the Coral USB Accelerator on the Pi and run Edge TPU detection models. It works for the Raspberry Pi 3 and Raspberry Pi 4 running either Rasbpian Buster or Rasbpian Stretch.
9 |
10 | This guide is part of my larger TensorFlow Lite tutorial series which shows how to [train, convert, and run custom TensorFlow Lite object detection models](https://github.com/EdjeElectronics/TensorFlow-Lite-Object-Detection-on-Android-and-Raspberry-Pi).
11 |
12 | TensorFlow Lite (TFLite) models run much faster than regular TensorFlow models on the Raspberry Pi. You can see a comparison of framerates obtained using regular TensorFlow, TensorFlow Lite, and Coral USB Accelerator models in my [TensorFlow Lite Performance Comparison YouTube video](https://www.youtube.com/watch?v=TiOKvOrYNII).
13 |
14 | This portion of the guide is split in to three sections:
15 |
16 | * [Section 1. Run TensorFlow Lite Object Detection Models on the Raspberry Pi](#section-1---how-to-set-up-and-run-tensorflow-lite-object-detection-models-on-the-raspberry-pi)
17 | * [Section 2. Run Edge TPU Object Detection Models on the Raspberry Pi Using the Coral USB Accelerator](#section-2---run-edge-tpu-object-detection-models-on-the-raspberry-pi-using-the-coral-usb-accelerator)
18 | * [Section 3. Compile Custom Edge TPU Object Detection Models](#section-2---run-edge-tpu-object-detection-models-on-the-raspberry-pi-using-the-coral-usb-accelerator)
19 |
20 | This repository also includes scripts for running the TFLite and Edge TPU models on images, videos, or webcam/Picamera feeds.
21 |
22 | ## Section 1 - How to Set Up and Run TensorFlow Lite Object Detection Models on the Raspberry Pi
23 |
24 | Setting up TensorFlow Lite on the Raspberry Pi is much easier than regular TensorFlow! These are the steps needed to set up TensorFlow Lite:
25 |
26 | - 1a. Update the Raspberry Pi
27 | - 1b. Download this repository and create virtual environment
28 | - 1c. Install TensorFlow and OpenCV
29 | - 1d. Set up TensorFlow Lite detection model
30 | - 1e. Run TensorFlow Lite model!
31 |
32 | I also made a YouTube video that walks through this guide:
33 |
34 | [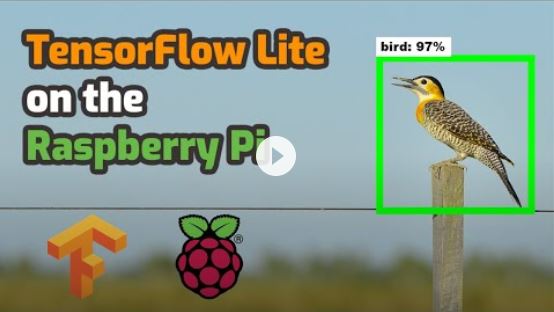](https://www.youtube.com/watch?v=aimSGOAUI8Y)
35 |
36 | ### Step 1a. Update the Raspberry Pi
37 | First, the Raspberry Pi needs to be fully updated. Open a terminal and issue:
38 | ```
39 | sudo apt-get update
40 | sudo apt-get dist-upgrade
41 | ```
42 | Depending on how long it’s been since you’ve updated your Pi, the update could take anywhere between a minute and an hour.
43 |
44 | While we're at it, let's make sure the camera interface is enabled in the Raspberry Pi Configuration menu. Click the Pi icon in the top left corner of the screen, select Preferences -> Raspberry Pi Configuration, and go to the Interfaces tab and verify Camera is set to Enabled. If it isn't, enable it now, and reboot the Raspberry Pi.
45 |
46 |
47 |  48 |
48 |
49 |
50 | ### Step 1b. Download this repository and create virtual environment
51 |
52 | Next, clone this GitHub repository by issuing the following command. The repository contains the scripts we'll use to run TensorFlow Lite, as well as a shell script that will make installing everything easier. Issue:
53 |
54 | ```
55 | git clone https://github.com/EdjeElectronics/TensorFlow-Lite-Object-Detection-on-Android-and-Raspberry-Pi.git
56 | ```
57 |
58 | This downloads everything into a folder called TensorFlow-Lite-Object-Detection-on-Android-and-Raspberry-Pi. That's a little long to work with, so rename the folder to "tflite1" and then cd into it:
59 |
60 | ```
61 | mv TensorFlow-Lite-Object-Detection-on-Android-and-Raspberry-Pi tflite1
62 | cd tflite1
63 | ```
64 |
65 | We'll work in this /home/pi/tflite1 directory for the rest of the guide. Next up is to create a virtual environment called "tflite1-env".
66 |
67 | I'm using a virtual environment for this guide because it prevents any conflicts between versions of package libraries that may already be installed on your Pi. Keeping TensorFlow installed in its own environment allows us to avoid version conflicts. For example, if you've already installed TensorFlow v1.8 on the Pi using my [other guide](https://www.youtube.com/watch?v=npZ-8Nj1YwY), you can leave that installation as-is without having to worry about overriding it.
68 |
69 | Install virtualenv by issuing:
70 |
71 | ```
72 | sudo pip3 install virtualenv
73 | ```
74 |
75 | Then, create the "tflite1-env" virtual environment by issuing:
76 |
77 | ```
78 | python3 -m venv tflite1-env
79 | ```
80 |
81 | This will create a folder called tflite1-env inside the tflite1 directory. The tflite1-env folder will hold all the package libraries for this environment. Next, activate the environment by issuing:
82 |
83 | ```
84 | source tflite1-env/bin/activate
85 | ```
86 |
87 | **You'll need to issue the `source tflite1-env/bin/activate` command from inside the /home/pi/tflite1 directory to reactivate the environment every time you open a new terminal window. You can tell when the environment is active by checking if (tflite1-env) appears before the path in your command prompt, as shown in the screenshot below.**
88 |
89 | At this point, here's what your tflite1 directory should look like if you issue `ls`.
90 |
91 |
92 |  93 |
93 |
94 |
95 | If your directory looks good, it's time to move on to Step 1c!
96 |
97 | ### Step 1c. Install TensorFlow Lite dependencies and OpenCV
98 | Next, we'll install TensorFlow, OpenCV, and all the dependencies needed for both packages. OpenCV is not needed to run TensorFlow Lite, but the object detection scripts in this repository use it to grab images and draw detection results on them.
99 |
100 | To make things easier, I wrote a shell script that will automatically download and install all the packages and dependencies. Run it by issuing:
101 |
102 | ```
103 | bash get_pi_requirements.sh
104 | ```
105 |
106 | This downloads about 400MB worth of installation files, so it will take a while. Go grab a cup of coffee while it's working! If you'd like to see everything that gets installed, simply open get_pi_dependencies.sh to view the list of packages.
107 |
108 | **NOTE: If you get an error while running the `bash get_pi_requirements.sh` command, it's likely because your internet connection timed out, or because the downloaded package data was corrupted. If you get an error, try re-running the command a few more times.**
109 |
110 | **ANOTHER NOTE: The shell script automatically installs the latest version of TensorFlow. If you'd like to install a specific version, issue `pip3 install tensorflow==X.XX` (where X.XX is replaced with the version you want to install) after running the script. This will override the existing installation with the specified version.**
111 |
112 | That was easy! On to the next step.
113 |
114 | ### Step 1d. Set up TensorFlow Lite detection model
115 | Next, we'll set up the detection model that will be used with TensorFlow Lite. This guide shows how to either download a sample TFLite model provided by Google, or how to use a model that you've trained yourself by following [my TensorFlow Lite training guide](https://github.com/EdjeElectronics/TensorFlow-Lite-Object-Detection-on-Android-and-Raspberry-Pi).
116 |
117 | A detection model has two files associated with it: a detect.tflite file (which is the model itself) and a labelmap.txt file (which provides a labelmap for the model). My preferred way to organize the model files is to create a folder (such as "BirdSquirrelRaccoon_TFLite_model") and keep both the detect.tflite and labelmap.txt in that folder. This is also how Google's downloadable sample TFLite model is organized.
118 |
119 | #### Option 1. Using Google's sample TFLite model
120 | Google provides a sample quantized SSDLite-MobileNet-v2 object detection model which is trained off the MSCOCO dataset and converted to run on TensorFlow Lite. It can detect and identify 80 different common objects, such as people, cars, cups, etc.
121 |
122 | Download the sample model (which can be found on [the Object Detection page of the official TensorFlow website](https://www.tensorflow.org/lite/models/object_detection/overview)) by issuing:
123 |
124 | ```
125 | wget https://storage.googleapis.com/download.tensorflow.org/models/tflite/coco_ssd_mobilenet_v1_1.0_quant_2018_06_29.zip
126 | ```
127 |
128 | Unzip it to a folder called "Sample_TFLite_model" by issuing (this command automatically creates the folder):
129 |
130 | ```
131 | unzip coco_ssd_mobilenet_v1_1.0_quant_2018_06_29.zip -d Sample_TFLite_model
132 | ```
133 |
134 | Okay, the sample model is all ready to go!
135 |
136 | #### Option 2: Using your own custom-trained model
137 | You can also use a custom object detection model by moving the model folder into the /home/pi/tflite directory. If you followed [my TensorFlow Lite training guide](https://github.com/EdjeElectronics/TensorFlow-Lite-Object-Detection-on-Android-and-Raspberry-Pi) to train and convert a TFLite model on your PC, you should have a folder named "TFLite_model" with a detect.tflite and labelmap.txt file. (It will also have a tflite_graph.pb and tflite_graph.pbtxt file, which are not needed by TensorFlow Lite but can be left in the folder.)
138 |
139 | You can simply copy that folder to a USB drive, insert the USB drive in your Raspberry Pi, and move the folder into the /home/pi/tflite1 directory. (Or you can email it to yourself, or put it on Google Drive, or do whatever your preferred method of file transfer is.) Here's an example of what my "BirdSquirrelRaccoon_TFLite_model" folder looks like in my /home/pi/tflite1 directory:
140 |
141 |
142 |  143 |
143 |
144 |
145 | Now your custom model is ready to go!
146 |
147 | ### Step 1e. Run the TensorFlow Lite model!
148 | It's time to see the TFLite object detection model in action! First, free up memory and processing power by closing any applications you aren't using. Also, make sure you have your webcam or Picamera plugged in.
149 |
150 | Run the real-time webcam detection script by issuing the following command from inside the /home/pi/tflite1 directory. (Before running the command, make sure the tflite1-env environment is active by checking that (tflite1-env) appears in front of the command prompt.) **The TFLite_detection_webcam.py script will work with either a Picamera or a USB webcam.**
151 |
152 | ```
153 | python3 TFLite_detection_webcam.py --modeldir=Sample_TFLite_model
154 | ```
155 |
156 | If your model folder has a different name than "Sample_TFLite_model", use that name instead. For example, I would use `--modeldir=BirdSquirrelRaccoon_TFLite_model` to run my custom bird, squirrel, and raccoon detection model.
157 |
158 | After a few moments of initializing, a window will appear showing the webcam feed. Detected objects will have bounding boxes and labels displayed on them in real time.
159 |
160 | The main page of my TensorFlow Lite training guide gives [instructions](https://github.com/EdjeElectronics/TensorFlow-Lite-Object-Detection-on-Android-and-Raspberry-Pi#video) for using the TFLite_detection_image.py and TFLite_detection_video.py scripts. Make sure to use `python3` rather than `python` when running the scripts.
161 |
162 | ## Section 2 - Run Edge TPU Object Detection Models on the Raspberry Pi Using the Coral USB Accelerator
163 |
164 | [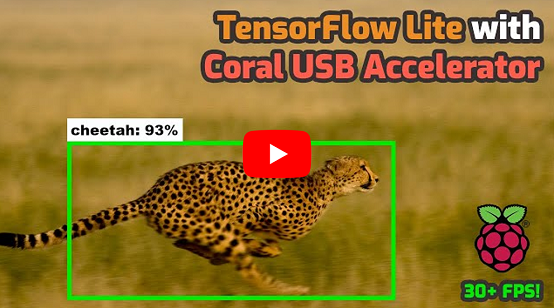](https://www.youtube.com/watch?v=qJMwNHQNOVU)
165 |
166 | The [Coral USB Accelerator](https://coral.withgoogle.com/products/accelerator/) is a USB hardware accessory for speeding up TensorFlow models. You can buy one [here (Amazon Associate link)](https://amzn.to/2BuG1Tv).
167 |
168 | The USB Accelerator uses the Edge TPU (tensor processing unit), which is an ASIC (application-specific integrated circuit) chip specially designed with highly parallelized ALUs (arithmetic logic units). While GPUs (graphics processing units) also have many parallelized ALUs, the TPU has one key difference: the ALUs are directly connected to eachother. The output of one ALU can be directly passed to the input of the next ALU without having to be stored and retrieved from a memory buffer. The extreme paralellization and removal of the memory bottleneck means the TPU can perform up to 4 trillion arithmetic operations per second! This is perfect for running deep neural networks, which require millions of multiply-accumulate operations to generate outputs from a single batch of input data.
169 |
170 |
171 |  172 |
172 |
173 |
174 | My Master's degree was in ASIC design, so the Edge TPU is very interesting to me! If you're a computer architecture nerd like me and want to learn more about the Edge TPU, [here is a great article that explains how it works](https://cloud.google.com/blog/products/ai-machine-learning/what-makes-tpus-fine-tuned-for-deep-learning).
175 |
176 | It makes object detection models run WAY faster, and it's easy to set up. These are the steps we'll go through to set up the Coral USB Accelerator:
177 |
178 | - 2a. Install libedgetpu library
179 | - 2b. Set up Edge TPU detection model
180 | - 2c. Run super-speed detection!
181 |
182 | This section of the guide assumes you have already completed [Section 1](https://github.com/EdjeElectronics/TensorFlow-Lite-Object-Detection-on-Android-and-Raspberry-Pi/blob/master/Raspberry_Pi_Guide.md#section-1---how-to-set-up-and-run-tensorflow-lite-object-detection-models-on-the-raspberry-pi) for setting up TFLite object detection on the Pi. If you haven't done that portion, scroll back up and work through it first.
183 |
184 | ### Step 2a. Install libedgetpu library
185 | First, we'll download and install the Edge TPU runtime, which is the library needed to interface with the USB Acccelerator. These instructions follow the [USB Accelerator setup guide](https://coral.withgoogle.com/docs/accelerator/get-started/) from official Coral website.
186 |
187 | Open a command terminal and move into the /home/pi/tflite1 directory and activate the tflite1-env virtual environment by issuing:
188 |
189 | ```
190 | cd /home/pi/tflite1
191 | source tflite1-env/bin/activate
192 | ```
193 |
194 | Add the Coral package repository to your apt-get distribution list by issuing the following commands:
195 |
196 | ```
197 | echo "deb https://packages.cloud.google.com/apt coral-edgetpu-stable main" | sudo tee /etc/apt/sources.list.d/coral-edgetpu.list
198 | curl https://packages.cloud.google.com/apt/doc/apt-key.gpg | sudo apt-key add -
199 | sudo apt-get update
200 | ```
201 |
202 | Install the libedgetpu library by issuing:
203 |
204 | ```
205 | sudo apt-get install libedgetpu1-std
206 | ```
207 |
208 | You can also install the libedgetpu1-max library, which runs the USB Accelerator at an overclocked frequency, allowing it to achieve even faster framerates. However, it also causes the USB Accelerator to get hotter. Here are the framerates I get when running TFLite_detection_webcam.py with 1280x720 resolution for each option with a Raspberry Pi 4 4GB model:
209 |
210 | * libedgetpu1-std: 22.6 FPS
211 | * libedgetpu1-max: 26.1 FPS
212 |
213 | I didn't measure the temperature of the USB Accelerator, but it does get a little hotter to the touch with the libedgetpu1-max version. However, it didn't seem hot enough to be unsafe or harmful to the electronics.
214 |
215 | If you want to use the libedgetpu-max library, install it by using `sudo apt-get install libedgetpu1-max`. (You can't have both the -std and the -max libraries installed. If you install the -max library, the -std library will automatically be uninstalled.)
216 |
217 | Alright! Now that the libedgetpu runtime is installed, it's time to set up an Edge TPU detection model to use it with.
218 |
219 | ### Step 2b. Set up Edge TPU detection model
220 | Edge TPU models are TensorFlow Lite models that have been compiled specifically to run on Edge TPU devices like the Coral USB Accelerator. They reside in a .tflite file and are used the same way as a regular TF Lite model. My preferred method is to keep the Edge TPU file in the same model folder as the TFLite model it was compiled from, and name it as "edgetpu.tflite".
221 |
222 | I'll show two options for setting up an Edge TPU model: using the sample model from Google, or using a custom model you compiled yourself.
223 |
224 | #### Option 1. Using Google's sample EdgeTPU model
225 | Google provides a sample Edge TPU model that is compiled from the quantized SSDLite-MobileNet-v2 we used in [Step 1e](https://github.com/EdjeElectronics/TensorFlow-Lite-Object-Detection-on-Android-and-Raspberry-Pi/blob/master/Raspberry_Pi_Guide.md#step-1e-set-up-tensorflow-lite-detection-model). Download it and move it into the Sample_TFLite_model folder (while simultaneously renaming it to "edgetpu.tflite") by issuing these commands:
226 |
227 | ```
228 | wget https://dl.google.com/coral/canned_models/mobilenet_ssd_v2_coco_quant_postprocess_edgetpu.tflite
229 |
230 | mv mobilenet_ssd_v2_coco_quant_postprocess_edgetpu.tflite Sample_TFLite_model/edgetpu.tflite
231 | ```
232 |
233 | Now the sample Edge TPU model is all ready to go. It will use the same labelmap.txt file as the TFLite model, which should already be located in the Sample_TFLite_model folder.
234 |
235 | #### Option 2. Using your own custom EdgeTPU model
236 | If you trained a custom TFLite detection model, you can compile it for use with the Edge TPU. Unfortunately, the edgetpu-compiler package doesn't work on the Raspberry Pi: you need a Linux PC to use it on. Section 3 of this guide gives a couple options for compiling your own model if you don't have a Linux PC. [Here are the official instructions that show how to compile an Edge TPU model from a TFLite model](https://coral.withgoogle.com/docs/edgetpu/compiler/).
237 |
238 | Assuming you've been able to compile your TFLite model into an EdgeTPU model, you can simply copy the .tflite file onto a USB and transfer it to the model folder on your Raspberry Pi. For my "BirdSquirrelRaccoon_TFLite_model" example from [Step 1e](https://github.com/EdjeElectronics/TensorFlow-Lite-Object-Detection-on-Android-and-Raspberry-Pi/blob/master/Raspberry_Pi_Guide.md#step-1e-set-up-tensorflow-lite-detection-model), I can compile my "BirdSquirrelRaccoon_TFLite_model" on a Linux PC, put the resulting edgetpu.tflite file on a USB, transfer the USB to my Pi, and move the edgetpu.tflite file into the /home/pi/tflite1/BirdSquirrelRaccoon_TFLite_model folder. It will use the same labelmap.txt file that already exists in the folder to get its labels.
239 |
240 | Once the edgetpu.tflite file has been moved into the model folder, it's ready to go!
241 |
242 | ### Step 2c. Run detection with Edge TPU!
243 |
244 | Now that everything is set up, it's time to test out the Coral's ultra-fast detection speed! Make sure to free up memory and processing power by closing any programs you aren't using. Make sure you have a webcam plugged in.
245 |
246 | Plug in your Coral USB Accelerator into one of the USB ports on the Raspberry Pi. If you're using a Pi 4, make sure to plug it in to one of the blue USB 3.0 ports.
247 |
248 | Make sure the tflite1-env environment is active by checking that (tflite1-env) appears in front of the command prompt in your terminal. Then, run the real-time webcam detection script with the --edgetpu argument:
249 |
250 | ```
251 | python3 TFLite_detection_webcam.py --modeldir=Sample_TFLite_model --edgetpu
252 | ```
253 |
254 | The `--edgetpu` argument tells the script to use the Coral USB Accelerator and the EdgeTPU-compiled .tflite file. If your model folder has a different name than "Sample_TFLite_model", use that name instead.
255 |
256 | After a brief initialization period, a window will appear showing the webcam feed with detections drawn on each from. The detection will run SIGNIFICANTLY faster with the Coral USB Accelerator.
257 |
258 | If you'd like to run the video or image detection scripts with the Accelerator, use these commands:
259 |
260 | ```
261 | python3 TFLite_detection_video.py --modeldir=Sample_TFLite_model --edgetpu
262 | python3 TFLite_detection_image.py --modeldir=Sample_TFLite_model --edgetpu
263 | ```
264 |
265 | Have fun with the blazing detection speeds of the Coral USB Accelerator!
266 |
267 | ## Section 3 - Compile Custom Edge TPU Object Detection Models
268 |
269 | To use a custom model on the Coral USB Accelerator, you have to run it through Coral's [Edge TPU Compiler](https://coral.ai/docs/edgetpu/compiler/) tool. Unfortunately, the compiler only works on Linux operating systems, and only on certain CPU architectures.
270 |
271 | The easiest way to compile the Edge TPU model is to use a Google Colab session. I created a Colab page specifically for compiling Edge TPU models. Please click the link below and follow the instructions in the Colab notebook.
272 |
273 | https://colab.research.google.com/drive/1o6cNNNgGhoT7_DR4jhpMKpq3mZZ6Of4N?usp=sharing
274 |
275 | ## Appendix: Common Errors
276 | This appendix lists common errors that have been encountered by users following this guide, and solutions showing how to resolve them.
277 |
278 | **Feel free to create Pull Requests to add your own errors and resolutions! I'd appreciate any help.**
279 |
280 | ### 1. TypeError: int() argument must be a string, a bytes-like object or a number, not 'NoneType'
281 | The 'NoneType' error means that the program received an empty array from the webcam, which typically means something is wrong with the webcam or the interface to the webcam. Try plugging and re-plugging the webcam in a few times, and/or power cycling the Raspberry Pi, and see if that works. If not, you may need to try using a new webcam.
282 |
283 | ### 2. ImportError: No module named 'cv2'
284 | This error occurs when you try to run any of the TFLite_detection scripts without activating the 'tflite1-env' first. It happens because Python cannot find the path to the OpenCV library (cv2) to import it.
285 |
286 | Resolve the issue by closing your terminal window, re-opening it, and issuing:
287 |
288 | ```
289 | cd tflite1
290 | source tflite1-env/bin/activate
291 | ```
292 |
293 | Then, try re-running the script as described in [Step 1e](https://github.com/EdjeElectronics/TensorFlow-Lite-Object-Detection-on-Android-and-Raspberry-Pi/blob/master/Raspberry_Pi_Guide.md#step-1e-run-the-tensorflow-lite-model).
294 |
295 | ### 3. THESE PACKAGES DO NOT MATCH THE HASHES FROM THE REQUIREMENTS FILE
296 | This error can occur when you run the `bash get_pi_requirements.sh` command in Step 1c. It occurs because the package data got corrupted while downloading. You can resolve the error by re-running the `bash get_pi_requirements.sh` command a few more times until it successfully completes without reporting that error.
297 |
298 | ### 4. Unsupported data type in custom op handler: 6488064Node number 2 (EdgeTpuDelegateForCustomOp) failed to prepare.
299 | This error occurs when trying to use a newer version of the libedgetpu library (v13.0 or greater) with an older version of TensorFlow (v2.0 or older). It can be resolved by uninstalling your current version of TensorFlow and installing the latest version of the tflite_runtime package. Issue these commands (make sure you are inside the tflite1-env virtual environment):
300 |
301 | ```
302 | pip3 uninstall tensorflow
303 | pip3 install https://dl.google.com/coral/python/tflite_runtime-2.1.0.post1-cp37-cp37m-linux_armv7l.whl
304 | ```
305 |
306 | (Or, if you're using Python 3.5, use `pip3 install https://dl.google.com/coral/python/tflite_runtime-2.1.0.post1-cp35-cp35m-linux_armv7l.whl` instead.)
307 |
308 | Then, re-run the TFLite detection script. It should work now!
309 |
310 | *Note: the URLs provided in these commands may change as newer versions of tflite_runtime are released. Check the [TFLite Python Quickstart page](https://www.tensorflow.org/lite/guide/python) for download URLs to the latest version of tflite_runtime.*
311 |
312 | ### 5. IndexError: list index out of range
313 | This error usually occurs when you try using an "image classification" model rather than an "object detection" model. Image classification models apply a single label to an image, while object detection models locate and label multiple objects in an image. The code in this repository is written for object detection models.
314 |
315 | Many people run in to this error when using models from Teachable Machine. This is because Teachable Machine creates image classification models rather than object detection models. To create an object detection model for TensorFow Lite, you'll have to follow the guide in this repository.
316 |
317 | If you'd like to see how to use an image classification model on the Raspberry Pi, please see this example:
318 | https://github.com/tensorflow/examples/tree/master/lite/examples/image_classification/raspberry_pi
319 |
--------------------------------------------------------------------------------
/deploy_guides/Windows_TFLite_Guide.md:
--------------------------------------------------------------------------------
1 | # How to Run TensorFlow Lite Models on Windows
2 | This guide shows how to set up a TensorFlow Lite Runtime environment on a Windows PC. We'll use [Anaconda](https://www.anaconda.com/) to create a Python environment to install the TFLite Runtime in. It's easy!
3 |
4 | ## Step 1. Download and Install Anaconda
5 | First, install [Anaconda](https://www.anaconda.com/), which is a Python environment manager that greatly simplifies Python package management and deployment. Anaconda allows you to create Python virtual environments on your PC without interfering with existing installations of Python. Go to the [Anaconda Downloads page](https://www.anaconda.com/products/distribution) and click the Download button.
6 |
7 | When the download finishes, open the downloaded .exe file and step through the installation wizard. Use the default install options.
8 |
9 | ## Step 2. Set Up Virtual Environment and Directory
10 | Go to the Start Menu, search for "Anaconda Command Prompt", and click it to open up a command terminal. We'll create a folder called `tflite1` directly in the C: drive. (You can use any other folder location you like, just make sure to modify the commands below to use the correct file paths.) Create the folder and move into it by issuing the following commands in the terminal:
11 |
12 | ```
13 | mkdir C:\tflite1
14 | cd C:\tflite1
15 | ```
16 |
17 | Next, create a Python 3.9 virtual environment by issuing:
18 |
19 | ```
20 | conda create --name tflite1-env python=3.9
21 | ```
22 |
23 | Enter "y" when it asks if you want to proceed. Activate the environment and install the required packages by issuing the commands below. We'll install TensorFlow, OpenCV, and a downgraded version of protobuf. TensorFlow is a pretty big download (about 450MB), so it will take a while.
24 |
25 | ```
26 | conda activate tflite1-env
27 | pip install tensorflow opencv-python protobuf==3.20.*
28 | ```
29 |
30 | Download the detection scripts from this repository by issuing:
31 |
32 | ```
33 | curl https://raw.githubusercontent.com/EdjeElectronics/TensorFlow-Lite-Object-Detection-on-Android-and-Raspberry-Pi/master/TFLite_detection_image.py --output TFLite_detection_image.py
34 | curl https://raw.githubusercontent.com/EdjeElectronics/TensorFlow-Lite-Object-Detection-on-Android-and-Raspberry-Pi/master/TFLite_detection_video.py --output TFLite_detection_video.py
35 | curl https://raw.githubusercontent.com/EdjeElectronics/TensorFlow-Lite-Object-Detection-on-Android-and-Raspberry-Pi/master/TFLite_detection_webcam.py --output TFLite_detection_webcam.py
36 | curl https://raw.githubusercontent.com/EdjeElectronics/TensorFlow-Lite-Object-Detection-on-Android-and-Raspberry-Pi/master/TFLite_detection_stream.py --output TFLite_detection_stream.py
37 | ```
38 |
39 | ## Step 3. Move TFLite Model into Directory
40 | Next, take the custom TFLite model that was trained and downloaded from the Colab notebook and move it into the C:\tflite1 directory. If you downloaded it from Colab, it should be in a file called `custom_model_lite.zip`. (If you haven't trained a model yet and just want to test one out, download my "change counter" model by clicking this [Dropbox link](https://www.dropbox.com/scl/fi/4fk8ls8s03c94g6sb3ngo/custom_model_lite.zip?rlkey=zqda21sowk0hrw6i3f2dgbsyy&dl=0).) Move that file to the C:\tflite1 directory. Once it's moved, unzip it using:
41 |
42 | ```
43 | tar -xf custom_model_lite.zip
44 | ```
45 |
46 | At this point, you should have a folder at C:\tflite1\custom_model_lite which contains at least a `detect.tflite` and `labelmap.txt` file.
47 |
48 | ## Step 4. Run TensorFlow Lite Model!
49 | Alright! Now that everything is set up, running the TFLite model is easy. Just call one of the detection scripts and point it at your model folder with the `--modeldir` option. For example, to run your `custom_model_lite` model on a webcam, issue:
50 |
51 | ```
52 | python TFLite_detection_webcam.py --modeldir=custom_model_lite
53 | ```
54 |
55 | A window will appear showing detection results drawn on the live webcam feed. For more information on how to use the detection scripts, please see [Step 3 in the main README page](https://github.com/EdjeElectronics/TensorFlow-Lite-Object-Detection-on-Android-and-Raspberry-Pi#step-3-run-tensorflow-lite-models).
56 |
57 | Have fun using TensorFlow Lite! Stay tuned for more examples on how to build cool applications around your model.
58 |
--------------------------------------------------------------------------------
/doc/BSR_demo.gif:
--------------------------------------------------------------------------------
https://raw.githubusercontent.com/EdjeElectronics/TensorFlow-Lite-Object-Detection-on-Android-and-Raspberry-Pi/f7f1fdec0f3e48161d598f99bf4657adbea944e8/doc/BSR_demo.gif
--------------------------------------------------------------------------------
/doc/BSR_directory1.png:
--------------------------------------------------------------------------------
https://raw.githubusercontent.com/EdjeElectronics/TensorFlow-Lite-Object-Detection-on-Android-and-Raspberry-Pi/f7f1fdec0f3e48161d598f99bf4657adbea944e8/doc/BSR_directory1.png
--------------------------------------------------------------------------------
/doc/Coral_and_EdgeTPU2.png:
--------------------------------------------------------------------------------
https://raw.githubusercontent.com/EdjeElectronics/TensorFlow-Lite-Object-Detection-on-Android-and-Raspberry-Pi/f7f1fdec0f3e48161d598f99bf4657adbea944e8/doc/Coral_and_EdgeTPU2.png
--------------------------------------------------------------------------------
/doc/MSYS_window.png:
--------------------------------------------------------------------------------
https://raw.githubusercontent.com/EdjeElectronics/TensorFlow-Lite-Object-Detection-on-Android-and-Raspberry-Pi/f7f1fdec0f3e48161d598f99bf4657adbea944e8/doc/MSYS_window.png
--------------------------------------------------------------------------------
/doc/TFL_download_links.png:
--------------------------------------------------------------------------------
https://raw.githubusercontent.com/EdjeElectronics/TensorFlow-Lite-Object-Detection-on-Android-and-Raspberry-Pi/f7f1fdec0f3e48161d598f99bf4657adbea944e8/doc/TFL_download_links.png
--------------------------------------------------------------------------------
/doc/TFLite-vs-EdgeTPU.gif:
--------------------------------------------------------------------------------
https://raw.githubusercontent.com/EdjeElectronics/TensorFlow-Lite-Object-Detection-on-Android-and-Raspberry-Pi/f7f1fdec0f3e48161d598f99bf4657adbea944e8/doc/TFLite-vs-EdgeTPU.gif
--------------------------------------------------------------------------------
/doc/YouTube_video1.JPG:
--------------------------------------------------------------------------------
https://raw.githubusercontent.com/EdjeElectronics/TensorFlow-Lite-Object-Detection-on-Android-and-Raspberry-Pi/f7f1fdec0f3e48161d598f99bf4657adbea944e8/doc/YouTube_video1.JPG
--------------------------------------------------------------------------------
/doc/YouTube_video2.png:
--------------------------------------------------------------------------------
https://raw.githubusercontent.com/EdjeElectronics/TensorFlow-Lite-Object-Detection-on-Android-and-Raspberry-Pi/f7f1fdec0f3e48161d598f99bf4657adbea944e8/doc/YouTube_video2.png
--------------------------------------------------------------------------------
/doc/calculate-mAP-demo1.gif:
--------------------------------------------------------------------------------
https://raw.githubusercontent.com/EdjeElectronics/TensorFlow-Lite-Object-Detection-on-Android-and-Raspberry-Pi/f7f1fdec0f3e48161d598f99bf4657adbea944e8/doc/calculate-mAP-demo1.gif
--------------------------------------------------------------------------------
/doc/camera_enabled.png:
--------------------------------------------------------------------------------
https://raw.githubusercontent.com/EdjeElectronics/TensorFlow-Lite-Object-Detection-on-Android-and-Raspberry-Pi/f7f1fdec0f3e48161d598f99bf4657adbea944e8/doc/camera_enabled.png
--------------------------------------------------------------------------------
/doc/colab_upload_button.png:
--------------------------------------------------------------------------------
https://raw.githubusercontent.com/EdjeElectronics/TensorFlow-Lite-Object-Detection-on-Android-and-Raspberry-Pi/f7f1fdec0f3e48161d598f99bf4657adbea944e8/doc/colab_upload_button.png
--------------------------------------------------------------------------------
/doc/labeled_image_example2.png:
--------------------------------------------------------------------------------
https://raw.githubusercontent.com/EdjeElectronics/TensorFlow-Lite-Object-Detection-on-Android-and-Raspberry-Pi/f7f1fdec0f3e48161d598f99bf4657adbea944e8/doc/labeled_image_example2.png
--------------------------------------------------------------------------------
/doc/labeled_image_examples.png:
--------------------------------------------------------------------------------
https://raw.githubusercontent.com/EdjeElectronics/TensorFlow-Lite-Object-Detection-on-Android-and-Raspberry-Pi/f7f1fdec0f3e48161d598f99bf4657adbea944e8/doc/labeled_image_examples.png
--------------------------------------------------------------------------------
/doc/labelmap_example.png:
--------------------------------------------------------------------------------
https://raw.githubusercontent.com/EdjeElectronics/TensorFlow-Lite-Object-Detection-on-Android-and-Raspberry-Pi/f7f1fdec0f3e48161d598f99bf4657adbea944e8/doc/labelmap_example.png
--------------------------------------------------------------------------------
/doc/local_training_guide.md:
--------------------------------------------------------------------------------
1 | # TensorFlow-Lite-Object-Detection-on-Android-and-Raspberry-Pi
2 | A guide showing how to train TensorFlow Lite object detection models on your local PC and then run them on Android, the Raspberry Pi, and more!
3 |
4 |
5 |  6 |
6 |
7 |
8 | **Important note: This guide is a bit outdated and has been replaced by the [Google Colab notebook](https://colab.research.google.com/github/EdjeElectronics/TensorFlow-Lite-Object-Detection-on-Android-and-Raspberry-Pi/blob/master/Train_TFLite2_Object_Detction_Model.ipynb) I wrote for training TFLite models using Google's virtual Colab machines. The steps in this guide worked when I wrote it 3 years ago, but I haven't tested it since then. I only recommend using this older guide if you have a strong reason for needing to train your TFLite model locally on your PC. Proceed at your own risk!**
9 |
10 | ## Introduction
11 | This guide provides step-by-step instructions for how set up a TensorFlow environment on your PC, and then use it to train, export, and deploy a custom TensorFlow Lite Object Detection model. Once you've completed the steps in this guide, you'll have a TFLite model that you can deploy using the inferencing scripts from this repository.
12 |
13 | ### A Note on Versions
14 | I used TensorFlow v1.13 while creating this guide, because TF v1.13 is a stable version that has great support from Anaconda.
15 |
16 | The TensorFlow team is always hard at work releasing updated versions of TensorFlow. I recommend picking one version and sticking with it for all your TensorFlow projects. Every part of this guide should work with newer or older versions, but you may need to use different versions of the tools needed to run or build TensorFlow (CUDA, cuDNN, bazel, etc). Google has provided a list of build configurations for [Linux](https://www.tensorflow.org/install/source#linux), [macOS](https://www.tensorflow.org/install/source#macos), and [Windows](https://www.tensorflow.org/install/source_windows#tested_build_configurations) that show which tool versions were used to build and run each version of TensorFlow.
17 |
18 | ## How to Train, Convert, and Run Custom TensorFlow Lite Object Detection Models on Windows 10
19 | This guide gives instructions for training and deploying your own custom TensorFlow Lite object detection model on a Windows 10 PC. The guide is based off the [tutorial in the TensorFlow Object Detection repository](https://github.com/tensorflow/models/blob/master/research/object_detection/g3doc/running_on_mobile_tensorflowlite.md), but it gives more detailed instructions and is written specifically for Windows. (It will work on Linux too with some minor changes, which I leave as an exercise for the Linux user.)
20 |
21 | There are three primary steps to training and deploying a TensorFlow Lite model:
22 | 1. [Train a quantized SSD-MobileNet model using TensorFlow, and export frozen graph for TensorFlow Lite](#step-1-train-quantized-ssd-mobilenet-model-and-export-frozen-tensorflow-lite-graph)
23 | 2. [Build TensorFlow from source on your PC](#step-2-build-tensorflow-from-source)
24 | 3. [Use TensorFlow Lite Optimizing Converter (TOCO) to create optimzed TensorFlow Lite model](#step-3-use-toco-to-create-optimzed-tensorflow-lite-model-create-label-map-run-model)
25 |
26 | This portion is a continuation of my previous guide: [How To Train an Object Detection Model Using TensorFlow on Windows 10](https://github.com/EdjeElectronics/TensorFlow-Object-Detection-API-Tutorial-Train-Multiple-Objects-Windows-10). I'll assume you have already set up TensorFlow to train a custom object detection model as described in that guide, including:
27 | * Setting up an Anaconda virtual environment for training
28 | * Setting up TensorFlow directory structure
29 | * Gathering and labeling training images
30 | * Preparing training data (generating TFRecords and label map)
31 |
32 | This tutorial uses the same Anaconda virtual environment, files, and directory structure that was set up in the previous one.
33 |
34 | Through the course of the guide, I'll use a bird, squirrel, and raccoon detector model I've been working on as an example. The intent of this detection model is to watch a bird feeder, and record videos of birds while triggering an alarm if a squirrel or raccoon is stealing from it! I'll show the steps needed to train, convert, and run a quantized TensorFlow Lite version of the bird/squirrel/raccoon detector.
35 |
36 | Parts 2 and 3 of this guide will go on to show how to deploy this newly trained TensorFlow Lite model on the Raspberry Pi or an Android device. If you're not feeling up to training and converting your own TensorFlow Lite model, you can skip Part 1 and use my custom-trained TFLite BSR detection model [(which you can download from Dropbox here)](https://www.dropbox.com/s/cpaon1j1r1yzflx/BirdSquirrelRaccoon_TFLite_model.zip?dl=0) or use the [TF Lite starter detection model](https://storage.googleapis.com/download.tensorflow.org/models/tflite/coco_ssd_mobilenet_v1_1.0_quant_2018_06_29.zip) (taken from https://www.tensorflow.org/lite/models/object_detection/overview) for Part 2 or Part 3.
37 |
38 | ### Step 1: Train Quantized SSD-MobileNet Model and Export Frozen TensorFlow Lite Graph
39 | First, we’ll use transfer learning to train a “quantized” SSD-MobileNet model. Quantized models use 8-bit integer values instead of 32-bit floating values within the neural network, allowing them to run much more efficiently on GPUs or specialized TPUs (TensorFlow Processing Units).
40 |
41 | You can also use a standard SSD-MobileNet model (V1 or V2), but it will not run quite as fast as the quantized model. Also, you will not be able to run it on the Google Coral TPU Accelerator. If you’re using an SSD-MobileNet model that has already been trained, you can skip to [Step 1d](#step-1d-export-frozen-inference-graph-for-tensorflow-lite) of this guide.
42 |
43 | **If you get any errors during this process, please look at the [FAQ section](#frequently-asked-questions-and-common-errors) at the bottom of this guide! It gives solutions to common errors that occur.**
44 |
45 | As I mentioned prevoiusly, this guide assumes you have already followed my [previous TensorFlow tutorial](https://github.com/EdjeElectronics/TensorFlow-Object-Detection-API-Tutorial-Train-Multiple-Objects-Windows-10) and set up the Anaconda virtual environment and full directory structure needed for using the TensorFlow Object Detection API. If you've done so, you should have a folder at C:\tensorflow1\models\research\object_detection that has everything needed for training. (If you used a different base folder name than "tensorflow1", that's fine - just make sure you continue to use that name throughout this guide.)
46 |
47 | Here's what your \object_detection folder should look like:
48 |
49 |  50 |
50 |
51 |
52 | If you don't have this folder, please go to my [previous tutorial](https://github.com/EdjeElectronics/TensorFlow-Object-Detection-API-Tutorial-Train-Multiple-Objects-Windows-10) and work through at least Steps 1 and 2. If you'd like to train your own model to detect custom objects, you'll also need to work through Steps 3, 4, and 5. If you don't want to train your own model but want to practice the process for converting a model to TensorFlow Lite, you can download the quantized MobileNet-SSD model (see next paragraph) and then skip to [Step 1d](#step-1d-export-frozen-inference-graph-for-tensorflow-lite).
53 |
54 | #### Step 1a. Download and extract quantized SSD-MobileNet model
55 | Google provides several quantized object detection models in their [detection model zoo](https://github.com/tensorflow/models/blob/master/research/object_detection/g3doc/tf1_detection_zoo.md). This tutorial will use the SSD-MobileNet-V2-Quantized-COCO model. Download the model [here](http://download.tensorflow.org/models/object_detection/ssd_mobilenet_v2_quantized_300x300_coco_2019_01_03.tar.gz). **Note: TensorFlow Lite does NOT support RCNN models such as Faster-RCNN! It only supports SSD models.**
56 |
57 | Move the downloaded .tar.gz file to the C:\tensorflow1\models\research\object_detection folder. (Henceforth, this folder will be referred to as the “\object_detection” folder.) Unzip the .tar.gz file using a file archiver like WinZip or 7-Zip. After the file has been fully unzipped, you should have a folder called "ssd_mobilenet_v2_quantized_300x300_coco_2019_01_03" within the \object_detection folder.
58 |
59 | #### Step 1b. Configure training
60 | If you're training your own TensorFlow Lite model, make sure the following items from my [previous guide](https://github.com/EdjeElectronics/TensorFlow-Object-Detection-API-Tutorial-Train-Multiple-Objects-Windows-10) have been completed:
61 | * Train and test images and their XML label files are placed in the \object_detection\images\train and \object_detection\images\test folders
62 | * train_labels.csv and test_labels.csv have been generated and are located in the \object_detection\images folder
63 | * train.record and test.record have been generated and are located in the \object_detection folder
64 | * labelmap.pbtxt file has been created and is located in the \object_detection\training folder
65 | * proto files in \object_detection\protos have been generated
66 |
67 | If you have any questions about these files or don’t know how to generate them, [Steps 2, 3, 4, and 5 of my previous tutorial](https://github.com/EdjeElectronics/TensorFlow-Object-Detection-API-Tutorial-Train-Multiple-Objects-Windows-10) show how they are all created.
68 |
69 | Copy the ssd_mobilenet_v2_quantized_300x300_coco.config file from the \object_detection\samples\configs folder to the \object_detection\training folder. Then, open the file using a text editor.
70 |
71 | Make the following changes to the ssd_mobilenet_v2_quantized_300x300_coco.config file. Note: The paths must be entered with single forward slashes (NOT backslashes), or TensorFlow will give a file path error when trying to train the model! Also, the paths must be in double quotation marks ( " ), not single quotation marks ( ' ).
72 |
73 | * Line 9. Change num_classes to the number of different objects you want the classifier to detect. For my bird/squirrel/raccoon detector example, there are three classes, so I set num_classes: 3
74 |
75 | * Line 141. Change batch_size: 24 to batch_size: 6 . The smaller batch size will prevent OOM (Out of Memory) errors during training.
76 |
77 | * Line 156. Change fine_tune_checkpoint to: "C:/tensorflow1/models/research/object_detection/ ssd_mobilenet_v2_quantized_300x300_coco_2019_01_03/model.ckpt"
78 |
79 | * Line 175. Change input_path to: "C:/tensorflow1/models/research/object_detection/train.record"
80 |
81 | * Line 177. Change label_map_path to: "C:/tensorflow1/models/research/object_detection/training/labelmap.pbtxt"
82 |
83 | * Line 181. Change num_examples to the number of images you have in the \images\test directory. For my bird/squirrel/raccoon detector example, there are 582 test images, so I set num_examples: 582.
84 |
85 | * Line 189. Change input_path to: "C:/tensorflow1/models/research/object_detection/test.record"
86 |
87 | * Line 191. Change label_map_path to: "C:/tensorflow1/models/research/object_detection/training/labelmap.pbtxt"
88 |
89 | Save and exit the training file after the changes have been made.
90 |
91 | #### Step 1c. Run training in Anaconda virtual environment
92 | All that's left to do is train the model! First, move the “train.py” file from the \object_detection\legacy folder into the main \object_detection folder. (See the [FAQ](#frequently-asked-questions-and-common-errors) for why I am using the legacy train.py script rather than model_main.py for training.)
93 |
94 | Then, open a new Anaconda Prompt window by searching for “Anaconda Prompt” in the Start menu and clicking on it. Activate the “tensorflow1” virtual environment (which was set up in my [previous tutorial](https://github.com/EdjeElectronics/TensorFlow-Object-Detection-API-Tutorial-Train-Multiple-Objects-Windows-10)) by issuing:
95 |
96 | ```
97 | activate tensorflow1
98 | ```
99 |
100 | Then, set the PYTHONPATH environment variable by issuing:
101 |
102 | ```
103 | set PYTHONPATH=C:\tensorflow1\models;C:\tensorflow1\models\research;C:\tensorflow1\models\research\slim
104 | ```
105 |
106 | Next, change directories to the \object_detection folder:
107 |
108 | ```
109 | cd C:\tensorflow1\models\research\object_detection
110 | ```
111 |
112 | Finally, train the model by issuing:
113 |
114 | ```
115 | python train.py --logtostderr –train_dir=training/ --pipeline_config_path=training/ssd_mobilenet_v2_quantized_300x300_coco.config
116 | ```
117 |
118 | If everything was set up correctly, the model will begin training after a couple minutes of initialization.
119 |
120 |
121 |  122 |
122 |
123 |
124 | Allow the model to train until the loss consistently drops below 2. For my bird/squirrel/raccoon detector model, this took about 9000 steps, or 8 hours of training. (Time will vary depending on how powerful your CPU and GPU are. Please see [Step 6 of my previous tutorial](https://github.com/EdjeElectronics/TensorFlow-Object-Detection-API-Tutorial-Train-Multiple-Objects-Windows-10/blob/master/README.md#6-run-the-training) for more information on training and an explanation of how to view the progress of the training job using TensorBoard.)
125 |
126 | Once training is complete (i.e. the loss has consistently dropped below 2), press Ctrl+C to stop training. The latest checkpoint will be saved in the \object_detection\training folder, and we will use that checkpoint to export the frozen TensorFlow Lite graph. Take note of the checkpoint number of the model.ckpt file in the training folder (i.e. model.ckpt-XXXX), as it will be used later.
127 |
128 | #### Step 1d. Export frozen inference graph for TensorFlow Lite
129 | Now that training has finished, the model can be exported for conversion to TensorFlow Lite using the export_tflite_ssd_graph.py script. First, create a folder in \object_detection called “TFLite_model” by issuing:
130 |
131 | ```
132 | mkdir TFLite_model
133 | ```
134 |
135 | Next, let’s set up some environment variables so the commands are easier to type out. Issue the following commands in Anaconda Prompt. (Note, the XXXX in the second command should be replaced with the highest-numbered model.ckpt file in the \object_detection\training folder.)
136 |
137 | ```
138 | set CONFIG_FILE=C:\\tensorflow1\models\research\object_detection\training\ssd_mobilenet_v2_quantized_300x300_coco.config
139 | set CHECKPOINT_PATH=C:\\tensorflow1\models\research\object_detection\training\model.ckpt-XXXX
140 | set OUTPUT_DIR=C:\\tensorflow1\models\research\object_detection\TFLite_model
141 | ```
142 |
143 | Now that those are set up, issue this command to export the model for TensorFlow Lite:
144 |
145 | ```
146 | python export_tflite_ssd_graph.py --pipeline_config_path=%CONFIG_FILE% --trained_checkpoint_prefix=%CHECKPOINT_PATH% --output_directory=%OUTPUT_DIR% --add_postprocessing_op=true
147 | ```
148 |
149 | After the command has executed, there should be two new files in the \object_detection\TFLite_model folder: tflite_graph.pb and tflite_graph.pbtxt.
150 |
151 | That’s it! The new inference graph has been trained and exported. This inference graph's architecture and network operations are compatible with TensorFlow Lite's framework. However, the graph still needs to be converted to an actual TensorFlow Lite model. We'll do that in Step 3. First, we have to build TensorFlow from source. On to Step 2!
152 |
153 | ### Step 2. Build TensorFlow From Source
154 | To convert the frozen graph we just exported into a model that can be used by TensorFlow Lite, it has to be run through the TensorFlow Lite Optimizing Converter (TOCO). Unfortunately, to use TOCO, we have to build TensorFlow from source on our computer. To do this, we’ll create a separate Anaconda virtual environment for building TensorFlow.
155 |
156 | This part of the tutorial breaks down step-by-step how to build TensorFlow from source on your Windows PC. It follows the [Build TensorFlow From Source on Windows](https://www.tensorflow.org/install/source_windows) instructions given on the official TensorFlow website, with some slight modifications.
157 |
158 | This guide will show how to build either the CPU-only version of TensorFlow or the GPU-enabled version of TensorFlow v1.13. If you would like to build a version other than TF v1.13, you can still use this guide, but check the [build configuration list](https://www.tensorflow.org/install/source_windows#tested_build_configurations) and make sure you use the correct package versions.
159 |
160 | **If you are only building TensorFlow to convert a TensorFlow Lite object detection model, I recommend building the CPU-only version!** It takes very little computational effort to export the model, so your CPU can do it just fine without help from your GPU. If you’d like to build the GPU-enabled version anyway, then you need to have the appropriate version of CUDA and cuDNN installed. [The TensorFlow installation guide](https://www.tensorflow.org/install/gpu#windows_setup) explains how to install CUDA and cuDNN. Check the [build configuration list](https://www.tensorflow.org/install/source_windows#tested_build_configurations) to see which versions of CUDA and cuDNN are compatible with which versions of TensorFlow.
161 |
162 | **If you get any errors during this process, please look at the [FAQ section](frequently-asked-questions-and-common-errors) at the bottom of this guide! It gives solutions to common errors that occur.**
163 |
164 | #### Step 2a. Install MSYS2
165 | MSYS2 has some binary tools needed for building TensorFlow. It also automatically converts Windows-style directory paths to Linux-style paths when using Bazel. The Bazel build won’t work without MSYS2 installed!
166 |
167 | First, install MSYS2 by following the instructions on the [MSYS2 website](https://www.msys2.org/). Download the msys2-x86_64 executable file and run it. Use the default options for installation. After installing, open MSYS2 and issue:
168 |
169 | ```
170 | pacman -Syu
171 | ```
172 |
173 |
174 |
175 | After it's completed, close the window, re-open it, and then issue the following two commands:
176 |
177 | ```
178 | pacman -Su
179 | pacman -S patch unzip
180 | ```
181 |
182 |
183 |  184 |
184 |
185 |
186 | This updates MSYS2’s package manager and downloads the patch and unzip packages. Now, close the MSYS2 window. We'll add the MSYS2 binary to the PATH environment variable in Step 2c.
187 |
188 | #### Step 2b. Install Visual C++ Build Tools 2015
189 | Install Microsoft Build Tools 2015 and Microsoft Visual C++ 2015 Redistributable by visiting the [Visual Studio older downloads](https://visualstudio.microsoft.com/vs/older-downloads/) page. Click the “Redistributables and Build Tools” dropdown at the bottom of the list. Download and install the following two packages:
190 |
191 | * **Microsoft Build Tools 2015 Update 3** - Use the default installation options in the install wizard. Once you begin installing, it goes through a fairly large download, so it will take a while if you have a slow internet connection. It may give you some warnings saying build tools or redistributables have already been installed. If so, that's fine; just click through them.
192 | * **Microsoft Visual C++ 2015 Redistributable Update 3** – This may give you an error saying the redistributable has already been installed. If so, that’s fine.
193 |
194 | Restart your PC after installation has finished.
195 |
196 | #### Step 2c. Update Anaconda and create tensorflow-build environment
197 | Now that the Visual Studio tools are installed and your PC is freshly restarted, open a new Anaconda Prompt window. First, update Anaconda to make sure its package list is up to date. In the Anaconda Prompt window, issue these two commands:
198 |
199 | ```
200 | conda update -n base -c defaults conda
201 | conda update --all
202 | ```
203 |
204 | The update process may take up to an hour, depending on how it's been since you installed or updated Anaconda. Next, create a new Anaconda virtual environment called “tensorflow-build”. We’ll work in this environment for the rest of the build process. Create and activate the environment by issuing:
205 |
206 | ```
207 | conda create -n tensorflow-build pip python=3.6
208 | conda activate tensorflow-build
209 | ```
210 |
211 | After the environment is activated, you should see (tensorflow-build) before the active path in the command window.
212 |
213 | Update pip by issuing:
214 |
215 | ```
216 | python -m pip install --upgrade pip
217 | ```
218 |
219 | We'll use Anaconda's git package to download the TensorFlow repository, so install git using:
220 |
221 | ```
222 | conda install -c anaconda git
223 | ```
224 |
225 | Next, add the MSYS2 binaries to this environment's PATH variable by issuing:
226 |
227 | ```
228 | set PATH=%PATH%;C:\msys64\usr\bin
229 | ```
230 |
231 | (If MSYS2 is installed in a different location than C:\msys64, use that location instead.) You’ll have to re-issue this PATH command if you ever close and re-open the Anaconda Prompt window.
232 |
233 | #### Step 2d. Download Bazel and Python package dependencies
234 | Next, we’ll install Bazel and some other Python packages that are used for building TensorFlow. Install the necessary Python packages by issuing:
235 |
236 | ```
237 | pip install six numpy wheel
238 | pip install keras_applications==1.0.6 --no-deps
239 | pip install keras_preprocessing==1.0.5 --no-deps
240 | ```
241 |
242 | Then install Bazel v0.21.0 by issuing the following command. (If you are building a version of TensorFlow other than v1.13, you may need to use a different version of Bazel.)
243 |
244 | ```
245 | conda install -c conda-forge bazel=0.21.0
246 | ```
247 |
248 | #### Step 2d. Download TensorFlow source and configure build
249 | Time to download TensorFlow’s source code from GitHub! Issue the following commands to create a new folder directly in C:\ called “tensorflow-build” and cd into it:
250 |
251 | ```
252 | mkdir C:\tensorflow-build
253 | cd C:\tensorflow-build
254 | ```
255 |
256 | Then, clone the TensorFlow repository and cd into it by issuing:
257 |
258 | ```
259 | git clone https://github.com/tensorflow/tensorflow.git
260 | cd tensorflow
261 | ```
262 |
263 | Next, check out the branch for TensorFlow v1.13:
264 |
265 | ```
266 | git checkout r1.13
267 | ```
268 |
269 | The version you check out should match the TensorFlow version you used to train your model in [Step 1](#step-1-train-quantized-ssd-mobilenet-model-and-export-frozen-tensorflow-lite-graph). If you used a different version than TF v1.13, then replace "1.13" with the version you used. See the [FAQs section](#how-do-i-check-which-tensorflow-version-i-used-to-train-my-detection-model) for instructions on how to check the TensorFlow version you used for training.
270 |
271 | Next, we’ll configure the TensorFlow build using the configure.py script. From the C:\tensorflow-build\tensorflow directory, issue:
272 |
273 | ```
274 | python ./configure.py
275 | ```
276 |
277 | This will initiate a Bazel session. As I mentioned before, you can build either the CPU-only version of TensorFlow or the GPU-enabled version of TensorFlow. If you're only using this TensorFlow build to convert your TensorFlow Lite model, **I recommend building the CPU-only version**. If you’d still like to build the GPU-enabled version for some other reason, then you need to have the appropriate version of CUDA and cuDNN installed. This guide doesn't cover building the GPU-enabled version of TensorFlow, but you can try following the official build instructions on the [TensorFlow website](https://www.tensorflow.org/install/source_windows).
278 |
279 | Here’s what the configuration session will look like if you are building for CPU only. Basically, press Enter to select the default option for each question.
280 |
281 | ```
282 | You have bazel 0.21.0- (@non-git) installed.
283 |
284 | Please specify the location of python. [Default is C:\ProgramData\Anaconda3\envs\tensorflow-build\python.exe]:
285 |
286 | Found possible Python library paths:
287 |
288 | C:\ProgramData\Anaconda3\envs\tensorflow-build\lib\site-packages
289 |
290 | Please input the desired Python library path to use. Default is [C:\ProgramData\Anaconda3\envs\tensorflow-build\lib\site-packages]
291 |
292 | Do you wish to build TensorFlow with XLA JIT support? [y/N]: N
293 | No XLA JIT support will be enabled for TensorFlow.
294 |
295 | Do you wish to build TensorFlow with ROCm support? [y/N]: N
296 | No ROCm support will be enabled for TensorFlow.
297 |
298 | Do you wish to build TensorFlow with CUDA support? [y/N]: N
299 | No CUDA support will be enabled for TensorFlow.
300 | ```
301 |
302 | Once the configuration is finished, TensorFlow is ready to be bulit!
303 |
304 | #### Step 2e. Build TensorFlow package
305 | Next, use Bazel to create the package builder for TensorFlow. To create the CPU-only version, issue the following command. The build process took about 70 minutes on my computer.
306 |
307 | ```
308 | bazel build --config=opt //tensorflow/tools/pip_package:build_pip_package
309 | ```
310 |
311 | Now that the package builder has been created, let’s use it to build the actual TensorFlow wheel file. Issue the following command (it took about 5 minutes to complete on my computer):
312 |
313 | ```
314 | bazel-bin\tensorflow\tools\pip_package\build_pip_package C:/tmp/tensorflow_pkg
315 | ```
316 |
317 | This creates the wheel file and places it in C:\tmp\tensorflow_pkg.
318 |
319 | #### Step 2f. Install TensorFlow and test it out!
320 | TensorFlow is finally ready to be installed! Open File Explorer and browse to the C:\tmp\tensorflow_pkg folder. Copy the full filename of the .whl file, and paste it in the following command:
321 |
322 | ```
323 | pip3 install C:/tmp/tensorflow_pkg/
324 | ```
325 |
326 | That's it! TensorFlow is installed! Let's make sure it installed correctly by opening a Python shell:
327 |
328 | ```
329 | python
330 | ```
331 |
332 | Once the shell is opened, issue these commands:
333 |
334 | ```
335 | >>> import tensorflow as tf
336 | >>> tf.__version__
337 | ```
338 |
339 | If everything was installed properly, it will respond with the installed version of TensorFlow. Note: You may get some deprecation warnings after the "import tensorflow as tf" command. As long as they are warnings and not actual errors, you can ignore them! Exit the shell by issuing:
340 |
341 | ```
342 | exit()
343 | ```
344 |
345 | With TensorFlow installed, we can finally convert our trained model into a TensorFlow Lite model. On to the last step: Step 3!
346 |
347 | ### Step 3. Use TOCO to Create Optimzed TensorFlow Lite Model, Create Label Map, Run Model
348 | Although we've already exported a frozen graph of our detection model for TensorFlow Lite, we still need run it through the TensorFlow Lite Optimizing Converter (TOCO) before it will work with the TensorFlow Lite interpreter. TOCO converts models into an optimized FlatBuffer format that allows them to run efficiently on TensorFlow Lite. We also need to create a new label map before running the model.
349 |
350 | #### Step 3a. Create optimized TensorFlow Lite model
351 | First, we’ll run the model through TOCO to create an optimzed TensorFLow Lite model. The TOCO tool lives deep in the C:\tensorflow-build directory, and it will be run from the “tensorflow-build” Anaconda virtual environment that we created and used during Step 2. Meanwhile, the model we trained in Step 1 lives inside the C:\tensorflow1\models\research\object_detection\TFLite_model directory. We’ll create an environment variable called OUTPUT_DIR that points at the correct model directory to make it easier to enter the TOCO command.
352 |
353 | If you don't already have an Anaconda Prompt window open with the "tensorflow-build" environment active and working in C:\tensorflow-build, open a new Anaconda Prompt window and issue:
354 |
355 | ```
356 | activate tensorflow-build
357 | cd C:\tensorflow-build
358 | ```
359 |
360 | Create the OUTPUT_DIR environment variable by issuing:
361 |
362 | ```
363 | set OUTPUT_DIR=C:\\tensorflow1\models\research\object_detection\TFLite_model
364 | ```
365 |
366 | Next, use Bazel to run the model through the TOCO tool by issuing this command:
367 |
368 | ```
369 | bazel run --config=opt tensorflow/lite/toco:toco -- --input_file=%OUTPUT_DIR%/tflite_graph.pb --output_file=%OUTPUT_DIR%/detect.tflite --input_shapes=1,300,300,3 --input_arrays=normalized_input_image_tensor --output_arrays=TFLite_Detection_PostProcess,TFLite_Detection_PostProcess:1,TFLite_Detection_PostProcess:2,TFLite_Detection_PostProcess:3 --inference_type=QUANTIZED_UINT8 --mean_values=128 --std_values=128 --change_concat_input_ranges=false --allow_custom_ops
370 | ```
371 |
372 | Note: If you are using a floating, non-quantized SSD model (e.g. the ssdlite_mobilenet_v2_coco model rather than the ssd_mobilenet_v2_quantized_coco model), the Bazel TOCO command must be modified slightly:
373 |
374 | ```
375 | bazel run --config=opt tensorflow/lite/toco:toco -- --input_file=$OUTPUT_DIR/tflite_graph.pb --output_file=$OUTPUT_DIR/detect.tflite --input_shapes=1,300,300,3 --input_arrays=normalized_input_image_tensor --output_arrays=TFLite_Detection_PostProcess,TFLite_Detection_PostProcess:1,TFLite_Detection_PostProcess:2,TFLite_Detection_PostProcess:3 --inference_type=FLOAT --allow_custom_ops
376 | ```
377 |
378 | If you are using Linux, make sure to use the commands given in the [official TensorFlow instructions here](https://github.com/tensorflow/models/blob/master/research/object_detection/g3doc/running_on_mobile_tensorflowlite.md). I removed the ' characters from the command, because for some reason they cause errors on Windows!
379 |
380 | After the command finishes running, you should see a file called detect.tflite in the \object_detection\TFLite_model directory. This is the model that can be used with TensorFlow Lite!
381 |
382 | #### Step 3b. Create new label map
383 | For some reason, TensorFlow Lite uses a different label map format than classic TensorFlow. The classic TensorFlow label map format looks like this (you can see an example in the \object_detection\data\mscoco_label_map.pbtxt file):
384 |
385 | ```
386 | item {
387 | name: "/m/01g317"
388 | id: 1
389 | display_name: "person"
390 | }
391 | item {
392 | name: "/m/0199g"
393 | id: 2
394 | display_name: "bicycle"
395 | }
396 | item {
397 | name: "/m/0k4j"
398 | id: 3
399 | display_name: "car"
400 | }
401 | item {
402 | name: "/m/04_sv"
403 | id: 4
404 | display_name: "motorcycle"
405 | }
406 | And so on...
407 | ```
408 |
409 | However, the label map provided with the [example TensorFlow Lite object detection model](https://storage.googleapis.com/download.tensorflow.org/models/tflite/coco_ssd_mobilenet_v1_1.0_quant_2018_06_29.zip) looks like this:
410 |
411 | ```
412 | person
413 | bicycle
414 | car
415 | motorcycle
416 | And so on...
417 | ```
418 |
419 | Basically, rather than explicitly stating the name and ID number for each class like the classic TensorFlow label map format does, the TensorFlow Lite format just lists each class. To stay consistent with the example provided by Google, I’m going to stick with the TensorFlow Lite label map format for this guide.
420 |
421 | Thus, we need to create a new label map that matches the TensorFlow Lite style. Open a text editor and list each class in order of their class number. Then, save the file as “labelmap.txt” in the TFLite_model folder. As an example, here's what the labelmap.txt file for my bird/squirrel/raccoon detector looks like:
422 |
423 |
424 |  425 |
425 |
426 |
427 | Now we’re ready to run the model!
428 |
429 | #### Step 3c. Run the TensorFlow Lite model!
430 | I wrote three Python scripts to run the TensorFlow Lite object detection model on an image, video, or webcam feed: `TFLite_detection_image.py`, `TFLite_detection_video.py`, and `TFLite_detection_webcam.py`. The scripts are based off the `label_image.py` example given in the [TensorFlow Lite examples GitHub repository](https://github.com/tensorflow/tensorflow/blob/master/tensorflow/lite/examples/python/label_image.py).
431 |
432 | We’ll download the Python scripts directly from this repository. First, install wget for Anaconda by issuing:
433 |
434 | ```
435 | conda install -c menpo wget
436 | ```
437 |
438 | Once it's installed, download the scripts by issuing:
439 |
440 | ```
441 | wget https://raw.githubusercontent.com/EdjeElectronics/TensorFlow-Lite-Object-Detection-on-Android-and-Raspberry-Pi/master/TFLite_detection_image.py --no-check-certificate
442 | wget https://raw.githubusercontent.com/EdjeElectronics/TensorFlow-Lite-Object-Detection-on-Android-and-Raspberry-Pi/master/TFLite_detection_video.py --no-check-certificate
443 | wget https://raw.githubusercontent.com/EdjeElectronics/TensorFlow-Lite-Object-Detection-on-Android-and-Raspberry-Pi/master/TFLite_detection_webcam.py --no-check-certificate
444 | ```
445 |
446 | Instructions for running the webcam, video, and image scripts are given on the main README page of this repository (link to be added). Go check them out to see how to deploy your newly trained model!
447 |
448 | ## Frequently Asked Questions and Common Errors
449 |
450 | #### Why does this guide use train.py rather than model_main.py for training?
451 | This guide uses "train.py" to run training on the TFLite detection model. The train.py script is deprecated, but the model_main.py script that replaced it doesn't log training progress by default, and it requires pycocotools to be installed. Using model_main.py requires a few extra setup steps, and I want to keep this guide as simple as possible. Since there are no major differences between train.py and model_main.py that will affect training ([see TensorFlow Issue #6100](https://github.com/tensorflow/models/issues/6100)), I use train.py for this guide.
452 |
453 | #### How do I check which TensorFlow version I used to train my detection model?
454 | Here’s how you can check the version of TensorFlow you used for training.
455 |
456 | 1. Open a new Anaconda Prompt window and issue `activate tensorflow1` (or whichever environment name you used)
457 | 2. Open a python shell by issuing `python`
458 | 3. Within the Python shell, import TensorFlow by issuing `import tensorflow as tf`
459 | 4. Check the TensorFlow version by issuing `tf.__version__` . It will respond with the version of TensorFlow. This is the version that you used for training.
460 |
461 | #### Building TensorFlow from source
462 | In case you run into error `error C2100: illegal indirection` during TensorFlow compilation, simply edit the file `tensorflow-build\tensorflow\tensorflow\core\framework\op_kernel.h`, go to line 405, and change `reference operator*() { return (*list_)[i_]; }` to `reference operator*() const { return (*list_)[i_]; }`. Credits go to: https://github.com/tensorflow/tensorflow/issues/15925#issuecomment-499569928
463 |
--------------------------------------------------------------------------------
/doc/object_detection_folder.png:
--------------------------------------------------------------------------------
https://raw.githubusercontent.com/EdjeElectronics/TensorFlow-Lite-Object-Detection-on-Android-and-Raspberry-Pi/f7f1fdec0f3e48161d598f99bf4657adbea944e8/doc/object_detection_folder.png
--------------------------------------------------------------------------------
/doc/squirrels!!.png:
--------------------------------------------------------------------------------
https://raw.githubusercontent.com/EdjeElectronics/TensorFlow-Lite-Object-Detection-on-Android-and-Raspberry-Pi/f7f1fdec0f3e48161d598f99bf4657adbea944e8/doc/squirrels!!.png
--------------------------------------------------------------------------------
/doc/tflite1_folder.png:
--------------------------------------------------------------------------------
https://raw.githubusercontent.com/EdjeElectronics/TensorFlow-Lite-Object-Detection-on-Android-and-Raspberry-Pi/f7f1fdec0f3e48161d598f99bf4657adbea944e8/doc/tflite1_folder.png
--------------------------------------------------------------------------------
/doc/training_in_progress.png:
--------------------------------------------------------------------------------
https://raw.githubusercontent.com/EdjeElectronics/TensorFlow-Lite-Object-Detection-on-Android-and-Raspberry-Pi/f7f1fdec0f3e48161d598f99bf4657adbea944e8/doc/training_in_progress.png
--------------------------------------------------------------------------------
/examples/ChangeCounter.py:
--------------------------------------------------------------------------------
1 | ######## Count Change Using Object Detection #########
2 | #
3 | # Author: Evan Juras, EJ Technology Consultants (www.ejtech.io)
4 | # Date: 10/29/22
5 | #
6 | # Description:
7 | # This program uses a TFLite coin detection model to locate and identify coins in
8 | # a live camera feed. It calculates the total value of the coins in the camera's view.
9 | # (Works on US currency, but can be modified to work with coins from other countries!)
10 |
11 | # Import packages
12 | import os
13 | import argparse
14 | import cv2
15 | import numpy as np
16 | import sys
17 | import time
18 | from threading import Thread
19 | import importlib.util
20 |
21 | ### User-defined variables
22 |
23 | # Model info
24 | MODEL_NAME = 'change_counter'
25 | GRAPH_NAME = 'detect.tflite'
26 | LABELMAP_NAME = 'labelmap.txt'
27 | use_TPU = False
28 |
29 | # Program settings
30 | min_conf_threshold = 0.50
31 | resW, resH = 1280, 720 # Resolution to run camera at
32 | imW, imH = resW, resH
33 |
34 | ### Set up model parameters
35 |
36 | # Import TensorFlow libraries
37 | # If tflite_runtime is installed, import interpreter from tflite_runtime, else import from regular tensorflow
38 | # If using Coral Edge TPU, import the load_delegate library
39 | pkg = importlib.util.find_spec('tflite_runtime')
40 | if pkg:
41 | from tflite_runtime.interpreter import Interpreter
42 | if use_TPU:
43 | from tflite_runtime.interpreter import load_delegate
44 | else:
45 | from tensorflow.lite.python.interpreter import Interpreter
46 | if use_TPU:
47 | from tensorflow.lite.python.interpreter import load_delegate
48 |
49 | # If using Edge TPU, assign filename for Edge TPU model
50 | if use_TPU:
51 | # If user has specified the name of the .tflite file, use that name, otherwise use default 'edgetpu.tflite'
52 | if (GRAPH_NAME == 'detect.tflite'):
53 | GRAPH_NAME = 'edgetpu.tflite'
54 |
55 | # Get path to current working directory
56 | CWD_PATH = os.getcwd()
57 |
58 | # Path to .tflite file, which contains the model that is used for object detection
59 | PATH_TO_CKPT = os.path.join(CWD_PATH,MODEL_NAME,GRAPH_NAME)
60 |
61 | # Path to label map file
62 | PATH_TO_LABELS = os.path.join(CWD_PATH,MODEL_NAME,LABELMAP_NAME)
63 |
64 | # Load the label map
65 | with open(PATH_TO_LABELS, 'r') as f:
66 | labels = [line.strip() for line in f.readlines()]
67 |
68 | ### Load Tensorflow Lite model
69 | # If using Edge TPU, use special load_delegate argument
70 | if use_TPU:
71 | interpreter = Interpreter(model_path=PATH_TO_CKPT,
72 | experimental_delegates=[load_delegate('libedgetpu.so.1.0')])
73 | else:
74 | interpreter = Interpreter(model_path=PATH_TO_CKPT)
75 |
76 | interpreter.allocate_tensors()
77 |
78 | # Get model details
79 | input_details = interpreter.get_input_details()
80 | output_details = interpreter.get_output_details()
81 | height = input_details[0]['shape'][1]
82 | width = input_details[0]['shape'][2]
83 |
84 | floating_model = (input_details[0]['dtype'] == np.float32)
85 |
86 | input_mean = 127.5
87 | input_std = 127.5
88 |
89 | # Check output layer name to determine if this model was created with TF2 or TF1,
90 | # because outputs are ordered differently for TF2 and TF1 models
91 | outname = output_details[0]['name']
92 |
93 | if ('StatefulPartitionedCall' in outname): # This is a TF2 model
94 | boxes_idx, classes_idx, scores_idx = 1, 3, 0
95 | else: # This is a TF1 model
96 | boxes_idx, classes_idx, scores_idx = 0, 1, 2
97 |
98 | # Initialize camera
99 | cap = cv2.VideoCapture(0)
100 | ret = cap.set(3, resW)
101 | ret = cap.set(4, resH)
102 |
103 | # Initialize frame rate calculation
104 | frame_rate_calc = 1
105 | freq = cv2.getTickFrequency()
106 |
107 | ### Continuously process frames from camera
108 | while True:
109 |
110 | # Start timer (for calculating frame rate)
111 | t1 = cv2.getTickCount()
112 |
113 | # Reset coin value count for this frame
114 | total_coin_value = 0
115 |
116 | # Grab frame from camera
117 | hasFrame, frame1 = cap.read()
118 |
119 | # Acquire frame and resize to input shape expected by model [1xHxWx3]
120 | frame = frame1.copy()
121 | frame_rgb = cv2.cvtColor(frame, cv2.COLOR_BGR2RGB)
122 | frame_resized = cv2.resize(frame_rgb, (width, height))
123 | input_data = np.expand_dims(frame_resized, axis=0)
124 |
125 | # Normalize pixel values if using a floating model (i.e. if model is non-quantized)
126 | if floating_model:
127 | input_data = (np.float32(input_data) - input_mean) / input_std
128 |
129 | # Perform detection by running the model with the image as input
130 | interpreter.set_tensor(input_details[0]['index'],input_data)
131 | interpreter.invoke()
132 |
133 | # Retrieve detection results
134 | boxes = interpreter.get_tensor(output_details[boxes_idx]['index'])[0] # Bounding box coordinates of detected objects
135 | classes = interpreter.get_tensor(output_details[classes_idx]['index'])[0] # Class index of detected objects
136 | scores = interpreter.get_tensor(output_details[scores_idx]['index'])[0] # Confidence of detected objects
137 |
138 | # Loop over all detections and process each detection if its confidence is above minimum threshold
139 | for i in range(len(scores)):
140 | if ((scores[i] > min_conf_threshold) and (scores[i] <= 1.0)):
141 |
142 | # Get bounding box coordinates
143 | # Interpreter can return coordinates that are outside of image dimensions, need to force them to be within image using max() and min()
144 | ymin = int(max(1,(boxes[i][0] * imH)))
145 | xmin = int(max(1,(boxes[i][1] * imW)))
146 | ymax = int(min(imH,(boxes[i][2] * imH)))
147 | xmax = int(min(imW,(boxes[i][3] * imW)))
148 |
149 | # Draw bounding box
150 | cv2.rectangle(frame, (xmin,ymin), (xmax,ymax), (10, 255, 0), 2)
151 |
152 | # Get object's name and draw label
153 | object_name = labels[int(classes[i])] # Look up object name from "labels" array using class index
154 | label = '%s: %d%%' % (object_name, int(scores[i]*100)) # Example: 'quarter: 72%'
155 | labelSize, baseLine = cv2.getTextSize(label, cv2.FONT_HERSHEY_SIMPLEX, 0.7, 2) # Get font size
156 | label_ymin = max(ymin, labelSize[1] + 10) # Make sure not to draw label too close to top of window
157 | cv2.rectangle(frame, (xmin, label_ymin-labelSize[1]-10), (xmin+labelSize[0], label_ymin+baseLine-10), (255, 255, 255), cv2.FILLED) # Draw white box to put label text in
158 | cv2.putText(frame, label, (xmin, label_ymin-7), cv2.FONT_HERSHEY_SIMPLEX, 0.7, (0, 0, 0), 2) # Draw label text
159 |
160 | # Assign the value of this coin based on the class name of the detected object
161 | # (There are more efficient ways to do this, but this shows an example of how to trigger an action when a certain class is detected)
162 | if object_name == 'penny':
163 | this_coin_value = 0.01
164 | elif object_name == 'nickel':
165 | this_coin_value = 0.05
166 | elif object_name == 'dime':
167 | this_coin_value = 0.10
168 | elif object_name == 'quarter':
169 | this_coin_value = 0.25
170 |
171 | # Add this coin's value to the running total
172 | total_coin_value = total_coin_value + this_coin_value
173 |
174 |
175 | # Now that we've gone through every detection, we know the total value of all coins in the frame. Let's display it in the corner of the frame.
176 | cv2.putText(frame,'Total change:',(20,80),cv2.FONT_HERSHEY_PLAIN,2,(0,0,0),4,cv2.LINE_AA)
177 | cv2.putText(frame,'Total change:',(20,80),cv2.FONT_HERSHEY_PLAIN,2,(230,230,230),2,cv2.LINE_AA)
178 | cv2.putText(frame,'$%.2f' % total_coin_value,(260,85),cv2.FONT_HERSHEY_PLAIN,2.5,(0,0,0),4,cv2.LINE_AA)
179 | cv2.putText(frame,'$%.2f' % total_coin_value,(260,85),cv2.FONT_HERSHEY_PLAIN,2.5,(85,195,105),2,cv2.LINE_AA)
180 |
181 | # Draw framerate in corner of frame
182 | cv2.putText(frame,'FPS: %.2f' % frame_rate_calc,(20,50),cv2.FONT_HERSHEY_PLAIN,2,(0,0,0),4,cv2.LINE_AA)
183 | cv2.putText(frame,'FPS: %.2f' % frame_rate_calc,(20,50),cv2.FONT_HERSHEY_PLAIN,2,(230,230,230),2,cv2.LINE_AA)
184 |
185 | # All the results have been drawn on the frame, so it's time to display it.
186 | cv2.imshow('Object detector', frame)
187 |
188 | # Calculate framerate
189 | t2 = cv2.getTickCount()
190 | time1 = (t2-t1)/freq
191 | frame_rate_calc= 1/time1
192 |
193 | # Press 'q' to quit
194 | if cv2.waitKey(1) == ord('q'):
195 | break
196 |
197 | # Clean up
198 | cv2.destroyAllWindows()
199 | cap.release()
200 |
--------------------------------------------------------------------------------
/examples/README.md:
--------------------------------------------------------------------------------
1 | # TensorFlow Lite Object Detection Examples
2 | You've trained a TensorFlow Lite object detection model, but now how do you build an actual program around it? This folder provides code for using TensorFlow Lite object detection models in example applications.
3 |
4 | ### ChangeCounter.py
5 |
--------------------------------------------------------------------------------
/get_pi_requirements.sh:
--------------------------------------------------------------------------------
1 | #!/bin/bash
2 |
3 | # Get packages required for OpenCV
4 |
5 | sudo apt-get -y install libjpeg-dev libtiff5-dev libjasper-dev libpng12-dev
6 | sudo apt-get -y install libavcodec-dev libavformat-dev libswscale-dev libv4l-dev
7 | sudo apt-get -y install libxvidcore-dev libx264-dev
8 | sudo apt-get -y install qt4-dev-tools
9 | sudo apt-get -y install libatlas-base-dev
10 |
11 | # Need to get an older version of OpenCV because version 4 has errors
12 | pip3 install opencv-python==3.4.11.41
13 |
14 | # Get packages required for TensorFlow
15 | # Using the tflite_runtime packages available at https://www.tensorflow.org/lite/guide/python
16 | # Will change to just 'pip3 install tensorflow' once newer versions of TF are added to piwheels
17 |
18 | #pip3 install tensorflow
19 |
20 | version=$(python3 -c 'import sys; print(".".join(map(str, sys.version_info[:2])))')
21 |
22 | if [ $version == "3.9" ]; then
23 | pip3 install https://github.com/google-coral/pycoral/releases/download/v2.0.0/tflite_runtime-2.5.0.post1-cp39-cp39-linux_armv7l.whl
24 | fi
25 |
26 | if [ $version == "3.8" ]; then
27 | pip3 install https://github.com/google-coral/pycoral/releases/download/v2.0.0/tflite_runtime-2.5.0.post1-cp38-cp38-linux_armv7l.whl
28 | fi
29 |
30 | if [ $version == "3.7" ]; then
31 | pip3 install https://github.com/google-coral/pycoral/releases/download/v2.0.0/tflite_runtime-2.5.0.post1-cp37-cp37m-linux_armv7l.whl
32 | fi
33 |
34 | if [ $version == "3.6" ]; then
35 | pip3 install https://github.com/google-coral/pycoral/releases/download/v2.0.0/tflite_runtime-2.5.0.post1-cp36-cp36m-linux_armv7l.whl
36 | fi
37 |
38 | if [ $version == "3.5" ]; then
39 | pip3 install https://github.com/google-coral/pycoral/releases/download/release-frogfish/tflite_runtime-2.5.0-cp35-cp35m-linux_armv7l.whl
40 | fi
41 |
--------------------------------------------------------------------------------
/test.mp4:
--------------------------------------------------------------------------------
https://raw.githubusercontent.com/EdjeElectronics/TensorFlow-Lite-Object-Detection-on-Android-and-Raspberry-Pi/f7f1fdec0f3e48161d598f99bf4657adbea944e8/test.mp4
--------------------------------------------------------------------------------
/test1.jpg:
--------------------------------------------------------------------------------
https://raw.githubusercontent.com/EdjeElectronics/TensorFlow-Lite-Object-Detection-on-Android-and-Raspberry-Pi/f7f1fdec0f3e48161d598f99bf4657adbea944e8/test1.jpg
--------------------------------------------------------------------------------
/util_scripts/README.md:
--------------------------------------------------------------------------------
1 | ## Utility Scripts for TensorFlow Lite Object Detection
2 | These scripts are used in the [TFLite Training Colab](https://colab.research.google.com/github/EdjeElectronics/TensorFlow-Lite-Object-Detection-on-Android-and-Raspberry-Pi/blob/master/Train_TFLite2_Object_Detction_Model.ipynb) to help with various steps of training a custom model. They can also be used as standalone tools.
3 |
4 | ### Calculate model mAP - (calculate_map_cartucho.py)
5 | Calculate your TFLite detection model's mAP score! I'll share instructions on how to use this outside the Colab notebook later.
6 |
7 |  8 |
9 | This tool uses the main.py script from [Cartucho's excellent repository](https://github.com/Cartucho/mAP), which takes in ground truth data and detection results to calculate average precision at a certain IoU threshold. The calculate_map_cartucho.py script performs the mAP calculation at multiple IoU thresholds to determine the COCO metric for average mAP @ 0.5:0.95.
10 |
11 | ### Split images into train, test, and validation sets - (train_val_test.py)
12 | This script takes a folder full of images and randomly splits them between train, test, and validation folders. It does an 80%/10%/10% split by default, but this can be modified by changing the `train_percent`, `test_percent`, and `val_percent` variables in the code.
13 |
14 | ### Create CSV annotation file - (create_csv.py)
15 | This script creates a single CSV data file from a set of Pascal VOC annotation files.
16 |
17 | Original credit for the script goes to [datitran](https://github.com/datitran/raccoon_dataset/blob/master/xml_to_csv.py).
18 |
19 | ### Create TFRecord file - (create_tfrecord.py)
20 | This script creates TFRecord files from a CSV annotation data file and a folder of images. TFRecords are the [data format required](https://github.com/tensorflow/models/blob/master/research/object_detection/g3doc/preparing_inputs.md) by the TensorFlow Object Detection API for training.
21 |
22 | Original credit for the script goes to [datitran](https://github.com/datitran/raccoon_dataset/blob/master/generate_tfrecord.py).
23 |
--------------------------------------------------------------------------------
/util_scripts/calculate_map_cartucho.py:
--------------------------------------------------------------------------------
1 | ##### Calculate object detection mAP score #####
2 | #
3 | # Author: Evan Juras, EJ Technology Consultants (https://ejtech.io)
4 | # Date: 11/12/22
5 | #
6 | # Description:
7 | # This script determines an object detection model's mAP score using a calculator from https://github.com/Cartucho/mAP .
8 | # It calculates the COCO metric (mAP @ 0.5:0.95) by running the calculator script ("main.py") multiple times at different
9 | # IoU thresholds, then averaging the result from each run. It also supports Pascal VOC metric (mAP @ 0.5) and custom user metrics.
10 |
11 | import os
12 | import sys
13 | import argparse
14 | import numpy as np
15 |
16 | # Define and parse input arguments
17 | parser = argparse.ArgumentParser()
18 | parser.add_argument('--labels', help='Path to the labelmap file', default='labelmap.txt')
19 | parser.add_argument('--outdir', help='Output folder to save results in', default='outputs')
20 | parser.add_argument('--metric', help='mAP metric to calculate: "coco", "pascalvoc", or "custom"', default='coco')
21 | parser.add_argument('--iou', help='(Only if using --metric=custom) Specify IoU threshholds \
22 | to use for evaluation (example: 0.5,0.6,0.7)')
23 | parser.add_argument('--show_images', help='Display and save images as they are evaluated', action='store_true') # Coming soon!
24 | parser.add_argument('--show_plots', help='Display and save plots showing precision/recall curve, mAP score, etc', action='store_true') # Coming soon!
25 |
26 | args = parser.parse_args()
27 |
28 | labelmap = args.labels
29 | outputs_dir = args.outdir
30 | metric = args.metric
31 | show_imgs = args.show_images
32 | show_plots = args.show_plots
33 |
34 | # Define which metric to use (i.e. which set of IoU thresholds to calculate mAP for)
35 | if metric=='coco':
36 | iou_threshes = [0.5,0.55,0.6,0.65,0.7,0.75,0.8,0.85,0.9,0.95]
37 | elif metric=='pascalvoc':
38 | iou_threshes = [0.5]
39 | elif metric=='custom':
40 | custom_ious = args.iou
41 | try:
42 | iou_threshes = [float(iou) for iou in custom_ious]
43 | except:
44 | print('Invalid entry for --iou. Example of a correct entry: "--iou=0.5,0.6,0.7"')
45 | sys.exit()
46 | else:
47 | print('Invalid entry for --metric. Please use coco, pascalvoc, or custom.')
48 | sys.exit()
49 |
50 | # Get file paths
51 | cwd = os.getcwd()
52 | output_path = os.path.join(cwd,outputs_dir)
53 | labelmap_path = os.path.join(cwd,labelmap)
54 |
55 | # Define arguments to show images and plots (if desired by user)
56 | if show_imgs: show_img_arg = ''
57 | else: show_img_arg = ' -na' # "-na" argument tells main.py NOT to show images
58 |
59 | if show_plots: show_plot_arg = ''
60 | else: show_plot_arg = ' -np' # "-np" argument tells main.py NOT to show plots
61 |
62 |
63 | # Load the label map
64 | with open(labelmap_path, 'r') as f:
65 | classes = [line.strip() for line in f.readlines()]
66 |
67 | # Make folder to store output result files
68 | if os.path.exists(output_path):
69 | print('The output folder %s already exists. Please delete it or specify a different folder name using --outdir.' % output_path)
70 | sys.exit()
71 | else:
72 | os.makedirs(output_path)
73 |
74 | # Create dictionary to store overall mAP results and results for each class
75 | mAP_results = {'overall':np.zeros(len(iou_threshes))}
76 | for classname in classes:
77 | mAP_results[classname] = np.zeros(len(iou_threshes)) # Add each class to dict
78 |
79 | for i, iou_thresh in enumerate(iou_threshes):
80 |
81 | # Modify main.py to use the specified IoU value
82 | with open('main.py', 'r') as f:
83 | data = f.read()
84 |
85 | # Set IoU threshold value
86 | data = data.replace('MINOVERLAP = 0.5', 'MINOVERLAP = %.2f' % iou_thresh)
87 | f.close()
88 |
89 | with open('main_modified.py', 'w') as f:
90 | f.write(data)
91 |
92 | # Run modified script
93 | print('Calculating mAP at %.2f IoU threshold...' % iou_thresh)
94 | os.system('python main_modified.py' + show_img_arg + show_plot_arg)
95 |
96 | # Extract mAP values by manually parsing the output.txt file
97 | with open('output/output.txt', 'r',) as f:
98 | for line in f:
99 | if '%' in line:
100 | # Overall mAP result is stored as "mAP = score%" (example: "mAP = 63.52%")
101 | if 'mAP' in line:
102 | vals = line.split(' ')
103 | overall_mAP = float(vals[2].replace('%',''))
104 | mAP_results['overall'][i] = overall_mAP
105 | # Class mAP results are stored as "score% = class AP" (example: "78.30% = dime AP")
106 | else:
107 | vals = line.split(' ')
108 | class_name = vals[2]
109 | class_mAP = float(vals[0].replace('%',''))
110 | mAP_results[class_name][i] = class_mAP
111 |
112 | # Save mAP results for this IoU value as a different folder name, then delete modified script
113 | newpath = os.path.join(output_path,'output_iou_%.2f' % iou_thresh)
114 | os.rename('output',newpath)
115 | os.remove('main_modified.py')
116 |
117 | # Okay, we found mAP at each IoU value! Now we just need to average the mAPs and display them.
118 | class_mAP_result = []
119 | print('\n***mAP Results***\n')
120 | print('Class\t\tAverage mAP @ 0.5:0.95')
121 | print('---------------------------------------')
122 | for classname in classes:
123 | class_vals = mAP_results[classname]
124 | class_avg = np.mean(class_vals)
125 | class_mAP_result.append(class_avg)
126 | print('%s\t\t%0.2f%%' % (classname, class_avg)) # TO DO: Find a better variable name than "classname"
127 |
128 | overall_mAP_result = np.mean(class_mAP_result)
129 | print('\nOverall\t\t%0.2f%%' % overall_mAP_result)
130 |
131 |
--------------------------------------------------------------------------------
/util_scripts/create_csv.py:
--------------------------------------------------------------------------------
1 | # Script to create CSV data file from Pascal VOC annotation files
2 | # Based off code from GitHub user datitran: https://github.com/datitran/raccoon_dataset/blob/master/xml_to_csv.py
3 |
4 | import os
5 | import glob
6 | import pandas as pd
7 | import xml.etree.ElementTree as ET
8 |
9 | def xml_to_csv(path):
10 | xml_list = []
11 | for xml_file in glob.glob(path + '/*.xml'):
12 | tree = ET.parse(xml_file)
13 | root = tree.getroot()
14 | for member in root.findall('object'):
15 | value = (root.find('filename').text,
16 | int(root.find('size')[0].text),
17 | int(root.find('size')[1].text),
18 | member[0].text,
19 | int(member[4][0].text),
20 | int(member[4][1].text),
21 | int(member[4][2].text),
22 | int(member[4][3].text)
23 | )
24 | xml_list.append(value)
25 | column_name = ['filename', 'width', 'height', 'class', 'xmin', 'ymin', 'xmax', 'ymax']
26 | xml_df = pd.DataFrame(xml_list, columns=column_name)
27 | return xml_df
28 |
29 | def main():
30 | for folder in ['train','validation']:
31 | image_path = os.path.join(os.getcwd(), ('images/' + folder))
32 | xml_df = xml_to_csv(image_path)
33 | xml_df.to_csv(('images/' + folder + '_labels.csv'), index=None)
34 | print('Successfully converted xml to csv.')
35 |
36 | main()
37 |
--------------------------------------------------------------------------------
/util_scripts/create_tfrecord.py:
--------------------------------------------------------------------------------
1 | # Script to create TFRecord files from train and test dataset folders
2 | # Originally from GitHub user datitran: https://github.com/datitran/raccoon_dataset/blob/master/generate_tfrecord.py
3 |
4 | """
5 | Usage:
6 | # From tensorflow/models/
7 | # Create train data:
8 | python generate_tfrecord.py --csv_input=images/train_labels.csv --image_dir=images/train --output_path=train.record
9 |
10 | # Create test data:
11 | python generate_tfrecord.py --csv_input=images/test_labels.csv --image_dir=images/test --output_path=test.record
12 | """
13 | from __future__ import division
14 | from __future__ import print_function
15 | from __future__ import absolute_import
16 |
17 | import os
18 | import io
19 | import pandas as pd
20 |
21 | from tensorflow.python.framework.versions import VERSION
22 | if VERSION >= "2.0.0a0":
23 | import tensorflow.compat.v1 as tf
24 | else:
25 | import tensorflow as tf
26 |
27 | from PIL import Image
28 | from object_detection.utils import dataset_util
29 | from collections import namedtuple, OrderedDict
30 |
31 | flags = tf.app.flags
32 | flags.DEFINE_string('csv_input', '', 'Path to the CSV input')
33 | flags.DEFINE_string('labelmap', '', 'Path to the labelmap file')
34 | flags.DEFINE_string('image_dir', '', 'Path to the image directory')
35 | flags.DEFINE_string('output_path', '', 'Path to output TFRecord')
36 | FLAGS = flags.FLAGS
37 |
38 | def split(df, group):
39 | data = namedtuple('data', ['filename', 'object'])
40 | gb = df.groupby(group)
41 | return [data(filename, gb.get_group(x)) for filename, x in zip(gb.groups.keys(), gb.groups)]
42 |
43 |
44 | def create_tf_example(group, path):
45 | with tf.gfile.GFile(os.path.join(path, '{}'.format(group.filename)), 'rb') as fid:
46 | encoded_jpg = fid.read()
47 | encoded_jpg_io = io.BytesIO(encoded_jpg)
48 | image = Image.open(encoded_jpg_io)
49 | width, height = image.size
50 |
51 | filename = group.filename.encode('utf8')
52 | image_format = b'jpg'
53 | xmins = []
54 | xmaxs = []
55 | ymins = []
56 | ymaxs = []
57 | classes_text = []
58 | classes = []
59 |
60 | labels = []
61 | with open(FLAGS.labelmap, 'r') as f:
62 | labels = [line.strip() for line in f.readlines()]
63 |
64 | for index, row in group.object.iterrows():
65 | xmins.append(row['xmin'] / width)
66 | xmaxs.append(row['xmax'] / width)
67 | ymins.append(row['ymin'] / height)
68 | ymaxs.append(row['ymax'] / height)
69 | classes_text.append(row['class'].encode('utf8'))
70 | classes.append(int(labels.index(row['class'])+1))
71 |
72 | tf_example = tf.train.Example(features=tf.train.Features(feature={
73 | 'image/height': dataset_util.int64_feature(height),
74 | 'image/width': dataset_util.int64_feature(width),
75 | 'image/filename': dataset_util.bytes_feature(filename),
76 | 'image/source_id': dataset_util.bytes_feature(filename),
77 | 'image/encoded': dataset_util.bytes_feature(encoded_jpg),
78 | 'image/format': dataset_util.bytes_feature(image_format),
79 | 'image/object/bbox/xmin': dataset_util.float_list_feature(xmins),
80 | 'image/object/bbox/xmax': dataset_util.float_list_feature(xmaxs),
81 | 'image/object/bbox/ymin': dataset_util.float_list_feature(ymins),
82 | 'image/object/bbox/ymax': dataset_util.float_list_feature(ymaxs),
83 | 'image/object/class/text': dataset_util.bytes_list_feature(classes_text),
84 | 'image/object/class/label': dataset_util.int64_list_feature(classes),
85 | }))
86 | return tf_example
87 |
88 |
89 | def main(_):
90 | # Load and prepare data
91 | writer = tf.python_io.TFRecordWriter(FLAGS.output_path)
92 | path = os.path.join(os.getcwd(), FLAGS.image_dir)
93 | examples = pd.read_csv(FLAGS.csv_input)
94 |
95 | # Create TFRecord files
96 | grouped = split(examples, 'filename')
97 | for group in grouped:
98 | tf_example = create_tf_example(group, path)
99 | writer.write(tf_example.SerializeToString())
100 |
101 | writer.close()
102 | output_path = os.path.join(os.getcwd(), FLAGS.output_path)
103 | print('Successfully created the TFRecords: {}'.format(output_path))
104 |
105 | # Create labelmap.pbtxt file
106 | path_to_labeltxt = os.path.join(os.getcwd(), FLAGS.labelmap)
107 | with open(path_to_labeltxt, 'r') as f:
108 | labels = [line.strip() for line in f.readlines()]
109 |
110 | path_to_labelpbtxt = os.path.join(os.getcwd(), 'labelmap.pbtxt')
111 | with open(path_to_labelpbtxt,'w') as f:
112 | for i, label in enumerate(labels):
113 | f.write('item {\n' +
114 | ' id: %d\n' % (i + 1) +
115 | ' name: \'%s\'\n' % label +
116 | '}\n' +
117 | '\n')
118 |
119 | if __name__ == '__main__':
120 | tf.app.run()
121 |
--------------------------------------------------------------------------------
/util_scripts/train_val_test_split.py:
--------------------------------------------------------------------------------
1 | ### Python script to split a labeled image dataset into Train, Validation, and Test folders.
2 | # Author: Evan Juras, EJ Technology Consultants
3 | # Date: 4/10/21
4 |
5 | # Randomly splits images to 80% train, 10% validation, and 10% test, and moves them to their respective folders.
6 | # This script is intended to be used in the TFLite Object Detection Colab notebook here:
7 | # https://colab.research.google.com/github/EdjeElectronics/TensorFlow-Lite-Object-Detection-on-Android-and-Raspberry-Pi/blob/master/Train_TFLite2_Object_Detction_Model.ipynb
8 |
9 | from pathlib import Path
10 | import random
11 | import os
12 | import sys
13 |
14 | # Define paths to image folders
15 | image_path = '/content/images/all'
16 | train_path = '/content/images/train'
17 | val_path = '/content/images/validation'
18 | test_path = '/content/images/test'
19 |
20 | # Get list of all images
21 | jpeg_file_list = [path for path in Path(image_path).rglob('*.jpeg')]
22 | jpg_file_list = [path for path in Path(image_path).rglob('*.jpg')]
23 | png_file_list = [path for path in Path(image_path).rglob('*.png')]
24 | bmp_file_list = [path for path in Path(image_path).rglob('*.bmp')]
25 |
26 | if sys.platform == 'linux':
27 | JPEG_file_list = [path for path in Path(image_path).rglob('*.JPEG')]
28 | JPG_file_list = [path for path in Path(image_path).rglob('*.JPG')]
29 | file_list = jpg_file_list + JPG_file_list + png_file_list + bmp_file_list + JPEG_file_list + jpeg_file_list
30 | else:
31 | file_list = jpg_file_list + png_file_list + bmp_file_list + jpeg_file_list
32 |
33 | file_num = len(file_list)
34 | print('Total images: %d' % file_num)
35 |
36 | # Determine number of files to move to each folder
37 | train_percent = 0.8 # 80% of the files go to train
38 | val_percent = 0.1 # 10% go to validation
39 | test_percent = 0.1 # 10% go to test
40 | train_num = int(file_num*train_percent)
41 | val_num = int(file_num*val_percent)
42 | test_num = file_num - train_num - val_num
43 | print('Images moving to train: %d' % train_num)
44 | print('Images moving to validation: %d' % val_num)
45 | print('Images moving to test: %d' % test_num)
46 |
47 | # Select 80% of files randomly and move them to train folder
48 | for i in range(train_num):
49 | move_me = random.choice(file_list)
50 | fn = move_me.name
51 | base_fn = move_me.stem
52 | parent_path = move_me.parent
53 | xml_fn = base_fn + '.xml'
54 | os.rename(move_me, train_path+'/'+fn)
55 | os.rename(os.path.join(parent_path,xml_fn),os.path.join(train_path,xml_fn))
56 | file_list.remove(move_me)
57 |
58 | # Select 10% of remaining files and move them to validation folder
59 | for i in range(val_num):
60 | move_me = random.choice(file_list)
61 | fn = move_me.name
62 | base_fn = move_me.stem
63 | parent_path = move_me.parent
64 | xml_fn = base_fn + '.xml'
65 | os.rename(move_me, val_path+'/'+fn)
66 | os.rename(os.path.join(parent_path,xml_fn),os.path.join(val_path,xml_fn))
67 | file_list.remove(move_me)
68 |
69 | # Move remaining files to test folder
70 | for i in range(test_num):
71 | move_me = random.choice(file_list)
72 | fn = move_me.name
73 | base_fn = move_me.stem
74 | parent_path = move_me.parent
75 | xml_fn = base_fn + '.xml'
76 | os.rename(move_me, test_path+'/'+fn)
77 | os.rename(os.path.join(parent_path,xml_fn),os.path.join(test_path,xml_fn))
78 | file_list.remove(move_me)
79 |
--------------------------------------------------------------------------------
/util_scripts/train_val_test_split_yolo.py:
--------------------------------------------------------------------------------
1 | ### Python script to split a labeled image dataset into Train, Validation, and Test folders. Modified to work for YOLO txt files.
2 | # Author: Evan Juras, EJ Technology Consultants
3 | # Date: 4/10/21
4 |
5 | # Randomly splits images to 80% train, 10% validation, and 10% test, and moves them to their respective folders.
6 | # This script is intended to be used in the TFLite Object Detection Colab notebook here:
7 | # https://colab.research.google.com/github/EdjeElectronics/TensorFlow-Lite-Object-Detection-on-Android-and-Raspberry-Pi/blob/master/Train_TFLite2_Object_Detction_Model.ipynb
8 |
9 | from pathlib import Path
10 | import random
11 | import os
12 | import sys
13 |
14 | # Define paths to image folders
15 | image_path = '/content/images/all'
16 | train_path = '/content/images/train'
17 | val_path = '/content/images/validation'
18 | test_path = '/content/images/test'
19 |
20 | # Get list of all images
21 | jpeg_file_list = [path for path in Path(image_path).rglob('*.jpeg')]
22 | jpg_file_list = [path for path in Path(image_path).rglob('*.jpg')]
23 | png_file_list = [path for path in Path(image_path).rglob('*.png')]
24 | bmp_file_list = [path for path in Path(image_path).rglob('*.bmp')]
25 |
26 | if sys.platform == 'linux':
27 | JPEG_file_list = [path for path in Path(image_path).rglob('*.JPEG')]
28 | JPG_file_list = [path for path in Path(image_path).rglob('*.JPG')]
29 | file_list = jpg_file_list + JPG_file_list + png_file_list + bmp_file_list + JPEG_file_list + jpeg_file_list
30 | else:
31 | file_list = jpg_file_list + png_file_list + bmp_file_list + jpeg_file_list
32 |
33 | file_num = len(file_list)
34 | print('Total images: %d' % file_num)
35 |
36 | # Determine number of files to move to each folder
37 | train_percent = 0.8 # 80% of the files go to train
38 | val_percent = 0.1 # 10% go to validation
39 | test_percent = 0.1 # 10% go to test
40 | train_num = int(file_num*train_percent)
41 | val_num = int(file_num*val_percent)
42 | test_num = file_num - train_num - val_num
43 | print('Images moving to train: %d' % train_num)
44 | print('Images moving to validation: %d' % val_num)
45 | print('Images moving to test: %d' % test_num)
46 |
47 | # Select 80% of files randomly and move them to train folder
48 | for i in range(train_num):
49 | move_me = random.choice(file_list)
50 | fn = move_me.name
51 | base_fn = move_me.stem
52 | parent_path = move_me.parent
53 | txt_fn = base_fn + '.txt'
54 | os.rename(move_me, train_path+'/'+fn)
55 | os.rename(os.path.join(parent_path,txt_fn),os.path.join(train_path,txt_fn))
56 | file_list.remove(move_me)
57 |
58 | # Select 10% of remaining files and move them to validation folder
59 | for i in range(val_num):
60 | move_me = random.choice(file_list)
61 | fn = move_me.name
62 | base_fn = move_me.stem
63 | parent_path = move_me.parent
64 | txt_fn = base_fn + '.txt'
65 | os.rename(move_me, val_path+'/'+fn)
66 | os.rename(os.path.join(parent_path,txt_fn),os.path.join(val_path,txt_fn))
67 | file_list.remove(move_me)
68 |
69 | # Move remaining files to test folder
70 | for i in range(test_num):
71 | move_me = random.choice(file_list)
72 | fn = move_me.name
73 | base_fn = move_me.stem
74 | parent_path = move_me.parent
75 | txt_fn = base_fn + '.txt'
76 | os.rename(move_me, test_path+'/'+fn)
77 | os.rename(os.path.join(parent_path,txt_fn),os.path.join(test_path,txt_fn))
78 | file_list.remove(move_me)
79 |
--------------------------------------------------------------------------------
8 |
9 | This tool uses the main.py script from [Cartucho's excellent repository](https://github.com/Cartucho/mAP), which takes in ground truth data and detection results to calculate average precision at a certain IoU threshold. The calculate_map_cartucho.py script performs the mAP calculation at multiple IoU thresholds to determine the COCO metric for average mAP @ 0.5:0.95.
10 |
11 | ### Split images into train, test, and validation sets - (train_val_test.py)
12 | This script takes a folder full of images and randomly splits them between train, test, and validation folders. It does an 80%/10%/10% split by default, but this can be modified by changing the `train_percent`, `test_percent`, and `val_percent` variables in the code.
13 |
14 | ### Create CSV annotation file - (create_csv.py)
15 | This script creates a single CSV data file from a set of Pascal VOC annotation files.
16 |
17 | Original credit for the script goes to [datitran](https://github.com/datitran/raccoon_dataset/blob/master/xml_to_csv.py).
18 |
19 | ### Create TFRecord file - (create_tfrecord.py)
20 | This script creates TFRecord files from a CSV annotation data file and a folder of images. TFRecords are the [data format required](https://github.com/tensorflow/models/blob/master/research/object_detection/g3doc/preparing_inputs.md) by the TensorFlow Object Detection API for training.
21 |
22 | Original credit for the script goes to [datitran](https://github.com/datitran/raccoon_dataset/blob/master/generate_tfrecord.py).
23 |
--------------------------------------------------------------------------------
/util_scripts/calculate_map_cartucho.py:
--------------------------------------------------------------------------------
1 | ##### Calculate object detection mAP score #####
2 | #
3 | # Author: Evan Juras, EJ Technology Consultants (https://ejtech.io)
4 | # Date: 11/12/22
5 | #
6 | # Description:
7 | # This script determines an object detection model's mAP score using a calculator from https://github.com/Cartucho/mAP .
8 | # It calculates the COCO metric (mAP @ 0.5:0.95) by running the calculator script ("main.py") multiple times at different
9 | # IoU thresholds, then averaging the result from each run. It also supports Pascal VOC metric (mAP @ 0.5) and custom user metrics.
10 |
11 | import os
12 | import sys
13 | import argparse
14 | import numpy as np
15 |
16 | # Define and parse input arguments
17 | parser = argparse.ArgumentParser()
18 | parser.add_argument('--labels', help='Path to the labelmap file', default='labelmap.txt')
19 | parser.add_argument('--outdir', help='Output folder to save results in', default='outputs')
20 | parser.add_argument('--metric', help='mAP metric to calculate: "coco", "pascalvoc", or "custom"', default='coco')
21 | parser.add_argument('--iou', help='(Only if using --metric=custom) Specify IoU threshholds \
22 | to use for evaluation (example: 0.5,0.6,0.7)')
23 | parser.add_argument('--show_images', help='Display and save images as they are evaluated', action='store_true') # Coming soon!
24 | parser.add_argument('--show_plots', help='Display and save plots showing precision/recall curve, mAP score, etc', action='store_true') # Coming soon!
25 |
26 | args = parser.parse_args()
27 |
28 | labelmap = args.labels
29 | outputs_dir = args.outdir
30 | metric = args.metric
31 | show_imgs = args.show_images
32 | show_plots = args.show_plots
33 |
34 | # Define which metric to use (i.e. which set of IoU thresholds to calculate mAP for)
35 | if metric=='coco':
36 | iou_threshes = [0.5,0.55,0.6,0.65,0.7,0.75,0.8,0.85,0.9,0.95]
37 | elif metric=='pascalvoc':
38 | iou_threshes = [0.5]
39 | elif metric=='custom':
40 | custom_ious = args.iou
41 | try:
42 | iou_threshes = [float(iou) for iou in custom_ious]
43 | except:
44 | print('Invalid entry for --iou. Example of a correct entry: "--iou=0.5,0.6,0.7"')
45 | sys.exit()
46 | else:
47 | print('Invalid entry for --metric. Please use coco, pascalvoc, or custom.')
48 | sys.exit()
49 |
50 | # Get file paths
51 | cwd = os.getcwd()
52 | output_path = os.path.join(cwd,outputs_dir)
53 | labelmap_path = os.path.join(cwd,labelmap)
54 |
55 | # Define arguments to show images and plots (if desired by user)
56 | if show_imgs: show_img_arg = ''
57 | else: show_img_arg = ' -na' # "-na" argument tells main.py NOT to show images
58 |
59 | if show_plots: show_plot_arg = ''
60 | else: show_plot_arg = ' -np' # "-np" argument tells main.py NOT to show plots
61 |
62 |
63 | # Load the label map
64 | with open(labelmap_path, 'r') as f:
65 | classes = [line.strip() for line in f.readlines()]
66 |
67 | # Make folder to store output result files
68 | if os.path.exists(output_path):
69 | print('The output folder %s already exists. Please delete it or specify a different folder name using --outdir.' % output_path)
70 | sys.exit()
71 | else:
72 | os.makedirs(output_path)
73 |
74 | # Create dictionary to store overall mAP results and results for each class
75 | mAP_results = {'overall':np.zeros(len(iou_threshes))}
76 | for classname in classes:
77 | mAP_results[classname] = np.zeros(len(iou_threshes)) # Add each class to dict
78 |
79 | for i, iou_thresh in enumerate(iou_threshes):
80 |
81 | # Modify main.py to use the specified IoU value
82 | with open('main.py', 'r') as f:
83 | data = f.read()
84 |
85 | # Set IoU threshold value
86 | data = data.replace('MINOVERLAP = 0.5', 'MINOVERLAP = %.2f' % iou_thresh)
87 | f.close()
88 |
89 | with open('main_modified.py', 'w') as f:
90 | f.write(data)
91 |
92 | # Run modified script
93 | print('Calculating mAP at %.2f IoU threshold...' % iou_thresh)
94 | os.system('python main_modified.py' + show_img_arg + show_plot_arg)
95 |
96 | # Extract mAP values by manually parsing the output.txt file
97 | with open('output/output.txt', 'r',) as f:
98 | for line in f:
99 | if '%' in line:
100 | # Overall mAP result is stored as "mAP = score%" (example: "mAP = 63.52%")
101 | if 'mAP' in line:
102 | vals = line.split(' ')
103 | overall_mAP = float(vals[2].replace('%',''))
104 | mAP_results['overall'][i] = overall_mAP
105 | # Class mAP results are stored as "score% = class AP" (example: "78.30% = dime AP")
106 | else:
107 | vals = line.split(' ')
108 | class_name = vals[2]
109 | class_mAP = float(vals[0].replace('%',''))
110 | mAP_results[class_name][i] = class_mAP
111 |
112 | # Save mAP results for this IoU value as a different folder name, then delete modified script
113 | newpath = os.path.join(output_path,'output_iou_%.2f' % iou_thresh)
114 | os.rename('output',newpath)
115 | os.remove('main_modified.py')
116 |
117 | # Okay, we found mAP at each IoU value! Now we just need to average the mAPs and display them.
118 | class_mAP_result = []
119 | print('\n***mAP Results***\n')
120 | print('Class\t\tAverage mAP @ 0.5:0.95')
121 | print('---------------------------------------')
122 | for classname in classes:
123 | class_vals = mAP_results[classname]
124 | class_avg = np.mean(class_vals)
125 | class_mAP_result.append(class_avg)
126 | print('%s\t\t%0.2f%%' % (classname, class_avg)) # TO DO: Find a better variable name than "classname"
127 |
128 | overall_mAP_result = np.mean(class_mAP_result)
129 | print('\nOverall\t\t%0.2f%%' % overall_mAP_result)
130 |
131 |
--------------------------------------------------------------------------------
/util_scripts/create_csv.py:
--------------------------------------------------------------------------------
1 | # Script to create CSV data file from Pascal VOC annotation files
2 | # Based off code from GitHub user datitran: https://github.com/datitran/raccoon_dataset/blob/master/xml_to_csv.py
3 |
4 | import os
5 | import glob
6 | import pandas as pd
7 | import xml.etree.ElementTree as ET
8 |
9 | def xml_to_csv(path):
10 | xml_list = []
11 | for xml_file in glob.glob(path + '/*.xml'):
12 | tree = ET.parse(xml_file)
13 | root = tree.getroot()
14 | for member in root.findall('object'):
15 | value = (root.find('filename').text,
16 | int(root.find('size')[0].text),
17 | int(root.find('size')[1].text),
18 | member[0].text,
19 | int(member[4][0].text),
20 | int(member[4][1].text),
21 | int(member[4][2].text),
22 | int(member[4][3].text)
23 | )
24 | xml_list.append(value)
25 | column_name = ['filename', 'width', 'height', 'class', 'xmin', 'ymin', 'xmax', 'ymax']
26 | xml_df = pd.DataFrame(xml_list, columns=column_name)
27 | return xml_df
28 |
29 | def main():
30 | for folder in ['train','validation']:
31 | image_path = os.path.join(os.getcwd(), ('images/' + folder))
32 | xml_df = xml_to_csv(image_path)
33 | xml_df.to_csv(('images/' + folder + '_labels.csv'), index=None)
34 | print('Successfully converted xml to csv.')
35 |
36 | main()
37 |
--------------------------------------------------------------------------------
/util_scripts/create_tfrecord.py:
--------------------------------------------------------------------------------
1 | # Script to create TFRecord files from train and test dataset folders
2 | # Originally from GitHub user datitran: https://github.com/datitran/raccoon_dataset/blob/master/generate_tfrecord.py
3 |
4 | """
5 | Usage:
6 | # From tensorflow/models/
7 | # Create train data:
8 | python generate_tfrecord.py --csv_input=images/train_labels.csv --image_dir=images/train --output_path=train.record
9 |
10 | # Create test data:
11 | python generate_tfrecord.py --csv_input=images/test_labels.csv --image_dir=images/test --output_path=test.record
12 | """
13 | from __future__ import division
14 | from __future__ import print_function
15 | from __future__ import absolute_import
16 |
17 | import os
18 | import io
19 | import pandas as pd
20 |
21 | from tensorflow.python.framework.versions import VERSION
22 | if VERSION >= "2.0.0a0":
23 | import tensorflow.compat.v1 as tf
24 | else:
25 | import tensorflow as tf
26 |
27 | from PIL import Image
28 | from object_detection.utils import dataset_util
29 | from collections import namedtuple, OrderedDict
30 |
31 | flags = tf.app.flags
32 | flags.DEFINE_string('csv_input', '', 'Path to the CSV input')
33 | flags.DEFINE_string('labelmap', '', 'Path to the labelmap file')
34 | flags.DEFINE_string('image_dir', '', 'Path to the image directory')
35 | flags.DEFINE_string('output_path', '', 'Path to output TFRecord')
36 | FLAGS = flags.FLAGS
37 |
38 | def split(df, group):
39 | data = namedtuple('data', ['filename', 'object'])
40 | gb = df.groupby(group)
41 | return [data(filename, gb.get_group(x)) for filename, x in zip(gb.groups.keys(), gb.groups)]
42 |
43 |
44 | def create_tf_example(group, path):
45 | with tf.gfile.GFile(os.path.join(path, '{}'.format(group.filename)), 'rb') as fid:
46 | encoded_jpg = fid.read()
47 | encoded_jpg_io = io.BytesIO(encoded_jpg)
48 | image = Image.open(encoded_jpg_io)
49 | width, height = image.size
50 |
51 | filename = group.filename.encode('utf8')
52 | image_format = b'jpg'
53 | xmins = []
54 | xmaxs = []
55 | ymins = []
56 | ymaxs = []
57 | classes_text = []
58 | classes = []
59 |
60 | labels = []
61 | with open(FLAGS.labelmap, 'r') as f:
62 | labels = [line.strip() for line in f.readlines()]
63 |
64 | for index, row in group.object.iterrows():
65 | xmins.append(row['xmin'] / width)
66 | xmaxs.append(row['xmax'] / width)
67 | ymins.append(row['ymin'] / height)
68 | ymaxs.append(row['ymax'] / height)
69 | classes_text.append(row['class'].encode('utf8'))
70 | classes.append(int(labels.index(row['class'])+1))
71 |
72 | tf_example = tf.train.Example(features=tf.train.Features(feature={
73 | 'image/height': dataset_util.int64_feature(height),
74 | 'image/width': dataset_util.int64_feature(width),
75 | 'image/filename': dataset_util.bytes_feature(filename),
76 | 'image/source_id': dataset_util.bytes_feature(filename),
77 | 'image/encoded': dataset_util.bytes_feature(encoded_jpg),
78 | 'image/format': dataset_util.bytes_feature(image_format),
79 | 'image/object/bbox/xmin': dataset_util.float_list_feature(xmins),
80 | 'image/object/bbox/xmax': dataset_util.float_list_feature(xmaxs),
81 | 'image/object/bbox/ymin': dataset_util.float_list_feature(ymins),
82 | 'image/object/bbox/ymax': dataset_util.float_list_feature(ymaxs),
83 | 'image/object/class/text': dataset_util.bytes_list_feature(classes_text),
84 | 'image/object/class/label': dataset_util.int64_list_feature(classes),
85 | }))
86 | return tf_example
87 |
88 |
89 | def main(_):
90 | # Load and prepare data
91 | writer = tf.python_io.TFRecordWriter(FLAGS.output_path)
92 | path = os.path.join(os.getcwd(), FLAGS.image_dir)
93 | examples = pd.read_csv(FLAGS.csv_input)
94 |
95 | # Create TFRecord files
96 | grouped = split(examples, 'filename')
97 | for group in grouped:
98 | tf_example = create_tf_example(group, path)
99 | writer.write(tf_example.SerializeToString())
100 |
101 | writer.close()
102 | output_path = os.path.join(os.getcwd(), FLAGS.output_path)
103 | print('Successfully created the TFRecords: {}'.format(output_path))
104 |
105 | # Create labelmap.pbtxt file
106 | path_to_labeltxt = os.path.join(os.getcwd(), FLAGS.labelmap)
107 | with open(path_to_labeltxt, 'r') as f:
108 | labels = [line.strip() for line in f.readlines()]
109 |
110 | path_to_labelpbtxt = os.path.join(os.getcwd(), 'labelmap.pbtxt')
111 | with open(path_to_labelpbtxt,'w') as f:
112 | for i, label in enumerate(labels):
113 | f.write('item {\n' +
114 | ' id: %d\n' % (i + 1) +
115 | ' name: \'%s\'\n' % label +
116 | '}\n' +
117 | '\n')
118 |
119 | if __name__ == '__main__':
120 | tf.app.run()
121 |
--------------------------------------------------------------------------------
/util_scripts/train_val_test_split.py:
--------------------------------------------------------------------------------
1 | ### Python script to split a labeled image dataset into Train, Validation, and Test folders.
2 | # Author: Evan Juras, EJ Technology Consultants
3 | # Date: 4/10/21
4 |
5 | # Randomly splits images to 80% train, 10% validation, and 10% test, and moves them to their respective folders.
6 | # This script is intended to be used in the TFLite Object Detection Colab notebook here:
7 | # https://colab.research.google.com/github/EdjeElectronics/TensorFlow-Lite-Object-Detection-on-Android-and-Raspberry-Pi/blob/master/Train_TFLite2_Object_Detction_Model.ipynb
8 |
9 | from pathlib import Path
10 | import random
11 | import os
12 | import sys
13 |
14 | # Define paths to image folders
15 | image_path = '/content/images/all'
16 | train_path = '/content/images/train'
17 | val_path = '/content/images/validation'
18 | test_path = '/content/images/test'
19 |
20 | # Get list of all images
21 | jpeg_file_list = [path for path in Path(image_path).rglob('*.jpeg')]
22 | jpg_file_list = [path for path in Path(image_path).rglob('*.jpg')]
23 | png_file_list = [path for path in Path(image_path).rglob('*.png')]
24 | bmp_file_list = [path for path in Path(image_path).rglob('*.bmp')]
25 |
26 | if sys.platform == 'linux':
27 | JPEG_file_list = [path for path in Path(image_path).rglob('*.JPEG')]
28 | JPG_file_list = [path for path in Path(image_path).rglob('*.JPG')]
29 | file_list = jpg_file_list + JPG_file_list + png_file_list + bmp_file_list + JPEG_file_list + jpeg_file_list
30 | else:
31 | file_list = jpg_file_list + png_file_list + bmp_file_list + jpeg_file_list
32 |
33 | file_num = len(file_list)
34 | print('Total images: %d' % file_num)
35 |
36 | # Determine number of files to move to each folder
37 | train_percent = 0.8 # 80% of the files go to train
38 | val_percent = 0.1 # 10% go to validation
39 | test_percent = 0.1 # 10% go to test
40 | train_num = int(file_num*train_percent)
41 | val_num = int(file_num*val_percent)
42 | test_num = file_num - train_num - val_num
43 | print('Images moving to train: %d' % train_num)
44 | print('Images moving to validation: %d' % val_num)
45 | print('Images moving to test: %d' % test_num)
46 |
47 | # Select 80% of files randomly and move them to train folder
48 | for i in range(train_num):
49 | move_me = random.choice(file_list)
50 | fn = move_me.name
51 | base_fn = move_me.stem
52 | parent_path = move_me.parent
53 | xml_fn = base_fn + '.xml'
54 | os.rename(move_me, train_path+'/'+fn)
55 | os.rename(os.path.join(parent_path,xml_fn),os.path.join(train_path,xml_fn))
56 | file_list.remove(move_me)
57 |
58 | # Select 10% of remaining files and move them to validation folder
59 | for i in range(val_num):
60 | move_me = random.choice(file_list)
61 | fn = move_me.name
62 | base_fn = move_me.stem
63 | parent_path = move_me.parent
64 | xml_fn = base_fn + '.xml'
65 | os.rename(move_me, val_path+'/'+fn)
66 | os.rename(os.path.join(parent_path,xml_fn),os.path.join(val_path,xml_fn))
67 | file_list.remove(move_me)
68 |
69 | # Move remaining files to test folder
70 | for i in range(test_num):
71 | move_me = random.choice(file_list)
72 | fn = move_me.name
73 | base_fn = move_me.stem
74 | parent_path = move_me.parent
75 | xml_fn = base_fn + '.xml'
76 | os.rename(move_me, test_path+'/'+fn)
77 | os.rename(os.path.join(parent_path,xml_fn),os.path.join(test_path,xml_fn))
78 | file_list.remove(move_me)
79 |
--------------------------------------------------------------------------------
/util_scripts/train_val_test_split_yolo.py:
--------------------------------------------------------------------------------
1 | ### Python script to split a labeled image dataset into Train, Validation, and Test folders. Modified to work for YOLO txt files.
2 | # Author: Evan Juras, EJ Technology Consultants
3 | # Date: 4/10/21
4 |
5 | # Randomly splits images to 80% train, 10% validation, and 10% test, and moves them to their respective folders.
6 | # This script is intended to be used in the TFLite Object Detection Colab notebook here:
7 | # https://colab.research.google.com/github/EdjeElectronics/TensorFlow-Lite-Object-Detection-on-Android-and-Raspberry-Pi/blob/master/Train_TFLite2_Object_Detction_Model.ipynb
8 |
9 | from pathlib import Path
10 | import random
11 | import os
12 | import sys
13 |
14 | # Define paths to image folders
15 | image_path = '/content/images/all'
16 | train_path = '/content/images/train'
17 | val_path = '/content/images/validation'
18 | test_path = '/content/images/test'
19 |
20 | # Get list of all images
21 | jpeg_file_list = [path for path in Path(image_path).rglob('*.jpeg')]
22 | jpg_file_list = [path for path in Path(image_path).rglob('*.jpg')]
23 | png_file_list = [path for path in Path(image_path).rglob('*.png')]
24 | bmp_file_list = [path for path in Path(image_path).rglob('*.bmp')]
25 |
26 | if sys.platform == 'linux':
27 | JPEG_file_list = [path for path in Path(image_path).rglob('*.JPEG')]
28 | JPG_file_list = [path for path in Path(image_path).rglob('*.JPG')]
29 | file_list = jpg_file_list + JPG_file_list + png_file_list + bmp_file_list + JPEG_file_list + jpeg_file_list
30 | else:
31 | file_list = jpg_file_list + png_file_list + bmp_file_list + jpeg_file_list
32 |
33 | file_num = len(file_list)
34 | print('Total images: %d' % file_num)
35 |
36 | # Determine number of files to move to each folder
37 | train_percent = 0.8 # 80% of the files go to train
38 | val_percent = 0.1 # 10% go to validation
39 | test_percent = 0.1 # 10% go to test
40 | train_num = int(file_num*train_percent)
41 | val_num = int(file_num*val_percent)
42 | test_num = file_num - train_num - val_num
43 | print('Images moving to train: %d' % train_num)
44 | print('Images moving to validation: %d' % val_num)
45 | print('Images moving to test: %d' % test_num)
46 |
47 | # Select 80% of files randomly and move them to train folder
48 | for i in range(train_num):
49 | move_me = random.choice(file_list)
50 | fn = move_me.name
51 | base_fn = move_me.stem
52 | parent_path = move_me.parent
53 | txt_fn = base_fn + '.txt'
54 | os.rename(move_me, train_path+'/'+fn)
55 | os.rename(os.path.join(parent_path,txt_fn),os.path.join(train_path,txt_fn))
56 | file_list.remove(move_me)
57 |
58 | # Select 10% of remaining files and move them to validation folder
59 | for i in range(val_num):
60 | move_me = random.choice(file_list)
61 | fn = move_me.name
62 | base_fn = move_me.stem
63 | parent_path = move_me.parent
64 | txt_fn = base_fn + '.txt'
65 | os.rename(move_me, val_path+'/'+fn)
66 | os.rename(os.path.join(parent_path,txt_fn),os.path.join(val_path,txt_fn))
67 | file_list.remove(move_me)
68 |
69 | # Move remaining files to test folder
70 | for i in range(test_num):
71 | move_me = random.choice(file_list)
72 | fn = move_me.name
73 | base_fn = move_me.stem
74 | parent_path = move_me.parent
75 | txt_fn = base_fn + '.txt'
76 | os.rename(move_me, test_path+'/'+fn)
77 | os.rename(os.path.join(parent_path,txt_fn),os.path.join(test_path,txt_fn))
78 | file_list.remove(move_me)
79 |
--------------------------------------------------------------------------------