├── 0-install_guide
└── README.md
├── 0-torch_base
├── act_demo.py
├── grad_descend.py
├── loss_demo.py
├── op.md
├── op_demo.py
└── optimizer.md
├── 1-tensor_guide
├── README.md
├── pytorch_tutorial.py
├── tensor_demo.py
└── tensors_deeper_tutorial.py
├── 10-tensorboard_guide
├── README.md
├── minist_loss_tensorboard.py
├── tensorboard_demo.py
└── tensorboardyt_tutorial.py
├── 11-distribute_guide
├── README.md
├── ddp_demo
│ ├── README.md
│ ├── command_demo.py
│ ├── multi_machine_command_launch.py
│ ├── multi_machine_one_process_one_gpu.py
│ ├── multi_machine_one_process_with_mgpu.py
│ ├── process_demo.py
│ ├── spawn_demo.py
│ └── torchrun.md
├── deep_speed
│ └── README.md
├── dp_demo
│ ├── README.md
│ ├── dp_demo.py
│ ├── dp_hello.py
│ └── image.png
├── megatron
│ └── README.md
├── model_parallel
│ ├── README.md
│ ├── model_parallel_demo.py
│ └── model_parallel_demo2.py
├── tensor_parallelism
│ ├── README.md
│ ├── example.py
│ └── requirements.txt
└── zero
│ └── READEME.md
├── 12-pytorch2_dynomo
├── README.md
├── dynamo_hello.py
├── model_demo.py
└── torch2_demo.py
├── 13-model_deploy_guide
├── cloud_deploy
│ └── README.md
├── container_deploy
│ ├── Dockerfile
│ └── README.md
├── cpp_deploy
│ ├── README.md
│ └── mnist
│ │ ├── CMakeLists.txt
│ │ ├── README.md
│ │ ├── mnist-infer.cpp
│ │ └── mnist-train.cpp
├── flask_deploy
│ ├── README.md
│ └── flask_demo
│ │ ├── hello.py
│ │ ├── imagenet_lable.py
│ │ ├── resnet_infer.py
│ │ ├── templates
│ │ ├── upload.html
│ │ └── upload_ok.html
│ │ └── upload_image.py
└── java_deploy
│ └── README.md
├── 14-docker_image_container_guide
├── README.md
└── test_mtn.py
├── 15-model_learning
├── README.md
├── chatGLM
│ └── README.md
└── miniGPT
│ ├── README.md
│ └── chatgpt_demo.py
├── 2-autograd_guide
├── README.md
└── autograd_demo.py
├── 3-module_guide
├── README.md
├── minist_main.py
├── module_demo.py
└── op_demo.py
├── 4-data_guide
├── README.md
├── data
│ └── FashionMNIST
│ │ └── raw
│ │ └── train-images-idx3-ubyte.gz
├── data_loading_tutorial.py
└── data_prepare.py
├── 5-optim_guide
├── README.md
└── stepLR_demo.py
├── 6-save_load_guide
├── README.md
└── save_load_demo.py
├── 7-pytorch_modes
├── README.md
└── mode_demo.py
├── 8-model_train_guide
├── README.md
├── bert_train
│ ├── README.md
│ ├── requirements.txt
│ ├── run.sh
│ └── run_ner.py
├── imagenet-train
│ ├── README.md
│ ├── extract_ILSVRC.sh
│ ├── main.py
│ └── requirements.txt
├── introyt1_tutorial.py
├── mnist
│ ├── README.md
│ └── mnist-main.py
├── nlp
│ ├── README.md
│ ├── advanced_tutorial.py
│ ├── deep_learning_tutorial.py
│ ├── sequence_models_tutorial.py
│ └── word_embeddings_tutorial.py
├── regression
│ ├── README.md
│ └── main.py
├── transformer_encoder
│ └── encoder.py
├── vit-train
│ ├── README.md
│ ├── main.py
│ └── requirements.txt
├── word_language_model
│ ├── README.md
│ ├── data.py
│ ├── generate.py
│ ├── main.py
│ ├── model.py
│ └── requirements.txt
└── yolov8
│ └── inference_demo.py
├── 9-model_infer
├── README.md
└── onnx_utils.py
├── README.md
└── python_demo
├── class_demo
├── Property整体继承.py
├── descriptor_0.py
├── descriptor_demo.py
├── discriptor_1.py
├── item相关魔术方法.py
├── lazyproperty.py
├── nonlocal用法.py
├── property_1.py
├── property_2.py
├── property_3.py
├── property_4.py
├── super_1.py
├── super_2.py
├── super_demo.py
├── super_test.py
├── super指向兄弟类的方法.py
├── super菱形继承.py
├── test.py
├── yield_from_demo.py
├── 函数装饰器.py
├── 函数装饰器2.py
├── 函数装饰器应用.py
├── 可迭代对象和迭代器.py
├── 多继承兄弟类.py
├── 多继承解决方案.py
├── 多继承问题.py
├── 定义数据类.py
├── 属性的代理访问.py
├── 抽象基类.py
├── 生成器yield.py
├── 生成器函数.py
├── 简化数据初始化.py
├── 类方法构造实例.py
├── 类的一般操作.py
├── 闭包的应用.py
├── 闭包陷阱.py
└── 闭包陷阱解决方案.py
├── design_pattern
├── README.md
├── abs_factory.jpg
├── abs_factory_pattern.py
├── adapter_pattern.py
├── factory_pattern.py
├── iterator_pattern.py
├── observer_pattern.py
└── singleton_demo.py
├── magic_method
├── README.md
├── __attr__.py
├── __call__方法展示.py
├── __dict__and_dir().py
├── __enter__and__exit__.py
├── __getitem__迭代器.py
├── __item__.py
├── __iter__and__next__.py
├── __iter__and_generator.py
├── __new__魔术方法展示.py
├── __private的继承.py
├── __slots__.py
├── __str__and__repr__.py
├── attr_method.py
└── property_demo.py
├── meta_program
├── README.md
└── class_demo.py
└── thread_and_process
├── README.md
├── corutine.py
├── multi_process.py
├── multi_process_v2.py
└── multi_thread.py
/0-install_guide/README.md:
--------------------------------------------------------------------------------
1 | # pytorch 介绍
2 | 
3 |
4 | #安装
5 | [安装链接](https://pytorch.org/)
6 |
7 | # 安装注意事项
8 | 1. 选Stable(选择稳定版本)
9 | 2. linux 和 windows;linux 工作时候;
10 | 3. pckage:pip install,
11 | 4. libtorch:它是pytorch的c++版本,c++ 部署的时候可能会用到;
12 | 5. language: Python
13 | 6. compute platform:
14 | cuda: 在Nvidia 的卡上跑模型要用到;
15 | cpu: 在cpu上跑模型;
16 | rocm: amd 显卡对应的计算平台;
17 | 7. cuda 和 driver 版本对应:
18 | [cuda driver 对照表](https://docs.nvidia.com/cuda/cuda-toolkit-release-notes/index.html)
19 |
20 | # conda 环境管理
21 | 1. (base) C:\Users\86183> : base : 我们现在在base 这个环境里;
22 | 2. conda env list : 查看conda 环境;
23 | 3. conda create -n python=3.9
24 | 4. conda activate base
25 |
26 | # pytorch 的软件栈
27 | 1. pytorch 软件本身;
28 | 2. cpu 版本 直接安装,依赖比较少:pip3 install torch torchvision torchaudio --index-url https://download.pytorch.org/whl/cpu
29 | 3. cuda:nvidia 开发的一个在 GPU 上进行编程的一种语言, 和 C语言很类似;*.cu
30 | 4. cuda 最终要的作用就是加速,在GPU上进行加速;
31 | 5. GPU 非常善于处理结构化的数据,深度学习中 这些计算 : 矩阵运算 --> 特别适合我们GPU来处理;
32 | 6. cuda --> nvcc 编译器;装好cuda 后 nvcc 自动安装;
33 | 7. cuda 一定要有nvidia的卡支持,不一定所有的nvidia的卡都支持cuda;
34 | 8. cuda 要依赖于一个 driver();
35 |
36 | [驱动选择](https://www.nvidia.cn/Download/index.aspx?lang=cn)
37 |
38 | # pytorch version
39 | - 2.0
40 | - 1.9.0 1.10 1.11 1.12 1.13 --> 2.0
41 | - 2023年
42 | - 加速 pip install pytorch -i 镜像地址
43 |
44 | # 安装其他版本
45 | [安装链接1](https://pytorch.org/get-started/previous-versions/)
46 | [安装链接2](https://download.pytorch.org/whl/torch/)
47 |
48 | # 常用的pytorch 模块
49 | - nn
50 | - utils
51 | - optim
52 | - autograd : 对用户不感知
53 | - distributed
54 | - profiler : 算子性能追踪
55 | - quantization: 量化模块
56 | - jit、onnx:模型保存相关;
57 |
58 | # 学习pytorch 相关模块
59 | 1. [pytorch doc](https://pytorch.org/docs/stable/search.html?q=&check_keywords=yes&area=default#)
60 | 2. .conda/envs/mmcv/lib/python3.8/site-packages/torch/
61 | 3. torch/_C/_VariableFunctions.pyi : pyi c++ 程序的python 接口
62 | 4. 其它 。。。
63 |
64 | # torchvision
65 |
--------------------------------------------------------------------------------
/0-torch_base/act_demo.py:
--------------------------------------------------------------------------------
1 | import torch
2 | import torch.nn as nn
3 |
4 | def elu_demo():
5 | m = nn.ELU()
6 | input = torch.randn(2)
7 | output = m(input)
8 | print(output)
9 |
10 | if __name__ == "__main__":
11 | elu_demo()
12 | print("run successfully")
--------------------------------------------------------------------------------
/0-torch_base/grad_descend.py:
--------------------------------------------------------------------------------
1 | '''
2 | 如果 X W 两个矩阵:
3 | W[n,k] @ X[k,m] = Y[n,m] #
4 | 则: dW = dY @ XT; dX = WT @ dY # 矩阵反向传播公式
5 | output = a + b
6 | '''
7 | import numpy as np
8 |
9 |
10 | def bp_demo():
11 | def sigmoid(input):
12 | return 1 / (1 + np.e**(-input))
13 |
14 | def sigmoid_backward(out):
15 | return out*(1- out)
16 |
17 | w1 = np.array([[0.1, 0.15], [0.2, 0.25], [0.3, 0.35]])
18 | w2 = np.array([[0.4, 0.45, 0.5], [0.55, 0.6, 0.65]])
19 | b1 = 0.35
20 | b2 = 0.65
21 | input = np.array([5, 10]).reshape(2, 1)
22 | label = np.array([0.01, 0.99]).reshape(2, 1)
23 |
24 | for i in range(100):
25 | net_h = w1 @ input + b1
26 | out_h = sigmoid(net_h)
27 |
28 | net_o = w2 @ out_h + b2
29 | out_o = sigmoid(net_o)
30 |
31 | loss = np.sum((out_o - label)**2)
32 | print(loss)
33 |
34 | dw2 = (out_o - label) * sigmoid_backward(out_o) @ out_h.T
35 |
36 | # (out_o - label) * sigmoid_backward(out_o) --> dloss/net_o
37 | dout_h = w2.T @ ((out_o - label) * sigmoid_backward(out_o))
38 |
39 | dw1 = dout_h * sigmoid_backward(out_h) @ input.T
40 |
41 | w1 = w1 - 0.5 * dw1
42 | w2 = w2 - 0.5 * dw2
43 | print(f"loss[{i}]: {loss}")
44 |
45 | print(w1)
46 |
47 |
48 | def matmul_grad():
49 | W = np.array([[4, 5], [7, 2]])
50 | X = np.array([2, 6.0]).reshape(2, 1)
51 | label = np.array([14, 11]).reshape(2, 1)
52 |
53 | for i in range(100):
54 | Y = W @ X # 线性相乘
55 | Loss = 0.5 * np.sum((Y-label)**2) # 损失值 --> 标量
56 | # dY = Y - label # 向量
57 | dW = (Y-label) @ X.T # 矩阵求导公式
58 | W = W - 0.01*dW # 更新weight
59 | print(f"============= loss[{i}]: ", Loss)
60 |
61 | print(W)
62 |
63 | def loss_grad(o1, o2, label):
64 | # loss = (o1 - 14)**2 + (o2 -11)**2 # 距离越远,值越大
65 | # Loss = np.sum((O - Lable)**2)
66 | grad = [2 * (o1 - label[0]), 2 * (o2 - label[1])]
67 | return np.array(grad)
68 |
69 | def matrix_grad_demo():
70 | """
71 | 4x + 5y = O1
72 | 7x + 2y = O1
73 |
74 | [[4, 5], [7, 2]] * [x, y]T = [01, 02] --> A*x = O
75 | label = [14, 11] # 代表我们期望的那个值
76 | loss = (o1 - 14)**2 + (o2 -11)**2 # 距离越远,值越大
77 | """
78 | A = np.array([[4.0, 5], [7.0, 2]])
79 | X = np.array([2, 6.0]) # 随便给的初始值
80 |
81 | Lable = np.array([14, 11])
82 | lr = 0.001
83 |
84 | for i in range(1000):
85 | O = A @ X # 前向
86 | grad = A.T @ loss_grad(O[0], O[1], Lable)
87 | X[0] = X[0] - lr*grad[0]
88 | X[1] = X[1] - lr*grad[1]
89 | print("x[0]: {}, x[1]: {}".format(X[0], X[1]))
90 | Loss = np.sum((O - Lable)**2)
91 | print("Loss: ", Loss)
92 |
93 | if __name__ == "__main__":
94 | # grad_demo()
95 | # matrix_grad_demo()
96 | # matmul_grad()
97 | bp_demo()
98 | print("run grad_descend.py successfully !!!")
99 |
100 |
--------------------------------------------------------------------------------
/0-torch_base/op.md:
--------------------------------------------------------------------------------
1 | # conv2d
2 | ```python
3 | torch.nn.Conv2d(
4 | in_channels, # 输入通道
5 | out_channels, # 输出通道
6 | kernel_size, # kernel 大小
7 | stride=1, # 步长
8 | padding=0, # padding
9 | dilation=1, # 膨胀系数
10 | groups=1, # 分组
11 | bias=True, # 偏置
12 | padding_mode='zeros', # padding mode
13 | device=None, # 设备
14 | dtype=None # 数据类型
15 | )
16 | ```
--------------------------------------------------------------------------------
/0-torch_base/optimizer.md:
--------------------------------------------------------------------------------
1 | # 优化器展示
2 |
3 |
4 | ## 1 adam
5 | [参考链接](https://pytorch.org/docs/master/generated/torch.optim.Adam.html?highlight=adam#torch.optim.Adam)
6 |
7 | ```python
8 | CLASS torch.optim.Adam(
9 | params, # 可迭代的parameters, 或者是装有parameter组的字典
10 | lr=0.001, # 学习率
11 | betas=(0.9, 0.999), # 用于计算梯度及其平方的移动平均值系数
12 | eps=1e-08, # 防止分母为0
13 | weight_decay=0, # 权重衰减系数,L2 惩罚, 默认为0
14 | amsgrad=False, # 是否使用该算法的amsgrad 变体
15 | *,
16 | foreach=None, #
17 | maximize=False, # 最大化梯度--> 梯度提升
18 | capturable=False, # 在CUDA图中捕获此实例是否安全
19 | differentiable=False, # 是否可进行自动微分
20 | fused=None # 是否使用融合实现(仅CUDA)。
21 | )
22 |
23 | add_param_group(param_group)
24 | '''
25 | 用于向优化器中添加新的参数组;
26 | 参数组:一组共享相同超参数(学习率、权重衰减等)的模型参数;
27 | 通过定义不同的参数组,可以为模型的不同部分或不同层,设置不同的超参数;
28 | 这在微调预训练的网络时很有用.
29 | '''
30 |
31 | ```
32 |
33 | *添加参数组
34 | ```python
35 | import torch
36 | import torch.optim as optim
37 |
38 | # 创建模型和优化器
39 | model = torch.nn.Linear(10, 2)
40 | optimizer = optim.SGD(model.parameters(), lr=0.1)
41 |
42 | # 创建新的参数组
43 | new_params = [{'params': model.parameters(), 'lr': 0.01}]
44 |
45 | # 将新的参数组添加到优化器中
46 | optimizer.add_param_group(new_params)
47 | ```
48 |
49 | ## 2 sgd
50 | ```python
51 | # 定义两个模型和它们的参数
52 | model1 = ...
53 | model2 = ...
54 | model_params1 = model1.parameters()
55 | model_params2 = model2.parameters()
56 |
57 | # 创建优化器,并传递使用新的参数组名称
58 | optimizer = optim.SGD([{'params': model_params1}, {'params': model_params2}], lr=0.01)
59 | optimizer = optim.SGD([
60 | {'params': params1, 'lr': 0.01, 'weight_decay': 0.001},
61 | {'params': params2, 'lr': 0.1, 'weight_decay': 0.0001}
62 | ])
63 | ```
64 |
65 |
--------------------------------------------------------------------------------
/1-tensor_guide/README.md:
--------------------------------------------------------------------------------
1 | # pytorch Tensor guide
2 |
3 | ## tensor 是什么
4 | - 张量 (weight activationg)
5 | - 多维数据,numpy --> ndarray
6 | - pytorch 里最大的一个类(class)
7 | - 属性、和方法
8 |
9 | ## 初始化一个tensor
10 | - torch.Tensor(***) 调用 Tensor 这个类的init方法完成初始化
11 | - torch.ones() 调用torch本身自带的一些函数来生成特殊类型的tensor
12 | - torch.ones_like() # 也是调用torch 自带的函数来生成,shape等信息采用另外一种tensor的;
13 | - numpy 与 tensor之间的互相转换:优先选用 from_numpy: 数据共享
14 |
15 | # tensor 的结构
16 | 1. meta_data :dtype、shape、dims、device、stride()
17 | 2. raw_data : 内存中的数据
18 | 3. data_ptr 查询的是我们raw_data;
19 | 4. id : raw_data 或者 mete_data 有一个改变就会改变
20 |
21 | # tensor 的视图
22 | - transpose storage 之后没有发生任何的变化,raw_data 没有变;
23 | - stride: 正常情况下某一维度的stride的值,后几个维度相乘;
24 |
25 | # reshape/view/permute/transpose
26 | - 这四个算子(方法) raw_data 都没变;
27 | - 变化的都是 shape 和 stride;
28 | - reshape 和 view 可以改变维度的;
29 | - permute/transpose 换轴之后就不满足这种规律(stride)了 --> 数据不连续 uncontiguous;
30 | - reshape 和 view : 在大部分情况下都是一样的;数据不连续的情况下就有区别了。
31 | - view: 永远不会生成新的数据,永远是一个view,视图;
32 | - reshape:如何可能返回一个视图的话,它就返回一个视图,如果出现数据不连续的情况导致返回不了视图,
33 | - reshape就会返回一个新的tensor(新的一份raw_data)
34 | - uncontiguous: 对我们硬件不有好的,会导致我们的性能下降;
35 |
36 | ## pytorch 相关代码
37 | - /site-packages/torch/_C/_VariableFunctions.pyi --> tensor 的c++接口
38 | - /lib/python3.8/site-packages/torch/_tensor.py
39 |
40 | ## 如何学习API(tensor api 举例)
41 | - 软件工程中 api, file name 都不是随便取的;
42 | - tensor的接口在哪里 --> _tensor.py 中;
43 | - _tensor.py 中的 class Tensor 只是子类,
44 | - 父类: class _TensorBase 在__init__.pyi 中
45 | - 常用的属性:
46 | **requires_grad、shape、dytpe、layout、ndim、grad_fn**
47 | - 常用的方法
48 | **pointewise类型的方法:abs、acos、add、addcdiv**
49 | **投票函数:all any**
50 | **bit相关的操作**
51 | **clone**
52 | **统计学上的运算:mean var median min max**
53 | **backward:反向传播的时候使用**
54 | **register_hook: 钩子函数**
55 | ** retain_grad: 保留梯度**
56 | ** resize:通过插值的方式进行尺度缩放 **
57 | ** grad 查询梯度信息**
58 |
59 | ## tensor 的构成
60 | - meta_data : 描述一个tensor(shape/dtype/ndim/stride)
61 | - raw_data : 内存中的数据,以裸指针;
62 | *ndarray.ctypes.data numpy 获取方式
63 | *tensor.data_ptr() torch tensor的获取方式
64 |
65 | ## pytorch tensor 与 numpy的 相互转化 与 数据共享
66 | - from_numpy 形成的 torch.tensor 和numpy 公用一套数据
67 | - .numpy() 返回到 numpy 格式
68 |
69 | ## to 的理解
70 | - 数据类型的转化: int --> float
71 | **数据要从cpu copy 到 gpu上:h2d**
72 | **数据从 gpu copy 到 cpu:d2h**
73 | - 设备的转化 host(cpu) 和 device(GPU)的 概念
74 | **d2h**
75 | - tensor.cpu()
76 | - 不同设备上的tensor,不能进行运算;
77 |
78 | ##自动选择后端
79 | ```python
80 | if torch.cuda.is_available():
81 | device = torch.device("cuda:0")
82 | else:
83 | device = torch.device("cpu")
84 | ```
85 |
86 | ## Tensor 的 id 和 ptr
87 | - id: tensor 的地址 (meta data 和 raw data 一个变就会变)
88 | - data_ptr: 数据的地址(meta_data 变换不影响它)
89 | - 视图要拿最终的raw data来看, id 经常出现问题。
90 |
91 | ## tensor的计算方式:matmul 、 pointwise 、 elementwise
92 | - 矩阵形式的计算:matmul、rashpe/ permute/ transpose
93 | - pointewise / elementwise (元素之间的操作)
94 | - broadcast: 1. shape 右对齐;2. 对应dim 有一个是1 或者 相同;
95 |
96 | ## inplace 操作
97 | - 原地操作(raw data 不变),新计算出来的结果,替换掉原来结果;
98 | - 节约内存,提升性能
99 | - 不推荐使用,除非非常了解。
100 |
101 | ## 理解tensor的视图
102 | **reshape、permute、transpose、view**
103 | - reshape 和 view 是一组:;
104 | - permute 和 transpose 是一组:数据不连续的现象;
105 | **这四个算子raw data 都一样**
106 | **通常我们根据shape 就可以推断出 stride**
107 | **但是 transpose 和 permute 不能通过shape 来推断出来**
108 | **此时发生数据不连续**
109 | - 影响我们计算结果吗?no
110 | - 性能不好;
111 | - 我们应该怎么办?contiguous
112 |
113 | **contiguous发生了什么**
114 | *1. 重新申请了内存*
115 | *2.数据重排了*
116 |
117 | **reshape vs view**
118 | - reshape 不管数据是否连续,都可以用;
119 | - view 智能用于数据连续的情况下;
120 | - 如果必须用view:数据要先进行 contiguous
121 | - 数据不连续的情况下:reshape = contiguous + view
122 | - reshape :数据不连续去情况下 reshape 自动进行 数据copy 和 reorder
123 | - contiguous:本身也就是 数据copy 和重排
124 |
125 | ## 扩展
126 | *_tensor.py*
127 | *data到底存储在哪里呢?*
128 |
--------------------------------------------------------------------------------
/10-tensorboard_guide/README.md:
--------------------------------------------------------------------------------
1 | # tensorboard
2 | [torch 链接](https://pytorch.org/docs/stable/tensorboard.html?highlight=tensorboard)
3 | - board:展板
4 | - tensorflow 率先采用个
5 | - 效果很好,pytorch 也采用了这个 -->
6 | - 只要我们把我们需要保存的信息 dump 成tensorboard支持的格式就行;
7 | - pytorch 里面还有一个叫 tensorboardX 的东西,和 tensorboard 很类似,我们用tensorboard就行
8 |
9 | # 安装方式
10 | - 我们安装好了 tensorflow 的话,tensorboard会自动安装;
11 | - pip install tensorboard
12 |
13 | #执行方式:
14 | tensorboard --logdir=./logsm
15 | python -m tensorboard.main --logdir=./logs
16 |
17 | # torch 中的tensorboard
18 | - 作用: 用于 dump 文件
19 | - 代码位置:from torch.utils.tensorboard import SummaryWriter
20 |
21 | # tensorboard 单独的包
22 | - 用来展示数据的
23 | - site-packages/tensorboard/__init__.py
24 |
25 | # run 指令:
26 | tensorboard --logdir=runs
27 |
28 | # 注意事项
29 | - 名字:以名字来区分windows的,
30 | - 数据是可以按照window的名字来追加
31 | - loss 是以追加的形式来的,信息不回丢失
32 |
--------------------------------------------------------------------------------
/10-tensorboard_guide/minist_loss_tensorboard.py:
--------------------------------------------------------------------------------
1 | # PyTorch model and training necessities
2 | import torch
3 | import torch.nn as nn
4 | import torch.nn.functional as F
5 | import torch.optim as optim
6 |
7 | # Image datasets and image manipulation
8 | import torchvision
9 | import torchvision.transforms as transforms
10 |
11 | # Image display
12 | import matplotlib.pyplot as plt
13 | import numpy as np
14 |
15 | # PyTorch TensorBoard support
16 | from torch.utils.tensorboard import SummaryWriter
17 |
18 | # Gather datasets and prepare them for consumption
19 | transform = transforms.Compose(
20 | [transforms.ToTensor(),
21 | transforms.Normalize((0.5,), (0.5,))])
22 |
23 | # Store separate training and validations splits in ./data
24 | training_set = torchvision.datasets.FashionMNIST('./data',
25 | download=True,
26 | train=True,
27 | transform=transform)
28 | validation_set = torchvision.datasets.FashionMNIST('./data',
29 | download=True,
30 | train=False,
31 | transform=transform)
32 |
33 | training_loader = torch.utils.data.DataLoader(training_set,
34 | batch_size=4,
35 | shuffle=True,
36 | num_workers=2)
37 |
38 |
39 | validation_loader = torch.utils.data.DataLoader(validation_set,
40 | batch_size=4,
41 | shuffle=False,
42 | num_workers=2)
43 |
44 | # Class labels
45 | classes = ('T-shirt/top', 'Trouser', 'Pullover', 'Dress', 'Coat',
46 | 'Sandal', 'Shirt', 'Sneaker', 'Bag', 'Ankle Boot')
47 |
48 | class Net(nn.Module):
49 | def __init__(self):
50 | super(Net, self).__init__()
51 | self.conv1 = nn.Conv2d(1, 6, 5)
52 | self.pool = nn.MaxPool2d(2, 2)
53 | self.conv2 = nn.Conv2d(6, 16, 5)
54 | self.fc1 = nn.Linear(16 * 4 * 4, 120)
55 | self.fc2 = nn.Linear(120, 84)
56 | self.fc3 = nn.Linear(84, 10)
57 |
58 | def forward(self, x):
59 | x = self.pool(F.relu(self.conv1(x)))
60 | x = self.pool(F.relu(self.conv2(x)))
61 | x = x.view(-1, 16 * 4 * 4)
62 | x = F.relu(self.fc1(x))
63 | x = F.relu(self.fc2(x))
64 | x = self.fc3(x)
65 | return x
66 |
67 | writer = SummaryWriter('mnist_log')
68 |
69 | net = Net()
70 | criterion = nn.CrossEntropyLoss()
71 | optimizer = optim.SGD(net.parameters(), lr=0.001, momentum=0.9)
72 |
73 | print(len(validation_loader))
74 | for epoch in range(10): # loop over the dataset multiple times
75 | running_loss = 0.0
76 |
77 | for i, data in enumerate(training_loader, 0):
78 | # basic training loop
79 | inputs, labels = data
80 | optimizer.zero_grad()
81 | outputs = net(inputs)
82 | loss = criterion(outputs, labels)
83 | loss.backward()
84 | optimizer.step()
85 |
86 | running_loss = loss.item()
87 | if i % 1000 == 999: # Every 1000 mini-batches...
88 | print('Batch {}'.format(i + 1))
89 | # Check against the validation set
90 | running_vloss = 0.0
91 |
92 | net.train(False) # Don't need to track gradents for validation
93 | for j, vdata in enumerate(validation_loader, 0):
94 | vinputs, vlabels = vdata
95 | voutputs = net(vinputs)
96 | vloss = criterion(voutputs, vlabels)
97 | running_vloss = vloss.item()
98 |
99 | net.train(True) # Turn gradients back on for training
100 |
101 | # avg_train_loss = running_loss / 1000
102 | # avg_val_loss = running_vloss / len(validation_loader)
103 | avg_train_loss = running_loss
104 | avg_val_loss = running_vloss
105 |
106 | # Log the running loss averaged per batch
107 | writer.add_scalars('Training vs. Validation Loss',
108 | { 'Training' : avg_train_loss, 'Validation' : avg_val_loss },
109 | epoch * len(training_loader) + i)
110 |
111 | running_loss = 0.0
112 | print('Finished Training')
113 |
114 | writer.flush()
115 |
116 |
117 |
118 |
--------------------------------------------------------------------------------
/11-distribute_guide/ddp_demo/command_demo.py:
--------------------------------------------------------------------------------
1 | import argparse
2 | import os
3 | import sys
4 | import tempfile
5 | from urllib.parse import urlparse
6 |
7 | import torch
8 | import torch.distributed as dist
9 | import torch.nn as nn
10 | import torch.optim as optim
11 | import torch.distributed.launch as launch
12 |
13 | from torch.nn.parallel import DistributedDataParallel as DDP
14 |
15 | class ToyModel(nn.Module):
16 | def __init__(self):
17 | super(ToyModel, self).__init__()
18 | self.net1 = nn.Linear(10, 10)
19 | self.relu = nn.ReLU()
20 | self.net2 = nn.Linear(10, 5)
21 |
22 | def forward(self, x):
23 | return self.net2(self.relu(self.net1(x)))
24 |
25 |
26 | def demo_basic(local_world_size, local_rank):
27 |
28 | # setup devices for this process. For local_world_size = 2, num_gpus = 8,
29 | # rank 0 uses GPUs [0, 1, 2, 3] and
30 | # rank 1 uses GPUs [4, 5, 6, 7].
31 | n = torch.cuda.device_count() // local_world_size
32 | device_ids = list(range(local_rank * n, (local_rank + 1) * n))
33 |
34 | print(
35 | f"[{os.getpid()}] rank = {dist.get_rank()}, "
36 | + f"world_size = {dist.get_world_size()}, n = {n}, device_ids = {device_ids} \n", end=''
37 | )
38 |
39 | model = ToyModel().cuda(device_ids[0])
40 | ddp_model = DDP(model, device_ids)
41 |
42 | loss_fn = nn.MSELoss()
43 | optimizer = optim.SGD(ddp_model.parameters(), lr=0.001)
44 |
45 | optimizer.zero_grad()
46 | outputs = ddp_model(torch.randn(20, 10))
47 | labels = torch.randn(20, 5).to(device_ids[0])
48 | loss_fn(outputs, labels).backward()
49 | optimizer.step()
50 |
51 |
52 | def spmd_main(local_world_size, local_rank):
53 | # These are the parameters used to initialize the process group
54 | env_dict = {
55 | key: os.environ[key]
56 | for key in ("MASTER_ADDR", "MASTER_PORT", "RANK", "WORLD_SIZE")
57 | }
58 |
59 | if sys.platform == "win32":
60 | # Distributed package only covers collective communications with Gloo
61 | # backend and FileStore on Windows platform. Set init_method parameter
62 | # in init_process_group to a local file.
63 | if "INIT_METHOD" in os.environ.keys():
64 | print(f"init_method is {os.environ['INIT_METHOD']}")
65 | url_obj = urlparse(os.environ["INIT_METHOD"])
66 | if url_obj.scheme.lower() != "file":
67 | raise ValueError("Windows only supports FileStore")
68 | else:
69 | init_method = os.environ["INIT_METHOD"]
70 | else:
71 | # It is a example application, For convience, we create a file in temp dir.
72 | temp_dir = tempfile.gettempdir()
73 | init_method = f"file:///{os.path.join(temp_dir, 'ddp_example')}"
74 | dist.init_process_group(backend="gloo", init_method=init_method, rank=int(env_dict["RANK"]), world_size=int(env_dict["WORLD_SIZE"]))
75 | else:
76 | print(f"[{os.getpid()}] Initializing process group with: {env_dict}")
77 | dist.init_process_group(backend="nccl")
78 |
79 | print(
80 | f"[{os.getpid()}]: world_size = {dist.get_world_size()}, "
81 | + f"rank = {dist.get_rank()}, backend={dist.get_backend()} \n", end=''
82 | )
83 |
84 | demo_basic(local_world_size, local_rank)
85 |
86 | # Tear down the process group
87 | dist.destroy_process_group()
88 |
89 |
90 | if __name__ == "__main__":
91 | parser = argparse.ArgumentParser()
92 | # This is passed in via launch.py
93 | parser.add_argument("--local_rank", type=int, default=0)
94 | # This needs to be explicitly passed in
95 | parser.add_argument("--local_world_size", type=int, default=1)
96 | args = parser.parse_args()
97 | # The main entry point is called directly without using subprocess
98 | spmd_main(args.local_world_size, args.local_rank)
99 | print("run command_demo.py successfully !!!")
100 |
--------------------------------------------------------------------------------
/11-distribute_guide/ddp_demo/multi_machine_command_launch.py:
--------------------------------------------------------------------------------
1 | import torch
2 | import torchvision
3 | import torch.utils.data.distributed
4 | import argparse
5 | import torch.distributed as dist
6 | from torchvision import transforms
7 |
8 | parser = argparse.ArgumentParser()
9 | parser.add_argument("--local_rank", type=int) # 增加local_rank
10 | args = parser.parse_args()
11 | torch.cuda.set_device(args.local_rank)
12 |
13 | def main():
14 | dist.init_process_group("nccl", init_method='env://') # init_method方式修改
15 | trans = transforms.Compose([transforms.ToTensor(), transforms.Normalize((0.5,), (1.0,))])
16 | data_set = torchvision.datasets.MNIST('~/DATA/', train=True,
17 | transform=trans, target_transform=None, download=True)
18 | train_sampler = torch.utils.data.distributed.DistributedSampler(data_set)
19 | data_loader_train = torch.utils.data.DataLoader(dataset=data_set,
20 | batch_size=256,
21 | sampler=train_sampler,
22 | num_workers=16,
23 | pin_memory=True)
24 | net = torchvision.models.resnet101(num_classes=10)
25 | net.conv1 = torch.nn.Conv1d(1, 64, (7, 7), (2, 2), (3, 3), bias=False)
26 | net = net.cuda()
27 | # DDP 输出方式修改:
28 | net = torch.nn.parallel.DistributedDataParallel(net, device_ids=[args.local_rank],
29 | output_device=args.local_rank)
30 | criterion = torch.nn.CrossEntropyLoss()
31 | opt = torch.optim.Adam(net.parameters(), lr=0.001)
32 | for epoch in range(1):
33 | for i, data in enumerate(data_loader_train):
34 | images, labels = data
35 | # 要将数据送入指定的对应的gpu中
36 | images.to(args.local_rank, non_blocking=True)
37 | labels.to(args.local_rank, non_blocking=True)
38 | opt.zero_grad()
39 | outputs = net(images)
40 | loss = criterion(outputs, labels)
41 | loss.backward()
42 | opt.step()
43 | if i % 10 == 0:
44 | print("loss: {}".format(loss.item()))
45 |
46 |
47 | if __name__ == "__main__":
48 | main()
--------------------------------------------------------------------------------
/11-distribute_guide/ddp_demo/multi_machine_one_process_one_gpu.py:
--------------------------------------------------------------------------------
1 | import torch
2 | import torch.distributed as dist
3 | import torch.multiprocessing as mp
4 | import torch.nn as nn
5 | import torch.optim as optim
6 | from torch.nn.parallel import DistributedDataParallel as DDP
7 | import argparse
8 |
9 | parser = argparse.ArgumentParser()
10 | parser.add_argument("--world_size", type=int)
11 | parser.add_argument("--node_rank", type=int)
12 | parser.add_argument("--master_addr", default="127.0.0.1", type=str)
13 | parser.add_argument("--master_port", default="12355", type=str)
14 | args = parser.parse_args()
15 |
16 |
17 | def example(local_rank, node_rank, local_size, world_size):
18 | # 初始化
19 | rank = local_rank + node_rank * local_size
20 | torch.cuda.set_device(local_rank)
21 | dist.init_process_group("nccl",
22 | init_method="tcp://{}:{}".format(args.master_addr, args.master_port),
23 | rank=rank,
24 | world_size=world_size)
25 | # 创建模型
26 | model = nn.Linear(10, 10).to(local_rank)
27 | # 放入DDP
28 | ddp_model = DDP(model, device_ids=[local_rank], output_device=local_rank)
29 | loss_fn = nn.MSELoss()
30 | optimizer = optim.SGD(ddp_model.parameters(), lr=0.001)
31 | # 进行前向后向计算
32 | for i in range(1000):
33 | outputs = ddp_model(torch.randn(20, 10).to(local_rank))
34 | labels = torch.randn(20, 10).to(local_rank)
35 | loss_fn(outputs, labels).backward()
36 | optimizer.step()
37 |
38 |
39 | def main():
40 | local_size = torch.cuda.device_count()
41 | print("local_size: %s" % local_size)
42 | mp.spawn(example,
43 | args=(args.node_rank, local_size, args.world_size,),
44 | nprocs=local_size,
45 | join=True)
46 |
47 |
48 | if __name__=="__main__":
49 | main()
50 |
--------------------------------------------------------------------------------
/11-distribute_guide/ddp_demo/multi_machine_one_process_with_mgpu.py:
--------------------------------------------------------------------------------
1 | # singe proc with multi gpu
2 | import torchvision
3 | from torchvision import transforms
4 | import torch.distributed as dist
5 | import torch.utils.data.distributed
6 | import argparse
7 |
8 | parser = argparse.ArgumentParser()
9 | parser.add_argument("--rank", default=0, type=int)
10 | parser.add_argument("--world_size", default=1, type=int)
11 | parser.add_argument("--master_addr", default="127.0.0.1", type=str)
12 | parser.add_argument("--master_port", default="12355", type=str)
13 | args = parser.parse_args()
14 |
15 | def main(rank, world_size):
16 | # 一个节点就一个rank,节点的数量等于world_size
17 | dist.init_process_group("gloo",
18 | init_method="tcp://{}:{}".format(args.master_addr, args.master_port),
19 | rank=rank,
20 | world_size=world_size)
21 | trans = transforms.Compose([transforms.ToTensor(), transforms.Normalize((0.5,), (1.0,))])
22 | data_set = torchvision.datasets.MNIST('~/DATA/', train=True,
23 | transform=trans, target_transform=None, download=True)
24 | train_sampler = torch.utils.data.distributed.DistributedSampler(data_set)
25 | data_loader_train = torch.utils.data.DataLoader(dataset=data_set,
26 | batch_size=256,
27 | sampler=train_sampler,
28 | num_workers=16,
29 | pin_memory=True)
30 | net = torchvision.models.resnet101(num_classes=10)
31 | net.conv1 = torch.nn.Conv1d(1, 64, (7, 7), (2, 2), (3, 3), bias=False)
32 | net = net.cuda()
33 | # net中不需要指定设备!
34 | net = torch.nn.parallel.DistributedDataParallel(net)
35 | criterion = torch.nn.CrossEntropyLoss()
36 | opt = torch.optim.Adam(net.parameters(), lr=0.001)
37 | for epoch in range(1):
38 | for i, data in enumerate(data_loader_train):
39 | images, labels = data
40 | images, labels = images.cuda(), labels.cuda()
41 | opt.zero_grad()
42 | outputs = net(images)
43 | loss = criterion(outputs, labels)
44 | loss.backward()
45 | opt.step()
46 | if i % 10 == 0:
47 | print("loss: {}".format(loss.item()))
48 |
49 |
50 | if __name__ == '__main__':
51 | main(args.rank, args.world_size)
52 |
--------------------------------------------------------------------------------
/11-distribute_guide/ddp_demo/process_demo.py:
--------------------------------------------------------------------------------
1 | import os
2 | import torch
3 | import torchvision
4 | import torch.distributed as dist
5 | import torch.utils.data.distributed
6 | from torchvision import transforms
7 | from torch.multiprocessing import Process
8 |
9 | # 主机地址 和 端口(端口) 设置
10 | os.environ['MASTER_ADDR'] = 'localhost'
11 | os.environ['MASTER_PORT'] = '12355'
12 |
13 | WORLD_SIZE = 1 # 一共启动多少个进程
14 |
15 | def main(rank):
16 | dist.init_process_group("sccl", rank=rank, world_size= WORLD_SIZE) # 初始化进程组(后端选择,rank,world_size)
17 | torch.cuda.set_device(rank) #device 设置
18 | trans = transforms.Compose([transforms.ToTensor(), transforms.Normalize((0.5,), (1.0,))])
19 | data_set = torchvision.datasets.MNIST("./data", train=True, transform=trans, target_transform=None, download=True)
20 | train_sampler = torch.utils.data.distributed.DistributedSampler(data_set) # 同 DP 相同的接口
21 | data_loader_train = torch.utils.data.DataLoader(dataset=data_set, batch_size=64, sampler=train_sampler)
22 |
23 | net = torchvision.models.resnet50(num_classes=10) # 适配mnist 数据集 --> class num: 10
24 |
25 | # monkey patch --> 猴子补丁
26 | net.conv1 = torch.nn.Conv2d(1, 64, (7, 7), (2, 2), (3, 3), bias=False) # 修改模型: --> minst 是一个灰度图(channel = 1)
27 | net = net.cuda()
28 | net = torch.nn.parallel.DistributedDataParallel(net, device_ids=[rank]) # 和 DP 类似了,将原来的model 转化为 distribute model
29 | criterion = torch.nn.CrossEntropyLoss()
30 | opt = torch.optim.Adam(net.parameters(), lr=0.001)
31 | for epoch in range(10):
32 | for i, data in enumerate(data_loader_train):
33 | images, labels = data
34 | images, labels = images.cuda(), labels.cuda()
35 | opt.zero_grad()
36 | outputs = net(images)
37 | loss = criterion(outputs, labels)
38 | loss.backward()
39 | opt.step()
40 | if i % 10 == 0:
41 | print("loss: {}".format(loss.item()))
42 |
43 | # 指定一个device 保存模型
44 | if rank == 0:
45 | torch.save(net, "my_net.pth")
46 |
47 | if __name__ == "__main__":
48 | size = 1
49 | processes = []
50 | # for 循环启动进程
51 | for rank in range(size):
52 | p = Process(target=main, args=(rank,))
53 | p.start()
54 | processes.append(p)
55 |
56 | # join 起来
57 | for p in processes:
58 | p.join()
--------------------------------------------------------------------------------
/11-distribute_guide/ddp_demo/spawn_demo.py:
--------------------------------------------------------------------------------
1 | import torch
2 | import torch.distributed as dist
3 | import torch.multiprocessing as mp
4 | import torch.nn as nn
5 | import torch.optim as optim
6 | from torch.nn.parallel import DistributedDataParallel as DDP
7 | import os
8 |
9 | # rank 表示当前节点的编号,从0开始,在分布式训练中,每个计算节点有一个唯一的rank编号;
10 | # rank 编号用于区分不同的节点, rank 可以通过 torch.distributed.get_rank()来获取
11 | # world_size 表示分布式训练中计算节点的总数,包括主节点和工作节点,可以通过torch.distributed.get_world_size()来获取;
12 | # 通过rank 和world_size 这两个参数,不同的计算节点可以进行通信和协调,共同完成模型训练的任务;
13 | def example(rank, world_size):
14 | # create default process group
15 | import pdb
16 | pdb.set_trace()
17 | print("=========rank: {}, world_size: {}".format(rank, world_size))
18 | dist.init_process_group("gloo", rank=rank, world_size=world_size)
19 | # create local model
20 | model = nn.Linear(10, 10).to(rank) #分发到不同的节点
21 | # construct DDP model
22 | ddp_model = DDP(model, device_ids=[rank]) #拿到不同节点的model
23 | # define loss function and optimizer
24 | loss_fn = nn.MSELoss()
25 | optimizer = optim.SGD(ddp_model.parameters(), lr=0.001)
26 |
27 | # forward pass
28 | outputs = ddp_model(torch.randn(20, 10).to(rank))
29 | labels = torch.randn(20, 10).to(rank)
30 | # backward pass
31 | loss_fn(outputs, labels).backward()
32 | # update parameters
33 | optimizer.step()
34 |
35 | def main():
36 | world_size = 1
37 | mp.spawn(example,
38 | args=(world_size,),
39 | nprocs=world_size,
40 | join=True)
41 |
42 | if __name__=="__main__":
43 | # Environment variables which need to be
44 | # set when using c10d's default "env"
45 | # initialization mode.
46 | '''
47 | 在进行分布式训练时,需要进行进程间通信来实现数据的交换和同步。为了使不同进程能够相互通信,需要指定一个进程作为主节点,其他进程则连接到主节点。
48 | os.environ["MASTER_ADDR"]和os.environ["MASTER_PORT"]就是用来指定主节点地址和端口的环境变量。
49 | '''
50 | os.environ["MASTER_ADDR"] = "localhost"
51 | os.environ["MASTER_PORT"] = "29500"
52 | main()
53 | print("run ddp_hello.py successfully !!!")
54 |
--------------------------------------------------------------------------------
/11-distribute_guide/ddp_demo/torchrun.md:
--------------------------------------------------------------------------------
1 | #
2 |
--------------------------------------------------------------------------------
/11-distribute_guide/deep_speed/README.md:
--------------------------------------------------------------------------------
1 | # 概述
2 | DeepSpeed团队通过将
3 | - DeepSpeed库中的ZeRO分片(ZeRO sharding)、数据并行(Data Parallelism)、管道并行(也称流水线并行,Pipeline Parallelism)
4 | - 与Megatron-LM中的张量并行(Tensor Parallelism,可以理解为模型并行的一种)相结合;
5 | - 开发了一种基于3D并行的实现,这就是Megatron-Deepspeed,它使得千亿级参数量以上的大规模语言模型比如BLOOM的分布式训练变得更简单、高效和有效。
6 |
7 | # 3D并行
8 | 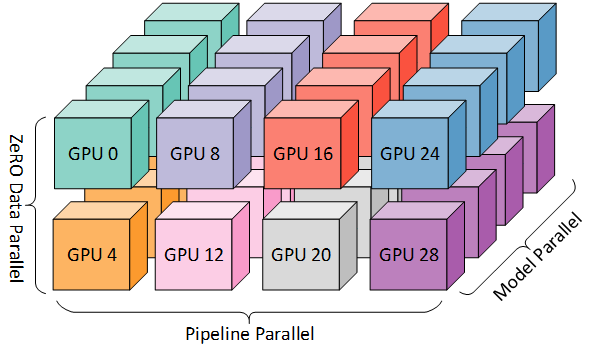
9 | - 数据并行 (Data Parallelism,DP) - 相同的设置和模型被复制多份,每份每次都被馈送不同的一份数据。处理是并行完成的,所有份在每个训练步结束时同步
10 | - 张量并行 (Tensor Parallelism,TP) - 每个张量都被分成多个块,因此张量的每个分片都位于其指定的 GPU 上,而不是让整个张量驻留在单个 GPU 上。在处理过程中,每个分片在不同的 GPU 上分别并行处理,结果在步骤结束时同步。这就是所谓的水平并行,因为是做的水平拆分
11 | - 流水线并行 (Pipeline Parallelism,PP) - 模型在多个 GPU 上垂直 (即按层) 拆分,因此只有一个或多个模型层放置在单个 GPU 上。每个 GPU 并行处理流水线的不同阶段,并处理 batch 的一部分数据
12 | - 零冗余优化器 (Zero Redundancy Optimizer,ZeRO) - 也执行与 TP 相类似的张量分片,但整个张量会及时重建以进行前向或反向计算,因此不需要修改模型。它还支持各种卸载技术以补偿有限的 GPU 内存
13 |
14 | # 参考链接:
15 | https://huggingface.co/blog/zh/bloom-megatron-deepspeed
16 |
--------------------------------------------------------------------------------
/11-distribute_guide/dp_demo/README.md:
--------------------------------------------------------------------------------
1 | # 1. DP(DataParalle)Summary
2 |
3 | ## 数据并行的概念
4 | 当一张 GPU 可以存储一个模型时,可以采用数据并行得到更准确的梯度或者加速训练:
5 | 即每个 GPU 复制一份模型,将一批样本分为多份输入各个模型并行计算。
6 | 因为求导以及加和都是线性的,数据并行在数学上也有效。
7 |
8 | ## DP原理及步骤
9 | - Parameter Server 架构 --> 单进程 多线程的方式 --> 只能在单机多卡上使用;
10 | - DP 基于单机多卡,所有设备都负责计算和训练网络;
11 | - 除此之外, device[0] (并非 GPU 真实标号而是输入参数 device_ids 首位) 还要负责整合梯度,更新参数。
12 | - 大体步骤:
13 | 1. 各卡分别计算损失和梯度;
14 | 2. 所有梯度整合到 device[0];
15 | 3. device[0] 进行参数更新,其他卡拉取 device[0] 的参数进行更新;
16 |
17 | 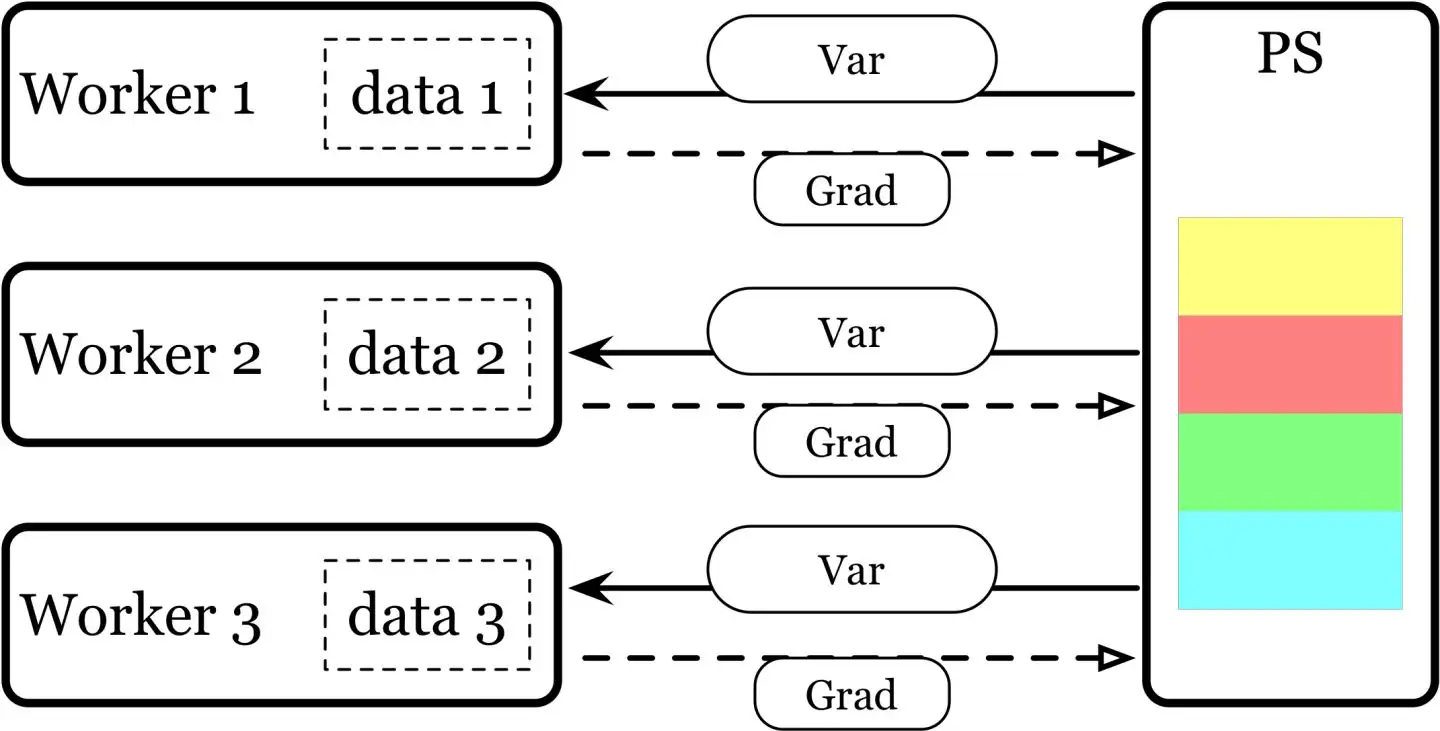
18 | 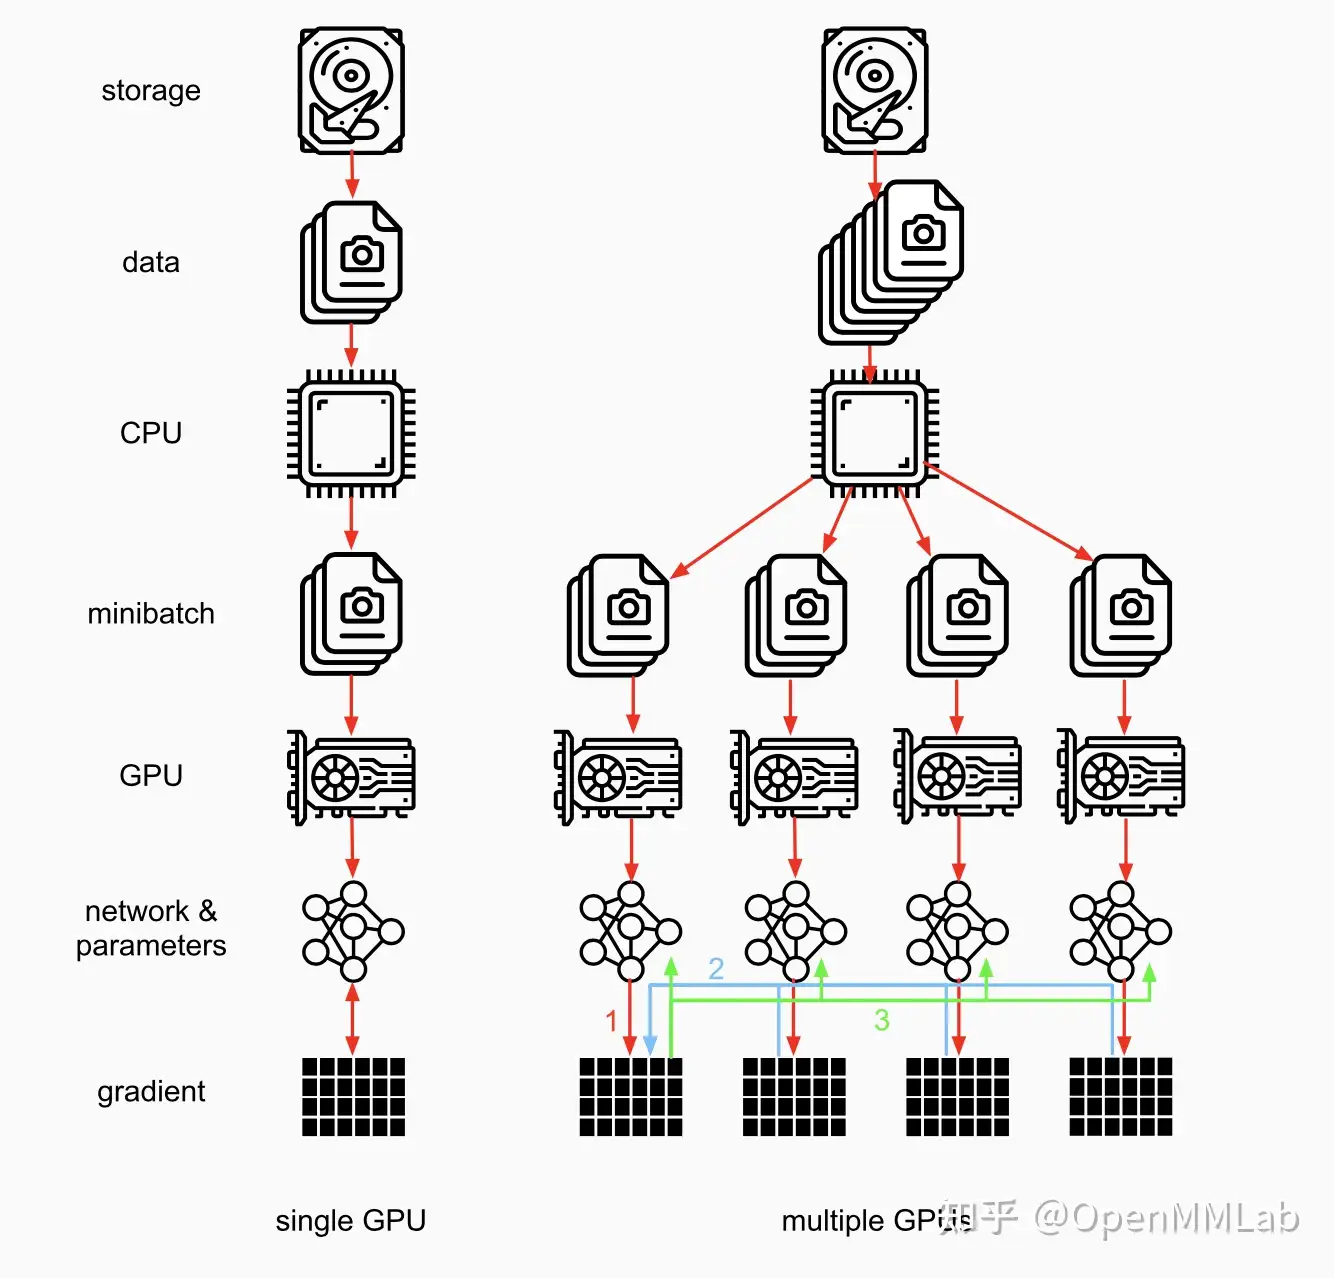
19 |
20 | # 2. code implement
21 | ## pytorch 相关源码
22 | ```python
23 | import torch.nn as nn
24 | model = nn.DataParallel(model) # 只需要将原来单卡的 module 用 DP 改成多卡
25 | class DataParallel(Module):
26 | ```
27 |
28 | ## train mode use pytorch DP
29 | **运行 dp_hello.py**
30 | ```shell
31 | python dp_hello.py
32 |
33 | output:
34 | >>> output: Let's use 2 GPUs!
35 | ```
36 |
37 | **运行 dp_demo.py**
38 | ```shell
39 | python dp_demo.py
40 |
41 | result:
42 | >>> data shape: torch.Size([64, 1, 28, 28])
43 | >>> =============x shape: torch.Size([32, 1, 28, 28])
44 | >>> =============x shape: torch.Size([32, 1, 28, 28])
45 | ```
46 |
47 | # 3. DP 的优缺点
48 | - 负载不均衡:device[0] 负载大一些;
49 | - 通信开销大;
50 | - 单进程;
51 | - Global Interpreter Lock (GIL)全局解释器锁,简单来说就是,一个 Python 进程只能利用一个 CPU kernel,
52 | 即单核多线程并发时,只能执行一个线程。考虑多核,多核多线程可能出现线程颠簸 (thrashing) 造成资源浪费,
53 | 所以 Python 想要利用多核最好是多进程。
54 |
55 | # 4. [references]
56 | 1. [pytorch 源码](https://github.com/pytorch/pytorch/blob/master/torch/nn/parallel/data_parallel.py)
57 | 2. [torch.nn.DataParallel](https://pytorch.org/docs/stable/generated/torch.nn.DataParallel.html?highlight=data+parallel#torch.nn.DataParallel)
58 | 3. [代码参考链接](https://pytorch.org/tutorials/beginner/blitz/data_parallel_tutorial.html#create-model-and-dataparallel)
59 | 4. [DP 和 DDP](https://link.zhihu.com/?target=https%3A//pytorch.org/docs/stable/notes/cuda.html%3Fhighlight%3Dbuffer)
60 |
--------------------------------------------------------------------------------
/11-distribute_guide/dp_demo/dp_demo.py:
--------------------------------------------------------------------------------
1 | import torch
2 | import torch.nn as nn
3 | import torch.optim as optim
4 | # import torch.distributed as dist
5 | import torchvision.datasets as datasets
6 | import torchvision.transforms as transforms
7 |
8 | # 定义分布式环境
9 | # dist.init_process_group(backend="gloo", rank=0, world_size=2)
10 |
11 | USE_CUDA = torch.cuda.is_available()
12 | device = torch.device("cuda:0" if USE_CUDA else "cpu")
13 |
14 | # 加载数据集
15 | train_dataset = datasets.MNIST(root="./data", train=True, transform=transforms.ToTensor(), download=True)
16 | # train_sampler = torch.utils.data.distributed.DistributedSampler(train_dataset, num_replicas=2, rank=0) # update num_replicas to gpus num
17 | # train_loader = torch.utils.data.DataLoader(train_dataset, batch_size=64, shuffle=False, sampler=train_sampler)
18 | train_loader = torch.utils.data.DataLoader(train_dataset, batch_size=64, shuffle=False)
19 |
20 | # 定义模型
21 | class Net(nn.Module):
22 | def __init__(self):
23 | super(Net, self).__init__()
24 | self.fc1 = nn.Linear(784, 512)
25 | self.fc2 = nn.Linear(512, 10)
26 | self.relu = nn.ReLU()
27 |
28 | def forward(self, x):
29 | print("=============x shape: ", x.shape)
30 | x = x.view(-1, 784)
31 | x = self.relu(self.fc1(x))
32 | x = self.fc2(x)
33 | return x
34 |
35 | model = Net()
36 |
37 | # 将模型复制到多个GPU上
38 | model = nn.DataParallel(model).to(device)
39 |
40 | # 定义损失函数和优化器
41 | content = nn.CrossEntropyLoss()
42 | optimizer = optim.SGD(model.parameters(), lr=0.01)
43 |
44 | # 训练模型
45 | for epoch in range(10):
46 | # train_sampler.set_epoch(epoch)
47 | for data, target in train_loader:
48 | print("data shape: ", data.shape)
49 | data = data.to(device)
50 | target = target.to(device)
51 | optimizer.zero_grad()
52 | output = model(data)
53 | loss = content(output, target)
54 | loss.backward()
55 | optimizer.step()
56 |
57 | print("Epoch {} completed".format(epoch))
--------------------------------------------------------------------------------
/11-distribute_guide/dp_demo/dp_hello.py:
--------------------------------------------------------------------------------
1 | import torch
2 | import torch.nn as nn
3 | import torch.optim as optim
4 | from torch.autograd import Variable
5 | from torch.utils.data import Dataset, DataLoader
6 |
7 |
8 | class RandomDataset(Dataset):
9 | def __init__(self, size, length):
10 | self.len = length
11 | self.data = torch.randn(length, size)
12 |
13 | def __getitem__(self, index):
14 | return self.data[index]
15 |
16 | def __len__(self):
17 | return self.len
18 |
19 |
20 | class Model(nn.Module):
21 | def __init__(self, input_size, output_size):
22 | super(Model, self).__init__()
23 | self.fc = nn.Linear(input_size, output_size)
24 | self.sigmoid = nn.Sigmoid()
25 | # self.modules = [self.fc, self.sigmoid]
26 |
27 | def forward(self, input):
28 | return self.sigmoid(self.fc(input))
29 |
30 |
31 | if __name__ == '__main__':
32 | # Parameters and DataLoaders
33 | input_size = 5
34 | output_size = 1
35 | batch_size = 30
36 | data_size = 100
37 |
38 | rand_loader = DataLoader(dataset=RandomDataset(input_size, data_size),
39 | batch_size=batch_size, shuffle=True)
40 |
41 | model = Model(input_size, output_size)
42 | if torch.cuda.device_count() > 1:
43 | print("Let's use", torch.cuda.device_count(), "GPUs!")
44 | model = nn.DataParallel(model).cuda()
45 |
46 | optimizer = optim.SGD(params=model.parameters(), lr=1e-3)
47 | cls_criterion = nn.BCELoss()
48 |
49 | for data in rand_loader:
50 | targets = torch.empty(data.size(0)).random_(2).view(-1, 1)
51 |
52 | if torch.cuda.is_available():
53 | input = Variable(data.cuda())
54 | with torch.no_grad():
55 | targets = Variable(targets.cuda())
56 | else:
57 | input = Variable(data)
58 | with torch.no_grad():
59 | targets = Variable(targets)
60 |
61 | output = model(input)
62 |
63 | optimizer.zero_grad()
64 | loss = cls_criterion(output, targets)
65 | loss.backward()
66 | optimizer.step()
67 |
--------------------------------------------------------------------------------
/11-distribute_guide/dp_demo/image.png:
--------------------------------------------------------------------------------
https://raw.githubusercontent.com/Elvin-Ma/pytorch_guide/da12d191ab1dae88e67c2c30246be9f29492f4c5/11-distribute_guide/dp_demo/image.png
--------------------------------------------------------------------------------
/11-distribute_guide/megatron/README.md:
--------------------------------------------------------------------------------
1 |
2 | # megatron 论文下载
3 | https://arxiv.org/pdf/1909.08053.pdf
4 |
5 | # 所有并行优化手段
6 | https://blog.csdn.net/weixin_42764932/article/details/131007832
7 |
8 | # 参考文献
9 | [中文简介](https://zhuanlan.zhihu.com/p/366906920)
10 | [中文简介](https://zhuanlan.zhihu.com/p/622212228)
11 |
--------------------------------------------------------------------------------
/11-distribute_guide/model_parallel/README.md:
--------------------------------------------------------------------------------
1 | # pytorch model parallel summary
2 |
3 | 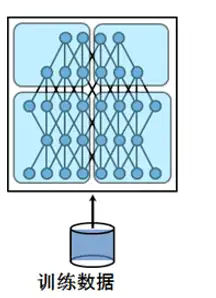
4 |
5 | ## 数据并行(DataParallel)的优缺点
6 | - 优点:将相同的模型复制到所有GPU,其中每个GPU消耗输入数据的不同分区,可以极大地加快训练过程。
7 | - 缺点:不适用于某些模型太大而无法容纳单个GPU的用例。
8 |
9 | ## 模型并行(model parallel)介绍
10 | - *模型并行的高级思想是将模型的不同子网(sub net)放置到不同的设备上,并相应地实现该 forward方法以在设备之间移动中间输出。*
11 | - *由于模型的一部分只能在任何单个设备上运行,因此一组设备可以共同为更大的模型服务。*
12 | - *在本文中,我们不会尝试构建庞大的模型并将其压缩到有限数量的GPU中。*
13 | - *取而代之的是,本文着重展示模型并行的思想。读者可以将这些想法应用到实际应用中。*
14 |
15 | # 代码展示
16 | ```shell
17 | python model_parallel_demo.py
18 | ```
19 |
20 | ## 性能展示
21 | **没有pipline时**
22 | 
23 |
24 | **有pipline时**
25 | 
26 |
27 | **异步执行pytorch kernel**
28 | As PyTorch launches CUDA operations asynchronously,
29 | the implementation does not need to spawn multiple threads to achieve concurrency.
30 |
31 | ## rpc:
32 | pytorch官方model parallel 库,类似与DDP,帮助我们完成模型并行的训练。
33 | [参考链接](https://pytorch.org/tutorials/intermediate/rpc_tutorial.html)
34 |
35 | ## pytorch 提供的模型并行方案
36 | - 模型划分不容易;
37 | - 相互沟通成本高;
38 | - bubble
39 |
40 | # [references]
41 | [参考文献1-pytorch](https://pytorch.org/tutorials/intermediate/model_parallel_tutorial.html)
42 | [参考文献2-pytorchRPC](https://pytorch.org/tutorials/intermediate/rpc_tutorial.html)
43 | [参考文献3](https://pytorch.org/tutorials/intermediate/rpc_param_server_tutorial.html)
44 | [参考文献4](https://juejin.cn/post/7043601075307282462)
45 | [参考文献5](https://pytorch.org/tutorials/intermediate/dist_pipeline_parallel_tutorial.html)
46 |
--------------------------------------------------------------------------------
/11-distribute_guide/model_parallel/model_parallel_demo.py:
--------------------------------------------------------------------------------
1 | import torch
2 | import torch.nn as nn
3 | import torch.optim as optim
4 |
5 | class ToyModel(nn.Module):
6 | def __init__(self):
7 | super(ToyModel, self).__init__()
8 | self.net1 = torch.nn.Linear(10, 10).to('cuda:0') # net1 --> gpu0 上
9 | self.relu = torch.nn.ReLU() # 没有任何可学习参数所以不需要to
10 | self.net2 = torch.nn.Linear(10, 5).to('cuda:0') # net2 --> gpu1 上
11 |
12 | def forward(self, x):
13 | x = x.to('cuda:0') # h2d : gpu0 上;
14 | x = self.net1(x) # 运算
15 | x = self.relu(x) # relu操作 x --> gpu0 上
16 | x = x.to('cuda:0') # 把 x --> gpu1 上
17 | x = self.net2(x) # 在 GPU1 上执行此操作
18 | return x # x 在gpu1 --> cuda:1
19 |
20 | if __name__ == "__main__":
21 | print("start to run model_parallel_demo.py !!!")
22 | model = ToyModel() # 实例化一个模型
23 | loss_fn = nn.MSELoss() # 损失函数定义
24 | optimizer = optim.SGD(model.parameters(), lr=0.001) # 定义优化器
25 |
26 | optimizer.zero_grad() # 梯度清0
27 | outputs = model(torch.randn(20, 10)) # forward 过程
28 | labels = torch.randn(20, 5).to('cuda:0') # label --> cuda:1 上
29 | loss = loss_fn(outputs, labels) # 计算损失
30 | loss.backward() # loss 的反向传播
31 | optimizer.step() # 更新权重
32 | print("run model_parallel_demo.py successfully !!!")
33 |
34 |
35 |
--------------------------------------------------------------------------------
/11-distribute_guide/model_parallel/model_parallel_demo2.py:
--------------------------------------------------------------------------------
1 | import torch
2 | import torch.nn as nn
3 | import torch.optim as optim
4 | from torchvision.models.resnet import ResNet, Bottleneck
5 |
6 | num_classes = 1000
7 |
8 | class ModelParallelResNet50(ResNet):
9 | def __init__(self, *args, **kwargs):
10 | super(ModelParallelResNet50, self).__init__(
11 | Bottleneck, [3, 4, 6, 3], num_classes=num_classes, *args, **kwargs)
12 |
13 | self.seq1 = nn.Sequential(
14 | self.conv1,
15 | self.bn1,
16 | self.relu,
17 | self.maxpool,
18 |
19 | self.layer1,
20 | self.layer2
21 | ).to('cuda:0')
22 |
23 | self.seq2 = nn.Sequential(
24 | self.layer3,
25 | self.layer4,
26 | self.avgpool,
27 | ).to('cuda:1')
28 |
29 | self.fc.to('cuda:1')
30 |
31 | def forward(self, x):
32 | x = self.seq2(self.seq1(x).to('cuda:1'))
33 | return self.fc(x.view(x.size(0), -1))
34 |
35 | class PipelineParallelResNet50(ModelParallelResNet50):
36 | def __init__(self, split_size=20, *args, **kwargs):
37 | super(PipelineParallelResNet50, self).__init__(*args, **kwargs)
38 | self.split_size = split_size
39 |
40 | def forward(self, x):
41 | splits = iter(x.split(self.split_size, dim=0)) # 对batch 维度进行split
42 | s_next = next(splits)
43 | s_prev = self.seq1(s_next) # s_prev --> cuda:0
44 | s_prev = s_prev.to('cuda:1') # s_prev --> cuda:0
45 | ret = []
46 |
47 | for s_next in splits:
48 | # A. ``s_prev`` runs on ``cuda:1``
49 | s_prev = self.seq2(s_prev) # s_prev: cuda:1
50 | ret.append(self.fc(s_prev.view(s_prev.size(0), -1)))
51 |
52 | # B. ``s_next`` runs on ``cuda:0``, which can run concurrently with A
53 | s_prev = self.seq1(s_next).to('cuda:1') # 执行seq1
54 |
55 | s_prev = self.seq2(s_prev)
56 | ret.append(self.fc(s_prev.view(s_prev.size(0), -1)))
57 |
58 | return torch.cat(ret)
59 |
60 |
61 | # setup = "model = PipelineParallelResNet50()"
62 | # pp_run_times = timeit.repeat(
63 | # stmt, setup, number=1, repeat=num_repeat, globals=globals())
64 | # pp_mean, pp_std = np.mean(pp_run_times), np.std(pp_run_times)
65 |
66 | # plot([mp_mean, rn_mean, pp_mean],
67 | # [mp_std, rn_std, pp_std],
68 | # ['Model Parallel', 'Single GPU', 'Pipelining Model Parallel'],
69 | # 'mp_vs_rn_vs_pp.png')
70 |
71 | # import torchvision.models as models
72 |
73 | # num_batches = 3
74 | # batch_size = 120
75 | # image_w = 128
76 | # image_h = 128
77 |
78 |
79 | # def train(model):
80 | # model.train(True)
81 | # loss_fn = nn.MSELoss()
82 | # optimizer = optim.SGD(model.parameters(), lr=0.001)
83 |
84 | # one_hot_indices = torch.LongTensor(batch_size) \
85 | # .random_(0, num_classes) \
86 | # .view(batch_size, 1)
87 |
88 | # for _ in range(num_batches):
89 | # # generate random inputs and labels
90 | # inputs = torch.randn(batch_size, 3, image_w, image_h)
91 | # labels = torch.zeros(batch_size, num_classes) \
92 | # .scatter_(1, one_hot_indices, 1)
93 |
94 | # # run forward pass
95 | # optimizer.zero_grad()
96 | # outputs = model(inputs.to('cuda:0'))
97 |
98 | # # run backward pass
99 | # labels = labels.to(outputs.device)
100 | # loss_fn(outputs, labels).backward()
101 | # optimizer.step()
--------------------------------------------------------------------------------
/11-distribute_guide/tensor_parallelism/README.md:
--------------------------------------------------------------------------------
1 | # PyTorch Tensor Parallelism for distributed training
2 |
3 | # Megatron-LM
4 | [Megatron-LM](https://github.com/NVIDIA/Megatron-LM#gpt-3-example)
5 |
6 | This example demonstrates SPMD Megatron-LM style tensor parallel by using
7 | PyTorch native Tensor Parallelism APIs, which include:
8 |
9 | 1. High-level APIs for module-level parallelism with a dummy MLP model.
10 | 2. Model agnostic ops for `DistributedTensor`, such as `Linear` and `RELU`.
11 | 3. A E2E demo of tensor parallel for a given toy model (Forward/backward + optimization).
12 |
13 | More details about the design can be found:
14 | https://github.com/pytorch/pytorch/issues/89884
15 |
16 | ```
17 | pip install -r requirements.txt
18 | python example.py
19 | ```
20 |
--------------------------------------------------------------------------------
/11-distribute_guide/tensor_parallelism/example.py:
--------------------------------------------------------------------------------
1 | import argparse
2 | import os
3 | import torch
4 | import torch.distributed as dist
5 | import torch.multiprocessing as mp
6 | import torch.nn as nn
7 |
8 | TP_AVAILABLE = False
9 | try:
10 | from torch.distributed._tensor import (
11 | DeviceMesh,
12 | )
13 | from torch.distributed.tensor.parallel import (
14 | PairwiseParallel,
15 | parallelize_module,
16 | )
17 | TP_AVAILABLE = True
18 | except BaseException as e:
19 | pass
20 |
21 |
22 | """
23 | This is the script to test Tensor Parallel(TP) on a toy model in a
24 | Megetron-LM SPMD style. We show an E2E working flow from forward,
25 | backward and optimization.
26 |
27 | More context about API designs can be found in the design:
28 |
29 | https://github.com/pytorch/pytorch/issues/89884.
30 |
31 | And it is built on top of Distributed Tensor which is proposed in:
32 |
33 | https://github.com/pytorch/pytorch/issues/88838.
34 |
35 | We use the example of two `nn.Linear` layers with an element-wise `nn.RELU`
36 | in between to show an example of Megatron-LM, which was proposed in paper:
37 |
38 | https://arxiv.org/abs/1909.08053.
39 |
40 | The basic idea is that we parallelize the first linear layer by column
41 | and also parallelize the second linear layer by row so that we only need
42 | one all reduce in the end of the second linear layer.
43 |
44 | We can speed up the model training by avoiding communications between
45 | two layers.
46 |
47 | To parallelize a nn module, we need to specify what parallel style we want
48 | to use and our `parallelize_module` API will parse and parallelize the modules
49 | based on the given `ParallelStyle`. We are using this PyTorch native Tensor
50 | Parallelism APIs in this example to show users how to use them.
51 | """
52 |
53 |
54 | def setup(rank, world_size):
55 | os.environ['MASTER_ADDR'] = 'localhost'
56 | os.environ['MASTER_PORT'] = '12355'
57 |
58 | # initialize the process group
59 | dist.init_process_group("nccl", rank=rank, world_size=world_size)
60 | torch.cuda.set_device(rank)
61 |
62 | def cleanup():
63 | dist.destroy_process_group()
64 |
65 |
66 | class ToyModel(nn.Module):
67 | def __init__(self):
68 | super(ToyModel, self).__init__()
69 | self.net1 = nn.Linear(10, 32)
70 | self.relu = nn.ReLU()
71 | self.net2 = nn.Linear(32, 5)
72 |
73 | def forward(self, x):
74 | return self.net2(self.relu(self.net1(x)))
75 |
76 |
77 | def demo_tp(rank, args):
78 | """
79 | Main body of the demo of a basic version of tensor parallel by using
80 | PyTorch native APIs.
81 | """
82 | print(f"Running basic Megatron style TP example on rank {rank}.")
83 | setup(rank, args.world_size)
84 | # create a sharding plan based on the given world_size.
85 | device_mesh = DeviceMesh(
86 | "cuda",
87 | torch.arange(args.world_size),
88 | )
89 |
90 | # create model and move it to GPU with id rank
91 | model = ToyModel().cuda(rank)
92 | # Create a optimizer for the parallelized module.
93 | LR = 0.25
94 | optimizer = torch.optim.SGD(model.parameters(), lr=LR)
95 | # Parallelize the module based on the given Parallel Style.
96 | model = parallelize_module(model, device_mesh, PairwiseParallel())
97 |
98 | # Perform a num of iterations of forward/backward
99 | # and optimizations for the sharded module.
100 | for _ in range(args.iter_nums):
101 | inp = torch.rand(20, 10).cuda(rank)
102 | output = model(inp)
103 | output.sum().backward()
104 | optimizer.step()
105 |
106 | cleanup()
107 |
108 |
109 | def run_demo(demo_fn, args):
110 | mp.spawn(demo_fn,
111 | args=(args,),
112 | nprocs=args.world_size,
113 | join=True)
114 |
115 |
116 | if __name__ == "__main__":
117 | n_gpus = torch.cuda.device_count()
118 | parser = argparse.ArgumentParser()
119 | # This is passed in via cmd
120 | parser.add_argument("--world_size", type=int, default=n_gpus)
121 | parser.add_argument("--iter_nums", type=int, default=10)
122 | args = parser.parse_args()
123 | # The main entry point is called directly without using subprocess
124 | if n_gpus < 2:
125 | print("Requires at least 2 GPUs to run.")
126 | elif not TP_AVAILABLE:
127 | print(
128 | "PyTorch doesn't have Tensor Parallelism available,"
129 | " need nightly build."
130 | )
131 | else:
132 | run_demo(demo_tp, args)
133 |
134 |
--------------------------------------------------------------------------------
/11-distribute_guide/tensor_parallelism/requirements.txt:
--------------------------------------------------------------------------------
1 | # Python dependencies required for running the example
2 |
3 | --pre
4 | --extra-index-url https://download.pytorch.org/whl/nightly/cu113
5 | --extra-index-url https://download.pytorch.org/whl/nightly/cu116
6 | torch >= 1.14.0.dev0; sys_platform == "linux"
--------------------------------------------------------------------------------
/11-distribute_guide/zero/READEME.md:
--------------------------------------------------------------------------------
1 | # 1. Zero(零冗余优化)
2 | - 它是DeepSpeed这一分布式训练框架的核心,被用来解决大模型训练中的显存开销问题。ZeRO的思想就是用通讯换显存。
3 | - ZeRO-1只对优化器状态进行分区。
4 | - ZeRO-2除了对优化器状态进行分区外,还对梯度进行分区,
5 | - ZeRO-3对所有模型状态进行分区。
6 |
7 | # 2. zero offload
8 |
9 |
10 | # 3 zero-infinity
11 | 1. ZeRO(ZeRO-3)的第3阶段允许通过跨数据并行过程划分模型状态来消除数据并行训练中的所有内存冗余。
12 | 2. Infinity Offload Engine是一个新颖的数据卸载库,通过将分区模型状态卸载到比GPU内存大得多的CPU或NVMe设备内存中,可以完全利用现代异构内存体系结构。
13 | 3.带有CPU卸载的激活检查点可以减少激活内存占用空间,在ZeRO-3和Infinity Offload Engine解决了模型状态所需的内存之后,这可能成为GPU上的内存瓶颈。
14 | 4.以内存为中心的运算符平铺,这是一种新颖的计算重新调度技术,可与ZeRO数据访问和通信调度配合使用,可减少难以置信的庞大单个层的内存占用,
15 | 这些单个层可能太大而无法容纳GPU内存,即使是一个时间。
16 |
17 | # 4. zero vs 模型并行
18 | - 知道模型并行的朋友,可能会想,既然ZeRO都把参数W给切了,那它应该是个模型并行呀?为什么要归到数据并行里呢?
19 | - 其实ZeRO是模型并行的形式,数据并行的实质。
20 | - 模型并行,是指在forward和backward的过程中,我只需要用自己维护的那块W来计算就行。即同样的输入X,每块GPU上各算模型的一部分,最后通过某些方式聚合结果。
21 | - 但对ZeRO来说,它做forward和backward的时候,是需要把各GPU上维护的W聚合起来的,即本质上还是用完整的W进行计算。它是不同的输入X,完整的参数W,最终再做聚合。
22 | - 因为下一篇要写模型并行Megatron-LM,因此现在这里罗列一下两者的对比。
23 |
24 | # 4. 参考文献:
25 | [zero 论文1](https://arxiv.org/pdf/1910.02054.pdf)
26 | [zero-offload](https://arxiv.org/pdf/2101.06840.pdf)
27 | [zero-infinity](https://arxiv.org/pdf/2104.07857.pdf)
28 | [zero-offload]https://www.usenix.org/conference/atc21/presentation/ren-jie
29 | [deepspeed1](https://www.microsoft.com/en-us/research/blog/deepspeed-extreme-scale-model-training-for-everyone/)
30 | [deepspeed2](https://www.microsoft.com/en-us/research/blog/ZeRO-deepspeed-new-system-optimizations-enable-training-models-with-over-100-billion-parameters/)
31 | [zero++](https://www.microsoft.com/en-us/research/publication/zero-extremely-efficient-collective-communication-for-giant-model-training/)
32 | [zero++ 中文](https://zhuanlan.zhihu.com/p/641297077)
33 | - DeepSpeed 在 https://github.com/microsoft/DeepSpeed/pull/3784 引入了 zero++的支持
34 | [中文简介](https://zhuanlan.zhihu.com/p/513571706)
35 |
--------------------------------------------------------------------------------
/12-pytorch2_dynomo/dynamo_hello.py:
--------------------------------------------------------------------------------
1 | import torch
2 | from torch._dynamo import optimize #
3 | import torch._inductor.config
4 |
5 | torch._inductor.config.debug = True
6 | torch._dynamo.config.suppress_errors = True
7 |
8 | # 对这个function 进行加速
9 | def fn(x):
10 | a = torch.sin(x).cuda()
11 | b = torch.sin(a).cuda()
12 | return b
13 |
14 | new_fn = optimize("inductor")(fn) # new_fn
15 | input_tensor = torch.randn(10000).to(device="cuda:0")
16 | a = new_fn(input_tensor)
17 | print("run dynamo_hell.py successfully !!!")
18 |
--------------------------------------------------------------------------------
/12-pytorch2_dynomo/model_demo.py:
--------------------------------------------------------------------------------
1 | import torch
2 | import time
3 | from torchvision.models import resnet18
4 |
5 | # Returns the result of running `fn()` and the time it took for `fn()` to run,
6 | # in seconds. We use CUDA events and synchronization for the most accurate
7 | # measurements.
8 | def timed(fn):
9 | # start = torch.cuda.Event(enable_timing=True)
10 | # end = torch.cuda.Event(enable_timing=True)
11 | a = time.time()
12 | # start.record()
13 | result = fn()
14 | # end.record()
15 | b = time.time()
16 | # torch.cuda.synchronize()
17 | return result, (b-a)
18 |
19 | # Generates random input and targets data for the model, where `b` is
20 | # batch size.
21 | def generate_data(b):
22 | return (
23 | torch.randn(b, 3, 128, 128).to(torch.float32).cuda(),
24 | torch.randint(1000, (b,)).cuda(),
25 | )
26 |
27 | def init_model():
28 | return resnet18().to(torch.float32).cuda()
29 |
30 | def evaluate(mod, inp):
31 | return mod(inp)
32 |
33 | if __name__ == "__main__":
34 |
35 | model = init_model()
36 |
37 | # # Reset since we are using a different mode.
38 | import torch._dynamo
39 | torch._dynamo.reset()
40 |
41 | evaluate_opt = torch.compile(evaluate, mode="reduce-overhead")
42 |
43 | # 验证一次
44 | # inp = generate_data(16)[0]
45 | # print("eager:", timed(lambda: evaluate(model, inp))[1])
46 | # print("compile:", timed(lambda: evaluate_opt(model, inp))[1])
47 |
48 | N_ITERS = 10
49 |
50 | eager_times = []
51 | for i in range(N_ITERS):
52 | inp = generate_data(16)[0]
53 | _, eager_time = timed(lambda: evaluate(model, inp))
54 | eager_times.append(eager_time)
55 | print(f"eager eval time {i}: {eager_time}")
56 |
57 | print("~" * 10)
58 |
59 | compile_times = []
60 | for i in range(N_ITERS):
61 | inp = generate_data(16)[0]
62 | _, compile_time = timed(lambda: evaluate_opt(model, inp))
63 | compile_times.append(compile_time)
64 | print(f"compile eval time {i}: {compile_time}")
65 | print("~" * 10)
66 |
67 | import numpy as np
68 | eager_med = np.median(eager_times)
69 | compile_med = np.median(compile_times)
70 | speedup = eager_med / compile_med
71 | print(f"(eval) eager median: {eager_med}, compile median: {compile_med}, speedup: {speedup}x")
72 | print("~" * 10)
73 |
--------------------------------------------------------------------------------
/12-pytorch2_dynomo/torch2_demo.py:
--------------------------------------------------------------------------------
1 | import torch
2 |
3 | def demo_1():
4 | def foo(x, y):
5 | a = torch.sin(x)
6 | b = torch.cos(x)
7 | return a + b
8 |
9 | opt_foo1 = torch.compile(foo)
10 | print(opt_foo1(torch.randn(10, 10), torch.randn(10, 10)))
11 |
12 | def demo_2():
13 | @torch.compile
14 | def opt_foo2(x, y):
15 | a = torch.sin(x)
16 | b = torch.cos(x)
17 | return a + b
18 | print(opt_foo2(torch.randn(10, 10), torch.randn(10, 10)))
19 |
20 | def demo_3():
21 | class MyModule(torch.nn.Module):
22 | def __init__(self):
23 | super().__init__()
24 | self.lin = torch.nn.Linear(100, 10)
25 |
26 | def forward(self, x):
27 | return torch.nn.functional.relu(self.lin(x))
28 |
29 | mod = MyModule()
30 | opt_mod = torch.compile(mod)
31 | print(opt_mod(torch.randn(10, 100)))
32 |
33 | if __name__ == "__main__":
34 | # demo_1()
35 | # demo_2()
36 | demo_3()
37 | print("run torch2_demo.py successfully !!!")
--------------------------------------------------------------------------------
/13-model_deploy_guide/cloud_deploy/README.md:
--------------------------------------------------------------------------------
1 | # 相关网址
2 | - [阿里云首页](https://www.aliyun.com/?utm_content=se_1013083955)
3 | - [机器学习平台pai](https://www.aliyun.com/product/bigdata/learn?spm=5176.28055625.J_3207526240.255.6a27154aXUTslL&scm=20140722.M_9003148._.V_1)
4 | - [机器学习平台pai帮助文档](https://help.aliyun.com/document_detail/69223.html?spm=5176.14066474.J_5834642020.6.71d5426as0DTyC)
5 | - [控制台部署说明](https://help.aliyun.com/document_detail/110985.html?spm=a2c4g.433127.0.0.5f5d5dffNclYQe#section-66n-18i-lmm)
6 | - [用python 部署](https://help.aliyun.com/document_detail/2261532.html?spm=a2c4g.2261500.0.0.3d535dff7DWrbQ)
7 |
8 | # PAI的部署方式EAS
9 | step1. 登录 EAS;
10 | step2. [python processor](https://help.aliyun.com/document_detail/130248.html?spm=a2c4g.113696.0.0.37b255caYgyZaT)
11 | step3. [所有参数说明](https://help.aliyun.com/document_detail/450525.html?spm=a2c4g.130248.0.0.7bf97788Oixfjd)
12 | step4. [服务调用](https://help.aliyun.com/document_detail/250807.html?spm=a2c4g.110984.0.0.51657baehuab6g)
13 | step5. [状态码说明](https://help.aliyun.com/document_detail/449809.html?spm=a2c4g.250807.0.0.153783b8bF8slo)
14 |
15 |
16 | # aliyun 三种部署方式
17 | - 镜像部署服务: 其依赖项打包成一个镜像文件,然后在目标环境中运行
18 | - 镜像部署AI-Web应用:将 AI 模型部署为服务,通过 API 接口提供服务,并使用容器镜像来提供 Web 界面。\n
19 | 这种方式需要将 AI 模型封装为 API 接口,然后使用 Flask、Django 等 Web 框架将接口暴露出来。
20 | 可以使用 Dockerfile 构建一个镜像,其中包含了 Flask、Django 等 Web 框架和 AI 模型服务。
21 | 然后将镜像上传到阿里云容器镜像服务中,并创建容器实例来运行镜像。
22 | - 模型+processor部署服务:另一种方式是将 AI 模型和处理器部署在同一个容器中,这种方式可以更好地控制模型和处理器的交互和数据流,可以提高系统的性能和可靠性。
23 | 可以使用 Dockerfile 构建一个镜像,其中包含了 AI 模型和处理器服务。然后将镜像上传到阿里云容器镜像服务中,并创建容器实例来运行镜像。
24 |
25 |
26 | # 我们采用自定义processor的方式
27 | [自定义processor](https://help.aliyun.com/document_detail/130248.html?spm=a2c4g.2250005.0.0.25121af2JsiwXd)
28 |
29 |
30 | # 事先准备:
31 | - aliyun 账号;
32 | - aliyun unix 服务器
33 | 登录阿里云官网,进入控制台页面:https://www.aliyun.com/
34 | 在控制台页面中,找到“产品与服务”菜单,选择“云服务器 ECS”。
35 | 在 ECS 页面中,单击“创建实例”按钮,进入创建实例页面。
36 | 在创建实例页面中,您需要选择实例的配置信息,包括实例规格、操作系统、网络等。您可以根据自己的实际需求进行选择。
37 | 完成配置后,单击“立即购买”按钮,确认订单信息并完成支付。
38 | 在支付完成后,您可以在 ECS 页面中找到您创建的实例,获取实例的公网 IP 地址和登录密码。
39 | 使用 SSH 工具(如 PuTTY)连接到您的 ECS 服务器,输入公网 IP 地址和登录密码即可登录。
40 | - 在aliyun ACR中创建一个保存镜像的hub;
41 | [aliyun ACR](https://help.aliyun.com/document_detail/257112.htm?spm=a2c4g.258246.0.0.2aea607bOIuVPJ)
42 | [容器镜像服务台](https://cr.console.aliyun.com/cn-shanghai/instance/dashboard)
43 | - 准备一个aliyun OSS 账户;
44 |
45 | # docker 镜像准备(模型、代码、数据全部放入到镜像中)
46 | [参考文献1](https://help.aliyun.com/document_detail/130248.html?spm=a2c4g.258246.0.0.2b127c54StN1RA)
47 | [参考文献2](https://help.aliyun.com/document_detail/258246.html?spm=a2c4g.468735.0.0.4ea15f29hGMxua)
48 | **操作步骤**
49 | - service docker start
50 | - 注册号个人的镜像服务:(设定命名空间、访问凭证)
51 | - 得到并登录aliyun image hub:sudo docker login --username=天才孤星000 registry.cn-shanghai.aliyuncs.com
52 | - 操作步骤:
53 | [详细操作步骤](https://cr.console.aliyun.com/repository/cn-shanghai/mtn_ai/test/details) --> 推送自己的镜像
54 | - 端口映射:主机的端口和容器内部的端口;
55 |
56 | # pai-eas部署
57 | - 编写processor 对应的 py 文件;不能叫 app.py
58 | - 将代码、模型传入 oss 对应文件中;
59 | - 配置编辑里 写上我们的 "data_image": *.v0.1
60 | - 连接测试:eas http sdk 三种测试;
61 |
62 | # 挂载
63 | **挂载都是将云存储服务挂载到服务器上,以便在服务器上像使用本地磁盘一样访问云存储中的数据。**
64 | [oss 挂载](https://help.aliyun.com/document_detail/153892.html?spm=a2c4g.11186623.6.750.2b03142bM5YPG3)
65 | [网页版教程](https://www.qycn.com/about/hd/5658.html)
66 |
67 | ##OSS挂载
68 | - OSS(Object Storage Service)是阿里云提供的对象存储服务。
69 | - OSS 挂载是将 OSS 存储桶(bucket)挂载到服务器上,以便在服务器上像使用本地磁盘一样访问 OSS 中的数据。
70 | - OSS 挂载支持 NFS 和 SMB 两种协议,可以通过在服务器上安装相应的客户端软件来实现挂载。
71 |
72 | ##NAS挂载
73 | - NAS(Network Attached Storage)是一种网络附加存储设备,可以提供文件级别的数据访问。
74 | - NAS 挂载是将 NAS 存储设备挂载到服务器上,以便在服务器上像使用本地磁盘一样访问 NAS 中的数据。
75 | - NAS 挂载支持 NFS、SMB 和 FTP 等多种协议,可以通过在服务器上安装相应的客户端软件来实现挂载。
76 |
77 | **镜像管理:**
78 | [镜像管理教程](https://help.aliyun.com/document_detail/213570.htm?spm=a2c4g.110985.0.0.6ee7167fYIeRzs#task-2074428)
79 | **自定义镜像:**
80 | [自定义镜像教程](https://help.aliyun.com/document_detail/258246.html?spm=a2c4g.465149.0.0.223c167fb7fVD3)
81 | **镜像拉取凭证**
82 | [凭证官方获取步骤](https://help.aliyun.com/document_detail/142247.html)
83 | **使用Python开发自定义Processor**
84 | [python Processor doc](https://help.aliyun.com/document_detail/130248.html?spm=a2c4g.69223.0.i1)
85 | **管理自己的镜像**
86 | [阿里云自己的镜像](https://cr.console.aliyun.com/cn-shanghai/instance/repositories)
87 |
88 | #aliyun docker 管理
89 | 1. 登录:docker login --username=*** registry.cn-shanghai.aliyuncs.com*
90 | 2. 查看:docker search registry.cn-hangzhou.aliyuncs.com//*
91 | *docker search registry.cn-hangzhou.aliyuncs.com/tensorflow/tensorflow*
92 | 3. 拉取:docker pull registry.cn-hangzhou.aliyuncs.com//:
93 | 4. 推送:docker push
94 |
95 | # RAM 是什么???
96 | - RAM(Resource Access Management)是阿里云提供的一种访问控制服务;
97 | - 它允许用户创建和管理多个用户身份(即RAM用户),并对这些用户的访问权限进行细粒度的控制;
98 | - RAM用户可以被视为与主账号(即阿里云账号)相对独立的子账号;
99 | - 它们可以拥有自己的登录密码和访问密钥,并且可以被授予访问阿里云各种资源的权限;
100 | - RAM用户常用于企业内部的权限管理和资源隔离,以及多人协作场景下的访问控制。
101 |
102 | # 部署调试的三种方式测试:
103 | 
104 | 1. python 调用调试: [python sdk](https://help.aliyun.com/document_detail/250807.html?spm=a2c4g.30347.0.0.51844a41SA02Jt)
105 | 2. http测试调试:[http 测试](https://help.aliyun.com/document_detail/111114.html?spm=a2c4g.250807.0.0.73d746dcImPYL9)
106 | 3. 阿里云控制板:在线调试窗口
107 |
108 | # 访问方式:
109 | curl -H -d 'input'
110 | curl http://1369908734298992.cn-shanghai.pai-eas.aliyuncs.com/api/predict/malaoshi_mmm -H 'Authorization: NjlhNjE5NzhmODkwZmZlYTU3NDVlOWFiZTkyZmM2NGM5ODNkZDMyZQ==' -d '1 200'
111 |
112 | # image-infer 访问
113 | curl http://1369908734298992.cn-shanghai.pai-eas.aliyuncs.com/api/predict/malaoshi_nnn -H 'Authorization: OTMzODUyNWYwYTE3YjU0ODRlYzEzNjQyNzUxYTYwMjdlYzQ1YWU1OQ==' -d 'cat.jpg 200'
114 |
--------------------------------------------------------------------------------
/13-model_deploy_guide/container_deploy/Dockerfile:
--------------------------------------------------------------------------------
1 | FROM nginx
2 | RUN echo '这是一个本地构建的nginx镜像' > /usr/share/nginx/html/index.html
--------------------------------------------------------------------------------
/13-model_deploy_guide/container_deploy/README.md:
--------------------------------------------------------------------------------
1 | # 镜像与容器 概念介绍
2 | **docker:管理镜像和容器**
3 |
4 | 
5 |
6 | [docker 入门教程](https://www.runoob.com/docker/docker-tutorial.html)
7 |
8 | # 理解docker
9 | - 目的:给我们提供了一个完整的环境:(自带的小系统)
10 | - 镜像image: 一个小系统 的模板(class);
11 | - 容器container:镜像的实例化 --> 我们就可以直接取用它了;
12 | - dockerfile: 用于创建镜像
13 | - docker:是一个软件,管理以上三项;
14 | - 镜像是可以保存的,就可以不用每次都run dockerfile了。
15 |
16 | # 一些重要网站
17 | [docker 官网](https://www.docker.com)
18 | [docker github](https://github.com/docker/docker-ce)
19 | [docker guide page](https://dockerdocs.cn/get-started/index.html)
20 | [dockerfile]https://www.runoob.com/docker/docker-dockerfile.html
21 | [docker 命令查询](https://docs.docker.com/engine/reference/commandline/docker/)
22 | [dockerfile 命令查询](https://docs.docker.com/engine/reference/builder/#understand-how-cmd-and-entrypoint-interact)
23 |
24 | #得到image的几种方法
25 | 方法1:docker pull # 拉取仓库的镜像
26 | 方法2:docker commit # 保持 container 的当前状态到image后,然后生成对应的 image
27 | 方法3:docker build # 使用dockerfile 文件自动化制作 image
28 |
29 | # 常用的doker 指令
30 | - docker 显示docker 的command
31 | - docker command --help # 查询每条指令的用法
32 | - docker pull # 直接拉取镜像
33 | - docker images / docker image list # 查看镜像
34 | - docker search #查询有哪些镜像
35 | - docker run -it <镜像名> /bin/bash # 从镜像 启动一个容器
36 | - exit # 退出容器 --> 不是关闭
37 | - docker ps -a # 查看所有容器(包含已经关闭的容器)
38 | - docker ps # 查看已经启动的容器
39 | - docker stop
40 | - docker start --> 并不意味着你连上它了
41 | - docker exec -it bash # 重新连接上了docker
42 | - docker rm # 删除容器:一定是在容器stop 时候删除
43 | - docker rmi # 删除镜像
44 | - docker commit # 把一个容器重新存为镜像
45 | - docker push # 推送镜像到hub中
46 | - docker login 登录hub
47 | - docker tag # 重新打标签
48 |
49 | # 用 container 部署
50 | 1. 裸服务器部署
51 | docker run -d -P training/webapp python app.py
52 | **服务器裸部署:直接run 这一行代码 就启动了一个服务**
53 |
54 | **jenkins自动化部署**
55 | # 管理一个 github(有我们的代码和dockerfile构建工具)
56 | # 自动的拉取我们的代码,利用dockerfile 在服务器上完成环境的搭建,
57 | # dockerfile里 最后会有一个CMD ["python", "app.py"]
58 |
59 | # 常用dockerfile 指令
60 | - RUN 构建镜像时运行的指定命令
61 | - CMD 运行容器时默认执行的命令,如果有多个CMD质量,最后一个生效。
62 | *当使用 docker run 命令启动容器时,可以覆盖 CMD 指令中的命令。*
63 | - FROM 指明当前的镜像基于哪个镜像构建
64 | - LABEL 标记镜像信息,添加元数据
65 | - ARG 定义构建镜像过程中使用的变量
66 | - ENV 指定环境变量
67 | - VOLUME 创建一个数据卷挂载点
68 | - USER 指定运行容器时的用户名或 UID
69 | - WORKDIR 配置工作目录
70 | - EXPOSE 容器运行时的端口,默认是TCP
71 | - ADD 从本地或URL添加文件或压缩包到镜像中,并自动解压
72 | - COPY 拷贝文件或目录到镜像中
73 | - ONBUILD 创建子镜像时指定自动执行的操作指令
74 | - SHELL 指定默认 shell 类型
75 | - ENTRYPOINT 指定镜像的默认入口命令
76 |
77 | # 使用dockerfile构建镜像
78 | ```dockerfile
79 | # 使用 Python 3.7 作为基础镜像
80 | FROM python:3.7***
81 | # 设置工作目录
82 | WORKDIR /app
83 | # 复制应用程序代码到容器中
84 | COPY . .
85 |
86 | # 安装所需的 Python 库
87 | RUN pip install -r requirements.txt
88 |
89 | # 暴露应用程序端口
90 | EXPOSE 5000
91 |
92 | # 启动应用程序
93 | CMD ["python", "app.py"]
94 | ```
95 | **docker build -t . 从上述dockerfile中创建镜像**
96 |
--------------------------------------------------------------------------------
/13-model_deploy_guide/cpp_deploy/README.md:
--------------------------------------------------------------------------------
1 | # cpp 部署
2 | - 训练框架(pytorch 等)
3 | - 推理框架 (tensorRT,mnn、onnxruntime、libtorch)
4 |
5 | # libtorch : pytorch 的c++接口
6 | - 可以进行训练
7 | - 也可以进行推理(torch.jit.trace)
8 |
9 | # 注意事项:
10 | - 需要找到torch的动态库和头文件
11 | - 假如我们已经安装了 pytorch的话,libtorch 环境肯定已经具备了;
12 | - .conda/envs/pytorch_env/lib/python3.8/site-packages/torch/
13 |
14 | **推理代码展示**
15 | ```c++
16 | #include
17 | #include
18 | #include
19 | #include
20 | #include
21 | #include
22 | #include
23 | void mnist_train() {
24 | torch::DeviceType device_type = torch::kCPU;
25 | torch::Device device(device_type);
26 | auto input = torch::rand({1, 1, 28, 28}, torch::kFloat32);
27 | auto module = torch::jit::load("../mnist_model.pt");
28 | torch::Tensor output = module.forward({input}).toTensor();
29 | auto max_result = output.max(1, true);
30 | auto max_index = std::get<1>(max_result).item();
31 | std::cout << "=========cpu max_index: " << max_index << std::endl;
32 | }
33 | ```
34 | # 操作流程
35 | 0. cmake/g++
36 | 1. cd mnist
37 | 2. 修改 CMakelist.txt 设置自己的 torch路径
38 | 3. make build && cd build
39 | 4. cmake ..
40 | 5. make -j16
41 | 6. ./mnist-infer
42 |
43 |
--------------------------------------------------------------------------------
/13-model_deploy_guide/cpp_deploy/mnist/CMakeLists.txt:
--------------------------------------------------------------------------------
1 | cmake_minimum_required(VERSION 3.1 FATAL_ERROR)
2 | project(mnist)
3 | set(CMAKE_CXX_STANDARD 14)
4 |
5 | # 设置自己的 torch 路径
6 | #set(Torch_DIR /home/elvin/.conda/envs/pytorch_env/lib/python3.8/site-packages/torch/share/cmake/Torch)
7 | set(Torch_DIR /home/elvin/miniconda3/envs/python3.10/lib/python3.10/site-packages/torch/share/cmake/Torch)
8 | find_package(Torch REQUIRED)
9 |
10 | option(DOWNLOAD_MNIST "Download the MNIST dataset from the internet" OFF)
11 | if (DOWNLOAD_MNIST)
12 | message(STATUS "Downloading MNIST dataset")
13 | execute_process(
14 | COMMAND python ${CMAKE_CURRENT_LIST_DIR}/../tools/download_mnist.py
15 | -d ${CMAKE_BINARY_DIR}/data
16 | ERROR_VARIABLE DOWNLOAD_ERROR)
17 | if (DOWNLOAD_ERROR)
18 | message(FATAL_ERROR "Error downloading MNIST dataset: ${DOWNLOAD_ERROR}")
19 | endif()
20 | endif()
21 |
22 | add_executable(mnist-infer mnist-infer.cpp)
23 | add_executable(mnist-train mnist-train.cpp)
24 | target_compile_features(mnist-train PUBLIC cxx_range_for)
25 | target_compile_features(mnist-infer PUBLIC cxx_range_for)
26 | target_link_libraries(mnist-train ${TORCH_LIBRARIES})
27 | target_link_libraries(mnist-infer ${TORCH_LIBRARIES})
28 |
29 | if (MSVC)
30 | file(GLOB TORCH_DLLS "${TORCH_INSTALL_PREFIX}/lib/*.dll")
31 | add_custom_command(TARGET mnist
32 | POST_BUILD
33 | COMMAND ${CMAKE_COMMAND} -E copy_if_different
34 | ${TORCH_DLLS}
35 | $)
36 | endif (MSVC)
37 |
--------------------------------------------------------------------------------
/13-model_deploy_guide/cpp_deploy/mnist/README.md:
--------------------------------------------------------------------------------
1 | # MNIST Example with the PyTorch C++ Frontend
2 |
3 | This folder contains an example of training a computer vision model to recognize
4 | digits in images from the MNIST dataset, using the PyTorch C++ frontend.
5 |
6 | The entire training code is contained in `mnist.cpp`.
7 |
8 | To build the code, run the following commands from your terminal:
9 |
10 | ```shell
11 | $ cd mnist
12 | $ mkdir build
13 | $ cd build
14 | $ cmake -DCMAKE_PREFIX_PATH=/path/to/libtorch ..
15 | $ make
16 | ```
17 |
18 | where `/path/to/libtorch` should be the path to the unzipped _LibTorch_
19 | distribution, which you can get from the [PyTorch
20 | homepage](https://pytorch.org/get-started/locally/).
21 |
22 | Execute the compiled binary to train the model:
23 |
24 | ```shell
25 | $ ./mnist
26 | Train Epoch: 1 [59584/60000] Loss: 0.4232
27 | Test set: Average loss: 0.1989 | Accuracy: 0.940
28 | Train Epoch: 2 [59584/60000] Loss: 0.1926
29 | Test set: Average loss: 0.1338 | Accuracy: 0.959
30 | Train Epoch: 3 [59584/60000] Loss: 0.1390
31 | Test set: Average loss: 0.0997 | Accuracy: 0.969
32 | Train Epoch: 4 [59584/60000] Loss: 0.1239
33 | Test set: Average loss: 0.0875 | Accuracy: 0.972
34 | ...
35 | ```
36 |
--------------------------------------------------------------------------------
/13-model_deploy_guide/cpp_deploy/mnist/mnist-infer.cpp:
--------------------------------------------------------------------------------
1 | #include //
2 | #include
3 | #include
4 | #include
5 | #include
6 | #include
7 | #include
8 |
9 | int mnist_train() {
10 | torch::DeviceType device_type = torch::kCPU;
11 | torch::Device device(device_type);
12 | auto input = torch::rand({1, 1, 28, 28}, torch::kFloat32);
13 | auto module = torch::jit::load("../traced_model.pt");
14 | torch::Tensor output = module.forward({input}).toTensor();
15 | auto max_result = output.max(1, true);
16 | auto max_index = std::get<1>(max_result).item();
17 | std::cout << "=========cpu max_index: " << max_index << std::endl;
18 | return max_index;
19 | }
20 |
21 | int main() {
22 | mnist_train();
23 | std::cout << "run mnist-infer.cpp successfully !!!" << std::endl;
24 | return 0;
25 | }
26 |
--------------------------------------------------------------------------------
/13-model_deploy_guide/cpp_deploy/mnist/mnist-train.cpp:
--------------------------------------------------------------------------------
1 | #include
2 |
3 | #include
4 | #include
5 | #include
6 | #include
7 | #include
8 |
9 | // Where to find the MNIST dataset.
10 | const char* kDataRoot = "./data";
11 |
12 | // The batch size for training.
13 | const int64_t kTrainBatchSize = 64;
14 |
15 | // The batch size for testing.
16 | const int64_t kTestBatchSize = 1000;
17 |
18 | // The number of epochs to train.
19 | const int64_t kNumberOfEpochs = 10;
20 |
21 | // After how many batches to log a new update with the loss value.
22 | const int64_t kLogInterval = 10;
23 |
24 | struct Net : torch::nn::Module {
25 | Net()
26 | : conv1(torch::nn::Conv2dOptions(1, 10, /*kernel_size=*/5)),
27 | conv2(torch::nn::Conv2dOptions(10, 20, /*kernel_size=*/5)),
28 | fc1(320, 50),
29 | fc2(50, 10) {
30 | register_module("conv1", conv1);
31 | register_module("conv2", conv2);
32 | register_module("conv2_drop", conv2_drop);
33 | register_module("fc1", fc1);
34 | register_module("fc2", fc2);
35 | }
36 |
37 | torch::Tensor forward(torch::Tensor x) {
38 | x = torch::relu(torch::max_pool2d(conv1->forward(x), 2));
39 | x = torch::relu(
40 | torch::max_pool2d(conv2_drop->forward(conv2->forward(x)), 2));
41 | x = x.view({-1, 320});
42 | x = torch::relu(fc1->forward(x));
43 | x = torch::dropout(x, /*p=*/0.5, /*training=*/is_training());
44 | x = fc2->forward(x);
45 | return torch::log_softmax(x, /*dim=*/1);
46 | }
47 |
48 | torch::nn::Conv2d conv1;
49 | torch::nn::Conv2d conv2;
50 | torch::nn::Dropout2d conv2_drop;
51 | torch::nn::Linear fc1;
52 | torch::nn::Linear fc2;
53 | };
54 |
55 | template
56 | void train(
57 | size_t epoch,
58 | Net& model,
59 | torch::Device device,
60 | DataLoader& data_loader,
61 | torch::optim::Optimizer& optimizer,
62 | size_t dataset_size) {
63 | model.train();
64 | size_t batch_idx = 0;
65 | for (auto& batch : data_loader) {
66 | auto data = batch.data.to(device), targets = batch.target.to(device);
67 | optimizer.zero_grad();
68 | auto output = model.forward(data);
69 | auto loss = torch::nll_loss(output, targets);
70 | AT_ASSERT(!std::isnan(loss.template item()));
71 | loss.backward();
72 | optimizer.step();
73 |
74 | if (batch_idx++ % kLogInterval == 0) {
75 | std::printf(
76 | "\rTrain Epoch: %ld [%5ld/%5ld] Loss: %.4f",
77 | epoch,
78 | batch_idx * batch.data.size(0),
79 | dataset_size,
80 | loss.template item());
81 | }
82 | }
83 | }
84 |
85 | template
86 | void test(
87 | Net& model,
88 | torch::Device device,
89 | DataLoader& data_loader,
90 | size_t dataset_size) {
91 | torch::NoGradGuard no_grad;
92 | model.eval();
93 | double test_loss = 0;
94 | int32_t correct = 0;
95 | for (const auto& batch : data_loader) {
96 | auto data = batch.data.to(device), targets = batch.target.to(device);
97 | auto output = model.forward(data);
98 | test_loss += torch::nll_loss(
99 | output,
100 | targets,
101 | /*weight=*/{},
102 | torch::Reduction::Sum)
103 | .template item();
104 | auto pred = output.argmax(1);
105 | correct += pred.eq(targets).sum().template item();
106 | }
107 |
108 | test_loss /= dataset_size;
109 | std::printf(
110 | "\nTest set: Average loss: %.4f | Accuracy: %.3f\n",
111 | test_loss,
112 | static_cast(correct) / dataset_size);
113 | }
114 |
115 | auto main() -> int {
116 | torch::manual_seed(1);
117 |
118 | torch::DeviceType device_type;
119 | if (torch::cuda::is_available()) {
120 | std::cout << "CUDA available! Training on GPU." << std::endl;
121 | device_type = torch::kCUDA;
122 | } else {
123 | std::cout << "Training on CPU." << std::endl;
124 | device_type = torch::kCPU;
125 | }
126 | torch::Device device(device_type);
127 |
128 | Net model;
129 | model.to(device);
130 |
131 | auto train_dataset = torch::data::datasets::MNIST(kDataRoot)
132 | .map(torch::data::transforms::Normalize<>(0.1307, 0.3081))
133 | .map(torch::data::transforms::Stack<>());
134 | const size_t train_dataset_size = train_dataset.size().value();
135 | auto train_loader =
136 | torch::data::make_data_loader(
137 | std::move(train_dataset), kTrainBatchSize);
138 |
139 | auto test_dataset = torch::data::datasets::MNIST(
140 | kDataRoot, torch::data::datasets::MNIST::Mode::kTest)
141 | .map(torch::data::transforms::Normalize<>(0.1307, 0.3081))
142 | .map(torch::data::transforms::Stack<>());
143 | const size_t test_dataset_size = test_dataset.size().value();
144 | auto test_loader =
145 | torch::data::make_data_loader(std::move(test_dataset), kTestBatchSize);
146 |
147 | torch::optim::SGD optimizer(
148 | model.parameters(), torch::optim::SGDOptions(0.01).momentum(0.5));
149 |
150 | for (size_t epoch = 1; epoch <= kNumberOfEpochs; ++epoch) {
151 | train(epoch, model, device, *train_loader, optimizer, train_dataset_size);
152 | test(model, device, *test_loader, test_dataset_size);
153 | }
154 | }
155 |
--------------------------------------------------------------------------------
/13-model_deploy_guide/flask_deploy/README.md:
--------------------------------------------------------------------------------
1 | # 模型部署的概念
2 | - 本质:给模型调用方提供接口(前端web、后端程序等);
3 | - 实现方式:
4 | **1. 机器学习平台*:aliyun、yamaxun:sagemaker 等**
5 | **2. 基于python、java、go语言提供一个服务:http 服务**
6 | - 直接在服务器上部署
7 | - 通过dockcer 部署,代码到--> 容器,run , jenkins平台等;
8 | **3. 将模型转化为c++支持的模型,边缘部署 (模型加速);
9 |
10 | # python的web 框架
11 | - flask(推荐)
12 | - Djiango
13 |
14 | # flask 指导地址
15 | [flask guide address](https://dormousehole.readthedocs.io/en/latest/quickstart.html#id2)
16 |
17 | # demo
18 | ```python
19 | from flask import Flask, jsonify
20 |
21 | app = Flask(__name__)
22 |
23 | @app.route("/")
24 | def index():
25 | print("hello student")
26 | ```
27 |
28 | # 几点注意事项:
29 | - 环境变量的设置,app.py --> flask run
30 | - 在main 函数里写上 app.run --> python main.py
31 | - http://127.0.0.1:8987 代表的就是localhost:8987
32 | - http://192.168.5.27:8987 : 让服务器被公开访问
33 |
34 | **语法注解**
35 | - request.from 是一个属性,用于获取请求中的表单数据。具体来说,它返回一个 MultiDict 对象,它包含了所有通过 POST 或 PUT 请求提交的表单数据。
36 | 这些数据可以是文本数据、文件数据或者二进制数据,取决于表单中提交的内容。
37 | - request.form 属性获取表单数据需要确保请求的方法是 POST 或 PUT,否则表单数据可能为空。
38 | 如果请求的方法是 GET,可以使用 request.args 属性获取 URL 中的查询参数。
39 | - 在 URL 中,查询参数是指在问号(?)后面的部分,用于在客户端和服务器之间传递数据。
40 | 查询参数由键值对组成,多个键值对之间用 & 符号连接,(http://example.com/path/to/resource?key1=value1&key2=value2)?text=
41 | - http://example.com/path/to/resource?key1=value1&key2=value2;
42 |
--------------------------------------------------------------------------------
/13-model_deploy_guide/flask_deploy/flask_demo/hello.py:
--------------------------------------------------------------------------------
1 | from flask import Flask
2 |
3 | app = Flask(__name__)
4 |
5 | @app.route('/')
6 | def hello_world():
7 | return 'Hello, World!'
8 |
9 | if __name__ =="__main__":
10 | app.run(host='0.0.0.0', port=5000)
11 |
--------------------------------------------------------------------------------
/13-model_deploy_guide/flask_deploy/flask_demo/resnet_infer.py:
--------------------------------------------------------------------------------
1 | import onnx
2 | #import onnxruntime
3 | import numpy as np
4 | from PIL import Image
5 | import torch
6 | import torchvision.models as models
7 | import os
8 | import time
9 | from imagenet_lable import imagenet_label
10 |
11 | def get_onnx_model(path):
12 | model = models.resnet50(pretrained=True)
13 | model.eval()
14 |
15 | x = torch.randn(1, 3, 224, 224, requires_grad=True)
16 |
17 | torch.onnx.export(model,
18 | x,
19 | path,
20 | export_params=True,#导入参数
21 | opset_version=10,
22 | input_names=["input"], #指定输入的名称(key)
23 | output_names=['output'],
24 | dynamic_axes={'input':{0:'batchsize'}, 'output':{0:'batchsize'}}
25 | )
26 |
27 |
28 | def image_process(path):
29 | img = Image.open(path)
30 | img = img.resize((224, 224))
31 | img = np.array(img, dtype = np.float32)
32 | mean = [0.485, 0.456, 0.406]
33 | std = [0.229, 0.224, 0.225]
34 | mean = np.array(mean).reshape((1, 1, -1))
35 | std = np.array(std).reshape((1, 1, -1))
36 | img = (img / 255.0 - mean) / std
37 | img = np.transpose(img, [2, 0, 1]).astype(np.float32)
38 | return img
39 |
40 | # 模型推理接口
41 | def image_infer(path, model_path):
42 | data = image_process(path)
43 |
44 | session = onnxruntime.InferenceSession(model_path)
45 |
46 | input_data = [data]
47 | input_name_1 = session.get_inputs()[0].name
48 |
49 | outputs = session.run([],{input_name_1:input_data})
50 | index = outputs[0][0].argmax()
51 | print(imagenet_label[index])
52 | return imagenet_label[index]
53 |
54 |
55 | if __name__ == "__main__":
56 | get_onnx_model("resnet50.onnx")
57 | # image_infer("cat.jpg", "resnet50.onnx")
58 | print("run resnet_infer.py successfully")
59 |
--------------------------------------------------------------------------------
/13-model_deploy_guide/flask_deploy/flask_demo/templates/upload.html:
--------------------------------------------------------------------------------
1 |
2 |
3 |
4 |
5 | Flask上传图片演示
6 |
7 |
8 | 使用Flask上传本地图片并显示示例一
9 |
16 |
17 |
18 |
--------------------------------------------------------------------------------
/13-model_deploy_guide/flask_deploy/flask_demo/templates/upload_ok.html:
--------------------------------------------------------------------------------
1 |
2 |
3 |
4 |
5 | Flask上传图片演示
6 |
7 |
8 | 使用Flask上传本地图片并显示示例一
9 |
16 | 阁下的心情是:{{userinput}}!
17 |  }}) 18 |
18 | 推理结果是:{{result}}!
19 |
20 |
21 |
22 |
--------------------------------------------------------------------------------
/13-model_deploy_guide/flask_deploy/flask_demo/upload_image.py:
--------------------------------------------------------------------------------
1 | # coding:utf-8
2 |
3 | from flask import Flask, render_template, request, redirect, url_for, make_response,jsonify
4 | from werkzeug.utils import secure_filename
5 | import os
6 | import cv2
7 | import time
8 |
9 | from datetime import timedelta
10 | from resnet_infer import image_infer
11 |
12 | #设置允许的文件格式
13 | ALLOWED_EXTENSIONS = set(['png', 'jpg', 'JPG', 'PNG', 'bmp'])
14 |
15 | def allowed_file(filename):
16 | return '.' in filename and filename.rsplit('.', 1)[1] in ALLOWED_EXTENSIONS
17 |
18 | app = Flask(__name__)
19 | # 设置静态文件缓存过期时间
20 | app.send_file_max_age_default = timedelta(seconds=1)
21 |
22 | # 映射路由
23 | @app.route('/')
24 | def hello_world():
25 | return 'please input /upload/ !'
26 |
27 | # @app.route('/upload', methods=['POST', 'GET'])
28 | @app.route('/upload/', methods=['POST', 'GET']) # 添加路由
29 | def upload():
30 | if request.method == 'POST':
31 | f = request.files['file']
32 |
33 | if not (f and allowed_file(f.filename)):
34 | return jsonify({"error": 1001, "msg": "请检查上传的图片类型,仅限于png、PNG、jpg、JPG、bmp"})
35 |
36 | user_input = request.form.get("name")
37 | print("===========user_input: ", user_input)
38 |
39 | basepath = os.path.dirname(__file__) # 当前文件所在路径
40 | print("================file name: ", f.filename)
41 |
42 | upload_path = os.path.join(basepath, 'static/data', secure_filename(f.filename)) # 注意:没有的文件夹一定要先创建,不然会提示没有该路径
43 | # upload_path = os.path.join(basepath, 'static/data','test.jpg') #注意:没有的文件夹一定要先创建,不然会提示没有该路径
44 | print("=================upload_path: ", upload_path)
45 | f.save(upload_path)
46 |
47 | # 使用Opencv转换一下图片格式和名称
48 | img = cv2.imread(upload_path)
49 | cv2.imwrite(os.path.join(basepath, 'static/data', 'test.jpg'), img)
50 |
51 | result = image_infer(upload_path, "resnet50.onnx")
52 |
53 | return render_template('upload_ok.html',userinput=user_input, result=result, val1=time.time())
54 |
55 | return render_template('upload.html')
56 |
57 |
58 | if __name__ == '__main__':
59 | # app.debug = True
60 | # app.run(host='0.0.0.0', port=8987, debug=True)
61 | app.run(host='0.0.0.0', port=8987)
62 | # app.run()
63 |
64 |
--------------------------------------------------------------------------------
/13-model_deploy_guide/java_deploy/README.md:
--------------------------------------------------------------------------------
1 | # 1. 部署我们自己的聊天机器人
2 |
3 | ## 1.1 代码准备
4 | git clone git@github.com:wenda-LLM/wenda.git
5 | *自己download 也可以*
6 |
7 | ## 1.2 模型准备
8 | - [链接](https://pan.baidu.com/s/1VPRGReHfnnqe_ULKjquoaQ?pwd=oaae)
9 | - 提取码:oaae
10 | - 将pretrained model 放到 wenda/model 下(建议);
11 |
12 | ## 1.3 环境准备
13 | ```shell
14 | - conda create -n python3.10 python=3.10(建议)
15 | - pip install torch==1.13.1+cu116 torchvision==0.14.1+cu116 torchaudio==0.13.1 --extra-index-url https://download.pytorch.org/whl/cu116
16 | - cd */wenda/requirements/
17 | - pip install -r requirements.txt # update transformers==4.27.1
18 | - pip install requirements-glm6b-lora.txt
19 | - pip install protobuf transformers==4.27.1 cpm_kernels
20 | ```
21 | ## 1.4 运行程序
22 | cp example.config.yml config.yml
23 | source run_GLM6B.sh
24 |
25 | ## 1.5 连接网络进行访问
26 | http://172.29.240.181:17860
27 | **注意:IP要换成自己的IP,端口号 和 config.yml 保存一致**
28 |
29 | # 2 [参考资料]
30 | [参考资料2](https://huggingface.co/THUDM/chatglm-6b-int4)
31 | [参考资料](https://github.com/wenda-LLM/wenda/tree/main)
--------------------------------------------------------------------------------
/14-docker_image_container_guide/README.md:
--------------------------------------------------------------------------------
1 | # start docker
2 | - sudo systemctl start docker
3 | - sudo service docker start
4 |
5 |
--------------------------------------------------------------------------------
/14-docker_image_container_guide/test_mtn.py:
--------------------------------------------------------------------------------
1 | from flask import Flask
2 |
3 | app = Flask(__name__)
4 |
5 | @app.route("/")
6 | def hello_world():
7 | return "Hello, World!
"
8 |
9 |
10 | if __name__ == '__main__':
11 | app.run(host='0.0.0.0', port=5000)
12 |
13 |
--------------------------------------------------------------------------------
/15-model_learning/README.md:
--------------------------------------------------------------------------------
1 | # 如何快速学习一种模型
2 | [sota 网址](https://paperswithcode.com/sota)
3 | - 学习论文(模型的结构,新的点、准确率提升了多少)--> 面试 : sota
4 | - 工程方面:代码,--> 跑起来
5 | - 工具:onnx tensorboard(帮助我们深入理解模型)--> 带shape信息的图
6 |
7 | # 如何run 开源代码
8 | [torch example 地址](https://github.com/pytorch/examples)
9 | - 找到example 的入口
10 | - README.md (这个模型是怎么run)
11 | - 创建一个自己的环境
12 | - 按照 README 中的步骤 run 环境;
13 |
14 | **清华源:https://pypi.tuna.tsinghua.edu.cn/simple**
15 |
--------------------------------------------------------------------------------
/15-model_learning/chatGLM/README.md:
--------------------------------------------------------------------------------
1 | # 聊天机器人
2 |
3 | ## 1.1 环境搭建
4 | ```shell
5 | - conda create -n python3.10 python=3.10(建议)
6 | - pip install torch==1.13.1+cu116 torchvision==0.14.1+cu116 torchaudio==0.13.1 --extra-index-url https://download.pytorch.org/whl/cu116
7 | - cd */wenda/requirements/
8 | - pip install -r requirements.txt # update transformers==4.27.1
9 | - pip install requirements-glm6b-lora.txt
10 | - pip install protobuf transformers==4.27.1 cpm_kernels
11 | ```
12 | ## coding
13 | ```python
14 | from transformers import AutoTokenizer, AutoModel
15 |
16 | tokenizer = AutoTokenizer.from_pretrained("./chatglm-6b-int4", trust_remote_code=True)
17 | model = AutoModel.from_pretrained("./chatglm-6b-int4", trust_remote_code=True).half().cuda()
18 | response, history = model.chat(tokenizer, "你好", history=[])
19 | print(response)
20 |
21 | # 你好👋!我是人工智能助手 ChatGLM-6B,很高兴见到你,欢迎问我任何问题。
22 |
23 | response, history = model.chat(tokenizer, "晚上睡不着应该怎么办", history=history)
24 | print(response)
25 | ```
26 |
27 | ## pretrained model
28 | - [链接](https://pan.baidu.com/s/1VPRGReHfnnqe_ULKjquoaQ?pwd=oaae)
29 | - 提取码:oaae
30 |
31 | # 参考资料
32 | [参考资料2](https://huggingface.co/THUDM/chatglm-6b-int4)
33 | [参考资料](https://github.com/wenda-LLM/wenda/tree/main)
--------------------------------------------------------------------------------
/15-model_learning/miniGPT/README.md:
--------------------------------------------------------------------------------
1 | # install
2 | ```shell
3 | git clone https://github.com/karpathy/minGPT.git
4 | #commit id: 37baab71b9abea1b76ab957409a1cc2fbfba8a26
5 | cd minGPT
6 | pip install -e .
7 | ```
8 |
9 | # 执行
10 | python chatgpt_demo.py
11 |
--------------------------------------------------------------------------------
/15-model_learning/miniGPT/chatgpt_demo.py:
--------------------------------------------------------------------------------
1 | import torch
2 | import pickle
3 | from torch.utils.data import Dataset
4 | from torch.utils.data.dataloader import DataLoader
5 |
6 | from mingpt.utils import set_seed
7 | from mingpt.model import GPT
8 | from mingpt.trainer import Trainer
9 |
10 | set_seed(3407)
11 |
12 | class SortDataset(Dataset):
13 | """
14 | Dataset for the Sort problem. E.g. for problem length 6:
15 | Input: 0 0 2 1 0 1 -> Output: 0 0 0 1 1 2
16 | Which will feed into the transformer concatenated as:
17 | input: 0 0 2 1 0 1 0 0 0 1 1
18 | output: I I I I I 0 0 0 1 1 2
19 | where I is "ignore", as the transformer is reading the input sequence
20 | """
21 |
22 | def __init__(self, split, length=6, num_digits=3):
23 | assert split in {'train', 'test'}
24 | self.split = split
25 | self.length = length
26 | self.num_digits = num_digits
27 |
28 | def __len__(self):
29 | return 10000 # ...
30 |
31 | def get_vocab_size(self):
32 | return self.num_digits
33 |
34 | def get_block_size(self):
35 | # the length of the sequence that will feed into transformer,
36 | # containing concatenated input and the output, but -1 because
37 | # the transformer starts making predictions at the last input element
38 | return self.length * 2 - 1
39 |
40 | def __getitem__(self, idx):
41 |
42 | # use rejection sampling to generate an input example from the desired split
43 | while True:
44 | # generate some random integers
45 | inp = torch.randint(self.num_digits, size=(self.length,), dtype=torch.long)
46 | # half of the time let's try to boost the number of examples that
47 | # have a large number of repeats, as this is what the model seems to struggle
48 | # with later in training, and they are kind of rate
49 | if torch.rand(1).item() < 0.5:
50 | if inp.unique().nelement() > self.length // 2:
51 | # too many unqiue digits, re-sample
52 | continue
53 | # figure out if this generated example is train or test based on its hash
54 | h = hash(pickle.dumps(inp.tolist()))
55 | inp_split = 'test' if h % 4 == 0 else 'train' # designate 25% of examples as test
56 | if inp_split == self.split:
57 | break # ok
58 |
59 | # solve the task: i.e. sort
60 | sol = torch.sort(inp)[0]
61 |
62 | # concatenate the problem specification and the solution
63 | cat = torch.cat((inp, sol), dim=0)
64 |
65 | # the inputs to the transformer will be the offset sequence
66 | x = cat[:-1].clone()
67 | y = cat[1:].clone()
68 | # we only want to predict at output locations, mask out the loss at the input locations
69 | y[:self.length-1] = -1
70 | return x, y
71 |
72 | if __name__ == "__main__":
73 |
74 | train_dataset = SortDataset('train')
75 | test_dataset = SortDataset('test')
76 | # x, y = train_dataset[0]
77 | # for a, b in zip(x,y):
78 | # print(int(a),int(b))
79 |
80 | # create a GPT instance
81 | model_config = GPT.get_default_config()
82 | model_config.model_type = 'gpt-nano'
83 | model_config.vocab_size = train_dataset.get_vocab_size()
84 | model_config.block_size = train_dataset.get_block_size()
85 | model = GPT(model_config)
86 |
87 | # train config
88 | train_config = Trainer.get_default_config()
89 | train_config.learning_rate = 5e-4 # the model we're using is so small that we can go a bit faster
90 | train_config.max_iters = 2000
91 | train_config.num_workers = 0
92 | trainer = Trainer(train_config, model, train_dataset)
93 |
94 | def batch_end_callback(trainer):
95 | if trainer.iter_num % 100 == 0:
96 | print(f"iter_dt {trainer.iter_dt * 1000:.2f}ms; iter {trainer.iter_num}: train loss {trainer.loss.item():.5f}")
97 | trainer.set_callback('on_batch_end', batch_end_callback)
98 |
99 | trainer.run()
100 | print("chatgpt_demo")
--------------------------------------------------------------------------------
/4-data_guide/README.md:
--------------------------------------------------------------------------------
1 | # 数据准备
2 |
3 | # 两个重要的类(pytorch接口)
4 | - dataset(/site-packages/torch/utils/data/dataset.py)
5 | ```python
6 | from torch.utils.data import Dataset
7 | ```
8 | - dataloader(site-packages/torch/utils/data/dataloader.py)
9 | ```python
10 | from torch.utils.data import DataLoader
11 | ```
12 |
13 | # torchvision 是什么
14 | - 它和 pytorch 是并列关系,它不属于pytorch的一部分;
15 | - 但是 torchvision 是依赖于pytorch的;
16 | - 计算机数据相关方面的工具集;
17 | - torchtext、torchaudio 都类似;
18 | - VisionDataset(data.Dataset)
19 |
20 | # pytorch 官方 dataset:
21 | ```python
22 | class Dataset(Generic[T_co]):
23 | def __getitem__(self, index) -> T_co:
24 | raise NotImplementedError
25 |
26 | def __add__(self, other: 'Dataset[T_co]') -> 'ConcatDataset[T_co]':
27 | return ConcatDataset([self, other])
28 | ```
29 | - /site-packages/torch/utils/data/dataset.py
30 | - 继承官方的dataset
31 | - 实现自己的 __getitem__ 和 __len__ 方法
32 | - 数据集和label 存放到__init__里(self.data self.label)
33 | - __len__ 返回数据集总的长度
34 | - __getitem__: 以 batch = 1
35 | 1. 从self.data 里拿到 具体的某一个index 的数据;
36 | 2. 从self.label 中拿到 对应index 的label;
37 | 3. 数据转换:转化为我们需要的数据形式(数据增强的过程就在这里);
38 | 4. 把 data 和 label 返回
39 |
40 | # dataloader
41 | - 多batch:一次调用多个__getitem__ 来实现多batch的添加;
42 | - 完成训练时候 每次batch的数据加载工作;
43 | - 用户需要输入 dataset,以及其它参数的一些设置
44 |
45 | # 应用官方工具
46 | ## 三大方向
47 | [pytorch 主仓库](https://github.com/pytorch)
48 | - vision
49 | - text
50 | - audio
51 |
52 | ## torchvison
53 | - datasets
54 | - models(预训练的model)
55 | - tranform
56 |
57 |
58 |
59 |
60 |
61 |
62 |
--------------------------------------------------------------------------------
/4-data_guide/data/FashionMNIST/raw/train-images-idx3-ubyte.gz:
--------------------------------------------------------------------------------
https://raw.githubusercontent.com/Elvin-Ma/pytorch_guide/da12d191ab1dae88e67c2c30246be9f29492f4c5/4-data_guide/data/FashionMNIST/raw/train-images-idx3-ubyte.gz
--------------------------------------------------------------------------------
/4-data_guide/data_prepare.py:
--------------------------------------------------------------------------------
1 | from torchvision import datasets
2 | from torchvision.transforms import ToTensor
3 | from torch.utils.data import Dataset
4 | import pandas as pd
5 | import os
6 | import pillow as PIL
7 | from torchvision.io import read_image
8 |
9 | def data_download():
10 | training_data = datasets.FashionMNIST(
11 | root="data",
12 | train=True,
13 | download=True,
14 | transform=ToTensor()
15 | )
16 |
17 | # 自己的一个dataset : 客户自己的dataset
18 | # 作用:方便我们处理数据;加速我们处理数据
19 | class CustomImageDataset(Dataset):
20 | def __init__(self, annotations_file, img_dir, transform=None, target_transform=None):
21 | self.img_labels = pd.read_csv(annotations_file) # 每一张图片名称,以及对应的label
22 | self.img_dir = img_dir # 图像的跟目录
23 | self.transform = transform
24 | self.target_transform = target_transform
25 |
26 | def __len__(self):
27 | return len(self.img_labels)
28 |
29 | # 最核心之处:idx
30 | def __getitem__(self, idx):
31 | img_path = os.path.join(self.img_dir, self.img_labels.iloc[idx, 0]) # 得到一张图片的完整路径
32 | image = read_image(img_path) # 用我们的图像读取工具来读取图片(opencv、pillow)
33 | label = self.img_labels.iloc[idx, 1] # 读取图片对应的label
34 | if self.transform:
35 | image = self.transform(image) # 图像的预处理
36 | if self.target_transform:
37 | label = self.target_transform(label) # 标签的预处理
38 | return image, label #把最终结果返回
39 |
40 | def data_loader():
41 | from torch.utils.data import DataLoader
42 | # training_data = datasets.FashionMNIST(
43 | # root="data",
44 | # train=True,
45 | # download=True,
46 | # transform=ToTensor()
47 | # )
48 |
49 | train_data = CustomImageDataset() # 实例化dataset
50 |
51 | train_dataloader = DataLoader(train_data, batch_size=32, shuffle=True)
52 | for batch_idx, (data, target) in enumerate(train_dataloader):
53 | # batch_idx : 第几次循环
54 | # data:最终输入data
55 | # target:label
56 | pass
57 |
58 | if __name__ == "__main__":
59 | data_download()
60 | print("run data_prepare.py successfully !!!")
61 |
62 |
63 |
64 |
--------------------------------------------------------------------------------
/5-optim_guide/README.md:
--------------------------------------------------------------------------------
1 | # lr_schecdule and optimizer
2 | [路径]:/torch/optim/__init__.py
3 | [lr 核心代码]:torch/optim/lr_scheduler.py
4 |
5 | # lr_schedule
6 | 1. torch.optim.lr_scheduler.StepLR
7 | 2. 先要有一个optimizer 的实例
8 | 3. 这个optimizer的实例作为我们lr_scheduler的参数
9 | 4. for i in (epoch_num): scheduler.step()
10 | 5. 更新的是 optimizer里的 lr;
11 |
12 | # lr_schedule 都继承自 _LRScheduler
13 | **重要属性**
14 | 1. optimizer;
15 | 2. last_epch
16 | **重要方法**
17 | 1. state_dict --> 获取状态参数;
18 | 2. load_state_dict; --> 重新加载参数;
19 | 3. step() # 完成更新
20 | 4. get_last_lr
21 | 5. get_lr (子类来实现)
22 |
23 | # lr_schedule
24 | - LambdaLR
25 | - MultiplicativeLR
26 | - StepLR
27 | - MultiStepLR
28 | - ExponentialLR
29 | - CosineAnnealingLR
30 | - ReduceLROnPlateau
31 | - CyclicLR
32 | - CosineAnnealingWarmRestarts
33 | - OneCycleLR
34 | ```python
35 | scheduler = MultiStepLR(optimizer, milestones=[30,80], gamma=0.1)
36 | for epoch in range(100):
37 | train(...)
38 | validate(...)
39 | scheduler.step()
40 | ```
41 |
42 | # optimizer 基类:
43 | **属性**
44 | - param_groups <-- model.parameters()
45 | - self.state 状态
46 | - self.param_groups()
47 | ** 重要的方法**
48 | - zero_grad() --> 梯度清0
49 | - step() --> 子类来实现
50 | - add_param_group
51 | - state_dict() --> 输出状态
52 | - load_state_dict() --> 重新加载状态
--------------------------------------------------------------------------------
/5-optim_guide/stepLR_demo.py:
--------------------------------------------------------------------------------
1 | import torch.optim.lr_scheduler as lr_scheduler
2 | import torch
3 | import torch.nn as nn
4 | import torch.optim as optim
5 |
6 | def step_lr():
7 | model = nn.Linear(30, 10) # 以一个最简单的model
8 | input = torch.randn(4, 30)
9 | label = torch.Tensor([2, 4, 5, 6]).to(torch.int64)
10 | criterion = nn.CrossEntropyLoss()
11 | optimizer = optim.SGD(model.parameters(), 0.01,
12 | momentum=0.9,
13 | weight_decay=0.01)
14 |
15 | # scheduler = lr_scheduler.StepLR(optimizer, step_size=2, gamma=0.1, verbose=True)
16 | scheduler = lr_scheduler.MultiStepLR(optimizer, milestones=[30, 50, 80], gamma=0.1, verbose=True)
17 |
18 | for i in range(100):
19 | model.train()
20 | optimizer.zero_grad()
21 | output = torch.sigmoid(model(input))
22 | loss = criterion(output, label)
23 | loss.backward()
24 | print("==========step: ", i)
25 | optimizer.step()
26 | # if i % 100 == 0: # 我就认为 100 步完成一个 epoch
27 | scheduler.step()
28 |
29 | if __name__ == "__main__":
30 | step_lr()
31 | print("run stepLR demo.py successfully !!!")
--------------------------------------------------------------------------------
/6-save_load_guide/README.md:
--------------------------------------------------------------------------------
1 | # save and load tensor
2 |
3 | # 课后作业: ???
4 | **一个模型通过torch.save(model, "model.pt")完整保存下来;**
5 | **把这个模型直接给第三方;**
6 | **第三方能直接运行这个模型吗???**
7 | ## 答案:no##
8 | **这时候的模型是工作在eager mode 下的,模型的结构信息它没有保存下来,
9 | eager mode:forward中的一个个的算子,走一步看一步。**
10 |
11 | # 保存及加载整个模型
12 | ```python
13 | torch.save(model, "mnist.pt")
14 | x = torch.load('tensor.pt')
15 | ```
16 |
17 | # 保存及加载模型参数
18 | ```python
19 | torch.save(model.state_dict(), "mnist_para.pth")
20 | param = torch.load("mnist_para.pth")
21 | model.load_state_dict(param)
22 | ```
23 |
24 | # 加载到GPU
25 | ```python
26 | model = torch.load('mnist.pt', map_location=device)
27 | ```
28 |
29 | # 保存和加载 ckpt
30 | ```python
31 | torch.save(checkpoint, 'model.ckpt')
32 | checkpoint = torch.load('model.ckpt') # load --> dict
33 | model.load_state_dict(checkpoint['model_state_dict'])
34 | optimizer.load_state_dict(checkpoint['optimizer_state_dict'])
35 | epoch = checkpoint['epoch']
36 | loss = checkpoint['loss']
37 | ```
38 | # 注意事项
39 | - pt 和 pth 、ckpt 用谁都行
40 | - state_dict : 只保存模型权重(parameters)和 buffer:tensor的信息
41 | - torch.save 和 torch.load 还可以保存 tensor、optimizer、 lr_schedule、 epoch 等
42 | - 使用state_dict 这种保存方式的话,加载的时候要用 load_state_dict 方法来加载;
43 | - 进一步,要使用load_state_dict 必须要实现建立一个对象;
44 | - torch.save 保存的是什么,torch.load 加载出来就是什么;
45 | - torch.save 保存模型--> 并没有保存具体的模型结构信息, 只是保存了模块和parameters/tensor等信息;
46 | - 可以直接load模型到我们的 cpu上,通过设置map_location 参数
47 | - 可以通过torch.jit 这种方式来保存成静态图模型(保存了模型的结构信息),重新加载不依赖与原来的图;
48 |
49 | # 静态图和动态图
50 | - tensorflow 刚开始是静态图
51 | - pytorch 刚开始是动态图;
52 | - tensorflow到后来也支持了动态图;
53 | - pytorch也是支持静态图的;
54 | - 动态图不利于部署,尤其在边缘测部署,性能很差,优化手段有限;
55 | - 静态图:保存了完整的图的结构信息,可以有很多的优化手段:
56 | eg:常量折叠、量化、裁剪、算子融合、缓存优化;
57 |
58 | # jit trace 保存
59 | ```python
60 | import torch
61 | import torchvision
62 |
63 | model = torchvision.models.resnet18()
64 | example_input = torch.rand(1, 3, 224, 224)
65 | traced_script_module = torch.jit.trace(model, example_input)
66 | traced_script_module.save("model.pt")
67 | loaded_script_module = torch.jit.load("model.pt")
68 | ```
69 | # onnx 格式保存
70 | ```python
71 | import torch
72 | import torchvision
73 |
74 | model = torchvision.models.resnet18()
75 | input_tensor = torch.randn(1, 3, 224, 224)
76 | torch.onnx.export(model, input_tensor, "model.onnx")
77 | ```
78 |
79 | # what is state_dict
80 | **reference: what_is_state_dict.py**
81 |
82 |
83 |
84 |
--------------------------------------------------------------------------------
/6-save_load_guide/save_load_demo.py:
--------------------------------------------------------------------------------
1 | from __future__ import print_function
2 | import argparse
3 | import torch
4 | import torch.nn as nn
5 | import torch.nn.functional as F
6 | import torch.optim as optim
7 |
8 | class Net(nn.Module):
9 | def __init__(self):
10 | super(Net, self).__init__()
11 | self.conv1 = nn.Conv2d(1, 32, 3, 1)
12 | self.conv2 = nn.Conv2d(32, 64, 3, 1)
13 | self.dropout1 = nn.Dropout(0.25)
14 | self.dropout2 = nn.Dropout(0.5)
15 | self.fc1 = nn.Linear(9216, 128)
16 | self.fc2 = nn.Linear(128, 10)
17 |
18 | def forward(self, x):
19 | x = self.conv1(x)
20 | x = F.relu(x)
21 | x = self.conv2(x)
22 | x = F.relu(x)
23 | x = F.max_pool2d(x, 2)
24 | x = self.dropout1(x)
25 | x = torch.flatten(x, 1)
26 | x = self.fc1(x)
27 | x = F.relu(x)
28 | x = self.dropout2(x)
29 | x = self.fc2(x)
30 | output = F.log_softmax(x, dim=1)
31 | return output
32 |
33 | def save_demo_v1():
34 | model = Net()
35 | input = torch.rand(1, 1, 28, 28)
36 | output = model(input)
37 | torch.save(model, "mnist.pt") # 4.6M : 保存
38 |
39 | def load_demo_v1():
40 | model = torch.load("mnist.pt")
41 | input = torch.rand(1, 1, 28, 28)
42 | output = model(input)
43 | print(f"output shape: {output.shape}")
44 |
45 | def save_para_demo():
46 | model = Net()
47 | torch.save(model.state_dict(), "mnist_para.pth")
48 |
49 | def load_para_demo():
50 | param = torch.load("mnist_para.pth")
51 | model = Net()
52 | model.load_state_dict(param)
53 | input = torch.rand(1, 1, 28, 28)
54 | output = model(input)
55 | print(f"output shape: {output.shape}")
56 |
57 | def tensor_save():
58 | tensor = torch.ones(5, 5)
59 | torch.save(tensor, "tensor.t")
60 | tensor_new = torch.load("tensor.t")
61 | print(tensor_new)
62 |
63 | def load_to_gpu():
64 | device = torch.device("cuda" if torch.cuda.is_available() else "cpu")
65 | model = torch.load('mnist.pt', map_location=device)
66 | print(f"model device: {model}")
67 |
68 | def save_ckpt_demo():
69 | model = Net()
70 | optimizer = optim.Adam(model.parameters(), lr=0.001)
71 | loss = torch.Tensor([0.25])
72 | epoch = 10
73 | checkpoint = {
74 | 'epoch': epoch,
75 | 'model_state_dict': model.state_dict(),
76 | 'optimizer_state_dict': optimizer.state_dict(),
77 | # 'loss': loss.item(),
78 | # 可以添加其他训练信息
79 | }
80 |
81 | torch.save(checkpoint, 'mnist.ckpt')
82 |
83 | def load_ckpt_demo():
84 | checkpoint = torch.load('model.ckpt')
85 | model = Net() # 需要事先定义一个net的实例
86 | optimizer = optim.Adam(model.parameters(), lr=0.001)
87 | model.load_state_dict(checkpoint['model_state_dict'])
88 | optimizer.load_state_dict(checkpoint['optimizer_state_dict'])
89 | epoch = checkpoint['epoch']
90 | loss = checkpoint['loss']
91 | input = torch.rand(1, 1, 28, 28)
92 | output = model(input)
93 | print("output shape: ", output.shape)
94 |
95 | def save_trace_model():
96 | model = Net().eval()
97 | # 通过trace 得到了一个新的model,我们最终保存的是这个新的model
98 | traced_model = torch.jit.trace(model, torch.randn(1, 1, 28, 28))
99 | traced_model.save("traced_model.pt")
100 | # torch.save(traced_model, "mnist_trace.pt")
101 |
102 | def load_trace_model():
103 | mm = torch.jit.load("traced_model.pt")
104 | output = mm(torch.randn(1, 1, 28, 28))
105 | print("load model succsessfully !")
106 | print("output: ", output)
107 |
108 | if __name__ == "__main__":
109 | # save_demo_v1()
110 | # load_demo_v1()
111 | # save_para_demo()
112 | # load_para_demo()
113 | # tensor_save()
114 | # load_to_gpu()
115 | # save_trace_model()
116 | # load_trace_model()
117 | save_ckpt_demo()
118 | # load_ckpt_demo()
119 | print("run save_load_demo.py successfully !!!")
120 |
--------------------------------------------------------------------------------
/7-pytorch_modes/README.md:
--------------------------------------------------------------------------------
1 | # 静态图和动态图
2 | - tensorflow 刚开始是静态图
3 | - pytorch 刚开始是动态图;
4 | - tensorflow到后来也支持了动态图;
5 | - pytorch也是支持静态图的;
6 | - 动态图不利于部署,尤其在边缘测部署,性能很差,优化手段有限;
7 | - 静态图:保存了完整的图的结构信息,可以有很多的优化手段:
8 | eg:常量折叠、量化、裁剪、算子融合、缓存优化;
9 |
10 | #
11 | # pytorch 几种mode
12 | ## eager mode : 动态图的方式
13 |
14 | ## eager jit mode:
15 | 1. torch.jit.script: 可以训练的,基本上保持了 eager mode 的所有功能(条件判断、动态shape等),
16 | 2. torch.jit.trace : (部署的时候) 追踪eager mode 的前向图,导出一个pt文件
17 | 3. 不局限于python,c++ 直接读取,并完成部署;
18 | 4. libtorch: pytroch的 C++ 部分,
19 | 5. trace:适用于没有控制流层模型(if for while);
20 | 6. trace mode 需要多给个模型的输入,因为它真的要把这个模型跑一遍;
21 | 6. script:允许使用控制流
22 |
23 | ## dynamo (pytorch 2.0新功能)
24 | [dynomo 官方blog](https://pytorch.org/get-started/pytorch-2.0/)
25 | 1. 一种新的图编译模式;
26 | 2. pytorch 版本:1.9.0 1.10.0 1.11.2 1.12.0 1.13.0 --> 2.0
27 | 3. 2023年最新发布
28 |
29 | ## onnx 中间格式:
30 | 1. google 的protobuffer 文件编码格式;
31 | 2. onnx : 跨平台、跨框架,
32 | 3. 业内都认可的一种形式;
33 | 4. 为推理而生的;
34 | 5. 把训练好的模型保存成onnx 格式,再送入到各式各样的推理引擎中完成推理;
35 |
36 | # torch.jit.script
37 | ```python
38 | import torch
39 | import torch.nn as nn
40 | import torch.optim as optim
41 | import torch.utils.data as data
42 |
43 | # 定义数据集
44 | class MyDataset(data.Dataset):
45 | def __init__(self):
46 | self.data = torch.randn(100, 10)
47 | self.target = torch.randint(0, 2, (100,))
48 |
49 | def __getitem__(self, index):
50 | return self.data[index], self.target[index]
51 |
52 | def __len__(self):
53 | return len(self.data)
54 |
55 | # 定义模型
56 | class MyModel(nn.Module):
57 | def __init__(self):
58 | super(MyModel, self).__init__()
59 | self.fc1 = nn.Linear(10, 5)
60 | self.fc2 = nn.Linear(5, 2)
61 |
62 | def forward(self, x):
63 | x = self.fc1(x)
64 | x = nn.functional.relu(x)
65 | x = self.fc2(x)
66 | return x
67 |
68 | # 实例化数据集dataset = MyDataset()
69 |
70 | # 实例化模型
71 | model = MyModel()
72 |
73 | # 将模型转换为script模式
74 | scripted_model = torch.jit.script(model)
75 |
76 | # 定义优化器和损失函数
77 | optimizer = optim.SGD(scripted_model.parameters(), lr=0.01)
78 | criterion = nn.CrossEntropyLoss()
79 |
80 | # 定义训练函数
81 | def train(model, dataset, optimizer, criterion, epochs):
82 | for epoch in range(epochs):
83 | running_loss = 0.0
84 | correct = 0
85 | total = 0
86 |
87 | for data, target in dataset:
88 | # 将数据和目标转换为Tensor类型
89 | data = torch.tensor(data)
90 | target = torch.tensor(target)
91 |
92 | # 前向传播
93 | output = model(data)
94 | loss = criterion(output, target)
95 |
96 | # 反向传播和优化
97 | optimizer.zero_grad()
98 | loss.backward()
99 | optimizer.step()
100 |
101 | # 统计损失和正确率
102 | running_loss += loss.item()
103 | _, predicted = torch.max(output.data, 1)
104 | total += target.size(0)
105 | correct += (predicted == target).sum().item()
106 |
107 | # 打印训练信息
108 | print('Epoch [{}/{}], Loss: {:.4f}, Accuracy: {:.2f}%'
109 | .format(epoch+1, epochs, running_loss/len(dataset), 100*correct/total))
110 |
111 | # 实例化数据集和数据加载器
112 | dataset = MyDataset()
113 | dataloader = data.DataLoader(dataset, batch_size=10, shuffle=True)
114 |
115 | # 调用训练函数
116 | train(scripted_model, dataloader, optimizer, criterion, epochs=10)
117 | ```
118 |
119 | #torch.jit.trace
120 | ```python
121 | # 将模型转换为Torch脚本
122 | scripted_model = torch.jit.trace(trained_model, torch.randn(1, 10))
123 |
124 | # 保存模型到文件
125 | scripted_model.save("my_model.pt")
126 |
127 | # 重新加载模型
128 | loaded_model = torch.jit.load("my_model.pt")
129 |
130 | # 重新运行模型
131 | input_data = torch.randn(1, 10)
132 | output_data = loaded_model(input_data)
133 | ```
134 | # onnx 格式的加载和run
135 | ```python
136 | # 将模型转换为ONNX格式
137 | dummy_input = torch.randn(1, 3, 32, 32)
138 | torch.onnx.export(model, dummy_input, "my_model.onnx")
139 |
140 | # 加载模型并运行
141 | ort_session = ort.InferenceSession("my_model.onnx")
142 | ort_inputs = {ort_session.get_inputs()[0].name: dummy_input.numpy()}
143 | ort_outputs = ort_session.run(None, ort_inputs)
144 | ```
145 |
146 | # torch dynamo 简介
147 |
148 | ```python
149 | import torch
150 |
151 | def train(model, dataloader):
152 | model = torch.compile(model)
153 | for batch in dataloader:
154 | run_epoch(model, batch)
155 |
156 | def infer(model, input):
157 | model = torch.compile(model)
158 | return model(\*\*input)
159 | ```
160 |
161 | 方式2:
162 | ```python
163 | @optimize('inductor')
164 | def forward(self, imgs, labels, mode):
165 | x = self.resnet(imgs)
166 | if mode == 'loss':
167 | return {'loss': F.cross_entropy(x, labels)}
168 | elif mode == 'predict':
169 | return x, labels
170 | ```
171 |
172 |
--------------------------------------------------------------------------------
/7-pytorch_modes/mode_demo.py:
--------------------------------------------------------------------------------
1 | import torch
2 | import torch.nn as nn
3 | import torch.optim as optim
4 | import torch.utils.data as data
5 |
6 | # 定义数据集
7 | class MyDataset(data.Dataset):
8 | def __init__(self):
9 | # fake data
10 | self.data = torch.randn(100, 10)
11 | self.target = torch.randint(0, 2, (100,))
12 |
13 | def __getitem__(self, index):
14 | return self.data[index], self.target[index]
15 |
16 | def __len__(self):
17 | return len(self.data)
18 |
19 | # 定义模型
20 | class MyModel(nn.Module):
21 | def __init__(self):
22 | super(MyModel, self).__init__()
23 | self.fc1 = nn.Linear(10, 5)
24 | self.fc2 = nn.Linear(5, 2)
25 |
26 | def forward(self, x):
27 | x = self.fc1(x)
28 | x = nn.functional.relu(x)
29 | x = self.fc2(x)
30 | return x
31 |
32 | # 定义训练函数
33 | def train(model, dataset, optimizer, criterion, epochs):
34 | for epoch in range(epochs):
35 | running_loss = 0.0
36 | correct = 0
37 | total = 0
38 |
39 | for data, target in dataset:
40 | # 将数据和目标转换为Tensor类型
41 | data = torch.tensor(data)
42 | target = torch.tensor(target)
43 |
44 | # 前向传播
45 | output = model(data)
46 | loss = criterion(output, target)
47 |
48 | # 反向传播和优化
49 | optimizer.zero_grad()
50 | loss.backward()
51 | optimizer.step()
52 |
53 | # 统计损失和正确率
54 | running_loss += loss.item()
55 | _, predicted = torch.max(output.data, 1)
56 | total += target.size(0)
57 | correct += (predicted == target).sum().item()
58 |
59 | # 打印训练信息
60 | print('Epoch [{}/{}], Loss: {:.4f}, Accuracy: {:.2f}%'
61 | .format(epoch+1, epochs, running_loss/len(dataset), 100*correct/total))
62 |
63 | def script_demo():
64 | # 实例化模型
65 | model = MyModel()
66 | # 将模型转换为script模式
67 | scripted_model = torch.jit.script(model)
68 | # 定义优化器和损失函数
69 | optimizer = optim.SGD(scripted_model.parameters(), lr=0.01)
70 | criterion = nn.CrossEntropyLoss()
71 | # 实例化数据集和数据加载器
72 | dataset = MyDataset()
73 | dataloader = data.DataLoader(dataset, batch_size=10, shuffle=True)
74 |
75 | # 调用训练函数
76 | train(scripted_model, dataloader, optimizer, criterion, epochs=10)
77 | scripted_model.save("scripted_model.pt")
78 |
79 | def stat_dict_demo():
80 | model = MyModel()
81 |
82 | aa = {"model_statdict":model.state_dict()}
83 | torch.save(aa, "state_dict.ckpt")
84 |
85 | def traced_demo():
86 | model = MyModel()
87 | scripted_model = torch.jit.trace(model, torch.randn(1, 10))
88 |
89 | # 保存模型到文件
90 | scripted_model.save("traced_model.pt")
91 |
92 | # 重新加载模型
93 | loaded_model = torch.jit.load("traced_model.pt")
94 |
95 | # 重新运行模型
96 | input_data = torch.randn(1, 10)
97 | output_data = loaded_model(input_data)
98 | print("traced model output: ", output_data)
99 |
100 | def onnx_demo():
101 | model = MyModel()
102 | torch.onnx.export(model, torch.randn(4, 10), "onnx_model.onnx")
103 |
104 | def onnx_infer():
105 | input = torch.randn(4,10)
106 | # 加载模型并运行
107 | import onnxruntime as ort
108 | ort_session = ort.InferenceSession("onnx_model.onnx") # 加载模型到 session中
109 | ort_inputs = {ort_session.get_inputs()[0].name: input.numpy()} # 设置我们input --> numpy 格式的数据
110 | ort_outputs = ort_session.run(None, ort_inputs) # 开始run --> outputs --
111 | print("onnx run output: ", ort_outputs[0]) # 取出结果
112 |
113 |
114 | # def dynamo_demo():
115 | # # 方式一:
116 | # def train(model, dataloader):
117 | # model = torch.compile(model) # 是有开销的
118 | # for batch in dataloader:
119 | # run_epoch(model, batch)
120 |
121 | # def infer(model, input):
122 | # model = torch.compile(model)
123 | # return model(\*\*input)
124 |
125 | # # 方式二:
126 | # @optimize('inductor')
127 | # def forward(self, imgs, labels, mode):
128 | # x = self.resnet(imgs)
129 | # if mode == 'loss':
130 | # return {'loss': F.cross_entropy(x, labels)}
131 | # elif mode == 'predict':
132 | # return x, labels
133 |
134 | def run_script_model():
135 | model = torch.jit.load("scripted_model.pt")
136 | output = model(torch.rand(4, 10))
137 | print("output: ", output)
138 |
139 | def eager_mode():
140 | model = MyModel()
141 | torch.save(model, "model.pt")
142 |
143 | if __name__ == "__main__":
144 | # script_demo()
145 | # traced_demo()
146 | # onnx_demo()
147 | # run_script_model()
148 | # onnx_infer()
149 | # eager_mode()
150 | stat_dict_demo()
151 | print("run mode_demo.py successfully!!!")
--------------------------------------------------------------------------------
/8-model_train_guide/README.md:
--------------------------------------------------------------------------------
1 | # pytorch 模型训练步骤
2 | 1. 参数解析(严格意义上不算整个训练过程);
3 | 2. device 选择(cpu 还是 gpu);
4 | 3. 数据集准备:
5 | - 两套:训练集、验证集
6 | - dataset
7 | - transform
8 | - dataloader
9 | 4. 模型搭建
10 | - 参数初始化
11 | - requires_grad设置
12 | - device 迁移:模型的初始参数(parameters)
13 | 5. 优化器学习率配置
14 | 6. 迭代式训练
15 | - 多个 epoch迭代训练: 完整的数据集跑一遍,就是一个epoch
16 | - train:训练并更新梯度
17 | - test:只查看loss/accuracy 等指标
18 | 7. 保存和输出模型
19 |
20 | # train 过程:
21 | 1. 模型设置成 train() 模式;
22 | 2. for 循环遍历训练数据集;
23 | 3. input 数据的 device 设置;
24 | - input 的数据搬移;
25 | 4. 梯度清0
26 | - optimizer 里的 parameters 和 model里的parameters 共享同一份;
27 | - 通过optimizer.zero_grad()
28 | - 通过model.zero_grad()
29 | 5. 前向传播
30 | - ouput = model(input)
31 | 6. 计算损失函数
32 | 7. 损失反向传播:
33 | loss.backward()
34 | 8. 权重更新:
35 | optimizer.step()
36 |
37 | # test 过程:
38 | 1. 模型设置成eval()模式
39 | - train 模式和eval模式在结构上还是有些不同的;
40 | - dropout 和 normalization 表现不太一样
41 | - parameters 的 requires_grad 还是True 吗? yes
42 | 2. with torch.no_grad():
43 | - 这一步设置的 requires_grad = False
44 | 3. 正常前向推理
45 | 4. 通常要计算correct
46 |
47 | # 数据集的划分
48 | - 训练集和测试集
49 | - 数据千万不要相互包含
50 | - 测试集千万不能参与到训练中,否则就起不到测试效果;
51 | - 最终模型效果要看的是测试集;
52 | - 测试集还是检测模型过不过拟合的重要手段
53 |
54 | # 课后模型调优
55 | - batch_size
56 | - bn, dropout
57 | - learn_rate : schedule
58 | - epoch : 最优的epoch
59 | - optimzier
60 | - 激活函数
61 | - 换损失函数
62 | - 正则化
63 |
64 | # SGD 优化器
65 | ```cpp
66 | struct TORCH_API SGDOptions {
67 | /* implicit */ SGDOptions(double lr);
68 | TORCH_ARG(double, lr);
69 | TORCH_ARG(double, momentum) = 0;
70 | TORCH_ARG(double, dampening) = 0;
71 | TORCH_ARG(double, weight_decay) = 0; // 正则化
72 | TORCH_ARG(bool, nesterov) = false;
73 | ```
74 |
--------------------------------------------------------------------------------
/8-model_train_guide/bert_train/README.md:
--------------------------------------------------------------------------------
1 | # 1. env prepare
2 | **install method 1**
3 | ```shell
4 | pip install transformers==4.31.0
5 | ```
6 | **install method 2**
7 | ```shell
8 | git clone https://github.com/huggingface/transformers
9 | cd transformers
10 | git checkout v4.31.0
11 | pip install .
12 | # PYTHONPATH=/path/to/transformers/:$PYTHONPATH
13 | ```
14 | **install bert depend pacakage**
15 | ```
16 | cd transformers/examples/pytorch/token-classification
17 | pip install -r requirements.txt
18 | ```
19 |
20 | # 2. run model
21 | ```shell
22 | cd transformers/examples/pytorch/token-classification
23 | bash run.sh
24 | ```
25 |
26 | # 3. data prepare
27 | ```python
28 | #data address
29 | ~/.cache/huggingface/hub/models--bert-base-uncased/snapshots/1dbc166cf8765166998eff31ade2eb64c8a40076
30 | # data and models:
31 | config.json
32 | model.safetensors
33 | tokenizer_config.json
34 | tokenizer.json
35 | vocab.txt
36 | ```
37 |
38 | # 4. 参考文档
39 | [transformer github](https://github.com/huggingface/transformers/tree/main)
40 | [huggingface](https://huggingface.co/)
41 | [simple start](https://huggingface.co/bert-base-uncased)
42 |
--------------------------------------------------------------------------------
/8-model_train_guide/bert_train/requirements.txt:
--------------------------------------------------------------------------------
1 | transformer==4.31.0
2 | accelerate >= 0.12.0
3 | seqeval
4 | datasets >= 1.8.0
5 | # torch >= 1.3
6 | evaluate
7 | joblib
8 | PyYAML
9 | regex
10 | sacremoses
11 | semantic-version
12 | setuptools-rust
13 | setuptools
14 | tokenizers
15 | tqdm
--------------------------------------------------------------------------------
/8-model_train_guide/bert_train/run.sh:
--------------------------------------------------------------------------------
1 | python -m ipdb run_ner.py \
2 | --model_name_or_path bert-base-uncased \
3 | --dataset_name conll2003 \
4 | --output_dir /tmp/test-ner \
5 | --do_train \
6 | --do_eval
--------------------------------------------------------------------------------
/8-model_train_guide/imagenet-train/extract_ILSVRC.sh:
--------------------------------------------------------------------------------
1 | #!/bin/bash
2 | #
3 | # script to extract ImageNet dataset
4 | # ILSVRC2012_img_train.tar (about 138 GB)
5 | # ILSVRC2012_img_val.tar (about 6.3 GB)
6 | # make sure ILSVRC2012_img_train.tar & ILSVRC2012_img_val.tar in your current directory
7 | #
8 | # Adapted from:
9 | # https://github.com/facebook/fb.resnet.torch/blob/master/INSTALL.md
10 | # https://gist.github.com/BIGBALLON/8a71d225eff18d88e469e6ea9b39cef4
11 | #
12 | # imagenet/train/
13 | # ├── n01440764
14 | # │ ├── n01440764_10026.JPEG
15 | # │ ├── n01440764_10027.JPEG
16 | # │ ├── ......
17 | # ├── ......
18 | # imagenet/val/
19 | # ├── n01440764
20 | # │ ├── ILSVRC2012_val_00000293.JPEG
21 | # │ ├── ILSVRC2012_val_00002138.JPEG
22 | # │ ├── ......
23 | # ├── ......
24 | #
25 | #
26 | # Make imagnet directory
27 | #
28 | mkdir imagenet
29 | #
30 | # Extract the training data:
31 | #
32 | # Create train directory; move .tar file; change directory
33 | mkdir imagenet/train && mv ILSVRC2012_img_train.tar imagenet/train/ && cd imagenet/train
34 | # Extract training set; remove compressed file
35 | tar -xvf ILSVRC2012_img_train.tar && rm -f ILSVRC2012_img_train.tar
36 | #
37 | # At this stage imagenet/train will contain 1000 compressed .tar files, one for each category
38 | #
39 | # For each .tar file:
40 | # 1. create directory with same name as .tar file
41 | # 2. extract and copy contents of .tar file into directory
42 | # 3. remove .tar file
43 | find . -name "*.tar" | while read NAME ; do mkdir -p "${NAME%.tar}"; tar -xvf "${NAME}" -C "${NAME%.tar}"; rm -f "${NAME}"; done
44 | #
45 | # This results in a training directory like so:
46 | #
47 | # imagenet/train/
48 | # ├── n01440764
49 | # │ ├── n01440764_10026.JPEG
50 | # │ ├── n01440764_10027.JPEG
51 | # │ ├── ......
52 | # ├── ......
53 | #
54 | # Change back to original directory
55 | cd ../..
56 | #
57 | # Extract the validation data and move images to subfolders:
58 | #
59 | # Create validation directory; move .tar file; change directory; extract validation .tar; remove compressed file
60 | mkdir imagenet/val && mv ILSVRC2012_img_val.tar imagenet/val/ && cd imagenet/val && tar -xvf ILSVRC2012_img_val.tar && rm -f ILSVRC2012_img_val.tar
61 | # get script from soumith and run; this script creates all class directories and moves images into corresponding directories
62 | wget -qO- https://raw.githubusercontent.com/soumith/imagenetloader.torch/master/valprep.sh | bash
63 | #
64 | # This results in a validation directory like so:
65 | #
66 | # imagenet/val/
67 | # ├── n01440764
68 | # │ ├── ILSVRC2012_val_00000293.JPEG
69 | # │ ├── ILSVRC2012_val_00002138.JPEG
70 | # │ ├── ......
71 | # ├── ......
72 | #
73 | #
74 | # Check total files after extract
75 | #
76 | # $ find train/ -name "*.JPEG" | wc -l
77 | # 1281167
78 | # $ find val/ -name "*.JPEG" | wc -l
79 | # 50000
80 | #
81 |
--------------------------------------------------------------------------------
/8-model_train_guide/imagenet-train/requirements.txt:
--------------------------------------------------------------------------------
1 | torch
2 | torchvision
3 |
--------------------------------------------------------------------------------
/8-model_train_guide/mnist/README.md:
--------------------------------------------------------------------------------
1 | # run command:
2 | python mnist-main.py
3 |
--------------------------------------------------------------------------------
/8-model_train_guide/nlp/README.md:
--------------------------------------------------------------------------------
1 | Deep Learning for NLP with Pytorch
2 | ----------------------------------
3 |
4 | 1. pytorch_tutorial.py
5 | Introduction to PyTorch
6 | https://pytorch.org/tutorials/beginner/nlp/pytorch_tutorial.html
7 |
8 | 2. deep_learning_tutorial.py
9 | Deep Learning with PyTorch
10 | https://pytorch.org/tutorials/beginner/nlp/deep_learning_tutorial.html
11 |
12 | 3. word_embeddings_tutorial.py
13 | Word Embeddings: Encoding Lexical Semantics
14 | https://pytorch.org/tutorials/beginner/nlp/word_embeddings_tutorial.html
15 |
16 | 4. sequence_models_tutorial.py
17 | Sequence Models and Long Short-Term Memory Networks
18 | https://pytorch.org/tutorials/beginner/nlp/sequence_models_tutorial.html
19 |
20 | 5. advanced_tutorial.py
21 | Advanced: Making Dynamic Decisions and the Bi-LSTM CRF
22 | https://pytorch.org/tutorials/beginner/nlp/advanced_tutorial.html
23 |
--------------------------------------------------------------------------------
/8-model_train_guide/regression/README.md:
--------------------------------------------------------------------------------
1 | # Linear regression example
2 |
3 | Trains a single fully-connected layer to fit a 4th degree polynomial.
4 |
--------------------------------------------------------------------------------
/8-model_train_guide/regression/main.py:
--------------------------------------------------------------------------------
1 | #!/usr/bin/env python
2 | from __future__ import print_function
3 | from itertools import count
4 |
5 | import torch
6 | import torch.nn.functional as F
7 |
8 | POLY_DEGREE = 4
9 | W_target = torch.randn(POLY_DEGREE, 1) * 5
10 | b_target = torch.randn(1) * 5
11 |
12 |
13 | def make_features(x):
14 | """Builds features i.e. a matrix with columns [x, x^2, x^3, x^4]."""
15 | x = x.unsqueeze(1)
16 | return torch.cat([x ** i for i in range(1, POLY_DEGREE+1)], 1)
17 |
18 |
19 | def f(x):
20 | """Approximated function."""
21 | return x.mm(W_target) + b_target.item()
22 |
23 |
24 | def poly_desc(W, b):
25 | """Creates a string description of a polynomial."""
26 | result = 'y = '
27 | for i, w in enumerate(W):
28 | result += '{:+.2f} x^{} '.format(w, i + 1)
29 | result += '{:+.2f}'.format(b[0])
30 | return result
31 |
32 |
33 | def get_batch(batch_size=32):
34 | """Builds a batch i.e. (x, f(x)) pair."""
35 | random = torch.randn(batch_size)
36 | x = make_features(random)
37 | y = f(x)
38 | return x, y
39 |
40 |
41 | # Define model
42 | fc = torch.nn.Linear(W_target.size(0), 1)
43 |
44 | for batch_idx in count(1):
45 | # Get data
46 | batch_x, batch_y = get_batch()
47 |
48 | # Reset gradients
49 | fc.zero_grad()
50 |
51 | # Forward pass
52 | output = F.smooth_l1_loss(fc(batch_x), batch_y)
53 | loss = output.item()
54 |
55 | # Backward pass
56 | output.backward()
57 |
58 | # Apply gradients
59 | for param in fc.parameters():
60 | param.data.add_(-0.1 * param.grad)
61 |
62 | # Stop criterion
63 | if loss < 1e-3:
64 | break
65 |
66 | print('Loss: {:.6f} after {} batches'.format(loss, batch_idx))
67 | print('==> Learned function:\t' + poly_desc(fc.weight.view(-1), fc.bias))
68 | print('==> Actual function:\t' + poly_desc(W_target.view(-1), b_target))
69 |
--------------------------------------------------------------------------------
/8-model_train_guide/transformer_encoder/encoder.py:
--------------------------------------------------------------------------------
1 | import torch
2 | import torch.nn as nn
3 | import torch.nn.functional as F
4 |
5 | class TransformerEncoder(nn.Module):
6 | def __init__(self, input_dim, hidden_dim, num_layers, num_heads, dropout_rate=0.1):
7 | super(TransformerEncoder, self).__init__()
8 | self.layers = nn.ModuleList([TransformerEncoderLayer(input_dim, hidden_dim, num_heads, dropout_rate) for _ in range(num_layers)])
9 |
10 | def forward(self, x, mask=None):
11 | for layer in self.layers:
12 | x = layer(x, mask)
13 | return x
14 |
15 | class TransformerEncoderLayer(nn.Module):
16 | def __init__(self, input_dim, hidden_dim, num_heads, dropout_rate=0.1):
17 | super(TransformerEncoderLayer, self).__init__()
18 | self.self_attention = MultiHeadAttention(input_dim, hidden_dim, num_heads, dropout_rate)
19 | self.feed_forward = FeedForward(input_dim, hidden_dim, dropout_rate)
20 | self.dropout = nn.Dropout(dropout_rate)
21 | self.layer_norm = nn.LayerNorm(input_dim)
22 |
23 | def forward(self, x, mask=None):
24 | residual = x
25 | x = self.layer_norm(x + self.dropout(self.self_attention(x, x, x, mask)))
26 | x = self.layer_norm(x + self.dropout(self.feed_forward(x)))
27 | return x
28 |
29 | class MultiHeadAttention(nn.Module):
30 | def __init__(self, input_dim, hidden_dim, num_heads, dropout_rate=0.1):
31 | super(MultiHeadAttention, self).__init__()
32 | self.num_heads = num_heads
33 | self.head_dim = hidden_dim // num_heads
34 |
35 | self.query = nn.Linear(input_dim, hidden_dim)
36 | self.key = nn.Linear(input_dim, hidden_dim)
37 | self.value = nn.Linear(input_dim, hidden_dim)
38 | self.dropout = nn.Dropout(dropout_rate)
39 | self.output_linear = nn.Linear(hidden_dim, input_dim)
40 |
41 | def forward(self, query, key, value, mask=None):
42 | batch_size = query.size(0)
43 | query_len = query.size(1)
44 | key_len = key.size(1)
45 |
46 | query = self.query(query).view(batch_size, query_len, self.num_heads, self.head_dim).transpose(1, 2)
47 | key = self.key(key).view(batch_size, key_len, self.num_heads, self.head_dim).transpose(1, 2)
48 | value = self.value(value).view(batch_size, key_len, self.num_heads, self.head_dim).transpose(1, 2)
49 |
50 | scores = torch.matmul(query, key.transpose(-2, -1)) / torch.sqrt(torch.tensor(self.head_dim).float())
51 |
52 | if mask is not None:
53 | mask = mask.unsqueeze(1)
54 | mask = mask.unsqueeze(1)
55 | scores = scores.masked_fill(mask == 0, float('-inf'))
56 |
57 | attention_weights = F.softmax(scores, dim=-1)
58 |
59 | x = torch.matmul(self.dropout(attention_weights), value)
60 | x = x.transpose(1, 2).contiguous().view(batch_size, query_len, self.num_heads * self.head_dim)
61 | x = self.output_linear(x)
62 | return x
63 |
64 | class FeedForward(nn.Module):
65 | def __init__(self, input_dim, hidden_dim, dropout_rate=0.1):
66 | super(FeedForward, self).__init__()
67 | self.linear1 = nn.Linear(input_dim, hidden_dim)
68 | self.linear2 = nn.Linear(hidden_dim, input_dim)
69 | self.dropout = nn.Dropout(dropout_rate)
70 | self.layer_norm = nn.LayerNorm(hidden_dim)
71 |
72 | def forward(self, x):
73 | residual = x
74 | x = self.layer_norm(self.dropout(F.relu(self.linear1(x))))
75 | x = self.linear2(x) + residual
76 | return x
77 |
78 | if __name__ == "__main__":
79 | # 示例用法
80 | input_dim = 512
81 | hidden_dim = 256
82 | num_layers = 6
83 | num_heads = 8
84 | dropout_rate = 0.1
85 | batch_size = 10
86 | sequence_length = 20
87 |
88 | # 创建Transformer编码器实例
89 | encoder = TransformerEncoder(input_dim, hidden_dim, num_layers, num_heads, dropout_rate)
90 |
91 | # 创建输入张量
92 | x = torch.randn(batch_size, sequence_length, input_dim)
93 |
94 | # 创建掩码(假设有掩盖的位置为0)
95 | mask = torch.ones(batch_size, sequence_length).byte()
96 | mask[5:, 15:] = 0 # 假设对序列位置5到10进行掩盖
97 |
98 | # 前向传播
99 | output = encoder(x, mask=mask)
100 | torch.onnx.export(encoder.eval(), (x, mask), "self_bert.onnx")
101 |
102 | # print(output.size()) # 输出形状:torch.Size([10, 20, 512])
103 | print("run encoder.py successfully !!!")
--------------------------------------------------------------------------------
/8-model_train_guide/vit-train/README.md:
--------------------------------------------------------------------------------
1 | # 1. Vision Transformer in PyTorch introduce
2 | This example shows a simple implementation of [Vision Transformer](https://arxiv.org/abs/2010.11929)
3 | on the [CIFAR-10](https://www.cs.toronto.edu/~kriz/cifar.html) dataset.
4 |
5 | # 2. 复现步骤
6 | ```bash
7 | # pytorch==1.13.0 + cu116; torchvision==1.14.1; numpy==1.23.5也可以
8 | pip3 install -r requirements.txt
9 | python3 main.py
10 | ```
11 |
12 | # 3. 其它选项
13 | ```bash
14 | usage: main.py [-h] [--no-cuda] [--patch-size PATCH_SIZE] [--latent-size LATENT_SIZE] [--n-channels N_CHANNELS] [--num-heads NUM_HEADS] [--num-encoders NUM_ENCODERS]
15 | [--dropout DROPOUT] [--img-size IMG_SIZE] [--num-classes NUM_CLASSES] [--epochs EPOCHS] [--lr LR] [--weight-decay WEIGHT_DECAY] [--batch-size BATCH_SIZE]
16 |
17 | Vision Transformer in PyTorch
18 |
19 | options:
20 | -h, --help show this help message and exit
21 | --no-cuda disables CUDA training
22 | --patch-size PATCH_SIZE
23 | patch size for images (default : 16)
24 | --latent-size LATENT_SIZE
25 | latent size (default : 768)
26 | --n-channels N_CHANNELS
27 | number of channels in images (default : 3 for RGB)
28 | --num-heads NUM_HEADS
29 | (default : 16)
30 | --num-encoders NUM_ENCODERS
31 | number of encoders (default : 12)
32 | --dropout DROPOUT dropout value (default : 0.1)
33 | --img-size IMG_SIZE image size to be reshaped to (default : 224
34 | --num-classes NUM_CLASSES
35 | number of classes in dataset (default : 10 for CIFAR10)
36 | --epochs EPOCHS number of epochs (default : 10)
37 | --lr LR base learning rate (default : 0.01)
38 | --weight-decay WEIGHT_DECAY
39 | weight decay value (default : 0.03)
40 | --batch-size BATCH_SIZE
41 | batch size (default : 4)
42 |
43 | ```
--------------------------------------------------------------------------------
/8-model_train_guide/vit-train/requirements.txt:
--------------------------------------------------------------------------------
1 | numpy==1.24.2
2 | torch==2.0.0
3 | torchvision==0.15.1
4 |
--------------------------------------------------------------------------------
/8-model_train_guide/word_language_model/README.md:
--------------------------------------------------------------------------------
1 | # Word-level Language Modeling using RNN and Transformer
2 |
3 | This example trains a multi-layer RNN (Elman, GRU, or LSTM) or Transformer on a language modeling task. By default, the training script uses the Wikitext-2 dataset, provided.
4 | The trained model can then be used by the generate script to generate new text.
5 |
6 | ```bash
7 | python main.py --cuda --epochs 6 # Train a LSTM on Wikitext-2 with CUDA.
8 | python main.py --cuda --epochs 6 --tied # Train a tied LSTM on Wikitext-2 with CUDA.
9 | python main.py --cuda --tied # Train a tied LSTM on Wikitext-2 with CUDA for 40 epochs.
10 | python main.py --cuda --epochs 6 --model Transformer --lr 5
11 | # Train a Transformer model on Wikitext-2 with CUDA.
12 |
13 | python generate.py # Generate samples from the default model checkpoint.
14 | ```
15 |
16 | The model uses the `nn.RNN` module (and its sister modules `nn.GRU` and `nn.LSTM`) or Transformer module (`nn.TransformerEncoder` and `nn.TransformerEncoderLayer`) which will automatically use the cuDNN backend if run on CUDA with cuDNN installed.
17 |
18 | During training, if a keyboard interrupt (Ctrl-C) is received, training is stopped and the current model is evaluated against the test dataset.
19 |
20 | The `main.py` script accepts the following arguments:
21 |
22 | ```bash
23 | optional arguments:
24 | -h, --help show this help message and exit
25 | --data DATA location of the data corpus
26 | --model MODEL type of network (RNN_TANH, RNN_RELU, LSTM, GRU, Transformer)
27 | --emsize EMSIZE size of word embeddings
28 | --nhid NHID number of hidden units per layer
29 | --nlayers NLAYERS number of layers
30 | --lr LR initial learning rate
31 | --clip CLIP gradient clipping
32 | --epochs EPOCHS upper epoch limit
33 | --batch_size N batch size
34 | --bptt BPTT sequence length
35 | --dropout DROPOUT dropout applied to layers (0 = no dropout)
36 | --tied tie the word embedding and softmax weights
37 | --seed SEED random seed
38 | --cuda use CUDA
39 | --mps enable GPU on macOS
40 | --log-interval N report interval
41 | --save SAVE path to save the final model
42 | --onnx-export ONNX_EXPORT
43 | path to export the final model in onnx format
44 | --nhead NHEAD the number of heads in the encoder/decoder of the transformer model
45 | --dry-run verify the code and the model
46 | ```
47 |
48 | With these arguments, a variety of models can be tested.
49 | As an example, the following arguments produce slower but better models:
50 |
51 | ```bash
52 | python main.py --cuda --emsize 650 --nhid 650 --dropout 0.5 --epochs 40
53 | python main.py --cuda --emsize 650 --nhid 650 --dropout 0.5 --epochs 40 --tied
54 | python main.py --cuda --emsize 1500 --nhid 1500 --dropout 0.65 --epochs 40
55 | python main.py --cuda --emsize 1500 --nhid 1500 --dropout 0.65 --epochs 40 --tied
56 | ```
57 |
--------------------------------------------------------------------------------
/8-model_train_guide/word_language_model/data.py:
--------------------------------------------------------------------------------
1 | import os
2 | from io import open
3 | import torch
4 |
5 | class Dictionary(object):
6 | def __init__(self):
7 | self.word2idx = {}
8 | self.idx2word = []
9 |
10 | def add_word(self, word):
11 | if word not in self.word2idx:
12 | self.idx2word.append(word)
13 | self.word2idx[word] = len(self.idx2word) - 1
14 | return self.word2idx[word]
15 |
16 | def __len__(self):
17 | return len(self.idx2word)
18 |
19 |
20 | class Corpus(object):
21 | def __init__(self, path):
22 | self.dictionary = Dictionary()
23 | self.train = self.tokenize(os.path.join(path, 'train.txt'))
24 | self.valid = self.tokenize(os.path.join(path, 'valid.txt'))
25 | self.test = self.tokenize(os.path.join(path, 'test.txt'))
26 |
27 | def tokenize(self, path):
28 | """Tokenizes a text file."""
29 | assert os.path.exists(path)
30 | # Add words to the dictionary
31 | with open(path, 'r', encoding="utf8") as f:
32 | for line in f:
33 | words = line.split() + ['']
34 | for word in words:
35 | self.dictionary.add_word(word)
36 |
37 | # Tokenize file content
38 | with open(path, 'r', encoding="utf8") as f:
39 | idss = []
40 | for line in f:
41 | words = line.split() + ['']
42 | ids = []
43 | for word in words:
44 | ids.append(self.dictionary.word2idx[word])
45 | idss.append(torch.tensor(ids).type(torch.int64))
46 | ids = torch.cat(idss)
47 |
48 | return ids
49 |
--------------------------------------------------------------------------------
/8-model_train_guide/word_language_model/generate.py:
--------------------------------------------------------------------------------
1 | ###############################################################################
2 | # Language Modeling on Wikitext-2
3 | #
4 | # This file generates new sentences sampled from the language model.
5 | #
6 | ###############################################################################
7 | import argparse
8 | import torch
9 |
10 | import data
11 |
12 | parser = argparse.ArgumentParser(description='PyTorch Wikitext-2 Language Model')
13 | # Model parameters.
14 | parser.add_argument('--data', type=str, default='./data/wikitext-2',
15 | help='location of the data corpus')
16 | parser.add_argument('--checkpoint', type=str, default='./model.pt',
17 | help='model checkpoint to use')
18 | parser.add_argument('--outf', type=str, default='generated.txt',
19 | help='output file for generated text')
20 | parser.add_argument('--words', type=int, default='1000',
21 | help='number of words to generate')
22 | parser.add_argument('--seed', type=int, default=1111,
23 | help='random seed')
24 | parser.add_argument('--cuda', action='store_true',
25 | help='use CUDA')
26 | parser.add_argument('--mps', action='store_true', default=False,
27 | help='enables macOS GPU training')
28 | parser.add_argument('--temperature', type=float, default=1.0,
29 | help='temperature - higher will increase diversity')
30 | parser.add_argument('--log-interval', type=int, default=100,
31 | help='reporting interval')
32 | args = parser.parse_args()
33 |
34 | # Set the random seed manually for reproducibility.
35 | torch.manual_seed(args.seed)
36 | if torch.cuda.is_available():
37 | if not args.cuda:
38 | print("WARNING: You have a CUDA device, so you should probably run with --cuda.")
39 | if torch.backends.mps.is_available():
40 | if not args.mps:
41 | print("WARNING: You have mps device, to enable macOS GPU run with --mps.")
42 |
43 | use_mps = args.mps and torch.backends.mps.is_available()
44 | if args.cuda:
45 | device = torch.device("cuda")
46 | elif use_mps:
47 | device = torch.device("mps")
48 | else:
49 | device = torch.device("cpu")
50 |
51 | if args.temperature < 1e-3:
52 | parser.error("--temperature has to be greater or equal 1e-3.")
53 |
54 | with open(args.checkpoint, 'rb') as f:
55 | model = torch.load(f, map_location=device)
56 | model.eval()
57 |
58 | corpus = data.Corpus(args.data)
59 | ntokens = len(corpus.dictionary)
60 |
61 | is_transformer_model = hasattr(model, 'model_type') and model.model_type == 'Transformer'
62 | if not is_transformer_model:
63 | hidden = model.init_hidden(1)
64 | input = torch.randint(ntokens, (1, 1), dtype=torch.long).to(device)
65 |
66 | with open(args.outf, 'w') as outf:
67 | with torch.no_grad(): # no tracking history
68 | for i in range(args.words):
69 | if is_transformer_model:
70 | output = model(input, False)
71 | word_weights = output[-1].squeeze().div(args.temperature).exp().cpu()
72 | word_idx = torch.multinomial(word_weights, 1)[0]
73 | word_tensor = torch.Tensor([[word_idx]]).long().to(device)
74 | input = torch.cat([input, word_tensor], 0)
75 | else:
76 | output, hidden = model(input, hidden)
77 | word_weights = output.squeeze().div(args.temperature).exp().cpu()
78 | word_idx = torch.multinomial(word_weights, 1)[0]
79 | input.fill_(word_idx)
80 |
81 | word = corpus.dictionary.idx2word[word_idx]
82 |
83 | outf.write(word + ('\n' if i % 20 == 19 else ' '))
84 |
85 | if i % args.log_interval == 0:
86 | print('| Generated {}/{} words'.format(i, args.words))
87 |
--------------------------------------------------------------------------------
/8-model_train_guide/word_language_model/requirements.txt:
--------------------------------------------------------------------------------
1 | torch
2 |
--------------------------------------------------------------------------------
/8-model_train_guide/yolov8/inference_demo.py:
--------------------------------------------------------------------------------
1 | from ultralytics import YOLO
2 |
3 |
4 | # train
5 | # Load a model
6 | # model = YOLO('yolov8n-seg.yaml') # build a new model from YAML
7 | # model = YOLO('yolov8n-seg.pt') # load a pretrained model (recommended for training)
8 | # model = YOLO('yolov8n-seg.yaml').load('yolov8n.pt') # build from YAML and transfer weights
9 |
10 | # # Train the model
11 | # model.train(data='coco128-seg.yaml', epochs=100, imgsz=640)
12 |
13 |
14 | # inference
15 | # Load a model
16 | model = YOLO('yolov8n-seg.pt') # load an official model
17 | # model = YOLO('path/to/best.pt') # load a custom model
18 |
19 | # Predict with the model
20 | results = model('https://ultralytics.com/images/bus.jpg') # predict on an image
21 | print(results)
22 |
--------------------------------------------------------------------------------
/9-model_infer/README.md:
--------------------------------------------------------------------------------
1 | # trainning --> infer 的过程:
2 | - 训练和推理;
3 | - 推理对性能要求更高;
4 |
5 | # 推理的不同方式:
6 | - model.eval() # pytorch eager mode 的推理方式;
7 | - torch.jit.script() # 可训练,可推理,会保证不同分支的信息
8 | - torch.jit.trace() # 需要给出模型的input,这个input追踪模型
9 | - torch.onnx.export() # 跨框架的静态图模型,也需要给input --> 追踪模型
10 |
11 | # 走不同的分支会带来 infer 时候的问题吗?
12 | - input 的shape 是最重要的,这个会影响最终的分支选择;
13 | - 很少说根据一个具体的tensor(activation) 的值来判断走哪个分支;
14 | - 静态图的表达能力就是有一定的局限性,(trace 和 export);
15 | - 局限性的解决办法:我们算法人员,或者工程人员,手动实现分支;
16 |
17 | # 推理(inference)
18 | - 面向部署
19 | - 加速,对性能要求特别高;
20 | - 业界有很多种推理引擎 --> 就是加速我们深度学习模型的推理;
21 | - TensorRT、MNN、NCNN TVM Onnxruntime都是比较成熟的推理硬气;
22 | - 常见的优化策略:算子融合,常量折叠,剪枝、稀疏化、量化、内存优化、去除无效分支;
23 |
24 | # traced_infer
25 | ```python
26 | def traced_demo():
27 | model = MyModel()
28 | scripted_model = torch.jit.trace(model, torch.randn(1, 10))
29 |
30 | # 保存模型到文件
31 | scripted_model.save("traced_model.pt")
32 |
33 | # 重新加载模型
34 | loaded_model = torch.jit.load("traced_model.pt")
35 |
36 | # 重新运行模型
37 | input_data = torch.randn(1, 10)
38 | output_data = loaded_model(input_data)
39 | print("traced model output: ", output_data)
40 | ```
41 |
42 | # onnx_infer
43 | ```python
44 | def onnx_demo():
45 | # model = MyModel()
46 | # torch.onnx.export(model, torch.randn(4, 10), "onnx_model.onnx")
47 |
48 | input = torch.randn(4,10)
49 | # 加载模型并运行
50 | import onnxruntime as ort
51 | ort_session = ort.InferenceSession("onnx_model.onnx")
52 | ort_inputs = {ort_session.get_inputs()[0].name: input.numpy()}
53 | ort_outputs = ort_session.run(None, ort_inputs)
54 | print("onnx run output: ", ort_outputs[0])
55 | ```
--------------------------------------------------------------------------------
/README.md:
--------------------------------------------------------------------------------
1 | # pytorch tutorial basic
2 | 0. install guide
3 | 1. tensor guide
4 | 2. autograd guide
5 | 3. model_build guide
6 | 4. data guide
7 | 5. transforms guide
8 | 6. save_load guide
9 | 7. model train guide
10 |
11 | # pytorch tutorial advanced
12 | 10. tensorboard guide
13 | 11. distribute guide
14 | 12. c++ train
15 | 13. model deploy guide
16 | - flash
17 | - docker
18 | - cloud
19 | - c++
20 |
21 | # Train model by your self
22 | ## three step
23 | 1. tutorial
24 | 2. example
25 | 3. well know website
26 |
27 | # 常用的pytorch 模块
28 | ```python
29 | import torch
30 | import torch.nn as nn
31 | import torch.nn.functional as F
32 | import torch.optim as optim # adam sgd lr_scheduler
33 | import torch.utils.data as data # dataset dataloader
34 | import torch.optim.lr_scheduler import as lr_scheduler
35 | from torch.utils.tensorboard import SummaryWriter
36 | from torchvision import datasets, transforms
37 | improt torch.jit as jit
38 | ```
39 |
40 |
--------------------------------------------------------------------------------
/python_demo/class_demo/Property整体继承.py:
--------------------------------------------------------------------------------
1 | # coding:utf8
2 |
3 | class Person:
4 | def __init__(self, name):
5 | self.name = name
6 | # Getter function
7 | @property
8 | def name(self):
9 | return self._name
10 | # Setter function
11 | @name.setter
12 | def name(self, value):
13 | if not isinstance(value, str):
14 | raise TypeError('Expected a string')
15 | self._name = value
16 | # Deleter function
17 | @name.deleter
18 | def name(self):
19 | raise AttributeError("Can't delete attribute")
20 |
21 | class SubPerson(Person):
22 | @property
23 | def name(self):
24 | print('Getting name')
25 | return super().name
26 | @name.setter
27 | def name(self, value):
28 | print('Setting name to', value)
29 | super(SubPerson, SubPerson).name.__set__(self,value)
30 | @name.deleter
31 | def name(self):
32 | print('Deleting name')
33 | super(SubPerson, SubPerson).name.__delete__(self)
34 |
35 | if __name__ == "__main__":
36 | s = SubPerson('Guido')
37 | print(s.name)
38 |
39 |
40 |
--------------------------------------------------------------------------------
/python_demo/class_demo/descriptor_0.py:
--------------------------------------------------------------------------------
1 | # coding:utf8
2 | class Integer:
3 | def __init__(self, name):
4 | self.name = name
5 | def __get__(self, instance, cls):
6 | if instance is None:
7 | print("I am Integer.")
8 | return self
9 | else:
10 | return instance.__dict__[self.name]
11 | def __set__(self, instance, value):
12 | if instance is None:
13 | print(100000)
14 | return
15 | if not isinstance(value, int):
16 | raise TypeError('Expected an int')
17 | # 关键一步,将value 加入到 实例的__dict__中
18 | # operate the instance's dic
19 | instance.__dict__[self.name] = value
20 |
21 | def __delete__(self, instance):
22 | del instance.__dict__[self.name]
23 |
24 | class Point:
25 | a = 100
26 | x = Integer('x')
27 | y = Integer('y')
28 | def __init__(self, x, y):
29 | self.x = x # not simple assign value
30 | self.y = y
31 |
32 | if __name__ == "__main__":
33 | test = Integer("Micheal")
34 | a = Point(2,3)
35 | print(a.x)
36 | print(Point.x)
37 |
--------------------------------------------------------------------------------
/python_demo/class_demo/descriptor_demo.py:
--------------------------------------------------------------------------------
1 | class ReadOnlyProperty:
2 | def __init__(self, getter):
3 | self.getter = getter
4 |
5 | def __get__(self, instance, owner):
6 | if instance is None:
7 | return self
8 | return self.getter(instance)
9 |
10 | class MyClass:
11 | def __init__(self, x):
12 | self._x = x
13 |
14 | @property
15 | def x(self):
16 | return self._x
17 |
18 | def y(self):
19 | return self._x * 2
20 |
21 | y = ReadOnlyProperty(y)
22 |
23 | if __name__ == "__main__":
24 | obj = MyClass(5)
25 | print(obj.x) # 输出 5
26 | print(obj.y) # 输出 10
27 |
--------------------------------------------------------------------------------
/python_demo/class_demo/discriptor_1.py:
--------------------------------------------------------------------------------
1 | # coding:utf8
2 |
3 | class Person:
4 | def __init__(self, name):
5 | self.name = name
6 | # Getter function
7 | @property
8 | def name(self):
9 | return self._name
10 | # Setter function
11 | @name.setter
12 | def name(self, value):
13 | if not isinstance(value, str):
14 | raise TypeError('Expected a string')
15 | self._name = value
16 | # Deleter function
17 | @name.deleter
18 | def name(self):
19 | raise AttributeError("Can't delete attribute")
20 |
21 | class SubPerson(Person):
22 | @property
23 | def name(self):
24 | print('Getting name')
25 | return super().name
26 | @name.setter
27 | def name(self, value):
28 | print('Setting name to', value)
29 | super(SubPerson, SubPerson).name.__set__(self, value)
30 | @name.deleter
31 | def name(self):
32 | print('Deleting name')
33 | super(SubPerson, SubPerson).name.__delete__(self)
34 |
35 | s = SubPerson('Guido')
36 | print(s.name)
37 |
38 |
39 |
--------------------------------------------------------------------------------
/python_demo/class_demo/item相关魔术方法.py:
--------------------------------------------------------------------------------
1 | # coding:utf8
2 | from abc import ABCMeta, abstractmethod
3 |
4 | class IStream(metaclass=ABCMeta):
5 | @abstractmethod
6 | def read(self, maxbytes=-1):
7 | print('abs_read')
8 | @abstractmethod
9 | def write(self, data):
10 | print('abs_write')
11 |
12 | class SocketStream(IStream):
13 | def read(self, maxbytes=-1):
14 | print(123)
15 | #def write(self, data):
16 | #print(data)
17 |
18 | a = SocketStream()
19 | #a.write(10)
20 | #a.read()
--------------------------------------------------------------------------------
/python_demo/class_demo/lazyproperty.py:
--------------------------------------------------------------------------------
1 | # coding:utf8
2 |
3 | import math
4 |
5 | class lazyproperty:
6 | ''' Only __get__ method is implemented'''
7 | def __init__(self, func):
8 | self.func = func
9 | # when descriptor only has __get__:只有当被访问属性不在实例底层的字典中时__get__() 方法才会被触发
10 | def __get__(self, instance, cls):
11 | if instance is None:
12 | return self
13 | else:
14 | value = self.func(instance) #self.func ???
15 | setattr(instance, self.func.__name__, value)
16 | return value
17 |
18 | class Circle:
19 | def __init__(self, radius):
20 | self.radius = radius
21 | @lazyproperty
22 | def area(self):
23 | print('Computing area')
24 | return math.pi * self.radius ** 2
25 | @lazyproperty
26 | def perimeter(self):
27 | print('Computing perimeter')
28 | return 2 * math.pi * self.radius
29 |
30 | c = Circle(4.0)
31 | print(c.area)
32 | print(c.area)
33 | print(c.perimeter)
--------------------------------------------------------------------------------
/python_demo/class_demo/nonlocal用法.py:
--------------------------------------------------------------------------------
1 | # coding:utf8
2 | #希望一次返回3个函数,分别计算1x1,2x2,3x3:
3 | def count():
4 | fs = []
5 | for i in range(1, 4):
6 | def f():
7 | return i*i
8 | fs.append(f)
9 | return fs
10 |
11 | f1, f2, f3 = count()
12 |
13 | print(f1(),f2(),f3())
14 |
15 |
16 |
--------------------------------------------------------------------------------
/python_demo/class_demo/property_1.py:
--------------------------------------------------------------------------------
1 | # coding:utf8
2 | import math
3 | from property_2 import fun
4 | class Circle:
5 | def __init__(self, radius):
6 | self.radius = radius
7 | @property
8 | def area(self):
9 | return math.pi * self.radius ** 2
10 | @property
11 | def diameter(self):
12 | return self.radius * 2
13 | @property
14 | def perimeter(self):
15 | return 2 * math.pi * self.radius
16 |
17 | #print(__name__)
18 | if __name__ == "__main__":
19 |
20 | cir_1 = Circle(2)
21 | print(cir_1.area) # 和访问属性差不多,但其是个property
22 | print(cir_1.__dict__)
23 | fun()
24 |
25 |
26 |
--------------------------------------------------------------------------------
/python_demo/class_demo/property_2.py:
--------------------------------------------------------------------------------
1 | class Person:
2 | def __init__(self, first_name):
3 | self.set_first_name(first_name)
4 | # Getter function
5 | def get_first_name(self):
6 | return self._first_name
7 | # Setter function
8 | def set_first_name(self, value):
9 | if not isinstance(value, str):
10 | raise TypeError('Expected a string')
11 | self._first_name = value
12 | # Deleter function (optional)
13 | def del_first_name(self):
14 | raise AttributeError("Can't delete attribute")
15 |
16 | # Make a property from existing get/set methods
17 | name = property(get_first_name, set_first_name, del_first_name)
18 |
19 | def fun():
20 | print(__name__)
21 |
22 | if __name__ == "__main__":
23 | a = Person('Monica')
24 | print(a.name)
--------------------------------------------------------------------------------
/python_demo/class_demo/property_3.py:
--------------------------------------------------------------------------------
https://raw.githubusercontent.com/Elvin-Ma/pytorch_guide/da12d191ab1dae88e67c2c30246be9f29492f4c5/python_demo/class_demo/property_3.py
--------------------------------------------------------------------------------
/python_demo/class_demo/property_4.py:
--------------------------------------------------------------------------------
1 | class Circle(object):
2 | def __init__(self, radius):
3 | self.radius = radius
4 | @property
5 | def diameter(self):
6 | return self.radius * 2
7 | @diameter.setter
8 | def diameter(self, new_diameter):
9 | self.radius = new_diameter / 2
10 |
11 |
12 | my_circle = Circle(2)
13 |
14 | print('radius is {}'.format(my_circle.radius))
15 | print('diameter is {}'.format(my_circle.diameter))
16 |
17 |
18 | #change the radius into 6
19 | my_circle.radius = 6
20 |
21 | print('radius is {}'.format(my_circle.radius))
22 | print('diameter is {}'.format(my_circle.diameter))
23 |
24 | #change the diameter into 6
25 | my_circle.diameter = 6
26 |
27 | print('radius is {}'.format(my_circle.radius))
28 | print('diameter is {}'.format(my_circle))
29 |
30 |
31 |
--------------------------------------------------------------------------------
/python_demo/class_demo/super_1.py:
--------------------------------------------------------------------------------
1 | # coding:utf8
2 | # https://www.runoob.com/w3cnote/python-super-detail-intro.html
3 | class A(object):
4 | def __init__(self):
5 | self.n=2
6 | def add(self,m):
7 | self.n +=m
8 | class B(A):
9 | def __init__(self):
10 | self.n=4
11 | def add(self,m):
12 | super(B,C).add(self,m)
13 | self.n +=2
14 | class C(B):
15 | def __init__(self):
16 | self.n=3
17 | def add(self,m):
18 | super(C,C).add(self,m) # B 代表什么
19 | self.n +=3
20 |
21 | if __name__ == "__main__":
22 | c = C()
23 | c.add(2)
24 | print(c.n)
25 | print(C.__mro__)
26 |
--------------------------------------------------------------------------------
/python_demo/class_demo/super_2.py:
--------------------------------------------------------------------------------
1 | # coding:utf8
2 |
3 | class A(object):
4 | def __init__(self):
5 | print("a init")
6 | self.n=2
7 | def add(self,m):
8 | print("A")
9 | self.n+=m
10 | class B(A):
11 | def __init__(self):
12 | print("b init")
13 | self.n=3
14 | def add(self,m):
15 | print("B")
16 | # D 确定继承顺序
17 | super(B,D).add(self,m) # mro 表根据D 来确定
18 | self.n+=3
19 | class C(A):
20 | def __init__(self):
21 | print("c init")
22 | self.n=-1000
23 | def add(self,m):
24 | print("C")
25 | super(C,C).add(self,m)
26 | self.n+=4
27 | class D(B,C):
28 | def __init__(self):
29 | print("D init")
30 | self.n= 5
31 | super(B,self).__init__()
32 | def add(self,m):
33 | print("D")
34 | super(D,D).add(self,m)
35 | self.n+=5
36 |
37 |
38 | if __name__ == "__main__":
39 | print(D.__mro__)
40 | print(B.__mro__)
41 | d=D()
42 | super(B, D).add(d, 10) # B 找索引的起始位置, D 确定mro 表
43 | super(B, d).add(10) # d 表示直接传入一个instance,同时确定mro表
44 | # print(type(D))
45 | # print(type(d).__mro__)
46 | # d.add(5)
47 | #b = B()
48 | ##d = D()
49 | ##print(d.n)
50 | #b.aadd(4)
51 | ##print(d.n)
52 | #print(b.n)
53 | # c = C()
54 | # print(super(C, c).__init__())
55 | # print(super(C, c).__init__())
56 |
57 |
58 |
59 |
60 |
--------------------------------------------------------------------------------
/python_demo/class_demo/super_demo.py:
--------------------------------------------------------------------------------
1 | #!/usr/bin/env python
2 | # -*- encoding: utf-8 -*-
3 | """
4 | Topic: sample
5 | Desc :
6 | """
7 |
8 | class A:
9 | def spam(self):
10 | print('A.spam')
11 |
12 |
13 | class B(A):
14 | def spam(self):
15 | print('B.spam')
16 | super().spam() # Call parent spam()
17 |
18 |
19 | class A1:
20 | def __init__(self):
21 | self.x = 0
22 |
23 |
24 | class B1(A1):
25 | def __init__(self):
26 | super().__init__()
27 | self.y = 1
28 |
29 |
30 | class Proxy():
31 | def __init__(self, obj):
32 | self._obj = obj
33 |
34 | # Delegate attribute lookup to internal obj
35 | def __getattr__(self, name):
36 | return getattr(self._obj, name)
37 |
38 | # Delegate attribute assignment
39 | def __setattr__(self, name, value):
40 | if name.startswith('_'):
41 | super().__setattr__(name, value) # Call original __setattr__
42 | else:
43 | setattr(self._obj, name, value)
44 |
45 |
46 | class Base:
47 | def __init__(self):
48 | print('Base.__init__')
49 |
50 |
51 | class AA(Base):
52 | def __init__(self):
53 | super().__init__()
54 | print('AA.__init__')
55 |
56 |
57 | class BB(Base):
58 | def __init__(self):
59 | super().__init__()
60 | print('BB.__init__')
61 |
62 |
63 | class CC(AA, BB):
64 | def __init__(self):
65 | super().__init__() # Only one call to super() here
66 | print('CC.__init__')
67 |
68 |
69 | CC()
70 | print(CC.__mro__)
71 |
72 |
73 | class A3:
74 | def spam(self):
75 | print('A3.spam')
76 | super().spam()
77 |
78 |
79 | class B3:
80 | def spam(self):
81 | print('B3.spam')
82 |
83 |
84 | class C3(A3, B3):
85 | pass
86 |
87 | print(C3.__mro__)
88 | C3().spam()
--------------------------------------------------------------------------------
/python_demo/class_demo/super_test.py:
--------------------------------------------------------------------------------
1 | # coding:utf8
2 | class A(object):
3 | def __init__(self):
4 | self.n=2
5 | def add(self,m):
6 | self.n +=m
7 |
8 | class B(A):
9 | def __init__(self):
10 | self.n=3
11 | def add(self,m):
12 | super(B,self).add(m)
13 | self.n +=3
14 |
15 | if __name__ == "__main__":
16 |
17 | b=B()
18 | b.add(3)
19 | print(b.n) # 是多少呢???
20 |
--------------------------------------------------------------------------------
/python_demo/class_demo/super指向兄弟类的方法.py:
--------------------------------------------------------------------------------
1 | class A:
2 | def spam(self):
3 | super().spam()
4 | print('A.spam')
5 |
6 | class B:
7 | def spam(self):
8 | print('B.spam')
9 |
10 | class C(A,B):
11 | pass
12 |
13 | if __name__ == "__main__":
14 | data = C()
15 | print(data.spam())
--------------------------------------------------------------------------------
/python_demo/class_demo/super菱形继承.py:
--------------------------------------------------------------------------------
1 | # coding:utf8
2 | class Base:
3 | def __init__(self):
4 | print('Base.__init__')
5 | class A(Base):
6 | def __init__(self):
7 | #Base.__init__(self)
8 | print('A.__init__')
9 | super().__init__()
10 |
11 | class B(Base):
12 | def __init__(self):
13 | #Base.__init__(self)
14 | print('B.__init__')
15 | super().__init__()
16 |
17 | class C(A,B):
18 | def __init__(self):
19 | #A.__init__(self)
20 | #B.__init__(self)
21 | print('C.__init__')
22 | super().__init__()
23 |
24 |
25 | if __name__ == "__main__":
26 | a = C()
27 | print(C.__mro__) # 方法解析顺序表
28 |
29 |
--------------------------------------------------------------------------------
/python_demo/class_demo/test.py:
--------------------------------------------------------------------------------
1 | def add(a, b):
2 | print("=====================")
3 | return a + b
4 |
5 |
6 | if __name__ == "__main__":
7 | add(10, 20)
8 | print("run test.py successfully !!!")
9 |
--------------------------------------------------------------------------------
/python_demo/class_demo/yield_from_demo.py:
--------------------------------------------------------------------------------
1 | # coding:utf8
2 | from collections import abc
3 |
4 | g = (i**2 for i in range(10))
5 | agen = (i for i in range(4, 8))
6 |
7 | def sol():
8 | for i in [1,2,3]: yield i
9 |
10 | def sol2(): #注意:sol2与sol效果等价
11 | #yield from是将可迭代对象中的元素一个一个yield出来
12 | yield from [1,2,3]
13 |
14 | def gen(*args, **kwargs):
15 | for item in args:
16 | yield item
17 |
18 |
19 | def gen2(*args, **kwargs):
20 | for item in args:
21 | yield from item
22 |
23 | if __name__ == "__main__":
24 |
25 | #type(next(g))
26 | #print(next(g))
27 | #print(next(g))
28 | #print(isinstance(g,abc.Iterator))
29 |
30 | iterab = sol()
31 | iterab2 = sol2()
32 | print(next(iterab),next(iterab))
33 | print(next(iterab2),next(iterab2))
34 |
35 |
36 | astr = "ABC"
37 | alist = [1, 2, 3]
38 | adict = {"nba": "湖人", "age": 18}
39 |
40 | new_list = gen(astr, alist, adict, agen)
41 | new_list2 = gen2(astr, alist, adict, agen)
42 | print(list(new_list))
43 | print(list(new_list2))
44 |
45 |
46 |
47 |
48 |
49 |
--------------------------------------------------------------------------------
/python_demo/class_demo/函数装饰器.py:
--------------------------------------------------------------------------------
1 | # coding:utf8
2 | from functools import wraps
3 | def decorator_name(f):
4 | @wraps(f)
5 | def decorated(*args, **kwargs):
6 | if not can_run:
7 | return "Function will not run"
8 | return f(*args, **kwargs)
9 | return decorated
10 |
11 | @decorator_name
12 | def func():
13 | return("Function is running")
14 |
15 | can_run = True
16 | print(func())
17 |
18 |
19 |
20 |
--------------------------------------------------------------------------------
/python_demo/class_demo/函数装饰器2.py:
--------------------------------------------------------------------------------
1 | # -*- coding=utf-8 -*-
2 | import time
3 | import functools
4 |
5 | #@functools.lru_cache()
6 | def fibnacci(n):
7 | if n<2:
8 | return n
9 | return fibnacci(n-2) + fibnacci(n-1)
10 |
11 | a = time.time()
12 | value = fibnacci(30)
13 | b = time.time()
14 | print(b-a)
15 | print(value)
16 |
17 |
--------------------------------------------------------------------------------
/python_demo/class_demo/函数装饰器应用.py:
--------------------------------------------------------------------------------
1 | # coding:utf8
2 | import functools
3 |
4 | def user_login_data(f):
5 | @functools.wraps(f) #可以保持当前装饰器去装饰的函数的 __name__ 的值不变
6 | def wrapper(*args, **kwargs):
7 | return f(*args, **kwargs)
8 |
9 | return wrapper
10 |
11 | @user_login_data
12 | def num1():
13 | print("aaa")
14 |
15 |
16 |
17 | @user_login_data
18 | def num2():
19 | print("bbbb")
20 |
21 | if __name__ == '__main__':
22 | print(num1.__name__)
23 | print(num2.__name__)
24 |
25 |
--------------------------------------------------------------------------------
/python_demo/class_demo/可迭代对象和迭代器.py:
--------------------------------------------------------------------------------
1 | # coding:utf8
2 | from collections import abc
3 | class Eg_1:
4 |
5 | def __init__(self,text):
6 | self.text = text
7 | self.sub_text = text.split()
8 |
9 | def __getitem__(self,index):
10 | return self.sub_text[index]
11 |
12 | b = Eg_1('I am Elvin!')
13 | print(isinstance(b,abc.Iterable))
14 | a = iter(b)
15 |
16 | print(isinstance(a,abc.Iterator))
17 |
18 |
19 |
20 |
--------------------------------------------------------------------------------
/python_demo/class_demo/多继承兄弟类.py:
--------------------------------------------------------------------------------
1 | # coding:utf8
2 | #coding:utf-8
3 | #单继承
4 | class A(object):
5 | def __init__(self):
6 | self.n=2
7 | def add(self,m):
8 | self.n +=m
9 | class B(A):
10 | def __init__(self):
11 | self.n=3
12 | def add(self,m):
13 | #super(B,self).add(m)
14 | self.n +=3
15 | b=B()
16 | b.add(3)
17 | print(b.n)
18 |
--------------------------------------------------------------------------------
/python_demo/class_demo/多继承解决方案.py:
--------------------------------------------------------------------------------
1 | # coding:utf8
2 | class A:
3 | def spam(self):
4 | print('A.spam')
5 | super().spam()
6 | class B:
7 | def spam(self):
8 | print('B.spam')
9 | class C(A,B):
10 | pass
11 |
12 | a = C()
13 | a.spam()
--------------------------------------------------------------------------------
/python_demo/class_demo/多继承问题.py:
--------------------------------------------------------------------------------
1 | # coding:utf8
2 | class Base:
3 | def __init__(self):
4 | print('Base.__init__')
5 | class A(Base):
6 | def __init__(self):
7 | #super().__init__()
8 | print('A.__init__')
9 | class B(Base):
10 | def __init__(self):
11 | super().__init__()
12 | print('B.__init__')
13 |
14 | class C(A,B):
15 | def __init__(self):
16 | super().__init__() #一句话即可
17 | print('C.__init__')
18 | a = C()
19 | print(C.__mro__)
--------------------------------------------------------------------------------
/python_demo/class_demo/定义数据类.py:
--------------------------------------------------------------------------------
1 | # coding:utf8
2 | class MyDict(object):
3 |
4 | def __init__(self):
5 | print('call fun __init__')
6 | self.item = {}
7 |
8 | def __getitem__(self,key):
9 | print('call fun __getItem__')
10 | return self.item.get(key)
11 |
12 | def __setitem__(self,key,value):
13 | print('call fun __setItem__')
14 | self.item[key] =value
15 |
16 | def __delitem__(self,key):
17 | print('cal fun __delitem__')
18 | del self.item[key]
19 |
20 | def __len__(self):
21 | return len(self.item)
22 |
23 | myDict = MyDict()
24 | print (myDict.item)
25 | myDict[2] = 'ch'
26 | myDict['hobb'] = 'sing'
27 | print(myDict.item)
28 |
29 |
--------------------------------------------------------------------------------
/python_demo/class_demo/属性的代理访问.py:
--------------------------------------------------------------------------------
1 | # coding:utf8
2 | class A:
3 | def spam(self, x):
4 | print("x = ",x)
5 | def foo(self):
6 | print("I am in A:foo")
7 |
8 | class B:
9 | """ 使用__getattr__ 的代理,代理方法比较多时候"""
10 | def __init__(self):
11 | self._a = A()
12 | def bar(self):
13 | pass
14 | # Expose all of the methods defined on class A
15 | def __getattr__(self, name):
16 | """ 这个方法在访问的attribute 不存在的时候被调用
17 | the __getattr__() method is actually a fallback method
18 | that only gets called when an attribute is not found"""
19 | return getattr(self._a, name)
20 |
21 | if __name__ == "__main__":
22 | b = B()
23 | #b.bar() # Calls B.bar() (exists on B)
24 | b.spam(1000)
25 |
--------------------------------------------------------------------------------
/python_demo/class_demo/抽象基类.py:
--------------------------------------------------------------------------------
1 |
2 | from abc import ABCMeta,abstractmethod
3 |
4 | class IStream(metaclass=ABCMeta):
5 | @abstractmethod
6 | def read(self, maxbytes=-1):
7 | pass
8 | @abstractmethod
9 | def write(self, data):
10 | pass
11 |
12 | class SocketStream(IStream):
13 | def read(self, maxbytes=-1):
14 | print("I am in sokerstream:read")
15 | def write(self, data):
16 | print("I am in sokerstream:write")
17 |
18 | if __name__ == "__main__":
19 | a = SocketStream()
20 | print(isinstance(a,IStream))
21 |
--------------------------------------------------------------------------------
/python_demo/class_demo/生成器yield.py:
--------------------------------------------------------------------------------
1 | # coding:utf8
2 | from collections import abc
3 | def sol():
4 | for i in [1,2,3]: yield i
5 |
6 | def sol2(): #注意:sol2与sol效果等价
7 | yield from [1,2,3]
8 | iterab = sol()
9 | iterab2 = sol2()
10 | print(next(iterab),next(iterab))
11 | print(next(iterab2),next(iterab2))
12 |
13 |
14 |
15 |
--------------------------------------------------------------------------------
/python_demo/class_demo/生成器函数.py:
--------------------------------------------------------------------------------
1 | # coding:utf8
2 | from collections import abc
3 |
4 | def fibonacci(n): # 生成器函数 - 斐波那契
5 | a, b, counter = 0, 1, 0
6 | while True:
7 | if (counter > n):
8 | return
9 | yield a
10 | a, b = b, a + b
11 | counter += 1
12 |
13 | if __name__ == "__main__":
14 | f = fibonacci(10) # f 是一个迭代器,由生成器返回生成
15 | print(type(f))
16 | print(isinstance(f,abc.Iterator))
17 | print(next(f))
18 | print(next(f))
19 |
20 |
21 |
22 |
--------------------------------------------------------------------------------
/python_demo/class_demo/简化数据初始化.py:
--------------------------------------------------------------------------------
1 | # coding:utf8
2 |
3 | import math
4 | class Structure1:
5 | # Class variable that specifies expected fields
6 | _fields = []
7 | def __init__(self, *args):
8 | if len(args) != len(self._fields):
9 | raise TypeError('Expected {} arguments'.format(len(self._fields)))
10 | # Set the arguments
11 | for name, value in zip(self._fields, args):
12 | setattr(self, name, value)
13 |
14 | class Stock(Structure1):
15 | # 不用写初始化函数
16 | _fields = ['name', 'shares', 'price']
17 |
18 | s1 = Stock('ACME', 50, 91.1)
19 | print(s1.shares)
20 |
21 |
22 |
--------------------------------------------------------------------------------
/python_demo/class_demo/类方法构造实例.py:
--------------------------------------------------------------------------------
1 |
2 | # coding:utf8
3 | import time
4 | class Date:
5 | """ 方法一:使用类方法"""
6 | # Primary constructor
7 | def __init__(self, year, month, day):
8 | self.year = year
9 | self.month = month
10 | self.day = day
11 |
12 |
13 | @classmethod
14 | def today(cls):
15 | t = time.localtime()
16 | return cls(t.tm_year, t.tm_mon, t.tm_mday,t.tm_hour)
17 |
18 | if __name__ == "__main__":
19 | a = Date(2012, 12, 21) # Primary
20 | b = Date.today() # Alternate
21 | print("today is {}-{}-{}".format(b.year, b.month, b.day))
22 |
23 | print(time.time())
24 | print(time.localtime())
25 | print(time.strftime('%Y-%m-%d %H:%M:%S'))
--------------------------------------------------------------------------------
/python_demo/class_demo/类的一般操作.py:
--------------------------------------------------------------------------------
1 | # coding:utf8
2 | # -*- coding: UTF-8 -*-
3 | class A(object):
4 | m = 10
5 | n = 20
6 | def __init__(self,a,b):
7 | self.a = a
8 | self.b = b
9 |
10 | def foo(self, x): # 实例方法
11 | print("executing foo(%s,%s)" % (self, x))
12 | print('self:', self)
13 | return self.a
14 | @classmethod # 类方法
15 | def class_foo(cls, x):
16 | print("executing class_foo(%s,%s)" % (cls, x))
17 | print('cls:', cls)
18 | return cls.n
19 | @staticmethod # 静态方法
20 | def static_foo(x):
21 | print("executing static_foo(%s)" % x)
22 | return
23 |
24 | a = A(3,4) # A 实例化了
25 | b = A(4,5) # B 是例化了
26 | print(a.__dict__)
27 | a.m = 1000 # 新增了一个实例属性,类属性还在
28 |
29 | print(a.__dict__)
30 | print(A.__dict__)
31 |
32 |
33 |
34 |
35 |
--------------------------------------------------------------------------------
/python_demo/class_demo/闭包的应用.py:
--------------------------------------------------------------------------------
1 | # coding:utf8
2 |
3 | def outer():
4 | x = 1
5 | def inner():
6 | print(x) # 1
7 | inner() # 2
8 |
9 | def outer2():
10 | x = 1
11 | y = 0
12 | def inner():
13 | print(x) # 1
14 | print(y)
15 | return inner
16 |
17 | class Averager():
18 |
19 | def __init__(self):
20 | self.series=[]
21 | def __call__(self,new_value):
22 | self.series.append(new_value)
23 | total = sum(self.series)
24 | return total/len(self.series)
25 |
26 | if __name__ == '__main__':
27 |
28 | outer()
29 | foo = outer2()
30 | foo() # 能打印出1吗?
31 | print(foo.__closure__)
32 |
33 |
34 | avg = Averager()
35 | print(avg(10))
36 | print(avg(11))
37 |
38 |
--------------------------------------------------------------------------------
/python_demo/class_demo/闭包陷阱.py:
--------------------------------------------------------------------------------
1 | # coding:utf8
2 | #希望一次返回3个函数,分别计算1x1,2x2,3x3:
3 | def count():
4 | fs = []
5 | for i in range(1, 4):
6 | def f(j):
7 | def g():
8 | return j*j
9 | return g
10 | fs.append(f(i))
11 | return fs
12 |
13 | f1, f2, f3 = count()
14 |
15 | print(f1(),f2(),f3())
16 |
17 |
--------------------------------------------------------------------------------
/python_demo/class_demo/闭包陷阱解决方案.py:
--------------------------------------------------------------------------------
1 | # coding:utf8
2 | def outer(some_func):
3 | def inner():
4 | print ("before some_func")
5 | ret = some_func() # 1
6 | return ret + 1
7 | return inner
8 | def foo():
9 | return 1
10 |
11 | decorated = outer(foo) # 2
12 | print(decorated())
13 |
14 |
15 |
16 |
--------------------------------------------------------------------------------
/python_demo/design_pattern/README.md:
--------------------------------------------------------------------------------
1 | # Design pattern
2 |
3 | ## 1.1 单例模式:
4 | - 让你能够保证一个类只有一个实例, 并提供一个访问该实例的全局节点。
5 | - 实现方式:隐藏构造函数并实现一个静态的构建方法即可;
6 | - 相同的类在多线程环境中会出错,多线程可能会同时调用构建方法并获取多个单例类的实例;
7 |
8 | ## 2 工厂模式
9 | ## 2.1 简单工厂模式
10 | - 简单工厂模式专门定义一个类来负责创建其他类的实例;
11 | - 创建的实例通常都具有共同的父类;
12 | - 简单工厂模式是工厂模式家族中最简单实用的模式;
13 | - 简单工厂模式通常被用于创建具有相似特征的对象,例如不同类型的图形对象、不同类型的数据库连接对象等。
14 |
15 | ## 2.2 工厂方法模式
16 | - 抽象基类的定义方式
17 | - 创建型设计模式,它提供了一种将对象的创建过程委托给子类的方式。
18 | - 工厂方法模式使用一个接口或抽象类来表示创建对象的工厂,然后将具体的创建逻辑委托给子类来实现;
19 |
20 | ## 3 抽象工厂模式
21 | 
22 | - 种创建型设计模式, 它能创建一系列相关的对象, 而无需指定其具体类。
23 | - 抽象工厂定义了用于创建不同产品的接口, 但将实际的创建工作留给了具体工厂类;
24 | - 每个工厂类型都对应一个特定的产品变体;
25 | - 客户端代码调用的是工厂对象的构建方法, 而不是直接调用构造函数 ( new操作符)。
26 | - 由于一个工厂对应一种产品变体, 因此它创建的所有产品都可相互兼容
27 | - 客户端代码仅通过其抽象接口与工厂和产品进行交互。 该接口允许同一客户端代码与不同产品进行交互。
28 | - 你只需创建一个具体工厂类并将其传递给客户端代码即可.
29 |
30 | ## 4 迭代器模式
31 | - 迭代器是一种行为设计模式, 让你能在不暴露复杂数据结构内部细节的情况下遍历其中所有的元素。
32 | - 该模式在 Python 代码中很常见。 许多框架和程序库都使用它来提供遍历其集合的标准方式。
33 | - 迭代器可以通过导航方法 (例如 next和 previous等) 来轻松识别。
34 |
35 | ## 5 适配器模式
36 | - 适配器是一种结构型设计模式, 它能使不兼容的对象能够相互合作;
37 | - 适配器可担任两个对象间的封装器, 它会接收对于一个对象的调用, 并将其转换为另一个对象可识别的格式和接口。
38 |
39 | ## 6 观察者模式
40 | - 观察者模式是一种行为设计模式, 允许你定义一种订阅机制, 可在对象事件发生时通知多个 “观察” 该对象的其他对象;
41 | - 遍历订阅者并调用其对象的特定通知方法;
42 | - 提供了一种作用于任何实现了订阅者接口的对象的机制, 可对其事件进行订阅和取消订阅;
43 | - 该模式可以通过将对象存储在列表中的订阅方法, 和对于面向该列表中对象的更新方法的调用来识别。
44 |
45 | # 参考文献
46 | [设计模式1](https://refactoringguru.cn/design-patterns/python)
47 | [设计模式2](https://www.modb.pro/db/634285)
48 | [设计模式2](https://baijiahao.baidu.com/s?id=1758410771062793648&wfr=spider&for=pc)
49 |
--------------------------------------------------------------------------------
/python_demo/design_pattern/abs_factory.jpg:
--------------------------------------------------------------------------------
https://raw.githubusercontent.com/Elvin-Ma/pytorch_guide/da12d191ab1dae88e67c2c30246be9f29492f4c5/python_demo/design_pattern/abs_factory.jpg
--------------------------------------------------------------------------------
/python_demo/design_pattern/abs_factory_pattern.py:
--------------------------------------------------------------------------------
1 | from __future__ import annotations
2 | from abc import ABC, abstractmethod
3 |
4 |
5 | class AbstractFactory(ABC):
6 | """
7 | The Abstract Factory interface declares a set of methods that return
8 | different abstract products. These products are called a family and are
9 | related by a high-level theme or concept. Products of one family are usually
10 | able to collaborate among themselves. A family of products may have several
11 | variants, but the products of one variant are incompatible with products of
12 | another.
13 | """
14 | @abstractmethod
15 | def create_product_a(self) -> AbstractProductA:
16 | pass
17 |
18 | @abstractmethod
19 | def create_product_b(self) -> AbstractProductB:
20 | pass
21 |
22 |
23 | class ConcreteFactory1(AbstractFactory):
24 | """
25 | Concrete Factories produce a family of products that belong to a single
26 | variant. The factory guarantees that resulting products are compatible. Note
27 | that signatures of the Concrete Factory's methods return an abstract
28 | product, while inside the method a concrete product is instantiated.
29 | """
30 |
31 | def create_product_a(self) -> AbstractProductA:
32 | return ConcreteProductA1()
33 |
34 | def create_product_b(self) -> AbstractProductB:
35 | return ConcreteProductB1()
36 |
37 |
38 | class ConcreteFactory2(AbstractFactory):
39 | """
40 | Each Concrete Factory has a corresponding product variant.
41 | """
42 |
43 | def create_product_a(self) -> AbstractProductA:
44 | return ConcreteProductA2()
45 |
46 | def create_product_b(self) -> AbstractProductB:
47 | return ConcreteProductB2()
48 |
49 |
50 | class AbstractProductA(ABC):
51 | """
52 | Each distinct product of a product family should have a base interface. All
53 | variants of the product must implement this interface.
54 | """
55 |
56 | @abstractmethod
57 | def useful_function_a(self) -> str:
58 | pass
59 |
60 |
61 | """
62 | Concrete Products are created by corresponding Concrete Factories.
63 | """
64 |
65 |
66 | class ConcreteProductA1(AbstractProductA):
67 | def useful_function_a(self) -> str:
68 | return "The result of the product A1."
69 |
70 |
71 | class ConcreteProductA2(AbstractProductA):
72 | def useful_function_a(self) -> str:
73 | return "The result of the product A2."
74 |
75 |
76 | class AbstractProductB(ABC):
77 | """
78 | Here's the the base interface of another product. All products can interact
79 | with each other, but proper interaction is possible only between products of
80 | the same concrete variant.
81 | """
82 | @abstractmethod
83 | def useful_function_b(self) -> None:
84 | """
85 | Product B is able to do its own thing...
86 | """
87 | pass
88 |
89 | @abstractmethod
90 | def another_useful_function_b(self, collaborator: AbstractProductA) -> None:
91 | """
92 | ...but it also can collaborate with the ProductA.
93 |
94 | The Abstract Factory makes sure that all products it creates are of the
95 | same variant and thus, compatible.
96 | """
97 | pass
98 |
99 |
100 | """
101 | Concrete Products are created by corresponding Concrete Factories.
102 | """
103 |
104 |
105 | class ConcreteProductB1(AbstractProductB):
106 | def useful_function_b(self) -> str:
107 | return "The result of the product B1."
108 |
109 | """
110 | The variant, Product B1, is only able to work correctly with the variant,
111 | Product A1. Nevertheless, it accepts any instance of AbstractProductA as an
112 | argument.
113 | """
114 |
115 | def another_useful_function_b(self, collaborator: AbstractProductA) -> str:
116 | result = collaborator.useful_function_a()
117 | return f"The result of the B1 collaborating with the ({result})"
118 |
119 |
120 | class ConcreteProductB2(AbstractProductB):
121 | def useful_function_b(self) -> str:
122 | return "The result of the product B2."
123 |
124 | def another_useful_function_b(self, collaborator: AbstractProductA):
125 | """
126 | The variant, Product B2, is only able to work correctly with the
127 | variant, Product A2. Nevertheless, it accepts any instance of
128 | AbstractProductA as an argument.
129 | """
130 | result = collaborator.useful_function_a()
131 | return f"The result of the B2 collaborating with the ({result})"
132 |
133 |
134 | def client_code(factory: AbstractFactory) -> None:
135 | """
136 | The client code works with factories and products only through abstract
137 | types: AbstractFactory and AbstractProduct. This lets you pass any factory
138 | or product subclass to the client code without breaking it.
139 | """
140 | product_a = factory.create_product_a()
141 | product_b = factory.create_product_b()
142 |
143 | print(f"{product_b.useful_function_b()}")
144 | print(f"{product_b.another_useful_function_b(product_a)} \n", end="")
145 |
146 |
147 | if __name__ == "__main__":
148 | """
149 | The client code can work with any concrete factory class.
150 | """
151 | print("Client: Testing client code with the first factory type:")
152 | client_code(ConcreteFactory1())
153 |
154 | print("\n")
155 |
156 | print("Client: Testing the same client code with the second factory type:\n")
157 | client_code(ConcreteFactory2())
--------------------------------------------------------------------------------
/python_demo/design_pattern/adapter_pattern.py:
--------------------------------------------------------------------------------
1 | class Target:
2 | """
3 | The Target defines the domain-specific interface used by the client code.
4 | """
5 |
6 | def request(self) -> str:
7 | return "Target: The default target's behavior."
8 |
9 |
10 | class Adaptee:
11 | """
12 | The Adaptee contains some useful behavior, but its interface is incompatible
13 | with the existing client code. The Adaptee needs some adaptation before the
14 | client code can use it.
15 | """
16 |
17 | def specific_request(self) -> str:
18 | return ".eetpadA eht fo roivaheb laicepS"
19 |
20 |
21 | class Adapter(Target, Adaptee):
22 | """
23 | The Adapter makes the Adaptee's interface compatible with the Target's
24 | interface via multiple inheritance.
25 | """
26 |
27 | def request(self) -> str:
28 | return f"Adapter: (TRANSLATED) {self.specific_request()[::-1]}"
29 |
30 |
31 | def client_code(target: "Target") -> None:
32 | """
33 | The client code supports all classes that follow the Target interface.
34 | """
35 |
36 | print(target.request(), end="")
37 |
38 |
39 | if __name__ == "__main__":
40 | print("Client: I can work just fine with the Target objects:")
41 | target = Target()
42 | client_code(target)
43 | print("\n")
44 |
45 | adaptee = Adaptee()
46 | print("Client: The Adaptee class has a weird interface. "
47 | "See, I don't understand it:")
48 | print(f"Adaptee: {adaptee.specific_request()}", end="\n\n")
49 |
50 | print("Client: But I can work with it via the Adapter:")
51 | adapter = Adapter()
52 | client_code(adapter)
--------------------------------------------------------------------------------
/python_demo/design_pattern/factory_pattern.py:
--------------------------------------------------------------------------------
1 | # 简单工程模式
2 | class Product:
3 | def operation(self):
4 | pass
5 |
6 | class ConcreteProductA(Product):
7 | def __init__(self):
8 | pass
9 | def operation(self):
10 | return "ConcreteProductA"
11 |
12 | class ConcreteProductB(Product):
13 | def operation(self):
14 | return "ConcreteProductB"
15 |
16 | class SimpleFactory:
17 | @staticmethod
18 | def create_product(product_type):
19 | if product_type == "A":
20 | return ConcreteProductA()
21 | elif product_type == "B":
22 | return ConcreteProductB()
23 | else:
24 | raise ValueError("Invalid product type")
25 |
26 | def simple_factory_demo():
27 | product_a = SimpleFactory.create_product("A")
28 | product_b = SimpleFactory.create_product("B")
29 |
30 | print(product_a.operation()) # 输出:ConcreteProductA
31 | print(product_b.operation()) # 输出:ConcreteProductB
32 |
33 |
34 | from abc import ABC, abstractmethod
35 |
36 | from abc import ABC, abstractmethod
37 |
38 | class Shape(ABC):
39 | @abstractmethod
40 | def area(self):
41 | pass
42 |
43 | class Rectangle(Shape):
44 | def __init__(self, width, height):
45 | self.width = width
46 | self.height = height
47 |
48 | def area(self):
49 | return self.width * self.height
50 |
51 | class Circle(Shape):
52 | def __init__(self, radius):
53 | self.radius = radius
54 |
55 | def area(self):
56 | return 3.14 * self.radius ** 2
57 |
58 | def abstract_base_class_demo():
59 | # shape = Shape()
60 | rectangle = Rectangle(3, 4) # 12
61 | print(rectangle.area())
62 |
63 | circle = Circle(5)
64 | print(circle.area()) #78.5
65 |
66 | # 定义抽象产品类
67 | # class Product(ABC):
68 | # '''
69 | # 抽象基类(抽象父类),Python 中的 abc 模块提供了抽象基类的支持,
70 | # 抽象基类是一种不能直接被实例化的类,它的主要作用是定义接口和规范子类的行为。
71 | # ABC: 是一个抽象基类,它的子类必须实现指定的抽象方法。如果子类没有实现抽象方法,
72 | # 则在实例化子类对象时会抛出 TypeError 异常。
73 | # abstractmethod: 是一个装饰器,它用于指定一个抽象方法。
74 | # 抽象方法是一个没有实现的方法,它只是一个接口,需要由子类去实现。
75 | # '''
76 | # @abstractmethod
77 | # def use(self):
78 | # pass
79 |
80 |
81 |
82 | # # 定义具体产品类 A
83 | # class ConcreteProductA(Product):
84 | # def use(self):
85 | # print("Using product A")
86 |
87 | # # 定义具体产品类 B
88 | # class ConcreteProductB(Product):
89 | # def use(self):
90 | # print("Using product B")
91 |
92 | # # 定义工厂类
93 | # class Creator(ABC):
94 | # @abstractmethod
95 | # def factory_method(self):
96 | # pass
97 |
98 | # def some_operation(self):
99 | # product = self.factory_method()
100 | # product.use()
101 |
102 | # # 定义具体工厂类 A
103 | # class ConcreteCreatorA(Creator):
104 | # def factory_method(self):
105 | # return ConcreteProductA()
106 |
107 | # # 定义具体工厂类 B
108 | # class ConcreteCreatorB(Creator):
109 | # def factory_method(self):
110 | # return ConcreteProductB()
111 |
112 | # def factory_method_demo():
113 | # creator_a = ConcreteCreatorA()
114 | # creator_a.some_operation()
115 |
116 | # creator_b = ConcreteCreatorB()
117 | # creator_b.some_operation()
118 |
119 | if __name__ == "__main__":
120 |
121 | simple_factory_demo()
122 | # factory_method_demo()
123 | print("run factory_pattern.py successfully !!!")
124 |
125 |
126 |
--------------------------------------------------------------------------------
/python_demo/design_pattern/iterator_pattern.py:
--------------------------------------------------------------------------------
1 | from __future__ import annotations
2 | from collections.abc import Iterable, Iterator
3 | from typing import Any, List
4 |
5 |
6 | """
7 | To create an iterator in Python, there are two abstract classes from the built-
8 | in `collections` module - Iterable,Iterator. We need to implement the
9 | `__iter__()` method in the iterated object (collection), and the `__next__ ()`
10 | method in theiterator.
11 | """
12 |
13 |
14 | class AlphabeticalOrderIterator(Iterator):
15 | """
16 | Concrete Iterators implement various traversal algorithms. These classes
17 | store the current traversal position at all times.
18 | """
19 |
20 | """
21 | `_position` attribute stores the current traversal position. An iterator may
22 | have a lot of other fields for storing iteration state, especially when it
23 | is supposed to work with a particular kind of collection.
24 | """
25 | _position: int = None
26 |
27 | """
28 | This attribute indicates the traversal direction.
29 | """
30 | _reverse: bool = False
31 |
32 | def __init__(self, collection: WordsCollection, reverse: bool = False) -> None:
33 | self._collection = collection
34 | self._reverse = reverse
35 | self._position = -1 if reverse else 0
36 |
37 | def __next__(self):
38 | """
39 | The __next__() method must return the next item in the sequence. On
40 | reaching the end, and in subsequent calls, it must raise StopIteration.
41 | """
42 | try:
43 | value = self._collection[self._position]
44 | self._position += -1 if self._reverse else 1
45 | except IndexError:
46 | raise StopIteration()
47 |
48 | return value
49 |
50 |
51 | class WordsCollection(Iterable):
52 | """
53 | Concrete Collections provide one or several methods for retrieving fresh
54 | iterator instances, compatible with the collection class.
55 | """
56 |
57 | def __init__(self, collection: List[Any] = []) -> None:
58 | self._collection = collection
59 |
60 | def __iter__(self) -> AlphabeticalOrderIterator:
61 | """
62 | The __iter__() method returns the iterator object itself, by default we
63 | return the iterator in ascending order.
64 | """
65 | return AlphabeticalOrderIterator(self._collection)
66 |
67 | def get_reverse_iterator(self) -> AlphabeticalOrderIterator:
68 | return AlphabeticalOrderIterator(self._collection, True)
69 |
70 | def add_item(self, item: Any):
71 | self._collection.append(item)
72 |
73 |
74 | if __name__ == "__main__":
75 | # The client code may or may not know about the Concrete Iterator or
76 | # Collection classes, depending on the level of indirection you want to keep
77 | # in your program.
78 | collection = WordsCollection()
79 | collection.add_item("First")
80 | collection.add_item("Second")
81 | collection.add_item("Third")
82 |
83 | print("Straight traversal:")
84 | print("\n".join(collection))
85 | print("")
86 |
87 | print("Reverse traversal:")
88 | print("\n".join(collection.get_reverse_iterator()), end="")
--------------------------------------------------------------------------------
/python_demo/design_pattern/observer_pattern.py:
--------------------------------------------------------------------------------
1 | from __future__ import annotations
2 | from abc import ABC, abstractmethod
3 | from random import randrange
4 | from typing import List
5 |
6 |
7 | class Subject(ABC):
8 | """
9 | The Subject interface declares a set of methods for managing subscribers.
10 | """
11 |
12 | @abstractmethod
13 | def attach(self, observer: Observer) -> None:
14 | """
15 | Attach an observer to the subject.
16 | """
17 | pass
18 |
19 | @abstractmethod
20 | def detach(self, observer: Observer) -> None:
21 | """
22 | Detach an observer from the subject.
23 | """
24 | pass
25 |
26 | @abstractmethod
27 | def notify(self) -> None:
28 | """
29 | Notify all observers about an event.
30 | """
31 | pass
32 |
33 |
34 | class ConcreteSubject(Subject):
35 | """
36 | The Subject owns some important state and notifies observers when the state
37 | changes.
38 | """
39 |
40 | _state: int = None
41 | """
42 | For the sake of simplicity, the Subject's state, essential to all
43 | subscribers, is stored in this variable.
44 | """
45 |
46 | _observers: List[Observer] = []
47 | """
48 | List of subscribers. In real life, the list of subscribers can be stored
49 | more comprehensively (categorized by event type, etc.).
50 | """
51 |
52 | def attach(self, observer: Observer) -> None:
53 | print("Subject: Attached an observer.")
54 | self._observers.append(observer)
55 |
56 | def detach(self, observer: Observer) -> None:
57 | self._observers.remove(observer)
58 |
59 | """
60 | The subscription management methods.
61 | """
62 |
63 | def notify(self) -> None:
64 | """
65 | Trigger an update in each subscriber.
66 | """
67 |
68 | print("Subject: Notifying observers...")
69 | for observer in self._observers:
70 | observer.update(self)
71 |
72 | def some_business_logic(self) -> None:
73 | """
74 | Usually, the subscription logic is only a fraction of what a Subject can
75 | really do. Subjects commonly hold some important business logic, that
76 | triggers a notification method whenever something important is about to
77 | happen (or after it).
78 | """
79 |
80 | print("\nSubject: I'm doing something important.")
81 | self._state = randrange(0, 10)
82 |
83 | print(f"Subject: My state has just changed to: {self._state}")
84 | self.notify()
85 |
86 |
87 | class Observer(ABC):
88 | """
89 | The Observer interface declares the update method, used by subjects.
90 | """
91 |
92 | @abstractmethod
93 | def update(self, subject: Subject) -> None:
94 | """
95 | Receive update from subject.
96 | """
97 | pass
98 |
99 |
100 | """
101 | Concrete Observers react to the updates issued by the Subject they had been
102 | attached to.
103 | """
104 |
105 |
106 | class ConcreteObserverA(Observer):
107 | def update(self, subject: Subject) -> None:
108 | if subject._state < 3:
109 | print("ConcreteObserverA: Reacted to the event")
110 |
111 |
112 | class ConcreteObserverB(Observer):
113 | def update(self, subject: Subject) -> None:
114 | if subject._state == 0 or subject._state >= 2:
115 | print("ConcreteObserverB: Reacted to the event")
116 |
117 |
118 | if __name__ == "__main__":
119 | # The client code.
120 |
121 | subject = ConcreteSubject()
122 |
123 | observer_a = ConcreteObserverA()
124 | subject.attach(observer_a)
125 |
126 | observer_b = ConcreteObserverB()
127 | subject.attach(observer_b)
128 |
129 | subject.some_business_logic()
130 | subject.some_business_logic()
131 |
132 | subject.detach(observer_a)
133 |
134 | subject.some_business_logic()
--------------------------------------------------------------------------------
/python_demo/design_pattern/singleton_demo.py:
--------------------------------------------------------------------------------
1 | ## 第一种方式:
2 |
3 | # 创建一个元类
4 | # 在这个例子中,我们创建了一个名为SingletonMeta的元类。
5 | # 这个元类有一个字典_instances,用来存储它创建的单例类的实例。
6 | # 当我们试图创建一个新的Singleton类的实例时,SingletonMeta元类的__call__方法会被调用。
7 | # 在这个方法中,我们首先检查我们是否已经为这个类创建了一个实例。
8 | # 如果没有,我们就调用super()方法来创建一个,并将其存储在_instances字典中。
9 | # 如果我们已经创建了一个实例,我们就直接返回这个实例。
10 | class SingletonMeta(type):
11 | """
12 | The Singleton class can be implemented in different ways in Python. Some
13 | possible methods include: base class, decorator, metaclass. We will use the
14 | metaclass because it is best suited for this purpose.
15 | """
16 |
17 | _instances = {}
18 |
19 | def __call__(cls, *args, **kwargs):
20 | """
21 | Possible changes to the value of the `__init__` argument do not affect
22 | the returned instance.
23 | cls: 元类对象本身,
24 | """
25 | if cls not in cls._instances:
26 | instance = super().__call__(*args, **kwargs)
27 | cls._instances[cls] = instance
28 | return cls._instances[cls]
29 |
30 | # Python会自动调用元类的__call__方法来创建类对象
31 | class Singleton(metaclass=SingletonMeta): # 使用自己定义的元类
32 |
33 | def some_business_logic(self):
34 | """
35 | Finally, any singleton should define some business logic, which can be
36 | executed on its instance.
37 | """
38 |
39 | # ...
40 |
41 |
42 | # 第二种实现方式:
43 | # class Singleton:
44 | # __instance = None
45 |
46 | # def __init__(self):
47 | # if Singleton.__instance is not None:
48 | # raise Exception("This class is a singleton!")
49 | # else:
50 | # Singleton.__instance = self
51 |
52 | # @staticmethod
53 | # def get_instance():
54 | # if Singleton.__instance is None:
55 | # Singleton()
56 | # return Singleton.__instance
57 |
58 |
59 | if __name__ == "__main__":
60 | # The client code.
61 | s1 = Singleton()
62 | # s1.set_attr(a=100)
63 | s1.name = "mmm"
64 | s2 = Singleton()
65 |
66 | if id(s1) == id(s2):
67 | print("==============: ", s2.name)
68 | print("Singleton works, both variables contain the same instance.")
69 | else:
70 | print("Singleton failed, variables contain different instances.")
--------------------------------------------------------------------------------
/python_demo/magic_method/README.md:
--------------------------------------------------------------------------------
1 | # 魔术方法汇总
2 |
3 | ## 基本魔术方法
4 | _new__(cls[, ...]) 1. __new__ 是在一个对象实例化的时候所调用的第一个方法
5 | __init__(self[, ...]) 构造器,当一个实例被创建的时候调用的初始化方法
6 | __del__(self) 析构器,当一个实例被销毁的时候调用的方法
7 | __call__(self[, args...]) 允许一个类的实例像函数一样被调用:x(a, b) 调用 x.__call__(a, b)
8 | __len__(self) 定义当被 len() 调用时的行为
9 | __repr__(self) 定义当被 repr() 调用时的行为
10 | __str__(self) 定义当被 str() 调用时的行为
11 | __bytes__(self) 定义当被 bytes() 调用时的行为
12 | __hash__(self) 定义当被 hash() 调用时的行为
13 | __bool__(self) 定义当被 bool() 调用时的行为,应该返回 True 或 False
14 | __format__(self, format_spec) 定义当被 format() 调用时的行为
15 |
16 | ## 属性相关魔术方法
17 | __getattr__(self, name) 定义当用户试图获取一个不存在的属性时的行为
18 | __getattribute__(self, name) 定义当该类的属性被访问时的行为
19 | __setattr__(self, name, value) 定义当一个属性被设置时的行为
20 | __delattr__(self, name) 定义当一个属性被删除时的行为
21 | __dir__(self) 定义当 dir() 被调用时的行为
22 | __get__(self, instance, owner) 定义当描述符的值被取得时的行为
23 | __set__(self, instance, value) 定义当描述符的值被改变时的行为
24 | __delete__(self, instance) 定义当描述符的值被删除时的行为
25 |
26 | ## 比较操作符
27 | __lt__(self, other) 定义小于号的行为:x < y 调用 x.__lt__(y)
28 | __le__(self, other) 定义小于等于号的行为:x <= y 调用 x.__le__(y)
29 | __eq__(self, other) 定义等于号的行为:x == y 调用 x.__eq__(y)
30 | __ne__(self, other) 定义不等号的行为:x != y 调用 x.__ne__(y)
31 | __gt__(self, other) 定义大于号的行为:x > y 调用 x.__gt__(y)
32 | __ge__(self, other) 定义大于等于号的行为:x >= y 调用 x.__ge__(y)
33 |
34 | ## 算术运算符
35 | __add__(self, other) 定义加法的行为:+
36 | __sub__(self, other) 定义减法的行为:-
37 | __mul__(self, other) 定义乘法的行为:*
38 | __truediv__(self, other) 定义真除法的行为:/
39 | __floordiv__(self, other) 定义整数除法的行为://
40 | __mod__(self, other) 定义取模算法的行为:%
41 | __divmod__(self, other) 定义当被 divmod() 调用时的行为
42 | __pow__(self, other[, modulo]) 定义当被 power() 调用或 ** 运算时的行为
43 | __lshift__(self, other) 定义按位左移位的行为:<<
44 | __rshift__(self, other) 定义按位右移位的行为:>>
45 | __and__(self, other) 定义按位与操作的行为:&
46 | __xor__(self, other) 定义按位异或操作的行为:^
47 | __or__(self, other) 定义按位或操作的行为:|
48 |
49 | ## 反运算
50 | __radd__(self, other) (与上方相同,当左操作数不支持相应的操作时被调用)
51 | __rsub__(self, other) (与上方相同,当左操作数不支持相应的操作时被调用)
52 | __rmul__(self, other) (与上方相同,当左操作数不支持相应的操作时被调用)
53 | __rtruediv__(self, other) (与上方相同,当左操作数不支持相应的操作时被调用)
54 | __rfloordiv__(self, other) (与上方相同,当左操作数不支持相应的操作时被调用)
55 | __rmod__(self, other) (与上方相同,当左操作数不支持相应的操作时被调用)
56 | __rdivmod__(self, other) (与上方相同,当左操作数不支持相应的操作时被调用)
57 | __rpow__(self, other) (与上方相同,当左操作数不支持相应的操作时被调用)
58 | __rlshift__(self, other) (与上方相同,当左操作数不支持相应的操作时被调用)
59 | __rrshift__(self, other) (与上方相同,当左操作数不支持相应的操作时被调用)
60 | __rand__(self, other) (与上方相同,当左操作数不支持相应的操作时被调用)
61 | __rxor__(self, other) (与上方相同,当左操作数不支持相应的操作时被调用)
62 | __ror__(self, other) (与上方相同,当左操作数不支持相应的操作时被调用)
63 |
64 | ## 增量赋值运算符
65 | __iadd__(self, other) 定义赋值加法的行为:+=
66 | __isub__(self, other) 定义赋值减法的行为:-=
67 | __imul__(self, other) 定义赋值乘法的行为:*=
68 | __itruediv__(self, other) 定义赋值真除法的行为:/=
69 | __ifloordiv__(self, other) 定义赋值整数除法的行为://=
70 | __imod__(self, other) 定义赋值取模算法的行为:%=
71 | __ipow__(self, other[, modulo]) 定义赋值幂运算的行为:**=
72 | __ilshift__(self, other) 定义赋值按位左移位的行为:<<=
73 | __irshift__(self, other) 定义赋值按位右移位的行为:>>=
74 | __iand__(self, other) 定义赋值按位与操作的行为:&=
75 | __ixor__(self, other) 定义赋值按位异或操作的行为:^=
76 | __ior__(self, other) 定义赋值按位或操作的行为:|=
77 |
78 | ## 一元操作符
79 | __pos__(self) 定义正号的行为:+x
80 | __neg__(self) 定义负号的行为:-x
81 | __abs__(self) 定义当被 abs() 调用时的行为
82 | __invert__(self) 定义按位求反的行为:~x
83 |
84 | ## 类型转换
85 | __complex__(self) 定义当被 complex() 调用时的行为(需要返回恰当的值)
86 | __int__(self) 定义当被 int() 调用时的行为(需要返回恰当的值)
87 | __float__(self) 定义当被 float() 调用时的行为(需要返回恰当的值)
88 | __round__(self[, n]) 定义当被 round() 调用时的行为(需要返回恰当的值)
89 | __index__(self)
90 | 1. 当对象是被应用在切片表达式中时,实现整形强制转换
91 | 2. 如果你定义了一个可能在切片时用到的定制的数值型,你应该定义 __index__
92 | 3. 如果 __index__ 被定义,则 __int__ 也需要被定义,且返回相同的值
93 |
94 | ## 上下文管理(with 语句)
95 | __enter__(self)
96 | 1. 定义当使用 with 语句时的初始化行为
97 | 2. __enter__ 的返回值被 with 语句的目标或者 as 后的名字绑定
98 | __exit__(self, exc_type, exc_value, traceback)
99 | 1. 定义当一个代码块被执行或者终止后上下文管理器应该做什么
100 | 2. 一般被用来处理异常,清除工作或者做一些代码块执行完毕之后的日常工作
101 |
102 | ## 容器类型
103 | __len__(self) 定义当被 len() 调用时的行为(返回容器中元素的个数)
104 | __getitem__(self, key) 定义获取容器中指定元素的行为,相当于 self[key]
105 | __setitem__(self, key, value) 定义设置容器中指定元素的行为,相当于 self[key] = value
106 | __delitem__(self, key) 定义删除容器中指定元素的行为,相当于 del self[key]
107 | __iter__(self) 定义当迭代容器中的元素的行为
108 | __reversed__(self) 定义当被 reversed() 调用时的行为
109 | __contains__(self, item) 定义当使用成员测试运算符(in 或 not in)时的行为
--------------------------------------------------------------------------------
/python_demo/magic_method/__attr__.py:
--------------------------------------------------------------------------------
1 | #coding:utf8
2 |
3 | class A(object):
4 | # test the __attr__ magic method
5 | def __init__(self,age):
6 | self.name = "Bob"
7 | self.age = age
8 | self.gender = "male"
9 |
10 | def __getattr__(self,name):
11 | print("I am in __getattr__ !")
12 |
13 | def __getattribute__(self, attr):
14 | # 拦截age属性
15 | if attr == "age":
16 | print("问年龄是不礼貌的行为")
17 | # 非age属性执行默认操作
18 | else:
19 | return super().__getattribute__(attr)
20 | #return object.__getattribute__(self, attr)
21 | def __setattr__(self, name, value):
22 | print("I am in __setattr__")
23 | return object.__setattr__(self, name, value)
24 | def __delattr__(self,name):
25 | print("I am in __delattr__")
26 |
27 |
28 | if __name__ == "__main__":
29 | a = A(67)
30 | print("age = ",a.name)
31 | getattr(a,"age")
32 | print(a.y)
33 | print(a.__dict__)
34 | print(A.__dict__)
35 | delattr(a,"age")
36 | print(a.age)
37 | #print(age)
38 | #print(a.name)
39 | #print(a.gender)
40 |
--------------------------------------------------------------------------------
/python_demo/magic_method/__call__方法展示.py:
--------------------------------------------------------------------------------
1 | # coding:utf8
2 |
3 |
4 | class Foo(object):
5 |
6 | def __init__(self,price = 50):
7 | print('调用__init__方法')
8 | self.price = price
9 |
10 | def __call__(self,n):
11 | print('调用__call__方法')
12 | return self.price * n
13 |
14 | def how_much_of_book(self,n):
15 | print('调用how_much_of_book方法')
16 | return self.price * n
17 |
18 | foo = Foo(40)
19 | print(foo(4))
20 | print(foo.how_much_of_book(4))
21 |
22 |
--------------------------------------------------------------------------------
/python_demo/magic_method/__dict__and_dir().py:
--------------------------------------------------------------------------------
1 | # -*- coding: utf-8 -*-
2 |
3 | class A(object):
4 | class_var = 1
5 | def __init__(self):
6 | self.name = 'xy'
7 | self.age = 2
8 |
9 | @property
10 | def num(self):
11 | return self.age + 10
12 |
13 | def fun(self):pass
14 | def static_f():pass
15 | def class_f(cls):pass
16 |
17 | if __name__ == '__main__':
18 | a = A()
19 | #print(a.__dict__)
20 | #print(A.__dict__)
21 | #print(object.__dict__)
22 | #dir(A)
23 | print(dir(a))
24 |
--------------------------------------------------------------------------------
/python_demo/magic_method/__enter__and__exit__.py:
--------------------------------------------------------------------------------
1 | # coding:utf8
2 |
3 | class nnn:
4 |
5 | def __init__(self,name):
6 | self.name = name
7 |
8 | def __enter__(self):
9 | print('出现with语句,对象的__enter__被触发,有返回值则赋值给as声明的变量')
10 | return self
11 |
12 | def __exit__(self, exc_type=0, exc_val=1, exc_tb=2):
13 | print('with中代码块执行完毕时执行我啊')
14 |
15 | #return True
16 |
17 | if __name__ == "__main__":
18 |
19 | with nnn('Monica') as f:
20 |
21 | print(f)
22 | print(f.name)
23 |
--------------------------------------------------------------------------------
/python_demo/magic_method/__getitem__迭代器.py:
--------------------------------------------------------------------------------
1 | # coding:utf8
2 | from collections import abc
3 |
4 | class Eg_1:
5 |
6 | def __init__(self,text):
7 | self.text = text
8 | self.sub_text = text.split()
9 |
10 | def __getitem__(self,index):
11 | return self.sub_text[index]
12 |
13 |
14 | if __name__ == "__main__":
15 |
16 | b = Eg_1('Jiao da Shen lan education!')
17 |
18 | print(isinstance(b,abc.Iterable)) # 用abc.Iterable 判断失效
19 | a = iter(b)
20 | print(isinstance(a,abc.Iterator))
21 |
--------------------------------------------------------------------------------
/python_demo/magic_method/__item__.py:
--------------------------------------------------------------------------------
1 | # coding:utf8
2 | class MyDict(object):
3 |
4 | def __init__(self):
5 | print('call fun __init__')
6 | self.item = {}
7 | def __getitem__(self,key):
8 | print('call fun __getItem__')
9 | return self.item.get(key)
10 | def __setitem__(self,key,value):
11 | print('call fun __setItem__')
12 | self.item[key] =value
13 | def __delitem__(self,key):
14 | print('cal fun __delitem__')
15 | del self.item[key]
16 | def __len__(self):
17 | return len(self.item)
18 |
19 | if __name__ == "__main__":
20 | a = list([1,2,3])
21 | myDict = MyDict()
22 | print (myDict.item)
23 | myDict[2] = 'ch'
24 | myDict['hobb'] = 'sing'
25 | print(myDict.item)
26 | print("2:",myDict[2])
27 |
--------------------------------------------------------------------------------
/python_demo/magic_method/__iter__and__next__.py:
--------------------------------------------------------------------------------
1 | #coding:utf8
2 |
3 | class Eg_1Iterator: # 迭代器建立
4 | def __init__(self,sub_text):
5 | self.sub_text = sub_text
6 | self.index = 0
7 | def __next__(self): # 成为迭代器
8 | try:
9 | subtext = self.sub_text[self.index]
10 | except IndexError:
11 | raise StopIteration()
12 | self.index +=1
13 | return subtext
14 | def __iter__(self): # 可迭代
15 | return self
16 |
17 | # 可迭代对象能否 加上 __next__方法变为自身的迭代器呢???
18 | class Eg_1: # 可迭代对象
19 | def __init__(self,text):
20 | self.text = text
21 | self.sub_text = text.split()
22 |
23 | def __iter__(self):# 可迭代
24 | return Eg_1Iterator(self.sub_text) #返回一个迭代器
25 |
26 | if __name__ == "__main__":
27 |
28 | a = Eg_1("My name is Elvin")
29 | b = iter(a) # 应用迭代器
30 | c = iter(a)
31 | print(next(b))
32 | print("next c,", next(c))
33 | print(next(b))
34 |
35 |
36 | """
37 |
38 | 迭代器必须支持对象的多种遍历,为里支持多种遍历,必须能从同一个可迭代的实例中,获取多个独立的迭代器,
39 | 而且各个迭代器要能维护自身的内部状态,因此这一模式正确的实现方式是:每次调用iter 都能创建一个独立的
40 | 迭代器,这就算为什么 可迭代对象不实现__next__ 方法,而必须借助一个迭代器。
41 |
42 | """
43 |
44 |
--------------------------------------------------------------------------------
/python_demo/magic_method/__iter__and_generator.py:
--------------------------------------------------------------------------------
1 | # coding:utf8
2 |
3 | class Eg_1: # 可迭代对象
4 | def __init__(self,text):
5 | self.text = text
6 | self.sub_text = text.split()
7 |
8 | def __iter__(self):
9 | for word in self.sub_text:
10 | yield word
11 |
12 |
13 | if __name__ == "__main__":
14 | test = Eg_1("Thanks for all students")
15 | it = iter(test)
16 | print(next(it))
17 | print(next(it))
--------------------------------------------------------------------------------
/python_demo/magic_method/__new__魔术方法展示.py:
--------------------------------------------------------------------------------
1 | # coding:utf8
2 |
3 | #创建一个新实例时调用__new__,初始化一个实例时用__init__
4 | #在__new__返回一个cls的实例时,后面的__init__才能被调用
5 |
6 |
7 |
8 | class MyClass2():
9 | ccc = 4
10 |
11 |
12 | class MyClass():
13 | abc = 123
14 |
15 | def __new__(cls,name):
16 | print("I am in __new__")
17 | obj2 = object.__new__(cls) #要借助父类object的__new__创建对象
18 | return obj2
19 |
20 | def __init__(self,name):
21 | self.name = name
22 | print("I am in __init__")
23 |
24 | #实例化对象
25 | obj = MyClass("monica")
26 | #obj2 = MyClass2("monica")
27 | #print (obj)
28 | #print (obj2.ccc)
29 |
30 |
31 |
--------------------------------------------------------------------------------
/python_demo/magic_method/__private的继承.py:
--------------------------------------------------------------------------------
1 | class B:
2 | def __init__(self):
3 | self.__private = 0
4 | def __private_method(self):
5 | print("I am in _B__private_method !")
6 | def public_method(self):
7 | print("I am in _B_public_method !")
8 | self.__private_method()
9 |
10 | class C(B):
11 | def __init__(self):
12 | super().__init__()
13 | self.__private = 1 # Does not override B.__private
14 | # Does not override B.__private_method()
15 | def __private_method(self):
16 | print("__C__private_method!")
17 |
18 | def public_method(self):
19 | self.__private_method()
20 |
21 |
22 | if __name__ =="__main__":
23 | data = C()
24 | print(data._C__private)
25 | print(data._B__private)
--------------------------------------------------------------------------------
/python_demo/magic_method/__slots__.py:
--------------------------------------------------------------------------------
1 | #coding:utf8
2 | class MyClass(object):
3 | __slots__ = ['name', 'identifier'] # 固定实例属性名
4 | def __init__(self, name, identifier):
5 | self.name = name
6 | self.identifier = identifier
7 |
8 |
9 | if __name__ == "__main__":
10 | A = MyClass('Monica','girl')
11 | B = MyClass('Elvin','boy')
12 | #A.new_attri = 'new attr' # 能否成功?
13 | #print(A.new_attri)
14 | print(B.name)
15 | print(A.name)
--------------------------------------------------------------------------------
/python_demo/magic_method/__str__and__repr__.py:
--------------------------------------------------------------------------------
1 | # coding:utf8
2 | class People:
3 |
4 | def __init__(self, name, sex):
5 | self.name = name
6 | self.sex = sex
7 | def __str__(self):
8 | return self.name
9 | def __repr__(self):
10 | return self.sex
11 |
12 |
13 | if __name__ == "__main__":
14 |
15 | A = People('Monica','girl')
16 | print([A])
17 | print(A)
18 | print(str(A))
19 | print(repr(A))
20 |
--------------------------------------------------------------------------------
/python_demo/magic_method/attr_method.py:
--------------------------------------------------------------------------------
1 | """ 属性访问顺序
2 | __getattribute__
3 | 数据描述符 : 从覆盖性描述符中获取(实现了__set__方法)
4 | 当前对象的属性 __dict__ 中获取
5 | 类的属性 __dict__ 中获取
6 | 非数据描述符 调用非覆盖型描述符(没有实现__set__方法)
7 | 父类的属性 从实例父类的 __dict__ 字典获取
8 | __getattr__
9 | """
10 |
11 | class User:
12 | def __init__(self, name, sex):
13 | self.name = name
14 | self.sex = sex
15 |
16 | def __getattribute__(self, item):
17 | '''
18 | 在访问对象成员属性的时候触发,无论是否存在。
19 | 返回值千万不能用self.name,这样会无限递归下去
20 | '''
21 | # return 6
22 | return object.__getattribute__(self, item)
23 |
24 | def getattribute_demo():
25 | user1 = User("monica", "girl")
26 | print(user1.name)
27 |
28 | class A(object):
29 | def __init__(self, x):
30 | self.x = x
31 |
32 | def hello(self):
33 | return 'hello func'
34 |
35 | def __getattr__(self, item):
36 | ''' be called if __getattribute__ return none'''
37 | print('in __getattr__')
38 | return super(A, self).__getattribute__(item)
39 |
40 | def __getattribute__(self, item):
41 | ''' must call '''
42 | print('in __getattribute__')
43 | return super(A, self).__getattribute__(item)
44 |
45 | def getattr_demo():
46 | a = A(100)
47 | # print(a.x)
48 | # print(a.y)
49 | c = getattr(a, 'y', 200)
50 | # print("========: ", c)
51 | print(a.__dict__['x'])
52 | print(dir(a))
53 |
54 |
55 | # __get()__ demo
56 | # 描述符,可以将访问对象属性转变为调用描述符方法。
57 | # 描述符可以让我们在获取或者给对象赋值时对数据值进行一些特殊的加工和处理;
58 |
59 |
60 |
61 | # property
62 | class Item:
63 | @property # 等价于price = property(price),也就是实例化了一个描述符对象price
64 | def price(self):
65 | print("~~~~~~")
66 | return self._price
67 |
68 | # 使用描述符对象的setter方法对price进行装饰(price = price.setter(price)),
69 | # 这里就是将设置属性值的方法传入描述符内,修改price属性时就会通过__set__方法调用传入的方法
70 | @price.setter
71 | def price(self, value):
72 | print("*************")
73 | if value > 0: # 校验price
74 | self._price = value
75 | else:
76 | raise ValueError("Valid value..")
77 |
78 | def property_demo():
79 | item = Item()
80 | item.price = 100
81 | print(item.price)
82 | # item.price = -100
83 | print(item.__dict__)
84 |
85 | if __name__ == "__main__":
86 | # getattribute_demo()
87 | # getattr_demo()
88 | property_demo()
89 | print("run attr_method successfully !!!")
90 |
--------------------------------------------------------------------------------
/python_demo/magic_method/property_demo.py:
--------------------------------------------------------------------------------
1 | class MyProperty(object):
2 | def __init__(self, fget=None, fset=None, fdel=None, doc=None):
3 | self.fget = fget
4 | self.fset = fset
5 | self.fdel = fdel
6 | self.__doc__ = doc
7 |
8 | def __get__(self, obj, objtype=None):
9 | print("====>in __get__")
10 | if obj is None:
11 | return self
12 | if self.fget is None:
13 | raise AttributeError
14 | return self.fget(obj)
15 |
16 | def __set__(self, obj, value):
17 | print("====>in __set__")
18 | if self.fset is None:
19 | raise AttributeError
20 | self.fset(obj, value)
21 |
22 | def __delete__(self, obj):
23 | print("====>in __delete__")
24 | if self.fdel is None:
25 | raise AttributeError
26 | self.fdel(obj)
27 |
28 | def getter(self, fget):
29 | pass
30 |
31 | def setter(self, fset):
32 | print("====>in setter")
33 | return type(self)(self.fget, fset, self.fdel, self.__doc__)
34 |
35 | def deleter(self, fdel):
36 | print("====>in deleter")
37 | return type(self)(self.fget, self.fset, fdel, self.__doc__)
38 |
39 | class Item:
40 | @MyProperty
41 | def price(self):
42 | return self._price
43 |
44 | @price.setter
45 | def price(self, value):
46 | if value > 0:
47 | self._price = value
48 | else:
49 | raise ValueError("Valid value..")
50 |
51 | def func1():
52 | item = Item()
53 | item.price = 100
54 | print(item.price)
55 |
56 | if __name__ == "__main__":
57 | func1()
58 | print("run property_demo.py successfully !!!")
--------------------------------------------------------------------------------
/python_demo/meta_program/README.md:
--------------------------------------------------------------------------------
1 | # type and object
2 | 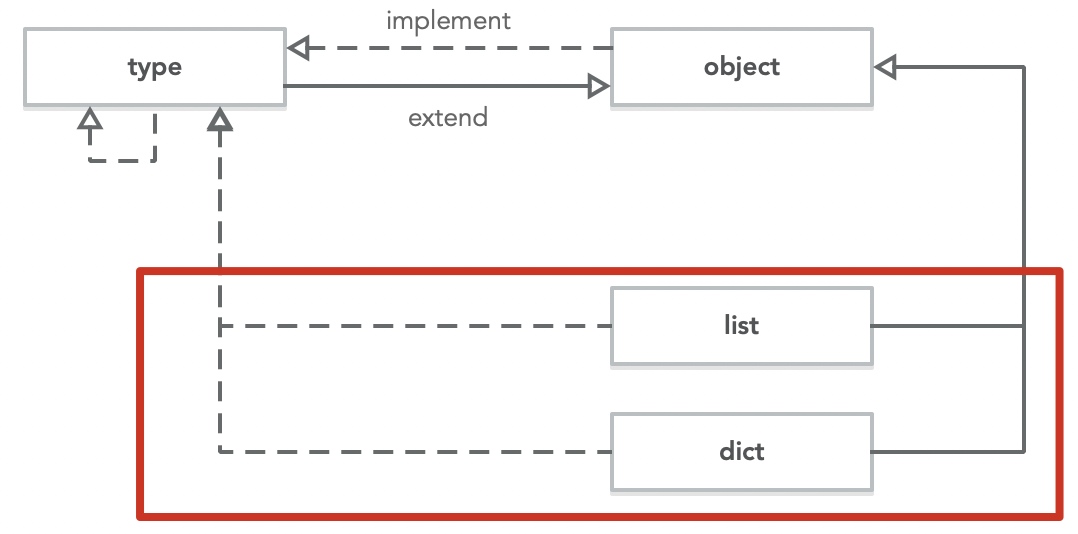
3 |
4 | **所有的对象都可以分类**
5 | 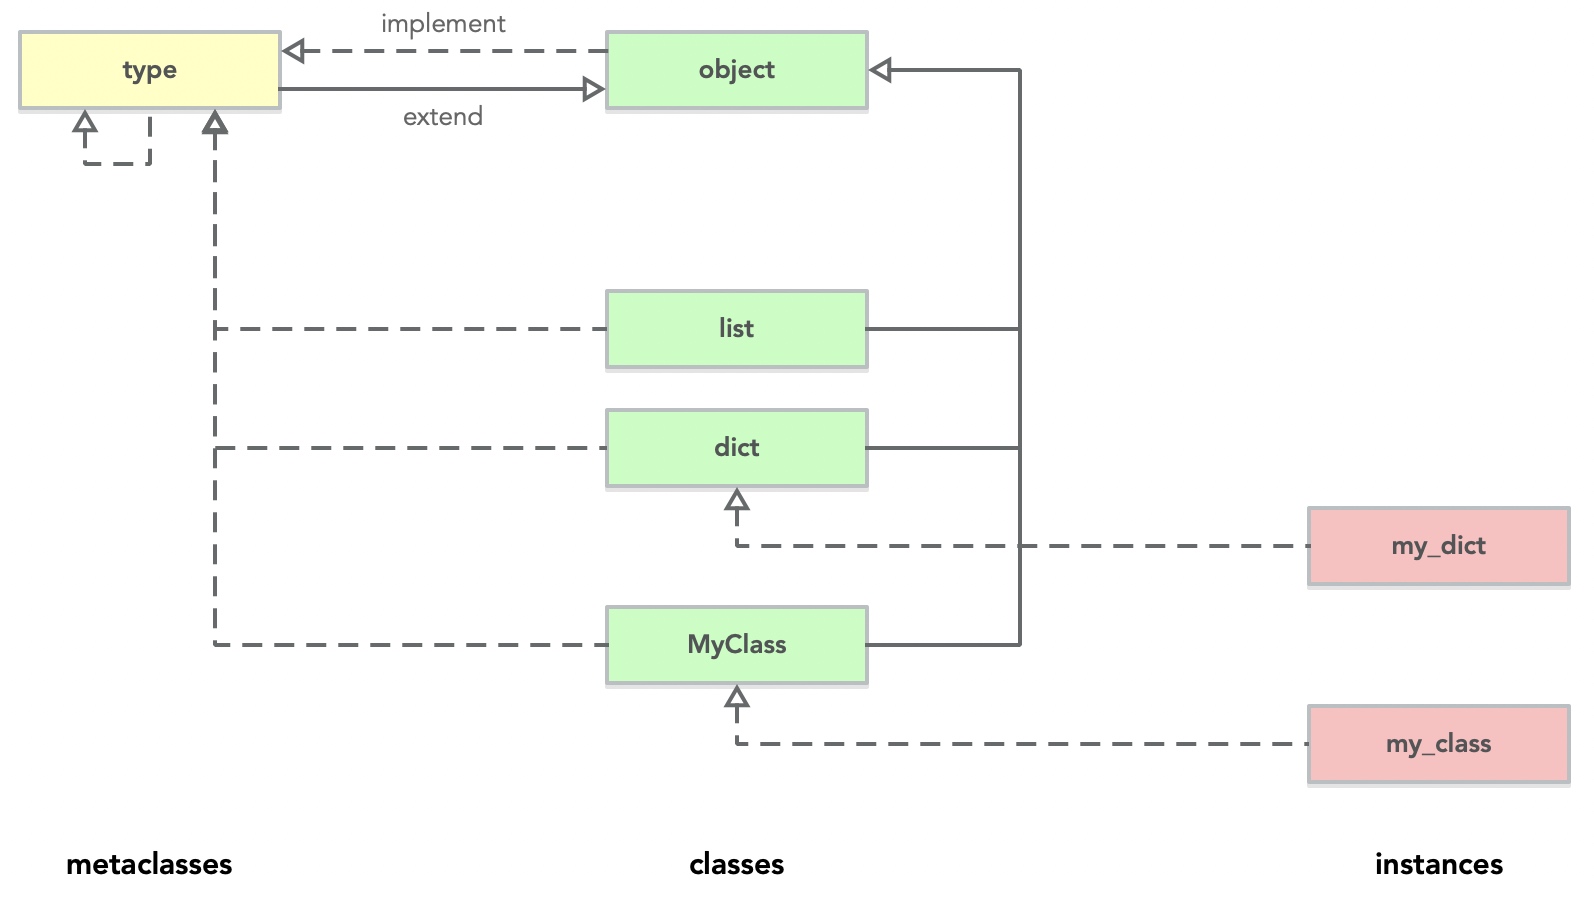
6 |
7 | # 实例化
8 | - python 内部实例化一个新的对象时,它其实都使用了自身的type 属性,并创造了一个新的实例对象;
9 | - 定义一个类时,会默认继承 object;
10 | - type 是实例化维度;object 是继承时间的产物;
11 | - __new__ 用于创建实例对象; __call__ 用于创建类对象;
12 |
--------------------------------------------------------------------------------
/python_demo/meta_program/class_demo.py:
--------------------------------------------------------------------------------
1 | # 使用type可以直接创建类
2 | Girl = type("Girl",(),{"country":"china","sex":"male"}) # country 属于类的属性
3 |
4 |
5 | # 还可以创建带有方法的类
6 |
7 | ## python中方法有普通方法,类方法,静态方法。
8 | def speak(self): #要带有参数self,因为类中方法默认带self参数。
9 | print("这是给类添加的普通方法")
10 |
11 | @classmethod
12 | def c_run(cls):
13 | print("这是给类添加的类方法")
14 |
15 | @staticmethod
16 | def s_eat():
17 | print("这是给类添加的静态方法")
18 |
19 |
20 | Boy = type("Boy",(),{"speak":speak,"c_run":c_run,"s_eat":s_eat,"sex":"female"})
21 |
22 | # 还可以通过type 定义带 继承的类
23 | class Person(object):
24 | def __init__(self,name):
25 | self.name = name
26 | def p(self):
27 | print("这是Person的方法")
28 | class Animal(object):
29 | def run(self):
30 | print("animal can run ")
31 | #定义一个拥有继承的类,继承的效果和性质和class一样。
32 | Worker = type("Worker",(Person,Animal),{"job":"程序员"})
33 | print(Worker.__class__.__class__) # 查看类的类
34 |
35 | # type 的理解
36 | # - 元类就是类的类,python中函数type实际上是一个元类:用于创建元类;
37 | # - type就是Python在背后用来创建所有类的元类;
38 | # - python查看对象所属类型既可以用type函数,也可以用对象自带的__class__属性
39 |
40 |
41 | # part 2:
42 |
43 | # __base__ : 可以查看父类
44 | # __class__ : 查看instance的类型
45 | # object 没有父类,它是所有父类的顶端,但它是由type实例化来的;
46 | # type的父类是 object,但同时:type 是由它自己实例化而来的; type.__base__ == object
47 | #
48 |
49 |
--------------------------------------------------------------------------------
/python_demo/thread_and_process/README.md:
--------------------------------------------------------------------------------
1 | # 并发与并行的区别
2 | 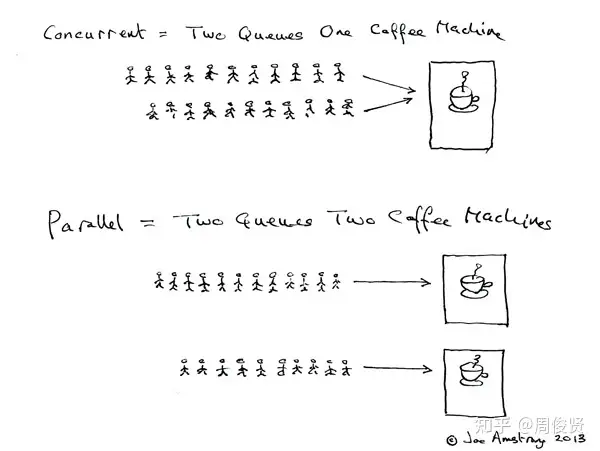
3 |
4 | - 并发(concurrency):指计算机似乎能在同一时刻做许多件不同的事情。在单核CPU的计算机上面,操作系统可以迅速切换这个处理器所运行的程序,
5 | 因此尽管同一时刻最多只有一个程序在运行,但这些程序能够交替地使用这个核心,从而造成一个假象,让人觉得它们好像真的在同时运行。
6 | - 并行(paralleslism):计算机真的能够在同一时刻做很多件不同的事情。例如,若计算机配有多个CPU核心,那么它就真的可以同时执行多个程序。
7 | 每个CPU核心执行的都是自己的那个程序之中的指令,这些程序能够同时向前推进。
8 |
9 | **使用场景**
10 | - 并发通常应用于 I/O 操作频繁的场景,比如你要从网站上下载多个文件,I/O 操作的时间可能会比 CPU 运行处理的时间长得多。
11 | - 而并行则更多应用于 CPU heavy 的场景,比如Hadoop、Spark等的MapReduce中的并行计算,为了加快运行速度,一般会用多台机器、多个处理器来完成。
12 |
13 | # 同步 和 异步 的概念
14 | - 同步(Sync):同步世界中,事件一次只发生一个。调用一个函数时,你的程序只能等待它完成,然后继续做下一件事情。
15 | 类比晚上回来用洗衣机洗衣服,洗衣机要等10分钟,在这10分钟内,你就只能干等,等洗衣机洗完再干其它的事情。
16 | - 异步(Async):在异步世界中,多个事情可以同时发生。当启动一个操作或调用一个函数时,程序将会继续运行,你可以执行其他操作或调用其他函数,
17 | 而不只是等待异步函数执行完成。一旦异步函数完成了工作,程序就可以访问异步函数的执行结果。类比晚上回来用洗衣机洗衣服,洗衣机要等10分钟,
18 | 在这10分钟内,你可以洗澡、刷牙,等洗衣机洗完后,你可以接着把衣服晾起来。
19 |
20 | # 多线程能加速吗?
21 | *而Python中,假如使用的是CPython解释器,其实就跟真正的的“多线程”无缘了。*
22 |
23 | **Python语言的标准实现叫做CPython,它分两步来运行Python程序。首先解析源代码文件,并将其编译成字节码(bytecode)。然后,CPython采用基于栈的解释器来运行字节码。这种字节码解释器在执行Python程序的过程中,必须确保相关的状态不受干扰,所以CPython会用一种叫做全局解释器锁(global interpreter lock, GIL)的机制来保证这一点。当解释器在运行线程A的字节码时,会先锁住自己的线程,阻止别的线程执行。**
24 |
25 | **GIL实际上就是一个互斥锁(mutual-eclusion lock, mutex),用来防止CPython的状态在抢占式的多线程之中收到干扰,因为在这种环境下,一条线程有可能突然打断另一条线程抢占程序的控制权。如果这种抢占行为来得不是时候,那么解释器的状态(例如为垃圾回收工作而设立的引用计数等,举个例子,有两个 Python 线程同时引用了 a,就会造成引用计数的 race condition,引用计数可能最终只增加 1,这样就会造成内存被污染。因为第一个线程结束时,会把引用计数减少 1,这时可能达到条件释放内存,当第二个线程再试图访问 a 时,就找不到有效的内存了)就会操作破坏。所以,CPython要通过GIL组织这样的动作,以确保它自身以及它的那些C拓展模块能够正确执行每一条字节码指令。**
26 |
27 | **线程由于不同的编程语言实现的方式不同,也有差别,对于C语言而言,线程也可以通过调度将多个线程分配到多个CPU的核上,而对于Python语言,由于Python在实现过程中(Cpython)人为的引入了GIL(全局解释器锁),使得Python的多线程程序在运行的时候,同一时刻只能运行一个线程,且同一时刻只能占用CPU的一个核,造成了一核有难、八核围观的窘境**
28 |
29 | # linux 进程 和 windows进程的区别
30 | *在Linux内核中,描述一个进程主要是task_struct,一个称为进程描述符的数据结构。这个数据结构很庞大,包含了内核管理一个进程所需的所有信息,描述了一个正在执行的进程,包括进程ID,它打开的文件,进程的地址空间,挂起的信号,进程的状态等等其他信息。*
31 |
32 | *Linux的线程机制和Windows等其他操作系统的很不一样,Linux中没有为线程设置专门的数据结构,也没有专门的线程调度算法,在Linux内核看来,线程就是一个进程,只是一个和其他进程共享资源的特殊进程而已。*
33 |
34 | *在Linux中,创建线程时,和创建普通的进程类似,每个线程都拥有自个的进程描述符task_struct,只是在调用clone()的时候需要传递一些参数标志来指明共享的资源。如图1所示。*
35 |
36 | 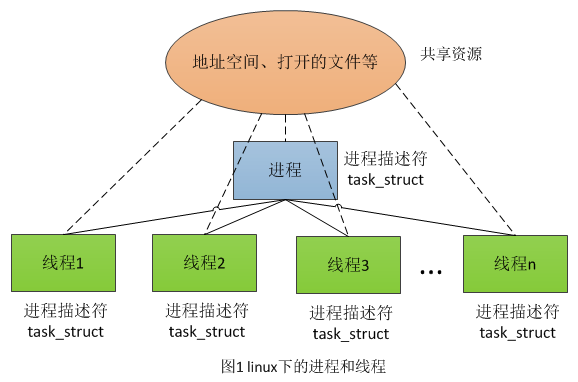
37 |
38 |
39 | *在windows等其他操作系统中,进程拥有一个进程描述符,描述一些地址空间和打开的文件等共享资源,进程中包含指向不同线程的指针,这些线程没有进程描述符,只描述一些少量的独有的资源,因此很轻量。同时这些线程共享进程的资源。如图2所示。*
40 |
41 | 
42 |
43 |
44 | # 协程
45 | 看起来A、B的执行有点像多线程,但协程的特点在于是一个线程执行,那和多线程比,协程有何优势?
46 |
47 | 最大的优势就是协程极高的执行效率。因为子程序切换不是线程切换,而是由程序自身控制,因此,没有线程切换的开销,和多线程比,线程数量越多,协程的性能优势就越明显。
48 |
49 | 第二大优势就是不需要多线程的锁机制,因为只有一个线程,也不存在同时写变量冲突,在协程中控制共享资源不加锁,只需要判断状态就好了,所以执行效率比多线程高很多。
50 |
51 | 因为协程是一个线程执行,那怎么利用多核CPU呢?最简单的方法是多进程+协程,既充分利用多核,又充分发挥协程的高效率,可获得极高的性能。
52 |
53 | # 查看核个数
54 | *查看物理CPU个数*
55 | cat /proc/cpuinfo| grep "physical id"| sort| uniq| wc -l
56 | *查看每个物理CPU中core的个数(即核数)*
57 | cat /proc/cpuinfo| grep "cpu cores"| uniq
58 | *查看逻辑CPU的个数*
59 | cat /proc/cpuinfo| grep "processor"| wc -l
--------------------------------------------------------------------------------
/python_demo/thread_and_process/corutine.py:
--------------------------------------------------------------------------------
1 | """
2 | 子程序:子程序,或者称为函数,在所有语言中都是层级调用,
3 | 比如A调用B,B在执行过程中又调用了C,
4 | C执行完毕返回,B执行完毕返回,最后是A执行完毕。
5 | 子程序调用总是一个入口,一次返回,调用顺序是明确的。而协程的调用和子程序不同。
6 | 协程:协程看上去也是子程序,但执行过程中,在子程序内部可中断,
7 | 然后转而执行别的子程序,在适当的时候再返回来接着执行。
8 | """
9 | def consumer():
10 | r = 100
11 | while True:
12 | n = yield r
13 | if not n:
14 | return
15 | print('[CONSUMER] Consuming %s...' % n)
16 | r = '200 OK'
17 |
18 | def produce(c):
19 | d = c.send(None)
20 | n = 0
21 | while n < 5:
22 | n = n + 1
23 | print('[PRODUCER] Producing %s...' % n)
24 | r = c.send(n)
25 | print('[PRODUCER] Consumer return: %s' % r)
26 | c.close()
27 |
28 | if __name__ == "__main__":
29 | c = consumer()
30 | produce(c)
31 | print("run corutine.py successfully !!!")
32 |
--------------------------------------------------------------------------------
/python_demo/thread_and_process/multi_process.py:
--------------------------------------------------------------------------------
1 | """
2 | 每启动一个进程,都要独立分配资源和拷贝访问的数据,
3 | 所以进程的启动和销毁的代价是比较大了,
4 | 所以在实际中使用多进程,要根据服务器的配置来设定。
5 | """
6 | def multi_process_demo1():
7 | from multiprocessing import Process
8 | from time import sleep
9 | import time
10 |
11 | def fun1(name, index):
12 | sleep(2)
13 | print('测试%s多进程: %d' %(name, index))
14 |
15 | process_list = []
16 | a = time.time()
17 | for i in range(5): #开启5个子进程执行fun1函数
18 | p = Process(target=fun1,args=('Python====', i)) #实例化进程对象
19 | p.start()
20 | process_list.append(p)
21 |
22 | for i in process_list:
23 | p.join()
24 |
25 | print(f'结束测试, 使用时间: {time.time() - a}.')
26 |
27 |
28 | def multi_process_demo2():
29 | from multiprocessing import Process
30 |
31 | class MyProcess(Process): #继承Process类
32 | def __init__(self,name):
33 | super(MyProcess,self).__init__()
34 | self.name = name
35 |
36 | def run(self):
37 | print('测试%s多进程' % self.name)
38 |
39 | process_list = []
40 | for i in range(5): #开启5个子进程执行fun1函数
41 | p = MyProcess('Python') #实例化进程对象
42 | p.start()
43 | process_list.append(p)
44 |
45 | for i in process_list:
46 | p.join()
47 |
48 | print('结束测试')
49 |
50 | def multi_process_queue():
51 | from multiprocessing import Process,Queue
52 | def fun1(q,i):
53 | print('子进程%s 开始put数据' %i)
54 | q.put('我是%s 通过Queue通信' %i)
55 |
56 | q = Queue()
57 |
58 | process_list = []
59 | for i in range(3):
60 | #注意args里面要把q对象传给我们要执行的方法,这样子进程才能和主进程用Queue来通信
61 | p = Process(target=fun1,args=(q,i,))
62 | p.start()
63 | process_list.append(p)
64 |
65 | for i in process_list:
66 | p.join()
67 |
68 | print('主进程获取Queue数据')
69 | print("======", q.get())
70 | print("======", q.get())
71 | print("======", q.get())
72 | print('结束测试')
73 |
74 | if __name__ == '__main__':
75 | # multi_process_demo1()
76 | multi_process_queue()
77 | print("run multi_process successfully !!!")
78 |
79 |
--------------------------------------------------------------------------------
/python_demo/thread_and_process/multi_process_v2.py:
--------------------------------------------------------------------------------
1 |
2 | from multiprocessing import Process
3 |
4 | def fun1(name):
5 | print('测试%s多进程' %name)
6 |
7 | if __name__ == '__main__':
8 | process_list = []
9 | for i in range(5): #开启5个子进程执行fun1函数
10 | p = Process(target=fun1,args=('Python',)) #实例化进程对象
11 | p.start()
12 | process_list.append(p)
13 |
14 | for i in process_list:
15 | p.join()
16 | print('结束测试')
17 |
18 |
19 |
--------------------------------------------------------------------------------
/python_demo/thread_and_process/multi_thread.py:
--------------------------------------------------------------------------------
1 | import time
2 | from threading import Thread
3 | from concurrent.futures import ProcessPoolExecutor, ThreadPoolExecutor
4 |
5 | def cpu_bound(number):
6 | print(sum(i * i for i in range(number)))
7 |
8 | # def calculate_sums(numbers):
9 | # for number in numbers:
10 | # cpu_bound(number)
11 |
12 | # def calculate_sums(numbers):
13 | # threads = []
14 | # for number in numbers:
15 | # thread = Thread(cpu_bound(number)) # 实例化
16 | # thread.start() # 启动线程
17 | # threads.append(thread)
18 |
19 | # for thread in threads:
20 | # thread.join() # 等待线程完成,并关闭线程
21 |
22 | # def calculate_sums(numbers):
23 | # pool = ThreadPoolExecutor(max_workers=4) # 开了4个线程
24 | # results= list(pool.map(cpu_bound, numbers))
25 |
26 | def calculate_sums(numbers):
27 | pool = ProcessPoolExecutor(max_workers=4) # 开了4个线程
28 | results= list(pool.map(cpu_bound, numbers))
29 |
30 | def main():
31 | start_time = time.perf_counter()
32 | numbers = [10000000 + x for x in range(4)]
33 | calculate_sums(numbers)
34 | end_time = time.perf_counter()
35 | print(f'Total time is {end_time-start_time:.4f} seconds')
36 |
37 | if __name__ == '__main__':
38 | # main()
39 |
40 | aa = list((1, 2, 3))
41 | a = iter(aa)
42 | print(type(a))
43 |
--------------------------------------------------------------------------------