├── .gitignore
├── README.md
├── Routing Installation
├── README.md
├── init_alpine
└── init_raspian
└── community-website
├── README.md
├── members
├── models
└── member.js
├── package-lock.json
├── package.json
├── public
├── assets
│ ├── bridge-logo.png
│ └── bridgeicon.png
├── js
│ ├── jquery-3.5.0.min.js
│ ├── main.js
│ ├── members.js
│ ├── networklistener.js
│ ├── profile.js
│ ├── signup.js
│ ├── socketio
│ │ └── socket.io.js
│ └── todos.js
└── styles
│ └── main.css
├── sass
├── main.css
├── main.css.map
├── style.css
├── style.css.map
└── style.scss
├── server.js
├── sessions
├── todos
└── views
├── chat.ejs
├── configuration.ejs
├── index.ejs
├── login.ejs
├── members.ejs
├── profile.ejs
├── signup.ejs
└── tasks.ejs
/.gitignore:
--------------------------------------------------------------------------------
1 | node_modules/
2 | **/node_modules
3 |
--------------------------------------------------------------------------------
/README.md:
--------------------------------------------------------------------------------
1 | # Bridge to the Internet
2 | *Bridge to the Internet* creates a platform for localized network infrastructure to minimize resources required for networked communication to better serve their local communities during times of intermittent connection.
3 |
4 | [Project Website](https://bridge.markofthelam.com)
5 |
6 | 
7 |
8 | ## Table of Contents
9 | - [About](#about)
10 | - [How It Works](#how-it-works)
11 | - [Installation Instructions](#installation)
12 | - [Post Installation](#post-installation)
13 | - [Services](#services)
14 | - [Acknowledgements](#acknowledgements)
15 |
16 | ## About
17 | *Bridge to the Internet* is a router image that hosts network bandwidth saving services and robust local area communication applications that activate local area networks to strengthen connection within a local community. With the internet under heavy strain due to the COVID-19 pandemic, it becomes clear that we must maximize our network resources and look for alternatives to internet-based communication.
18 |
19 | It implements, in a single device, a wireless access point, a web-cache server, a DNS sinkhole server, and an intranet web server that hosts resilient communication applications that allow peers to communicate over Wi-Fi if direct communication is not possible and when the internet is inaccessible. The Bridge image is designed to be quickly and easily set up with a one-line configuration script for non-technical network administrators. It is distributed as open-source software with detailed installation instructions for multiple build systems.
20 |
21 | Ultimately, *Bridge to the Internet* seeks to educate about network infrastructure and begin a conversation about the internet's role in local communities to reimagine the sharing of network resources.
22 |
23 | **Internal Web Links**:
24 | - Community Website: `http://bridge` or `http://10.0.0.1`
25 | - Pi-Hole Dashboard: `http://pi.hole:8080/admin` or `http://10.0.0.1:8080/admin`
26 |
27 | ### Included software:
28 | - [Squid](http://www.squid-cache.org)
29 | - [Pi-Hole](https://pi-hole.net/)
30 | - Local web server
31 | - Wireless access point with hostapd
32 | - DHCP Server with dnsmasq
33 |
34 | ## How It Works
35 | 
36 |
37 | *Bridge to the Internet* uses hostapd to create a wireless hotspot that forwards network traffic to the internet using the onboard Wi-Fi module. A wireless access point is automatically set up with the installation of the image and uses dnsmasq as a DHCP server. Internet access forwards traffic to the Ethernet port with iptables.
38 |
39 | 
40 |
41 | To increase internet speeds on a network with limited bandwidth, the *Bridge* implements network infrastructure typically reserved for businesses and institutions. A web cache server is implemented with [Squid](http://www.squid-cache.org), a Forward HTTP proxy. The web cache distributes resources at the network level so that all connected devices can experience a faster internet while minimizing the need for external web requests.
42 |
43 | 
44 |
45 | *Bridge* comes configured with [Pi-Hole](https://pi-hole.net/), a DNS sinkhole, that acts as a network ad-blocker where all connected clients benefit from the ad blocker. Network resources are further maximized as requests for advertisements are dropped.
46 |
47 | 
48 |
49 | *Bridge* hosts a local webserver with running a community task list for asynchronous communication and a real-time chat for synchronous communication. It provides alternative communication channels that do not depend on internet connectivity. The message boards allow for community organization and a way for network peers to be more connected.
50 |
51 | 
52 |
53 | *Bridge* wants to educate about network infrastructure and bring attention to the communities that are formed from the local area network infrastructure, and explore ways to share network resources to benefit all.
54 |
55 | ## Installation
56 | *Bridge* is distributed as a disk image for a Raspberry Pi, version 3B+/4B. Its software is provided as open-source with detailed installation instructions for Windows, Mac OS, and Linux build machines. It requires minimal hardware to operate, using the onboard wifi to create a wireless access point. To provide internet sharing, the network needs an ethernet cable and internet modem or router.
57 |
58 | Instructions for:
59 |
60 | * [Windows OS](#windows)
61 | * [Mac OS](#mac-os)
62 | * [Linux OS](#linux)
63 |
64 | ### Build Requirements
65 | - Raspberry Pi 3B+/ 4B (with on-board WiFi)
66 | - 8GB+ Micro SD card (C10 Preferred)
67 | - Ethernet Cable
68 | - [*Bridge* image](https://drive.google.com/open?id=1dwv18Lyx4Elu50rah06Jb-MrmHzcGZB5)
69 | - Internet connectivity
70 | - Micro SD card reader
71 | - [Balena Etcher](https://www.balena.io/etcher/)
72 | - SSH Client ([PuTTY](https://www.chiark.greenend.org.uk/~sgtatham/putty/) for Windows Build Machines, Linux and Mac OS will have a built-in SSH client)
73 | - Internet Modem/ Router
74 |
75 | 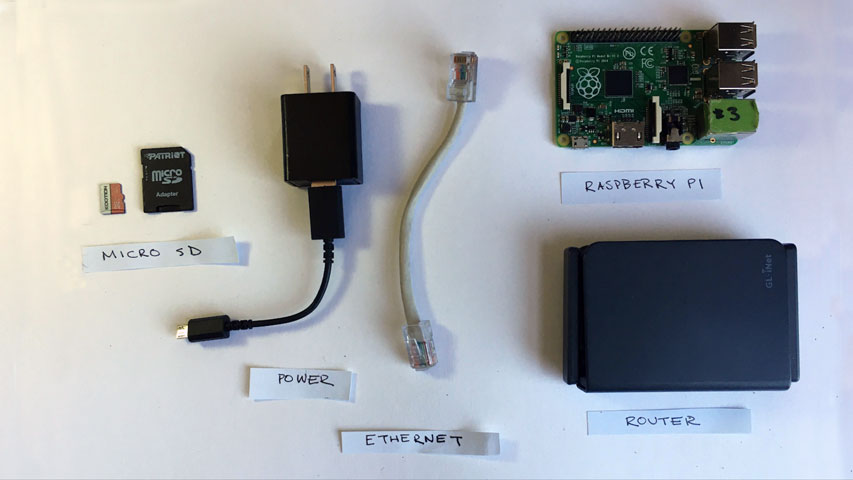
76 |
77 | ### Windows
78 | 1. Download and install [Balena Etcher](https://www.balena.io/etcher/)
79 | 2. Download [*Bridge* image](https://drive.google.com/open?id=1dwv18Lyx4Elu50rah06Jb-MrmHzcGZB5)
80 | 3. Insert Micro SD card into build machine
81 | 4. Open Balena Etcher and select *bridge.img.gz* as your image and your SD card as target drive
82 | 5. Confirm your target drive and Flash
83 | 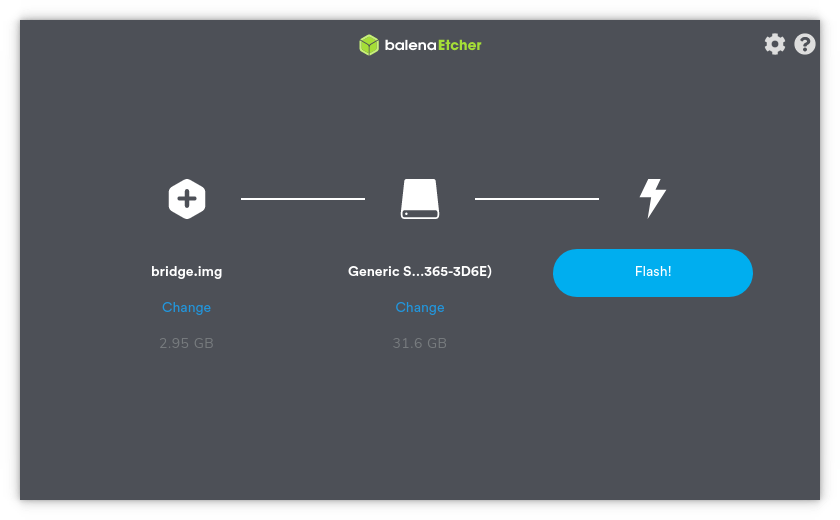
84 | 6. When flash is complete eject SD card and insert into Raspberry Pi
85 | 7. Connect Raspberry Pi to internet modem with Ethernet cable and power on the Raspberry Pi
86 | 8. The first boot will take extra time to expand the SD card and initialize software, wait at least 10 minutes
87 | 9. When it is completed a wireless network should be visible named `Bridge WiFi` (If it does not appear please power cycle the Raspberry Pi)
88 | 10. Connect to `Bridge WiFi` with the password `community`
89 | 11. Use PuTTY to SSH into the Raspberry Pi
90 | - Host: `oper@10.0.0.1`
91 | - Port: `22`
92 | - Password: `bridge`
93 | 12. Change WiFi SSID and Password by running `sudo bash configurewifi.sh` in the Raspberry Pi shell
94 | 13. You should now be broadcasting your own WiFi network with Pi Hole DNS sinkhole, Squid Cache, and Node Express Web Server
95 | - The local web server can be accessed in the browser at either `http://bridge` or `http://10.0.0.1`
96 | - The Pi-Hole Dashboard can be accessed in the browser at `http://pi.hole:8080/admin`
97 | 14. Follow post-installation instructions to configure your clients to make use of Squid HTTP proxy.
98 |
99 | ### Mac OS
100 | 1. Download and install [Balena Etcher](https://www.balena.io/etcher/)
101 | 2. Download [*Bridge* image](https://drive.google.com/open?id=1dwv18Lyx4Elu50rah06Jb-MrmHzcGZB5)
102 | 3. Insert Micro SD card into build machine
103 | 4. Open Balena Etcher and select *bridge.img.gz* as your image and your SD card as target drive
104 | 5. Confirm your target drive and Flash
105 | 
106 | 6. When flash is complete eject SD card and insert into Raspberry Pi
107 | 7. Connect Raspberry Pi to internet modem with Ethernet cable and power on the Raspberry Pi
108 | 8. The first boot will take extra time to expand the SD card and initialize software, wait at least 10 minutes
109 | 9. When it is completed a wireless network should be visible named `Bridge WiFi` (If it doesn't appear please power cycle the Raspberry Pi)
110 | 
111 | 10. Connect to `Bridge WiFi` with the password `community`
112 | 11. Use your preferred terminal to SSH into the Raspberry Pi with `ssh oper@bridge` and password: `bridge`
113 | 12. Change WiFi SSID and Password by running `sudo bash configurewifi.sh` in the Raspberry Pi shell
114 | 13. You should now be broadcasting your own WiFi network with Pi Hole DNS sinkhole, Squid Cache, and Node Express Web Server
115 | - The local web server can be accessed in the browser at either `http://bridge` or `http://10.0.0.1`
116 | - The Pi-Hole Dashboard can be accessed in the browser at `http://pi.hole:8080/admin`
117 | 14. Follow post-installation instructions to configure your clients to make use of Squid HTTP proxy.
118 |
119 | ### Linux
120 | 1. Download and install [Balena Etcher](https://www.balena.io/etcher/)
121 | 2. Download [*Bridge* image](https://drive.google.com/open?id=1dwv18Lyx4Elu50rah06Jb-MrmHzcGZB5)
122 | 3. Insert Micro SD card into build machine
123 | 4. Open Balena Etcher and select *bridge.img.gz* as your image and your SD card as target drive
124 | 5. Confirm your target drive and Flash
125 | 
126 | 6. When flash is complete eject SD card and insert into Raspberry Pi
127 | 7. Connect Raspberry Pi to internet modem with Ethernet cable and power on the Raspberry Pi
128 | 8. The first boot will take extra time to expand the SD card and initialize software, wait at least 10 minutes
129 | 9. When it is completed a wireless network should be visible named `Bridge WiFi`
130 | 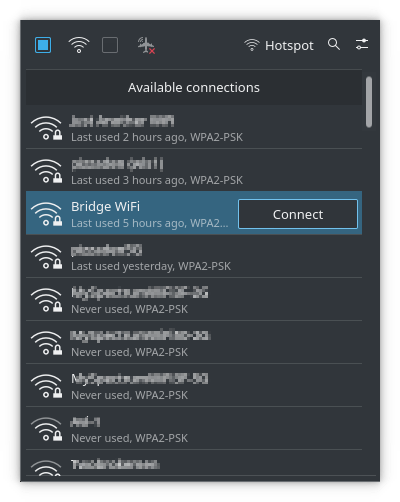
131 | 10. Connect to `Bridge WiFi` with the password `community`
132 | 11. Use your preferred terminal to SSH into the Raspberry Pi with `ssh oper@bridge` and password: `bridge`
133 | 12. Change WiFi SSID and Password by running `sudo bash configurewifi.sh` in the Raspberry Pi shell
134 | 13. You should now be broadcasting your own WiFi network with Pi Hole DNS sinkhole, Squid Cache, and Node Express Web Server
135 | - The local web server can be accessed in the browser at either `http://bridge` or `http://10.0.0.1`
136 | - The Pi-Hole Dashboard can be accessed in the browser at `http://pi.hole:8080/admin`
137 | 14. Follow post-installation instructions to configure your clients to make use of Squid HTTP proxy.
138 |
139 | ## Post Installation
140 | To make use of Squid HTTP Web Cache you must configure your client devices to use the router as the HTTP Proxy. This enables Squid Cache to act as a proxy server allowing all connected to use the network cache server which will allow faster web requests for connected clients. It is optimal to configure the proxy in your system settings so that all applications running your device. The specific instructions will vary between operating systems, but you can use Chrome Browser to navigate to your system proxy settings.
141 |
142 | ### Computer Proxy Setup
143 | #### Chrome/ Chromium Proxy Setup
144 | Chromium uses your system proxy settings. When changed it will affect all applications on your machine.
145 |
146 | 1. Open Chrome and open Preferences panel
147 | 2. Navigate to Advanced > Systems page
148 | 3. Manually configure proxy with the router IP address as your proxy server
149 | - HTTP Proxy: `10.0.0.1`
150 | - Port: `3128`
151 | 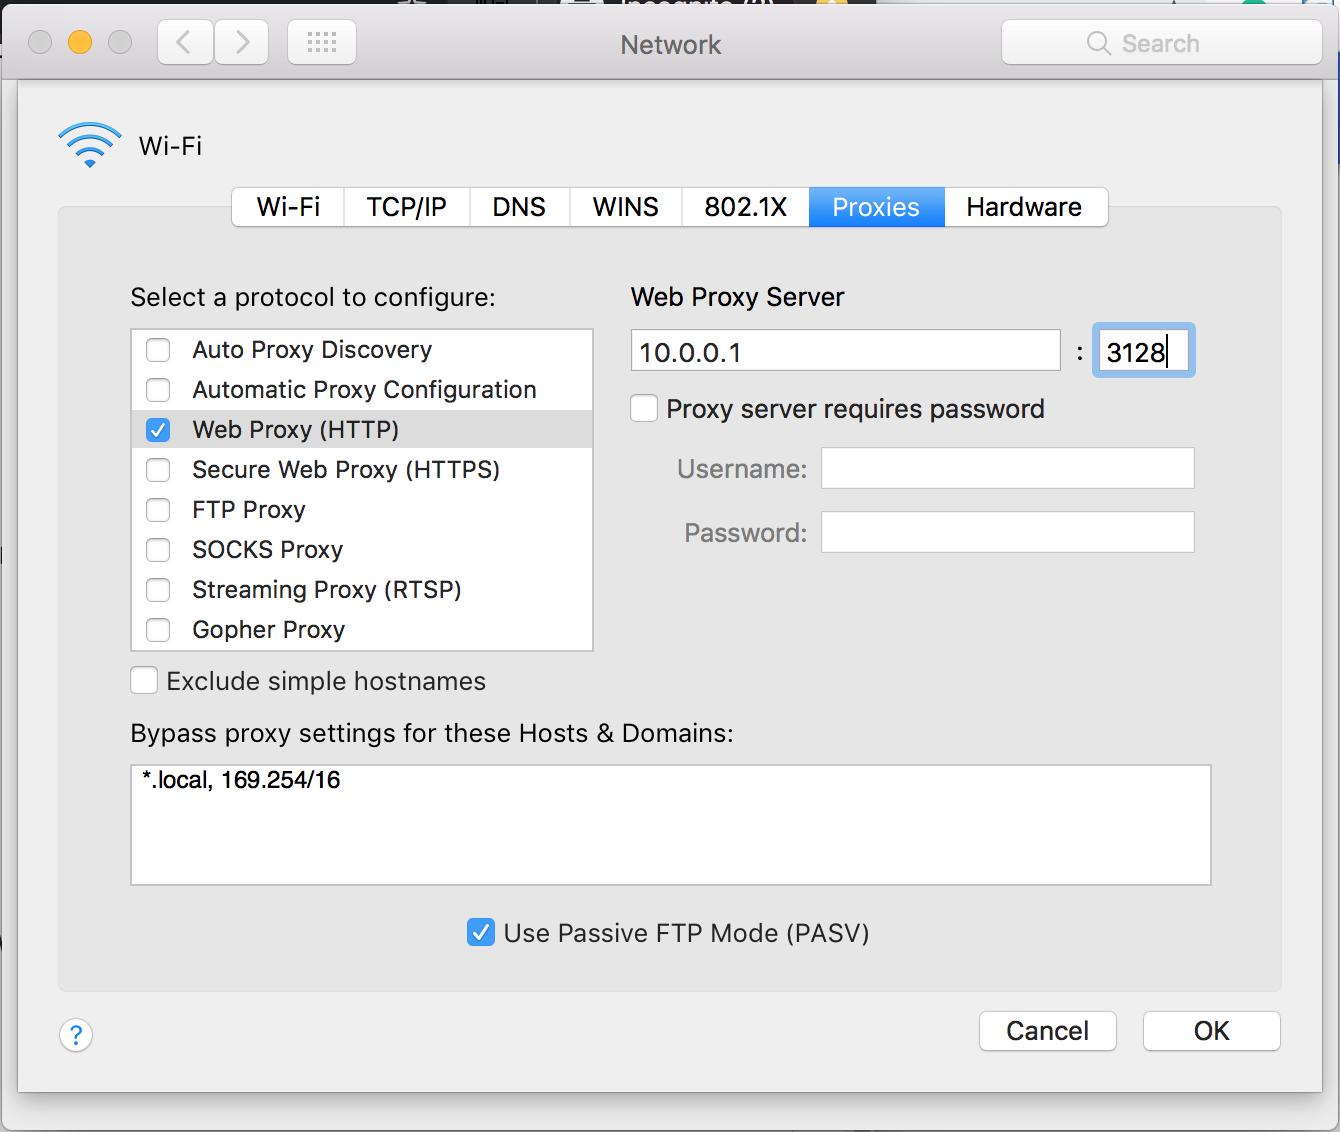
152 | 4. You can test if it is operating properly by visiting a bogus URL (ldfkjalgkjalj.com). If you receive an error from Squid it means your device is sending requests through the proxy server. Alternatively you can run a packet capture to see HTTP requests are going through port 3128.
153 | 5. You should be now be sending requests to the Squid Proxy Server! This will speed up your internet as devices on the network will cache http here.
154 | 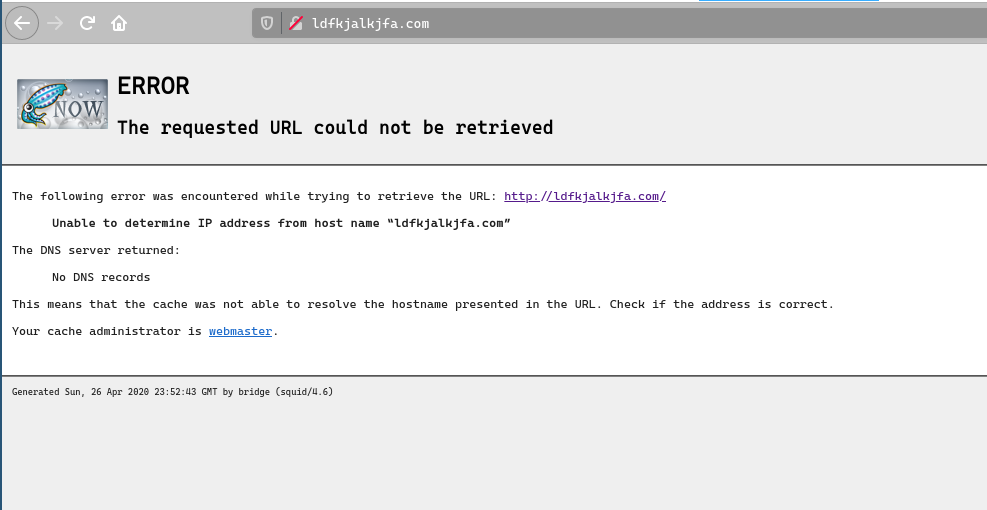
155 |
156 | #### Firefox Proxy Setup
157 | You can manually set the router as the proxy server on Firefox Browser. You will do this in the browser's preferences page.
158 |
159 | 1. Open Firefox Browser and go to Preferences panel
160 | 2. Navigate to Network Settings and select *settings*
161 | 3. Select Manual Proxy Configuration and set:
162 | - HTTP Proxy: `10.0.0.1`
163 | - Port: `3128`
164 | 4. You can test if it is operating properly by visiting a bogus URL (ldfkjalgkjalj.com). If you receive an error from Squid it means your device is sending requests through the proxy server. Alternatively you can run a packet capture to see HTTP requests are going through port 3128.
165 | 5. You should be now be sending requests to the Squid Proxy Server! This will speed up your internet as devices on the network will cache http here.
166 | 
167 |
168 | ### Mobile Devices
169 | #### IPhone
170 | 1. Navigate WiFi Settings
171 | 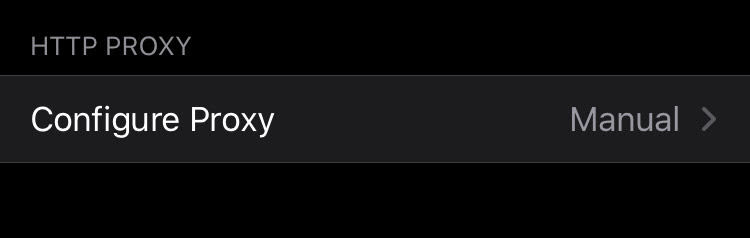
172 | 2. Select to Bridge WiFi options
173 | 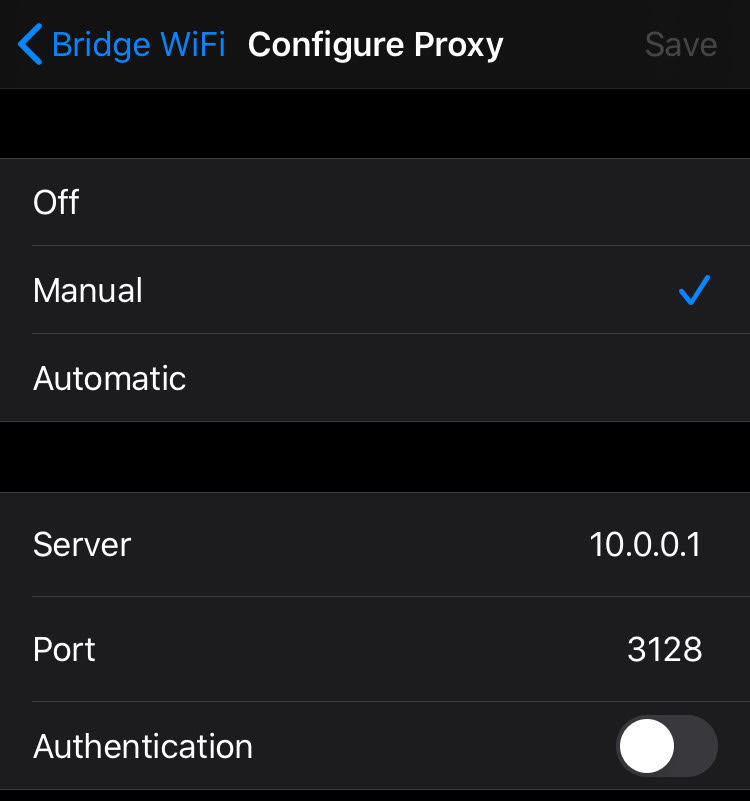
174 | 3. Select Configure Proxy
175 | 4. Enable Manual Proxy
176 | - Server: `10.0.0.1`
177 | - Port: `3128`
178 | 4. You can test if it is operating properly by visiting a bogus URL (ldfkjalgkjalj.com). If you receive an error from Squid it means your device is sending requests through the proxy server. Alternatively you can run a packet capture to see HTTP requests are going through port 3128.
179 | 5. You should be now be sending requests to the Squid Proxy Server! This will speed up your internet as devices on the network will cache http here.
180 | 
181 |
182 |
183 | ## Services
184 | ### Pi Hole
185 | *Bridge WiFi* has Pi-Hole pre-configured. Pi-Hole is a DNS Sinkhole which acts as a network level ad-blocker. It greatly improves network speeds by re-directing malicious and advertisement dns requests. Please view the [Pi Hole Website](https://pi-hole.net/) for instructions for advanced configurations.
186 |
187 | The Pi-Hole web dashboard can be viewed at:
188 | - `http://pi.hole:8080/admin` or `http://10.0.0.1:8080/admin`
189 | 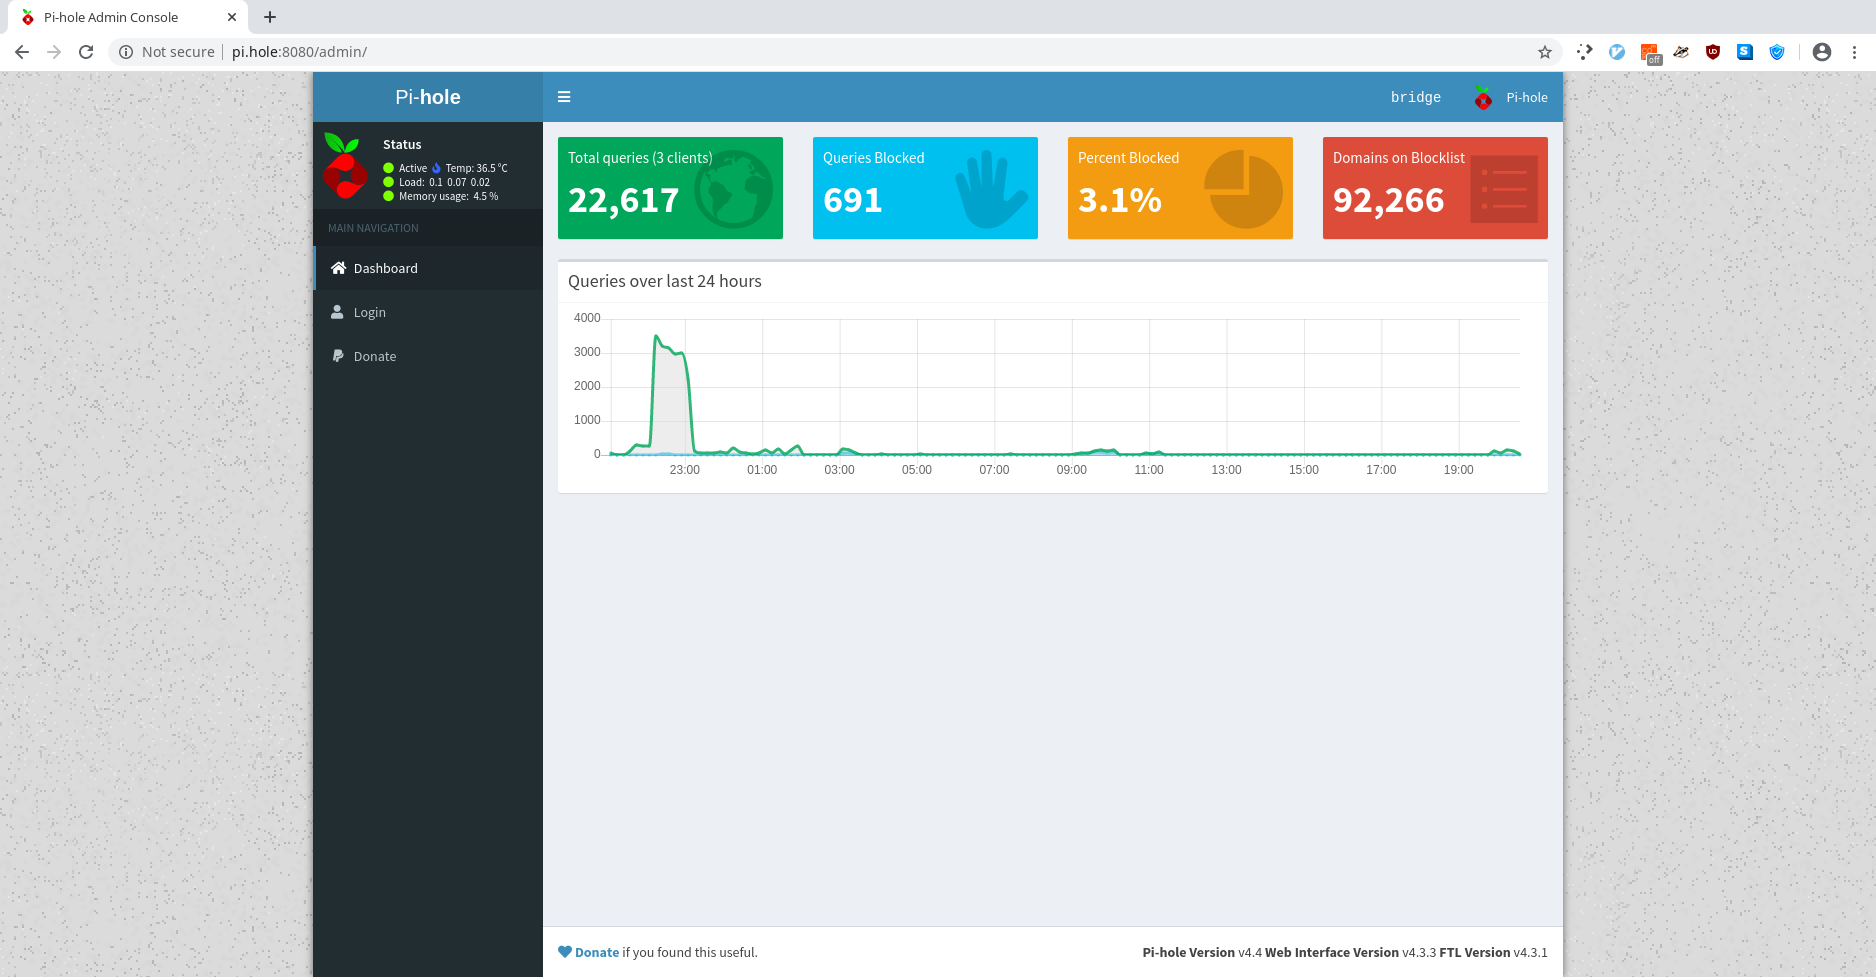
190 |
191 | ### Squid Cache
192 | [Squid](http://www.squid-cache.org/) is a caching proxy for the Web supporting HTTP, HTTPS, FTP, and more. It reduces bandwidth and improves response times by caching and reusing frequently-requested web pages
193 |
194 | ## Acknowledgements
195 | - [Mimi Onuoha](https://github.com/MimiOnuoha/), Thesis Advisor
196 | - [Alden Jones](https://github.com/miamiww), Thesis Resident
197 | - [Ellen Nickles](https://github.com/ellennickles), Thesis Resident
198 | - [Tom Igoe](https://github.com/tigoe), Advisor
199 | - [Anthony Bui](https://github.com/epylinkn)
200 | - [Luming Hao](https://github.com/lh00000000)
201 | - [Tushar Goyal](https://github.com/asd0999)
202 |
203 | ### Powered by
204 | 
205 | 
206 |
207 |
--------------------------------------------------------------------------------
/Routing Installation/README.md:
--------------------------------------------------------------------------------
1 | # Setup a basic router on
2 |
3 | These scripts will check for software dependencies, configure routing files, and create a wireless access point. Please run the script for your operating system.
4 |
5 | ## Requirements
6 | - Raspberry Pi with onbard WiFi
7 | - Ethernet connection
8 | - Software packages installed:
9 | - hostapd
10 | - dnsmasq
11 | - iptables
12 |
13 |
--------------------------------------------------------------------------------
/Routing Installation/init_alpine:
--------------------------------------------------------------------------------
1 | #!/bin/sh
2 |
3 | ########################################
4 | ########################################
5 | #### ###
6 | #### ALPINE ROUTER CONFIGURATION ###
7 | #### ###
8 | ########################################
9 | ########################################
10 |
11 | echo "Checking for dependencies..."
12 |
13 | HOSTAPD=$(apk info | grep hostapd)
14 | DNSMASQ=$(apk info | grep dnsmasq)
15 | IPTABLES=$(apk info | grep iptables)
16 |
17 | if [ "$HOSTAPD" = "" ];then
18 | echo "Adding hostapd"
19 | apk add hostapd
20 | else
21 | service hostapd stop
22 | fi
23 |
24 | if [ "$DNSMASQ" = "" ];then
25 | echo "Adding dnsmasq"
26 | apk add dnsmasq
27 | else
28 | service dnsmasq stop
29 | fi
30 |
31 | if [ "$IPTABLES" = "" ];then
32 | echo "Adding adding iptables"
33 | apk add iptables
34 | fi
35 |
36 | echo "Moving config files..."
37 |
38 | mv files/hostapd.conf /etc/hostapd/hostapd.conf
39 | mv files/dnsmasq.conf /etc/dnsmasq.conf
40 | mv files/interfaces /etc/network/interfaces
41 |
42 | echo "Configure iptables..."
43 |
44 | iptables --flush
45 | iptables --table nat --flush
46 | iptables --delete-chain
47 | iptables --table nat --delete-chain
48 | iptables --table nat --append POSTROUTING --out-interface eth0 -j MASQUERADE
49 | iptables --append FORWARD --in-interface wlan0 -j ACCEPT
50 |
51 | sysctl -w net.ipv4.ip_forward=1
52 |
53 | #################################################
54 | ############ SET UP THE NETWORK #################
55 | #################################################
56 |
57 |
58 | ################# START WIFI ####################
59 |
60 | if [ "$(ip link | grep wlan0)" ]
61 | then
62 | echo "Killing WiFi."
63 | ifconfig wlan0 down
64 | sleep 1s
65 | fi
66 |
67 | echo "Starting wifi."
68 | ifconfig wlan0 up 10.0.0.1 netmask 255.255.255.0
69 | sleep 2s
70 |
71 | echo "Starting wireless access point."
72 | service hostapd start
73 | service dnsmasq start
74 |
75 |
--------------------------------------------------------------------------------
/Routing Installation/init_raspian:
--------------------------------------------------------------------------------
1 | #!/bin/sh
2 |
3 | ########################################
4 | ########################################
5 | ### ###
6 | ### RASPIAN ROUTER CONFIGURATION ###
7 | ### ###
8 | ########################################
9 | ############################EMCEELAMB###
10 |
11 | if [[ $(/usr/bin/id -u) -ne 0 ]]; then
12 | echo "Not running as root"
13 | exit
14 | fi
15 |
16 | echo "Checking for dependencies..."
17 |
18 | HOSTAPD=$(which hostapd | grep hostapd)
19 | DNSMASQ=$(which dnsmasq | grep dnsmasq)
20 | IPTABLES=$(which iptables | grep iptables)
21 |
22 | if [ "$HOSTAPD" = "" ];then
23 | echo "Adding hostapd"
24 | sudo apt install hostapd
25 | sed "/^DAEMON_CONF/ { s/^#//; s%=.*%=\"/etc/hostapd/hostapd.conf\"%; }" /etc/default/hostapd
26 | else
27 | sudo killall hostapd
28 | fi
29 |
30 | if [ "$DNSMASQ" = "" ];then
31 | echo "Adding dnsmasq"
32 | sudo apt install dnsmasq
33 | else
34 | sudo killall dnsmasq
35 | fi
36 |
37 | if [ "$IPTABLES" = "" ];then
38 | echo "Adding adding iptables"
39 | sudo apt install iptables
40 | sudo apt install iptables-persistent
41 | fi
42 |
43 | echo "Moving config files..."
44 |
45 | sudo cp files/hostapd.conf /etc/hostapd/hostapd.conf
46 | sudo cp files/hostapd /etc/default/hostapd
47 | sudo cp files/dnsmasq.conf /etc/dnsmasq.conf
48 | sudo cp files/interfaces /etc/network/interfaces
49 | sudo cp files/sysctl.conf /etc/sysctl.conf
50 |
51 | echo "Configure dns..."
52 |
53 | if [ -z "$(ps -e | grep dnsmasq)" ]
54 | then
55 | dnsmasq
56 | fi
57 |
58 | echo "Configure iptables..."
59 |
60 | iptables --flush
61 | iptables --table nat --flush
62 | iptables --delete-chain
63 | iptables --table nat --delete-chain
64 | iptables --table nat --append POSTROUTING --out-interface eth0 -j MASQUERADE
65 | iptables --append FORWARD --in-interface wlan0 -j ACCEPT
66 |
67 | sysctl -w net.ipv4.ip_forward=1
68 |
69 | ##################################################
70 | ############# SET UP THE NETWORK #################
71 | ##################################################
72 |
73 |
74 | ################## START WIFI ####################
75 |
76 | if [ "$(ip link | grep wlan0)" ]
77 | then
78 | echo "Killing WiFi."
79 | ifconfig wlan0 down
80 | sleep 1s
81 | fi
82 |
83 | echo "Starting wifi."
84 | ifconfig wlan0 up 10.0.0.1 netmask 255.255.255.0
85 | sleep 2s
86 |
87 | echo "Starting wireless access point."
88 | hostapd /etc/hostapd/hostapd.conf 1> /dev/null
89 | ~
90 | ~
91 |
--------------------------------------------------------------------------------
/community-website/README.md:
--------------------------------------------------------------------------------
1 | # Bridge Community website
2 | This is the website pre-installed on the Bridge router image.
3 | It contains:
4 | - Community Task List/ Message Board
5 | - Real Time Text Chta
6 | - Members list
7 | - HTTP Cache Configuration
8 |
9 | ## Installation
10 | To run the website locally without the bridge image please clone this repository:
11 | ```
12 | git clone https://github.com/emceelamb/bridge
13 | cd community-website
14 | npm install
15 | ```
16 |
17 | To run:
18 | `npm run dev`
19 |
20 | To run forever use [pm2](https://github.com/Unitech/pm2).
21 |
22 |
--------------------------------------------------------------------------------
/community-website/members:
--------------------------------------------------------------------------------
https://raw.githubusercontent.com/Emceelamb/bridge/99ee90cc8a41e3538661e430da1e66f7328cb4d2/community-website/members
--------------------------------------------------------------------------------
/community-website/models/member.js:
--------------------------------------------------------------------------------
https://raw.githubusercontent.com/Emceelamb/bridge/99ee90cc8a41e3538661e430da1e66f7328cb4d2/community-website/models/member.js
--------------------------------------------------------------------------------
/community-website/package.json:
--------------------------------------------------------------------------------
1 | {
2 | "name": "chat",
3 | "version": "1.0.0",
4 | "description": "",
5 | "main": "server.js",
6 | "scripts": {
7 | "test": "echo \"Error: no test specified\" && exit 1",
8 | "start": "node server.js",
9 | "dev": "nodemon server.js"
10 | },
11 | "author": "",
12 | "license": "ISC",
13 | "dependencies": {
14 | "cookie-parser": "^1.4.5",
15 | "dotenv": "^8.2.0",
16 | "ejs": "^3.0.2",
17 | "express": "^4.17.1",
18 | "express-session": "^1.17.0",
19 | "http": "0.0.1-security",
20 | "nedb": "^1.8.0",
21 | "nedb-session-store": "^1.1.2",
22 | "nodemon": "^2.0.2",
23 | "socket.io": "^2.3.0",
24 | "uuid": "^7.0.3"
25 | }
26 | }
27 |
--------------------------------------------------------------------------------
/community-website/public/assets/bridge-logo.png:
--------------------------------------------------------------------------------
https://raw.githubusercontent.com/Emceelamb/bridge/99ee90cc8a41e3538661e430da1e66f7328cb4d2/community-website/public/assets/bridge-logo.png
--------------------------------------------------------------------------------
/community-website/public/assets/bridgeicon.png:
--------------------------------------------------------------------------------
https://raw.githubusercontent.com/Emceelamb/bridge/99ee90cc8a41e3538661e430da1e66f7328cb4d2/community-website/public/assets/bridgeicon.png
--------------------------------------------------------------------------------
/community-website/public/js/main.js:
--------------------------------------------------------------------------------
1 | class Todos {
2 | constructor() {
3 | this.baseurl = '/api/v1/todos';
4 | this.todos = [];
5 | this.$todos = document.querySelector('.todo-list');
6 | this.$form = document.querySelector('.todo-form')
7 | }
8 |
9 | async init() {
10 | await this.updateTodos();
11 | this.$form.addEventListener('submit', async evt => {
12 | evt.preventDefault();
13 | await this.createTodo();
14 | });
15 | }
16 |
17 | async getTodos() {
18 | let data = await fetch (this.baseurl);
19 | data = await data.json();
20 | this.todos = data;
21 | let incomplete =[];
22 | let complete =[];
23 | let toDoList=[];
24 |
25 | for(var item of this.todos){
26 | if(item.status=="incomplete"){incomplete.push(item)}
27 | if(incomplete.length == 6)break
28 |
29 | }
30 | // this.todos.forEach((item)=>{
31 | // if(item.status=="incomplete"){incomplete.push(item)}
32 | // if(item.status=="complete"){complete.push(item)}
33 | // console.log(incomplete.length, "length of in")
34 | // if(incomplete.length == 6)break
35 |
36 | // })
37 |
38 | if(incomplete.length!=0){
39 | incomplete.sort((a,b)=>{
40 | return a.date.localeCompare(b.date);
41 | });
42 | for(let i = 0; i < incomplete.length;i++){
43 | toDoList.push(incomplete[i])
44 | }
45 | }
46 |
47 | if(complete.length!=0){
48 | console.log(complete)
49 | complete.sort((a,b)=>{
50 | return a.date.localeCompare(b.date);
51 | });
52 | for(let i = 0; i < complete.length;i++){
53 | toDoList.push(complete[i])
54 | }
55 | }
56 |
57 | this.todos=toDoList;
58 | console.log(this.todos, "getTodos")
59 | await this.renderTodos();
60 | }
61 |
62 | async createTodo(){
63 | try {
64 | const newData = {
65 | todo: this.$form.todo.value,
66 | status: 'incomplete',
67 | date: new Date().toLocaleString()
68 | };
69 |
70 | const options = {
71 | method: 'POST',
72 | headers: {
73 | Accept: 'application/json',
74 | 'Content-Type': 'application/json'
75 | },
76 | body: JSON.stringify(newData)
77 | };
78 | let data = await fetch(this.baseurl,options);
79 | data = await data.json();
80 | await this.updateTodos();
81 | } catch(error){
82 | console.error(error);
83 | }
84 | }
85 |
86 | async updateTodo(id, newData) {
87 | try {
88 | const options = {
89 | method: 'PUT',
90 | headers: {
91 | Accept: 'application/json',
92 | 'Content-Type': 'application/json'
93 | },
94 | body: JSON.stringify(newData)
95 | };
96 | let data = await fetch(this.baseurl + `/${id}`, options);
97 | data = await data.json();
98 | await this.updateTodos();
99 | } catch (error) {
100 | console.error(error);
101 | }
102 | }
103 |
104 | async deleteTodo(id) {
105 | try {
106 | const options = {
107 | method: 'DELETE'
108 | };
109 | let data = await fetch(this.baseurl + `/${id}`, options);
110 | data = await data.json();
111 | this.updateTodos();
112 | } catch (error) {
113 | console.error(error);
114 | }
115 | }
116 |
117 | async updateTodos() {
118 | await this.getTodos();
119 | this.renderTodos();
120 | }
121 |
122 | renderTodos() {
123 | this.$todos.innerHTML ='';
124 | this.todos.forEach(item =>{
125 | this.$todos.innerHTML += `
126 |
To make use of Squid HTTP Web Cache you must configure your client devices to use the router as the HTTP Proxy. This enables Squid Cache to act as a proxy server allowing all connected to use the network cache server which will allow faster web requests for connected clients. It is optimal to configure the proxy in your system settings so that all applications running your device. The specific instructions will vary between operating systems.
29 |
30 |
Chrome/ Chromium Proxy Setup
31 |
32 | Chromium uses your system proxy settings. When changed it will affect all applications on your machine.
33 |
34 |
35 |
36 | Open Chrome and open Preferences panel
37 |
38 |
39 | Navigate to Advanced > Systems page
40 |
41 |
42 |
43 | Manually configure proxy with the router IP address as your proxy server
44 |
45 | - HTTP Proxy: `10.0.0.1`
46 |
47 | - Port: `3128`
48 |
49 |
50 |
51 |
52 |
53 | You can test the proxy server by running: curl -x 10.0.0.1:3128 google.com and if it returns the page your proxy works!
54 |
55 |
56 | You should be now be sending requests to the Squid Proxy Server! This will speed up your internet as devices on the network will cache http here.
57 |
58 |
59 |
60 |
61 |
62 |
Fire Fox Proxy Setup
63 |
64 |
65 | You can manually set the router as the proxy server on Firefox Browser. You will do this in the browser's preferences page.
66 |
67 |
68 |
69 |
70 |
71 | Open Firefox Browser and go to Preferences panel
72 |
73 |
74 | Navigate to Network Settings and select *settings*
75 |
86 | You can test the proxy server by running: curl -x 10.0.0.1:3128 google.com and if it returns the page your proxy works!
87 |
88 |
89 | You should be now be sending requests to the Squid Proxy Server! This will speed up your internet as devices on the network will cache http here.
90 |
91 |
92 |
124 | You can test the proxy server by running: curl -x 10.0.0.1:3128 google.com and if it returns the page your proxy works!
125 |
126 |
127 | You should be now be sending requests to the Squid Proxy Server! This will speed up your internet as devices on the network will cache http here.
128 |
 50 |
51 |
52 |
50 |
51 |
52 | ) 92 |
93 |
92 |
93 |  102 |
103 |
104 |
102 |
103 |
104 |  108 |
109 |
110 |
108 |
109 |
110 |