├── 13th-gen-fingerprint-reader-firmware.md
├── 22.04-OEM-C.md
├── 22.04-OEM-D.md
├── 23.-4-term-11thgen.png
├── 23.04-term.png
├── 3.png
├── FPR-320-firmware
└── readme.md
├── Fedora37-11thGen.md
├── Fedora37-12thGen.md
├── Fedora38-11thGen.md
├── Fedora38-12thGen.md
├── Fedora38-13thGen.md
├── Fedora38-amd-fw13.md
├── Fedora39-11thGen.md
├── Fedora39-12thGen.md
├── Fedora39-13thGen.md
├── Fedora39-amd-fw13.md
├── Fedora39-fw16.md
├── Fedora40-11thGen.md
├── Fedora40-12thGen.md
├── Fedora40-13thGen.md
├── Fedora40-Setup-Intel-Core-Ultra-Series-1.md
├── Fedora40-amd-fw13.md
├── Fedora40-fw16.md
├── Fingerprint-Checker
├── fpr-checker.sh
├── images
│ ├── checker.png
│ └── readme
└── readme.md
├── LICENSE
├── LinuxMint21-1-Manual-Setup-11thGen.md
├── LinuxMint21-1-Manual-Setup-12thGen.md
├── LinuxMint21-1-Manual-Setup-13thGen.md
├── LinuxMint21-2-11th-Gen.md
├── Manjaro11thgen.md
├── Manjaro12thgen.md
├── Manjaro13thgen.md
├── ManjaroBIOSVersion.md
├── Network-Diagnostic-Scripts
├── 5ghz-diag.sh
├── Ethernet-Diagnostic.sh
├── README.md
├── Wifi-Diagnostic.sh
└── images
│ ├── 5gz1.png
│ ├── 5gz2.png
│ ├── Ethernet-Diag.png
│ ├── README
│ └── WiFi_Diag.png
├── README.md
├── Tuned-PPD-Customizer-Script
├── LICENSE
├── images
│ ├── 1.png
│ ├── 2.png
│ ├── 3.png
│ ├── 4.png
│ ├── 5.png
│ ├── 6.png
│ ├── 7.png
│ └── readme
├── readme.md
└── tuned-ppd.sh
├── Ubuntu22.04LTS-Manual-Setup-11thGen.md
├── Ubuntu22.04LTS-Manual-Setup-12thGen.md
├── Ubuntu22.04LTS-Manual-Setup-13thGen.md
├── Ubuntu23.04-Manual-Setup-11thGen.md
├── Ubuntu23.04-Manual-Setup-12thGen.md
├── Ubuntu23.04-Manual-Setup-13thGen.md
├── Ubuntu24.04LTS-Setup-11thGen.md
├── Ubuntu24.04LTS-Setup-12thGen.md
├── Ubuntu24.04LTS-Setup-13thGen.md
├── Ubuntu24.04LTS-Setup-Intel-Core-Ultra-Series-1.md
├── Ubuntu24.04LTS-Setup-amd-fw13.md
├── Ubuntu24.04LTS-Setup-amd-fw16.md
├── amdgpu-workarounds
├── amdgpu_freesync_video
│ ├── Ubuntu_amdgpu.freesync_video_workaround.sh
│ └── amdgpu_freesync_video.md
└── images
│ ├── after.png
│ ├── before.png
│ └── readme
├── copied.png
├── disable-accidental-wakeup
├── images
│ ├── install.png
│ ├── readme
│ └── remove.png
├── readme.md
├── restore_defaults.sh
└── wakeup.sh
├── dmidecode-and-CPU-info.md
├── easy-effects
├── Fedora-easy-effects-13-installer.sh
├── Fedora-easy-effects-16-installer.sh
├── README.md
├── Ubuntu-easy-effects-13-installer.sh
├── Ubuntu-easy-effects-16-installer.sh
├── fw13-easy-effects.json
├── fw16-easy-effects.json
├── images
│ ├── fw16-easyeffects.png
│ ├── readme
│ └── ubuntu-easy-effects.png
└── irs
│ └── IR_22ms_27dB_5t_15s_0c.irs
├── flatpaks
├── flatseal-installer.sh
├── images
│ ├── flatseal-gimp-filesystem.png
│ ├── flatseal.png
│ ├── mission.png
│ └── readme
├── mission-center-installer.sh
└── readme.md
├── framework-desktop
└── Fedora-42.md
├── framework-laptop-16-disable-touchpad-typing.md
├── framework12
├── Fedora42.md
├── Ubuntu-24-04.md
├── Ubuntu-25-04-accel-ubuntu25.04.md
├── Ubuntu-25-04.md
└── images
│ ├── install.png
│ ├── oszone.png
│ ├── readme
│ └── tablet.png
├── framework13
├── Fedora41-11thGen.md
├── Fedora41-12thGen.md
├── Fedora41-13thGen.md
├── Fedora41-Setup-Intel-Core-Ultra-Series-1.md
├── Fedora41-amd-fw13.md
└── Ryzen-AI-300-Series.md
├── framework16
├── Fedora-42-fw16.md
└── Fedora41-fw16.md
├── goodix-moc-609c-v01000330.cab
├── hibernation
├── hibernate-fedora-automatic.md
├── hibernate-fedora-manual-method.md
├── images
│ ├── 1.png
│ ├── 2.png
│ ├── 3.png
│ ├── hibernate-extension.png
│ ├── installed1.png
│ ├── installrun3.png
│ ├── installrun4.png
│ ├── readme
│ ├── running1.png
│ └── software-center.png
├── kernel-6-11-workarounds
│ ├── rfkill-suspender.sh
│ └── suspend-hibernate-bluetooth-workaround.md
└── readme
├── log-helper
├── combined.sh
├── how-it-works.md
├── images
│ ├── 1.gif
│ ├── 2.gif
│ ├── 3.gif
│ └── readme
├── older-version.txt
└── readme.md
├── misc
├── LUKS-Keyboard-Layout.md
└── secure-boot.md
├── oem-d-alert.png
├── paste-code.png
├── ubuntu-22.04-amd-fw13.md
├── ubuntu-22.04-fw-16.md
├── ubuntu-kernel-switcher
├── images
│ ├── defaults.png
│ ├── readme
│ └── rollback.png
├── readme.md
├── ubuntu-grub-defaults.sh
└── ubuntu-grub-rollback.sh
├── usb-events
├── images
│ ├── readme
│ ├── stitched_image.png
│ └── summary.png
├── readme.md
└── usbevents.sh
└── wifi-powersave
├── powersave.sh
└── readme.md
/13th-gen-fingerprint-reader-firmware.md:
--------------------------------------------------------------------------------
1 | This guide has been moved and improved at https://knowledgebase.frame.work/en_us/updating-fingerprint-reader-firmware-on-linux-for-13th-gen-and-amd-ryzen-7040-series-laptops-HJrvxv_za
2 |
--------------------------------------------------------------------------------
/22.04-OEM-C.md:
--------------------------------------------------------------------------------
1 | ### OEM kernels are not needed at this time.
2 |
3 |
4 | ```
5 | sudo nano /etc/default/grub
6 | ```
7 |
8 | Make sure this line has the adddtional details removed to look like this:
9 | ```
10 | GRUB_CMDLINE_LINUX_DEFAULT="quiet splash"
11 | ```
12 | Then update grub, reboot.
13 |
14 | ```
15 | sudo update-grub
16 | ```
17 | if your grub configuration is still trying to use an OEM kernel and you would like to reset grub to it's conf defaults.
18 |
19 | Click here --->: [Bring grub back to default, use latest kernel installed.](https://github.com/FrameworkComputer/linux-docs/tree/main/ubuntu-kernel-switcher#bring-grub-back-to-default-use-latest-kernel-installed)
20 |
--------------------------------------------------------------------------------
/22.04-OEM-D.md:
--------------------------------------------------------------------------------
1 | ### OEM kernels are not needed at this time.
2 |
3 |
4 | ```
5 | sudo nano /etc/default/grub
6 | ```
7 |
8 | Make sure this line has the adddtional details removed to look like this:
9 | ```
10 | GRUB_CMDLINE_LINUX_DEFAULT="quiet splash"
11 | ```
12 | Then update grub, reboot.
13 |
14 | ```
15 | sudo update-grub
16 | ```
17 | if your grub configuration is still trying to use an OEM kernel and you would like to reset grub to it's conf defaults.
18 |
19 | Click here --->: [Bring grub back to default, use latest kernel installed.](https://github.com/FrameworkComputer/linux-docs/tree/main/ubuntu-kernel-switcher#bring-grub-back-to-default-use-latest-kernel-installed)
20 |
--------------------------------------------------------------------------------
/23.-4-term-11thgen.png:
--------------------------------------------------------------------------------
https://raw.githubusercontent.com/FrameworkComputer/linux-docs/41615e0145b7d968fc6e5e3774efebc019de88e1/23.-4-term-11thgen.png
--------------------------------------------------------------------------------
/23.04-term.png:
--------------------------------------------------------------------------------
https://raw.githubusercontent.com/FrameworkComputer/linux-docs/41615e0145b7d968fc6e5e3774efebc019de88e1/23.04-term.png
--------------------------------------------------------------------------------
/3.png:
--------------------------------------------------------------------------------
https://raw.githubusercontent.com/FrameworkComputer/linux-docs/41615e0145b7d968fc6e5e3774efebc019de88e1/3.png
--------------------------------------------------------------------------------
/FPR-320-firmware/readme.md:
--------------------------------------------------------------------------------
1 |
2 | ## Framework Laptop Fingerprint Readers with 01000320 Firmware Update Guide
3 | ### A step by step guide
4 | #### This assumes you are on a disro such as Ubuntu LTS or Fedora, and have libfprint version of **at least** v1.92.0 or newer.
5 |
6 |
7 | - Verify that this is in fact, firmare version 01000320.
8 | - You must use a distro that is has a libfprint version of **at least** v1.92.0 or **newer**. Fully package updated Ubuntu LTS and Fedora Workstation will meet this requirement. Other distros, even based on these distros, may or may not.
9 | - You will need to open a terminal from your launcher, then paste in the provided lines of code to get validcation of firmware version, update it and so forth.
10 | - The tiny icons on the right side of each code box allow you to easily click it, to copy the code. Then you can right click paste the code into the terminal. If it errors out, try Ctrl Shift V instead to paste.
11 |
12 | - Let's check your firmware version, verify it's 01000320.
13 |
14 | ```
15 | fwupdmgr get-devices | awk '/Fingerprint Sensor:/{flag=1} flag; /Device Flags:/{flag=0}'
16 | ```
17 |
18 | - If it comes back with "Current version: 01000320", then continue with this guide.
19 |
20 | - Making sure we are using the correct **GUID** from the output above:
21 |
22 | - To verify you have the correct GUID, you can run this to verify it's correct with the output from this code:
23 |
24 | ```
25 | fwupdmgr get-devices | awk '/Fingerprint Sensor:/{flag=1} flag; /Device Flags:/{flag=0}' | grep 'GUID:' | awk -F'GUID: ' '{print $2}' | awk '{print $1}'
26 | ```
27 |
28 | The GUID should return with: 1e8c8470-a49c-571a-82fd-19c9fa32b8c3. With the GUID verified:
29 |
30 | ```
31 | fwupdmgr get-devices 1e8c8470-a49c-571a-82fd-19c9fa32b8c3
32 | ```
33 |
34 | - Let's enable testing as at this time, lvfs testing has the firmware.
35 |
36 | ```
37 | fwupdmgr enable-remote lvfs-testing
38 | ```
39 |
40 | - Now refresh everything:
41 |
42 | ```
43 | fwupdmgr refresh --force
44 | ```
45 |
46 | - Let's try to update the firmeware now.
47 |
48 | ```
49 | fwupdmgr update 1e8c8470-a49c-571a-82fd-19c9fa32b8c3
50 | ```
51 |
52 | You will likely see something like this:
53 |
54 | ```
55 | ╔════════════════════════════════════════════════════════════════════════════╗
56 | ║ Upgrade Fingerprint Sensor from 01000320 to 01000334? ║
57 | ╠════════════════════════════════════════════════════════════════════════════╣
58 | ║ Fix physical MITM vulnerability that was found from blackwinghq - a touch ║
59 | ║ of pwn part 1. ║
60 | ║ ║
61 | ║ Fingerprint Sensor and all connected devices may not be usable while ║
62 | ║ updating. ║
63 | ╚════════════════════════════════════════════════════════════════════════════╝
64 | Perform operation? [Y|n]:
65 | Writing… [************************************ ]
66 | failed to write: failed to reply: transfer timed out
67 |
68 | > fwupdmgr get-devices 1e8c8470-a49c-571a-82fd-19c9fa32b8c3
69 | Selected device: Fingerprint Sensor
70 | Framework Laptop (12th Gen Intel Core)
71 | │
72 | └─Fingerprint Sensor:
73 | Device ID: d432baa2162a32c1554ef24bd8281953b9d07c11
74 | Summary: Match-On-Chip fingerprint sensor
75 | Current version: 01000320
76 | Vendor: Goodix (USB:0x27C6)
77 | Install Duration: 10 seconds
78 | Serial Number: UIDXXXXXXXX_XXXX_MOC_B0
79 | Update State: Failed
80 | Problems: • An update is in progress
81 | Last modified: 2024-08-30 08:20
82 | GUID: 1e8c8470-a49c-571a-82fd-19c9fa32b8c3 ← USB\VID_27C6&PID_609C
83 | Device Flags: • Supported on remote server
84 | • Device stages updates
85 | • Device can recover flash failures
86 | • Updatable
87 | • Signed Payload
88 | ```
89 |
90 | - Note the update **status of failed**. We can verify again this with:
91 |
92 | ```
93 | fwupdmgr get-devices 1e8c8470-a49c-571a-82fd-19c9fa32b8c3
94 | ```
95 |
96 | This will likely **still reflect the old 01000320 firmware**.
97 |
98 | - At this stage, **reboot** your laptop.
99 |
100 | - Now run this again:
101 |
102 | ```
103 | fwupdmgr get-devices 1e8c8470-a49c-571a-82fd-19c9fa32b8c3
104 | ```
105 |
106 | - At this point, you should be looking at Current version: 01000334
107 |
108 | - From here, we can enroll fingerprints from GNOME on Ubuntu LTS or Fedora Workstation.
109 |
110 | #### Troubleshooting
111 |
112 | - You may find it times out. Let it sit for a few minutes, then sudo sytemctl reboot -i
113 | - fwupdmgr get-devices 1e8c8470-a49c-571a-82fd-19c9fa32b8c3 again.
114 | - fwupdmgr update 1e8c8470-a49c-571a-82fd-19c9fa32b8c3 again.
115 | - This may take up to three times, but it will eventually go.
116 |
117 | #### Return to the Fingerprint Troubleshooting guides
118 |
119 | - Return to the [Ubuntu Fingerprint Troubleshooting](https://knowledgebase.frame.work/en_us/ubuntu-fingerprint-troubleshooting-r1_DA0TMn) or [Fedora Fingerprint Troubleshooting](https://knowledgebase.frame.work/en_us/fedora-fingerprint-troubleshooting-SyfIAyCM3) guides.
120 |
121 |
122 |
--------------------------------------------------------------------------------
/Fedora37-11thGen.md:
--------------------------------------------------------------------------------
1 | # This is for 11th Gen Intel® Core™ Framework Laptop 13 ONLY.
2 |
3 | ## This Fedora guide will assist with:
4 |
5 | - Workaround needed to get the best suspend battery life for SSD power drain.
6 | - Enable improved fractional scaling support Fedora's GNOME environment using Wayland.
7 | - Enable tap to click on the touchpad.
8 | - Getting your finger print reader working for Fedora user login.
9 |
10 |
11 | ### Make sure to update your packages first
12 | ``sudo dnf upgrade``
13 |
14 | ### If you want to enable fractional scaling on Wayland:
15 | ``
16 | gsettings set org.gnome.mutter experimental-features "['scale-monitor-framebuffer']"
17 | ``
18 |
19 | ### If you want to enable tap-to-click on the touchpad:
20 | ``
21 | gsettings set org.gnome.desktop.peripherals.touchpad tap-to-click true
22 | ``
23 |
24 | ### Improve power saving for NVMe drives:
25 | ``
26 | sudo grubby --update-kernel=ALL --args="nvme.noacpi=1"
27 | ``
28 |
29 | ## If your Fedora 37 install is experiencing freezing, use this to prevent freezing:
30 | ``
31 | sudo grubby --update-kernel=ALL --args="i915.enable_psr=0"
32 | ``
33 |
34 |
35 | ## Configure the fingerprint reader
36 | This may not always be needed, but as of late, these steps have been needed in Fedora 37 with recent updates.
37 |
38 | ### Install the needed packages
39 | ``
40 | sudo dnf install fprintd fprintd-pam
41 | ``
42 |
43 | ### NEW - Make sure to complete the following.
44 | ``
45 | sudo gnome-text-editor /usr/lib/systemd/system/fprintd.service
46 | ``
47 |
48 | ### At the bottom of the file, add:
49 | ``
50 | [Install]
51 | WantedBy=multi-user.target
52 | ``
53 |
54 | ### Save the file.
55 | ``
56 | systemctl restart fprintd.service
57 | ``
58 |
59 | ### Enable fprintd even if previously enabled, this will make sure it's working after reboot.
60 | ``
61 | systemctl enable fprintd.service
62 | ``
63 |
64 |
65 | ### Erase any old fingerprints
66 | ``
67 | fprintd-delete $USER
68 | ``
69 |
70 | ### Enroll your new fingerprint
71 | ``
72 | fprintd-enroll
73 | ``
74 |
75 | ### Verify your new fingerprint
76 | ``
77 | fprintd-verify
78 | ``
79 |
80 | ### Make sure PAM is authenticated for your fingerprint
81 | ``
82 | sudo authselect enable-feature with-fingerprint
83 | ``
84 | ``
85 | sudo authselect apply-changes
86 | ``
87 |
88 | ## Verify it that the fingerprint reader is authorized
89 | ### This will list what has been authorized.
90 | ``
91 | sudo authselect current
92 | ``
93 |
94 | If authselect looks good, upon reboot, your fingerprint will allow you login.
95 |
--------------------------------------------------------------------------------
/Fedora37-12thGen.md:
--------------------------------------------------------------------------------
1 | # This is for 12th Gen Intel® Core™ Framework Laptop 13 ONLY.
2 |
3 | ## This Fedora guide will assist with:
4 |
5 | - Workaround needed to get the best suspend battery life for SSD power drain.
6 | - Enable improved fractional scaling support Fedora's GNOME environment using Wayland.
7 | - Enable tap to click on the touchpad.
8 | - Getting your finger print reader working for Fedora user login.
9 |
10 |
11 | ### Make sure to update your packages first
12 | ``sudo dnf upgrade``
13 |
14 | ### Enable brightness keys
15 | ``
16 | sudo grubby --update-kernel=ALL --args="module_blacklist=hid_sensor_hub"
17 | ``
18 |
19 | ### If you want to enable fractional scaling on Wayland:
20 | ``
21 | gsettings set org.gnome.mutter experimental-features "['scale-monitor-framebuffer']"
22 | ``
23 |
24 | ### If you want to enable tap-to-click on the touchpad:
25 | ``
26 | gsettings set org.gnome.desktop.peripherals.touchpad tap-to-click true
27 | ``
28 |
29 | ### Improve power saving for NVMe drives:
30 | ``
31 | sudo grubby --update-kernel=ALL --args="nvme.noacpi=1"
32 | ``
33 | ## If your Fedora 37 install is experiencing freezing, use this to prevent freezing:
34 | ``
35 | sudo grubby --update-kernel=ALL --args="i915.enable_psr=0"
36 | ``
37 |
38 | ## Configure the fingerprint reader
39 | This may not always be needed, but as of late, these steps have been needed in Fedora 37 with recent updates.
40 |
41 | ### Install the needed packages
42 | ``
43 | sudo dnf install fprintd fprintd-pam
44 | ``
45 |
46 | ### NEW - Make sure to complete the following.
47 | ``
48 | sudo gnome-text-editor /usr/lib/systemd/system/fprintd.service
49 | ``
50 |
51 | ### At the bottom of the file, add:
52 | ``
53 | [Install]
54 | WantedBy=multi-user.target
55 | ``
56 |
57 | ### Save the file.
58 | ``
59 | systemctl restart fprintd.service
60 | ``
61 |
62 | ### Enable fprintd even if previously enabled, this will make sure it's working after reboot.
63 | ``
64 | systemctl enable fprintd.service
65 | ``
66 |
67 |
68 | ### Erase any old fingerprints
69 | ``
70 | fprintd-delete $USER
71 | ``
72 |
73 | ### Enroll your new fingerprint
74 | ``
75 | fprintd-enroll
76 | ``
77 |
78 | ### Verify your new fingerprint
79 | ``
80 | fprintd-verify
81 | ``
82 |
83 | ### Make sure PAM is authenticated for your fingerprint
84 | ``
85 | sudo authselect enable-feature with-fingerprint
86 | ``
87 |
88 | ``
89 | sudo authselect apply-changes
90 | ``
91 |
92 | ## Verify it that the fingerprint reader is authorized
93 | ### This will list what has been authorized.
94 | ``
95 | sudo authselect current
96 | ``
97 |
98 | If authselect looks good, upon reboot, your fingerprint will allow you login.
99 |
--------------------------------------------------------------------------------
/Fedora38-11thGen.md:
--------------------------------------------------------------------------------
1 | # This is for 11th Gen Intel® Core™ Framework Laptop 13 ONLY
2 |
3 |
4 | ## This will:
5 |
6 | - Getting your laptop fully updated.
7 | - Enable improved fractional scaling support Fedora's GNOME environment using Wayland.
8 | - Enabling tap to click on the touchpad.
9 |
10 |
11 |
12 |
13 |
14 | ### Step 1 Updating your software packages
15 |
16 | - Browse to the Activities menu in the upper left corner, click to open it.
17 | - Type out the word terminal, click to open it.
18 | - Copy the code below in the gray box, right click/paste it into the terminal window.
19 | - Then press the enter key, user password, enter key, **reboot.**
20 |
21 |
22 | ```
23 | sudo dnf upgrade
24 | ```
25 | > **TIP:** You can use the little clipboard icon to the right of the code to copy to your clipboard.
26 |
27 |
28 | **Reboot**
29 |
30 |
31 |
32 |
33 |
34 | ### Step 2 - If you want to enable fractional scaling on Wayland:
35 |
36 | - Browse to the Activities menu in the upper left corner, click to open it.
37 | - Type out the word terminal, click to open it.
38 | - Left click and drag to highlight and copy the code below in the gray box, right click/paste it into the terminal window.
39 | - Then press the enter key, user password, enter key.
40 | - Browse to the Activities menu in the upper left corner, click to open it.
41 | - Type out the word Displays.
42 | - Look for "Scale", set it to your preference, click Apply.
43 |
44 |
45 | ```
46 | gsettings set org.gnome.mutter experimental-features "['scale-monitor-framebuffer']"
47 | ```
48 | > **TIP:** You can use the little clipboard icon to the right of the code to copy to your clipboard.
49 |
50 |
51 |
52 |
53 | ### Step 3 - If you want to enable "tap-to-click" on the touchpad:
54 |
55 | - Browse to the Activities menu in the upper left corner, click to open it.
56 | - Type out the word mouse, look for Mouse and Touchpad, click to open it.
57 | - Click the touchpad option at the top.
58 | - Under "Clicking", select Tap to Click and enable it.
59 |
60 |
61 |
62 |
63 |
--------------------------------------------------------------------------------
/Fedora38-12thGen.md:
--------------------------------------------------------------------------------
1 | # This is for 12th Gen Intel® Core™ Framework Laptop 13 ONLY
2 |
3 |
4 | ## This will:
5 |
6 | - Getting your laptop fully updated.
7 | - Enable improved fractional scaling support Fedora's GNOME environment using Wayland.
8 | - Enabling tap to click on the touchpad.
9 | - Enabling brightness keys.
10 |
11 |
12 |
13 |
14 |
15 |
16 | ### Step 1 Updating your software packages
17 |
18 | - Browse to the Activities menu in the upper left corner, click to open it.
19 | - Type out the word terminal, click to open it.
20 | - Copy the code below in the gray box, right click/paste it into the terminal window.
21 | - Then press the enter key, user password, enter key, **reboot.**
22 |
23 |
24 | ```
25 | sudo dnf upgrade
26 | ```
27 | > **TIP:** You can use the little clipboard icon to the right of the code to copy to your clipboard.
28 |
29 |
30 | **Reboot**
31 |
32 |
33 |
34 |
35 |
36 | ### Step 2 - If you want to enable fractional scaling on Wayland:
37 |
38 | - Browse to the Activities menu in the upper left corner, click to open it.
39 | - Type out the word terminal, click to open it.
40 | - Left click and drag to highlight and copy the code below in the gray box, right click/paste it into the terminal window.
41 | - Then press the enter key, user password, enter key.
42 | - Browse to the Activities menu in the upper left corner, click to open it.
43 | - Type out the word Displays.
44 | - Look for "Scale", set it to your preference, click Apply.
45 |
46 |
47 | ```
48 | gsettings set org.gnome.mutter experimental-features "['scale-monitor-framebuffer']"
49 | ```
50 | > **TIP:** You can use the little clipboard icon to the right of the code to copy to your clipboard.
51 |
52 |
53 |
54 |
55 |
56 | ### Step 3 - If you want to enable "tap-to-click" on the touchpad:
57 |
58 | - Browse to the Activities menu in the upper left corner, click to open it.
59 | - Type out the word mouse, look for Mouse and Touchpad, click to open it.
60 | - Click the touchpad option at the top.
61 | - Under "Clicking", select Tap to Click and enable it.
62 |
63 |
64 |
65 |
66 |
67 | ### Enable brightness keys
68 |
69 | - Browse to the Activities menu in the upper left corner, click to open it.
70 | - Type out the word terminal, click to open it.
71 | - Copy the code below in the gray box, right click/paste it into the terminal window.
72 | - Then press the enter key, user password, enter key, **reboot.**
73 |
74 |
75 | ```
76 | sudo grubby --update-kernel=ALL --args="module_blacklist=hid_sensor_hub"
77 | ```
78 | > **TIP:** You can use the little clipboard icon to the right of the code to copy to your clipboard.
79 |
80 |
81 | **Reboot**
82 |
83 |
84 |
85 |
86 |
--------------------------------------------------------------------------------
/Fedora38-13thGen.md:
--------------------------------------------------------------------------------
1 | # This is for 13th Gen Intel® Core™ Framework Laptop 13 ONLY
2 |
3 | ## This will:
4 |
5 | - Getting your laptop fully updated.
6 | - Enable improved fractional scaling support Fedora's GNOME environment using Wayland.
7 | - Enabling tap to click on the touchpad.
8 | - Enabling brightness keys.
9 |
10 |
11 |
12 |
13 |
14 |
15 | ### Step 1 Updating your software packages
16 |
17 | - Browse to the Activities menu in the upper left corner, click to open it.
18 | - Type out the word terminal, click to open it.
19 | - Copy the code below in the gray box, right click/paste it into the terminal window.
20 | - Then press the enter key, user password, enter key, **reboot.**
21 |
22 |
23 | ```
24 | sudo dnf upgrade
25 | ```
26 | > **TIP:** You can use the little clipboard icon to the right of the code to copy to your clipboard.
27 |
28 |
29 | **Reboot**
30 |
31 |
32 |
33 |
34 |
35 | ### Step 2 - If you want to enable fractional scaling on Wayland:
36 |
37 | - Browse to the Activities menu in the upper left corner, click to open it.
38 | - Type out the word terminal, click to open it.
39 | - Left click and drag to highlight and copy the code below in the gray box, right click/paste it into the terminal window.
40 | - Then press the enter key, user password, enter key.
41 | - Browse to the Activities menu in the upper left corner, click to open it.
42 | - Type out the word Displays.
43 | - Look for "Scale", set it to your preference, click Apply.
44 |
45 |
46 | ```
47 | gsettings set org.gnome.mutter experimental-features "['scale-monitor-framebuffer']"
48 | ```
49 | > **TIP:** You can use the little clipboard icon to the right of the code to copy to your clipboard.
50 |
51 |
52 |
53 |
54 |
55 | ### Step 3 - If you want to enable "tap-to-click" on the touchpad:
56 |
57 | - Browse to the Activities menu in the upper left corner, click to open it.
58 | - Type out the word mouse, look for Mouse and Touchpad, click to open it.
59 | - Click the touchpad option at the top.
60 | - Under "Clicking", select Tap to Click and enable it.
61 |
62 |
63 |
64 |
65 |
66 | ### Enable brightness keys
67 |
68 | - Browse to the Activities menu in the upper left corner, click to open it.
69 | - Type out the word terminal, click to open it.
70 | - Copy the code below in the gray box, right click/paste it into the terminal window.
71 | - Then press the enter key, user password, enter key, **reboot.**
72 |
73 |
74 | ```
75 | sudo grubby --update-kernel=ALL --args="module_blacklist=hid_sensor_hub"
76 | ```
77 | > **TIP:** You can use the little clipboard icon to the right of the code to copy to your clipboard.
78 |
79 |
80 | **Reboot**
81 |
82 |
83 |
84 |
85 |
--------------------------------------------------------------------------------
/Fedora38-amd-fw13.md:
--------------------------------------------------------------------------------
1 | ## Place holder
2 |
--------------------------------------------------------------------------------
/Fedora39-11thGen.md:
--------------------------------------------------------------------------------
1 | # This is for 11th Gen Intel® Core™ Framework Laptop 13 ONLY
2 |
3 |
4 | ## This will:
5 |
6 | - Getting your laptop fully updated.
7 | - Enable improved fractional scaling support Fedora's GNOME environment using Wayland.
8 | - Enabling tap to click on the touchpad.
9 |
10 |
11 |
12 |
13 |
14 | ### Step 1 Updating your software packages
15 |
16 | - Browse to the horizontal line in the upper left corner, click to open it.
17 | - Type out the word terminal, click to open it.
18 | - Copy the code below in the gray box, right click/paste it into the terminal window.
19 | - Then press the enter key, user password, enter key, **reboot.**
20 |
21 |
22 | ```
23 | sudo dnf upgrade
24 | ```
25 | > **TIP:** You can use the little clipboard icon to the right of the code to copy to your clipboard.
26 |
27 |
28 | **Reboot**
29 |
30 |
31 |
32 |
33 |
34 | ### Step 2 - If you want to enable fractional scaling on Wayland:
35 |
36 | - Browse to the horizontal line in the upper left corner, click to open it.
37 | - Type out the word terminal, click to open it.
38 | - Left click and drag to highlight and copy the code below in the gray box, right click/paste it into the terminal window.
39 | - Then press the enter key, user password, enter key.
40 | - Browse to the horizontal line in the upper left corner, click to open it.
41 | - Type out the word Displays.
42 | - Look for "Scale", set it to your preference, click Apply.
43 |
44 |
45 | ```
46 | gsettings set org.gnome.mutter experimental-features "['scale-monitor-framebuffer']"
47 | ```
48 | > **TIP:** You can use the little clipboard icon to the right of the code to copy to your clipboard.
49 |
50 |
51 |
52 |
53 | ### Step 3 - If you want to enable "tap-to-click" on the touchpad:
54 |
55 | - Browse to the horizontal line in the upper left corner, click to open it.
56 | - Type out the word mouse, look for Mouse and Touchpad, click to open it.
57 | - Click the touchpad option at the top.
58 | - Under "Clicking", select Tap to Click and enable it.
59 |
60 |
61 |
62 |
63 |
--------------------------------------------------------------------------------
/Fedora39-12thGen.md:
--------------------------------------------------------------------------------
1 | # This is for 12th Gen Intel® Core™ Framework Laptop 13 ONLY
2 |
3 |
4 | ## This will:
5 |
6 | - Getting your laptop fully updated.
7 | - Enable improved fractional scaling support Fedora's GNOME environment using Wayland.
8 | - Enabling tap to click on the touchpad.
9 | - Enabling brightness keys.
10 |
11 |
12 |
13 |
14 |
15 |
16 | ### Step 1 Updating your software packages
17 |
18 | - Browse to the horizontal line in the upper left corner, click to open it.
19 | - Type out the word terminal, click to open it.
20 | - Copy the code below in the gray box, right click/paste it into the terminal window.
21 | - Then press the enter key, user password, enter key, **reboot.**
22 |
23 |
24 | ```
25 | sudo dnf upgrade
26 | ```
27 | > **TIP:** You can use the little clipboard icon to the right of the code to copy to your clipboard.
28 |
29 |
30 | **Reboot**
31 |
32 |
33 |
34 |
35 |
36 | ### Step 2 - If you want to enable fractional scaling on Wayland:
37 |
38 | - Browse to the horizontal line in the upper left corner, click to open it.
39 | - Type out the word terminal, click to open it.
40 | - Left click and drag to highlight and copy the code below in the gray box, right click/paste it into the terminal window.
41 | - Then press the enter key, user password, enter key.
42 | - Browse to the horizontal line in the upper left corner, click to open it.
43 | - Type out the word Displays.
44 | - Look for "Scale", set it to your preference, click Apply.
45 |
46 |
47 | ```
48 | gsettings set org.gnome.mutter experimental-features "['scale-monitor-framebuffer']"
49 | ```
50 | > **TIP:** You can use the little clipboard icon to the right of the code to copy to your clipboard.
51 |
52 |
53 |
54 |
55 |
56 | ### Step 3 - If you want to enable "tap-to-click" on the touchpad:
57 |
58 | - Browse to the horizontal line in the upper left corner, click to open it.
59 | - Type out the word mouse, look for Mouse and Touchpad, click to open it.
60 | - Click the touchpad option at the top.
61 | - Under "Clicking", select Tap to Click and enable it.
62 |
63 |
64 |
65 |
66 |
67 | ### Enable brightness keys
68 |
69 | - Browse to the horizontal line in the upper left corner, click to open it.
70 | - Type out the word terminal, click to open it.
71 | - Copy the code below in the gray box, right click/paste it into the terminal window.
72 | - Then press the enter key, user password, enter key, **reboot.**
73 |
74 |
75 | ```
76 | sudo grubby --update-kernel=ALL --args="module_blacklist=hid_sensor_hub"
77 | ```
78 | > **TIP:** You can use the little clipboard icon to the right of the code to copy to your clipboard.
79 |
80 |
81 | **Reboot**
82 |
83 |
84 |
85 |
86 |
--------------------------------------------------------------------------------
/Fedora39-13thGen.md:
--------------------------------------------------------------------------------
1 | # This is for 13th Gen Intel® Core™ Framework Laptop 13 ONLY
2 |
3 | ## This will:
4 |
5 | - Getting your laptop fully updated.
6 | - Enable improved fractional scaling support Fedora's GNOME environment using Wayland.
7 | - Enabling tap to click on the touchpad.
8 | - Enabling brightness keys.
9 |
10 |
11 |
12 |
13 |
14 |
15 | ### Step 1 Updating your software packages
16 |
17 | - Browse to the horizontal line in the upper left corner, click to open it.
18 | - Type out the word terminal, click to open it.
19 | - Copy the code below in the gray box, right click/paste it into the terminal window.
20 | - Then press the enter key, user password, enter key, **reboot.**
21 |
22 |
23 | ```
24 | sudo dnf upgrade
25 | ```
26 | > **TIP:** You can use the little clipboard icon to the right of the code to copy to your clipboard.
27 |
28 |
29 | **Reboot**
30 |
31 |
32 |
33 |
34 |
35 | ### Step 2 - If you want to enable fractional scaling on Wayland:
36 |
37 | - Browse to the horizontal line in the upper left corner, click to open it.
38 | - Type out the word terminal, click to open it.
39 | - Left click and drag to highlight and copy the code below in the gray box, right click/paste it into the terminal window.
40 | - Then press the enter key, user password, enter key.
41 | - Browse to the horizontal line in the upper left corner, click to open it.
42 | - Type out the word Displays.
43 | - Look for "Scale", set it to your preference, click Apply.
44 |
45 |
46 | ```
47 | gsettings set org.gnome.mutter experimental-features "['scale-monitor-framebuffer']"
48 | ```
49 | > **TIP:** You can use the little clipboard icon to the right of the code to copy to your clipboard.
50 |
51 |
52 |
53 |
54 |
55 | ### Step 3 - If you want to enable "tap-to-click" on the touchpad:
56 |
57 | - Browse to the horizontal line in the upper left corner, click to open it.
58 | - Type out the word mouse, look for Mouse and Touchpad, click to open it.
59 | - Click the touchpad option at the top.
60 | - Under "Clicking", select Tap to Click and enable it.
61 |
62 |
63 |
64 |
65 |
66 | ### Enable brightness keys
67 |
68 | - Browse to the horizontal line in the upper left corner, click to open it.
69 | - Type out the word terminal, click to open it.
70 | - Copy the code below in the gray box, right click/paste it into the terminal window.
71 | - Then press the enter key, user password, enter key, **reboot.**
72 |
73 |
74 | ```
75 | sudo grubby --update-kernel=ALL --args="module_blacklist=hid_sensor_hub"
76 | ```
77 | > **TIP:** You can use the little clipboard icon to the right of the code to copy to your clipboard.
78 |
79 |
80 | **Reboot**
81 |
82 |
83 |
84 |
85 |
--------------------------------------------------------------------------------
/Fedora39-amd-fw13.md:
--------------------------------------------------------------------------------
1 |
2 | # This is for AMD Ryzen 7040 Series configuration on the Framework Laptop 13 ONLY.
3 |
4 | ## This will:
5 |
6 | - Getting your laptop fully updated.
7 | - Enable improved fractional scaling support Fedora's GNOME environment using Wayland.
8 | - Enabling tap to click on the touchpad.
9 |
10 |
11 |
12 |
13 |
14 | ### Step 1 Updating your software packages
15 |
16 | - Browse to the horizontal line in the upper left corner, click to open it.
17 | - Type out the word terminal, click to open it.
18 | - Copy the code below in the gray box, right click/paste it into the terminal window.
19 | - Then press the enter key, user password, enter key, **reboot.**
20 |
21 |
22 | ```
23 | sudo dnf upgrade
24 | ```
25 | > **TIP:** You can use the little clipboard icon to the right of the code to copy to your clipboard.
26 |
27 |
28 | **Reboot**
29 |
30 |
31 |
32 |
33 |
34 | ### Step 2 - If you want to enable fractional scaling on Wayland:
35 |
36 | - Browse to the horizontal line in the upper left corner, click to open it.
37 | - Type out the word terminal, click to open it.
38 | - Left click and drag to highlight and copy the code below in the gray box, right click/paste it into the terminal window.
39 | - Then press the enter key.
40 | - Browse to the horizontal line in the upper left corner, click to open it.
41 | - Type out the word Displays.
42 | - Look for "Scale", set it to your preference, click Apply.
43 |
44 |
45 | ```
46 | gsettings set org.gnome.mutter experimental-features "['scale-monitor-framebuffer']"
47 | ```
48 | > **TIP:** You can use the little clipboard icon to the right of the code to copy to your clipboard.
49 |
50 |
51 |
52 |
53 | ### Step 3 - If you want to enable "tap-to-click" on the touchpad:
54 |
55 | - Browse to the horizontal line in the upper left corner, click to open it.
56 | - Type out the word mouse, look for Mouse and Touchpad, click to open it.
57 | - Click the touchpad option at the top.
58 | - Under "Clicking", select Tap to Click and enable it.
59 |
60 |
61 |
62 |
63 |
64 |
65 |
66 | ## Optional and *only if needed* - current AMD Ryzen 7040 Series workarounds to common issues
67 |
68 | ### To prevent graphical artifacts from appearing:
69 | (Note, this workaround may be unneeded as it is difficult to reproduce, however, if you find you're experiencing [the issue described here](https://bugzilla.redhat.com/show_bug.cgi?id=2247154#c3), you can implement this boot parameter)
70 |
71 |
72 | - Browse to the horizontal line in the upper left corner, click to open it.
73 | - Type out the word terminal, click to open it.
74 | - Then press the enter key, user password, enter key.
75 |
76 | ```
77 | sudo grubby --update-kernel=ALL --args="amdgpu.sg_display=0"
78 | ```
79 | > **TIP:** You can use the little clipboard icon to the right of the code to copy to your clipboard.
80 |
81 |
82 | **Reboot**
83 |
84 | ### Suspend with lid while attached to power workaround
85 | There is an active bug that occurs for some users, creating a bogus key press when you suspend. This provides a solid workaround.
86 |
87 | ```
88 | sudo sh -c '[ ! -f /etc/udev/rules.d/20-suspend-fixes.rules ] && echo "ACTION==\"add\", SUBSYSTEM==\"serio\", DRIVERS==\"atkbd\", ATTR{power/wakeup}=\"disabled\"" > /etc/udev/rules.d/20-suspend-fixes.rules'
89 | ```
90 | This checks for an existing /etc/udev/rules.d/20-suspend-fixes.rules file, if none is found, creates it and appends ACTION=="add", SUBSYSTEM=="serio", DRIVERS=="atkbd", ATTR{power/wakeup}="disabled" to the file.
91 |
92 | **Reboot**
93 |
94 |
95 |
96 |
97 | ### Buzzing sound from 3.5mm jack
98 |
99 | - Browse to the horizontal line in the upper left corner, click to open it.
100 | - Type out the word terminal, click to open it.
101 | - Copy/paste in the following code below.
102 | - Press the enter key, user password, enter key.
103 |
104 | ```
105 | echo 0 | sudo tee /sys/module/snd_hda_intel/parameters/power_save
106 | ```
107 | > **TIP:** You can use the little clipboard icon to the right of the code to copy to your clipboard.
108 |
109 |
110 | **Reboot**
111 |
112 |
113 |
114 |
115 |
116 | ### 3.5mm jack mic won't work
117 |
118 | - Browse to the horizontal line in the upper left corner, click to open it.
119 | - Type out the word terminal, click to open it.
120 | - Copy/paste in the following code below.
121 | - Press the enter key, user password, enter key.
122 |
123 | ```
124 | sudo tee /etc/modprobe.d/alsa.conf <<< "options snd-hda-intel index=1,0 model=auto,dell-headset-multi"
125 | ```
126 | > **TIP:** You can use the little clipboard icon to the right of the code to copy to your clipboard.
127 |
--------------------------------------------------------------------------------
/Fedora39-fw16.md:
--------------------------------------------------------------------------------
1 | # This is for the Framework Laptop 16 (AMD Ryzen™ 7040 Series) ONLY.
2 |
3 | ## This will:
4 |
5 | - Getting your laptop fully updated.
6 | - Allow both CPU and platform drivers to be simultaneously active.
7 | - Enable improved fractional scaling support Fedora's GNOME environment using Wayland.
8 | - Enabling tap to click on the touchpad.
9 |
10 |
11 |
12 |
13 |
14 | ### Step 1 Updating your software packages
15 |
16 | - Browse to the horizontal line in the upper left corner, click to open it.
17 | - Type out the word terminal, click to open it.
18 | - Copy the code below in the gray box, right click/paste it into the terminal window.
19 | - Then press the enter key, user password, enter key, **reboot.**
20 |
21 |
22 | ```
23 | sudo dnf upgrade
24 | ```
25 | > **TIP:** You can use the little clipboard icon to the right of the code to copy to your clipboard.
26 |
27 |
28 | **Reboot**
29 |
30 |
31 |
32 |
33 |
34 |
35 | ### Step 2 - If you want to enable fractional scaling on Wayland:
36 |
37 | - Browse to the horizontal line in the upper left corner, click to open it.
38 | - Type out the word terminal, click to open it.
39 | - Left click and drag to highlight and copy the code below in the gray box, right click/paste it into the terminal window.
40 | - Then press the enter key.
41 | - Browse to the horizontal line in the upper left corner, click to open it.
42 | - Type out the word Displays.
43 | - Look for "Scale", set it to your preference, click Apply.
44 |
45 |
46 | ```
47 | gsettings set org.gnome.mutter experimental-features "['scale-monitor-framebuffer']"
48 | ```
49 | > **TIP:** You can use the little clipboard icon to the right of the code to copy to your clipboard.
50 |
51 |
52 |
53 |
54 | ### Step 3 - If you want to enable "tap-to-click" on the touchpad:
55 |
56 | - Browse to the horizontal line in the upper left corner, click to open it.
57 | - Type out the word mouse, look for Mouse and Touchpad, click to open it.
58 | - Click the touchpad option at the top.
59 | - Under "Clicking", select Tap to Click and enable it.
60 |
61 |
62 |
63 |
64 | ## Optional and *only if needed* - current AMD Ryzen 7040 Series workarounds to common issues
65 |
66 | ### To prevent graphical artifacts from appearing:
67 | (Note, this workaround may be unneeded as it is difficult to reproduce, however, if you find you're experiencing [the issue described here](https://bugzilla.redhat.com/show_bug.cgi?id=2247154#c3), you can implement this boot parameter)
68 |
69 |
70 | - Browse to the horizontal line in the upper left corner, click to open it.
71 | - Type out the word terminal, click to open it.
72 | - Then press the enter key, user password, enter key.
73 |
74 | ```
75 | sudo grubby --update-kernel=ALL --args="amdgpu.sg_display=0"
76 | ```
77 | > **TIP:** You can use the little clipboard icon to the right of the code to copy to your clipboard.
78 |
79 |
80 | **Reboot**
81 |
82 | ## Addtionally, we recommend the following as well if you are experiencing graphical artifacts from appearing
83 |
84 | - Please follow the steps outlined in this guide:
85 | https://knowledgebase.frame.work/allocate-additional-ram-to-igpu-framework-laptop-13-amd-ryzen-7040-series-BkpPUPQa
86 |
87 |
88 |
89 |
90 |
--------------------------------------------------------------------------------
/Fedora40-11thGen.md:
--------------------------------------------------------------------------------
1 | # This is for 11th Gen Intel® Core™ Framework Laptop 13 ONLY
2 |
3 |
4 | ## This will:
5 |
6 | - Getting your laptop fully updated.
7 | - Enable improved fractional scaling support Fedora's GNOME environment using Wayland.
8 | - Enabling tap to click on the touchpad.
9 |
10 |
11 |
12 |
13 |
14 | ### Step 1 Updating your software packages
15 |
16 | - Browse to the horizontal line in the upper left corner, click to open it.
17 | - Type out the word terminal, click to open it.
18 | - Copy the code below in the gray box, right click/paste it into the terminal window.
19 | - Then press the enter key, user password, enter key, **reboot.**
20 |
21 |
22 | ```
23 | sudo dnf upgrade
24 | ```
25 | > **TIP:** You can use the little clipboard icon to the right of the code to copy to your clipboard.
26 |
27 |
28 | **Reboot**
29 |
30 |
31 |
32 |
33 |
34 | ### Step 2 - If you want to enable fractional scaling on Wayland:
35 |
36 | - Browse to the horizontal line in the upper left corner, click to open it.
37 | - Type out the word terminal, click to open it.
38 | - Left click and drag to highlight and copy the code below in the gray box, right click/paste it into the terminal window.
39 | - Then press the enter key, user password, enter key.
40 | - Browse to the horizontal line in the upper left corner, click to open it.
41 | - Type out the word Displays.
42 | - Look for "Scale", set it to your preference, click Apply.
43 |
44 |
45 | ```
46 | gsettings set org.gnome.mutter experimental-features "['scale-monitor-framebuffer']"
47 | ```
48 | > **TIP:** You can use the little clipboard icon to the right of the code to copy to your clipboard.
49 |
50 |
51 |
52 |
53 | ### Step 3 - If you want to enable "tap-to-click" on the touchpad:
54 |
55 | - Browse to the horizontal line in the upper left corner, click to open it.
56 | - Type out the word mouse, look for Mouse and Touchpad, click to open it.
57 | - Click the touchpad option at the top.
58 | - Under "Clicking", select Tap to Click and enable it.
59 |
60 |
61 |
62 |
63 |
--------------------------------------------------------------------------------
/Fedora40-12thGen.md:
--------------------------------------------------------------------------------
1 | # This is for 12th Gen Intel® Core™ Framework Laptop 13 ONLY
2 |
3 |
4 | ## This will:
5 |
6 | - Getting your laptop fully updated.
7 | - Enable improved fractional scaling support Fedora's GNOME environment using Wayland.
8 | - Enabling tap to click on the touchpad.
9 | - Enabling brightness keys.
10 |
11 |
12 |
13 |
14 |
15 |
16 | ### Step 1 Updating your software packages
17 |
18 | - Browse to the horizontal line in the upper left corner, click to open it.
19 | - Type out the word terminal, click to open it.
20 | - Copy the code below in the gray box, right click/paste it into the terminal window.
21 | - Then press the enter key, user password, enter key, **reboot.**
22 |
23 |
24 | ```
25 | sudo dnf upgrade
26 | ```
27 | > **TIP:** You can use the little clipboard icon to the right of the code to copy to your clipboard.
28 |
29 |
30 | **Reboot**
31 |
32 |
33 |
34 |
35 |
36 | ### Step 2 - If you want to enable fractional scaling on Wayland:
37 |
38 | - Browse to the horizontal line in the upper left corner, click to open it.
39 | - Type out the word terminal, click to open it.
40 | - Left click and drag to highlight and copy the code below in the gray box, right click/paste it into the terminal window.
41 | - Then press the enter key, user password, enter key.
42 | - Browse to the horizontal line in the upper left corner, click to open it.
43 | - Type out the word Displays.
44 | - Look for "Scale", set it to your preference, click Apply.
45 |
46 |
47 | ```
48 | gsettings set org.gnome.mutter experimental-features "['scale-monitor-framebuffer']"
49 | ```
50 | > **TIP:** You can use the little clipboard icon to the right of the code to copy to your clipboard.
51 |
52 |
53 |
54 |
55 |
56 | ### Step 3 - If you want to enable "tap-to-click" on the touchpad:
57 |
58 | - Browse to the horizontal line in the upper left corner, click to open it.
59 | - Type out the word mouse, look for Mouse and Touchpad, click to open it.
60 | - Click the touchpad option at the top.
61 | - Under "Clicking", select Tap to Click and enable it.
62 |
63 |
64 |
65 |
66 |
67 |
68 |
69 |
70 |
71 |
72 |
--------------------------------------------------------------------------------
/Fedora40-13thGen.md:
--------------------------------------------------------------------------------
1 | # This is for 13th Gen Intel® Core™ Framework Laptop 13 ONLY
2 |
3 | ## This will:
4 |
5 | - Getting your laptop fully updated.
6 | - Enable improved fractional scaling support Fedora's GNOME environment using Wayland.
7 | - Enabling tap to click on the touchpad.
8 | - Enabling brightness keys.
9 |
10 |
11 |
12 |
13 |
14 |
15 | ### Step 1 Updating your software packages
16 |
17 | - Browse to the horizontal line in the upper left corner, click to open it.
18 | - Type out the word terminal, click to open it.
19 | - Copy the code below in the gray box, right click/paste it into the terminal window.
20 | - Then press the enter key, user password, enter key, **reboot.**
21 |
22 |
23 | ```
24 | sudo dnf upgrade
25 | ```
26 | > **TIP:** You can use the little clipboard icon to the right of the code to copy to your clipboard.
27 |
28 |
29 | **Reboot**
30 |
31 |
32 |
33 |
34 |
35 | ### Step 2 - If you want to enable fractional scaling on Wayland:
36 |
37 | - Browse to the horizontal line in the upper left corner, click to open it.
38 | - Type out the word terminal, click to open it.
39 | - Left click and drag to highlight and copy the code below in the gray box, right click/paste it into the terminal window.
40 | - Then press the enter key, user password, enter key.
41 | - Browse to the horizontal line in the upper left corner, click to open it.
42 | - Type out the word Displays.
43 | - Look for "Scale", set it to your preference, click Apply.
44 |
45 |
46 | ```
47 | gsettings set org.gnome.mutter experimental-features "['scale-monitor-framebuffer']"
48 | ```
49 | > **TIP:** You can use the little clipboard icon to the right of the code to copy to your clipboard.
50 |
51 |
52 |
53 |
54 |
55 | ### Step 3 - If you want to enable "tap-to-click" on the touchpad:
56 |
57 | - Browse to the horizontal line in the upper left corner, click to open it.
58 | - Type out the word mouse, look for Mouse and Touchpad, click to open it.
59 | - Click the touchpad option at the top.
60 | - Under "Clicking", select Tap to Click and enable it.
61 |
62 |
63 |
64 |
65 | ### Bonus Step (for former Mac users) Reduce Font Scaling to Match Your Needs
66 |
67 | We received feedback that for users coming from OS X, installing GNOME Tweaks, browsing to Fonts, and reducing the font size from 1.00 to 0.80 may be preferred.
68 |
69 | - Goto Displays, set scaling to 200%. This will look too large, so let's fix the fonts.
70 | - Install with:
71 |
72 | ```
73 | sudo dnf install gnome-tweaks -y
74 | ```
75 |
76 | - Open Tweaks by using the "Super" or Windows key, search tweaks, and enter.
77 |
78 | - At the top, select fonts. Now in that panel, scroll all the way down. Look for Size. Change from 1.00 to 0.80. Close Tweaks.
79 |
80 | Note: This is for the displays for the laptop only. This will look super odd on external displays and likely too large even still.
81 |
82 |
83 |
84 |
85 |
86 |
87 |
--------------------------------------------------------------------------------
/Fedora40-Setup-Intel-Core-Ultra-Series-1.md:
--------------------------------------------------------------------------------
1 | # This is for Intel® Core™ Ultra Series 1 Framework Laptop 13 ONLY.
2 |
3 | ## This will:
4 |
5 | - Getting your laptop fully updated.
6 | - Enable improved fractional scaling support Fedora's GNOME environment using Wayland.
7 | - Enabling tap to click on the touchpad.
8 |
9 | ### Step 1 Updating your software packages
10 |
11 | - Browse to the horizontal line in the upper left corner, click to open it.
12 | - Type out the word terminal, click to open it.
13 | - Copy the code below in the gray box, right click/paste it into the terminal window.
14 | - Then press the enter key, user password, enter key, **reboot.**
15 |
16 |
17 | ```
18 | sudo dnf upgrade
19 | ```
20 | > **TIP:** You can use the little clipboard icon to the right of the code to copy to your clipboard.
21 |
22 |
23 | **Reboot**
24 |
25 |
26 |
27 |
28 |
29 | ### Step 2 - If you want to enable fractional scaling on Wayland:
30 |
31 | - Browse to the horizontal line in the upper left corner, click to open it.
32 | - Type out the word terminal, click to open it.
33 | - Left click and drag to highlight and copy the code below in the gray box, right click/paste it into the terminal window.
34 | - Then press the enter key, user password, enter key.
35 | - Browse to the horizontal line in the upper left corner, click to open it.
36 | - Type out the word Displays.
37 | - Look for "Scale", set it to your preference, click Apply.
38 |
39 |
40 | ```
41 | gsettings set org.gnome.mutter experimental-features "['scale-monitor-framebuffer']"
42 | ```
43 | > **TIP:** You can use the little clipboard icon to the right of the code to copy to your clipboard.
44 |
45 |
46 |
47 |
48 |
49 | ### Step 3 - If you want to enable "tap-to-click" on the touchpad:
50 |
51 | - Browse to the horizontal line in the upper left corner, click to open it.
52 | - Type out the word mouse, look for Mouse and Touchpad, click to open it.
53 | - Click the touchpad option at the top.
54 | - Under "Clicking", select Tap to Click and enable it.
55 |
56 |
57 |
58 |
59 | ### Bonus Step (for former Mac users) Reduce Font Scaling to Match Your Needs
60 |
61 | We received feedback that for users coming from OS X, installing GNOME Tweaks, browsing to Fonts, and reducing the font size from 1.00 to 0.80 may be preferred.
62 |
63 | - Goto Displays, set scaling to 200%. This will look too large, so let's fix the fonts.
64 | - Install with:
65 |
66 | ```
67 | sudo dnf install gnome-tweaks -y
68 | ```
69 |
70 | - Open Tweaks by using the "Super" or Windows key, search tweaks, and enter.
71 |
72 | - At the top, select fonts. Now in that panel, scroll all the way down. Look for Size. Change from 1.00 to 0.80. Close Tweaks.
73 |
74 | Note: This is for the displays for the laptop only. This will look super odd on external displays and likely too large even still.
75 |
76 |
77 |
78 |
79 |
80 |
81 |
--------------------------------------------------------------------------------
/Fedora40-amd-fw13.md:
--------------------------------------------------------------------------------
1 |
2 | # This is for AMD Ryzen 7040 Series configuration on the Framework Laptop 13 ONLY.
3 |
4 | ## This will:
5 |
6 | - Getting your laptop fully updated.
7 | - Enable improved fractional scaling support Fedora's GNOME environment using Wayland.
8 | - Enabling tap to click on the touchpad.
9 |
10 |
11 |
12 |
13 |
14 | ### Step 1 Updating your software packages
15 |
16 | - Browse to the horizontal line in the upper left corner, click to open it.
17 | - Type out the word terminal, click to open it.
18 | - Copy the code below in the gray box, right click/paste it into the terminal window.
19 | - Then press the enter key, user password, enter key, **reboot.**
20 |
21 |
22 | ```
23 | sudo dnf upgrade
24 | ```
25 | > **TIP:** You can use the little clipboard icon to the right of the code to copy to your clipboard.
26 |
27 |
28 | **Reboot**
29 |
30 |
31 |
32 |
33 |
34 | ### Step 2 - If you want to enable fractional scaling on Wayland:
35 |
36 | - Browse to the horizontal line in the upper left corner, click to open it.
37 | - Type out the word terminal, click to open it.
38 | - Left click and drag to highlight and copy the code below in the gray box, right click/paste it into the terminal window.
39 | - Then press the enter key.
40 | - Browse to the horizontal line in the upper left corner, click to open it.
41 | - Type out the word Displays.
42 | - Look for "Scale", set it to your preference, click Apply.
43 |
44 |
45 | ```
46 | gsettings set org.gnome.mutter experimental-features "['scale-monitor-framebuffer']"
47 | ```
48 | > **TIP:** You can use the little clipboard icon to the right of the code to copy to your clipboard.
49 |
50 |
51 |
52 |
53 | ### Step 3 - If you want to enable "tap-to-click" on the touchpad:
54 |
55 | - Browse to the horizontal line in the upper left corner, click to open it.
56 | - Type out the word mouse, look for Mouse and Touchpad, click to open it.
57 | - Click the touchpad option at the top.
58 | - Under "Clicking", select Tap to Click and enable it.
59 |
60 |
61 |
62 |
63 |
64 |
65 |
66 | ## Optional and *only if needed* - current AMD Ryzen 7040 Series workarounds to common issues
67 |
68 | ### To prevent graphical artifacts from appearing:
69 | (Note, this workaround may be unneeded as it is difficult to reproduce, however, if you find you're experiencing [the issue described here](https://bugzilla.redhat.com/show_bug.cgi?id=2247154#c3), you can implement this boot parameter)
70 |
71 |
72 | - Browse to the horizontal line in the upper left corner, click to open it.
73 | - Type out the word terminal, click to open it.
74 | - Then press the enter key, user password, enter key.
75 |
76 | ```
77 | sudo grubby --update-kernel=ALL --args="amdgpu.sg_display=0"
78 | ```
79 | > **TIP:** You can use the little clipboard icon to the right of the code to copy to your clipboard.
80 |
81 |
82 | **Reboot**
83 |
84 | ### Suspend with lid while attached to power workaround
85 | There is an active bug that occurs for some users, creating a bogus key press when you suspend. This provides a solid workaround.
86 |
87 | ```
88 | sudo sh -c '[ ! -f /etc/udev/rules.d/20-suspend-fixes.rules ] && echo "ACTION==\"add\", SUBSYSTEM==\"serio\", DRIVERS==\"atkbd\", ATTR{power/wakeup}=\"disabled\"" > /etc/udev/rules.d/20-suspend-fixes.rules'
89 | ```
90 | This checks for an existing /etc/udev/rules.d/20-suspend-fixes.rules file, if none is found, creates it and appends ACTION=="add", SUBSYSTEM=="serio", DRIVERS=="atkbd", ATTR{power/wakeup}="disabled" to the file.
91 |
92 | **Reboot**
93 |
94 |
95 |
96 |
97 | ### Buzzing sound from 3.5mm jack
98 |
99 | - Browse to the horizontal line in the upper left corner, click to open it.
100 | - Type out the word terminal, click to open it.
101 | - Copy/paste in the following code below.
102 | - Press the enter key, user password, enter key.
103 |
104 | ```
105 | echo 0 | sudo tee /sys/module/snd_hda_intel/parameters/power_save
106 | ```
107 | > **TIP:** You can use the little clipboard icon to the right of the code to copy to your clipboard.
108 |
109 |
110 | **Reboot**
111 |
112 |
113 |
114 |
115 |
116 | ### 3.5mm jack mic won't work
117 |
118 | - Browse to the horizontal line in the upper left corner, click to open it.
119 | - Type out the word terminal, click to open it.
120 | - Copy/paste in the following code below.
121 | - Press the enter key, user password, enter key.
122 |
123 | ```
124 | sudo tee /etc/modprobe.d/alsa.conf <<< "options snd-hda-intel index=1,0 model=auto,dell-headset-multi"
125 | ```
126 | > **TIP:** You can use the little clipboard icon to the right of the code to copy to your clipboard.
127 |
128 |
129 |
130 |
131 | ### Bonus Step (for former Mac users) Reduce Font Scaling to Match Your Needs
132 |
133 | We received feedback that for users coming from OS X, installing GNOME Tweaks, browsing to Fonts, and reducing the font size from 1.00 to 0.80 may be preferred.
134 |
135 | - Goto Displays, set scaling to 200%. This will look too large, so let's fix the fonts.
136 | - Install with:
137 |
138 | ```
139 | sudo dnf install gnome-tweaks -y
140 | ```
141 |
142 | - Open Tweaks by using the "Super" or Windows key, search tweaks, and enter.
143 |
144 | - At the top, select fonts. Now in that panel, scroll all the way down. Look for Size. Change from 1.00 to 0.80. Close Tweaks.
145 |
146 | Note: This is for the displays for the laptop only. This will look super odd on external displays and likely too large even still.
147 |
148 |
149 |
150 |
151 |
--------------------------------------------------------------------------------
/Fingerprint-Checker/fpr-checker.sh:
--------------------------------------------------------------------------------
1 | #!/bin/bash
2 |
3 | # fpr-checker.sh - A script to manage fingerprint data using fprintd with a selectable menu.
4 |
5 | # Colors for output
6 | RED=$(tput setaf 1)
7 | GREEN=$(tput setaf 2)
8 | YELLOW=$(tput setaf 3)
9 | RESET=$(tput sgr0)
10 |
11 | # Determine the actual user invoking the script, whether through sudo or not
12 | if [ -n "$SUDO_USER" ]; then
13 | USER=$SUDO_USER
14 | else
15 | USER=$(whoami)
16 | fi
17 |
18 | # Function to detect the desktop environment
19 | detect_desktop_environment() {
20 | if [ "$XDG_CURRENT_DESKTOP" ]; then
21 | echo "${YELLOW}Desktop Environment: $XDG_CURRENT_DESKTOP${RESET}"
22 | if [[ "$XDG_CURRENT_DESKTOP" != *"GNOME"* ]]; then
23 | echo "${RED}Note: Fingerprint login might not work with this desktop environment, but you can still configure sudo to work with fingerprints.${RESET}"
24 | fi
25 | else
26 | echo "${YELLOW}Desktop Environment: Unknown${RESET}"
27 | fi
28 | }
29 |
30 | # Function to enroll a specific finger for the actual user
31 | enroll_finger() {
32 | local finger=$1
33 | echo "${YELLOW}Enrolling $finger for user $USER...${RESET}"
34 | sudo -u "$USER" fprintd-enroll -f "$finger"
35 | if [ $? -eq 0 ]; then
36 | echo "${GREEN}Fingerprint enrolled successfully for $finger.${RESET}"
37 | else
38 | echo "${RED}Failed to enroll fingerprint for $finger.${RESET}"
39 | fi
40 | read -p "Press [Enter] key to continue..." # Pause to let the user see the output
41 | }
42 |
43 | # Function to get standard Linux users (UID between 1000 and 60000)
44 | get_standard_users() {
45 | awk -F: '($3 == 0 || ($3 >= 1000 && $3 <= 60000)) {print $1}' /etc/passwd
46 | }
47 |
48 | # Function to delete all fingerprints for standard Linux users
49 | delete_all_fingerprints() {
50 | echo "${RED}Deleting all fingerprints for standard Linux users...${RESET}"
51 | local deleted_any=0
52 |
53 | for user in $(get_standard_users); do
54 | sudo fprintd-delete "$user" 2>/dev/null
55 | if [ $? -eq 0 ]; then
56 | echo "${GREEN}All fingerprints deleted successfully for user: $user${RESET}"
57 | deleted_any=1
58 | else
59 | echo "${YELLOW}No fingerprints found for user: $user${RESET}"
60 | fi
61 | done
62 |
63 | if [ $deleted_any -eq 0 ]; then
64 | echo "${YELLOW}No fingerprints were found to delete for standard Linux users.${RESET}"
65 | fi
66 |
67 | read -p "Press [Enter] key to continue..." # Pause to let the user see the output
68 | }
69 |
70 | # Function to list registered fingerprints for standard Linux users
71 | list_fingerprints_for_all() {
72 | echo "${YELLOW}Listing registered fingerprints for standard Linux users...${RESET}"
73 | local registered=0
74 |
75 | for user in $(get_standard_users); do
76 | output=$(sudo fprintd-list "$user" 2>/dev/null)
77 |
78 | if [[ "$output" != *"no fingers enrolled"* && -n "$output" ]]; then
79 | echo "${GREEN}Fingerprints for user: $user${RESET}"
80 | echo "$output"
81 | echo
82 | registered=1
83 | fi
84 | done
85 |
86 | if [ $registered -eq 0 ]; then
87 | echo "${YELLOW}No fingerprints registered for any standard Linux users.${RESET}"
88 | fi
89 |
90 | read -p "Press [Enter] key to continue..." # Pause to let the user see the output
91 | }
92 |
93 | # Main menu function
94 | show_menu() {
95 | clear
96 | detect_desktop_environment
97 | echo "===================================="
98 | echo " Fingerprint Management Script"
99 | echo "===================================="
100 | echo "1. Enroll Left Thumb"
101 | echo "2. Enroll Left Index Finger"
102 | echo "3. Enroll Left Middle Finger"
103 | echo "4. Enroll Left Ring Finger"
104 | echo "5. Enroll Left Little Finger"
105 | echo "6. Enroll Right Thumb"
106 | echo "7. Enroll Right Index Finger"
107 | echo "8. Enroll Right Middle Finger"
108 | echo "9. Enroll Right Ring Finger"
109 | echo "10. Enroll Right Little Finger"
110 | echo "11. Delete All Fingerprints for Standard Users"
111 | echo "12. List Registered Fingerprints for Standard Users"
112 | echo "13. Exit"
113 | echo "===================================="
114 | echo -n "Choose an option: "
115 | }
116 |
117 | # Function to handle user input
118 | read_options() {
119 | local choice
120 | read -r choice
121 | case $choice in
122 | 1) enroll_finger "left-thumb" ;;
123 | 2) enroll_finger "left-index-finger" ;;
124 | 3) enroll_finger "left-middle-finger" ;;
125 | 4) enroll_finger "left-ring-finger" ;;
126 | 5) enroll_finger "left-little-finger" ;;
127 | 6) enroll_finger "right-thumb" ;;
128 | 7) enroll_finger "right-index-finger" ;;
129 | 8) enroll_finger "right-middle-finger" ;;
130 | 9) enroll_finger "right-ring-finger" ;;
131 | 10) enroll_finger "right-little-finger" ;;
132 | 11) delete_all_fingerprints ;;
133 | 12) list_fingerprints_for_all ;;
134 | 13) exit 0 ;;
135 | *) echo "${RED}Invalid option!${RESET}" && sleep 2
136 | esac
137 | }
138 |
139 | # Main script loop
140 | while true
141 | do
142 | show_menu
143 | read_options
144 | done
145 |
--------------------------------------------------------------------------------
/Fingerprint-Checker/images/checker.png:
--------------------------------------------------------------------------------
https://raw.githubusercontent.com/FrameworkComputer/linux-docs/41615e0145b7d968fc6e5e3774efebc019de88e1/Fingerprint-Checker/images/checker.png
--------------------------------------------------------------------------------
/Fingerprint-Checker/images/readme:
--------------------------------------------------------------------------------
1 |
2 |
--------------------------------------------------------------------------------
/Fingerprint-Checker/readme.md:
--------------------------------------------------------------------------------
1 | ## Fingerprint Checker
2 |
3 | Fingerprint Checker is merely a friendly terminal front end to [fprintd](https://fprint.freedesktop.org/)
4 |
5 | ### Desktop Environment Detection
6 |
7 | - **Highlight:** The script automatically detects the current desktop environment and displays it at the top of the menu in yellow.
8 | - **Desktop Environment Detection:** If the desktop environment is not GNOME, the script warns the user that fingerprint login might not work, but configuring sudo with fingerprint authentication is still possible.
9 |
10 | ### User-Friendly Menu:
11 |
12 | - **Clear Interface:** The script presents a clear and simple menu that allows users to manage their fingerprint data through options like listing, enrolling, deleting, and verifying fingerprints.
13 | - **Highlighted Output:** Important outputs, such as the desktop environment, fingerprint entries, and verification processes, are highlighted in yellow for easy visibility.
14 |
15 | ### Fingerprint Management
16 |
17 | - **Listing Fingerprints:** Users can list all enrolled fingerprints for the current or a specified user.
18 | - **Enrolling Fingerprints:** The script supports enrolling new fingerprints for the current user.
19 | - **Deleting Fingerprints:** Users can delete all fingerprints for users.
20 | - **Verifying Fingerprints:** The script allows users to verify an enrolled fingerprint for the current user, with the verification process highlighted in yellow.
21 |
22 |
23 | ### Error Handling and Feedback:
24 |
25 | - **Input Validation:** The script handles invalid input gracefully, providing feedback and re-prompting the user when necessary.
26 | Pausing for Review: After each operation, the script pauses and prompts the user to press Enter, ensuring they have time to review the output before returning to the menu.
27 |
28 | 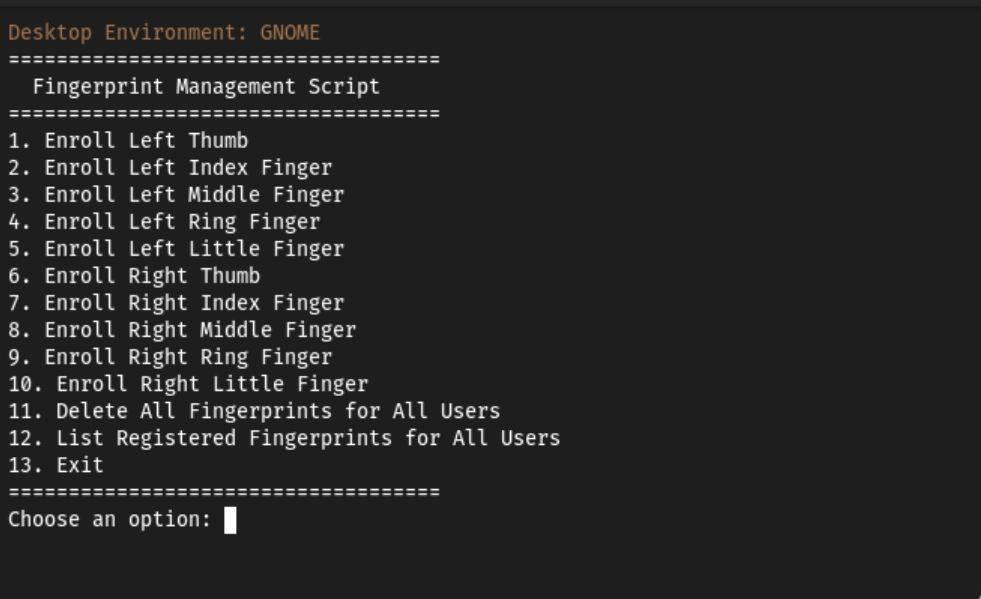
29 |
30 | -------------------------------------------------------------
31 |
32 | ### Install Curl
33 |
34 | Curl should already be installed, but just in case:
35 |
36 | #### Fedora
37 | ```
38 | sudo dnf install curl -y
39 | ```
40 |
41 | or
42 |
43 | #### Ubuntu
44 | ```
45 | sudo apt install curl -y
46 | ```
47 |
48 | ### To Install, simply run:
49 |
50 | ```
51 | curl -s https://raw.githubusercontent.com/FrameworkComputer/linux-docs/main/Fingerprint-Checker/fpr-checker.sh -o fpr-checker.sh && clear && bash fpr-checker.sh
52 | ```
53 |
54 |
55 |
56 | #### Running the script in the future
57 |
58 | >After the install, you can run going forward with the following in the HOME directory. So merely opening a terminal and running this will work if the original script has not been moved.
59 |
60 | ```
61 | bash fpr-checker.sh
62 | ```
63 |
64 |
65 |
66 | -------------------------------------------------------------
67 |
68 | ### FAQ
69 |
70 | - _Why do we need this?_
71 |
72 |
73 | You likely do not, but, if you find that you get your finterprint reader detection your prints, this is a little more user friendly than using fprintd-list, fprintd-enroll, fprintd-delete and fprintd-verify.
74 |
75 |
76 | - _I would rather do this the manual way._
77 |
78 |
79 | Great, simply use fprintd-list, fprintd-enroll, fprintd-delete and fprintd-verify and $USER for each command.
80 |
81 |
82 | Example:
83 |
84 | ```
85 | fprintd-verify $USER
86 | ```
87 |
88 |
89 | #### Return to the Fingerprint Troubleshooting guides
90 |
91 | - Return to the [Ubuntu Fingerprint Troubleshooting](https://knowledgebase.frame.work/en_us/ubuntu-fingerprint-troubleshooting-r1_DA0TMn) or [Fedora Fingerprint Troubleshooting](https://knowledgebase.frame.work/en_us/fedora-fingerprint-troubleshooting-SyfIAyCM3) guides.
92 |
--------------------------------------------------------------------------------
/LinuxMint21-1-Manual-Setup-11thGen.md:
--------------------------------------------------------------------------------
1 | # This is for 11th Gen Intel® Core™ Framework Laptop 13 ONLY.
2 |
3 |
4 | ## This will:
5 |
6 | - Update your Linux Mint install's packages.
7 | - Install the recommended OEM kernel. Now recommending a new OEM kernel.
8 | - Workaround needed to get the best suspend battery life for SSD power drain.
9 | - Enable headset mic input.
10 |
11 | ## *****COPY AND PASTE THIS CODE BELOW INTO A TERMINAL*****
12 |
13 |
14 | - Go to the Linux Mint Launcher or press the super key.
15 | - Type out the word terminal, click to open it.
16 | - Left click and drag to highlight and copy the code below in the gray box, right click/paste to copy it into the terminal window.
17 | - **Then press the enter key, password, reboot.**
18 |
19 |
20 | ``
21 | sudo apt update && sudo apt upgrade -y && sudo apt-get install linux-oem-22.04c -y && echo "options snd-hda-intel model=dell-headset-multi" | sudo tee -a /etc/modprobe.d/alsa-base.conf && sudo sed -i 's/^GRUB_CMDLINE_LINUX_DEFAULT.*/GRUB_CMDLINE_LINUX_DEFAULT="quiet splash nvme.noacpi=1"/g' /etc/default/grub && sudo update-grub && echo "[connection]" | sudo tee /etc/NetworkManager/conf.d/default-wifi-powersave-on.conf && echo "wifi.powersave = 2" | sudo tee -a /etc/NetworkManager/conf.d/default-wifi-powersave-on.conf
22 | ``
23 |
24 | ## *****COPY AND PASTE THIS CODE ABOVE INTO A TERMINAL*****
25 |
26 |
27 | **Pasted code will look similar to the image below:**
28 | 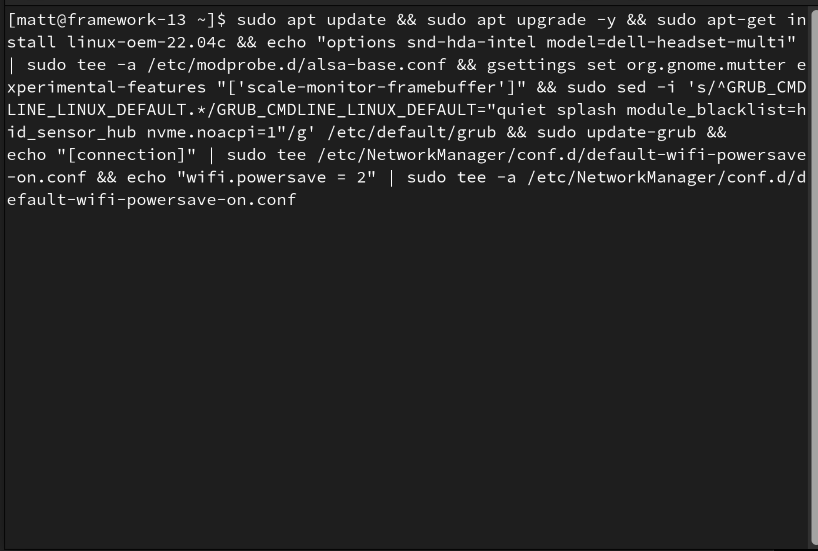
29 |
30 |
31 | -----
32 |
33 | # For intermediate to advanced users:
34 |
35 | If you would rather enter the commands individually **instead** of using the code block provided previously:
36 |
37 |
38 | ### Updating packages.
39 | ``sudo apt update && sudo apt upgrade -y``
40 |
41 | ### Install the recommended OEM kernel.
42 | ``sudo apt install linux-oem-22.04c``
43 |
44 | ### Enable headset mic input.
45 | ``echo "options snd-hda-intel model=dell-headset-multi" | sudo tee -a /etc/modprobe.d/alsa-base.conf``
46 |
47 | ### Then run
48 | ``sudo update-grub``
49 |
50 | ### Workaround needed to get the best suspend battery life for SSD power drain.
51 | ``sudo gedit /etc/default/grub``
52 |
53 | ### Append the following to the GRUB_CMDLINE_LINUX_DEFAULT="quiet splash section.
54 | This is an ACPI parameter that helps ensure compatibility by disabling ACPI support for NVMe.
55 | Advanced Linux users: You're welcome to remove it if you feel it's not needed for any reason and sudo update-grub.
56 | ``
57 | GRUB_CMDLINE_LINUX_DEFAULT="quiet splash nvme.noacpi=1"
58 | ``
59 |
60 | ### Then run
61 | ``sudo update-grub``
62 |
63 | ### Preventing wifi drop offs.
64 | ``sudo gedit /etc/NetworkManager/conf.d/default-wifi-powersave-on.conf``
65 |
66 | ### Change 3 into a 2
67 | ``wifi.powersave = 2``
68 |
--------------------------------------------------------------------------------
/LinuxMint21-1-Manual-Setup-12thGen.md:
--------------------------------------------------------------------------------
1 | # This is for 12th Gen Intel® Core™ Framework Laptop 13 ONLY.
2 |
3 |
4 | ## This will:
5 |
6 | - Update your Linux Mint install's packages.
7 | - Install the recommended OEM kernel. Now recommending a new OEM kernel.
8 | - Workaround needed to get the best suspend battery life for SSD power drain.
9 | - Disable the ALS sensor so that your brightness keys work.
10 | - Enable headset mic input.
11 |
12 | ## *****COPY AND PASTE THIS CODE BELOW INTO A TERMINAL*****
13 |
14 |
15 | - Go to the Linux Mint Launcher or press the super key.
16 | - Type out the word terminal, click to open it.
17 | - Left click and drag to highlight and copy the code below in the gray box, right click/paste to copy it into the terminal window.
18 | - **Then press the enter key, password, reboot.**
19 |
20 |
21 | ``
22 | sudo apt update && sudo apt upgrade -y && sudo apt-get install linux-oem-22.04c -y && echo "options snd-hda-intel model=dell-headset-multi" | sudo tee -a /etc/modprobe.d/alsa-base.conf && sudo sed -i 's/^GRUB_CMDLINE_LINUX_DEFAULT.*/GRUB_CMDLINE_LINUX_DEFAULT="quiet splash module_blacklist=hid_sensor_hub nvme.noacpi=1"/g' /etc/default/grub && sudo update-grub && echo "[connection]" | sudo tee /etc/NetworkManager/conf.d/default-wifi-powersave-on.conf && echo "wifi.powersave = 2" | sudo tee -a /etc/NetworkManager/conf.d/default-wifi-powersave-on.conf
23 | ``
24 |
25 | ## *****COPY AND PASTE THIS CODE ABOVE INTO A TERMINAL*****
26 |
27 |
28 | **Pasted code will look similar to the image below:**
29 | 
30 |
31 |
32 | -----
33 |
34 | # For intermediate to advanced users:
35 |
36 | If you would rather enter the commands individually **instead** of using the code block provided previously:
37 |
38 |
39 | ### Updating packages.
40 | ``sudo apt update && sudo apt upgrade -y``
41 |
42 | ### Install the recommended OEM kernel.
43 | ``sudo apt install linux-oem-22.04c``
44 |
45 | ### Enable headset mic input.
46 | ``echo "options snd-hda-intel model=dell-headset-multi" | sudo tee -a /etc/modprobe.d/alsa-base.conf``
47 |
48 | ### Disable the ALS sensor so that your brightness keys work, 13th gen only.
49 | ``sudo gedit /etc/default/grub``
50 |
51 | ### Append the following to the GRUB_CMDLINE_LINUX_DEFAULT="quiet splash section.
52 | ``
53 | GRUB_CMDLINE_LINUX_DEFAULT="quiet splash module_blacklist=hid_sensor_hub"
54 | ``
55 |
56 | ### Then run
57 | ``sudo update-grub``
58 |
59 | ### Workaround needed to get the best suspend battery life for SSD power drain.
60 | ``sudo gedit /etc/default/grub``
61 |
62 | ### Append the following to the GRUB_CMDLINE_LINUX_DEFAULT="quiet splash section.
63 | This is an ACPI parameter that helps ensure compatibility by disabling ACPI support for NVMe.
64 | Advanced Linux users: You're welcome to remove it if you feel it's not needed for any reason and sudo update-grub.``
65 | GRUB_CMDLINE_LINUX_DEFAULT="quiet splash nvme.noacpi=1"
66 | ``
67 |
68 | ### Then run
69 | ``sudo update-grub``
70 |
71 | ### Preventing wifi drop offs.
72 | ``sudo gedit /etc/NetworkManager/conf.d/default-wifi-powersave-on.conf``
73 |
74 | ### Change 3 into a 2
75 | ``wifi.powersave = 2``
76 |
--------------------------------------------------------------------------------
/LinuxMint21-1-Manual-Setup-13thGen.md:
--------------------------------------------------------------------------------
1 | # This is for 13th Gen Intel® Core™ Framework Laptop 13 ONLY.
2 |
3 |
4 | ## This will:
5 |
6 | - Update your Linux Mint install's packages.
7 | - Install the recommended OEM kernel. Now recommending a new OEM kernel.
8 | - Workaround needed to get the best suspend battery life for SSD power drain.
9 | - Disable the ALS sensor so that your brightness keys work.
10 | - Enable headset mic input.
11 |
12 | ## *****COPY AND PASTE THIS CODE BELOW INTO A TERMINAL*****
13 |
14 |
15 | - Go to the Linux Mint Launcher or press the super key.
16 | - Type out the word terminal, click to open it.
17 | - Left click and drag to highlight and copy the code below in the gray box, right click/paste to copy it into the terminal window.
18 | - **Then press the enter key, password, reboot.**
19 |
20 |
21 | ``
22 | sudo apt update && sudo apt upgrade -y && sudo apt-get install linux-oem-22.04c -y && echo "options snd-hda-intel model=dell-headset-multi" | sudo tee -a /etc/modprobe.d/alsa-base.conf && sudo sed -i 's/^GRUB_CMDLINE_LINUX_DEFAULT.*/GRUB_CMDLINE_LINUX_DEFAULT="quiet splash module_blacklist=hid_sensor_hub nvme.noacpi=1"/g' /etc/default/grub && sudo update-grub && echo "[connection]" | sudo tee /etc/NetworkManager/conf.d/default-wifi-powersave-on.conf && echo "wifi.powersave = 2" | sudo tee -a /etc/NetworkManager/conf.d/default-wifi-powersave-on.conf
23 | ``
24 |
25 | ## *****COPY AND PASTE THIS CODE ABOVE INTO A TERMINAL*****
26 |
27 |
28 | **Pasted code will look similar to the image below:**
29 | 
30 |
31 |
32 | -----
33 |
34 | # For intermediate to advanced users:
35 |
36 | If you would rather enter the commands individually **instead** of using the code block provided previously:
37 |
38 |
39 | ### Updating packages.
40 | ``sudo apt update && sudo apt upgrade -y``
41 |
42 | ### Install the recommended OEM kernel.
43 | ``sudo apt install linux-oem-22.04c``
44 |
45 | ### Enable headset mic input.
46 | ``echo "options snd-hda-intel model=dell-headset-multi" | sudo tee -a /etc/modprobe.d/alsa-base.conf``
47 |
48 | ### Disable the ALS sensor so that your brightness keys work, 13th gen only.
49 | ``sudo gedit /etc/default/grub``
50 |
51 | ### Append the following to the GRUB_CMDLINE_LINUX_DEFAULT="quiet splash section.
52 | This will address your brightness keys.
53 |
54 | ``
55 | GRUB_CMDLINE_LINUX_DEFAULT="quiet splash module_blacklist=hid_sensor_hub"
56 | ``
57 |
58 | ### Then run
59 | ``sudo update-grub``
60 |
61 | ### Workaround needed to get the best suspend battery life for SSD power drain.
62 | ``sudo gedit /etc/default/grub``
63 |
64 | ### Append the following to the GRUB_CMDLINE_LINUX_DEFAULT="quiet splash section.
65 | ``
66 | GRUB_CMDLINE_LINUX_DEFAULT="quiet splash nvme.noacpi=1"
67 | ``
68 |
69 | ### Then run
70 | ``sudo update-grub``
71 |
72 | ### Preventing wifi drop offs.
73 | ``sudo gedit /etc/NetworkManager/conf.d/default-wifi-powersave-on.conf``
74 |
75 | ### Change 3 into a 2
76 | ``wifi.powersave = 2``
77 |
--------------------------------------------------------------------------------
/LinuxMint21-2-11th-Gen.md:
--------------------------------------------------------------------------------
1 | # This is for 11th Gen Intel® Core™ Framework Laptop 13 ONLY.
2 |
3 |
4 | ## This will:
5 |
6 | - Update your Linux Mint install's packages.
7 | - Install the recommended OEM kernel. Now recommending a new OEM kernel.
8 | - Workaround needed to get the best suspend battery life for SSD power drain.
9 | - Enable headset mic input.
10 |
11 | ## *****COPY AND PASTE THIS CODE BELOW INTO A TERMINAL*****
12 |
13 |
14 | - Go to the Linux Mint Launcher or press the super key.
15 | - Type out the word terminal, click to open it.
16 | - Left click and drag to highlight and copy the code below in the gray box, right click/paste to copy it into the terminal window.
17 | - **Then press the enter key, password, reboot.**
18 |
19 |
20 | ``
21 | sudo apt update && sudo apt upgrade -y && sudo apt-get install linux-oem-22.04c -y && sudo sed -i 's/^GRUB_CMDLINE_LINUX_DEFAULT.*/GRUB_CMDLINE_LINUX_DEFAULT="quiet splash nvme.noacpi=1"/g' /etc/default/grub && sudo update-grub
22 | ``
23 |
24 | ## *****COPY AND PASTE THIS CODE ABOVE INTO A TERMINAL*****
25 |
26 |
27 | **Pasted code will look similar to the image below:**
28 | 
29 |
30 |
31 | -----
32 |
33 | # For intermediate to advanced users:
34 |
35 | If you would rather enter the commands individually **instead** of using the code block provided previously:
36 |
37 |
38 | ### Updating packages.
39 | ``sudo apt update && sudo apt upgrade -y``
40 |
41 | ### Install the recommended OEM kernel.
42 | ``sudo apt install linux-oem-22.04c``
43 |
44 | ### Then run
45 | ``sudo update-grub``
46 |
47 | ### Workaround needed to get the best suspend battery life for SSD power drain.
48 | ``sudo gedit /etc/default/grub``
49 |
50 | ### Append the following to the GRUB_CMDLINE_LINUX_DEFAULT="quiet splash section.
51 | This is an ACPI parameter that helps ensure compatibility by disabling ACPI support for NVMe.
52 | Advanced Linux users: You're welcome to remove it if you feel it's not needed for any reason and sudo update-grub.
53 | ``
54 | GRUB_CMDLINE_LINUX_DEFAULT="quiet splash nvme.noacpi=1"
55 | ``
56 |
57 | ### Then run
58 | ``sudo update-grub``
59 |
--------------------------------------------------------------------------------
/Manjaro11thgen.md:
--------------------------------------------------------------------------------
1 | # This is for 11th Gen Intel® Core™ Framework Laptop 13 ONLY.
2 |
3 |
4 | ## This will:
5 |
6 | - Update your Manjaro install's packages.
7 | - Workaround needed to get the best suspend battery life for SSD power drain.
8 | - Prevent wireless drops.
9 |
10 | ## *****COPY AND PASTE THIS CODE BELOW INTO A TERMINAL*****
11 |
12 |
13 | - Go to the Manjaro Launcher or press the super key.
14 | - Type out the word terminal, click to open it.
15 | - Left click and drag to highlight and copy the code below in the gray box, right click/paste to copy it into the terminal window.
16 | - **Then press the enter key, password, reboot.**
17 |
18 |
19 | ``
20 | sudo pacman -Syyu --noconfirm && sudo sed -i.bak 's/^\(GRUB_CMDLINE_LINUX_DEFAULT="[^"]*\)"$/\1 nvme.noacpi=1"/' /etc/default/grub && sudo update-grub && echo "[connection]" | sudo tee /etc/NetworkManager/conf.d/default-wifi-powersave-on.conf && echo "wifi.powersave = 2" | sudo tee -a /etc/NetworkManager/conf.d/default-wifi-powersave-on.conf && sleep 1 && sudo echo -e "\033[1;33mProcess is complete"``
21 |
22 | ## *****COPY AND PASTE THIS CODE ABOVE INTO A TERMINAL*****
23 |
24 |
25 | -----
26 |
27 | # For intermediate to advanced users:
28 |
29 | If you would rather enter the commands individually **instead** of using the code block provided previously:
30 |
31 |
32 | ### Updating packages.
33 | ``sudo pacman -Syyu --noconfirm``
34 |
35 | ### Workaround needed to get the best suspend battery life for SSD power drain.
36 | If encrypted, make sure you place this correctly or use the copy/paste command above instead.
37 |
38 | ``sudo gedit /etc/default/grub``
39 |
40 | ### Append the following to the GRUB_CMDLINE_LINUX_DEFAULT="quiet splash section.
41 | If encrypted, make sure you place this correctly or use the copy/paste command above instead.
42 |
43 | This is an ACPI parameter that helps ensure compatibility by disabling ACPI support for NVMe. Advanced Linux users: You're welcome to remove it if you feel it's not needed for any reason and sudo update-grub.
44 | ``
45 | GRUB_CMDLINE_LINUX_DEFAULT="quiet splash nvme.noacpi=1"
46 | ``
47 |
48 | ### Then run
49 | ``sudo update-grub``
50 |
51 | ### Preventing wifi drop offs.
52 | ``sudo gedit /etc/NetworkManager/conf.d/default-wifi-powersave-on.conf``
53 |
54 | ### Change 3 into a 2
55 | ``wifi.powersave = 2``
56 |
--------------------------------------------------------------------------------
/Manjaro12thgen.md:
--------------------------------------------------------------------------------
1 | # This is for 12th Gen Intel® Core™ Framework Laptop 13 ONLY.
2 |
3 |
4 | ## This will:
5 |
6 | - Update your Manjaro install's packages.
7 | - Workaround needed to get the best suspend battery life for SSD power drain.
8 | - Disable the ALS sensor so that your brightness keys work.
9 | - Prevent wireless drops.
10 |
11 | ## *****COPY AND PASTE THIS CODE BELOW INTO A TERMINAL*****
12 |
13 |
14 | - Go to the Manjaro Launcher or press the super key.
15 | - Type out the word terminal, click to open it.
16 | - Left click and drag to highlight and copy the code below in the gray box, right click/paste to copy it into the terminal window.
17 | - **Then press the enter key, password, reboot.**
18 |
19 |
20 | ``
21 | sudo pacman -Syyu --noconfirm && sudo sed -i.bak 's/^\(GRUB_CMDLINE_LINUX_DEFAULT="[^"]*\)"$/\1 module_blacklist=hid_sensor_hub nvme.noacpi=1"/' /etc/default/grub && sudo update-grub && echo "[connection]" | sudo tee /etc/NetworkManager/conf.d/default-wifi-powersave-on.conf && echo "wifi.powersave = 2" | sudo tee -a /etc/NetworkManager/conf.d/default-wifi-powersave-on.conf && sleep 1 && sudo echo -e "\033[1;33mProcess is complete"``
22 |
23 | ## *****COPY AND PASTE THIS CODE ABOVE INTO A TERMINAL*****
24 |
25 |
26 | -----
27 |
28 | # For intermediate to advanced users:
29 |
30 | If you would rather enter the commands individually **instead** of using the code block provided previously:
31 |
32 |
33 | ### Updating packages.
34 | ``sudo pacman -Syyu --noconfirm``
35 |
36 | ### Disable the ALS sensor so that your brightness keys work, 13th gen only.
37 | ``sudo gedit /etc/default/grub``
38 |
39 | ### Append the following to the GRUB_CMDLINE_LINUX_DEFAULT="quiet splash section.
40 | If encrypted, make sure you place this correctly or use the copy/paste command above instead.
41 | ``
42 | GRUB_CMDLINE_LINUX_DEFAULT="quiet splash module_blacklist=hid_sensor_hub"
43 | ``
44 |
45 | ### Then run
46 | ``sudo update-grub``
47 |
48 | ### Workaround needed to get the best suspend battery life for SSD power drain.
49 | If encrypted, make sure you place this correctly or use the copy/paste command above instead.
50 |
51 | ``sudo gedit /etc/default/grub``
52 |
53 | ### Append the following to the GRUB_CMDLINE_LINUX_DEFAULT="quiet splash section.
54 | If encrypted, make sure you place this correctly or use the copy/paste command above instead.
55 |
56 | This is an ACPI parameter that helps ensure compatibility by disabling ACPI support for NVMe. Advanced Linux users: You're welcome to remove it if you feel it's not needed for any reason and sudo update-grub.
57 |
58 | ``
59 | GRUB_CMDLINE_LINUX_DEFAULT="quiet splash nvme.noacpi=1"
60 | ``
61 |
62 | ### Then run
63 | ``sudo update-grub``
64 |
65 | ### Preventing wifi drop offs.
66 | ``sudo gedit /etc/NetworkManager/conf.d/default-wifi-powersave-on.conf``
67 |
68 | ### Change 3 into a 2
69 | ``wifi.powersave = 2``
70 |
--------------------------------------------------------------------------------
/Manjaro13thgen.md:
--------------------------------------------------------------------------------
1 | # This is for 13th Gen Intel® Core™ Framework Laptop 13 ONLY.
2 |
3 |
4 | ## This will:
5 |
6 | - Update your Manjaro install's packages.
7 | - Workaround needed to get the best suspend battery life for SSD power drain.
8 | - Disable the ALS sensor so that your brightness keys work.
9 | - Prevent wireless drops.
10 |
11 | ## *****COPY AND PASTE THIS CODE BELOW INTO A TERMINAL*****
12 |
13 |
14 | - Go to the Manjaro Launcher or press the super key.
15 | - Type out the word terminal, click to open it.
16 | - Left click and drag to highlight and copy the code below in the gray box, right click/paste to copy it into the terminal window.
17 | - **Then press the enter key, password, reboot.**
18 |
19 |
20 | ``
21 | sudo pacman -Syyu --noconfirm && sudo sed -i.bak 's/^\(GRUB_CMDLINE_LINUX_DEFAULT="[^"]*\)"$/\1 module_blacklist=hid_sensor_hub nvme.noacpi=1"/' /etc/default/grub && sudo update-grub && echo "[connection]" | sudo tee /etc/NetworkManager/conf.d/default-wifi-powersave-on.conf && echo "wifi.powersave = 2" | sudo tee -a /etc/NetworkManager/conf.d/default-wifi-powersave-on.conf && sleep 1 && sudo echo -e "\033[1;33mProcess is complete"``
22 |
23 | ## *****COPY AND PASTE THIS CODE ABOVE INTO A TERMINAL*****
24 |
25 |
26 | -----
27 |
28 | # For intermediate to advanced users:
29 |
30 | If you would rather enter the commands individually **instead** of using the code block provided previously:
31 |
32 |
33 | ### Updating packages.
34 | ``sudo pacman -Syyu --noconfirm``
35 |
36 | ### Disable the ALS sensor so that your brightness keys work, 13th gen only.
37 | ``sudo gedit /etc/default/grub``
38 |
39 | ### Append the following to the GRUB_CMDLINE_LINUX_DEFAULT="quiet splash section.
40 | If encrypted, make sure you place this correctly or use the copy/paste command above instead.
41 | ``
42 | GRUB_CMDLINE_LINUX_DEFAULT="quiet splash module_blacklist=hid_sensor_hub"
43 | ``
44 |
45 | ### Then run
46 | ``sudo update-grub``
47 |
48 | ### Workaround needed to get the best suspend battery life for SSD power drain.
49 | If encrypted, make sure you place this correctly or use the copy/paste command above instead.
50 |
51 | ``sudo gedit /etc/default/grub``
52 |
53 | ### Append the following to the GRUB_CMDLINE_LINUX_DEFAULT="quiet splash section.
54 | If encrypted, make sure you place this correctly or use the copy/paste command above instead.
55 |
56 | This is an ACPI parameter that helps ensure compatibility by disabling ACPI support for NVMe. Advanced Linux users: You're welcome to remove it if you feel it's not needed for any reason and sudo update-grub.
57 |
58 | ``
59 | GRUB_CMDLINE_LINUX_DEFAULT="quiet splash nvme.noacpi=1"
60 | ``
61 |
62 | ### Then run
63 | ``sudo update-grub``
64 |
65 | ### Preventing wifi drop offs.
66 | ``sudo gedit /etc/NetworkManager/conf.d/default-wifi-powersave-on.conf``
67 |
68 | ### Change 3 into a 2
69 | ``wifi.powersave = 2``
70 |
--------------------------------------------------------------------------------
/ManjaroBIOSVersion.md:
--------------------------------------------------------------------------------
1 | ## Simply copy and paste this entire code into the terminal
2 | The output will give you BIOS, CPU and kernel information.
3 |
4 | Go to the Manjaro Launcher or press the super key. Search for Terminal, launch the application.
5 |
6 | ``
7 | sudo pacman -S dmidecode lshw --noconfirm && sudo dmidecode | grep -A3 'Vendor:' && sudo lshw -C cpu | grep -A3 'product:' && sudo echo -e "\033[1;33mKernel: $(uname -r)\033[0m"
8 | ``
9 |
--------------------------------------------------------------------------------
/Network-Diagnostic-Scripts/images/5gz1.png:
--------------------------------------------------------------------------------
https://raw.githubusercontent.com/FrameworkComputer/linux-docs/41615e0145b7d968fc6e5e3774efebc019de88e1/Network-Diagnostic-Scripts/images/5gz1.png
--------------------------------------------------------------------------------
/Network-Diagnostic-Scripts/images/5gz2.png:
--------------------------------------------------------------------------------
https://raw.githubusercontent.com/FrameworkComputer/linux-docs/41615e0145b7d968fc6e5e3774efebc019de88e1/Network-Diagnostic-Scripts/images/5gz2.png
--------------------------------------------------------------------------------
/Network-Diagnostic-Scripts/images/Ethernet-Diag.png:
--------------------------------------------------------------------------------
https://raw.githubusercontent.com/FrameworkComputer/linux-docs/41615e0145b7d968fc6e5e3774efebc019de88e1/Network-Diagnostic-Scripts/images/Ethernet-Diag.png
--------------------------------------------------------------------------------
/Network-Diagnostic-Scripts/images/README:
--------------------------------------------------------------------------------
1 |
2 |
--------------------------------------------------------------------------------
/Network-Diagnostic-Scripts/images/WiFi_Diag.png:
--------------------------------------------------------------------------------
https://raw.githubusercontent.com/FrameworkComputer/linux-docs/41615e0145b7d968fc6e5e3774efebc019de88e1/Network-Diagnostic-Scripts/images/WiFi_Diag.png
--------------------------------------------------------------------------------
/README.md:
--------------------------------------------------------------------------------
1 | # linux-docs
2 | ## Linux Markdown Guides & Related Files
3 |
4 | This repo serves as a place to host the formatted code blocks and instructions for the Linux guides.
5 |
--------------------------------------------------------------------------------
/Tuned-PPD-Customizer-Script/LICENSE:
--------------------------------------------------------------------------------
1 |
2 |
--------------------------------------------------------------------------------
/Tuned-PPD-Customizer-Script/images/1.png:
--------------------------------------------------------------------------------
https://raw.githubusercontent.com/FrameworkComputer/linux-docs/41615e0145b7d968fc6e5e3774efebc019de88e1/Tuned-PPD-Customizer-Script/images/1.png
--------------------------------------------------------------------------------
/Tuned-PPD-Customizer-Script/images/2.png:
--------------------------------------------------------------------------------
https://raw.githubusercontent.com/FrameworkComputer/linux-docs/41615e0145b7d968fc6e5e3774efebc019de88e1/Tuned-PPD-Customizer-Script/images/2.png
--------------------------------------------------------------------------------
/Tuned-PPD-Customizer-Script/images/3.png:
--------------------------------------------------------------------------------
https://raw.githubusercontent.com/FrameworkComputer/linux-docs/41615e0145b7d968fc6e5e3774efebc019de88e1/Tuned-PPD-Customizer-Script/images/3.png
--------------------------------------------------------------------------------
/Tuned-PPD-Customizer-Script/images/4.png:
--------------------------------------------------------------------------------
https://raw.githubusercontent.com/FrameworkComputer/linux-docs/41615e0145b7d968fc6e5e3774efebc019de88e1/Tuned-PPD-Customizer-Script/images/4.png
--------------------------------------------------------------------------------
/Tuned-PPD-Customizer-Script/images/5.png:
--------------------------------------------------------------------------------
https://raw.githubusercontent.com/FrameworkComputer/linux-docs/41615e0145b7d968fc6e5e3774efebc019de88e1/Tuned-PPD-Customizer-Script/images/5.png
--------------------------------------------------------------------------------
/Tuned-PPD-Customizer-Script/images/6.png:
--------------------------------------------------------------------------------
https://raw.githubusercontent.com/FrameworkComputer/linux-docs/41615e0145b7d968fc6e5e3774efebc019de88e1/Tuned-PPD-Customizer-Script/images/6.png
--------------------------------------------------------------------------------
/Tuned-PPD-Customizer-Script/images/7.png:
--------------------------------------------------------------------------------
https://raw.githubusercontent.com/FrameworkComputer/linux-docs/41615e0145b7d968fc6e5e3774efebc019de88e1/Tuned-PPD-Customizer-Script/images/7.png
--------------------------------------------------------------------------------
/Tuned-PPD-Customizer-Script/images/readme:
--------------------------------------------------------------------------------
1 |
2 |
--------------------------------------------------------------------------------
/Ubuntu22.04LTS-Manual-Setup-11thGen.md:
--------------------------------------------------------------------------------
1 | # This is for 11th Gen Intel® Core™ Framework Laptop 13 ONLY.
2 |
3 | - Browse to Activities in the upper left corner, click to open it.
4 | - Type out the word terminal, click to open it.
5 | - Click on the small icon shown in the image below to copy the code below in the gray box, right click/paste it into the terminal window.
6 | - Then press the enter key, user password, enter key, **reboot.**
7 |
8 | ```
9 | sudo apt update && sudo apt upgrade -y && sudo snap refresh
10 | ```
11 |
12 | > **TIP:** You can use the little clipboard icon to the right of the code to copy to your clipboard.
13 |
14 | 
15 |
16 |
17 |
18 |
19 |
--------------------------------------------------------------------------------
/Ubuntu22.04LTS-Manual-Setup-12thGen.md:
--------------------------------------------------------------------------------
1 | # This is for 12th Gen Intel® Core™ Framework Laptop 13 ONLY.
2 |
3 |
4 |
5 |
6 | - Browse to Activities in the upper left corner, click to open it.
7 | - Type out the word terminal, click to open it.
8 | - Click on the small icon shown in the image below to copy the code below in the gray box, right click/paste it into the terminal window.
9 | - Then press the enter key, user password, enter key, **reboot.**
10 |
11 | ```
12 | sudo apt update && sudo apt upgrade -y && sudo snap refresh
13 | ```
14 |
15 | > **TIP:** You can use the little clipboard icon to the right of the code to copy to your clipboard.
16 |
17 |
18 |
19 |
20 |
21 |
22 |
--------------------------------------------------------------------------------
/Ubuntu22.04LTS-Manual-Setup-13thGen.md:
--------------------------------------------------------------------------------
1 | # This is for 13th Gen Intel® Core™ Framework Laptop 13 ONLY.
2 |
3 |
4 | - Browse to Activities in the upper left corner, click to open it.
5 | - Type out the word terminal, click to open it.
6 | - Click on the small icon shown in the image below to copy the code below in the gray box, right click/paste it into the terminal window.
7 | - Then press the enter key, user password, enter key, **reboot.**
8 |
9 | ```
10 | sudo apt update && sudo apt upgrade -y && sudo snap refresh
11 | ```
12 |
13 | > **TIP:** You can use the little clipboard icon to the right of the code to copy to your clipboard.
14 |
15 |
16 |
17 |
18 |
19 |
20 |
--------------------------------------------------------------------------------
/Ubuntu23.04-Manual-Setup-11thGen.md:
--------------------------------------------------------------------------------
1 | # This is for 11th Gen Intel® Core™ Framework Laptop 13 ONLY.
2 |
3 |
4 | ## This will:
5 |
6 | - Update your Ubuntu install's packages.
7 | - Workaround needed to get the best suspend battery life for SSD power drain.
8 | - Enable improved fractional scaling support for Ubuntu's GNOME environment using Wayland.
9 | - Enable headset mic input.
10 |
11 |
12 |
13 |
14 | ## *****COPY AND PASTE THIS CODE BELOW INTO A TERMINAL*****
15 |
16 |
17 | - Browse to Activities in the upper left corner, click to open it.
18 | - Type out the word terminal, click to open it.
19 | - Left click and drag to highlight and copy the code below in the gray box, right click/paste to copy it into the terminal window.
20 | - **Then press the enter key, password, reboot.**
21 |
22 |
23 | ``
24 | sudo apt update && sudo apt upgrade -y && sudo snap refresh && echo "options snd-hda-intel model=dell-headset-multi" | sudo tee -a /etc/modprobe.d/alsa-base.conf && gsettings set org.gnome.mutter experimental-features "['scale-monitor-framebuffer']" && sudo sed -i 's/^GRUB_CMDLINE_LINUX_DEFAULT.*/GRUB_CMDLINE_LINUX_DEFAULT="quiet splash nvme.noacpi=1"/g' /etc/default/grub && sudo update-grub && echo "[connection]" | sudo tee /etc/NetworkManager/conf.d/default-wifi-powersave-on.conf && echo "wifi.powersave = 2" | sudo tee -a /etc/NetworkManager/conf.d/default-wifi-powersave-on.conf
25 | ``
26 |
27 | ## *****COPY AND PASTE THIS CODE ABOVE INTO A TERMINAL*****
28 |
29 |
30 | **Pasted code will look similar to the image below:**
31 | 
32 |
33 |
34 | -----
35 |
36 | # For intermediate to advanced users:
37 |
38 | If you would rather enter the commands individually **instead** of using the code block provided previously:
39 |
40 |
41 | ### Updating packages.
42 | ``sudo apt update && sudo apt upgrade -y``
43 |
44 | ### Enable headset mic input.
45 | ``echo "options snd-hda-intel model=dell-headset-multi" | sudo tee -a /etc/modprobe.d/alsa-base.conf``
46 |
47 | ### Enable improved fractional scaling support for Ubuntu's GNOME environment using Wayland.
48 | ``
49 | gsettings set org.gnome.mutter experimental-features "['scale-monitor-framebuffer']"
50 | ``
51 |
52 | ### Append the following to the GRUB_CMDLINE_LINUX_DEFAULT="quiet splash section.
53 | ``
54 | GRUB_CMDLINE_LINUX_DEFAULT="quiet splash module_blacklist=hid_sensor_hub"
55 | ``
56 |
57 | ### Then run
58 | ``sudo update-grub``
59 |
60 | ### Workaround needed to get the best suspend battery life for SSD power drain.
61 | ``sudo gnome-text-editor /etc/default/grub``
62 |
63 | ### Append the following to the GRUB_CMDLINE_LINUX_DEFAULT="quiet splash section.
64 | This is an ACPI parameter that helps ensure compatibility by disabling ACPI support for NVMe.
65 | Advanced Linux users: You're welcome to remove it if you feel it's not needed for any reason and sudo update-grub.
66 | ``
67 | GRUB_CMDLINE_LINUX_DEFAULT="quiet splash nvme.noacpi=1"
68 | ``
69 |
70 | ### Then run
71 | ``sudo update-grub``
72 |
73 | ### Preventing wifi drop offs.
74 | ``sudo gnome-text-editor /etc/NetworkManager/conf.d/default-wifi-powersave-on.conf``
75 |
76 | ### Change 3 into a 2
77 | ``wifi.powersave = 2``
78 |
--------------------------------------------------------------------------------
/Ubuntu23.04-Manual-Setup-12thGen.md:
--------------------------------------------------------------------------------
1 | # This is for 12th Gen Intel® Core™ Framework Laptop 13 ONLY.
2 |
3 |
4 | ## This will:
5 |
6 | - Update your Ubuntu install's packages.
7 | - Workaround needed to get the best suspend battery life for SSD power drain.
8 | - Disable the ALS sensor so that your brightness keys work.
9 | - Enable improved fractional scaling support for Ubuntu's GNOME environment using Wayland.
10 | - Enable headset mic input.
11 |
12 |
13 |
14 |
15 | ## *****COPY AND PASTE THIS CODE BELOW INTO A TERMINAL*****
16 |
17 |
18 | - Browse to Activities in the upper left corner, click to open it.
19 | - Type out the word terminal, click to open it.
20 | - Left click and drag to highlight and copy the code below in the gray box, right click/paste to copy it into the terminal window.
21 | - **Then press the enter key, password, reboot.**
22 |
23 |
24 | ``
25 | sudo apt update && sudo apt upgrade -y && sudo snap refresh && echo "options snd-hda-intel model=dell-headset-multi" | sudo tee -a /etc/modprobe.d/alsa-base.conf && gsettings set org.gnome.mutter experimental-features "['scale-monitor-framebuffer']" && sudo sed -i 's/^GRUB_CMDLINE_LINUX_DEFAULT.*/GRUB_CMDLINE_LINUX_DEFAULT="quiet splash module_blacklist=hid_sensor_hub nvme.noacpi=1"/g' /etc/default/grub && sudo update-grub && echo "[connection]" | sudo tee /etc/NetworkManager/conf.d/default-wifi-powersave-on.conf && echo "wifi.powersave = 2" | sudo tee -a /etc/NetworkManager/conf.d/default-wifi-powersave-on.conf
26 | ``
27 |
28 | ## *****COPY AND PASTE THIS CODE ABOVE INTO A TERMINAL*****
29 |
30 |
31 | **Pasted code will look similar to the image below:**
32 | 
33 |
34 |
35 | -----
36 |
37 | # For intermediate to advanced users:
38 |
39 | If you would rather enter the commands individually **instead** of using the code block provided previously:
40 |
41 |
42 | ### Updating packages.
43 | ``sudo apt update && sudo apt upgrade -y``
44 |
45 | ### Enable headset mic input.
46 | ``echo "options snd-hda-intel model=dell-headset-multi" | sudo tee -a /etc/modprobe.d/alsa-base.conf``
47 |
48 | ### Enable improved fractional scaling support for Ubuntu's GNOME environment using Wayland.
49 | ``
50 | gsettings set org.gnome.mutter experimental-features "['scale-monitor-framebuffer']"
51 | ``
52 |
53 | ### Disable the ALS sensor so that your brightness keys work, 12th gen only.
54 | ``sudo gnome-text-editor /etc/default/grub``
55 |
56 | ### Append the following to the GRUB_CMDLINE_LINUX_DEFAULT="quiet splash section.
57 | ``
58 | GRUB_CMDLINE_LINUX_DEFAULT="quiet splash module_blacklist=hid_sensor_hub"
59 | ``
60 |
61 | ### Then run
62 | ``sudo update-grub``
63 |
64 | ### Workaround needed to get the best suspend battery life for SSD power drain.
65 | ``sudo gnome-text-editor /etc/default/grub``
66 |
67 | ### Append the following to the GRUB_CMDLINE_LINUX_DEFAULT="quiet splash section.
68 | This is an ACPI parameter that helps ensure compatibility by disabling ACPI support for NVMe.
69 | Advanced Linux users: You're welcome to remove it if you feel it's not needed for any reason and sudo update-grub.
70 | ``
71 | GRUB_CMDLINE_LINUX_DEFAULT="quiet splash nvme.noacpi=1"
72 | ``
73 |
74 | ### Then run
75 | ``sudo update-grub``
76 |
77 | ### Preventing wifi drop offs.
78 | ``sudo gedit /etc/NetworkManager/conf.d/default-wifi-powersave-on.conf``
79 |
80 | ### Change 3 into a 2
81 | ``wifi.powersave = 2``
82 |
--------------------------------------------------------------------------------
/Ubuntu23.04-Manual-Setup-13thGen.md:
--------------------------------------------------------------------------------
1 | # This is for 13th Gen Intel® Core™ Framework Laptop 13 ONLY.
2 |
3 |
4 | ## This will:
5 |
6 | - Update your Ubuntu install's packages.
7 | - Workaround needed to get the best suspend battery life for SSD power drain.
8 | - Disable the ALS sensor so that your brightness keys work.
9 | - Enable improved fractional scaling support for Ubuntu's GNOME environment using Wayland.
10 | - Enable headset mic input.
11 |
12 |
13 |
14 |
15 | ## *****COPY AND PASTE THIS CODE BELOW INTO A TERMINAL*****
16 |
17 |
18 | - Browse to Activities in the upper left corner, click to open it.
19 | - Type out the word terminal, click to open it.
20 | - Left click and drag to highlight and copy the code below in the gray box, right click/paste to copy it into the terminal window.
21 | - **Then press the enter key, password, reboot.**
22 |
23 |
24 | ``
25 | sudo apt update && sudo apt upgrade -y && sudo snap refresh && echo "options snd-hda-intel model=dell-headset-multi" | sudo tee -a /etc/modprobe.d/alsa-base.conf && gsettings set org.gnome.mutter experimental-features "['scale-monitor-framebuffer']" && sudo sed -i 's/^GRUB_CMDLINE_LINUX_DEFAULT.*/GRUB_CMDLINE_LINUX_DEFAULT="quiet splash module_blacklist=hid_sensor_hub nvme.noacpi=1"/g' /etc/default/grub && sudo update-grub && echo "[connection]" | sudo tee /etc/NetworkManager/conf.d/default-wifi-powersave-on.conf && echo "wifi.powersave = 2" | sudo tee -a /etc/NetworkManager/conf.d/default-wifi-powersave-on.conf
26 | ``
27 |
28 | ## *****COPY AND PASTE THIS CODE ABOVE INTO A TERMINAL*****
29 |
30 |
31 | **Pasted code will look similar to the image below:**
32 | 
33 |
34 |
35 | -----
36 |
37 | # For intermediate to advanced users:
38 |
39 | If you would rather enter the commands individually **instead** of using the code block provided previously:
40 |
41 |
42 | ### Updating packages.
43 | ``sudo apt update && sudo apt upgrade -y``
44 |
45 | ### Enable headset mic input.
46 | ``echo "options snd-hda-intel model=dell-headset-multi" | sudo tee -a /etc/modprobe.d/alsa-base.conf``
47 |
48 | ### Enable improved fractional scaling support for Ubuntu's GNOME environment using Wayland.
49 | ``
50 | gsettings set org.gnome.mutter experimental-features "['scale-monitor-framebuffer']"
51 | ``
52 |
53 | ### Disable the ALS sensor so that your brightness keys work, 13th gen only.
54 | ``sudo gnome-text-editor /etc/default/grub``
55 |
56 | ### Append the following to the GRUB_CMDLINE_LINUX_DEFAULT="quiet splash section.
57 | ``
58 | GRUB_CMDLINE_LINUX_DEFAULT="quiet splash module_blacklist=hid_sensor_hub"
59 | ``
60 |
61 | ### Then run
62 | ``sudo update-grub``
63 |
64 | ### Workaround needed to get the best suspend battery life for SSD power drain.
65 | ``sudo gnome-text-editor /etc/default/grub``
66 |
67 | ### Append the following to the GRUB_CMDLINE_LINUX_DEFAULT="quiet splash section.
68 | This is an ACPI parameter that helps ensure compatibility by disabling ACPI support for NVMe.
69 | Advanced Linux users: You're welcome to remove it if you feel it's not needed for any reason and sudo update-grub.``
70 | GRUB_CMDLINE_LINUX_DEFAULT="quiet splash nvme.noacpi=1"
71 | ``
72 |
73 | ### Then run
74 | ``sudo update-grub``
75 |
76 | ### Preventing wifi drop offs.
77 | ``sudo gedit /etc/NetworkManager/conf.d/default-wifi-powersave-on.conf``
78 |
79 | ### Change 3 into a 2
80 | ``wifi.powersave = 2``
81 |
--------------------------------------------------------------------------------
/Ubuntu24.04LTS-Setup-11thGen.md:
--------------------------------------------------------------------------------
1 | # This is for 11th Gen Intel® Core™ Framework Laptop 13 ONLY.
2 |
3 |
4 | ## This will:
5 |
6 | - Update your Ubuntu install's packages.
7 | - Provide a workaround for dropped Intel AX210 wifi.
8 | - We are NOT recommending an OEM kernel at this time, this may change in the future. Default kernel is where you need to be.
9 |
10 |
11 |
12 |
13 |
14 | ### Step 1 Get everything updated
15 |
16 | - Browse to the upper left corner, click the horizontal line to open the menu.
17 | - Type out the word terminal, click to open it.
18 | - Click on the small icon shown in the image below to copy the code below in the gray box, right click/paste it into the terminal window.
19 | - Then press the enter key, user password, enter key, **reboot.**
20 |
21 | ```
22 | sudo apt update && sudo apt upgrade -y && sudo snap refresh
23 | ```
24 | > **TIP:** You can use the little clipboard icon to the right of the code to copy to your clipboard.
25 |
26 |
27 |
28 |
29 |
30 |
31 | ### Step 2 Disable power save for Intel Wi-Fi (note, there appears to be a regression where Wi-Fi drops off on AX210 cards, this will serve as a workaround)
32 |
33 | - Browse to the upper left corner, click the horizontal line to open the menu.
34 | - Type out the word terminal, click to open it.
35 | - Click on the small icon shown in the image below to copy the code below in the gray box, right click/paste it into the terminal window.
36 |
37 | ```
38 | sudo apt install iw && interface=$(nmcli -t -f active,device d wifi list | grep '^yes' | cut -d':' -f2) && echo -e "\n\033[1;33mInterface:\033[0m $interface" && iw dev $interface get power_save
39 | ```
40 | This will indicate if your Wi-Fi power save is on or off. If it's on and you're seeing drops, continue to the next line.
41 |
42 | ```
43 | sudo sed -i '/^wifi.powersave = 3$/s/3/2/' /etc/NetworkManager/conf.d/default-wifi-powersave-on.conf
44 | ```
45 |
46 | This will change 3 into 2, which will disable powersave.
47 |
48 | > **TIP:** You can use the little clipboard icon to the right of the code to copy to your clipboard.
49 |
50 |
51 |
52 | **reboot.**
53 |
54 |
55 |
--------------------------------------------------------------------------------
/Ubuntu24.04LTS-Setup-12thGen.md:
--------------------------------------------------------------------------------
1 | # This is for 12th Gen Intel® Core™ Framework Laptop 13 ONLY.
2 |
3 |
4 | ## This will:
5 |
6 | - Update your Ubuntu install's packages.
7 | - Provide a workaround for dropped Intel AX210 wifi.
8 | - We are NOT recommending an OEM kernel at this time, this may change in the future. Default kernel is where you need to be.
9 |
10 |
11 |
12 |
13 |
14 | ### Step 1 Get everything updated
15 |
16 | - Browse to the upper left corner, click the horizontal line to open the menu.
17 | - Type out the word terminal, click to open it.
18 | - Click on the small icon shown in the image below to copy the code below in the gray box, right click/paste it into the terminal window.
19 | - Then press the enter key, user password, enter key, **reboot.**
20 |
21 | ```
22 | sudo apt update && sudo apt upgrade -y && sudo snap refresh
23 | ```
24 | > **TIP:** You can use the little clipboard icon to the right of the code to copy to your clipboard.
25 |
26 |
27 |
28 |
29 |
30 |
31 | ### Step 2 Disable power save for Intel Wi-Fi (note, there appears to be a regression where Wi-Fi drops off on AX210 cards, this will serve as a workaround)
32 |
33 | - Browse to the upper left corner, click the horizontal line to open the menu.
34 | - Type out the word terminal, click to open it.
35 | - Click on the small icon shown in the image below to copy the code below in the gray box, right click/paste it into the terminal window.
36 |
37 | ```
38 | sudo apt install iw && interface=$(nmcli -t -f active,device d wifi list | grep '^yes' | cut -d':' -f2) && echo -e "\n\033[1;33mInterface:\033[0m $interface" && iw dev $interface get power_save
39 | ```
40 | This will indicate if your Wi-Fi power save is on or off. If it's on and you're seeing drops, continue to the next line.
41 |
42 | ```
43 | sudo sed -i '/^wifi.powersave = 3$/s/3/2/' /etc/NetworkManager/conf.d/default-wifi-powersave-on.conf
44 | ```
45 |
46 | This will change 3 into 2, which will disable powersave.
47 |
48 | > **TIP:** You can use the little clipboard icon to the right of the code to copy to your clipboard.
49 |
50 |
51 |
52 | **reboot.**
53 |
54 |
55 |
56 |
--------------------------------------------------------------------------------
/Ubuntu24.04LTS-Setup-13thGen.md:
--------------------------------------------------------------------------------
1 | # This is for 13th Gen Intel® Core™ Framework Laptop 13 ONLY.
2 |
3 |
4 | ## This will:
5 |
6 | - Update your Ubuntu install's packages.
7 | - (ONLY IF NEEDED) Provide an optional workaround for dropped Intel AX210 wifi.
8 | - We are NOT recommending an OEM kernel at this time, this may change in the future. Default kernel is where you need to be.
9 |
10 |
11 |
12 |
13 |
14 | ### Get everything updated
15 |
16 | - Browse to the upper left corner, click the horizontal line to open the menu.
17 | - Type out the word terminal, click to open it.
18 | - Click on the small icon shown in the image below to copy the code below in the gray box, right click/paste it into the terminal window.
19 | - Then press the enter key, user password, enter key, **reboot.**
20 |
21 | ```
22 | sudo apt update && sudo apt upgrade -y && sudo snap refresh
23 | ```
24 | > **TIP:** You can use the little clipboard icon to the right of the code to copy to your clipboard.
25 |
26 |
27 |
28 |
29 |
30 |
31 |
32 | ### Bonus Step (for former Mac users) Reduce Font Scaling to Match Your Needs
33 |
34 | We received feedback that for users coming from OS X, installing GNOME Tweaks, browsing to Fonts, and reducing the font size from 1.00 to 0.80 may be preferred.
35 |
36 | - Goto Displays, set scaling to 200%. This will look too large, so let's fix the fonts.
37 | - Install with:
38 |
39 | ```
40 | sudo apt update && sudo apt install gnome-tweaks -y
41 | ```
42 |
43 | - Open Tweaks by using the "Super" or Windows key, search tweaks, and enter.
44 |
45 | - At the top, select fonts. Now in that panel, scroll all the way down. Look for Size. Change from 1.00 to 0.80. Close Tweaks.
46 |
47 | Note: This is for the displays for the laptop only. This will look super odd on external displays and likely too large even still.
48 |
49 | ### (Only if needed) WiFi Workaround if seeing drops in connecvity with AX210 Intel Wifi.
50 |
51 | - Browse to the upper left corner, click the horizontal line to open the menu.
52 | - Type out the word terminal, click to open it.
53 | - Click on the small icon shown in the image below to copy the code below in the gray box, right click/paste it into the terminal window.
54 |
55 | ```
56 | sudo apt install iw && interface=$(nmcli -t -f active,device d wifi list | grep '^yes' | cut -d':' -f2) && echo -e "\n\033[1;33mInterface:\033[0m $interface" && iw dev $interface get power_save
57 | ```
58 | This will indicate if your Wi-Fi power save is on or off. If it's on and you're seeing drops, continue to the next line.
59 |
60 | ```
61 | sudo sed -i '/^wifi.powersave = 3$/s/3/2/' /etc/NetworkManager/conf.d/default-wifi-powersave-on.conf
62 | ```
63 |
64 | This will change 3 into 2, which will disable powersave.
65 |
66 | > **TIP:** You can use the little clipboard icon to the right of the code to copy to your clipboard.
67 |
68 |
69 |
70 | **reboot.**
71 |
72 |
--------------------------------------------------------------------------------
/Ubuntu24.04LTS-Setup-Intel-Core-Ultra-Series-1.md:
--------------------------------------------------------------------------------
1 | # This is for Intel® Core™ Ultra Series 1 Framework Laptop 13 ONLY.
2 |
3 | #### Requires kernel 6.8.0-40 or better. Officially supporting from Ubuntu 24.04.1
4 | Please use the **"Get everything updated"** section below if you are on standard Ubuntu 24.04 without the the "dot 1 release."
5 |
6 | As of August 29th, the latest 24.04.1 ISOs are [live and avaialble](https://ubuntu.com/download/desktop).
7 |
8 | ## This will:
9 |
10 | - Update your Ubuntu install's packages.
11 | - (ONLY IF NEEDED) Provide an optional workaround for dropped Intel AX210 wifi.
12 | - We are NOT recommending an OEM kernel at this time, this may change in the future. Default kernel is where you need to be.
13 |
14 |
15 |
16 |
17 |
18 | ### Get everything updated
19 |
20 | - Browse to the upper left corner, click the horizontal line to open the menu.
21 | - Type out the word terminal, click to open it.
22 | - Click on the small icon shown in the image below to copy the code below in the gray box, right click/paste it into the terminal window.
23 | - Then press the enter key, user password, enter key, **reboot.**
24 |
25 | ```
26 | sudo apt update && sudo apt upgrade -y && sudo snap refresh
27 | ```
28 | > **TIP:** You can use the little clipboard icon to the right of the code to copy to your clipboard.
29 |
30 |
31 |
32 |
33 |
34 |
35 |
36 | ### Bonus Step (for former Mac users) Reduce Font Scaling to Match Your Needs
37 |
38 | We received feedback that for users coming from OS X, installing GNOME Tweaks, browsing to Fonts, and reducing the font size from 1.00 to 0.80 may be preferred.
39 |
40 | - Goto Displays, set scaling to 200%. This will look too large, so let's fix the fonts.
41 | - Install with:
42 |
43 | ```
44 | sudo apt update && sudo apt install gnome-tweaks -y
45 | ```
46 |
47 | - Open Tweaks by using the "Super" or Windows key, search tweaks, and enter.
48 |
49 | - At the top, select fonts. Now in that panel, scroll all the way down. Look for Size. Change from 1.00 to 0.80. Close Tweaks.
50 |
51 | Note: This is for the displays for the laptop only. This will look super odd on external displays and likely too large even still.
52 |
53 | ### (Only if needed) WiFi Workaround if seeing drops in connecvity with AX210 Intel Wifi.
54 |
55 | - Browse to the upper left corner, click the horizontal line to open the menu.
56 | - Type out the word terminal, click to open it.
57 | - Click on the small icon shown in the image below to copy the code below in the gray box, right click/paste it into the terminal window.
58 |
59 | ```
60 | sudo apt install iw && interface=$(nmcli -t -f active,device d wifi list | grep '^yes' | cut -d':' -f2) && echo -e "\n\033[1;33mInterface:\033[0m $interface" && iw dev $interface get power_save
61 | ```
62 | This will indicate if your Wi-Fi power save is on or off. If it's on and you're seeing drops, continue to the next line.
63 |
64 | ```
65 | sudo sed -i '/^wifi.powersave = 3$/s/3/2/' /etc/NetworkManager/conf.d/default-wifi-powersave-on.conf
66 | ```
67 |
68 | This will change 3 into 2, which will disable powersave.
69 |
70 | > **TIP:** You can use the little clipboard icon to the right of the code to copy to your clipboard.
71 |
72 |
73 |
74 | **reboot.**
75 |
76 |
--------------------------------------------------------------------------------
/Ubuntu24.04LTS-Setup-amd-fw13.md:
--------------------------------------------------------------------------------
1 | # This is for the AMD Ryzen 7040 Series Framework Laptop 13 ONLY.
2 |
3 |
4 | ## This will:
5 |
6 | - Update your Ubuntu install's packages.
7 | - (Optional) Stop buzzing sound from headphone jack if its present.
8 | - We are NOT recommending an OEM kernel at this time, this may change in the future. Default kernel is where you need to be.
9 |
10 |
11 |
12 |
13 |
14 | ### Step 1 Get everything updated
15 |
16 | - Browse to the upper left corner, click the horizontal line to open the menu.
17 | - Type out the word terminal, click to open it.
18 | - Click on the small icon shown in the image below to copy the code below in the gray box, right click/paste it into the terminal window.
19 | - Then press the enter key, user password, enter key, **reboot.**
20 |
21 | ```
22 | sudo apt update && sudo apt upgrade -y && sudo snap refresh
23 | ```
24 | > **TIP:** You can use the little clipboard icon to the right of the code to copy to your clipboard.
25 |
26 |
27 |
28 | **reboot.**
29 |
30 |
31 |
32 | ### Optional and only if needed - current AMD Ryzen 7040 Series workarounds to common issues
33 |
34 | ### Buzzing sound from headphone jack
35 |
36 | - Browse to the horizontal line in the upper left corner, click to open it.
37 | - Type out the word terminal, click to open it.
38 | - Copy/paste in the following code below.
39 | - Press the enter key, user password, enter key.
40 |
41 | ```
42 | echo 0 | sudo tee /sys/module/snd_hda_intel/parameters/power_save
43 | ```
44 | > **TIP:** You can use the little clipboard icon to the right of the code to copy to your clipboard.
45 |
46 |
47 | Then:
48 |
49 | **Reboot**
50 |
51 |
52 |
53 | ### Bonus Step (for former Mac users) Reduce Font Scaling to Match Your Needs
54 |
55 | We received feedback that for users coming from OS X, installing GNOME Tweaks, browsing to Fonts, and reducing the font size from 1.00 to 0.80 may be preferred.
56 |
57 | - Goto Displays, set scaling to 200%. This will look too large, so let's fix the fonts.
58 | - Install with:
59 |
60 | ```
61 | sudo apt update && sudo apt install gnome-tweaks -y
62 | ```
63 |
64 | - Open Tweaks by using the "Super" or Windows key, search tweaks, and enter.
65 |
66 | - At the top, select fonts. Now in that panel, scroll all the way down. Look for Size. Change from 1.00 to 0.80. Close Tweaks.
67 |
68 | Note: This is for the displays for the laptop only. This will look super odd on external displays and likely too large even still.
69 |
--------------------------------------------------------------------------------
/Ubuntu24.04LTS-Setup-amd-fw16.md:
--------------------------------------------------------------------------------
1 | # This is for the AMD Ryzen 7040 Series Framework Laptop 16 ONLY.
2 |
3 |
4 | ## This will:
5 |
6 | - Update your Ubuntu install's packages.
7 | - (Optional) Stop buzzing sound from headphone jack if its present.
8 | - Unlike in 22.04, we are NOT recommending an OEM kernel at this time, this may change in the future. Default kernel is where you need to be.
9 |
10 |
11 |
12 |
13 |
14 | ### Get everything updated
15 |
16 | - Browse to the upper left corner, click the horizontal line to open the menu.
17 | - Type out the word terminal, click to open it.
18 | - Click on the small icon shown in the image below to copy the code below in the gray box, right click/paste it into the terminal window.
19 | - Then press the enter key, user password, enter key, **reboot.**
20 |
21 | ```
22 | sudo apt update && sudo apt upgrade -y && sudo snap refresh
23 | ```
24 | > **TIP:** You can use the little clipboard icon to the right of the code to copy to your clipboard.
25 |
26 |
27 |
28 | **reboot.**
29 |
30 |
31 |
32 | ### (No Longer Needed) USB-C Video Out from dGPU directly
33 | UPDATED: CURRENT FIRMWARE MAKES THIS UNNEEDED, JUST MAKE SURE [YOUR FIRMWARE IS CURRENT](https://guides.frame.work/Guide/Fedora+41+Installation+on+the+Framework+Laptop+16/394?lang=en#s2261).
34 | **With the latest firmware, just connect your display**.
35 |
36 | By default, when you attach a USB-C cable to the dGPU port, it will not come out of [D3cold](https://learn.microsoft.com/en-us/windows-hardware/drivers/kernel/device-power-states) - this is by design and is to preserve your battery life during everyday usage.
37 |
38 | But you may find instances where you wish to connect to this port (HDMI/DP dongle to USB-C for example). There are a few ways to bring the dGPU out of D3cold.
39 |
40 | - [Mission Center](https://missioncenter.io/) or ``lspci -v``
41 | - Installing nvtop, then using this method.
42 |
43 | ```
44 | sudo apt update && sudo apt install nvtop -y
45 | ```
46 | Create a script with the following:
47 |
48 | ```
49 | sudo nano /usr/local/bin/external_video.sh
50 | ```
51 | Paste in:
52 |
53 | ```
54 | #!/bin/bash
55 | echo "USB device connected. Running nvtop for 2 seconds."
56 |
57 | timeout 2 nvtop
58 |
59 | echo "nvtop run completed."
60 | ```
61 |
62 | Save the file. Then set it to executable.
63 |
64 | ```
65 | sudo chmod +x /usr/local/bin/external_video.sh
66 | ```
67 |
68 | Now setup a udev rule.
69 | ```
70 | sudo nano /etc/udev/rules.d/99-external_video.rules
71 | ```
72 |
73 | Paste in.
74 |
75 | ```
76 | ACTION=="add", SUBSYSTEM=="usb", RUN+="/usr/local/bin/external_video.sh"
77 | ```
78 |
79 | Save the file, then run these commands.
80 |
81 | ``sudo udevadm control --reload-rules``
82 | then
83 | ``sudo udevadm trigger``
84 |
85 | - Plug in your adapter into the USB-C port on your dGPU port on the back, your display will come on.
86 | - NOTE: If you are using HDMI, USB-C or DP explansion cards in the expansion bays on the side of the laptop, this is not needed.
87 |
88 |
89 |
90 |
91 |
92 | ### Optional and only if needed - current AMD Ryzen 7040 Series workarounds to common issues
93 |
94 | ### Buzzing sound from headphone jack
95 |
96 | - Browse to the horizontal line in the upper left corner, click to open it.
97 | - Type out the word terminal, click to open it.
98 | - Copy/paste in the following code below.
99 | - Press the enter key, user password, enter key.
100 |
101 | ```
102 | echo 0 | sudo tee /sys/module/snd_hda_intel/parameters/power_save
103 | ```
104 | > **TIP:** You can use the little clipboard icon to the right of the code to copy to your clipboard.
105 |
106 |
107 | Then:
108 |
109 | **Reboot**
110 |
111 |
112 |
113 | ### Bonus Step (for former Mac users) Reduce Font Scaling to Match Your Needs
114 |
115 | We received feedback that for users coming from macOS, that installing GNOME Tweaks, browsing to Fonts, and reducing the font size from 1.00 to 0.80 may be preferred.
116 |
117 | - Goto Displays, set scaling to 200%. This will look too large, so let's fix the fonts.
118 | - Install GNOME Tweaks either by searching for it in Ubuntu Software or on the terminal with:
119 |
120 | ```
121 | sudo apt update && sudo apt install gnome-tweaks -y
122 | ```
123 |
124 | - Open Tweaks by using the "Super" or Windows key, search tweaks, and enter.
125 |
126 | - At the top, select fonts. Now in that panel, scroll all the way down. Look for Size. Change from 1.00 to 0.80. Close Tweaks.
127 |
128 | Note: This is for the displays for the laptop only. This will look super odd on external displays and likely too large even still.
129 |
130 |
131 |
132 |
133 |
134 | ----------------------------------------
135 |
136 | ## Framework Laptop 16 not providing all of the expected refresh rates in kernels 6.9 and up - affects 24.10 Ubuntu at this time.
137 | ###
138 |
139 | [Framework Laptop 16 not providing all of the expected refresh rates ](https://github.com/FrameworkComputer/linux-docs/blob/main/amdgpu-workarounds/amdgpu_freesync_video/amdgpu_freesync_video.md#amdgpufreesync_video1-parameter-workaround-franework-laptop-16-only)
140 |
141 |
142 |
143 |
144 |
145 |
146 |
--------------------------------------------------------------------------------
/amdgpu-workarounds/amdgpu_freesync_video/Ubuntu_amdgpu.freesync_video_workaround.sh:
--------------------------------------------------------------------------------
1 | #!/bin/bash
2 |
3 | # Backup the current GRUB configuration
4 | sudo cp /etc/default/grub /etc/default/grub.bak
5 |
6 | # Add the amdgpu.freesync_video=1 parameter if it's not already present
7 | if grep -q "amdgpu.freesync_video=1" /etc/default/grub; then
8 | echo "amdgpu.freesync_video=1 is already set in GRUB."
9 | else
10 | # Check if the GRUB_CMDLINE_LINUX_DEFAULT line exists, then append the parameter
11 | sudo sed -i '/^GRUB_CMDLINE_LINUX_DEFAULT=/ s/"$/ amdgpu.freesync_video=1"/' /etc/default/grub
12 | echo "amdgpu.freesync_video=1 has been added to GRUB."
13 | fi
14 |
15 | # Update GRUB to apply changes
16 | sudo update-grub
17 |
18 | echo "GRUB has been updated. Please reboot for changes to take effect."
19 |
20 |
21 |
22 | ## There is a bug reported whereas not all of the refresh rates are being displayed in Display settings (GNOME or Plasma).
23 |
24 | The recommended workaround is to append amdgpu.freesync_video=1 to your grub settings.
25 |
--------------------------------------------------------------------------------
/amdgpu-workarounds/amdgpu_freesync_video/amdgpu_freesync_video.md:
--------------------------------------------------------------------------------
1 | # NO Longer Needed - retaining just in case it resurfaces again
2 | ## amdgpu.freesync_video=1 parameter workaround Franework Laptop 16 ONLY
3 | ### For Framework Laptop 16 not providing all of the expected refresh rates in kernels 6.9 and up.
4 |
5 | Note: Once this is resolved, we'll keep this posted but mark it resolved.
6 | Please ONLY run this if you were told to by support or, you meet the following criteria:
7 |
8 | - Ubuntu 24.10 or Fedora 40/41, kernels 6.9.x and HIGHER.
9 | - Only run if you find the refresh rates that should be available are limited to 60 and 160.
10 |
11 | **Example Before:**
12 |
13 | 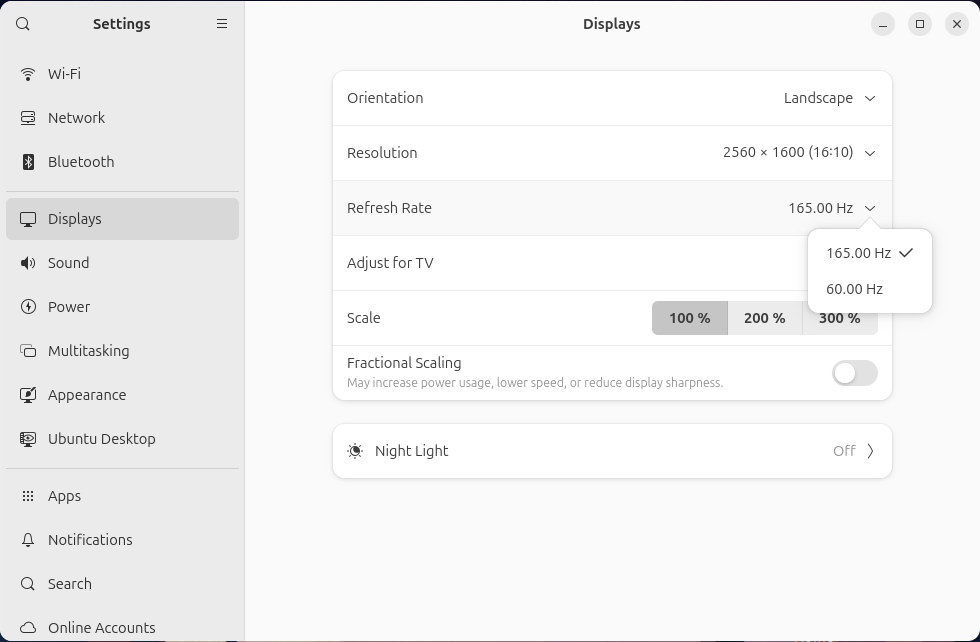
14 |
15 | **Example After the workaround:**
16 |
17 | 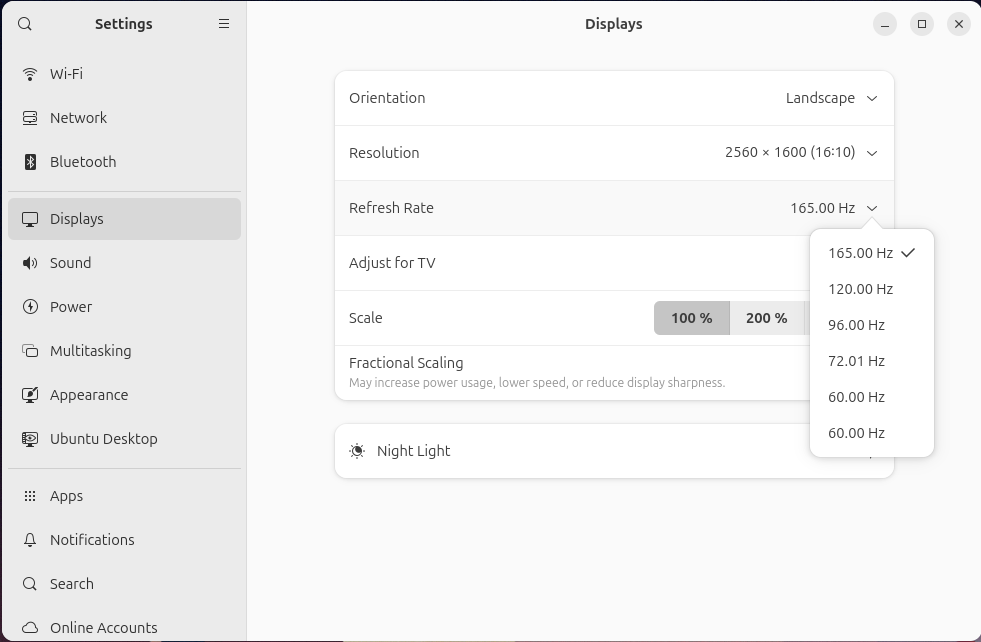
18 |
19 |
20 |
21 |
22 | - **Ubuntu 24.10 Or for Ubuntu users on 6.9+ kernels - script grub workaround (most users)**
23 | ```
24 | curl -s https://raw.githubusercontent.com/FrameworkComputer/linux-docs/refs/heads/main/amdgpu-workarounds/amdgpu_freesync_video/Ubuntu_amdgpu.freesync_video_workaround.sh -o Ubuntu_amdgpu.freesync_video_workaround.sh && clear && bash Ubuntu_amdgpu.freesync_video_workaround.sh
25 | ```
26 |
27 | - Copy and paste the above into a terminal. Press return, user password, then once complete, reboot.
28 |
29 | ## Or if you prefer to do this manually on Ubuntu 24.10
30 |
31 | **Ubuntu 24.10 manual method, no script for Ubuntu users on 6.9+ kernels - (advanced users)**
32 |
33 | ```
34 | GRUB_CMDLINE_LINUX_DEFAULT="..........existing entries....amdgpu.freesync_video=1"
35 | ```
36 |
37 | ```
38 | sudo update-grub
39 | ```
40 |
41 | - Run the above, reboot.
42 |
43 |
44 | **Fedora 40/41 grub workaround**
45 |
46 | ```
47 | sudo grubby --update-kernel=ALL --args="amdgpu.freesync_video=1"
48 | ```
49 |
50 | - Copy and paste the above into a terminal. Press return, user password, then once complete, reboot.
51 |
--------------------------------------------------------------------------------
/amdgpu-workarounds/images/after.png:
--------------------------------------------------------------------------------
https://raw.githubusercontent.com/FrameworkComputer/linux-docs/41615e0145b7d968fc6e5e3774efebc019de88e1/amdgpu-workarounds/images/after.png
--------------------------------------------------------------------------------
/amdgpu-workarounds/images/before.png:
--------------------------------------------------------------------------------
https://raw.githubusercontent.com/FrameworkComputer/linux-docs/41615e0145b7d968fc6e5e3774efebc019de88e1/amdgpu-workarounds/images/before.png
--------------------------------------------------------------------------------
/amdgpu-workarounds/images/readme:
--------------------------------------------------------------------------------
1 |
2 |
--------------------------------------------------------------------------------
/copied.png:
--------------------------------------------------------------------------------
https://raw.githubusercontent.com/FrameworkComputer/linux-docs/41615e0145b7d968fc6e5e3774efebc019de88e1/copied.png
--------------------------------------------------------------------------------
/disable-accidental-wakeup/images/install.png:
--------------------------------------------------------------------------------
https://raw.githubusercontent.com/FrameworkComputer/linux-docs/41615e0145b7d968fc6e5e3774efebc019de88e1/disable-accidental-wakeup/images/install.png
--------------------------------------------------------------------------------
/disable-accidental-wakeup/images/readme:
--------------------------------------------------------------------------------
1 |
2 |
--------------------------------------------------------------------------------
/disable-accidental-wakeup/images/remove.png:
--------------------------------------------------------------------------------
https://raw.githubusercontent.com/FrameworkComputer/linux-docs/41615e0145b7d968fc6e5e3774efebc019de88e1/disable-accidental-wakeup/images/remove.png
--------------------------------------------------------------------------------
/disable-accidental-wakeup/readme.md:
--------------------------------------------------------------------------------
1 | # Disable Accidental Wakeup Script
2 |
3 | **Which laptop does this work with:** Framework Laptop 16.
4 |
5 | **(Considering this Beta/Testing as I am ironing out some keyboard backlighting behavior)**
6 |
7 | >
8 | >
9 | > **NOTE:** This may not disable the keyboard backlighting when you place it into suspend. By default without this script, the keyboard backlight goes out automatically.
10 | With this script,you will need to **Fn space bar to turn off the backlight** before you enter suspend or it may remain on. This is a side effect of the script.
11 | >
12 | >
13 |
14 |
15 |
16 |
17 |
18 | **The problem:** In some instances, Framework Laptop 16 can accidentally come out of its suspend state. This usually occurs when traveling, walking, taking a bus, placing the laptop into a backpack.
19 | Overall the agreed upon cause is that this happens due to keyboard presses while it's in a state of suspend, thus waking it up.
20 |
21 | **The workaround:** Our engineering team has it [on their roadmap](https://community.frame.work/t/responded-waking-from-suspend-w-lid-closed/47497/73?u=matt_hartley) to fix this on the BIOS level, however until that is available this script is a reliable workaround.
22 |
23 | **What this script does:** This script creates and enables a systemd service that prevents specific devices from waking the laptop from suspend. It disables wakeup functionality for **keyboard presses, touchpad presses, and lid lift events** by modifying the wakeup settings for USB devices and other relevant system devices. However, it ensures the system can still be brought out of suspend with a power button push.
24 | The script configures the service to run at boot, ensuring these settings are applied consistently, and reloads the systemd daemon to recognize the new service.
25 |
26 | **How do I resume from suspend after running this script:** Press the power button one time.
27 |
28 | **Does this break functionality:** No, this script does not break functionality as long as it is implemented using this script on Ubuntu LTS or Fedora.
29 | The script ensures that specific wakeup events, such as keyboard presses, touchpad presses, and lid lifts, are disabled, but it leaves the power button functional for resuming the system from suspend.
30 |
31 | - Suspend Behavior: The laptop can still enter suspend mode when the lid is closed.
32 | - Resume Behavior: The laptop can be brought out of suspend using the power button.
33 | - Disabled Wakeup Events: Keyboard and touchpad presses, as well as lifting the lid, will no longer wake the system, ensuring the system only resumes through intentional user interaction (e.g., the power button).
34 |
35 | **Restoring back to defaults:** Obviously this is not going to be a match for everyone, user habits may change. Therefore wwe also offer a script to restore your suspend configuration back to installation defaults.
36 | This script is provided here as well.
37 |
38 | **Will this work on other distros:** Likely yes, I see no reason why it would not assuming paths and so forth match what we are doing here. But it is completely untested.
39 |
40 |
41 | ## Download and activate the Disable Accidental Wakeup Script
42 |
43 | Fedora, make sure curl is installed:
44 |
45 | ```
46 | sudo dnf install curl -y
47 | ```
48 |
49 | Ubuntu, make sure curl is installed:
50 |
51 | ```
52 | sudo apt update && sudo apt install curl -y
53 | ```
54 |
55 | Simply paste in this command into your kernel, press the enter:
56 | (No reboot is needed, it's ready to go after running this script)
57 |
58 | ```
59 | curl -s https://raw.githubusercontent.com/FrameworkComputer/linux-docs/main/disable-accidental-wakeup/wakeup.sh -o wakeup.sh && clear && sudo bash wakeup.sh
60 | ```
61 |
62 | 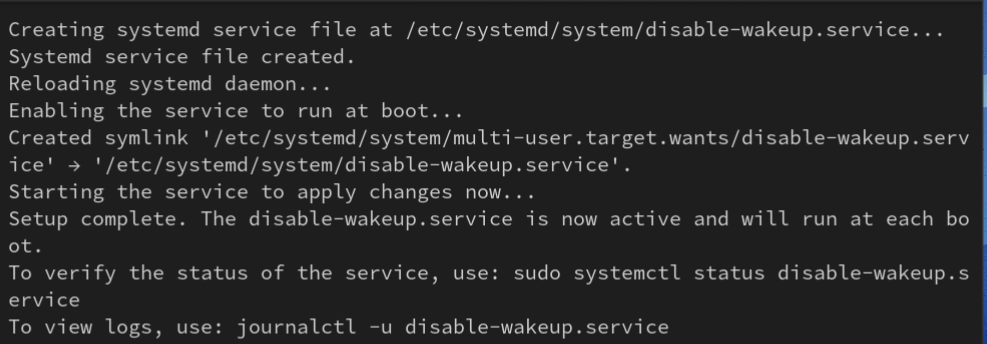
63 |
64 |
65 |
66 |
67 | ## Stop, disable and remove the Disable Accidental Wakeup Script
68 | (Including the removal of disable-wakeup.service)
69 | (No reboot is needed, it's ready to go after running this script)
70 |
71 | ```
72 | curl -s https://raw.githubusercontent.com/FrameworkComputer/linux-docs/refs/heads/main/disable-accidental-wakeup/restore_defaults.sh -o restore_defaults.sh && clear && sudo bash restore_defaults.sh
73 | ```
74 |
75 | 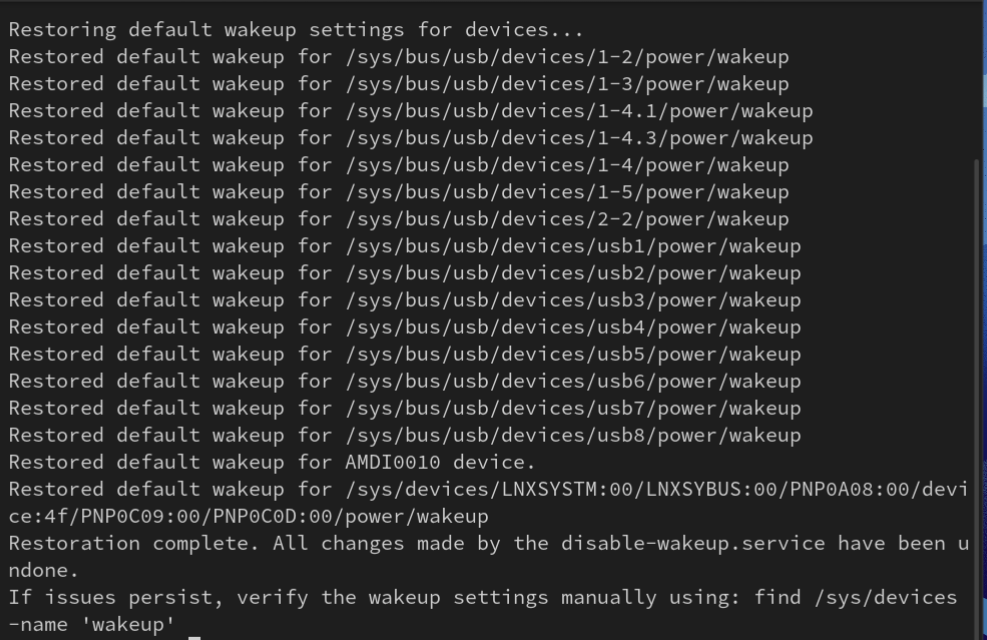
76 |
77 |
78 |
--------------------------------------------------------------------------------
/disable-accidental-wakeup/restore_defaults.sh:
--------------------------------------------------------------------------------
1 | #!/bin/bash
2 |
3 | # Script to restore wakeup functionality and remove custom disable-wakeup.service
4 | # Compatible with Fedora and Ubuntu
5 |
6 | # Define the systemd service file path
7 | SERVICE_FILE="/etc/systemd/system/disable-wakeup.service"
8 |
9 | # Step 1: Check for root privileges
10 | if [[ $EUID -ne 0 ]]; then
11 | echo "This script must be run as root. Please use sudo."
12 | exit 1
13 | fi
14 |
15 | # Step 2: Stop and disable the service
16 | echo "Stopping and disabling the disable-wakeup.service..."
17 | systemctl stop disable-wakeup.service 2>/dev/null
18 | systemctl disable disable-wakeup.service 2>/dev/null
19 |
20 | if [[ $? -eq 0 ]]; then
21 | echo "Service stopped and disabled successfully."
22 | else
23 | echo "The service may not exist or was not running. Proceeding..."
24 | fi
25 |
26 | # Step 3: Remove the systemd service file
27 | if [[ -f "$SERVICE_FILE" ]]; then
28 | echo "Removing the systemd service file at $SERVICE_FILE..."
29 | rm -f "$SERVICE_FILE"
30 | if [[ $? -eq 0 ]]; then
31 | echo "Service file removed."
32 | else
33 | echo "Failed to remove the service file. Please check permissions."
34 | exit 1
35 | fi
36 | else
37 | echo "Service file not found. Skipping removal."
38 | fi
39 |
40 | # Step 4: Reload systemd daemon
41 | echo "Reloading systemd daemon to apply changes..."
42 | systemctl daemon-reload
43 |
44 | # Step 5: Restore default wakeup settings
45 | echo "Restoring default wakeup settings for devices..."
46 | for device in /sys/bus/usb/devices/*/power/wakeup; do
47 | if [[ -f "$device" ]]; then
48 | echo "enabled" > "$device"
49 | echo "Restored default wakeup for $device"
50 | fi
51 | done
52 |
53 | if [[ -f "/sys/devices/platform/AMDI0010:03/i2c-1/i2c-PIXA3854:00/power/wakeup" ]]; then
54 | echo "enabled" > /sys/devices/platform/AMDI0010:03/i2c-1/i2c-PIXA3854:00/power/wakeup
55 | echo "Restored default wakeup for AMDI0010 device."
56 | fi
57 |
58 | find /sys/devices -type f -name 'wakeup' | grep -i PNP0C0D | while read -r wakeup_file; do
59 | echo "enabled" > "$wakeup_file"
60 | echo "Restored default wakeup for $wakeup_file"
61 | done
62 |
63 | # Final Step: Notify the user
64 | echo "Restoration complete. All changes made by the disable-wakeup.service have been undone."
65 | echo "If issues persist, verify the wakeup settings manually using: find /sys/devices -name 'wakeup'"
66 |
67 |
--------------------------------------------------------------------------------
/disable-accidental-wakeup/wakeup.sh:
--------------------------------------------------------------------------------
1 | #!/bin/bash
2 |
3 | # Script to create and enable a systemd service to disable wakeup for specific devices at boot
4 | # Compatible with Fedora and Ubuntu
5 |
6 | # Define the systemd service file path
7 | SERVICE_FILE="/etc/systemd/system/disable-wakeup.service"
8 |
9 | # Step 1: Check for root privileges
10 | if [[ $EUID -ne 0 ]]; then
11 | echo "This script must be run as root. Please use sudo."
12 | exit 1
13 | fi
14 |
15 | # Step 2: Create the systemd service file
16 | echo "Creating systemd service file at $SERVICE_FILE..."
17 | cat << 'EOF' > "$SERVICE_FILE"
18 | [Unit]
19 | Description=Disable Wakeup on Devices
20 | After=multi-user.target
21 |
22 | [Service]
23 | Type=oneshot
24 | ExecStart=/bin/bash -c "echo disabled > /sys/devices/platform/AMDI0010:03/i2c-1/i2c-PIXA3854:00/power/wakeup"
25 | ExecStartPost=/bin/bash -c "for device in /sys/bus/usb/devices/*/power/wakeup; do echo disabled > \"$device\"; done"
26 | ExecStartPost=/bin/bash -c "find /sys/devices -type f -name 'wakeup' | grep -i PNP0C0D | awk '{print \"echo disabled | sudo tee \" $0}' | bash"
27 |
28 | [Install]
29 | WantedBy=multi-user.target
30 | EOF
31 |
32 | echo "Systemd service file created."
33 |
34 | # Step 3: Reload systemd daemon to recognize the new service
35 | echo "Reloading systemd daemon..."
36 | systemctl daemon-reload
37 | if [[ $? -ne 0 ]]; then
38 | echo "Failed to reload systemd daemon. Exiting."
39 | exit 1
40 | fi
41 |
42 | # Step 4: Enable the service to run at boot
43 | echo "Enabling the service to run at boot..."
44 | systemctl enable disable-wakeup.service
45 | if [[ $? -ne 0 ]]; then
46 | echo "Failed to enable the service. Exiting."
47 | exit 1
48 | fi
49 |
50 | # Step 5: Optionally start the service immediately
51 | echo "Starting the service to apply changes now..."
52 | systemctl start disable-wakeup.service
53 | if [[ $? -ne 0 ]]; then
54 | echo "Failed to start the service. Check the service logs for details."
55 | exit 1
56 | fi
57 |
58 | # Final Step: Notify the user
59 | echo "Setup complete. The disable-wakeup.service is now active and will run at each boot."
60 | echo "To verify the status of the service, use: sudo systemctl status disable-wakeup.service"
61 | echo "To view logs, use: journalctl -u disable-wakeup.service"
62 |
63 |
--------------------------------------------------------------------------------
/dmidecode-and-CPU-info.md:
--------------------------------------------------------------------------------
1 | # Fedora Only
2 |
3 | ## Copy and paste this into the terminal using your touchpad or mouse, then press enter.
4 |
5 | ``
6 | sudo dnf install lshw dmidecode -y && clear && sudo dmidecode | grep -A3 'Vendor:\|Product:' && sudo lshw -C cpu | grep -A3 'product:\|vendor:'
7 | ``
8 |
--------------------------------------------------------------------------------
/easy-effects/Fedora-easy-effects-13-installer.sh:
--------------------------------------------------------------------------------
1 | #!/bin/bash
2 |
3 | log_file="/tmp/easy_effects_install.log"
4 |
5 | # Function to install Easy Effects via Flatpak
6 | install_easy_effects() {
7 | echo "Installing Easy Effects via Flatpak..." | tee -a "$log_file"
8 |
9 | # Ensure Flatpak is installed
10 | if ! command -v flatpak &> /dev/null; then
11 | echo "Flatpak is not installed. Please install Flatpak first." | tee -a "$log_file"
12 | exit 1
13 | fi
14 | clear
15 |
16 | # Ensure Flathub is up-to-date
17 | echo "Updating Flatpak appstream data..." | tee -a "$log_file"
18 | sudo flatpak update --appstream -y | tee -a "$log_file"
19 |
20 | # Install Easy Effects
21 | echo "Running Flatpak install command for Easy Effects..." | tee -a "$log_file"
22 | flatpak install flathub com.github.wwmm.easyeffects -y | tee -a "$log_file"
23 | if [ $? -ne 0 ]; then
24 | echo "Flatpak installation failed. Please check the log for details." | tee -a "$log_file"
25 | exit 1
26 | fi
27 | clear
28 | echo "Easy Effects installation completed." | tee -a "$log_file"
29 | }
30 |
31 | # Install Easy Effects
32 | install_easy_effects
33 |
34 | echo -e "Creating configuration directory...\n" | tee -a "$log_file"
35 | clear
36 |
37 | # Define config directory and file
38 | config_dir=~/.var/app/com.github.wwmm.easyeffects/config/easyeffects/output
39 | config_file="$config_dir/fw13-easy-effects.json"
40 | irs_dir=~/.var/app/com.github.wwmm.easyeffects/config/easyeffects/irs
41 | irs_file="$irs_dir/IR_22ms_27dB_5t_15s_0c.irs"
42 |
43 | # Create config directory if it doesn't exist
44 | mkdir -p "$config_dir"
45 | mkdir -p "$irs_dir"
46 |
47 | echo -e "Downloading the configuration file...\n" | tee -a "$log_file"
48 | clear
49 | # Download the configuration file
50 | curl -fo "$config_file" https://raw.githubusercontent.com/FrameworkComputer/linux-docs/main/easy-effects/fw13-easy-effects.json | tee -a "$log_file"
51 |
52 | # Check if the downloaded file is empty
53 | if [ ! -s "$config_file" ]; then
54 | echo -e "Error: The downloaded configuration file is empty. Please check the source URL.\n" | tee -a "$log_file"
55 | exit 1
56 | fi
57 |
58 | echo -e "Configuration file downloaded to $config_file\n" | tee -a "$log_file"
59 |
60 | echo -e "Downloading the convolver impact file...\n" | tee -a "$log_file"
61 | curl -fo "$irs_file" https://raw.githubusercontent.com/FrameworkComputer/linux-docs/main/easy-effects/irs/IR_22ms_27dB_5t_15s_0c.irs | tee -a "$log_file"
62 | if [ ! -s "$irs_file" ]; then
63 | echo -e "Error: The downloaded convolver impact file is empty. Please check the source URL.\n" | tee -a "$log_file"
64 | exit 1
65 | fi
66 | echo -e "Convolver impact file downloaded to $irs_file\n" | tee -a "$log_file"
67 |
68 | echo -e "Stopping any running Easy Effects processes...\n" | tee -a "$log_file"
69 |
70 | # Kill existing Easy Effects process if running
71 | pkill easyeffects || true
72 |
73 | echo -e "Starting Easy Effects...\n" | tee -a "$log_file"
74 | clear
75 | # Start Easy Effects
76 | nohup flatpak run com.github.wwmm.easyeffects &>/dev/null &
77 |
78 | echo -e "Easy Effects has been started.\n" | tee -a "$log_file"
79 | echo -e "Please open Easy Effects and load the 'fw13-easy-effects' profile manually.\n" | tee -a "$log_file"
80 |
--------------------------------------------------------------------------------
/easy-effects/Fedora-easy-effects-16-installer.sh:
--------------------------------------------------------------------------------
1 | #!/bin/bash
2 |
3 | log_file="/tmp/easy_effects_install.log"
4 |
5 | # Function to install Easy Effects via Flatpak
6 | install_easy_effects() {
7 | echo "Installing Easy Effects via Flatpak..." | tee -a "$log_file"
8 |
9 | # Ensure Flatpak is installed
10 | if ! command -v flatpak &> /dev/null; then
11 | echo "Flatpak is not installed. Please install Flatpak first." | tee -a "$log_file"
12 | exit 1
13 | fi
14 | clear
15 |
16 | # Ensure Flathub is up-to-date
17 | echo "Updating Flatpak appstream data..." | tee -a "$log_file"
18 | sudo flatpak update --appstream -y | tee -a "$log_file"
19 |
20 | # Install Easy Effects
21 | echo "Running Flatpak install command for Easy Effects..." | tee -a "$log_file"
22 | flatpak install flathub com.github.wwmm.easyeffects -y | tee -a "$log_file"
23 | if [ $? -ne 0 ]; then
24 | echo "Flatpak installation failed. Please check the log for details." | tee -a "$log_file"
25 | exit 1
26 | fi
27 | clear
28 | echo "Easy Effects installation completed." | tee -a "$log_file"
29 | }
30 |
31 | # Install Easy Effects
32 | install_easy_effects
33 |
34 |
35 | echo -e "Creating configuration directory...\n" | tee -a "$log_file"
36 | clear
37 |
38 | # Define config directory and file
39 | config_dir=~/.var/app/com.github.wwmm.easyeffects/config/easyeffects/output
40 | config_file="$config_dir/fw16-easy-effects.json"
41 |
42 | # Create config directory if it doesn't exist
43 | mkdir -p "$config_dir"
44 |
45 |
46 | echo -e "Downloading the configuration file...\n" | tee -a "$log_file"
47 | clear
48 | # Download the configuration file
49 | curl -o "$config_file" https://raw.githubusercontent.com/FrameworkComputer/linux-docs/main/easy-effects/fw16-easy-effects.json | tee -a "$log_file"
50 |
51 | # Check if the downloaded file is empty
52 | if [ ! -s "$config_file" ]; then
53 | echo -e "Error: The downloaded configuration file is empty. Please check the source URL.\n" | tee -a "$log_file"
54 | exit 1
55 | fi
56 |
57 |
58 | echo -e "Configuration file downloaded to $config_file\n" | tee -a "$log_file"
59 |
60 |
61 | echo -e "Stopping any running Easy Effects processes...\n" | tee -a "$log_file"
62 |
63 | # Kill existing Easy Effects process if running
64 | pkill easyeffects || true
65 |
66 |
67 | echo -e "Starting Easy Effects...\n" | tee -a "$log_file"
68 | clear
69 | # Start Easy Effects
70 | nohup flatpak run com.github.wwmm.easyeffects &>/dev/null &
71 |
72 |
73 | echo -e "Easy Effects has been started.\n" | tee -a "$log_file"
74 | echo -e "Please open Easy Effects and load the 'fw16-easy-effects' profile manually.\n" | tee -a "$log_file"
75 |
--------------------------------------------------------------------------------
/easy-effects/README.md:
--------------------------------------------------------------------------------
1 | ## Easy Effects for FW 16 and 13.
2 |
3 | ### Sourced from [this Arch wiki guide](https://wiki.archlinux.org/title/Framework_Laptop_16#Easy_Effects).
4 | #### fw16-easy-effects.json is based on [amesb's fw16 EE profile.json](https://gist.github.com/amesb/cc5d717472d7e322b5f551b643ff03f4) and fw13-easy-effects.json is based on [Gracefu's Edits.json](https://github.com/cab404/framework-dsp/blob/master/config/output/Gracefu's%20Edits.json).
5 |
6 | > It's worth noting, you can load these both up - even running one script after another is fine and will not overwrite anything. So if you want to compare fw13 vs fw16 scripts, you can. I find the fw16 option has more bass whereas the fw13 profile has more clarity. In other words, install both profiles with confidence that this is supported fully. It will attempt to install the flatpak twice, which is totally fine and won't change anything as it will sense the flatpak is already install and move on, installing the second sound profile.
7 |
8 | ## For Fedora users on their Framework Laptop 16:
9 |
10 | ### Automated method:
11 |
12 | Ensure curl is installed:
13 |
14 | ```
15 | sudo dnf install curl -y
16 | ```
17 |
18 | Then paste this and press enter.
19 |
20 | ```
21 | curl https://raw.githubusercontent.com/FrameworkComputer/linux-docs/main/easy-effects/Fedora-easy-effects-16-installer.sh | bash
22 | ```
23 | \
24 | \
25 | \
26 | **IMPORTANT:** Load the profile by clicking the "Presets" pulldown, then "Load profile" option as shown below.
27 |
28 | 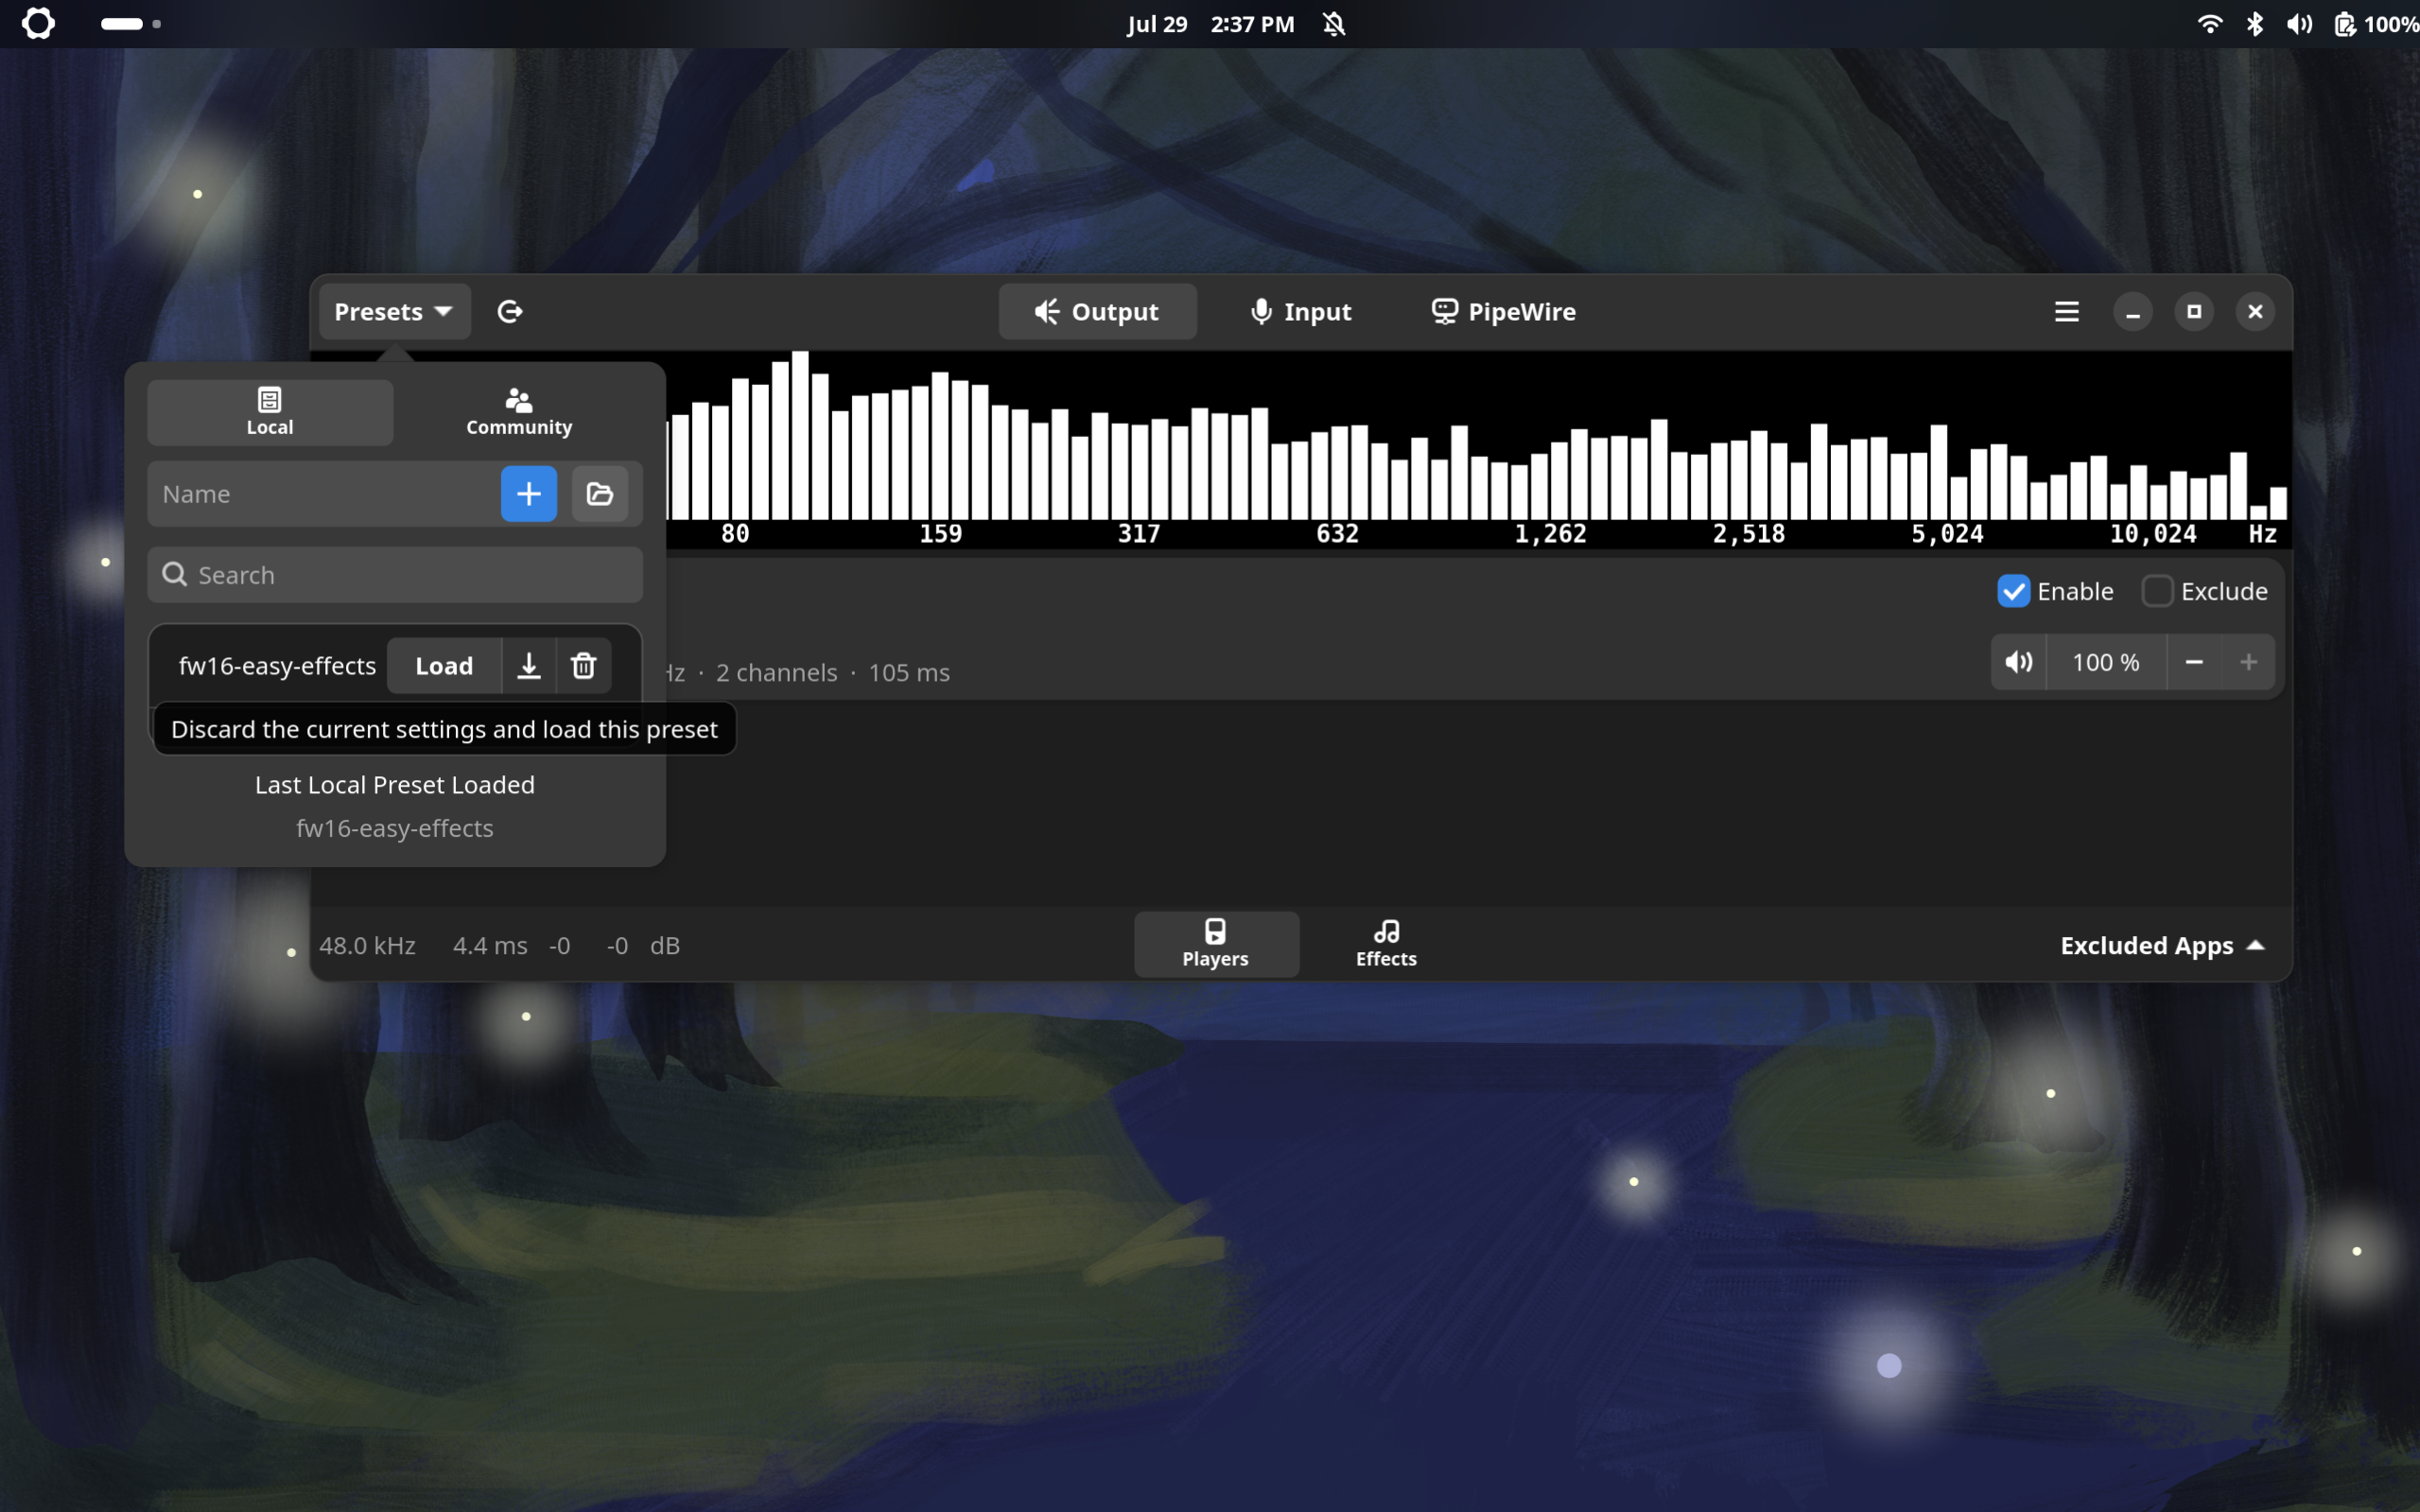
29 |
30 | -----------------------
31 |
32 | ## For Fedora users on their Framework Laptop 13:
33 |
34 | ### Automated method:
35 |
36 | Ensure curl is installed:
37 |
38 | ```
39 | sudo dnf install curl -y
40 | ```
41 |
42 | Then paste this and press enter.
43 |
44 | ```
45 | curl https://raw.githubusercontent.com/FrameworkComputer/linux-docs/main/easy-effects/Fedora-easy-effects-13-installer.sh | bash
46 | ```
47 | \
48 | \
49 | \
50 | **IMPORTANT:** Load the profile by clicking the "Presets" pulldown, then "Load profile" option as shown below.
51 |
52 | 
53 |
54 |
55 | --------------------------
56 | ## For Ubuntu users on their Framework Laptop 16:
57 |
58 | ### Automated method:
59 |
60 | Ensure curl is installed:
61 |
62 | ```
63 | sudo apt install curl -y
64 | ```
65 |
66 | Then paste this and press enter.
67 |
68 | ```
69 | curl https://raw.githubusercontent.com/FrameworkComputer/linux-docs/main/easy-effects/Ubuntu-easy-effects-16-installer.sh | bash
70 | ```
71 |
72 | Then just load the profile by clicking the Load profile option as shown below.
73 |
74 | 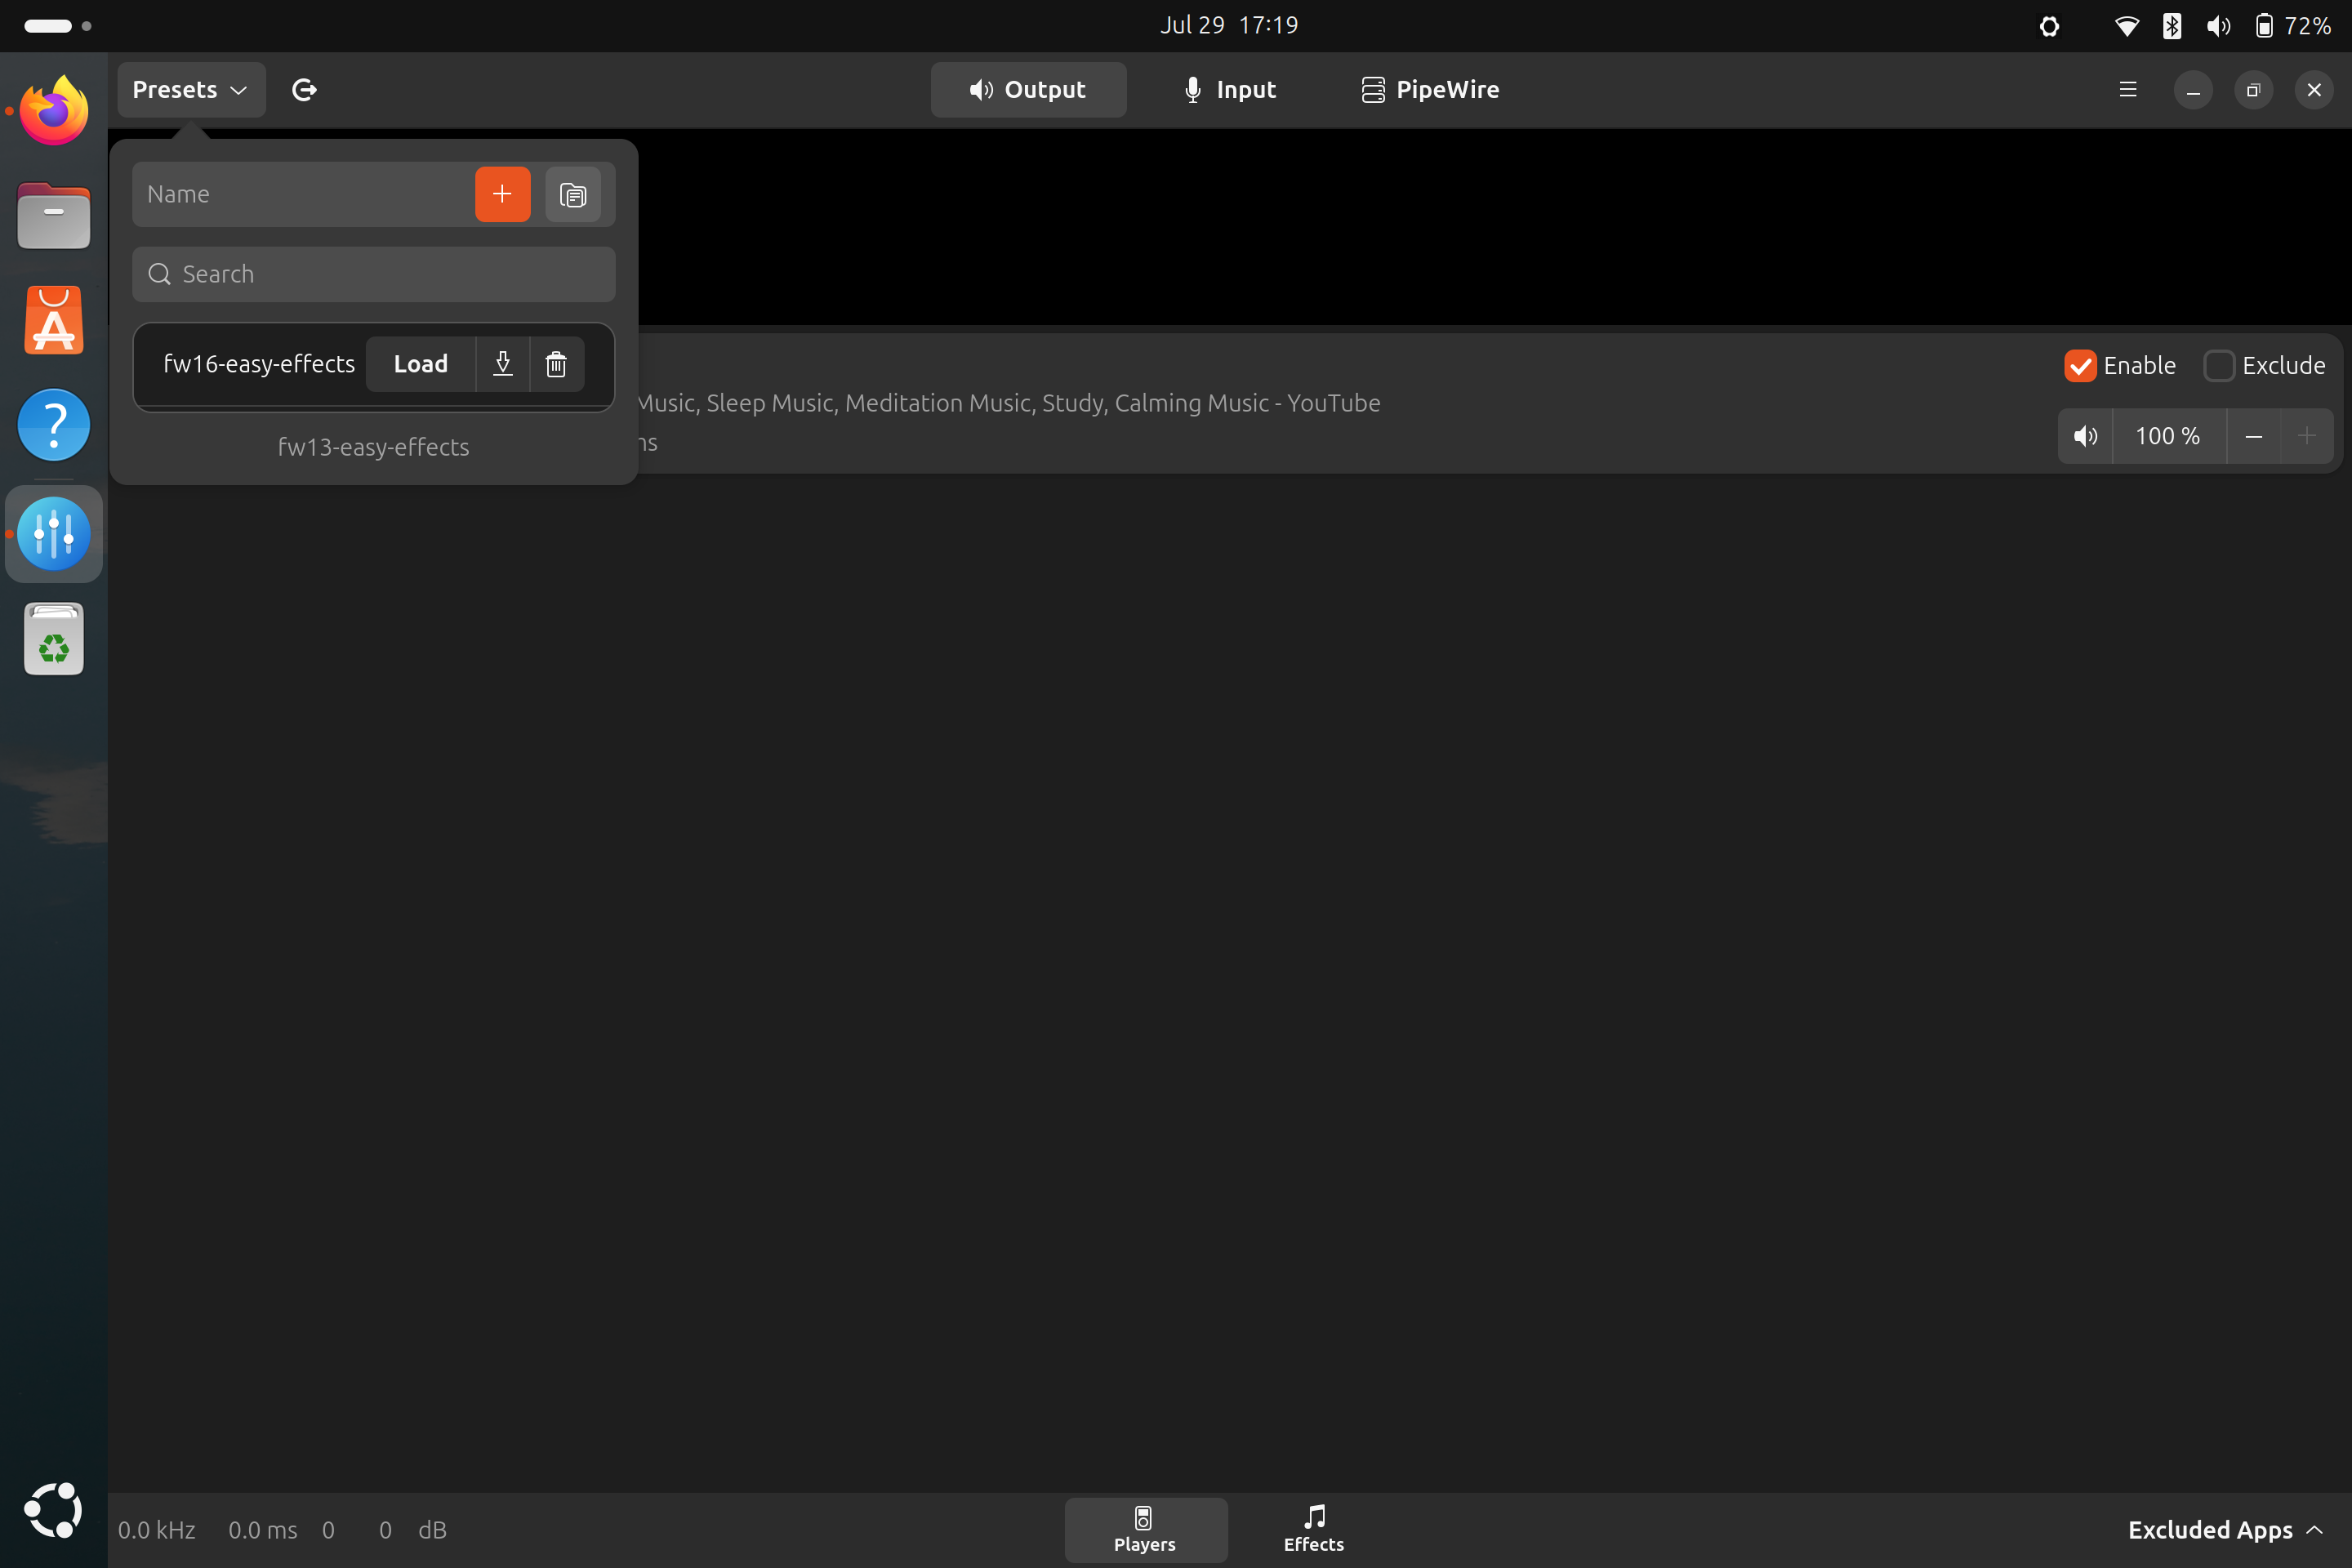
75 |
76 | --------------------------
77 | ## For Ubuntu users on their Framework Laptop 13:
78 |
79 | ### Automated method:
80 |
81 | Ensure curl is installed:
82 |
83 | ```
84 | sudo apt install curl -y
85 | ```
86 |
87 | Then paste this and press enter.
88 |
89 | ```
90 | curl https://raw.githubusercontent.com/FrameworkComputer/linux-docs/main/easy-effects/Ubuntu-easy-effects-13-installer.sh | bash
91 | ```
92 |
93 | Then just load the profile by clicking the Load profile option as shown below. Yes, the image below shows FW16, but the image is merely a visual aid. It will reflect the appropriate profile.
94 |
95 | 
96 |
97 | --------------------------
98 |
99 | ## FAQ
100 |
101 | - Can you run both of these to compare them?
102 | > Yes, you can. Nothing is overwritten, it will just try to install the flatpack twice which is fine and affects nothing.
103 |
104 | - Do you need to look for the profile once it's installed?
105 | > Nope, just follow the image. It's browsed for you, just load it.
106 |
107 | - I'd rather load this manually. How?
108 | > We're going to recommend the automated method, but if you on our own, wish to do this:
109 | > - Install Easy Effects.
110 | > - Download the json file you wish to use.
111 | > - Browse to it from the present menu.
112 |
--------------------------------------------------------------------------------
/easy-effects/Ubuntu-easy-effects-13-installer.sh:
--------------------------------------------------------------------------------
1 | #!/bin/bash
2 |
3 | log_file="/tmp/easy_effects_install.log"
4 |
5 | # Function to install Easy Effects via apt
6 | install_easy_effects() {
7 | echo "Installing Easy Effects via apt..." | tee -a "$log_file"
8 |
9 | # Update package list
10 | echo "Updating package list..." | tee -a "$log_file"
11 | sudo apt update | tee -a "$log_file"
12 |
13 | # Install Easy Effects
14 | echo "Running apt install command for Easy Effects..." | tee -a "$log_file"
15 | sudo apt install -y easyeffects | tee -a "$log_file"
16 | if [ $? -ne 0 ]; then
17 | echo "apt installation failed. Please check the log for details." | tee -a "$log_file"
18 | exit 1
19 | fi
20 |
21 | echo "Easy Effects installation completed." | tee -a "$log_file"
22 | }
23 |
24 | # Install Easy Effects
25 | install_easy_effects
26 |
27 | echo -e "Creating configuration directory...\n" | tee -a "$log_file"
28 |
29 | # Define config directory and file
30 | config_dir=~/.config/easyeffects/output
31 | config_file="$config_dir/fw13-easy-effects.json"
32 | irs_dir=~/.config/easyeffects/irs
33 | irs_file="$irs_dir/IR_22ms_27dB_5t_15s_0c.irs"
34 |
35 | # Create config directory if it doesn't exist
36 | mkdir -p "$config_dir"
37 | mkdir -p "$irs_dir"
38 |
39 | echo -e "Downloading the configuration file...\n" | tee -a "$log_file"
40 |
41 | # Download the configuration file
42 | curl -fo "$config_file" https://raw.githubusercontent.com/FrameworkComputer/linux-docs/main/easy-effects/fw13-easy-effects.json | tee -a "$log_file"
43 |
44 | # Check if the downloaded file is empty
45 | if [ ! -s "$config_file" ]; then
46 | echo -e "Error: The downloaded configuration file is empty. Please check the source URL.\n" | tee -a "$log_file"
47 | exit 1
48 | fi
49 | echo -e "Configuration file downloaded to $config_file\n" | tee -a "$log_file"
50 |
51 | echo -e "Downloading the convolver impact file...\n" | tee -a "$log_file"
52 |
53 | curl -fo "$irs_file" https://raw.githubusercontent.com/FrameworkComputer/linux-docs/main/easy-effects/irs/IR_22ms_27dB_5t_15s_0c.irs | tee -a "$log_file"
54 | # Check if the downloaded file is empty
55 | if [ ! -s "$irs_file" ]; then
56 | echo -e "Error: The downloaded convolver file is empty. Please check the source URL.\n" | tee -a "$log_file"
57 | exit 1
58 | fi
59 |
60 | echo -e "Convolver impact file downloaded to $irs_file\n" | tee -a "$log_file"
61 |
62 | echo -e "Stopping any running Easy Effects processes...\n" | tee -a "$log_file"
63 |
64 | # Kill existing Easy Effects process if running
65 | pkill easyeffects || true
66 |
67 | echo -e "Starting Easy Effects...\n" | tee -a "$log_file"
68 |
69 | # Start Easy Effects
70 | nohup easyeffects &>/dev/null &
71 |
72 | echo -e "Easy Effects has been started.\n" | tee -a "$log_file"
73 | echo -e "Please open Easy Effects and load the 'fw13-easy-effects' profile manually.\n" | tee -a "$log_file"
74 |
--------------------------------------------------------------------------------
/easy-effects/Ubuntu-easy-effects-16-installer.sh:
--------------------------------------------------------------------------------
1 | #!/bin/bash
2 |
3 | log_file="/tmp/easy_effects_install.log"
4 |
5 | # Function to install Easy Effects via apt
6 | install_easy_effects() {
7 | echo "Installing Easy Effects via apt..." | tee -a "$log_file"
8 |
9 | # Update package list
10 | echo "Updating package list..." | tee -a "$log_file"
11 | sudo apt update | tee -a "$log_file"
12 |
13 | # Install Easy Effects
14 | echo "Running apt install command for Easy Effects..." | tee -a "$log_file"
15 | sudo apt install -y easyeffects | tee -a "$log_file"
16 | if [ $? -ne 0 ]; then
17 | echo "apt installation failed. Please check the log for details." | tee -a "$log_file"
18 | exit 1
19 | fi
20 |
21 | echo "Easy Effects installation completed." | tee -a "$log_file"
22 | }
23 |
24 | # Install Easy Effects
25 | install_easy_effects
26 |
27 | echo -e "Creating configuration directory...\n" | tee -a "$log_file"
28 |
29 | # Define config directory and file
30 | config_dir=~/.config/easyeffects/output
31 | config_file="$config_dir/fw16-easy-effects.json"
32 |
33 | # Create config directory if it doesn't exist
34 | mkdir -p "$config_dir"
35 |
36 | echo -e "Downloading the configuration file...\n" | tee -a "$log_file"
37 |
38 | # Download the configuration file
39 | curl -o "$config_file" https://raw.githubusercontent.com/FrameworkComputer/linux-docs/main/easy-effects/fw16-easy-effects.json | tee -a "$log_file"
40 |
41 | # Check if the downloaded file is empty
42 | if [ ! -s "$config_file" ]; then
43 | echo -e "Error: The downloaded configuration file is empty. Please check the source URL.\n" | tee -a "$log_file"
44 | exit 1
45 | fi
46 |
47 | echo -e "Configuration file downloaded to $config_file\n" | tee -a "$log_file"
48 |
49 | echo -e "Stopping any running Easy Effects processes...\n" | tee -a "$log_file"
50 |
51 | # Kill existing Easy Effects process if running
52 | pkill easyeffects || true
53 |
54 | echo -e "Starting Easy Effects...\n" | tee -a "$log_file"
55 |
56 | # Start Easy Effects
57 | nohup easyeffects &>/dev/null &
58 |
59 | echo -e "Easy Effects has been started.\n" | tee -a "$log_file"
60 | echo -e "Please open Easy Effects and load the 'fw16-easy-effects' profile manually.\n" | tee -a "$log_file"
61 |
--------------------------------------------------------------------------------
/easy-effects/images/fw16-easyeffects.png:
--------------------------------------------------------------------------------
https://raw.githubusercontent.com/FrameworkComputer/linux-docs/41615e0145b7d968fc6e5e3774efebc019de88e1/easy-effects/images/fw16-easyeffects.png
--------------------------------------------------------------------------------
/easy-effects/images/readme:
--------------------------------------------------------------------------------
1 |
2 |
--------------------------------------------------------------------------------
/easy-effects/images/ubuntu-easy-effects.png:
--------------------------------------------------------------------------------
https://raw.githubusercontent.com/FrameworkComputer/linux-docs/41615e0145b7d968fc6e5e3774efebc019de88e1/easy-effects/images/ubuntu-easy-effects.png
--------------------------------------------------------------------------------
/easy-effects/irs/IR_22ms_27dB_5t_15s_0c.irs:
--------------------------------------------------------------------------------
https://raw.githubusercontent.com/FrameworkComputer/linux-docs/41615e0145b7d968fc6e5e3774efebc019de88e1/easy-effects/irs/IR_22ms_27dB_5t_15s_0c.irs
--------------------------------------------------------------------------------
/flatpaks/flatseal-installer.sh:
--------------------------------------------------------------------------------
1 | #!/bin/bash
2 |
3 | # Update and install Flatpak
4 | sudo apt update
5 | sudo apt install -y flatpak
6 |
7 | # Add the Flathub repository (if not already added)
8 | sudo flatpak remote-add --if-not-exists flathub https://flathub.org/repo/flathub.flatpakrepo
9 |
10 | # Install Flatseal Flathub
11 | flatpak install flathub com.github.tchx84.Flatseal -y
12 |
13 | # Verify the installation
14 | flatpak list | grep Flatseal
15 |
16 | echo "Flatseal been installed successfully."
17 |
--------------------------------------------------------------------------------
/flatpaks/images/flatseal-gimp-filesystem.png:
--------------------------------------------------------------------------------
https://raw.githubusercontent.com/FrameworkComputer/linux-docs/41615e0145b7d968fc6e5e3774efebc019de88e1/flatpaks/images/flatseal-gimp-filesystem.png
--------------------------------------------------------------------------------
/flatpaks/images/flatseal.png:
--------------------------------------------------------------------------------
https://raw.githubusercontent.com/FrameworkComputer/linux-docs/41615e0145b7d968fc6e5e3774efebc019de88e1/flatpaks/images/flatseal.png
--------------------------------------------------------------------------------
/flatpaks/images/mission.png:
--------------------------------------------------------------------------------
https://raw.githubusercontent.com/FrameworkComputer/linux-docs/41615e0145b7d968fc6e5e3774efebc019de88e1/flatpaks/images/mission.png
--------------------------------------------------------------------------------
/flatpaks/images/readme:
--------------------------------------------------------------------------------
1 |
2 |
--------------------------------------------------------------------------------
/flatpaks/mission-center-installer.sh:
--------------------------------------------------------------------------------
1 | #!/bin/bash
2 |
3 | # Update and install Flatpak
4 | sudo apt update
5 | sudo apt install -y flatpak
6 |
7 | # Add the Flathub repository (if not already added)
8 | sudo flatpak remote-add --if-not-exists flathub https://flathub.org/repo/flathub.flatpakrepo
9 |
10 | # Install Mission Center from Flathub
11 | flatpak install flathub io.missioncenter.MissionCenter -y
12 |
13 | # Verify the installation
14 | flatpak list | grep MissionCenter
15 |
16 | echo "Mission Center has been installed successfully."
17 |
--------------------------------------------------------------------------------
/flatpaks/readme.md:
--------------------------------------------------------------------------------
1 | # Flatpaks, what are they?
2 |
3 | By design, Flatpaks have limited access to your home folder and system in general. For most applications, this is perfectly fine, though in some cases this may limit the access you need—such as a webcam or microphone for Zoom, or a directory outside your home folder (for example, an external flash/thumb drive). You can extend this access using Flatseal, which itself can be installed via Flatpak.
4 |
5 | ## Setting up Flatseal on Ubuntu
6 |
7 | - Step 1
8 |
9 | ```
10 | sudo apt install curl -y && \
11 | curl -O https://raw.githubusercontent.com/FrameworkComputer/linux-docs/main/flatpaks/flatseal-installer.sh && \
12 | bash flatseal-installer.sh
13 | ```
14 |
15 | ## Setting up Mission Center Installer for Ubuntu
16 | - Step 1
17 |
18 | ```
19 | sudo apt install curl -y && \
20 | curl -O https://raw.githubusercontent.com/FrameworkComputer/linux-docs/main/flatpaks/mission-center-installer.sh && \
21 | bash mission-center-installer.sh
22 | ```
23 |
24 | - Step 2
25 |
26 | Log out, then log back in or reboot.
27 |
--------------------------------------------------------------------------------
/framework-desktop/Fedora-42.md:
--------------------------------------------------------------------------------
1 | # This is for Framework Desktop ONLY
2 |
3 | ## This will:
4 |
5 | - Getting your desktop fully updated.
6 | - Enable improved fractional scaling support Fedora's GNOME environment using Wayland.
7 |
8 |
9 |
10 |
11 |
12 |
13 | ### Step 1 Updating your software packages
14 |
15 | - Browse to the horizontal line in the upper left corner, click to open it.
16 | - Type out the word terminal, click to open it.
17 | - Copy the code below in the gray box, right click/paste it into the terminal window.
18 | - Then press the enter key, user password, enter key, **reboot.**
19 |
20 |
21 | ```
22 | sudo dnf upgrade
23 | ```
24 | > **TIP:** You can use the little clipboard icon to the right of the code to copy to your clipboard.
25 |
26 |
27 | **Reboot**
28 |
29 |
30 |
31 |
32 |
33 | ### Step 2 - If you want to enable fractional scaling on Wayland:
34 |
35 | - Type out the word Displays.
36 | - Look for scale you want and select it, click Apply.
37 |
38 |
39 |
40 |
41 |
42 |
43 | ### Bonus Step (for former Mac users) Reduce Font Scaling to Match Your Needs
44 |
45 | We received feedback that for users coming from OS X, installing GNOME Tweaks, browsing to Fonts, and reducing the font size from 1.00 to 0.80 may be preferred. Your own display may vary, so note any changes made if you need to revert back.
46 |
47 | - Goto Displays, set scaling to 200%. This will look too large, so let's fix the fonts.
48 |
49 | - Install with:
50 |
51 | ```
52 | sudo dnf install gnome-tweaks -y
53 | ```
54 |
55 | - Open Tweaks by using the "Super" or Windows key, search tweaks, and enter.
56 |
57 | - At the top, select fonts. Now in that panel, scroll all the way down. Look for Size. Change from 1.00 to 0.80. Close Tweaks. This will vary depending on what you are using for fractional scaling under Displays.
58 |
59 |
60 |
61 |
62 |
63 |
64 |
--------------------------------------------------------------------------------
/framework-laptop-16-disable-touchpad-typing.md:
--------------------------------------------------------------------------------
1 | ```
2 | sudo tee -a /usr/share/libinput/50-framework.quirks > /dev/null <<'EOF'
3 | [Framework Laptop 16 Keyboard Module]
4 | MatchName=Framework Laptop 16 Keyboard Module*
5 | MatchUdevType=keyboard
6 | MatchDMIModalias=dmi:*svnFramework:pnLaptop16*
7 | AttrKeyboardIntegration=internal
8 | EOF
9 | ```
10 |
--------------------------------------------------------------------------------
/framework12/Fedora42.md:
--------------------------------------------------------------------------------
1 | # This is for Framework Laptop 12 ONLY
2 |
3 | ## This will:
4 |
5 | - Getting your laptop fully updated.
6 | - Enable improved fractional scaling support Fedora's GNOME environment using Wayland.
7 | - Enabling tap to click on the touchpad.
8 |
9 |
10 |
11 |
12 |
13 |
14 | ### Step 1 Updating your software packages
15 |
16 | - Browse to the horizontal line in the upper left corner, click to open it.
17 | - Type out the word terminal, click to open it.
18 | - Copy the code below in the gray box, right click/paste it into the terminal window.
19 | - Then press the enter key, user password, enter key, **reboot.**
20 |
21 |
22 | ```
23 | sudo dnf upgrade
24 | ```
25 | > **TIP:** You can use the little clipboard icon to the right of the code to copy to your clipboard.
26 |
27 |
28 | **Reboot**
29 |
30 |
31 |
32 |
33 |
34 | ### Step 2 - If you want to enable fractional scaling on Wayland:
35 |
36 | - Type out the word Displays.
37 | - Look for scale you want and select it, click Apply.
38 |
39 |
40 |
41 |
42 |
43 | ### Step 3 - If you want to enable "tap-to-click" on the touchpad:
44 |
45 | - Browse to the horizontal line in the upper left corner, click to open it.
46 | - Type out the word mouse, look for Mouse and Touchpad, click to open it.
47 | - Click the touchpad option at the top.
48 | - Under "Clicking", select Tap to Click and enable it.
49 |
50 |
51 |
52 |
53 | ### Bonus Step (for former Mac users) Reduce Font Scaling to Match Your Needs
54 |
55 | We received feedback that for users coming from OS X, installing GNOME Tweaks, browsing to Fonts, and reducing the font size from 1.00 to 0.80 may be preferred.
56 |
57 | - Goto Displays, set scaling to 200%. This will look too large, so let's fix the fonts.
58 | - Install with:
59 |
60 | ```
61 | sudo dnf install gnome-tweaks -y
62 | ```
63 |
64 | - Open Tweaks by using the "Super" or Windows key, search tweaks, and enter.
65 |
66 | - At the top, select fonts. Now in that panel, scroll all the way down. Look for Size. Change from 1.00 to 0.80. Close Tweaks. This will vary depending on what you are using for fractional scaling under Displays.
67 |
68 | Note: This is for the displays for the laptop only. This will look super odd on external displays and likely too large even still.
69 |
70 |
71 |
72 |
73 |
74 |
75 |
--------------------------------------------------------------------------------
/framework12/Ubuntu-24-04.md:
--------------------------------------------------------------------------------
1 | # This is for Framework Laptop 12 ONLY.
2 |
3 |
4 | ## This will:
5 |
6 | - Update your Ubuntu install's packages.
7 |
8 |
9 |
10 |
11 | ### Get everything updated
12 |
13 | - Browse to the upper left corner, click the horizontal line to open the menu.
14 | - Type out the word terminal, click to open it.
15 | - Click on the small icon shown in the image below to copy the code below in the gray box, right click/paste it into the terminal window.
16 | - Then press the enter key, user password, enter key, **reboot.**
17 |
18 | ```
19 | sudo apt update && sudo apt upgrade -y && sudo snap refresh
20 | ```
21 | > **TIP:** You can use the little clipboard icon to the right of the code to copy to your clipboard.
22 |
23 |
24 |
25 |
26 |
27 |
28 |
29 | ### Bonus Step (for former Mac users) Reduce Font Scaling to Match Your Needs
30 |
31 | We received feedback that for users coming from OS X, installing GNOME Tweaks, browsing to Fonts, and reducing the font size from 1.00 to 0.80 may be preferred. This will vary greatly how you have your fractional scaling setup in the Displays settings area.
32 |
33 | - Goto Displays, set scaling to 200%. This will look too large, so let's fix the fonts.
34 | - Install with:
35 |
36 | ```
37 | sudo apt update && sudo apt install gnome-tweaks -y
38 | ```
39 |
40 | - Open Tweaks by using the "Super" or Windows key, search tweaks, and enter.
41 |
42 | - At the top, select fonts. Now in that panel, scroll all the way down. Look for Size. Change from 1.00 to 0.80. Close Tweaks.
43 |
44 | Note: This is for the displays for the laptop only. This will look super odd on external displays and likely too large even still.
45 |
46 | ### Bonus Step - Correct blurry text rendering in the Chrome browser
47 |
48 | - Open your Chrome browser, browse to chrome://flags/ and press enter.
49 | - Look for the search box at the top of the page, type in the words _ozone platform_ then press the enter key.
50 | - Look for the box marked Default, change it to Auto.
51 | - With this changed to Auto, relaunch your Chrome browser.
52 |
53 | 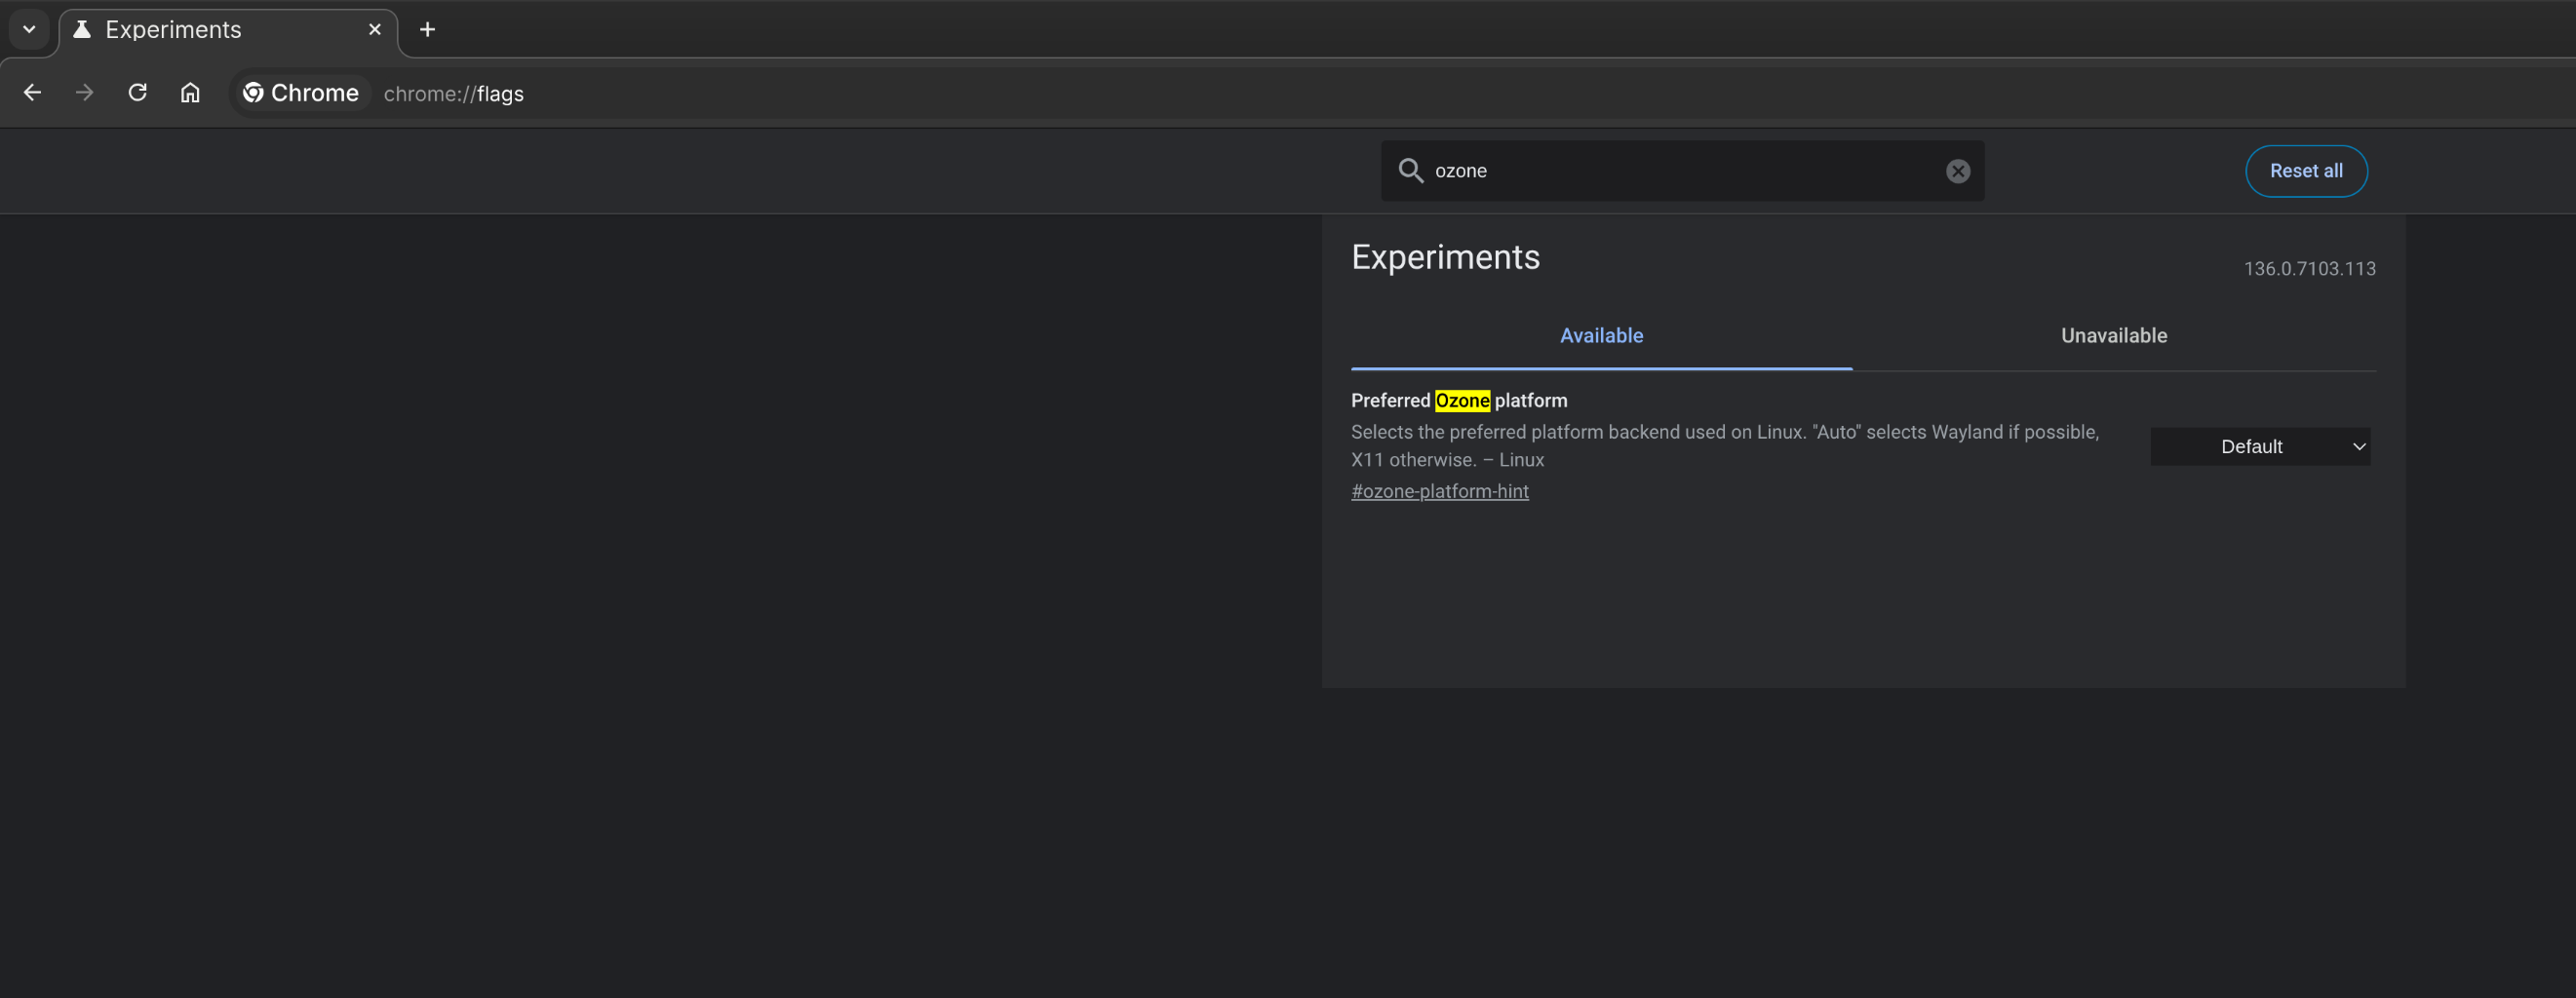
54 |
55 |
56 |
--------------------------------------------------------------------------------
/framework12/Ubuntu-25-04-accel-ubuntu25.04.md:
--------------------------------------------------------------------------------
1 | # Ubuntu 25.04 Tablet Mode Setup Udev Edit
2 |
3 | This guide will help set up screen rotation support for your laptop on Ubuntu 25.04, giving you an experience similar to what Fedora 42 and Bazzite offer out of the box.
4 |
5 | > Rather not deal with this at all? [Bazzite](https://guides.frame.work/Guide/Bazzite+Installation+on+the+Framework+Laptop+12/409?lang=en) and [Fedora](https://guides.frame.work/Guide/Fedora+42+Installation+on+the+Framework+Laptop+12/410?lang=en) are ready to go out of the box, zero configuration.
6 |
7 | Ubuntu 25.05 currently ships with iio-sensor-proxy 3.7 that has [a bug](https://gitlab.freedesktop.org/hadess/iio-sensor-proxy/-/issues/411) preventing it from delivering accelerometer events from kernel to userspace (GNOME, KDE, ...).
8 |
9 | ```
10 | sed 's/.*iio-buffer-accel/#&/' /usr/lib/udev/rules.d/80-iio-sensor-proxy.rules | sudo tee /etc/udev/rules.d/80-iio-sensor-proxy.rules
11 | sudo udevadm trigger --settle
12 | sudo systemctl restart iio-sensor-proxy
13 | ```
14 |
15 | Then you can check if screen rotation works:
16 |
17 | ```
18 | > monitor-sensor --accel
19 | Waiting for iio-sensor-proxy to appear
20 | +++ iio-sensor-proxy appeared
21 | === Has accelerometer (orientation: normal)
22 | ```
23 |
24 | > Tablet rotation mode should work immediately. Howver if for some reason it does not, reboot then test rotation again. Remember to flip the the screen completely back to test rotation properly.
25 |
--------------------------------------------------------------------------------
/framework12/Ubuntu-25-04.md:
--------------------------------------------------------------------------------
1 | # This is for Ubuntu 25.04 on Framework Laptop 12 ONLY.
2 |
3 |
4 | ## This will:
5 |
6 | - Update your Ubuntu install's packages.
7 | - Walk you getting tablet mode setup for Ubuntu 25.04 (ONLY)
8 |
9 |
10 |
11 |
12 | ### Get everything updated
13 |
14 | - Browse to the upper left corner, click the horizontal line to open the menu.
15 | - Type out the word terminal, click to open it.
16 | - Click on the small icon shown in the image below to copy the code below in the gray box, right click/paste it into the terminal window.
17 | - Then press the enter key, user password, enter key, **reboot.**
18 |
19 | ```
20 | sudo apt update && sudo apt upgrade -y && sudo snap refresh
21 | ```
22 | > **TIP:** You can use the little clipboard icon to the right of the code to copy to your clipboard.
23 |
24 |
25 |
26 | - **Then reboot**
27 |
28 |
29 |
30 | ## Tablet mode on Ubuntu
31 |
32 |
33 | - Only works on 25.04, and even then needs a little help.
34 | - [This script will get tablet mode set up and running fast](https://github.com/FrameworkComputer/linux-docs/blob/main/framework12/Ubuntu-25-04-accel-ubuntu25.04.md#ubuntu-2504-tablet-mode-setup-udev-edit).
35 | - Onscreen keyboard only appears when you call for it by interacting in a text area.
36 |
37 | 
38 |
39 |
40 |
41 |
42 | ### Bonus Step (for former Mac users) Reduce Font Scaling to Match Your Needs
43 |
44 | We received feedback that for users coming from OS X, installing GNOME Tweaks, browsing to Fonts, and reducing the font size from 1.00 to 0.80 may be preferred. This will vary greatly how you have your fractional scaling setup in the Displays settings area.
45 |
46 | - Goto Displays, set scaling to 200%. This will look too large, so let's fix the fonts.
47 | - Install with:
48 |
49 | ```
50 | sudo apt update && sudo apt install gnome-tweaks -y
51 | ```
52 |
53 | - Open Tweaks by using the "Super" or Windows key, search tweaks, and enter.
54 |
55 | - At the top, select fonts. Now in that panel, scroll all the way down. Look for Size. Change from 1.00 to 0.80. Close Tweaks.
56 |
57 | Note: This is for the displays for the laptop only. This will look super odd on external displays and likely too large even still.
58 |
--------------------------------------------------------------------------------
/framework12/images/install.png:
--------------------------------------------------------------------------------
https://raw.githubusercontent.com/FrameworkComputer/linux-docs/41615e0145b7d968fc6e5e3774efebc019de88e1/framework12/images/install.png
--------------------------------------------------------------------------------
/framework12/images/oszone.png:
--------------------------------------------------------------------------------
https://raw.githubusercontent.com/FrameworkComputer/linux-docs/41615e0145b7d968fc6e5e3774efebc019de88e1/framework12/images/oszone.png
--------------------------------------------------------------------------------
/framework12/images/readme:
--------------------------------------------------------------------------------
1 |
2 |
--------------------------------------------------------------------------------
/framework12/images/tablet.png:
--------------------------------------------------------------------------------
https://raw.githubusercontent.com/FrameworkComputer/linux-docs/41615e0145b7d968fc6e5e3774efebc019de88e1/framework12/images/tablet.png
--------------------------------------------------------------------------------
/framework13/Fedora41-11thGen.md:
--------------------------------------------------------------------------------
1 | # This is for 11th Gen Intel® Core™ Framework Laptop 13 ONLY
2 |
3 | ## This will:
4 |
5 | - Getting your laptop fully updated.
6 | - Enable improved fractional scaling support Fedora's GNOME environment using Wayland.
7 | - Enabling tap to click on the touchpad.
8 |
9 |
10 |
11 |
12 |
13 |
14 | ### Step 1 Updating your software packages
15 |
16 | - Browse to the horizontal line in the upper left corner, click to open it.
17 | - Type out the word terminal, click to open it.
18 | - Copy the code below in the gray box, right click/paste it into the terminal window.
19 | - Then press the enter key, user password, enter key, **reboot.**
20 |
21 |
22 | ```
23 | sudo dnf upgrade
24 | ```
25 | > **TIP:** You can use the little clipboard icon to the right of the code to copy to your clipboard.
26 |
27 |
28 | **Reboot**
29 |
30 |
31 |
32 |
33 |
34 | ### Step 2 - If you want to enable fractional scaling on Wayland:
35 |
36 | - Type out the word Displays.
37 | - Look for scale you want and select it, click Apply.
38 |
39 |
40 |
41 |
42 |
43 | ### Step 3 - If you want to enable "tap-to-click" on the touchpad:
44 |
45 | - Browse to the horizontal line in the upper left corner, click to open it.
46 | - Type out the word mouse, look for Mouse and Touchpad, click to open it.
47 | - Click the touchpad option at the top.
48 | - Under "Clicking", select Tap to Click and enable it.
49 |
50 |
51 |
52 |
53 | ### Bonus Step (for former Mac users) Reduce Font Scaling to Match Your Needs
54 |
55 | We received feedback that for users coming from OS X, installing GNOME Tweaks, browsing to Fonts, and reducing the font size from 1.00 to 0.80 may be preferred.
56 |
57 | - Goto Displays, set scaling to 200%. This will look too large, so let's fix the fonts.
58 | - Install with:
59 |
60 | ```
61 | sudo dnf install gnome-tweaks -y
62 | ```
63 |
64 | - Open Tweaks by using the "Super" or Windows key, search tweaks, and enter.
65 |
66 | - At the top, select fonts. Now in that panel, scroll all the way down. Look for Size. Change from 1.00 to 0.80. Close Tweaks.
67 |
68 | Note: This is for the displays for the laptop only. This will look super odd on external displays and likely too large even still.
69 |
70 |
71 |
72 |
73 |
74 |
75 |
--------------------------------------------------------------------------------
/framework13/Fedora41-12thGen.md:
--------------------------------------------------------------------------------
1 | # This is for 12th Gen Intel® Core™ Framework Laptop 13 ONLY
2 |
3 | ## This will:
4 |
5 | - Getting your laptop fully updated.
6 | - Enable improved fractional scaling support Fedora's GNOME environment using Wayland.
7 | - Enabling tap to click on the touchpad.
8 |
9 |
10 |
11 |
12 |
13 |
14 | ### Step 1 Updating your software packages
15 |
16 | - Browse to the horizontal line in the upper left corner, click to open it.
17 | - Type out the word terminal, click to open it.
18 | - Copy the code below in the gray box, right click/paste it into the terminal window.
19 | - Then press the enter key, user password, enter key, **reboot.**
20 |
21 |
22 | ```
23 | sudo dnf upgrade
24 | ```
25 | > **TIP:** You can use the little clipboard icon to the right of the code to copy to your clipboard.
26 |
27 |
28 | **Reboot**
29 |
30 |
31 |
32 |
33 |
34 | ### Step 2 - If you want to enable fractional scaling on Wayland:
35 |
36 | - Type out the word Displays.
37 | - Look for scale you want and select it, click Apply.
38 |
39 |
40 |
41 |
42 |
43 | ### Step 3 - If you want to enable "tap-to-click" on the touchpad:
44 |
45 | - Browse to the horizontal line in the upper left corner, click to open it.
46 | - Type out the word mouse, look for Mouse and Touchpad, click to open it.
47 | - Click the touchpad option at the top.
48 | - Under "Clicking", select Tap to Click and enable it.
49 |
50 |
51 |
52 |
53 | ### Bonus Step (for former Mac users) Reduce Font Scaling to Match Your Needs
54 |
55 | We received feedback that for users coming from OS X, installing GNOME Tweaks, browsing to Fonts, and reducing the font size from 1.00 to 0.80 may be preferred.
56 |
57 | - Goto Displays, set scaling to 200%. This will look too large, so let's fix the fonts.
58 | - Install with:
59 |
60 | ```
61 | sudo dnf install gnome-tweaks -y
62 | ```
63 |
64 | - Open Tweaks by using the "Super" or Windows key, search tweaks, and enter.
65 |
66 | - At the top, select fonts. Now in that panel, scroll all the way down. Look for Size. Change from 1.00 to 0.80. Close Tweaks.
67 |
68 | Note: This is for the displays for the laptop only. This will look super odd on external displays and likely too large even still.
69 |
70 |
71 |
72 |
73 |
74 |
75 |
--------------------------------------------------------------------------------
/framework13/Fedora41-13thGen.md:
--------------------------------------------------------------------------------
1 | # This is for 13th Gen Intel® Core™ Framework Laptop 13 ONLY
2 |
3 | ## This will:
4 |
5 | - Getting your laptop fully updated.
6 | - Enable improved fractional scaling support Fedora's GNOME environment using Wayland.
7 | - Enabling tap to click on the touchpad.
8 |
9 |
10 |
11 |
12 |
13 |
14 | ### Step 1 Updating your software packages
15 |
16 | - Browse to the horizontal line in the upper left corner, click to open it.
17 | - Type out the word terminal, click to open it.
18 | - Copy the code below in the gray box, right click/paste it into the terminal window.
19 | - Then press the enter key, user password, enter key, **reboot.**
20 |
21 |
22 | ```
23 | sudo dnf upgrade
24 | ```
25 | > **TIP:** You can use the little clipboard icon to the right of the code to copy to your clipboard.
26 |
27 |
28 | **Reboot**
29 |
30 |
31 |
32 |
33 |
34 | ### Step 2 - If you want to enable fractional scaling on Wayland:
35 |
36 | - Type out the word Displays.
37 | - Look for scale you want and select it, click Apply.
38 |
39 |
40 |
41 |
42 |
43 | ### Step 3 - If you want to enable "tap-to-click" on the touchpad:
44 |
45 | - Browse to the horizontal line in the upper left corner, click to open it.
46 | - Type out the word mouse, look for Mouse and Touchpad, click to open it.
47 | - Click the touchpad option at the top.
48 | - Under "Clicking", select Tap to Click and enable it.
49 |
50 |
51 |
52 |
53 | ### Bonus Step (for former Mac users) Reduce Font Scaling to Match Your Needs
54 |
55 | We received feedback that for users coming from OS X, installing GNOME Tweaks, browsing to Fonts, and reducing the font size from 1.00 to 0.80 may be preferred.
56 |
57 | - Goto Displays, set scaling to 200%. This will look too large, so let's fix the fonts.
58 | - Install with:
59 |
60 | ```
61 | sudo dnf install gnome-tweaks -y
62 | ```
63 |
64 | - Open Tweaks by using the "Super" or Windows key, search tweaks, and enter.
65 |
66 | - At the top, select fonts. Now in that panel, scroll all the way down. Look for Size. Change from 1.00 to 0.80. Close Tweaks.
67 |
68 | Note: This is for the displays for the laptop only. This will look super odd on external displays and likely too large even still.
69 |
70 |
71 |
72 |
73 |
74 |
75 |
--------------------------------------------------------------------------------
/framework13/Fedora41-Setup-Intel-Core-Ultra-Series-1.md:
--------------------------------------------------------------------------------
1 | # This is for Intel® Core™ Ultra Series 1 Framework Laptop 13 ONLY.
2 |
3 | ## This will:
4 |
5 | - Getting your laptop fully updated.
6 | - Enable improved fractional scaling support Fedora's GNOME environment using Wayland.
7 | - Enabling tap to click on the touchpad.
8 |
9 |
10 |
11 |
12 |
13 |
14 | ### Step 1 Updating your software packages
15 |
16 | - Browse to the horizontal line in the upper left corner, click to open it.
17 | - Type out the word terminal, click to open it.
18 | - Copy the code below in the gray box, right click/paste it into the terminal window.
19 | - Then press the enter key, user password, enter key, **reboot.**
20 |
21 |
22 | ```
23 | sudo dnf upgrade
24 | ```
25 | > **TIP:** You can use the little clipboard icon to the right of the code to copy to your clipboard.
26 |
27 |
28 | **Reboot**
29 |
30 |
31 |
32 |
33 |
34 | ### Step 2 - If you want to enable fractional scaling on Wayland:
35 |
36 | - Type out the word Displays.
37 | - Look for scale you want and select it, click Apply.
38 |
39 |
40 |
41 |
42 |
43 | ### Step 3 - If you want to enable "tap-to-click" on the touchpad:
44 |
45 | - Browse to the horizontal line in the upper left corner, click to open it.
46 | - Type out the word mouse, look for Mouse and Touchpad, click to open it.
47 | - Click the touchpad option at the top.
48 | - Under "Clicking", select Tap to Click and enable it.
49 |
50 |
51 |
52 |
53 | ### Bonus Step (for former Mac users) Reduce Font Scaling to Match Your Needs
54 |
55 | We received feedback that for users coming from OS X, installing GNOME Tweaks, browsing to Fonts, and reducing the font size from 1.00 to 0.80 may be preferred.
56 |
57 | - Goto Displays, set scaling to 200%. This will look too large, so let's fix the fonts.
58 | - Install with:
59 |
60 | ```
61 | sudo dnf install gnome-tweaks -y
62 | ```
63 |
64 | - Open Tweaks by using the "Super" or Windows key, search tweaks, and enter.
65 |
66 | - At the top, select fonts. Now in that panel, scroll all the way down. Look for Size. Change from 1.00 to 0.80. Close Tweaks.
67 |
68 | Note: This is for the displays for the laptop only. This will look super odd on external displays and likely too large even still.
69 |
70 |
71 |
72 |
73 |
74 |
75 |
--------------------------------------------------------------------------------
/framework13/Ryzen-AI-300-Series.md:
--------------------------------------------------------------------------------
1 | # This is for Ryzen™ AI 300 Series Framework Laptop 13 ONLY.
2 |
3 | ## This will:
4 |
5 | - Getting your laptop fully updated.
6 | - Enable improved fractional scaling support Fedora's GNOME environment using Wayland.
7 | - Enabling tap to click on the touchpad.
8 |
9 |
10 |
11 |
12 |
13 |
14 | ### Step 1 Updating your software packages
15 |
16 | - Browse to the horizontal line in the upper left corner, click to open it.
17 | - Type out the word terminal, click to open it.
18 | - Copy the code below in the gray box, right click/paste it into the terminal window.
19 | - Then press the enter key, user password, enter key, **reboot.**
20 |
21 |
22 | ```
23 | sudo dnf upgrade
24 | ```
25 | > **TIP:** You can use the little clipboard icon to the right of the code to copy to your clipboard.
26 |
27 |
28 | **Reboot**
29 |
30 |
31 |
32 |
33 |
34 | ### Step 2 - If you want to enable fractional scaling on Wayland:
35 |
36 | - Type out the word Displays.
37 | - Look for scale you want and select it, click Apply.
38 |
39 |
40 |
41 |
42 |
43 | ### Step 3 - If you want to enable "tap-to-click" on the touchpad:
44 |
45 | - Browse to the horizontal line in the upper left corner, click to open it.
46 | - Type out the word mouse, look for Mouse and Touchpad, click to open it.
47 | - Click the touchpad option at the top.
48 | - Under "Clicking", select Tap to Click and enable it.
49 |
50 |
51 |
52 |
53 | ### Bonus Step (for former Mac users) Reduce Font Scaling to Match Your Needs
54 |
55 | We received feedback that for users coming from OS X, installing GNOME Tweaks, browsing to Fonts, and reducing the font size from 1.00 to 0.80 may be preferred.
56 |
57 | - Goto Displays, set scaling to 200%. This will look too large, so let's fix the fonts.
58 | - Install with:
59 |
60 | ```
61 | sudo dnf install gnome-tweaks -y
62 | ```
63 |
64 | - Open Tweaks by using the "Super" or Windows key, search tweaks, and enter.
65 |
66 | - At the top, select fonts. Now in that panel, scroll all the way down. Look for Size. Change from 1.00 to 0.80. Close Tweaks.
67 |
68 | Note: This is for the displays for the laptop only. This will look super odd on external displays and likely too large even still.
69 |
70 |
71 |
72 |
73 |
74 |
75 |
--------------------------------------------------------------------------------
/framework16/Fedora-42-fw16.md:
--------------------------------------------------------------------------------
1 | # This is for the Framework Laptop 16 (AMD Ryzen™ 7040 Series) ONLY.
2 |
3 | ## This will:
4 |
5 | - Getting your laptop fully updated.
6 | - Allow both CPU and platform drivers to be simultaneously active.
7 | - Enable improved fractional scaling support Fedora's GNOME environment using Wayland.
8 | - Enabling tap to click on the touchpad.
9 |
10 |
11 |
12 |
13 |
14 | ### Step 1 Updating your software packages
15 |
16 | - Browse to the horizontal line in the upper left corner, click to open it.
17 | - Type out the word terminal, click to open it.
18 | - Copy the code below in the gray box, right click/paste it into the terminal window.
19 | - Then press the enter key, user password, enter key, **reboot.**
20 |
21 |
22 | ```
23 | sudo dnf upgrade
24 | ```
25 | > **TIP:** You can use the little clipboard icon to the right of the code to copy to your clipboard.
26 |
27 |
28 | **Reboot**
29 |
30 |
31 |
32 |
33 |
34 |
35 | ### Step 2 - If you want to enable fractional scaling on Wayland:
36 |
37 | - Browse to the horizontal line in the upper left corner, click to open it.
38 | - Type out the word Displays.
39 | - Look for "Scale", set it to your preference, click Apply.
40 |
41 |
42 |
43 |
44 | ### Step 3 - If you want to enable "tap-to-click" on the touchpad:
45 |
46 | - Browse to the horizontal line in the upper left corner, click to open it.
47 | - Type out the word mouse, look for Mouse and Touchpad, click to open it.
48 | - Click the touchpad option at the top.
49 | - Under "Clicking", select Tap to Click and enable it.
50 |
51 |
52 |
53 |
54 | ### Bonus Step (for former Mac users) Reduce Font Scaling to Match Your Needs
55 |
56 | We received feedback that for users coming from OS X, installing GNOME Tweaks, browsing to Fonts, and reducing the font size from 1.00 to 0.80 may be preferred.
57 |
58 | - Goto Displays, set scaling to 200%. This will look too large, so let's fix the fonts.
59 | - Install with:
60 |
61 | ```
62 | sudo dnf install gnome-tweaks -y
63 | ```
64 |
65 | - Open Tweaks by using the "Super" or Windows key, search tweaks, and enter.
66 |
67 | - At the top, select fonts. Now in that panel, scroll all the way down. Look for Size. Change from 1.00 to 0.80. Close Tweaks.
68 |
69 | Note: This is for the displays for the laptop only. This will look super odd on external displays and likely too large even still.
70 |
71 |
72 |
73 |
74 |
75 | ----------------------------------------
76 | ----------------------------------------
77 |
78 |
79 |
80 |
--------------------------------------------------------------------------------
/goodix-moc-609c-v01000330.cab:
--------------------------------------------------------------------------------
https://raw.githubusercontent.com/FrameworkComputer/linux-docs/41615e0145b7d968fc6e5e3774efebc019de88e1/goodix-moc-609c-v01000330.cab
--------------------------------------------------------------------------------
/hibernation/images/1.png:
--------------------------------------------------------------------------------
https://raw.githubusercontent.com/FrameworkComputer/linux-docs/41615e0145b7d968fc6e5e3774efebc019de88e1/hibernation/images/1.png
--------------------------------------------------------------------------------
/hibernation/images/2.png:
--------------------------------------------------------------------------------
https://raw.githubusercontent.com/FrameworkComputer/linux-docs/41615e0145b7d968fc6e5e3774efebc019de88e1/hibernation/images/2.png
--------------------------------------------------------------------------------
/hibernation/images/3.png:
--------------------------------------------------------------------------------
https://raw.githubusercontent.com/FrameworkComputer/linux-docs/41615e0145b7d968fc6e5e3774efebc019de88e1/hibernation/images/3.png
--------------------------------------------------------------------------------
/hibernation/images/hibernate-extension.png:
--------------------------------------------------------------------------------
https://raw.githubusercontent.com/FrameworkComputer/linux-docs/41615e0145b7d968fc6e5e3774efebc019de88e1/hibernation/images/hibernate-extension.png
--------------------------------------------------------------------------------
/hibernation/images/installed1.png:
--------------------------------------------------------------------------------
https://raw.githubusercontent.com/FrameworkComputer/linux-docs/41615e0145b7d968fc6e5e3774efebc019de88e1/hibernation/images/installed1.png
--------------------------------------------------------------------------------
/hibernation/images/installrun3.png:
--------------------------------------------------------------------------------
https://raw.githubusercontent.com/FrameworkComputer/linux-docs/41615e0145b7d968fc6e5e3774efebc019de88e1/hibernation/images/installrun3.png
--------------------------------------------------------------------------------
/hibernation/images/installrun4.png:
--------------------------------------------------------------------------------
https://raw.githubusercontent.com/FrameworkComputer/linux-docs/41615e0145b7d968fc6e5e3774efebc019de88e1/hibernation/images/installrun4.png
--------------------------------------------------------------------------------
/hibernation/images/readme:
--------------------------------------------------------------------------------
1 | Directory for images.
2 |
--------------------------------------------------------------------------------
/hibernation/images/running1.png:
--------------------------------------------------------------------------------
https://raw.githubusercontent.com/FrameworkComputer/linux-docs/41615e0145b7d968fc6e5e3774efebc019de88e1/hibernation/images/running1.png
--------------------------------------------------------------------------------
/hibernation/images/software-center.png:
--------------------------------------------------------------------------------
https://raw.githubusercontent.com/FrameworkComputer/linux-docs/41615e0145b7d968fc6e5e3774efebc019de88e1/hibernation/images/software-center.png
--------------------------------------------------------------------------------
/hibernation/kernel-6-11-workarounds/rfkill-suspender.sh:
--------------------------------------------------------------------------------
1 | #!/bin/bash
2 |
3 | # Define service files and paths
4 | SUSPEND_SERVICE="/etc/systemd/system/bluetooth-rfkill-suspend.service"
5 | RESUME_SERVICE="/etc/systemd/system/bluetooth-rfkill-resume.service"
6 |
7 | # Create and configure the suspend service
8 | echo "Setting up bluetooth-rfkill-suspend.service..."
9 | sudo tee "$SUSPEND_SERVICE" > /dev/null < /dev/null <
55 |
56 | ## Troubleshooting
57 |
58 | - If you find the script is not working right or taking over 10 minutes, you can run this to trim down your journal a bit to make it easier to manage for the script.**
59 |
60 | ```
61 | sudo journalctl --vacuum-time=30d --vacuum-size=500M
62 | ```
63 | (Then reboot, run the script again)
64 |
65 | - Your log file keeps getting overwritten.
66 | >This is by design. So if you wish to prevent this and keep this from happening, copy your combined_log.txt file to another location so it will not be overwritten.
67 |
68 | **[BACK TO MAIN PAGE](https://github.com/FrameworkComputer/linux-docs/tree/main/log-helper#framework-log-helper-aka-combinedsh)**
69 |
70 |
71 |
72 |
--------------------------------------------------------------------------------
/log-helper/images/1.gif:
--------------------------------------------------------------------------------
https://raw.githubusercontent.com/FrameworkComputer/linux-docs/41615e0145b7d968fc6e5e3774efebc019de88e1/log-helper/images/1.gif
--------------------------------------------------------------------------------
/log-helper/images/2.gif:
--------------------------------------------------------------------------------
https://raw.githubusercontent.com/FrameworkComputer/linux-docs/41615e0145b7d968fc6e5e3774efebc019de88e1/log-helper/images/2.gif
--------------------------------------------------------------------------------
/log-helper/images/3.gif:
--------------------------------------------------------------------------------
https://raw.githubusercontent.com/FrameworkComputer/linux-docs/41615e0145b7d968fc6e5e3774efebc019de88e1/log-helper/images/3.gif
--------------------------------------------------------------------------------
/log-helper/images/readme:
--------------------------------------------------------------------------------
1 |
2 |
--------------------------------------------------------------------------------
/misc/LUKS-Keyboard-Layout.md:
--------------------------------------------------------------------------------
1 |
2 | # ⚠️ Known Limitation — LUKS Keyboard Layout
3 |
4 | > ⚠️ **Important for non‑US keyboard users:**
5 | > The keyboard layout selected during installation is **not** used for the LUKS unlock screen. The early‑boot environment defaults to **`en‑US`**.
6 | > As a result, the keys you press may produce different characters when you enter your passphrase at boot.
7 |
8 | ---
9 |
10 | ## During Installation
11 | - Choose a passphrase you can type on **both** US‑QWERTY *and* your local layout, **or**
12 | - Use only **A–Z** and **0–9** (keys that do not change position).
13 |
14 | > 💡 **Simplest solution:** use a passphrase made **only** of letters A–Z and/or numbers 0–9. These keys map the same on nearly every layout and will always work at the unlock prompt.
15 |
16 | ---
17 |
18 | ## After Installation (first boot)
19 |
20 | > ✅ **Skip the entire section below** if you used only A–Z/0‑9 **and** you can already unlock successfully.
21 |
22 | ### ✅ Fedora Atomic desktops
23 | *(Silverblue / Kinoite / Bazzite / Bluefin …)*
24 |
25 | # 1 Write your keymap
26 | echo 'KEYMAP=de' | sudo tee /etc/vconsole.conf
27 |
28 | # 2 Track that file so every future deployment includes it
29 | sudo rpm-ostree initramfs-etc --track=/etc/vconsole.conf
30 |
31 | # 3 Rebuild the initramfs now *and* enable automatic rebuilds
32 | sudo rpm-ostree initramfs --enable
33 |
34 | # 4 (Optional but harmless) force a dracut run on the current deployment
35 | sudo dracut -f
36 |
37 | # 5 Reboot
38 | sudo reboot
39 |
40 | ---
41 |
42 | ### ✅ Fedora Workstation / Server (traditional RPM systems)
43 |
44 | sudo nano /etc/vconsole.conf # add or edit: KEYMAP=de
45 | sudo dracut -fv --regenerate-all # rebuild every installed kernel
46 | sudo reboot
47 |
48 | ---
49 |
50 | ### ✅ Ubuntu & Debian‑based systems
51 |
52 | sudo nano /etc/default/keyboard # e.g. XKBLAYOUT="de"
53 | sudo dpkg-reconfigure keyboard-configuration # interactive; rebuilds current initrd
54 | sudo update-initramfs -u -k all # rebuild all other initrds
55 | sudo reboot
56 |
57 | ---
58 |
59 | ### ✅ Arch Linux & derivatives
60 |
61 | echo 'KEYMAP=de' | sudo tee /etc/vconsole.conf
62 | sudo sed -i 's/^HOOKS=.*/HOOKS=(base udev autodetect modconf kms keyboard keymap encrypt filesystems)/' /etc/mkinitcpio.conf
63 | sudo mkinitcpio -P # rebuild every preset
64 | sudo reboot
65 |
66 | ---
67 |
68 | ## 🛠️ Emergency Unlock (if the keymap is wrong)
69 |
70 | ### Fedora / Atomic
71 | 1. At the GRUB menu press **e**.
72 | 2. Append `rd.vconsole.keymap=de` to the end of the `linux` line.
73 | 3. Boot with **Ctrl + X** or **F10**.
74 | 4. After login, apply the permanent fix above.
75 |
76 | ### Ubuntu family
77 |
78 | # At GRUB choose “Recovery Mode → root shell”
79 | mount -o remount,rw /
80 | nano /etc/default/keyboard # set XKBLAYOUT="de"
81 | update-initramfs -u -k all
82 | reboot
83 |
84 | ---
85 |
86 | ## 📘 Helpful Commands
87 |
88 | # List available keymaps
89 | localectl list-keymaps | grep -i
90 |
91 | # Verify your map is embedded in the current initrd
92 | lsinitramfs /boot/initrd.img-$(uname -r) | grep kmap
93 |
94 | Once these steps are complete, your chosen layout is active at the LUKS prompt, early TTYs, and Plymouth. Your desktop environment continues to use the layout configured in GNOME, KDE, etc.
95 |
--------------------------------------------------------------------------------
/misc/secure-boot.md:
--------------------------------------------------------------------------------
1 | # Secure Boot explained
2 |
3 | ### Secure Boot is a feature of modern UEFI firmware that ensures only trusted software, signed by a recognized authority, can execute during the boot process. This is particularly useful for preventing certain types of attacks, such as bootkits and rootkits, which can compromise a system at the firmware or bootloader level.
4 |
5 | > If you are unsure, leave it enabled as it is defaulted to in the BIOS. It's a method of securing the boot process that can be left as is unless you have the need to disable it.
6 |
7 |
8 |
9 | ### On the other side of the coin, secure Boot can block unsigned kernels from running during the boot process, which may include:
10 |
11 | **1.Custom Kernels and Bootloaders:**
12 |
13 | - If you build your own kernel or use a custom bootloader like GRUB, it must be signed with a key that Secure Boot recognizes, or it won't boot.
14 |
15 | **2.Third-Party Drivers:**
16 |
17 | - Some proprietary drivers might not work unless they are signed and compatible with Secure Boot.
18 |
19 | **3. Live USB keys with Linux ISOs:**
20 |
21 | -_Some_ live Linux USB ISOs, especially custom-built ones, may fail to boot unless Secure Boot is disabled or the bootloader is properly signed.
22 |
23 | **4. Kernel Modules:**
24 |
25 | - Unsigned kernel modules or modules not signed with a key recognized by Secure Boot will not load. This can affect hardware drivers or custom software that relies on kernel extensions.
26 |
27 | **5. Alternative Boot Methods:**
28 |
29 | - Secure Boot may interfere with hibernate resuming from cold boot (unsigned kernels for example), and with certain alternative boot methods (e.g., PXE boot) or older bootloaders.
30 | So for hibernation, Ubuntu will likely work with hibernation whereas Fedora will not when using secure boot. All comes down to kernel signing.
31 |
32 | > Remember. We advice leaving this enabled - disabling may lead to issues with our various upgrade processes. This also means it will interfere with EFI firmware updates if secure boot is disabled. So before you disable it, make sure you acknowledge this. No EFI updaters if secure boot is disabled.
33 |
34 | ### How to disable it if you choose to.
35 |
36 | **On AMD Ryzen 7040 Series / Intel Core Ultra:**
37 |
38 | - Boot into BIOS by tapping F2 just before the Framework splash screen.
39 |
40 | - Arrow down to Administer Secure Boot. Press enter.
41 |
42 | - Arrow down to Enforce Secure Boot. Press enter, select Disabled, press enter.
43 |
44 | - Press F10 to save and reboot. With Yes selected, press Enter.
45 |
46 | **On 13th Gen:**
47 |
48 | - Boot into BIOS by tapping F2 just before the Framework splash screen.
49 |
50 | - Arrow down to Administer Secure Boot. Press enter.
51 |
52 | - Arrow down to Enforce Secure Boot. Press enter, select Disabled, press enter.
53 |
54 | - Press F10 to save and reboot. With Yes selected, press Enter.
55 |
56 | **On 12th Gen:**
57 |
58 | - Boot into BIOS by tapping F2 just before the Framework splash screen.
59 |
60 | - Left arrow over to Security.
61 |
62 | - Arrow all the way down to Secure Boot. Press enter.
63 |
64 | - Select Enforce Secure Boot, press enter, select Disable, press enter.
65 |
66 | - Press F10 to save and reboot. With Yes selected, press Enter.
67 |
68 | **On 11th Gen:**
69 |
70 | - Boot into BIOS by tapping F2 just before the Framework splash screen.
71 |
72 | - Left arrow over to Security.
73 |
74 | - Arrow all the way down to Secure Boot. Press enter.
75 |
76 | - Select Enforce Secure Boot, press enter, select Disable, press enter.
77 |
78 | - Press F10 to save and reboot. With Yes selected, press Enter.
79 |
80 | --------------
81 |
82 | ## Machine Owner Key Enrollment (MOK)
83 |
84 | MOK is part of the Secure Boot mechanism that ensures only trusted code can run during the boot process.
85 |
86 | - Purpose: Secure Boot authentication
87 | - What it does: Allows the system to load signed kernel modules and drivers when Secure Boot is enabled
88 | - When you use it: When installing third-party drivers (like NVIDIA) or custom kernel modules on a system with Secure Boot enabled
89 | - Level of operation: Boot process (firmware/UEFI level)
90 | - User interaction: Usually only when installing drivers or enrolling new keys
91 |
92 | If you have secure boot enabled, you will see something asking you to enroll MOK.
93 |
94 | Two options are available:
95 |
96 | - Continue Boot (**Most people choose this option**)
97 |
98 | - Enroll MOK (You are looking at something involving proprietary modules, VirtualBox built with DKMS for example)
99 |
100 | - [Enrolling MOK with Fedora](https://docs.fedoraproject.org/en-US/quick-docs/mok-enrollment/)
101 | - [Enrolling MOK with Bazzite](https://docs.bazzite.gg/General/Installation_Guide/secure_boot/)
102 | - [Enrolling MOK with Ubuntu](https://wiki.ubuntu.com/UEFI/SecureBoot)
103 |
--------------------------------------------------------------------------------
/oem-d-alert.png:
--------------------------------------------------------------------------------
https://raw.githubusercontent.com/FrameworkComputer/linux-docs/41615e0145b7d968fc6e5e3774efebc019de88e1/oem-d-alert.png
--------------------------------------------------------------------------------
/paste-code.png:
--------------------------------------------------------------------------------
https://raw.githubusercontent.com/FrameworkComputer/linux-docs/41615e0145b7d968fc6e5e3774efebc019de88e1/paste-code.png
--------------------------------------------------------------------------------
/ubuntu-22.04-amd-fw13.md:
--------------------------------------------------------------------------------
1 | # This is for AMD Ryzen 7040 Series configuration on the Framework Laptop 13 ONLY.
2 |
3 |
4 |
5 | ## If you are experiencing graphical artifacts from appearing
6 |
7 | - Please follow the steps outlined in this guide:
8 | https://knowledgebase.frame.work/allocate-additional-ram-to-igpu-framework-laptop-13-amd-ryzen-7040-series-BkpPUPQa
9 |
10 |
11 |
12 |
13 |
14 | ## Suspend with lid while attached to power workaround
15 | There is an active bug that occurs for some users, creating a bogus key press when you suspend. This provides a solid workaround.
16 |
17 | ```
18 | sudo sh -c '[ ! -f /etc/udev/rules.d/20-suspend-fixes.rules ] && echo "ACTION==\"add\", SUBSYSTEM==\"serio\", DRIVERS==\"atkbd\", ATTR{power/wakeup}=\"disabled\"" > /etc/udev/rules.d/20-suspend-fixes.rules'
19 | ```
20 | This checks for an existing /etc/udev/rules.d/20-suspend-fixes.rules file, if none is found, creates it and appends ACTION=="add", SUBSYSTEM=="serio", DRIVERS=="atkbd", ATTR{power/wakeup}="disabled" to the file.
21 |
22 | ---------
23 |
24 |
25 |
26 |
27 |
28 |
29 |
30 | ### Buzzing sound from headphone jack
31 |
32 | - Browse to the horizontal line in the upper left corner, click to open it.
33 | - Type out the word terminal, click to open it.
34 | - Copy/paste in the following code below.
35 | - Press the enter key, user password, enter key.
36 |
37 | ```
38 | echo 0 | sudo tee /sys/module/snd_hda_intel/parameters/power_save
39 | ```
40 | > **TIP:** You can use the little clipboard icon to the right of the code to copy to your clipboard.
41 |
42 |
43 | Then:
44 |
45 | **Reboot**
46 |
47 |
48 |
49 |
50 |
--------------------------------------------------------------------------------
/ubuntu-22.04-fw-16.md:
--------------------------------------------------------------------------------
1 | # This is for the Framework Laptop 16 (AMD Ryzen™ 7040 Series) ONLY.
2 |
3 |
4 | ## If you are experiencing graphical artifacts from appearing
5 |
6 | - Please follow the steps outlined in this guide:
7 | https://knowledgebase.frame.work/allocate-additional-ram-to-igpu-framework-laptop-13-amd-ryzen-7040-series-BkpPUPQa
8 |
9 |
10 |
11 |
12 |
13 | ----------------------------------------------
14 |
15 | ### Suspend keeps waking up or fails to suspend
16 |
17 | ```
18 | sudo nano /etc/default/grub
19 | ```
20 |
21 | `Change GRUB_CMDLINE_LINUX_DEFAULT="quiet splash"`
22 | into
23 | `GRUB_CMDLINE_LINUX_DEFAULT="quiet splash rtc_cmos.use_acpi_alarm=1"`
24 |
25 | Then
26 |
27 | ```
28 | sudo update-grub
29 | ```
30 |
31 | Then
32 |
33 | Reboot
34 |
--------------------------------------------------------------------------------
/ubuntu-kernel-switcher/images/defaults.png:
--------------------------------------------------------------------------------
https://raw.githubusercontent.com/FrameworkComputer/linux-docs/41615e0145b7d968fc6e5e3774efebc019de88e1/ubuntu-kernel-switcher/images/defaults.png
--------------------------------------------------------------------------------
/ubuntu-kernel-switcher/images/readme:
--------------------------------------------------------------------------------
1 |
2 |
--------------------------------------------------------------------------------
/ubuntu-kernel-switcher/images/rollback.png:
--------------------------------------------------------------------------------
https://raw.githubusercontent.com/FrameworkComputer/linux-docs/41615e0145b7d968fc6e5e3774efebc019de88e1/ubuntu-kernel-switcher/images/rollback.png
--------------------------------------------------------------------------------
/ubuntu-kernel-switcher/readme.md:
--------------------------------------------------------------------------------
1 | # Ubuntu Kernel Switcher
2 |
3 | If you need to rollback a kernel or restore your grub settings, this is the tool for you.
4 |
5 | **NOTE:** The ubuntu-grub-defaults.sh tool will strip any custom parameters and bring grub back to its default state. You should not need any custom parameters in current Ubuntu 22.04 or 24.04 fully updated, but just in case - you may need to re-add if you use them.
6 |
7 | ### Install Curl
8 |
9 | Curl should already be installed, but just in case:
10 |
11 |
12 | ### Ubuntu
13 | ```
14 | sudo apt install curl -y
15 | ```
16 |
17 |
18 |
19 | Both scripts prioritize safety by backing up the original configuration and requiring user confirmation before making changes.
20 |
21 |
22 |
23 | ## Roll back your kernel
24 |
25 | This script allows users to pin a specific kernel version in GRUB, effectively rolling back to a previous kernel if needed. It's useful for situations where a newer kernel update causes issues and the user wants to boot consistently with an older, stable kernel.
26 | Key Features:
27 |
28 | - Extracts and displays available kernel versions from GRUB configuration
29 | - Allows user to select a specific kernel to pin
30 | - Backs up the current GRUB configuration before making changes
31 | - Modifies GRUB to use the selected kernel as default
32 | - Provides colored output for better readability
33 | - Includes multiple confirmation steps to prevent accidental changes
34 | - Updates GRUB after changes are confirmed
35 |
36 | ```
37 | curl -s https://raw.githubusercontent.com/FrameworkComputer/linux-docs/main/ubuntu-kernel-switcher/ubuntu-grub-rollback.sh -o ubuntu-grub-rollback.sh && bash ubuntu-grub-rollback.sh
38 | ```
39 |
40 | Running the script in the future
41 | After the install, you can run going forward with the following in the HOME directory. So merely opening a terminal and running this will work if the original script has not been moved.
42 |
43 | ```
44 | bash ubuntu-grub-rollback.sh
45 | ```
46 |
47 |
48 | 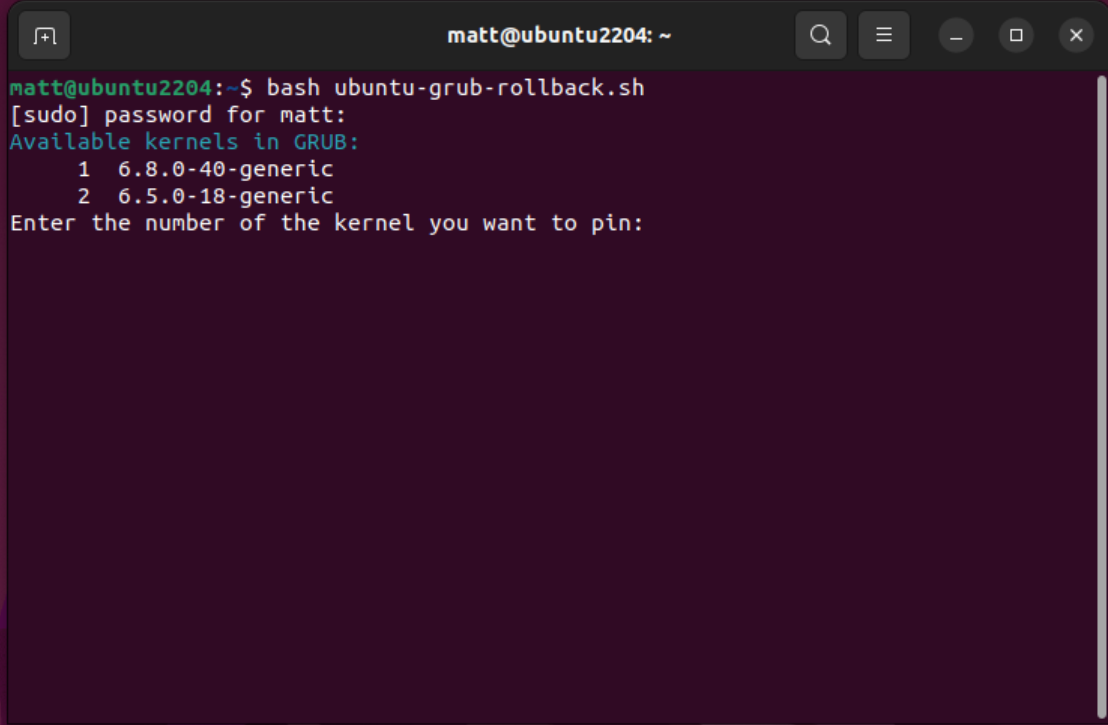
49 |
50 | -----------------------------------------------------------------------
51 |
52 | ## Bring grub back to default, use latest kernel installed
53 |
54 | This script modifies the GRUB configuration to set default values, primarily aimed at speeding up the boot process by hiding the GRUB menu and setting a minimal timeout. It's useful for users who want a faster, streamlined boot experience without seeing the GRUB menu.
55 | Key Features:
56 |
57 | - Backs up the current GRUB configuration before making changes
58 | - Sets GRUB_DEFAULT to 0 (first menu entry)
59 | - Hides the GRUB menu (GRUB_TIMEOUT_STYLE=hidden)
60 | - Sets GRUB_TIMEOUT to 0 for immediate booting
61 | - Sets GRUB_CMDLINE_LINUX_DEFAULT to "quiet splash" for a cleaner boot process
62 | - Displays a colored diff of proposed changes
63 | - Includes confirmation steps before applying changes
64 | - Updates GRUB after changes are confirmed
65 |
66 |
67 | ```
68 | curl -s https://raw.githubusercontent.com/FrameworkComputer/linux-docs/main/ubuntu-kernel-switcher/ubuntu-grub-defaults.sh -o ubuntu-grub-defaults.sh && bash ubuntu-grub-defaults.sh
69 | ```
70 |
71 |
72 | Running the script in the future
73 | After the install, you can run going forward with the following in the HOME directory. So merely opening a terminal and running this will work if the original script has not been moved.
74 |
75 | ```
76 | bash ubuntu-grub-defaults.sh
77 | ```
78 |
79 |
80 | 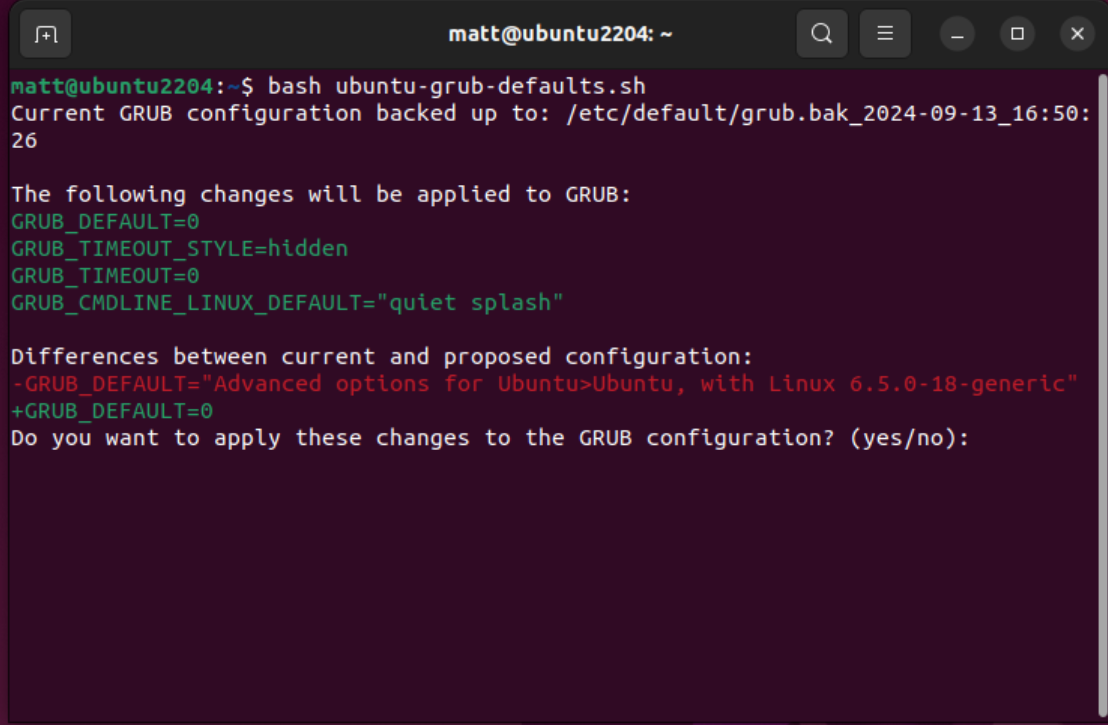
81 |
--------------------------------------------------------------------------------
/ubuntu-kernel-switcher/ubuntu-grub-defaults.sh:
--------------------------------------------------------------------------------
1 | #!/bin/bash
2 |
3 | # Define color codes
4 | RED='\033[0;31m'
5 | GREEN='\033[0;32m'
6 | NC='\033[0m' # No Color
7 |
8 | # Step 1: Backup the current GRUB configuration
9 | GRUB_CONFIG="/etc/default/grub"
10 | GRUB_BACKUP="/etc/default/grub.bak_$(date +%F_%T)"
11 | sudo cp $GRUB_CONFIG $GRUB_BACKUP
12 |
13 | echo "Current GRUB configuration backed up to: $GRUB_BACKUP"
14 |
15 | # Step 2: Display the proposed changes for review
16 | echo -e "\nThe following changes will be applied to GRUB:"
17 | echo -e "${GREEN}GRUB_DEFAULT=0${NC}"
18 | echo -e "${GREEN}GRUB_TIMEOUT_STYLE=hidden${NC}"
19 | echo -e "${GREEN}GRUB_TIMEOUT=0${NC}"
20 | echo -e "${GREEN}GRUB_CMDLINE_LINUX_DEFAULT=\"quiet splash\"${NC}"
21 |
22 | # Step 3: Perform diff manually and colorize
23 | echo -e "\nDifferences between current and proposed configuration:"
24 | while IFS= read -r line; do
25 | if [[ "$line" == -* ]]; then
26 | echo -e "${RED}$line${NC}"
27 | elif [[ "$line" == +* ]]; then
28 | echo -e "${GREEN}$line${NC}"
29 | fi
30 | done < <(diff --unchanged-line-format="" \
31 | --old-line-format="-%L" \
32 | --new-line-format="+%L" \
33 | <(grep -E "^GRUB_DEFAULT|^GRUB_TIMEOUT_STYLE|^GRUB_TIMEOUT|^GRUB_CMDLINE_LINUX_DEFAULT" $GRUB_CONFIG) <(cat < /dev/null
57 | fi
58 |
59 | # Step 9: Display changes made
60 | echo -e "${CYAN}The following change has been made to GRUB:${RESET}"
61 | echo -e "${GREEN}GRUB_DEFAULT=\"$GRUB_DEFAULT\"${RESET}"
62 |
63 | # Step 10: Ask for final confirmation
64 | echo -e "${YELLOW}Do you want to save these changes and update GRUB?${RESET}"
65 | read -p "(yes/no): " final_response
66 |
67 | if [ "$final_response" != "yes" ]; then
68 | echo -e "${RED}Reverting changes. Restoring GRUB backup.${RESET}"
69 | sudo cp $GRUB_BACKUP $GRUB_CONFIG
70 | exit 0
71 | fi
72 |
73 | # Step 11: Update GRUB
74 | echo -e "${CYAN}Updating GRUB...${RESET}"
75 | sudo update-grub
76 |
77 | echo -e "${GREEN}GRUB has been updated. The system will now boot with the kernel: ${CYAN}$SELECTED_KERNEL${RESET}"
78 |
79 |
--------------------------------------------------------------------------------
/usb-events/images/readme:
--------------------------------------------------------------------------------
1 |
2 |
--------------------------------------------------------------------------------
/usb-events/images/stitched_image.png:
--------------------------------------------------------------------------------
https://raw.githubusercontent.com/FrameworkComputer/linux-docs/41615e0145b7d968fc6e5e3774efebc019de88e1/usb-events/images/stitched_image.png
--------------------------------------------------------------------------------
/usb-events/images/summary.png:
--------------------------------------------------------------------------------
https://raw.githubusercontent.com/FrameworkComputer/linux-docs/41615e0145b7d968fc6e5e3774efebc019de88e1/usb-events/images/summary.png
--------------------------------------------------------------------------------
/usb-events/readme.md:
--------------------------------------------------------------------------------
1 | # USB Event Logger script
2 |
3 | This is designed to collect, organize, and summarize USB-related events from your system logs. Here's an overview of its main functions:
4 |
5 | - Log Collection: It uses the journalctl command to retrieve today's system logs.
6 | - Event Filtering: The script filters these logs to focus on USB-related events, including connections, disconnections, errors, resets, and device information.
7 | - Event Categorization: It categorizes these events into different types such as new connections, disconnections, failures, errors, resets, attachments, enumerations, and device information.
8 | - Context Preservation: For each event, it includes 10 lines of context (5 before and 5 after) to provide more detailed information.
9 | - Formatted Output: The script organizes the events by category, making the log easy to read and navigate.
10 | - Event Summary: At the end of the log, it provides a summary that counts the occurrences of each event type and calculates the total number of USB events.
11 | - Log File Creation: All this information is saved to a text file (default name: usb_events.txt).
12 | - File Location: The script records and displays the full path of the log file, making it easy to locate for future reference.
13 | - Timestamp: It includes the date and time when the log was generated.
14 | - Display: After processing, the script displays the entire log content in the terminal.
15 |
16 | This tool is useful for troubleshooting USB-related issues. It provides a comprehensive yet easy-to-read overview of all USB activity on the system for the current day.
17 |
18 | Plus the summary can be helpful as well.
19 |
20 | 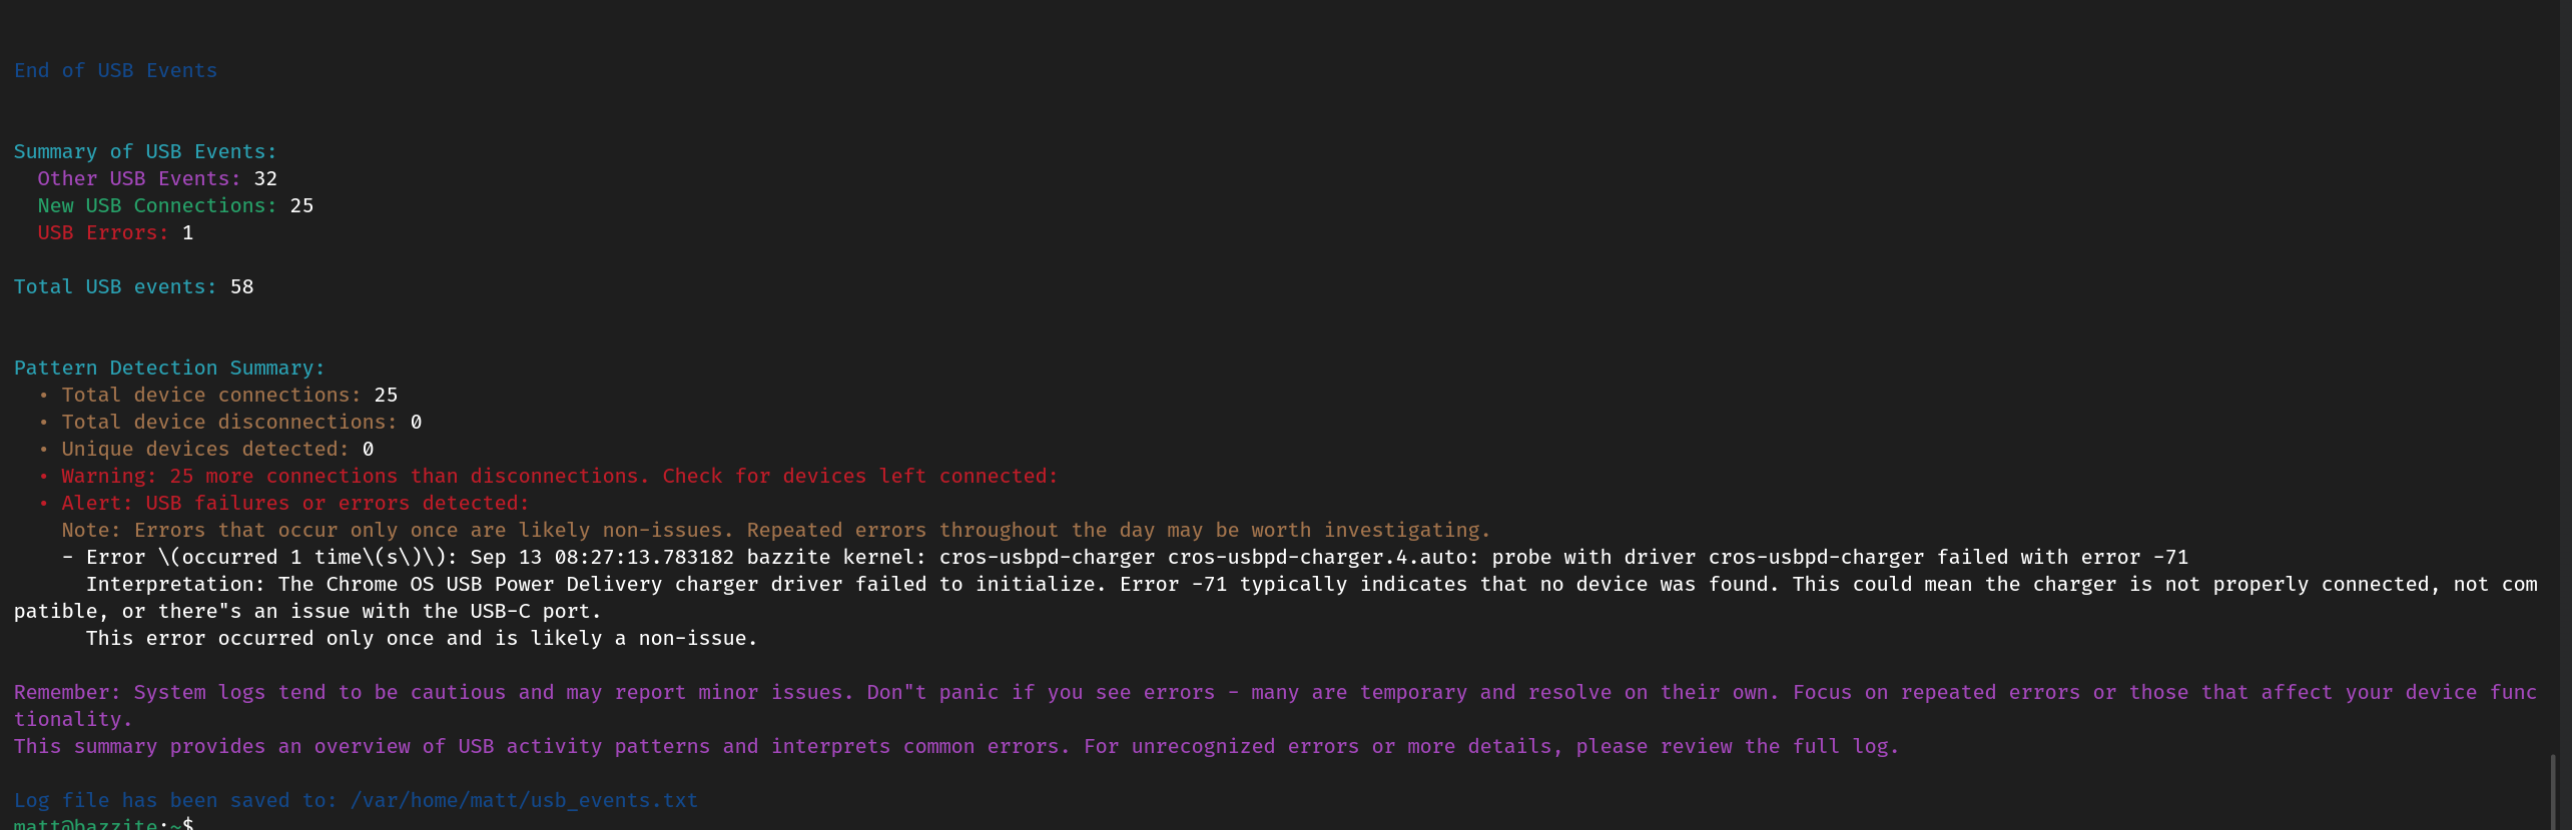
21 |
22 |
23 |
24 | ### This provides the output as follows:
25 |
26 | - Other USB Events:
27 | - New USB Connections:
28 | - USB Errors:
29 | - USB Resets:
30 |
31 |
32 | ### Install Curl
33 |
34 | Curl should already be installed, but just in case:
35 |
36 | ### Fedora
37 | ```
38 | sudo dnf install curl -y
39 | ```
40 |
41 | or
42 |
43 | ### Ubuntu
44 | ```
45 | sudo apt install curl -y
46 | ```
47 |
48 | ## To Install USB Event Logger script, simply run:
49 |
50 |
51 | ```
52 | curl -s https://raw.githubusercontent.com/FrameworkComputer/linux-docs/main/usb-events/usbevents.sh -o usbevents.sh && clear && sudo bash usbevents.sh
53 | ```
54 |
55 | Running the script in the future
56 | After the install, you can run going forward with the following in the HOME directory. So merely opening a terminal and running this will work if the original script has not been moved.
57 |
58 | ```
59 | sudo bash usbevents.sh
60 | ```
61 |
62 | ### Log file
63 |
64 | Log file is provioded as usb_events.txt in your home directory.
65 |
66 |
67 | 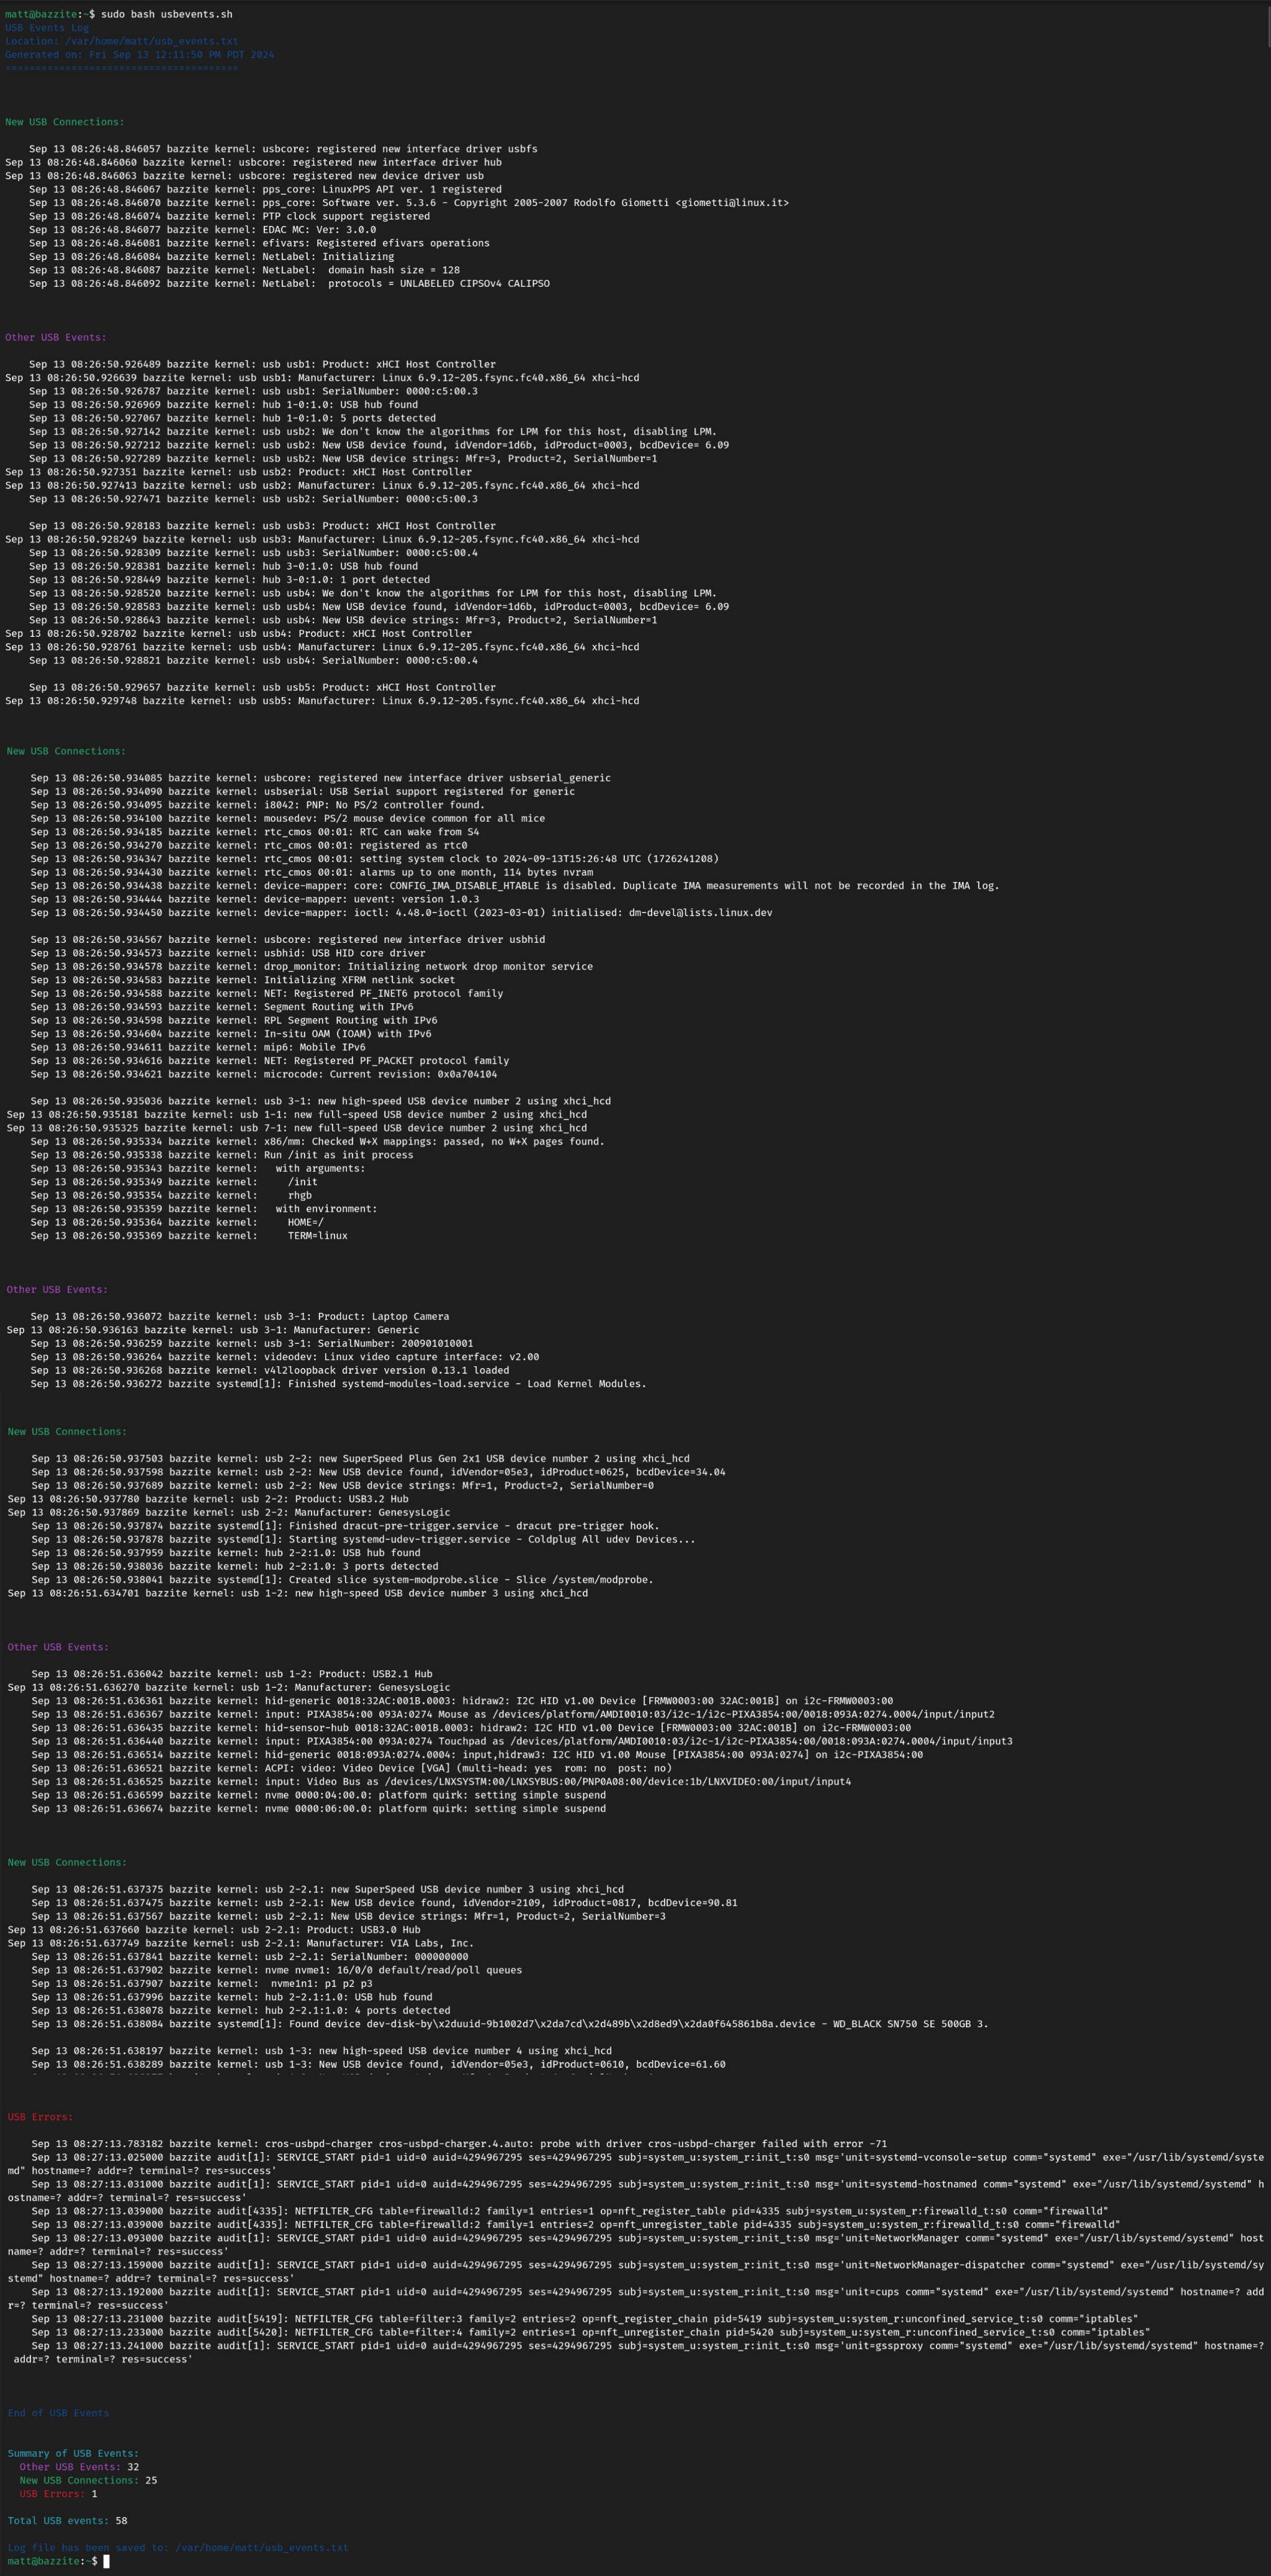
68 |
--------------------------------------------------------------------------------
/wifi-powersave/powersave.sh:
--------------------------------------------------------------------------------
1 | #!/bin/bash
2 |
3 | # Function to set power save for a given interface
4 | set_power_save() {
5 | local interface=$1
6 | local state=$2
7 | echo "Setting power save to $state for $interface..."
8 |
9 | if sudo iw dev $interface set power_save $state; then
10 | echo "Power save set to $state for $interface using iw command."
11 | else
12 | echo "Failed to set power save using iw command. Please check your permissions or wireless interface status."
13 | return 1
14 | fi
15 | }
16 |
17 | # Function to get and display power save status
18 | get_power_save_status() {
19 | local interface=$1
20 | local status=$(iw dev $interface get power_save | awk '{print $3}')
21 | echo -n "$interface: Power save: "
22 | if [ "$status" = "on" ]; then
23 | echo "on"
24 | elif [ "$status" = "off" ]; then
25 | echo "off"
26 | else
27 | echo "unknown (raw output: $status)"
28 | fi
29 | }
30 |
31 | # Function to make changes persistent
32 | make_persistent() {
33 | local state=$1
34 | echo "Making power save settings persistent..."
35 |
36 | # Create a script to be executed by the service
37 | cat << EOF | sudo tee /usr/local/bin/set-wifi-power-save.sh > /dev/null
38 | #!/bin/bash
39 | sleep 10 # Wait for network interfaces to be fully up
40 | for interface in \$(iw dev | awk '\$1=="Interface"{print \$2}'); do
41 | iw dev \$interface set power_save $state
42 | echo "Set power_save $state for \$interface"
43 | done
44 | EOF
45 | sudo chmod +x /usr/local/bin/set-wifi-power-save.sh
46 |
47 | # Create a systemd service file
48 | cat << EOF | sudo tee /etc/systemd/system/wifi-power-save.service > /dev/null
49 | [Unit]
50 | Description=Set WiFi Power Save
51 | After=network-online.target
52 | Wants=network-online.target
53 |
54 | [Service]
55 | Type=oneshot
56 | ExecStart=/usr/local/bin/set-wifi-power-save.sh
57 | RemainAfterExit=yes
58 |
59 | [Install]
60 | WantedBy=multi-user.target
61 | EOF
62 |
63 | # Reload systemd, enable and start the service
64 | sudo systemctl daemon-reload
65 | sudo systemctl enable wifi-power-save.service
66 | sudo systemctl start wifi-power-save.service
67 |
68 | echo "Persistent service created and enabled."
69 | }
70 |
71 | # Function to install a package if not installed
72 | install_if_needed() {
73 | local package=$1
74 | if ! command -v $package &> /dev/null; then
75 | echo "$package not found, installing..."
76 | if [ -f /etc/fedora-release ]; then
77 | sudo dnf install -y $package
78 | elif [ -f /etc/lsb-release ]; then
79 | sudo apt-get update
80 | sudo apt-get install -y $package
81 | else
82 | echo "Unsupported Linux distribution. Please install $package manually."
83 | exit 1
84 | fi
85 | else
86 | echo "$package is already installed."
87 | fi
88 | }
89 |
90 | # Install iw and lshw if necessary
91 | install_if_needed iw
92 | install_if_needed lshw
93 | clear
94 |
95 | # Get all wireless interfaces
96 | wireless_interfaces=$(iw dev | awk '$1=="Interface"{print $2}')
97 |
98 | if [ -z "$wireless_interfaces" ]; then
99 | echo "No wireless interfaces found."
100 | exit 1
101 | fi
102 |
103 | # Prompt user for power save state
104 | echo "Choose power save state:"
105 | echo "1) On"
106 | echo "2) Off"
107 | read -p "Enter your choice (1 or 2): " choice
108 |
109 | case $choice in
110 | 1) state="on" ;;
111 | 2) state="off" ;;
112 | *) echo "Invalid choice. Exiting."; exit 1 ;;
113 | esac
114 |
115 | # Set power save for each wireless interface
116 | for interface in $wireless_interfaces; do
117 | set_power_save $interface $state
118 | done
119 |
120 | # Verify power save status
121 | echo -e "\nVerifying power save status:"
122 | for interface in $wireless_interfaces; do
123 | get_power_save_status $interface
124 | done
125 |
126 | # Make changes persistent
127 | make_persistent $state
128 |
129 | echo -e "\nPower save settings applied and made persistent."
130 | echo "Changes should persist across reboots."
131 | echo "You can check the status of the persistent service with: sudo systemctl status wifi-power-save.service"
132 | echo "If issues persist, check the system logs with: sudo journalctl -u wifi-power-save.service"
133 |
--------------------------------------------------------------------------------
/wifi-powersave/readme.md:
--------------------------------------------------------------------------------
1 | # Wi-Fi Power Save Utility
2 | A terminal utility to disable or enable Wi-Fi power save functionality.
3 |
4 |
5 | ### Install Curl
6 |
7 | Curl should already be installed, but just in case:
8 |
9 | ### Fedora
10 | ```
11 | sudo dnf install curl -y
12 | ```
13 |
14 | or
15 |
16 | ### Ubuntu
17 | ```
18 | sudo apt install curl -y
19 | ```
20 |
21 | ------------------------------------------------------------------------------------------------------------------------------
22 |
23 | ## To Install Power Save Script, simply run:
24 |
25 | ```
26 | curl -s https://raw.githubusercontent.com/FrameworkComputer/linux-docs/main/wifi-powersave/powersave.sh -o powersave.sh && clear && bash powersave.sh
27 | ```
28 |
29 | Running the script in the future
30 | After the install, you can run going forward with the following in the HOME directory. So merely opening a terminal and running this will work if the original script has not been moved.
31 |
32 | ```
33 | bash powersave.sh
34 | ```
35 |
36 |
--------------------------------------------------------------------------------