├── Tutorials
├── 00 - 环境配置
│ ├── ExampleMod
│ │ ├── src
│ │ │ └── main
│ │ │ │ ├── java
│ │ │ │ └── ExampleMod.java
│ │ │ │ └── resources
│ │ │ │ └── ModTheSpire.json
│ │ ├── ExampleMod.iml
│ │ └── pom.xml
│ └── README.md
├── 前人的代码基础
│ ├── README.md
│ ├── 分开独立的能力
│ │ └── README.md
│ ├── 包装卡牌类
│ │ └── README.md
│ ├── 匿名函数
│ │ └── README.md
│ └── 添加音频及注意事项
│ │ └── README.md
├── 10 - 添加action
│ ├── 图片.png
│ └── README.md
├── 02 - 添加新卡牌
│ ├── Strike.png
│ ├── Strike_p.png
│ ├── Strike.java
│ └── README.md
├── 07 - 添加新遗物
│ ├── MyRelic.png
│ ├── MyRelic_Outline.png
│ ├── ExampleMod.java
│ └── README.md
├── 09 - 添加新能力
│ ├── Example32.png
│ ├── Example84.png
│ └── README.md
├── 高级技巧
│ ├── 01 - Patch
│ │ ├── images
│ │ │ ├── examplpatch_pfc_01.PNG
│ │ │ ├── examplpatch_raw_01.PNG
│ │ │ ├── examplpatch_raw_02.PNG
│ │ │ ├── faq_7_source_code.png
│ │ │ ├── examplpatch_byref_01.PNG
│ │ │ ├── examplepatch_insert_04.PNG
│ │ │ ├── examplpatch_insert_01.PNG
│ │ │ ├── examplpatch_insert_03.PNG
│ │ │ ├── examplpatch_insert_04.PNG
│ │ │ ├── examplpatch_insert_05.PNG
│ │ │ ├── examplpatch_posfix_01.PNG
│ │ │ ├── examplpatch_posfix_02.PNG
│ │ │ ├── examplpatch_prefix_02.PNG
│ │ │ ├── examplpatch_prefix_03.PNG
│ │ │ ├── examplpatch_replace_01.PNG
│ │ │ ├── examplpatch_instrument_01.PNG
│ │ │ ├── examplpatch_spirefield_01.PNG
│ │ │ ├── examplpatch_spirefield_02.PNG
│ │ │ └── examplpatch_spirereturn_01.PNG
│ │ └── README.md
│ ├── 02 - 依赖其他mod
│ │ └── README.md
│ ├── 03 - 保存数据
│ │ └── README.md
│ └── 04 - BaseMod提供的工具
│ │ └── README.md
├── 06 - 添加新人物
│ ├── ExampleModResources
│ │ └── img
│ │ │ ├── 512
│ │ │ ├── bg_power_512.png
│ │ │ ├── bg_skill_512.png
│ │ │ └── bg_attack_512.png
│ │ │ ├── 1024
│ │ │ ├── bg_power.png
│ │ │ ├── bg_skill.png
│ │ │ └── bg_attack.png
│ │ │ ├── UI
│ │ │ └── orb
│ │ │ │ ├── vfx.png
│ │ │ │ ├── layer1.png
│ │ │ │ ├── layer2.png
│ │ │ │ ├── layer3.png
│ │ │ │ ├── layer4.png
│ │ │ │ ├── layer5.png
│ │ │ │ ├── layer6.png
│ │ │ │ ├── layer1d.png
│ │ │ │ ├── layer2d.png
│ │ │ │ ├── layer3d.png
│ │ │ │ ├── layer4d.png
│ │ │ │ └── layer5d.png
│ │ │ └── char
│ │ │ ├── corpse.png
│ │ │ ├── Victory1.png
│ │ │ ├── Victory2.png
│ │ │ ├── Victory3.png
│ │ │ ├── card_orb.png
│ │ │ ├── cost_orb.png
│ │ │ ├── character.png
│ │ │ ├── shoulder1.png
│ │ │ ├── shoulder2.png
│ │ │ ├── small_orb.png
│ │ │ ├── Character_Button.png
│ │ │ └── Character_Portrait.png
│ ├── ExampleMod.java
│ ├── MyCharacter.java
│ └── README.md
├── 05 - 添加新颜色
│ ├── ExampleModResources
│ │ └── img
│ │ │ ├── 512
│ │ │ ├── bg_power_512.png
│ │ │ ├── bg_skill_512.png
│ │ │ └── bg_attack_512.png
│ │ │ ├── 1024
│ │ │ ├── bg_power.png
│ │ │ ├── bg_skill.png
│ │ │ └── bg_attack.png
│ │ │ └── char
│ │ │ ├── card_orb.png
│ │ │ ├── cost_orb.png
│ │ │ ├── small_orb.png
│ │ │ ├── Character_Button.png
│ │ │ └── Character_Portrait.png
│ ├── ExampleMod.java
│ └── README.md
├── 01 - 模组核心
│ ├── ExampleMod.java
│ └── README.md
├── 新手必备知识
│ ├── 02 - 反编译游戏
│ │ └── README.md
│ ├── 03 - 杀戮尖塔描述学
│ │ └── README.md
│ └── 01 - 查看报错信息
│ │ └── README.md
├── 11 - 如何上传mod
│ └── README.md
├── 04 - 本地化
│ ├── Strike.java
│ └── README.md
├── 03 - 添加卡牌效果
│ ├── Strike.java
│ └── README.md
├── 08 - 添加新关键词
│ └── README.md
└── 12 - 添加新怪物
│ └── README.md
└── README.md
/Tutorials/00 - 环境配置/ExampleMod/src/main/java/ExampleMod.java:
--------------------------------------------------------------------------------
1 |
--------------------------------------------------------------------------------
/Tutorials/前人的代码基础/README.md:
--------------------------------------------------------------------------------
1 | # 介绍
2 |
3 | 这里时不时收录一些mod作者会经常想到的,但是刚开始写的mod作者不会写的东西。
--------------------------------------------------------------------------------
/Tutorials/00 - 环境配置/ExampleMod/ExampleMod.iml:
--------------------------------------------------------------------------------
1 |
2 |
--------------------------------------------------------------------------------
/Tutorials/10 - 添加action/图片.png:
--------------------------------------------------------------------------------
https://raw.githubusercontent.com/GlitchedReme/SlayTheSpireModTutorials/HEAD/Tutorials/10 - 添加action/图片.png
--------------------------------------------------------------------------------
/Tutorials/02 - 添加新卡牌/Strike.png:
--------------------------------------------------------------------------------
https://raw.githubusercontent.com/GlitchedReme/SlayTheSpireModTutorials/HEAD/Tutorials/02 - 添加新卡牌/Strike.png
--------------------------------------------------------------------------------
/Tutorials/07 - 添加新遗物/MyRelic.png:
--------------------------------------------------------------------------------
https://raw.githubusercontent.com/GlitchedReme/SlayTheSpireModTutorials/HEAD/Tutorials/07 - 添加新遗物/MyRelic.png
--------------------------------------------------------------------------------
/Tutorials/02 - 添加新卡牌/Strike_p.png:
--------------------------------------------------------------------------------
https://raw.githubusercontent.com/GlitchedReme/SlayTheSpireModTutorials/HEAD/Tutorials/02 - 添加新卡牌/Strike_p.png
--------------------------------------------------------------------------------
/Tutorials/09 - 添加新能力/Example32.png:
--------------------------------------------------------------------------------
https://raw.githubusercontent.com/GlitchedReme/SlayTheSpireModTutorials/HEAD/Tutorials/09 - 添加新能力/Example32.png
--------------------------------------------------------------------------------
/Tutorials/09 - 添加新能力/Example84.png:
--------------------------------------------------------------------------------
https://raw.githubusercontent.com/GlitchedReme/SlayTheSpireModTutorials/HEAD/Tutorials/09 - 添加新能力/Example84.png
--------------------------------------------------------------------------------
/Tutorials/07 - 添加新遗物/MyRelic_Outline.png:
--------------------------------------------------------------------------------
https://raw.githubusercontent.com/GlitchedReme/SlayTheSpireModTutorials/HEAD/Tutorials/07 - 添加新遗物/MyRelic_Outline.png
--------------------------------------------------------------------------------
/Tutorials/高级技巧/01 - Patch/images/examplpatch_pfc_01.PNG:
--------------------------------------------------------------------------------
https://raw.githubusercontent.com/GlitchedReme/SlayTheSpireModTutorials/HEAD/Tutorials/高级技巧/01 - Patch/images/examplpatch_pfc_01.PNG
--------------------------------------------------------------------------------
/Tutorials/高级技巧/01 - Patch/images/examplpatch_raw_01.PNG:
--------------------------------------------------------------------------------
https://raw.githubusercontent.com/GlitchedReme/SlayTheSpireModTutorials/HEAD/Tutorials/高级技巧/01 - Patch/images/examplpatch_raw_01.PNG
--------------------------------------------------------------------------------
/Tutorials/高级技巧/01 - Patch/images/examplpatch_raw_02.PNG:
--------------------------------------------------------------------------------
https://raw.githubusercontent.com/GlitchedReme/SlayTheSpireModTutorials/HEAD/Tutorials/高级技巧/01 - Patch/images/examplpatch_raw_02.PNG
--------------------------------------------------------------------------------
/Tutorials/高级技巧/01 - Patch/images/faq_7_source_code.png:
--------------------------------------------------------------------------------
https://raw.githubusercontent.com/GlitchedReme/SlayTheSpireModTutorials/HEAD/Tutorials/高级技巧/01 - Patch/images/faq_7_source_code.png
--------------------------------------------------------------------------------
/Tutorials/高级技巧/01 - Patch/images/examplpatch_byref_01.PNG:
--------------------------------------------------------------------------------
https://raw.githubusercontent.com/GlitchedReme/SlayTheSpireModTutorials/HEAD/Tutorials/高级技巧/01 - Patch/images/examplpatch_byref_01.PNG
--------------------------------------------------------------------------------
/Tutorials/06 - 添加新人物/ExampleModResources/img/UI/orb/vfx.png:
--------------------------------------------------------------------------------
https://raw.githubusercontent.com/GlitchedReme/SlayTheSpireModTutorials/HEAD/Tutorials/06 - 添加新人物/ExampleModResources/img/UI/orb/vfx.png
--------------------------------------------------------------------------------
/Tutorials/06 - 添加新人物/ExampleModResources/img/char/corpse.png:
--------------------------------------------------------------------------------
https://raw.githubusercontent.com/GlitchedReme/SlayTheSpireModTutorials/HEAD/Tutorials/06 - 添加新人物/ExampleModResources/img/char/corpse.png
--------------------------------------------------------------------------------
/Tutorials/高级技巧/01 - Patch/images/examplepatch_insert_04.PNG:
--------------------------------------------------------------------------------
https://raw.githubusercontent.com/GlitchedReme/SlayTheSpireModTutorials/HEAD/Tutorials/高级技巧/01 - Patch/images/examplepatch_insert_04.PNG
--------------------------------------------------------------------------------
/Tutorials/高级技巧/01 - Patch/images/examplpatch_insert_01.PNG:
--------------------------------------------------------------------------------
https://raw.githubusercontent.com/GlitchedReme/SlayTheSpireModTutorials/HEAD/Tutorials/高级技巧/01 - Patch/images/examplpatch_insert_01.PNG
--------------------------------------------------------------------------------
/Tutorials/高级技巧/01 - Patch/images/examplpatch_insert_03.PNG:
--------------------------------------------------------------------------------
https://raw.githubusercontent.com/GlitchedReme/SlayTheSpireModTutorials/HEAD/Tutorials/高级技巧/01 - Patch/images/examplpatch_insert_03.PNG
--------------------------------------------------------------------------------
/Tutorials/高级技巧/01 - Patch/images/examplpatch_insert_04.PNG:
--------------------------------------------------------------------------------
https://raw.githubusercontent.com/GlitchedReme/SlayTheSpireModTutorials/HEAD/Tutorials/高级技巧/01 - Patch/images/examplpatch_insert_04.PNG
--------------------------------------------------------------------------------
/Tutorials/高级技巧/01 - Patch/images/examplpatch_insert_05.PNG:
--------------------------------------------------------------------------------
https://raw.githubusercontent.com/GlitchedReme/SlayTheSpireModTutorials/HEAD/Tutorials/高级技巧/01 - Patch/images/examplpatch_insert_05.PNG
--------------------------------------------------------------------------------
/Tutorials/高级技巧/01 - Patch/images/examplpatch_posfix_01.PNG:
--------------------------------------------------------------------------------
https://raw.githubusercontent.com/GlitchedReme/SlayTheSpireModTutorials/HEAD/Tutorials/高级技巧/01 - Patch/images/examplpatch_posfix_01.PNG
--------------------------------------------------------------------------------
/Tutorials/高级技巧/01 - Patch/images/examplpatch_posfix_02.PNG:
--------------------------------------------------------------------------------
https://raw.githubusercontent.com/GlitchedReme/SlayTheSpireModTutorials/HEAD/Tutorials/高级技巧/01 - Patch/images/examplpatch_posfix_02.PNG
--------------------------------------------------------------------------------
/Tutorials/高级技巧/01 - Patch/images/examplpatch_prefix_02.PNG:
--------------------------------------------------------------------------------
https://raw.githubusercontent.com/GlitchedReme/SlayTheSpireModTutorials/HEAD/Tutorials/高级技巧/01 - Patch/images/examplpatch_prefix_02.PNG
--------------------------------------------------------------------------------
/Tutorials/高级技巧/01 - Patch/images/examplpatch_prefix_03.PNG:
--------------------------------------------------------------------------------
https://raw.githubusercontent.com/GlitchedReme/SlayTheSpireModTutorials/HEAD/Tutorials/高级技巧/01 - Patch/images/examplpatch_prefix_03.PNG
--------------------------------------------------------------------------------
/Tutorials/高级技巧/01 - Patch/images/examplpatch_replace_01.PNG:
--------------------------------------------------------------------------------
https://raw.githubusercontent.com/GlitchedReme/SlayTheSpireModTutorials/HEAD/Tutorials/高级技巧/01 - Patch/images/examplpatch_replace_01.PNG
--------------------------------------------------------------------------------
/Tutorials/05 - 添加新颜色/ExampleModResources/img/1024/bg_power.png:
--------------------------------------------------------------------------------
https://raw.githubusercontent.com/GlitchedReme/SlayTheSpireModTutorials/HEAD/Tutorials/05 - 添加新颜色/ExampleModResources/img/1024/bg_power.png
--------------------------------------------------------------------------------
/Tutorials/05 - 添加新颜色/ExampleModResources/img/1024/bg_skill.png:
--------------------------------------------------------------------------------
https://raw.githubusercontent.com/GlitchedReme/SlayTheSpireModTutorials/HEAD/Tutorials/05 - 添加新颜色/ExampleModResources/img/1024/bg_skill.png
--------------------------------------------------------------------------------
/Tutorials/05 - 添加新颜色/ExampleModResources/img/char/card_orb.png:
--------------------------------------------------------------------------------
https://raw.githubusercontent.com/GlitchedReme/SlayTheSpireModTutorials/HEAD/Tutorials/05 - 添加新颜色/ExampleModResources/img/char/card_orb.png
--------------------------------------------------------------------------------
/Tutorials/05 - 添加新颜色/ExampleModResources/img/char/cost_orb.png:
--------------------------------------------------------------------------------
https://raw.githubusercontent.com/GlitchedReme/SlayTheSpireModTutorials/HEAD/Tutorials/05 - 添加新颜色/ExampleModResources/img/char/cost_orb.png
--------------------------------------------------------------------------------
/Tutorials/06 - 添加新人物/ExampleModResources/img/1024/bg_power.png:
--------------------------------------------------------------------------------
https://raw.githubusercontent.com/GlitchedReme/SlayTheSpireModTutorials/HEAD/Tutorials/06 - 添加新人物/ExampleModResources/img/1024/bg_power.png
--------------------------------------------------------------------------------
/Tutorials/06 - 添加新人物/ExampleModResources/img/1024/bg_skill.png:
--------------------------------------------------------------------------------
https://raw.githubusercontent.com/GlitchedReme/SlayTheSpireModTutorials/HEAD/Tutorials/06 - 添加新人物/ExampleModResources/img/1024/bg_skill.png
--------------------------------------------------------------------------------
/Tutorials/06 - 添加新人物/ExampleModResources/img/UI/orb/layer1.png:
--------------------------------------------------------------------------------
https://raw.githubusercontent.com/GlitchedReme/SlayTheSpireModTutorials/HEAD/Tutorials/06 - 添加新人物/ExampleModResources/img/UI/orb/layer1.png
--------------------------------------------------------------------------------
/Tutorials/06 - 添加新人物/ExampleModResources/img/UI/orb/layer2.png:
--------------------------------------------------------------------------------
https://raw.githubusercontent.com/GlitchedReme/SlayTheSpireModTutorials/HEAD/Tutorials/06 - 添加新人物/ExampleModResources/img/UI/orb/layer2.png
--------------------------------------------------------------------------------
/Tutorials/06 - 添加新人物/ExampleModResources/img/UI/orb/layer3.png:
--------------------------------------------------------------------------------
https://raw.githubusercontent.com/GlitchedReme/SlayTheSpireModTutorials/HEAD/Tutorials/06 - 添加新人物/ExampleModResources/img/UI/orb/layer3.png
--------------------------------------------------------------------------------
/Tutorials/06 - 添加新人物/ExampleModResources/img/UI/orb/layer4.png:
--------------------------------------------------------------------------------
https://raw.githubusercontent.com/GlitchedReme/SlayTheSpireModTutorials/HEAD/Tutorials/06 - 添加新人物/ExampleModResources/img/UI/orb/layer4.png
--------------------------------------------------------------------------------
/Tutorials/06 - 添加新人物/ExampleModResources/img/UI/orb/layer5.png:
--------------------------------------------------------------------------------
https://raw.githubusercontent.com/GlitchedReme/SlayTheSpireModTutorials/HEAD/Tutorials/06 - 添加新人物/ExampleModResources/img/UI/orb/layer5.png
--------------------------------------------------------------------------------
/Tutorials/06 - 添加新人物/ExampleModResources/img/UI/orb/layer6.png:
--------------------------------------------------------------------------------
https://raw.githubusercontent.com/GlitchedReme/SlayTheSpireModTutorials/HEAD/Tutorials/06 - 添加新人物/ExampleModResources/img/UI/orb/layer6.png
--------------------------------------------------------------------------------
/Tutorials/06 - 添加新人物/ExampleModResources/img/char/Victory1.png:
--------------------------------------------------------------------------------
https://raw.githubusercontent.com/GlitchedReme/SlayTheSpireModTutorials/HEAD/Tutorials/06 - 添加新人物/ExampleModResources/img/char/Victory1.png
--------------------------------------------------------------------------------
/Tutorials/06 - 添加新人物/ExampleModResources/img/char/Victory2.png:
--------------------------------------------------------------------------------
https://raw.githubusercontent.com/GlitchedReme/SlayTheSpireModTutorials/HEAD/Tutorials/06 - 添加新人物/ExampleModResources/img/char/Victory2.png
--------------------------------------------------------------------------------
/Tutorials/06 - 添加新人物/ExampleModResources/img/char/Victory3.png:
--------------------------------------------------------------------------------
https://raw.githubusercontent.com/GlitchedReme/SlayTheSpireModTutorials/HEAD/Tutorials/06 - 添加新人物/ExampleModResources/img/char/Victory3.png
--------------------------------------------------------------------------------
/Tutorials/06 - 添加新人物/ExampleModResources/img/char/card_orb.png:
--------------------------------------------------------------------------------
https://raw.githubusercontent.com/GlitchedReme/SlayTheSpireModTutorials/HEAD/Tutorials/06 - 添加新人物/ExampleModResources/img/char/card_orb.png
--------------------------------------------------------------------------------
/Tutorials/06 - 添加新人物/ExampleModResources/img/char/cost_orb.png:
--------------------------------------------------------------------------------
https://raw.githubusercontent.com/GlitchedReme/SlayTheSpireModTutorials/HEAD/Tutorials/06 - 添加新人物/ExampleModResources/img/char/cost_orb.png
--------------------------------------------------------------------------------
/Tutorials/高级技巧/01 - Patch/images/examplpatch_instrument_01.PNG:
--------------------------------------------------------------------------------
https://raw.githubusercontent.com/GlitchedReme/SlayTheSpireModTutorials/HEAD/Tutorials/高级技巧/01 - Patch/images/examplpatch_instrument_01.PNG
--------------------------------------------------------------------------------
/Tutorials/高级技巧/01 - Patch/images/examplpatch_spirefield_01.PNG:
--------------------------------------------------------------------------------
https://raw.githubusercontent.com/GlitchedReme/SlayTheSpireModTutorials/HEAD/Tutorials/高级技巧/01 - Patch/images/examplpatch_spirefield_01.PNG
--------------------------------------------------------------------------------
/Tutorials/高级技巧/01 - Patch/images/examplpatch_spirefield_02.PNG:
--------------------------------------------------------------------------------
https://raw.githubusercontent.com/GlitchedReme/SlayTheSpireModTutorials/HEAD/Tutorials/高级技巧/01 - Patch/images/examplpatch_spirefield_02.PNG
--------------------------------------------------------------------------------
/Tutorials/05 - 添加新颜色/ExampleModResources/img/1024/bg_attack.png:
--------------------------------------------------------------------------------
https://raw.githubusercontent.com/GlitchedReme/SlayTheSpireModTutorials/HEAD/Tutorials/05 - 添加新颜色/ExampleModResources/img/1024/bg_attack.png
--------------------------------------------------------------------------------
/Tutorials/05 - 添加新颜色/ExampleModResources/img/512/bg_power_512.png:
--------------------------------------------------------------------------------
https://raw.githubusercontent.com/GlitchedReme/SlayTheSpireModTutorials/HEAD/Tutorials/05 - 添加新颜色/ExampleModResources/img/512/bg_power_512.png
--------------------------------------------------------------------------------
/Tutorials/05 - 添加新颜色/ExampleModResources/img/512/bg_skill_512.png:
--------------------------------------------------------------------------------
https://raw.githubusercontent.com/GlitchedReme/SlayTheSpireModTutorials/HEAD/Tutorials/05 - 添加新颜色/ExampleModResources/img/512/bg_skill_512.png
--------------------------------------------------------------------------------
/Tutorials/05 - 添加新颜色/ExampleModResources/img/char/small_orb.png:
--------------------------------------------------------------------------------
https://raw.githubusercontent.com/GlitchedReme/SlayTheSpireModTutorials/HEAD/Tutorials/05 - 添加新颜色/ExampleModResources/img/char/small_orb.png
--------------------------------------------------------------------------------
/Tutorials/06 - 添加新人物/ExampleModResources/img/1024/bg_attack.png:
--------------------------------------------------------------------------------
https://raw.githubusercontent.com/GlitchedReme/SlayTheSpireModTutorials/HEAD/Tutorials/06 - 添加新人物/ExampleModResources/img/1024/bg_attack.png
--------------------------------------------------------------------------------
/Tutorials/06 - 添加新人物/ExampleModResources/img/512/bg_power_512.png:
--------------------------------------------------------------------------------
https://raw.githubusercontent.com/GlitchedReme/SlayTheSpireModTutorials/HEAD/Tutorials/06 - 添加新人物/ExampleModResources/img/512/bg_power_512.png
--------------------------------------------------------------------------------
/Tutorials/06 - 添加新人物/ExampleModResources/img/512/bg_skill_512.png:
--------------------------------------------------------------------------------
https://raw.githubusercontent.com/GlitchedReme/SlayTheSpireModTutorials/HEAD/Tutorials/06 - 添加新人物/ExampleModResources/img/512/bg_skill_512.png
--------------------------------------------------------------------------------
/Tutorials/06 - 添加新人物/ExampleModResources/img/UI/orb/layer1d.png:
--------------------------------------------------------------------------------
https://raw.githubusercontent.com/GlitchedReme/SlayTheSpireModTutorials/HEAD/Tutorials/06 - 添加新人物/ExampleModResources/img/UI/orb/layer1d.png
--------------------------------------------------------------------------------
/Tutorials/06 - 添加新人物/ExampleModResources/img/UI/orb/layer2d.png:
--------------------------------------------------------------------------------
https://raw.githubusercontent.com/GlitchedReme/SlayTheSpireModTutorials/HEAD/Tutorials/06 - 添加新人物/ExampleModResources/img/UI/orb/layer2d.png
--------------------------------------------------------------------------------
/Tutorials/06 - 添加新人物/ExampleModResources/img/UI/orb/layer3d.png:
--------------------------------------------------------------------------------
https://raw.githubusercontent.com/GlitchedReme/SlayTheSpireModTutorials/HEAD/Tutorials/06 - 添加新人物/ExampleModResources/img/UI/orb/layer3d.png
--------------------------------------------------------------------------------
/Tutorials/06 - 添加新人物/ExampleModResources/img/UI/orb/layer4d.png:
--------------------------------------------------------------------------------
https://raw.githubusercontent.com/GlitchedReme/SlayTheSpireModTutorials/HEAD/Tutorials/06 - 添加新人物/ExampleModResources/img/UI/orb/layer4d.png
--------------------------------------------------------------------------------
/Tutorials/06 - 添加新人物/ExampleModResources/img/UI/orb/layer5d.png:
--------------------------------------------------------------------------------
https://raw.githubusercontent.com/GlitchedReme/SlayTheSpireModTutorials/HEAD/Tutorials/06 - 添加新人物/ExampleModResources/img/UI/orb/layer5d.png
--------------------------------------------------------------------------------
/Tutorials/06 - 添加新人物/ExampleModResources/img/char/character.png:
--------------------------------------------------------------------------------
https://raw.githubusercontent.com/GlitchedReme/SlayTheSpireModTutorials/HEAD/Tutorials/06 - 添加新人物/ExampleModResources/img/char/character.png
--------------------------------------------------------------------------------
/Tutorials/06 - 添加新人物/ExampleModResources/img/char/shoulder1.png:
--------------------------------------------------------------------------------
https://raw.githubusercontent.com/GlitchedReme/SlayTheSpireModTutorials/HEAD/Tutorials/06 - 添加新人物/ExampleModResources/img/char/shoulder1.png
--------------------------------------------------------------------------------
/Tutorials/06 - 添加新人物/ExampleModResources/img/char/shoulder2.png:
--------------------------------------------------------------------------------
https://raw.githubusercontent.com/GlitchedReme/SlayTheSpireModTutorials/HEAD/Tutorials/06 - 添加新人物/ExampleModResources/img/char/shoulder2.png
--------------------------------------------------------------------------------
/Tutorials/06 - 添加新人物/ExampleModResources/img/char/small_orb.png:
--------------------------------------------------------------------------------
https://raw.githubusercontent.com/GlitchedReme/SlayTheSpireModTutorials/HEAD/Tutorials/06 - 添加新人物/ExampleModResources/img/char/small_orb.png
--------------------------------------------------------------------------------
/Tutorials/高级技巧/01 - Patch/images/examplpatch_spirereturn_01.PNG:
--------------------------------------------------------------------------------
https://raw.githubusercontent.com/GlitchedReme/SlayTheSpireModTutorials/HEAD/Tutorials/高级技巧/01 - Patch/images/examplpatch_spirereturn_01.PNG
--------------------------------------------------------------------------------
/Tutorials/05 - 添加新颜色/ExampleModResources/img/512/bg_attack_512.png:
--------------------------------------------------------------------------------
https://raw.githubusercontent.com/GlitchedReme/SlayTheSpireModTutorials/HEAD/Tutorials/05 - 添加新颜色/ExampleModResources/img/512/bg_attack_512.png
--------------------------------------------------------------------------------
/Tutorials/06 - 添加新人物/ExampleModResources/img/512/bg_attack_512.png:
--------------------------------------------------------------------------------
https://raw.githubusercontent.com/GlitchedReme/SlayTheSpireModTutorials/HEAD/Tutorials/06 - 添加新人物/ExampleModResources/img/512/bg_attack_512.png
--------------------------------------------------------------------------------
/Tutorials/05 - 添加新颜色/ExampleModResources/img/char/Character_Button.png:
--------------------------------------------------------------------------------
https://raw.githubusercontent.com/GlitchedReme/SlayTheSpireModTutorials/HEAD/Tutorials/05 - 添加新颜色/ExampleModResources/img/char/Character_Button.png
--------------------------------------------------------------------------------
/Tutorials/06 - 添加新人物/ExampleModResources/img/char/Character_Button.png:
--------------------------------------------------------------------------------
https://raw.githubusercontent.com/GlitchedReme/SlayTheSpireModTutorials/HEAD/Tutorials/06 - 添加新人物/ExampleModResources/img/char/Character_Button.png
--------------------------------------------------------------------------------
/Tutorials/05 - 添加新颜色/ExampleModResources/img/char/Character_Portrait.png:
--------------------------------------------------------------------------------
https://raw.githubusercontent.com/GlitchedReme/SlayTheSpireModTutorials/HEAD/Tutorials/05 - 添加新颜色/ExampleModResources/img/char/Character_Portrait.png
--------------------------------------------------------------------------------
/Tutorials/06 - 添加新人物/ExampleModResources/img/char/Character_Portrait.png:
--------------------------------------------------------------------------------
https://raw.githubusercontent.com/GlitchedReme/SlayTheSpireModTutorials/HEAD/Tutorials/06 - 添加新人物/ExampleModResources/img/char/Character_Portrait.png
--------------------------------------------------------------------------------
/Tutorials/00 - 环境配置/ExampleMod/src/main/resources/ModTheSpire.json:
--------------------------------------------------------------------------------
1 | {
2 | "modid": "ExampleMod",
3 | "name": "事例mod",
4 | "author_list": ["REME"],
5 | "description": "一个事例mod。",
6 | "version": "0.0.1",
7 | "sts_version": "12-22-2020",
8 | "mts_version": "3.23.2",
9 | "dependencies": ["basemod"]
10 | }
--------------------------------------------------------------------------------
/Tutorials/前人的代码基础/分开独立的能力/README.md:
--------------------------------------------------------------------------------
1 | # 独立计算的能力
2 |
3 | 你可能需要炸弹那样独立计算的能力。查看`ApplyPowerAction`,我们发现能力叠加检查是看能力的id是否相同,所以只要使你添加的每个同名buff的id不同即可。一种实现方式如下:
4 |
5 | ```java
6 | public class ExamplePower extends AbstractPower {
7 |
8 | private static int postfix = 0;
9 |
10 | public ExamplePower(AbstractCreature owner, int Amount) {
11 | // 确保每个能力的id都不同
12 | this.ID = POWER_ID + postfix++;
13 |
14 | this.owner = owner;
15 | this.amount = Amount;
16 | }
17 | }
18 | ```
--------------------------------------------------------------------------------
/Tutorials/01 - 模组核心/ExampleMod.java:
--------------------------------------------------------------------------------
1 | package examplemod.modcore;
2 |
3 | import com.evacipated.cardcrawl.modthespire.lib.SpireInitializer;
4 |
5 | import basemod.BaseMod;
6 | import basemod.interfaces.EditCardsSubscriber;
7 |
8 | @SpireInitializer
9 | public class ExampleMod implements EditCardsSubscriber {
10 | public ExampleMod() {
11 | BaseMod.subscribe(this);
12 | }
13 |
14 | public static void initialize() {
15 | new ExampleMod();
16 | }
17 |
18 | @Override
19 | public void receiveEditCards() {
20 | }
21 | }
--------------------------------------------------------------------------------
/Tutorials/新手必备知识/02 - 反编译游戏/README.md:
--------------------------------------------------------------------------------
1 | # 学习他人代码
2 |
3 | 你想看原版某张卡或某个遗物是怎么写的,这个时候需要反编译。以下提供三个方法的反编译。
4 | 注意:如果仅仅学习代码,哪个都可以。如果你要查看Patch的行数,请使用JD-GUI,idea和vscode自带的行数不准确。
5 |
6 | ## idea
7 | 查看左侧项目结构,下方的`External Libraries`中可以找到游戏源码的位置。游戏的资源一般裸露在外(~~因为矢野没有套一层文件夹~~),游戏的代码放在`com.megacrit.cardcrawl`中。
8 |
9 | 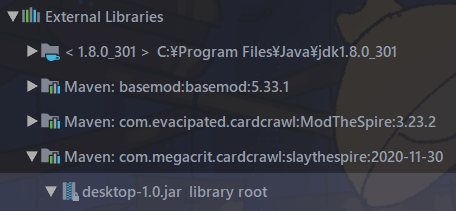
10 |
11 | 或者,直接输入你想看的类,然后ctrl+单击即可。
12 |
13 | ## vscode
14 | 在`JAVA PROJECTS`中找到`Maven Dependencies`。游戏的资源一般裸露在外(~~因为矢野没有套一层文件夹~~),游戏的代码放在`com.megacrit.cardcrawl`中。
15 |
16 | 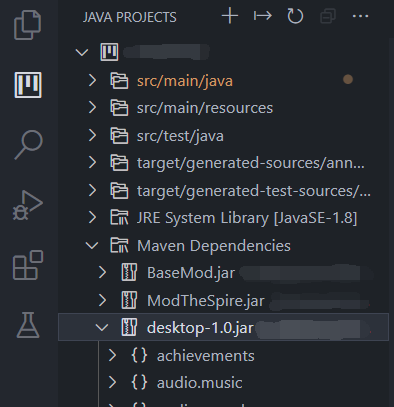
17 |
18 | 或直接输入你想看的类,然后ctrl+单击即可。
19 |
20 | ## JD-GUI
21 | 首先下载[JD-GUI](http://java-decompiler.github.io/)。打开软件,将游戏根目录下的`desktop-1.0.jar`直接拖入该软件(如果不知道如何查找steam游戏根目录可以百度)即可查看。
--------------------------------------------------------------------------------
/Tutorials/02 - 添加新卡牌/Strike.java:
--------------------------------------------------------------------------------
1 | import com.megacrit.cardcrawl.characters.AbstractPlayer;
2 | import com.megacrit.cardcrawl.monsters.AbstractMonster;
3 |
4 | import basemod.abstracts.CustomCard;
5 |
6 | public class Strike extends CustomCard {
7 | public static final String ID = "Strike";
8 | private static final String NAME = "打击";
9 | private static final String IMG_PATH = "ExampleModResources/img/cards/Strike.png";
10 | private static final int COST = 1;
11 | private static final String DESCRIPTION = "造成 !D! 点伤害。";
12 | private static final CardType TYPE = CardType.ATTACK;
13 | private static final CardColor COLOR = CardColor.COLORLESS;
14 | private static final CardRarity RARITY = CardRarity.BASIC;
15 | private static final CardTarget TARGET = CardTarget.ENEMY;
16 |
17 | public Strike() {
18 | super(ID, NAME, IMG_PATH, COST, DESCRIPTION, TYPE, COLOR, RARITY, TARGET);
19 | }
20 |
21 | @Override
22 | public void upgrade() {
23 |
24 | }
25 |
26 | @Override
27 | public void use(AbstractPlayer p, AbstractMonster m) {
28 | }
29 |
30 | }
--------------------------------------------------------------------------------
/Tutorials/新手必备知识/03 - 杀戮尖塔描述学/README.md:
--------------------------------------------------------------------------------
1 | # 杀戮尖塔描述写法(中文)
2 |
3 | ## 卡牌描述
4 |
5 | 卡牌描述与其他描述的格式不同。
6 | 有以下几条(都需要前后空格):
7 | * `NL`换行。
8 | * `!D!`,`!B!`,`!M!`分别被伤害数值、格挡数值、特殊值替代。
9 | ```java
10 | this.damage = 6;
11 | this.block = 6;
12 | this.magicNumber = 6;
13 | ```
14 | ```json
15 | "造成 !D! 点伤害 !M! 次。 NL 获得 !B! 点 格挡 。"
16 | ```
17 | * `*`可以染成黄色。
18 | ```json
19 | "将一张 *小刀 加入手中。"
20 | ```
21 | * 原版游戏关键词前后空格可以染色。
22 | * `[E]`表示能量图标。`[R]` `[G]` `[P]` `[B]`也是,但单指一个角色的。
23 |
24 | ## 遗物,TIP,能力,姿态等描述
25 |
26 | 所有小方框的描述都适用,卡牌不适用。(也需要前后空格)
27 |
28 | * `NL`换行。
29 | * `#b`,`#r`,`#g`,`#y`,`#p`分别染成蓝色、红色、绿色、黄色、紫色。
30 | * `[E]`表示能量图标。
31 |
32 | ### 扩展
33 |
34 | #### 自定义颜色
35 |
36 | 使用十六进制颜色可以染成自定义颜色。所有描述都能使用。
37 | ```json
38 | "这是一段 [#87CEEB]描述[] 。" // 天蓝色
39 | ```
40 |
41 | #### 自定义变量
42 |
43 | 自定义变量可向basemod注册使用。只有卡牌描述能使用。
44 | https://github.com/daviscook477/BaseMod/wiki/Dynamic-Variables
45 |
46 | ```json
47 | "给予 !M! 层 虚弱 !ExampleMod:M2! 次。" // 若你注册了DynamicVariable且key()返回“ExampleMod:M2”
48 | ```
49 | *注意自定义变量不能在行尾,不然会出bug*
50 |
51 | ### 自定义关键词
52 |
53 | 自定义关键词可以在向basemod注册后使用。详情看09 - 添加新关键词。
54 | ```java
55 | BaseMod.addKeyword("examplemod", keyword.NAMES[0], keyword.NAMES, keyword.DESCRIPTION);
56 | ```
57 |
58 | ```json
59 | "给予 !M! 层 examplemod:恐惧 。" // 如果你注册了关键词恐惧
60 | ```
--------------------------------------------------------------------------------
/Tutorials/11 - 如何上传mod/README.md:
--------------------------------------------------------------------------------
1 | # 上传mod
2 |
3 | 1. 打开杀戮尖塔游戏根目录(即`steam/steamapps/common/SlayTheSpire`),在此处打开cmd(在文件管理器上方路径输入cmd并回车)。
4 |
5 | 2. 在命令行中输入`java -jar mod-uploader.jar new -w [你mod的名字]`新建一个工作区。
6 |
7 | 3. 此时目录下会出现一个新的文件夹,打开它。
8 | * 该文件夹中,`image.jpg`为你mod的预览图,可以制作一张预览图并替换(注意是`jpg`格式)。
9 | * `config.json`文件为你mod的设置文件,可以设置你mod在工坊里的标题、描述等。
10 | 1. `title`为mod标题,建议写英文。
11 | 2. `description`为mod描述,建议不写或删除该行,之后在工坊里更改。
12 | 3. `visibility`为mod可见性,private为本人可见,public为公开。可以在工坊里更改,不过记得第二次上传前也修改该项。
13 | 4. `changeNote`为更新日志,建议不写或删除该行,之后在工坊里更改。
14 | 5. `tags`为你mod的标签。可以上工坊看看有哪些常用标签,你写其他的也行。例子:`"tags": ["Character", "English"]`
15 |
16 | 所有这些设置,都不能写中文,否则工坊里会乱码。
17 |
18 | 将你mod的jar放入`content`文件夹告诉程序你要上传什么。此外也可以自己设置`pom.xml`,打包后自动复制一份到该目录。
19 |
20 | 4. 回到根目录,打开cmd,输入`java -jar mod-uploader.jar upload -w [你mod的名字]`上传你的mod。上传完成后过一段时间就能看到你的mod了。
21 |
22 | 5. 方便起见,可以在该目录下新建一个txt文件,把上传的命令复制到该文件,然后将它后缀改为cmd。这样以后上传只需要双击这个文件就可以了。
23 |
24 | ## 重建工作区
25 |
26 | 如果你因为换电脑等原因导致上传配置丢失,可以先重建一个新的工作区,然后在`config.json`中添加一个变量`steamPublishedID`。这个id可以在你mod的工坊页面URL中找到,格式为`https://steamcommunity.com/sharedfiles/filedetails/?id=1234567890`,其中的`1234567890`就是你的`steamPublishedID`。
27 |
28 | ```json
29 | {
30 | "steamPublishedID": "1234567890",
31 | "title": "xxxxx",
32 | "description": "",
33 | "visibility": "public",
34 | "changeNote": "",
35 | "tags": ["English", "Simplified Chinese", "Character"]
36 | }
37 | ```
38 |
39 | ## 使用GIF作为工坊图
40 |
41 | 首先准备一张`gif`,把它转成`webp`格式,然后将其命名为`image.jpg`(是的直接修改后缀名)替换原来的文件。
42 |
43 | 注意:确保最终的文件小于1MB
--------------------------------------------------------------------------------
/Tutorials/04 - 本地化/Strike.java:
--------------------------------------------------------------------------------
1 | import com.megacrit.cardcrawl.characters.AbstractPlayer;
2 | import com.megacrit.cardcrawl.monsters.AbstractMonster;
3 |
4 | import basemod.abstracts.CustomCard;
5 |
6 | public class Strike extends CustomCard {
7 | public static final String ID = ModHelper.makePath("Strike");
8 | private static final CardStrings CARD_STRINGS = CardCrawlGame.languagePack.getCardStrings(ID); // 从游戏系统读取本地化资源
9 | // private static final String NAME = "打击";
10 | private static final String NAME = CARD_STRINGS.NAME; // 读取本地化的名字
11 | private static final String IMG_PATH = "";
12 | private static final int COST = 1;
13 | // private static final String DESCRIPTION = "造成 !D! 点伤害。";
14 | private static final String DESCRIPTION = CARD_STRINGS.DESCRIPTION; // 读取本地化的描述
15 | private static final CardType TYPE = CardType.ATTACK;
16 | private static final CardColor COLOR = CardColor.COLORLESS;
17 | private static final CardRarity RARITY = CardRarity.BASIC;
18 | private static final CardTarget TARGET = CardTarget.ENEMY;
19 |
20 | public Strike() {
21 | super(ID, NAME, IMG_PATH, COST, DESCRIPTION, TYPE, COLOR, RARITY, TARGET);
22 | }
23 |
24 | @Override
25 | public void use(AbstractPlayer p, AbstractMonster m) {
26 | this.addToBot(new DamageAction(m, new DamageInfo(p, damage, DamageType.NORMAL)));
27 | }
28 |
29 | @Override
30 | public void upgrade() {
31 | if (!this.upgraded) {
32 | this.upgradeName();
33 | this.upgradeDamage(3);
34 | }
35 | }
36 | }
--------------------------------------------------------------------------------
/Tutorials/01 - 模组核心/README.md:
--------------------------------------------------------------------------------
1 | # 模组核心
2 |
3 | 想要将自己的mod添加到游戏中,首先需要让Mod The Spire(以后简称mts)知道你创建了一个mod。通过向你的模组核心类添加`@SpireInitializer`注解让mts知道你创建了一个mod,并开始加载你mod的内容。
4 |
5 | ## 1.创建你的模组核心类
6 |
7 | 首先创建一个你的mod文件夹(idea为目录右键new package),并在其中创建一个modcore类。(*它的命名可以由你随意更改*)
8 |
9 | 如果有`Main.java`文件,可以将其删掉。
10 |
11 | 项目结构看起来像这样:
12 | * src
13 | * main
14 | * java
15 | * examplemod(套一层文件夹防止和其他mod重名)
16 | * modcore
17 | * ExampleMod.java
18 |
19 | ExampleMod.java:
20 | ```java
21 | @SpireInitializer // 加载mod的注解
22 | public class ExampleMod {
23 | // 构造方法
24 | public ExampleMod() {
25 | }
26 |
27 | // 注解需要调用的方法,必须写
28 | public static void initialize() {
29 | new ExampleMod();
30 | }
31 | }
32 | ```
33 |
34 | 注意!这段代码并没有`package`和`import`,请读者自行添加,参考文件夹下的`ExampleMod.java`。如果你不了解相关知识,请学习一些java知识再查看教程。
35 |
36 | ## 2.向basemod订阅事件
37 |
38 | basemod提供了许多钩子,也就是在特定时间点调用所有订阅了该钩子的类的特定方法的东西。例如可以通过订阅`EditCardsSubscriber`来向basemod注册你的mod卡牌。
39 |
40 | 要想订阅这些事件,首先你要实现相应接口,然后写相应的触发函数,最后告诉basemod你要订阅事件。
41 |
42 | ExampleMod.java:
43 | ```java
44 | @SpireInitializer
45 | public class ExampleMod implements EditCardsSubscriber { // 实现接口
46 | public ExampleMod() {
47 | BaseMod.subscribe(this); // 告诉basemod你要订阅事件
48 | }
49 |
50 | public static void initialize() {
51 | new ExampleMod();
52 | }
53 |
54 | // 当basemod开始注册mod卡牌时,便会调用这个函数
55 | @Override
56 | public void receiveEditCards() {
57 | // TODO 这里写添加你卡牌的代码
58 | }
59 | }
60 | ```
61 |
62 | 关于如何添加之后的章节会提及。
63 |
64 |
65 | TIPS:可以在文件夹找到本章的代码。
--------------------------------------------------------------------------------
/README.md:
--------------------------------------------------------------------------------
1 | 杀戮尖塔mod制作教程
2 | =====================
3 |
4 | 本教程不会讲解Java编程知识,建议先了解一些编程基础再来学习。
5 |
6 | 如果读者在阅读本教程时发现了错误或者一些不合理的地方,可以通过提交issues帮助改进这篇教程。
7 |
8 | 如果你有任何不懂的,可以添加下面的交流群或者在上方的discussions处提出你的问题。
9 |
10 | 点击上方的Tutorials文件夹或者右侧的[教程网站](https://glitchedreme.github.io/SlayTheSpireModTutorials/)查看所有教程。
11 |
12 | 个人交流群:542370192
13 |
14 | # 一些实用的工具/网站
15 |
16 | ## 目录
17 | * [网站](#网站)
18 | * [工具](#工具)
19 | * [mod样板](mod样板)
20 | * [动画](#动画)
21 |
22 | ## 网站
23 | * [ModTheSpire Wiki](https://github.com/kiooeht/ModTheSpire/wiki)
24 | ModTheSpire(简称MTS)是一种无需修改基础游戏文件即可为 Slay the Spire 加载外部模组的工具,同时允许模组将自己的代码修补到游戏代码中。
25 | MTS Wiki上写了如何进行全局保存、patch等。
26 |
27 |
28 | * [BaseMod Wiki](https://github.com/daviscook477/BaseMod/wiki)
29 | BaseMod是模组的基础API,能够让mod作者方便的向游戏中添加自己的卡牌等内容并且集中管理这些内容。
30 | Wiki上写了一些很实用的小工具,例如自动注册所有卡牌(AutoAdd)、卡牌修改器(CardModifier)、一局游戏内保存(CustomSavable)等。也包括BaseMod作者写的mod制作教程。
31 |
32 | ## 工具
33 | * [JD-GUI](http://java-decompiler.github.io/)
34 | 一个Java反编译工具,具有GUI界面。
35 | 可以让你查看游戏或其他mod重构后的源代码方便~~拷贝~~学习其他人的代码。
36 | 也可以用来查询打patch需要的行数。(idea自带的反编译不准确)
37 |
38 | * [sts裁图器](https://github.com/JohnnyBazooka89/StSModdingToolCardImagesCreator)
39 | 把图片裁剪成尖塔卡图需要的形状和尺寸。
40 | 我并没有用过这个,群里有群友自己制作的另一个相同功能的工具。
41 |
42 | ## mod样板
43 | * [战神徽章mod](https://github.com/Rita-Bernstein/Warlord-Emblem)
44 | ~~Rita推荐,必属精品~~
45 | 比较标准化的一个mod范例。
46 |
47 | ## 动画
48 | * [龙骨](https://dragonbones.github.io/cn/index.html)
49 | 可以导出spine动画的软件,一般使用这个足够,可以自己寻找可用版本。
50 |
51 | *制作动画需要一些基础,但其实大多数mod只需要一张图就够了。*
52 | * [Spine](http://zh.esotericsoftware.com/)
53 | 尖塔使用的2D动画软件。
54 |
--------------------------------------------------------------------------------
/Tutorials/03 - 添加卡牌效果/Strike.java:
--------------------------------------------------------------------------------
1 | import com.megacrit.cardcrawl.actions.common.DamageAction;
2 | import com.megacrit.cardcrawl.cards.DamageInfo;
3 | import com.megacrit.cardcrawl.cards.DamageInfo.DamageType;
4 | import com.megacrit.cardcrawl.characters.AbstractPlayer;
5 | import com.megacrit.cardcrawl.monsters.AbstractMonster;
6 |
7 | import basemod.abstracts.CustomCard;
8 |
9 | public class Strike extends CustomCard {
10 | public static final String ID = "Strike";
11 | public static final String NAME = "打击";
12 | public static final String IMG_PATH = "ExampleModResources/img/cards/Strike.png";
13 | public static final int COST = 1;
14 | public static final String DESCRIPTION = "造成 !D! 点伤害。";
15 | public static final CardType TYPE = CardType.ATTACK;
16 | public static final CardColor COLOR = CardColor.COLORLESS;
17 | public static final CardRarity RARITY = CardRarity.BASIC;
18 | public static final CardTarget TARGET = CardTarget.ENEMY;
19 |
20 | public Strike() {
21 | super(ID, NAME, IMG_PATH, COST, DESCRIPTION, TYPE, COLOR, RARITY, TARGET);
22 | this.damage = this.baseDamage = 6;
23 | this.tags.add(CardTags.STARTER_STRIKE);
24 | this.tags.add(CardTags.STRIKE);
25 | }
26 |
27 | @Override
28 | public void upgrade() {
29 | if (!this.upgraded) {
30 | this.upgradeName();
31 | this.upgradeDamage(3);
32 | }
33 | }
34 |
35 | @Override
36 | public void use(AbstractPlayer p, AbstractMonster m) {
37 | // AbstractCard中实现了addToBot方法,它的效果和AbstractDungeon.actionManager.addToBottom相同
38 | this.addToBot(new DamageAction(m, new DamageInfo(p, damage, DamageType.NORMAL)));
39 | }
40 |
41 | }
--------------------------------------------------------------------------------
/Tutorials/新手必备知识/01 - 查看报错信息/README.md:
--------------------------------------------------------------------------------
1 | # 查看报错信息
2 |
3 | ## 1.异常处理
4 |
5 | 有时候,游戏崩溃了,你想要查看是哪里的代码出错了。这时候需要查看mts的debug窗口。
6 |
7 | *需要在mod加载窗口勾选debug*
8 |
9 | 
10 |
11 | 在`Game crashed.`下便是这次的报错信息。它展示了必备组件的版本,开启的mod和异常信息。
12 |
13 | 这里显示的是空指针错误(NullPointerException),说明程序将调用对象时却遇到了null。(不懂的可以去看java异常处理)
14 |
15 | 具体报错的是`ExampleMod`类的
16 | `receiveEditCards`方法,并且是`ExampleMod`的第20行。
17 |
18 | 如果难以看出是哪个mod出的错,可以向上翻几行,上面有详细的异常处理信息。
19 |
20 | 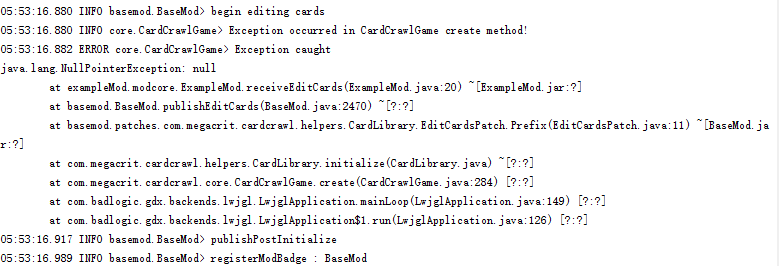
21 | *ExampleMod出错了*
22 |
23 | 最后展示一下杀戮尖塔mod常见的几种异常。
24 | | 名称 | 可能原因 | 如何纠错 |
25 | | --- | --- | --- |
26 | | NullPointerException | 一个变量为空,但你却当它不为空来使用;可能是缺少图片、文本,具体看上下文 | 进行`val != null`的判断;查看自己是否缺少资源 |
27 | | ArrayIndexOutOfBoundsException | 你索引的数组序号在其范围之外。 | 查看数组序号是否超范围。 |
28 | | ConcurrentModificationException | 你在遍历中增加或删除了元素。(常见的在effects中直接添加、怪物直接在怪物列表添加怪物) | 换一个方向遍历,使用正规的添加删除手段 |
29 |
30 | *(当遇到`ConcurrentModificationException`时,如果是`effectList`报错,可以通过往`effectQueue`,`topLevelEffects`,`topLevelEffectsQueue`添加尝试解决)*
31 |
32 | ## 2.输出控制台
33 |
34 | 有时候你想在一个地方检查某个变量的值。这时候你可以在控制台中打印一些信息。有两种方法。(但不止两种)
35 |
36 | * System.out.print(...);
37 | * 使用`logger`。(带有时间,和是哪个类发出的信息,比较格式化)
38 |
39 | ```java
40 | import org.apache.logging.log4j.LogManager;
41 | import org.apache.logging.log4j.Logger;
42 | // 省略...
43 | public class ExampleMod {
44 | public static final Logger logger = LogManager.getLogger(ExampleMod.class);
45 |
46 | public ExampleMod() {
47 | BaseMod.subscribe(this);
48 | }
49 |
50 | public static void initialize() {
51 | new ExampleMod();
52 |
53 | // 两种方法
54 | System.out.print("你好世界!");
55 | logger.info("你好世界!");
56 |
57 | // 带变量
58 | int x = 10;
59 | logger.info("x的值为" + x);
60 | logger.info(String.format("x的值为%d", x));
61 | }
62 | }
63 | ```
--------------------------------------------------------------------------------
/Tutorials/08 - 添加新关键词/README.md:
--------------------------------------------------------------------------------
1 | # 添加关键词
2 |
3 | BaseMod为Mod作者提供了一种添加自定义关键词的方式:
4 | ```java
5 | public class ExampleMod implements EditKeywordsSubscriber {
6 | //...省略
7 | @Override
8 | public void receiveEditKeywords() {
9 | BaseMod.addKeyword("examplemod", "流血", new String[] {"流血"}, "拥有 #y流血 的角色在受到伤害时失去等量生命。");
10 | }
11 | //...省略
12 | }
13 | ```
14 |
15 | `addKeyword(String modID, String proper, String[] names, String description)`
16 |
17 | `modID`:你的mod的id,用于和其他mod的关键词区分。当你使用modID时,你的关键词需要加上前缀,如:"examplemod:流血"。
18 |
19 | `proper`:关键词的正确名称,显示在关键词提示框中。
20 |
21 | `names`:所有能别识别的名称,例如,如果你`proper`设置为“法术(X)”,`names`设置为“法术”,“法术的”,那么描述中“examplemod:法术”和“examplemod:法术的”都会被识别为该关键词,提示框的标题为“法术(X)”。
22 |
23 | `description`:关键词描述。
24 |
25 | ## 使用JSON加载关键词
26 |
27 | 理论上,这样可以添加关键词,但是修改起来十分麻烦,~~还可能因为硬编码被群里的作者打~~。这里提供一种使用json加载关键词的方式。
28 |
29 | ```java
30 | public class ExampleMod implements EditKeywordsSubscriber {
31 | //...省略
32 | @Override
33 | public void receiveEditKeywords() {
34 | Gson gson = new Gson();
35 | String lang = "eng";
36 | if (language == Settings.GameLanguage.ZHS) {
37 | lang = "zhs";
38 | }
39 |
40 | String json = Gdx.files.internal("ExampleModResources/localization/Keywords_" + lang + ".json")
41 | .readString(String.valueOf(StandardCharsets.UTF_8));
42 | Keyword[] keywords = gson.fromJson(json, Keyword[].class);
43 | if (keywords != null) {
44 | for (Keyword keyword : keywords) {
45 | // 这个id要全小写
46 | BaseMod.addKeyword("examplemod", keyword.NAMES[0], keyword.NAMES, keyword.DESCRIPTION);
47 | }
48 | }
49 | }
50 | //...省略
51 | ```
52 |
53 | 这样的话,只要写json就能添加关键词了,还可以处理本地化问题。
54 |
55 | keywords_zhs.json:
56 | ```json
57 | // 注意!!!如果使用这种写法,最外层不是{而是[
58 | [
59 | {
60 | "NAMES": [
61 | "恐惧"
62 | ],
63 | "DESCRIPTION": "拥有 #y恐惧 的角色造成的伤害减少。"
64 | }
65 | ]
66 | ```
67 |
68 | 在卡牌描述中使用:
69 | ```json
70 | "DESCRIPTION": "造成 !D! 点伤害。 NL 给予 !M! 层 examplemod:恐惧 。"
71 | ```
72 |
73 | 在遗物描述中使用:
74 | ```json
75 | "DESCRIPTIONS": [
76 | "战斗开始时,给予随机敌人 !M! 层 #yexamplemod:恐惧 。"
77 | ]
78 | ```
79 |
80 | 能力、关键词描述中不会再解析关键词,只需要`#y恐惧`即可。
--------------------------------------------------------------------------------
/Tutorials/05 - 添加新颜色/ExampleMod.java:
--------------------------------------------------------------------------------
1 | @SpireInitializer
2 | public class ExampleMod implements EditCardsSubscriber, EditStringsSubscriber {
3 | private static final String MY_CHARACTER_BUTTON = "ExampleModResources/img/char/Character_Button.png";
4 | private static final String MY_CHARACTER_PORTRAIT = "ExampleModResources/img/char/Character_Portrait.png";
5 | private static final String BG_ATTACK_512 = "ExampleModResources/img/512/bg_attack_512.png";
6 | private static final String BG_POWER_512 = "ExampleModResources/img/512/bg_power_512.png";
7 | private static final String BG_SKILL_512 = "ExampleModResources/img/512/bg_skill_512.png";
8 | private static final String small_orb = "ExampleModResources/img/char/small_orb.png";
9 | private static final String BG_ATTACK_1024 = "ExampleModResources/img/1024/bg_attack.png";
10 | private static final String BG_POWER_1024 = "ExampleModResources/img/1024/bg_power.png";
11 | private static final String BG_SKILL_1024 = "ExampleModResources/img/1024/bg_skill.png";
12 | private static final String big_orb = "ExampleModResources/img/char/card_orb.png";
13 | private static final String energy_orb = "ExampleModResources/img/char/cost_orb.png";
14 |
15 | public static final Color MY_COLOR = new Color(79.0F / 255.0F, 185.0F / 255.0F, 9.0F / 255.0F, 1.0F);
16 |
17 | public ExampleMod() {
18 | BaseMod.subscribe(this);
19 | BaseMod.addColor(EXAMPLE_GREEN, MY_COLOR, MY_COLOR, MY_COLOR,
20 | MY_COLOR, MY_COLOR, MY_COLOR, MY_COLOR, BG_ATTACK_512,
21 | BG_SKILL_512, BG_POWER_512, energy_orb, BG_ATTACK_1024,
22 | BG_SKILL_1024, BG_POWER_1024, big_orb, small_orb
23 | );
24 | }
25 |
26 | public static void initialize() {
27 | new ExampleMod();
28 | }
29 |
30 | @Override
31 | public void receiveEditCards() {
32 | BaseMod.addCard(new Strike());
33 | }
34 |
35 | public void receiveEditStrings() {
36 | String lang;
37 | if (Settings.language == GameLanguage.ZHS) {
38 | lang = "ZHS";
39 | } else {
40 | lang = "ENG";
41 | }
42 | BaseMod.loadCustomStringsFile(CardStrings.class, "ExampleResources/localization/" + lang + "/cards.json");
43 | }
44 | }
--------------------------------------------------------------------------------
/Tutorials/前人的代码基础/包装卡牌类/README.md:
--------------------------------------------------------------------------------
1 | # 包装卡牌类
2 |
3 | 将卡牌类包装可以把一些经常用到的代码用更简单的方式实现,或者实现某种共性的功能。
4 |
5 | 下面分享我的卡牌封装类:
6 |
7 | *没有规定你一定得按我方式的来写,我只是提供一个代码简化思路。*
8 | *没有规定你一定得按我方式的来写,我只是提供一个代码简化思路。*
9 | *没有规定你一定得按我方式的来写,我只是提供一个代码简化思路。*
10 |
11 |
12 | ```java
13 | public abstract class AbstractExampleCard extends CustomCard {
14 | // useTmpArt表示是否使用测试卡图,当你卡图不够用时可以使用
15 | public AbstractExampleCard(String ID, boolean useTmpArt, CardStrings strings, int COST, CardType TYPE,
16 | CardRarity RARITY, CardTarget TARGET) {
17 | super(ID, strings.NAME, useTmpArt ? getTmpImgPath(TYPE) : getImgPath(TYPE, ID), COST, strings.DESCRIPTION, TYPE,
18 | GOLDENGLOW_CARD, RARITY, TARGET);
19 | }
20 |
21 | // 如果按这个方法实现,在cards文件夹下分别放test_attack.png、test_power.png、test_skill.png即可
22 | private static String getTmpImgPath(CardType t) {
23 | String type;
24 | switch (t) {
25 | case ATTACK:
26 | type = "attack";
27 | break;
28 | case POWER:
29 | type = "power";
30 | break;
31 | case STATUS:
32 | case CURSE:
33 | case SKILL:
34 | type = "skill";
35 | break;
36 | default:
37 | throw new IllegalStateException("Unexpected value: " + t);
38 | }
39 | return String.format(ModHelper.MakeAssetPath("img/cards/test_%s.png"), type);
40 | }
41 |
42 | // 如果实现这个方法,只要将相应类型的卡牌丢进相应文件夹即可,如攻击牌卡图添加进img/cards/attack/下
43 | private static String getImgPath(CardType t, String name) {
44 | String type;
45 | switch (t) {
46 | case ATTACK:
47 | type = "attack";
48 | break;
49 | case POWER:
50 | type = "power";
51 | break;
52 | case STATUS:
53 | type = "status";
54 | break;
55 | case CURSE:
56 | type = "curse";
57 | break;
58 | case SKILL:
59 | type = "skill";
60 | break;
61 | default:
62 | throw new IllegalStateException("Unexpected value: " + t);
63 | }
64 | return String.format(ModHelper.MakeAssetPath("img/cards/%s/%s.png"), type, name.replace(ModHelper.makePath(""), ""));
65 | }
66 | }
67 | ```
68 |
69 | 类似的,可以在这个类里写一些通用的方法以便快捷使用。
--------------------------------------------------------------------------------
/Tutorials/前人的代码基础/匿名函数/README.md:
--------------------------------------------------------------------------------
1 | # 匿名函数(Lambda表达式)
2 |
3 | > Lambda 表达式,也可称为闭包,它是推动 Java 8 发布的最重要新特性。
4 | > Lambda 允许把函数作为一个方法的参数(函数作为参数传递进方法中)。
5 | > 使用 Lambda 表达式可以使代码变的更加简洁紧凑。
6 |
7 | Lambda可以让你不写类就能实现某种效果。在写尖塔mod时有用的地方比如:可以不用新写action类。
8 |
9 | 一种实现方法:
10 | 在你的`ModHelper`或你的通用接口里写:
11 | ```java
12 | public class ModHelper {
13 | public static void addToBotAbstract(Lambda func) {
14 | AbstractDungeon.actionManager.addToBottom(new AbstractGameAction() {
15 | @Override
16 | public void update() {
17 | func.run();
18 | isDone = true;
19 | }
20 | });
21 | }
22 |
23 | public static void addToTopAbstract(Lambda func) {
24 | AbstractDungeon.actionManager.addToTop(new AbstractGameAction() {
25 | @Override
26 | public void update() {
27 | func.run();
28 | isDone = true;
29 | }
30 | });
31 | }
32 |
33 | public interface Lambda extends Runnable {}
34 | }
35 | ```
36 |
37 | 这样你就能很轻松的写卡牌效果什么的了,并且执行顺序也有保障:
38 | ```java
39 | public void use(AbstractPlayer p, AbstractMonster m) {
40 | if (m != null) {
41 | this.addToBot(new VFXAction(new PressurePointEffect(m.hb.cX, m.hb.cY)));
42 | }
43 | this.addToBot(new ApplyPowerAction(m, p, new MarkPower(m, this.magicNumber), this.magicNumber));
44 | // 这里
45 | ModHelper.addToBotAbstract(() -> {
46 | if (m.hasPower(MarkPower.POWER_ID))
47 | addToTop(new GainBlockAction(p, p, m.getPower(MarkPower.POWER_ID).amount));
48 | });
49 | }
50 | ```
51 |
52 | 上面的代码相当于下面的添加action和一个新的action类:
53 | ```java
54 | public void use(AbstractPlayer p, AbstractMonster m) {
55 | if (m != null) {
56 | this.addToBot(new VFXAction(new PressurePointEffect(m.hb.cX, m.hb.cY)));
57 | }
58 | this.addToBot(new ApplyPowerAction(m, p, new MarkPower(m, this.magicNumber), this.magicNumber));
59 | // 这里
60 | this.addToBot(new ATestAction(m));
61 | }
62 | ```
63 | ```java
64 | public class ATestAction extends AbstractGameAction {
65 | public ATestAction(AbstractMonster target) {
66 | this.target = target;
67 | }
68 |
69 | @Overrider
70 | public void update() {
71 | if (this.target.hasPower(MarkPower.POWER_ID)) {
72 | AbstractPlayer p = AbstractDungeon.player;
73 | addToTop(new GainBlockAction(p, p, this.target.getPower(MarkPower.POWER_ID).amount));
74 | isDone = true;
75 | }
76 | }
77 | }
78 | ```
--------------------------------------------------------------------------------
/Tutorials/06 - 添加新人物/ExampleMod.java:
--------------------------------------------------------------------------------
1 | @SpireInitializer
2 | public class ExampleMod implements EditCardsSubscriber, EditStringsSubscriber, EditCharactersSubscriber{
3 | private static final String MY_CHARACTER_BUTTON = "ExampleModResources/img/char/Character_Button.png";
4 | private static final String MY_CHARACTER_PORTRAIT = "ExampleModResources/img/char/Character_Portrait.png";
5 | private static final String BG_ATTACK_512 = "ExampleModResources/img/512/bg_attack_512.png";
6 | private static final String BG_POWER_512 = "ExampleModResources/img/512/bg_power_512.png";
7 | private static final String BG_SKILL_512 = "ExampleModResources/img/512/bg_skill_512.png";
8 | private static final String SMALL_ORB = "ExampleModResources/img/char/small_orb.png";
9 | private static final String BG_ATTACK_1024 = "ExampleModResources/img/1024/bg_attack.png";
10 | private static final String BG_POWER_1024 = "ExampleModResources/img/1024/bg_power.png";
11 | private static final String BG_SKILL_1024 = "ExampleModResources/img/1024/bg_skill.png";
12 | private static final String BIG_ORB = "ExampleModResources/img/char/card_orb.png";
13 | private static final String ENERGY_ORB = "ExampleModResources/img/char/cost_orb.png";
14 |
15 | public static final Color MY_COLOR = new Color(79.0F / 255.0F, 185.0F / 255.0F, 9.0F / 255.0F, 1.0F);
16 |
17 | public ExampleMod() {
18 | BaseMod.subscribe(this);
19 | // 这里的EXAMPLE_GREEN是人物类里的,应写成MyCharacter.PlayerColorEnum.EXAMPLE_GREEN
20 | BaseMod.addColor(EXAMPLE_GREEN, MY_COLOR, MY_COLOR, MY_COLOR,
21 | MY_COLOR, MY_COLOR, MY_COLOR, MY_COLOR, BG_ATTACK_512,
22 | BG_SKILL_512, BG_POWER_512, ENERGY_ORB, BG_ATTACK_1024,
23 | BG_SKILL_1024, BG_POWER_1024, BIG_ORB, SMALL_ORB
24 | );
25 | }
26 |
27 | public static void initialize() {
28 | new ExampleMod();
29 | }
30 |
31 | @Override
32 | public void receiveEditCards() {
33 | BaseMod.addCard(new Strike());
34 | }
35 |
36 | @Override
37 | public void receiveEditCharacters() {
38 | // 向basemod注册人物
39 | BaseMod.addCharacter(new MyCharacter(CardCrawlGame.playerName), MY_CHARACTER_BUTTON, MY_CHARACTER_PORTRAIT, MY_CHARACTER);
40 | }
41 |
42 | public void receiveEditStrings() {
43 | String lang;
44 | if (Settings.language == GameLanguage.ZHS) {
45 | lang = "ZHS";
46 | } else {
47 | lang = "ENG";
48 | }
49 | BaseMod.loadCustomStringsFile(CardStrings.class, "ExampleResources/localization/" + lang + "/cards.json");
50 | BaseMod.loadCustomStringsFile(CharacterStrings.class, "ExampleResources/localization/" + lang + "/characters.json");
51 | }
52 | }
--------------------------------------------------------------------------------
/Tutorials/07 - 添加新遗物/ExampleMod.java:
--------------------------------------------------------------------------------
1 | @SpireInitializer
2 | public class ExampleMod implements EditCardsSubscriber, EditStringsSubscriber, EditCharactersSubscriber{
3 | private static final String MY_CHARACTER_BUTTON = "ExampleModResources/img/char/Character_Button.png";
4 | private static final String MY_CHARACTER_PORTRAIT = "ExampleModResources/img/char/Character_Portrait.png";
5 | private static final String BG_ATTACK_512 = "ExampleModResources/img/512/bg_attack_512.png";
6 | private static final String BG_POWER_512 = "ExampleModResources/img/512/bg_power_512.png";
7 | private static final String BG_SKILL_512 = "ExampleModResources/img/512/bg_skill_512.png";
8 | private static final String small_orb = "ExampleModResources/img/char/small_orb.png";
9 | private static final String BG_ATTACK_1024 = "ExampleModResources/img/1024/bg_attack.png";
10 | private static final String BG_POWER_1024 = "ExampleModResources/img/1024/bg_power.png";
11 | private static final String BG_SKILL_1024 = "ExampleModResources/img/1024/bg_skill.png";
12 | private static final String big_orb = "ExampleModResources/img/char/card_orb.png";
13 | private static final String energy_orb = "ExampleModResources/img/char/cost_orb.png";
14 |
15 | private static final Color MY_COLOR = new Color(79.0F / 255.0F, 185.0F / 255.0F, 9.0F / 255.0F, 1.0F);
16 |
17 | public ExampleMod() {
18 | BaseMod.subscribe(this);
19 | BaseMod.addColor(EXAMPLE_GREEN, MY_COLOR, MY_COLOR, MY_COLOR,
20 | MY_COLOR, MY_COLOR, MY_COLOR, MY_COLOR, BG_ATTACK_512,
21 | BG_SKILL_512, BG_POWER_512, energy_orb, BG_ATTACK_1024,
22 | BG_SKILL_1024, BG_POWER_1024, big_orb, small_orb
23 | );
24 | }
25 |
26 | public static void initialize() {
27 | new ExampleMod();
28 | }
29 |
30 | @Override
31 | public void receiveEditCards() {
32 | BaseMod.addCard(new Strike());
33 | }
34 |
35 | @Override
36 | public void receiveEditCharacters() {
37 | // 向basemod注册人物
38 | BaseMod.addCharacter(new MyCharacter(CardCrawlGame.playerName), MY_CHARACTER_BUTTON, MY_CHARACTER_PORTRAIT, MY_CHARACTER);
39 | }
40 |
41 | public void receiveEditStrings() {
42 | String lang;
43 | if (Settings.language == GameLanguage.ZHS) {
44 | lang = "ZHS";
45 | } else {
46 | lang = "ENG";
47 | }
48 | BaseMod.loadCustomStringsFile(CardStrings.class, "ExampleResources/localization/" + lang + "/cards.json");
49 | BaseMod.loadCustomStringsFile(CharacterStrings.class, "ExampleResources/localization/" + lang + "/characters.json");
50 | BaseMod.loadCustomStringsFile(RelicStrings.class, "ExampleResources/localization/" + lang + "/relics.json");
51 | }
52 | }
--------------------------------------------------------------------------------
/Tutorials/10 - 添加action/README.md:
--------------------------------------------------------------------------------
1 | # 自定义Action
2 |
3 | action是构成卡牌、遗物、能力等效果的一个基础单元。比如说抽牌使用的是`DrawCardAction`,伤害使用的是`DamageAction`。
4 |
5 | 每添加一个action实质上是往一个队列里排队,排在前面的先执行。
6 |
7 | 下面我们来一步步构造一个“造成伤害,并在斩杀时抽一张牌”的action。
8 |
9 | 首先新建一个空的action。
10 | ```java
11 | public class ExampleAction extends AbstractGameAction {
12 |
13 | public ExampleAction() {
14 | }
15 |
16 | @Override
17 | public void update() {
18 | }
19 |
20 | }
21 | ```
22 | 这里包含一个构造函数和一个`update`方法。`update`方法的作用是每次游戏循环时执行你这个action产生一些效果。
23 |
24 | 我们需要告诉action你攻击的目标是谁,并在`update`时对其造成伤害。
25 | ```java
26 | public class ExampleAction extends AbstractGameAction {
27 | // 伤害信息
28 | public DamageInfo info;
29 |
30 | public ExampleAction(AbstractMonster target, DamageInfo info) {
31 | this.target = target;
32 | this.info = info;
33 | }
34 |
35 | @Override
36 | public void update() {
37 | // 目标受到伤害
38 | this.target.damage(this.info);
39 | }
40 |
41 | }
42 | ```
43 | 受到伤害写好了,接下来写如果斩杀就抽一张牌。
44 | ```java
45 | public class ExampleAction extends AbstractGameAction {
46 | public DamageInfo info;
47 |
48 | public ExampleAction(AbstractMonster target, DamageInfo info) {
49 | this.target = target;
50 | this.info = info;
51 | }
52 |
53 | @Override
54 | public void update() {
55 | this.target.damage(this.info);
56 | if ((this.target.isDying || this.target.currentHealth <= 0) && !this.target.halfDead
57 | && !this.target.hasPower("Minion")) {
58 | this.addToTop(new DrawCardAction(1));
59 | }
60 | this.isDone = true;
61 | }
62 |
63 | }
64 | ```
65 | `if`里的条件分别表示:
66 | `(this.target.isDying || this.target.currentHealth <= 0`表示造成伤害后使目标的生命降至0或以下,或目标现在濒死。
67 | `!this.target.halfDead`非半死,主要判断是否为觉醒者一阶段。
68 | `this.target.hasPower("Minion")`没有爪牙能力,斩杀的一个条件。
69 |
70 | 如果上述条件满足,则`addToTop`一个抽牌action。
71 |
72 | 关于addToBot和addToTop,addToBot表示排在最下边,addToTop表示排在最上边。按从上往下的顺序执行action。
73 | 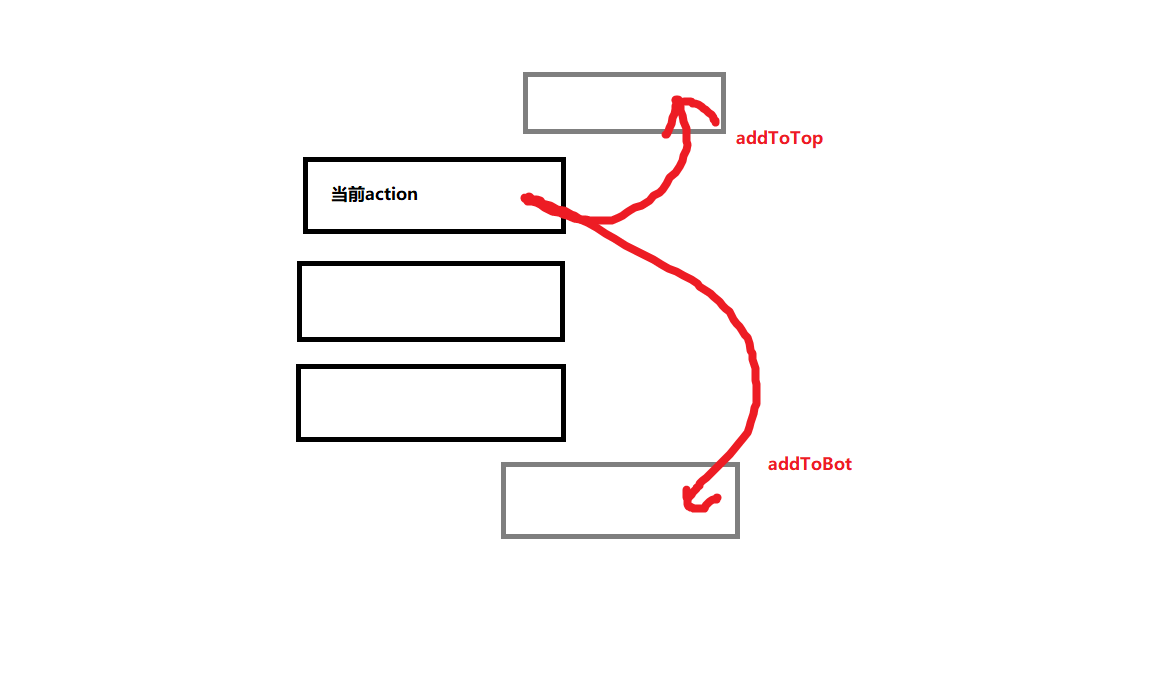
74 | 在action里添加action时,一般使用`addToTop`排在最上边,这样让你的效果马上执行。
75 |
76 | *注意当有多个`addToTop`的时候,由于写在下面的被排到最上边了,写在上面的会后执行!*
77 |
78 | ## 最后最重要的一点
79 | `isDone=true`是必须写的,这表示你这个action执行完了。下次游戏循环检测时,如果你这个action的isDone为true,则不会执行update方法,并将你的action移除,执行下一个action。
80 |
81 | 但是`isDone`并没有结束代码的作用!像下面的代码,`isDone`后面的内容还是会执行
82 | ```java
83 | @Override
84 | public void update() {
85 | System.out.println("被执行");
86 | this.isDone = true;
87 | System.out.println("也被执行");
88 | }
89 | ```
90 |
91 | 这样一个action就写好了。action的使用不需要注册,只要在某些时候加入队列即可。例如往你的卡牌效果里写:
92 | ```java
93 | @Override
94 | public void use(AbstractPlayer p, AbstractMonster m) {
95 | this.addToBot(new ExampleAction(m, new DamageInfo(p, this.damage, DamageType.NORMAL)));
96 | }
97 | ```
--------------------------------------------------------------------------------
/Tutorials/05 - 添加新颜色/README.md:
--------------------------------------------------------------------------------
1 | # 添加新颜色
2 |
3 | 之后的几章是关于添加新人物的。人物涉及许多美术资源,你可以先使用文件夹下来自刻俄柏mod的临时资源,之后再慢慢替换。
4 |
5 | ## 1.选择你的颜色
6 | 根据你的人物颜色基调在modcore类新建一个RGB的`Color`颜色变量。如果你对什么是RGB颜色不熟悉,可以打开画图编辑颜色,右下角红绿蓝三色的数值经过计算后可以填入`Color`的构造函数。
7 |
8 | > 前三个参数表示RGB,范围为0.0-1.0。而画图中的RGB范围为0-255,所以前三个参数需要除以255。第四个参数表示透明度。
9 |
10 | 
11 |
12 | ```java
13 | // ...省略
14 | // **注意是引用这个**
15 | import com.badlogic.gdx.graphics.Color;
16 |
17 | public class ExampleMod implements EditCardsSubscriber {
18 | // 除以255得出需要的参数。你也可以直接写出计算值。
19 | public static final Color MY_COLOR = new Color(79.0F / 255.0F, 185.0F / 255.0F, 9.0F / 255.0F, 1.0F);
20 |
21 | public ExampleMod() {
22 | BaseMod.subscribe(this);
23 | }
24 | // ...省略
25 | }
26 |
27 | ```
28 | > 数字后面加f或F表示该数字为浮点数。
29 |
30 |
31 | ## 2.添加颜色
32 | 接下来是向basemod注册自己的颜色。这里需要填的东西很多,它们代表的意思本教程一一列举在旁边。你也可以查看对应路径的图片。
33 |
34 | ```java
35 | // 这段代码不能编译
36 | public class ExampleMod implements EditStringsSubscriber,EditCardsSubscriber {
37 | // 人物选择界面按钮的图片
38 | private static final String MY_CHARACTER_BUTTON = "ExampleModResources/img/char/Character_Button.png";
39 | // 人物选择界面的立绘
40 | private static final String MY_CHARACTER_PORTRAIT = "ExampleModResources/img/char/Character_Portrait.png";
41 | // 攻击牌的背景(小尺寸)
42 | private static final String BG_ATTACK_512 = "ExampleModResources/img/512/bg_attack_512.png";
43 | // 能力牌的背景(小尺寸)
44 | private static final String BG_POWER_512 = "ExampleModResources/img/512/bg_power_512.png";
45 | // 技能牌的背景(小尺寸)
46 | private static final String BG_SKILL_512 = "ExampleModResources/img/512/bg_skill_512.png";
47 | // 在卡牌和遗物描述中的能量图标
48 | private static final String SMALL_ORB = "ExampleModResources/img/char/small_orb.png";
49 | // 攻击牌的背景(大尺寸)
50 | private static final String BG_ATTACK_1024 = "ExampleModResources/img/1024/bg_attack.png";
51 | // 能力牌的背景(大尺寸)
52 | private static final String BG_POWER_1024 = "ExampleModResources/img/1024/bg_power.png";
53 | // 技能牌的背景(大尺寸)
54 | private static final String BG_SKILL_1024 = "ExampleModResources/img/1024/bg_skill.png";
55 | // 在卡牌预览界面的能量图标
56 | private static final String BIG_ORB = "ExampleModResources/img/char/card_orb.png";
57 | // 小尺寸的能量图标(战斗中,牌堆预览)
58 | private static final String ENEYGY_ORB = "ExampleModResources/img/char/cost_orb.png";
59 | public static final Color MY_COLOR = new Color(79.0F / 255.0F, 185.0F / 255.0F, 9.0F / 255.0F, 1.0F);
60 |
61 |
62 | public ExampleMod() {
63 | BaseMod.subscribe(this);
64 | // 这里注册颜色
65 | BaseMod.addColor(EXAMPLE_GREEN, MY_COLOR, MY_COLOR, MY_COLOR, MY_COLOR, MY_COLOR, MY_COLOR, MY_COLOR,BG_ATTACK_512,BG_SKILL_512,BG_POWER_512,ENEYGY_ORB,BG_ATTACK_1024,BG_SKILL_1024,BG_POWER_1024,BIG_ORB,SMALL_ORB);
66 | }
67 | ```
68 | *这里缺少一个卡牌颜色的枚举`EXAMPLE_GREEN`。将在下一章介绍。*
69 | 查看接下来一章了解如何添加新人物。
--------------------------------------------------------------------------------
/Tutorials/高级技巧/02 - 依赖其他mod/README.md:
--------------------------------------------------------------------------------
1 | # 依赖
2 |
3 | ## 必要前置依赖
4 |
5 | 如果你要使用`stslib`,`actlikeit`或`lazy man kits`这样的前置mod以减少自己的代码工作量,看这一节。
6 |
7 | 1. 先找到那个mod在steam的位置。例如stslib是在`xxx\steam\steamapps\workshop\content\646570\1609158507`这个位置。
8 |
9 | 2. 打开你项目中的pom.xml,找到``这个结构,像已经写好的`modthespire`和`basemod`一样,这么写:
10 |
11 | ```xml
12 |
13 |
14 | com.megacrit.cardcrawl
15 | slaythespire
16 | 2020-11-30
17 | system
18 | ${Steam.path}/common/SlayTheSpire/desktop-1.0.jar
19 |
20 |
21 | basemod
22 | basemod
23 | 5.33.1
24 | system
25 | ${Steam.path}/workshop/content/646570/1605833019/BaseMod.jar
26 |
27 |
28 | com.evacipated.cardcrawl
29 | ModTheSpire
30 | 3.23.2
31 | system
32 | ${Steam.path}/workshop/content/646570/1605060445/ModTheSpire.jar
33 |
34 |
35 |
36 |
37 | com.evacipated.cardcrawl.mod
38 | stslib
39 | 2.5.0
40 | system
41 | ${Steam.path}/workshop/content/646570/1609158507/StsLib.jar
42 |
43 |
44 | ```
45 |
46 | 3. 如果你使用`idea`,写完后如果右上角有一个刷新按钮,就点击刷新,完成后你就可以使用`stslib`的东西了。
47 |
48 | 4. 最后你要在`ModTheSpire.json`里添加你加入的依赖,这样mts就能知道你使用了该前置mod。
49 | (`dependencies`中写该mod的`modid`。你可以在那个mod的`ModTheSpire.json`中找到。)
50 |
51 | ```json
52 | {
53 | "dependencies": ["basemod", "stslib"]
54 | }
55 | ```
56 |
57 | ## 可选前置依赖(进阶)
58 |
59 | 进阶一点,如果你想使用`遗物升级lib`或`危机合约`这样的前置mod,但你并不想让它们作为必要的前置,仅在开启相应mod时有联动,看这一节。
60 |
61 | 1. 先像添加前置依赖一样将你需要的mod写在`pom.xml`里。
62 |
63 | 2. 在`ModTheSpire.json`里添加`optional_dependencies`。
64 |
65 | ```json
66 | {
67 | "optional_dependencies": ["RelicUpgradeLib"]
68 | }
69 | ```
70 |
71 | 3. 创建一个新的类,并且只在这个类里使用你想依赖的mod的内容。(如果你想使用`遗物升级lib`,可以参考`testmod`是怎么写的,~~`REMEMod`的结构过于混乱不建议参考~~)
72 |
73 | ```java
74 | import relicupgradelib.RelicUpgradeLib;
75 |
76 | public class RelicUpgradeMgr {
77 |
78 | public static void addAllUpgradeRelics() {
79 | // 在这里注册
80 | RelicUpgradeLib.addUpgrade(...);
81 | }
82 | }
83 | ```
84 |
85 | 4. 找一个合适的初始化时机(例如,如果你想依赖`遗物升级lib`,可以在`receiveEditRelics`里,所有遗物注册完后写),判断是否开启该mod。
86 |
87 | ```java
88 | public void receiveEditRelics() {
89 | // 省略
90 |
91 | if (Loader.isModLoaded("RelicUpgradeLib")) {
92 | // 这里调用你对那个mod的管理类的初始化函数
93 | RelicUpgradeMgr.addAllUpgradeRelics();
94 | }
95 | }
96 | ```
97 |
98 | 这样做的话,如果不开启该mod,那么你的mod就不会尝试调用那个mod的内容。
--------------------------------------------------------------------------------
/Tutorials/03 - 添加卡牌效果/README.md:
--------------------------------------------------------------------------------
1 | # 造成6点伤害
2 |
3 | ## 1.卡牌效果
4 | 本章介绍如何让你的卡牌有造成伤害的效果。我们先来介绍`use`这个方法。
5 |
6 | *本章内容有点多,可以先抄写之后再理解。*
7 |
8 | ### use(AbstractPlayer p, AbstractMonster m)
9 |
10 | ```java
11 | /**
12 | * 当卡牌被使用时,调用这个方法。
13 | *
14 | * @param p 你的玩家实体类。
15 | * @param m 指向的怪物类。(无指向时为null,包括攻击所有敌人时)
16 | */
17 | @Override
18 | public void use(AbstractPlayer p, AbstractMonster m) {
19 | }
20 | ```
21 |
22 | 想要让打击具有造成伤害的效果,我们需要向事件队列中添加一个事件。
23 |
24 | > 尖塔各种伤害抽牌等效果都是通过添加action来实现的。这个队列类似于现实生活中的排队,先排到的先执行,没有排到第一个的只能排到队伍的最后一个,等到第一个执行完退出队列轮到第二个,重复直到轮到自己。可以总结成四个字,“先进先出”。(当然有插队的方法,这个另外讨论)
25 |
26 | ```java
27 | /**
28 | * 当卡牌被使用时,调用这个方法。
29 | *
30 | * @param p 你的玩家实体类。
31 | * @param m 指向的怪物类。(无指向时为null,包括攻击所有敌人时)
32 | */
33 | @Override
34 | public void use(AbstractPlayer p, AbstractMonster m) {
35 | AbstractDungeon.actionManager.addToBottom(
36 | new DamageAction(
37 | m,
38 | new DamageInfo(
39 | p,
40 | damage,
41 | DamageType.NORMAL
42 | )
43 | )
44 | );
45 | }
46 | ```
47 |
48 | 写成这样方便读者了解结构。让我们一个一个解释。
49 |
50 | *你并不需要立刻了解以下这些全部,可以先抄写学习*
51 |
52 | ### AbstractDungeon.actionManager.addToBottom(...)
53 | 这行代码的意思是调用`AbstractDungeon`的变量`actionManager`的方法`addToBottom`。
54 | `AbstractDungeon`是一个拥有游戏大部分代码的类(~~游戏作者矢野偷懒把东西都写在这里了~~)。
55 | `actionManager`是游戏的事件队列管理器。
56 | `addToBottom`将你输入的参数添加到事件队列的末尾。
57 |
58 | ### DamageAction(AbstractCreature target, DamageInfo info)
59 | 造成伤害的事件。该事件的构造函数有许多重载,这里使用两个参数的该重载。
60 | `target`是该事件造成伤害的目标,比如你指向的怪物。
61 | `info`是伤害信息。
62 |
63 | ### DamageInfo(AbstractCreature source, int base, DamageType type)
64 | 描述伤害的信息。
65 | `source`是该伤害的来源(比如说玩家)。
66 | `base`是该伤害的数值(关于伤害计算详见另外章节)。
67 | `type`是伤害类型。攻击伤害使用`NORMAL`,非攻击伤害(荆棘等)使用`THORNS`,失去生命使用`HP_LOSS`。
68 |
69 | 综上,这段代码的意思是,向事件队列排入一个来源是玩家,造成该卡牌伤害数值的伤害事件,当该事件排队轮到时执行。
70 |
71 | *Q:写action好麻烦,能不能不在卡牌中写action?*
72 | *A:不能。现在你也许感受不到,但如果你直接在`use`中写效果,会导致你的判断提前执行,让你的卡牌效果出现异常。*
73 |
74 | ## 2.卡牌的数值及升级
75 |
76 | 这张卡牌暂时不能造成伤害,因为我们并没有告诉系统这张牌的伤害数值。在构造方法中这样写。
77 |
78 | Strike.java:
79 | ```java
80 | public Strike() {
81 | super(ID, NAME, IMG_PATH, COST, DESCRIPTION, TYPE, COLOR, RARITY, TARGET);
82 | this.damage = this.baseDamage = 6;
83 | this.tags.add(CardTags.STARTER_STRIKE);
84 | this.tags.add(CardTags.STRIKE);
85 | }
86 | ```
87 | `baseDamage`是卡牌的基础伤害数值,也就是没有计算易伤等之前的伤害。
88 | `tags`是卡牌的标签,例如添加`STARTER_STRIKE`(基础打击)让潘多拉变化这张牌,添加`STRIKE`(打击)让完美打击计算这张牌。注意添加了`STARTER_STRIKE`并不会视为添加了`STRIKE`。
89 |
90 | 接下来在`upgrade`方法中这样写。
91 | ```java
92 | public void upgrade() { // 升级调用的方法
93 | if (!this.upgraded) {
94 | this.upgradeName(); // 卡牌名字变为绿色并添加“+”,且标为升级过的卡牌,之后不能再升级。
95 | this.upgradeDamage(3); // 将该卡牌的伤害提高3点。
96 | }
97 | }
98 | ```
99 |
100 | 好了,这样你便做出一张能造成6点伤害,升级变为9点的打击卡了。恭喜!
101 |
102 | 想知道其他类型的卡牌如何制作,你可以反编译游戏(使用JD-GUI,第一个README.md中提到过)查看原版的卡牌是如何制作的。
103 |
104 | 下一章我们将介绍本地化,请到时候修改你的卡牌类的内容。
105 |
106 | 样例代码中进行了优化,可以查看以少写一些代码。
--------------------------------------------------------------------------------
/Tutorials/00 - 环境配置/ExampleMod/pom.xml:
--------------------------------------------------------------------------------
1 |
2 |
5 | 4.0.0
6 |
7 | ExampleMod
8 | ExampleMod
9 | 1.0-SNAPSHOT
10 | jar
11 |
12 | ExampleMod
13 | sts mod!
14 |
15 |
16 | 1.8
17 | 1.8
18 | 12-22-2020
19 | 3.23.2
20 | D:/xxx/steam/steamapps
21 |
22 |
23 |
24 |
25 | com.megacrit.cardcrawl
26 | slaythespire
27 | 2020-11-30
28 | system
29 | ${Steam.path}/common/SlayTheSpire/desktop-1.0.jar
30 |
31 |
32 | basemod
33 | basemod
34 | 5.33.1
35 | system
36 | ${Steam.path}/workshop/content/646570/1605833019/BaseMod.jar
37 |
38 |
39 | com.evacipated.cardcrawl
40 | ModTheSpire
41 | 3.23.2
42 | system
43 | ${Steam.path}/workshop/content/646570/1605060445/ModTheSpire.jar
44 |
45 |
46 |
47 |
48 | ${project.artifactId}
49 |
50 |
51 | org.apache.maven.plugins
52 | maven-compiler-plugin
53 | 3.7.0
54 |
55 | 1.8
56 | 1.8
57 |
58 |
59 |
60 | org.apache.maven.plugins
61 | maven-antrun-plugin
62 | 1.8
63 |
64 |
65 | package
66 |
67 |
68 |
69 |
70 |
71 |
72 | run
73 |
74 |
75 |
76 |
77 |
78 |
79 |
--------------------------------------------------------------------------------
/Tutorials/高级技巧/03 - 保存数据/README.md:
--------------------------------------------------------------------------------
1 | 保存数据分为两类:全局保存和局内保存。其中全局保存一般使用`SpireConfig`,局内保存一般使用`CustomSavable`,这两个功能分别在`ModTheSpire`Wiki和`Basemod`Wiki上有说明。
2 |
3 | # 全局保存(SpireConfig)
4 | 首先自己选择一个时刻初始化保存数据,例如模组核心的构造函数,`initialize`函数,或者`implements PostInitializeSubscriber`后使用`receivePostInitialize`等接口。本例子使用`receivePostInitialize`接口。
5 |
6 | 读取数据:
7 | ```java
8 | // 为模组核心添加新的字段
9 | public static boolean saveField;
10 |
11 | @Override
12 | public void receivePostInitialize() {
13 | try {
14 | // 设置默认值
15 | Properties defaults = new Properties();
16 | defaults.setProperty("save_field", "false");
17 | // defaults.setProperty("save_field_2", "false");
18 |
19 | // 第一个字符串输入你的modid
20 | SpireConfig config = new SpireConfig("ExampleMod", "Common", defaults);
21 | // 如果之前有数据,则读取本地保存的数据,没有就使用上面设置的默认数据
22 | saveField = config.getBool("save_field");
23 | } catch (IOException var2) {
24 | var2.printStackTrace();
25 | }
26 | }
27 | ```
28 | 除了`boolean`类型,你还可以使用其他数据类型,例如`int`等。
29 |
30 | 当你想要保存时:
31 | ```java
32 | ExampleMod.saveField = true;
33 | try {
34 | SpireConfig config = new SpireConfig("ExampleMod", "Common");
35 | config.setBool("save_field", true);
36 | config.save();
37 | } catch (IOException e) {
38 | e.printStackTrace();
39 | }
40 | ```
41 |
42 | # 局内保存(CustomSavable)
43 |
44 | `CustomSavable`用于保存某局游戏的数据,例如你可以实现自己的**仪式匕首**、**遗传算法**等。
45 |
46 | 当你想保存`CustomCard`、`CustomRelic`、`CustomPotion`的数据时,非常简单:
47 | ```java
48 | // 接入CustomSavable接口,泛型填你要保存的、可以转换为json元素的任意类型
49 | public class Strike extends CustomCard implements CustomSavable {
50 | public int value = 0;
51 |
52 | // 保存
53 | @Override
54 | public Integer onSave() {
55 | return value;
56 | }
57 |
58 | // 读取
59 | @Override
60 | public void onLoad(Integer save) {
61 | this.value = save;
62 | }
63 | }
64 | ```
65 |
66 | 当你想要保存多个数据时,可以使用`ArrayList`或`HashMap`,或者新建一个类进行保存:
67 | ```java
68 | // 接入CustomSavable接口,泛型填ModSaveData
69 | public class Strike extends CustomCard implements CustomSavable {
70 | public int val1 = 0;
71 | public ArrayList val2 = new ArrayList<>();
72 |
73 | // 保存
74 | @Override
75 | public ModSaveData onSave() {
76 | return new ModSaveData(val1, val2);
77 | }
78 |
79 | // 读取
80 | @Override
81 | public void onLoad(ModSaveData save) {
82 | this.val1 = save.val1;
83 | this.val2 = save.val2;
84 | }
85 |
86 | public static class ModSaveData {
87 | public int val1;
88 | public ArrayList val2;
89 |
90 | public ModSaveData(int val1, ArrayList val2) {
91 | this.val1 = val1;
92 | this.val2 = val2;
93 | }
94 | }
95 | }
96 | ```
97 |
98 | 当你想要在其他地方,例如模组核心处保存,需要额外做以下工作:
99 | 1. 接入**至少一个继承了`ISubscriber`的接口**,例如`EditCardsSubscriber`等。如果你不想产生额外函数,接入`ISubscriber`即可。
100 | 2. 在构造函数使用`BaseMod.subscribe`和`BaseMod.addSaveField`。
101 | ```java
102 | //
103 | @SpireInitializer
104 | public class ExampleMod implements ISubscriber, CustomSavable {
105 | public ExampleMod() {
106 | // 至少订阅一次
107 | BaseMod.subscribe(this);
108 | // 字符串填不会和其他SaveField重名的id
109 | BaseMod.addSaveField("ExampleMod:ModSaveData", this);
110 | }
111 | }
112 | ```
113 | 之后正常编写`onSave`和`onLoad`函数即可。
--------------------------------------------------------------------------------
/Tutorials/07 - 添加新遗物/README.md:
--------------------------------------------------------------------------------
1 | # 为你的人物添加初始遗物
2 |
3 | 尖塔里每个人物都有自己的初始遗物。本章教学如何添加遗物。
4 |
5 | 经过之前章节的学习,你大概了解了如何添加一个尖塔内容:
6 |
7 | * 在相应文件夹下创建并编写类
8 | * 编写本地化文件,并在类中使用本地化内容
9 | * 向basemod注册该内容
10 |
11 | 你可以先不看教程尝试如何制作遗物。
12 |
13 |
14 |
15 | ## 1.创建遗物类
16 |
17 | 首先创建一个文件夹管理遗物类,再创建一个遗物类。
18 |
19 | * examplemod
20 | * actions
21 | * cards
22 | * characters
23 | * modcore
24 | * relics
25 | * MyRelic.java <-
26 |
27 | MyRelic.java:
28 | ```java
29 | // 继承CustomRelic
30 | public class MyRelic extends CustomRelic {
31 | // 遗物ID(此处的ModHelper在“04 - 本地化”中提到)
32 | public static final String ID = ModHelper.makePath("MyRelic");
33 | // 图片路径(大小128x128,可参考同目录的图片)
34 | private static final String IMG_PATH = "ExampleModResources/img/relics/MyRelic.png";
35 | // 遗物未解锁时的轮廓。可以不使用。如果要使用,取消注释
36 | // private static final String OUTLINE_PATH = "ExampleModResources/img/relics/MyRelic_Outline.png";
37 | // 遗物类型
38 | private static final RelicTier RELIC_TIER = RelicTier.STARTER;
39 | // 点击音效
40 | private static final LandingSound LANDING_SOUND = LandingSound.FLAT;
41 |
42 | public MyRelic() {
43 | super(ID, ImageMaster.loadImage(IMG_PATH), RELIC_TIER, LANDING_SOUND);
44 | // 如果你需要轮廓图,取消注释下面一行并注释上面一行,不需要就删除
45 | // super(ID, ImageMaster.loadImage(IMG_PATH), ImageMaster.loadImage(OUTLINE_PATH), RELIC_TIER, LANDING_SOUND);
46 | }
47 |
48 | // 获取遗物描述,但原版游戏只在初始化和获取遗物时调用,故该方法等于初始描述
49 | public String getUpdatedDescription() {
50 | return this.DESCRIPTIONS[0];
51 | }
52 |
53 | public AbstractRelic makeCopy() {
54 | return new MyRelic();
55 | }
56 | }
57 | ```
58 |
59 | 添加效果只需要在你需要触发时机的方法中书写效果即可。例如下方的方法表示战斗开始时抽一张牌。
60 | ```java
61 | public class MyRelic extends CustomRelic {
62 | // ...其余省略
63 | @Override
64 | public void atBattleStart() {
65 | super.atBattleStart();
66 | this.addToBot(new DrawCardAction(1));
67 | }
68 | // ...
69 | }
70 | ```
71 |
72 | ## 2.本地化内容
73 | 遗物类只需要保证ID对的上即可。
74 |
75 | relics.json:
76 | ```json
77 | {
78 | "ExampleMod:MyRelic": {
79 | "NAME": "测试遗物", // 名称
80 | "FLAVOR": "这个人很懒,什么都没写", // 遗物检视界面的风味描述
81 | "DESCRIPTIONS": [
82 | "每场战斗开始时,抽 #b1 张牌。" // 描述。注意不要忘记中括号(表示数组)。这里#b表示染成蓝色,详见新手必备知识。
83 | ]
84 | }
85 | }
86 | ```
87 |
88 | ## 3.注册内容
89 | 在basemod中注册。
90 |
91 | ExampleMod.java:
92 | ```java
93 | public class ExampleMod implements EditCardsSubscriber, EditStringsSubscriber, EditCharactersSubscriber,
94 | EditRelicsSubscriber { // 新增
95 | // ...其余省略
96 |
97 | public void receiveEditStrings() {
98 | String lang;
99 | if (Settings.language == GameLanguage.ZHS) {
100 | lang = "ZHS";
101 | } else {
102 | lang = "ENG";
103 | }
104 | BaseMod.loadCustomStringsFile(CardStrings.class, "ExampleResources/localization/" + lang + "/cards.json");
105 | BaseMod.loadCustomStringsFile(CharacterStrings.class, "ExampleResources/localization/" + lang + "/characters.json");
106 | // 添加注册json
107 | BaseMod.loadCustomStringsFile(RelicStrings.class, "ExampleResources/localization/" + lang + "/relics.json");
108 | }
109 |
110 | @Override
111 | public void receiveEditRelics() {
112 | BaseMod.addRelic(new MyRelic(), RelicType.SHARED); // RelicType表示是所有角色都能拿到的遗物,还是一个角色的独有遗物
113 | }
114 | }
115 | ```
116 |
117 | 如果你想添加到初始遗物:
118 |
119 | MyCharacter.java:
120 | ```java
121 | public ArrayList getStartingRelics() {
122 | ArrayList retVal = new ArrayList<>();
123 | retVal.add(MyRelic.ID); // 这里
124 | return retVal;
125 | }
126 | ```
127 |
--------------------------------------------------------------------------------
/Tutorials/高级技巧/04 - BaseMod提供的工具/README.md:
--------------------------------------------------------------------------------
1 | # BaseMod提供的工具
2 |
3 | basemod提供了许多方便写mod的妙妙小工具,你可以不会用,但不能不知道有这些东西。下面简单介绍一下其中一些。
4 |
5 | - [AutoAdd](#autoadd)
6 | - [CardModifier](#card-modifier)
7 | - [Custom Savable](#custom-savable)
8 | - [Dynamic Text Blocks](#dynamic-text-blocks)
9 | - [ReflectionHacks](#reflectionhacks)
10 |
11 | ## AutoAdd
12 |
13 | wiki:https://github.com/daviscook477/BaseMod/wiki/AutoAdd
14 |
15 | `AutoAdd`让你免受需要一个一个添加卡牌或者遗物的痛苦。
16 |
17 | 不用再:
18 | ```java
19 | @Override
20 | public void receiveEditCards()
21 | {
22 | BaseMod.addCard(new Card1());
23 | BaseMod.addCard(new Card2());
24 | BaseMod.addCard(new Card3());
25 | BaseMod.addCard(new Card4());
26 | // ...
27 | }
28 | ```
29 |
30 | 而是:
31 | ```java
32 | @Override
33 | public void receiveEditCards()
34 | {
35 | new AutoAdd("ExampleMod") // 这里填写你在ModTheSpire.json中写的modid
36 | .packageFilter(AbstractExampleCard.class) // 寻找所有和此类同一个包及内部包的类(本例子是所有卡牌)
37 | .setDefaultSeen(true) // 是否将卡牌标为可见
38 | .cards(); // 开始批量添加卡牌
39 | }
40 | ```
41 |
42 | 如果你不想一张卡被自动注册,对其打上`@AutoAdd.Ignore`注解即可。
43 |
44 | `AutoAdd`不止可以批量添加卡牌遗物,还可以使用`any()`方法批量添加任意内容。
45 |
46 | 具体查看wiki和自行查看源码。
47 |
48 | ## Card Modifier
49 |
50 | wiki:https://github.com/daviscook477/BaseMod/wiki/CardModifiers
51 |
52 | `CardModifier`可以看成给卡牌上一个buff。你可以使用`CardModifier`给卡牌添加额外的消耗、保留、虚无等,或者各种额外效果。
53 |
54 | ### 简单用途:
55 | 添加:
56 | ```java
57 | // 给卡牌添加消耗modifier
58 | CardModifierManager.addModifier(card, new ExhaustMod());
59 | ```
60 | 这样以后,这张卡牌就带有消耗,描述会加上消耗,*并且在被复制时也会将消耗一同复制。*
61 |
62 | 移除方式一:
63 | ```java
64 | // 通过ID删除modifier
65 | CardModifierManager.removeModifiersById(card, ExhaustMod.ID, false);
66 | ```
67 | 第三个参数表示你是否希望让一个`modifier`可以有额外检测是否能被移除,可以通过重写`isInherent`方法实现。大多数情况输入`false`即可。
68 |
69 | ### 示例:
70 | 以下是一个示例的自定义标记`modifier`,表示一张卡牌是复制品:
71 | ```java
72 | public class CopyModifier extends AbstractCardModifier {
73 | public static String ID = "ExampleMod:CopyModifier";
74 | private static final UIStrings STRINGS = CardCrawlGame.languagePack.getUIString(ID);
75 |
76 | // 修改描述
77 | @Override
78 | public String modifyDescription(String rawDescription, AbstractCard card) {
79 | return String.format(STRINGS.TEXT[0], rawDescription);
80 | }
81 |
82 | @Override
83 | public AbstractCardModifier makeCopy() {
84 | return new CopyModifier();
85 | }
86 |
87 | // modifier的ID
88 | @Override
89 | public String identifier(AbstractCard card) {
90 | return ID;
91 | }
92 | }
93 | ```
94 | json:
95 | ```json
96 | "ExampleMod:CopyModifier": {
97 | "TEXT": [
98 | " *复制品 。 NL %s"
99 | ]
100 | },
101 | ```
102 | 如果要实现`复制一张卡牌,不能复制已经复制过的卡牌`的效果,可以使用`CardModifierManager.hasModifier`检测卡牌是否拥有此`modifier`,如果没有则复制卡牌,使用`CardModifierManager.addModifier`给卡牌加上此`modifier`。
103 |
104 | ### 注意事项:
105 | 如果给`masterDeck`中的卡牌添加`modifier`,它们会自动保存。可以通过打上`@AbstractCardModifier.SaveIgnore`注解跳过被保存。
106 |
107 | ## Custom Savable
108 |
109 | 用于局内保存。查看《03 - 保存数据》。
110 |
111 | ## Dynamic Text Blocks
112 |
113 | wiki:https://github.com/daviscook477/BaseMod/wiki/Dynamic-Text-Blocks
114 |
115 | 这是一个动态卡牌描述的功能,主要用来解决英文文本中的单复数问题。
116 |
117 | ```json
118 | "DESCRIPTION": "{@@}Draw !M! card{!M!|>1=s}."
119 | ```
120 | 在文本中添加`{@@}`表示你希望使用此功能。一般放在开头即可。
121 |
122 | `{!M!|>1=s}`表示当`magicNumber`大于1时,这个字符串表示为`s`,否则不表示。
123 |
124 | 因此,当`magicNumber`为1时,文本则为:`Draw 1 card.`
125 |
126 | 当`magicNumber`大于1时,文本则为:`Draw n cards.`
127 |
128 | 其他功能和如何注册自定义检测器查看wiki。
129 |
130 | ## ReflectionHacks
131 |
132 | 该类提供了java反射相关的工具。它缓存了你读取的信息以提高运行效率,因此如果要使用反射使用此功能更好。
133 |
134 | ### 例子:
135 |
136 | 例如,你希望获得`AbstractPlayer`类中的`hoveredMonster`变量,但是可恶的矢野将它设置成了私有变量:
137 | ```java
138 | private AbstractMonster hoveredMonster;
139 | ```
140 | 因此这样不行:
141 | ```java
142 | AbstractMonster m = AbstractDungeon.player.hoveredMonster;
143 | ```
144 | 此时需要使用反射:
145 | ```java
146 | AbstractMonster m = ReflectionHacks.getPrivate(AbstractDungeon.player, AbstractPlayer.class, "hoveredMonster");
147 | ```
148 |
149 | 其他用法查看`ReflectionHacks`源码。
--------------------------------------------------------------------------------
/Tutorials/09 - 添加新能力/README.md:
--------------------------------------------------------------------------------
1 | # 添加新能力
2 |
3 | 能力的制作很简单,因为不需要注册就能用。
4 |
5 | ## 1. 编写能力类
6 |
7 | 要创建一个新能力,首先创建一个powers文件夹管理,然后新建一个类。
8 |
9 | ```java
10 | public class ExamplePower extends AbstractPower {
11 | // 能力的ID
12 | public static final String POWER_ID = ModHelper.makePath("ExamplePower");
13 | // 能力的本地化字段
14 | private static final PowerStrings powerStrings = CardCrawlGame.languagePack.getPowerStrings(POWER_ID);
15 | // 能力的名称
16 | private static final String NAME = powerStrings.NAME;
17 | // 能力的描述
18 | private static final String[] DESCRIPTIONS = powerStrings.DESCRIPTIONS;
19 |
20 | public ExamplePower(AbstractCreature owner, int Amount) {
21 | this.name = NAME;
22 | this.ID = POWER_ID;
23 | this.owner = owner;
24 | this.type = PowerType.BUFF;
25 |
26 | // 如果需要不能叠加的能力,只需将上面的Amount参数删掉,并把下面的Amount改成-1就行
27 | this.amount = Amount;
28 |
29 | // 添加一大一小两张能力图
30 | String path128 = "ExampleModResources/img/powers/Example84.png";
31 | String path48 = "ExampleModResources/img/powers/Example32.png";
32 | this.region128 = new AtlasRegion(ImageMaster.loadImage(path128), 0, 0, 84, 84);
33 | this.region48 = new AtlasRegion(ImageMaster.loadImage(path48), 0, 0, 32, 32);
34 |
35 | // 首次添加能力更新描述
36 | this.updateDescription();
37 | }
38 |
39 | // 能力在更新时如何修改描述
40 | public void updateDescription() {
41 | this.description = DESCRIPTIONS[0] + this.amount + DESCRIPTIONS[1];
42 | }
43 | }
44 | ```
45 |
46 | *以上图像加载的写法过于占用内存。你可以考虑使用静态变量的方式改变。*
47 |
48 | ## 2.添加效果
49 |
50 | 这里我们举例做一个受到未被格挡的伤害时回复能力层数血量的能力。只要在能力类里重载受到伤害时方法,再实现效果就行。
51 |
52 | 当你需要特定条件的能力时,只要思考原版什么能力可以参考去看就行。
53 |
54 | ```java
55 | public class ExamplePower extends AbstractPower {
56 | // 省略其他
57 |
58 | // 被攻击时
59 | public int onAttacked(DamageInfo info, int damageAmount) {
60 | // 非荆棘伤害,非生命流失伤害,伤害来源不为空,伤害来源不是能力持有者本身,伤害大于0
61 | if (info.type != DamageType.THORNS && info.type != DamageType.HP_LOSS && info.owner != null && info.owner != this.owner && damageAmount > 0) {
62 | // 能力闪烁一下
63 | this.flash();
64 |
65 | // 添加回复action
66 | this.addToTop(new HealAction(owner, owner, this.amount));
67 | }
68 |
69 | // 如果该能力不会修改受到伤害的数值,按原样返回即可
70 | return damageAmount;
71 | }
72 | // 省略其他
73 | }
74 | ```
75 |
76 | ## 3.本地化文本
77 |
78 | 我们已经写过很多本地化文本了,相信你已经得心应手了。
79 |
80 | powers.json:
81 | ```json
82 | {
83 | "ExampleMod:ExamplePower": {
84 | "NAME": "示例能力",
85 | "DESCRIPTIONS": [ // 注意这里最后的S,很人都没注意所以出了问题!!!!!!!!!
86 | "当你受到 #y未被格挡 的攻击伤害时,回复 #b",
87 | " 点生命。" // #y #b 表示把文本染成黄色和蓝色。
88 | ]
89 | }
90 | }
91 | ```
92 |
93 | modcore.java:
94 | ```java
95 | public void receiveEditStrings() {
96 | String lang;
97 | if (Settings.language == GameLanguage.ZHS) {
98 | lang = "ZHS";
99 | } else {
100 | lang = "ENG";
101 | }
102 | BaseMod.loadCustomStringsFile(CardStrings.class, "ExampleResources/localization/" + lang + "/cards.json");
103 | BaseMod.loadCustomStringsFile(CharacterStrings.class, "ExampleResources/localization/" + lang + "/characters.json");
104 | BaseMod.loadCustomStringsFile(RelicStrings.class, "ExampleResources/localization/" + lang + "/relics.json");
105 | // 添加power json
106 | BaseMod.loadCustomStringsFile(PowerStrings.class, "ExampleResources/localization/" + lang + "/powers.json");
107 | }
108 | ```
109 |
110 | ## 4.一些优化
111 |
112 | ### 4.1.描述翻新
113 |
114 | 像原版那样,一段描述拆成两个字符串真的太反人类了。我们可以使用格式化字符串等优化。如下:
115 |
116 | powers.json:
117 | ```json
118 | {
119 | "ExampleMod:ExamplePower": {
120 | "NAME": "示例能力",
121 | "DESCRIPTIONS": [ // 注意这里最后的S,很多新手都没注意所以出了问题!!!!!!!!!
122 | "当你受到 #y未被格挡 的攻击伤害时,回复 #b%d 点生命。" // %d表示能被格式化成int,不懂的建议学习java字符串相关知识
123 | ]
124 | }
125 | }
126 | ```
127 |
128 | ExamplePower.java:
129 | ```java
130 | public class ExamplePower extends AbstractPower {
131 | // 省略其他
132 |
133 | // 能力在更新时如何修改描述
134 | public void updateDescription() {
135 | this.description = String.format(DESCRIPTIONS[0], this.amount); // 这样,%d就被替换成能力的层数
136 | }
137 | // 省略其他
138 | }
139 | ```
140 |
141 | ## 5.最后
142 |
143 | 这样,使用`ApplyPowerAction`就能添加power了。(如何使用这个action参考其他给予能力的卡牌)
144 |
145 | 文件夹下放了原版的能力图,可以作为学习被直接使用。
--------------------------------------------------------------------------------
/Tutorials/02 - 添加新卡牌/README.md:
--------------------------------------------------------------------------------
1 | # “你好,打击!”
2 |
3 | 相对于编程入门的打印“hello world!”,制作出一张能运行的打击卡就算是mod制作入门了。
4 |
5 | ## 1.创建卡牌类
6 |
7 | 首先,你需要创建一个卡牌类。在那之前创建一个文件夹管理所有卡牌。
8 |
9 | * examplemod
10 | * cards
11 | * Strike.java
12 | * modcore
13 |
14 | 要让java或basemod知道你这个类是一张卡牌,你需要继承CustomCard类。
15 |
16 | Strike.java:
17 | ```java
18 | // 这段代码不能编译
19 | public class Strike extends CustomCard {
20 |
21 | }
22 | ```
23 |
24 | 这时候,你的代码编辑器会提醒你出错了(出现红色波浪线)。鼠标移到错误上,它提醒你没有继承抽象方法。你需要重写`upgrade()`方法和`use()`方法,因为这两个方法分别代表升级卡牌需要调用的方法和使用卡牌调用的方法,这对于一张卡牌是必须的。
25 |
26 | > 如果你使用的代码编辑器有智能纠正功能,你可以将光标移动到错误代码处,然后按下纠错键(idea为alt+enter,vscode为ctrl+.)选择你需要的纠错选项。
27 |
28 | 除此以外,你还需要添加一个构造方法。
29 |
30 | Strike.java:
31 | ```java
32 | // 这段代码不能编译
33 | public class Strike extends CustomCard {
34 | public Strike() {
35 | super(id, name, img, cost, rawDescription, type, color, rarity, target);
36 | }
37 |
38 | // 这些方法怎么写,之后再讨论
39 | @Override
40 | public void upgrade() {
41 |
42 | }
43 |
44 | @Override
45 | public void use(AbstractPlayer p, AbstractMonster m) {
46 | }
47 |
48 | }
49 | ```
50 |
51 | ## 2.添加卡牌信息
52 |
53 | 你发现这段代码还是一片红。电脑告诉你像`id`、`name`等这些参数没有定义。你需要告诉它你这张卡牌的信息。本教程建议你把这些信息写成常量方便管理。
54 |
55 | Strike.java:
56 | ```java
57 | public class Strike extends CustomCard {
58 | public static final String ID = "ExampleMod:Strike";
59 | private static final String NAME = "打击";
60 | private static final String IMG_PATH = "ExampleModResources/img/cards/Strike.png";
61 | private static final int COST = 1;
62 | private static final String DESCRIPTION = "造成 !D! 点伤害。";
63 | private static final CardType TYPE = CardType.ATTACK;
64 | private static final CardColor COLOR = CardColor.COLORLESS;
65 | private static final CardRarity RARITY = CardRarity.BASIC;
66 | private static final CardTarget TARGET = CardTarget.ENEMY;
67 |
68 | public Strike() {
69 | // 为了命名规范修改了变量名。这些参数具体的作用见下方
70 | super(ID, NAME, IMG_PATH, COST, DESCRIPTION, TYPE, COLOR, RARITY, TARGET);
71 | }
72 |
73 | @Override
74 | public void upgrade() {
75 |
76 | }
77 |
78 | @Override
79 | public void use(AbstractPlayer p, AbstractMonster m) {
80 | }
81 |
82 | }
83 | ```
84 |
85 | 一下子写了很多信息可能一下子反应不过来。我们一个一个解释。
86 |
87 | ### ID
88 | ID是一张卡牌的同种类标识,用来区分不同卡名的卡牌。例如:
89 | * 打击和防御的ID不同。
90 | * 打击和打击+的ID相同。
91 | * 一张痛击和另一张痛击的ID相同。
92 | * 不同颜色的打击的ID是不同的。(例如蓝色打击为"Strike_B",红色打击为"Strike_R")
93 |
94 | 为了和其他mod区分开来,你需要在ID之前加上你的modid前缀。
95 | ```java
96 | public static final String ID = "ExampleMod:Strike";
97 | ```
98 |
99 | ### NAME
100 | NAME是显示在卡牌上方的卡牌名字。
101 |
102 | ### IMG_PATH
103 | IMG_PATH是该卡牌卡图的路径。它从`resources`文件夹开始查找。你可以把一张处理好的卡图放在该文件夹下,再为这个变量赋值你输入的路径即可配对卡图。
104 | > 1.对于资源路径,也建议套一层文件夹以防和其他mod的资源重名。
105 |
106 | > 2.尖塔的卡图需要一张图的两个尺寸,你需要准备一张大小为500 * 380的xxx_p.png(注意后缀)和一张大小为250 * 190的xxx.png,并将他们放在同一个文件夹下。读取时只需要读取无后缀名的png。注意为了美观裁剪成尖塔需要的形状。(文件夹中准备了两张打击图,可直接复制学习用)
107 |
108 | > 3.该路径为相对路径,从`resources`文件夹开始查找,例如下方的路径查找的是`resources/ExampleModResources/img/cards/Strike.png`。
109 |
110 | *例子:*
111 |
112 | 目录:
113 | * java
114 | * resources
115 | * ExampleModResources <- 套一层自己的文件夹
116 | * img
117 | * cards
118 | * Strike.png
119 | * Strike_p.png
120 |
121 | *注意并不是java的子文件夹,是和java文件夹平行的resources文件夹*
122 |
123 | Strike.java:
124 | ```java
125 | private static final String IMG_PATH = "ExampleModResources/img/cards/Strike.png";
126 | ```
127 |
128 | 你可以自己按分类创建攻击卡,技能卡和能力卡的卡图文件夹,怎么管理资源就见仁见智了。
129 |
130 | ### COST
131 | 卡牌的费用。
132 |
133 | 特殊的:-2费不显示能量图标(如诅咒卡状态卡等),-1费为X费(旋风斩等)。
134 |
135 | ### DESCRIPTION
136 | 卡牌的描述。
137 |
138 | 尖塔使用了自己的描述方式,该方面见另外的教程。本教程中,` !D! `(前后空格)将被伤害数值替代。
139 | //TODO
140 | ```java
141 | private static final String DESCRIPTION = "造成 !D! 点伤害。";
142 | ```
143 |
144 | ### TYPE
145 | 卡牌类型。(攻击牌、技能牌、能力牌、诅咒牌、状态牌)
146 |
147 | *Q:能自定义卡牌类型吗?*
148 | *A:自定义卡牌类型需要修改很多地方,并且极大可能与其他mod不兼容,一般禁止自定义卡牌类型,但可以修改卡牌类型的描述文字(卡牌中间)。关于如何修改详见patch章节。*
149 |
150 | ### COLOR
151 | 卡牌颜色,比如原版的红、绿、蓝、紫、无色,诅咒。
152 |
153 | ### RARITY
154 | 卡牌稀有度。
155 |
156 | | 枚举 | 名称 | 出现在战斗奖励和商店 | 卡框颜色 | 说明 |
157 | | --- | --- | --- | --- | --- |
158 | | BASIC | 基础 | X | 灰 | 打击、防御、痛击等 |
159 | | COMMON | 普通 | √ | 灰 | |
160 | | UNCOMMON | 罕见 | √ | 蓝 | |
161 | | RARE | 稀有 | √ | 金 | |
162 | | SPECIAL | 特殊 | X | 灰 | 小刀等衍生牌,JAX等事件牌 |
163 | | CURSE | 诅咒 | X | 灰 | 诅咒需要卡牌颜色和稀有度都为CURSE。 |
164 |
165 | ### TARGET
166 | 卡牌指向类型的目标。实际功能只有是否指向敌人的区分。
167 |
168 | 这样,一张卡牌就制作完成了。在你的modcore类注册该卡牌,打包后运行游戏即可在图书馆看到这张卡。
169 |
170 | ExampleMod.java:
171 | ```java
172 | public void receiveEditCards() {
173 | // 向basemod注册卡牌
174 | BaseMod.addCard(new Strike());
175 | }
176 | ```
177 |
178 | 在游戏控制台键入`hand add [card_id]`。如果出现了这张牌,说明你成功注册了它。如果没有,检查你的代码直到出现。
179 |
180 | > 如何使用[控制台](https://github.com/daviscook477/BaseMod/wiki/Console)?
181 |
182 | *如果你的代码报错并且输出了报错信息(前提是mts中勾选debug),你可以查看哪里出错。详见其他章节。*
183 |
184 | 事例代码依旧在文件夹下。注意这些代码缺少了package,并不能实际运行。(~~就是别照抄的意思~~)
185 |
186 | 然后你发现这张卡牌并没有任何效果。查看下一章如何书写卡牌效果。
--------------------------------------------------------------------------------
/Tutorials/12 - 添加新怪物/README.md:
--------------------------------------------------------------------------------
1 | 这篇教程只讲解如何制作基础的怪物和添加怪物,如要制作**觉醒者**、**小黑**这类特殊的怪物请读者自行使用**jd-gui**反编译原版游戏进行代码查阅和学习。
2 |
3 |
4 | ```java
5 | public class MyMonster extends CustomMonster {
6 | // 怪物ID(此处的ModHelper在“04 - 本地化”中提到)
7 | private static final String ID = ModHelper.makePath("MyMonster");
8 | private static final MonsterStrings monsterStrings = CardCrawlGame.languagePack.getMonsterStrings(ID);
9 | public static final String NAME = monsterStrings.NAME;
10 | // 怪物的图片,请自行添加
11 | public static final String IMG = "";
12 |
13 | public MyMonster(float x, float y) {
14 | // 参数的作用分别是:
15 | // 名字
16 | // ID
17 | // 最大生命值,由于在之后还会设置可以随意填写
18 | // hitbox偏移量 - x方向
19 | // hitbox偏移量 - y方向
20 | // hitbox大小 - x方向(会影响血条宽度)
21 | // hitbox大小 - y方向
22 | // 图片
23 | // 怪物位置(x,y)
24 | super(NAME, ID, 140, 0.0F, 0.0F, 250.0F, 270.0F, IMG, x, y);
25 |
26 | // 如果你要做进阶改变血量和伤害意图等,这样写
27 | if (AbstractDungeon.ascensionLevel >= 7) {
28 | this.setHp(155, 166);
29 | } else {
30 | this.setHp(150, 160);
31 | }
32 |
33 | // 怪物伤害意图的数值
34 | int slashDmg;
35 | int multiDmg;
36 | if (AbstractDungeon.ascensionLevel >= 2) {
37 | slashDmg = 20;
38 | multiDmg = 5;
39 | } else {
40 | slashDmg = 18;
41 | multiDmg = 7;
42 | }
43 | // 意图0的伤害
44 | this.damage.add(new DamageInfo(this, slashDmg));
45 | // 意图1的伤害
46 | this.damage.add(new DamageInfo(this, multiDmg));
47 | }
48 |
49 | // 战斗开始时
50 | @Override
51 | public void usePreBattleAction() {
52 | super.usePreBattleAction();
53 | AbstractDungeon.actionManager.addToBottom(new ApplyPowerAction(this, this, new RitualPower(this, 5, false)));
54 | }
55 |
56 | // 当怪物roll意图的时候,这里设置其意图。num是一个0~99的随机数。
57 | @Override
58 | public void getMove(int num) {
59 | // 有40%的概率执行意图0,60%执行意图1
60 | int move;
61 | if (num < 40) {
62 | this.setMove((byte)0, Intent.ATTACK, damage.get(0).base);
63 | } else {
64 | this.setMove((byte)1, Intent.ATTACK, damage.get(1).base, 3, true);
65 | }
66 | }
67 |
68 | // 执行动作
69 | @Override
70 | public void takeTurn() {
71 | // nextMove就是roll到的意图,0就是意图0,1就是意图1
72 | switch(this.nextMove) {
73 | case 0:
74 | AbstractDungeon.actionManager.addToBottom(new DamageAction(AbstractDungeon.player, this.damage.get(0), AbstractGameAction.AttackEffect.SLASH_HEAVY));
75 | break;
76 | case 1:
77 | for(int i = 0 ; i < 2 ; i++){
78 | AbstractDungeon.actionManager.addToBottom(new DamageAction(AbstractDungeon.player, this.damage.get(1), AbstractGameAction.AttackEffect.SLASH_DIAGONAL));
79 | }
80 | AbstractDungeon.actionManager.addToBottom(new DamageAction(AbstractDungeon.player, this.damage.get(1), AbstractGameAction.AttackEffect.SLASH_HEAVY));
81 | }
82 |
83 | // 要加一个rollmove的action,重roll怪物的意图
84 | AbstractDungeon.actionManager.addToBottom(new RollMoveAction(this));
85 | }
86 | }
87 | ```
88 |
89 | 由于没有添加怪物的接口,在你的主类里,你可以写在任意初始化接口中:
90 | ```java
91 | @Override
92 | public void receivePostInitialize() {
93 | receiveEditMonsters();
94 | }
95 |
96 | private void receiveEditMonsters() {
97 | // 注册怪物组合,你可以多添加几个怪物
98 | BaseMod.addMonster("ExampleMod:MyMonster", MyMonster.NAME, () -> new MyMonster(0.0F, 0.0F));
99 | // 两个异鸟
100 | // BaseMod.addMonster("ExampleMod:2 Byrds", "", () -> new MonsterGroup(new AbstractMonster[] { new Byrd(-80.0F, MathUtils.random(25.0F, 70.0F)), new Byrd(200.0F, MathUtils.random(25.0F, 70.0F)) }));
101 |
102 | // 添加战斗遭遇
103 | // 在第二章添加精英遭遇,权重为1.0,权重越高越可能遇到
104 | BaseMod.addEliteEncounter("TheCity", new MonsterInfo("ExampleMod:MyMonster", 1.0F));
105 | }
106 | ```
107 | 如果要添加弱怪、强怪,使用`BaseMod.addMonsterEncounter`和`BaseMod.addStrongMonsterEncounter`。
108 |
109 | 此外,不要忘了添加本地化文件。
110 |
111 | ```java
112 | public void receiveEditStrings() {
113 | String lang;
114 | if (Settings.language == GameLanguage.ZHS) {
115 | lang = "ZHS";
116 | } else {
117 | lang = "ENG";
118 | }
119 | BaseMod.loadCustomStringsFile(CardStrings.class, "ExampleResources/localization/" + lang + "/cards.json");
120 | BaseMod.loadCustomStringsFile(CharacterStrings.class, "ExampleResources/localization/" + lang + "/characters.json");
121 | BaseMod.loadCustomStringsFile(RelicStrings.class, "ExampleResources/localization/" + lang + "/relics.json");
122 | BaseMod.loadCustomStringsFile(PowerStrings.class, "ExampleResources/localization/" + lang + "/powers.json");
123 | // 新的
124 | BaseMod.loadCustomStringsFile(MonsterStrings.class, "ExampleResources/localization/" + lang + "/monsters.json");
125 | }
126 | ```
127 |
128 | monsters.json:
129 | ```json
130 | {
131 | "ExampleMod:MyMonster":{
132 | "NAME":"示例怪物",
133 | "DIALOG": [""]
134 | }
135 | }
136 | ```
--------------------------------------------------------------------------------
/Tutorials/04 - 本地化/README.md:
--------------------------------------------------------------------------------
1 | # 本地化内容
2 |
3 | 通常你想向不同语言的玩家提供不同语言的内容。这时候需要按照杀戮尖塔的方式本地化。
4 |
5 | ## 1. 创建文本资源
6 |
7 | 1. 让我们先来创建一个文件夹管理本地化资源。
8 |
9 | * src
10 | * main
11 | * java
12 | * resources
13 | * ExampleResources
14 | * localization
15 | * images
16 | * ModTheSpire.json
17 |
18 | 2. 你可以创建不同文件夹放置不同语言的资源。
19 |
20 | * localization
21 | * ZHS
22 | * ENG
23 | * JPN
24 | * ...
25 |
26 | 3. 我们先编写一个中文版本。在`ZHS`(简体中文)文件夹下创建一个新文件`cards.json`,并依葫芦画瓢填写。
27 |
28 | cards.json:
29 | ```json
30 | {
31 | "ExampleMod:Strike": { // 这里填写你卡牌的ID
32 | "NAME": "打击", // 卡名
33 | "DESCRIPTION": "造成 !D! 点伤害。", // 原始描述
34 | "UPGRADE_DESCRIPTION": " 固有 。 NL 造成 !D! 点伤害。" // [可选],升级描述,若升级前后只是数值的变化可不写
35 | }
36 | }
37 | ```
38 |
39 | *请在你的文件里删除括号及其里面的注释!!!!!!!!*
40 |
41 | *你发现伤害数值需要用`!D!`代替,关键词前后需要有空格,并且不显示升级后的文本。这些内容在另外的章节介绍。(见新手必备知识-杀戮尖塔描述写法)*
42 |
43 | ## 2.注册资源和使用资源
44 |
45 | 和注册一张卡牌一样,注册本地化内容需要用到basemod的钩子。以下更新了模组核心。
46 |
47 | ```java
48 | @SpireInitializer
49 | public class ExampleMod implements EditCardsSubscriber, EditStringsSubscriber {
50 | public ExampleMod() {
51 | BaseMod.subscribe(this);
52 | }
53 |
54 | public static void initialize() {
55 | new ExampleMod();
56 | }
57 |
58 | @Override
59 | public void receiveEditCards() {
60 | BaseMod.addCard(new Strike());
61 | }
62 |
63 | public void receiveEditStrings() {
64 | String lang;
65 | if (Settings.language == GameLanguage.ZHS) {
66 | lang = "ZHS"; // 如果语言设置为简体中文,则加载ZHS文件夹的资源
67 | } else {
68 | lang = "ENG"; // 如果没有相应语言的版本,默认加载英语
69 | }
70 | BaseMod.loadCustomStringsFile(CardStrings.class, "ExampleResources/localization/" + lang + "/cards.json"); // 加载相应语言的卡牌本地化内容。
71 | // 如果是中文,加载的就是"ExampleResources/localization/ZHS/cards.json"
72 | }
73 | }
74 | ```
75 |
76 | 你可以自己尝试改成根据语言名字读取文件,而不是上面的ifelse类型的。
77 |
78 | 这样资源就成功加入了。接下来我们修改打击的代码,让它使用本地化资源。
79 |
80 | Strike.java:
81 | ```java
82 | public class Strike extends CustomCard {
83 | public static final String ID = "ExampleMod:Strike";
84 | private static final CardStrings CARD_STRINGS = CardCrawlGame.languagePack.getCardStrings(ID); // 从游戏系统读取本地化资源
85 | // private static final String NAME = "打击";
86 | private static final String NAME = CARD_STRINGS.NAME; // 读取本地化的名字
87 | private static final String IMG_PATH = "";
88 | private static final int COST = 1;
89 | // private static final String DESCRIPTION = "造成 !D! 点伤害。";
90 | private static final String DESCRIPTION = CARD_STRINGS.DESCRIPTION; // 读取本地化的描述
91 | private static final CardType TYPE = CardType.ATTACK;
92 | private static final CardColor COLOR = CardColor.COLORLESS;
93 | private static final CardRarity RARITY = CardRarity.BASIC;
94 | private static final CardTarget TARGET = CardTarget.ENEMY;
95 | // 省略...
96 | }
97 | ```
98 | 好了!现在它能在中文语言下运行。如果你还写了英文文本,那么这张牌在中文和英文语言下都能运行了。
99 |
100 | 如果遇到任何错误,查看查看报错信息一节了解哪步出错了。也可以浏览其他mod是如何处理本地化文本的。
101 |
102 | ## 升级描述
103 |
104 | 如果你发现你的卡牌升级并没有改变描述,是因为你没有写这些:
105 | ```java
106 | @Override
107 | public void upgrade() {
108 | if (!this.upgraded) {
109 | this.upgradeName();
110 | this.upgradeDamage(3);
111 |
112 | // 加上以下两行就能使用UPGRADE_DESCRIPTION了(如果你写了的话)
113 | this.rawDescription = CARD_STRINGS.UPGRADE_DESCRIPTION;
114 | this.initializeDescription();
115 | }
116 | }
117 | ```
118 |
119 |
120 |
121 | *可以先跳过,学习之后的章节*
122 | ## 进阶:简化代码
123 |
124 | ### 简化卡牌ID
125 |
126 | 你发现卡牌ID每张都要写前缀太麻烦了。
127 |
128 | > 02 - 添加新卡牌
为了和其他mod区分开来,你需要在ID之前加上你的modid前缀。
129 |
130 | 为了偷懒,你可以写一个帮手方法。首先创建一个帮手类。
131 |
132 | * modcore
133 | * cards
134 | * helpers
135 | * ModHelper.java <-这里
136 |
137 | ModHelper.java:
138 | ```java
139 | public class ModHelper {
140 | public static String makePath(String id) {
141 | return "ExampleMod:" + id;
142 | }
143 | }
144 | ```
145 |
146 | 通过调用这个方法,你就只需要写实际的ID了。
147 |
148 | ```java
149 | public static final String ID = ModHelper.makePath("Strike");
150 | // ID 实际等于 "ExampleMod:Strike"
151 | ```
152 |
153 | ### 还能再简化?
154 |
155 | 通常,你的卡牌名和类名是一致的,所以直接获取类名即可,此外还可以骗过文本编辑器,让它在复制时直接修改类名,就不用修改ID了。
156 |
157 | ```java
158 | public static final String ID = ModHelper.makePath(Strike.class.getSimpleName());
159 | ```
160 |
161 | ### 小帮手
162 |
163 | 关于可重用代码不仅可以放在帮手类,也可以做一个帮手接口,通过实现默认方法就可以直接调用了。详见文件夹下事例代码。
164 |
165 | ### 为什么只有ID是public的?
166 |
167 | > java 修饰符:
168 | > public表示对所有类可见,也就是所有类都能获取这个变量或调用这个方法。private只有在这个类内部可以获取或调用。
169 |
170 | Strike.java:
171 | ```java
172 | public class Strike extends CustomCard {
173 | public static final String ID = ModHelper.makePath("Strike");
174 | private static final CardStrings CARD_STRINGS = CardCrawlGame.languagePack.getCardStrings(ID);
175 | private static final String NAME = CARD_STRINGS.NAME;
176 | private static final String IMG_PATH = "";
177 | private static final int COST = 1;
178 | private static final String DESCRIPTION = CARD_STRINGS.DESCRIPTION;
179 | private static final CardType TYPE = CardType.ATTACK;
180 | private static final CardColor COLOR = CardColor.COLORLESS;
181 | private static final CardRarity RARITY = CardRarity.BASIC;
182 | private static final CardTarget TARGET = CardTarget.ENEMY;
183 | }
184 | ```
185 |
186 | 直接调用这个常量难道不比手写方便很多。
187 | ```java
188 | card.cardID == "ExampleMod:Strike" // no
189 | Strike.ID.equals(card.cardID)// yes
190 | ```
--------------------------------------------------------------------------------
/Tutorials/前人的代码基础/添加音频及注意事项/README.md:
--------------------------------------------------------------------------------
1 |
2 |
3 | # 一些注意事项
4 |
5 | 如果 Mod 作者想要添加新的音效,可以使用 `BaseMod.addAudio`。
6 |
7 | 由于原版的**硬编码**处理的过程较多,特此添加一些注意事项。
8 | ## 背景音乐
9 | 原版中处理音频的类有以下这些,都在包 `com.megacrit.cardcrawl.audio` 下:
10 |
11 | ```
12 | MusicMaster.class
13 | SoundMaster.class
14 | MainMusic.class
15 | TempMusic.class
16 | ```
17 |
18 | 其中 `SoundMaster.class` 是处理音效的类,例如打击音效、观者的真言音效等等。
19 |
20 | 而 `MusicMaster.class` 是处理音乐的类,例如商店的背景音乐、各层的战斗背景音乐等等。
21 |
22 | 如果 Mod 作者想要类似于**打醒乐嘉维林会改变背景音乐**的效果,让我们先来看看原版是怎么实现的:
23 |
24 | 怪物乐嘉维林类(反编译的部分代码):
25 |
26 | ```
27 | com.megacrit.cardcrawl.monsters.exordium.Lagavulin.class
28 | ```
29 |
30 | ```java
31 | // 战斗开始前乐嘉维林的准备
32 | public void usePreBattleAction() {
33 | // this.asleep 对应的是在开始战斗时乐嘉维林的行为:进入精英房的初始意图是睡觉,并且没有播放音乐;在摸尸体事件中初始意图为强 Debuff,并且立即播放音乐
34 | if (this.asleep) {
35 | // 这一行的意思是缓存乐嘉维林被打醒时的音乐
36 | // 字符串 "ELITE" 对应 TempMusic.class getSong 方法中的 switch 的一个 case
37 | CardCrawlGame.music.precacheTempBgm("ELITE");
38 |
39 | // 获得 8 点格挡,获得 8 点金属化(对应乐嘉在战斗开始时的行为)
40 | AbstractDungeon.actionManager.addToBottom(new GainBlockAction(this, this, 8));
41 | AbstractDungeon.actionManager.addToBottom(new ApplyPowerAction(this, this, new MetallicizePower(this, 8), 8));
42 | } else {
43 | // 取消静音背景音乐
44 | CardCrawlGame.music.unsilenceBGM();
45 | AbstractDungeon.scene.fadeOutAmbiance();
46 |
47 | // 立即播放乐嘉维林的音乐
48 | CardCrawlGame.music.playTempBgmInstantly("ELITE");
49 |
50 | // 设置意图为强 Debuff
51 | setMove(DEBUFF_NAME, 1, AbstractMonster.Intent.STRONG_DEBUFF);
52 | }
53 | }
54 |
55 | // 其他方法...
56 |
57 | // 改变乐嘉维林状态的方法
58 | public void changeState(String stateName) {
59 | if (stateName.equals("ATTACK")) {
60 | this.state.setAnimation(0, "Attack", false);
61 | this.state.addAnimation(0, "Idle_2", true, 0.0F);
62 | } else if (stateName.equals("DEBUFF")) {
63 | this.state.setAnimation(0, "Debuff", false);
64 | this.state.addAnimation(0, "Idle_2", true, 0.0F);
65 | } else if (stateName.equals("OPEN") && !this.isDying) {
66 | // 如果乐嘉的音乐变为 打开 状态并且不是已被击杀的
67 | this.isOut = true;
68 | updateHitbox(0.0F, -25.0F, 320.0F, 360.0F);
69 | AbstractDungeon.actionManager.addToBottom(new TalkAction(this, DIALOG[3], 0.5F, 2.0F));
70 | AbstractDungeon.actionManager.addToBottom(new ReducePowerAction(this, this, "Metallicize", 8));
71 |
72 | // 取消静音背景音乐
73 | CardCrawlGame.music.unsilenceBGM();
74 | AbstractDungeon.scene.fadeOutAmbiance();
75 |
76 | // 立即播放之前缓存的音乐(这里是 usePreBattleAction() 中缓存的 "ELITE" )
77 | CardCrawlGame.music.playPrecachedTempBgm();
78 |
79 | this.state.setAnimation(0, "Coming_out", false);
80 | this.state.addAnimation(0, "Idle_2", true, 0.0F);
81 | }
82 | }
83 |
84 | // 其他方法...
85 |
86 | // 乐嘉维林在死亡时的方法
87 | public void die() {
88 | super.die();
89 |
90 | // 乐嘉维林在死亡时淡出背景音乐
91 | AbstractDungeon.scene.fadeInAmbiance();
92 | CardCrawlGame.music.fadeOutTempBGM();
93 | }
94 | ```
95 |
96 | 从上面这些代码可以得知,如果 Mod 作者想要类似于**打醒乐嘉维林会改变背景音乐**的效果:
97 |
98 | 可以使用原版的 `CardCrawlGame.music.playTempBgmInstantly(String key)` 和 `CardCrawlGame.music.playPrecachedTempBgm()` 方法来**分别** *立即播放* 临时背景音乐 和 *立即播放* 之前 *缓存的* 临时背景音乐。
99 |
100 | 让我们来看看原版的这些方法是怎么写的呢?(反编译的部分代码)
101 |
102 | **请看** `TempMusic.class` 中 `getSong(String key)` 方法的**注意事项**:
103 |
104 | ```
105 | com.megacrit.cardcrawl.audio.MusicMaster.class
106 | ```
107 | ```java
108 | public void playTempBgmInstantly(String key) {
109 | if (key != null) {
110 | logger.info("Playing " + key);
111 |
112 | // new 了一个新的 TempMusic 并加入 tempTrack
113 | this.tempTrack.add(new TempMusic(key, true));
114 |
115 | // 静音其他主背景音乐
116 | for (MainMusic m : this.mainTrack)
117 | m.silenceInstantly();
118 | }
119 | }
120 |
121 | public void precacheTempBgm(String key) {
122 | if (key != null) {
123 | logger.info("Pre-caching " + key);
124 |
125 | // new 了一个新的 TempMusic 并加入 tempTrack
126 | this.tempTrack.add(new TempMusic(key, true, true, true));
127 | }
128 | }
129 |
130 | public void playPrecachedTempBgm() {
131 | if (!this.tempTrack.isEmpty()) {
132 | // 播放之前加入进 tempTrack 的音乐
133 | this.tempTrack.get(0).playPrecached();
134 |
135 | // 静音其他主背景音乐
136 | for (MainMusic m : this.mainTrack)
137 | m.silenceInstantly();
138 | }
139 | }
140 |
141 | public void playTempBgmInstantly(String key, boolean loop) {
142 | if (key != null) {
143 | logger.info("Playing " + key);
144 |
145 | // new 了一个新的 TempMusic 并加入 tempTrack
146 | this.tempTrack.add(new TempMusic(key, true, loop));
147 |
148 | // 静音其他主背景音乐
149 | for (MainMusic m : this.mainTrack)
150 | m.silenceInstantly();
151 | }
152 | }
153 | ```
154 |
155 | **请看** `TempMusic.class` 中 `getSong(String key)` 方法的**注意事项**:
156 |
157 | ```
158 | com.megacrit.cardcrawl.audio.TempMusic.class
159 | ```
160 | ```java
161 | public TempMusic(String key, boolean isFast) {
162 | this(key, isFast, true);
163 | }
164 |
165 | public TempMusic(String key, boolean isFast, boolean loop) {
166 | this.key = key;
167 | this.music = getSong(key);
168 | if (isFast) {
169 | this.fadeTimer = 0.25F;
170 | this.fadeTime = 0.25F;
171 | } else {
172 | this.fadeTimer = 4.0F;
173 | this.fadeTime = 4.0F;
174 | }
175 | this.music.setLooping(loop);
176 | this.music.play();
177 | this.music.setVolume(0.0F);
178 | }
179 |
180 | public TempMusic(String key, boolean isFast, boolean loop, boolean precache) {
181 | this.key = key;
182 | this.music = getSong(key);
183 | if (isFast) {
184 | this.fadeTimer = 0.25F;
185 | this.fadeTime = 0.25F;
186 | } else {
187 | this.fadeTimer = 4.0F;
188 | this.fadeTime = 4.0F;
189 | }
190 | this.music.setLooping(loop);
191 | this.music.setVolume(0.0F);
192 | }
193 |
194 | private Music getSong(String key) {
195 | // 注意到所有的构造 TempMusic 方法都使用了 getSong(String key) 来将 key 映射到某个具体的音乐
196 | // 杀戮尖塔的开发组在这里使用了 **硬编码** 来对应各个音乐
197 | // 显然如果 Mod 作者直接传入对应的 key 的话,需要注意下面几点:
198 | // 1. Mod 作者的音频文件路径和原版一致时这个方法可以正常进行,但这样有 文件冲突 的风险
199 | // 2. 如果不一致,需要使用 Patch 来捕获 key 并提前处理(具体请参见 高级技巧/01 - Patch),否则会导致 NullPointerException
200 | // 可以参考 ActLikeIt Mod 框架下的 TempMusicPatch:actlikeit.patches.TempMusicPatch.class
201 |
202 | switch (key) {
203 | case "SHOP":
204 | return MainMusic.newMusic("audio/music/STS_Merchant_NewMix_v1.ogg");
205 | case "SHRINE":
206 | return MainMusic.newMusic("audio/music/STS_Shrine_NewMix_v1.ogg");
207 | case "MINDBLOOM":
208 | return MainMusic.newMusic("audio/music/STS_Boss1MindBloom_v1.ogg");
209 | case "BOSS_BOTTOM":
210 | return MainMusic.newMusic("audio/music/STS_Boss1_NewMix_v1.ogg");
211 | case "BOSS_CITY":
212 | return MainMusic.newMusic("audio/music/STS_Boss2_NewMix_v1.ogg");
213 | case "BOSS_BEYOND":
214 | return MainMusic.newMusic("audio/music/STS_Boss3_NewMix_v1.ogg");
215 | case "BOSS_ENDING":
216 | return MainMusic.newMusic("audio/music/STS_Boss4_v6.ogg");
217 | case "ELITE":
218 | return MainMusic.newMusic("audio/music/STS_EliteBoss_NewMix_v1.ogg");
219 | case "CREDITS":
220 | return MainMusic.newMusic("audio/music/STS_Credits_v5.ogg");
221 | }
222 | // 如果你的文件路径和原版不同,那么 "audio/music/" + key 可能无法构成合法路径,进而导致 NullPointerException
223 | return MainMusic.newMusic("audio/music/" + key);
224 | }
225 | ```
226 |
--------------------------------------------------------------------------------
/Tutorials/00 - 环境配置/README.md:
--------------------------------------------------------------------------------
1 | # 环境搭建
2 |
3 | 在环境搭建之前,你需要了解开发杀戮尖塔mod需要的技术知识和东西:
4 | * Java
5 | * Json
6 | * 简单的图像处理(PS)
7 | * 耐心
8 |
9 | *杀戮尖塔是使用Java编写的LibGDX游戏框架编写的,所以首先你需要一个开发Java的环境。*
10 |
11 | ## 1.安装Java
12 |
13 | 杀戮尖塔使用Java8开发,首先你需要安装Java8。你可以选择[Oracle](https://www.oracle.com/java/technologies/downloads/#java8-windows)或者[Adoptium](https://adoptium.net/zh-CN/temurin/releases/?version=8&os=any&arch=any)或者其他发行版。
14 |
15 | 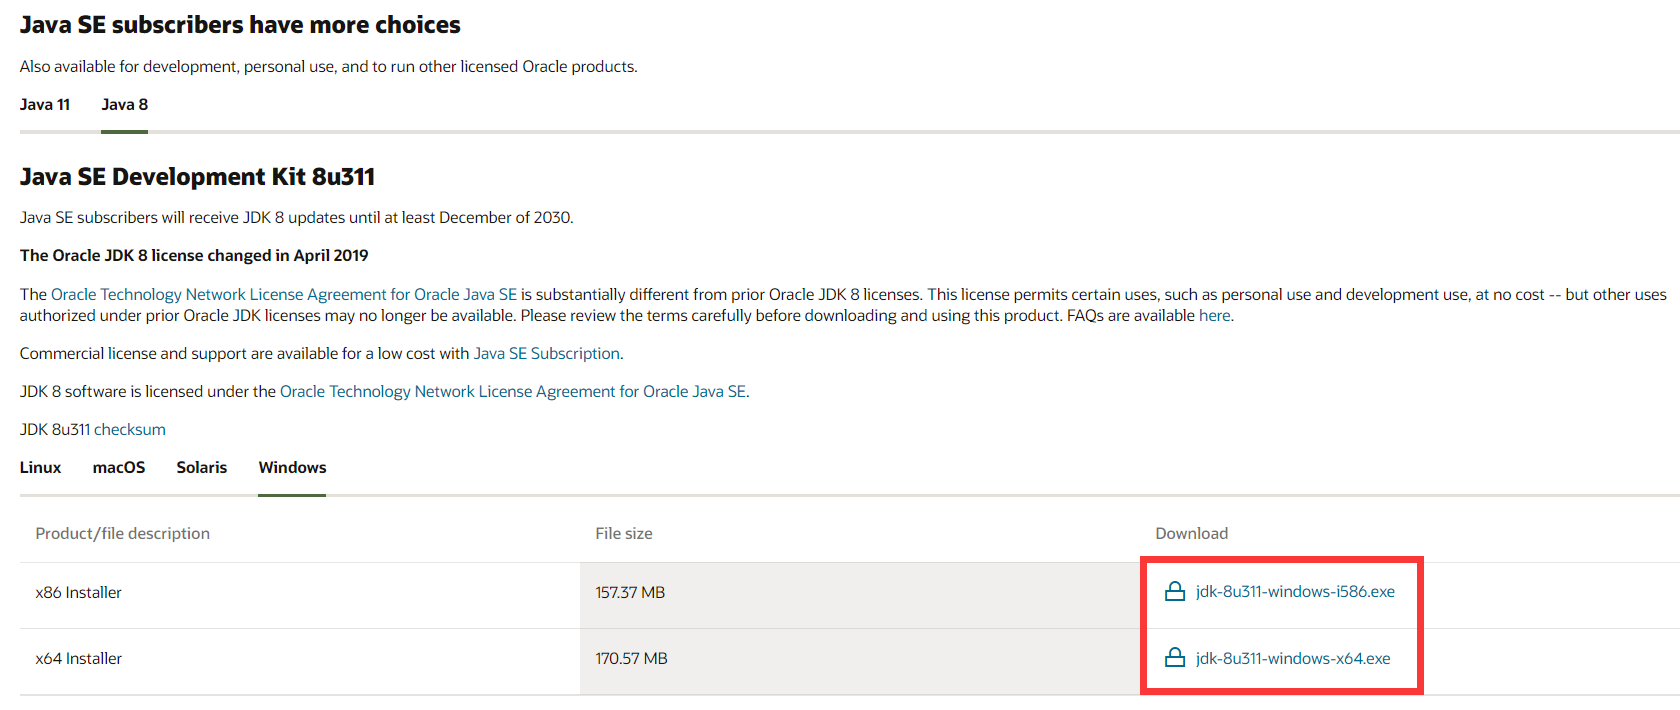
16 | *注意Java版本、电脑操作系统和32位和64位(x64是64位)*
17 |
18 | *如果你选择IDEA作为编辑器,那么可以自动下载所需的Java版本,具体自行搜索。*
19 |
20 | ## 2.选择开发工具
21 |
22 | 理论上使用什么编辑器都可以,可使用的有Eclipse,IntelliJ,VSCode或~~记事本~~。对于新手建议使用[Intellij](https://www.jetbrains.com/idea/download/#section=windows),本教程对于Intellij和VSCode的使用都会讲解。
23 |
24 | ### Intellij IDEA(以下简称idea)
25 |
26 | 1. 安装
27 |
28 | 点击下方链接下载idea,注意下载免费社区版(Community)开发mod足够了。
29 | https://www.jetbrains.com/idea/download/#section=windows
30 |
31 | 2. 创建新项目
32 |
33 | 安装完成后打开idea,点击New Project创建新项目。如果你下载了其他人的样板代码,可以通过Open导入。
34 | 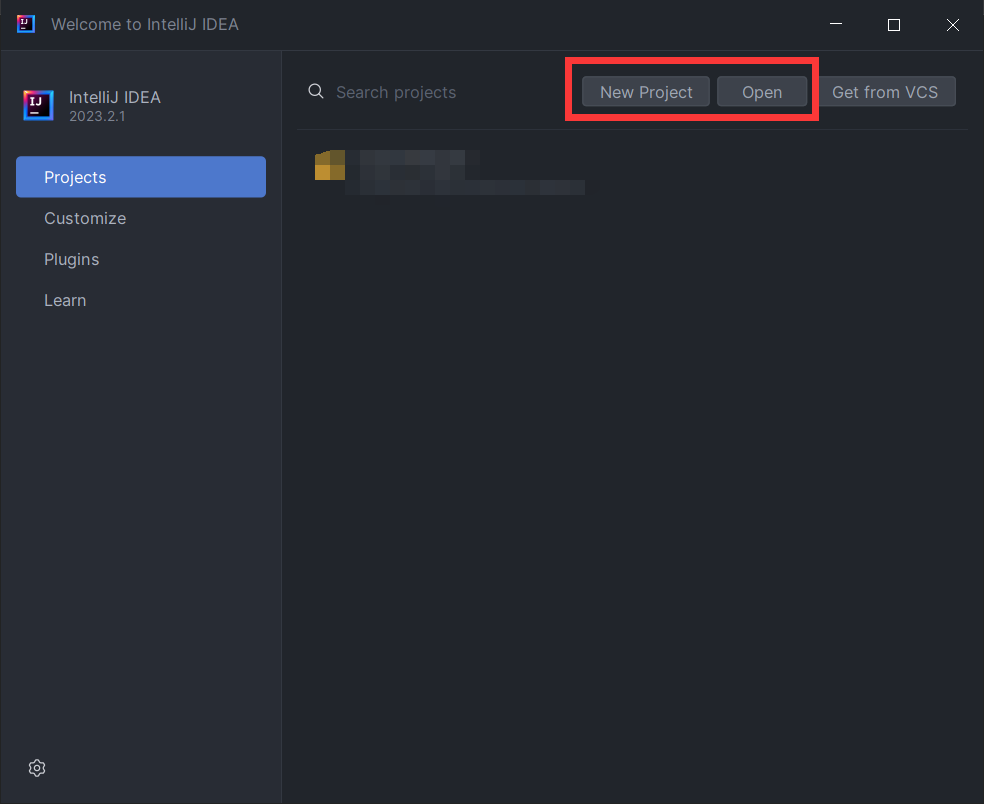
35 |
36 |
37 | 如图,创建一个maven项目。注意jdk版本。
38 | 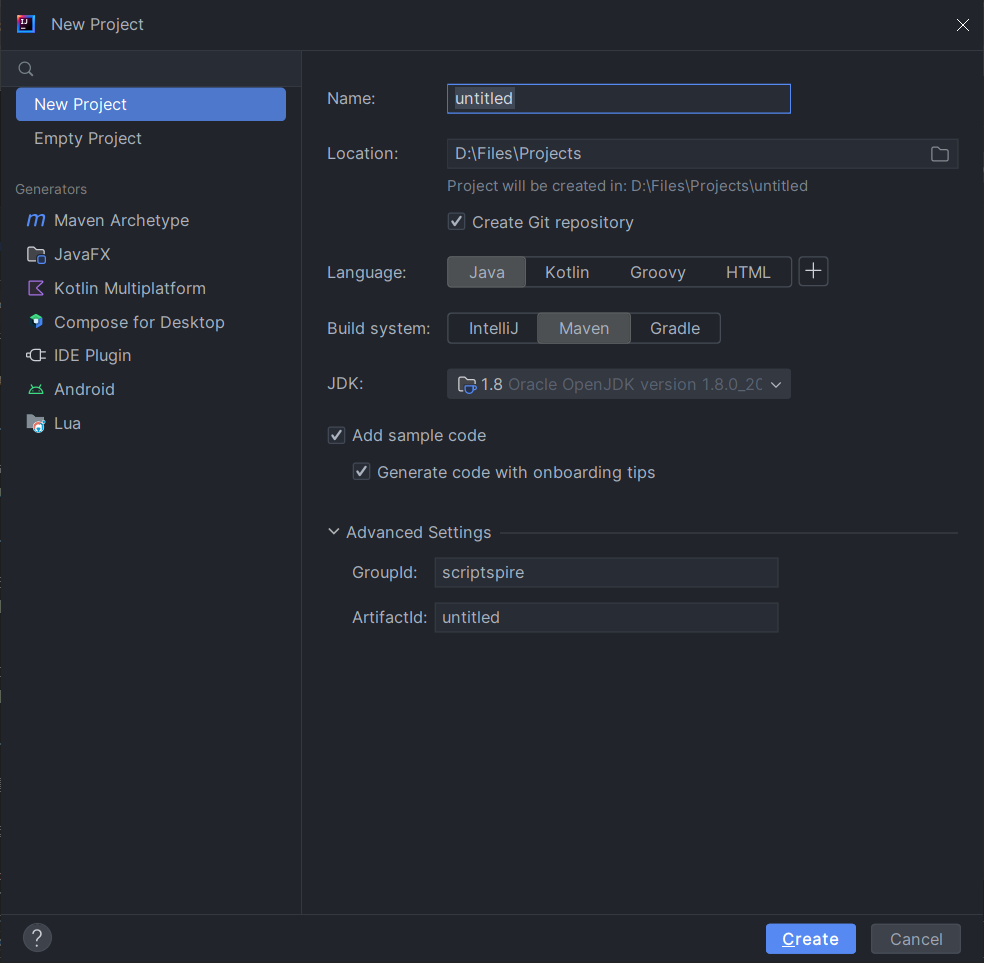
39 |
40 | 3. 创建配置文件
41 |
42 | 需要书写`pom.xml`和`ModTheSpire.json`文件,两者缺一不可。
43 |
44 | 选择你的mod名称和路径。创建完成后,会索引到一个pom.xml文件。这是maven项目的管理文件,制作杀戮尖塔mod可以直接复制以下文本。(注意注释的下方一行需要改动以适配你的环境)
45 |
46 | pom.xml:
47 | ```xml
48 |
49 |
52 | 4.0.0
53 |
54 |
55 | example-mod
56 |
57 | example-mod
58 | 1.0-SNAPSHOT
59 | jar
60 |
61 |
62 | ExampleMod
63 |
64 | a sts mod.
65 |
66 |
67 | 1.8
68 | 1.8
69 | 12-22-2020
70 | 3.23.2
71 |
72 |
73 |
74 | D:/xxx/steam/steamapps
75 |
76 |
77 |
78 |
79 | com.megacrit.cardcrawl
80 | slaythespire
81 | 2020-11-30
82 | system
83 | ${Steam.path}/common/SlayTheSpire/desktop-1.0.jar
84 |
85 |
86 | basemod
87 | basemod
88 | 5.33.1
89 | system
90 | ${Steam.path}/workshop/content/646570/1605833019/BaseMod.jar
91 |
92 |
93 | com.evacipated.cardcrawl
94 | ModTheSpire
95 | 3.23.2
96 | system
97 | ${Steam.path}/workshop/content/646570/1605060445/ModTheSpire.jar
98 |
99 |
100 |
101 |
102 | ${project.artifactId}
103 |
104 |
105 | org.apache.maven.plugins
106 | maven-compiler-plugin
107 | 3.7.0
108 |
109 | 1.8
110 | 1.8
111 |
112 |
113 |
114 | org.apache.maven.plugins
115 | maven-antrun-plugin
116 | 1.8
117 |
118 |
119 | package
120 |
121 |
122 |
123 |
124 |
125 |
126 | run
127 |
128 |
129 |
130 |
131 |
132 |
133 |
134 | ```
135 |
136 | 修改完成后,右上角如果有一个刷新按钮,点击刷新。
137 |
138 | 打开左方的项目文件夹,找到以下结构。
139 | * src
140 | * main
141 | * java
142 | * resources
143 |
144 | *其中java文件夹是你代码放置的位置,resources是你资源(如图片、本地化文本等)放置的位置。*
145 |
146 | 接下来在`resources`文件夹下创建一个新文件`ModTheSpire.json`。(右键->new->file)据下方内容根据你的要求填写。
147 |
148 | ```json
149 | {
150 | "modid": "ExampleMod", // 你mod的唯一标识,取得独特一些以防重名
151 | "name": "事例Mod", // 该mod在读取界面显示的名称
152 | "author_list": ["REME"], // 作者们(一定要写花括号)
153 | "description": "作为教程的mod。", // mod在读取界面的介绍
154 | "version": "0.0.1", // mod版本
155 | "sts_version": "12-22-2020", // 游戏本体版本,根据时间填写你当前能运行的版本即可
156 | "mts_version": "3.23.2", // Mod The Spire版本
157 | "dependencies": ["basemod"] // 该mod的所有依赖。目前我们只需要basemod。
158 | }
159 | ```
160 |
161 | TIPS:
162 | * *这里的json注释是不合法的,请在你的文件中删掉json的注释!!!*
163 | * 版本号怎么写没有具体要求,你写mod的打包时间也可以。(例如"2021-11-10")
164 | * 当你依赖了一个其他mod如stslib,一定要在这里加上。
165 |
166 | 4. 打包项目
167 |
168 | 编辑器界面右侧有个maven,点击并找到以下按钮,双击运行。
169 |
170 | 
171 |
172 | 等到命令行显示`BUILD SUCCESS`或其他打包成功信息时,说明打包成功。(你搁这搁这呢)
173 |
174 | 如果你一切配置成功,那么打开mod版杀戮尖塔就可以在mod界面找到你刚制作的mod。在菜单打开mods并确保找到你的mod。
175 |
176 | 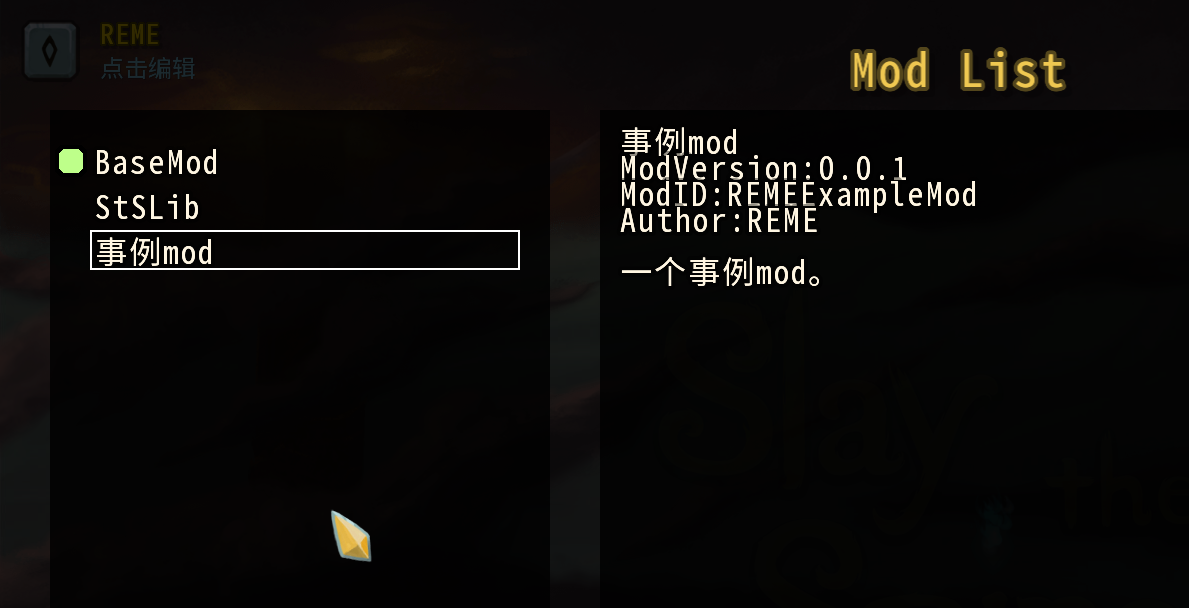
177 |
178 | *如果没有,回头看看哪里出错了。*
179 |
180 | 那么恭喜你!迈出了mod制作的第一步。翻阅接下来的mod学习如何为你的mod制作内容。
181 |
182 |
183 |
184 | *后面的内容是关于vscode的配置的。如果你不需要跳过即可。*
185 |
186 | ### VSCode
187 |
188 | vscode简洁美观,并且可以自由使用许多插件。首先下载[VSCode](https://code.visualstudio.com/download)。
189 |
190 | 1. 在扩展中安装`Extension Pack for Java`插件。(如何安装插件参考搜索引擎,由于时间原因以下不可参考)
191 |
192 | 
193 |
194 | ~~确保该界面出现以下信息。(如有错误可以自行搜索vscode如何安装java开发环境)~~
195 |
196 | 
197 |
198 | 2. 第二步需要安装[MAVEN](https://www.runoob.com/maven/maven-setup.html),确保添加到`PATH`。
199 |
200 | 3. 第三步创建项目。使用vscode自带的创建项目有些麻烦,你可以直接复制该文件夹下的项目作为你的开始项目。(`pom.xml`和`ModTheSpire.json`文件需要配置,请参照上方idea的文件配置一节)
201 |
202 | 4. 设置调试环境。
203 |
204 | 在`.vscode/launch.json`文件中添加以下内容。
205 |
206 | ```json
207 | {
208 | {
209 | "version": "0.2.0",
210 | "configurations": [
211 | {
212 | "type": "java",
213 | "name": "Launch Java Program",
214 | "request": "launch",
215 | "mainClass": "com.megacrit.cardcrawl.desktop.DesktopLauncher",
216 | // ModTheSpire的命令行配置,参考https://github.com/kiooeht/ModTheSpire/wiki/Command-Line-Arguments
217 | // "args": ["--mods", "basemod"],
218 | // 杀戮尖塔根目录
219 | "cwd": "path\\to\\your\\SlayTheSpire",
220 | // Java8的路径
221 | "javaExec": "path\\to\\your\\bin\\java.exe",
222 | "preLaunchTask": "maven-package",
223 | // Steam的路径
224 | "classPaths": [
225 | "path\\to\\your\\Steam\\steamapps\\workshop\\content\\646570\\1605060445\\ModTheSpire.jar"
226 | ]
227 | }
228 | ]
229 | }
230 | }
231 | ```
232 |
233 | 在`.vscode/tasks.json`文件中添加以下内容。
234 |
235 | ```json
236 | {
237 | "version": "2.0.0",
238 | "tasks": [
239 | {
240 | "label": "maven-package",
241 | "type": "shell",
242 | "command": "mvn package",
243 | "group": {
244 | "kind": "build",
245 | "isDefault": true
246 | },
247 | "presentation": {
248 | // "reveal": "silent",
249 | "clear": true,
250 | "panel": "shared"
251 | },
252 | "problemMatcher": [
253 | "$msCompile"
254 | ]
255 | }
256 | ]
257 | }
258 | ```
259 |
260 | 然后按`F5`即可调试。
--------------------------------------------------------------------------------
/Tutorials/06 - 添加新人物/MyCharacter.java:
--------------------------------------------------------------------------------
1 | // 省略package路径和部分import,复制的时候不要忘记写上自己的package
2 |
3 | import basemod.abstracts.CustomPlayer;
4 | import com.badlogic.gdx.graphics.Color;
5 | import com.badlogic.gdx.graphics.g2d.BitmapFont;
6 | import com.evacipated.cardcrawl.modthespire.lib.SpireEnum;
7 | import com.megacrit.cardcrawl.actions.AbstractGameAction;
8 | import com.megacrit.cardcrawl.cards.AbstractCard;
9 | import com.megacrit.cardcrawl.characters.AbstractPlayer;
10 | import com.megacrit.cardcrawl.core.CardCrawlGame;
11 | import com.megacrit.cardcrawl.core.EnergyManager;
12 | import com.megacrit.cardcrawl.core.Settings;
13 | import com.megacrit.cardcrawl.cutscenes.CutscenePanel;
14 | import com.megacrit.cardcrawl.events.city.Vampires;
15 | import com.megacrit.cardcrawl.helpers.CardLibrary;
16 | import com.megacrit.cardcrawl.helpers.FontHelper;
17 | import com.megacrit.cardcrawl.helpers.ScreenShake;
18 | import com.megacrit.cardcrawl.localization.CharacterStrings;
19 | import com.megacrit.cardcrawl.relics.Vajra;
20 | import com.megacrit.cardcrawl.screens.CharSelectInfo;
21 | import java.util.ArrayList;
22 |
23 | import static examplemod.character.MyCharacter.PlayerColorEnum.EXAMPLE_GREEN;
24 | import static examplemod.character.MyCharacter.PlayerColorEnum.MY_CHARACTER;
25 |
26 | public class MyCharacter extends CustomPlayer {
27 | // 火堆的人物立绘(行动前)
28 | private static final String MY_CHARACTER_SHOULDER_1 = "ExampleModResources/img/char/shoulder1.png";
29 | // 火堆的人物立绘(行动后)
30 | private static final String MY_CHARACTER_SHOULDER_2 = "ExampleModResources/img/char/shoulder2.png";
31 | // 人物死亡图像
32 | private static final String CORPSE_IMAGE = "ExampleModResources/img/char/corpse.png";
33 | // 战斗界面左下角能量图标的每个图层
34 | private static final String[] ORB_TEXTURES = new String[]{
35 | "ExampleModResources/img/UI/orb/layer5.png",
36 | "ExampleModResources/img/UI/orb/layer4.png",
37 | "ExampleModResources/img/UI/orb/layer3.png",
38 | "ExampleModResources/img/UI/orb/layer2.png",
39 | "ExampleModResources/img/UI/orb/layer1.png",
40 | "ExampleModResources/img/UI/orb/layer6.png",
41 | "ExampleModResources/img/UI/orb/layer5d.png",
42 | "ExampleModResources/img/UI/orb/layer4d.png",
43 | "ExampleModResources/img/UI/orb/layer3d.png",
44 | "ExampleModResources/img/UI/orb/layer2d.png",
45 | "ExampleModResources/img/UI/orb/layer1d.png"
46 | };
47 | // 每个图层的旋转速度
48 | private static final float[] LAYER_SPEED = new float[]{-40.0F, -32.0F, 20.0F, -20.0F, 0.0F, -10.0F, -8.0F, 5.0F, -5.0F, 0.0F};
49 | // 人物的本地化文本,如卡牌的本地化文本一样,如何书写见下
50 | private static final CharacterStrings characterStrings = CardCrawlGame.languagePack.getCharacterString("ExampleMod:MyCharacter");
51 |
52 | public MyCharacter(String name) {
53 | super(name, MY_CHARACTER, ORB_TEXTURES,"ExampleModResources/img/UI/orb/vfx.png", LAYER_SPEED, null, null);
54 |
55 |
56 | // 人物对话气泡的大小,如果游戏中尺寸不对在这里修改(libgdx的坐标轴左下为原点)
57 | this.dialogX = (this.drawX + 0.0F * Settings.scale);
58 | this.dialogY = (this.drawY + 150.0F * Settings.scale);
59 |
60 |
61 | // 初始化你的人物,如果你的人物只有一张图,那么第一个参数填写你人物图片的路径。
62 | this.initializeClass(
63 | "ExampleModResources/img/char/character.png", // 人物图片
64 | MY_CHARACTER_SHOULDER_2, MY_CHARACTER_SHOULDER_1,
65 | CORPSE_IMAGE, // 人物死亡图像
66 | this.getLoadout(),
67 | 0.0F, 0.0F,
68 | 200.0F, 220.0F, // 人物碰撞箱大小,越大的人物模型这个越大
69 | new EnergyManager(3) // 初始每回合的能量
70 | );
71 |
72 |
73 | // 如果你的人物没有动画,那么这些不需要写
74 | // this.loadAnimation("ExampleModResources/img/char/character.atlas", "ExampleModResources/img/char/character.json", 1.8F);
75 | // AnimationState.TrackEntry e = this.state.setAnimation(0, "Idle", true);
76 | // e.setTime(e.getEndTime() * MathUtils.random());
77 | // e.setTimeScale(1.2F);
78 |
79 |
80 | }
81 |
82 | // 初始卡组的ID,可直接写或引用变量
83 | public ArrayList getStartingDeck() {
84 | ArrayList retVal = new ArrayList<>();
85 | for(int x = 0; x<5; x++) {
86 | retVal.add(Strike.ID);
87 | }
88 | for(int x = 0; x<5; x++) {
89 | retVal.add(Defend.ID);
90 | }
91 | return retVal;
92 | }
93 |
94 | // 初始遗物的ID,可以先写个原版遗物凑数
95 | public ArrayList getStartingRelics() {
96 | ArrayList retVal = new ArrayList<>();
97 | retVal.add(Vajra.ID);
98 | return retVal;
99 | }
100 |
101 | public CharSelectInfo getLoadout() {
102 | return new CharSelectInfo(
103 | characterStrings.NAMES[0], // 人物名字
104 | characterStrings.TEXT[0], // 人物介绍
105 | 75, // 当前血量
106 | 75, // 最大血量
107 | 0, // 初始充能球栏位
108 | 99, // 初始携带金币
109 | 5, // 每回合抽牌数量
110 | this, // 别动
111 | this.getStartingRelics(), // 初始遗物
112 | this.getStartingDeck(), // 初始卡组
113 | false // 别动
114 | );
115 | }
116 |
117 | // 人物名字(出现在游戏左上角)
118 | @Override
119 | public String getTitle(PlayerClass playerClass) {
120 | return characterStrings.NAMES[0];
121 | }
122 |
123 | // 你的卡牌颜色(这个枚举在最下方创建)
124 | @Override
125 | public AbstractCard.CardColor getCardColor() {
126 | return EXAMPLE_GREEN;
127 | }
128 |
129 | // 翻牌事件出现的你的职业牌(一般设为打击)
130 | @Override
131 | public AbstractCard getStartCardForEvent() {
132 | return new Strike();
133 | }
134 |
135 | // 卡牌轨迹颜色
136 | @Override
137 | public Color getCardTrailColor() {
138 | return ExampleMod.MY_COLOR;
139 | }
140 |
141 | // 高进阶带来的生命值损失
142 | @Override
143 | public int getAscensionMaxHPLoss() {
144 | return 5;
145 | }
146 |
147 | // 卡牌的能量字体,没必要修改
148 | @Override
149 | public BitmapFont getEnergyNumFont() {
150 | return FontHelper.energyNumFontBlue;
151 | }
152 |
153 | // 人物选择界面点击你的人物按钮时触发的方法,这里为屏幕轻微震动
154 | @Override
155 | public void doCharSelectScreenSelectEffect() {
156 | CardCrawlGame.screenShake.shake(ScreenShake.ShakeIntensity.MED, ScreenShake.ShakeDur.SHORT, false);
157 | }
158 |
159 | // 碎心图片
160 | @Override
161 | public ArrayList getCutscenePanels() {
162 | ArrayList panels = new ArrayList<>();
163 | // 有两个参数的,第二个参数表示出现图片时播放的音效
164 | panels.add(new CutscenePanel("ExampleModResources/img/char/Victory1.png", "ATTACK_MAGIC_FAST_1"));
165 | panels.add(new CutscenePanel("ExampleModResources/img/char/Victory2.png"));
166 | panels.add(new CutscenePanel("ExampleModResources/img/char/Victory3.png"));
167 | return panels;
168 | }
169 |
170 | // 自定义模式选择你的人物时播放的音效
171 | @Override
172 | public String getCustomModeCharacterButtonSoundKey() {
173 | return "ATTACK_HEAVY";
174 | }
175 |
176 | // 游戏中左上角显示在你的名字之后的人物名称
177 | @Override
178 | public String getLocalizedCharacterName() {
179 | return characterStrings.NAMES[0];
180 | }
181 |
182 | // 创建人物实例,照抄
183 | @Override
184 | public AbstractPlayer newInstance() {
185 | return new MyCharacter(this.name);
186 | }
187 |
188 | // 第三章面对心脏说的话(例如战士是“你握紧了你的长刀……”之类的)
189 | @Override
190 | public String getSpireHeartText() {
191 | return characterStrings.TEXT[1];
192 | }
193 |
194 | // 打心脏的颜色,不是很明显
195 | @Override
196 | public Color getSlashAttackColor() {
197 | return ExampleMod.MY_COLOR;
198 | }
199 |
200 | // 吸血鬼事件文本,主要是他(索引为0)和她(索引为1)的区别(机器人另外)
201 | @Override
202 | public String getVampireText() {
203 | return Vampires.DESCRIPTIONS[0];
204 | }
205 |
206 | // 卡牌选择界面选择该牌的颜色
207 | @Override
208 | public Color getCardRenderColor() {
209 | return ExampleMod.MY_COLOR;
210 | }
211 |
212 | // 第三章面对心脏造成伤害时的特效
213 | @Override
214 | public AbstractGameAction.AttackEffect[] getSpireHeartSlashEffect() {
215 | return new AbstractGameAction.AttackEffect[]{AbstractGameAction.AttackEffect.SLASH_HEAVY, AbstractGameAction.AttackEffect.FIRE, AbstractGameAction.AttackEffect.SLASH_DIAGONAL, AbstractGameAction.AttackEffect.SLASH_HEAVY, AbstractGameAction.AttackEffect.FIRE, AbstractGameAction.AttackEffect.SLASH_DIAGONAL};
216 | }
217 |
218 | // 以下为原版人物枚举、卡牌颜色枚举扩展的枚举,需要写,接下来要用
219 |
220 | // 注意此处是在 MyCharacter 类内部的静态嵌套类中定义的新枚举值
221 | // 不可将该定义放在外部的 MyCharacter 类中,具体原因见《高级技巧 / 01 - Patch / SpireEnum》
222 | public static class PlayerColorEnum {
223 | // 修改为你的颜色名称,确保不会与其他mod冲突
224 | @SpireEnum
225 | public static PlayerClass MY_CHARACTER;
226 |
227 | // ***将CardColor和LibraryType的变量名改为你的角色的颜色名称,确保不会与其他mod冲突***
228 | // ***并且名称需要一致!!!***
229 | @SpireEnum
230 | public static AbstractCard.CardColor EXAMPLE_GREEN;
231 |
232 | // 如果你想添加新的颜色,不要忘记同时添加两个枚举
233 | // @SpireEnum
234 | // public static AbstractCard.CardColor EXAMPLE_RED;
235 | }
236 |
237 | public static class PlayerLibraryEnum {
238 | // ***将CardColor和LibraryType的变量名改为你的角色的颜色名称,确保不会与其他mod冲突***
239 | // ***并且名称需要一致!!!***
240 |
241 | // 这个变量未被使用(呈现灰色)是正常的
242 | @SpireEnum
243 | public static CardLibrary.LibraryType EXAMPLE_GREEN;
244 |
245 | // 如果你想添加新的颜色,不要忘记同时添加两个枚举
246 | // @SpireEnum
247 | // public static CardLibrary.LibraryType EXAMPLE_RED;
248 | }
249 | }
--------------------------------------------------------------------------------
/Tutorials/06 - 添加新人物/README.md:
--------------------------------------------------------------------------------
1 | # 添加新人物
2 |
3 | 添加颜色之后,就可以添加新人物了。我们先来创建一个人物类。首先新建一个文件夹管理你的人物类。
4 |
5 | * examplemod
6 | * cards
7 | * characters <-这里添加
8 | * MyCharacter.java
9 | * modcore
10 |
11 | 接下来也是繁杂的理解并填写的过程,你可以直接复制并慢慢修改,但要注意哪些能修改哪些不能修改的提醒。同样的本教程将准备事例资源。
12 |
13 | > 技巧:当你需要修改同一指代的单词时(如一个类名),idea可以shift+f6修改,vscode按下f2。
14 |
15 |
16 | MyCharacter.java:
17 | ```java
18 | // 继承CustomPlayer类
19 | public class MyCharacter extends CustomPlayer {
20 | // 火堆的人物立绘(行动前)
21 | private static final String MY_CHARACTER_SHOULDER_1 = "ExampleModResources/img/char/shoulder1.png";
22 | // 火堆的人物立绘(行动后)
23 | private static final String MY_CHARACTER_SHOULDER_2 = "ExampleModResources/img/char/shoulder2.png";
24 | // 人物死亡图像
25 | private static final String CORPSE_IMAGE = "ExampleModResources/img/char/corpse.png";
26 | // 战斗界面左下角能量图标的每个图层
27 | private static final String[] ORB_TEXTURES = new String[]{
28 | "ExampleModResources/img/UI/orb/layer5.png",
29 | "ExampleModResources/img/UI/orb/layer4.png",
30 | "ExampleModResources/img/UI/orb/layer3.png",
31 | "ExampleModResources/img/UI/orb/layer2.png",
32 | "ExampleModResources/img/UI/orb/layer1.png",
33 | "ExampleModResources/img/UI/orb/layer6.png",
34 | "ExampleModResources/img/UI/orb/layer5d.png",
35 | "ExampleModResources/img/UI/orb/layer4d.png",
36 | "ExampleModResources/img/UI/orb/layer3d.png",
37 | "ExampleModResources/img/UI/orb/layer2d.png",
38 | "ExampleModResources/img/UI/orb/layer1d.png"
39 | };
40 | // 每个图层的旋转速度
41 | private static final float[] LAYER_SPEED = new float[]{-40.0F, -32.0F, 20.0F, -20.0F, 0.0F, -10.0F, -8.0F, 5.0F, -5.0F, 0.0F};
42 | // 人物的本地化文本,如卡牌的本地化文本一样,如何书写见下
43 | private static final CharacterStrings characterStrings = CardCrawlGame.languagePack.getCharacterString("ExampleMod:MyCharacter");
44 |
45 | public MyCharacter(String name) {
46 | super(name, MY_CHARACTER,ORB_TEXTURES,"ExampleModResources/img/UI/orb/vfx.png", LAYER_SPEED, null, null);
47 |
48 |
49 | // 人物对话气泡的大小,如果游戏中尺寸不对在这里修改(libgdx的坐标轴左下为原点)
50 | this.dialogX = (this.drawX + 0.0F * Settings.scale);
51 | this.dialogY = (this.drawY + 150.0F * Settings.scale);
52 |
53 |
54 | // 初始化你的人物,如果你的人物只有一张图,那么第一个参数填写你人物图片的路径。
55 | this.initializeClass(
56 | "ExampleModResources/img/char/character.png", // 人物图片
57 | MY_CHARACTER_SHOULDER_2, MY_CHARACTER_SHOULDER_1,
58 | CORPSE_IMAGE, // 人物死亡图像
59 | this.getLoadout(),
60 | 0.0F, 0.0F,
61 | 200.0F, 220.0F, // 人物碰撞箱大小,越大的人物模型这个越大
62 | new EnergyManager(3) // 初始每回合的能量
63 | );
64 |
65 |
66 | // 如果你的人物没有动画,那么这些不需要写
67 | // this.loadAnimation("ExampleModResources/img/char/character.atlas", "ExampleModResources/img/char/character.json", 1.8F);
68 | // AnimationState.TrackEntry e = this.state.setAnimation(0, "Idle", true);
69 | // e.setTime(e.getEndTime() * MathUtils.random());
70 | // e.setTimeScale(1.2F);
71 |
72 |
73 | }
74 |
75 | // 初始卡组的ID,可直接写或引用变量
76 | public ArrayList getStartingDeck() {
77 | ArrayList retVal = new ArrayList<>();
78 | for(int x = 0; x<5; x++) {
79 | retVal.add(Strike.ID);
80 | }
81 | retVal.add("ExampleMod:Strike");
82 | return retVal;
83 | }
84 |
85 | // 初始遗物的ID,可以先写个原版遗物凑数
86 | public ArrayList getStartingRelics() {
87 | ArrayList retVal = new ArrayList<>();
88 | retVal.add(Vajra.ID);
89 | return retVal;
90 | }
91 |
92 | public CharSelectInfo getLoadout() {
93 | return new CharSelectInfo(
94 | characterStrings.NAMES[0], // 人物名字
95 | characterStrings.TEXT[0], // 人物介绍
96 | 75, // 当前血量
97 | 75, // 最大血量
98 | 0, // 初始充能球栏位
99 | 99, // 初始携带金币
100 | 5, // 每回合抽牌数量
101 | this, // 别动
102 | this.getStartingRelics(), // 初始遗物
103 | this.getStartingDeck(), // 初始卡组
104 | false // 别动
105 | );
106 | }
107 |
108 | // 人物名字(出现在游戏左上角)
109 | @Override
110 | public String getTitle(PlayerClass playerClass) {
111 | return characterStrings.NAMES[0];
112 | }
113 |
114 | // 你的卡牌颜色(这个枚举在最下方创建)
115 | @Override
116 | public AbstractCard.CardColor getCardColor() {
117 | return EXAMPLE_GREEN;
118 | }
119 |
120 | // 翻牌事件出现的你的职业牌(一般设为打击)
121 | @Override
122 | public AbstractCard getStartCardForEvent() {
123 | return new Strike();
124 | }
125 |
126 | // 卡牌轨迹颜色
127 | @Override
128 | public Color getCardTrailColor() {
129 | return ExampleMod.MY_COLOR;
130 | }
131 |
132 | // 高进阶带来的生命值损失
133 | @Override
134 | public int getAscensionMaxHPLoss() {
135 | return 5;
136 | }
137 |
138 | // 卡牌的能量字体,没必要修改
139 | @Override
140 | public BitmapFont getEnergyNumFont() {
141 | return FontHelper.energyNumFontBlue;
142 | }
143 |
144 | // 人物选择界面点击你的人物按钮时触发的方法,这里为屏幕轻微震动
145 | @Override
146 | public void doCharSelectScreenSelectEffect() {
147 | CardCrawlGame.screenShake.shake(ScreenShake.ShakeIntensity.MED, ScreenShake.ShakeDur.SHORT, false);
148 | }
149 |
150 | // 碎心图片
151 | @Override
152 | public ArrayList getCutscenePanels() {
153 | ArrayList panels = new ArrayList<>();
154 | // 有两个参数的,第二个参数表示出现图片时播放的音效
155 | panels.add(new CutscenePanel("ExampleModResources/img/char/Victory1.png", "ATTACK_MAGIC_FAST_1"));
156 | panels.add(new CutscenePanel("ExampleModResources/img/char/Victory2.png"));
157 | panels.add(new CutscenePanel("ExampleModResources/img/char/Victory3.png"));
158 | return panels;
159 | }
160 |
161 | // 自定义模式选择你的人物时播放的音效
162 | @Override
163 | public String getCustomModeCharacterButtonSoundKey() {
164 | return "ATTACK_HEAVY";
165 | }
166 |
167 | // 人物名称
168 | @Override
169 | public String getLocalizedCharacterName() {
170 | return characterStrings.NAMES[0];
171 | }
172 |
173 | // 创建人物实例,照抄,记得替换MyCharacter为你的类名
174 | @Override
175 | public AbstractPlayer newInstance() {
176 | return new MyCharacter(this.name);
177 | }
178 |
179 | // 第三章面对心脏说的话(例如战士是“你握紧了你的长刀……”之类的)
180 | @Override
181 | public String getSpireHeartText() {
182 | return characterStrings.TEXT[1];
183 | }
184 |
185 | // 打心脏的颜色,不是很明显
186 | @Override
187 | public Color getSlashAttackColor() {
188 | return ExampleMod.MY_COLOR;
189 | }
190 |
191 | // 吸血鬼事件文本,主要是他(索引为0)和她(索引为1)的区别(机器人另外)
192 | @Override
193 | public String getVampireText() {
194 | return Vampires.DESCRIPTIONS[0];
195 | }
196 |
197 | // 卡牌选择界面选择该牌的颜色
198 | @Override
199 | public Color getCardRenderColor() {
200 | return ExampleMod.MY_COLOR;
201 | }
202 |
203 | // 第三章面对心脏造成伤害时的特效
204 | @Override
205 | public AbstractGameAction.AttackEffect[] getSpireHeartSlashEffect() {
206 | return new AbstractGameAction.AttackEffect[]{AbstractGameAction.AttackEffect.SLASH_HEAVY, AbstractGameAction.AttackEffect.FIRE, AbstractGameAction.AttackEffect.SLASH_DIAGONAL, AbstractGameAction.AttackEffect.SLASH_HEAVY, AbstractGameAction.AttackEffect.FIRE, AbstractGameAction.AttackEffect.SLASH_DIAGONAL};
207 | }
208 |
209 | // 以下为原版人物枚举、卡牌颜色枚举扩展的枚举,需要写,接下来要用
210 |
211 | // 注意此处是在 MyCharacter 类内部的静态嵌套类中定义的新枚举值
212 | // 不可将该定义放在外部的 MyCharacter 类中,具体原因见《高级技巧 / 01 - Patch / SpireEnum》
213 | public static class PlayerColorEnum {
214 | // 修改为你的颜色名称,确保不会与其他mod冲突
215 | @SpireEnum
216 | public static PlayerClass MY_CHARACTER;
217 |
218 | // ***将CardColor和LibraryType的变量名改为你的角色的颜色名称,确保不会与其他mod冲突***
219 | // ***并且名称需要一致!***
220 | @SpireEnum
221 | public static AbstractCard.CardColor EXAMPLE_GREEN;
222 | }
223 |
224 | public static class PlayerLibraryEnum {
225 | // ***将CardColor和LibraryType的变量名改为你的角色的颜色名称,确保不会与其他mod冲突***
226 | // ***并且名称需要一致!***
227 |
228 | // 这个变量未被使用(呈现灰色)是正常的
229 | @SpireEnum
230 | public static CardLibrary.LibraryType EXAMPLE_GREEN;
231 | }
232 | }
233 | ```
234 |
235 | 最下面我们添加了一些必要的枚举,你可以在你之前添加颜色的地方引用它。
236 |
237 | ```java
238 | // 主类
239 | import static examplemod.characters.MyCharacter.PlayerColorEnum.EXAMPLE_GREEN;
240 |
241 | // 省略其他
242 | public ExampleMod() {
243 | BaseMod.subscribe(this);
244 | // 这里注册颜色
245 | BaseMod.addColor(EXAMPLE_GREEN, MY_COLOR, MY_COLOR, MY_COLOR, MY_COLOR, MY_COLOR, MY_COLOR, MY_COLOR,BG_ATTACK_512,BG_SKILL_512,BG_POWER_512,ENEYGY_ORB,BG_ATTACK_1024,BG_SKILL_1024,BG_POWER_1024,BIG_ORB,SMALL_ORB);
246 | }
247 | // 省略其他
248 | ```
249 | *如果你想让你的卡牌也使用这个卡牌颜色,改变以下变量:*
250 |
251 | ```java
252 | // 卡牌类
253 | import static examplemod.characters.MyCharacter.PlayerColorEnum.EXAMPLE_GREEN;
254 |
255 | public class Strike extends CustomCard {
256 | private static final CardColor COLOR = EXAMPLE_GREEN;
257 | ```
258 |
259 | 和给卡牌添加本地化文本一样,我们需要给人物添加本地化内容。首先新建`characters.json`文件。
260 |
261 | * ExampleModResources
262 | * localization
263 | * ZHS
264 | * cards.json
265 | * characters.json <-localization/ZHS文件夹下新建
266 |
267 | characters.json:
268 | ```json
269 | {
270 | "ExampleMod:MyCharacter": { // ID要和人物类中getCharStrings的参数一致
271 | "NAMES": [
272 | "自定义人物"
273 | ],
274 | "TEXT": [
275 | "这是一段人物描述", // 上面提到的人物描述
276 | "“你就是心脏?”" // 上面提到的面对心脏的文本
277 | ]
278 | }
279 | }
280 | ```
281 |
282 | 还要向basemod注册。
283 |
284 | ExampleMod.java:
285 | ```java
286 | import static examplemod.characters.MyCharacter.PlayerColorEnum.MY_CHARACTER;
287 |
288 | @SpireInitializer
289 | public class ExampleMod implements EditCardsSubscriber, EditStringsSubscriber,
290 | EditCharactersSubscriber { // 添加EditCharactersSubscriber
291 | //...省略
292 |
293 | // 当开始添加人物时,调用这个方法
294 | @Override
295 | public void receiveEditCharacters() {
296 | // 向basemod注册人物
297 | BaseMod.addCharacter(new MyCharacter(CardCrawlGame.playerName), MY_CHARACTER_BUTTON, MY_CHARACTER_PORTRAIT, MY_CHARACTER);
298 | }
299 |
300 | public void receiveEditStrings() {
301 | String lang;
302 | if (Settings.language == GameLanguage.ZHS) {
303 | lang = "ZHS";
304 | } else {
305 | lang = "ENG";
306 | }
307 | BaseMod.loadCustomStringsFile(CardStrings.class, "ExampleResources/localization/" + lang + "/cards.json");
308 | // 这里添加注册本地化文本
309 | BaseMod.loadCustomStringsFile(CharacterStrings.class, "ExampleResources/localization/" + lang + "/characters.json");
310 | }
311 |
312 | }
313 | ```
314 |
315 | *并未实际运行,如果出错请在issues或评论留言*
316 |
317 | 好了!如果你能选择自己的人物,那么算是正式入了mod制作的大门了。在下一章添加新遗物之后,我们将通过几个例子拓宽制作mod的思路。
318 |
319 | 如果你在关卡结束后报错了,原因是卡牌太少,每个类型至少需要3张牌。
320 |
--------------------------------------------------------------------------------
/Tutorials/高级技巧/01 - Patch/README.md:
--------------------------------------------------------------------------------
1 | # 杀戮尖塔 Mod 开发的 Patch 指南
2 |
3 | (本文作者:RS76)
4 |
5 | - [杀戮尖塔 Mod 开发的 Patch 指南](#杀戮尖塔-mod-开发的-patch-指南)
6 | - [1. 概述](#1-概述)
7 | - [2. SpirePatch 的一般规则](#2-spirepatch-的一般规则)
8 | - [@SpirePatch 参数](#spirepatch-参数)
9 | - [Patch 的加载顺序](#patch-的加载顺序)
10 | - [3. 一般的 Patch 技术](#3-一般的-patch-技术)
11 | - [Prefix](#prefix)
12 | - [可用特性](#可用特性)
13 | - [Postfix](#postfix)
14 | - [可用特性](#可用特性-1)
15 | - [Insert](#insert)
16 | - [@SpireInsertPatch 参数](#spireinsertpatch-参数)
17 | - [可用特性](#可用特性-2)
18 | - [Locator](#locator)
19 | - [Replace](#replace)
20 | - [SpireField](#spirefield)
21 | - [SpireOverride](#spireoverride)
22 | - [SpireEnum](#spireenum)
23 | - [4. Patch 可用的特性](#4-patch-可用的特性)
24 | - [@ByRef](#byref)
25 | - [Private Field Captures](#private-field-captures)
26 | - [参数的顺序](#参数的顺序)
27 | - [SpireReturn](#spirereturn)
28 | - [5. 进阶 Patch 技术](#5-进阶-patch-技术)
29 | - [Instrument](#instrument)
30 | - [Raw](#raw)
31 | - [6. 编译 Patch 后的代码](#6-编译-patch-后的代码)
32 | - [FAQ](#faq)
33 |
34 | ## 1. 概述
35 |
36 | 本教程基于 ModTheSpire 的 Wiki 上所提供的 Patch 教程,攥写 Patch 需要有足够的 Java 和 Javassist 知识,对于其中涉及的 Java 原理,本教程不提供任何的解释。SpirePatch 允许 Mods 将自己的代码写入杀戮尖塔原本的代码中。当一个 Mod 被加载时,ModTheSpire 首先搜寻该 Mod 中所有带有 @SpirePatch 注解的类。也就是说,对于每个你想要插入代码的原版方法,你必须创建一个带有 @SpirePatch 注解的类。
37 |
38 | ModTheSpire 还提供了一个较新的 Patch 类型,SpirePatch2。它对 Patch 方法参数的处理方式与最基本的 SpirePatch 有所区别。在阅读 SpirePatch2 的指南前,你需要对 SpirePatch 的工作原理有足够的理解。当然,SpirePatch2 的指南你得自己上 ModTheSpire 的 Wiki 看,因为它本身没啥难度。
39 |
40 | 本教程会介绍下列类型的 Patch:
41 |
42 | * [Prefix](#prefix)
43 | * [Postfix](#postfix)
44 | * [Insert](#insert)
45 | * [Replace](#replace)
46 | * [SpireField](#spirefield)
47 | * [SpireOverride](#spireoverride)
48 | * [SpireEnum](#spireenum)
49 | * [Instrument](#instrument)
50 | * [Raw](#raw)
51 |
52 | 对于刚入门 Mod 制作且想要写 Patch 的新手,请**仔细并认真且耐心地一步步地从头到尾一字不拉地同时完完全全地在不跳行、不跳字的情况下**阅读完本篇教程。
53 |
54 | 对于刚写 Patch 时遇到难以解决的问题的新手,在阅读完教程的主要部分后,请先**仔细并认真且耐心地一步步地从头到尾一字不拉地同时完完全全地在不跳行、不跳字的情况下**阅读 [FAQ](#faq) 部分。
55 |
56 | 若 FAQ 部分无法解答你的疑惑,可以到 Mod 交流群**直接说出**你想要实现的具体效果并贴出你为了实现这个效果正在写的 Patch 代码进行提问。
57 |
58 | ## 2. SpirePatch 的一般规则
59 |
60 | * Patch 类如果是**嵌套类**,那它必须是**静态嵌套类**。
61 | * Patch 方法必须是**静态方法**。
62 | * Patch 类需有 @SpirePatch 注解。
63 | * Patch 方法接收所有**原方法(被 Patch 的方法)**的参数。当且仅当原方法是**非静态**方法,Patch 方法还接收(被)Patch 的**原方法所属的类的实例**(Instance)参数。示例如下。
64 |
65 | ```java
66 | public static void [Patch方法名]([实例类型] __instance, [参数列表]...) {...}
67 | ```
68 |
69 | * Patch 方法**按顺序**接收参数,实例在前,然后是**原方法的参数顺序**。一般地,实例和参数名不影响接收的顺序。
70 | * Patch 方法接收参数的逻辑与一般的 Java 没有区别,即**按值接收**,而不是按引用接收。
71 | * Java 方法接收的参数是原值 A 的一个复制 A1,A 和 A1 指向同个引用。因此修改 A1.value 也会同时修改 A.value,但给 A1 赋新值并不影响 A 本身。
72 |
73 | ### @SpirePatch 参数
74 |
75 | * `clz` 定义包含需要(被)Patch 的原方法的类,接收 Class 类型。
76 | * `cls` 定义包含需要(被)Patch 的原方法的类,接收 String 类型。必须是完整的类路径和类名。
77 | * `method` 定义需要(被)Patch 的原方法 [名] ,接收 String 类型。
78 | * 使用 `SpirePatch.CONSTRUCTOR` 来定义构造体。
79 | * 使用 `SpirePatch.STATICINITIALIZER` 来定义静态初始化块。
80 | * 使用 `SpirePatch.CLASS` 来定义类。
81 | * `paramtypez` 定义需要(被)Patch 的原方法的参数类型,接收 Class 类型的数组(当原方法有多个重载,即同名方法,时需要填写该参数,无参方法的写法为 `paramtypez = {}` )
82 | * `paramtypes` 定义需要(被)Patch 的原方法的参数类型,接收 String 类型的数组。必须填写参数类型完整的类路径和类名。
83 | * `requiredModId` 定义该 Patch 方法加载时所需加载的 Mod 的 ID,接收 String 类型。
84 | * 用于跨 Mod 直接进行 Patch.
85 | * 当 Mod ID 所指明的 Mod 加载了但 Patch 失败时会产生错误。
86 | * `optional` 当设为 true 时,如果需要(被)Patch 的类和方法不存在时(例如跨 Mod 但另一个 Mod 未加载),该 Patch 会被忽略。
87 | * 当 Patch 失败时不会产生错误。
88 |
89 | 下面是对 AbstractPlayer 类中 useCard 方法 Patch 的示例。
90 |
91 | ```java
92 | @SpirePatch(clz = AbstractPlayer.class, method = "useCard",
93 | paramtypez = {AbstractCard.class, AbstractMonster.class, int.class})
94 | public class ExamplePatch {
95 | @SpirePrefixPatch
96 | public static void Prefix(AbstractPlayer __instance, AbstractCard c, AbstractMonster m, int e) {
97 | ...
98 | }
99 | }
100 | ```
101 |
102 | 注意,原方法 useCard 并无重载,因此 paramtypez 不是必填的。
103 |
104 | ### Patch 的加载顺序
105 |
106 | Patch 首先按类型进行加载,然后按 Mod 顺序进行加载。按类型加载的先后顺序为:Insert,Instrument,Replace,Prefix,Postfix,Raw. 这意味着所有的 Insert Patch 都会在 Instrument Patch 之前加载,等等。如果有 2 个及以上正在加载的 Mod 同时定义了相同类型的 Patch ,这些 Patch 会按 Mod 在 ModTheSpire 中的顺序进行加载。如果一个 Mod 定义多个相同类型的 Patch,这些 Patch 会按任意顺序加载。
107 |
108 |
109 |
110 | ## 3. 一般的 Patch 技术
111 |
112 |
113 |
114 | ### Prefix
115 |
116 | ------
117 |
118 | Prefix 会在原方法的最开始插入你的 Patch 方法。
119 |
120 | 你可以使用 `@SpirePrefixPatch` 注解来定义一个 Prefix 类型的 Patch 方法。
121 |
122 | 注意,ModTheSpire 优先按照 Patch 方法名判断该 Patch 的类型,因此一个方法名为 Postfix 但带有 `@SpirePrefixPatch` 注解的 Patch 方法会被视为 Postifx 而不是 Prefix. 部分其他类型的 Patch 同样适用该规则,下不提醒。
123 |
124 | 下面是对 AbstractPlayer 中的 draw 方法插入 Prefix Patch 的实例,以及插入前和插入后反编译出的源码效果。注意 draw 方法有 2 个重载,因此需要填写 paramtypez 参数。往后 Patch 实例不再详细解释。
125 |
126 | ```java
127 | @SpirePatch(clz = AbstractPlayer.class, method = "draw", paramtypez = {int.class})
128 | public static class ExamplePrefixPatch {
129 | // 此处使用注解 @SpirePrefixPatch 来定义 prefix 类型的 patch 方法
130 | // 亦可通过将方法名从 ExampleMethod 改为 Prefix 来定义 prefix 类型的 patch 方法
131 | @SpirePrefixPatch
132 | // 按照一般规则,该 patch 方法应该接收两个参数——原方法所属类的一个实例,以及原方法的唯一一个参数
133 | // 接收原方法所属类的一个实例的参数为 _inst,接收原方法的原参数(numCards)的参数为 num
134 | public static void ExampleMethod(AbstractPlayer _inst, int num) {
135 | System.out.printf("[%s] draws [%d] cards", _inst.name, num);
136 | }
137 | }
138 | ```
139 |
140 | 
141 |
142 | 
143 |
144 | #### 可用特性
145 |
146 | * [@ByRef](#byref)
147 | * [Private Field Captures](#private-field-captures)
148 | * [SpireReturn](#spirereturn)
149 |
150 | ### Postfix
151 |
152 | ------
153 |
154 | Posfix 会在原方法的最后插入你的 Patch 方法。如果原方法有返回值的话,那么 Postfix 总会在 return 之前插入,这意味这你可以通过 Posfix 更改原方法的返回值,即 retVal = postfix( foobar(params) ).
155 |
156 | 若要修改原方法的返回值,可在 Patch 方法的参数列表中添加一个类型为原方法返回值类型的参数,**该参数必须是 Patch 方法的第一个参数**。
157 |
158 | 你可以使用 `@SpirePostfixPatch` 注解来定义一个 Postfix 类型的 Patch 方法,或是将方法名写成 Postfix.
159 |
160 | 
161 |
162 | 
163 |
164 | #### 可用特性
165 |
166 | * [@ByRef](#byref)
167 | * [Private Field Captures](#private-field-captures)
168 |
169 | ### Insert
170 |
171 | ------
172 |
173 | Insert 允许你在原方法中间的任意位置插入你的 Patch 方法。Insert 总是在你给出的位置**之前**插入 Patch 方法。
174 |
175 | **必须**使用 `@SpireInsertPatch` 注解来定义一个 Insert 类型的 Patch 方法。ModTheSpire 不会依据方法名判断该方法是否为 Insert 类型的 Patch 方法。
176 |
177 | #### @SpireInsertPatch 参数
178 |
179 | `loc` 、`rloc` 和 `locator` 三者中**必须有 1 个且同时只能有 1 个**参数被赋值。这三个参数都是用于让 ModTheSpire 知道你的 Patch 方法要在原方法的何处插入。其中 `loc` 是插入位置的绝对行数,`rloc` 是插入位置的相对行数,而 `locator` 是对插入位置的一个定位。你可以通过反编译来获取相应的行数。JD-GUI 反编译出的代码行数较为准确,推荐使用 JD-GUI. 如果碰上 JD-GUI 无法反编译的类或是 JD-GUI 反编译有明显错误的地方,可以使用 Luyten 进行反编译。
180 |
181 | 下面以 print 方法为模板,对 `loc` 和 `rloc` 进行说明。
182 |
183 | ```java
184 | public void print(params) {
185 | 120: System.out.println("A");
186 | 121: System.out.println("B");
187 | ...
188 | 125: System.out.println("F");
189 | // 在此处插入代码
190 | 126: System.out.println("F");
191 | }
192 | ```
193 |
194 | 对于 `loc` ,你只需要传入绝对行数,即 `loc = 126` 行。若要使用 `rloc` ,那么你需要用该行的行数减掉原方法第一行的行数,在此例中为 126 - 120 = 6,即 `rloc = 6`. 也就是说,`rloc = 0` 意味着该 Insert Patch 会被插到原方法的开头。 一般来说,使用相对行数 `rloc` 的稳定性相较于使用绝对行数 `loc` 的稳定性高些,因此建议优先使用 `rloc` 而不是 `loc`.
195 |
196 | 你如果要在原方法的多个位置插入同样的 Patch 方法,那么可以使用 `locs` 或 `rlocs` 参数,两者均接收整形数组,例如 `locs = {121, 126}`. 使用 `locs` 或 `rlocs` 时,无需再定义 `loc` 和 `rloc`.
197 |
198 | 正如前面提到,Insert 类型的 Patch 方法会在给出的位置插入。插入后编译出的代码行数不会改变,也就是,允许多个 Insert Patch 插入同一行,先后顺序以 Mod 顺序为准,即
199 |
200 | ```java
201 | 126: insert1(params);insert2(params);insert3(params);System.out.println("F");
202 | ```
203 |
204 | * `loc` 定义插入位置的绝对行数,从类文件的开头开始计算。
205 | * `rloc` 定义插入位置相对于原方法开头的行数。
206 | * `locs` 定义多个插入位置的绝对行数的数组。
207 | * `rlocs` 定义多个插入位置的相对行数的数组。
208 | * `localvars` 用于捕获任何局部变量并传递给 Patch 方法。捕获的变量以参数的形式传递给 Patch 方法,变量的参数在原方法参数之后。捕获的变量**必须在 Patch 方法插入的位置之前已经声明**。
209 |
210 | 
211 |
212 | ```java
213 | @SpirePatch(clz = AbstractCard.class, method = "calculateCardDamage")
214 | public static class ExampleInsertPatch {
215 | // 此处 rloc 也可以写成,rloc = 3249 - 3226,可能会更方便
216 | @SpireInsertPatch(rloc = 23, localvars = {"tmp"})
217 | // 注意捕获的局部变量要在 patch 方法的其他参数之后
218 | public static void ExampleInsert(AbstractCard _inst, AbstractMonster m, float tmp) {
219 | System.out.println("i am an insert patch method");
220 | }
221 | }
222 | ```
223 |
224 | #### 可用特性
225 |
226 | * [@ByRef](#byref)
227 | * [Private Field Captures](#private-field-captures)
228 | * [SpireReturn](#spirereturn)
229 |
230 | #### Locator
231 |
232 | 前面提到,`rloc` 的稳定性要优于 `loc`. 在很久以前,杀戮尖塔还经常更新的时候,代码改动导致行数变化是经常的事,这就可能会导致 `rloc` 在某次更新后定位到错误的位置。又或者,当 JD-GUI 的反编译出先问题,或你把握不准行数时,`rloc` 也有可能定位到错误的位置。你可以使用 `Locator` 来对插入位置进行一个定位。Locator 采用 Javassist 提供的 API ,传递原方法的 CtBehavior,并按照使用者给出的条件进行定位。Locator 会返回一个包含可能位置的行数的数组,该数组会被用于确定 Insert 类型的 Patch 方法的插入位置。通过填写 `@SpireInsertPatch` 的 `locator` 参数,你可以指定一个 Insert Patch 所要使用的 Locator. 当使用 `locator` 时,正如前文所述,你不能再定义 `loc` 或 `rloc` 等其他定位用的参数。
233 |
234 | Locator 优于 `rloc` 的一点是,它允许你通过游戏代码的逻辑去定位,再此不过多赘述。
235 |
236 | ModTheSpire 提供了一个有助于在 Locator 中快速定位行数的 API,`LineFinder`. LineFinder 提供了两个方法 `findInOrder` 和 `findAllInOrder` ,前者用于找到***首个***符合条件的位置所在的行数,后者用于按顺序找到***所有***符合条件的位置行数。条件由参数 `List expectedMatches` 和 `Matcher finalMatcher` 限定。Matcher 是一个工具类,提供了用于寻找代码中某个逻辑的便捷方法。
237 |
238 | 下面是对 AbstractCard 类中的 calculateCardDamage 方法插入使用了 Locator 的 Insert Patch 的示例。其中 Locator 用于定位从原方法的参数 `mo` 中第二次调用的域 `powers` 的所在的位置。
239 |
240 | 
241 |
242 | 
243 |
244 | 
245 |
246 | 除了在 Insert Patch 中使用,Locator 以及 LineFinder 还可以在类似 Instrument 和 Raw 这类允许你直接使用 Javassist 的 Patch 中使用,即 Locator 和 LineFinder 并非 Insert 的限定工具。
247 |
248 | 更多类型的 Matcher 的介绍,请自己去翻 ModTheSpire 的 Wiki 上的[说明](https://github.com/kiooeht/ModTheSpire/wiki/Matcher)。
249 |
250 | ### Replace
251 |
252 | ------
253 |
254 | Replace 会用 Patch 方法将原方法**完全替换**掉。在程序运行过程中,原方法体中的代码**全都不会**被调用,而是调用 Patch 方法,即 foobar(params) 会变成 replace(params). 下面的 Replace Patch 会完全替换掉 CardLibrary 类中 `getCardList` 方法的原代码。
255 |
256 | 
257 |
258 | 注意,按照 ModTheSpire 加载 Patch 的顺序,Replace 会覆盖掉对同一个方法生效的所有 Insert 和 Instrument 类型的 Patch.
259 |
260 | 警告:不要使用 Replace 类型的 Patch,除非是万不得已的情况。Replace 的破坏性会导致原方法的其他 Patch 失效或产生其他意料之外的效果。
261 |
262 | ### SpireField
263 |
264 | ------
265 |
266 | SpireField 提供了一种为原版游戏中原先存在的类添加新的域的便捷方式。
267 |
268 | SpireField 也是一种 Patch,因此需要将其写在一个 Patch 类内,但 @SpirePatch 的参数中的 `method` 需要使用 `SpirePatch.CLASS` 定义。
269 |
270 | 下例在 AbstractCard 类中新添加了一个类型为 String,名称中包含 example 的域。
271 |
272 | 
273 |
274 | 注意,新添加的域的名称在编译后的代码中并不完全和你在代码中写的名称一样。因为, 为了防止出现多个域同名的情况,ModTheSpire 会使用索引变更你提供的名称,因此不应该使用反射按照域的名称获取你添加的域。
275 |
276 | 可通过下面的方式访问和修改你添加的域:
277 |
278 | 
279 |
280 | 在添加基本数据类型的域时,需要使用其对应的包装类。
281 |
282 | 使用 SpireField 添加的域为动态域,要添加静态域需使用 StaticSpireField. 两者用法相差不大,这里不过多赘述。
283 |
284 | ### SpireOverride
285 |
286 | ------
287 |
288 | SpireOverride 提供了重写父类私有方法的手段。例如:
289 |
290 | ```java
291 | class A {
292 | private int baz(int i) { return i; }
293 | }
294 | class B extends A {
295 | // 不允许
296 | @Override
297 | private int baz(int i) { return i + 1; }
298 |
299 | // 可行
300 | @SpireOverride
301 | protected int baz(int i) { return i + 1; }
302 | }
303 | ```
304 |
305 | 要在这类重写方法中调用父类的实现,使用 `SpireSuper.call(params)` 而不是 `super.method(params)`.
306 |
307 | ### SpireEnum
308 |
309 | ------
310 |
311 | SpireEnum 是一种为尖塔源码中已有的枚举类添加新枚举值的手段,通过为一个静态域打上 `@SpireEnum` 注解来将该域变为原有枚举类的枚举值,同时,**该静态域的类型必须是目标枚举类型**。例如,为原版的枚举类 `AbstractPlayer.PlayerClass` 添加一个名为 `My_New_Player_Class` 的枚举,演示代码如下:
312 |
313 | ```java
314 | public class MyEnums {
315 | @SpireEnum(name = "My_New_Player_Class")
316 | public static AbstractPlayer.PlayerClass MY_PLAYER;
317 | }
318 | ```
319 |
320 | 上面的例子中,若 SpireEnum 的参数 `name` 留空(即不写),那么被新加进去的枚举名即为变量名,即 `MY_PLAYER` 而不是 `My_New_Player_Class`.
321 |
322 | 要在你的代码中调用由 SpireEnum 新加的枚举,按照调用静态域的方法来调用即可:
323 |
324 | ```java
325 | public void foobar(AbstractPlayer.PlayerClass playerClass) {
326 | if (playerClass == MyEnums.MY_PLAYER) {
327 | ...
328 | }
329 | }
330 | ```
331 |
332 | **注意:不能也不可以将任何新的枚举值定义在任何从定义该枚举类型的类派生出的类中。**
333 |
334 | 换句话说,下面的代码是错误的,但不是语法错误,所以你的 IDE 不会提示你。
335 |
336 | ```java
337 | // 定义枚举类型 PlayerClass 的类
338 | public abstract class AbstractPlayer {
339 | ...;
340 | public static enum PlayerClass {
341 | IRONCLAD, THE_SILENT, DEFECT, WATCHER;
342 | }
343 | }
344 | // MyPlayer 是 AbstractPlayer 的派生类
345 | public class MyPlayer extends AbstractPlayer {
346 | ...;
347 | // 此处的 patch 会失败,相当于没添加枚举值 MY_PLAYER 到原版的 PlayerClass 中
348 | @SpireEnum(name = "My_New_Player_Class")
349 | public static AbstractPlayer.PlayerClass MY_PLAYER;
350 | }
351 | ```
352 |
353 |
354 |
355 | ## 4. Patch 可用的特性
356 |
357 | ### @ByRef
358 |
359 | ByRef 允许 Patch 方法按引用接收参数的方法,当然,不是真的按引用接收,只是提供了变相修改参数引用的手段。ByRef 的参数以一个单一元素数组的形式传递给 Patch 方法。
360 |
361 | * ByRef 适用于 Prefix、Postfix 和 Insert 类型的 Patch
362 | * 参数前使用 `@ByRef` 注解以标明该参数为 ByRef 参数
363 |
364 | 
365 |
366 | ### Private Field Captures
367 |
368 | Private Field Captures(PFC) 是 ModTheSpire 提供的一个特性,允许 Patch 将原方法所在类的私有域作为参数接收。
369 |
370 | 要接收某个私有域,需在 Patch 方法的参数列表中写入,与该私有域的变量名**同名同类型**的参数,并且该参数前需带有三个下划线,即 `fieldName` 写成 `___fieldName`.
371 |
372 | * Prefix、Postfix 和 Insert 均可捕获私有域
373 | * 接收私有域的参数写在原方法的参数之后
374 | * 捕获的私有域可用 `@ByRef` 注解
375 |
376 | #### 参数的顺序
377 |
378 | Insert 类型的 Patch 方法中,PFC 的参数必须在任何接收局部变量的参数之前。即 Patch 方法的参数顺序应为:
379 |
380 | 1. 实例参数(若方法为非静态方法)
381 | 2. 原方法的参数
382 | 3. 接收私有域的参数
383 | 4. 接收局部变量的参数
384 |
385 | 
386 |
387 | ### SpireReturn
388 |
389 | SpireReutn 允许 Patch 方法在原方法中提前调用 `return` 语句。
390 |
391 | * SpireReturn 适用于 Prefix 和 Insert 类型的 Patch .(用脑子想想为什么不适用于 Postfix)
392 |
393 | 
394 |
395 | 对于原方法返回值类型为基本数据类型的方法,需使用其对应的包装类定义 SpireReturn,例如:
396 |
397 | ```java
398 | public static SpireReturn Insert() {...}
399 | ```
400 |
401 |
402 |
403 | ## 5. 进阶 Patch 技术
404 |
405 | 前文介绍的 Prefix、Postfix、Insert 和 Replace 类型的 Patch,只需读者有一定的 Java 基础就能勉强使用。**下面介绍的 Instrument 和 Raw 类型的 Patch 需要读者有一定的 Javassist 基础才能使用。同样地,本教程不过多对 Javassist 的内容进行教学**。
406 |
407 |
408 |
409 | ### Instrument
410 |
411 | ------
412 |
413 | Instrument 允许你修改原方法中的代码,例如移除或替换某个方法的调用,或是修改等。详细的教程见:https://www.javassist.org/tutorial/tutorial2.html#alter
414 |
415 | ModTheSpire 提供的 Instrument 是简化过的,只允许返回 ExprEditor. Patch 方法返回的 ExprEditor 会被用作原方法的 CtBehavior 的 instrument 方法的参数。想要更自由地使用 Instrument,需使用 Raw 类型的 Patch.
416 |
417 | 你可以使用 `@SpireInstrumentPatch` 注解来定义一个 Instrument 类型的 Patch 方法,或是将方法名写成 Instrument.
418 |
419 | 下面是对 UseCardAction 中的一个构造体进行修改的简单的 Instrument Patch. 当调用的方法名为`onUse` 或 `triggerOnCardPlayed` 和接收的参数符合一定的条件时,原调用方法才可被调用。
420 |
421 | 
422 |
423 | Instrument 类型的 Patch 只会在 ModTheSpire 编译的期间运行一次。
424 |
425 | ### Raw
426 |
427 | ------
428 |
429 | Raw 放宽了条件,允许你更自由地使用 Javassist 提供的 API 进行低水平的修改,例如修改字节码。ModTheSpire 会将原方法的 CtBehavior 作为参数传递给 Raw 类型的 Patch 方法,然后你就可以自由地使用 Javassist 修改原版的代码。详细的说明见 [CtBehavior 的 Javadoc](http://www.javassist.org/html/javassist/CtBehavior.html) 和 [Javassist 的教程](https://www.javassist.org/tutorial/tutorial.html)。
430 |
431 | 你可以使用 `@SpireRawPatch` 注解来定义一个 Raw 类型的 Patch 方法,或是将方法名写成 Raw.
432 |
433 | Raw Patch 允许访问字节码水平的修改,例如通过传递 CodeConvertor 作为 instrument 的参数,在遍历到某个符合条件的字节码时对源代码进行修改。下面是允许格挡突破 999 层上限的简单示例,可通过修改源代码中判断格挡层数的代码达成。
434 |
435 | 
436 |
437 | 又或者为其他类添加新的方法,打上新的注解等。
438 |
439 | 
440 |
441 | 同样地,Raw 类型的 Patch 只会在 ModTheSpire 编译的期间运行一次。
442 |
443 |
444 |
445 | ## 6. 编译 Patch 后的代码
446 |
447 | ModTheSpire 在勾选 `debug` 启动时,会在游戏日志中显示每个 Patch 被应用的行数,尽管从技术上讲,这些信息已足以确认 Patch 应用在了正确的位置,但 `--out-jar` 能够让用户更方便直观地检查 Patch 的位置。
448 |
449 | `--out-jar` 标记并不像 `debug` 一样直接显示在 ModTheSpire 的界面中,要使用 `--out-jar` 功能,需要在命令行启动 ModTheSpire,如:
450 |
451 | ```java
452 | java -jar ModTheSpire.jar --out-jar
453 | ```
454 |
455 | 通过 `--out-jar` 启动的 ModTheSpire 并不会启动游戏,而是将所勾选 Mods 的 Patch 编译到游戏源码中(也就是给游戏打 Patch),然后将编译好的代码(即打完 Patch 的游戏代码)转存到 `desktop-1.0-patched.jar` 文件中。然后你就可以使用 JD-GUI 或 Luyten 反编译 `desktop-1.0-patched.jar` 从而查看被 Patch 后的游戏代码。
456 |
457 |
458 |
459 | ## FAQ
460 | 1. 我怎么知道我的 Patch 有没有被应用、有没有打到我想要的位置上?
461 |
462 | **答:** 请一字不拉地阅读 [编译 Patch 后的代码](#6-编译-patch-后的代码) 部分。
463 |
464 | 2. 如何修改原版代码中的某个局部变量的值?
465 |
466 | **答:** 请一字不拉地阅读 [Insert Patch](#insert) 部分,了解 `localvars` 的用法,以及 [@ByRef](#byref) 部分。
467 |
468 | 3. 什么是静态嵌套类?什么是静态方法?什么是静态初始化块?
469 |
470 | **答:**
471 |
472 | Java 基础不牢固导致的问题。以下为一图流简单解释。想要深入理解静态 `static` 关键字的工作原理请善用免费的搜索引擎。
473 |
474 | ```java
475 | public class WhatAreStatics {
476 | static String id;
477 | static int index;
478 | static Object obj;
479 | // 静态初始化块
480 | static {
481 | id = "STATIC FIELD";
482 | index = 10;
483 | obj = new Object();
484 | }
485 |
486 | String name;
487 | // 非静态初始化块
488 | {
489 | name = "Not static one";
490 | }
491 |
492 | // 静态方法
493 | public static void StaticVmethod() {
494 | ...
495 | }
496 | // 也是静态方法
497 | public static boolean StaticBool(String args) {
498 | ...
499 | }
500 | // 同样也是静态方法
501 | public static Object NameDoesntMatter(Object o1, Object o2, int i1) {
502 | ...
503 | }
504 | // 构造体不是静态方法!!!!!
505 | // 构造体不是静态方法!!!!!
506 | // 构造体不是静态方法!!!!!
507 | public WhatAreStatics() {
508 | ...
509 | }
510 |
511 | // 静态嵌套类
512 | public static class NestedClass {
513 | ...
514 | }
515 | }
516 | ```
517 |
518 |
519 |
520 | 4. 什么是原方法?什么是 Patch 方法?什么是 Patch 类?什么又是被 Patch 的类?什么又是 Patch 的类?
521 |
522 | **答:**
523 |
524 | 甲往乙的脸上打了一拳。那么,
525 |
526 | 乙的脸,就是原方法;
527 |
528 | 甲打的那一拳,就是 Patch 方法;
529 |
530 | 甲本身,就是 Patch 类;
531 |
532 | 被打的乙本身,就是被 Patch 的类,也是很多语境下 Patch 的类。
533 |
534 | 在诸如“你 Patch 的类是哪个类?”、“你 Patch 的类呢?”和“你要 Patch 哪个类?”此类语句中,Patch 作动词,表示往哪个类(哪位乙)上打 Patch. 当然,在不同的语境(不同上下文)下,这类说法亦有可能指代你写 Patch 的那个类(甲)而不是被 Patch 的类。
535 |
536 |
537 |
538 | 5. 原方法里用到了 `this` 关键字,可是 Patch 方法里不接收 `this` 参数,我该怎么办呢?
539 |
540 | **答:**
541 |
542 | 非常经典的由 Java 基础不牢固导致的问题。如果你真的被这个问题困扰了很久,建议重学一遍 Java 再来写 Patch.
543 |
544 | Java 中的 `this` 关键字是指向类的对象本身,而这个对象本身,就是你在 Patch 方法中接收的实例,即Instance 参数。实际上,你在类中攥写的非静态方法也会隐式地接收一个指向该类实例化后的对象本身的参数,这个参数的表现形式就是 `this`. 因此你可以在这类方法中使用 `this` 关键字。不过非静态方法是隐式接收,即不需要你写在方法参数列表中,而 Patch 方法需要你显式地写在参数列表中。
545 |
546 | 简而言之,**大部分情况下**,Patch 方法中接收的实例参数可等价**视为**原方法中的 `this` 关键字。
547 |
548 |
549 |
550 | 6. 我要 Patch 原版的 MeteorStrike 类的构造体,写了如下的 Patch,可是不成功,为什么呢?我明明是按着教程一步步来的呀?
551 |
552 | ```java
553 | @SpirePatch(clz = MeteorStrike.class, method = "MeteorStrike")
554 | public static class MeteorStrikePatch {
555 | @SpirePostfixPatch
556 | public static void Postfix(BootSequence _inst) {
557 | ...
558 | }
559 | }
560 | ```
561 |
562 | **答:**
563 |
564 | Java 基础不牢固,教程跳着看等多种因素导致的问题。
565 |
566 | 本教程在第二部分 [SpirePatch 的一般规则](#2-spirepatch-的一般规则) 中就已经很明确地说明了这些非常基础的问题。下为原文。
567 |
568 | > Patch 方法接收所有**原方法(被 Patch 的方法)**的参数。当且仅当原方法是**非静态**方法,Patch 方法还接收(被)Patch 的**原方法所属的类的实例**(Instance)参数。示例如下。
569 | >
570 | > ```java
571 | > public static void [Patch方法名]([实例类型] __instance, [参数列表]...) {...}
572 | > ```
573 |
574 | > `method` 定义需要(被)Patch 的原方法 [名] ,接收 String 类型。
575 | >
576 | > * 使用 `SpirePatch.CONSTRUCTOR` 来定义构造体。
577 | > * 使用 `SpirePatch.STATICINITIALIZER` 来定义静态初始化块。
578 | > * 使用 `SpirePatch.CLASS` 来定义类。
579 |
580 | 一步步分析,首先最明显的问题就是提问的人要 Patch 构造体,但给 `method` 赋了个 `"MeteorStrike"`,典型的将 Java 类的构造体(构造方法)和其他方法混为一谈的错误。
581 |
582 | 其次,提问的人 Patch 的类是 `MeteorStrike` 但在Patch 方法里却接收了个 `BootSequence` 类型的实例参数,可能是典型的不动脑复制粘贴别人代码导致的错误。实际上,Patch 方法接收的实例参数类型除了是(被)Patch 的类,亦可以是该类的父类,即在本例中可为 `AbstractCard` 或 `Object`. 换句话说,实例的类型必须是可由(被)Patch 的类的类型转换而来的类型。
583 |
584 | 综上,修改后正确的代码为:
585 |
586 | ```java
587 | @SpirePatch(clz = MeteorStrike.class, method = SpirePatch.CONSTRUCTOR)
588 | public static class MeteorStrikePatch {
589 | @SpirePostfixPatch
590 | public static void Postfix(MeteorStrike _inst) {
591 | ...
592 | }
593 | }
594 | ```
595 |
596 | 或是:
597 |
598 | ```java
599 | @SpirePatch(clz = MeteorStrike.class, method = SpirePatch.CONSTRUCTOR)
600 | public static class MeteorStrikePatch {
601 | @SpirePostfixPatch
602 | public static void Postfix(AbstractCard _inst) {
603 | ...
604 | }
605 | }
606 | ```
607 |
608 |
609 |
610 | 7. 我想 Patch 原版 DrawPilePanel 中的 hasRelic 方法,我按照教程一步步来写了如下代码,可是为什么一直报错说找不到方法呢?
611 |
612 |
613 | ```java
614 | @SpirePatch(clz = DrawPilePanel.class, method = "hasRelic", paramtypez = {String.class})
615 | public static class SomeStrangePatch {
616 | @SpireInsertPatch(rloc = 0)
617 | public static SpireReturn Insert() {
618 | if (AbstractDungeon.player.hasPower("SomeStrangePower"))
619 | return SpireReturn.Return(true);
620 | return SpireReturn.Continue();
621 | }
622 | }
623 | ```
624 |
625 | (附原版代码如下)
626 |
627 | 
628 |
629 | **答:**
630 | 不知道是作为星际深度玩家还是Java 基础不牢固,教程跳着看等多种因素导致的问题。
631 |
632 | 本教程在第二部分 [SpirePatch 的一般规则](#2-spirepatch-的一般规则) 中就已经很明确地说明了这些非常基础的问题。下为原文。
633 |
634 | > * Patch 方法接收所有**原方法(被 Patch 的方法)**的参数。当且仅当原方法是**非静态**方法,Patch 方法还接收(被)Patch 的**原方法所属的类的实例**(Instance)参数。示例如下。
635 | >
636 | > ```java
637 | > public static void [Patch方法名]([实例类型] __instance, [参数列表]...) {...}
638 | > ```
639 |
640 | > ### @SpirePatch 参数
641 | >
642 | > * `clz` 定义包含需要(被)Patch 的原方法的类,接收 Class 类型。
643 | > * `cls` 定义包含需要(被)Patch 的原方法的类,接收 String 类型。必须是完整的类路径和类名。
644 | > * `method` 定义需要(被)Patch 的原方法 [名] ,接收 String 类型。
645 |
646 | 先说明一个 Java 中非常基础的概念——类的方法不是指所有在这个类的代码中出现的方法。
647 |
648 | 从上述例子来看,提问者所说的 `DrawPilePanel` 中的 `hasRelic` 方法显而易见地不是 `DrawPilePanel` 这个类的方法,而是在 `DrawPilePanel` 这个类中的 `render` 方法中被调用的方法。也就是,`DrawPilePanel` 这个类中的 `render` 方法通过 `AbstractPlayer` 类型的实例 `AbstractDungeon.player` 调用了 `hasRelic` 方法,那么很显然这个 `hasRelic` 其实是 `AbstractPlayer` 类的方法,而不是 `DrawPilePanel` 类中的方法,它只是在 `DrawPilePanel` 中被调用。而提问者所使用的 Patch 中的参数 `clz` 和 `method` 必须是一一对应的,所以它无法在 `DrawPilePanel` 这个类中找到不存在于 `DrawPilePanel` 中的 `hasRelic` 方法。
649 |
650 | 其次,非常明显地,`hasRelic` 是通过一个对象调用,而不是静态方法的 `类名.方法名` 的形式调用,换句话说,这个 `hasRelic` 不是个静态方法。按照本教程所述 SpirePatch 的一般规则,使用 @SpirePatch 而非 @SpirePatch2 时,Patch 方法必须接收原方法所属的类的实例作为一个参数。
651 |
652 | 再其次,即使 `hasRelic` 真的是 `DrawPilePanel` 中的静态方法,但依旧如同本教程所述,使用 @SpirePatch 而不是 @SpirePatch2 的 Patch 方法**要接收原方法的所有参数**,提问者都知道 `hasRelic` 会接收一个 `String` 类型的参数(还特地写在了 `paramtypez` 里),但却不知为何在自己的 Patch 方法中,也就是
653 |
654 | ```java
655 | public static SpireReturn Insert() {
656 | if (AbstractDungeon.player.hasPower("SomeStrangePower"))
657 | return SpireReturn.Return(true);
658 | return SpireReturn.Continue();
659 | }
660 | ```
661 |
662 | 不提供一个 `String` 类型的参数。
663 |
664 | 综上,在**无法揣测提问者原本想要的 Patch 效果的情况下**,提供一个**仅供参考**的修正版代码示例如下
665 |
666 | ```java
667 | @SpirePatch(clz = AbstractPlayer.class, method = "hasRelic", paramtypez = {String.class})
668 | public static class SomeStrangePatch {
669 | @SpireInsertPatch(rloc = 0)
670 | public static SpireReturn Insert(AbstractPlayer _inst, String s) {
671 | if (_inst.hasPower("SomeStrangePower"))
672 | return SpireReturn.Return(true);
673 | return SpireReturn.Continue();
674 | }
675 | }
676 | ```
677 |
678 |
679 |
680 | 8. 写个 Patch 需要了解的名词和概念怎么这么多?这么多东西这么复杂还容易混淆谁记得住?
681 |
682 | **答:**
683 |
684 | 诚然,在劝不学靡然成风的现状下,学习一些和尖塔 Mod 有关的 Java 基础,以及使用小学语文阅读理解能力耐心地阅读教程已然难于初中数学。
685 |
686 | 总之,此问题碍于作者水平有限,无法解答,建议咨询师爷。
687 |
688 | 不过作者还是建议各位读者不要受劝不学这类不良之风的影响,每天花费30分钟到1小时不等的时间,结合菜鸟教程等免费的在线 Java 教程,认真学一学 Java 的基础知识。简单的尖塔 Mod 所涉及的 Java 基础不多。实际上,Java 已经是最通俗易懂的面向对象编程语言了。
689 |
690 |
691 |
692 | 9. 暂无
693 |
--------------------------------------------------------------------------------