 26 |
26 |  41 |
42 |
41 |
42 | Unicode 引用
138 |139 | 140 |
Unicode 是字体在网页端最原始的应用方式,特点是:
141 |-
142 |
- 支持按字体的方式去动态调整图标大小,颜色等等。 143 |
- 默认情况下不支持多色,直接添加多色图标会自动去色。 144 |
146 |148 |注意:新版 iconfont 支持两种方式引用多色图标:SVG symbol 引用方式和彩色字体图标模式。(使用彩色字体图标需要在「编辑项目」中开启「彩色」选项后并重新生成。)
147 |
Unicode 使用步骤如下:
149 |第一步:拷贝项目下面生成的 @font-face
150 | @font-face {
152 | font-family: 'iconfont';
153 | src: url('iconfont.woff2?t=1669963366750') format('woff2'),
154 | url('iconfont.woff?t=1669963366750') format('woff'),
155 | url('iconfont.ttf?t=1669963366750') format('truetype');
156 | }
157 | 第二步:定义使用 iconfont 的样式
159 |.iconfont {
161 | font-family: "iconfont" !important;
162 | font-size: 16px;
163 | font-style: normal;
164 | -webkit-font-smoothing: antialiased;
165 | -moz-osx-font-smoothing: grayscale;
166 | }
167 | 第三步:挑选相应图标并获取字体编码,应用于页面
169 |
170 | <span class="iconfont">3</span>
172 |
173 | 174 |176 |"iconfont" 是你项目下的 font-family。可以通过编辑项目查看,默认是 "iconfont"。
175 |
 15 |
16 |
17 |
15 |
16 |
17 |  18 |
19 |
18 |
19 |  20 |
21 |
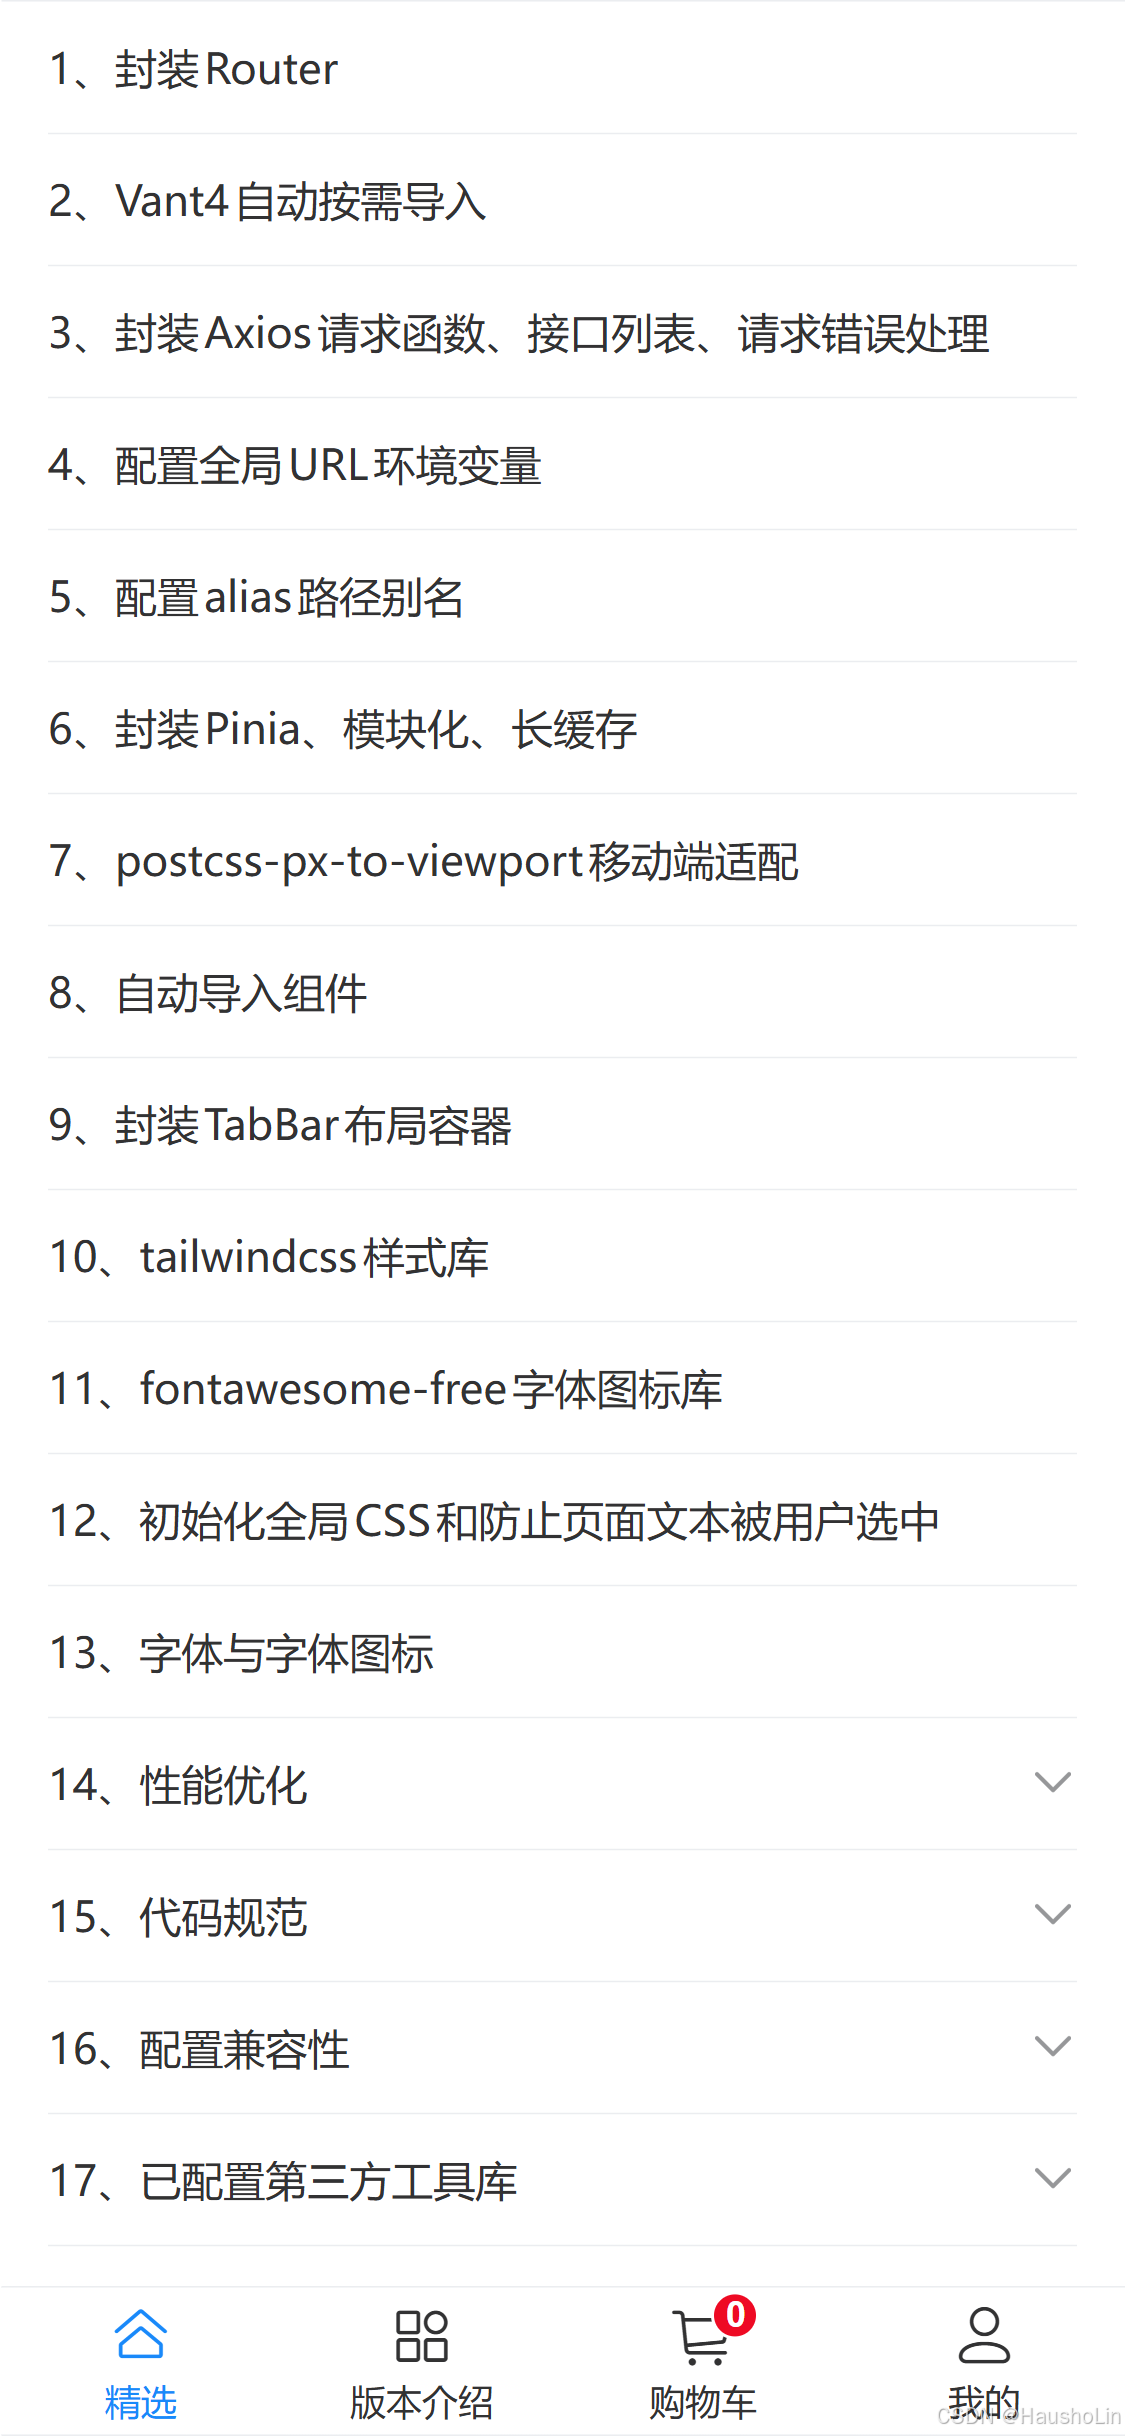
22 | ### 项目结构
23 |
24 | ```js
25 | learn-vite -- UI 主目录
26 | ├── dist 打包后自动生成的文件夹
27 | ├── public -- 静态资源
28 | ├ ├── favicon.ico -- 图标
29 | ├── src -- 源码目录
30 | ├ ├── assets -- 全局静态资源
31 | ├ ├ ├── iconfont -- 字体和字体图标
32 | ├ ├ ├── images -- 图片存放路径
33 | ├ ├ ├── json -- 静态json
34 | ├ ├ └── scss -- index.scss 全局样式,reset.scss初始化样式
35 | ├ ├── components -- 封装的组件
36 | ├ ├── global 配置全局URL环境变量
37 | ├ ├── hooks -- vue3 Hooks
38 | ├ ├── layout -- 全局Tabbar配置、keep-alive可配置需长缓存的路由
39 | ├ ├── polyfill 解决浏览器兼容性的文件
40 | ├ ├── router -- VUE 路由
41 | ├ ├ ├── index -- 路由入口
42 | ├ ├── service
43 | ├ ├ ├── apiList.ts -- 接口列表
44 | ├ ├ ├── error.ts -- 封装的接口错误提示
45 | ├ ├ ├── handleError.ts -- 处理接口请求错误
46 | ├ ├ ├── requestList.ts -- 请求函数列表
47 | ├ ├ └── webRequest.ts -- 封装Axios请求函数
48 | ├ ├── store -- Pinia
49 | ├ ├ ├── index -- 统一导出整个pinia和store
50 | ├ ├ └── modules.ts store模块化
51 | ├ ├── typings -- 存储TS类型别名
52 | ├ ├── utils -- 工具包
53 | ├ ├── views -- 业务上的 vue 页面
54 | ├ ├── App.vue -- 根组件
55 | ├ └── main.ts -- 入口 ts
56 | ├── components.d.ts -- 自动注册组件文件
57 | ├── .eslintrc.js -- ESLint 配置
58 | ├── .gitignore -- git 忽略
59 | ├── tsconfig.json -- vscode 路径引入配置
60 | ├── tailwind.config.js -- tailwindcss 配置文件
61 | ├── index.html -- 首页
62 | ├── package.json -- 依赖管理
63 | ├── vite.config.ts -- vite5的相关配置
64 | └── windi.config.ts -- WindiCSS的配置文件
65 | ```
66 |
67 | ## 命令
68 |
69 | ```js
70 | git clone https://github.com/HSg666/vue3.3-Mobile-template
71 | // 或 git clone git@github.com:HSg666/vue3.3-Mobile-template
72 | pnpm i // 装依赖
73 | pnpm start // 启动
74 | pnpm run build // 打包
75 | rm -rf node_modules // 强行删除依赖包
76 | ```
77 | 准备打包上线时请看
20 |
21 |
22 | ### 项目结构
23 |
24 | ```js
25 | learn-vite -- UI 主目录
26 | ├── dist 打包后自动生成的文件夹
27 | ├── public -- 静态资源
28 | ├ ├── favicon.ico -- 图标
29 | ├── src -- 源码目录
30 | ├ ├── assets -- 全局静态资源
31 | ├ ├ ├── iconfont -- 字体和字体图标
32 | ├ ├ ├── images -- 图片存放路径
33 | ├ ├ ├── json -- 静态json
34 | ├ ├ └── scss -- index.scss 全局样式,reset.scss初始化样式
35 | ├ ├── components -- 封装的组件
36 | ├ ├── global 配置全局URL环境变量
37 | ├ ├── hooks -- vue3 Hooks
38 | ├ ├── layout -- 全局Tabbar配置、keep-alive可配置需长缓存的路由
39 | ├ ├── polyfill 解决浏览器兼容性的文件
40 | ├ ├── router -- VUE 路由
41 | ├ ├ ├── index -- 路由入口
42 | ├ ├── service
43 | ├ ├ ├── apiList.ts -- 接口列表
44 | ├ ├ ├── error.ts -- 封装的接口错误提示
45 | ├ ├ ├── handleError.ts -- 处理接口请求错误
46 | ├ ├ ├── requestList.ts -- 请求函数列表
47 | ├ ├ └── webRequest.ts -- 封装Axios请求函数
48 | ├ ├── store -- Pinia
49 | ├ ├ ├── index -- 统一导出整个pinia和store
50 | ├ ├ └── modules.ts store模块化
51 | ├ ├── typings -- 存储TS类型别名
52 | ├ ├── utils -- 工具包
53 | ├ ├── views -- 业务上的 vue 页面
54 | ├ ├── App.vue -- 根组件
55 | ├ └── main.ts -- 入口 ts
56 | ├── components.d.ts -- 自动注册组件文件
57 | ├── .eslintrc.js -- ESLint 配置
58 | ├── .gitignore -- git 忽略
59 | ├── tsconfig.json -- vscode 路径引入配置
60 | ├── tailwind.config.js -- tailwindcss 配置文件
61 | ├── index.html -- 首页
62 | ├── package.json -- 依赖管理
63 | ├── vite.config.ts -- vite5的相关配置
64 | └── windi.config.ts -- WindiCSS的配置文件
65 | ```
66 |
67 | ## 命令
68 |
69 | ```js
70 | git clone https://github.com/HSg666/vue3.3-Mobile-template
71 | // 或 git clone git@github.com:HSg666/vue3.3-Mobile-template
72 | pnpm i // 装依赖
73 | pnpm start // 启动
74 | pnpm run build // 打包
75 | rm -rf node_modules // 强行删除依赖包
76 | ```
77 | 准备打包上线时请看