26 |
27 | 如果需要用一句话来介绍这本小册的话,「**一年磨一剑**」应该是最好的答案了。
28 |
29 | 为什么这样说呢?在出小册之前,我花了半年的时间做了一个这个开源项目。在半年的时间里,我收集了大量的一线大厂面试题,通过大数据统计出了近百个常考知识点,然后根据这些知识点写成了**近十万字**的内容。
30 |
31 | 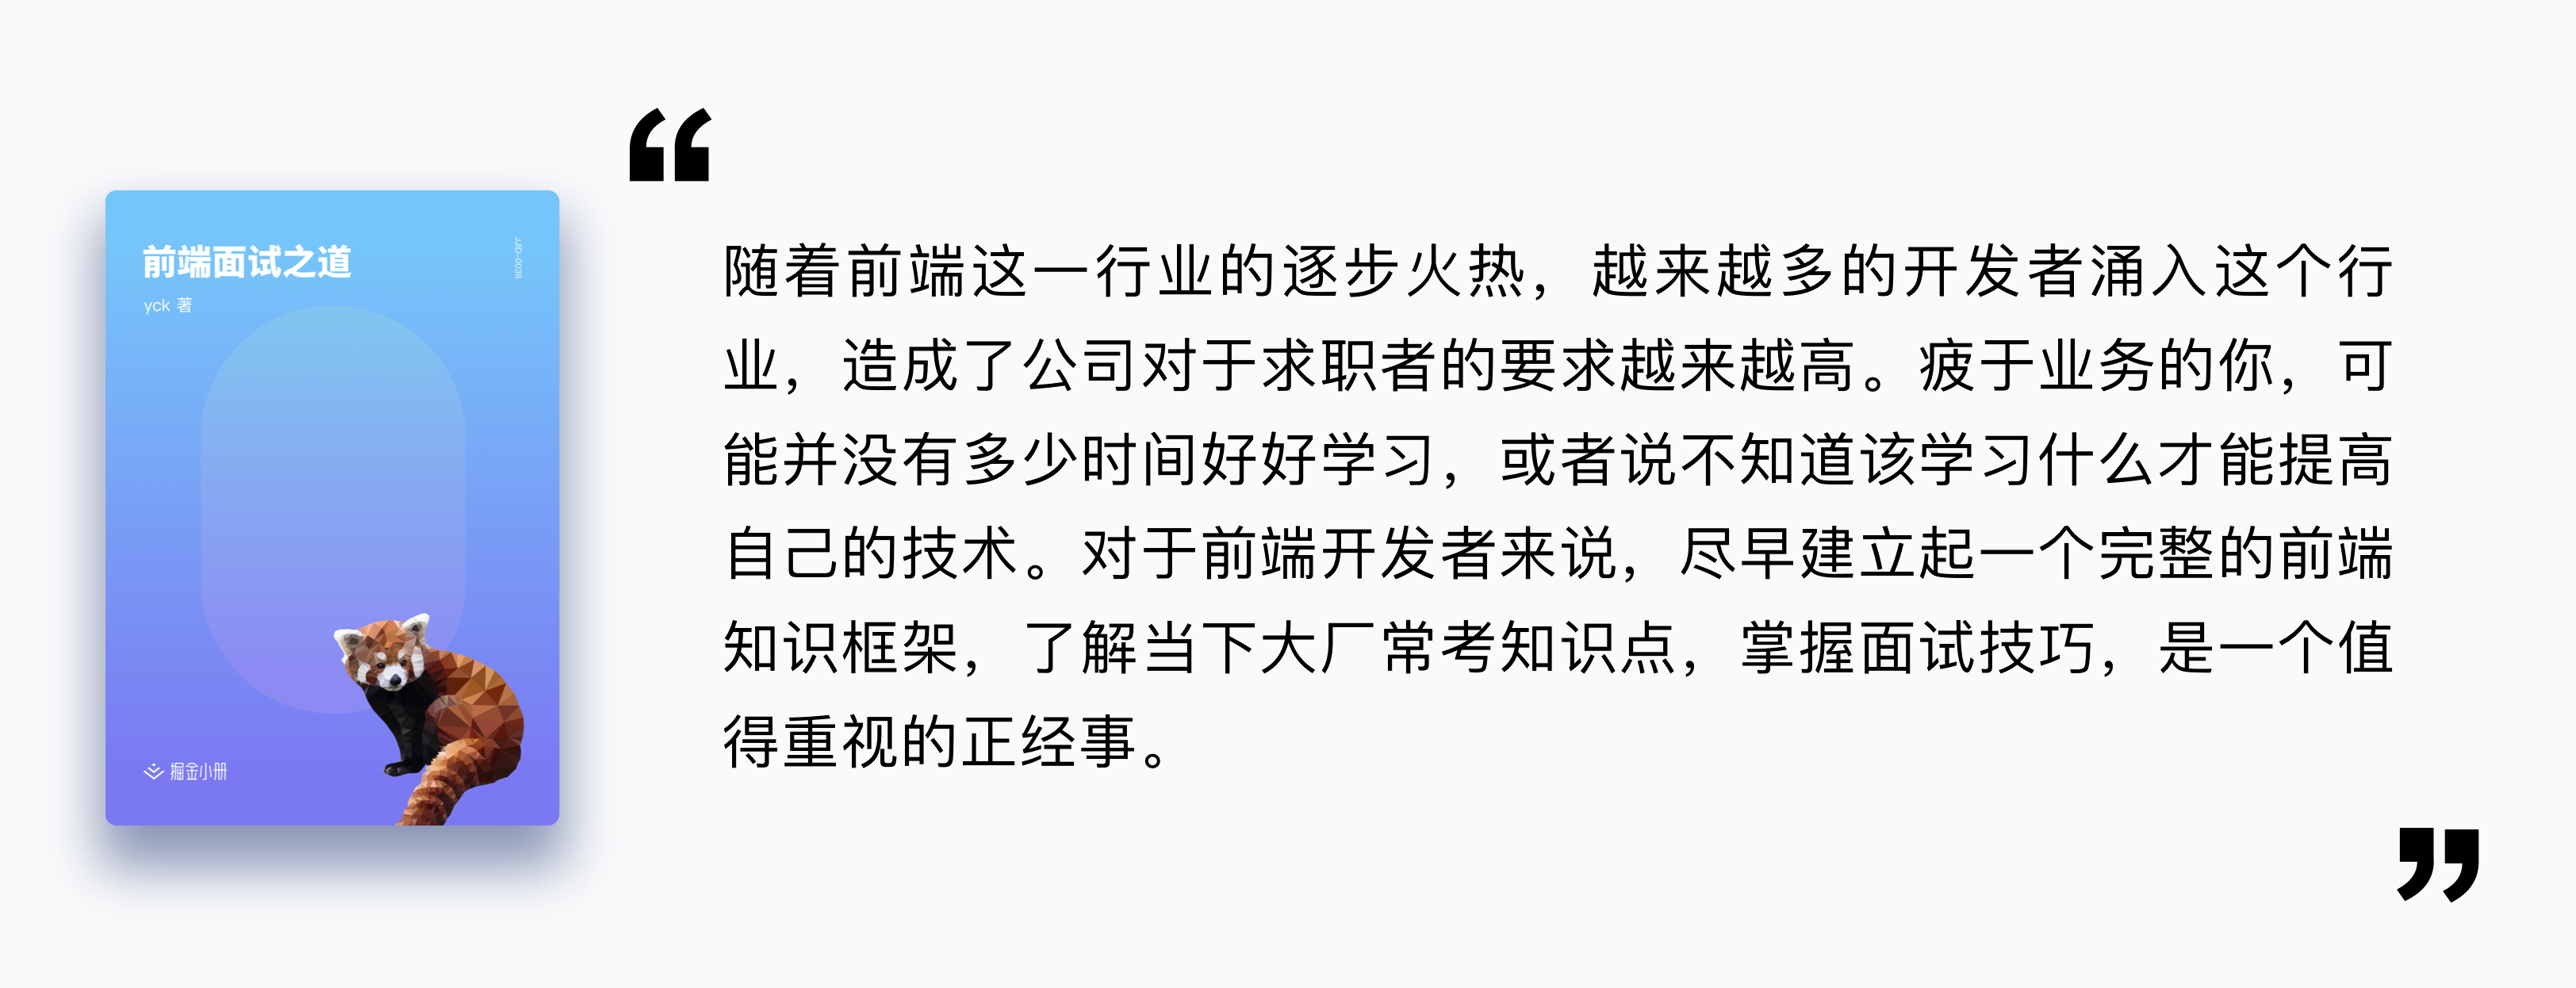
32 |
33 | 这本小册是基于本开源项目重新写的一份前端面试书籍(目前已经写作三个月,预计成品需要五个月),对原本的内容进行了大幅度的优化,并且新增了很多新的内容。这本小册可以说是一线互联网大厂的面试精华总结,同时还包含了如何写简历和面试技巧的内容,能够帮助你省时省力地准备面试,让找工作不再是一个难题。
34 |
35 | 当然小册面向的群体不单单是求职者,同时也适合初级进阶,中级查漏补缺。如果你是一名面试官的话,说不定这本小册也能给你带来一些灵感。
36 |
37 | 面试是每个程序员都绕不开的坎,虽然这本小册不能帮你一夜之间技术一蹴而就,但是如果你能**细细阅读**的话,绝对能让你醍醐灌顶。
38 |
39 | 如果你对于内容不放心的话,可以看一下这两位业内大佬的评价,他们都是仔细读过小册后才给出的一个推荐。
40 |
41 | 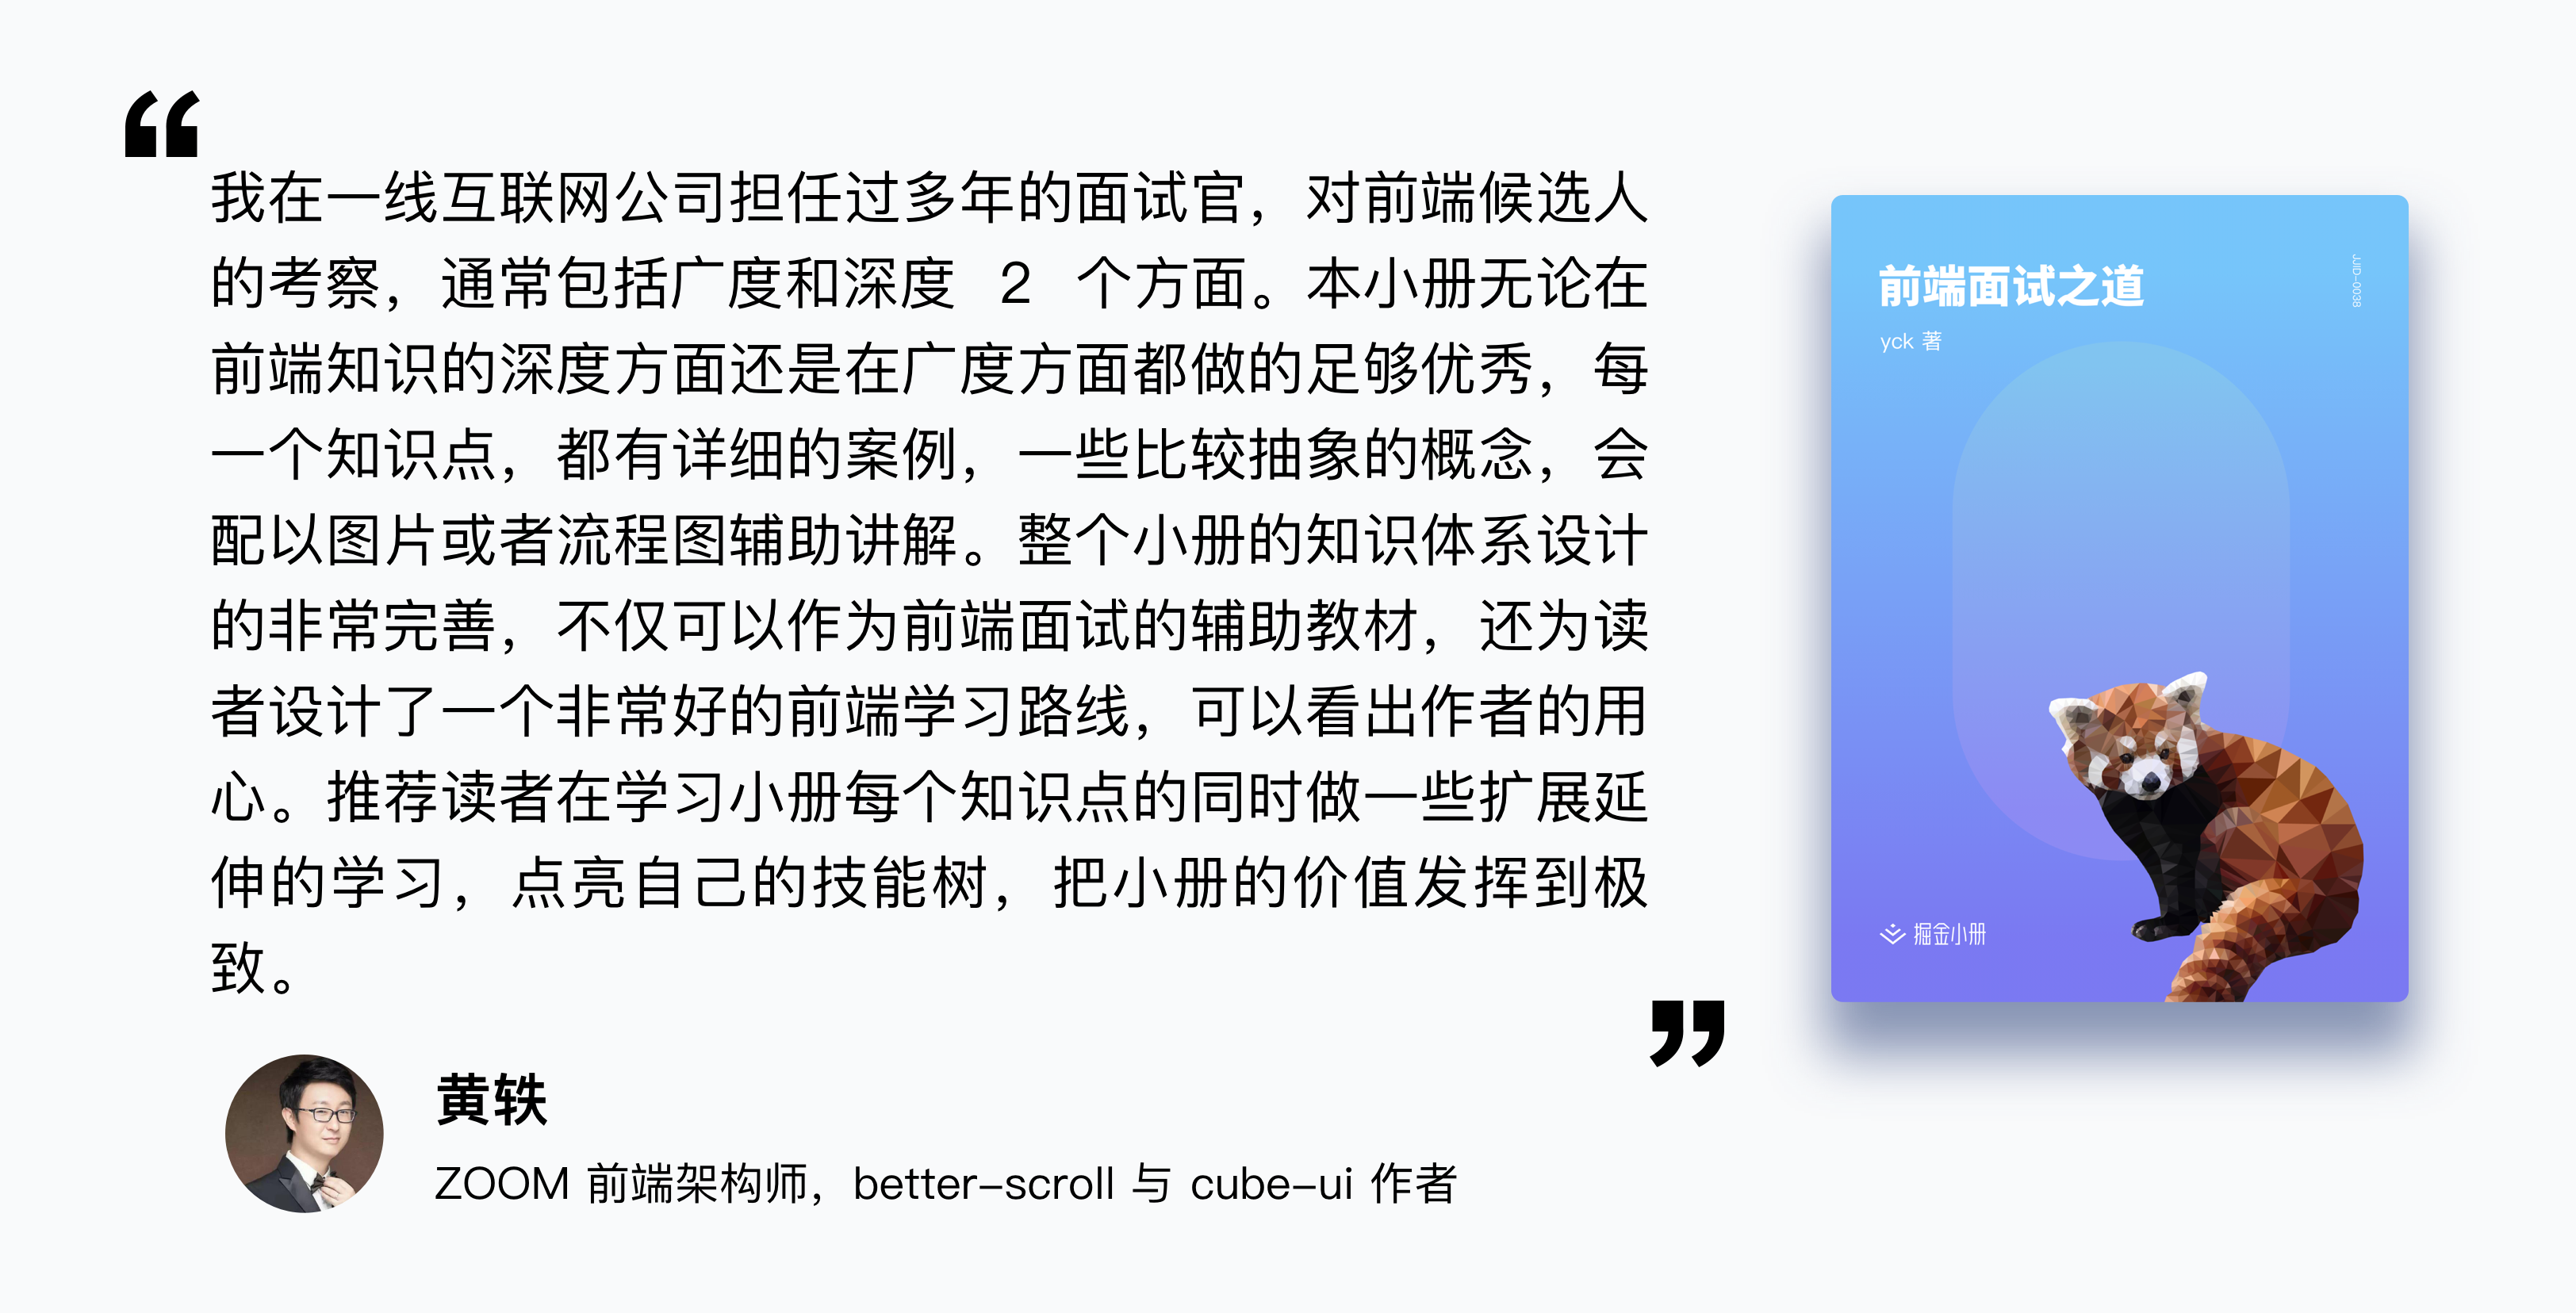
42 |
43 | 
44 |
45 | ## 贡献
46 |
47 | 如果你发现知识点内容有出错或者代码有 Bug,欢迎你提交英文 [issue](https://github.com/InterviewMap/CS-Interview-Knowledge-Map/issues/new),如果你英文不好的话,请在 [该 issue](https://github.com/InterviewMap/CS-Interview-Knowledge-Map/issues/18) 中讨论
48 |
49 | 如果你认为有一个不错的知识点或者也想参与翻译校对,欢迎提交 [PR](https://github.com/InterviewMap/CS-Interview-Knowledge-Map/pulls),或者也可以联系我
50 |
51 | ## 协议
52 |
53 | [MIT](LICENSE). Copyright (c)
54 |
--------------------------------------------------------------------------------
/Career/How-to-use-your-time-correctly.md:
--------------------------------------------------------------------------------
1 |
2 |
3 | **Table of Contents** *generated with [DocToc](https://github.com/thlorenz/doctoc)*
4 |
5 | - [花时间补基础,读文档](#%E8%8A%B1%E6%97%B6%E9%97%B4%E8%A1%A5%E5%9F%BA%E7%A1%80%E8%AF%BB%E6%96%87%E6%A1%A3)
6 | - [学会搜索](#%E5%AD%A6%E4%BC%9A%E6%90%9C%E7%B4%A2)
7 | - [学点英语](#%E5%AD%A6%E7%82%B9%E8%8B%B1%E8%AF%AD)
8 | - [画个图,想一想再做](#%E7%94%BB%E4%B8%AA%E5%9B%BE%E6%83%B3%E4%B8%80%E6%83%B3%E5%86%8D%E5%81%9A)
9 | - [利用好下班时间学习](#%E5%88%A9%E7%94%A8%E5%A5%BD%E4%B8%8B%E7%8F%AD%E6%97%B6%E9%97%B4%E5%AD%A6%E4%B9%A0)
10 | - [列好 ToDo](#%E5%88%97%E5%A5%BD-todo)
11 | - [反思和整理](#%E5%8F%8D%E6%80%9D%E5%92%8C%E6%95%B4%E7%90%86)
12 |
13 |
14 |
15 | 你是否时常会焦虑时间过的很快,没时间学习,本文将会分享一些个人的见解。
16 |
17 | ### 花时间补基础,读文档
18 | 在工作中我们时常会花很多时间去 debug,但是你是否发现很多问题最终只是你基础不扎实或者文档没有仔细看。
19 |
20 | 基础是你技术的基石,一定要花时间打好基础,而不是追各种新的技术。一旦你的基础扎实,学习各种新的技术也肯定不在话下,因为新的技术,究其根本都是相通的。
21 |
22 | 文档同样也是一门技术的基础。一个优秀的库,开发人员肯定已经把如何使用这个库都写在文档中了,仔细阅读文档一定会是少写 bug 的最省事路子。
23 |
24 | ### 学会搜索
25 | 如果你还在使用百度搜索编程问题,请尽快抛弃这个垃圾搜索引擎。同样一个关键字,使用百度和谷歌,谷歌基本完胜的。即使你使用中文在谷歌中搜索,得到的结果也往往是谷歌占优,所以如果你想迅速的通过搜索引擎来解决问题,那一定是谷歌。
26 |
27 | ### 学点英语
28 | 说到英语,一定是大家所最不想听的。其实我一直认为程序员学习英语是简单的,因为我们工作中是一直接触着英语,并且看懂技术文章,文档所需要的单词量是极少的。我时常在群里看到大家发出一个问题的截图问什么原因,其实在截图中英语已经很明白的说明了问题的所在,如果你的英语过关,完全不需要浪费时间来提问和搜索。所以我认为学点英语也是节省时间中很重要的一点。
29 |
30 | 那么如何去学习呢,chrome 装个翻译插件,直接拿英文文档或文章读,不会的就直接划词翻译,然后记录下这个单词并背诵。每天花半小时看点英文文档和文章,坚持两个月,你的英语水平不说别的,看文档和文章绝对不会有难题了。这一定是一个很划算的个人时间投资,花点时间学习英语,能为你将来的技术之路铺平很多坎。
31 |
32 | ### 画个图,想一想再做
33 | 你是否遇到过这种问题,需求一下来,看一眼,然后马上就按照设计稿开始做了,可能中间出个问题导致你需要返工。
34 |
35 | 如果你存在这样的问题,我很推荐在看到设计稿和需求的时候花点时间想一想,画一画。考虑一下设计稿中是否可以找到可以拆分出来的复用组件,是否存在之前写过的组件。该如何组织这个界面,数据的流转是怎么样的。然后画一下这个页面的需求,最后再动手做。
36 |
37 | ### 利用好下班时间学习
38 | 说到下班时间,那可能就有人说了公司很迟下班,这其实是国内很普遍的情况。但是我认为正常的加班是可以的,但是强制的加班就是在损耗你的身体和前途。
39 |
40 | 可以这么说,大部分的 996 公司,加班的这些时间并不会增加你的技术,无非就是在写一些重复的业务逻辑。也许你可以拿到更多的钱,但是代价是身体还有前途。程序员是靠技术吃饭的,如果你长久呆在一个长时间加班的公司,不能增长你的技术还要吞噬你的下班学习时间,那么你一定会废掉的。如果你遇到了这种情况,只能推荐尽快跳槽到非 996 的公司。
41 |
42 | 那么如果你有足够的下班时间,一定要花上 1, 2 小时去学习,上班大家基本都一样,技术的精进就是看下班以后的那几个小时了。如果你能利用好下班时间来学习,坚持下去,时间一定会给你很好的答复。
43 |
44 | ### 列好 ToDo
45 | 我喜欢规划好一段时间内要做的事情,并且要把事情拆分为小点。给 ToDo 列好优先级,紧急的优先级最高。相同优先级的我喜欢先做简单的,因为这样一旦完成就能划掉一个,提高成就感。
46 |
47 | ### 反思和整理
48 | 每周末都会花上点时间整理下本周记录的笔记和看到的不错文章。然后考虑下本周完成的工作和下周准备要完成的工作。
49 |
--------------------------------------------------------------------------------
/Git/git-en.md:
--------------------------------------------------------------------------------
1 |
2 |
3 | **Table of Contents** *generated with [DocToc](https://github.com/thlorenz/doctoc)*
4 |
5 | - [Merge with Rebase](#merge-with-rebase)
6 | - [stash](#stash)
7 | - [reflog](#reflog)
8 | - [Reset](#reset)
9 |
10 |
11 |
12 | This is not for rookie, we'll introduce something about more advanced.
13 | ## Merge with Rebase
14 | This command shows no difference with the command `merge`.
15 |
16 | We usually use `merge` to merge the code from one branch to `master` , like this:
17 |
18 | 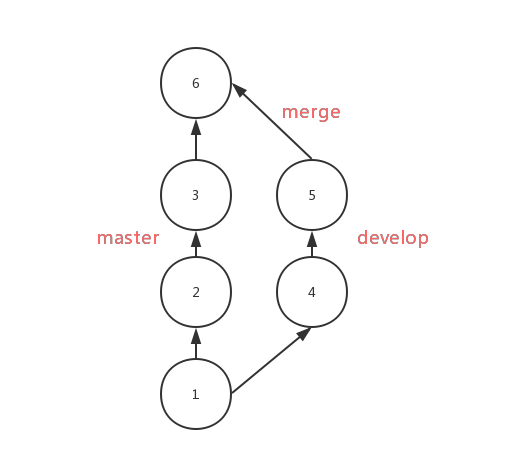
19 |
20 | After using `rebase ` , the commits from `develop` will be moved to the third `commit` of the `master` in order, as follows:
21 |
22 | 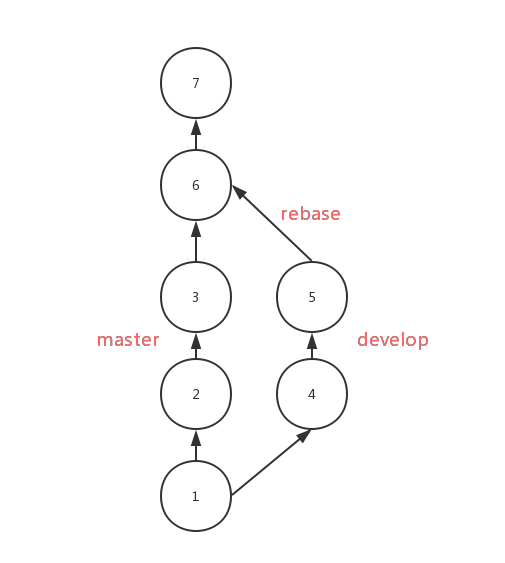
23 |
24 | Compare with `merge`, the result of `rebase` is very clear with a single flow. But if there is any conflict, you'll be in trouble to solving them. You have to solve them one by one , while you only need to solve them one-time if using `merge`.
25 |
26 | You should use `rebase` on the local branchs which need be rebased. If you need to `rebase` the `develop` to the `master`, you should do as follows:
27 |
28 | ```shell
29 | ## branch develop
30 | git rebase master
31 | git checkout master
32 | ## move HEAD on `master` to the latest commit
33 | git merge develop
34 | ```
35 |
36 | ## stash
37 |
38 | Use `git stash` to save the current state of the working directory while you want to check out branch, if you don't want to use `commit`.
39 |
40 | ```shell
41 | git stash
42 | ```
43 | This command can record the current state of the working directory, if you want to recover it, you can do like this:
44 |
45 | ```shell
46 | git stash pop
47 | ```
48 | then you'll back to the exactly state before.
49 |
50 | ## reflog
51 |
52 | This command will show you the records of HEAD's trace. If you delete a branch by mistake, you can examine the hashs of HEAD by using `reflog`.
53 |
54 | 
55 |
56 | According to the picture, the last movement of HEAD is just after `merge`, and then the `new` branch was deleted, so we can get the branch back by the following command:
57 |
58 | ```shell
59 | git checkout 37d9aca
60 | git checkout -b new
61 | ```
62 |
63 | PS:`reflog` is time-bound, it can only record the state over a period of time.
64 |
65 |
66 | ## Reset
67 |
68 | If you want to delete the last commit, you can do like this:
69 |
70 | ```shell
71 | git reset --hard HEAD^
72 | ```
73 | But this command doesn't delete the commit, it just reset the HEAD and branch.
74 |
--------------------------------------------------------------------------------
/README-EN.md:
--------------------------------------------------------------------------------
1 |
2 |
3 |
4 | Interview Map
5 |
6 |
7 |
This is a map that can help you prepare better for the next interview
8 |
9 |
10 |
11 |
12 |
13 |
14 | ## Foreword
15 |
16 | > When you are old, looking back on your life, you will find out: when to study abroad, when to decide on your first occupation, when to choose the other half to fall in love with, when to marry; all of these are great changes in fate. We were just standing at the three-forked intersection and seeing the wind blow the clouds and sails. The day you made your choice was a quite dull and peaceful day in the diary, and it was thought to be an ordinary day in your life.
17 | > A project to change the interview — Interview Map.
18 |
19 |
20 | The best job-hopping months, September and October, are coming(in Chinese, there is an idiom called "Golden September and Silver October”). Most people will be eager to prepare for and to pursue better job opportunities. The interview will be their biggest challenge.
21 |
22 | For the interview, the usual accumulation of learning is necessary, but the preparation before the interview is also crucial.
23 |
24 | A few months ago, I set up a small team. It took us half a year to search for interview questions from big companies, filtering out nearly 100 knowledge points, writing the content and translating it all into English. Today, we finally release the first version and the total number of words has reached more than 100,000 so far.
25 |
26 | We think that rote learning of the interview questions is not very useful. Only when you are familiar with the various knowledge points and are capable of integrating them, can you get through the interviews. This InterviewMap currently contains nearly a hundred high-frequency knowledge points. No matter the preparation before the interview or the study, we believe that it will help you. The current content includes JS, network, browser related, performance optimization, security, framework, Git, data structures, algorithms, etc. Whether it is basic or advanced learning or source code interpretation, you can get a satisfactory answer in this InterviewMap, and we hope that the InterviewMap can help you better prepare for your interview.
27 |
28 | The contents of the repository will update continuously, and more content will be added into the repository later, such as system design, the blockchain, operating and support, backend, etc. Of course, these are not my strengths, and I will invite friends who have good experience in this area to write this content.
29 |
30 |
31 | # Outline
32 | 
33 |
34 |
35 | ## Contributing
36 | If you find something wrong with the knowledge point or there’s a bug in the code, you are welcome to submit an English [issue](https://github.com/InterviewMap/CS-Interview-Knowledge-Map/issues/new). If your English is not good, please discuss it in [this issue](https://github.com/InterviewMap/CS-Interview-Knowledge-Map/issues/18).
37 |
38 | If you think you know of a good knowledge point to contribute, or would like to participate in translation and proofreading, you are welcome to submit a [PR](https://github.com/InterviewMap/CS-Interview-Knowledge-Map/pulls), or you can contact me at .
39 |
40 | ## Todo
41 |
42 | * Complete the content about CSS
43 | * Complete the content about Webpack
44 | * Complete the content about the mini program (WeiXin)
45 | * Improve the content of the framework
46 |
47 | The above content is expected to be updated completely in September, and you are welcome to participate in the construction of this interviewmap.
48 |
49 | ## Reading
50 |
51 | [Online version is clearer to read](https://yuchengkai.cn/docs/).
52 |
53 | ## Communicate and share
54 | If you want to communicate and discuss the content of this interviewmap with others, you can join [communicate group](https://github.com/InterviewMap/CS-Interview-Knowledge-Map/issues/19) or [gitter](https://gitter.im/interview-map/Lobby?utm_source=share-link&utm_medium=link&utm_campaign=share-link).
55 |
56 |
57 | ## Support us
58 | If the interviewmap helps you with your interview or study, you can [support our work](https://github.com/InterviewMap/CS-Interview-Knowledge-Map/issues/20).
59 |
60 |
61 | ## License
62 | [MIT](LICENSE). Copyright (c)
63 |
--------------------------------------------------------------------------------
/Safety/safety-cn.md:
--------------------------------------------------------------------------------
1 |
2 |
3 | **Table of Contents** *generated with [DocToc](https://github.com/thlorenz/doctoc)*
4 |
5 | - [XSS](#xss)
6 | - [如何攻击](#%E5%A6%82%E4%BD%95%E6%94%BB%E5%87%BB)
7 | - [如何防御](#%E5%A6%82%E4%BD%95%E9%98%B2%E5%BE%A1)
8 | - [CSP](#csp)
9 | - [CSRF](#csrf)
10 | - [如何攻击](#%E5%A6%82%E4%BD%95%E6%94%BB%E5%87%BB-1)
11 | - [如何防御](#%E5%A6%82%E4%BD%95%E9%98%B2%E5%BE%A1-1)
12 | - [SameSite](#samesite)
13 | - [验证 Referer](#%E9%AA%8C%E8%AF%81-referer)
14 | - [Token](#token)
15 | - [密码安全](#%E5%AF%86%E7%A0%81%E5%AE%89%E5%85%A8)
16 | - [加盐](#%E5%8A%A0%E7%9B%90)
17 |
18 |
19 |
20 | ## XSS
21 |
22 | > **跨网站指令码**(英语:Cross-site scripting,通常简称为:XSS)是一种网站应用程式的安全漏洞攻击,是[代码注入](https://www.wikiwand.com/zh-hans/%E4%BB%A3%E7%A2%BC%E6%B3%A8%E5%85%A5)的一种。它允许恶意使用者将程式码注入到网页上,其他使用者在观看网页时就会受到影响。这类攻击通常包含了 HTML 以及使用者端脚本语言。
23 |
24 | XSS 分为三种:反射型,存储型和 DOM-based
25 |
26 | ### 如何攻击
27 |
28 | XSS 通过修改 HTML 节点或者执行 JS 代码来攻击网站。
29 |
30 | 例如通过 URL 获取某些参数
31 |
32 | ```html
33 |
34 |
<script>alert("xss");</script>
71 | console.log(html);
72 | ```
73 |
74 | 以上示例使用了 `js-xss` 来实现。可以看到在输出中保留了 `h1` 标签且过滤了 `script` 标签
75 |
76 | ### CSP
77 |
78 | > 内容安全策略 ([CSP](https://developer.mozilla.org/en-US/docs/Glossary/CSP)) 是一个额外的安全层,用于检测并削弱某些特定类型的攻击,包括跨站脚本 ([XSS](https://developer.mozilla.org/en-US/docs/Glossary/XSS)) 和数据注入攻击等。无论是数据盗取、网站内容污染还是散发恶意软件,这些攻击都是主要的手段。
79 |
80 | 我们可以通过 CSP 来尽量减少 XSS 攻击。CSP 本质上也是建立白名单,规定了浏览器只能够执行特定来源的代码。
81 |
82 | 通常可以通过 HTTP Header 中的 `Content-Security-Policy` 来开启 CSP
83 |
84 | - 只允许加载本站资源
85 |
86 | ```http
87 | Content-Security-Policy: default-src ‘self’
88 | ```
89 |
90 | - 只允许加载 HTTPS 协议图片
91 |
92 | ```http
93 | Content-Security-Policy: img-src https://*
94 | ```
95 |
96 | - 允许加载任何来源框架
97 |
98 | ```http
99 | Content-Security-Policy: child-src 'none'
100 | ```
101 |
102 | 更多属性可以查看 [这里](https://content-security-policy.com/)
103 |
104 | ## CSRF
105 |
106 | > **跨站请求伪造**(英语:Cross-site request forgery),也被称为 **one-click attack** 或者 **session riding**,通常缩写为 **CSRF** 或者 **XSRF**, 是一种挟制用户在当前已登录的Web应用程序上执行非本意的操作的攻击方法。[[1\]](https://www.wikiwand.com/zh/%E8%B7%A8%E7%AB%99%E8%AF%B7%E6%B1%82%E4%BC%AA%E9%80%A0#citenoteRistic1) 跟[跨網站指令碼](https://www.wikiwand.com/zh/%E8%B7%A8%E7%B6%B2%E7%AB%99%E6%8C%87%E4%BB%A4%E7%A2%BC)(XSS)相比,**XSS** 利用的是用户对指定网站的信任,CSRF 利用的是网站对用户网页浏览器的信任。
107 |
108 | 简单点说,CSRF 就是利用用户的登录态发起恶意请求。
109 |
110 | ### 如何攻击
111 |
112 | 假设网站中有一个通过 Get 请求提交用户评论的接口,那么攻击者就可以在钓鱼网站中加入一个图片,图片的地址就是评论接口
113 |
114 | ```html
115 |
116 | ```
117 |
118 | 如果接口是 Post 提交的,就相对麻烦点,需要用表单来提交接口
119 |
120 | ```html
121 |
124 | ```
125 |
126 | ### 如何防御
127 |
128 | 防范 CSRF 可以遵循以下几种规则:
129 |
130 | 1. Get 请求不对数据进行修改
131 | 2. 不让第三方网站访问到用户 Cookie
132 | 3. 阻止第三方网站请求接口
133 | 4. 请求时附带验证信息,比如验证码或者 token
134 |
135 | #### SameSite
136 |
137 | 可以对 Cookie 设置 `SameSite` 属性。该属性设置 Cookie 不随着跨域请求发送,该属性可以很大程度减少 CSRF 的攻击,但是该属性目前并不是所有浏览器都兼容。
138 |
139 | #### 验证 Referer
140 |
141 | 对于需要防范 CSRF 的请求,我们可以通过验证 Referer 来判断该请求是否为第三方网站发起的。
142 |
143 | #### Token
144 |
145 | 服务器下发一个随机 Token(算法不能复杂),每次发起请求时将 Token 携带上,服务器验证 Token 是否有效。
146 |
147 | ## 密码安全
148 |
149 | 密码安全虽然大多是后端的事情,但是作为一名优秀的前端程序员也需要熟悉这方面的知识。
150 |
151 | ### 加盐
152 |
153 | 对于密码存储来说,必然是不能明文存储在数据库中的,否则一旦数据库泄露,会对用户造成很大的损失。并且不建议只对密码单纯通过加密算法加密,因为存在彩虹表的关系。
154 |
155 | 通常需要对密码加盐,然后进行几次不同加密算法的加密。
156 |
157 | ```js
158 | // 加盐也就是给原密码添加字符串,增加原密码长度
159 | sha256(sha1(md5(salt + password + salt)))
160 | ```
161 |
162 | 但是加盐并不能阻止别人盗取账号,只能确保即使数据库泄露,也不会暴露用户的真实密码。一旦攻击者得到了用户的账号,可以通过暴力破解的方式破解密码。对于这种情况,通常使用验证码增加延时或者限制尝试次数的方式。并且一旦用户输入了错误的密码,也不能直接提示用户输错密码,而应该提示账号或密码错误。
163 |
--------------------------------------------------------------------------------
/Framework/vue-en.md:
--------------------------------------------------------------------------------
1 |
2 |
3 | **Table of Contents** *generated with [DocToc](https://github.com/thlorenz/doctoc)*
4 |
5 | - [NextTick principle analysis](#nexttick-principle-analysis)
6 | - [Lifecycle analysis](#lifecycle-analysis)
7 |
8 |
9 |
10 | # NextTick principle analysis
11 |
12 | `nextTick` allows us to defer the callback to be executed after the next DOM update cycle, to get the updated DOM.
13 |
14 | Before version 2.4, Vue used microtasks, but the priority of microtasks is too high, and in some cases, it may faster than event bubbling, but if you use macrotasks, there may be some issues of rendering performance. So in the new version, microtasks will be used by default, but macrotasks will be used in special cases, such as v-on.
15 |
16 | For implementing macrotasks, you will first determine if `setImmediate` can be used, if not, downgrade to `MessageChannel`. If not again, use `setTimeout`.
17 |
18 | ```js
19 | if (typeof setImmediate !== 'undefined' && isNative(setImmediate)) {
20 | macroTimerFunc = () => {
21 | setImmediate(flushCallbacks)
22 | }
23 | } else if (
24 | typeof MessageChannel !== 'undefined' &&
25 | (isNative(MessageChannel) ||
26 | // PhantomJS
27 | MessageChannel.toString() === '[object MessageChannelConstructor]')
28 | ) {
29 | const channel = new MessageChannel()
30 | const port = channel.port2
31 | channel.port1.onmessage = flushCallbacks
32 | macroTimerFunc = () => {
33 | port.postMessage(1)
34 | }
35 | } else {
36 | /* istanbul ignore next */
37 | macroTimerFunc = () => {
38 | setTimeout(flushCallbacks, 0)
39 | }
40 | }
41 | ```
42 |
43 | `nextTick` also supports the use of `Promise`, which will determine whether `Promise` is implemented.
44 |
45 | ```js
46 | export function nextTick(cb?: Function, ctx?: Object) {
47 | let _resolve
48 | // Consolidate callback functions into an array
49 | callbacks.push(() => {
50 | if (cb) {
51 | try {
52 | cb.call(ctx)
53 | } catch (e) {
54 | handleError(e, ctx, 'nextTick')
55 | }
56 | } else if (_resolve) {
57 | _resolve(ctx)
58 | }
59 | })
60 | if (!pending) {
61 | pending = true
62 | if (useMacroTask) {
63 | macroTimerFunc()
64 | } else {
65 | microTimerFunc()
66 | }
67 | }
68 | // Determine if Promise can be used
69 | // Assign _resolve if possible
70 | // This way the callback function can be called in the way of promise
71 | if (!cb && typeof Promise !== 'undefined') {
72 | return new Promise(resolve => {
73 | _resolve = resolve
74 | })
75 | }
76 | }
77 | ```
78 |
79 | # Lifecycle analysis
80 |
81 | The lifecycle function is the hook function that the component will trigger when it initializes or updates the data.
82 |
83 | 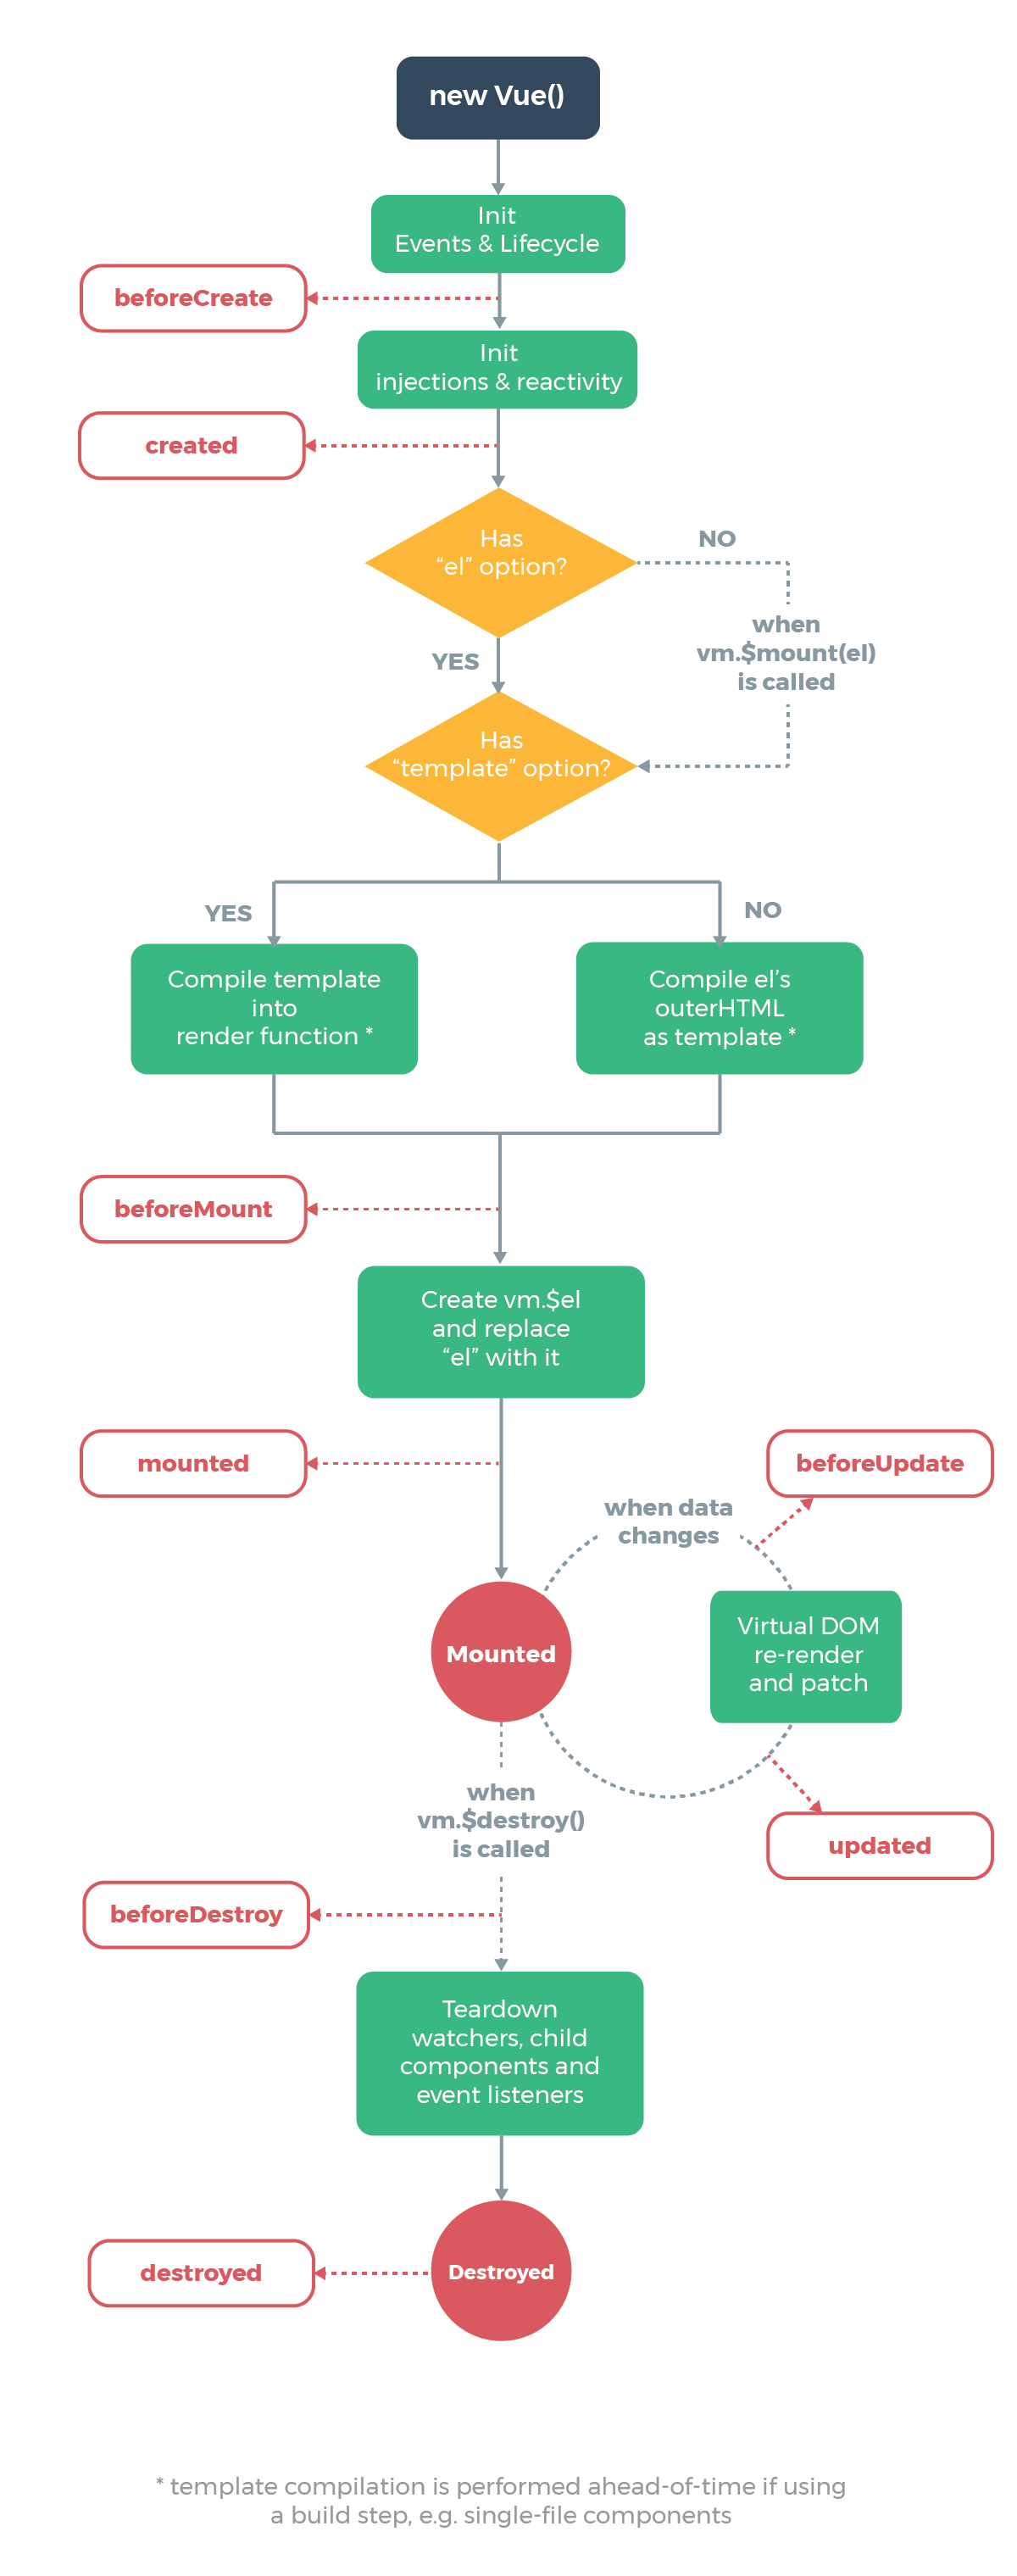
84 |
85 | The following code will be called at initialization, and lifecycle is called by `callHook`
86 |
87 | ```js
88 | Vue.prototype._init = function(options) {
89 | initLifecycle(vm)
90 | initEvents(vm)
91 | initRender(vm)
92 | callHook(vm, 'beforeCreate') // can not get props data
93 | initInjections(vm)
94 | initState(vm)
95 | initProvide(vm)
96 | callHook(vm, 'created')
97 | }
98 | ```
99 |
100 | It can be found that in the above code when `beforeCreate` is called, the data in `props` or `data` cannot be obtained because the initialization of these data is in `initState`.
101 |
102 | Next, the mount function will be called
103 |
104 | ```js
105 | export function mountComponent {
106 | callHook(vm, 'beforeMount')
107 | // ...
108 | if (vm.$vnode == null) {
109 | vm._isMounted = true
110 | callHook(vm, 'mounted')
111 | }
112 | }
113 | ```
114 |
115 | `beforeMount` will be executed before mounting the instance, then starts to create the VDOM and replace it with the real DOM, and finally call the `mounted` hook. And there’s a judgment logic here that if it is an external `new Vue({}) `, `$vnode` doesn’t exist, so the `mounted` hook will be executed directly. If there are child components, they will be mounted recursively, only when all the child components are mounted, the mount hooks of the root components will be executed.
116 |
117 | Next, it comes to the hook function that will be called when the data is updated.
118 |
119 | ```js
120 | function flushSchedulerQueue() {
121 | // ...
122 | for (index = 0; index < queue.length; index++) {
123 | watcher = queue[index]
124 | if (watcher.before) {
125 | watcher.before() // call `beforeUpdate`
126 | }
127 | id = watcher.id
128 | has[id] = null
129 | watcher.run()
130 | // in dev build, check and stop circular updates.
131 | if (process.env.NODE_ENV !== 'production' && has[id] != null) {
132 | circular[id] = (circular[id] || 0) + 1
133 | if (circular[id] > MAX_UPDATE_COUNT) {
134 | warn(
135 | 'You may have an infinite update loop ' +
136 | (watcher.user
137 | ? `in watcher with expression "${watcher.expression}"`
138 | : `in a component render function.`),
139 | watcher.vm
140 | )
141 | break
142 | }
143 | }
144 | }
145 | callUpdatedHooks(updatedQueue)
146 | }
147 |
148 | function callUpdatedHooks(queue) {
149 | let i = queue.length
150 | while (i--) {
151 | const watcher = queue[i]
152 | const vm = watcher.vm
153 | if (vm._watcher === watcher && vm._isMounted) {
154 | callHook(vm, 'updated')
155 | }
156 | }
157 | }
158 | ```
159 |
160 | There are two lifecycle functions that aren’t mentioned in the above diagram, `activated` and `deactivated`, and only the `kee-alive` component has these two life cycles. Components wrapped with `keep-alive` will not be destroyed during the switch, but be cached in memory and execute the `deactivated` hook function, and execute the `actived` hook function after matching the cache and rendering.
161 |
162 | Finally, let’s see the hook function that used to destroy the component.
163 |
164 | ```js
165 | Vue.prototype.$destroy = function() {
166 | // ...
167 | callHook(vm, 'beforeDestroy')
168 | vm._isBeingDestroyed = true
169 | // remove self from parent
170 | const parent = vm.$parent
171 | if (parent && !parent._isBeingDestroyed && !vm.$options.abstract) {
172 | remove(parent.$children, vm)
173 | }
174 | // teardown watchers
175 | if (vm._watcher) {
176 | vm._watcher.teardown()
177 | }
178 | let i = vm._watchers.length
179 | while (i--) {
180 | vm._watchers[i].teardown()
181 | }
182 | // remove reference from data ob
183 | // frozen object may not have observer.
184 | if (vm._data.__ob__) {
185 | vm._data.__ob__.vmCount--
186 | }
187 | // call the last hook...
188 | vm._isDestroyed = true
189 | // invoke destroy hooks on current rendered tree
190 | vm.__patch__(vm._vnode, null)
191 | // fire destroyed hook
192 | callHook(vm, 'destroyed')
193 | // turn off all instance listeners.
194 | vm.$off()
195 | // remove __vue__ reference
196 | if (vm.$el) {
197 | vm.$el.__vue__ = null
198 | }
199 | // release circular reference (#6759)
200 | if (vm.$vnode) {
201 | vm.$vnode.parent = null
202 | }
203 | }
204 | ```
205 |
206 | The `beforeDestroy` hook function will be called before the destroy operation is performed, and then a series of destruction operations are performed. If there are child components, they will be destroyed recursively, and only when all the child components are destroyed, the hook `destroyed` of the root component will be executed.
207 |
--------------------------------------------------------------------------------
/Framework/vue-br.md:
--------------------------------------------------------------------------------
1 |
2 |
3 | **Table of Contents** *generated with [DocToc](https://github.com/thlorenz/doctoc)*
4 |
5 | - [Análises do princípio NextTick](#nexttick-principle-analysis)
6 | - [Análises do ciclo de vid](#lifecycle-analysis)
7 |
8 |
9 |
10 | # Análises do princípio NextTick
11 |
12 | `nextTick` permiti-nos adiar a callback ser executada depois da próxima atualizada do ciclo do DOM, para obter a atualização.
13 |
14 | Antes da versão 2.4, Vue usou micro tarefas, mas prioridade das micro tarefas é bem alta, e em alguns casos, isso deve ser mais rápido que o evento de bubbling, mas se você usar macro tarefas, pode haver alguns problemas de performance na renderização. Então na nova versão, micro tarefas são usadas por padrão, mas macro tarefas serão usadas em casos especiais, como v-on.
15 |
16 | Para implementar macro tarefas, você primeiro deve determinar se o `setImmediate` pode ser usado, se não, abaixe para `MessageChannel`. Se não novamente, use `setTimeout`.
17 |
18 | ```js
19 | if (typeof setImmediate !== 'undefined' && isNative(setImmediate)) {
20 | macroTimerFunc = () => {
21 | setImmediate(flushCallbacks)
22 | }
23 | } else if (
24 | typeof MessageChannel !== 'undefined' &&
25 | (isNative(MessageChannel) ||
26 | // PhantomJS
27 | MessageChannel.toString() === '[object MessageChannelConstructor]')
28 | ) {
29 | const channel = new MessageChannel()
30 | const port = channel.port2
31 | channel.port1.onmessage = flushCallbacks
32 | macroTimerFunc = () => {
33 | port.postMessage(1)
34 | }
35 | } else {
36 | /* istanbul ignore next */
37 | macroTimerFunc = () => {
38 | setTimeout(flushCallbacks, 0)
39 | }
40 | }
41 | ```
42 |
43 | `nextTick` também suporta o uso de `Promise`, do qual ira determinar se a `Promise` está implementada.
44 |
45 | ```js
46 | export function nextTick(cb?: Function, ctx?: Object) {
47 | let _resolve
48 | // Consolide funções de callback dentro do de um array
49 | callbacks.push(() => {
50 | if (cb) {
51 | try {
52 | cb.call(ctx)
53 | } catch (e) {
54 | handleError(e, ctx, 'nextTick')
55 | }
56 | } else if (_resolve) {
57 | _resolve(ctx)
58 | }
59 | })
60 | if (!pending) {
61 | pending = true
62 | if (useMacroTask) {
63 | macroTimerFunc()
64 | } else {
65 | microTimerFunc()
66 | }
67 | }
68 | // Determina se a Promisse pode ser usada
69 | // Atribuir _resolve se possivel
70 | // Desta maneira a função callback pode ser chamada em forma de promise
71 | if (!cb && typeof Promise !== 'undefined') {
72 | return new Promise(resolve => {
73 | _resolve = resolve
74 | })
75 | }
76 | }
77 | ```
78 |
79 | # Análise do Ciclo de Vida
80 |
81 | A função do ciclo de vida é a função gancho que o componente vai disparar quando inicializar ou atualizar os dados.
82 |
83 | 
84 |
85 | O seguinte código irá ser chamado na inicialização, e o ciclo de vida vai ser chamado pelo `callHook`
86 |
87 | ```js
88 | Vue.prototype._init = function(options) {
89 | initLifecycle(vm)
90 | initEvents(vm)
91 | initRender(vm)
92 | callHook(vm, 'beforeCreate') // não consegue receber dados das props
93 | initInjections(vm)
94 | initState(vm)
95 | initProvide(vm)
96 | callHook(vm, 'created')
97 | }
98 | ```
99 |
100 | Ele pode ser encontrado no código acima quando `beforeCreate` é chamado, o dado no `props` ou `data` não pode ser obtido porque a inicialização desse dado está no `initState`.
101 |
102 | No próximo, a função montadora vai ser chamada
103 |
104 | ```js
105 | export function mountComponent {
106 | callHook(vm, 'beforeMount')
107 | // ...
108 | if (vm.$vnode == null) {
109 | vm._isMounted = true
110 | callHook(vm, 'mounted')
111 | }
112 | }
113 | ```
114 |
115 | `beforeMount` vai ser executado antes de montar uma instância, então comece a criar o VDOM e substituir ele com o DOM real, e finalmente chame o gancho `mounted`. E há um julgamente lógico aqui, que se ele for um `new Vue({}) ` externo, `$vnode` não existe, então o gancho `mounted` será executado diretamente. Se existe um componente filho, ele vai ser montado recursivamente, apenas quando todos os componentes filhos forem montados, o gancho de montar o componente raíz vai ser executado.
116 |
117 | Próximo, isso vem para a função gancho que vai ser chamada quando os dados forem atualizados.
118 |
119 | ```js
120 | function flushSchedulerQueue() {
121 | // ...
122 | for (index = 0; index < queue.length; index++) {
123 | watcher = queue[index]
124 | if (watcher.before) {
125 | watcher.before() // chama `beforeUpdate`
126 | }
127 | id = watcher.id
128 | has[id] = null
129 | watcher.run()
130 | // no dev build, verifca e para check and stop circular updates.
131 | if (process.env.NODE_ENV !== 'production' && has[id] != null) {
132 | circular[id] = (circular[id] || 0) + 1
133 | if (circular[id] > MAX_UPDATE_COUNT) {
134 | warn(
135 | 'You may have an infinite update loop ' +
136 | (watcher.user
137 | ? `in watcher with expression "${watcher.expression}"`
138 | : `in a component render function.`),
139 | watcher.vm
140 | )
141 | break
142 | }
143 | }
144 | }
145 | callUpdatedHooks(updatedQueue)
146 | }
147 |
148 | function callUpdatedHooks(queue) {
149 | let i = queue.length
150 | while (i--) {
151 | const watcher = queue[i]
152 | const vm = watcher.vm
153 | if (vm._watcher === watcher && vm._isMounted) {
154 | callHook(vm, 'updated')
155 | }
156 | }
157 | }
158 | ```
159 |
160 | Existem duas funções do ciclo de vida que não são mencionada no diagrama acima, `activated` e `deactivated`, e apenas o componente `kee-alive` possui esses dois ciclos. Componente encapsulado com `keep-alive` não serão destruídos durante o switch, mas sera cacheado em memória e executado a função gancho `deactivated`, e executar a função `actived` depois de coincidir o cache e a renderização.
161 |
162 | Finalmente, vamos olhar a função gancho usada para destruir o componente.
163 |
164 | ```js
165 | Vue.prototype.$destroy = function() {
166 | // ...
167 | callHook(vm, 'beforeDestroy')
168 | vm._isBeingDestroyed = true
169 | // remove-se mesmo a partir do pai
170 | const parent = vm.$parent
171 | if (parent && !parent._isBeingDestroyed && !vm.$options.abstract) {
172 | remove(parent.$children, vm)
173 | }
174 | // destroi watchers
175 | if (vm._watcher) {
176 | vm._watcher.teardown()
177 | }
178 | let i = vm._watchers.length
179 | while (i--) {
180 | vm._watchers[i].teardown()
181 | }
182 | // remove a referência a partir do dado ob
183 | // objeto congelados não devem ter um observador.
184 | if (vm._data.__ob__) {
185 | vm._data.__ob__.vmCount--
186 | }
187 | // chame o último gancho...
188 | vm._isDestroyed = true
189 | // invoque ganchos destruídos na árvore atualmente renderizada
190 | // dispare o gancho destruído
191 | callHook(vm, 'destroyed')
192 | // desligo todos os ouvintes da instância.
193 | vm.$off()
194 | // remove __vue__ reference
195 | // remove __vue__ reference
196 | if (vm.$el) {
197 | vm.$el.__vue__ = null
198 | }
199 | // lance uma referência circular (#6759)
200 | if (vm.$vnode) {
201 | vm.$vnode.parent = null
202 | }
203 | }
204 | ```
205 |
206 | A função `beforeDestroy` será chamada antes da operação de destruir ser desempenhada, e então uma série de operações de destruição são desempenhadas. Se existe um componente filho, eles serão destruidos recursivamente, e apenas quando todos os componente filhos são destruídos, o gancho `destroyed` do componente raíz será executado.
207 |
--------------------------------------------------------------------------------
/Performance/performance-ch.md:
--------------------------------------------------------------------------------
1 |
2 |
3 | **Table of Contents** *generated with [DocToc](https://github.com/thlorenz/doctoc)*
4 |
5 | - [网络相关](#%E7%BD%91%E7%BB%9C%E7%9B%B8%E5%85%B3)
6 | - [DNS 预解析](#dns-%E9%A2%84%E8%A7%A3%E6%9E%90)
7 | - [缓存](#%E7%BC%93%E5%AD%98)
8 | - [强缓存](#%E5%BC%BA%E7%BC%93%E5%AD%98)
9 | - [协商缓存](#%E5%8D%8F%E5%95%86%E7%BC%93%E5%AD%98)
10 | - [Last-Modified 和 If-Modified-Since](#last-modified-%E5%92%8C-if-modified-since)
11 | - [ETag 和 If-None-Match](#etag-%E5%92%8C-if-none-match)
12 | - [选择合适的缓存策略](#%E9%80%89%E6%8B%A9%E5%90%88%E9%80%82%E7%9A%84%E7%BC%93%E5%AD%98%E7%AD%96%E7%95%A5)
13 | - [使用 HTTP / 2.0](#%E4%BD%BF%E7%94%A8-http--20)
14 | - [预加载](#%E9%A2%84%E5%8A%A0%E8%BD%BD)
15 | - [预渲染](#%E9%A2%84%E6%B8%B2%E6%9F%93)
16 | - [优化渲染过程](#%E4%BC%98%E5%8C%96%E6%B8%B2%E6%9F%93%E8%BF%87%E7%A8%8B)
17 | - [懒执行](#%E6%87%92%E6%89%A7%E8%A1%8C)
18 | - [懒加载](#%E6%87%92%E5%8A%A0%E8%BD%BD)
19 | - [文件优化](#%E6%96%87%E4%BB%B6%E4%BC%98%E5%8C%96)
20 | - [图片优化](#%E5%9B%BE%E7%89%87%E4%BC%98%E5%8C%96)
21 | - [计算图片大小](#%E8%AE%A1%E7%AE%97%E5%9B%BE%E7%89%87%E5%A4%A7%E5%B0%8F)
22 | - [图片加载优化](#%E5%9B%BE%E7%89%87%E5%8A%A0%E8%BD%BD%E4%BC%98%E5%8C%96)
23 | - [其他文件优化](#%E5%85%B6%E4%BB%96%E6%96%87%E4%BB%B6%E4%BC%98%E5%8C%96)
24 | - [CDN](#cdn)
25 | - [其他](#%E5%85%B6%E4%BB%96)
26 | - [使用 Webpack 优化项目](#%E4%BD%BF%E7%94%A8-webpack-%E4%BC%98%E5%8C%96%E9%A1%B9%E7%9B%AE)
27 | - [监控](#%E7%9B%91%E6%8E%A7)
28 | - [面试题](#%E9%9D%A2%E8%AF%95%E9%A2%98)
29 |
30 |
31 |
32 | # 网络相关
33 |
34 | ## DNS 预解析
35 |
36 | DNS 解析也是需要时间的,可以通过预解析的方式来预先获得域名所对应的 IP。
37 |
38 | ```html
39 |
40 | ```
41 |
42 | ## 缓存
43 |
44 | 缓存对于前端性能优化来说是个很重要的点,良好的缓存策略可以降低资源的重复加载提高网页的整体加载速度。
45 |
46 | 通常浏览器缓存策略分为两种:强缓存和协商缓存。
47 |
48 | ### 强缓存
49 |
50 | 实现强缓存可以通过两种响应头实现:`Expires` 和 `Cache-Control` 。强缓存表示在缓存期间不需要请求,`state code` 为 200
51 |
52 | ```js
53 | Expires: Wed, 22 Oct 2018 08:41:00 GMT
54 | ```
55 |
56 | `Expires` 是 HTTP / 1.0 的产物,表示资源会在 `Wed, 22 Oct 2018 08:41:00 GMT` 后过期,需要再次请求。并且 `Expires` 受限于本地时间,如果修改了本地时间,可能会造成缓存失效。
57 |
58 | ```js
59 | Cache-control: max-age=30
60 | ```
61 |
62 | `Cache-Control` 出现于 HTTP / 1.1,优先级高于 `Expires` 。该属性表示资源会在 30 秒后过期,需要再次请求。
63 |
64 | ### 协商缓存
65 |
66 | 如果缓存过期了,我们就可以使用协商缓存来解决问题。协商缓存需要请求,如果缓存有效会返回 304。
67 |
68 | 协商缓存需要客户端和服务端共同实现,和强缓存一样,也有两种实现方式。
69 |
70 | #### Last-Modified 和 If-Modified-Since
71 |
72 | `Last-Modified` 表示本地文件最后修改日期,`If-Modified-Since` 会将 `Last-Modified` 的值发送给服务器,询问服务器在该日期后资源是否有更新,有更新的话就会将新的资源发送回来。
73 |
74 | 但是如果在本地打开缓存文件,就会造成 `Last-Modified` 被修改,所以在 HTTP / 1.1 出现了 `ETag` 。
75 |
76 | #### ETag 和 If-None-Match
77 |
78 | `ETag` 类似于文件指纹,`If-None-Match` 会将当前 `ETag` 发送给服务器,询问该资源 `ETag` 是否变动,有变动的话就将新的资源发送回来。并且 `ETag` 优先级比 `Last-Modified` 高。
79 |
80 | ### 选择合适的缓存策略
81 |
82 | 对于大部分的场景都可以使用强缓存配合协商缓存解决,但是在一些特殊的地方可能需要选择特殊的缓存策略
83 |
84 | - 对于某些不需要缓存的资源,可以使用 `Cache-control: no-store` ,表示该资源不需要缓存
85 | - 对于频繁变动的资源,可以使用 `Cache-Control: no-cache` 并配合 `ETag` 使用,表示该资源已被缓存,但是每次都会发送请求询问资源是否更新。
86 | - 对于代码文件来说,通常使用 `Cache-Control: max-age=31536000` 并配合策略缓存使用,然后对文件进行指纹处理,一旦文件名变动就会立刻下载新的文件。
87 |
88 | ## 使用 HTTP / 2.0
89 |
90 | 因为浏览器会有并发请求限制,在 HTTP / 1.1 时代,每个请求都需要建立和断开,消耗了好几个 RTT 时间,并且由于 TCP 慢启动的原因,加载体积大的文件会需要更多的时间。
91 |
92 | 在 HTTP / 2.0 中引入了多路复用,能够让多个请求使用同一个 TCP 链接,极大的加快了网页的加载速度。并且还支持 Header 压缩,进一步的减少了请求的数据大小。
93 |
94 | 更详细的内容你可以查看 [该小节](../Network/Network-zh.md##http-20)
95 |
96 | ## 预加载
97 |
98 | 在开发中,可能会遇到这样的情况。有些资源不需要马上用到,但是希望尽早获取,这时候就可以使用预加载。
99 |
100 | 预加载其实是声明式的 `fetch` ,强制浏览器请求资源,并且不会阻塞 `onload` 事件,可以使用以下代码开启预加载
101 |
102 | ```html
103 |
104 | ```
105 |
106 | 预加载可以一定程度上降低首屏的加载时间,因为可以将一些不影响首屏但重要的文件延后加载,唯一缺点就是兼容性不好。
107 |
108 | ## 预渲染
109 |
110 | 可以通过预渲染将下载的文件预先在后台渲染,可以使用以下代码开启预渲染
111 |
112 | ```html
113 |
114 | ```
115 |
116 | 预渲染虽然可以提高页面的加载速度,但是要确保该页面百分百会被用户在之后打开,否则就白白浪费资源去渲染
117 |
118 | # 优化渲染过程
119 |
120 | 对于代码层面的优化,你可以查阅浏览器系列中的 [相关内容](../Browser/browser-ch.md#渲染机制)。
121 |
122 | ## 懒执行
123 |
124 | 懒执行就是将某些逻辑延迟到使用时再计算。该技术可以用于首屏优化,对于某些耗时逻辑并不需要在首屏就使用的,就可以使用懒执行。懒执行需要唤醒,一般可以通过定时器或者事件的调用来唤醒。
125 |
126 | ## 懒加载
127 |
128 | 懒加载就是将不关键的资源延后加载。
129 |
130 | 懒加载的原理就是只加载自定义区域(通常是可视区域,但也可以是即将进入可视区域)内需要加载的东西。对于图片来说,先设置图片标签的 `src` 属性为一张占位图,将真实的图片资源放入一个自定义属性中,当进入自定义区域时,就将自定义属性替换为 `src` 属性,这样图片就会去下载资源,实现了图片懒加载。
131 |
132 | 懒加载不仅可以用于图片,也可以使用在别的资源上。比如进入可视区域才开始播放视频等等。
133 |
134 | # 文件优化
135 |
136 | ## 图片优化
137 |
138 | ### 计算图片大小
139 |
140 | 对于一张 100 * 100 像素的图片来说,图像上有 10000 个像素点,如果每个像素的值是 RGBA 存储的话,那么也就是说每个像素有 4 个通道,每个通道 1 个字节(8 位 = 1个字节),所以该图片大小大概为 39KB(10000 * 1 * 4 / 1024)。
141 |
142 | 但是在实际项目中,一张图片可能并不需要使用那么多颜色去显示,我们可以通过减少每个像素的调色板来相应缩小图片的大小。
143 |
144 | 了解了如何计算图片大小的知识,那么对于如何优化图片,想必大家已经有 2 个思路了:
145 |
146 | - 减少像素点
147 | - 减少每个像素点能够显示的颜色
148 |
149 | ### 图片加载优化
150 |
151 | 1. 不用图片。很多时候会使用到很多修饰类图片,其实这类修饰图片完全可以用 CSS 去代替。
152 | 2. 对于移动端来说,屏幕宽度就那么点,完全没有必要去加载原图浪费带宽。一般图片都用 CDN 加载,可以计算出适配屏幕的宽度,然后去请求相应裁剪好的图片。
153 | 3. 小图使用 base64 格式
154 | 4. 将多个图标文件整合到一张图片中(雪碧图)
155 | 6. 选择正确的图片格式:
156 | - 对于能够显示 WebP 格式的浏览器尽量使用 WebP 格式。因为 WebP 格式具有更好的图像数据压缩算法,能带来更小的图片体积,而且拥有肉眼识别无差异的图像质量,缺点就是兼容性并不好
157 | - 小图使用 PNG,其实对于大部分图标这类图片,完全可以使用 SVG 代替
158 | - 照片使用 JPEG
159 |
160 | ## 其他文件优化
161 |
162 | - CSS 文件放在 `head` 中
163 | - 服务端开启文件压缩功能
164 | - 将 `script` 标签放在 `body` 底部,因为 JS 文件执行会阻塞渲染。当然也可以把 `script` 标签放在任意位置然后加上 `defer` ,表示该文件会并行下载,但是会放到 HTML 解析完成后顺序执行。对于没有任何依赖的 JS 文件可以加上 `async` ,表示加载和渲染后续文档元素的过程将和 JS 文件的加载与执行并行无序进行。
165 | - 执行 JS 代码过长会卡住渲染,对于需要很多时间计算的代码可以考虑使用 `Webworker`。`Webworker` 可以让我们另开一个线程执行脚本而不影响渲染。
166 |
167 | ## CDN
168 |
169 | 静态资源尽量使用 CDN 加载,由于浏览器对于单个域名有并发请求上限,可以考虑使用多个 CDN 域名。对于 CDN 加载静态资源需要注意 CDN 域名要与主站不同,否则每次请求都会带上主站的 Cookie。
170 |
171 | # 其他
172 |
173 | ## 使用 Webpack 优化项目
174 |
175 | - 对于 Webpack4,打包项目使用 production 模式,这样会自动开启代码压缩
176 | - 使用 ES6 模块来开启 tree shaking,这个技术可以移除没有使用的代码
177 | - 优化图片,对于小图可以使用 base64 的方式写入文件中
178 | - 按照路由拆分代码,实现按需加载
179 | - 给打包出来的文件名添加哈希,实现浏览器缓存文件
180 |
181 | ## 监控
182 |
183 | 对于代码运行错误,通常的办法是使用 `window.onerror` 拦截报错。该方法能拦截到大部分的详细报错信息,但是也有例外
184 |
185 | - 对于跨域的代码运行错误会显示 `Script error.` 对于这种情况我们需要给 `script` 标签添加 `crossorigin` 属性
186 | - 对于某些浏览器可能不会显示调用栈信息,这种情况可以通过 `arguments.callee.caller` 来做栈递归
187 |
188 | 对于异步代码来说,可以使用 `catch` 的方式捕获错误。比如 `Promise` 可以直接使用 `catch` 函数,`async await` 可以使用 `try catch`
189 |
190 | 但是要注意线上运行的代码都是压缩过的,需要在打包时生成 sourceMap 文件便于 debug。
191 |
192 | 对于捕获的错误需要上传给服务器,通常可以通过 `img` 标签的 `src` 发起一个请求。
193 |
194 | ## 面试题
195 |
196 | **如何渲染几万条数据并不卡住界面**
197 |
198 | 这道题考察了如何在不卡住页面的情况下渲染数据,也就是说不能一次性将几万条都渲染出来,而应该一次渲染部分 DOM,那么就可以通过 `requestAnimationFrame` 来每 16 ms 刷新一次。
199 |
200 | ```html
201 |
202 |
203 |
204 |
205 |
206 |
207 |
208 | Document
209 |
210 |
211 |
控件
212 |
242 |
243 |
244 | ```
245 |
246 |
--------------------------------------------------------------------------------
/Safety/safety-en.md:
--------------------------------------------------------------------------------
1 |
2 |
3 | **Table of Contents** *generated with [DocToc](https://github.com/thlorenz/doctoc)*
4 |
5 | - [XSS](#xss)
6 | - [How to attack](#how-to-attack)
7 | - [How to defend](#how-to-defend)
8 | - [CSP](#csp)
9 | - [CSRF](#csrf)
10 | - [How to attack](#how-to-attack-1)
11 | - [How to defend](#how-to-defend-1)
12 | - [SameSite](#samesite)
13 | - [Verify Referer](#verify-referer)
14 | - [Token](#token)
15 | - [Password security](#password-security)
16 | - [Add salt](#add-salt)
17 |
18 |
19 |
20 | ## XSS
21 |
22 | > **Cross-site scripting**(Cross-site scripting in English, often abbreviated as XSS)is one kind of security vulnerabilities attack of web applications , and is a kind of [code input](https://www.wikiwand.com/zh-hans/%E4%BB%A3%E7%A2%BC%E6%B3%A8%E5%85%A5)It allows malicious users to input code into web pages, and other users are affected when they browse web pages. Such attacks often include HTML and consumer-side scripting languages.
23 |
24 | XSS is divided into three types: reflective type, storage type, and DOM-based type
25 |
26 | ### How to attack
27 |
28 | XSS attacks websites by modifying HTML nodes or run JS code.
29 |
30 | For example, get some parameters through the URL
31 |
32 | ```html
33 |
34 |
{{name}}
35 | ```
36 |
37 | The URL input above may change the HTML into `` so that there is an extra executable script out of the page. This type of attack is a reflection attack, or DOM-based attack
38 |
39 | There is also another scenario. For example, if you write an article that contains the attack code ``, then users who may be browsing the article will be attacked. This type of attack is a store attack, which can also be called a DOM-based attack.
40 |
41 | ### How to defend
42 |
43 | The most common practice is to escape the input and output, escape the quotes, angle brackets, and slashes.
44 |
45 | ```js
46 | function escape(str) {
47 | str = str.replace(/&/g, "&");
48 | str = str.replace(//g, ">");
50 | str = str.replace(/"/g, "&quto;");
51 | str = str.replace(/'/g, "'");
52 | str = str.replace(/`/g, "`");
53 | str = str.replace(/\//g, "/");
54 | return str
55 | }
56 | ```
57 |
58 | The attack code `` can be changed by escaping
59 |
60 | ```js
61 | // -> <script>alert(1)</script>
62 | escape('')
63 | ```
64 |
65 | For displaying rich text, all characters cannot be escaped by the above method, because this will filter out the required format. This kind of situation usually adopts the method of the white list to filter, certainly can also pass the black list to filter, but consider the too many labels and attribute that need to filter, it is more recommended to use the white list way.
66 |
67 | ```js
68 | var xss = require("xss");
69 | var html = xss('
XSS Demo
');
70 | // ->
XSS Demo
<script>alert("xss");</script>
71 | console.log(html);
72 | ```
73 |
74 | The above example uses `js-xss` to implement. You can see that the `h1` tag is preserved in the output and the `script` tag is filtered.
75 |
76 | ### CSP
77 |
78 | The Content Security Policy ([CSP] (https://developer.mozilla.org/en-US/docs/Glossary/CSP)) is an additional layer of security that detects and undermines certain types of attacks, including Cross-site scripting ([XSS] (https://developer.mozilla.org/en-US/docs/Glossary/XSS)) and data injection attacks. Whether it's data theft, website content contamination or malware, these attacks are the primary means.
79 |
80 | We can minimize XSS attacks with CSP. CSP is also essentially whitelisted, which stipulates that browsers can only execute code from a specific source.
81 |
82 | You can usually enable the CSP with the `Content-Security-Policy` in the HTTP Header.
83 |
84 | - Only allow loading of self-site resource
85 |
86 | ```http
87 | Content-Security-Policy: default-src ‘self’
88 | ```
89 |
90 | - Only allow loading HTTPS protocol pictures
91 |
92 | ```http
93 | Content-Security-Policy: img-src https://*
94 | ```
95 |
96 | - Allow loading of any source frame
97 |
98 | ```http
99 | Content-Security-Policy: child-src 'none'
100 | ```
101 |
102 | More attributes can be viewed at [here] (https://content-security-policy.com/)
103 |
104 | ## CSRF
105 |
106 | > **Cross-site request forgery (English: Cross-site request forgery), also known as **one-click attack** or **session riding**, usually abbreviated as **CSRF** or **XSRF** is an attack method that forces users to perform unintended operations on currently logged-in web applications. [[1\]](https://www.wikiwand.com/zh/%E8%B7%A8%E7%AB%99%E8%AF%B7%E6%B1%82%E4%BC%AA%E9%80%A0#citenoteRistic1) Follow [cross-site script](https://www.wikiwand.com/zh/%E8%B7%A8%E7%B6%B2%E7%AB%99%E6%8C%87%E4%BB%A4%E7%A2%BC) (XSS) Compared to **XSS**, users trust the designated website and CSRF uses the website's trust in the user's web browser.
107 |
108 | To put it simply, CSRF uses the login state of the user to initiate a malicious request.
109 |
110 | ### How to attack
111 |
112 | Assume that there is an interface on the site that submits user comments through a Get request. The attacker can then add a picture to the phishing site. The address of the picture is the comment interface.
113 |
114 | ```html
115 |
116 | ```
117 |
118 | If the interface is submitted by the Post, it is relatively troublesome, you need to use the form to submit the interface.
119 |
120 | ```html
121 |
124 | ```
125 |
126 | ### How to defend
127 |
128 | There are several rules for defending against CSRF:
129 |
130 | 1. Get request does not modify the data
131 | 2. Do not allow third-party websites to access user cookies
132 | 3. Block third-party website request interfaces
133 | 4. Request verification information, such as verification code or token
134 |
135 | #### SameSite
136 |
137 | The `SameSite` attribute can be set on cookies. This attribute sets the cookie not to be sent along with cross-domain requests. This attribute can greatly reduce the CSRF attack, but this attribute is currently not compatible with all browsers.
138 |
139 | #### Verify Referer
140 |
141 | For requests that need protection against CSRF, we can verify the Referer to determine if the request was initiated by a third-party website.
142 |
143 | #### Token
144 |
145 | The server sends a random Token (the algorithm cannot be complex). The Token is carried on each request, and the server verifies that the Token is valid.
146 |
147 | ## Password security
148 |
149 | Although password security is mostly a back-end thing, as a good front-end programmer, you need to be familiar with this knowledge.
150 |
151 | ### Add salt
152 |
153 | For password storage, it must be stored in the database in the clear, otherwise, once the database is leaked, it will cause great losses to the user. And it is not recommended to encrypt the password only by the encryption algorithm because of the rainbow table relationship.
154 |
155 | It is usually necessary to add salt to the password and then perform several encryptions with different encryption algorithms.
156 |
157 | It is often necessary to add a salt to the password and then encrypt it several times with different encryption algorithms.
158 |
159 | ```js
160 | // Adding salt means adding a string to the original password and increasing the length of the original password.
161 | sha256(sha1(md5(salt + password + salt)))
162 | ```
163 |
164 | But adding salt does not prevent others from stealing accounts. It only ensures that even if the database is compromised, the user's real password will not be exposed. Once the attacker gets the user's account, the password can be cracked by brute force. In this case, a verification code is usually used to increase the delay or limit the number of attempts. And once the user enters the wrong password, the user cannot directly prompt the user to enter the wrong password, but should prompt the account or password to be incorrect.
165 |
--------------------------------------------------------------------------------
/Performance/performance-en.md:
--------------------------------------------------------------------------------
1 |
2 |
3 | **Table of Contents** *generated with [DocToc](https://github.com/thlorenz/doctoc)*
4 |
5 | - [Network related](#network-related)
6 | - [DNS Prefetching](#dns-prefetching)
7 | - [Cache](#cache)
8 | - [Strong cache](#strong-cache)
9 | - [Negotiation cache](#negotiation-cache)
10 | - [`Last-Modified` and `If-Modified-Since`](#last-modified--and--if-modified-since)
11 | - [`ETag` and `If-None-Match`](#etag-and-if-none-match)
12 | - [Choosing the suitable caching strategy](#choosing-the-suitable-caching-strategy)
13 | - [Use HTTP / 2.0](#use-http--20)
14 | - [PreLoad](#preload)
15 | - [Pre-render](#pre-render)
16 | - [Optimizing the rendering process](#optimizing-the-rendering-process)
17 | - [Lazy execution](#lazy-execution)
18 | - [Lazy load](#lazy-load)
19 | - [File optimization](#file-optimization)
20 | - [Image optimization](#image-optimization)
21 | - [Calculate the size of image](#calculate-the-size-of-image)
22 | - [Image loading optimization](#image-loading-optimization)
23 | - [Optimization of other files](#optimization-of-other-files)
24 | - [CDN](#cdn)
25 | - [Others](#others)
26 | - [Use Webpack to optimize the project](#use-webpack-to-optimize-the-project)
27 | - [Monitor](#monitor)
28 | - [An interview question](#an-interview-question)
29 | - [How to render tens of thousands of data without blocking the interface](#how-to-render-tens-of-thousands-of-data-without-blocking-the-interface)
30 |
31 |
32 |
33 | # Network related
34 |
35 | ## DNS Prefetching
36 |
37 | It takes time for DNS resolution. We can obtain the IP corresponding to the domain name in advance through DNS prefetching.
38 |
39 | ```html
40 |
41 | ```
42 |
43 | ## Cache
44 |
45 | Cache is a very important point for front-end performance optimization. A good caching strategy can reduce the repeated loading of resources and increase the overall loading speed of the websites.
46 |
47 | Browser cache strategy is usually divided into two types: strong cache and negotiation cache
48 |
49 | ### Strong cache
50 |
51 | Implementing strong caching can be achieved with two response headers: `Expires` and `Cache-Control`. Strong cache means that no request is required during caching, the `state code` is 200.
52 |
53 | ```js
54 | Expires: Wed, 22 Oct 2018 08:41:00 GMT
55 | ```
56 |
57 | `Expires` is a product of HTTP / 1.0, indicating that the resource expires after `Wed, 22 Oct 2018 08:41:00 GMT` and needs to be requested again. And `Expires` is limited by the local time, if the local time is modified, the cache may be invalidated.
58 |
59 | ```js
60 | Cache-control: max-age=30
61 | ```
62 |
63 | `Cache-Control` appears in HTTP/1.1 and takes precedence over `Expires`. This attribute indicates that the resource expires after 30 seconds and needs to be requested again.
64 |
65 | ### Negotiation cache
66 |
67 | If the cache expires, we can use negotiation cache to solve the problem. Negotiation cache requires a request and returns 304 if the cache is valid.
68 |
69 | Negotiation cache needs to be implemented by the client-side and server-side together. Like strong caching, there are two implementations.
70 |
71 | ## `Last-Modified` and `If-Modified-Since`
72 |
73 | `Last-Modified` indicates the last modified date of the local file. `If-Modified-Since` will send the value of `Last-Modified` to the server, asking the server if the resource has been updated after that date, and if there is an update, the new resource will be sent back.
74 |
75 | But if you open the cache file locally, it will cause `Last-Modified` to be modified, so `ETag` appears in HTTP / 1.1
76 |
77 | ## `ETag` and `If-None-Match`
78 |
79 | `ETag` is similar to the fingerprint of a file. `If-None-Match` sends the current `ETag` to the server and asks whether the `ETag` of the resource changes. If there is a change, the new resource will be sent back. And `ETag` has a higher priority than `Last-Modified`
80 |
81 | ### Choosing the suitable caching strategy
82 |
83 | We can use strong cache with negotiation cache to solve most problems, but in some special cases, we may need to choose a special caching strategy.
84 |
85 | - For some resources that do not need to be cached, we can use `Cache-control: no-store` to indicate that the resource does not need to be cached.
86 | - For the resources that will be frequently changed, we can use `Cache-Control: no-cache` with `ETag` to indicate that the resource is cached, but each time it will send a request to ask if the resource is updated.
87 | - For code files, we usually use `Cache-Control: max-age=31536000` with the negotiation cache, and then make the file fingerprinted. Once the name of the file changes, the new file will be downloaded immediately.
88 |
89 | ## Use HTTP / 2.0
90 |
91 | Since browsers have limitations on concurrent requests, each request needs to be established and disconnected in the era of HTTP/1.1, which will consume several `RTT` , and loading large files requires more time because of `TCP Slow Start`.
92 |
93 | Multiplexing was introduced in HTTP/2.0, allowing multiple requests to use the same TCP connect, greatly speeding up the loading of websites. Header compression is also supported, further shortening the size of the request data.
94 |
95 | To know more detailed content, you can view [this section](../Network/Network-zh.md##http-20) TODO
96 |
97 | ## PreLoad
98 |
99 | In development, you may encounter such a situation. Some resources do not need to be used immediately, but you want to get it as soon as possible. At this point, you can use preloading.
100 |
101 | Preloading is actually a declarative `fetch` that forces the browser to request resources and does not block the `onload` event. You can use the following code to enable preloading
102 |
103 | ```html
104 |
105 | ```
106 |
107 | Preloading can reduce the loading time of home screen to a certain degree because some important files that do not affect the home screen can be delayed for loading. The only disadvantage is that the compatibility is not good.
108 |
109 | ## Pre-render
110 |
111 | The downloaded file can be pre-rendered in the background through pre-rendering. You can use the following code to enable pre-rendering.
112 |
113 | ```html
114 |
115 | ```
116 |
117 | Although pre-rendering can improve the loading speed of a website, it must be 100 percent ensured that this page will be opened by the user, otherwise, it would waste resources to render.
118 |
119 | # Optimizing the rendering process
120 |
121 | As for the optimization about code, you can refer to [the relevant content](../Browser/browser-en.md#rendering-machanism) in the browser series
122 |
123 | ## Lazy execution
124 |
125 | Lazy execution delays some logic until it is used. This technique can be used for the first screen optimization. Lazy execution can be used in some time-consuming logic that does not need to be used on the first screen. And lazy execution requires a wake-up, which can typically be awakened by a timer or event call.
126 |
127 | ## Lazy load
128 |
129 | Lazy loading is to delay the loading of non-critical resources
130 |
131 | The principle of lazy loading is to only load those that need to be loaded in the custom area (usually the visible area, but it can also be the visible area that will be entered soon). For the image, firstly set the src attribute of the `image` tag to be a placeholder, then put the real url into a custom attribute. When entering the custom area, replace the custom attribute with the src attribute, and the `image` tag will go to download resources, which achieves lazy loading of the image.
132 |
133 | Lazy loading can be used not only for images but also for other resources. For example, start playing video after entering the visible area and so on.
134 |
135 | # File optimization
136 |
137 | ## Image optimization
138 |
139 | ### Calculate the size of image
140 |
141 | There are 10,000 pixels on a 100 * 100-pixel image. If the value of each pixel is stored in the way of RGBA, then there are 4 channels per pixel and 1 byte per channel (8 bits = 1 byte), so the size of the image is about 39KB (10000 * 1 * 4 / 1024)
142 |
143 | But in a real project, it may not need so many colors to display an image, we can reduce the size of the image by reducing the color palette of each pixel.
144 |
145 | After knowing how to calculate the size of an image, I guess that you may have 2 ways to optimize image:
146 |
147 | - Reduce pixels
148 | - Reduce the color that each pixel can display
149 |
150 | ### Image loading optimization
151 |
152 | 1. No image. Sometimes we would use a lot of modified images, those can be completely replaced by CSS.
153 | 2. For the mobile side, since the screen width is small, there is no need to load the original image, which wastes bandwidth. We generally load images from CDN, firstly calculate the suitably width, and then request the corresponding cropped images.
154 | 3. Use base64 for thumbnails
155 | 4. Integrate multiple icon files into one image (Sprite image)
156 | 5. Choose the correct image format
157 | - Use WebP format as much as possible for browsers that can display WebP format. Because the WebP format has a better image data compression algorithm, which can bring a smaller image volume, and there is no difference in image quality with the naked eye, the disadvantage is that the compatibility of WebP format is not good
158 | - The thumbnail uses PNG format. In fact, for most of the icons, they can be completely replaced by SVG.
159 | - Photo use JPEG format.
160 |
161 | ## Optimization of other files
162 |
163 | - Put the CSS file in `head`
164 | - Server opens the function of file compression
165 | - Place the `script` tag at the bottom of the `body`, because the execution of JS file will block the process of rendering. Of course, you can put the `script` tag anywhere and add `defer` to indicate that the file will be downloaded in parallel, but it will be executed sequentially after the HTML parsing is completed. `async` can be used to the JS files that don’t have any dependencies, indicating that the process of loading and rendering subsequent document elements will be performed in parallel with the loading and execution of the JS file.
166 | - The execution of the excessive JS code will block the process of rendering. For codes that take a lot of time to calculate, we can consider using `Webworker`. `Webworker` will not effect the rendering process by allowing developers to open another thread to execute the script.
167 |
168 | ## CDN
169 |
170 | Use CDN to load static resources as far as possible. Since the browser has a limit on concurrent requests for a single domain name, we can consider using multiple CDN domain names. And we should be careful that the CDN domain name must be different from the master station when loading static resources from CDN, otherwise, each request will carry the cookie of the master station.
171 |
172 | # Others
173 |
174 | ## Use Webpack to optimize the project
175 |
176 | - For Webpack4, use `production` mode to packaged projects, which will automatically open code compression.
177 | - Use the ES6 module to open `tree shaking`, which can remove unused code.
178 | - Optimize the image, the thumbnail can be written to the file using base64.
179 | - Split code In accordance with the route, to achieve on-demand loading.
180 | - Add a hash to the name of the packaged file, to implement the browser cache file
181 |
182 | ## Monitor
183 |
184 | For the errors of code execution, the usual way is to use `window.onerror` to intercept the error. This method can intercept most of the detailed error information, but there are exceptions
185 |
186 | - The execution error of cross-domain code will show `script error`. For this case, we need to add the `crossorigin` attribute to the `script` tag.
187 | - Call stack information may not be displayed for some browsers. For this case, we can use `arguments.callee.caller` to implement stack recursion
188 |
189 | For asynchronous code, we can use `catch` to catch errors. For example, `Promise` can use the `catch` function directly, and `async await `can use `try catch`.
190 |
191 | However, it should be noted that the codes which are running online are compressed, and it is necessary to generate a `sourceMap` file to facilitate debugging.
192 |
193 | The captured errors need to be uploaded to the server, usually, we can implement that by sending a network request using the `src` attribute of the `ima` tag.
194 |
195 | ## An interview question
196 |
197 | ### How to render tens of thousands of data without blocking the interface
198 |
199 | The question examines how to render data without blocking the interface. It means that you cannot render tens of thousands at a time. Instead, you should render part of the DOM at once. Then you can use the `requestAnimationFrame` to refresh every 16 milliseconds.
200 |
201 | ```html
202 |
203 |
204 |
205 |
206 |
207 |
208 |
209 | Document
210 |
211 |
212 |
 2 |
3 |
2 |
3 |  |
|  |
16 |
17 | [线上版本阅读更清晰](https://yuchengkai.cn/docs/zh/)
18 |
19 | ## 小册
20 |
21 | 很荣幸在「掘金」平台发售了这个开源项目的进阶版面试小册「前端面试之道」。
22 |
23 |
|
16 |
17 | [线上版本阅读更清晰](https://yuchengkai.cn/docs/zh/)
18 |
19 | ## 小册
20 |
21 | 很荣幸在「掘金」平台发售了这个开源项目的进阶版面试小册「前端面试之道」。
22 |
23 |  11 |
11 |