├── .nojekyll
├── CNAME
├── README.md
├── _coverpage.md
├── _sidebar.md
├── index.html
├── latest
├── build
│ ├── building.md
│ └── install.md
├── config
│ └── renewal.md
├── daemon
│ └── install.md
├── discord
│ └── oauth.md
├── migration
│ ├── jexactyl.md
│ └── pterodactyl.md
├── panel
│ ├── install
│ │ ├── database.md
│ │ ├── dependencies.md
│ │ ├── download.md
│ │ ├── environment.md
│ │ └── queue-workers.md
│ ├── updating
│ │ └── manual.md
│ └── webservers
│ │ ├── apache-ssl.md
│ │ ├── apache.md
│ │ ├── directadmin.md
│ │ ├── nginx-ssl.md
│ │ ├── nginx.md
│ │ └── setup-ssl.md
└── payments
│ ├── paypal.md
│ └── stripe.md
└── public
└── images
├── discord_id.png
├── discord_id_2.png
├── discord_jexactyl.png
├── discord_redirect.png
├── favicon.ico
├── hostez.png
├── new
├── admin-blue.png
├── admin-default.png
├── create.png
├── dashboard.png
├── server.png
└── store.png
├── store_admin.png
├── stripe-api-secret.jpg
├── stripe-apikey.jpg
├── stripe-dashboard.jpg
├── stripe-perms.jpg
├── stripe-webhook-secret.jpg
└── stripe-webhook.png
/.nojekyll:
--------------------------------------------------------------------------------
https://raw.githubusercontent.com/Jexactyl/docs/98849f1b23e15ee5b9917d705297baf4dab68ea4/.nojekyll
--------------------------------------------------------------------------------
/CNAME:
--------------------------------------------------------------------------------
1 | docs.jexactyl.com
--------------------------------------------------------------------------------
/README.md:
--------------------------------------------------------------------------------
1 | # Welcome to Jexactyl!
2 |
3 | Jexactyl is a modern, fast and feature-rich fork of [Pterodactyl Panel](https://github.com/pterodactyl/panel).
4 | Jexactyl aims to improve already-existing features of this software as well as integrate many more functions
5 | to make this software easier more advanced while also being nicer to use.
6 |
7 | 
8 |
9 | ## Features
10 | - Built using the latest dependencies and packages
11 | - Allows users to purchase resources and create servers
12 | - Clean, minimalistic UI
13 | - Fully configurable
14 | - Server Renewal system
15 |
16 | ## Ready to get started?
17 | If you're a new user, you should check out our [Installation Guides](https://docs.jexactyl.com/#/latest/panel/install/dependencies).
18 |
19 | If you're a more experienced user who wants to edit the Panel, check out our [Modification Guides](https://docs.jexactyl.com/#/latest/build/install).
20 |
21 | ## Screenshots
22 | 
23 | 
24 | 
25 | 
26 | 
27 | 
28 |
--------------------------------------------------------------------------------
/_coverpage.md:
--------------------------------------------------------------------------------
1 | # Jexactyl 3.x
2 |
3 | > The documentation for Jexactyl.
4 |
5 | [Get Started](/README.md)
6 | [Discord](https://discord.com/invite/qttGR4Z5Pk)
--------------------------------------------------------------------------------
/_sidebar.md:
--------------------------------------------------------------------------------
1 | * **Panel (v3.x)**
2 | * `Installation`
3 | * [Install Dependencies](latest/panel/install/dependencies.md)
4 | * [Download Files](latest/panel/install/download.md)
5 | * [Database Setup](latest/panel/install/database.md)
6 | * [Environment Setup](latest/panel/install/environment.md)
7 | * [Queue Workers](latest/panel/install/queue-workers.md)
8 |
9 | * `Webserver Setup`
10 | * [SSL Setup](latest/panel/webservers/setup-ssl.md)
11 | * [NGINX with SSL](latest/panel/webservers/nginx-ssl.md)
12 | * [NGINX without SSL](latest/panel/webservers/nginx.md)
13 | * [DirectAdmin](latest/panel/webservers/directadmin.md)
14 | * [Apache with SSL](latest/panel/webservers/apache-ssl.md)
15 | * [Apache without SSL](latest/panel/webservers/apache.md)
16 |
17 | * `Updating`
18 | * [Manual Update](latest/panel/updating/manual.md)
19 |
20 | * **Daemon (v1.x)**
21 | * [Installation](latest/daemon/install.md)
22 |
23 | ***
24 |
25 | * **Migration**
26 | * [From Pterodactyl (v1.x)](latest/migration/pterodactyl.md)
27 | * [From Jexactyl (v2.x)](latest/migration/jexactyl.md)
28 |
29 | * **Additional Configuration**
30 | * [Discord Registration](latest/discord/oauth.md)
31 | * [Setting up PayPal](latest/payments/paypal.md)
32 | * [Setting up Stripe](latest/payments/stripe.md)
33 | * [Configuring Renewals](latest/config/renewal.md)
34 |
35 | * **Modification**
36 | * [Install build tools](latest/build/install.md)
37 | * [Build frontend files](latest/build/building.md)
38 |
39 |
--------------------------------------------------------------------------------
/index.html:
--------------------------------------------------------------------------------
1 |
2 |
3 |
4 |
5 |
6 | Jexactyl
7 |
8 |
9 |
10 |
11 |
12 |
13 |
14 |
24 |
25 |
26 |
27 |
28 |
29 |
30 |
31 |
32 |
33 |
34 |
35 |
36 |
37 |
38 |
--------------------------------------------------------------------------------
/latest/build/building.md:
--------------------------------------------------------------------------------
1 | # Building Frontend Files
2 |
3 | ***
4 |
5 | ### Running build command
6 |
7 | Run the commands below in order to rebuild Jexactyl's frontend.
8 |
9 | ```bash
10 | cd /var/www/jexactyl
11 |
12 | # If building in a development environment:
13 | yarn watch
14 |
15 | # If building for production:
16 | yarn build:production
17 | ```
--------------------------------------------------------------------------------
/latest/build/install.md:
--------------------------------------------------------------------------------
1 | # Install Build Tools
2 |
3 | ***
4 |
5 | This guide will inform you on how to get started with building and modifying Jexactyl.
6 |
7 | ***
8 |
9 | ### Installing NodeJS and Yarn
10 |
11 | Firstly, we'll need to install the `NodeJS` package and also add `Yarn` so we can build the Panel's frontend.
12 |
13 | ```bash
14 | curl -sL https://deb.nodesource.com/setup_16.x | sudo -E bash -
15 | apt install -y nodejs
16 | ```
17 |
18 | Install `Yarn` and the dependencies needed for Jexactyl to be built.
19 |
20 | ```bash
21 | npm i -g yarn
22 | cd /var/www/jexactyl
23 | yarn # Installs building dependencies.
24 | ```
25 |
26 | ***
27 |
28 | Next, refer to our [building](latest/build/building.md) guide on how to build the frontend.
--------------------------------------------------------------------------------
/latest/config/renewal.md:
--------------------------------------------------------------------------------
1 | # Renewal System Configuration
2 |
3 | ***
4 |
5 | Add this line to your system's crontab in order to run the renewal script daily.
6 |
7 | ```bash
8 | crontab -e # Pick '1' if prompted
9 | ```
10 | Then, paste this line and exit after:
11 |
12 | ```bash
13 | 0 0 * * * php /var/www/jexactyl/artisan p:schedule:renewal >> /dev/null 2>&1
14 | ```
15 |
16 | ?>
17 | Congrats! Renewals have been configured and should be functioning normally.
18 | If you encounter any issues, please let us know on our [Discord](https://discord.com/invite/qttGR4Z5Pk).
19 |
--------------------------------------------------------------------------------
/latest/daemon/install.md:
--------------------------------------------------------------------------------
1 | # Daemon Installation
2 |
3 | ***
4 |
5 | Currently, Jexactyl supports the use of [Pterodactyl Wings](https://github.com/pterodactyl/wings) as the server
6 | management solution for nodes. Please follow Pterodactyl's guide for installation [here](https://pterodactyl.io/wings/1.0/installing.html).
--------------------------------------------------------------------------------
/latest/discord/oauth.md:
--------------------------------------------------------------------------------
1 | # Configure Discord for Jexactyl
2 |
3 | ***
4 |
5 | This guide will show you how to link a Discord auth application to Jexactyl, which allows
6 | users to authenticate with Jexactyl via their Discord account.
7 |
8 | ***
9 |
10 | ### Configure a Discord application
11 |
12 | Firstly, you'll need to make a Discord App in order to obtain a Client ID and Client Secret.
13 | You can do this by heading to the [Discord Developer Portal](https://discord.com/developers)
14 | and clicking the 'New Application' button. Give it a name of your choice (this WILL be visible to
15 | clients), and hit 'Create'.
16 |
17 | ### Obtain the Client ID and Secret
18 |
19 | Next, we'll need to grab two things: our app's ID and also its Secret in order to keep the app secure.
20 | 
21 | 
22 |
23 | ### Configure Redirect URLs
24 |
25 | You will now need to configure Redirects so Discord knows where to point your users after authentication.
26 | You can do this by clicking the 'Add Redirect' button and adding these two URLs.
27 | 
28 |
29 | ### Add Client ID and Secret to Jexactyl
30 |
31 | Finally, head over to Jexactyl's 'User Registration' settings page and fill in your Client ID and Secret
32 | for Discord. Make sure to enable the registration module, otherwise users will not be able to authenticate!
33 | 
34 |
35 | ### Test your Application
36 |
37 | Give it a whirl and try to log in via Discord. If you encounter an error like `invalid_redirect_uri`, go over
38 | step 3 again and make sure your settings are 100% correct and valid.
39 |
40 | ?>
41 | Congrats! Jexactyl Discord Oauth should be functioning normally.
42 | If you encounter any issues, please let us know on our [Discord](https://discord.com/invite/qttGR4Z5Pk).
43 |
--------------------------------------------------------------------------------
/latest/migration/jexactyl.md:
--------------------------------------------------------------------------------
1 | # Migrate from Jexactyl v2.x
2 |
3 | ***
4 |
5 | Using this guide, you'll be able to upgrade to Jexactyl v3.x from v2.x.
6 |
7 | ***
8 |
9 | ### Backup your Panel!
10 |
11 | While this migration is designed to be as simple as possible, we strongly advise you take a backup
12 | of all data, just to make sure nothing goes wrong during migration.
13 | You can do this by running the following commands:
14 |
15 | ```bash
16 | # Backs up the file structure and .env key.
17 | cp -R /var/www/jexactyl /var/www/jexactyl-backup
18 |
19 | # Dump the MySQL database and save it in the backup dir.
20 | mysqldump -u root -p panel > /var/www/jexactyl-backup/panel.sql
21 | ```
22 |
23 | ***
24 |
25 | ### Mark Panel as unavailable
26 |
27 | ?> Make sure you're in the `/var/www/jexactyl` directory before continuing.
28 |
29 | While the migration takes place, we'll put the Panel into an 'unavailable' state so users cannot
30 | access the UI or API. We can do this by running the following:
31 |
32 | ```bash
33 | php artisan down
34 | ```
35 |
36 | ***
37 |
38 | ### Download Jexactyl
39 |
40 | After your backup is complete and the Panel is offline, we'll download the Jexactyl files
41 | and overwrite the existing ones.
42 |
43 | ```bash
44 | # Download the latest Jexactyl release using CURL.
45 | curl -L -o panel.tar.gz https://github.com/jexactyl/jexactyl/releases/latest/download/panel.tar.gz
46 |
47 | # Download the updated files and delete the archive file.
48 | tar -xzvf panel.tar.gz && rm -f panel.tar.gz
49 | ```
50 |
51 | Then, set permissions so that the Panel's files can be accessed.
52 |
53 | ```bash
54 | chmod -R 755 storage/* bootstrap/cache
55 | ```
56 |
57 | ***
58 |
59 | ### Update Composer dependencies
60 |
61 | After the new files have been downloaded, you'll need to update the PHP Composer dependencies
62 | that run this Panel. To do so, use `composer` to update the packages:
63 |
64 | ```bash
65 | # Temporary fix for errors.
66 | composer require asbiin/laravel-webauthn
67 |
68 | composer install --no-dev --optimize-autoloader
69 | ```
70 |
71 | ***
72 |
73 | ### Clear compiled UI cache
74 |
75 | You'll also want to clear the Panel's cache so that the new site will appear correctly.
76 |
77 | ```bash
78 | php artisan optimize:clear
79 | ```
80 |
81 | ***
82 |
83 | ### Update database migrations
84 |
85 | Jexactyl includes new features and functions that require you to migrate to your database.
86 | Luckily, this is a simple process which only involves running one command:
87 |
88 | ```bash
89 | php artisan migrate --seed --force
90 | ```
91 |
92 | ***
93 |
94 | ### Reassign webserver permissions
95 |
96 | Due to the change in files on the machine, we'll need to allow Apache/NGINX to read these
97 | new files. You can do so by running the command specific to your webserver:
98 |
99 | ```bash
100 | # If using NGINX or Apache (not on CentOS):
101 | chown -R www-data:www-data /var/www/jexactyl/*
102 |
103 | # If using NGINX on CentOS:
104 | chown -R nginx:nginx /var/www/jexactyl/*
105 |
106 | # If using Apache on CentOS
107 | chown -R apache:apache /var/www/jexactyl/*
108 | ```
109 |
110 | ### Restart Queue Workers
111 |
112 | After every update you should restart the queue worker, to ensure that the new code is loaded and used.
113 |
114 | ```bash
115 | php artisan queue:restart
116 | ```
117 |
118 | ***
119 |
120 | ### Mark Panel as online
121 |
122 | Now that the migration is complete, you can bring the Panel back online and make it available to users.
123 |
124 | ```bash
125 | php artisan up
126 | ```
127 |
128 | ?>
129 | Congrats! You have migrated to Jexactyl and everything should be functioning normally.
130 | If you encounter any issues, please let us know on our [Discord](https://discord.com/invite/qttGR4Z5Pk).
131 |
--------------------------------------------------------------------------------
/latest/migration/pterodactyl.md:
--------------------------------------------------------------------------------
1 | # Migrate from Pterodactyl v1.x
2 |
3 | ***
4 |
5 | Using this guide, you'll be able to upgrade to Jexactyl from Pterodactyl v1.x.
6 |
7 | !> Pterodactyl v0.7 is EOL (end-of-life) and is not supported for migration by Jexactyl.
8 | If you're running v0.7, please upgrade from Pterodactyl v0.7 to Pterodactyl v1.0 before
9 | following this migration guide.
10 |
11 | ***
12 |
13 | ### Backup your Panel!
14 |
15 | While this migration is designed to be as simple as possible, we strongly advise you take a backup
16 | of all data, just to make sure nothing goes wrong during migration.
17 | You can do this by running the following commands:
18 |
19 | ```bash
20 | # Backs up the file structure and .env key.
21 | cp -R /var/www/pterodactyl /var/www/pterodactyl-backup
22 |
23 | # Dump the MySQL database and save it in the backup dir.
24 | mysqldump -u root -p panel > /var/www/pterodactyl-backup/panel.sql
25 | ```
26 |
27 | ***
28 |
29 | ### Mark Panel as unavailable
30 |
31 | ?> Make sure you're in the `/var/www/pterodactyl` directory before continuing.
32 |
33 | While the migration takes place, we'll put the Panel into an 'unavailable' state so users cannot
34 | access the UI or API. We can do this by running the following:
35 |
36 | ```bash
37 | php artisan down
38 | ```
39 |
40 | ***
41 |
42 | ### Download Jexactyl
43 |
44 | After your backup is complete and the Panel is offline, we'll download the Jexactyl files
45 | and overwrite the existing Pterodactyl files.
46 |
47 | ```bash
48 | # Download the latest Jexactyl release using CURL.
49 | curl -L -o panel.tar.gz https://github.com/jexactyl/jexactyl/releases/latest/download/panel.tar.gz
50 |
51 | # Download the updated files and delete the archive file.
52 | tar -xzvf panel.tar.gz && rm -f panel.tar.gz
53 | ```
54 |
55 | Then, set permissions so that the Panel's files can be accessed.
56 |
57 | ```bash
58 | chmod -R 755 storage/* bootstrap/cache
59 | ```
60 |
61 | ***
62 |
63 | ### Update Composer dependencies
64 |
65 | After the new files have been downloaded, you'll need to update the PHP Composer dependencies
66 | that run this Panel. To do so, use `composer` to update the packages:
67 |
68 | ```bash
69 | # Temporary fix for errors.
70 | composer require asbiin/laravel-webauthn
71 |
72 | composer install --no-dev --optimize-autoloader
73 | ```
74 |
75 | ***
76 |
77 | ### Clear compiled UI cache
78 |
79 | You'll also want to clear the Panel's cache so that the new site will appear correctly.
80 |
81 | ```bash
82 | php artisan optimize:clear
83 | ```
84 |
85 | ***
86 |
87 | ### Update database migrations
88 |
89 | Jexactyl includes new features and functions that require you to migrate to your database.
90 | Luckily, this is a simple process which only involves running one command:
91 |
92 | ```bash
93 | php artisan migrate --seed --force
94 | ```
95 |
96 | ***
97 |
98 | ### Reassign webserver permissions
99 |
100 | Due to the change in files on the machine, we'll need to allow Apache/NGINX to read these
101 | new files. You can do so by running the command specific to your webserver:
102 |
103 | ```bash
104 | # If using NGINX or Apache (not on CentOS):
105 | chown -R www-data:www-data /var/www/pterodactyl/*
106 |
107 | # If using NGINX on CentOS:
108 | chown -R nginx:nginx /var/www/pterodactyl/*
109 |
110 | # If using Apache on CentOS
111 | chown -R apache:apache /var/www/pterodactyl/*
112 | ```
113 |
114 | ### Restart Queue Workers
115 |
116 | After every update you should restart the queue worker, to ensure that the new code is loaded and used.
117 |
118 | ```bash
119 | php artisan queue:restart
120 | ```
121 |
122 | ***
123 |
124 | ### Mark Panel as online
125 |
126 | Now that the migration is complete, you can bring the Panel back online and make it available to users.
127 |
128 | ```bash
129 | php artisan up
130 | ```
131 |
132 | ?>
133 | Congrats! You have migrated to Jexactyl and everything should be functioning normally.
134 | If you encounter any issues, please let us know on our [Discord](https://discord.com/invite/qttGR4Z5Pk).
--------------------------------------------------------------------------------
/latest/panel/install/database.md:
--------------------------------------------------------------------------------
1 | # Database Setup
2 | ***
3 | In order for the Panel to get and set data, we'll need a database.
4 | This is where all the information about the Panel is stored.
5 | In this case, we're using MySQL - although Amazon Lambda and other
6 | database services are also viable options.
7 |
8 | ?>
9 | One thing you could do to further secure and scale the Panel is to have a
10 | separate VPS or server for databasing. This could be beneficial down the
11 | line for things like multi-cluster deployments and load balancing databases.
12 |
13 | ***
14 | ### Create database
15 | ```sql
16 | mysql -u root -p
17 |
18 | # Remember to change 'yourPassword' below to be a unique password
19 | CREATE USER 'jexactyl'@'127.0.0.1' IDENTIFIED BY 'yourPassword';
20 | CREATE DATABASE panel;
21 | GRANT ALL PRIVILEGES ON panel.* TO 'jexactyl'@'127.0.0.1' WITH GRANT OPTION;
22 | exit
23 | ```
--------------------------------------------------------------------------------
/latest/panel/install/dependencies.md:
--------------------------------------------------------------------------------
1 | # Install Dependencies
2 | You'll need to install the following dependencies in order to run and use Jexactyl:
3 |
4 | ***
5 |
6 | ?>
7 |
8 | 
9 |
10 | Looking for a premium, high quality hosting provider? Check out [HostEZ.io](https://hostez.io),
11 | who support gameservers such as Valheim, Minecraft, and Terraria - while also offering VPS and bare metal solutions.
12 |
13 | PHP `8.1` with the extensions:
14 | - `cli`
15 | - `openssl`
16 | - `gd`
17 | - `mysql`
18 | - `PDO`
19 | - `mbstring`
20 | - `tokenizer`
21 | - `bcmath`
22 | - `xml`
23 | - `curl`
24 | - `zip`
25 | - `fpm`.
26 |
27 | MariaDB `10.2` or higher, with `redis-server`.
28 |
29 | A webserver (`NGINX` is preferred.)
30 |
31 | `curl`, `tar`, `unzip`, `git` and `composer` v2.
32 |
33 | ## Example Dependency Installation
34 |
35 | !> Your OS may be different to the one we've used for this installation.
36 | Make sure that these commands work for you, and if they don't, consult
37 | your operating system's package manager for how to install the dependencies.
38 |
39 | ```bash
40 | apt -y install software-properties-common curl apt-transport-https ca-certificates gnupg lsb-release
41 |
42 | LC_ALL=C.UTF-8 add-apt-repository -y ppa:ondrej/php
43 |
44 | # redis.io repo - works for Debian & Ubuntu
45 | curl -fsSL https://packages.redis.io/gpg | sudo gpg --dearmor -o /usr/share/keyrings/redis-archive-keyring.gpg
46 | echo "deb [signed-by=/usr/share/keyrings/redis-archive-keyring.gpg] https://packages.redis.io/deb $(lsb_release -cs) main" | sudo tee /etc/apt/sources.list.d/redis.list
47 |
48 | # The command below is not needed if you are using Ubuntu 22.04 or higher.
49 | curl -LsS https://r.mariadb.com/downloads/mariadb_repo_setup | sudo bash
50 |
51 | apt update
52 | apt -y install php8.1 php8.1-{cli,gd,mysql,pdo,mbstring,tokenizer,bcmath,xml,fpm,curl,zip} mariadb-server nginx tar unzip git redis
53 | curl -sS https://getcomposer.org/installer | sudo php -- --install-dir=/usr/local/bin --filename=composer
54 | ```
55 |
--------------------------------------------------------------------------------
/latest/panel/install/download.md:
--------------------------------------------------------------------------------
1 | # Download Files
2 |
3 | ***
4 |
5 | ### Create Directory
6 |
7 | The first step in this process is to create the folder where the
8 | panel will run and then move ourselves into that newly created folder.
9 | Below is an example of how to perform this operation.
10 |
11 | ```bash
12 | mkdir -p /var/www/jexactyl
13 | cd /var/www/jexactyl
14 | ```
15 |
16 | ***
17 |
18 | ### Download Panel
19 |
20 | Once you have entered this directory, you can `curl` (download) the latest release to your machine.
21 | Then, you can extract it using the `tar` command and assign permissions using `chmod`. We assign permissions
22 | to the `storage/*` and `bootstrap/cache` directories in order to allow the site to cache objects and load faster.
23 |
24 | ```bash
25 | curl -Lo panel.tar.gz https://github.com/jexactyl/jexactyl/releases/latest/download/panel.tar.gz
26 | tar -xzvf panel.tar.gz
27 | chmod -R 755 storage/* bootstrap/cache/
28 | ```
--------------------------------------------------------------------------------
/latest/panel/install/environment.md:
--------------------------------------------------------------------------------
1 | # Environment Setup
2 |
3 | ***
4 |
5 | ### Create configuration file
6 | We'll need to start by copying over the default settings file, called `.env.example`. We'll want
7 | this to be called `.env`, so it's just a case of copying the file over in order to set up the Panel
8 | exactly how you want it.
9 |
10 | ```bash
11 | cp .env.example .env
12 | ```
13 |
14 | ***
15 |
16 | ### Install Composer packages
17 | After this, we'll need to install Composer dependencies - which will allow the PHP code in our project
18 | (such as the backend and admin-side) to run properly.
19 |
20 | ```bash
21 | composer install --no-dev --optimize-autoloader
22 | ```
23 |
24 | Finally, we'll generate a random token which will be the encryption/app key for our project.
25 |
26 | !> This encryption key is used to store important data (such as API keys).
27 | Do NOT share this key with anyone - protect it like a password.
28 | If you lose this key, all data is impossible to recover.
29 |
30 | ```bash
31 | php artisan key:generate --force
32 | ```
33 |
34 | ***
35 |
36 | ### Configure Panel Environment
37 | Jexactyl uses CLI commands to configure most of the base settings of the Panel.
38 | The following will allow you to set up general, database and mail settings.
39 |
40 | ```bash
41 | php artisan p:environment:setup
42 | php artisan p:environment:database
43 | php artisan p:environment:mail # Not required to run the Panel.
44 | ```
45 |
46 | ***
47 |
48 | ### Database Migration
49 | Now we need to set up all the base data for the Panel in the database you created earlier. The command below may take some time to run depending on your machine. Please **DO NOT exit the process** until it is completed! This command will set up the database tables and then add all the Nests & Eggs that power Jexactyl.
50 |
51 | ```bash
52 | php artisan migrate --seed --force
53 | ```
54 |
55 | ***
56 |
57 | ### Create admin user
58 | To access the Panel for the first time, you'll need to make a user via the CLI - don't worry, you can
59 | create users easily via the frontend! Here's a simple command which will take you through the steps of
60 | setting up the initial admin account:
61 | ```bash
62 | php artisan p:user:make
63 | ```
64 |
65 | ***
66 |
67 | ### Assign Permissions
68 | In order for the webserver you're using to access the Panel files, we'll need to assign it permissions
69 | with the `chown` command. Here's how to do this for all types of webservers:
70 | ```bash
71 | # If using NGINX or Apache (not on CentOS):
72 | chown -R www-data:www-data /var/www/jexactyl/*
73 |
74 | # If using NGINX on CentOS:
75 | chown -R nginx:nginx /var/www/jexactyl/*
76 |
77 | # If using Apache on CentOS:
78 | chown -R apache:apache /var/www/jexactyl/*
79 | ```
--------------------------------------------------------------------------------
/latest/panel/install/queue-workers.md:
--------------------------------------------------------------------------------
1 | # Queue Workers
2 |
3 | ***
4 |
5 | ### Crontab
6 | The first thing we need to do is create a new cronjob that runs every minute to process specific Jexactyl tasks, such as session cleanup and sending scheduled tasks to daemons.
7 |
8 | You'll want to open your crontab using `sudo crontab -e` and then paste the line below. **Nano is the easiest text editor to use, so press `1` when prompted to pick an editor.**
9 |
10 | ```bash
11 | * * * * * php /var/www/jexactyl/artisan schedule:run >> /dev/null 2>&1
12 | ```
13 |
14 | ***
15 |
16 | ### Systemd Queue Worker
17 | Next you need to create a new systemd worker to keep our queue process running in the background. This queue is responsible for sending emails and handling many other background tasks for Jexactyl.
18 |
19 | Create a file called `panel.service` in `/etc/systemd/system` with the contents below.
20 |
21 | ```bash
22 | # Jexactyl Queue Worker File
23 | # ----------------------------------
24 |
25 | [Unit]
26 | Description=Jexactyl Queue Worker
27 |
28 | [Service]
29 | User=www-data
30 | Group=www-data
31 | Restart=always
32 | ExecStart=/usr/bin/php /var/www/jexactyl/artisan queue:work --queue=high,standard,low --sleep=3 --tries=3
33 | StartLimitInterval=180
34 | StartLimitBurst=30
35 | RestartSec=5s
36 |
37 | [Install]
38 | WantedBy=multi-user.target
39 | ```
40 |
41 | ### Enable Queue Workers
42 | Finally, enable the jexactyl panel service we just made as well as the redis service to start and run on boot.
43 | ```bash
44 | sudo systemctl enable --now panel.service
45 | sudo systemctl enable --now redis-server
46 | ```
47 |
--------------------------------------------------------------------------------
/latest/panel/updating/manual.md:
--------------------------------------------------------------------------------
1 | # Updating Jexactyl
2 |
3 | ***
4 |
5 | Updating Jexactyl keeps your system stable, secure and allows
6 | your users/admins to experience new features quicker. Use
7 | the following guide below as a reference for updating Jexactyl.
8 |
9 | ?>
10 | Take a backup of your installation before continuing.
11 |
12 | ***
13 |
14 | ### Maintenance mode
15 |
16 | Start by shutting down the Panel while we perform upgrades.
17 |
18 | ```bash
19 | cd /var/www/jexactyl # Replace 'jexactyl' with 'pterodactyl' if you have migrated
20 | php artisan down
21 | ```
22 |
23 | ### Download new version
24 |
25 | Next, we'll use cURL to download the release archive from GitHub
26 | and extract it.
27 |
28 | ```bash
29 | curl -L https://github.com/jexactyl/jexactyl/releases/latest/download/panel.tar.gz | tar -xzv
30 | chmod -R 755 storage/* bootstrap/cache # Set server permissions properly
31 | ```
32 |
33 | ### Update Composer packages
34 |
35 | Due to Jexactyl staying up-to-date using the latest packages, you
36 | will need to update the Composer dependencies which allow Jexactyl
37 | to run properly on your machine.
38 |
39 | ```bash
40 | composer install --no-dev --optimize-autoloader
41 | ```
42 |
43 | ### Sync database changes
44 |
45 | You will need to migrate new database information into your
46 | database in order to use the latest Jexactyl features.
47 |
48 | ```bash
49 | php artisan migrate --seed --force
50 | ```
51 |
52 | ### Set webserver permissions
53 |
54 | After changing the files, we must re-allow permissions for our
55 | webserver so that Jexactyl can be hosted and accessed properly.
56 |
57 | ```bash
58 | cd /var/www/jexactyl
59 |
60 | # ONLY RUN ONE OF THE FOLLOWING COMMANDS!
61 |
62 | # If using NGINX or Apache (not on CentOS):
63 | chown -R www-data:www-data *
64 |
65 | # If using NGINX on CentOS:
66 | chown -R nginx:nginx *
67 |
68 | # If using Apache on CentOS
69 | chown -R apache:apache *
70 | ```
71 |
72 | ### Finalize update
73 |
74 | As a final step, restart the queue worker and bring the Panel
75 | back online so that users can experience the very latest.
76 |
77 | ```bash
78 | sudo systemctl restart panel.service # Replace 'panel' with 'pteroq' if you have migrated
79 | php artisan up
80 | ```
81 |
82 | ?> Any issues? Please reach out to us on [Discord](https://discord.gg/qttGR4Z5Pk).
83 |
84 |
--------------------------------------------------------------------------------
/latest/panel/webservers/apache-ssl.md:
--------------------------------------------------------------------------------
1 | # Apache with SSL Configuration
2 |
3 | ***
4 |
5 | ### Disabling default configuration
6 |
7 | Firstly, let's remove the default Apache configuration from your server.
8 | ```bash
9 | a2dissite 000-default.conf
10 | ```
11 |
12 | After we've done that, we can make our configuration for Jexactyl to run.
13 |
14 | ***
15 |
16 | ### Create configuration file
17 |
18 | !> Make sure to replace `` with your own domain in this config file.
19 | Please also note that this configuration is for Apache with SSL enabled.
20 | If you want to use NGINX as a webserver, or do not want to use SSL, please refer
21 | to the other webserver instructions.
22 |
23 | Note: When using Apache, make sure you have the `libapache2-mod-php` package installed or else PHP will not display on your webserver.
24 |
25 | Make a file called `panel.conf` in `/etc/apache2/sites-available` and insert the following:
26 |
27 | ```apache
28 |
29 | ServerName
30 |
31 | RewriteEngine On
32 | RewriteCond %{HTTPS} !=on
33 | RewriteRule ^/?(.*) https://%{SERVER_NAME}/$1 [R,L]
34 |
35 |
36 |
37 | ServerName
38 | DocumentRoot "/var/www/jexactyl/public"
39 |
40 | AllowEncodedSlashes On
41 |
42 | php_value upload_max_filesize 100M
43 | php_value post_max_size 100M
44 |
45 |
46 | Require all granted
47 | AllowOverride all
48 |
49 |
50 | SSLEngine on
51 | SSLCertificateFile /etc/letsencrypt/live//fullchain.pem
52 | SSLCertificateKeyFile /etc/letsencrypt/live//privkey.pem
53 |
54 | ```
55 |
56 | ***
57 |
58 | ### Enabling configuration
59 |
60 | Firstly, let's link the file we've made to the directory which Apache uses for configs.
61 | ```bash
62 | ln -s /etc/apache2/sites-available/panel.conf /etc/apache2/sites-enabled/panel.conf
63 | ```
64 |
65 | Then, we'll apply the settings Apache needs to host Jexactyl.
66 | ```bash
67 | sudo a2enmod rewrite
68 | sudo a2enmod ssl
69 | ```
70 |
71 | Finally, we'll restart Apache in order to bring Jexactyl online.
72 | ```bash
73 | systemctl restart apache2
74 | ```
75 |
76 | ?>
77 | Congrats! Jexactyl is installed and should be functioning normally.
78 | If you encounter any issues, please let us know on our [Discord](https://discord.com/invite/qttGR4Z5Pk).
79 |
--------------------------------------------------------------------------------
/latest/panel/webservers/apache.md:
--------------------------------------------------------------------------------
1 | # Apache without SSL Configuration
2 |
3 | ***
4 |
5 | ### Disabling default configuration
6 |
7 | Firstly, let's remove the default Apache configuration from your server.
8 | ```bash
9 | a2dissite 000-default.conf
10 | ```
11 |
12 | After we've done that, we can make our configuration for Jexactyl to run.
13 |
14 | ***
15 |
16 | ### Create configuration file
17 |
18 | !> Make sure to replace `` with your own domain in this config file.
19 | Please also note that this configuration is for Apache with SSL enabled.
20 | If you want to use NGINX as a webserver, or do not want to use SSL, please refer
21 | to the other webserver instructions.
22 |
23 | Note: When using Apache, make sure you have the `libapache2-mod-php` package installed or else PHP will not display on your webserver.
24 |
25 | Make a file called `panel.conf` in `/etc/apache2/sites-available` and insert the following:
26 |
27 | ```apache
28 |
29 | ServerName
30 | DocumentRoot "/var/www/jexactyl/public"
31 |
32 | AllowEncodedSlashes On
33 |
34 | php_value upload_max_filesize 100M
35 | php_value post_max_size 100M
36 |
37 |
38 | AllowOverride all
39 | Require all granted
40 |
41 |
42 | ```
43 |
44 | ***
45 |
46 | ### Enabling configuration
47 |
48 | Firstly, let's link the file we've made to the directory which Apache uses for configs.
49 | ```bash
50 | ln -s /etc/apache2/sites-available/panel.conf /etc/apache2/sites-enabled/panel.conf
51 | ```
52 |
53 | Then, we'll apply the settings Apache needs to host Jexactyl.
54 | ```bash
55 | sudo a2enmod rewrite
56 | sudo a2enmod ssl
57 | ```
58 |
59 | Finally, we'll restart Apache in order to bring Jexactyl online.
60 | ```bash
61 | systemctl restart apache2
62 | ```
63 |
64 | ?>
65 | Congrats! Jexactyl is installed and should be functioning normally.
66 | If you encounter any issues, please let us know on our [Discord](https://discord.com/invite/qttGR4Z5Pk).
67 |
--------------------------------------------------------------------------------
/latest/panel/webservers/directadmin.md:
--------------------------------------------------------------------------------
1 | # DirectAdmin & OpenLiteSpeed
2 |
3 | ***
4 |
5 | !> This is not recommended for production usage, whatsoever, it is possible to do if you have access to the DirectAdmin directory via SSH. It also requires some basic understanding of Linux commands.
6 |
7 | ### Edit the docRoot
8 |
9 | In order to change the document root from, for example `/home/panel/domains/panel.jexactyl.com/public_html` to `/home/panel/domains/panel.jexactyl.com/public_html/public` and make the change permanent, we'll need to go to the User tab (if you're a reseller), next, go to Account Manager, click the dropdown, then go into Subdomain Management. On this page, you should look for a row named `Docroot` with a Default check if you haven't edited it, and a pencil. Now, you'll need to click the pencil which should bring you to another page. In this page, you're going to click `Custom` inside 'Public HTML Root', which should bring the directory of your root domain. It should have this format: `/domains/`.
10 | If this is correct, then you should add the following to the current directory. Do note, means the first letters of your domain before the dot, so if your domain is `panel.jexactyl.com`, then you'll only need to input `panel`. In here, you can also change the PHP version.
11 |
12 | `/public_html//public`
13 |
14 | Afterwards, you can click Save and it should be good to go.
15 |
16 | ### Restart the webserver
17 |
18 | Afterwards, restart OpenLiteSpeed or your webserver with:
19 | ```bash
20 | systemctl restart
21 | ```
22 |
23 | and you should be ready-to-go. This fixes the 404 issues after installing it correctly.
24 |
25 | ?>
26 | Congrats! Jexactyl is installed and should be functioning normally.
27 | If you encounter any issues, please let us know on our [Discord](https://discord.com/invite/qttGR4Z5Pk).
28 |
--------------------------------------------------------------------------------
/latest/panel/webservers/nginx-ssl.md:
--------------------------------------------------------------------------------
1 | # Nginx with SSL Configuration
2 |
3 | ***
4 |
5 | ### Remove default configuration
6 |
7 | Firstly, let's remove the default NGINX configuration from your server.
8 | ```bash
9 | rm /etc/nginx/sites-available/default; rm /etc/nginx/sites-enabled/default
10 | ```
11 |
12 | After we've done that, we can make our configuration for Jexactyl to run.
13 |
14 | ***
15 |
16 | ### Create configuration file
17 |
18 | !> Make sure to replace `` with your own domain in this config file.
19 | Please also note that this configuration is for NGINX with SSL enabled.
20 | If you want to use Apache as a webserver, or do not want to use SSL, please refer
21 | to the other webserver instructions.
22 |
23 | Make a file called `panel.conf` in `/etc/nginx/sites-available` and insert the following:
24 |
25 | ```nginx
26 | server {
27 | listen 80;
28 | server_name ;
29 | return 301 https://$server_name$request_uri;
30 | }
31 |
32 | server {
33 | listen 443 ssl http2;
34 | server_name ;
35 |
36 | root /var/www/jexactyl/public;
37 | index index.php;
38 |
39 | access_log /var/log/nginx/jexactyl.app-access.log;
40 | error_log /var/log/nginx/jexactyl.app-error.log error;
41 |
42 | # allow larger file uploads and longer script runtimes
43 | client_max_body_size 100m;
44 | client_body_timeout 120s;
45 |
46 | sendfile off;
47 |
48 | # SSL Configuration
49 | ssl_certificate /etc/letsencrypt/live//fullchain.pem;
50 | ssl_certificate_key /etc/letsencrypt/live//privkey.pem;
51 | ssl_session_cache shared:SSL:10m;
52 | ssl_protocols TLSv1.2 TLSv1.3;
53 | ssl_ciphers "ECDHE-ECDSA-AES128-GCM-SHA256:ECDHE-RSA-AES128-GCM-SHA256:ECDHE-ECDSA-AES256-GCM-SHA384:ECDHE-RSA-AES256-GCM-SHA384:ECDHE-ECDSA-CHACHA20-POLY1305:ECDHE-RSA-CHACHA20-POLY1305:DHE-RSA-AES128-GCM-SHA256:DHE-RSA-AES256-GCM-SHA384";
54 | ssl_prefer_server_ciphers on;
55 |
56 | add_header X-Content-Type-Options nosniff;
57 | add_header X-XSS-Protection "1; mode=block";
58 | add_header X-Robots-Tag none;
59 | add_header Content-Security-Policy "frame-ancestors 'self'";
60 | add_header X-Frame-Options DENY;
61 | add_header Referrer-Policy same-origin;
62 |
63 | location / {
64 | try_files $uri $uri/ /index.php?$query_string;
65 | }
66 |
67 | location ~ \.php$ {
68 | fastcgi_split_path_info ^(.+\.php)(/.+)$;
69 | fastcgi_pass unix:/run/php/php8.1-fpm.sock;
70 | fastcgi_index index.php;
71 | include fastcgi_params;
72 | fastcgi_param PHP_VALUE "upload_max_filesize = 100M \n post_max_size=100M";
73 | fastcgi_param SCRIPT_FILENAME $document_root$fastcgi_script_name;
74 | fastcgi_param HTTP_PROXY "";
75 | fastcgi_intercept_errors off;
76 | fastcgi_buffer_size 16k;
77 | fastcgi_buffers 4 16k;
78 | fastcgi_connect_timeout 300;
79 | fastcgi_send_timeout 300;
80 | fastcgi_read_timeout 300;
81 | include /etc/nginx/fastcgi_params;
82 | }
83 |
84 | location ~ /\.ht {
85 | deny all;
86 | }
87 | }
88 | ```
89 |
90 | ***
91 |
92 | ### Enabling Configuration
93 |
94 | Firstly, let's link the file we've made to the directory which NGINX uses for configs.
95 | ```bash
96 | ln -s /etc/nginx/sites-available/panel.conf /etc/nginx/sites-enabled/panel.conf
97 | ```
98 |
99 | Then, we can test our nginx configuration to make sure it's working and valid:
100 | ```bash
101 | nginx -t
102 | ```
103 |
104 | Finally, we can restart the NGINX server process to make our Panel available on the domain.
105 | ```bash
106 | systemctl restart nginx
107 | ```
108 |
109 | ?>
110 | Congrats! Jexactyl is installed and should be functioning normally.
111 | If you encounter any issues, please let us know on our [Discord](https://discord.com/invite/qttGR4Z5Pk).
112 |
--------------------------------------------------------------------------------
/latest/panel/webservers/nginx.md:
--------------------------------------------------------------------------------
1 | # Nginx without SSL Configuration
2 |
3 | ***
4 |
5 | > Jexactyl strongly recommends you use SSL in order to secure your site.
6 | Please consider enabling SSL by following the [Setting up SSL](docs/webservers/ssl-setup.md) guide.
7 |
8 | ***
9 |
10 | ### Remove default configuration
11 |
12 | Firstly, let's remove the default NGINX configuration from your server.
13 | ```bash
14 | rm /etc/nginx/sites-available/default; rm /etc/nginx/sites-enabled/default
15 | ```
16 |
17 | After we've done that, we can make our configuration for Jexactyl to run.
18 |
19 | ***
20 |
21 | ### Create configuration file
22 |
23 | !> Make sure to replace `` with your own domain in this config file.
24 | Please also note that this configuration is for NGINX with SSL enabled.
25 | If you want to use Apache as a webserver, or do not want to use SSL, please refer
26 | to the other webserver instructions.
27 |
28 | Make a file called `panel.conf` in `/etc/nginx/sites-available` and insert the following:
29 |
30 | ```nginx
31 | server {
32 | # Replace the example with your domain name or IP address
33 | listen 80;
34 | server_name ;
35 |
36 |
37 | root /var/www/jexactyl/public;
38 | index index.html index.htm index.php;
39 | charset utf-8;
40 |
41 | location / {
42 | try_files $uri $uri/ /index.php?$query_string;
43 | }
44 |
45 | location = /favicon.ico { access_log off; log_not_found off; }
46 | location = /robots.txt { access_log off; log_not_found off; }
47 |
48 | access_log off;
49 | error_log /var/log/nginx/jexactyl.app-error.log error;
50 |
51 | # allow larger file uploads and longer script runtimes
52 | client_max_body_size 100m;
53 | client_body_timeout 120s;
54 |
55 | sendfile off;
56 |
57 | location ~ \.php$ {
58 | fastcgi_split_path_info ^(.+\.php)(/.+)$;
59 | fastcgi_pass unix:/run/php/php8.1-fpm.sock;
60 | fastcgi_index index.php;
61 | include fastcgi_params;
62 | fastcgi_param PHP_VALUE "upload_max_filesize = 100M \n post_max_size=100M";
63 | fastcgi_param SCRIPT_FILENAME $document_root$fastcgi_script_name;
64 | fastcgi_param HTTP_PROXY "";
65 | fastcgi_intercept_errors off;
66 | fastcgi_buffer_size 16k;
67 | fastcgi_buffers 4 16k;
68 | fastcgi_connect_timeout 300;
69 | fastcgi_send_timeout 300;
70 | fastcgi_read_timeout 300;
71 | }
72 |
73 | location ~ /\.ht {
74 | deny all;
75 | }
76 | }
77 |
78 | ```
79 |
80 | ***
81 |
82 | ### Enabling Configuration
83 |
84 | Firstly, let's link the file we've made to the directory which NGINX uses for configs.
85 | ```bash
86 | ln -s /etc/nginx/sites-available/panel.conf /etc/nginx/sites-enabled/panel.conf
87 | ```
88 |
89 | Then, we can test our nginx configuration to make sure it's working and valid:
90 | ```bash
91 | nginx -t
92 | ```
93 |
94 | Finally, we can restart the NGINX server process to make our Panel available on the domain.
95 | ```bash
96 | systemctl restart nginx
97 | ```
98 |
99 | ?>
100 | Congrats! Jexactyl is installed and should be functioning normally.
101 | If you encounter any issues, please let us know on our [Discord](https://discord.com/invite/qttGR4Z5Pk).
102 |
--------------------------------------------------------------------------------
/latest/panel/webservers/setup-ssl.md:
--------------------------------------------------------------------------------
1 | # Setup SSL with Certbot
2 |
3 | ***
4 |
5 | ### Download Certbot package
6 |
7 | We'll start by downloading the `certbot` package which can be used to create SSL certificates
8 | for your website.
9 | ```bash
10 | # If using NGINX run the following:
11 | apt install -y certbot python3-certbot-nginx
12 |
13 | # If using Apache run the following:
14 | apt install -y certbot python3-certbot-apache
15 | ```
16 |
17 | ***
18 |
19 | ### Creating a certificate
20 |
21 | Assuming you have set your domain to point to your webserver IP, you're ready to create a certificate.
22 | Creating an SSL cert is as simple as running one of the commands below:
23 |
24 | ```bash
25 | # If you are using NGINX:
26 | certbot certonly --nginx -d example.com
27 |
28 | # If you are using Apache:
29 | certbot certonly --apache -d example.com
30 |
31 | # Use this if neither works. Make sure to stop your webserver first when using this method.
32 | certbot certonly --standalone -d example.com
33 | ```
34 |
--------------------------------------------------------------------------------
/latest/payments/paypal.md:
--------------------------------------------------------------------------------
1 | # Accept payments with PayPal
2 |
3 | ***
4 |
5 | This guide will show you how to easily get started with using PayPal with Jexactyl
6 | in order to process credit purchases.
7 |
8 | !> This system was implemented in `v3.1.0`. Please make sure you're running this version
9 | or newer in order to use the PayPal system.
10 |
11 | ***
12 |
13 | ### Obtain Client ID and Client Secret
14 |
15 | You'll need to firstly create a new 'App' with PayPal in order to get a Client ID and secret
16 | for use with Jexactyl.
17 |
18 | ***
19 |
20 | ### 1. Log into PayPal Developer Console
21 | 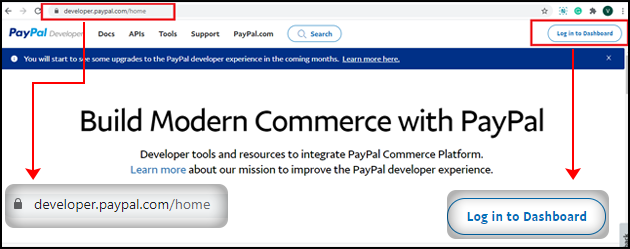
22 | 
23 |
24 | ### 2. Head to the dashboard and create a new App
25 | !> Make sure that the toggle at the top of the page is set to LIVE mode, not Sandbox.
26 |
27 | 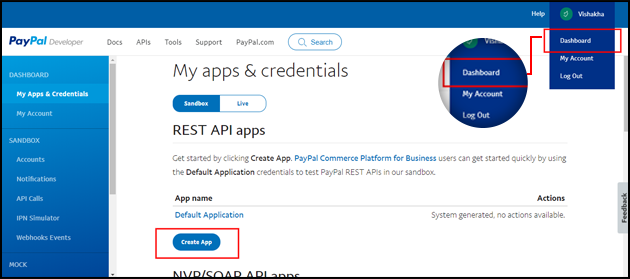
28 |
29 | ### 3. Create your PayPal App
30 | 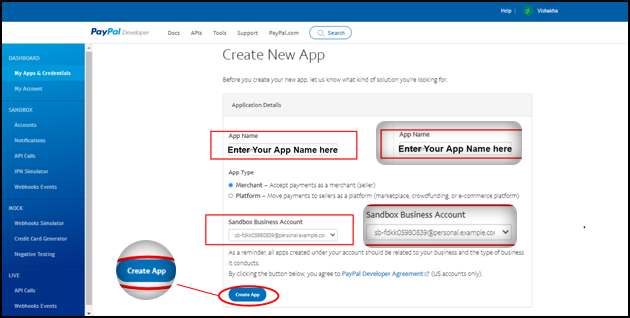
31 |
32 | ### 4. Obtain Client ID and Secret
33 | 
34 |
35 | ***
36 |
37 | ### 5. Add Client ID and Secret to Jexactyl
38 | Next, you'll need to place these keys in your `.env` file in order to allow Jexactyl to login.
39 |
40 | ```bash
41 | cd /var/www/jexactyl
42 | nano .env
43 |
44 | # Fill in the fields PAYPAL_CLIENT_ID and PAYPAL_CLIENT_SECRET
45 | ```
46 |
47 | ### 6. Enable the PayPal gateway in settings
48 |
49 | ?> Make sure the 'PayPal enabled' setting is set to `Enabled`.
50 |
51 | 
52 |
53 | ### 7. Test your configuration
54 |
55 | Head over to the Jexactyl Storefront and click the 'Balance' tab. Once you're there, attempt to buy `x` credits with PayPal.
56 | If the page redirects to a PayPal purchase portal, congrats! You've successfully set up and configured PayPal.
57 |
58 | ?> If you run into issues while getting started with PayPal, let us know in the [Jexactyl Discord](https://discord.com/invite/qttGR4Z5Pk)
59 |
--------------------------------------------------------------------------------
/latest/payments/stripe.md:
--------------------------------------------------------------------------------
1 | # Accepting payments with the Stripe API
2 |
3 | ***
4 |
5 | This guide will show you how to easily get started with using Stripe with Jexactyl
6 | in order to process credit purchases.
7 |
8 | !> This system was implemented in `v3.2.0`. Please make sure you're running this version
9 | or newer in order to use the Stripe system.
10 |
11 | ***
12 |
13 | ### Obtain Client Secret and Webhook Secret
14 |
15 | In order to process payments via Stripe, you'll need to firstly
16 | create an account and generate an API key as well as a webhook secret.
17 |
18 | ?> Register an account with Stripe at https://stripe.com to get started.
19 |
20 | ***
21 |
22 | ### 1. Log into the Stripe Dashboard
23 |
24 | Once logged in and set up, you should be at a page which looks like this:
25 |
26 | 
27 |
28 | ### 2. Generate an API Key
29 |
30 | Click the `Developers` tab on the right of the screen. Then, on the sidebar,
31 | head to 'API keys' and generate a new API key.
32 |
33 | 
34 |
35 | ### 3. Create Webhook
36 |
37 | After creating the API key, you'll need to create a `webhook` which will
38 | allow Stripe events to be processed via Jexactyl. Head to 'Webhooks' on the sidebar
39 | and generate a new webhook.
40 |
41 | 
42 |
43 | In the `Endpoint URL` field enter this: `https:///stripe/listen`.
44 |
45 | Then add the following events:
46 |
47 | 
48 |
49 | ### 4. Copy generated keys
50 |
51 | After you've done this, copy both your webhook secret and your API key,
52 | so we can put them in the .env configuration file.
53 |
54 | 
55 | 
56 |
57 | ***
58 |
59 | ### 5. Add Client ID and Secret to Jexactyl
60 | Next, you'll need to place these keys in your `.env` file in order to allow Jexactyl to login.
61 |
62 | ```bash
63 | cd /var/www/jexactyl
64 | nano .env
65 |
66 | # Fill in the fields STRIPE_CLIENT_SECRET and STRIPE_WEBHOOK_SECRET
67 | ```
68 |
69 | ### 6. Enable the Stripe gateway in settings
70 |
71 | ?> Make sure the 'Stripe enabled' setting is set to `Enabled`.
72 |
73 | 
74 |
75 | ### 7. Test your configuration
76 |
77 | Head over to the Jexactyl Storefront and click the 'Balance' tab. Once you're there, attempt to buy `x` credits with Stripe.
78 | If the page redirects to a Stripe purchase portal, congrats! You've successfully set up and configured Stripe.
79 |
80 | ?> If you run into issues while getting started with PayPal, let us know in the [Jexactyl Discord](https://discord.com/invite/qttGR4Z5Pk)
81 |
--------------------------------------------------------------------------------
/public/images/discord_id.png:
--------------------------------------------------------------------------------
https://raw.githubusercontent.com/Jexactyl/docs/98849f1b23e15ee5b9917d705297baf4dab68ea4/public/images/discord_id.png
--------------------------------------------------------------------------------
/public/images/discord_id_2.png:
--------------------------------------------------------------------------------
https://raw.githubusercontent.com/Jexactyl/docs/98849f1b23e15ee5b9917d705297baf4dab68ea4/public/images/discord_id_2.png
--------------------------------------------------------------------------------
/public/images/discord_jexactyl.png:
--------------------------------------------------------------------------------
https://raw.githubusercontent.com/Jexactyl/docs/98849f1b23e15ee5b9917d705297baf4dab68ea4/public/images/discord_jexactyl.png
--------------------------------------------------------------------------------
/public/images/discord_redirect.png:
--------------------------------------------------------------------------------
https://raw.githubusercontent.com/Jexactyl/docs/98849f1b23e15ee5b9917d705297baf4dab68ea4/public/images/discord_redirect.png
--------------------------------------------------------------------------------
/public/images/favicon.ico:
--------------------------------------------------------------------------------
https://raw.githubusercontent.com/Jexactyl/docs/98849f1b23e15ee5b9917d705297baf4dab68ea4/public/images/favicon.ico
--------------------------------------------------------------------------------
/public/images/hostez.png:
--------------------------------------------------------------------------------
https://raw.githubusercontent.com/Jexactyl/docs/98849f1b23e15ee5b9917d705297baf4dab68ea4/public/images/hostez.png
--------------------------------------------------------------------------------
/public/images/new/admin-blue.png:
--------------------------------------------------------------------------------
https://raw.githubusercontent.com/Jexactyl/docs/98849f1b23e15ee5b9917d705297baf4dab68ea4/public/images/new/admin-blue.png
--------------------------------------------------------------------------------
/public/images/new/admin-default.png:
--------------------------------------------------------------------------------
https://raw.githubusercontent.com/Jexactyl/docs/98849f1b23e15ee5b9917d705297baf4dab68ea4/public/images/new/admin-default.png
--------------------------------------------------------------------------------
/public/images/new/create.png:
--------------------------------------------------------------------------------
https://raw.githubusercontent.com/Jexactyl/docs/98849f1b23e15ee5b9917d705297baf4dab68ea4/public/images/new/create.png
--------------------------------------------------------------------------------
/public/images/new/dashboard.png:
--------------------------------------------------------------------------------
https://raw.githubusercontent.com/Jexactyl/docs/98849f1b23e15ee5b9917d705297baf4dab68ea4/public/images/new/dashboard.png
--------------------------------------------------------------------------------
/public/images/new/server.png:
--------------------------------------------------------------------------------
https://raw.githubusercontent.com/Jexactyl/docs/98849f1b23e15ee5b9917d705297baf4dab68ea4/public/images/new/server.png
--------------------------------------------------------------------------------
/public/images/new/store.png:
--------------------------------------------------------------------------------
https://raw.githubusercontent.com/Jexactyl/docs/98849f1b23e15ee5b9917d705297baf4dab68ea4/public/images/new/store.png
--------------------------------------------------------------------------------
/public/images/store_admin.png:
--------------------------------------------------------------------------------
https://raw.githubusercontent.com/Jexactyl/docs/98849f1b23e15ee5b9917d705297baf4dab68ea4/public/images/store_admin.png
--------------------------------------------------------------------------------
/public/images/stripe-api-secret.jpg:
--------------------------------------------------------------------------------
https://raw.githubusercontent.com/Jexactyl/docs/98849f1b23e15ee5b9917d705297baf4dab68ea4/public/images/stripe-api-secret.jpg
--------------------------------------------------------------------------------
/public/images/stripe-apikey.jpg:
--------------------------------------------------------------------------------
https://raw.githubusercontent.com/Jexactyl/docs/98849f1b23e15ee5b9917d705297baf4dab68ea4/public/images/stripe-apikey.jpg
--------------------------------------------------------------------------------
/public/images/stripe-dashboard.jpg:
--------------------------------------------------------------------------------
https://raw.githubusercontent.com/Jexactyl/docs/98849f1b23e15ee5b9917d705297baf4dab68ea4/public/images/stripe-dashboard.jpg
--------------------------------------------------------------------------------
/public/images/stripe-perms.jpg:
--------------------------------------------------------------------------------
https://raw.githubusercontent.com/Jexactyl/docs/98849f1b23e15ee5b9917d705297baf4dab68ea4/public/images/stripe-perms.jpg
--------------------------------------------------------------------------------
/public/images/stripe-webhook-secret.jpg:
--------------------------------------------------------------------------------
https://raw.githubusercontent.com/Jexactyl/docs/98849f1b23e15ee5b9917d705297baf4dab68ea4/public/images/stripe-webhook-secret.jpg
--------------------------------------------------------------------------------
/public/images/stripe-webhook.png:
--------------------------------------------------------------------------------
https://raw.githubusercontent.com/Jexactyl/docs/98849f1b23e15ee5b9917d705297baf4dab68ea4/public/images/stripe-webhook.png
--------------------------------------------------------------------------------