├── Custom widgets.md
├── Custom widgets
├── burning_widget.py
└── img
│ └── image-20210619210157102.png
├── Date and time.md
├── Date and time
├── arithmetic.py
├── battles.py
├── current_date_time.py
├── daylight_saving.py
├── julian_day.py
├── n_of_days.py
├── unix_time.py
├── utc_local.py
└── xmas.py
├── Dialogs.md
├── Dialogs
├── color_dialog.py
├── file_dialog.py
├── font_dialog.py
├── img
│ ├── image-20210617175356639.png
│ └── open.png
└── input_dialog.py
├── Drag & drop.md
├── Drag & drop
├── drag_button.py
├── img
│ └── image-20210618151201975.png
└── simple.py
├── Events and signals.md
├── Events and signals
├── custom_signal.py
├── event_object.py
├── event_sender.py
├── img
│ ├── image-20210614204459852.png
│ ├── image-20210614210417063.png
│ └── image-20210614212436159.png
├── reimplement_handler.py
└── signals_slots.py
├── First programs.md
├── First programs
├── center.py
├── img
│ ├── image-20210613145725126.png
│ ├── image-20210613151219139.png
│ ├── image-20210613152347253.png
│ └── image-20210613160315565.png
├── messagebox.py
├── quit_button.py
├── simple.py
└── tooltip.py
├── Introduction.md
├── Introduction
└── version.py
├── Layout management.md
├── Layout management
├── absolute.py
├── box_layout.py
├── calculator.py
├── img
│ ├── image-20210614160258237.png
│ ├── image-20210614161426013.png
│ ├── image-20210614162316241.png
│ └── image-20210614162945125.png
└── review.py
├── Menus and toolbars.md
├── Menus and toolbars
├── check_menu.py
├── context_menu.py
├── img
│ ├── exit.png
│ ├── image-20210613210325588.png
│ ├── image-20210613211050889.png
│ ├── image-20210613220040127.png
│ └── image-20210613220448187.png
├── main_window.py
├── simple_menu.py
├── statusbar.py
├── submenu.py
└── toolbar.py
├── Painting.md
├── Painting
├── bezier_curve.py
├── brushes.py
├── colours.py
├── draw_points.py
├── draw_text.py
├── img
│ ├── image-20210618225250881.png
│ ├── image-20210618225620602.png
│ ├── image-20210618225744951.png
│ ├── image-20210618230227377.png
│ ├── image-20210618230420456.png
│ └── image-20210618230729351.png
└── pens.py
├── README.md
├── The Tetris game.md
├── The Tetris game
├── img
│ ├── coordinates.png
│ ├── image-20210619231356476.png
│ └── tetrominoes.png
└── tetris.py
├── Widgets II.md
├── Widgets II
├── combobox.py
├── img
│ ├── image-20210618102845014.png
│ ├── image-20210618105544854.png
│ ├── image-20210618110033614.png
│ └── sid.png
├── line_edit.py
├── pixmap.py
└── splitter.py
├── Widgets.md
├── Widgets
├── calendar.py
├── check_box.py
├── img
│ ├── image-20210617204451891.png
│ ├── image-20210617213535523.png
│ ├── image-20210617223034230.png
│ ├── image-20210617223524029.png
│ ├── max.png
│ ├── med.png
│ ├── min.png
│ └── mute.png
├── progressbar.py
├── slider.py
└── toggle_button.py
└── date and time.md
/Custom widgets.md:
--------------------------------------------------------------------------------
1 | [目录](https://github.com/LC-space/PyQt6-tutorial/blob/main/README.md) [上一章](https://github.com/LC-space/PyQt6-tutorial/blob/main/Painting.md) [下一章](https://github.com/LC-space/PyQt6-tutorial/blob/main/The%20Tetris%20game.md)
2 |
3 | # PyQt6中的自定义控件
4 |
5 | *最近更新于2021年5月17日*
6 |
7 | PyQt6有一组丰富的控件。但是,没有工具箱能够提供程序员在其应用程序中可能需要的所有控件。工具箱通常只提供最常见的控件,如按钮、文本控件或滑块。如果需要一个更专业的控件,我们必须自己创建它。
8 |
9 | 使用工具箱提供的绘图工具创建自定义控件。有两种基本的可能性:程序员可以修改或增强现有的控件,也可以从头创建自定义控件。
10 |
11 | ## PyQt6烧录控件
12 |
13 | 这是我们可以在Nero、K3B或其他CD/DVD刻录软件中看到的一个控件。
14 |
15 | ```python
16 | # burning_widget.py
17 | #!/usr/bin/python
18 |
19 | """
20 | ZetCode PyQt6 tutorial
21 |
22 | In this example, we create a custom widget.
23 |
24 | Author: Jan Bodnar
25 | Website: zetcode.com
26 | """
27 |
28 | from PyQt6.QtWidgets import (QWidget, QSlider, QApplication,
29 | QHBoxLayout, QVBoxLayout)
30 | from PyQt6.QtCore import QObject, Qt, pyqtSignal
31 | from PyQt6.QtGui import QPainter, QFont, QColor, QPen
32 | import sys
33 |
34 |
35 | class Communicate(QObject):
36 | updateBW = pyqtSignal(int)
37 |
38 |
39 | class BurningWidget(QWidget):
40 |
41 | def __init__(self):
42 | super().__init__()
43 |
44 | self.initUI()
45 |
46 |
47 | def initUI(self):
48 |
49 | self.setMinimumSize(1, 30)
50 | self.value = 75
51 | self.num = [75, 150, 225, 300, 375, 450, 525, 600, 675]
52 |
53 |
54 | def setValue(self, value):
55 |
56 | self.value = value
57 |
58 |
59 | def paintEvent(self, e):
60 |
61 | qp = QPainter()
62 | qp.begin(self)
63 | self.drawWidget(qp)
64 | qp.end()
65 |
66 |
67 | def drawWidget(self, qp):
68 |
69 | MAX_CAPACITY = 700
70 | OVER_CAPACITY = 750
71 |
72 | font = QFont('Serif', 7, QFont.Weight.Light)
73 | qp.setFont(font)
74 |
75 | size = self.size()
76 | w = size.width()
77 | h = size.height()
78 |
79 | step = int(round(w / 10))
80 |
81 | till = int(((w / OVER_CAPACITY) * self.value))
82 | full = int(((w / OVER_CAPACITY) * MAX_CAPACITY))
83 |
84 | if self.value >= MAX_CAPACITY:
85 |
86 | qp.setPen(QColor(255, 255, 255))
87 | qp.setBrush(QColor(255, 255, 184))
88 | qp.drawRect(0, 0, full, h)
89 | qp.setPen(QColor(255, 175, 175))
90 | qp.setBrush(QColor(255, 175, 175))
91 | qp.drawRect(full, 0, till - full, h)
92 |
93 | else:
94 |
95 | qp.setPen(QColor(255, 255, 255))
96 | qp.setBrush(QColor(255, 255, 184))
97 | qp.drawRect(0, 0, till, h)
98 |
99 | pen = QPen(QColor(20, 20, 20), 1,
100 | Qt.PenStyle.SolidLine)
101 |
102 | qp.setPen(pen)
103 | qp.setBrush(Qt.BrushStyle.NoBrush)
104 | qp.drawRect(0, 0, w - 1, h - 1)
105 |
106 | j = 0
107 |
108 | for i in range(step, 10 * step, step):
109 |
110 | qp.drawLine(i, 0, i, 5)
111 | metrics = qp.fontMetrics()
112 | fw = metrics.horizontalAdvance(str(self.num[j]))
113 |
114 | x, y = int(i - fw/2), int(h / 2)
115 | qp.drawText(x, y, str(self.num[j]))
116 | j = j + 1
117 |
118 |
119 | class Example(QWidget):
120 |
121 | def __init__(self):
122 | super().__init__()
123 |
124 | self.initUI()
125 |
126 |
127 | def initUI(self):
128 |
129 | OVER_CAPACITY = 750
130 |
131 | sld = QSlider(Qt.Orientation.Horizontal, self)
132 | sld.setFocusPolicy(Qt.FocusPolicy.NoFocus)
133 | sld.setRange(1, OVER_CAPACITY)
134 | sld.setValue(75)
135 | sld.setGeometry(30, 40, 150, 30)
136 |
137 | self.c = Communicate()
138 | self.wid = BurningWidget()
139 | self.c.updateBW[int].connect(self.wid.setValue)
140 |
141 | sld.valueChanged[int].connect(self.changeValue)
142 | hbox = QHBoxLayout()
143 | hbox.addWidget(self.wid)
144 | vbox = QVBoxLayout()
145 | vbox.addStretch(1)
146 | vbox.addLayout(hbox)
147 | self.setLayout(vbox)
148 |
149 | self.setGeometry(300, 300, 390, 210)
150 | self.setWindowTitle('Burning widget')
151 | self.show()
152 |
153 |
154 | def changeValue(self, value):
155 |
156 | self.c.updateBW.emit(value)
157 | self.wid.repaint()
158 |
159 |
160 | def main():
161 |
162 | app = QApplication(sys.argv)
163 | ex = Example()
164 | sys.exit(app.exec())
165 |
166 |
167 | if __name__ == '__main__':
168 | main()
169 | ```
170 |
171 | 在我们的例子中,我们有一个QSlider和一个自定义控件。滑块控制自定义控件。这个控件以图形方式显示了媒体介质的总容量和可用的空闲空间。我们自定义控件的最小值是1,最大值是OVER_CAPACITY。如果我们达到MAX_CAPACITY值,我们开始用红色绘制。这通常表示超刻。
172 |
173 | 烧录控件位于窗口的底部。这是通过一个QHBoxLayout和一个QVBoxLayout实现的。
174 |
175 | ```python
176 | class BurningWidget(QWidget):
177 |
178 | def __init__(self):
179 | super().__init__()
180 | ```
181 |
182 | 烧录控件它基于QWidget控件。
183 |
184 | ```python
185 | self.setMinimumSize(1, 30)
186 | ```
187 |
188 | 我们改变了控件的最小大小(高度)。默认值对我们来说有点小。
189 |
190 | ```python
191 | font = QFont('Serif', 7, QFont.Weight.Light)
192 | qp.setFont(font)
193 | ```
194 |
195 | 我们使用比默认字体更小的字体。这更适合我们的需要。
196 |
197 | ```python
198 | size = self.size()
199 | w = size.width()
200 | h = size.height()
201 |
202 | step = int(round(w / 10))
203 |
204 |
205 | till = int(((w / OVER_CAPACITY) * self.value))
206 | full = int(((w / OVER_CAPACITY) * MAX_CAPACITY))
207 | ```
208 |
209 | 控件采用了动态绘制技术。窗体越大,控件也随之变大;反之亦然。这也是我们需要计算自定义控件的载体控件(即窗体)尺寸的原因。till参数定义了需要绘制的总尺寸,它根据slider控件计算得出,是整体区域的比例值。full参数定义了红色区域的绘制起点。注意在绘制时为取得较大精度而使用的浮点数运算。
210 |
211 | 实际的绘制分三个步骤。黄色或红黄矩形的绘制,然后是刻度线的绘制,最后是刻度值的绘制。
212 |
213 | ```python
214 | metrics = qp.fontMetrics()
215 | fw = metrics.horizontalAdvance(str(self.num[j]))
216 |
217 | x, y = int(i - fw/2), int(h / 2)
218 | qp.drawText(x, y, str(self.num[j]))
219 | ```
220 |
221 | 我们使用字体度量来绘制文本。为了使文本以垂直线为中心,我们必须知道文本的宽度。
222 |
223 | ```python
224 | def changeValue(self, value):
225 |
226 | self.c.updateBW.emit(value)
227 | self.wid.repaint()
228 | ```
229 |
230 | 当我们移动滑块时,会调用changeValue方法。在该方法内部,我们发送一个带有参数的自定义updateBW信号。该参数是滑块的当前值。该值稍后用于计算要绘制的烧录控件的容量。然后将重新绘制自定义控件。
231 |
232 | 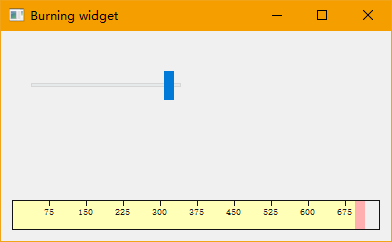
233 |
234 | 在PyQt6教程的这一部分中,我们创建了一个自定义控件。
235 |
236 | [目录](https://github.com/LC-space/PyQt6-tutorial/blob/main/README.md) [上一章](https://github.com/LC-space/PyQt6-tutorial/blob/main/Painting.md) [下一章](https://github.com/LC-space/PyQt6-tutorial/blob/main/The%20Tetris%20game.md)
237 |
238 |
--------------------------------------------------------------------------------
/Custom widgets/burning_widget.py:
--------------------------------------------------------------------------------
1 | # burning_widget.py
2 | #!/usr/bin/python
3 |
4 | """
5 | ZetCode PyQt6 tutorial
6 |
7 | In this example, we create a custom widget.
8 |
9 | Author: Jan Bodnar
10 | Website: zetcode.com
11 | """
12 |
13 | from PyQt6.QtWidgets import (QWidget, QSlider, QApplication,
14 | QHBoxLayout, QVBoxLayout)
15 | from PyQt6.QtCore import QObject, Qt, pyqtSignal
16 | from PyQt6.QtGui import QPainter, QFont, QColor, QPen
17 | import sys
18 |
19 |
20 | class Communicate(QObject):
21 | updateBW = pyqtSignal(int)
22 |
23 |
24 | class BurningWidget(QWidget):
25 |
26 | def __init__(self):
27 | super().__init__()
28 |
29 | self.initUI()
30 |
31 |
32 | def initUI(self):
33 |
34 | self.setMinimumSize(1, 30)
35 | self.value = 75
36 | self.num = [75, 150, 225, 300, 375, 450, 525, 600, 675]
37 |
38 |
39 | def setValue(self, value):
40 |
41 | self.value = value
42 |
43 |
44 | def paintEvent(self, e):
45 |
46 | qp = QPainter()
47 | qp.begin(self)
48 | self.drawWidget(qp)
49 | qp.end()
50 |
51 |
52 | def drawWidget(self, qp):
53 |
54 | MAX_CAPACITY = 700
55 | OVER_CAPACITY = 750
56 |
57 | font = QFont('Serif', 7, QFont.Weight.Light)
58 | qp.setFont(font)
59 |
60 | size = self.size()
61 | w = size.width()
62 | h = size.height()
63 |
64 | step = int(round(w / 10))
65 |
66 | till = int(((w / OVER_CAPACITY) * self.value))
67 | full = int(((w / OVER_CAPACITY) * MAX_CAPACITY))
68 |
69 | if self.value >= MAX_CAPACITY:
70 |
71 | qp.setPen(QColor(255, 255, 255))
72 | qp.setBrush(QColor(255, 255, 184))
73 | qp.drawRect(0, 0, full, h)
74 | qp.setPen(QColor(255, 175, 175))
75 | qp.setBrush(QColor(255, 175, 175))
76 | qp.drawRect(full, 0, till - full, h)
77 |
78 | else:
79 |
80 | qp.setPen(QColor(255, 255, 255))
81 | qp.setBrush(QColor(255, 255, 184))
82 | qp.drawRect(0, 0, till, h)
83 |
84 | pen = QPen(QColor(20, 20, 20), 1,
85 | Qt.PenStyle.SolidLine)
86 |
87 | qp.setPen(pen)
88 | qp.setBrush(Qt.BrushStyle.NoBrush)
89 | qp.drawRect(0, 0, w - 1, h - 1)
90 |
91 | j = 0
92 |
93 | for i in range(step, 10 * step, step):
94 |
95 | qp.drawLine(i, 0, i, 5)
96 | metrics = qp.fontMetrics()
97 | fw = metrics.horizontalAdvance(str(self.num[j]))
98 |
99 | x, y = int(i - fw/2), int(h / 2)
100 | qp.drawText(x, y, str(self.num[j]))
101 | j = j + 1
102 |
103 |
104 | class Example(QWidget):
105 |
106 | def __init__(self):
107 | super().__init__()
108 |
109 | self.initUI()
110 |
111 |
112 | def initUI(self):
113 |
114 | OVER_CAPACITY = 750
115 |
116 | sld = QSlider(Qt.Orientation.Horizontal, self)
117 | sld.setFocusPolicy(Qt.FocusPolicy.NoFocus)
118 | sld.setRange(1, OVER_CAPACITY)
119 | sld.setValue(75)
120 | sld.setGeometry(30, 40, 150, 30)
121 |
122 | self.c = Communicate()
123 | self.wid = BurningWidget()
124 | self.c.updateBW[int].connect(self.wid.setValue)
125 |
126 | sld.valueChanged[int].connect(self.changeValue)
127 | hbox = QHBoxLayout()
128 | hbox.addWidget(self.wid)
129 | vbox = QVBoxLayout()
130 | vbox.addStretch(1)
131 | vbox.addLayout(hbox)
132 | self.setLayout(vbox)
133 |
134 | self.setGeometry(300, 300, 390, 210)
135 | self.setWindowTitle('Burning widget')
136 | self.show()
137 |
138 |
139 | def changeValue(self, value):
140 |
141 | self.c.updateBW.emit(value)
142 | self.wid.repaint()
143 |
144 |
145 | def main():
146 |
147 | app = QApplication(sys.argv)
148 | ex = Example()
149 | sys.exit(app.exec())
150 |
151 |
152 | if __name__ == '__main__':
153 | main()
--------------------------------------------------------------------------------
/Custom widgets/img/image-20210619210157102.png:
--------------------------------------------------------------------------------
https://raw.githubusercontent.com/LC-space/PyQt6-tutorial/b684346d01e667cf855c69058bbb13f2bd2c6762/Custom widgets/img/image-20210619210157102.png
--------------------------------------------------------------------------------
/Date and time.md:
--------------------------------------------------------------------------------
1 | [目录](https://github.com/LC-space/PyQt6-tutorial/blob/main/README.md) [上一章](https://github.com/LC-space/PyQt6-tutorial/blob/main/Introduction.md) [下一章](https://github.com/LC-space/PyQt6-tutorial/blob/main/First%20programs.md)
2 |
3 | # PyQt6日期和时间
4 |
5 | *最近更新于2021年4月23日*
6 |
7 | PyQt6教程的这一部分展示了如何在PyQt6中使用日期和时间。
8 |
9 | ## QDate,QTime,QDateTime
10 |
11 | PyQt6有QDate、QDateTime、QTime类来处理日期和时间。QDate是一个用于处理公历中的日历日期的类。它具有确定日期、比较或操纵日期的方法。QTime类与时钟时间一起工作。它提供了比较时间、确定时间和各种其他时间操作方法的方法。QDateTime是一个类,它将QDate和QTime对象组合成一个对象。
12 |
13 | ## PyQt当前日期和时间
14 |
15 | PyQt6有currentDate、currentTime和currentDateTime方法,用于确定当前日期和时间。
16 |
17 | ```python
18 | # current_date_time.py
19 | #!/usr/bin/python
20 |
21 | from PyQt6.QtCore import QDate, QTime, QDateTime, Qt
22 |
23 | now = QDate.currentDate()
24 |
25 | print(now.toString(Qt.DateFormat.ISODate))
26 | print(now.toString(Qt.DateFormat.RFC2822Date))
27 |
28 | datetime = QDateTime.currentDateTime()
29 |
30 | print(datetime.toString())
31 |
32 | time = QTime.currentTime()
33 | print(time.toString(Qt.DateFormat.ISODate))
34 | ```
35 |
36 | 该示例以各种格式打印当前日期、日期和时间以及时间。
37 |
38 | ```python
39 | now = QDate.currentDate()
40 | ```
41 |
42 | currentDate方法返回当前日期。
43 |
44 | ```python
45 | print(now.toString(Qt.DateFormat.ISODate))
46 | print(now.toString(Qt.DateFormat.RFC2822Date))
47 | ```
48 |
49 | 通过将值Qt.DateFormat.ISODate和Qt.DateFormat.RFC2822Date传递给toString方法,日期以两种不同的格式打印。
50 |
51 | ```python
52 | datetime = QDateTime.currentDateTime()
53 | ```
54 |
55 | currentDateTime返回当前日期和时间。
56 |
57 | ```python
58 | time = QTime.currentTime()
59 | ```
60 |
61 | 最后,currentTime方法返回当前时间。
62 |
63 | ```
64 | 2021-06-12
65 | 12 Jun 2021
66 | Sat Jun 12 22:32:55 2021
67 | 22:32:55
68 | ```
69 |
70 | ## PyQt6 UTC时间
71 |
72 | 我们的星球是一个球体;它绕轴旋转。地球自西向东转,所以太阳在不同的时间和地点升起。地球大约每24小时自转一次。因此,世界被划分为24个时区。在每个时区,都有不同的当地时间。这个当地时间通常会被夏令时进一步修改。
73 |
74 | 务实的需要是“一个全球时间”。一个全球时间有助于避免时区和夏令时的混淆。选择UTC (Universal Coordinated time)作为主要时间标准。UTC用于航空、天气预报、飞行计划、空中交通管制许可和地图。与当地时间不同,UTC不会随着季节的变化而变化。
75 |
76 | ```python
77 | # utc_local.py
78 | #!/usr/bin/python
79 |
80 | from PyQt6.QtCore import QDateTime, Qt
81 |
82 | now = QDateTime.currentDateTime()
83 |
84 | print('Local datetime: ', now.toString(Qt.DateFormat.ISODate))
85 | print('Universal datetime: ', now.toUTC().toString(Qt.DateFormat.ISODate))
86 |
87 | print(f'The offset from UTC is: {now.offsetFromUtc()} seconds')
88 | ```
89 |
90 | 该示例确定当前世界和本地日期和时间。
91 |
92 | ```python
93 | print('Local datetime: ', now.toString(Qt.DateFormat.ISODate))
94 | ```
95 |
96 | currentDateTime方法返回表示为本地时间的当前日期和时间。我们可以使用toLocalTime将通用时间转换为本地时间。
97 |
98 | ```python
99 | print('Universal datetime: ', now.toUTC().toString(Qt.DateFormat.ISODate))
100 | ```
101 |
102 | 我们使用toUTC方法从日期时间对象中获得世界时间。
103 |
104 | ```python
105 | print(f'The offset from UTC is: {now.offsetFromUtc()} seconds')
106 | ```
107 |
108 | offsetFromUtc给出了通用时间和本地时间之间的差值,以秒为单位。
109 |
110 | ```
111 | Local datetime: 2021-06-12T22:51:45
112 | Universal datetime: 2021-06-12T14:51:45Z
113 | The offset from UTC is: 28800 seconds
114 | ```
115 |
116 | ## PyQt6天数
117 |
118 | 具体月份的天数由daysInMonth方法返回,一年中的天数由daysInYear方法返回。
119 |
120 | ```python
121 | # n_of_days.py
122 | #!/usr/bin/python
123 |
124 | from PyQt6.QtCore import QDate
125 |
126 | now = QDate.currentDate()
127 |
128 | d = QDate(1945, 5, 7)
129 |
130 | print(f'Days in month: {d.daysInMonth()}')
131 | print(f'Days in year: {d.daysInYear()}')
132 | ```
133 |
134 | 该示例打印所选日期的每月和每年的天数。
135 |
136 | ```
137 | Days in month: 31
138 | Days in year: 365
139 | ```
140 |
141 | ## PyQt6的天数差值
142 |
143 | 方法返回从一个日期到另一个日期的天数。
144 |
145 | ```python
146 | # xmas.py
147 | #!/usr/bin/python
148 |
149 | from PyQt6.QtCore import QDate, Qt
150 |
151 | now = QDate.currentDate()
152 | y = now.year()
153 |
154 | print(f'today is {now.toString(Qt.DateFormat.ISODate)}')
155 |
156 | xmas1 = QDate(y-1, 12, 25)
157 | xmas2 = QDate(y, 12, 25)
158 |
159 | dayspassed = xmas1.daysTo(now)
160 | print(f'{dayspassed} days have passed since last XMas')
161 |
162 | nofdays = now.daysTo(xmas2)
163 | print(f'There are {nofdays} days until next XMas')
164 | ```
165 |
166 | 该示例计算从上一个圣诞节算起的天数和到下一个圣诞节的天数。
167 |
168 | ```
169 | today is 2021-06-12
170 | 169 days have passed since last XMas
171 | There are 196 days until next XMas
172 | ```
173 |
174 | ## PyQt6 datetime算法
175 |
176 | 我们经常需要在datetime值中添加或减去天、秒或年。
177 |
178 | ```python
179 | # arithmetic.py
180 | #!/usr/bin/python
181 |
182 | from PyQt6.QtCore import QDateTime, Qt
183 |
184 | now = QDateTime.currentDateTime()
185 |
186 | print(f'Today: {now.toString(Qt.DateFormat.ISODate)}')
187 | print(f'Adding 12 days: {now.addDays(12).toString(Qt.DateFormat.ISODate)}')
188 | print(f'Subtracting 22 days: {now.addDays(-22).toString(Qt.DateFormat.ISODate)}')
189 |
190 | print(f'Adding 50 seconds: {now.addSecs(50).toString(Qt.DateFormat.ISODate)}')
191 | print(f'Adding 3 months: {now.addMonths(3).toString(Qt.DateFormat.ISODate)}')
192 | print(f'Adding 12 years: {now.addYears(12).toString(Qt.DateFormat.ISODate)}')
193 | ```
194 |
195 | 该示例确定当前日期时间,并添加或减去日、秒、月和年。
196 |
197 | ```
198 | Today: 2021-06-12T23:03:47
199 | Adding 12 days: 2021-06-24T23:03:47
200 | Subtracting 22 days: 2021-05-21T23:03:47
201 | Adding 50 seconds: 2021-06-12T23:04:37
202 | Adding 3 months: 2021-09-12T23:03:47
203 | Adding 12 years: 2033-06-12T23:03:47
204 | ```
205 |
206 | ## PyQt6夏令时
207 |
208 | 夏令时(DST)是一种在夏季提前时钟的做法,这样晚上的日光就会持续更长时间。在立春时,时间向前调整一小时,在秋季时,时间向后调整为标准时间。
209 |
210 | ```python
211 | # daylight_saving.py
212 | #!/usr/bin/python
213 |
214 | from PyQt6.QtCore import QDateTime, QTimeZone, Qt
215 |
216 | now = QDateTime.currentDateTime()
217 |
218 | print(f'Time zone: {now.timeZoneAbbreviation()}')
219 |
220 | if now.isDaylightTime():
221 | print('The current date falls into DST time')
222 | else:
223 | print('The current date does not fall into DST time')
224 | ```
225 |
226 | 示例检查datetime是否为夏时制。
227 |
228 | ```python
229 | print(f'Time zone: {now.timeZoneAbbreviation()}')
230 | ```
231 |
232 | timezoneacronym方法返回datetime的时区缩写。
233 |
234 | ```python
235 | if now.isDaylightTime():
236 | ...
237 | ```
238 |
239 | 如果datetime是夏时制,则返回isDaylightTime。
240 |
241 | ```
242 | Time zone: 中国标准时间
243 | The current date does not fall into DST time
244 | ```
245 |
246 | 该项目在欧洲中部城市布拉迪斯拉发(Bratislava)的夏季执行。中欧夏季时间(CEST)比世界时间早2小时。这个时区是一个日光节约时区,在欧洲和南极洲使用。在冬季使用的标准时间是中欧时间(CET)。
247 |
248 | ## PyQt6 unix纪元
249 |
250 | 一个新纪元是被选择为某个特定时代起源的时间上的一个瞬间。例如,在西方基督教国家,时间纪元从耶稣诞生的第0天开始。另一个例子是法国共和历,它使用了12年。这一时期是共和时代的开始,这是在1792年9月22日宣布的,这一天宣布了第一共和国和废除君主制。
251 |
252 | 计算机也有自己的纪元。其中最流行的是Unix纪元。Unix纪元是1970年1月1日00:00:00 UTC时间(或1970-01-01T00:00:00Z ISO 8601)。计算机中的日期和时间是根据自该计算机或平台的定义纪元以来所经过的秒数或时钟滴答数确定的。
253 |
254 | Unix时间是自Unix纪元以来经过的秒数。
255 |
256 | Unix date命令可用于获取Unix时间。现在距离Unix纪元已经过去了1623511317秒。
257 |
258 | ```python
259 | # unix_time.py
260 | #!/usr/bin/python
261 |
262 | from PyQt6.QtCore import QDateTime, Qt
263 |
264 | now = QDateTime.currentDateTime()
265 |
266 | unix_time = now.toSecsSinceEpoch()
267 | print(unix_time)
268 |
269 | d = QDateTime.fromSecsSinceEpoch(unix_time)
270 | print(d.toString(Qt.DateFormat.ISODate))
271 | ```
272 |
273 | 示例打印Unix时间并将其转换回QDateTime。
274 |
275 | ```python
276 | now = QDateTime.currentDateTime()
277 | ```
278 |
279 | 首先,检索当前日期和时间。
280 |
281 | ```python
282 | unix_time = now.toSecsSinceEpoch()
283 | ```
284 |
285 | toSecsSinceEpoch返回Unix时间。
286 |
287 | ```python
288 | d = QDateTime.fromSecsSinceEpoch(unix_time)
289 | ```
290 |
291 | 使用fromSecsSinceEpoch,我们将Unix时间转换为QDateTime。
292 |
293 | ```
294 | 1623511317
295 | 2021-06-12T23:21:57
296 | ```
297 |
298 | ## PyQt6儒略日
299 |
300 | 儒略日是指自儒略时期开始的连续天数。它主要由天文学家使用。它不应该与儒略历混淆。儒略时期开始于公元前4713年。公元前4713年1月1日的中午开始,儒略历号为0。
301 |
302 | 儒略日数(JDN)是指从这个时期开始算起所经过的天数。任何时刻的儒略日(JD)是前一个中午的儒略日数加上自该时刻起当天的一段时间。(Qt不计算这一段时间。)除了天文学,儒略日期经常被军事和大型计算机程序使用。
303 |
304 | ```python
305 | # julian_day.py
306 | #!/usr/bin/python
307 |
308 | from PyQt6.QtCore import QDate, Qt
309 |
310 | now = QDate.currentDate()
311 |
312 | print('Gregorian date for today:', now.toString(Qt.DateFormat.ISODate))
313 | print('Julian day for today:', now.toJulianDay())
314 | ```
315 |
316 | 在这个例子中,我们计算今天的公历日和儒略日。
317 |
318 | ```python
319 | print('Julian day for today:', now.toJulianDay())
320 | ```
321 |
322 | 儒略日通过toJulianDay()方法返回。
323 |
324 | ```
325 | Gregorian date for today: 2021-06-12
326 | Julian day for today: 2459378
327 | ```
328 |
329 | ## 历史战役
330 |
331 | 有了儒略日,就可以进行跨越几个世纪的计算。
332 |
333 | ```python
334 | # battles.py
335 | #!/usr/bin/python
336 |
337 | from PyQt6.QtCore import QDate, Qt
338 |
339 | borodino_battle = QDate(1812, 9, 7)
340 | slavkov_battle = QDate(1805, 12, 2)
341 |
342 | now = QDate.currentDate()
343 |
344 | j_today = now.toJulianDay()
345 | j_borodino = borodino_battle.toJulianDay()
346 | j_slavkov = slavkov_battle.toJulianDay()
347 |
348 | d1 = j_today - j_slavkov
349 | d2 = j_today - j_borodino
350 |
351 | print(f'Days since Slavkov battle: {d1}')
352 | print(f'Days since Borodino battle: {d2}')
353 | ```
354 |
355 | 该示例计算自两个历史事件以来经过的天数。
356 |
357 | ```python
358 | borodino_battle = QDate(1812, 9, 7)
359 | slavkov_battle = QDate(1805, 12, 2)
360 | ```
361 |
362 | 我们有两个拿破仑时代的战役日期。
363 |
364 | ```python
365 | j_today = now.toJulianDay()
366 | j_borodino = borodino_battle.toJulianDay()
367 | j_slavkov = slavkov_battle.toJulianDay()
368 | ```
369 |
370 | 我们计算今天和斯拉夫科夫战役和波罗底诺战役的儒略日。
371 |
372 | ```python
373 | d1 = j_today - j_slavkov
374 | d2 = j_today - j_borodino
375 | ```
376 |
377 | 我们计算了两场战役结束后的天数。
378 |
379 | ```
380 | Days since Slavkov battle: 78720
381 | Days since Borodino battle: 76249
382 | ```
383 |
384 | 当我们运行这个脚本时,从斯拉科夫战役到现在已经过去了78720天,从波罗底诺战役到现在已经过去了76249天。
385 |
386 | 在PyQt6教程的这一部分中,我们使用了日期和时间。
387 |
388 | [目录](https://github.com/LC-space/PyQt6-tutorial/blob/main/README.md) [上一章](https://github.com/LC-space/PyQt6-tutorial/blob/main/Introduction.md) [下一章](https://github.com/LC-space/PyQt6-tutorial/blob/main/First%20programs.md)
389 |
390 |
--------------------------------------------------------------------------------
/Date and time/arithmetic.py:
--------------------------------------------------------------------------------
1 | # arithmetic.py
2 | #!/usr/bin/python
3 |
4 | from PyQt6.QtCore import QDateTime, Qt
5 |
6 | now = QDateTime.currentDateTime()
7 |
8 | print(f'Today: {now.toString(Qt.DateFormat.ISODate)}')
9 | print(f'Adding 12 days: {now.addDays(12).toString(Qt.DateFormat.ISODate)}')
10 | print(f'Subtracting 22 days: {now.addDays(-22).toString(Qt.DateFormat.ISODate)}')
11 |
12 | print(f'Adding 50 seconds: {now.addSecs(50).toString(Qt.DateFormat.ISODate)}')
13 | print(f'Adding 3 months: {now.addMonths(3).toString(Qt.DateFormat.ISODate)}')
14 | print(f'Adding 12 years: {now.addYears(12).toString(Qt.DateFormat.ISODate)}')
--------------------------------------------------------------------------------
/Date and time/battles.py:
--------------------------------------------------------------------------------
1 | # battles.py
2 | #!/usr/bin/python
3 |
4 | from PyQt6.QtCore import QDate, Qt
5 |
6 | borodino_battle = QDate(1812, 9, 7)
7 | slavkov_battle = QDate(1805, 12, 2)
8 |
9 | now = QDate.currentDate()
10 |
11 | j_today = now.toJulianDay()
12 | j_borodino = borodino_battle.toJulianDay()
13 | j_slavkov = slavkov_battle.toJulianDay()
14 |
15 | d1 = j_today - j_slavkov
16 | d2 = j_today - j_borodino
17 |
18 | print(f'Days since Slavkov battle: {d1}')
19 | print(f'Days since Borodino battle: {d2}')
--------------------------------------------------------------------------------
/Date and time/current_date_time.py:
--------------------------------------------------------------------------------
1 | # current_date_time.py
2 | #!/usr/bin/python
3 |
4 | from PyQt6.QtCore import QDate, QTime, QDateTime, Qt
5 |
6 | now = QDate.currentDate()
7 |
8 | print(now.toString(Qt.DateFormat.ISODate))
9 | print(now.toString(Qt.DateFormat.RFC2822Date))
10 |
11 | datetime = QDateTime.currentDateTime()
12 |
13 | print(datetime.toString())
14 |
15 | time = QTime.currentTime()
16 | print(time.toString(Qt.DateFormat.ISODate))
--------------------------------------------------------------------------------
/Date and time/daylight_saving.py:
--------------------------------------------------------------------------------
1 | # daylight_saving.py
2 | #!/usr/bin/python
3 |
4 | from PyQt6.QtCore import QDateTime, QTimeZone, Qt
5 |
6 | now = QDateTime.currentDateTime()
7 |
8 | print(f'Time zone: {now.timeZoneAbbreviation()}')
9 |
10 | if now.isDaylightTime():
11 | print('The current date falls into DST time')
12 | else:
13 | print('The current date does not fall into DST time')
--------------------------------------------------------------------------------
/Date and time/julian_day.py:
--------------------------------------------------------------------------------
1 | # julian_day.py
2 | #!/usr/bin/python
3 |
4 | from PyQt6.QtCore import QDate, Qt
5 |
6 | now = QDate.currentDate()
7 |
8 | print('Gregorian date for today:', now.toString(Qt.DateFormat.ISODate))
9 | print('Julian day for today:', now.toJulianDay())
--------------------------------------------------------------------------------
/Date and time/n_of_days.py:
--------------------------------------------------------------------------------
1 | # n_of_days.py
2 | #!/usr/bin/python
3 |
4 | from PyQt6.QtCore import QDate
5 |
6 | now = QDate.currentDate()
7 |
8 | d = QDate(1945, 5, 7)
9 |
10 | print(f'Days in month: {d.daysInMonth()}')
11 | print(f'Days in year: {d.daysInYear()}')
--------------------------------------------------------------------------------
/Date and time/unix_time.py:
--------------------------------------------------------------------------------
1 | # unix_time.py
2 | #!/usr/bin/python
3 |
4 | from PyQt6.QtCore import QDateTime, Qt
5 |
6 | now = QDateTime.currentDateTime()
7 |
8 | unix_time = now.toSecsSinceEpoch()
9 | print(unix_time)
10 |
11 | d = QDateTime.fromSecsSinceEpoch(unix_time)
12 | print(d.toString(Qt.DateFormat.ISODate))
--------------------------------------------------------------------------------
/Date and time/utc_local.py:
--------------------------------------------------------------------------------
1 | # utc_local.py
2 | #!/usr/bin/python
3 |
4 | from PyQt6.QtCore import QDateTime, Qt
5 |
6 | now = QDateTime.currentDateTime()
7 |
8 | print('Local datetime: ', now.toString(Qt.DateFormat.ISODate))
9 | print('Universal datetime: ', now.toUTC().toString(Qt.DateFormat.ISODate))
10 |
11 | print(f'The offset from UTC is: {now.offsetFromUtc()} seconds')
--------------------------------------------------------------------------------
/Date and time/xmas.py:
--------------------------------------------------------------------------------
1 | # xmas.py
2 | #!/usr/bin/python
3 |
4 | from PyQt6.QtCore import QDate, Qt
5 |
6 | now = QDate.currentDate()
7 | y = now.year()
8 |
9 | print(f'today is {now.toString(Qt.DateFormat.ISODate)}')
10 |
11 | xmas1 = QDate(y-1, 12, 25)
12 | xmas2 = QDate(y, 12, 25)
13 |
14 | dayspassed = xmas1.daysTo(now)
15 | print(f'{dayspassed} days have passed since last XMas')
16 |
17 | nofdays = now.daysTo(xmas2)
18 | print(f'There are {nofdays} days until next XMas')
--------------------------------------------------------------------------------
/Dialogs.md:
--------------------------------------------------------------------------------
1 | [目录](https://github.com/LC-space/PyQt6-tutorial/blob/main/README.md) [上一章](https://github.com/LC-space/PyQt6-tutorial/blob/main/Events%20and%20signals.md) [下一章](https://github.com/LC-space/PyQt6-tutorial/blob/main/Widgets.md)
2 |
3 | # PyQt6中的对话框
4 |
5 | *最近更新于2021年4月30日*
6 |
7 | 对话被定义为两个或两个以上的人之间的对话。在计算机应用程序中,对话框是用来与应用程序“对话”的窗口。对话框用于从用户获取数据或更改应用程序设置。
8 |
9 | ## PyQt6 QInputDialog
10 |
11 | QInputDialog提供了一个简单方便的对话框,从用户那里获取单个值。输入值可以是字符串、数字或列表中的项。
12 |
13 | ```python
14 | # input_dialog.py
15 | #!/usr/bin/python
16 |
17 | """
18 | ZetCode PyQt6 tutorial
19 |
20 | In this example, we receive data from
21 | a QInputDialog dialog.
22 |
23 | Aauthor: Jan Bodnar
24 | Website: zetcode.com
25 | """
26 |
27 | from PyQt6.QtWidgets import (QWidget, QPushButton, QLineEdit,
28 | QInputDialog, QApplication)
29 | import sys
30 |
31 |
32 | class Example(QWidget):
33 |
34 | def __init__(self):
35 | super().__init__()
36 |
37 | self.initUI()
38 |
39 |
40 | def initUI(self):
41 |
42 | self.btn = QPushButton('Dialog', self)
43 | self.btn.move(20, 20)
44 | self.btn.clicked.connect(self.showDialog)
45 |
46 | self.le = QLineEdit(self)
47 | self.le.move(130, 22)
48 |
49 | self.setGeometry(300, 300, 450, 350)
50 | self.setWindowTitle('Input dialog')
51 | self.show()
52 |
53 |
54 | def showDialog(self):
55 |
56 | text, ok = QInputDialog.getText(self, 'Input Dialog',
57 | 'Enter your name:')
58 |
59 | if ok:
60 | self.le.setText(str(text))
61 |
62 |
63 | def main():
64 |
65 | app = QApplication(sys.argv)
66 | ex = Example()
67 | sys.exit(app.exec())
68 |
69 |
70 | if __name__ == '__main__':
71 | main()
72 | ```
73 |
74 | 该示例有一个按钮和一个行编辑控件。该按钮显示用于获取文本值的输入对话框。输入的文本将显示在line edit控件中。
75 |
76 | ```python
77 | text, ok = QInputDialog.getText(self, 'Input Dialog',
78 | 'Enter your name:')
79 | ```
80 |
81 | 这一行显示输入对话框。第一个字符串是对话框标题,第二个是对话框中的消息。对话框返回输入的文本和一个布尔值。如果我们单击Ok按钮,布尔值为true。
82 |
83 | ```python
84 | if ok:
85 | self.le.setText(str(text))
86 | ```
87 |
88 | 我们从对话框接收到的文本被设置为使用setText()的行编辑控件。
89 |
90 | 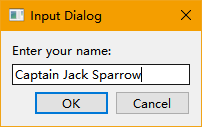
91 |
92 | ## PyQt6 QColorDialog
93 |
94 | QColorDialog提供了一个用于选择颜色值的对话框控件。
95 |
96 | ```python
97 | # color_dialog.py
98 | #!/usr/bin/python
99 |
100 | """
101 | ZetCode PyQt6 tutorial
102 |
103 | In this example, we select a color value
104 | from the QColorDialog and change the background
105 | color of a QFrame widget.
106 |
107 | Author: Jan Bodnar
108 | Website: zetcode.com
109 | """
110 |
111 | from PyQt6.QtWidgets import (QWidget, QPushButton, QFrame,
112 | QColorDialog, QApplication)
113 | from PyQt6.QtGui import QColor
114 | import sys
115 |
116 |
117 | class Example(QWidget):
118 |
119 | def __init__(self):
120 | super().__init__()
121 |
122 | self.initUI()
123 |
124 |
125 | def initUI(self):
126 |
127 | col = QColor(0, 0, 0)
128 |
129 | self.btn = QPushButton('Dialog', self)
130 | self.btn.move(20, 20)
131 |
132 | self.btn.clicked.connect(self.showDialog)
133 |
134 | self.frm = QFrame(self)
135 | self.frm.setStyleSheet("QWidget { background-color: %s }"
136 | % col.name())
137 | self.frm.setGeometry(130, 22, 200, 200)
138 |
139 | self.setGeometry(300, 300, 450, 350)
140 | self.setWindowTitle('Color dialog')
141 | self.show()
142 |
143 |
144 | def showDialog(self):
145 |
146 | col = QColorDialog.getColor()
147 |
148 | if col.isValid():
149 |
150 | self.frm.setStyleSheet("QWidget { background-color: %s }"
151 | % col.name())
152 |
153 |
154 | def main():
155 |
156 | app = QApplication(sys.argv)
157 | ex = Example()
158 | sys.exit(app.exec())
159 |
160 |
161 | if __name__ == '__main__':
162 | main()
163 | ```
164 |
165 | 用程序示例显示了一个按钮和一个QFrame。控件的背景设置为黑色。使用QColorDialog,我们可以改变它的背景。
166 |
167 | ```python
168 | col = QColor(0, 0, 0)
169 | ```
170 |
171 | 这是QFrame背景的初始颜色。
172 |
173 | ```python
174 | col = QColorDialog.getColor()
175 | ```
176 |
177 | 这一行弹出QColorDialog。
178 |
179 | ```python
180 | if col.isValid():
181 |
182 | self.frm.setStyleSheet("QWidget { background-color: %s }"
183 | % col.name())
184 | ```
185 |
186 | 我们检查颜色是否有效。如果我们点击Cancel按钮,将不会返回有效的颜色。如果颜色有效,我们将使用样式表更改背景颜色。
187 |
188 | ## PyQt6 QFontDialog
189 |
190 | QFontDialog是一个用于选择字体的对话框控件。
191 |
192 | ```python
193 | # font_dialog.py
194 | #!/usr/bin/python
195 |
196 | """
197 | ZetCode PyQt6 tutorial
198 |
199 | In this example, we select a font name
200 | and change the font of a label.
201 |
202 | Author: Jan Bodnar
203 | Website: zetcode.com
204 | """
205 |
206 | from PyQt6.QtWidgets import (QWidget, QVBoxLayout, QPushButton,
207 | QSizePolicy, QLabel, QFontDialog, QApplication)
208 | import sys
209 |
210 |
211 | class Example(QWidget):
212 |
213 | def __init__(self):
214 | super().__init__()
215 |
216 | self.initUI()
217 |
218 |
219 | def initUI(self):
220 |
221 | vbox = QVBoxLayout()
222 |
223 | btn = QPushButton('Dialog', self)
224 | btn.setSizePolicy(QSizePolicy.Policy.Fixed, QSizePolicy.Policy.Fixed)
225 | btn.move(20, 20)
226 |
227 | vbox.addWidget(btn)
228 |
229 | btn.clicked.connect(self.showDialog)
230 |
231 | self.lbl = QLabel('Knowledge only matters', self)
232 | self.lbl.move(130, 20)
233 |
234 | vbox.addWidget(self.lbl)
235 | self.setLayout(vbox)
236 |
237 | self.setGeometry(300, 300, 450, 350)
238 | self.setWindowTitle('Font dialog')
239 | self.show()
240 |
241 |
242 | def showDialog(self):
243 |
244 | font, ok = QFontDialog.getFont()
245 |
246 | if ok:
247 | self.lbl.setFont(font)
248 |
249 |
250 | def main():
251 |
252 | app = QApplication(sys.argv)
253 | ex = Example()
254 | sys.exit(app.exec())
255 |
256 |
257 | if __name__ == '__main__':
258 | main()
259 | ```
260 |
261 | 在我们的示例中,我们有一个按钮和一个标签。使用QFontDialog,我们改变标签的字体。
262 |
263 | ```python
264 | font, ok = QFontDialog.getFont()
265 | ```
266 |
267 | 这里我们弹出字体对话框。getFont方法返回字体名称和ok参数。如果用户单击Ok,它等于True;否则为False。
268 |
269 | ```python
270 | if ok:
271 | self.label.setFont(font)
272 | ```
273 |
274 | 如果我们点击Ok,标签的字体会被setFont改变。
275 |
276 | ## PyQt6 QFileDialog
277 |
278 | QFileDialog是一个允许用户选择文件或目录的对话框。可以选择打开和保存文件。
279 |
280 | ```python
281 | # file_dialog.py
282 | #!/usr/bin/python
283 |
284 | """
285 | ZetCode PyQt6 tutorial
286 |
287 | In this example, we select a file with a
288 | QFileDialog and display its contents
289 | in a QTextEdit.
290 |
291 | Author: Jan Bodnar
292 | Website: zetcode.com
293 | """
294 |
295 | from PyQt6.QtWidgets import (QMainWindow, QTextEdit,
296 | QFileDialog, QApplication)
297 | from PyQt6.QtGui import QIcon, QAction
298 | from pathlib import Path
299 | import sys
300 |
301 |
302 | class Example(QMainWindow):
303 |
304 | def __init__(self):
305 | super().__init__()
306 |
307 | self.initUI()
308 |
309 |
310 | def initUI(self):
311 |
312 | self.textEdit = QTextEdit()
313 | self.setCentralWidget(self.textEdit)
314 | self.statusBar()
315 |
316 | openFile = QAction(QIcon('img/open.png'), 'Open', self)
317 | openFile.setShortcut('Ctrl+O')
318 | openFile.setStatusTip('Open new File')
319 | openFile.triggered.connect(self.showDialog)
320 |
321 | menubar = self.menuBar()
322 | fileMenu = menubar.addMenu('&File')
323 | fileMenu.addAction(openFile)
324 |
325 | self.setGeometry(300, 300, 550, 450)
326 | self.setWindowTitle('File dialog')
327 | self.show()
328 |
329 |
330 | def showDialog(self):
331 |
332 | home_dir = str(Path.home())
333 | fname = QFileDialog.getOpenFileName(self, 'Open file', home_dir)
334 |
335 | if fname[0]:
336 |
337 | f = open(fname[0], 'r')
338 |
339 | with f:
340 |
341 | data = f.read()
342 | self.textEdit.setText(data)
343 |
344 |
345 | def main():
346 |
347 | app = QApplication(sys.argv)
348 | ex = Example()
349 | sys.exit(app.exec())
350 |
351 |
352 | if __name__ == '__main__':
353 | main()
354 | ```
355 |
356 | 该示例显示了一个菜单栏、集中设置的文本编辑控件和一个状态栏。菜单项显示用于选择文件的QFileDialog。文件的内容被加载到文本编辑控件中。
357 |
358 | ```python
359 | class Example(QMainWindow):
360 |
361 | def __init__(self):
362 | super().__init__()
363 |
364 | self.initUI()
365 | ```
366 |
367 | 这个示例基于QMainWindow控件,因为我们集中设置了一个文本编辑控件。
368 |
369 | ```python
370 | home_dir = str(Path.home())
371 | fname = QFileDialog.getOpenFileName(self, 'Open file', home_dir)
372 | ```
373 |
374 | 我们弹出QFileDialog。getOpenFileName方法中的第一个字符串是标题。第二个字符串指定对话框的工作目录。我们使用path模块来确定用户的主目录。缺省情况下,文件过滤器设置为“所有文件(*)”。
375 |
376 | ```python
377 | if fname[0]:
378 |
379 | f = open(fname[0], 'r')
380 |
381 | with f:
382 |
383 | data = f.read()
384 | self.textEdit.setText(data)
385 | ```
386 |
387 | 读取选定的文件名,并将文件的内容设置为文本编辑控件。
388 |
389 | 在PyQt6教程的这一部分中,我们使用了对话框。
390 |
391 | [目录](https://github.com/LC-space/PyQt6-tutorial/blob/main/README.md) [上一章](https://github.com/LC-space/PyQt6-tutorial/blob/main/Events%20and%20signals.md) [下一章](https://github.com/LC-space/PyQt6-tutorial/blob/main/Widgets.md)
392 |
393 |
--------------------------------------------------------------------------------
/Dialogs/color_dialog.py:
--------------------------------------------------------------------------------
1 | # color_dialog.py
2 | #!/usr/bin/python
3 |
4 | """
5 | ZetCode PyQt6 tutorial
6 |
7 | In this example, we select a color value
8 | from the QColorDialog and change the background
9 | color of a QFrame widget.
10 |
11 | Author: Jan Bodnar
12 | Website: zetcode.com
13 | """
14 |
15 | from PyQt6.QtWidgets import (QWidget, QPushButton, QFrame,
16 | QColorDialog, QApplication)
17 | from PyQt6.QtGui import QColor
18 | import sys
19 |
20 |
21 | class Example(QWidget):
22 |
23 | def __init__(self):
24 | super().__init__()
25 |
26 | self.initUI()
27 |
28 |
29 | def initUI(self):
30 |
31 | col = QColor(0, 0, 0)
32 |
33 | self.btn = QPushButton('Dialog', self)
34 | self.btn.move(20, 20)
35 |
36 | self.btn.clicked.connect(self.showDialog)
37 |
38 | self.frm = QFrame(self)
39 | self.frm.setStyleSheet("QWidget { background-color: %s }"
40 | % col.name())
41 | self.frm.setGeometry(130, 22, 200, 200)
42 |
43 | self.setGeometry(300, 300, 450, 350)
44 | self.setWindowTitle('Color dialog')
45 | self.show()
46 |
47 |
48 | def showDialog(self):
49 |
50 | col = QColorDialog.getColor()
51 |
52 | if col.isValid():
53 |
54 | self.frm.setStyleSheet("QWidget { background-color: %s }"
55 | % col.name())
56 |
57 |
58 | def main():
59 |
60 | app = QApplication(sys.argv)
61 | ex = Example()
62 | sys.exit(app.exec())
63 |
64 |
65 | if __name__ == '__main__':
66 | main()
--------------------------------------------------------------------------------
/Dialogs/file_dialog.py:
--------------------------------------------------------------------------------
1 | # file_dialog.py
2 | #!/usr/bin/python
3 |
4 | """
5 | ZetCode PyQt6 tutorial
6 |
7 | In this example, we select a file with a
8 | QFileDialog and display its contents
9 | in a QTextEdit.
10 |
11 | Author: Jan Bodnar
12 | Website: zetcode.com
13 | """
14 |
15 | from PyQt6.QtWidgets import (QMainWindow, QTextEdit,
16 | QFileDialog, QApplication)
17 | from PyQt6.QtGui import QIcon, QAction
18 | from pathlib import Path
19 | import sys
20 |
21 |
22 | class Example(QMainWindow):
23 |
24 | def __init__(self):
25 | super().__init__()
26 |
27 | self.initUI()
28 |
29 |
30 | def initUI(self):
31 |
32 | self.textEdit = QTextEdit()
33 | self.setCentralWidget(self.textEdit)
34 | self.statusBar()
35 |
36 | openFile = QAction(QIcon('img/open.png'), 'Open', self)
37 | openFile.setShortcut('Ctrl+O')
38 | openFile.setStatusTip('Open new File')
39 | openFile.triggered.connect(self.showDialog)
40 |
41 | menubar = self.menuBar()
42 | fileMenu = menubar.addMenu('&File')
43 | fileMenu.addAction(openFile)
44 |
45 | self.setGeometry(300, 300, 550, 450)
46 | self.setWindowTitle('File dialog')
47 | self.show()
48 |
49 |
50 | def showDialog(self):
51 |
52 | home_dir = str(Path.home())
53 | fname = QFileDialog.getOpenFileName(self, 'Open file', home_dir)
54 |
55 | if fname[0]:
56 |
57 | f = open(fname[0], 'r')
58 |
59 | with f:
60 |
61 | data = f.read()
62 | self.textEdit.setText(data)
63 |
64 |
65 | def main():
66 |
67 | app = QApplication(sys.argv)
68 | ex = Example()
69 | sys.exit(app.exec())
70 |
71 |
72 | if __name__ == '__main__':
73 | main()
--------------------------------------------------------------------------------
/Dialogs/font_dialog.py:
--------------------------------------------------------------------------------
1 | # font_dialog.py
2 | #!/usr/bin/python
3 |
4 | """
5 | ZetCode PyQt6 tutorial
6 |
7 | In this example, we select a font name
8 | and change the font of a label.
9 |
10 | Author: Jan Bodnar
11 | Website: zetcode.com
12 | """
13 |
14 | from PyQt6.QtWidgets import (QWidget, QVBoxLayout, QPushButton,
15 | QSizePolicy, QLabel, QFontDialog, QApplication)
16 | import sys
17 |
18 |
19 | class Example(QWidget):
20 |
21 | def __init__(self):
22 | super().__init__()
23 |
24 | self.initUI()
25 |
26 |
27 | def initUI(self):
28 |
29 | vbox = QVBoxLayout()
30 |
31 | btn = QPushButton('Dialog', self)
32 | btn.setSizePolicy(QSizePolicy.Policy.Fixed, QSizePolicy.Policy.Fixed)
33 | btn.move(20, 20)
34 |
35 | vbox.addWidget(btn)
36 |
37 | btn.clicked.connect(self.showDialog)
38 |
39 | self.lbl = QLabel('Knowledge only matters', self)
40 | self.lbl.move(130, 20)
41 |
42 | vbox.addWidget(self.lbl)
43 | self.setLayout(vbox)
44 |
45 | self.setGeometry(300, 300, 450, 350)
46 | self.setWindowTitle('Font dialog')
47 | self.show()
48 |
49 |
50 | def showDialog(self):
51 |
52 | font, ok = QFontDialog.getFont()
53 |
54 | if ok:
55 | self.lbl.setFont(font)
56 |
57 |
58 | def main():
59 |
60 | app = QApplication(sys.argv)
61 | ex = Example()
62 | sys.exit(app.exec())
63 |
64 |
65 | if __name__ == '__main__':
66 | main()
--------------------------------------------------------------------------------
/Dialogs/img/image-20210617175356639.png:
--------------------------------------------------------------------------------
https://raw.githubusercontent.com/LC-space/PyQt6-tutorial/b684346d01e667cf855c69058bbb13f2bd2c6762/Dialogs/img/image-20210617175356639.png
--------------------------------------------------------------------------------
/Dialogs/img/open.png:
--------------------------------------------------------------------------------
https://raw.githubusercontent.com/LC-space/PyQt6-tutorial/b684346d01e667cf855c69058bbb13f2bd2c6762/Dialogs/img/open.png
--------------------------------------------------------------------------------
/Dialogs/input_dialog.py:
--------------------------------------------------------------------------------
1 | # input_dialog.py
2 | #!/usr/bin/python
3 |
4 | """
5 | ZetCode PyQt6 tutorial
6 |
7 | In this example, we receive data from
8 | a QInputDialog dialog.
9 |
10 | Aauthor: Jan Bodnar
11 | Website: zetcode.com
12 | """
13 |
14 | from PyQt6.QtWidgets import (QWidget, QPushButton, QLineEdit,
15 | QInputDialog, QApplication)
16 | import sys
17 |
18 |
19 | class Example(QWidget):
20 |
21 | def __init__(self):
22 | super().__init__()
23 |
24 | self.initUI()
25 |
26 |
27 | def initUI(self):
28 |
29 | self.btn = QPushButton('Dialog', self)
30 | self.btn.move(20, 20)
31 | self.btn.clicked.connect(self.showDialog)
32 |
33 | self.le = QLineEdit(self)
34 | self.le.move(130, 22)
35 |
36 | self.setGeometry(300, 300, 450, 350)
37 | self.setWindowTitle('Input dialog')
38 | self.show()
39 |
40 |
41 | def showDialog(self):
42 |
43 | text, ok = QInputDialog.getText(self, 'Input Dialog',
44 | 'Enter your name:')
45 |
46 | if ok:
47 | self.le.setText(str(text))
48 |
49 |
50 | def main():
51 |
52 | app = QApplication(sys.argv)
53 | ex = Example()
54 | sys.exit(app.exec())
55 |
56 |
57 | if __name__ == '__main__':
58 | main()
--------------------------------------------------------------------------------
/Drag & drop.md:
--------------------------------------------------------------------------------
1 | [目录](https://github.com/LC-space/PyQt6-tutorial/blob/main/README.md) [上一章](https://github.com/LC-space/PyQt6-tutorial/blob/main/Widgets%20II.md) [下一章](https://github.com/LC-space/PyQt6-tutorial/blob/main/Painting.md)
2 |
3 | # PyQt6中的拖放
4 |
5 | *最近更新于2021年5月15日*
6 |
7 | 在PyQt6教程的这一部分中,我们将介绍拖放操作。
8 |
9 | 在计算机图形用户界面中,拖放是点击一个虚拟对象并将其拖到不同位置或另一个虚拟对象的动作(或支持该动作)。一般来说,它可以用来调用多种类型的操作,或者在两个抽象对象之间创建各种类型的关联。
10 |
11 | 拖放是图形用户界面的一部分。拖放操作可以让用户直观地做复杂的事情。
12 |
13 | 通常,我们可以拖放两个东西:数据或一些图形对象。如果我们将图像从一个应用程序拖到另一个应用程序,我们就拖放二进制数据。如果我们在Firefox中拖动一个标签并将其移动到另一个地方,我们就拖放了一个图形组件。
14 |
15 | ## QDrag
16 |
17 | QDrag支持基于MIME的拖放数据传输。它处理拖放操作的大部分细节。传输的数据包含在QMimeData对象中。
18 |
19 | ## PyQt6中的简单拖放示例
20 |
21 | 在第一个例子中,我们有一个QLineEdit和一个QPushButton。我们从line edit控件中拖出纯文本,并将其拖放到按钮控件上。按钮的标签将改变。
22 |
23 | ```python
24 | # simple.py
25 | #!/usr/bin/python
26 |
27 | """
28 | ZetCode PyQt6 tutorial
29 |
30 | This is a simple drag and
31 | drop example.
32 |
33 | Author: Jan Bodnar
34 | Website: zetcode.com
35 | """
36 |
37 | import sys
38 |
39 | from PyQt6.QtWidgets import (QPushButton, QWidget,
40 | QLineEdit, QApplication)
41 |
42 |
43 | class Button(QPushButton):
44 |
45 | def __init__(self, title, parent):
46 | super().__init__(title, parent)
47 |
48 | self.setAcceptDrops(True)
49 |
50 |
51 | def dragEnterEvent(self, e):
52 |
53 | if e.mimeData().hasFormat('text/plain'):
54 | e.accept()
55 | else:
56 | e.ignore()
57 |
58 |
59 | def dropEvent(self, e):
60 |
61 | self.setText(e.mimeData().text())
62 |
63 |
64 | class Example(QWidget):
65 |
66 | def __init__(self):
67 | super().__init__()
68 |
69 | self.initUI()
70 |
71 |
72 | def initUI(self):
73 |
74 | edit = QLineEdit('', self)
75 | edit.setDragEnabled(True)
76 | edit.move(30, 65)
77 |
78 | button = Button("Button", self)
79 | button.move(190, 65)
80 |
81 | self.setWindowTitle('Simple drag and drop')
82 | self.setGeometry(300, 300, 300, 150)
83 |
84 |
85 | def main():
86 |
87 | app = QApplication(sys.argv)
88 | ex = Example()
89 | ex.show()
90 | app.exec()
91 |
92 |
93 | if __name__ == '__main__':
94 | main()
95 | ```
96 |
97 | 这个例子展示了一个简单的拖放操作。
98 |
99 | ```python
100 | class Button(QPushButton):
101 |
102 | def __init__(self, title, parent):
103 | super().__init__(title, parent)
104 |
105 | ...
106 | ```
107 |
108 | 为了在QPushButton控件上拖放文本,我们必须重新实现一些方法。因此,我们创建了自己的Button类,它继承自QPushButton类。
109 |
110 | ```python
111 | self.setAcceptDrops(True)
112 | ```
113 |
114 | 我们使用setAcceptDrops为控件启用拖放事件。
115 |
116 | ```python
117 | def dragEnterEvent(self, e):
118 |
119 | if e.mimeData().hasFormat('text/plain'):
120 | e.accept()
121 | else:
122 | e.ignore()
123 | ```
124 |
125 | 首先,我们重新实现dragEnterEvent方法。我们通知我们接受的数据类型。在我们的例子中,它是纯文本。
126 |
127 | ```python
128 | def dropEvent(self, e):
129 |
130 | self.setText(e.mimeData().text())
131 | ```
132 |
133 | 通过重新实现dropEvent方法,我们定义了在删除事件中发生的事情。这里我们更改按钮控件的文本。
134 |
135 | ```python
136 | edit = QLineEdit('', self)
137 | edit.setDragEnabled(True)
138 | ```
139 |
140 | QLineEdit控件内置了对拖动操作的支持。我们需要做的就是调用setDragEnabled方法来激活它。
141 |
142 | 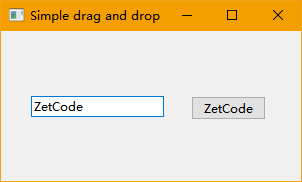
143 |
144 | ## 拖放一个按钮控件
145 |
146 | 下面的示例演示了如何拖放按钮控件。
147 |
148 | ```python
149 | # drag_button.py
150 | #!/usr/bin/python
151 |
152 | """
153 | ZetCode PyQt6 tutorial
154 |
155 | In this program, we can press on a button with a left mouse
156 | click or drag and drop the button with the right mouse click.
157 |
158 | Author: Jan Bodnar
159 | Website: zetcode.com
160 | """
161 |
162 | import sys
163 |
164 | from PyQt6.QtCore import Qt, QMimeData
165 | from PyQt6.QtGui import QDrag
166 | from PyQt6.QtWidgets import QPushButton, QWidget, QApplication
167 |
168 |
169 | class Button(QPushButton):
170 |
171 | def __init__(self, title, parent):
172 | super().__init__(title, parent)
173 |
174 |
175 | def mouseMoveEvent(self, e):
176 |
177 | if e.buttons() != Qt.MouseButton.RightButton:
178 | return
179 |
180 | mimeData = QMimeData()
181 |
182 | drag = QDrag(self)
183 | drag.setMimeData(mimeData)
184 |
185 | drag.setHotSpot(e.position().toPoint() - self.rect().topLeft())
186 |
187 | dropAction = drag.exec(Qt.DropAction.MoveAction)
188 |
189 |
190 | def mousePressEvent(self, e):
191 |
192 | super().mousePressEvent(e)
193 |
194 | if e.button() == Qt.MouseButton.LeftButton:
195 | print('press')
196 |
197 |
198 | class Example(QWidget):
199 |
200 | def __init__(self):
201 | super().__init__()
202 |
203 | self.initUI()
204 |
205 |
206 | def initUI(self):
207 |
208 | self.setAcceptDrops(True)
209 |
210 | self.button = Button('Button', self)
211 | self.button.move(100, 65)
212 |
213 | self.setWindowTitle('Click or Move')
214 | self.setGeometry(300, 300, 550, 450)
215 |
216 |
217 | def dragEnterEvent(self, e):
218 |
219 | e.accept()
220 |
221 |
222 | def dropEvent(self, e):
223 |
224 | position = e.position()
225 | self.button.move(position.toPoint())
226 |
227 | e.setDropAction(Qt.DropAction.MoveAction)
228 | e.accept()
229 |
230 |
231 | def main():
232 |
233 | app = QApplication(sys.argv)
234 | ex = Example()
235 | ex.show()
236 | app.exec()
237 |
238 |
239 | if __name__ == '__main__':
240 | main()
241 | ```
242 |
243 | 在我们的代码示例中,窗口上有一个QPushButton。如果我们用鼠标左键点击按钮,‘press’信息就会打印到控制台。通过右键单击并移动按钮,我们将对按钮控件执行拖放操作。
244 |
245 | ```python
246 | class Button(QPushButton):
247 |
248 | def __init__(self, title, parent):
249 | super().__init__(title, parent)
250 | ```
251 |
252 | 我们创建了一个来自QPushButton的Button类。我们还重新实现了QPushButton的两个方法:mouseemoveevent和mousePressEvent。mouseMoveEvent方法是拖放操作开始的地方。
253 |
254 | ```python
255 | if e.buttons() != Qt.MouseButton.RightButton:
256 | return
257 | ```
258 |
259 | 这里我们决定只使用鼠标右键来执行拖放操作。鼠标左键保留用于单击该按钮。
260 |
261 | ```python
262 | drag = QDrag(self)
263 | drag.setMimeData(mimeData)
264 |
265 | drag.setHotSpot(e.position().toPoint() - self.rect().topLeft())
266 | ```
267 |
268 | QDrag对象被创建。该类提供了对基于MIME的拖放数据传输的支持。
269 |
270 | ```python
271 | dropAction = drag.exec(Qt.DropAction.MoveAction)
272 | ```
273 |
274 | 拖动对象的exec方法将启动拖放操作。
275 |
276 | ```python
277 | def mousePressEvent(self, e):
278 |
279 | super().mousePressEvent(e)
280 |
281 | if e.button() == Qt.MouseButton.LeftButton:
282 | print('press')
283 | ```
284 |
285 | 如果我们用鼠标左键点击按钮,我们将“press”打印到控制台。注意,我们也在父类上调用mousePressEvent方法。否则,我们将看不到按钮被按下。
286 |
287 | ```python
288 | position = e.pos()
289 | self.button.move(position)
290 | ```
291 |
292 | 在dropEvent方法中,我们指定释放鼠标按钮并完成放操作后发生的事情。在我们的例子中,我们找到当前鼠标指针的位置,并相应地移动按钮。
293 |
294 | ```python
295 | e.setDropAction(Qt.MoveAction)
296 | e.accept()
297 | ```
298 |
299 | 我们使用setDropAction来指定拖放操作的类型。在我们的例子中,它是一个移动动作。
300 |
301 | PyQt6教程的这一部分专门用于拖放操作。
302 |
303 | [目录](https://github.com/LC-space/PyQt6-tutorial/blob/main/README.md) [上一章](https://github.com/LC-space/PyQt6-tutorial/blob/main/Widgets%20II.md) [下一章](https://github.com/LC-space/PyQt6-tutorial/blob/main/Painting.md)
304 |
305 |
--------------------------------------------------------------------------------
/Drag & drop/drag_button.py:
--------------------------------------------------------------------------------
1 | # drag_button.py
2 | #!/usr/bin/python
3 |
4 | """
5 | ZetCode PyQt6 tutorial
6 |
7 | In this program, we can press on a button with a left mouse
8 | click or drag and drop the button with the right mouse click.
9 |
10 | Author: Jan Bodnar
11 | Website: zetcode.com
12 | """
13 |
14 | import sys
15 |
16 | from PyQt6.QtCore import Qt, QMimeData
17 | from PyQt6.QtGui import QDrag
18 | from PyQt6.QtWidgets import QPushButton, QWidget, QApplication
19 |
20 |
21 | class Button(QPushButton):
22 |
23 | def __init__(self, title, parent):
24 | super().__init__(title, parent)
25 |
26 |
27 | def mouseMoveEvent(self, e):
28 |
29 | if e.buttons() != Qt.MouseButton.RightButton:
30 | return
31 |
32 | mimeData = QMimeData()
33 |
34 | drag = QDrag(self)
35 | drag.setMimeData(mimeData)
36 |
37 | drag.setHotSpot(e.position().toPoint() - self.rect().topLeft())
38 |
39 | dropAction = drag.exec(Qt.DropAction.MoveAction)
40 |
41 |
42 | def mousePressEvent(self, e):
43 |
44 | super().mousePressEvent(e)
45 |
46 | if e.button() == Qt.MouseButton.LeftButton:
47 | print('press')
48 |
49 |
50 | class Example(QWidget):
51 |
52 | def __init__(self):
53 | super().__init__()
54 |
55 | self.initUI()
56 |
57 |
58 | def initUI(self):
59 |
60 | self.setAcceptDrops(True)
61 |
62 | self.button = Button('Button', self)
63 | self.button.move(100, 65)
64 |
65 | self.setWindowTitle('Click or Move')
66 | self.setGeometry(300, 300, 550, 450)
67 |
68 |
69 | def dragEnterEvent(self, e):
70 |
71 | e.accept()
72 |
73 |
74 | def dropEvent(self, e):
75 |
76 | position = e.position()
77 | self.button.move(position.toPoint())
78 |
79 | e.setDropAction(Qt.DropAction.MoveAction)
80 | e.accept()
81 |
82 |
83 | def main():
84 |
85 | app = QApplication(sys.argv)
86 | ex = Example()
87 | ex.show()
88 | app.exec()
89 |
90 |
91 | if __name__ == '__main__':
92 | main()
--------------------------------------------------------------------------------
/Drag & drop/img/image-20210618151201975.png:
--------------------------------------------------------------------------------
https://raw.githubusercontent.com/LC-space/PyQt6-tutorial/b684346d01e667cf855c69058bbb13f2bd2c6762/Drag & drop/img/image-20210618151201975.png
--------------------------------------------------------------------------------
/Drag & drop/simple.py:
--------------------------------------------------------------------------------
1 | # simple.py
2 | #!/usr/bin/python
3 |
4 | """
5 | ZetCode PyQt6 tutorial
6 |
7 | This is a simple drag and
8 | drop example.
9 |
10 | Author: Jan Bodnar
11 | Website: zetcode.com
12 | """
13 |
14 | import sys
15 |
16 | from PyQt6.QtWidgets import (QPushButton, QWidget,
17 | QLineEdit, QApplication)
18 |
19 |
20 | class Button(QPushButton):
21 |
22 | def __init__(self, title, parent):
23 | super().__init__(title, parent)
24 |
25 | self.setAcceptDrops(True)
26 |
27 |
28 | def dragEnterEvent(self, e):
29 |
30 | if e.mimeData().hasFormat('text/plain'):
31 | e.accept()
32 | else:
33 | e.ignore()
34 |
35 |
36 | def dropEvent(self, e):
37 |
38 | self.setText(e.mimeData().text())
39 |
40 |
41 | class Example(QWidget):
42 |
43 | def __init__(self):
44 | super().__init__()
45 |
46 | self.initUI()
47 |
48 |
49 | def initUI(self):
50 |
51 | edit = QLineEdit('', self)
52 | edit.setDragEnabled(True)
53 | edit.move(30, 65)
54 |
55 | button = Button("Button", self)
56 | button.move(190, 65)
57 |
58 | self.setWindowTitle('Simple drag and drop')
59 | self.setGeometry(300, 300, 300, 150)
60 |
61 |
62 | def main():
63 |
64 | app = QApplication(sys.argv)
65 | ex = Example()
66 | ex.show()
67 | app.exec()
68 |
69 |
70 | if __name__ == '__main__':
71 | main()
--------------------------------------------------------------------------------
/Events and signals.md:
--------------------------------------------------------------------------------
1 | [目录](https://github.com/LC-space/PyQt6-tutorial/blob/main/README.md) [上一章]() [下一章](https://github.com/LC-space/PyQt6-tutorial/blob/main/Layout%20management.md)
2 |
3 | # PyQt6事件和信号
4 |
5 | *最近更新于2021年4月29日*
6 |
7 | 在PyQt6编程教程的这一部分中,我们将探索应用程序中发生的事件和信号。
8 |
9 | ## PyQt6事件
10 |
11 | GUI应用程序是事件驱动的。事件主要由应用程序的用户生成。但它们也可以通过其他方式产生;例如,一个互联网连接,一个窗口管理器,或一个定时器。当我们调用应用程序的exec()方法时,应用程序进入主循环。主循环获取事件并将它们发送给对象。
12 |
13 | 在事件模型中,有三个参与者:
14 |
15 | * 事件源
16 | * 事件对象
17 | * 事件目标
18 |
19 | 事件源是状态发生变化的对象。它生成事件。事件对象(event)封装了事件源中的状态更改。事件目标是希望被通知的对象。事件源对象将处理事件的任务委托给事件目标。
20 |
21 | ## PyQt6信号和槽
22 |
23 | 这是一个简单的例子,演示了PyQt6中的信号和槽。
24 |
25 | ```python
26 | # signals_slots.py
27 | #!/usr/bin/python
28 |
29 | """
30 | ZetCode PyQt6 tutorial
31 |
32 | In this example, we connect a signal
33 | of a QSlider to a slot of a QLCDNumber.
34 |
35 | Author: Jan Bodnar
36 | Website: zetcode.com
37 | """
38 |
39 | import sys
40 | from PyQt6.QtCore import Qt
41 | from PyQt6.QtWidgets import (QWidget, QLCDNumber, QSlider,
42 | QVBoxLayout, QApplication)
43 |
44 |
45 | class Example(QWidget):
46 |
47 | def __init__(self):
48 | super().__init__()
49 |
50 | self.initUI()
51 |
52 |
53 | def initUI(self):
54 |
55 | lcd = QLCDNumber(self)
56 | sld = QSlider(Qt.Orientation.Horizontal, self)
57 |
58 | vbox = QVBoxLayout()
59 | vbox.addWidget(lcd)
60 | vbox.addWidget(sld)
61 |
62 | self.setLayout(vbox)
63 | sld.valueChanged.connect(lcd.display)
64 |
65 | self.setGeometry(300, 300, 350, 250)
66 | self.setWindowTitle('Signal and slot')
67 | self.show()
68 |
69 |
70 | def main():
71 |
72 | app = QApplication(sys.argv)
73 | ex = Example()
74 | sys.exit(app.exec())
75 |
76 |
77 | if __name__ == '__main__':
78 | main()
79 | ```
80 |
81 | 在我们的例子中,我们显示了一个QtGui。qcdnumber和QtGui.QSlider。我们通过拖动滑块旋钮来改变液晶显示数字。
82 |
83 | ```python
84 | sld.valueChanged.connect(lcd.display)
85 | ```
86 |
87 | 这里我们将滑块的valueChanged信号连接到lcd数字的显示槽。
88 |
89 | 发送方是一个发送信号的对象。接收器是接收信号的对象。槽是对信号作出反应的方法。
90 |
91 | 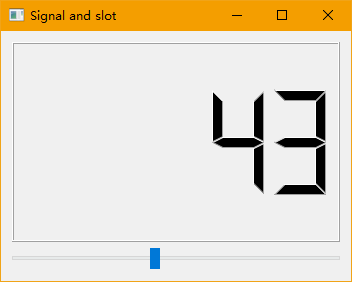
92 |
93 | ## PyQt6重新实现事件处理程序
94 |
95 | PyQt6中的事件通常通过重新实现事件处理程序来处理。
96 |
97 | ```python
98 | # reimplement_handler.py
99 | #!/usr/bin/python
100 |
101 | """
102 | ZetCode PyQt6 tutorial
103 |
104 | In this example, we reimplement an
105 | event handler.
106 |
107 | Author: Jan Bodnar
108 | Website: zetcode.com
109 | """
110 |
111 | import sys
112 | from PyQt6.QtCore import Qt
113 | from PyQt6.QtWidgets import QWidget, QApplication
114 |
115 |
116 | class Example(QWidget):
117 |
118 | def __init__(self):
119 | super().__init__()
120 |
121 | self.initUI()
122 |
123 |
124 | def initUI(self):
125 |
126 | self.setGeometry(300, 300, 350, 250)
127 | self.setWindowTitle('Event handler')
128 | self.show()
129 |
130 |
131 | def keyPressEvent(self, e):
132 |
133 | if e.key() == Qt.Key.Key_Escape.value:
134 | self.close()
135 |
136 |
137 | def main():
138 |
139 | app = QApplication(sys.argv)
140 | ex = Example()
141 | sys.exit(app.exec())
142 |
143 |
144 | if __name__ == '__main__':
145 | main()
146 | ```
147 |
148 | 在我们的示例中,我们重新实现了keyPressEvent事件处理程序。
149 |
150 | ```python
151 | def keyPressEvent(self, e):
152 |
153 | if e.key() == Qt.Key.Key_Escape.value:
154 | self.close()
155 | ```
156 |
157 | 如果单击Escape按钮,应用程序将终止。
158 |
159 | ## PyQt6事件对象
160 |
161 | 事件对象是一个Python对象,它包含许多描述事件的属性。事件对象特定于生成的事件类型。
162 |
163 | ```python
164 | # event_object.py
165 | #!/usr/bin/python
166 |
167 | """
168 | ZetCode PyQt6 tutorial
169 |
170 | In this example, we display the x and y
171 | coordinates of a mouse pointer in a label widget.
172 |
173 | Author: Jan Bodnar
174 | Website: zetcode.com
175 | """
176 |
177 | import sys
178 | from PyQt6.QtCore import Qt
179 | from PyQt6.QtWidgets import QWidget, QApplication, QGridLayout, QLabel
180 |
181 |
182 | class Example(QWidget):
183 |
184 | def __init__(self):
185 | super().__init__()
186 |
187 | self.initUI()
188 |
189 |
190 | def initUI(self):
191 |
192 | grid = QGridLayout()
193 |
194 | x = 0
195 | y = 0
196 |
197 | self.text = f'x: {x}, y: {y}'
198 |
199 | self.label = QLabel(self.text, self)
200 | grid.addWidget(self.label, 0, 0, Qt.AlignmentFlag.AlignTop)
201 |
202 | self.setMouseTracking(True)
203 | self.setLayout(grid)
204 |
205 | self.setGeometry(300, 300, 450, 300)
206 | self.setWindowTitle('Event object')
207 | self.show()
208 |
209 |
210 | def mouseMoveEvent(self, e):
211 |
212 | x = int(e.position().x())
213 | y = int(e.position().y())
214 |
215 | text = f'x: {x}, y: {y}'
216 | self.label.setText(text)
217 |
218 |
219 | def main():
220 |
221 | app = QApplication(sys.argv)
222 | ex = Example()
223 | sys.exit(app.exec())
224 |
225 |
226 | if __name__ == '__main__':
227 | main()
228 | ```
229 |
230 | 在本例中,我们在标签控件中显示鼠标指针的x和y坐标。
231 |
232 | ```python
233 | self.setMouseTracking(True)
234 | ```
235 |
236 | 鼠标跟踪在默认情况下是禁用的,所以当鼠标被移动时至少有一个鼠标按钮被按下时,控件才接收鼠标移动事件。如果启用了鼠标跟踪,那么即使没有按下按钮,控件也会接收鼠标移动事件。
237 |
238 | ```python
239 | def mouseMoveEvent(self, e):
240 |
241 | x = int(e.position().x())
242 | y = int(e.position().y())
243 | ...
244 | ```
245 |
246 | e是事件对象;它包含有关被触发事件的数据。在我们的例子中,它是鼠标移动事件。通过position().x()和e.p eposition ().y()方法,我们确定了鼠标指针的x和y坐标。
247 |
248 | ```python
249 | self.text = f'x: {x}, y: {y}'
250 | self.label = QLabel(self.text, self)
251 | ```
252 |
253 | x和y坐标显示在QLabel控件中。
254 |
255 | 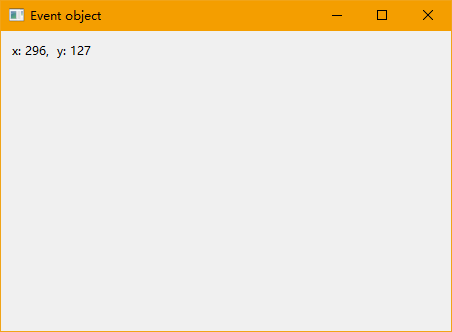
256 |
257 | ## PyQt6事件发送方
258 |
259 | 有时,知道哪个控件是信号的发送者是很方便的。为此,PyQt6有sender方法。
260 |
261 | ```python
262 | # event_sender.py
263 | #!/usr/bin/python
264 |
265 | """
266 | ZetCode PyQt6 tutorial
267 |
268 | In this example, we determine the event sender
269 | object.
270 |
271 | Author: Jan Bodnar
272 | Website: zetcode.com
273 | """
274 |
275 | import sys
276 | from PyQt6.QtWidgets import QMainWindow, QPushButton, QApplication
277 |
278 |
279 | class Example(QMainWindow):
280 |
281 | def __init__(self):
282 | super().__init__()
283 |
284 | self.initUI()
285 |
286 |
287 | def initUI(self):
288 |
289 | btn1 = QPushButton("Button 1", self)
290 | btn1.move(30, 50)
291 |
292 | btn2 = QPushButton("Button 2", self)
293 | btn2.move(150, 50)
294 |
295 | btn1.clicked.connect(self.buttonClicked)
296 | btn2.clicked.connect(self.buttonClicked)
297 |
298 | self.statusBar()
299 |
300 | self.setGeometry(300, 300, 450, 350)
301 | self.setWindowTitle('Event sender')
302 | self.show()
303 |
304 |
305 | def buttonClicked(self):
306 |
307 | sender = self.sender()
308 |
309 | msg = f'{sender.text()} was pressed'
310 | self.statusBar().showMessage(msg)
311 |
312 |
313 | def main():
314 |
315 | app = QApplication(sys.argv)
316 | ex = Example()
317 | sys.exit(app.exec())
318 |
319 |
320 | if __name__ == '__main__':
321 | main()
322 | ```
323 |
324 | 在我们的示例中有两个按钮。在buttonclick方法中,我们通过调用发送方方法来确定我们点击了哪个按钮。
325 |
326 | ```python
327 | btn1.clicked.connect(self.buttonClicked)
328 | btn2.clicked.connect(self.buttonClicked)
329 | ```
330 |
331 | 两个按钮连接在同一个槽位上。
332 |
333 | ```python
334 | def buttonClicked(self):
335 |
336 | sender = self.sender()
337 |
338 | msg = f'{sender.text()} was pressed'
339 | self.statusBar().showMessage(msg)
340 | ```
341 |
342 | 我们通过调用发送方方法来确定信号源。在应用程序的状态栏中,我们显示了被按下的按钮的标签。
343 |
344 | 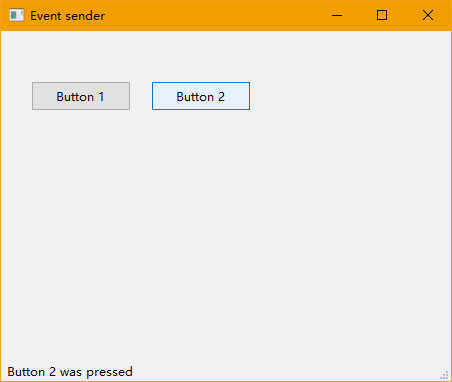
345 |
346 | ## PyQt6发出信号
347 |
348 | 从QObject创建的对象可以发出信号。下面的示例展示了如何发出自定义信号。
349 |
350 | ```python
351 | # custom_signal.py
352 | #!/usr/bin/python
353 |
354 | """
355 | ZetCode PyQt6 tutorial
356 |
357 | In this example, we show how to
358 | emit a custom signal.
359 |
360 | Author: Jan Bodnar
361 | Website: zetcode.com
362 | """
363 |
364 | import sys
365 | from PyQt6.QtCore import pyqtSignal, QObject
366 | from PyQt6.QtWidgets import QMainWindow, QApplication
367 |
368 |
369 | class Communicate(QObject):
370 |
371 | closeApp = pyqtSignal()
372 |
373 |
374 | class Example(QMainWindow):
375 |
376 | def __init__(self):
377 | super().__init__()
378 |
379 | self.initUI()
380 |
381 |
382 | def initUI(self):
383 |
384 | self.c = Communicate()
385 | self.c.closeApp.connect(self.close)
386 |
387 | self.setGeometry(300, 300, 450, 350)
388 | self.setWindowTitle('Emit signal')
389 | self.show()
390 |
391 |
392 | def mousePressEvent(self, e):
393 |
394 | self.c.closeApp.emit()
395 |
396 |
397 | def main():
398 |
399 | app = QApplication(sys.argv)
400 | ex = Example()
401 | sys.exit(app.exec())
402 |
403 |
404 | if __name__ == '__main__':
405 | main()
406 | ```
407 |
408 | 我们创建一个名为closeApp的新信号。这个信号在鼠标按下事件期间发出。信号连接到qmain窗口的关闭槽。
409 |
410 | ```python
411 | class Communicate(QObject):
412 |
413 | closeApp = pyqtSignal()
414 | ```
415 |
416 | 使用pyqtSignal作为外部通信类的类属性创建信号。
417 |
418 | ```python
419 | self.c = Communicate()
420 | self.c.closeApp.connect(self.close)
421 | ```
422 |
423 | 自定义closeApp信号连接到QMainWindow的关闭槽。
424 |
425 | ```python
426 | def mousePressEvent(self, event):
427 |
428 | self.c.closeApp.emit()
429 | ```
430 |
431 | 当我们用鼠标指针单击窗口时,会发出closeApp信号。应用程序终止。
432 |
433 | 在PyQt6教程的这一部分中,我们讨论了信号和槽。
434 |
435 | [目录](https://github.com/LC-space/PyQt6-tutorial/blob/main/README.md) [上一章]() [下一章](https://github.com/LC-space/PyQt6-tutorial/blob/main/Layout%20management.md)
436 |
437 |
--------------------------------------------------------------------------------
/Events and signals/custom_signal.py:
--------------------------------------------------------------------------------
1 | # custom_signal.py
2 | #!/usr/bin/python
3 |
4 | """
5 | ZetCode PyQt6 tutorial
6 |
7 | In this example, we show how to
8 | emit a custom signal.
9 |
10 | Author: Jan Bodnar
11 | Website: zetcode.com
12 | """
13 |
14 | import sys
15 | from PyQt6.QtCore import pyqtSignal, QObject
16 | from PyQt6.QtWidgets import QMainWindow, QApplication
17 |
18 |
19 | class Communicate(QObject):
20 |
21 | closeApp = pyqtSignal()
22 |
23 |
24 | class Example(QMainWindow):
25 |
26 | def __init__(self):
27 | super().__init__()
28 |
29 | self.initUI()
30 |
31 |
32 | def initUI(self):
33 |
34 | self.c = Communicate()
35 | self.c.closeApp.connect(self.close)
36 |
37 | self.setGeometry(300, 300, 450, 350)
38 | self.setWindowTitle('Emit signal')
39 | self.show()
40 |
41 |
42 | def mousePressEvent(self, e):
43 |
44 | self.c.closeApp.emit()
45 |
46 |
47 | def main():
48 |
49 | app = QApplication(sys.argv)
50 | ex = Example()
51 | sys.exit(app.exec())
52 |
53 |
54 | if __name__ == '__main__':
55 | main()
--------------------------------------------------------------------------------
/Events and signals/event_object.py:
--------------------------------------------------------------------------------
1 | # event_object.py
2 | #!/usr/bin/python
3 |
4 | """
5 | ZetCode PyQt6 tutorial
6 |
7 | In this example, we display the x and y
8 | coordinates of a mouse pointer in a label widget.
9 |
10 | Author: Jan Bodnar
11 | Website: zetcode.com
12 | """
13 |
14 | import sys
15 | from PyQt6.QtCore import Qt
16 | from PyQt6.QtWidgets import QWidget, QApplication, QGridLayout, QLabel
17 |
18 |
19 | class Example(QWidget):
20 |
21 | def __init__(self):
22 | super().__init__()
23 |
24 | self.initUI()
25 |
26 |
27 | def initUI(self):
28 |
29 | grid = QGridLayout()
30 |
31 | x = 0
32 | y = 0
33 |
34 | self.text = f'x: {x}, y: {y}'
35 |
36 | self.label = QLabel(self.text, self)
37 | grid.addWidget(self.label, 0, 0, Qt.AlignmentFlag.AlignTop)
38 |
39 | self.setMouseTracking(True)
40 | self.setLayout(grid)
41 |
42 | self.setGeometry(300, 300, 450, 300)
43 | self.setWindowTitle('Event object')
44 | self.show()
45 |
46 |
47 | def mouseMoveEvent(self, e):
48 |
49 | x = int(e.position().x())
50 | y = int(e.position().y())
51 |
52 | text = f'x: {x}, y: {y}'
53 | self.label.setText(text)
54 |
55 |
56 | def main():
57 |
58 | app = QApplication(sys.argv)
59 | ex = Example()
60 | sys.exit(app.exec())
61 |
62 |
63 | if __name__ == '__main__':
64 | main()
--------------------------------------------------------------------------------
/Events and signals/event_sender.py:
--------------------------------------------------------------------------------
1 | # event_sender.py
2 | #!/usr/bin/python
3 |
4 | """
5 | ZetCode PyQt6 tutorial
6 |
7 | In this example, we determine the event sender
8 | object.
9 |
10 | Author: Jan Bodnar
11 | Website: zetcode.com
12 | """
13 |
14 | import sys
15 | from PyQt6.QtWidgets import QMainWindow, QPushButton, QApplication
16 |
17 |
18 | class Example(QMainWindow):
19 |
20 | def __init__(self):
21 | super().__init__()
22 |
23 | self.initUI()
24 |
25 |
26 | def initUI(self):
27 |
28 | btn1 = QPushButton("Button 1", self)
29 | btn1.move(30, 50)
30 |
31 | btn2 = QPushButton("Button 2", self)
32 | btn2.move(150, 50)
33 |
34 | btn1.clicked.connect(self.buttonClicked)
35 | btn2.clicked.connect(self.buttonClicked)
36 |
37 | self.statusBar()
38 |
39 | self.setGeometry(300, 300, 450, 350)
40 | self.setWindowTitle('Event sender')
41 | self.show()
42 |
43 |
44 | def buttonClicked(self):
45 |
46 | sender = self.sender()
47 |
48 | msg = f'{sender.text()} was pressed'
49 | self.statusBar().showMessage(msg)
50 |
51 |
52 | def main():
53 |
54 | app = QApplication(sys.argv)
55 | ex = Example()
56 | sys.exit(app.exec())
57 |
58 |
59 | if __name__ == '__main__':
60 | main()
--------------------------------------------------------------------------------
/Events and signals/img/image-20210614204459852.png:
--------------------------------------------------------------------------------
https://raw.githubusercontent.com/LC-space/PyQt6-tutorial/b684346d01e667cf855c69058bbb13f2bd2c6762/Events and signals/img/image-20210614204459852.png
--------------------------------------------------------------------------------
/Events and signals/img/image-20210614210417063.png:
--------------------------------------------------------------------------------
https://raw.githubusercontent.com/LC-space/PyQt6-tutorial/b684346d01e667cf855c69058bbb13f2bd2c6762/Events and signals/img/image-20210614210417063.png
--------------------------------------------------------------------------------
/Events and signals/img/image-20210614212436159.png:
--------------------------------------------------------------------------------
https://raw.githubusercontent.com/LC-space/PyQt6-tutorial/b684346d01e667cf855c69058bbb13f2bd2c6762/Events and signals/img/image-20210614212436159.png
--------------------------------------------------------------------------------
/Events and signals/reimplement_handler.py:
--------------------------------------------------------------------------------
1 | # reimplement_handler.py
2 | #!/usr/bin/python
3 |
4 | """
5 | ZetCode PyQt6 tutorial
6 |
7 | In this example, we reimplement an
8 | event handler.
9 |
10 | Author: Jan Bodnar
11 | Website: zetcode.com
12 | """
13 |
14 | import sys
15 | from PyQt6.QtCore import Qt
16 | from PyQt6.QtWidgets import QWidget, QApplication
17 |
18 |
19 | class Example(QWidget):
20 |
21 | def __init__(self):
22 | super().__init__()
23 |
24 | self.initUI()
25 |
26 |
27 | def initUI(self):
28 |
29 | self.setGeometry(300, 300, 350, 250)
30 | self.setWindowTitle('Event handler')
31 | self.show()
32 |
33 |
34 | def keyPressEvent(self, e):
35 |
36 | if e.key() == Qt.Key.Key_Escape.value:
37 | self.close()
38 |
39 |
40 | def main():
41 |
42 | app = QApplication(sys.argv)
43 | ex = Example()
44 | sys.exit(app.exec())
45 |
46 |
47 | if __name__ == '__main__':
48 | main()
--------------------------------------------------------------------------------
/Events and signals/signals_slots.py:
--------------------------------------------------------------------------------
1 | # signals_slots.py
2 | #!/usr/bin/python
3 |
4 | """
5 | ZetCode PyQt6 tutorial
6 |
7 | In this example, we connect a signal
8 | of a QSlider to a slot of a QLCDNumber.
9 |
10 | Author: Jan Bodnar
11 | Website: zetcode.com
12 | """
13 |
14 | import sys
15 | from PyQt6.QtCore import Qt
16 | from PyQt6.QtWidgets import (QWidget, QLCDNumber, QSlider,
17 | QVBoxLayout, QApplication)
18 |
19 |
20 | class Example(QWidget):
21 |
22 | def __init__(self):
23 | super().__init__()
24 |
25 | self.initUI()
26 |
27 |
28 | def initUI(self):
29 |
30 | lcd = QLCDNumber(self)
31 | sld = QSlider(Qt.Orientation.Horizontal, self)
32 |
33 | vbox = QVBoxLayout()
34 | vbox.addWidget(lcd)
35 | vbox.addWidget(sld)
36 |
37 | self.setLayout(vbox)
38 | sld.valueChanged.connect(lcd.display)
39 |
40 | self.setGeometry(300, 300, 350, 250)
41 | self.setWindowTitle('Signal and slot')
42 | self.show()
43 |
44 |
45 | def main():
46 |
47 | app = QApplication(sys.argv)
48 | ex = Example()
49 | sys.exit(app.exec())
50 |
51 |
52 | if __name__ == '__main__':
53 | main()
--------------------------------------------------------------------------------
/First programs.md:
--------------------------------------------------------------------------------
1 | [目录](https://github.com/LC-space/PyQt6-tutorial/blob/main/README.md) [上一章](https://github.com/LC-space/PyQt6-tutorial/blob/main/Date%20and%20time.md) [下一章](https://github.com/LC-space/PyQt6-tutorial/blob/main/Menus%20and%20toolbars.md)
2 |
3 | # PyQt6中的第一个程序
4 |
5 | *最近更新于2021年4月23日*
6 |
7 | 在PyQt6教程的这一部分中,我们将学习一些基本的功能。这些示例显示了一个提示信息和一个图标,关闭一个窗口,显示一个消息框,并在桌面上显示一个窗口。
8 |
9 | ## PyQt6简单的例子
10 |
11 | 这是一个显示小窗口的简单示例。然而,我们可以利用这个窗口做很多事情。我们可以调整它的大小,最大化或最小化。这需要大量的编码。有人已经编写了这个功能。因为它在大多数应用程序中都是重复的,所以不需要重新编写代码。PyQt6是一个高级工具包。如果我们在较低级别的工具包中编写代码,下面的代码示例很容易有数百行代码。
12 |
13 | ```python
14 | # simple.py
15 | #!/usr/bin/python
16 |
17 | """
18 | ZetCode PyQt6 tutorial
19 |
20 | In this example, we create a simple
21 | window in PyQt6.
22 |
23 | Author: Jan Bodnar
24 | Website: zetcode.com
25 | """
26 |
27 |
28 | import sys
29 | from PyQt6.QtWidgets import QApplication, QWidget
30 |
31 |
32 | def main():
33 |
34 | app = QApplication(sys.argv)
35 |
36 | w = QWidget()
37 | w.resize(250, 200)
38 | w.move(300, 300)
39 |
40 | w.setWindowTitle('Simple')
41 | w.show()
42 |
43 | sys.exit(app.exec())
44 |
45 |
46 | if __name__ == '__main__':
47 | main()
48 | ```
49 |
50 | 上面的代码示例在屏幕上显示了一个小窗口。
51 |
52 | ```python
53 | import sys
54 | from PyQt6.QtWidgets import QApplication, QWidget
55 | ```
56 |
57 | 这里我们提供了必要的导入。基本控件位于PyQt6中。QtWidgets模块。
58 |
59 | ```python
60 | app = QApplication(sys.argv)
61 | ```
62 |
63 | 每个PyQt6应用程序都必须创建一个应用程序对象。sys.Argv参数是来自命令行的参数列表。Python脚本可以从shell运行。这是我们控制脚本启动的一种方式。
64 |
65 | ```python
66 | w = QWidget()
67 | ```
68 |
69 | QWidget控件是PyQt6中所有用户接口对象的基类。我们为QWidget提供了默认构造函数。默认构造函数没有父类。没有父组件的控件称为窗口。
70 |
71 | ```python
72 | w.resize(250, 150)
73 | ```
74 |
75 | resize方法调整控件的大小。它是250px宽,150px高。
76 |
77 | ```python
78 | w.move(300, 300)
79 | ```
80 |
81 | move方法将控件移动到屏幕上坐标为x=300, y=300的位置。
82 |
83 | ```python
84 | w.setWindowTitle('Simple')
85 | ```
86 |
87 | 我们使用setWindowTitle设置窗口的标题。标题显示在标题栏中。
88 |
89 | ```python
90 | w.show()
91 | ```
92 |
93 | show方法将控件显示在屏幕上。控件首先在内存中创建,然后显示在屏幕上。
94 |
95 | ```python
96 | sys.exit(app.exec())
97 | ```
98 |
99 | 最后,我们进入应用程序的主循环。事件处理从这里开始。主循环从窗口系统接收事件,并将它们分派给应用程序控件。如果我们调用exit方法,或者主控件被关闭,则主循环结束。sys.exit方法确保完全的退出。将告知环境应用程序是如何结束的。
100 |
101 | 
102 |
103 | ## PyQt6提示信息
104 |
105 | 我们可以为任何控件提供气泡帮助。
106 |
107 | ```python
108 | # tooltip.py
109 | #!/usr/bin/python
110 |
111 | """
112 | ZetCode PyQt6 tutorial
113 |
114 | This example shows a tooltip on
115 | a window and a button.
116 |
117 | Author: Jan Bodnar
118 | Website: zetcode.com
119 | """
120 |
121 | import sys
122 | from PyQt6.QtWidgets import (QWidget, QToolTip,
123 | QPushButton, QApplication)
124 | from PyQt6.QtGui import QFont
125 |
126 |
127 | class Example(QWidget):
128 |
129 | def __init__(self):
130 | super().__init__()
131 |
132 | self.initUI()
133 |
134 |
135 | def initUI(self):
136 |
137 | QToolTip.setFont(QFont('SansSerif', 10))
138 |
139 | self.setToolTip('This is a QWidget widget')
140 |
141 | btn = QPushButton('Button', self)
142 | btn.setToolTip('This is a QPushButton widget')
143 | btn.resize(btn.sizeHint())
144 | btn.move(50, 50)
145 |
146 | self.setGeometry(300, 300, 300, 200)
147 | self.setWindowTitle('Tooltips')
148 | self.show()
149 |
150 |
151 | def main():
152 |
153 | app = QApplication(sys.argv)
154 | ex = Example()
155 | sys.exit(app.exec())
156 |
157 |
158 | if __name__ == '__main__':
159 | main()
160 | ```
161 |
162 | 在这个例子中,我们展示了两个PyQt6控件的提示信息。
163 |
164 | ```python
165 | QToolTip.setFont(QFont('SansSerif', 10))
166 | ```
167 |
168 | 此静态方法设置用于呈现提示信息的字体。我们使用10pt SansSerif字体。
169 |
170 | ```python
171 | self.setToolTip('This is a QWidget widget')
172 | ```
173 |
174 | 要创建提示信息,我们调用setTooltip方法。我们可以使用富文本格式。
175 |
176 | ```python
177 | btn = QPushButton('Button', self)
178 | btn.setToolTip('This is a QPushButton widget')
179 | ```
180 |
181 | 我们创建一个按钮部件并为它设置一个工具提示。
182 |
183 | ```python
184 | btn.resize(btn.sizeHint())
185 | btn.move(50, 50)
186 | ```
187 |
188 | 调整窗口上按钮的大小和移动。sizeHint方法给出了按钮的推荐大小。
189 |
190 | 
191 |
192 | ## PyQt6退出按钮
193 |
194 | 关闭窗口最明显的方法是单击标题栏上的x标记。在下一个示例中,我们将展示如何以编程方式关闭窗口。我们将简要地讨论信号和槽。
195 |
196 | 下面是我们在示例中使用的QPushButton控件的构造函数。
197 |
198 | ```python
199 | QPushButton(string text, QWidget parent = None)
200 | ```
201 |
202 | text参数是将显示在按钮上的文本。parent是放置按钮的控件。在我们的例子中,它将是一个QWidget。应用程序的控件形成了层次结构。在这个层次结构中,大多数控件都有它们的父控件。没有父控件的控件是顶层窗口。
203 |
204 | ```python
205 | # quit_button.py
206 | #!/usr/bin/python
207 |
208 | """
209 | ZetCode PyQt6 tutorial
210 |
211 | This program creates a quit
212 | button. When we press the button,
213 | the application terminates.
214 |
215 | Author: Jan Bodnar
216 | Website: zetcode.com
217 | """
218 |
219 | import sys
220 | from PyQt6.QtWidgets import QWidget, QPushButton, QApplication
221 |
222 | class Example(QWidget):
223 |
224 | def __init__(self):
225 | super().__init__()
226 |
227 | self.initUI()
228 |
229 |
230 | def initUI(self):
231 |
232 | qbtn = QPushButton('Quit', self)
233 | qbtn.clicked.connect(QApplication.instance().quit)
234 | qbtn.resize(qbtn.sizeHint())
235 | qbtn.move(50, 50)
236 |
237 | self.setGeometry(300, 300, 350, 250)
238 | self.setWindowTitle('Quit button')
239 | self.show()
240 |
241 |
242 | def main():
243 |
244 | app = QApplication(sys.argv)
245 | ex = Example()
246 | sys.exit(app.exec())
247 |
248 |
249 | if __name__ == '__main__':
250 | main()
251 | ```
252 |
253 | 在本例中,我们创建了一个退出按钮。单击按钮后,应用程序终止。
254 |
255 | ```python
256 | qbtn = QPushButton('Quit', self)
257 | ```
258 |
259 | 我们创造了一个按钮。按钮是QPushButton类的一个实例。构造函数的第一个参数是按钮的标签。第二个参数是父控件。父控件是Example控件,它继承自QWidget。
260 |
261 | ```python
262 | qbtn.clicked.connect(QApplication.instance().quit)
263 | ```
264 |
265 | PyQt6中的事件处理系统是用信号&槽机制构建的。如果我们点击按钮,就会发出被点击的信号。槽可以是Qt槽或任何Python可调用对象。
266 |
267 | QCoreApplication,它是用QApplication.instance检索的。包含主事件循环——它处理和分派所有事件。单击的信号连接到终止应用程序的quit方法。通信是在两个对象之间完成的:发送方和接收方。发送方是按钮,接收方是应用程序对象。
268 |
269 | 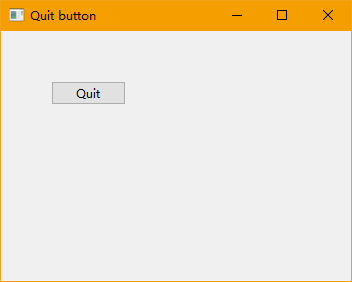
270 |
271 | ## PyQt6消息框
272 |
273 | 默认情况下,如果我们单击标题栏上的x按钮,QWidget是会关闭的。有时我们想要修改这个默认行为。例如,如果我们在编辑器中打开了一个文件,我们对它做了一些更改。我们将显示一个消息框来确认操作。
274 |
275 | ```python
276 | # messagebox.py
277 | #!/usr/bin/python
278 |
279 | """
280 | ZetCode PyQt6 tutorial
281 |
282 | This program shows a confirmation
283 | message box when we click on the close
284 | button of the application window.
285 |
286 | Author: Jan Bodnar
287 | Website: zetcode.com
288 | """
289 |
290 | import sys
291 | from PyQt6.QtWidgets import QWidget, QMessageBox, QApplication
292 |
293 |
294 | class Example(QWidget):
295 |
296 | def __init__(self):
297 | super().__init__()
298 |
299 | self.initUI()
300 |
301 | def initUI(self):
302 |
303 | self.setGeometry(300, 300, 350, 200)
304 | self.setWindowTitle('Message box')
305 | self.show()
306 |
307 | def closeEvent(self, event):
308 |
309 | reply = QMessageBox.question(self, 'Message',
310 | "Are you sure to quit?", QMessageBox.StandardButton.Yes |
311 | QMessageBox.StandardButton.No, QMessageBox.StandardButton.No)
312 |
313 | if reply == QMessageBox.StandardButton.Yes:
314 |
315 | event.accept()
316 | else:
317 |
318 | event.ignore()
319 |
320 |
321 | def main():
322 | app = QApplication(sys.argv)
323 | ex = Example()
324 | sys.exit(app.exec())
325 |
326 |
327 | if __name__ == '__main__':
328 | main()
329 | ```
330 |
331 | 如果我们关闭一个QWidget,就会生成QCloseEvent。要修改控件行为,我们需要重新实现closeEvent事件处理程序。
332 |
333 | ```python
334 | reply = QMessageBox.question(self, 'Message',
335 | "Are you sure to quit?", QMessageBox.StandardButton.Yes |
336 | QMessageBox.StandardButton.No, QMessageBox.StandardButton.No)
337 | ```
338 |
339 | 我们将显示一个带有两个按钮的消息框:Yes和No。第一个字符串出现在标题栏上。第二个字符串是对话框显示的消息文本。第三个参数指定对话框中出现的按钮组合。最后一个参数是默认按钮。它是最初具有键盘焦点的按钮。返回值存储在reply变量中。
340 |
341 | ```python
342 | if reply == QMessageBox.StandardButton.Yes:
343 | event.accept()
344 | else:
345 | event.ignore()
346 | ```
347 |
348 | 这里我们测试返回值。如果单击Yes按钮,就会接受导致控件关闭和应用程序终止的事件。否则我们将忽略关闭事件。
349 |
350 | 
351 |
352 | ## PyQt6中心窗口
353 |
354 | 下面的脚本展示了如何在桌面屏幕上居中一个窗口。
355 |
356 | ```python
357 | # center.py
358 | #!/usr/bin/python
359 |
360 | """
361 | ZetCode PyQt6 tutorial
362 |
363 | This program centers a window
364 | on the screen.
365 |
366 | Author: Jan Bodnar
367 | Website: zetcode.com
368 | """
369 |
370 | import sys
371 | from PyQt6.QtWidgets import QWidget, QApplication
372 |
373 |
374 | class Example(QWidget):
375 |
376 | def __init__(self):
377 | super().__init__()
378 |
379 | self.initUI()
380 |
381 | def initUI(self):
382 |
383 | self.resize(350, 250)
384 | self.center()
385 |
386 | self.setWindowTitle('Center')
387 | self.show()
388 |
389 | def center(self):
390 |
391 | qr = self.frameGeometry()
392 | cp = self.screen().availableGeometry().center()
393 |
394 | qr.moveCenter(cp)
395 | self.move(qr.topLeft())
396 |
397 |
398 | def main():
399 |
400 | app = QApplication(sys.argv)
401 | ex = Example()
402 | sys.exit(app.exec())
403 |
404 |
405 | if __name__ == '__main__':
406 | main()
407 | ```
408 |
409 | QScreen类用于查询屏幕属性。
410 |
411 | ```python
412 | self.center()
413 | ```
414 |
415 | 将窗口居中的代码放置在自定义center方法中。
416 |
417 | ```python
418 | qr = self.frameGeometry()
419 | ```
420 |
421 | 我们得到一个指定主窗口几何形状的矩形。这包括任何窗口框架。
422 |
423 | ```python
424 | cp = self.screen().availableGeometry().center()
425 | ```
426 |
427 | 我们计算出显示器的屏幕分辨率。通过这个分辨率,我们得到了中心点。
428 |
429 | ```python
430 | qr.moveCenter(cp)
431 | ```
432 |
433 | 我们的矩形已经有了它的宽和高。现在我们将矩形的中心设置为屏幕的中心。矩形的大小不变。
434 |
435 | ```python
436 | self.move(qr.topLeft())
437 | ```
438 |
439 | 我们将应用程序窗口的左上角移动到qr矩形的左上角,从而使窗口在屏幕上居中。
440 |
441 | 在PyQt6教程的这一部分中,我们已经在PyQt6中创建了简单的代码示例。
442 |
443 | [目录](https://github.com/LC-space/PyQt6-tutorial/blob/main/README.md) [上一章](https://github.com/LC-space/PyQt6-tutorial/blob/main/Date%20and%20time.md) [下一章](https://github.com/LC-space/PyQt6-tutorial/blob/main/Menus%20and%20toolbars.md)
444 |
445 |
--------------------------------------------------------------------------------
/First programs/center.py:
--------------------------------------------------------------------------------
1 | # center.py
2 | #!/usr/bin/python
3 |
4 | """
5 | ZetCode PyQt6 tutorial
6 |
7 | This program centers a window
8 | on the screen.
9 |
10 | Author: Jan Bodnar
11 | Website: zetcode.com
12 | """
13 |
14 | import sys
15 | from PyQt6.QtWidgets import QWidget, QApplication
16 |
17 |
18 | class Example(QWidget):
19 |
20 | def __init__(self):
21 | super().__init__()
22 |
23 | self.initUI()
24 |
25 | def initUI(self):
26 |
27 | self.resize(350, 250)
28 | self.center()
29 |
30 | self.setWindowTitle('Center')
31 | self.show()
32 |
33 | def center(self):
34 |
35 | qr = self.frameGeometry()
36 | cp = self.screen().availableGeometry().center()
37 |
38 | qr.moveCenter(cp)
39 | self.move(qr.topLeft())
40 |
41 |
42 | def main():
43 |
44 | app = QApplication(sys.argv)
45 | ex = Example()
46 | sys.exit(app.exec())
47 |
48 |
49 | if __name__ == '__main__':
50 | main()
--------------------------------------------------------------------------------
/First programs/img/image-20210613145725126.png:
--------------------------------------------------------------------------------
https://raw.githubusercontent.com/LC-space/PyQt6-tutorial/b684346d01e667cf855c69058bbb13f2bd2c6762/First programs/img/image-20210613145725126.png
--------------------------------------------------------------------------------
/First programs/img/image-20210613151219139.png:
--------------------------------------------------------------------------------
https://raw.githubusercontent.com/LC-space/PyQt6-tutorial/b684346d01e667cf855c69058bbb13f2bd2c6762/First programs/img/image-20210613151219139.png
--------------------------------------------------------------------------------
/First programs/img/image-20210613152347253.png:
--------------------------------------------------------------------------------
https://raw.githubusercontent.com/LC-space/PyQt6-tutorial/b684346d01e667cf855c69058bbb13f2bd2c6762/First programs/img/image-20210613152347253.png
--------------------------------------------------------------------------------
/First programs/img/image-20210613160315565.png:
--------------------------------------------------------------------------------
https://raw.githubusercontent.com/LC-space/PyQt6-tutorial/b684346d01e667cf855c69058bbb13f2bd2c6762/First programs/img/image-20210613160315565.png
--------------------------------------------------------------------------------
/First programs/messagebox.py:
--------------------------------------------------------------------------------
1 | # messagebox.py
2 | #!/usr/bin/python
3 |
4 | """
5 | ZetCode PyQt6 tutorial
6 |
7 | This program shows a confirmation
8 | message box when we click on the close
9 | button of the application window.
10 |
11 | Author: Jan Bodnar
12 | Website: zetcode.com
13 | """
14 |
15 | import sys
16 | from PyQt6.QtWidgets import QWidget, QMessageBox, QApplication
17 |
18 |
19 | class Example(QWidget):
20 |
21 | def __init__(self):
22 | super().__init__()
23 |
24 | self.initUI()
25 |
26 | def initUI(self):
27 |
28 | self.setGeometry(300, 300, 350, 200)
29 | self.setWindowTitle('Message box')
30 | self.show()
31 |
32 | def closeEvent(self, event):
33 |
34 | reply = QMessageBox.question(self, 'Message',
35 | "Are you sure to quit?", QMessageBox.StandardButton.Yes |
36 | QMessageBox.StandardButton.No, QMessageBox.StandardButton.No)
37 |
38 | if reply == QMessageBox.StandardButton.Yes:
39 |
40 | event.accept()
41 | else:
42 |
43 | event.ignore()
44 |
45 |
46 | def main():
47 | app = QApplication(sys.argv)
48 | ex = Example()
49 | sys.exit(app.exec())
50 |
51 |
52 | if __name__ == '__main__':
53 | main()
--------------------------------------------------------------------------------
/First programs/quit_button.py:
--------------------------------------------------------------------------------
1 | # quit_button.py
2 | #!/usr/bin/python
3 |
4 | """
5 | ZetCode PyQt6 tutorial
6 |
7 | This program creates a quit
8 | button. When we press the button,
9 | the application terminates.
10 |
11 | Author: Jan Bodnar
12 | Website: zetcode.com
13 | """
14 |
15 | import sys
16 | from PyQt6.QtWidgets import QWidget, QPushButton, QApplication
17 |
18 | class Example(QWidget):
19 |
20 | def __init__(self):
21 | super().__init__()
22 |
23 | self.initUI()
24 |
25 |
26 | def initUI(self):
27 |
28 | qbtn = QPushButton('Quit', self)
29 | qbtn.clicked.connect(QApplication.instance().quit)
30 | qbtn.resize(qbtn.sizeHint())
31 | qbtn.move(50, 50)
32 |
33 | self.setGeometry(300, 300, 350, 250)
34 | self.setWindowTitle('Quit button')
35 | self.show()
36 |
37 |
38 | def main():
39 |
40 | app = QApplication(sys.argv)
41 | ex = Example()
42 | sys.exit(app.exec())
43 |
44 |
45 | if __name__ == '__main__':
46 | main()
--------------------------------------------------------------------------------
/First programs/simple.py:
--------------------------------------------------------------------------------
1 | # simple.py
2 | #!/usr/bin/python
3 |
4 | """
5 | ZetCode PyQt6 tutorial
6 |
7 | In this example, we create a simple
8 | window in PyQt6.
9 |
10 | Author: Jan Bodnar
11 | Website: zetcode.com
12 | """
13 |
14 |
15 | import sys
16 | from PyQt6.QtWidgets import QApplication, QWidget
17 |
18 |
19 | def main():
20 |
21 | app = QApplication(sys.argv)
22 |
23 | w = QWidget()
24 | w.resize(250, 200)
25 | w.move(300, 300)
26 |
27 | w.setWindowTitle('Simple')
28 | w.show()
29 |
30 | sys.exit(app.exec())
31 |
32 |
33 | if __name__ == '__main__':
34 | main()
--------------------------------------------------------------------------------
/First programs/tooltip.py:
--------------------------------------------------------------------------------
1 | # tooltip.py
2 | #!/usr/bin/python
3 |
4 | """
5 | ZetCode PyQt6 tutorial
6 |
7 | This example shows a tooltip on
8 | a window and a button.
9 |
10 | Author: Jan Bodnar
11 | Website: zetcode.com
12 | """
13 |
14 | import sys
15 | from PyQt6.QtWidgets import (QWidget, QToolTip,
16 | QPushButton, QApplication)
17 | from PyQt6.QtGui import QFont
18 |
19 |
20 | class Example(QWidget):
21 |
22 | def __init__(self):
23 | super().__init__()
24 |
25 | self.initUI()
26 |
27 |
28 | def initUI(self):
29 |
30 | QToolTip.setFont(QFont('SansSerif', 10))
31 |
32 | self.setToolTip('This is a QWidget widget')
33 |
34 | btn = QPushButton('Button', self)
35 | btn.setToolTip('This is a QPushButton widget')
36 | btn.resize(btn.sizeHint())
37 | btn.move(50, 50)
38 |
39 | self.setGeometry(300, 300, 300, 200)
40 | self.setWindowTitle('Tooltips')
41 | self.show()
42 |
43 |
44 | def main():
45 |
46 | app = QApplication(sys.argv)
47 | ex = Example()
48 | sys.exit(app.exec())
49 |
50 |
51 | if __name__ == '__main__':
52 | main()
--------------------------------------------------------------------------------
/Introduction.md:
--------------------------------------------------------------------------------
1 | [目录](https://github.com/LC-space/PyQt6-tutorial/blob/main/README.md) [下一章](https://github.com/LC-space/PyQt6-tutorial/blob/main/Date%20and%20time.md)
2 |
3 | # 介绍PyQt6
4 |
5 | *最近修改于2021年4月22日*
6 |
7 | 这是PyQt6的介绍性教程。本教程的目的是让您开始使用PyQt6工具包。
8 |
9 | ## 关于PyQt6
10 |
11 | pyqt6是一套Python绑定Digia QT5应用的框架。Qt库是最强大的GUI库之一。PyQt6的官方主页是https://www.riverbankcomputing.co.uk/news。PyQt6是由Riverbank Computing公司开发的。
12 |
13 | pyqt6是Python的一个模块。它是一个多平台的工具包,可以在所有主要的操作系统上运行,包括Unix、Windows和Mac OS。PyQt6是双重许可;开发人员可以在GPL和商业许可之间进行选择。
14 |
15 | ## PyQt6模块
16 |
17 | PyQt6的类被分为几个模块,包括以下模块:
18 |
19 | - QtCore
20 | - QtGui
21 | - QtWidgets
22 | - QtDBus
23 | - QtNetwork
24 | - QtHelp
25 | - QtXml
26 | - QtSvg
27 | - QtSql
28 | - QtTest
29 |
30 | QtCore模块包含了核心的非GUI功能。这个模块用于处理时间、文件和目录、各种数据类型、流、URL、MIME类型、线程或进程。QtGui包含窗口系统集成、事件处理、2D图形、基本图像、字体和文本等类。QtWidgets模块包含的类提供了一组UI元素来创建经典的桌面风格的用户界面。
31 |
32 | QtDBus包含使用D-Bus协议支持IPC的类。QtNetwork模块包含用于网络编程的类。这些类通过使网络编程更简单、更易移植来方便TCP/IP和UDP客户端和服务器的编码。QtHelp包含用于创建和查看可搜索文档的类。
33 |
34 | QtXml包含用于处理XML文件的类。这个模块提供了SAX和DOM api的实现。QtSvg模块提供了显示SVG文件内容的类。可伸缩矢量图形(SVG)是一种用XML描述二维图形和图形应用程序的语言。QtSql模块提供了处理数据库的类。QtTest包含启用PyQt6应用程序单元测试的函数。
35 |
36 | ## Python
37 |
38 | Python是一种通用的、动态的、面向对象的编程语言。Python语言的设计目的强调程序员的工作效率和代码的可读性。它于1991年首次发布。Python受到ABC、Haskell、Java、Lisp、Icon和Perl编程语言的启发。Python是一种高级的、通用的、多平台的解释语言。Python是一种极简语言。Python是由世界各地的一群志愿者维护的。
39 |
40 | Python编程语言的官方网站是[python.org](https://python.org/)。
41 |
42 | ## PyQt6版本
43 |
44 | QT_VERSION_STR提供了Qt的版本和PyQt6的PYQT_VERSION_STR版本。
45 |
46 | ```Python
47 | # version.py
48 | #!/usr/bin/python
49 |
50 | from PyQt6.QtCore import QT_VERSION_STR
51 | from PyQt6.QtCore import PYQT_VERSION_STR
52 |
53 | print(QT_VERSION_STR)
54 | print(PYQT_VERSION_STR)
55 | ```
56 |
57 | 我们打印Qt库和PyQt6模块的版本。
58 |
59 | ```
60 | 6.1.0
61 | 6.1.0
62 | ```
63 |
64 | 本章介绍了PyQt6工具包。
65 |
66 | [目录](https://github.com/LC-space/PyQt6-tutorial/blob/main/README.md) [下一章](https://github.com/LC-space/PyQt6-tutorial/blob/main/Date%20and%20time.md)
67 |
68 |
--------------------------------------------------------------------------------
/Introduction/version.py:
--------------------------------------------------------------------------------
1 | #!/usr/bin/python
2 |
3 | from PyQt6.QtCore import QT_VERSION_STR
4 | from PyQt6.QtCore import PYQT_VERSION_STR
5 |
6 | print(QT_VERSION_STR)
7 | print(PYQT_VERSION_STR)
--------------------------------------------------------------------------------
/Layout management.md:
--------------------------------------------------------------------------------
1 | [目录](https://github.com/LC-space/PyQt6-tutorial/blob/main/README.md) [上一章](https://github.com/LC-space/PyQt6-tutorial/blob/main/Menus%20and%20toolbars.md) [下一章](https://github.com/LC-space/PyQt6-tutorial/blob/main/Events%20and%20signals.md)
2 |
3 | # PyQt6中的布局管理
4 |
5 | *最近更新于2021年4月27日*
6 |
7 | 布局管理是我们在应用程序窗口中放置控件的方式。我们可以使用绝对定位或布局类来放置控件。使用布局管理器管理布局是组织控件的首选方式。
8 |
9 | ## 绝对定位
10 |
11 | 程序员以像素为单位指定每个控件的位置和大小。当你使用绝对定位时,我们必须了解以下限制:
12 |
13 | * 如果我们调整窗口的大小,控件的大小和位置不会改变
14 | * 应用程序在不同的平台上可能看起来不同
15 | * 改变应用程序中的字体可能会破坏布局
16 | * 如果我们决定改变我们的布局,我们必须完全重做我们的布局,这是乏味和耗时的
17 |
18 | 下面的示例以绝对坐标来定位控件。
19 |
20 | ```python
21 | # absolute.py
22 | #!/usr/bin/python
23 |
24 | """
25 | ZetCode PyQt6 tutorial
26 |
27 | This example shows three labels on a window
28 | using absolute positioning.
29 |
30 | Author: Jan Bodnar
31 | Website: zetcode.com
32 | """
33 |
34 | import sys
35 | from PyQt6.QtWidgets import QWidget, QLabel, QApplication
36 |
37 |
38 | class Example(QWidget):
39 |
40 | def __init__(self):
41 | super().__init__()
42 |
43 | self.initUI()
44 |
45 |
46 | def initUI(self):
47 |
48 | lbl1 = QLabel('ZetCode', self)
49 | lbl1.move(15, 10)
50 |
51 | lbl2 = QLabel('tutorials', self)
52 | lbl2.move(35, 40)
53 |
54 | lbl3 = QLabel('for programmers', self)
55 | lbl3.move(55, 70)
56 |
57 | self.setGeometry(300, 300, 350, 250)
58 | self.setWindowTitle('Absolute')
59 | self.show()
60 |
61 |
62 | def main():
63 |
64 | app = QApplication(sys.argv)
65 | ex = Example()
66 | sys.exit(app.exec())
67 |
68 |
69 | if __name__ == '__main__':
70 | main()
71 | ```
72 |
73 | 我们使用move方法来定位控件。在我们的例子中,这些是标签。我们通过提供x和y坐标来定位它们。坐标系的起点在左上角。x值从左到右递增。y值从上到下递增。
74 |
75 | ```python
76 | lbl1 = QLabel('ZetCode', self)
77 | lbl1.move(15, 10)
78 | ```
79 |
80 | 标签控件位于x=15和y=10。
81 |
82 | 
83 |
84 | ## PyQt6 QHBoxLayout
85 |
86 | QHBoxLayout和QVBoxLayout是基本的布局类,可以水平和垂直排列控件。
87 |
88 | 假设我们想在右下角放置两个按钮。要创建这样的布局,我们使用一个水平框和一个垂直框。为了创造必要的空间,我们添加了一个伸缩控件。
89 |
90 | ```python
91 | # box_layout.py
92 | #!/usr/bin/python
93 |
94 | """
95 | ZetCode PyQt6 tutorial
96 |
97 | In this example, we position two push
98 | buttons in the bottom-right corner
99 | of the window.
100 |
101 | Author: Jan Bodnar
102 | Website: zetcode.com
103 | """
104 |
105 | import sys
106 | from PyQt6.QtWidgets import (QWidget, QPushButton,
107 | QHBoxLayout, QVBoxLayout, QApplication)
108 |
109 |
110 | class Example(QWidget):
111 |
112 | def __init__(self):
113 | super().__init__()
114 |
115 | self.initUI()
116 |
117 |
118 | def initUI(self):
119 |
120 | okButton = QPushButton("OK")
121 | cancelButton = QPushButton("Cancel")
122 |
123 | hbox = QHBoxLayout()
124 | hbox.addStretch(1)
125 | hbox.addWidget(okButton)
126 | hbox.addWidget(cancelButton)
127 |
128 | vbox = QVBoxLayout()
129 | vbox.addStretch(1)
130 | vbox.addLayout(hbox)
131 |
132 | self.setLayout(vbox)
133 |
134 | self.setGeometry(300, 300, 350, 250)
135 | self.setWindowTitle('Buttons')
136 | self.show()
137 |
138 |
139 | def main():
140 |
141 | app = QApplication(sys.argv)
142 | ex = Example()
143 | sys.exit(app.exec())
144 |
145 |
146 | if __name__ == '__main__':
147 | main()
148 | ```
149 |
150 | 该示例在窗口的右下角放置了两个按钮。当我们调整应用程序窗口的大小时,它们仍然在那里。我们同时使用HBoxLayout和QVBoxLayout。
151 |
152 | ```python
153 | okButton = QPushButton("OK")
154 | cancelButton = QPushButton("Cancel")
155 | ```
156 |
157 | 这里我们创建了两个按钮。
158 |
159 | ```python
160 | hbox = QHBoxLayout()
161 | hbox.addStretch(1)
162 | hbox.addWidget(okButton)
163 | hbox.addWidget(cancelButton)
164 | ```
165 |
166 | 我们创建一个水平框布局,添加一个伸缩控件和两个按钮。拉伸在两个按钮之前增加了一个可伸缩的空间。这会把他们推到窗口的右边。
167 |
168 | ```python
169 | vbox = QVBoxLayout()
170 | vbox.addStretch(1)
171 | vbox.addLayout(hbox)
172 | ```
173 |
174 | 水平布局被置于垂直布局中。垂直框中的伸缩控件将把带有按钮的水平框推到窗口的底部。
175 |
176 | ```python
177 | self.setLayout(vbox)
178 | ```
179 |
180 | 最后,我们设置了窗口的主布局。
181 |
182 | 
183 |
184 | ## PyQt6 QGridLayout
185 |
186 | QGridLayout是最通用的布局类。它将空间分成行和列。
187 |
188 | ```python
189 | # calculator.py
190 | #!/usr/bin/python
191 |
192 | """
193 | ZetCode PyQt6 tutorial
194 |
195 | In this example, we create a skeleton
196 | of a calculator using QGridLayout.
197 |
198 | Author: Jan Bodnar
199 | Website: zetcode.com
200 | """
201 |
202 | import sys
203 | from PyQt6.QtWidgets import (QWidget, QGridLayout,
204 | QPushButton, QApplication)
205 |
206 |
207 | class Example(QWidget):
208 |
209 | def __init__(self):
210 | super().__init__()
211 |
212 | self.initUI()
213 |
214 |
215 | def initUI(self):
216 |
217 | grid = QGridLayout()
218 | self.setLayout(grid)
219 |
220 | names = ['Cls', 'Bck', '', 'Close',
221 | '7', '8', '9', '/',
222 | '4', '5', '6', '*',
223 | '1', '2', '3', '-',
224 | '0', '.', '=', '+']
225 |
226 | positions = [(i, j) for i in range(5) for j in range(4)]
227 |
228 | for position, name in zip(positions, names):
229 |
230 | if name == '':
231 | continue
232 |
233 | button = QPushButton(name)
234 | grid.addWidget(button, *position)
235 |
236 | self.move(300, 150)
237 | self.setWindowTitle('Calculator')
238 | self.show()
239 |
240 |
241 | def main():
242 |
243 | app = QApplication(sys.argv)
244 | ex = Example()
245 | sys.exit(app.exec())
246 |
247 |
248 | if __name__ == '__main__':
249 | main()
250 | ```
251 |
252 | 在我们的示例中,我们创建了一个按钮网格。
253 |
254 | ```python
255 | grid = QGridLayout()
256 | self.setLayout(grid)
257 | ```
258 |
259 | 创建QGridLayout的实例并将其设置为应用程序窗口的布局。
260 |
261 | ```python
262 | names = ['Cls', 'Bck', '', 'Close',
263 | '7', '8', '9', '/',
264 | '4', '5', '6', '*',
265 | '1', '2', '3', '-',
266 | '0', '.', '=', '+']
267 | ```
268 |
269 | 这些是后来用于按钮的标签。
270 |
271 | ```python
272 | positions = [(i,j) for i in range(5) for j in range(4)]
273 | ```
274 |
275 | 我们在网格中创建一个位置列表。
276 |
277 | ```python
278 | for position, name in zip(positions, names):
279 |
280 | if name == '':
281 | continue
282 |
283 | button = QPushButton(name)
284 | grid.addWidget(button, *position)
285 | ```
286 |
287 | 使用addWidget方法创建按钮并将其添加到布局中。
288 |
289 | 
290 |
291 | ## 评论的例子
292 |
293 | 控件可以跨越网格中的多个列或行。在下一个示例中,我们将对此进行说明。
294 |
295 | ```python
296 | # review.py
297 | #!/usr/bin/python
298 |
299 | """
300 | ZetCode PyQt6 tutorial
301 |
302 | In this example, we create a bit
303 | more complicated window layout using
304 | the QGridLayout manager.
305 |
306 | Author: Jan Bodnar
307 | Website: zetcode.com
308 | """
309 |
310 | import sys
311 | from PyQt6.QtWidgets import (QWidget, QLabel, QLineEdit,
312 | QTextEdit, QGridLayout, QApplication)
313 |
314 |
315 | class Example(QWidget):
316 |
317 | def __init__(self):
318 | super().__init__()
319 |
320 | self.initUI()
321 |
322 |
323 | def initUI(self):
324 |
325 | title = QLabel('Title')
326 | author = QLabel('Author')
327 | review = QLabel('Review')
328 |
329 | titleEdit = QLineEdit()
330 | authorEdit = QLineEdit()
331 | reviewEdit = QTextEdit()
332 |
333 | grid = QGridLayout()
334 | grid.setSpacing(10)
335 |
336 | grid.addWidget(title, 1, 0)
337 | grid.addWidget(titleEdit, 1, 1)
338 |
339 | grid.addWidget(author, 2, 0)
340 | grid.addWidget(authorEdit, 2, 1)
341 |
342 | grid.addWidget(review, 3, 0)
343 | grid.addWidget(reviewEdit, 3, 1, 5, 1)
344 |
345 | self.setLayout(grid)
346 |
347 | self.setGeometry(300, 300, 350, 300)
348 | self.setWindowTitle('Review')
349 | self.show()
350 |
351 |
352 | def main():
353 |
354 | app = QApplication(sys.argv)
355 | ex = Example()
356 | sys.exit(app.exec())
357 |
358 |
359 | if __name__ == '__main__':
360 | main()
361 | ```
362 |
363 | 我们创建一个窗口,其中有三个标签、两个行编辑和一个文本编辑控件。布局是通过QGridLayout完成的。
364 |
365 | ```python
366 | grid = QGridLayout()
367 | grid.setSpacing(10)
368 | ```
369 |
370 | 我们创建一个网格布局并设置控件之间的间距。
371 |
372 | ```python
373 | grid.addWidget(reviewEdit, 3, 1, 5, 1)
374 | ```
375 |
376 | 如果将控件添加到网格中,则可以提供控件的行跨度和列跨度。在我们的例子中,我们让reviewEdit控件跨越5行。
377 |
378 | 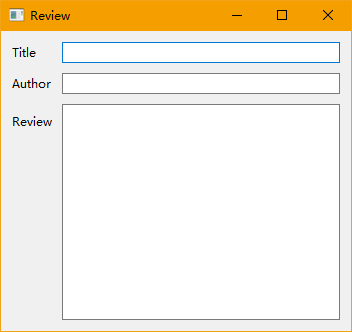
379 |
380 | PyQt6教程的这一部分专注于布局管理。
381 |
382 | [目录](https://github.com/LC-space/PyQt6-tutorial/blob/main/README.md) [上一章](https://github.com/LC-space/PyQt6-tutorial/blob/main/Menus%20and%20toolbars.md) [下一章](https://github.com/LC-space/PyQt6-tutorial/blob/main/Events%20and%20signals.md)
383 |
384 |
--------------------------------------------------------------------------------
/Layout management/absolute.py:
--------------------------------------------------------------------------------
1 | # absolute.py
2 | #!/usr/bin/python
3 |
4 | """
5 | ZetCode PyQt6 tutorial
6 |
7 | This example shows three labels on a window
8 | using absolute positioning.
9 |
10 | Author: Jan Bodnar
11 | Website: zetcode.com
12 | """
13 |
14 | import sys
15 | from PyQt6.QtWidgets import QWidget, QLabel, QApplication
16 |
17 |
18 | class Example(QWidget):
19 |
20 | def __init__(self):
21 | super().__init__()
22 |
23 | self.initUI()
24 |
25 |
26 | def initUI(self):
27 |
28 | lbl1 = QLabel('ZetCode', self)
29 | lbl1.move(15, 10)
30 |
31 | lbl2 = QLabel('tutorials', self)
32 | lbl2.move(35, 40)
33 |
34 | lbl3 = QLabel('for programmers', self)
35 | lbl3.move(55, 70)
36 |
37 | self.setGeometry(300, 300, 350, 250)
38 | self.setWindowTitle('Absolute')
39 | self.show()
40 |
41 |
42 | def main():
43 |
44 | app = QApplication(sys.argv)
45 | ex = Example()
46 | sys.exit(app.exec())
47 |
48 |
49 | if __name__ == '__main__':
50 | main()
--------------------------------------------------------------------------------
/Layout management/box_layout.py:
--------------------------------------------------------------------------------
1 | # box_layout.py
2 | #!/usr/bin/python
3 |
4 | """
5 | ZetCode PyQt6 tutorial
6 |
7 | In this example, we position two push
8 | buttons in the bottom-right corner
9 | of the window.
10 |
11 | Author: Jan Bodnar
12 | Website: zetcode.com
13 | """
14 |
15 | import sys
16 | from PyQt6.QtWidgets import (QWidget, QPushButton,
17 | QHBoxLayout, QVBoxLayout, QApplication)
18 |
19 |
20 | class Example(QWidget):
21 |
22 | def __init__(self):
23 | super().__init__()
24 |
25 | self.initUI()
26 |
27 |
28 | def initUI(self):
29 |
30 | okButton = QPushButton("OK")
31 | cancelButton = QPushButton("Cancel")
32 |
33 | hbox = QHBoxLayout()
34 | hbox.addStretch(1)
35 | hbox.addWidget(okButton)
36 | hbox.addWidget(cancelButton)
37 |
38 | vbox = QVBoxLayout()
39 | vbox.addStretch(1)
40 | vbox.addLayout(hbox)
41 |
42 | self.setLayout(vbox)
43 |
44 | self.setGeometry(300, 300, 350, 250)
45 | self.setWindowTitle('Buttons')
46 | self.show()
47 |
48 |
49 | def main():
50 |
51 | app = QApplication(sys.argv)
52 | ex = Example()
53 | sys.exit(app.exec())
54 |
55 |
56 | if __name__ == '__main__':
57 | main()
--------------------------------------------------------------------------------
/Layout management/calculator.py:
--------------------------------------------------------------------------------
1 | # calculator.py
2 | #!/usr/bin/python
3 |
4 | """
5 | ZetCode PyQt6 tutorial
6 |
7 | In this example, we create a skeleton
8 | of a calculator using QGridLayout.
9 |
10 | Author: Jan Bodnar
11 | Website: zetcode.com
12 | """
13 |
14 | import sys
15 | from PyQt6.QtWidgets import (QWidget, QGridLayout,
16 | QPushButton, QApplication)
17 |
18 |
19 | class Example(QWidget):
20 |
21 | def __init__(self):
22 | super().__init__()
23 |
24 | self.initUI()
25 |
26 |
27 | def initUI(self):
28 |
29 | grid = QGridLayout()
30 | self.setLayout(grid)
31 |
32 | names = ['Cls', 'Bck', '', 'Close',
33 | '7', '8', '9', '/',
34 | '4', '5', '6', '*',
35 | '1', '2', '3', '-',
36 | '0', '.', '=', '+']
37 |
38 | positions = [(i, j) for i in range(5) for j in range(4)]
39 |
40 | for position, name in zip(positions, names):
41 |
42 | if name == '':
43 | continue
44 |
45 | button = QPushButton(name)
46 | grid.addWidget(button, *position)
47 |
48 | self.move(300, 150)
49 | self.setWindowTitle('Calculator')
50 | self.show()
51 |
52 |
53 | def main():
54 |
55 | app = QApplication(sys.argv)
56 | ex = Example()
57 | sys.exit(app.exec())
58 |
59 |
60 | if __name__ == '__main__':
61 | main()
--------------------------------------------------------------------------------
/Layout management/img/image-20210614160258237.png:
--------------------------------------------------------------------------------
https://raw.githubusercontent.com/LC-space/PyQt6-tutorial/b684346d01e667cf855c69058bbb13f2bd2c6762/Layout management/img/image-20210614160258237.png
--------------------------------------------------------------------------------
/Layout management/img/image-20210614161426013.png:
--------------------------------------------------------------------------------
https://raw.githubusercontent.com/LC-space/PyQt6-tutorial/b684346d01e667cf855c69058bbb13f2bd2c6762/Layout management/img/image-20210614161426013.png
--------------------------------------------------------------------------------
/Layout management/img/image-20210614162316241.png:
--------------------------------------------------------------------------------
https://raw.githubusercontent.com/LC-space/PyQt6-tutorial/b684346d01e667cf855c69058bbb13f2bd2c6762/Layout management/img/image-20210614162316241.png
--------------------------------------------------------------------------------
/Layout management/img/image-20210614162945125.png:
--------------------------------------------------------------------------------
https://raw.githubusercontent.com/LC-space/PyQt6-tutorial/b684346d01e667cf855c69058bbb13f2bd2c6762/Layout management/img/image-20210614162945125.png
--------------------------------------------------------------------------------
/Layout management/review.py:
--------------------------------------------------------------------------------
1 | # review.py
2 | #!/usr/bin/python
3 |
4 | """
5 | ZetCode PyQt6 tutorial
6 |
7 | In this example, we create a bit
8 | more complicated window layout using
9 | the QGridLayout manager.
10 |
11 | Author: Jan Bodnar
12 | Website: zetcode.com
13 | """
14 |
15 | import sys
16 | from PyQt6.QtWidgets import (QWidget, QLabel, QLineEdit,
17 | QTextEdit, QGridLayout, QApplication)
18 |
19 |
20 | class Example(QWidget):
21 |
22 | def __init__(self):
23 | super().__init__()
24 |
25 | self.initUI()
26 |
27 |
28 | def initUI(self):
29 |
30 | title = QLabel('Title')
31 | author = QLabel('Author')
32 | review = QLabel('Review')
33 |
34 | titleEdit = QLineEdit()
35 | authorEdit = QLineEdit()
36 | reviewEdit = QTextEdit()
37 |
38 | grid = QGridLayout()
39 | grid.setSpacing(10)
40 |
41 | grid.addWidget(title, 1, 0)
42 | grid.addWidget(titleEdit, 1, 1)
43 |
44 | grid.addWidget(author, 2, 0)
45 | grid.addWidget(authorEdit, 2, 1)
46 |
47 | grid.addWidget(review, 3, 0)
48 | grid.addWidget(reviewEdit, 3, 1, 5, 1)
49 |
50 | self.setLayout(grid)
51 |
52 | self.setGeometry(300, 300, 350, 300)
53 | self.setWindowTitle('Review')
54 | self.show()
55 |
56 |
57 | def main():
58 |
59 | app = QApplication(sys.argv)
60 | ex = Example()
61 | sys.exit(app.exec())
62 |
63 |
64 | if __name__ == '__main__':
65 | main()
--------------------------------------------------------------------------------
/Menus and toolbars.md:
--------------------------------------------------------------------------------
1 | [目录](https://github.com/LC-space/PyQt6-tutorial/blob/main/README.md) [上一章](https://github.com/LC-space/PyQt6-tutorial/blob/main/First%20programs.md) [下一章](https://github.com/LC-space/PyQt6-tutorial/blob/main/Layout%20management.md)
2 |
3 | # PyQt6中的菜单栏和工具栏
4 |
5 | *最近更新于2021年4月24日*
6 |
7 | 在PyQt6教程的这一部分中,我们将创建状态栏、菜单栏和工具栏。菜单是位于菜单栏中的一组命令。工具栏具有应用程序中一些常用命令的按钮。状态栏显示状态信息,通常位于应用程序窗口的底部。
8 |
9 | ## PyQt6 QMainWindow
10 |
11 | QMainWindow类提供了一个主应用程序窗口。这样就可以创建一个带有状态栏、工具栏和菜单栏的经典应用程序框架。
12 |
13 | ## PyQt6状态栏
14 |
15 | 状态栏是用于显示状态信息的控件。
16 |
17 | ```python
18 | # statusbar.py
19 | #!/usr/bin/python
20 |
21 | """
22 | ZetCode PyQt6 tutorial
23 |
24 | This program creates a statusbar.
25 |
26 | Author: Jan Bodnar
27 | Website: zetcode.com
28 | """
29 |
30 | import sys
31 | from PyQt6.QtWidgets import QMainWindow, QApplication
32 |
33 |
34 | class Example(QMainWindow):
35 |
36 | def __init__(self):
37 | super().__init__()
38 |
39 | self.initUI()
40 |
41 |
42 | def initUI(self):
43 |
44 | self.statusBar().showMessage('Ready')
45 |
46 | self.setGeometry(300, 300, 350, 250)
47 | self.setWindowTitle('Statusbar')
48 | self.show()
49 |
50 |
51 | def main():
52 |
53 | app = QApplication(sys.argv)
54 | ex = Example()
55 | sys.exit(app.exec())
56 |
57 |
58 | if __name__ == '__main__':
59 | main()
60 | ```
61 |
62 | 状态栏是在QMainWindow控件的帮助下创建的。
63 |
64 | ```python
65 | self.statusBar().showMessage('Ready')
66 | ```
67 |
68 | 为了获得状态栏,我们调用QtGui.QMainWindow类的statusBar方法。该方法的第一次调用将创建一个状态栏。随后的调用返回状态栏对象。showMessage在状态栏上显示一条消息。
69 |
70 | ## PyQt6简单的菜单
71 |
72 | 菜单栏是GUI应用程序的常见部分。它是位于各种菜单中的一组命令。(Mac OS对菜单的处理方式不同。要获得类似的结果,我们可以添加以下行:menubar.setNativeMenuBar(False)。
73 |
74 | ```python
75 | # simple_menu.py
76 | #!/usr/bin/python
77 |
78 | """
79 | ZetCode PyQt6 tutorial
80 |
81 | This program creates a menubar. The
82 | menubar has one menu with an exit action.
83 |
84 | Author: Jan Bodnar
85 | Website: zetcode.com
86 | """
87 |
88 | import sys
89 | from PyQt6.QtWidgets import QMainWindow, QApplication
90 | from PyQt6.QtGui import QIcon, QAction
91 |
92 |
93 | class Example(QMainWindow):
94 |
95 | def __init__(self):
96 | super().__init__()
97 |
98 | self.initUI()
99 |
100 |
101 | def initUI(self):
102 |
103 | exitAct = QAction(QIcon('img/exit.png'), '&Exit', self)
104 | exitAct.setShortcut('Ctrl+Q')
105 | exitAct.setStatusTip('Exit application')
106 | exitAct.triggered.connect(QApplication.instance().quit)
107 |
108 | self.statusBar()
109 |
110 | menubar = self.menuBar()
111 | fileMenu = menubar.addMenu('&File')
112 | fileMenu.addAction(exitAct)
113 |
114 | self.setGeometry(300, 300, 350, 250)
115 | self.setWindowTitle('Simple menu')
116 | self.show()
117 |
118 |
119 | def main():
120 |
121 | app = QApplication(sys.argv)
122 | ex = Example()
123 | sys.exit(app.exec())
124 |
125 |
126 | if __name__ == '__main__':
127 | main()
128 | ```
129 |
130 | 在上面的例子中,我们创建了一个只有一个菜单的菜单栏。此菜单包含一个操作,如果选中,该操作将终止应用程序。状态栏也会被创建。该操作可以通过Ctrl+Q快捷键访问。
131 |
132 | ```python
133 | exitAct = QAction(QIcon('img/exit.png'), '&Exit', self)
134 | exitAct.setShortcut('Ctrl+Q')
135 | exitAct.setStatusTip('Exit application')
136 | ```
137 |
138 | QAction是对使用菜单栏、工具栏或自定义键盘快捷键执行的操作的抽象。在上面的三行代码中,我们创建了一个带有特定图标和'Exit'标签的操作。此外,还为该操作定义了一个快捷方式。第三行创建一个状态提示,当我们将鼠标指针悬停在菜单项上时,它将显示在状态栏中。
139 |
140 | ```python
141 | exitAct.triggered.connect(QApplication.instance().quit)
142 | ```
143 |
144 | 当我们选择这个特定的动作时,一个被触发的信号被发射。信号连接到QApplication控件的退出方法。这将终止应用程序。
145 |
146 | ```python
147 | menubar = self.menuBar()
148 | fileMenu = menubar.addMenu('&File')
149 | fileMenu.addAction(exitAct)
150 | ```
151 |
152 | menuBar方法创建一个菜单栏。我们用addMenu创建一个文件菜单,并用addAction添加动作。
153 |
154 | ## PyQt6子菜单
155 |
156 | 子菜单是位于另一个菜单中的菜单。
157 |
158 | ```python
159 | # submenu.py
160 | #!/usr/bin/python
161 |
162 | """
163 | ZetCode PyQt6 tutorial
164 |
165 | This program creates a submenu.
166 |
167 | Author: Jan Bodnar
168 | Website: zetcode.com
169 | """
170 |
171 | import sys
172 | from PyQt6.QtWidgets import QMainWindow, QMenu, QApplication
173 | from PyQt6.QtGui import QAction
174 |
175 |
176 | class Example(QMainWindow):
177 |
178 | def __init__(self):
179 | super().__init__()
180 |
181 | self.initUI()
182 |
183 |
184 | def initUI(self):
185 |
186 | menubar = self.menuBar()
187 | fileMenu = menubar.addMenu('File')
188 |
189 | impMenu = QMenu('Import', self)
190 | impAct = QAction('Import mail', self)
191 | impMenu.addAction(impAct)
192 |
193 | newAct = QAction('New', self)
194 |
195 | fileMenu.addAction(newAct)
196 | fileMenu.addMenu(impMenu)
197 |
198 | self.setGeometry(300, 300, 350, 250)
199 | self.setWindowTitle('Submenu')
200 | self.show()
201 |
202 |
203 | def main():
204 |
205 | app = QApplication(sys.argv)
206 | ex = Example()
207 | sys.exit(app.exec())
208 |
209 |
210 | if __name__ == '__main__':
211 | main()
212 | ```
213 |
214 | 在这个例子中,我们有两个菜单项;一个位于文件菜单,另一个位于文件的导入子菜单。
215 |
216 | ```python
217 | impMenu = QMenu('Import', self)
218 | ```
219 |
220 | 使用QMenu创建新菜单。
221 |
222 | ```python
223 | impAct = QAction('Import mail', self)
224 | impMenu.addAction(impAct)
225 | ```
226 |
227 | 通过addAction向子菜单添加一个操作。
228 |
229 | 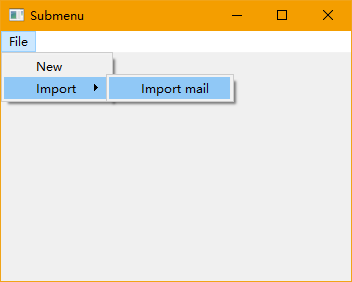
230 |
231 | ## PyQt6可选菜单
232 |
233 | 在下面的示例中,我们创建了一个可以勾选和取消勾选的菜单。
234 |
235 | ```python
236 | # check_menu.py
237 | #!/usr/bin/python
238 |
239 | """
240 | ZetCode PyQt6 tutorial
241 |
242 | This program creates a checkable menu.
243 |
244 | Author: Jan Bodnar
245 | Website: zetcode.com
246 | """
247 |
248 | import sys
249 | from PyQt6.QtWidgets import QMainWindow, QApplication
250 | from PyQt6.QtGui import QAction
251 |
252 |
253 | class Example(QMainWindow):
254 |
255 | def __init__(self):
256 | super().__init__()
257 |
258 | self.initUI()
259 |
260 |
261 | def initUI(self):
262 |
263 | self.statusbar = self.statusBar()
264 | self.statusbar.showMessage('Ready')
265 |
266 | menubar = self.menuBar()
267 | viewMenu = menubar.addMenu('View')
268 |
269 | viewStatAct = QAction('View statusbar', self, checkable=True)
270 | viewStatAct.setStatusTip('View statusbar')
271 | viewStatAct.setChecked(True)
272 | viewStatAct.triggered.connect(self.toggleMenu)
273 |
274 | viewMenu.addAction(viewStatAct)
275 |
276 | self.setGeometry(300, 300, 350, 250)
277 | self.setWindowTitle('Check menu')
278 | self.show()
279 |
280 |
281 | def toggleMenu(self, state):
282 |
283 | if state:
284 | self.statusbar.show()
285 | else:
286 | self.statusbar.hide()
287 |
288 |
289 | def main():
290 |
291 | app = QApplication(sys.argv)
292 | ex = Example()
293 | sys.exit(app.exec())
294 |
295 |
296 | if __name__ == '__main__':
297 | main()
298 | ```
299 |
300 | 代码示例创建了一个可操作的View菜单。该操作显示或隐藏状态栏。当状态栏可见时,菜单项被选中。
301 |
302 | ```python
303 | viewStatAct = QAction('View statusbar', self, checkable=True)
304 | ```
305 |
306 | 使用可勾选选项,我们创建了一个可选菜单。
307 |
308 | ```
309 | viewStatAct.setChecked(True)
310 | ```
311 |
312 | 因为状态栏从一开始就是可见的,所以我们用setChecked方法来勾选这个动作。
313 |
314 | ```python
315 | def toggleMenu(self, state):
316 |
317 | if state:
318 | self.statusbar.show()
319 | else:
320 | self.statusbar.hide()
321 | ```
322 |
323 | 根据操作的状态,显示或隐藏状态栏。
324 |
325 | 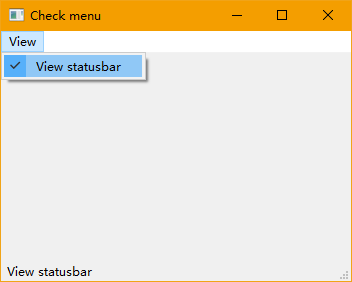
326 |
327 | ## PyQt6上下文菜单
328 |
329 | 上下文菜单,也称为弹出菜单,是出现在某个上下文下的命令列表。例如,在Opera网络浏览器中,当我们右击网页时,我们会得到一个上下文菜单。在这里,我们可以重新加载页面、返回或查看页面源。如果我们右键单击工具栏,我们会得到另一个管理工具栏的上下文菜单。
330 |
331 | ```python
332 | # context_menu.py
333 | #!/usr/bin/python
334 |
335 | """
336 | ZetCode PyQt6 tutorial
337 |
338 | This program creates a context menu.
339 |
340 | Author: Jan Bodnar
341 | Website: zetcode.com
342 | """
343 |
344 | import sys
345 | from PyQt6.QtWidgets import QMainWindow, QMenu, QApplication
346 |
347 |
348 | class Example(QMainWindow):
349 |
350 | def __init__(self):
351 | super().__init__()
352 |
353 | self.initUI()
354 |
355 |
356 | def initUI(self):
357 |
358 | self.setGeometry(300, 300, 350, 250)
359 | self.setWindowTitle('Context menu')
360 | self.show()
361 |
362 |
363 | def contextMenuEvent(self, event):
364 |
365 | cmenu = QMenu(self)
366 |
367 | newAct = cmenu.addAction("New")
368 | openAct = cmenu.addAction("Open")
369 | quitAct = cmenu.addAction("Quit")
370 | action = cmenu.exec(self.mapToGlobal(event.pos()))
371 |
372 | if action == quitAct:
373 | QApplication.instance().quit()
374 |
375 |
376 | def main():
377 |
378 | app = QApplication(sys.argv)
379 | ex = Example()
380 | sys.exit(app.exec())
381 |
382 |
383 | if __name__ == '__main__':
384 | main()
385 | ```
386 |
387 | 要使用上下文菜单,我们必须重新实现contextMenuEvent方法。
388 |
389 | ```python
390 | action = cmenu.exec(self.mapToGlobal(event.pos()))
391 | ```
392 |
393 | 使用exec方法显示上下文菜单。从事件对象获取鼠标指针的坐标。mapToGlobal方法将控件坐标转换为全局屏幕坐标。
394 |
395 | ```python
396 | if action == quitAct:
397 | QApplication.instance().quit()
398 | ```
399 |
400 | 如果从上下文菜单返回的操作等于quit操作,则终止应用程序。
401 |
402 | ## PyQt6工具栏
403 |
404 | 菜单将我们可以在应用程序中使用的所有命令分组。工具栏提供了对最常用命令的快速访问。
405 |
406 | ```python
407 | # toolbar.py
408 | #!/usr/bin/python
409 |
410 | """
411 | ZetCode PyQt6 tutorial
412 |
413 | This program creates a toolbar.
414 | The toolbar has one action, which
415 | terminates the application, if triggered.
416 |
417 | Author: Jan Bodnar
418 | Website: zetcode.com
419 | """
420 |
421 | import sys
422 | from PyQt6.QtWidgets import QMainWindow, QApplication
423 | from PyQt6.QtGui import QIcon, QAction
424 |
425 |
426 | class Example(QMainWindow):
427 |
428 | def __init__(self):
429 | super().__init__()
430 |
431 | self.initUI()
432 |
433 |
434 | def initUI(self):
435 |
436 | exitAct = QAction(QIcon('img/exit.png'), 'Exit', self)
437 | exitAct.setShortcut('Ctrl+Q')
438 | exitAct.triggered.connect(QApplication.instance().quit)
439 |
440 | self.toolbar = self.addToolBar('Exit')
441 | self.toolbar.addAction(exitAct)
442 |
443 | self.setGeometry(300, 300, 350, 250)
444 | self.setWindowTitle('Toolbar')
445 | self.show()
446 |
447 |
448 | def main():
449 |
450 | app = QApplication(sys.argv)
451 | ex = Example()
452 | sys.exit(app.exec())
453 |
454 |
455 | if __name__ == '__main__':
456 | main()
457 | ```
458 |
459 | 在上面的示例中,我们创建了一个简单的工具栏。工具栏有一个工具操作,即当被触发时终止应用程序的退出操作。
460 |
461 | ```python
462 | exitAct = QAction(QIcon('img/exit.png'), 'Exit', self)
463 | exitAct.setShortcut('Ctrl+Q')
464 | exitAct.triggered.connect(QApplication.instance().quit)
465 | ```
466 |
467 | 类似于上面的菜单栏示例,我们创建了一个动作对象。该对象具有标签、图标和快捷方式。QApplication的退出方法连接到触发信号。
468 |
469 | ```python
470 | self.toolbar = self.addToolBar('Exit')
471 | self.toolbar.addAction(exitAction)
472 | ```
473 |
474 | 工具栏是使用addToolBar方法创建的。我们通过addAction向工具栏添加一个动作对象。
475 |
476 | 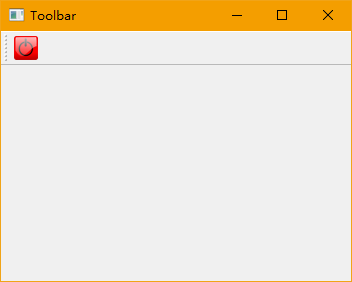
477 |
478 | ## PyQt6主窗口
479 |
480 | 在本节的最后一个示例中,我们将创建一个菜单栏、工具栏和状态栏。我们还创建了一个中心控件。
481 |
482 | ```python
483 | # main_window.py
484 | #!/usr/bin/python
485 |
486 | """
487 | ZetCode PyQt6 tutorial
488 |
489 | This program creates a skeleton of
490 | a classic GUI application with a menubar,
491 | toolbar, statusbar, and a central widget.
492 |
493 | Author: Jan Bodnar
494 | Website: zetcode.com
495 | """
496 |
497 | import sys
498 | from PyQt6.QtWidgets import QMainWindow, QTextEdit, QApplication
499 | from PyQt6.QtGui import QIcon, QAction
500 |
501 |
502 | class Example(QMainWindow):
503 |
504 | def __init__(self):
505 | super().__init__()
506 |
507 | self.initUI()
508 |
509 |
510 | def initUI(self):
511 |
512 | textEdit = QTextEdit()
513 | self.setCentralWidget(textEdit)
514 |
515 | exitAct = QAction(QIcon('img/exit.png'), 'Exit', self)
516 | exitAct.setShortcut('Ctrl+Q')
517 | exitAct.setStatusTip('Exit application')
518 | exitAct.triggered.connect(self.close)
519 |
520 | self.statusBar()
521 |
522 | menubar = self.menuBar()
523 | fileMenu = menubar.addMenu('&File')
524 | fileMenu.addAction(exitAct)
525 |
526 | toolbar = self.addToolBar('Exit')
527 | toolbar.addAction(exitAct)
528 |
529 | self.setGeometry(300, 300, 350, 250)
530 | self.setWindowTitle('Main window')
531 | self.show()
532 |
533 |
534 | def main():
535 |
536 | app = QApplication(sys.argv)
537 | ex = Example()
538 | sys.exit(app.exec())
539 |
540 |
541 | if __name__ == '__main__':
542 | main()
543 | ```
544 |
545 | 这个代码示例创建了一个带有菜单栏、工具栏和状态栏的经典GUI应用程序的框架。
546 |
547 | ```python
548 | textEdit = QTextEdit()
549 | self.setCentralWidget(textEdit)
550 | ```
551 |
552 | 这里我们创建了一个文本编辑控件。我们将它设置为QMainWindow的中心控件。中央控件会占用所有剩余的空间。
553 |
554 | 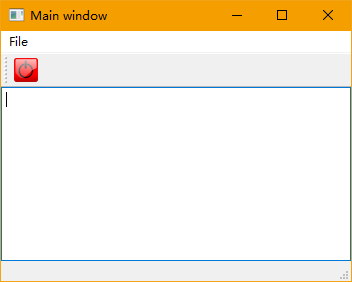
555 |
556 | 在PyQt6教程的这一部分中,我们使用了菜单、工具栏、状态栏和主应用程序窗口。
557 |
558 | [目录](https://github.com/LC-space/PyQt6-tutorial/blob/main/README.md) [上一章](https://github.com/LC-space/PyQt6-tutorial/blob/main/First%20programs.md) [下一章](https://github.com/LC-space/PyQt6-tutorial/blob/main/Layout%20management.md)
559 |
560 |
--------------------------------------------------------------------------------
/Menus and toolbars/check_menu.py:
--------------------------------------------------------------------------------
1 | # check_menu.py
2 | #!/usr/bin/python
3 |
4 | """
5 | ZetCode PyQt6 tutorial
6 |
7 | This program creates a checkable menu.
8 |
9 | Author: Jan Bodnar
10 | Website: zetcode.com
11 | """
12 |
13 | import sys
14 | from PyQt6.QtWidgets import QMainWindow, QApplication
15 | from PyQt6.QtGui import QAction
16 |
17 |
18 | class Example(QMainWindow):
19 |
20 | def __init__(self):
21 | super().__init__()
22 |
23 | self.initUI()
24 |
25 |
26 | def initUI(self):
27 |
28 | self.statusbar = self.statusBar()
29 | self.statusbar.showMessage('Ready')
30 |
31 | menubar = self.menuBar()
32 | viewMenu = menubar.addMenu('View')
33 |
34 | viewStatAct = QAction('View statusbar', self, checkable=True)
35 | viewStatAct.setStatusTip('View statusbar')
36 | viewStatAct.setChecked(True)
37 | viewStatAct.triggered.connect(self.toggleMenu)
38 |
39 | viewMenu.addAction(viewStatAct)
40 |
41 | self.setGeometry(300, 300, 350, 250)
42 | self.setWindowTitle('Check menu')
43 | self.show()
44 |
45 |
46 | def toggleMenu(self, state):
47 |
48 | if state:
49 | self.statusbar.show()
50 | else:
51 | self.statusbar.hide()
52 |
53 |
54 | def main():
55 |
56 | app = QApplication(sys.argv)
57 | ex = Example()
58 | sys.exit(app.exec())
59 |
60 |
61 | if __name__ == '__main__':
62 | main()
--------------------------------------------------------------------------------
/Menus and toolbars/context_menu.py:
--------------------------------------------------------------------------------
1 | # context_menu.py
2 | #!/usr/bin/python
3 |
4 | """
5 | ZetCode PyQt6 tutorial
6 |
7 | This program creates a context menu.
8 |
9 | Author: Jan Bodnar
10 | Website: zetcode.com
11 | """
12 |
13 | import sys
14 | from PyQt6.QtWidgets import QMainWindow, QMenu, QApplication
15 |
16 |
17 | class Example(QMainWindow):
18 |
19 | def __init__(self):
20 | super().__init__()
21 |
22 | self.initUI()
23 |
24 |
25 | def initUI(self):
26 |
27 | self.setGeometry(300, 300, 350, 250)
28 | self.setWindowTitle('Context menu')
29 | self.show()
30 |
31 |
32 | def contextMenuEvent(self, event):
33 |
34 | cmenu = QMenu(self)
35 |
36 | newAct = cmenu.addAction("New")
37 | openAct = cmenu.addAction("Open")
38 | quitAct = cmenu.addAction("Quit")
39 | action = cmenu.exec(self.mapToGlobal(event.pos()))
40 |
41 | if action == quitAct:
42 | QApplication.instance().quit()
43 |
44 |
45 | def main():
46 |
47 | app = QApplication(sys.argv)
48 | ex = Example()
49 | sys.exit(app.exec())
50 |
51 |
52 | if __name__ == '__main__':
53 | main()
--------------------------------------------------------------------------------
/Menus and toolbars/img/exit.png:
--------------------------------------------------------------------------------
https://raw.githubusercontent.com/LC-space/PyQt6-tutorial/b684346d01e667cf855c69058bbb13f2bd2c6762/Menus and toolbars/img/exit.png
--------------------------------------------------------------------------------
/Menus and toolbars/img/image-20210613210325588.png:
--------------------------------------------------------------------------------
https://raw.githubusercontent.com/LC-space/PyQt6-tutorial/b684346d01e667cf855c69058bbb13f2bd2c6762/Menus and toolbars/img/image-20210613210325588.png
--------------------------------------------------------------------------------
/Menus and toolbars/img/image-20210613211050889.png:
--------------------------------------------------------------------------------
https://raw.githubusercontent.com/LC-space/PyQt6-tutorial/b684346d01e667cf855c69058bbb13f2bd2c6762/Menus and toolbars/img/image-20210613211050889.png
--------------------------------------------------------------------------------
/Menus and toolbars/img/image-20210613220040127.png:
--------------------------------------------------------------------------------
https://raw.githubusercontent.com/LC-space/PyQt6-tutorial/b684346d01e667cf855c69058bbb13f2bd2c6762/Menus and toolbars/img/image-20210613220040127.png
--------------------------------------------------------------------------------
/Menus and toolbars/img/image-20210613220448187.png:
--------------------------------------------------------------------------------
https://raw.githubusercontent.com/LC-space/PyQt6-tutorial/b684346d01e667cf855c69058bbb13f2bd2c6762/Menus and toolbars/img/image-20210613220448187.png
--------------------------------------------------------------------------------
/Menus and toolbars/main_window.py:
--------------------------------------------------------------------------------
1 | # main_window.py
2 | #!/usr/bin/python
3 |
4 | """
5 | ZetCode PyQt6 tutorial
6 |
7 | This program creates a skeleton of
8 | a classic GUI application with a menubar,
9 | toolbar, statusbar, and a central widget.
10 |
11 | Author: Jan Bodnar
12 | Website: zetcode.com
13 | """
14 |
15 | import sys
16 | from PyQt6.QtWidgets import QMainWindow, QTextEdit, QApplication
17 | from PyQt6.QtGui import QIcon, QAction
18 |
19 |
20 | class Example(QMainWindow):
21 |
22 | def __init__(self):
23 | super().__init__()
24 |
25 | self.initUI()
26 |
27 |
28 | def initUI(self):
29 |
30 | textEdit = QTextEdit()
31 | self.setCentralWidget(textEdit)
32 |
33 | exitAct = QAction(QIcon('img/exit.png'), 'Exit', self)
34 | exitAct.setShortcut('Ctrl+Q')
35 | exitAct.setStatusTip('Exit application')
36 | exitAct.triggered.connect(self.close)
37 |
38 | self.statusBar()
39 |
40 | menubar = self.menuBar()
41 | fileMenu = menubar.addMenu('&File')
42 | fileMenu.addAction(exitAct)
43 |
44 | toolbar = self.addToolBar('Exit')
45 | toolbar.addAction(exitAct)
46 |
47 | self.setGeometry(300, 300, 350, 250)
48 | self.setWindowTitle('Main window')
49 | self.show()
50 |
51 |
52 | def main():
53 |
54 | app = QApplication(sys.argv)
55 | ex = Example()
56 | sys.exit(app.exec())
57 |
58 |
59 | if __name__ == '__main__':
60 | main()
--------------------------------------------------------------------------------
/Menus and toolbars/simple_menu.py:
--------------------------------------------------------------------------------
1 | # simple_menu.py
2 | #!/usr/bin/python
3 |
4 | """
5 | ZetCode PyQt6 tutorial
6 |
7 | This program creates a menubar. The
8 | menubar has one menu with an exit action.
9 |
10 | Author: Jan Bodnar
11 | Website: zetcode.com
12 | """
13 |
14 | import sys
15 | from PyQt6.QtWidgets import QMainWindow, QApplication
16 | from PyQt6.QtGui import QIcon, QAction
17 |
18 |
19 | class Example(QMainWindow):
20 |
21 | def __init__(self):
22 | super().__init__()
23 |
24 | self.initUI()
25 |
26 |
27 | def initUI(self):
28 |
29 | exitAct = QAction(QIcon('img/exit.png'), '&Exit', self)
30 | exitAct.setShortcut('Ctrl+Q')
31 | exitAct.setStatusTip('Exit application')
32 | exitAct.triggered.connect(QApplication.instance().quit)
33 |
34 | self.statusBar()
35 |
36 | menubar = self.menuBar()
37 | fileMenu = menubar.addMenu('&File')
38 | fileMenu.addAction(exitAct)
39 |
40 | self.setGeometry(300, 300, 350, 250)
41 | self.setWindowTitle('Simple menu')
42 | self.show()
43 |
44 |
45 | def main():
46 |
47 | app = QApplication(sys.argv)
48 | ex = Example()
49 | sys.exit(app.exec())
50 |
51 |
52 | if __name__ == '__main__':
53 | main()
--------------------------------------------------------------------------------
/Menus and toolbars/statusbar.py:
--------------------------------------------------------------------------------
1 | # statusbar.py
2 | #!/usr/bin/python
3 |
4 | """
5 | ZetCode PyQt6 tutorial
6 |
7 | This program creates a statusbar.
8 |
9 | Author: Jan Bodnar
10 | Website: zetcode.com
11 | """
12 |
13 | import sys
14 | from PyQt6.QtWidgets import QMainWindow, QApplication
15 |
16 |
17 | class Example(QMainWindow):
18 |
19 | def __init__(self):
20 | super().__init__()
21 |
22 | self.initUI()
23 |
24 |
25 | def initUI(self):
26 |
27 | self.statusBar().showMessage('Ready')
28 |
29 | self.setGeometry(300, 300, 350, 250)
30 | self.setWindowTitle('Statusbar')
31 | self.show()
32 |
33 |
34 | def main():
35 |
36 | app = QApplication(sys.argv)
37 | ex = Example()
38 | sys.exit(app.exec())
39 |
40 |
41 | if __name__ == '__main__':
42 | main()
--------------------------------------------------------------------------------
/Menus and toolbars/submenu.py:
--------------------------------------------------------------------------------
1 | # submenu.py
2 | #!/usr/bin/python
3 |
4 | """
5 | ZetCode PyQt6 tutorial
6 |
7 | This program creates a submenu.
8 |
9 | Author: Jan Bodnar
10 | Website: zetcode.com
11 | """
12 |
13 | import sys
14 | from PyQt6.QtWidgets import QMainWindow, QMenu, QApplication
15 | from PyQt6.QtGui import QAction
16 |
17 |
18 | class Example(QMainWindow):
19 |
20 | def __init__(self):
21 | super().__init__()
22 |
23 | self.initUI()
24 |
25 |
26 | def initUI(self):
27 |
28 | menubar = self.menuBar()
29 | fileMenu = menubar.addMenu('File')
30 |
31 | impMenu = QMenu('Import', self)
32 | impAct = QAction('Import mail', self)
33 | impMenu.addAction(impAct)
34 |
35 | newAct = QAction('New', self)
36 |
37 | fileMenu.addAction(newAct)
38 | fileMenu.addMenu(impMenu)
39 |
40 | self.setGeometry(300, 300, 350, 250)
41 | self.setWindowTitle('Submenu')
42 | self.show()
43 |
44 |
45 | def main():
46 |
47 | app = QApplication(sys.argv)
48 | ex = Example()
49 | sys.exit(app.exec())
50 |
51 |
52 | if __name__ == '__main__':
53 | main()
--------------------------------------------------------------------------------
/Menus and toolbars/toolbar.py:
--------------------------------------------------------------------------------
1 | # toolbar.py
2 | #!/usr/bin/python
3 |
4 | """
5 | ZetCode PyQt6 tutorial
6 |
7 | This program creates a toolbar.
8 | The toolbar has one action, which
9 | terminates the application, if triggered.
10 |
11 | Author: Jan Bodnar
12 | Website: zetcode.com
13 | """
14 |
15 | import sys
16 | from PyQt6.QtWidgets import QMainWindow, QApplication
17 | from PyQt6.QtGui import QIcon, QAction
18 |
19 |
20 | class Example(QMainWindow):
21 |
22 | def __init__(self):
23 | super().__init__()
24 |
25 | self.initUI()
26 |
27 |
28 | def initUI(self):
29 |
30 | exitAct = QAction(QIcon('img/exit.png'), 'Exit', self)
31 | exitAct.setShortcut('Ctrl+Q')
32 | exitAct.triggered.connect(QApplication.instance().quit)
33 |
34 | self.toolbar = self.addToolBar('Exit')
35 | self.toolbar.addAction(exitAct)
36 |
37 | self.setGeometry(300, 300, 350, 250)
38 | self.setWindowTitle('Toolbar')
39 | self.show()
40 |
41 |
42 | def main():
43 |
44 | app = QApplication(sys.argv)
45 | ex = Example()
46 | sys.exit(app.exec())
47 |
48 |
49 | if __name__ == '__main__':
50 | main()
--------------------------------------------------------------------------------
/Painting.md:
--------------------------------------------------------------------------------
1 | [目录](https://github.com/LC-space/PyQt6-tutorial/blob/main/README.md) [上一章](https://github.com/LC-space/PyQt6-tutorial/blob/main/Drag%20%26%20drop.md) [下一章](https://github.com/LC-space/PyQt6-tutorial/blob/main/Custom%20widgets.md)
2 |
3 | # PyQt6中的绘图
4 |
5 | *最近更新于2021年5月15日*
6 |
7 | PyQt6绘图系统能够渲染矢量图形、图像和基于轮廓字体的文本。当我们想要更改或增强现有的控件,或者从头创建自定义控件时,在应用程序中需要绘图。为了绘图,我们使用PyQt6工具箱提供的绘图API。
8 |
9 | ## QPainter
10 |
11 | QPainter在控件和其他绘图设备上执行低级绘图。从简单的线条到复杂的形状,它都能画。
12 |
13 | ## paintEvent方法
14 |
15 | 绘图是在paintEvent方法中完成的。绘图代码放置在QPainter对象的开始和结束方法之间。它在控件和其他绘图设备上执行低级绘图。
16 |
17 | ## PyQt6绘制文本
18 |
19 | 我们首先在窗口的客户端区域绘制一些Unicode文本。
20 |
21 | ```python
22 | # draw_text.py
23 | # #!/usr/bin/python
24 |
25 | """
26 | ZetCode PyQt6 tutorial
27 |
28 | In this example, we draw text in Russian Cylliric.
29 |
30 | Author: Jan Bodnar
31 | Website: zetcode.com
32 | """
33 |
34 | import sys
35 | from PyQt6.QtWidgets import QWidget, QApplication
36 | from PyQt6.QtGui import QPainter, QColor, QFont
37 | from PyQt6.QtCore import Qt
38 |
39 |
40 | class Example(QWidget):
41 |
42 | def __init__(self):
43 | super().__init__()
44 |
45 | self.initUI()
46 |
47 |
48 | def initUI(self):
49 |
50 | self.text = "Лев Николаевич Толстой\nАнна Каренина"
51 |
52 | self.setGeometry(300, 300, 350, 300)
53 | self.setWindowTitle('Drawing text')
54 | self.show()
55 |
56 |
57 | def paintEvent(self, event):
58 |
59 | qp = QPainter()
60 | qp.begin(self)
61 | self.drawText(event, qp)
62 | qp.end()
63 |
64 |
65 | def drawText(self, event, qp):
66 |
67 | qp.setPen(QColor(168, 34, 3))
68 | qp.setFont(QFont('Decorative', 10))
69 | qp.drawText(event.rect(), Qt.AlignmentFlag.AlignCenter, self.text)
70 |
71 |
72 | def main():
73 |
74 | app = QApplication(sys.argv)
75 | ex = Example()
76 | sys.exit(app.exec())
77 |
78 |
79 | if __name__ == '__main__':
80 | main()
81 | ```
82 |
83 | 在我们的示例中,我们用西利克语绘制一些文本。文本是垂直和水平对齐的。
84 |
85 | ```python
86 | def paintEvent(self, event):
87 | ...
88 | ```
89 |
90 | 绘图是在绘制事件中完成的。
91 |
92 | ```python
93 | qp = QPainter()
94 | qp.begin(self)
95 | self.drawText(event, qp)
96 | qp.end()
97 | ```
98 |
99 | QPainter类负责所有低级的绘制。所有的绘图方法都在开始方法和结束方法之间。实际的绘图被委托给drawText方法。
100 |
101 | ```python
102 | qp.setPen(QColor(168, 34, 3))
103 | qp.setFont(QFont('Decorative', 10))
104 | ```
105 |
106 | 在这里,我们定义了用于绘制文本的钢笔和字体。
107 |
108 | ```python
109 | qp.drawText(event.rect(), Qt.AlignmentFlag.AlignCenter, self.text)
110 | ```
111 |
112 | drawText方法在窗口上绘制文本。paint事件的rect方法返回需要更新的矩形。使用Qt.AlignmentFlag.Aligncenter,我们在两个维度上对齐文本。
113 |
114 | 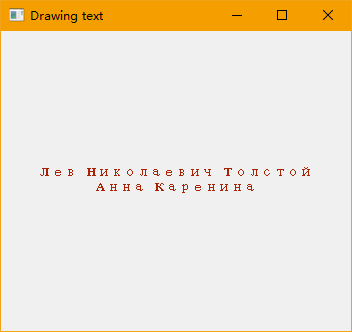
115 |
116 | ## PyQt6画点
117 |
118 | 点是可以绘制的最简单的图形对象。它是窗口上的一个小点。
119 |
120 | ```python
121 | # draw_points.py
122 | #!/usr/bin/python
123 |
124 | """
125 | ZetCode PyQt6 tutorial
126 |
127 | In the example, we draw randomly 1000 red points
128 | on the window.
129 |
130 | Author: Jan Bodnar
131 | Website: zetcode.com
132 | """
133 |
134 | from PyQt6.QtWidgets import QWidget, QApplication
135 | from PyQt6.QtGui import QPainter
136 | from PyQt6.QtCore import Qt
137 | import sys, random
138 |
139 |
140 | class Example(QWidget):
141 |
142 | def __init__(self):
143 | super().__init__()
144 |
145 | self.initUI()
146 |
147 |
148 | def initUI(self):
149 |
150 | self.setMinimumSize(50, 50)
151 | self.setGeometry(300, 300, 350, 300)
152 | self.setWindowTitle('Points')
153 | self.show()
154 |
155 |
156 | def paintEvent(self, e):
157 |
158 | qp = QPainter()
159 | qp.begin(self)
160 | self.drawPoints(qp)
161 | qp.end()
162 |
163 |
164 | def drawPoints(self, qp):
165 |
166 | qp.setPen(Qt.GlobalColor.red)
167 | size = self.size()
168 |
169 | for i in range(1000):
170 |
171 | x = random.randint(1, size.width() - 1)
172 | y = random.randint(1, size.height() - 1)
173 | qp.drawPoint(x, y)
174 |
175 |
176 | def main():
177 |
178 | app = QApplication(sys.argv)
179 | ex = Example()
180 | sys.exit(app.exec())
181 |
182 |
183 | if __name__ == '__main__':
184 | main()
185 | ```
186 |
187 | 在我们的示例中,我们在窗口的客户端区域随机绘制1000个红色点。
188 |
189 | ```python
190 | qp.setPen(Qt.GlobalColor.red)
191 | ```
192 |
193 | 我们把钢笔调成红色。我们使用一个预定义的Qt.GlobalColor.red颜色常量。
194 |
195 | ```python
196 | size = self.size()
197 | ```
198 |
199 | 每次我们调整窗口的大小,就会生成一个绘制事件。我们通过size方法获得窗口的当前大小。我们使用窗口的大小来分配所有的点在窗口的客户区域。
200 |
201 | ```python
202 | qp.drawPoint(x, y)
203 | ```
204 |
205 | 我们用drawPoint方法绘制这个点。
206 |
207 | 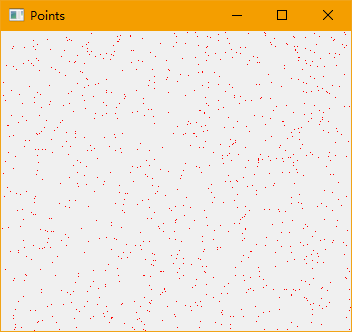
208 |
209 | ## PyQt6颜色
210 |
211 | 颜色是表示红、绿、蓝(RGB)强度值组合的对象。有效的RGB值范围是0到255。我们可以用不同的方法定义一种颜色。最常见的是RGB十进制值或十六进制值。我们也可以使用RGBA值来代表红色、绿色、蓝色和Alpha。这里我们添加了一些关于透明度的额外信息。Alpha值255定义完全不透明度,0表示完全透明,例如颜色是不可见的。
212 |
213 | ```python
214 | # colours.py
215 | #!/usr/bin/python
216 |
217 | """
218 | ZetCode PyQt6 tutorial
219 |
220 | This example draws three rectangles in three
221 | different colours.
222 |
223 | Author: Jan Bodnar
224 | Website: zetcode.com
225 | """
226 |
227 | from PyQt6.QtWidgets import QWidget, QApplication
228 | from PyQt6.QtGui import QPainter, QColor
229 | import sys
230 |
231 |
232 | class Example(QWidget):
233 |
234 | def __init__(self):
235 | super().__init__()
236 |
237 | self.initUI()
238 |
239 |
240 | def initUI(self):
241 |
242 | self.setGeometry(300, 300, 350, 100)
243 | self.setWindowTitle('Colours')
244 | self.show()
245 |
246 |
247 | def paintEvent(self, e):
248 |
249 | qp = QPainter()
250 | qp.begin(self)
251 | self.drawRectangles(qp)
252 | qp.end()
253 |
254 |
255 | def drawRectangles(self, qp):
256 |
257 | col = QColor(0, 0, 0)
258 | col.setNamedColor('#d4d4d4')
259 | qp.setPen(col)
260 |
261 | qp.setBrush(QColor(200, 0, 0))
262 | qp.drawRect(10, 15, 90, 60)
263 |
264 | qp.setBrush(QColor(255, 80, 0, 160))
265 | qp.drawRect(130, 15, 90, 60)
266 |
267 | qp.setBrush(QColor(25, 0, 90, 200))
268 | qp.drawRect(250, 15, 90, 60)
269 |
270 |
271 | def main():
272 |
273 | app = QApplication(sys.argv)
274 | ex = Example()
275 | sys.exit(app.exec())
276 |
277 |
278 | if __name__ == '__main__':
279 | main()
280 | ```
281 |
282 | 在我们的例子中,我们绘制了三个彩色矩形。
283 |
284 | ```python
285 | color = QColor(0, 0, 0)
286 | color.setNamedColor('#d4d4d4')
287 | ```
288 |
289 | 这里我们使用十六进制表示法定义颜色。
290 |
291 | ```python
292 | qp.setBrush(QColor(200, 0, 0))
293 | qp.drawRect(10, 15, 90, 60)
294 | ```
295 |
296 | 这里我们定义一个画笔并绘制一个矩形。笔刷是一种基本的图形对象,用于绘制形状的背景。drawRect方法接受四个参数。前两个是轴上的x和y值。第三和第四个参数是矩形的宽度和高度。该方法使用当前的钢笔和画笔绘制矩形。
297 |
298 | 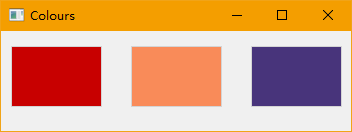
299 |
300 | ## PyQt6 QPen
301 |
302 | QPen是一个基本的图形对象。它用于绘制直线、曲线和矩形、椭圆、多边形或其他形状的轮廓。
303 |
304 | ```python
305 | # pens.py
306 | #!/usr/bin/python
307 |
308 | """
309 | ZetCode PyQt6 tutorial
310 |
311 | In this example we draw 6 lines using
312 | different pen styles.
313 |
314 | Author: Jan Bodnar
315 | Website: zetcode.com
316 | """
317 |
318 | from PyQt6.QtWidgets import QWidget, QApplication
319 | from PyQt6.QtGui import QPainter, QPen
320 | from PyQt6.QtCore import Qt
321 | import sys
322 |
323 |
324 | class Example(QWidget):
325 |
326 | def __init__(self):
327 | super().__init__()
328 |
329 | self.initUI()
330 |
331 |
332 | def initUI(self):
333 |
334 | self.setGeometry(300, 300, 280, 270)
335 | self.setWindowTitle('Pen styles')
336 | self.show()
337 |
338 |
339 | def paintEvent(self, e):
340 |
341 | qp = QPainter()
342 | qp.begin(self)
343 | self.drawLines(qp)
344 | qp.end()
345 |
346 |
347 | def drawLines(self, qp):
348 |
349 | pen = QPen(Qt.GlobalColor.black, 2, Qt.PenStyle.SolidLine)
350 |
351 | qp.setPen(pen)
352 | qp.drawLine(20, 40, 250, 40)
353 |
354 | pen.setStyle(Qt.PenStyle.DashLine)
355 | qp.setPen(pen)
356 | qp.drawLine(20, 80, 250, 80)
357 |
358 | pen.setStyle(Qt.PenStyle.DashDotLine)
359 | qp.setPen(pen)
360 | qp.drawLine(20, 120, 250, 120)
361 |
362 | pen.setStyle(Qt.PenStyle.DotLine)
363 | qp.setPen(pen)
364 | qp.drawLine(20, 160, 250, 160)
365 |
366 | pen.setStyle(Qt.PenStyle.DashDotDotLine)
367 | qp.setPen(pen)
368 | qp.drawLine(20, 200, 250, 200)
369 |
370 | pen.setStyle(Qt.PenStyle.CustomDashLine)
371 | pen.setDashPattern([1, 4, 5, 4])
372 | qp.setPen(pen)
373 | qp.drawLine(20, 240, 250, 240)
374 |
375 |
376 | def main():
377 |
378 | app = QApplication(sys.argv)
379 | ex = Example()
380 | sys.exit(app.exec())
381 |
382 |
383 | if __name__ == '__main__':
384 | main()
385 | ```
386 |
387 | 在我们的例子中,我们画了六条线。这些线条有六种不同的笔法。有五种预定义的钢笔风格。我们也可以创建自定义的钢笔样式。最后一条线是使用自定义钢笔风格绘制的。
388 |
389 | ```python
390 | pen = QPen(Qt.GlobalColor.black, 2, Qt.PenStyle.SolidLine)
391 | ```
392 |
393 | 我们创建一个QPen对象。颜色是黑色的。宽度设置为2像素,以便我们可以看到钢笔风格之间的差异。solidline是预定义的钢笔样式之一。
394 |
395 | ```python
396 | pen.setStyle(Qt.PenStyle.CustomDashLine)
397 | pen.setDashPattern([1, 4, 5, 4])
398 | qp.setPen(pen)
399 | ```
400 |
401 | 这里我们定义了一个自定义的钢笔样式。我们设置一个Qt.PenStyle.CustomDashLine钢笔样式,并调用setDashPattern方法。数字列表定义了一种风格。必须有偶数个数字。奇数定义破折号,偶数定义空格。数字越大,空格或破折号就越大。我们的图案是1px短划,4px间距,5px短划,4px间距等等。
402 |
403 | 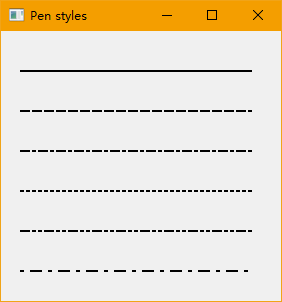
404 |
405 | ## PyQt6 QBrush
406 |
407 | QBrush是一个基本的图形对象。它用于绘制图形形状的背景,如矩形、椭圆或多边形。一个笔刷可以有三种不同的类型:一个预定义的笔刷,一个渐变,或者一个纹理模式。
408 |
409 | ```python
410 | # brushes.py
411 | #!/usr/bin/python
412 |
413 | """
414 | ZetCode PyQt6 tutorial
415 |
416 | This example draws nine rectangles in different
417 | brush styles.
418 |
419 | Author: Jan Bodnar
420 | Website: zetcode.com
421 | """
422 |
423 | from PyQt6.QtWidgets import QWidget, QApplication
424 | from PyQt6.QtGui import QPainter, QBrush
425 | from PyQt6.QtCore import Qt
426 | import sys
427 |
428 |
429 | class Example(QWidget):
430 |
431 | def __init__(self):
432 | super().__init__()
433 |
434 | self.initUI()
435 |
436 |
437 | def initUI(self):
438 |
439 | self.setGeometry(300, 300, 355, 280)
440 | self.setWindowTitle('Brushes')
441 | self.show()
442 |
443 |
444 | def paintEvent(self, e):
445 |
446 | qp = QPainter()
447 | qp.begin(self)
448 | self.drawBrushes(qp)
449 | qp.end()
450 |
451 |
452 | def drawBrushes(self, qp):
453 |
454 | brush = QBrush(Qt.BrushStyle.SolidPattern)
455 | qp.setBrush(brush)
456 | qp.drawRect(10, 15, 90, 60)
457 |
458 | brush.setStyle(Qt.BrushStyle.Dense1Pattern)
459 | qp.setBrush(brush)
460 | qp.drawRect(130, 15, 90, 60)
461 |
462 | brush.setStyle(Qt.BrushStyle.Dense2Pattern)
463 | qp.setBrush(brush)
464 | qp.drawRect(250, 15, 90, 60)
465 |
466 | brush.setStyle(Qt.BrushStyle.DiagCrossPattern)
467 | qp.setBrush(brush)
468 | qp.drawRect(10, 105, 90, 60)
469 |
470 | brush.setStyle(Qt.BrushStyle.Dense5Pattern)
471 | qp.setBrush(brush)
472 | qp.drawRect(130, 105, 90, 60)
473 |
474 | brush.setStyle(Qt.BrushStyle.Dense6Pattern)
475 | qp.setBrush(brush)
476 | qp.drawRect(250, 105, 90, 60)
477 |
478 | brush.setStyle(Qt.BrushStyle.HorPattern)
479 | qp.setBrush(brush)
480 | qp.drawRect(10, 195, 90, 60)
481 |
482 | brush.setStyle(Qt.BrushStyle.VerPattern)
483 | qp.setBrush(brush)
484 | qp.drawRect(130, 195, 90, 60)
485 |
486 | brush.setStyle(Qt.BrushStyle.BDiagPattern)
487 | qp.setBrush(brush)
488 | qp.drawRect(250, 195, 90, 60)
489 |
490 |
491 | def main():
492 |
493 | app = QApplication(sys.argv)
494 | ex = Example()
495 | sys.exit(app.exec())
496 |
497 |
498 | if __name__ == '__main__':
499 | main()
500 | ```
501 |
502 | 在我们的例子中,我们画了9个不同的矩形。
503 |
504 | ```python
505 | brush = QBrush(Qt.BrushStyle.SolidPattern)
506 | qp.setBrush(brush)
507 | qp.drawRect(10, 15, 90, 60)
508 | ```
509 |
510 | 我们定义一个画笔对象。我们将其设置为画家对象,并通过调用drawRect方法绘制矩形。
511 |
512 | 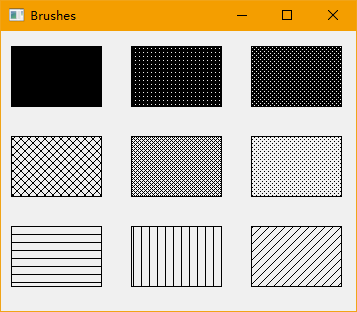
513 |
514 | ## 贝塞尔曲线
515 |
516 | 贝塞尔曲线是一条三次直线。可以使用QPainterPath创建PyQt6中的贝塞尔曲线。画家路径是由许多图形构建块(如矩形、椭圆、直线和曲线)组成的对象。
517 |
518 | ```python
519 | # bezier_curve.py
520 | #!/usr/bin/python
521 |
522 | """
523 | ZetCode PyQt6 tutorial
524 |
525 | This program draws a Bézier curve with
526 | QPainterPath.
527 |
528 | Author: Jan Bodnar
529 | Website: zetcode.com
530 | """
531 |
532 | import sys
533 |
534 | from PyQt6.QtGui import QPainter, QPainterPath
535 | from PyQt6.QtWidgets import QWidget, QApplication
536 |
537 |
538 | class Example(QWidget):
539 |
540 | def __init__(self):
541 | super().__init__()
542 |
543 | self.initUI()
544 |
545 |
546 | def initUI(self):
547 |
548 | self.setGeometry(300, 300, 380, 250)
549 | self.setWindowTitle('Bézier curve')
550 | self.show()
551 |
552 |
553 | def paintEvent(self, e):
554 |
555 | qp = QPainter()
556 | qp.begin(self)
557 | qp.setRenderHint(QPainter.RenderHint.Antialiasing)
558 | self.drawBezierCurve(qp)
559 | qp.end()
560 |
561 |
562 | def drawBezierCurve(self, qp):
563 |
564 | path = QPainterPath()
565 | path.moveTo(30, 30)
566 | path.cubicTo(30, 30, 200, 350, 350, 30)
567 |
568 | qp.drawPath(path)
569 |
570 |
571 | def main():
572 |
573 | app = QApplication(sys.argv)
574 | ex = Example()
575 | sys.exit(app.exec())
576 |
577 |
578 | if __name__ == '__main__':
579 | main()
580 | ```
581 |
582 | 这个例子绘制了一个贝塞尔曲线。
583 |
584 | ```python
585 | path = QPainterPath()
586 | path.moveTo(30, 30)
587 | path.cubicTo(30, 30, 200, 350, 350, 30)
588 | ```
589 |
590 | 我们使用QPainterPath路径创建了一个贝塞尔曲线。这条曲线是用cubicTo方法创建的,它取三个点:起点、控制点和终点。
591 |
592 | ```python
593 | qp.drawPath(path)
594 | ```
595 |
596 | 最终的路径是用drawPath方法绘制的。
597 |
598 | 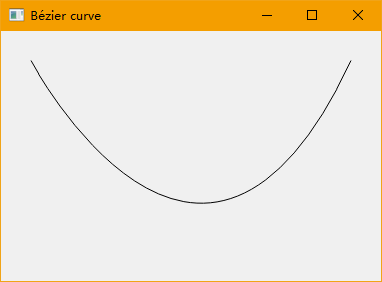
599 |
600 | 在PyQt6教程的这一部分中,我们做了一些基本的绘画。
601 |
602 | [目录](https://github.com/LC-space/PyQt6-tutorial/blob/main/README.md) [上一章](https://github.com/LC-space/PyQt6-tutorial/blob/main/Drag%20%26%20drop.md) [下一章](https://github.com/LC-space/PyQt6-tutorial/blob/main/Custom%20widgets.md)
--------------------------------------------------------------------------------
/Painting/bezier_curve.py:
--------------------------------------------------------------------------------
1 | # bezier_curve.py
2 | #!/usr/bin/python
3 |
4 | """
5 | ZetCode PyQt6 tutorial
6 |
7 | This program draws a Bézier curve with
8 | QPainterPath.
9 |
10 | Author: Jan Bodnar
11 | Website: zetcode.com
12 | """
13 |
14 | import sys
15 |
16 | from PyQt6.QtGui import QPainter, QPainterPath
17 | from PyQt6.QtWidgets import QWidget, QApplication
18 |
19 |
20 | class Example(QWidget):
21 |
22 | def __init__(self):
23 | super().__init__()
24 |
25 | self.initUI()
26 |
27 |
28 | def initUI(self):
29 |
30 | self.setGeometry(300, 300, 380, 250)
31 | self.setWindowTitle('Bézier curve')
32 | self.show()
33 |
34 |
35 | def paintEvent(self, e):
36 |
37 | qp = QPainter()
38 | qp.begin(self)
39 | qp.setRenderHint(QPainter.RenderHint.Antialiasing)
40 | self.drawBezierCurve(qp)
41 | qp.end()
42 |
43 |
44 | def drawBezierCurve(self, qp):
45 |
46 | path = QPainterPath()
47 | path.moveTo(30, 30)
48 | path.cubicTo(30, 30, 200, 350, 350, 30)
49 |
50 | qp.drawPath(path)
51 |
52 |
53 | def main():
54 |
55 | app = QApplication(sys.argv)
56 | ex = Example()
57 | sys.exit(app.exec())
58 |
59 |
60 | if __name__ == '__main__':
61 | main()
--------------------------------------------------------------------------------
/Painting/brushes.py:
--------------------------------------------------------------------------------
1 | # brushes.py
2 | #!/usr/bin/python
3 |
4 | """
5 | ZetCode PyQt6 tutorial
6 |
7 | This example draws nine rectangles in different
8 | brush styles.
9 |
10 | Author: Jan Bodnar
11 | Website: zetcode.com
12 | """
13 |
14 | from PyQt6.QtWidgets import QWidget, QApplication
15 | from PyQt6.QtGui import QPainter, QBrush
16 | from PyQt6.QtCore import Qt
17 | import sys
18 |
19 |
20 | class Example(QWidget):
21 |
22 | def __init__(self):
23 | super().__init__()
24 |
25 | self.initUI()
26 |
27 |
28 | def initUI(self):
29 |
30 | self.setGeometry(300, 300, 355, 280)
31 | self.setWindowTitle('Brushes')
32 | self.show()
33 |
34 |
35 | def paintEvent(self, e):
36 |
37 | qp = QPainter()
38 | qp.begin(self)
39 | self.drawBrushes(qp)
40 | qp.end()
41 |
42 |
43 | def drawBrushes(self, qp):
44 |
45 | brush = QBrush(Qt.BrushStyle.SolidPattern)
46 | qp.setBrush(brush)
47 | qp.drawRect(10, 15, 90, 60)
48 |
49 | brush.setStyle(Qt.BrushStyle.Dense1Pattern)
50 | qp.setBrush(brush)
51 | qp.drawRect(130, 15, 90, 60)
52 |
53 | brush.setStyle(Qt.BrushStyle.Dense2Pattern)
54 | qp.setBrush(brush)
55 | qp.drawRect(250, 15, 90, 60)
56 |
57 | brush.setStyle(Qt.BrushStyle.DiagCrossPattern)
58 | qp.setBrush(brush)
59 | qp.drawRect(10, 105, 90, 60)
60 |
61 | brush.setStyle(Qt.BrushStyle.Dense5Pattern)
62 | qp.setBrush(brush)
63 | qp.drawRect(130, 105, 90, 60)
64 |
65 | brush.setStyle(Qt.BrushStyle.Dense6Pattern)
66 | qp.setBrush(brush)
67 | qp.drawRect(250, 105, 90, 60)
68 |
69 | brush.setStyle(Qt.BrushStyle.HorPattern)
70 | qp.setBrush(brush)
71 | qp.drawRect(10, 195, 90, 60)
72 |
73 | brush.setStyle(Qt.BrushStyle.VerPattern)
74 | qp.setBrush(brush)
75 | qp.drawRect(130, 195, 90, 60)
76 |
77 | brush.setStyle(Qt.BrushStyle.BDiagPattern)
78 | qp.setBrush(brush)
79 | qp.drawRect(250, 195, 90, 60)
80 |
81 |
82 | def main():
83 |
84 | app = QApplication(sys.argv)
85 | ex = Example()
86 | sys.exit(app.exec())
87 |
88 |
89 | if __name__ == '__main__':
90 | main()
--------------------------------------------------------------------------------
/Painting/colours.py:
--------------------------------------------------------------------------------
1 | # colours.py
2 | #!/usr/bin/python
3 |
4 | """
5 | ZetCode PyQt6 tutorial
6 |
7 | This example draws three rectangles in three
8 | different colours.
9 |
10 | Author: Jan Bodnar
11 | Website: zetcode.com
12 | """
13 |
14 | from PyQt6.QtWidgets import QWidget, QApplication
15 | from PyQt6.QtGui import QPainter, QColor
16 | import sys
17 |
18 |
19 | class Example(QWidget):
20 |
21 | def __init__(self):
22 | super().__init__()
23 |
24 | self.initUI()
25 |
26 |
27 | def initUI(self):
28 |
29 | self.setGeometry(300, 300, 350, 100)
30 | self.setWindowTitle('Colours')
31 | self.show()
32 |
33 |
34 | def paintEvent(self, e):
35 |
36 | qp = QPainter()
37 | qp.begin(self)
38 | self.drawRectangles(qp)
39 | qp.end()
40 |
41 |
42 | def drawRectangles(self, qp):
43 |
44 | col = QColor(0, 0, 0)
45 | col.setNamedColor('#d4d4d4')
46 | qp.setPen(col)
47 |
48 | qp.setBrush(QColor(200, 0, 0))
49 | qp.drawRect(10, 15, 90, 60)
50 |
51 | qp.setBrush(QColor(255, 80, 0, 160))
52 | qp.drawRect(130, 15, 90, 60)
53 |
54 | qp.setBrush(QColor(25, 0, 90, 200))
55 | qp.drawRect(250, 15, 90, 60)
56 |
57 |
58 | def main():
59 |
60 | app = QApplication(sys.argv)
61 | ex = Example()
62 | sys.exit(app.exec())
63 |
64 |
65 | if __name__ == '__main__':
66 | main()
--------------------------------------------------------------------------------
/Painting/draw_points.py:
--------------------------------------------------------------------------------
1 | # draw_points.py
2 | #!/usr/bin/python
3 |
4 | """
5 | ZetCode PyQt6 tutorial
6 |
7 | In the example, we draw randomly 1000 red points
8 | on the window.
9 |
10 | Author: Jan Bodnar
11 | Website: zetcode.com
12 | """
13 |
14 | from PyQt6.QtWidgets import QWidget, QApplication
15 | from PyQt6.QtGui import QPainter
16 | from PyQt6.QtCore import Qt
17 | import sys, random
18 |
19 |
20 | class Example(QWidget):
21 |
22 | def __init__(self):
23 | super().__init__()
24 |
25 | self.initUI()
26 |
27 |
28 | def initUI(self):
29 |
30 | self.setMinimumSize(50, 50)
31 | self.setGeometry(300, 300, 350, 300)
32 | self.setWindowTitle('Points')
33 | self.show()
34 |
35 |
36 | def paintEvent(self, e):
37 |
38 | qp = QPainter()
39 | qp.begin(self)
40 | self.drawPoints(qp)
41 | qp.end()
42 |
43 |
44 | def drawPoints(self, qp):
45 |
46 | qp.setPen(Qt.GlobalColor.red)
47 | size = self.size()
48 |
49 | for i in range(1000):
50 |
51 | x = random.randint(1, size.width() - 1)
52 | y = random.randint(1, size.height() - 1)
53 | qp.drawPoint(x, y)
54 |
55 |
56 | def main():
57 |
58 | app = QApplication(sys.argv)
59 | ex = Example()
60 | sys.exit(app.exec())
61 |
62 |
63 | if __name__ == '__main__':
64 | main()
--------------------------------------------------------------------------------
/Painting/draw_text.py:
--------------------------------------------------------------------------------
1 | # draw_text.py
2 | # #!/usr/bin/python
3 |
4 | """
5 | ZetCode PyQt6 tutorial
6 |
7 | In this example, we draw text in Russian Cylliric.
8 |
9 | Author: Jan Bodnar
10 | Website: zetcode.com
11 | """
12 |
13 | import sys
14 | from PyQt6.QtWidgets import QWidget, QApplication
15 | from PyQt6.QtGui import QPainter, QColor, QFont
16 | from PyQt6.QtCore import Qt
17 |
18 |
19 | class Example(QWidget):
20 |
21 | def __init__(self):
22 | super().__init__()
23 |
24 | self.initUI()
25 |
26 |
27 | def initUI(self):
28 |
29 | self.text = "Лев Николаевич Толстой\nАнна Каренина"
30 |
31 | self.setGeometry(300, 300, 350, 300)
32 | self.setWindowTitle('Drawing text')
33 | self.show()
34 |
35 |
36 | def paintEvent(self, event):
37 |
38 | qp = QPainter()
39 | qp.begin(self)
40 | self.drawText(event, qp)
41 | qp.end()
42 |
43 |
44 | def drawText(self, event, qp):
45 |
46 | qp.setPen(QColor(168, 34, 3))
47 | qp.setFont(QFont('Decorative', 10))
48 | qp.drawText(event.rect(), Qt.AlignmentFlag.AlignCenter, self.text)
49 |
50 |
51 | def main():
52 |
53 | app = QApplication(sys.argv)
54 | ex = Example()
55 | sys.exit(app.exec())
56 |
57 |
58 | if __name__ == '__main__':
59 | main()
--------------------------------------------------------------------------------
/Painting/img/image-20210618225250881.png:
--------------------------------------------------------------------------------
https://raw.githubusercontent.com/LC-space/PyQt6-tutorial/b684346d01e667cf855c69058bbb13f2bd2c6762/Painting/img/image-20210618225250881.png
--------------------------------------------------------------------------------
/Painting/img/image-20210618225620602.png:
--------------------------------------------------------------------------------
https://raw.githubusercontent.com/LC-space/PyQt6-tutorial/b684346d01e667cf855c69058bbb13f2bd2c6762/Painting/img/image-20210618225620602.png
--------------------------------------------------------------------------------
/Painting/img/image-20210618225744951.png:
--------------------------------------------------------------------------------
https://raw.githubusercontent.com/LC-space/PyQt6-tutorial/b684346d01e667cf855c69058bbb13f2bd2c6762/Painting/img/image-20210618225744951.png
--------------------------------------------------------------------------------
/Painting/img/image-20210618230227377.png:
--------------------------------------------------------------------------------
https://raw.githubusercontent.com/LC-space/PyQt6-tutorial/b684346d01e667cf855c69058bbb13f2bd2c6762/Painting/img/image-20210618230227377.png
--------------------------------------------------------------------------------
/Painting/img/image-20210618230420456.png:
--------------------------------------------------------------------------------
https://raw.githubusercontent.com/LC-space/PyQt6-tutorial/b684346d01e667cf855c69058bbb13f2bd2c6762/Painting/img/image-20210618230420456.png
--------------------------------------------------------------------------------
/Painting/img/image-20210618230729351.png:
--------------------------------------------------------------------------------
https://raw.githubusercontent.com/LC-space/PyQt6-tutorial/b684346d01e667cf855c69058bbb13f2bd2c6762/Painting/img/image-20210618230729351.png
--------------------------------------------------------------------------------
/Painting/pens.py:
--------------------------------------------------------------------------------
1 | # pens.py
2 | #!/usr/bin/python
3 |
4 | """
5 | ZetCode PyQt6 tutorial
6 |
7 | In this example we draw 6 lines using
8 | different pen styles.
9 |
10 | Author: Jan Bodnar
11 | Website: zetcode.com
12 | """
13 |
14 | from PyQt6.QtWidgets import QWidget, QApplication
15 | from PyQt6.QtGui import QPainter, QPen
16 | from PyQt6.QtCore import Qt
17 | import sys
18 |
19 |
20 | class Example(QWidget):
21 |
22 | def __init__(self):
23 | super().__init__()
24 |
25 | self.initUI()
26 |
27 |
28 | def initUI(self):
29 |
30 | self.setGeometry(300, 300, 280, 270)
31 | self.setWindowTitle('Pen styles')
32 | self.show()
33 |
34 |
35 | def paintEvent(self, e):
36 |
37 | qp = QPainter()
38 | qp.begin(self)
39 | self.drawLines(qp)
40 | qp.end()
41 |
42 |
43 | def drawLines(self, qp):
44 |
45 | pen = QPen(Qt.GlobalColor.black, 2, Qt.PenStyle.SolidLine)
46 |
47 | qp.setPen(pen)
48 | qp.drawLine(20, 40, 250, 40)
49 |
50 | pen.setStyle(Qt.PenStyle.DashLine)
51 | qp.setPen(pen)
52 | qp.drawLine(20, 80, 250, 80)
53 |
54 | pen.setStyle(Qt.PenStyle.DashDotLine)
55 | qp.setPen(pen)
56 | qp.drawLine(20, 120, 250, 120)
57 |
58 | pen.setStyle(Qt.PenStyle.DotLine)
59 | qp.setPen(pen)
60 | qp.drawLine(20, 160, 250, 160)
61 |
62 | pen.setStyle(Qt.PenStyle.DashDotDotLine)
63 | qp.setPen(pen)
64 | qp.drawLine(20, 200, 250, 200)
65 |
66 | pen.setStyle(Qt.PenStyle.CustomDashLine)
67 | pen.setDashPattern([1, 4, 5, 4])
68 | qp.setPen(pen)
69 | qp.drawLine(20, 240, 250, 240)
70 |
71 |
72 | def main():
73 |
74 | app = QApplication(sys.argv)
75 | ex = Example()
76 | sys.exit(app.exec())
77 |
78 |
79 | if __name__ == '__main__':
80 | main()
--------------------------------------------------------------------------------
/README.md:
--------------------------------------------------------------------------------
1 | # Python PyQt6
2 |
3 | ### PyQt6安装
4 |
5 | 1. 使用pip工具安装PyQt6工具。
6 |
7 | ```
8 | pip install PyQt6
9 | ```
10 |
11 | 2. 安装Qt Designer图形界面开发工具。
12 |
13 | ```
14 | pip install PyQt6-tools
15 | ```
16 |
17 | (本教程翻译自[https://zetcode.com/pyqt6/](https://zetcode.com/pyqt6/),并将内容同步至网站[PyQt6-tutorial](http://www.lcspace.tech/PyQt6-tutorial/README.html),可以打开网站直接阅读。译者水平有限,难免会有纰漏,望谅解,如果有难以理解之处可直接浏览英语网站。以下是原文翻译。)
18 |
19 | *最近修改于 2021年5月18日*
20 |
21 | 这是PyQt6教程。本教程适合初学者和中级程序员。阅读本教程之后,您将能够编写重要的PyQt6应用程序。代码示例可以在作者的[PyQt6-Tutorial-Examples](https://github.com/janbodnar/PyQt6-Tutorial-Examples)仓库中找到。
22 |
23 | ## 目录
24 |
25 | * [介绍](https://github.com/LC-space/PyQt6-tutorial/blob/main/Introduction.md)
26 | * [日期及时间](https://github.com/LC-space/PyQt6-tutorial/blob/main/Date%20and%20time.md)
27 | * [第一个程序](https://github.com/LC-space/PyQt6-tutorial/blob/main/First%20programs.md)
28 | * [菜单栏和工具栏](https://github.com/LC-space/PyQt6-tutorial/blob/main/Menus%20and%20toolbars.md)
29 | * [布局管理](https://github.com/LC-space/PyQt6-tutorial/blob/main/Layout%20management.md)
30 | * [事件和信号](https://github.com/LC-space/PyQt6-tutorial/blob/main/Events%20and%20signals.md)
31 | * [对话框](https://github.com/LC-space/PyQt6-tutorial/blob/main/Dialogs.md)
32 | * [控件](https://github.com/LC-space/PyQt6-tutorial/blob/main/Widgets.md)
33 | * [控件2](https://github.com/LC-space/PyQt6-tutorial/blob/main/Widgets%20II.md)
34 | * [拖放](https://github.com/LC-space/PyQt6-tutorial/blob/main/Drag%20%26%20drop.md)
35 | * [绘画](https://github.com/LC-space/PyQt6-tutorial/blob/main/Painting.md)
36 | * [自定义控件](https://github.com/LC-space/PyQt6-tutorial/blob/main/Custom%20widgets.md)
37 | * [俄罗斯方块](https://github.com/LC-space/PyQt6-tutorial/blob/main/The%20Tetris%20game.md)
38 |
39 | ## 电子书
40 |
41 | 包含PyQt5库高级特性的一本独一无二的电子书:[advanced PyQt5电子书](https://zetcode.com/ebooks/advancedpyqt5/)。
42 |
43 | ## 相关教程
44 |
45 | [PyQt5 tutorial](https://zetcode.com/gui/pyqt5/)涵盖了PyQt的前一个版本。[wxPython tutorial](https://zetcode.com/wxpython/)教程,[Python Gtk tutorial](https://zetcode.com/python/gtk/)和[Python Gtk tutorial](https://zetcode.com/python/gtk/)是其他流行的Python GUI绑定教程。
--------------------------------------------------------------------------------
/The Tetris game/img/coordinates.png:
--------------------------------------------------------------------------------
https://raw.githubusercontent.com/LC-space/PyQt6-tutorial/b684346d01e667cf855c69058bbb13f2bd2c6762/The Tetris game/img/coordinates.png
--------------------------------------------------------------------------------
/The Tetris game/img/image-20210619231356476.png:
--------------------------------------------------------------------------------
https://raw.githubusercontent.com/LC-space/PyQt6-tutorial/b684346d01e667cf855c69058bbb13f2bd2c6762/The Tetris game/img/image-20210619231356476.png
--------------------------------------------------------------------------------
/The Tetris game/img/tetrominoes.png:
--------------------------------------------------------------------------------
https://raw.githubusercontent.com/LC-space/PyQt6-tutorial/b684346d01e667cf855c69058bbb13f2bd2c6762/The Tetris game/img/tetrominoes.png
--------------------------------------------------------------------------------
/The Tetris game/tetris.py:
--------------------------------------------------------------------------------
1 | # tetris.py
2 | #!/usr/bin/python
3 |
4 | """
5 | ZetCode PyQt6 tutorial
6 |
7 | This is a Tetris game clone.
8 |
9 | Author: Jan Bodnar
10 | Website: zetcode.com
11 | """
12 |
13 | import random
14 | import sys
15 |
16 | from PyQt6.QtCore import Qt, QBasicTimer, pyqtSignal
17 | from PyQt6.QtGui import QPainter, QColor
18 | from PyQt6.QtWidgets import QMainWindow, QFrame, QApplication
19 |
20 |
21 | class Tetris(QMainWindow):
22 |
23 | def __init__(self):
24 | super().__init__()
25 |
26 | self.initUI()
27 |
28 |
29 | def initUI(self):
30 | """initiates application UI"""
31 |
32 | self.tboard = Board(self)
33 | self.setCentralWidget(self.tboard)
34 |
35 | self.statusbar = self.statusBar()
36 | self.tboard.msg2Statusbar[str].connect(self.statusbar.showMessage)
37 |
38 | self.tboard.start()
39 |
40 | self.resize(180, 380)
41 | self.center()
42 | self.setWindowTitle('Tetris')
43 | self.show()
44 |
45 |
46 | def center(self):
47 | """centers the window on the screen"""
48 |
49 | qr = self.frameGeometry()
50 | cp = self.screen().availableGeometry().center()
51 |
52 | qr.moveCenter(cp)
53 | self.move(qr.topLeft())
54 |
55 |
56 | class Board(QFrame):
57 |
58 | msg2Statusbar = pyqtSignal(str)
59 |
60 | BoardWidth = 10
61 | BoardHeight = 22
62 | Speed = 300
63 |
64 |
65 | def __init__(self, parent):
66 | super().__init__(parent)
67 |
68 | self.initBoard()
69 |
70 |
71 | def initBoard(self):
72 | """initiates board"""
73 |
74 | self.timer = QBasicTimer()
75 | self.isWaitingAfterLine = False
76 |
77 | self.curX = 0
78 | self.curY = 0
79 | self.numLinesRemoved = 0
80 | self.board = []
81 |
82 | self.setFocusPolicy(Qt.FocusPolicy.StrongFocus)
83 | self.isStarted = False
84 | self.isPaused = False
85 | self.clearBoard()
86 |
87 |
88 | def shapeAt(self, x, y):
89 | """determines shape at the board position"""
90 |
91 | return self.board[(y * Board.BoardWidth) + x]
92 |
93 |
94 | def setShapeAt(self, x, y, shape):
95 | """sets a shape at the board"""
96 |
97 | self.board[(y * Board.BoardWidth) + x] = shape
98 |
99 |
100 | def squareWidth(self):
101 | """returns the width of one square"""
102 |
103 | return self.contentsRect().width() // Board.BoardWidth
104 |
105 |
106 | def squareHeight(self):
107 | """returns the height of one square"""
108 |
109 | return self.contentsRect().height() // Board.BoardHeight
110 |
111 |
112 | def start(self):
113 | """starts game"""
114 |
115 | if self.isPaused:
116 | return
117 |
118 | self.isStarted = True
119 | self.isWaitingAfterLine = False
120 | self.numLinesRemoved = 0
121 | self.clearBoard()
122 |
123 | self.msg2Statusbar.emit(str(self.numLinesRemoved))
124 |
125 | self.newPiece()
126 | self.timer.start(Board.Speed, self)
127 |
128 |
129 | def pause(self):
130 | """pauses game"""
131 |
132 | if not self.isStarted:
133 | return
134 |
135 | self.isPaused = not self.isPaused
136 |
137 | if self.isPaused:
138 | self.timer.stop()
139 | self.msg2Statusbar.emit("paused")
140 |
141 | else:
142 | self.timer.start(Board.Speed, self)
143 | self.msg2Statusbar.emit(str(self.numLinesRemoved))
144 |
145 | self.update()
146 |
147 |
148 | def paintEvent(self, event):
149 | """paints all shapes of the game"""
150 |
151 | painter = QPainter(self)
152 | rect = self.contentsRect()
153 |
154 | boardTop = rect.bottom() - Board.BoardHeight * self.squareHeight()
155 |
156 | for i in range(Board.BoardHeight):
157 | for j in range(Board.BoardWidth):
158 | shape = self.shapeAt(j, Board.BoardHeight - i - 1)
159 |
160 | if shape != Tetrominoe.NoShape:
161 | self.drawSquare(painter,
162 | rect.left() + j * self.squareWidth(),
163 | boardTop + i * self.squareHeight(), shape)
164 |
165 | if self.curPiece.shape() != Tetrominoe.NoShape:
166 |
167 | for i in range(4):
168 | x = self.curX + self.curPiece.x(i)
169 | y = self.curY - self.curPiece.y(i)
170 | self.drawSquare(painter, rect.left() + x * self.squareWidth(),
171 | boardTop + (Board.BoardHeight - y - 1) * self.squareHeight(),
172 | self.curPiece.shape())
173 |
174 |
175 | def keyPressEvent(self, event):
176 | """processes key press events"""
177 |
178 | if not self.isStarted or self.curPiece.shape() == Tetrominoe.NoShape:
179 | super(Board, self).keyPressEvent(event)
180 | return
181 |
182 | key = event.key()
183 |
184 | if key == Qt.Key.Key_P:
185 | self.pause()
186 | return
187 |
188 | if self.isPaused:
189 | return
190 |
191 | elif key == Qt.Key.Key_Left.value:
192 | self.tryMove(self.curPiece, self.curX - 1, self.curY)
193 |
194 | elif key == Qt.Key.Key_Right.value:
195 | self.tryMove(self.curPiece, self.curX + 1, self.curY)
196 |
197 | elif key == Qt.Key.Key_Down.value:
198 | self.tryMove(self.curPiece.rotateRight(), self.curX, self.curY)
199 |
200 | elif key == Qt.Key.Key_Up.value:
201 | self.tryMove(self.curPiece.rotateLeft(), self.curX, self.curY)
202 |
203 | elif key == Qt.Key.Key_Space.value:
204 | self.dropDown()
205 |
206 | elif key == Qt.Key.Key_D.value:
207 | self.oneLineDown()
208 |
209 | else:
210 | super(Board, self).keyPressEvent(event)
211 |
212 |
213 | def timerEvent(self, event):
214 | """handles timer event"""
215 |
216 | if event.timerId() == self.timer.timerId():
217 |
218 | if self.isWaitingAfterLine:
219 | self.isWaitingAfterLine = False
220 | self.newPiece()
221 | else:
222 | self.oneLineDown()
223 |
224 | else:
225 | super(Board, self).timerEvent(event)
226 |
227 |
228 | def clearBoard(self):
229 | """clears shapes from the board"""
230 |
231 | for i in range(Board.BoardHeight * Board.BoardWidth):
232 | self.board.append(Tetrominoe.NoShape)
233 |
234 |
235 | def dropDown(self):
236 | """drops down a shape"""
237 |
238 | newY = self.curY
239 |
240 | while newY > 0:
241 |
242 | if not self.tryMove(self.curPiece, self.curX, newY - 1):
243 | break
244 |
245 | newY -= 1
246 |
247 | self.pieceDropped()
248 |
249 |
250 | def oneLineDown(self):
251 | """goes one line down with a shape"""
252 |
253 | if not self.tryMove(self.curPiece, self.curX, self.curY - 1):
254 | self.pieceDropped()
255 |
256 |
257 | def pieceDropped(self):
258 | """after dropping shape, remove full lines and create new shape"""
259 |
260 | for i in range(4):
261 | x = self.curX + self.curPiece.x(i)
262 | y = self.curY - self.curPiece.y(i)
263 | self.setShapeAt(x, y, self.curPiece.shape())
264 |
265 | self.removeFullLines()
266 |
267 | if not self.isWaitingAfterLine:
268 | self.newPiece()
269 |
270 |
271 | def removeFullLines(self):
272 | """removes all full lines from the board"""
273 |
274 | numFullLines = 0
275 | rowsToRemove = []
276 |
277 | for i in range(Board.BoardHeight):
278 |
279 | n = 0
280 | for j in range(Board.BoardWidth):
281 | if not self.shapeAt(j, i) == Tetrominoe.NoShape:
282 | n = n + 1
283 |
284 | if n == 10:
285 | rowsToRemove.append(i)
286 |
287 | rowsToRemove.reverse()
288 |
289 | for m in rowsToRemove:
290 |
291 | for k in range(m, Board.BoardHeight):
292 | for l in range(Board.BoardWidth):
293 | self.setShapeAt(l, k, self.shapeAt(l, k + 1))
294 |
295 | numFullLines = numFullLines + len(rowsToRemove)
296 |
297 | if numFullLines > 0:
298 | self.numLinesRemoved = self.numLinesRemoved + numFullLines
299 | self.msg2Statusbar.emit(str(self.numLinesRemoved))
300 |
301 | self.isWaitingAfterLine = True
302 | self.curPiece.setShape(Tetrominoe.NoShape)
303 | self.update()
304 |
305 |
306 | def newPiece(self):
307 | """creates a new shape"""
308 |
309 | self.curPiece = Shape()
310 | self.curPiece.setRandomShape()
311 | self.curX = Board.BoardWidth // 2 + 1
312 | self.curY = Board.BoardHeight - 1 + self.curPiece.minY()
313 |
314 | if not self.tryMove(self.curPiece, self.curX, self.curY):
315 |
316 | self.curPiece.setShape(Tetrominoe.NoShape)
317 | self.timer.stop()
318 | self.isStarted = False
319 | self.msg2Statusbar.emit("Game over")
320 |
321 |
322 | def tryMove(self, newPiece, newX, newY):
323 | """tries to move a shape"""
324 |
325 | for i in range(4):
326 |
327 | x = newX + newPiece.x(i)
328 | y = newY - newPiece.y(i)
329 |
330 | if x < 0 or x >= Board.BoardWidth or y < 0 or y >= Board.BoardHeight:
331 | return False
332 |
333 | if self.shapeAt(x, y) != Tetrominoe.NoShape:
334 | return False
335 |
336 | self.curPiece = newPiece
337 | self.curX = newX
338 | self.curY = newY
339 | self.update()
340 |
341 | return True
342 |
343 |
344 | def drawSquare(self, painter, x, y, shape):
345 | """draws a square of a shape"""
346 |
347 | colorTable = [0x000000, 0xCC6666, 0x66CC66, 0x6666CC,
348 | 0xCCCC66, 0xCC66CC, 0x66CCCC, 0xDAAA00]
349 |
350 | color = QColor(colorTable[shape])
351 | painter.fillRect(x + 1, y + 1, self.squareWidth() - 2,
352 | self.squareHeight() - 2, color)
353 |
354 | painter.setPen(color.lighter())
355 | painter.drawLine(x, y + self.squareHeight() - 1, x, y)
356 | painter.drawLine(x, y, x + self.squareWidth() - 1, y)
357 |
358 | painter.setPen(color.darker())
359 | painter.drawLine(x + 1, y + self.squareHeight() - 1,
360 | x + self.squareWidth() - 1, y + self.squareHeight() - 1)
361 | painter.drawLine(x + self.squareWidth() - 1,
362 | y + self.squareHeight() - 1, x + self.squareWidth() - 1, y + 1)
363 |
364 |
365 | class Tetrominoe:
366 |
367 | NoShape = 0
368 | ZShape = 1
369 | SShape = 2
370 | LineShape = 3
371 | TShape = 4
372 | SquareShape = 5
373 | LShape = 6
374 | MirroredLShape = 7
375 |
376 |
377 | class Shape:
378 |
379 | coordsTable = (
380 | ((0, 0), (0, 0), (0, 0), (0, 0)),
381 | ((0, -1), (0, 0), (-1, 0), (-1, 1)),
382 | ((0, -1), (0, 0), (1, 0), (1, 1)),
383 | ((0, -1), (0, 0), (0, 1), (0, 2)),
384 | ((-1, 0), (0, 0), (1, 0), (0, 1)),
385 | ((0, 0), (1, 0), (0, 1), (1, 1)),
386 | ((-1, -1), (0, -1), (0, 0), (0, 1)),
387 | ((1, -1), (0, -1), (0, 0), (0, 1))
388 | )
389 |
390 | def __init__(self):
391 |
392 | self.coords = [[0, 0] for i in range(4)]
393 | self.pieceShape = Tetrominoe.NoShape
394 |
395 | self.setShape(Tetrominoe.NoShape)
396 |
397 |
398 | def shape(self):
399 | """returns shape"""
400 |
401 | return self.pieceShape
402 |
403 |
404 | def setShape(self, shape):
405 | """sets a shape"""
406 |
407 | table = Shape.coordsTable[shape]
408 |
409 | for i in range(4):
410 | for j in range(2):
411 | self.coords[i][j] = table[i][j]
412 |
413 | self.pieceShape = shape
414 |
415 |
416 | def setRandomShape(self):
417 | """chooses a random shape"""
418 |
419 | self.setShape(random.randint(1, 7))
420 |
421 |
422 | def x(self, index):
423 | """returns x coordinate"""
424 |
425 | return self.coords[index][0]
426 |
427 |
428 | def y(self, index):
429 | """returns y coordinate"""
430 |
431 | return self.coords[index][1]
432 |
433 |
434 | def setX(self, index, x):
435 | """sets x coordinate"""
436 |
437 | self.coords[index][0] = x
438 |
439 |
440 | def setY(self, index, y):
441 | """sets y coordinate"""
442 |
443 | self.coords[index][1] = y
444 |
445 |
446 | def minX(self):
447 | """returns min x value"""
448 |
449 | m = self.coords[0][0]
450 | for i in range(4):
451 | m = min(m, self.coords[i][0])
452 |
453 | return m
454 |
455 |
456 | def maxX(self):
457 | """returns max x value"""
458 |
459 | m = self.coords[0][0]
460 | for i in range(4):
461 | m = max(m, self.coords[i][0])
462 |
463 | return m
464 |
465 |
466 | def minY(self):
467 | """returns min y value"""
468 |
469 | m = self.coords[0][1]
470 | for i in range(4):
471 | m = min(m, self.coords[i][1])
472 |
473 | return m
474 |
475 |
476 | def maxY(self):
477 | """returns max y value"""
478 |
479 | m = self.coords[0][1]
480 | for i in range(4):
481 | m = max(m, self.coords[i][1])
482 |
483 | return m
484 |
485 |
486 | def rotateLeft(self):
487 | """rotates shape to the left"""
488 |
489 | if self.pieceShape == Tetrominoe.SquareShape:
490 | return self
491 |
492 | result = Shape()
493 | result.pieceShape = self.pieceShape
494 |
495 | for i in range(4):
496 | result.setX(i, self.y(i))
497 | result.setY(i, -self.x(i))
498 |
499 | return result
500 |
501 |
502 | def rotateRight(self):
503 | """rotates shape to the right"""
504 |
505 | if self.pieceShape == Tetrominoe.SquareShape:
506 | return self
507 |
508 | result = Shape()
509 | result.pieceShape = self.pieceShape
510 |
511 | for i in range(4):
512 | result.setX(i, -self.y(i))
513 | result.setY(i, self.x(i))
514 |
515 | return result
516 |
517 |
518 | def main():
519 |
520 | app = QApplication([])
521 | tetris = Tetris()
522 | sys.exit(app.exec())
523 |
524 |
525 | if __name__ == '__main__':
526 | main()
--------------------------------------------------------------------------------
/Widgets II.md:
--------------------------------------------------------------------------------
1 | [目录](https://github.com/LC-space/PyQt6-tutorial/blob/main/README.md) [上一章](https://github.com/LC-space/PyQt6-tutorial/blob/main/Widgets.md) [下一章](https://github.com/LC-space/PyQt6-tutorial/blob/main/Drag%20%26%20drop.md)
2 |
3 | # PyQt6控件2
4 |
5 | *最近更新于2021年5月5日*
6 |
7 | 在本章中,我们继续介绍PyQt6控件。我们涵盖了QPixmap, QLineEdit, QSplitter和QComboBox。
8 |
9 | ## PyQt6 QPixmap
10 |
11 | QPixmap是用于处理图像的控件之一。它为在屏幕上显示图像进行了优化。在我们的代码示例中,我们将使用QPixmap在窗口上显示图像。
12 |
13 | ```python
14 | # pixmap.py
15 | #!/usr/bin/python
16 |
17 | """
18 | ZetCode PyQt6 tutorial
19 |
20 | In this example, we display an image
21 | on the window.
22 |
23 | Author: Jan Bodnar
24 | Website: zetcode.com
25 | """
26 |
27 | from PyQt6.QtWidgets import (QWidget, QHBoxLayout,
28 | QLabel, QApplication)
29 | from PyQt6.QtGui import QPixmap
30 | import sys
31 |
32 |
33 | class Example(QWidget):
34 |
35 | def __init__(self):
36 | super().__init__()
37 |
38 | self.initUI()
39 |
40 |
41 | def initUI(self):
42 |
43 | hbox = QHBoxLayout(self)
44 | pixmap = QPixmap('img/sid.jpg')
45 |
46 | lbl = QLabel(self)
47 | lbl.setPixmap(pixmap)
48 |
49 | hbox.addWidget(lbl)
50 | self.setLayout(hbox)
51 |
52 | self.move(300, 200)
53 | self.setWindowTitle('Sid')
54 | self.show()
55 |
56 |
57 | def main():
58 |
59 | app = QApplication(sys.argv)
60 | ex = Example()
61 | sys.exit(app.exec())
62 |
63 |
64 | if __name__ == '__main__':
65 | main()
66 | ```
67 |
68 | 在我们的示例中,我们在窗口上显示一个图像。
69 |
70 | ```python
71 | pixmap = QPixmap('img/sid.jpg')
72 | ```
73 |
74 | 我们创建一个QPixmap对象。它以文件名作为参数。
75 |
76 | ```python
77 | lbl = QLabel(self)
78 | lbl.setPixmap(pixmap)
79 | ```
80 |
81 | 我们将pixmap放到QLabel控件中。
82 |
83 | ## PyQt6 QLineEdit
84 |
85 | QLineEdit是一个控件,它允许输入和编辑单行纯文本。这个控件有撤消和重做,剪切和粘贴,以及拖放功能。
86 |
87 | ```python
88 | # line_edit.py
89 | #!/usr/bin/python
90 |
91 | """
92 | ZetCode PyQt6 tutorial
93 |
94 | This example shows text which
95 | is entered in a QLineEdit
96 | in a QLabel widget.
97 |
98 | Author: Jan Bodnar
99 | Website: zetcode.com
100 | """
101 |
102 | import sys
103 | from PyQt6.QtWidgets import (QWidget, QLabel,
104 | QLineEdit, QApplication)
105 |
106 |
107 | class Example(QWidget):
108 |
109 | def __init__(self):
110 | super().__init__()
111 |
112 | self.initUI()
113 |
114 |
115 | def initUI(self):
116 |
117 | self.lbl = QLabel(self)
118 | qle = QLineEdit(self)
119 |
120 | qle.move(60, 100)
121 | self.lbl.move(60, 40)
122 |
123 | qle.textChanged[str].connect(self.onChanged)
124 |
125 | self.setGeometry(300, 300, 350, 250)
126 | self.setWindowTitle('QLineEdit')
127 | self.show()
128 |
129 |
130 | def onChanged(self, text):
131 |
132 | self.lbl.setText(text)
133 | self.lbl.adjustSize()
134 |
135 |
136 | def main():
137 |
138 | app = QApplication(sys.argv)
139 | ex = Example()
140 | sys.exit(app.exec())
141 |
142 |
143 | if __name__ == '__main__':
144 | main()
145 | ```
146 |
147 | 这个例子显示了一个行编辑控件和一个标签。我们在行编辑中键入的文本立即显示在标签控件中。
148 |
149 | ```python
150 | qle = QLineEdit(self)
151 | ```
152 |
153 | 创建了QLineEdit控件。
154 |
155 | ```python
156 | qle.textChanged[str].connect(self.onChanged)
157 | ```
158 |
159 | 如果行编辑控件中的文本发生了变化,我们就调用onChanged方法。
160 |
161 | ```python
162 | def onChanged(self, text):
163 |
164 | self.lbl.setText(text)
165 | self.lbl.adjustSize()
166 | ```
167 |
168 | 在onChanged方法内部,我们将类型化文本设置为标签控件。我们调用adjustSize方法来调整标签的大小以适应文本的长度。
169 |
170 | 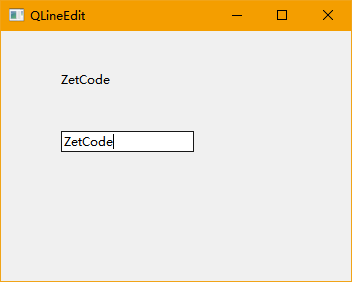
171 |
172 | ## PyQt6 QSplitter
173 |
174 | QSplitter允许用户通过拖动控件之间的边界来控制子控件的大小。在我们的示例中,我们展示了用两个分割器组织的三个QFrame控件。
175 |
176 | ```python
177 | # splitter.py
178 | #!/usr/bin/python
179 |
180 | """
181 | ZetCode PyQt6 tutorial
182 |
183 | This example shows
184 | how to use QSplitter widget.
185 |
186 | Author: Jan Bodnar
187 | Website: zetcode.com
188 | """
189 |
190 | import sys
191 |
192 | from PyQt6.QtCore import Qt
193 | from PyQt6.QtWidgets import (QWidget, QHBoxLayout, QFrame,
194 | QSplitter, QApplication)
195 |
196 |
197 | class Example(QWidget):
198 |
199 | def __init__(self):
200 | super().__init__()
201 |
202 | self.initUI()
203 |
204 |
205 | def initUI(self):
206 |
207 | hbox = QHBoxLayout(self)
208 |
209 | topleft = QFrame(self)
210 | topleft.setFrameShape(QFrame.Shape.StyledPanel)
211 |
212 | topright = QFrame(self)
213 | topright.setFrameShape(QFrame.Shape.StyledPanel)
214 |
215 | bottom = QFrame(self)
216 | bottom.setFrameShape(QFrame.Shape.StyledPanel)
217 |
218 | splitter1 = QSplitter(Qt.Orientation.Horizontal)
219 | splitter1.addWidget(topleft)
220 | splitter1.addWidget(topright)
221 |
222 | splitter2 = QSplitter(Qt.Orientation.Vertical)
223 | splitter2.addWidget(splitter1)
224 | splitter2.addWidget(bottom)
225 |
226 | hbox.addWidget(splitter2)
227 | self.setLayout(hbox)
228 |
229 | self.setGeometry(300, 300, 450, 400)
230 | self.setWindowTitle('QSplitter')
231 | self.show()
232 |
233 |
234 | def main():
235 |
236 | app = QApplication(sys.argv)
237 | ex = Example()
238 | sys.exit(app.exec())
239 |
240 |
241 | if __name__ == '__main__':
242 | main()
243 | ```
244 |
245 | 在我们的示例中,我们有三个框架控件和两个分割器。请注意,在某些主题下,分割器可能不是可见的。
246 |
247 | ```python
248 | topleft = QFrame(self)
249 | topleft.setFrameShape(QFrame.Shape.StyledPanel)
250 | ```
251 |
252 | 为了查看QFrame控件之间的边界,我们使用了一个样式化的框架。
253 |
254 | ```python
255 | plitter1 = QSplitter(Qt.Orientations.Horizontal)
256 | splitter1.addWidget(topleft)
257 | splitter1.addWidget(topright)
258 | ```
259 |
260 | 我们创建一个QSplitter控件并向其添加两个框架。
261 |
262 | ```python
263 | splitter2 = QSplitter(Qt.Orientations.Vertical)
264 | splitter2.addWidget(splitter1)
265 | ```
266 |
267 | 我们还可以向另一个分割器控件添加分割器。
268 |
269 | 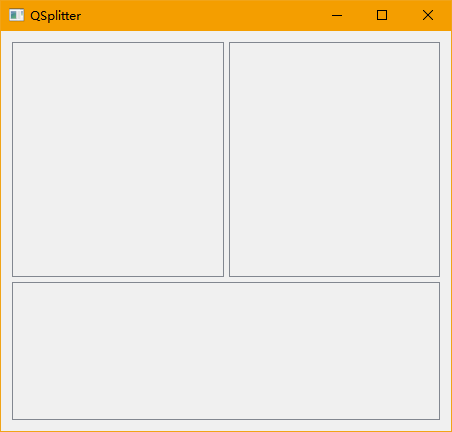
270 |
271 | ## PyQt6 QComboBox
272 |
273 | QComboBox是一个控件,允许用户从选项列表中进行选择。
274 |
275 | ```python
276 | # combobox.py
277 | #!/usr/bin/python
278 |
279 | """
280 | ZetCode PyQt6 tutorial
281 |
282 | This example shows how to use
283 | a QComboBox widget.
284 |
285 | Author: Jan Bodnar
286 | Website: zetcode.com
287 | """
288 |
289 | import sys
290 |
291 | from PyQt6.QtWidgets import (QWidget, QLabel,
292 | QComboBox, QApplication)
293 |
294 |
295 | class Example(QWidget):
296 |
297 | def __init__(self):
298 | super().__init__()
299 |
300 | self.initUI()
301 |
302 |
303 | def initUI(self):
304 |
305 | self.lbl = QLabel('Ubuntu', self)
306 |
307 | combo = QComboBox(self)
308 |
309 | combo.addItem('Ubuntu')
310 | combo.addItem('Mandriva')
311 | combo.addItem('Fedora')
312 | combo.addItem('Arch')
313 | combo.addItem('Gentoo')
314 |
315 | combo.move(50, 50)
316 | self.lbl.move(50, 150)
317 |
318 | combo.textActivated[str].connect(self.onActivated)
319 |
320 | self.setGeometry(300, 300, 450, 400)
321 | self.setWindowTitle('QComboBox')
322 | self.show()
323 |
324 |
325 | def onActivated(self, text):
326 |
327 | self.lbl.setText(text)
328 | self.lbl.adjustSize()
329 |
330 |
331 | def main():
332 |
333 | app = QApplication(sys.argv)
334 | ex = Example()
335 | sys.exit(app.exec())
336 |
337 |
338 | if __name__ == '__main__':
339 | main()
340 | ```
341 |
342 | 这个例子显示了一个QComboBox和一个QLabel。组合框有一个包含五个选项的列表。这些是Linux发行版的名称。标签控件显示组合框中选择的选项。
343 |
344 | ```python
345 | combo = QComboBox(self)
346 |
347 | combo.addItem('Ubuntu')
348 | combo.addItem('Mandriva')
349 | combo.addItem('Fedora')
350 | combo.addItem('Arch')
351 | combo.addItem('Gentoo')
352 | ```
353 |
354 | 我们创建了一个带有五个选项的QComboBox控件。
355 |
356 | ```python
357 | combo.textActivated[str].connect(self.onActivated)
358 | ```
359 |
360 | 在项目选择之后,我们调用onActivated方法。
361 |
362 | ```python
363 | def onActivated(self, text):
364 |
365 | self.lbl.setText(text)
366 | self.lbl.adjustSize()
367 | ```
368 |
369 | 在该方法内部,我们将所选项目的文本设置为标签控件。我们调整标签的大小。
370 |
371 | 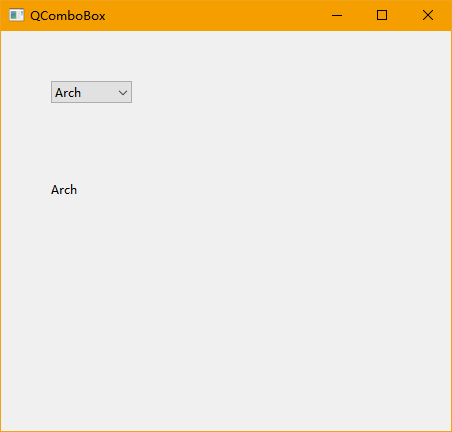
372 |
373 | 在PyQt6教程的这一部分,我们已经讨论了QPixmap, QLineEdit, QSplitter和QComboBox。
374 |
375 | [目录](https://github.com/LC-space/PyQt6-tutorial/blob/main/README.md) [上一章](https://github.com/LC-space/PyQt6-tutorial/blob/main/Widgets.md) [下一章](https://github.com/LC-space/PyQt6-tutorial/blob/main/Drag%20%26%20drop.md)
376 |
--------------------------------------------------------------------------------
/Widgets II/combobox.py:
--------------------------------------------------------------------------------
1 | # combobox.py
2 | #!/usr/bin/python
3 |
4 | """
5 | ZetCode PyQt6 tutorial
6 |
7 | This example shows how to use
8 | a QComboBox widget.
9 |
10 | Author: Jan Bodnar
11 | Website: zetcode.com
12 | """
13 |
14 | import sys
15 |
16 | from PyQt6.QtWidgets import (QWidget, QLabel,
17 | QComboBox, QApplication)
18 |
19 |
20 | class Example(QWidget):
21 |
22 | def __init__(self):
23 | super().__init__()
24 |
25 | self.initUI()
26 |
27 |
28 | def initUI(self):
29 |
30 | self.lbl = QLabel('Ubuntu', self)
31 |
32 | combo = QComboBox(self)
33 |
34 | combo.addItem('Ubuntu')
35 | combo.addItem('Mandriva')
36 | combo.addItem('Fedora')
37 | combo.addItem('Arch')
38 | combo.addItem('Gentoo')
39 |
40 | combo.move(50, 50)
41 | self.lbl.move(50, 150)
42 |
43 | combo.textActivated[str].connect(self.onActivated)
44 |
45 | self.setGeometry(300, 300, 450, 400)
46 | self.setWindowTitle('QComboBox')
47 | self.show()
48 |
49 |
50 | def onActivated(self, text):
51 |
52 | self.lbl.setText(text)
53 | self.lbl.adjustSize()
54 |
55 |
56 | def main():
57 |
58 | app = QApplication(sys.argv)
59 | ex = Example()
60 | sys.exit(app.exec())
61 |
62 |
63 | if __name__ == '__main__':
64 | main()
--------------------------------------------------------------------------------
/Widgets II/img/image-20210618102845014.png:
--------------------------------------------------------------------------------
https://raw.githubusercontent.com/LC-space/PyQt6-tutorial/b684346d01e667cf855c69058bbb13f2bd2c6762/Widgets II/img/image-20210618102845014.png
--------------------------------------------------------------------------------
/Widgets II/img/image-20210618105544854.png:
--------------------------------------------------------------------------------
https://raw.githubusercontent.com/LC-space/PyQt6-tutorial/b684346d01e667cf855c69058bbb13f2bd2c6762/Widgets II/img/image-20210618105544854.png
--------------------------------------------------------------------------------
/Widgets II/img/image-20210618110033614.png:
--------------------------------------------------------------------------------
https://raw.githubusercontent.com/LC-space/PyQt6-tutorial/b684346d01e667cf855c69058bbb13f2bd2c6762/Widgets II/img/image-20210618110033614.png
--------------------------------------------------------------------------------
/Widgets II/img/sid.png:
--------------------------------------------------------------------------------
https://raw.githubusercontent.com/LC-space/PyQt6-tutorial/b684346d01e667cf855c69058bbb13f2bd2c6762/Widgets II/img/sid.png
--------------------------------------------------------------------------------
/Widgets II/line_edit.py:
--------------------------------------------------------------------------------
1 | # line_edit.py
2 | #!/usr/bin/python
3 |
4 | """
5 | ZetCode PyQt6 tutorial
6 |
7 | This example shows text which
8 | is entered in a QLineEdit
9 | in a QLabel widget.
10 |
11 | Author: Jan Bodnar
12 | Website: zetcode.com
13 | """
14 |
15 | import sys
16 | from PyQt6.QtWidgets import (QWidget, QLabel,
17 | QLineEdit, QApplication)
18 |
19 |
20 | class Example(QWidget):
21 |
22 | def __init__(self):
23 | super().__init__()
24 |
25 | self.initUI()
26 |
27 |
28 | def initUI(self):
29 |
30 | self.lbl = QLabel(self)
31 | qle = QLineEdit(self)
32 |
33 | qle.move(60, 100)
34 | self.lbl.move(60, 40)
35 |
36 | qle.textChanged[str].connect(self.onChanged)
37 |
38 | self.setGeometry(300, 300, 350, 250)
39 | self.setWindowTitle('QLineEdit')
40 | self.show()
41 |
42 |
43 | def onChanged(self, text):
44 |
45 | self.lbl.setText(text)
46 | self.lbl.adjustSize()
47 |
48 |
49 | def main():
50 |
51 | app = QApplication(sys.argv)
52 | ex = Example()
53 | sys.exit(app.exec())
54 |
55 |
56 | if __name__ == '__main__':
57 | main()
--------------------------------------------------------------------------------
/Widgets II/pixmap.py:
--------------------------------------------------------------------------------
1 | # pixmap.py
2 | #!/usr/bin/python
3 |
4 | """
5 | ZetCode PyQt6 tutorial
6 |
7 | In this example, we display an image
8 | on the window.
9 |
10 | Author: Jan Bodnar
11 | Website: zetcode.com
12 | """
13 |
14 | from PyQt6.QtWidgets import (QWidget, QHBoxLayout,
15 | QLabel, QApplication)
16 | from PyQt6.QtGui import QPixmap
17 | import sys
18 |
19 |
20 | class Example(QWidget):
21 |
22 | def __init__(self):
23 | super().__init__()
24 |
25 | self.initUI()
26 |
27 |
28 | def initUI(self):
29 |
30 | hbox = QHBoxLayout(self)
31 | pixmap = QPixmap('img/sid.png')
32 |
33 | lbl = QLabel(self)
34 | lbl.setPixmap(pixmap)
35 |
36 | hbox.addWidget(lbl)
37 | self.setLayout(hbox)
38 |
39 | self.move(300, 200)
40 | self.setWindowTitle('logo')
41 | self.show()
42 |
43 |
44 | def main():
45 |
46 | app = QApplication(sys.argv)
47 | ex = Example()
48 | sys.exit(app.exec())
49 |
50 |
51 | if __name__ == '__main__':
52 | main()
--------------------------------------------------------------------------------
/Widgets II/splitter.py:
--------------------------------------------------------------------------------
1 | # splitter.py
2 | #!/usr/bin/python
3 |
4 | """
5 | ZetCode PyQt6 tutorial
6 |
7 | This example shows
8 | how to use QSplitter widget.
9 |
10 | Author: Jan Bodnar
11 | Website: zetcode.com
12 | """
13 |
14 | import sys
15 |
16 | from PyQt6.QtCore import Qt
17 | from PyQt6.QtWidgets import (QWidget, QHBoxLayout, QFrame,
18 | QSplitter, QApplication)
19 |
20 |
21 | class Example(QWidget):
22 |
23 | def __init__(self):
24 | super().__init__()
25 |
26 | self.initUI()
27 |
28 |
29 | def initUI(self):
30 |
31 | hbox = QHBoxLayout(self)
32 |
33 | topleft = QFrame(self)
34 | topleft.setFrameShape(QFrame.Shape.StyledPanel)
35 |
36 | topright = QFrame(self)
37 | topright.setFrameShape(QFrame.Shape.StyledPanel)
38 |
39 | bottom = QFrame(self)
40 | bottom.setFrameShape(QFrame.Shape.StyledPanel)
41 |
42 | splitter1 = QSplitter(Qt.Orientation.Horizontal)
43 | splitter1.addWidget(topleft)
44 | splitter1.addWidget(topright)
45 |
46 | splitter2 = QSplitter(Qt.Orientation.Vertical)
47 | splitter2.addWidget(splitter1)
48 | splitter2.addWidget(bottom)
49 |
50 | hbox.addWidget(splitter2)
51 | self.setLayout(hbox)
52 |
53 | self.setGeometry(300, 300, 450, 400)
54 | self.setWindowTitle('QSplitter')
55 | self.show()
56 |
57 |
58 | def main():
59 |
60 | app = QApplication(sys.argv)
61 | ex = Example()
62 | sys.exit(app.exec())
63 |
64 |
65 | if __name__ == '__main__':
66 | main()
--------------------------------------------------------------------------------
/Widgets.md:
--------------------------------------------------------------------------------
1 | [目录](https://github.com/LC-space/PyQt6-tutorial/blob/main/README.md) [上一章](https://github.com/LC-space/PyQt6-tutorial/blob/main/Dialogs.md) [下一章]()
2 |
3 | # PyQt6控件
4 |
5 | *最近更新于2021年5月3日*
6 |
7 | 控件是应用程序的基本构建块。PyQt6有各种各样的控件,包括按钮、复选框、滑块或列表框。在本教程的这一节中,我们将描述几个有用的小部件:QCheckBox、toggle模式下的QPushButton、QSlider、QProgressBar和QCalendarWidget。
8 |
9 | ## PyQt6 QCheckBox
10 |
11 | QCheckBox是一个具有两种状态的控件:开和关。这是一个带标签的盒子。复选框通常用于表示应用程序中可以启用或禁用的特性。
12 |
13 | ```python
14 | # check_box.py
15 | #!/usr/bin/python
16 |
17 | """
18 | ZetCode PyQt6 tutorial
19 |
20 | In this example, a QCheckBox widget
21 | is used to toggle the title of a window.
22 |
23 | Author: Jan Bodnar
24 | Website: zetcode.com
25 | """
26 |
27 | from PyQt6.QtWidgets import QWidget, QCheckBox, QApplication
28 | from PyQt6.QtCore import Qt
29 | import sys
30 |
31 |
32 | class Example(QWidget):
33 |
34 | def __init__(self):
35 | super().__init__()
36 |
37 | self.initUI()
38 |
39 |
40 | def initUI(self):
41 |
42 | cb = QCheckBox('Show title', self)
43 | cb.move(20, 20)
44 | cb.toggle()
45 | cb.stateChanged.connect(self.changeTitle)
46 |
47 | self.setGeometry(300, 300, 350, 250)
48 | self.setWindowTitle('QCheckBox')
49 | self.show()
50 |
51 |
52 | def changeTitle(self, state):
53 |
54 | if state == Qt.CheckState.Checked.value:
55 | self.setWindowTitle('QCheckBox')
56 | else:
57 | self.setWindowTitle(' ')
58 |
59 |
60 | def main():
61 |
62 | app = QApplication(sys.argv)
63 | ex = Example()
64 | sys.exit(app.exec())
65 |
66 |
67 | if __name__ == '__main__':
68 | main()
69 | ```
70 |
71 | 我们创建一个用于切换窗口标题的复选框。
72 |
73 | ```python
74 | cb = QCheckBox('Show title', self)
75 | ```
76 |
77 | 这是一个QCheckBox构造函数。
78 |
79 | ```python
80 | cb.toggle()
81 | ```
82 |
83 | 我们已经设置了窗口标题,所以我们也选中了复选框。
84 |
85 | ```python
86 | cb.stateChanged.connect(self.changeTitle)
87 | ```
88 |
89 | 我们将用户定义的changeTitle方法连接到stateChanged信号。changeTitle方法切换窗口标题。
90 |
91 | ```python
92 | if state == Qt.CheckState.Checked.value:
93 | self.setWindowTitle('QCheckBox')
94 | else:
95 | self.setWindowTitle(' ')
96 | ```
97 |
98 | 控件的状态被赋给状态变量中的changeTitle方法。如果控件被选中,我们将设置窗口的标题。否则,我们为标题栏设置一个空字符串。
99 |
100 | 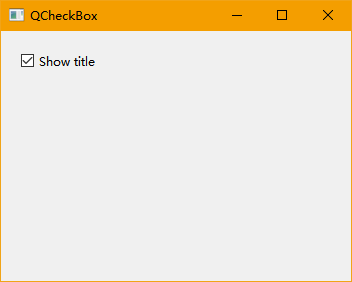
101 |
102 | ## 开关按钮
103 |
104 | 开关按钮是一个特殊模式下的QPushButton。这个按钮有两种状态:按下和未按下。我们通过点击它来在这两种状态之间切换。
105 |
106 | ```python
107 | #!/usr/bin/python
108 |
109 | """
110 | ZetCode PyQt6 tutorial
111 |
112 | In this example, we create three toggle buttons.
113 | They control the background color of a QFrame.
114 |
115 | Author: Jan Bodnar
116 | Website: zetcode.com
117 | """
118 |
119 | from PyQt6.QtWidgets import (QWidget, QPushButton,
120 | QFrame, QApplication)
121 | from PyQt6.QtGui import QColor
122 | import sys
123 |
124 |
125 | class Example(QWidget):
126 |
127 | def __init__(self):
128 | super().__init__()
129 |
130 | self.initUI()
131 |
132 |
133 | def initUI(self):
134 |
135 | self.col = QColor(0, 0, 0)
136 |
137 | redb = QPushButton('Red', self)
138 | redb.setCheckable(True)
139 | redb.move(10, 10)
140 |
141 | redb.clicked[bool].connect(self.setColor)
142 |
143 | greenb = QPushButton('Green', self)
144 | greenb.setCheckable(True)
145 | greenb.move(10, 60)
146 |
147 | greenb.clicked[bool].connect(self.setColor)
148 |
149 | blueb = QPushButton('Blue', self)
150 | blueb.setCheckable(True)
151 | blueb.move(10, 110)
152 |
153 | blueb.clicked[bool].connect(self.setColor)
154 |
155 | self.square = QFrame(self)
156 | self.square.setGeometry(150, 20, 100, 100)
157 | self.square.setStyleSheet("QWidget { background-color: %s }" %
158 | self.col.name())
159 |
160 | self.setGeometry(300, 300, 300, 250)
161 | self.setWindowTitle('Toggle button')
162 | self.show()
163 |
164 |
165 | def setColor(self, pressed):
166 |
167 | source = self.sender()
168 |
169 | if pressed:
170 | val = 255
171 | else:
172 | val = 0
173 |
174 | if source.text() == "Red":
175 | self.col.setRed(val)
176 | elif source.text() == "Green":
177 | self.col.setGreen(val)
178 | else:
179 | self.col.setBlue(val)
180 |
181 | self.square.setStyleSheet("QFrame { background-color: %s }" %
182 | self.col.name())
183 |
184 |
185 | def main():
186 |
187 | app = QApplication(sys.argv)
188 | ex = Example()
189 | sys.exit(app.exec())
190 |
191 |
192 | if __name__ == '__main__':
193 | main()
194 | ```
195 |
196 | 在我们的示例中,我们创建了三个开关按钮和一个QWidget。我们将QWidget的背景颜色设置为黑色。切换按钮切换颜色值的红色、绿色和蓝色部分。背景颜色取决于所按的切换按钮。
197 |
198 | ```python
199 | self.col = QColor(0, 0, 0)
200 | ```
201 |
202 | 这是初始的黑色值。
203 |
204 | ```python
205 | redb = QPushButton('Red', self)
206 | redb.setCheckable(True)
207 | redb.move(10, 10)
208 | ```
209 |
210 | 要创建一个开关按钮,我们创建一个QPushButton,并通过调用setCheckable方法使其可选择。
211 |
212 | ```python
213 | redb.clicked[bool].connect(self.setColor)
214 | ```
215 |
216 | 我们将一个点击信号连接到用户定义的方法。我们使用使用布尔值的clicked信号。
217 |
218 | ```python
219 | source = self.sender()
220 | ```
221 |
222 | 我们得到了被切换的按钮。
223 |
224 | ```python
225 | if source.text() == "Red":
226 | self.col.setRed(val)
227 | ```
228 |
229 | 如果是红色按钮,我们会相应地更新颜色的红色部分。
230 |
231 | ```python
232 | self.square.setStyleSheet("QFrame { background-color: %s }" %
233 | self.col.name())
234 | ```
235 |
236 | 我们使用样式表来改变背景颜色。使用setStyleSheet方法更新样式表。
237 |
238 | 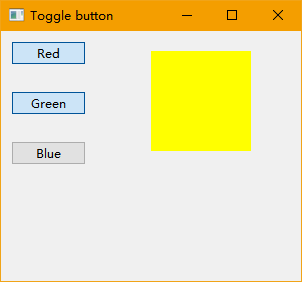
239 |
240 | ## PyQt6 QSlider
241 |
242 | QSlider是一个具有简单滑块的控件。这个滑块可以左右拉动。通过这种方式,我们可以为特定的任务选择一个值。有时使用滑块比输入数字或使用旋转框更自然。
243 |
244 | 在我们的例子中,我们显示了一个滑块和一个标签。标签显示图像。滑块控制标签。
245 |
246 | ```python
247 | # slider.py
248 | #!/usr/bin/python
249 |
250 | """
251 | ZetCode PyQt6 tutorial
252 |
253 | This example shows a QSlider widget.
254 |
255 | Author: Jan Bodnar
256 | Website: zetcode.com
257 | """
258 |
259 | from PyQt6.QtWidgets import (QWidget, QSlider,
260 | QLabel, QApplication)
261 | from PyQt6.QtCore import Qt
262 | from PyQt6.QtGui import QPixmap
263 | import sys
264 |
265 |
266 | class Example(QWidget):
267 |
268 | def __init__(self):
269 | super().__init__()
270 |
271 | self.initUI()
272 |
273 |
274 | def initUI(self):
275 |
276 | sld = QSlider(Qt.Orientation.Horizontal, self)
277 | sld.setFocusPolicy(Qt.FocusPolicy.NoFocus)
278 | sld.setGeometry(30, 40, 200, 30)
279 | sld.valueChanged[int].connect(self.changeValue)
280 |
281 | self.label = QLabel(self)
282 | self.label.setPixmap(QPixmap('img/mute.png'))
283 | self.label.setGeometry(250, 40, 80, 30)
284 |
285 | self.setGeometry(300, 300, 350, 250)
286 | self.setWindowTitle('QSlider')
287 | self.show()
288 |
289 |
290 | def changeValue(self, value):
291 |
292 | if value == 0:
293 |
294 | self.label.setPixmap(QPixmap('img/mute.png'))
295 | elif 0 < value <= 30:
296 |
297 | self.label.setPixmap(QPixmap('img/min.png'))
298 | elif 30 < value < 80:
299 |
300 | self.label.setPixmap(QPixmap('img/med.png'))
301 | else:
302 |
303 | self.label.setPixmap(QPixmap('img/max.png'))
304 |
305 |
306 | def main():
307 |
308 | app = QApplication(sys.argv)
309 | ex = Example()
310 | sys.exit(app.exec())
311 |
312 |
313 | if __name__ == '__main__':
314 | main()
315 | ```
316 |
317 | 在我们的示例中,我们模拟音量控制。通过拖动滑块的手柄,我们可以改变标签上的图像。
318 |
319 | ```python
320 | sld = QSlider(Qt.Orientation.Horizontal, self)
321 | ```
322 |
323 | 这里我们创建了一个水平的QSlider。
324 |
325 | ```python
326 | self.label = QLabel(self)
327 | self.label.setPixmap(QPixmap('img/mute.png'))
328 | ```
329 |
330 | 我们创建一个QLabel小部件,并为它设置一个初始的静音图像。
331 |
332 | ```python
333 | sld.valueChanged[int].connect(self.changeValue)
334 | ```
335 |
336 | 我们将valueChanged信号连接到用户定义的changeValue方法。
337 |
338 | ```python
339 | if value == 0:
340 | self.label.setPixmap(QPixmap('img/mute.png'))
341 | ...
342 | ```
343 |
344 | 根据滑块的值,我们将图像设置为标签。在上面的代码中,如果滑块等于0,我们将mute .png图像设置到标签。
345 |
346 | 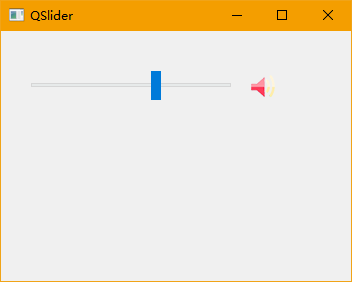
347 |
348 | ## PyQt6 QProgressBar
349 |
350 | 进度条是处理冗长任务时使用的控件。它是动画的,以便用户知道任务正在进行。QProgressBar控件在PyQt6工具箱中提供了一个水平或垂直的进度条。程序员可以为进度条设置最小值和最大值。默认值为0和99。
351 |
352 | ```python
353 | # progressbar.py
354 | #!/usr/bin/python
355 |
356 | """
357 | ZetCode PyQt6 tutorial
358 |
359 | This example shows a QProgressBar widget.
360 |
361 | Author: Jan Bodnar
362 | Website: zetcode.com
363 | """
364 |
365 | from PyQt6.QtWidgets import (QWidget, QProgressBar,
366 | QPushButton, QApplication)
367 | from PyQt6.QtCore import QBasicTimer
368 | import sys
369 |
370 |
371 | class Example(QWidget):
372 |
373 | def __init__(self):
374 | super().__init__()
375 |
376 | self.initUI()
377 |
378 |
379 | def initUI(self):
380 |
381 | self.pbar = QProgressBar(self)
382 | self.pbar.setGeometry(30, 40, 200, 25)
383 |
384 | self.btn = QPushButton('Start', self)
385 | self.btn.move(40, 80)
386 | self.btn.clicked.connect(self.doAction)
387 |
388 | self.timer = QBasicTimer()
389 | self.step = 0
390 |
391 | self.setGeometry(300, 300, 280, 170)
392 | self.setWindowTitle('QProgressBar')
393 | self.show()
394 |
395 |
396 | def timerEvent(self, e):
397 |
398 | if self.step >= 100:
399 |
400 | self.timer.stop()
401 | self.btn.setText('Finished')
402 | return
403 |
404 | self.step = self.step + 1
405 | self.pbar.setValue(self.step)
406 |
407 |
408 | def doAction(self):
409 |
410 | if self.timer.isActive():
411 | self.timer.stop()
412 | self.btn.setText('Start')
413 | else:
414 | self.timer.start(100, self)
415 | self.btn.setText('Stop')
416 |
417 |
418 | def main():
419 |
420 | app = QApplication(sys.argv)
421 | ex = Example()
422 | sys.exit(app.exec())
423 |
424 |
425 | if __name__ == '__main__':
426 | main()
427 | ```
428 |
429 | 在我们的例子中,我们有一个水平进度条和一个按钮。按钮启动和停止进度条。
430 |
431 | ```python
432 | self.pbar = QProgressBar(self)
433 | ```
434 |
435 | 这是一个QProgressBar构造函数。
436 |
437 | ```python
438 | self.timer = QBasicTimer()
439 | ```
440 |
441 | 为了激活进度条,我们使用一个计时器对象。
442 |
443 | ```python
444 | self.timer.start(100, self)
445 | ```
446 |
447 | 要启动一个计时器事件,我们调用它的start方法。这个方法有两个参数:超时和接收事件的对象。
448 |
449 | ```python
450 | def timerEvent(self, e):
451 |
452 | if self.step >= 100:
453 |
454 | self.timer.stop()
455 | self.btn.setText('Finished')
456 | return
457 |
458 | self.step = self.step + 1
459 | self.pbar.setValue(self.step)
460 | ```
461 |
462 | 每个QObject及其后代都有一个timerEvent事件处理程序。为了响应计时器事件,我们重新实现了事件处理程序。
463 |
464 | ```python
465 | def doAction(self):
466 |
467 | if self.timer.isActive():
468 | self.timer.stop()
469 | self.btn.setText('Start')
470 |
471 | else:
472 | self.timer.start(100, self)
473 | self.btn.setText('Stop')
474 | ```
475 |
476 | 在doAction方法中,我们启动和停止计时器。
477 |
478 | 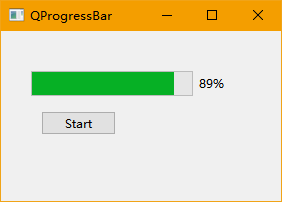
479 |
480 | ## PyQt6 QCalendarWidget
481 |
482 | QCalendarWidget提供了一个基于月度的日历控件。它允许用户以简单直观的方式选择日期。
483 |
484 | ```python
485 | # calendar.py
486 | #!/usr/bin/python
487 |
488 | """
489 | ZetCode PyQt6 tutorial
490 |
491 | This example shows a QCalendarWidget widget.
492 |
493 | Author: Jan Bodnar
494 | Website: zetcode.com
495 | """
496 |
497 | from PyQt6.QtWidgets import (QWidget, QCalendarWidget,
498 | QLabel, QApplication, QVBoxLayout)
499 | from PyQt6.QtCore import QDate
500 | import sys
501 |
502 |
503 | class Example(QWidget):
504 |
505 | def __init__(self):
506 | super().__init__()
507 |
508 | self.initUI()
509 |
510 |
511 | def initUI(self):
512 |
513 | vbox = QVBoxLayout(self)
514 |
515 | cal = QCalendarWidget(self)
516 | cal.setGridVisible(True)
517 | cal.clicked[QDate].connect(self.showDate)
518 |
519 | vbox.addWidget(cal)
520 |
521 | self.lbl = QLabel(self)
522 | date = cal.selectedDate()
523 | self.lbl.setText(date.toString())
524 |
525 | vbox.addWidget(self.lbl)
526 |
527 | self.setLayout(vbox)
528 |
529 | self.setGeometry(300, 300, 350, 300)
530 | self.setWindowTitle('Calendar')
531 | self.show()
532 |
533 |
534 | def showDate(self, date):
535 | self.lbl.setText(date.toString())
536 |
537 |
538 | def main():
539 |
540 | app = QApplication(sys.argv)
541 | ex = Example()
542 | sys.exit(app.exec())
543 |
544 |
545 | if __name__ == '__main__':
546 | main()
547 | ```
548 |
549 | 这个示例有一个日历控件和一个标签控件。当前选择的日期显示在标签控件中。
550 |
551 | ```python
552 | cal = QCalendarWidget(self)
553 | ```
554 |
555 | QCalendarWidget被创建。
556 |
557 | ```python
558 | cal.clicked[QDate].connect(self.showDate)
559 | ```
560 |
561 | 如果我们从小部件中选择一个日期,则会发出一个单击的[QDate]信号。我们将这个信号连接到用户定义的showDate方法。
562 |
563 | ```python
564 | def showDate(self, date):
565 |
566 | self.lbl.setText(date.toString())
567 | ```
568 |
569 | 我们通过调用selectedDate方法来检索选定的日期。然后我们将日期对象转换为字符串,并将其设置为标签控件。
570 |
571 | 在PyQt6教程的本部分中,我们已经介绍了以下控件:QCheckBox、在tooggle模式下的QPushButton、QSlider、QProgressBar和QCalendarWidget。
572 |
573 | [目录](https://github.com/LC-space/PyQt6-tutorial/blob/main/README.md) [上一章](https://github.com/LC-space/PyQt6-tutorial/blob/main/Dialogs.md) [下一章]()
--------------------------------------------------------------------------------
/Widgets/calendar.py:
--------------------------------------------------------------------------------
1 | # calendar.py
2 | #!/usr/bin/python
3 |
4 | """
5 | ZetCode PyQt6 tutorial
6 |
7 | This example shows a QCalendarWidget widget.
8 |
9 | Author: Jan Bodnar
10 | Website: zetcode.com
11 | """
12 |
13 | from PyQt6.QtWidgets import (QWidget, QCalendarWidget,
14 | QLabel, QApplication, QVBoxLayout)
15 | from PyQt6.QtCore import QDate
16 | import sys
17 |
18 |
19 | class Example(QWidget):
20 |
21 | def __init__(self):
22 | super().__init__()
23 |
24 | self.initUI()
25 |
26 |
27 | def initUI(self):
28 |
29 | vbox = QVBoxLayout(self)
30 |
31 | cal = QCalendarWidget(self)
32 | cal.setGridVisible(True)
33 | cal.clicked[QDate].connect(self.showDate)
34 |
35 | vbox.addWidget(cal)
36 |
37 | self.lbl = QLabel(self)
38 | date = cal.selectedDate()
39 | self.lbl.setText(date.toString())
40 |
41 | vbox.addWidget(self.lbl)
42 |
43 | self.setLayout(vbox)
44 |
45 | self.setGeometry(300, 300, 350, 300)
46 | self.setWindowTitle('Calendar')
47 | self.show()
48 |
49 |
50 | def showDate(self, date):
51 | self.lbl.setText(date.toString())
52 |
53 |
54 | def main():
55 |
56 | app = QApplication(sys.argv)
57 | ex = Example()
58 | sys.exit(app.exec())
59 |
60 |
61 | if __name__ == '__main__':
62 | main()
--------------------------------------------------------------------------------
/Widgets/check_box.py:
--------------------------------------------------------------------------------
1 | # check_box.py
2 | #!/usr/bin/python
3 |
4 | """
5 | ZetCode PyQt6 tutorial
6 |
7 | In this example, a QCheckBox widget
8 | is used to toggle the title of a window.
9 |
10 | Author: Jan Bodnar
11 | Website: zetcode.com
12 | """
13 |
14 | from PyQt6.QtWidgets import QWidget, QCheckBox, QApplication
15 | from PyQt6.QtCore import Qt
16 | import sys
17 |
18 |
19 | class Example(QWidget):
20 |
21 | def __init__(self):
22 | super().__init__()
23 |
24 | self.initUI()
25 |
26 |
27 | def initUI(self):
28 |
29 | cb = QCheckBox('Show title', self)
30 | cb.move(20, 20)
31 | cb.toggle()
32 | cb.stateChanged.connect(self.changeTitle)
33 |
34 | self.setGeometry(300, 300, 350, 250)
35 | self.setWindowTitle('QCheckBox')
36 | self.show()
37 |
38 |
39 | def changeTitle(self, state):
40 |
41 | if state == Qt.CheckState.Checked.value:
42 | self.setWindowTitle('QCheckBox')
43 | else:
44 | self.setWindowTitle(' ')
45 |
46 |
47 | def main():
48 |
49 | app = QApplication(sys.argv)
50 | ex = Example()
51 | sys.exit(app.exec())
52 |
53 |
54 | if __name__ == '__main__':
55 | main()
--------------------------------------------------------------------------------
/Widgets/img/image-20210617204451891.png:
--------------------------------------------------------------------------------
https://raw.githubusercontent.com/LC-space/PyQt6-tutorial/b684346d01e667cf855c69058bbb13f2bd2c6762/Widgets/img/image-20210617204451891.png
--------------------------------------------------------------------------------
/Widgets/img/image-20210617213535523.png:
--------------------------------------------------------------------------------
https://raw.githubusercontent.com/LC-space/PyQt6-tutorial/b684346d01e667cf855c69058bbb13f2bd2c6762/Widgets/img/image-20210617213535523.png
--------------------------------------------------------------------------------
/Widgets/img/image-20210617223034230.png:
--------------------------------------------------------------------------------
https://raw.githubusercontent.com/LC-space/PyQt6-tutorial/b684346d01e667cf855c69058bbb13f2bd2c6762/Widgets/img/image-20210617223034230.png
--------------------------------------------------------------------------------
/Widgets/img/image-20210617223524029.png:
--------------------------------------------------------------------------------
https://raw.githubusercontent.com/LC-space/PyQt6-tutorial/b684346d01e667cf855c69058bbb13f2bd2c6762/Widgets/img/image-20210617223524029.png
--------------------------------------------------------------------------------
/Widgets/img/max.png:
--------------------------------------------------------------------------------
https://raw.githubusercontent.com/LC-space/PyQt6-tutorial/b684346d01e667cf855c69058bbb13f2bd2c6762/Widgets/img/max.png
--------------------------------------------------------------------------------
/Widgets/img/med.png:
--------------------------------------------------------------------------------
https://raw.githubusercontent.com/LC-space/PyQt6-tutorial/b684346d01e667cf855c69058bbb13f2bd2c6762/Widgets/img/med.png
--------------------------------------------------------------------------------
/Widgets/img/min.png:
--------------------------------------------------------------------------------
https://raw.githubusercontent.com/LC-space/PyQt6-tutorial/b684346d01e667cf855c69058bbb13f2bd2c6762/Widgets/img/min.png
--------------------------------------------------------------------------------
/Widgets/img/mute.png:
--------------------------------------------------------------------------------
https://raw.githubusercontent.com/LC-space/PyQt6-tutorial/b684346d01e667cf855c69058bbb13f2bd2c6762/Widgets/img/mute.png
--------------------------------------------------------------------------------
/Widgets/progressbar.py:
--------------------------------------------------------------------------------
1 | # progressbar.py
2 | #!/usr/bin/python
3 |
4 | """
5 | ZetCode PyQt6 tutorial
6 |
7 | This example shows a QProgressBar widget.
8 |
9 | Author: Jan Bodnar
10 | Website: zetcode.com
11 | """
12 |
13 | from PyQt6.QtWidgets import (QWidget, QProgressBar,
14 | QPushButton, QApplication)
15 | from PyQt6.QtCore import QBasicTimer
16 | import sys
17 |
18 |
19 | class Example(QWidget):
20 |
21 | def __init__(self):
22 | super().__init__()
23 |
24 | self.initUI()
25 |
26 |
27 | def initUI(self):
28 |
29 | self.pbar = QProgressBar(self)
30 | self.pbar.setGeometry(30, 40, 200, 25)
31 |
32 | self.btn = QPushButton('Start', self)
33 | self.btn.move(40, 80)
34 | self.btn.clicked.connect(self.doAction)
35 |
36 | self.timer = QBasicTimer()
37 | self.step = 0
38 |
39 | self.setGeometry(300, 300, 280, 170)
40 | self.setWindowTitle('QProgressBar')
41 | self.show()
42 |
43 |
44 | def timerEvent(self, e):
45 |
46 | if self.step >= 100:
47 |
48 | self.timer.stop()
49 | self.btn.setText('Finished')
50 | return
51 |
52 | self.step = self.step + 1
53 | self.pbar.setValue(self.step)
54 |
55 |
56 | def doAction(self):
57 |
58 | if self.timer.isActive():
59 | self.timer.stop()
60 | self.btn.setText('Start')
61 | else:
62 | self.timer.start(100, self)
63 | self.btn.setText('Stop')
64 |
65 |
66 | def main():
67 |
68 | app = QApplication(sys.argv)
69 | ex = Example()
70 | sys.exit(app.exec())
71 |
72 |
73 | if __name__ == '__main__':
74 | main()
--------------------------------------------------------------------------------
/Widgets/slider.py:
--------------------------------------------------------------------------------
1 | # slider.py
2 | #!/usr/bin/python
3 |
4 | """
5 | ZetCode PyQt6 tutorial
6 |
7 | This example shows a QSlider widget.
8 |
9 | Author: Jan Bodnar
10 | Website: zetcode.com
11 | """
12 |
13 | from PyQt6.QtWidgets import (QWidget, QSlider,
14 | QLabel, QApplication)
15 | from PyQt6.QtCore import Qt
16 | from PyQt6.QtGui import QPixmap
17 | import sys
18 |
19 |
20 | class Example(QWidget):
21 |
22 | def __init__(self):
23 | super().__init__()
24 |
25 | self.initUI()
26 |
27 |
28 | def initUI(self):
29 |
30 | sld = QSlider(Qt.Orientation.Horizontal, self)
31 | sld.setFocusPolicy(Qt.FocusPolicy.NoFocus)
32 | sld.setGeometry(30, 40, 200, 30)
33 | sld.valueChanged[int].connect(self.changeValue)
34 |
35 | self.label = QLabel(self)
36 | self.label.setPixmap(QPixmap('img/mute.png'))
37 | self.label.setGeometry(250, 40, 80, 30)
38 |
39 | self.setGeometry(300, 300, 350, 250)
40 | self.setWindowTitle('QSlider')
41 | self.show()
42 |
43 |
44 | def changeValue(self, value):
45 |
46 | if value == 0:
47 |
48 | self.label.setPixmap(QPixmap('img/mute.png'))
49 | elif 0 < value <= 30:
50 |
51 | self.label.setPixmap(QPixmap('img/min.png'))
52 | elif 30 < value < 80:
53 |
54 | self.label.setPixmap(QPixmap('img/med.png'))
55 | else:
56 |
57 | self.label.setPixmap(QPixmap('img/max.png'))
58 |
59 |
60 | def main():
61 |
62 | app = QApplication(sys.argv)
63 | ex = Example()
64 | sys.exit(app.exec())
65 |
66 |
67 | if __name__ == '__main__':
68 | main()
--------------------------------------------------------------------------------
/Widgets/toggle_button.py:
--------------------------------------------------------------------------------
1 | # toggle_button.py
2 | #!/usr/bin/python
3 |
4 | """
5 | ZetCode PyQt6 tutorial
6 |
7 | In this example, we create three toggle buttons.
8 | They control the background color of a QFrame.
9 |
10 | Author: Jan Bodnar
11 | Website: zetcode.com
12 | """
13 |
14 | from PyQt6.QtWidgets import (QWidget, QPushButton,
15 | QFrame, QApplication)
16 | from PyQt6.QtGui import QColor
17 | import sys
18 |
19 |
20 | class Example(QWidget):
21 |
22 | def __init__(self):
23 | super().__init__()
24 |
25 | self.initUI()
26 |
27 |
28 | def initUI(self):
29 |
30 | self.col = QColor(0, 0, 0)
31 |
32 | redb = QPushButton('Red', self)
33 | redb.setCheckable(True)
34 | redb.move(10, 10)
35 |
36 | redb.clicked[bool].connect(self.setColor)
37 |
38 | greenb = QPushButton('Green', self)
39 | greenb.setCheckable(True)
40 | greenb.move(10, 60)
41 |
42 | greenb.clicked[bool].connect(self.setColor)
43 |
44 | blueb = QPushButton('Blue', self)
45 | blueb.setCheckable(True)
46 | blueb.move(10, 110)
47 |
48 | blueb.clicked[bool].connect(self.setColor)
49 |
50 | self.square = QFrame(self)
51 | self.square.setGeometry(150, 20, 100, 100)
52 | self.square.setStyleSheet("QWidget { background-color: %s }" %
53 | self.col.name())
54 |
55 | self.setGeometry(300, 300, 300, 250)
56 | self.setWindowTitle('Toggle button')
57 | self.show()
58 |
59 |
60 | def setColor(self, pressed):
61 |
62 | source = self.sender()
63 |
64 | if pressed:
65 | val = 255
66 | else:
67 | val = 0
68 |
69 | if source.text() == "Red":
70 | self.col.setRed(val)
71 | elif source.text() == "Green":
72 | self.col.setGreen(val)
73 | else:
74 | self.col.setBlue(val)
75 |
76 | self.square.setStyleSheet("QFrame { background-color: %s }" %
77 | self.col.name())
78 |
79 |
80 | def main():
81 |
82 | app = QApplication(sys.argv)
83 | ex = Example()
84 | sys.exit(app.exec())
85 |
86 |
87 | if __name__ == '__main__':
88 | main()
--------------------------------------------------------------------------------
/date and time.md:
--------------------------------------------------------------------------------
1 | [目录](https://github.com/LC-space/PyQt6-tutorial/blob/main/README.md) [上一章](https://github.com/LC-space/PyQt6-tutorial/blob/main/Introduction.md) [下一章](https://github.com/LC-space/PyQt6-tutorial/blob/main/First%20programs.md)
2 |
3 | # PyQt6日期和时间
4 |
5 | *最近更新于2021年4月23日*
6 |
7 | PyQt6教程的这一部分展示了如何在PyQt6中使用日期和时间。
8 |
9 | ## QDate,QTime,QDateTime
10 |
11 | PyQt6有QDate、QDateTime、QTime类来处理日期和时间。QDate是一个用于处理公历中的日历日期的类。它具有确定日期、比较或操纵日期的方法。QTime类与时钟时间一起工作。它提供了比较时间、确定时间和各种其他时间操作方法的方法。QDateTime是一个类,它将QDate和QTime对象组合成一个对象。
12 |
13 | ## PyQt当前日期和时间
14 |
15 | PyQt6有currentDate、currentTime和currentDateTime方法,用于确定当前日期和时间。
16 |
17 | ```python
18 | # current_date_time.py
19 | #!/usr/bin/python
20 |
21 | from PyQt6.QtCore import QDate, QTime, QDateTime, Qt
22 |
23 | now = QDate.currentDate()
24 |
25 | print(now.toString(Qt.DateFormat.ISODate))
26 | print(now.toString(Qt.DateFormat.RFC2822Date))
27 |
28 | datetime = QDateTime.currentDateTime()
29 |
30 | print(datetime.toString())
31 |
32 | time = QTime.currentTime()
33 | print(time.toString(Qt.DateFormat.ISODate))
34 | ```
35 |
36 | 该示例以各种格式打印当前日期、日期和时间以及时间。
37 |
38 | ```python
39 | now = QDate.currentDate()
40 | ```
41 |
42 | currentDate方法返回当前日期。
43 |
44 | ```python
45 | print(now.toString(Qt.DateFormat.ISODate))
46 | print(now.toString(Qt.DateFormat.RFC2822Date))
47 | ```
48 |
49 | 通过将值Qt.DateFormat.ISODate和Qt.DateFormat.RFC2822Date传递给toString方法,日期以两种不同的格式打印。
50 |
51 | ```python
52 | datetime = QDateTime.currentDateTime()
53 | ```
54 |
55 | currentDateTime返回当前日期和时间。
56 |
57 | ```python
58 | time = QTime.currentTime()
59 | ```
60 |
61 | 最后,currentTime方法返回当前时间。
62 |
63 | ```
64 | 2021-06-12
65 | 12 Jun 2021
66 | Sat Jun 12 22:32:55 2021
67 | 22:32:55
68 | ```
69 |
70 | ## PyQt6 UTC时间
71 |
72 | 我们的星球是一个球体;它绕轴旋转。地球自西向东转,所以太阳在不同的时间和地点升起。地球大约每24小时自转一次。因此,世界被划分为24个时区。在每个时区,都有不同的当地时间。这个当地时间通常会被夏令时进一步修改。
73 |
74 | 务实的需要是“一个全球时间”。一个全球时间有助于避免时区和夏令时的混淆。选择UTC (Universal Coordinated time)作为主要时间标准。UTC用于航空、天气预报、飞行计划、空中交通管制许可和地图。与当地时间不同,UTC不会随着季节的变化而变化。
75 |
76 | ```python
77 | # utc_local.py
78 | #!/usr/bin/python
79 |
80 | from PyQt6.QtCore import QDateTime, Qt
81 |
82 | now = QDateTime.currentDateTime()
83 |
84 | print('Local datetime: ', now.toString(Qt.DateFormat.ISODate))
85 | print('Universal datetime: ', now.toUTC().toString(Qt.DateFormat.ISODate))
86 |
87 | print(f'The offset from UTC is: {now.offsetFromUtc()} seconds')
88 | ```
89 |
90 | 该示例确定当前世界和本地日期和时间。
91 |
92 | ```python
93 | print('Local datetime: ', now.toString(Qt.DateFormat.ISODate))
94 | ```
95 |
96 | currentDateTime方法返回表示为本地时间的当前日期和时间。我们可以使用toLocalTime将通用时间转换为本地时间。
97 |
98 | ```python
99 | print('Universal datetime: ', now.toUTC().toString(Qt.DateFormat.ISODate))
100 | ```
101 |
102 | 我们使用toUTC方法从日期时间对象中获得世界时间。
103 |
104 | ```python
105 | print(f'The offset from UTC is: {now.offsetFromUtc()} seconds')
106 | ```
107 |
108 | offsetFromUtc给出了通用时间和本地时间之间的差值,以秒为单位。
109 |
110 | ```
111 | Local datetime: 2021-06-12T22:51:45
112 | Universal datetime: 2021-06-12T14:51:45Z
113 | The offset from UTC is: 28800 seconds
114 | ```
115 |
116 | ## PyQt6天数
117 |
118 | 具体月份的天数由daysInMonth方法返回,一年中的天数由daysInYear方法返回。
119 |
120 | ```python
121 | # n_of_days.py
122 | #!/usr/bin/python
123 |
124 | from PyQt6.QtCore import QDate
125 |
126 | now = QDate.currentDate()
127 |
128 | d = QDate(1945, 5, 7)
129 |
130 | print(f'Days in month: {d.daysInMonth()}')
131 | print(f'Days in year: {d.daysInYear()}')
132 | ```
133 |
134 | 该示例打印所选日期的每月和每年的天数。
135 |
136 | ```
137 | Days in month: 31
138 | Days in year: 365
139 | ```
140 |
141 | ## PyQt6的天数差值
142 |
143 | 方法返回从一个日期到另一个日期的天数。
144 |
145 | ```python
146 | # xmas.py
147 | #!/usr/bin/python
148 |
149 | from PyQt6.QtCore import QDate, Qt
150 |
151 | now = QDate.currentDate()
152 | y = now.year()
153 |
154 | print(f'today is {now.toString(Qt.DateFormat.ISODate)}')
155 |
156 | xmas1 = QDate(y-1, 12, 25)
157 | xmas2 = QDate(y, 12, 25)
158 |
159 | dayspassed = xmas1.daysTo(now)
160 | print(f'{dayspassed} days have passed since last XMas')
161 |
162 | nofdays = now.daysTo(xmas2)
163 | print(f'There are {nofdays} days until next XMas')
164 | ```
165 |
166 | 该示例计算从上一个圣诞节算起的天数和到下一个圣诞节的天数。
167 |
168 | ```
169 | today is 2021-06-12
170 | 169 days have passed since last XMas
171 | There are 196 days until next XMas
172 | ```
173 |
174 | ## PyQt6 datetime算法
175 |
176 | 我们经常需要在datetime值中添加或减去天、秒或年。
177 |
178 | ```python
179 | # arithmetic.py
180 | #!/usr/bin/python
181 |
182 | from PyQt6.QtCore import QDateTime, Qt
183 |
184 | now = QDateTime.currentDateTime()
185 |
186 | print(f'Today: {now.toString(Qt.DateFormat.ISODate)}')
187 | print(f'Adding 12 days: {now.addDays(12).toString(Qt.DateFormat.ISODate)}')
188 | print(f'Subtracting 22 days: {now.addDays(-22).toString(Qt.DateFormat.ISODate)}')
189 |
190 | print(f'Adding 50 seconds: {now.addSecs(50).toString(Qt.DateFormat.ISODate)}')
191 | print(f'Adding 3 months: {now.addMonths(3).toString(Qt.DateFormat.ISODate)}')
192 | print(f'Adding 12 years: {now.addYears(12).toString(Qt.DateFormat.ISODate)}')
193 | ```
194 |
195 | 该示例确定当前日期时间,并添加或减去日、秒、月和年。
196 |
197 | ```
198 | Today: 2021-06-12T23:03:47
199 | Adding 12 days: 2021-06-24T23:03:47
200 | Subtracting 22 days: 2021-05-21T23:03:47
201 | Adding 50 seconds: 2021-06-12T23:04:37
202 | Adding 3 months: 2021-09-12T23:03:47
203 | Adding 12 years: 2033-06-12T23:03:47
204 | ```
205 |
206 | ## PyQt6夏令时
207 |
208 | 夏令时(DST)是一种在夏季提前时钟的做法,这样晚上的日光就会持续更长时间。在立春时,时间向前调整一小时,在秋季时,时间向后调整为标准时间。
209 |
210 | ```python
211 | # daylight_saving.py
212 | #!/usr/bin/python
213 |
214 | from PyQt6.QtCore import QDateTime, QTimeZone, Qt
215 |
216 | now = QDateTime.currentDateTime()
217 |
218 | print(f'Time zone: {now.timeZoneAbbreviation()}')
219 |
220 | if now.isDaylightTime():
221 | print('The current date falls into DST time')
222 | else:
223 | print('The current date does not fall into DST time')
224 | ```
225 |
226 | 示例检查datetime是否为夏时制。
227 |
228 | ```python
229 | print(f'Time zone: {now.timeZoneAbbreviation()}')
230 | ```
231 |
232 | timezoneacronym方法返回datetime的时区缩写。
233 |
234 | ```python
235 | if now.isDaylightTime():
236 | ...
237 | ```
238 |
239 | 如果datetime是夏时制,则返回isDaylightTime。
240 |
241 | ```
242 | Time zone: 中国标准时间
243 | The current date does not fall into DST time
244 | ```
245 |
246 | 该项目在欧洲中部城市布拉迪斯拉发(Bratislava)的夏季执行。中欧夏季时间(CEST)比世界时间早2小时。这个时区是一个日光节约时区,在欧洲和南极洲使用。在冬季使用的标准时间是中欧时间(CET)。
247 |
248 | ## PyQt6 unix纪元
249 |
250 | 一个新纪元是被选择为某个特定时代起源的时间上的一个瞬间。例如,在西方基督教国家,时间纪元从耶稣诞生的第0天开始。另一个例子是法国共和历,它使用了12年。这一时期是共和时代的开始,这是在1792年9月22日宣布的,这一天宣布了第一共和国和废除君主制。
251 |
252 | 计算机也有自己的纪元。其中最流行的是Unix纪元。Unix纪元是1970年1月1日00:00:00 UTC时间(或1970-01-01T00:00:00Z ISO 8601)。计算机中的日期和时间是根据自该计算机或平台的定义纪元以来所经过的秒数或时钟滴答数确定的。
253 |
254 | Unix时间是自Unix纪元以来经过的秒数。
255 |
256 | Unix date命令可用于获取Unix时间。现在距离Unix纪元已经过去了1623511317秒。
257 |
258 | ```python
259 | # unix_time.py
260 | #!/usr/bin/python
261 |
262 | from PyQt6.QtCore import QDateTime, Qt
263 |
264 | now = QDateTime.currentDateTime()
265 |
266 | unix_time = now.toSecsSinceEpoch()
267 | print(unix_time)
268 |
269 | d = QDateTime.fromSecsSinceEpoch(unix_time)
270 | print(d.toString(Qt.DateFormat.ISODate))
271 | ```
272 |
273 | 示例打印Unix时间并将其转换回QDateTime。
274 |
275 | ```python
276 | now = QDateTime.currentDateTime()
277 | ```
278 |
279 | 首先,检索当前日期和时间。
280 |
281 | ```python
282 | unix_time = now.toSecsSinceEpoch()
283 | ```
284 |
285 | toSecsSinceEpoch返回Unix时间。
286 |
287 | ```python
288 | d = QDateTime.fromSecsSinceEpoch(unix_time)
289 | ```
290 |
291 | 使用fromSecsSinceEpoch,我们将Unix时间转换为QDateTime。
292 |
293 | ```
294 | 1623511317
295 | 2021-06-12T23:21:57
296 | ```
297 |
298 | ## PyQt6儒略日
299 |
300 | 儒略日是指自儒略时期开始的连续天数。它主要由天文学家使用。它不应该与儒略历混淆。儒略时期开始于公元前4713年。公元前4713年1月1日的中午开始,儒略历号为0。
301 |
302 | 儒略日数(JDN)是指从这个时期开始算起所经过的天数。任何时刻的儒略日(JD)是前一个中午的儒略日数加上自该时刻起当天的一段时间。(Qt不计算这一段时间。)除了天文学,儒略日期经常被军事和大型计算机程序使用。
303 |
304 | ```python
305 | # julian_day.py
306 | #!/usr/bin/python
307 |
308 | from PyQt6.QtCore import QDate, Qt
309 |
310 | now = QDate.currentDate()
311 |
312 | print('Gregorian date for today:', now.toString(Qt.DateFormat.ISODate))
313 | print('Julian day for today:', now.toJulianDay())
314 | ```
315 |
316 | 在这个例子中,我们计算今天的公历日和儒略日。
317 |
318 | ```python
319 | print('Julian day for today:', now.toJulianDay())
320 | ```
321 |
322 | 儒略日通过toJulianDay()方法返回。
323 |
324 | ```
325 | Gregorian date for today: 2021-06-12
326 | Julian day for today: 2459378
327 | ```
328 |
329 | ## 历史战役
330 |
331 | 有了儒略日,就可以进行跨越几个世纪的计算。
332 |
333 | ```python
334 | # battles.py
335 | #!/usr/bin/python
336 |
337 | from PyQt6.QtCore import QDate, Qt
338 |
339 | borodino_battle = QDate(1812, 9, 7)
340 | slavkov_battle = QDate(1805, 12, 2)
341 |
342 | now = QDate.currentDate()
343 |
344 | j_today = now.toJulianDay()
345 | j_borodino = borodino_battle.toJulianDay()
346 | j_slavkov = slavkov_battle.toJulianDay()
347 |
348 | d1 = j_today - j_slavkov
349 | d2 = j_today - j_borodino
350 |
351 | print(f'Days since Slavkov battle: {d1}')
352 | print(f'Days since Borodino battle: {d2}')
353 | ```
354 |
355 | 该示例计算自两个历史事件以来经过的天数。
356 |
357 | ```python
358 | borodino_battle = QDate(1812, 9, 7)
359 | slavkov_battle = QDate(1805, 12, 2)
360 | ```
361 |
362 | 我们有两个拿破仑时代的战役日期。
363 |
364 | ```python
365 | j_today = now.toJulianDay()
366 | j_borodino = borodino_battle.toJulianDay()
367 | j_slavkov = slavkov_battle.toJulianDay()
368 | ```
369 |
370 | 我们计算今天和斯拉夫科夫战役和波罗底诺战役的儒略日。
371 |
372 | ```python
373 | d1 = j_today - j_slavkov
374 | d2 = j_today - j_borodino
375 | ```
376 |
377 | 我们计算了两场战役结束后的天数。
378 |
379 | ```
380 | Days since Slavkov battle: 78720
381 | Days since Borodino battle: 76249
382 | ```
383 |
384 | 当我们运行这个脚本时,从斯拉科夫战役到现在已经过去了78720天,从波罗底诺战役到现在已经过去了76249天。
385 |
386 | 在PyQt6教程的这一部分中,我们使用了日期和时间。
387 |
388 | [目录](https://github.com/LC-space/PyQt6-tutorial/blob/main/README.md) [上一章](https://github.com/LC-space/PyQt6-tutorial/blob/main/Introduction.md) [下一章](https://github.com/LC-space/PyQt6-tutorial/blob/main/First%20programs.md)
389 |
390 |
--------------------------------------------------------------------------------