10 | A web app built using Javascript, communicating with a MongoDB database through express. The front-end is displayed using React.
11 |
12 |
13 | The app allows the user to manage their recipes and meal planner. The user has full CRUD methods on the recipes, and they can assign them to a weekly meal planner, where they can also be managed. The app automatically updates a shopping list, sourcing the ingredients from the recipes in the planner, and consilidates it to avoid multiples of the same item.
14 | Other functions include search and filters for easier recipe management.
15 |
16 |
17 |
18 |
19 | ## Site
20 |
21 | ### Homepage
22 |
23 | 
24 |
25 | ### Add Recipe
26 | 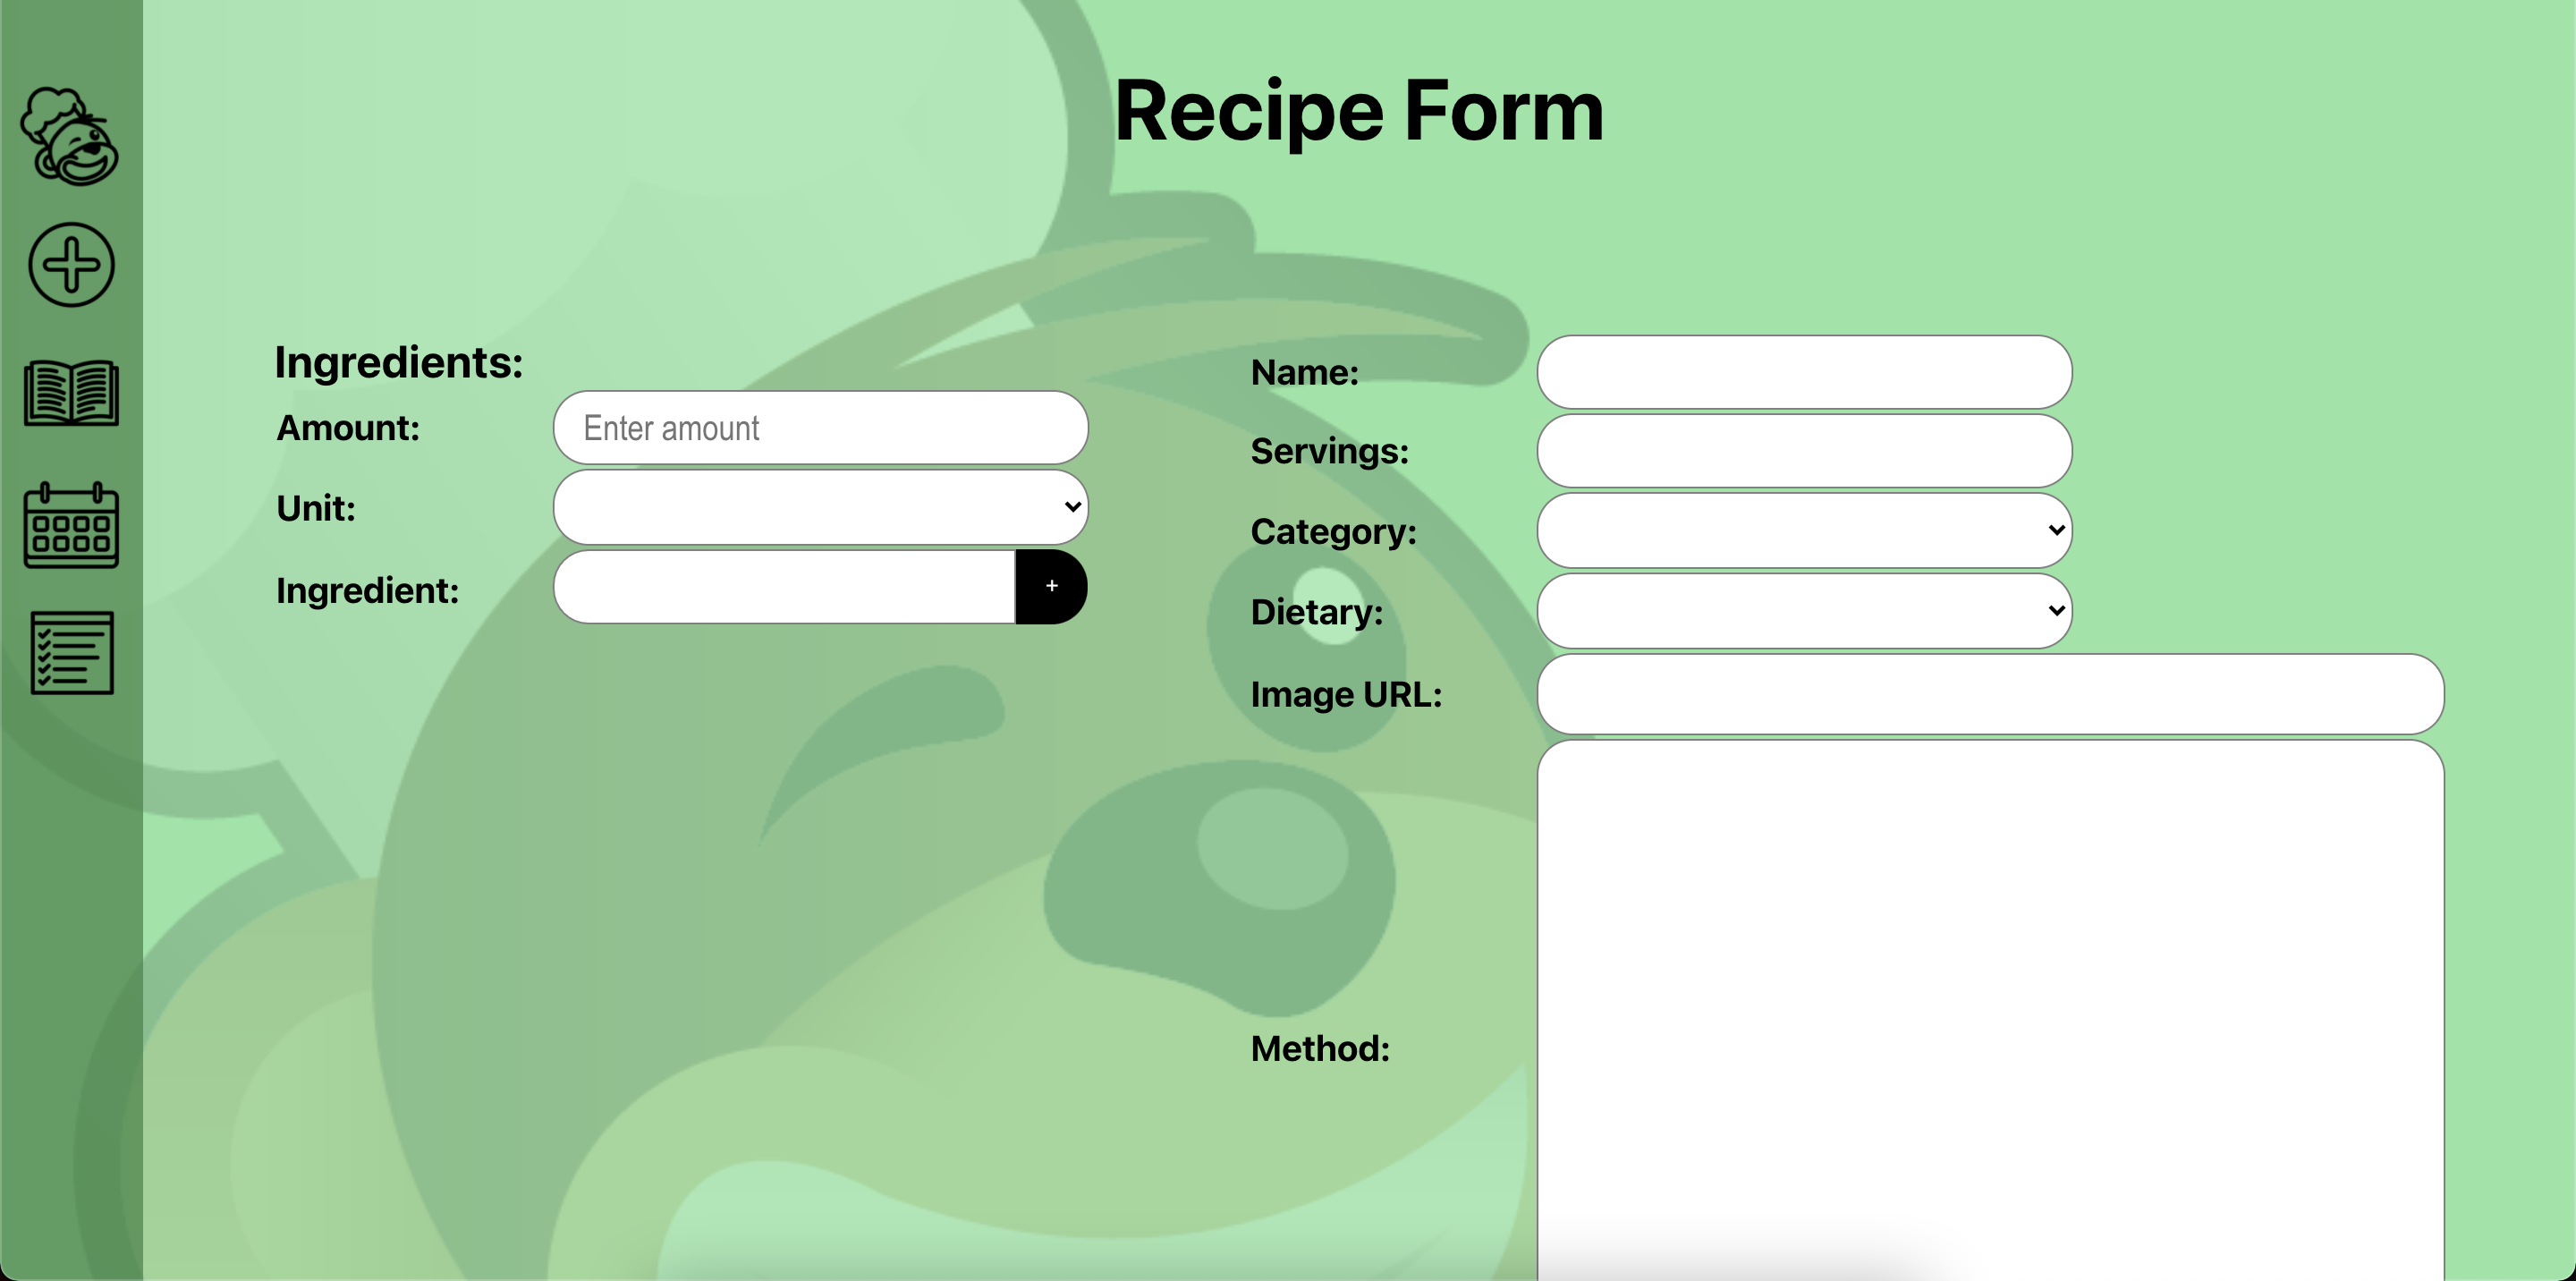
27 |
28 | ### Recipe Page
29 | 
30 |
31 | ### Recipe Book
32 | 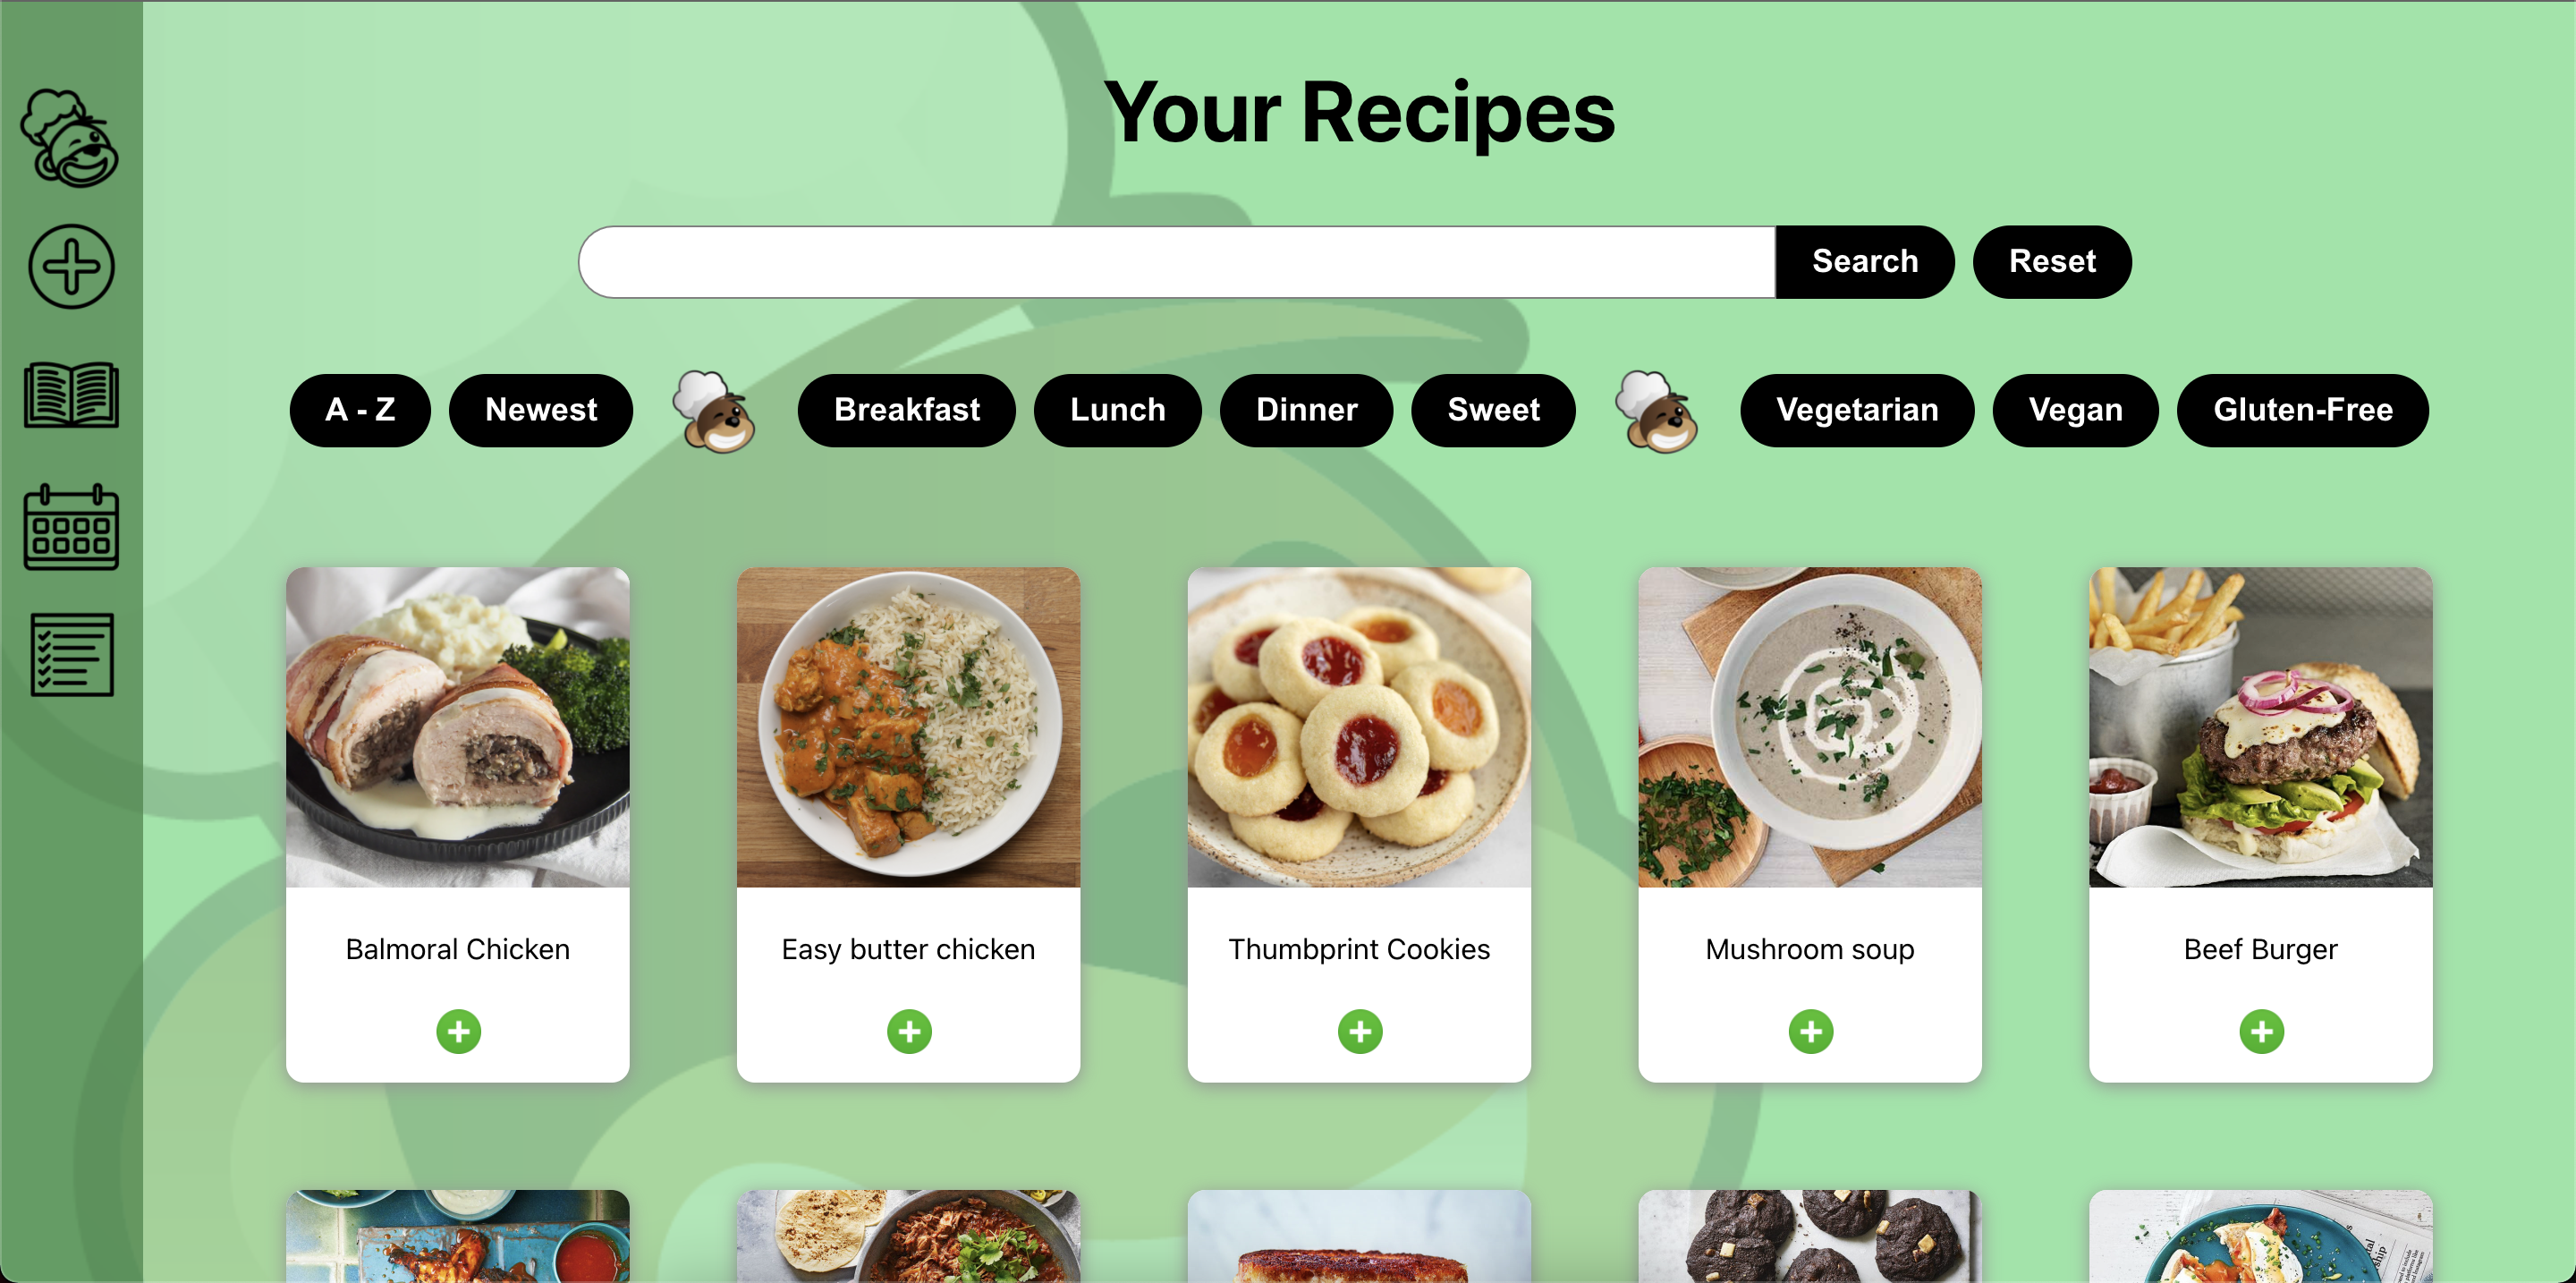
33 |
34 | ### Planner
35 | 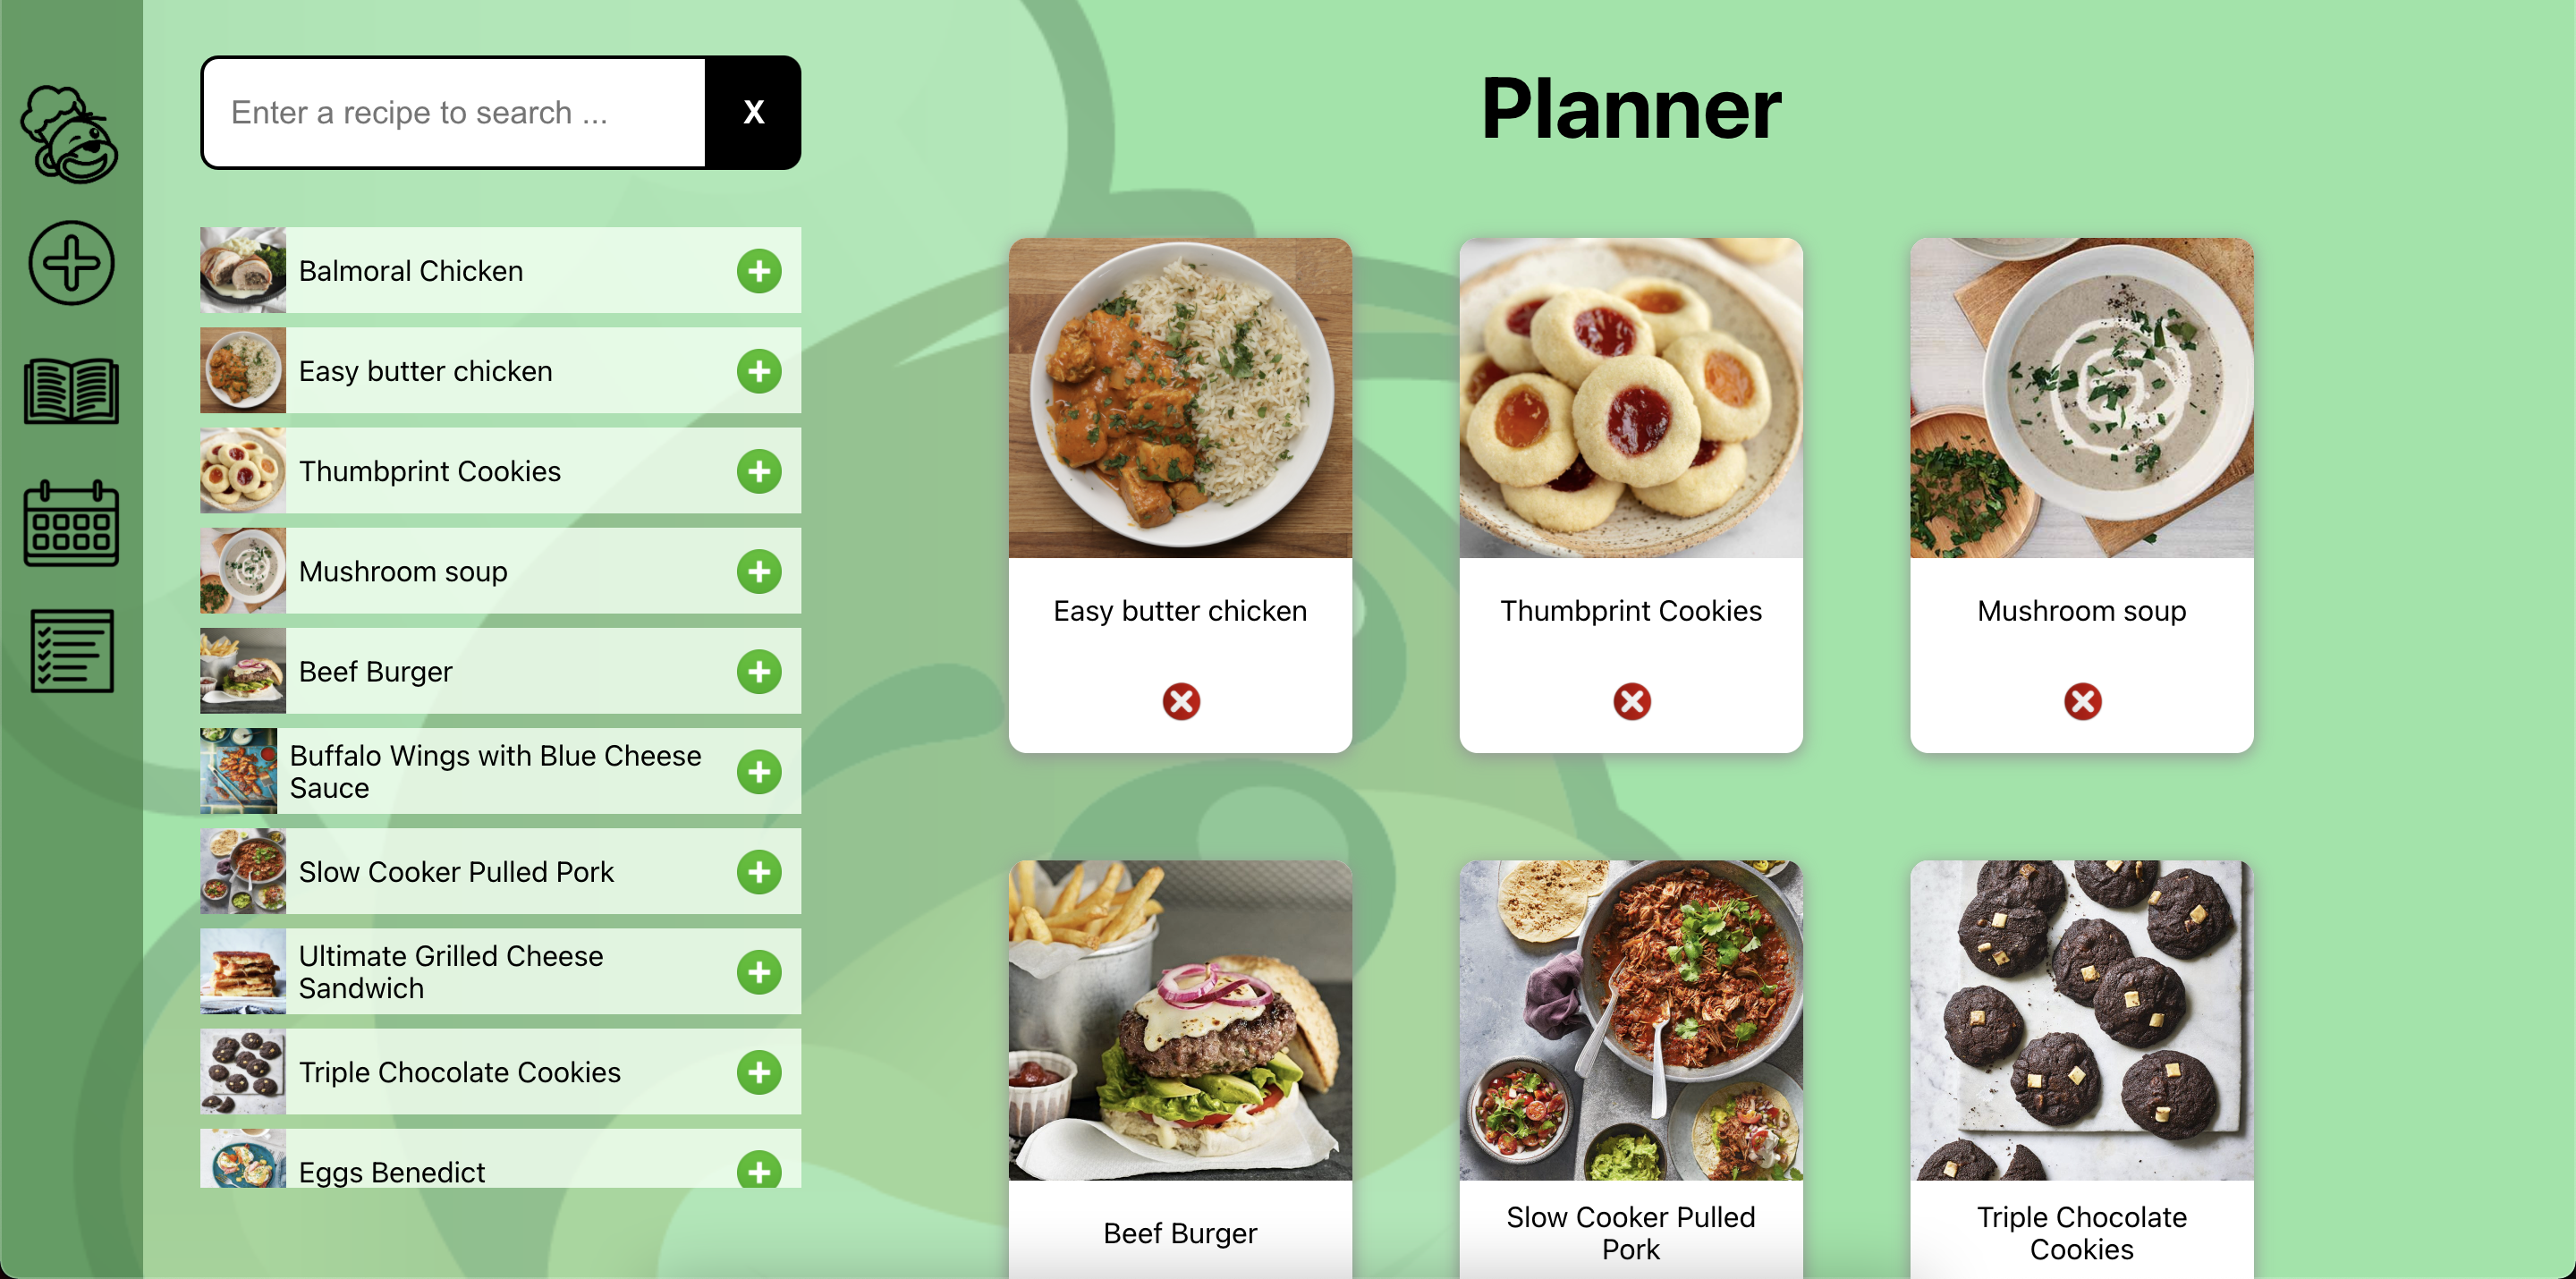
36 |
37 | ### Shopping List
38 | 
39 |
40 |
41 | ## How to Run
42 | ----------
43 |
44 |
45 | ### Client:
46 |
47 | To get the application running you must install all the dependencies:
48 |
49 | npm install
50 |
51 | Start the application in development mode. running this command will open ( http://localhost:3000 ) in a browser to view the application:
52 |
53 | npm start
54 |
55 | ### Server:
56 |
57 | To get the application running you must install all the dependencies:
58 |
59 | npm install
60 |
61 | Then seed the database and run the server:
62 |
63 | npm run seeds
64 |
65 | npm run server:dev
66 |
67 |
68 |
69 |
70 | ## Built with
71 |
72 | - [JavaScript]
73 | - [React]
74 | - [MongoDB]
75 | - [Express]
76 |
77 |
78 | ## Team
79 |
80 | ### [Anita Safar](https://github.com/AnitaSafar)
81 | ### [Craig Marshall](https://github.com/Marshall3c03)
82 | ### [Ina Kurlovich](https://github.com/innessa89)
83 | ### [Ross Napier](https://github.com/RossNapier)
84 |
--------------------------------------------------------------------------------
/client/src/containers/ShoppingList.js:
--------------------------------------------------------------------------------
1 | import React, {useState, useEffect} from "react";
2 | import "../static/CSS/shoppinglist.css";
3 |
4 | const ShoppingList = () => {
5 |
6 | const RecipesApi = [
7 | {
8 | name: "recipes",
9 | url: "http://localhost:5000/api/planner"
10 | }
11 | ]
12 |
13 | const [recipesList, setDisplayedRecipesList] = useState([]);
14 |
15 | const shoppingList = [];
16 |
17 | useEffect(() => {
18 | loadRecipes(RecipesApi[0].url)
19 | }, []);
20 |
21 | const loadRecipes = url => {
22 | fetch(url)
23 | .then(result => result.json())
24 | .then(recipesJson => setDisplayedRecipesList(recipesJson))
25 | }
26 |
27 | let listOfIngredients = recipesList.map(recipe => {
28 |
29 | let fullIngredientList = recipe.ingredients.map(ingredient => {
30 |
31 | shoppingList.push(ingredient);
32 |
33 | return (
34 | <>
35 | {ingredient.amount}{ingredient.unit} {ingredient.ingredient}
36 |
37 | )})
38 | });
39 |
40 |
41 | const loopedList = {};
42 |
43 | for (let item of shoppingList) {
44 |
45 | const ingNames = Object.keys(loopedList);
46 |
47 | let found = false;
48 | const name = item.ingredient.toLowerCase();
49 | const amount = item.amount;
50 | let unit = item.unit;
51 | let details = {"unit" : unit, "amount": amount};
52 |
53 | for (let ingName of ingNames){
54 | if (loopedList[name] !== undefined) {
55 | if (ingName === name) {
56 | found = true
57 | }
58 | }
59 | }
60 | if(found){
61 | loopedList[name]["amount"] += details["amount"];
62 | } else {
63 | loopedList[name] = details
64 | }
65 | };
66 |
67 | let condensedList = Object.entries(loopedList);
68 |
69 | let listItems = condensedList.map((item, index) => {
70 | return (
71 |
72 |
73 |
74 |
75 | )
76 | })
77 |
78 | return(
79 | <>
80 |
81 |
82 | Shopping List
83 |
84 |
85 |
86 | {listItems}
87 |
88 |
89 | );
90 | };
91 |
92 | export default ShoppingList;
--------------------------------------------------------------------------------
/client/src/static/CSS/addRecipeForm.css:
--------------------------------------------------------------------------------
1 | .add-recipe-title{
2 | display: flex;
3 | flex-direction: row;
4 | justify-content: center;
5 | align-content: center;
6 | font-size: 3rem;
7 | margin-top: 0;
8 | }
9 |
10 | .ingredient-text{
11 | font-size: 20px;
12 | font-weight: bold;
13 | }
14 | .add-recipe-form-container{
15 | display:flex;
16 | flex-direction: row;
17 | justify-content: center;
18 | padding-top: 5%;
19 | margin-left: 2rem;
20 | margin-right: 2rem;
21 | }
22 |
23 | .select-option-recipe {
24 | height: 43px;
25 | padding: 2px;
26 | padding-left: 1rem;
27 | border-radius: 20px;
28 | border: 1px solid grey;
29 | width: 300px;
30 | margin-right: 5px;
31 | font-size: 20px;
32 | font-family: 'Franklin Gothic Medium', 'Arial Narrow', Arial, sans-serif;
33 | }
34 |
35 | .add-recipe-imageurl{
36 | font-size: 15px;
37 | width: 30.5rem;
38 | border-radius: 20px;
39 | border: 1px solid grey;
40 | height: 2.6rem;
41 | padding-left: 1rem;
42 | }
43 |
44 | #method{
45 | width: 30rem;
46 | height: 20rem;
47 | }
48 |
49 | #notes{
50 | width: 30rem;
51 | height: 10rem;
52 | }
53 |
54 | .input-add-recipe {
55 | padding: 10px;
56 | padding-left: 1rem;
57 | border-radius: 20px;
58 | border: 1px solid grey;
59 | width: 272px;
60 | height: 20px;
61 | margin-right: 5px;
62 | font-size: 20px;
63 | font-family: 'Franklin Gothic Medium', 'Arial Narrow', Arial, sans-serif;
64 | }
65 |
66 | .input-add-recipe-ingredient {
67 | padding: 10px;
68 | border-radius: 20px;
69 | border-top-right-radius: 0px;
70 | border-bottom-right-radius: 0px;
71 | border: 1px solid grey;
72 | width: 237px;
73 | height: 20px;
74 | margin-right: 0px;
75 | font-size: 20px;
76 | font-family: 'Franklin Gothic Medium', 'Arial Narrow', Arial, sans-serif;
77 | }
78 |
79 |
80 | textarea{
81 | border-radius: 20px;
82 | border: 1px solid grey;
83 | font-size: 22px;
84 | font-family: 'Franklin Gothic Medium', 'Arial Narrow', Arial, sans-serif;
85 | padding: 10px;
86 | padding-left: 1rem;
87 | }
88 |
89 | .plus input{
90 | border-top-right-radius: 20px;
91 | border-bottom-right-radius: 20px;
92 | border: 0px;
93 | background-color: black;
94 | height: 42px;
95 | width: 40px;
96 | position: relative;
97 | top: -3px;
98 | color: white;
99 | padding: 0px;
100 | text-align: center;
101 | }
102 |
103 | .save input{
104 | border-radius: 20px;
105 | border: 0px;
106 | background-color: black;
107 | height: 3rem;
108 | width: 20rem;
109 | color: white;
110 | padding: 0px;
111 | text-align: center;
112 | }
113 |
114 | .add-recipe-save{
115 | padding-left: 13.5rem;
116 | display: flex;
117 | justify-content: center;
118 | align-items: center;
119 | }
120 |
121 | label{
122 | font-weight: bold;
123 | font-size: 20px;
124 | }
125 |
126 | .ingredients{
127 | font-size: 25px;
128 | }
129 |
130 | .ingredient-form{
131 | padding-right: 80px;
132 | }
133 |
134 |
135 | .ingredient-input{
136 | display: flex;
137 | flex-direction: row;
138 | background-color: white;
139 | width: 20rem;
140 | }
141 |
142 | td{
143 | padding-right:50px;
144 | min-width: 80px;
145 | }
146 |
147 |
148 |
149 |
150 |
151 |
152 |
153 |
154 |
155 |
156 |
157 |
158 |
159 |
--------------------------------------------------------------------------------
/client/README.md:
--------------------------------------------------------------------------------
1 | # Getting Started with Create React App
2 |
3 | This project was bootstrapped with [Create React App](https://github.com/facebook/create-react-app).
4 |
5 | ## Available Scripts
6 |
7 | In the project directory, you can run:
8 |
9 | ### `npm start`
10 |
11 | Runs the app in the development mode.\
12 | Open [http://localhost:3000](http://localhost:3000) to view it in your browser.
13 |
14 | The page will reload when you make changes.\
15 | You may also see any lint errors in the console.
16 |
17 | ### `npm test`
18 |
19 | Launches the test runner in the interactive watch mode.\
20 | See the section about [running tests](https://facebook.github.io/create-react-app/docs/running-tests) for more information.
21 |
22 | ### `npm run build`
23 |
24 | Builds the app for production to the `build` folder.\
25 | It correctly bundles React in production mode and optimizes the build for the best performance.
26 |
27 | The build is minified and the filenames include the hashes.\
28 | Your app is ready to be deployed!
29 |
30 | See the section about [deployment](https://facebook.github.io/create-react-app/docs/deployment) for more information.
31 |
32 | ### `npm run eject`
33 |
34 | **Note: this is a one-way operation. Once you `eject`, you can't go back!**
35 |
36 | If you aren't satisfied with the build tool and configuration choices, you can `eject` at any time. This command will remove the single build dependency from your project.
37 |
38 | Instead, it will copy all the configuration files and the transitive dependencies (webpack, Babel, ESLint, etc) right into your project so you have full control over them. All of the commands except `eject` will still work, but they will point to the copied scripts so you can tweak them. At this point you're on your own.
39 |
40 | You don't have to ever use `eject`. The curated feature set is suitable for small and middle deployments, and you shouldn't feel obligated to use this feature. However we understand that this tool wouldn't be useful if you couldn't customize it when you are ready for it.
41 |
42 | ## Learn More
43 |
44 | You can learn more in the [Create React App documentation](https://facebook.github.io/create-react-app/docs/getting-started).
45 |
46 | To learn React, check out the [React documentation](https://reactjs.org/).
47 |
48 | ### Code Splitting
49 |
50 | This section has moved here: [https://facebook.github.io/create-react-app/docs/code-splitting](https://facebook.github.io/create-react-app/docs/code-splitting)
51 |
52 | ### Analyzing the Bundle Size
53 |
54 | This section has moved here: [https://facebook.github.io/create-react-app/docs/analyzing-the-bundle-size](https://facebook.github.io/create-react-app/docs/analyzing-the-bundle-size)
55 |
56 | ### Making a Progressive Web App
57 |
58 | This section has moved here: [https://facebook.github.io/create-react-app/docs/making-a-progressive-web-app](https://facebook.github.io/create-react-app/docs/making-a-progressive-web-app)
59 |
60 | ### Advanced Configuration
61 |
62 | This section has moved here: [https://facebook.github.io/create-react-app/docs/advanced-configuration](https://facebook.github.io/create-react-app/docs/advanced-configuration)
63 |
64 | ### Deployment
65 |
66 | This section has moved here: [https://facebook.github.io/create-react-app/docs/deployment](https://facebook.github.io/create-react-app/docs/deployment)
67 |
68 | ### `npm run build` fails to minify
69 |
70 | This section has moved here: [https://facebook.github.io/create-react-app/docs/troubleshooting#npm-run-build-fails-to-minify](https://facebook.github.io/create-react-app/docs/troubleshooting#npm-run-build-fails-to-minify)
71 |
--------------------------------------------------------------------------------
/client/src/static/CSS/homepage.css:
--------------------------------------------------------------------------------
1 | :root {
2 | --page-button-group-margin: 30px;
3 | }
4 |
5 | .body{
6 | background-color: black;
7 | }
8 |
9 | .homepage-banner {
10 | background-image: url("graphics/jungle.png");
11 | width: 95%;
12 | height: 15vw;
13 | margin-left: auto;
14 | margin-right: auto;
15 | margin-top: 0.5 rem;
16 | margin-bottom: 4vw;
17 | border-radius: 1vw;
18 | }
19 |
20 | .banner-image {
21 | width: 20vw;
22 | filter: drop-shadow(0px 15px 15px #000000c8);
23 | display: flex;
24 | animation: float 3s infinite linear;
25 | display:inline-block;
26 | }
27 |
28 | @keyframes float {
29 | 0% { transform: translateY(0px) rotate(15deg); }
30 | 50% { transform: translateY(0px) rotate(0deg); }
31 | 100% { transform: translateY(0px) rotate(15deg); }
32 | }
33 |
34 | .banner-message {
35 | color: white;
36 | font-weight: 700;
37 | text-align: right;
38 | font-size: 5vw;
39 | filter: drop-shadow(0px 0px 10px #000000c8);
40 | display: inline-block;
41 | position: relative;
42 | top: -11vw;
43 | }
44 |
45 | .link-container {
46 | display: flex;
47 | flex-direction: row;
48 | flex-wrap: wrap;
49 | justify-content: center;
50 | align-items: center;
51 | margin-bottom: 2.5rem;
52 | }
53 |
54 | .home-banner-image {
55 | width: 50%;
56 | filter: drop-shadow(30px 10px 4px #070730);
57 | display:inline-block;
58 | vertical-align:top
59 | }
60 |
61 | .home-button-group {
62 | margin: var(--page-button-group-margin);
63 | background-color: white;
64 | border-radius: 10px;
65 | padding: 20px;
66 | width: 200px;
67 | height: 270px;
68 | display: flex;
69 | flex-direction: column;
70 | transition: 0.5s ease;
71 | justify-content: center;
72 | align-items: center;
73 | box-shadow: 2px 2px 5px #818181;
74 | }
75 |
76 | .home-button-group:hover {
77 | margin: var(--page-button-group-margin);
78 | background-color: rgb(255, 255, 255);
79 | transition: 1s ease;
80 | padding: 20px;
81 | width: 200px;
82 | height: 270px;
83 | display: flex;
84 | flex-direction: column;
85 | justify-content: center;
86 | align-items: center;
87 | transform: scale(1.1, 1.1);
88 | box-shadow: 0px 10px 30px #555555;
89 | }
90 |
91 | .home-button-group .home-button-title {
92 | color: black;
93 | font-weight: 500;
94 | font-size: xx-large;
95 | display: flex;
96 | margin-top: 0;
97 | margin-bottom: 1rem;
98 | text-align: center;
99 | }
100 |
101 | .home-button-image {
102 | width: 100%;
103 | height: 100%;
104 | object-fit: cover;
105 | }
106 |
107 | .banner-container {
108 | display: flex;
109 | justify-content: center;
110 | align-items: center;
111 | }
112 |
113 | .banner-container .banner-group {
114 | margin: 50px;
115 | background-color: rgb(50, 191, 183);
116 | border-radius: 10px;
117 | padding: 20px;
118 | width: 800px;
119 | height: 200px;
120 | display: flex;
121 | flex-direction: column;
122 | justify-content: center;
123 | align-items: center;
124 | box-shadow: rgba(100, 100, 111, 0.2) 0px 7px 29px 0px;}
125 |
126 | .banner-container .banner-group:hover {
127 | margin: 50px;
128 | background-color: rgb(27, 90, 227);
129 | box-shadow: rgba(28, 28, 162, 0.2) 0px 7px 29px 0px;
130 | border-radius: 10px;
131 | transition: all 1s ease;
132 | padding: 20px;
133 | width: 800px;
134 | height: 200px;
135 | display: flex;
136 | flex-direction: column;
137 | justify-content: center;
138 | align-items: center;
139 | }
--------------------------------------------------------------------------------
/client/src/containers/Recipe.js:
--------------------------------------------------------------------------------
1 | import React, {useEffect, useState} from "react";
2 | import { useNavigate, useParams } from "react-router-dom";
3 | import MealPlannerService from "./MealPlannerService";
4 | import MealRecipeService from "./MealRecipeService";
5 | import '../static/CSS/recipe.css';
6 |
7 | const Recipe = () => {
8 | const navigate = useNavigate();
9 | const [currentRecipe,setCurrentRecipe] = useState(null);
10 | const [servings, setServings] = useState(4);
11 | const [mealAddedToPlanner, setMealAddedToPlanner] = useState(null);
12 | const {recipeId} = useParams();
13 |
14 | useEffect(()=>{
15 | MealRecipeService.getById(recipeId)
16 | .then(resultJson => setCurrentRecipe(resultJson))
17 | }, []);
18 |
19 | const handleMinus = function() {
20 | if (servings > 1) {
21 | setServings(servings - 1);
22 | }
23 | };
24 |
25 | const handlePlus = function() {
26 | setServings(servings + 1);
27 | };
28 |
29 | const handleDelete = ()=>{
30 | MealRecipeService.delete(recipeId)
31 | setTimeout(()=>navigate("/recipebook"),500)
32 | }
33 |
34 | const numOfServings = currentRecipe?.servings;
35 |
36 | const handleAdding = ()=> {
37 | MealPlannerService.create(currentRecipe)
38 | setMealAddedToPlanner()
39 | };
40 |
41 | const handleUpdate=()=>{
42 | MealRecipeService.update(recipeId);
43 | navigate(`/update-recipe/${recipeId}`);
44 | }
45 |
46 | let counter = 1;
47 |
48 | const fullIngredients = currentRecipe?.ingredients.map((ingredient) => {
49 |
50 | const perDesiredPortions = ((ingredient.amount/numOfServings) * servings).toFixed(1);
51 |
52 | counter += 1;
53 | return(
54 |
218 | )
219 | }
220 |
221 | export default AddRecipe;
--------------------------------------------------------------------------------
/server/db/seeds.js:
--------------------------------------------------------------------------------
1 | use recipes;
2 |
3 | db.dropDatabase();
4 |
5 | db.recipes.insertMany([
6 | {
7 | "name" : "Balmoral Chicken",
8 | "ingredients" : [
9 | { "amount" : 4,
10 | "ingredient" : "chicken breasts" },
11 | { "amount" : 130,
12 | "unit" : "g",
13 | "ingredient" : "haggis" },
14 | { "amount" : 4,
15 | "ingredient" : "rashes of bacon" },
16 | { "amount" : 30,
17 | "unit" : "ml",
18 | "ingredient" : "olive oil" },
19 | { "amount" : 20,
20 | "unit" : "g",
21 | "ingredient" : "butter" },
22 | ],
23 | "method" : "1. Preheat oven to 180°C. 2. Slice down the side of each chicken breast, making a pocket. 3. Slice the haggis into small chunks and squidge (technical term) into the chicken pocket. 4. Wrap each breast in a rasher of bacon and secure with a toothpick if necessary. 5. Heat the oil and butter in a non-stick frying pan, sear the bacon wrapped around the chicken breasts. Give 2 minutes on each side. 6. Place in an oven proof dish and transfer to the oven for 35-40 minutes or until cooked through & piping hot. 7. Serve with the peppercorn sauce and a selection of vegetables and/ or mash potato.",
24 | "image": "https://www.carolinescooking.com/wp-content/uploads/2022/01/haggis-stuffed-chicken-Balmoral-featured-pic-sq.jpg",
25 | "category": "dinner",
26 | "servings" : 4
27 | },
28 | {
29 | "name" : "Easy butter chicken",
30 | "ingredients" : [
31 | { "amount" : 500 ,
32 | "unit" : "g",
33 | "ingredient" : "Skinless boneless chicken thighs"
34 | },
35 | { "amount" : 1 ,
36 | "ingredient" : "Lemon"
37 | },
38 | { "amount" : 2 ,
39 | "ingredient" : "Ground cumin"
40 | },
41 | { "amount" : 2 ,
42 | "unit" : "tsp",
43 | "ingredient" : "Paprika"
44 | },
45 | { "amount" : 1.5 ,
46 | "unit" : "tsp",
47 | "ingredient" : "Hot chilli powder"
48 | },
49 | { "amount" : 200 ,
50 | "unit" : "g",
51 | "ingredient" : "Natural yogurt"
52 | },
53 | { "amount" : 2 ,
54 | "unit" : "tbsp",
55 | "ingredient" : "Vegetable oil"
56 | },
57 | { "amount" : 1 ,
58 | "ingredient" : "Onion"
59 | },
60 | { "amount" : 3 ,
61 | "ingredient" : "Garlic cloves"
62 | },
63 | { "amount" : 1 ,
64 | "ingredient" : "Green chilli"
65 | },
66 | { "amount" : 1 ,
67 | "ingredient" : "Thumb-sized piece of ginger"
68 | },
69 | { "amount" : 1 ,
70 | "unit" : "tsp",
71 | "ingredient" : "Garam masala"
72 | },
73 | { "amount" : 2 ,
74 | "unit" : "tsp",
75 | "ingredient" : "Ground fenugreek"
76 | },
77 | { "amount" : 3 ,
78 | "unit" : "tbsp",
79 | "ingredient" : "Tomato purée"
80 | },
81 | { "amount" : 300 ,
82 | "unit" : "ml",
83 | "ingredient" : "Chicken stock"
84 | },
85 | { "amount" : 50 ,
86 | "unit" : "g",
87 | "ingredient" : "Flaked almonds"
88 | }
89 | ],
90 | "method" : "STEP 1: In a medium bowl, mix all the marinade ingredients with some seasoning. Chop the chicken into bite-sized pieces and toss with the marinade. Cover and chill in the fridge for 1 hr or overnight. STEP 2: In a large, heavy saucepan, heat the oil. Add the onion, garlic, green chilli, ginger and some seasoning. Fry on a medium heat for 10 mins or until soft. STEP 3: Add the spices with the tomato purée, cook for a further 2 mins until fragrant, then add the stock and marinated chicken. Cook for 15 mins, then add any remaining marinade left in the bowl. Simmer for 5 mins, then sprinkle with the toasted almonds. Serve with rice, naan bread, chutney, coriander and lime wedges, if you like.",
91 | "image": "https://img.buzzfeed.com/video-api-prod/assets/6e6a56c27c68410991ce7d4e4acc7dee/BFV8692_Easy_Butter_Chicken_Thumb.jpg",
92 | "category": "dinner",
93 | "servings" : 4
94 | },
95 | {
96 | "name" : "Thumbprint Cookies",
97 | "ingredients" : [
98 | { "amount" : 270,
99 | "unit" : "g",
100 | "ingredient" : "plain flour"
101 | },
102 | { "amount" : 100,
103 | "unit" : "g",
104 | "ingredient" : "sugar"
105 | },
106 | { "amount" : 1,
107 | "ingredient" : "egg"
108 | },
109 | { "amount" : 170,
110 | "unit" : "g",
111 | "ingredient" : "butter"
112 | }],
113 |
114 | "image": "https://www.livewellbakeoften.com/wp-content/uploads/2019/07/Thumbprint-Cookies-10-5.jpg",
115 | "category": "sweet",
116 | "servings" : 16
117 | },
118 | {
119 | "name" : "Mushroom soup",
120 | "ingredients" : [
121 | { "amount" : 90,
122 | "unit" : "g",
123 | "ingredient" : "butter"},
124 | { "amount" : 2,
125 | "ingredient" : "onion"},
126 | { "amount" : 1,
127 | "ingredient" : "garlic clove"},
128 | { "amount" : 500,
129 | "unit" : "g",
130 | "ingredient" : "mushrooms"},
131 | { "amount" : 2,
132 | "unit" : "tbsp",
133 | "ingredient" : "plain flour"},
134 | { "amount" : 1,
135 | "unit" : "l",
136 | "ingredient" : "hot chicken stock"},
137 | { "amount" : 1,
138 | "ingredient" : "bay leaf"},
139 | { "amount" : 4,
140 | "unit" : "tbsp",
141 | "ingredient" : "single cream"},
142 | { "amount" : 1,
143 | "ingredient" : "small flat-leaf parsley"},
144 | ],
145 | "image": "https://images.immediate.co.uk/production/volatile/sites/30/2020/08/mushroom_soup-9b55c55.jpg",
146 | "dietary": "dairy-free",
147 | "category": "lunch",
148 | "servings" : 8
149 | },
150 |
151 | {
152 | "name" : "Beef Burger",
153 | "ingredients" : [
154 | { "amount" : 1,
155 | "unit" : "kg",
156 | "ingredient" : "beef mince" },
157 | { "amount" : 1,
158 | "ingredient" : "onion" },
159 | { "amount" : 1,
160 | "ingredient" : "garlic clove" },
161 | { "amount" : 2,
162 | "unit" : "tsp",
163 | "ingredient" : "dijon mustard" },
164 | { "amount" : 1,
165 | "unit" : "tbsp",
166 | "ingredient" : "Worcestershire sauce" },
167 | { "amount" : 1,
168 | "ingredient" : "small handful of chopped fresh flatleaf parsley" },
169 | { "amount" : 1,
170 | "ingredient" : "large dill pickle, finely chopped" },
171 | { "amount" : 1,
172 | "ingredient" : "egg" },
173 | { "amount" : 8,
174 | "ingredient" : "rolls" }
175 | ],
176 | "method" : "Place all the ingredients for the burgers in a large bowl. Season and mix well. Cover and chill in the fridge for 1 hour. Using wet hands, shape the mixture into 8 burgers. If you want to cook them straight away skip to step 4. If you are freezing them; place flat between sheets of baking paper in a rigid freezerproof container. Freeze for up to 3 months. When ready to use, defrost the burgers completely in the fridge; this will take 3-4 hours. Heat a griddle pan or barbecue to hot. Brush both sides of the burgers with oil and cook for 3-4 minutes each side or until well browned and cooked. Meanwhile, preheat the grill to medium hot. Top each burger with a slice of cheese and grill for 2 minutes until bubbling. Toast the burger buns until lightly golden. Mix the mayonnaise with the mustard and spread over the base of each bun. Add some tomato, lettuce and avocado slices, then the burger, red onion slices and the other half of the bun. Serve with a small bowl of ketchup and fries, if you like.",
177 | "image" : "https://www.deliciousmagazine.co.uk/wp-content/uploads/2018/09/905610-1-eng-GB_burger-768x960.jpg",
178 | "category" : "dinner",
179 | "servings" : 8
180 | },
181 |
182 | {
183 | "name" : "Buffalo Wings with Blue Cheese Sauce",
184 | "ingredients" : [
185 | { "amount" : 3,
186 | "unit" : "tbsp",
187 | "ingredient" : "plain flour" },
188 | { "amount" : 2,
189 | "unit" : "tsp",
190 | "ingredient" : "garlic powder" },
191 | { "amount" : 2,
192 | "unit" : "tsp",
193 | "ingredient" : "cayenne pepper" },
194 | { "amount" : 1,
195 | "unit" : "tsp",
196 | "ingredient" : "paprika" },
197 | { "amount" : 1.5,
198 | "unit" : "kg",
199 | "ingredient" : "chicken wings" },
200 | { "amount" : 120,
201 | "unit" : "ml",
202 | "ingredient" : "hot sauce" },
203 | { "amount" : 100,
204 | "unit" : "ml",
205 | "ingredient" : "salted butter" },
206 | { "amount" : 50,
207 | "unit" : "g",
208 | "ingredient" : "soft brown sugar" },
209 | { "amount" : 3,
210 | "unit" : "tbsp",
211 | "ingredient" : "runny honey" },
212 | { "amount" : 1,
213 | "unit" : "tbsp",
214 | "ingredient" : "white wine vinegar" },
215 | { "amount" : 40,
216 | "unit" : "g",
217 | "ingredient" : "salted butter" },
218 | { "amount" : 2,
219 | "unit" : "tbsp",
220 | "ingredient" : "plain flour" },
221 | { "amount" : 150,
222 | "unit" : "ml",
223 | "ingredient" : "whole milk" },
224 | { "amount" : 150,
225 | "unit" : "g",
226 | "ingredient" : "blue cheese (eg. stilton)" },
227 | { "amount" : 100,
228 | "unit" : "ml",
229 | "ingredient" : "soured cream" }
230 | ],
231 | "method" : "Mix the flour, garlic powder, cayenne pepper, paprika and a large pinch of salt in a large bowl. Add the chicken and toss to coat, then cover and chill for 30 minutes. For the buffalo sauce, mix all the ingredients in a small pan over a medium heat, stirring often, until smooth. Bring to a simmer, then set aside to cool. For the blue cheese sauce, melt the butter in a medium pan, then add the flour and cook, stirring, for 1 minute. Add the milk gradually, stirring, until smooth and thickened. Bring to a simmer, stirring, then remove from the heat and crumble in the cheese. Stir until smooth. Stir in the soured cream, then season to taste and leave to cool. Light the barbecue so the coals are glowing (and not directly underthe food) or the gas is on medium. Cook the wings for 10-15 minutes with the lid closed, turning from time to time. Transfer the wings to a large bowl and toss with the buffalo sauce, then return to the barbecue and cook for 10-15 minutes more, turning and basting with leftover buffalo sauce, until charred and cooked through. Serve the wings hot, with the cheese sauce and an apple and celery salad, if you like.",
232 | "image" : "https://www.deliciousmagazine.co.uk/wp-content/uploads/2021/06/01.Delicious-BBQ-buffalo-wings-960-768x960.jpg",
233 | "category" : "dinner",
234 | "servings" : 4,
235 | "notes" : "here is note"
236 | },
237 |
238 | {
239 | "name" : "Slow Cooker Pulled Pork",
240 | "ingredients" : [
241 | { "amount" : 800,
242 | "unit" : "g",
243 | "ingredient" : "pork shoulder" },
244 | { "amount" : 2,
245 | "ingredient" : "red onions" },
246 | { "amount" : 4,
247 | "ingredient" : "garlic cloves" },
248 | { "amount" : 1,
249 | "unit" : "tbsp",
250 | "ingredient" : "ground cumin" },
251 | { "amount" : 1,
252 | "unit" : "tbsp",
253 | "ingredient" : "ground coriander" },
254 | { "amount" : 0.5,
255 | "unit" : "tsp",
256 | "ingredient" : "chilli powder" },
257 | { "amount" : 0.5,
258 | "unit" : "tsp",
259 | "ingredient" : "paprika" },
260 | { "amount" : 0.5,
261 | "unit" : "tsp",
262 | "ingredient" : "ground all spice" },
263 | { "amount" : 2,
264 | "unit" : "tsp",
265 | "ingredient" : "oregano" },
266 | { "amount" : 4,
267 | "unit" : "tbsp",
268 | "ingredient" : "tomato puree" },
269 | { "amount" : 4,
270 | "unit" : "tbsp",
271 | "ingredient" : "red wine vinegar" },
272 | { "amount" : 400,
273 | "unit" : "g",
274 | "ingredient" : "chopped tomatoes" }
275 | ],
276 | "method" : "Add all the ingredients (except the coriander, limes and Tabasco), some salt and pepper and 100ml water to your slow cooker and cook on low for 6 hours, or on high for 4 hours. There’s no need to stir the pork while it’s cooking so you can go out and leave it simmering (see Know-how below for how to cook it in a regular oven). Once the cooking time is up, check the seasoning then, using 2 forks, shred the meat to ‘pull’ it. Serve sprinkled with the coriander, with lime wedges for squeezing, hot sauce, if you like, and rice, as a jacket potato topper or in a Tex-Mex pasta bake.",
277 | "image" : "https://www.deliciousmagazine.co.uk/wp-content/uploads/2021/04/960_SLOW_COOKED_PULLED_PORK_FLATBREAD_GUACAMOLE_SALSA_02-768x960.jpg",
278 | "category" : "dinner",
279 | "servings" : 8,
280 | "notes" : ""
281 | },
282 |
283 | {
284 | "name" : "Ultimate Grilled Cheese Sandwich",
285 | "ingredients" : [
286 | { "amount" : 2,
287 | "ingredient" : "crusty white bread slices" },
288 | { "amount" : 25,
289 | "unit" : "g",
290 | "ingredient" : "cheddar" },
291 | { "amount" : 25,
292 | "unit" : "g",
293 | "ingredient" : "gruyere" },
294 | { "amount" : 25,
295 | "unit" : "g",
296 | "ingredient" : "mozzarella" },
297 | ],
298 | "method" : "Lightly toast the bread, then cool slightly. Spread butter on both sides of each slice, then divide the cheeses between them. Heat a splash of oil in the pan over a medium heat. Add both slices of bread, cheese-side up, then cover with the lid to help the cheese start to melt. After 2 minutes, remove the lid and continue frying until the underside of the bread is golden and the cheese looks melty. Carefully and quickly sandwich the 2 slices together so all the cheeses are in the middle, then gently press down with a spatula/fish slice and continue cooking until the cheese has melted and the bread is deep golden – it’s best to turn the sandwich every minute or so. Slice, then serve straightaway with gherkins and pickle/chutney.",
299 | "image" : "https://www.deliciousmagazine.co.uk/wp-content/uploads/2020/01/02.Delicious-January-2020-cheese-sandwich-768x960.jpg",
300 | "category" : "lunch",
301 | "servings" : 1,
302 | "notes" : ""
303 | },
304 |
305 | {
306 | "name" : "Triple Chocolate Cookies",
307 | "ingredients" : [
308 | { "amount" : 125,
309 | "unit" : "g",
310 | "ingredient" : "salted butter" },
311 | { "amount" : 100,
312 | "unit" : "g",
313 | "ingredient" : "golden caste sugar" },
314 | { "amount" : 25,
315 | "unit" : "g",
316 | "ingredient" : "dark muscovado sugar" },
317 | { "amount" : 1,
318 | "unit" : "tsp",
319 | "ingredient" : "vanilla bean paste" },
320 | { "amount" : 1,
321 | "ingredient" : "medium egg" },
322 | { "amount" : 2,
323 | "unit" : "tbsp",
324 | "ingredient" : "milk" },
325 | { "amount" : 100,
326 | "unit" : "g",
327 | "ingredient" : "plain flour" },
328 | { "amount" : 50,
329 | "unit" : "g",
330 | "ingredient" : "cocoa powder" },
331 | { "amount" : 75,
332 | "unit" : "g",
333 | "ingredient" : "chocolate chunks" },
334 | ],
335 | "method" : "Put the butter and both sugars in a large mixing bowl (or in the bowl of a food processor fitted with a paddle beater) and beat until soft, lightly and creamy (about 7-10 minutes). Stir in the vanilla bean paste. Mix the egg and milk together in a jug, then add to the bowl with the butter/sugar and mix until smooth. Add the flour, cocoa and chocolate chunks and beat to form a smooth dough. Heat the oven to 180ºC/160ºC fan/gas 4. Divide the dough into 14 equal amounts, then roll into rough balls (see tip). Space the balls out over the baking sheets, leaving room for them to spread as they bake. Chill the cookie balls for 30 minutes. Bake the cookies for 12-15 minutes, then remove from the oven. Working with one baking sheet at a time, give the baking sheet a short, sharp bang on the work surface (this knocks out any air in the puffed cookies and gives them the desired ripple effect). Repeat with the other baking sheet. Set both sheets on a wire rack to cool for 5 minutes. Lift the baking paper sheets and cookies onto the wire rack until the biscuits are cool enough to eat.",
336 | "image" : "https://www.deliciousmagazine.co.uk/wp-content/uploads/2019/09/triple-chocolate-cookies-768x960.jpg",
337 | "category" : "sweet",
338 | "servings" : 14,
339 | "notes" : ""
340 | },
341 |
342 | {
343 | "name" : "Eggs Benedict",
344 | "ingredients" : [
345 | { "amount" : 8,
346 | "ingredient" : "bacon slices" },
347 | { "amount" : 1,
348 | "unit" : "tbsp",
349 | "ingredient" : "white wine vinegar" },
350 | { "amount" : 4,
351 | "ingredient" : "english muffins" },
352 | { "amount" : 1,
353 | "unit" : "tbsp",
354 | "ingredient" : "chives" },
355 | { "amount" : 225,
356 | "unit" : "g",
357 | "ingredient" : "unsalted butter" },
358 | { "amount" : 2,
359 | "ingredient" : "eggs" },
360 | { "amount" : 1,
361 | "ingredient" : "juice of half a lemon" },
362 | { "amount" : 1,
363 | "ingredient" : "pinch of cayenne pepper" },
364 | ],
365 | "method" : "Put the bacon on the grill tray ready for cooking. Half-fill a large pan with water and bring to the boil. Add the vinegar and a pinch of salt. Split the muffins and line a baking tray with kitchen paper. Next, poach the eggs in 2 batches of four. Turn the vinegar water to a very gentle simmer (a few bubbles at the base of the pan, but no more). Break an egg into a teacup, then slide it into the pan. Repeat 3 times, then cook for 3 minutes. Carefully lift out the eggs with a slotted spoon onto the lined baking tray. Repeat with the other 4 eggs. Cover the poached eggs with cling film (or with a large upturned bowl) and set aside. Leave the water on a gentle simmer. For the hollandaise sauce, put the butter in a small pan and leave over a very low heat until melted. Carefully skim off any foam from the surface, then pour the clear melted butter into a small bowl, leaving behind the milky liquid that will have settled on the base of the pan. Discard the milky liquid, wipe the pan clean, then return the clear melted butter to the pan and put over a low heat. Fill a medium pan with about 5cm water and bring to a simmer. Sit a medium heatproof glass bowl over the pan without the base touching the water. Add the egg yolks and 2 tbsp cold water and whisk by hand or with an electric hand mixer until thick and mousse-like - it needs to feel warm when you dip in your little finger. Heat the grill to high. Increase the heat under the pan of clarified butter until it’s gently bubbling and hot. Remove the bowl containing the egg yolks from over the pan and very gradually drizzle in the hot clarified butter, whisking all the time, until the mixture becomes thick and glossy. Whisk in the lemon juice, cayenne pepper and salt to taste. Cover the bowl with cling film, sit it back over the pan of hot water and set aside off the heat. Toast the muffins until golden. Meanwhile, grill the bacon for 1-2 minutes until just cooked through but not crisp. Slide the poached eggs back into the just-simmering water and leave for 30 seconds. Reline the baking tray with kitchen paper, then lift out the eggs onto the tray and leave to drain briefly. Put 2 muffin halves on each of 4 warmed plates, spread with a little butter and top each half with a bacon rasher and a poached egg. Spoon some of the hollandaise sauce over each egg, sprinkle with chives and a little extra cayenne pepper and serve straightaway.",
366 | "image" : "https://www.deliciousmagazine.co.uk/wp-content/uploads/2018/09/eggs-benedict-768x960.jpg",
367 | "category" : "breakfast",
368 | "servings" : 4,
369 | "notes" : ""
370 | },
371 |
372 | {
373 | "name" : "Banoffee Pie",
374 | "ingredients" : [
375 | { "amount" : 175,
376 | "unit" : "g",
377 | "ingredient" : "plain flour" },
378 | { "amount": 50,
379 | "unit" : "g",
380 | "ingredient" : "icing sugar" },
381 | { "amount" : 205,
382 | "unit" : "g",
383 | "ingredient" : "butter" },
384 | { "amount" : 1,
385 | "ingredient" : "egg" },
386 | { "amount" : 115,
387 | "unit" : "g",
388 | "ingredient" : "light muscovado sugar" },
389 | { "amount" : 397,
390 | "unit" : "g",
391 | "ingredient" : "carnation caramel" },
392 | { "amount" : 0.5,
393 | "unit" : "tsp",
394 | "ingredient" : "sea salt" },
395 | { "amount" : 300,
396 | "unit" : "ml",
397 | "ingredient" : "double cream" },
398 | { "amount" : 1,
399 | "unit" : "tsp",
400 | "ingredient" : "instant coffee powder" },
401 | { "amount" : 2,
402 | "unit" : "tsp",
403 | "ingredient" : "caster sugar" },
404 | { "amount" : 5,
405 | "ingredient" : "medium ripe bananas" },
406 | { "amount" : 30,
407 | "unit" : "g",
408 | "ingredient" : "dark chocolate" },
409 | ],
410 | "method" : "Put a baking sheet on the middle shelf of the oven and heat the oven to 200°C/180°C fan/gas 6. For the pastry, sift the flour, icing sugar and a pinch of salt into a food processor. Add the butter and pulse briefly until the mixture resembles fine breadcrumbs. (Alternatively, sift the flour and icing sugar into a large bowl and rub in the butter using your fingertips.) In a small bowl, beat the egg yolk briefly with 2 tbsp cold water. Tip the crumb mixture into a large bowl, add the egg yolk mixture and bring together into a ball. Turn out onto a lightly floured surface and knead briefly until smooth. Shape into a disc, wrap in cling film and chill for 15 minutes. Once chilled, remove the pastry from the fridge, roll out to a circle 30cm wide and about 3mm thick, then use to line the prepared tin. Chill for another 15 minutes. Line the pastry case with foil and a layer of baking beans or uncooked rice and bake for 15-20 minutes until the edge is biscuit-coloured. Carefully remove the foil and beans/rice and bake for 6-8 minutes more or until crisp and golden. Set aside to cool. While the pastry case cools, make the toffee filling. Put the butter and sugar in a medium pan over a medium heat. Whisk continuously as the butter melts and the sugar dissolves until it comes together ina smooth toffee sauce with no trace of melted butter. Stir in the caramel, then bring to the boil and simmer for 3 minutes. Remove from the heat and stir in the sea salt, if using. Pour the filling into the case and chill for at least 1 hour before topping. For the topping, whip together the cream, coffee powder and caster sugar until just forming soft peaks. Thickly slice the bananas and scatter them evenly over the toffee sauce. Spoon over the cream topping, taking it right to the edges and swirling it attractively as you go. Chill for 1 hour. To serve, carefully remove the pie from the tin to a serving plate. Melt the chocolate in bursts in a microwave (or in a small bowl set over a pan of barely simmering water – don’t let the bowl touch the water), then drizzle it over the pie. Serve cut into wedges.",
411 | "image" : "https://www.deliciousmagazine.co.uk/wp-content/uploads/2018/07/941116-1-eng-GB_banoffee-pie-768x960.jpg",
412 | "category" : "sweet",
413 | "servings" : 12,
414 | "notes" : ""
415 | },
416 |
417 | {
418 | "name" : "Spiced Beef and Chirozo Empanada",
419 | "ingredients" : [
420 | { "amount" : 475,
421 | "unit" : "ml",
422 | "ingredient" : "boiling water" },
423 | { "amount" : 115,
424 | "unit" : "g",
425 | "ingredient" : "lard" },
426 | { "amount" : 1.5,
427 | "unit" : "tsp",
428 | "ingredient" : "salt" },
429 | { "amount" : 750,
430 | "unit" : "g",
431 | "ingredient" : "plain flour" },
432 | { "amount" : 600,
433 | "unit" : "g",
434 | "ingredient" : "beef shin" },
435 | { "amount" : 200,
436 | "unit" : "g",
437 | "ingredient" : "chorizo" },
438 | { "amount" : 1,
439 | "ingredient" : "onion" },
440 | { "amount" : 4,
441 | "ingredient" : "garlic cloves" },
442 | { "amount" : 1,
443 | "unit" : "tsp",
444 | "ingredient" : "paprika" },
445 | { "amount" : 1,
446 | "ingredient" : "pinch off cayenne pepper" },
447 | { "amount" : 1,
448 | "unit" : "tbsp",
449 | "ingredient" : "ground cumin" },
450 | { "amount" : 2,
451 | "unit" : "tbsp",
452 | "ingredient" : "tomato puree" },
453 | { "amount" : 2,
454 | "unit" : "tbsp",
455 | "ingredient" : "thyme" },
456 | { "amount" : 1,
457 | "unit" : "tbsp",
458 | "ingredient" : "oregano" },
459 | { "amount" : 1,
460 | "unit" : "l",
461 | "ingredient" : "beef stock" },
462 | { "amount" : 4,
463 | "ingredient" : "spring onions" }
464 | ],
465 | "method" : "To make the pastry, put the boiling water, lard and salt in a mixing bowl or jug, then stir to melt the lard. Put the flour in another mixing bowl, then gradually stir in the liquid, until it forms a smooth dough. As soon as it's cool enough, work it with your hands - the dough will become too stiff at the end to work with a spoon. Once all the water has been incorporated, tip the dough out onto a work surface and knead for a few minutes until smooth. th shortcrust, which shouldn't be handled too much). When it's soft and pliable, wrap in cling film and chill. To make the filling, heat a glug of oil in a large sauté pan or deep frying pan over a high heat. Toss the beef in the seasoned flour, shaking off the excess, then fry on all sides until browned and slightly caramelised (don’t crowd the pan – cook in batches if necessary). Transfer to a bowl and set aside. Add the chorizo to the pan and fry until it releases its oil and turns crisp, then turn down the heat, remove the chorizo with a slotted spoon and add to the beef bowl. Add the onion and garlic to the pan and cook gently for 5-10 minutes over a low-medium heat, stirring often, until the onion has softened but not coloured. Add the spices and cook for a few minutes, stirring, then add the tomato purée and herbs, and cook for a further few minutes. Return the meat to the pan, pour in enough stock to cover, then bring to a gentle simmer and cook, uncovered, for 2½-3 hours, stirring frequently, until the beef is very tender. If the mixture looks like it's becoming dry at any point, top up with any leftover stock or freshly boiled water. The liquid should reduce and thicken, but don't let it dry out. Once the beef is tender, stir in the spring onions and olives, then cook for another 5 minutes. Remove from the heat and leave to cool completely. When you're ready to assemble the empanadas, heat the oven to 200°C/180°C fan/gas 6. Roll out the pastry on a lightly floured surface to the thickness of a £1 coin. Cut out about 15 x 12-15cm diameter circles, using a small plate or saucer as a guide, re-rolling the pastry offcuts as necessary. Put around 2 tbsp of filling which should now be thick - leave behind any runny sauce) into the centre of each circle and brush the edges with water. You can crimp the edges (like a Cornish pasty) to seal or simply press them with a fork. Put the empanadas on baking sheets and bake for 25-30 minutes.",
466 | "image" : "https://www.deliciousmagazine.co.uk/wp-content/uploads/2018/07/712647-1-eng-GB_beef-empananads-768x960.jpg",
467 | "category" : "dinner",
468 | "servings" : 4,
469 | "notes" : ""
470 | },
471 |
472 | {
473 | "name" : "Cheese and Broccoli Bake",
474 | "ingredients" : [
475 | { "amount" : 300,
476 | "unit" : "g",
477 | "ingredient" : "macaroni" },
478 | { "amount" : 200,
479 | "unit" : "g",
480 | "ingredient" : "tenderstem broccoli" },
481 | { "amount" : 50,
482 | "unit" : "ml",
483 | "ingredient" : "olive oil" },
484 | { "amount" : 1,
485 | "ingredient" : "onion" },
486 | { "amount" : 50,
487 | "unit" : "g",
488 | "ingredient" : "plain flour" },
489 | { "amount" : 550,
490 | "unit" : "ml",
491 | "ingredient" : "semi-skimmed milk" },
492 | { "amount" : 100,
493 | "unit" : "g",
494 | "ingredient" : "spinach" },
495 | { "amount" : 60,
496 | "unit" : "g",
497 | "ingredient" : "cheddar" },
498 | { "amount" : 60,
499 | "unit" : "g",
500 | "ingredient" : "gruyere" },
501 | { "amount" : 40,
502 | "unit" : "g",
503 | "ingredient" : "breadcrumbs" }
504 | ],
505 | "method" : "Bring a large pan of salted water to the boil over a high heat. Add the macaroni and cook for 8 minutes or until it still has some bite (al dente). For the last 2 minutes add the broccoli, then drain and rinse under cold water to refresh. Cover with damp kitchen paper. Meanwhile in another large deep saucepan, warm the olive oil over a medium heat. Add the onion and gently fry for 10 minutes or until soft. Add the flour, turn up the heat slightly and cook for 2-3 minutes, stirring, until the flour turns a little darker and smells biscuity. Heat the oven to 200°C/ 180°C fan/gas 6. Turn the heat to low, then slowly add the milk, whisking all the time with a balloon whisk. Turn the heat to medium and stir until the mix thickens and boils gently. Add the spinach and half the grated cheeses. Stir until the spinach wilts and the cheese melts. Add the pasta and broccoli, season to taste, then pour into a 1.5 litre ovenproof dish (see make ahead). Mix the rest of the cheese with the breadcrumbs, then use to top the macaroni. Bake for 20-25 minutes until the top is deep golden brown and the sauce is bubbling. Serve with a sharply dressed green salad, if you like.",
506 | "image" : "https://www.deliciousmagazine.co.uk/wp-content/uploads/2018/07/612151-1-eng-GB_delicious_midweekbible_nov15_19015_maccheesespinachbroccoli-768x960.jpg",
507 | "category" : "dinner",
508 | "servings" : 4,
509 | "dietary" : "vegetarian",
510 | "notes" : ""
511 | },
512 |
513 | {
514 | "name" : "Root Vegetable and Lentil Tagine",
515 | "ingredients" : [
516 | { "amount" : 1,
517 | "unit" : "tbsp",
518 | "ingredient" : "olive oil" },
519 | { "amount" : 900,
520 | "unit" : "g",
521 | "ingredient" : "mixed root vegetables" },
522 | { "amount" : 3,
523 | "unit" : "tbsp",
524 | "ingredient" : "dried harissa" },
525 | { "amount" : 1,
526 | "ingredient" : "large handful fresh parsley" },
527 | { "amount" : 200,
528 | "unit" : "g",
529 | "ingredient" : "dried green lentils" },
530 | { "amount" : 800,
531 | "unit" : "g",
532 | "ingredient" : "chopped tomatoes" },
533 | { "amount" : 700,
534 | "unit" : "ml",
535 | "ingredient" : "vegetable stock" },
536 | { "amount" : 1,
537 | "ingredient" : "lemon" },
538 | { "amount" : 6,
539 | "ingredient" : "prunes" },
540 | { "amount" : 1,
541 | "ingredient" : "small cauliflower" },
542 | { "amount" : 500,
543 | "unit" : "g",
544 | "ingredient" : "rice" }
545 | ],
546 | "method" : "Heat the oil in a large heavy-based flameproof casserole (with a lid) over a medium heat. Add the root veg and fry for 10 minutes, stirring occasionally, until beginning to soften. Stir in the harissa paste, parsley stalks and lentils. Add the tomatoes and stock, then stir in the preserved lemon and prunes. Bring to a simmer, then cover and cook for 20-25 minutes, stirring occasionally, until the lentils are tender. Stir in the cauliflower, then bring back to a simmer. Season, then cook for 3-4 minutes, uncovered, until the cauliflower is starting to become tender. Add the cauliflower leaves, then cook for 2 minutes more. Serve with coconut yogurt and the parsley leaves scattered over the top, with rice or couscous.",
547 | "image" : "https://www.deliciousmagazine.co.uk/wp-content/uploads/2019/03/tagine-768x960.jpg",
548 | "category" : "dinner",
549 | "servings" : 6,
550 | "dietary" : "vegan",
551 | "notes" : ""
552 | },
553 |
554 | {
555 | "name" : "Vegan Pesto Spaghetti",
556 | "ingredients" : [
557 | { "amount" : 2,
558 | "unit" : "tbsp",
559 | "ingredient" : "olive oil" },
560 | { "amount" : 1,
561 | "ingredient" : "small onion" },
562 | { "amount" : 2,
563 | "ingredient" : "garlic cloves" },
564 | { "amount" : 1,
565 | "ingredient" : "courgette" },
566 | { "amount" : 400,
567 | "unit" : "ml",
568 | "ingredient" : "vegetable stock" },
569 | { "amount" : 150,
570 | "unit" : "g",
571 | "ingredient" : "spaghetti" },
572 | { "amount" : 50,
573 | "unit" : "g",
574 | "ingredient" : "broad beans" },
575 | { "amount" : 50,
576 | "unit" : "g",
577 | "ingredient" : "runner beans" },
578 | { "amount" : 1,
579 | "ingredient" : "lemon" },
580 | { "amount" : 50,
581 | "unit" : "g",
582 | "ingredient" : "green olives" },
583 | { "amount" : 130,
584 | "unit" : "g",
585 | "ingredient" : "vegan pesto" },
586 | ],
587 | "method" : "Heat 1 tbsp of the oil in a large pan over a medium heat. Add the chopped onion and cook for 5 minutes until softening. Add the garlic and cook for a further minute. Add the remaining 1 tbsp oil to the pan, then stir in the courgette and fry for 5 minutes until the edges are charred and the courgette slices are lightly coloured. Pour in the stock, stirring to combine, then bring to a simmer and add the spaghetti, broad beans, runner beans and lemon wedges. Simmer on a medium-high heat for 10 minutes or until the pasta is tender (al denté). Once the pasta has cooked and the stock has reduced, add the green olives and pesto, tossing everything together gently to combine. Serve with the lemon zest and juice, an extra drizzle of olive oil and, if you like, and basil leaves.",
588 | "image" : "https://www.deliciousmagazine.co.uk/wp-content/uploads/2021/08/960_ONE_PAN_PESTO_SPAGHETTI_LEMON_COURGETTES-768x960.jpg",
589 | "category" : "dinner",
590 | "servings" : 2,
591 | "dietary" : "vegan",
592 | "notes" : ""
593 | },
594 |
595 | {
596 | "name" : "Orzo with Roasted Veg Sauce",
597 | "ingredients" : [
598 | { "amount" : 1,
599 | "ingredient" : "large red onion" },
600 | { "amount" : 1,
601 | "ingredient" : "large red pepper" },
602 | { "amount" : 1,
603 | "ingredient" : "large yellow pepper" },
604 | { "amount" : 4,
605 | "ingredient" : "garlic cloves" },
606 | { "amount" : 5,
607 | "ingredient" : "plum tomatoes" },
608 | { "amount" : 1,
609 | "unit" : "tbsp",
610 | "ingredient" : "balsamic vinegar" },
611 | { "amount" : 100,
612 | "unit" : "g",
613 | "ingredient" : "orzo" },
614 | { "amount" : 200,
615 | "unit" : "ml",
616 | "ingredient" : "vegan vegetable stock" },
617 | { "amount" : 1,
618 | "ingredient" : "handful of basil leaves" },
619 | ],
620 | "method" : `Heat the oven to 180°C fan/gas 6. Put the onion, peppers and garlic in a roasting tin, drizzle with a little olive oil and add a good pinch of salt. Roast for about 20 minutes. Add the tomatoes and balsamic vinegar and stir. Return the vegetables to the oven and roast for a further 25-30 minutes. At this stage there should be a lovely concentrated sauce in the bottom of the roasting tin. Transfer everything to a food processor and whizz. Pour the sauce into a saucepan, add the orzo and simmer gently for about 10 minutes until the sauce has thickened and reduced and the orzo is starting to soften. Add the vegetable stock in small increments – you probably won’t need all of it. What you’re aiming for is a risotto-like texture, where the orzo is cooked al dente and the sauce is thick and rich. Garnish with basil leaves before serving.`,
621 | "image" : "https://www.deliciousmagazine.co.uk/wp-content/uploads/2021/06/960-Orzo-with-roasted-vegetable-sauce-768x960.jpg",
622 | "category" : "dinner",
623 | "servings" : 2,
624 | "dietary" : "vegan",
625 | "notes" : ""
626 | },
627 |
628 | {
629 | "name" : "Spiced carrot and lentil soup",
630 | "ingredients" : [
631 | { "amount" : 2,
632 | "unit" : "tbsp",
633 | "ingredient" : "cumin seeds"},
634 | { "amount" : 1,
635 | "unit" : "pinch",
636 | "ingredient" : "chili flakes"},
637 | { "amount" : 600,
638 | "unit" : "g",
639 | "ingredient" : "carrot"},
640 | { "amount" : 140,
641 | "unit" : "g",
642 | "ingredient" : "red lentil"},
643 | { "amount" : 1,
644 | "unit" : "l",
645 | "ingredient" : "hot vegetable stock"},
646 | { "amount" : 125,
647 | "unit" : "ml",
648 | "ingredient" : "milk"
649 | }],
650 | "method" : "STEP 1Heat a large saucepan and dry-fry 2 tsp cumin seeds and a pinch of chilli flakes for 1 min, or until they start to jump around the pan and release their aromas.STEP 2Scoop out about half with a spoon and set aside. Add 2 tbsp olive oil, 600g coarsely grated carrots, 140g split red lentils, 1l hot vegetable stock and 125ml milk to the pan and bring to the boil. STEP 3Simmer for 15 mins until the lentils have swollen and softened. STEP 4 Whizz the soup with a stick blender or in a food processor until smooth (or leave it chunky if you prefer). STEP 5 Season to taste and finish with a dollop of plain yogurt and a sprinkling of the reserved toasted spices. Serve with warmed naan breads.",
651 | "image": "https://elizabethchloe.com/wp-content/uploads/2020/11/Spicy-Carrot-and-Lentil-Soup-Thumbnail-2.jpg",
652 | "dietary" : "gluten-free",
653 | "category" : "dinner",
654 | "servings" : 4,
655 | "notes" : "Add notes "
656 | },
657 |
658 | {
659 | "name": "Pizza dough",
660 | "ingredients": [
661 | {
662 | "amount": 1,
663 | "unit": "kg",
664 | "ingredient": "flour"},
665 | {
666 | "amount": 0.5,
667 | "unit": "l",
668 | "ingredient": "water"},
669 | {
670 | "amount": 3,
671 | "unit": "tbsp",
672 | "ingredient": "olive oil"},
673 | {
674 | "amount": 50,
675 | "unit": "g",
676 | "ingredient": "fresh yeast"},
677 | {
678 | "amount": 1,
679 | "unit": "tbsp",
680 | "ingredient": "salt"},
681 | {
682 | "amount": 1,
683 | "unit": "tsp",
684 | "ingredient": "sugar"
685 | }],
686 | "method": "Warm up the water, make sure it's not too hot. Add the sugar, stir to dissolve. Gently stir in the yeast, let it sit for 5-10 minutes. When it's ready, add it to the flour, add the salt and oil and start mixing it together.",
687 | "image": "https://img.taste.com.au/JBQ8zWnO/taste/2016/11/pizza-dough_1980x1320-118409-1.jpg",
688 | "dietary": "vegan",
689 | "category": "dinner",
690 | "servings": 4,
691 | "notes" : "a true pizza needs to rise twice"
692 | },
693 |
694 | {
695 | "name": "Waffles",
696 | "ingredients": [
697 | {
698 | "amount": 200,
699 | "unit": "g",
700 | "ingredient": "butter"},
701 | {
702 | "amount": 200,
703 | "unit": "g",
704 | "ingredient": "sugar"
705 | },
706 | {
707 | "amount": 3,
708 | "ingredient": "eggs"
709 | },
710 | {
711 | "amount": 0.5,
712 | "unit": "l",
713 | "ingredient": "milk"
714 | },
715 | {
716 | "amount": 500,
717 | "unit": "g",
718 | "ingredient": "plain flour"
719 | },
720 | {
721 | "amount": 2,
722 | "unit": "tsp",
723 | "ingredient": "baking powder"
724 | },
725 | {
726 | "amount": 2,
727 | "unit": "tsp",
728 | "ingredient": "vanilla extract"
729 | },
730 | {
731 | "amount": 1,
732 | "ingredient": "lemon"
733 | }
734 | ],
735 | "method": "Beat the eggs with the sugar for 5 minutes. Add melted butter, vanilla extract, zest of the lemon and the milk. Mix until combined. Sift in the flour and baking powder. Mix until combined.",
736 | "image": "https://bakingmischief.com/wp-content/uploads/2019/09/crispy-waffles-image-square.jpg",
737 | "dietary": "",
738 | "category": "breakfast",
739 | "servings": 4,
740 | "notes" : "Soft, can be used for american pancakes as well."
741 | },
742 |
743 |
744 |
745 | {
746 | "name": "Saucy bean baked eggs",
747 | "ingredients": [
748 | {
749 | "amount": 800,
750 | "unit": "g",
751 | "ingredient": "cherry tomatoes(canned)"
752 | },
753 | {
754 | "amount": 400,
755 | "unit": "g",
756 | "ingredient": "mixed beans(canned)"
757 | },
758 | {
759 | "amount": 200,
760 | "unit": "g",
761 | "ingredient": "spinach"
762 | },
763 | {
764 | "amount": 4,
765 | "ingredient": "eggs"
766 | },
767 | {
768 | "amount": 50,
769 | "unit": "g",
770 | "ingredient": "ham"
771 | }
772 | ],
773 | "method": "STEP 1 Tip the tomatoes and bean salad into an ovenproof frying pan or shallow flameproof casserole dish. Simmer for 10 mins, or until reduced. Stir in the spinach and cook for 5 mins more until wilted. STEP 2 Heat the grill to medium. Make four indentations in the mixture using the back of a spoon, then crack one egg in each. Nestle the ham in the mixture, then grill for 4-5 mins, or until the whites are set and the yolks runny. Serve with rye bread, if you like.",
774 | "image": "https://images.immediate.co.uk/production/volatile/sites/30/2020/08/saucy-bean-baked-eggs-d582e18.jpg",
775 | "dietary": "gluten-free",
776 | "category": "lunch",
777 | "servings": 2,
778 | "notes" : "Best served with fresh bread"
779 | },
780 |
781 | {
782 | "name": "Curry soup",
783 | "ingredients": [
784 | {
785 | "amount": 1,
786 | "ingredient": "cauliflower"
787 | },
788 | {
789 | "amount": 1.5,
790 | "unit": "tbsp",
791 | "ingredient": "oil"
792 | },
793 | {
794 | "amount": 2,
795 | "unit": "tsp",
796 | "ingredient": "fennel seeds"
797 | },
798 | {
799 | "amount": 150,
800 | "unit": "g",
801 | "ingredient": "red lentils"
802 | },
803 | {
804 | "amount": 3,
805 | "unit": "tbsp",
806 | "ingredient": "curry paste"
807 | },
808 | {
809 | "amount": 0.5,
810 | "ingredient": "lemon"
811 | }
812 | ],
813 | "method": "STEP 1 Remove the outer leaves from the cauliflower, cut off the stalk and roughly chop, then cut the head into small florets. Toss a quarter of the florets in 1 tbsp oil and 1 tsp of the fennel seeds, season well, then tip into a roasting tin and set aside. STEP 2 Heat oven to 220C/200C fan/gas 7. Heat 0.5 tbsp oil in a saucepan over a medium heat and add the remaining fennel seeds, toast for 2 mins, then add the lentils and the remaining cauliflower. Stir in the curry paste, then add 1 litre water and bring to the boil. Simmer for 25 mins until the cauliflower is tender and the lentils are cooked through. STEP 3 Meanwhile, put the roasting tin of cauliflower in the oven and cook for 20 mins until crisp and slightly charred. Tip the soup mixture into a food processor and blitz until smooth, tip back into the pan to warm through, adding the lemon juice and a little water if it's too thick. Tip into bowls and top with the crispy cauliflower and fennel seeds to serve.",
814 | "image": "https://encrypted-tbn0.gstatic.com/images?q=tbn:ANd9GcS0drsyBmEIj_ywNKt2zp1fvKYedEE17qsyjw&usqp=CAU",
815 | "dietary": "vegan",
816 | "category": "lunch",
817 | "servings": 3,
818 | "notes" : "Not even sure how to bin it. It's blocking up the sink. Avoid this one!"
819 | },
820 | {
821 | "name": "Raspberry honey flapjacks",
822 | "ingredients": [
823 | {
824 | "amount": 150,
825 | "unit": "g",
826 | "ingredient": "butter"
827 | },
828 | {
829 | "amount": 150,
830 | "unit": "g",
831 | "ingredient": "light brown soft sugar"
832 | },
833 | {
834 | "amount": 4,
835 | "unit": "tbsp",
836 | "ingredient": "honey"
837 | },
838 | {
839 | "amount": 300,
840 | "unit": "g",
841 | "ingredient": "porridge oats"
842 | },
843 | {
844 | "amount": 100,
845 | "unit": "g",
846 | "ingredient": "raspberries(frozen/fresh)"
847 | }
848 | ],
849 | "method": "STEP 1 Heat oven to 200C/180C fan/gas 6 and line a 20 x 20cm baking tin with parchment. Melt the butter, sugar, honey and a pinch of salt in a pan. Once the mixture is bubbling and combined, stir in the oats. STEP 2 Tip the oat mixture into the lined baking tin and press down with the back of a spoon. Scatter over the raspberries, then lightly press them into the oat mixture. Bake for 25-30 mins until golden brown. Leave to cool, then cut into 9 or 12 flapjacks.",
850 | "image": "https://images.immediate.co.uk/production/volatile/sites/30/2020/08/raspberry-honey-flapjacks-90b2df5.jpg?quality=90&resize=440,400",
851 | "dietary": "vegetarian",
852 | "category": "sweet",
853 | "servings": 10,
854 | "notes" : "Stir raspberries into the mixture before adding to the baking tray."
855 | },
856 | {
857 | "name": "Sausage mustard apple hash",
858 | "ingredients": [
859 | {
860 | "amount": 450,
861 | "unit": "g",
862 | "ingredient": "potatoes"
863 | },
864 | {
865 | "amount": 30,
866 | "unit": "g",
867 | "ingredient": "butter"
868 | },
869 | {
870 | "amount": 2,
871 | "ingredient": "apples"
872 | },
873 | {
874 | "amount": 4,
875 | "ingredient": "pork sausages"
876 | },
877 | {
878 | "amount": 2,
879 | "unit": "tsp",
880 | "ingredient": "wholegrain mustard"
881 | },
882 | {
883 | "amount": 2,
884 | "unit": "tsp",
885 | "ingredient": "thyme"
886 | }
887 | ],
888 | "method": "STEP 1 Bring a large pan of salted water to the boil. Add the potatoes and cook for 4 mins. Drain and leave to steam dry in a colander. STEP 2 Heat half the butter and 1 tbsp olive oil in a large frying pan or shallow casserole dish over a medium-high heat. Add the apple wedges and fry on each side for 5 mins or until golden brown and starting to caramelise. Remove with a slotted spoon and set aside on a plate. STEP 3 In the same pan, heat the remaining butter and a little more oil over a medium heat and add the potatoes and sausage chunks. Fry for 10-15 mins, turning every so often until the potatoes and sausage are crisp and golden brown. Season to taste. Stir through the mustard and the apple wedges, then scatter over some thyme leaves, and serve with watercress salad.",
889 | "image": "https://images.immediate.co.uk/production/volatile/sites/30/2020/08/sausage-mustard-apple-hash-26022bb.jpg",
890 | "dietary": "gluten-free",
891 | "category": "dinner",
892 | "servings": 2,
893 | "notes" : ""
894 | },
895 | {"name": "Salmon & pea pasta",
896 | "ingredients": [
897 | {
898 | "amount": 240,
899 | "unit": "g",
900 | "ingredient": "fusilli"
901 | },
902 | {
903 | "amount": 25,
904 | "unit": "g",
905 | "ingredient": "butter"
906 | },
907 | {
908 | "amount": 1,
909 | "ingredient": "shallot"
910 | },
911 | {
912 | "amount": 2,
913 | "ingredient": "salmon fillets(skinless)"
914 | },
915 | {
916 | "amount": 140,
917 | "unit": "g",
918 | "ingredient": "creme fraiche"
919 | },
920 | {
921 | "amount": 0.5,
922 | "ingredient": "stock cube"
923 | }
924 | ],
925 | "method": "STEP 1 Bring a pan of water to the boil and cook the fusilli according to the pack instructions. STEP 2 Meanwhile, heat a knob of butter in a saucepan, then add the shallot and cook for 5 mins or until softened. STEP 3 Add the peas, salmon, crème fraîche and 50ml water. Crumble in the stock cube. STEP 4 Cook for 3-4 mins until cooked through, stir in the chives and some black pepper. Then stir through to coat the pasta. Serve in bowls.",
926 | "image": "https://images.immediate.co.uk/production/volatile/sites/30/2020/08/salmonpasta-11bb3f0.jpg?quality=90&webp=true&resize=440,400",
927 | "dietary": "",
928 | "category": "dinner",
929 | "servings": 3,
930 | "notes" : "Quick and easy."
931 | },
932 | {
933 | "name" : "Gluten-free Brownies",
934 | "ingredients" : [
935 | { "amount" : 4,
936 | "ingredient" : "eggs" },
937 | { "amount" : 250,
938 | "unit" : "g",
939 | "ingredient" : "unsalted butter" },
940 | { "amount" : 250,
941 | "unit" : "g",
942 | "ingredient" : "dark chocolate" },
943 | { "amount" : 300,
944 | "unit" : "g",
945 | "ingredient" : "caster sugar" },
946 | { "amount" : 0.5,
947 | "unit" : "tsp",
948 | "ingredient" : "vanilla extract" },
949 | { "amount" : 100,
950 | "unit" : "g",
951 | "ingredient" : "gluten-free plain flour" },
952 | { "amount" : 60,
953 | "unit" : "g",
954 | "ingredient" : "cocoa powder" },
955 | { "amount" : 0.5,
956 | "unit" : "tsp",
957 | "ingredient" : "sea salt" },
958 | { "amount" : 150,
959 | "unit" : "g",
960 | "ingredient" : "milk chocolate" },
961 | ],
962 | "dietary" : "gluten-free",
963 | "category" : "snack",
964 | "servings" : 12,
965 | "method" : "Method Goes Here",
966 | "image" : "https://images.immediate.co.uk/production/volatile/sites/30/2020/08/gluten-free-brownies-4be63ff.jpg",
967 | "notes" : ""
968 | },
969 | {
970 | "name" : "Chocolate, cardamom & hazelnut torte",
971 | "ingredients" : [
972 | { "amount" : 8,
973 | "ingredient" : "green cardamom pods" },
974 | { "amount" : 150,
975 | "unit" : "g",
976 | "ingredient" : "hazelnuts" },
977 | { "amount" : 150,
978 | "unit" : "g",
979 | "ingredient" : "dark chocolate" },
980 | { "amount" : 125,
981 | "unit" : "g",
982 | "ingredient" : "butter" },
983 | { "amount": 6,
984 | "ingredient" : "egg" },
985 | { "amount" : 125,
986 | "unit" : "g",
987 | "ingredient" : "caster sugar" },
988 | { "amount" : 15,
989 | "unit" : "g",
990 | "ingredient" : "cocoa powder" },
991 | { "amount" : 1,
992 | "ingredient" : "creme fraiche" }
993 | ],
994 | "dietary" : "gluten-free",
995 | "category" : "sweet",
996 | "servings" : 8,
997 | "method" : "Method Goes Here",
998 | "image" : "https://images.immediate.co.uk/production/volatile/sites/30/2020/08/chocolate-torte-d56ded1.jpg",
999 | "notes" : ""
1000 | },
1001 | {
1002 | "name" : "Egg & tomato baps",
1003 | "ingredients" : [
1004 | { "amount" :2,
1005 | "ingredient" : "tomato" },
1006 | { "amount" : 2,
1007 | "unit" : "tsp",
1008 | "ingredient" : "olive oil" },
1009 | { "amount": 4,
1010 | "ingredient" : "egg" },
1011 | { "amount" : 1,
1012 | "ingredient" : "parsley" },
1013 | { "amount" : 1,
1014 | "ingredient" : "garlic clove"},
1015 | { "amount" : 2,
1016 | "ingredient" : "wholewheat baps" }
1017 | ],
1018 | "dietary" : "dairy-free",
1019 | "category" : "breakfast",
1020 | "servings" : 2,
1021 | "method" : "Method Goes Here",
1022 | "image" : "https://images.immediate.co.uk/production/volatile/sites/30/2020/08/eggtomatobap_5639-223e135.jpg",
1023 | "notes" : ""
1024 | },
1025 | {
1026 | "name" : "Egg & rocket pizzas",
1027 | "ingredients" : [
1028 | { "amount" : 2,
1029 | "ingredient" : "seeded wraps" },
1030 | { "amount" : 150,
1031 | "unit" : "g",
1032 | "ingredient" : "hazelnuts" },
1033 | { "amount" : 1,
1034 | "ingredient" : "red pepper" },
1035 | { "amount" : 2,
1036 | "ingredient" : "tomato" },
1037 | { "amount": 2,
1038 | "ingredient" : "egg" },
1039 | { "amount" : 2,
1040 | "unit" : "tbsp",
1041 | "ingredient" : "tomato purée" },
1042 | { "amount" : 1,
1043 | "ingredient" : "dill" },
1044 | { "amount" : 1,
1045 | "ingredient" : "parsley" },
1046 | { "amount" : 65,
1047 | "unit" : "g",
1048 | "ingredient" : "rocket" },
1049 | { "amount" : 0.5,
1050 | "ingredient" : "red onion" }
1051 | ],
1052 | "dietary" : "gluten-free",
1053 | "category" : "dinner",
1054 | "servings" : 2,
1055 | "method" : "Method Goes Here",
1056 | "image" : "https://images.immediate.co.uk/production/volatile/sites/30/2020/08/eggrocketpizzas_5729-ebc7e0d.jpg",
1057 | "notes" : ""
1058 | },
1059 | {
1060 | "name" : "Tuna & tomato pasta bake",
1061 | "ingredients" : [
1062 | { "amount" : 500,
1063 | "unit" : "g",
1064 | "ingredient" : "pasta" },
1065 | { "amount" : 120,
1066 | "unit" : "g",
1067 | "ingredient" : "tuna" },
1068 | { "amount" : 500,
1069 | "unit" : "ml",
1070 | "ingredient" : "milk" },
1071 | { "amount" : 4,
1072 | "unit" : "tbsp",
1073 | "ingredient" : "flour" },
1074 | { "amount" : 150,
1075 | "unit" : "g",
1076 | "ingredient" : "mature cheddar" },
1077 | { "amount" : 0.5,
1078 | "unit" : "tsp",
1079 | "ingredient" : "mustard powder" },
1080 | { "amount" : 325,
1081 | "unit" : "g",
1082 | "ingredient" : "sweetcorn" },
1083 | { "amount" : 2,
1084 | "ingredient" : "tomato" }
1085 | ],
1086 | "dietary" : "",
1087 | "category" : "dinner",
1088 | "servings" : 5,
1089 | "method" : "Method Goes Here",
1090 | "image" : "https://images.immediate.co.uk/production/volatile/sites/30/2020/08/tuna-tomato-pasta-bake-2e58450.jpg",
1091 | "notes" : ""
1092 | },
1093 | {
1094 | "name" : "Toad-in-the-hole",
1095 | "ingredients" : [
1096 | { "amount" : 12,
1097 | "ingredient" : "chipolata" },
1098 |
1099 | { "amount" : 1,
1100 | "unit" : "tbsp",
1101 | "ingredient" : "sunflower oil" },
1102 | { "amount" : 140,
1103 | "unit" : "g",
1104 | "ingredient" : "plain flour" },
1105 | { "amount" : 2,
1106 | "ingredient" : "egg" },
1107 | { "amount" : 175,
1108 | "unit" : "ml",
1109 | "ingredient" : "semi-skimmed milk" },
1110 | ],
1111 | "dietary" : "",
1112 | "category" : "dinner",
1113 | "servings" : 4,
1114 | "method" : "Method Goes Here",
1115 | "image" : "https://images.immediate.co.uk/production/volatile/sites/30/2020/08/recipe-image-legacy-id-736458_11-5ff6be2.jpg",
1116 | "notes" : ""
1117 | },
1118 |
1119 | {
1120 | "name" : "Simple White Cake",
1121 | "ingredients" : [
1122 | { "amount" : 1,
1123 | "unit" : "cup",
1124 | "ingredient" : "white sugar" },
1125 | { "amount" : 0.5,
1126 | "unit" : "cup",
1127 | "ingredient" : "butter" },
1128 | { "amount" : 2,
1129 | "ingredient" : "egg"},
1130 | { "amount" : 2,
1131 | "unit" : "tsp",
1132 | "ingredient" : "vanilla extract"},
1133 | { "amount" : 1.5,
1134 | "unit" : "tsp",
1135 | "ingredient" : "baking powder"},
1136 | { "amount" : 0.5,
1137 | "unit" : "cup",
1138 | "ingredient" : "milk"
1139 | }],
1140 | "method" : "Step 1 Preheat oven to 350 degrees F (175 degrees C). Grease and flour a 9x9 inch pan or line a muffin pan with paper liners. Step 2 In a medium bowl, cream together the sugar and butter. Beat in the eggs, one at a time, then stir in the vanilla. Combine flour and baking powder, add to the creamed mixture and mix well. Finally stir in the milk until batter is smooth. Pour or spoon batter into the prepared pan.Step 3 Bake for 30 to 40 minutes in the preheated oven. For cupcakes, bake 20 to 25 minutes. Cake is done when it springs back to the touch.",
1141 | "image": "https://www.nelliebellie.com/wp-content/uploads/2014/11/homemade-white-cake-recipe.png",
1142 | "dietary": "",
1143 | "category": "sweet",
1144 | "servings" : 12,
1145 | "notes" : ""
1146 | },
1147 | {
1148 | "name" : "Greek salad",
1149 | "ingredients" : [
1150 | { "amount" : 6,
1151 | "unit" : "tbsp",
1152 | "ingredient" : "extra virgin olive oil"
1153 | },
1154 | { "amount" : 2,
1155 | "unit" : "tbsp",
1156 | "ingredient" : "fresh lemon juice"
1157 | },
1158 | { "amount" : 0.5,
1159 | "unit" : "tsp",
1160 | "ingredient" : "chopped garlic"
1161 | },
1162 | { "amount" : 0.5,
1163 | "unit" : "tsp",
1164 | "ingredient" : "dried dill"
1165 | },
1166 | { "amount" : 3,
1167 | "ingredient" : "tomato"
1168 | },
1169 | { "amount" : 1,
1170 | "ingredient" : "cucumber"
1171 | },
1172 | { "amount" : 0.5,
1173 | "ingredient" : "red onion"
1174 | },
1175 | { "amount" : 1,
1176 | "ingredient" : "bell pepper"
1177 | },
1178 | { "amount" : 1,
1179 | "unit" : "cup",
1180 | "ingredient" : "pitted black olives"
1181 | },
1182 | { "amount" : 0.5,
1183 | "unit" : "cup",
1184 | "ingredient" : "crumbled feta"
1185 | }
1186 | ],
1187 |
1188 | "dietary" : "vegetarian",
1189 | "category" : "dinner",
1190 | "servings" : 6,
1191 | "notes" : "Add notes ",
1192 | "method" : "Make dressing: Whisk the olive oil, lemon juice, garlic, vinegar, oregano, and dill together until blended. Season to taste with salt and freshly ground black pepper. This can be prepared 3 hours ahead. Let stand at room temperature. Re-whisk before using. Combine salad ingredients: Combine the tomatoes, cucumber, onion, bell pepper, olives in a bowl. Toss with dressing. Sprinkle with cheese and serve",
1193 | "image": "https://www.simplyrecipes.com/thmb/au60mVTA5EPLLknjdtQ9BYO0OC4=/1067x1067/smart/filters:no_upscale()/__opt__aboutcom__coeus__resources__content_migration__simply_recipes__uploads__2011__08__dads-greek-salad-horiz-a-1600-bc71b85bc907414a9bb3179a923b58fc.jpg"
1194 | },
1195 | {
1196 | "name" : "Granola",
1197 | "ingredients" : [
1198 | { "amount" : 3,
1199 | "unit" : "cup",
1200 | "ingredient" : "rolled oats"
1201 | },
1202 | { "amount" : 1.5,
1203 | "unit" : "cup",
1204 | "ingredient" : "almonds"
1205 | },
1206 | { "amount" : 0.5,
1207 | "unit" : "cup",
1208 | "ingredient" : "pumpkin seeds"
1209 | },
1210 | { "amount" : 2,
1211 | "unit" : "tsp",
1212 | "ingredient" : "cinnamon"
1213 | },
1214 | { "amount" : 0.5,
1215 | "unit" : "tsp",
1216 | "ingredient" : "salt"
1217 | },
1218 | { "amount" : 0.5,
1219 | "unit" : "cup",
1220 | "ingredient" : "maple syrup"
1221 |
1222 | }],
1223 |
1224 | "dietary" : "protein",
1225 | "category" : "breakfast",
1226 | "servings" : 6,
1227 | "notes" : "Add notes ",
1228 | "method" : " 1.Preheat the oven to 325°F and line a baking sheet with parchment paper. 2. In a large bowl, add the rolled oats, almonds, pumpkin seeds, cinnamon and salt and stir to combine. 3. In a small bowl, add the melted coconut oil, maple syrup and vanilla extract and whisk to combine. 4. Drizzle the wet ingredients over the dry ingredients and mix until everything is well coated. 5. Pour the granola onto a parchment paper-lined baking sheet and use a spatula or spoon to spread it into an even layer. 6. Transfer the baking sheet to the oven for 20 minutes, remove it from the oven and give it stir on the baking sheet, then return it to the oven for a final 10-15 minutes until golden brown. 7. Once baked, remove it from the oven, add flaked coconut and raisins, then allow to cool completely. (If you want the granola to be extra chunky, add an extra drizzle of maple syrup over the top of the warm granola to help it stick together as it cools.) 8. Once cooled, the granola can be stored in an air-tight container in the cupboard for up to a week or frozen for up to 3 months.",
1229 | "image": "https://www.thelastfoodblog.com/wp-content/uploads/2020/07/granola-close-up-2.jpg"
1230 | },
1231 | {
1232 | "name" : "Garlic Butter Steak",
1233 | "ingredients" : [
1234 | { "amount" : 1,
1235 | "ingredient" : "ribeye steak"
1236 | },
1237 | { "amount" : 3,
1238 | "unit" : "tbsp",
1239 | "ingredient" : "olive oil"
1240 | },
1241 | { "amount" : 3,
1242 | "unit" : "tbsp",
1243 | "ingredient" : "butter"
1244 | },
1245 | { "amount" : 3,
1246 | "unit" : "cloves",
1247 | "ingredient" : "garlic"
1248 | },
1249 | { "amount" : 2,
1250 | "ingredient" : "rosemary sprig"
1251 | },
1252 | { "amount" : 3,
1253 | "ingredient" : "thyme sprig"
1254 | }],
1255 | "dietary" : "protein",
1256 | "category" : "dinner",
1257 | "servings" : 2,
1258 | "notes" : "Add notes",
1259 | "method" : "1. Preheat oven to 200°F (95°C).2. Generously season all sides of the steak with salt and pepper.3. Transfer to a wire rack on top of a baking sheet, then bake for about 45 minutes to an hour until the internal temperature reads about 125°F (51° C) for medium-rare. Adjust the bake time based on if you like your steak more rare or more well-done (you monster).4. Heat the canola oil in a pan over high heat until smoking. Do not use olive oil, as its smoke point is significantly lower than that of canola oil and will smoke before reaching the desired cooking temperature.5. Sear the steak for 30 seconds on the first side, then flip.6. Add the butter, garlic, rosemary, and thyme and swirl around the pan.7. Transfer the garlic and herbs on top of the steak and baste the steak with the butter using a large spoon.8. Baste for about 30 seconds, then flip and baste the other side for about 15 seconds.9. Turn the steak on its side and cook to render off any excess fat.10. Rest the steak on a cutting board or wire rack for about 10 minutes. Slicing the steak before the resting period has finished will result in a lot of the juices leaking out, which may not be desirable. 11. Slice the steak into 0.5 -inch (1 cm) strips, then fan out the slices and serve.",
1260 | "image": "https://natashaskitchen.com/wp-content/uploads/2020/03/Pan-Seared-Steak-4-500x500.jpg"
1261 | },
1262 | ]);
1263 |
1264 | db.planner.insertMany([
1265 | // {
1266 | // "name" : "Balmoral Chicken",
1267 | // "ingredients" : [
1268 | // { "amount" : 4,
1269 | // "ingredient" : "chicken breasts" },
1270 | // { "amount" : 130,
1271 | // "unit" : "g",
1272 | // "ingredient" : "haggis" },
1273 | // { "amount" : 4,
1274 | // "ingredient" : "rashes of bacon" },
1275 | // { "amount" : 30,
1276 | // "unit" : "ml",
1277 | // "ingredient" : "olive oil" },
1278 | // { "amount" : 20,
1279 | // "unit" : "g",
1280 | // "ingredient" : "butter" },
1281 | // ],
1282 | // "method" : "1. Preheat oven to 180°C. 2. Slice down the side of each chicken breast, making a pocket. 3. Slice the haggis into small chunks and squidge (technical term) into the chicken pocket. 4. Wrap each breast in a rasher of bacon and secure with a toothpick if necessary. 5. Heat the oil and butter in a non-stick frying pan, sear the bacon wrapped around the chicken breasts. Give 2 minutes on each side. 6. Place in an oven proof dish and transfer to the oven for 35-40 minutes or until cooked through & piping hot. 7. Serve with the peppercorn sauce and a selection of vegetables and/ or mash potato.",
1283 | // "image": "https://www.carolinescooking.com/wp-content/uploads/2022/01/haggis-stuffed-chicken-Balmoral-featured-pic-sq.jpg",
1284 | // "dietary": "gluten-free",
1285 | // "category": "dinner",
1286 | // "servings" : 4
1287 | // }
1288 | ])
--------------------------------------------------------------------------------
}/) 25 |
25 | }) 33 |
33 | }) 38 |
38 | }) 43 |
43 | }) 48 |
48 | }/)