├── .github
└── workflows
│ └── stale-issues.yml
├── .vscode
└── launch.json
├── CODE_OF_CONDUCT - sp-MX.md
├── CODE_OF_CONDUCT.md
├── Getting-Started
├── 00-PowerShell-or-ISE - sp-MX.md
├── 00-PowerShell-or-ISE.md
├── 01-Common-Errors - sp-MX.md
├── 01-Common-Errors.md
├── 02-Manual-Installation -sp-MX.md
├── 02-Manual-Installation.md
├── README - sp-MX.md
├── README.md
└── images
│ ├── MilestonePSTools-nupkg-contents.png
│ ├── PowerShell-ISE.png
│ ├── Start-Menu.png
│ ├── VSCode.png
│ └── Windows-PowerShell.png
├── LICENSE
├── LICENSE - sp-MX
├── README - sp-MX.md
├── README.md
├── Samples
├── Active-PTZ-Preset-Positions
│ ├── Invoke-PtzPreset.ps1
│ ├── README sp-MX.md
│ └── README.md
├── AddRemoveViewLayouts
│ ├── Add-VmsViewLayout.ps1
│ └── Remove-VmsViewLayout.ps1
├── Add_Hardware_from_CSV.ps1
├── Adding_Hardware_with_Universal_Driver.ps1
├── BackupMediaDb
│ ├── BackupMediaDb.psm1
│ ├── Public
│ │ ├── Backup-Bank.ps1
│ │ ├── Backup-MediaDb.ps1
│ │ └── Backup-Storage.ps1
│ ├── README sp-MX.md
│ └── README.md
├── Daily-LPR-Exports
│ └── SetupDailyLPRExports.ps1
├── Extend_Get-CameraReport.ps1
├── Find-XProtectDevice.ps1
├── General_Login_Script.ps1
├── Get-CameraConnectivityReport.ps1
├── Get-CameraGroupDeviceCount.ps1
├── Get-CameraReport.ps1
├── Get-DevicePermissionsByRole.ps1
├── Get-ItemState.ps1
├── Get-RecorderProperties.ps1
├── Get-UsersInRoles.ps1
├── Get-VmsCameraPosition.ps1
├── Group-CamerasByModel.ps1
├── Import-GPS-Coordinates
│ ├── Import-GpsCoordinates.png
│ ├── Import-GpsCoordinates.ps1
│ └── README.md
├── ImportFromCsvWithPermissions.ps1
├── ReportOnTransactSources.ps1
├── Reporting
│ ├── Get-RecorderReport.ps1
│ ├── Get-RoleReport.ps1
│ ├── Get-VmsCameraDiskUsage.ps1
│ ├── README - sp-MX.md
│ └── README.md
├── Rules
│ ├── Get-VmsRule.ps1
│ ├── README sp-MX.md
│ ├── README.md
│ └── Remove-VmsRule.ps1
├── Scheduled-Video-Export
│ ├── README sp-MX.md
│ ├── README.md
│ └── ScheduledVideoExport.png
├── ScheduledCameraReport
│ ├── README sp-MX.md
│ ├── README.md
│ ├── ScheduledCameraReport.ps1
│ └── ScheduledCameraReport_screenshot.png
├── ScheduledLogExport
│ ├── README sp-MX.md
│ ├── README.md
│ ├── ScheduledLogExport.ps1
│ └── ScheduledLogExport_screenshot.png
├── Set-AdaptiveStreaming.ps1
├── Set-AxisCameraSettings.ps1
├── Set-HttpsEnabled.ps1
├── Set-MilestoneNames.ps1
├── Snapshots-On-Interval
│ ├── README - sp-MX.md
│ ├── README.md
│ └── setup.ps1
├── Test-DataPresence
│ ├── README - sp-MX.md
│ ├── README.md
│ └── Test-DataPresence.ps1
└── Test-VmsBestPractices.ps1
└── images
├── logo.png
└── screenshot.png
/.github/workflows/stale-issues.yml:
--------------------------------------------------------------------------------
1 | name: 'Close stale issues and PRs'
2 | on:
3 | schedule:
4 | - cron: '30 1 * * *'
5 |
6 | jobs:
7 | stale:
8 | runs-on: ubuntu-latest
9 | permissions:
10 | issues: write
11 | pull-requests: write
12 | steps:
13 | - uses: actions/stale@v9
14 | with:
15 | stale-issue-message: 'This issue is stale because it has been open 30 days with no activity. Remove stale label or comment or this will be closed in 5 days.'
16 | close-issue-message: 'This issue is being closed due to inactivity. If the issue is not resolved, please open a new issue with a reference back to this issue number.'
17 | days-before-stale: 30
18 | days-before-close: 5
--------------------------------------------------------------------------------
/.vscode/launch.json:
--------------------------------------------------------------------------------
1 | {
2 | // Use IntelliSense to learn about possible attributes.
3 | // Hover to view descriptions of existing attributes.
4 | // For more information, visit: https://go.microsoft.com/fwlink/?linkid=830387
5 | "version": "0.2.0",
6 | "configurations": [
7 | {
8 | "name": "PowerShell: Launch Current File",
9 | "type": "PowerShell",
10 | "request": "launch",
11 | "script": "${file}",
12 | "cwd": "${file}"
13 | }
14 | ]
15 | }
--------------------------------------------------------------------------------
/CODE_OF_CONDUCT - sp-MX.md:
--------------------------------------------------------------------------------
1 | # Código de conducta del pacto del colaborador
2 |
3 | ## Nuestro compromiso
4 |
5 | Con el interés de fomentar un entorno abierto y acogedor, nosotros, como contribuyentes y mantenedores, nos comprometemos a hacer de la participación en nuestro proyecto y nuestra comunidad una experiencia libre de acoso para todos, independientemente de su edad, tamaño corporal, discapacidad, etnia, identidad y expresión de género, nivel de experiencia, nacionalidad, apariencia personal, raza, religión, identidad y orientación sexual, o inclinaciones sexuales entre adultos que consienten.
6 |
7 | ## Nuestros estándares
8 |
9 | Ejemplos de comportamiento que contribuye a crear un entorno positivo.
10 | incluir:
11 |
12 | * Usar un lenguaje acogedor e inclusivo
13 | * Ser respetuoso con los diferentes puntos de vista y experiencias.
14 | * Aceptando con gracia las críticas constructivas
15 | * Centrarse en lo que es mejor para la comunidad
16 | * Mostrar empatía hacia otros miembros de la comunidad.
17 |
18 | Ejemplos de comportamiento inaceptable por parte de los participantes incluyen:
19 |
20 | * El uso de lenguaje o imágenes sexualizadas y atención o insinuaciones sexuales no deseadas.
21 | * Trolking, comentarios insultantes / despectivos y ataques personales o políticos.
22 | * Acoso público o privado
23 | * Publicar información privada de otros, como una información física o electrónica.
24 | dirección, sin permiso explícito
25 | * Otra conducta que razonablemente podría considerarse inapropiada en un
26 | entorno profesional
27 |
28 | ## Nuestras responsabilidades
29 |
30 | Los encargados del mantenimiento del proyecto son responsables de aclarar los estándares de comportamiento aceptable y se espera que tomen las medidas correctivas adecuadas y justas en respuesta a cualquier caso de comportamiento inaceptable.
31 |
32 | Los encargados del mantenimiento del proyecto tienen el derecho y la responsabilidad de eliminar, editar o rechazar comentarios, confirmaciones, códigos, ediciones de wiki, problemas y otras contribuciones que no estén alineadas con este Código de Conducta, o prohibir temporal o permanentemente a cualquier colaborador por otros comportamientos que lo consideran inapropiado, amenazante, ofensivo o dañino.
33 |
34 | ## Alcance
35 |
36 | Este Código de Conducta se aplica tanto dentro de los espacios del proyecto como en los espacios públicos cuando una persona representa el proyecto o su comunidad. Ejemplos de representación de un proyecto o comunidad incluyen el uso de una dirección de correo electrónico oficial del proyecto, la publicación a través de una cuenta oficial de redes sociales o la actuación como representante designado en un evento en línea o fuera de línea. Los encargados del mantenimiento del proyecto pueden definir y aclarar más la representación de un proyecto.
37 |
38 | ## Ejecución
39 |
40 | Los casos de comportamiento abusivo, acosador o inaceptable de otro modo pueden informarse comunicándose con el equipo del proyecto en [jh@milestone.us] (mailto: jh@milestone.us). Todas las quejas serán revisadas e investigadas y resultarán en una respuesta que
41 | se considera necesario y apropiado a las circunstancias. El equipo del proyecto está obligado a mantener la confidencialidad con respecto al informante de un incidente.
42 |
43 | Se pueden publicar más detalles de las políticas de aplicación específicas por separado.
44 |
45 | Los mantenedores del proyecto que no sigan o hagan cumplir el Código de Conducta de buena fe pueden enfrentar repercusiones temporales o permanentes según lo determinen otros miembros del liderazgo del proyecto.
46 |
47 | ## Atribución
48 |
49 | Este Código de conducta está adaptado del [Pacto del colaborador] [página de inicio], versión 1.4.1, disponible en [http://contributor-covenant.org/version/1/4/1][version]
50 |
51 | [página de inicio]: http://contributor-covenant.org
52 | [versión]: http://contributor-covenant.org/version/1/4/
--------------------------------------------------------------------------------
/CODE_OF_CONDUCT.md:
--------------------------------------------------------------------------------
1 | # Contributor Covenant Code of Conduct
2 |
3 | ## Our Pledge
4 |
5 | In the interest of fostering an open and welcoming environment, we as
6 | contributors and maintainers pledge to making participation in our project and
7 | our community a harassment-free experience for everyone, regardless of age, body
8 | size, disability, ethnicity, sex characteristics, gender identity and expression,
9 | level of experience, education, socio-economic status, nationality, personal
10 | appearance, race, religion, or sexual identity and orientation.
11 |
12 | ## Our Standards
13 |
14 | Examples of behavior that contributes to creating a positive environment
15 | include:
16 |
17 | * Using welcoming and inclusive language
18 | * Being respectful of differing viewpoints and experiences
19 | * Gracefully accepting constructive criticism
20 | * Focusing on what is best for the community
21 | * Showing empathy towards other community members
22 |
23 | Examples of unacceptable behavior by participants include:
24 |
25 | * The use of sexualized language or imagery and unwelcome sexual attention or
26 | advances
27 | * Trolling, insulting/derogatory comments, and personal or political attacks
28 | * Public or private harassment
29 | * Publishing others' private information, such as a physical or electronic
30 | address, without explicit permission
31 | * Other conduct which could reasonably be considered inappropriate in a
32 | professional setting
33 |
34 | ## Our Responsibilities
35 |
36 | Project maintainers are responsible for clarifying the standards of acceptable
37 | behavior and are expected to take appropriate and fair corrective action in
38 | response to any instances of unacceptable behavior.
39 |
40 | Project maintainers have the right and responsibility to remove, edit, or
41 | reject comments, commits, code, wiki edits, issues, and other contributions
42 | that are not aligned to this Code of Conduct, or to ban temporarily or
43 | permanently any contributor for other behaviors that they deem inappropriate,
44 | threatening, offensive, or harmful.
45 |
46 | ## Scope
47 |
48 | This Code of Conduct applies both within project spaces and in public spaces
49 | when an individual is representing the project or its community. Examples of
50 | representing a project or community include using an official project e-mail
51 | address, posting via an official social media account, or acting as an appointed
52 | representative at an online or offline event. Representation of a project may be
53 | further defined and clarified by project maintainers.
54 |
55 | ## Enforcement
56 |
57 | Instances of abusive, harassing, or otherwise unacceptable behavior may be
58 | reported by contacting the project team at jh@milestonesys.com. All
59 | complaints will be reviewed and investigated and will result in a response that
60 | is deemed necessary and appropriate to the circumstances. The project team is
61 | obligated to maintain confidentiality with regard to the reporter of an incident.
62 | Further details of specific enforcement policies may be posted separately.
63 |
64 | Project maintainers who do not follow or enforce the Code of Conduct in good
65 | faith may face temporary or permanent repercussions as determined by other
66 | members of the project's leadership.
67 |
68 | ## Attribution
69 |
70 | This Code of Conduct is adapted from the [Contributor Covenant][homepage], version 1.4,
71 | available at https://www.contributor-covenant.org/version/1/4/code-of-conduct.html
72 |
73 | [homepage]: https://www.contributor-covenant.org
74 |
75 | For answers to common questions about this code of conduct, see
76 | https://www.contributor-covenant.org/faq
77 |
--------------------------------------------------------------------------------
/Getting-Started/00-PowerShell-or-ISE - sp-MX.md:
--------------------------------------------------------------------------------
1 | # PowerShell o ISE?
2 |
3 | En un sistema operativo Windows estándar, normalmente tiene dos opciones para usar PowerShell. Tiene más opciones si considera las variantes x86 (32 bits). Cuando está comenzando, puede ser difícil saber cuál usar y porqué. Cuando hace clic en el botón del menú Inicio o presiona su tecla de Windows (⊞), y escribe "powershell", esto es lo que obtiene...
4 |
5 | 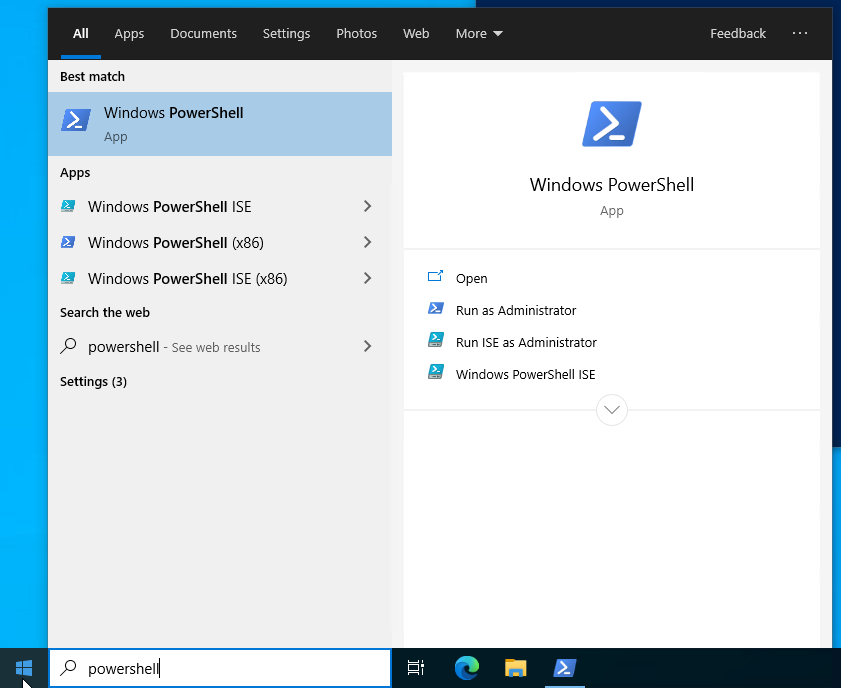
6 |
7 | ## PowerShell de Windows
8 |
9 | Esta es su opción de acceso para ingresar un comando a la vez para realizar una tarea simple y única. No es ideal para escribir secuencias de comandos más largos y complejas, ya que cada vez que presione Enter evaluará lo que ha escrito y lo ejecutará. A menudo uso el terminal de Windows PowerShell para ejecutar comandos individuales como `ping`, y `Test-NetConnection`, o en ocasiones para tareas únicas que requieren varios comandos que me siento cómodo ejecutando en una terminal en lugar de un editor como ISE.
10 |
11 | 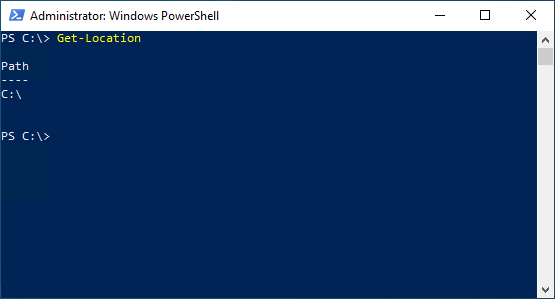
12 |
13 | ## Windows PowerShell ISE
14 |
15 | El Entorno de Scripting Integrado (ISE) PowerShell se incluye en todas las versiones de Windows y proporciona un entorno fácil de usar para escribir scripts en un editor de texto y ejecutar esas secuencias de comandos en la misma interfaz. Aquí es donde desea estar si desea crear una secuencia de comandos de PowerShell. Puede utilizar el Bloc de notas para escribir un archivo .PS1, pero PowerShell ISE ofrece tabulación completa e "Intellisense". Intellisense es como un compañero de desarrollador que conoce todos los parámetros disponibles para cualquier comando que esté escribiendo, por lo que tan pronto como escriba "-" después de `Get-ChildItem` le mostrará todos los parámetros disponibles.
16 |
17 | También puede ejecutar una o más líneas de código a la vez con F8 o ejecutar todo el archivo con F5. Cuando se sienta cómodo con PowerShell como lenguaje y el entorno ISE, incluso puede agregar puntos de interrupción y *depurar* sus secuencias de comandos cuando lo hagan de forma inesperada.
18 |
19 | Hay mejores entornos para escribir código de PowerShell que el ISE. Por ejemplo, Visual Studio Code es un editor *gratuito* de Microsoft con extensiones para PowerShell que lo convierten en un entorno mucho más productivo para proyectos de PowerShell más grandes. Sin embargo, el ISE está disponible en *todos* los equipos con Windows y ofrece el punto de partida menos intimidante para la ruta de aprendizaje de PowerShell.
20 |
21 | 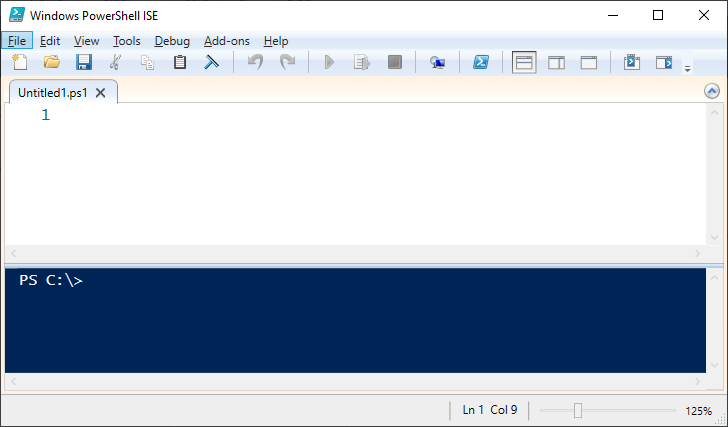
22 |
23 | ## Windows PowerShell (x86) y Windows PowerShell ISE (x86)
24 |
25 | Estos son los equivalentes de 32 bits de los mismos dos entornos de PowerShell ya mencionados. Los entornos estándar de PowerShell son de 64 bits y rara vez necesitará un entorno de 32 bits, pero si lo necesita, lo tiene. Puesto que el MIP SDK de Milestone se proporciona principalmente como paquetes NuGet de 64 bits y el MIP SDK de 32 bits está en desuso, necesitará un entorno Windows PowerShell 5.1 de 64 bits para usar el módulo MilestonePSTools PowerShell.
26 |
27 | ## Visual Studio Code
28 |
29 | VSCode de Microsoft es un entorno fantástico para trabajar en muchos tipos de proyectos, desde PowerShell hasta HTML/CSS/JavaScript, Python y más. Es un editor de texto con extensiones que lo convierten en un entorno cómodo para trabajar con múltiples archivos de diferentes tipos, e incluso ejecutar código. Es una parte integral del mantenimiento de MilestonePSTools y otros proyectos de PowerShell en los que hemos trabajado y, a medida que se sienta más cómodo con PowerShell, le recomiendo que lo pruebe. La siguiente secuencia de comandos automatizará la instalación de código, así como mis extensiones favoritas para trabajar con PowerShell y GitHub.
30 |
31 | 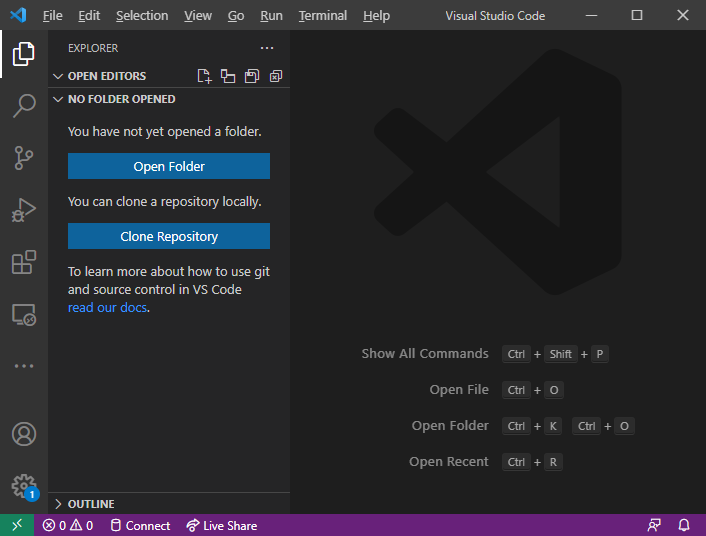
32 |
33 | ```powershell
34 | $InformationPreference = 'Continue'
35 | $requestParams = @{
36 | Uri = "https://code.visualstudio.com/sha/download?build=stable&os=win32-x64"
37 | OutFile = Join-Path $env:TEMP VSCodeUserSetup.exe
38 | }
39 | Write-Information "Downloading VSCode from $($requestParams.Uri)"
40 | Invoke-WebRequest @requestParams
41 |
42 | if (-not (Test-Path -Path $requestParams.OutFile)) {
43 | throw "Could not find the downloaded installer at $($requestParams.OutFile)"
44 | }
45 |
46 | Write-Information 'Installing VSCode from $($requestParams.OutFile). . .'
47 | $installerArgs = @{
48 | FilePath = $requestParams.OutFile
49 | Wait = $true
50 | NoNewWindow = $true
51 | PassThru = $true
52 | ErrorAction = 'Stop'
53 | ArgumentList = @(
54 | '/verysilent',
55 | '/suppressmsgboxes',
56 | '/mergetasks="!runCode, desktopicon, quicklaunchicon, addcontextmenufiles, addcontextmenufolders, associatewithfiles, addtopath"'
57 | )
58 | }
59 | $result = Start-Process @installerArgs
60 | Remove-Item -Path $requestParams.OutFile -Force
61 | if ($result.ExitCode -notin @(0, 1641, 3010)) {
62 | throw "VSCode installer exited with code $($result.ExitCode)"
63 | }
64 | $env:Path = [System.Environment]::GetEnvironmentVariable("Path","Machine") + ";" + [System.Environment]::GetEnvironmentVariable("Path","User")
65 | Write-Information "Success! VSCode version $(code --version)"
66 |
67 | Write-Information "Installing a couple important VSCode extensions. Some other fun ones include Rainbow Brackets, indent-rainbox, Live Share*, and markdownlint."
68 | $extensions = @(
69 |
70 | )
71 | $extensions = @(
72 | 'ms-vscode.powershell',
73 | 'github.vscode-pull-request-github',
74 | 'davidanson.vscode-markdownlint',
75 | 'usernamehw.errorlens'
76 | )
77 | $extensions | Foreach-Object { code --install-extension $_ --force }
78 |
79 | Write-Information 'Done! Type "code" to open VSCode or "code ." to open the current directory in VSCode.'
80 | ```
81 |
--------------------------------------------------------------------------------
/Getting-Started/00-PowerShell-or-ISE.md:
--------------------------------------------------------------------------------
1 | # PowerShell or ISE?
2 |
3 | On an standard Windows operating system you typically have two choices for how to use PowerShell. More if you consider the x86 (32-bit) variants! When you're getting started, it's difficult to know which to use, and why. When you click the Start menu button or press your Windows key (⊞), and type "powershell", here's what you get...
4 |
5 | 
6 |
7 | ## Windows PowerShell
8 |
9 | This is your go-to option for entering one command at a time to perform a simple, one-time task. It's not great for writing out longer, complex scripts since every time you press Enter it will evaluate what you've typed and run it. I often use the Windows PowerShell terminal to run single commands like `ping`, and `Test-NetConnection`, or sometimes for one-off tasks that require multiple commands that I'm comfortable running in a terminal instead of an editer like ISE.
10 |
11 | 
12 |
13 | ## Windows PowerShell ISE
14 |
15 | The PowerShell Integrated Scripting Environment (ISE) is included in all versions of Windows and provides you with a user-friendly environment to write scripts in a text editor, and run those scripts in the same interface. This is where you want to be if you want to craft a PowerShell script. You can use Notepad to write a .PS1 file, but PowerShell ISE offers tab-completion and "Intellisense". Intellisense is like a developer side-kick who knows all the parameters available for whatever command you're writing, so as soon as you type "-" after `Get-ChildItem` it will show you all the available parameters you can use.
16 |
17 | You can also run one or more lines of code at a time using F8 or run the whole file using F5. When you get comfortable with PowerShell as a language, and the ISE environment, you can even add break points and *debug* your scripts when they do the unexpected.
18 |
19 | There are better environments to write PowerShell code in than the ISE. For instance, Visual Studio Code is a *free* editor from Microsoft with extensions for PowerShell which make it a far more productive environment for larger PowerShell projects. However, the ISE is available on *every* Windows computer and offers the least intimidating starting point for your PowerShell learning path.
20 |
21 | 
22 |
23 | ## Windows PowerShell (x86) and Windows PowerShell ISE (x86)
24 |
25 | These are the 32-bit equivalents of the same two PowerShell environments already mentioned. The standard PowerShell environments are 64-bit and you will rarely need a 32-bit environment but if you need it, you have it. Since the Milestone MIP SDK is provided primarily as 64-bit NuGet packages and the 32-bit MIP SDK is deprecated, you will require a 64-bit Windows PowerShell 5.1 environment to use the MilestonePSTools PowerShell module.
26 |
27 | ## Visual Studio Code
28 |
29 | Microsoft's VSCode is a fantastic environment for working on many different kinds of projects from PowerShell, to HTML/CSS/JavaScript, to Python and more. It's a text editor with extensions which make it a comfortable environment for working with multiple files of different types, and even running/executing code. It's an integral part of the maintenance of MilestonePSTools and other PowerShell projects we've worked on and as you get more comfortable with PowerShell, I highly recommend trying it out. The script below will automate the installation of code, as well as my favorite extensions for working with PowerShell and GitHub.
30 |
31 | 
32 |
33 | ```powershell
34 | $InformationPreference = 'Continue'
35 | $requestParams = @{
36 | Uri = "https://code.visualstudio.com/sha/download?build=stable&os=win32-x64"
37 | OutFile = Join-Path $env:TEMP VSCodeUserSetup.exe
38 | }
39 | Write-Information "Downloading VSCode from $($requestParams.Uri)"
40 | Invoke-WebRequest @requestParams
41 |
42 | if (-not (Test-Path -Path $requestParams.OutFile)) {
43 | throw "Could not find the downloaded installer at $($requestParams.OutFile)"
44 | }
45 |
46 | Write-Information 'Installing VSCode from $($requestParams.OutFile). . .'
47 | $installerArgs = @{
48 | FilePath = $requestParams.OutFile
49 | Wait = $true
50 | NoNewWindow = $true
51 | PassThru = $true
52 | ErrorAction = 'Stop'
53 | ArgumentList = @(
54 | '/verysilent',
55 | '/suppressmsgboxes',
56 | '/mergetasks="!runCode, desktopicon, quicklaunchicon, addcontextmenufiles, addcontextmenufolders, associatewithfiles, addtopath"'
57 | )
58 | }
59 | $result = Start-Process @installerArgs
60 | Remove-Item -Path $requestParams.OutFile -Force
61 | if ($result.ExitCode -notin @(0, 1641, 3010)) {
62 | throw "VSCode installer exited with code $($result.ExitCode)"
63 | }
64 | $env:Path = [System.Environment]::GetEnvironmentVariable("Path","Machine") + ";" + [System.Environment]::GetEnvironmentVariable("Path","User")
65 | Write-Information "Success! VSCode version $(code --version)"
66 |
67 | Write-Information "Installing a couple important VSCode extensions. Some other fun ones include Rainbow Brackets, indent-rainbox, Live Share*, and markdownlint."
68 | $extensions = @(
69 |
70 | )
71 | $extensions = @(
72 | 'ms-vscode.powershell',
73 | 'github.vscode-pull-request-github',
74 | 'davidanson.vscode-markdownlint',
75 | 'usernamehw.errorlens'
76 | )
77 | $extensions | Foreach-Object { code --install-extension $_ --force }
78 |
79 | Write-Information 'Done! Type "code" to open VSCode or "code ." to open the current directory in VSCode.'
80 | ```
81 |
--------------------------------------------------------------------------------
/Getting-Started/01-Common-Errors - sp-MX.md:
--------------------------------------------------------------------------------
1 | # Common Errors
2 |
3 | La secuencia de comandos de instalación proporcionada en el archivo README.md de este proyecto está diseñado para protegerlo de errores comunes cuando instala cosas de la Galería de PowerShell por primera vez. A continuación se muestra una colección de estos errores, por lo que si se encuentra con ellos, sepa lo que significan y qué debe hacer.
4 |
5 | ## No se encontró ninguna coincidencia para los criterios de búsqueda y el nombre del módulo especificados
6 |
7 | No se encontró ninguna coincidencia para los criterios de búsqueda y el nombre del módulo especificados
8 |
9 | ```powershell
10 | PS C:\> Install-Module MilestonePSTools
11 | WARNING: Unable to resolve package source 'https://www.powershellgallery.com/api/v2'.
12 | PackageManagement\Install-Package : No match was found for the specified search criteria and module name
13 | 'MilestonePSTools'. Try Get-PSRepository to see all available registered module repositories.
14 | At C:\Program Files\WindowsPowerShell\Modules\PowerShellGet\1.0.0.1\PSModule.psm1:1809 char:21
15 | + ... $null = PackageManagement\Install-Package @PSBoundParameters
16 | + ~~~~~~~~~~~~~~~~~~~~~~~~~~~~~~~~~~~~~~~~~~~~~~~~~~~~
17 | + CategoryInfo : ObjectNotFound: (Microsoft.Power....InstallPackage:InstallPackage) [Install-Package], Ex
18 | ception
19 | + FullyQualifiedErrorId : NoMatchFoundForCriteria,Microsoft.PowerShell.PackageManagement.Cmdlets.InstallPackage
20 | ```
21 |
22 | El problema no es que el nombre del módulo se haya escrito incorrectamente o que no se pueda encontrar en PSGallery. El problema es que PowerShell no pudo *conectarse* a [https://www.powershellgallery.com](https://www.powershellgallery.com) porque PSGallery requiere una conexión HTTPS usando al menos TLS 1.2, y las versiones anteriores de PowerShellGet aún usan una versión anterior de TLS o SSL.
23 |
24 |
25 | ### Solución
26 |
27 | Para resolver esto, necesitamos decirle a PowerShell qué protocolos queremos usar. Una forma de hacerlo es ejecutar la línea bastante esotérica del código de PowerShell a continuación. Utiliza la clase .NET System.Net.ServicePointManager y modifica SecurityProtocol para incluir TLS 1.2 además de los protocolos que ya estén permitidos.
28 |
29 | ```powershell
30 | [Net.ServicePointManager]::SecurityProtocol = [Net.ServicePointManager]::SecurityProtocol -bor [Net.SecurityProtocolType]::Tls12
31 | ```
32 |
33 | Así es como se ve después de ejecutar esto en una instancia limpia de Windows 10 Sandbox:
34 |
35 | ```powershell
36 | PS C:\> [Net.ServicePointManager]::SecurityProtocol = [Net.ServicePointManager]::SecurityProtocol -bor [Net.SecurityProtocolType]::Tls12
37 | PS C:\> [Net.ServicePointManager]::SecurityProtocol
38 | Tls11, Tls12
39 | PS C:\>
40 | ```
41 |
42 | ## El comando se encontró en el módulo, pero el módulo no se pudo cargar
43 |
44 | Esto es muy común en Windows 10 porque la política de ejecución predeterminada de Microsoft en Windows 10 es "Restringida". Esto significa que PowerShell no puede ejecutar *ningún* archivo *.ps1 o *.psm1. Cuando utiliza `Import-Module` para importar MilestonePSTools, o cuando usa un comando dentro del módulo como `Connect-ManagementServer`, lo primero que hace PowerShell es ejecutar el archivo .PSM1 dentro de la carpeta de instalación del módulo. Con una política de ejecución de "Restringida", PowerShell no puede cargar el módulo..
45 |
46 | ```powershell
47 | PS C:\> Connect-ManagementServer -ShowDialog
48 | Connect-ManagementServer : The 'Connect-ManagementServer' command was found in the module 'MilestonePSTools', but the
49 | module could not be loaded. For more information, run 'Import-Module MilestonePSTools'.
50 | At line:1 char:1
51 | + Connect-ManagementServer -ShowDialog
52 | + ~~~~~~~~~~~~~~~~~~~~~~~~
53 | + CategoryInfo : ObjectNotFound: (Connect-ManagementServer:String) [], CommandNotFoundException
54 | + FullyQualifiedErrorId : CouldNotAutoloadMatchingModule
55 | ```
56 |
57 | PowerShell suele ser bastante bueno para brindarle la información que necesita en el mensaje de error. En este caso, le recomienda ejecutar `Import-Module MilestonePSTools` para obtener más información sobre el problema. Así es como se ve eso ...
58 |
59 | ```powershell
60 | PS C:\> Import-Module MilestonePSTools
61 | Import-Module : File C:\Program Files\WindowsPowerShell\Modules\MipSdkRedist\21.1.1\MipSdkRedist.psm1 cannot be loaded
62 | because running scripts is disabled on this system. For more information, see about_Execution_Policies at
63 | https:/go.microsoft.com/fwlink/?LinkID=135170.
64 | At line:1 char:1
65 | + import-module milestonepstools
66 | + ~~~~~~~~~~~~~~~~~~~~~~~~~~~~~~
67 | + CategoryInfo : SecurityError: (:) [Import-Module], PSSecurityException
68 | + FullyQualifiedErrorId : UnauthorizedAccess,Microsoft.PowerShell.Commands.ImportModuleCommand
69 | ```
70 |
71 | Puede ver que el mensaje de error más detallado hace referencia a las políticas de ejecución de manera más específica
72 |
73 | ### Solución
74 |
75 | La forma de solucionarlo es [cambiar su política de ejecución](https:/go.microsoft.com/fwlink/?LinkID=135170).. Recomiendo leer más sobre las políticas de ejecución de Microsoft, ya que no podemos cubrir todo el tema aquí. Nuestra preferencia por una política de ejecución es cambiarla a "RemoteSigned". Esto significa que podrá ejecutar cualquier secuencia de comandos local de PowerShell, pero se requerirá que otras secuencias de comandos, descargadas de un origen de Internet que no sea de confianza, estén firmadas por un certificado de firma de código en el que ya confíe. Puede hacer que una secuencia de comandos ”remota” que no sea de confianza sea “local” y “de confianza” al hacer clic derecho en el archivo y marcando la casilla de verificación “desbloquear” en la parte inferior de la pestaña General. Si no ve esa casilla de verificación, entonces el archivo no está “bloqueado” y Windows debería permitirle ejecutar el archivo siempre que su política de ejecución sea al menos “RemoteSigned”.
76 |
77 | Ejecute el comando `Set-ExecutionPolicy` como administrador para modificar la política en el nivel del equipo. También puede especificar un alcance de "CurrentUser" o "Process", por lo que, si tiene tiempo, le recomiendo leer la base de conocimiento de Microsoft sobre políticas de ejecución para obtener una comprensión completa de las opciones y sus implicaciones.
78 |
79 | ```powershell
80 | Set-ExecutionPolicy -ExecutionPolicy RemoteSigned
81 | ```
82 |
83 | ## Repositorio que no es de confianza
84 |
85 | Si bien en realidad no es un error, cuando ve este mensaje por primera vez puede ser confuso. Justificadamente, es posible que se pregunte si debe proceder a instalar algo de una fuente que no sea de confianza. El repositorio de PSGallery es la [Galería de PowerShell](https://www.powershellgallery.com) administrada por Microsoft. Es una colección de miles de paquetes que contienen módulos de PowerShell como [MilestonePSTools](https://www.powershellgallery.com/packages/MilestonePSTools). De forma predeterminada, el repositorio de PSGallery incluido con el módulo PowerShellGet integrado no es de confianza. Por lo tanto, se le preguntará cada vez que necesite instalar o actualizar un módulo de este repositorio.
86 |
87 | ```powershell
88 | PS C:\> Install-Module MilestonePSTools
89 |
90 | Untrusted repository
91 | You are installing the modules from an untrusted repository. If you trust this repository, change its
92 | InstallationPolicy value by running the Set-PSRepository cmdlet. Are you sure you want to install the modules from
93 | 'PSGallery'?
94 | ```
95 |
96 | ### SoluSolucióntion
97 |
98 | Puede optar por reconocer este mensaje cada vez o puede establecer la `Política de instalación` para el repositorio en "De confianza". A continuación, le indicamos cómo hacerlo:
99 |
100 | ```powershell
101 | Set-PSRepository -Name PSGallery -InstallationPolicy Trusted
102 | ```
103 |
--------------------------------------------------------------------------------
/Getting-Started/01-Common-Errors.md:
--------------------------------------------------------------------------------
1 | # Common Errors
2 |
3 | The installation script provided in this project's README.md is designed to protect you from common errors when you install things from PowerShell Gallery for the first time. Following are a collection of these errors so if you run into them, you know what it means and what to do!
4 |
5 | ## No match was found for the specified search criteria and module name
6 |
7 | If you receive this error when installing a PowerShell module, there's a good chance you typed the name correctly.
8 |
9 | ```powershell
10 | PS C:\> Install-Module MilestonePSTools
11 | WARNING: Unable to resolve package source 'https://www.powershellgallery.com/api/v2'.
12 | PackageManagement\Install-Package : No match was found for the specified search criteria and module name
13 | 'MilestonePSTools'. Try Get-PSRepository to see all available registered module repositories.
14 | At C:\Program Files\WindowsPowerShell\Modules\PowerShellGet\1.0.0.1\PSModule.psm1:1809 char:21
15 | + ... $null = PackageManagement\Install-Package @PSBoundParameters
16 | + ~~~~~~~~~~~~~~~~~~~~~~~~~~~~~~~~~~~~~~~~~~~~~~~~~~~~
17 | + CategoryInfo : ObjectNotFound: (Microsoft.Power....InstallPackage:InstallPackage) [Install-Package], Ex
18 | ception
19 | + FullyQualifiedErrorId : NoMatchFoundForCriteria,Microsoft.PowerShell.PackageManagement.Cmdlets.InstallPackage
20 | ```
21 |
22 | The issue is not that the module name was wrong or it couldn't be found on PSGallery. The issue is PowerShell couldn't *connect* to [https://www.powershellgallery.com](https://www.powershellgallery.com) because PSGallery requires an HTTPS connection using at least TLS 1.2, and older versions of PowerShellGet still use an older version of TLS or SSL.
23 |
24 | ### Solution
25 |
26 | To solve this, we need to tell PowerShell which protocol(s) we want to use. One way to do this is to run the rather esoteric line of PowerShell code below. It uses the .NET System.Net.ServicePointManager class and modifies the SecurityProtocol to include TLS 1.2 in addition to whatever protocols are already allowed.
27 |
28 | ```powershell
29 | [Net.ServicePointManager]::SecurityProtocol = [Net.ServicePointManager]::SecurityProtocol -bor [Net.SecurityProtocolType]::Tls12
30 | ```
31 |
32 | Here's what it looks like after I run this on a clean Windows 10 Sandbox instance...
33 |
34 | ```powershell
35 | PS C:\> [Net.ServicePointManager]::SecurityProtocol = [Net.ServicePointManager]::SecurityProtocol -bor [Net.SecurityProtocolType]::Tls12
36 | PS C:\> [Net.ServicePointManager]::SecurityProtocol
37 | Tls11, Tls12
38 | PS C:\>
39 | ```
40 |
41 | ## The command was found in the module, but the module could not be loaded
42 |
43 | This is really common on Windows 10 because Microsoft's default execution policy on Windows 10 is "Restricted". This means PowerShell is not allowed to execute *any* \*.ps1 files or \*.psm1 files. When you use `Import-Module` to import MilestonePSTools, or when you use a command within the module like `Connect-ManagementServer` the first thing PowerShell does is run the .PSM1 file inside the module's installation folder. With an execution policy of "Restricted", PowerShell can't do that.
44 |
45 | ```powershell
46 | PS C:\> Connect-ManagementServer -ShowDialog
47 | Connect-ManagementServer : The 'Connect-ManagementServer' command was found in the module 'MilestonePSTools', but the
48 | module could not be loaded. For more information, run 'Import-Module MilestonePSTools'.
49 | At line:1 char:1
50 | + Connect-ManagementServer -ShowDialog
51 | + ~~~~~~~~~~~~~~~~~~~~~~~~
52 | + CategoryInfo : ObjectNotFound: (Connect-ManagementServer:String) [], CommandNotFoundException
53 | + FullyQualifiedErrorId : CouldNotAutoloadMatchingModule
54 | ```
55 |
56 | PowerShell is usually pretty good at giving you the information you need in the error message. In this case, it recommends you to run `Import-Module MilestonePSTools` to get more information about the problem. Here's what that looks like...
57 |
58 | ```powershell
59 | PS C:\> Import-Module MilestonePSTools
60 | Import-Module : File C:\Program Files\WindowsPowerShell\Modules\MipSdkRedist\21.1.1\MipSdkRedist.psm1 cannot be loaded
61 | because running scripts is disabled on this system. For more information, see about_Execution_Policies at
62 | https:/go.microsoft.com/fwlink/?LinkID=135170.
63 | At line:1 char:1
64 | + import-module milestonepstools
65 | + ~~~~~~~~~~~~~~~~~~~~~~~~~~~~~~
66 | + CategoryInfo : SecurityError: (:) [Import-Module], PSSecurityException
67 | + FullyQualifiedErrorId : UnauthorizedAccess,Microsoft.PowerShell.Commands.ImportModuleCommand
68 | ```
69 |
70 | You can see that the more detailed error more specifically references execution policies.
71 |
72 | ### Solution
73 |
74 | The fix is to [change your execution policy](https:/go.microsoft.com/fwlink/?LinkID=135170). I recommend reading more about execution policies from Microsoft as we can't possibly cover the subject here. Our preference for execution policy is to change it to "RemoteSigned". This means you will be able to run any local PowerShell script, but any script downloaded from an untrusted Internet source will be required to be signed by a code signing certificate you already trust. You can make an untrusted "remote" script "local" and trusted by right-clicking on the file and checking the "unblock" checkbox at the bottom of the General tab. If you don't see that checkbox, then the file is not "blocked" and Windows should let you execute the file so long as your execution policy is at least "RemoteSigned".
75 |
76 | Run the `Set-ExecutionPolicy` command as Administrator to modify the policy at the machine level. You can also specify a scope of "CurrentUser" or "Process" so if you have time, I do recommend reading Microsoft's KB on execution policies to get a full understanding of the options and their implications.
77 |
78 | ```powershell
79 | Set-ExecutionPolicy -ExecutionPolicy RemoteSigned
80 | ```
81 |
82 | ## Untrusted repository
83 |
84 | While not an error, when you see this message for the first time it can be confusing. Justifiably, you may wonder whether you should proceed to install something from an untrusted source. The PSGallery repository is the [PowerShell Gallery](https://www.powershellgallery.com) managed by Microsoft. It is a collection of thousands of packages containing PowerShell modules like [MilestonePSTools](https://www.powershellgallery.com/packages/MilestonePSTools). By default, the PSGallery repository included with the built-in PowerShellGet module is not trusted. So you will be asked each time you need to install or update a module from this repository.
85 |
86 | ```powershell
87 | PS C:\> Install-Module MilestonePSTools
88 |
89 | Untrusted repository
90 | You are installing the modules from an untrusted repository. If you trust this repository, change its
91 | InstallationPolicy value by running the Set-PSRepository cmdlet. Are you sure you want to install the modules from
92 | 'PSGallery'?
93 | ```
94 |
95 | ### Solution
96 |
97 | You can either choose to acknowledge this message each time, or you can set the `InstallationPolicy` for the repository to "Trusted". Here's how to do that...
98 |
99 | ```powershell
100 | Set-PSRepository -Name PSGallery -InstallationPolicy Trusted
101 | ```
102 |
--------------------------------------------------------------------------------
/Getting-Started/02-Manual-Installation -sp-MX.md:
--------------------------------------------------------------------------------
1 | # Instalación manual
2 |
3 | Si su VMS de Milestone está "aislado" o por cualquier otra razón no puede instalar un módulo de PowerShell con el cmdlet `Install-Module` que lo descarga directamente desde la Galería de PowerShell, aún puede instalar MilestonePSTools. Síganos para aprender cómo.
4 |
5 | ## Descargar los archivos nupkg
6 |
7 | ¿Qué se supone que es un archivo nupkg? Para empezar, puedes pronunciarlo “nup-keg”, ¡lo cual es divertido! Y significa “Paquete NuGet”. NuGet es el nombre del administrador de paquetes de Microsoft introducido principalmente para administrar paquetes de aplicaciones .NET. En este caso, "paquete" significa uno o más archivos DLL y algunas instrucciones básicas para dónde van. Antes de 2010, la mayoría de los desarrolladores de .NET copiaban manualmente alrededor de archivos DLL y agregaban referencias a ellos cuando era necesario. Hizo que fuera muy complicado compartir bibliotecas reutilizables. Ahora, con NuGet.org, puede hacer referencia a un paquete por su nombre y descargar/desempaquetar/usar automáticamente ese paquete.
8 |
9 | Para descargar manualmente MilestonePSTools, deberá descargar dos archivos. El primero es el "archivo nupgk sin formato" MilestonePSTools y el segundo es el MipSdkRedist nupkg. El módulo MipSdkRedist es el contenedor utilizado para el MIP SDK de Milestone en el que se basa MilestonePSTools. Estos son los vínculos a los dos módulos de PowerShell en PSGallery. Una vez allí, haga clic en **Descarga manual** en **Opciones de instalación** y luego haga clic en **Descargar el archivo nupkg sin procesar**.
10 |
11 | - [MilestonePSTools](https://www.powershellgallery.com/packages/MilestonePSTools)
12 | - [MipSdkRedist](https://www.powershellgallery.com/packages/MipSdkRedist)
13 |
14 | Estos archivos nupkg son en realidad archivos ZIP. Si agrega la extensión .zip al archivo, puede ver/extraer el contenido como cualquier otro archivo zip. Así es como se ven los contenidos de MilestonePSTools:
15 |
16 | 
17 |
18 | Antes de extraer los archivos ZIP, asegúrese de hacer clic derecho en ambos archivos y abrir **Propiedades**. Si ve una casilla de verificación para "desbloquear" los archivos, debe hacerlo antes de extraerlos. De lo contrario, *también* se bloqueará cada archivo extraído individualmente.
19 |
20 | Al extraer los archivos del módulo, el mejor lugar para colocarlos es en una de las ubicaciones en las que PowerShell busca *automáticamente* los módulos de PowerShell. Si instala el módulo *solo para usted*, debe colocar el módulo en su directorio Documentos en `~\Documents\WindowsPowerShell\Modules`. Es posible que las carpetas no existan todavía. De ser así, está bien que las cree usted mismo.
21 |
22 | Como alternativa, si desea que los módulos estén disponibles para cualquier usuario de un equipo local (útil si desea que una cuenta de servicio, un sistema local o un servicio de red acceda a ellos desde una tarea programada), puede colocarlos en `C:\Program Files\WindowsPowerShell\Modules.`
23 |
24 | En la estructura de la carpeta Módulos, el primer nivel incluye una carpeta que coincide con el nombre del módulo, y la subcarpeta contiene una o más versiones de ese módulo donde el nombre de la carpeta coincide con la versión exacta del módulo tal como se define en el archivo `*.psd1` en la raíz de la carpeta del módulo específico. En el siguiente ejemplo, tenemos MilestonePSTools versión 21.1.451603, y dentro de esa carpeta están los contenidos de la captura de pantalla anterior, de modo que MilestonePSTools.psd1 existe dentro de la carpeta llamada "21.1.451603".
25 |
26 | ```text
27 | +---Modules
28 | +---MilestonePSTools
29 | | \---21.1.451603
30 | +---MipSdkRedist
31 | | \---21.1.1
32 | ```
33 |
34 | Una vez que haya extraído los módulos y los haya colocado en la ubicación correcta, debería poder ejecutar `Import-Module MilestonePSTools` y tanto MipSdkRedist como MilestonePSTools se cargarán en su sesión de PowerShell. Si recibe un mensaje de error, consulte [01-CommonErrors](01-CommonErrors.md) para ver si ya hemos compartido algunos consejos sobre cómo solucionarlo.
--------------------------------------------------------------------------------
/Getting-Started/02-Manual-Installation.md:
--------------------------------------------------------------------------------
1 | # Manual Installation
2 |
3 | If your Milestone VMS is "air-gapped" or for any other reason you're unable to install a PowerShell module using the `Install-Module` cmdlet which downloads it directly from PowerShell Gallery, you can still install MilestonePSTools! Follow along to learn how.
4 |
5 | ## Download the Nupkg files
6 |
7 | What on earth is a nupkg file? For starters, you can pronounce it as "Nup-keg" which is fun! And it stands for "NuGet Package". Oh, and NuGet is the name of Microsoft's package manager introduced primarily for managing .NET application packages. In this case, "package" means one or more DLL files and some basic instructions for where they go. Back before ~2010, most .NET developers were manually copying around DLL files and adding references to them when needed. It made it very complicated to share reusable libraries. Now, with NuGet.org, you can reference a package by name, and automatically download/unpack/use that package.
8 |
9 | To manually download MilestonePSTools, you'll need to download two files. The first is the MilestonePSTools "raw nupgk file", and the second is the MipSdkRedist nupkg. The MipSdkRedist module is the container used for the Milestone MIP SDK on which MilestonePSTools is based. Here are the links to the two PowerShell modules on PSGallery. Once there, click **Manual Download** under **Installation Options** and then click **Download the raw nupkg file**.
10 |
11 | - [MilestonePSTools](https://www.powershellgallery.com/packages/MilestonePSTools)
12 | - [MipSdkRedist](https://www.powershellgallery.com/packages/MipSdkRedist)
13 |
14 | These nupkg files are actually ZIP files! If you add the `.zip` extension to the file, you can view/extract the contents like any other zip file. Here's what the contents look like for MilestonePSTools...
15 |
16 | 
17 |
18 | Before you extract the ZIP files, make sure to right-click on both files and open **Properties**. If you see a checkbox to "unblock" the files, you should do this before extracting them. Otherwise each individual extracted file will *also* be blocked.
19 |
20 | When you extract the files for the module, the best place to put them is in one of the locations PowerShell *automatically* looks for PowerShell modules. If you install the module for *just you*, then you should place the module in your Documents directory under `~\Documents\WindowsPowerShell\Modules`. The folder(s) may not already exist. If so, it is okay to create them yourself.
21 |
22 | Alternatively if you want to make the module(s) available to any user on the local machine (useful if you want a service account, local system, or network service to access them from a scheduled task!), you can place them in `C:\Program Files\WindowsPowerShell\Modules`.
23 |
24 | The structure for the Modules folder is that the first level includes a folder matching the name of the module, and the subfolder contains one or more versions of that module where the name of the folder matches the exact version of the module as defined in the `*.psd1` file at the root of the specific module's folder. In the example below, we have MilestonePSTools version 21.1.451603, and inside that folder are the contents from the screenshot above such that MilestonePSTools.psd1 exists inside the folder named "21.1.451603".
25 |
26 | ```text
27 | +---Modules
28 | +---MilestonePSTools
29 | | \---21.1.451603
30 | +---MipSdkRedist
31 | | \---21.1.1
32 | ```
33 |
34 | Once you have the modules extracted and placed in the right location, you should be able to run `Import-Module MilestonePSTools` and both MipSdkRedist and MilestonePSTools will be loaded into your PowerShell session. If you get an error message, check out [01-CommonErrors](01-CommonErrors.md) to see if we've already shared some tips on how to deal with it!
35 |
--------------------------------------------------------------------------------
/Getting-Started/README - sp-MX.md:
--------------------------------------------------------------------------------
1 | # Introducción (MÁS)
2 |
3 | Si es nuevo en PowerShell, el archivo principal README de este proyecto es mucho para digerir de inmediato. Los temas de esta carpeta están aquí cuando esté listo para responder a preguntas y errores comunes.
4 |
5 | Los primeros temas tratan sobre cómo comenzar con PowerShell y no necesariamente se aplican específicamente a Milestone. Después de eso, comenzaremos a explorar tareas comunes, comenzando con conectarse a su sistema Milestone y ejecutar comandos e informes comunes. A continuación, exploraremos algunas tareas más avanzadas, como agregar y configurar hardware y explorar algunos de los cmdlets menos utilizados.
6 |
7 | Si tiene tiempo, lea los temas de esta carpeta y explore los ejemplos. La carpeta Ejemplos en la raíz de este repositorio es otro buen lugar para buscar ejemplos sin procesar de cómo escribir funciones y realizar tareas en un sistema Milestone. Esta carpeta tiene como objetivo ofrecer una introducción suave a su experiencia PowerShell/MilestonePSTools.
8 |
--------------------------------------------------------------------------------
/Getting-Started/README.md:
--------------------------------------------------------------------------------
1 | # Getting Started (MORE)
2 |
3 | If you are new to PowerShell, the main README on this project is a lot to digest all at once. The topics in this folder are here for when you're ready for answers to common questions and errors.
4 |
5 | The first few topics are specifically about getting started with PowerShell and don't necessarily apply to Milestone at all. After that, we'll start exploring common tasks beginning with getting connected to your Milestone system, running common commands and reports, and then some more advanced tasks like adding and configuring hardware and exploring some of the lesser-used cmdlets.
6 |
7 | If you have the time, read through the topics in this folder and explore the examples. The Samples folder at the root of this repository are another good place to look for raw examples of how to write functions and perform tasks against a Milestone system. This folder aims to offer a more gentle approach to your PowerShell/MilestonePSTools experience.
8 |
--------------------------------------------------------------------------------
/Getting-Started/images/MilestonePSTools-nupkg-contents.png:
--------------------------------------------------------------------------------
https://raw.githubusercontent.com/MilestoneSystemsInc/PowerShellSamples/ecbb1d9db0c12efd0946d7d904cc63a49e36e827/Getting-Started/images/MilestonePSTools-nupkg-contents.png
--------------------------------------------------------------------------------
/Getting-Started/images/PowerShell-ISE.png:
--------------------------------------------------------------------------------
https://raw.githubusercontent.com/MilestoneSystemsInc/PowerShellSamples/ecbb1d9db0c12efd0946d7d904cc63a49e36e827/Getting-Started/images/PowerShell-ISE.png
--------------------------------------------------------------------------------
/Getting-Started/images/Start-Menu.png:
--------------------------------------------------------------------------------
https://raw.githubusercontent.com/MilestoneSystemsInc/PowerShellSamples/ecbb1d9db0c12efd0946d7d904cc63a49e36e827/Getting-Started/images/Start-Menu.png
--------------------------------------------------------------------------------
/Getting-Started/images/VSCode.png:
--------------------------------------------------------------------------------
https://raw.githubusercontent.com/MilestoneSystemsInc/PowerShellSamples/ecbb1d9db0c12efd0946d7d904cc63a49e36e827/Getting-Started/images/VSCode.png
--------------------------------------------------------------------------------
/Getting-Started/images/Windows-PowerShell.png:
--------------------------------------------------------------------------------
https://raw.githubusercontent.com/MilestoneSystemsInc/PowerShellSamples/ecbb1d9db0c12efd0946d7d904cc63a49e36e827/Getting-Started/images/Windows-PowerShell.png
--------------------------------------------------------------------------------
/LICENSE:
--------------------------------------------------------------------------------
1 | MIT License
2 |
3 | Copyright (c) 2020 Milestone Systems Inc.
4 |
5 | Permission is hereby granted, free of charge, to any person obtaining a copy
6 | of this software and associated documentation files (the "Software"), to deal
7 | in the Software without restriction, including without limitation the rights
8 | to use, copy, modify, merge, publish, distribute, sublicense, and/or sell
9 | copies of the Software, and to permit persons to whom the Software is
10 | furnished to do so, subject to the following conditions:
11 |
12 | The above copyright notice and this permission notice shall be included in all
13 | copies or substantial portions of the Software.
14 |
15 | THE SOFTWARE IS PROVIDED "AS IS", WITHOUT WARRANTY OF ANY KIND, EXPRESS OR
16 | IMPLIED, INCLUDING BUT NOT LIMITED TO THE WARRANTIES OF MERCHANTABILITY,
17 | FITNESS FOR A PARTICULAR PURPOSE AND NONINFRINGEMENT. IN NO EVENT SHALL THE
18 | AUTHORS OR COPYRIGHT HOLDERS BE LIABLE FOR ANY CLAIM, DAMAGES OR OTHER
19 | LIABILITY, WHETHER IN AN ACTION OF CONTRACT, TORT OR OTHERWISE, ARISING FROM,
20 | OUT OF OR IN CONNECTION WITH THE SOFTWARE OR THE USE OR OTHER DEALINGS IN THE
21 | SOFTWARE.
22 |
--------------------------------------------------------------------------------
/LICENSE - sp-MX:
--------------------------------------------------------------------------------
1 | Copyright (c) 2020 Milestone Systems Inc.
2 |
3 | Por la presente se concede permiso, libre de cargos, a cualquier persona que obtenga una copia de este software y de los archivos de documentación asociados (el "Software"), a utilizar el Software sin restricción, incluyendo sin limitación los derechos a usar, copiar, modificar, fusionar, publicar, distribuir, sublicenciar, y/o vender copias del Software, y a permitir a las personas a las que se les proporcione el Software a hacer lo mismo, sujeto a las siguientes condiciones:
4 |
5 | El aviso de copyright anterior y este aviso de permiso se incluirán en todas las copias o partes sustanciales del Software.
6 |
7 | EL SOFTWARE SE PROPORCIONA "COMO ESTA", SIN GARANTÍA DE NINGÚN TIPO, EXPRESA O IMPLÍCITA, INCLUYENDO PERO NO LIMITADO A GARANTÍAS DE COMERCIALIZACIÓN, IDONEIDAD PARA UN PROPÓSITO PARTICULAR E INCUMPLIMIENTO. EN NINGÚN CASO LOS AUTORES O PROPIETARIOS DE LOS DERECHOS DE AUTOR SERÁN RESPONSABLES DE NINGUNA RECLAMACIÓN, DAÑOS U OTRAS RESPONSABILIDADES, YA SEA EN UNA ACCIÓN DE CONTRATO, AGRAVIO O CUALQUIER OTRO MOTIVO, DERIVADAS DE, FUERA DE O EN CONEXIÓN CON EL SOFTWARE O SU USO U OTRO TIPO DE ACCIONES EN EL SOFTWARE.
8 |
--------------------------------------------------------------------------------
/Samples/Active-PTZ-Preset-Positions/Invoke-PtzPreset.ps1:
--------------------------------------------------------------------------------
1 | function Invoke-PtzPreset {
2 | <#
3 | .SYNOPSIS
4 | Send a command to activate the specified PtzPreset resulting in the associated PTZ camera
5 | moving to the designated coordinates.
6 |
7 | .DESCRIPTION
8 | Send a command to activate the specified PtzPreset resulting in the associated PTZ camera
9 | moving to the designated coordinates.
10 |
11 | The PtzPreset parameter should reference an existing PTZ preset position configured in the
12 | VMS. This cmdlet cannot move a PTZ camera to an arbitratry user-defined coordinate.
13 |
14 | .PARAMETER PtzPreset
15 | The PtzPreset configuration item found under $camera.PtzPresetFolder.PtzPresets
16 |
17 | .PARAMETER VerifyCoordinates
18 | Wait for the camera to arrive at the designated PtzPreset coordinates. Only applies if the
19 | camera uses absolute PTZ positioning.
20 |
21 | .PARAMETER Tolerance
22 | Default: 0.001. Specifies the tolerance for PTZ coordinates as some cameras may not arrive
23 | at the exact coordinates.
24 |
25 | .PARAMETER Timeout
26 | Default: 5 seconds. Specifies the time in seconds to wait for the camera to arrive at the
27 | PtzPreset position. Only applies when the VerifyCoordinates switch is provided, and only
28 | for cameras using absolute PTZ positioning.
29 |
30 | Cameras with relative positioning, or calling this cmdlet without the VerifyCoordinates switch
31 | will result in an immediate return without waiting for the camera to complete it's movement.
32 |
33 | .EXAMPLE
34 | Invoke-PtzPreset -PtzPreset $ptzPreset -VerifyCoordinates
35 |
36 | Calls the $ptsPreset position and instructs the cmdlet to verify the camera has arrived at
37 | the designated position.
38 | #>
39 | [CmdletBinding()]
40 | param (
41 | [Parameter(Mandatory)]
42 | [VideoOS.Platform.ConfigurationItems.PtzPreset]
43 | $PtzPreset,
44 |
45 | [Parameter()]
46 | [switch]
47 | $VerifyCoordinates,
48 |
49 | [Parameter()]
50 | [double]
51 | $Tolerance = 0.001,
52 |
53 | [Parameter()]
54 | [int]
55 | $Timeout = 5
56 | )
57 |
58 | process {
59 | $cameraId = if ($PtzPreset.ParentItemPath -match 'Camera\[(.{36})\]') {
60 | $Matches[1]
61 | }
62 | else {
63 | Write-Error "Could not parse camera ID from ParentItemPath value '$($PtzPreset.ParentItemPath)'"
64 | return
65 | }
66 |
67 | $camera = Get-Camera -Id $cameraId
68 | $cameraItem = $camera | Get-PlatformItem
69 | $presetItem = [VideoOS.Platform.Configuration]::Instance.GetItem([guid]::new($PtzPreset.Id), [VideoOS.Platform.Kind]::Preset)
70 |
71 | $params = @{
72 | MessageId = 'Control.TriggerCommand'
73 | DestinationEndpoint = $presetItem.FQID
74 | UseEnvironmentManager = $true
75 | }
76 | Send-MipMessage @params
77 |
78 | if (-not $VerifyCoordinates) {
79 | return
80 | }
81 |
82 | if ($cameraItem.Properties['pan'] -ne 'Absolute' -or $cameraItem.Properties['pan'] -ne 'Absolute' -or $cameraItem.Properties['zoom'] -ne 'Absolute') {
83 | Write-Warning "VerifyCoordinates switch provided but camera does not use absolute PTZ positioning. Coordinates will not be verified."
84 | return
85 | }
86 |
87 | $positionReached = $false
88 | $stopwatch = [Diagnostics.StopWatch]::StartNew()
89 | while ($stopwatch.ElapsedMilliseconds -lt ($timeout * 1000)) {
90 | $position = Send-MipMessage -MessageId Control.PTZGetAbsoluteRequest -DestinationEndpoint $cameraItem.FQID -UseEnvironmentManager
91 |
92 | $xDifference = [Math]::Abs($position.Pan) - [Math]::Abs($ptzPreset.Pan)
93 | $yDifference = [Math]::Abs($position.Tilt) - [Math]::Abs($ptzPreset.Tilt)
94 | $zDifference = [Math]::Abs($position.Zoom) - [Math]::Abs($ptzPreset.Zoom)
95 |
96 | if ($xDifference -gt $Tolerance) {
97 | Write-Warning "Expected Pan = $($ptzPreset.Pan), Current Pan = $($position.Pan), Off by $xDifference"
98 | }
99 | elseif ($yDifference -gt $Tolerance) {
100 | Write-Warning "Desired Tilt = $($ptzPreset.Tilt), Current Pan = $($position.Tilt), Off by $yDifference"
101 | }
102 | elseif ($zDifference -gt $Tolerance) {
103 | Write-Warning "Desired Zoom = $($ptzPreset.Zoom), Current Pan = $($position.Zoom), Off by $zDifference"
104 | }
105 | else {
106 | $positionReached = $true
107 | break
108 | }
109 | Start-Sleep -Milliseconds 100
110 | }
111 | if (-not $positionReached) {
112 | Write-Error "Camera failed to reach preset position"
113 | }
114 | }
115 | }
--------------------------------------------------------------------------------
/Samples/Active-PTZ-Preset-Positions/README sp-MX.md:
--------------------------------------------------------------------------------
1 | ## Activate PTZ Preset Positions
2 | En este ejemplo, aprovecharemos una nueva característica introducida en MilestonePSTools v1.0.75, Send-MipMessage. Consulte el contenido de Invoke-PtzPreset.ps1 para obtener un ejemplo de cómo activar una posición posición prestablecida o recuperar las coordenadas PTZ actuales mediante Send-MipMessage.
3 |
4 | En la siguiente secuencia de comandos, encontraremos todas las cámaras con al menos una posición preestablecida PTZ, luego llamaremos a Invoke-PtzPreset en cada una. Luego tomaremos una instantánea de la cámara, guardando una imagen en el disco con la cámara y los nombres de posición prestablecidos en el nombre del archivo.
5 |
6 |
7 | ```powershell
8 | # Pídale a PowerShell que nos muestre mensajes de "información" que normalmente están ocultos / ignorados
9 | $InformationPreference = 'Continue'
10 |
11 | # Seleccione todas las cámaras con al menos una posición predefinida PTZ
12 | $cameras = Get-Hardware | Where-Object Enabled | Get-Camera | Where-Object { $_.Enabled -and $_.PtzPresetFolder.PtzPresets.Count -gt 0 }
13 |
14 | # Esto es "dot sourcing" donde llamamos a un script externo. En este caso, solo estamos cargando la función Invoke-PtzPreset. Asumiremos que el archivo Invoke-PtzPreset.ps1 está en la misma carpeta que este script.
15 | . .\Invoke-PtzPreset.ps1
16 |
17 | foreach ($camera in $cameras) {
18 |
19 | foreach ($ptzPreset in $camera.PtzPresetFolder.PtzPresets) {
20 |
21 | Write-Information "Moving $($camera.Name) to $($ptzPreset.Name) preset position"
22 | Invoke-PtzPreset -PtzPreset $ptzPreset -VerifyCoordinates
23 |
24 | Write-Information "Taking snapshot . . ."
25 | $snapshotParams = @{
26 | Live = $true
27 | Quality = 95
28 | Save = $true
29 | Path = "C:\demo"
30 | FileName = "$($camera.Name) -- $($ptzPreset.Name).jpg"
31 | }
32 | $null = $camera | Get-Snapshot @snapshotParams
33 | }
34 | }
35 | ```
--------------------------------------------------------------------------------
/Samples/Active-PTZ-Preset-Positions/README.md:
--------------------------------------------------------------------------------
1 | ## Activate PTZ Preset Positions
2 | In this sample we will take advantage of a new feature introduced in MilestonePSTools v1.0.75,
3 | Send-MipMessage. See the contents of Invoke-PtzPreset.ps1 for an example of how to trigger
4 | a PTZ preset position or retrieve the current PTZ coordinates using Send-MipMessage.
5 |
6 | In the following script, we'll find all cameras with at least one PTZ preset position, then
7 | call Invoke-PtzPreset on each one. Then we'll take a snapshot of the camera, saving an image
8 | to disk with the camera and preset position names in the file name.
9 |
10 | ```powershell
11 | # Ask PowerShell to show us "Information" messages which are normally hidden/ignored
12 | $InformationPreference = 'Continue'
13 |
14 | # Select all cameras with at least one PTZ preset position
15 | $cameras = Get-Hardware | Where-Object Enabled | Get-Camera | Where-Object { $_.Enabled -and $_.PtzPresetFolder.PtzPresets.Count -gt 0 }
16 |
17 | # This is "dot sourcing" where we call an external script. In this case we're just
18 | # loading the Invoke-PtzPreset function. We'll assume the Invoke-PtzPreset.ps1 file
19 | # is in the same folder as this script.
20 | . .\Invoke-PtzPreset.ps1
21 |
22 | foreach ($camera in $cameras) {
23 |
24 | foreach ($ptzPreset in $camera.PtzPresetFolder.PtzPresets) {
25 |
26 | Write-Information "Moving $($camera.Name) to $($ptzPreset.Name) preset position"
27 | Invoke-PtzPreset -PtzPreset $ptzPreset -VerifyCoordinates
28 |
29 | Write-Information "Taking snapshot . . ."
30 | $snapshotParams = @{
31 | Live = $true
32 | Quality = 95
33 | Save = $true
34 | Path = "C:\demo"
35 | FileName = "$($camera.Name) -- $($ptzPreset.Name).jpg"
36 | }
37 | $null = $camera | Get-Snapshot @snapshotParams
38 | }
39 | }
40 | ```
--------------------------------------------------------------------------------
/Samples/AddRemoveViewLayouts/Remove-VmsViewLayout.ps1:
--------------------------------------------------------------------------------
1 | function Remove-VmsViewLayout {
2 | <#
3 | .SYNOPSIS
4 | Removes a view layout, that has previously been added, from the Milestone XProtect system
5 | .DESCRIPTION
6 | Removes a custom view layout that was added via Add-VmsViewLayout or some other method. The view layout name and the
7 | layout group need to be provided.
8 | .PARAMETER ViewLayoutName
9 | Specify the name of the view to be removed.
10 | .PARAMETER LayoutFolder
11 | Specify which view layout group the view to be removed resides in.
12 | .PARAMETER ListCustomLayouts
13 | List all custom layouts along with the Layout Folder they belong to.
14 | .EXAMPLE
15 | Remove-VmsViewLayout -ViewLayoutName 'Sample View' -LayoutFolder '16:9'
16 |
17 | Removes custom view layout named 'Sample View'
18 | .EXAMPLE
19 | # Connect-Vms only required if not already connected
20 | Connect-Vms -ShowDialog -AcceptEula
21 | Remove-VmsViewLayout -ListCustomLayouts
22 |
23 | Returns a list of all custom layouts and which Layout Folder they belong to
24 | .NOTES
25 | The software provided by Milestone Systems, Inc. (hereinafter referred to as "the Software") is provided on
26 | an "as is" basis, without any warranties or representations, express or implied, including but not limited to
27 | the implied warranties of merchantability, fitness for a particular purpose, or non-infringement.
28 |
29 | Warranty Disclaimer:
30 | The Software is provided without any warranty of any kind, whether expressed or implied. Milestone Systems, Inc.
31 | expressly disclaims all warranties, conditions, and representations, including but not limited to warranties of
32 | title, non-infringement, merchantability, or fitness for a particular purpose. The entire risk arising out of the
33 | use or performance of the Software remains with the user.
34 |
35 | Support Disclaimer:
36 | Milestone Systems, Inc. does not provide any support or maintenance services for the Software. The user acknowledges
37 | and agrees that Milestone Systems, Inc. shall have no obligation to provide any updates, bug fixes, or technical
38 | support for the Software, whether through telephone, email, or any other means.
39 |
40 | User Responsibility:
41 | The user acknowledges and agrees that they are solely responsible for the selection, installation, use, and results
42 | obtained from the Software. Milestone Systems, Inc. shall not be held liable for any errors, defects, or damages arising
43 | from the use or inability to use the Software, including but not limited to direct, indirect, incidental, consequential,
44 | or special damages.
45 |
46 | Indemnification:
47 | The user agrees to indemnify, defend, and hold harmless Milestone Systems, Inc. and its directors, officers, employees,
48 | and agents from any and all claims, liabilities, damages, losses, costs, and expenses (including reasonable attorneys' fees)
49 | arising out of or related to the user's use or misuse of the Software.
50 |
51 | By using the Software, the user acknowledges that they have read and understood this clause and agree to be bound by its terms.
52 | #>
53 |
54 | [CmdletBinding()]
55 | param (
56 | [Parameter(Mandatory, ParameterSetName = 'Remove')]
57 | [string]
58 | $ViewLayoutName,
59 | [Parameter(Mandatory, ParameterSetName = 'Remove')]
60 | [ValidateSet('4:3','16:9','4:3 Portrait','16:9 Portrait')]
61 | [string]
62 | $LayoutFolder,
63 | [Parameter(Mandatory, ParameterSetName = 'List')]
64 | [switch]
65 | $ListCustomLayouts
66 | )
67 |
68 | $ms = Get-VmsManagementServer -ErrorAction SilentlyContinue
69 | if ([string]::IsNullOrEmpty($ms.Version)) {
70 | Write-Warning "Please connect to a Milestone XProtect system first."
71 | break
72 | }
73 |
74 | $layoutGroups = $ms.LayoutGroupFolder.LayoutGroups
75 | $customViews = New-Object System.Collections.Generic.List[PSCustomObject]
76 | if ($ListCustomLayouts) {
77 | foreach ($lg in $layoutGroups) {
78 | $task = $lg.LayoutFolder.RemoveLayout()
79 | ($task.ItemSelectionValues).Keys | ForEach-Object {
80 | $viewName = $_
81 | $row = [PSCustomObject]@{
82 | "View Layout Name" = $viewName
83 | "View Layout Folder" = $lg.Name
84 | }
85 | $customViews.Add($row)
86 | }
87 | }
88 |
89 | if (-not [string]::IsNullOrEmpty($customViews.'View Layout Folder')) {
90 | return $customViews
91 | break
92 | } else {
93 | Write-Warning "There are no custom view layouts in this system."
94 | break
95 | }
96 | }
97 |
98 | $layoutGroup = $layoutGroups | Where-Object {$_.Name -eq $LayoutFolder}
99 | $layout = $layoutGroup.LayoutFolder.Layouts | Where-Object {$_.Name -eq $ViewLayoutName}
100 | if ([string]::IsNullOrEmpty($layout.Id)) {
101 | Write-Warning 'The selected view does not exist in the selected view layout group.'
102 | break
103 | }
104 |
105 | $null = $layoutGroup.LayoutFolder.RemoveLayout($layout.Path)
106 | }
--------------------------------------------------------------------------------
/Samples/Add_Hardware_from_CSV.ps1:
--------------------------------------------------------------------------------
1 | <#
2 | Add hardware from a CSV file
3 |
4 | This sample shows how you can use Import-HardwareCsv to add and configure
5 | many cameras quickly.
6 |
7 | To use the sample, please login to your VMS with Connect-ManagementServer
8 | and consider changing which Recording Server the camera is added to. The
9 | first Recording Server returned by Get-RecordingServer will be used.
10 |
11 | The script below will first create a CSV file with a universal driver
12 | camera to use in the Import-HardwareCsv command. You would normally prepare
13 | your own CSV file instead. The CSV generated by this script will be placed
14 | in the current folder and will look like this:
15 |
16 | "HardwareName","HardwareAddress","UserName","Password","DriverNumber","GroupPath"
17 | "Universal Driver","http://wowzaec2demo.streamlock.net","root","pass","421","/New Cameras"
18 | #>
19 |
20 | $rows = @([pscustomobject]@{
21 | HardwareName = "Universal Driver"
22 | HardwareAddress = "http://wowzaec2demo.streamlock.net"
23 | UserName = 'root'
24 | Password = 'pass'
25 | DriverNumber = 421
26 | GroupPath = "/New Cameras"
27 | })
28 | $rows | Export-Csv .\test.csv -NoTypeInformation
29 |
30 | $recorder = (Get-RecordingServer)[0]
31 | $newHardware = Import-HardwareCsv -Path .\test.csv -RecordingServer $recorder
32 |
33 | foreach ($hardware in $newHardware) {
34 | [pscustomobject]@{
35 | Name = $hardware.Name
36 | Id = $hardware.Id
37 | Address = $hardware.Address
38 | Cameras = $hardware.CameraFolder.Cameras.Count
39 | }
40 | }
--------------------------------------------------------------------------------
/Samples/Adding_Hardware_with_Universal_Driver.ps1:
--------------------------------------------------------------------------------
1 | <#
2 | Add hardware using the Universal Driver
3 |
4 | This sample shows how you can add and configure an RTSP stream.
5 | The RTSP stream in this sample is hosted by Wowza Streaming Engine at
6 | https://www.wowza.com/html/mobile.html
7 |
8 | To use the sample, please login to your VMS with Connect-ManagementServer
9 | and consider changing which Recording Server the camera is added to. It
10 | will be added to the first Recording Server returned by Get-RecordingServer
11 | #>
12 |
13 | # Retrieve the first Recording Server
14 | $recorder = Get-RecordingServer | Select-Object -First 1
15 | $hardwareParams = @{
16 | Address = 'http://wowzaec2demo.streamlock.net'
17 | DriverId = 421
18 | GroupPath = '/Add-Hardware Demo'
19 | }
20 |
21 | try {
22 | $hardware = $recorder | Add-Hardware @hardwareParams
23 | }
24 | catch {
25 | # If the hardware fails to add for some reason, lets quit the script
26 | throw
27 | }
28 |
29 | # Select the camera device at index 0 on the new hardware and configure it
30 | $camera = $hardware | Get-Camera -Channel 0
31 | $camera | Set-CameraSetting -Stream -StreamNumber 0 -Name FPS -Value 25
32 | $camera | Set-CameraSetting -Stream -StreamNumber 0 -Name StreamingMode -Value 'RTP over RTSP (TCP)'
33 | $camera | Set-CameraSetting -Stream -StreamNumber 0 -Name ConnectionURI -Value 'vod/mp4:BigBuckBunny_115k.mov'
34 |
35 | # Select the microphone, configure it, and enable it
36 | $microphone = $hardware | Get-Microphone -Channel 0
37 | $microphone | Set-MicrophoneSetting -Stream -StreamNumber 0 -Name Codec -Value AAC
38 | $microphone | Set-MicrophoneSetting -Stream -StreamNumber 0 -Name ConnectionURI -Value 'vod/mp4:BigBuckBunny_115k.mov'
39 | $microphone | Set-MicrophoneSetting -Stream -StreamNumber 0 -Name StreamingMode -Value 'RTP over RTSP (TCP)'
40 | $microphone.Enabled = $true; $microphone.Save()
41 | # Create a device group for the microphone and add the mic to it
42 | $group = Add-DeviceGroup -DeviceCategory Microphone -Path '/New Mics'
43 | Add-DeviceGroupMember -DeviceGroup $group -DeviceCategory Microphone -DeviceId $microphone.Id
44 |
45 | # Lets just show some information about the newly added device at the end
46 | [pscustomobject]@{
47 | Camera = $camera.Name
48 | Id = $camera.Id
49 | Uri = ($camera | Get-CameraSetting -Stream -StreamNumber 0).ConnectionURI
50 | }
--------------------------------------------------------------------------------
/Samples/BackupMediaDb/BackupMediaDb.psm1:
--------------------------------------------------------------------------------
1 | $public = @( Get-ChildItem -Path $PSScriptRoot\Public\*.ps1 -Recurse -ErrorAction Ignore )
2 | $private = @( Get-ChildItem -Path $PSScriptRoot\Private\*.ps1 -Recurse -ErrorAction Ignore )
3 |
4 | foreach ($import in $public + $private) {
5 | try {
6 | . $import.FullName
7 | }
8 | catch {
9 | Write-Error "Failed to import function $($import.FullName): $_"
10 | }
11 | }
12 |
13 | Export-ModuleMember -Function $public.BaseName
--------------------------------------------------------------------------------
/Samples/BackupMediaDb/Public/Backup-Bank.ps1:
--------------------------------------------------------------------------------
1 | function Backup-Bank {
2 | [CmdletBinding()]
3 | param (
4 | [Parameter(Mandatory)]
5 | [ValidateScript({Test-Path $_})]
6 | [string]
7 | $BankPath,
8 | [Parameter(Mandatory)]
9 | [ValidateScript({Test-Path $_})]
10 | [string]
11 | $Destination,
12 | [Parameter()]
13 | [DateTime]
14 | $Start = [DateTime]::Now.AddYears(-100),
15 | [Parameter()]
16 | [DateTime]
17 | $End = [DateTime]::Now,
18 | [Parameter()]
19 | [string[]]
20 | $DeviceId
21 | )
22 |
23 | begin {
24 | }
25 |
26 | process {
27 | $bankId = Split-Path -Path $BankPath -Leaf
28 | $backupFolder = Join-Path $Destination $bankId
29 | if (-not (Test-Path $backupFolder)) {
30 | $null = New-Item -Path $backupFolder -ItemType Directory -Force
31 | }
32 |
33 | Get-ChildItem -Path (Join-Path -Path $BankPath "*.xml") | Copy-Item -Destination $backupFolder
34 |
35 | foreach ($table in Get-BankTable -Path $BankPath -StartTime $Start -EndTime $End -DeviceId $DeviceId) {
36 | $source = $table.Path
37 | $dest = Join-Path $backupFolder (Split-Path $table.Path -Leaf)
38 | $log = Join-Path $backupFolder "robocopy.log"
39 | robocopy $source $dest /E /Z /NP /MT:8 /LOG+:$log
40 | }
41 | }
42 |
43 | end {
44 |
45 | }
46 | }
--------------------------------------------------------------------------------
/Samples/BackupMediaDb/Public/Backup-MediaDb.ps1:
--------------------------------------------------------------------------------
1 | function Backup-MediaDb {
2 | [CmdletBinding()]
3 | param (
4 | [Parameter(Mandatory)]
5 | [ValidateScript({Test-Path $_})]
6 | [string]
7 | $Destination,
8 | [Parameter()]
9 | [DateTime]
10 | $Start = [DateTime]::Now.AddYears(-100),
11 | [Parameter()]
12 | [DateTime]
13 | $End = [DateTime]::Now,
14 | [Parameter()]
15 | [string[]]
16 | $DeviceId
17 | )
18 |
19 | begin {
20 | $recorderConfig = Get-RecorderConfig
21 | if ($null -eq $recorderConfig) {
22 | throw "Get-RecorderConfig failed to return RecorderConfig information"
23 | }
24 | }
25 |
26 | process {
27 | $backupFolder = Join-Path $Destination $recorderConfig.RecorderId
28 | if (-not (Test-Path $backupFolder)) {
29 | $null = New-Item -Path $backupFolder -ItemType Directory -Force
30 | }
31 |
32 | $recorder = Get-RecordingServer -Id $recorderConfig.RecorderId
33 | foreach ($storage in $recorder.StorageFolder.Storages) {
34 | Backup-Storage -Storage $storage -Destination $backupFolder -Start $Start -End $End -DeviceId $DeviceId
35 | }
36 | }
37 |
38 | end {
39 |
40 | }
41 | }
--------------------------------------------------------------------------------
/Samples/BackupMediaDb/Public/Backup-Storage.ps1:
--------------------------------------------------------------------------------
1 | function Backup-Storage {
2 | [CmdletBinding()]
3 | param (
4 | [Parameter(Mandatory)]
5 | [ValidateNotNull()]
6 | [VideoOS.Platform.ConfigurationItems.Storage]
7 | $Storage,
8 | [Parameter(Mandatory)]
9 | [ValidateScript({Test-Path $_})]
10 | [string]
11 | $Destination,
12 | [Parameter()]
13 | [DateTime]
14 | $Start = [DateTime]::Now.AddYears(-100),
15 | [Parameter()]
16 | [DateTime]
17 | $End = [DateTime]::Now,
18 | [Parameter()]
19 | [string[]]
20 | $DeviceId
21 | )
22 |
23 | begin {
24 | }
25 |
26 | process {
27 | $Storage | ConvertTo-Json | Out-File -FilePath (Join-Path $Destination "$($Storage.Id).json")
28 | $backupFolder = Join-Path $Destination $Storage.Id
29 | if (-not (Test-Path $backupFolder)) {
30 | $null = New-Item -Path $backupFolder -ItemType Directory -Force
31 | }
32 |
33 | Backup-Bank -BankPath (Join-Path $Storage.DiskPath $Storage.Id) -Destination $backupFolder -Start $Start -End $End -DeviceId $DeviceId
34 | foreach ($archive in $Storage.ArchiveStorageFolder.ArchiveStorages | Sort-Object RetainMinutes) {
35 | Backup-Bank -BankPath (Join-Path $archive.DiskPath $archive.Id) -Destination $backupFolder -Start $Start -End $End -DeviceId $DeviceId
36 | }
37 | }
38 |
39 | end {
40 |
41 | }
42 | }
--------------------------------------------------------------------------------
/Samples/BackupMediaDb/README sp-MX.md:
--------------------------------------------------------------------------------
1 | ## BackupMediaDb
2 | En este ejemplo se muestra cómo puede usar una combinación de características de PowerShell, MilestonePSTools y robocopy para realizar copias de seguridad de parte de una base de datos multimedia de Milestone en un servidor de grabación.
3 |
4 | El cmdlet Backup-MediaDb está diseñado para ejecutarse directamente en un servidor de grabación después de conectarse al servidor de gestión con el cmdlet Connect-ManagementServer MilestonePSTools. El identificador del servidor de grabación se detectará automáticamente mediante el cmdlet Get-RecorderConfig y la configuración de almacenamiento de la grabadora se leerá desde el servidor de gestión. A continuación, se comprobará cada configuración de almacenamiento en busca de tablas que coincidan con los criterios de tiempo e identificación de dispositivo proporcionados.
5 |
6 |
7 | ```powershell
8 | # Backup the last 7 days worth of files from any and all Media Database
9 | # locations on this Recording Server
10 | Connect-ManagementServer
11 | Backup-MediaDb -Destination E:\backup -Start (Get-Date).AddDays(-7) -End (Get-Date)
12 | ```
--------------------------------------------------------------------------------
/Samples/BackupMediaDb/README.md:
--------------------------------------------------------------------------------
1 | ## BackupMediaDb
2 | This sample demonstrates how you could use a mix of features from PowerShell,
3 | MilestonePSTools, and robocopy to backup part of a Milestone media database
4 | on a Recording Server.
5 |
6 | The Backup-MediaDb cmdlet is intended to be run directly on a Recording Server
7 | after connecting to the Management Server with the Connect-ManagementServer
8 | MilestonePSTools cmdlet. The Recording Server ID will be autodetected using the
9 | Get-RecorderConfig cmdlet, and the storage configuration for the recorder will
10 | be read from the Management Server. Then each storage configuration will be
11 | checked for tables matching the provided time and device ID criteria.
12 |
13 | ```powershell
14 | # Backup the last 7 days worth of files from any and all Media Database
15 | # locations on this Recording Server
16 | Connect-ManagementServer
17 | Backup-MediaDb -Destination E:\backup -Start (Get-Date).AddDays(-7) -End (Get-Date)
18 | ```
--------------------------------------------------------------------------------
/Samples/Daily-LPR-Exports/SetupDailyLPRExports.ps1:
--------------------------------------------------------------------------------
1 | <#
2 | .SYNOPSIS
3 |
4 | Creates a scheduled task in Windows to export all LPR events from the past 7 days to a CSV file.
5 |
6 | .DESCRIPTION
7 |
8 | This script will prompt the user for a path to store the server address and credentials in a
9 | configuration file, followed by the VMS server address, credentials, and whether the credential is
10 | for a basic user. These settings will be stored in the given file path as configuration.xml after
11 | we have verified we can login to the VMS using the given credentials.
12 |
13 | A scheduled task will then be created to run once every day at 7am. That task will login to the
14 | VMS, retrieve all 'LPR Event' events for the last 7 days, and export them to a csv file in the
15 | provided path. A log file will also be created which is useful for troubleshooting.
16 |
17 | This script is designed to be run again if you want to change something. If the scheduled task
18 | already exists, it will be removed before creating a new one.
19 |
20 | #>
21 |
22 | #Requires -RunAsAdministrator
23 | #Requires -Modules MilestonePSTools
24 | $InformationPreference = "Continue"
25 | $ErrorActionPreference = "Stop"
26 |
27 | $path = Read-Host -Prompt "Path to store configuration and reports"
28 | if (-not (Test-Path $path)) {
29 | $null = mkdir $path
30 | }
31 |
32 | do {
33 | try {
34 | $serverAddress = Read-Host -Prompt "Milestone VMS Server Address"
35 | $credential = Get-Credential -Message "Milestone VMS Credentials"
36 | $basicUser = (Read-Host -Prompt "Basic User? (y/n)") -eq 'y'
37 | Write-Information "Testing VMS server connection. . ."
38 | Connect-ManagementServer -Server $serverAddress -Credential $credential -BasicUser:$basicUser
39 | Write-Information "VMS connection successful. Disconnecting. . ."
40 | Disconnect-ManagementServer
41 | Write-Information "Disconnected"
42 | break
43 | }
44 | catch {
45 | Write-Warning "Connection to the VMS failed. Please re-enter the information."
46 | }
47 | } while ($true)
48 |
49 |
50 | # Gather the necessary variables and save them to a file. The credential is stored in an encrypted format
51 | $configuration = [pscustomobject]@{
52 | Server = $serverAddress
53 | Credential = $credential
54 | BasicUser = $basicUser
55 | }
56 | $configuration | Export-Clixml -Path (Join-Path -Path $path configuration.xml)
57 |
58 | # Create our Scheduled Task trigger to run daily at 7am. Modify the 'At' parameter to change the time of day the task will run
59 | $jobTrigger = New-JobTrigger -Daily -At (Get-Date -Hour 7)
60 |
61 | # Find and delete this job if it already exists so we can modify and recreate the job using the same script
62 | Get-ScheduledJob -Name 'Daily Milestone LPR Export' -ErrorAction SilentlyContinue | Unregister-ScheduledJob
63 | Write-Information "Creating scheduled task. . ."
64 | $job = Register-ScheduledJob -Name 'Daily Milestone LPR Export' -Trigger $jobTrigger -ArgumentList $path -ScriptBlock {
65 | param($path)
66 | $InformationPreference = "Continue"
67 | Start-Transcript -Path (Join-Path $path 'daily-lpr-export.log')
68 | $configuration = Import-Clixml -Path (Join-Path $path configuration.xml)
69 | $connected = $false
70 | try {
71 | Write-Host "$(Get-Date) - Connecting to $($configuration.Server) with user $($configuration.Credential.UserName). . ."
72 | Connect-ManagementServer -Server $configuration.Server -Credential $configuration.Credential -BasicUser:$configuration.BasicUser
73 | Write-Host "$(Get-Date) - Connected"
74 | $connected = $true
75 | $timeCondition = New-AlarmCondition -Target Timestamp -Operator GreaterThan -Value (Get-Date).AddDays(-7).ToUniversalTime()
76 | $typeCondition = New-AlarmCondition -Target Type -Operator Equals -Value 'LPR Event'
77 | Write-Host "$(Get-Date) - Retrieving LPR Events. . ."
78 | Get-EventLine -Conditions $timeCondition, $typeCondition -PageSize 1000 -Verbose | `
79 | Select Timestamp, SourceName, ObjectValue | `
80 | Export-Csv -Path (Join-Path $path lpr_export.csv) -NoTypeInformation
81 | Write-Host "$(Get-Date) - LPR data exported to $(Join-Path $path lpr_export.csv)"
82 | }
83 | finally {
84 | if ($connected) {
85 | Write-Host "$(Get-Date) - Disconnecting from $($configuration.Server)"
86 | Disconnect-ManagementServer
87 | }
88 | Stop-Transcript
89 | }
90 | }
91 | Write-Information "Scheduled Task $($job.Name) created with ID $($job.Id). It will now run daily at $($jobTrigger.At.Hour)"
92 | if ((Read-Host -Prompt "Would you like to test this scheduled task now? (y/n)") -eq 'y') {
93 | Write-Information "Running the scheduled task - the log will be displayed when completed. . ."
94 | $job.Run()
95 | Get-Content -Path (Join-Path $path 'daily-lpr-export.log')
96 | }
--------------------------------------------------------------------------------
/Samples/Extend_Get-CameraReport.ps1:
--------------------------------------------------------------------------------
1 | <#
2 | Extend Get-CameraReport by performing a Test-NetConnection against any
3 | cameras with the state 'Not Responding' in the VMS.
4 |
5 | To use the sample, please login to your VMS with Connect-ManagementServer
6 | and ensure you are running the script from a PC with direct network access
7 | to the cameras. If the cameras are segmented from the rest of the network
8 | you may need to run this script on your Recording Server(s) or Management
9 | Server.
10 |
11 | Finally, the results in this script are piped to Out-GridView. You may wish
12 | to send the results to Export-Csv instead.
13 | #>
14 |
15 | $report = Get-CameraReport
16 |
17 | foreach ($row in $report) {
18 | $networkState = 'Online'
19 |
20 | if ($row.State -eq 'Not Responding') {
21 | $uri = [Uri]$row.Address
22 | $reachable = Test-NetConnection -ComputerName $uri.Host -Port $uri.Port -InformationLevel Quiet
23 | if (-not $reachable) {
24 | $networkState = 'Offline'
25 | }
26 | }
27 |
28 | $row | Add-Member -MemberType NoteProperty -Name 'NetworkState' -Value $networkState
29 | }
30 |
31 | $report | Out-GridView
--------------------------------------------------------------------------------
/Samples/Find-XProtectDevice.ps1:
--------------------------------------------------------------------------------
1 | function Find-XProtectDevice {
2 | <#
3 | .SYNOPSIS
4 | Search for any string of text related to hardware or any device attached to hardware.
5 | .DESCRIPTION
6 | Search the properties for any string related to hardware or cameras, microphones, speakers, metadata channels, inputs, or outputs attached to hardware. All results will return the Recording Server and Hardware that the device is attached to.
7 | .EXAMPLE
8 | Find-XProtectDevice -ItemType Hardware -SearchString "10.1.10.30" -EnabledOnly
9 |
10 | Searches for any Enabled hardware with "10.1.10.30" existing on any of its properties
11 | .EXAMPLE
12 | Find-XProtectDevice -ItemType Camera -SearchString "Northwest"
13 |
14 | Searches for any camera (enabled or disabled) with "Northwest" existing on any of its properties
15 | .EXAMPLE
16 | Find-XProtectDevice -ItemType Speaker -SearchString parking*entrance -EnabledOnly
17 |
18 | Searches for any Enabled speaker that has the words "parking" and "entrance" (in that order)
19 | .EXAMPLE
20 | Find-XProtectDevice -ItemType Hardware -SearchString dd*be
21 |
22 | When searching for a MAC address, seperate each octet with an asterisk (*) because some MAC addresses are stored with the separating colons and some are stored without the separating colons. By using the asterisk, it will catch it either way.
23 | #>
24 | [CmdletBinding()]
25 | param (
26 | [Parameter(Mandatory)]
27 | [string]
28 | [ValidateSet('Hardware','Camera','Microphone','Speaker','Metadata','Input','Output')]
29 | $ItemType,
30 | [Parameter(Mandatory)]
31 | [string]
32 | $SearchString,
33 | [Parameter()]
34 | [switch]
35 | $EnabledOnly
36 | )
37 | process {
38 | $recs = Get-RecordingServer
39 |
40 | if ($EnabledOnly -eq $true)
41 | {
42 | $hw = Get-Hardware | Where-Object Enabled
43 | switch ($ItemType) {
44 | 'Hardware' {$items = $hw | Where-Object Enabled}
45 | 'Camera' {$items = $hw | Get-Camera | Where-Object Enabled}
46 | 'Microphone' {$items = $hw | Get-Microphone | Where-Object Enabled}
47 | 'Speaker' {$items = $hw | Get-Speaker | Where-Object Enabled}
48 | 'Metadata' {$items = $hw | Get-Metadata | Where-Object Enabled}
49 | 'Input' {$items = $hw | Get-Input | Where-Object Enabled}
50 | 'Output' {$items = $hw | Get-Output | Where-Object Enabled}
51 | }
52 | } else {
53 | $hw = Get-Hardware
54 | switch ($ItemType) {
55 | 'Hardware' {$items = $hw}
56 | 'Camera' {$items = $hw | Get-Camera}
57 | 'Microphone' {$items = $hw | Get-Microphone}
58 | 'Speaker' {$items = $hw | Get-Speaker}
59 | 'Metadata' {$items = $hw | Get-Metadata}
60 | 'Input' {$items = $hw | Get-Input}
61 | 'Output' {$items = $hw | Get-Output}
62 | }
63 | }
64 |
65 | $found = New-Object System.Collections.Generic.List[PSCustomObject]
66 |
67 | if ($ItemType -ne 'Hardware')
68 | {
69 | foreach ($device in $items)
70 | {
71 | $deviceHash = Convert-ObjectToHashTable $device
72 | $deviceHash.GetEnumerator() | ForEach-Object {
73 | if ($null -ne $_.Value -and $_.Value -like "*$($SearchString)*")
74 | {
75 | $hwObject = $hw | Where-Object {$device.ParentItemPath -eq $_.Path}
76 |
77 | $hwName = $hwObject.Name
78 | $recObject = $recs | Where-Object {$hwObject.ParentItemPath -eq $_.Path}
79 | $recName = $recObject.Name
80 |
81 | $row = [PSCustomObject]@{
82 | 'RecordingServer' = $recName
83 | 'HardwareName' = $hwName
84 | 'DeviceName' = $device
85 | }
86 | $found.Add($row)
87 | }
88 | }
89 | }
90 | $foundSorted = $found | Sort-Object RecordingServer, HardwareName, DeviceName -Unique
91 | } else
92 | {
93 | foreach ($hardware in $items)
94 | {
95 | $hardwareSettings = $hardware | Get-HardwareSetting
96 |
97 | $hardwareHash = Convert-ObjectToHashTable $hardware
98 | $hardwareSettingsHash = Convert-ObjectToHashTable $hardwareSettings
99 | $allHardwareInfoHash = $hardwareHash + $hardwareSettingsHash
100 | $allHardwareInfoHash.GetEnumerator() | ForEach-Object {
101 | if ($null -ne $_.Value -and $_.Value -like "*$($SearchString)*")
102 | {
103 | $recObject = $recs | Where-Object {$hardware.ParentItemPath -eq $_.Path}
104 | $recName = $recObject.Name
105 |
106 | $row = [PSCustomObject]@{
107 | 'RecordingServer' = $recName
108 | 'HardwareName' = $hardware.Name
109 | }
110 | $found.Add($row)
111 | }
112 | }
113 | }
114 | $foundSorted = $found | Sort-Object RecordingServer, HardwareName -Unique
115 | }
116 | }
117 | end {
118 | if ($null -ne $foundSorted)
119 | {
120 | $foundSorted
121 | } else {
122 | Write-Host "No results found!" -ForegroundColor Green
123 | }
124 | }
125 | }
126 |
127 | function Convert-ObjectToHashTable
128 | {
129 | <#
130 | .SYNOPSIS
131 | Converts an Object to a Hash Table
132 | #>
133 | [CmdletBinding()]
134 | param
135 | (
136 | [parameter(Mandatory=$true,ValueFromPipeline=$true)]
137 | [pscustomobject] $Object
138 | )
139 | $HashTable = @{}
140 | $ObjectMembers = Get-Member -InputObject $Object -MemberType *Property
141 | foreach ($Member in $ObjectMembers)
142 | {
143 | $HashTable.$($Member.Name) = $Object.$($Member.Name)
144 | }
145 | return $HashTable
146 | }
--------------------------------------------------------------------------------
/Samples/General_Login_Script.ps1:
--------------------------------------------------------------------------------
1 | ###################################################################################################
2 | #
3 | # This login script can be placed in front of any other script or used standalone to simplify the
4 | # login process for a user that isn't as familiar with PowerShell as other users. It will prompt
5 | # for the IP address or hostname of the Management Server, then it will ask what user type,
6 | # and then it asks for the credentials and completes the login process.
7 | #
8 | ###################################################################################################
9 |
10 | Import-Module MilestonePSTools
11 | $currentErrorActionPreference = $ErrorActionPreference
12 | $ErrorActionPreference = "Stop"
13 |
14 | # Checks to see if the MIP SDK EULA has been accepted already. If it hasn't, it asks the user to accept it.
15 | if ((Test-Path "$($env:USERPROFILE)\AppData\Roaming\MilestonePSTools\user-accepted-eula.txt") -ne $true)
16 | {
17 | do
18 | {
19 | Write-Host "Have you read and agree to the End User License Agreement for the Milestone Redistributable MIP SDK? (Y or N): " -NoNewline -ForegroundColor Green
20 | $eulaAcceptance = Read-Host
21 | Switch ($eulaAcceptance)
22 | {
23 | "Y" {Continue}
24 | "N" {
25 | Invoke-MipSdkEula
26 | }
27 | Default
28 | {
29 | Write-Host "Invalid input. Please try again." -ForegroundColor White -BackgroundColor Red -NoNewline
30 | }
31 | }
32 | } while ($eulaAcceptance -ne "Y")
33 | }
34 |
35 | Write-Host 'Please enter IP Address or hostname of the Management Server (leave blank for "localhost"): ' -NoNewline -ForegroundColor Green
36 | $server = Read-Host
37 |
38 | # If no server name was entered then set $server to localhost
39 | if ([string]::IsNullOrWhiteSpace($server))
40 | {
41 | $server = "localhost"
42 | }
43 |
44 | # Sets $userType to the appropriate user type based on the input of 1, 2, or 3 requested.
45 | do
46 | {
47 | $userType = ""
48 | Write-Host "`nPlease enter your user type (without quotes). Enter `"1`" for Windows Authentication (current user), enter `"2`" for Windows Authentication, or enter `"3`" for Basic User: " -NoNewline -ForegroundColor Green
49 | $auth = Read-Host
50 | Switch ($auth)
51 | {
52 | 1 {$userType = "CurrentUser"; break}
53 | 2 {$userType = "WindowsUser"; break}
54 | 3 {$userType = "BasicUser"; break}
55 | Default
56 | {
57 | Write-Host "Invalid input. Please try again." -ForegroundColor White -BackgroundColor Red -NoNewline
58 | }
59 | }
60 | } while ((($auth -ne 1) -and ($auth -ne 2) -and ($auth -ne 3)))
61 |
62 | Write-Host "`nConnecting to Management Server.`n" -ForegroundColor Green
63 |
64 | try
65 | {
66 | # Start the login process. If $userType is WindowsUser or BasicUser, it will prompt for credentials.
67 | if ($userType -eq "WindowsUser" -or $userType -eq "BasicUser")
68 | {
69 | switch ($userType)
70 | {
71 | "WindowsUser" {Connect-ManagementServer -Server $server -Credential (Get-Credential) -AcceptEula -Force}
72 | "BasicUser" {Connect-ManagementServer -Server $server -Credential (Get-Credential) -AcceptEula -BasicUser -Force}
73 | }
74 | }
75 | else
76 | {
77 | Connect-ManagementServer -Server $server -AcceptEula
78 | }
79 | }
80 |
81 | catch
82 | {
83 | $categoryError = $_.CategoryInfo
84 | switch ($categoryError.Reason)
85 | {
86 | "ServerNotFoundMIPException" {Write-Host "Server $($server) not found. Please try again." -ForegroundColor Red}
87 | "InvalidCredentialsMIPException" {Write-Host "Authentication error. Please try again." -ForegroundColor Red}
88 | }
89 | Exit
90 | }
91 |
92 | finally
93 | {
94 | $ErrorActionPreference = $currentErrorActionPreference
95 | }
96 |
97 | $ms = Get-VmsManagementServer -ErrorAction Ignore
98 | if ($null -ne $ms)
99 | {
100 | Write-Host "`nSuccessfully connected to Management Server" -ForegroundColor Green
101 | }
--------------------------------------------------------------------------------
/Samples/Get-CameraConnectivityReport.ps1:
--------------------------------------------------------------------------------
1 | function Get-CameraConnectivityReport {
2 | <#
3 | .SYNOPSIS
4 | Gets report of number of times cameras were offline over specified period and if the camera is still offline.
5 | .DESCRIPTION
6 | Gets report of number of times cameras were offline over specified period and if the camera is still offline.
7 | .EXAMPLE
8 | Connect-ManagementServer -ShowDialog -Force
9 | Get-CameraConnectivityReport -DurationDays 3
10 |
11 | Returns a report of number of times cameras were offline over the last 3 days and if they are still offline
12 | #>
13 |
14 | [CmdletBinding()]
15 | param (
16 | [Parameter(Mandatory=$true)]
17 | [int]
18 | $DurationDays
19 | )
20 |
21 | $camStatus = New-Object System.Collections.Generic.List[PSCustomObject]
22 | $commErrors = Get-VmsLog -LogType System -StartTime (Get-Date).AddDays(-$DurationDays) -EndTime (Get-Date) | Where-Object {$_.'Message text' -eq "Communication error." -and $_.'Source type' -eq "Device"}
23 | $groupedCommErrors = $commErrors.'Source name' | Group-Object
24 |
25 | foreach($rec in Get-VmsRecordingServer)
26 | {
27 | $deviceStatus = Get-VmsDeviceStatus -RecordingServerId $rec.Id -DeviceType Camera
28 | foreach($hw in $rec | Get-VmsHardware | Where-Object Enabled)
29 | {
30 | foreach($cam in $hw | Get-VmsCamera | Where-Object Enabled)
31 | {
32 | if(($groupedCommErrors | Where-Object {$_.Name -eq $cam.Name}).Count -gt 0)
33 | {
34 | $offlineCount = ($groupedCommErrors | Where-Object {$_.Name -eq $cam.Name}).Count
35 | } else {
36 | $offlineCount = 0
37 | }
38 |
39 | $row = [PSCustomObject]@{
40 | RecordingServer = $rec.Name
41 | Hardware = $hw.Name
42 | Camera = $cam.Name
43 | NumberOfTimesOffline = $offlineCount
44 | "StillOffline?" = ($deviceStatus | Where-Object DeviceName -eq $cam.Name).Error
45 | }
46 | $camStatus.Add($row)
47 | }
48 | }
49 | }
50 | $camStatus | Out-GridView
51 | }
--------------------------------------------------------------------------------
/Samples/Get-CameraGroupDeviceCount.ps1:
--------------------------------------------------------------------------------
1 | function Get-CameraGroupDeviceCount
2 | {
3 | <#
4 | .SYNOPSIS
5 | Calculates and displays the number of cameras in each camera group.
6 |
7 | .DESCRIPTION
8 | Will provide an output displaying the cumulative number of cameras in each group (including cameras in subgroups)
9 | as well as just cameras in that particular group (not including subgroups). The -IncludeCameraNames switch can also
10 | be used to display the cameras that are in each group.
11 |
12 | .PARAMETER IncludeCameraNames
13 | Specifies the hostname of the Recording Server the script should be run against. The hostname must
14 | exactly match the hostname shown in the Management Client.
15 |
16 | .EXAMPLE
17 | Get-CameraGroupDeviceCount
18 |
19 | Will create a tree report showing just the number of cameras in each camera group.
20 |
21 | .EXAMPLE
22 | Get-CameraGroupDeviceCount -IncludeCameraNames
23 |
24 | In addition to showing the number of cameras in each group, the report will also include the camera names.
25 | #>
26 |
27 | param(
28 | [Parameter(Mandatory = $false)]
29 | [switch] $IncludeCameraNames
30 | )
31 |
32 | Import-Module -Name MilestonePSTools
33 |
34 | # Get Camera groups
35 | $ms = Get-VmsManagementServer
36 | $cameraGroups = $ms.CameraGroupFolder.CameraGroups
37 | $cameraGroupInfo = New-Object System.Collections.Generic.List[PSCustomObject]
38 |
39 | # Call recursive function and only return the total camera count of the system.
40 | $totalCameraCount = Get-CameraGroupDeviceCountRecursive "" ([ref]$cameraGroupInfo) ([ref]$cameraGroups)
41 |
42 | $row = [PSCustomObject]@{
43 | 'Group' = "!All Cameras"
44 | 'CameraCount' = 0
45 | 'CameraCountIncludingSublevels' = $totalCameraCount
46 | 'CameraName' = $null
47 | }
48 | $cameraGroupInfo.Add($row)
49 |
50 | $cameraGroupInfo | Sort-Object Group, CameraCount, CameraName
51 | }
52 |
53 | function Get-CameraGroupDeviceCountRecursive ([string]$path,[ref]$cameraGroupInfo,[ref]$cameraGroups)
54 | {
55 | <#
56 | .SYNOPSIS
57 | Don't run this script directly. It gets run by Get-CameraGroupDeviceCount.
58 | Recursively goes through each camera group to get the camera counts and names.
59 |
60 | .DESCRIPTION
61 | Don't run this script directly. It gets run by Get-CameraGroupDeviceCount.
62 | Recursively goes through each camera group to get the camera counts and names.
63 | #>
64 |
65 | $individualCameraCount = 0
66 | $combinedCameraCount = 0
67 | $totalCameraCount = 0
68 |
69 | if ($null -ne $cameraGroups.value.Name)
70 | {
71 | foreach ($cameraGroup in $cameraGroups.value)
72 | {
73 | $individualCameraCount = $cameraGroup.CameraFolder.Cameras.Count
74 | $combinedCameraCount = $individualCameraCount + (Get-CameraGroupDeviceCountRecursive "$($path)/$($cameraGroup.Name)" ([ref]$cameraGroupInfo.value) ([ref]$cameraGroup.CameraGroupFolder.CameraGroups))
75 | $row = [PSCustomObject]@{
76 | 'Group' = "$($path)/$($cameraGroup.Name)"
77 | 'CameraCount' = $individualCameraCount
78 | 'CameraCountIncludingSublevels' = $combinedCameraCount
79 | 'CameraName' = $null
80 | }
81 | $cameraGroupInfo.value.Add($row)
82 | $totalCameraCount += $combinedCameraCount
83 |
84 | if ($IncludeCameraNames)
85 | {
86 | $cameras = $cameraGroup.CameraFolder.Cameras
87 |
88 | foreach ($camera in $cameras)
89 | {
90 | $row = [PSCustomObject]@{
91 | 'Group' = "$($path)/$($cameraGroup.Name)"
92 | 'CameraCount' = "xx"
93 | 'CameraCountIncludingSublevels' = $null
94 | 'CameraName' = $camera.Name
95 | }
96 | $cameraGroupInfo.value.Add($row)
97 | }
98 | }
99 | }
100 | }
101 | return $totalCameraCount
102 | }
--------------------------------------------------------------------------------
/Samples/Get-ItemState.ps1:
--------------------------------------------------------------------------------
1 | $itemKinds = @(
2 | [VideoOS.Platform.Kind]::Camera,
3 | [VideoOS.Platform.Kind]::Hardware)
4 |
5 |
6 | $list = New-Object System.Collections.Generic.List[object]
7 | foreach ($result in Get-ItemState) {
8 |
9 | if (-not $itemKinds.Contains($result.FQID.Kind)) {
10 | continue
11 | }
12 |
13 | $item = $result.FQID | Get-PlatformItem
14 |
15 | $address = $null
16 | if ($result.State -ne "Responding") {
17 | if ($result.FQID.Kind -eq [VideoOS.Platform.Kind]::Hardware) {
18 | $address = (Get-Hardware -HardwareId $result.FQID.ObjectId).Address
19 | }
20 | else {
21 | $camera = Get-Camera -Id $result.FQID.ObjectId
22 | $hardware = Get-ConfigurationItem -Path $camera.ParentItemPath
23 | $address = ($hardware.Properties | Where-Object Key -eq Address).Value
24 | }
25 | }
26 |
27 | $entry = [pscustomobject]@{
28 | Name = $item.Name
29 | State = $result.State
30 | Type = [VideoOS.Platform.Kind]::DefaultTypeToNameTable[$result.FQID.Kind]
31 | Address = $address
32 | }
33 |
34 | $entry
35 | $list.Add($entry)
36 | }
37 |
38 | $list | Out-GridView
--------------------------------------------------------------------------------
/Samples/Get-UsersInRoles.ps1:
--------------------------------------------------------------------------------
1 | function Get-UsersInRoles {
2 | <#
3 | .SYNOPSIS
4 | Returns users/groups, the role they are in, and the type of user.
5 | .DESCRIPTION
6 | Returns all users/groups, the role they are in, and the type of user (WindowsUser, WindowsGroup, and BasicUser). WindowsUser
7 | and WindowsGroup could be either Windows or Active Directory. If it is a group, it will only display the group. It will
8 | not display the users in the group.
9 | .EXAMPLE
10 | PS C:\> Get-UsersInRoles
11 | Returns all users/groups from all roles
12 | .EXAMPLE
13 | PS C:\> Get-UsersInRoles -RoleName "Administrators"
14 | Returns all of the users/groups that are in the Administrators role
15 | .EXAMPLE
16 | PS C:\> Get-UsersInRoles | Out-GridView
17 | Outputs the results to a GridView pop-up.
18 | .EXAMPLE
19 | PS C:\> Get-UsersInRoles | Export-Csv -Path C:\CsvExports\Users.csv -NoTypeInformation
20 | Exports the information to a CSV file called Users.csv located at C:\CsvExports. The CsvExports folder must exist before running the command.
21 | #>
22 | [CmdletBinding()]
23 | param (
24 | # Specifies the name of the role. Supports wildcard characters. Default is * and returns all roles.
25 | [Parameter()]
26 | [ValidateNotNullOrEmpty()]
27 | [string]
28 | $RoleName = '*'
29 | )
30 |
31 | process {
32 | $resultFound = $false
33 | foreach ($role in Get-VmsRole -Name $RoleName)
34 | {
35 | $resultFound = $true
36 | foreach ($user in $role.UserFolder.Users)
37 | {
38 | [pscustomobject]@{
39 | Role = $role.Name
40 | User = $user.AccountName
41 | Domain = $user.Domain
42 | IdentityType = $user.IdentityType
43 | }
44 | }
45 | }
46 | if (-not $resultFound -and -not [system.management.automation.wildcardpattern]::ContainsWildcardCharacters($RoleName)) {
47 | Write-Error "Cannot find role '$RoleName' because it does not exist."
48 | }
49 | }
50 | }
--------------------------------------------------------------------------------
/Samples/Get-VmsCameraPosition.ps1:
--------------------------------------------------------------------------------
1 | function Get-VmsCameraPosition {
2 | <#
3 | .SYNOPSIS
4 | Returns position data (latitude, longitude, field of view, etc.) for each camera in the system
5 | .DESCRIPTION
6 | For each camera in the system, this function returns the camera name, latitude, longitude, Field of View (in degrees),
7 | the direction the camera is facing both in Cardinal (i.e. N, NW, SE, etc.) and Degrees, and depth of the Field of View (in feet).
8 |
9 | If latitude and longitude are empty, then the rest of the values are ignored.
10 | .EXAMPLE
11 | Get-VmsCameraPosition
12 | Outputs the following information
13 |
14 | CamName Latitude Longitude FOV (Degrees) Direction (Cardinal) Direction (Degrees) Depth (Feet)
15 | ------- -------- --------- ------------- -------------------- ------------------- ------------
16 | Axis M1125 - Camera 1 45.4170433700828 -122.732230489572 150.74 N 1.43 27.72
17 | Axis P3265-LVE - Camera 1 34.4257539305559 -117.131595665415 72 NE 46.3 231.89
18 | Canon VB-S30D - Camera 1 12.000030728223 -11.0000179326625 72 N 0 65.62
19 | #>
20 |
21 | $camInfo = New-Object System.Collections.Generic.List[PSCustomObject]
22 |
23 | $directionArray = @(
24 | "N"
25 | "NNE"
26 | "NE"
27 | "ENE"
28 | "E"
29 | "ESE"
30 | "SE"
31 | "SSE"
32 | "S"
33 | "SSW"
34 | "SW"
35 | "WSW"
36 | "W"
37 | "WNW"
38 | "NW"
39 | "NNW"
40 | )
41 |
42 | foreach ($cam in Get-VmsCamera)
43 | {
44 | $gisPoint = $cam.GisPoint
45 | if ($gisPoint.Substring(7, $GisPoint.Length - 8) -match "[0-9]")
46 | {
47 | $long = $gisPoint.Substring(7, $GisPoint.Length - 8).Split(" ")[0]
48 | $lat = $gisPoint.Substring(7, $GisPoint.Length - 8).Split(" ")[1]
49 | } else
50 | {
51 | $long = $null
52 | $lat = $null
53 | }
54 |
55 | if ($gisPoint -eq "POINT EMPTY")
56 | {
57 | $fov = $null
58 | $directionCardinal = $null
59 | $directionDegrees = $null
60 | $depth = $null
61 | } else
62 | {
63 | $fov = $cam.CoverageFieldOfView * 360
64 |
65 | # Sometimes degrees is stored as 0 to 360 and sometimes it is stored as -180 to 180.
66 | # Both need to be accounted for.
67 | if ($cam.CoverageDirection -ge 0)
68 | {
69 | $directionDegrees = $cam.CoverageDirection * 360
70 | } elseif ($cam.CoverageDirection -lt 0)
71 | {
72 | $directionDegrees = 360 + ($cam.CoverageDirection * 360)
73 | }
74 |
75 | if (($cam.CoverageDirection * 360) -ne 360)
76 | {
77 | $index = [math]::Floor($directionDegrees / 22.5)
78 | $directionCardinal = $directionArray[$index]
79 | } elseif (($cam.CoverageDirection * 360) -eq 360)
80 | {
81 | $directionCardinal = "N"
82 | } else
83 | {
84 | $directionCardinal = $null
85 | }
86 | $depth = $cam.CoverageDepth * 3.28084
87 | }
88 |
89 | $row = [PSCustomObject]@{
90 | CamName = $cam.Name
91 | Latitude = $lat
92 | Longitude = $long
93 | "FOV (Degrees)" = $fov
94 | "Direction (Cardinal)" = $directionCardinal
95 | "Direction (Degrees)" = if ($null -ne $directionDegrees) {[math]::Round($directionDegrees,2)} else {$null}
96 | "Depth (Feet)" = if ($null -ne $depth) {[math]::Round($depth,2)} else {$null}
97 | }
98 | $camInfo.Add($row)
99 | }
100 | $camInfo
101 | }
--------------------------------------------------------------------------------
/Samples/Group-CamerasByModel.ps1:
--------------------------------------------------------------------------------
1 | function Group-CamerasByModel {
2 | <#
3 | .SYNOPSIS
4 | Creates a camera group for each camera make and model.
5 |
6 | .DESCRIPTION
7 | Creates a specified base camera group, and within that base group, it creates a group for every enabled camera
8 | make/model. For each camera model, a group is created with a name like 1-X where X is the number of cameras in that
9 | group. If the number exceeds 400, it will create another group called 401-X, until all enabled cameras of that model
10 | have been added to a group.
11 |
12 | Groups larger than 400 should not be created as the Management Client will not be able to do bulk configurations on them.
13 |
14 | Having groups of camera models is very useful for doing bulk configurations. Note that in some instances, cameras
15 | report their models as a series of cameras and not a specific model. In cases like this, bulk configuration will
16 | likely not work as the cameras in the series might support different resolutions and/or frame rates.
17 |
18 | .PARAMETER BaseGroupPath
19 | Specifies the camera group under which cameras should be grouped by model. For example, "/__ADMIN__/Models".
20 |
21 | .PARAMETER MaxGroupSize
22 | Specifies the maximum number of cameras to add to a single camera group. The default value is 400 which is also the maximum
23 | number of cameras the Management Client will allow bulk configuration operations on.
24 |
25 | .EXAMPLE
26 | Group-CamerasByModel -BaseGroupPath /__ADMIN__/Models
27 |
28 | Creates a top-level group called "__ADMIN__" which will typically be listed at the top of the device group list, and
29 | a "Models" subgroup. Cameras are then grouped by model under the Models camera subgroup.
30 |
31 | .EXAMPLE
32 | Group-CamerasByModel -BaseGroupPath /zzADMIN/Models -MaxGroupSize 200
33 |
34 | Creates a top-level group called "zzADMIN__" which will typically be listed at the bottom of the device group list, and
35 | a "Models" subgroup. Cameras are then grouped by model under the Models camera subgroup with a maximum group size of
36 | 200 cameras.
37 |
38 | .NOTES
39 | For reference, on a 5217 camera test system with 148 unique models, this function completes in 6 minutes 13 seconds.
40 | The time required to run in your environment may vary based on many factors including total number of cameras and
41 | models, management server and/or sql server load, and latency between the PowerShell session and the management server.
42 | #>
43 | [CmdletBinding()]
44 | param (
45 | [Parameter(Position = 0, ValueFromPipelineByPropertyName, Mandatory)]
46 | [string]
47 | $BaseGroupPath,
48 |
49 | [Parameter(Position = 1, ValueFromPipelineByPropertyName)]
50 | [ValidateRange(1, 400)]
51 | [int]
52 | $MaxGroupSize = 400
53 | )
54 |
55 | process {
56 | $parentProgress = @{
57 | Activity = 'Creating camera groups by model'
58 | Status = 'Discovering camera models'
59 | Id = Get-Random
60 | PercentComplete = 0
61 | }
62 | $childProgress = @{
63 | Activity = 'Populating camera groups'
64 | Id = Get-Random
65 | ParentId = $parentProgress.Id
66 | PercentComplete = 0
67 | }
68 | try {
69 | Write-Progress @parentProgress
70 |
71 | Write-Verbose "Removing camera group '$BaseGroupPath' if present"
72 | Clear-VmsCache
73 | Get-VmsDeviceGroup -Path $BaseGroupPath -ErrorAction SilentlyContinue | Remove-VmsDeviceGroup -Recurse -Confirm:$false -ErrorAction Stop
74 |
75 | Write-Verbose 'Discovering all enabled cameras'
76 | $ms = [VideoOS.Platform.ConfigurationItems.ManagementServer]::new((Get-VmsSite).FQID.ServerId)
77 | $filters = 'RecordingServer', 'Hardware', 'Camera' | ForEach-Object {
78 | [VideoOS.ConfigurationApi.ClientService.ItemFilter]::new($_, $null, 'Enabled')
79 | }
80 | $ms.FillChildren($filters.ItemType, $filters)
81 |
82 | $parentProgress.Status = 'Grouping and sorting cameras'
83 | Write-Progress @parentProgress
84 |
85 | Write-Verbose 'Sorting cameras by model'
86 | $modelGroups = $ms.RecordingServerFolder.RecordingServers.HardwareFolder.Hardwares | Group-Object Model | Sort-Object Name
87 | $totalCameras = ($modelGroups.Group.CameraFolder.Cameras).Count
88 | $camerasProcessed = 0
89 |
90 | $parentProgress.Status = 'Processing'
91 | Write-Progress @parentProgress
92 |
93 | foreach ($group in $modelGroups) {
94 | $modelName = $group.Name
95 | $safeModelName = $modelName.Replace('/', '`/')
96 |
97 | $cameras = $group.Group.CameraFolder.Cameras | Sort-Object Name
98 | $totalForModel = $cameras.Count
99 |
100 | $groupNumber = $positionInGroup = 1
101 | $group = $null
102 |
103 | $childProgress.Status = "Current: $BaseGroupPath/$modelName"
104 | $parentProgress.PercentComplete = $camerasProcessed / $totalCameras * 100
105 | Write-Progress @parentProgress
106 |
107 | Write-Verbose "Creating groups for $totalForModel cameras of model '$modelName'"
108 | for ($i = 0; $i -lt $totalForModel; $i++) {
109 | $childProgress.PercentComplete = $i / $totalForModel * 100
110 | Write-Progress @childProgress
111 | if ($null -eq $group) {
112 | $first = $groupNumber * $MaxGroupSize - ($MaxGroupSize - 1)
113 | $last = $groupNumber * $MaxGroupSize
114 | if ($totalForModel - ($i + 1) -lt $MaxGroupSize) {
115 | $last = $totalForModel
116 | }
117 | $groupName = '{0}-{1}' -f $first, $last
118 | Write-Verbose "Creating group $BaseGroupPath/$modelName/$groupName"
119 | $group = New-VmsDeviceGroup -Type Camera -Path "$BaseGroupPath/$safeModelName/$groupName"
120 | }
121 |
122 | Add-VmsDeviceGroupMember -Group $group -Device $cameras[$i]
123 |
124 | $camerasProcessed++
125 | $positionInGroup++
126 | if ($positionInGroup -gt $MaxGroupSize) {
127 | $group = $null
128 | $positionInGroup = 1
129 | $groupNumber++
130 | }
131 | }
132 | }
133 | } finally {
134 | $childProgress.Completed = $true
135 | Write-Progress @childProgress
136 |
137 | $parentProgress.Completed = $true
138 | Write-Progress @parentProgress
139 | }
140 | }
141 | }
142 |
--------------------------------------------------------------------------------
/Samples/Import-GPS-Coordinates/Import-GpsCoordinates.png:
--------------------------------------------------------------------------------
https://raw.githubusercontent.com/MilestoneSystemsInc/PowerShellSamples/ecbb1d9db0c12efd0946d7d904cc63a49e36e827/Samples/Import-GPS-Coordinates/Import-GpsCoordinates.png
--------------------------------------------------------------------------------
/Samples/Import-GPS-Coordinates/Import-GpsCoordinates.ps1:
--------------------------------------------------------------------------------
1 | function Import-GpsCoordinates {
2 | <#
3 | .SYNOPSIS
4 | Updates the GPS coordinates of cameras in Milestone based on a CSV file with MAC addresses
5 | and the corresponding GPS coordinates.
6 |
7 | .DESCRIPTION
8 | This sample function allows you to override the default column names of "MAC" and
9 | "Coordinates" if desired, and the coordinates are expected to be found in
10 | "latitude, longitude" format with no special characters except the separating comma.
11 |
12 | .PARAMETER Path
13 | The path to the source CSV file to use as input.
14 |
15 | .PARAMETER MacColumn
16 | Override the default column name to look for in the CSV file for the hardware MAC address.
17 | Default: MAC
18 |
19 | .PARAMETER CoordinateColumn
20 | Override the default column name to look for in the CSV file for the camera coordinates address.
21 | Default: Coordinates
22 |
23 | .EXAMPLE
24 | Import-GpsCoordinates -Path .\coordinates.csv
25 |
26 | Uses coordinates.csv to update the GisPoint property of all cameras who's parent Hardware object
27 | has a MAC address value found in the CSV file.
28 | #>
29 | [CmdletBinding()]
30 | param (
31 | # CSV file Path
32 | [Parameter(Mandatory, ValueFromPipeline, ValueFromPipelineByPropertyName)]
33 | [string]
34 | $Path,
35 | # Optional: MAC Address column name. Default: MAC
36 | [Parameter()]
37 | [string]
38 | $MacColumn = "MAC",
39 | # Optional: Coordinate column name. Default: Coordinates
40 | [Parameter()]
41 | [string]
42 | $CoordinateColumn = "Coordinates"
43 | )
44 |
45 | process {
46 | $source = Import-Csv -Path $Path
47 | foreach ($hardware in Get-Hardware) {
48 | $mac = ($hardware | Get-HardwareSetting).MacAddress
49 | $matchingRow = $source | Where-Object $MacColumn -eq $mac
50 | if ($null -eq $matchingRow) {
51 | Write-Warning "No row found in CSV file matching MAC address '$mac'"
52 | continue
53 | }
54 |
55 | $lat, $long = $matchingRow.$CoordinateColumn -split ","
56 | $point = "POINT ($long $lat)"
57 | foreach ($camera in $hardware | Get-Camera) {
58 | $camera.GisPoint = $point
59 | $camera.Save()
60 | }
61 | }
62 | }
63 | }
--------------------------------------------------------------------------------
/Samples/Import-GPS-Coordinates/README.md:
--------------------------------------------------------------------------------
1 | ## Import-GpsCoordinates
2 | Update the GPS coordinates of cameras in Milestone based on a CSV file
3 |
4 |  5 |
6 |
7 | ### Demo
8 |
9 | See [This demo](https://youtu.be/o5XK-WZRZYY) on YouTube where a simplified version of this sample is written and demonstrated from scratch.
10 |
11 | ### Documentation
12 |
13 | ```powershell
14 | PS C:\demo> Get-Help Import-GpsCoordinates -Full
15 |
16 | NAME
17 | Import-GpsCoordinates
18 |
19 | SYNOPSIS
20 | Updates the GPS coordinates of cameras in Milestone based on a CSV file with MAC addresses
21 | and the corresponding GPS coordinates.
22 |
23 |
24 | SYNTAX
25 | Import-GpsCoordinates [-Path] [[-MacColumn] ] [[-CoordinateColumn] ] []
26 |
27 |
28 | DESCRIPTION
29 | This sample function allows you to override the default column names of "MAC" and
30 | "Coordinates" if desired, and the coordinates are expected to be found in
31 | "latitude, longitude" format with no special characters except the separating comma.
32 |
33 |
34 | PARAMETERS
35 | -Path
36 | The path to the source CSV file to use as input.
37 |
38 | Required? true
39 | Position? 1
40 | Default value
41 | Accept pipeline input? true (ByValue, ByPropertyName)
42 | Accept wildcard characters? false
43 |
44 | -MacColumn
45 | Override the default column name to look for in the CSV file for the hardware MAC address.
46 | Default: MAC
47 |
48 | Required? false
49 | Position? 2
50 | Default value MAC
51 | Accept pipeline input? false
52 | Accept wildcard characters? false
53 |
54 | -CoordinateColumn
55 | Override the default column name to look for in the CSV file for the camera coordinates address.
56 | Default: Coordinates
57 |
58 | Required? false
59 | Position? 3
60 | Default value Coordinates
61 | Accept pipeline input? false
62 | Accept wildcard characters? false
63 |
64 |
65 | This cmdlet supports the common parameters: Verbose, Debug,
66 | ErrorAction, ErrorVariable, WarningAction, WarningVariable,
67 | OutBuffer, PipelineVariable, and OutVariable. For more information, see
68 | about_CommonParameters (https:/go.microsoft.com/fwlink/?LinkID=113216).
69 |
70 | INPUTS
71 |
72 | OUTPUTS
73 |
74 | -------------------------- EXAMPLE 1 --------------------------
75 |
76 | PS C:\>Import-GpsCoordinates -Path .\coordinates.csv
77 |
78 | Uses coordinates.csv to update the GisPoint property of all cameras who's parent Hardware object
79 | has a MAC address value found in the CSV file.
80 |
81 |
82 |
83 |
84 |
85 | RELATED LINKS
86 | ```
--------------------------------------------------------------------------------
/Samples/ImportFromCsvWithPermissions.ps1:
--------------------------------------------------------------------------------
1 | # This sample demonstrates one way you can import cameras from a CSV file and
2 | # grant some basic read permissions to a pipe-delimited set of roles. Errors
3 | # will be logged as warnings to the console and any failed records will be
4 | # saved in the $failed variable.
5 | #
6 | # It is assumed you are already logged in to your VMS, and you have a CSV file
7 | # prepared which resembles the example below:
8 | #
9 | # Address,UserName,Password,RecordingServer,Name,Group,Roles
10 | # "http://192.168.1.100","root","pass","Recorder1","Driveway","/Outdoor","Operators|Security"
11 |
12 |
13 | $newHardwareRows = Import-Csv -Path .\newhardware.csv
14 | $failed = New-Object System.Collections.Generic.List[pscustomobject]
15 | foreach ($record in $newHardwareRows)
16 | {
17 | try {
18 | $recorder = Get-RecordingServer -Name $record.RecordingServer
19 | $params = @{
20 | Address = $record.Address
21 | UserName = $record.UserName
22 | Password = $record.Password
23 | Name = $record.Name
24 | GroupPath = $record.Group
25 | }
26 | $hw = $recorder | Add-Hardware @params -Enabled
27 |
28 | foreach ($camera in $hw | Get-Camera) {
29 | foreach ($roleName in $record.Roles.Split('|')) {
30 | $acl = $camera | Get-DeviceAcl -RoleName $roleName
31 |
32 | $acl.SecurityAttributes["GENERIC_READ"] = "True"
33 | $acl.SecurityAttributes["VIEW_LIVE"] = "True"
34 | $acl.SecurityAttributes["PLAYBACK"] = "True"
35 | $acl.SecurityAttributes["PTZ_CONTROL"] = "True"
36 | $acl.SecurityAttributes["READ_BOOKMARKS"] = "True"
37 | $acl.SecurityAttributes["READ_EVIDENCE_LOCK"] = "True"
38 | $acl.SecurityAttributes["READ_SEQUENCES"] = "True"
39 |
40 | $acl | Set-DeviceAcl
41 | }
42 | }
43 | }
44 | catch {
45 | Write-Warning "Error adding $($record.Address): $($_.Message)"
46 | $failed.Add($record)
47 | }
48 | }
--------------------------------------------------------------------------------
/Samples/ReportOnTransactSources.ps1:
--------------------------------------------------------------------------------
1 | # Retrieve all Transact Sources using the TCP Client Transact Connector and
2 | # output the name, host, port and retention properties.
3 | # NOTE: This requires MilestonePSTools 1.0.71 or greater.
4 |
5 | # Items in a VMS configuration have a 'Kind' property which defines what type
6 | # of object it is, or what types of objects it contains in the event it's a
7 | # container with child items in it. We need the GUID value used for items of
8 | # Transact type or 'Kind'.
9 | $transactKind = (Get-Kind -List | Where-Object DisplayName -eq Transact).Kind
10 |
11 | foreach ($item in Get-PlatformItem -Kind $transactKind) {
12 | # The value a20d8523-547b-4bb3-b5aa-7899c62c68f6 is the ID for the built-in
13 | # TCP Client transact connector. This script ignores other connectors as
14 | # they may have different property names.
15 | if ($item.Properties['TransactConnectorId'] -notlike "a20d8523-547b-4bb3-b5aa-7899c62c68f6") {
16 | continue
17 | }
18 |
19 | $result = [pscustomobject]@{
20 | Name = $item.Name
21 | Host = $item.Properties["_HOST"]
22 | Port = $item.Properties["_PORT"]
23 | Retention = $item.Properties["Retention"]
24 | }
25 |
26 | Write-Output $result
27 | }
--------------------------------------------------------------------------------
/Samples/Reporting/Get-RecorderReport.ps1:
--------------------------------------------------------------------------------
1 | function Get-RecorderReport {
2 | [CmdletBinding()]
3 | param (
4 | # Specifies one or more Recording Servers from which to generate a camera report. By default all Recording Servers will be used.
5 | [Parameter(ValueFromPipeline)]
6 | [VideoOS.Platform.ConfigurationItems.RecordingServer[]]
7 | $RecordingServer
8 | )
9 |
10 | begin {
11 | $runspacepool = [runspacefactory]::CreateRunspacePool(4, 16)
12 | $runspacepool.Open()
13 | $threads = New-Object System.Collections.Generic.List[pscustomobject]
14 |
15 | $process = {
16 | param(
17 | [VideoOS.Platform.ConfigurationItems.RecordingServer]$Recorder
18 | )
19 | try {
20 | $hardware = $recorder | Get-VmsHardware
21 | $cameras = $hardware | Get-VmsCamera -EnableFilter All
22 | $enabledHardware = $hardware | Where-Object Enabled
23 | $enabledCameras = $cameras | Where-Object { $_.Enabled -and $_.ParentItemPath -in $enabledHardware.Path }
24 |
25 | $obj = [PSCustomObject]@{
26 | RecordingServer = $recorder.Name
27 | TotalHardware = $hardware.Count
28 | EnabledHardware = $enabledHardware.Count
29 | TotalCameras = $cameras.Count
30 | EnabledCameras = $enabledCameras.Count
31 | CamerasStarted = 0
32 | UsedSpaceInBytes = 0
33 | RecordedBPS = 0
34 | TotalBPS = 0
35 | OverflowCount = 0
36 | CamerasWithErrors = 0
37 | CamerasNotConnected = 0
38 | DatabaseRepairsInProgress = 0
39 | DatabaseWriteErrors = 0
40 | CamerasNotLicensed = 0
41 | }
42 |
43 | try {
44 | $svc = $recorder | Get-RecorderStatusService2
45 | $stats = $svc.GetVideoDeviceStatistics((Get-VmsToken), [guid[]]$enabledCameras.Id)
46 | $status = $svc.GetCurrentDeviceStatus((Get-VmsToken), [guid[]]$enabledCameras.Id)
47 | $liveStreams = $stats.VideoStreamStatisticsArray | Where-Object RecordingStream -eq $false
48 | $recordedStreams = $stats.VideoStreamStatisticsArray | Where-Object RecordingStream
49 | $recordedBPS = $recordedStreams | Measure-Object -Property BPS -Sum | Select-Object -ExpandProperty Sum
50 |
51 | $obj.CamerasStarted = ($status.CameraDeviceStatusArray | Where-Object Started).Count
52 | $obj.UsedSpaceInBytes = $stats | Measure-Object -Property UsedSpaceInBytes -Sum | Select-Object -ExpandProperty Sum
53 | $obj.RecordedBPS = $recordedBPS
54 | $obj.TotalBPS = $recordedBPS + ( $liveStreams | Measure-Object -Property BPS -Sum | Select-Object -ExpandProperty Sum )
55 | $obj.OverflowCount = ($status.CameraDeviceStatusArray | Where-Object ErrorOverflow).Count
56 | $obj.CamerasWithErrors = ($status.CameraDeviceStatusArray | Where-Object Error).Count
57 | $obj.CamerasNotConnected = ($status.CameraDeviceStatusArray | Where-Object ErrorNoConnection).Count
58 | $obj.DatabaseRepairsInProgress = ($status.CameraDeviceStatusArray | Where-Object DbRepairInProgress).Count
59 | $obj.DatabaseWriteErrors = ($status.CameraDeviceStatusArray | Where-Object ErrorWritingGop).Count
60 | $obj.CamerasNotLicensed = ($status.CameraDeviceStatusArray | Where-Object CamerasNotLicensed).Count
61 | }
62 | catch {
63 | Write-Error -Exception $_.Exception -Message "Error collecting statistics from $($recorder.Name) ($($recorder.Hostname))"
64 | }
65 |
66 | Write-Output $obj
67 | }
68 | catch {
69 | Write-Error -Exception $_.Exception -Message "Unexpected error: $($_.Message). $($recorder.Name) ($($recorder.Hostname)) will not be included in the report."
70 | }
71 | finally {
72 | $svc.Dispose()
73 | }
74 | }
75 | }
76 |
77 | process {
78 | $progressParams = @{
79 | Activity = $MyInvocation.MyCommand.Name
80 | CurrentOperation = ''
81 | PercentComplete = 0
82 | Completed = $false
83 | }
84 |
85 | if ($null -eq $RecordingServer) {
86 | $RecordingServer = Get-VmsRecordingServer
87 | }
88 |
89 | try {
90 | foreach ($recorder in $RecordingServer) {
91 | $ps = [powershell]::Create()
92 | $ps.RunspacePool = $runspacepool
93 | $asyncResult = $ps.AddScript($process).AddParameters(@{
94 | Recorder = $recorder
95 | }).BeginInvoke()
96 | $threads.Add([pscustomobject]@{
97 | PowerShell = $ps
98 | Result = $asyncResult
99 | })
100 | }
101 |
102 | if ($threads.Count -eq 0) {
103 | return
104 | }
105 |
106 | $progressParams.CurrentOperation = 'Processing requests for recorder information'
107 | $completedThreads = New-Object System.Collections.Generic.List[pscustomobject]
108 | $totalJobs = $threads.Count
109 | while ($threads.Count -gt 0) {
110 | $progressParams.PercentComplete = ($totalJobs - $threads.Count) / $totalJobs * 100
111 | $progressParams.Status = "Processed $($totalJobs - $threads.Count) out of $totalJobs requests"
112 | Write-Progress @progressParams
113 | foreach ($thread in $threads) {
114 | if ($thread.Result.IsCompleted) {
115 | $thread.PowerShell.EndInvoke($thread.Result)
116 | $thread.PowerShell.Dispose()
117 | $completedThreads.Add($thread)
118 | }
119 | }
120 | $completedThreads | Foreach-Object { [void]$threads.Remove($_)}
121 | $completedThreads.Clear()
122 | if ($threads.Count -eq 0) {
123 | break;
124 | }
125 | Start-Sleep -Seconds 1
126 | }
127 | }
128 | finally {
129 | if ($threads.Count -gt 0) {
130 | Write-Warning "Stopping $($threads.Count) running PowerShell instances. This may take a minute. . ."
131 | foreach ($thread in $threads) {
132 | $thread.PowerShell.Dispose()
133 | }
134 | }
135 | $runspacepool.Close()
136 | $runspacepool.Dispose()
137 | $progressParams.Completed = $true
138 | Write-Progress @progressParams
139 | }
140 | }
141 | }
--------------------------------------------------------------------------------
/Samples/Reporting/Get-RoleReport.ps1:
--------------------------------------------------------------------------------
1 | function Get-RoleReport {
2 | <#
3 | .SYNOPSIS
4 | Gets a list of all cameras and the permissions associated with the specified role
5 | .DESCRIPTION
6 | Device permissions are saved either as "overall security attributes" at the role level, or they
7 | are associated with each individual device, or a mix of the two. This report helps consolidate
8 | permissions into a verbose report where each row represents a role and it's effective permissions
9 | on a specific camera.
10 | .EXAMPLE
11 | PS C:\> Get-RoleReport -RoleName 'Guards' | Export-Csv ~\Desktop\Role-Report.csv
12 | Creates a CSV containing a list of all devices the 'Guards' role has at least 'GENERIC_READ' access to.
13 | .EXAMPLE
14 | PS C:\> Get-RoleReport -IncludeNoAccess | Export-Csv ~\Desktop\Role-Report.csv
15 | Creates a CSV containing a list of all roles and their permissions on all devices. Devices where the role has no access will be included in the report.
16 | .NOTES
17 | This report is not meaningful for the Administrator role, so if your RoleName filter returns only the built-in Administrators role, you will receive an error.
18 | #>
19 | [CmdletBinding()]
20 | param(
21 | # Specifies the name of the role. Supports wildcard characters. Default is * and returns all roles.
22 | [Parameter()]
23 | [ValidateNotNullOrEmpty()]
24 | [string]
25 | $RoleName = '*',
26 |
27 | # Specifies that rows where the role lacks read access should still be included in the report.
28 | [Parameter()]
29 | [switch]
30 | $IncludeNoAccess
31 | )
32 |
33 | process {
34 | $roles = Get-VmsRole -Name $RoleName -ErrorAction Stop | Where-Object RoleType -eq UserDefined
35 | $cameras = Get-VmsCamera
36 | if ($null -eq $roles -or $roles.Count -eq 0) {
37 | Write-Error "Cannot find user-defined role '$RoleName' because it does not exist."
38 | }
39 |
40 | $overallSecurity = @{}
41 | foreach($role in $roles) {
42 | $securityAttributes = @{}
43 | $invokeInfo = $role.ChangeOverallSecurityPermissions('623d03f8-c5d5-46bc-a2f4-4c03562d4f85')
44 | foreach ($key in $invokeInfo.GetPropertyKeys()) {
45 | $securityAttributes.$key = $invokeInfo.GetProperty($key)
46 | }
47 | $overallSecurity.($role.Id) = $securityAttributes
48 | }
49 |
50 | $rowsCompleted = 0
51 | $totalRows = $cameras.Count * $roles.Count
52 | try {
53 | foreach ($camera in $cameras) {
54 | foreach ($role in $roles) {
55 | Write-Progress -Activity "Auding camera permissions per role" -PercentComplete ([int]($rowsCompleted / $totalRows * 100))
56 | $acl = $camera | Get-DeviceAcl -Role $role
57 | if ($IncludeNoAccess -or $overallSecurity.($role.Id).'GENERIC_READ' -eq 'Allow' -or $acl.SecurityAttributes.GENERIC_READ -eq 'True') {
58 | $row = [ordered]@{
59 | Role = $role.Name
60 | Camera = $camera.Name
61 | }
62 | foreach ($key in $acl.SecurityAttributes.Keys) {
63 | $overallSecurityAttribute = $overallSecurity.($role.Id).$key
64 | if ($overallSecurityAttribute -eq 'None') {
65 | $row.$key = $acl.SecurityAttributes.$key
66 | }
67 | else {
68 | $row.$key = $overallSecurityAttribute -eq 'Allow'
69 | }
70 | }
71 | $row.RoleId = $role.Id
72 | $row.CameraId = $camera.Id
73 |
74 | Write-Output ([pscustomobject]$row)
75 | }
76 | $rowsCompleted++
77 | }
78 | }
79 | }
80 | finally {
81 | Write-Progress -Activity "Auding camera permissions per role" -Completed
82 | }
83 | }
84 | }
--------------------------------------------------------------------------------
/Samples/Reporting/Get-VmsCameraDiskUsage.ps1:
--------------------------------------------------------------------------------
1 | #Requires -Modules MilestonePSTools
2 | function Get-VmsCameraDiskUsage {
3 | <#
4 | .SYNOPSIS
5 | Gets the amount of space used for all cameras
6 | .DESCRIPTION
7 | Gets the amount of space used for all cameras
8 | .EXAMPLE
9 | PS C:\> Get-VmsCameraDiskUsage | Out-GridView
10 | Gets the disk usage information for all cameras and all storages used by those cameras and displays them in a grid view
11 | #>
12 |
13 | begin {
14 | $offlineRecorders = New-Object System.Collections.Generic.List[PSCustomObject]
15 | $svc = Get-IServerCommandService
16 | $config = $svc.GetConfiguration((Get-Token))
17 | }
18 |
19 | process {
20 | #$config.Recorders | ForEach-Object {
21 | foreach ($recInfo in $config.Recorders) {
22 | #$recInfo = $_
23 | $statusSvc = Get-RecorderStatusService2 -RecordingServer (Get-VmsRecordingServer -Id $recInfo.RecorderId) -ErrorAction SilentlyContinue
24 | try {
25 | $stats = $statusSvc.GetVideoDeviceStatistics((Get-Token), $recInfo.Cameras.DeviceId)
26 | } catch {
27 | $offlineRecorders.Add($recInfo.Name)
28 | }
29 |
30 | $statsHash = @{}
31 | $stats | ForEach-Object {
32 | $statsHash[$_.DeviceId] = $_
33 | }
34 |
35 | foreach ($hw in $recInfo.Hardware){
36 | if ($hw.Disabled -eq $true) {
37 | Break
38 | }
39 | foreach ($cam in Get-VmsCamera -Hardware (Get-VmsHardware -Id $hw.HardwareId) -EnableFilter Enabled) {
40 | if (-not [string]::IsNullOrEmpty($statsHash[[guid]$cam.Id])) {
41 | [pscustomobject]@{
42 | Camera = $cam.Name
43 | Hardware = $hw.Name
44 | Recorder = $recInfo.Name
45 | 'UsedSpace(GB)' = [math]::Round(($statsHash[[guid]$cam.Id] | Select-Object -Expand UsedSpaceInBytes) / 1GB,2)
46 | }
47 | } else {
48 | [pscustomobject]@{
49 | Camera = $cam.Name
50 | Hardware = $hw.Name
51 | Recorder = $recInfo.Name
52 | 'UsedSpace(GB)' = "Unknown"
53 | }
54 | }
55 | }
56 | }
57 | }
58 | }
59 |
60 | end {
61 | if (-not [string]::IsNullOrEmpty($offlineRecorders[0])) {
62 | foreach ($offlineRecorder in $offlineRecorders) {
63 | Write-Warning "Recording Server $($offlineRecorder) was unavailable and was skipped."
64 | }
65 | }
66 | }
67 | }
--------------------------------------------------------------------------------
/Samples/Reporting/README - sp-MX.md:
--------------------------------------------------------------------------------
1 | # Informar es divertido
2 |
3 | Las funciones y los ejemplos de esta carpeta muestran los métodos para recuperar información con fines de generación de informes. Probablemente existan tantos conjuntos diferentes de datos deseados por los clientes y operadores de VMS como instalaciones de VMS en el mundo, por lo que estas herramientas deben combinarse o utilizarse como inspiración según sea necesario para que usted obtenga los datos que necesita.
4 |
5 | ## Una nota sobre las interfaces no compatibles
6 |
7 | Milestone proporciona una gran cantidad de funcionalidades en MIP SDK. Casi todo el módulo MilestonePSTools está escrito mediante componentes puros de MIP SDK. Cambiar y ampliar MIP SDK al tiempo que se maximiza la compatibilidad con los sistemas anteriores o posteriores y se minimizan los cambios importantes es un verdadero desafío y tengo un profundo respeto por el equipo del Kit de desarrollo de software (SDK) por sus esfuerzos para llevar la funcionalidad tan necesaria a las manos de desarrolladores externos.
8 | Sin embargo, existen algunas funciones que el MIP SDK aún no puede realizar y dado que un número muy pequeño de usuarios necesita o desea acceder a estas funciones, el equipo del SDK tardará algún tiempo en abordar esas necesidades e implementar nuevas características con soporte a largo plazo. Mientras tanto, con un poco de investigación y persuasión, ocasionalmente podemos superar estas limitaciones utilizando API que no estaban destinadas a ser utilizadas por el público.
9 | Encontrará varias funciones con ciertas interfaces que no son intuitivas y carecen de documentación en los documentos en línea del MIP SDK. Estas funciones estarán claramente documentadas en los comentarios de ayuda y no se promete absolutamente ningún soporte cuando las interfaces no compatibles utilizadas por estas funciones cambian entre versiones y la compatibilidad con versiones anteriores o posteriores se pierda o empeore.
10 |
11 | ## Get-VmsCameraDiskUsage
12 |
13 | Una solicitud común que actualmente no se ha cumplido con MIP SDK es la capacidad de recuperar la cantidad de almacenamiento utilizada por cámara. Es posible extraer el espacio utilizado/disponible para una ubicación de almacenamiento en directo o de archivo, pero no cámara por cámara.
14 |
15 | –“Pero la información está en Management Client", le escucho decir. “Entonces, ¿por qué no podemos obtenerlo con el SDK? ¿El Management Client no usa el SDK?” Bueno, en realidad no, no es así. Gran parte del Management Client hace uso de interfaces internas donde los desarrolladores tienen la flexibilidad de agregar/cambiar capacidades entre versiones mientras mantienen las interfaces MIP SDK más estables con el tiempo. De todos modos, mucho de lo que se hace en Management Client es irrelevante para la mayoría de los desarrolladores de integración de MIP SDK.
16 |
17 | En pocas palabras, esta función usa una interfaz de cliente WCF que no es compatible para uso externo. El método de uso de esta interfaz es muy similar a las otras interfaces _compatibles_ como IConfigurationService, por ejemplo, y técnicamente cualquier persona que conozca la URL web del servicio puede usarla. La autenticación de la interfaz es la misma que cualquier otra interfaz WCF de Milestone y esta función autentifica y usa esta API de forma transparente en su nombre. Así es como se ve la salida: Los valores de UsedSpace están en bytes, y simplemente ignore los valores de AvailableSpace por ahora. Al parecer puede haber algún tipo de error de desbordamiento en el que estos valores no tengan mucho sentido; es probable que el campo no se use en Management Client. Si necesita conocer AvailableSpace, navegue hasta los objetos de almacenamiento/archivo `$RecordingServer.StorageFolder.Storages[$i]` or `$RecordingServer.StorageFolder.Storages[$i].ArchiveStorageFolder.ArchiveStorages[$j]`.
18 |
19 | ```powershell
20 | PS C:\> Get-Hardware | Get-Camera | Get-VmsCameraDiskUsage | Format-Table *
21 |
22 | CameraId StorageId RecorderId UsedSpace AvailableSpace IsOnline
23 | -------- --------- ---------- --------- -------------- --------
24 | 3c25ff7a-7c76-49bd-bda0-116f5e051e48 cce0ef0f-36b1-4221-964d-e5de1f641741 72080191-d39d-4229-b151-65bcd740c393 4513 157586161664 True
25 | afa846f8-846c-4932-b206-c1c6c24e0b5f def84b4a-1e7a-4f99-ac5f-671ae76d520b 72080191-d39d-4229-b151-65bcd740c393 4519 157586161664 True
26 | c2733741-0c71-4197-89d2-030339c7a9ea def84b4a-1e7a-4f99-ac5f-671ae76d520b 72080191-d39d-4229-b151-65bcd740c393 161278294 157586161664 True
27 | c2733741-0c71-4197-89d2-030339c7a9ea e96f206b-3ecd-421a-906b-e32393b4bedb 72080191-d39d-4229-b151-65bcd740c393 705524466 12260420734976 True
28 | c2733741-0c71-4197-89d2-030339c7a9ea 2358075f-2291-4c43-86c8-9d6351f2ed59 72080191-d39d-4229-b151-65bcd740c393 71165280 197973835776 True
29 |
30 | PS C:\>
31 | ```
32 |
--------------------------------------------------------------------------------
/Samples/Reporting/README.md:
--------------------------------------------------------------------------------
1 | # Reporting is fun
2 |
3 | The functions and examples in this folder demonstrate methods of retrieving information for reporting purposes. I suspect there are as many different sets of data desired by customers and operators of a VMS as there are VMS installations in the world, so these tools should be combined and/or used as inspiration to the extent necessary to get the data you need.
4 |
5 | ## Note about unsupported interfaces
6 |
7 | Milestone provides a ton of functionality in the MIP SDK. Almost the entire MilestonePSTools module is written using pure MIP SDK components. Changing and extending MIP SDK while maximizing backward/forward compatibility and minimizing breaking changes is a challenge and I have a deep respect for the team for their efforts to bring much needed functionality to the hands of 3rd party developers.
8 |
9 | There are things the MIP SDK cannot yet do however, and since a very small number of users need/want access to these things, it will take some time for the SDK team to address those needs and implement new features with long term support. Meanwhile, with some investigation and persuasion, we can occasionally overcome these limitations using API's that were never intended to be used by the public.
10 |
11 | You will find a small handful of functions where certain interfaces are used that are unintuitive and lack documentation in the online MIP SDK docs. These functions will be clearly documented in the help comments, and absolutely no support is promised when the unsupported interfaces used by these functions changes between versions and backwards/forwards compatibility is lost or worse.
12 |
13 | ## Get-VmsCameraDiskUsage
14 |
15 | One common request that is currently unfulfilled by MIP SDK is the ability to retrieve the amount of storage used on a per-camera basis. It's possible to pull the space used/available for a live or archive storage location, but not on a camera by camera basis.
16 |
17 | I hear you - the information is in the Management Client right? So why can't we get it with the SDK? Doesn't the Management Client use the SDK? Well, no actually! A lot of the Management Client makes use of internal interfaces where developers have the flexibility to add/change capabilities between versions while keeping the MIP SDK interfaces more stable over time. A lot of what is done in the Management Client is irrelevant to most MIP SDK integration developers anyway.
18 |
19 | Long story short, this function uses a WCF client interface that is not supported for external use. The method of using this interface is very similar to the other _supported_ interfaces like the IConfigurationService for example and technically anyone who knows the web URL for the service can use it. The authentication for the interface is the same as any other Milestone WCF interface and this function transparently authenticates and uses this API on your behalf. Here's what the output looks like. The UsedSpace values are in bytes, and just ignore the AvailableSpace values for now. It seems like there may be some sort of overflow error where these values don't make a lot of sense - the field is probably not used in Management Client. If you need to know the AvailableSpace you should navigate down to the storage/archive objects under `$RecordingServer.StorageFolder.Storages[$i]` or `$RecordingServer.StorageFolder.Storages[$i].ArchiveStorageFolder.ArchiveStorages[$j]`.
20 |
21 | ```powershell
22 | PS C:\> Get-Hardware | Get-Camera | Get-VmsCameraDiskUsage | Format-Table *
23 |
24 | CameraId StorageId RecorderId UsedSpace AvailableSpace IsOnline
25 | -------- --------- ---------- --------- -------------- --------
26 | 3c25ff7a-7c76-49bd-bda0-116f5e051e48 cce0ef0f-36b1-4221-964d-e5de1f641741 72080191-d39d-4229-b151-65bcd740c393 4513 157586161664 True
27 | afa846f8-846c-4932-b206-c1c6c24e0b5f def84b4a-1e7a-4f99-ac5f-671ae76d520b 72080191-d39d-4229-b151-65bcd740c393 4519 157586161664 True
28 | c2733741-0c71-4197-89d2-030339c7a9ea def84b4a-1e7a-4f99-ac5f-671ae76d520b 72080191-d39d-4229-b151-65bcd740c393 161278294 157586161664 True
29 | c2733741-0c71-4197-89d2-030339c7a9ea e96f206b-3ecd-421a-906b-e32393b4bedb 72080191-d39d-4229-b151-65bcd740c393 705524466 12260420734976 True
30 | c2733741-0c71-4197-89d2-030339c7a9ea 2358075f-2291-4c43-86c8-9d6351f2ed59 72080191-d39d-4229-b151-65bcd740c393 71165280 197973835776 True
31 |
32 | PS C:\>
33 | ```
34 |
--------------------------------------------------------------------------------
/Samples/Rules/Get-VmsRule.ps1:
--------------------------------------------------------------------------------
1 | function Get-VmsRule {
2 | <#
3 | .SYNOPSIS
4 | Gets all VMS Rules available through Milestone's Configuration API.
5 | .DESCRIPTION
6 | Version 2020 R1 introduced support for rules in the Configuration API. This function is an example of how the Configuration API
7 | function Get-ConfigurationItem can be used to retrieve all the rules from the /RuleFolder configuration api path.
8 | .EXAMPLE
9 | PS C:\> Get-VmsRule -Name Default* | Select DisplayName, Path
10 | Gets all default rules from the VMS and displays only the name and path of the rule objects
11 | .EXAMPLE
12 | PS C:\> Get-VmsRule -Name 'Test Rule #1' | Select DisplayName, Path
13 | Gets a single rule named 'Test Rule #1' or emits an error if this rule does not exist since no wildcard is present in the Name parameter.
14 | .PARAMETER Name
15 | Specifies the display name, or partial name of the rule(s). Wildcards are supported and the default is to return all rules.
16 | .NOTES
17 | Support for rules was introduced in version 2020 R1, and early support for rules is quite limited. Check the MIP SDK Configuration API documentation for more information about rules.
18 | #>
19 | [CmdletBinding()]
20 | param(
21 | [Parameter(ValueFromPipelineByPropertyName)]
22 | [Alias('DisplayName')]
23 | [string]
24 | $Name = '*'
25 | )
26 |
27 | begin {
28 | $ms = Get-VmsManagementServer -ErrorAction Ignore
29 | if ($null -eq $ms) {
30 | throw "You must be connected to a Management Server. Use Connect-ManagementServer and then try again."
31 | }
32 | if ([version]$ms.Version -lt [version]'20.1') {
33 | throw "Support for rules in Milestone's Configuration API was not added until version 2020 R1. You must upgrade the Management Server to use this function."
34 | }
35 | }
36 |
37 | process {
38 | $matchingRuleCount = 0
39 | Get-ConfigurationItem -Path /RuleFolder -ChildItems | Where-Object DisplayName -like $Name | Foreach-Object {
40 | $matchingRuleCount++
41 | Write-Output $_
42 | }
43 |
44 | if ($matchingRuleCount -lt 1 -and ![wildcardpattern]::ContainsWildcardCharacters($Name)) {
45 | Write-Error "Rule not found matching name '$Name'"
46 | }
47 | }
48 | }
--------------------------------------------------------------------------------
/Samples/Rules/README sp-MX.md:
--------------------------------------------------------------------------------
1 | # Trabajar con reglas
2 |
3 | Milestone introdujo soporte para trabajar con reglas en la versión 2020 R1, y el soporte se ha expandido en las versiones lanzadas desde entonces. Inicialmente había muchas acciones de regla que, si estaban presentes, evitarían que la regla se devolviera al solicitar elementos secundarios de /RuleFolder. En la versión 2020 R3 se admiten las acciones de reglas más comunes y la funcionalidad es mucho más utilizable.
4 |
5 | Dicho esto, actualmente no hay funciones/cmdlets integrados en MilestonePSTools para manipular reglas desde PowerShell. Parte de esto se debe al tiempo limitado disponible para extender MilestonePSTools, la otra parte es el desafío de diseñar funciones simples para trabajar con un concepto e interfaz complejos.
6 |
7 | Las secuencias de comandos de esta carpeta son ejemplos funcionales de cómo puede trabajar con reglas y se agregarán más adelante a medida que el tiempo lo permita. Estas funciones pueden llegar al módulo MilestonePSTools, o tal vez se creará un submódulo como "MilestonePSTools.Rules", ya que cualquier función desarrollada para trabajar con reglas son efectivamente solo arreglos creativos de las funciones Get-ConfigurationItem, Invoke-Item y Set-ConfigurationItem que a su vez envuelven el proxy WCF IConfigurationService. Es posible que tenga una opinión diferente sobre cómo se podría implementar la compatibilidad con las reglas en PowerShell, y al mantener nuestras versiones de opinión fuera del espacio de nombres del módulo MilestonePSTools, puede ser más fácil para usted hacer las cosas a su manera sin preocuparse por las colisiones de nombres de funciones.
8 |
9 |
10 | ## Get-VmsRule
11 |
12 | Esta función es un contenedor muy simple alrededor de la función `Get-ConfigurationItem` existente, que es a su vez un contenedor alrededor del cliente WCF IConfigurationService que interactúa directamente con la API de configuración en el servidor de gestión. He agregado el prefijo Vms ya que existe una buena posibilidad de que `Get-Rule` pueda colisionar con cualquier número de otros módulos (piense en firewalls, antivirus, etc.).
13 |
14 | Admite comodines y tiene un aspecto similar al de esto cuando se importa a la sesión de PowerShell y se llama a un conjunto predeterminado de reglas de VMS.
15 |
16 | ```powershell
17 | PS C:\> Get-VmsRule | select DisplayName, ItemType, Path, @{ Name = 'Enabled'; Expression = { $_.EnableProperty.Enabled } }
18 |
19 | DisplayName ItemType Path Enabled
20 | ----------- -------- ---- -------
21 | Default Start Audio Feed Rule Rule Rule[162fdb73-e0dc-4a2d-baa6-54b0d2b16684] True
22 | Default Record on Motion Rule Rule Rule[3307c095-a170-49d3-ab11-1baf8783acb9] True
23 | Default Record on Bookmark Rule Rule Rule[4ce46d3e-c4c7-46b2-a580-fc98cdc24611] True
24 | Default Goto Preset when PTZ is done Rule Rule Rule[7aa28f82-f3ff-4398-9781-061299178c7f] False
25 | Default Start Feed Rule Rule Rule[e34e9353-e6f5-43ff-8e8f-d4a558159b2b] True
26 | Default Record on Request Rule Rule Rule[fa2f8209-8d9b-4580-a6eb-17e58c99a610] True
27 | Default Start Metadata Feed Rule Rule Rule[fe61841f-544e-44d7-b7a8-cd709195162d] True
28 |
29 |
30 |
31 | PS C:\>
32 | ```
33 |
34 | ## Remove-VmsRule
35 |
36 | Esta es una función un poco más compleja que Get-VmsRule, pero sigue siendo un contenedor relativamente simple alrededor de las funciones Get-ConfigurationItem e Invoke-Method que utilizan la API de configuración para modificar la configuración de VMS. Esto es lo que se vería al eliminar la “Regla de fuente de audio de inicio predeterminada” usando comodines en el nombre de la regla (si realmente desea realizar la eliminación, puede omitir el switch WhatIf).
37 |
38 | ```powershell
39 | PS C:\> Remove-VmsRule -Name 'Default*Audio*' -WhatIf
40 | What if: Performing the operation "Remove Rule" on target "Default Start Audio Feed Rule".
41 |
42 | PS C:\>
43 | ```
44 |
--------------------------------------------------------------------------------
/Samples/Rules/README.md:
--------------------------------------------------------------------------------
1 | # Working with Rules
2 |
3 | Milestone introduced support for working with rules in version 2020 R1, and that support has expanded in the versions released since then. Initially there were many rule actions that, if present, would prevent the rule from being returned when requesting child items from /RuleFolder. In version 2020 R3 the most common rule actions are supported and the functionality is much more usable.
4 |
5 | That said - there are currently no functions/cmdlets built-in to MilestonePSTools for manipulating rules from PowerShell. Part of this is limited time available to spend on extending MilestonePSTools, and another is the challenge of designing simple functions to work with a fairly complex concept and interface.
6 |
7 | The scripts in this folder are functional examples of how you can work with rules, and more will be added later as time permits. These functions may make their way into the MilestonePSTools module, or perhaps a submodule will be created like "MilestonePSTools.Rules" since any functions developed for working with rules are effectively just creative arrangements of the Get-ConfigurationItem, Invoke-Item, and Set-ConfigurationItem functions which in turn are wrapping the IConfigurationService WCF proxy. You may have a different opinion on how support for rules in PowerShell should be implemented, and by keeping our opinionated versions out of the MilestonePSTools module namespace, it would be easier for you to do things your way without worrying about function name collisions.
8 |
9 | ## Get-VmsRule
10 |
11 | This function is a really simple wrapper around the existing `Get-ConfigurationItem` function which is itself a wrapper around the IConfigurationService WCF client which interfaces directly with the Configuration API on the Management Server. I added the Vms prefix since there's a good chance `Get-Rule` could collide with any number of other modules (think firewalls, antivirus, etc).
12 |
13 | It supports wildcards and looks something like this when imported into your PowerShell session and called against a default set of VMS rules.
14 |
15 | ```powershell
16 | PS C:\> Get-VmsRule | select DisplayName, ItemType, Path, @{ Name = 'Enabled'; Expression = { $_.EnableProperty.Enabled } }
17 |
18 | DisplayName ItemType Path Enabled
19 | ----------- -------- ---- -------
20 | Default Start Audio Feed Rule Rule Rule[162fdb73-e0dc-4a2d-baa6-54b0d2b16684] True
21 | Default Record on Motion Rule Rule Rule[3307c095-a170-49d3-ab11-1baf8783acb9] True
22 | Default Record on Bookmark Rule Rule Rule[4ce46d3e-c4c7-46b2-a580-fc98cdc24611] True
23 | Default Goto Preset when PTZ is done Rule Rule Rule[7aa28f82-f3ff-4398-9781-061299178c7f] False
24 | Default Start Feed Rule Rule Rule[e34e9353-e6f5-43ff-8e8f-d4a558159b2b] True
25 | Default Record on Request Rule Rule Rule[fa2f8209-8d9b-4580-a6eb-17e58c99a610] True
26 | Default Start Metadata Feed Rule Rule Rule[fe61841f-544e-44d7-b7a8-cd709195162d] True
27 |
28 |
29 |
30 | PS C:\>
31 | ```
32 |
33 | ## Remove-VmsRule
34 |
35 | This is a slightly more complex function than Get-VmsRule, yet still a relatively simple wrapper around the Get-ConfigurationItem, and Invoke-Method functions which use the Configuration API to modify the VMS configuration. Here's what it would look like to remove the 'Default Start Audio Feed Rule' using wildcards in the rule name. If you wanted to actually perform the removal, you can omit the -WhatIf switch.
36 |
37 | ```powershell
38 | PS C:\> Remove-VmsRule -Name 'Default*Audio*' -WhatIf
39 | What if: Performing the operation "Remove Rule" on target "Default Start Audio Feed Rule".
40 |
41 | PS C:\>
42 | ```
43 |
--------------------------------------------------------------------------------
/Samples/Rules/Remove-VmsRule.ps1:
--------------------------------------------------------------------------------
1 | function Remove-VmsRule {
2 | <#
3 | .SYNOPSIS
4 | Removes all VMS Rules with DisplayName's matching the provided name
5 | .DESCRIPTION
6 | Version 2020 R1 introduced support for rules in the Configuration API. This function is an example of how the Configuration API
7 | functions can be used to retrieve all the rules from the /RuleFolder configuration api path, and remove the matching rules by
8 | using Invoke-Method to call a Configuration API method available on the /RuleFolder object.
9 |
10 | This advanced function supports "ShouldProcess" so you may use the -WhatIf parameter to see what would happen if the -WhatIf switch
11 | were omitted.
12 | .EXAMPLE
13 | PS C:\> Remove-VmsRule -Name 'Test Rule #1' -WhatIf
14 | Shows what would happen if you used the same command without the -WhatIf switch
15 | .EXAMPLE
16 | PS C:\> Remove-VmsRule -Name 'Test Rule #1'
17 | Removes the 'Test Rule #1' rule from the Milestone VMS or emits an error if the rule could not be found.
18 | .PARAMETER Name
19 | Specifies the display name, or partial name of the rule(s). Wildcards are supported and the default is to return all rules.
20 | .NOTES
21 | Support for rules was introduced in version 2020 R1, and early support for rules is quite limited. Check the MIP SDK Configuration API documentation for more information about rules.
22 | #>
23 | [CmdletBinding(SupportsShouldProcess)]
24 | param(
25 | [Parameter(Mandatory, ValueFromPipelineByPropertyName)]
26 | [Alias('DisplayName')]
27 | [ValidateNotNullOrEmpty()]
28 | [string]
29 | $Name
30 | )
31 |
32 | begin {
33 | $ms = Get-VmsManagementServer -ErrorAction Ignore
34 | if ($null -eq $ms) {
35 | throw "You must be connected to a Management Server. Use Connect-ManagementServer and then try again."
36 | }
37 | if ([version]$ms.Version -lt [version]'20.1') {
38 | throw "Support for rules in Milestone's Configuration API was not added until version 2020 R1. You must upgrade the Management Server to use this function."
39 | }
40 | }
41 |
42 | process {
43 | $ruleFolder = Get-ConfigurationItem -Path /RuleFolder -Recurse
44 | $rules = [array]($ruleFolder.Children | Where-Object DisplayName -like $Name)
45 | if ($rules.Count -lt 1 -and ![wildcardpattern]::ContainsWildcardCharacters($Name)) {
46 | Write-Error "Rule not found matching name '$Name'"
47 | return
48 | }
49 | foreach ($rule in $rules) {
50 | if ($PSCmdlet.ShouldProcess($rule.DisplayName, 'Remove Rule')) {
51 | $invokeInfo = $ruleFolder | Invoke-Method -MethodId RemoveRule
52 | $invokeInfo | Set-ConfigurationItemProperty -Key 'RemoveRulePath' -Value $rule.Path
53 | $invokeInfo | Invoke-Method -MethodId RemoveRule
54 | }
55 | }
56 | }
57 | }
--------------------------------------------------------------------------------
/Samples/Scheduled-Video-Export/README sp-MX.md:
--------------------------------------------------------------------------------
1 | ## Exportación de video programada
2 |
3 |
4 |
5 |
6 |
7 | ### Demo
8 |
9 | See [This demo](https://youtu.be/o5XK-WZRZYY) on YouTube where a simplified version of this sample is written and demonstrated from scratch.
10 |
11 | ### Documentation
12 |
13 | ```powershell
14 | PS C:\demo> Get-Help Import-GpsCoordinates -Full
15 |
16 | NAME
17 | Import-GpsCoordinates
18 |
19 | SYNOPSIS
20 | Updates the GPS coordinates of cameras in Milestone based on a CSV file with MAC addresses
21 | and the corresponding GPS coordinates.
22 |
23 |
24 | SYNTAX
25 | Import-GpsCoordinates [-Path] [[-MacColumn] ] [[-CoordinateColumn] ] []
26 |
27 |
28 | DESCRIPTION
29 | This sample function allows you to override the default column names of "MAC" and
30 | "Coordinates" if desired, and the coordinates are expected to be found in
31 | "latitude, longitude" format with no special characters except the separating comma.
32 |
33 |
34 | PARAMETERS
35 | -Path
36 | The path to the source CSV file to use as input.
37 |
38 | Required? true
39 | Position? 1
40 | Default value
41 | Accept pipeline input? true (ByValue, ByPropertyName)
42 | Accept wildcard characters? false
43 |
44 | -MacColumn
45 | Override the default column name to look for in the CSV file for the hardware MAC address.
46 | Default: MAC
47 |
48 | Required? false
49 | Position? 2
50 | Default value MAC
51 | Accept pipeline input? false
52 | Accept wildcard characters? false
53 |
54 | -CoordinateColumn
55 | Override the default column name to look for in the CSV file for the camera coordinates address.
56 | Default: Coordinates
57 |
58 | Required? false
59 | Position? 3
60 | Default value Coordinates
61 | Accept pipeline input? false
62 | Accept wildcard characters? false
63 |
64 |
65 | This cmdlet supports the common parameters: Verbose, Debug,
66 | ErrorAction, ErrorVariable, WarningAction, WarningVariable,
67 | OutBuffer, PipelineVariable, and OutVariable. For more information, see
68 | about_CommonParameters (https:/go.microsoft.com/fwlink/?LinkID=113216).
69 |
70 | INPUTS
71 |
72 | OUTPUTS
73 |
74 | -------------------------- EXAMPLE 1 --------------------------
75 |
76 | PS C:\>Import-GpsCoordinates -Path .\coordinates.csv
77 |
78 | Uses coordinates.csv to update the GisPoint property of all cameras who's parent Hardware object
79 | has a MAC address value found in the CSV file.
80 |
81 |
82 |
83 |
84 |
85 | RELATED LINKS
86 | ```
--------------------------------------------------------------------------------
/Samples/ImportFromCsvWithPermissions.ps1:
--------------------------------------------------------------------------------
1 | # This sample demonstrates one way you can import cameras from a CSV file and
2 | # grant some basic read permissions to a pipe-delimited set of roles. Errors
3 | # will be logged as warnings to the console and any failed records will be
4 | # saved in the $failed variable.
5 | #
6 | # It is assumed you are already logged in to your VMS, and you have a CSV file
7 | # prepared which resembles the example below:
8 | #
9 | # Address,UserName,Password,RecordingServer,Name,Group,Roles
10 | # "http://192.168.1.100","root","pass","Recorder1","Driveway","/Outdoor","Operators|Security"
11 |
12 |
13 | $newHardwareRows = Import-Csv -Path .\newhardware.csv
14 | $failed = New-Object System.Collections.Generic.List[pscustomobject]
15 | foreach ($record in $newHardwareRows)
16 | {
17 | try {
18 | $recorder = Get-RecordingServer -Name $record.RecordingServer
19 | $params = @{
20 | Address = $record.Address
21 | UserName = $record.UserName
22 | Password = $record.Password
23 | Name = $record.Name
24 | GroupPath = $record.Group
25 | }
26 | $hw = $recorder | Add-Hardware @params -Enabled
27 |
28 | foreach ($camera in $hw | Get-Camera) {
29 | foreach ($roleName in $record.Roles.Split('|')) {
30 | $acl = $camera | Get-DeviceAcl -RoleName $roleName
31 |
32 | $acl.SecurityAttributes["GENERIC_READ"] = "True"
33 | $acl.SecurityAttributes["VIEW_LIVE"] = "True"
34 | $acl.SecurityAttributes["PLAYBACK"] = "True"
35 | $acl.SecurityAttributes["PTZ_CONTROL"] = "True"
36 | $acl.SecurityAttributes["READ_BOOKMARKS"] = "True"
37 | $acl.SecurityAttributes["READ_EVIDENCE_LOCK"] = "True"
38 | $acl.SecurityAttributes["READ_SEQUENCES"] = "True"
39 |
40 | $acl | Set-DeviceAcl
41 | }
42 | }
43 | }
44 | catch {
45 | Write-Warning "Error adding $($record.Address): $($_.Message)"
46 | $failed.Add($record)
47 | }
48 | }
--------------------------------------------------------------------------------
/Samples/ReportOnTransactSources.ps1:
--------------------------------------------------------------------------------
1 | # Retrieve all Transact Sources using the TCP Client Transact Connector and
2 | # output the name, host, port and retention properties.
3 | # NOTE: This requires MilestonePSTools 1.0.71 or greater.
4 |
5 | # Items in a VMS configuration have a 'Kind' property which defines what type
6 | # of object it is, or what types of objects it contains in the event it's a
7 | # container with child items in it. We need the GUID value used for items of
8 | # Transact type or 'Kind'.
9 | $transactKind = (Get-Kind -List | Where-Object DisplayName -eq Transact).Kind
10 |
11 | foreach ($item in Get-PlatformItem -Kind $transactKind) {
12 | # The value a20d8523-547b-4bb3-b5aa-7899c62c68f6 is the ID for the built-in
13 | # TCP Client transact connector. This script ignores other connectors as
14 | # they may have different property names.
15 | if ($item.Properties['TransactConnectorId'] -notlike "a20d8523-547b-4bb3-b5aa-7899c62c68f6") {
16 | continue
17 | }
18 |
19 | $result = [pscustomobject]@{
20 | Name = $item.Name
21 | Host = $item.Properties["_HOST"]
22 | Port = $item.Properties["_PORT"]
23 | Retention = $item.Properties["Retention"]
24 | }
25 |
26 | Write-Output $result
27 | }
--------------------------------------------------------------------------------
/Samples/Reporting/Get-RecorderReport.ps1:
--------------------------------------------------------------------------------
1 | function Get-RecorderReport {
2 | [CmdletBinding()]
3 | param (
4 | # Specifies one or more Recording Servers from which to generate a camera report. By default all Recording Servers will be used.
5 | [Parameter(ValueFromPipeline)]
6 | [VideoOS.Platform.ConfigurationItems.RecordingServer[]]
7 | $RecordingServer
8 | )
9 |
10 | begin {
11 | $runspacepool = [runspacefactory]::CreateRunspacePool(4, 16)
12 | $runspacepool.Open()
13 | $threads = New-Object System.Collections.Generic.List[pscustomobject]
14 |
15 | $process = {
16 | param(
17 | [VideoOS.Platform.ConfigurationItems.RecordingServer]$Recorder
18 | )
19 | try {
20 | $hardware = $recorder | Get-VmsHardware
21 | $cameras = $hardware | Get-VmsCamera -EnableFilter All
22 | $enabledHardware = $hardware | Where-Object Enabled
23 | $enabledCameras = $cameras | Where-Object { $_.Enabled -and $_.ParentItemPath -in $enabledHardware.Path }
24 |
25 | $obj = [PSCustomObject]@{
26 | RecordingServer = $recorder.Name
27 | TotalHardware = $hardware.Count
28 | EnabledHardware = $enabledHardware.Count
29 | TotalCameras = $cameras.Count
30 | EnabledCameras = $enabledCameras.Count
31 | CamerasStarted = 0
32 | UsedSpaceInBytes = 0
33 | RecordedBPS = 0
34 | TotalBPS = 0
35 | OverflowCount = 0
36 | CamerasWithErrors = 0
37 | CamerasNotConnected = 0
38 | DatabaseRepairsInProgress = 0
39 | DatabaseWriteErrors = 0
40 | CamerasNotLicensed = 0
41 | }
42 |
43 | try {
44 | $svc = $recorder | Get-RecorderStatusService2
45 | $stats = $svc.GetVideoDeviceStatistics((Get-VmsToken), [guid[]]$enabledCameras.Id)
46 | $status = $svc.GetCurrentDeviceStatus((Get-VmsToken), [guid[]]$enabledCameras.Id)
47 | $liveStreams = $stats.VideoStreamStatisticsArray | Where-Object RecordingStream -eq $false
48 | $recordedStreams = $stats.VideoStreamStatisticsArray | Where-Object RecordingStream
49 | $recordedBPS = $recordedStreams | Measure-Object -Property BPS -Sum | Select-Object -ExpandProperty Sum
50 |
51 | $obj.CamerasStarted = ($status.CameraDeviceStatusArray | Where-Object Started).Count
52 | $obj.UsedSpaceInBytes = $stats | Measure-Object -Property UsedSpaceInBytes -Sum | Select-Object -ExpandProperty Sum
53 | $obj.RecordedBPS = $recordedBPS
54 | $obj.TotalBPS = $recordedBPS + ( $liveStreams | Measure-Object -Property BPS -Sum | Select-Object -ExpandProperty Sum )
55 | $obj.OverflowCount = ($status.CameraDeviceStatusArray | Where-Object ErrorOverflow).Count
56 | $obj.CamerasWithErrors = ($status.CameraDeviceStatusArray | Where-Object Error).Count
57 | $obj.CamerasNotConnected = ($status.CameraDeviceStatusArray | Where-Object ErrorNoConnection).Count
58 | $obj.DatabaseRepairsInProgress = ($status.CameraDeviceStatusArray | Where-Object DbRepairInProgress).Count
59 | $obj.DatabaseWriteErrors = ($status.CameraDeviceStatusArray | Where-Object ErrorWritingGop).Count
60 | $obj.CamerasNotLicensed = ($status.CameraDeviceStatusArray | Where-Object CamerasNotLicensed).Count
61 | }
62 | catch {
63 | Write-Error -Exception $_.Exception -Message "Error collecting statistics from $($recorder.Name) ($($recorder.Hostname))"
64 | }
65 |
66 | Write-Output $obj
67 | }
68 | catch {
69 | Write-Error -Exception $_.Exception -Message "Unexpected error: $($_.Message). $($recorder.Name) ($($recorder.Hostname)) will not be included in the report."
70 | }
71 | finally {
72 | $svc.Dispose()
73 | }
74 | }
75 | }
76 |
77 | process {
78 | $progressParams = @{
79 | Activity = $MyInvocation.MyCommand.Name
80 | CurrentOperation = ''
81 | PercentComplete = 0
82 | Completed = $false
83 | }
84 |
85 | if ($null -eq $RecordingServer) {
86 | $RecordingServer = Get-VmsRecordingServer
87 | }
88 |
89 | try {
90 | foreach ($recorder in $RecordingServer) {
91 | $ps = [powershell]::Create()
92 | $ps.RunspacePool = $runspacepool
93 | $asyncResult = $ps.AddScript($process).AddParameters(@{
94 | Recorder = $recorder
95 | }).BeginInvoke()
96 | $threads.Add([pscustomobject]@{
97 | PowerShell = $ps
98 | Result = $asyncResult
99 | })
100 | }
101 |
102 | if ($threads.Count -eq 0) {
103 | return
104 | }
105 |
106 | $progressParams.CurrentOperation = 'Processing requests for recorder information'
107 | $completedThreads = New-Object System.Collections.Generic.List[pscustomobject]
108 | $totalJobs = $threads.Count
109 | while ($threads.Count -gt 0) {
110 | $progressParams.PercentComplete = ($totalJobs - $threads.Count) / $totalJobs * 100
111 | $progressParams.Status = "Processed $($totalJobs - $threads.Count) out of $totalJobs requests"
112 | Write-Progress @progressParams
113 | foreach ($thread in $threads) {
114 | if ($thread.Result.IsCompleted) {
115 | $thread.PowerShell.EndInvoke($thread.Result)
116 | $thread.PowerShell.Dispose()
117 | $completedThreads.Add($thread)
118 | }
119 | }
120 | $completedThreads | Foreach-Object { [void]$threads.Remove($_)}
121 | $completedThreads.Clear()
122 | if ($threads.Count -eq 0) {
123 | break;
124 | }
125 | Start-Sleep -Seconds 1
126 | }
127 | }
128 | finally {
129 | if ($threads.Count -gt 0) {
130 | Write-Warning "Stopping $($threads.Count) running PowerShell instances. This may take a minute. . ."
131 | foreach ($thread in $threads) {
132 | $thread.PowerShell.Dispose()
133 | }
134 | }
135 | $runspacepool.Close()
136 | $runspacepool.Dispose()
137 | $progressParams.Completed = $true
138 | Write-Progress @progressParams
139 | }
140 | }
141 | }
--------------------------------------------------------------------------------
/Samples/Reporting/Get-RoleReport.ps1:
--------------------------------------------------------------------------------
1 | function Get-RoleReport {
2 | <#
3 | .SYNOPSIS
4 | Gets a list of all cameras and the permissions associated with the specified role
5 | .DESCRIPTION
6 | Device permissions are saved either as "overall security attributes" at the role level, or they
7 | are associated with each individual device, or a mix of the two. This report helps consolidate
8 | permissions into a verbose report where each row represents a role and it's effective permissions
9 | on a specific camera.
10 | .EXAMPLE
11 | PS C:\> Get-RoleReport -RoleName 'Guards' | Export-Csv ~\Desktop\Role-Report.csv
12 | Creates a CSV containing a list of all devices the 'Guards' role has at least 'GENERIC_READ' access to.
13 | .EXAMPLE
14 | PS C:\> Get-RoleReport -IncludeNoAccess | Export-Csv ~\Desktop\Role-Report.csv
15 | Creates a CSV containing a list of all roles and their permissions on all devices. Devices where the role has no access will be included in the report.
16 | .NOTES
17 | This report is not meaningful for the Administrator role, so if your RoleName filter returns only the built-in Administrators role, you will receive an error.
18 | #>
19 | [CmdletBinding()]
20 | param(
21 | # Specifies the name of the role. Supports wildcard characters. Default is * and returns all roles.
22 | [Parameter()]
23 | [ValidateNotNullOrEmpty()]
24 | [string]
25 | $RoleName = '*',
26 |
27 | # Specifies that rows where the role lacks read access should still be included in the report.
28 | [Parameter()]
29 | [switch]
30 | $IncludeNoAccess
31 | )
32 |
33 | process {
34 | $roles = Get-VmsRole -Name $RoleName -ErrorAction Stop | Where-Object RoleType -eq UserDefined
35 | $cameras = Get-VmsCamera
36 | if ($null -eq $roles -or $roles.Count -eq 0) {
37 | Write-Error "Cannot find user-defined role '$RoleName' because it does not exist."
38 | }
39 |
40 | $overallSecurity = @{}
41 | foreach($role in $roles) {
42 | $securityAttributes = @{}
43 | $invokeInfo = $role.ChangeOverallSecurityPermissions('623d03f8-c5d5-46bc-a2f4-4c03562d4f85')
44 | foreach ($key in $invokeInfo.GetPropertyKeys()) {
45 | $securityAttributes.$key = $invokeInfo.GetProperty($key)
46 | }
47 | $overallSecurity.($role.Id) = $securityAttributes
48 | }
49 |
50 | $rowsCompleted = 0
51 | $totalRows = $cameras.Count * $roles.Count
52 | try {
53 | foreach ($camera in $cameras) {
54 | foreach ($role in $roles) {
55 | Write-Progress -Activity "Auding camera permissions per role" -PercentComplete ([int]($rowsCompleted / $totalRows * 100))
56 | $acl = $camera | Get-DeviceAcl -Role $role
57 | if ($IncludeNoAccess -or $overallSecurity.($role.Id).'GENERIC_READ' -eq 'Allow' -or $acl.SecurityAttributes.GENERIC_READ -eq 'True') {
58 | $row = [ordered]@{
59 | Role = $role.Name
60 | Camera = $camera.Name
61 | }
62 | foreach ($key in $acl.SecurityAttributes.Keys) {
63 | $overallSecurityAttribute = $overallSecurity.($role.Id).$key
64 | if ($overallSecurityAttribute -eq 'None') {
65 | $row.$key = $acl.SecurityAttributes.$key
66 | }
67 | else {
68 | $row.$key = $overallSecurityAttribute -eq 'Allow'
69 | }
70 | }
71 | $row.RoleId = $role.Id
72 | $row.CameraId = $camera.Id
73 |
74 | Write-Output ([pscustomobject]$row)
75 | }
76 | $rowsCompleted++
77 | }
78 | }
79 | }
80 | finally {
81 | Write-Progress -Activity "Auding camera permissions per role" -Completed
82 | }
83 | }
84 | }
--------------------------------------------------------------------------------
/Samples/Reporting/Get-VmsCameraDiskUsage.ps1:
--------------------------------------------------------------------------------
1 | #Requires -Modules MilestonePSTools
2 | function Get-VmsCameraDiskUsage {
3 | <#
4 | .SYNOPSIS
5 | Gets the amount of space used for all cameras
6 | .DESCRIPTION
7 | Gets the amount of space used for all cameras
8 | .EXAMPLE
9 | PS C:\> Get-VmsCameraDiskUsage | Out-GridView
10 | Gets the disk usage information for all cameras and all storages used by those cameras and displays them in a grid view
11 | #>
12 |
13 | begin {
14 | $offlineRecorders = New-Object System.Collections.Generic.List[PSCustomObject]
15 | $svc = Get-IServerCommandService
16 | $config = $svc.GetConfiguration((Get-Token))
17 | }
18 |
19 | process {
20 | #$config.Recorders | ForEach-Object {
21 | foreach ($recInfo in $config.Recorders) {
22 | #$recInfo = $_
23 | $statusSvc = Get-RecorderStatusService2 -RecordingServer (Get-VmsRecordingServer -Id $recInfo.RecorderId) -ErrorAction SilentlyContinue
24 | try {
25 | $stats = $statusSvc.GetVideoDeviceStatistics((Get-Token), $recInfo.Cameras.DeviceId)
26 | } catch {
27 | $offlineRecorders.Add($recInfo.Name)
28 | }
29 |
30 | $statsHash = @{}
31 | $stats | ForEach-Object {
32 | $statsHash[$_.DeviceId] = $_
33 | }
34 |
35 | foreach ($hw in $recInfo.Hardware){
36 | if ($hw.Disabled -eq $true) {
37 | Break
38 | }
39 | foreach ($cam in Get-VmsCamera -Hardware (Get-VmsHardware -Id $hw.HardwareId) -EnableFilter Enabled) {
40 | if (-not [string]::IsNullOrEmpty($statsHash[[guid]$cam.Id])) {
41 | [pscustomobject]@{
42 | Camera = $cam.Name
43 | Hardware = $hw.Name
44 | Recorder = $recInfo.Name
45 | 'UsedSpace(GB)' = [math]::Round(($statsHash[[guid]$cam.Id] | Select-Object -Expand UsedSpaceInBytes) / 1GB,2)
46 | }
47 | } else {
48 | [pscustomobject]@{
49 | Camera = $cam.Name
50 | Hardware = $hw.Name
51 | Recorder = $recInfo.Name
52 | 'UsedSpace(GB)' = "Unknown"
53 | }
54 | }
55 | }
56 | }
57 | }
58 | }
59 |
60 | end {
61 | if (-not [string]::IsNullOrEmpty($offlineRecorders[0])) {
62 | foreach ($offlineRecorder in $offlineRecorders) {
63 | Write-Warning "Recording Server $($offlineRecorder) was unavailable and was skipped."
64 | }
65 | }
66 | }
67 | }
--------------------------------------------------------------------------------
/Samples/Reporting/README - sp-MX.md:
--------------------------------------------------------------------------------
1 | # Informar es divertido
2 |
3 | Las funciones y los ejemplos de esta carpeta muestran los métodos para recuperar información con fines de generación de informes. Probablemente existan tantos conjuntos diferentes de datos deseados por los clientes y operadores de VMS como instalaciones de VMS en el mundo, por lo que estas herramientas deben combinarse o utilizarse como inspiración según sea necesario para que usted obtenga los datos que necesita.
4 |
5 | ## Una nota sobre las interfaces no compatibles
6 |
7 | Milestone proporciona una gran cantidad de funcionalidades en MIP SDK. Casi todo el módulo MilestonePSTools está escrito mediante componentes puros de MIP SDK. Cambiar y ampliar MIP SDK al tiempo que se maximiza la compatibilidad con los sistemas anteriores o posteriores y se minimizan los cambios importantes es un verdadero desafío y tengo un profundo respeto por el equipo del Kit de desarrollo de software (SDK) por sus esfuerzos para llevar la funcionalidad tan necesaria a las manos de desarrolladores externos.
8 | Sin embargo, existen algunas funciones que el MIP SDK aún no puede realizar y dado que un número muy pequeño de usuarios necesita o desea acceder a estas funciones, el equipo del SDK tardará algún tiempo en abordar esas necesidades e implementar nuevas características con soporte a largo plazo. Mientras tanto, con un poco de investigación y persuasión, ocasionalmente podemos superar estas limitaciones utilizando API que no estaban destinadas a ser utilizadas por el público.
9 | Encontrará varias funciones con ciertas interfaces que no son intuitivas y carecen de documentación en los documentos en línea del MIP SDK. Estas funciones estarán claramente documentadas en los comentarios de ayuda y no se promete absolutamente ningún soporte cuando las interfaces no compatibles utilizadas por estas funciones cambian entre versiones y la compatibilidad con versiones anteriores o posteriores se pierda o empeore.
10 |
11 | ## Get-VmsCameraDiskUsage
12 |
13 | Una solicitud común que actualmente no se ha cumplido con MIP SDK es la capacidad de recuperar la cantidad de almacenamiento utilizada por cámara. Es posible extraer el espacio utilizado/disponible para una ubicación de almacenamiento en directo o de archivo, pero no cámara por cámara.
14 |
15 | –“Pero la información está en Management Client", le escucho decir. “Entonces, ¿por qué no podemos obtenerlo con el SDK? ¿El Management Client no usa el SDK?” Bueno, en realidad no, no es así. Gran parte del Management Client hace uso de interfaces internas donde los desarrolladores tienen la flexibilidad de agregar/cambiar capacidades entre versiones mientras mantienen las interfaces MIP SDK más estables con el tiempo. De todos modos, mucho de lo que se hace en Management Client es irrelevante para la mayoría de los desarrolladores de integración de MIP SDK.
16 |
17 | En pocas palabras, esta función usa una interfaz de cliente WCF que no es compatible para uso externo. El método de uso de esta interfaz es muy similar a las otras interfaces _compatibles_ como IConfigurationService, por ejemplo, y técnicamente cualquier persona que conozca la URL web del servicio puede usarla. La autenticación de la interfaz es la misma que cualquier otra interfaz WCF de Milestone y esta función autentifica y usa esta API de forma transparente en su nombre. Así es como se ve la salida: Los valores de UsedSpace están en bytes, y simplemente ignore los valores de AvailableSpace por ahora. Al parecer puede haber algún tipo de error de desbordamiento en el que estos valores no tengan mucho sentido; es probable que el campo no se use en Management Client. Si necesita conocer AvailableSpace, navegue hasta los objetos de almacenamiento/archivo `$RecordingServer.StorageFolder.Storages[$i]` or `$RecordingServer.StorageFolder.Storages[$i].ArchiveStorageFolder.ArchiveStorages[$j]`.
18 |
19 | ```powershell
20 | PS C:\> Get-Hardware | Get-Camera | Get-VmsCameraDiskUsage | Format-Table *
21 |
22 | CameraId StorageId RecorderId UsedSpace AvailableSpace IsOnline
23 | -------- --------- ---------- --------- -------------- --------
24 | 3c25ff7a-7c76-49bd-bda0-116f5e051e48 cce0ef0f-36b1-4221-964d-e5de1f641741 72080191-d39d-4229-b151-65bcd740c393 4513 157586161664 True
25 | afa846f8-846c-4932-b206-c1c6c24e0b5f def84b4a-1e7a-4f99-ac5f-671ae76d520b 72080191-d39d-4229-b151-65bcd740c393 4519 157586161664 True
26 | c2733741-0c71-4197-89d2-030339c7a9ea def84b4a-1e7a-4f99-ac5f-671ae76d520b 72080191-d39d-4229-b151-65bcd740c393 161278294 157586161664 True
27 | c2733741-0c71-4197-89d2-030339c7a9ea e96f206b-3ecd-421a-906b-e32393b4bedb 72080191-d39d-4229-b151-65bcd740c393 705524466 12260420734976 True
28 | c2733741-0c71-4197-89d2-030339c7a9ea 2358075f-2291-4c43-86c8-9d6351f2ed59 72080191-d39d-4229-b151-65bcd740c393 71165280 197973835776 True
29 |
30 | PS C:\>
31 | ```
32 |
--------------------------------------------------------------------------------
/Samples/Reporting/README.md:
--------------------------------------------------------------------------------
1 | # Reporting is fun
2 |
3 | The functions and examples in this folder demonstrate methods of retrieving information for reporting purposes. I suspect there are as many different sets of data desired by customers and operators of a VMS as there are VMS installations in the world, so these tools should be combined and/or used as inspiration to the extent necessary to get the data you need.
4 |
5 | ## Note about unsupported interfaces
6 |
7 | Milestone provides a ton of functionality in the MIP SDK. Almost the entire MilestonePSTools module is written using pure MIP SDK components. Changing and extending MIP SDK while maximizing backward/forward compatibility and minimizing breaking changes is a challenge and I have a deep respect for the team for their efforts to bring much needed functionality to the hands of 3rd party developers.
8 |
9 | There are things the MIP SDK cannot yet do however, and since a very small number of users need/want access to these things, it will take some time for the SDK team to address those needs and implement new features with long term support. Meanwhile, with some investigation and persuasion, we can occasionally overcome these limitations using API's that were never intended to be used by the public.
10 |
11 | You will find a small handful of functions where certain interfaces are used that are unintuitive and lack documentation in the online MIP SDK docs. These functions will be clearly documented in the help comments, and absolutely no support is promised when the unsupported interfaces used by these functions changes between versions and backwards/forwards compatibility is lost or worse.
12 |
13 | ## Get-VmsCameraDiskUsage
14 |
15 | One common request that is currently unfulfilled by MIP SDK is the ability to retrieve the amount of storage used on a per-camera basis. It's possible to pull the space used/available for a live or archive storage location, but not on a camera by camera basis.
16 |
17 | I hear you - the information is in the Management Client right? So why can't we get it with the SDK? Doesn't the Management Client use the SDK? Well, no actually! A lot of the Management Client makes use of internal interfaces where developers have the flexibility to add/change capabilities between versions while keeping the MIP SDK interfaces more stable over time. A lot of what is done in the Management Client is irrelevant to most MIP SDK integration developers anyway.
18 |
19 | Long story short, this function uses a WCF client interface that is not supported for external use. The method of using this interface is very similar to the other _supported_ interfaces like the IConfigurationService for example and technically anyone who knows the web URL for the service can use it. The authentication for the interface is the same as any other Milestone WCF interface and this function transparently authenticates and uses this API on your behalf. Here's what the output looks like. The UsedSpace values are in bytes, and just ignore the AvailableSpace values for now. It seems like there may be some sort of overflow error where these values don't make a lot of sense - the field is probably not used in Management Client. If you need to know the AvailableSpace you should navigate down to the storage/archive objects under `$RecordingServer.StorageFolder.Storages[$i]` or `$RecordingServer.StorageFolder.Storages[$i].ArchiveStorageFolder.ArchiveStorages[$j]`.
20 |
21 | ```powershell
22 | PS C:\> Get-Hardware | Get-Camera | Get-VmsCameraDiskUsage | Format-Table *
23 |
24 | CameraId StorageId RecorderId UsedSpace AvailableSpace IsOnline
25 | -------- --------- ---------- --------- -------------- --------
26 | 3c25ff7a-7c76-49bd-bda0-116f5e051e48 cce0ef0f-36b1-4221-964d-e5de1f641741 72080191-d39d-4229-b151-65bcd740c393 4513 157586161664 True
27 | afa846f8-846c-4932-b206-c1c6c24e0b5f def84b4a-1e7a-4f99-ac5f-671ae76d520b 72080191-d39d-4229-b151-65bcd740c393 4519 157586161664 True
28 | c2733741-0c71-4197-89d2-030339c7a9ea def84b4a-1e7a-4f99-ac5f-671ae76d520b 72080191-d39d-4229-b151-65bcd740c393 161278294 157586161664 True
29 | c2733741-0c71-4197-89d2-030339c7a9ea e96f206b-3ecd-421a-906b-e32393b4bedb 72080191-d39d-4229-b151-65bcd740c393 705524466 12260420734976 True
30 | c2733741-0c71-4197-89d2-030339c7a9ea 2358075f-2291-4c43-86c8-9d6351f2ed59 72080191-d39d-4229-b151-65bcd740c393 71165280 197973835776 True
31 |
32 | PS C:\>
33 | ```
34 |
--------------------------------------------------------------------------------
/Samples/Rules/Get-VmsRule.ps1:
--------------------------------------------------------------------------------
1 | function Get-VmsRule {
2 | <#
3 | .SYNOPSIS
4 | Gets all VMS Rules available through Milestone's Configuration API.
5 | .DESCRIPTION
6 | Version 2020 R1 introduced support for rules in the Configuration API. This function is an example of how the Configuration API
7 | function Get-ConfigurationItem can be used to retrieve all the rules from the /RuleFolder configuration api path.
8 | .EXAMPLE
9 | PS C:\> Get-VmsRule -Name Default* | Select DisplayName, Path
10 | Gets all default rules from the VMS and displays only the name and path of the rule objects
11 | .EXAMPLE
12 | PS C:\> Get-VmsRule -Name 'Test Rule #1' | Select DisplayName, Path
13 | Gets a single rule named 'Test Rule #1' or emits an error if this rule does not exist since no wildcard is present in the Name parameter.
14 | .PARAMETER Name
15 | Specifies the display name, or partial name of the rule(s). Wildcards are supported and the default is to return all rules.
16 | .NOTES
17 | Support for rules was introduced in version 2020 R1, and early support for rules is quite limited. Check the MIP SDK Configuration API documentation for more information about rules.
18 | #>
19 | [CmdletBinding()]
20 | param(
21 | [Parameter(ValueFromPipelineByPropertyName)]
22 | [Alias('DisplayName')]
23 | [string]
24 | $Name = '*'
25 | )
26 |
27 | begin {
28 | $ms = Get-VmsManagementServer -ErrorAction Ignore
29 | if ($null -eq $ms) {
30 | throw "You must be connected to a Management Server. Use Connect-ManagementServer and then try again."
31 | }
32 | if ([version]$ms.Version -lt [version]'20.1') {
33 | throw "Support for rules in Milestone's Configuration API was not added until version 2020 R1. You must upgrade the Management Server to use this function."
34 | }
35 | }
36 |
37 | process {
38 | $matchingRuleCount = 0
39 | Get-ConfigurationItem -Path /RuleFolder -ChildItems | Where-Object DisplayName -like $Name | Foreach-Object {
40 | $matchingRuleCount++
41 | Write-Output $_
42 | }
43 |
44 | if ($matchingRuleCount -lt 1 -and ![wildcardpattern]::ContainsWildcardCharacters($Name)) {
45 | Write-Error "Rule not found matching name '$Name'"
46 | }
47 | }
48 | }
--------------------------------------------------------------------------------
/Samples/Rules/README sp-MX.md:
--------------------------------------------------------------------------------
1 | # Trabajar con reglas
2 |
3 | Milestone introdujo soporte para trabajar con reglas en la versión 2020 R1, y el soporte se ha expandido en las versiones lanzadas desde entonces. Inicialmente había muchas acciones de regla que, si estaban presentes, evitarían que la regla se devolviera al solicitar elementos secundarios de /RuleFolder. En la versión 2020 R3 se admiten las acciones de reglas más comunes y la funcionalidad es mucho más utilizable.
4 |
5 | Dicho esto, actualmente no hay funciones/cmdlets integrados en MilestonePSTools para manipular reglas desde PowerShell. Parte de esto se debe al tiempo limitado disponible para extender MilestonePSTools, la otra parte es el desafío de diseñar funciones simples para trabajar con un concepto e interfaz complejos.
6 |
7 | Las secuencias de comandos de esta carpeta son ejemplos funcionales de cómo puede trabajar con reglas y se agregarán más adelante a medida que el tiempo lo permita. Estas funciones pueden llegar al módulo MilestonePSTools, o tal vez se creará un submódulo como "MilestonePSTools.Rules", ya que cualquier función desarrollada para trabajar con reglas son efectivamente solo arreglos creativos de las funciones Get-ConfigurationItem, Invoke-Item y Set-ConfigurationItem que a su vez envuelven el proxy WCF IConfigurationService. Es posible que tenga una opinión diferente sobre cómo se podría implementar la compatibilidad con las reglas en PowerShell, y al mantener nuestras versiones de opinión fuera del espacio de nombres del módulo MilestonePSTools, puede ser más fácil para usted hacer las cosas a su manera sin preocuparse por las colisiones de nombres de funciones.
8 |
9 |
10 | ## Get-VmsRule
11 |
12 | Esta función es un contenedor muy simple alrededor de la función `Get-ConfigurationItem` existente, que es a su vez un contenedor alrededor del cliente WCF IConfigurationService que interactúa directamente con la API de configuración en el servidor de gestión. He agregado el prefijo Vms ya que existe una buena posibilidad de que `Get-Rule` pueda colisionar con cualquier número de otros módulos (piense en firewalls, antivirus, etc.).
13 |
14 | Admite comodines y tiene un aspecto similar al de esto cuando se importa a la sesión de PowerShell y se llama a un conjunto predeterminado de reglas de VMS.
15 |
16 | ```powershell
17 | PS C:\> Get-VmsRule | select DisplayName, ItemType, Path, @{ Name = 'Enabled'; Expression = { $_.EnableProperty.Enabled } }
18 |
19 | DisplayName ItemType Path Enabled
20 | ----------- -------- ---- -------
21 | Default Start Audio Feed Rule Rule Rule[162fdb73-e0dc-4a2d-baa6-54b0d2b16684] True
22 | Default Record on Motion Rule Rule Rule[3307c095-a170-49d3-ab11-1baf8783acb9] True
23 | Default Record on Bookmark Rule Rule Rule[4ce46d3e-c4c7-46b2-a580-fc98cdc24611] True
24 | Default Goto Preset when PTZ is done Rule Rule Rule[7aa28f82-f3ff-4398-9781-061299178c7f] False
25 | Default Start Feed Rule Rule Rule[e34e9353-e6f5-43ff-8e8f-d4a558159b2b] True
26 | Default Record on Request Rule Rule Rule[fa2f8209-8d9b-4580-a6eb-17e58c99a610] True
27 | Default Start Metadata Feed Rule Rule Rule[fe61841f-544e-44d7-b7a8-cd709195162d] True
28 |
29 |
30 |
31 | PS C:\>
32 | ```
33 |
34 | ## Remove-VmsRule
35 |
36 | Esta es una función un poco más compleja que Get-VmsRule, pero sigue siendo un contenedor relativamente simple alrededor de las funciones Get-ConfigurationItem e Invoke-Method que utilizan la API de configuración para modificar la configuración de VMS. Esto es lo que se vería al eliminar la “Regla de fuente de audio de inicio predeterminada” usando comodines en el nombre de la regla (si realmente desea realizar la eliminación, puede omitir el switch WhatIf).
37 |
38 | ```powershell
39 | PS C:\> Remove-VmsRule -Name 'Default*Audio*' -WhatIf
40 | What if: Performing the operation "Remove Rule" on target "Default Start Audio Feed Rule".
41 |
42 | PS C:\>
43 | ```
44 |
--------------------------------------------------------------------------------
/Samples/Rules/README.md:
--------------------------------------------------------------------------------
1 | # Working with Rules
2 |
3 | Milestone introduced support for working with rules in version 2020 R1, and that support has expanded in the versions released since then. Initially there were many rule actions that, if present, would prevent the rule from being returned when requesting child items from /RuleFolder. In version 2020 R3 the most common rule actions are supported and the functionality is much more usable.
4 |
5 | That said - there are currently no functions/cmdlets built-in to MilestonePSTools for manipulating rules from PowerShell. Part of this is limited time available to spend on extending MilestonePSTools, and another is the challenge of designing simple functions to work with a fairly complex concept and interface.
6 |
7 | The scripts in this folder are functional examples of how you can work with rules, and more will be added later as time permits. These functions may make their way into the MilestonePSTools module, or perhaps a submodule will be created like "MilestonePSTools.Rules" since any functions developed for working with rules are effectively just creative arrangements of the Get-ConfigurationItem, Invoke-Item, and Set-ConfigurationItem functions which in turn are wrapping the IConfigurationService WCF proxy. You may have a different opinion on how support for rules in PowerShell should be implemented, and by keeping our opinionated versions out of the MilestonePSTools module namespace, it would be easier for you to do things your way without worrying about function name collisions.
8 |
9 | ## Get-VmsRule
10 |
11 | This function is a really simple wrapper around the existing `Get-ConfigurationItem` function which is itself a wrapper around the IConfigurationService WCF client which interfaces directly with the Configuration API on the Management Server. I added the Vms prefix since there's a good chance `Get-Rule` could collide with any number of other modules (think firewalls, antivirus, etc).
12 |
13 | It supports wildcards and looks something like this when imported into your PowerShell session and called against a default set of VMS rules.
14 |
15 | ```powershell
16 | PS C:\> Get-VmsRule | select DisplayName, ItemType, Path, @{ Name = 'Enabled'; Expression = { $_.EnableProperty.Enabled } }
17 |
18 | DisplayName ItemType Path Enabled
19 | ----------- -------- ---- -------
20 | Default Start Audio Feed Rule Rule Rule[162fdb73-e0dc-4a2d-baa6-54b0d2b16684] True
21 | Default Record on Motion Rule Rule Rule[3307c095-a170-49d3-ab11-1baf8783acb9] True
22 | Default Record on Bookmark Rule Rule Rule[4ce46d3e-c4c7-46b2-a580-fc98cdc24611] True
23 | Default Goto Preset when PTZ is done Rule Rule Rule[7aa28f82-f3ff-4398-9781-061299178c7f] False
24 | Default Start Feed Rule Rule Rule[e34e9353-e6f5-43ff-8e8f-d4a558159b2b] True
25 | Default Record on Request Rule Rule Rule[fa2f8209-8d9b-4580-a6eb-17e58c99a610] True
26 | Default Start Metadata Feed Rule Rule Rule[fe61841f-544e-44d7-b7a8-cd709195162d] True
27 |
28 |
29 |
30 | PS C:\>
31 | ```
32 |
33 | ## Remove-VmsRule
34 |
35 | This is a slightly more complex function than Get-VmsRule, yet still a relatively simple wrapper around the Get-ConfigurationItem, and Invoke-Method functions which use the Configuration API to modify the VMS configuration. Here's what it would look like to remove the 'Default Start Audio Feed Rule' using wildcards in the rule name. If you wanted to actually perform the removal, you can omit the -WhatIf switch.
36 |
37 | ```powershell
38 | PS C:\> Remove-VmsRule -Name 'Default*Audio*' -WhatIf
39 | What if: Performing the operation "Remove Rule" on target "Default Start Audio Feed Rule".
40 |
41 | PS C:\>
42 | ```
43 |
--------------------------------------------------------------------------------
/Samples/Rules/Remove-VmsRule.ps1:
--------------------------------------------------------------------------------
1 | function Remove-VmsRule {
2 | <#
3 | .SYNOPSIS
4 | Removes all VMS Rules with DisplayName's matching the provided name
5 | .DESCRIPTION
6 | Version 2020 R1 introduced support for rules in the Configuration API. This function is an example of how the Configuration API
7 | functions can be used to retrieve all the rules from the /RuleFolder configuration api path, and remove the matching rules by
8 | using Invoke-Method to call a Configuration API method available on the /RuleFolder object.
9 |
10 | This advanced function supports "ShouldProcess" so you may use the -WhatIf parameter to see what would happen if the -WhatIf switch
11 | were omitted.
12 | .EXAMPLE
13 | PS C:\> Remove-VmsRule -Name 'Test Rule #1' -WhatIf
14 | Shows what would happen if you used the same command without the -WhatIf switch
15 | .EXAMPLE
16 | PS C:\> Remove-VmsRule -Name 'Test Rule #1'
17 | Removes the 'Test Rule #1' rule from the Milestone VMS or emits an error if the rule could not be found.
18 | .PARAMETER Name
19 | Specifies the display name, or partial name of the rule(s). Wildcards are supported and the default is to return all rules.
20 | .NOTES
21 | Support for rules was introduced in version 2020 R1, and early support for rules is quite limited. Check the MIP SDK Configuration API documentation for more information about rules.
22 | #>
23 | [CmdletBinding(SupportsShouldProcess)]
24 | param(
25 | [Parameter(Mandatory, ValueFromPipelineByPropertyName)]
26 | [Alias('DisplayName')]
27 | [ValidateNotNullOrEmpty()]
28 | [string]
29 | $Name
30 | )
31 |
32 | begin {
33 | $ms = Get-VmsManagementServer -ErrorAction Ignore
34 | if ($null -eq $ms) {
35 | throw "You must be connected to a Management Server. Use Connect-ManagementServer and then try again."
36 | }
37 | if ([version]$ms.Version -lt [version]'20.1') {
38 | throw "Support for rules in Milestone's Configuration API was not added until version 2020 R1. You must upgrade the Management Server to use this function."
39 | }
40 | }
41 |
42 | process {
43 | $ruleFolder = Get-ConfigurationItem -Path /RuleFolder -Recurse
44 | $rules = [array]($ruleFolder.Children | Where-Object DisplayName -like $Name)
45 | if ($rules.Count -lt 1 -and ![wildcardpattern]::ContainsWildcardCharacters($Name)) {
46 | Write-Error "Rule not found matching name '$Name'"
47 | return
48 | }
49 | foreach ($rule in $rules) {
50 | if ($PSCmdlet.ShouldProcess($rule.DisplayName, 'Remove Rule')) {
51 | $invokeInfo = $ruleFolder | Invoke-Method -MethodId RemoveRule
52 | $invokeInfo | Set-ConfigurationItemProperty -Key 'RemoveRulePath' -Value $rule.Path
53 | $invokeInfo | Invoke-Method -MethodId RemoveRule
54 | }
55 | }
56 | }
57 | }
--------------------------------------------------------------------------------
/Samples/Scheduled-Video-Export/README sp-MX.md:
--------------------------------------------------------------------------------
1 | ## Exportación de video programada
2 |
3 |
4 |  5 |
6 |
7 | En este ejemplo usaremos el cmdlet Register-ScheduledJob incluido en PowerShell para crear una tarea programada en Windows que ejecute nuestro script de exportación todos los días a medianoche.
8 |
9 | El siguiente ejemplo se puede copiar y pegar en una instancia elevada de PowerShell o PowerShell ISE. Asegúrese de ejecutar PowerShell como administrador; de lo contrario, Register-ScheduledJob producirá un error.
10 |
11 | La secuencia de comandos recopilará la dirección y las credenciales de VMS, y le pedirá una palabra clave de selección de cámara. Si desea exportar todas las cámaras con la palabra "Ascensor" en el nombre, puede ingresarla como palabra clave. La palabra clave no distingue entre mayúsculas y minúsculas. A continuación, se le pedirá una ruta de destino para guardar las exportaciones. Cada exportación se almacenará aquí en una subcarpeta con la fecha marcada. Antes de registrar el trabajo programado, se validarán las credenciales y la selección de la cámara. Si no se puede realizar una conexión o no hay cámaras que coincidan con la palabra clave proporcionada, no se creará el trabajo programado.
12 |
13 | El bit $expandingString puede parecer algo extraño. Lo que estamos haciendo aquí es crear un bloque de secuencia de comandos donde las variables específicas se expanden en sus valores reales antes de almacenarse en el trabajo programado. Esto nos permite pasar las respuestas desde la parte superior de la secuencia de comandos al cuerpo del scriptblock llamado por el trabajo programado.
14 |
15 | Al hacerlo de esta manera, podemos pedirle sus credenciales de VMS sin exponer su contraseña o tener que conservarla en el disco en forma cifrada. Su contraseña se recopila como una cadena segura y, a continuación, se convierte en una cadena larga que solo puede descifrar el usuario de Windows con el que está ejecutando la secuencia de comandos.
16 |
17 |
18 | ```powershell
19 | $InformationPreference = 'Continue'
20 | $server = Read-Host -Prompt "Server Address"
21 | $username = Read-Host -Prompt "Username"
22 | $password = Read-Host -Prompt "Password" -AsSecureString | ConvertFrom-SecureString
23 |
24 | do {
25 | $isBasic = Read-Host -Prompt "Basic user? (y/n)"
26 | } while ('y', 'n' -notcontains $isBasic)
27 |
28 | $keyword = Read-Host -Prompt "Keyword for camera selection"
29 |
30 | do {
31 | $destination = Read-Host -Prompt "Export path"
32 | } while (-not (Test-Path -Path $destination))
33 |
34 | try {
35 | Write-Information "Validating credentials and camera selection before we register the scheduled job"
36 | Write-Information "Connecting to $server as $username"
37 | $connected = $false
38 | Connect-ManagementServer -Server $server -Credential ([pscredential]::new($username, ($password | ConvertTo-SecureString))) -BasicUser:($isBasic -eq 'y')
39 | Write-Information "Connected"
40 | $connected = $true
41 |
42 | Write-Information "Verifying there is at least one camera with a name matching keyword '$keyword'"
43 | $cameras = Get-Hardware | Where-Object Enabled | Get-Camera | Where-Object { $_.Enabled -and $_.Name -like "*$keyword*" }
44 | if ($null -eq $cameras) {
45 | throw "No cameras found matching keyword '$keyword'"
46 | }
47 | else {
48 | Write-Information "Identified $($cameras.Count) cameras matching keyword '$keyword'"
49 | }
50 | }
51 | catch {
52 | throw
53 | }
54 | finally {
55 | if ($connected) {
56 | Disconnect-ManagementServer
57 | }
58 | }
59 |
60 |
61 | $expandingString = "
62 | `$pass = '$password' | ConvertTo-SecureString
63 | `$cred = [pscredential]::new('$username', `$pass)
64 | `$isBasic = '$isBasic' -eq 'y'
65 | Connect-ManagementServer -Server $server -Credential `$cred -BasicUser:`$isBasic
66 | `$cameras = Get-Hardware | Where-Object Enabled | Get-Camera | Where-Object { `$_.Enabled -and `$_.Name -like '*$keyword*' }
67 |
68 | `$start = (Get-Date -Hour 13 -Minute 0 -Second 0).AddDays(-1)
69 | `$end = (Get-Date -Hour 15 -Minute 0 -Second 0).AddDays(-1)
70 |
71 | Start-Export -CameraIds `$cameras.Id -StartTime `$start -EndTime `$end -Format DB -Path ""$destination\`$(`$start.ToString('yyyy-MM-dd'))""
72 |
73 | Disconnect-ManagementServer
74 | "
75 |
76 | $script = [scriptblock]::Create($expandingString)
77 | $trigger = New-JobTrigger -Daily -DaysInterval 1 -At (Get-Date -Hour 0 -Minute 0)
78 | Register-ScheduledJob -Name "Automated Export Example" -ScriptBlock $script -Trigger $trigger
79 | ```
80 |
--------------------------------------------------------------------------------
/Samples/Scheduled-Video-Export/README.md:
--------------------------------------------------------------------------------
1 | ## Scheduled Video Export
2 |
3 |
4 |
5 |
6 |
7 | In this sample we will use the Register-ScheduledJob cmdlet included in PowerShell to create a
8 | scheduled task in Windows which runs our export script every day at midnight.
9 |
10 | The sample below can be copied and pasted into an elevated PowerShell or PowerShell ISE instance.
11 | Make sure to run PowerShell as Administrator, otherwise the Register-ScheduledJob will throw an
12 | error.
13 |
14 | The script will collect the VMS address, credentials, and ask you for a camera selection keyword.
15 | If you want to export all cameras with the word "Elevator" in the name, you can enter that as a
16 | keyword. They keyword is case-insensitive. You will then be asked for a destination path to save
17 | exports. Each export will be stored in a date-stamped subfolder here. And before we register the
18 | scheduled job, the credentials and camera selection will be validated. If a connection cannot be
19 | made or there are no cameras matching the provided keyword, the scheduled job will not be created.
20 |
21 | The $expandingString bit may look somewhat foreign. What we're doing here is creating a script
22 | block where specific variables are expanded into their actual values before being stored in the
23 | scheduled job. This is allowing us to pass the answers from the top of the script into the body
24 | of the scriptblock called by the scheduled job.
25 |
26 | By doing it this way, we're able to ask you for your VMS credentials without exposing your password
27 | or having to persist it to disk in encrypted form. Your password is collected as a secure string,
28 | then converted to a long string that can only be decrypted by the Windows user with which you're
29 | executing the script.
30 |
31 | ```powershell
32 | $InformationPreference = 'Continue'
33 | $server = Read-Host -Prompt "Server Address"
34 | $username = Read-Host -Prompt "Username"
35 | $password = Read-Host -Prompt "Password" -AsSecureString | ConvertFrom-SecureString
36 |
37 | do {
38 | $isBasic = Read-Host -Prompt "Basic user? (y/n)"
39 | } while ('y', 'n' -notcontains $isBasic)
40 |
41 | $keyword = Read-Host -Prompt "Keyword for camera selection"
42 |
43 | do {
44 | $destination = Read-Host -Prompt "Export path"
45 | } while (-not (Test-Path -Path $destination))
46 |
47 | try {
48 | Write-Information "Validating credentials and camera selection before we register the scheduled job"
49 | Write-Information "Connecting to $server as $username"
50 | $connected = $false
51 | Connect-ManagementServer -Server $server -Credential ([pscredential]::new($username, ($password | ConvertTo-SecureString))) -BasicUser:($isBasic -eq 'y')
52 | Write-Information "Connected"
53 | $connected = $true
54 |
55 | Write-Information "Verifying there is at least one camera with a name matching keyword '$keyword'"
56 | $cameras = Get-Hardware | Where-Object Enabled | Get-Camera | Where-Object { $_.Enabled -and $_.Name -like "*$keyword*" }
57 | if ($null -eq $cameras) {
58 | throw "No cameras found matching keyword '$keyword'"
59 | }
60 | else {
61 | Write-Information "Identified $($cameras.Count) cameras matching keyword '$keyword'"
62 | }
63 | }
64 | catch {
65 | throw
66 | }
67 | finally {
68 | if ($connected) {
69 | Disconnect-ManagementServer
70 | }
71 | }
72 |
73 |
74 | $expandingString = "
75 | `$pass = '$password' | ConvertTo-SecureString
76 | `$cred = [pscredential]::new('$username', `$pass)
77 | `$isBasic = '$isBasic' -eq 'y'
78 | Connect-ManagementServer -Server $server -Credential `$cred -BasicUser:`$isBasic
79 | `$cameras = Get-Hardware | Where-Object Enabled | Get-Camera | Where-Object { `$_.Enabled -and `$_.Name -like '*$keyword*' }
80 |
81 | `$start = (Get-Date -Hour 13 -Minute 0 -Second 0).AddDays(-1)
82 | `$end = (Get-Date -Hour 15 -Minute 0 -Second 0).AddDays(-1)
83 |
84 | Start-Export -CameraIds `$cameras.Id -StartTime `$start -EndTime `$end -Format DB -Path ""$destination\`$(`$start.ToString('yyyy-MM-dd'))""
85 |
86 | Disconnect-ManagementServer
87 | "
88 |
89 | $script = [scriptblock]::Create($expandingString)
90 | $trigger = New-JobTrigger -Daily -DaysInterval 1 -At (Get-Date -Hour 0 -Minute 0)
91 | Register-ScheduledJob -Name "Automated Export Example" -ScriptBlock $script -Trigger $trigger
92 | ```
93 |
--------------------------------------------------------------------------------
/Samples/Scheduled-Video-Export/ScheduledVideoExport.png:
--------------------------------------------------------------------------------
https://raw.githubusercontent.com/MilestoneSystemsInc/PowerShellSamples/ecbb1d9db0c12efd0946d7d904cc63a49e36e827/Samples/Scheduled-Video-Export/ScheduledVideoExport.png
--------------------------------------------------------------------------------
/Samples/ScheduledCameraReport/README sp-MX.md:
--------------------------------------------------------------------------------
1 | # Informe de cámara programado
2 |
3 |
5 |
6 |
7 | En este ejemplo usaremos el cmdlet Register-ScheduledJob incluido en PowerShell para crear una tarea programada en Windows que ejecute nuestro script de exportación todos los días a medianoche.
8 |
9 | El siguiente ejemplo se puede copiar y pegar en una instancia elevada de PowerShell o PowerShell ISE. Asegúrese de ejecutar PowerShell como administrador; de lo contrario, Register-ScheduledJob producirá un error.
10 |
11 | La secuencia de comandos recopilará la dirección y las credenciales de VMS, y le pedirá una palabra clave de selección de cámara. Si desea exportar todas las cámaras con la palabra "Ascensor" en el nombre, puede ingresarla como palabra clave. La palabra clave no distingue entre mayúsculas y minúsculas. A continuación, se le pedirá una ruta de destino para guardar las exportaciones. Cada exportación se almacenará aquí en una subcarpeta con la fecha marcada. Antes de registrar el trabajo programado, se validarán las credenciales y la selección de la cámara. Si no se puede realizar una conexión o no hay cámaras que coincidan con la palabra clave proporcionada, no se creará el trabajo programado.
12 |
13 | El bit $expandingString puede parecer algo extraño. Lo que estamos haciendo aquí es crear un bloque de secuencia de comandos donde las variables específicas se expanden en sus valores reales antes de almacenarse en el trabajo programado. Esto nos permite pasar las respuestas desde la parte superior de la secuencia de comandos al cuerpo del scriptblock llamado por el trabajo programado.
14 |
15 | Al hacerlo de esta manera, podemos pedirle sus credenciales de VMS sin exponer su contraseña o tener que conservarla en el disco en forma cifrada. Su contraseña se recopila como una cadena segura y, a continuación, se convierte en una cadena larga que solo puede descifrar el usuario de Windows con el que está ejecutando la secuencia de comandos.
16 |
17 |
18 | ```powershell
19 | $InformationPreference = 'Continue'
20 | $server = Read-Host -Prompt "Server Address"
21 | $username = Read-Host -Prompt "Username"
22 | $password = Read-Host -Prompt "Password" -AsSecureString | ConvertFrom-SecureString
23 |
24 | do {
25 | $isBasic = Read-Host -Prompt "Basic user? (y/n)"
26 | } while ('y', 'n' -notcontains $isBasic)
27 |
28 | $keyword = Read-Host -Prompt "Keyword for camera selection"
29 |
30 | do {
31 | $destination = Read-Host -Prompt "Export path"
32 | } while (-not (Test-Path -Path $destination))
33 |
34 | try {
35 | Write-Information "Validating credentials and camera selection before we register the scheduled job"
36 | Write-Information "Connecting to $server as $username"
37 | $connected = $false
38 | Connect-ManagementServer -Server $server -Credential ([pscredential]::new($username, ($password | ConvertTo-SecureString))) -BasicUser:($isBasic -eq 'y')
39 | Write-Information "Connected"
40 | $connected = $true
41 |
42 | Write-Information "Verifying there is at least one camera with a name matching keyword '$keyword'"
43 | $cameras = Get-Hardware | Where-Object Enabled | Get-Camera | Where-Object { $_.Enabled -and $_.Name -like "*$keyword*" }
44 | if ($null -eq $cameras) {
45 | throw "No cameras found matching keyword '$keyword'"
46 | }
47 | else {
48 | Write-Information "Identified $($cameras.Count) cameras matching keyword '$keyword'"
49 | }
50 | }
51 | catch {
52 | throw
53 | }
54 | finally {
55 | if ($connected) {
56 | Disconnect-ManagementServer
57 | }
58 | }
59 |
60 |
61 | $expandingString = "
62 | `$pass = '$password' | ConvertTo-SecureString
63 | `$cred = [pscredential]::new('$username', `$pass)
64 | `$isBasic = '$isBasic' -eq 'y'
65 | Connect-ManagementServer -Server $server -Credential `$cred -BasicUser:`$isBasic
66 | `$cameras = Get-Hardware | Where-Object Enabled | Get-Camera | Where-Object { `$_.Enabled -and `$_.Name -like '*$keyword*' }
67 |
68 | `$start = (Get-Date -Hour 13 -Minute 0 -Second 0).AddDays(-1)
69 | `$end = (Get-Date -Hour 15 -Minute 0 -Second 0).AddDays(-1)
70 |
71 | Start-Export -CameraIds `$cameras.Id -StartTime `$start -EndTime `$end -Format DB -Path ""$destination\`$(`$start.ToString('yyyy-MM-dd'))""
72 |
73 | Disconnect-ManagementServer
74 | "
75 |
76 | $script = [scriptblock]::Create($expandingString)
77 | $trigger = New-JobTrigger -Daily -DaysInterval 1 -At (Get-Date -Hour 0 -Minute 0)
78 | Register-ScheduledJob -Name "Automated Export Example" -ScriptBlock $script -Trigger $trigger
79 | ```
80 |
--------------------------------------------------------------------------------
/Samples/Scheduled-Video-Export/README.md:
--------------------------------------------------------------------------------
1 | ## Scheduled Video Export
2 |
3 |
4 |
5 |
6 |
7 | In this sample we will use the Register-ScheduledJob cmdlet included in PowerShell to create a
8 | scheduled task in Windows which runs our export script every day at midnight.
9 |
10 | The sample below can be copied and pasted into an elevated PowerShell or PowerShell ISE instance.
11 | Make sure to run PowerShell as Administrator, otherwise the Register-ScheduledJob will throw an
12 | error.
13 |
14 | The script will collect the VMS address, credentials, and ask you for a camera selection keyword.
15 | If you want to export all cameras with the word "Elevator" in the name, you can enter that as a
16 | keyword. They keyword is case-insensitive. You will then be asked for a destination path to save
17 | exports. Each export will be stored in a date-stamped subfolder here. And before we register the
18 | scheduled job, the credentials and camera selection will be validated. If a connection cannot be
19 | made or there are no cameras matching the provided keyword, the scheduled job will not be created.
20 |
21 | The $expandingString bit may look somewhat foreign. What we're doing here is creating a script
22 | block where specific variables are expanded into their actual values before being stored in the
23 | scheduled job. This is allowing us to pass the answers from the top of the script into the body
24 | of the scriptblock called by the scheduled job.
25 |
26 | By doing it this way, we're able to ask you for your VMS credentials without exposing your password
27 | or having to persist it to disk in encrypted form. Your password is collected as a secure string,
28 | then converted to a long string that can only be decrypted by the Windows user with which you're
29 | executing the script.
30 |
31 | ```powershell
32 | $InformationPreference = 'Continue'
33 | $server = Read-Host -Prompt "Server Address"
34 | $username = Read-Host -Prompt "Username"
35 | $password = Read-Host -Prompt "Password" -AsSecureString | ConvertFrom-SecureString
36 |
37 | do {
38 | $isBasic = Read-Host -Prompt "Basic user? (y/n)"
39 | } while ('y', 'n' -notcontains $isBasic)
40 |
41 | $keyword = Read-Host -Prompt "Keyword for camera selection"
42 |
43 | do {
44 | $destination = Read-Host -Prompt "Export path"
45 | } while (-not (Test-Path -Path $destination))
46 |
47 | try {
48 | Write-Information "Validating credentials and camera selection before we register the scheduled job"
49 | Write-Information "Connecting to $server as $username"
50 | $connected = $false
51 | Connect-ManagementServer -Server $server -Credential ([pscredential]::new($username, ($password | ConvertTo-SecureString))) -BasicUser:($isBasic -eq 'y')
52 | Write-Information "Connected"
53 | $connected = $true
54 |
55 | Write-Information "Verifying there is at least one camera with a name matching keyword '$keyword'"
56 | $cameras = Get-Hardware | Where-Object Enabled | Get-Camera | Where-Object { $_.Enabled -and $_.Name -like "*$keyword*" }
57 | if ($null -eq $cameras) {
58 | throw "No cameras found matching keyword '$keyword'"
59 | }
60 | else {
61 | Write-Information "Identified $($cameras.Count) cameras matching keyword '$keyword'"
62 | }
63 | }
64 | catch {
65 | throw
66 | }
67 | finally {
68 | if ($connected) {
69 | Disconnect-ManagementServer
70 | }
71 | }
72 |
73 |
74 | $expandingString = "
75 | `$pass = '$password' | ConvertTo-SecureString
76 | `$cred = [pscredential]::new('$username', `$pass)
77 | `$isBasic = '$isBasic' -eq 'y'
78 | Connect-ManagementServer -Server $server -Credential `$cred -BasicUser:`$isBasic
79 | `$cameras = Get-Hardware | Where-Object Enabled | Get-Camera | Where-Object { `$_.Enabled -and `$_.Name -like '*$keyword*' }
80 |
81 | `$start = (Get-Date -Hour 13 -Minute 0 -Second 0).AddDays(-1)
82 | `$end = (Get-Date -Hour 15 -Minute 0 -Second 0).AddDays(-1)
83 |
84 | Start-Export -CameraIds `$cameras.Id -StartTime `$start -EndTime `$end -Format DB -Path ""$destination\`$(`$start.ToString('yyyy-MM-dd'))""
85 |
86 | Disconnect-ManagementServer
87 | "
88 |
89 | $script = [scriptblock]::Create($expandingString)
90 | $trigger = New-JobTrigger -Daily -DaysInterval 1 -At (Get-Date -Hour 0 -Minute 0)
91 | Register-ScheduledJob -Name "Automated Export Example" -ScriptBlock $script -Trigger $trigger
92 | ```
93 |
--------------------------------------------------------------------------------
/Samples/Scheduled-Video-Export/ScheduledVideoExport.png:
--------------------------------------------------------------------------------
https://raw.githubusercontent.com/MilestoneSystemsInc/PowerShellSamples/ecbb1d9db0c12efd0946d7d904cc63a49e36e827/Samples/Scheduled-Video-Export/ScheduledVideoExport.png
--------------------------------------------------------------------------------
/Samples/ScheduledCameraReport/README sp-MX.md:
--------------------------------------------------------------------------------
1 | # Informe de cámara programado
2 |
3 |  4 |
5 | Hay muchas maneras de ejecutar secuencias de comandos/tareas programadas. En Windows, la forma más común es a través del Programador de tareas de Windows. Incluso existen varias formas de ejecutar secuencias de comandos de PowerShell en el Programador de tareas. Usted puede crear una tarea programada estándar a mano, o mediante algunos de los cmdlets de PowerShell en el módulo ScheduledTasks o, por último, mediante el módulo PSScheduledJob, que es la ruta que tomé para este ejemplo.
6 | Para utilizar este ejemplo, puede descargar ScheduledCameraReport.ps1 y colocarlo en una carpeta en el cliente o servidor de Windows donde desea que se encuentren los archivos de registro y los CSV de informes de cámara. Por ejemplo, puede colocarlo en `C:\scripts\ScheduledCameraReports\`. A continuación, abra PowerShell como administrador y ejecute la secuencia de comandos. ¡Eso es todo!
7 |
8 | ## Pero, ¿cómo funciona?
9 |
10 | La secuencia de comandos utiliza el nuevo parámetro de cambio “ShowDialog” en Connect-ManagementServer para darle la oportunidad de conectarse con éxito a su servidor de gestión. Una vez conectado, sus opciones de inicio de sesión se conservan en el disco en un archivo connection.xml en la misma carpeta. Si proporcionó una contraseña, se cifrará como una cadena segura automáticamente utilizando el ámbito “CurrentUser”. Esto significa que solo su cuenta de usuario puede descifrar esa contraseña.
11 |
12 | La tarea programada importará ese archivo connection.xml y colocará esos parámetros en el comando `Connect-ManagementServer`. Después de eso, ejecutamos el informe de la cámara y guardamos la salida en un archivo con marca de tiempo en la subcarpeta de informes que ahora debería existir en la carpeta en la que se encuentra su secuencia de comandos.
13 |
14 | Se creará un archivo de registro gracias al uso de `Start-Transcript` para darle una idea de cómo se ejecutó la tarea durante la última ejecución. El archivo se sobrescribirá cada vez para evitar que *eventualmente* llene su disco con registros. Asimismo, cualquier informe de la cámara con más de 30 días de duración se eliminará durante cada ejecución.
15 |
16 | ## Reflexiones adicionales
17 |
18 | El módulo PSScheduledJob es interesante por la forma en que funciona. Encontrará que la tarea programada ejecuta powershell.exe con un comando que carga la definición de trabajo programada desde `C:\Users\\AppData\Local\Microsoft\Windows\PowerShell\ScheduledJobs`. Si sucede algo extraño y su archivo de registro de transcripción no lo muestra, puede encontrar más información en la subcarpeta `Salida` en la carpeta de definición de trabajo programada. Si la contraseña de usuario de Windows cambia, es posible que deba iniciar sesión en este equipo para asegurarse de que la secuencia de comandos todavía se está ejecutando, ya que se ejecuta bajo su contexto de usuario.
19 |
20 | Si el servidor de gestión está en un sistema diferente al de esta secuencia de comandos, es posible que deba agregar el parámetro `Credencial` a `Register-ScheduledJob` y proporcionar la credencial de usuario de Windows, a menos que decida usar la autenticación explícita de usuario de Windows o la autenticación de usuario básico y proporcione un nombre de usuario y una contraseña mientras ejecuta la secuencia de comandos para crear el trabajo o la tarea programados.
21 |
--------------------------------------------------------------------------------
/Samples/ScheduledCameraReport/README.md:
--------------------------------------------------------------------------------
1 | # Scheduled Camera Report
2 |
3 |
4 |
5 | There are are lot of ways to execute scripts/tasks on a schedule. In Windows, the most common way
6 | to do this is through the Windows Task Scheduler. And there are even multiple ways to execute
7 | PowerShell scripts in Task Scheduler! You can create a standard scheduled task by hand, or by using
8 | some of the PowerShell cmdlets in the ScheduledTasks module, or finally by using the PSScheduledJob
9 | module which is the route I went for this sample.
10 |
11 | To use this sample, you can download ScheduledCameraReport.ps1 and place it in some folder on your
12 | Windows client or server where you want your log file and camera report CSV's to live. For example,
13 | you could place it in `C:\scripts\ScheduledCameraReports\`. Then open PowerShell as Administrator
14 | and execute the script. That's it!
15 |
16 | ## But how does it work?
17 |
18 | The script uses the new "ShowDialog" switch parameter in Connect-ManagementServer to give you the
19 | opportunity to successfully connect to your Management Server. Once connected, your login choices
20 | get persisted to disk in a connection.xml file in the same folder. If you provided a password, it
21 | will be encrypted as a secure string automatically using "CurrentUser" scope. This means only your
22 | user account can decrypt that password.
23 |
24 | The scheduled task will import that connection.xml file and splat those parameters into the
25 | `Connect-ManagementServer` command. After that, we run the camera report and save the output to a
26 | timestamped file in the `reports` subfolder that should now exist in the folder your script is in.
27 |
28 | A log file will be created thanks to the use of `Start-Transcript` to give you an idea of how the
29 | task ran during the last execution. The file will be overwritten each time to avoid *eventually*
30 | filling your disk up with logs. Likewise, any camera reports older than 30 days will be deleted
31 | during each run.
32 |
33 | ## Additional thoughts
34 |
35 | The PSScheduledJob module is interesting in the way it works. You'll find the scheduled task runs
36 | powershell.exe with a command that loads your scheduled job definition from
37 | `C:\Users\\AppData\Local\Microsoft\Windows\PowerShell\ScheduledJobs`. If something weird
38 | happens and your transcript log file doesn't show it, you might find more information in the
39 | `Output` subfolder under your scheduled job defintion folder. And if your Windows user password
40 | changes, you may need to be sure to login to this machine to make sure the script is still running
41 | since it runs under your user context.
42 |
43 | If your Management Server is on a different system than this script, you might need to add the
44 | `Credential` parameter to `Register-ScheduledJob` and provide your Windows user credential unless
45 | you decide to use explicit Windows user authentication or basic user authentication and provide
46 | both a username and password while running the script to create the scheduled job/task.
47 |
--------------------------------------------------------------------------------
/Samples/ScheduledCameraReport/ScheduledCameraReport.ps1:
--------------------------------------------------------------------------------
1 | #Requires -RunAsAdministrator
2 | #Requires -Modules MilestonePSTools, MipSdkRedist, PSScheduledJob
3 |
4 | # Collect & test Management Server login details and persist to disk
5 | Connect-ManagementServer -ShowDialog -Force -AcceptEula -ErrorAction Stop
6 | $loginSettings = Get-LoginSettings
7 | $authType = if ($loginSettings.IsBasicUser) { 'Basic' } else { 'Negotiate' }
8 | $credential = $loginSettings.CredentialCache.GetCredential($loginSettings.Uri, $authType)
9 | if ($credential.UserName -eq [string]::Empty) {
10 | $credential = $null
11 | }
12 | else {
13 | $credential = [pscredential]::new("$(if (![string]::IsNullOrWhiteSpace($credential.Domain)) {"$($credential.Domain)\"})$($credential.UserName)", $credential.SecurePassword)
14 | }
15 | $connectParams = @{
16 | ServerAddress = $loginSettings.Uri
17 | Credential = $credential
18 | BasicUser = $loginSettings.IsBasicUser
19 | SecureOnly = $loginSettings.SecureOnly
20 | AcceptEula = $true
21 | }
22 | $connectParams | Export-Clixml -Path $PSScriptRoot\connection.xml -Force
23 | Disconnect-ManagementServer
24 |
25 |
26 |
27 |
28 | # Setup scheduled job using PSScheduledJob module commands
29 | $jobOptions = New-ScheduledJobOption -RequireNetwork -MultipleInstancePolicy IgnoreNew
30 | $jobTrigger = New-JobTrigger -Daily -At (Get-Date -Hour 6 -Minute 0 -Second 0)
31 | $jobParams = @{
32 | Name = 'Daily Camera Report'
33 | ScheduledJobOption = $jobOptions
34 | Trigger = $jobTrigger
35 | RunNow = $true
36 | ArgumentList = $PSScriptRoot
37 | }
38 | Get-ScheduledJob -Name $jobParams.Name -ErrorAction Ignore | Unregister-ScheduledJob -Force -ErrorAction Stop
39 | Register-ScheduledJob @jobParams -ScriptBlock {
40 | param([string]$WorkingDirectory)
41 | try {
42 | # Transcript file is overwritten after every execution of the job so it always contains logs from the last run and does not grow indefinitely
43 | Start-Transcript -Path $WorkingDirectory\ScheduledCameraReport.log
44 | $reportsFolder = New-Item -Path (Join-Path $WorkingDirectory 'reports\') -ItemType Directory -Force | Select-Object -ExpandProperty FullName
45 | Write-Host 'Cleaning up camera reports older than 30 days'
46 | Get-ChildItem -Path $reportsFolder\Camera-Report_*.csv | Where-Object CreationTime -lt (Get-Date).AddDays(-30) | Remove-Item -Verbose
47 |
48 | # Import Management Server connection details from disk
49 | $connectParams = Import-Clixml -Path $WorkingDirectory\connection.xml
50 | Write-Host "Connecting to $($connectParams.ServerAddress). . ."
51 | Connect-ManagementServer @connectParams -Verbose
52 |
53 | $csvPath = Join-Path $reportsFolder "CameraReport_$(Get-Date -Format FileDateTime).csv"
54 | Write-Host "Running Get-CameraReport and saving results to $csvPath"
55 | Get-CameraReport -Verbose | Export-Csv -Path $csvPath -NoTypeInformation -Force
56 | }
57 | catch {
58 | Write-Error $_
59 | }
60 | finally {
61 | $loadedModules = Get-Module | Select-Object Name, Version | Out-String
62 | Write-Host "Loaded modules and versions: $loadedModules"
63 | Write-Host 'Finished. Disconnecting from Management Server.'
64 | Disconnect-ManagementServer
65 | Stop-Transcript
66 | }
67 | }
--------------------------------------------------------------------------------
/Samples/ScheduledCameraReport/ScheduledCameraReport_screenshot.png:
--------------------------------------------------------------------------------
https://raw.githubusercontent.com/MilestoneSystemsInc/PowerShellSamples/ecbb1d9db0c12efd0946d7d904cc63a49e36e827/Samples/ScheduledCameraReport/ScheduledCameraReport_screenshot.png
--------------------------------------------------------------------------------
/Samples/ScheduledLogExport/README sp-MX.md:
--------------------------------------------------------------------------------
1 | # ScheduledLogExport
2 |
3 |
4 |
5 | Hay muchas maneras de ejecutar secuencias de comandos/tareas programadas. En Windows, la forma más común es a través del Programador de tareas de Windows. Incluso existen varias formas de ejecutar secuencias de comandos de PowerShell en el Programador de tareas. Usted puede crear una tarea programada estándar a mano, o mediante algunos de los cmdlets de PowerShell en el módulo ScheduledTasks o, por último, mediante el módulo PSScheduledJob, que es la ruta que tomé para este ejemplo.
6 | Para utilizar este ejemplo, puede descargar ScheduledCameraReport.ps1 y colocarlo en una carpeta en el cliente o servidor de Windows donde desea que se encuentren los archivos de registro y los CSV de informes de cámara. Por ejemplo, puede colocarlo en `C:\scripts\ScheduledCameraReports\`. A continuación, abra PowerShell como administrador y ejecute la secuencia de comandos. ¡Eso es todo!
7 |
8 | ## Pero, ¿cómo funciona?
9 |
10 | La secuencia de comandos utiliza el nuevo parámetro de cambio “ShowDialog” en Connect-ManagementServer para darle la oportunidad de conectarse con éxito a su servidor de gestión. Una vez conectado, sus opciones de inicio de sesión se conservan en el disco en un archivo connection.xml en la misma carpeta. Si proporcionó una contraseña, se cifrará como una cadena segura automáticamente utilizando el ámbito “CurrentUser”. Esto significa que solo su cuenta de usuario puede descifrar esa contraseña.
11 |
12 | La tarea programada importará ese archivo connection.xml y colocará esos parámetros en el comando `Connect-ManagementServer`. Después de eso, ejecutamos el informe de la cámara y guardamos la salida en un archivo con marca de tiempo en la subcarpeta de informes que ahora debería existir en la carpeta en la que se encuentra su secuencia de comandos.
13 |
14 | Se creará un archivo de registro gracias al uso de `Start-Transcript` para darle una idea de cómo se ejecutó la tarea durante la última ejecución. El archivo se sobrescribirá cada vez para evitar que *eventualmente* llene su disco con registros. Asimismo, cualquier informe de la cámara con más de 30 días de duración se eliminará durante cada ejecución.
15 |
16 | ## Reflexiones adicionales
17 |
18 | El módulo PSScheduledJob es interesante por la forma en que funciona. Encontrará que la tarea programada ejecuta powershell.exe con un comando que carga la definición de trabajo programada desde `C:\Users\\AppData\Local\Microsoft\Windows\PowerShell\ScheduledJobs`. Si sucede algo extraño y su archivo de registro de transcripción no lo muestra, puede encontrar más información en la subcarpeta `Salida` en la carpeta de definición de trabajo programada. Si la contraseña de usuario de Windows cambia, es posible que deba iniciar sesión en este equipo para asegurarse de que la secuencia de comandos todavía se está ejecutando, ya que se ejecuta bajo su contexto de usuario.
19 |
20 | Si el servidor de gestión está en un sistema diferente al de esta secuencia de comandos, es posible que deba agregar el parámetro `Credencial` a `Register-ScheduledJob` y proporcionar la credencial de usuario de Windows, a menos que decida usar la autenticación explícita de usuario de Windows o la autenticación de usuario básico y proporcione un nombre de usuario y una contraseña mientras ejecuta la secuencia de comandos para crear el trabajo o la tarea programados.
21 |
--------------------------------------------------------------------------------
/Samples/ScheduledCameraReport/README.md:
--------------------------------------------------------------------------------
1 | # Scheduled Camera Report
2 |
3 |
4 |
5 | There are are lot of ways to execute scripts/tasks on a schedule. In Windows, the most common way
6 | to do this is through the Windows Task Scheduler. And there are even multiple ways to execute
7 | PowerShell scripts in Task Scheduler! You can create a standard scheduled task by hand, or by using
8 | some of the PowerShell cmdlets in the ScheduledTasks module, or finally by using the PSScheduledJob
9 | module which is the route I went for this sample.
10 |
11 | To use this sample, you can download ScheduledCameraReport.ps1 and place it in some folder on your
12 | Windows client or server where you want your log file and camera report CSV's to live. For example,
13 | you could place it in `C:\scripts\ScheduledCameraReports\`. Then open PowerShell as Administrator
14 | and execute the script. That's it!
15 |
16 | ## But how does it work?
17 |
18 | The script uses the new "ShowDialog" switch parameter in Connect-ManagementServer to give you the
19 | opportunity to successfully connect to your Management Server. Once connected, your login choices
20 | get persisted to disk in a connection.xml file in the same folder. If you provided a password, it
21 | will be encrypted as a secure string automatically using "CurrentUser" scope. This means only your
22 | user account can decrypt that password.
23 |
24 | The scheduled task will import that connection.xml file and splat those parameters into the
25 | `Connect-ManagementServer` command. After that, we run the camera report and save the output to a
26 | timestamped file in the `reports` subfolder that should now exist in the folder your script is in.
27 |
28 | A log file will be created thanks to the use of `Start-Transcript` to give you an idea of how the
29 | task ran during the last execution. The file will be overwritten each time to avoid *eventually*
30 | filling your disk up with logs. Likewise, any camera reports older than 30 days will be deleted
31 | during each run.
32 |
33 | ## Additional thoughts
34 |
35 | The PSScheduledJob module is interesting in the way it works. You'll find the scheduled task runs
36 | powershell.exe with a command that loads your scheduled job definition from
37 | `C:\Users\\AppData\Local\Microsoft\Windows\PowerShell\ScheduledJobs`. If something weird
38 | happens and your transcript log file doesn't show it, you might find more information in the
39 | `Output` subfolder under your scheduled job defintion folder. And if your Windows user password
40 | changes, you may need to be sure to login to this machine to make sure the script is still running
41 | since it runs under your user context.
42 |
43 | If your Management Server is on a different system than this script, you might need to add the
44 | `Credential` parameter to `Register-ScheduledJob` and provide your Windows user credential unless
45 | you decide to use explicit Windows user authentication or basic user authentication and provide
46 | both a username and password while running the script to create the scheduled job/task.
47 |
--------------------------------------------------------------------------------
/Samples/ScheduledCameraReport/ScheduledCameraReport.ps1:
--------------------------------------------------------------------------------
1 | #Requires -RunAsAdministrator
2 | #Requires -Modules MilestonePSTools, MipSdkRedist, PSScheduledJob
3 |
4 | # Collect & test Management Server login details and persist to disk
5 | Connect-ManagementServer -ShowDialog -Force -AcceptEula -ErrorAction Stop
6 | $loginSettings = Get-LoginSettings
7 | $authType = if ($loginSettings.IsBasicUser) { 'Basic' } else { 'Negotiate' }
8 | $credential = $loginSettings.CredentialCache.GetCredential($loginSettings.Uri, $authType)
9 | if ($credential.UserName -eq [string]::Empty) {
10 | $credential = $null
11 | }
12 | else {
13 | $credential = [pscredential]::new("$(if (![string]::IsNullOrWhiteSpace($credential.Domain)) {"$($credential.Domain)\"})$($credential.UserName)", $credential.SecurePassword)
14 | }
15 | $connectParams = @{
16 | ServerAddress = $loginSettings.Uri
17 | Credential = $credential
18 | BasicUser = $loginSettings.IsBasicUser
19 | SecureOnly = $loginSettings.SecureOnly
20 | AcceptEula = $true
21 | }
22 | $connectParams | Export-Clixml -Path $PSScriptRoot\connection.xml -Force
23 | Disconnect-ManagementServer
24 |
25 |
26 |
27 |
28 | # Setup scheduled job using PSScheduledJob module commands
29 | $jobOptions = New-ScheduledJobOption -RequireNetwork -MultipleInstancePolicy IgnoreNew
30 | $jobTrigger = New-JobTrigger -Daily -At (Get-Date -Hour 6 -Minute 0 -Second 0)
31 | $jobParams = @{
32 | Name = 'Daily Camera Report'
33 | ScheduledJobOption = $jobOptions
34 | Trigger = $jobTrigger
35 | RunNow = $true
36 | ArgumentList = $PSScriptRoot
37 | }
38 | Get-ScheduledJob -Name $jobParams.Name -ErrorAction Ignore | Unregister-ScheduledJob -Force -ErrorAction Stop
39 | Register-ScheduledJob @jobParams -ScriptBlock {
40 | param([string]$WorkingDirectory)
41 | try {
42 | # Transcript file is overwritten after every execution of the job so it always contains logs from the last run and does not grow indefinitely
43 | Start-Transcript -Path $WorkingDirectory\ScheduledCameraReport.log
44 | $reportsFolder = New-Item -Path (Join-Path $WorkingDirectory 'reports\') -ItemType Directory -Force | Select-Object -ExpandProperty FullName
45 | Write-Host 'Cleaning up camera reports older than 30 days'
46 | Get-ChildItem -Path $reportsFolder\Camera-Report_*.csv | Where-Object CreationTime -lt (Get-Date).AddDays(-30) | Remove-Item -Verbose
47 |
48 | # Import Management Server connection details from disk
49 | $connectParams = Import-Clixml -Path $WorkingDirectory\connection.xml
50 | Write-Host "Connecting to $($connectParams.ServerAddress). . ."
51 | Connect-ManagementServer @connectParams -Verbose
52 |
53 | $csvPath = Join-Path $reportsFolder "CameraReport_$(Get-Date -Format FileDateTime).csv"
54 | Write-Host "Running Get-CameraReport and saving results to $csvPath"
55 | Get-CameraReport -Verbose | Export-Csv -Path $csvPath -NoTypeInformation -Force
56 | }
57 | catch {
58 | Write-Error $_
59 | }
60 | finally {
61 | $loadedModules = Get-Module | Select-Object Name, Version | Out-String
62 | Write-Host "Loaded modules and versions: $loadedModules"
63 | Write-Host 'Finished. Disconnecting from Management Server.'
64 | Disconnect-ManagementServer
65 | Stop-Transcript
66 | }
67 | }
--------------------------------------------------------------------------------
/Samples/ScheduledCameraReport/ScheduledCameraReport_screenshot.png:
--------------------------------------------------------------------------------
https://raw.githubusercontent.com/MilestoneSystemsInc/PowerShellSamples/ecbb1d9db0c12efd0946d7d904cc63a49e36e827/Samples/ScheduledCameraReport/ScheduledCameraReport_screenshot.png
--------------------------------------------------------------------------------
/Samples/ScheduledLogExport/README sp-MX.md:
--------------------------------------------------------------------------------
1 | # ScheduledLogExport
2 |
3 |  4 |
5 | Hay muchas maneras de ejecutar secuencias de comandos/tareas programadas. En Windows, la forma más común de hacerlo es a través del Programador de tareas de Windows. Incluso existen varias formas de ejecutar secuencias de comandos de PowerShell en el Programador de tareas. Usted puede crear una tarea programada estándar a mano, o mediante algunos de los cmdlets de PowerShell en el módulo ScheduledTasks o, por último, mediante el módulo PSScheduledJob, que es la ruta que tomé para este ejemplo.
6 | Para utilizar este ejemplo, puede descargar ScheduledLogExport.ps1 y colocarlo en una carpeta en el cliente o servidor de Windows donde desea que se encuentren los archivos de registro y los CSV de exportación de registros. Por ejemplo, puede colocarlo en C:\scripts\ScheduledLogExport\. A continuación, abra PowerShell como administrador y ejecute la secuencia de comandos. ¡Eso es todo!
7 |
8 | ## Pero, ¿cómo funciona?
9 |
10 | La secuencia de comandos utiliza el nuevo parámetro de cambio “ShowDialog” en Connect-ManagementServer para darle la oportunidad de conectarse con éxito a su servidor de gestión. Una vez conectado, sus opciones de inicio de sesión se conservan en el disco en un archivo connection.xml en la misma carpeta. Si proporcionó una contraseña, se cifrará como una cadena segura automáticamente utilizando el ámbito “CurrentUser”. Esto significa que solo su cuenta de usuario puede descifrar esa contraseña.
11 |
12 | La tarea programada importará ese archivo connection.xml y colocará esos parámetros en el comando `Connect-ManagementServer`. Después de eso, ejecutamos la exportación de registros y guardamos la salida en un archivo con marca de tiempo en la subcarpeta de `exportaciones` que ahora debería existir en la carpeta en la que se encuentra su secuencia de comandos.
13 |
14 | Se creará un archivo de registro gracias al uso de `Start-Transcript` para darle una idea de cómo se ejecutó la tarea durante la última ejecución. El archivo se sobrescribirá cada vez para evitar que eventualmente llene su disco con registros. Asimismo, cualquier exportación con más de 30 días de duración se eliminará durante cada ejecución.
15 |
16 | ## En lugar de CSV
17 |
18 | Este ejemplo está diseñado para mostrar una forma en que puede automatizar la recuperación de registros. Muchas veces un archivo CSV no es el formato adecuado para los fines previstos. Si, en cambio, desea transformar y enviar estos datos a otra herramienta como Splunk, ElasticSearch, DataDog o simplemente otra base de datos SQL, puede modificar el ejemplo a partir de la línea 55 y, en lugar de canalizar los registros a CSV, puede optar por usar cualquier número de módulos de PowerShell para ayudar a conectarse al sistema de destino y enviar los registros allí. Cuando esté listo, vuelva a ejecutar la secuencia de comandos para eliminar el trabajo programado anterior y registre uno nuevo con las actualizaciones que haya agregado.
19 |
20 | ## Reflexiones adicionales
21 |
22 | El módulo PSScheduledJob es interesante por la forma en que funciona. Encontrará que la tarea programada ejecuta powershell.exe con un comando que carga la definición de trabajo programada desde `C:\Users\\AppData\Local\Microsoft\Windows\PowerShell\ScheduledJobs`. Si sucede algo extraño y su archivo de registro de transcripción no lo muestra, puede encontrar más información en la subcarpeta Salida en la carpeta de definición de trabajo programada. Si la contraseña de usuario de Windows cambia, es posible que deba iniciar sesión en este equipo para asegurarse de que la secuencia de comandos todavía se está ejecutando, ya que se ejecuta bajo su contexto de usuario.
23 |
24 | Si el servidor de gestión está en un sistema diferente al de esta secuencia de comandos, es posible que deba agregar el parámetro `Credencial` a `Register-ScheduledJob` y proporcionar la credencial de usuario de Windows, a menos que decida usar la autenticación explícita de usuario de Windows o la autenticación de usuario básico y proporcione un nombre de usuario y una contraseña mientras ejecuta la secuencia de comandos para crear el trabajo o la tarea programados.
25 |
--------------------------------------------------------------------------------
/Samples/ScheduledLogExport/README.md:
--------------------------------------------------------------------------------
1 | # ScheduledLogExport
2 |
3 |
4 |
5 | There are are lot of ways to execute scripts/tasks on a schedule. In Windows, the most common way
6 | to do this is through the Windows Task Scheduler. And there are even multiple ways to execute
7 | PowerShell scripts in Task Scheduler! You can create a standard scheduled task by hand, or by using
8 | some of the PowerShell cmdlets in the ScheduledTasks module, or finally by using the PSScheduledJob
9 | module which is the route I went for this sample.
10 |
11 | To use this sample, you can download ScheduledLogExport.ps1 and place it in some folder on your
12 | Windows client or server where you want your log file and log export CSV's to live. For example,
13 | you could place it in `C:\scripts\ScheduledLogExport\`. Then open PowerShell as Administrator
14 | and execute the script. That's it!
15 |
16 | ## But how does it work?
17 |
18 | The script uses the new "ShowDialog" switch parameter in Connect-ManagementServer to give you the
19 | opportunity to successfully connect to your Management Server. Once connected, your login choices
20 | get persisted to disk in a connection.xml file in the same folder. If you provided a password, it
21 | will be encrypted as a secure string automatically using "CurrentUser" scope. This means only your
22 | user account can decrypt that password.
23 |
24 | The scheduled task will import that connection.xml file and splat those parameters into the
25 | `Connect-ManagementServer` command. After that, we run the log export and save the output to a
26 | timestamped file in the `exports` subfolder that should now exist in the folder your script is in.
27 |
28 | A log file will be created thanks to the use of `Start-Transcript` to give you an idea of how the
29 | task ran during the last execution. The file will be overwritten each time to avoid *eventually*
30 | filling your disk up with logs. Likewise, any exports older than 30 days will be deleted
31 | during each run.
32 |
33 | ## Instead of CSV
34 |
35 | This sample is intended to show one way you can automate log retrieval. Often times a CSV file is
36 | not the right format for your intended purposes. If you instead want to transform and send this
37 | data to another tool like Splunk, ElasticSearch, DataDog, or just another SQL database, you can
38 | modify the sample starting around line 55 and instead of piping the logs to CSV, you could choose
39 | to use any number of PowerShell modules to help connect to the destination system and send the logs
40 | there instead! When you're ready, re-run the script to remove the old scheduled job and register a
41 | new one with the updates you've added.
42 |
43 | ## Additional thoughts
44 |
45 | The PSScheduledJob module is interesting in the way it works. You'll find the scheduled task runs
46 | powershell.exe with a command that loads your scheduled job definition from
47 | `C:\Users\\AppData\Local\Microsoft\Windows\PowerShell\ScheduledJobs`. If something weird
48 | happens and your transcript log file doesn't show it, you might find more information in the
49 | `Output` subfolder under your scheduled job defintion folder. And if your Windows user password
50 | changes, you may need to be sure to login to this machine to make sure the script is still running
51 | since it runs under your user context.
52 |
53 | If your Management Server is on a different system than this script, you might need to add the
54 | `Credential` parameter to `Register-ScheduledJob` and provide your Windows user credential unless
55 | you decide to use explicit Windows user authentication or basic user authentication and provide
56 | both a username and password while running the script to create the scheduled job/task.
57 |
--------------------------------------------------------------------------------
/Samples/ScheduledLogExport/ScheduledLogExport.ps1:
--------------------------------------------------------------------------------
1 | #Requires -RunAsAdministrator
2 | #Requires -Modules MilestonePSTools, MipSdkRedist, PSScheduledJob
3 |
4 | # Collect & test Management Server login details and persist to disk
5 | Connect-ManagementServer -ShowDialog -Force -AcceptEula -ErrorAction Stop
6 | $loginSettings = Get-LoginSettings
7 | $authType = if ($loginSettings.IsBasicUser) { 'Basic' } else { 'Negotiate' }
8 | $credential = $loginSettings.CredentialCache.GetCredential($loginSettings.Uri, $authType)
9 | if ($credential.UserName -eq [string]::Empty) {
10 | $credential = $null
11 | }
12 | else {
13 | $credential = [pscredential]::new("$(if (![string]::IsNullOrWhiteSpace($credential.Domain)) {"$($credential.Domain)\"})$($credential.UserName)", $credential.SecurePassword)
14 | }
15 | $connectParams = @{
16 | ServerAddress = $loginSettings.Uri
17 | Credential = $credential
18 | BasicUser = $loginSettings.IsBasicUser
19 | SecureOnly = $loginSettings.SecureOnly
20 | AcceptEula = $true
21 | }
22 | $connectParams | Export-Clixml -Path $PSScriptRoot\connection.xml -Force
23 | Disconnect-ManagementServer
24 |
25 |
26 |
27 |
28 | # Setup scheduled job using PSScheduledJob module commands
29 | $jobOptions = New-ScheduledJobOption -RequireNetwork -MultipleInstancePolicy IgnoreNew
30 | $jobTrigger = New-JobTrigger -Daily -At (Get-Date -Hour 6 -Minute 0 -Second 0)
31 | $jobParams = @{
32 | Name = 'Daily Log Export'
33 | ScheduledJobOption = $jobOptions
34 | Trigger = $jobTrigger
35 | RunNow = $true
36 | ArgumentList = $PSScriptRoot
37 | }
38 | Get-ScheduledJob -Name $jobParams.Name -ErrorAction Ignore | Unregister-ScheduledJob -Force -ErrorAction Stop
39 | Register-ScheduledJob @jobParams -ScriptBlock {
40 | param([string]$WorkingDirectory)
41 | try {
42 | # Transcript file is overwritten after every execution of the job so it always contains logs from the last run and does not grow indefinitely
43 | Start-Transcript -Path $WorkingDirectory\ScheduledLogExport.log
44 | $reportsFolder = New-Item -Path (Join-Path $WorkingDirectory 'exports\') -ItemType Directory -Force | Select-Object -ExpandProperty FullName
45 | Write-Host 'Cleaning up exports older than 30 days'
46 | Get-ChildItem -Path "$reportsFolder\Log-Export_*.csv" | Where-Object CreationTime -lt (Get-Date).AddDays(-30) | Remove-Item -Verbose
47 |
48 | # Import Management Server connection details from disk
49 | $connectParams = Import-Clixml -Path $WorkingDirectory\connection.xml
50 | Write-Host "Connecting to $($connectParams.ServerAddress). . ."
51 | Connect-ManagementServer @connectParams -Verbose
52 |
53 | $csvPath = Join-Path $reportsFolder "Log-Export_$(Get-Date -Format FileDateTime).csv"
54 | Write-Host "Running Get-Log and saving results to $csvPath"
55 | Get-Log -LogType Audit -BeginTime (Get-Date).Date.AddDays(-1) -EndTime (Get-Date).Date | Export-Csv -Path $csvPath -NoTypeInformation
56 | }
57 | catch {
58 | Write-Error $_
59 | }
60 | finally {
61 | $loadedModules = Get-Module | Select-Object Name, Version | Out-String
62 | Write-Host "Loaded modules and versions: $loadedModules"
63 | Write-Host 'Finished. Disconnecting from Management Server.'
64 | Disconnect-ManagementServer
65 | Stop-Transcript
66 | }
67 | }
--------------------------------------------------------------------------------
/Samples/ScheduledLogExport/ScheduledLogExport_screenshot.png:
--------------------------------------------------------------------------------
https://raw.githubusercontent.com/MilestoneSystemsInc/PowerShellSamples/ecbb1d9db0c12efd0946d7d904cc63a49e36e827/Samples/ScheduledLogExport/ScheduledLogExport_screenshot.png
--------------------------------------------------------------------------------
/Samples/Set-AxisCameraSettings.ps1:
--------------------------------------------------------------------------------
1 | function Set-AxisCameraSettings
2 | {
3 | <#
4 | .SYNOPSIS
5 | Set Axis Zipstream settings, as well as frame rate
6 | .DESCRIPTION
7 | Quickly set some or all of the Axis Zipstream settings, as well as frame rate, on all streams or just the recorded or just the live
8 | .EXAMPLE
9 | Set-AxisCameraSettings -RecordingServerName * -StreamType Recorded -FPS 10 -ZipstreamCompression medium -ZipstreamFPSMode dynamic
10 |
11 | Sets the Record stream on all Axis cameras on all Recording Servers to 10 fps, Medium zipstream, and Dynamic FPS mode.
12 | .EXAMPLE
13 | Set-AxisCameraSettings -RecordingServerName "Milestone-RS" -StreamType LiveDefault -FPS 15 -ZipstreamGOPMode dynamic -ZipstreamMaxGOPLength 500
14 |
15 | Sets the Live stream on all Axis cameras on Recording Server "Milestone-RS" to 15fps, Dynamic GOP length, and a max GOP length of 500.
16 | .EXAMPLE
17 | Set-AxisCameraSettings -RecordingServerName * -StreamType All -FPS 8 -ZipstreamCompress extreme
18 |
19 | Sets all streams on all Axis cameras on all Recording Servers to 8fps and Extreme zipstream.
20 | #>
21 | [CmdletBinding()]
22 | param (
23 | [Parameter(Mandatory = $true)]
24 | $RecordingServerName,
25 | [Parameter(Mandatory = $true)]
26 | [ValidateSet("All","LiveDefault","Record")]
27 | $StreamType,
28 | [Parameter()]
29 | [ValidateRange(1,30)]
30 | $FPS,
31 | [Parameter()]
32 | [ValidateSet("off","low","medium","high","higher","extreme")]
33 | $ZipstreamCompression,
34 | [Parameter()]
35 | [ValidateSet("fixed","dynamic")]
36 | $ZipstreamFPSMode,
37 | [Parameter()]
38 | [ValidateSet("fixed","dynamic")]
39 | $ZipstreamGOPMode,
40 | [Parameter()]
41 | [ValidateRange(62,1200)]
42 | $ZipstreamMaxGOPLength
43 | )
44 |
45 | begin
46 | {
47 | if ($RecordingServerName -ne "*" -and (Get-RecordingServer).Name -notcontains $RecordingServerName)
48 | {
49 | Write-Host "Recording Server does not exist. Please check spelling and try again." -ForegroundColor Red
50 | Return
51 | }
52 | }
53 |
54 | process
55 | {
56 | foreach ($rec in Get-RecordingServer -Name $RecordingServerName)
57 | {
58 | Write-Progress -Activity "Recording Server $($rec.name)" -Id 1
59 | $hwProcessed = 1
60 | $allAxisHardware = $rec | Get-Hardware | Where-Object {$_.Enabled -and ($_ | Get-HardwareSetting).ProductID -like "*Axis*"}
61 | $hwQty = $allAxisHardware.Count
62 | foreach ($hardware in $allAxisHardware)
63 | {
64 | Write-Progress -Activity "Processing hardware $($hwProcessed) of $($hwQty)" -ParentId 1 -Id 2 -PercentComplete ($hwProcessed / $hwQty * 100)
65 | foreach ($camera in $hardware | Get-Camera | Where-Object Enabled)
66 | {
67 | $allStreams = $camera | Get-Stream -All
68 |
69 | if ($StreamType -eq "Record" -or $StreamType -eq "LiveDefault")
70 | {
71 | $streamNum = 0
72 | foreach ($stream in $allStreams)
73 | {
74 | if ($stream.$($StreamType) -ne $true)
75 | {
76 | $streamNum++
77 | } else
78 | {
79 | Break
80 | }
81 | }
82 |
83 | Set-AxisCameraSettingsHelper $camera $streamNum $FPS $ZipstreamCompression $ZipstreamFPSMode $ZipstreamGOPMode $ZipstreamMaxGOPLength
84 | }
85 |
86 | if ($StreamType -eq "All")
87 | {
88 | for ($streamNum = 0;$streamNum -lt $allStreams.Count;$streamNum++)
89 | {
90 | Set-AxisCameraSettingsHelper $camera $streamNum $FPS $ZipstreamCompression $ZipstreamFPSMode $ZipstreamGOPMode $ZipstreamMaxGOPLength
91 | }
92 | }
93 | }
94 | $hwProcessed++
95 | }
96 | }
97 | }
98 | }
99 |
100 | function Set-AxisCameraSettingsHelper ($camera,$streamNum,$FPS,$ZipstreamCompression,$ZipstreamFPSMode,$ZipstreamGOPMode,$ZipstreamMaxGOPLength)
101 | {
102 | <#
103 | .SYNOPSIS
104 | Don't run this script directly. It gets run by Set-AxisCameraSettings.
105 |
106 | .DESCRIPTION
107 | Don't run this script directly. It gets run by Set-AxisCameraSettings.
108 | #>
109 |
110 | $cameraSettings = $camera | Get-CameraSetting -Stream -StreamNumber $streamNum
111 |
112 | if ($null -ne $FPS -and $null -ne $cameraSettings.FPS)
113 | {
114 | $camera | Set-CameraSetting -Stream -StreamNumber $streamNum -Name FPS -Value $FPS
115 | }
116 |
117 | if ($null -ne $ZipstreamCompression -and $null -ne $cameraSettings.ZStrength)
118 | {
119 | $camera | Set-CameraSetting -Stream -StreamNumber $streamNum -Name ZStrength -Value $ZipstreamCompression
120 | }
121 |
122 | if ($null -ne $ZipstreamFPSMode -and $null -ne $cameraSettings.ZFpsMode)
123 | {
124 | $camera | Set-CameraSetting -Stream -StreamNumber $streamNum -Name ZFpsMode -Value $ZipstreamFPSMode
125 | }
126 |
127 | if ($null -ne $ZipstreamGOPMode -and $null -ne $cameraSettings.ZGopMode)
128 | {
129 | $camera | Set-CameraSetting -Stream -StreamNumber $streamNum -Name ZGopMode -Value $ZipstreamGOPMode
130 | }
131 |
132 | if ($null -ne $ZipstreamMaxGOPLength -and $null -ne $cameraSettings.ZGopLength)
133 | {
134 | $camera | Set-CameraSetting -Stream -StreamNumber $streamNum -Name ZGopLength -Value $ZipstreamMaxGOPLength
135 | }
136 | }
--------------------------------------------------------------------------------
/Samples/Set-HttpsEnabled.ps1:
--------------------------------------------------------------------------------
1 | function Set-HttpsEnabled {
2 | <#
3 | .SYNOPSIS
4 | Sets the HTTPSEnabled property for a hardware device to whatever value is valid for that device.
5 |
6 | .DESCRIPTION
7 | Each device driver publishes its own settings and validation parameters to the Management Server
8 | and values are case sensitive. Some drivers expect "Yes" and others expect "yes" for the same
9 | setting. This function demonstrates one way you could abstract this complication away into a
10 | function which will try to find the valid value name for you. All you have to do is supply the
11 | Enabled or Disabled switch when calling Set-HttpsEnabled.
12 |
13 | .PARAMETER Hardware
14 | Specifies the hardware device you will be making the change on. You can get this hardware object
15 | using Get-Hardware.
16 |
17 | .PARAMETER Enabled
18 | Specifies that the HTTPSEnabled setting should be enabled. The function will figure out it the
19 | right value is yes, enabled, true, or on, and whether those values should be capitalized or not.
20 |
21 | .PARAMETER Disabled
22 | Specifies that the HTTPSEnabled setting should be disabled. The function will figure out it the
23 | right value is no, disabled, false, or off, and whether those values should be capitalized or not.
24 |
25 | .PARAMETER SettingName
26 | Specifies the name of the HTTPSEnabled setting. Normally this is HTTPSEnabled, but just in case it
27 | is something else for another driver, you can specify the setting name here. Technically this means
28 | you could use this function to modify any "boolean" style setting.
29 |
30 | .EXAMPLE
31 | Get-Hardware | Set-HttpsEnabled -Enabled
32 |
33 | Sets the HTTPSEnabled value for all hardware devices to whatever the "enabled" value is.
34 | #>
35 | [CmdletBinding()]
36 | param(
37 | [Parameter(Mandatory, ValueFromPipeline, ParameterSetName='Enabled')]
38 | [Parameter(Mandatory, ValueFromPipeline, ParameterSetName='Disabled')]
39 | [VideoOS.Platform.ConfigurationItems.Hardware]
40 | $Hardware,
41 | [Parameter(Mandatory, ParameterSetName='Enabled')]
42 | [switch]
43 | $Enabled,
44 | [Parameter(Mandatory, ParameterSetName='Disabled')]
45 | [switch]
46 | $Disabled,
47 | [Parameter(ParameterSetName='Enabled')]
48 | [Parameter(ParameterSetName='Disabled')]
49 | [string]
50 | $SettingName = 'HTTPSEnabled'
51 | )
52 |
53 | process {
54 | $validValues = if ($Enabled) { @('yes', 'true', 'on', 'enabled') } else { @('no', 'false', 'off', 'disabled') }
55 | $infos = $Hardware | Get-HardwareSetting -Name $SettingName -ValueTypeInfo
56 | Write-Verbose "Valid values for $SettingName on $($Hardware.Model) are $(($infos | Get-Member -MemberType NoteProperty | Select -ExpandProperty Name) -join ', ')"
57 | if ($null -eq $infos -or ($infos | Get-Member -MemberType NoteProperty).Count -eq 0) {
58 | Write-Error "ValueTypeInfo for $SettingName could not be found. Use Get-HardwareSetting to see a list of valid setting names."
59 | return
60 | }
61 |
62 | $valueName = ($infos | Get-Member -MemberType NoteProperty | Where-Object Name -in $validValues).Name
63 | if ($null -eq $valueName) {
64 | Write-Error "$SettingName has a value that is neither yes/no, true/false, or on/off."
65 | return
66 | }
67 | Write-Verbose "Setting $SettingName to $($infos.$valueName) on $($Hardware.Name) ($($Hardware.Id))"
68 | $Hardware | Set-HardwareSetting -Name $SettingName -Value $infos.$valueName
69 | }
70 | }
--------------------------------------------------------------------------------
/Samples/Set-MilestoneNames.ps1:
--------------------------------------------------------------------------------
1 | function Set-MilestoneNames
2 | {
3 | <#
4 | .SYNOPSIS
5 | Allows user to export enabled hardware and camera names to CSV. Once new names are added, allows user to import the updated names from the CSV.
6 |
7 | .DESCRIPTION
8 | Steps for use (if you are familiar with PowerShell functions, skip to step #):
9 | 1. Once opening Set-MilestoneNames.ps1 in Windows PowerShell ISE, click the green "Run Script" arrow (or just press F5)
10 | 2. Run the command in the first example below to Export the CSV. The path can be changed if desired.
11 | 3. If the machin this script is running on does not have Excel, copy the CSV file to a machine with Excel installed.
12 | 4. For any hardware or cameras where the name needs to be changed, enter the new name in the "NewHardwareName" or
13 | "NewCameraName" column. If the name doesn't need to be changed, don't do anything for that row.
14 | a. Do NOT change any of the other data.
15 | 5. Copy the CSV back to the machine this script is running on (if it was copied to another machine).
16 | 6. Run the command in the second example below to Import the new names. Make sure the path points to the CSV file.
17 |
18 | .EXAMPLE
19 | Set-MilestoneNames -Export -CsvPath "$($env:USERPROFILE)\Desktop\MilestoneNames.csv"
20 |
21 | Exports a CSV file named MilestoneNames.csv to the users desktop. This file contains all of the enabled hardware and camera named
22 | .EXAMPLE
23 | Set-MilestoneNames -Import -CsvPath "$($env:USERPROFILE)\Desktop\MilestoneNames.csv"
24 |
25 | Imports a CSV file that contains updated hardware or camera names.
26 | #>
27 |
28 | [CmdletBinding()]
29 | param (
30 | [Parameter(Mandatory=$false)]
31 | [switch]
32 | $Import,
33 | [Parameter(Mandatory=$false)]
34 | [switch]
35 | $Export,
36 | [Parameter(Mandatory=$true)]
37 | [string]
38 | $CsvPath
39 | )
40 |
41 | if ($Import -eq $false -and $Export -eq $false -or ($Import -eq $true -and $Export -eq $true))
42 | {
43 | Write-Host "Either -Import or -Export needs to be specified." -ForegroundColor Red
44 | Break
45 | }
46 |
47 | Connect-ManagementServer -ShowDialog -Force
48 | $data = New-Object System.Collections.Generic.List[PSCustomObject]
49 |
50 | if ($Export)
51 | {
52 | foreach ($hw in Get-VmsHardware | Where-Object Enabled)
53 | {
54 | $row = [PSCustomObject]@{
55 | Type = "Hardware"
56 | CurrentHardwareName = $hw.Name
57 | NewHardwareName = ""
58 | HardwareId = $hw.Id
59 | CurrentCameraName = ""
60 | NewCameraName = ""
61 | CameraId = ""
62 | }
63 | $data.Add($row)
64 |
65 | foreach ($cam in $hw | Get-VmsCamera)
66 | {
67 | $row = [PSCustomObject]@{
68 | Type = "Camera"
69 | CurrentHardwareName = ""
70 | NewHardwareName = ""
71 | HardwareId = ""
72 | CurrentCameraName = $cam.Name
73 | NewCameraName = ""
74 | CameraId = $cam.Id
75 | }
76 | $data.Add($row)
77 | }
78 | }
79 | $data | Export-Csv -Path $CsvPath -NoTypeInformation
80 | }
81 |
82 | if ($Import)
83 | {
84 | $csv = Import-Csv -Path $CsvPath
85 |
86 | foreach ($item in $csv)
87 | {
88 | if ($item.Type -eq "Hardware" -and -not [string]::IsNullOrEmpty($item.NewHardwareName))
89 | {
90 | Get-VmsHardware -HardwareId $item.HardwareID | Set-VmsHardware -Name $item.NewHardwareName
91 | }
92 |
93 | if ($item.Type -eq "Camera" -and -not [string]::IsNullOrEmpty($item.NewCameraName))
94 | {
95 | Get-VmsCamera -Id $item.CameraId | Set-VmsCamera -Name $item.NewCameraName
96 | }
97 | }
98 | }
99 | }
--------------------------------------------------------------------------------
/Samples/Snapshots-On-Interval/README - sp-MX.md:
--------------------------------------------------------------------------------
1 | # Instantáneas en intervalos
2 |
3 | En este ejemplo se muestra cómo puede programar una tarea en Windows para recuperar instantáneas JPEG de cámaras seleccionadas en un intervalo determinado.
4 |
5 | Para probarlo, simplemente ejecute la secuencia de comandos setup.ps1 como administrador. La elevación es necesaria porque creará una tarea programada, pero la tarea en sí no requerirá ni se ejecutará con privilegios elevados.
6 | Asegúrese de ejecutar la secuencia de comandos desde un archivo en lugar de copiar y pegar la secuencia de comandos en una terminal de PowerShell. La secuencia de comandos utiliza la variable automática $PSScriptRoot para determinar el “directorio de trabajo” donde se almacenarán la configuración, el registro y las instantáneas. Por lo tanto, dondequiera que ejecute setup.ps1 será el directorio de trabajo para la tarea programada.
7 |
8 | Cuando ejecute la secuencia de comandos, se le pedirá la dirección y las credenciales del servidor de Milestone, luego ingresará el intervalo deseado entre instantáneas en segundos y seleccionará una o más cámaras para incluir a través de la GUI del “Selector de elementos” de Milestone.
9 |
10 | A continuación, guarde esta información en un archivo XML mediante Export-CliXml, lo que garantizará que las credenciales se cifren mediante la API de protección de datos de Windows (DPAPI) con el ámbito “CurrentUser”, lo que significa que solo el usuario de Windows actual podrá leer la credencial desde el disco.
11 |
12 | Por último, use Register-ScheduledJob para crear una tarea programada en Windows que encontrará en el Programador de tareas en Microsoft\/Windows\/PowerShell\/ScheduledJobs. La tarea programada se iniciará inmediatamente, así como en cada inicio de Windows, lea el archivo config.xml y use la información allí para iniciar sesión en el VMS de Milestone, luego comenzará a guardar instantáneas en el intervalo dado. La secuencia de comandos se ejecutará indefinidamente en un bucle infinito, y dormirá durante el tiempo adecuado entre la toma de instantáneas.
13 |
14 | Tenga en cuenta que si hay cientos de cámaras o más, este proceso podría llevar mucho tiempo y las instantáneas se tomarán en serie en lugar de en paralelo.
15 |
16 |
--------------------------------------------------------------------------------
/Samples/Snapshots-On-Interval/README.md:
--------------------------------------------------------------------------------
1 | # Snapshots On Interval
2 |
3 | This sample demonstrates how you can schedule a task in Windows to retrieve JPEG snapshots from select cameras on a given interval.
4 |
5 | To try it out, simply run the setup.ps1 script as Administrator. Elevation is required because you'll be creating a scheduled task,
6 | but the task itself will not require, or run with elevated privileges.
7 |
8 | Make sure to run the script from a file rather than copying and pasting the script into a PowerShell terminal. The script uses
9 | the $PSScriptRoot automatic variable to determine the "working directory" where the configuration, log, and snapshots will be stored.
10 | So wherever you run setup.ps1 from will be the working directory for the scheduled task.
11 |
12 | When you run the script, you will be prompted for Milestone server address and credentials, then you will enter the desired interval
13 | between snapshots in seconds, and you will select one or more cameras to be included via the Milestone "Item Picker" GUI.
14 |
15 | We then save this information to an XML file using Export-CliXml which will ensure the credentials are encrypted using the Windows
16 | Data Protection API (DPAPI) with "CurrentUser" scope meaning only the current windows user is able to read the credential from disk.
17 |
18 | Finally, we use Register-ScheduledJob to create a scheduled task in Windows which you'll find in Task Scheduler under
19 | Microsoft/Windows/PowerShell/ScheduledJobs. The scheduled task will start immediately, and also on every Windows startup, read the
20 | config.xml file and use the information there to login to the Milestone VMS, then begin saving snapshots on the given interval. The
21 | script will run indefinitely in a never-ending loop, sleeping for an appropriate time between taking snapshots.
22 |
23 | Note that if there are hundreds of cameras or more, this process could take a long time and the snapshots are being taken in serial
24 | fashion rather than in parallel.
25 |
--------------------------------------------------------------------------------
/Samples/Snapshots-On-Interval/setup.ps1:
--------------------------------------------------------------------------------
1 | #Requires -RunAsAdministrator
2 | #Requires -Modules 'MilestonePSTools'
3 |
4 | # The Requires statements ensure the user runs the script as Administrator, and has the MilestonePSTools module installed
5 |
6 | # Instead of setting -ErrorAction 'Stop' in every function call, we set ErrorActionPreference which applies to the whole script
7 | # This way, we stop the script if something goes wrong instead of proceeding with incomplete data
8 | $ErrorActionPreference = "Stop"
9 |
10 | # Present a login dialog and on successful login, store the properties we'll need to reconnect from the scheduled task in a hashtable.
11 | Connect-ManagementServer -ShowDialog -AcceptEula -Force
12 | $loginSettings = Get-LoginSettings
13 | $nc = $loginSettings.CredentialCache | Select-Object -First 1
14 | $config = @{
15 | Connection = @{
16 | ServerAddress = $loginSettings.Uri
17 | Credential = if ([string]::IsNullOrWhiteSpace($nc.UserName)) { $null } else { [pscredential]::new($nc.UserName, $nc.SecurePassword) }
18 | BasicUser = $loginSettings.IsBasicUser
19 | AcceptEula = $true
20 | }
21 | }
22 |
23 | # Get seconds between snapshots or the snapshot interval
24 | # Tests the user-input to make sure it's a valid integer before continuing
25 | while ($true) {
26 | $interval = Read-Host -Prompt "How many seconds between snapshots"
27 | $intValue = 0
28 | if ([int]::TryParse($interval, [ref] $intValue) -and $intValue -ge 1) {
29 | $config.IntervalSeconds = $intValue
30 | break
31 | }
32 | else {
33 | Write-Warning "Value must be an integer greater than 0. Please try again. . ."
34 | }
35 | }
36 |
37 | # Let the user select which cameras will be used. Note this gets the raw camera ids and even though
38 | # you can add cameras using a device group, only the cameras in that group at the time this script
39 | # is run will be included in the snapshot collection when the scheduled job is running.
40 | do {
41 | [array]$cameraIds = (Select-Camera -AllowFolders -AllowServers -RemoveDuplicates -OutputAsItem).FQID.ObjectId
42 | } while ($cameraIds.Count -le 0)
43 | $config.CameraIds = $cameraIds
44 |
45 | Disconnect-ManagementServer
46 |
47 |
48 | # Save the server address, credentials and settings to an XML file.
49 | # PowerShell encrypts the password in the credential so that only the current
50 | # user can actually decrypt it.
51 | $config | Export-Clixml -Path $PSScriptRoot\config.xml
52 |
53 | # Check if the scheduled job has previously been created, and delete it if so.
54 | $jobName = "Milestone Snapshot Task"
55 | Get-ScheduledJob -Name $jobName -ErrorAction Ignore | Unregister-ScheduledJob -Force
56 |
57 | # Create / Recreate the scheduled task with a trigger on system startup.
58 | $trigger = New-JobTrigger -AtStartup
59 |
60 | # If the job is already running and is triggered again, ignore the new instance. Require network as well
61 | $options = New-ScheduledJobOption -MultipleInstancePolicy IgnoreNew -RequireNetwork
62 |
63 | # Create the scheduled job. This appears in Task Scheduler in Windows under Microsoft/Windows/PowerShell/ScheduledJobs
64 | # We'll run the job immediately upon creation so that the task starts running in the background immediately
65 | $null = Register-ScheduledJob -Name $jobName -ScheduledJobOption $options -Trigger $trigger -RunNow -ArgumentList $PSScriptRoot -ScriptBlock {
66 | param([string]$WorkingDirectory)
67 | $ErrorActionPreference = "Stop"
68 | function Write-Log {
69 | <#
70 | .SYNOPSIS
71 | We want the transcript to include a timestamp for each line to make it easier to understand when
72 | and how long operations are taking. So all Write-Host commands will use Write-Log instead.
73 |
74 | Also, normally we'd use Write-Information but a bug in PowerShell means the transcript does not
75 | include anything from the Information stream. So Write-Host it is.
76 | #>
77 | param([string]$Message)
78 | Write-Host "$(Get-Date -Format "yyyy-MM-dd HH:mm:ss.fff") - $Message"
79 | }
80 |
81 | try {
82 | Start-Transcript -Path (Join-Path -Path $WorkingDirectory -ChildPath job.log) -Force
83 |
84 | if (-not (Test-Path $WorkingDirectory\snapshots)) {
85 | Write-Log "Creating missing snapshots subfolder"
86 | $null = New-Item -Path $WorkingDirectory\snapshots -ItemType Directory -Force
87 | }
88 |
89 | Write-Log "Importing configuration"
90 | $config = Import-Clixml -Path $WorkingDirectory\config.xml
91 |
92 | $connected = $false
93 | Write-Log "Connecting to Management Server at $($config.Server) with user $($config.Credential.UserName). . ."
94 | $connection = $config.Connection
95 | Connect-ManagementServer @connection
96 | Write-Log "Connected"
97 | $connected = $true
98 |
99 | Write-Log "Retrieving snapshots every $($config.IntervalSeconds) seconds"
100 | $interval = New-TimeSpan -Seconds $config.IntervalSeconds
101 | $stopwatch = [diagnostics.stopwatch]::new()
102 | while ($true) {
103 | $stopwatch.Restart()
104 | foreach ($id in $config.CameraIds) {
105 | $camera = Get-VmsCamera -Id $id
106 | $folder = Join-Path -Path $WorkingDirectory -ChildPath snapshots\$($camera.Name)\
107 | if (-not (Test-Path -Path $folder)) {
108 | Write-Log "Creating subfolder for camera $($camera.Name) at $folder"
109 | $null = New-Item -Path $folder -ItemType Directory -Force
110 | }
111 | Write-Log "Getting snapshot from $($camera.Name)"
112 | $null = $camera | Get-Snapshot -Live -Save -Path $folder -UseFriendlyName
113 | }
114 |
115 | # Figure out how much we need to sleep in order to aim for the user-defined interval.
116 | # So subtract the time we spent generating snapshots from the desired interval, and sleep
117 | # for the difference. If the snapshots took longer than the interval time, then we'll just
118 | # skip the delay and repeat the process immediately
119 | $delay = $interval - $stopwatch.Elapsed
120 | if ($delay.TotalMilliseconds -gt 0) {
121 | Write-Log "Completed cycle in $($stopwatch.Elapsed.TotalSeconds) seconds. Sleeping for $($delay.TotalMilliseconds)ms"
122 | Start-Sleep -Milliseconds $delay.TotalMilliseconds
123 | }
124 | else {
125 | Write-Log "WARNING: Completed cycle in $($stopwatch.Elapsed.TotalSeconds) seconds. This is longer than the desired interval of $($interval.TotalSeconds)"
126 | }
127 | }
128 | }
129 | finally {
130 | if ($connected) {
131 | Write-Log "Logging out of Management Server"
132 | Disconnect-ManagementServer
133 | }
134 | Stop-Transcript
135 | }
136 | }
137 |
--------------------------------------------------------------------------------
/Samples/Test-DataPresence/README - sp-MX.md:
--------------------------------------------------------------------------------
1 | ## Test Data Presence
2 |
3 | En este cmdlet (o grupo de cmdlets) probamos la presencia de datos entre un StartTime y EndTime determinados para dispositivos de cualquier tipo, incluidas cámaras, micrófonos, altavoces y metadatos.
4 |
5 | El método utilizado para comprobar la presencia de datos es recuperar una instantánea en el StartTime dado y comprobar el valor de la propiedad DateTime. Si está entre StartTime y EndTime, sabemos que hay al menos _algunos_ datos dentro del lapso de tiempo dado.
6 |
7 | Gracias al comportamiento y a las propiedades adicionales disponibles en los datos de reproducción, podemos determinar a partir de esa única instantánea si hay algún dato disponible en todo el lapso de tiempo. Ya sea que la instantánea sea para una cámara, micrófono, altavoz o metadatos.
8 |
9 | Al llamar a “GetNearest ([DateTime])” en una fuente de datos en MIP SDK, se devolverá un fotograma de datos si existe algo disponible y será algún tiempo antes o después del valor DateTime dado. Junto con los datos habrá valores que indican el valor DateTime del siguiente fotograma de datos disponible y el fotograma de datos anterior (si está disponible).
10 |
11 | Por lo tanto, si los datos devueltos son _anteriores_ a StartTime, y el valor de NextDateTime está entre StartTime y EndTime, podemos afirmar con seguridad que existen datos disponibles en ese lapso de tiempo.
12 |
13 | Y si el fotograma más cercano está _después_ de EndTime, sabemos que la imagen más cercana a StartTime es posterior de EndTime, por lo que no existen datos presentes entre StartTime y EndTime.
14 |
15 | El cmdlet Test-DataPresence acepta un elemento de configuración de cualquiera de los cuatro tipos de datos y pasa la solicitud a funciones más específicas como Test-VideoPresence, Test-AudioPresence o Test-MetadataPresence. Pero las tres funciones operan de manera muy similar, cada una haciendo uso de las clases de fuente de datos coincidentes del MIP SDK para consultar la base de datos multimedia.
16 |
17 | ```powershell
18 | $InformationPreference = 'Continue'
19 | $server = Read-Host -Prompt "Server Address"
20 | $credential = Get-Credential
21 |
22 | do {
23 | $isBasic = Read-Host -Prompt "Basic user? (y/n)"
24 | } while ('y', 'n' -notcontains $isBasic)
25 |
26 | try {
27 | Write-Information "Connecting to $server as $username"
28 | $connected = $false
29 | Connect-ManagementServer -Server $server -Credential $credential -BasicUser:($isBasic -eq 'y')
30 | Write-Information "Connected"
31 | $connected = $true
32 |
33 | foreach ($lock in Get-EvidenceLock) {
34 | $lockHasData = $false
35 | $cameras = $lock.DeviceIds | Foreach-Object { try { Get-Camera -Id $_ } catch { } }
36 | foreach ($camera in $cameras) {
37 | $dataExists = $camera | Test-DataPresence -StartTime $lock.StartTime -EndTime $lock.EndTime
38 | if ($dataExists) {
39 | $lockHasData = $true
40 | break;
41 | }
42 | }
43 |
44 | if (-not $lockHasData) {
45 | $lock
46 | }
47 | }
48 | }
49 | catch {
50 | throw
51 | }
52 | finally {
53 | if ($connected) {
54 | Disconnect-ManagementServer
55 | }
56 | }
57 | ```
58 |
--------------------------------------------------------------------------------
/Samples/Test-DataPresence/README.md:
--------------------------------------------------------------------------------
1 | ## Test Data Presence
2 |
3 | In this cmdlet (or group of cmdlets) we test for the presence of data between a given StartTime
4 | and EndTime for devices of any type including cameras, microphones, speakers and metadata.
5 |
6 | The method used to test for the presence of data is to retrieve a snapshot at the given StartTime
7 | and check the value of the DateTime property. If it's between StartTime and EndTime, we know that
8 | there's at least _some_ data within the given span of time.
9 |
10 | Thanks to the behavior, and additional properties available on playback data, we can determine
11 | from that single snapshot whether any data is available in the entire span of time. Whether the
12 | snapshot is for a camera, microphone, speaker, or metadata.
13 |
14 | When calling "GetNearest([DateTime])" on a data source in MIP SDK, a frame of data will be
15 | returned if anything is available, and it will be some time before or after the given DateTime
16 | value. Along with the data will be values indicating the DateTime value of the next available
17 | frame of data, and the previous frame of data (if available).
18 |
19 | So if the data returned is _before_ the StartTime, and the NextDateTime value is between
20 | StartTime and EndTime, then we can safely say there is data available in that time span.
21 |
22 | And if the nearest frame is _after_ the EndTime, we know that the nearest image to StartTime is
23 | after the EndTime and thus there is no data present between StartTime and EndTime.
24 |
25 | The Test-DataPresence cmdlet accepts a configuration item of any of the four data types, and
26 | passes the request on to more specific functions like Test-VideoPresence, Test-AudioPresence, or
27 | Test-MetadataPresence. But all three of these functions work very similarly - each making use of
28 | the matching data source classes from MIP SDK to query the media database.
29 |
30 | ```powershell
31 | $InformationPreference = 'Continue'
32 | $server = Read-Host -Prompt "Server Address"
33 | $credential = Get-Credential
34 |
35 | do {
36 | $isBasic = Read-Host -Prompt "Basic user? (y/n)"
37 | } while ('y', 'n' -notcontains $isBasic)
38 |
39 | try {
40 | Write-Information "Connecting to $server as $username"
41 | $connected = $false
42 | Connect-ManagementServer -Server $server -Credential $credential -BasicUser:($isBasic -eq 'y')
43 | Write-Information "Connected"
44 | $connected = $true
45 |
46 | foreach ($lock in Get-EvidenceLock) {
47 | $lockHasData = $false
48 | $cameras = $lock.DeviceIds | Foreach-Object { try { Get-Camera -Id $_ } catch { } }
49 | foreach ($camera in $cameras) {
50 | $dataExists = $camera | Test-DataPresence -StartTime $lock.StartTime -EndTime $lock.EndTime
51 | if ($dataExists) {
52 | $lockHasData = $true
53 | break;
54 | }
55 | }
56 |
57 | if (-not $lockHasData) {
58 | $lock
59 | }
60 | }
61 | }
62 | catch {
63 | throw
64 | }
65 | finally {
66 | if ($connected) {
67 | Disconnect-ManagementServer
68 | }
69 | }
70 | ```
71 |
--------------------------------------------------------------------------------
/images/logo.png:
--------------------------------------------------------------------------------
https://raw.githubusercontent.com/MilestoneSystemsInc/PowerShellSamples/ecbb1d9db0c12efd0946d7d904cc63a49e36e827/images/logo.png
--------------------------------------------------------------------------------
/images/screenshot.png:
--------------------------------------------------------------------------------
https://raw.githubusercontent.com/MilestoneSystemsInc/PowerShellSamples/ecbb1d9db0c12efd0946d7d904cc63a49e36e827/images/screenshot.png
--------------------------------------------------------------------------------
4 |
5 | Hay muchas maneras de ejecutar secuencias de comandos/tareas programadas. En Windows, la forma más común de hacerlo es a través del Programador de tareas de Windows. Incluso existen varias formas de ejecutar secuencias de comandos de PowerShell en el Programador de tareas. Usted puede crear una tarea programada estándar a mano, o mediante algunos de los cmdlets de PowerShell en el módulo ScheduledTasks o, por último, mediante el módulo PSScheduledJob, que es la ruta que tomé para este ejemplo.
6 | Para utilizar este ejemplo, puede descargar ScheduledLogExport.ps1 y colocarlo en una carpeta en el cliente o servidor de Windows donde desea que se encuentren los archivos de registro y los CSV de exportación de registros. Por ejemplo, puede colocarlo en C:\scripts\ScheduledLogExport\. A continuación, abra PowerShell como administrador y ejecute la secuencia de comandos. ¡Eso es todo!
7 |
8 | ## Pero, ¿cómo funciona?
9 |
10 | La secuencia de comandos utiliza el nuevo parámetro de cambio “ShowDialog” en Connect-ManagementServer para darle la oportunidad de conectarse con éxito a su servidor de gestión. Una vez conectado, sus opciones de inicio de sesión se conservan en el disco en un archivo connection.xml en la misma carpeta. Si proporcionó una contraseña, se cifrará como una cadena segura automáticamente utilizando el ámbito “CurrentUser”. Esto significa que solo su cuenta de usuario puede descifrar esa contraseña.
11 |
12 | La tarea programada importará ese archivo connection.xml y colocará esos parámetros en el comando `Connect-ManagementServer`. Después de eso, ejecutamos la exportación de registros y guardamos la salida en un archivo con marca de tiempo en la subcarpeta de `exportaciones` que ahora debería existir en la carpeta en la que se encuentra su secuencia de comandos.
13 |
14 | Se creará un archivo de registro gracias al uso de `Start-Transcript` para darle una idea de cómo se ejecutó la tarea durante la última ejecución. El archivo se sobrescribirá cada vez para evitar que eventualmente llene su disco con registros. Asimismo, cualquier exportación con más de 30 días de duración se eliminará durante cada ejecución.
15 |
16 | ## En lugar de CSV
17 |
18 | Este ejemplo está diseñado para mostrar una forma en que puede automatizar la recuperación de registros. Muchas veces un archivo CSV no es el formato adecuado para los fines previstos. Si, en cambio, desea transformar y enviar estos datos a otra herramienta como Splunk, ElasticSearch, DataDog o simplemente otra base de datos SQL, puede modificar el ejemplo a partir de la línea 55 y, en lugar de canalizar los registros a CSV, puede optar por usar cualquier número de módulos de PowerShell para ayudar a conectarse al sistema de destino y enviar los registros allí. Cuando esté listo, vuelva a ejecutar la secuencia de comandos para eliminar el trabajo programado anterior y registre uno nuevo con las actualizaciones que haya agregado.
19 |
20 | ## Reflexiones adicionales
21 |
22 | El módulo PSScheduledJob es interesante por la forma en que funciona. Encontrará que la tarea programada ejecuta powershell.exe con un comando que carga la definición de trabajo programada desde `C:\Users\\AppData\Local\Microsoft\Windows\PowerShell\ScheduledJobs`. Si sucede algo extraño y su archivo de registro de transcripción no lo muestra, puede encontrar más información en la subcarpeta Salida en la carpeta de definición de trabajo programada. Si la contraseña de usuario de Windows cambia, es posible que deba iniciar sesión en este equipo para asegurarse de que la secuencia de comandos todavía se está ejecutando, ya que se ejecuta bajo su contexto de usuario.
23 |
24 | Si el servidor de gestión está en un sistema diferente al de esta secuencia de comandos, es posible que deba agregar el parámetro `Credencial` a `Register-ScheduledJob` y proporcionar la credencial de usuario de Windows, a menos que decida usar la autenticación explícita de usuario de Windows o la autenticación de usuario básico y proporcione un nombre de usuario y una contraseña mientras ejecuta la secuencia de comandos para crear el trabajo o la tarea programados.
25 |
--------------------------------------------------------------------------------
/Samples/ScheduledLogExport/README.md:
--------------------------------------------------------------------------------
1 | # ScheduledLogExport
2 |
3 |
4 |
5 | There are are lot of ways to execute scripts/tasks on a schedule. In Windows, the most common way
6 | to do this is through the Windows Task Scheduler. And there are even multiple ways to execute
7 | PowerShell scripts in Task Scheduler! You can create a standard scheduled task by hand, or by using
8 | some of the PowerShell cmdlets in the ScheduledTasks module, or finally by using the PSScheduledJob
9 | module which is the route I went for this sample.
10 |
11 | To use this sample, you can download ScheduledLogExport.ps1 and place it in some folder on your
12 | Windows client or server where you want your log file and log export CSV's to live. For example,
13 | you could place it in `C:\scripts\ScheduledLogExport\`. Then open PowerShell as Administrator
14 | and execute the script. That's it!
15 |
16 | ## But how does it work?
17 |
18 | The script uses the new "ShowDialog" switch parameter in Connect-ManagementServer to give you the
19 | opportunity to successfully connect to your Management Server. Once connected, your login choices
20 | get persisted to disk in a connection.xml file in the same folder. If you provided a password, it
21 | will be encrypted as a secure string automatically using "CurrentUser" scope. This means only your
22 | user account can decrypt that password.
23 |
24 | The scheduled task will import that connection.xml file and splat those parameters into the
25 | `Connect-ManagementServer` command. After that, we run the log export and save the output to a
26 | timestamped file in the `exports` subfolder that should now exist in the folder your script is in.
27 |
28 | A log file will be created thanks to the use of `Start-Transcript` to give you an idea of how the
29 | task ran during the last execution. The file will be overwritten each time to avoid *eventually*
30 | filling your disk up with logs. Likewise, any exports older than 30 days will be deleted
31 | during each run.
32 |
33 | ## Instead of CSV
34 |
35 | This sample is intended to show one way you can automate log retrieval. Often times a CSV file is
36 | not the right format for your intended purposes. If you instead want to transform and send this
37 | data to another tool like Splunk, ElasticSearch, DataDog, or just another SQL database, you can
38 | modify the sample starting around line 55 and instead of piping the logs to CSV, you could choose
39 | to use any number of PowerShell modules to help connect to the destination system and send the logs
40 | there instead! When you're ready, re-run the script to remove the old scheduled job and register a
41 | new one with the updates you've added.
42 |
43 | ## Additional thoughts
44 |
45 | The PSScheduledJob module is interesting in the way it works. You'll find the scheduled task runs
46 | powershell.exe with a command that loads your scheduled job definition from
47 | `C:\Users\\AppData\Local\Microsoft\Windows\PowerShell\ScheduledJobs`. If something weird
48 | happens and your transcript log file doesn't show it, you might find more information in the
49 | `Output` subfolder under your scheduled job defintion folder. And if your Windows user password
50 | changes, you may need to be sure to login to this machine to make sure the script is still running
51 | since it runs under your user context.
52 |
53 | If your Management Server is on a different system than this script, you might need to add the
54 | `Credential` parameter to `Register-ScheduledJob` and provide your Windows user credential unless
55 | you decide to use explicit Windows user authentication or basic user authentication and provide
56 | both a username and password while running the script to create the scheduled job/task.
57 |
--------------------------------------------------------------------------------
/Samples/ScheduledLogExport/ScheduledLogExport.ps1:
--------------------------------------------------------------------------------
1 | #Requires -RunAsAdministrator
2 | #Requires -Modules MilestonePSTools, MipSdkRedist, PSScheduledJob
3 |
4 | # Collect & test Management Server login details and persist to disk
5 | Connect-ManagementServer -ShowDialog -Force -AcceptEula -ErrorAction Stop
6 | $loginSettings = Get-LoginSettings
7 | $authType = if ($loginSettings.IsBasicUser) { 'Basic' } else { 'Negotiate' }
8 | $credential = $loginSettings.CredentialCache.GetCredential($loginSettings.Uri, $authType)
9 | if ($credential.UserName -eq [string]::Empty) {
10 | $credential = $null
11 | }
12 | else {
13 | $credential = [pscredential]::new("$(if (![string]::IsNullOrWhiteSpace($credential.Domain)) {"$($credential.Domain)\"})$($credential.UserName)", $credential.SecurePassword)
14 | }
15 | $connectParams = @{
16 | ServerAddress = $loginSettings.Uri
17 | Credential = $credential
18 | BasicUser = $loginSettings.IsBasicUser
19 | SecureOnly = $loginSettings.SecureOnly
20 | AcceptEula = $true
21 | }
22 | $connectParams | Export-Clixml -Path $PSScriptRoot\connection.xml -Force
23 | Disconnect-ManagementServer
24 |
25 |
26 |
27 |
28 | # Setup scheduled job using PSScheduledJob module commands
29 | $jobOptions = New-ScheduledJobOption -RequireNetwork -MultipleInstancePolicy IgnoreNew
30 | $jobTrigger = New-JobTrigger -Daily -At (Get-Date -Hour 6 -Minute 0 -Second 0)
31 | $jobParams = @{
32 | Name = 'Daily Log Export'
33 | ScheduledJobOption = $jobOptions
34 | Trigger = $jobTrigger
35 | RunNow = $true
36 | ArgumentList = $PSScriptRoot
37 | }
38 | Get-ScheduledJob -Name $jobParams.Name -ErrorAction Ignore | Unregister-ScheduledJob -Force -ErrorAction Stop
39 | Register-ScheduledJob @jobParams -ScriptBlock {
40 | param([string]$WorkingDirectory)
41 | try {
42 | # Transcript file is overwritten after every execution of the job so it always contains logs from the last run and does not grow indefinitely
43 | Start-Transcript -Path $WorkingDirectory\ScheduledLogExport.log
44 | $reportsFolder = New-Item -Path (Join-Path $WorkingDirectory 'exports\') -ItemType Directory -Force | Select-Object -ExpandProperty FullName
45 | Write-Host 'Cleaning up exports older than 30 days'
46 | Get-ChildItem -Path "$reportsFolder\Log-Export_*.csv" | Where-Object CreationTime -lt (Get-Date).AddDays(-30) | Remove-Item -Verbose
47 |
48 | # Import Management Server connection details from disk
49 | $connectParams = Import-Clixml -Path $WorkingDirectory\connection.xml
50 | Write-Host "Connecting to $($connectParams.ServerAddress). . ."
51 | Connect-ManagementServer @connectParams -Verbose
52 |
53 | $csvPath = Join-Path $reportsFolder "Log-Export_$(Get-Date -Format FileDateTime).csv"
54 | Write-Host "Running Get-Log and saving results to $csvPath"
55 | Get-Log -LogType Audit -BeginTime (Get-Date).Date.AddDays(-1) -EndTime (Get-Date).Date | Export-Csv -Path $csvPath -NoTypeInformation
56 | }
57 | catch {
58 | Write-Error $_
59 | }
60 | finally {
61 | $loadedModules = Get-Module | Select-Object Name, Version | Out-String
62 | Write-Host "Loaded modules and versions: $loadedModules"
63 | Write-Host 'Finished. Disconnecting from Management Server.'
64 | Disconnect-ManagementServer
65 | Stop-Transcript
66 | }
67 | }
--------------------------------------------------------------------------------
/Samples/ScheduledLogExport/ScheduledLogExport_screenshot.png:
--------------------------------------------------------------------------------
https://raw.githubusercontent.com/MilestoneSystemsInc/PowerShellSamples/ecbb1d9db0c12efd0946d7d904cc63a49e36e827/Samples/ScheduledLogExport/ScheduledLogExport_screenshot.png
--------------------------------------------------------------------------------
/Samples/Set-AxisCameraSettings.ps1:
--------------------------------------------------------------------------------
1 | function Set-AxisCameraSettings
2 | {
3 | <#
4 | .SYNOPSIS
5 | Set Axis Zipstream settings, as well as frame rate
6 | .DESCRIPTION
7 | Quickly set some or all of the Axis Zipstream settings, as well as frame rate, on all streams or just the recorded or just the live
8 | .EXAMPLE
9 | Set-AxisCameraSettings -RecordingServerName * -StreamType Recorded -FPS 10 -ZipstreamCompression medium -ZipstreamFPSMode dynamic
10 |
11 | Sets the Record stream on all Axis cameras on all Recording Servers to 10 fps, Medium zipstream, and Dynamic FPS mode.
12 | .EXAMPLE
13 | Set-AxisCameraSettings -RecordingServerName "Milestone-RS" -StreamType LiveDefault -FPS 15 -ZipstreamGOPMode dynamic -ZipstreamMaxGOPLength 500
14 |
15 | Sets the Live stream on all Axis cameras on Recording Server "Milestone-RS" to 15fps, Dynamic GOP length, and a max GOP length of 500.
16 | .EXAMPLE
17 | Set-AxisCameraSettings -RecordingServerName * -StreamType All -FPS 8 -ZipstreamCompress extreme
18 |
19 | Sets all streams on all Axis cameras on all Recording Servers to 8fps and Extreme zipstream.
20 | #>
21 | [CmdletBinding()]
22 | param (
23 | [Parameter(Mandatory = $true)]
24 | $RecordingServerName,
25 | [Parameter(Mandatory = $true)]
26 | [ValidateSet("All","LiveDefault","Record")]
27 | $StreamType,
28 | [Parameter()]
29 | [ValidateRange(1,30)]
30 | $FPS,
31 | [Parameter()]
32 | [ValidateSet("off","low","medium","high","higher","extreme")]
33 | $ZipstreamCompression,
34 | [Parameter()]
35 | [ValidateSet("fixed","dynamic")]
36 | $ZipstreamFPSMode,
37 | [Parameter()]
38 | [ValidateSet("fixed","dynamic")]
39 | $ZipstreamGOPMode,
40 | [Parameter()]
41 | [ValidateRange(62,1200)]
42 | $ZipstreamMaxGOPLength
43 | )
44 |
45 | begin
46 | {
47 | if ($RecordingServerName -ne "*" -and (Get-RecordingServer).Name -notcontains $RecordingServerName)
48 | {
49 | Write-Host "Recording Server does not exist. Please check spelling and try again." -ForegroundColor Red
50 | Return
51 | }
52 | }
53 |
54 | process
55 | {
56 | foreach ($rec in Get-RecordingServer -Name $RecordingServerName)
57 | {
58 | Write-Progress -Activity "Recording Server $($rec.name)" -Id 1
59 | $hwProcessed = 1
60 | $allAxisHardware = $rec | Get-Hardware | Where-Object {$_.Enabled -and ($_ | Get-HardwareSetting).ProductID -like "*Axis*"}
61 | $hwQty = $allAxisHardware.Count
62 | foreach ($hardware in $allAxisHardware)
63 | {
64 | Write-Progress -Activity "Processing hardware $($hwProcessed) of $($hwQty)" -ParentId 1 -Id 2 -PercentComplete ($hwProcessed / $hwQty * 100)
65 | foreach ($camera in $hardware | Get-Camera | Where-Object Enabled)
66 | {
67 | $allStreams = $camera | Get-Stream -All
68 |
69 | if ($StreamType -eq "Record" -or $StreamType -eq "LiveDefault")
70 | {
71 | $streamNum = 0
72 | foreach ($stream in $allStreams)
73 | {
74 | if ($stream.$($StreamType) -ne $true)
75 | {
76 | $streamNum++
77 | } else
78 | {
79 | Break
80 | }
81 | }
82 |
83 | Set-AxisCameraSettingsHelper $camera $streamNum $FPS $ZipstreamCompression $ZipstreamFPSMode $ZipstreamGOPMode $ZipstreamMaxGOPLength
84 | }
85 |
86 | if ($StreamType -eq "All")
87 | {
88 | for ($streamNum = 0;$streamNum -lt $allStreams.Count;$streamNum++)
89 | {
90 | Set-AxisCameraSettingsHelper $camera $streamNum $FPS $ZipstreamCompression $ZipstreamFPSMode $ZipstreamGOPMode $ZipstreamMaxGOPLength
91 | }
92 | }
93 | }
94 | $hwProcessed++
95 | }
96 | }
97 | }
98 | }
99 |
100 | function Set-AxisCameraSettingsHelper ($camera,$streamNum,$FPS,$ZipstreamCompression,$ZipstreamFPSMode,$ZipstreamGOPMode,$ZipstreamMaxGOPLength)
101 | {
102 | <#
103 | .SYNOPSIS
104 | Don't run this script directly. It gets run by Set-AxisCameraSettings.
105 |
106 | .DESCRIPTION
107 | Don't run this script directly. It gets run by Set-AxisCameraSettings.
108 | #>
109 |
110 | $cameraSettings = $camera | Get-CameraSetting -Stream -StreamNumber $streamNum
111 |
112 | if ($null -ne $FPS -and $null -ne $cameraSettings.FPS)
113 | {
114 | $camera | Set-CameraSetting -Stream -StreamNumber $streamNum -Name FPS -Value $FPS
115 | }
116 |
117 | if ($null -ne $ZipstreamCompression -and $null -ne $cameraSettings.ZStrength)
118 | {
119 | $camera | Set-CameraSetting -Stream -StreamNumber $streamNum -Name ZStrength -Value $ZipstreamCompression
120 | }
121 |
122 | if ($null -ne $ZipstreamFPSMode -and $null -ne $cameraSettings.ZFpsMode)
123 | {
124 | $camera | Set-CameraSetting -Stream -StreamNumber $streamNum -Name ZFpsMode -Value $ZipstreamFPSMode
125 | }
126 |
127 | if ($null -ne $ZipstreamGOPMode -and $null -ne $cameraSettings.ZGopMode)
128 | {
129 | $camera | Set-CameraSetting -Stream -StreamNumber $streamNum -Name ZGopMode -Value $ZipstreamGOPMode
130 | }
131 |
132 | if ($null -ne $ZipstreamMaxGOPLength -and $null -ne $cameraSettings.ZGopLength)
133 | {
134 | $camera | Set-CameraSetting -Stream -StreamNumber $streamNum -Name ZGopLength -Value $ZipstreamMaxGOPLength
135 | }
136 | }
--------------------------------------------------------------------------------
/Samples/Set-HttpsEnabled.ps1:
--------------------------------------------------------------------------------
1 | function Set-HttpsEnabled {
2 | <#
3 | .SYNOPSIS
4 | Sets the HTTPSEnabled property for a hardware device to whatever value is valid for that device.
5 |
6 | .DESCRIPTION
7 | Each device driver publishes its own settings and validation parameters to the Management Server
8 | and values are case sensitive. Some drivers expect "Yes" and others expect "yes" for the same
9 | setting. This function demonstrates one way you could abstract this complication away into a
10 | function which will try to find the valid value name for you. All you have to do is supply the
11 | Enabled or Disabled switch when calling Set-HttpsEnabled.
12 |
13 | .PARAMETER Hardware
14 | Specifies the hardware device you will be making the change on. You can get this hardware object
15 | using Get-Hardware.
16 |
17 | .PARAMETER Enabled
18 | Specifies that the HTTPSEnabled setting should be enabled. The function will figure out it the
19 | right value is yes, enabled, true, or on, and whether those values should be capitalized or not.
20 |
21 | .PARAMETER Disabled
22 | Specifies that the HTTPSEnabled setting should be disabled. The function will figure out it the
23 | right value is no, disabled, false, or off, and whether those values should be capitalized or not.
24 |
25 | .PARAMETER SettingName
26 | Specifies the name of the HTTPSEnabled setting. Normally this is HTTPSEnabled, but just in case it
27 | is something else for another driver, you can specify the setting name here. Technically this means
28 | you could use this function to modify any "boolean" style setting.
29 |
30 | .EXAMPLE
31 | Get-Hardware | Set-HttpsEnabled -Enabled
32 |
33 | Sets the HTTPSEnabled value for all hardware devices to whatever the "enabled" value is.
34 | #>
35 | [CmdletBinding()]
36 | param(
37 | [Parameter(Mandatory, ValueFromPipeline, ParameterSetName='Enabled')]
38 | [Parameter(Mandatory, ValueFromPipeline, ParameterSetName='Disabled')]
39 | [VideoOS.Platform.ConfigurationItems.Hardware]
40 | $Hardware,
41 | [Parameter(Mandatory, ParameterSetName='Enabled')]
42 | [switch]
43 | $Enabled,
44 | [Parameter(Mandatory, ParameterSetName='Disabled')]
45 | [switch]
46 | $Disabled,
47 | [Parameter(ParameterSetName='Enabled')]
48 | [Parameter(ParameterSetName='Disabled')]
49 | [string]
50 | $SettingName = 'HTTPSEnabled'
51 | )
52 |
53 | process {
54 | $validValues = if ($Enabled) { @('yes', 'true', 'on', 'enabled') } else { @('no', 'false', 'off', 'disabled') }
55 | $infos = $Hardware | Get-HardwareSetting -Name $SettingName -ValueTypeInfo
56 | Write-Verbose "Valid values for $SettingName on $($Hardware.Model) are $(($infos | Get-Member -MemberType NoteProperty | Select -ExpandProperty Name) -join ', ')"
57 | if ($null -eq $infos -or ($infos | Get-Member -MemberType NoteProperty).Count -eq 0) {
58 | Write-Error "ValueTypeInfo for $SettingName could not be found. Use Get-HardwareSetting to see a list of valid setting names."
59 | return
60 | }
61 |
62 | $valueName = ($infos | Get-Member -MemberType NoteProperty | Where-Object Name -in $validValues).Name
63 | if ($null -eq $valueName) {
64 | Write-Error "$SettingName has a value that is neither yes/no, true/false, or on/off."
65 | return
66 | }
67 | Write-Verbose "Setting $SettingName to $($infos.$valueName) on $($Hardware.Name) ($($Hardware.Id))"
68 | $Hardware | Set-HardwareSetting -Name $SettingName -Value $infos.$valueName
69 | }
70 | }
--------------------------------------------------------------------------------
/Samples/Set-MilestoneNames.ps1:
--------------------------------------------------------------------------------
1 | function Set-MilestoneNames
2 | {
3 | <#
4 | .SYNOPSIS
5 | Allows user to export enabled hardware and camera names to CSV. Once new names are added, allows user to import the updated names from the CSV.
6 |
7 | .DESCRIPTION
8 | Steps for use (if you are familiar with PowerShell functions, skip to step #):
9 | 1. Once opening Set-MilestoneNames.ps1 in Windows PowerShell ISE, click the green "Run Script" arrow (or just press F5)
10 | 2. Run the command in the first example below to Export the CSV. The path can be changed if desired.
11 | 3. If the machin this script is running on does not have Excel, copy the CSV file to a machine with Excel installed.
12 | 4. For any hardware or cameras where the name needs to be changed, enter the new name in the "NewHardwareName" or
13 | "NewCameraName" column. If the name doesn't need to be changed, don't do anything for that row.
14 | a. Do NOT change any of the other data.
15 | 5. Copy the CSV back to the machine this script is running on (if it was copied to another machine).
16 | 6. Run the command in the second example below to Import the new names. Make sure the path points to the CSV file.
17 |
18 | .EXAMPLE
19 | Set-MilestoneNames -Export -CsvPath "$($env:USERPROFILE)\Desktop\MilestoneNames.csv"
20 |
21 | Exports a CSV file named MilestoneNames.csv to the users desktop. This file contains all of the enabled hardware and camera named
22 | .EXAMPLE
23 | Set-MilestoneNames -Import -CsvPath "$($env:USERPROFILE)\Desktop\MilestoneNames.csv"
24 |
25 | Imports a CSV file that contains updated hardware or camera names.
26 | #>
27 |
28 | [CmdletBinding()]
29 | param (
30 | [Parameter(Mandatory=$false)]
31 | [switch]
32 | $Import,
33 | [Parameter(Mandatory=$false)]
34 | [switch]
35 | $Export,
36 | [Parameter(Mandatory=$true)]
37 | [string]
38 | $CsvPath
39 | )
40 |
41 | if ($Import -eq $false -and $Export -eq $false -or ($Import -eq $true -and $Export -eq $true))
42 | {
43 | Write-Host "Either -Import or -Export needs to be specified." -ForegroundColor Red
44 | Break
45 | }
46 |
47 | Connect-ManagementServer -ShowDialog -Force
48 | $data = New-Object System.Collections.Generic.List[PSCustomObject]
49 |
50 | if ($Export)
51 | {
52 | foreach ($hw in Get-VmsHardware | Where-Object Enabled)
53 | {
54 | $row = [PSCustomObject]@{
55 | Type = "Hardware"
56 | CurrentHardwareName = $hw.Name
57 | NewHardwareName = ""
58 | HardwareId = $hw.Id
59 | CurrentCameraName = ""
60 | NewCameraName = ""
61 | CameraId = ""
62 | }
63 | $data.Add($row)
64 |
65 | foreach ($cam in $hw | Get-VmsCamera)
66 | {
67 | $row = [PSCustomObject]@{
68 | Type = "Camera"
69 | CurrentHardwareName = ""
70 | NewHardwareName = ""
71 | HardwareId = ""
72 | CurrentCameraName = $cam.Name
73 | NewCameraName = ""
74 | CameraId = $cam.Id
75 | }
76 | $data.Add($row)
77 | }
78 | }
79 | $data | Export-Csv -Path $CsvPath -NoTypeInformation
80 | }
81 |
82 | if ($Import)
83 | {
84 | $csv = Import-Csv -Path $CsvPath
85 |
86 | foreach ($item in $csv)
87 | {
88 | if ($item.Type -eq "Hardware" -and -not [string]::IsNullOrEmpty($item.NewHardwareName))
89 | {
90 | Get-VmsHardware -HardwareId $item.HardwareID | Set-VmsHardware -Name $item.NewHardwareName
91 | }
92 |
93 | if ($item.Type -eq "Camera" -and -not [string]::IsNullOrEmpty($item.NewCameraName))
94 | {
95 | Get-VmsCamera -Id $item.CameraId | Set-VmsCamera -Name $item.NewCameraName
96 | }
97 | }
98 | }
99 | }
--------------------------------------------------------------------------------
/Samples/Snapshots-On-Interval/README - sp-MX.md:
--------------------------------------------------------------------------------
1 | # Instantáneas en intervalos
2 |
3 | En este ejemplo se muestra cómo puede programar una tarea en Windows para recuperar instantáneas JPEG de cámaras seleccionadas en un intervalo determinado.
4 |
5 | Para probarlo, simplemente ejecute la secuencia de comandos setup.ps1 como administrador. La elevación es necesaria porque creará una tarea programada, pero la tarea en sí no requerirá ni se ejecutará con privilegios elevados.
6 | Asegúrese de ejecutar la secuencia de comandos desde un archivo en lugar de copiar y pegar la secuencia de comandos en una terminal de PowerShell. La secuencia de comandos utiliza la variable automática $PSScriptRoot para determinar el “directorio de trabajo” donde se almacenarán la configuración, el registro y las instantáneas. Por lo tanto, dondequiera que ejecute setup.ps1 será el directorio de trabajo para la tarea programada.
7 |
8 | Cuando ejecute la secuencia de comandos, se le pedirá la dirección y las credenciales del servidor de Milestone, luego ingresará el intervalo deseado entre instantáneas en segundos y seleccionará una o más cámaras para incluir a través de la GUI del “Selector de elementos” de Milestone.
9 |
10 | A continuación, guarde esta información en un archivo XML mediante Export-CliXml, lo que garantizará que las credenciales se cifren mediante la API de protección de datos de Windows (DPAPI) con el ámbito “CurrentUser”, lo que significa que solo el usuario de Windows actual podrá leer la credencial desde el disco.
11 |
12 | Por último, use Register-ScheduledJob para crear una tarea programada en Windows que encontrará en el Programador de tareas en Microsoft\/Windows\/PowerShell\/ScheduledJobs. La tarea programada se iniciará inmediatamente, así como en cada inicio de Windows, lea el archivo config.xml y use la información allí para iniciar sesión en el VMS de Milestone, luego comenzará a guardar instantáneas en el intervalo dado. La secuencia de comandos se ejecutará indefinidamente en un bucle infinito, y dormirá durante el tiempo adecuado entre la toma de instantáneas.
13 |
14 | Tenga en cuenta que si hay cientos de cámaras o más, este proceso podría llevar mucho tiempo y las instantáneas se tomarán en serie en lugar de en paralelo.
15 |
16 |
--------------------------------------------------------------------------------
/Samples/Snapshots-On-Interval/README.md:
--------------------------------------------------------------------------------
1 | # Snapshots On Interval
2 |
3 | This sample demonstrates how you can schedule a task in Windows to retrieve JPEG snapshots from select cameras on a given interval.
4 |
5 | To try it out, simply run the setup.ps1 script as Administrator. Elevation is required because you'll be creating a scheduled task,
6 | but the task itself will not require, or run with elevated privileges.
7 |
8 | Make sure to run the script from a file rather than copying and pasting the script into a PowerShell terminal. The script uses
9 | the $PSScriptRoot automatic variable to determine the "working directory" where the configuration, log, and snapshots will be stored.
10 | So wherever you run setup.ps1 from will be the working directory for the scheduled task.
11 |
12 | When you run the script, you will be prompted for Milestone server address and credentials, then you will enter the desired interval
13 | between snapshots in seconds, and you will select one or more cameras to be included via the Milestone "Item Picker" GUI.
14 |
15 | We then save this information to an XML file using Export-CliXml which will ensure the credentials are encrypted using the Windows
16 | Data Protection API (DPAPI) with "CurrentUser" scope meaning only the current windows user is able to read the credential from disk.
17 |
18 | Finally, we use Register-ScheduledJob to create a scheduled task in Windows which you'll find in Task Scheduler under
19 | Microsoft/Windows/PowerShell/ScheduledJobs. The scheduled task will start immediately, and also on every Windows startup, read the
20 | config.xml file and use the information there to login to the Milestone VMS, then begin saving snapshots on the given interval. The
21 | script will run indefinitely in a never-ending loop, sleeping for an appropriate time between taking snapshots.
22 |
23 | Note that if there are hundreds of cameras or more, this process could take a long time and the snapshots are being taken in serial
24 | fashion rather than in parallel.
25 |
--------------------------------------------------------------------------------
/Samples/Snapshots-On-Interval/setup.ps1:
--------------------------------------------------------------------------------
1 | #Requires -RunAsAdministrator
2 | #Requires -Modules 'MilestonePSTools'
3 |
4 | # The Requires statements ensure the user runs the script as Administrator, and has the MilestonePSTools module installed
5 |
6 | # Instead of setting -ErrorAction 'Stop' in every function call, we set ErrorActionPreference which applies to the whole script
7 | # This way, we stop the script if something goes wrong instead of proceeding with incomplete data
8 | $ErrorActionPreference = "Stop"
9 |
10 | # Present a login dialog and on successful login, store the properties we'll need to reconnect from the scheduled task in a hashtable.
11 | Connect-ManagementServer -ShowDialog -AcceptEula -Force
12 | $loginSettings = Get-LoginSettings
13 | $nc = $loginSettings.CredentialCache | Select-Object -First 1
14 | $config = @{
15 | Connection = @{
16 | ServerAddress = $loginSettings.Uri
17 | Credential = if ([string]::IsNullOrWhiteSpace($nc.UserName)) { $null } else { [pscredential]::new($nc.UserName, $nc.SecurePassword) }
18 | BasicUser = $loginSettings.IsBasicUser
19 | AcceptEula = $true
20 | }
21 | }
22 |
23 | # Get seconds between snapshots or the snapshot interval
24 | # Tests the user-input to make sure it's a valid integer before continuing
25 | while ($true) {
26 | $interval = Read-Host -Prompt "How many seconds between snapshots"
27 | $intValue = 0
28 | if ([int]::TryParse($interval, [ref] $intValue) -and $intValue -ge 1) {
29 | $config.IntervalSeconds = $intValue
30 | break
31 | }
32 | else {
33 | Write-Warning "Value must be an integer greater than 0. Please try again. . ."
34 | }
35 | }
36 |
37 | # Let the user select which cameras will be used. Note this gets the raw camera ids and even though
38 | # you can add cameras using a device group, only the cameras in that group at the time this script
39 | # is run will be included in the snapshot collection when the scheduled job is running.
40 | do {
41 | [array]$cameraIds = (Select-Camera -AllowFolders -AllowServers -RemoveDuplicates -OutputAsItem).FQID.ObjectId
42 | } while ($cameraIds.Count -le 0)
43 | $config.CameraIds = $cameraIds
44 |
45 | Disconnect-ManagementServer
46 |
47 |
48 | # Save the server address, credentials and settings to an XML file.
49 | # PowerShell encrypts the password in the credential so that only the current
50 | # user can actually decrypt it.
51 | $config | Export-Clixml -Path $PSScriptRoot\config.xml
52 |
53 | # Check if the scheduled job has previously been created, and delete it if so.
54 | $jobName = "Milestone Snapshot Task"
55 | Get-ScheduledJob -Name $jobName -ErrorAction Ignore | Unregister-ScheduledJob -Force
56 |
57 | # Create / Recreate the scheduled task with a trigger on system startup.
58 | $trigger = New-JobTrigger -AtStartup
59 |
60 | # If the job is already running and is triggered again, ignore the new instance. Require network as well
61 | $options = New-ScheduledJobOption -MultipleInstancePolicy IgnoreNew -RequireNetwork
62 |
63 | # Create the scheduled job. This appears in Task Scheduler in Windows under Microsoft/Windows/PowerShell/ScheduledJobs
64 | # We'll run the job immediately upon creation so that the task starts running in the background immediately
65 | $null = Register-ScheduledJob -Name $jobName -ScheduledJobOption $options -Trigger $trigger -RunNow -ArgumentList $PSScriptRoot -ScriptBlock {
66 | param([string]$WorkingDirectory)
67 | $ErrorActionPreference = "Stop"
68 | function Write-Log {
69 | <#
70 | .SYNOPSIS
71 | We want the transcript to include a timestamp for each line to make it easier to understand when
72 | and how long operations are taking. So all Write-Host commands will use Write-Log instead.
73 |
74 | Also, normally we'd use Write-Information but a bug in PowerShell means the transcript does not
75 | include anything from the Information stream. So Write-Host it is.
76 | #>
77 | param([string]$Message)
78 | Write-Host "$(Get-Date -Format "yyyy-MM-dd HH:mm:ss.fff") - $Message"
79 | }
80 |
81 | try {
82 | Start-Transcript -Path (Join-Path -Path $WorkingDirectory -ChildPath job.log) -Force
83 |
84 | if (-not (Test-Path $WorkingDirectory\snapshots)) {
85 | Write-Log "Creating missing snapshots subfolder"
86 | $null = New-Item -Path $WorkingDirectory\snapshots -ItemType Directory -Force
87 | }
88 |
89 | Write-Log "Importing configuration"
90 | $config = Import-Clixml -Path $WorkingDirectory\config.xml
91 |
92 | $connected = $false
93 | Write-Log "Connecting to Management Server at $($config.Server) with user $($config.Credential.UserName). . ."
94 | $connection = $config.Connection
95 | Connect-ManagementServer @connection
96 | Write-Log "Connected"
97 | $connected = $true
98 |
99 | Write-Log "Retrieving snapshots every $($config.IntervalSeconds) seconds"
100 | $interval = New-TimeSpan -Seconds $config.IntervalSeconds
101 | $stopwatch = [diagnostics.stopwatch]::new()
102 | while ($true) {
103 | $stopwatch.Restart()
104 | foreach ($id in $config.CameraIds) {
105 | $camera = Get-VmsCamera -Id $id
106 | $folder = Join-Path -Path $WorkingDirectory -ChildPath snapshots\$($camera.Name)\
107 | if (-not (Test-Path -Path $folder)) {
108 | Write-Log "Creating subfolder for camera $($camera.Name) at $folder"
109 | $null = New-Item -Path $folder -ItemType Directory -Force
110 | }
111 | Write-Log "Getting snapshot from $($camera.Name)"
112 | $null = $camera | Get-Snapshot -Live -Save -Path $folder -UseFriendlyName
113 | }
114 |
115 | # Figure out how much we need to sleep in order to aim for the user-defined interval.
116 | # So subtract the time we spent generating snapshots from the desired interval, and sleep
117 | # for the difference. If the snapshots took longer than the interval time, then we'll just
118 | # skip the delay and repeat the process immediately
119 | $delay = $interval - $stopwatch.Elapsed
120 | if ($delay.TotalMilliseconds -gt 0) {
121 | Write-Log "Completed cycle in $($stopwatch.Elapsed.TotalSeconds) seconds. Sleeping for $($delay.TotalMilliseconds)ms"
122 | Start-Sleep -Milliseconds $delay.TotalMilliseconds
123 | }
124 | else {
125 | Write-Log "WARNING: Completed cycle in $($stopwatch.Elapsed.TotalSeconds) seconds. This is longer than the desired interval of $($interval.TotalSeconds)"
126 | }
127 | }
128 | }
129 | finally {
130 | if ($connected) {
131 | Write-Log "Logging out of Management Server"
132 | Disconnect-ManagementServer
133 | }
134 | Stop-Transcript
135 | }
136 | }
137 |
--------------------------------------------------------------------------------
/Samples/Test-DataPresence/README - sp-MX.md:
--------------------------------------------------------------------------------
1 | ## Test Data Presence
2 |
3 | En este cmdlet (o grupo de cmdlets) probamos la presencia de datos entre un StartTime y EndTime determinados para dispositivos de cualquier tipo, incluidas cámaras, micrófonos, altavoces y metadatos.
4 |
5 | El método utilizado para comprobar la presencia de datos es recuperar una instantánea en el StartTime dado y comprobar el valor de la propiedad DateTime. Si está entre StartTime y EndTime, sabemos que hay al menos _algunos_ datos dentro del lapso de tiempo dado.
6 |
7 | Gracias al comportamiento y a las propiedades adicionales disponibles en los datos de reproducción, podemos determinar a partir de esa única instantánea si hay algún dato disponible en todo el lapso de tiempo. Ya sea que la instantánea sea para una cámara, micrófono, altavoz o metadatos.
8 |
9 | Al llamar a “GetNearest ([DateTime])” en una fuente de datos en MIP SDK, se devolverá un fotograma de datos si existe algo disponible y será algún tiempo antes o después del valor DateTime dado. Junto con los datos habrá valores que indican el valor DateTime del siguiente fotograma de datos disponible y el fotograma de datos anterior (si está disponible).
10 |
11 | Por lo tanto, si los datos devueltos son _anteriores_ a StartTime, y el valor de NextDateTime está entre StartTime y EndTime, podemos afirmar con seguridad que existen datos disponibles en ese lapso de tiempo.
12 |
13 | Y si el fotograma más cercano está _después_ de EndTime, sabemos que la imagen más cercana a StartTime es posterior de EndTime, por lo que no existen datos presentes entre StartTime y EndTime.
14 |
15 | El cmdlet Test-DataPresence acepta un elemento de configuración de cualquiera de los cuatro tipos de datos y pasa la solicitud a funciones más específicas como Test-VideoPresence, Test-AudioPresence o Test-MetadataPresence. Pero las tres funciones operan de manera muy similar, cada una haciendo uso de las clases de fuente de datos coincidentes del MIP SDK para consultar la base de datos multimedia.
16 |
17 | ```powershell
18 | $InformationPreference = 'Continue'
19 | $server = Read-Host -Prompt "Server Address"
20 | $credential = Get-Credential
21 |
22 | do {
23 | $isBasic = Read-Host -Prompt "Basic user? (y/n)"
24 | } while ('y', 'n' -notcontains $isBasic)
25 |
26 | try {
27 | Write-Information "Connecting to $server as $username"
28 | $connected = $false
29 | Connect-ManagementServer -Server $server -Credential $credential -BasicUser:($isBasic -eq 'y')
30 | Write-Information "Connected"
31 | $connected = $true
32 |
33 | foreach ($lock in Get-EvidenceLock) {
34 | $lockHasData = $false
35 | $cameras = $lock.DeviceIds | Foreach-Object { try { Get-Camera -Id $_ } catch { } }
36 | foreach ($camera in $cameras) {
37 | $dataExists = $camera | Test-DataPresence -StartTime $lock.StartTime -EndTime $lock.EndTime
38 | if ($dataExists) {
39 | $lockHasData = $true
40 | break;
41 | }
42 | }
43 |
44 | if (-not $lockHasData) {
45 | $lock
46 | }
47 | }
48 | }
49 | catch {
50 | throw
51 | }
52 | finally {
53 | if ($connected) {
54 | Disconnect-ManagementServer
55 | }
56 | }
57 | ```
58 |
--------------------------------------------------------------------------------
/Samples/Test-DataPresence/README.md:
--------------------------------------------------------------------------------
1 | ## Test Data Presence
2 |
3 | In this cmdlet (or group of cmdlets) we test for the presence of data between a given StartTime
4 | and EndTime for devices of any type including cameras, microphones, speakers and metadata.
5 |
6 | The method used to test for the presence of data is to retrieve a snapshot at the given StartTime
7 | and check the value of the DateTime property. If it's between StartTime and EndTime, we know that
8 | there's at least _some_ data within the given span of time.
9 |
10 | Thanks to the behavior, and additional properties available on playback data, we can determine
11 | from that single snapshot whether any data is available in the entire span of time. Whether the
12 | snapshot is for a camera, microphone, speaker, or metadata.
13 |
14 | When calling "GetNearest([DateTime])" on a data source in MIP SDK, a frame of data will be
15 | returned if anything is available, and it will be some time before or after the given DateTime
16 | value. Along with the data will be values indicating the DateTime value of the next available
17 | frame of data, and the previous frame of data (if available).
18 |
19 | So if the data returned is _before_ the StartTime, and the NextDateTime value is between
20 | StartTime and EndTime, then we can safely say there is data available in that time span.
21 |
22 | And if the nearest frame is _after_ the EndTime, we know that the nearest image to StartTime is
23 | after the EndTime and thus there is no data present between StartTime and EndTime.
24 |
25 | The Test-DataPresence cmdlet accepts a configuration item of any of the four data types, and
26 | passes the request on to more specific functions like Test-VideoPresence, Test-AudioPresence, or
27 | Test-MetadataPresence. But all three of these functions work very similarly - each making use of
28 | the matching data source classes from MIP SDK to query the media database.
29 |
30 | ```powershell
31 | $InformationPreference = 'Continue'
32 | $server = Read-Host -Prompt "Server Address"
33 | $credential = Get-Credential
34 |
35 | do {
36 | $isBasic = Read-Host -Prompt "Basic user? (y/n)"
37 | } while ('y', 'n' -notcontains $isBasic)
38 |
39 | try {
40 | Write-Information "Connecting to $server as $username"
41 | $connected = $false
42 | Connect-ManagementServer -Server $server -Credential $credential -BasicUser:($isBasic -eq 'y')
43 | Write-Information "Connected"
44 | $connected = $true
45 |
46 | foreach ($lock in Get-EvidenceLock) {
47 | $lockHasData = $false
48 | $cameras = $lock.DeviceIds | Foreach-Object { try { Get-Camera -Id $_ } catch { } }
49 | foreach ($camera in $cameras) {
50 | $dataExists = $camera | Test-DataPresence -StartTime $lock.StartTime -EndTime $lock.EndTime
51 | if ($dataExists) {
52 | $lockHasData = $true
53 | break;
54 | }
55 | }
56 |
57 | if (-not $lockHasData) {
58 | $lock
59 | }
60 | }
61 | }
62 | catch {
63 | throw
64 | }
65 | finally {
66 | if ($connected) {
67 | Disconnect-ManagementServer
68 | }
69 | }
70 | ```
71 |
--------------------------------------------------------------------------------
/images/logo.png:
--------------------------------------------------------------------------------
https://raw.githubusercontent.com/MilestoneSystemsInc/PowerShellSamples/ecbb1d9db0c12efd0946d7d904cc63a49e36e827/images/logo.png
--------------------------------------------------------------------------------
/images/screenshot.png:
--------------------------------------------------------------------------------
https://raw.githubusercontent.com/MilestoneSystemsInc/PowerShellSamples/ecbb1d9db0c12efd0946d7d904cc63a49e36e827/images/screenshot.png
--------------------------------------------------------------------------------