├── styles
└── style.scss
├── docs
├── Development
│ ├── TechnicalGuides
│ │ ├── ItemAddons.md
│ │ ├── CustomMaps.md
│ │ ├── CustomCosmetics.md
│ │ ├── CustomItems.md
│ │ └── CustomPerks.md
│ ├── index.md
│ ├── ModdingGuides
│ │ ├── Meshes
│ │ │ ├── index.md
│ │ │ ├── StaticMesh.md
│ │ │ └── SkeletalMesh.md
│ │ ├── Textures.md
│ │ ├── Physics.md
│ │ ├── Sounds.md
│ │ ├── EmissionMaps.md
│ │ ├── MaterialInstances.md
│ │ └── Animations.md
│ ├── UnrealEngine
│ │ ├── index.md
│ │ ├── Chunking.md
│ │ └── ProjectSetup.md
│ ├── Resources.md
│ └── DeadByDaylight
│ │ ├── CharacterIds.md
│ │ ├── MapIds.md
│ │ └── StatusEffectIds.md
├── img
│ ├── logo.png
│ ├── favicon.ico
│ ├── screenshots
│ │ ├── Mixamo
│ │ │ ├── Mixamo-Home.png
│ │ │ └── Mixamo-Save.png
│ │ ├── UModel
│ │ │ ├── UModel-Save.png
│ │ │ └── UModel-Settings.png
│ │ ├── Blender
│ │ │ ├── Blender-Import1.png
│ │ │ └── Blender-Import2.png
│ │ ├── DevBuild
│ │ │ ├── fiddler-options.png
│ │ │ ├── dev-server-release.png
│ │ │ ├── dev-server-run.bat.png
│ │ │ └── dev-server-setup.bat.png
│ │ └── Animations-Project
│ │ │ ├── Animations-HXD.png
│ │ │ ├── Animations-Details.png
│ │ │ ├── Animations-Import.png
│ │ │ ├── Animations-Preview.png
│ │ │ ├── Animations-Renamed.png
│ │ │ ├── Animations-AddNotify.png
│ │ │ ├── Animations-AddSound.png
│ │ │ ├── Animations-Explorer.png
│ │ │ ├── Animations-Extracting.mp4
│ │ │ ├── Animations-Imported.png
│ │ │ ├── Animations-Structure.png
│ │ │ ├── Animations-AssetEditor.png
│ │ │ ├── Animations-BloodPreview.png
│ │ │ ├── Animations-DeletedMats.png
│ │ │ ├── Animations-ShowDetails.png
│ │ │ ├── Animations-SoundPreview.png
│ │ │ ├── Animations-AddNotifyTrack.png
│ │ │ ├── Animations-DeletedMixamo.png
│ │ │ ├── Animations-NotifyLocation.png
│ │ │ ├── Animations-ParticlePreview.png
│ │ │ └── Animations-AddNotifyParticles.png
│ └── icons
│ │ ├── icons8-external-link.svg
│ │ ├── icons8-info.svg
│ │ ├── icons8-search.svg
│ │ └── icons8-github.svg
├── scripts
│ └── main.js
├── DevBuild
│ ├── CharacterIds.md
│ ├── Server
│ │ ├── index.md
│ │ ├── Commands.md
│ │ ├── Config.md
│ │ └── Setup.md
│ ├── index.md
│ ├── FiddlerSetup.md
│ ├── Cinematics.md
│ ├── ConsoleUsage.md
│ ├── UsefulCommands.md
│ └── AdvancedConsoleUsage.md
├── PrivateServer
│ ├── index.md
│ ├── ModInstallation.md
│ └── ConfigEdits.md
└── index.md
├── .gitattributes
├── .gitignore
├── Dockerfile
├── .github
└── workflows
│ ├── pr-close.yml
│ ├── push-dev.yml
│ ├── push-master.yml
│ └── pr.yml
├── package.json
├── gulpfile.js
├── README.md
├── mkdocs.yml
└── LICENSE
/styles/style.scss:
--------------------------------------------------------------------------------
1 |
--------------------------------------------------------------------------------
/docs/Development/TechnicalGuides/ItemAddons.md:
--------------------------------------------------------------------------------
1 |
--------------------------------------------------------------------------------
/docs/img/logo.png:
--------------------------------------------------------------------------------
https://raw.githubusercontent.com/ModByDaylight/Documentation/HEAD/docs/img/logo.png
--------------------------------------------------------------------------------
/docs/img/favicon.ico:
--------------------------------------------------------------------------------
https://raw.githubusercontent.com/ModByDaylight/Documentation/HEAD/docs/img/favicon.ico
--------------------------------------------------------------------------------
/.gitattributes:
--------------------------------------------------------------------------------
1 | docs/*.md linguist-detectable
2 | docs/**/*.md linguist-detectable
3 | docs/** -linguist-documentation
4 |
--------------------------------------------------------------------------------
/docs/img/screenshots/Mixamo/Mixamo-Home.png:
--------------------------------------------------------------------------------
https://raw.githubusercontent.com/ModByDaylight/Documentation/HEAD/docs/img/screenshots/Mixamo/Mixamo-Home.png
--------------------------------------------------------------------------------
/docs/img/screenshots/Mixamo/Mixamo-Save.png:
--------------------------------------------------------------------------------
https://raw.githubusercontent.com/ModByDaylight/Documentation/HEAD/docs/img/screenshots/Mixamo/Mixamo-Save.png
--------------------------------------------------------------------------------
/docs/img/screenshots/UModel/UModel-Save.png:
--------------------------------------------------------------------------------
https://raw.githubusercontent.com/ModByDaylight/Documentation/HEAD/docs/img/screenshots/UModel/UModel-Save.png
--------------------------------------------------------------------------------
/.gitignore:
--------------------------------------------------------------------------------
1 | build/
2 | node_modules/
3 | site/
4 | docs/style.css
5 | .DS_Store
6 | docs/.DS_Store
7 | docs/img/.DS_Store
8 | docs/img/screenshots/.DS_Store
--------------------------------------------------------------------------------
/docs/img/screenshots/UModel/UModel-Settings.png:
--------------------------------------------------------------------------------
https://raw.githubusercontent.com/ModByDaylight/Documentation/HEAD/docs/img/screenshots/UModel/UModel-Settings.png
--------------------------------------------------------------------------------
/docs/img/screenshots/Blender/Blender-Import1.png:
--------------------------------------------------------------------------------
https://raw.githubusercontent.com/ModByDaylight/Documentation/HEAD/docs/img/screenshots/Blender/Blender-Import1.png
--------------------------------------------------------------------------------
/docs/img/screenshots/Blender/Blender-Import2.png:
--------------------------------------------------------------------------------
https://raw.githubusercontent.com/ModByDaylight/Documentation/HEAD/docs/img/screenshots/Blender/Blender-Import2.png
--------------------------------------------------------------------------------
/docs/img/screenshots/DevBuild/fiddler-options.png:
--------------------------------------------------------------------------------
https://raw.githubusercontent.com/ModByDaylight/Documentation/HEAD/docs/img/screenshots/DevBuild/fiddler-options.png
--------------------------------------------------------------------------------
/docs/img/screenshots/DevBuild/dev-server-release.png:
--------------------------------------------------------------------------------
https://raw.githubusercontent.com/ModByDaylight/Documentation/HEAD/docs/img/screenshots/DevBuild/dev-server-release.png
--------------------------------------------------------------------------------
/docs/img/screenshots/DevBuild/dev-server-run.bat.png:
--------------------------------------------------------------------------------
https://raw.githubusercontent.com/ModByDaylight/Documentation/HEAD/docs/img/screenshots/DevBuild/dev-server-run.bat.png
--------------------------------------------------------------------------------
/docs/img/screenshots/DevBuild/dev-server-setup.bat.png:
--------------------------------------------------------------------------------
https://raw.githubusercontent.com/ModByDaylight/Documentation/HEAD/docs/img/screenshots/DevBuild/dev-server-setup.bat.png
--------------------------------------------------------------------------------
/docs/img/screenshots/Animations-Project/Animations-HXD.png:
--------------------------------------------------------------------------------
https://raw.githubusercontent.com/ModByDaylight/Documentation/HEAD/docs/img/screenshots/Animations-Project/Animations-HXD.png
--------------------------------------------------------------------------------
/docs/img/screenshots/Animations-Project/Animations-Details.png:
--------------------------------------------------------------------------------
https://raw.githubusercontent.com/ModByDaylight/Documentation/HEAD/docs/img/screenshots/Animations-Project/Animations-Details.png
--------------------------------------------------------------------------------
/docs/img/screenshots/Animations-Project/Animations-Import.png:
--------------------------------------------------------------------------------
https://raw.githubusercontent.com/ModByDaylight/Documentation/HEAD/docs/img/screenshots/Animations-Project/Animations-Import.png
--------------------------------------------------------------------------------
/docs/img/screenshots/Animations-Project/Animations-Preview.png:
--------------------------------------------------------------------------------
https://raw.githubusercontent.com/ModByDaylight/Documentation/HEAD/docs/img/screenshots/Animations-Project/Animations-Preview.png
--------------------------------------------------------------------------------
/docs/img/screenshots/Animations-Project/Animations-Renamed.png:
--------------------------------------------------------------------------------
https://raw.githubusercontent.com/ModByDaylight/Documentation/HEAD/docs/img/screenshots/Animations-Project/Animations-Renamed.png
--------------------------------------------------------------------------------
/docs/img/screenshots/Animations-Project/Animations-AddNotify.png:
--------------------------------------------------------------------------------
https://raw.githubusercontent.com/ModByDaylight/Documentation/HEAD/docs/img/screenshots/Animations-Project/Animations-AddNotify.png
--------------------------------------------------------------------------------
/docs/img/screenshots/Animations-Project/Animations-AddSound.png:
--------------------------------------------------------------------------------
https://raw.githubusercontent.com/ModByDaylight/Documentation/HEAD/docs/img/screenshots/Animations-Project/Animations-AddSound.png
--------------------------------------------------------------------------------
/docs/img/screenshots/Animations-Project/Animations-Explorer.png:
--------------------------------------------------------------------------------
https://raw.githubusercontent.com/ModByDaylight/Documentation/HEAD/docs/img/screenshots/Animations-Project/Animations-Explorer.png
--------------------------------------------------------------------------------
/docs/img/screenshots/Animations-Project/Animations-Extracting.mp4:
--------------------------------------------------------------------------------
https://raw.githubusercontent.com/ModByDaylight/Documentation/HEAD/docs/img/screenshots/Animations-Project/Animations-Extracting.mp4
--------------------------------------------------------------------------------
/docs/img/screenshots/Animations-Project/Animations-Imported.png:
--------------------------------------------------------------------------------
https://raw.githubusercontent.com/ModByDaylight/Documentation/HEAD/docs/img/screenshots/Animations-Project/Animations-Imported.png
--------------------------------------------------------------------------------
/docs/img/screenshots/Animations-Project/Animations-Structure.png:
--------------------------------------------------------------------------------
https://raw.githubusercontent.com/ModByDaylight/Documentation/HEAD/docs/img/screenshots/Animations-Project/Animations-Structure.png
--------------------------------------------------------------------------------
/docs/img/screenshots/Animations-Project/Animations-AssetEditor.png:
--------------------------------------------------------------------------------
https://raw.githubusercontent.com/ModByDaylight/Documentation/HEAD/docs/img/screenshots/Animations-Project/Animations-AssetEditor.png
--------------------------------------------------------------------------------
/docs/img/screenshots/Animations-Project/Animations-BloodPreview.png:
--------------------------------------------------------------------------------
https://raw.githubusercontent.com/ModByDaylight/Documentation/HEAD/docs/img/screenshots/Animations-Project/Animations-BloodPreview.png
--------------------------------------------------------------------------------
/docs/img/screenshots/Animations-Project/Animations-DeletedMats.png:
--------------------------------------------------------------------------------
https://raw.githubusercontent.com/ModByDaylight/Documentation/HEAD/docs/img/screenshots/Animations-Project/Animations-DeletedMats.png
--------------------------------------------------------------------------------
/docs/img/screenshots/Animations-Project/Animations-ShowDetails.png:
--------------------------------------------------------------------------------
https://raw.githubusercontent.com/ModByDaylight/Documentation/HEAD/docs/img/screenshots/Animations-Project/Animations-ShowDetails.png
--------------------------------------------------------------------------------
/docs/img/screenshots/Animations-Project/Animations-SoundPreview.png:
--------------------------------------------------------------------------------
https://raw.githubusercontent.com/ModByDaylight/Documentation/HEAD/docs/img/screenshots/Animations-Project/Animations-SoundPreview.png
--------------------------------------------------------------------------------
/docs/img/screenshots/Animations-Project/Animations-AddNotifyTrack.png:
--------------------------------------------------------------------------------
https://raw.githubusercontent.com/ModByDaylight/Documentation/HEAD/docs/img/screenshots/Animations-Project/Animations-AddNotifyTrack.png
--------------------------------------------------------------------------------
/docs/img/screenshots/Animations-Project/Animations-DeletedMixamo.png:
--------------------------------------------------------------------------------
https://raw.githubusercontent.com/ModByDaylight/Documentation/HEAD/docs/img/screenshots/Animations-Project/Animations-DeletedMixamo.png
--------------------------------------------------------------------------------
/docs/img/screenshots/Animations-Project/Animations-NotifyLocation.png:
--------------------------------------------------------------------------------
https://raw.githubusercontent.com/ModByDaylight/Documentation/HEAD/docs/img/screenshots/Animations-Project/Animations-NotifyLocation.png
--------------------------------------------------------------------------------
/docs/img/screenshots/Animations-Project/Animations-ParticlePreview.png:
--------------------------------------------------------------------------------
https://raw.githubusercontent.com/ModByDaylight/Documentation/HEAD/docs/img/screenshots/Animations-Project/Animations-ParticlePreview.png
--------------------------------------------------------------------------------
/docs/img/screenshots/Animations-Project/Animations-AddNotifyParticles.png:
--------------------------------------------------------------------------------
https://raw.githubusercontent.com/ModByDaylight/Documentation/HEAD/docs/img/screenshots/Animations-Project/Animations-AddNotifyParticles.png
--------------------------------------------------------------------------------
/docs/Development/index.md:
--------------------------------------------------------------------------------
1 | # Development
2 |
3 | If you'd like to make your own mod, this section of the docs is for you!
4 |
5 | Here you can find information regarding making mods and getting your development environment up and running. Check out the subcategories on the left to get started.
6 |
7 | If you're just looking to play Dead By Daylight with mods, check out how to install mods [here](../PrivateServer/ModInstallation.md) instead.
--------------------------------------------------------------------------------
/docs/img/icons/icons8-external-link.svg:
--------------------------------------------------------------------------------
1 |
--------------------------------------------------------------------------------
/Dockerfile:
--------------------------------------------------------------------------------
1 | FROM preston159/node-python3-nginx:16.13.1-3.9.7-1.20.2
2 |
3 | EXPOSE 8080:80
4 |
5 | WORKDIR /documentation
6 | ADD docs/ /documentation/docs/
7 | ADD styles/ /documentation/styles/
8 | ADD mkdocs.yml gulpfile.js package.json /documentation/
9 |
10 | RUN apk update && apk add python3-dev gcc libc-dev
11 | RUN npm run setup
12 | RUN npm run build
13 | RUN mv /documentation/site/* /www/
14 |
15 | CMD [ "/usr/sbin/nginx", "-g", "daemon off;" ]
16 |
--------------------------------------------------------------------------------
/.github/workflows/pr-close.yml:
--------------------------------------------------------------------------------
1 | name: PR Close
2 |
3 | on:
4 | pull_request:
5 | branches:
6 | - dev
7 | types:
8 | - closed
9 |
10 | jobs:
11 | close_preview:
12 | name: Close Preview
13 | runs-on: ubuntu-latest
14 | steps:
15 | - name: Close Preview
16 | uses: distributhor/workflow-webhook@v2
17 | env:
18 | webhook_url: ${{ secrets.WEBHOOK_URL_PR_CLOSE }}${{ github.event.number }}
19 | webhook_secret: ${{ secrets.WEBHOOK_SECRET }}
--------------------------------------------------------------------------------
/docs/img/icons/icons8-info.svg:
--------------------------------------------------------------------------------
1 |
--------------------------------------------------------------------------------
/docs/scripts/main.js:
--------------------------------------------------------------------------------
1 | function fixTableCodeLineBreaks() {
2 | document.querySelectorAll('td > code').forEach(e => {
3 | if(e.innerHTML.indexOf('<') >= 0) {
4 | // contains html tags, do nothing
5 | return
6 | }
7 | if(e.innerHTML.length < 16) {
8 | // string is short, do nothing
9 | return
10 | }
11 | e.innerHTML = e.innerHTML.replace(/([a-z])([A-Z])/g, '$1$2')
12 | })
13 | }
14 |
15 | window.onload = () => {
16 | fixTableCodeLineBreaks()
17 | }
18 |
--------------------------------------------------------------------------------
/docs/img/icons/icons8-search.svg:
--------------------------------------------------------------------------------
1 |
--------------------------------------------------------------------------------
/docs/Development/ModdingGuides/Meshes/index.md:
--------------------------------------------------------------------------------
1 | # Meshes
2 |
3 | **What is the difference between a static and skeletal mesh?**
4 |
5 | A static mesh is an object with no skeleton that does not have any animations. It is permanently stuck in one pose.
6 | A skeletal mesh is an object with a skeleton that has weights, bones, etc. Typically these come with animations and aren't bound to one pose.
7 |
8 | Static Mesh. Can be identified in the Class section.
9 |
10 | 
11 |
12 | Skeletal Mesh. Can be identified in the Class section.
13 |
14 | 
--------------------------------------------------------------------------------
/docs/img/icons/icons8-github.svg:
--------------------------------------------------------------------------------
1 |
--------------------------------------------------------------------------------
/docs/Development/UnrealEngine/index.md:
--------------------------------------------------------------------------------
1 | # Unreal Engine
2 |
3 | Dead By Daylight uses Unreal Engine 4.27.2 as its Game Engine.
4 | UE provides a solid framework for developing fast executing native code and an interface for artists to use an easier way for creating content.
5 |
6 | In this section we go over some minor basics you should know.
7 |
8 | !!! warning
9 |
10 | This does not replace the [Unreal Engine Documentation](https://docs.unrealengine.com/).
11 |
12 | Even if we make mods and not a standalone game, most of the stuff you will need to use is not stuff from Dead By Daylight, it will be actually from the Unreal Engine. That means we highly recommend you to go through some Unreal Engine tutorials and try to make such a tutorial game. The process creating the content is nearly the same!
13 |
14 | *[UE]: Unreal Engine
--------------------------------------------------------------------------------
/docs/DevBuild/CharacterIds.md:
--------------------------------------------------------------------------------
1 | | Character | ID |
2 | | ----------- | -- |
3 | | Dwight | 0 |
4 | | Meg | 1 |
5 | | Claudette | 2 |
6 | | Jake | 3 |
7 | | Nea | 4 |
8 | | Laurie | 5 |
9 | | Ace | 6 |
10 | | Bill | 7 |
11 | | Feng | 8 |
12 | | David | 9 |
13 | | Kate | 10 |
14 | | Quentin | 11 |
15 | | Tapp | 12 |
16 | | Adam | 13 |
17 | | Jeff | 14 |
18 | | Jane | 15 |
19 | | Ash | 16 |
20 | | Trapper | 268435456 |
21 | | Wraith | 268435457 |
22 | | Billy | 268435458 |
23 | | Nurse | 268435459 |
24 | | Hag | 268435460 |
25 | | Myers | 268435461 |
26 | | Doctor | 268435462 |
27 | | Huntress | 268435463 |
28 | | Leatherface | 268435464 |
29 | | Freddy | 268435465 |
30 | | Pig | 268435466 |
31 | | Clown | 268435467 |
32 | | Spirit | 268435468 |
33 | | Legion | 268435469 |
34 | | Plague | 268435470 |
35 | | Ghostface | 268435471 |
36 |
--------------------------------------------------------------------------------
/docs/DevBuild/Server/index.md:
--------------------------------------------------------------------------------
1 | # Dev Build Server
2 |
3 | Follow these instructions to get the dev build up and running without Fiddler.
4 |
5 | !!! note
6 |
7 | Setting up a DBD dev build server is not necessary if you use the [Fiddler fix](../FiddlerSetup.md) and vice versa. The Fiddler fix modifies traffic to allow the game to use Behaviour's game servers, while this server emulates those servers making the fix unnecessary.
8 |
9 | ## Self Host
10 |
11 | Instructions to run the server on your local machine can be found [here](Setup.md).
12 |
13 | !!! warning
14 |
15 | If you plan to host the server on a computer other than your own (i.e. over the internet) it is highly recommended to replace the TLS certificate in `private/` (`cert.crt` and `privatekey.key`). The keys included with the server exist only for convenience, and may open the door to MITM attacks if used over the internet. Replacement keys can be self-signed but must include the domains "latest.dev.dbd.bhvronline.com" and "cdn.dev.dbd.bhvronline.com".
16 |
17 | *[DBD]: Dead by Daylight
--------------------------------------------------------------------------------
/docs/DevBuild/Server/Commands.md:
--------------------------------------------------------------------------------
1 | # Dev Build Server Commands
2 |
3 | !!! note
4 |
5 | This guide only applies if you are hosting the server yourself.
6 |
7 | The dev build server supports a few commands which can be typed directly into the console.
8 |
9 | - `events enable `
10 | - Manages the active event, if any. This can be used without restarting the server, but will not affect clients which are already connected. must be one of the following:
11 | - None (to disable the active event)
12 | - Winter2017
13 | - Lunar
14 | - Summer
15 | - Halloween2018
16 | - Winter2018
17 | - Lunar2019
18 | - Anniversary2019
19 | - `help`
20 | - Lists all commands
21 | - `help `
22 | - Displays the usage for the given command
23 | - `aliases `
24 | - Lists all aliases of the given command
25 | - `count connections`
26 | - Displays the number of active HTTP/S connections
27 | - `count sessions`
28 | - Displays the number of active game sessions
29 | - `stop`
30 | - Shuts down the server
31 |
--------------------------------------------------------------------------------
/docs/Development/Resources.md:
--------------------------------------------------------------------------------
1 | # Resources
2 |
3 | - [Mod By Daylight](https://discord.gg/xkbgW3aCRJ) - Our Discord Server. You can use the /dbd commands on the Mod By Daylight Discord Bot to get information about characters and other useful things.
4 | - [Unreal Engine](https://www.unrealengine.com/en-US/download) - Used to cook assets that the game can read.
5 | - [UE Viewer](https://www.gildor.org/en/projects/umodel) - Used to view and export textures, models, animations, and more.
6 | - [FModel](https://github.com/iAmAsval/FModel) - Beginner-friendly and open-source software for data-mining games made with Unreal Engine.
7 | - [Blender](https://www.blender.org/download/) - Open source 3d modeling program.
8 | - [Psk/Psa Import/Export](https://github.com/Befzz/blender3d_import_psk_psa) - Used to import psk & psa files into Blender.
9 | - [HxD](https://mh-nexus.de/en/hxd/) - Hex editor used for raw editing of files.
10 | - [Asset Registry Helper](https://cdn.discordapp.com/attachments/877980209083723797/908631102703403018/AssetRegistryHelper.zip) - A tool by Archengius that allows you to merge asset registry files together.
11 | - [UAssetGUI](https://github.com/atenfyr/UAssetGUI) - A tool by atenfyr/adolescent for parsing and modifying cooked uasset files.
--------------------------------------------------------------------------------
/docs/DevBuild/index.md:
--------------------------------------------------------------------------------
1 | # Developer Build (3.0.0)
2 |
3 | The 3.0.0 developer build is a leaked build of Dead by Daylight which was accidentally pushed onto Steam during the development of the Ghost Face chapter. It's useful because it's very easy to mod and has the developer console enabled.
4 |
5 | !!! note
6 |
7 | These guides are for the outdated Developer Build of the game (3.0.0), they will not work on the live version of the game or on the [Private Server](../PrivateServer/index.md).
8 |
9 | Follow the instructions in [Server Setup](Server/Setup.md) or [Fiddler Setup](FiddlerSetup.md) to get started.
10 |
11 | ## FAQ
12 |
13 | - *Is there a newer version of the developer build available?*
14 | - No, and there won't be.
15 | - *Is it possible to play the developer build on console, Epic Games, Microsoft Store, or Stadia?*
16 | - No, the dev build can only be installed on Steam.
17 | - *Can I get banned for playing on the developer build?*
18 | - Technically it's possible, but the chances are basically zero. If you want to be extra safe, use the server from the [Server Setup](Server/Setup.md) page.
19 | - *Can I play public matches?*
20 | - No, there's no matchmaking on dev build. You can only play KYF with Steam friends or by yourself.
--------------------------------------------------------------------------------
/package.json:
--------------------------------------------------------------------------------
1 | {
2 | "name": "documentation",
3 | "version": "1.0.0",
4 | "description": "Dead by Daylight Modding Documentation",
5 | "directories": {
6 | "doc": "docs"
7 | },
8 | "scripts": {
9 | "presetup": "npm i",
10 | "setup": "pip install mkdocs mkdocs-material",
11 | "preserve": "npx gulp buildstyles",
12 | "serve": "npm-run-all --parallel watchstyles serve:1",
13 | "serve:1": "mkdocs serve",
14 | "preserve:theme": "npx gulp buildstyles",
15 | "serve:theme": "npm-run-all --parallel watchstyles serve:theme:1",
16 | "serve:theme:1" : "mkdocs serve --watch-theme",
17 | "prebuild": "npx gulp buildstyles",
18 | "build": "mkdocs build",
19 | "postbuild": "npx gulp postbuild",
20 | "watchstyles": "npx gulp watchstyles",
21 | "build-and-serve": "npm run build && python3 -m http.server --directory site/"
22 | },
23 | "author": "",
24 | "license": "SEE LICENSE IN LICENSE",
25 | "devDependencies": {
26 | "@types/gulp": "^4.0.9",
27 | "@types/node": "^17.0.8",
28 | "gulp": "^4.0.2",
29 | "gulp-html-beautify": "^1.0.1",
30 | "gulp-sass": "^5.1.0",
31 | "npm-run-all": "^4.1.5",
32 | "sass": "^1.47.0",
33 | "typescript": "^4.5.4"
34 | },
35 | "dependencies": {
36 | "ts-node": "^10.4.0"
37 | }
38 | }
39 |
--------------------------------------------------------------------------------
/docs/PrivateServer/index.md:
--------------------------------------------------------------------------------
1 | # Private Server
2 |
3 | The Private Server is a modified version of the live game which is 100% offline from the live servers and has modding support. You are able to mod the latest version of the game with no limitations and play matches with others playing.
4 |
5 | ## Prerequisites
6 |
7 | - [Private Server](https://github.com/ModByDaylight/PrivateServer/releases)
8 |
9 | ## Private Server Setup
10 |
11 | 1. Download and extract the Private Server Setup folder.
12 | 2. Run the `PrivateSeverLauncher.bat` and follow the setup steps.
13 | 3. Once the setup has been completed, run the launcher again and select the **Launch Private Server** option.
14 |
15 | ## Matchmaking
16 |
17 | In the Private Server, matches can be queued for normally. Matches can also be created through the **Custom Game** mode in the main menu. Other players can be invited to your lobby through Steam.
18 |
19 | !!! note
20 |
21 | Matches in the Private Server do not have role limits and have a limit of 32 players. Refer to the [Config Edits](ConfigEdits.md) page for configuring more options.
22 |
23 | ## Returning to Live Servers
24 |
25 | If you want to return to the live servers, run the `PrivateSeverLauncher.bat` and select the **Launch Live** option. Dead By Daylight can also be launched through Steam.
--------------------------------------------------------------------------------
/gulpfile.js:
--------------------------------------------------------------------------------
1 | const gulp = require('gulp')
2 | const htmlbeautify = require('gulp-html-beautify')
3 | const sass = require('gulp-sass')(require('sass'))
4 | const { renameSync, mkdirSync, rmSync } = require('fs')
5 |
6 | // internal tasks
7 |
8 | gulp.task('setup', done => {
9 | rmSync('./build/', { recursive: true, force: true })
10 | renameSync('./site/', './build/')
11 | mkdirSync('./site/')
12 | done()
13 | })
14 |
15 | gulp.task('copy', () => {
16 | return gulp.src('./build/**/*')
17 | .pipe(gulp.dest('./site/'))
18 | })
19 |
20 | gulp.task('htmlbeautify', () => {
21 | const beautifyOptions = {
22 | indent_size: 1,
23 | indent_char: '\t',
24 | }
25 | return gulp.src('./build/**/*.html')
26 | .pipe(htmlbeautify(beautifyOptions))
27 | .pipe(gulp.dest('./site/', { overwrite: true }))
28 | })
29 |
30 | // external tasks
31 |
32 | gulp.task('buildstyles', () => {
33 | return gulp.src('./styles/**/*.scss')
34 | .pipe(sass({ outputStyle: 'compressed', sourceComments: false }).on('error', sass.logError))
35 | .pipe(gulp.dest('./docs/'))
36 | })
37 |
38 | gulp.task('watchstyles', () => {
39 | gulp.watch('./styles/**/*.scss', gulp.task('buildstyles'))
40 | })
41 |
42 | gulp.task('postbuild', gulp.series('setup', 'copy', 'htmlbeautify'))
43 |
--------------------------------------------------------------------------------
/docs/index.md:
--------------------------------------------------------------------------------
1 | ---
2 | hide:
3 | - navigation
4 | - toc
5 | ---
6 |
7 | # Dead By Daylight Modding Documentation
8 |
9 | ## Basics
10 |
11 | Welcome to Mod By Daylight, the official modding community for Dead By Daylight!
12 |
13 | Here you can find lots of information regarding modding [Dead By Daylight](https://deadbydaylight.com/), an asymmetrical multiplayer (4vs1) horror game by [Behaviour Interactive](https://www.bhvr.com/).
14 |
15 | In this page, we will provide some surface level information for both mod users and developers.
16 |
17 | !!! note
18 |
19 | If you want to take part in our community, we recommend you join our [Discord Server](https://discord.gg/xkbgW3aCRJ).
20 |
21 | ## Getting Started
22 |
23 | If you'd like to get started using mods, this section is for you.
24 |
25 | ### Private Server
26 |
27 | The Private Server is a modified version of the live game which is 100% offline from the live servers and has modding support. You are able to mod the latest version of the game with no limitations and play matches with others playing. Directions for setting up the Private Server can be found [here](PrivateServer/index.md).
28 |
29 | ### Installing Mods
30 |
31 | We highly recommend using pak files when installing mods, as it makes using mods that much easier. Directions for installing mods can be found [here](PrivateServer/ModInstallation.md).
32 |
33 | ### Creating Mods
34 |
35 | If you're looking to create your own mods, we suggest you check out our [modding guides](Development/).
--------------------------------------------------------------------------------
/docs/Development/TechnicalGuides/CustomMaps.md:
--------------------------------------------------------------------------------
1 | # Custom Maps Guide
2 |
3 | This guide will show you how you can add your own maps and tiles with the use of data tables and blueprints.
4 |
5 | !!! note
6 |
7 | This page is a work in progress.
8 |
9 | ## Prerequisites
10 |
11 | - [Project Setup](../../Development/UnrealEngine/ProjectSetup.md)
12 | - [Procedural Level Generation](https://cdn.discordapp.com/attachments/917649484450775061/940370562751029338/ProceduralLevelGeneration.zip)
13 | - [Asset Registry Helper](https://cdn.discordapp.com/attachments/877980209083723797/908631102703403018/AssetRegistryHelper.zip)
14 |
15 | ## Required Setup
16 |
17 | Download the Procedural Level Generation files. Unzip `ProceduralLevelGeneration.zip` into your project's `[ProjectName]/Content` folder. This will allow you to create and edit tiled maps.
18 |
19 | ## Creating Tiled Maps
20 |
21 | 1. Navigate to `/Content/ProceduralLevelGeneration/TiledMaps/Completed` and right click to create a new tile map asset in one of the existing realm subdirectories. You can rename this tile map to whatever you want.
22 |
23 | 
24 |
25 | 1. Open your tile map and create five new tile layers named `Base`, `Paths`, `Types`, `Numbers`, and `Tags`.
26 |
27 | 
28 |
29 | ## Procedural Maps Data Table
30 |
31 | ## Custom Map Tiles
32 |
33 | ## Final Steps
--------------------------------------------------------------------------------
/.github/workflows/push-dev.yml:
--------------------------------------------------------------------------------
1 | name: Build and Push
2 |
3 | on:
4 | push:
5 | branches:
6 | - dev
7 |
8 | jobs:
9 | build:
10 | name: Build
11 | runs-on: ubuntu-latest
12 | steps:
13 | - name: Checkout
14 | uses: actions/checkout@v2
15 |
16 | - name: Install Node.JS
17 | uses: actions/setup-node@v2
18 | with:
19 | node-version: '16'
20 |
21 | - name: Install Python3
22 | uses: actions/setup-python@v2
23 | with:
24 | python-version: '3.x'
25 |
26 | - name: Install Dependencies
27 | run: npm run setup
28 |
29 | - name: Build
30 | run: npm run build
31 |
32 | push:
33 | name: Push
34 | needs: build
35 | runs-on: ubuntu-latest
36 | steps:
37 | - name: Checkout
38 | uses: actions/checkout@v2
39 |
40 | - name: Login to GitHub Container Registry
41 | uses: docker/login-action@v1
42 | with:
43 | registry: ghcr.io
44 | username: ${{ github.actor }}
45 | password: ${{ secrets.GITHUB_TOKEN }}
46 |
47 | - name: Build Image
48 | uses: docker/build-push-action@v2
49 | with:
50 | context: .
51 | push: true
52 | tags: ghcr.io/modbydaylight/documentation:dev
53 |
54 | - name: Update Docker image
55 | uses: distributhor/workflow-webhook@v2
56 | env:
57 | webhook_url: ${{ secrets.WEBHOOK_URL_DEV }}
58 | webhook_secret: ${{ secrets.WEBHOOK_SECRET }}
--------------------------------------------------------------------------------
/docs/DevBuild/FiddlerSetup.md:
--------------------------------------------------------------------------------
1 | # Developer Build Setup (Fiddler)
2 |
3 | !!! note
4 |
5 | Setting up Fiddler is not necessary if you use the server from [Server Setup](Server/Setup.md) and vice versa.
6 |
7 | !!! warning
8 |
9 | Game data is still sent to BHVR using this method.
10 |
11 |
12 | ## Prerequisites
13 |
14 | - [Developer Build (3.0.0)](https://www.mediafire.com/file/w0flhwditpyt4wy/DevBuild.zip/file)
15 | - [Fiddler](https://www.telerik.com/download/fiddler)
16 |
17 | ## Instructions
18 |
19 | 1. Download and extract the dev build folder.
20 | 1. Download and install Fiddler.
21 | 1. In Fiddler, go to `Tools` → `Options` → `HTTPS`.
22 | 1. Check the boxes "Capture HTTPS CONNECTs", "Decrypt HTTPS traffic", and "Ignore server certificate errors".
23 |
24 | 
25 |
26 | 1. Click to the pop-up asking to trust Fiddler's certificate.
27 | 1. Open the Fiddler script editor by going to `Rules` → `Customize Rules`.
28 | 1. Replace everything in the file with the contents of [this paste](https://pastebin.com/6HbtkGam) and save.
29 | 1. Launch the dev build by double-clicking one of the .bat files in the dev build root folder. Always keep Fiddler open when running the dev build.
30 |
31 | !!! note
32 |
33 | You need to be logged into a Steam account which owns Dead by Daylight for the developer build to work with Steam. A banned account will not work.
34 |
35 | If doing all these steps in Fiddler takes your internet away, go to Windows Proxy settings and uncheck "Use a proxy server".
--------------------------------------------------------------------------------
/.github/workflows/push-master.yml:
--------------------------------------------------------------------------------
1 | name: Build and Push
2 |
3 | on:
4 | workflow_dispatch:
5 | push:
6 | branches:
7 | - master
8 |
9 | jobs:
10 | build:
11 | name: Build
12 | runs-on: ubuntu-latest
13 | steps:
14 | - name: Checkout
15 | uses: actions/checkout@v2
16 |
17 | - name: Install Node.JS
18 | uses: actions/setup-node@v2
19 | with:
20 | node-version: '16'
21 |
22 | - name: Install Python3
23 | uses: actions/setup-python@v2
24 | with:
25 | python-version: '3.x'
26 |
27 | - name: Install Dependencies
28 | run: npm run setup
29 |
30 | - name: Build
31 | run: npm run build
32 |
33 | push:
34 | name: Push
35 | needs: build
36 | runs-on: ubuntu-latest
37 | steps:
38 | - name: Checkout
39 | uses: actions/checkout@v2
40 |
41 | - name: Login to GitHub Container Registry
42 | uses: docker/login-action@v1
43 | with:
44 | registry: ghcr.io
45 | username: ${{ github.actor }}
46 | password: ${{ secrets.GITHUB_TOKEN }}
47 |
48 | - name: Build Image
49 | uses: docker/build-push-action@v2
50 | with:
51 | context: .
52 | push: true
53 | tags: ghcr.io/modbydaylight/documentation:master
54 |
55 | - name: Update Docker image
56 | uses: distributhor/workflow-webhook@v2
57 | env:
58 | webhook_url: ${{ secrets.WEBHOOK_URL }}
59 | webhook_secret: ${{ secrets.WEBHOOK_SECRET }}
60 |
--------------------------------------------------------------------------------
/docs/PrivateServer/ModInstallation.md:
--------------------------------------------------------------------------------
1 | # Installing Mods
2 |
3 | ## Prerequisites
4 |
5 | - [Private Server](https://github.com/ModByDaylight/PrivateServer/releases)
6 |
7 | ## Creating Pak Mods
8 |
9 | Download the Private Server folder from the releases page on GitHub. Unzip `PrivateServer.zip` to get the necessary files.
10 |
11 | Run the `PrivateSeverLauncher.bat` and follow the setup steps. Once the setup has been completed, create a new folder named `pakchunkXX-[PlatformName]` inside the UnrealPak folder.
12 |
13 | !!! tip
14 |
15 | `[PlatformName]` should be replaced with the naming the platform you are playing on uses, i.e. `WindowsNoEditor` for Steam and `EGS` for Epic Games Store. The "XX" in the pakchunk name should also be replaced with numbers that are not already being used by another pakchunk.
16 |
17 | Place the `DeadByDaylight` folder of the unpackaged mod you are installing into this folder. If you already have the `.pak` file for the mod you are installing, you can skip to the [Installing Pak Mods](#installing-pak-mods) section.
18 |
19 | Drag and drop the `pakchunkXX-[PlatformName]` folder onto the `UnrealPak.bat` file. This will pack your files and will automatically move them into the `Paks` folder in your game files. (`DeadByDaylight/Content/Paks`)
20 |
21 | ### Installing Pak Mods
22 |
23 | Download the `.pak` file for the respective mod drag and drop them into the `Paks` folder in your game files. (`DeadByDaylight/Content/Paks`)
24 |
25 | !!! success
26 |
27 | Now that you've packaged the assets into a pak file, Dead by Daylight should launch with your mods enabled.
28 |
--------------------------------------------------------------------------------
/docs/DevBuild/Server/Config.md:
--------------------------------------------------------------------------------
1 | # Dev Build Server Config Edits
2 |
3 | !!! note
4 |
5 | This guide only applies if you are hosting the server yourself.
6 |
7 |
8 | The dev build server has several settings which can be changed and affect all connected clients. The settings are loaded from .HJSON files in `settings/`.
9 |
10 | ## events.hjson
11 |
12 | This file supports enabling all in-game events for which the dev build has support. Only one may be enabled at a time. Supported events are:
13 |
14 | - Winter Solstice (2017)
15 | - Chinese New Year (2017)
16 | - Scorching Summer BBQ (2018)
17 | - Howling Grounds (2018)
18 | - The Hallowed Blight (2018)
19 | - Winter Solstice (2018)
20 | - Moonrise (2019)
21 | - 3 Year Anniversary (2019)
22 |
23 | ## starting-values.hjson
24 |
25 | Settings in this file control players' starting bloodpoints, rank, and player level.
26 |
27 | ## server-settings.hjson
28 |
29 | This file contains some server settings that don't directly affect the client. The most useful are:
30 |
31 | For those who plan to use the server only for themselves
32 |
33 | - `saveToFile`
34 | - Enables or disables persistent player saves. If disabled, players will have the default save each time they log in. Persistent saves only work when launching dev build using Steam.
35 |
36 | For those who plan to host the server publicly
37 |
38 | - `requireSteam`
39 | - If true, clients will only be allowed to connect if launched using Steam.
40 | - `whitelistEnabled`
41 | - Enables or disables the IP whitelist. If true, only IP addresses listed in `whitelist.txt` will be allowed to connect.
42 |
43 | ## logging.hjson
44 |
45 | Configures logging. Pretty boring.
--------------------------------------------------------------------------------
/docs/Development/UnrealEngine/Chunking.md:
--------------------------------------------------------------------------------
1 | # Preparing Assets for Chunking
2 |
3 | How to divide assets into chunks and cook them into .pak files
4 |
5 | ## Required Setup
6 |
7 | Projects do not generate chunks during cooking or packaging by default. To set your project up for chunking, open your `Project Settings` and navigate to `Project` → `Packaging`, then make sure that `Use Pak File` and `Generate Chunks` are both enabled.
8 |
9 | 
10 |
11 | To enable ChunkID assignments, open your `Editor Preferences` and navigate to `General` → `Experimental`, then make sure that `Allow ChunkID Assignments` is enabled.
12 |
13 | 
14 |
15 | ## Organizing Your Chunking Scheme
16 |
17 | Now that you have enabled chunking, you need to organize your assets and package them into chunks.
18 |
19 | To assign an asset to a chunk, right-click on the asset and `Asset Actions` → `Assign to Chunk`.
20 |
21 | 
22 |
23 | This will bring up a new window asking you to enter a Chunk ID. Enter a number that isn't already in use.
24 |
25 | 
26 |
27 | ## Packaging Chunks
28 |
29 | Once you have defined your Chunk IDs, packaging your project will automatically create .pak files for each chunk. You can locate them in your project's `Saved/StagedBuilds/[PlatformName]/[ProjectName]/Content/Paks` folder.
30 |
31 | 
--------------------------------------------------------------------------------
/docs/PrivateServer/ConfigEdits.md:
--------------------------------------------------------------------------------
1 | # Config Edits
2 |
3 | The config files can be edited to change certain console variables. This can be done by editing the `DefaultDeviceProfiles.ini` config file and replacing it with a pak mod.
4 |
5 | This example unlocks all customization items.
6 |
7 | ```ini title="DefaultDeviceProfiles.ini"
8 | [Windows DeviceProfile]
9 | +CVars=dbd.UnlockAllCustomizationItems=1
10 | ```
11 |
12 | ## Console Variables
13 |
14 | The following console variables can be added below the `[Windows DeviceProfile]` section of the config file to configure these options.
15 |
16 | | Console Variable | Description
17 | |---------|---------|
18 | | dbd.AllowPrivateMatchWithOnePlayer | Allow private match with one player.
19 | | DBD.ChestItemOverride | Force the chests to give you this item.
20 | | dbd.DisableInteractions | Disable interactions progressively, where each level is loosely related to a callstack depth level
21 | | DBD.DisableInvalidRoleCancellation | Disables the cancellation of games due to invalid role.
22 | | dbd.EnableMaxGeneratorsAndHooks | If non-zero, forces maximum number of generators and hooks to spawn regardless of actual player count.
23 | | DBD.ForcedSurvivorStartItem | The start item survivors will start with.
24 | | DBD.ForceItemAvailable | Force all items to be available.
25 | | DBD.GenerationSeed | The generation seed to use to generate the level. If smaller than 0, the generation seed is considered invalid.
26 | | dbd.ForcePrivateMatchAPI | 0 - Do not force private match API. 1 - Force private match API
27 | | dbd.IgnoreGameEndConditions | Game will never end even if conditions are met.
28 | | dbd.ReplaceDisconnectedPlayersWithBots | Replaces disconnected players with bots.
29 | | dbd.SpawnExposerEnabled | Toggles the spawning of crows.
30 | | dbd.UnlockAllCustomizationItems | Unlock all customization items.
31 | | r.dbd.HideAllHUD | Hides all HUD components.
--------------------------------------------------------------------------------
/docs/Development/UnrealEngine/ProjectSetup.md:
--------------------------------------------------------------------------------
1 | # Project Setup
2 |
3 | This page will guide you through setting up the template project for Dead By Daylight.
4 |
5 | ## Prerequisites
6 |
7 | - [Dead By Daylight Project](https://github.com/ModByDaylight/DeadByDaylightProject)
8 | - [Unreal Engine](https://www.unrealengine.com/en-US/download) (4.27.2)
9 | - [Visual Studio](https://visualstudio.microsoft.com/)
10 |
11 | ## Template Project
12 |
13 | Download the Dead By Daylight Template Project from GitHub by navigating to `Code` → `Download ZIP`. Unzip `DeadByDaylightProject-master.zip` to get the Template Project files.
14 |
15 | This will be the folder that all of your mod's files will be put into, so extract the folder somewhere convenient so you can find it later, such as your Documents folder. Of note - keep the file path as short as possible. When packing Unreal projects, some filenames can get long, so a very nested location may cause issues.
16 |
17 | ## Generate Visual Studio Files
18 |
19 | Next, you'll need to generate the remaining files for the project with Unreal Engine's "Generate Visual Studio Project Files" tool.
20 |
21 | To do this, right-click on the `.uproject` file and select `Generate Visual Studio project files`.
22 |
23 | ## Project Compilation
24 |
25 | Next up is compiling the project from Visual Studio. It is possible for Unreal to compile the project as well on launch, but if there is an error, Unreal will give a very vague report as to what went wrong. As such, it's best just to always compile from Visual Studio so you don't have to build a second time to see the error report.
26 |
27 | Open up the the .sln file in your project folder. Once Visual Studio loads, make sure that you have `Development Editor` and `Win64` selected in the top toolbar. On the right side in Solution Explorer, right click on the `DeadByDaylight` project and hit Build. This will take some time. You can monitor its progress from the Output log window if desired.
28 |
29 | If you encounter issues during this step, consider asking for help on the Discord.
30 |
31 | !!! success
32 |
33 | Now that you've built the binaries, the Editor should open without any issues.
--------------------------------------------------------------------------------
/.github/workflows/pr.yml:
--------------------------------------------------------------------------------
1 | name: PR Preview
2 |
3 | on:
4 | pull_request:
5 | branches:
6 | - dev
7 | types:
8 | - labeled
9 |
10 | jobs:
11 | build:
12 | name: Build
13 | runs-on: ubuntu-latest
14 | if: contains(github.event.pull_request.labels.*.name, 'safe to preview')
15 | steps:
16 | - name: Checkout
17 | uses: actions/checkout@v2
18 |
19 | - name: Install Node.JS
20 | uses: actions/setup-node@v2
21 | with:
22 | node-version: '16'
23 |
24 | - name: Install Python3
25 | uses: actions/setup-python@v2
26 | with:
27 | python-version: '3.x'
28 |
29 | - name: Install Dependencies
30 | run: npm run setup
31 |
32 | - name: Build
33 | run: npm run build
34 |
35 | push:
36 | name: Push
37 | needs: build
38 | runs-on: ubuntu-latest
39 | if: contains(github.event.pull_request.labels.*.name, 'safe to preview')
40 | steps:
41 | - name: Checkout
42 | uses: actions/checkout@v2
43 |
44 | - name: Login to GitHub Container Registry
45 | uses: docker/login-action@v1
46 | with:
47 | registry: ghcr.io
48 | username: ${{ secrets.GHCR_ACTOR }}
49 | password: ${{ secrets.GHCR_PAT }}
50 |
51 | - name: Build Image
52 | uses: docker/build-push-action@v2
53 | with:
54 | context: .
55 | push: true
56 | tags: ghcr.io/modbydaylight/documentation:pr${{ github.event.number }}
57 |
58 | - name: Update Docker image
59 | uses: distributhor/workflow-webhook@v2
60 | env:
61 | webhook_url: ${{ secrets.WEBHOOK_URL_PR }}${{ github.event.number }}
62 | webhook_secret: ${{ secrets.WEBHOOK_SECRET }}
63 |
64 | comment:
65 | name: Comment on PR
66 | needs: push
67 | runs-on: ubuntu-latest
68 | if: contains(github.event.pull_request.labels.*.name, 'safe to preview')
69 | steps:
70 | - name: Get Port
71 | env:
72 | prnum: ${{ github.event.number }}
73 | run: |
74 | echo "port=$(($prnum+10000))" >> $GITHUB_ENV
75 |
76 | - name: Comment
77 | uses: thollander/actions-comment-pull-request@v1
78 | with:
79 | message: 'This pull request can be previewed at http://modbydaylight.com:${{ env.port }}/'
80 | GITHUB_TOKEN: ${{ secrets.GITHUB_TOKEN }}
--------------------------------------------------------------------------------
/README.md:
--------------------------------------------------------------------------------
1 | [](https://discord.gg/FgZVnGBWyg)
2 | [](https://github.com/ModByDaylight/Documentation/issues)
3 | [](https://github.com/ModByDaylight/Documentation/pulls)
4 | [](https://github.com/ModByDaylight/Documentation/graphs/contributors)
5 |
6 | # Dead by Daylight Modding Documentation
7 |
8 | Documentation for Dead by Daylight modding. The `master` branch is hosted on https://modbydaylight.com.
9 |
10 | ## Contributing
11 |
12 | Contributions are welcomed and appreciated. All pull requests should target the `dev` branch.
13 |
14 | Before opening a pull request, it is recommended you [test your changes locally](#development-setup) to ensure there are no linking errors and everything displays as expected.
15 |
16 | ## Development Setup
17 |
18 | Requirements:
19 |
20 | - [Node.JS](https://nodejs.org/en/)
21 | - [Python 3](https://www.python.org/)
22 | - npm and pip, which should be installed with Node.JS and Python respectively
23 |
24 | Instructions:
25 |
26 | 1. Open a terminal window in the documentation root directory and run `npm run setup` to install necessary dependencies.
27 | If the installer complains about the installation directory not being included in the path, it may be necessary to add it.
28 | 1. Run `npm run serve` to launch a webserver at http://localhost:8000, which you can then connect to with a browser. The webserver will watch for changes to documentation files and automatically update and refresh your browser as you make changes. You may also run `npm run build` which will generate output HTML in the `site` directory.
29 | > **NOTE**: If the theme is being modified, run `npm run serve:theme` to make the server also watch for changes to theme files. Additionally, because stylesheets are built from SCSS files, changes to files in the `styles` directory will not be automatically updated. Running `npm run build` will automatically update them, or you can run `npx gulp buildstyles` to only update the CSS.
30 | 1. Run `npm run build-and-serve` and visit http://localhost:8000 to ensure your changes will display correctly once uploaded.
31 |
--------------------------------------------------------------------------------
/docs/DevBuild/Cinematics.md:
--------------------------------------------------------------------------------
1 | # Cinematics
2 |
3 | ## How to get in game cinematics
4 |
5 | There are a few methods of doing this.
6 |
7 | 1. After loading into a match, press ++single-quote++ and ++tab++ to enter into freecam mode. This will leave you with a menu top left so it is not the cleanest.
8 |
9 | 
10 |
11 | 2. After loading into a match, press your console key (default should be ++f10++) and type the command `toggledebugcamera`. This will bring you into a freecam mode but there is still an overlay. You can remove this overlay by hitting ++backspace++.
12 |
13 | 
14 |
15 | 
16 |
17 | 3. Download the program [Universal Unreal Unlocker](https://framedsc.github.io/GeneralGuides/universal_ue4_consoleunlocker.htm). Once downloaded, run the program and select `Dead By Daylight` and inject the dll.
18 |
19 | 
20 |
21 | 
22 |
23 | 
24 |
25 | It should look like this if all goes well.
26 |
27 | 
28 |
29 | You can set key bindings for all the different things here.
30 |
31 | 
32 |
33 | To enter camera mode press whichever key you have this set to while in game. This camera also works in the lobby and other places the 2 previous methods don't.
34 |
35 | 
36 |
37 | 
38 |
39 | Read through and play around with all the options you now have available.
40 |
41 | ### Other useful things for cinematics
42 |
43 | In debug camera you can use the scroll wheel to change speeds.
44 |
45 | Commands:
46 |
47 | `Fov` (enter number from 0-180).
48 |
49 | `Slomo` (0 freezes all movement in the game, 1 is regular speed, 2 is double speed etc).
50 |
51 | ### Remove HUD while in the lobby
52 |
53 | `DBD_ContextSystemRequestTransition 0 14 0`
54 | (You will need to restart your game after using this.)
--------------------------------------------------------------------------------
/docs/DevBuild/Server/Setup.md:
--------------------------------------------------------------------------------
1 | # Dev Build Server Setup
2 |
3 | ## Prerequisites
4 |
5 | - [Developer Build (3.0.0)](https://www.mediafire.com/file/w0flhwditpyt4wy/DevBuild.zip/file)
6 | - [DBD Dev Server](https://github.com/Preston159/dbd-server/releases)
7 |
8 | ## Instructions
9 |
10 | 1. Open Notepad as Administrator and open `C:\Windows\system32\drivers\etc\hosts`. Add these three lines to the bottom of the file and save.
11 | ```
12 | 127.0.0.1 latest.dev.dbd.bhvronline.com
13 | 127.0.0.1 cdn.dev.dbd.bhvronline.com
14 | 0.0.0.0 analytic.live.dbd.bhvronline.com
15 | ```
16 | If you're having trouble with this step, check out [this guide](https://www.howtogeek.com/howto/27350/beginner-geek-how-to-edit-your-hosts-file/).
17 |
18 | 1. Navigate to your dev build game files and find `DeadByDaylight/Config/DefaultEngine.ini`. Add these lines to the end.
19 | (This step can be skipped if you downloaded the dev build from the [Developer Build](../index.md) page, as this modification is already included)
20 | ```ini
21 | [/Script/Engine.NetworkSettings]
22 | n.VerifyPeer=false
23 | ```
24 | 1. Download and install [NodeJS 18 LTS](https://nodejs.org/en/). LTS versions 16 and 14 have also been tested.
25 | 1. Download and extract the latest release of the [server](https://github.com/Preston159/dbd-server/releases) using the "Source code (zip)" link.
26 | 
27 | 1. Navigate to the folder where you extracted the server files and run `setup.bat`. You should see an output like this:
28 | 
29 | 1. Run `run.bat` to start the server. You should see an output like this:
30 | 
31 | 1. You should be done, so start your game! Repeat step 6 each time you want to start the server.
32 |
33 | ## Common Errors
34 |
35 | `EACCES` or `EADDRINUSE`: Something on your system is using port 80 or port 443, both of which are necessary for the server to function. To find out what, run PowerShell as Administrator and run `Get-Process -Id (Get-NetTCPConnection -LocalPort 80).OwningProcess` (replacing 80 with 443 if necessary). `EACCES` can also be caused by not having permission to access the necessary ports on Linux.
36 |
37 | ## Tinkering
38 |
39 | Many of the server's settings can be changed by modifying the HJSON configuration files in the settings folder. These settings include the amount of starting bloodpoints, default player level/devotion, whitelist, and which event is active (if any). Instructions can be found [here](Config.md).
40 |
41 | ## Bugs and Feature Requests
42 |
43 | If you find a bug or missing feature, feel free to create an issue https://github.com/Preston159/dbd-server/issues[here]. +
44 | Please be sure to include as much information as possible, especially when concerning bugs.
--------------------------------------------------------------------------------
/docs/DevBuild/ConsoleUsage.md:
--------------------------------------------------------------------------------
1 | # Console Usage
2 |
3 | Here you'll learn the basics of console usage.
4 |
5 | By default, the console key is set to ++f10++. Pressing it once will bring up a small single-line console, and pressing it again opens a bigger one allowing you to see its output. You'll find all the console output in the log file as well if needed. The console key can be changed at the bottom of `DefaultInput.ini` in `DeadByDaylight/Config`.
6 |
7 | In the console, you'll see text in 3 different colors. Green means it is a console variable (CVar), grey means it's a readonly CVar and purple means that it is a command / function.
8 |
9 | 
10 |
11 | To see the value of a CVar, simply type it's name and hit ++enter++ in the console.
12 |
13 | 
14 |
15 | To set a value of a CVar, type it's name followed by a spacebar and the new value.
16 |
17 | 
18 |
19 | You can not set the value of readonly CVars with the console. If you want to set a readonly variable, it has to be done before launch in one of the configs. You can use the `[SystemSettings]` section in `/DeadByDaylight/Config/DefaultEngine.ini` or you can modify the `[Windows DeviceProfile]` section in `/DeadByDaylight/Config/DefaultDeviceProfiles.ini`.
20 | Both of those achieve the same result, so it doesn't matter which one you use.
21 |
22 | 
23 |
24 | To learn what a CVar does or affects, you can type in its name followed by a spacebar and a question mark.
25 |
26 | 
27 |
28 | Console commands can require from zero to multiple arguments. The arguments specify their type as well as their name.
29 |
30 | *Argument value types:*
31 | int32 = basic whole number
32 | float = number with decimals
33 | bool = either TRUE or FALSE (can be typed in as 1 or 0)
34 | FString = text
35 | FName = text
36 |
37 | 
38 |
39 | !!! note
40 |
41 | Many of the CVars / commands only work if the host of the match does them. Sometimes to get it working properly everyone else has to do it too.
42 |
43 | !!! warning
44 |
45 | While running the game with steam, do NOT execute commands such as `online.resetachievements` as this will CLEAR ALL DBD ACHIEVEMENTS FROM YOUR PROFILE AND RESET STATS. There are other commands similar to this, so just refrain from trying anything that you suspect might have permanent effects.
46 |
47 | *[DBD]: Dead by Daylight
48 | *[CVar]: Console Variable
--------------------------------------------------------------------------------
/docs/Development/DeadByDaylight/CharacterIds.md:
--------------------------------------------------------------------------------
1 | | Character | Codename | ID |
2 | |-------------------------|---------------|-----------|
3 | | Dwight Fairfield | Dwight | 0 |
4 | | Meg Thomas | Meg | 1 |
5 | | Claudette Morel | Claudette | 2 |
6 | | Jake Park | Jake | 3 |
7 | | Nea Karlsson | Nea | 4 |
8 | | Laurie Strode | Laurie | 5 |
9 | | Ace Visconti | Ace | 6 |
10 | | William "Bill" Overbeck | Bill | 7 |
11 | | Feng Min | Feng | 8 |
12 | | David King | David | 9 |
13 | | Kate Denson | Guam | 10 |
14 | | Quentin Smith | Quentin | 11 |
15 | | David Tapp | Finland | 12 |
16 | | Adam Francis | Haiti | 13 |
17 | | Jeff Johansen | Kenya | 14 |
18 | | Jane Romero | Mali | 15 |
19 | | Ashley J. Williams | Mali_Licensed | 16 |
20 | | Nancy Wheeler | Qatar_F | 17 |
21 | | Steve Harrington | Qatar_M | 18 |
22 | | Yui Kimura | Sweden | 19 |
23 | | Zarina Kassir | Ukraine | 20 |
24 | | Cheryl Mason | S22 | 21 |
25 | | Felix Richter | S23 | 22 |
26 | | Élodie Rakoto | S24 | 23 |
27 | | Yun-Jin Lee | S25 | 24 |
28 | | Jill Valentine | S26 | 25 |
29 | | Leon S. Kennedy | S27 | 26 |
30 | | Mikaela Reid | S28 | 27 |
31 | | Jonah Vasquez | S29 | 28 |
32 | | The Trapper | Trapper | 268435456 |
33 | | The Wraith | Wraith | 268435457 |
34 | | The Hillbilly | Crooked | 268435458 |
35 | | The Nurse | Nurse | 268435459 |
36 | | The Hag | Witch | 268435460 |
37 | | The Shape | Michael_Myers | 268435461 |
38 | | The Doctor | Doctor | 268435462 |
39 | | The Huntress | Bear | 268435463 |
40 | | The Cannibal | Cannibal | 268435464 |
41 | | The Nightmare | Sandman | 268435465 |
42 | | The Pig | Finland | 268435466 |
43 | | The Clown | Guam | 268435467 |
44 | | The Spirit | Haiti | 268435468 |
45 | | The Legion | Kenya | 268435469 |
46 | | The Plague | Maili | 268435470 |
47 | | The Ghost Face | Oman | 268435471 |
48 | | The Demogorgon | Qatar | 268435472 |
49 | | The Oni | Sweden | 268435473 |
50 | | The Deathslinger | Ukraine | 268435474 |
51 | | The Executioner | K20 | 268435475 |
52 | | The Blight | K21 | 268435476 |
53 | | The Twins | K22 | 268435477 |
54 | | The Trickster | K23 | 268435478 |
55 | | The Nemesis | K24 | 268435479 |
56 | | The Cenobite | K25 | 268435480 |
57 | | The Artist | K26 | 268435481 |
--------------------------------------------------------------------------------
/docs/Development/TechnicalGuides/CustomCosmetics.md:
--------------------------------------------------------------------------------
1 | # Custom Cosmetics Guide
2 |
3 | This guide will show you how you can add your own customization items with the use of data tables.
4 |
5 | ## Prerequisites
6 |
7 | - [Project Setup](../../Development/UnrealEngine/ProjectSetup.md)
8 |
9 | ## Customization Item Data Table
10 |
11 | 1. Navigate to `/Content/Data/Dlc` (or any subdirectory of `/Data/Dlc` of your choosing, you can even create new directories) and right click to create a new data table asset.
12 |
13 | 
14 |
15 | 2. Select “Customization Item Data” as the Row Structure.
16 |
17 | 
18 |
19 | 3. Now rename the data table asset to "CustomizationItemDB".
20 | 4. Click on “Add” to add a new row to the data table.
21 |
22 | 
23 |
24 | 5. Double click on the row name to change it to a custom cosmetic ID. It can be anything, but make sure to try and use a unique name, so no two cosmetics or mods overlap. Some ingame cosmetic IDs are:
25 | ```
26 | AV_Head01 (Ace Head)
27 | J_Legs02 (Jake Legs)
28 | HA_Body01 (Hag Body)
29 | ```
30 |
31 | 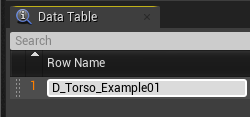
32 |
33 | 6. Start filling out the fields under the "Customization Item Data" category.
34 |
35 | | Property | Value
36 | | --- | ----------- |
37 | | `Category` | Select the appropriate option
38 | | `Item Mesh` | The skeletal mesh for the cosmetic
39 | | `Anim Class` | For special animation behavior. (Not required)
40 | | `Item Blueprint` | A blueprint for any special behavior. (Not required)
41 |
42 | 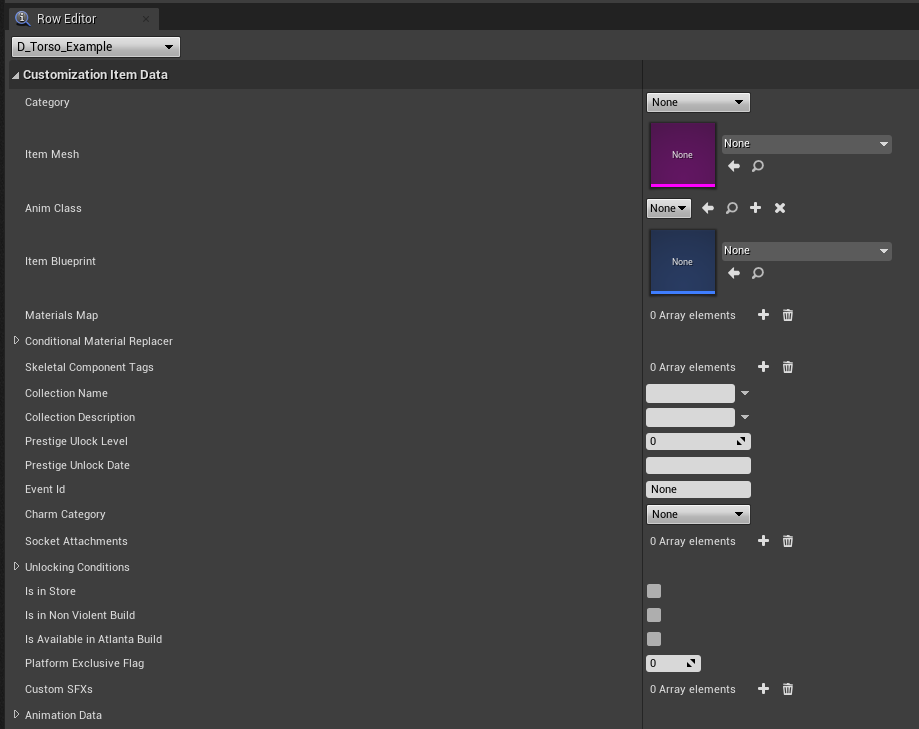
43 |
44 | 7. Fill out the fields under the "Customization Data" category.
45 |
46 | | Property | Value
47 | | --- | ----------- |
48 | | `ID` | Same as the row name.
49 | | `Associated Character` | The character ID who the cosmetic belongs to.
50 | | `Associated Role` | Select Camper / Slasher depending on if the cosmetic is for a killer or a survivor.
51 | | `Rarity` | The rarity of the customization item in game.
52 | | `Display Name` | The name of the customization item in game.
53 | | `Description` | The description of the customization item in game.
54 | | `Icon File Path List` | Add a new array entry and in that the path to the icon for your item (.png) Eg. “UI/Icons/Items/iconItems_flashlight.png”
55 | | `Availability` | Available
56 | | `DLCId` | 0
57 | | `Cloud Inventory Id` | -1
58 | | `Community Id` | 0
59 |
60 | 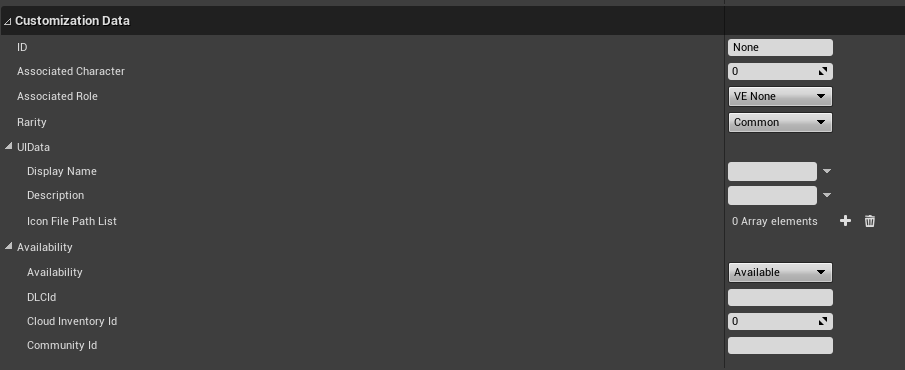
61 |
62 | 8. Repeat from step 4 for each cosmetic you want to add.
63 | 9. Save and cook as normal.
--------------------------------------------------------------------------------
/mkdocs.yml:
--------------------------------------------------------------------------------
1 | # Project information
2 | site_name: Mod By Daylight Docs
3 | site_description: Dead by Daylight Modding Documentation
4 | site_url: https://modbydaylight.com/
5 |
6 | # Repository
7 | # repo_name: ModByDaylight/Documentation
8 | repo_url: https://github.com/ModByDaylight/Documentation
9 |
10 | extra_css:
11 | - 'style.css'
12 | extra_javascript:
13 | - '/scripts/main.js'
14 |
15 | theme:
16 | name: material
17 | features:
18 | - navigation.top
19 | - navigation.tabs
20 | - navigation.instant
21 | - navigation.indexes
22 | - toc.integrate
23 | - search.share
24 | palette:
25 | - scheme: slate
26 | primary: deep purple
27 | accent: deep purple
28 | toggle:
29 | icon: material/toggle-switch-off-outline
30 | name: Switch to light mode
31 | - scheme: default
32 | primary: deep purple
33 | accent: deep purple
34 | toggle:
35 | icon: material/toggle-switch
36 | name: Switch to dark mode
37 | - scheme: slate
38 | primary: indigo
39 | accent: indigo
40 | toggle:
41 | icon: material/toggle-switch-off-outline
42 | name: Switch to light mode
43 | - scheme: default
44 | primary: indigo
45 | accent: indigo
46 | toggle:
47 | icon: material/toggle-switch
48 | name: Switch to dark mode
49 | icon:
50 | logo: logo
51 | repo: fontawesome/brands/github
52 |
53 | # Customization
54 | extra:
55 | embed_image: /img/logo.png
56 | social:
57 | - icon: fontawesome/brands/github
58 | link: https://github.com/ModByDaylight
59 | - icon: fontawesome/brands/discord
60 | link: https://discord.gg/xkbgW3aCRJ
61 |
62 | # Extensions
63 | markdown_extensions:
64 | - abbr
65 | - admonition
66 | - attr_list
67 | - md_in_html
68 | - pymdownx.details
69 | - pymdownx.superfences
70 | - pymdownx.keys
71 | - pymdownx.inlinehilite
72 | - pymdownx.snippets
73 | - pymdownx.highlight:
74 | anchor_linenums: true
75 | - toc:
76 | permalink: true
77 | nav:
78 | - Home: index.md
79 | - Development:
80 | - Development: Development/index.md
81 | - Resources: Development/Resources.md
82 | - Unreal Engine:
83 | - Unreal Engine: Development/UnrealEngine/index.md
84 | - Project Setup: Development/UnrealEngine/ProjectSetup.md
85 | - Chunking: Development/UnrealEngine/Chunking.md
86 | - Dead By Daylight:
87 | - Character IDs : Development/DeadByDaylight/CharacterIds.md
88 | - Map IDs: Development/DeadByDaylight/MapIds.md
89 | - Status Effect IDs: Development/DeadByDaylight/StatusEffectIds.md
90 | - Modding Guides:
91 | - Textures: Development/ModdingGuides/Textures.md
92 | - Sounds: Development/ModdingGuides/Sounds.md
93 | - Emission Maps: Development/ModdingGuides/EmissionMaps.md
94 | - Material Instances: Development/ModdingGuides/MaterialInstances.md
95 | - Meshes:
96 | - Meshes: Development/ModdingGuides/Meshes/index.md
97 | - Static Meshes: Development/ModdingGuides/Meshes/StaticMesh.md
98 | - Skeletal Meshes: Development/ModdingGuides/Meshes/SkeletalMesh.md
99 | - Physics: Development/ModdingGuides/Physics.md
100 | - Animations: Development/ModdingGuides/Animations.md
101 | - Technical Modding Guides:
102 | - Cosmetics: Development/TechnicalGuides/CustomCosmetics.md
103 | - Items: Development/TechnicalGuides/CustomItems.md
104 | - Perks: Development/TechnicalGuides/CustomPerks.md
105 | - Maps: Development/TechnicalGuides/CustomMaps.md
106 | - Private Server:
107 | - Private Server: PrivateServer/index.md
108 | - Mod Installation: PrivateServer/ModInstallation.md
109 | - Config Edits: PrivateServer/ConfigEdits.md
110 | - Dev Build:
111 | - Dev Build: DevBuild/index.md
112 | - Server:
113 | - Server: DevBuild/Server/index.md
114 | - Setup: DevBuild/Server/Setup.md
115 | - Config: DevBuild/Server/Config.md
116 | - Commands: DevBuild/Server/Commands.md
117 | - Fiddler Setup: DevBuild/FiddlerSetup.md
118 | - Cinematics: DevBuild/Cinematics.md
119 | - Console Usage: DevBuild/ConsoleUsage.md
120 | - Advanced Console Usage: DevBuild/AdvancedConsoleUsage.md
121 | - Useful Commands: DevBuild/UsefulCommands.md
122 | - Character IDs: DevBuild/CharacterIds.md
--------------------------------------------------------------------------------
/docs/DevBuild/UsefulCommands.md:
--------------------------------------------------------------------------------
1 | # Useful Commands
2 |
3 | !!! note
4 |
5 | This just a small list of handpicked commands and there are many more available. Find more information on the [Console Usage](ConsoleUsage.md) page
6 |
7 | | Console Command | Description
8 | | --- | ----------- |
9 | | `DBD_ForceStartMatch` | Forcibly starts the match.
10 | | `DBD_BackToIIS` | Forcibily causes the player to be sent back to the start screen. Can be used if you get stuck in a loading screen.
11 | | `SetBind ` | Allow the player to set a key to execute a console command. (Ex: `SetBind v Ghost` will make the ++v++ key execute the `Ghost` command when pressed.)
12 | | `DBD_AddAllItemsAddonsOfferingsToInventory ` | Gives the selected character all items, add-ons, and offerings in their inventory.
13 | | `DBD_AddCells ` | Add Auric Cells (Ex: `DBD_AddCells 100000`)
14 | | `DBD_SpawnItem ` | Allows you to spawn any item (Ex: `DBD_SpawnItem Item_Camper_Flashlight` will spawn a yellow flashlight.)
15 | | `DBD_ListDBItems` | Lists the database of item names. Useful for finding arguments for the previous command.
16 | | `DBD_SpawnItemAddon ` | Allows you to spawn any add-on (Ex: `DBD_SpawnItemAddon Addon_Flashlight_001` will spawn a brown battery.)
17 | | `DBD_ListDBItemAddons` | Lists the database of add-on names. Useful for finding arguments for the previous command.
18 | | `DBD_SpawnPerk ` | Allows you to spawn any perk (Ex: `DBD_SpawnPerk Bamboozle 3` will spawn Bamboozle Level 3.)
19 | | `DBD_ListDBPerks` | Lists the database of perk names. Useful for finding arguments for the previous command.
20 | | `ToggleDebugCamera`| Toggles the debug freecam. For cinematics it is recommended you go to cinematics instead of using this camera.
21 | | `Ghost` | Activates noclip and flight.
22 | | `Summon ` | Summons an object of the specified class. (Ex: `Summon BP_Brl_BigTree_01_C` will spawn a big tree.) You can find classes by going into debug camera, looking at an object, and looking at the name under HitActor Class.
23 | | `Slomo ` | Controls speed of the game. 1 is default, higher is faster and lower is slower.
24 | | `ChangeSize ` | Changes the players size. 1 is default, 0.5 is half, 2 is 2x size.
25 | | `Fov ` | Changes field of view. 90 is default FOV.
26 | | `DBD_AllowKilling` | Makes all survivors able to be killed (mori). Only works if the host is killer and does the command.
27 | | `DBD_ComeToMeMyChildren` | Teleports all characters to the player.
28 | | `Exit` | Forcibly closes the game.
29 | | `dbd_setkillerheadvisibility ` | Fixes issues where the killer appears distorted in freecam. (Ex: `dbd_setkillerheadvisibility true`)
30 | | `DBD_AddHP` | Adds one health state to the survivor.
31 | | `DBD_RemoveHP` | Removes one health state from the survivor.
32 | | `DBD_SpawnCamperByName ` | Spawns a survivor by the name you type (Ex: `DBD_SpawnCamperByName Jake`)
33 | | `DBD_SpawnCharacter ` | Spawns a killer or survivor. (Ex: `DBD_SpawnCharacter 268435456 false` will spawn The Trapper. Other parameters can be changed, such as outfit selection. A full list of character IDs can be found [here](CharacterIds.md).
34 |
35 | !!! note
36 |
37 | Add-on and perk spawn commands stack past the allowed amount, meaning you can have more than 2 add-ons and more than 4 perks. Only the first 2 add-ons and first 4 perks will be visible on the HUD.
38 |
39 | | Console Variable | Description
40 | | --- | ----------- |
41 | | `r.dbd.HideAllHUD <0|1>` | Hides all HUD components. (Ex: `r.dbd.HideAllHUD 1` will hide the HUD, `r.dbd.HideAllHUD 0` will show the HUD.)
42 | | `dbd.FlashlightInfiniteEnergy <0|1>` | Toggle if flashlights have infinite energy.
43 | | `DBD.DisableDLCChecks <0|1>` | Disables the DLC checking, just like the command line version, but dynamically.
44 | | `r.PostProcessAAQuality <0..6>` | Defines the postprocess anti aliasing method which allows to adjust for quality or performance. 0:off, 1:very low (faster FXAA), 2:low (FXAA), 3:medium (faster TemporalAA), 4:high (default TemporalAA), 5:very high, 6:max.
45 | | `DBD.GenerationSeed ` | The generation seed to use to generate the level. If smaller than 0, the generation seed is considered invalid.
46 | | `dbd.UnlockAllCustomizationItems <0|1>` | Unlock all customization items.
47 | | `dbd.SpawnExposerEnabled <0|1>` | Toggles the spawning of crows.
48 | | `t.MaxFPS ` | Caps FPS to the given value. Set to <= 0 to be uncapped.
49 |
--------------------------------------------------------------------------------
/docs/Development/TechnicalGuides/CustomItems.md:
--------------------------------------------------------------------------------
1 | # Custom Items Guide
2 |
3 | This guide will show you how you can add your own items with the use of data tables and blueprints.
4 |
5 | ## Prerequisites
6 |
7 | - [Project Setup](../../Development/UnrealEngine/ProjectSetup.md)
8 |
9 | ## Item Data Table
10 |
11 | 1. Navigate to `Content/Data/Dlc` (or any subdirectory of `Data/Dlc` of your choosing, you can even create new directories) and right click to create a new data table asset.
12 |
13 | 
14 |
15 | 2. Select "Item Data” as the Row Structure.
16 |
17 | 
18 |
19 | 3. Now rename the data table asset to "ItemDB".
20 | 4. Click on “Add” to add a new row to the data table.
21 |
22 | 
23 |
24 | 5. Double click on the row name to change it to a custom item ID. It can be anything, but make sure to try and use a unique name, so no two items or mods overlap. Some ingame item IDs are:
25 | ```
26 | Item_Camper_Flashlight (Uncommon Flashlight)
27 | Item_Camper_MedKit (Common Med-Kit)
28 | Item_Camper_Toolbox (Common Toolbox)
29 | ```
30 |
31 | 
32 |
33 | 6. Start filling out the fields under the "Item Data" category.
34 |
35 | | Property | Value
36 | | --- | ----------- |
37 | | `Item Mesh` | The skeletal mesh for the item in the lobby.
38 | | `Hand Position` | How the item is held in the lobby.
39 | | `Role` | Camper
40 | | `Rarity` | The rarity of the item in game.
41 | | `Inventory` | True
42 | | `Chest` | Spawns this item in chests. (Optional)
43 | | `Availability` | Available
44 | | `DLCId` | 0
45 | | `Cloud Inventory Id` | -1
46 | | `Community Id` | 0
47 | | `Bloodweb` | Spawns this item in the Bloodweb. (Optional).
48 | | `Can Keep in Loadout` | True
49 | | `Item Type` | The item type.
50 |
51 | 
52 |
53 | 7. Fill out the fields under the "Base Item Data" category.
54 |
55 | | Property | Value
56 | | --- | ----------- |
57 | | `ID` | Item ID. Should be the same as the row name.
58 | | `Type` | Item
59 | | `Display Name` | The name of the item in game.
60 | | `Description` | The description of the item in game.
61 | | `Icon File Path List` | Add a new array entry and in that the path to the icon for your item (.png) Eg. “UI/Icons/Items/iconItems_flashlight.png”
62 | | `Item Blueprint` | Your item's blueprint. (You haven't created this yet)
63 |
64 | 
65 |
66 | ## Item Blueprint
67 |
68 | 1. Navigate to `Content/Blueprints/GameplayElements/Item/Common`. Right click and create a `Blueprint Class` and set the class to `BaseCamperCollectable`.
69 |
70 | Create a dummy blueprint for each of the following. Make sure they have the exact same names.
71 |
72 | 
73 |
74 | (Make sure you don't replace these blueprints when cooking)
75 |
76 | 2. Right click on the item blueprint which is the same type of item as the one you are creating and select `Create Child Blueprint Class`.
77 |
78 | 
79 |
80 | Give the child blueprint a name you can remember.
81 |
82 | 3. Double-click on the child blueprint and navigate to the `Details` tab.
83 |
84 | 4. Start filling out the fields under the "Collectable" category.
85 |
86 | You will only need to change a few properties since your item is using the properties from the blueprint you parented it to.
87 |
88 | | Property | Value
89 | | --- | ----------- |
90 | | `Item ID` | The same ID you set in your item data table.
91 |
92 | 
93 |
94 | 5. Go back to your item data table and set the `Item Blueprint`.
95 | 6. Save all and select `File` → `Cook Content for Windows`.
96 |
97 | ### Item Modifiers
98 | This part will provide some information on how to set modifier values for your item using the event graph.
99 |
100 | By using the `Set Base Item Modifier` and `Set Modifier Value` nodes, you can set different modifier values for your item.
101 |
102 | The example below shows the node graph you can use to modify the amount of charges your item will have in game.
103 |
104 | 
--------------------------------------------------------------------------------
/docs/Development/ModdingGuides/Textures.md:
--------------------------------------------------------------------------------
1 | # Custom Textures Guide
2 |
3 | This guide will show you how to replace textures in Dead By Daylight.
4 |
5 | ## Prerequisites
6 |
7 | - [UE Viewer](https://www.gildor.org/en/projects/umodel)
8 | - [Unreal Engine](https://www.unrealengine.com/en-US/download)
9 | - Image editor (Photoshop, GIMP, paint.net, etc)
10 |
11 | ## Exporting from Dead By Daylight
12 |
13 | 1. Open UE Viewer.
14 | 2. Set the path to game files as the base of your Dead By Daylight files.
15 | 3. Check override game detection and select Unreal engine 4.27.
16 | 4. Leave all other settings at default and select OK.
17 |
18 | 
19 |
20 | UE Viewer will now attempt to open all DBD game files, this process can take anywhere from a couple seconds to a couple minutes. If it takes exceedingly long (>10 minutes) recheck all settings are correct and try again.
21 |
22 | 5. Find the texture you want to edit and export it with ++ctrl+x++.
23 | 6. Set where you would like the image to be saved and press OK.
24 |
25 | 
26 |
27 | ## Editing & Cooking
28 |
29 | 1. Open your TGA texture in your image editor of choice.
30 |
31 | 
32 |
33 | 2. Edit it to your heart's content!
34 |
35 | 
36 |
37 | 3. When you're finished, save as a .PNG with lossless compression. This will give you the best possible quality with transparency, although most file formats can be used in Unreal Engine, so dont feel forced to use .PNG
38 | 4. Open Unreal Engine.
39 | 5. Create a new project with no starter content.
40 |
41 | 
42 | 
43 | 
44 |
45 | 6. Go to `Edit` → `Project Settings` → `Packaging` and make sure "Use pak file" is unchecked.
46 | 7. Now that all project set up is done, you are going to recreate the file structure of the texture you are editing in Unreal Engine. For example, if I am editing Nea's Cropped Hoodie, I would make several folders in Unreal Engine, starting from a folder named `Characters`, then `Campers`, `Nea`, `Textures`, `Outfit009`.
47 | 8. Drag your edited image into the folder you just made, so I would drag my image into `Outfit009`.
48 |
49 | 
50 | 
51 |
52 | 9. Name the image the exact same as the original file, for example the texture im replacing is called `T_NKTorso009_BC`, so after importing my image I would make sure it is named `T_NKTorso009_BC` in Unreal Engine.
53 | 10. Save all and select `File` → `Cook Content for Windows`.
54 |
55 | Your file should now be cooking, this can take anywhere from a couple seconds to minutes, it typically takes longer the first time you cook.
56 |
57 | ## Importing into DBD
58 |
59 | 1. Find where your Unreal Engine project is saved in File Explorer. If you dont know where it is saved, you can find it in `Settings` → `Project Settings` → `Packaging` under "Staging Directory".
60 |
61 | 
62 |
63 | 2. Go to your project's `Saved\Cooked\WindowsNoEditor` folder.
64 | 3. You should now see a folder with the name of your project. Open that folder, and now follow the directory to where you saved your texture.
65 | For example, mine would be `Content\Characters\Campers\Nea\Textures\Outfit009`.
66 | 4. Copy the texture you cooked in that path. Preferably save it somewhere and make it easy to know what it is and where it should go.
67 |
68 | 
69 |
70 | 5. Place the texture in the same path as the original and package as usual.
71 |
72 | *[DBD]: Dead by Daylight
--------------------------------------------------------------------------------
/docs/Development/ModdingGuides/Physics.md:
--------------------------------------------------------------------------------
1 | # Physics Guide
2 |
3 | ## Prerequisites
4 |
5 | - [Better Fbx Importer & Exporter](https://blendermarket.com/products/better-fbx-importer--exporter) - For Blender users
6 | - [Unreal Engine](https://www.unrealengine.com/en-US/download) (4.27.2)
7 |
8 | !!! note
9 |
10 | To use this guide for Blender, you must install the Better Fbx Importer & Exporter addon and use the FBX export for it. If you unchecked scale down when importing, set the export scale to 1. If you left scale down checked then leave the export scale at 100.
11 |
12 | ## Importing your mesh into Unreal Engine
13 |
14 | 1. Import your model into Unreal Engine.
15 | 2. Make sure Create Physics Asset is checked.
16 | 3. If your model is already imported simply right click your mesh and navigate to `Create` → `Physics Asset` → `Create and Assign`.
17 |
18 | 
19 |
20 | 4. You should now have your mesh and Physics Asset inside the editor.
21 |
22 | 
23 |
24 | 5. Rename your mesh to match the corresponding files it's going to be replacing. The Physics Asset can be named anything since it is not replacing an existing file.
25 |
26 | ## Editing the Physics Asset
27 |
28 | !!! note
29 |
30 | Depending on your mesh, you don't always have to make a custom Physics Asset. Sometimes the default one will work fine.
31 |
32 |
33 | 1. Right click on your Physics Asset and hit Edit.
34 | 2. The Physics window will open and you will see your model with these capsules all around it.
35 |
36 | 
37 |
38 | 3. Resize, move, and rotate these capsules around to match your model more closely. These capsules prevent mesh with physics from clipping. You can also add or delete capsules of different shapes to fit your needs.
39 |
40 | 
41 |
42 | 4. Once you have a result you're happy with hit Save.
43 |
44 | ## Painting Cloth Physics onto your Mesh
45 |
46 | 1. Right click on the mesh you want to add physics to and hit Edit.
47 | 2. The mesh viewer window will open up.
48 | 3. Hit Section Selection up at the top and select the mesh you want to add physics to.
49 |
50 | 
51 |
52 | 4. Go to Window at the top and open up the Clothing window.
53 | 5. Right click on your mesh and select Create Clothing Data from Selection. Make sure the Physics Asset is set to the one you created and that Remove from Mesh is unchecked and hit Create.
54 |
55 | 
56 |
57 | 6. You should now have an asset under the Clothing Data tab click it and then click Activate Cloth Paint at the top.
58 | 7. Your mesh should now highlight in purple and some options should appear in the Clothing window.
59 |
60 | 
61 |
62 | 8. In the options tweak the settings to your liking. Paint Value determines how strong the physics are. A higher value will make the physics more floppy and appear more white, while a lower value will make them stiffer and appear more grey.
63 | 9. Paint the parts you want to apply physics to your mesh.
64 |
65 | 
66 |
67 | 10. Use different values to blend where the physics start and end for a smoother transition.
68 | 11. Hit Deactivate Cloth Paint. Physics should now be applied to you mesh.
69 | 12. To test out physics right click on the mesh and hit Apply Clothing Data. To reset the mesh right click again and hit Remove Clothing Data.
70 |
71 |
75 |
76 | ## Cloth Configuration
77 |
78 | 1. After painting the physics onto your mesh, you can tweak how the physics work by expanding Cloth Config in the Clothing window.
79 |
80 | 
81 |
82 | 2. Tweak the settings to get different physics reactions. (Increasing the X, Y, and Z values in Damping will cause the physics to be more floaty as if it were moving in water, or tweak the gravity to make the physics more floaty and ghostly)
83 | 3. As before, to test out the physics right click on the mesh and hit Apply Clothing Data. To reset the mesh right click again and hit Remove Clothing Data.
84 |
85 | ## Cooking your assets
86 |
87 | 1. Replace the mesh as you would normally. The physics asset can be anywhere as long as you copy it over.
88 | 2. Save all and select `File` → `Cook Content For Windows`.
89 |
90 | If all went well your mesh should have physics ingame now!
91 |
92 |
--------------------------------------------------------------------------------
/docs/Development/ModdingGuides/Meshes/StaticMesh.md:
--------------------------------------------------------------------------------
1 | # Static Mesh Guide
2 |
3 | ## Prerequisites
4 |
5 | - [UE Viewer](https://www.gildor.org/en/projects/umodel)
6 | - [Blender](https://www.blender.org/download/)
7 | - [Psk/Psa Import/Export](https://github.com/Befzz/blender3d_import_psk_psa)
8 | - [Unreal Engine](https://www.unrealengine.com/en-US/download)
9 |
10 | ## Exporting from Dead By Daylight
11 |
12 | 1. Open UE Viewer.
13 | 2. Set the path to game files as the base of your Dead By Daylight files.
14 | 3. Check override game detection and select Unreal engine 4.27.
15 | 4. Leave all other settings at default and select OK.
16 |
17 | 
18 |
19 | 5. Find a static mesh you want to replace. Open the static mesh and export it with ++ctrl+x++. Keep default settings.
20 | 6. Find the exported static mesh. You can find where it exported in UE Viewer by going to `Tools` → `Open export folder`.
21 |
22 | ## Replacing the Mesh
23 |
24 | 1. Open Blender and start a new general file.
25 |
26 | 
27 |
28 | 2. Delete all the default Blender objects by selecting all the assets and pressing delete.
29 |
30 | 
31 |
32 | 3. `File` → `Import` → `Skeleton Mesh .psk`.
33 | (Make sure you have the Psk/Psa Import/Export plugin installed. Instructions are on the GitHub repository.)
34 | 4. Find your exported psk and import it. Make sure scale down is checked when importing.
35 |
36 | 
37 |
38 | You should now have the model in Blender. Feel free to select the object then right click to shade it smooth.
39 |
40 | 
41 |
42 | 
43 |
44 | 5. Go to the Shading tab in Blender.
45 |
46 | 
47 |
48 | 6. Select use nodes on all the materials your object has.
49 |
50 | 
51 |
52 | You should now have your material looking like this. You may have multiple materials to do this on.
53 |
54 | 
55 |
56 | 7. `Add` → `Search` → `Image Texture`.
57 |
58 | This node will appear
59 |
60 | 
61 |
62 | 8. Press open on the node and find the texture that goes with your model, it should be somewhere in your UE Viewer export folder. All textures linked to the model are automatically exported with the model.
63 |
64 | (For example, mine were in Textures\Props\Cars)
65 |
66 | 
67 |
68 | 9. Select the colored texture and select open.
69 | 10. Connect the color node to the Base Color node in the Principled BDSF.
70 |
71 | 
72 |
73 | It should now look textured
74 |
75 | 
76 |
77 | 11. Go back to the Layout tab in Blender and select viewport shading to see your textures.
78 |
79 | 
80 |
81 | 12. Now, feel free to edit the model to your heart's content. If you need help using Blender feel free to look up plenty of tutorials online.
82 |
83 | 13. When you're done editing, `Export` → `Export as FBX`.
84 |
85 | ## Cooking in Unreal Engine
86 |
87 | 1. Open Unreal Engine and open your project. If you havent already made one, refer to the [Custom Textures Guide](../Textures.md).
88 | 2. Now you will have to recreate the folder structure of the original mesh. For example, I would make a folder called Meshes, then make a folder inside that called Props, and so on. Remember it is case sensitive.
89 | 3. Drag your fbx into the folder where the mesh would be in the original game.
90 | 4. Import all, make sure your settings are the same as shown.
91 |
92 | 
93 |
94 | If there are any error messages, they can most likely be ignored.
95 |
96 | You should now have your mesh imported in. Mine looks like this
97 |
98 | 
99 |
100 | I have the mesh, the material for the car, the base texture of the car, and my material for Jigglypuff and it's texture. There should only be one mesh. If not, make sure you joined everything together in Blender.
101 |
102 | 5. Refer to [Material Instances Guide](../MaterialInstances) for texturing your model.
103 | 6. Name your mesh the same as the mesh you are replacing.
104 |
105 | 
106 |
107 | 7. Save all and select `File` → `Cook Content For Windows`.
--------------------------------------------------------------------------------
/docs/Development/TechnicalGuides/CustomPerks.md:
--------------------------------------------------------------------------------
1 | # Custom Perks Guide
2 |
3 | This guide will show you how you can add your own perks with the use of data tables and blueprints.
4 |
5 | ## Prerequisites
6 |
7 | - [Project Setup](../../Development/UnrealEngine/ProjectSetup.md)
8 |
9 | ## Perk Data Table
10 |
11 | 1. Navigate to `Content/Data/Dlc` (or any subdirectory of `Data/Dlc` of your choosing, you can even create new directories) and right click to create a new data table asset.
12 |
13 | 
14 |
15 | 2. Select "Perk Properties" as the Row Structure.
16 |
17 | 
18 |
19 | 3. Now rename the data table asset to "PerkDB".
20 | 4. Click on “Add” to add a new row to the data table.
21 |
22 | 
23 |
24 | 5. Double click on the row name to change it to a custom item ID. It can be anything, but make sure to try and use a unique name, so no two perks or mods overlap.
25 |
26 | 
27 |
28 | 6. Start filling out the fields under the "Perk Properties" category.
29 |
30 | | Property | Value
31 | | --- | ----------- |
32 | | `Tags` | Survivor / Killer depending on if the perk is for a killer or a survivor.
33 | | `Associated Player Index` | -1
34 | | `Mandatory on Bloodweblevel` | -1
35 | | `Teachable on Bloodweblevel` | -1
36 | | `Atlanta Teachable Level` | -1
37 | | `Perk Category` | Select an appropriate category
38 | | `Perk Blueprint` | Your perk's blueprint. (You haven't created this yet)
39 | | `Perk Level Rarity` | Your perk's rarity for each level
40 | | `Perk Level Tunables` | Allows changing perk description based on the perk level. Entries in this array are indexed from 0, and each entry describes values of the placeholder on each perk level. You can refer to these values as `{0}` in the description text and so on.
41 |
42 | 
43 |
44 | 7. Start filling out the fields under the "Item Data" category.
45 |
46 | | Property | Value
47 | | --- | ----------- |
48 | | `Role` | Select Camper / Slasher depending on if the perk is for a killer or a survivor.
49 | | `Inventory` | True
50 | | `Chest` | True
51 | | `Availability` | Available
52 | | `DLCId` | 0
53 | | `Cloud Inventory Id` | -1
54 | | `Community Id` | 0
55 | | `Is in Non Violent Build` | True
56 | | `Is Available in Atlanta Build` | True
57 | | `Bloodweb` | True
58 | | `Can Keep in Loadout` | True
59 | | `Item Type` | The item type.
60 |
61 | 
62 |
63 | 8. Fill out the fields under the "Base Item Data" category.
64 |
65 | | Property | Value
66 | | --- | ----------- |
67 | | `ID` | Perk ID. Should be the same as the row name.
68 | | `Type` | Select Camper Perk / Slasher Perk depending on if the perk is for a killer or a survivor.
69 | | `Display Name` | The name of the perk in game.
70 | | `Description` | The description of the perk in game.
71 | | `Icon File Path List` | Add a new array entry and in that the path to the icon for your item (.png) Eg. “UI/Icons/Perks/iconPerks_agitation.png”
72 |
73 | 
74 |
75 | ## Perk Blueprint
76 |
77 | In this example, we are going to make a simple perk using `Gameplay Modifiers`.
78 |
79 | !!! info "Gameplay Modifiers"
80 |
81 | A lot of logic in Dead By Daylight is based on Gameplay Tags. They are basically tags and flags attached to various objects in the game and changing based on their lifetime and various conditions. A lot of objects have them: Survivors, Killers, Interactable Objects, but their primary effect is on the killers and survivors.
82 |
83 | You have multiple ways of influencing them, either by calling Set Gameplay Tag Value function directly (because if you take a closer look, Perk actually is a child of GameplayModifierContainer), or by using the properties on your perk that apply the modifiers conditionally, e.g. the property PerkLevelData. Each out of 3 values in it correspond to the perk level and has few values: Conditions, Modifiers and Flags. Conditions dictate when the modifications are applied, if you add entry and click there you will see a lot of default conditions you can use. Modifiers apply modifications to the values of chosen gameplay tags, and Flags just set the gameplay tags on the object (e.g. survivor or killer).
84 |
85 | 1. Navigate to `Content/Blueprints/Perks`. Right click and create a `Blueprint Class` and set the class to `Perk`.
86 | 2. Double-click on the blueprint and navigate to the `Details` tab.
87 | 3. Navigate to `Perk Level Data` under the "Perk" category.
88 |
89 | All of the values in this array represent a different perk level. If you want to modify the perk while it's at level 3, you would go to the third value in the array.
90 |
91 | Add the `Modifiers` entry to the third value in the array, set `Type` to `GameplayModifierType.ModifyFOV` and `ModifierValue` to 15. This will unconditionally increase the player's FOV level by 15 degrees when the perk is equipped.
92 |
93 | 
94 |
95 | 5. Go back to your perk data table and set the `Perk Blueprint`.
96 | 6. Save all and select `File` → `Cook Content for Windows`.
--------------------------------------------------------------------------------
/docs/Development/ModdingGuides/Sounds.md:
--------------------------------------------------------------------------------
1 | # Custom Sounds Guide
2 |
3 | This guide will show you how to replace sounds Dead By Daylight.
4 |
5 | ## Prerequisites
6 |
7 | - [Wwise Launcher](https://www.audiokinetic.com/download/) - Creating .wem files from audio files
8 | - [DBD Unpacker](https://github.com/BrandonItaly/DBDUnpacker/releases/latest) - Unpacking audio files
9 | - [BnkEditor](https://cdn.discordapp.com/attachments/844107725092290600/846589986857811968/BnkEditor.exe) - Replacing .wem files in .bnk files
10 | - [RExplorer](https://www.scampers.org/steve/sms/other/RavioliGameTools_v2.10.zip) - Previewing .wem files in .bnk files
11 |
12 | ### Additional Resources
13 |
14 | - [DBDSounds](https://github.com/Masusder/DBDSounds) - Collection of all in-game audio in the .wav audio format
15 | - [WAV Converter](https://audio.online-convert.com/convert-to-wav) - Converting audio files to the Waveform Audio File Format
16 |
17 | ## Creating a Wwise Project
18 |
19 | 1. Open the Wwise Launcher and select the Wwise tab.
20 | 1. Install the latest version of Wwise under Install New Version. A window will appear asking you to select which Packages and Deployment Platforms you'd like to install. Leave all settings as default and press Install.
21 | 1. Launch Wwise under Versions Installed. Create a new project by pressing New and give a title to the project. Under Import factory assets to project click Select None and press OK.
22 | 1. Navigate to `Project` → `Project Settings...` → `Source Settings` → `Default Conversion Settings` and click on the three dots. Select Vorbis Quality High and press OK.
23 |
24 | 
25 |
26 | ## Importing and Exporting Audio
27 |
28 | 1. To import your audio file(s), navigate to `Project` → `Import Audio Files...` → `Add Files`, select your audio file and press Import. These audio files must be in the .wav audio format.
29 | 1. To export your audio file(s), navigate to `Project` → `Convert All Audio Files...` and press convert. This will convert all of your .wav audio files into .wem files.
30 | 1. To find your exported audio, navigate to `Project` → `File Manager...`, right click on Project Folder, and click on Open Containing Folder.
31 |
32 | 
33 |
34 | 1. A new window will be opened in File Explorer. Inside the folder, navigate to `.cache/Windows/SFX`. This is where your exported .wem files are located.
35 |
36 | 
37 |
38 | ## Finding and Replacing Audio (.wem files)
39 |
40 | 1. Download and extract the latest release of the [DBD Unpacker](https://github.com/BrandonItaly/DBDUnpacker/releases/latest) from GitHub.
41 | 1. Open `DBDUnpacker.bat` and enter your Dead by Daylight game path.
42 | 1. Select `Unpack Single Pak` then enter the number 2. This will unpack the `pakchunk2-[PlatformName].pak` file which contains all of the audio files.
43 | 1. Navigate to the unpacked audio folder. (`[PlatformName]/Content/WwiseAudio/Windows`)
44 |
45 | 
46 |
47 | 1. Navigate to the file called `SoundbanksInfo.xml` and open it in any text editor.
48 | 1. Use ++ctrl+f++ to easily search for the name of the audio file you want to replace. For example, you would search for `lobby_survivor` if you wanted to replace the Survivor Lobby Music.
49 | ```xml title="SoundbanksInfo.xml"
50 |
51 | Music\mu_menu_lobby_survivor.wav
52 | SFX\Music\mu_menu_lobby_survivor_0BC91DCF.wem
53 |
54 | ```
55 | 1. Copy the File Id of the sound and search for it in the Dead By Daylight audio folder.
56 |
57 | 
58 |
59 | 1. Rename your exported .wem file from Wwise to the File Id you searched in the audio folder.
60 |
61 | 
62 |
63 | 1. Place the .wem file in the same path as the original and package as usual.
64 |
65 | ## Finding and Replacing Audio (.bnk files)
66 |
67 | 1. Download and extract the latest release of the [DBD Unpacker](https://github.com/BrandonItaly/DBDUnpacker/releases/latest) from GitHub.
68 | 1. Open `DBDUnpacker.bat` and enter your Dead by Daylight game path.
69 | 1. Select `Unpack Single Pak` then enter the number 2. This will unpack the `pakchunk2-[PlatformName].pak` file which contains all of the audio files.
70 | 1. Navigate to the unpacked audio folder. (`[PlatformName]/Content/WwiseAudio/Windows`)
71 | 1. Drag and drop the .bnk file you want to edit into RExplorer. A list of all containing .wem files will be previewed.
72 |
73 | 
74 |
75 | Clicking on a .wem file in RExplorer will play a preview of the audio. The length of the audio file will be displayed at the bottom of the preview.
76 |
77 | 1. Find the File Id of the .wem file you would like to replace.
78 | 1. Now open BnkEditor and drag and drop the .bnk file you want to edit and press ++enter++.
79 | 1. Drag and drop the .wem file you want to replace with the audio you previewed in RExplorer and press ++enter++.
80 | 1. Search for the File Id of the .wem file you previewed in RExplorer in the list of .wem files in BnkEditor.
81 | 1. Enter the index of the .wem file you want to replace. A list of indexes and File IDs will be shown in the console.
82 | 1. Your edited .bnk file will be exported where the program's executable file is located.
83 | 1. Place the .bnk file in the same path as the original and package as usual.
--------------------------------------------------------------------------------
/docs/Development/ModdingGuides/Meshes/SkeletalMesh.md:
--------------------------------------------------------------------------------
1 | # Skeletal Mesh Guide
2 |
3 | ## Prerequisites
4 |
5 | - [UE Viewer](https://www.gildor.org/en/projects/umodel)
6 | - [Blender](https://www.blender.org/download/)
7 | - [Psk/Psa Import/Export](https://github.com/Befzz/blender3d_import_psk_psa)
8 | - [Unreal Engine](https://www.unrealengine.com/en-US/download)
9 |
10 | ## Exporting from Dead By Daylight
11 |
12 | 1. Open UE Viewer.
13 | 2. Set the path to game files as the base of your Dead By Daylight files.
14 | 3. Check override game detection and select Unreal engine 4.27.
15 | 4. Leave all other settings at default and select OK.
16 |
17 | 
18 |
19 | 5. Find a skeletal mesh you want to replace. Open the skeletal mesh and export it with ++ctrl+x++. Keep default settings.
20 | 6. Find the exported skeletal mesh. You can find where it exported in UE Viewer by going to `Tools` → `Open export folder`.
21 |
22 | ## Replacing the Mesh
23 |
24 | 1. Open Blender and start a new general file.
25 |
26 | 
27 |
28 | 2. Delete all the default Blender objects by selecting all the assets and pressing delete.
29 |
30 | 
31 |
32 | 3. `File` → `Import` → `Skeleton Mesh .psk`.
33 | (Make sure you have the Psk/Psa Import/Export plugin installed. Instructions are on the GitHub repository.)
34 | 4. Find your exported psk and import it. Make sure scale down is checked when importing.
35 |
36 | 
37 |
38 | You should now have the model in Blender. Feel free to select the object then right click to shade it smooth.
39 |
40 | 
41 |
42 | 
43 |
44 | 5. Go to the Shading tab in Blender.
45 |
46 | 
47 |
48 | 6. Select use nodes on all the materials your object has.
49 |
50 | 
51 |
52 | You should now have your material looking like this. You may have multiple materials to do this on.
53 |
54 | 
55 |
56 | 7. `Add` → `Search` → `Image Texture`.
57 |
58 | This node will appear
59 |
60 | 
61 |
62 | 8. Press open on the node and find the texture that goes with your model, it should be somewhere in your UE Viewer export folder. All textures linked to the model are automatically exported with the model.
63 |
64 | (For example, mine were in Characters\Campers\Nea\Textures\Outfit00 and Characters\Campers\Nea\Textures\Outfit01)
65 |
66 | 
67 |
68 | 9. Select the colored texture and select open.
69 | 10. Connect the color node to the Base Color node in the Principled BDSF.
70 |
71 | 
72 |
73 | It should now look textured
74 |
75 | 
76 |
77 | 11. Go back to the Layout tab in Blender and select viewport shading to see your textures.
78 |
79 | 
80 |
81 | 12. Now, feel free to edit the model to your heart's content. If you need help using Blender feel free to look up plenty of tutorials online.
82 |
83 | 13. When you're done editing, `Export` → `Export as FBX`.
84 |
85 | ### Advanced Model Editing
86 |
87 | This is for people who are adding extra resources to the model instead of just slightly changing the base model.
88 |
89 | This is hard to communicate, so I will be leaving a clip of me doing different types of models and annotating as I do them.
90 |
91 |
94 |
95 |
98 |
99 |
102 |
103 | ## Cooking in Unreal Engine
104 |
105 | 1. Open Unreal Engine and open your project. If you havent already made one, refer to the [Custom Textures Guide](../Textures.md).
106 | 2. Now you will have to recreate the folder structure of the original mesh. For example, I would make a folder called Characters, then make a folder inside that called Campers, and so on. Remember it is case sensitive.
107 | 3. Drag your fbx into the folder where the mesh would be in the original game.
108 | 4. Import all, make sure your settings are the same as shown.
109 |
110 | 
111 |
112 | (Turn import animations off)
113 |
114 | If there are any error messages, they can most likely be ignored.
115 |
116 | You should now have your mesh imported in. Mine looks like this
117 |
118 | 
119 |
120 | I have the mesh, the material for the car, the base texture of the car, and my material for Jigglypuff and it's texture. There should only be one mesh. If not, make sure you joined everything together in Blender.
121 |
122 | 5. Refer to [Material Instances Guide](../MaterialInstances) for texturing your model.
123 | 6. Name your mesh the same as the mesh you are replacing.
124 |
125 | 
126 |
127 | 7. Save all and select `File` → `Cook Content For Windows`.
--------------------------------------------------------------------------------
/docs/Development/ModdingGuides/EmissionMaps.md:
--------------------------------------------------------------------------------
1 | # Emission Maps Guide
2 |
3 | This guide will show you how to change the values of emission maps, such as the color and position.
4 |
5 | ## Prerequisites
6 |
7 | - [UE Viewer](https://www.gildor.org/en/projects/umodel)
8 | - [HxD](https://mh-nexus.de/en/hxd/)
9 |
10 | ## How to change the color of EM Maps
11 |
12 | 1. Open your Dead By Daylight folder in UE Viewer.
13 |
14 | 
15 |
16 | 2. Find a material with an EM map and export it with ++ctrl+x++.
17 | 3. Find the exported material and open the `props.txt` file. You can find where it exported in UE Viewer by going to `Tools` → `Open export folder`.
18 |
19 | 
20 |
21 | 4. Find the EM color values.
22 | ```
23 | R = Red
24 | G = Green
25 | B = Blue
26 | A = Alpha (0 = Transparent, 1 = Opaque)
27 | ```
28 |
29 | 
30 |
31 | 5. [Pick the color](https://htmlcolorcodes.com/color-picker/) you want your EM Color to be.
32 | 6. Take each value and divide them by 255. (Ex: This would be 0, 0.09803921568, 1)
33 |
34 | 
35 |
36 | 7. Open HxD
37 | 8. Drag in the original .uexp file.
38 |
39 | You should now be here.
40 |
41 | 
42 |
43 | 9. Go back to the `props.txt` file and use ++ctrl+f++ for the most unique value. For example, my original values in `props.txt` are 1, 0.552359, 0.212663, and 1
44 |
45 | I shouldn't search for 1 because it is a generic number which will have multiple results. Instead search for the more specific numbers because they will only appear one time.
46 |
47 | 
48 |
49 | It should look something like this after searching. (It won't be exactly the same)
50 |
51 | 
52 |
53 | 10. Select up a couple lines from where you are highlighted.
54 |
55 | 
56 |
57 | 11. ++ctrl+f++ and search for the original red value. Make sure you search forward.
58 |
59 | 
60 |
61 | 12. When it is selected in blue, select the original value and change it to the red value you got earlier.
62 | In my case, I am changing the Single (float32) at the right from a 1 to a 0.
63 |
64 | 
65 |
66 | 13. ++ctrl+f++ for the next value (blue) and repeat the above steps. Make sure to select forward. You do not need to go up any lines, keep your selection where it is.
67 | 14. `File` → `Save`.
68 | Your uasset is now edited with custom EM color values, a backup of the original uasset is automatically created as the .bak file. Just remove the .bak file ending to bring back the original.
69 |
70 | 
71 |
72 | EM Intensity can be changed in pretty much the same way, this will change the Intensity of the brightness.
73 |
74 | ## How to change the position of EM Maps
75 |
76 | 1. Open your Dead By Daylight folder in UE Viewer.
77 |
78 | 
79 |
80 | 2. Find the BDE texture of an EM map you want to change the positioning of. Open the texture and export it with ++ctrl+x++. Keep default settings.
81 |
82 | 
83 |
84 | 3. Find the exported texture and open it in your photo editing software of choice (Paint.net, Gimp, and Photoshop all work well.) You can find where it exported in UE Viewer by going to `Tools` → `Open export folder`.
85 | 4. Edit the texture with a side-by-side view of the original for comparison on where to paint.
86 |
87 | 
88 |
89 | Ignore green, its a bug when exporting with UE Viewer. The brightness of the blue and where you place it determines how the legacy will look. If you paint with blue at max brightness it will be the most bright, if you paint with half it will be half, etc.
90 |
91 | Here is an example of a custom BDE by @vic<3#1848 on Discord.
92 |
93 | 
94 |
95 | Continue in the [Custom Textures Guide](../Textures/#editing-cooking).
96 |
97 | !!! success "Congrats!"
98 |
99 | { align=left }
100 |
101 | The same can be done for changing the flashlight beam color by editing `MI_FlashLightBeam_01` and `MI_FlashLightBeam_02`. (`Content/Effects/Materials`)
--------------------------------------------------------------------------------
/docs/DevBuild/AdvancedConsoleUsage.md:
--------------------------------------------------------------------------------
1 | # Advanced Console Usage
2 |
3 | Welcome to the advanced dev build console usage guide!
4 |
5 | This will show how you can read and set properties of objects as well as some general tips for console usage.
6 |
7 | *What is a class?*
8 |
9 | A class is essentially a template for an object. It contains all the object's variables and properties with only the default (often blank) values. Dead By Daylight has thousands of classes with many of them having many instances in game.
10 |
11 | *What is an object?*
12 |
13 | An object is an instance of a class. It's basically a filled in version with all the properties set to certain values. An object would be for example a single tile in a map (instance of eg. `BP_TL_Fr_16x16_MD01_C`), a survivor player (instance of eg. `BP_CamperMale01_C`) and so forth. Object names usually are just the class names with the post fix "_" followed by a number. This is not true for some manually generated objects, but that's not important for now.
14 |
15 | *Relevant console commands:*
16 |
17 | Remember that console output is also saved in the games log file (`DeadByDaylight/Saved/Logs/DeadByDaylight.log`). It can be very useful to look at longer console output there rather than the console itself.
18 |
19 | | Console Command | Description
20 | | --- | ----------- |
21 | | `obj classes` | Prints out a list of all classes.
22 | | `obj dump