20 |
21 | {% include footer.html %}
22 |
23 |
24 |
25 |
--------------------------------------------------------------------------------
/_plugins/octopress_filters.rb:
--------------------------------------------------------------------------------
1 | # Filters taken from the Octopress project by Brandon Mathis.
2 | # https://github.com/imathis/octopress/blob/master/plugins/octopress_filters.rb
3 | module Jekyll
4 |
5 | module Filters
6 |
7 | # Escapes CDATA sections in post content
8 | def cdata_escape(input)
9 | input.gsub(//, ']]>')
10 | end
11 |
12 | # Replaces relative urls with full urls
13 | def expand_urls(input, url='')
14 | url ||= '/'
15 | input.gsub /(\s+(href|src)\s*=\s*["|']{1})(\/[^\"'>]*)/ do
16 | $1+url+$3
17 | end
18 | end
19 |
20 | end
21 |
22 | end
--------------------------------------------------------------------------------
/en/_posts/2016-04-24-marathon-container-logs.md:
--------------------------------------------------------------------------------
1 | ---
2 | layout: post
3 | title: "Marathon containers logs in PaaS Logs"
4 | categories: Docker
5 | author: devatoria
6 | lang: en
7 | ---
8 |
9 | It may be useful to send your application logs to the [PaaS Logs RunAbove lab](https://www.runabove.com/paas-logs.xml). Indeed, if your containers stop, or if you want to be able ti debug something, you will be happy to have access to your application logs.
10 |
11 | #Inject my token into my container
12 |
13 | To be able to push logs into the PaaS Logs platform, you have to generate a new token from the RunAbove user interface. You will find more information on the [PaaS Logs quick start guide](https://community.runabove.com/kb/en/logs/quick-start.html). Once you have your token, you must inject it into your application containers using the label `USER_THOT_TOKEN`, when creating/editing your app.
14 |
15 | 
16 |
--------------------------------------------------------------------------------
/_config.yml:
--------------------------------------------------------------------------------
1 | # Website settings
2 | title: RunAbove knowledge base
3 | email: developers@runabove.com
4 | description: "Public knowledge base for RunAbove users."
5 | baseurl: "/kb"
6 | url: "https://community.runabove.com"
7 | twitter_username: runabove
8 | github_username: runabove
9 |
10 | # Build settings
11 | markdown: redcarpet
12 | highlighter: pygments
13 | permalink: none
14 |
15 | # Pagination
16 | paginate: 7
17 | paginate_path: "/page:num"
18 | paginate_categories: true
19 |
20 | # Categories plugin settings
21 | category_dir: category
22 | category_title_prefix: ""
23 |
24 | # Languages
25 | languages: [en]
26 |
27 | # Translations
28 | t:
29 | home:
30 | en:
31 | categories: "Categories"
32 | latest_articles: "Latest tutorials"
33 | nav:
34 | en:
35 | contributing: "Contributing"
36 | read_in: "Read in English"
37 | subscribe: "Subscribe via"
38 | category:
39 | en:
40 | filed_under: "Filed under"
41 |
--------------------------------------------------------------------------------
/styles/responsive-nav.css:
--------------------------------------------------------------------------------
1 | /*! responsive-nav.js 1.0.32 by @viljamis */
2 |
3 | .nav-collapse ul {
4 | margin: 0;
5 | padding: 0;
6 | width: 100%;
7 | display: block;
8 | list-style: none;
9 | }
10 |
11 | .nav-collapse li {
12 | display: block;
13 | }
14 |
15 | .js .nav-collapse {
16 | clip: rect(0 0 0 0);
17 | max-height: 0;
18 | position: absolute;
19 | display: block;
20 | overflow: hidden;
21 | zoom: 1;
22 | }
23 |
24 | .nav-collapse.opened {
25 | max-height: 9999px;
26 | }
27 |
28 | .disable-pointer-events {
29 | pointer-events: none !important;
30 | }
31 |
32 | .nav-toggle {
33 | -webkit-tap-highlight-color: rgba(0,0,0,0);
34 | -webkit-touch-callout: none;
35 | -webkit-user-select: none;
36 | -moz-user-select: none;
37 | -ms-user-select: none;
38 | -o-user-select: none;
39 | user-select: none;
40 | }
41 |
42 | @media screen and (min-width: 768px) {
43 | .js .nav-collapse {
44 | position: relative;
45 | }
46 | .js .nav-collapse.closed {
47 | max-height: none;
48 | }
49 | .nav-toggle {
50 | display: none;
51 | }
52 | }
53 |
--------------------------------------------------------------------------------
/_includes/custom/category_feed.xml:
--------------------------------------------------------------------------------
1 | ---
2 | layout: nil
3 | ---
4 |
5 |
6 |
7 | <![CDATA[{{ page.title }} | {{ site.title }}]]>
8 |
9 |
10 | {{ site.time | date_to_xmlschema }}
11 | {{ site.url }}/
12 |
13 |
14 | {% if site.email %}{% endif %}
15 |
16 | Recurser
17 |
18 | {% for post in site.categories[page.category] limit: 10 %}
19 |
20 | <![CDATA[{{ post.title | cdata_escape }}]]>
21 |
22 | {{ post.date | date_to_xmlschema }}
23 | {{ site.url }}{{ post.id }}
24 |
25 |
26 | {% endfor %}
27 |
28 |
--------------------------------------------------------------------------------
/_includes/head.html:
--------------------------------------------------------------------------------
1 |
2 |
3 | {% if page.title %}{{ page.title }} - {% endif %}{{ site.title }}
4 |
5 |
6 |
7 |
8 |
9 |
10 |
11 |
12 |
13 |
14 |
15 | {% if page.description %}{% endif %}
16 |
--------------------------------------------------------------------------------
/en/_posts/2014-09-24-foreman-openstack-multi-region.markdown:
--------------------------------------------------------------------------------
1 | ---
2 | layout: post
3 | title: "Manage a multi-region OpenStack infrastructure with Foreman"
4 | categories: Instances
5 | author: NicolasLM
6 | lang: en
7 | ---
8 |
9 | Foreman is a tool that a allows to manage an infrastructure of servers easily.
10 | It is compatible with OpenStack so it can automatize the deployment of RunAbove
11 | instances.
12 |
13 | Foreman uses a Ruby library called [fog](https://github.com/fog/fog) to be
14 | compatible with many providers. This library does the abstraction layer between
15 | Foreman and OpenStack.
16 |
17 | In RunAbove we have an OpenStack cloud with two regions, `SBG-1` and `BHS-1`.
18 | This is handled correctly in fog, but Foreman does not allow to select the
19 | proper OpenStack region. Thus it fails with the message:
20 |
21 | Multiple regions available choose one of these 'SBG-1,BHS-1'
22 |
23 | Until the Foreman developers update their software to use the multi-region
24 | feature of fog, a quick patch can be made, allowing to set one region. Just
25 | patch the file
26 | [openstack.rb](https://github.com/theforeman/foreman/blob/d21103bcf13b5981601be88330ce73dbe4a1ed77/app/models/compute_resources/foreman/model/openstack.rb#L104)
27 | line 104, and add:
28 |
29 | :openstack_region => 'SBG-1' ,
30 |
31 | This will tell fog to only work on the `SBG-1` region. Restart Foreman and you
32 | will be able to work on a multi-region OpenStack cloud.
33 |
--------------------------------------------------------------------------------
/feed.xml:
--------------------------------------------------------------------------------
1 | ---
2 | layout: none
3 | ---
4 |
5 |
6 |
7 | {{ site.title | xml_escape }}
8 | {{ site.description | xml_escape }}
9 | {{ site.url }}{{ site.baseurl }}/
10 |
11 | {{ site.time | date_to_rfc822 }}
12 | {{ site.time | date_to_rfc822 }}
13 | Jekyll v{{ jekyll.version }}
14 | {% for post in site.posts limit:10 %}
15 |
16 | {{ post.title | xml_escape }}
17 | {{ post.excerpt | strip_html | xml_escape }}
18 | {{ post.author | xml_escape }}
19 | {{ post.date | date_to_rfc822 }}
20 | {{ post.url | prepend: site.baseurl | prepend: site.url }}
21 | {{ post.url | prepend: site.baseurl | prepend: site.url }}
22 | {% for tag in post.tags %}
23 | {{ tag | xml_escape }}
24 | {% endfor %}
25 | {% for cat in post.categories %}
26 | {{ cat | xml_escape }}
27 | {% endfor %}
28 |
29 | {% endfor %}
30 |
31 |
32 |
--------------------------------------------------------------------------------
/en/_posts/2014-05-16-how-to-create-a-windows-instance.markdown:
--------------------------------------------------------------------------------
1 | ---
2 | layout: post
3 | title: "How to create a Windows instance?"
4 | categories: Instances
5 | author: VincentCasse
6 | lang: en
7 | ---
8 | Windows instances are available inside RunAbove offers. How create Windows instances and how to use it?
9 |
10 | # Open your manager
11 |
12 | Open RunAbove [https://cloud.runabove.com](https://cloud.runabove.com) with your login details.
13 |
14 | 
15 |
16 | # Add a new Windows instance
17 |
18 | Click on __Add__ in the left-hand menu and choose to add __An instance__.
19 |
20 | Fill in the form with your custom configuration:
21 | * Image with _Windows Server 2012 R2_
22 | * Region is the area where the instance is stored
23 | * Template is the hardware profile you want
24 |
25 | 
26 |
27 | # Your Windows instance is ready
28 |
29 | When the status of your instance is _ACTIVE_, you can open a screen on your instance. 
30 | You can configure your account inside Windows: localization information, contract agreements and account credentials. Now, your Windows instance is ready! You could use it with VNC console or [configure a _Remote Desktop_ access](/kb/en/instances/how-to-configure-remote-desktop-on-windows-server.html).
31 |
32 | 
--------------------------------------------------------------------------------
/en/_posts/2014-05-19-import-a-custom-image-in-your-runabove-account.markdown:
--------------------------------------------------------------------------------
1 | ---
2 | layout: post
3 | title: "Import a custom image in your RunAbove Account"
4 | categories: Instances
5 | author: NicolasLM
6 | lang: en
7 | ---
8 | By default, RunAbove proposes different operating systems. If you need to launch an instance of a particular operating system, you can add an image very easily to your RunAbove account.
9 |
10 | # How do you add a custom operation system?
11 |
12 | You just need to go to [OpenStack Horizon](https://cloud.runabove.com/horizon), in the "__Image__" tab and then, click on "__Create Image__". A pop-up will ask you for a few details about the system that you want to create and where to find the image itself.
13 |
14 | 
15 |
16 | * The __name__ and __description__ should describe the system you want to upload.
17 | * The __image source__ can be a public location on the web or a local file on your computer.
18 | * The __format__ describes the virtual disk type of the image. The most common ones are Raw and Qcow2.
19 | * The others parameters are optional.
20 |
21 | Just click on "__Create Image__", if you create an image from a local file it will be uploaded, otherwise it will be fetched from the location you specified.
22 |
23 | You can now find your custom system in the “__Image__” field when you launch instances. If you need a customized image you can [easily create it for RunAbove](/kb/en/instances/how-to-create-a-custom-image-for-runabove.html).
24 |
--------------------------------------------------------------------------------
/en/_posts/2014-10-06-power8-features.markdown:
--------------------------------------------------------------------------------
1 | ---
2 | layout: post
3 | title: "How to use Power8 features"
4 | categories: Instances
5 | author: NicolasLM
6 | ---
7 |
8 | Power8 is a new generation of processors designed to improve performances of
9 | parallelized computations. This guide will explain how to customize the
10 | features of the processor on the go.
11 |
12 | How Power8 processors are different?
13 | ------------------------------------
14 |
15 | Power8 allows you to changes the specifications of the system on the go. You
16 | can adapt the characteristics of the CPU to your needs.
17 |
18 | Customize the features
19 | ----------------------
20 |
21 | Running the command `ppc64_cpu` as root you can manage the Power8 features.
22 |
23 | ### Threads
24 |
25 | If you application use a reduced number of instructions or do not do expensive
26 | IO, you can benefit from disabling threads. For example, set 8 threads per
27 | core:
28 |
29 | sudo ppc64_cpu --smt=8
30 |
31 | Completely disable threads:
32 |
33 | sudo ppc64_cpu --smt=off
34 |
35 | ### Cores
36 |
37 | Our Power8 processor has 22 cores, as you can check with:
38 |
39 | sudo ppc64_cpu --cores-present
40 | - Number of cores present = 22
41 |
42 | You can disable cores on the go:
43 |
44 | sudo ppc64_cpu --cores-on=8
45 | sudo ppc64_cpu --cores-on
46 | - Number of cores online = 8
47 |
48 | Do not forget to buy a second monitor dedicated to htop, otherwise you will not
49 | see any process:
50 |
51 | 
52 |
--------------------------------------------------------------------------------
/en/_posts/2016-04-23-marathon-health-checks.md:
--------------------------------------------------------------------------------
1 | ---
2 | layout: post
3 | title: "Health checks with Marathon"
4 | categories: Docker
5 | author: devatoria
6 | lang: en
7 | ---
8 |
9 | Health checks are useful to ensure that your containers are running; and even better, are behaving as expected. You can add multiple health checks per application. Marathon supports both high level HTTP and lower level TCP health checks.
10 | HTTP checks allow for better, higher level checks on a specific URL like `http://localhost:port/my/health/path`. It automatically ignores informational status codes in the range 100 to 199.
11 |
12 | # Configure a health check for a nginx application
13 |
14 | In the [previous tutorial](/kb/en/docker/quick-start-with-marathon.html), we ran a simple nginx container. Let's now configure some HTTP health check for this application.
15 |
16 | 
17 |
18 | - **Grace Period**: health check failures are ignored within this number of seconds or until the task becomes healthy for the first time *(useful if you have a task with a long startup time, to avoid having the health check failing because of this)*.
19 | - **Interval**: number of seconds to wait between each health check
20 | - **Timeout**: number of seconds after which a health check is considered a failure regardless of the response.
21 |
22 | ##Configure the port to check
23 |
24 | There are two ways to configure the port to check: by port *index* or by port *number*. By default, the port is passed by index: 0 is the first port you passed in the port mapping configuration, 1 is the second one, etc. You can also specify a port by simply choosing the **port number** type.
25 |
--------------------------------------------------------------------------------
/en/_posts/2014-04-17-how-to-create-a-compute-instance-in-few-seconds.markdown:
--------------------------------------------------------------------------------
1 | ---
2 | layout: post
3 | title: "How to create instances in few seconds?"
4 | categories: Instances
5 | author: VincentCasse
6 | lang: en
7 | ---
8 |
9 | In RunAbove, it is possible to create new instances with dedicated hardware in few seconds! But how you can create new instances?
10 |
11 | # Generate an SSH key
12 |
13 | The first time you create a instance, you will need to add a new SSH key. This key will be used to administer your server. To create a new SSH key, you can use ssh-keygen. Your public key will be available in _.ssh/id_rsa.pub_
14 |
15 | ```
16 | ssh-keygen -t rsa -b 4096 -C "firstname.lastname@domain.com"
17 | ```
18 |
19 | # Open your manager
20 |
21 | Open RunAbove [Control panel](https://cloud.runabove.com) with your login details.
22 |
23 | 
24 |
25 | # Add a new instance
26 |
27 | Click on __Add__ in the left-hand menu and choose to add an __Instance__.
28 |
29 | Fill in the form with your custom configuration:
30 |
31 | * Image is the distribution you choose
32 | * Region is the area where the instance is stored
33 | * Template is the hardware profile you want
34 |
35 | If you don't already have registered a SSH key, select __Create an SSH key__ and give it a name, and copy the content of your public key.
36 |
37 | 
38 |
39 | # Your instance is ready!
40 |
41 | When the status of your instance is __active__, you can access your server with SSH
42 |
43 | ```
44 | ssh admin@ip.of.your.vm
45 | ```
--------------------------------------------------------------------------------
/en/_posts/2014-09-26-update-bash-shellshock.markdown:
--------------------------------------------------------------------------------
1 | ---
2 | layout: post
3 | title: "Protect your bash from Shellshock"
4 | categories: Instances
5 | author: NicolasLM
6 | ---
7 |
8 | On September 24th a critical security issue has been found in `bash`. The issue
9 | is called
10 | [Shellshock](https://security-tracker.debian.org/tracker/CVE-2014-6271). Under
11 | certain circumstances, a remote attacker could execute commands on the system
12 | using this breach. Here is what to do to safely use RunAbove systems.
13 |
14 | New instances
15 | -------------
16 |
17 | Images on RunAbove has been updated with the latest security fix. Each new
18 | instance will not be vulnerable anymore. You do not need to do anything else.
19 |
20 | Already existing instances
21 | --------------------------
22 |
23 | For instances launched before September 26th it is very important to update
24 | `bash`.
25 |
26 | By now all distribution vendors have fixed the issue in the `bash` package. To
27 | benefit from the fix you only need to update your system with the package
28 | manager.
29 |
30 | ### Debian and Ubuntu
31 |
32 | On Debian and Ubuntu you can update your system with `apt`:
33 |
34 | sudo apt-get update && sudo apt-get upgrade
35 |
36 | ### Fedora and CentOS
37 |
38 | On Fedora and CentOS you can update your system with `yum`:
39 |
40 | sudo yum update
41 |
42 | Other systems
43 | -------------
44 |
45 | If you feel like compiling the latest version of `bash` from sources you can
46 | fetch the tarball and run the build with:
47 |
48 | wget http://ftp.gnu.org/gnu/bash/bash-4.3.tar.gz
49 | tar -xf bash-4.3.tar.gz
50 | cd bash-4.3
51 | make
52 |
53 | You can then install it:
54 |
55 | make install
56 |
--------------------------------------------------------------------------------
/styles/knowledge-base.css:
--------------------------------------------------------------------------------
1 | .pagination {
2 | display: inline-block;
3 | text-align: center;
4 | width: 100%;
5 | margin: 20px 0;
6 | }
7 | .pagination span, .pagination em, .pagination a {
8 | display: inline-block;
9 | margin-right: 6px;
10 | vertical-align: text-bottom;
11 | background: none repeat scroll 0% 0% #2E2E2C;
12 | color: #7D7979;
13 | padding: 5px 2%;
14 | font-size: 18px;
15 | font-weight: 300;
16 | line-height: 24px;
17 | }
18 | .pagination a {
19 | color: #FFA51B;
20 | }
21 | .post-content {
22 | margin: 30px 0;
23 | }
24 |
25 | .post-content p {
26 | margin: 15px 0;
27 | }
28 |
29 | .post-content h1 {
30 | text-indent: inherit;
31 | margin:30px 0 10px 0;
32 | font-size:34px;
33 | line-height:40px;
34 | font-weight: 200;
35 | }
36 | .post-content h2 {
37 | margin:30px 0 10px 0;
38 | font-size:26px;
39 | line-height:30px;
40 | }
41 | .post-content h3 {
42 | margin:30px 0 10px 0;
43 | font-size:18px;
44 | line-height:24px;
45 | }
46 | .post-content h4 {
47 | margin:30px 0 10px 0;
48 | font-size:16px;
49 | line-height:22px;
50 | }
51 | .post-content pre code {
52 | margin: 20px 0 10px 0;
53 | display: block;
54 | padding: 10px 20px;
55 | background-color: rgba(24, 24, 24, 0.1);
56 | }
57 | .post-content code {
58 | margin: 20px 0 10px 0;
59 | background-color: rgba(24, 24, 24, 0.1);
60 | }
61 | .arian {
62 | display: block;
63 | width: 100%;
64 | margin: 0px 0px 20px;
65 | }
66 | .arian a {
67 | font-size: 16px;
68 | font-weight: 300;
69 | }
70 | .meta, .meta a {
71 | color: #747070;
72 | }
73 | .banner {
74 | width: 80%;
75 | margin: auto;
76 | margin-bottom: 50px;
77 | }
78 | code, .highlight pre code, .highlight pre code span {
79 | overflow: auto;
80 | font-family: "Courier" !important;
81 | }
82 | .highlight .bp {
83 | font-size: 15px !important;
84 | }
85 | .github_icon {
86 | width: 14px;
87 | height: 14px;
88 | }
89 |
--------------------------------------------------------------------------------
/en/_posts/2015-10-13-how-to-use-vps-hdd-lab.markdown:
--------------------------------------------------------------------------------
1 | ---
2 | layout: post
3 | title: "How to subscribe to and use the VPS-HDD lab"
4 | categories: Labs
5 | author: xXraphXx
6 | lang: en
7 | ---
8 |
9 | VPS-HDD: 1 physical disk dedicated to your virtual machine, 1T, 2T and 4T volumes.
10 |
11 | # Subscribe
12 |
13 | Go to [Runabove](https://www.runabove.com) > Labs > Discover Vps-HDD > Start Now
14 |
15 | 
16 |
17 | To activate the vps-hdd lab you will have to provide a payment mean
18 |
19 | 
20 |
21 | # Spawn your instance(s)
22 |
23 | Take care of choosing the correct parameters
24 |
25 | * Region where VPS-HDD is available: **`HZ-1`**
26 |
27 | * Images: Ubuntu 14.04, Debian 7, Fedora 20, CentOS 7
28 |
29 | * Flavors: vps-hdd-1000, vps-hdd-2000, vps-hdd-4000
30 |
31 | 
32 |
33 | # Notes
34 |
35 | * When subscribing to the lab, if you go to the openstack dashboard you will also be presented some images related to the armcloud lab (ubuntu-14.04-aarch64), they are not intended (and cannot) be used for vps-hdd. If you still want to use them, subscribe to the arm lab first
36 |
37 | * When spawning your vps-hdd you have two disks attached to the virtual machines: one small 10G one containing the rootfs (vda), and the big volume (vdb), with a capacity matching to the flavor you chose (1T, 2T or 4T). By default we have formatted it in ext4 and mounted it on /home. Nothing prevents you from changing this if you want to.
38 |
39 | * When you rebuild your instance (nova rebuild, or through the openstack dahsboard), only the primary disk content is restored. The secondary disk content will be preserved. Only if you terminate/destroy the instance will it be erased
40 |
41 | 
42 |
43 |
--------------------------------------------------------------------------------
/en/_posts/2014-05-13--how-to-optimize-upload-with-openstack-swift.markdown:
--------------------------------------------------------------------------------
1 | ---
2 | layout: post
3 | title: "How to optimize uploads with Openstack Swift"
4 | categories: Object-Storage
5 | lang: en
6 | author: gierschv
7 | ---
8 |
9 | OpenStack Swift allows you to store objects with a non-limited size by splitting them in [small segments](http://docs.openstack.org/developer/swift/overview_large_objects.html).
10 |
11 | When a Swift client processes a request to upload an object (or a segment of an object), the Swift proxy determines the Swift storage node using a hash of the object name. Therefore, there is a high probability that the segments will be stored in several storage nodes, which allow you to write your object(s) at an incredible speed.
12 |
13 | Here is an example using a Run Above instance, uploading a big object (10Gio) using the [official command line client
14 | (python-swiftclient)](https://github.com/openstack/python-swiftclient) on
15 | Ubuntu or Debian:
16 |
17 | 1 - Install the client
18 | ----------------------
19 |
20 | apt-get install python-pip
21 | pip install python-keystoneclient python-swiftclient
22 |
23 | 2 - Get your credentials
24 | ------------------------
25 |
26 | Set your credentials in your environment using the [Open RC
27 | file](https://manager.runabove.com/horizon/project/access_and_security/api_access/openrc/)
28 | that you can download using the horizon dashboard.
29 |
30 | source XXXXXXX-openrc.sh
31 |
32 | 3 - Example
33 | -----------
34 |
35 | Upload into the "backups" container a 10 Gio file in 100 Mio parts using 100
36 | simultaneous connections:
37 |
38 | dd if=/dev/random of=10Gio.dat bs=$(( 2 ** 20 )) count=1024
39 | swift upload --segment-size $(( 2 ** 20 * 100 )) --segment-threads 100
40 | backups 10Gio.dat
41 |
42 | 4 - Measure
43 | -----------
44 |
45 | You can measure the upload using iftop, as shown below:
46 | 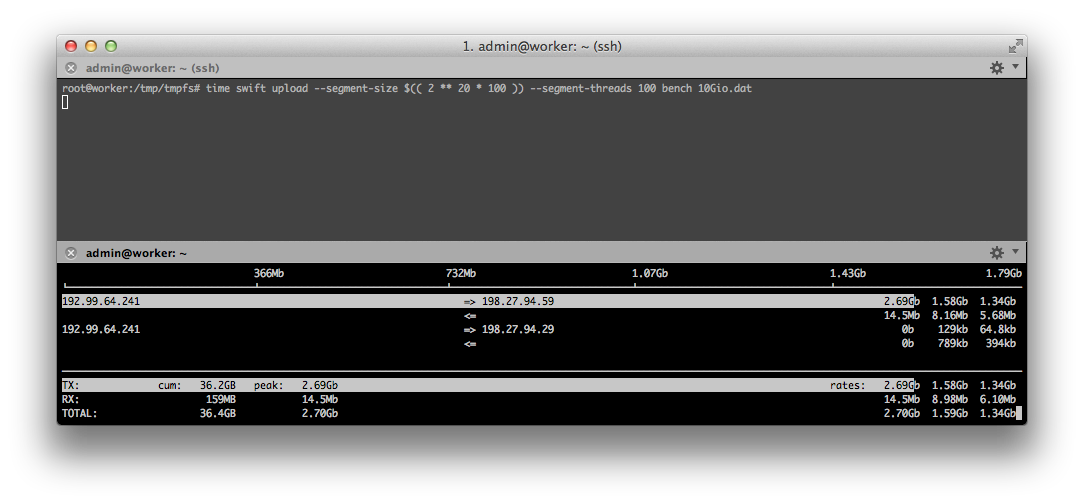
47 |
--------------------------------------------------------------------------------
/Gemfile.lock:
--------------------------------------------------------------------------------
1 | GEM
2 | remote: https://rubygems.org/
3 | specs:
4 | addressable (2.4.0)
5 | blankslate (2.1.2.4)
6 | classifier-reborn (2.0.4)
7 | fast-stemmer (~> 1.0)
8 | coffee-script (2.4.1)
9 | coffee-script-source
10 | execjs
11 | coffee-script-source (1.10.0)
12 | colorator (0.1)
13 | execjs (2.7.0)
14 | faraday (0.9.2)
15 | multipart-post (>= 1.2, < 3)
16 | fast-stemmer (1.0.2)
17 | ffi (1.9.10)
18 | jekyll (2.3.0)
19 | classifier-reborn (~> 2.0)
20 | colorator (~> 0.1)
21 | jekyll-coffeescript (~> 1.0)
22 | jekyll-gist (~> 1.0)
23 | jekyll-paginate (~> 1.0)
24 | jekyll-sass-converter (~> 1.0)
25 | jekyll-watch (~> 1.1)
26 | kramdown (~> 1.3)
27 | liquid (~> 2.6.1)
28 | mercenary (~> 0.3.3)
29 | pygments.rb (~> 0.6.0)
30 | redcarpet (~> 3.1)
31 | safe_yaml (~> 1.0)
32 | toml (~> 0.1.0)
33 | jekyll-coffeescript (1.0.1)
34 | coffee-script (~> 2.2)
35 | jekyll-gist (1.4.0)
36 | octokit (~> 4.2)
37 | jekyll-paginate (1.1.0)
38 | jekyll-sass-converter (1.4.0)
39 | sass (~> 3.4)
40 | jekyll-watch (1.4.0)
41 | listen (~> 3.0, < 3.1)
42 | kramdown (1.11.1)
43 | liquid (2.6.3)
44 | listen (3.0.8)
45 | rb-fsevent (~> 0.9, >= 0.9.4)
46 | rb-inotify (~> 0.9, >= 0.9.7)
47 | mercenary (0.3.6)
48 | multipart-post (2.0.0)
49 | octokit (4.3.0)
50 | sawyer (~> 0.7.0, >= 0.5.3)
51 | parslet (1.5.0)
52 | blankslate (~> 2.0)
53 | posix-spawn (0.3.11)
54 | pygments.rb (0.6.3)
55 | posix-spawn (~> 0.3.6)
56 | yajl-ruby (~> 1.2.0)
57 | rb-fsevent (0.9.7)
58 | rb-inotify (0.9.7)
59 | ffi (>= 0.5.0)
60 | redcarpet (3.3.4)
61 | safe_yaml (1.0.4)
62 | sass (3.4.22)
63 | sawyer (0.7.0)
64 | addressable (>= 2.3.5, < 2.5)
65 | faraday (~> 0.8, < 0.10)
66 | toml (0.1.2)
67 | parslet (~> 1.5.0)
68 | yajl-ruby (1.2.1)
69 |
70 | PLATFORMS
71 | ruby
72 |
73 | DEPENDENCIES
74 | jekyll (= 2.3.0)
75 |
76 | BUNDLED WITH
77 | 1.12.5
78 |
--------------------------------------------------------------------------------
/en/_posts/2014-04-22-how-to-use-cyberduck-with-openstack-swift.markdown:
--------------------------------------------------------------------------------
1 | ---
2 | layout: post
3 | title: "How to use Cyberduck with Openstack Swift?"
4 | categories: Object-Storage
5 | lang: en
6 | author: VincentCasse
7 | ---
8 |
9 | To use RunAbove object storage, you can code integration into your software. However, you will sometimes need to access your object storage without using your software. Cyberduck (available on Windows and Mac) is an application for accessing and managing your object storage, such as an FTP
10 |
11 | # 1. Preparation
12 |
13 | ## Download Cyberduck
14 |
15 | Download the latest version of Cyberduck at [cyberduck.io](http://cyberduck.io) and install it.
16 |
17 | Cyberduck is compatible with RunAbove from version 4.4.4. If you have version 4.4.3, you need to change the update channel to beta version. You can change the channel in the __Preferences__ menu, under the __Update__ tab. Change _Release_ to _beta_ and click on __Check for Update Now__
18 |
19 | ## Get missing information
20 |
21 | To connect to your RunAbove object storage, you will need to have your login, password and tenant name. This last information can be found in __OpenStack Horizon__ below __current project__
22 |
23 | 
24 |
25 | # 2. Connection
26 |
27 | 
28 |
29 | * Click on the __Open Connection__ button and select __Openstack Swift (keystone)__.
30 | * Type _auth.runabove.io_ in the __Server__ field, your username in the __Username__ field and your password in... the __Password__ field!
31 | * Submit form by clicking on __Connect__
32 | * Type your tenant name and click on __Login__
33 |
34 | 
35 |
36 | Congrats! You can now manage your objects, such as dragging and dropping files, or deleting folders.
37 |
--------------------------------------------------------------------------------
/en/_posts/2014-06-17-how-to-install-docker-on-runabove.markdown:
--------------------------------------------------------------------------------
1 | ---
2 | layout: post
3 | title: "How to install Docker on RunAbove?"
4 | categories: Instances
5 | author: KDevroede
6 | lang: en
7 | ---
8 |
9 | Docker is a great tool to simplify the deployment of applications. It separates development from deployment, allowing you to run your application inside containers with complete resource isolation.
10 |
11 | As RunAbove supports cloud-init post-installation, we can take advantage of this to easily install docker when spawning an instance.
12 |
13 | # Launch host instance:
14 |
15 | From [OpenStack Horizon](https://cloud.runabove.com/horizon/), click on _Instances_ panel and then on _Launch instance_ button. This guide is tested on Ubuntu, Debian and CoreOS, but you can test other operating system.
16 |
17 | 
18 |
19 | Don't forget to add a network interface into _Networking_ tab!
20 |
21 | # Add post-installation script to deploy docker:
22 |
23 | Next, go to the _Post-Creation_ tab and add the command below into _Customization script_ field.
24 |
25 | ```bash
26 | #include https://get.docker.io
27 | ```
28 |
29 | 
30 |
31 | Click on _Launch_ button to create your Docker platform.
32 |
33 | # Use Docker
34 |
35 | Once your instance is spawned, you can ssh into it and start using Docker.
36 |
37 | ```bash
38 | admin@docker:~$ sudo docker version
39 | Client version: 1.0.0
40 | Client API version: 1.12
41 | Go version (client): go1.2.1
42 | Git commit (client): 63fe64c
43 | Server version: 1.0.0
44 | Server API version: 1.12
45 | Go version (server): go1.2.1
46 | Git commit (server): 63fe64c
47 | ```
48 |
49 | If you want to learn more about Docker and how to use it, you can follow this guide:
50 | [http://www.docker.com/tryit/](http://www.docker.com/tryit)
51 |
52 | You can see also [how to install CoreOS on RunAbove](/kb/en/instances/how-to-deploy-core-os-on-runabove.html) to deploy a very small operating system below Docker containers.
53 |
--------------------------------------------------------------------------------
/_layouts/post.html:
--------------------------------------------------------------------------------
1 | ---
2 | layout: root
3 | ---
4 |
55 |
56 |
--------------------------------------------------------------------------------
/en/_posts/2014-04-22-how-to-store-your-backup-with-duplicity-and-openstack-swift.markdown:
--------------------------------------------------------------------------------
1 | ---
2 | layout: post
3 | title: "How to store your backup with duplicity and Openstack Swift?"
4 | categories: Object-Storage
5 | lang: en
6 | author: VincentCasse
7 | ---
8 |
9 | Duplicity is an open source tool for backing up your files. You can find more information on the official [website](http://duplicity.nongnu.org/).
10 |
11 | Since version 0.6.22, Swift has been on the list of available back-ends. So you can use Duplicity to send your backup on RunAbove object storage.
12 |
13 | # 1. Preparation
14 |
15 | ## Download Duplicity
16 |
17 | Download Duplicity with version 0.6.22 or later. Packaged versions are available for the most widely known distributions.
18 |
19 | ## Get missing information
20 |
21 | To connect to your RunAbove object storage, you will need to have your login, password and tenant name. This information can be found in __Openstack Horizon__ manager below __current project__
22 |
23 | 
24 |
25 | ## Create a new container
26 |
27 | RunAbove object storage allows you to create distinct areas called __containers__ to store your files. It's good practice to use a specific backup container. You can create it in your [control panel](https://cloud.runabove.com/#/add).
28 |
29 | Under __What do you want to add?__, select _A storage_, then define your container name and geographical region.
30 |
31 | # 2. Ready to backup?
32 |
33 | The last step before starting your backup is to define your account information for Duplicity. You must define these environment variables:
34 |
35 | * SWIFT_USERNAME: your username
36 | * SWIFT_PASSWORD: your password
37 | * SWIFT_AUTHURL: https://auth.runabove.io:443/v2.0
38 | * SWIFT_AUTHVERSION: 2
39 | * SWIFT_TENANTNAME: your tenant name
40 | * SWIFT_REGIONNAME: (optional) region where you want to store backup (BHS-1, SBG-1...) (Available in duplicity>=0.7.02)
41 |
42 | Finally, you can back up the __configuration__ folder in your __backup__ container.
43 |
44 | ```
45 | duplicity configuration/ swift://backup
46 | ```
47 |
--------------------------------------------------------------------------------
/en/_posts/2014-10-16-how-to-fix-sslv3-poodle-vulnerability-nginx-apache-on-ubuntu-14.04.markdown:
--------------------------------------------------------------------------------
1 | ---
2 | layout: post
3 | title: "How to fix SSLv3 POODLE vulnerability in Nginx and Apache on Ubuntu 14.04.1"
4 | categories: Security
5 | author: krnflake
6 | ---
7 | **Introduction**:
8 | ---
9 | The recently published [Poodle attack by Google](https://www.openssl.org/~bodo/ssl-poodle.pdf)
10 | forces a relapse of an encrypted connection to the long outdated SSLv3 protocol. For reasons of
11 | compatibility, almost all browsers still support this outdated protocol. This old protocol isn't
12 | really needed anymore. Hence the best protection is: just to turn it off. The worst
13 | that can happen is, that older browsers can't establish an encrypted connections, but
14 | this does only come into existence in individual cases. This certainly applies to the
15 | Internet Explorer 6, which is only rarely used. And who still uses the monster from
16 | time immemorial, has to contend with a lot of other problems. Web servers should actually
17 | support at least TLS 1.0.
18 |
19 | **How to disable SSLv3 on Nginx**:
20 | ---
21 | 1) Find all virtualhost configuration files which use of the “ssl_protocols” directive:
22 |
23 | $ grep -R "ssl_protocols" /etc/nginx/sites-*
24 |
25 | 2) Edit each file which we found in Step 1) that has the “ssl_protocols” directive:
26 |
27 | $ sudo nano /etc/nginx/sites-available/default
28 |
29 | 3) Now find the following line:
30 |
31 | ssl_protocols SSLv3 TLSv1 TLSv1.1 TLSv1.2;
32 |
33 | 4) And remove the option "SSLv3" so that the line will look like this:
34 |
35 | ssl_protocols TLSv1 TLSv1.1 TLSv1.2;
36 |
37 | 5) In order to make the change effective restart Nginx:
38 |
39 | $ sudo service nginx reload
40 |
41 | **How to disable SSLv3 on Apache**:
42 | ---
43 | 1) Edit Apache's SSL configuration:
44 |
45 | $ sudo nano /etc/apache2/mods-enabled/ssl.conf
46 |
47 | 2) Find the following line:
48 |
49 | SSLProtocol all -SSLv2
50 |
51 | 3) And add the option "-SSLv3" so that the line will look like this:
52 |
53 | SSLProtocol all -SSLv2 -SSLv3
54 |
55 | 4) In order to make the change effective restart Apache:
56 |
57 | $ sudo service apache2 restart
58 |
--------------------------------------------------------------------------------
/_includes/footer.html:
--------------------------------------------------------------------------------
1 |
2 |
53 |
--------------------------------------------------------------------------------
/en/_posts/2014-05-20-how-to-configure-remote-desktop-on-windows-server.markdown:
--------------------------------------------------------------------------------
1 | ---
2 | layout: post
3 | title: "How to configure 'Remote Desktop' on your Windows Instance?"
4 | categories: Instances
5 | author: VincentCasse
6 | lang: en
7 | ---
8 |
9 | You already have a Windows instance, but you want remote desktop access directly within your account. You need to open a port inside the firewall and configure Windows to authorize RDP access. What is RDP? A Windows protocol for sharing desktop screens between machines over the internet. With this protocol, you can control other computers or servers in the same way as with your own personal machine.
10 |
11 | If you don't have a Windows instance, you should read "[how to create a Windows instance?](/kb/en/instances/how-to-create-a-windows-instance.html)"
12 |
13 | # Open RDP port in firewall
14 |
15 | Your instance is protected by an external firewall. By default, only ports 80 (HTTP) and 443 (HTTPS) are open and you need to open port 3389 to authorize the RDP protocol. The firewall rules can be edited in OpenStack Horizon, using the manager, under the _Access & Security_ tab.
16 |
17 | If you haven't replaced your security group since your instance was launched, your security group will be _default_.
18 |
19 | * Click on _Edit Rules_
20 | * Then on _Add Rules_
21 | * Choose _RDP_ inside Rule field.
22 |
23 | By default, port 3389 will be open to the entire internet and you can limit it to a specific IP. For example, if you want to limit access to the IP 127.0.0.1, simply enter 127.0.0.1/32 in CIDR field.
24 |
25 | 
26 |
27 | # Authorize RDP access inside a Windows instance
28 |
29 | Launch your Windows instance and open a console. To configure the RDP access, open the _Server Manager_ and click on _Local Server_ in the left-hand menu. You will see the _Remote Desktop_ status and if it's disabled, click on it to edit the configuration.
30 |
31 | Choose _Allow remote connections to this computer_. If your RDP client doesn't use Network Level Authentication, or if this feature is not available on your network, be sure the field _Allow connections only from computers running Remote Desktop with Network Level Authentication_, is not selected.
32 |
33 | # Open an RDP client
34 |
35 | You can now open your favorite RDP client. On Linux, you could use rdesktop.
36 |
37 | ```bash
38 | rdesktop 127.0.0.1
39 | ```
40 |
--------------------------------------------------------------------------------
/en/_posts/2014-07-07-how-to-configure-owncloud-7-with-swift.markdown:
--------------------------------------------------------------------------------
1 | ---
2 | layout: post
3 | title: "How to configure Owncloud 7 with Openstack Swift?"
4 | categories: Object-Storage
5 | lang: en
6 | author: ArnaudJost
7 | ---
8 |
9 | Owncloud is a software application which allows you to host, sync and share files, hosted on your own dedicated or virtual server.
10 |
11 | The past few releases of OwnCloud allo users to host files on external storage, using a module. For example, you can use FTP or Openstack swift as a second backend storage.
12 |
13 | With Owncloud 7, you can now use Openstack swift as [u]main storage[/u], and benefit with fast and secure storage from RunAbove without local storage problem (drive failure..).
14 |
15 |
16 | # Prerequistes :
17 |
18 | * Working Owncloud instance, freshly installed on your server (you can donwload and find help about Owncloud here : [https://owncloud.org/install/](https://owncloud.org/install/)
19 | * Your tenant name is your project number. You can find it in [OpenStack Horizon](https://cloud.runabove.com/horizon/).
20 |
21 | # Configure Owncloud 7 to use Runabove storage:
22 |
23 | You have to manually configure Openstack storage in Owncloud's config file. You'll find it in Owncloud's http storage directory: config/config.php.
24 |
25 | Edit this file, and add this new configuration element in $CONFIG array :
26 |
27 | ```php
28 | 'objectstore' => array(
29 | 'class' => 'OC\\Files\\ObjectStore\\Swift',
30 | 'arguments' => array(
31 | 'username' => 'myusername@mymail.com', // Runabove username
32 | 'password' => 'mypassword', // Runabove password
33 | 'container' => 'owncloud', // Container name. Ownclound store files using it's own metadata,
34 | // so, keep a container only for Owncloud use.
35 | 'autocreate' => true, // Create the container if it does not exist. default is false
36 | 'region' => 'SBG-1', // Region where you want to store files
37 | 'url' => 'https://auth.Runabove.io/v2.0', // Runabove identity endpoint
38 | 'tenantName' => '1234567', // project name
39 | 'serviceName' => 'swift', // service name, should be 'swift' on Runabove[
40 | ),
41 | )
42 | ```
43 |
44 | Then, just reload Owncloud on your favorite browser. Every users now store files on Runabove instead of using local storage. Please note that local storage is not longer used, so, please use a fresh install of Owncloud 7 or backup your files before.
45 |
--------------------------------------------------------------------------------
/styles/styles-nav.css:
--------------------------------------------------------------------------------
1 | @charset "UTF-8";
2 |
3 | /* ------------------------------------------
4 | NAVIGATION STYLES
5 | (+ responsive-nav.css file is loaded in the )
6 | --------------------------------------------- */
7 |
8 | .fixed {
9 | position: fixed;
10 | width: 100%;
11 | top: 0;
12 | left: 0;
13 | }
14 |
15 |
16 | @media screen and (max-width: 770px) {
17 | .nav-collapse { width : 100%; }
18 |
19 | .nav-collapse ul.topmenu li {
20 | width : 100%;
21 | text-align: center;
22 | background: #000;
23 | border-bottom : 1px solid #FFFFFF;
24 | }
25 |
26 | #header .wrapper ul.topmenu li span {
27 | display : block;
28 | width: 100%;
29 | }
30 |
31 | #header .wrapper ul.topmenu li a {
32 | display : block;
33 | height : 100%;
34 | padding : 0.7em 1em;
35 | width: 100%;
36 | }
37 |
38 | #header .wrapper ul.topmenu li a:hover { background-color : #333; color:#fff;}
39 |
40 | .nav-collapse ul.topmenu li a {
41 | text-align : center;
42 | color : #FFFFFF;
43 | font-weight : 600;
44 | }
45 | }
46 |
47 |
48 | /* ------------------------------------------
49 | NAV TOGGLE STYLES
50 | --------------------------------------------- */
51 |
52 | .nav-toggle {
53 | position: fixed;
54 | -webkit-font-smoothing: antialiased;
55 | -moz-osx-font-smoothing: grayscale;
56 | -webkit-touch-callout: none;
57 | -webkit-user-select: none;
58 | -moz-user-select: none;
59 | -ms-user-select: none;
60 | user-select: none;
61 | text-decoration: none;
62 | text-indent: -999px;
63 | position: relative;
64 | overflow: hidden;
65 | width: 70px;
66 | height: 55px;
67 | float: right;
68 | }
69 |
70 | .nav-toggle:before {
71 | color: #FF980A; /* Edit this to change the icon color */
72 | font-family: "responsivenav", sans-serif;
73 | font-style: normal;
74 | font-weight: normal;
75 | font-variant: normal;
76 | font-size: 65px;
77 | text-transform: none;
78 | position: absolute;
79 | content: "≡";
80 | text-indent: 0;
81 | text-align: center;
82 | line-height: 70px;
83 | speak: none;
84 | width: 100%;
85 | top: 0;
86 | left: 0;
87 | }
88 |
89 | .nav-toggle.active::before {
90 | font-size: 40px;
91 | content:"x";
92 | }
93 |
94 | @media screen and (max-width: 390px) {
95 | .nav-toggle:before {
96 | font-size: 40px;
97 | }
98 | .nav-toggle.active::before {
99 | font-size: 30px;
100 | }
101 | }
102 |
103 |
--------------------------------------------------------------------------------
/_layouts/home.html:
--------------------------------------------------------------------------------
1 | ---
2 | layout: default
3 | ---
4 |
5 |
78 |
--------------------------------------------------------------------------------
/en/_posts/2014-10-28-how-to-set-up-an-ipv6-tunnel-on-ubuntu-14.04.markdown:
--------------------------------------------------------------------------------
1 | ---
2 | layout: post
3 | title: "How to set up an IPv6 tunnel on Ubuntu 14.04"
4 | categories: Instances
5 | author: DrOfAwesomeness
6 | lang: en
7 | ---
8 | In this guide, I'll show you how to set up IPv6 on RunAbove instances using the free [Tunnelbroker](https://www.tunnelbroker.net) service from Hurricane Electric.
9 |
10 | 1. Preparing the tunnel
11 | ===
12 |
13 | The first thing you'll need to do is create an account on the [Tunnelbroker Site](https://www.tunnelbroker.net/). After you have registered an account, click the "Create Regular Tunnel" button on the left side of the Tunnelbroker portal. Put the IP address of your RunAbove instance in the IPv4 Endpoint field and select a tunnel server from the list (I used the Toronto, ON, CA tunnel server when writing this tutorial.) Next, from your RunAbove control panel, edit your [Security Groups](https://cloud.runabove.com/horizon/project/access_and_security/?tab=access_security_tabs__security_groups_tab) (in OpenStack Horizon under "Access & Security") and allow all TCP traffic from the Tunnel Server IPv4 address (as displayed on the Tunnelbroker "Tunnel Details" page).
14 |
15 | 2. Connecting to the tunnel
16 | ===
17 |
18 | Now that your tunnel has been set up, it's time to connect to it. To do so, SSH in to your RunAbove instance, open the /etc/network/interfaces file (`sudo nano /etc/network/interfaces`) and add the following at the end of the file:
19 |
20 | ```
21 | auto he-ipv6
22 | iface he-ipv6 inet6 v4tunnel
23 | address
24 | netmask 64
25 | endpoint
26 | local
27 | ttl 255
28 | gateway
29 | ```
30 | Be sure to replace ``, ``, and `` with the appropriate information from your Tunnelbroker "Tunnel Details" page and `` with the IPv4 address of your RunAbove instance. Next, to bring the `he-ipv6` interface up, run the following command:
31 |
32 | ```bash
33 | sudo ifup he-ipv6
34 | ```
35 |
36 | Your instance now has IPv6 connectivity! Your IPv6 address is the "Client IPv6 Address" shown on the Tunnelbroker "Tunnel Details" page. If you'd like to test your IPv6 connectivity, you can ping Google's IPv6 server with `ping6 ipv6.google.com`. If you don't get any errors, Congrats! If you run into problems or want to learn more about Tunnelbroker, be sure to check out the Tunnelbroker Section of the Hurricane Electric IPv6 [FAQ](https://ipv6.he.net/certification/faq.php).
37 |
--------------------------------------------------------------------------------
/en/_posts/2014-04-22-how-to-use-vagrant-with-openstack.markdown:
--------------------------------------------------------------------------------
1 | ---
2 | layout: post
3 | title: "How to use vagrant with Openstack?"
4 | categories: Instances
5 | author: Jean Sébastien Bruneau
6 | lang: en
7 | ---
8 |
9 | Can this be done? Yup!
10 | (you do need a recent fully functioning vagrant installation but if you are here, chances are that you do. If not, head to [http://www.vagrantup.com/](http://www.vagrantup.com).
11 |
12 | # Prerequisites:
13 |
14 | Get started, practice spining up local machine and get enlightened! Once you are done, keep on reading)
15 |
16 | First, setup an ssh key via the runabove control panel. We will need that to connect into the instance once it's setup.
17 |
18 | In OpenStack Horizon, under __Access & Security__, then under __Key Pairs__ and finally clicking the import Key Pair button gives instruction on how to generate and import a key.
19 |
20 | 
21 |
22 | # Vagrant installation
23 |
24 | Next, hit [https://github.com/cloudbau/vagrant-openstack-plugin](https://github.com/cloudbau/vagrant-openstack-plugin). The doc should get you going pretty fast. Only 2 commands are needed:
25 |
26 | ```
27 | vagrant plugin install vagrant-openstack-plugin
28 | vagrant box add dummy https://github.com/cloudbau/vagrant-openstack plugin/raw/master/dummy.box
29 | ```
30 |
31 | Once you are done, it's time to build a Vagrantfile, you can use this as a starting point:
32 |
33 | ```
34 | Vagrant.configure("2") do |config|
35 | config.vm.box = "dummy"
36 |
37 | # Make sure the private key from the key pair is provided
38 | config.ssh.private_key_path = "/path/to/your/id_rsa"
39 |
40 | config.vm.provider :openstack do |os|
41 | os.username = "[your-runabove-username]"
42 | os.api_key = "[yourS3cre7pa55w0rd]"
43 | os.flavor = /[name-of-the-instance-model]/
44 | os.image = /[name-of-the-desired-os]/
45 | os.endpoint = "https://auth.runabove.io/v2.0/tokens"
46 | os.keypair_name = "[name-of-the-key-you-uploaded]"[/
47 |
48 | os.ssh_username = "admin"
49 | os.network = "Ext-Net"
50 | end
51 | end
52 | ```
53 |
54 | Replace everything between the tags [] with your information (including the square braquets, you don't need them). Don't forget to add your provisioner stuff in there. You probably want to use a shell provisioner to bootstrap your favorite DevOps tool.
55 |
56 | # And deploy vagrant inside openstack
57 |
58 | Once you are happy with the configuration simply do a:
59 |
60 | ```
61 | vagrant up --provider=openstack
62 | ```
63 |
64 | Well that's it! you now have a very powerfull dev box!
65 |
--------------------------------------------------------------------------------
/_layouts/category_index.html:
--------------------------------------------------------------------------------
1 | ---
2 | layout: default
3 | ---
4 |
5 |
53 | {% if paginator.previous_page %}
54 | « Prev
55 | {% else %}
56 | « Prev
57 | {% endif %}
58 |
59 | {% for p in (1..paginator.total_pages) %}
60 | {% if p == paginator.page %}
61 | {{ p }}
62 | {% elsif p == 1 %}
63 | {{ p }}
64 | {% else %}
65 | {{ p }}
66 | {% endif %}
67 | {% endfor %}
68 |
69 | {% if paginator.next_page %}
70 | Next »
71 | {% else %}
72 | Next »
73 | {% endif %}
74 |
75 | {% endif %}
76 |
77 |
78 |
--------------------------------------------------------------------------------
/en/_posts/2014-06-18-upload-your-first-object-inside-swift.markdown:
--------------------------------------------------------------------------------
1 | ---
2 | layout: post
3 | title: "Upload your first object inside Openstack Swift"
4 | categories: Object-Storage
5 | lang: en
6 | author: VincentCasse
7 | ---
8 |
9 | You have got a new Runabove account and you want to use object storage but you don't know how! Take five minutes to learn it!
10 |
11 | # Some prerequisites:
12 |
13 | Before all, you need to have a RunAbove account with valid credentials, a web browser, python and pip (python packager) installed on your computer... Yes, that's all!
14 |
15 | # Installation:
16 |
17 | To communicate with OpenStack APIs proposed by RunAbove, you need to install official OpenStack clients:
18 |
19 | ```
20 | pip install python-swiftclient python-keystoneclient
21 | ```
22 |
23 | Now you can begin to store your data!
24 |
25 | # How to authenticate?
26 |
27 | To be authenticated inside your Object Storage, you need to define some environment variables with your account credentials.
28 |
29 | The simpliest way is to download a script to do it. You can find it in your control panel, in OpenStack Horizon.
30 | Then go into _Access & Security_ panel, then into _API Access_ tab. Finally, click on _Download OpenStack RC File_.
31 |
32 | 
33 |
34 | Launch this script and enter your RunAbove password:
35 |
36 | ```
37 | source 13370042-openrc.sh
38 | ```
39 |
40 | Select the region you want to work in:
41 |
42 | ```
43 | export OS_REGION_NAME="SBG-1"
44 | ```
45 |
46 | To verify if you are authenticated, you can launch the next request and you will get some account metadata.
47 |
48 | ```
49 | swift stat
50 | ```
51 |
52 | # Upload your first object:
53 |
54 | To upload _the_object.txt_ file into your Object Storage, you can use this command:
55 |
56 | ```
57 | swift upload container_name path_to_the_object.txt
58 | ```
59 |
60 | You can verify that your file is in container_name with:
61 |
62 | ```
63 | swift list container
64 | ```
65 |
66 | # Interact with your object:
67 |
68 | You can download content of your object with:
69 |
70 | ```
71 | swift download container_name path_to_the_object.txt
72 | ```
73 |
74 | When you need to delete your object, you can use this request:
75 |
76 | ```
77 | swift delete container_name path_to_the_object.txt
78 | ```
79 |
80 | # How to continue to discover Object Storage?
81 |
82 | To begin, you can continue to discover features of your Object Storage with documentation of the client:
83 |
84 | ```
85 | swift help
86 | ```
87 |
88 | Now you can think about direct integration of Object Storage in your applications and use officials SDKs or directly with HTTP requests to OpenStack APIs.
89 |
--------------------------------------------------------------------------------
/en/_posts/2014-11-07-private-network-nat.markdown:
--------------------------------------------------------------------------------
1 | ---
2 | layout: post
3 | title: "Configure a private network with NAT"
4 | categories: instances
5 | lang: en
6 | author: NicolasLM
7 | ---
8 |
9 | A common network layout is to have a gateway handling all the traffic between
10 | the inside of a network and the outside. This guide will show the simple steps
11 | on how to reproduce this layout on RunAbove.
12 |
13 | 
14 |
15 | Create a new local network
16 | --------------------------
17 |
18 | Go to OpenStack Horizon and in the `Network Topology` tab click on
19 | `Create Network`.
20 |
21 | ### Network
22 |
23 | Give a name to your network (ie. Local) and set the admin state.
24 |
25 | 
26 |
27 | ### Subnet
28 |
29 | Create a subnet with a name (ie. Local), select and IP network. Here we use
30 | `192.168.0.0/24` in IPv4. Finally activate a gateway at `192.168.0.4`.
31 |
32 | 
33 |
34 | ### Subnet Detail
35 |
36 | Enable DHCP and create the network.
37 |
38 | 
39 |
40 | Launch and configure the gateway
41 | --------------------------------
42 |
43 | Create the gateway as you wish and set the external network as first interface
44 | and the local one as the second interface.
45 |
46 | 
47 |
48 | Connect to your instance:
49 |
50 | ssh admin@
51 |
52 | Login as root and configure network and NAT routing:
53 |
54 | sudo su -
55 | ifconfig eth1 192.168.0.4/24
56 | echo 1 > /proc/sys/net/ipv4/ip_forward
57 | iptables -t nat -A POSTROUTING -o eth0 -j MASQUERADE
58 |
59 | Launch your internal instances
60 | ------------------------------
61 |
62 | Create your internal instances, they should have only one private IP address.
63 | Once you have an address go to your gateway and add a rule to forward the port
64 | to be able to connect with SSH. For example if your internal instance has the
65 | address `192.168.0.7` you can create a rule to contact it from the port 2201 of
66 | your gateway with:
67 |
68 | iptables -t nat -A PREROUTING -p tcp --dport 2201 -j DNAT --to-destination
69 | 192.168.0.7:22
70 |
71 | Finally open the port 2201 in the security group of your gateway. To do that go
72 | to `Access & Security` and add a rule to your security group to allow incoming
73 | TCP traffic to port 2201.
74 |
75 | You can now connect to your internal instance with:
76 |
77 | ssh admin@ -p 2201
78 |
79 |
--------------------------------------------------------------------------------
/en/_posts/2014-12-29-security-groups.md:
--------------------------------------------------------------------------------
1 | ---
2 | layout: post
3 | title: "Protect your instances with RunAbove firewall"
4 | categories: instances
5 | lang: en
6 | author: NicolasLM
7 | ---
8 |
9 | RunAbove encourages you to manage the security of your instances by integrating
10 | an easy to use firewall in front of all your servers. This guide shows the
11 | possibilities it offers as well as how to manage it.
12 |
13 | Security groups
14 | ---------------
15 |
16 | When you create your RunAbove account we enable for you a security group called
17 | `default`. All the instances you launch go into this security group by default.
18 |
19 | You can add an unlimited numbers of rules to this security group. A rule allows
20 | one kind of traffic to reach or go out of your instance.
21 |
22 | Default rules
23 | -------------
24 |
25 | The default security group is populated with four main rules. They allow:
26 |
27 | * All outgoing traffic
28 | * To access your instance by SSH on port 22
29 | * To access a web server over HTTP on port 80
30 | * To access a web server over HTTPS on port 443
31 |
32 | All other incoming traffic is denied to protect your instance.
33 |
34 | Adding a rule
35 | -------------
36 |
37 | You can easily add a rule to allow another kind of traffic. Go to [OpenStack
38 | Horizon](https://cloud.runabove.com/horizon/project/access_and_security/), in
39 | "Access & Security" you will see your security groups. By clicking on "Edit
40 | rules" you will be able to list the rules that currently apply.
41 |
42 | Click on "Add Rule" and a form will ask you a few information about the traffic
43 | you want to allow. Some rules for common services like DNS, RDP or IMAP are
44 | already shipped.
45 |
46 | 
47 |
48 | If your service is not in the list select "Custom TCP Rule" and the direction
49 | "Ingress". Then specify if you only want to open one port or a port range.
50 |
51 | The "Remote" field has two properties:
52 |
53 | * CIRD, a network form which the traffic will be allowed. `0.0.0.0/0` means
54 | everywhere in CIDR notation. You can restrict to one IP with for example
55 | `83.222.45.67/32`.
56 | * Security group, a security group from which all instances in this group will
57 | be able to access the service.
58 |
59 | Going further with security groups
60 | ----------------------------------
61 |
62 | You can create other security groups for each kind of servers you have. Imagine
63 | that you have a cluster of web servers and a database server.
64 |
65 | You can create two security groups (ie. web and database). They will both have
66 | different rules:
67 |
68 | * Web, allows traffic on port 80 from everywhere
69 | * Database, allows traffic on port 3306 from the security group web
70 |
71 |
--------------------------------------------------------------------------------
/en/_posts/2014-04-14-how-to-deploy-core-os-on-runabove.markdown:
--------------------------------------------------------------------------------
1 | ---
2 | layout: post
3 | title: "How to deploy CoreOS on RunAbove?"
4 | categories: Instances
5 | author: yadutaf
6 | lang: en
7 | ---
8 | CoreOS is Linux for Massive Server Deployments. It leverages state of the art software like [Docker](https://www.docker.com/) and [systemd](http://fr.wikipedia.org/wiki/Systemd) to become *the* cluster operating system.
9 |
10 | It supports painless upgrade, service discovery, overlay networks, Ceph, ... In a word, it's awesome!
11 |
12 | And deploying it on Runabove is a breeze.
13 |
14 | # 1. Create a custom VM template
15 |
16 | Go the [OpenStack Horizon](https://cloud.runabove.com/horizon/), then go to _Images_ panel and then on the _create image_ button to install the new image.
17 |
18 | 
19 |
20 | CoreOS distributes official OpenStack compressed images that we'll need to prepare. For example:
21 |
22 | ```
23 | wget http://alpha.release.core-os.net/amd64-usr/current/coreos_production_openstack_image.img.bz2
24 | bunzip2 coreos_production_openstack_image.img.bz2
25 | ```
26 |
27 | You can then upload resulting ``coreos_production_openstack_image.img`` file (around 400MB). Alternatively You'll find an already [inflated images of CoreOS 431 here](https://storage.bhs-1.runabove.io/v1/AUTH_721b7c504d1b476691659bfee21308d8/public/CoreOS-431.img).
28 |
29 | # 2. Launch an instance from this image
30 |
31 | Click the _Launch_ button right next to your new image.
32 |
33 | Pick a cool name for your instance. Say ``agent_007``. Make sure to select a network like ``Ext-Net``. Then move on to the _post-creation_ tab.
34 |
35 | # 3. Configure your instance
36 |
37 | 
38 |
39 | If you don't have one already, generate a unique token to identify your new CoreOS cluster. This token will allow cluster members to automatically discover their peers.
40 |
41 | ```
42 | curl https://discovery.etcd.io/new; echo
43 | ```
44 |
45 | Paste and customize the following [cloud-config](https://coreos.com/docs/cluster-management/setup/cloudinit-cloud-config/) script. Cloud-config is the standard for VM customization and especially well integrated by CoreOS team.
46 |
47 | ```yaml
48 | #cloud-config
49 | coreos:
50 | etcd:
51 | # as generated above
52 | discovery: https://discovery.etcd.io/
53 | addr: $private_ipv4:4001
54 | peer-addr: $private_ipv4:7001
55 | units:
56 | - name: etcd.service
57 | command: start
58 | - name: fleet.service
59 | command: start
60 | ```
61 |
62 | # Launch... And voilà !
63 |
64 | Don't forget to login with the user `core` instead of `admin` or `root`!
65 |
66 | 
67 |
68 | You can find more information: https://coreos.com/docs/running-coreos/platforms/openstack/
69 |
--------------------------------------------------------------------------------
/en/_posts/2015-12-10-create-mysql-managed-stack-api.md:
--------------------------------------------------------------------------------
1 | ---
2 | layout: post
3 | title: "How to create a MySQL Managed Stack using the API"
4 | categories: ManagedStacks
5 | author: popawu
6 | lang: en
7 | ---
8 |
9 | In this guide you will learn how to create your Managed Stacks MySQL cluster using the API.
10 |
11 | Requirements
12 | ============
13 |
14 | - applicationKey, consumerKey and signature generated for OVH API access. You will also need to manage timestamps. You can find details on the [first step with the OVH API page.][1]
15 |
16 | For the sake of command lines' brevity you can define this helpful aliases to interact with Managed Stacks API.
17 |
18 | ```bash
19 | user@desk:~$ MANAGEDSTACKS_LAB=https://api.runabove.com/1.0
20 | user@desk:~$ alias auth_curl='curl --include -H "X-Ovh-Application:$applicationKey" -H "X-Ovh-Timestamp:$time" -H "X-Ovh-Signature:$signature" -H "X-Ovh-Consumer:$consumerKey" -H "Content-Type: application/json"'
21 | ```
22 |
23 | Create MySQL Managed Stack
24 | ===========================
25 |
26 | - CALL
27 | ```bash
28 | user@desk:~$ auth_curl -X POST ${MANAGEDSTACKS_LAB}/stackMysql
29 | ```
30 |
31 | - RETURN
32 | ```json
33 | {
34 | "msg": "cluster created"
35 | }
36 | ```
37 |
38 | Get your cluster's id
39 | =====================
40 |
41 | - CALL
42 | ```bash
43 | user@desk:~$ auth_curl -X GET ${MANAGEDSTACKS_LAB}/stackMysql
44 | ```
45 |
46 | - RETURN
47 | ```json
48 | {
49 | "products": [
50 | {
51 | "id":
52 | }
53 | ]
54 | }
55 | ```
56 |
57 | Get informations about your cluster
58 | ===================================
59 |
60 | - CALL
61 | ```bash
62 | user@desk:~$ auth_curl -X GET ${MANAGEDSTACKS_LAB}/stackMysql/
63 | ```
64 |
65 | - RETURN
66 | ```json
67 | {
68 | "active": ,
69 | "nodes": [
70 | {
71 | "addr": "",
72 | "product_id":
73 | },
74 | {
75 | "addr": "",
76 | "product_id":
77 | }
78 | ],
79 | "product_id":
80 | }
81 | ```
82 |
83 | Get monitoring status information about your cluster
84 | ====================================================
85 |
86 |
87 | - CALL
88 | ```bash
89 | user@desk:~$ auth_curl -X GET ${MANAGEDSTACKS_LAB}/stackMysql//status
90 | ```
91 |
92 | - RETURN
93 | Json object, list of probes for each node. The object key is the probe name, object value is the result.
94 |
95 | Delete your cluster
96 | ===================
97 |
98 | - CALL
99 | ```bash
100 | user@desk:~$ auth_curl -X DELETE ${MANAGEDSTACKS_LAB}/stackMysql/
101 | ```
102 |
103 | - RETURN
104 | ```json
105 | {
106 | "msg": "cluster deleted"
107 | }
108 | ```
109 |
110 | Go further
111 | ==========
112 |
113 | You may have a look at:
114 |
115 | - Guide: [Create MySQL Managed Stack from RunAbove manager][2]
116 |
117 | [1]: https://api.ovh.com/g934.first_step_with_api
118 | [2]: create-mysql-managed-stack.html
119 |
--------------------------------------------------------------------------------
/en/_posts/2015-08-24-how-to-sync-runabove-object-storage-containers-to-ovh-public-cloud.markdown:
--------------------------------------------------------------------------------
1 | ---
2 | layout: post
3 | title: "How to synchronize RunAbove container to OVH Public Cloud?"
4 | categories: Object-Storage
5 | author: pilgrimstack
6 | lang: en
7 | ---
8 |
9 | Swift provides a very simple way to synchronize different containers even if the source and the destination are not in the same infrastructure. That is our case here with RunAbove Object Storage and OVH Public Cloud.
10 |
11 | A job runs on the RunAbove Swift server. It will replicate all write transactions in the container on RunAbove to an other on OVH Public Cloud.
12 |
13 | # Prerequistes :
14 |
15 | * Python installed on your computer ([https://www.python.org/](https://www.python.org/)
16 | * Openstack swift client ([https://github.com/openstack/python-swiftclient](https://github.com/openstack/python-swiftclient) or curl (Unix)
17 |
18 | # How it works :
19 |
20 | The authentication will be done by using a shared key.
21 |
22 | The source container should have two specials metadata:
23 |
24 | * X-Container-Sync-To: the destination of the container on the other infrastructure
25 | * X-Container-Sync-Key: the shared key between containers
26 |
27 | The destination container should have one special metadata:
28 |
29 | * X-Container-Sync-Key: the shared key between containers
30 |
31 | # Generate the shared key :
32 |
33 | ```sharedKey=$(openssl rand -base64 32)
34 | ```
35 |
36 | # With Python client :
37 |
38 | Assuming you have sourced your environnement with OVH Public Cloud credentials, you have to add the key to the destiantion container.
39 |
40 | ```swift post --sync-key "$sharedKey" myContainer
41 | ```
42 |
43 | Then you have to get the public address of this container.
44 |
45 | ```destContainer=$(swift --debug stat myContainer 2>&1 | grep 'curl -i.*storage' | awk '{ print $4 }')
46 | ```
47 |
48 | Now you can tell to the source container which destination it should pushed the data with the shared key.
49 |
50 | Start by sourcing the RunAbove credentials, then:
51 |
52 | ```swift post --sync-key "$sharedKey" --sync-to "$destContainer" myContainer
53 | ```
54 |
55 | # With cURL :
56 |
57 | On the destination:
58 |
59 | ```curl -i https://storage.sbg1.cloud.ovh.net/v1/AUTH_YYYYYYYYY/myContainer
60 | -X POST -H "X-Container-Sync-Key: $sharedKey" -H "Content-Length: 0"
61 | -H "X-Auth-Token: abcd1234"
62 | ```
63 |
64 | On the source:
65 |
66 | ```curl -i https://https://storage.bhs-1.runabove.io/v1/AUTH_XXXXXXX/myContainer
67 | -X POST -H "X-Container-Sync-Key: $sharedKey" -H "Content-Length: 0"
68 | -H "X-Auth-Token: abcd1234"
69 | -H "X-Container-Sync-To: https://storage.sbg1.cloud.ovh.net/v1/AUTH_YYYYYYYYY/myContainer"
70 | ```
71 |
72 | # Conclusion :
73 |
74 | This synchronization between two containers is a very good way to migrate data from one infrastructure to another without any service interruption. If you want, you can use it for any others reasons : share objects between openstack users, replicate your data between two geographical and separate infras...
75 |
--------------------------------------------------------------------------------
/en/_posts/2014-10-16-how-to-install-gitlab.md:
--------------------------------------------------------------------------------
1 | ---
2 | layout: post
3 | title: "How to install Gitlab on Ubuntu 14.04"
4 | categories: Instances
5 | author: DrOfAwesomeness
6 | lang: en
7 | ---
8 | [Gitlab](https://about.gitlab.com/) Community Edition is a free and open-source git repository management and code collaboration tool. It provides an issue tracker, pull request system, and repository management system.
9 |
10 | 1. Installing Gitlab
11 | ================
12 | Installing Gitlab is a straightforward and easy process. Note that because RunAbove currently blocks outbound port 25 due to abuse, if you want your Gitlab instance to be able to send email, you'll need to install Postfix and [configure it to use another mail server as a relay](/kb/en/instances/how-to-relay-postfix-mails-via-smtp.gmail.com-on-ubuntu-14.04.html). To set up Gitlab, you'll need to download the official deb package and install it:
13 |
14 | ```bash
15 | wget https://downloads-packages.s3.amazonaws.com/ubuntu-14.04/gitlab_7.3.2-omnibus-1_amd64.deb
16 | sudo dpkg -i gitlab_7.3.2-omnibus-1_amd64.deb
17 | ```
18 |
19 | Please note that the `dpkg` command above may take up to 10 minutes to complete. After `dpkg` has finished, you'll need to edit the Gitlab configuration file with `sudo -e /etc/gitlab/gitlab.rb`. In the editor, change the `external_url` line to the URL you will be using to access Gitlab, which can be the IP address of your instance if you don't have a domain name pointed at it. After you've set the `external_url`, save the file and run `sudo gitlab-ctl reconfigure`. Congratulations, you have successfully installed Gitlab CE on your RunAbove instance!
20 |
21 | 2. Configuring Users and Projects
22 | ============================
23 | So, now that you have successfully set up Gitlab CE on your instance, you'll probably want to add some users and projects. Go ahead and browse to the IP address or domain name of your instance. You'll be greeted with a sign in screen. The default username is `root` and the default password is `5iveL!fe`. Upon signing in, you'll immediately be prompted for a new password.
24 |
25 | After updating your password, you'll be presented with your user dashboard. From here you can create a new project or group. If you want to make a new project, simply click on the New Project button, enter the project name, choose the project visibility, and hit the Create Project button. If you want to add more users to your Gitlab instance, you can do so by clicking the Admin Area icon (a large gear and two smaller gears) in the upper-right corner of your screen, and clicking on "New User". Please note that if you did not install Postfix and [configure it to use another mail server as a relay](/kb/en/instances/how-to-relay-postfix-mails-via-smtp.gmail.com-on-ubuntu-14.04.html), you will need to edit the user after creation to set the password.
26 |
27 | Congratulations, you now have a working Gitlab CE instance! There are no limits to the number of projects you can create in Gitlab CE besides the limitations of the disk space on your RunAbove instance. If you want to learn more about Gitlab CE, be sure to check out the [documentation](http://doc.gitlab.com/ce/).
28 |
--------------------------------------------------------------------------------
/en/_posts/2014-09-25-use-openstack-command-line-tools.markdown:
--------------------------------------------------------------------------------
1 | ---
2 | layout: post
3 | title: "How to use OpenStack command line tools?"
4 | categories: Instances
5 | author: bartekzurawski
6 | ---
7 |
8 | OpenStack is a cloud computing software built with several modules (Nova,
9 | Swift, Neutron...) interacting with each others. In this guide we will focus on
10 | how to use the command line clients of these modules.
11 |
12 | OpenRC file
13 | -----------
14 |
15 | To use any command line client, you need to load the `openrc` file. This file
16 | contains special environments variables which are used by command line clients
17 | to authenticate to the server where the service is running.
18 |
19 | Let's start! To begin, go to the [OpenStack Horizon
20 | panel](https://cloud.runabove.com/horizon/project/access_and_security/), go to
21 | __Access & Security__ and switch tab to __API Access__. Finally __Download
22 | OpenStack RC File__ will allow you to retrieve the credentials needed to
23 | interact with OpenStack services.
24 |
25 | The file that you downloaded, is a shell script. To load it, you can use the
26 | source command of your shell:
27 |
28 | source
29 |
30 | For security reasons your password is not stored in this file, so you will be
31 | prompted to enter your RunAbove password.
32 |
33 | You can now check that the environment is correctly loaded, perform:
34 |
35 | env | grep OS_
36 |
37 | As you can see your environment has been loaded correctly. Remind to reload
38 | this file each time you start a new shell.
39 |
40 | Command line clients
41 | --------------------
42 |
43 | ### Python pip
44 |
45 | To use command line clients, you need to install them first. The most
46 | convenient way to do that is with `pip`, the standard tool for installing
47 | Python packages. On any Debian like operating system you can install `pip`
48 | with:
49 |
50 | sudo apt-get install python-pip
51 |
52 | If you are familiar with Python Virtualenv, you can then create a new
53 | virtualenv and install the OpenStack clients in it, but this is not mandatory.
54 |
55 | ### Installing OpenStack clients
56 |
57 | OpenStack provides a [list of
58 | clients](https://wiki.openstack.org/wiki/OpenStackClients) you can install.
59 | Just enter the command below with the name of the client, for example:
60 |
61 | sudo pip install python-novaclient
62 |
63 | ### Using the clients
64 |
65 | In RunAbove there are two region, `BHS-1` and `SBG-1`. If you want get data
66 | from only one of them, you need to add the parameter `--os-region-name
67 | ` for example:
68 |
69 | nova --os-region-name BHS-1 list
70 | glance --os-region-name SBG-1 image-list
71 |
72 | It is also possible to define the region in an environment variable, just do:
73 |
74 | export OS_REGION_NAME=BHS-1
75 |
76 | OpenStack clients have a useful help accessible with `help`, for example for
77 | nova:
78 |
79 | nova help
80 |
81 | You can get the detailed usage of a subcommand with:
82 |
83 | nova help boot
84 |
85 | You can also check the [online
86 | documentation](http://docs.openstack.org/cli-reference/content/) of all
87 | OpenStack clients.
88 |
--------------------------------------------------------------------------------
/en/_posts/2016-04-25-marathon-container-metrics.md:
--------------------------------------------------------------------------------
1 | ---
2 | layout: post
3 | title: "Marathon containers metrics in PaaS Timeseries"
4 | categories: Docker
5 | author: devatoria
6 | lang: en
7 | ---
8 |
9 | We integrated the Docker PaaS with the [Timeseries PaaS lab](https://www.runabove.com/iot-paas-timeseries.xml), to allow you to graph your application metrics about your containers in a Grafana dashboard. We automatically send metrics for:
10 |
11 | - CPU usage
12 | - memory usage
13 | - network I/O
14 | - disk I/O
15 | - out of memory kill count (coming soon!)
16 |
17 | #Configure your token
18 |
19 | From the RunAbove manager, join the PaaS Timeseries lab and generate a new credentials pair (read/write). Next, inject the write credentials into your applications using `USER_IOT_ID` and `USER_IOT_KEY` labels.
20 |
21 | 
22 |
23 | Metrics are aggregated, averaged and pushed every minute.
24 |
25 | #Analyse my data
26 | ##Create graphs
27 |
28 | Once your applications metrics are sent to the PaaS Timeseries, you can create some graphs to easily watch how your applications behave, and adapt your stack according to your needs. Available metrics for graphs are:
29 |
30 | - cpu
31 | - memory.usage
32 | - memory.limit
33 | - network.rx
34 | - network.tx
35 | - blkio.input
36 | - blkio.output
37 |
38 | 
39 |
40 | ###Filtering using tags
41 |
42 | On each metrics, you can filter on the following tags:
43 |
44 | - frameworkID: your marathon ID (useful if you have multiple stack logging metrics with the same credentials)
45 | - appID: your application ID (useful if you want to graph multiple applications instead of the full stack)
46 | - taskID: your task ID (identifying a single container)
47 |
48 | ###CPU data
49 |
50 | The CPU data are not dependent of the host capacity, but on the limit you are setting in your application. For example, if you create an application with 2 cpus, and if it consumes only one, your CPU usage will be 50%
51 |
52 | Be careful though, if you create an application with a cpu limit less than one, let's say 0.5, the application could be able to consume one cpu if needed resources are available. Your CPU usage will be 200%.
53 |
54 | To interpret your data in Grafana, you have multiple ways. We have two interesting use cases:
55 |
56 | - you have a few apps, or a graph per app: you should filter your CPU usage metrics using the flag `taskID: *` and a `sum aggregate`
57 | - you have a lot of apps to be displayed in a single graph: you should filter your CPU usage metrics using the flag `appID: *` and an `average aggregate`
58 |
59 | ###Memory data
60 |
61 | As for the CPU data, the usage and limit increase depending on your instances count. We recommend to use task ID tags to make the data more readable.
62 |
63 | ###Networking and disk data
64 |
65 | These data are cumulative. We recommend to use rate graphs for these values, so you will be able to see usage variation. Be careful, you can sometime have **negative values**. This usually happens on a scale down because of the rate graph: collected data are cumulative, and when a container is deleted, they are removed from the sum. So, the rate is interpreting this as a negative value.
66 |
--------------------------------------------------------------------------------
/en/_posts/2014-09-09-how-to-schedule-deletion-of-objects.markdown:
--------------------------------------------------------------------------------
1 | ---
2 | layout: post
3 | title: "How to schedule deletion of objects"
4 | categories: Object-Storage
5 | lang: en
6 | author: ArnaudJost
7 | ---
8 |
9 | Sometimes, you need to delete one ore more object at a specific time.
10 |
11 | For example, if you want to manage backups and delete them when older than X month, if you want to create a cache for an application, or just because the data itself has a specific lifetime. It's very difficult to do this by hand : you have to list objects, check dates, and delete if needed...
12 |
13 | Openstack Swift includes a very cool feature which is a nice solution to this problem : X-Delete-* header. You just have to push this header associated with a date on your object, and swift will do the job for you. Simple & Efficient.
14 |
15 | # Prerequisites :
16 |
17 | * Python installed on your computer (https://www.python.org/)
18 | * Openstack swift client (https://github.com/openstack/python-swiftclient) or curl on unix.
19 |
20 | # How it works :
21 |
22 | An internal process parses objects on your account, and checks if the header X-Delete-At exists. If the header exists, it deletes the object if it's time, without any other intervention.
23 |
24 |
25 | Please note that you'll always find the same header on your object: X-Delete-At, but you can push another header on your object : X-Delete-After (delete in X seconds). X-Delete-After is converted in X-Delete-At when you push it on your object.
26 |
27 | ```
28 | X-Delete-After: delete in X seconds
29 | X-Delete-At: delete at this date, in unix epoch format
30 | ```
31 |
32 | # Let's delete an object automatically
33 |
34 | First, get epoch time (or get the number of seconds that you need, if using X-Delete-After):
35 |
36 | * Using http://www.epochconverter.com/
37 | * On linux : date +%s
38 |
39 | Then, post the header on your object.
40 |
41 | With curl :
42 |
43 | ```bash
44 | curl -X POST \
45 | -H 'X-Delete-After: 3600'\
46 | -H 'X-Auth-Token: 123' \
47 | https://storage.bhs-1.runabove.io/default/image.jpg
48 |
49 | curl -X POST\
50 | -H 'X-Delete-At: 1401268563'\
51 | -H 'X-Auth-Token: 123'\
52 | https://storage.bhs-1.runabove.io/default/image.jpg
53 | ```
54 |
55 | With swift client :
56 |
57 | ```bash
58 | swift -v -V 2.0 -A https://auth.runabove.io/v2.0 -U tenant:login -K pass post --header "X-Delete-After: 3600" container object
59 | swift -v -V 2.0 -A https://auth.runabove.io/v2.0 -U tenant:login -K pass post --header "X-Delete-At: 1401268563" container object
60 | ```
61 |
62 | You can check if the header is correctly applied using swift client :
63 |
64 | ```bash
65 | swift -v -V 2.0 -A https://auth.runabove.io/v2.0 -U tenant:login -K pass stat container object
66 | ```
67 |
68 | Or with curl :
69 |
70 | ```bash
71 | curl -X HEAD -H 'X-Auth-Token: 123' https://storage.bhs-1.runabove.io/default/image.jpg
72 | ```
73 |
74 | You should see something like :
75 |
76 | ```
77 | X-Delete-At: 1402647646
78 | ```
79 |
80 | And it's already done ! You have nothing more to do, swift will delete the object on the chosen date.
81 |
82 | # Conclusion :
83 |
84 | With Openstack swift, it's very easy to create objects based on lifetime duration. With very few requests, you can set a destroy date and not be bothered with the deletion of old object.
85 | You can also easily develop a scalable cache without management of deletion.
86 |
--------------------------------------------------------------------------------
/en/_posts/2015-10-13-how-to-use-arm-lab.markdown:
--------------------------------------------------------------------------------
1 | ---
2 | layout: post
3 | title: "How to subscribe to and use the Arm lab"
4 | categories: Labs
5 | author: xXraphXx
6 | lang: en
7 | ---
8 |
9 | Quick tutorial about the way to subscribe to the arm lab and spawn your very first aarch64 virtual machine! List of known issues with arm instances at the end.
10 |
11 | # Spawn a virtual machine on arm
12 |
13 | ## Step 1
14 |
15 | Go to [Runabove](https://www.runabove.com) > Labs > Discover armcloud > Start Now
16 |
17 | 
18 |
19 | 
20 |
21 | ## Step 2
22 |
23 | Either sign up (create new account) or sign in (use existing account)
24 |
25 | 
26 |
27 | ## Step 3
28 |
29 | Important: SSH Keys. Once logged in, you fall back on the classical runabove interface to manage your cloud objects.
30 | Please make sure that you have registered a public key in region **`HZ-1`** to be used to access your machine once deployed.
31 |
32 | 
33 |
34 | ## Step 4
35 |
36 | Create a new instance. Important: take care of choosing the correct region, flavor and image.
37 |
38 | * Region: arm instances are only available in region **`HZ-1`**, so make sure you select this region when spawning your server
39 |
40 | * Flavor: currently only one flavor available, **`vps-arm-1`**, more to be coming soon
41 |
42 | * Image: **`ubuntu-14.04-aarch64`**
43 |
44 | 
45 |
46 | 
47 |
48 | 
49 |
50 | 
51 |
52 | 
53 |
54 |
55 | # Known issues on arm
56 |
57 | * If you were one of the first to subscribe to the lab, you may have entcountered poor disk and network io performances due to the kernel 3.18. The kernel 4.2 will be very soon proposed and is far better in terms of performance, so you may consider respawning a virtual machine from scratch (important: kernel upgrade directly from within the guest won't have the same effect, you won't be rescheduled at the correct place)
58 |
59 | * If you are using the 3.18 kernel image, you may entcounter some unstabilities concerning your instances, please forgive us for the disturbance
60 |
61 | * Suspend/resume -> currently not working, if your machine falls in ERROR, just shut it down and start it again.
62 |
63 | * Note that as a consequence of the suspend/resume limitation above, live snapshots are not working either. please shutdown your instance before taking any snapshot (actually, under kernel 3.18, the live snapshot will work, but the machine will never resume, so you may as well shut down your instance directly...)
64 |
65 | * No vnc console access, but you can still get a serial console access. See this [tutorial](/kb/en/labs/how-to-serial-console-arm-instance.html)
66 |
67 | * When subscribing to the lab you are also presented the vps-hdd flavors (vps-hdd-\*) and images, as if you had subscribed to the vps-hdd lab. You can use them as well but this is not arm :). See [here](https://community.runabove.com/kb/en/labs/how-to-use-vps-hdd-lab.html) for more details.
68 |
--------------------------------------------------------------------------------
/en/_posts/2015-08-10-how-to-get-data-from-runabove-iot.markdown:
--------------------------------------------------------------------------------
1 | ---
2 | layout: post
3 | title: "How to get data from the RunAbove IoT metrics storage"
4 | categories: iot
5 | lang: en
6 | author: babelouest
7 | ---
8 |
9 | [IoT Labs][6] is an Internet of Things Platform designed to store and retrieve metric data, and automatically compute and process that data.
10 |
11 | This documentation is about how to get data from the RunAbove IoT metrics storage. It explains how to transfer your data from the service via an https REST API.
12 |
13 | We assume you have a valid READ token from the application you're working with. Applications and token management is explained in the [How to push data to the RunAbove IoT metrics storage][1]
14 |
15 | # Get IoT Metrics Data
16 |
17 | ## Query data from OpenTSDB HTTPS REST API
18 |
19 | The Runabove Metrics Storage system can be queried using a subset of the OpenTSDB REST API. [OpenTSDB](http://opentsdb.net) is a popular open source time series database which is integrated in many third-party tools such as [collectd](https://collectd.org/wiki/index.php/Plugin:OpenTSDB) or [Grafana](http://grafana.org/)
20 |
21 | The endpoint to query data via the webservice is at `https://opentsdb.iot.runabove.io/api/query`
22 |
23 | This endpoint uses the POST method, expecting data in the request body in JSON format. The complete documentation for OpenTSDB queries is available in the official [OpenTSDB Documentation][3]
24 |
25 | A valid example body has the following form:
26 |
27 | ```json
28 | {
29 | "start":1438956901,
30 | "queries":[{
31 | "metric":"my.metric",
32 | "aggregator":"sum",
33 | "tags":{
34 | "boxid": "1F43"
35 | }
36 | }]
37 | }
38 | ```
39 |
40 | Please note that RunAbove IoT Metrics Storage does not implement TSUIDs, so a query filter using TSUID will be ignored.
41 |
42 | The other most common parameters are the following:
43 |
44 | - start: numeric, start date in Unix Epoch format in seconds (required)
45 | - end: numeric, end date in Unix Epoch format in seconds (optional)
46 | - queries: Array, a list of subqueries to filter data (required)
47 |
48 | A subquery accepts (but not only) the following parameters:
49 |
50 | - metric: string, the name of the metric stored (required)
51 | - aggregator: string, the name of the [aggregator function][5] to use (required)
52 |
53 | The authentication method is a HTTP Basic Auth using a read token: use the token id as the username, and the token key as the password.
54 |
55 | On success, the body response has the following format:
56 |
57 | ```json
58 | [{
59 | "metric":"my.metric",
60 | "tags":{
61 | "boxid":"1F43"
62 | },
63 | "aggregateTags":[],
64 | "dps":{
65 | "1438956980":1,
66 | "1438957000":4,
67 | "1438957110":3,
68 | "1438957280":1
69 | }
70 | }]
71 | ```
72 |
73 | In this exemple, the main parameters are the following:
74 |
75 | - metrics: string, the metric name
76 | - tags: object, the common tags for the data,
77 | - dps: object, the data points with the timestamp as key and the numeric value as value.
78 |
79 | For a complete description, the query parameters are fully described in the official [OpenTSDB documentation][4].
80 |
81 | [1]: /kb/en/iot/how-to-push-data-to-runabove-iot.html
82 | [3]: http://opentsdb.net/docs/build/html/api_http/index.html
83 | [4]: http://opentsdb.net/docs/build/html/api_http/query/index.html
84 | [5]: http://opentsdb.net/docs/build/html/api_http/aggregators.html
85 | [6]: https://runabove.com/iot/
86 |
--------------------------------------------------------------------------------
/en/_posts/2015-12-10-create-mysql-managed-stack.md:
--------------------------------------------------------------------------------
1 | ---
2 | layout: post
3 | title: "How to create a MySQL Managed Stack"
4 | categories: ManagedStacks
5 | author: popawu
6 | lang: en
7 | ---
8 |
9 | Deploy your database stack, we take care of it !
10 |
11 | In this guide you will learn how to subscribe to the Managed Stacks lab and create your MySQL cluster.
12 |
13 | Now available with your cluster :
14 |
15 | - MySQL High availability : 2 MySQL nodes with SSL master/master replication
16 | - Real-time resources visualization : Monitoring probes to check MySQL status, server load and disk space on each node
17 | - Managed stack : 24/7 hardware/software monitoring and system security management
18 |
19 | New features will be added soon and this guide will be updated accordingly.
20 | Enjoy !
21 |
22 |
23 | Requirements
24 | ============
25 |
26 | * MySQL client ([http://dev.mysql.com/doc/refman/5.7/en/programs-client.html](http://dev.mysql.com/doc/refman/5.7/en/programs-client.html)
27 |
28 | Activate Managed Stacks lab
29 | ===========================
30 |
31 | Go to [Runabove](https://www.runabove.com) > Labs > Discover Managed Stacks > Start Now
32 |
33 | 
34 |
35 | Either sign up (create new account) or sign in (use existing account)
36 |
37 | 
38 |
39 | To activate Managed Stacks Lab, click on 'More labs...' and 'Activate'
40 |
41 | 
42 |
43 | Create MySQL Managed Stack
44 | ============================
45 |
46 | To create a new stack, click on 'Managed stacks' in the left menu, and then on '+ New stack'.
47 |
48 | 
49 |
50 | 
51 |
52 | You will receive an email confirming the creation of your new stack.
53 |
54 | Start using your Create MySQL Managed Stack
55 | ===========================================
56 |
57 | Wait for your to stack to be in active status. The stack delivery last about 10 minutes.
58 |
59 | 
60 |
61 | Once your stack is active, you will receive a second email containing all information about it :
62 | * IP/Hostname of the first node of your cluster
63 | * IP/Hostname of the second node of your cluster
64 | * root and user account of your cluster
65 |
66 | You can test your access to the nodes with this command :
67 | ```bash
68 | user@desk:~$ mysql -u{username} -p{password} -h{node IP or hostname}
69 | ```
70 |
71 | You can get the details of your stack by clicking on the application name :
72 |
73 | 
74 |
75 | You will see details of your cluster and 3 monitoring probes for each node.
76 |
77 | 
78 |
79 | Delete your Managed Stacks MySQL cluster
80 | ========================================
81 |
82 | Click on 'Managed stacks' in the left menu, and then on the garbage in the action column :
83 |
84 | 
85 |
86 | Confirm your action :
87 |
88 | 
89 |
--------------------------------------------------------------------------------
/en/_posts/2014-04-17-spinning-up-instances-with-saltstack.markdown:
--------------------------------------------------------------------------------
1 | ---
2 | layout: post
3 | title: "Spinning up instances with saltstack / salt-cloud"
4 | categories: Instances
5 | author: Jean Sébastien Bruneau
6 | lang: en
7 | ---
8 |
9 | There are quite a few devops tools out there, i like saltstack and thanks to the openstack backend of runabove, you can spin up instances with salt-cloud!
10 |
11 | You need to have salt, libcloud and salt-cloud installed, i am running these versions.
12 | ```
13 | jsb@dev:/etc/salt$ salt-cloud --versions-report
14 | Salt: 2014.1.0-4765-gcbe7c7e
15 | Python: 2.7.3 (default, Feb 27 2014, 19:58:35)
16 | Jinja2: 2.6[
17 | M2Crypto: 0.21.1
18 | msgpack-python: 0.1.10
19 | msgpack-pure: Not Installed
20 | pycrypto: 2.4.1
21 | PyYAML: 3.10
22 | PyZMQ: 13.0.0
23 | ZMQ: 3.2.2
24 | Apache Libcloud: 0.14.1
25 | ```
26 |
27 | Check the official doc if you need setup instruction for salt and salt-cloud.
28 | Once that's done, you need to setup a provider. I created the following YAML file
29 |
30 | ```yaml
31 | runabove:
32 | identity_url: https://auth.runabove.io/v2.0/tokens
33 | compute_name: nova
34 | compute_region: #THE-REGION#
35 | service_type: compute
36 | tenant: '#THE-TENANT#'
37 | user: '#your-email@test.tld#'
38 | password: #S3cr37Pa55w0rd#
39 | provider: openstack
40 | networks:
41 | - fixed:
42 | - #NETWORK-UUDI#
43 | ```
44 |
45 | Everything that's wrapped in "#" needs to be configured for your account, here is how to get the information. First, get some command line tools:
46 |
47 | ```
48 | sudo pip install python-novaclient.
49 | ```
50 |
51 | Once that's done, go in the manager, in OpenStack Horizon, under __Access & Security__ and finally under __API Access__. Download the __OpenStack RC file__. Save it on your box, source it and enter your password. It's safe it comes from runabove.
52 |
53 | ```
54 | source /home/jsb/openstackrc
55 | Please enter your OpenStack Password:
56 | ```
57 |
58 | Now we are ready to gather the information to complete de provider setup:
59 |
60 | * #THE-REGION#: run "nova endpoints". In the nova table you will find the region, mine looks like "BHS-1"
61 | * #THE-TENANT#: run "nova credentials", at the end of the table, you should see "name": "00000000" where 000000 is a bunch of number. This can also be seen in the manager, under current project. Make sure this is between quotes in your config file or it will not work.
62 | * #NETWORK-UUDI#: run "nova network-list" and grab what's in the id column, that will be your static network. In my case, there is only one and it's labelled "Ext-Net".
63 |
64 | Once that's done, the only thing left is to create vm image profiles. Im using these:
65 |
66 | ```
67 | cat cloud.profiles.d/runabove.conf
68 | high-cpu:
69 | provider: runabove
70 | size: pci2.d.c1
71 | deploy: False
72 |
73 | high-mem:
74 | provider: runabove
75 | size: pci2.d.r1
76 | deploy: False
77 |
78 | ubuntu-lts:
79 | image: Ubuntu 12.04
80 | extends: high-cpu
81 | ```
82 |
83 | You can run nova flavor-list to see what size are available and nova image-list for the OS. In both case, the configuration is expecting what's in the Name column.
84 |
85 | Once you are all set, spin up a new instance:
86 |
87 | ```
88 | salt-cloud -p #the-cloud-profile-you-chose# #the-instance-name#
89 | ```
90 |
91 | Happy automated deployment folks!
92 |
--------------------------------------------------------------------------------
/en/_posts/2014-10-21-how-to-install-the-codebox-ide.md:
--------------------------------------------------------------------------------
1 | ---
2 | layout: post
3 | title: "How to install the Codebox IDE on Ubuntu 14.04"
4 | categories: Instances
5 | author: DrOfAwesomeness
6 | lang: en
7 | ---
8 |
9 | The [Codebox IDE](https://github.com/CodeboxIDE/codebox) is the open-source
10 | component of the [Codebox](https://www.codebox.io/) Cloud IDE service. It
11 | provides developers with a cloud-based development code editor, terminal, and
12 | file manager. This tutorial will show you how to set up the Codebox IDE on
13 | Ubuntu 14.04.
14 |
15 | ##1. Set up Node.js
16 | The Codebox IDE is written in Node.js, so we'll need to install the Node.js
17 | runtime. The version of Node.js in the Ubuntu repositories is outdated, so
18 | we'll be using the Nodesource repository to install Node.js. Note that we're
19 | also installing the `build-essential` and `git` packages, as they are Codebox
20 | IDE dependencies.
21 |
22 | ```bash
23 | curl -sL https://deb.nodesource.com/setup | sudo bash -
24 | sudo apt-get install -y nodejs build-essential git
25 | ```
26 |
27 | ## 2. Install and run the Codebox IDE
28 | Now that we have Node.js, it's time to install and run the Codebox IDE. First,
29 | we need to install the `codebox` package with npm:
30 |
31 | ```bash
32 | sudo npm install -g codebox
33 | ```
34 |
35 | Next, since it's not a good idea to run the IDE as the `admin` or `root` user
36 | (IDE users have terminal access), we'll add a user for it:
37 |
38 | ```bash
39 | sudo adduser --disabled-password --gecos "Codebox IDE" codebox
40 | ```
41 |
42 | Finally, we'll set up our workspace and run the Codebox IDE:
43 |
44 | ```bash
45 | sudo -u codebox -i
46 | mkdir -p Workspace/your_project_name # or git clone Workspace/your_project_name
47 | git init Workspace/your_project_name # skip this if you cloned from a git repository in the last command
48 | codebox run Workspace/your_project_name
49 | ```
50 |
51 | Your IDE is now available at `http://your-instance-ip:8000`. If you are using
52 | the default RunAbove firewall settings, you'll need to allow traffic on port
53 | 8000.
54 |
55 | From OpenStack Horizon, click on "Access & Security", and add a rule to the
56 | default security group allowing ingress traffic to port 8000. Note that your
57 | instance is currently open to the public. If you want to password-protect your
58 | IDE, you can specify usernames and passwords as shown below.
59 |
60 | ```bash
61 | # Run this as the codebox user
62 | codebox run Workspace/your_project_name -u user1:passwd1,user2:passwd2
63 | ```
64 |
65 | **SECURITY NOTE:** The Codebox IDE currently does not provide a way to hash
66 | passwords or hide them from the output of `ps ux`. Because of this, you should
67 | use a unique, secure password to access the IDE. Additionally, if you are using
68 | the Codebox IDE in a multi-user environment, you may want to avoid the internal
69 | user system altogether and set up an authenticating reverse proxy.
70 |
71 | If you don't want to leave your SSH window open the whole time the Codebox IDE
72 | is running, you can run it in the background using `nohup`:
73 |
74 | ```bash
75 | # Run this as the codebox user
76 | nohup codebox run Workspace/your_project_name -u user1:passwd1,user2:passwd2 &
77 | ```
78 |
79 | Congratulations! You have now installed and configured the Codebox IDE. If you
80 | want to learn more about configuring and using the Codebox IDE, be sure to
81 | check out the articles under the "Codebox IDE" section of the [Codebox Help
82 | Site](http://help.codebox.io/).
83 |
84 |
--------------------------------------------------------------------------------
/en/_posts/2016-05-03-how-to-use-deskaas-lab.md:
--------------------------------------------------------------------------------
1 | ---
2 | layout: post
3 | title: "How to subscribe to and use the DeskaaS lab"
4 | categories: vdi
5 | author: lrivallain
6 | lang: en
7 | ---
8 |
9 | ## Joining the lab
10 |
11 | Beforehand, make sure to have an OVH.com account. If you don't, you may create one from [ovh.com](https://www.ovh.com/manager/web/login/) and select "Create Account"
12 |
13 | ### From RunAbove website
14 |
15 | To order : Visit [https://www.runabove.com/deskaas.xml](https://www.runabove.com/deskaas.xml) and clic on "Start Now !"
16 |
17 | You'll be redirected to the order wizard and will receive a mail with deskaas login and url.
18 |
19 | ### From OVH.com customer interface
20 |
21 | Log-in on customer interface. Deskaas product is available in the "sunrise" part of customer interface.
22 |
23 | Clic on the "**+**" link at the right of "Desktop as a service" ):
24 |
25 | 
26 |
27 | You'll be redirected to the order wizard and will receive a mail with deskaas login and url.
28 |
29 | ## Available offers
30 |
31 | Currently, only one offer is available :
32 |
33 | * 1 core + 2GB RAM + 10GB Storage + Windows OS
34 |
35 | 
36 |
37 | We are planned to quickly add more models with more storage, RAM or CPU cores. Stay tuned!
38 |
39 |
40 | ## Quickstart
41 |
42 | ### Web client access
43 |
44 | The delivery mail contains an URL of the form of https://*.deskaas.com to join the web client:
45 |
46 | 
47 |
48 | Use the mail credentials to log-in:
49 |
50 | 
51 |
52 | Then it's possible to open the virtual desktop:
53 |
54 | 
55 |
56 | Virtual desktop can now be used directly through the web browser:
57 |
58 | 
59 |
60 | A settings menu is available on the left side of the desk :
61 |
62 | 
63 |
64 |
65 | ### Software client
66 |
67 | A software client is available on most OS to access to the virtual desktop : [vmware_horizon_clients](https://my.vmware.com/en/web/vmware/info/slug/desktop_end_user_computing/vmware_horizon_clients/4_0)
68 |
69 | Once the client is install and launched, you can create a shortcut for the server:
70 |
71 | 
72 |
73 | Add the https://*.deskaas.com URI from the mail and validate:
74 |
75 | 
76 |
77 | Click on server to log-in:
78 |
79 | 
80 |
81 | Then, the list of available desktop is displayed :
82 |
83 | 
84 |
85 | And virtual desktop is ready to used:
86 |
87 | 
88 |
89 | ## Useful links
90 | * [Discover Desktop as a service lab](https://www.runabove.com/deskaas.xml)
91 | * Subscribe to the mailing list: [deskaas-subscribe@ml.ovh.net](mailto:deskaas-subscribe@ml.ovh.net)
92 |
--------------------------------------------------------------------------------
/en/_posts/2014-07-09-what-is-object-storage.markdown:
--------------------------------------------------------------------------------
1 | ---
2 | layout: post
3 | title: "What is Object Storage?"
4 | categories: Object-Storage
5 | lang: en
6 | author: BaQs
7 | ---
8 |
9 | RunAbove have an Object Storage offer to manage huge quantity of data. Is it good for you?
10 |
11 | # Definitions
12 |
13 | First of all, the most important: an object storage __IS NOT a file system:__ it has no hierarchy!
14 |
15 | Imagine yourself having an huge (unlimited) shelf, with a lot of drawers.
16 | You can [PUT](http://docs.openstack.org/api/openstack-object-storage/1.0/content/PUT_createOrReplaceObject__v1__account___container___object__storage_object_services.html) anything in any drawer, [DELETE](http://docs.openstack.org/api/openstack-object-storage/1.0/content/DELETE_deleteObject__v1__account___container___object__storage_object_services.html) it afterwards, or [GET](http://docs.openstack.org/api/openstack-object-storage/1.0/content/GET_getObject__v1__account___container___object__storage_object_services.html) its content.
17 |
18 | You can provide access publicly to your shelf via HTTP links.
19 |
20 | Using RunAbove Object Storage, you have many shelves like that. We call them containers. Moreover, anything you store is replicated 3 times, you won't loose it.
21 |
22 | # What is it good for ?
23 |
24 | Basically, anything you want to store & share. An object storage is a distribution platform. Upload it once and it can be available directly via http. Millions of downloads can occur, we will handle it.
25 |
26 | If you actually use a web application to serve file, you do not need it any more. That's what an object storage is for. You can make objects expire after some time, share them for a period, add metadata that web browsers understand.
27 |
28 | You want to host a static website ? It's PERFECT!
29 |
30 | Privately, you can store any file that need to be accessed by others applications/scripts or users, or as part of a process.
31 |
32 | ## For instance:
33 | You store a big video, then download it on another server to re-encode it, then push it back to share it with a lot of people.
34 |
35 | There are tons of examples like that, and there is no limit !
36 |
37 | # Where/how to begin ?
38 |
39 | RunAbove runs Openstack Swift, and makes it simple to use:
40 |
41 | ## Use OpenStack Horizon
42 |
43 | Some screenshots to guide you through (from simple mode to Horizon)
44 | 
45 | 
46 | 
47 |
48 | ## Use any language of your choice:
49 |
50 | * [Python](https://github.com/runabove/python-runabove)
51 | * [Go](https://github.com/ncw/swift)
52 | * Java with [JOSS](http://joss.javaswift.org)
53 |
54 | Long story short, anything that is compatible with OpenStack Swift will work.
55 | Checkout all [openstack available SDKs](https://wiki.openstack.org/wiki/SDKs) _C, Clojure, Erlang, Go, Java, Android, JavaScript, .Net, Node.js, Perl, PHP, Python, Ruby_
56 |
57 | You can even use [Owncloud](/kb/en/object-storage/how-to-configure-owncloud-7-with-swift.html), [Duplicity](/kb/en/object-storage/how-to-store-your-backup-with-duplicity-and-openstack-swift.html)or even [CyberDuck](/kb/en/object-storage/how-to-use-cyberduck-with-openstack-swift.html).
58 | Or if you're addicted to Command Line, you can also use [CURL](http://docs.openstack.org/api/openstack-object-storage/1.0/content/examples.html).
59 |
60 | As a last link, OpenStack Swift documentation: http://docs.openstack.org/developer/swift/
61 |
--------------------------------------------------------------------------------
/en/_posts/2014-11-17-send-reliable-emails-from-your-runabove-instance-with-mailjet.markdown:
--------------------------------------------------------------------------------
1 | ---
2 | layout: post
3 | title: "Send reliable emails from your RunAbove instances using Mailjet"
4 | categories: Instances
5 | author: gierschv
6 | ---
7 |
8 | During the usage of your RunAbove instances, you'll need to send some emails
9 | for different purposes (i.e. monitoring, notifications, web application, etc).
10 | However if sending emails is not your job and you've never heard of *SPF*,
11 | *DKIM*, *IP Reputation* or *PTR*, you may just want a reliable way to send
12 | your emails without without wasting time in configuration and monitoring.
13 |
14 |
15 |
16 |
17 |
18 | In this guide, you'll discover how to configure a postfix service in your
19 | instance to use [Mailjet](https://mailjet.com) as a reliable email relay.
20 | Mailjet allows you to send emails without taking care of the email
21 | infrastructure, assuring you a great deliverability in your mailings. This
22 | service
23 | [is recommended by OVH.com](http://blog.mailjet.com/post/47188898598/partnership-ovh-com-recommends-mailjet-for-email), the creator of RunAbove.
24 |
25 | If you don't have a Mailjet account, create one in few seconds on the
26 | [Mailjet website](https://mailjet.com).
27 | For your information, Mailjet provides a **free tier up to 12 000 emails per
28 | months**.
29 |
30 | ## Postfix as a local relay
31 |
32 | In this guide, we'll use [Postfix](http://www.postfix.org/) as a local email
33 | relay to the
34 | [Mailjet SMTP](https://www.mailjet.com/support/how-can-i-configure-my-smtp-parameters,2.htm)
35 | service. This simple configuration will allow you to send emails using your
36 | usual configuration (i.e. ```127.0.0.1:25``` or the ```sendmail``` command).
37 |
38 | If you are using a debian or ubuntu image, install the necessary packages:
39 |
40 | $ sudo apt-get install postfix libsasl2-2 libsasl2-modules
41 |
42 | Postfix configuration wizard will ask you some questions. Just select
43 | **Internet Site** and for FQDN, something like **your_domain.com**.
44 |
45 | Then, grab the SMTP credentials provided in the Mailjet dashboard, and edit your
46 | Postfix config file, ```/etc/postfix/main.cf``` configuring the following
47 | parameters:
48 |
49 | relayhost = [in-v3.mailjet.com]:587
50 | smtp_sasl_auth_enable = yes
51 | smtp_sasl_password_maps = hash:/etc/postfix/sasl_passwd
52 | smtp_sasl_security_options = noanonymous
53 | smtp_tls_security_level = encrypt
54 |
55 | In ```/etc/postfix/sasl_passwd```, add your Mailjet SMTP credentials:
56 |
57 | [in-v3.mailjet.com]:587 user:password
58 |
59 | Rebuild the map and chown these it to ensure only *root* is able to read it:
60 |
61 | $ sudo postmap /etc/postfix/sasl_passwd
62 | $ sudo chown root:root /etc/postfix/sasl_passwd*
63 | $ sudo chmod 600 /etc/postfix/sasl_passwd*
64 |
65 | Finally, reload your Postfix service:
66 |
67 | $ sudo /etc/init.d/postfix reload
68 |
69 | You can now send your first mail using your local Mail Transfer Agent and the
70 | Mailjet service:
71 |
72 | $ echo 'Hello world' | sendmail -f from@your.domain -t to@your.domain
73 |
74 | And monitor your outgoing emails reading your mail log:
75 |
76 | $ tail -f /var/log/mail.log
77 | Nov 17 15:09:32 my-instance.runabove.com postfix/smtp[1234]: DA4E220008A: to=, relay=in-v3.mailjet.com[5.196.43.129]:587, delay=0.18, delays=0.03/0/0.13/0.02, dsn=2.0.0, status=sent (250 2.0.0 Ok: queued as 0C0151AC06F9)
78 |
--------------------------------------------------------------------------------
/en/_posts/2016-02-28-field-naming-conventions.md:
--------------------------------------------------------------------------------
1 | ---
2 | layout: post
3 | title: "Field Naming convention"
4 | categories: Logs
5 | author: Babacar Diassé
6 | lang: en
7 | ---
8 |
9 | Now that you can send logs, you are maybe wondering how to tell PaaS Logs what kind of data you send. It can be date, or number or boolean or just plain string. At OVH, we love to create fancy dashboards with all these kind of stuff. If you want to be sure that your logs will be properly parsed, this document is made for you !
10 |
11 |
12 | #1 What is a valid log for PaaS Logs ?
13 |
14 | A well formatted log for PaaS Logs is a [GELF](http://docs.graylog.org/en/latest/pages/gelf.html) formatted log. What is GELF ? A standardized JSON way to send logs.
15 | GELF stands for Graylog Extended Log Format. Using this format gives us two advantages, It is directly compatible with Graylog and it is still extensible enough to enrich your logs as you would like to.
16 | This format impose a few conventions that if you don't follow can have many consequences :
17 |
18 | - PaaS Logs will rewrite your field as an incorrect one (with a _fixit suffix).
19 | - Your log will be rejected and lost in space (not kidding here).
20 | - We will send Liam Neeson to your house (not kidding either).
21 |
22 | First please check the table below to know which field are reserved and what is their meaning. Note that some of these fields are mandatory and have to be set by whatever library you use to send logs to PaaS Logs.
23 | Refer to the documentation of the library or to some of our awesome tutorials to know how to send them.
24 |
25 |
26 | 
27 |
28 |
29 | # 2. Can I go deeper ?
30 |
31 | Of course as we said before you can send some additional fields as long as you prepend them with the '_' (underscore) character. You can use any JSON valid character for your field, except the '.' (dot) character. But don't worry, if you do so, we will rewrite your '.' in a very cute underscore. So how can you send special type as number, date and boolean ? Here is the answer :
32 |
33 |
34 | 
35 |
36 | As you can see it is fairly straightforward. Suffix your field with the right value and you will be able to send anything you want. For reference here is a full example of a valid gelf message with every type we have :
37 |
38 | {"version": "1.1","host":"my_host", "_some_num": 87.6, "_some_user_id_float":123, "a_good_date" : "2016-01-01T17:04:25.000", "short_message":"A short message that can save your life","full_message":"all the things you want up to 32768 characters","_line":, "level":1,"_power_level_int":"9001","_some_info":"info","_ovh_is_wonderful_bool" : "true"}
39 |
40 |
41 | Specifying correct numeric suffixes types is the only way to generate numeric Widgets for Dashboards. Here is an example of graph you can generate with a numeric value:
42 |
43 |
44 | 
45 |
46 |
47 | So this is everything you need to know to send valid messages format and not shoot yourself in the foot.
48 | If you have any question you can always reach us by using the mailing list.
49 |
50 | Happy Logging
51 |
52 |
53 | #Getting Help
54 |
55 | - Getting Started : [Quick Start](/kb/en/logs/quick-start.html)
56 | - Documentation : [Guides](/kb/en/logs)
57 | - Mailing List : [paas.logs-subscribe@ml.ovh.net](mailto:paas.logs-subscribe@ml.ovh.net)
58 | - Visit our community: [community.runabove.com](https://community.runabove.com)
59 | - Create an account: [PaaS Logs Beta](https://cloud.runabove.com/signup/?launch=paas-logs)
60 |
61 |
--------------------------------------------------------------------------------
/en/_posts/2015-01-29-attach-volume.md:
--------------------------------------------------------------------------------
1 | ---
2 | layout: post
3 | title: "Attach additional storage to an instance"
4 | categories: instances
5 | lang: en
6 | author: NicolasLM
7 | ---
8 |
9 | Thanks to OpenStack Cinder you can attach additional disk space to your
10 | instance. This guide will show you how to use this feature.
11 |
12 | Create a volume
13 | ---------------
14 |
15 | On Cinder a drive is called a volume. The first thing you need to do is to
16 | create a new volume in the region you want. To do that go to OpenStack Horizon
17 | in the volumes area.
18 |
19 | Click on `Create Volume` and a form asking a few parameters will appear. Select
20 | the type of volume you need, its name, size, `nova` as availability zone and
21 | select `empty volume`. Finally you can create the volume.
22 |
23 | 
24 |
25 | Attach the volume to an instance
26 | --------------------------------
27 |
28 | From the volumes list click on `More` and `Edit Attachments` to attach a volume
29 | to a running instance.
30 |
31 | 
32 |
33 | Select the instance on which you want extra disk space and click on `Attach
34 | Volume`.
35 |
36 | 
37 |
38 | You will see to which device your volume is attached to. This device will be
39 | accessible directly into your instance.
40 |
41 | Format and mount the volume
42 | ---------------------------
43 |
44 | Once the volume is attached to your instance you need to format the device and
45 | mount it. This operations are different if you use GNU/Linux or Windows
46 | instances.
47 |
48 | ### GNU/Linux
49 |
50 | From a shell issue the `lsblk` command, this will list the block devices you
51 | can use:
52 |
53 | ```
54 | admin@mariadb:~$ lsblk
55 | NAME MAJ:MIN RM SIZE RO TYPE MOUNTPOINT
56 | vda 253:0 0 160G 0 disk
57 | └─vda1 253:1 0 160G 0 part /
58 | vdb 253:16 0 9.8T 0 disk
59 | ```
60 |
61 | The device `/dev/vda` is the root disk of your system. It has one partition
62 | called `/dev/vda1` filling all the space. Then you can see `/dev/vdb` which is
63 | the volume you just attached.
64 |
65 | In order to be able to use it you need to format it and mount it somewhere.
66 | This is easily done with:
67 |
68 | ```
69 | admin@mariadb:~$ sudo mkfs.ext4 /dev/vdb
70 | Allocating group tables: done
71 | Writing inode tables: done
72 | Creating journal (32768 blocks): done
73 | Writing superblocks and filesystem accounting information: done
74 |
75 | admin@mariadb:~$ sudo mkdir /mnt/database
76 |
77 | admin@mariadb:~$ sudo mount /dev/vdb /mnt/database/
78 |
79 | admin@mariadb:~$ df -h
80 | Filesystem Size Used Avail Use% Mounted on
81 | /dev/vda1 158G 1.1G 150G 1% /
82 | /dev/vdb 9.7T 38M 9.3T 1% /mnt/database
83 | ```
84 |
85 | You can now store your files on the directory `/mnt/database`.
86 |
87 | ### Microsoft Windows Server
88 |
89 | Right click on the Windows button and select `Disk management`.
90 |
91 | 
92 |
93 | There you can right click on `Disk 1` and select `Online`, then again select
94 | `New Simple Volume`. Select the options you want, the default selected one are
95 | fine.
96 |
97 | 
98 |
99 | 
100 |
101 | Once the formatting is done, a new drive will be available on your instance.
102 |
103 | 
104 |
105 |
106 |
--------------------------------------------------------------------------------
/en/_posts/2014-10-14-how-to-relay-postfix-mails-via-smtp.gmail.com-on-ubuntu-14.04.markdown:
--------------------------------------------------------------------------------
1 | ---
2 | layout: post
3 | title: "How To Relay Postfix mails via smtp.gmail.com on Ubuntu 14.04.1"
4 | categories: Instances
5 | author: neoark
6 | ---
7 | **Introduction**:
8 | -------------
9 | --------------------------------------
10 | This guide will help you to use a Gmail account as a free SMTP server on your Ubuntu-Linux server 14.04. Once configured, all emails from your server will be sent via Gmail. This method will be useful if you have many sites on your server and want them all to send emails via Gmail’s SMTP server. Please Limits [Google's Sending](https://support.google.com/a/answer/166852?hl=en) to see the amount of mail one user can send.
11 | **Steps:**
12 | -------
13 | -------------------------------------------
14 | Install all necessary packages:
15 |
16 | $ sudo apt-get install postfix mailutils libsasl2-2 ca-certificates libsasl2-modules nano
17 |
18 | Postfix configuration wizard will ask you some questions. Just select your server as ***Internet Site*** and for FQDN use something like ***mail.your_domain.com***
19 |
20 | Then open your postfix config file:
21 |
22 | $ nano /etc/postfix/main.cf
23 |
24 | add/modify the following lines:
25 |
26 | relayhost = [smtp.gmail.com]:587
27 | smtp_sasl_auth_enable = yes
28 | smtp_sasl_password_maps = hash:/etc/postfix/sasl/sasl_passwd
29 | smtp_sasl_security_options = noanonymous
30 | smtp_tls_CAfile = /etc/postfix/cacert.pem
31 | smtp_use_tls = yes
32 |
33 | Validate Certificate & Open/Create ***sasl_passwd***:
34 |
35 | $ cat /etc/ssl/certs/Thawte_Premium_Server_CA.pem | sudo tee -a /etc/postfix/cacert.pem
36 | $ sudo nano /etc/postfix/sasl/sasl_passwd
37 |
38 | And add following line:
39 |
40 | [smtp.gmail.com]:587 USERNAME@gmail.com:PASSWORD
41 |
42 | If you want to use your Google App’s domain, replace ***@gmail.com*** with your ***@domain.com***. Also for ***PASSWORD*** use Google [App password](https://support.google.com/accounts/answer/185833?hl=en) if you have enabled 2-Step-Verification.
43 |
44 | Set ***sasl_passwd*** file permission and update postfix config to use ***sasl_passwd*** file:
45 |
46 | $ sudo chmod 400 /etc/postfix/sasl/sasl_passwd
47 | $ sudo postmap /etc/postfix/sasl/sasl_passwd
48 | Reload postfix config for changes to take effect:
49 |
50 | $ sudo /usr/sbin/postfix reload
51 |
52 | Testing:
53 | --------
54 | If you have configured everything correctly, following command should generate a test mail from your server to your mailbox. Replace ***you@example.com*** with your email address.
55 |
56 | $ echo "Test mail from postfix" | mail -s "Test Postfix" you@example.com
57 |
58 | Other Notes:
59 | ------------
60 | This will work with any mail server that provides SMTP relaying.
61 |
62 | Troubleshooting:
63 | ---------------
64 |
65 | - Monitor postfix mail log in a separate session with the following command:
66 |
67 | $ tail -f /var/log/maillog
68 |
69 | - If you receive the following error in your maillog file:
70 |
71 | postfix/smtp[3191]: AAC325FA46: SASL authentication failed; server smtp.gmail.com[64.233.166.108] said: 534-5.7.14 Please log in via your web browser and then try again.?534-5.7.14 Learn more at?534 5.7.14 https://support.google.com/mail/bin/answer.py?answer=78754 c214wjb.23 - gsmtp
72 |
73 | Follow steps on [Allowing less secure apps to access your account](https://support.google.com/accounts/answer/6010255). If the error still persist turn on Google's [2-Step-Verification] (https://support.google.com/accounts/answer/185839?hl=en&ref_topic=1099588) and [Sign in using App Passwords](https://support.google.com/accounts/answer/185833?hl=en) to resolve the error.
74 |
--------------------------------------------------------------------------------
/en/_posts/2015-12-08-start-puppet-master.md:
--------------------------------------------------------------------------------
1 | ---
2 | layout: post
3 | title: "Start a Managed Puppet Master"
4 | categories: puppet
5 | author: NicolasLM
6 | lang: en
7 | ---
8 |
9 | In this guide you will learn how to create a Puppet Master service. You are going to:
10 |
11 | - generate a deployment key to put in your Git repository,
12 | - create a master pointing to your puppet modules,
13 | - connect a puppet agent to your master.
14 |
15 | Requirements:
16 |
17 | - Your Puppet modules must be stored in a Git repository (public or private) reachable from the Internet.
18 |
19 | Connect to Puppet as a Service interface
20 | ========================================
21 |
22 | To activate the Puppet as a Service lab, please go to [runabove.com][3] and create your credentials. Then go to [Puppet as a Service manager](https://manager.puppet.runabove.io). Use your credentials to sign in there.
23 |
24 | Create a deployment key
25 | =======================
26 |
27 | _You can skip this step if your Git repository is public._
28 |
29 | Go to the `Deploy keys` tab and create your first deploy key. Copy the public part of the key pair and add it to your Git repository's permissions in order to allow the puppet master service to clone your puppet modules.
30 |
31 | 
32 |
33 | Create a Puppet Master
34 | ======================
35 |
36 | Go to `Masters` tab and create your master. A straightforward form will ask you a few parameters about your master setup.
37 |
38 | 
39 |
40 | - `Name`: The name of your master. Its final URL will include this name.
41 | - `Git repository`: The URL of your git repository. It can be either SSH, HTTP or HTTPS.
42 | - `Deploy key`: If your Git repository is accessed by SSH you can select your key pair here.
43 | - `Type`: The size of your master. A bigger master will be able to handle more agents concurrently.
44 |
45 | You may use our example repository: `https://github.com/runabove/puppet-nginx-example.git`, in that case you won't need a deployment key. The puppet module installs _nginx_ and runs a web server (obviously do not run it on a production host!).
46 |
47 | Connect an agent to your master
48 | ===============================
49 |
50 | On the page with the details of your master you will find the command used for connecting an agent to your master. Copy this command and execute it on a remote server. Refresh the page of your master and you will see the pending certificate of your agent.
51 |
52 | 
53 |
54 | Sign the certificate and your agent will be able to fetch its configuration during the next run.
55 |
56 | In the case you used the example repository you can now browse the web page served by your agent to check it is working properly.
57 |
58 | For more explanations, see the [dedicated guide][5] about connecting an agent to your Puppet master.
59 |
60 | Go further
61 | ==========
62 |
63 | You may have a look at:
64 |
65 | - Guide: [how to use hiera with the Puppet as a Service lab][4]
66 | - Documentation: [Reference documentation][1], [Guides][2]
67 | - Create your account: [runabove.com][3]
68 |
69 | [1]: http://puppet.runabove.io/doc
70 | [2]: /kb/en/puppet
71 | [3]: https://www.runabove.com
72 | [4]: how-to-use-hiera.html
73 | [5]: how-to-connect-an-agent.html
74 |
75 |
76 | Troubleshooting
77 | ===============
78 |
79 | Unreachable code repository
80 | ---------------------------
81 |
82 | The master status `Cannot fetch git repository` means the service could not clone your code repository.
83 |
84 | - Double-check the URL.
85 | - Make sure you have loaded the deployment key in your repository.
86 |
87 | Those are examples of working URLs using HTTPS and SSH protocols:
88 |
89 | - `https://git.company.com/username/puppet-modules.git`
90 | - `ssh://git@git.company.com/username/puppet-modules.git`
91 |
--------------------------------------------------------------------------------
/en/_posts/2014-07-28-deploy-load-balanced-wordpress.markdown:
--------------------------------------------------------------------------------
1 | ---
2 | layout: post
3 | title: "How to deploy load balanced wordpress application using Juju charms"
4 | categories: Instances
5 | lang: en
6 | author: bartekzurawski
7 | ---
8 | WordPress is web software you can use to create a beautiful website or blog.This guide will show how quick and efficiently it is to deploy your WordPress application with an OpenStack cloud, like RunAbove and Juju
9 |
10 | Requirements:
11 | -------------
12 |
13 | First you need Juju environment. If you don't have it, you can quickly [create it](/kb/en/instances/how-to-install-an-orchestration-tool-juju.html) using guide. Next you need to do is download charms. You can do this by cloning git repo using this: `git clone git@github.com:bartekzurawski/charm.git`
14 |
15 | Wordpress instances:
16 | --------------------
17 |
18 | Using ssh go to the machine where you have installed juju. Using this command in command line: `juju deploy --repository=charms/ local:precise/wordpress` you can launch instance with WordPress.
19 |
20 | 
21 |
22 | MySQL instance:
23 | ---------------
24 |
25 | WordPress use MySQL to store data about webpages, users, configuration etc.
26 | Just deploy MySQL instance using this: `juju deploy --repository=charms/ local:precise/mysql` . When your database is deployed it's time to make ralation between the application and database. It's simple to do that, you need to click on the charm and "Build Relation".
27 |
28 | 
29 |
30 |
31 | NFS instance:
32 | -------------
33 |
34 | If you want to use load balancing on your WordPress application, for sure you need more than one instance with WordPress. But to make it work, each WordPress instace should have the same content in `wp-content/` directory. To do that, you need NFS instance. Just deploy it using this: `juju deploy --repository=charms/ local:precise/nfs` . After NFS is deployed build relation between NFS and WordPress service.
35 |
36 |
37 | 
38 |
39 |
40 | Load Balancer:
41 | --------------
42 |
43 | Last step is to deploy the load balancer. The best option for this cluster is use "haproxy". Deploy it: `juju deploy --repository=charms/ local:precise/haproxy` . Next you need to build relation between WordPress and haproxy. Finally you need to change haproxy configuration by modifying "services" parameter. To do that, you need to click on haproxy charm, switch tab to service settings, find services parameter and change it using this configuration:
44 |
45 | - service_name: haproxy_service
46 | service_host: "0.0.0.0"
47 | service_port: 80
48 | service_options: [balance roundrobin, cookie SRVNAME insert]
49 | server_options: cookie S{i} check
50 |
51 | 
52 |
53 | On the above screenshot you can see whole structure of the infrastructure with HAproxy as load balancer, WordPress as application, MySQL as database and NFS as file server.
54 |
55 | Test it!
56 | --------
57 |
58 | Now you can test that setup, how it works. Get the IP of your load balancer by clicking on the haproxy charm, then on "running unit" and finally on the name of the instance. Connect to this address using your browser and you will see WordPress instalation page.
59 |
60 | You can add more WordPress units if you want. It's very simple, just click on WordPress charm, and change number of units.
61 |
62 | As you can see, every WordPress instance have the same content. This is due to the fact that relation between WordWress and MySQL instance are working (eaach WordPress instance use the same database) also relation between WordPress and NFS are working (each WordPress instance is connected to the same NFS instance)
63 |
--------------------------------------------------------------------------------
/en/_posts/2016-01-20-create-sqlserver-instance.md:
--------------------------------------------------------------------------------
1 | ---
2 | layout: post
3 | title: "How to create a SQL Server instance"
4 | categories: Sqlserver
5 | author: clabman
6 | lang: en
7 | ---
8 |
9 | The Microsoft SQL Server environment to power your database as a service!
10 |
11 | In this guide you will learn how to subscribe to the SQLServer As A Service lab and create your SQLServer Instance.
12 |
13 |
14 | Your Microsoft SQL server Database as a Service in 1 click!
15 |
16 | From Azure Pack (hosted in OVH datacenter) deploy in 30 seconds your turn key database. Powered by the SQL server technology, enjoy the simplicity, the reliability and the performance of this managed Microsoft environment!
17 |
18 | - Up to 5x SQL server Database aaS
19 | - 1 GB/ Database
20 | - Secured connexion
21 | - SQL Server 2014
22 |
23 | New features will be added soon and this guide will be updated accordingly.
24 | Enjoy !
25 |
26 | Activate SQLServer As A Service lab
27 | ===========================
28 |
29 | Go to [Runabove](https://www.runabove.com) > Labs > Discover SQL Server As A Service > Start Now
30 |
31 | 
32 |
33 | Either sign up (create new account) or sign in (use existing account)
34 |
35 | 
36 |
37 | To activate SQLServer As A Service Lab, click on 'More labs...' and 'Activate'
38 |
39 | 
40 |
41 | Create SQLServer As A Service lab
42 | ============================
43 |
44 | To create a new SQL Server Instance, click on 'SQL Server as a service' in the left menu, and then on '+ New SQL Server'.
45 |
46 | 
47 |
48 | 
49 |
50 | You will receive an email confirming the creation of your new SQL Server instance (in about 5 minutes).
51 |
52 | Start using your SQL Server instance
53 | ===========================================
54 |
55 | Once you received the email, your instance is now ready.
56 | You can now see it in your manager :
57 |
58 | 
59 |
60 | All informations about how to connect to your SQLServer instance is in email :
61 | Login : Your Email
62 | Password : Password sent by email
63 | Url : Windows Azure Pack Url
64 |
65 | Follow this Url, then logon with your credentials
66 |
67 | 
68 |
69 | Once done you will arrive on your portal that allow you to create Database on your SQLServer Instance.
70 |
71 | To create a database please click on 'ADD A NEW DATABASE'.
72 | 
73 |
74 | Then you will just have to follow creation step.
75 |
76 | Great your first SQLServer database is now ready to use.
77 | 
78 |
79 | During this beta you can create a maximum of 5 databases
80 |
81 | When you select your database you can do several actions :
82 | 
83 |
84 | - View Info : This allow you to find the ConnectionString
85 | - Delete : This allow you to remove your database
86 | - Change Password : This allow you to change your database password
87 | - Resize : This allow you to resize your database without any downtime
88 |
89 | You will now able to connect with any SQLServer client, here an example with ManagementStudio :
90 | 
91 |
92 | 
93 |
94 | Please do not forget to subscribre to sqlserveraas-subscribe@ml.ovh.net mailing list and send us your feedbacks.
95 |
96 |
--------------------------------------------------------------------------------
/en/_posts/2015-11-28-migrate-from-runabove-to-public-cloud.markdown:
--------------------------------------------------------------------------------
1 | ---
2 | layout: post
3 | title: "Migrate from RunAbove to Public Cloud"
4 | categories: Instances
5 | author: VincentCasse
6 | lang: en
7 | ---
8 | As you can see on the website, [RunAbove](https://www.runabove.com/index.xml) is now the brand representing all of OVH's innovations in various *Lab* forms such as [Desktop as a service](https://www.runabove.com/deskaas.xml) and of course everything to do with [IoT](https://www.runabove.com/iot-paas-timeseries.xml).
9 |
10 | Labs such as [Object Storage](https://www.runabove.com/cloud-storage.xml), [instances ](https://www.runabove.com/cloud-instance.xml) and [additionnal volumes](https://www.runabove.com/cloud-disks.xml) are now closed. However, you can still find them on the [OVH Public Cloud](https://www.ovh.com/us/cloud/) in a new and improved version.
11 |
12 | # Migrate to OVH Public Cloud
13 |
14 | Since RunAbove is now in its closing phase, it is necessary to migrate your activities based on instances, additional volumes and object storage as soon as possible. Several guides have been created in order to assist you with this migration.
15 |
16 | ## Requirements
17 |
18 | * [Prepare the environment for using the OpenStack API](https://community.runabove.com/kb/en/instances/use-openstack-command-line-tools.html)
19 |
20 | ## Modifying the OpenStack environment variables for RunAbove
21 |
22 | First, you need to retrieve the RC file containing all the information necessary for the use of the OpenStack APIs:
23 |
24 | * Login to your RunAbove account
25 | * Click on your name in the upper right corner and select OpenStack Horizon
26 | 
27 | * Select the region on the left-hand side;
28 | * Go to the Access & Security menu and then to the API Access tab;
29 | 
30 | * Click on Download OpenStack RC File;
31 | * Load the OpenStack environment variables for RunAbove by using the RC file;
32 |
33 | ```bash
34 | root@serveur:~$ source RunAbove_OpenRC.sh
35 | ```
36 |
37 | ## Migration
38 |
39 | There are guides explaining how to transfer instance backups and additional volumes from one datacenter to another.
40 |
41 | Since they're compatible with RunAbove, you can use them as a support tool for the migration your project:
42 |
43 | * **Migrating instances:** [Tranfer instance backup from one datacentre to another](https://community.runabove.com/kb/en/instances/transfer-instance-backup-from-one-datacenter-to-another.html)
44 | * **Migrating additional volumes:** [Transfer volume backup from one datacentre to another](https://community.runabove.com/kb/en/instances/transfer-volume-backup-from-one-datacenter-to-another.html)
45 | * **Migrating object storage:** When it comes to migrating an Object Storage, it is possible to download and send your data to your new project. It is also possible to synchronize two containers between each other [Synchronise object containers](https://community.runabove.com/kb/en/object-storage/how-to-sync-runabove-object-storage-containers-to-ovh-public-cloud.html)
46 |
47 | # Differences between RunAbove and Public Cloud
48 |
49 | ## Billing
50 |
51 | Contrary to RunAbove, there are 2 types of billing:
52 |
53 | * **Hourly billing:** As with the RunAbove's billing system, the invoice will be generated based on your usage during the following month.
54 | * **Monthly billing:** You can take advantage of a 50% discount when you choose this billing method. The invoice will be generated automatically on a pro rata basis for the current month.
55 |
56 | ## Features
57 |
58 | Some features are currently unavailable on Public Cloud:
59 |
60 | * Private networks (Private networks will arrive soon and will be compatible with vRack.)
61 | * Floating IPs
62 |
63 | At the same time, other functionalities that weren't present on RunAbove are now available on Public Cloud:
64 |
65 | * Windows licenses are available for EG and SP instances
66 | * Import of Failover IP addresses
67 | * Use of IP load balancing
68 |
69 |
70 |
--------------------------------------------------------------------------------
/en/_posts/2016-04-20-introduction-to-docker-with-mesos-marathon.md:
--------------------------------------------------------------------------------
1 | ---
2 | layout: post
3 | title: "Introduction to Docker with Apache Mesos & Marathon"
4 | categories: Docker
5 | author: devatoria
6 | lang: en
7 | ---
8 |
9 | #Welcome to the Docker PaaS lab!
10 |
11 | In this series of articles, we'll guide you through using our Docker PaaS, explaining what [Docker](https://www.docker.com/), [Apache Mesos](https://mesos.apache.org/) and [Marathon](https://mesosphere.github.io/marathon/) are, and how we use them to provide you with a managed Docker as a Service platform.
12 |
13 | ##What is Docker?
14 |
15 | Docker is now a standard containerization software. It allows you to build an read-only image of your application and all its dependencies, and run this image in software containers (isolated user-space processes), on any server supporting Docker (bare metal, public/provate cloud, VM, etc).
16 |
17 | ##What is Apache Mesos?
18 |
19 | Apache Mesos abstracts cluster **resources**, like CPU, disk or memory, to distribute it to **frameworks** (applications using Mesos resources) using an **offer system**. It is based on a Master/Slave architecture with a ZooKeeper quorum, ensuring you a high availablity.
20 |
21 | Frameworks are used to launch **tasks** on Mesos slaves. Each framework is composed of two main components: the **scheduler** and the **executor**. The scheduler registers with the Mesos master, to be able to receive resources offers. The executor is a process that will be launched on Mesos slaves to run the **tasks**.
22 |
23 | If you want more information about the Apache Mesos architecture, please read the really good [Mesos architecture documentation](http://mesos.apache.org/documentation/latest/architecture/).
24 |
25 | ##What is Marathon?
26 |
27 | [Marathon](https://mesosphere.github.io/marathon/) is an Apache Mesos framework to run Docker containers. It provides a lot of features like framework high availibility through an active/passive system, anti-affinity constraints to ensure containers are launched on different hosts or racks, application health checks, etc. You can manage your applications and containers using a web UI, allowing you to easily launch new containers, scale your applications, and more.
28 |
29 | #What do we provide?
30 |
31 | The Docker PaaS lab is based on all these software stacks, adding some other cool stuff, like redirecting your application Logs to our PaaS Logs, and your application metrics our PaaS Timeseries.. Our lab is stack managed, it means that **we** deploy and manage your infrastructure.
32 |
33 | ##Your resources are dedicated
34 |
35 | We are not providing a pool of slaves where everybody launches containers. You have **dedicated** Public Cloud instances, and dedicated resources. Your containers are running on your instances, and only yours, without noisy neighbours.
36 | During the beta, you'll be limited to a single (and free) [VPS SSD 3](https://www.ovh.com/fr/vps/vps-ssd.xml). However, you'll be able to add more resources as we advance, not limited to the OVH cloud.
37 |
38 | ##We manage everything
39 |
40 | We manage Mesos masters, ZooKeepers, load balancers and Mesos slaves. However, we provide you with an access to the marathon web UI and to your HAProxy load balancer stats.
41 |
42 | ##We do not only give you containers
43 | We provide you with a full stack, integrated with the OVH ecosystem. It means that your stack is fully extensible: as the beta evolves, you'll be able to add new instances, as your needs evolve, from any kind (Public Cloud, Dedicated Server, etc).
44 |
45 | To easily assess if you have enough resources for your running applications, we provide you with [a way to obtain metrics using the Timeseries PaaS lab](/kb/en/docker/marathon-container-metrics.html), and exploit them with Grafana dashboards.
46 |
47 | Also, you can have access to your application logs [using the PaaS Logs lab](/kb/en/docker/marathon-container-logs.html) in Graylog.
48 |
49 | #How do I start?
50 |
51 | If you want to run your first application now, please [register to our lab](https://www.runabove.com/docker-with-mesos-marathon.xml) and read the [quick start guide](/kb/en/docker/quick-start-with-marathon.html).
52 |
--------------------------------------------------------------------------------
/en/_posts/2014-10-01-create-ssh-keys.markdown:
--------------------------------------------------------------------------------
1 | ---
2 | layout: post
3 | title: "Create and use SSH keys"
4 | categories: Instances
5 | author: NicolasLM
6 | ---
7 |
8 | SSH keys are a safer alternative to passwords when it comes to authenticating
9 | to a remote server. Sysadmins tend to love them because they allow to
10 | administrate servers without remembering thousands of passwords. This guide
11 | will explain how to generate and use them.
12 |
13 | Root access and admin user
14 | --------------------------
15 |
16 | On RunAbove your SSH key allows you to connect as the user `admin`. This user
17 | has sudo capacities, which means that you can use root privileges with it. You
18 | can for instance install software with:
19 |
20 | sudo apt-get install nginx
21 |
22 | You can also directly have a root shell with:
23 |
24 | sudo su -
25 |
26 | What are SSH keys?
27 | -------------------
28 |
29 | SSH keys work in pairs, one key can be shared with anyone, the other one must
30 | be kept secret. To authenticate to a remote server you put your public key on
31 | the server and gain access to it using your private key.
32 |
33 | As the private key shall always remain private it is common to encrypt it using
34 | a passphrase. It prevents a bad guy from using your private key if your
35 | computer get stolen.
36 |
37 | How to generate them?
38 | ---------------------
39 |
40 | ### Linux and Mac OS X
41 |
42 | Before generating a pair of SSH keys, check that you do not have one already.
43 | Open a terminal and type:
44 |
45 | ls ~/.ssh
46 |
47 | If you see two file named `id_rsa` and `id_rsa.pub` you already have SSH keys
48 | and can skip the generation. The files can also be called `id_dsa` and
49 | `id_dsa.pub` depending on the encryption algorithm.
50 |
51 | To generate a pair of keys use the `ssh-keygen` command:
52 |
53 | ssh-keygen -b 4096 -t rsa
54 |
55 | You will be asked where to save the keys, the default value is a good choice,
56 | and for a passphrase. The later is not mandatory but recommended, it adds a lot
57 | of security if someone gets access to your machine.
58 |
59 | Starting from now you have a pair of SSH keys:
60 |
61 | * `~/.ssh/id_rsa` is your private key
62 | * `~/.ssh/id_rsa.pub` is the public key that goes to remote servers
63 |
64 | ### Windows
65 |
66 | On Windows you can generate SSH keys with a program called
67 | [PuTTYgen](http://www.chiark.greenend.org.uk/~sgtatham/putty/download.html).
68 | Download it and run it. Click on `Generate` and move your mouse on the window
69 | to generate entropy used to craft a truly random key.
70 |
71 | 
72 |
73 | When the process is finished copy the public key displayed in a file. Save the
74 | private key on your computer, you will need it to connect to a server.
75 |
76 | Adding your SSH key to RunAbove
77 | -------------------------------
78 |
79 | Once you have your keys, go to the RunAbove dashboard and add an SSH key. Give
80 | it a name and copy/paste the public key in the form. This key will be available
81 | to be integrated in the instances you launch from now on.
82 |
83 | Launching an instance
84 | ---------------------
85 |
86 | When you launch an instance choose the SSH key you have just added. This will
87 | allow you to remotely connect to the instance without password. Once the
88 | instance is booted, grab the IP address from the dashboard and connect to it.
89 |
90 | ### Linux and Mac OS X
91 |
92 | On Linux and Mac OS X you have nothing more to do, just open a terminal and:
93 |
94 | ssh admin@
95 |
96 | ### Windows
97 |
98 | If you connect from Windows with PuTTY you need to tell PuTTY to use your
99 | private key. This can be done in `SSH` > `Auth`, select your private key file:
100 |
101 | 
102 |
103 | Go back to the `Session` tab, paste the IP address of your instance and press
104 | `Open`. Log in as `admin` and you get a shell without entering any password.
105 |
106 |
--------------------------------------------------------------------------------
/en/_posts/2016-04-22-marathon-load-balancer.md:
--------------------------------------------------------------------------------
1 | ---
2 | layout: post
3 | title: "Marathon load balancer configuration"
4 | categories: Docker
5 | author: devatoria
6 | lang: en
7 | ---
8 |
9 | In this tutorial, we'll see how to configure the frontends and backends of our application in the [HAProxy](https://cbonte.github.io/haproxy-dconv/intro-1.6.html) load balancer, through application labels.
10 |
11 | ## First and foremost
12 |
13 | This tutorial assumes you have an nginx container up and running. If that's not the case, please read [the previous tutorial](/kb/en/docker/quick-start-with-marathon.html).
14 |
15 |
16 | ## Architecture
17 |
18 | Inside the `[marathon-lb](https://github.com/mesosphere/marathon-lb)` container, the marathon-lb.py script connects to the Marathon API to retrieve all running apps, generates a HAProxy config and reloads HAProxy. By default, marathon-lb binds to the service port of every application and sends incoming requests to the application instances.
19 |
20 | 
21 |
22 | Marathon provides you with a way of configuring the [HAProxy](https://cbonte.github.io/haproxy-dconv/intro-1.6.html) frontend and backends: application labels.
23 |
24 |
25 | ## Configuring your load balancer using labels
26 |
27 | The Marathon load balancer can be configured to expose your HTTP application behing a virtual host. Let's say we'd like to have access to our nginx container via the ``myapp.info`` domain. First, add a CNAME entry into the domain DNS zone, redirecting `myapp.info` to `.lb..containers.ovh.net`.
28 |
29 | **Note**: you can derive the value of both `username` and `cluster` from the address of your marathon web ui. For example, if your UI URL is `http://lb.sbg-1.containers.ovh.net/marathon/docker-abcdef-1/`, the value of `cluster` and `username` are respectively `sbg-1` and `docker-abcdef-1`.
30 |
31 | To make marathon-lb configure HAProxy with your virtual host, you just have to add the following labels to your application:
32 |
33 | - **HAPROXY\_0\_MODE**: "http"
34 | - **HAPROXY\_0\_VHOST**: "myapp.info"
35 |
36 | 
37 |
38 | **Note**: the `HAPROXY_0_` prefix will make sure the labels will apply to the first (remember, arrays indexes start at 0) service port defined in the application port mappings.
39 |
40 | Marathon-lb will then generate the following HAProxy backend and frontends:
41 |
42 | ```
43 | frontend marathon_http_in
44 | bind *:80
45 | mode http
46 | acl host_myapp_info hdr(host) -i myapp.info
47 | use_backend nginx_10080 if host_myapp_info
48 |
49 | frontend marathon_https_in
50 | bind *:443 ssl crt /etc/ssl/mesosphere.com.pem
51 | mode http
52 | use_backend nginx_10080 if { ssl_fc_sni myapp.info }
53 |
54 | frontend nginx_10080
55 | bind *:10080
56 | mode http
57 | use_backend nginx_10080
58 |
59 | backend nginx_10080
60 | balance leastconn
61 | mode http option forwardfor
62 | http-request set-header X-Forwarded-Port %[dst_port]
63 | http-request add-header X-Forwarded-Proto https if { ssl_fc }
64 | option httpchk GET /
65 | timeout check 20s
66 | server somehost_31736 127.0.1.1:31736 check inter 60s fall 4
67 | ```
68 |
69 | To reach you nginx, you can thus connect to the load balancer on the port 10080 (the application service port), or just request ``http://myapp.info`` (or even https). The global http (or https) HAProxy frontend will then redirect you to the `nginx_10080` backend.
70 |
71 | ## Configuring ACLs
72 |
73 | You can configure ACLs (Access Control List) on your applications, thus only allowing given IPs or networks to have access to your containers.
74 | To use this feature, add the ``HAPROXY_{n}_BACKEND_NETWORK_ALLOWED_ACL`` label, with value a space separated list of allowed IPs and/or networks (example: ``167.114.239.226 167.114.238.0/22``).
75 |
76 | ## Other labels
77 |
78 | Marathon-lb defines a [list of labels](https://github.com/mesosphere/marathon-lb/blob/master/Longhelp.md#other-labels) you can apply on each service port of each of your apps, to configure the backend weights, groups, path, stickyness, etc.
79 |
--------------------------------------------------------------------------------
 30 | {{ page.author }}
31 | {% endif %}
30 | {{ page.author }}
31 | {% endif %} 52 |
52 |  16 |
16 |