├── Bitwise operation
├── bitwiseAND.py
├── bitwiseNOT.py
├── bitwiseOR.py
└── bitwiseXOR.py
├── Blurring Techniques
├── averageBlur.py
├── bilateralBlur.py
├── gaussianBlur.py
└── medianBlur.py
├── Color Channels
└── splittingAndMergingColor.py
├── Color Spaces
├── LAB.py
├── LABtoBGR.py
├── bgrToRgb.py
├── grayscale.py
├── hsvToBGR.py
├── hues.py
└── matplotlibandopencv.py
├── Computing histograms
├── colorshistogram.py
├── histogramGRAY.py
└── histogramMasking.py
├── GradientsAndEdges
├── absoluteLaplacian.py
├── combinedsovel.py
├── laplacian.py
├── sobel.py
└── sobelandlaplacian.py
├── Image Transformations
├── imageflipping.py
├── imagerotations.py
└── transformshiftimage.py
├── Important color scaling
├── Canny.py
├── gaussianBlur.py
└── grayscale.py
├── Masking
├── circleMasking.py
├── rectangleMasking.py
└── weirdShape.py
├── README.md
├── Some reallife implementations
└── motionDetection.py
├── Thresholding
├── adaptiveThresh.py
├── inverseThresh.py
└── simpleThresh.py
├── basic reading and rescaling
├── cv2readingimage.py
├── cv2readingvideos.py
├── cv2resizeandrescale.py
├── cv2resizing.py
└── cv2webcam.py
├── contours
└── contourdetection.py
├── draw and write on images
└── draw.py
└── resources
├── images
├── dog.jpg
├── dog2.jpg
├── dog3.jpg
├── dog4.jpg
├── rnr1.jpg
└── shrek.png
├── results
├── BGRhistogram.png
├── LAB.png
├── LABtobgr.png
├── absoluteLaplacian.png
├── adaptivethresh.png
├── averageBlurring.png
├── bgrtogray.png
├── bgrtorgb.png
├── bilateralblurring.png
├── bitwiseNOT.png
├── bitwiseOR.png
├── bitwiseXOR.png
├── bitwizeAND.png
├── canny.png
├── circle.png
├── circlemask.png
├── combinedsobel.png
├── contouredges.png
├── contourthresh.png
├── contourthreshs.png
├── gaussianblur.png
├── gaussianblurimage.png
├── gray.png
├── histogramgray.png
├── hsvtoBGR.png
├── hues.png
├── imageflipping.png
├── imagerotation.png
├── imageshifting.png
├── inversethresh.png
├── lines.png
├── maskingregionhist.png
├── medianblur.png
├── mergingBGR.png
├── rectanglemasking.png
├── rectangles.png
├── resizingvideo.png
├── simplelaplacian.png
├── simplethresholding.png
├── singlerectangle.png
├── sobel.png
├── splittingblue.png
├── splittinggreen.png
├── splittingred.png
├── texts.png
└── weirdshapemasking.png
└── videos
├── nature.MOV
└── nature2.MOV
/Bitwise operation/bitwiseAND.py:
--------------------------------------------------------------------------------
1 | import cv2
2 | import numpy as np
3 |
4 | blank = np.zeros((400,400), dtype = "uint8")
5 |
6 | rectangle = cv2.rectangle(blank.copy(), (30,30), (370,370), 255, -1)
7 | circle = cv2.circle(blank.copy(), (200,200), 200, 255, -1)
8 |
9 | cv2.imshow("original rectangle", rectangle)
10 | cv2.imshow("original circle", circle)
11 |
12 | #bitwise and operator
13 | bitwiseAnd = cv2.bitwise_and(rectangle, circle)
14 | cv2.imshow("bitwiseAnd", bitwiseAnd)
15 |
16 | """
17 | bitwise and operator is used to find the common pixels between two images.
18 | """
19 |
20 | cv2.waitKey(0)
21 | cv2.destroyAllWindows()
22 |
23 |
--------------------------------------------------------------------------------
/Bitwise operation/bitwiseNOT.py:
--------------------------------------------------------------------------------
1 | import cv2
2 | import numpy as np
3 |
4 | blank = np.zeros((400,400), dtype = "uint8")
5 |
6 | rectangle = cv2.rectangle(blank.copy(),(30,30), (370,370), 255, -1)
7 | circle = cv2.circle(blank.copy(), (200,200), 200, 255, -1)
8 |
9 | cv2.imshow("Original rectangle", rectangle)
10 | cv2.imshow("Original circle", circle)
11 |
12 | #bitwise NOT operator
13 |
14 | bitwiseNOT = cv2.bitwise_not(rectangle)
15 | cv2.imshow("bitwiseNOT", bitwiseNOT)
16 |
17 | bitwizeNOTcircle = cv2.bitwise_not(circle)
18 | cv2.imshow("bitwiseNOTcircle", bitwizeNOTcircle)
19 | """
20 | bitwise NOT operator is used to find the uncommon pixels in image.
21 | """
22 |
23 | cv2.waitKey(0)
24 | cv2.destroyAllWindows()
25 |
--------------------------------------------------------------------------------
/Bitwise operation/bitwiseOR.py:
--------------------------------------------------------------------------------
1 | import cv2
2 | import numpy as np
3 |
4 | blank = np.zeros((400,400), dtype = "uint8")
5 |
6 | rectangle = cv2.rectangle(blank.copy(), (30,30), (370,370), 255, -1)
7 | circle = cv2.circle(blank.copy(), (200,200), 200, 255, -1)
8 |
9 | cv2.imshow("original rectangle", rectangle)
10 | cv2.imshow("original circle", circle)
11 |
12 | #bitwise or operator
13 | bitwiseOr = cv2.bitwise_or(rectangle, circle)
14 | cv2.imshow("bitwiseOr", bitwiseOr)
15 |
16 | """
17 | bitwise or operator is used to find the common pixels between two images.
18 | """
19 |
20 | cv2.waitKey(0)
21 | cv2.destroyAllWindows()
22 |
--------------------------------------------------------------------------------
/Bitwise operation/bitwiseXOR.py:
--------------------------------------------------------------------------------
1 | import cv2
2 | import numpy as np
3 |
4 | blank = np.zeros((400,400), dtype="uint8")
5 |
6 | rectangle = cv2.rectangle(blank.copy(), (30,30), (370,370), 255, -1)
7 |
8 | circle = cv2.circle(blank.copy(), (200,200), 200, 255, -1)
9 |
10 | cv2.imshow("original rectangle", rectangle)
11 | cv2.imshow("original circle", circle)
12 |
13 | #bitwise XOR operator
14 |
15 | bitwiseXOR = cv2.bitwise_xor(rectangle, circle)
16 |
17 | cv2.imshow("bitwiseXOR", bitwiseXOR)
18 |
19 | """
20 | bitwise XOR operator finds the not common pixel between two images.
21 | """
22 |
23 | cv2.waitKey(0)
24 | cv2.destroyAllWindows()
25 |
26 |
27 |
--------------------------------------------------------------------------------
/Blurring Techniques/averageBlur.py:
--------------------------------------------------------------------------------
1 | import cv2
2 | img = cv2.imread("/home/drox/Documents/computervision/ComputerVisionExercise/resources/images/dog3.jpg")
3 | cv2.imshow("original", img)
4 |
5 | average = cv2.blur(img, (3,3))
6 | cv2.imshow("average", average)
7 |
8 | cv2.waitKey(0)
9 | cv2.destroyAllWindows()
10 |
--------------------------------------------------------------------------------
/Blurring Techniques/bilateralBlur.py:
--------------------------------------------------------------------------------
1 | # most used bluring technique
2 | # bilateral bluring is used to reduce noise while keeping edges sharp
3 |
4 | import cv2
5 |
6 | img = cv2.imread("/home/drox/Documents/computervision/ComputerVisionExercise/resources/images/dog3.jpg")
7 |
8 | cv2.imshow("original", img)
9 |
10 | bilateral = cv2.bilateralFilter(img, 10, 35, 25)
11 | cv2.imshow("bilateral", bilateral)
12 |
13 | cv2.waitKey(0)
14 | cv2.destroyAllWindows()
15 |
--------------------------------------------------------------------------------
/Blurring Techniques/gaussianBlur.py:
--------------------------------------------------------------------------------
1 | import cv2
2 | img = cv2.imread("/home/drox/Documents/computervision/ComputerVisionExercise/resources/images/dog3.jpg")
3 |
4 | cv2.imshow("original", img)
5 |
6 | gaussian = cv2.GaussianBlur(img, (3,3), 0)
7 | cv2.imshow("gaussian", gaussian)
8 |
9 | cv2.waitKey(0)
10 | cv2.destroyAllWindows()
11 |
--------------------------------------------------------------------------------
/Blurring Techniques/medianBlur.py:
--------------------------------------------------------------------------------
1 | import cv2
2 | img = cv2.imread(
3 | "/home/drox/Documents/computervision/ComputerVisionExercise/resources/images/dog3.jpg")
4 |
5 | cv2.imshow("original", img)
6 |
7 | median = cv2.medianBlur(img, 3)
8 | cv2.imshow("median", median)
9 |
10 | cv2.waitKey(0)
11 | cv2.destroyAllWindows()
12 |
--------------------------------------------------------------------------------
/Color Channels/splittingAndMergingColor.py:
--------------------------------------------------------------------------------
1 | import cv2
2 | import numpy as np
3 |
4 | #reading image and splitting it into channels
5 | img = cv2.imread(
6 | "/home/drox/Documents/computervision/ComputerVisionExercise/resources/images/dog3.jpg")
7 |
8 | blank = np.zeros(img.shape[:2], dtype="uint8")
9 |
10 | cv2.imshow("original", img)
11 | b, g, r = cv2.split(img)
12 |
13 | cv2.imshow("Blue", b)
14 | cv2.imshow("Green", g)
15 | cv2.imshow("Red", r)
16 |
17 | blue = cv2.merge([b, blank, blank])
18 | green = cv2.merge([blank, g, blank])
19 | red = cv2.merge([blank, blank, r])
20 |
21 | cv2.imshow("blue", blue)
22 | cv2.imshow("green", green)
23 | cv2.imshow("red", red)
24 |
25 | # it is shown as grayscale because grayscale has the single channel operaiton
26 | print(img.shape)
27 | print(b.shape)
28 | print(g.shape)
29 | print(r.shape)
30 |
31 |
32 | # merging the channels
33 | merged = cv2.merge([b, g, r])
34 | cv2.imshow("Merged image", merged)
35 |
36 | cv2.waitKey(0)
37 | cv2.destroyAllWindows()
38 |
--------------------------------------------------------------------------------
/Color Spaces/LAB.py:
--------------------------------------------------------------------------------
1 | import cv2
2 |
3 | img = cv2.imread(
4 | "/home/drox/Documents/computervision/ComputerVisionExercise/resources/images/dog4.jpg")
5 | cv2.imshow("original", img)
6 |
7 | labs = cv2.cvtColor(img, cv2.COLOR_BGR2LAB)
8 | cv2.imshow("labs", labs)
9 |
10 | cv2.waitKey(0)
11 | cv2.destroyAllWindows()
12 |
--------------------------------------------------------------------------------
/Color Spaces/LABtoBGR.py:
--------------------------------------------------------------------------------
1 | import cv2
2 |
3 | img = cv2.imread("/home/drox/Documents/computervision/ComputerVisionExercise/resources/images/dog2.jpg")
4 | cv2.imshow("original", img)
5 |
6 | labs = cv2.cvtColor(img, cv2.COLOR_BGR2LAB)
7 | cv2.imshow("labs", labs)
8 |
9 | hues = cv2.cvtColor (img, cv2.COLOR_BGR2HSV)
10 | cv2.imshow("hues", hues)
11 |
12 | #conversion of labs format to BGR color format
13 | labs_bgr = cv2.cvtColor(labs, cv2.COLOR_LAB2BGR)
14 | cv2.imshow("labs to BGR", labs_bgr)
15 |
16 | #conversion of hues format to BGR color format
17 | hues_bgr = cv2.cvtColor(hues, cv2.COLOR_HSV2BGR)
18 | cv2.imshow("hues to BGR", hues_bgr)
19 |
20 | cv2.waitKey(0)
21 | cv2.destroyAllWindows()
--------------------------------------------------------------------------------
/Color Spaces/bgrToRgb.py:
--------------------------------------------------------------------------------
1 | import cv2
2 | import matplotlib.pyplot as plt
3 |
4 | img = cv2.imread("/home/drox/Documents/computervision/ComputerVisionExercise/resources/images/dog3.jpg")
5 |
6 | cv2.imshow("original", img)
7 |
8 | rgb = cv2.cvtColor(img, cv2.COLOR_BGR2RGB)
9 | cv2.imshow("rgb", rgb)
10 |
11 | plt.imshow(rgb)
12 | plt.show()
13 |
14 | cv2.waitKey(0)
15 | cv2.destroyAllWindows()
--------------------------------------------------------------------------------
/Color Spaces/grayscale.py:
--------------------------------------------------------------------------------
1 | import cv2
2 |
3 | img = cv2.imread("/home/drox/Documents/computervision/ComputerVisionExercise/resources/images/dog3.jpg")
4 |
5 | cv2.imshow("original", img)
6 |
7 | gray = cv2.cvtColor(img, cv2.COLOR_BGR2GRAY)
8 | cv2.imshow("grey", gray)
9 | cv2.waitKey(0)
10 |
11 | cv2.destroyAllWindows()
--------------------------------------------------------------------------------
/Color Spaces/hsvToBGR.py:
--------------------------------------------------------------------------------
1 | import cv2
2 |
3 | img = cv2.imread("/home/drox/Documents/computervision/ComputerVisionExercise/resources/images/dog3.jpg")
4 |
5 | cv2.imshow("original image", img)
6 |
7 | hsv = cv2.cvtColor(img, cv2.COLOR_BGR2HSV)
8 | cv2.imshow("HSV", hsv)
9 |
10 | #conversion of HSV to BGR color format
11 | bgr = cv2.cvtColor(hsv, cv2.COLOR_HSV2BGR)
12 | cv2.imshow("HSV to BGR", bgr)
13 |
14 | cv2.waitKey(0)
15 | cv2.destroyAllWindows()
--------------------------------------------------------------------------------
/Color Spaces/hues.py:
--------------------------------------------------------------------------------
1 | import cv2
2 |
3 | img = cv2.imread("/home/drox/Documents/computervision/ComputerVisionExercise/resources/images/dog2.jpg")
4 | cv2.imshow("original", img)
5 |
6 | hues = cv2.cvtColor(img, cv2.COLOR_BGR2HSV)
7 | cv2.imshow("hues", hues)
8 | cv2.waitKey(0)
9 |
10 | cv2.destroyAllWindows()
--------------------------------------------------------------------------------
/Color Spaces/matplotlibandopencv.py:
--------------------------------------------------------------------------------
1 | #Color reading in reality is not the same as color reading in computer vision. The reason is that the human eye is not the same as the computer's. So we get different perspective of the same image plotted using matplotlib and opencv.
2 |
3 | #matplotlib takes the image as a numpy array and plots it. Opencv takes the image as a numpy array and plots it with BGR features.
4 |
5 | import cv2
6 | import matplotlib.pyplot as plt
7 |
8 | image = plt.imread("/home/drox/Documents/computervision/ComputerVisionExercise/resources/images/dog3.jpg")
9 | plt.imshow(image)
10 | plt.show()
11 |
12 | img = cv2.imread("/home/drox/Documents/computervision/ComputerVisionExercise/resources/images/dog3.jpg")
13 | cv2.imshow("original", img)
14 | cv2.waitKey(0)
15 | cv2.destroyAllWindows()
--------------------------------------------------------------------------------
/Computing histograms/colorshistogram.py:
--------------------------------------------------------------------------------
1 | import cv2
2 | import numpy as np
3 | import matplotlib.pyplot as plt
4 |
5 | img = cv2.imread("/home/drox/Documents/computervision/ComputerVisionExercise/resources/images/dog4.jpg")
6 | cv2.imshow("original Image", img)
7 |
8 | plt.figure()
9 | plt.title("color image")
10 | plt.xlabel("Bins")
11 | plt.ylabel("# of Pixels")
12 | #color histogram
13 | colors = {"b","g","r"}
14 | for i, col in enumerate(colors):
15 | hist = cv2.calcHist([img], [i], None, [256], [0,256])
16 | plt.plot(hist, color = col)
17 | plt.xlim([0,256])
18 | plt.show()
19 |
20 |
--------------------------------------------------------------------------------
/Computing histograms/histogramGRAY.py:
--------------------------------------------------------------------------------
1 |
2 | """
3 | Histograms for the images file is nothing but the frequency of pixels present in the image.
4 | BGR is the content of color present to form the image.
5 | so we can plot such a graph for each color channel with a histogram.
6 | Checks distribution of colors in the image.
7 | """
8 |
9 | import matplotlib.pyplot as plt
10 | import cv2
11 |
12 | img = cv2.imread("/home/drox/Documents/computervision/ComputerVisionExercise/resources/images/dog4.jpg")
13 | cv2.imshow("original", img)
14 |
15 | gray = cv2.cvtColor(img, cv2.COLOR_BGR2GRAY)
16 | cv2.imshow("gray", gray)
17 |
18 | gray_hist = cv2.calcHist([gray], [0], None, [256], [0, 256])
19 | plt.figure()
20 | plt.title("Grayscale Histogram")
21 | plt.xlabel("Bins")
22 | plt.ylabel("# of Pixels")
23 | plt.plot(gray_hist)
24 | plt.xlim([0, 256])
25 | plt.show()
26 |
27 | cv2.waitKey(0)
28 |
29 | cv2.destroyAllWindows()
--------------------------------------------------------------------------------
/Computing histograms/histogramMasking.py:
--------------------------------------------------------------------------------
1 | import cv2
2 | import numpy as np
3 | import matplotlib.pyplot as plt
4 |
5 | img = cv2.imread("/home/drox/Documents/computervision/ComputerVisionExercise/resources/images/dog2.jpg")
6 |
7 | cv2.imshow("original", img)
8 |
9 | blank = np.zeros(img.shape[:2], dtype="uint8")
10 | gray = cv2.cvtColor(img, cv2.COLOR_BGR2GRAY)
11 | cv2.imshow("gray", gray)
12 |
13 | mask = cv2.circle(blank, (img.shape[1]//2, img.shape[0]//2 + 45),100, 255, -1)
14 | cv2.imshow("mask", mask)
15 |
16 | maskedImg = cv2.bitwise_and(gray, gray, mask=mask)
17 | cv2.imshow("maskedImg", maskedImg)
18 |
19 | gray_hist = cv2.calcHist([gray], [0], mask, [256], [0,256])
20 | plt.plot(gray_hist)
21 | plt.xlim([0,256])
22 | plt.show()
23 | cv2.waitKey(0)
24 | cv2.destroyAllWindows()
25 |
--------------------------------------------------------------------------------
/GradientsAndEdges/absoluteLaplacian.py:
--------------------------------------------------------------------------------
1 | import cv2
2 | import numpy as np
3 |
4 | img = cv2.imread("/home/drox/Documents/computervision/ComputerVisionExercise/resources/images/dog3.jpg")
5 |
6 | cv2.imshow("original", img)
7 |
8 |
9 | gray = cv2.cvtColor(img, cv2.COLOR_BGR2GRAY)
10 |
11 | # absolute laplacian
12 | laplacian = cv2.Laplacian(gray, cv2.CV_64F)
13 | laplacian = np.uint8(np.absolute(laplacian))
14 |
15 | #displaying laplacian image
16 | cv2.imshow("laplacian", laplacian)
17 |
18 | cv2.waitKey(0)
19 | cv2.destroyAllWindows()
--------------------------------------------------------------------------------
/GradientsAndEdges/combinedsovel.py:
--------------------------------------------------------------------------------
1 | import cv2
2 | import numpy as np
3 |
4 | img = cv2.imread("/home/drox/Documents/computervision/ComputerVisionExercise/resources/images/dog2.jpg")
5 | gray = cv2.cvtColor(img, cv2.COLOR_BGR2GRAY)
6 |
7 | cv2.imshow("gray", gray)
8 |
9 | lap = cv2.Laplacian(gray, cv2.CV_64F)
10 | lap = np.uint8(np.absolute(lap))
11 | cv2.imshow("lap", lap)
12 |
13 | sobelx = cv2.Sobel(gray, cv2.CV_64F, 1, 0)
14 | sobely = cv2.Sobel(gray, cv2.CV_64F, 0, 1)
15 |
16 | combined_sobel = cv2.bitwise_or(sobelx, sobely)
17 |
18 | cv2.imshow("sobelx", sobelx)
19 | cv2.imshow("sobely", sobely)
20 | cv2.imshow("combined_sobel", combined_sobel)
21 |
22 | cv2.waitKey(0)
23 |
24 | cv2.destroyAllWindows()
25 |
--------------------------------------------------------------------------------
/GradientsAndEdges/laplacian.py:
--------------------------------------------------------------------------------
1 | import cv2
2 | import numpy as np
3 | img = cv2.imread("/home/drox/Documents/computervision/ComputerVisionExercise/resources/images/dog2.jpg")
4 |
5 | cv2.imshow("Original", img)
6 |
7 | gray = cv2.cvtColor(img, cv2.COLOR_BGR2GRAY)
8 |
9 | # laplacian
10 | laplacian = cv2.Laplacian(gray, cv2.CV_64F)
11 |
12 | cv2.imshow("Laplacian", laplacian)
13 |
14 | cv2.waitKey(0)
15 | cv2.destroyAllWindows()
--------------------------------------------------------------------------------
/GradientsAndEdges/sobel.py:
--------------------------------------------------------------------------------
1 | import cv2
2 |
3 | img = cv2.imread("/home/drox/Documents/computervision/ComputerVisionExercise/resources/images/dog2.jpg")
4 | gray = cv2.cvtColor(img, cv2.COLOR_BGR2GRAY)
5 |
6 | cv2.imshow("gray", gray)
7 |
8 | # Compare this snippet from GradientsAndEdges/sobel.py:
9 |
10 | sobelx = cv2.Sobel(gray, cv2.CV_64F, 1, 0)
11 | sobely = cv2.Sobel(gray, cv2.CV_64F, 0, 1)
12 |
13 | cv2.imshow("sobelx", sobelx)
14 | cv2.imshow("sobely", sobely)
15 |
16 | cv2.waitKey(0)
17 |
18 | cv2.destroyAllWindows()
19 |
--------------------------------------------------------------------------------
/GradientsAndEdges/sobelandlaplacian.py:
--------------------------------------------------------------------------------
1 | import cv2
2 | import numpy as np
3 |
4 | img = cv2.imread("/home/drox/Documents/computervision/ComputerVisionExercise/resources/images/dog2.jpg")
5 | gray = cv2.cvtColor(img, cv2.COLOR_BGR2GRAY)
6 |
7 | cv2.imshow("gray", gray)
8 |
9 | lap = cv2.Laplacian(gray, cv2.CV_64F)
10 | lap = np.uint8(np.absolute(lap))
11 | cv2.imshow("lap", lap)
12 |
13 |
14 | sobelx = cv2.Sobel(gray, cv2.CV_64F, 1, 0)
15 |
16 | sobely = cv2.Sobel(gray, cv2.CV_64F, 0, 1)
17 |
18 | combined_sobel = cv2.bitwise_or(sobelx, sobely)
19 |
20 | cv2.imshow("sobelx", sobelx)
21 |
22 | cv2.imshow("sobely", sobely)
23 |
24 | cv2.imshow("combined_sobel", combined_sobel)
25 |
26 | canny = cv2.Canny(gray, 100, 200)
27 | cv2.imshow("canny", canny)
28 |
29 | cv2.waitKey(0)
30 |
31 | cv2.destroyAllWindows()
32 |
--------------------------------------------------------------------------------
/Image Transformations/imageflipping.py:
--------------------------------------------------------------------------------
1 | import cv2
2 |
3 | img = cv2.imread("/home/drox/Documents/computervision/ComputerVisionExercise/resources/images/shrek.png")
4 |
5 | img = cv2.resize(img, (500,500), interpolation = cv2.INTER_AREA)
6 | cv2.imshow('Original',img)
7 |
8 | flip = cv2.flip(img, 1) #it can be 0, 1 or -1 only
9 | cv2.imshow('Flipped1',flip)
10 |
11 | flip = cv2.flip(img, 0) #it can be 0, 1 or -1 only
12 | cv2.imshow('Flipped2',flip)
13 |
14 | flip = cv2.flip(img, -1) #it can be 0, 1 or -1 only
15 | cv2.imshow('Flipped3',flip)
16 |
17 | cv2.waitKey(0)
18 | cv2.destroyAllWindows()
19 |
--------------------------------------------------------------------------------
/Image Transformations/imagerotations.py:
--------------------------------------------------------------------------------
1 | # rotation
2 | import cv2
3 |
4 | img = cv2.imread(
5 | "/home/drox/Documents/computervision/ComputerVisionExercise/resources/images/dog2.jpg")
6 | img = cv2.resize(img, (500, 500), interpolation=cv2.INTER_CUBIC)
7 | cv2.imshow('Original', img)
8 |
9 | def rotate(img, angle, rotPoint=None):
10 | (height, width) = img.shape[:2]
11 | if rotPoint is None:
12 | rotPoint = (width//2, height//2)
13 | rotMat = cv2.getRotationMatrix2D(rotPoint, angle, 1.0)
14 | dimentions = (width, height)
15 | return cv2.warpAffine(img, rotMat, dimentions)
16 |
17 |
18 | rotated = rotate(img, 90)
19 | cv2.imshow("rotated1", rotated)
20 |
21 | rotated = rotate(img, -90)
22 | cv2.imshow("rotated2", rotated)
23 | cv2.waitKey(0)
24 | cv2.destroyAllWindows()
25 |
--------------------------------------------------------------------------------
/Image Transformations/transformshiftimage.py:
--------------------------------------------------------------------------------
1 |
2 | import cv2 as cv
3 | import numpy as np
4 |
5 | img = cv.imread("/home/drox/Documents/computervision/ComputerVisionExercise/resources/images/dog3.jpg")
6 | cv.imshow("original", img)
7 |
8 | #translation
9 | def translate(img, x, y):
10 | transMat = np.float32([[1,0,x],[0,1,y]])
11 | dimentions = (img.shape[1], img.shape[0])
12 | return cv.warpAffine(img, transMat, dimentions)
13 |
14 | # -x --> Left
15 | # +x --> Right
16 | # -y --> Up
17 | # +y --> Down
18 |
19 | translated = translate(img,100,100)
20 | cv.imshow("translated1",translated)
21 |
22 | translated = translate(img,-100,-100)
23 | cv.imshow("translated2",translated)
24 |
25 | translated = translate(img,-100,100)
26 | cv.imshow("translated3",translated)
27 |
28 | translated = translate(img,100,-100)
29 | cv.imshow("translated4",translated)
30 |
31 | cv.waitKey(0)
32 | cv.destroyAllWindows()
33 |
34 | #image will shift by x and y pixels
--------------------------------------------------------------------------------
/Important color scaling/Canny.py:
--------------------------------------------------------------------------------
1 | import cv2 as cv
2 |
3 | img = cv.imread("/home/drox/Documents/computervision/ComputerVisionExercise/resources/images/rnr1.jpg")
4 | canny = cv.Canny(img, 100, 200)
5 | cv.imshow("canny", canny)
6 | cv.waitKey(0)
7 | cv.destroyAllWindows()
8 |
9 | #with blur and canny tor reduce some of the edges
10 | img = cv.imread("/home/drox/Documents/computervision/ComputerVisionExercise/resources/images/rnr1.jpg")
11 | blur= cv.GaussianBlur(img,(7,7), cv.BORDER_DEFAULT)
12 | canny = cv.Canny(blur, 100,200)
13 | cv.imshow("Canny Edges", canny)
14 | cv.waitKey(0)
15 | cv.destroyAllWindows()
16 |
17 | #dialating the images
18 | dilated = cv.dilate(canny, (7,7), iterations=3)
19 | cv.imshow("dilated", dilated)
20 | cv.waitKey(0)
21 |
22 | #eroding the images
23 | eroded = cv.erode(dilated,(7,7), iterations=3)
24 | cv.imshow("eroded", eroded)
25 | cv.waitKey(0)
26 | cv.destroyAllWindows()
27 |
28 | #resize
29 | resized = cv.resize(img, (500,500), interpolation=cv.INTER_CUBIC)
30 | cv.imshow("resized", resized)
31 | cv.waitKey(0)
32 | cv.destroyAllWindows()
33 |
34 | #cropping
35 | cropped = resized[0:200, 0:200]
36 | cv.imshow("cropped", cropped)
37 | cv.waitKey(0)
38 | cv.destroyAllWindows()
--------------------------------------------------------------------------------
/Important color scaling/gaussianBlur.py:
--------------------------------------------------------------------------------
1 | import cv2 as cv
2 | img = cv.imread("/home/drox/Documents/computervision/ComputerVisionExercise/resources/images/dog4.jpg")
3 | blur = cv.GaussianBlur(img,(7,7), cv.BORDER_DEFAULT)
4 | cv.imshow("blur", blur)
5 | cv.waitKey(0)
6 | cv.destroyAllWindows()
--------------------------------------------------------------------------------
/Important color scaling/grayscale.py:
--------------------------------------------------------------------------------
1 | import cv2 as cv
2 | img = cv.imread("/home/drox/Documents/computervision/ComputerVisionExercise/resources/images/dog2.jpg")
3 | gray = cv.cvtColor(img, cv.COLOR_BGR2GRAY)
4 | cv.imshow("gray", gray)
5 | cv.waitKey(0)
6 | cv.destroyAllWindows()
7 |
--------------------------------------------------------------------------------
/Masking/circleMasking.py:
--------------------------------------------------------------------------------
1 | import cv2
2 | import numpy as np
3 |
4 | img = cv2.imread("/home/drox/Documents/computervision/ComputerVisionExercise/resources/images/dog2.jpg")
5 | cv2.imshow("original", img)
6 |
7 | blank = np.zeros(img.shape[:2], dtype="uint8")
8 | mask = cv2.circle(blank, (img.shape[1]//2, img.shape[0]//2 + 45),100, 255, -1)
9 | cv2.imshow("mask", mask)
10 |
11 | maskedImg = cv2.bitwise_and(img, img, mask=mask)
12 | cv2.imshow("maskedImg", maskedImg)
13 |
14 | cv2.waitKey(0)
15 | cv2.destroyAllWindows()
16 |
--------------------------------------------------------------------------------
/Masking/rectangleMasking.py:
--------------------------------------------------------------------------------
1 | from inspect import ismemberdescriptor
2 | import cv2
3 | import numpy as np
4 |
5 | img = cv2.imread(
6 | "/home/drox/Documents/computervision/ComputerVisionExercise/resources/images/dog2.jpg")
7 | cv2.imshow("original", img)
8 |
9 | blank = np.zeros(img.shape[:2], dtype="uint8")
10 |
11 | mask = cv2.rectangle(blank, (img.shape[1]//2-200, img.shape[0]//2),
12 | (img.shape[1]//2, img.shape[0]//2+200), 255, -1)
13 | cv2.imshow("mask", mask)
14 |
15 | masked = cv2.bitwise_and(img, img, mask=mask)
16 | cv2.imshow("masked", masked)
17 |
18 | cv2.waitKey(0)
19 | cv2.destroyAllWindows()
20 |
--------------------------------------------------------------------------------
/Masking/weirdShape.py:
--------------------------------------------------------------------------------
1 | import cv2
2 | import numpy as np
3 |
4 | img = cv2.imread("/home/drox/Documents/computervision/ComputerVisionExercise/resources/images/dog2.jpg")
5 | cv2.imshow("original", img)
6 |
7 | blank = np.zeros(img.shape[:2], dtype="uint8")
8 |
9 | rectangle = cv2.rectangle(blank.copy(), (80,80), (500,400), 255, -1)
10 |
11 | circle = cv2.circle(blank.copy(), (img.shape[1]//2-200, img.shape[0]//2),100, 255, -1)
12 |
13 | mask = cv2.bitwise_or(rectangle, circle)
14 |
15 | # cv2.imshow("mask", mask)
16 |
17 | masked = cv2.bitwise_and(img, img, mask=mask)
18 | cv2.imshow("masked", masked)
19 |
20 | cv2.waitKey(0)
21 | cv2.destroyAllWindows()
22 |
--------------------------------------------------------------------------------
/README.md:
--------------------------------------------------------------------------------
1 | # ComputerVisionExercise
2 |
3 | In this repository I will be contributing all the necessary tools in OpenCV and its application with better code explanation. Every operations are explain well below with their examples.
4 |
5 | ## Bitwise operation
6 | Bitwise operation is similar to logic gate we have studied during our high school. This operation contains AND, OR, NOT, XOR operators that deals with same mathematical solution for images.
7 |
8 | 1. bitwiseAND
9 | Bitwise AND maps the common pixels present in overlapping images.
10 |  11 |
12 | 2. bitwiseOR
11 |
12 | 2. bitwiseOR
13 | Bitwise OR maps all images overlapping and non overlapping conditions.
14 |  15 |
16 | 3. bitwiseNOT
15 |
16 | 3. bitwiseNOT
17 | Bitwise NOT maps overlapping condition and inverse it with non overlapping conditions.
18 |  19 |
20 | 4. bitwiseXOR
19 |
20 | 4. bitwiseXOR
21 | Bitwise XOR maps exclusive overlapping conditions.
22 |  23 |
24 |
25 | ## Blurring Techniques
26 | 1. averageBlur
23 |
24 |
25 | ## Blurring Techniques
26 | 1. averageBlur
27 | The image is convolved with a box filter (normalized). In this process, the central element of the image is replaced by the average of all the pixels in the kernel area.
28 |  29 |
30 | 2. bilateralBlur
29 |
30 | 2. bilateralBlur
31 | Bilaretal bluring is also known as image smoothing, image blurring is achieved by convolving the image with a low-pass filter kernel. It is useful for removing noise. It actually removes high frequency content (eg: noise, edges) from the image.
32 |  33 |
34 | 3. gaussianBlur
33 |
34 | 3. gaussianBlur
35 | In Gaussian Blur operation, the image is convolved with a Gaussian filter instead of the box filter. The Gaussian filter is a low-pass filter that removes the high-frequency components are reduced.
36 |  37 |
38 | 4. medianBlur
37 |
38 | 4. medianBlur
39 | Here, the central element of the image is replaced by the median of all the pixels in the kernel area. This operation processes the edges while removing the noise.
40 |  41 |
42 | ## Color Channels
43 | This folder contains channeling of the images that combines all the basic colors that is red blue and green.
44 | 1. splitting and merging colors
41 |
42 | ## Color Channels
43 | This folder contains channeling of the images that combines all the basic colors that is red blue and green.
44 | 1. splitting and merging colors
45 | Since images in OpenCV are internally represented as NumPy arrays, accessing each channel can be accomplished in multiple ways, implying multiple ways to skin this images.
46 | a. Splitting red color
47 | 
48 | b. Splitting blue color
49 | 
50 | c. Splitting green color
51 | 
52 |
53 |
54 | ## Color Spaces
55 | This folder contains most used image color spaces such as hue, gray, labs and blur.
56 |
57 | 1. LAB
58 | It expresses color as three values: L* for perceptual lightness, and a* and b* for the four unique colors of human vision: red, green, blue, and yellow. CIELAB was intended as a perceptually uniform space, where a given numerical change corresponds to a similar perceived change in color.
59 | 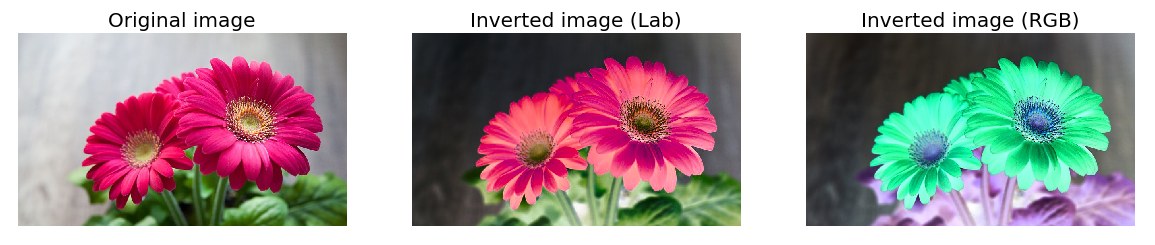 60 |
61 | 2. Grayscale
60 |
61 | 2. Grayscale
62 | The grayscale image of the same size as a color image, made of just one of these primary colors. For instance, an image from a standard digital camera will have a red, green and blue channel. A grayscale image has just one channel.
63 |  64 |
64 | 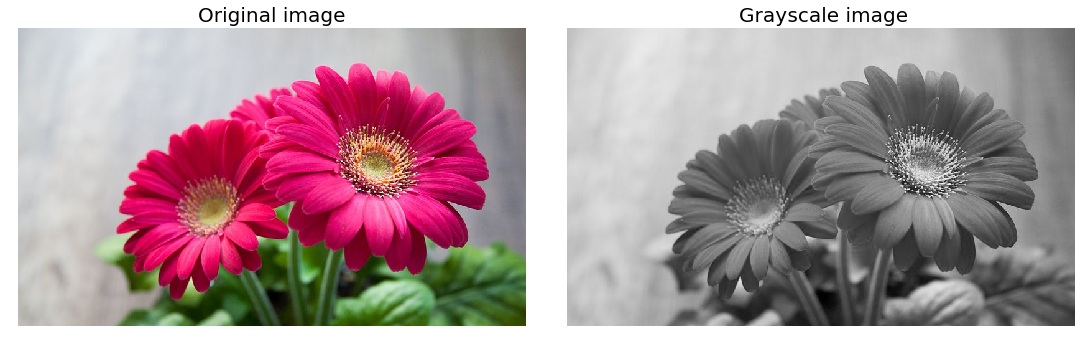 65 |
66 | 3. Hues
65 |
66 | 3. Hues
67 | Hue refers to the dominant color family. Hue refers to the origin of the colors we can see. Primary and Secondary colors (Yellow, Orange, Red, Violet, Blue, and Green) are considered hues.
68 |  69 |
70 | 4. LABtoBGR
69 |
70 | 4. LABtoBGR
71 | Conversion of image with channel LAB to BGR.
72 |  73 |
74 | 5. bgrtorgb
73 |
74 | 5. bgrtorgb
75 | Conversion of image with channel BGR to RGB.
76 |  77 |
78 | 6. hsvtobgr
77 |
78 | 6. hsvtobgr
79 | Conversion of images with channel HSV to BGR.
80 |  81 |
82 | ## Computing Histogram
83 | Histogram from matplotlib can clearly classify which color channel the image adapt. This program creates a frequency of all the color channel used in the image.
84 |
85 | 1. Colorhistogram
81 |
82 | ## Computing Histogram
83 | Histogram from matplotlib can clearly classify which color channel the image adapt. This program creates a frequency of all the color channel used in the image.
84 |
85 | 1. Colorhistogram
86 | Frequency of all the color present in the colored images.
87 |  88 |
89 | 2. Grayhistogram
88 |
89 | 2. Grayhistogram
90 | Frequency of the channel grayscale images.
91 |  92 |
93 | 3. Histogram masking
92 |
93 | 3. Histogram masking
94 | This checks colors frequency of masked area.
95 |  96 |
97 | ## Gradients and edges
98 | Every pixel inside the Gradient image represents the contrast intensity in the neighborhood of a pixel. It is used for image segmentation and edge detection.
96 |
97 | ## Gradients and edges
98 | Every pixel inside the Gradient image represents the contrast intensity in the neighborhood of a pixel. It is used for image segmentation and edge detection.
99 | Edge detection is an image-processing technique, which is used to identify the boundaries (edges) of objects, or regions within an image. Edges are among the most important features associated with images.
100 |
101 | 1. AbsoluteLaplation
102 |  103 |
104 | 2. Laplacian
103 |
104 | 2. Laplacian
105 |  106 |
107 | 3. Sobel
106 |
107 | 3. Sobel
108 |  109 |
110 | ## Image Transformations
111 | This folder contains all the image transformations related functions and libraries in OpenCV.
112 |
113 | 1. Image Flipping.
109 |
110 | ## Image Transformations
111 | This folder contains all the image transformations related functions and libraries in OpenCV.
112 |
113 | 1. Image Flipping.
114 | 
115 | 2. Image Rotation.
116 | 
117 | 3. Shifting Images.
118 | 
119 |
120 | ## Important color scaling
121 | It contains all the scaling features of openCV.
122 |
123 | 1. Canny.
124 | 
125 | 2. Gaussian Blur.
126 |
127 | 3. GrayScale.
128 |
129 |
130 |
131 | ## Masking
132 | Masking is something we consider as focusing in some areas of image. Lets have a look into some of the methods that are carried out for masking.
133 | circleMasking
134 | 
135 |
136 | 2. rectangleMasking
137 | 
138 |
139 | 3. weirdshapes
140 | 
141 |
142 |
143 | ## Some reallife implementations
144 | This folder contains all the real life implementation that I have done using OpenCV.
145 |
146 | 1. motion detection.
147 |
148 | ## Basic reading and rescaling
149 | This folder contains all the basic reading and rescaling technique in OpenCV.
150 |
151 | 1. cv2 reading image.
152 | 2. cv2 reading videos.
153 | 3. cv2 resize and rescale.
154 | 4. cv2 resizing.
155 | 5. cv2 webcam.
156 |
157 | ## Draw and write on images.
158 | This folder contains drawing in a blank canvas or creating a bounding box in the detected place.
159 |
160 | 1. Draw.
161 |
162 | ## Resources
163 | This folder contains images and video used for all the programs.
164 |
165 | 1. Images.
166 | 2. Videos.
167 |
168 | These are some of the fundamentals of this repository.
169 | Hope it helps somebody who is exploring OpenCV and ended up here.
170 |
171 | ## Thresholding
172 | 1. AdaptiveThresholding
173 | Adaptive thresholding is the method where the threshold value is calculated for smaller regions and therefore, there will be different threshold values for different regions.
174 | 
175 |
176 | 2. InverseThresholding
177 | Inverse-Binary Thresholding is just the opposite of Binary Thresholding. The destination pixel is set to: zero, if the corresponding source pixel is greater than the threshold.
178 | 
179 |
180 | 3. SimpleThresholding
181 | Simple thresholding where we manually supply parameters to segment the image — this works extremely well in controlled lighting conditions where we can ensure high contrast between the foreground and background of the image.
182 | 
183 |
184 |
185 | ## happy coding.
186 |
--------------------------------------------------------------------------------
/Some reallife implementations/motionDetection.py:
--------------------------------------------------------------------------------
1 | # Importing the Pandas libraries
2 | import pandas as panda
3 |
4 | # Importing the OpenCV libraries
5 | import cv2
6 |
7 | # Importing the time module
8 | import time
9 |
10 | # Importing the datetime function of the datetime module
11 | from datetime import datetime
12 |
13 | # Assigning our initial state in the form of variable initialState as None for initial frames
14 | initialState = None
15 |
16 | # List of all the tracks when there is any detected of motion in the frames
17 | motionTrackList= [ None, None ]
18 |
19 | # A new list 'time' for storing the time when movement detected
20 | motionTime = []
21 |
22 | # Initialising DataFrame variable 'dataFrame' using pandas libraries panda with Initial and Final column
23 | dataFrame = panda.DataFrame(columns = ["Initial", "Final"])
24 |
25 | # starting the webCam to capture the video using cv2 module
26 | video = cv2.VideoCapture(0)
27 |
28 | # using infinite loop to capture the frames from the video
29 | while True:
30 |
31 | # Reading each image or frame from the video using read function
32 |
33 | check, cur_frame = video.read()
34 |
35 |
36 |
37 | # Defining 'motion' variable equal to zero as initial frame
38 |
39 | var_motion = 0
40 |
41 |
42 |
43 | # From colour images creating a gray frame
44 |
45 | gray_image = cv2.cvtColor(cur_frame, cv2.COLOR_BGR2GRAY)
46 |
47 |
48 |
49 | # To find the changes creating a GaussianBlur from the gray scale image
50 |
51 | gray_frame = cv2.GaussianBlur(gray_image, (21, 21), 0)
52 |
53 |
54 |
55 | # For the first iteration checking the condition
56 |
57 | # we will assign grayFrame to initalState if is none
58 |
59 | if initialState is None:
60 |
61 | initialState = gray_frame
62 |
63 | continue
64 |
65 |
66 |
67 | # Calculation of difference between static or initial and gray frame we created
68 |
69 | differ_frame = cv2.absdiff(initialState, gray_frame)
70 |
71 |
72 |
73 | # the change between static or initial background and current gray frame are highlighted
74 |
75 |
76 |
77 | thresh_frame = cv2.threshold(differ_frame, 30, 255, cv2.THRESH_BINARY)[1]
78 |
79 | thresh_frame = cv2.dilate(thresh_frame, None, iterations = 2)
80 |
81 |
82 |
83 | # For the moving object in the frame finding the coutours
84 |
85 | cont,_ = cv2.findContours(thresh_frame.copy(),
86 |
87 | cv2.RETR_EXTERNAL, cv2.CHAIN_APPROX_SIMPLE)
88 |
89 |
90 |
91 | for cur in cont:
92 |
93 | if cv2.contourArea(cur) < 10000:
94 |
95 | continue
96 |
97 | var_motion = 1
98 |
99 | (cur_x, cur_y,cur_w, cur_h) = cv2.boundingRect(cur)
100 |
101 |
102 |
103 | # To create a rectangle of green color around the moving object
104 |
105 | cv2.rectangle(cur_frame, (cur_x, cur_y), (cur_x + cur_w, cur_y + cur_h), (0, 255, 0), 3)
106 |
107 |
108 |
109 | # from the frame adding the motion status
110 |
111 | motionTrackList.append(var_motion)
112 |
113 | motionTrackList = motionTrackList[-2:]
114 |
115 |
116 |
117 | # Adding the Start time of the motion
118 |
119 | if motionTrackList[-1] == 1 and motionTrackList[-2] == 0:
120 |
121 | motionTime.append(datetime.now())
122 |
123 |
124 |
125 | # Adding the End time of the motion
126 |
127 | if motionTrackList[-1] == 0 and motionTrackList[-2] == 1:
128 |
129 | motionTime.append(datetime.now())
130 |
131 |
132 |
133 | # In the gray scale displaying the captured image
134 |
135 | cv2.imshow("The image captured in the Gray Frame is shown below: ", gray_frame)
136 |
137 |
138 |
139 | # To display the difference between inital static frame and the current frame
140 |
141 | cv2.imshow("Difference between the inital static frame and the current frame: ", differ_frame)
142 |
143 |
144 |
145 | # To display on the frame screen the black and white images from the video
146 |
147 | cv2.imshow("Threshold Frame created from the PC or Laptop Webcam is: ", thresh_frame)
148 |
149 |
150 |
151 | # Through the colour frame displaying the contour of the object
152 |
153 | cv2.imshow("From the PC or Laptop webcam, this is one example of the Colour Frame:", cur_frame)
154 |
155 |
156 |
157 | # Creating a key to wait
158 |
159 | wait_key = cv2.waitKey(1)
160 |
161 |
162 |
163 | # With the help of the 'm' key ending the whole process of our system
164 |
165 | if wait_key == ord('m'):
166 |
167 | # adding the motion variable value to motiontime list when something is moving on the screen
168 |
169 | if var_motion == 1:
170 |
171 | motionTime.append(datetime.now())
172 |
173 | break
174 |
175 | # At last we are adding the time of motion or var_motion inside the data frame
176 | for a in range(0, len(motionTime), 2):
177 |
178 | dataFrame = dataFrame.append({"Initial" : time[a], "Final" : motionTime[a + 1]}, ignore_index = True)
179 |
180 |
181 | # To record all the movements, creating a CSV file
182 | dataFrame.to_csv("EachMovement.csv")
183 |
184 | # Releasing the video
185 | video.release(1)
186 |
187 | # Now, Closing or destroying all the open windows with the help of openCV
188 | cv2.destroyAllWindows()
--------------------------------------------------------------------------------
/Thresholding/adaptiveThresh.py:
--------------------------------------------------------------------------------
1 | import cv2
2 | img = cv2.imread("/home/drox/Documents/computervision/ComputerVisionExercise/resources/images/dog3.jpg")
3 |
4 | cv2.imshow("Original", img)
5 |
6 | gray = cv2.cvtColor(img, cv2.COLOR_BGR2GRAY)
7 |
8 | # Adaptive thresholding
9 |
10 | thresh = cv2.adaptiveThreshold(gray, 255, cv2.ADAPTIVE_THRESH_MEAN_C, cv2.THRESH_BINARY, 11, 9)
11 |
12 | cv2.imshow("Adaptive Mean Thresholded", thresh)
13 |
14 | gaussianthresh = cv2.adaptiveThreshold(gray, 255, cv2.ADAPTIVE_THRESH_GAUSSIAN_C, cv2.THRESH_BINARY, 11, 9)
15 |
16 | cv2.imshow("Adaptive Gaussian Thresholded", gaussianthresh)
17 |
18 | cv2.waitKey(0)
19 |
20 | cv2.destroyAllWindows()
21 |
--------------------------------------------------------------------------------
/Thresholding/inverseThresh.py:
--------------------------------------------------------------------------------
1 | import cv2
2 |
3 | img = cv2.imread("/home/drox/Documents/computervision/ComputerVisionExercise/resources/images/dog3.jpg")
4 |
5 | cv2.imshow("Original", img)
6 |
7 | gray = cv2.cvtColor(img, cv2.COLOR_BGR2GRAY)
8 |
9 | # Inverse thresholding
10 |
11 | threshold, thresh_inv = cv2.threshold(gray, 150, 255, cv2.THRESH_BINARY_INV)
12 |
13 | cv2.imshow("Inverse Thresholded", thresh_inv)
14 |
15 | cv2.waitKey(0)
16 |
17 | cv2.destroyAllWindows()
18 |
19 | """
20 | The result is shown below:
21 |
22 | The inverse thresholding is the opposite of the simple thresholding. The pixels that are above the threshold are set to 0 and the pixels that are below the threshold are set to 255. This is useful when you want to extract the foreground from the background.
23 | """
--------------------------------------------------------------------------------
/Thresholding/simpleThresh.py:
--------------------------------------------------------------------------------
1 | import cv2
2 | img = cv2.imread("/home/drox/Documents/computervision/ComputerVisionExercise/resources/images/dog3.jpg")
3 |
4 | cv2.imshow("Original", img)
5 |
6 | gray = cv2.cvtColor(img, cv2.COLOR_BGR2GRAY)
7 | cv2.imshow("Gray", gray)
8 |
9 |
10 | # Simple thresholding
11 | threshold, thresh = cv2.threshold(gray, 150, 255, cv2.THRESH_BINARY)
12 | cv2.imshow("Simple Thresholded", thresh)
13 |
14 |
15 | cv2.waitKey(0)
16 | cv2.destroyAllWindows()
--------------------------------------------------------------------------------
/basic reading and rescaling/cv2readingimage.py:
--------------------------------------------------------------------------------
1 | import cv2 as cv
2 | img = cv.imread("/home/drox/Documents/computervision/ComputerVisionExercise/resources/images/dog3.jpg")
3 | cv.imshow("image", img)
4 | cv.waitKey(0)
--------------------------------------------------------------------------------
/basic reading and rescaling/cv2readingvideos.py:
--------------------------------------------------------------------------------
1 | import cv2 as cv
2 |
3 | capture = cv.VideoCapture("/home/drox/Documents/computervision/ComputerVisionExercise/resources/videos/nature2.MOV") # 0 is the id of the camera
4 | while True:
5 | isTrue, frame = capture.read()
6 | cv.imshow("video", frame)
7 | if cv.waitKey(20) & 0xFF==ord('d'):
8 | break
9 | capture.release()
10 | cv.destroyAllWindows()
11 |
--------------------------------------------------------------------------------
/basic reading and rescaling/cv2resizeandrescale.py:
--------------------------------------------------------------------------------
1 | import cv2 as cv
2 |
3 | capture = cv.VideoCapture(0) # 0 is the id of the camera
4 | while True:
5 | isTrue, frame = capture.read() # isTrue is a boolean, frame is the image
6 | cv.imshow("video", frame) # show the image
7 | if cv.waitKey(20) & 0xFF==ord('d'):
8 | break # exit the loop
9 | capture.release() # release the camera
10 | cv.destroyAllWindows() # close all the windows
11 |
--------------------------------------------------------------------------------
/basic reading and rescaling/cv2resizing.py:
--------------------------------------------------------------------------------
1 | import cv2 as cv
2 |
3 | def rescaleFrame(frame, scale=0.75):
4 | #works with images, videos, live videos
5 | width = int(frame.shape[1] * scale)
6 | height = int(frame.shape[0] * scale)
7 | dimentions = (width, height)
8 | return cv.resize(frame, dimentions, interpolation=cv.INTER_AREA)
9 |
10 | capture = cv.VideoCapture("/home/drox/Documents/computervision/ComputerVisionExercise/resources/videos/nature.MOV") # 0 is the id of the camera
11 |
12 | def changeResolution(frame, width, height):
13 | #works only with live videos
14 | capture.set(3,width)
15 | capture.set(4,height)
16 |
17 | return cv.resize(frame, (width, height), interpolation=cv.INTER_AREA)
18 |
19 | while True:
20 | isTrue, frame = capture.read()
21 | frame_resized = rescaleFrame(frame)
22 |
23 | cv.imshow("video", frame)
24 | cv.imshow("resized",frame_resized)
25 | if cv.waitKey(20) & 0xFF == ord('q'):
26 | break
27 |
28 | capture.release()
29 | cv.destroyAllWindows()
--------------------------------------------------------------------------------
/basic reading and rescaling/cv2webcam.py:
--------------------------------------------------------------------------------
1 | #accessing the web camera
2 |
3 | import cv2 as cv
4 | capture = cv.VideoCapture(0) # 0 is the id of the camera
5 | while True:
6 | isTrue, frame = capture.read() # isTrue is a boolean, frame is the image
7 | cv.imshow("video", frame) # show the image
8 | if cv.waitKey(20) & 0xFF==ord('d'):
9 | break # exit the loop
10 | capture.release() # release the camera
11 | cv.destroyAllWindows() # close all the windows
--------------------------------------------------------------------------------
/contours/contourdetection.py:
--------------------------------------------------------------------------------
1 | import cv2
2 | import numpy as np
3 |
4 | img = cv2.imread(
5 | "/home/drox/Documents/computervision/ComputerVisionExercise/resources/images/dog2.jpg")
6 |
7 | blank = np.zeros(img.shape, np.uint8)
8 |
9 |
10 | gray = cv2.cvtColor(img, cv2.COLOR_BGR2GRAY)
11 |
12 |
13 | blur = cv2.GaussianBlur(gray, (5, 5), cv2.BORDER_DEFAULT)
14 |
15 |
16 | # recommended method for edge detection is Canny edge detection
17 | canny = cv2.Canny(blur, 125, 175)
18 | cv2.imshow("Canny Edges", canny)
19 |
20 | contours, hierarchy = cv2.findContours(
21 | canny, cv2.RETR_LIST, cv2.CHAIN_APPROX_SIMPLE)
22 | print(f"{len(contours)}, contours(s) found")
23 | cv2.drawContours(img, contours, -1, (0, 255, 0), 3)
24 | cv2.imshow("contours", img)
25 |
26 |
27 | ret, thresh = cv2.threshold(gray, 125, 125, cv2.THRESH_BINARY)
28 | cv2.imshow("thresh", thresh)
29 | cv2.waitKey(0)
30 |
31 | contours, hierarchy = cv2.findContours(
32 | thresh, cv2.RETR_LIST, cv2.CHAIN_APPROX_SIMPLE)
33 | print(f"{len(contours)}, contours(s) found")
34 | cv2.drawContours(img, contours, -1, (0, 255, 0), 3)
35 | cv2.imshow("contours", img)
36 |
37 | cv2.drawContours(blank, contours, -1, (0, 0, 255), 1)
38 | cv2.imshow("blank", blank)
39 | cv2.waitKey(0)
40 |
41 | cv2.destroyAllwindows()
42 |
--------------------------------------------------------------------------------
/draw and write on images/draw.py:
--------------------------------------------------------------------------------
1 | import cv2 as cv
2 | import numpy as np
3 |
4 | blank = np.zeros((500,500,3),dtype='uint8') # create a blank image
5 | cv.imshow("blank", blank) # show the blank image
6 |
7 | #paint the images with certain color
8 | blank[200:300, 300:400] = 0,0,255 # paint the blank image with green
9 | cv.imshow("Green Line", blank) # show the blank image
10 |
11 |
12 | #draw a rectangle
13 | cv.rectangle(blank, (0,0), (150,150), (0,255,0), thickness=-1) # draw a rectangle with green color and thickness 3
14 | #thickness can be positive for bounding boxes and negative for filled rectangles
15 |
16 |
17 | # alternatively,
18 | cv.rectangle(blank, (0,0), (blank.shape[1]//2, blank.shape[0]//2), (0,0,255), thickness=2) # draw a rectangle with green color and thickness -1
19 | cv.imshow("Rectangle", blank) # show the blank image
20 |
21 | #drawing a circle
22 | cv.circle(blank, (350,250), 100, (255,0,0), thickness=-1) # draw a circle with red color and thickness 3
23 | cv.imshow("Circle", blank) # show the blank image
24 |
25 | #draw a line
26 | cv.line(blank, (0,0), (500,500), (255,255,255), thickness=3) # draw a line with green color and thickness 3
27 | cv.imshow("Line", blank) # show the blank image
28 |
29 |
30 | #how to write texts
31 | font = cv.FONT_HERSHEY_SIMPLEX # font style
32 | cv.putText(blank, "Hello from Rahul", (210,150), font, 1, (0,255,0), 2, cv.LINE_AA) # write a text with white color and thickness 2
33 | cv.imshow("Text", blank) # show the blank image
34 | cv.waitKey(0)
--------------------------------------------------------------------------------
/resources/images/dog.jpg:
--------------------------------------------------------------------------------
https://raw.githubusercontent.com/RahulParajuli/OpenCV-ComputerVisionBasics/7fe76f5af736d42b806917c189f772eeb8407365/resources/images/dog.jpg
--------------------------------------------------------------------------------
/resources/images/dog2.jpg:
--------------------------------------------------------------------------------
https://raw.githubusercontent.com/RahulParajuli/OpenCV-ComputerVisionBasics/7fe76f5af736d42b806917c189f772eeb8407365/resources/images/dog2.jpg
--------------------------------------------------------------------------------
/resources/images/dog3.jpg:
--------------------------------------------------------------------------------
https://raw.githubusercontent.com/RahulParajuli/OpenCV-ComputerVisionBasics/7fe76f5af736d42b806917c189f772eeb8407365/resources/images/dog3.jpg
--------------------------------------------------------------------------------
/resources/images/dog4.jpg:
--------------------------------------------------------------------------------
https://raw.githubusercontent.com/RahulParajuli/OpenCV-ComputerVisionBasics/7fe76f5af736d42b806917c189f772eeb8407365/resources/images/dog4.jpg
--------------------------------------------------------------------------------
/resources/images/rnr1.jpg:
--------------------------------------------------------------------------------
https://raw.githubusercontent.com/RahulParajuli/OpenCV-ComputerVisionBasics/7fe76f5af736d42b806917c189f772eeb8407365/resources/images/rnr1.jpg
--------------------------------------------------------------------------------
/resources/images/shrek.png:
--------------------------------------------------------------------------------
https://raw.githubusercontent.com/RahulParajuli/OpenCV-ComputerVisionBasics/7fe76f5af736d42b806917c189f772eeb8407365/resources/images/shrek.png
--------------------------------------------------------------------------------
/resources/results/BGRhistogram.png:
--------------------------------------------------------------------------------
https://raw.githubusercontent.com/RahulParajuli/OpenCV-ComputerVisionBasics/7fe76f5af736d42b806917c189f772eeb8407365/resources/results/BGRhistogram.png
--------------------------------------------------------------------------------
/resources/results/LAB.png:
--------------------------------------------------------------------------------
https://raw.githubusercontent.com/RahulParajuli/OpenCV-ComputerVisionBasics/7fe76f5af736d42b806917c189f772eeb8407365/resources/results/LAB.png
--------------------------------------------------------------------------------
/resources/results/LABtobgr.png:
--------------------------------------------------------------------------------
https://raw.githubusercontent.com/RahulParajuli/OpenCV-ComputerVisionBasics/7fe76f5af736d42b806917c189f772eeb8407365/resources/results/LABtobgr.png
--------------------------------------------------------------------------------
/resources/results/absoluteLaplacian.png:
--------------------------------------------------------------------------------
https://raw.githubusercontent.com/RahulParajuli/OpenCV-ComputerVisionBasics/7fe76f5af736d42b806917c189f772eeb8407365/resources/results/absoluteLaplacian.png
--------------------------------------------------------------------------------
/resources/results/adaptivethresh.png:
--------------------------------------------------------------------------------
https://raw.githubusercontent.com/RahulParajuli/OpenCV-ComputerVisionBasics/7fe76f5af736d42b806917c189f772eeb8407365/resources/results/adaptivethresh.png
--------------------------------------------------------------------------------
/resources/results/averageBlurring.png:
--------------------------------------------------------------------------------
https://raw.githubusercontent.com/RahulParajuli/OpenCV-ComputerVisionBasics/7fe76f5af736d42b806917c189f772eeb8407365/resources/results/averageBlurring.png
--------------------------------------------------------------------------------
/resources/results/bgrtogray.png:
--------------------------------------------------------------------------------
https://raw.githubusercontent.com/RahulParajuli/OpenCV-ComputerVisionBasics/7fe76f5af736d42b806917c189f772eeb8407365/resources/results/bgrtogray.png
--------------------------------------------------------------------------------
/resources/results/bgrtorgb.png:
--------------------------------------------------------------------------------
https://raw.githubusercontent.com/RahulParajuli/OpenCV-ComputerVisionBasics/7fe76f5af736d42b806917c189f772eeb8407365/resources/results/bgrtorgb.png
--------------------------------------------------------------------------------
/resources/results/bilateralblurring.png:
--------------------------------------------------------------------------------
https://raw.githubusercontent.com/RahulParajuli/OpenCV-ComputerVisionBasics/7fe76f5af736d42b806917c189f772eeb8407365/resources/results/bilateralblurring.png
--------------------------------------------------------------------------------
/resources/results/bitwiseNOT.png:
--------------------------------------------------------------------------------
https://raw.githubusercontent.com/RahulParajuli/OpenCV-ComputerVisionBasics/7fe76f5af736d42b806917c189f772eeb8407365/resources/results/bitwiseNOT.png
--------------------------------------------------------------------------------
/resources/results/bitwiseOR.png:
--------------------------------------------------------------------------------
https://raw.githubusercontent.com/RahulParajuli/OpenCV-ComputerVisionBasics/7fe76f5af736d42b806917c189f772eeb8407365/resources/results/bitwiseOR.png
--------------------------------------------------------------------------------
/resources/results/bitwiseXOR.png:
--------------------------------------------------------------------------------
https://raw.githubusercontent.com/RahulParajuli/OpenCV-ComputerVisionBasics/7fe76f5af736d42b806917c189f772eeb8407365/resources/results/bitwiseXOR.png
--------------------------------------------------------------------------------
/resources/results/bitwizeAND.png:
--------------------------------------------------------------------------------
https://raw.githubusercontent.com/RahulParajuli/OpenCV-ComputerVisionBasics/7fe76f5af736d42b806917c189f772eeb8407365/resources/results/bitwizeAND.png
--------------------------------------------------------------------------------
/resources/results/canny.png:
--------------------------------------------------------------------------------
https://raw.githubusercontent.com/RahulParajuli/OpenCV-ComputerVisionBasics/7fe76f5af736d42b806917c189f772eeb8407365/resources/results/canny.png
--------------------------------------------------------------------------------
/resources/results/circle.png:
--------------------------------------------------------------------------------
https://raw.githubusercontent.com/RahulParajuli/OpenCV-ComputerVisionBasics/7fe76f5af736d42b806917c189f772eeb8407365/resources/results/circle.png
--------------------------------------------------------------------------------
/resources/results/circlemask.png:
--------------------------------------------------------------------------------
https://raw.githubusercontent.com/RahulParajuli/OpenCV-ComputerVisionBasics/7fe76f5af736d42b806917c189f772eeb8407365/resources/results/circlemask.png
--------------------------------------------------------------------------------
/resources/results/combinedsobel.png:
--------------------------------------------------------------------------------
https://raw.githubusercontent.com/RahulParajuli/OpenCV-ComputerVisionBasics/7fe76f5af736d42b806917c189f772eeb8407365/resources/results/combinedsobel.png
--------------------------------------------------------------------------------
/resources/results/contouredges.png:
--------------------------------------------------------------------------------
https://raw.githubusercontent.com/RahulParajuli/OpenCV-ComputerVisionBasics/7fe76f5af736d42b806917c189f772eeb8407365/resources/results/contouredges.png
--------------------------------------------------------------------------------
/resources/results/contourthresh.png:
--------------------------------------------------------------------------------
https://raw.githubusercontent.com/RahulParajuli/OpenCV-ComputerVisionBasics/7fe76f5af736d42b806917c189f772eeb8407365/resources/results/contourthresh.png
--------------------------------------------------------------------------------
/resources/results/contourthreshs.png:
--------------------------------------------------------------------------------
https://raw.githubusercontent.com/RahulParajuli/OpenCV-ComputerVisionBasics/7fe76f5af736d42b806917c189f772eeb8407365/resources/results/contourthreshs.png
--------------------------------------------------------------------------------
/resources/results/gaussianblur.png:
--------------------------------------------------------------------------------
https://raw.githubusercontent.com/RahulParajuli/OpenCV-ComputerVisionBasics/7fe76f5af736d42b806917c189f772eeb8407365/resources/results/gaussianblur.png
--------------------------------------------------------------------------------
/resources/results/gaussianblurimage.png:
--------------------------------------------------------------------------------
https://raw.githubusercontent.com/RahulParajuli/OpenCV-ComputerVisionBasics/7fe76f5af736d42b806917c189f772eeb8407365/resources/results/gaussianblurimage.png
--------------------------------------------------------------------------------
/resources/results/gray.png:
--------------------------------------------------------------------------------
https://raw.githubusercontent.com/RahulParajuli/OpenCV-ComputerVisionBasics/7fe76f5af736d42b806917c189f772eeb8407365/resources/results/gray.png
--------------------------------------------------------------------------------
/resources/results/histogramgray.png:
--------------------------------------------------------------------------------
https://raw.githubusercontent.com/RahulParajuli/OpenCV-ComputerVisionBasics/7fe76f5af736d42b806917c189f772eeb8407365/resources/results/histogramgray.png
--------------------------------------------------------------------------------
/resources/results/hsvtoBGR.png:
--------------------------------------------------------------------------------
https://raw.githubusercontent.com/RahulParajuli/OpenCV-ComputerVisionBasics/7fe76f5af736d42b806917c189f772eeb8407365/resources/results/hsvtoBGR.png
--------------------------------------------------------------------------------
/resources/results/hues.png:
--------------------------------------------------------------------------------
https://raw.githubusercontent.com/RahulParajuli/OpenCV-ComputerVisionBasics/7fe76f5af736d42b806917c189f772eeb8407365/resources/results/hues.png
--------------------------------------------------------------------------------
/resources/results/imageflipping.png:
--------------------------------------------------------------------------------
https://raw.githubusercontent.com/RahulParajuli/OpenCV-ComputerVisionBasics/7fe76f5af736d42b806917c189f772eeb8407365/resources/results/imageflipping.png
--------------------------------------------------------------------------------
/resources/results/imagerotation.png:
--------------------------------------------------------------------------------
https://raw.githubusercontent.com/RahulParajuli/OpenCV-ComputerVisionBasics/7fe76f5af736d42b806917c189f772eeb8407365/resources/results/imagerotation.png
--------------------------------------------------------------------------------
/resources/results/imageshifting.png:
--------------------------------------------------------------------------------
https://raw.githubusercontent.com/RahulParajuli/OpenCV-ComputerVisionBasics/7fe76f5af736d42b806917c189f772eeb8407365/resources/results/imageshifting.png
--------------------------------------------------------------------------------
/resources/results/inversethresh.png:
--------------------------------------------------------------------------------
https://raw.githubusercontent.com/RahulParajuli/OpenCV-ComputerVisionBasics/7fe76f5af736d42b806917c189f772eeb8407365/resources/results/inversethresh.png
--------------------------------------------------------------------------------
/resources/results/lines.png:
--------------------------------------------------------------------------------
https://raw.githubusercontent.com/RahulParajuli/OpenCV-ComputerVisionBasics/7fe76f5af736d42b806917c189f772eeb8407365/resources/results/lines.png
--------------------------------------------------------------------------------
/resources/results/maskingregionhist.png:
--------------------------------------------------------------------------------
https://raw.githubusercontent.com/RahulParajuli/OpenCV-ComputerVisionBasics/7fe76f5af736d42b806917c189f772eeb8407365/resources/results/maskingregionhist.png
--------------------------------------------------------------------------------
/resources/results/medianblur.png:
--------------------------------------------------------------------------------
https://raw.githubusercontent.com/RahulParajuli/OpenCV-ComputerVisionBasics/7fe76f5af736d42b806917c189f772eeb8407365/resources/results/medianblur.png
--------------------------------------------------------------------------------
/resources/results/mergingBGR.png:
--------------------------------------------------------------------------------
https://raw.githubusercontent.com/RahulParajuli/OpenCV-ComputerVisionBasics/7fe76f5af736d42b806917c189f772eeb8407365/resources/results/mergingBGR.png
--------------------------------------------------------------------------------
/resources/results/rectanglemasking.png:
--------------------------------------------------------------------------------
https://raw.githubusercontent.com/RahulParajuli/OpenCV-ComputerVisionBasics/7fe76f5af736d42b806917c189f772eeb8407365/resources/results/rectanglemasking.png
--------------------------------------------------------------------------------
/resources/results/rectangles.png:
--------------------------------------------------------------------------------
https://raw.githubusercontent.com/RahulParajuli/OpenCV-ComputerVisionBasics/7fe76f5af736d42b806917c189f772eeb8407365/resources/results/rectangles.png
--------------------------------------------------------------------------------
/resources/results/resizingvideo.png:
--------------------------------------------------------------------------------
https://raw.githubusercontent.com/RahulParajuli/OpenCV-ComputerVisionBasics/7fe76f5af736d42b806917c189f772eeb8407365/resources/results/resizingvideo.png
--------------------------------------------------------------------------------
/resources/results/simplelaplacian.png:
--------------------------------------------------------------------------------
https://raw.githubusercontent.com/RahulParajuli/OpenCV-ComputerVisionBasics/7fe76f5af736d42b806917c189f772eeb8407365/resources/results/simplelaplacian.png
--------------------------------------------------------------------------------
/resources/results/simplethresholding.png:
--------------------------------------------------------------------------------
https://raw.githubusercontent.com/RahulParajuli/OpenCV-ComputerVisionBasics/7fe76f5af736d42b806917c189f772eeb8407365/resources/results/simplethresholding.png
--------------------------------------------------------------------------------
/resources/results/singlerectangle.png:
--------------------------------------------------------------------------------
https://raw.githubusercontent.com/RahulParajuli/OpenCV-ComputerVisionBasics/7fe76f5af736d42b806917c189f772eeb8407365/resources/results/singlerectangle.png
--------------------------------------------------------------------------------
/resources/results/sobel.png:
--------------------------------------------------------------------------------
https://raw.githubusercontent.com/RahulParajuli/OpenCV-ComputerVisionBasics/7fe76f5af736d42b806917c189f772eeb8407365/resources/results/sobel.png
--------------------------------------------------------------------------------
/resources/results/splittingblue.png:
--------------------------------------------------------------------------------
https://raw.githubusercontent.com/RahulParajuli/OpenCV-ComputerVisionBasics/7fe76f5af736d42b806917c189f772eeb8407365/resources/results/splittingblue.png
--------------------------------------------------------------------------------
/resources/results/splittinggreen.png:
--------------------------------------------------------------------------------
https://raw.githubusercontent.com/RahulParajuli/OpenCV-ComputerVisionBasics/7fe76f5af736d42b806917c189f772eeb8407365/resources/results/splittinggreen.png
--------------------------------------------------------------------------------
/resources/results/splittingred.png:
--------------------------------------------------------------------------------
https://raw.githubusercontent.com/RahulParajuli/OpenCV-ComputerVisionBasics/7fe76f5af736d42b806917c189f772eeb8407365/resources/results/splittingred.png
--------------------------------------------------------------------------------
/resources/results/texts.png:
--------------------------------------------------------------------------------
https://raw.githubusercontent.com/RahulParajuli/OpenCV-ComputerVisionBasics/7fe76f5af736d42b806917c189f772eeb8407365/resources/results/texts.png
--------------------------------------------------------------------------------
/resources/results/weirdshapemasking.png:
--------------------------------------------------------------------------------
https://raw.githubusercontent.com/RahulParajuli/OpenCV-ComputerVisionBasics/7fe76f5af736d42b806917c189f772eeb8407365/resources/results/weirdshapemasking.png
--------------------------------------------------------------------------------
/resources/videos/nature.MOV:
--------------------------------------------------------------------------------
https://raw.githubusercontent.com/RahulParajuli/OpenCV-ComputerVisionBasics/7fe76f5af736d42b806917c189f772eeb8407365/resources/videos/nature.MOV
--------------------------------------------------------------------------------
/resources/videos/nature2.MOV:
--------------------------------------------------------------------------------
https://raw.githubusercontent.com/RahulParajuli/OpenCV-ComputerVisionBasics/7fe76f5af736d42b806917c189f772eeb8407365/resources/videos/nature2.MOV
--------------------------------------------------------------------------------