${rsp.err}`);
153 | }
154 | }
155 | }
156 | };
157 | xhr.upload.addEventListener("progress", function (e) {
158 | let x = Math.round(e.loaded * 100 / file.size)
159 | if (e.lengthComputable) setFwGuage(x < 50 ? x : (x - 5));
160 | }, false);
161 | xhr.upload.addEventListener("error", function (e) {
162 | setTimeout(function () {
163 | alertErr("Uploading " + fn + " failed!");
164 | closeEditor(editorId);
165 | }, 100);
166 | }, false);
167 | xhr.upload.addEventListener("abort", () => closeEditor(editorId), false);
168 | xhr.open("PUT", "private/command.lsp?cmd=uploadfw");
169 | xhr.setRequestHeader("X-Requested-With", "upload");
170 | xhr.setRequestHeader("X-File-Name", fn);
171 | xhr.send(file);
172 | elems.fwdrop.hide();
173 | elems.fwguage.show();
174 | }
175 |
176 | elems.fwguage.hide();
177 | pe.bind('dragover', (e) => { if(!topElem.hasClass('dragover')) topElem.addClass('dragover'); });
178 | pe.bind('dragleave', (e) => { topElem.removeClass('dragover'); });
179 | topElem.find('input').bind('change', (e) => { const file = e.target.files[0]; if (file) sendFile(file); });
180 | topElem.unbind('drop').bind('drop', (e) => {
181 | topElem.removeClass('dragover');
182 | e.preventDefault();
183 | var file = e.originalEvent.dataTransfer.files[0];
184 | sendFile(file);
185 | });
186 | setFwGuage(90);
187 | }
188 |
--------------------------------------------------------------------------------
/.lua/XedgePlugins/fwupdate.lua:
--------------------------------------------------------------------------------
1 | local commands=...
2 | local busy=false
3 |
4 | local function senderror(cmd,msg)
5 | cmd:setheader("X-Error",msg)
6 | cmd:senderror(503, msg)
7 | cmd:abort()
8 | end
9 |
10 | function commands.getfwver(cmd)
11 | if esp32.ota then
12 | local v=esp32.ota()
13 | v.sha256=nil
14 | cmd:json(v)
15 | end
16 | cmd:json{err="No OTA API"}
17 | end
18 |
19 | function commands.uploadfw(cmd)
20 | cmd:allow{"PUT"}
21 | local fn = cmd:header"X-File-Name"
22 | if not fn then cmd:senderror(400) cmd:abort() end
23 | local n,ext=fn:match"(.-)%.([^%./]+)$"
24 | if not n or not ext then cmd:senderror(400,"Invalid file name") cmd:abort() end
25 | ext=ext:lower()
26 | if "zip" == ext then
27 | local rsp
28 | fn=n.."."..ext
29 | local io=ba.openio"disk"
30 | if io:stat(n) then
31 | rsp={err="
Conflict Detected: The server has found an existing directory with the same name as your uploaded zip file, indicating a non-deployed application already exists with this name. Deployed applications are uploaded and managed as zip files, whereas non-deployed applications exist as directories on the server.
To resolve this:
If you intend to update or replace the existing non-deployed application, please delete the corresponding directory on the server first, then attempt the upload again.
If deploying a new application, rename your zip file to avoid naming conflicts and upload it again.
"}
32 | else
33 | local upgrade = io:stat(fn) and true or false
34 | local fp,err = io:open(fn,"w")
35 | if fp then
36 | local ok,err
37 | for data in cmd:rawrdr(4096) do
38 | ok,err=fp:write(data)
39 | if not ok then break end
40 | end
41 | fp:close()
42 | rsp={ok=ok,err=err,upgrade=upgrade}
43 | else
44 | rsp={err=err}
45 | end
46 | end
47 | cmd:json(rsp)
48 | cmd:abort()
49 | end
50 | if busy then senderror(cmd,"Busy: processing firmware update") end
51 | local ok
52 | local ota,err=esp32.ota"begin"
53 | if ota then
54 | for data in cmd:rawrdr(4096) do
55 | ok,err=ota:write(data)
56 | if not ok then break end
57 | end
58 | if ok then ok,err=ota:commit() end
59 | end
60 | busy=false
61 | if not ok then
62 | senderror(cmd,"firmware update failed: "..tostring(err))
63 | end
64 | ba.timer(function() esp32.execute"restart" end):set(500,true)
65 | cmd:setstatus(204)
66 | cmd:abort()
67 | end
68 |
69 | local started
70 | local function cb(ip)
71 | if not started then started=true return end
72 | local dns=package.loaded["acme/dns"]
73 | if dns then dns.setip(ip) end
74 | xedge.elog({ts=true},"New IP %s",ip)
75 | end
76 | xedge.event("wip",cb)
77 | xedge.event("eth",cb)
78 |
79 |
--------------------------------------------------------------------------------
/.lua/bme280.lua:
--------------------------------------------------------------------------------
1 | -- This code was constructed by extracting parts of the following C
2 | -- file and then converting the C code to Lua code:
3 | -- https://github.com/SFeli/ESP32_BME280_IDF
4 |
5 | --Register names:
6 | local DIG_T1_LSB_REG = 0x88
7 | local DIG_T1_MSB_REG = 0x89
8 | local DIG_T2_LSB_REG = 0x8A
9 | local DIG_T2_MSB_REG = 0x8B
10 | local DIG_T3_LSB_REG = 0x8C
11 | local DIG_T3_MSB_REG = 0x8D
12 | local DIG_P1_LSB_REG = 0x8E
13 | local DIG_P1_MSB_REG = 0x8F
14 | local DIG_P2_LSB_REG = 0x90
15 | local DIG_P2_MSB_REG = 0x91
16 | local DIG_P3_LSB_REG = 0x92
17 | local DIG_P3_MSB_REG = 0x93
18 | local DIG_P4_LSB_REG = 0x94
19 | local DIG_P4_MSB_REG = 0x95
20 | local DIG_P5_LSB_REG = 0x96
21 | local DIG_P5_MSB_REG = 0x97
22 | local DIG_P6_LSB_REG = 0x98
23 | local DIG_P6_MSB_REG = 0x99
24 | local DIG_P7_LSB_REG = 0x9A
25 | local DIG_P7_MSB_REG = 0x9B
26 | local DIG_P8_LSB_REG = 0x9C
27 | local DIG_P8_MSB_REG = 0x9D
28 | local DIG_P9_LSB_REG = 0x9E
29 | local DIG_P9_MSB_REG = 0x9F
30 | local DIG_H1_REG = 0xA1
31 | local CHIP_ID_REG = 0xD0
32 | local DIG_H2_LSB_REG = 0xE1
33 | local DIG_H2_MSB_REG = 0xE2
34 | local DIG_H3_REG = 0xE3
35 | local DIG_H4_MSB_REG = 0xE4
36 | local DIG_H4_LSB_REG = 0xE5
37 | local DIG_H5_MSB_REG = 0xE6
38 | local DIG_H6_REG = 0xE7
39 | local CTRL_HUMIDITY_REG = 0xF2
40 | local CTRL_MEAS_REG = 0xF4
41 | local CONFIG_REG = 0xF5
42 | local MEASUREMENTS_REG = 0xF7
43 |
44 | local MODE_SLEEP = 0x00
45 | local MODE_NORMAL = 0x03
46 |
47 | local sbyte=string.byte
48 | local btac=ba.bytearray.create
49 |
50 | local function read(self,regAddr,len)
51 | local i2cm=self.i2cm
52 | local x,err=i2cm:readfrom(self.address, regAddr, len)
53 | if not x then trace("read failed",err) end
54 | return x,err
55 | end
56 |
57 | local function readBA(self,regAddr,len)
58 | local data,err=read(self,regAddr,len)
59 | if data then return btac(data) end
60 | return nil,err
61 | end
62 |
63 | local function write(self,regAddr,data)
64 | local i2cm=self.i2cm
65 | -- Convert `regAddr` to a single-byte string and concatenate with `data`
66 | local writeBuffer = string.char(regAddr) .. string.char(data)
67 | -- Send the combined buffer in a single transaction
68 | local x, err = i2cm:write(self.address, writeBuffer)
69 | if not x then trace("write failed",err) end
70 | return x,err
71 | end
72 |
73 | local function readReg(self,regAddr)
74 | local data,err=read(self,regAddr,1)
75 | if data then return sbyte(data) end
76 | return nil,err
77 | end
78 |
79 | --Validates an over sample value
80 | --Allowed values are 0 to 16
81 | --These are used in the humidity, pressure, and temp oversample functions
82 | local sampleT = {[0]=0,[1]=1,[2]=2,[4]=3,[8]=4,[16]=5}
83 | local function checkSampleValue(val) return sampleT[val] or 1 end
84 |
85 | local B={} -- BME280 module
86 |
87 | --Set the mode bits in the ctrl_meas register
88 | -- Mode 00 = Sleep
89 | -- 01 and 10 = Forced
90 | -- 11 = Normal mode
91 | function B:setMode(mode)
92 | if(mode > 3) then mode = 0 end --Error check. Default to sleep mode
93 | local controlData = readReg(self,CTRL_MEAS_REG)
94 | controlData = controlData & 0xFC --Clear the mode[1:0] bits
95 | controlData = controlData | mode --Set
96 | write(self,CTRL_MEAS_REG, controlData)
97 | end
98 |
99 | --Gets the current mode bits in the ctrl_meas register
100 | --Mode 00 = Sleep
101 | -- 01 and 10 = Forced
102 | -- 11 = Normal mode
103 | function B:getMode()
104 | local controlData = readReg(self,CTRL_MEAS_REG)
105 | return controlData & 3 --Clear bits 7 through 2
106 | end
107 |
108 | --Set the filter bits in the config register
109 | --filter can be off or number of FIR coefficients to use:
110 | -- 0, filter off
111 | -- 1, coefficients = 2
112 | -- 2, coefficients = 4
113 | -- 3, coefficients = 8
114 | -- 4, coefficients = 16
115 | function B:setFilter(filterSetting)
116 | --0b111: Error check. Default to filter off
117 | if(filterSetting > 7) then filterSetting = 0 end
118 | local controlData = readReg(self,CONFIG_REG)
119 | controlData = controlData & 0xE3 --Clear the 4/3/2 bits
120 | controlData = controlData | (filterSetting << 2) --Align with bits 4/3/2
121 | write(self,CONFIG_REG, controlData)
122 | end
123 |
124 | --Set the temperature oversample value
125 | --0 turns off temp sensing
126 | --1 to 16 are valid over sampling values
127 | function B:setTempOverSample(overSampleAmount)
128 | overSampleAmount = checkSampleValue(overSampleAmount) --Error check
129 | local originalMode = B.getMode(self) --Get the current mode so we can go back to it at the end
130 | B.setMode(self,MODE_SLEEP) --Config will only be writeable in sleep mode, so first go to sleep mode
131 | --Set the osrs_t bits (7, 6, 5) to overSampleAmount
132 | local controlData = readReg(self,CTRL_MEAS_REG)
133 | controlData = controlData & 0x1F --Clear bits 765
134 | controlData = controlData | (overSampleAmount << 5) --Align overSampleAmount to bits 7/6/5
135 | write(self,CTRL_MEAS_REG, controlData)
136 | B.setMode(self,originalMode) --Return to the original user's choice
137 | end
138 |
139 | --Set the pressure oversample value
140 | --0 turns off pressure sensing
141 | --1 to 16 are valid over sampling values
142 | function B:setPressureOverSample(overSampleAmount)
143 | overSampleAmount = checkSampleValue(overSampleAmount) --Error check
144 | local originalMode = B.getMode(self) --Get the current mode so we can go back to it at the end
145 | B.setMode(self,MODE_SLEEP) --Config will only be writeable in sleep mode, so first go to sleep mode
146 | --Set the osrs_p bits (4, 3, 2) to overSampleAmount
147 | local controlData = readReg(self,CTRL_MEAS_REG)
148 | controlData = controlData & 0xE3 --Clear the 4/3/2 bits
149 | controlData = controlData | (overSampleAmount << 2) --Align overSampleAmount to bits 4/3/2
150 | write(self,CTRL_MEAS_REG, controlData)
151 | B.setMode(self,originalMode) --Return to the original user's choice
152 | end
153 |
154 | --Set the humidity oversample value
155 | --0 turns off humidity sensing
156 | --1 to 16 are valid over sampling values
157 | function B:setHumidityOverSample(overSampleAmount)
158 | overSampleAmount = checkSampleValue(overSampleAmount) --Error check
159 | local originalMode = B.getMode(self) --Get the current mode so we can go back to it at the end
160 | B.setMode(self,MODE_SLEEP) --Config will only be writeable in sleep mode, so first go to sleep mode
161 | --Set the osrs_h bits (2, 1, 0) to overSampleAmount
162 | local controlData = readReg(self,CTRL_HUMIDITY_REG)
163 | controlData = controlData & 0xF8 --Clear bits 2/1/0
164 | controlData = controlData | overSampleAmount --Align overSampleAmount to bits 2/1/0
165 | write(self,CTRL_HUMIDITY_REG, controlData)
166 | B.setMode(self,originalMode) --Return to the original user's choice
167 | end
168 |
169 | --Set the standby bits in the config register
170 | -- timeSetting can be:
171 | -- 0, 0.5ms
172 | -- 1, 62.5ms
173 | -- 2, 125ms
174 | -- 3, 250ms
175 | -- 4, 500ms
176 | -- 5, 1000ms
177 | -- 6, 10ms
178 | -- 7, 20ms
179 | function B:setStandbyTime(timeSetting)
180 | if(timeSetting > 7) then timeSetting = 0 end -- > 0b111: Error check. Default 0.5ms
181 | local controlData = readReg(self,CONFIG_REG)
182 | controlData = controlData & 0x1F --Clear bits 7/6/5
183 | controlData = controlData | (timeSetting << 5) --Align with bits 7/6/5
184 | return write(self,CONFIG_REG, controlData)
185 | end
186 |
187 | function B:close()
188 | if self.i2cm then
189 | self.i2cm:close()
190 | self.i2cm=nil
191 | end
192 | end
193 |
194 | B.__index,B.__gc,B.__close=B,B.close,B.close
195 |
196 | local function compTemp(self, temp)
197 | local cali=self.calibration
198 | local var1,var2
199 | local tempMin,tempMax = -40,85
200 | var1 = temp / 16384.0 - cali.dig_T1 / 1024.0
201 | var1 = var1 * (cali.dig_T2)
202 | var2 = (temp / 131072.0 - cali.dig_T1 / 8192.0)
203 | var2 = (var2 * var2) * cali.dig_T3
204 | self.t_fine = var1 + var2
205 | temp = (var1 + var2) / 5120.0
206 | if temp < tempMin then
207 | temp = tempMin
208 | elseif temp > tempMax then
209 | temp = tempMax
210 | end
211 | return temp
212 | end
213 |
214 | local function compHumidity(self,humidity)
215 | local cali=self.calibration
216 | local humidityMin,humidityMax = 0.0,100.0
217 | local var1,var2,var3,var4,var5,var6
218 | var1 = self.t_fine - 76800.0
219 | var2 = (cali.dig_H4 * 64.0 + (cali.dig_H5 / 16384.0) * var1)
220 | var3 = humidity - var2
221 | var4 = (cali.dig_H2) / 65536.0
222 | var5 = (1.0 + (cali.dig_H3 / 67108864.0) * var1)
223 | var6 = 1.0 + (cali.dig_H6 / 67108864.0) * var1 * var5
224 | var6 = var3 * var4 * (var5 * var6)
225 | humidity = var6 * (1.0 - cali.dig_H1 * var6 / 524288.0)
226 | if humidity > humidityMax then
227 | humidity = humidityMax
228 | elseif humidity < humidityMin then
229 | humidity = humidityMin
230 | end
231 | return humidity
232 | end
233 |
234 | local function compPressure(self,pressure)
235 | local cali=self.calibration
236 | local var1,var2,var3
237 | local pressure_min = 30000.0
238 | local pressure_max = 110000.0
239 | var1 = (self.t_fine / 2.0) - 64000.0
240 | var2 = var1 * var1 * cali.dig_P6 / 32768.0
241 | var2 = var2 + var1 * cali.dig_P5 * 2.0
242 | var2 = (var2 / 4.0) + (cali.dig_P4 * 65536.0)
243 | var3 = cali.dig_P3 * var1 * var1 / 524288.0
244 | var1 = (var3 + cali.dig_P2 * var1) / 524288.0
245 | var1 = (1.0 + var1 / 32768.0) * cali.dig_P1
246 | -- avoid exception caused by division by zero
247 | if var1 > (0.0) then
248 | pressure = 1048576.0 - pressure
249 | pressure = (pressure - (var2 / 4096.0)) * 6250.0 / var1
250 | var1 = cali.dig_P9 * pressure * pressure / 2147483648.0
251 | var2 = pressure * cali.dig_P8 / 32768.0
252 | pressure = pressure + (var1 + var2 + cali.dig_P7) / 16.0
253 | if (pressure < pressure_min) then
254 | pressure = pressure_min
255 | elseif (pressure > pressure_max) then
256 | pressure = pressure_max
257 | end
258 | else
259 | pressure = pressure_min -- Invalid case
260 | end
261 | return pressure
262 | end
263 |
264 | function B:read()
265 | local rdata,err=readBA(self,MEASUREMENTS_REG,8)
266 | if not rdata then return nil,err end
267 | local dmsb = rdata[1] << 12;
268 | local dlsb = rdata[2] << 4;
269 | local dxlsb = rdata[3] >> 4;
270 | local pressure = dmsb | dlsb | dxlsb;
271 | dmsb = rdata[4] << 12;
272 | dlsb = rdata[5] << 4;
273 | dxlsb = rdata[6] >> 4;
274 | local temp = dmsb | dlsb | dxlsb;
275 | dmsb = rdata[7] << 8;
276 | dlsb = rdata[8];
277 | local humidity = dmsb | dlsb;
278 | return compTemp(self, temp), compHumidity(self,humidity), compPressure(self,pressure)
279 | end
280 |
281 |
282 | local function s16(v)
283 | if v > 32766 then return v - 65536 end
284 | return v
285 | end
286 |
287 | local function s8(v)
288 | if v > 128 then return v - 256 end
289 | return v
290 | end
291 |
292 | local function bme280(port, address, sda, scl, settings)
293 | local ok,data,err
294 | settings = settings or {}
295 | settings.tempCorrection = settings.tempCorrection or 0.0
296 | local i2cm = esp32.i2cmaster(port, sda, scl, settings.speed or 100000)
297 | --Search the device in the bus.
298 | if not i2cm:probe(address) then
299 | i2cm:close()
300 | return nil,"BME280 not connected or wrong address"
301 | end
302 | local self={i2cm=i2cm, address=address, settings=settings, t_fine=0}
303 | -- Read as if signed 16 bit
304 | local function rr(reg) return readReg(self,reg) end
305 | data,err=rr(CHIP_ID_REG)
306 | if 0x58 == data or 0x60 == data then -- BMP or BME
307 | if not pcall(function()
308 | self.calibration = {
309 | dig_T1 = (rr(DIG_T1_MSB_REG) << 8) + rr(DIG_T1_LSB_REG),
310 | dig_T2 = s16((rr(DIG_T2_MSB_REG) << 8) + rr(DIG_T2_LSB_REG)),
311 | dig_T3 = s16((rr(DIG_T3_MSB_REG) << 8) + rr(DIG_T3_LSB_REG)),
312 | dig_P1 = (rr(DIG_P1_MSB_REG) << 8) + rr(DIG_P1_LSB_REG),
313 | dig_P2 = s16((rr(DIG_P2_MSB_REG) << 8) + rr(DIG_P2_LSB_REG)),
314 | dig_P3 = s16((rr(DIG_P3_MSB_REG) << 8) + rr(DIG_P3_LSB_REG)),
315 | dig_P4 = s16((rr(DIG_P4_MSB_REG) << 8) + rr(DIG_P4_LSB_REG)),
316 | dig_P5 = s16((rr(DIG_P5_MSB_REG) << 8) + rr(DIG_P5_LSB_REG)),
317 | dig_P6 = s16((rr(DIG_P6_MSB_REG) << 8) + rr(DIG_P6_LSB_REG)),
318 | dig_P7 = s16((rr(DIG_P7_MSB_REG) << 8) + rr(DIG_P7_LSB_REG)),
319 | dig_P8 = s16((rr(DIG_P8_MSB_REG) << 8) + rr(DIG_P8_LSB_REG)),
320 | dig_P9 = s16((rr(DIG_P9_MSB_REG) << 8) + rr(DIG_P9_LSB_REG)),
321 | dig_H1 = s8(rr(DIG_H1_REG)),
322 | dig_H2 = s16((rr(DIG_H2_MSB_REG) << 8) + rr(DIG_H2_LSB_REG)),
323 | dig_H3 = s8(rr(DIG_H3_REG)),
324 | dig_H4 = s16((rr(DIG_H4_MSB_REG) << 4) + (rr(DIG_H4_LSB_REG) & 0x0F)),
325 | dig_H5 = s16((rr(DIG_H5_MSB_REG) << 4) + ((rr(DIG_H4_LSB_REG) >> 4)&0x0F)),
326 | dig_H6 = s8(rr(DIG_H6_REG))
327 | }
328 | end) then
329 | err="Failed reading calibration data"
330 | else
331 | B.setStandbyTime(self,settings.tStandby or 0)
332 | B.setFilter(self,settings.filter or 0)
333 | B.setPressureOverSample(self,settings.pressOverSample or 1)
334 | B.setHumidityOverSample(self,settings.humidOverSample or 1)
335 | B.setTempOverSample(self,settings.tempOverSample or 1)
336 | B.setMode(self,MODE_NORMAL); --Go!
337 | data,err=rr(CHIP_ID_REG)
338 | if data then
339 | return setmetatable(self,B)
340 | end
341 | end
342 | else
343 | err="wrong chip ID"
344 | end
345 | i2cm:close()
346 | return nil,err
347 | end
348 |
349 | return {create=bme280}
350 |
--------------------------------------------------------------------------------
/.lua/modbus/rtu.lua:
--------------------------------------------------------------------------------
1 | local schar,sbyte,ssub=string.char,string.byte,string.sub
2 | local h2n=ba.socket.h2n
3 | local cResume,cYield=coroutine.resume,coroutine.yield
4 |
5 | local U={} -- UART read/write socket API wrapper
6 | U.__index=U
7 |
8 |
9 | function U:close()
10 | if self.uart then
11 | self.uart:close()
12 | self.uart=nil
13 | self.err="closed"
14 | end
15 | return true
16 | end
17 |
18 |
19 | function U:state()
20 | return self.uart and "UART" or "terminated"
21 | end
22 |
23 | function U:write(data)
24 | if self.err then return nil,self.err end
25 | if self.transaction then
26 | local sndQHead=self.sndQHead
27 | assert(nil == self.sndQT[sndQHead])
28 | self.sndQT[sndQHead]=data
29 | self.sndQHead = sndQHead+1
30 | return true
31 | end
32 | self.transaction=ssub(data,1,2)
33 | local pl=ssub(data,7)
34 | local crc=esp32.crc("modbus",pl)
35 | local cHigh,cLow=crc>>8,crc&0xff
36 | self.uart:write(pl..schar(cLow,cHigh))
37 | self.timer:set(self.timeout)
38 | return true
39 | end
40 |
41 | function U:read(timeout)
42 | if self.err then return nil,self.err end
43 | self.timeout=timeout
44 | local pl,err=cYield()
45 | self.timer:cancel()
46 | local tran=self.transaction
47 | self.transaction=nil
48 | if not pl or #pl < 7 then
49 | err = err or "invalidresponse"
50 | self.err=err
51 | return nil,err
52 | end
53 | local sndQTail=self.sndQTail
54 | if self.sndQHead ~= sndQTail then
55 | local sndQT=self.sndQT
56 | self:write(sndQT[sndQTail])
57 | sndQT[sndQTail]=nil
58 | self.sndQTail=sndQTail+1
59 | end
60 | local cLow,cHigh=sbyte(ssub(pl,-2),1,2)
61 | pl=ssub(pl,1,-3)
62 | if esp32.crc("modbus",pl,cHigh << 8 | cLow) then
63 | return tran..h2n(2,0)..h2n(2,#pl)..schar(0xFF)..ssub(pl,2)
64 | end
65 | return nil,"CRC"
66 | end
67 |
68 | local function onData(self,pl,err)
69 | if self.transaction then
70 | local ok,err=cResume(self.co,pl,err)
71 | if not ok then
72 | xedge.sendErr("%s",debug.traceback(self.co,err))
73 | self.mc:close()
74 | end
75 | end
76 | end
77 |
78 |
79 | local function connect(port,cfg)
80 | cfg=cfg or {}
81 | local timeout=cfg.timeout or 1000
82 | cfg.timeout=4 -- Modbus spec. 3.5 chars
83 | cfg.pattern=nil
84 | local self
85 | cfg.callback=function(pl,err) onData(self,pl,err) end
86 | self=setmetatable({
87 | id=1,sndQT={},sndQHead=1,sndQTail=1,
88 | timer=ba.timer(function() onData(self,nil,"timeout") end),
89 | uart=esp32.uart(port,cfg)},U)
90 | assert(self.uart)
91 | self.co=coroutine.create(function()
92 | local start
93 | self.mc,start=require"modbus.client".connect(self, {async=true,onclose=cfg.onclose,timeout=timeout})
94 | start()
95 | end)
96 | assert(cResume(self.co))
97 | return self.mc
98 | end
99 |
100 | return {connect=connect}
101 |
--------------------------------------------------------------------------------
/BuildESP32ResourceFile.sh:
--------------------------------------------------------------------------------
1 | #!/bin/bash
2 |
3 | echo "Building Xedge32 resource file main/BAS/examples/xedge/obj/XedgeZip.c"
4 |
5 | directories=("main/BAS" "main/BAS-Resources" "main/lua-protobuf")
6 | for dir in "${directories[@]}"; do
7 | if [ ! -d "$dir" ]; then
8 | echo "Directory '$dir' does not exist."
9 | echo "Please make sure you cloned the repository recursively."
10 | exit 1
11 | fi
12 | done
13 |
14 | mkdir -p main/BAS/examples/xedge/obj || exit 1
15 |
16 | export BIN2C=main/BAS-Resources/tools/linux/bin2c
17 | #Resource build directory
18 | RB=main/BAS-Resources/build
19 | pushd $RB || exit 1
20 | chmod +x Xedge.sh
21 | echo "Running $PWD/Xedge.sh"
22 | export NO_BIN2C=1
23 | ./Xedge.sh || exit 1
24 | popd
25 |
26 | echo "Adding ESP32 modules"
27 | if [ "$NO_FWUPDATE" == "1" ]; then
28 | zip -D -r -9 $RB/Xedge.zip .lua -x ".lua/XedgePlugins/fw*" || exit 1
29 | else
30 | zip -d main/BAS-Resources/build/Xedge.zip ".lua/XedgePlugins/appupdate.*"
31 | zip -D -r -9 $RB/Xedge.zip .lua || exit 1
32 | fi
33 |
34 | $BIN2C -z getLspZipReader $RB/Xedge.zip main/BAS/examples/xedge/obj/XedgeZip.c || exit 1
35 | echo "Created: main/BAS/examples/xedge/obj/XedgeZip.c"
36 |
37 |
38 |
39 |
--------------------------------------------------------------------------------
/CMakeLists.txt:
--------------------------------------------------------------------------------
1 | # The following lines of boilerplate have to be in your project's CMakeLists
2 | # in this exact order for cmake to work correctly
3 | cmake_minimum_required(VERSION 3.5)
4 |
5 | include($ENV{IDF_PATH}/tools/cmake/project.cmake)
6 | project(xedge)
7 |
--------------------------------------------------------------------------------
/ESP32-partitions.csv:
--------------------------------------------------------------------------------
1 | # Name, Type, SubType, Offset, Size, Flags
2 | # Note: if you have increased the bootloader size, make sure to update the offsets to avoid overlap
3 | nvs, data, nvs, , 0x6000,
4 | phy_init, data, phy, , 0x1000,
5 | factory, app, factory, , 0x250000,
6 | storage, data, fat, , 0x198000,
7 | xcfg, data,fat, , 0x8000,
8 |
--------------------------------------------------------------------------------
/ESP32s3-partitions.csv:
--------------------------------------------------------------------------------
1 | # Name, Type, SubType, Offset, Size, Flags
2 | nvs, data, nvs, , 0x6000,
3 | otadata, data, ota, , 0x2000,
4 | phy_init, data, phy, , 0x1000,
5 | ota_0, app, ota_0, , 0x310000,
6 | ota_1, app, ota_1, , 0x310000,
7 | storage, data, fat, , 0x1B5000,
8 | xcfg, data,fat, , 0x8000,
9 |
--------------------------------------------------------------------------------
/LICENSE:
--------------------------------------------------------------------------------
1 | License Agreement
2 |
3 | This License Agreement applies to the Xedge32 Repository.
4 | Please see the submodules for their respective licenses:
5 | https://github.com/RealTimeLogic/BAS/blob/main/LICENSE
6 | https://github.com/surfskidude/lua-protobuf/blob/master/LICENSE
7 |
8 | Copyright (c) 2023 Real Time Logic
9 |
10 | Permission is hereby granted, free of charge, to any person obtaining a copy
11 | of this software and associated documentation files (the "Software"), to deal
12 | in the Software without restriction, including without limitation the rights
13 | to use, copy, modify, merge, publish, distribute, sublicense, and/or sell
14 | copies of the Software, and to permit persons to whom the Software is
15 | furnished to do so, subject to the following conditions:
16 |
17 | THE SOFTWARE IS PROVIDED "AS IS", WITHOUT WARRANTY OF ANY KIND, EXPRESS OR
18 | IMPLIED, INCLUDING BUT NOT LIMITED TO THE WARRANTIES OF MERCHANTABILITY,
19 | FITNESS FOR A PARTICULAR PURPOSE AND NONINFRINGEMENT. IN NO EVENT SHALL THE
20 | AUTHORS OR COPYRIGHT HOLDERS BE LIABLE FOR ANY CLAIM, DAMAGES OR OTHER
21 | LIABILITY, WHETHER IN AN ACTION OF CONTRACT, TORT OR OTHERWISE, ARISING FROM,
22 | OUT OF OR IN CONNECTION WITH THE SOFTWARE OR THE USE OR OTHER DEALINGS IN THE
23 | SOFTWARE.
24 |
25 | https://opensource.org/licenses/MIT
26 |
27 |
--------------------------------------------------------------------------------
/Makefile:
--------------------------------------------------------------------------------
1 | #
2 | # This is a project Makefile. It is assumed the directory this Makefile resides in is a
3 | # project subdirectory.
4 | #
5 |
6 | PROJECT_NAME := file_server
7 |
8 | EXTRA_COMPONENT_DIRS = $(IDF_PATH)/examples/common_components/protocol_examples_common
9 |
10 | include $(IDF_PATH)/make/project.mk
11 |
12 |
--------------------------------------------------------------------------------
/README.md:
--------------------------------------------------------------------------------
1 | # Xedge32
2 |
3 | ### (Xedge Lua IDE and REPL for ESP32)
4 |
5 | Looking to turn your ESP32 into a powerful [Edge Controller or IoT Gateway](https://realtimelogic.com/products/edge-controller/)? Look no further than Xedge32! This incredible development tool empowers users of all levels to program their ESP32 using the simple and intuitive Lua Scripting language. With Xedge32, you can easily unlock the full potential of your ESP32 and create advanced IoT solutions that will impress even the most tech-savvy enthusiasts.
6 |
7 | 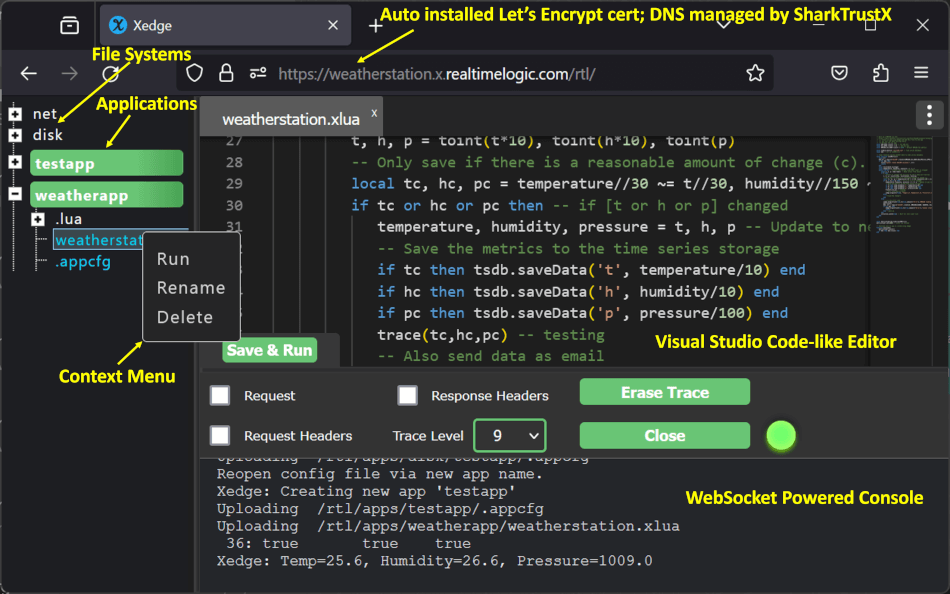
8 |
9 | **Figure 1: Xedge32 in developer mode**
10 |
11 | ## Getting Started
12 |
13 | You do not need to compile Xedge32. Compiling Xedge32 is for C code experts.
14 |
15 | * [Download the Xedge32 Firmware](https://realtimelogic.com/downloads/bas/ESP32/)
16 | * [Xedge32 Tutorials](https://realtimelogic.com/xedge32-tutorials/)
17 | * [Xedge32 South Bridge API](https://realtimelogic.com/ba/ESP32/) - GPIO and HW APIs
18 | * [How to use Xedge32 in developer mode](https://realtimelogic.com/ba/doc/en/Xedge.html)
19 |
20 |
21 | ## Understanding the Xedge32 Architecture
22 |
23 | As outlined in the tutorial [Your First Xedge32 Project](https://realtimelogic.com/articles/Your-First-Xedge32-Project), Xedge32 is explicitly **[built for OEM integration](#xedge32-and-oem-integration)**. It's an ESP32 customized version of the more general-purpose Xedge framework, which itself is powered by the [Barracuda App Server](https://github.com/RealTimeLogic/BAS).
24 |
25 | **For more details:**
26 |
27 | * [Xedge product page](https://realtimelogic.com/products/xedge/)
28 | * [Advanced compilation options including release build options](https://realtimelogic.com/ba/examples/xedge/readme.html)
29 |
30 |
31 | ## Compiling The C Code (for experts)
32 |
33 | **Note:** [Xedge32](https://realtimelogic.com/ba/ESP32/) is built on the more generic [Xedge](https://realtimelogic.com/products/xedge/), which itself is based on the [Barracuda App Server library](https://realtimelogic.com/products/barracuda-application-server/). Xedge32, Xedge, and the Barracuda App Server are OEM software components designed for easy integration into OEM products. All components are [designed to be extended](https://realtimelogic.com/articles/Using-Lua-for-Embedded-Development-vs-Traditional-C-Code).
34 |
35 | To compile the source code, you must use the latest ESP-IDF, which can be found on [GitHub](https://github.com/espressif/esp-idf).
36 |
37 | The following Linux commands show all steps required for installing the development tools, downloading the required source code, and compiling the code:
38 |
39 | ```
40 | sudo apt -y update
41 | sudo apt -y install git wget zip flex bison gperf python3 python3-venv cmake ninja-build ccache libffi-dev libssl-dev dfu-util libusb-1.0-0
42 |
43 | cd
44 | # remove old installation, if any
45 | rm -rf .espressif esp/esp-idf
46 |
47 | # Install the latest esp-idf
48 | mkdir esp
49 | cd esp
50 | git clone --recursive https://github.com/espressif/esp-idf.git
51 | # Execute the 3 following lines if you plan on using the CAM plugin.
52 | cd esp-idf/components
53 | git clone https://github.com/espressif/esp32-camera.git
54 | cd ..
55 | ./install.sh
56 | cd ..
57 | source esp-idf/export.sh
58 |
59 | # Download and update Xedge32
60 | git clone --recursive --recurse-submodules https://github.com/RealTimeLogic/xedge32.git xedge
61 | cd xedge
62 | git submodule update --init --remote
63 |
64 | # Build the Xedge resource file Xedge.zip, convert to C, and copy C file to Xedge directory
65 | chmod +x BuildESP32ResourceFile.sh
66 | ./BuildESP32ResourceFile.sh
67 |
68 | #set target to one of:
69 | #idf.py set-target esp32
70 | #idf.py set-target esp32s3
71 |
72 | # Configure Xedge32 options such as enabling CAM and mDNS. Details below.
73 | #idf.py menuconfig
74 |
75 | # Build the code
76 | idf.py build
77 | ```
78 |
79 | Windows: The code can be compiled in a Linux console, including the Windows Subsystem for Linux (WSL). If you use WSL, it's recommended to use generation one (WSL1), as it can be difficult to get the USB serial working in WSL2. For more information, see [the WSL documentation](https://docs.microsoft.com/en-us/windows/wsl/about).
80 |
81 | To upload the firmware to your ESP32, follow these steps:
82 |
83 | 1. Wait for the build process to complete.
84 | 2. Upload the code using:
85 | - Linux: idf.py flash monitor
86 | - WSL: idf.py -p /dev/ttyS4 -b 115200 flash monitor
87 |
88 |
89 | # Configuring Xedge32
90 |
91 | To configure Xedge32, use the `idf.py menuconfig` command. This allows you to enable various features such as mDNS, Camera, OPC UA, and softTPM eFuse registers. Below is an overview of each feature, along with configuration tips.
92 |
93 | ## Configuration Steps
94 |
95 | ### 1. Enable mDNS
96 |
97 | mDNS (Multicast DNS) enables local network discovery, making it possible to access Xedge32 by navigating to `http://xedge32.local` in your browser. You can customize this name within your Lua script if desired.
98 |
99 | ### 2. Enable OPC UA
100 |
101 | [OPC UA](https://realtimelogic.com/products/opc-ua/) is an industrial protocol useful for machine-to-machine communication. To enable OPC UA:
102 |
103 | - Use `idf.py menuconfig` and select the OPC UA option.
104 | - After configuring through menuconfig, ensure that you also choose "Yes" when prompted by `BuildESP32ResourceFile.sh`.
105 |
106 | ### 3. Enable softTPM eFuse
107 |
108 | The softTPM eFuse option allows for secure storage of secrets directly in eFuse registers, making them permanently accessible on the device. This feature is part of the advanced security configuration settings. For full details on available configuration options, refer to the configuration section in the [generic Xedge build documentation](https://realtimelogic.com/ba/examples/xedge/readme.html).
109 |
110 | ## Embedding Lua Apps and configuring NVS
111 |
112 | Lua apps and the Xedge configuration file can be embedded in the firmware binary using `fatfsgen.py` and `nvs_partition_gen.py`. See the [Partitions Generator Utility](partitions/README.md) readme file for details.
113 |
114 | ## Xedge32 and OEM Integration
115 |
116 | OEM integration means you are not using Xedge32 as a one-size-fits-all product. You are working with a platform designed to be embedded inside your firmware. Instead of starting from scratch, you extend and customize the platform to fit your specific needs, then ship it as an integral part of your product.
117 |
118 | Xedge32 is built for precisely this. It gives you a solid base, and with Lua, you can add features, tweak behavior, and expose your own Lua to C APIs without modifying the core system. For a high-level conceptual view, check out the article [Using Lua for Embedded Development vs. Traditional C Code](https://realtimelogic.com/articles/Using-Lua-for-Embedded-Development-vs-Traditional-C-Code) and the tutorial on [creating Lua to C code APIs](https://tutorial.realtimelogic.com/Lua-Bindings.lsp).
119 |
120 |
121 | ## Export restrictions
122 |
123 | This distribution includes cryptographic software. The country in
124 | which you currently reside may have restrictions on the import,
125 | possession, use, and/or re-export to another country, of
126 | encryption software. BEFORE using any encryption software, please
127 | check your country's laws, regulations and policies concerning the
128 | import, possession, or use, and re-export of encryption software, to
129 | see if this is permitted. See http://www.wassenaar.org/ for more
130 | information.
131 |
132 | The U.S. Government Department of Commerce, Bureau of Industry and
133 | Security (BIS), has classified this software as Export Commodity
134 | Control Number (ECCN) 5D002.C.1, which includes information security
135 | software using or performing cryptographic functions with asymmetric
136 | algorithms. The form and manner of this distribution makes it
137 | eligible for export under the License Exception ENC Technology
138 | Software Unrestricted (TSU) exception (see the BIS Export
139 | Administration Regulations, Section 740.13) for both object code and
140 | source code.
141 |
142 | The following page provides details on the included cryptographic
143 | software: https://github.com/RealTimeLogic/SharkSSL
144 |
--------------------------------------------------------------------------------
/conv2serial0.sh:
--------------------------------------------------------------------------------
1 | echo "------------Building for serial 0------------"
2 | sed -i '/^CONFIG_ESP_CONSOLE_UART_NUM/s/^/#/' sdkconfig
3 | sed -i '/^CONFIG_ESP_CONSOLE_USB_SERIAL_JTAG/s/^/#/' sdkconfig
4 | cat <> sdkconfig
5 | CONFIG_ESP_CONSOLE_UART_DEFAULT=y
6 | CONFIG_ESP_CONSOLE_UART_NUM=0
7 | CONFIG_ESP_CONSOLE_UART_BAUDRATE=115200
8 | CONFIG_CONSOLE_UART_DEFAULT=y
9 | CONFIG_CONSOLE_UART=y
10 | CONFIG_CONSOLE_UART_NUM=0
11 | CONFIG_CONSOLE_UART_BAUDRATE=115200
12 | EOL
13 |
14 |
15 |
--------------------------------------------------------------------------------
/doc/Makefile:
--------------------------------------------------------------------------------
1 | # Minimal makefile for Sphinx documentation
2 | #
3 |
4 | # You can set these variables from the command line, and also
5 | # from the environment for the first two.
6 | SPHINXOPTS ?=
7 | SPHINXBUILD ?= sphinx-build
8 | SOURCEDIR = .
9 | BUILDDIR = _build
10 |
11 | # Put it first so that "make" without argument is like "make help".
12 | help:
13 | @$(SPHINXBUILD) -M help "$(SOURCEDIR)" "$(BUILDDIR)" $(SPHINXOPTS) $(O)
14 |
15 | .PHONY: help Makefile
16 |
17 | # Catch-all target: route all unknown targets to Sphinx using the new
18 | # "make mode" option. $(O) is meant as a shortcut for $(SPHINXOPTS).
19 | %: Makefile
20 | @$(SPHINXBUILD) -M $@ "$(SOURCEDIR)" "$(BUILDDIR)" $(SPHINXOPTS) $(O)
21 |
--------------------------------------------------------------------------------
/doc/conf.py:
--------------------------------------------------------------------------------
1 | # Configuration file for the Sphinx documentation builder.
2 | #
3 | # This file only contains a selection of the most common options. For a full
4 | # list see the documentation:
5 | # https://www.sphinx-doc.org/en/master/usage/configuration.html
6 |
7 | # -- Path setup --------------------------------------------------------------
8 |
9 | # If extensions (or modules to document with autodoc) are in another directory,
10 | # add these directories to sys.path here. If the directory is relative to the
11 | # documentation root, use os.path.abspath to make it absolute, like shown here.
12 | #
13 | # import os
14 | # import sys
15 | # sys.path.insert(0, os.path.abspath('.'))
16 |
17 |
18 | # -- Project information -----------------------------------------------------
19 |
20 | project = 'Xedge32'
21 | copyright = '2025, RTL'
22 | author = 'RTL'
23 |
24 | "master_doc = 'index'"
25 |
26 | # -- General configuration ---------------------------------------------------
27 |
28 | # Add any Sphinx extension module names here, as strings. They can be
29 | # extensions coming with Sphinx (named 'sphinx.ext.*') or your custom
30 | # ones.
31 | extensions = [
32 | 'sphinxcontrib.luadomain',
33 | 'sphinx_lua',
34 | 'sphinx.ext.autosectionlabel'
35 | ]
36 |
37 | # Available options and default values
38 | lua_source_path = ["./"]
39 | lua_source_encoding = 'utf8'
40 | lua_source_comment_prefix = '---'
41 | lua_source_use_emmy_lua_syntax = True
42 | lua_source_private_prefix = '_'
43 |
44 | # Add any paths that contain templates here, relative to this directory.
45 | templates_path = ['_templates']
46 |
47 | # List of patterns, relative to source directory, that match files and
48 | # directories to ignore when looking for source files.
49 | # This pattern also affects html_static_path and html_extra_path.
50 | exclude_patterns = ['_build', 'Thumbs.db', '.DS_Store']
51 |
52 |
53 | # -- Options for HTML output -------------------------------------------------
54 |
55 | # The theme to use for HTML and HTML Help pages. See the documentation for
56 | # a list of builtin themes.
57 | #
58 | html_theme = 'sphinx_rtd_theme'
59 |
60 | # Add any paths that contain custom static files (such as style sheets) here,
61 | # relative to this directory. They are copied after the builtin static files,
62 | # so a file named "default.css" will overwrite the builtin "default.css".
63 | #html_static_path = ['_static']
64 |
--------------------------------------------------------------------------------
/doc/index.rst:
--------------------------------------------------------------------------------
1 | .. ESP32 Lua API documentation master file, created by
2 | sphinx-quickstart on Wed Feb 22 12:03:44 2023.
3 |
4 | Xedge32 Introduction
5 | =======================
6 |
7 | :ref:`Xedge32` is `Xedge `_ with a peripheral Lua API designed for the ESP32. Xedge is a Lua REPL designed for edge devices and powered by an `advanced IoT toolkit `_.
8 |
9 |
10 | .. image:: https://realtimelogic.com/GZ/images/BAS-ESP32.svg
11 | :alt: Xedge32
12 |
13 | **Think of Xedge32 as an enhanced version of Xedge, featuring an additional peripheral south bridge specifically engineered for the ESP32.**
14 |
15 | .. tip:: If you're new to this technology, start with our `Xedge32 introduction `_.
16 |
17 | Xedge32 significantly accelerates the development of IoT devices, combining a comprehensive ready-to-use `IoT north bridge API <../doc/?url=IoT.html>`_ with the ESP32 peripheral, aka south bridge API. This approach, which does not require C coding, streamlines working with device components such as sensors. The added advantage of using the ESP32, a cost-effective solution, makes it easy to retrofit existing products with IoT capabilities. By streamlining development and testing stages, Xedge32 dramatically reduces the time it takes to bring secure IoT-enabled sensor products to market. All these benefits make Xedge32 an exceptionally user-friendly and efficient choice for IoT device development.
18 |
19 | Xedge32 leverages the high-level Lua language. Lua's learning curve is considerably less steep than other computer languages, making it an invaluable tool in high-paced development environments, including creating secure IoT-enabled device products. If you're new to Lua, be sure to check out the `Online Interactive Lua Tutorials `_ for an easy and accessible way to learn the language.
20 |
21 | **Xedge vs. Xedge32**
22 |
23 | This documentation exclusively covers Xedge32 specific features, the ESP32 peripheral Lua API, and how to use Xedge on the ESP32. If you are looking for documentation on network-related and other APIs provided by the Barracuda App Server development foundation, please refer to the Barracuda App Server API and the generic Xedge documentation.
24 |
25 | Xedge32 APIs
26 | --------------
27 |
28 | #. The ESP32 peripheral APIs found here (Xedge32 specific API)
29 | #. `Xedge documentation `_ (generic API)
30 | #. `Barracuda App Server's Lua API `_
31 | #. `IoT Protocols `_
32 |
33 | **API Key Points:**
34 |
35 | #. Xedge32's ESP32 LUA API offers a selected range of the `ESP-IDF C peripheral APIs `_ adapted for Lua.
36 | #. Out of the box, Xedge32 grants access only to the Lua APIs from the Barracuda App Server. For full access to the C APIs, developers need to `compile and extend Xedge32 `_, an option for those with C experience.
37 |
38 |
39 | Interrupts
40 | -----------
41 |
42 | The ESP32 Lua API is designed to take advantage of interrupt-driven events, and it is highly recommended to use the interrupt-driven (callback) API when it is available. While it is possible to poll for data using a `timer <../ba/doc/?url=ua.html#ba_timer>`_, it is not the recommended approach for APIs that provide event-driven data reading.
43 |
44 | Automatic collection of HW resources
45 | -------------------------------------
46 |
47 | Lua includes a garbage collector that reclaims memory when no more references exist to the object. The ESP32 API takes advantage of this by creating Lua objects for the ESP32 peripheral hardware. When using an LSP page as a REPL, the objects no longer have any references once the page has been executed. This construction can be made to automatically reclaim hardware resources that are no longer in use, simplifying the hot reloading of the new code.
48 |
49 | For example, you can modify an `LSP page `_ containing Lua code and refresh the page to compile the new code. This allows you to quickly make changes and test them without worrying about manually releasing the hardware resources since the garbage collector takes care of it automatically. See the :ref:`GPIO examples` for how this can be done.
50 |
51 |
52 |
53 | Xedge ESP32
54 | ==============
55 |
56 | .. toctree::
57 | :maxdepth: 3
58 | :caption: Contents:
59 |
60 | source/GettingStarted
61 | source/AccessPointMode.rst
62 | source/LuaShell32
63 | source/xedge
64 | source/ADC
65 | source/cam
66 | source/GPIO
67 | source/I2C
68 | source/PCNT
69 | source/PWM
70 | source/RMT
71 | source/UART
72 | source/misc
73 | source/BME280
74 | source/RTU
75 | source/tutorials
76 | source/applications.rst
77 | source/license
78 |
79 |
80 |
81 | Indices and tables
82 | ==================
83 |
84 | * :ref:`genindex`
85 | * :ref:`modindex`
86 | * :ref:`search`
87 |
--------------------------------------------------------------------------------
/doc/make.bat:
--------------------------------------------------------------------------------
1 | @ECHO OFF
2 |
3 | pushd %~dp0
4 |
5 | REM Command file for Sphinx documentation
6 |
7 | if "%SPHINXBUILD%" == "" (
8 | set SPHINXBUILD=sphinx-build
9 | )
10 | set SOURCEDIR=.
11 | set BUILDDIR=_build
12 |
13 | if "%1" == "" goto help
14 |
15 | %SPHINXBUILD% >NUL 2>NUL
16 | if errorlevel 9009 (
17 | echo.
18 | echo.The 'sphinx-build' command was not found. Make sure you have Sphinx
19 | echo.installed, then set the SPHINXBUILD environment variable to point
20 | echo.to the full path of the 'sphinx-build' executable. Alternatively you
21 | echo.may add the Sphinx directory to PATH.
22 | echo.
23 | echo.If you don't have Sphinx installed, grab it from
24 | echo.https://www.sphinx-doc.org/
25 | exit /b 1
26 | )
27 |
28 | %SPHINXBUILD% -M %1 %SOURCEDIR% %BUILDDIR% %SPHINXOPTS% %O%
29 | goto end
30 |
31 | :help
32 | %SPHINXBUILD% -M help %SOURCEDIR% %BUILDDIR% %SPHINXOPTS% %O%
33 |
34 | :end
35 | popd
36 |
--------------------------------------------------------------------------------
/doc/source/ADC.rst:
--------------------------------------------------------------------------------
1 | ADC API
2 | =============
3 |
4 |
5 | The Analog to Digital Converter (ADC) API allows you to interface with the ESP32's on-chip ADC sensor, which can measure analog signals from dedicated analog IO pads. The Lua API internally uses the OneShot Mode and Continuous Mode provided by the ESP-IDF.
6 |
7 | OneShot Mode is a simpler approach, where you can directly poll for data. Continuous Mode, on the other hand, employs interrupts and allows Lua to sample data at a rate of up to 48 kHz.
8 |
9 | OneShot Mode
10 | -------------
11 |
12 | To use the OneShot Mode, you can call the following function:
13 |
14 | .. code-block:: lua
15 |
16 | esp32.adc(unit, channel [, cfg])
17 |
18 | - ``unit``: The ESP32 has two ADC units, represented by numbers 1 and 2.
19 | - ``channel``: The specific ADC channel you want to use.
20 | - ``cfg``: (Optional) A configuration table with the following options:
21 | * ``attenuation``: (String) One of "0db" | "2.5db" | "6db" | "11db". The default value is "11db".
22 | * ``volt``: (Boolean) If set to true, the API will return the raw ADC data and the data converted to millivolts.
23 | * ``bitwidth``: (Number) A value between 9 and 13, where the default is 13.
24 |
25 | The ``esp32.adc()`` function returns an ADC object (``adc``) and the GPIO pin number used by the specified channel. The ADC object has the following methods:
26 |
27 | - ``adc:read()``: Returns the raw ADC data and, if the 'volt' option is set in the configuration table, the raw data converted to millivolts.
28 | - ``adc:close()``: Closes the ADC object and releases the resources.
29 |
30 | **Example**
31 |
32 | This example demonstrates how to open ADC unit 1, channel 0, and poll for data every second using a timer. The ADC object is configured to return both raw data and millivolts.
33 |
34 | .. code-block:: lua
35 |
36 | local adc, pin = esp32.adc(1, 0, {volt = true})
37 | if adc then
38 | -- Prints 36, the VP pin
39 | trace("ADC using GPIO pin", pin)
40 | local function pollADC()
41 | local raw, volt = adc:read()
42 | trace(string.format("ADC raw data: %d, volt: %d", raw, volt))
43 | return true -- Continue timer
44 | end
45 | ba.timer(pollADC):set(1000)
46 | else
47 | trace("Failed", pin) -- Pin now represents the error code
48 | end
49 |
50 | Continuous Mode
51 | ----------------
52 |
53 | .. note:: This is an experimental API.
54 |
55 | The Continuous Mode uses interrupts to sample the ADC at a high frequency. This data is then provided to Lua via a callback. However, Lua cannot accept a callback being called 48,000 times a second, which is the maximum supported sample rate. Instead, filters provide the data in a way Lua can handle it. The Lua callback can be called up to a hundred times per second. Note that the minimum sampling rate for an ESP32 is 20,000; thus, the Continuous Mode puts some strain on your ESP32.
56 |
57 | To use the Continuous Mode, call the following function:
58 |
59 | .. code-block:: lua
60 |
61 | esp32.adc(unit, channel, cfg)
62 |
63 | When using Continuous Mode, the following additional options must be set in the configuration table 'cfg':
64 |
65 | - ``callback``: (Function) A Lua callback that is called each time a sample block 'bl' is ready. This function will at most be called 100 times per second.
66 | - ``fs``: (Number) The frequency sample rate is how fast the ADC samples in Hz. For example, setting this value to 20000 provides 20,000 samples per second. This value will be auto-adjusted if outside the acceptable range.
67 | - ``bl``: (Number) Sample block length is how many samples should be collected before calling the Lua callback. This value, together with 'fs', controls how many times per second the Lua callback is called and can be calculated as fs/bl. Note that bl will be auto-adjusted such that the following is true: fs/bl >= 100.
68 | - ``filter``: (String) One of "data" or "mean". These are the two filters currently provided.
69 |
70 | The 'data' filter provides all data collected during a sample 'bl' as a Lua string with 16-bit values in little-endian format. This format is referred to as Pulse Code Modulation (PCM).
71 |
72 | The 'mean' filter provides a mean value of the sampled values.
73 |
74 | **Callback with 'data' filter**
75 |
76 | .. code-block:: lua
77 |
78 | function mycallback(data, err)
79 |
80 | - ``data``: A PCM-encoded binary object encoded as a Lua string.
81 | - ``err``: Set if data is nil. The error "overflow" should be expected once in a while.
82 |
83 | **Callback with 'mean' filter**
84 |
85 | .. code-block:: lua
86 |
87 | function mycallback(raw, volt)
88 |
89 | - ``raw``: The raw ADC value.
90 | - ``volt``: Set if the configuration table included the 'volt' option. Note that the second argument is the error code if 'raw' is nil.
91 |
92 | **Example: Continuous Mode with 'mean' filter**
93 |
94 | This example shows how to use the continuous mode with the 'mean' filter. We set fs and bl to zero, letting them be auto-adjusted. On an ESP32, fs will be set to 20000, and bl will be set to 200, which causes the callback to be called at the highest rate. We only print every 100th value in the callback to limit the amount of data being printed. You should see a printout every second.
95 |
96 | .. code-block:: lua
97 |
98 | local cnt = 0
99 |
100 | local function callback(raw, volt)
101 | if cnt % 100 == 0 then
102 | trace(raw, volt) -- This can print nil,emsg
103 | end
104 | cnt = cnt + 1
105 | end
106 |
107 | local adc, pin = esp32.adc(1, 0, {
108 | volt = true,
109 | bl = 0, -- auto-adjust
110 | callback = callback,
111 | fs = 0, -- auto-adjust
112 | filter = "mean"
113 | })
114 |
115 | **Example: Continuous Mode with 'data' filter**
116 |
117 | This example shows how to use the continuous mode with the 'data' filter. We set fs to the highest possible value and let bl be auto-adjusted. The callback prints the length of the binary data, which in this case is 960. If you do the math, you will find that bl will be auto-adjusted to 480. The data is twice this size since the data contains 16-bit PCM-encoded values.
118 |
119 | .. code-block:: lua
120 |
121 | local cnt = 0
122 |
123 | local function callback(data, err)
124 | if data then
125 | if cnt % 100 == 0 then
126 | trace(#data)
127 | end
128 | cnt = cnt + 1
129 | else
130 | trace(err)
131 | end
132 | end
133 |
134 | local adc, pin = esp32.adc(1, 0, {
135 | volt = true,
136 | bl = 0, -- auto-adjust
137 | callback = callback,
138 | fs = 48000,
139 | filter = "data"
140 | })
141 |
--------------------------------------------------------------------------------
/doc/source/AccessPointMode.rst:
--------------------------------------------------------------------------------
1 |
2 | Access Point Mode
3 | ===================
4 |
5 | After successfully :ref:`flashing the firmware ` onto your ESP32 for the first time, Xedge32 automatically configures the ESP32 to operate in Access Point Mode. The default name of this access point is ``xedge32``.
6 |
7 | Connecting to Xedge32
8 | ------------------------------------
9 |
10 | 1. **Connecting to the Access Point**:
11 |
12 | - On your device, connect to the ``xedge32`` Wi-Fi network. The default password is 12345678 (can be changed).
13 |
14 | 2. **Accessing the Web Interface**:
15 |
16 | - Open a web browser and navigate to `http://xedge32.local `_.
17 | - **Note**: If you're using a computer that does not support mDNS, you will not be able to access the URL ``http://xedge32.local``. Instead, use the IP address ``http://192.168.190.0``.
18 |
19 | 3. **Navigating to Xedge32 IDE**:
20 |
21 | - Upon accessing ``http://xedge32.local``, you'll be greeted with a default 404 page. Here, click on the ``Xedge IDE`` link to proceed to the :ref:`Xedge IDE Web Editor`.
22 |
23 | Access Point Mode Considerations
24 | ------------------------------------
25 |
26 | While in Access Point Mode, be aware that the web-based editor will be a basic HTML textarea, not the advanced `Visual Studio Code-like editor `_ you will see if your computer can access the Internet. If you prefer to keep your ESP32 in Access Point Mode for development, it's recommended to use a computer that is connected to the ESP32 via Wi-Fi and simultaneously to the Internet through a wired connection, as shown in the figure below. This setup ensures that the advanced web-based code editor can be loaded from the Internet.
27 |
28 | .. figure:: img/Xedge32-IDE-Access-Point-Mode.svg
29 | :alt: Xedge32 IDE Access Point Mode
30 |
31 | Figure 1: Loading the advanced code editor when in Access Point Mode
32 |
33 | Switching to Station Mode
34 | ------------------------------------
35 |
36 | **Station Mode** is the recommended mode for Xedge32, as it enables the full range of IoT features available in this tool. To switch from **Access Point Mode** to **Station Mode**, follow these steps:
37 |
38 | 1. **Accessing the Lua Shell**:
39 |
40 | - Click the three dots (``...``) in the upper right corner of the Xedge editor.
41 | - Select **Lua Shell** to open the web-based :ref:`LuaShell32`.
42 |
43 | 2. **Programming Station Mode**:
44 |
45 | - In LuaShell32, enter the following command to connect to your Wi-Fi network::
46 |
47 | esp32.netconnect("wifi", {ssid="your-Wi-Fi-SSID", pwd="password"})
48 |
49 | Replace ``your-Wi-Fi-SSID`` and ``password`` with your actual Wi-Fi credentials.
50 |
51 | 3. **Switching Modes**:
52 |
53 | - The ESP32 will attempt to switch from **Access Point Mode** to **Station Mode**.
54 | - If the connection is successful, the ESP32 remains in **Station Mode**.
55 | - If the connection fails, the ESP32 reverts to **Access Point Mode**.
56 |
57 | 4. **Reconnecting the ESP32 when in Station Mode**:
58 |
59 | - If your computer supports mDNS, reconnect with the ESP32 by navigating to ``http://xedge32.local/`` or simply refresh the browser window.
60 | - If your computer does not support mDNS, find the ESP32's new IP address assigned by your router. This is typically found on the router's DHCP client list page, where the ESP32 should appear as ``xedge``.
61 |
62 | **Note:** Upon switching from Access Point Mode to Station Mode, and if you are accessing the Xedge IDE via http://xedge32.local/. If your computer and the ESP32 are on the same network, when the ESP32 switches to AP Mode, the IDE will automatically reconnect to the ESP32. Initially, a 'disconnect' error will appear in the Xedge IDE console, followed by several 'reconnect' errors. After a short duration, a "connected" message will confirm successful reconnection.
63 |
64 |
65 | Station Mode Considerations
66 | ------------------------------------
67 |
68 | Here are the best practices for navigating to your ESP32 when in Station Mode:
69 |
70 | - **http://xedge32.local:** You can navigate to http://xedge32.local/ if you are using the Pre-Compiled Firmware or have enabled mDNS when you compiled your own firmware. **Note:**
71 |
72 | - You can change the mdns name using :ref:`esp32-execute-label`.
73 | - mDNS can be slower than standard DNS. This is because mDNS typically requires additional time to resolve local network names into IP addresses. In some cases, this might lead to noticeable delays when accessing your device. Given the potential slower response times with mDNS, you may consider using the alternative methods to connect to your ESP32.
74 |
75 | - **IP Address Assignment:** The ESP32 gets an IP address from the network's DHCP (Dynamic Host Configuration Protocol). Usually, your router will assign the same IP address each time the ESP32 reconnects to the network. You can bookmark this IP address in your web browser. That way, the next time you power on your ESP32, you can simply click the bookmark to connect to it.
76 |
77 | - **Consistent IP Address with DHCP Reservations:** If you want to make sure the ESP32 always uses the same IP address, most routers allow you to reserve that IP address specifically for your device using `DHCP reservations `_. This ensures consistent IP address assignment for the ESP32.
78 |
79 | - **Using Let's Encrypt Plugin - SharkTrust:** As an alternative, you can also enable a permanent URL for your ESP32 by activating the Let's Encrypt plugin called SharkTrust through the `Xedge's configuration menu `_.
80 |
81 | By following the above instructions, you can easily browse to your your ESP32 device without using a serial connection to discover the IP address assignment.
82 |
83 |
84 |
85 | Switching Back to Access Point Mode
86 | ------------------------------------
87 |
88 | **Important:** In Station Mode, after at least one successful Station Mode Mode connection, the ESP32 will not automatically switch back to Access Point Mode, even if it fails to establish a connection. This behavior is intentional and serves as a security measure. To revert to Access Point Mode manually:
89 |
90 | - In LuaShell32, execute the following command::
91 |
92 | esp32.netconnect"wifi"
93 |
94 | This command will switch the ESP32 back to **Access Point Mode**.
95 |
--------------------------------------------------------------------------------
/doc/source/BME280.rst:
--------------------------------------------------------------------------------
1 | BME280 Module
2 | =============
3 |
4 | This module provides an easy-to-use interface for communicating with the BME280 chip, a popular environmental sensor that measures temperature, humidity, and pressure.
5 |
6 | .. note:: The Lua module is included in the Xedge32 firmware but may be removed in later versions and provided as a separate module.
7 |
8 |
9 | The Bosch Sensortec BME280/BMP280 temperature/air pressure/humidity sensor communicates with the ESP32 using the :ref:`I2C interface `. See the `BME280 Lua Source Code `_ for details.
10 |
11 | Usage
12 | -----
13 |
14 | To use this module, you first need to create a BME280 object by calling the ``create`` function and passing the following parameters:
15 |
16 | module.create()
17 | ---------------
18 |
19 | .. code-block:: lua
20 |
21 | bme=require"bme280".create(port, address, sda, scl, settings)
22 |
23 | Create a BME280 object.
24 |
25 | **Parameters:**
26 |
27 | - ``port`` (``int``): I2C port number, e.g., ``0``
28 | - ``address`` (``int``): the BME280 I2C address, typically ``0x76``
29 | - ``sda`` (``int``): the GPIO number used for the I2C Serial Data
30 | - ``scl`` (``int``): the GPIO number used for the I2C Serial Clock
31 | - ``settings`` (``table``, optional): a Lua table with settings. See the `WeatherStation demo `_ for example code.
32 |
33 | **Returns:**
34 |
35 | - A new BME280 object.
36 |
37 | BME280 Object Methods
38 | ---------------------
39 |
40 | bme:read()
41 | ~~~~~~~~~~~
42 |
43 | .. code-block:: lua
44 |
45 | local temperature, humidity, pressure = bme:read()
46 |
47 |
48 | Reads the temperature, humidity, and pressure from the BME280 sensor.
49 |
50 | **Returns:**
51 |
52 | - Three values: the temperature (in degrees Celsius), the humidity (as a percentage), and the pressure (in Pascals).
53 |
54 | BME280 Examples
55 | ----------------
56 |
57 | Basic example
58 | ~~~~~~~~~~~~~~~~~~~~~~~~~~~~~~~~~~~~~~~
59 |
60 | Here's an example of how to use the ``bme280`` module:
61 |
62 | .. code-block:: lua
63 |
64 | local bmeModule = require"bme280"
65 | local port = 0
66 | local address = 0x76
67 | local sda = 5
68 | local scl = 6
69 | local bme = bmeModule.create(port, address, sda, scl)
70 | local temp, hum, pres = bme:read()
71 |
72 | This example creates a new BME280 object, reads the temperature, humidity, and pressure from the sensor, and stores the values in the ``temp``, ``hum``, and ``pres`` variables. Note that we've assumed that the I2C port, address, SDA, and SCL pins are specified as local variables. You may need to adjust these variables to fit your specific use case.
73 |
74 | Online Examples
75 | ~~~~~~~~~~~~~~~~~~~~~~~~~~~~~~~~~~~~~~~
76 |
77 | - `bme280.xlua `_
78 | - `Weather Station `_
79 |
80 |
--------------------------------------------------------------------------------
/doc/source/GPIO.rst:
--------------------------------------------------------------------------------
1 |
2 | GPIO API
3 | ===========
4 |
5 | This API provides access to the GPIO (General Purpose Input/Output) subsystem.
6 |
7 | esp32.gpio(pin, mode, cfg)
8 | -----------------------------------
9 |
10 | The `gpio.init()` function initializes a GPIO pin and returns a `gpio` object.
11 |
12 | :param pin: A valid GPIO pin number.
13 | :param mode: The GPIO mode must be set to one of the following strings:
14 |
15 | - ``IN``: input-only mode.
16 | - ``OUT``: output-only mode.
17 | - ``OUTOD``: output-only mode with open-drain.
18 | - ``INOUTOD``: input/output mode with open-drain.
19 | - ``INOUT``: input/output mode.
20 |
21 | :param cfg: An optional table with the following options:
22 |
23 | - ``pullup``: Enables a GPIO pull-up. Defaults to ``false``.
24 | - ``pulldown``: Enables a GPIO pull-down. Defaults to ``false``.
25 | - ``callback``: A callback function. Enables interrupt mode. The interrupt is controlled by the `type` key.
26 | - ``type``: The interrupt type can be set to one of the following strings:
27 |
28 | - ``POSEDGE``: interrupt on rising edge.
29 | - ``NEGEDGE``: interrupt on falling edge.
30 | - ``ANYEDGE``: interrupt on both rising and falling edges.
31 |
32 | Defaults to ``POSEDGE`` if a callback is provided; interrupts are disabled if no callback is provided.
33 |
34 |
35 | gpio Object Methods
36 | --------------------
37 |
38 | The `gpio` object has the following methods:
39 |
40 | gpio:value([val])
41 | ~~~~~~~~~~~~~~~~~
42 |
43 | Sets the value of the GPIO to `true` (high) or `false` (low) or returns the GPIO value if no argument is provided.
44 |
45 | gpio:close()
46 | ~~~~~~~~~~~~
47 |
48 | Releases the GPIO, freeing the resources associated with it. Use this method when you are finished using the GPIO.
49 |
50 | .. _GpioExamples:
51 |
52 | Examples
53 | --------
54 | The following examples are designed to be run as Lua Server Pages (LSP) pages.
55 |
56 | Example 1: Setting GPIO 18 High
57 | ~~~~~~~~~~~~~~~~~~~~~~~~~~~~~~~~
58 |
59 | The following example configures GPIO 18 for output mode, sets the GPIO high, waits for 2 seconds, then closes the GPIO. The GPIO is automatically closed since we use Lua's syntax, which automatically closes the object when it goes out of scope.
60 |
61 | .. code-block:: lua
62 |
63 | local pin = esp32.gpio(18,"OUT")
64 | pin:value(true)
65 | ba.sleep(2000)
66 |
67 | Example 2: Turning LED On and Off
68 | ~~~~~~~~~~~~~~~~~~~~~~~~~~~~~~~~~~
69 |
70 | The following example performs a full garbage-collection cycle, sleeps for 2 seconds, then opens pin 18 for output mode, and sets the GPIO high. If you connect an LED to the pin you will see the LED turning on and stay on. When the page is refreshed, the garbage collector collects the previous instance, thus turning the LED off. We then sleep for two seconds before creating a new object. The effect is that the LED will be on until the page is refreshed, thereby turning off the LED for two seconds.
71 |
72 | .. code-block:: lua
73 |
74 | collectgarbage()
75 | ba.sleep(2000)
76 | local pin = esp32.gpio(18,"OUT")
77 | pin:value(true)
78 |
79 | Example 3: Reading Button State
80 | ~~~~~~~~~~~~~~~~~~~~~~~~~~~~~~~~
81 |
82 | The following example configures pin 15 as input with pulldown set to true. The code then pulls the pin for a maximum of 30 seconds. If you connect a button to the pin and press the button, the loop exits before it has looped 30 times.
83 |
84 | .. code-block:: lua
85 |
86 | local pin = esp32.gpio(15,"IN",{pulldown=true})
87 | for i= 1,30 do
88 | local val = pin:value()
89 | trace(i,val)
90 | if val then break end
91 | ba.sleep(1000)
92 | end
93 |
94 | Example 4: Using Interrupt Callback Function
95 | ~~~~~~~~~~~~~~~~~~~~~~~~~~~~~~~~~~~~~~~~~~~~~
96 |
97 | The following example builds on the previous example and installs an interrupt callback function that gets called at both rising and falling edges. The callback is called each time you click the button and also when you release the button. The callback is called as long as the GPIO object is not collected by Lua's garbage collector.
98 |
99 | .. code-block:: lua
100 |
101 | local cfg={
102 | pulldown=true,
103 | type="ANYEDGE",
104 | callback=function(level)
105 | trace("level",level)
106 | end
107 | }
108 | trace(esp32.gpio(15,"IN", cfg))
109 |
--------------------------------------------------------------------------------
/doc/source/GettingStarted.rst:
--------------------------------------------------------------------------------
1 | Getting Started
2 | ================
3 |
4 | To start using Xedge, you need to upload the firmware onto an ESP32-S3 or an ESP32 with PSRAM (for example, the ESP32 WROVER). Before you begin, ensure your ESP32 device meets the following requirements for the pre-compiled firmware:
5 |
6 | - **Standard ESP32**: Requires a minimum of 4MB flash memory and 4MB RAM.
7 | - **ESP32-S3 Variant**: Requires a minimum of 8MB flash memory and 8MB RAM, but comes with additional features.
8 |
9 |
10 | First Time Installers
11 | ----------------------
12 |
13 | We suggest using the user-friendly web-based installer available on the `Xedge32 introduction page `_ for a straightforward installation process. Please consult the advanced installation instructions below if you require more detailed customization.
14 |
15 | OTA Upgrade
16 | ------------
17 |
18 | For users with Xedge32 already installed on an ESP32-S3 device, take advantage of the `integrated Xedge32 OTA Upgrade Manager `_ for a seamless update experience. Begin by downloading the latest `ESP32-S3 firmware zip file `_. Once downloaded, extract the contents of the ZIP file. Then, simply drag and drop the xedge.bin or xedge-s0.bin firmware file onto the Upgrade Manager's user interface to commence the upgrade process.
19 |
20 | Advanced Installation/Upgrade
21 | ---------------------------------
22 |
23 | We offer two options for the firmware:
24 |
25 | 1. Ready-to-use firmware binary files which you can directly upload onto your board.
26 | 2. C source code files which you can compile using the Espressif ESP-IDF toolchain.
27 |
28 | **Important:** We provide instructions suitable for both the ESP32 and the newer ESP32-S3 chips. Make sure to follow the correct instructions for the chip that you're using.
29 |
30 | .. contents:: Get started as follows:
31 | :depth: 2
32 | :local:
33 |
34 | .. _flashing-the-firmware:
35 |
36 |
37 | Firmware Option 1: Use Pre-Compiled Firmware
38 | ~~~~~~~~~~~~~~~~~~~~~~~~~~~~~~~~~~~~~~~~~~~~~
39 |
40 | The firmware binaries can be uploaded using Windows, Mac, and Linux using the command line tool `esptool`. Refer to the instructions below for details. We will start by showing how to use a graphical installer, which is only compatible with Windows.
41 |
42 | Windows Graphical Installer
43 | ^^^^^^^^^^^^^^^^^^^^^^^^^^^^^^^^^^^^^^^^^
44 |
45 | .. raw:: html
46 |
47 |
48 |
49 | **How to flash the Xedge32 IDE**
50 |
51 | To upload the Xcode32 firmware to your ESP32 board, begin by downloading the `ESPRESSIF Flash Tool `_ and one of:
52 |
53 | - `ESP32 Xedge Firmware `_
54 | - `ESP32-S3 Xedge Firmware `_: includes two firmware files. See the `firmware-options`_ for details.
55 |
56 | Unzip the `ESPRESSIF Flash Tool` archive and the `Xedge32-Firmware.zip` or `Xedge32-S3-Firmware.zip archive`.
57 |
58 | 1. Connect your ESP32 board to your computer and find the com port used by using the Device Manager.
59 | 2. Start the ESPRESSIF Flash Tool `flash_download_tool_3.9.4.exe` executable.
60 | 3. When the tool starts, select ChipType ESP32 or ESP32-S3 and click OK.
61 | 4. On the SPIDownload page, `set the COM port to the one used by the ESP32 `_ and set Speed to 115200.
62 | 5. Click the ERASE button and wait for it to complete.
63 | 6. Click the 3 dots (...) to browse to the bin files you downloaded.
64 | 7. Select the following binary files and set the address accordingly:
65 |
66 | a. Option 1: When using the merged binary firmware file merged-xedge.bin
67 |
68 | +-----------------------+--------------+
69 | | Binary File | Address |
70 | +=======================+==============+
71 | | `merged-xedge.bin` | `0x0` |
72 | +-----------------------+--------------+
73 |
74 | Click the checkbox to the left of the binary file to select it.
75 |
76 | b. Option 2: When using the three separate binary files
77 |
78 | +-----------------------+-------------------+-------------------+
79 | | Binary File | ESP32 Address | ESP32-S3 Address |
80 | +=======================+===================+===================+
81 | | `bootloader.bin` | `0x1000` | `0x0` |
82 | +-----------------------+-------------------+-------------------+
83 | | `partition_table.bin` | `0x8000` | `0x8000` |
84 | +-----------------------+-------------------+-------------------+
85 | | `xedge.bin` | `0x10000` | `0x20000` |
86 | +-----------------------+-------------------+-------------------+
87 |
88 | Click the three checkboxes to the left of the three bin files to select them.
89 |
90 | 8. Do not change any other values.
91 | 9. Click the START button and wait for it to upload the bin files to your ESP32.
92 | 10. When completed, open a terminal emulator such as Putty.
93 | 11. You should see a terminal window with text being printed, as shown in the screenshot below.
94 | 12. When you see `LuaShell32 ready` being printed, proceed by :ref:`configuring the ESP32 ` as explained below.
95 |
96 | .. image:: https://realtimelogic.com/images/Xedg32-Flash-Firmware.png
97 | :alt: Firmware Upload Tool
98 |
99 | The screenshot above displays the firmware tool on the left with three separate binary files selected, and on the right, it shows a Putty terminal connected to the device. Option one is more user-friendly as it employs a merged binary firmware file, combining the three separate files into one entity.
100 |
101 |
102 | **Potential Issues and Solutions:**
103 |
104 | - On certain boards, you must press the boot button before connecting the USB. Once the USB is plugged in, you can release the button.
105 | - If you're using an ESP32-S3 board equipped with both USB-OTG and USB-UART, you will need to perform flashing using the USB-UART connection. Meanwhile, connect Putty to USB-OTG.
106 | - If you do not see the :ref:`LuaShell32` after connecting Putty, try the following: Configure Putty with the required serial connection parameters so you can quickly click the Open button, then do as follows: Click the ESP32 development board's reset button, followed by quickly clicking the Open button in Putty.
107 |
108 |
109 | Linux, Mac, and Windows using the command line tool `esptool`
110 | ^^^^^^^^^^^^^^^^^^^^^^^^^^^^^^^^^^^^^^^^^^^^^^^^^^^^^^^^^^^^^^^
111 |
112 |
113 | The following examples show how to use Linux. The commands are similar for Mac and Windows.
114 |
115 | Install the required tool:
116 |
117 | .. code-block:: sh
118 |
119 | sudo apt install python3-pip
120 | pip install esptool
121 |
122 |
123 | Upload the **ESP32** firmware:
124 |
125 | .. code-block:: sh
126 |
127 | wget https://realtimelogic.com/downloads/bas/Xedge32-Firmware.zip
128 | unzip Xedge32-Firmware.zip
129 | cd Xedge32-Firmware
130 |
131 | # Use one of:
132 |
133 | # python -m esptool --chip esp32 --before default_reset --after hard_reset write_flash --flash_mode dio --flash_size detect --flash_freq 40m 0x0 merged-xedge.bin
134 |
135 | # python -m esptool --chip esp32 --before default_reset --after hard_reset write_flash --flash_mode dio --flash_size detect --flash_freq 40m 0x1000 bootloader.bin 0x8000 partition-table.bin 0x10000 xedge.bin
136 |
137 | Upload the **ESP32-S3** firmware:
138 |
139 | .. code-block:: sh
140 |
141 | wget https://realtimelogic.com/downloads/bas/Xedge32-S3-Firmware.zip
142 | unzip Xedge32-S3-Firmware.zip
143 | cd Xedge32-Firmware
144 |
145 | # Use one of:
146 |
147 | # python -m esptool --chip esp32s3 --before default_reset --after hard_reset write_flash --flash_mode dio --flash_size detect --flash_freq 80m 0x0 merged-xedge.bin
148 |
149 | # python -m esptool --chip esp32s3 --before default_reset --after hard_reset write_flash --flash_mode dio --flash_size detect --flash_freq 80m 0x0 bootloader.bin 0x8000 partition-table.bin 0x20000 xedge.bin
150 |
151 |
152 | .. _firmware-options:
153 |
154 | For the ESP32-S3, we provide two firmware options
155 | ^^^^^^^^^^^^^^^^^^^^^^^^^^^^^^^^^^^^^^^^^^^^^^^^^^
156 |
157 | .. image:: img/esp-s3-usb.jpg
158 | :align: right
159 |
160 | **xedge.bin (merged-xedge.bin)**
161 | - Tailored for boards like "xiao esp32-s3" with a single USB port.
162 | - This firmware activates the Xedge32 console :ref:`LuaShell32` through the USB port.
163 |
164 | **xedge-s0.bin (merged-xedge-s0.bin)**
165 | - Ideal for boards that utilize serial UART0 for flashing or console logging. The USB to serial converter chip, such as CP210x or FTDI, can be integrated or external.
166 | - This firmware version initializes the Xedge32 console using :ref:`LuaShell32` via the USB-to-UART serial connection.
167 |
168 | .. note::
169 | If you upload the xedge.bin software via USB-to-UART, and your board has two USB ports, you'll need to switch to the other USB port after uploading. However, with xedge-s0.bin, you can continue using the same USB-to-UART port.
170 |
171 |
172 | Firmware Option 2: Compile The Code
173 | ~~~~~~~~~~~~~~~~~~~~~~~~~~~~~~~~~~~~~~~~~~~~~
174 |
175 | See the `GitHub Repository `_ for details.
176 |
177 |
178 | Configure the ESP32
179 | --------------------------
180 |
181 | .. _configesp32:
182 |
183 | Once the firmware upload is complete, reboot the ESP32. The ESP32 will be in Access Point mode after restarting. You can now :ref:`connect to it using a serial terminal ` or :ref:`access the web-based shell by connection to the access point `. Select one of these options and program the ESP32 as follows if you want it to connect to your network and not operate as an access point:
184 |
185 |
186 | In the :ref:`LuaShell32` prompt, type the following to connect to your network:
187 |
188 | - Using **Wi-Fi**:
189 |
190 | .. code-block:: lua
191 |
192 | esp32.netconnect("wifi", {ssid="your-Wi-Fi-SSID", pwd="password"})
193 |
194 | - Using **Ethernet**:
195 |
196 | .. code-block:: lua
197 |
198 | esp32.netconnect("W5500", {spi-settings})
199 |
200 | The next time you turn on your ESP32 device, it will automatically connect to your Wi-Fi network, so there's no need to reconnect the serial console and use the LuaShell32.
201 |
202 | Next Step
203 | ------------
204 |
205 | Once Xedge has successfully connected to your network, continue your journey by exploring our guide on how to use :ref:`Xedge32` .
206 |
207 |
208 | Firmware Upgrade Options
209 | -------------------------
210 |
211 | The pre-compiled firmware for the ESP32-S3 features convenient drag-and-drop upgrades. To upgrade Xedge32, you have two options:
212 |
213 | 1. Follow the detailed firmware installation process described in this tutorial, but only upload xedge.bin or xedge-s0.bin.
214 | 2. Opt for the more straightforward drag-and-drop method as previosly explained.
215 |
216 |
217 | Support and Discussions
218 | ------------------------
219 |
220 | If you encounter any issues, have questions, or simply want to join discussions about the firmware, our main platform for support is the GitHub Discussions page for the project.
221 |
222 | Please visit the `Xedge32 Discussions on GitHub`_ for assistance and community interactions.
223 |
224 | .. _Xedge32 Discussions on GitHub: https://github.com/RealTimeLogic/Xedge32/discussions
225 |
--------------------------------------------------------------------------------
/doc/source/I2C.rst:
--------------------------------------------------------------------------------
1 | I2C API
2 | ========================
3 |
4 | The I2C API enables communication with I2C-enabled devices on your ESP32.
5 |
6 | To use the I2C API, begin by creating an I2C master object with ``esp32.i2cmaster``, specifying the I2C port, SDA GPIO, SCL GPIO, and desired communication speed. This bus-based API allows for direct interactions with I2C devices using simplified methods.
7 |
8 | **I2C Interactions:**
9 |
10 | - **Device Check:** Use ``i2cm:probe`` to verify if an I2C device is connected at a specific address.
11 |
12 | - **Simple Read:** For a simpler read operation that does not require a specific register, use ``i2cm:read`` to retrieve data.
13 |
14 | - **Read Data From Register:** Use ``i2cm:readfrom`` to read from a specified register of the device without issuing a stop condition between the write and read operations.
15 |
16 | - **Write Data:** Use ``i2cm:write`` to send data directly to the I2C device.
17 |
18 | - **Close Connection:** When finished, release the I2C bus by calling ``i2cm:close``.
19 |
20 |
21 | esp32.i2cmaster
22 | ----------------
23 |
24 | Create an I2C master object.
25 |
26 | .. code-block:: lua
27 |
28 | i2cm=esp32.i2cmaster(port, pinSDA, pinSCL, speed)
29 |
30 |
31 | **Parameters:**
32 |
33 | - **port** (``int``): I2C port number - e.g. 0
34 | - **pinSDA** (``int``): the GPIO number used for the I2C Serial Data
35 | - **pinSCL** (``int``): the GPIO number used for the I2C Serial Clock
36 | - **speed** (``int``): the clock speed
37 |
38 | I2C Master Object Methods
39 | --------------------------
40 |
41 | **Note:** Some methods may block for up to the specified timeout. In real-time applications where responsiveness is critical, consider running these methods in a separate thread or on a dedicated LSP page, as described in the `Lua Thread Library documentation `_.
42 |
43 |
44 | i2cm:probe(address, [timeout])
45 | ------------------------------
46 |
47 | Probes a device at the specified address to verify if an I2C device is connected at this address.
48 |
49 | **Parameters:**
50 |
51 | - **address** (``int``): The I2C device address
52 | - **timeout** (``int``, optional): Timeout duration in ms, defaults to 500ms
53 |
54 | **Returns**:
55 | ``true`` if the device responds, otherwise ``nil``, ``error code``.
56 |
57 | i2cm:read(address, len, [timeout])
58 | ----------------------------------
59 | Read from Device: For a simpler read operation that does not require a specific register, use i2cm:read to retrieve data.
60 |
61 | **Parameters:**
62 |
63 | - **address** (``int``): I2C device address
64 | - **len** (``int``): Number of bytes to read
65 | - **timeout** (``int``, optional): Timeout duration in ms, defaults to 500ms
66 |
67 | **Returns**:
68 | ``x, err``: The data read as a Lua string if successful, or ``nil``, ``error code`` if the operation fails.
69 |
70 |
71 | i2cm:readfrom(address, register, len, [timeout])
72 | ------------------------------------------------
73 | Reads data from a specified register on the I2C device. This method does not send a stop condition between the write and read operations, ensuring a repeated start.
74 |
75 | **Parameters:**
76 |
77 | - **address** (``int``): I2C device address
78 | - **register** (``int``): Register address to read from
79 | - **len** (``int``): Number of bytes to read
80 | - **timeout** (``int``, optional): Timeout duration in ms, defaults to 500ms
81 |
82 | **Returns**:
83 | ``x, err``: The data read as a Lua string if successful, or ``nil``, ``error code`` if the operation fails.
84 |
85 | i2cm:write(address, data, [timeout])
86 | ------------------------------------
87 | Writes data to the specified I2C device.
88 |
89 | **Parameters:**
90 |
91 | - **address** (``int``): I2C device address
92 | - **data** (``string`` or ``int``): Data to write, as a single byte or string
93 | - **timeout** (``int``, optional): Timeout duration in ms, defaults to 500ms
94 |
95 | **Returns**:
96 | ``true`` on success; otherwise, ``nil``, ``error code`` is returned.
97 |
98 | i2cm:close()
99 | ------------
100 | Closes the I2C connection and releases allocated resources for the device.
101 |
102 | **Returns**:
103 | ``true`` on success; otherwise, ``nil``, ``error code`` is returned.
104 |
105 |
106 | I2C Example
107 | ------------------
108 |
109 | The following example shows the read and write functions in the :ref:`BME280 Lua Module `. Variable regAddr is the register to read in the BME280 chip.
110 |
111 | .. code-block:: lua
112 |
113 | -- Initialize the I2C master
114 | local i2cm = esp32.i2cmaster(0, 21, 22, 400000) -- Port 0, SDA on GPIO 21, SCL on GPIO 22, Speed 400kHz
115 |
116 | -- Probe the device at address 0x76
117 | local found = i2cm:probe(0x76)
118 | if found then
119 | print("Device found at address 0x76")
120 | else
121 | print("Device not found")
122 | end
123 |
124 | -- Write a value to a register
125 | i2cm:write(0x76, "\xF4\x27") -- Write 0x27 to register 0xF4 at address 0x76
126 |
127 | -- Read multiple bytes from a specific register
128 | local data = i2cm:readfrom(0x76, 0xF7, 8) -- Read 8 bytes from register 0xF7 at address 0x76
129 | print("Data read from register:", data)
130 |
131 | -- Perform a simple read from the device without specifying a register
132 | local simple_data = i2cm:read(0x76, 4) -- Read 4 bytes directly from address 0x76
133 | print("Simple data read:", simple_data)
134 |
135 | -- Close the I2C connection when done
136 | i2cm:close()
137 |
138 |
--------------------------------------------------------------------------------
/doc/source/LuaShell32.rst:
--------------------------------------------------------------------------------
1 | LuaShell32
2 | =======================
3 |
4 | The LuaShell32 is an interactive Lua prompt that is available via USB/serial for the ESP32 microcontroller and via a web based shell. With this prompt, you can enter and execute Lua code in real-time, providing you with full control over the behavior of your ESP32 device.
5 |
6 | How to Start the Shell:
7 | -------------------------
8 |
9 | - **Using a serial connection:** Connect your ESP32 device to your computer using a USB cable and open a terminal program that supports serial communication. Set the serial port to the appropriate baud rate (e.g. 115200) and connect to the ESP32 device.
10 | - **Using the web based shell:**
11 | - Click the three dots (``...``) in the upper right corner of the Xedge editor.
12 | - Select **Lua Shell** to open the web-based LuaShell32.
13 |
14 | .. note:: When working with the web-based LuaShell32, it's essential to clear previously executed commands before entering new ones. This is because the web interface accumulates commands in its shell editor. Failing to clear past commands can lead to unintended command sequences or errors.
15 |
16 | Once you're connected and the ESP32 boot process completes, you should see a prompt that looks like this:
17 |
18 | ::
19 |
20 | >
21 |
22 | This is the LuaShell32 prompt, which indicates that the prompt is ready to accept Lua code. To execute a command, simply type it into the prompt and press Enter. For example, you could enter the following command to print a message to the console:
23 |
24 | ::
25 |
26 | print("Hello, world!")
27 |
28 | When you press Enter, LuaShell32 will execute the command and display the output:
29 |
30 | ::
31 |
32 | > print("Hello, world!")
33 | Hello, world!
34 |
35 | You can also define variables and functions in LuaShell32. For example, you could define a variable like this:
36 |
37 | ::
38 |
39 | x = 42
40 |
41 | And then use it in a calculation like this:
42 |
43 | ::
44 |
45 | y = x + 8
46 | print(y)
47 |
48 | This would output:
49 |
50 | ::
51 |
52 | > x = 42
53 | > y = x + 8
54 | > print(y)
55 | 50
56 |
57 |
58 | In LuaShell32, you have access to all of the standard Lua libraries and functions, the Barracuda App Server APIs, and the ESP32 APIs.
59 |
60 | That's a quick introduction to LuaShell32. With this tool, you can experiment with Lua code and explore the capabilities of the ESP32 microcontroller. However, note that the :ref:`Web-Based Lua REPL ` included in Xedge provides a much better user experience. For example, you can modify an LSP page containing Lua code and refresh the page, using your browser, to compile the new code.
61 |
62 | See the :ref:`Xedge32` for more information.
63 |
--------------------------------------------------------------------------------
/doc/source/PCNT.rst:
--------------------------------------------------------------------------------
1 |
2 | PCNT API
3 | ==========
4 |
5 | The Lua PCNT module interfaces with the `ESP-IDF PCNT `_ (Pulse Counter) functionality, designed for counting the rising and falling edges of an input signal on the ESP32.
6 |
7 | Key Features
8 | ------------
9 |
10 | - **16-bit Signed Counter**
11 |
12 | - Each pulse counter unit features a 16-bit signed counter register. The maximum frequency the counters can manage is 40 Mhz.
13 |
14 | - **Two Configurable Channels**
15 |
16 | - There are two channels per unit, each configurable to increment or decrement the counter based on the input signal.
17 |
18 | - **Signal and Control Inputs**
19 |
20 | - *Signal Input*: Accepts signal edges (rising or falling) for detection.
21 | - *Control Input*: Enables or disables the signal input dynamically.
22 |
23 | - **Input Filters**
24 |
25 | - Optional filters are available for count and control inputs to eliminate unwanted signal glitches.
26 |
27 | - **Watchpoints and Interrupts**
28 |
29 | - The pulse counters offer five watchpoints sharing a single interrupt. The watchpoints include:
30 |
31 | - *Maximum/Minimum Count Value*: Triggers an interrupt when the counter reaches the set upper (positive number) or lower (negative number) limit, resetting the counter to 0.
32 | - *Two Threshold Values (Threshold 0 and 1)*: Triggers an interrupt when these preset values are reached while counting continues.
33 | - *Zero*: Triggers an interrupt when the counter value is zero, with counting continuing.
34 |
35 | For a comprehensive understanding of the pulse counter hardware, refer to Chapter 17 of the `ESP32 Technical Reference Manual `_.
36 |
37 |
38 |
39 | esp32.pcnt
40 | ~~~~~~~~~~~~~~~~~~~~~~~~
41 |
42 | Create a PCNT object.
43 |
44 | .. code-block:: lua
45 |
46 | pcntm=esp32.pcnt(cfg)
47 |
48 |
49 |
50 | Argument cfg is a table with the following fields:
51 | ~~~~~~~~~~~~~~~~~~~~~~~~~~~~~~~~~~~~~~~~~~~~~~~~~~~~~~~~~~~~~~~~~~~~~~~~
52 |
53 | - ``high``
54 |
55 | - The upper limit for the pulse counter.
56 | - Type: number
57 |
58 | - ``low``
59 |
60 | - The lower limit for the pulse counter.
61 | - Type: number
62 |
63 | - ``accumulator`` (optional)
64 |
65 | - Determines whether the counter should accumulate values or reset on reaching limits.
66 | - Type: boolean
67 | - Default: false
68 |
69 | - ``glitch`` (optional) glitch filter
70 |
71 | - Sets a filter to ignore glitches (spurious pulses) on the input signal. Value is in nano seconds.
72 | - Type: number
73 | - Default: 0 (no filter)
74 |
75 | - ``watch`` (optional)
76 |
77 | - Configuration for watch points and associated callback.
78 | - Type: table
79 | - Fields:
80 |
81 | - ``points``
82 |
83 | - A list of numbers where the counter will trigger a callback.
84 | - Type: array of numbers
85 |
86 | - ``callback``
87 |
88 | - The function to call when a watch point is reached. Receives the current count as an argument.
89 | - Type: function
90 | - Signature: ``function(count, crossmode)``
91 | - Arguments:
92 |
93 | - ``count`` Watch point value that triggered the event
94 | - ``crossmode`` Indicates how the PCNT unit crossed the last zero point. The possible zero cross modes are:
95 |
96 | - 0 Start from positive value, end to zero, i.e., +N -> 0
97 | - 1 Start from negative value, end to zero, i.e., -N -> 0
98 | - 2 Start from negative value, end to positive value, i.e., -N -> +M
99 | - 3 Start from positive value, end to negative value, i.e., +N -> -M
100 |
101 | - ``channels``
102 |
103 | - An array of channel configurations.
104 | - Type: array of tables
105 | - Structure:
106 |
107 | - ``gpio``
108 |
109 | - GPIO configuration for the channel.
110 | - Type: table
111 | - Fields:
112 |
113 | - ``edge``
114 |
115 | - GPIO number for edge detection.
116 | - Type: number
117 |
118 | - ``level``
119 |
120 | - GPIO number for level detection.
121 | - Type: number
122 |
123 | - ``action``
124 |
125 | - Action configuration for the channel.
126 | - Type: table
127 | - Fields:
128 |
129 | - ``edge``
130 |
131 | - Actions for positive and negative edges.
132 | - Type: table
133 | - Fields:
134 |
135 | - ``positive``
136 |
137 | - Action on positive edge.
138 | - Type: string
139 | - Options: "HOLD", "INCREASE", "DECREASE"
140 |
141 | - ``negative``
142 |
143 | - Action on negative edge.
144 | - Type: string
145 | - Options: "HOLD", "INCREASE", "DECREASE"
146 |
147 | - ``level``
148 |
149 | - Actions for high and low levels.
150 | - Type: table
151 | - Fields:
152 |
153 | - ``high``
154 |
155 | - Action when the level is high.
156 | - Type: string
157 | - Options: "KEEP", "INVERSE", "HOLD"
158 |
159 | - ``low``
160 |
161 | - Action when the level is low.
162 | - Type: string
163 | - Options: "KEEP", "INVERSE", "HOLD"
164 |
165 | Return Object
166 | ~~~~~~~~~~~~~~~~~~~~~~~~
167 |
168 | The `esp32.pcnt` function returns an object with the following methods:
169 |
170 | - ``start()``
171 |
172 | - Starts the pulse counter.
173 |
174 | - ``stop()``
175 |
176 | - Stops the pulse counter.
177 |
178 | - ``count()``
179 |
180 | - Returns the current count value.
181 |
182 | - ``clear()``
183 |
184 | - Clears the counter.
185 |
186 |
187 | Usage Example
188 | ~~~~~~~~~~~~~~~~~~~~~~~~
189 |
190 | This Lua example is designed to mirror the functionality of the `Rotary Encoder C Code Example `_.
191 |
192 | .. code-block:: lua
193 |
194 | local gpioA = 0
195 | local gpioB = 2
196 |
197 | pcnt,err = esp32.pcnt{
198 | high = 100,
199 | low = -100,
200 | glitch=1000,
201 | watch = {
202 | points = {-100, -50, 0, 50, 100},
203 | callback = function(count)
204 | trace("Watch point reached with count: ", count)
205 | end
206 | },
207 | channels = {
208 | { -- Channel 1
209 | gpio = {
210 | edge = gpioA,
211 | level = gpioB
212 | },
213 | action = {
214 | edge = {
215 | positive = "DECREASE",
216 | negative = "INCREASE"
217 | },
218 | level = {
219 | high = "KEEP",
220 | low = "INVERSE"
221 | }
222 | }
223 | },
224 | { -- Channel 2
225 | gpio = {
226 | edge = gpioB,
227 | level = gpioA
228 | },
229 | action = {
230 | edge = {
231 | positive = "INCREASE",
232 | negative = "DECREASE"
233 | },
234 | level = {
235 | high = "KEEP",
236 | low = "INVERSE"
237 | }
238 | }
239 | }
240 | }
241 | }
242 | if pcnt then
243 | pcnt:start()
244 | timer=ba.timer(function() trace("Pulse count:",pcnt:count()) return true end)
245 | timer:set(1000)
246 | else
247 | trace(err)
248 | end
249 |
250 |
251 | How to Use the Example
252 | ~~~~~~~~~~~~~~~~~~~~~~~~
253 |
254 | This section provides an example of how to use the ESP32's Pulse Counter (PCNT) functionality with a rotary encoder.
255 |
256 | Hardware Required
257 | ~~~~~~~~~~~~~~~~~~~~~~~~
258 |
259 | - An ESP development board.
260 | - An EC11 rotary encoder, or other encoders capable of producing quadrature waveforms.
261 |
262 | Connection
263 | ~~~~~~~~~~~~~~~~~~~~~~~~
264 |
265 | Connect the ESP development board and the rotary encoder as follows:
266 |
267 | .. code-block:: text
268 |
269 | +--------+ +---------------------------------+
270 | | | | |
271 | | A +--------------+ GPIO 0 (internal pull-up) |
272 | | | | |
273 | +-------+| | |
274 | | | | GND +--------------+ GND |
275 | +-------+| | |
276 | | | | |
277 | | B +--------------+ GPIO 2 (internal pull-up) |
278 | | | | |
279 | +--------+ +---------------------------------+
280 |
281 | In this setup:
282 |
283 | - Connect pin A (CLK) of the rotary encoder to GPIO 0 on the ESP development board.
284 | - Connect pin B (DT) of the rotary encoder to GPIO 2 on the ESP development board.
285 | - Connect the GND pin of the rotary encoder to the GND pin on the ESP development board.
286 |
287 | This configuration allows the ESP32 to read the quadrature waveforms generated by the rotary encoder through GPIO 0 and GPIO 2. In this example, each complete rotary step will result in PCNT counter increasing or decreasing by 4.
288 |
--------------------------------------------------------------------------------
/doc/source/PWM.rst:
--------------------------------------------------------------------------------
1 | PWM API
2 | ========================
3 |
4 | The Lua PWM API interfaces with the esp-idf LED control (LEDC). This peripheral is primarily designed to control the intensity of LEDs, although it can also be used to generate PWM signals for other purposes, such as controlling servos. The PWM feature includes 16 channels that have the capability of generating independent waveforms. This feature is useful, for instance, in driving RGB LED devices. These channels are divided into two groups, with each group consisting of 8 channels. One of the groups is designed to operate in high-speed mode, which is implemented in hardware. This mode enables automatic and seamless changes to the PWM duty cycle. The other group of channels operate in low-speed mode. See the `esp-idf documentation `_ for details.
5 |
6 | .. image:: https://docs.espressif.com/projects/esp-idf/en/latest/esp32/_images/ledc-api-settings.jpg
7 | :alt: PWM Controller
8 |
9 | To use the PWM, you need to perform the following steps:
10 |
11 | #. Configure Timer by specifying the PWM signal's frequency and duty cycle resolution via ``esp32.pwmtimer()``.
12 | #. Configure Channel by associating it with the timer and GPIO via ``esp32.pwmchannel()`` to output the PWM signal.
13 | #. Change PWM Signal (via ``channel:duty()`` or ``channel:fade()``) that drives the output in order to change PWM duty-cycle. This can be done under the full control of software or with hardware fading functions, using Lua callbacks.
14 |
15 | To use the API, begin by configuring a timer with a call to ``esp32.pwmtimer()``, where you can specify options such as the timer resolution in bits, which timer to use, and the frequency. Once a timer has been configured, you can open a channel object by calling the ``esp32.pwmchannel()`` function. For example, the code below configures timer 0, opens channel 0 connected to GPIO 18, and sets the initial duty cycle to 100%, turning the LED on fully. After two seconds, the duty cycle is set to 0%, turning off the LED. Note that calling the ``led:close()`` method also turns off the LED in addition to releasing all used resources. See Examples below for additional examples.
16 |
17 | .. code-block:: lua
18 |
19 | local ok, err = esp32.pwmtimer{
20 | mode = "LOW", -- low speed mode
21 | bits = 13, -- duty resolution (bits)
22 | timer = 0, -- timer number
23 | freq = 5000, -- 5 kHz freq_hz
24 | }
25 |
26 | if ok then
27 | local led, err = esp32.pwmchannel{
28 | mode = "LOW",
29 | timer = 0, -- must match above
30 | channel = 0, -- Use channel 0
31 | gpio = 18, -- Connect to GPIO 18
32 | duty = 2^13-1, -- Set duty to 100%; 2^bits-1
33 | }
34 | if ok then
35 | ba.sleep(2000) -- 2 seconds
36 | led:duty(0) -- Set duty to 0%
37 | led:close() -- Release
38 | end
39 | end
40 |
41 |
42 | esp32.pwmtimer(config)
43 | --------------------------
44 |
45 | This function is used to configure a timer. It must be called prior to calling ``esp32.pwmchannel()`` for the timer used by the channel. This function should be called only once for a specific timer. It returns ``true`` on success and ``nil,err`` on error.
46 |
47 | **Parameters:**
48 | - ``config``: a Lua table with the following required settings:
49 | - ``mode``: One of "LOW" or "HIGH". See the ESP-IDF documentation for more details.
50 | - ``bits``: The duty resolution in bits.
51 | - ``timer``: The timer number.
52 | - ``freq``: The frequency in Hertz.
53 |
54 | esp32.pwmchannel(config)
55 | ----------------------------
56 |
57 | This function is used to configure and open a channel object. It returns a channel object on success and ``nil,error`` on failure.
58 |
59 | **Parameters:**
60 | - ``config``: a Lua table with the following settings:
61 | - Required: ``mode`` - must match the mode set with ``esp32.pwmtimer()``.
62 | - Required: ``timer`` - must match the mode set with ``esp32.pwmtimer()``.
63 | - Required: ``channel`` - the channel number to use.
64 | - Required: ``gpio`` - the GPIO where the PWM signal is output.
65 | - Optional: ``duty`` - a number between 0 and 2^bits -1, where ``bits`` is the value set with ``esp32.pwmtimer()``. The default value is zero.
66 | - Optional: ``hpoint`` - see the ESP-IDF documentation for more information on hpoint. The default value is zero.
67 | - Optional: ``callback`` - set a Lua callback function and enable hardware-supported fading by using the method ``channel:fade()``. See the examples below for how to use this feature.
68 |
69 | Channel Object Methods
70 | -----------------------
71 |
72 | channel:duty(pwm-duty-cycle [, hpoint])
73 | ~~~~~~~~~~~~~~~~~~~~~~~~~~~~~~~~~~~~~~~~
74 |
75 | This method is used to set the duty cycle.
76 |
77 | Arguments:
78 | - ``pwm-duty-cycle``: Any number between 0 and 2^bits-1.
79 | - ``hpoint`` (optional): Change the hpoint value configured with ``esp32.pwmtimer()``.
80 |
81 | channel:fade(pwm-duty-cycle, time)
82 | ~~~~~~~~~~~~~~~~~~~~~~~~~~~~~~~~~~~
83 |
84 |
85 | This method is used to use the hardware to fade from the current value to the target duty cycle. You must have installed the callback for this to work. See the two examples below for how to use the fade function.
86 |
87 | **Parameters:**
88 | - ``pwm-duty-cycle``: The target duty cycle can be any number between 0 and 2^bits-1.
89 | - ``time``: The maximum time of the fading in milliseconds.
90 |
91 | channel:close()
92 | ~~~~~~~~~~~~~~~~
93 |
94 |
95 | This method is used to release the channel and free the resources associated with it. Use this method when you have finished using the channel.
96 |
97 |
98 | PWM Examples
99 | -------------
100 |
101 | The following example demonstrates how to use interrupt mode by providing a callback and using the ``led:fade()`` method. After creating a channel object, the code calls the callback to activate the channel instance ``led``. The code is triggered when ``led:fade()`` is called. Upon completion of the fading, the callback is called via an interrupt, and the fading direction is inverted, repeating the cycle.
102 |
103 |
104 | .. code-block:: lua
105 |
106 | -- Define constants
107 | local bits = 13 -- duty resolution (bits)
108 | local maxPwmDuty = 2^bits - 1 -- maximum duty cycle value
109 |
110 | -- Configure timer for high-speed mode
111 | local ok, err = esp32.pwmtimer{
112 | mode = "HIGH", -- high speed mode
113 | bits = bits, -- duty resolution
114 | timer = 0, -- timer number
115 | freq = 5000, -- frequency of 5 kHz
116 | }
117 |
118 | if ok then
119 | local duty,led = 0,0
120 | local function callback()
121 | -- Callback function to toggle LED duty cycle
122 | trace("led callback triggered", duty)
123 | duty = duty == 0 and maxPwmDuty or 0
124 | led:fade(duty, 1000) -- Fade LED to new duty cycle over 1 second
125 | end
126 | led, err = esp32.pwmchannel{
127 | callback = callback,
128 | mode = "HIGH", -- high speed mode
129 | channel = 0, -- use channel 0
130 | timer = 0, -- must match above
131 | gpio = 18, -- connect to GPIO 18
132 | }
133 | if led then
134 | callback() -- Activate by calling the callback
135 | end
136 | end
137 |
138 |
139 | The following example is similar to the above, but is designed to slowly turn a servo from 0 to 180 degrees and then back again. This cycle continues as long as the channel object is not garbage collected. If you put this example in an LSP page, no references to the channel object remain after running the page, so it may be collected and released. The two variables, ``minServoDuty`` and ``maxServoDuty``, were calculated by the ``calculatePwmDutyCycle()`` function in the `servo.lsp source code example `_.
140 |
141 | .. code-block:: lua
142 |
143 | -- Configure timer for 50 Hz frequency (20 ms used by servos)
144 | local ok, err = esp32.pwmtimer{
145 | mode = "LOW", -- low speed mode
146 | bits = 13, -- duty resolution (bits)
147 | timer = 0, -- timer number
148 | freq = 50, -- frequency of 50 Hz
149 | }
150 |
151 | if ok then
152 | local minServoDuty, maxServoDuty = 409, 819 -- duty cycle values for 0 and 180 degrees
153 | local duty = maxServoDuty -- set initial duty cycle to 180 degrees
154 | local servo
155 | local function callback()
156 | -- Callback function to toggle servo duty cycle between 0 and 180 degrees
157 | trace("servo callback triggered", duty)
158 | duty = duty == minServoDuty and maxServoDuty or minServoDuty
159 | servo:fade(duty, 3000) -- Fade servo to new duty cycle over 3 seconds
160 | end
161 | servo, err = esp32.pwmchannel{
162 | callback = callback,
163 | mode = "LOW", -- low speed mode
164 | channel = 0, -- use channel 0
165 | timer = 0, -- must match above
166 | gpio = 14, -- connect to GPIO 14 (servo control pin)
167 | }
168 | if servo then
169 | callback() -- initial callback to set servo to 180 degrees
170 | end
171 | end
172 |
173 |
--------------------------------------------------------------------------------
/doc/source/RTU.rst:
--------------------------------------------------------------------------------
1 | Modbus RTU Module
2 | ====================
3 |
4 | This Lua module extends the functionality of the Barracuda App Server's Modbus TCP Client by adding support for RTU (RS-232 and RS-485) communication. Essentially, it acts as a driver that enables the Modbus TCP Client to operate as a Modbus RTU Client. This module uses the :ref:`uart-api`.
5 |
6 | .. note:: The Lua module is included in the Xedge32 firmware but may be removed in later versions and provided as a separate module.
7 |
8 | .. code-block:: lua
9 |
10 | rtu=require"modbus.rtu".create(port, config)
11 |
12 | Create a Modbus RTU object.
13 |
14 | **Parameters:**
15 |
16 | The port and config parameters are sent to the :ref:`uart-func` function. The config table takes one additional option, which optionally sets the `Modbus TCP Client's onclose configuration option `_.
17 |
18 | **Returns:**
19 |
20 | - A new Modbus RTU object with the same API methods as provided by the `Modbus TCP Client `_. The returned Modbus object is pre-configured for asynchronous cosocket mode, thus a callback is required for all method operations. See the example below for details.
21 |
22 | **Example:**
23 |
24 | .. code-block:: lua
25 |
26 | local cfg = {
27 | baudrate = 9600,
28 | txpin = 42,
29 | rxpin = 41,
30 | onclose=function(err) trace("Serial Comm. Err.",err) end
31 | }
32 |
33 | -- Does not return errors, but may throw on incorrect settings
34 | mb=require"modbus.rtu".connect(1,cfg)
35 |
36 | local function mycallback(data, err, transaction, mb)
37 | trace("table" == type(data) and ba.json.encode(data) or data, err)
38 | end
39 | local unitId=1 -- Optional for RS232, required for multidrop RS485.
40 | mb:wholding(0, {1,2,3,4,5,6,7,8,9,10,11,12,13,14,15,16,17,18,19,20}, unitId, mycallback)
41 | mb:rholding(0, 20, unitId, mycallback)
42 |
43 | The above callback prints the following, which are the Modbus server's return values for the calls to mb:wholding() and mb:rholding(). The nil value at the end is from the ``err`` argument.
44 |
45 | .. code-block:: text
46 |
47 | true nil
48 | [1,2,3,4,5,6,7,8,9,10,11,12,13,14,15,16,17,18,19,20] nil
49 |
50 | The above example configures the UART for RS232 mode or full duplex RS485. Half duplex (two-wire) RS485 communication requires collision detection and a chip such as ADM483 wired to the RTS GPIO pin. See the UART option ``rs485`` for details. Half duplex RS485 mode can be configured as follows:
51 |
52 | .. code-block:: lua
53 |
54 | local cfg = {
55 | baudrate = 9600,
56 | txpin = 42,
57 | rxpin = 41,
58 | rtspin=40,
59 | rs485=true
60 | }
61 |
62 | Modbus Test Bench:
63 | -------------------
64 |
65 | (How to set up a two-wire RS485 Modbus test bench)
66 |
67 |
68 | The following image shows our test bench.
69 |
70 | .. image:: img/Modbus-test-bench.jpg
71 | :align: center
72 |
73 |
74 | We used the following components for our test bench:
75 |
76 | - ESP32s3
77 | - ANMBEST MAX485 RS485 Transceiver Module
78 | - USB to RS485 converter
79 | - Modbus Slave Simulator running on Windows (connected to the USB to RS485 converter)
80 |
81 | How to wire the components:
82 | ############################
83 |
84 | The following wiring matches the above configuration table.
85 |
86 | Power Connections
87 | ^^^^^^^^^^^^^^^^^
88 |
89 | - **VCC** on MAX485 to **5V** on ESP32
90 | - **GND** on MAX485 to **GND** on ESP32
91 |
92 | Data Connections
93 | ^^^^^^^^^^^^^^^^
94 |
95 | - **DI** on MAX485 to GPIO pin 42 on the ESP32: **TX**
96 | - **RO** on MAX485 to GPIO pin 41 on the ESP32: **RX**
97 |
98 | Control Pins
99 | ^^^^^^^^^^^^
100 | - **RE and DE** on MAX485 connected together, then to GPIO pin 40: **RTS**
101 |
102 | RS485 Terminals
103 | ^^^^^^^^^^^^^^^
104 |
105 | - **A and B** terminals on MAX485 to the A and B lines on the USB to RS485 converter
106 |
--------------------------------------------------------------------------------
/doc/source/UART.rst:
--------------------------------------------------------------------------------
1 | .. _uart-api:
2 |
3 | UART API
4 | ========
5 |
6 | This API provides a Lua API to the UART (Universal Asynchronous Receiver/Transmitter) subsystem `provided by esp-idf `_.
7 |
8 | To use the API, begin by creating a UART object through a call to `esp32.uart`, where you specify configuration options such as the UART port number and GPIO pins. It is recommended to use the asynchronous (interrupt-driven) API by providing a callback instead of pulling for received data using `uart:read`.
9 |
10 | The UART instance can operate in a semi-asynchronous mode. This mode enhances data handling efficiency by utilizing a callback for receiving RX data asynchronously and non-blocking mechanisms for sending data (TX) as long as the TX ring buffer can buffer the data being transmitted.
11 |
12 | .. _uart-func:
13 |
14 | esp32.uart()
15 | ----------------------------
16 |
17 | .. code-block:: lua
18 |
19 | uart = esp32.uart(port [,config])
20 |
21 | This function creates, configures, and returns a UART object.
22 |
23 | ``port`` - UART port number, e.g., 0.
24 |
25 | ``config`` - An optional table with the following options:
26 |
27 | - ``callback`` - A callback function that enables interrupt mode.
28 | - ``databits`` - Data bits, ranging from 5 to 8. The default is 8.
29 | - ``baudrate`` - Default baud rate is 9600.
30 | - ``rxbufsize`` - The default receive buffer size is 1024.
31 | - ``txbufsize`` - The default transmit buffer size is 1024.
32 | - ``txpin`` - UART TX pin GPIO number, which defaults to the default pin used by the UART port.
33 | - ``rxpin`` - UART RX pin GPIO number, which defaults to the default pin used by the UART port.
34 | - ``rtspin`` - UART RTS pin GPIO number, which is disabled by default.
35 | - ``ctspin`` - UART CTS pin GPIO number, which is disabled by default.
36 | - ``stopbits`` - Stop bits, which can be 1, 2, 1.5, or 2. You cannot set the number to 1.5, but any value other than 1 and 2 sets the stop bits to 1.5. The default is 1.
37 | - ``parity`` - Parity, which can be either "EVEN" or "ODD". Disabled if not set.
38 | - ``flowctrl`` - Flow control, which can be either "RTS", "CTS", or "CTSRTS". Disabled if not set.
39 | - ``rs485`` - Enable RS-485 half duplex mode for use with an RS485 chip such as ADM483, where the RTS pin is used for driving the RS485 chip's collition detect. You need to set the ``rtspin`` for this to work.
40 | - ``timeout`` - Default 0 (not used). When used without setting the ``pattern`` option, specifies how long to wait before triggering the callback. The option is defined in terms of UART character times. One character time is the time it takes to transmit one character (bit) on the UART bus, which is determined by the baud rate of the UART. For example, at 9600 baud, one character time is approximately 104 microseconds.
41 | - ``pattern`` - Enable pattern detection. The pattern, which can be of any length, must be of the same type, e.g., "+++". A callback is required when setting this option.
42 | The following additional flags may be set when pattern is enabled. For details, see the C code function `enable_pattern_det_baud_intr() `_.
43 |
44 | - ``maxlen`` - Default 0 (not used). Enable recording at most ``maxlen`` pattern positions.
45 | - ``timeout`` - Default 0. Used to determine if a series of received characters can be considered as part of the same pattern. If the gap between two characters exceeds this timeout, the ongoing pattern detection is reset. This prevents false positives from scattered similar characters over a long duration.
46 | - ``postidle`` - Default 0. Defines the minimum duration of silence (no data received) after a pattern is detected. It's the idle period that must be observed following the last character of the pattern.
47 | - ``preidle`` - Default 0. Sets the minimum idle period before a pattern starts. It's the duration of silence that must be observed before the first character of the pattern is received.
48 |
49 | The callback triggers when characters are received according to the pattern and timeout options. The callback function can receive the following arguments:
50 |
51 | - ``function(data,pattern)`` - One or several characters packaged into the Lua string 'data'. The pattern argument is a boolean set to true if this is a pattern match.
52 | - ``function(nil, emsg)`` - An error or special character received; ``emsg`` can be one of:
53 |
54 | - ``full`` - UART RX buffer full event; queue was reset (UART_BUFFER_FULL).
55 | - ``overflow`` - UART FIFO overflow event; queue was reset (UART_FIFO_OVF).
56 | - ``frame`` - UART RX frame error event (UART_FRAME_ERR).
57 | - ``parity`` - UART RX parity event (UART_PARITY_ERR).
58 | - ``databreak`` - UART TX data and break event (UART_DATA_BREAK).
59 | - ``break`` - UART break event (UART_BREAK).
60 |
61 | UART Object Methods
62 | -------------------
63 |
64 | The UART object has the following methods:
65 |
66 | uart:read([timeout])
67 | ~~~~~~~~~~~~~~~~~~~~~~~~
68 |
69 | This method reads data from the RX queue and optionally waits for the specified ``timeout`` in milliseconds. Do not call this method if you have installed the RX callback.
70 |
71 | uart:write(data)
72 | ~~~~~~~~~~~~~~~~~~~~
73 |
74 | This method sends data to the UART. It will not return until all the data have been pushed into the TX FIFO, which means that it blocks if the FIFO is full. Use method uart:txsize() to find the free space size.
75 |
76 | uart:txsize()
77 | ~~~~~~~~~~~~~~~~~~~~
78 |
79 | Returns the TX ring buffer's free space.
80 |
81 | uart:close()
82 | ~~~~~~~~~~~~~~~~
83 |
84 | This method releases the UART and frees the resources associated with it. Use this method when you have finished using the UART.
85 |
86 | UART Example
87 | ------------
88 |
89 | The following UART echo example demonstrates how to open a UART object and configure it for asynchronous receive mode:
90 |
91 | .. code-block:: lua
92 |
93 | local uart
94 | local cfg = {
95 | baudrate = 115200,
96 | txpin = 4,
97 | rxpin = 5,
98 | callback = function(data, err)
99 | if data then
100 | uart:write(data) -- Echo
101 | else
102 | trace("Err", err)
103 | end
104 | end
105 | }
106 | uart = esp32.uart(2, cfg)
107 |
108 | In the example, a UART object is created with a baud rate of 115200 and GPIO pins 4 and 5 for the TX and RX pins, respectively. The object is also set to operate in asynchronous receive mode using a callback function. When data is received, the callback function sends the same data back to the UART, effectively creating an echo effect.
109 |
110 |
--------------------------------------------------------------------------------
/doc/source/applications.rst:
--------------------------------------------------------------------------------
1 | Applications
2 | =============
3 |
4 | Creating and Managing Xedge32 Applications
5 | --------------------------------------------
6 |
7 | An Xedge32 application is essentially a Lua-based application packaged as a ZIP file. This convenient packaging allows you to upload and execute the application directly on the Xedge32 platform without unpacking. Follow these steps to get your application up and running:
8 |
9 | Uploading Your Application
10 | --------------------------
11 |
12 | 1. **Firmware Update & App Upload Page**: To upload your application, you can simply drag and drop the ZIP file onto the "Firmware Update & App Upload" page. Access this page by clicking the three dots at the top right corner of the Xedge32 interface and selecting "Firmware Update & App Upload."
13 |
14 | 2. **Web File Manager**: Another method involves navigating to the Web File Manager, where you can drag and drop your ZIP file. Afterward, add the ZIP file as an application via the Xedge32 IDE.
15 |
16 | 3. **WebDAV Plugin**: Alternatively, mount the device as a network drive using the WebDAV plugin. Upload the ZIP file and then, similar to the previous methods, add the ZIP file as an application using the Xedge32 IDE.
17 |
18 | The first option is notably the most straightforward: It automatically installs the ZIP file as an application on your device. Certain packaged applications may require this approach due to `specific post-installation configuration scripts `_ that must be run.
19 |
20 | ZIP File Applications
21 | ----------------------
22 |
23 | A ZIP file is considered a ready-to-run deployed application, distinct from directly creating and uploading Lua files to the Xedge32. This upload feature also provides the flexibility to unpack the ZIP file post-upload, allowing for modifications to the code directly on the Xedge32.
24 |
25 | **Note:** While you can open files within an uploaded ZIP file, saving them is not an option.
26 |
27 | For additional insights on leveraging the second and third options, refer to the tutorials `Designing Your First Professional Embedded Web Interface, section Getting Started `_ and `Your First Embedded Single Page Application, section Uploading the SPA and Server-Side Code `_.
28 |
29 | .. _mkapp:
30 |
31 | Creating an Xedge32 Application
32 | -------------------------------
33 |
34 | To craft an Xedge32 application, compile your Lua code and any necessary CSS, HTML, etc., into a ZIP file. Ensure the directory name is not included within the ZIP. For instance, if you include a `.preload` script, this file should reside at the root of the ZIP.
35 |
36 | An Xedge32 application may also contain a `.config` script for specifying additional details and executing code post-installation. Should your ZIP file include a `.config` script, it must return a table with these optional entries:
37 |
38 | - **String name**: Designates the application's name in the Xedge32's left pane menu. The ZIP file's name is used if the name is absent.
39 | - **Boolean autostart**: If true, the application's autostart flag is activated, and its status is set to running, enabling automatic startup post-upload.
40 | - **Function install**: Executes for new installations.
41 | - **Function upgrade**: Invoked when the application is re-uploaded.
42 |
43 | Example code:
44 |
45 | .. code-block:: lua
46 |
47 | -- Argument 'io' is the application's IO instance
48 | local function install(io)
49 | trace("install", io:realpath("")) -- Prints empty string if ZIP file
50 | return "This message is sent to the browser and displayed after completing the installation"
51 |
52 | end
53 |
54 | local function upgrade(io)
55 | return "This message is sent to the browser and displayed after completing the upgrade"
56 | end
57 |
58 |
59 | return {
60 | name="MY APP",
61 | autostart=true,
62 | install=install,
63 | upgrade=upgrade
64 | }
65 |
--------------------------------------------------------------------------------
/doc/source/cam.rst:
--------------------------------------------------------------------------------
1 | Camera API
2 | ===========
3 |
4 | Xedge32 features the ESP32 Camera Driver and a Lua interface to this driver. To use the camera API, follow these steps:
5 |
6 | **Note that the cam documentation is not yet complete!!!**
7 |
8 | 1. Create a camera object by invoking ``esp32.cam``, passing a configuration table as an argument.
9 | 2. Call the ``cam:read`` method as many times as needed to fetch new images.
10 | 3. Once done, call the ``cam:close`` method to close the camera object and free up resources.
11 |
12 | The API functions and methods are detailed below:
13 |
14 | ``esp32.cam(cfg)``
15 | ------------------
16 |
17 | This function creates a camera object.
18 |
19 | - **cfg**: A configuration table, whose structure is detailed below.
20 |
21 | The function returns the camera object if successful. If the creation of the camera object fails, it returns ``nil``, ``error message``.
22 |
23 | The camera object provides the following methods:
24 |
25 | ``cam:read()``
26 | --------------
27 |
28 | This method is used to fetch a new image from the camera.
29 |
30 | ``cam:close()``
31 | ---------------
32 |
33 | This method closes the camera object, freeing up any resources it was using.
34 |
35 | The Configuration Table
36 | -------------------------
37 |
38 | The argument accepted by esp32.cam is a Lua table that maps various parameters to specific GPIO pins on the ESP32 board. These settings are used to initialize the camera module on the ESP32-CAM board.
39 |
40 | Required parameters:
41 | ~~~~~~~~~~~~~~~~~~~~~
42 |
43 | - **d0 to d7**: These are the GPIO pins that the camera module's pixel data lines (D0-D7) are connected to. The camera module sends digital pixel data to the ESP32 through these lines.
44 | - **xclk**: This is the GPIO pin that the camera clock (XCLK) is connected to.
45 | - **pclk**: This is the GPIO pin that the pixel clock (PCLK) is connected to.
46 | - **vsync**: This is the GPIO pin that the vertical sync (VSYNC) is connected to.
47 | - **href**: This is the GPIO pin that the horizontal reference (HREF) is connected to.
48 | - **sda**: This is the GPIO pin that the SCCB Data (SIOD) is connected to.
49 | - **scl**: This is the GPIO pin that the SCCB Clock (SIOC) is connected to.
50 | - **reset**: This is the GPIO pin that the camera reset line is connected to. Using this pin, you can perform a hardware reset of the camera.
51 | - **freq**: This sets the frequency of the XCLK signal to the camera module. It's typically set to a value between 10 MHz and 20 MHz. Lower frequencies might be more stable, but could lead to lower frame rates.
52 |
53 | Optional parameters:
54 | ~~~~~~~~~~~~~~~~~~~~~
55 | - **pwdn**: This is the GPIO pin that the Power Down (PWDN) line is connected to.
56 | - **frame**: This defines the resolution of the camera. "HD" stands for High Definition, which is typically 1280x720 pixels. This is not related to a GPIO pin but rather a configuration setting for the camera.
57 | - **format**: This sets the pixel format for the camera. Typical values include "RGB565", "YUV422", "GRAYSCALE", or "JPEG". The exact formats supported can depend on the specific camera module used.
58 | - **vflip**: If set to true, this setting flips the image vertically. This can be useful if the camera is physically installed upside down.
59 | - **hmirror**: If set to true, this setting mirrors the image horizontally. This can be useful if the camera image needs to be mirrored for some reason.
60 |
61 |
62 | Configuration Table Examples:
63 | ~~~~~~~~~~~~~~~~~~~~~~~~~~~~~~
64 |
65 | .. code-block:: lua
66 |
67 | -- Settings for Seeed Studio XIAO ESP32S3 Sense
68 | local cfg={
69 | d0=15, d1=17, d2=18, d3=16, d4=14, d5=12, d6=11, d7=48,
70 | xclk=10, pclk=13, vsync=38, href=47, sda=40, scl=39, pwdn=-1,
71 | reset=-1, freq="20000000", frame="HD"
72 | }
73 |
74 | -- Settings for Aideepen ESP32-CAM
75 | local cfg={
76 | d0=5, d1=18, d2=19, d3=21, d4=36, d5=39, d6=34, d7=35,
77 | xclk=0, pclk=22, vsync=25, href=23, sda=26, scl=27, pwdn=32,
78 | reset=-1, freq="20000000", frame="HD"
79 | }
80 |
81 | -- Settings for FREENOVE ESP32-S3 WROOM
82 | local cfg={
83 | d0=11, d1=9, d2=8, d3=10, d4=12, d5=18, d6=17, d7=16,
84 | xclk=15, pclk=13, vsync=6, href=7, sda=4, scl=5, pwdn=-1,
85 | reset=-1, freq="20000000", frame="HD"
86 | }
87 |
88 |
89 |
--------------------------------------------------------------------------------
/doc/source/img/Modbus-test-bench.jpg:
--------------------------------------------------------------------------------
https://raw.githubusercontent.com/RealTimeLogic/Xedge32/ae7dd4c31d2a7ca75f3b63580a108a5d9ff8288e/doc/source/img/Modbus-test-bench.jpg
--------------------------------------------------------------------------------
/doc/source/img/Xedge32-IDE-Access-Point-Mode.svg:
--------------------------------------------------------------------------------
1 |
--------------------------------------------------------------------------------
/doc/source/img/esp-s3-usb.jpg:
--------------------------------------------------------------------------------
https://raw.githubusercontent.com/RealTimeLogic/Xedge32/ae7dd4c31d2a7ca75f3b63580a108a5d9ff8288e/doc/source/img/esp-s3-usb.jpg
--------------------------------------------------------------------------------
/doc/source/license.rst:
--------------------------------------------------------------------------------
1 | License
2 | ========
3 |
4 | Xedge32 is built using components from the `Barracuda App Server's amalgamated C code library `_. The library is available under three licensing options: `GPLv2, a free commercial license, and a standard royalty-free commercial license `_.
5 |
6 | This `Xedge32 South Bridge C code `_ is licensed under the permissive MIT license.
7 |
--------------------------------------------------------------------------------
/doc/source/misc.rst:
--------------------------------------------------------------------------------
1 | Miscellaneous API
2 | ==================
3 |
4 | The `esp32` module provides some miscellaneous functions.
5 |
6 | esp32.apinfo()
7 | --------------------
8 |
9 | Returns a Lua table with WiFi information for the connected WiFi. The table includes several fields with WiFi information, where the most important one is the 'rssi' field, which stands for Received Signal Strength Indicator. The 'rssi' field indicates the strength of the WiFi signal that the ESP32 is receiving. RSSI is typically expressed in decibels relative to a milliwatt (dBm). The value of 'rssi' is usually negative, as it represents power loss. Here is a general guideline for interpreting 'rssi' values:
10 |
11 | - **-30 dBm**: Amazing. You're practically standing next to the router.
12 | - **-50 dBm**: Excellent. Signal strength is really strong.
13 | - **-60 dBm**: Good. Most online activities should work well.
14 | - **-70 dBm**: Fair. You might start experiencing noticeable dips in speed.
15 | - **-80 dBm or worse**: Poor. Connection might be spotty and unstable.
16 |
17 | Example using the `serpent `_ module for formatting.
18 |
19 | .. code-block:: lua
20 |
21 | local serpent = require("serpent")
22 | print(serpent.block(esp32.apinfo()))
23 |
24 |
25 |
26 | esp32.loglevel(level)
27 | -----------------------
28 | :param level: A string representing the desired log level for the ESP32 system log.
29 |
30 | This function allows you to configure the log level for the ESP32 system log.
31 | The log level determines which log messages are displayed. The valid options for the ``level`` parameter are:
32 |
33 | - **none**: No log messages will be displayed.
34 | - **error**: Only error messages will be displayed (default setting).
35 | - **warn**: Error and warning messages will be displayed.
36 | - **info**: Error, warning, and informational messages will be displayed.
37 | - **debug**: Error, warning, informational, and debug messages will be displayed.
38 | - **verbose**: All log messages, including verbose debug messages, will be displayed.
39 |
40 | .. note::
41 |
42 | The maximum log level is configured in the menuconfig settings.
43 | If an invalid log level is provided, or if the requested log level exceeds the
44 | maximum level set in menuconfig, an error will be raised with a detailed message.
45 |
46 |
47 | esp32.mac()
48 | --------------------
49 | This function returns the ESP32's 6 byte base MAC address.
50 |
51 | Example:
52 |
53 | .. code-block:: lua
54 |
55 | local mac=esp32.mac()
56 | -- Print MAC as hexadecimal numbers
57 | print(mac:gsub(".",function(x) return string.format("%02X",string.byte(x)) end))
58 |
59 |
60 | esp32.wscan([print])
61 | --------------------
62 |
63 | Scan for Wi-Fi networks. The function returns a list of tables, where each table represents a network. The optional `print` argument can be set to `true` to print the data to :ref:`LuaShell32`.
64 |
65 | Example:
66 |
67 | .. code-block:: lua
68 |
69 | local fmt = string.format
70 | for _, net in pairs(esp32.wscan()) do
71 | print(fmt("SSID: %s\nChannel: %d\nRSSI: %d\nAuthmode: %s\nPChiper: %s\nGCipher: %s\n",
72 | net.ssid, net.channel, net.rssi, net.authmode, net.pchiper, net.gcipher))
73 | end
74 |
75 | Note that this function takes some time to return.
76 |
77 | esp32.netconnect(network, cfg)
78 | --------------------------------
79 |
80 | Initiate a WiFi or wired network connection by supplying the necessary configuration parameters. This function initiates the connection process in the background and returns control immediately. The status of the connection is displayed in the :ref:`LuaShell32`. The ``cfg`` parameters are saved in NVRAM on a successful network connection. This enables the ESP32 to reconnect to the network automatically using these parameters upon restart. The device initially operates in Access Point Mode by default, with the SSID set to xedge32. The default SSID password is 12345678.
81 |
82 | - ``network``: a string that can be one of:
83 | * ``wifi``: Connect to a Wi-Fi network by providing the SSID and password
84 | * ``W5500``: Connect to an Ethernet network via a W5500 chip.
85 | - ``cfg``: a configuration table that must include:
86 | * For WiFi networks:
87 | * ``ssid``: the WiFi network's SSID
88 | * ``pwd``: the WiFi network's password
89 | * For wired networks via W5500:
90 | * ``spi``: The SPI bus number to which the W5500 chip is connected.
91 | * ``clk``: The GPIO pin number for the clock signal of the SPI bus.
92 | * ``mosi``: The GPIO pin number for the Master Out Slave In (MOSI) signal of the SPI bus.
93 | * ``miso``: The GPIO pin number for the Master In Slave Out (MISO) signal of the SPI bus.
94 | * ``cs``: The GPIO pin number for the chip select signal of the W5500 chip.
95 | * ``irq``: The GPIO pin number for the interrupt request signal of the W5500 chip.
96 | * ``freq``: The clock frequency (in Hz) of the SPI bus.
97 |
98 | if ``cfg`` is not provided and device is in WiFi Station Mode, the device reverts back to Access Point mode.
99 |
100 | You can also call this function to disconnect from a network by not providing the ``cfg`` configuration table argument. For WiFi, you may call this function with new configuration options to switch to another network.
101 |
102 | .. code-block:: lua
103 |
104 | -- Example 1: connecting to Wi-Fi
105 | esp32.netconnect("wifi",{ssid="My-Wi-Fi", pwd="My-Password"})
106 | -- Example 2: Configuring Ethernet for EdgeBox-ESP-100
107 | esp32.netconnect("W5500", {spi=2,clk=13,mosi=12,miso=11,cs=10,freq=40000000,irq=14})
108 | -- Example 3: Configuring Ethernet for LILYGO T-ETH-Lite
109 | esp32.netconnect("W5500", {spi=2,clk=13,mosi=12,miso=11,cs=10,freq=40000000,irq=14})
110 | -- Example 4: Revert a device operating in Station Mode to its original Access Point Mode.
111 | esp32.netconnect"wifi"
112 |
113 | esp32.sdcard(width)
114 | ---------------------------
115 |
116 | You can register a new disk named 'sd' if your ESP32 board includes an SDMMC interface. The `IO interface `_ can then be opened by calling ``ba.openio("sd")``.
117 |
118 | The function takes the following hardware dependent arguments:
119 |
120 | .. code-block:: lua
121 |
122 | esp32.sdcard(width)
123 | esp32.sdcard(width, clk, cmd, d0)
124 | esp32.sdcard(width, clk, cmd, d0, d1, d2, d3)
125 | esp32.sdcard(width, clk, cmd, d0, d1, d2, d3, d4, d5, d6, d7)
126 |
127 | Parameters:
128 | ~~~~~~~~~~~~~
129 | - **width**: "bus width", can be 1, 4, or 8.
130 | - **clk, cmd, d0-d7:** Pin configuration parameters use the defaults for the CPU if not set.
131 |
132 | #. ``clk``: GPIO number for the SD card clock pin.
133 | #. ``cmd``: GPIO number for the SD card command pin.
134 | #. ``d0``: GPIO number for the SD card data pin 0.
135 | #. ``d1``: GPIO number for the SD card data pin 1 (when 4-bit wide bus).
136 | #. ``d2``: GPIO number for the SD card data pin 2 (when 4-bit wide bus).
137 | #. ``d3``: GPIO number for the SD card data pin 3 (when 4-bit wide bus).
138 |
139 | Default pins:
140 | ~~~~~~~~~~~~~~~~~~~~
141 |
142 | On ESP32, SDMMC peripheral is connected to specific GPIO pins using the IO MUX. GPIO pins cannot be customized. The following list shows the default settings:
143 |
144 | - clk = GPIO14, cmd = GPIO15, d0 = GPIO2,
145 | - d1 = GPIO4, d2 = GPIO12, d3 = GPIO13,
146 | - d4 = GPIO33, d5 = GPIO34, d5 = GPIO35, d5 = GPIO36.
147 |
148 | On ESP32-S3, SDMMC peripheral is connected to GPIO pins using a GPIO matrix, which enables arbitrary GPIOs to be used to connect an SD card. The following list shows the default settings:
149 |
150 | - clk = GPIO34, cmd = GPIO33, d0 = GPIO37,
151 | - d1 = GPIO38, d2 = GPIO39, d3 = GPIO36,
152 | - d4 = GPIO35, d5 = GPIO40, d6 = GPIO42, d7 = 41.
153 |
154 | Returns:
155 | ~~~~~~~~~
156 |
157 | The function returns ``nil, error`` if it is unable to detect the SD card. Upon successfully configuring the settings, the function saves the values in the NVRAM and reboots the system. To remove existing settings, call this function without any arguments.
158 |
159 | Examples:
160 | ~~~~~~~~~
161 |
162 | Initialize the SD-CARD driver of a 1-bit wide bus that has clock pin connected to GPIO14, command to GPI15, and data to GPIO2.
163 |
164 | .. code-block:: lua
165 |
166 | esp32.sdcard(1)
167 |
168 | The following example shows how to set the GPIO pins CLK, CMD, and D0 for a few board.
169 |
170 | .. code-block:: lua
171 |
172 | esp32.sdcard(1, 39, 38, 40) -- ESP32-S3-WROOM CAM Board
173 | esp32.sdcard(1, 7, 6, 5) -- Lilygo's T-ETH-Lite
174 | esp32.sdcard(1, 7, 9, 8) -- XIAO ESP32S3 Sense
175 |
176 | .. _esp32-execute-label:
177 |
178 | esp32.execute(command)
179 | -------------------------
180 |
181 | This function performs various actions depending on the provided argument.
182 |
183 | Commands:
184 |
185 | - ``"erase"``: Erases the first FAT partition, which corresponds to the internal SPIFFS FAT file system. Call this function if the FAT file system becomes corrupt. The ESP32 will reboot after erasing the flash, and the FAT file system will be reformatted upon restart.
186 |
187 | - ``"restart"``: Restarts the ESP32.
188 |
189 | - ``"killmain"``: Terminates the main process powering LuaShell32, and reclaims memory. You may choose to terminate the main process and stop LuaShell32 when a network connection is established. Refer to the ``xedge.event()`` function for example code.
190 |
191 | - ``"mdns"``: Change the mDNS name (see example below). The default name is Xedge32.
192 |
193 | .. code-block:: lua
194 |
195 | esp32.execute("mdns", "myesp") -- Change mDNS name to 'myesp'
196 | esp32.execute"restart" -- Navigate to http://myesp.local after restart
197 |
198 |
199 |
200 | xedge.event()
201 | -----------------
202 |
203 | Xedge32 extends the Xedge xedge.event() mechanism, allowing you to subscribe and unsubscribe from network events, thus enabling the monitoring of network status changes. The following shows the xedge.event() function in the `Xedge xedge.event() `_ documentation.
204 |
205 | .. code-block:: lua
206 |
207 | xedge.event(event, callback [,unsubscribe])
208 |
209 | All Xedge32 events carry a 'retained' flag, ensuring subscribers receive these events even if they subscribe after the event's generation.
210 |
211 | The specified ``callback`` function will be called when the network changes state or when an error or warning message is generated. The function takes the following arguments, all represented as Lua strings, including numbers:
212 |
213 | - ``"wifi"``: Indicates that the event is related to Wi-Fi connectivity.
214 |
215 | - **Arg1**: ``"up"``: Wi-Fi has transitioned from not connected to connected.
216 | - **Arg1**: ``"down"``: Wi-Fi has transitioned from connected to not connected.
217 | - **Arg1**: ``number``: A warning or error number as defined in the ESP-IDF (Espressif IoT Development Framework).
218 | - **Arg2**: ``"ap" | "sta"``: Tells you Wi-Fi mode, which is Access Point Mode or Station Mode.
219 |
220 |
221 | - ``wip`` (WiFi IP address received): Indicates that the device has successfully obtained its IP address, netmask, and gateway from the DHCP server over the WiFi connection.
222 |
223 | - **Arg1**: ``ip-address``: The assigned IP address.
224 | - **Arg2**: ``netmask``: The assigned network mask.
225 | - **Arg3**: ``gateway``: The assigned gateway.
226 |
227 | - ``eth`` (Ethernet IP address received): Indicates that the device has successfully obtained its IP address, netmask, and gateway from the DHCP server over the Ethernet connection. This event is distributed on devices that has a connected Ethernet port.
228 |
229 | - **Arg1**: ``ip-address``: The assigned IP address.
230 | - **Arg2**: ``netmask``: The assigned network mask.
231 | - **Arg3**: ``gateway``: The assigned gateway.
232 |
233 | - ``"sntp"``: This event indicates that the ESP32 has synchronized its system time with the time provided by the Network Time Protocol (NTP) server, typically pool.ntp.org. This event is generated when the device receives the time from the network. A correct system time is especially crucial when establishing a secure connection to a server using the Transport Layer Security (TLS) protocol. When a client connects to a server over TLS, one of the first steps in the handshake process is the verification of the server's certificate. This certificate includes a validity period - a 'not before' and 'not after' timestamp - and the client will check its current system time against this validity period. The system time on the client device (in this case, the ESP32) is not set before receiving this event. Therefore, before establishing a secure server connection, any client must subscribe to the ``"sntp"`` event. This subscription ensures that the system time on the ESP32 is synchronized and accurate, thus allowing the TLS handshake process to proceed successfully. Attempting to establish a connection with a server before the system time has been updated will likely result in a failure due to the reasons outlined above. It's therefore crucial to monitor the ``"sntp"`` event and only proceed with the TLS handshake once the system time has been synchronized.
234 |
235 |
236 | Event Examples
237 | ~~~~~~~~~~~~~~~
238 |
239 | .. code-block:: lua
240 |
241 | xedge.event("wifi",function(status)
242 | if status == "up" then
243 | trace("Wi-Fi connected")
244 | elseif status == "down" then
245 | trace("Wi-Fi disconnected")
246 | else
247 | trace("Wi-Fi error:", status)
248 | end
249 | end)
250 |
251 | xedge.event("wip",function(ip,mask,gw)
252 | trace("IP address:", ip, "network mask", mask, "gateway", gw)
253 | -- We do not need LuaShell32 when we have a network connection
254 | esp32.execute"killmain"
255 | end)
256 |
257 | xedge.event("eth",function(ip,mask,gw)
258 | -- Received if this device has Ethernet and Ethernet connected during runtime.
259 | trace("IP address:", ip, "network mask", mask, "gateway", gw)
260 | end)
261 |
262 | xedge.event("sntp",function()
263 | trace("Time synchronized")
264 | end)
265 |
266 |
267 |
268 | The following example shows how to register and de-register an event using xedge.event(). It subscribes to "sntp" events, which are triggered after system startup and any time the system clock is synchronized via SNTP. The code demonstrates how to handle only the first event, record the system's boot time, and then unregister the handler to avoid processing future events. The captured time is saved to the app table for use elsewhere in the application.
269 |
270 | .. code-block:: lua
271 |
272 | local sntp -- Function forward declaration
273 |
274 | -- Cleanup hook: removes the SNTP event listener.
275 | -- Called automatically when the application stops, or manually after
276 | -- handling the event once.
277 | function onunload()
278 | xedge.event("sntp", sntp, true) -- Unsubscribe from the "sntp" event
279 | end
280 |
281 | -- Event handler: called the first time SNTP syncs the clock.
282 | -- Automatically unregisters itself after running once.
283 | sntp = function()
284 | -- Remove the event listener so we don't handle future "sntp" events
285 | onunload()
286 | startTime = ba.datetime"NOW" -- Record boot/start time
287 | -- Log event with timestamp
288 | xedge.elog({ts=true}, "Boot time=%s", startTime:tostring())
289 | xedge.eflush({subject="App starting"}) -- Flush event log with context
290 | end
291 |
292 | -- Register our one-time SNTP sync handler
293 | xedge.event("sntp", sntp)
294 |
295 |
296 | Note
297 | ~~~~
298 |
299 | All arguments provided by C-code-generated-events are represented as Lua strings, including numbers.
300 |
301 |
302 | Xedge32 OTA
303 | ------------
304 |
305 | Xedge32 supports Over-The-Air (OTA) firmware update core functionality through the ``esp32.ota`` function.
306 |
307 | - **Without Arguments**: Returns the current firmware version as a table.
308 | - **With "begin" Argument**: Returns an OTA firmware upgrade object.
309 |
310 | OTA Examples
311 | ~~~~~~~~~~~~~
312 |
313 | Retrieve the current firmware version:
314 |
315 | .. code-block:: lua
316 |
317 | local ver = esp32.ota()
318 | for k,v in pairs(ver) do trace(k,v) end
319 |
320 | Initiate an OTA firmware upgrade:
321 |
322 | .. code-block:: lua
323 |
324 | local ota, err = esp32.ota"begin"
325 |
326 | OTA Object Member Methods
327 | ~~~~~~~~~~~~~~~~~~~~~~~~~
328 |
329 | The OTA object provides methods to manage the firmware upgrade process:
330 |
331 | - **write(data)**: Write firmware data. Keep calling this function until all firmware data has been passed to the write method. Returns ``true`` on success, or ``nil, error`` on failure or data inconsistency.
332 |
333 | .. code-block:: lua
334 |
335 | local ok, err = ota:write(data)
336 |
337 | - **commit()**: Commits the written firmware data. Returns ``true`` on success, or ``nil, error`` if the firmware is not accepted.
338 |
339 | .. code-block:: lua
340 |
341 | local ok, err = ota:commit()
342 |
343 | - **abort()**: Aborts the upgrade process.
344 |
345 | .. code-block:: lua
346 |
347 | ota:abort()
348 |
--------------------------------------------------------------------------------
/doc/source/tutorials.rst:
--------------------------------------------------------------------------------
1 | Tutorials and AUX APIs
2 | =======================
3 |
4 | - `Xedge32 Tutorials `_:
5 | Comprehensive guides to master Xedge32's functionalities, tailored for both beginners and advanced users.
6 |
7 | - `Online Interactive Lua Tutorial `_:
8 | An engaging, hands-on tutorial for learning Lua, the programming language used in Xedge32, available online.
9 |
10 | - `GitHub Xedge32 Examples `_:
11 | A rich collection of practical examples and code snippets for Xedge32, hosted on GitHub.
12 |
13 | - `Mako Server Tutorials `_:
14 | Extensive tutorials from the Mako Server, Xedge32's larger counterpart, which are also applicable and beneficial for Xedge32 users.
15 |
16 |
17 |
18 | Xedge32 Components and Documentation
19 | ~~~~~~~~~~~~~~~~~~~~~~~~~~~~~~~~~~~~~~~
20 |
21 | Keep in mind that this document exclusively covers Xedge32-specific features. Xedge32 is composed of three software components:
22 |
23 | 1. **Barracuda App Server**: The cornerstone of Xedge32, this advanced IoT toolkit constitutes 90% of its functionality. Serving as a foundational tool for embedded systems and IoT applications, it provides web server capabilities, data encryption, and multi-protocol support, making it the backbone for secure and scalable IoT projects.
24 |
25 | - `Lua API `_
26 | - `IoT Protocols `_
27 | - `Product page `_
28 |
29 | 2. **Xedge**: A generic, Lua-based development platform (REPL) that facilitates rapid prototyping without the need for frequent compile and deploy cycles and is applicable beyond just ESP32.
30 |
31 | - `Xedge API and howto `_
32 | - `Online demo `_
33 |
34 |
35 | 3. **Xedge32 for ESP32**: Specifically designed for the ESP32 microcontroller, this component leverages the Xedge framework and Barracuda App Server. It enables easier utilization of ESP32's hardware features like GPIOs through Lua.
36 |
37 | - `Introduction <../index.html>`_
38 |
39 |
--------------------------------------------------------------------------------
/doc/source/xedge.rst:
--------------------------------------------------------------------------------
1 | Xedge32
2 | ================
3 |
4 | Xedge32 is a development tool for embedded edge devices. Its web-based user interface makes it incredibly easy to develop embedded software using the Lua language.
5 |
6 | .. image:: https://realtimelogic.com/images/xedge/v1/Xedge.png
7 | :alt: Xedge32 UI
8 |
9 | Xedge is a versatile tool that runs on various platforms, including ESP32. This documentation focuses on getting started with Xedge on ESP32. For more details on using Xedge, please refer to the `Xedge Main Documentation `_.
10 |
11 | How To Use Xedge32
12 | ---------------------------------------
13 |
14 | The LSP-Example's GitHub repository includes `ESP32 specific examples `_ that we will use in the instructions below. First, download these files to your computer and then upload them to the ESP32 using the built-in Web File Manager. You can use the combined WebDAV and Web File Manager URL at ``http://ip-address/rtl/apps/`` to upload files to the ESP32. You can refer to the :download:`WebDAV how-to video ` for more information on how to mount a WebDAV drive.
15 |
16 | Upload this directory to the ESP32 by using WebDAV or If using the Web File Manager as shown below, use a browser and navigate to ``http://ip-address/rtl/apps/``
17 |
18 | |Web File manager: Drag and Drop|
19 |
20 | Navigate to ``http://ip-address/rtl/apps/`` and click the :guilabel:`+` button to create a directory named "Lua-Examples". Then, click the "Lua-Examples" link to navigate to ``http://ip-address/rtl/apps/Lua-Examples/``, select the files, and drag & drop the files into the browser window at ``http://ip-address/rtl/apps/Lua-Examples/``. The Web File Manager starts uploading the files as soon as you drop them into the browser window.
21 |
22 | |Web File Manager: Upload|
23 |
24 | After completing the upload process, navigate to ``http://ip-address/rtl/``, expand :guilabel:`disk` in the left pane, and right click the "Lua-Examples" directory. Then, click :guilabel:`New App`. In the dialog, enable :guilabel:`Running` and :guilabel:`LSP App`. click :guilabel:`Save`
25 |
26 | In the Xedge Lua IDE, you can expand the examples in the left pane, and click any of the examples to open the source code in the editor. Then, click the run button to execute the example.
27 |
28 | How To Use an External IDE
29 | --------------------------
30 |
31 | While the internal web-based Lua IDE is easy to use since it is an integral part of Xedge32, a more advanced IDE may be preferred and is required for debugging Lua code.
32 |
33 | You can use any external IDE or editor to edit files directly on the ESP32 by mounting the device as a WebDAV drive. For instructions on how to mount the WebDAV drive using various client operating systems, visit the `How to Mount a WebDAV Drive `__ page on the FuguHub site.
34 |
35 | To mount the ESP32's WebDAV server, use the URL https://ip-address/rtl/apps/.
36 |
37 | .. _LuaDebug:
38 |
39 |
40 | How To Debug Lua Code
41 | ---------------------
42 |
43 | Debugging Lua code is made easy with the Barracuda App Server's `Lua debug module `__, which is compatible with Visual Studio Code and the Lua plugin. To use the debugger, you need access to the Lua files, but it's not possible to access them via WebDAV from the device when debugging. This is because the debug module stops all activity in the server, including the WebDAV server, when a breakpoint is hit. Instead, keep the Lua files on your host computer and access them from the device using the NetIo feature. Refer to the Xedge32 documentation for `additional NetIo details `__.
44 |
45 | **Configure a debug session as follows:**
46 |
47 | Follow the instructions in our `How to Debug Lua Code Using Visual Studio Code `__ guide on GitHub. Make sure to install all tools listed in the `Prerequisites `__ section and configure Visual Studio Code as explained in the `Configuring VS `__ section.
48 |
49 | Next, navigate to your local ``xedge`` directory and copy the `File Server Directory from GitHub `__ to ``xedge-ESP32/BAS/examples/xedge/FileServer``.
50 |
51 | To start the Mako Server, run the following command in the ``xedge-ESP32/BAS/examples/xedge`` directory:
52 |
53 | .. container:: cmd
54 |
55 | mako -l::FileServer
56 |
57 | If the Mako Server is not in the path, use this command instead:
58 |
59 | .. container:: cmd
60 |
61 | /path/2/mako -l::FileServer
62 |
63 | The File Server App sets up a file server that is accessed by the NetIo client running in the device. The File Server App should automatically open a browser window with the Web File Manager. Click the Lua-Examples link (1) and copy the full URL (2).
64 |
65 | |Web File Server|
66 |
67 | Using the browser, navigate to ``http://ip-address/rtl/``, right-click :guilabel:`net` in the left pane and paste in the URL in the app dialog's :guilabel:`URL` field. Enable :guilabel:`Running` and :guilabel:`LSP App`. click :guilabel:`Save`.
68 |
69 | The following printout should appear in the File Server console as soon as the NetIo client connects to the File Server App running on your host:
70 |
71 | ::
72 |
73 | Creating 'Visual Studio Code' config file: Lua-Examples/.vscode/launch.json
74 |
75 |
76 |
77 | As detailed in the GitHub documentation, a launch.json file is required with a `sourceMaps attribute `__. This file with the sourceMaps attribute is automatically created by the File Server App.
78 |
79 | Start Visual Studio Code and open the local directory: xedge-ESP32/BAS/examples/xedge/Lua-Examples
80 |
81 | Click on the httpclient.lsp file and add the two following lines at the top of the file just below the comment:
82 |
83 | .. code-block:: lua
84 |
85 | require"ldbgmon".connect{client=false}
86 | trace"Running LSP page"
87 |
88 | The following screenshot shows the code modification:
89 |
90 | |Visual Studio Code with Lua|
91 |
92 | Using your browser, navigate to ``http://ip-address/LuaExamples/httpclient.lsp``, where ip-address is your ESP32's IP address. The browser will now be waiting (spinning) since the web server is now frozen and waiting for the debugger client (Visual Studio Code) to connect. The web server can at this point only be resumed by the debugger.
93 |
94 | In Visual Studio Code, press the F5 button to start a debug session. Visual Studio Code should now connect to the debug monitor and automatically halt the code as shown in the screenshot below.
95 |
96 | |Visual Studio Code with Lua Http Client|
97 |
98 | You can now step through the code or simply resume by pressing F5. When the server resumes, the browser window stops spinning. Refreshing the browser window will not stop the LSP page again now that you have an established debugger connection. To stop the code at the same location, set a breakpoint at the trace() call in the editor.
99 |
100 | |Visual Studio Code Set Breakpoint|
101 |
102 | You can now refresh the browser and the new breakpoint will be hit. Try stepping into the code (F11). Notice that you can step into the HTTP client library `httpm `__, which is partly implemented in Lua. The code is not part of your application, but is embedded inside the firmware. The debug monitor sends the Lua source code to Visual Studio Code from the Xedge32's ZIP file embedded in the firmware.
103 |
104 | The following short video shows how to remotely debug Lua code on a Raspberry Pi. The instructions are similar; however, the server running on the Raspberry Pi (the one being debugged) is the Mako Server and not Xedge32.
105 |
106 | Further Reading
107 | ---------------
108 |
109 | Prior to reading any of the following tutorials, check out the `online Lua Tutorials `__ and read the `Xedge Documentation `_.
110 |
111 | **Lua examples designed for ESP32:**
112 |
113 | See the `ESP32 section `_ in the LSP-Example's GitHub repository.
114 |
115 | **Lua examples and tutorials compatible with ESP32:**
116 |
117 | .. container:: list
118 |
119 | - `How to connect the ESP32 to an MQTT cloud server using Mutual
120 | TLS
121 | Authentication `__
122 | - `How to design a web user interface by using a ready to use
123 | dashboard app
124 | template `__
125 | - `How to perform rapid IoT device client development using
126 | Lua `__
127 | - `How to access the web server behind a firewall without using port
128 | forwarding `__
129 | - `Ajax for
130 | beginners `__
131 | - `How to design a modern multiuser reactive web
132 | interface `__
133 | - `Why use Lua for embedded web application
134 | development `__
135 | - `Using the ESP32 as a foundation for your On-Premises IoT
136 | Platform `__
137 |
138 | .. |Web File manager: Drag and Drop| image:: https://realtimelogic.com/downloads/bas/rt1020/Web-File-manager-Drag-Drop.png
139 | :class: fright
140 | .. |Web File Manager: Upload| image:: https://realtimelogic.com/downloads/bas/rt1020/Web-File-Manager-Upload.png
141 | :class: fright
142 | .. |Lua Debugger Screenshot| image:: https://makoserver.net/blogmedia/Lua-Debugger.gif
143 | .. |Web File Server| image:: https://realtimelogic.com/downloads/bas/rt1020/FileServer-URL.png
144 | .. |Visual Studio Code with Lua| image:: https://realtimelogic.com/downloads/bas/rt1020/VS-HttpClient-Mod.png
145 | .. |Visual Studio Code with Lua Http Client| image:: https://realtimelogic.com/downloads/bas/rt1020/VS-HttpClient-Auto-BP.png
146 | .. |Visual Studio Code Set Breakpoint| image:: https://realtimelogic.com/downloads/bas/rt1020/VS-HttpClient-Set-BP.png
147 |
148 |
--------------------------------------------------------------------------------
/main/BaCam.c:
--------------------------------------------------------------------------------
1 | /*
2 | * Copyright (c) Real Time Logic
3 | * This software may only be used by the terms and conditions stipulated
4 | * in the corresponding license agreement under which the software has
5 | * been supplied. All use of this code is subject to the terms and
6 | * conditions of the included License Agreement.
7 | *
8 | * This Lua binding interfaces with the ESP32 camera module, utilizing
9 | * the ESP-IDF camera driver. It offers functions for both
10 | * initializing the camera and capturing images. The 'lcam' function
11 | * takes a Lua table containing configuration options and returns a
12 | * camera object on success. This camera object is used by the
13 | * 'LCAM_lread' function. The 'LCAM_lread' function captures an image
14 | * with the initialized camera object and returns a Lua string with
15 | * the image data. Please note that this binding assumes the ESP-IDF
16 | * camera driver has already been configured and installed.
17 | */
18 |
19 | #include "BaESP32.h"
20 | #if CONFIG_CAM_ENABLED
21 |
22 | #include "esp_camera.h"
23 |
24 | #define BACAM "CAM"
25 |
26 | typedef struct {
27 | sensor_t* sensor;
28 | int pins[16];
29 | } LCAM;
30 |
31 |
32 | static LCAM* LCAM_getUD(lua_State* L)
33 | {
34 | return (LCAM*)luaL_checkudata(L, 1, BACAM);
35 | }
36 |
37 | static LCAM* LCAM_checkUD(lua_State* L)
38 | {
39 | LCAM* o = LCAM_getUD(L);
40 | if (o->sensor == NULL)
41 | {
42 | luaL_error(L, "Camera not initialized");
43 | }
44 | return o;
45 | }
46 |
47 |
48 |
49 | static int LCAM_close(lua_State* L)
50 | {
51 | LCAM* o = LCAM_getUD(L);
52 | if(o->sensor)
53 | {
54 | for(int i = 0 ; i < sizeof(o->pins)/sizeof(o->pins[0]) ; i++)
55 | {
56 | if(o->pins[i] >= 0)
57 | {
58 | activeGPIO[o->pins[i]] = NULL; // Release
59 | }
60 | }
61 | // The sensor field at NULL indicates that the camera could not
62 | // be initialized.
63 | o->sensor = NULL;
64 | // Free camera configuration memory.
65 | // Deinit camera.
66 | esp_err_t err = esp_camera_deinit();
67 | if (err != ESP_OK)
68 | {
69 | return pushEspRetVal(L, err, "Deinit camera failed", FALSE);
70 | }
71 | return 1;
72 | }
73 | return 0;
74 | }
75 |
76 |
77 | /*
78 | * Lua binding for close the ESP32 camera module.
79 | * Returns true on success and nil,err on failure.
80 | * Raises an error if the camera has not been initialized or has been closed.
81 | */
82 | static int LCAM_lclose(lua_State* L)
83 | {
84 | LCAM_checkUD(L);
85 | LCAM_close(L);
86 | return 0;
87 | }
88 |
89 | /*
90 | * Lua binding for capturing an image from ESP32 camera module.
91 | * Returns the binary cam data as a Lua string.
92 | * Raises an error if the camera has not been initialized.
93 | * returns nil, err if capture failed.
94 | */
95 | static int LCAM_lread(lua_State* L)
96 | {
97 | LCAM_checkUD(L);
98 | /* We capture the image with global mutex released since this
99 | * function may take a few milliseconds.
100 | */
101 | ThreadMutex_release(soDispMutex);
102 | camera_fb_t *fb = esp_camera_fb_get();
103 | ThreadMutex_set(soDispMutex);
104 | if(!fb)
105 | {
106 | return pushEspRetVal(L, ESP_FAIL, "Camera Capture Failed", FALSE);
107 | }
108 | luaL_Buffer lb;
109 | luaL_buffinit(L, &lb);
110 | uint8_t* buf = (uint8_t*)luaL_prepbuffsize(&lb, fb->len);
111 | memcpy(buf, fb->buf, fb->len);
112 | luaL_pushresultsize(&lb, fb->len);
113 | esp_camera_fb_return(fb);
114 | return 1;
115 | }
116 |
117 |
118 | static const luaL_Reg camObjLib[] = {
119 | {"read", LCAM_lread},
120 | {"close", LCAM_lclose},
121 | {"__close", LCAM_close},
122 | {"__gc", LCAM_close},
123 | {NULL, NULL}
124 | };
125 |
126 | /*
127 | * Lua binding for initializing the ESP32 camera module.
128 | * Accepts a table with the following optional fields:
129 | * - d0-d7: camera data pins, default 5-12.
130 | * - xclk: the GPIO pin used for XCLK, default is 4.
131 | * - pclk: the GPIO pin used for PCLK, default is 5.
132 | * - vsync: the GPIO pin used for VSYNC, default is 18.
133 | * - href: the GPIO pin used for HREF, default is 23.
134 | * - sda: the GPIO pin used for SDA, default is 19.
135 | * - scl: the GPIO pin used for SCL, default is 18.
136 | * - reset: the GPIO pin used for RESET, default is -1 (no reset pin).
137 | * - pwdn: the GPIO pin used for PWDN, default is -1 (no power down pin).
138 | * - freq: the frequency of XCLK in Hz, default is 100,000,000.
139 | * - format: the pixel format of the image captured (JPEG, RGB565 or YUV422), default is JPEG.
140 | * - frame: the image frame size (QQVGA, QVGA, SVGA ...), default is QVGA.
141 | * - vflip: vertical flip on camera output, default false.
142 | * - hmirror: horizontal mirror on camera output, default false.
143 | * Returns the camera object, or nil,err on error.
144 | */
145 | int lcam(lua_State* L)
146 | {
147 | int pixel_format;
148 | int frame_size;
149 | camera_config_t cfg;
150 |
151 | lInitConfigTable(L, 1);
152 | lua_Integer d0 = balua_checkIntField(L, 1, "d0");
153 | lua_Integer d1 = balua_checkIntField(L, 1, "d1");
154 | lua_Integer d2 = balua_checkIntField(L, 1, "d2");
155 | lua_Integer d3 = balua_checkIntField(L, 1, "d3");
156 | lua_Integer d4 = balua_checkIntField(L, 1, "d4");
157 | lua_Integer d5 = balua_checkIntField(L, 1, "d5");
158 | lua_Integer d6 = balua_checkIntField(L, 1, "d6");
159 | lua_Integer d7 = balua_checkIntField(L, 1, "d7");
160 | lua_Integer xclk = balua_checkIntField(L, 1, "xclk");
161 | lua_Integer pclk = balua_checkIntField(L, 1, "pclk");
162 | lua_Integer vsync = balua_checkIntField(L, 1, "vsync");
163 | lua_Integer href = balua_checkIntField(L, 1, "href");
164 | lua_Integer sda = balua_checkIntField(L, 1, "sda");
165 | lua_Integer scl = balua_checkIntField(L, 1, "scl");
166 | lua_Integer reset = balua_checkIntField(L, 1, "reset");
167 | lua_Integer pwdn = balua_getIntField(L, 1, "pwdn", -1);
168 | lua_Integer freq = balua_checkIntField(L, 1, "freq");
169 | const char* format = balua_getStringField(L, 1, "format", "JPEG");
170 | const char* frame = balua_getStringField(L, 1, "frame", "QVGA");
171 | int vflip = balua_getBoolField(L, 1, "vflip", FALSE);
172 | int hmirror = balua_getBoolField(L, 1, "hmirror", FALSE);
173 |
174 | lua_Integer pins[] = {
175 | pwdn,reset,xclk,sda,scl,d7,d6,d5,d4,d3,d2,d1,d0,vsync,href,pclk
176 | };
177 | for(int i = 0 ; i < sizeof(pins)/sizeof(pins[0]) ; i++)
178 | {
179 | if(pins[i] >= 0)
180 | {
181 | if(pins[i] >= GPIO_NUM_MAX || activeGPIO[pins[i]])
182 | luaL_error(L,"Pin %d in use", pins[i]);
183 | }
184 | }
185 |
186 | // Check pixel format
187 | if (strcmp(format, "JPEG") == 0)
188 | {
189 | pixel_format = PIXFORMAT_JPEG;
190 | } else if (strcmp(format, "YUV422") == 0)
191 | {
192 | pixel_format = PIXFORMAT_YUV422;
193 | } else if (strcmp(format, "RGB565") == 0)
194 | {
195 | pixel_format = PIXFORMAT_RGB565;
196 | } else if (strcmp(format, "GRAYSCALE") == 0)
197 | {
198 | pixel_format = PIXFORMAT_GRAYSCALE;
199 | } else if (strcmp(format, "RGB888") == 0)
200 | {
201 | pixel_format = PIXFORMAT_RGB888;
202 | } else if (strcmp(format, "RAW") == 0)
203 | {
204 | pixel_format = PIXFORMAT_RAW;
205 | } else if (strcmp(format, "RGB444") == 0)
206 | {
207 | pixel_format = PIXFORMAT_RGB444;
208 | } else if (strcmp(format, "RGB555") == 0)
209 | {
210 | pixel_format = PIXFORMAT_RGB555;
211 | } else {
212 | return luaL_error(L, "invalid pixel format '%s'", format);
213 | }
214 |
215 | // Check frame size format
216 | if (strcmp(frame, "96X96") == 0)
217 | {
218 | frame_size = FRAMESIZE_96X96;
219 | } else if (strcmp(frame, "QQVGA") == 0)
220 | {
221 | frame_size = FRAMESIZE_QQVGA;
222 | } else if (strcmp(frame, "QCIF") == 0)
223 | {
224 | frame_size = FRAMESIZE_QCIF;
225 | } else if (strcmp(frame, "HQVGA") == 0)
226 | {
227 | frame_size = FRAMESIZE_HQVGA;
228 | } else if (strcmp(frame, "240X240") == 0)
229 | {
230 | frame_size = FRAMESIZE_240X240;
231 | } else if (strcmp(frame, "QVGA") == 0)
232 | {
233 | frame_size = FRAMESIZE_QVGA;
234 | } else if (strcmp(frame, "CIF") == 0)
235 | {
236 | frame_size = FRAMESIZE_CIF;
237 | } else if (strcmp(frame, "HVGA") == 0)
238 | {
239 | frame_size = FRAMESIZE_HVGA;
240 | } else if (strcmp(frame, "VGA") == 0)
241 | {
242 | frame_size = FRAMESIZE_VGA;
243 | } else if (strcmp(frame, "SVGA") == 0)
244 | {
245 | frame_size = FRAMESIZE_SVGA;
246 | } else if (strcmp(frame, "XGA") == 0)
247 | {
248 | frame_size = FRAMESIZE_XGA;
249 | } else if (strcmp(frame, "HD") == 0)
250 | {
251 | frame_size = FRAMESIZE_HD;
252 | } else {
253 | return luaL_error(L, "invalid frame size '%s'", frame);
254 | }
255 |
256 | if (esp_camera_sensor_get() != NULL)
257 | {
258 | return luaL_error(L, "Camera already initialized");
259 | }
260 |
261 | // Create the CAM object and copy the sensor and configuration information to it.
262 | // For now it is only used in the close and read functions, but in the future it
263 | // may be necessary to send commands to the camera.
264 | LCAM* cam = (LCAM*)lNewUdata(L, sizeof(LCAM), BACAM, camObjLib);
265 |
266 | // Init camera config struct
267 | cfg.pin_pwdn = pwdn;
268 | cfg.pin_reset = reset;
269 | cfg.pin_xclk = xclk;
270 | cfg.pin_sccb_sda = sda;
271 | cfg.pin_sccb_scl = scl;
272 |
273 | cfg.pin_d7 = d7;
274 | cfg.pin_d6 = d6;
275 | cfg.pin_d5 = d5;
276 | cfg.pin_d4 = d4;
277 | cfg.pin_d3 = d3;
278 | cfg.pin_d2 = d2;
279 | cfg.pin_d1 = d1;
280 | cfg.pin_d0 = d0;
281 | cfg.pin_vsync = vsync;
282 | cfg.pin_href = href;
283 | cfg.pin_pclk = pclk;
284 |
285 | cfg.pixel_format = pixel_format;
286 | cfg.frame_size = frame_size;
287 |
288 | // XCLK 20MHz or 10MHz for OV2640 double FPS (Experimental)
289 | cfg.xclk_freq_hz = freq;
290 | cfg.ledc_timer = LEDC_TIMER_0;
291 | cfg.ledc_channel = LEDC_CHANNEL_0;
292 |
293 | cfg.jpeg_quality = 12; // 0-63 lower number means higher quality
294 |
295 | #if CONFIG_FB_ONE
296 | cfg.fb_count = 1;
297 | #elif CONFIG_FB_TWO
298 | cfg.fb_count = 2; // if more than one, i2s runs in continuous mode. Use only with JPEG
299 | #endif
300 |
301 | #if CONFIG_GRAB_LATEST
302 | cfg.grab_mode = CAMERA_GRAB_LATEST;
303 | #elif CONFIG_GRAB_WHEN_EMPTY
304 | cfg.grab_mode = CAMERA_GRAB_WHEN_EMPTY;
305 | #endif
306 |
307 | cfg.fb_location = CAMERA_FB_IN_PSRAM;
308 |
309 | esp_err_t err = esp_camera_init(&cfg);
310 | if (err != ESP_OK)
311 | {
312 | return pushEspRetVal(L, ESP_FAIL, "Camera Init Failed", TRUE);
313 | }
314 |
315 | cam->sensor = esp_camera_sensor_get();
316 | cam->sensor->set_vflip(cam->sensor, vflip);
317 | cam->sensor->set_hmirror(cam->sensor, hmirror);
318 |
319 | for(int i = 0 ; i < sizeof(pins)/sizeof(pins[0]) ; i++)
320 | {
321 | /* We assign the activeGPIO a non NULL value to indicate it is
322 | * in use; the pointer is only used for checking that it is non
323 | * NULL and it is not used as a valid pointer value.
324 | */
325 | if(pins[i] >= 0)
326 | {
327 | activeGPIO[pins[i]] = (struct LGPIO*)1;
328 | }
329 | }
330 | baAssert(sizeof(pins)/sizeof(pins[0]) == sizeof(cam->pins)/sizeof(cam->pins[0]));
331 | for(int i = 0 ; i < sizeof(pins)/sizeof(pins[0]) ; i++)
332 | {
333 | cam->pins[i]=pins[i];
334 | }
335 | return 1;
336 | }
337 | #endif // CONFIG_CAM_ENABLED
338 |
339 |
--------------------------------------------------------------------------------
/main/BaESP32.h:
--------------------------------------------------------------------------------
1 | #pragma once
2 |
3 | #include
4 | #include
5 |
6 | typedef union {
7 | gpio_num_t pin;
8 | void* ptr;
9 | } EventBrokerCallbackArg;
10 |
11 | typedef void (*EventBrokerCallback)(EventBrokerCallbackArg arg);
12 |
13 | typedef struct {
14 | EventBrokerCallback callback;
15 | EventBrokerCallbackArg arg;
16 | } EventBrokerQueueNode;
17 |
18 | extern QueueHandle_t eventBrokerQueue;
19 |
20 | void init_dlmalloc(char* heapstart, char* heapend); /* BAS.c */
21 | void barracuda(void); /* xedge.c */
22 | void installESP32Libs(lua_State* L); /* BaESP32.c */
23 | void manageConsole(bool start); /* console.c */
24 | void wifiScan(int print, lua_State* L, /* main.c */
25 | void (*cb)(lua_State* L, const uint8_t* ssid, int rssi,
26 | const char* authmode,const char* pchiper,
27 | const char* gcipher, int channel));
28 | void eventBrokerTask(void *params);
29 | #if CONFIG_CAM_ENABLED
30 | int lcam(lua_State* L); /* BaCam.c */
31 | #endif
32 | void lInitConfigTable(lua_State* L, int ix);
33 | void* lNewUdata(lua_State *L,size_t size,const char *tname,const luaL_Reg *l);
34 | int lsdcard(lua_State* L);
35 | int pushEspRetVal(lua_State* L, esp_err_t err, const char* msg, int throwOnInvArg);
36 |
37 | const char* wifiCipherType(
38 | int pcipher, int gcipher, int print, const char** pciphers);
39 | const char* wifiAuthMode(int authmode, int print);
40 |
41 | struct LGPIO;
42 |
43 | extern struct LGPIO* activeGPIO[GPIO_NUM_MAX];
44 |
45 |
46 | /*
47 | The LThreadMgr created and configured in xedge.c
48 | */
49 | extern LThreadMgr ltMgr;
50 | extern ThreadMutex* soDispMutex; /* BaESP32.c */
51 |
--------------------------------------------------------------------------------
/main/CMakeLists.txt:
--------------------------------------------------------------------------------
1 |
2 | idf_component_register(
3 | SRCS "BAS/src/BAS.c" "BAS/src/DiskIo/posix/BaFile.c" "BAS/src/arch/FreeRTOS/ThreadLib.c" "BAS/src/arch/NET/LwIP/SoDisp.c" "BAS/src/dlmalloc.c" "main.c" "NetESP32.c" "CfgESP32.c" "BAS/examples/xedge/src/xedge.c" "BAS/examples/xedge/obj/XedgeZip.c" "console.c" "BaESP32.c" "LPeg/lpcset.c" "LPeg/lpcap.c" "LPeg/lpcode.c" "LPeg/lpprint.c" "LPeg/lptree.c" "LPeg/lpvm.c" "CBOR/cbor_c.c" "CBOR/dnf.c" "lua-protobuf/pb.c" "BaCam.c"
4 | INCLUDE_DIRS "."
5 | "BAS/inc"
6 | "BAS/inc/arch/NET/LwIP"
7 | "BAS/inc/arch/FreeRTOS"
8 | "BAS/examples/xedge/src"
9 | )
10 |
11 | # -fno-inline-small-functions is required. The Xtensa ESP32 compiler
12 | # generates faulty BAS binary code without this setting.
13 |
14 | target_compile_options(${COMPONENT_LIB} PRIVATE -DBA_ESP32 -DMAXTHREADS=2 -DBA_FREERTOS -DBA_LWIP -DUSE_DLMALLOC -DBP_IO=0 -DUSE_LPEG=1 -DUSE_CBOR=1 -DUSE_PROTOBUF=1 -DUSE_REVCON=1 -DB_LITTLE_ENDIAN -DLUA_NUMBER_INTEGER=0 -DUSE_DBGMON=1)
15 |
16 |
17 | # -fno-inline-small-functions is required. The Xtensa ESP32 compiler
18 | # generates faulty BAS binary code without this setting.
19 | target_compile_options(${COMPONENT_LIB} PRIVATE -fno-inline-small-functions -Wno-char-subscripts -Wno-implicit-fallthrough -Wno-attributes)
20 |
21 | # Create a FATFS image from the contents of the 'partitions/storage' directory
22 | # that fits the partition named 'storage'. FLASH_IN_PROJECT indicates that
23 | # the generated image should be flashed when the entire project is flashed to
24 | # the target with 'idf.py -p PORT flash'.
25 | fatfs_create_spiflash_image(storage ../partitions/storage FLASH_IN_PROJECT PRESERVE_TIME)
26 |
27 | # Generate NVS partition binary from 'nvs_xedge_values.cvs' file that contains
28 | # Key-value pairs. FLASH_IN_PROJECT indicates that the generated image should be
29 | # flashed when the entire project is flashed to the target with 'idf.py -p PORT flash'.
30 | nvs_create_partition_image(nvs ../partitions/nvs_xedge_values.csv FLASH_IN_PROJECT)
31 |
--------------------------------------------------------------------------------
/main/CfgESP32.c:
--------------------------------------------------------------------------------
1 | /**
2 | * Configuration parameter module for xedge32.c
3 | *
4 | * Copyright (c) Real Time Logic
5 | *
6 | * This software may only be used by the terms and conditions
7 | * stipulated in the corresponding license agreement under which the
8 | * software has been supplied. All use of this code is subject to the
9 | * terms and conditions of the included License Agreement.
10 | */
11 | #include
12 | #include
13 | #include
14 | #include
15 | #include
16 | #include "CfgESP32.h"
17 |
18 | // TODO: Found the value for no init.
19 | static nvs_handle_t nvsh;
20 |
21 | static const char TAG[]={"X"};
22 |
23 | /**
24 | * @brief Initialize the configuration parameters module.
25 | * This function initializes the NVS (Non-Volatile Storage) Flash
26 | * and opens the NVS namespace for reading and writing configuration parameters.
27 | *
28 | * @note This function should be called at the start of the application.
29 | * @return ESP_OK if the configuration module is successfully initialized.
30 | */
31 | esp_err_t cfgInit(void)
32 | {
33 | esp_err_t err = nvs_flash_init();
34 |
35 | if((err == ESP_ERR_NVS_NO_FREE_PAGES) || (err == ESP_ERR_NVS_NEW_VERSION_FOUND))
36 | {
37 | ESP_LOGE(TAG, "NVS init failed! Erasing memory.");
38 | ESP_ERROR_CHECK(nvs_flash_erase());
39 | err = nvs_flash_init();
40 | }
41 |
42 | ESP_ERROR_CHECK(err);
43 |
44 | ESP_ERROR_CHECK(nvs_open("xedge", NVS_READWRITE, &nvsh));
45 |
46 | return err;
47 | }
48 |
49 |
50 | /**
51 | Save mDNS name in NVRAM if 'namebuf' is set, otherwise read mDNS name from
52 | NVRAM and copy to 'namebuf'.
53 | */
54 | #if CONFIG_mDNS_ENABLED
55 | esp_err_t mDnsCfg(char namebuf[80])
56 | {
57 | size_t size=80;
58 | return namebuf[0] ? nvs_set_str(nvsh, "mdns", namebuf) : nvs_get_str(nvsh, "mdns",namebuf,&size);
59 | }
60 | #endif
61 |
62 | /**
63 | * @brief Save the SD card parameters to the configuration storage.
64 | *
65 | * @param cfg Pointer to the SD card slot configuration structure.
66 | * @return ESP_OK if the SD card parameters are successfully saved.
67 | */
68 | esp_err_t cfgSetSdCard(sdmmc_slot_config_t* cfg)
69 | {
70 | nvs_set_i32(nvsh, "SdWidth", (int32_t)cfg->width);
71 |
72 | #ifdef SOC_SDMMC_USE_GPIO_MATRIX
73 | nvs_set_i32(nvsh, "SdClk", (int32_t)cfg->clk);
74 | nvs_set_i32(nvsh, "SdCmd", (int32_t)cfg->cmd);
75 | nvs_set_i32(nvsh, "SdD0", (int32_t)cfg->d0);
76 | nvs_set_i32(nvsh, "SdD1", (int32_t)cfg->d1);
77 | nvs_set_i32(nvsh, "SdD2", (int32_t)cfg->d2);
78 | nvs_set_i32(nvsh, "SdD3", (int32_t)cfg->d3);
79 | nvs_set_i32(nvsh, "SdD4", (int32_t)cfg->d4);
80 | nvs_set_i32(nvsh, "SdD5", (int32_t)cfg->d5);
81 | nvs_set_i32(nvsh, "SdD6", (int32_t)cfg->d6);
82 | nvs_set_i32(nvsh, "SdD7", (int32_t)cfg->d7);
83 | #endif
84 |
85 | return ESP_OK;
86 | }
87 |
88 | /**
89 | * @brief Read the SD card parameters of the configuration storage.
90 | *
91 | * @param cfg Pointer to the SD card slot configuration structure.
92 | * @return ESP_OK if the SD card parameters are successfully read.
93 | */
94 | esp_err_t cfgGetSdCard(sdmmc_slot_config_t* cfg)
95 | {
96 | int32_t width;
97 |
98 | if(ESP_OK == nvs_get_i32(nvsh, "SdWidth", &width))
99 | {
100 | cfg->width = width;
101 | #ifdef SOC_SDMMC_USE_GPIO_MATRIX
102 | if(width >= 1)
103 | {
104 | int32_t clk;
105 | int32_t cmd;
106 | int32_t d0;
107 |
108 | if((ESP_OK == nvs_get_i32(nvsh, "SdClk", &clk)) &&
109 | (ESP_OK == nvs_get_i32(nvsh, "SdCmd", &cmd)) &&
110 | (ESP_OK == nvs_get_i32(nvsh, "SdD0", &d0)))
111 | {
112 | cfg->clk = clk;
113 | cfg->cmd = cmd;
114 | cfg->d0 = d0;
115 | }
116 | else
117 | {
118 | return ESP_FAIL;
119 | }
120 | }
121 |
122 | if(width >= 4)
123 | {
124 | int32_t d1;
125 | int32_t d2;
126 | int32_t d3;
127 |
128 | if((ESP_OK == nvs_get_i32(nvsh, "SdD1", &d1)) &&
129 | (ESP_OK == nvs_get_i32(nvsh, "SdD2", &d2)) &&
130 | (ESP_OK == nvs_get_i32(nvsh, "SdD3", &d3)))
131 | {
132 | cfg->d1 = d1;
133 | cfg->d2 = d2;
134 | cfg->d3 = d3;
135 | }
136 | else
137 | {
138 | return ESP_FAIL;
139 | }
140 | }
141 |
142 | if(width == 8)
143 | {
144 | int32_t d4;
145 | int32_t d5;
146 | int32_t d6;
147 | int32_t d7;
148 |
149 | if((ESP_OK == nvs_get_i32(nvsh, "SdD4", &d4)) &&
150 | (ESP_OK == nvs_get_i32(nvsh, "SdD5", &d5)) &&
151 | (ESP_OK == nvs_get_i32(nvsh, "SdD6", &d6)) &&
152 | (ESP_OK == nvs_get_i32(nvsh, "SdD7", &d7)))
153 | {
154 | cfg->d4 = d4;
155 | cfg->d5 = d5;
156 | cfg->d6 = d6;
157 | cfg->d6 = d7;
158 | }
159 | else
160 | {
161 | return ESP_FAIL;
162 | }
163 | }
164 | #endif // SOC_SDMMC_USE_GPIO_MATRIX
165 |
166 | return ESP_OK;
167 | }
168 |
169 | return ESP_FAIL;
170 | }
171 |
172 | /**
173 | * @brief Erase all the SD card parameters from the configuration storage.
174 | *
175 | * @param cfg Pointer to the SD card slot configuration structure.
176 | * @return ESP_OK if the SD card parameters are successfully saved.
177 | */
178 | esp_err_t cfgEraseSdCard(void)
179 | {
180 | esp_err_t errWidth = nvs_erase_key(nvsh, "SdWidth");
181 | #ifdef SOC_SDMMC_USE_GPIO_MATRIX
182 | esp_err_t errClk = nvs_erase_key(nvsh, "SdClk");
183 | esp_err_t errCmd = nvs_erase_key(nvsh, "SdCmd");
184 | esp_err_t errD0 = nvs_erase_key(nvsh, "SdD0");
185 | esp_err_t errD1 = nvs_erase_key(nvsh, "SdD1");
186 | esp_err_t errD2 = nvs_erase_key(nvsh, "SdD2");
187 | esp_err_t errD3 = nvs_erase_key(nvsh, "SdD3");
188 | esp_err_t errD4 = nvs_erase_key(nvsh, "SdD4");
189 | esp_err_t errD5 = nvs_erase_key(nvsh, "SdD5");
190 | esp_err_t errD6 = nvs_erase_key(nvsh, "SdD6");
191 | esp_err_t errD7 = nvs_erase_key(nvsh, "SdD7");
192 | #endif
193 |
194 | if(ESP_OK == errWidth)
195 | {
196 | #ifdef SOC_SDMMC_USE_GPIO_MATRIX
197 | if((ESP_OK == errClk) && (ESP_OK == errCmd) &&
198 | (ESP_OK == errD0) && (ESP_OK == errD1) &&
199 | (ESP_OK == errD2) && (ESP_OK == errD3) &&
200 | (ESP_OK == errD4) && (ESP_OK == errD5) &&
201 | (ESP_OK == errD6) && (ESP_OK == errD7))
202 | {
203 | return ESP_OK;
204 | }
205 | #else
206 | return ESP_OK;
207 | #endif
208 | }
209 |
210 | return ESP_FAIL;
211 | }
212 |
213 | /**
214 | * @brief Read the Network parameters to the configuration storage.
215 | *
216 | * @param cfg Pointer to the network configuration structure.
217 | * @return ESP_OK if the network parameters are successfully read.
218 | */
219 | esp_err_t cfgGetNet(netConfig_t* cfg)
220 | {
221 | size_t size = sizeof(cfg->adapter);
222 | if(nvs_get_str(nvsh, "netAdapter", cfg->adapter, &size) != ESP_OK)
223 | {
224 | strcpy(cfg->adapter, "close");
225 | }
226 |
227 | size = sizeof(cfg->ssid);
228 | nvs_get_str(nvsh, "netSsid", cfg->ssid, &size);
229 |
230 | size = sizeof(cfg->password);
231 | nvs_get_str(nvsh, "netPassword", cfg->password, &size);
232 |
233 | nvs_get_i32(nvsh, "netSpiHostId", &cfg->spi.hostId);
234 | nvs_get_i32(nvsh, "netSpiClk", &cfg->spi.clk);
235 | nvs_get_i32(nvsh, "netSpiMosi", &cfg->spi.mosi);
236 | nvs_get_i32(nvsh, "netSpiMiso", &cfg->spi.miso);
237 | nvs_get_i32(nvsh, "netSpiCs", &cfg->spi.cs);
238 | nvs_get_i32(nvsh, "netSpiIrq", &cfg->spi.irq);
239 | nvs_get_i32(nvsh, "netSpiFreq", &cfg->spi.freq);
240 |
241 | nvs_get_i32(nvsh, "netPhyRst", &cfg->phyRstPin);
242 | nvs_get_i32(nvsh, "netPhyMdio", &cfg->phyMdioPin);
243 | nvs_get_i32(nvsh, "netPhyMdc", &cfg->phyMdcPin);
244 |
245 | return ESP_OK;
246 | }
247 |
248 | /**
249 | * @brief Save the Network parameters to the configuration storage.
250 | *
251 | * @param cfg Pointer to the network configuration structure.
252 | * @return ESP_OK if the network parameters are successfully saved.
253 | */
254 | esp_err_t cfgSetNet(netConfig_t* cfg)
255 | {
256 | nvs_set_str(nvsh, "netAdapter", cfg->adapter);
257 | nvs_set_str(nvsh, "netSsid", cfg->ssid);
258 | nvs_set_str(nvsh, "netPassword", cfg->password);
259 |
260 | nvs_set_i32(nvsh, "netSpiHostId", cfg->spi.hostId);
261 | nvs_set_i32(nvsh, "netSpiClk", cfg->spi.clk);
262 | nvs_set_i32(nvsh, "netSpiMosi", cfg->spi.mosi);
263 | nvs_set_i32(nvsh, "netSpiMiso", cfg->spi.miso);
264 | nvs_set_i32(nvsh, "netSpiCs", cfg->spi.cs);
265 | nvs_set_i32(nvsh, "netSpiIrq", cfg->spi.irq);
266 | nvs_set_i32(nvsh, "netSpiFreq", cfg->spi.freq);
267 |
268 | nvs_set_i32(nvsh, "netPhyRst", cfg->phyRstPin);
269 | nvs_set_i32(nvsh, "netPhyMdio", cfg->phyMdioPin);
270 | nvs_set_i32(nvsh, "netPhyMdc", cfg->phyMdcPin);
271 |
272 | return ESP_OK;
273 | }
274 |
275 | /**
276 | * @brief Erase all the Network parameters from the configuration storage.
277 | *
278 | * @param cfg Pointer to the network configuration structure.
279 | * @return ESP_OK if the network parameters are successfully erased.
280 | */
281 | esp_err_t cfgEraseNet(void)
282 | {
283 | nvs_erase_key(nvsh, "netAdapter");
284 | nvs_erase_key(nvsh, "netSsid");
285 | nvs_erase_key(nvsh, "netPassword");
286 | nvs_erase_key(nvsh, "netSpiHostId");
287 | nvs_erase_key(nvsh, "netSpiClk");
288 | nvs_erase_key(nvsh, "netSpiMosi");
289 | nvs_erase_key(nvsh, "netSpiMiso");
290 | nvs_erase_key(nvsh, "netSpiCs");
291 | nvs_erase_key(nvsh, "netSpiIrq");
292 | nvs_erase_key(nvsh, "netSpiFreq");
293 |
294 | nvs_erase_key(nvsh, "netPhyRst");
295 | nvs_erase_key(nvsh, "netPhyMdio");
296 | nvs_erase_key(nvsh, "netPhyMdc");
297 |
298 | return ESP_OK;
299 | }
300 |
301 |
302 |
--------------------------------------------------------------------------------
/main/CfgESP32.h:
--------------------------------------------------------------------------------
1 | /**
2 | * Configuration parameter module for xedge32.c
3 | *
4 | * Copyright (c) Real Time Logic
5 | *
6 | * This software may only be used by the terms and conditions
7 | * stipulated in the corresponding license agreement under which the
8 | * software has been supplied. All use of this code is subject to the
9 | * terms and conditions of the included License Agreement.
10 | */
11 | #pragma once
12 |
13 | #include
14 | #include "NetESP32.h"
15 |
16 | esp_err_t cfgInit(void);
17 | esp_err_t mDnsCfg(char namebuf[80]);
18 | esp_err_t cfgSetSdCard(sdmmc_slot_config_t* cfg);
19 | esp_err_t cfgGetSdCard(sdmmc_slot_config_t* cfg);
20 | esp_err_t cfgEraseSdCard(void);
21 |
22 | esp_err_t cfgGetNet(netConfig_t* cfg);
23 | esp_err_t cfgSetNet(netConfig_t* cfg);
24 | esp_err_t cfgEraseNet(void);
25 |
--------------------------------------------------------------------------------
/main/Kconfig.projbuild:
--------------------------------------------------------------------------------
1 | menu "Xedge config"
2 |
3 | menu "Camera"
4 |
5 | config CAM_ENABLED
6 | bool "Enable camera module"
7 | default n
8 | help
9 | Includes in the compilation the CAM module, note that it is not compatible with the esp32 standard.
10 |
11 |
12 | if CAM_ENABLED
13 | choice CAM_GRAB
14 | prompt "Image capturing mode"
15 | default GRAB_WHEN_EMPTY
16 | help
17 | Select the camera capturing images mode.
18 |
19 | config GRAB_WHEN_EMPTY
20 | bool "EMPTY"
21 | help
22 | Fills buffers when they are empty. Less resources but first 'fb_count' frames might be old.
23 |
24 | config GRAB_LATEST
25 | bool "LATEST"
26 | help
27 | Except when 1 frame buffer is used, queue will always contain the last 'fb_count' frames.
28 | endchoice
29 |
30 | choice CAM_FB_COUNT
31 | prompt "Number of frame buffers"
32 | default FB_ONE
33 | help
34 | Select number of frame buffers.
35 |
36 | config FB_ONE
37 | bool "ONE"
38 | help
39 | Normal speed.
40 |
41 | config FB_TWO
42 | bool "TWO"
43 | help
44 | Two double speed.
45 | endchoice
46 | endif # CAM_ENABLED
47 | endmenu
48 |
49 | menu "Connection"
50 |
51 | config WIFI_SCAN_RSSI_THRESHOLD
52 | int "WiFi minimum rssi"
53 | range -127 0
54 | default -127
55 | help
56 | The minimum rssi to accept in the scan mode.
57 |
58 | config ETHERNET_EMAC_TASK_STACK_SIZE
59 | int "emac_rx task stack size"
60 | default 2048
61 | help
62 | This set stack size for emac_rx task
63 |
64 | config ETHERNET_PHY_ADDR
65 | int "PHY Address"
66 | range 0 31 if EXAMPLE_USE_INTERNAL_ETHERNET
67 | default 1
68 | help
69 | Set PHY address according your board schematic.
70 |
71 | menu "Wifi AP"
72 |
73 | config WIFI_AP_SSID
74 | string "WiFi SSID"
75 | default "xedge32"
76 | help
77 | SSID (network name) for to connect to.
78 |
79 | config WIFI_AP_PASSWORD
80 | string "WiFi Password"
81 | default "12345678"
82 | help
83 | WiFi password (WPA or WPA2) minimun 8 characters.
84 | config WIFI_AP_CHANNEL
85 | int "WiFi Channel"
86 | range 1 13
87 | default 1
88 | help
89 | WiFi channel (network channel).
90 |
91 | config WIFI_AP_MAX_STA_CONN
92 | int "Maximal STA connections"
93 | default 4
94 | help
95 | Max number of the STA connects to AP.
96 |
97 | menu "Network Settings"
98 |
99 | config WIFI_AP_IP_ADDR
100 | string "IP Address"
101 | default "192.168.190.0"
102 |
103 | config WIFI_AP_GATEWAY
104 | string "Gateway"
105 | default "192.168.190.0"
106 |
107 | config WIFI_AP_NETMASK
108 | string "Netmask"
109 | default "255.0.0.0"
110 |
111 | endmenu
112 | endmenu
113 | endmenu
114 |
115 | menu "mDNS"
116 | config mDNS_ENABLED
117 | bool "Enable mDNS"
118 | default n
119 | help
120 | Enable mDNS - zeroconf
121 | endmenu
122 |
123 | menu "OPC UA"
124 | config OPCUA_ENABLED
125 | bool "Enable OPC UA"
126 | default n
127 | help
128 | Enabling this is required if you build BAS-Resources:Xedge with OPC UA
129 | endmenu
130 |
131 | menu "softTPM"
132 | config softTPM_EFUSE_ENABLED
133 | bool "Use eFuse"
134 | default n
135 | help
136 | Use Efuse for storing soft TPM (Trusted Platform Module) key
137 | endmenu
138 |
139 |
140 | menu "Debug Threads"
141 | config DEBUG_THREADS
142 | bool "Enable Debug Threads"
143 | default n
144 | help
145 | Enable this option to enable debugging of threads.
146 |
147 | # Automatically set CONFIG_FREERTOS_USE_TRACE_FACILITY to y when DEBUG_THREADS is enabled
148 | select FREERTOS_USE_TRACE_FACILITY if DEBUG_THREADS
149 | endmenu
150 | endmenu
151 |
--------------------------------------------------------------------------------
/main/NetESP32.h:
--------------------------------------------------------------------------------
1 | /**
2 | * Low level network module for xedge32.c
3 | *
4 | * Copyright (c) Real Time Logic
5 | *
6 | * This software may only be used by the terms and conditions
7 | * stipulated in the corresponding license agreement under which the
8 | * software has been supplied. All use of this code is subject to the
9 | * terms and conditions of the included License Agreement.
10 | */
11 | #pragma once
12 |
13 | #include
14 | #include
15 | #include
16 |
17 | /**< Network adapter string options. */
18 | /**< "close" the network connection. */
19 | /**< "wifi" use the internal ESP32 radio. */
20 | /**< "IP101" use RMII IP101 of 10/100M Ethernet from IC Plus. */
21 | /**< "RTL8201" use RMII RTL82xx of 10/100M Ethernet from Realtek. */
22 | /**< "LAN87XX" use RMII LAN87xx of 10/100M Ethernet from Microchip. */
23 | /**< "DP83848" use RMII DP83848, 10/100M Ethernet from TI. */
24 | /**< "KSZ80XX" use RMII KSZ8051, 10/100M Ethernet from Microchip. */
25 | /**< "W5500" use SPI PHY W5500, 10/100M Ethernet from Wiznet. */
26 | /**< "DM9051" use SPI PHY DM9051, 10/100M Ethernet from Dacom. */
27 |
28 | /**< SPI interface configuration. */
29 | typedef struct {
30 | int32_t hostId; /**< SPI host device ID. */
31 | int32_t clk; /**< Clock pin. */
32 | int32_t mosi; /**< MOSI (Master Output Slave Input) pin. */
33 | int32_t miso; /**< MISO (Master Input Slave Output) pin. */
34 | int32_t cs; /**< Chip select pin. */
35 | int32_t irq; /**< Interrupt request pin. */
36 | int32_t freq; /**< SPI frequency. */
37 | } netSpi_t;
38 |
39 | /**< Network configuration parameters. */
40 | typedef struct
41 | {
42 | char adapter[32]; /**< Network adapter (wifi/eth) selection. */
43 | /**< SSID (Service Set Identifier) of the target access point. */
44 | char ssid[sizeof(((wifi_sta_config_t*)0)->ssid)];
45 | /**< Password of the target access point. */
46 | char password[sizeof(((wifi_sta_config_t*)0)->password)];
47 | netSpi_t spi; /**< SPI configuration for ethernet. */
48 | int32_t phyRstPin; /**< Pin to reset the PHY by default disabled (-1). */
49 | int32_t phyMdioPin; /**< Mdio pin of the internal PHY. */
50 | int32_t phyMdcPin; /**< Mdc pin of the internal PHY. */
51 | } netConfig_t;
52 |
53 | bool netInit(void);
54 | esp_err_t netConnect(netConfig_t* cfg);
55 | esp_err_t netWifiConnect(char* ssid, char* password);
56 | esp_err_t netEthConnect(void);
57 |
58 | const char* wifiAuthMode(int authmode, int print);
59 | const char* wifiCipherType(int pcipher, int gcipher, int print, const char** pciphers);
60 | void wifiScan(int print, lua_State* L,
61 | void (*cb)(lua_State* L, const uint8_t* ssid, int rssi,
62 | const char* authmode,const char* pchiper,
63 | const char* gcipher, int channel));
64 |
65 | /**
66 | * @brief Enumeration for AP mode states.
67 | *
68 | * This enumeration defines the possible states for the Access Point (AP) mode.
69 | */
70 | typedef enum {
71 | AP_MODE_DISABLED, /**< AP mode is disabled, by default. */
72 | AP_MODE_ENABLED, /**< AP mode is enabled. */
73 | AP_MODE_USER_REQUESTED /**< AP mode is explicitly requested by the user. */
74 | } ap_mode_t;
75 |
76 | void netWaitIP(void);
77 | int netGotIP(void);
78 | esp_err_t netWifiApStart(bool regHandler);
79 |
80 | int netIsAdapterSpi(char* adapter);
81 | int netIsAdapterRmii(char* adapter);
82 |
83 | void* netCheckAlloc(void* mem);
84 |
--------------------------------------------------------------------------------
/main/console.c:
--------------------------------------------------------------------------------
1 | /* Console init
2 |
3 | This example code is in the Public Domain (or CC0 licensed, at your option.)
4 | */
5 |
6 | #include
7 | #include
8 | #include
9 | #include
10 | #include "esp_system.h"
11 | #include "esp_vfs_dev.h"
12 | #include "driver/usb_serial_jtag.h"
13 | #include "driver/usb_serial_jtag_vfs.h"
14 | #include "driver/uart.h"
15 | #include "driver/uart_vfs.h"
16 | #include "linenoise/linenoise.h"
17 | #include "esp_console.h"
18 |
19 | void manageConsole(bool start)
20 | {
21 | static TaskHandle_t mainTaskHandle;
22 | if(false == start)
23 | {
24 | /* Called by Lua binding esp32.execute"killmain" */
25 | vTaskDelete(mainTaskHandle);
26 | return;
27 | }
28 | /* called by main() */
29 | mainTaskHandle = xTaskGetCurrentTaskHandle();
30 |
31 | #if defined(CONFIG_ESP_CONSOLE_UART_DEFAULT) || defined(CONFIG_ESP_CONSOLE_UART_CUSTOM)
32 | esp_console_dev_uart_config_t hw_config = ESP_CONSOLE_DEV_UART_CONFIG_DEFAULT();
33 | /* Minicom, screen, idf_monitor send CR when ENTER key is pressed */
34 | uart_vfs_dev_port_set_rx_line_endings(hw_config.channel, ESP_LINE_ENDINGS_CR);
35 | /* Move the caret to the beginning of the next line on '\n' */
36 | uart_vfs_dev_port_set_tx_line_endings(hw_config.channel, ESP_LINE_ENDINGS_CRLF);
37 | /* Configure UART. Note that REF_TICK is used so that the baud rate remains
38 | * correct while APB frequency is changing in light sleep mode.
39 | */
40 | const uart_config_t uart_config = {
41 | .baud_rate = hw_config.baud_rate,
42 | .data_bits = UART_DATA_8_BITS,
43 | .parity = UART_PARITY_DISABLE,
44 | .stop_bits = UART_STOP_BITS_1,
45 | #if SOC_UART_SUPPORT_REF_TICK
46 | .source_clk = UART_SCLK_REF_TICK,
47 | #elif SOC_UART_SUPPORT_XTAL_CLK
48 | .source_clk = UART_SCLK_XTAL,
49 | #endif
50 | };
51 | /* Drain stdout before reconfiguring it */
52 | fflush(stdout);
53 | fsync(fileno(stdout));
54 |
55 | /* Install UART driver for interrupt-driven reads and writes */
56 | ESP_ERROR_CHECK( uart_driver_install(hw_config.channel, 256, 0, 0, NULL, 0) );
57 | ESP_ERROR_CHECK(uart_param_config(hw_config.channel, &uart_config));
58 | ESP_ERROR_CHECK(uart_set_pin(hw_config.channel, hw_config.tx_gpio_num, hw_config.rx_gpio_num, -1, -1));
59 |
60 | /* Tell VFS to use UART driver */
61 | uart_vfs_dev_use_driver(hw_config.channel);
62 |
63 | #elif defined(CONFIG_ESP_CONSOLE_USB_SERIAL_JTAG)
64 | /* Minicom, screen, idf_monitor send CR when ENTER key is pressed */
65 | usb_serial_jtag_vfs_set_rx_line_endings(ESP_LINE_ENDINGS_CR);
66 |
67 | /* Move the caret to the beginning of the next line on '\n' */
68 | usb_serial_jtag_vfs_set_tx_line_endings(ESP_LINE_ENDINGS_CRLF);
69 |
70 | /* Enable blocking mode on stdin and stdout */
71 | fcntl(fileno(stdout), F_SETFL, 0);
72 | fcntl(fileno(stdin), F_SETFL, 0);
73 |
74 | usb_serial_jtag_driver_config_t usb_serial_jtag_config = USB_SERIAL_JTAG_DRIVER_CONFIG_DEFAULT();
75 |
76 | /* Install USB-SERIAL-JTAG driver for interrupt-driven reads and writes */
77 | ESP_ERROR_CHECK( usb_serial_jtag_driver_install(&usb_serial_jtag_config) );
78 |
79 | /* Tell vfs to use usb-serial-jtag driver */
80 | usb_serial_jtag_vfs_use_driver();
81 | #else
82 | #error Unsupported console type
83 | #endif
84 |
85 | /* Configure linenoise line completion library */
86 | /* Enable multiline editing. If not set, long commands will scroll within
87 | * single line.
88 | */
89 | linenoiseSetMultiLine(1);
90 | /* Set command history size */
91 | linenoiseHistorySetMaxLen(10);
92 | /* Set command maximum length */
93 | linenoiseSetMaxLineLen(256);
94 | /* Don't return empty lines */
95 | linenoiseAllowEmpty(false);
96 |
97 | /* Disable buffering on stdin of the current task.
98 | * If the console is ran on a different UART than the default one,
99 | * buffering shall only be disabled for the current one. */
100 | setvbuf(stdin, NULL, _IONBF, 0);
101 | }
102 |
--------------------------------------------------------------------------------
/main/idf_component.yml:
--------------------------------------------------------------------------------
1 | ## IDF Component Manager Manifest File
2 | dependencies:
3 | espressif/mdns: "*"
4 | ## Required IDF version
5 | idf:
6 | version: ">=4.1.0"
7 | # # Put list of dependencies here
8 | # # For components maintained by Espressif:
9 | # component: "~1.0.0"
10 | # # For 3rd party components:
11 | # username/component: ">=1.0.0,<2.0.0"
12 | # username2/component2:
13 | # version: "~1.0.0"
14 | # # For transient dependencies `public` flag can be set.
15 | # # `public` flag doesn't have an effect dependencies of the `main` component.
16 | # # All dependencies of `main` are public by default.
17 | # public: true
18 |
--------------------------------------------------------------------------------
/partitions/README.md:
--------------------------------------------------------------------------------
1 | Partitions Generator Utility
2 | ============================
3 |
4 | Introduction
5 | ------------
6 | The Partitions Generator Utility is used during manufacturing to write various resources such as LUA applications, configurations, certificates, and network connection parameters to flash memory. It is based on two tools provided by Espressif: [fatfsgen.py](https://github.com/espressif/esp-idf/blob/master/components/fatfs/fatfsgen.py) for generating the FAT image and [nvs_partition_gen.py](https://github.com/espressif/esp-idf/blob/master/components/nvs_flash/nvs_partition_generator/nvs_partition_gen.py) for generating the NVS partition binary file.
7 |
8 | Prerequisites
9 | -------------
10 | Ensure that the files for applications/configurations/certificates are copied to the **partitions/storage** folder, and the connection parameters are set in the **partitions/nvs_xedge_values.csv** file.
11 |
12 | Usage
13 | -----
14 |
15 | This tool provides the opportunity to use the stock **Xedge32** firmware and generate/write the binary images of the FAT and NVS by console commands. Additionally, it can generate/flash the FAT and NVS images with the firmware and bootloader when executing the **idf.py build flash** commands.
16 |
17 | 1. **Integrated Usage with CMakeLists.txt:**
18 | - Modify the main `CMakeLists.txt` to use the macros **fatfs_create_spiflash_image** and **nvs_create_partition_image** with **FLASH_IN_PROJECT** to automate the generation of binary files and include them in the **idf.py flash** command.
19 |
20 | 2. **Manual Usage:**
21 | - Generate the files separately and flash them to the ESP32 using the **esp_tool.py** utility provided by Espressif.
22 |
23 | Running the Utility for NVS Manually
24 | ------------------------------------
25 | Before running the utility manually, ensure that you have modified the connection parameters in the **nvs_xedge_values.csv** file.
26 |
27 | For example, for Wi-Fi, you need to modify the parameter like this:
28 |
29 | ```
30 | netAdapter,data,string,"wifi"
31 | netSsid,data,string,"provider"
32 | netPassword,data,string,"password"
33 | ```
34 |
35 | **Usage**::
36 |
37 | python ~/esp/esp-idf/components/nvs_flash/nvs_partition_generator/nvs_partition_gen.py generate nvs_xedge_values.csv nvs.bin 0x6000
38 |
39 | python ~/esp/esp-idf/components/esptool_py/esptool/esptool.py write_flash -z 0x9000 nvs.bin
40 |
41 | Running the Utility to Generate the FAT Image Manually
42 | -------------------------------------------------------
43 | Before generating the FAT image manually, copy the required files to the `storage` folder.
44 |
45 | **Usage**::
46 |
47 | python ~/esp/esp-idf/components/fatfs/wl_fatfsgen.py --output_file storage.bin --sector_size 4096 --partition_size 0x1B5000 --long_name_support ./storage
48 |
49 | python ~/esp/esp-idf/components/esptool_py/esptool/esptool.py write_flash -z 0x640000 storage.bin
50 |
51 |
52 |
--------------------------------------------------------------------------------
/partitions/nvs_xedge_values.csv:
--------------------------------------------------------------------------------
1 | # Sample csv file
2 | key,type,encoding,value
3 | xedge,namespace,,
4 | netAdapter,data,string,"close"
5 | netSsid,data,string,""
6 | netPassword,data,string,""
7 | netSpiHostId,data,i32,2
8 | netSpiClk,data,i32,-1
9 | netSpiMosi,data,i32,-1
10 | netSpiMiso,data,i32,-1
11 | netSpiCs,data,i32,-1
12 | netSpiIrq,data,i32,-1
13 | netSpiFreq,data,i32,40000000
14 | netPhyRst,data,i32,-1
15 | netPhyMdio,data,i32,-1
16 | netPhyMdc,data,i32,-1
17 |
18 |
--------------------------------------------------------------------------------
/partitions/storage/blink/blinkled.xlua:
--------------------------------------------------------------------------------
1 | --[[
2 |
3 | This Lua script creates a new blinking LED timer coroutine each time it runs.
4 | Click the refresh button to create a new.
5 |
6 | The timer object is free-floating since we are not referencing
7 | (anchoring) the object. The created timer(s) will eventually be
8 | collected by the Lua garbage collector.
9 |
10 | Online timer example with documentation: https://tutorial.realtimelogic.com/Lua-Coroutines.lsp
11 | Scroll down to Creating a Timer in Coroutine Mode
12 |
13 | Timer documentation:
14 | https://realtimelogic.com/ba/doc/?url=lua.html#ba_timer
15 |
16 | The example uses GPIO #4. Connect an LED between GPIO 4 and ground.
17 | --]]
18 |
19 | local function blink()
20 | local pin = esp32.gpio(4,"OUT")
21 | while true do
22 | trace"blink"
23 | pin:value(true)
24 | coroutine.yield(true) -- Sleep
25 | pin:value(false)
26 | coroutine.yield(true) -- Sleep
27 | end
28 | end
29 | ba.timer(blink):set(1000)
30 |
31 |
--------------------------------------------------------------------------------
/sdkconfig.defaults:
--------------------------------------------------------------------------------
1 | CONFIG_APP_PROJECT_VER="3.6"
2 | CONFIG_APP_PROJECT_VER_FROM_CONFIG=y
3 |
4 | # Watchdog does not work when server is idle.
5 | CONFIG_ESP_TASK_WDT_CHECK_IDLE_TASK_CPU0=n
6 | CONFIG_ESP_TASK_WDT_CHECK_IDLE_TASK_CPU1=n
7 |
8 | CONFIG_ADC_CONTINUOUS_ISR_IRAM_SAFE=y
9 |
10 | CONFIG_PARTITION_TABLE_CUSTOM=y
11 | CONFIG_COMPILER_OPTIMIZATION_PERF=y
12 | CONFIG_ESPTOOLPY_FLASHSIZE_8MB=y
13 | CONFIG_ESP_DEFAULT_CPU_FREQ_MHZ_240=y
14 | CONFIG_ESP_DEFAULT_CPU_FREQ_MHZ=240
15 | CONFIG_SPIRAM=y
16 | CONFIG_SPIRAM_BOOT_INIT=y
17 | CONFIG_SPIRAM_USE_MALLOC=y
18 | CONFIG_SPIRAM_MEMTEST=y
19 | CONFIG_SPIRAM_MALLOC_ALWAYSINTERNAL=16384
20 | CONFIG_SPIRAM_MALLOC_RESERVE_INTERNAL=32768
21 | CONFIG_SPIRAM_ALLOW_BSS_SEG_EXTERNAL_MEMORY=y
22 | #CONFIG_SPIRAM_MALLOC_ALWAYSINTERNAL=4096
23 | CONFIG_SPIRAM_TRY_ALLOCATE_WIFI_LWIP=y
24 | CONFIG_FATFS_ALLOC_PREFER_EXTRAM=y
25 | CONFIG_FATFS_LFN_HEAP=y
26 | CONFIG_FATFS_LFN_NONE=n
27 | CONFIG_FREERTOS_HZ=1000
28 | CONFIG_LWIP_LOCAL_HOSTNAME="xedge"
29 | CONFIG_LWIP_IRAM_OPTIMIZATION=y
30 | CONFIG_LWIP_MAX_SOCKETS=16
31 | CONFIG_LWIP_IP4_REASSEMBLY=y
32 | CONFIG_LWIP_MAX_ACTIVE_TCP=32
33 | CONFIG_LWIP_TCP_WND_DEFAULT=14360
34 | CONFIG_LWIP_TCP_RECVMBOX_SIZE=12
35 | CONFIG_SPIRAM_TRY_ALLOCATE_WIFI_LWIP=y
36 | #CONFIG_WIFI_DYNAMIC_RX_BUFFER_NUM=64
37 | #CONFIG_WIFI_CACHE_TX_BUFFER_NUM=64
38 | #CONFIG_EXAMPLE_CONNECT_WIFI=y
39 | CONFIG_MBEDTLS_CERTIFICATE_BUNDLE=n
40 | CONFIG_MBEDTLS_CERTIFICATE_BUNDLE_DEFAULT_FULL=n
41 | CONFIG_FREERTOS_USE_TRACE_FACILITY=n
42 |
43 | CONFIG_ESPTOOLPY_HEADER_FLASHSIZE_UPDATE=y
44 |
45 | CONFIG_CAMERA_TASK_STACK_SIZE=4048
46 | CONFIG_OV7670_SUPPORT=n
47 | CONFIG_OV7725_SUPPORT=n
48 | CONFIG_NT99141_SUPPORT=n
49 | CONFIG_OV2640_SUPPORT=y
50 | CONFIG_OV3660_SUPPORT=y
51 | CONFIG_OV5640_SUPPORT=y
52 | CONFIG_GC2145_SUPPORT=n
53 | CONFIG_GC032A_SUPPORT=n
54 | CONFIG_GC0308_SUPPORT=n
55 | CONFIG_BF3005_SUPPORT=n
56 | CONFIG_BF20A6_SUPPORT=n
57 | CONFIG_SC030IOT_SUPPORT=n
58 |
59 | CONFIG_ESP_SYSTEM_EVENT_TASK_STACK_SIZE=8192
60 |
61 |
--------------------------------------------------------------------------------
/sdkconfig.defaults.esp32:
--------------------------------------------------------------------------------
1 | CONFIG_ESPTOOLPY_FLASHSIZE_4MB=y
2 | #CONFIG_ESPTOOLPY_HEADER_FLASHSIZE_UPDATE=y
3 |
4 | #
5 | # SPIRAM workaround libraries placement
6 | #
7 | CONFIG_SPIRAM_CACHE_LIBJMP_IN_IRAM=n
8 | CONFIG_SPIRAM_CACHE_LIBMATH_IN_IRAM=n
9 | CONFIG_SPIRAM_CACHE_LIBNUMPARSER_IN_IRAM=n
10 | CONFIG_SPIRAM_CACHE_LIBIO_IN_IRAM=n
11 | CONFIG_SPIRAM_CACHE_LIBTIME_IN_IRAM=n
12 | CONFIG_SPIRAM_CACHE_LIBCHAR_IN_IRAM=n
13 | CONFIG_SPIRAM_CACHE_LIBMEM_IN_IRAM=n
14 | CONFIG_SPIRAM_CACHE_LIBSTR_IN_IRAM=n
15 | CONFIG_SPIRAM_CACHE_LIBRAND_IN_IRAM=n
16 | CONFIG_SPIRAM_CACHE_LIBENV_IN_IRAM=n
17 | CONFIG_SPIRAM_CACHE_LIBFILE_IN_IRAM=n
18 | CONFIG_SPIRAM_CACHE_LIBMISC_IN_IRAM=n
19 | # end of SPIRAM workaround libraries placement
20 |
21 | CONFIG_PARTITION_TABLE_CUSTOM_FILENAME="ESP32-partitions.csv"
22 | CONFIG_PARTITION_TABLE_FILENAME="ESP32-partitions.csv"
23 |
24 |
25 | CONFIG_ETH_ENABLED=n
26 | CONFIG_ETH_USE_ESP32_EMAC=n
27 | CONFIG_ETH_USE_SPI_ETHERNET=n
28 | CONFIG_ETH_SPI_ETHERNET_DM9051=n
29 | CONFIG_ETH_SPI_ETHERNET_W5500=n
30 |
--------------------------------------------------------------------------------
/sdkconfig.defaults.esp32s3:
--------------------------------------------------------------------------------
1 | CONFIG_IDF_TARGET="esp32s3"
2 | CONFIG_IDF_TARGET_ESP32S3=y
3 |
4 | CONFIG_ESPTOOLPY_FLASHSIZE_8MB=y
5 | CONFIG_SPIRAM_SPEED_80M=y
6 |
7 | CONFIG_SPIRAM_TYPE_AUTO=y
8 | CONFIG_SPIRAM_MODE_OCT=y
9 |
10 | CONFIG_ESP_CONSOLE_USB_SERIAL_JTAG=y
11 |
12 | CONFIG_GRAB_LATEST=y
13 | CONFIG_FB_TWO=y
14 |
15 | CONFIG_PARTITION_TABLE_CUSTOM_FILENAME="ESP32s3-partitions.csv"
16 | CONFIG_PARTITION_TABLE_FILENAME="ESP32s3-partitions.csv"
17 |
18 | CONFIG_ETH_ENABLED=y
19 | CONFIG_ETH_USE_ESP32_EMAC=n
20 | CONFIG_ETH_USE_SPI_ETHERNET=y
21 | CONFIG_ETH_SPI_ETHERNET_DM9051=n
22 | CONFIG_ETH_SPI_ETHERNET_W5500=y
23 |
24 |
--------------------------------------------------------------------------------