├── tutorials
├── gui
│ ├── add_camera
│ │ ├── 4_add_camera.usd
│ │ └── 4_add_camera.md
│ ├── move_simple_robot
│ │ ├── 3_move_robot.usd
│ │ └── 3_move_robot.md
│ ├── create_simple_robot
│ │ ├── 2_create_robot.usd
│ │ └── 2_create_simple_robot.md
│ ├── script_editor
│ │ ├── 5_script_editor_USDAPI.usd
│ │ ├── 5_script_editor_IssacSimCoreAPI.usd
│ │ └── 5_script_editor.md
│ ├── save_custom_usd
│ │ └── 33_save_custom_usd.md
│ ├── cad_importer
│ │ └── 35_cad_importer.md
│ ├── change_object_texture
│ │ └── 34_change_object_texture.md
│ └── intaractive_demos
│ │ └── 37_interactive_demos.md
├── required
│ ├── hello_world
│ │ ├── 8_hello_world.usd
│ │ ├── my_application.py
│ │ └── 8_hellow_world.md
│ ├── isaac_sim_workflow
│ │ ├── 7_issac_sim_workflows.usd
│ │ └── 7_isaac_sim_workflows.md
│ ├── required_interface
│ │ ├── 6_required_interface.usd
│ │ └── 6_required_interface.md
│ ├── adding_controller
│ │ └── 10_adding_controller.md
│ ├── hello_robot
│ │ └── 9_hello_robot.md
│ ├── adding_a_manipulator_robot
│ │ └── 11_adding_a_manipulator_robots.md
│ ├── mutiple_tasks
│ │ └── 13_multiple_tasks.md
│ └── adding_multiple_robots
│ │ └── 12_adding_multiple_robots.md
├── ros
│ ├── cameras
│ │ ├── simple_room_apriltag_with_turtlebot3_with_camera.usd
│ │ └── 26_cameras.md
│ ├── import_and_drive_turtlebot3
│ │ ├── simple_room_apriltag_with_turtlebot3.usd
│ │ └── 25_import_and_drive_turtlebot3.md
│ ├── lidar_sensors
│ │ ├── simple_room_apriltag_with_turtlebot3_with_camera_and_lidar.usd
│ │ └── 27_lidar_sensors.md
│ ├── transform_trees
│ │ ├── simple_room_apriltag_with_turtlebot3_with_camera_and_lidar_tf_publisher.usd
│ │ └── 28_transform_trees.md
│ ├── april_tags
│ │ └── 29_april_tags.md
│ ├── moveit_motion_planning_framework
│ │ └── 32_moveit_motion_planning_framework.md
│ ├── ros_navigation
│ │ └── 30_ros_navigation.md
│ └── multiple_robots_ros_navigation
│ │ └── 31_multiple_robots_ros_navigation.md
├── advanced
│ ├── using_input_devices_keyboard
│ │ └── 14_using_input_devices_keyboard.md
│ ├── using_contact_sensor
│ │ └── 36_using_contact_sensor.md
│ ├── occupancy_map_generation
│ │ └── 17_occupacy_map_generation.md
│ ├── using_sensors_generic_range_sensor
│ │ └── 16_using_sensor_generic_range_sensor.md
│ ├── jupyter_notebook
│ │ └── 18_jupyter_notebook.md
│ ├── dynamic_control
│ │ └── 38_dynamic_control.md
│ └── using_sensors_lidar
│ │ └── 15_using_sensor_lidar.md
├── replicator
│ ├── visualize_synthetic_data
│ │ └── 21_visualize_synthetic_data.md
│ ├── offline_dataset_generation
│ │ └── 22_offline_dataset_generation.md
│ ├── recording_synthetic_data
│ │ └── 20_recording_synthetic_data.md
│ ├── applying_and_visualizing_semantic_data
│ │ └── 19_applying_and_visualizing_semantic_data.md
│ ├── replicator_playgroud
│ │ └── 23_replicator_playgroud.md
│ └── replicator_composer
│ │ └── 24_replicator_composer.md
└── install
│ └── 1_install.md
└── README.md
/tutorials/gui/add_camera/4_add_camera.usd:
--------------------------------------------------------------------------------
https://raw.githubusercontent.com/SOutaHI/isaac_sim_examples/HEAD/tutorials/gui/add_camera/4_add_camera.usd
--------------------------------------------------------------------------------
/tutorials/gui/move_simple_robot/3_move_robot.usd:
--------------------------------------------------------------------------------
https://raw.githubusercontent.com/SOutaHI/isaac_sim_examples/HEAD/tutorials/gui/move_simple_robot/3_move_robot.usd
--------------------------------------------------------------------------------
/tutorials/required/hello_world/8_hello_world.usd:
--------------------------------------------------------------------------------
https://raw.githubusercontent.com/SOutaHI/isaac_sim_examples/HEAD/tutorials/required/hello_world/8_hello_world.usd
--------------------------------------------------------------------------------
/tutorials/gui/create_simple_robot/2_create_robot.usd:
--------------------------------------------------------------------------------
https://raw.githubusercontent.com/SOutaHI/isaac_sim_examples/HEAD/tutorials/gui/create_simple_robot/2_create_robot.usd
--------------------------------------------------------------------------------
/tutorials/gui/script_editor/5_script_editor_USDAPI.usd:
--------------------------------------------------------------------------------
https://raw.githubusercontent.com/SOutaHI/isaac_sim_examples/HEAD/tutorials/gui/script_editor/5_script_editor_USDAPI.usd
--------------------------------------------------------------------------------
/tutorials/gui/script_editor/5_script_editor_IssacSimCoreAPI.usd:
--------------------------------------------------------------------------------
https://raw.githubusercontent.com/SOutaHI/isaac_sim_examples/HEAD/tutorials/gui/script_editor/5_script_editor_IssacSimCoreAPI.usd
--------------------------------------------------------------------------------
/tutorials/required/isaac_sim_workflow/7_issac_sim_workflows.usd:
--------------------------------------------------------------------------------
https://raw.githubusercontent.com/SOutaHI/isaac_sim_examples/HEAD/tutorials/required/isaac_sim_workflow/7_issac_sim_workflows.usd
--------------------------------------------------------------------------------
/tutorials/required/required_interface/6_required_interface.usd:
--------------------------------------------------------------------------------
https://raw.githubusercontent.com/SOutaHI/isaac_sim_examples/HEAD/tutorials/required/required_interface/6_required_interface.usd
--------------------------------------------------------------------------------
/tutorials/ros/cameras/simple_room_apriltag_with_turtlebot3_with_camera.usd:
--------------------------------------------------------------------------------
https://raw.githubusercontent.com/SOutaHI/isaac_sim_examples/HEAD/tutorials/ros/cameras/simple_room_apriltag_with_turtlebot3_with_camera.usd
--------------------------------------------------------------------------------
/tutorials/ros/import_and_drive_turtlebot3/simple_room_apriltag_with_turtlebot3.usd:
--------------------------------------------------------------------------------
https://raw.githubusercontent.com/SOutaHI/isaac_sim_examples/HEAD/tutorials/ros/import_and_drive_turtlebot3/simple_room_apriltag_with_turtlebot3.usd
--------------------------------------------------------------------------------
/tutorials/ros/lidar_sensors/simple_room_apriltag_with_turtlebot3_with_camera_and_lidar.usd:
--------------------------------------------------------------------------------
https://raw.githubusercontent.com/SOutaHI/isaac_sim_examples/HEAD/tutorials/ros/lidar_sensors/simple_room_apriltag_with_turtlebot3_with_camera_and_lidar.usd
--------------------------------------------------------------------------------
/tutorials/ros/transform_trees/simple_room_apriltag_with_turtlebot3_with_camera_and_lidar_tf_publisher.usd:
--------------------------------------------------------------------------------
https://raw.githubusercontent.com/SOutaHI/isaac_sim_examples/HEAD/tutorials/ros/transform_trees/simple_room_apriltag_with_turtlebot3_with_camera_and_lidar_tf_publisher.usd
--------------------------------------------------------------------------------
/tutorials/required/hello_world/my_application.py:
--------------------------------------------------------------------------------
1 | #launch Isaac Sim before any other imports
2 | #default first two lines in any standalone application
3 |
4 | # if exe this script, you have to exe from python.sh
5 | # https://docs.omniverse.nvidia.com/app_isaacsim/app_isaacsim/manual_standalone_python.html
6 |
7 |
8 | from omni.isaac.kit import SimulationApp
9 | simulation_app = SimulationApp({"headless": False}) # we can also run as headless.
10 |
11 | from omni.isaac.core import World
12 | from omni.isaac.core.objects import DynamicCuboid
13 | import numpy as np
14 |
15 | world = World(stage_units_in_meters=0.01)
16 | world.scene.add_default_ground_plane()
17 | fancy_cube = world.scene.add(
18 | DynamicCuboid(
19 | prim_path="/World/random_cube",
20 | name="fancy_cube",
21 | position=np.array([0, 0, 100.0]),
22 | size=np.array([50.15, 50.15, 50.15]),
23 | color=np.array([0, 0, 1.0]),
24 | ))
25 | # Resetting the world needs to be called before querying anything related to an articulation specifically.
26 | # Its recommended to always do a reset after adding your assets, for physics handles to be propagated properly
27 | world.reset()
28 | for i in range(500):
29 | position, orientation = fancy_cube.get_world_pose()
30 | linear_velocity = fancy_cube.get_linear_velocity()
31 | # will be shown on terminal
32 | print("Cube position is : " + str(position))
33 | print("Cube's orientation is : " + str(orientation))
34 | print("Cube's linear velocity is : " + str(linear_velocity))
35 | # we have control over stepping physics and rendering in this workflow
36 | # things run in sync
37 | world.step(render=True) # execute one physics step and one rendering step
38 |
39 | simulation_app.close() # close Isaac Sim
40 |
--------------------------------------------------------------------------------
/tutorials/advanced/using_input_devices_keyboard/14_using_input_devices_keyboard.md:
--------------------------------------------------------------------------------
1 | # 概要
2 | keyboardからの入力を、シミュレーション内で使用するExampleを紹介します。
3 |
4 | Issac Simのtutorialに上記の内容が記載されており、この内容に沿って進めます。
5 | https://docs.omniverse.nvidia.com/app_isaacsim/app_isaacsim/tutorial_advanced_keyboard_control.html
6 |
7 | # 実行環境
8 |
9 | - インストール実行環境
10 |
11 | | unit | specification |
12 | |:-----------------:|:------------------:|
13 | | CPU | i9-11900H |
14 | | GPU | GeForce RTX 3080 Laptop|
15 | | RAM | 32GB |
16 | | OS | Ubuntu 20.04.3 LTS |
17 |
18 | - Nvidia Driverバージョン
19 | - 510.39.01
20 | - Issac simバージョン
21 | - 2021.2.1
22 |
23 | # 概要
24 |
25 | JetbotのExampleとして、キーボードからの入力により、Jetbotの両輪の速度を制御します。
26 |
27 | 1. Jetbot Keyboardを実行する
28 |
29 | ## 1. Jetbot Keyboardを実行する
30 | ### 1.1 OmniverseからIssac Simを起動する
31 | 
32 |
33 | ### 1.2 Jetbot Keyboardのソースコードを表示
34 | メニューバーのIsaac Examples > Input Devices > Jetbot Keyboardを選択します。
35 | 
36 |
37 | 次に、Jetbot keyboardのウィンドウの右上にある3つのボタンの内、一番左側のOpen Source Codeボタンを選択します。
38 | 
39 |
40 | 選択すると、がVScodeが開き、Jetbot keyboardのソースコードが表示されます。
41 | 
42 |
43 |
44 | Loadを選択すると、Jetbotが表示されます。
45 | 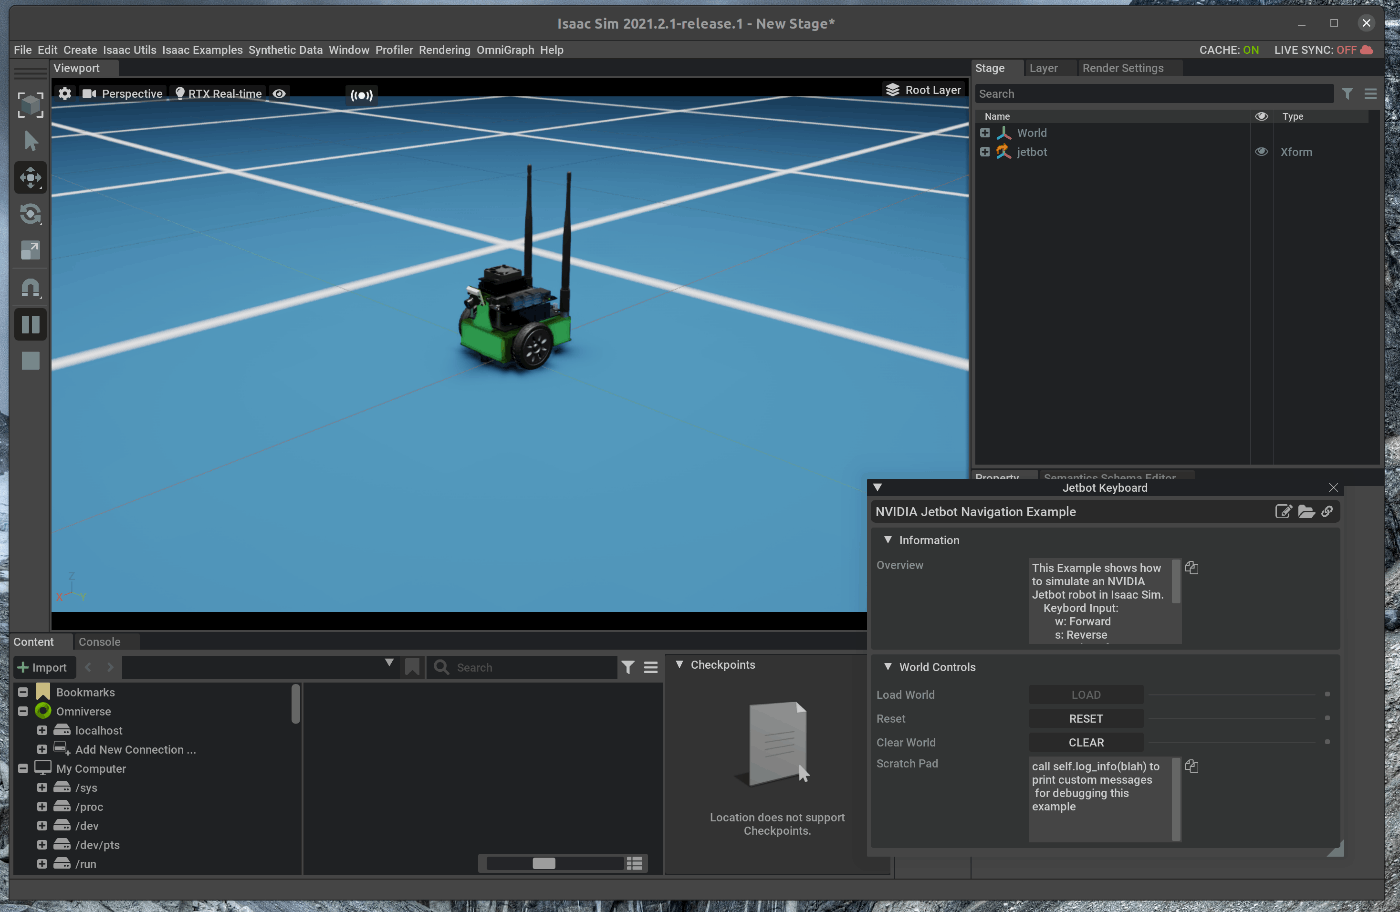
46 |
47 | この状態で、Viewportの左側のPLAYボタンを押すと、Keyboardからの入力を受け付け、Jetbotが移動します。
48 |
49 | - W: 前進
50 | - S: 停止
51 | - A: 左旋回
52 | - D: 右旋回
53 |
54 | 
55 |
56 |
--------------------------------------------------------------------------------
/tutorials/advanced/using_contact_sensor/36_using_contact_sensor.md:
--------------------------------------------------------------------------------
1 |
2 | # 概要
3 | シミュレーション内で接触センサを使用します。
4 |
5 | Issac SimのDocumentationのExtension部分に上記の内容が記載されており、この内容に沿って進めます。
6 | https://docs.omniverse.nvidia.com/app_isaacsim/app_isaacsim/ext_omni_isaac_contact_sensor.html
7 |
8 | # 実行環境
9 |
10 | - インストール実行環境
11 |
12 | | unit | specification |
13 | |:-----------------:|:------------------:|
14 | | CPU | i9-11900H |
15 | | GPU | GeForce RTX 3080 Laptop|
16 | | RAM | 32GB |
17 | | OS | Ubuntu 20.04.3 LTS |
18 |
19 | - Nvidia Driverバージョン
20 | - 510.39.01
21 | - Issac simバージョン
22 | - 2021.2.1
23 |
24 |
25 | # 手順
26 |
27 | Isaac SimのExampleの中に、接触センサのExampleが存在します。
28 | 今回はこのExamdpleを実行します。
29 |
30 | 1. Exampleシーンのロード
31 | 2. シミュレーションの実行
32 |
33 |
34 | ## 1. Exampleシーンのロード
35 |
36 | ### 1.1 OmniverseからIssac Simを起動する
37 | 
38 |
39 | ### 1.2 Exampleシーンをロードする
40 | メニューバーのIsaac Examples > Sensors > Contactを選択します。
41 | 
42 | 
43 |
44 | ポップアップしたウィンドウにおいて、”Open Source Code”をクリックすると、ExampleのソースコードがVscode上に展開されます。
45 | 
46 |
47 | ## 2. シミュレーションの実行
48 | ## 2.1 シミュレーションを実行する
49 | Viewportの左側のPLAYボタンを押すと、シミュレーションが開始されます。
50 | センサ値はロボットの各足部に設定されており、取得されるセンサ値は、Exampleシーンロード時のポップアップウィンドウに表示されます。
51 | 
52 | 
53 |
54 | センサ値はロボットの各足部に設定されており、取得されるセンサ値は、Exampleシーンロード時のポップアップウィンドウに表示されます。
55 |
56 |
--------------------------------------------------------------------------------
/tutorials/replicator/visualize_synthetic_data/21_visualize_synthetic_data.md:
--------------------------------------------------------------------------------
1 | # 概要
2 | 保存した合成データをVisualizeします。
3 |
4 | Issac Simのtutorialに上記の内容が記載されており、この内容に沿って進めます。
5 | https://docs.omniverse.nvidia.com/app_isaacsim/app_isaacsim/tutorial_replicator_visualize_groundtruth.html
6 |
7 | # 実行環境
8 |
9 | - インストール実行環境
10 |
11 | | unit | specification |
12 | |:-----------------:|:------------------:|
13 | | CPU | i9-11900H |
14 | | GPU | GeForce RTX 3080 Laptop|
15 | | RAM | 32GB |
16 | | OS | Ubuntu 20.04.3 LTS |
17 |
18 | - Nvidia Driverバージョン
19 | - 510.39.01
20 | - Issac simバージョン
21 | - 2021.2.1
22 |
23 |
24 | # 手順
25 | 保存した合成データをVisualizeします。
26 |
27 | 1. Exampleコードの実行
28 | 2. 保存したデータの確認
29 |
30 | ## 1. Exampleコードの実行
31 | ### 1.1 Exampleコードを実行する
32 | terminalで次のコマンドを実行します。
33 |
34 | ~~~ bash:shell
35 | $ cd ~/.local/share/ov/pkg/isaac_sim-2021.2.1
36 | $ ./python.sh standalone_examples/replicator/visualize_groundtruth.py
37 | ~~~
38 |
39 | 
40 | 
41 |
42 | visualize_groundtruth.pyでは、Stageの設定及び、画像の取得、Visualizationの処理が記載されています。
43 | 詳細は次のURLにから確認することが可能です(説明は追記予定)。
44 | https://docs.omniverse.nvidia.com/app_isaacsim/app_isaacsim/tutorial_replicator_visualize_groundtruth.html#the-code
45 |
46 | ## 2.保存したデータの確認
47 | ### 2.1 保存したデータを確認する
48 | 保存されたデータを確認します。
49 | terminalを開き、次のコマンドを入力します。
50 |
51 | ~~~ bash:shell
52 | $ cd ~/.local/share/ov/pkg/isaac_sim-2021.2.1
53 | $ nautlius ./ &
54 | ~~~
55 |
56 | 実行すると、保存先ディレクトリが表示されます。
57 | 保存したデータはこのディレクトリ直下に存在します。
58 | 
59 |
60 | 該当データを開き、撮影されたデータが存在することを確認します。
61 | 
62 |
63 |
--------------------------------------------------------------------------------
/tutorials/replicator/offline_dataset_generation/22_offline_dataset_generation.md:
--------------------------------------------------------------------------------
1 | # 概要
2 | Offlineで学習用のデータセットを作成します。
3 |
4 | Issac Simのtutorialに上記の内容が記載されており、この内容に沿って進めます。
5 | https://docs.omniverse.nvidia.com/app_isaacsim/app_isaacsim/tutorial_replicator_offline_generation.html
6 |
7 | # 実行環境
8 |
9 | - インストール実行環境
10 |
11 | | unit | specification |
12 | |:-----------------:|:------------------:|
13 | | CPU | i9-11900H |
14 | | GPU | GeForce RTX 3080 Laptop|
15 | | RAM | 32GB |
16 | | OS | Ubuntu 20.04.3 LTS |
17 |
18 | - Nvidia Driverバージョン
19 | - 510.39.01
20 | - Issac simバージョン
21 | - 2021.2.1
22 |
23 |
24 | # 手順
25 | ランダムなシーンを作成し、シーンにおける合成データを連続して保存します。
26 |
27 | 1. Exampleコードの実行
28 | 2. 保存したデータの確認
29 |
30 | ## 1. Exampleコードの実行
31 | ### 1.1 Exampleコードを実行する
32 | terminalで次のコマンドを実行します。
33 |
34 | ~~~ bash:shell
35 | $ cd ~/.local/share/ov/pkg/isaac_sim.2021.2.1/
36 | $ ./python.sh standalone_examples/replicator/offline_generation.py --scenario omniverse://localhost/Isaac/Samples/Synthetic_Data/Stage/warehouse_with_sensors.usd --num_frames 10 --max_queue_size 500
37 | ~~~
38 | 
39 | 
40 | 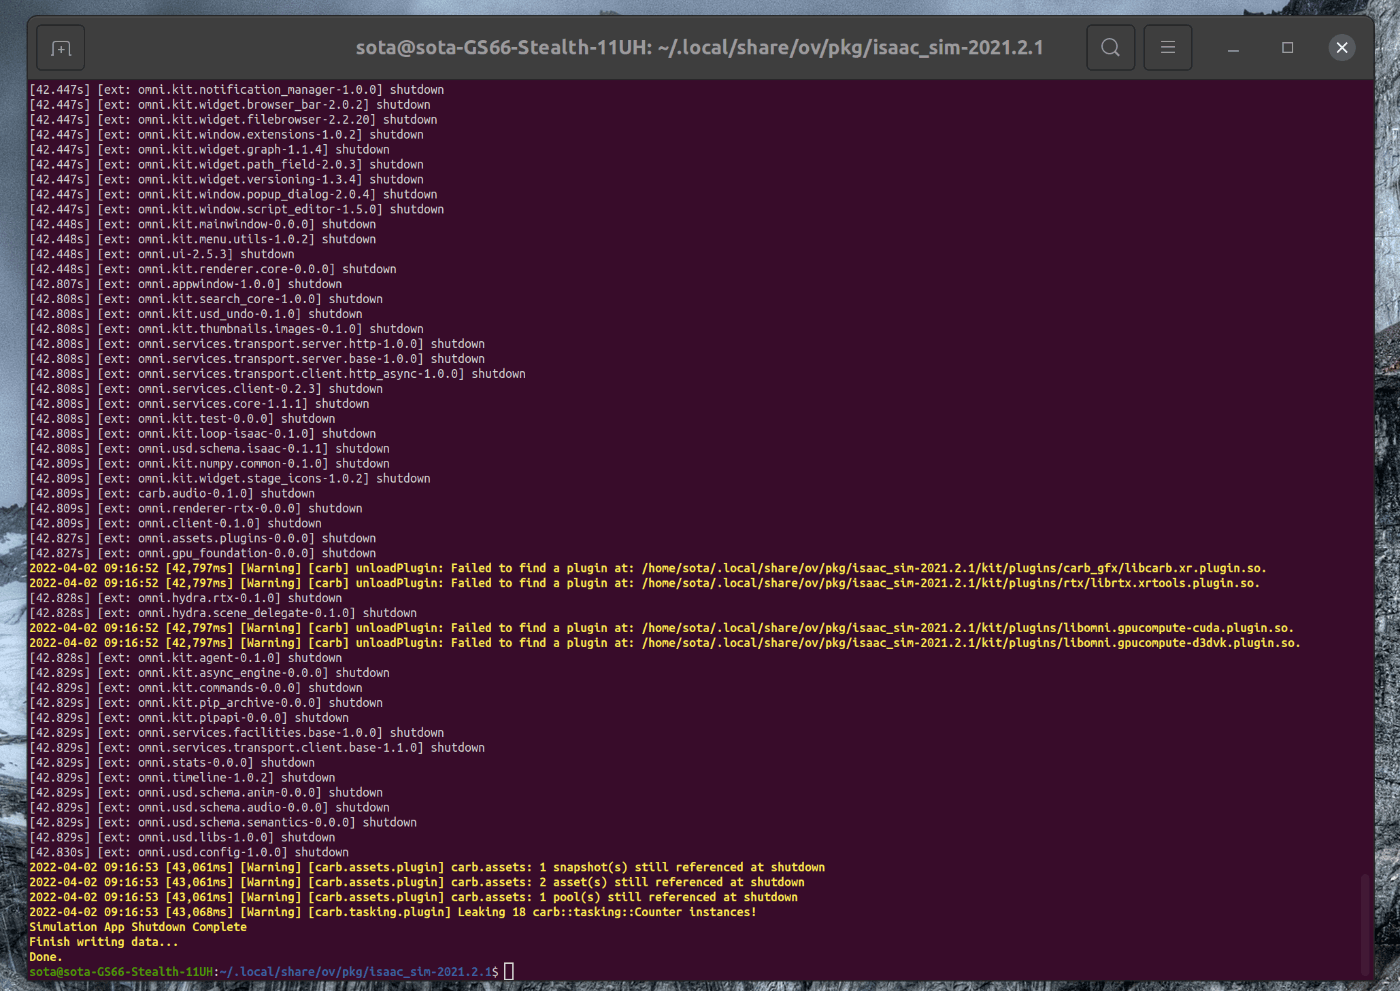]
41 |
42 | offline_generation.pyの詳細は次のURLにから確認することが可能です(説明は追記します)。
43 | https://docs.omniverse.nvidia.com/app_isaacsim/app_isaacsim/tutorial_replicator_offline_generation.html#loading-the-environment
44 |
45 |
46 | ## 2. 保存したデータの確認
47 | ### 2.1 保存したデータを確認する
48 | 保存されたデータを確認します。
49 | terminalを開き、次のコマンドを入力します。
50 |
51 | ~~~ bash:shell
52 | $ cd /home/"user名"/output/Viewport/
53 | $ nautlius ./ &
54 | ~~~
55 | 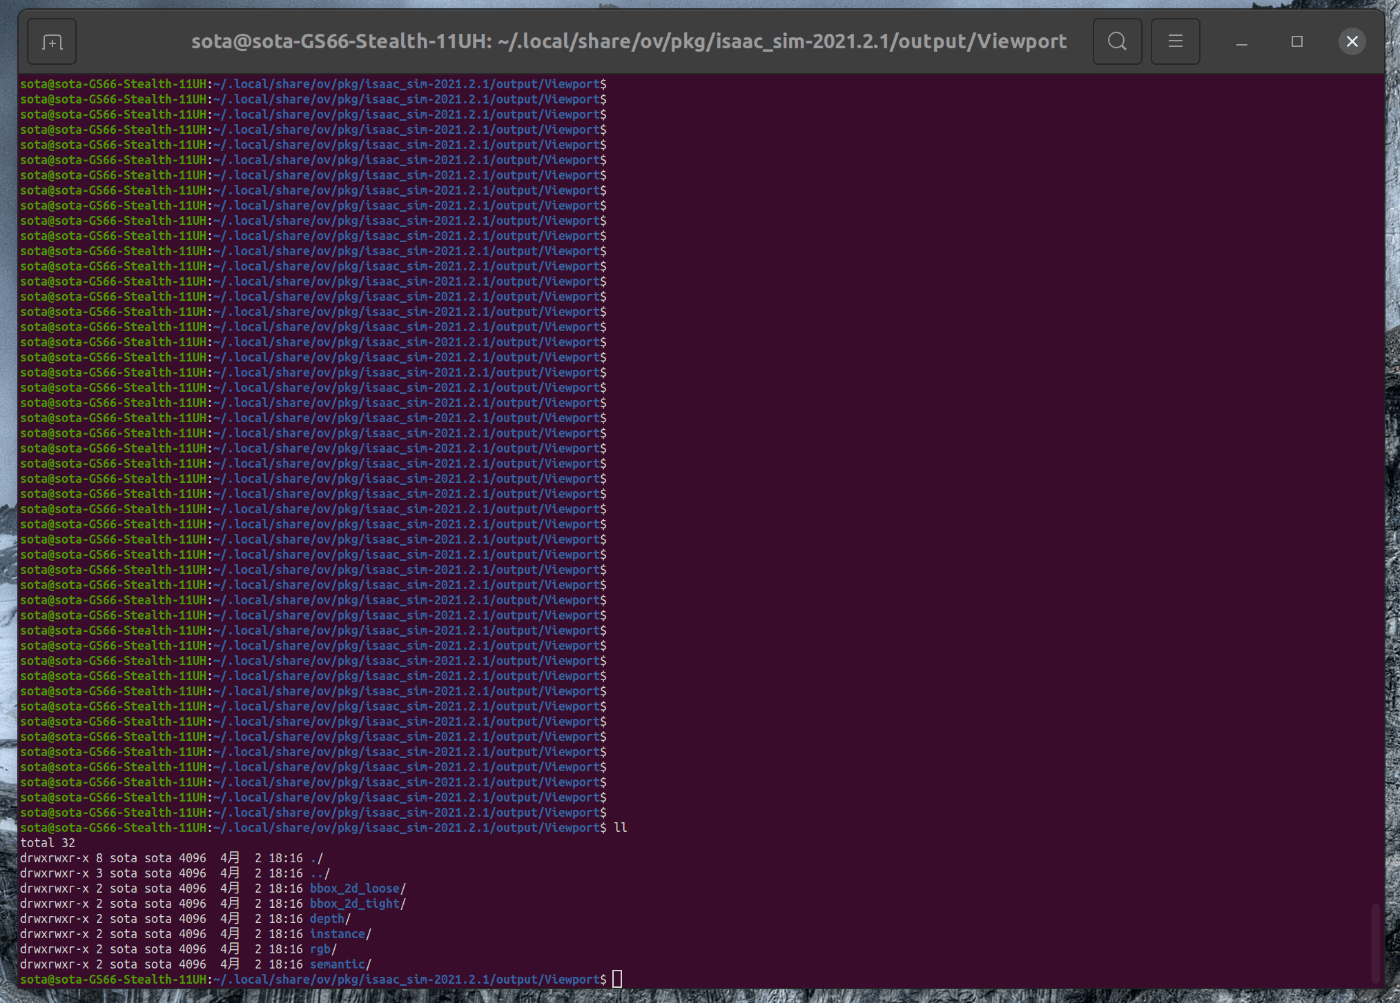
56 |
57 | 実行すると、保存先ディレクトリが表示されます。
58 | 各ディレクトリの中のデータを開き、撮影されたデータが存在することを確認します。
59 | 
60 |
61 |
62 |
63 |
--------------------------------------------------------------------------------
/tutorials/gui/add_camera/4_add_camera.md:
--------------------------------------------------------------------------------
1 | # 概要
2 | Nvidia Issac simのGUIの機能を使用し、簡単な2輪ロボットのモデルにカメラを追加します。
3 |
4 | Issac Simのtutorialに上記の内容が記載されており、この内容に沿って進めます。
5 | https://docs.omniverse.nvidia.com/app_isaacsim/app_isaacsim/tutorial_gui_camera_sensors.html#isaac-sim-app-tutorial-gui-camera-sensors
6 |
7 | # 実行環境
8 |
9 | - インストール実行環境
10 |
11 | | unit | specification |
12 | |:-----------------:|:------------------:|
13 | | CPU | i9-11900H |
14 | | GPU | GeForce RTX 3080 Laptop|
15 | | RAM | 32GB |
16 | | OS | Ubuntu 20.04.3 LTS |
17 |
18 | - Nvidia Driverバージョン
19 | - 510.39.01
20 | - Issac simバージョン
21 | - 2021.2.1
22 |
23 |
24 |
25 | # 手順
26 |
27 | 大まかな手順は次の通りです。
28 |
29 | 1. シーンにカメラを追加
30 | 2. 2輪ロボットにカメラを追加
31 |
32 | 以下内容のシーンファイルはこちらからダウンロードできます。
33 | ()[]
34 |
35 | ## 1. シーンにカメラを追加
36 | こちらのページに記載してある手順を進めます。
37 | https://docs.omniverse.nvidia.com/app_isaacsim/app_isaacsim/tutorial_gui_camera_sensors.html#getting-started
38 |
39 | ### 1.1 OmniverseからIssac Simを起動する
40 | 
41 |
42 | ### 1.2 シーンをロードする
43 | 以前作成した2輪のロボットモデルをロードします。
44 | シーンファイルは[こちらからダウンロード]()できます。
45 | メニューバーのFile > Open を選択します。
46 | 該当ファイルを選択し、シーンをロードします。
47 |
48 |
49 | ## 1.3 カメラの追加
50 | シーン内にカメラを追加します。
51 | メニューバーのCreate > Physics > Cameraを選択します。
52 |
53 | 選択後、右側のStageタブの中にCameraが追加されていることを確認します。
54 |
55 |
56 | ## 2. 2輪ロボットにカメラを追加
57 | 右側のStageタブの中でcameraを右クリックし、renameを選択します。
58 | renameにより次の名称に変更します。
59 | - camera > car_camera
60 |
61 | ### 2.1 Viewportの追加
62 | カメラで撮影した画像を映し出すViewportを作成します。
63 | メニューバーのWindow > New Viewport Windowを選択します。
64 |
65 | 選択後、生成したWindowをGUI内でドラッグアンドドロップで移動し、任意の位置に配置します。
66 |
67 | 配置したウィンドウ中のPerspectiveをクリックし、Cameraをcar_cameraにします。
68 |
69 | ### 2.2 2輪ロボットへのアタッチ
70 | 右側のStageタブの中でcar_cameraをドラッグアンドドロップでBodyの下に移動させます。
71 |
72 |
73 | Bodyの下に追加したcar_cameraを選択します。
74 | 選択した状態で、右下にあるPropertyの中から、次の値を変更します。
75 | - transformationのtransformのXを20にする
76 | - transformationのtransformのYを0にする
77 | - transformationのtransformのZを200にする
78 | - transformationのorientationのXを0にする
79 | - transformationのorientationのYを70にする
80 | - transformationのorientationのZを90にする
81 |
82 |
83 | カメラの位置および姿勢の設定が完了すると、ロボットの前のシーンがViewportに写し出されます。
84 |
85 |
86 | この状態で、側のツールバーのシミュレーションPlayボタンを押し、ロボットが進んでいる状態でカメラ画像が変化していることを確認します。
87 |
88 |
--------------------------------------------------------------------------------
/tutorials/ros/transform_trees/28_transform_trees.md:
--------------------------------------------------------------------------------
1 | # 概要
2 | Isaac Sim上に配置したCameraのTFをros topicとして発行します。
3 |
4 | Issac Simのtutorialに上記の内容が記載されており、この内容に沿って進めます。
5 | https://docs.omniverse.nvidia.com/app_isaacsim/app_isaacsim/tutorial_ros_tf.html
6 |
7 | # 実行環境
8 |
9 | - インストール実行環境
10 |
11 | | unit | specification |
12 | |:-----------------:|:------------------:|
13 | | CPU | i9-11900H |
14 | | GPU | GeForce RTX 3080 Laptop|
15 | | RAM | 32GB |
16 | | OS | Ubuntu 20.04.3 LTS |
17 |
18 | - Nvidia Driverバージョン
19 | - 510.39.01
20 | - Issac simバージョン
21 | - 2021.2.1
22 |
23 |
24 | # 手順
25 | Isaac Sim上に配置したCameraのTFをros topicとして発行します。
26 | シーンファイルとして、Turtlebotを追加したシーンファイルを使用します。
27 | シーンファイルはこちらからダウンロードできます。
28 |
29 | 1. シーンのロード
30 | 2. ROS PoseTreeの追加
31 | 3. Topicの確認
32 |
33 | ## 1. シーンのロード
34 | ### 1.1 OmniverseからIssac Simを起動する
35 | 
36 |
37 | ### 1.2 シーンをロードする
38 | Isaac Simの下部にあるContentの中から、”ダウンロードしたディレクトリ” > simple_room_apriltag_with_turtlebot3_with_camera_and_lidar.usdをダブルクリックします。
39 | 
40 | 
41 |
42 | ## 2. ROS PoseTreeの追加
43 | ### 2.1 ROS PoseTreを追加する
44 | メニューバーのCreate > Isaac > ROS > Pose Treeを選択します。
45 | 
46 |
47 | 右側のStageの中で、追加したROS_PoseTreeを選択します。
48 | 
49 |
50 | 選択した状態で、Stage下部のpropertyのRaw USD propertiesを開きます。
51 | Raw USD propertiesの中で、 targetPrimsを選択し、Stageの中のCamera_1とCamera_2 を選択します。
52 | 
53 | 
54 |
55 | ## 3. Topicの確認
56 | 新たにterminalを開き、roscoreを起動します。
57 | 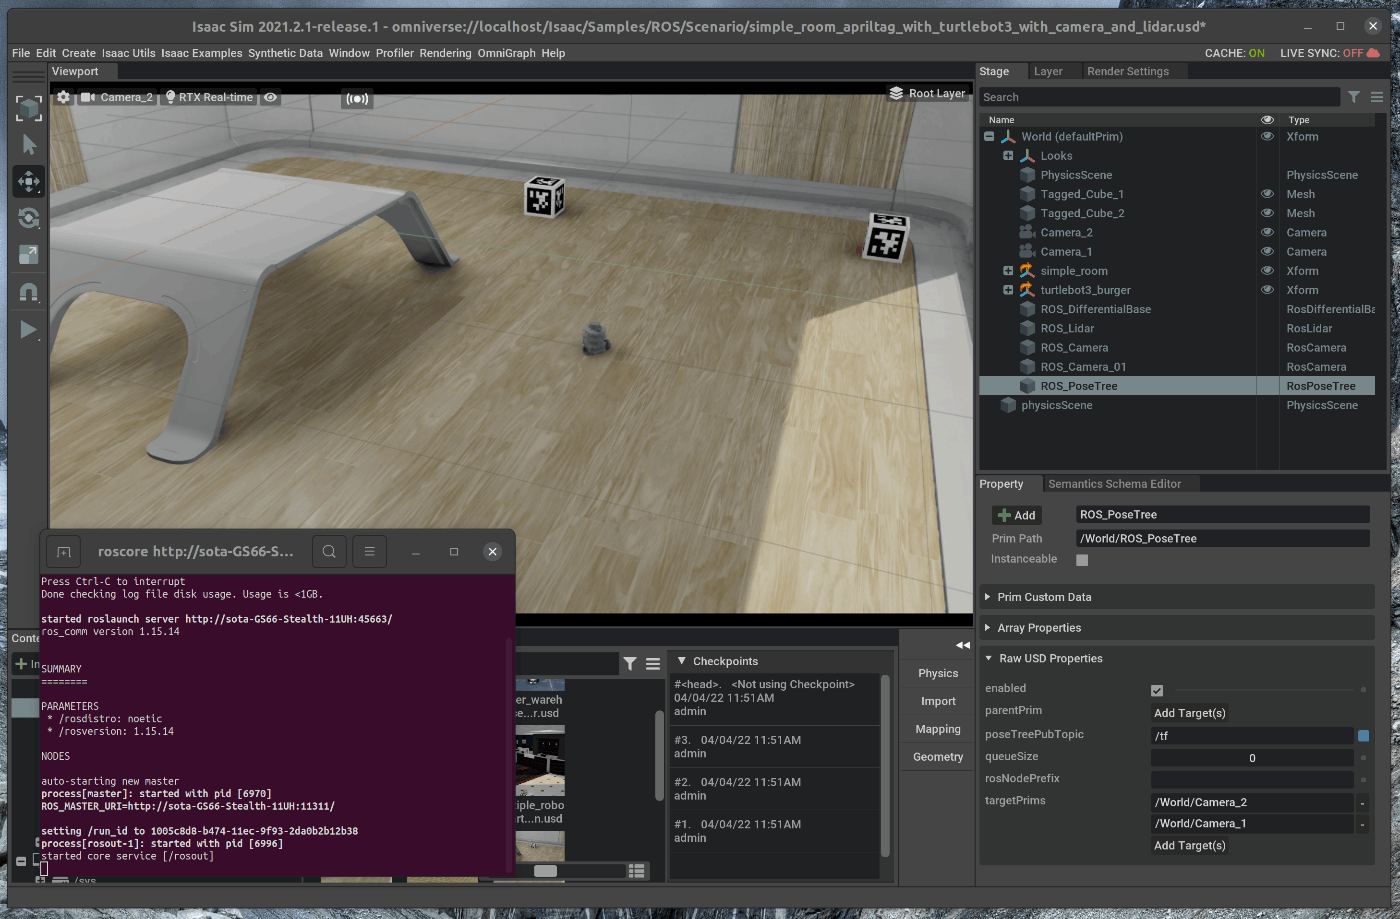
58 |
59 | この状態で、Viewportの左側のPLAYボタンを押すと、各種topicが発行されます。
60 | 新たにterminalを開き、次のコマンドを入力します。
61 |
62 | ~~~ bash:shell
63 | $ rostop list
64 | ~~~
65 | 
66 |
67 | TFが発行されていることが確認できます。
68 | rostopic echoを使用すると、Topicの内容を確認できます。
69 |
70 | 
71 |
72 |
73 |
74 |
75 |
76 |
77 |
78 |
--------------------------------------------------------------------------------
/tutorials/ros/april_tags/29_april_tags.md:
--------------------------------------------------------------------------------
1 | # 概要
2 | Isaac Sim上に配置したApril Tagsをros topicとして発行し, detectionの処理を実行します。
3 |
4 | Issac Simのtutorialに上記の内容が記載されており、この内容に沿って進めます。
5 | https://docs.omniverse.nvidia.com/app_isaacsim/app_isaacsim/tutorial_ros_apriltag.html
6 |
7 | # 実行環境
8 |
9 | - インストール実行環境
10 |
11 | | unit | specification |
12 | |:-----------------:|:------------------:|
13 | | CPU | i9-11900H |
14 | | GPU | GeForce RTX 3080 Laptop|
15 | | RAM | 32GB |
16 | | OS | Ubuntu 20.04.3 LTS |
17 |
18 | - Nvidia Driverバージョン
19 | - 510.39.01
20 | - Issac simバージョン
21 | - 2021.2.1
22 |
23 |
24 | # 手順
25 | Isaac Sim上に配置したApril Tagsをros topicとして発行し, detectionの処理を実行します。
26 | detectionの処理はros側で実行します。
27 |
28 | 1. シーンのロード
29 | 2. detection処理の実行
30 | 3. Topicの確認
31 |
32 | ## 1. シーンのロード
33 | ### 1.1 OmniverseからIssac Simを起動する
34 | 
35 |
36 | ### 1.2 シーンをロードする
37 | メニューバーのIsaac Examples > ROS > April Tagを選択します。
38 | 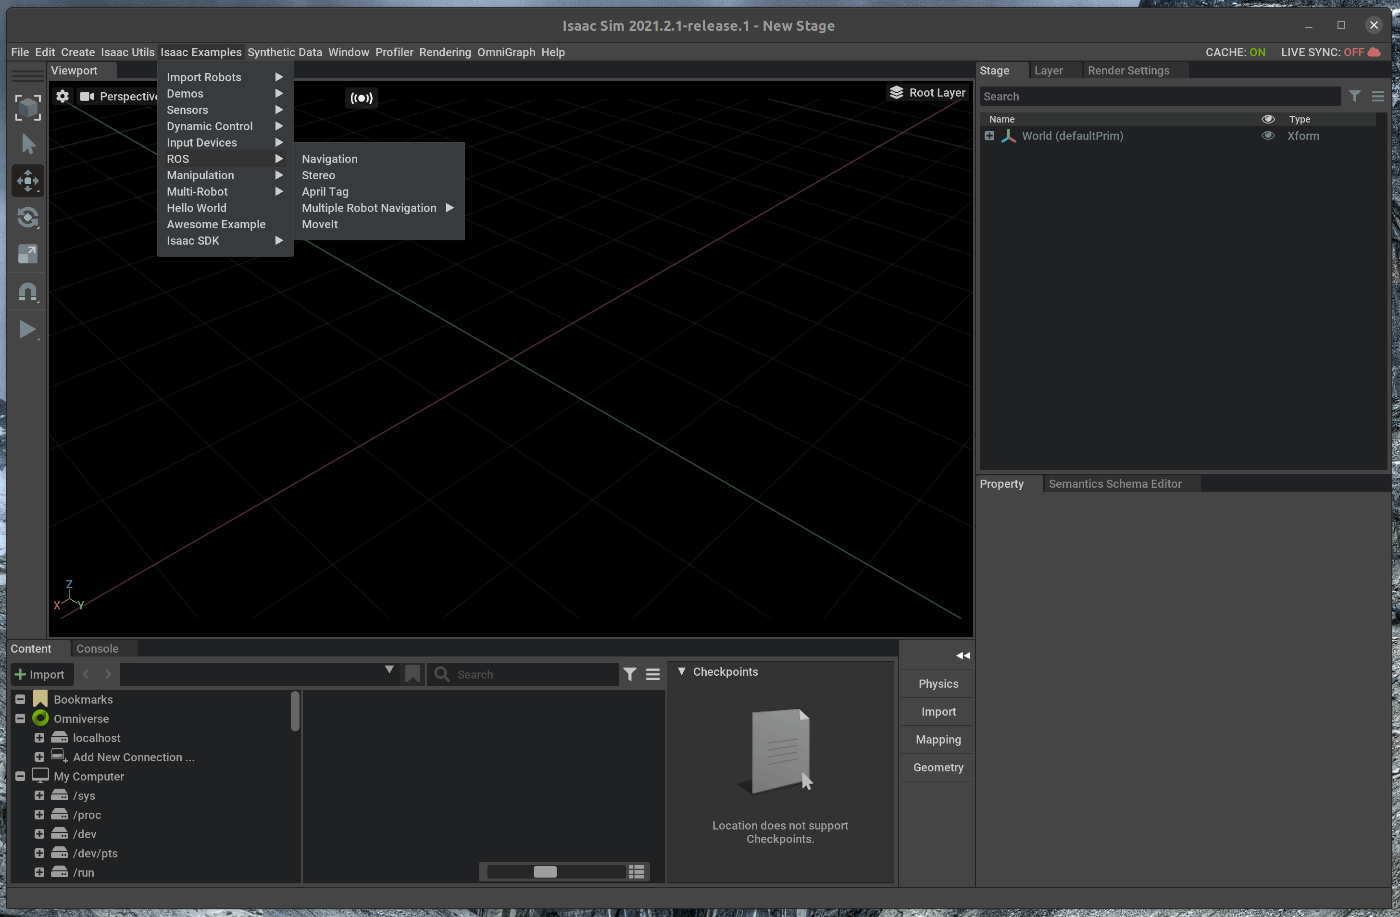
39 | 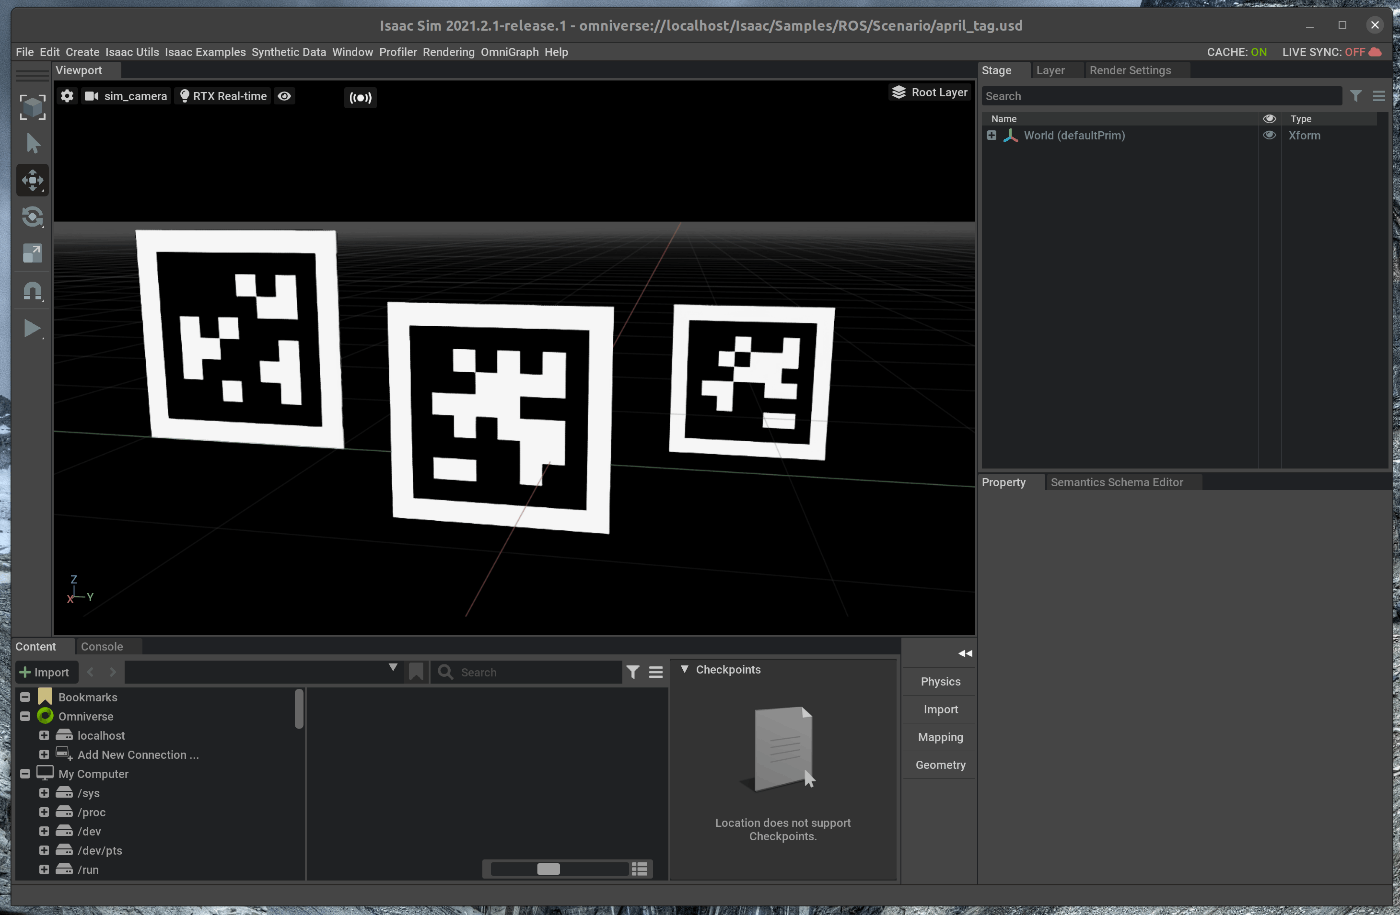
40 |
41 | 新たにterminalを開き、roscoreを起動します。
42 | 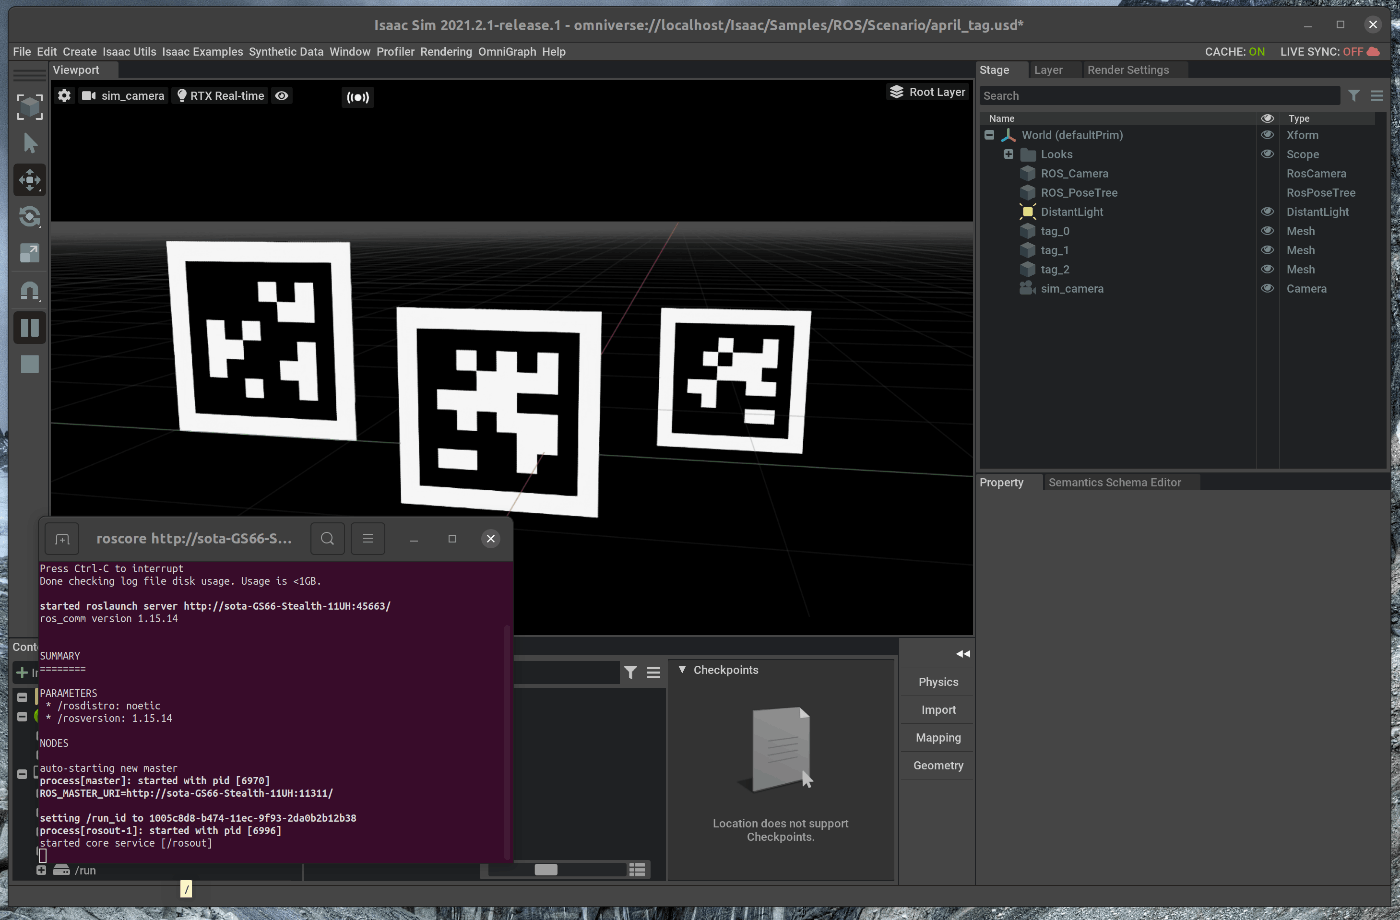
43 |
44 | この状態で、Viewportの左側のPLAYボタンを押すと、各種topicが発行されます。
45 |
46 | ## 2. detection処理の実行
47 | ### 2.1 detection用のLaunchを実行する
48 |
49 | また、新たにterminalを開き、次のコマンドを入力します。
50 |
51 | ~~~ bash:shell
52 | $ cd ~/.local/share/ov/pkg/isaac_sim-2021.2.1/ros_workspace/
53 | $ cd ./src
54 | $ git clone https://github.com/AprilRobotics/apriltag.git
55 | $ git clone https://github.com/AprilRobotics/apriltag_ros.git
56 | $ caktin b
57 | $ source devel/setup.bash
58 | $ roslaunch isaac_tutorials apriltag_continuous_detection.launch
59 | ~~~
60 | 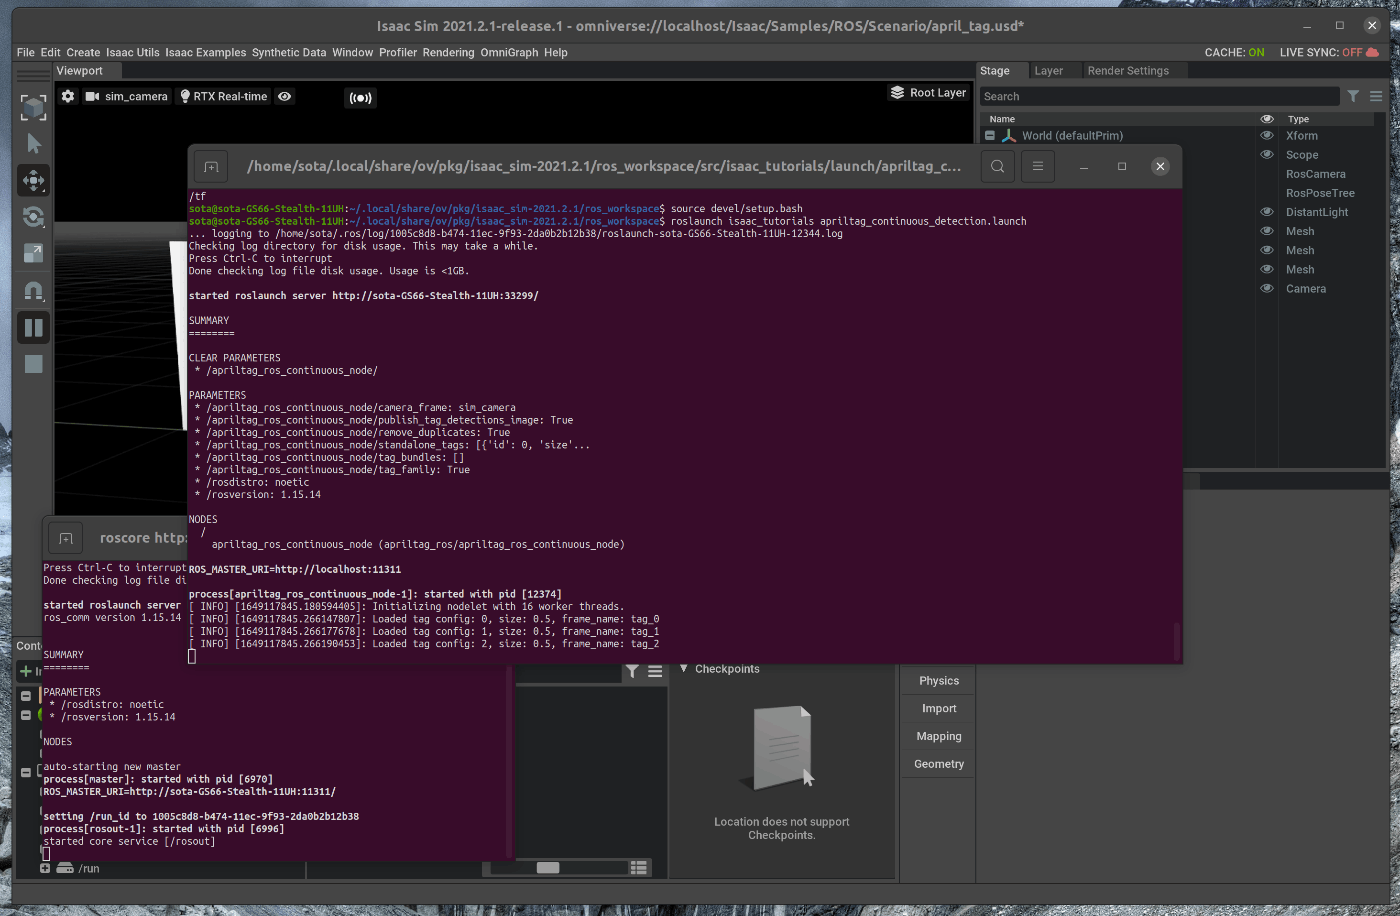
61 |
62 | ## 3. Topicの確認
63 | Detectionの結果をRviz上で確認します。
64 | 新たにterminalを開き、次のコマンドを入力します。
65 |
66 | ~~~ bash:shell
67 | $ cd ~/.local/share/ov/pkg/isaac_sim_2(version)/ros_workspace/
68 | $ rviz -d src/isaac_tutorials/rviz/apriltag_config.rviz
69 | ~~~
70 | 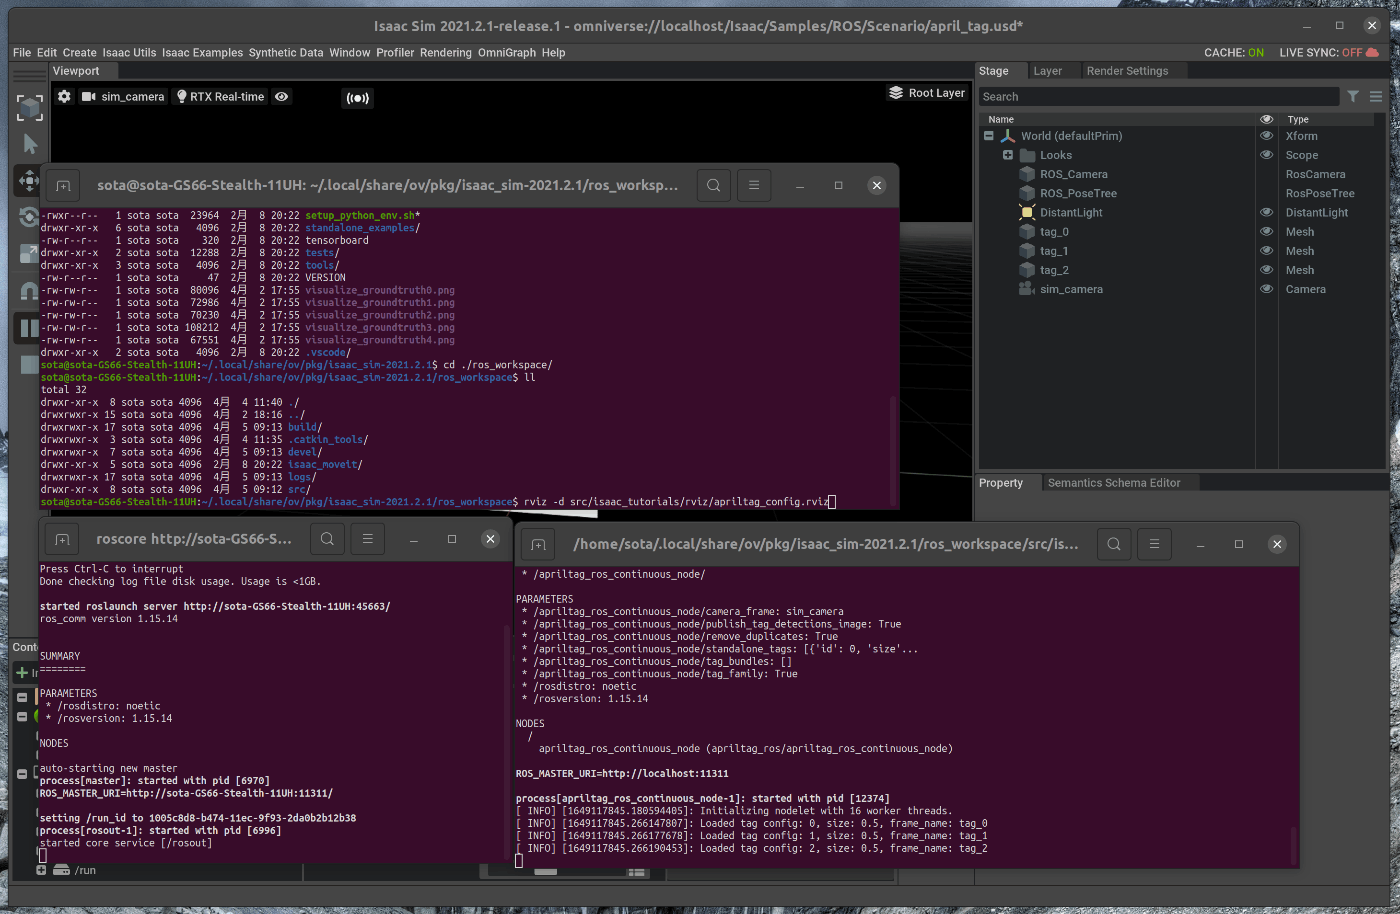
71 |
72 | Detectionされていることが確認できます。
73 | 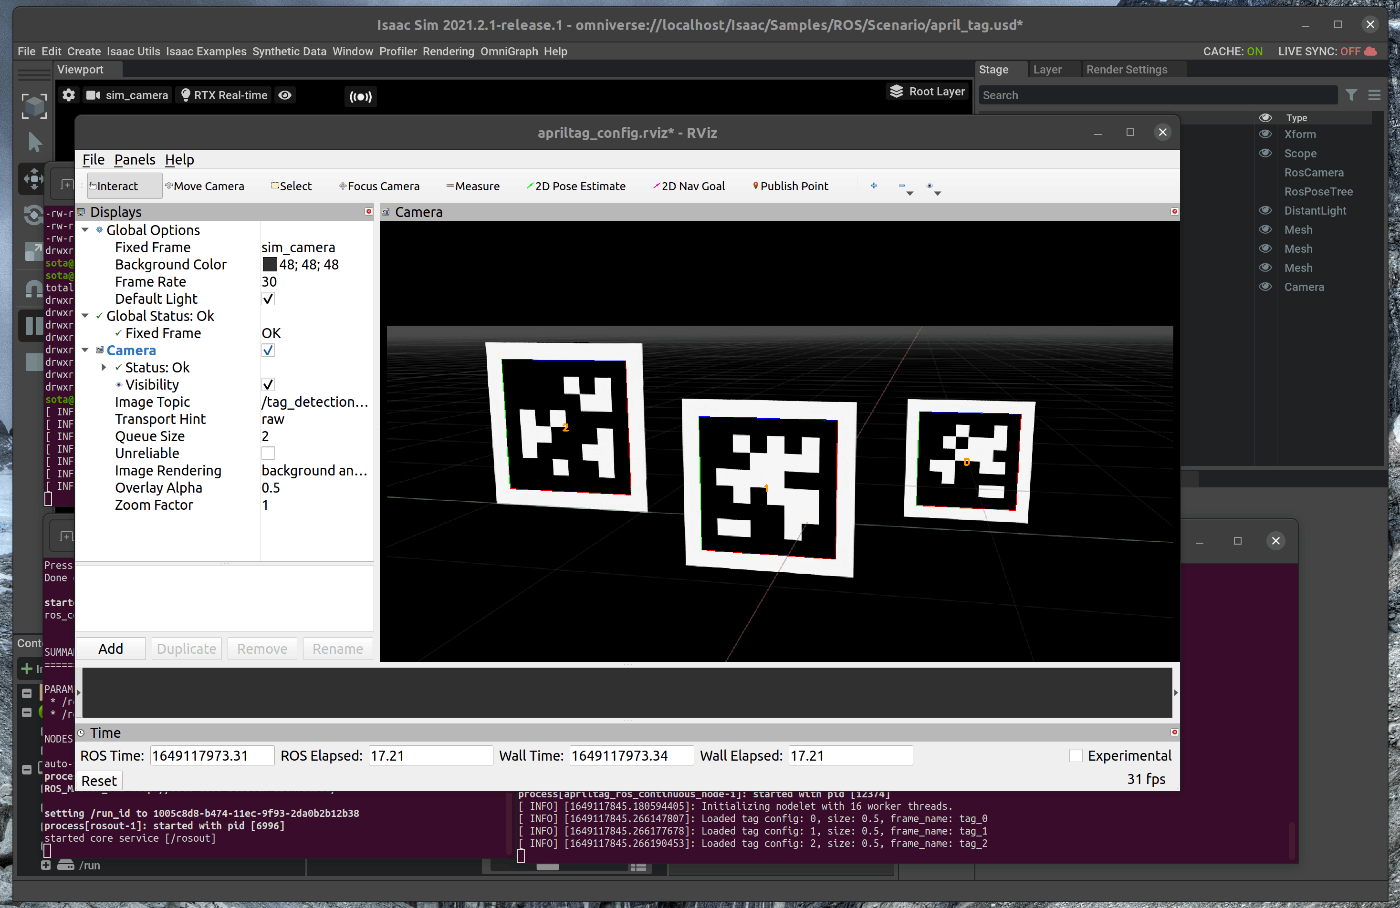
74 |
75 | 各種Topicも発行されています。
76 | 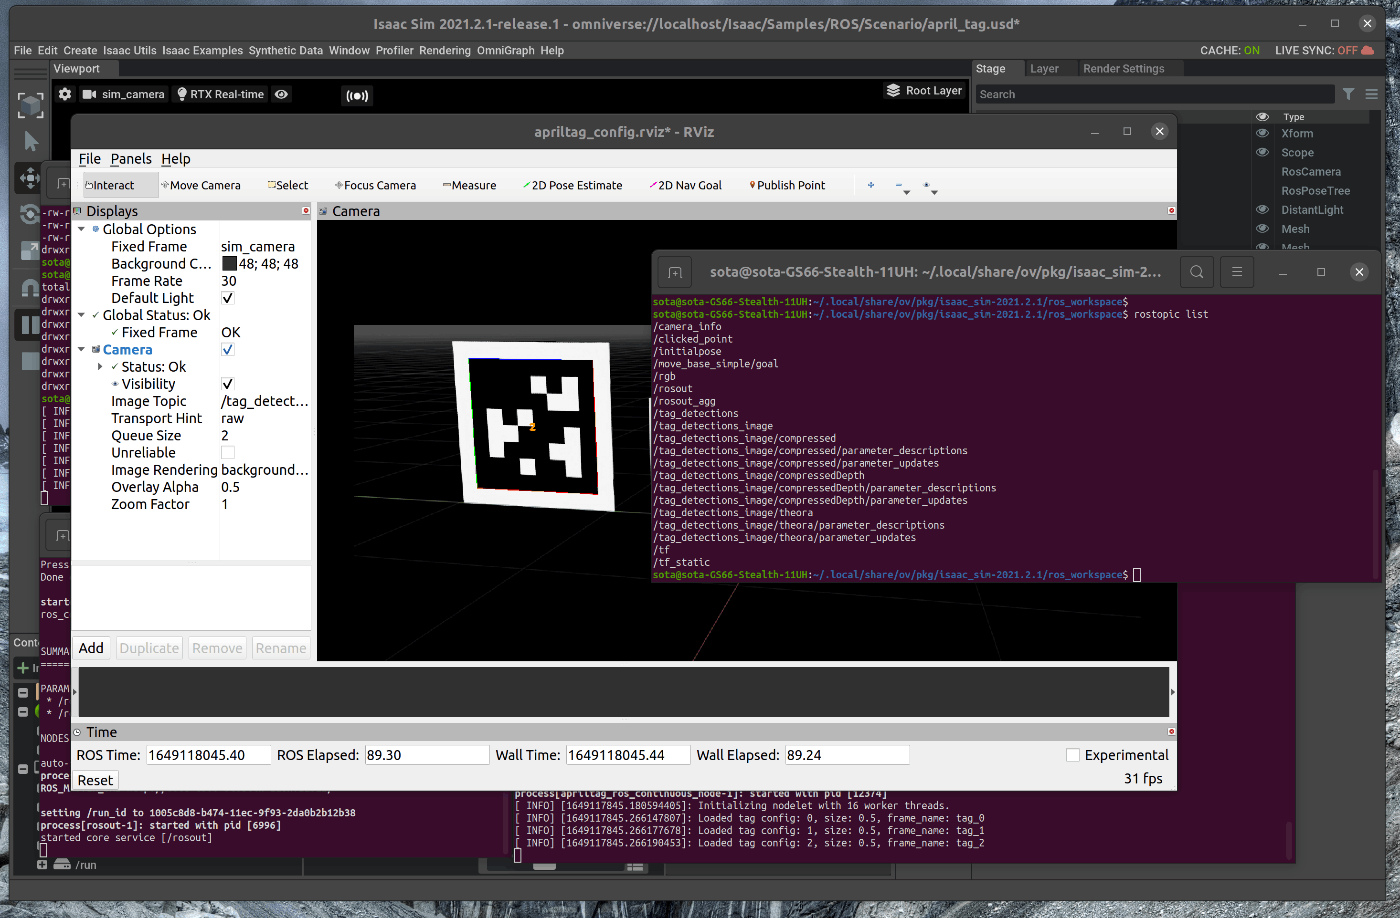
77 |
78 |
79 |
80 |
81 |
82 |
--------------------------------------------------------------------------------
/tutorials/replicator/recording_synthetic_data/20_recording_synthetic_data.md:
--------------------------------------------------------------------------------
1 | # 概要
2 | 合成データを連続して取得し、保存します。
3 |
4 | Issac Simのtutorialに上記の内容が記載されており、この内容に沿って進めます。
5 | https://docs.omniverse.nvidia.com/app_isaacsim/app_isaacsim/tutorial_replicator_recorder.html
6 |
7 | # 実行環境
8 |
9 | - インストール実行環境
10 |
11 | | unit | specification |
12 | |:-----------------:|:------------------:|
13 | | CPU | i9-11900H |
14 | | GPU | GeForce RTX 3080 Laptop|
15 | | RAM | 32GB |
16 | | OS | Ubuntu 20.04.3 LTS |
17 |
18 | - Nvidia Driverバージョン
19 | - 510.39.01
20 | - Issac simバージョン
21 | - 2021.2.1
22 |
23 |
24 | # 手順
25 | GUI上での操作で、シーン内のカメラから合成データを連続して取得し、保存します。
26 |
27 | 1. テストシーンのロード
28 | 2. Synthetic Data Recordeの使用
29 |
30 | ## 1. テストシーンのロード
31 | ### 1.1 OmniverseからIssac Simを起動する
32 | 
33 |
34 | ### 1.2 テストシーンをロードする
35 | Isaac Simの下部にあるContentの中から、Isaac > Samples > Synthetic_Data > Stage > warehouse_with_sensors.usdをダブルクリックします。
36 | 
37 |
38 | ## 2. Synthetic Data Recordeの使用
39 | ### 2.1 Viewportの設定を変更する
40 | Viewportの中の上部にある目のアイコンをクリックします。
41 | 
42 |
43 | ”Show By Type”の中で、CemaraとLightのチェックを外します。
44 | 
45 |
46 | 次に、Viewportの中の上部にあるカメラのアイコンの表示名が”RandomCamera”になっているか確認します。
47 |
48 | ### 2.2 Synthetic Data Recorderを使用する
49 | メニューバーのSynthetic Data > Synthetic Data Recodarをクリックします。
50 | 
51 |
52 | ポップアップした”Synthetic Data Recoder”のWindowをstage下部のPropertyの右隣に追加します。
53 | 
54 |
55 | ”Synthetic Data Recoder”の”Viewport: Sensor Settings”の中のすべての欄にチェックを入れます。
56 | 
57 |
58 | 左側のツールバーのPLAYボタンを押し、Viewportに表示されるシーンが切り替わることを確認します。
59 | 
60 |
61 | この状態で、”Synthetic Data Recoder”の”Start Recording”をクリックします。
62 | 10sec程度経過した後、”Synthetic Data Recoder”の”Stop Recording”をクリックします。
63 |
64 | ### 2.3 保存したデータを確認する
65 | 保存されたデータを確認します。
66 | terminalを開き、次のコマンドを入力します。
67 |
68 | ~~~ bash:shell
69 | $ cd /home/"user名"/output/Viewport/
70 | $ nautlius ./ &
71 | ~~~
72 |
73 | 実行すると、保存先ディレクトリが表示されます。
74 | 
75 |
76 | 各ディレクトリの中のデータを開き、撮影されたデータが存在することを確認します。
77 | 
78 | 
79 |
80 |
81 |
82 |
83 |
84 |
--------------------------------------------------------------------------------
/tutorials/gui/save_custom_usd/33_save_custom_usd.md:
--------------------------------------------------------------------------------
1 | # 概要
2 | Isaac SimのGUI上でサンプルのオブジェクトを複数まとめて、USDファイルとして保存します。
3 |
4 |
5 | # 実行環境
6 |
7 | - インストール実行環境
8 |
9 | | unit | specification |
10 | |:-----------------:|:------------------:|
11 | | CPU | i9-11900H |
12 | | GPU | GeForce RTX 3080 Laptop|
13 | | RAM | 32GB |
14 | | OS | Ubuntu 20.04.3 LTS |
15 |
16 | - Nvidia Driverバージョン
17 | - 510.39.01
18 | - Issac simバージョン
19 | - 2021.2.1
20 |
21 |
22 | # 手順
23 |
24 | 大まかな手順は次の通りです。
25 |
26 | 1. オブジェクトをシーンに追加
27 | 2. Groupにまとめたオブジェクトの保存
28 |
29 | シミュレーション上でロボットを動作させる環境を作成する場合、決まったオブジェクトはある程度まとめて設置したいと思います。
30 | そのような場合には、事前にオブジェクトをまとめたオブジェクト群を1つのUSDファイルとして、保存しておくと便利です。
31 | 実際に、そのオブジェクト群を使用する場合には、1つのUSDファイルのインポートで実現することができます。
32 |
33 | ## 1. オブジェクトをシーンに追加
34 | ### 1.1 OmniverseからIssac Simを起動する
35 | 
36 |
37 | ### 1.2 シーンをロードする
38 | メニューバーのCreate > Physics > Groud Planeを選択します。
39 | 
40 |
41 | ### 1.3 オブジェクトの追加
42 | シーン内にオブジェクトを追加します。
43 | 今回は、ウォーターサーバーと机を追加します。
44 |
45 | Viewportの下にあるContentの中で、omniverse/localhost/Isaac/Enviroments/Hospital/Props/SM_WaterDispenser_01a.usdを選択します。
46 | 選択した状態で、選択したUSDファイルをドラッグアンドドロップでViewport内に移動します。
47 | 移動すると、シーン内にウォーターサーバーが追加されます。
48 | 
49 |
50 | 次に、机を追加します。
51 | Viewportの下にあるContentの中で、omniverse/localhost/Isaac/Enviroments/Simple_Room/Props/table_low.usdを選択します。
52 | 選択した状態で、選択したUSDファイルをドラッグアンドドロップでViewport内に移動します。
53 | 移動すると、シーン内に机が追加されます。
54 | 
55 |
56 | ### 1.4 オブジェクト間の相対位置を変更する
57 | 追加したウォーターサーバーと机の位置を変更します。
58 | 今回は、机の上にウォーターサーバーを置きます。
59 |
60 | 右側のStageタブの中で、SM_WaterDispenser_01aを選択し、Viewport内の座標系の座標面を選択し、机の上に設置するように移動します。
61 | 
62 |
63 |
64 | ## 2. Groupにまとめたオブジェクトの保存
65 | ### 2.1 Groupとしてまとめる
66 |
67 | 右側のStageタブの中で、SM_WaterDispenser_01aとtable_lowを選択します。
68 | 
69 |
70 | 選択した状態で、右クリックし、Group Selectedを選択します。
71 | 
72 |
73 | ### 2.2 GroupをUSDファイルとしてエクスポートする
74 |
75 | 右側のStageタブの中で、Groupを選択します。
76 |
77 | 選択した状態で、右クリックし、Export Selectedを選択します。
78 | ポップアップしたウィンドウにて、任意の保存名と保存先を指定します。
79 | 
80 |
81 | ### 2.3 保存したUSDファイルをインポートする
82 | 今回はomniverse/localhost/Isaac/Enviroments/Simple_Room/Props/water_server_on_desk.usdとして保存しました。
83 | 1.3の手順と同様にViewport内に該当のUSDファイルをドラッグアンドドロップすると、机の上にウォーターサーバーが設置されているオブジェクトが追加されます。
84 | 
85 |
--------------------------------------------------------------------------------
/tutorials/advanced/occupancy_map_generation/17_occupacy_map_generation.md:
--------------------------------------------------------------------------------
1 | # 概要
2 | シミュレーション内で2DのOccupacy Mapを作成します。
3 |
4 | Issac Simのtutorialに上記の内容が記載されており、この内容に沿って進めます。
5 | https://docs.omniverse.nvidia.com/app_isaacsim/app_isaacsim/tutorial_advanced_occupancy_map.html
6 |
7 | # 実行環境
8 |
9 | - インストール実行環境
10 |
11 | | unit | specification |
12 | |:-----------------:|:------------------:|
13 | | CPU | i9-11900H |
14 | | GPU | GeForce RTX 3080 Laptop|
15 | | RAM | 32GB |
16 | | OS | Ubuntu 20.04.3 LTS |
17 |
18 | - Nvidia Driverバージョン
19 | - 510.39.01
20 | - Issac simバージョン
21 | - 2021.2.1
22 |
23 |
24 | # 手順
25 |
26 | GUI上からの操作によって、Occupacy Mapを作成します。
27 | Occupacy Mapは時系列のセンサ情報をもとに事後確率として障害物の存在性を評価する際に使用されます。
28 | [参考:菅沼、魚住、自動車の自律走行のためのOccupacy Grid Mapに基づく全方位障害物検出、2013](https://www.jstage.jst.go.jp/article/jsaeronbun/44/3/44_20134483/_pdf)
29 |
30 | 1. 2D Occupacy Mapの作成(GUI)
31 |
32 | ## 1. 2D Occupacy Mapの作成(GUI)
33 | こちらのページに記載してある手順を進めます。
34 | https://docs.omniverse.nvidia.com/app_isaacsim/app_isaacsim/tutorial_advanced_range_sensor_lidar.html#getting-started
35 |
36 | ### 1.1 OmniverseからIssac Simを起動する
37 | 
38 |
39 | ### 1.2 シーンを作成する
40 | メニューバーのCreate > Physics > Phisics Sceneを選択します。
41 | 
42 |
43 |
44 | ### 1.3 Warehouse環境のロード
45 | Warehouseの環境をシーン内にロードします。
46 | メニューバーのCreate -> Isaac -> Environments -> Warehouse Multiple Shelvesを選択します。
47 | 
48 | 
49 |
50 | ### 1.3 Occupacy Mapの作成
51 | まず、Occupacy Map Generatorをロードします。
52 | メニューバーのIsaac Utils -> Occupacy Mapを選択します。
53 | 
54 | 
55 |
56 | Viewportの下にあるOccupacy Map ExtensionのOriginの値を次の値に設定します。
57 |
58 | - OriginのXを200にする
59 | - OriginのYを0にする
60 | - OriginのZを120にする
61 | 
62 |
63 | Viwport内に2DのGridが作成されることを確認します。
64 | 
65 |
66 | 次に、右側にあるStageの中で、ロードしたWarehouseを選択します。
67 | この状態で、Viewportの下にあるOccupacy Map Extensionの”BOUND SELECTION”を選択します。
68 | 
69 |
70 | Viewportの下にあるOccupacy MapのUpper Boundの値を次の値に設定します。
71 |
72 | - Upper BoundのZを300にする
73 | 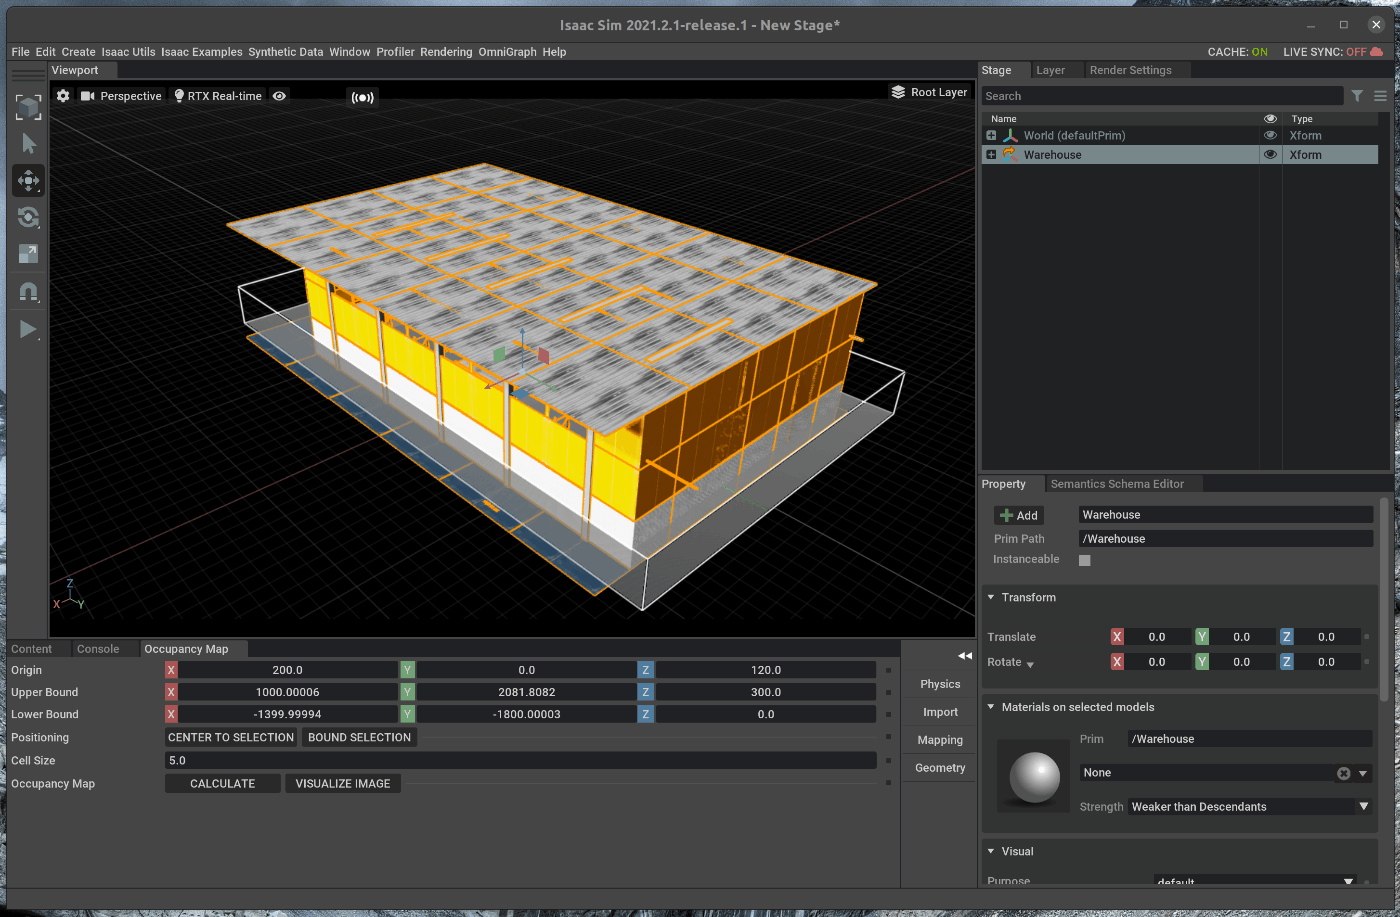
74 |
75 | Occupacy Map Extensionの”CALCULATE” > "VISUALIZE IMAGE"を選択します。
76 | 選択すると、2DのOccupacy Mapが表示されます。
77 | 
78 |
79 |
80 |
81 |
82 |
83 |
84 |
85 |
86 |
87 |
--------------------------------------------------------------------------------
/tutorials/advanced/using_sensors_generic_range_sensor/16_using_sensor_generic_range_sensor.md:
--------------------------------------------------------------------------------
1 |
2 | # 概要
3 | シミュレーション内で投射パターンを自由に変更することが可能なLIDARを使用します。
4 |
5 | Issac Simのtutorialに上記の内容が記載されており、この内容に沿って進めます。
6 | https://docs.omniverse.nvidia.com/app_isaacsim/app_isaacsim/tutorial_advanced_range_sensor_generic.html#
7 |
8 | # 実行環境
9 |
10 | - インストール実行環境
11 |
12 | | unit | specification |
13 | |:-----------------:|:------------------:|
14 | | CPU | i9-11900H |
15 | | GPU | GeForce RTX 3080 Laptop|
16 | | RAM | 32GB |
17 | | OS | Ubuntu 20.04.3 LTS |
18 |
19 | - Nvidia Driverバージョン
20 | - 510.39.01
21 | - Issac simバージョン
22 | - 2021.2.1
23 |
24 |
25 | # 手順
26 |
27 | GUI上からの操作と、Python APIからシーンにLIDARを追加します。
28 |
29 | 1. Generic Range Sensorの追加(GUI)
30 | 2. Generic Range Sensorの設定を変更する
31 |
32 |
33 | ## 1. Generic Range Sensorの追加(GUI)
34 | こちらのページに記載してある手順を進めます。
35 | https://docs.omniverse.nvidia.com/app_isaacsim/app_isaacsim/tutorial_advanced_range_sensor_lidar.html#getting-started
36 |
37 | ### 1.1 OmniverseからIssac Simを起動する
38 | 
39 |
40 | ### 1.2 シーンを作成する
41 | メニューバーのCreate > Physics > Phisics Sceneを選択します。
42 | 
43 |
44 |
45 | ### 1.3 LIDARの追加
46 | 作成したシーン内に、Generic Range Sensorを追加します。
47 | メニューバーのIsaac Examples > Sensors > Generic Range Sensorを選択します。
48 | 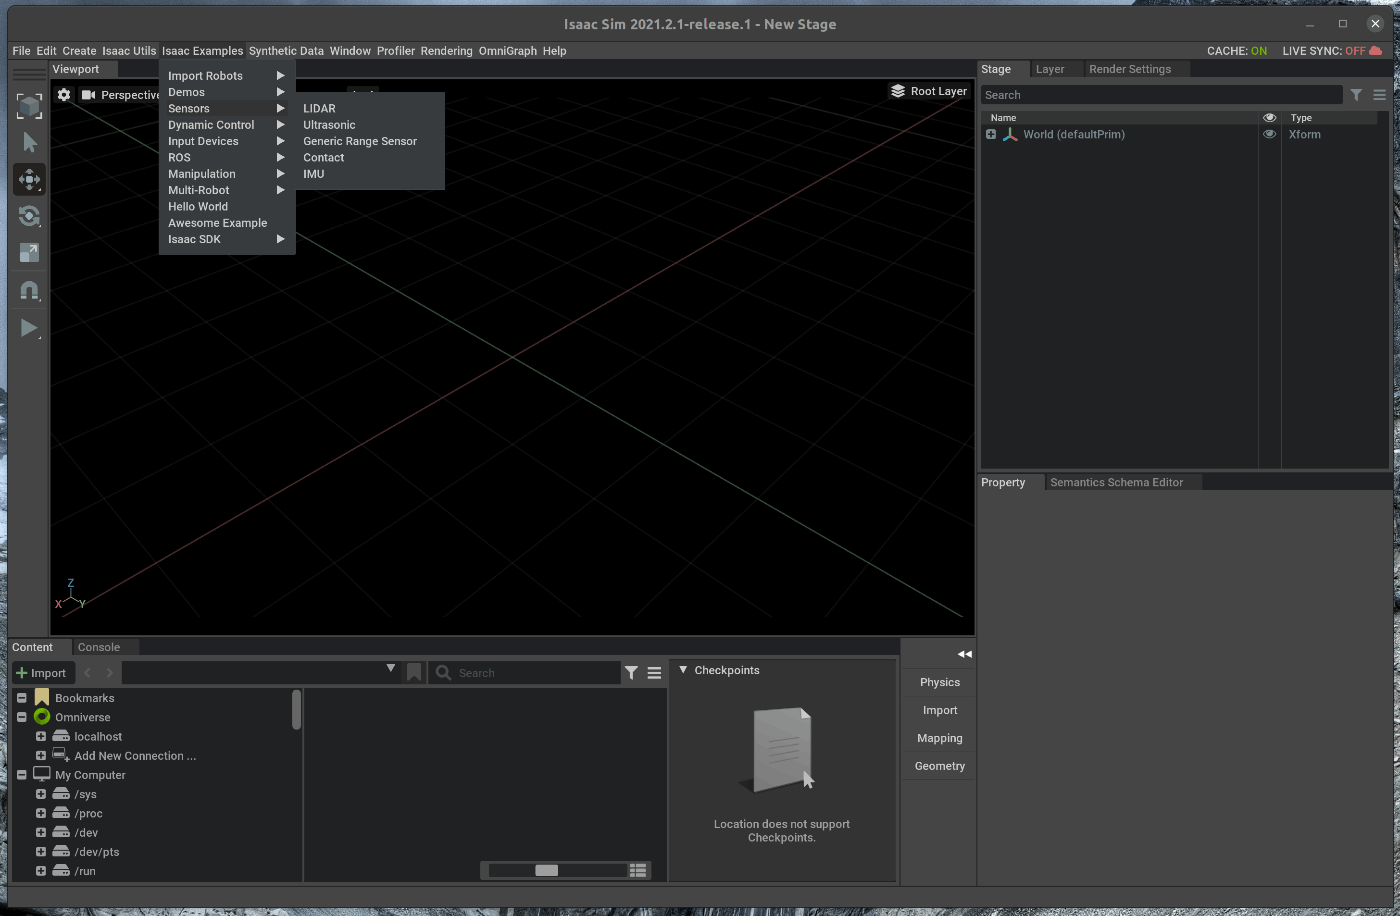
49 |
50 | ポップアップしたWindowにおいて、"Load Sensor"を選択します。
51 | 
52 |
53 | 次に、ポップアップしたWindowにおいて、”Load Scene”を選択します。
54 | 
55 |
56 | ”Set Sensor Pattern”をすると、ExampleのSensor Patternが読み込まれます。
57 | 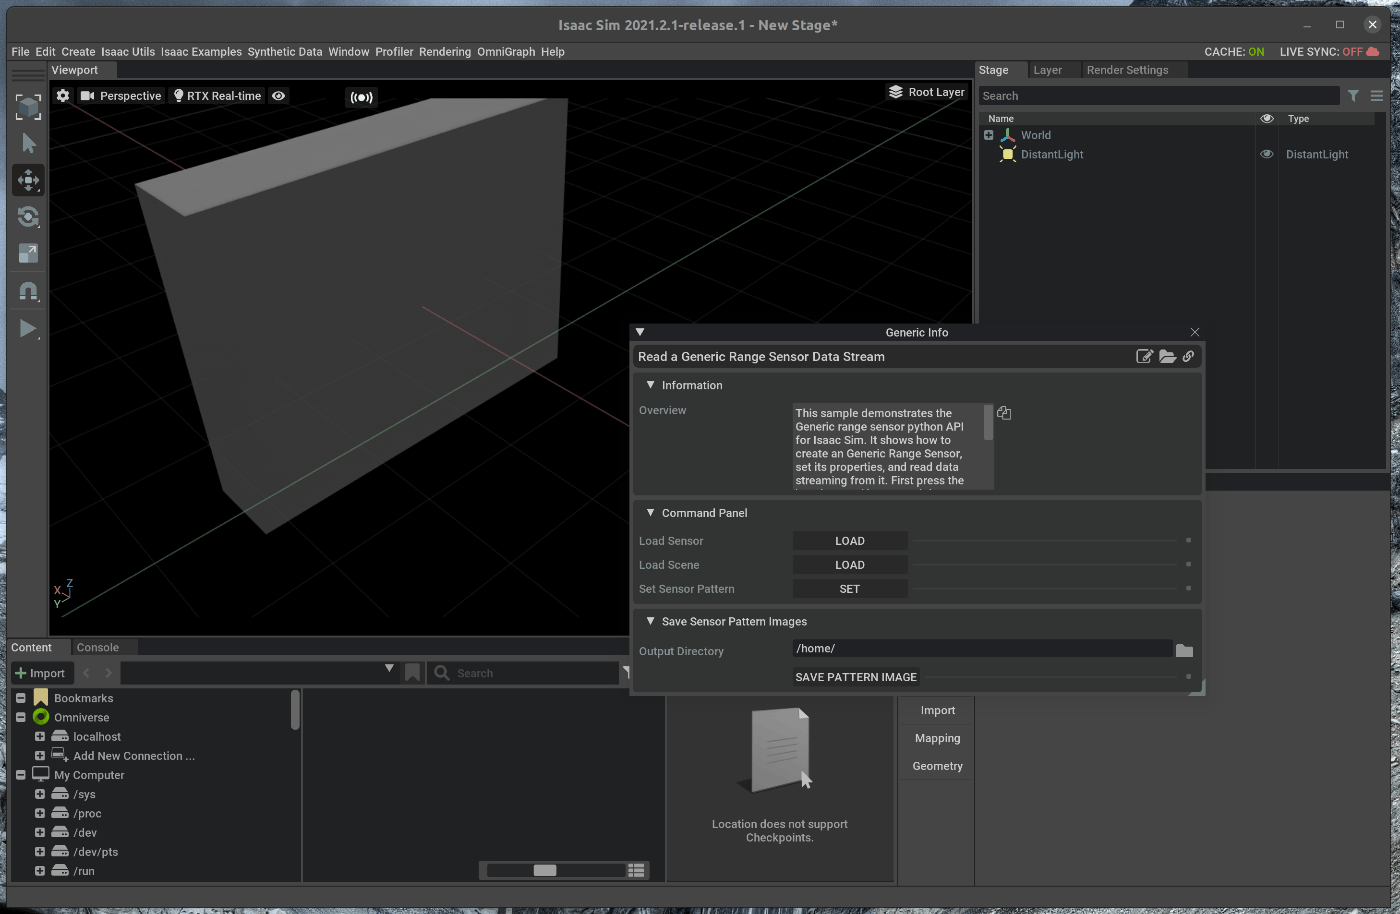
58 |
59 | この状態で、Viewportの左側のPLAYボタンを押すと、Exampleのレーザパターンが照射されます。
60 | 
61 |
62 | ## 2. Generic Range Sensorの設定を変更する
63 | ## 2.1 Generic Range Sensorのサンプルコードを開く
64 |
65 | ポップアップしているウィンドウの右上にある3つのボタンの内、一番左側のOpen Source Codeボタンを選択します。
66 | 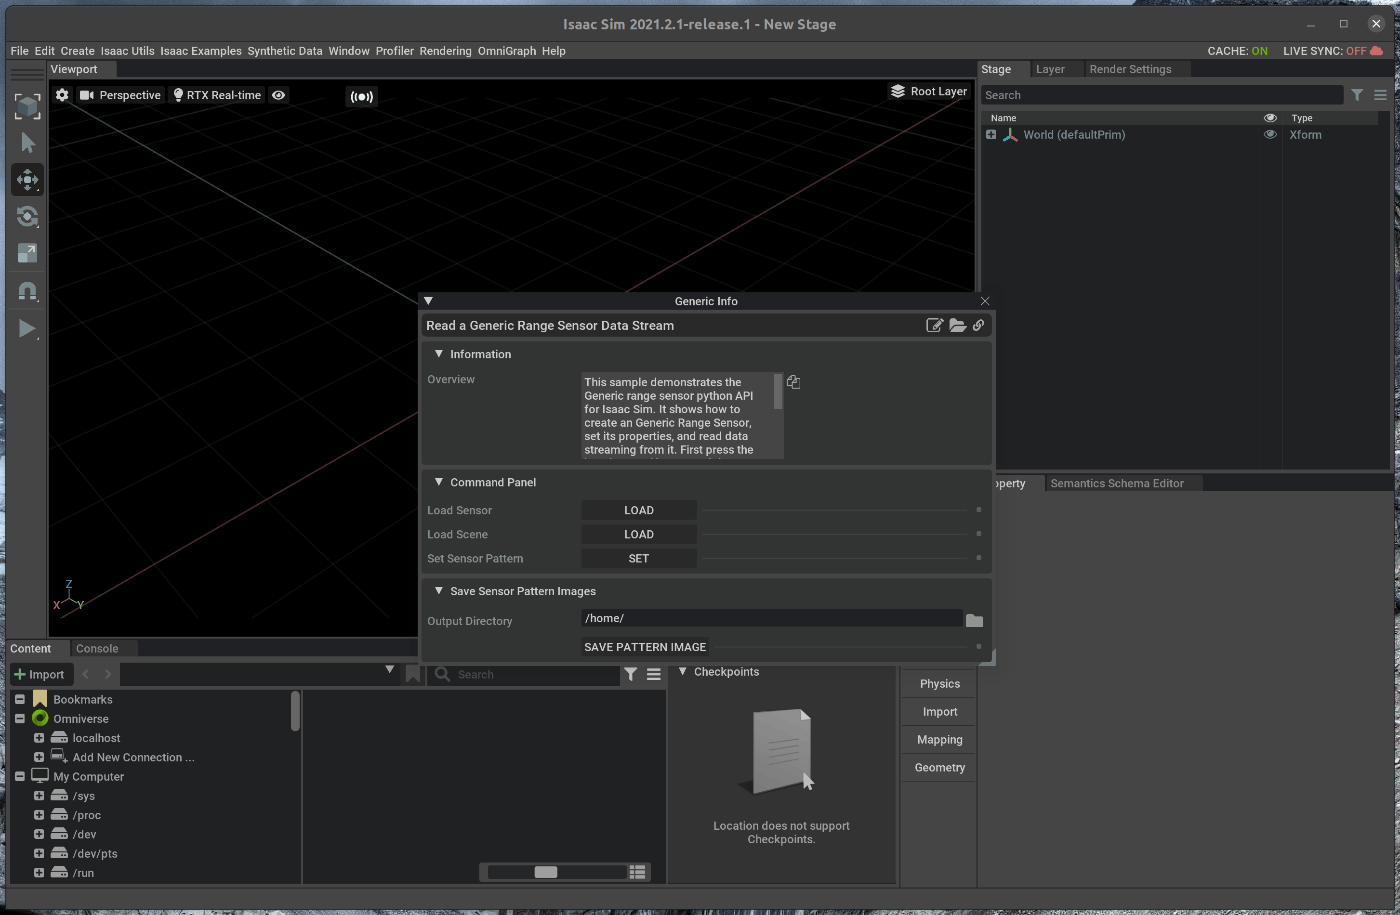
67 |
68 | 選択すると、がVScodeが開き、Generic Range SensorのExampleのソースコードが表示されます。
69 | 
70 |
71 | ## 2.2 Generic Range Sensorの設定を変更する
72 | ソースコードを変更し、レーザの照射レートを変更します。
73 | Exampleの248行目を以下の設定に変更します。
74 |
75 | ~~~ change_prop_generic_range_sensor.py:Python3
76 | frequency = 100
77 | ~~~
78 |
79 | ポップアップしたWindowにおいて、"Load Sensor" > ”Load Scene” > ”Set Sensor Pattern”を順番に選択します。
80 | 
81 |
82 | この状態で、Viewportの左側のPLAYボタンを押すと、照射レートが変更されたレーザパターンが照射されます。
83 | 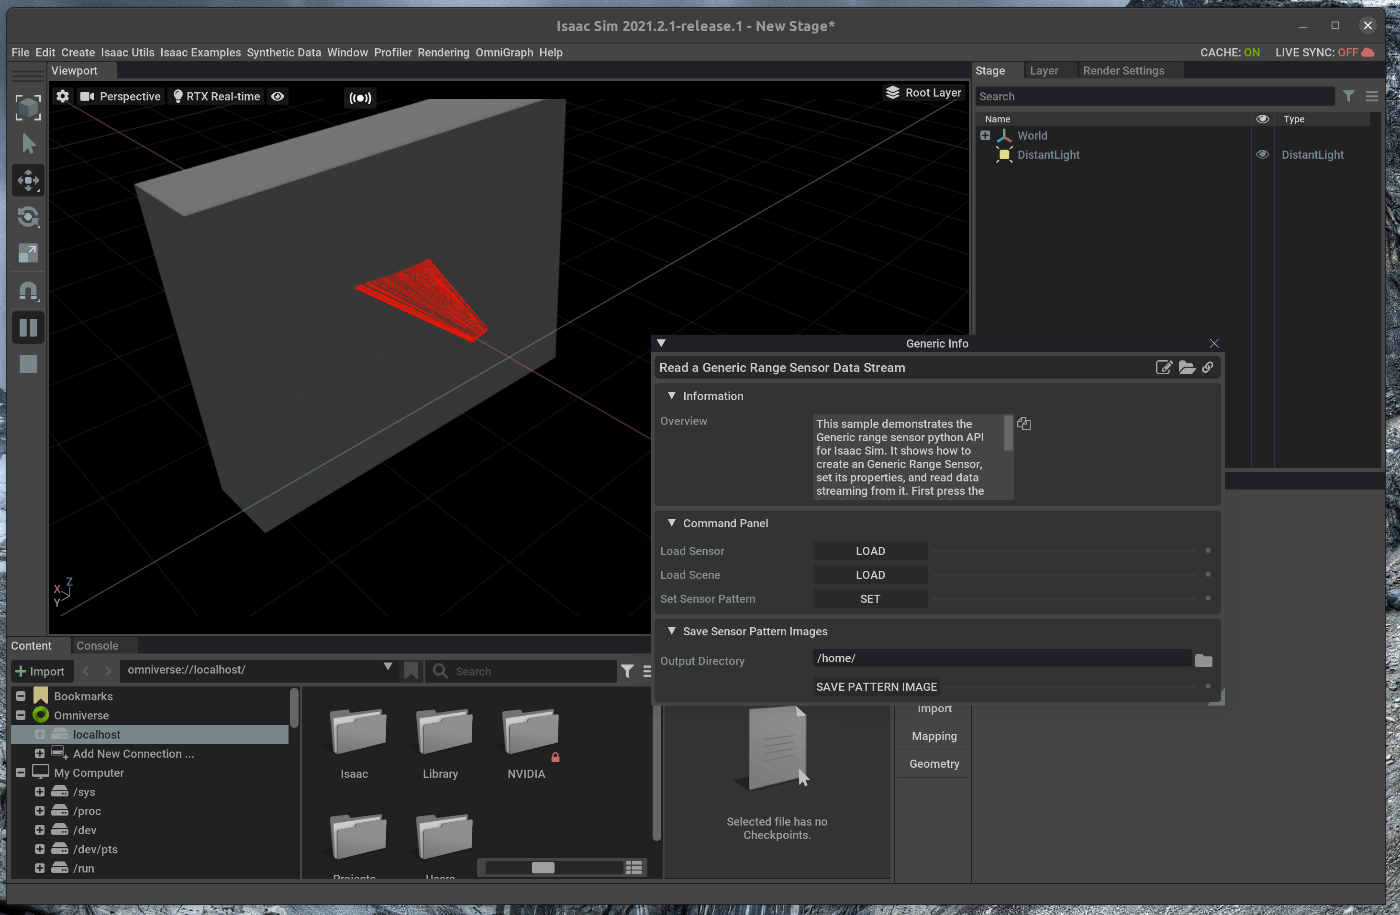
84 |
85 |
--------------------------------------------------------------------------------
/tutorials/gui/cad_importer/35_cad_importer.md:
--------------------------------------------------------------------------------
1 | # 概要
2 | Isaac SimにUSDファイル以外のファイル形式の3Dモデルをインポートします。
3 |
4 | Issac SimのExtension部分に上記の内容が記載されており、この内容に沿って進めます。
5 | https://docs.omniverse.nvidia.com/app_isaacsim/prod_extensions/ext_cad-importer.html
6 |
7 | # 実行環境
8 |
9 | - インストール実行環境
10 |
11 | | unit | specification |
12 | |:-----------------:|:------------------:|
13 | | CPU | i9-11900H |
14 | | GPU | GeForce RTX 3080 Laptop|
15 | | RAM | 32GB |
16 | | OS | Ubuntu 20.04.3 LTS |
17 |
18 | - Nvidia Driverバージョン
19 | - 510.39.01
20 | - Issac simバージョン
21 | - 2021.2.1
22 |
23 |
24 | # 手順
25 | 大まかな手順は次の通りです。
26 |
27 | 1. Cad Importerの有効化
28 | 2. オブジェクトのインポート(.stp)
29 | 3. オブジェクトの保存(USDファイル)
30 |
31 | 今回はstpファイルをインポートします。
32 | 他にもobj形式のモデル等もインポート可能です。
33 |
34 | ## 1. Cad Importerの有効化
35 | ### 1.1 OmniverseからIssac Simを起動する
36 | 
37 |
38 | ### 1.2 Cad Importerを有効化する
39 | メニューバーのWindow > Extensionsを選択します。
40 | 
41 |
42 | ポップアップしたWindowの検索部分に”CAD”と入力します。
43 | 検索結果として、CAD Importerが表示されます。
44 |
45 | ポップアップしたWindowの右上部分にExtensionの有効状態が表示されています。
46 | 緑色で”Enable”と表示されている場合には、有効な状態です。
47 | 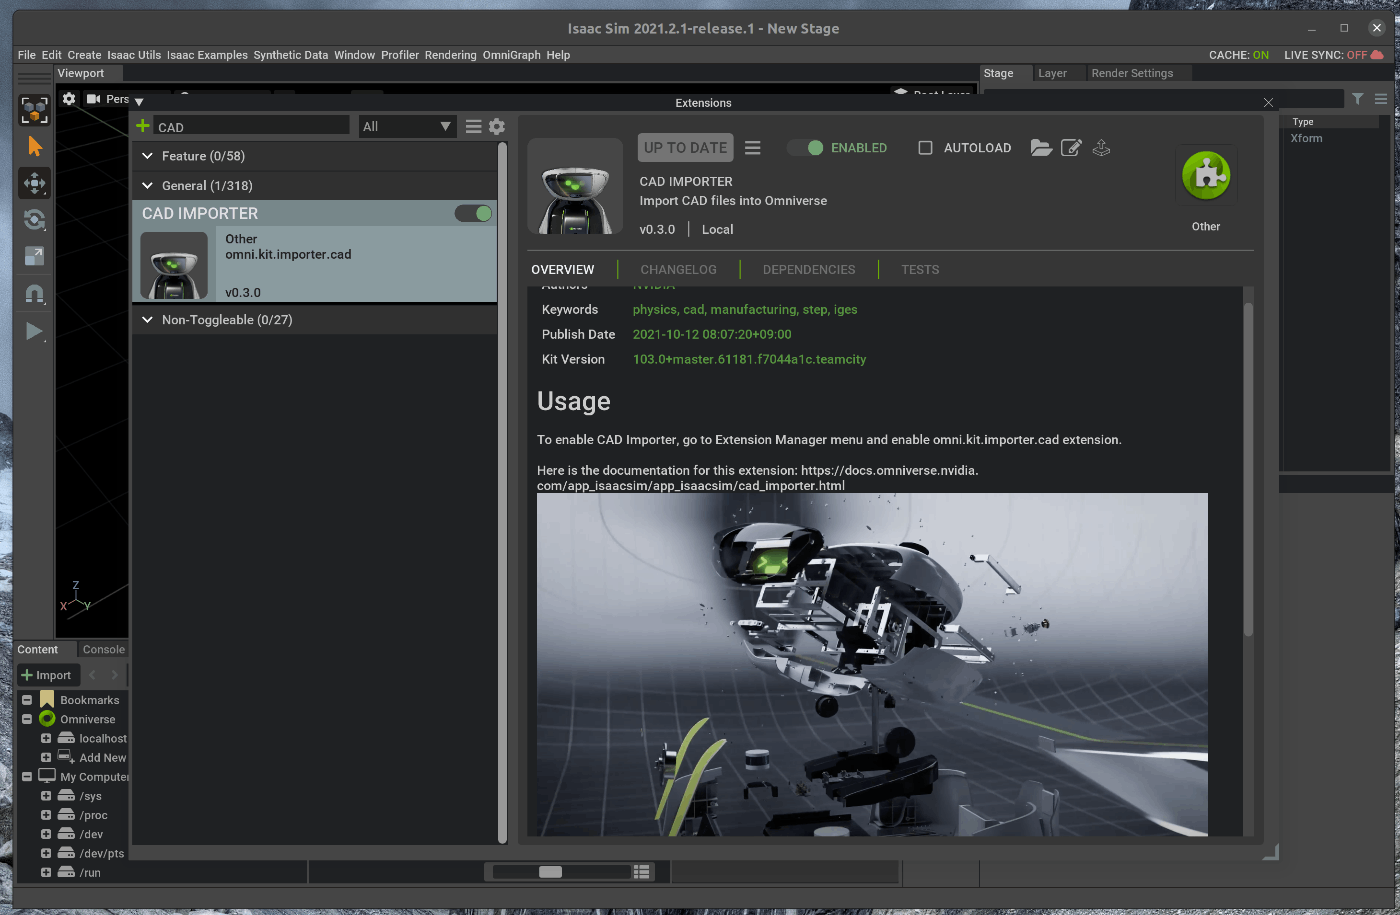
48 |
49 | 上記の状態になっていない場合には、トグルスイッチをクリックし、Enable状態にします。
50 |
51 | ## 2. オブジェクトのインポート(.stp)
52 | ### 2.1 シーンをロードする
53 | メニューバーのCreate > Physics > Groud Planeを選択します。
54 | 
55 | 
56 |
57 | ### 2.2 オブジェクトのインポート
58 | シーン内にオブジェクトを追加します。
59 | 今回は、.stpファイルをインポートします。
60 | メニューバーのFile > Importを選択します。
61 | 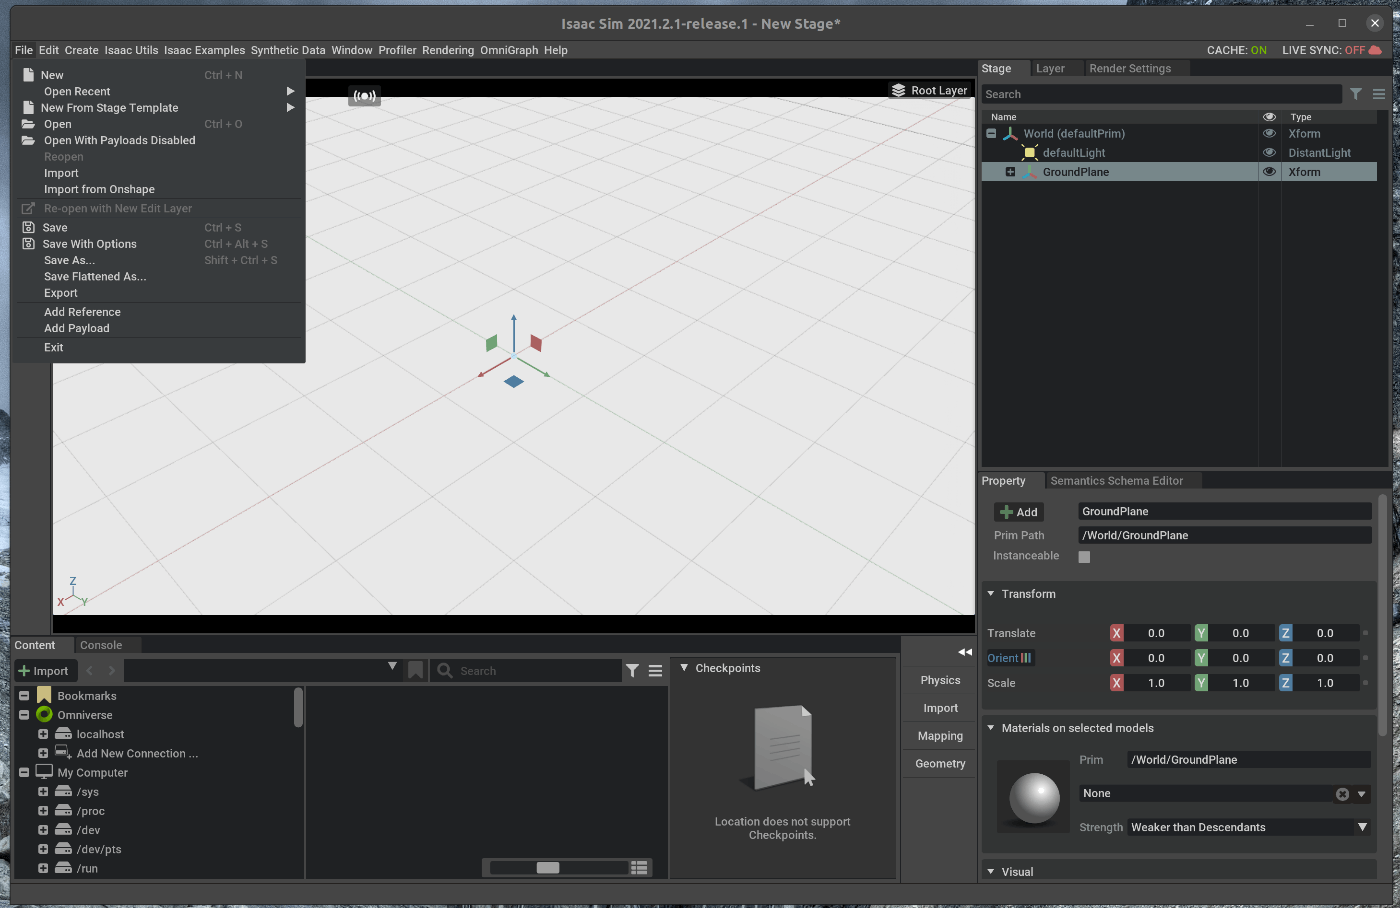
62 |
63 | ポップアップしたWindowにおいて、任意のstpファイルを選択します。
64 | 
65 |
66 | 選択し、Openをクリックすると、Viewport内にstpファイルに記述されているオブジェクトがインポートされます。
67 | 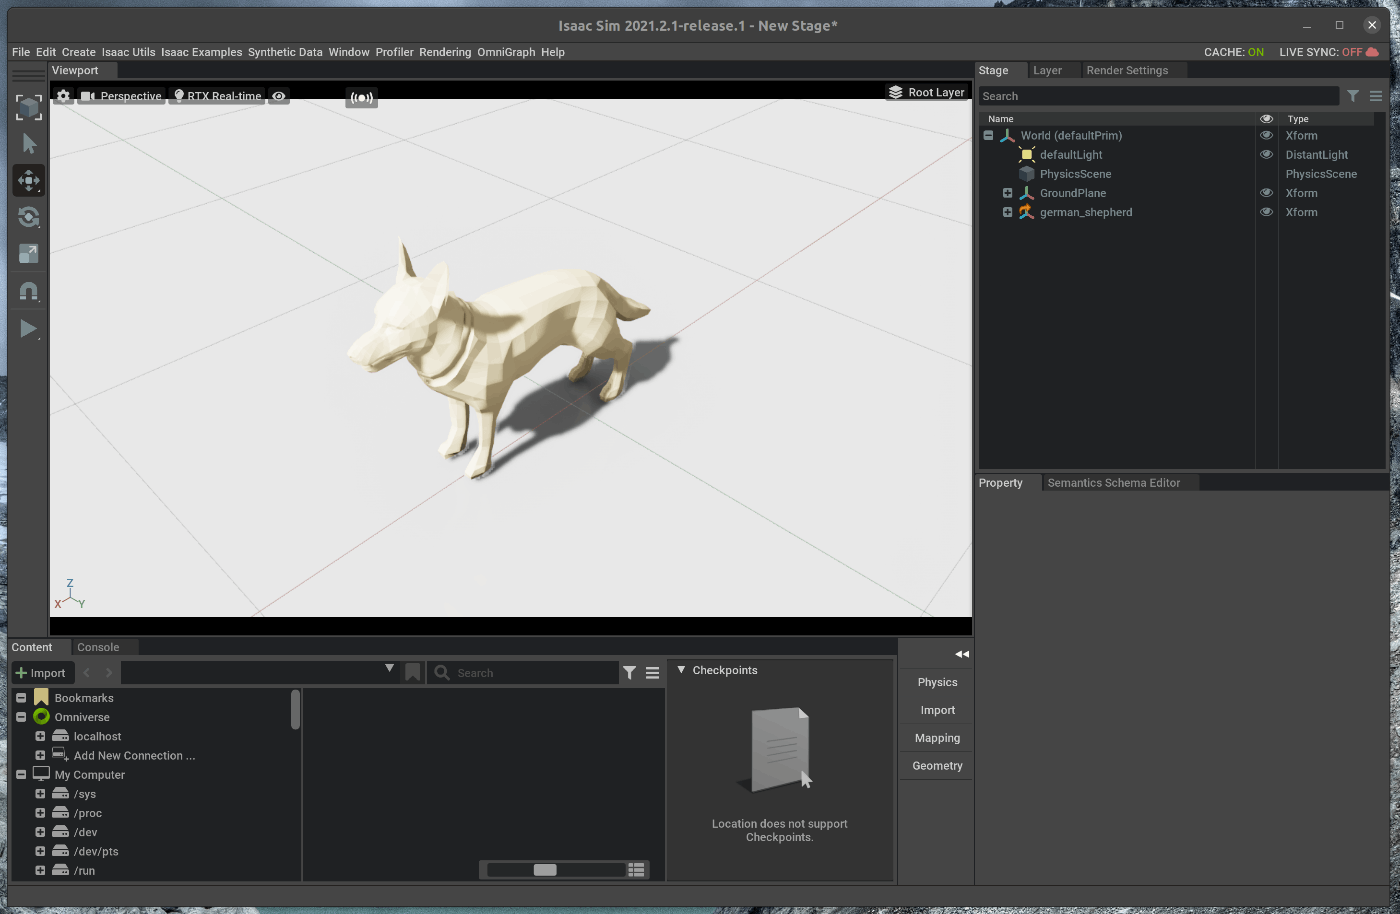
68 |
69 | ## 3. オブジェクトの保存(USDファイル)
70 | ### 3.1 オブジェクトをGropu化する
71 | 右側のStageタブの中で、先ほどインポートしたオブジェクトを選択します。
72 | 選択した状態で、右クリックし、Group Selectedを選択します。
73 | 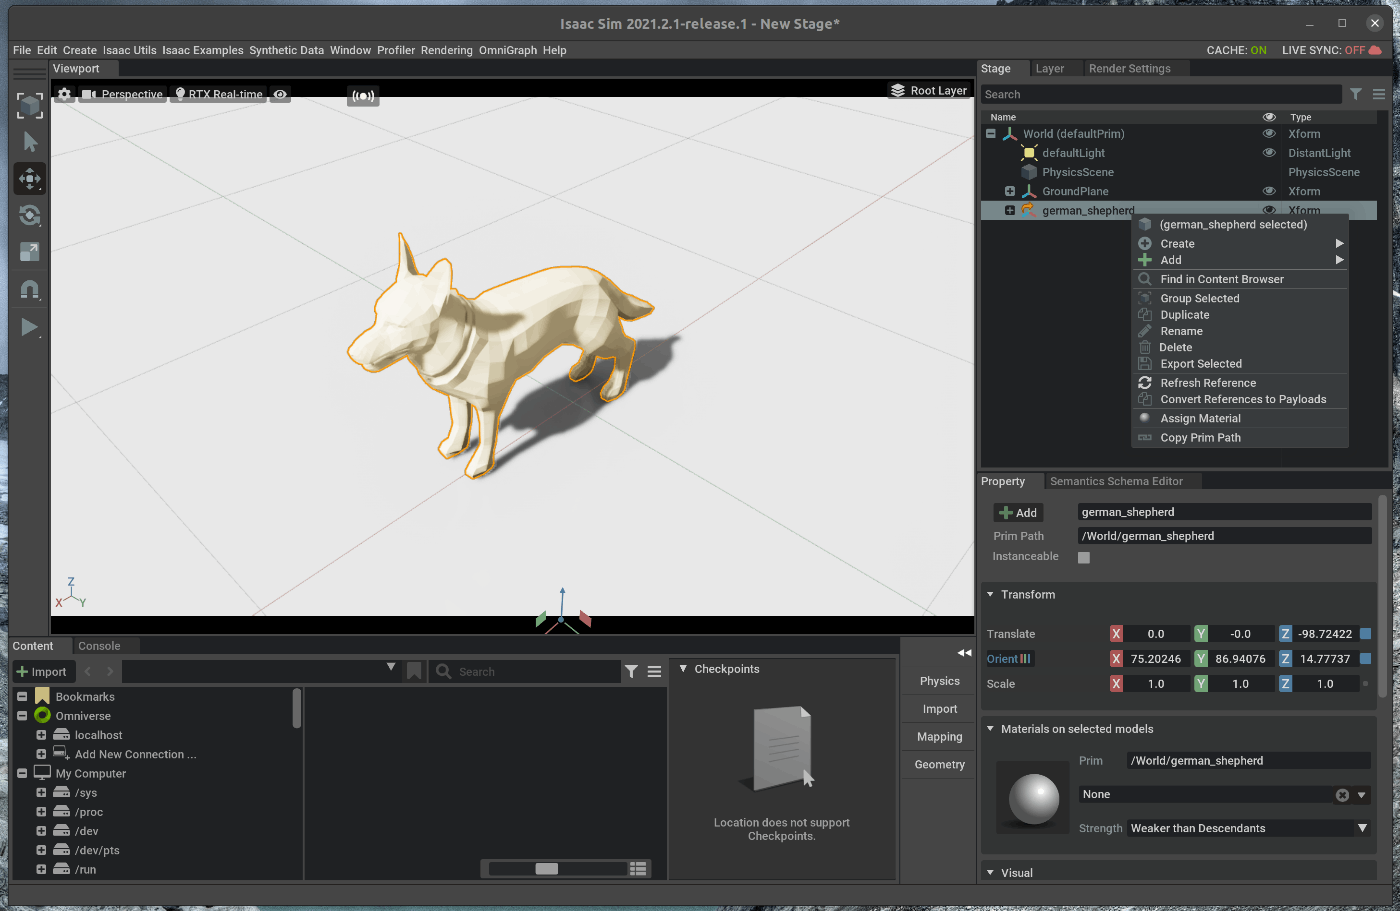
74 |
75 | ### 3.2 GroupをUSDファイルとしてエクスポートする
76 | 右側のStageタブの中で、Groupを選択します。
77 | 選択した状態で、右クリックし、Export Selectedを選択します。
78 |
79 | ポップアップしたウィンドウにて、任意の保存名と保存先を指定します。
80 | 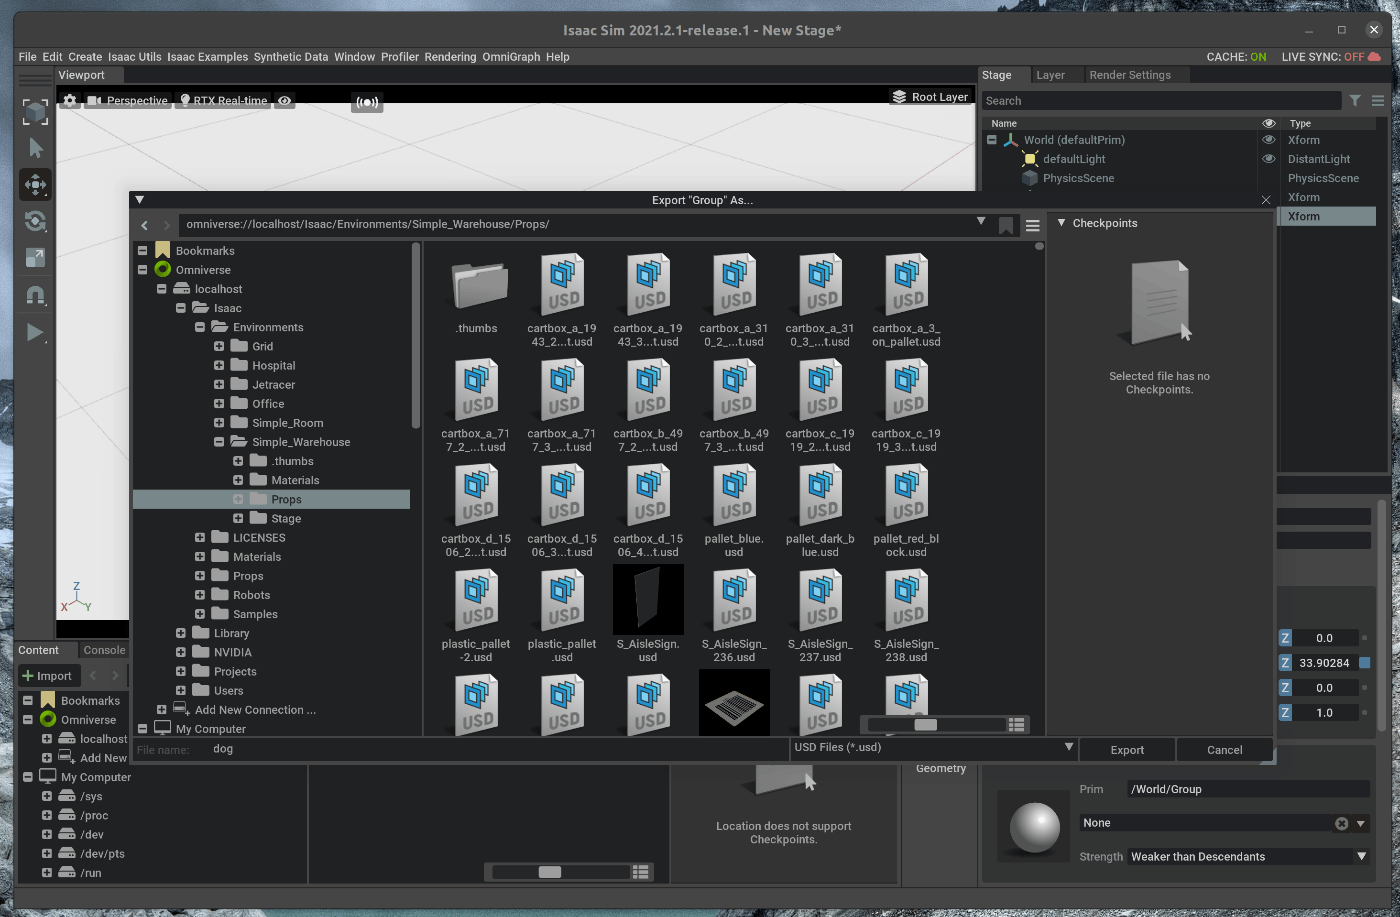
81 |
82 | ### 2.2 保存したUSDファイルをインポートする
83 | 今回はomniverse/localhost/Isaac/Enviroments/Simple_Room/Props/dog.usdとして保存しました。
84 | Viwportの下にあるContentの中から、Viewport内に該当のUSDファイルをドラッグアンドドロップすると、USDファイルとして先ほどインポートしたstpファイルがインポートされます。
85 | 
86 | 
87 |
--------------------------------------------------------------------------------
/tutorials/replicator/applying_and_visualizing_semantic_data/19_applying_and_visualizing_semantic_data.md:
--------------------------------------------------------------------------------
1 | # 概要
2 | GUI上での操作で、シーン内のカメラから合成データを取得します。
3 |
4 | Issac Simのtutorialに上記の内容が記載されており、この内容に沿って進めます。
5 | https://docs.omniverse.nvidia.com/app_isaacsim/app_isaacsim/tutorial_replicator_semantics.html
6 |
7 | # 実行環境
8 |
9 | - インストール実行環境
10 |
11 | | unit | specification |
12 | |:-----------------:|:------------------:|
13 | | CPU | i9-11900H |
14 | | GPU | GeForce RTX 3080 Laptop|
15 | | RAM | 32GB |
16 | | OS | Ubuntu 20.04.3 LTS |
17 |
18 | - Nvidia Driverバージョン
19 | - 510.39.01
20 | - Issac simバージョン
21 | - 2021.2.1
22 |
23 |
24 | # 手順
25 | GUI上での操作で、シーン内のカメラから合成データを取得します。
26 |
27 | 1. テストシーンのロード
28 | 2. 個別のオブジェクトのSemantic dataの生成
29 | 3. Stage全体のSemantic dataの生成
30 |
31 | ## 1. テストシーンのロード
32 | ### 1.1 OmniverseからIssac Simを起動する
33 | 
34 |
35 | ### 1.2 テストシーンをロードする
36 | Isaac Simの下部にあるContentの中から、Isaac > Environments > Simple_Room > simple_room.usdをダブルクリックします。
37 | 
38 |
39 | 次に、メニューバーのSynthetic Data > Sematics Schema Editorを選択します。
40 | 
41 |
42 | ポップアップしたSematics Schema EditorのWindowをドラッグし、Stageの下のPropertyの右隣に追加します。
43 |
44 |
45 | ## 2. 個別のオブジェクトのSemantic dataの生成
46 | ### 2.1 個別のオブジェクトのSemantic dataを生成する
47 | Viwportの中で、左上にある目のアイコンの隣のアイコンを選択します。
48 | 表示されたWindowの中で、RGBとSemantic Segmentaitonにチェックを入れます。
49 | 
50 |
51 | チェック後に、”Visualize”を選択すると、シーン内のカメラで撮影されたRGB画像が表示されます。
52 | 
53 |
54 | 次に、シーン内のテーブルをSemantic Segmentationの結果で認識するように設定を変更します。
55 | Stageの中でRoot > table_low_327 > table_lowを選択します。
56 |
57 | 選択した状態で、Stageの下部にあるPropertyの”Raw USD properties”の中の”semantic:Semantics:params:semanticData”と”semantic:Semantics:params:semanticType”の値を確認します。
58 |
59 | 確認した値を、Semantic Schema Editorの”Apply Semantic data on selected objects”のTableのTypeとDataの値にそれぞれ入力します。
60 | 
61 |
62 | 追加後、Viwportの中で、左上にある目のアイコンの隣のアイコンを選択します。
63 | 再度、”Visualize”を選択すると、シーン内のカメラで撮影されたRGB画像とTableが認識されたSemantic Segmentationの結果が表示されます。
64 | 
65 |
66 | ## 3. Stage全体のSemantic dataの生成
67 | ### 3.1 Stage全体のSemantic dataを生成する
68 |
69 | Semantic Schema Editorの設定値を次の様に変更します。
70 |
71 | - "Prim types to label"に”Mesh”を入力する
72 | - "Class list"に”table,floor,wall”を入力する
73 | 
74 |
75 | 入力後、"Prim types to label"欄の中で、”Generate Labels”を選択します。
76 |
77 | 追加後、Viwportの中で、左上にある目のアイコンの隣のアイコンを選択します。
78 | 
79 |
80 | 再度、”Visualize”を選択すると、シーン内のカメラで撮影されたRGB画像とTableが認識されたSemantic Segmentationの結果が表示されます。
81 | 
--------------------------------------------------------------------------------
/tutorials/replicator/replicator_playgroud/23_replicator_playgroud.md:
--------------------------------------------------------------------------------
1 | # 手順
2 | 学習用のデータセットを作成し、Replicator Playgroudからモデルの学習を行います。
3 | 今回の例はサンプルとして説明されており、学習したモデルを保存することはできません、、、、
4 | 合成データの作成から学習までGUIの操作で完結しているため、操作の利便性はかなり高いと感じました。
5 |
6 | 1. 合成データの作成
7 | 2. Replicator Playgroudを用いた学習
8 |
9 | ## 1. 合成データの作成
10 | ### 1.1 OmniverseからIssac Simを起動する
11 | 
12 |
13 | ### 1.2 シーンをロードする
14 | メニューバーのCreate > Synthetic Data > Replicator playgroudを選択します。
15 | 
16 |
17 | ポップアップした”Replicator playgroud”のWindowをViewport下部のConsoleの右隣に追加します。
18 | 
19 |
20 | 追加したReplicator playgroudのScene and Randamization > Base Sceneをクリックし、”Simple Room”を選択します。
21 | 選択後、”Base Scene”の下の”LOAD”をクリックすると、”Simple Room”がロードされます。
22 | 
23 |
24 | ### 1.3 シーンのColorを変更する
25 |
26 | 追加したReplicator playgroudのScene and Randamization > Select randamzationをクリックし、”Color”を選択します。
27 | 選択後、”Select randamzation”の下の”ADD”をクリックすると、ランダムなカラーが適用されます。
28 | 適用されたカラーは、”ADD”の下にある”Preview”を選択すると、表示されます。
29 | 
30 |
31 | ### 1.4 合成データのデータセットを作成する
32 | メニューバーのCreate > Synthetic Data > Synthetic Data Recodarを選択します。
33 | ポップアップした”Synthetic Data Recoda”のWindowをViewport下部のReplicator playgroudyの右隣に追加します。
34 | 
35 |
36 | Synthetic Data Recodar > Sensor Settingの中で、学習に必要なデータにチェックを入れます。
37 | チェックを入れるデータは次の通りです。
38 |
39 | - RGB ( status )
40 | - Instance Segmentation (status, Save array)
41 | - 2D Tight Bounding Box (status, Save array)
42 |
43 | また、学習データの保存先ディレクトリは、Recodar Settingsの”output directory”において指定します。
44 | 
45 |
46 | チェック後、シミュレータ左側のツールバーの”PLAY”を押すと、シーンのカラーがランダムに変更されます。
47 | 
48 |
49 | Synthetic Data RecodarのRecodar Settingにある”Start Recording”を選択します。
50 | 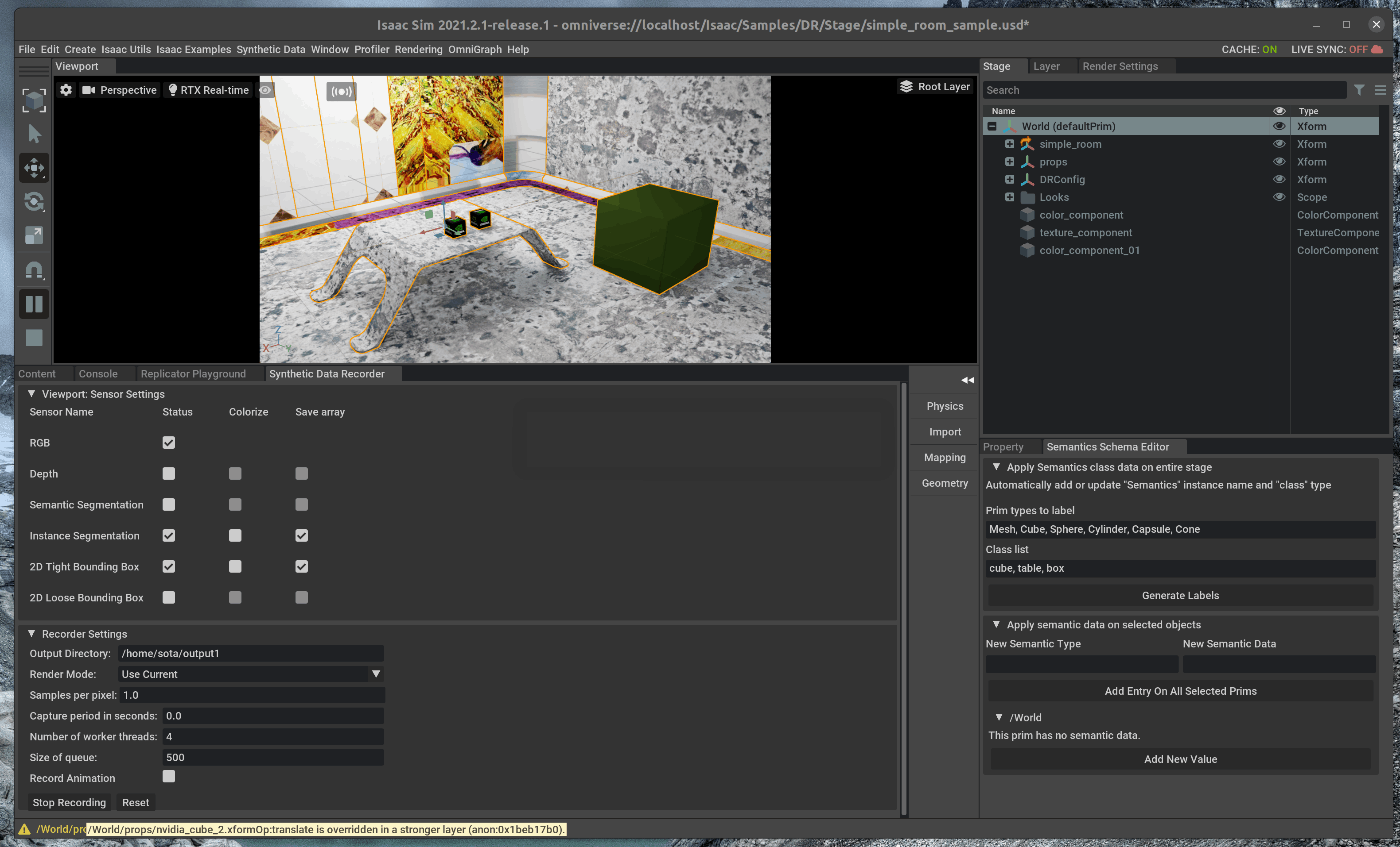
51 |
52 | 10sec程度経過後、”Stop Recording”を選択します。
53 |
54 | ## 2. Replicator Playgroudを用いた学習
55 |
56 | Replicator playgroudのTrainingの設定値を次の通りに変更します。
57 |
58 | - "input directory"を先ほど学習データを生成したSynthetic Data Recodarの出力先ディレクトリに変更する
59 | - "Training Scenario"を”instance Segmentation”に設定する
60 | - instance segmentationはMaskR-CNNが使用されています。
61 |
62 | 
63 |
64 | 設定後、Replicator playgroudのTrainingの”LOAD”を選択します。
65 | Replicator playgroudのTrainingの”GENERATEを選択すると、データセットの統計値のグラフ表示されます。また、”Visualize”を選択すると、学習データを可視化することができます。
66 | 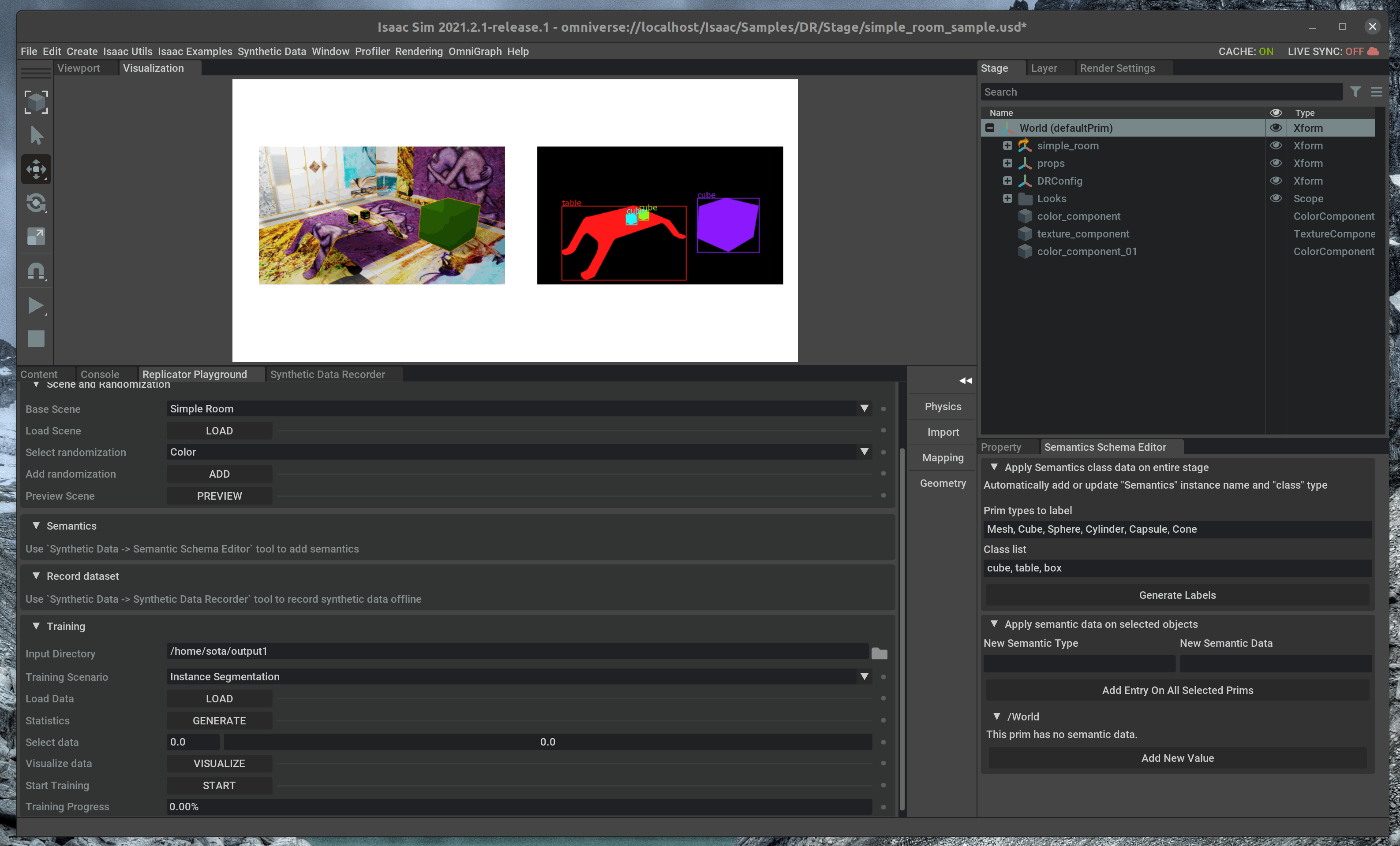
67 |
68 |
69 | 最後に、Replicator playgroudのTrainingの”START"を選択すると、学習が開始されます。
70 | 
71 |
72 | 学習が経過するにつれて、学習できていることが確認できます。
73 | 
74 | 
75 | 
--------------------------------------------------------------------------------
/tutorials/required/required_interface/6_required_interface.md:
--------------------------------------------------------------------------------
1 | # 概要
2 | GUI上でExtensionを追加します。
3 |
4 | Issac Simのtutorialに上記の内容が記載されており、この内容に沿って進めます。
5 | https://docs.omniverse.nvidia.com/app_isaacsim/app_isaacsim/tutorial_required_interface.html
6 | # 実行環境
7 |
8 | - インストール実行環境
9 |
10 | | unit | specification |
11 | |:-----------------:|:------------------:|
12 | | CPU | i9-11900H |
13 | | GPU | GeForce RTX 3080 Laptop|
14 | | RAM | 32GB |
15 | | OS | Ubuntu 20.04.3 LTS |
16 |
17 | - Nvidia Driverバージョン
18 | - 510.39.01
19 | - Issac simバージョン
20 | - 2021.2.1
21 |
22 | # 概要
23 |
24 | Isaac Sim上では、GUI上からの操作性を向上するExtensionが容易されています。
25 | 今回は、Extensionの使用例として、”TimeSample Editor”を用いて、オブジェクトを操作します。
26 | GUIでの操作はすべてPythonのAPIから操作することが可能です。
27 |
28 | 1. GUI内にObjectを追加
29 | 2. Extensionの追加
30 |
31 |
32 | ## 1. GUI内にObjectを追加
33 | こちらのページに記載してある手順を進めます。
34 | https://docs.omniverse.nvidia.com/app_isaacsim/app_isaacsim/tutorial_required_interface.html
35 |
36 | ### 1.1 OmniverseからIssac Simを起動する
37 | 
38 |
39 | ### 1.2 シーンにObjectを追加
40 | メニューバーのCCreate > Shapes > Cubeを選択します。
41 | 
42 |
43 | 次に、球体をシーンに追加します。
44 | メニューバーのCreate > Shapes > Sphereを選択します。
45 |
46 | 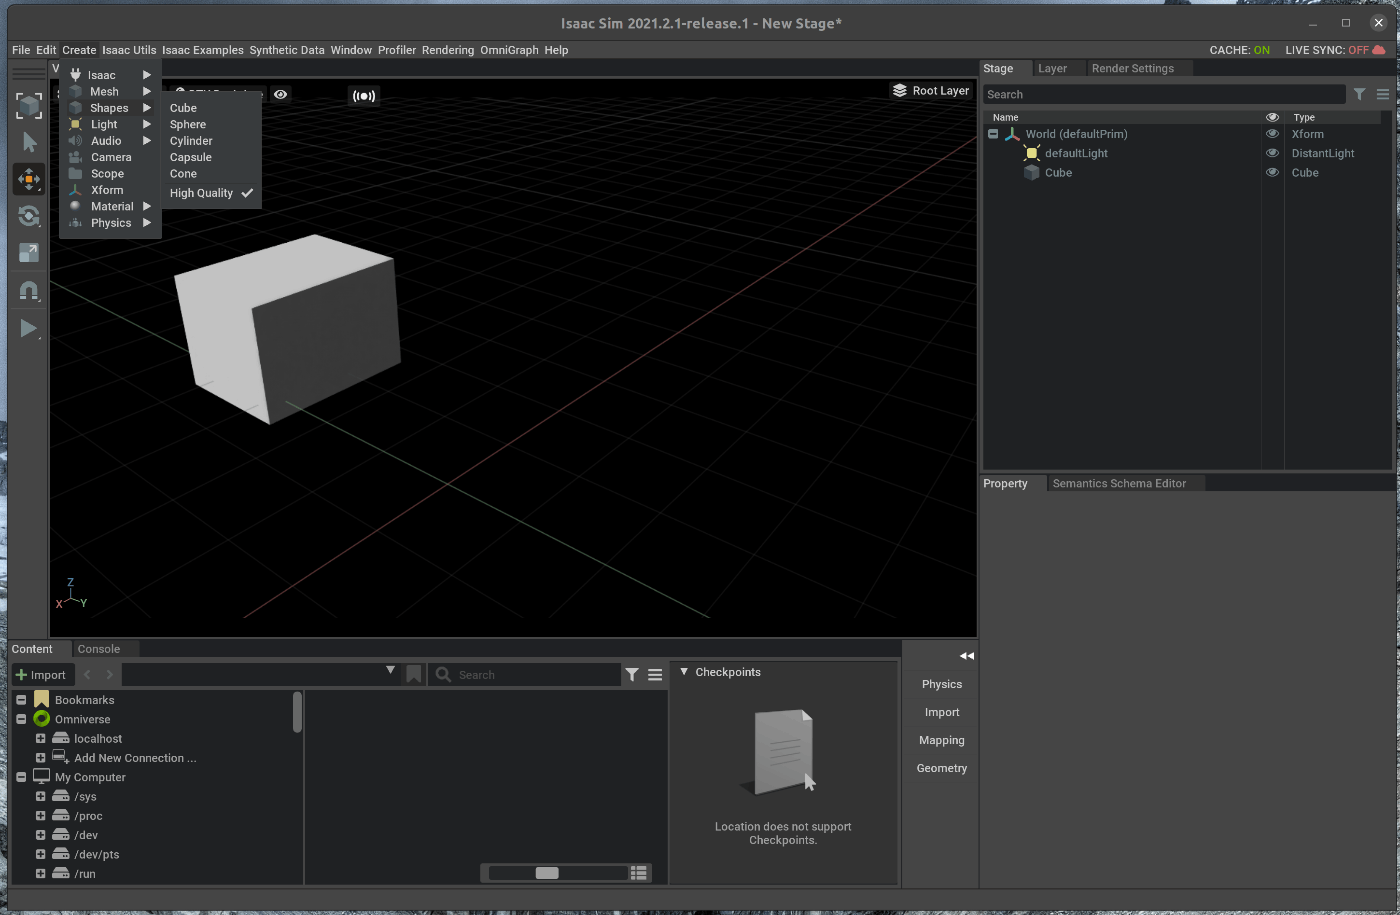
47 | 
48 |
49 | ### 1.3 Objectの関係
50 | 右側のStageタブの中でCubeをドラッグアンドドロップでSphereの下に移動させます。
51 | 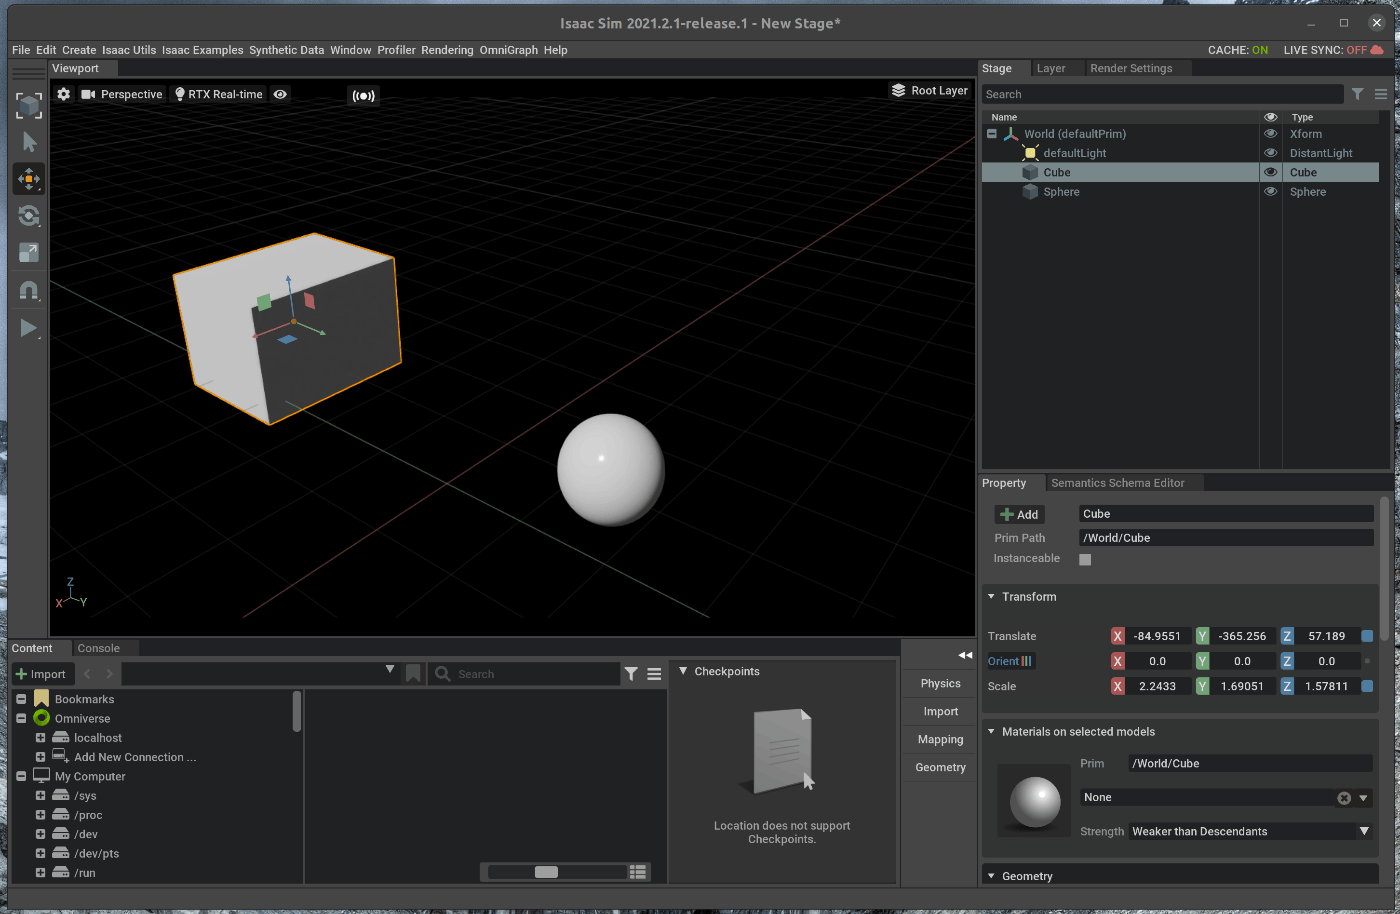
52 | この状態で、Sphereをシーン内で動かすと、CubeもSphereとの相対位置を保ったまま、動きます。
53 | 
54 |
55 | CubeとSphereを独立させる場合には、CubeをドラッグアンドドロップでWorldの下に移動させます。
56 |
57 | 
58 |
59 |
60 | ## 2. Extensionの追加
61 |
62 | ## 2.1 TimeSample Editorの有効化
63 | シーンにExtensionを追加します。
64 | TimeSample Editorは時間ごとのObjectの動きを記録し、再生するExtensionです。
65 | メニューバーのWindow > Extensionsを選択します。
66 | 
67 | 
68 |
69 | ポップアップしたウィンドウのSearchの部分に“TimeSample Editor”を入力します。
70 | 
71 |
72 | 検索結果の”TimeSample Editor”の右側のトグルボタンをクリックし、Enableにします。
73 | Enableにすると、インストールされます。
74 | 
75 |
76 | インストール後、ポップアップされた”TimeSample Editor”のウィンドウを、右側のStageの下にドラッグアンドドロップで移動させます。
77 | 
78 |
79 | ## 2.2 TimeSample Editorの設定
80 | 右側のStageの中のSphereを選択します。
81 | 
82 |
83 | Stageの下についかしたTimeSample Editorの”xformOp:translate”の”Add key”を選択します。
84 | 
85 |
86 | Viewportの中のTimelineを50程度の位置に変更します。
87 | この状態で、Sphereを動かします。
88 | Viewportの中のTimelineを100程度の位置に変更します。
89 | この状態で、Sphereを動かします。
90 |
91 | 
92 |
93 | 上記の設定の完了後、'Space'キーを押すと、Animationが開始されます。
94 |
--------------------------------------------------------------------------------
/tutorials/gui/change_object_texture/34_change_object_texture.md:
--------------------------------------------------------------------------------
1 | # 概要
2 | Isaac SimのGUI上でオブジェクトのテクスチャを変更します。
3 |
4 |
5 | # 実行環境
6 |
7 | - インストール実行環境
8 |
9 | | unit | specification |
10 | |:-----------------:|:------------------:|
11 | | CPU | i9-11900H |
12 | | GPU | GeForce RTX 3080 Laptop|
13 | | RAM | 32GB |
14 | | OS | Ubuntu 20.04.3 LTS |
15 |
16 | - Nvidia Driverバージョン
17 | - 510.39.01
18 | - Issac simバージョン
19 | - 2021.2.1
20 |
21 |
22 | # 手順
23 | 大まかな手順は次の通りです。
24 |
25 | 1. オブジェクトのテクスチャを変更
26 | 2. テクスチャを変更したオブジェクトの保存
27 |
28 | 物体認識等の学習モデル用の正解データを作成する際に、オブジェクトのテクスチャを変更したいと思います。
29 | このような場合に、GUIから任意のテクスチャに変更する方法を紹介します。
30 |
31 | ## 1. オブジェクトのテクスチャを変更
32 | ### 1.1 OmniverseからIssac Simを起動する
33 | 
34 |
35 | ### 1.2 シーンをロードする
36 | メニューバーのCreate > Physics > Groud Planeを選択します。
37 | 
38 |
39 | ### 1.3 オブジェクトの追加
40 | シーン内にオブジェクトを追加します。
41 | 今回は、前回作成したウォーターサーバーと机をまとめたオブジェクトを追加します。
42 |
43 | Viewportの下にあるContentの中で、omniverse/localhost/Isaac/Enviroments/Simple_Room/Props/water_server_on_desk.usdを選択します。
44 | 選択した状態で、選択したUSDファイルをドラッグアンドドロップでViewport内に移動します。
45 | 移動すると、シーン内にウォーターサーバーと机をまとめたオブジェクトが追加されます。
46 | 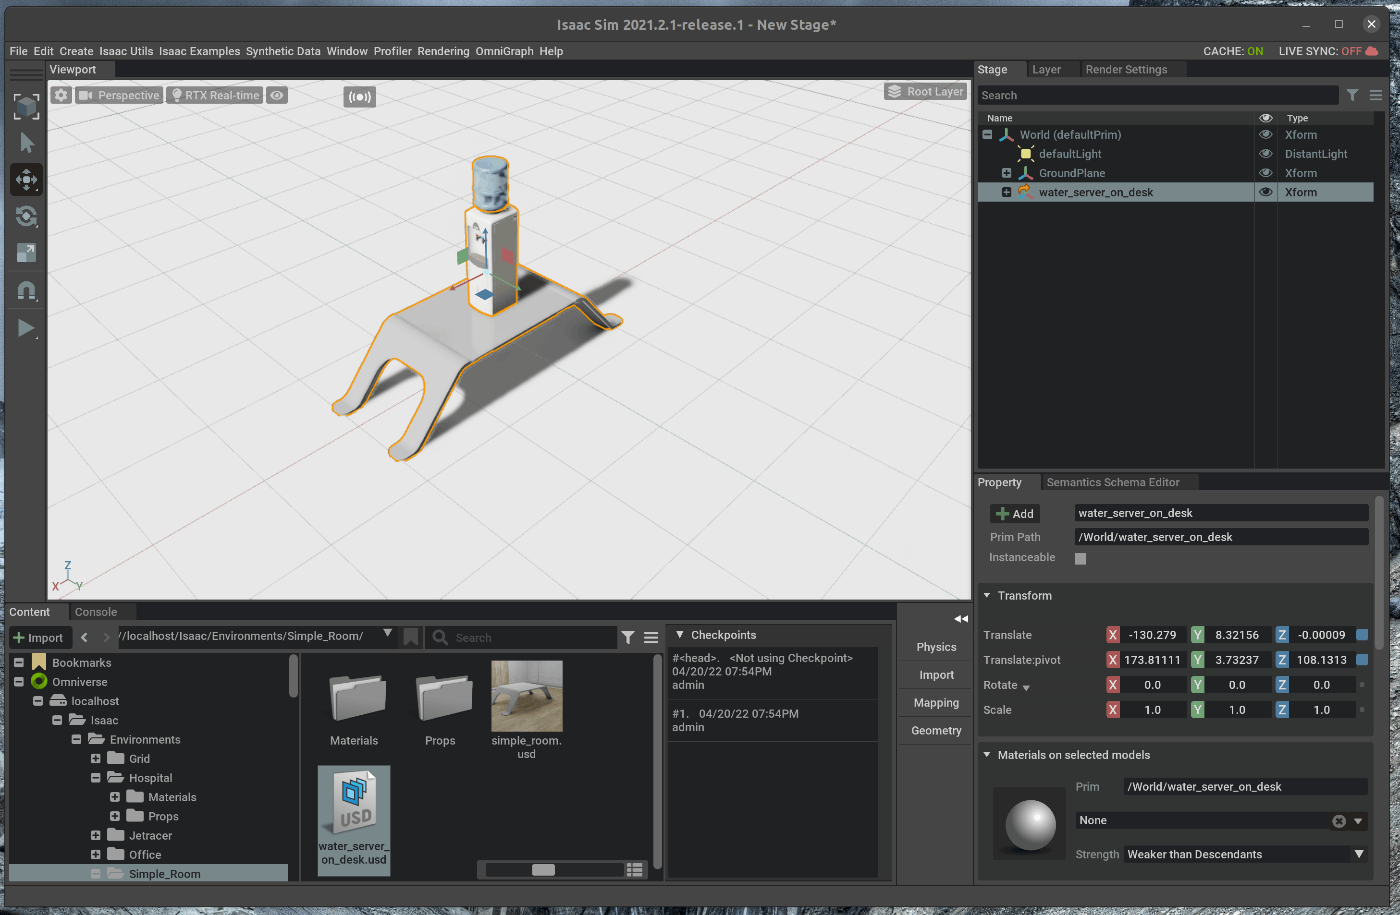
47 |
48 | ### 1.4 オブジェクトのテクスチャを変更する
49 | 右側のStageタブの中で、water_server_on_desk > SM_WaterDispenser_01a > MI_WaterDispenser_01aを選択します。
50 | 選択すると、Stageタブ下のPropeertyの中に、Material Shader > Inputsが表示されます。
51 | 
52 | 
53 |
54 | マテリアルについての詳細な説明は、Omniverseのマニュアルに記載されています。
55 | https://docs.omniverse.nvidia.com/prod_materials-and-rendering/prod_materials-and-rendering/materials.html
56 |
57 | 今回は、Inputs:Normal, Inputs:Albedo, Inputs:RMAをそれぞれ、空の風景のテクスチャに変更します。
58 |
59 | まず、Inputs:Normalを変更します。
60 | Inputs:Normalの横にあるフォルダマークをクリックし、ポップアップしたウィンドウにおいて、T_Sky_Blue.pngを選択します。
61 | 
62 | 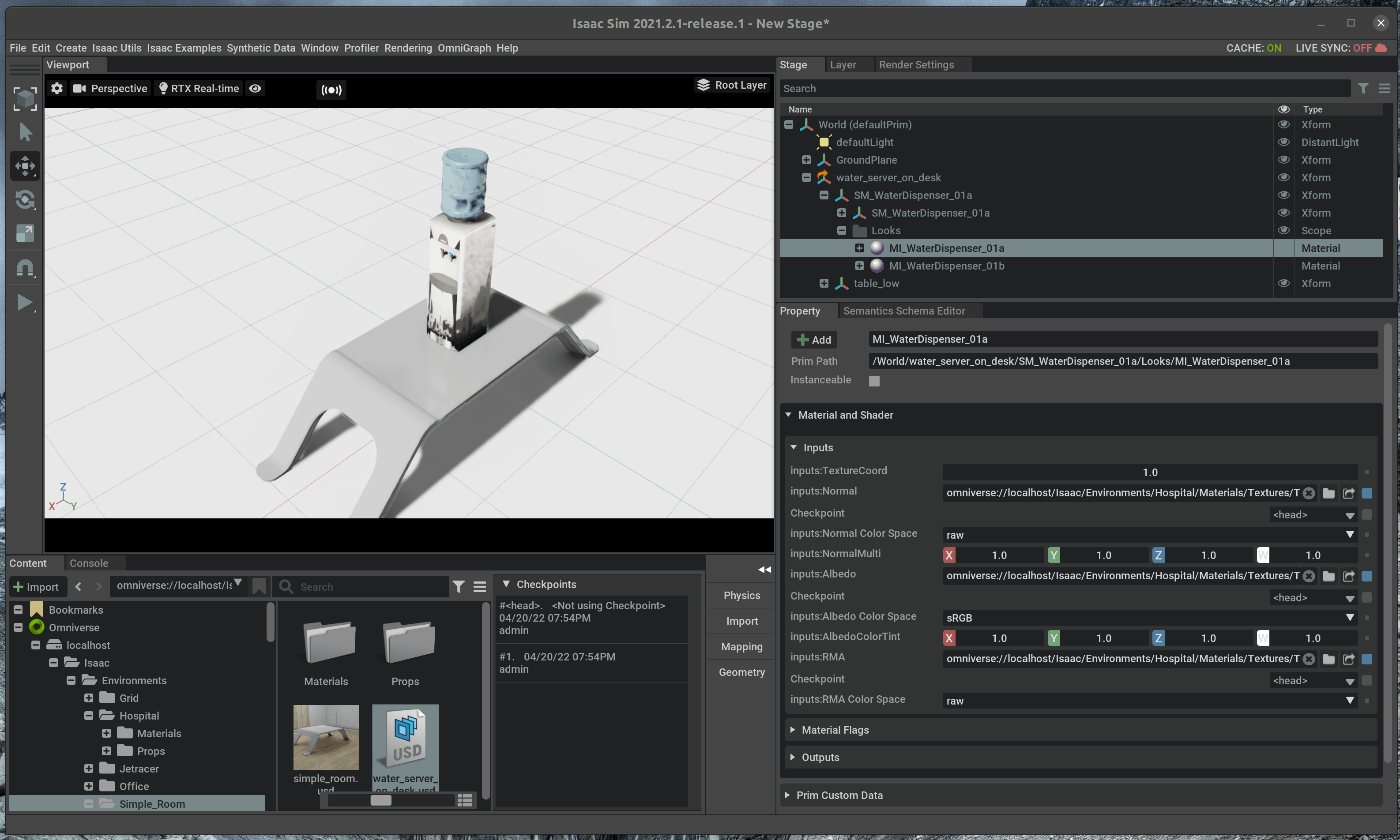
63 |
64 | 次に、Inputs:Albedoを変更します。
65 | Inputs:Albedoの横にあるフォルダマークをクリックし、ポップアップしたウィンドウにおいて、T_Sky_Blue.pngを選択します。
66 | 
67 | 
68 |
69 | 最後に、Inputs:RMAを変更します。
70 | Inputs:RMAの横にあるフォルダマークをクリックし、ポップアップしたウィンドウにおいて、T_Sky_Blue.pngを選択します。
71 | 
72 |
73 |
74 | ## 2. テクスチャを変更したオブジェクトの保存
75 | ### 2.1 GroupをUSDファイルとしてエクスポートする
76 |
77 | 右側のStageタブの中で、Groupを選択します。
78 | 選択した状態で、右クリックし、Export Selectedを選択します。
79 | 
80 |
81 | ポップアップしたウィンドウにて、任意の保存名と保存先を指定します。
82 | 
83 |
84 |
85 | ### 2.2 保存したUSDファイルをインポートする
86 | 今回はomniverse/localhost/Isaac/Enviroments/Simple_Room/Props/water_server_with_texture_on_desk.usdとして保存しました。
87 | 1.3の手順と同様にViewport内に該当のUSDファイルをドラッグアンドドロップすると、机の上にウォーターサーバーが設置されているオブジェクトが追加されます。
88 | 
89 | 
--------------------------------------------------------------------------------
/tutorials/advanced/jupyter_notebook/18_jupyter_notebook.md:
--------------------------------------------------------------------------------
1 | # 概要
2 | Jupyter notebook上からソースコードを実行し、Stageをインタラクティブに操作します。
3 |
4 | Issac Simのtutorialに上記の内容が記載されており、この内容に沿って進めます。
5 | https://docs.omniverse.nvidia.com/app_isaacsim/app_isaacsim/tutorial_advanced_jupyter.html
6 |
7 |
8 | # 実行環境
9 |
10 | - インストール実行環境
11 |
12 | | unit | specification |
13 | |:-----------------:|:------------------:|
14 | | CPU | i9-11900H |
15 | | GPU | GeForce RTX 3080 Laptop|
16 | | RAM | 32GB |
17 | | OS | Ubuntu 20.04.3 LTS |
18 |
19 | - Nvidia Driverバージョン
20 | - 510.39.01
21 | - Issac simバージョン
22 | - 2021.2.1
23 |
24 |
25 | # 手順
26 | Jupyter notebook上からScriptを実行し、Stageをインタラクティブに操作します。
27 | シミュレーション内のStageを、Jupyter notebookから操作する際には、Stageの設定を変更します。
28 |
29 | 1. Jupyter notebookからシミュレーションを実行する
30 | 2. Jupyter notebookからインタラクティブに操作する
31 |
32 | ## 1. Jupyter notebookからシミュレーションを実行する
33 | こちらのページに記載してある手順を進めます。
34 |
35 | ### 1.1 Jupyter notebookを起動する
36 | terminalで次のコマンドを実行します。
37 |
38 | ~~~ bash:shell
39 | $ cd ~/.local/share/ov/pkg/isaac_sim-2021.2.1/
40 | $ ./jupyter_notebook.sh standalone_examples/notebooks/scene_generation.ipynb
41 | ~~~
42 |
43 | 
44 | 
45 |
46 | ./jupyter_notebook.shを実行すると、Jupyter notebookが起動します。
47 | 
48 |
49 | ### 1.2 シーンをロードする
50 | Jupyter notebook上で、1つ目のCellを実行します。
51 |
52 | 次に、Isaac Simの下部にあるContentのOmniverse > localhost > Users > "User名" > temp_jupyter_stage.usdをダブルクリックします。
53 | 
54 |
55 | ## 1.3 Live SyncをEnableにする
56 | 読み込んだシーンをJupyter notebookから操作できるように、設定を変更します。
57 | Isaac Simの右上にあるLayerタブを選択し、Cloudアイコンをクリックします。
58 | 
59 |
60 | クリックすると、Isaac Simの上部に存在するLive Syncのアイコンの色が緑色に変化します。
61 | 
62 |
63 | ## 1.4 Jupyter notebookから操作する
64 | Jupyter NootebookのCell 1以外のCellを上から順番に実行します。
65 | 実行する前に、最後のCellに記載されている、SimulaterのShutdownコマンドをコメントアウトします。
66 |
67 | 最後のCellの1つ前のCellを実行すると、シーンに設置したカメラから取得されたRGB画像、Depth画像、Semantic Segmentaitonの結果が表示されます。
68 | 
69 |
70 | ## 2. Jupyter notebookからインタラクティブに操作する
71 |
72 | シーン内のオブジェクトをJupyter notebookから操作します。
73 | まず、Viewport内で右クリックし、Create > Mesh > Cone選択します。
74 | 
75 |
76 | 次に、SimulaterのShutdownコマンドをコメントアウトしたcellに次のコードを追加します。
77 |
78 | ~~~ add_process:Python3
79 | carter_prim = stage.GetPrimAtPath(stage_path)
80 | print(carter_prim)
81 |
82 | xform_prim = XFormPrim(stage_path)
83 | xform_prim.set_world_pose(position = np.array([0,100,0]))
84 | simulation_world.render()
85 |
86 | simulation_world.step()
87 | cone_prim = stage.GetPrimAtPath('/Cone')
88 | print(cone_prim)
89 | ~~~
90 | 
91 |
92 | 追加したコードでは、ロボットの位置を変更し、シーン内に追加したConeのPrimを取得しています。
93 | 追加後、編集したCellを実行します。
94 |
95 | 実行後、最後のCellの1つ前のCellを再実行すると、Coneが追加されたシーンでの撮影結果が表示されます。
96 | 
97 |
98 |
99 |
100 |
--------------------------------------------------------------------------------
/tutorials/ros/lidar_sensors/27_lidar_sensors.md:
--------------------------------------------------------------------------------
1 | # 概要
2 | Isaac Sim上に配置したLiDARからのlazer_scanをros topicとして発行します。
3 |
4 | Issac Simのtutorialに上記の内容が記載されており、この内容に沿って進めます。
5 | https://docs.omniverse.nvidia.com/app_isaacsim/app_isaacsim/tutorial_ros_sensors.html
6 |
7 | # 実行環境
8 |
9 | - インストール実行環境
10 |
11 | | unit | specification |
12 | |:-----------------:|:------------------:|
13 | | CPU | i9-11900H |
14 | | GPU | GeForce RTX 3080 Laptop|
15 | | RAM | 32GB |
16 | | OS | Ubuntu 20.04.3 LTS |
17 |
18 | - Nvidia Driverバージョン
19 | - 510.39.01
20 | - Issac simバージョン
21 | - 2021.2.1
22 |
23 |
24 | # 手順
25 | Isaac Sim上に配置したLiDARからのlazer_scanをros topicとして発行します。
26 | シーンファイルとして、Turtlebotを追加したシーンファイルを使用します。
27 | シーンファイルはこちらからダウンロードできます。
28 |
29 | 1. シーンのロード
30 | 2. ROS LiDARの追加
31 | 3. Topicの確認
32 |
33 | ## 1. シーンのロード
34 | ### 1.1 OmniverseからIssac Simを起動する
35 | 
36 |
37 | ### 1.2 シーンをロードする
38 | Isaac Simの下部にあるContentの中から、”ダウンロードしたディレクトリ” > simple_room_apriltag_with_camera.usdをダブルクリックします。
39 | 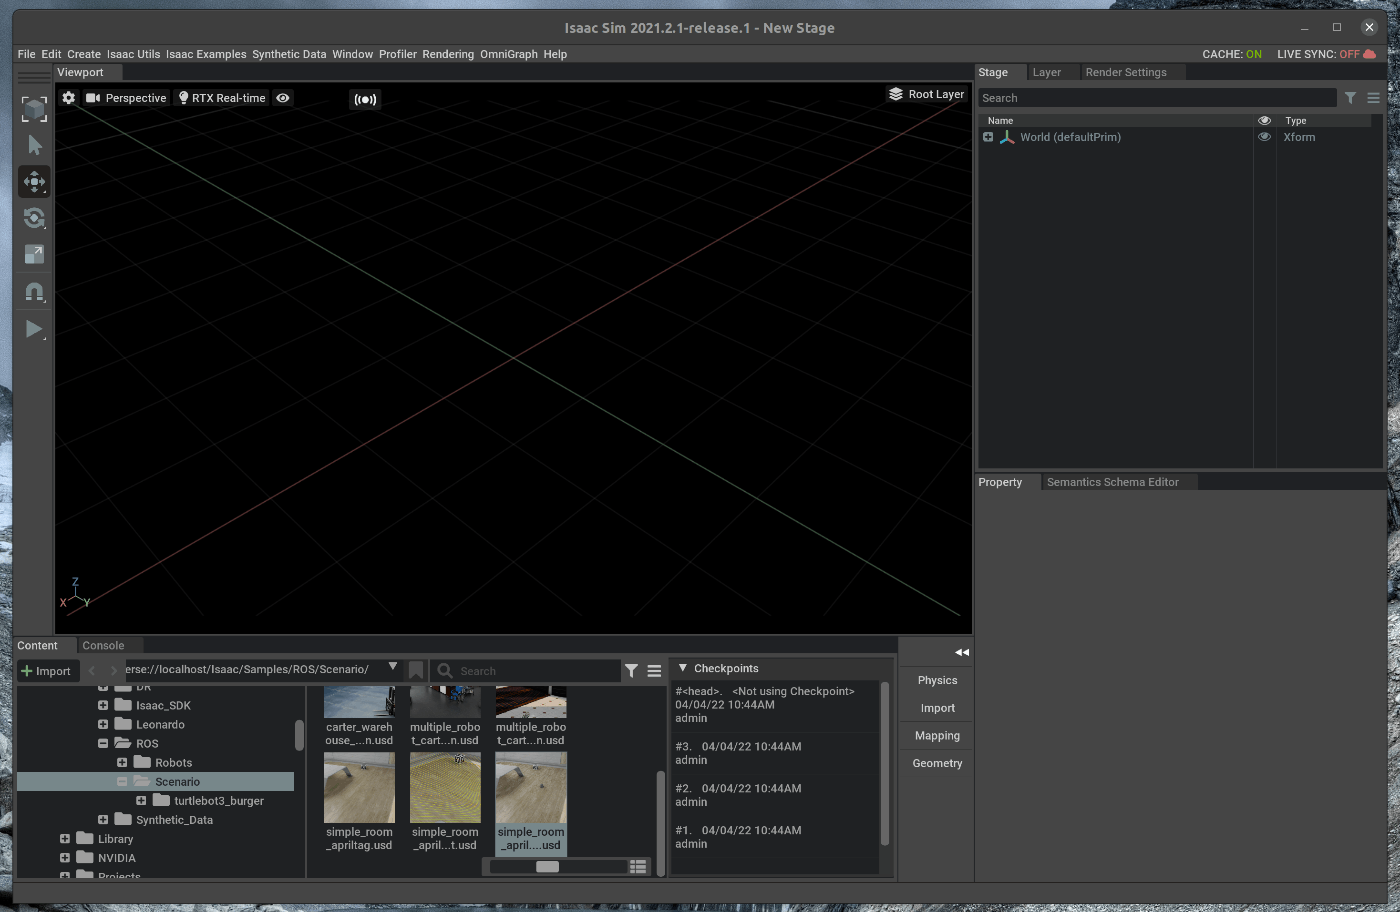
40 | 
41 |
42 | ## 2. ROS LiDARの追加
43 | ### 2.1 LiDARを追加する
44 | メニューバーのCreate > Isaac > Sensors > Lidar > Rotatingを選択します。
45 | 
46 |
47 | 右側のStageの中で追加したLiDARをWorld > turtlebot3_burger > base_scanの下にドラッグアンドドロップします。
48 | 
49 |
50 | 右側のStageの中で追加したLiDARを選択します。
51 | Stage下部のTransformの値を次の通りに変更します。
52 |
53 | - translateのXを0.0にする
54 | - translateのYを0.0にする
55 | - translateのZを0.0にする
56 | 
57 |
58 | Stage下部のpropertyのRaw USD propertiesを開きます。
59 | 設定値の中で次の値を変更します。
60 |
61 | - maxRangeに25を設定します
62 | - drawLinesにチェックを入れる
63 | 
64 |
65 | この状態で、Viewportの左側のPLAYボタンを押すと、LiDARのレーザ光が出力されます。
66 | 
67 |
68 | ### 2.2 ROS LiDARを追加する
69 | メニューバーのCreate > Isaac > ROS > Lidarを選択します。
70 | 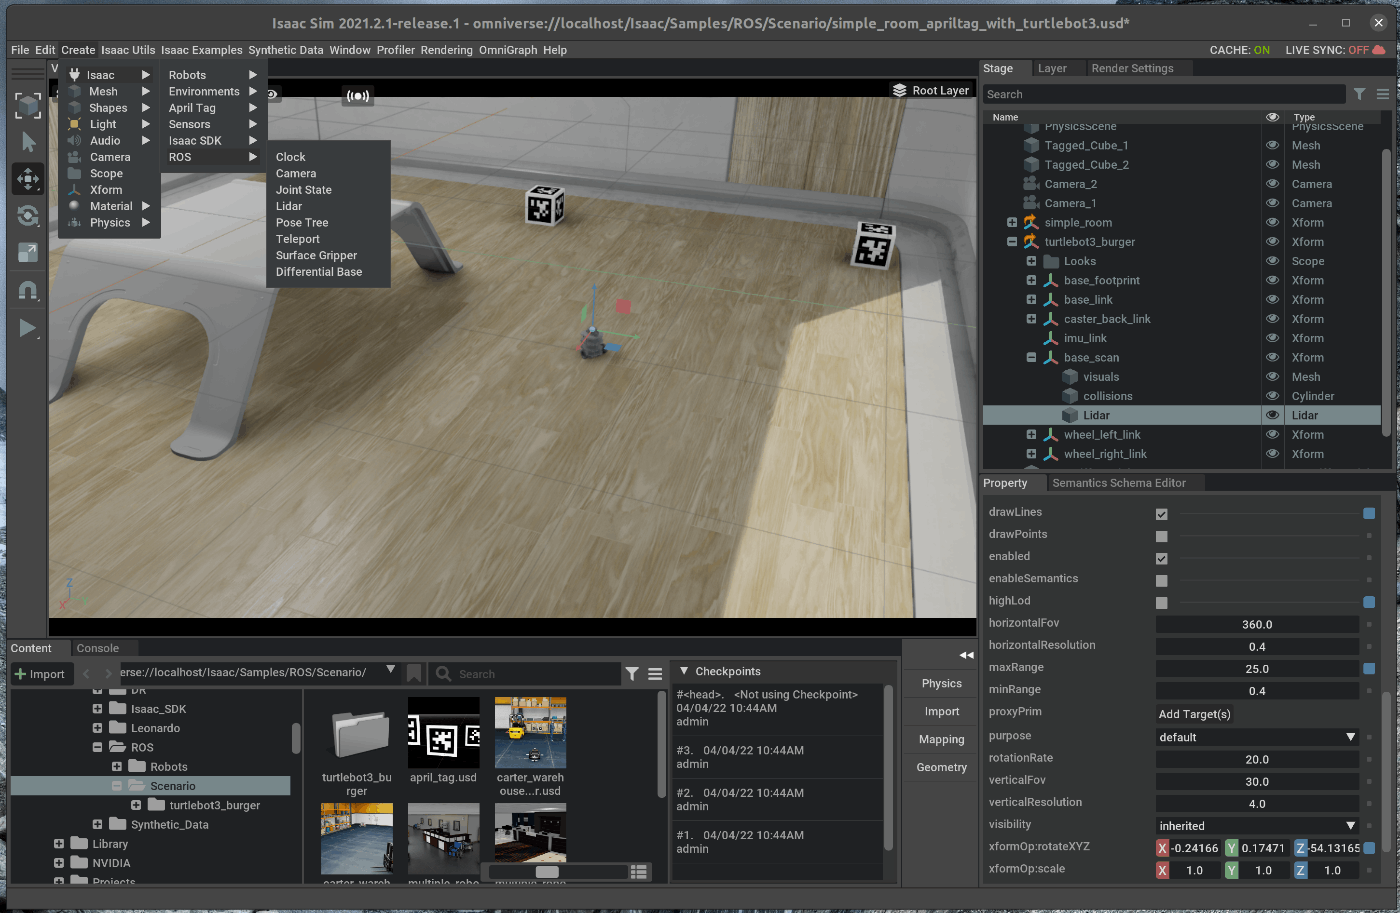
71 |
72 | 右側のStageの中で、追加したROS_LiDARを選択します。
73 | 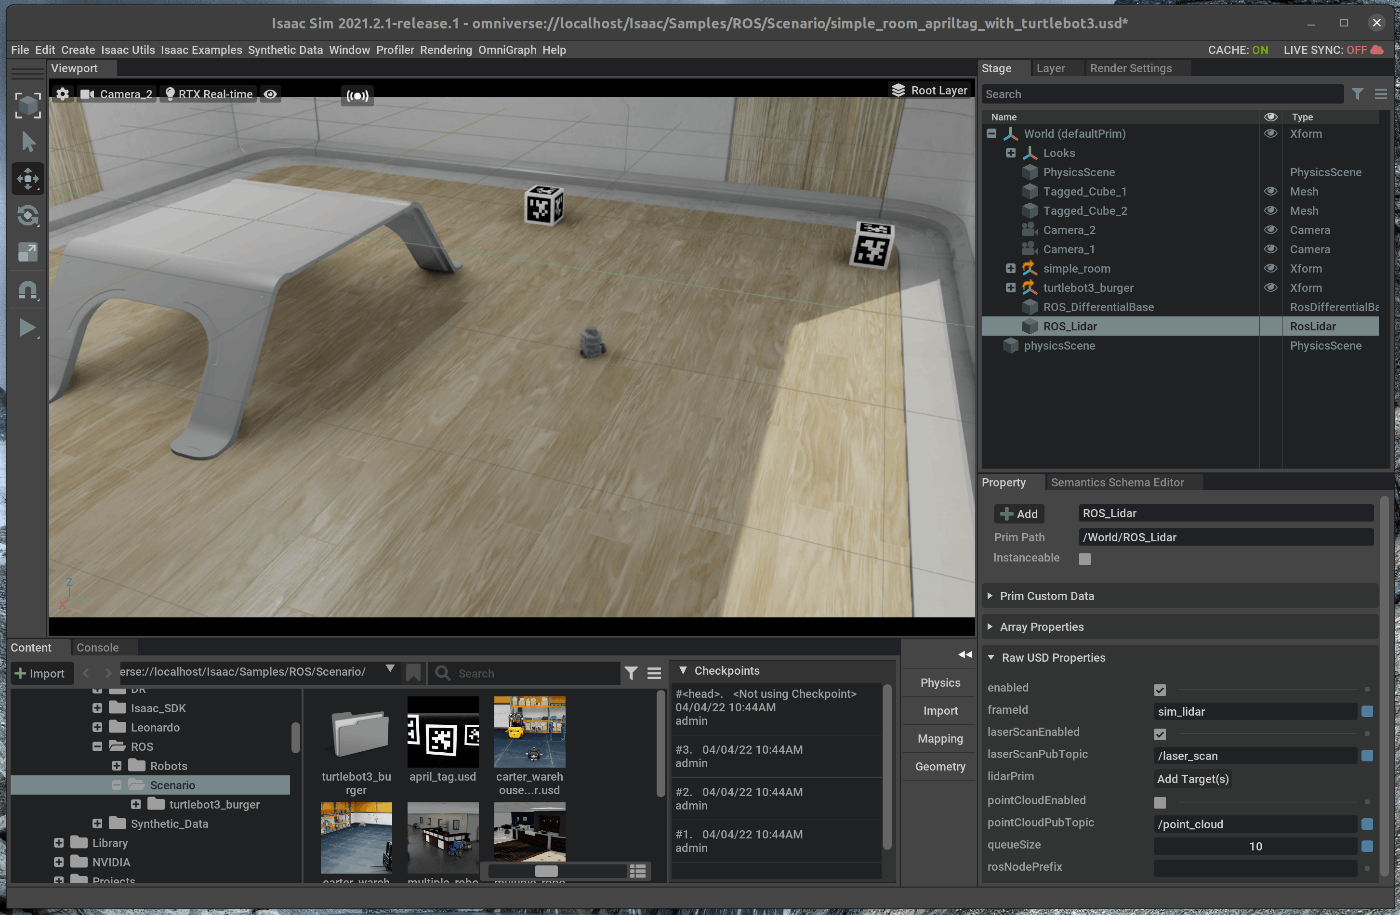
74 |
75 | 選択した状態で、Stage下部のpropertyのRaw USD propertiesを開きます。
76 | Raw USD propertiesの中で、lidarPrimを選択し、Stageの中の/world/turtlebot3_burger/base_scan/Lidarを選択します。
77 | 
78 |
79 | 設定値の中で次の値を変更します。
80 |
81 | - pointCloudEnabledにチェックを入れる
82 | - lazerScanEnabledにチェックを入れる
83 | 
84 |
85 | また、ROS Camera、ROS Camera_1, ROS_LIDARのRaw USD propertiessのframeIdを”turtle”に変更します。
86 |
87 | ## 3. Topicの確認
88 | 新たにterminalを開き、roscoreを起動します。
89 | 
90 |
91 | この状態で、Viewportの左側のPLAYボタンを押すと、各種topicが発行されます。
92 | 
93 |
94 | また、新たにterminalを開き、次のコマンドを入力します。
95 |
96 | ~~~ bash:shell
97 | $ cd ~/.local/share/ov/pkg/isaac_sim-2021.2.1/ros_workspace/
98 | $ rosdep install -i --from-paths ./src/
99 | $ caktin b
100 | $ source devel/setup.bash
101 | $ rviz -d src/isaac_tutorials/rviz/camera_lidar.rviz
102 | ~~~
103 |
104 | rvizにカメラとLiDARから取得できる情報が表示されます。
105 | 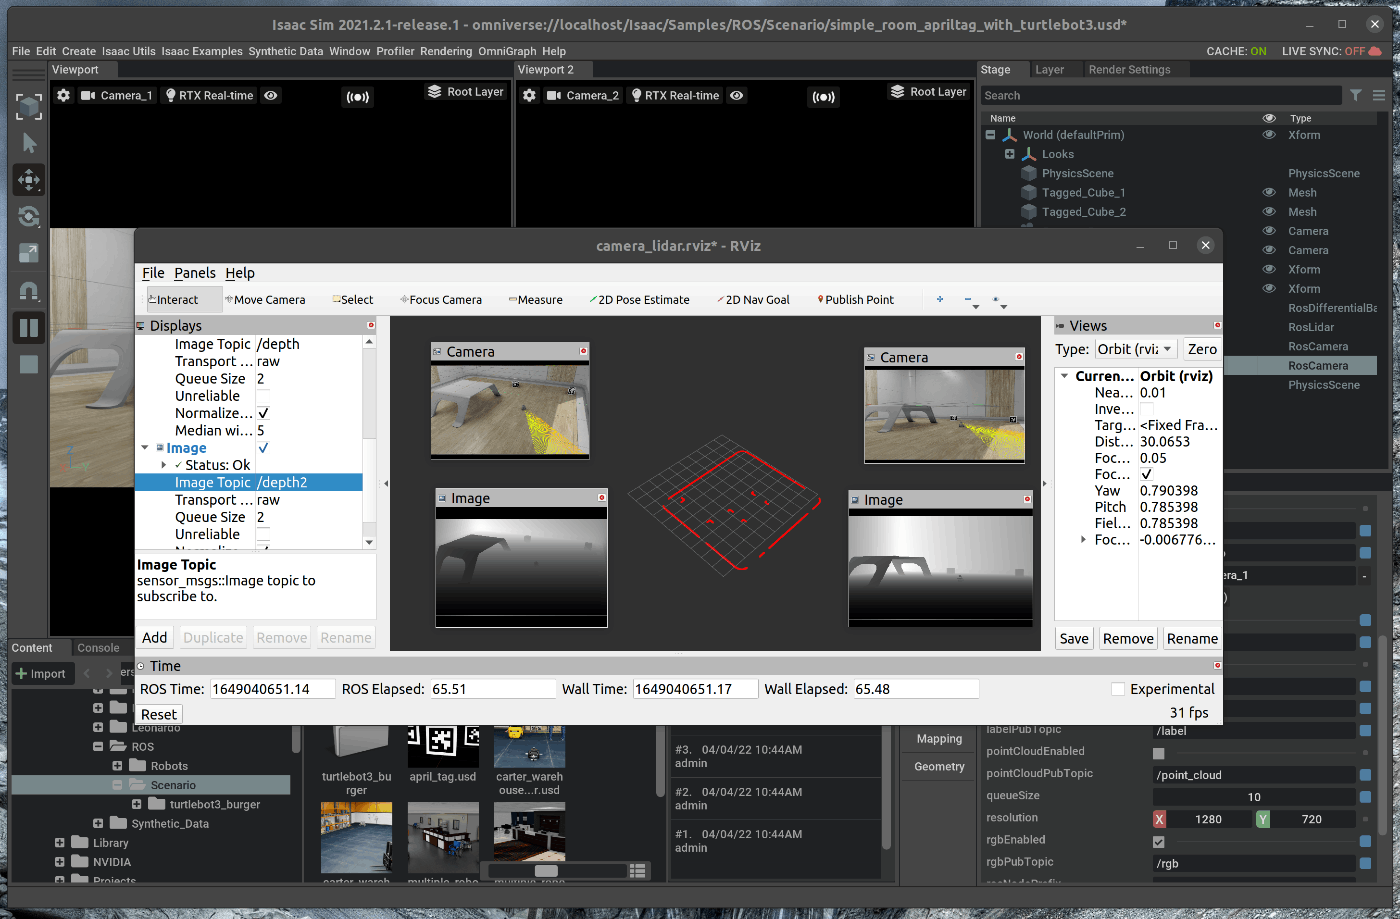
106 |
107 |
108 |
109 |
--------------------------------------------------------------------------------
/tutorials/required/isaac_sim_workflow/7_isaac_sim_workflows.md:
--------------------------------------------------------------------------------
1 | # 概要
2 | Isaac SimのWorkflowを紹介します。
3 |
4 | Issac Simのtutorialに上記の内容が記載されており、この内容に沿って進めます。
5 | https://docs.omniverse.nvidia.com/app_isaacsim/app_isaacsim/tutorial_required_workflows.html
6 |
7 | # 実行環境
8 |
9 | - インストール実行環境
10 |
11 | | unit | specification |
12 | |:-----------------:|:------------------:|
13 | | CPU | i9-11900H |
14 | | GPU | GeForce RTX 3080 Laptop|
15 | | RAM | 32GB |
16 | | OS | Ubuntu 20.04.3 LTS |
17 |
18 | - Nvidia Driverバージョン
19 | - 510.39.01
20 | - Issac simバージョン
21 | - 2021.2.1
22 |
23 |
24 |
25 | # 概要
26 |
27 | Isaac simでは、次の3種類の開発方式が用意されています。
28 |
29 | - Extensionts
30 | - Standalone Applications
31 | - Jupyter Notebook
32 |
33 | 上記の内、ExtensionsとStandalone Applicationについて紹介します。
34 |
35 | 1. Extensionsにおける操作
36 | 2. Standalone Applicationにおける操作
37 |
38 |
39 | ## 1. Extensionsにおける操作
40 |
41 | ExtensionsはOmniverse kitのcore building blockです。
42 | 上記の様に、ExtensionsはOmniverse kitの要素として設計されている為、Issac simに限らず他のOmniverseのApplication内でも使用することが可能です。
43 |
44 | Extensionsでは、Applicationは非同期に実行されるという特徴を持ちます。
45 | これは、タイムステップの制御(例えば、phisics stepやrendering step)を行わないということを意味してます。
46 |
47 | また、もう1つの特徴として、hot reloadingという機能を持っています。
48 | Isaac simでは、Aplicationのソースコードを変更を、Aplicationのreloadによって確認することが可能です。
49 | reloadはGUIの操作から実行することが可能であり、Issac sim自体のシャットダウンやリスタートは必要ありません。
50 |
51 | 今回はサンプルシーンをロードし、ロードしたシーン内にScript Editorからオブジェクトを追加します。
52 | その後、サンプルシーンをリロードし、変更点の反映を確認します。
53 |
54 |
55 | ### 1.1 OmniverseからIssac Simを起動する
56 | 
57 |
58 | ### 1.2 Hello Worldのロード
59 | メニューバーのIsaac Examples > Hello Worldを選択します。
60 | 
61 | 
62 |
63 | ポップアップしたHello Worldのウィンドウの中のLoadを選択します。
64 | 選択すると、シーンがロードされます。
65 | 
66 |
67 | このシーンのソースコードを変更する場合には、Hello Worldのウィンドウの右上にある3つのボタンの内、一番左側のボタンを選択します。
68 | 選択すると、VScodeが開き、Hello Worldのソースコードを編集することができます。
69 | 
70 |
71 | ### 1.3 Script Editorからオブジェクトを追加
72 | ポップアップしたHello WorldのウィンドウはViewportの下にドラッグアンドドロップで移動させます。
73 | 
74 |
75 | メニューバーのWindow > Script Editorを選択します。
76 | 
77 | ポップアップしたScript Editorのウィンドウを、Viewportの下にドラッグアンドドロップで移動させます。
78 | 
79 |
80 | Script Editorに次のコードを記述します。
81 |
82 | ~~~ add_object:Python3
83 |
84 |
85 | ~~~
86 |
87 | 追加後、実行すると、シーン内にCubeが追加されます。
88 | また、Hello Worldのウィンドウにおいて、Resetを選択し、その後loadを選択すると、Cubeが追加されたシーンがロードされます。
89 |
90 |
91 | ## 2. Standalone Applicationにおける操作
92 |
93 | Applicationは、PythonのScriptとしても実行することが可能です。
94 | Standalone Applicationでは、Applicationは同期して実行されます。
95 | Extensionsとは異なり、タイムステップの制御(例えば、phisics stepやrendering step)を行うということを意味してます。
96 |
97 | ターミナルで次のコマンドを実行します。
98 |
99 | ~~~ franka:bash
100 |
101 | cd ~/.local/share/ov/pkg/isaac_sim-2021.2.1
102 | ./python.sh standalone_examples/api/omni.isaac.franka/follow_target.py
103 |
104 | ~~~
105 |
106 | 
107 |
108 | 実行すると、Isaac simが立ち上がり、FrankaのExampleシーンがロードされます。
109 | Frankaのグリッパーの中心にあるTargetCubeを動かすと、Cubeの位置に合わせて、Frankaの手先が追従します。
110 |
111 | 
112 | 
--------------------------------------------------------------------------------
/tutorials/ros/moveit_motion_planning_framework/32_moveit_motion_planning_framework.md:
--------------------------------------------------------------------------------
1 | # 概要
2 | Isaac Sim上でFrankaを配置し、Moveitを用いてRobotを動かします。
3 |
4 | Issac Simのtutorialに上記の内容が記載されており、この内容に沿って進めます。
5 | https://docs.omniverse.nvidia.com/app_isaacsim/app_isaacsim/tutorial_ros_moveit.html
6 |
7 | # 実行環境
8 |
9 | - インストール実行環境
10 |
11 | | unit | specification |
12 | |:-----------------:|:------------------:|
13 | | CPU | i9-11900H |
14 | | GPU | GeForce RTX 3080 Laptop|
15 | | RAM | 32GB |
16 | | OS | Ubuntu 20.04.3 LTS |
17 |
18 | - Nvidia Driverバージョン
19 | - 510.39.01
20 | - Issac simバージョン
21 | - 2021.2.1
22 |
23 |
24 | # 手順
25 | Isaac Sim上でFrankaを配置し、Moveitを用いてRobotを動かします。
26 | moveitはros側から実行し、rviz上でmoveitを使用します。
27 |
28 | 1. moveitのインストール
29 | 2. シーンのロード
30 | 3. moveitの実行
31 | 4. トラブルシューティング
32 |
33 | ## 1. moveitのインストール
34 | ### 1.1 moveitをインストールする
35 | terminalで次のコマンドを実行します。
36 |
37 | ~~~ bash:shell
38 | $ sudo apt-get install -y ros-noetic-moveit
39 | ~~~
40 |
41 | ## 2. シーンのロード
42 | ### 2.1 OmniverseからIssac Simを起動する
43 | 
44 |
45 | ### 2.2 シーンをロードする
46 | メニューバーのIsaac Examples > ROS > MoveItを選択します。
47 | 
48 |
49 | この状態で、Viewportの左側のPLAYボタンを押します。
50 | 
51 |
52 | ## 3. moveitの実行
53 |
54 | 新たにterminalを開き、次のコマンドを入力します
55 |
56 | ~~~ bash:shell
57 | $ cd ~/.local/share/ov/pkg/isaac_sim-2021.2.1/ros_workspace/
58 | $ source devel/setup.bash
59 | $ roslaunch isaac_moveit franka_isaac_execution.launch
60 | ~~~
61 |
62 | 最後のコマンドを実行すると、rvizが立ち上がります。
63 | 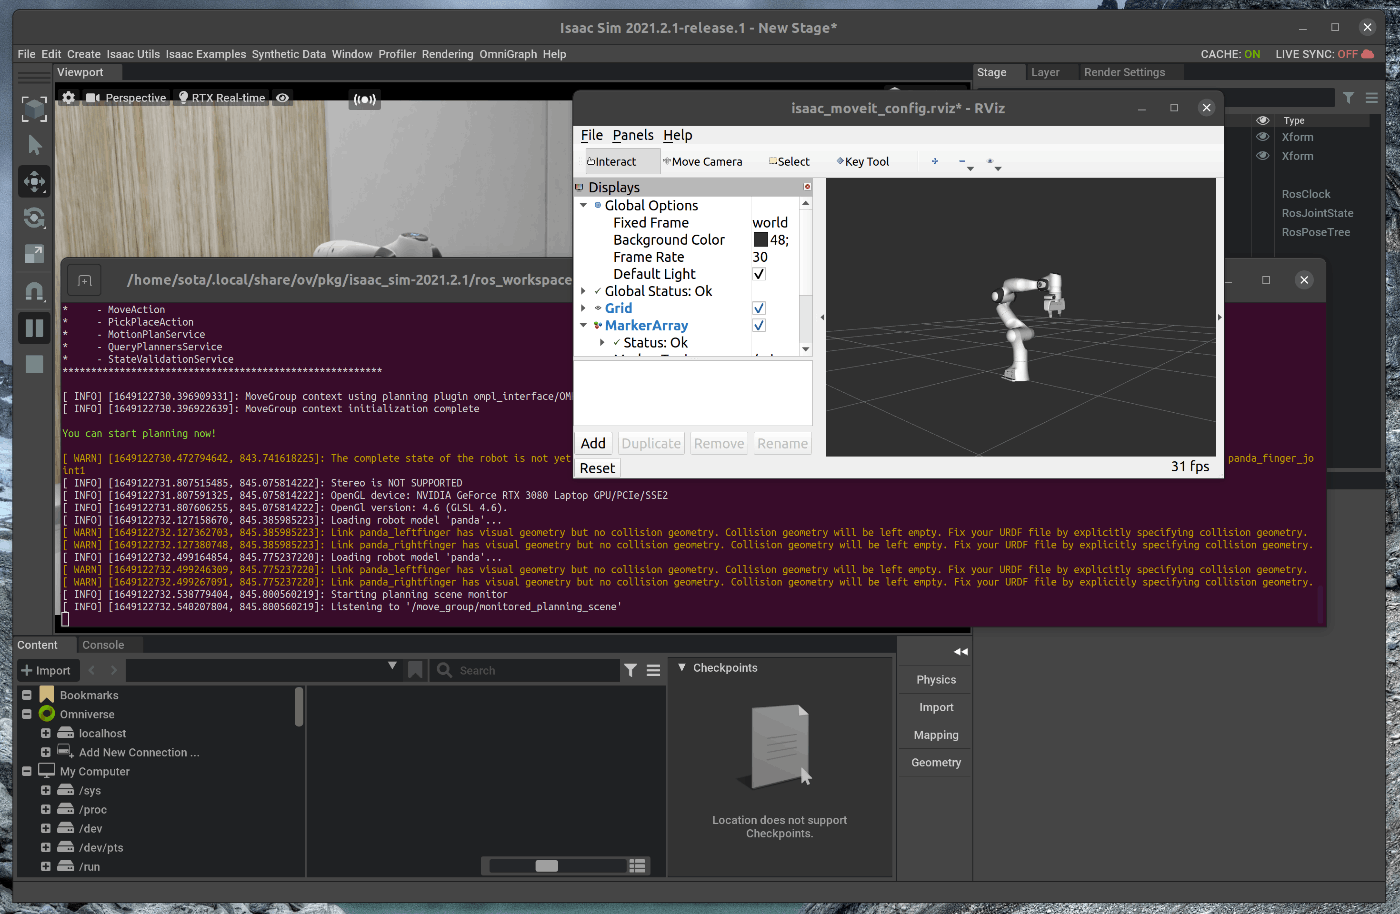
64 |
65 | rviz上で、左側にある”ADD”をクリックし、ポップアップしたWindowの中から”MotionPlaning”を選択します。
66 | 
67 |
68 | rviz上で、左下にある”MotionPlanning”の”PlanningGroup”を”panda_arm”に変更します。
69 | 
70 |
71 | rviz上でArmの姿勢を変更し、”MotionPlanning”のPlan > Executeを選択すると、Isaac Sim上で動作することを確認できます。
72 | 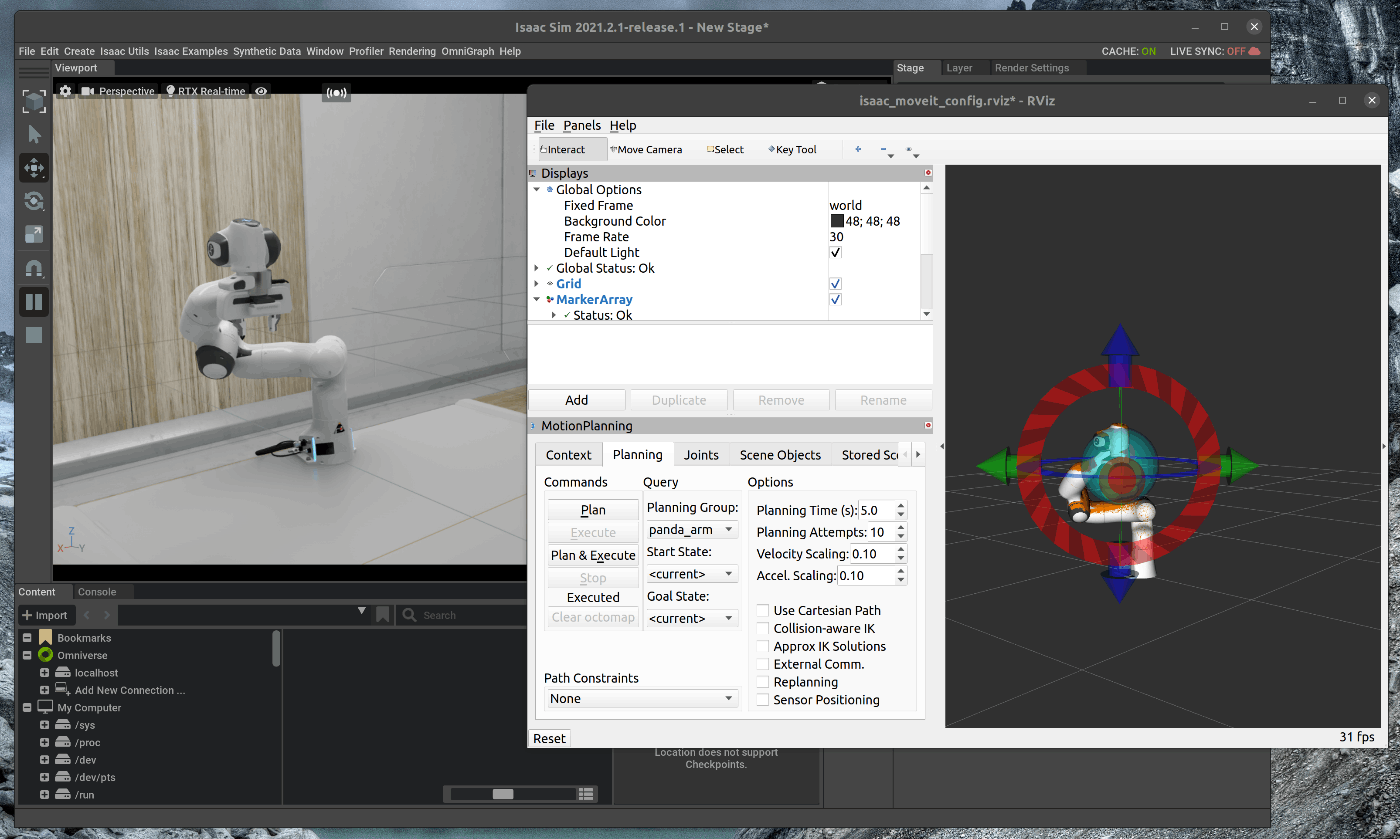
73 | 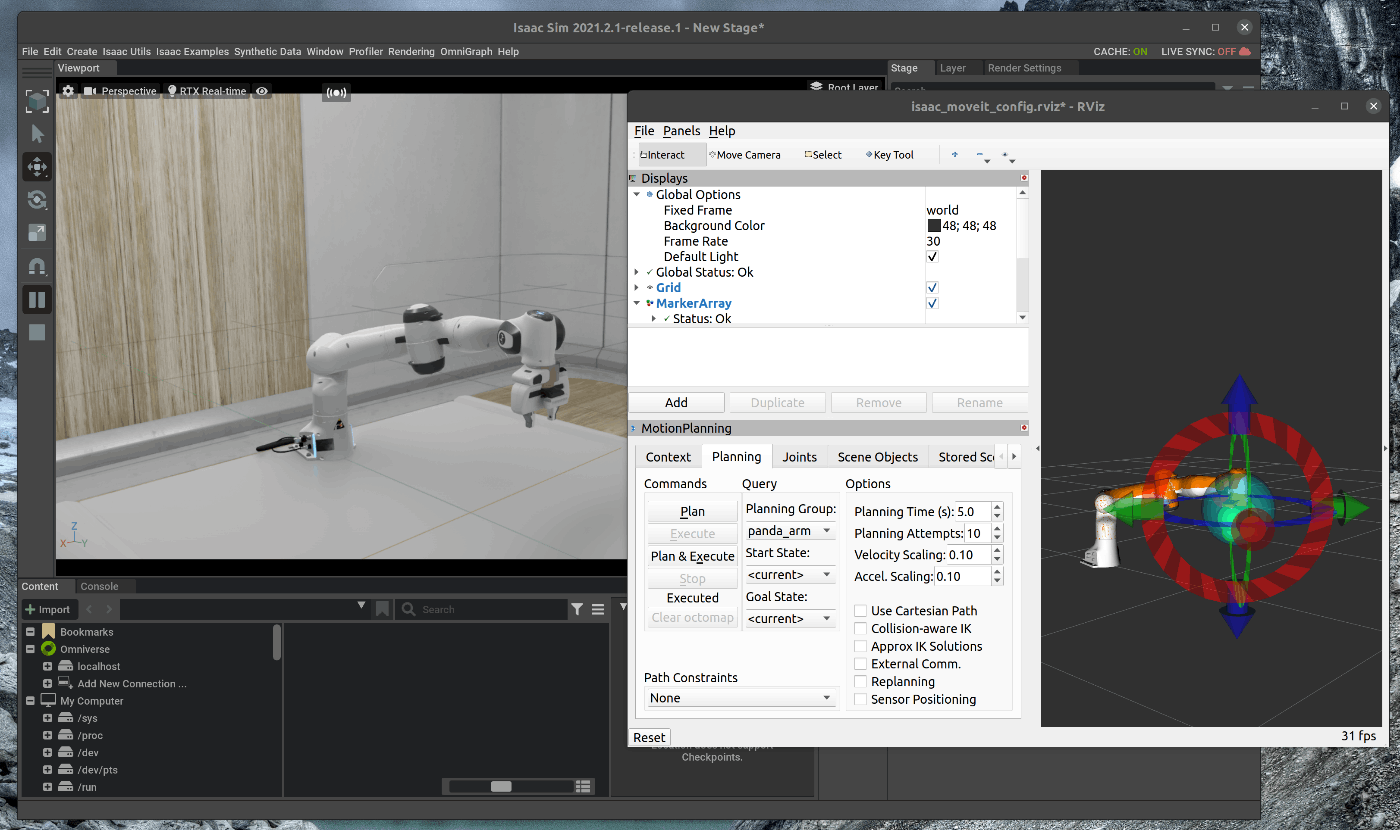
74 |
75 | ## トラブルシューティング
76 |
77 | 次のコマンドを実行する際にエラーが発生し、実行できないことがありました。
78 |
79 | ~~~ bash:shell
80 | $ roslaunch isaac_moveit franka_isaac_execution.launch
81 | ~~~
82 |
83 | エラー内容は次の通りです。
84 | 
85 |
86 | このエラーはFrankaのPackageに含まれているlaunchのエラーであり、[該当launchファイル(https://answers.ros.org/question/384900/failed-to-lunch-this-command/
87 | https://github.com/ros-planning/panda_moveit_config/blob/noetic-devel/launch/planning_context.launch)のエラー箇所を修正することで解決できました。
88 |
89 | こちらを参考にしました。
90 | https://answers.ros.org/question/384900/failed-to-lunch-this-command/
91 |
92 |
93 | まず、frankaのpackageをクローンします。
94 |
95 | ~~~ bash:shell
96 | $ cd ~/.local/share/ov/pkg/isaac_sim-2021.2.1/ros_workspace/src/
97 | $ git clone git@github.com:ros-planning/panda_moveit_config.git
98 | ~~~
99 |
100 | エディタで該当launchファイルを開き、コードを変更します。
101 | 変更部分は11行目です。元の部分を次の内容に置き換えます。
102 |
103 | ~~~ xml:xml
104 |
105 | ~~~
106 |
107 | buildすると、実行できるようになります。
108 |
109 | ~~~ bash:shell
110 | $ cd ~/.local/share/ov/pkg/isaac_sim-2021.2.1/ros_workspace/
111 | $ catkin b
112 | $ source devel/setup.bash
113 | $ roslaunch isaac_moveit franka_isaac_execution.launch
114 | ~~~
--------------------------------------------------------------------------------
/tutorials/ros/ros_navigation/30_ros_navigation.md:
--------------------------------------------------------------------------------
1 | # 概要
2 | Isaac Sim上でSceneとRobotを配置し、ROS Nvigation Stackを用いてRobotを動かします。
3 |
4 | Issac Simのtutorialに上記の内容が記載されており、この内容に沿って進めます。
5 | https://docs.omniverse.nvidia.com/app_isaacsim/app_isaacsim/tutorial_ros_navigation.html
6 |
7 | # 実行環境
8 |
9 | - インストール実行環境
10 |
11 | | unit | specification |
12 | |:-----------------:|:------------------:|
13 | | CPU | i9-11900H |
14 | | GPU | GeForce RTX 3080 Laptop|
15 | | RAM | 32GB |
16 | | OS | Ubuntu 20.04.3 LTS |
17 |
18 | - Nvidia Driverバージョン
19 | - 510.39.01
20 | - Issac simバージョン
21 | - 2021.2.1
22 |
23 |
24 | # 手順
25 | Isaac Sim上でSceneとRobotを配置し、ROS Nvigation Stackを用いてRobotを動かします。
26 | まず、ROS Nvigation Stack上で使用するOccupacy MapをIssac Sim上で作成します。
27 | 作成したOccupacy Mapを用いて、Navigationを実行します。
28 |
29 | 1. ROS Navigationのインストール
30 | 2. Occupacy Mapの生成
31 | 3. Navigationの実行
32 |
33 | ## 1. ROS Navigationのインストール
34 | ### 1.1 ROS Navigationをインストールする
35 | terminalで次のコマンドを実行します。
36 |
37 | ~~~ bash:shell
38 | $ sudo apt-get install -y ros-noetic-navigation
39 | ~~~
40 |
41 | ## 2. Occupacy Mapの生成
42 | ### 2.1 OmniverseからIssac Simを起動する
43 | 
44 |
45 | ### 2.2 シーンをロードする
46 | メニューバーのIsaac Examples > ROS > Navigation > warehouseを選択します。
47 | 
48 | 
49 |
50 | この状態で、Viewportの左側のPLAYボタンを押します。
51 | 
52 |
53 | viewportのカメラアイコンをクリックし、carter_camera_stereo_leftを選択します。
54 | また、ドロップダウンしたメニューの中から”Top”を選択します。
55 | 
56 |
57 | ### 2.3 Occupacy Mapを生成する
58 | メニューバーのIsaac Utils > Occupancy Mapを選択します。
59 | ポップアップしたWindowをViwport下部にあるConsoleの右隣にドラッグし、追加します。
60 | 
61 |
62 | Occupacy Mapの設定を次の通りに変更します。
63 |
64 | - originのXを0.0にする
65 | - originのYを0.0にする
66 | - originのZを0.0にする
67 | - Lower BpundのZを10.0にする
68 | - Upprer BoundのZを62.0にする
69 |
70 | 
71 |
72 | 右側のStage上で、warehouse_with_forkliftsを選択します。
73 | 
74 |
75 | この状態で、Occupacy Mapの”BOUND SELECTION”をクリックします。
76 | クリックすると、map parametersがwarehouse_with_forkliftsに合うようにアップデートされます。
77 | 
78 |
79 | 次に、Occupacy Mapの”CALCULATE” > "VISUALIZE IMAG"をクリックします。
80 | 
81 |
82 | 表示されたOccupacy MapのWindowの中で次の設定を変更します。
83 |
84 | - rotationを180にする
85 | - Coordinate Typeを”ROS Occupancy Map Parameters File (YAML)”にする
86 |
87 | 設定後、Occupacy Mapの”RE-GENERATE IMAGE”を選択します。
88 | 
89 |
90 | 生成したImage(Occupacy Map)を保存します。
91 | Imageの保存名は”carter_warehouse_navigation.png”に設定します。
92 |
93 | この状態で、Viewportの左側のSTOPボタンを押します。
94 |
95 | ## 3. Navigationの実行
96 | ### 3.1 NavigationのLaunchを実行する
97 |
98 | 新たにterminalを開き、次のコマンドを入力します
99 |
100 | ~~~ bash:shell
101 | $ cd ~/.local/share/ov/pkg/isaac_sim-2021.2.1/ros_workspace/
102 | $ source devel/setup.bash
103 | $ roslaunch carter_2dnav carter_navigation.launch
104 | ~~~
105 | 
106 |
107 | rviz上で、2D Nav Goalを使用すると、ロボットが動くことが確認できます。
108 | 
109 | 
110 |
--------------------------------------------------------------------------------
/tutorials/ros/cameras/26_cameras.md:
--------------------------------------------------------------------------------
1 | # 概要
2 | Isaac Sim上に配置したカメラにおける画像をros topicとして発行します。
3 |
4 | Issac Simのtutorialに上記の内容が記載されており、この内容に沿って進めます。
5 | https://docs.omniverse.nvidia.com/app_isaacsim/app_isaacsim/tutorial_ros_camera.html
6 |
7 | # 実行環境
8 |
9 | - インストール実行環境
10 |
11 | | unit | specification |
12 | |:-----------------:|:------------------:|
13 | | CPU | i9-11900H |
14 | | GPU | GeForce RTX 3080 Laptop|
15 | | RAM | 32GB |
16 | | OS | Ubuntu 20.04.3 LTS |
17 |
18 | - Nvidia Driverバージョン
19 | - 510.39.01
20 | - Issac simバージョン
21 | - 2021.2.1
22 |
23 |
24 | # 手順
25 | Isaac Sim上でTurtlebot3のURDFをロードし、ROSのTopicから車輪の速度指令値を発行し、TurtleBot3を動かします。
26 |
27 | 1. シーンのロード
28 | 2. ROS Cameraの追加
29 | 3. Topicの確認
30 |
31 | ## 1. シーンのロード
32 | ### 1.1 OmniverseからIssac Simを起動する
33 | 
34 |
35 | ### 1.2 シーンをロードする
36 | Isaac Simの下部にあるContentの中から、Isaac > Samples > ROS > Scenario > simple_room_apriltag.usd.をダブルクリックします。
37 | 
38 |
39 | ## 2. ROS Cameraの追加
40 | ### 2.1 camera_1用のROS Cameraを追加する
41 | メニューバーのCreate > Isaac > ROS > Cameraを選択します。
42 | 
43 |
44 | 右側のStageの中で、追加したROS_Cameraを選択します。
45 | 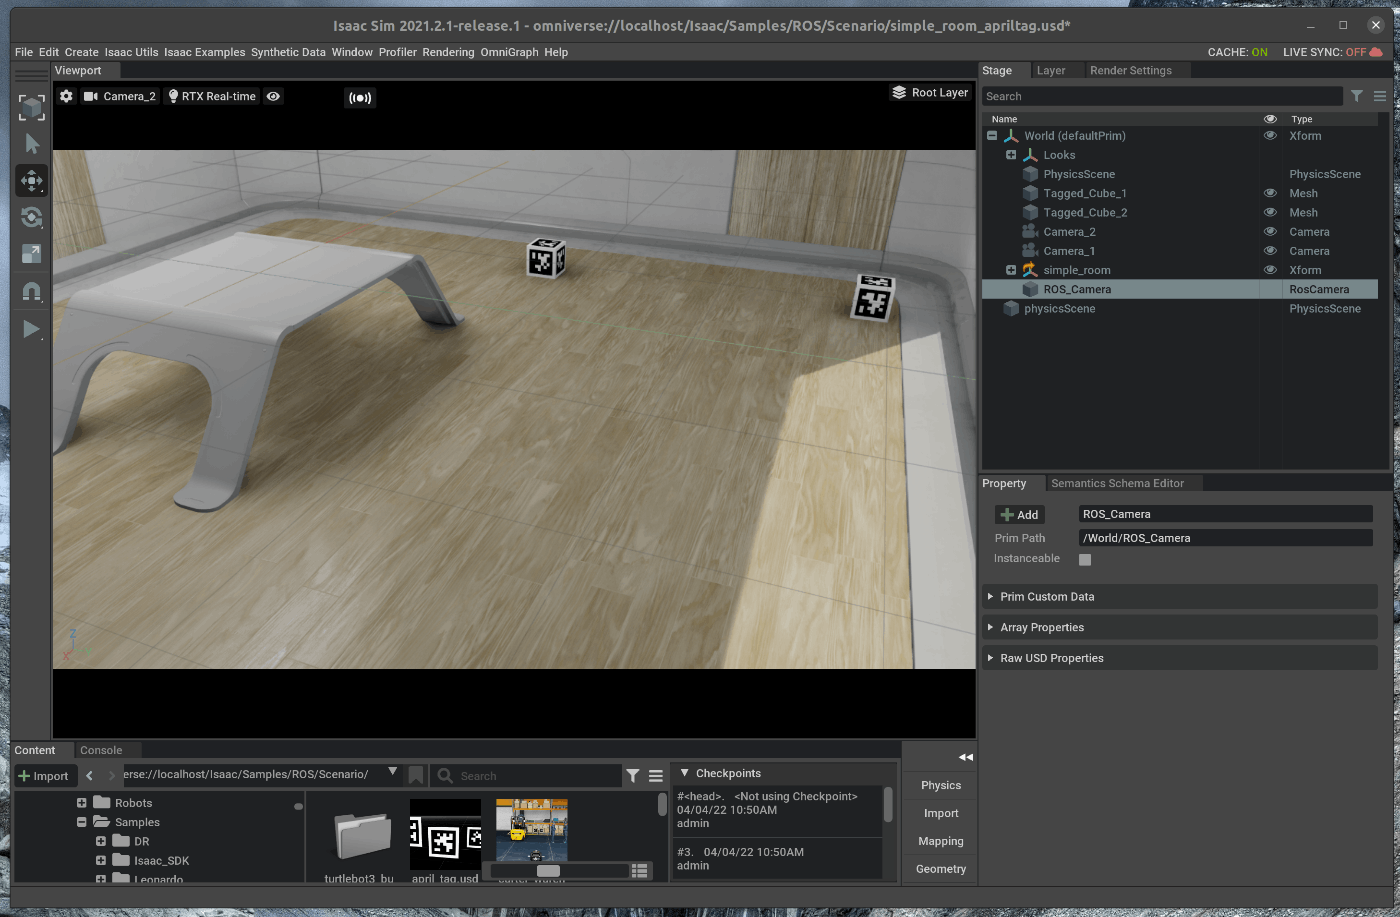
46 |
47 | 選択した状態で、Stage下部のpropertyのRaw USD propertiesを開きます。
48 | 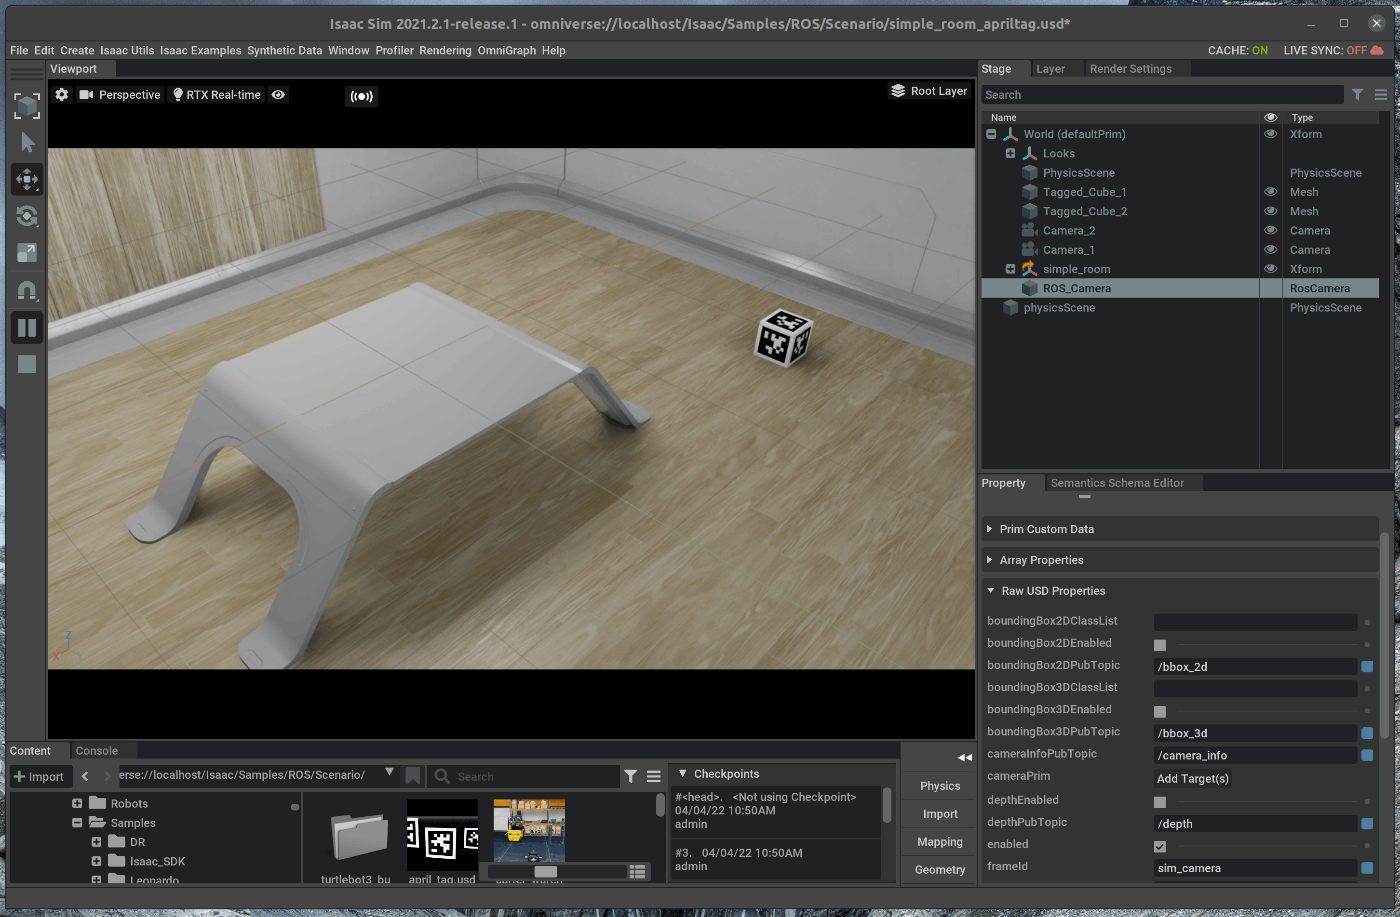
49 |
50 | Raw USD propertiesの中で、cameraPrimを選択し、Stageの中の/world/Camera_1を選択します。
51 | 
52 |
53 | 新たにterminalを開き、roscoreを起動します。
54 | 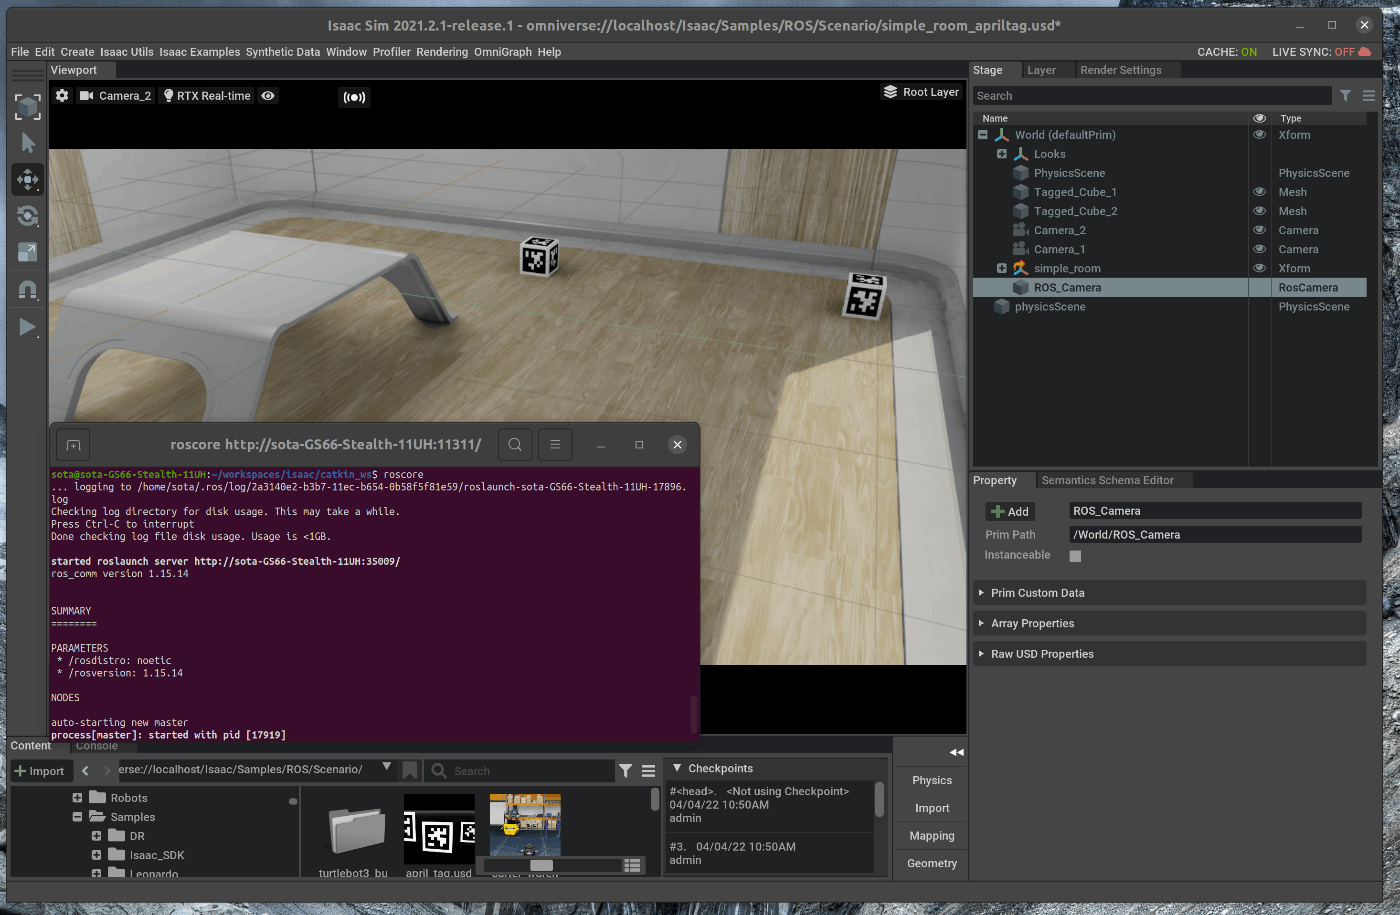
55 |
56 | この状態で、Viewportの左側のPLAYボタンを押すと、各種topicが発行されます。
57 | また、新たにterminalを開き、次のコマンドを入力します。
58 |
59 | ~~~ bash:shell
60 | $ rosrun rqt_image_viewer rqt_image_viewer
61 | ~~~
62 | topicに/rgbを選択すると、カメラからの画像を取得することができます。
63 | 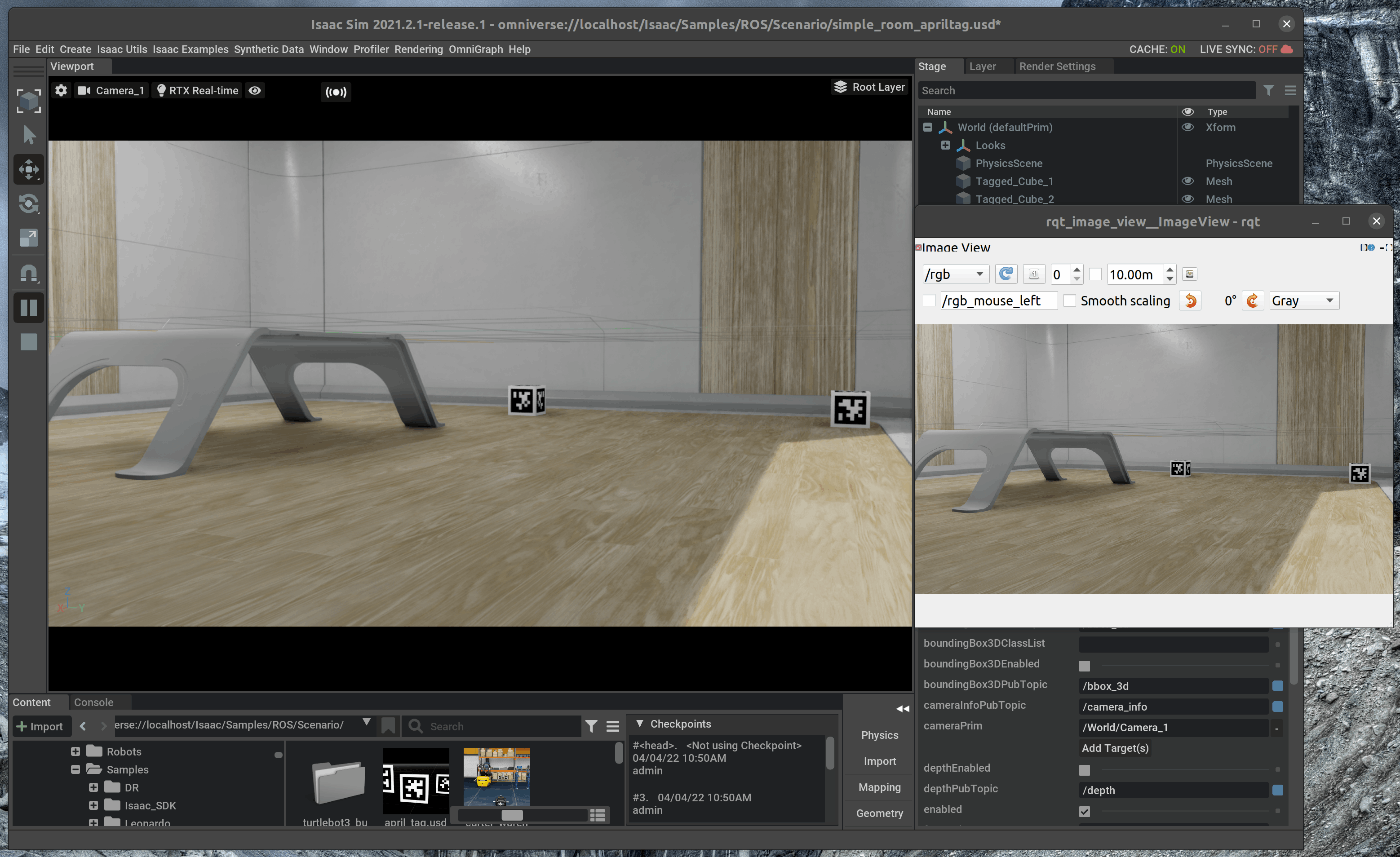
64 |
65 | ### 2.2 camera_2用のROS Cameraを追加する
66 | 次に2つ目のカメラのROS Cameraを追加します。
67 | 操作方法は1つ目のカメラと同様です。
68 |
69 | まず、メニューバーのWindow > New Viewport windowを選択します。
70 | 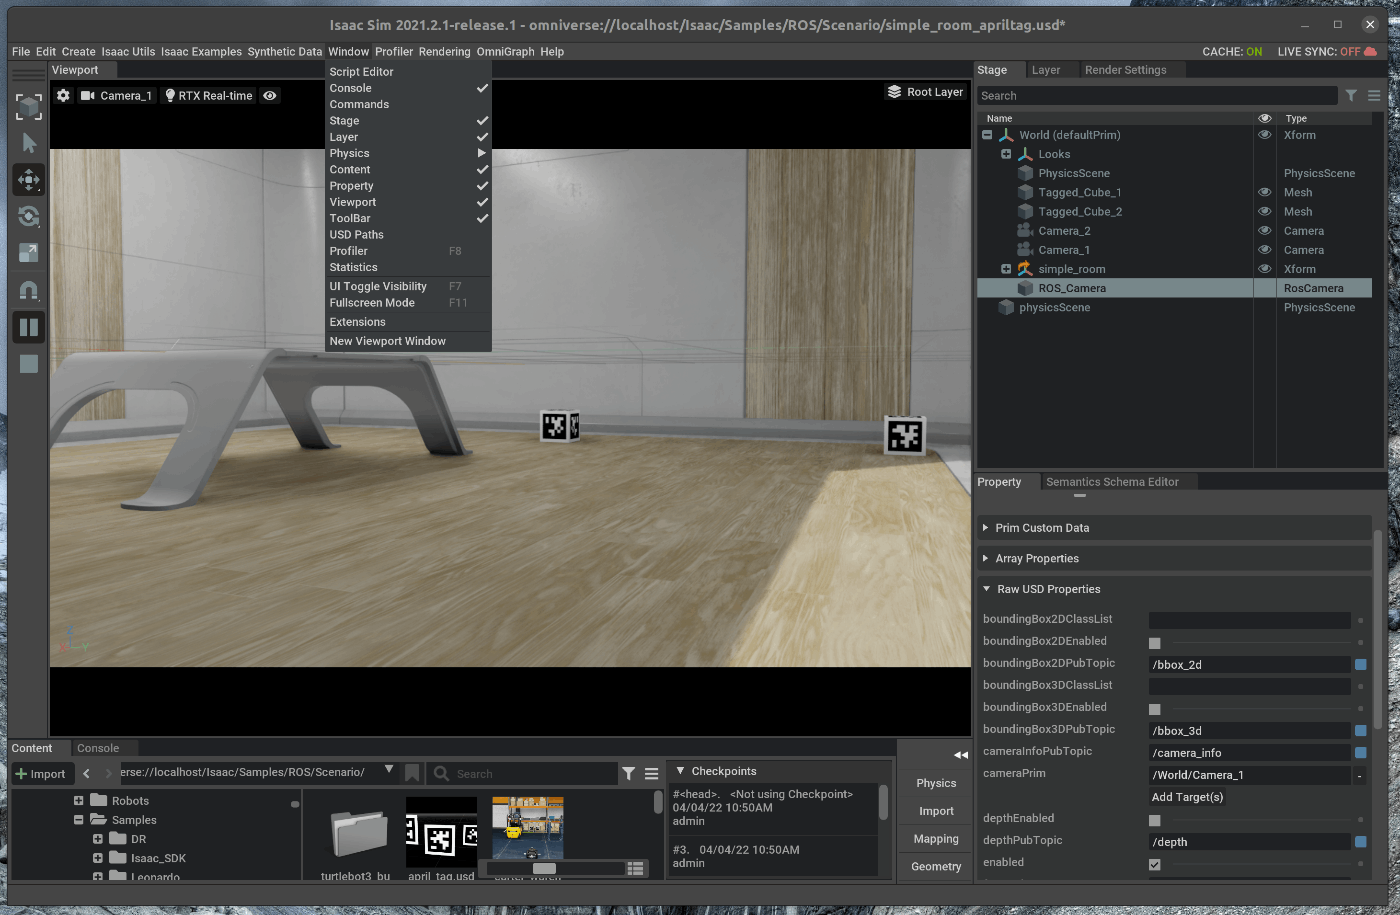
71 |
72 | ポップアップしたWindowを1つ目のViewportの隣に追加します。
73 | 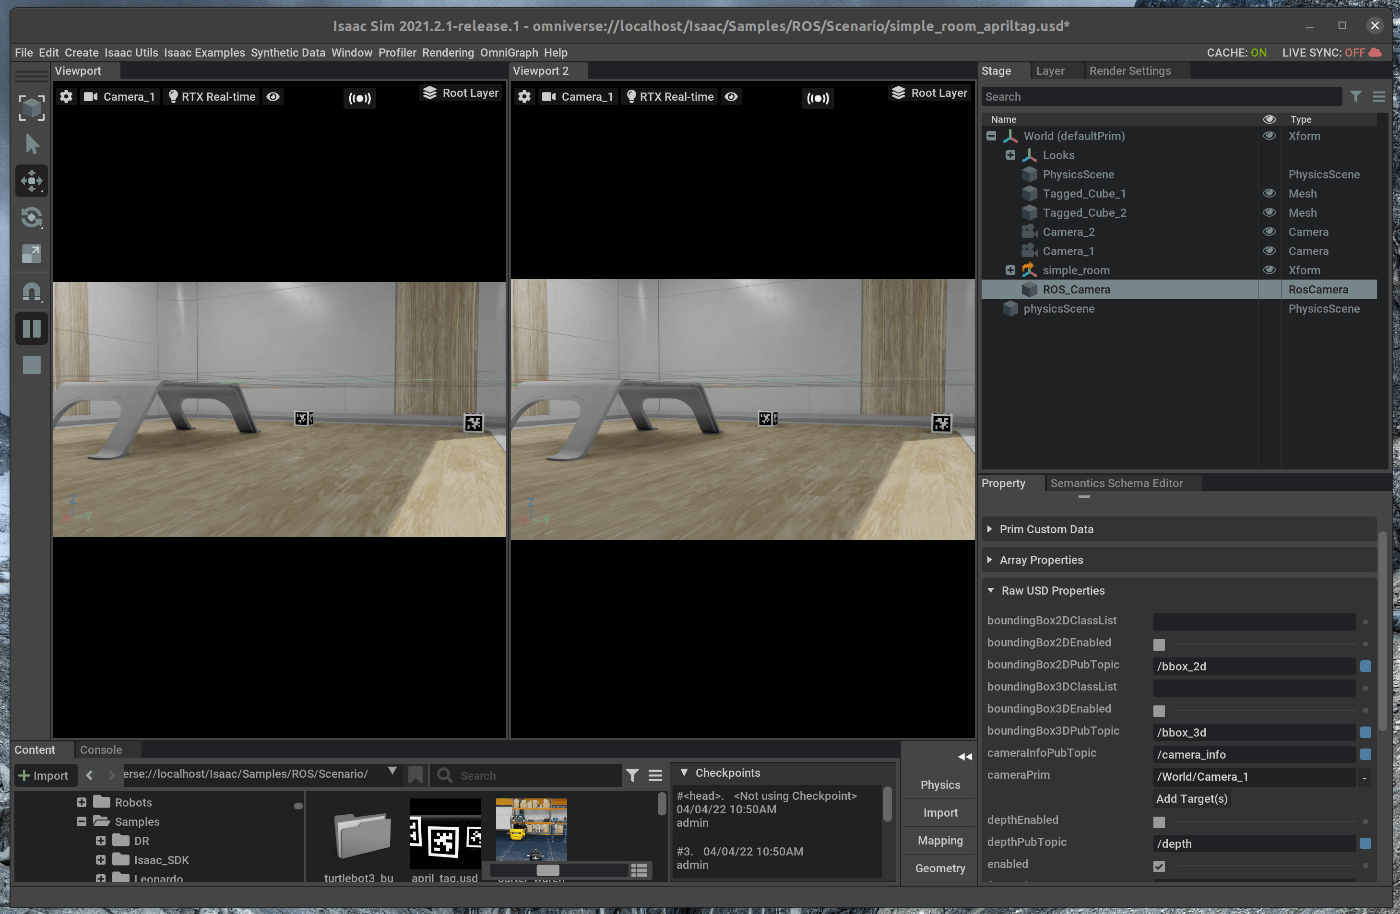
74 |
75 | 追加した2つ目のViewportのカメラアイコンをdクリックし、Camera_2を選択します。
76 | 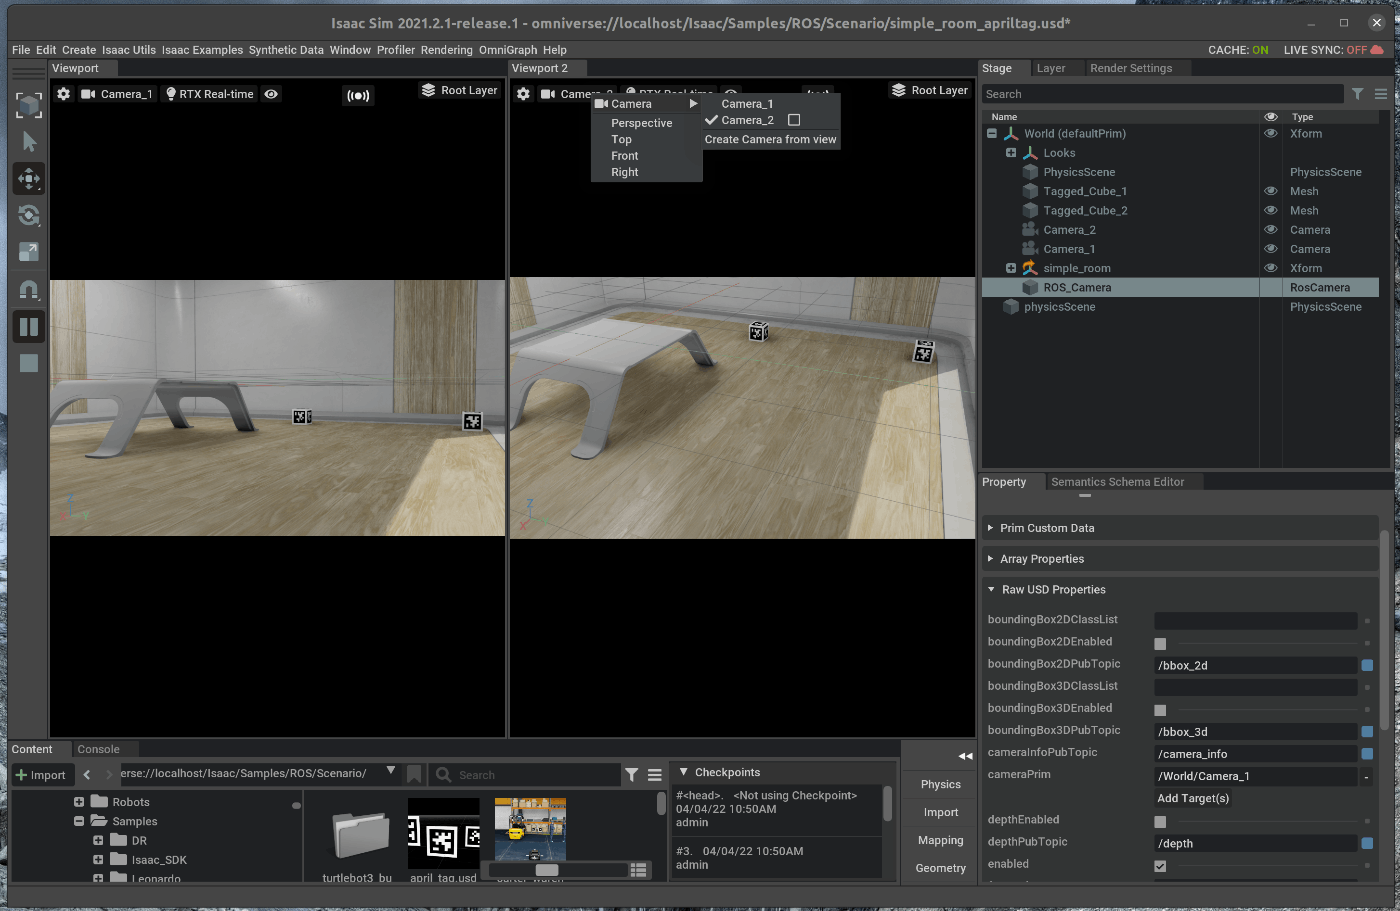
77 |
78 | メニューバーのCreate > Isaac > ROS > Cameraを選択します。
79 | 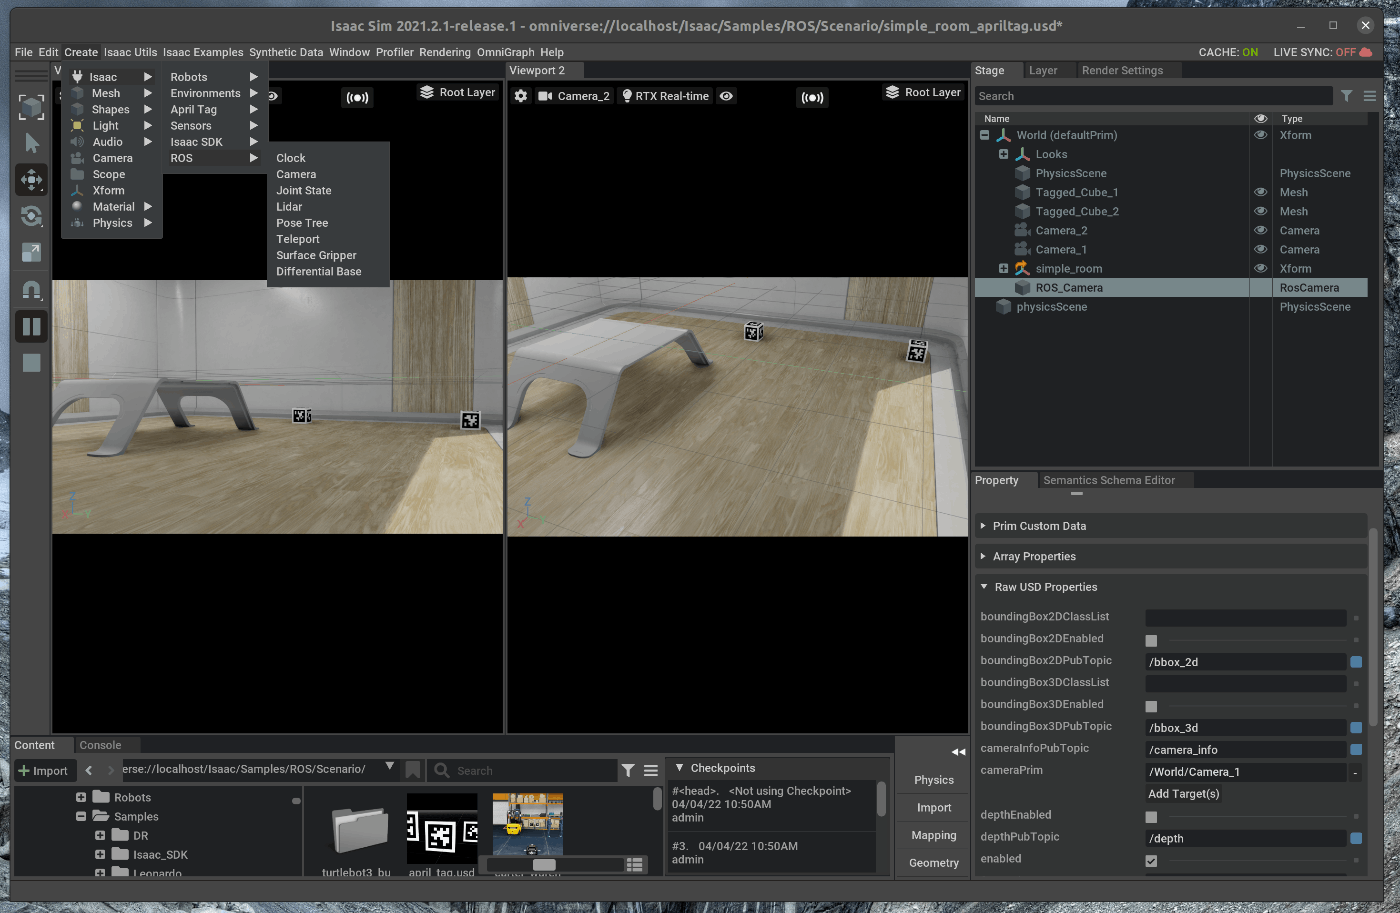
80 |
81 | 右側のStageの中で、追加したROS_Cameraを選択します。
82 | 選択した状態で、Stage下部のpropertyのRaw USD propertiesを開きます。
83 | Raw USD propertiesの中で、cameraPrimを選択し、Stageの中の/world/Camera_2を選択します。
84 | 
85 | 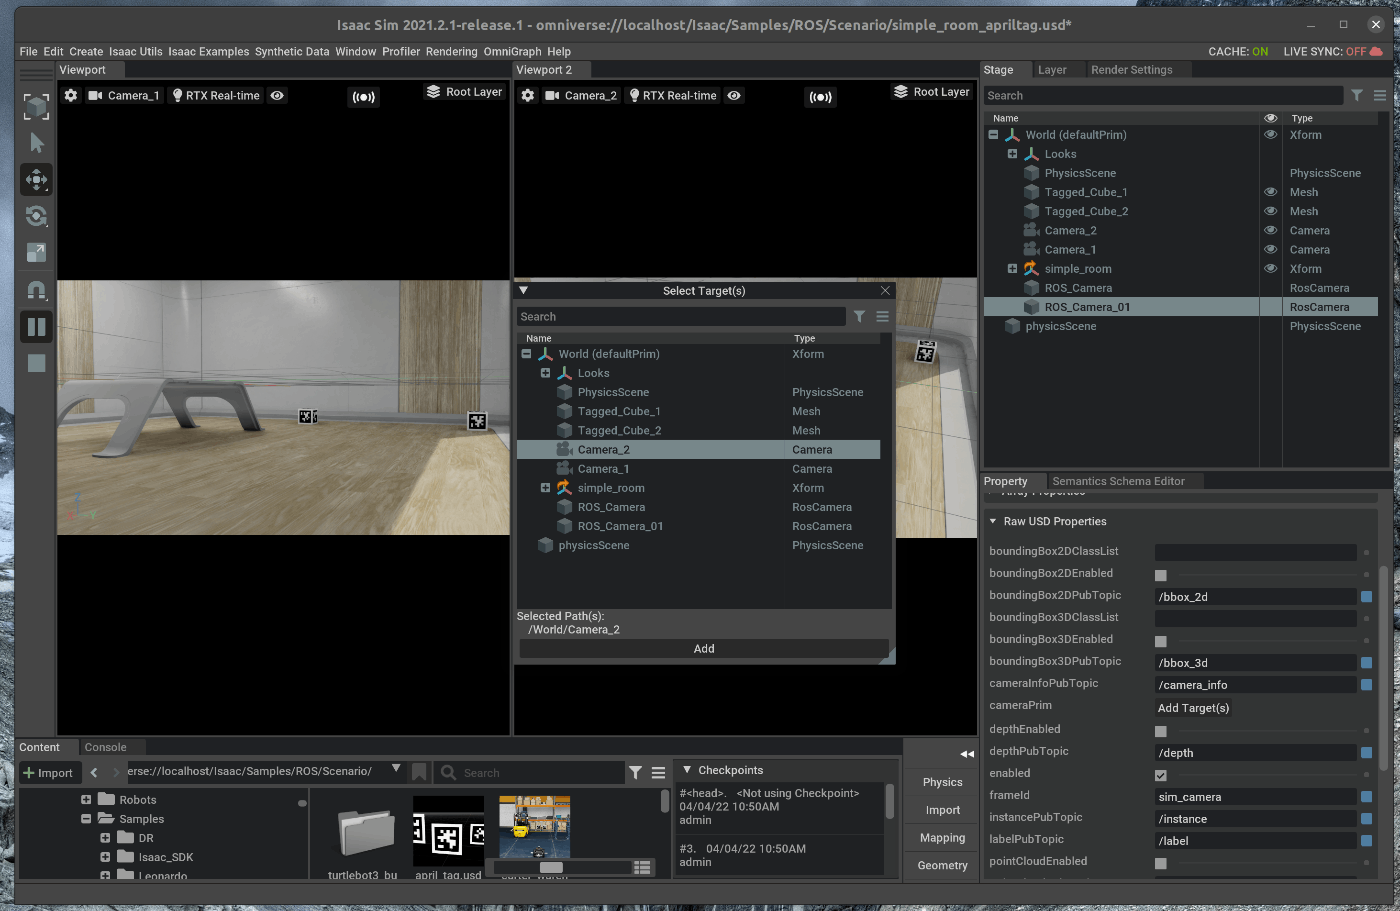
86 |
87 | 新たにterminalを開き、次のコマンドを入力します。
88 |
89 | ~~~ bash:shell
90 | $ rosrun rqt_image_viewer rqt_image_viewer
91 | ~~~
92 |
93 | topicに/rgb2を選択すると、カメラからの画像を取得することができます。
94 | 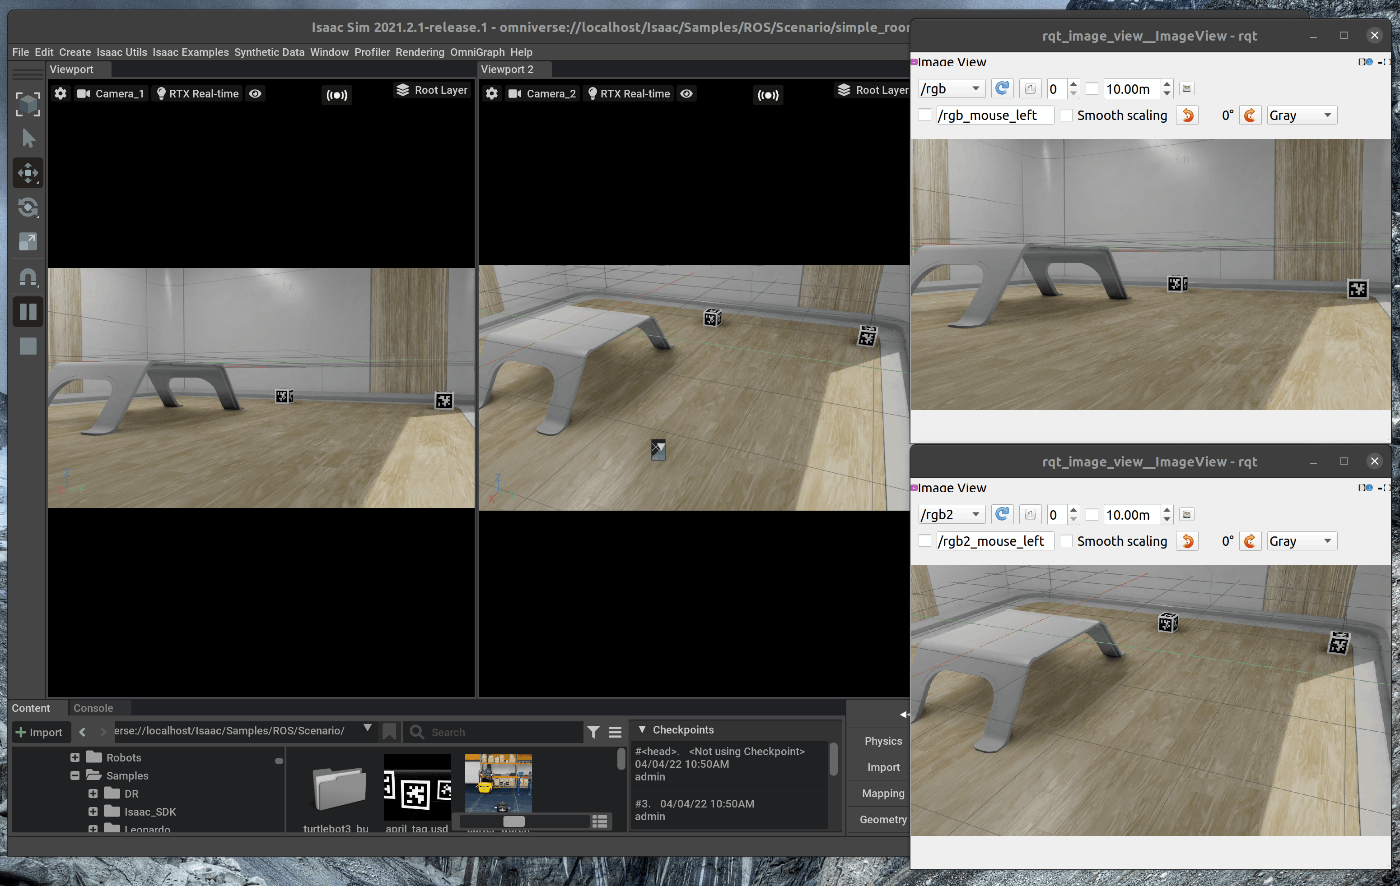
95 |
96 | ### 2.3 Depth画像の発行
97 | 右側のStageの中で、ROS_Camera_01を選択します。
98 | 選択した状態で、Stage下部のpropertyのRaw USD propertiesを開きます。
99 |
100 | depthEnabledにチェックを入れます。
101 | 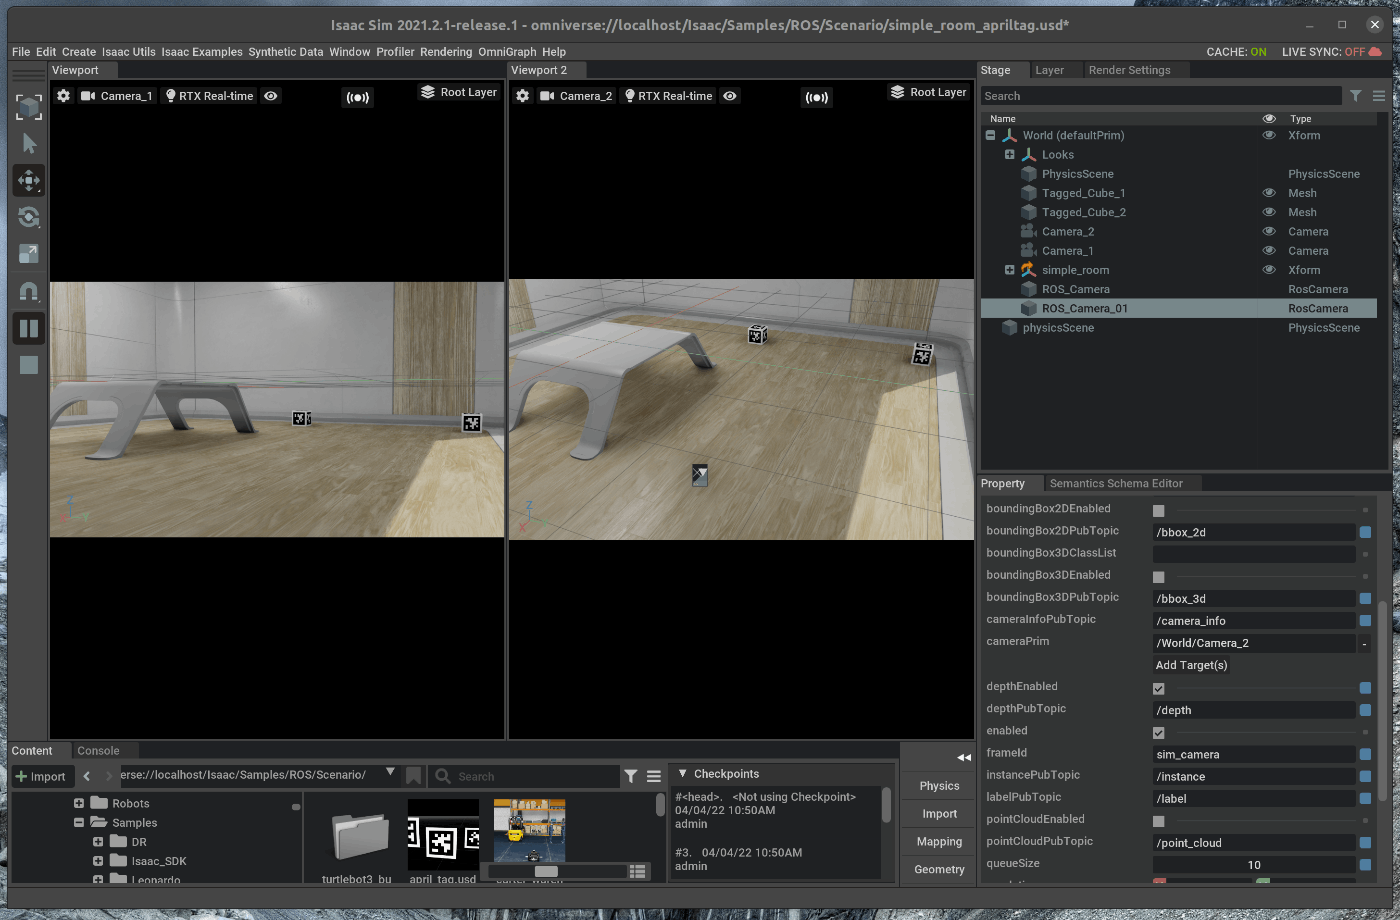
102 |
103 | 新たにterminalを開き、次のコマンドを入力します。
104 |
105 | ~~~ bash:shell
106 | $ rosrun rqt_image_viewer rqt_image_viewer
107 | ~~~
108 |
109 | topicに/depthを選択すると、カメラからのdepth画像を取得することができます。
110 | 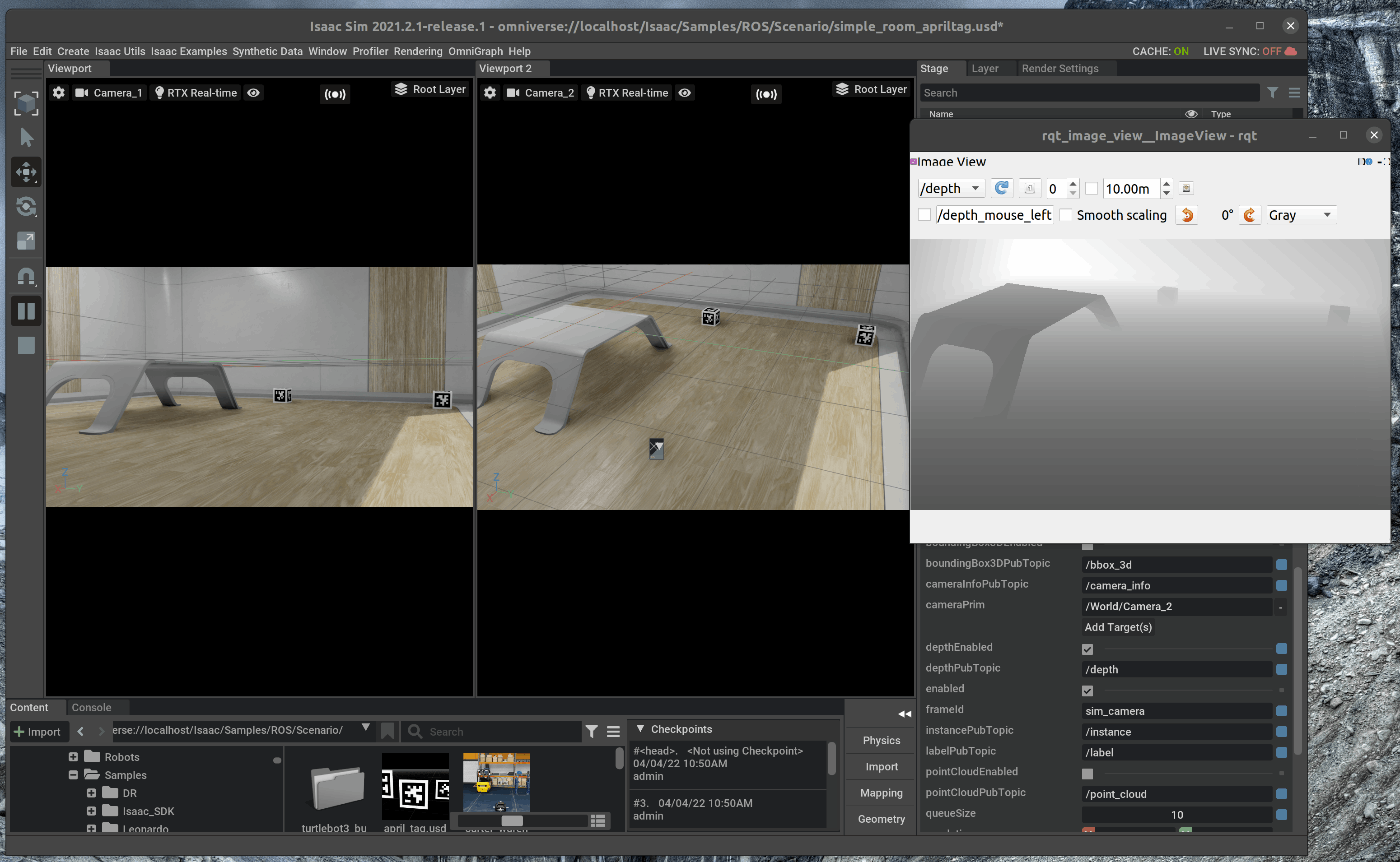
111 |
--------------------------------------------------------------------------------
/tutorials/gui/move_simple_robot/3_move_robot.md:
--------------------------------------------------------------------------------
1 | # 概要
2 | Nvidia Issac simのGUIの機能を使用し、簡単な2輪ロボットのモデルを動かします。
3 |
4 | Issac Simのtutorialに上記の内容が記載されており、この内容に沿って進めます。
5 | https://docs.omniverse.nvidia.com/app_isaacsim/app_isaacsim/tutorial_gui_simple_robot.html
6 |
7 | # 実行環境
8 |
9 | - インストール実行環境
10 |
11 | | unit | specification |
12 | |:-----------------:|:------------------:|
13 | | CPU | i9-11900H |
14 | | GPU | GeForce RTX 3080 Laptop|
15 | | RAM | 32GB |
16 | | OS | Ubuntu 20.04.3 LTS |
17 |
18 | - Nvidia Driverバージョン
19 | - 510.39.01
20 | - Issac simバージョン
21 | - 2021.2.1
22 |
23 |
24 |
25 | # 手順
26 |
27 | 大まかな手順は次の通りです。
28 |
29 | 1. 2輪ロボットモデルにJoint設定を追加
30 | 2. 2輪ロボットにJointDriveを追加
31 |
32 | 以下内容のシーンファイルはこちらからダウンロードできます。(準備中)
33 |
34 | ## 1. 2輪ロボットモデルにJoint設定を追加
35 | こちらのページに記載してある手順を進めます。
36 | https://docs.omniverse.nvidia.com/app_isaacsim/app_isaacsim/tutorial_gui_simple_robot.html#isaac-sim-app-tutorial-gui-simple-robot
37 |
38 | ### 1.1 OmniverseからIssac Simを起動する
39 | 
40 |
41 | ### 1.2 シーンをロードする
42 | 以前作成した2輪のロボットモデルをロードします。
43 | シーンファイルは[こちらからダウンロード]()できます。
44 | メニューバーのFile > Open を選択します。
45 | 該当ファイルを選択し、シーンをロードします。
46 |
47 | ## 1.3 Primの追加
48 | シーン内にPrimを追加します。Primはコンテナオブジェクトであり、Stageの中に名前空間を作ることができます。
49 | 右側のStageタブの中で右クリックし、Create>Xformを選択します。
50 | 
51 |
52 | 追加したXformを右クリックし、Renameを選択します。
53 | 名称は次の名称に変更します。
54 | - mock_robot
55 |
56 | 右側のStageタブの中で、CubeとCylinders, Physics Material, Looksフォルダーを選択し、mock_robotの下にドラッグアンドドロップで移動させます。
57 | 
58 | 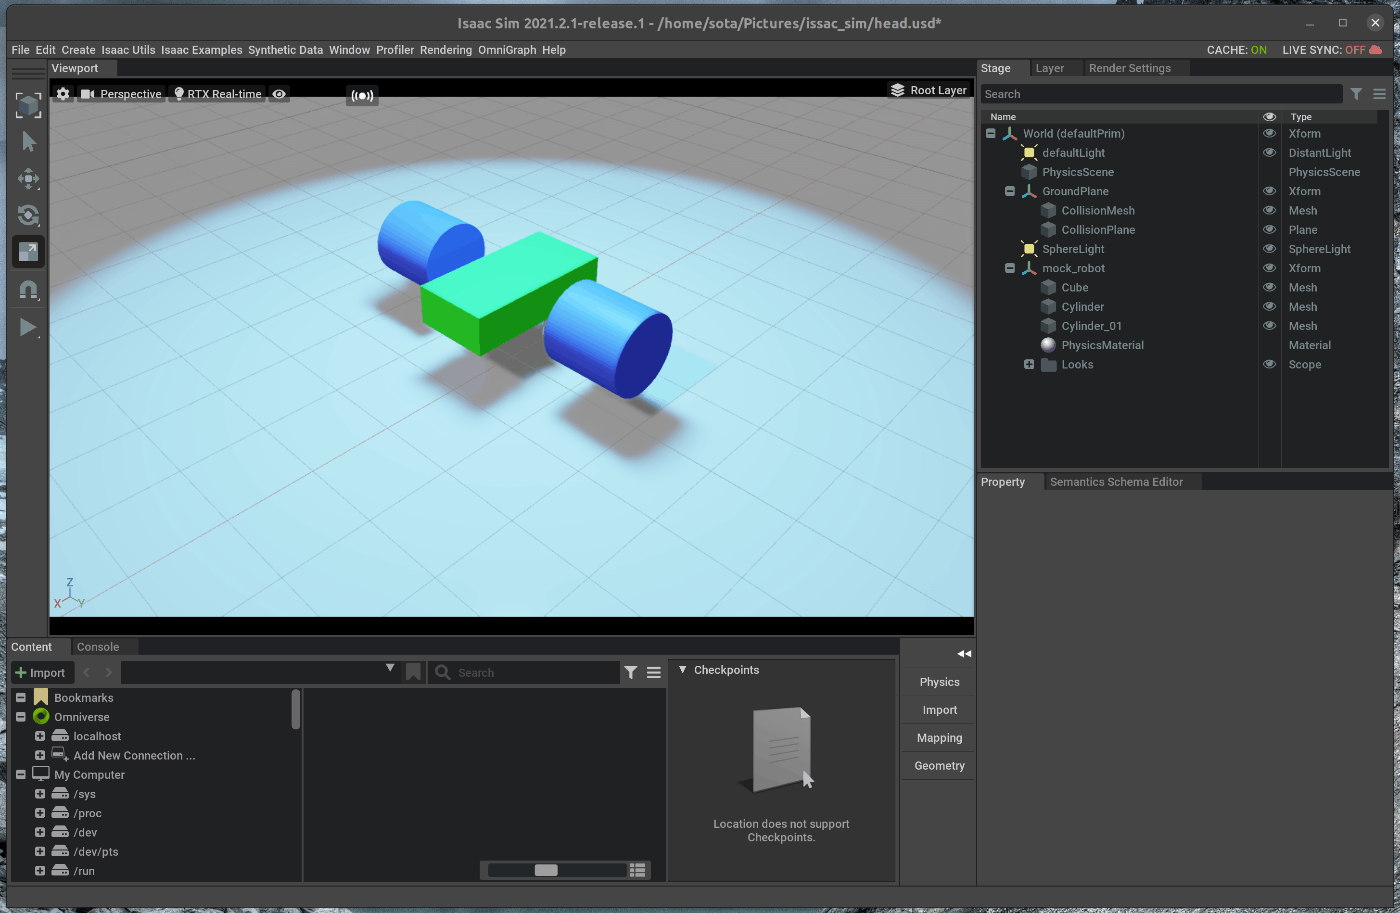
59 |
60 | 移動後、CubeとCylindersをそれぞれ右クリックし、次の名称にrenameします。
61 | - cube > body
62 | - cylinders > wheel_left
63 | - cylinders_01 > wheel_right
64 |
65 | 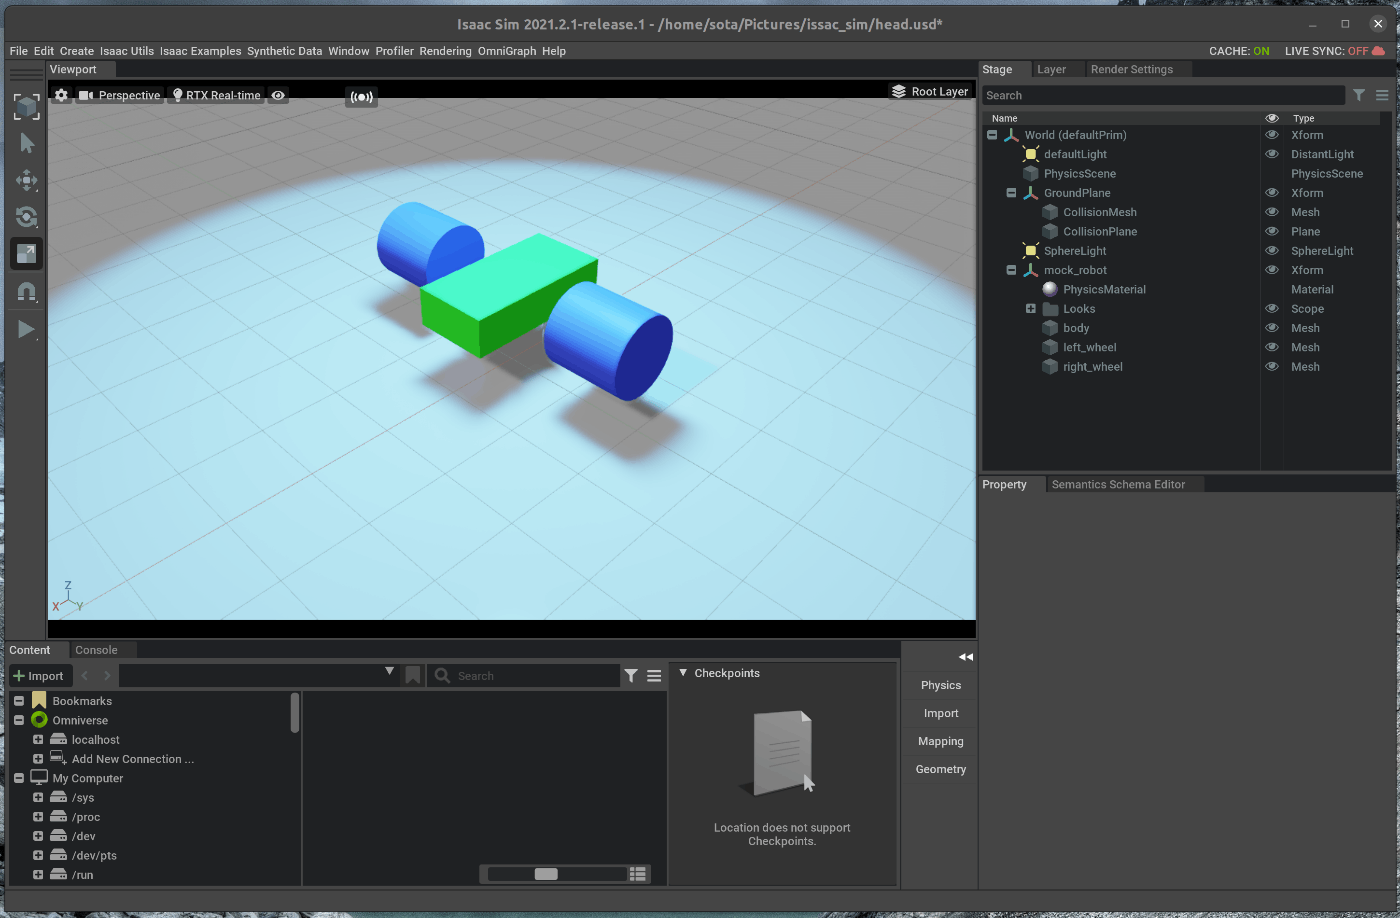
66 |
67 | ## 1.4 Jointの追加
68 | BodyとWheel間にJointを追加します。
69 | 右側にあるStageの中で、”wheel_left”を選択します。
70 | 選択した状態で、Ctrl+Shiftを押しながら、bodyを選択します。
71 |
72 | 右側のStageタブの中で右クリックし、Create > Physics > Joints > Revoluteを選択します。
73 | 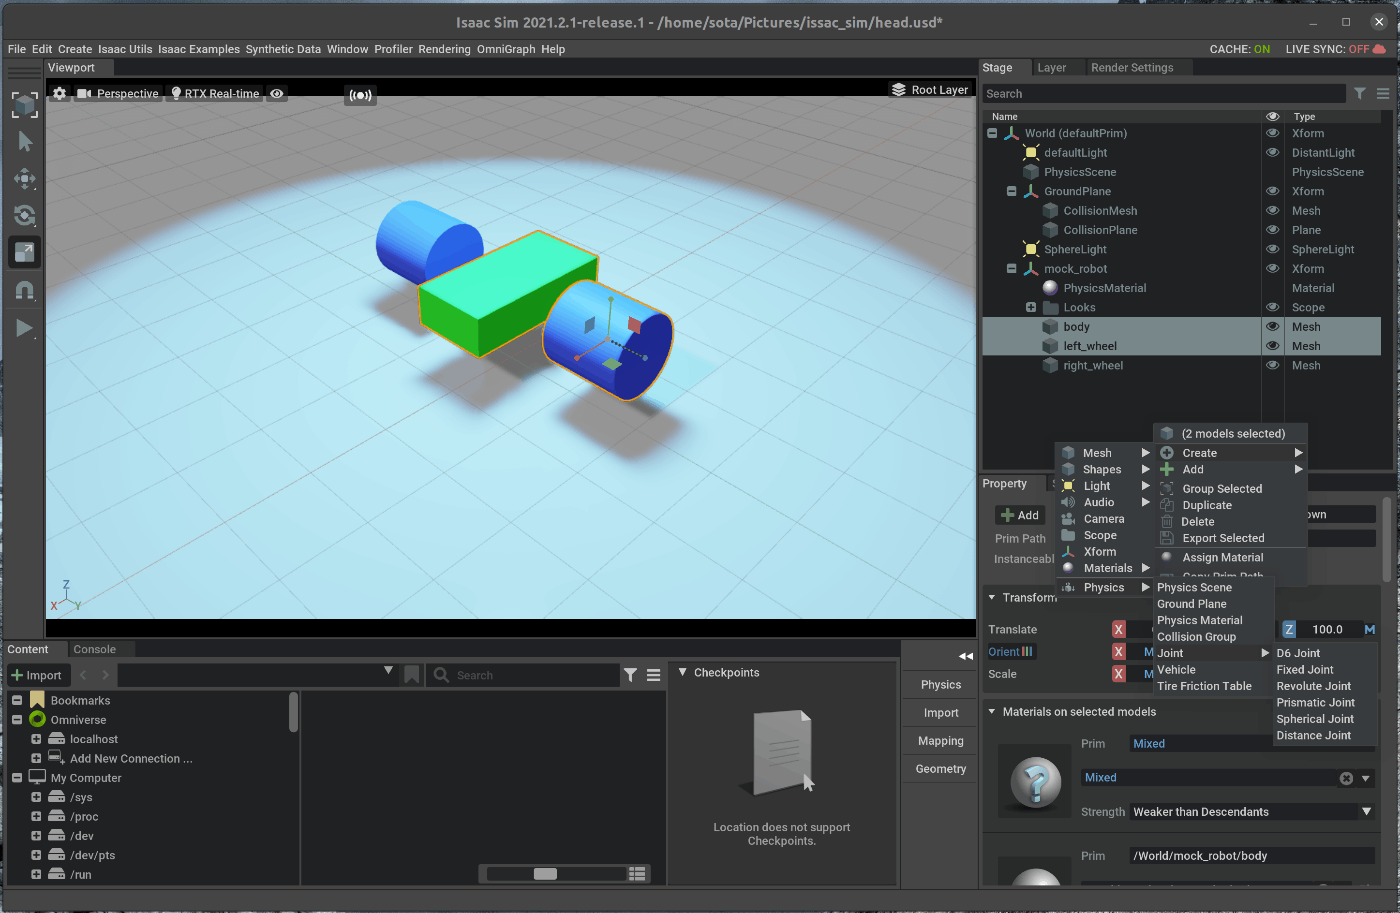
74 | 
75 |
76 | Bodyの下のRevoluteJointを右クリックし、renameします。
77 | - RevoluteJoint > wheel_joint_left
78 |
79 | 
80 |
81 | 右側のStageタブの中で、wheel_joint_leftを選択します。
82 | 選択した状態で、右下にあるPropertyの中から、次の値を変更します。
83 | - AxisをYにする
84 | - Local Rotation 1のXを-90にする
85 |
86 | 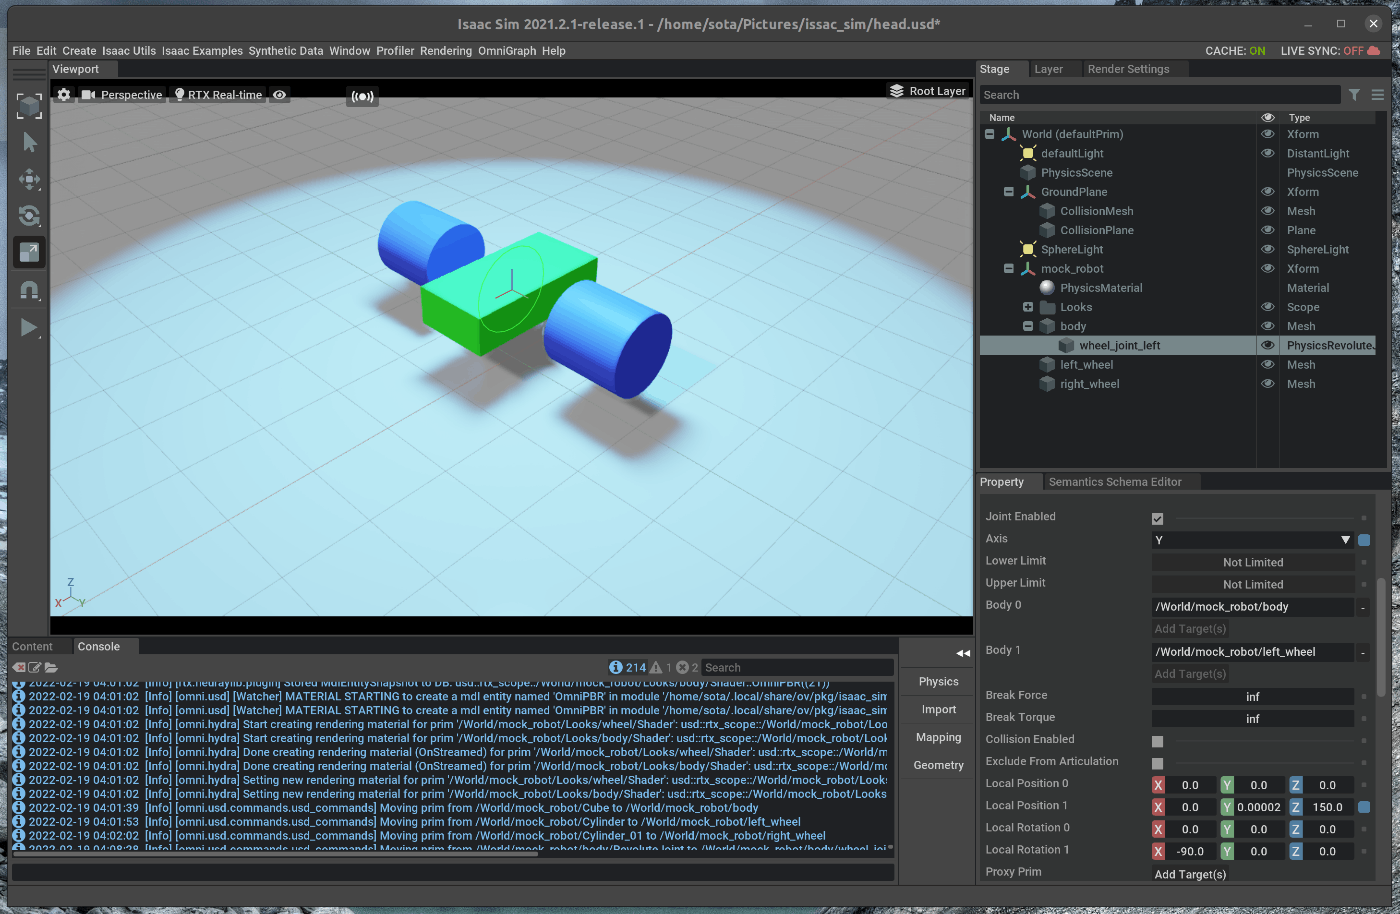
87 |
88 | 左タイヤに対して行ったJointの設定を右タイヤについても同様に行います。
89 |
90 | 
91 |
92 | 各wheelの設定完了後、右側のツールバーのシミュレーションstartボタンを押すと、関節関係が保たれたまま、重力がかかり落下することを確認します。
93 |
94 | 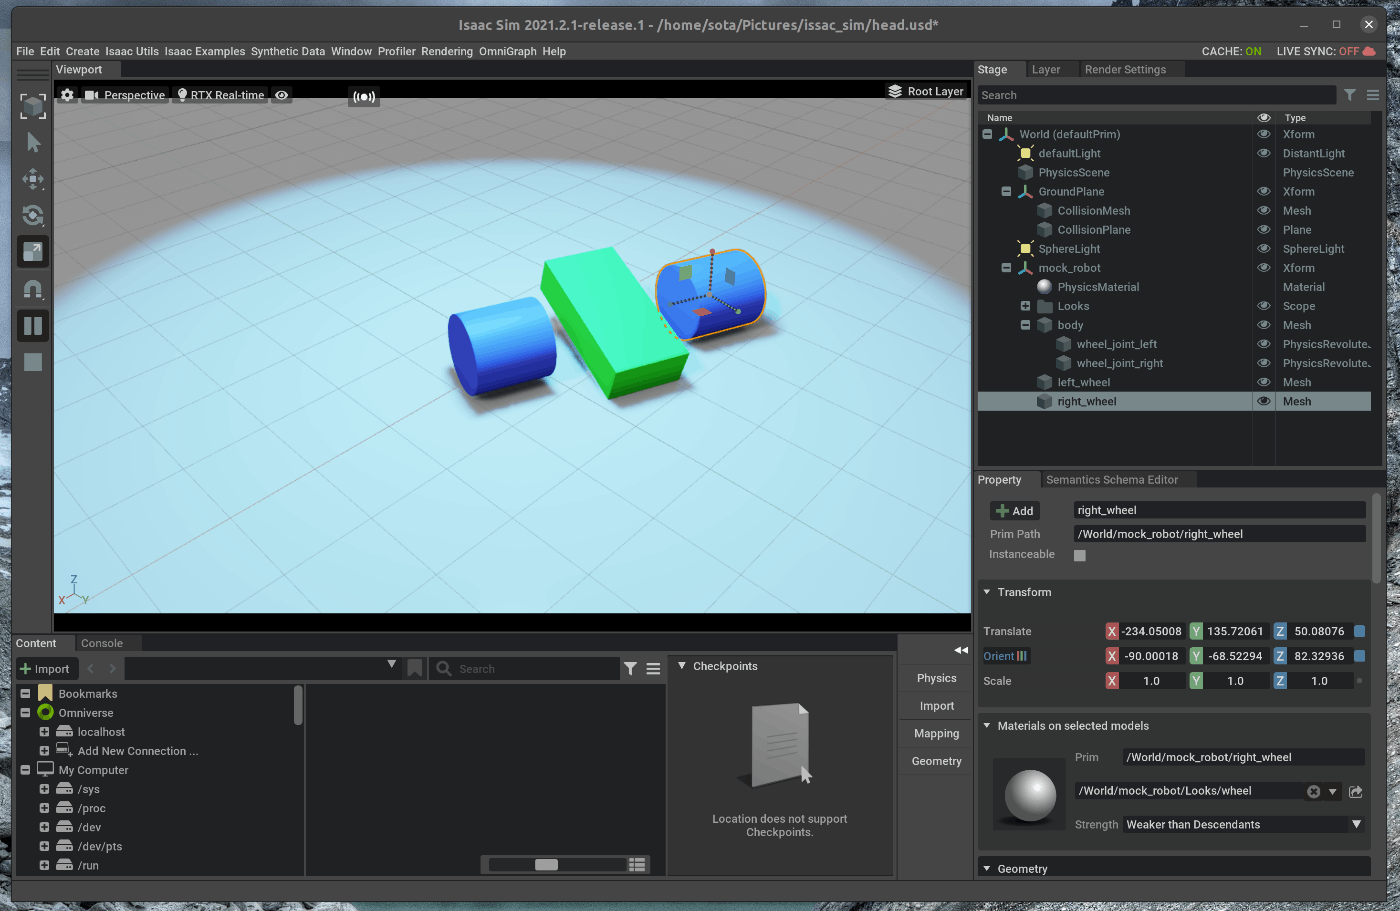
95 |
96 | ## 2. Joint Driveの追加
97 | Jointを制御するための設定を追加します。
98 | 右側のStageタブの中で、wheel_joint_leftとwheel_joint_rightを選択します。
99 | 選択した状態で、右下のPropertyの”+Add”をクリックし、Physics > Angular Driveを選択します。
100 |
101 | 
102 |
103 | それぞれのJointにおいて、ダンパと指令各速度値を設定します。
104 | 右側のStageタブの中で、wheel_joint_leftを選択します。
105 | 選択した状態で、右下のPropertyの中のDrive >Angularの次の値を変更します。
106 | - Dampingを1e4にする
107 | - Target Velocityを2000にする
108 | 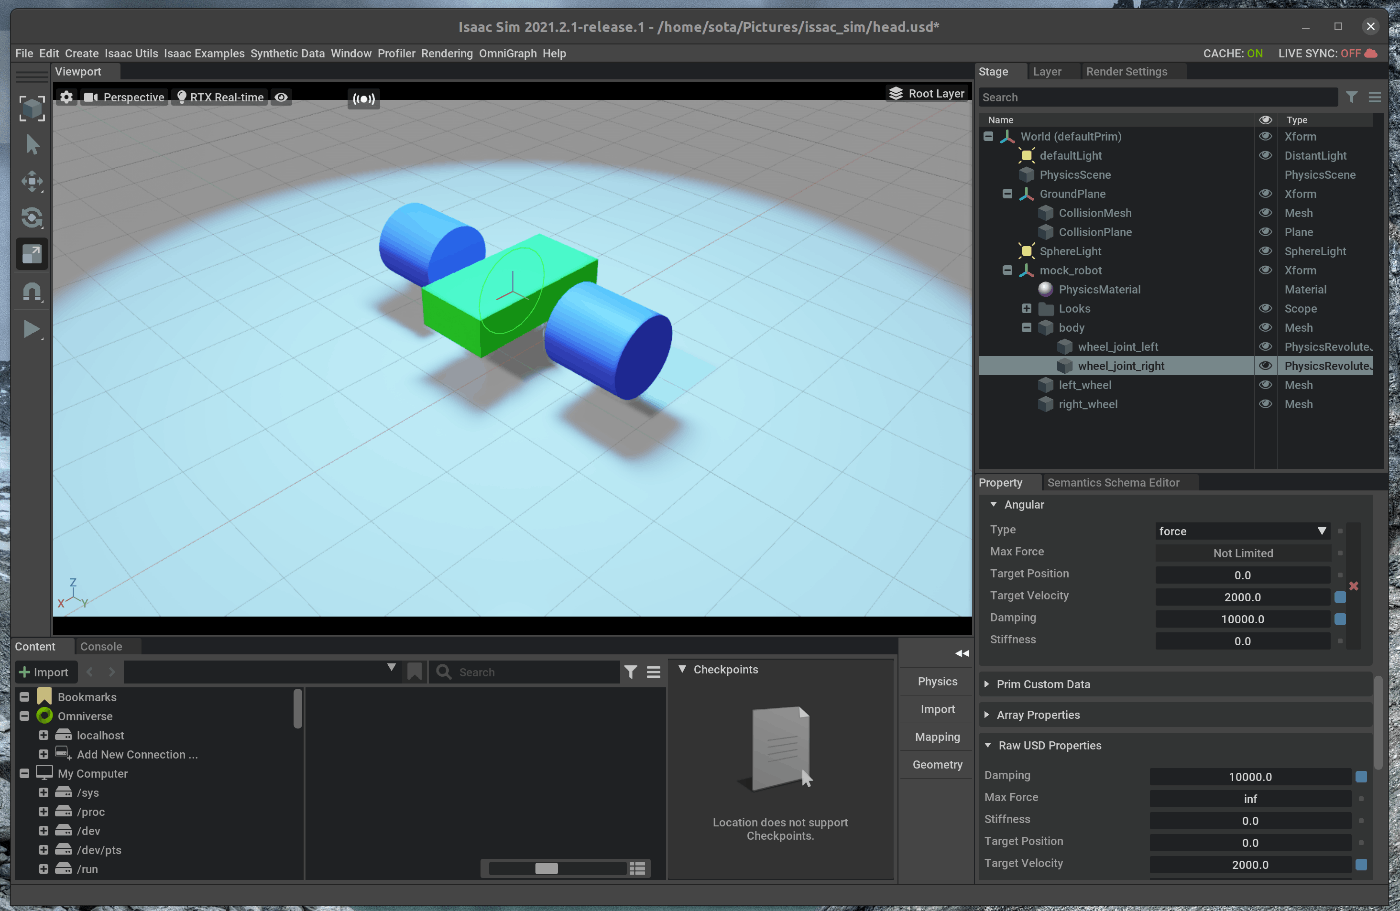
109 |
110 | wheel_joint_rightにおいても同様の手順を行い、ダンパと指令各速度値を設定します。
111 |
112 | 両方のWheelにおいて設定が完了し、左側のツールバーのシミュレーションStartボタンを押すと、ロボットが進むことを確認します。
113 |
114 | 
115 |
--------------------------------------------------------------------------------
/tutorials/replicator/replicator_composer/24_replicator_composer.md:
--------------------------------------------------------------------------------
1 | # 概要
2 | Replicator Comporserを用いてデータセットを作成します。
3 |
4 | Issac Simのtutorialに上記の内容が記載されており、この内容に沿って進めます。
5 | https://docs.omniverse.nvidia.com/app_isaacsim/app_isaacsim/tutorial_replicator_composer.html
6 |
7 | # 実行環境
8 |
9 | - インストール実行環境
10 |
11 | | unit | specification |
12 | |:-----------------:|:------------------:|
13 | | CPU | i9-11900H |
14 | | GPU | GeForce RTX 3080 Laptop|
15 | | RAM | 32GB |
16 | | OS | Ubuntu 20.04.3 LTS |
17 |
18 | - Nvidia Driverバージョン
19 | - 510.39.01
20 | - Issac simバージョン
21 | - 2021.2.1
22 |
23 |
24 | # 手順
25 | Replicator Composerを用いてデータセットを作成します。
26 | Replicator Composerでは、Parameter FileとAsset Fileの2つのファイルからシーンを生成します。
27 | シーンの設定では、Objectの種類や特性、環境の種類や特性をそれぞれ設定するこが可能です。
28 |
29 | 設定値の一覧はこちらのReferenceから確認できます。
30 | https://docs.omniverse.nvidia.com/app_isaacsim/app_isaacsim/manual_replicator_composer_parameter_list.html#isaac-sim-app-manual-replicator-composer-parameter-list
31 |
32 | Replicator ComposerのTutorialとして用意されているParameter FileとAsset Fileを用いてデータセットを作成します。
33 |
34 | また、Tutorialには、Launcherから実行する方法とDocker上で実行する方法が記載されています。
35 | 今回はLauncherから実行する方法によってデータセットを作成します。
36 |
37 | 流れを次に示します。
38 |
39 | 1. Isaac SimのインストールディレクトリでTerminalを開く
40 | 2. データ生成のコマンドの実行
41 |
42 | ## 1. Isaac SimのインストールディレクトリでTerminalを開く
43 | ### 1.1 OmniverseからIsaac Simを起動する
44 | まず、OmniverseのLauncherからIsaac SimのLauncherを起動します。
45 | 
46 |
47 | ### 1.2 Isaac SimのインストールディレクトリでTerminalを開く
48 | 次に、Isaac SimのLauncherから”Open in Terminal”を選択します。
49 | 
50 | 
51 |
52 | ## 2. データ生成のコマンドの実行
53 | ### 2.1 データ保存先ディレクトリを作成する
54 | データ保存先ディレクトリを作成します。
55 | 開いたterminalで次のコマンドを実行する
56 |
57 | ~~~ bash:shell
58 | $ mkdir -p ~/workspace/isaac/
59 | ~~~
60 |
61 | ### 2.2 tool/composer/main.pyを修正する
62 | 自分の環境において、[このコマンド](https://docs.omniverse.nvidia.com/app_isaacsim/app_isaacsim/tutorial_replicator_composer.html#sample-input-parameterizations)を実行すると、エラーが発生しデータを生成することができませんでした。
63 |
64 | エラー内容は次の様な内容でした。
65 |
66 | こちらについて調べたところ、Isaacのある複数のパッケージはSimulationAppのインスタンスに依存しており、依存しているパッケージはインスタンス生成後にimportしないと、ImportErrorになるという報告がありました。
67 | https://forums.developer.nvidia.com/t/omni-kit-error-isaac-sim-implementation/204275
68 |
69 | そのため、実行ファイルであるtool/composer/main.pyを編集し、先にSimulationAppのインスタンスを生成するように変更しました。
70 | まず、エディタで該当ファイルを開きます。
71 |
72 | ~~~ bash:shell
73 | $ vim tool/composer/main.py
74 | ~~~
75 | 
76 | 
77 |
78 | 16行目に次の処理を追加します。
79 | ~~~ Python:Python
80 | kit = SimulationApp()
81 | ~~~
82 |
83 | 52行目をコメントアウトします。
84 | ~~~ Python:Python
85 | # self.sim_app = SimulationApp(config)kit = SimulationApp()
86 | ~~~
87 |
88 | ### 2.3 データ生成のコマンドを実行する
89 | #### 2.3.1 Factory環境におけるデータ生成
90 | Factory環境でデータを生成するコマンドを実行します。
91 |
92 | ~~~ bash:shell
93 | $ ./python.sh tools/composer/src/main.py --input parameters/warehouse.yaml --output */datasets/warehouse --num-scenes 10 --headless --mount ~/workspace/isaac/
94 | ~~~
95 | 
96 |
97 | 実行が完了すると/workspace/isaac/datasets/warehouse/にデータが保存されます。
98 | 
99 | 
100 |
101 | #### 2.3.1 FlyingThings3Dを用いたデータ生成
102 | FlyingThings3Dを用いてデータを生成するコマンドを実行します。
103 |
104 | ~~~ bash:shell
105 | $ ./python.sh tools/composer/src/main.py --input parameters/flying_things_3d.yaml --output */datasets/flying_things_3d --num-scenes 10 --headless --mount ~/workspace/isaac/
106 | ~~~
107 |
108 | 実行が完了すると/workspace/isaac/datasets/flying_things_3d/にデータが保存されます。
109 | 
110 |
111 |
--------------------------------------------------------------------------------
/tutorials/ros/multiple_robots_ros_navigation/31_multiple_robots_ros_navigation.md:
--------------------------------------------------------------------------------
1 | # 概要
2 | Isaac Sim上でSceneと複数のRobotを配置し、ROS Nvigation Stackを用いてRobotを動かします。
3 |
4 | Issac Simのtutorialに上記の内容が記載されており、この内容に沿って進めます。
5 | https://docs.omniverse.nvidia.com/app_isaacsim/app_isaacsim/tutorial_ros_multi_navigation.html
6 |
7 | # 実行環境
8 |
9 | - インストール実行環境
10 |
11 | | unit | specification |
12 | |:-----------------:|:------------------:|
13 | | CPU | i9-11900H |
14 | | GPU | GeForce RTX 3080 Laptop|
15 | | RAM | 32GB |
16 | | OS | Ubuntu 20.04.3 LTS |
17 |
18 | - Nvidia Driverバージョン
19 | - 510.39.01
20 | - Issac simバージョン
21 | - 2021.2.1
22 |
23 |
24 | # 手順
25 | Isaac Sim上でSceneと複数のRobotを配置し、ROS Nvigation Stackを用いてRobotを動かします。
26 | まず、ROS Nvigation Stack上で使用するOccupacy MapをIssac Sim上で作成します。
27 | 作成したOccupacy Mapを用いて、Navigationを実行します。
28 |
29 | 1. ROS Navigationのインストール
30 | 2. Occupacy Mapの生成
31 | 3. Navigationの実行
32 |
33 | ## 1. ROS Navigationのインストール
34 | ### 1.1 ROS Navigationをインストールする
35 | terminalで次のコマンドを実行します。
36 |
37 | ~~~ bash:shell
38 | $ sudo apt-get install -y ros-noetic-navigation
39 | ~~~
40 |
41 | ## 2. Occupacy Mapの生成
42 | ### 2.1 OmniverseからIssac Simを起動する
43 | 
44 |
45 | ### 2.2 シーンをロードする
46 | メニューバーのIsaac Examples > ROS > Navigation > Hospitalを選択します。
47 | 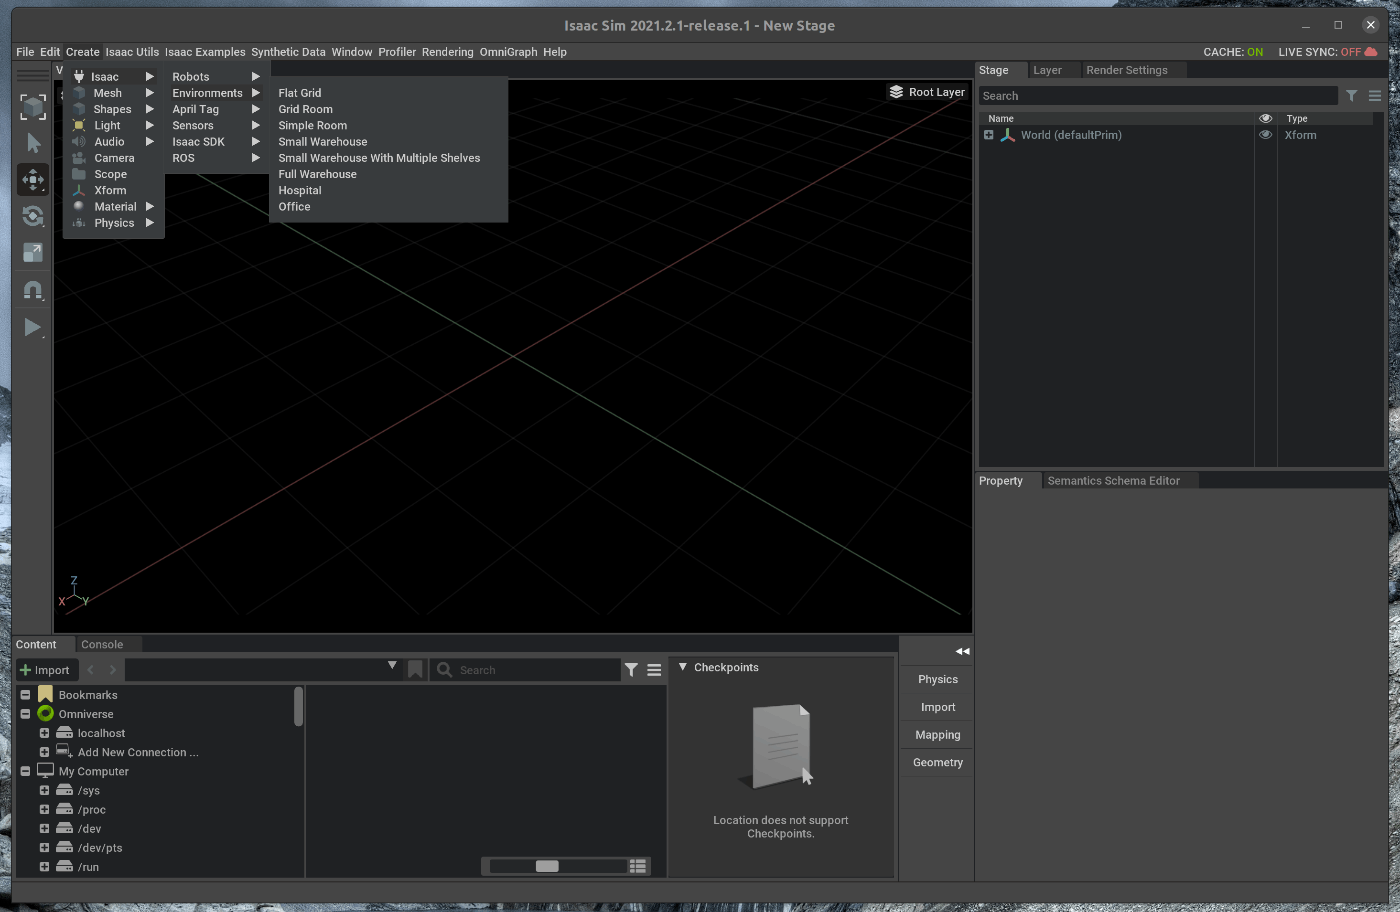
48 | 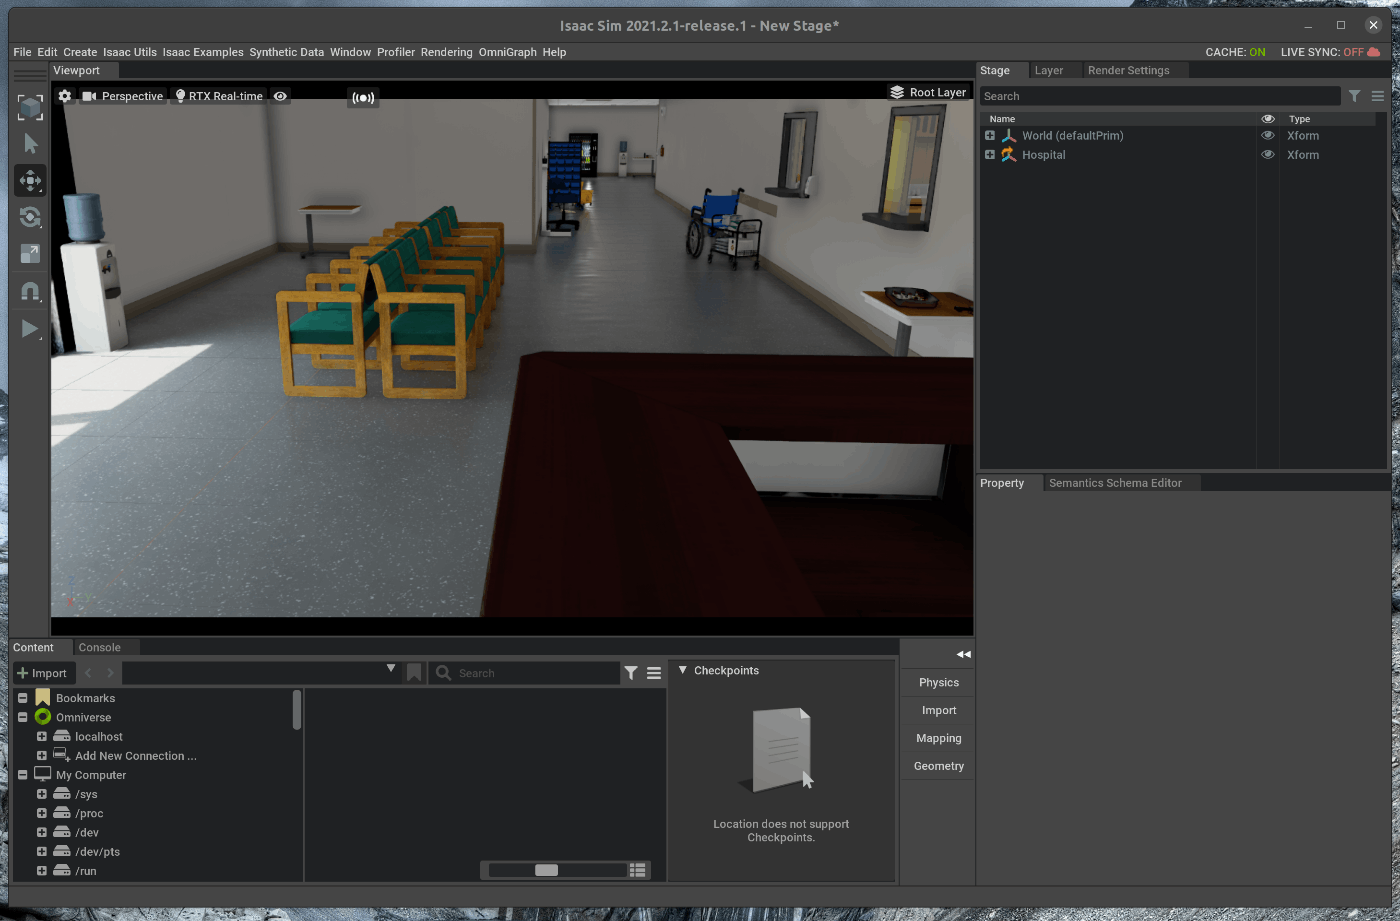
49 |
50 | この状態で、Viewportの左側のPLAYボタンを押します。
51 |
52 | viewportのカメラアイコンをクリックし、Perspectiveを選択します。
53 | また、ドロップダウンしたメニューの中から”Top”を選択します。
54 | 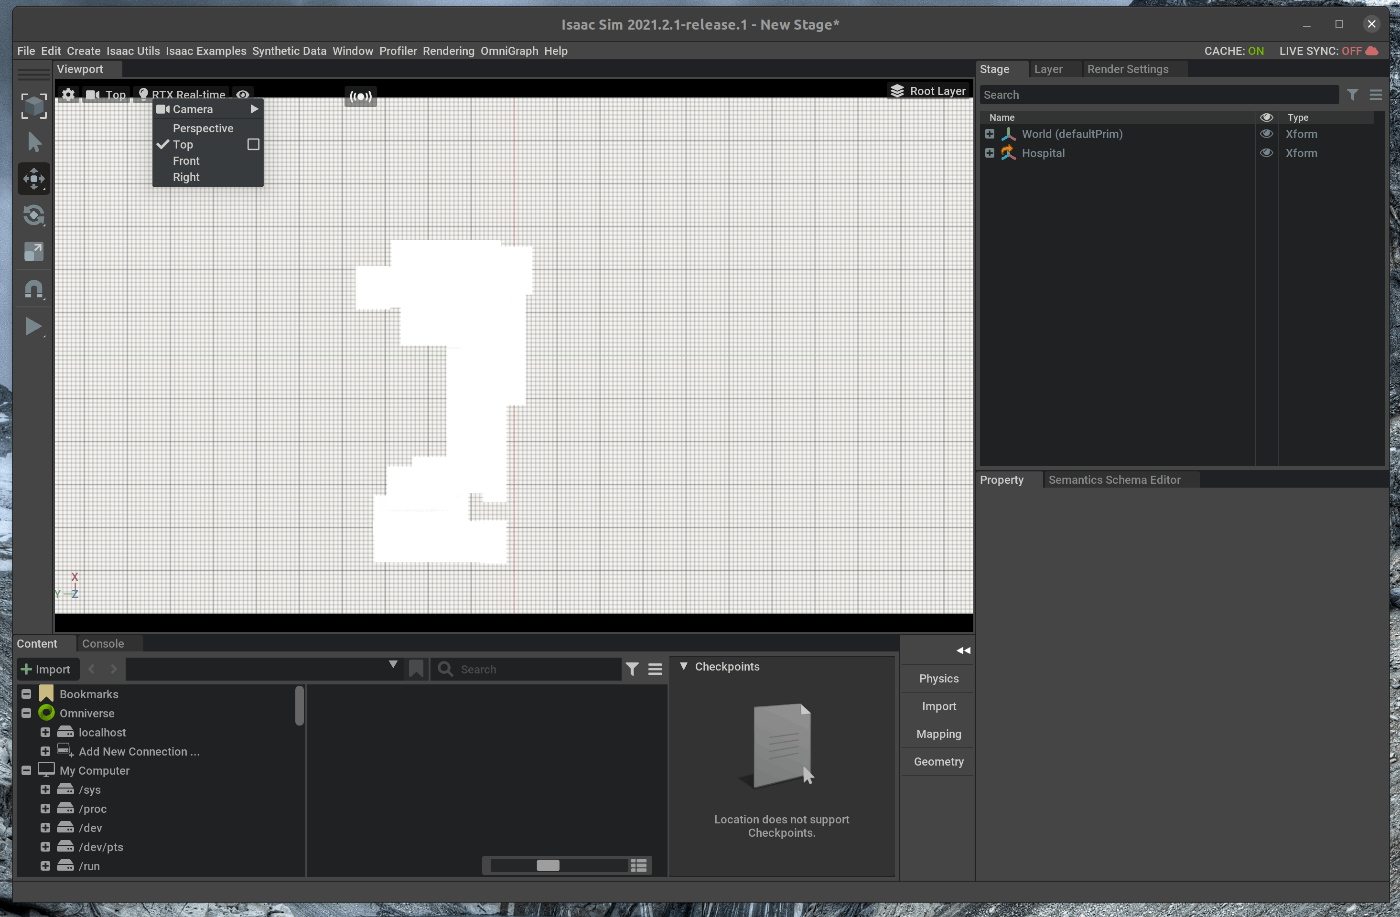
55 |
56 | ### 2.3 Occupacy Mapを生成する
57 | メニューバーのIsaac Utils > Occupancy Mapを選択します。
58 | 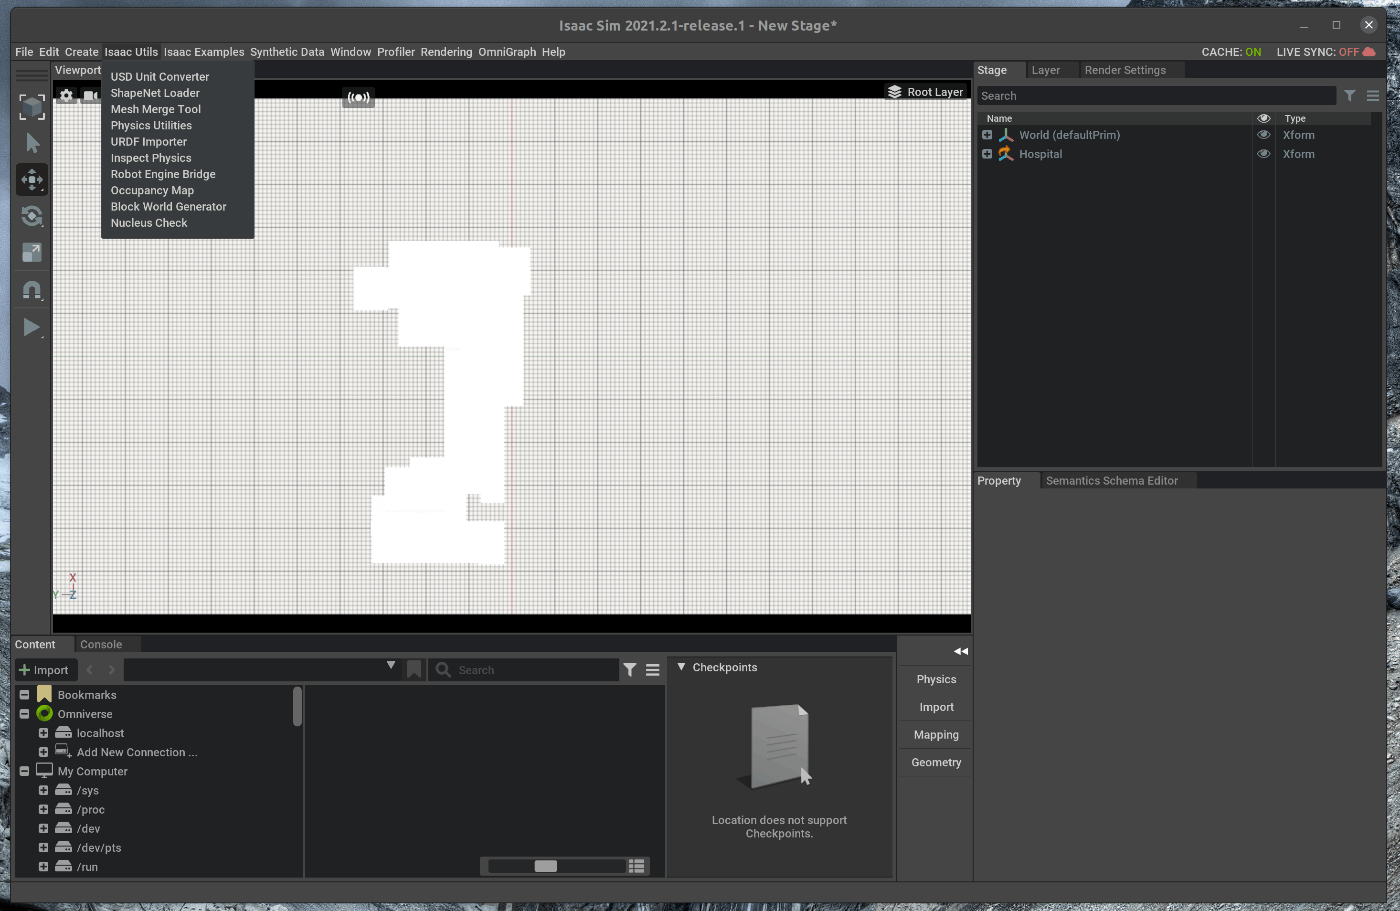
59 |
60 | ポップアップしたWindowをViwport下部にあるConsoleの右隣にドラッグし、追加します。
61 |
62 |
63 | Occupacy Mapの設定を次の通りに変更します。
64 |
65 | - originのXを0.0にする
66 | - originのYを0.0にする
67 | - originのZを0.0にする
68 | - Lower BpundのZを10.0にする
69 | - Upprer BoundのZを62.0にする
70 |
71 |
72 | 右側のStage上で、Hospitalを選択します。
73 | 
74 |
75 | この状態で、Occupacy Mapの”BOUND SELECTION”をクリックします。
76 | クリックすると、map parametersがHospitalに合うようにアップデートされます。
77 | 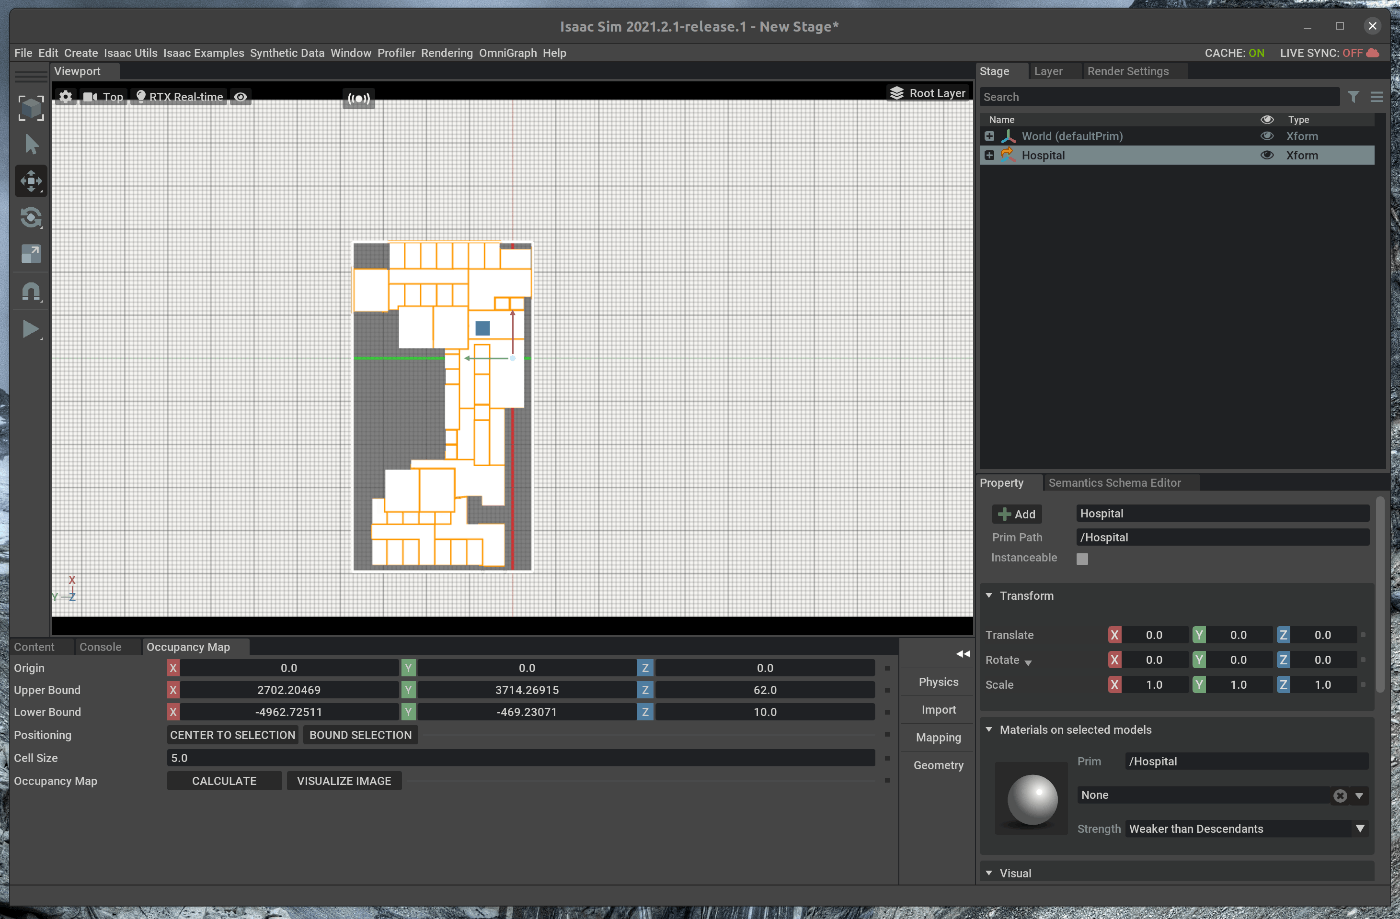
78 |
79 | 次に、Occupacy Mapの”CALCULATE” > "VISUALIZE IMAG"をクリックします。
80 | 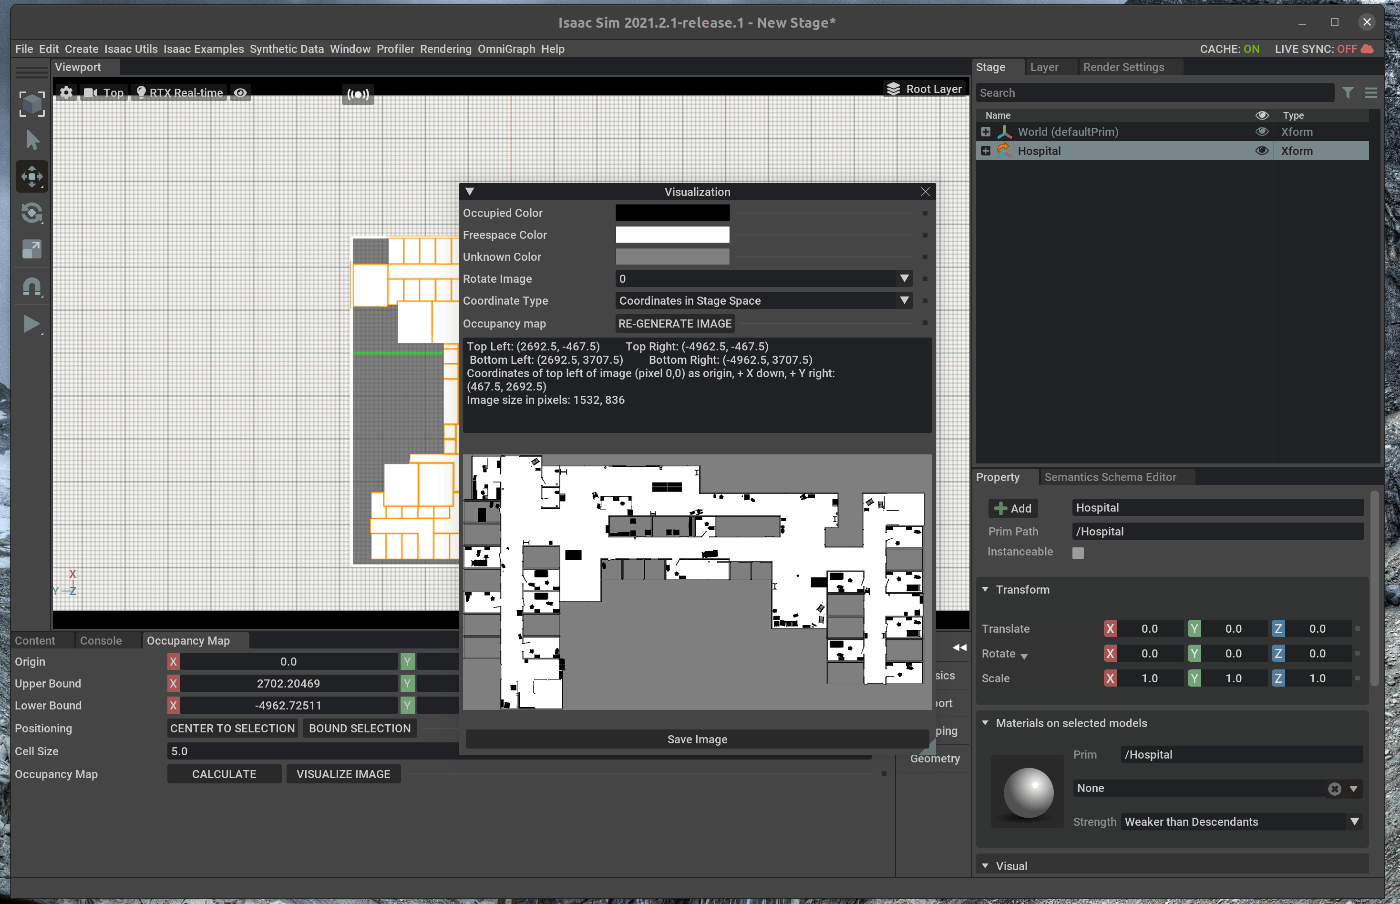
81 |
82 | 表示されたOccupacy MapのWindowの中で次の設定を変更します。
83 |
84 | - rotationを180にする
85 | - Coordinate Typeを”ROS Occupancy Map Parameters File (YAML)”にする
86 |
87 | 設定後、Occupacy Mapの”RE-GENERATE IMAGE”を選択する。
88 | 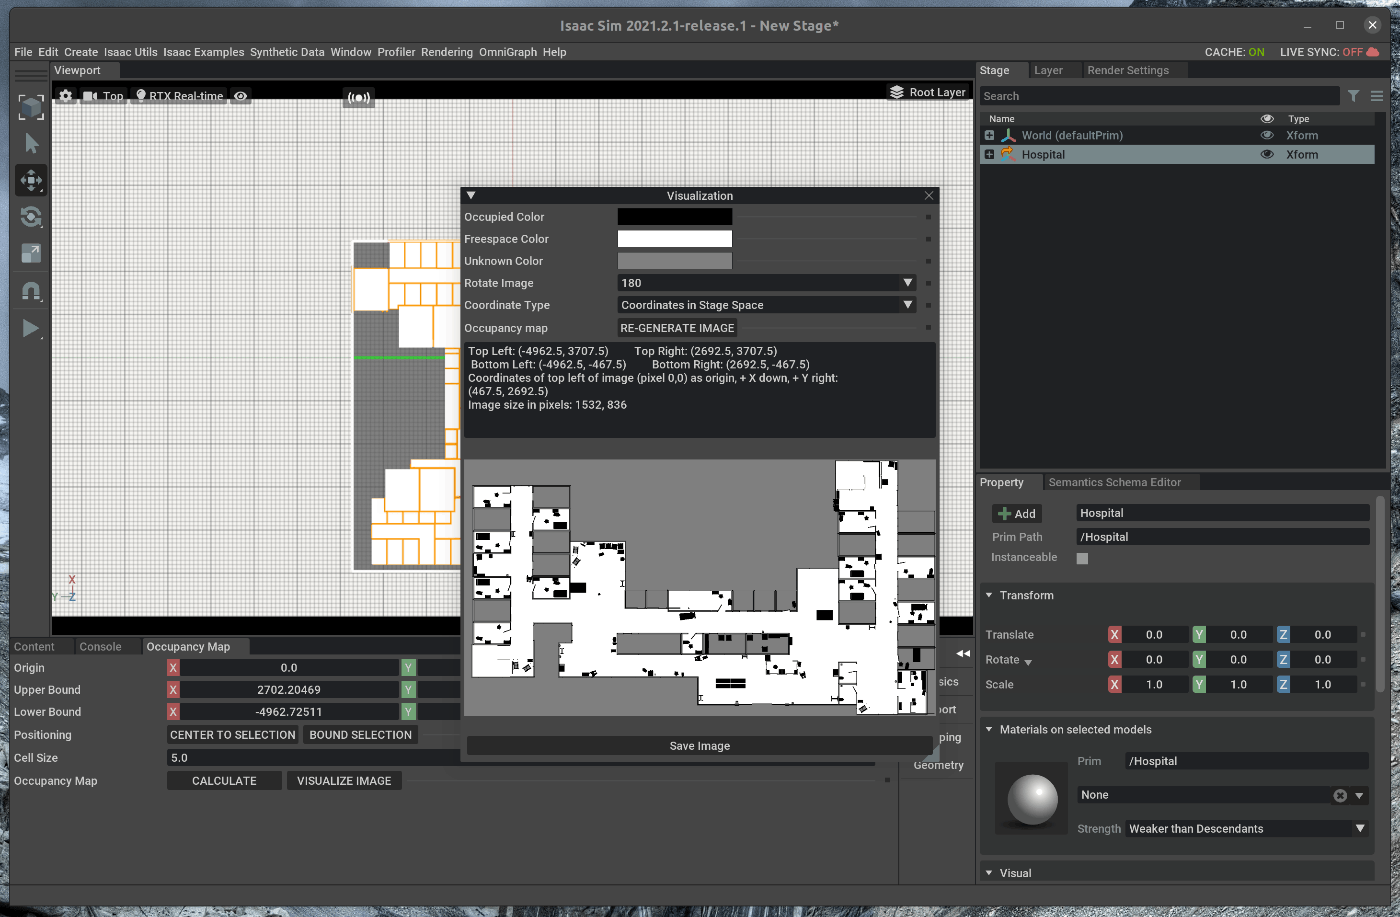
89 |
90 | 生成したImage(Occupacy Map)を保存します。
91 | Imageの保存名は”carter_hospital_navigation.yaml”に設定します。
92 |
93 | この状態で、Viewportの左側のSTOPボタンを押します。
94 |
95 | ## 3. Navigationの実行
96 | ### 3.1 シーンをロードする
97 | メニューバーのIsaac Examples > ROS > Multi Robot Navigation > Hospitalを選択します。
98 | 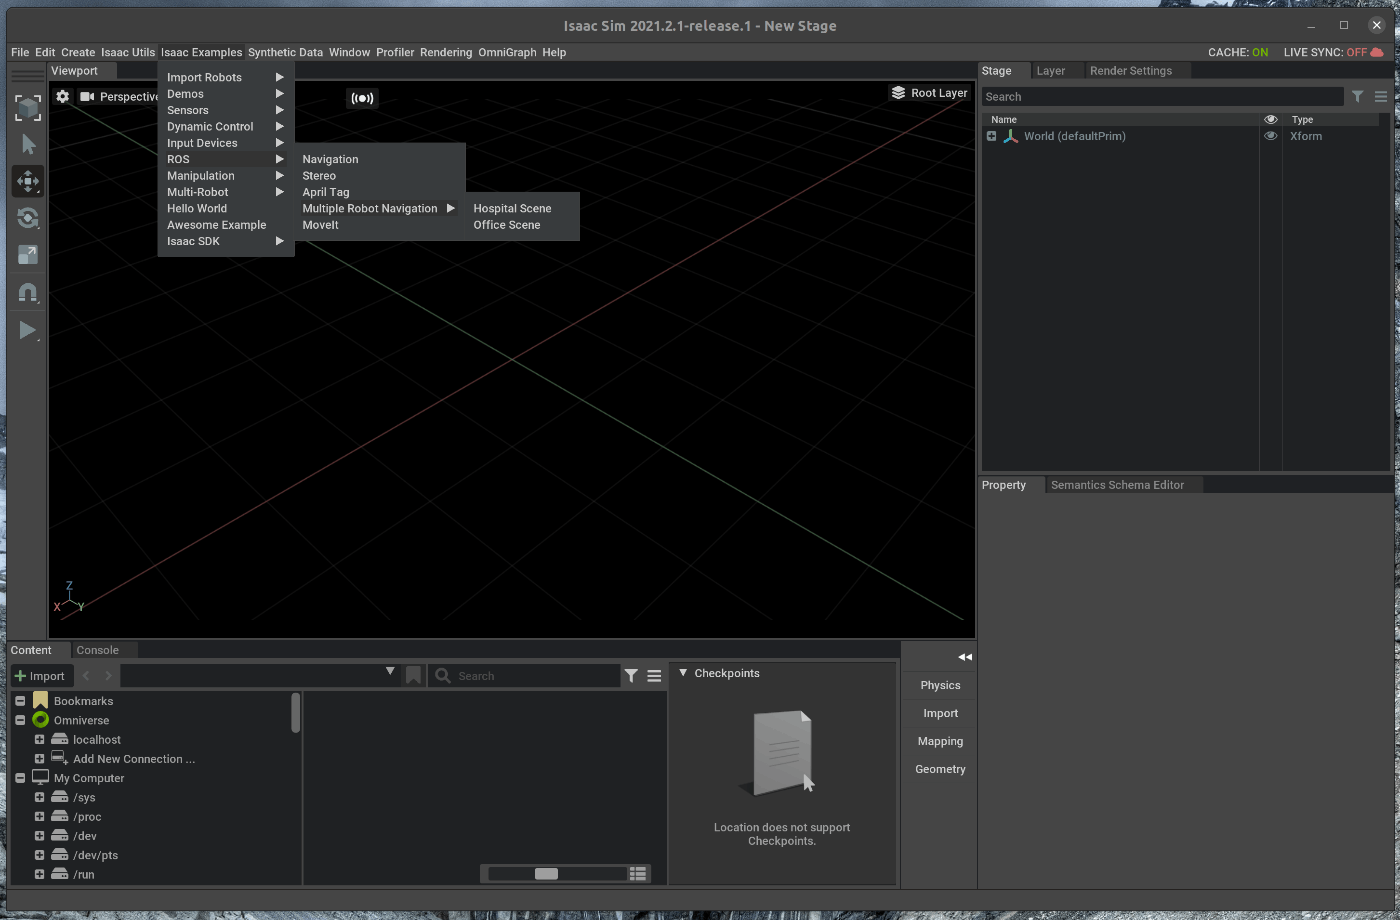
99 | 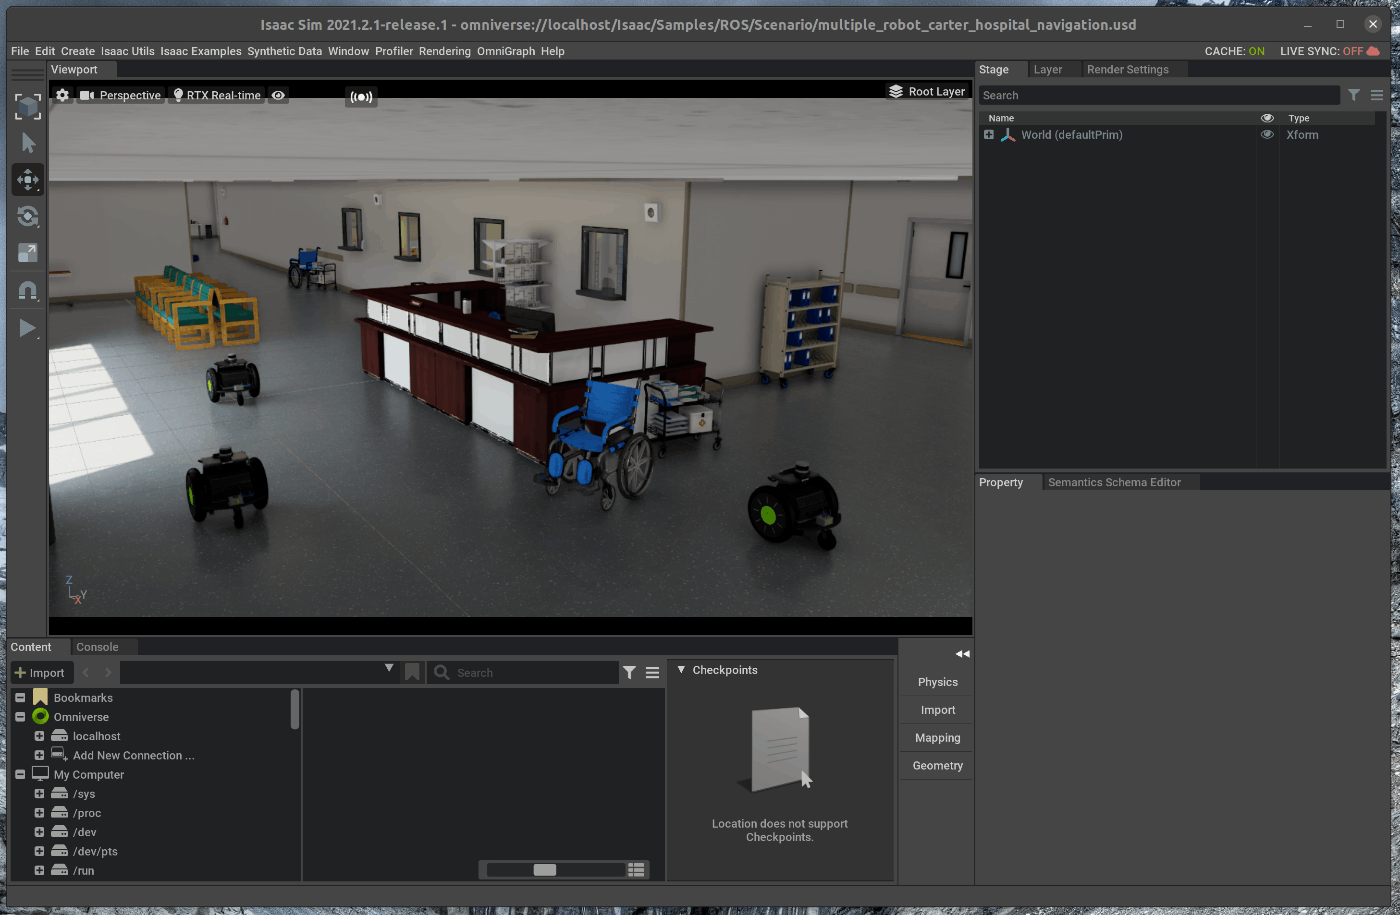
100 |
101 | 新たにterminalを開き、roscoreを起動します。
102 | この状態で、Viewportの左側のPLAYボタンを押します。
103 | 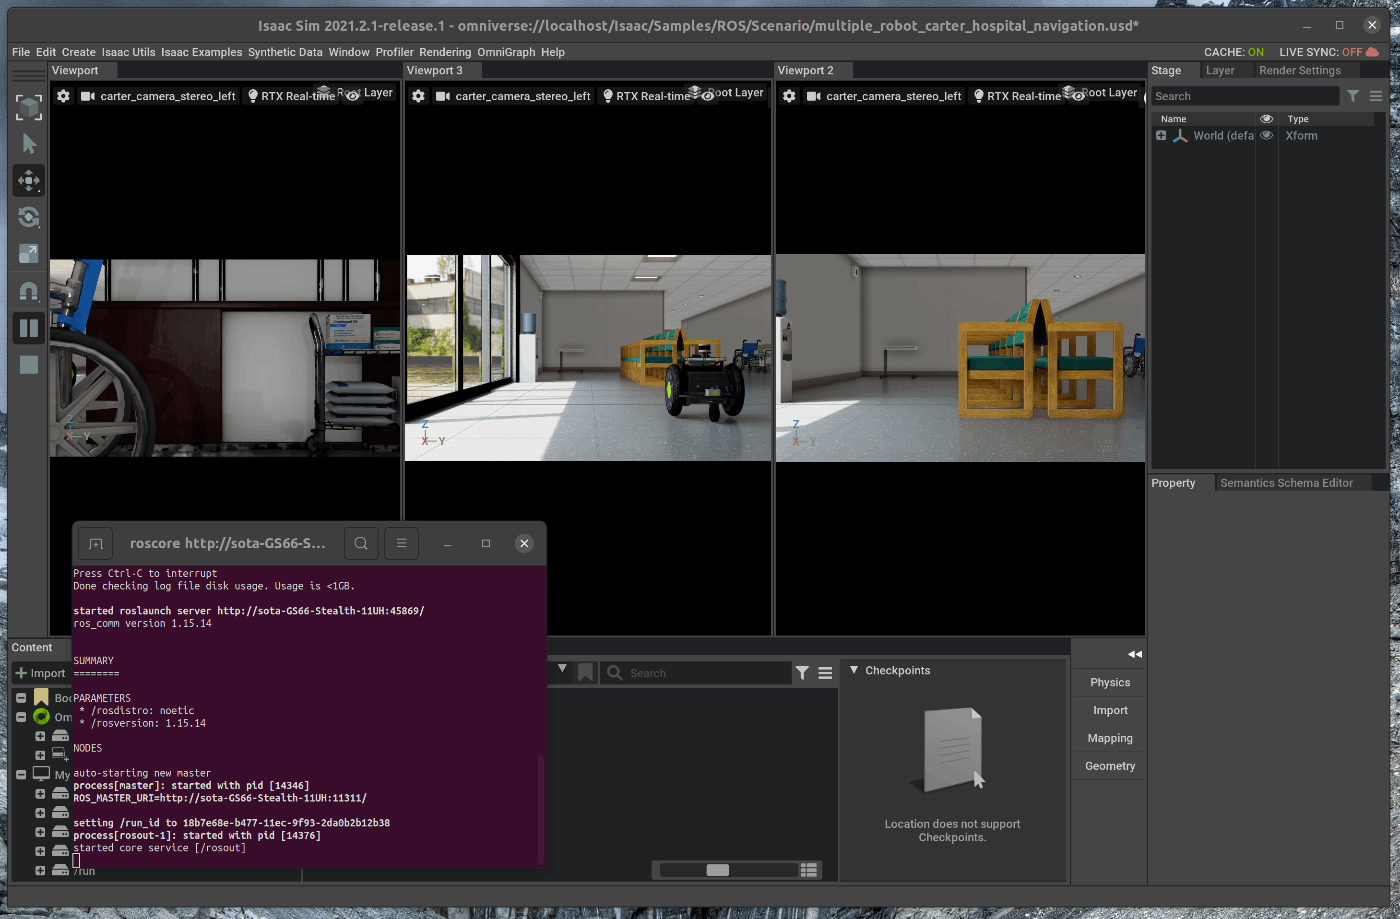
104 |
105 | ### 3.2 NavigationのLaunchを実行する
106 |
107 | 新たにterminalを開き、次のコマンドを入力します
108 |
109 | ~~~ bash:shell
110 | $ cd ~/.local/share/ov/pkg/isaac_sim-2021.2.1/ros_workspace/
111 | $ source devel/setup.bash
112 | $ roslaunch carter_2dnav multiple_robot_carter_navigation.launch env_name:=hospital
113 | ~~~
114 | 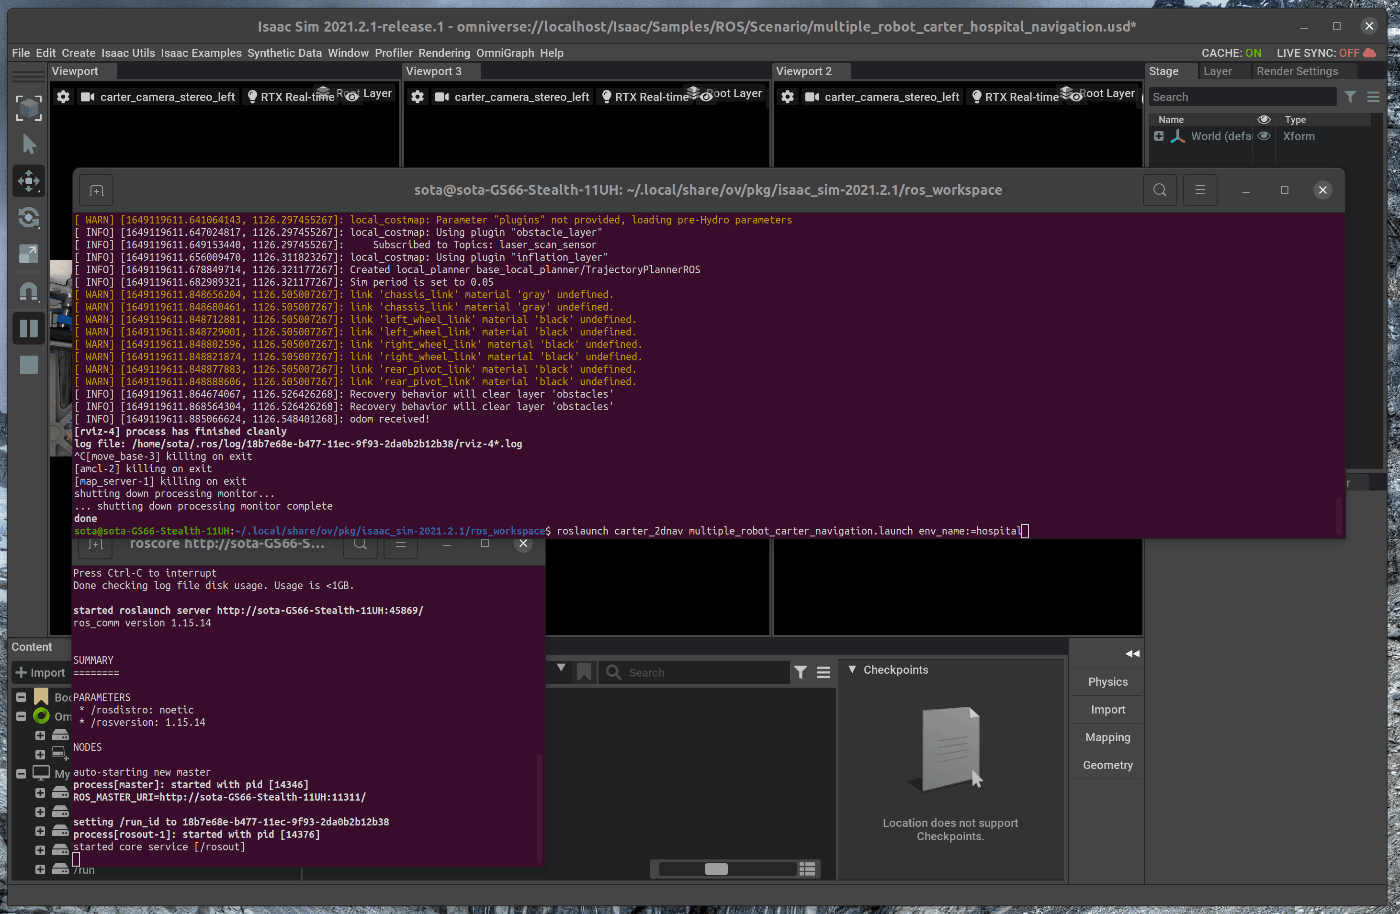
115 |
116 | rviz上で、2D Nav Goalを使用すると、ロボットが動くことが確認できます。
117 | 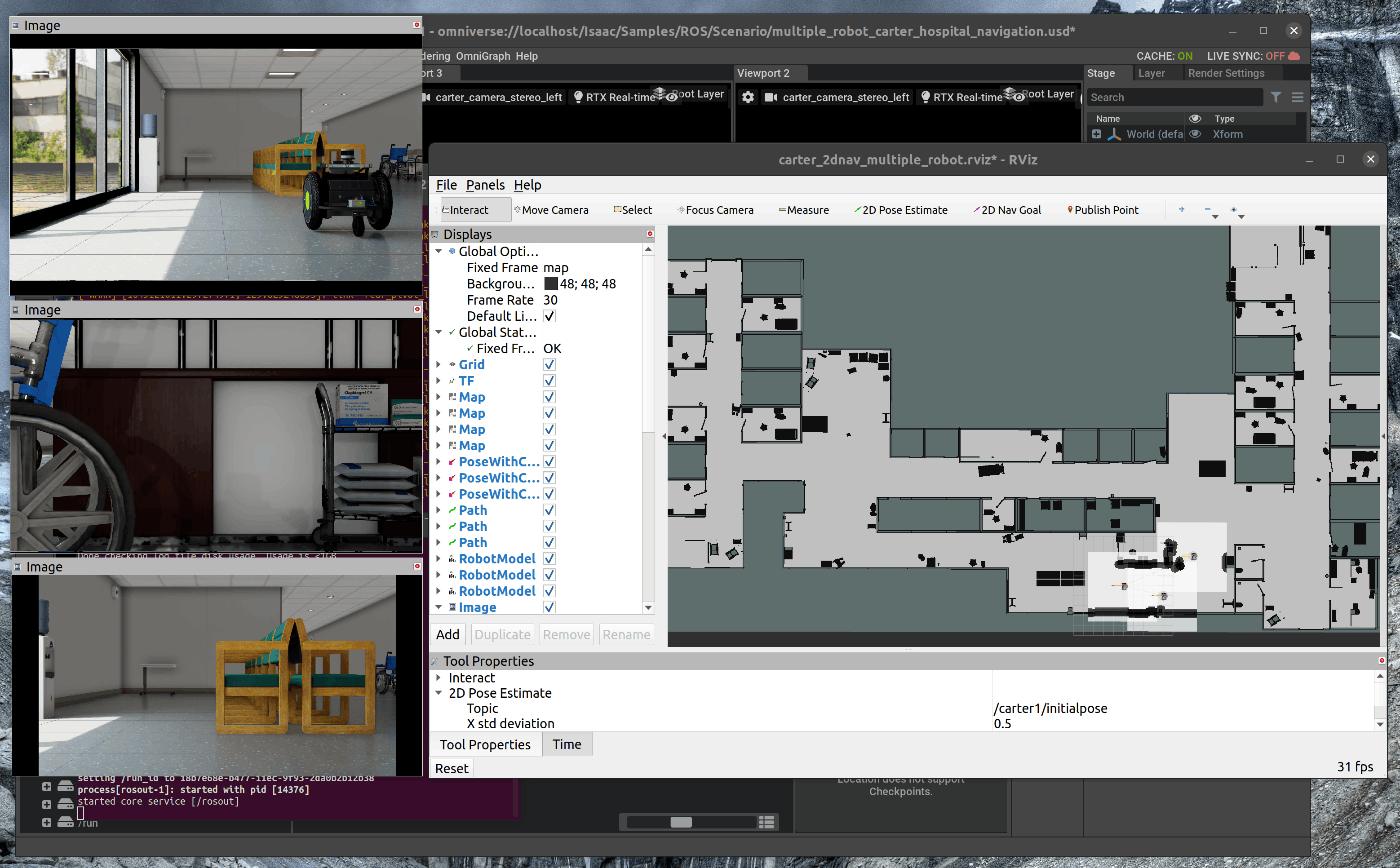
118 | 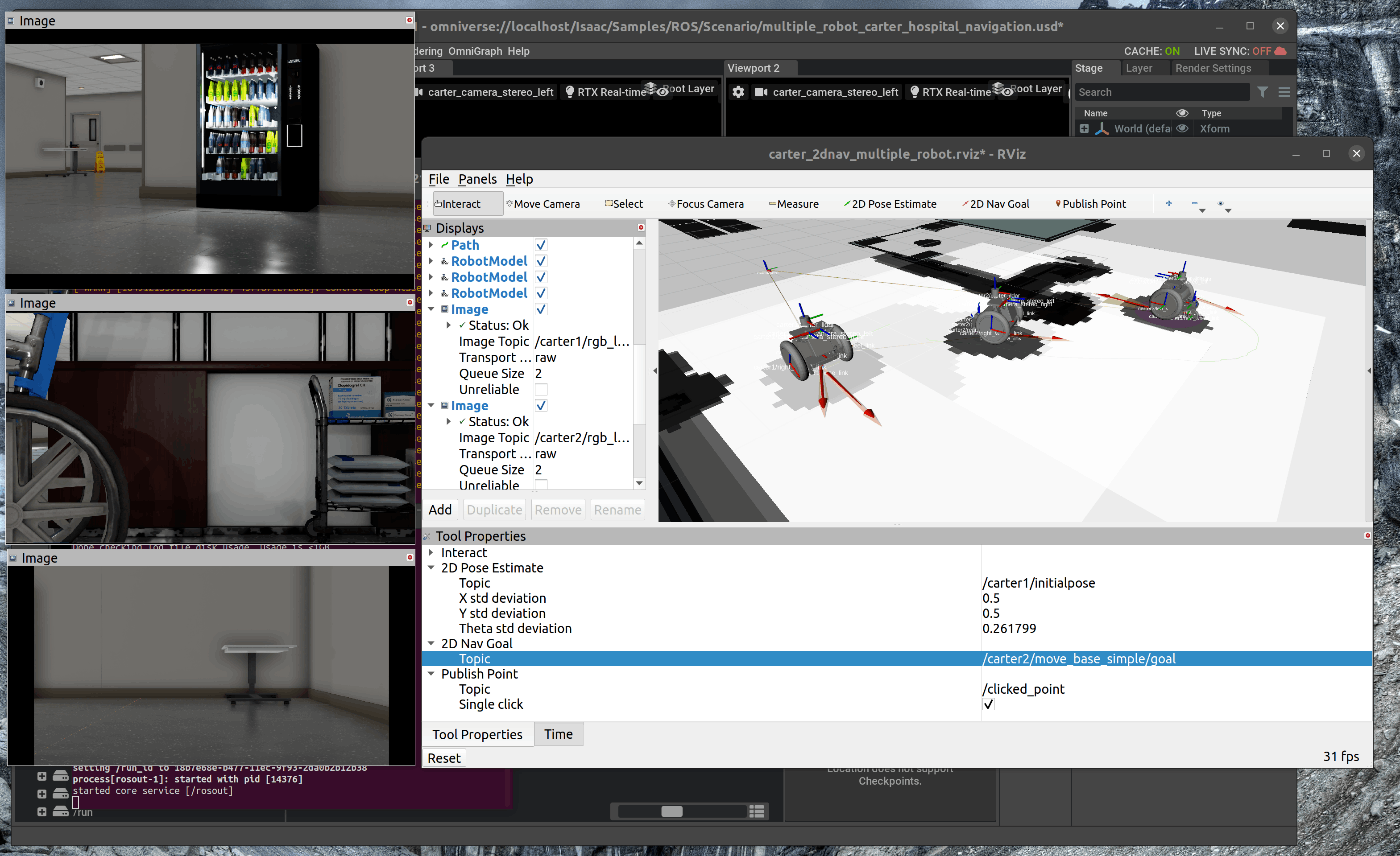
119 |
120 |
121 |
122 |
123 |
124 |
125 |
126 |
--------------------------------------------------------------------------------
/tutorials/gui/script_editor/5_script_editor.md:
--------------------------------------------------------------------------------
1 | # 概要
2 | PythonのAPIからシーンを操作します。
3 |
4 | Issac Simのtutorialに上記の内容が記載されており、この内容に沿って進めます。
5 | https://docs.omniverse.nvidia.com/app_isaacsim/app_isaacsim/tutorial_gui_script_editor.html
6 |
7 | # 実行環境
8 |
9 | - インストール実行環境
10 |
11 | | unit | specification |
12 | |:-----------------:|:------------------:|
13 | | CPU | i9-11900H |
14 | | GPU | GeForce RTX 3080 Laptop|
15 | | RAM | 32GB |
16 | | OS | Ubuntu 20.04.3 LTS |
17 |
18 | - Nvidia Driverバージョン
19 | - 510.39.01
20 | - Issac simバージョン
21 | - 2021.2.1
22 |
23 |
24 |
25 | # 概要
26 |
27 | GUIでの操作はすべてPythonのAPIから操作することが可能です。
28 | (逆にPython APIからのすべての操作がGUI上から実行できるわけではない為。注意します)
29 |
30 | issac Sim上でのPython APIは、Omniverse USD APIとIssac Sim core APIが用意されています。
31 | 今回は、2つのAPIを用いて、シーン内に立方体を追加します。
32 |
33 | 1. GUI内にScript Editorを追加
34 | 2. USD APIでシーンを操作
35 | 3. Issac Sim Core APIでシーンを操作
36 |
37 | 以下内容のシーンファイルはこちらからダウンロードできます。
38 | ()[]
39 |
40 | ## 1. GUI内にScript Editorを追加
41 | こちらのページに記載してある手順を進めます。
42 | https://docs.omniverse.nvidia.com/app_isaacsim/app_isaacsim/tutorial_gui_script_editor.html
43 |
44 | ### 1.1 OmniverseからIssac Simを起動する
45 | 
46 |
47 | ### 1.2 Script Editorを追加
48 | メニューバーのWindow > Script Editpを選択します。
49 |
50 | 
51 | 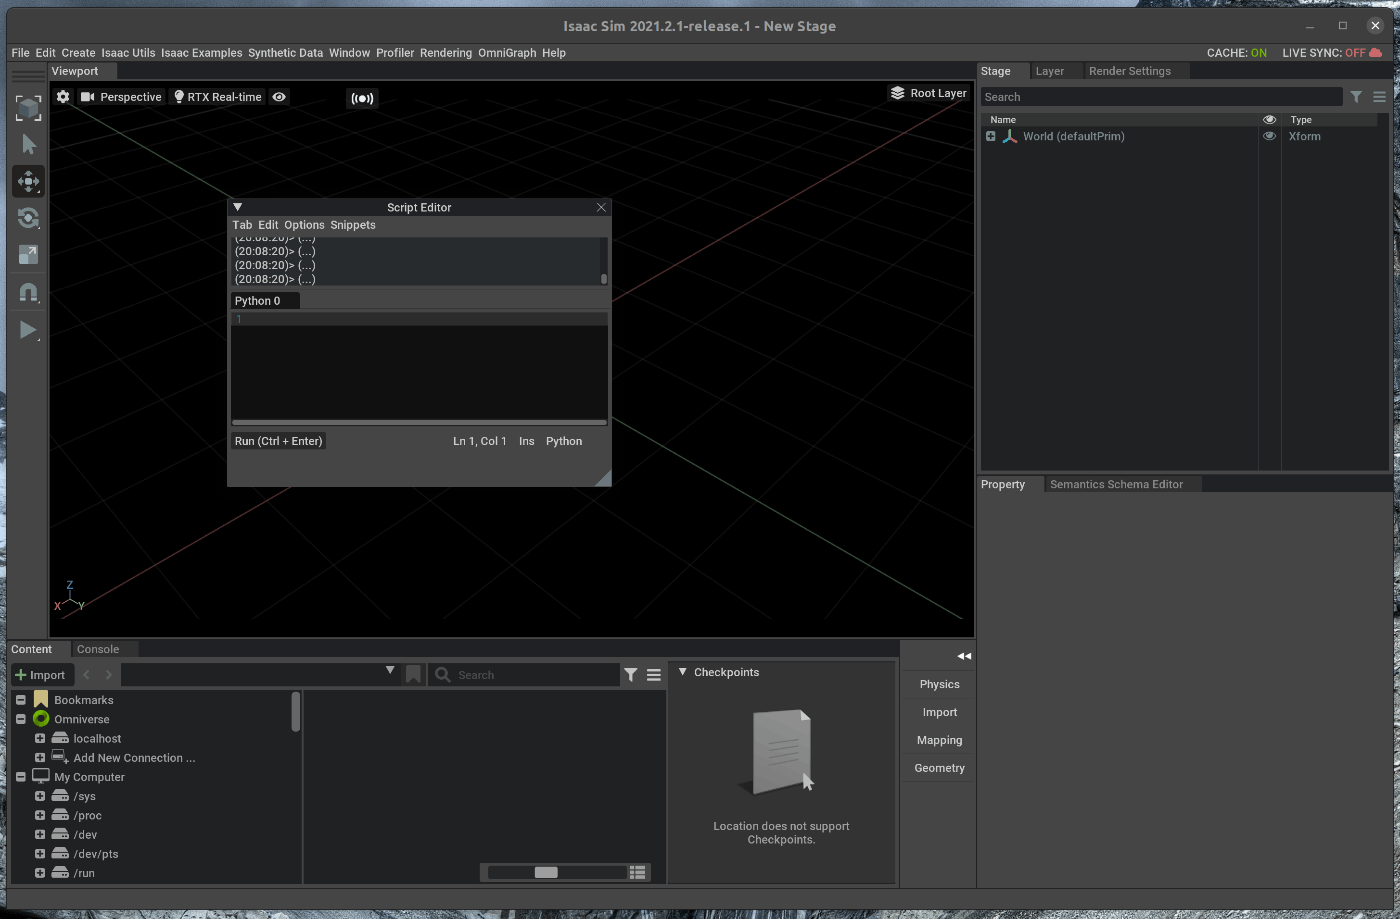
52 | 選択後、GUIの任意の位置にドラッグアンドドロップで配置します。
53 | 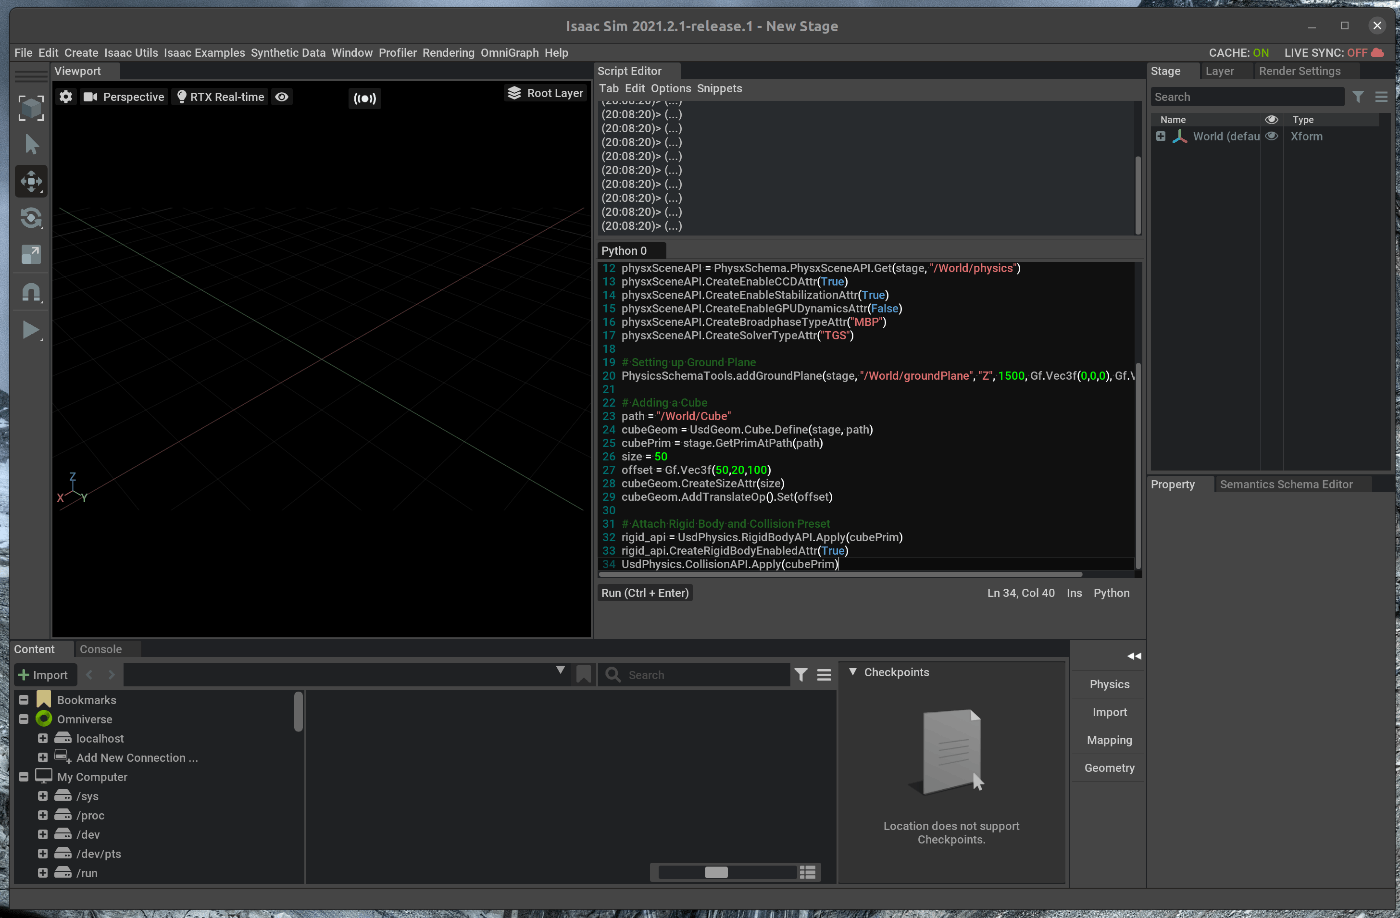
54 |
55 | ## 2. USD APIでシーンを操作
56 | 追加したScript EditorにUSD APIを用いてシーンを操作するScriptを記述し、実行します。
57 | 追加したScript Editorに次のコードを記述します。
58 |
59 | ~~~ usd_api.py:Python3
60 | from pxr import UsdPhysics, PhysxSchema, Gf, PhysicsSchemaTools
61 | import omni
62 |
63 | stage = omni.usd.get_context().get_stage()
64 |
65 | # Setting up Physics Scene
66 | gravity = 980
67 | scene = UsdPhysics.Scene.Define(stage, "/World/physics")
68 | scene.CreateGravityDirectionAttr().Set(Gf.Vec3f(0.0, 0.0, -1.0))
69 | scene.CreateGravityMagnitudeAttr().Set(gravity)
70 | PhysxSchema.PhysxSceneAPI.Apply(stage.GetPrimAtPath("/World/physics"))
71 | physxSceneAPI = PhysxSchema.PhysxSceneAPI.Get(stage, "/World/physics")
72 | physxSceneAPI.CreateEnableCCDAttr(True)
73 | physxSceneAPI.CreateEnableStabilizationAttr(True)
74 | physxSceneAPI.CreateEnableGPUDynamicsAttr(False)
75 | physxSceneAPI.CreateBroadphaseTypeAttr("MBP")
76 | physxSceneAPI.CreateSolverTypeAttr("TGS")
77 |
78 | # Setting up Ground Plane
79 | PhysicsSchemaTools.addGroundPlane(stage, "/World/groundPlane", "Z", 1500, Gf.Vec3f(0,0,0), Gf.Vec3f(0.5))
80 |
81 | # Adding a Cube
82 | path = "/World/Cube"
83 | cubeGeom = UsdGeom.Cube.Define(stage, path)
84 | cubePrim = stage.GetPrimAtPath(path)
85 | size = 50
86 | offset = Gf.Vec3f(50,20,100)
87 | cubeGeom.CreateSizeAttr(size)
88 | cubeGeom.AddTranslateOp().Set(offset)
89 |
90 | # Attach Rigid Body and Collision Preset
91 | rigid_api = UsdPhysics.RigidBodyAPI.Apply(cubePrim)
92 | rigid_api.CreateRigidBodyEnabledAttr(True)
93 | UsdPhysics.CollisionAPI.Apply(cubePrim
94 | ~~~
95 | 
96 | 記述後、Ctrl+Enterを押すとScriptが実行され、シーン内に立方体が追加されます。
97 |
98 | 
99 | 左側のツールバーのシミュレーションStartボタンを押すと、重力により立方体が落下します。
100 | 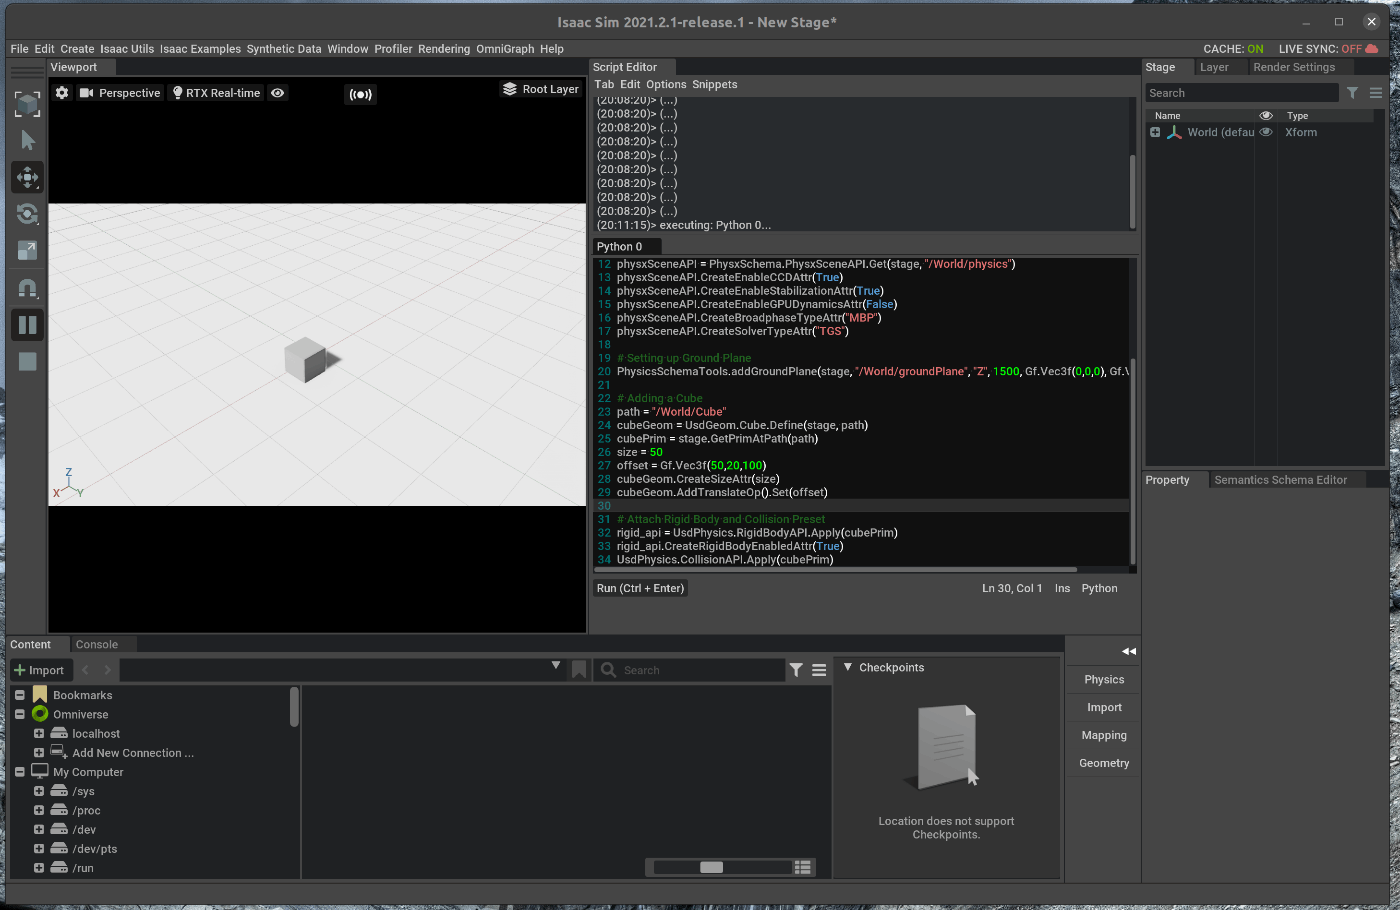
101 |
102 | ## 2. Issac Sim Core APIでシーンを操作
103 | 追加したScript EditorにIssac Sim Core APIを用いてシーンを操作するScriptを記述し、実行します。
104 | Issac Sim Core APIでは、USD APIと比較して、よりロボットの操作が容易になるように設計されています。
105 | その為、Issac Sim Core APIでは、上記で示したUSD APIでのScriptで実現したシーンを、より少ないコード量で実現することが可能です。
106 |
107 | 以下のスクリプトを実行する場合には、上記とは別の空のシーンを作成します。
108 | 
109 |
110 | 追加したScript Editorに次のコードを記述します。
111 |
112 | ~~~ issac_sim_core_api.py:Python3
113 |
114 | import numpy as np
115 | from omni.isaac.core.objects import DynamicCuboid
116 | from omni.isaac.core.objects.ground_plane import GroundPlane
117 |
118 | GroundPlane(prim_path="/World/groundPlane", size=1000, color=np.array([0.5, 0.5, 0.5]))
119 | DynamicCuboid(prim_path="/World/cube",
120 | position=np.array([50, 20, 100.0]),
121 | size=np.array([50, 50, 50]),
122 | color=np.array([20,30,0]))
123 | ~~~
124 |
125 | 記述後、Ctrl+Enterを押すとScriptが実行され、シーン内に立方体が追加されます。
126 | 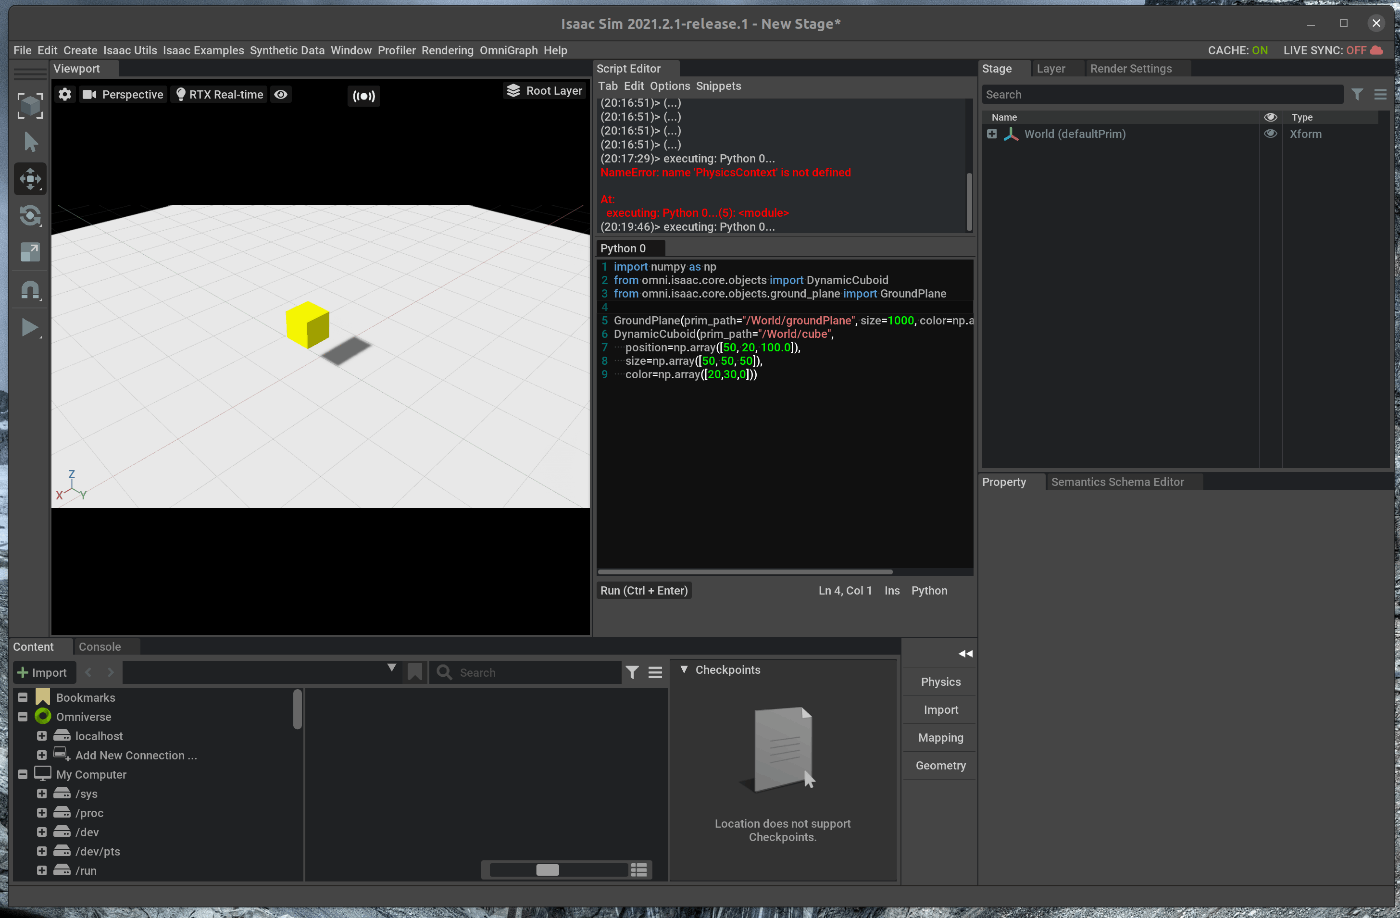
127 |
128 | 左側のツールバーのシミュレーションStartボタンを押すと、重力により立方体が落下します。
--------------------------------------------------------------------------------
/tutorials/install/1_install.md:
--------------------------------------------------------------------------------
1 |
2 | # 概要
3 | [Nvidia Issac sim](https://docs.omniverse.nvidia.com/app_isaacsim/app_isaacsim/overview.html)のインストール手順を記載します。
4 | 基本的には、公開されているインストール手順通りインストールすれば問題ありません。
5 |
6 | "install issac sim"と検索すると古いバージョンのIssac Simのインストール手順が検索結果に出てきます。
7 | 最新バージョンをインストールする場合には注意します。
8 |
9 | 最新バージョンではNvidia Omniverse上からIssac Simをインストールする手順になっています。
10 | 従って、はじめにNvidia Omniverseをインストールします。
11 | Omniverseインストール完了後にIssac Simをインストールします。
12 |
13 | また、OmniverseおよびIssac Simには実行するための最小スペックが記載されています。
14 | 最小スペックに対して不十分なスペックのPCで実行する場合には、予期せぬエラーが発生する可能性があるため、注意します。
15 |
16 | [Omniverse最小スペックおよび推奨スペック](https://docs.omniverse.nvidia.com/app_view_deprecated/app_view_deprecated/requirements.html)
17 | [Issac Sim最小スペックおよび推奨スペック](https://docs.omniverse.nvidia.com/app_isaacsim/app_isaacsim/requirements.html)
18 |
19 | # 実行環境
20 |
21 | - インストール実行環境
22 |
23 | | unit | specification |
24 | |:-----------------:|:------------------:|
25 | | CPU | i9-11900H |
26 | | GPU | GeForce RTX 3080 Laptop|
27 | | RAM | 32GB |
28 | | OS | Ubuntu 20.04.3 LTS |
29 |
30 | - Nvidia Driverバージョン
31 |
32 | - Issac simバージョン
33 | - 2021.2.1
34 |
35 |
36 | # 手順
37 |
38 | 大まかな手順は次の通りです。
39 |
40 | 1. Nvidia Omniverseをインストールする
41 | 2. Cacheをインストールする
42 | 3. Nucleus のサービスをローカル環境に作成する
43 | 4. IssacSimをインストールする
44 |
45 | ## 1. Nvidia Omniverseをインストールする
46 | こちらのページに記載してある手順を進めます。
47 | https://docs.omniverse.nvidia.com/prod_install-guide/prod_install-guide/workstation.html
48 |
49 | ### 1.1 Omniverseのインストーラをダウンロードする
50 | ダウンロードする際に、メールアドレスやOmniverseの使用目的について聞かれるので、適宜回答します。
51 | 
52 |
53 | ### 1.2 Omniverseのインストーラを起動する
54 | インストーラを起動する前に、インストーラの実行権限を変更し、実行できるようにします。
55 |
56 | ```bash
57 | cd /"インストーラをダウンロードしたディレクトリ"/
58 | sudo chmod +x omniverse-launcher-linux.AppImage
59 | ```
60 | インストーラを実行します
61 |
62 | ```bash
63 | ./omniverse-launcher-linux.AppImage
64 | ```
65 |
66 | インストーラの実行すると、必要な情報(インストールディレクトリ等)を聞かれるので、適宜入力します。
67 | インストーラの進め方はこちらに記載されています。
68 | https://docs.omniverse.nvidia.com/prod_install-guide/prod_launcher/installing_launcher.html#launcher-setup
69 |
70 |
71 | ## 2. Cacheをインストールする
72 | Cacheをインストールします。
73 | インストーラの実行途中でも、[Cacheのインストール](https://docs.omniverse.nvidia.com/prod_install-guide/prod_launcher/installing_launcher.html#install-cache)について聞かれますが、Skipしてした場合には、次の手順でインストールします。
74 |
75 | ### 2.1 Omniverseを起動します
76 | 
77 | ### 2.2 Cacheをインストールします
78 | ヘッダーの”Exchage”を選択します。選択すると、インストール可能なアプリケーションとプラグインが表示されます。
79 | 
80 |
81 | アプリケーションの中からOmniverse Cacheを選択します。
82 | 
83 | バージョンを”2021.2.2"に指定し、INSRTALLを選択します。
84 | 
85 | インストール後、””にアクセスし、Cacheのインストールを確認します。
86 | 
87 |
88 | ## 3. Nucleus のサービスをローカル環境に作成する
89 | ヘッダーのNUCLEUSを選択し、”Add Local Nucleus Service"を選択します。
90 | 
91 | Data Pathに問題がなければ、NEXTを選択します。
92 | 
93 | サービスのAdiministrator情報を設定します。
94 | 
95 | サービスが立ち上がっていることを確認します。
96 | 
97 |
98 | ## 4. Issac simをインストールする
99 | Issac Simのインストール手順はこちらに記載されています。この手順通りに進めると、インストールすことができます。
100 | https://docs.omniverse.nvidia.com/app_isaacsim/app_isaacsim/install_basic.html#isaac-sim-app-install-basic
101 |
102 | ヘッダーの”Exchage”を選択します。選択すると、インストール可能なアプリケーションとプラグインが表示されます。
103 | アプリケーションの中からISSAC SIMを選択します。
104 | 
105 |
106 | バージョンを”2021.2.1"に設定し、”INSTALL”を選択します。
107 | インストール時間は20分程かかります。
108 | 
109 | インストール完了後、バージョン横の”INSTALL”部分が”LAUNCH”に変わります。
110 | この”LAUNCH”を選択します。
111 | 
112 | ”Issac Sim”を選択し、一番したにある”START"を選択します。
113 | 
114 | ”Issac Sim”の初回起動時に、Exampleのデータをダウンロードするためのフォルダーが存在しないという警告が出てきます。
115 | ”Delete folder before download"にチェックを入れて、”Download assets”を選択すれば、Exampleのデータをダウンロードするためのフォルダーが自動的に作成されます。
116 | 
117 | Assetsのダウンロードには、Issac simのインストールよりも長い時間が必要です(30分程度)
118 | 
119 | Assetsのダウンロードが完了できれば、Issac Simのインストールは完了です。
120 |
--------------------------------------------------------------------------------
/tutorials/advanced/dynamic_control/38_dynamic_control.md:
--------------------------------------------------------------------------------
1 | # 概要
2 | Dynamic Control Extensionを使用し、ロボットを動かします。
3 |
4 | Issac SimのExtension部分に上記の内容が記載されており、この内容に沿って進めます。
5 | https://docs.omniverse.nvidia.com/app_isaacsim/app_isaacsim/ext_omni_isaac_dynamic_control.html#isaac-dynamic-control
6 |
7 | # 実行環境
8 |
9 | - インストール実行環境
10 |
11 | | unit | specification |
12 | |:-----------------:|:------------------:|
13 | | CPU | i9-11900H |
14 | | GPU | GeForce RTX 3080 Laptop|
15 | | RAM | 32GB |
16 | | OS | Ubuntu 20.04.3 LTS |
17 |
18 | - Nvidia Driverバージョン
19 | - 510.39.01
20 | - Issac simバージョン
21 | - 2021.2.1
22 |
23 |
24 | # 手順
25 | Dynamic Control Extensionは、オブジェクトを制御する為の拡張機能です。
26 | 拡張機能には、位置制御、速度制御、トルク制御等の制御器が含まれています。
27 | また、軸単位の制御や位置、速度の値の取得も可能です。
28 |
29 | APIのReferenceはこちらに記載されています。
30 | https://docs.omniverse.nvidia.com/py/isaacsim/source/extensions/omni.isaac.dynamic_control/docs/index.html
31 |
32 | 今回は、簡易的なデモとしてScript Editorからの実行及び、2つのExampleを実行します。
33 |
34 | 1. Script Editorからの実行
35 | 2. Read Articulations Exampleの実行
36 | 3. Joint Controller Exampleの実行
37 |
38 |
39 | ## 1. Script Editorからの実行
40 | ### 1.1 OmniverseからIssac Simを起動する
41 | 
42 |
43 | ### 1.2 ロボットをロードする
44 | メニューバーのcreate > Isaac > Robots > From Library > Manipulators > Frankaを選択します。
45 | 
46 |
47 | ロボットの読み込みの完了後、右側のツールバーの中のPlayボタンを選択し、シミュレーションを開始します。
48 | 
49 |
50 | ### 1.3 Script Editorの起動する
51 | メニューバーのWindow > Script Editorを選択します。
52 | 
53 |
54 | ### 1.4 制御器を追加する
55 | 今回は速度制御器を追加します。
56 | 位置制御やトルク制御の例は以下のURLに記載されています。
57 | https://docs.omniverse.nvidia.com/app_isaacsim/app_isaacsim/ext_omni_isaac_dynamic_control.html#code-snippets
58 |
59 |
60 | 先ほど起動したScript Editorに以下のコードを追加します。
61 |
62 | ~~~ script editor:Python3
63 | import omni
64 | omni.timeline.get_timeline_interface().play()
65 |
66 | from pxr import UsdPhysics
67 | stage = omni.usd.get_context().get_stage()
68 | for prim in stage.TraverseAll():
69 | prim_type = prim.GetTypeName()
70 | if prim_type in ["PhysicsRevoluteJoint" , "PhysicsPrismaticJoint"]:
71 | if prim_type == "PhysicsRevoluteJoint":
72 | drive = UsdPhysics.DriveAPI.Get(prim, "angular")
73 | else:
74 | drive = UsdPhysics.DriveAPI.Get(prim, "linear")
75 | drive.GetStiffnessAttr().Set(0)
76 | from omni.isaac.dynamic_control import _dynamic_control
77 | import numpy as np
78 | dc = _dynamic_control.acquire_dynamic_control_interface()
79 | #Note: getting the articulation has to happen after changing the drive stiffness
80 | articulation = dc.get_articulation("/Franka")
81 | dc.wake_up_articulation(articulation)
82 | joint_vels = [-np.random.rand(9)*10]
83 | dc.set_articulation_dof_velocity_targets(articulation, joint_vels)
84 | ~~~
85 |
86 | 
87 |
88 | ### 1.5 追加した制御器からロボットを動かす
89 | script Editor内で、RUNを選択すると、ロボットが動きます。
90 |
91 | ## 2. Read Articulations Exampleの実行
92 | このExampleでは、ロボットの各種関節情報を取得することができます。
93 |
94 | ### 2.1 Exampleをロードする
95 | メニューバーのIsaac Examples > Dynamic Control > Read Articulationsを選択します。
96 | 
97 | 
98 |
99 | ### 2.2 ロボットをロードする
100 | ポップアップしたウィンドウにおいて、”Load Robot”を選択します。
101 | 選択すると、ロボットがロードされます。
102 | 
103 |
104 | ロボットの読み込みの完了後、右側のツールバーの中のPlayボタンを選択し、シミュレーションを開始します
105 |
106 | ### 2.3 関節情報を取得する
107 | ポップアップしたウィンドウにおいて、”Get Articulation Information”を選択します。
108 | 選択すると、ロボットの関節情報がポップアップしたウィンドウに表示されます。
109 | 
110 |
111 | ## 3. Joint Controller Exampleの実行
112 | このExampleでは、ロボットを動かしつつ、ロボットの各種関節情報を取得することができます。
113 |
114 | ### 3.1 Exampleをロードする
115 | メニューバーのIsaac Examples > Dynamic Control > Joint Controllerを選択します。
116 | 
117 | 
118 |
119 | ### 3.2 ロボットをロードする
120 | ポップアップしたウィンドウにおいて、”Load Robot”を選択します。
121 | 選択すると、ロボットがロードされます。
122 | 
123 |
124 | ロボットの読み込みの完了後、右側のツールバーの中のPlayボタンを選択し、シミュレーションを開始します
125 |
126 | ### 3.3 関節情報を取得する
127 | ポップアップしたウィンドウにおいて、”move”を選択します。
128 | 選択すると、ロボットが動き、ロボットの関節情報がポップアップしたウィンドウに表示されます。
129 | 
130 |
131 |
132 |
133 |
134 |
135 |
136 |
137 |
138 |
139 |
140 |
141 |
--------------------------------------------------------------------------------
/tutorials/ros/import_and_drive_turtlebot3/25_import_and_drive_turtlebot3.md:
--------------------------------------------------------------------------------
1 | # 概要
2 | Isaac Sim上でTurtlebot3のURDFをロードし、ROSのTopicから車輪の速度指令値を発行し、TurtleBot3を動かします。
3 |
4 | Issac Simのtutorialに上記の内容が記載されており、この内容に沿って進めます。
5 | https://docs.omniverse.nvidia.com/app_isaacsim/app_isaacsim/tutorial_ros_turtlebot.html
6 |
7 | # 実行環境
8 |
9 | - インストール実行環境
10 |
11 | | unit | specification |
12 | |:-----------------:|:------------------:|
13 | | CPU | i9-11900H |
14 | | GPU | GeForce RTX 3080 Laptop|
15 | | RAM | 32GB |
16 | | OS | Ubuntu 20.04.3 LTS |
17 |
18 | - Nvidia Driverバージョン
19 | - 510.39.01
20 | - Issac simバージョン
21 | - 2021.2.1
22 |
23 |
24 | # 手順
25 | Isaac Sim上でTurtlebot3のURDFをロードし、ROSのTopicから車輪の速度指令値を発行し、TurtleBot3を動かします。
26 |
27 | 1. turtlebotのビルド
28 | 2. turtlebotのURDFの生成
29 | 3. turtlebotのURDFのインポート
30 | 4. Differential Drive Bridgeの追加
31 | 5. 車輪の速度指令値を発行する
32 |
33 | ## 1. turtlebotのビルド
34 | はじめに、turtlebotのリポジトリをクローンします。
35 |
36 | ~~~ bash:shell
37 | $ git clone https://github.com/ROBOTIS-GIT/turtlebot3.git
38 | ~~~
39 | 
40 |
41 | ## 2. turtlebotのURDFの生成
42 | 次に、turtlebotのxacroからurdfを生成します。
43 |
44 | ~~~ bash:shell
45 | $ cd ./turtlebot3/turtlebot3_description/urdf
46 | $ rosrun xacro xacro -o turtlebot3_burger.urdf turtlebot3_burger.urdf.xacro
47 | ~~~
48 |
49 | 上記のコマンドを実行すると、turtlebot3_burgerのurdfが生成されます。
50 | 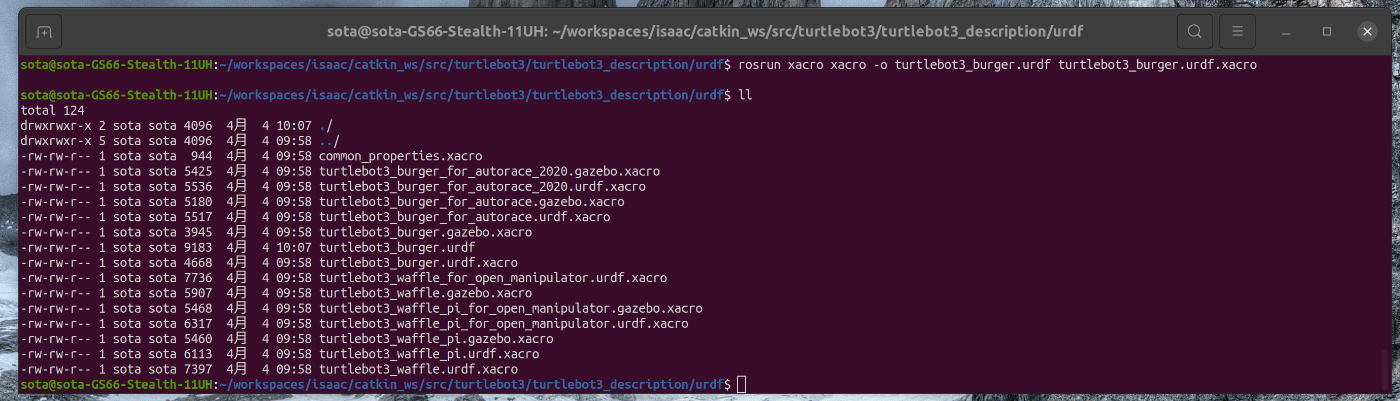
51 |
52 | ## 3. turtlebotのURDFのインポート
53 | ### 3.1 OmniverseからIssac Simを起動する
54 | 
55 |
56 | ### 3.2 ros extensionをEnableにする
57 | メニューバーのwindow > Extensonsを選択します。
58 | 
59 |
60 | ポップアップしたWindowの左上の検索窓に”ros”と入力し、Enterキーを押します。
61 | 
62 |
63 | 検索結果が表示され、ROS BRIDGEとROS UIのExtensionがEnable状態になっていることを確認します。
64 | 
65 |
66 | Enableになってない場合には、各Extensionの横のトグルバーをクリックし、Enable状態に変更します。
67 |
68 | ### 3.3 シーンのロード
69 | Isaac Simの下部にあるContentの中から、Isaac > Samples > ROS > Scenario > simple_room_apriltag.usd.をダブルクリックします。
70 | 
71 | 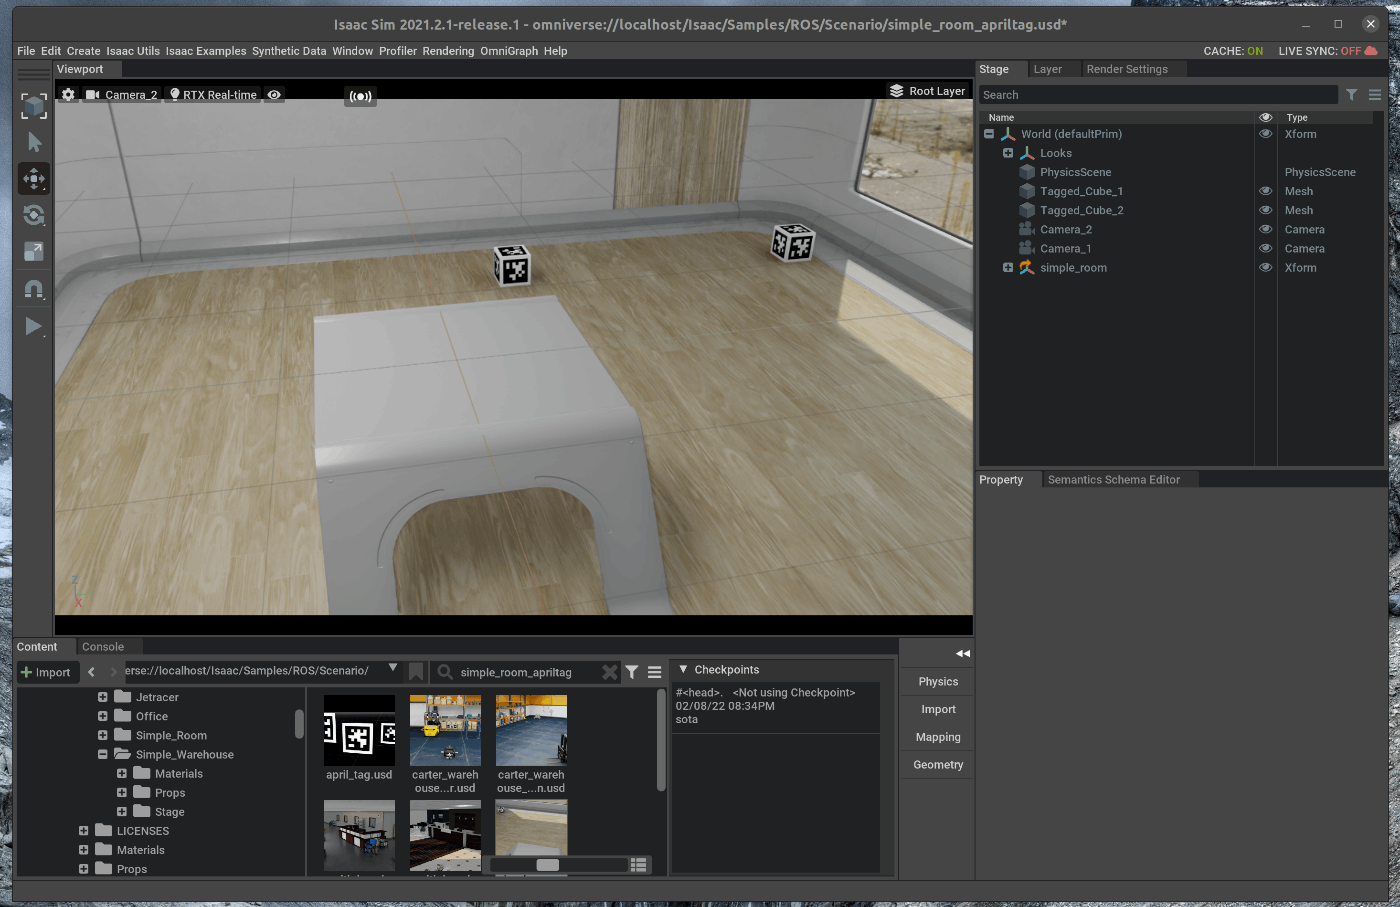
72 |
73 | ### 3.4 turtlebotのURFDをロードする
74 | メニューバーのIsaac Utils > URDF Importerを選択します。
75 | 
76 |
77 | ポップアップした”URDF Importer”のWindowをViewport下部のConsoleの右隣に追加します。
78 | 
79 |
80 | URDF Importerの設定を次の通りに変更します。
81 |
82 | - Fix Bsseのチェックを外す
83 | - Joint Drive TypeにVelocityを指定する
84 |
85 | 次に、”SLECT AND INPORT”を選択し、先ほど生成したturtlebot3のURDFを指定します。
86 | 
87 |
88 | インポートすると、テーブルの上にturtlebotが現れます。
89 | 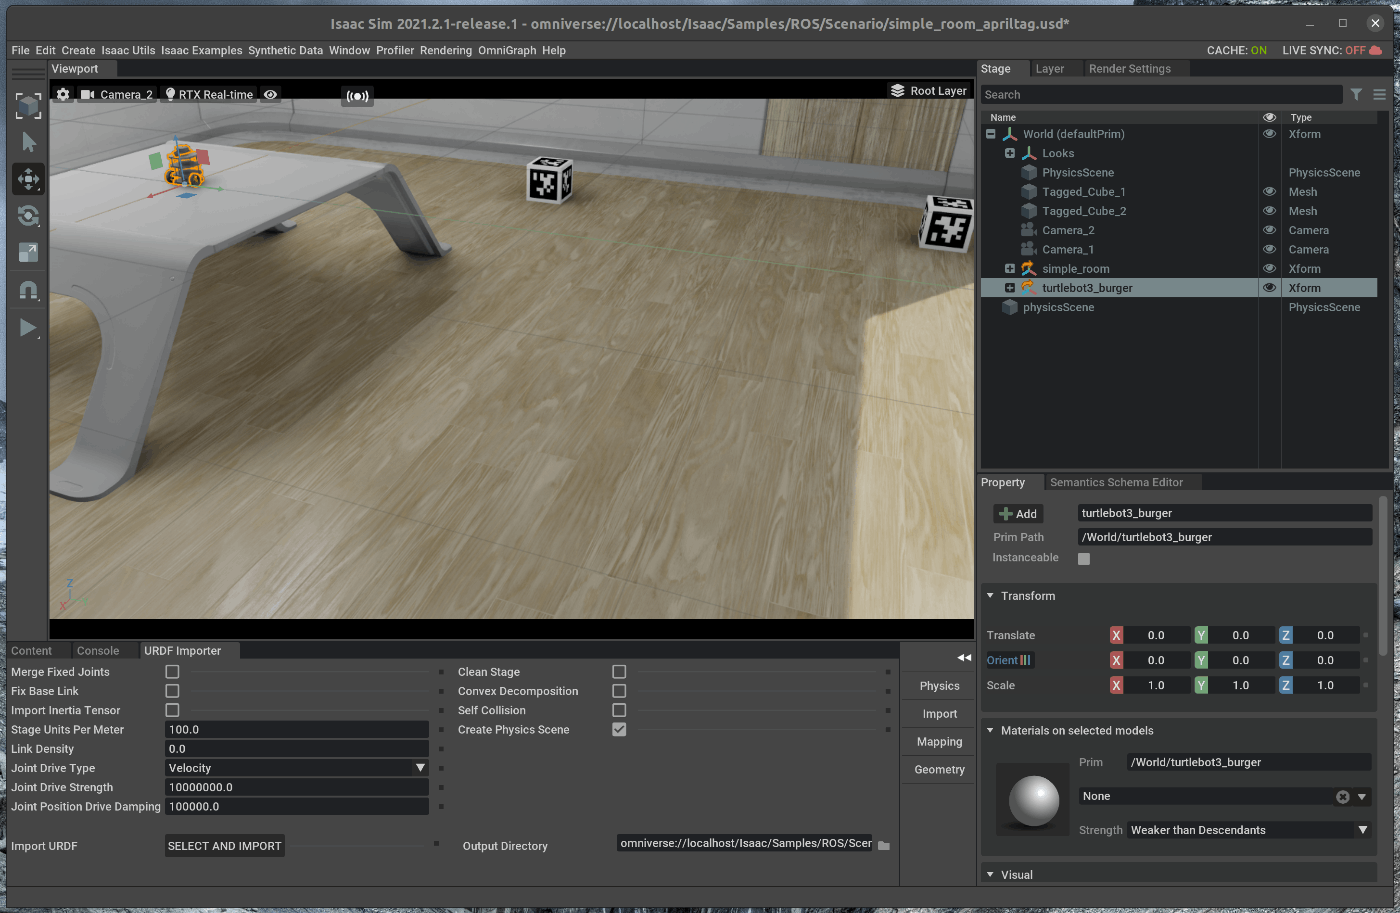
90 |
91 | 次に台車を制御するため、Viewport内でturtlebotをドラッグし、床面におろします。
92 | 
93 |
94 | また、インポートする際に/World外にインポートした場合には、Stageの中でturtlebotをドラッグし、/worldの下側に移動させます。
95 |
96 | ## 4. Differential Drive Bridgeの追加
97 | メニューバーのCreate > ROS > Differential Baseを選択します。
98 | 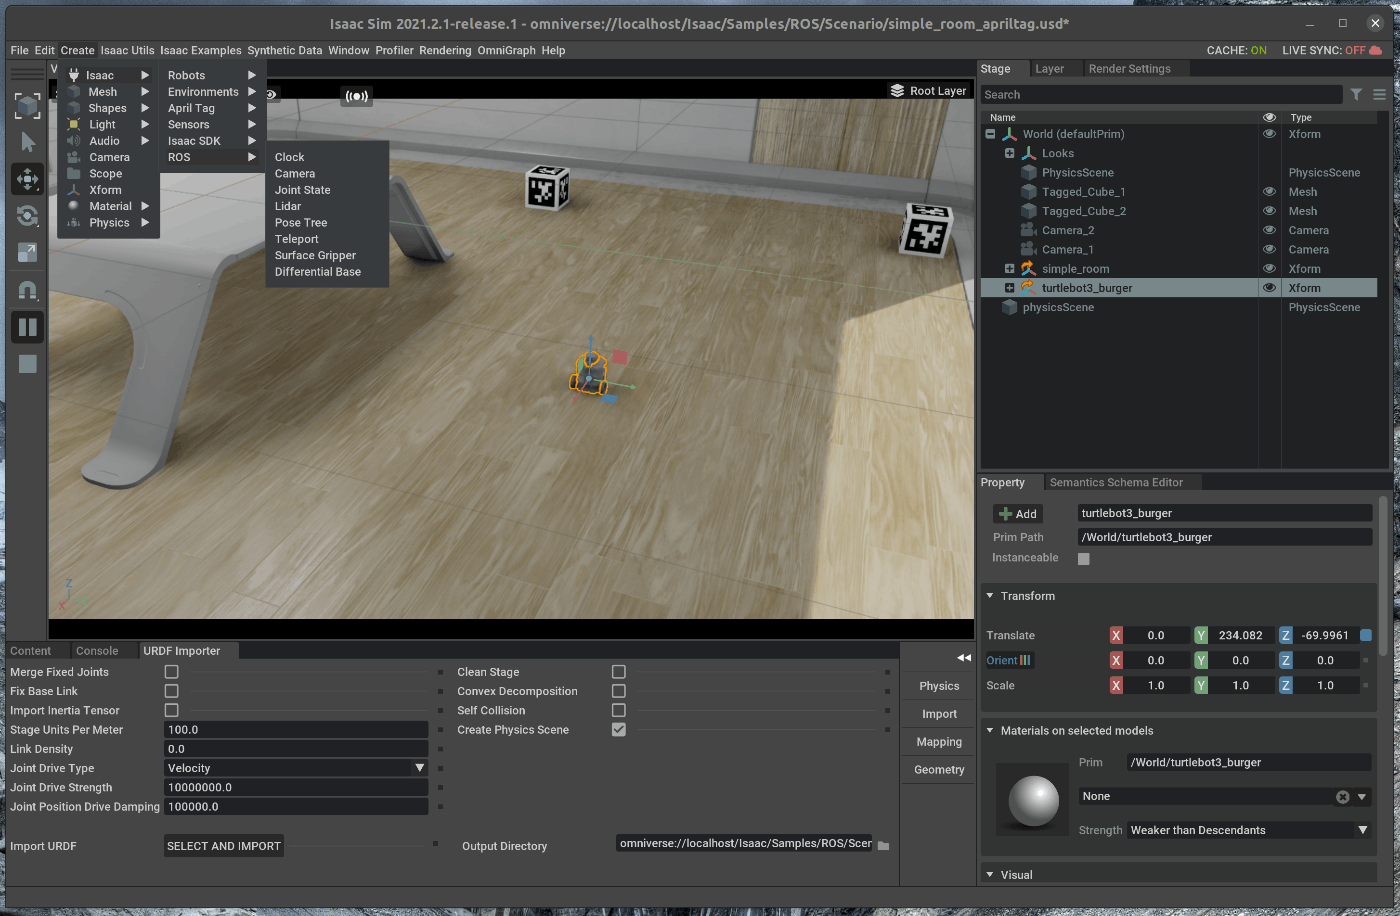
99 |
100 | 右側のStageの中で、追加したROS_DifferentialBaseを選択します。
101 | 選択した状態で、Stageの下側にあるPopertyの中で、Raw USD Propertiesを開きます。
102 | chassisPrimを選択し、stage中のturtlebot3_burgerを選択します。
103 | 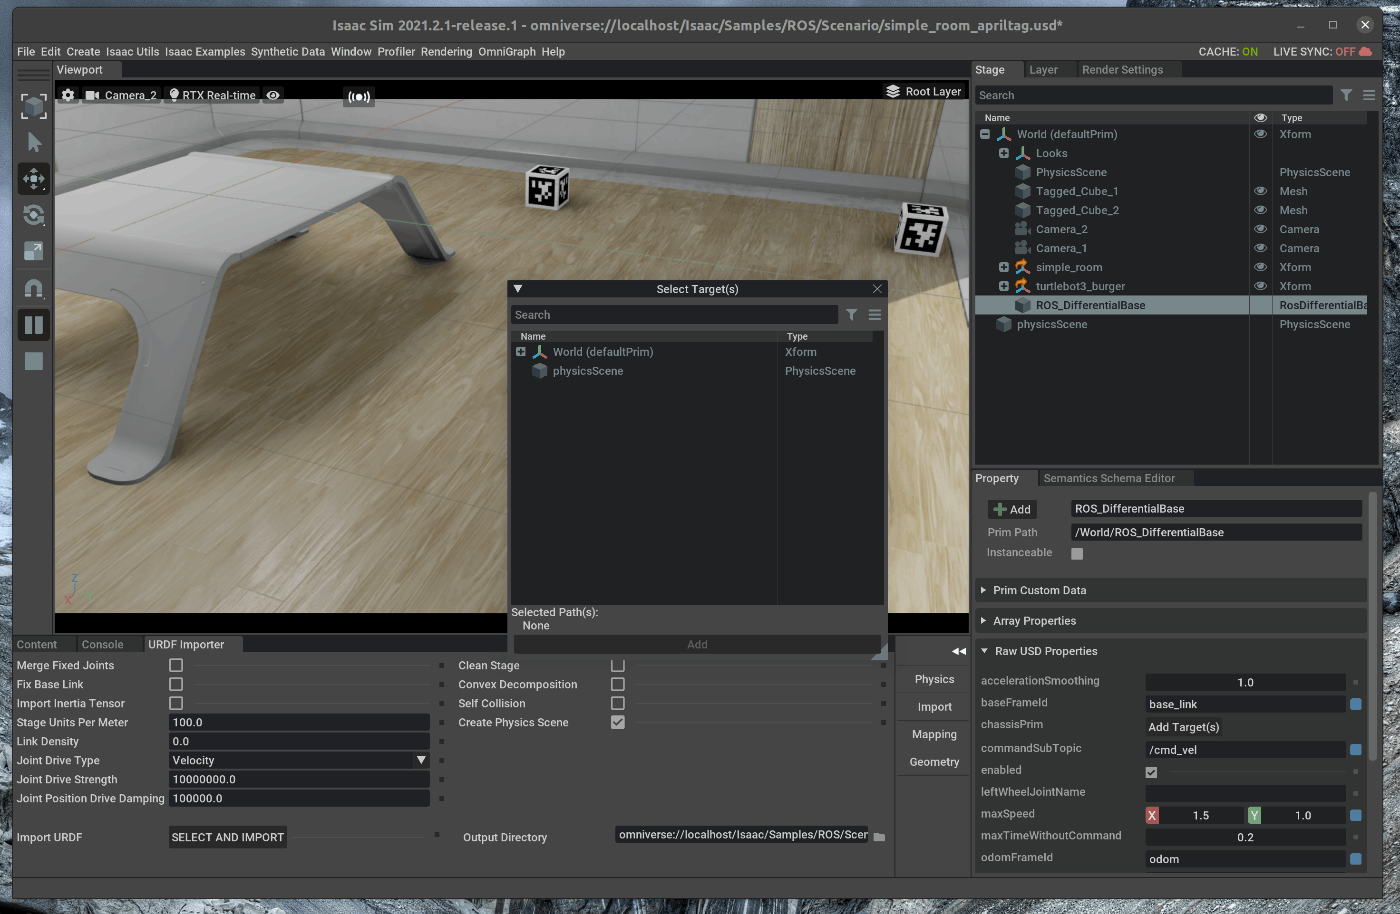
104 | 
105 |
106 | また、他の設定値を次の値に変更します。
107 |
108 | - leftWheelJointNameに”wheel_left_joint”を入力する
109 | - rightWheelJointNameに”wheel_right_joint”を入力する
110 | - maxSpeedに0.22を入力する
111 | - wheelBaseに0.16を入力する
112 | - wheelRadiusに0.025を入力する
113 | 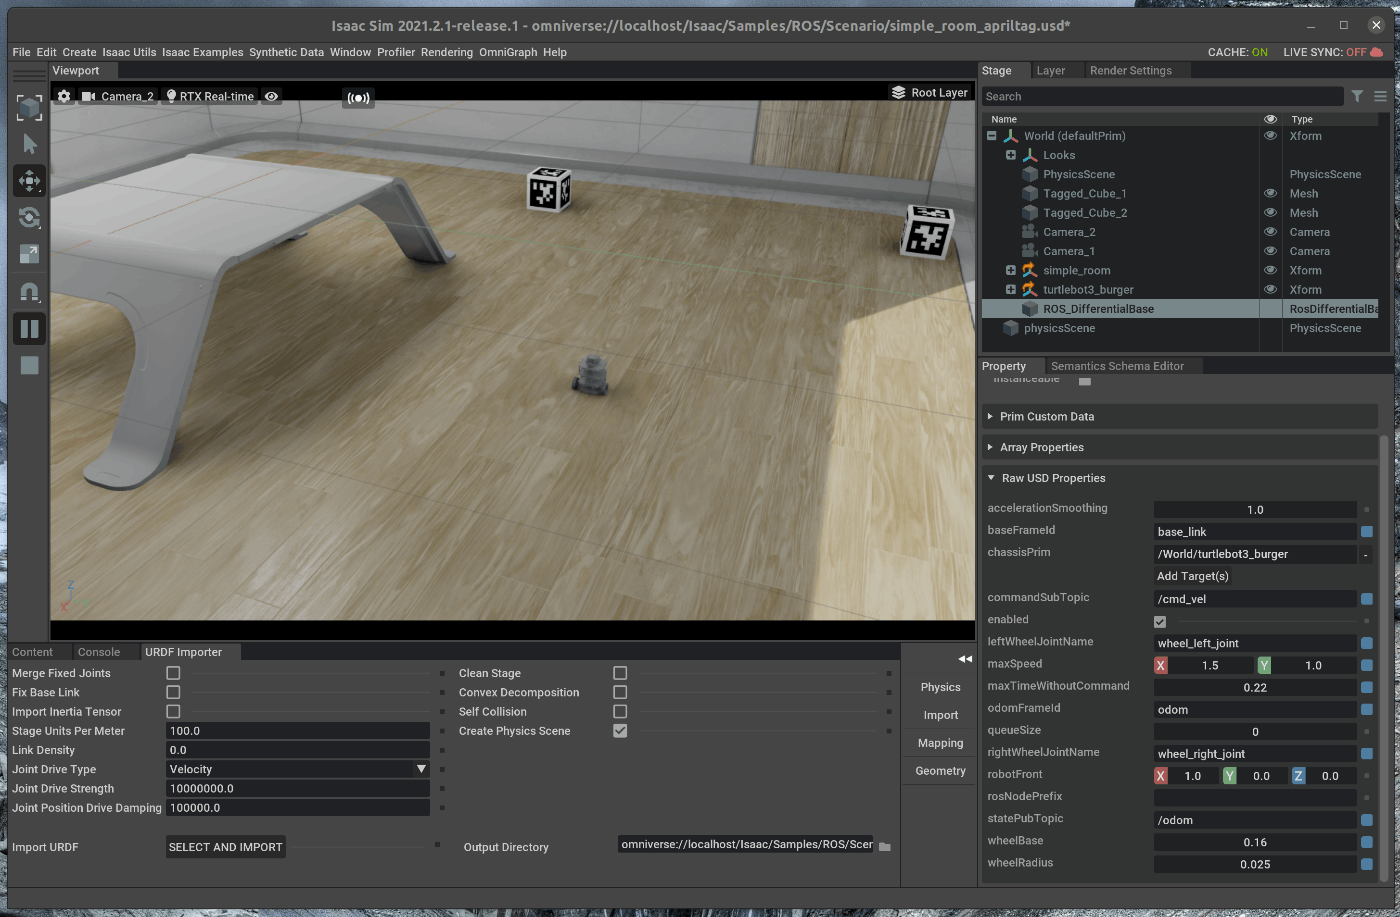
114 |
115 | ## 5. 車輪の速度指令値を発行する
116 |
117 | 新たにterminalを開き、roscoreを起動します。
118 | 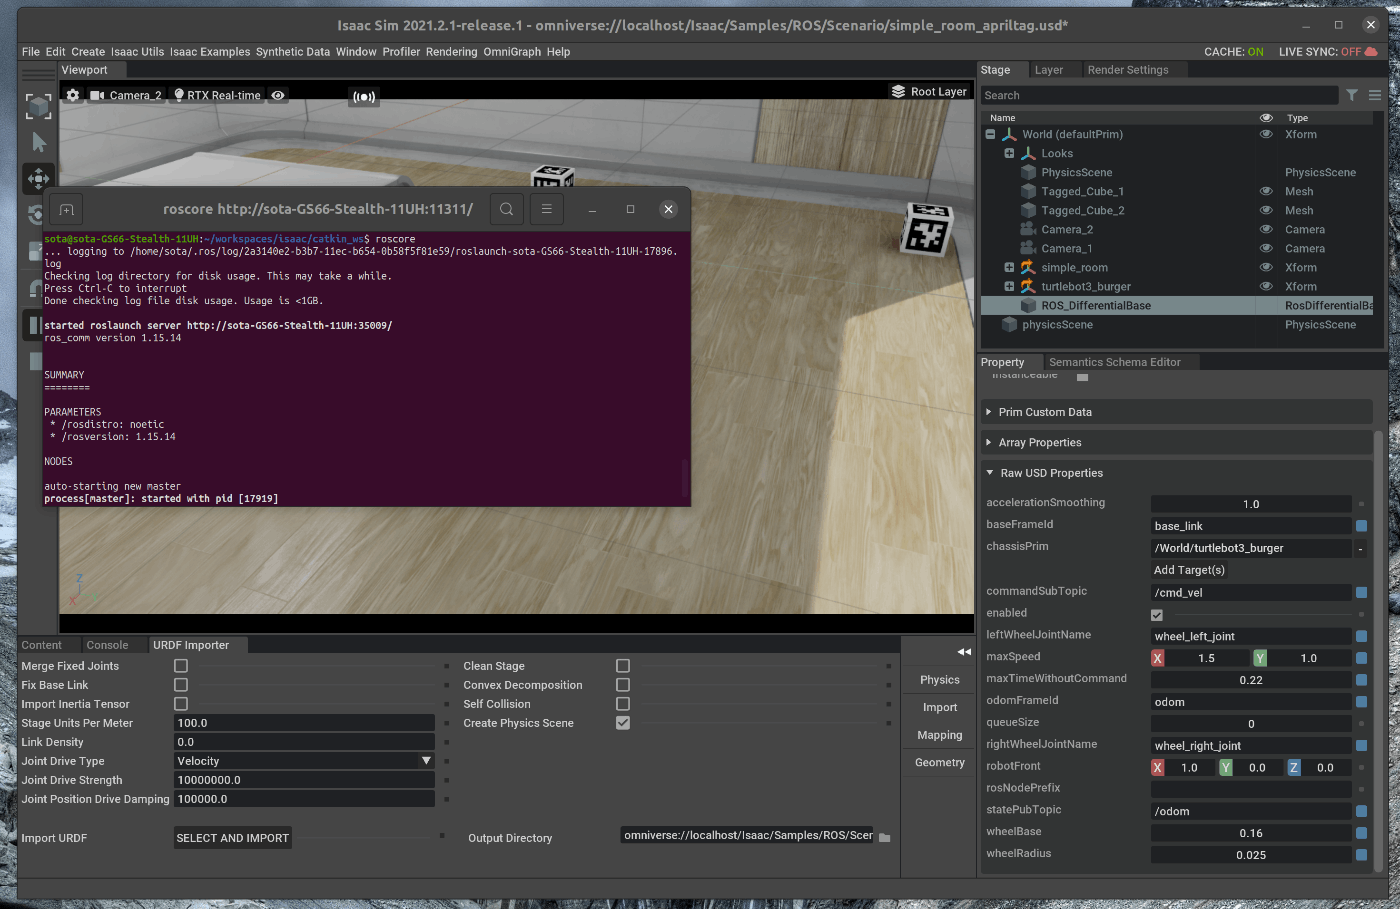
119 |
120 | この状態で、Viewportの左側のPLAYボタンを押すと、各種topicが発行されます。
121 | 
122 |
123 | また、新たにterminalを開き、以下のコマンドを実行し、cmd_vel topicを発行するnodeを立ち上げます。
124 |
125 | ~~~ bash:shell
126 | $ rosrun teleop_twist_keyboard teleop_twist_keyboard.py
127 | ~~~
128 | 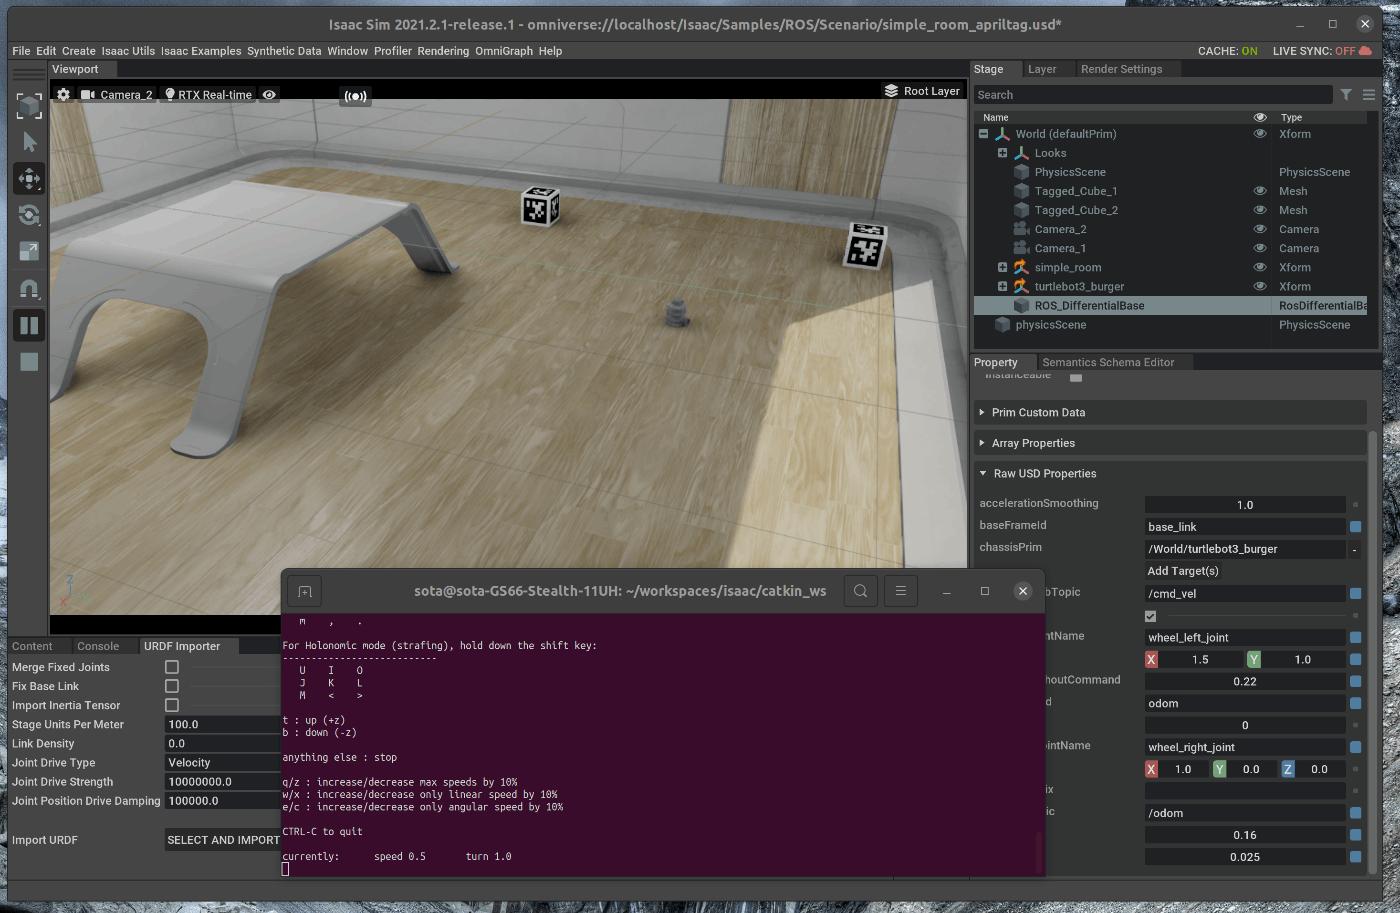
129 |
130 | 実行できない場合には、teleop-twist-keyboardをgithubからクローンしbuildするか、aptからインストールする必要があります。
131 |
132 | 実行すると、対話式のプログラムになっており、cmd_velのTopicがキーボードの入力から操作することができます。
133 | キーを入力すると、turtlebotが動くことを確認できます。
134 |
--------------------------------------------------------------------------------
/tutorials/gui/intaractive_demos/37_interactive_demos.md:
--------------------------------------------------------------------------------
1 | # 概要
2 | インタラクティブに操作可能なロボットのデモを動かします。
3 |
4 | Issac SimのExtension部分に上記の内容が記載されており、この内容に沿って進めます。
5 | https://docs.omniverse.nvidia.com/app_isaacsim/app_isaacsim/manual_omni_isaac_demos.html
6 |
7 | # 実行環境
8 |
9 | - インストール実行環境
10 |
11 | | unit | specification |
12 | |:-----------------:|:------------------:|
13 | | CPU | i9-11900H |
14 | | GPU | GeForce RTX 3080 Laptop|
15 | | RAM | 32GB |
16 | | OS | Ubuntu 20.04.3 LTS |
17 |
18 | - Nvidia Driverバージョン
19 | - 510.39.01
20 | - Issac simバージョン
21 | - 2021.2.1
22 |
23 |
24 | # 手順
25 | Insaac simにはインタラクティブに操作可能なデモが、3つ含まれています。
26 | 今回はこの3つのデモをそれぞれ実行します。
27 |
28 | 1. Leonardoを用いたデモの実行
29 | 2. UR10を用いたデモの実行
30 | 3. Navigationデモの実行
31 |
32 |
33 | ## 1. Leonardoを用いたデモの実行
34 | このデモでは、マニピュレータがシーン内のトイブロックをスタックするタスクを実行します。
35 |
36 | ### 1.1 OmniverseからIssac Simを起動する
37 | 
38 |
39 | ### 1.2 シーンをロードする
40 | メニューバーのIsaac Examples > Demos > Leonardo Demoを選択します。
41 | 
42 |
43 | 次にポップアップしたWindowにおいて、”Create Scenario”を選択します。
44 | 選択すると、ロボットが読み込まれます。
45 | 
46 | 
47 |
48 | 読み込みの完了後、右側のツールバーの中のPlayボタンを選択し、シミュレーションを開始します。
49 | 
50 |
51 | ### 1.3 デモを実行する
52 | ポップアップしたウィンドウにおいて、”Perform Task”を選択します。
53 | 選択すると、タスクが実行されます。
54 |
55 | 
56 | 
57 |
58 | また、”Togggle Obstacle”を選択し、キューブをシーン内で移動させると、キューブを避けるようにマニピュレータの軌道が計算されます。
59 |
60 | ## 2. UR10を用いたデモの実行
61 | UR10を用いたデモは2つ用意されています。
62 | 一つは、UR10の手先に取り付けられているSuction Gripperでコンテナを持ち、そのコンテナの中ににランダムにオブジェクトを落下させるデモ(Bin fillデモ)です、
63 | もう一つは、UR10を用いたパレタイジングのデモ(Stack binデモ)です。
64 |
65 | ### 2.1 Bin fillデモを実行する
66 | ### 2.1.1 シーンをロードする
67 | メニューバーのIsaac Examples > Demos > UR10 Palletizingを選択します。
68 |
69 | 次にポップアップしたWindowにおいて、”Selected Scenario”の欄をクリックし、”fill bin”を選択します。
70 | 
71 |
72 | 選択後、同様のWindowにおいて、”Create Scenario”を選択します。
73 | 選択すると、ロボットが読み込まれます。
74 | 
75 |
76 | 読み込みの完了後、右側のツールバーの中のPlayボタンを選択し、シミュレーションを開始します。
77 | 
78 |
79 | ### 2.1.2 デモを実行する
80 | ポップアップしたウィンドウにおいて、”Perform Task”を選択します。
81 | 選択すると、タスクが実行されます。
82 |
83 | 
84 |
85 | ### 2.2 Stack binデモを実行する
86 | ### 2.2.1 シーンをロードする
87 | メニューバーのIsaac Examples -> Demos -> UR10 Palletizingを選択します。
88 |
89 | 次にポップアップしたWindowにおいて、”Selected Scenario”の欄をクリックし、”Stack bin”を選択します。
90 | 
91 |
92 | 選択後、同様のWindowにおいて、”Create Scenario”を選択します。
93 | 選択すると、ロボットが読み込まれます。
94 | 
95 |
96 | 読み込みの完了後、右側のツールバーの中のPlayボタンを選択し、シミュレーションを開始します。
97 | 
98 |
99 | ### 2.2.2 デモを実行する
100 | ポップアップしたウィンドウにおいて、”Perform Task”を選択します。
101 | 選択すると、タスクが実行されます。
102 |
103 | 
104 | 
105 | 
106 |
107 | ## 3. Navigationデモの実行
108 | このデモでは、AGVを使用します。
109 | AGVの目標位置、目標姿勢を登録すると、その位置に向かってAGVが移動します。
110 |
111 | ### 3.1 シーンをロードする
112 | メニューバーのIsaac Examples > Demos > Robot Navigationを選択します。
113 |
114 | 次にポップアップしたWindowにおいて、”Load”を選択します。
115 | 
116 |
117 | 選択すると、ロボットが読み込まれます。
118 | 
119 |
120 | ”Robot Type”をCarterに変更すると、Carterがロードされます。
121 | 
122 |
123 | ポップアップしたウィンドウにおいて、”Open Source Code”をクリックすると、ExampleのソースコードがVscode上に展開されます。
124 |
125 | 読み込みの完了後、右側のツールバーの中のPlayボタンを選択し、シミュレーションを開始します。
126 |
127 |
128 | ### 3.2 デモを実行する
129 | ポップアップしたウィンドウにおいて、”Move Robot"の”Move”を選択すると、ロボットが前進します。また、"Spin Robot"の”Rotate”を選択すると、ロボットが回転します。
130 |
131 | 移動後、”target Pose"に値を入力し、"Move to Target"の”Move”を選択すると、ロボットが設定したTarget poseに移動します。
132 | 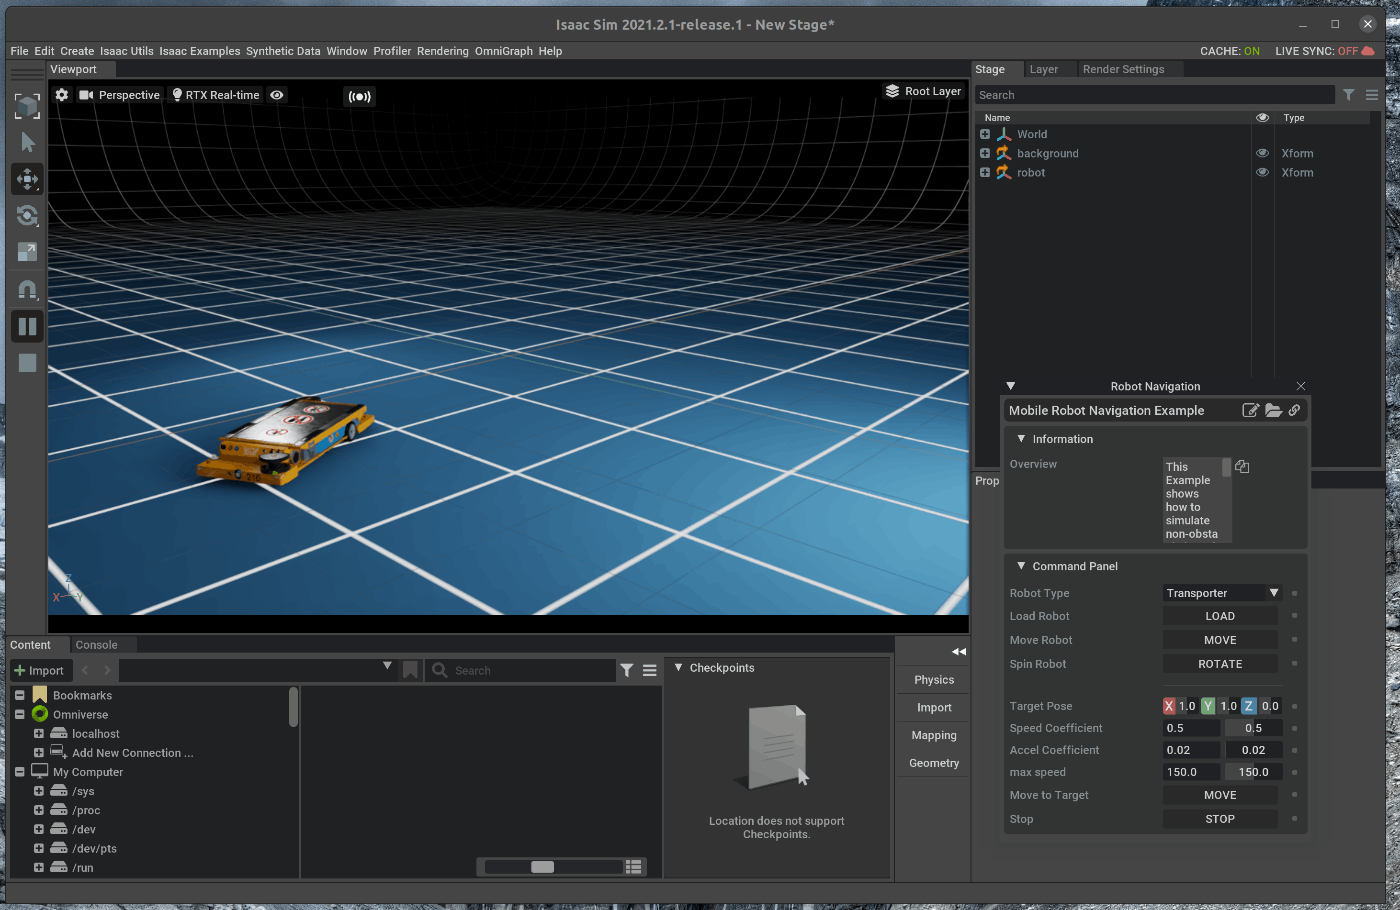
133 |
134 | Robot TypeをCarterに設定し、ロードした場合でも、同様にNavigationは実行可能です。
135 | 
136 | 
137 |
138 |
139 |
140 |
141 |
142 |
143 |
144 |
145 |
146 |
147 |
148 |
--------------------------------------------------------------------------------
/tutorials/required/adding_controller/10_adding_controller.md:
--------------------------------------------------------------------------------
1 | # 概要
2 | Adding Controllerのチュートリアルを進めます。
3 | このチュートリアルはmulti robotのチュートリアルの6部の内の3部目です。
4 |
5 | Issac Simのtutorialに上記の内容が記載されており、この内容に沿って進めます。
6 | https://docs.omniverse.nvidia.com/app_isaacsim/app_isaacsim/tutorial_required_adding_controller.html
7 |
8 | # 実行環境
9 |
10 | - インストール実行環境
11 |
12 | | unit | specification |
13 | |:-----------------:|:------------------:|
14 | | CPU | i9-11900H |
15 | | GPU | GeForce RTX 3080 Laptop|
16 | | RAM | 32GB |
17 | | OS | Ubuntu 20.04.3 LTS |
18 |
19 | - Nvidia Driverバージョン
20 | - 510.39.01
21 | - Issac simバージョン
22 | - 2021.2.1
23 |
24 | # 概要
25 |
26 | Jetbotを追加したAwesome worldのExampleのソースコードに処理を追加し、シーンにNvidia Jetbotを追加します。
27 | 次の手順を進めます。
28 |
29 | 1. Awesome Exampleのソースコードを開く
30 | 2. Custom Controllerを追加する
31 |
32 | ## 1. Awesome Exampleのソースコードを開く
33 | ### 1.1 OmniverseからIssac Simを起動する
34 | 
35 |
36 | ### 1.2 Awesome Exampleのソースコードを表示
37 | メニューバーのIsaac Examples > Awesome Exampleを選択します。
38 | 
39 |
40 | 次に、Awesome Examplesのウィンドウの右上にある3つのボタンの内、一番左側のOpen Source Codeボタンを選択します。
41 | 
42 |
43 | 選択すると、がVScodeが開き、Hello Worldのソースコードが表示されます。
44 | 
45 |
46 | ## 2. Custom Controllerを追加する
47 | vscode上で、hello_world.pyを編集します。
48 |
49 | ## 2.1 Custom Controllerの追加
50 | Jetbotの差動2輪にオープンループのControllerを追加します。
51 | BaseControllerのクラスを継承したクラスを作成し、オープンループ制御のクラスを作成します。
52 | hello_world.pyのsetup_sceneメソッドに次の処理を追加します。
53 |
54 | ~~~ hello_world.py:Python3
55 |
56 | from omni.isaac.examples.base_sample import BaseSample
57 | from omni.isaac.jetbot import Jetbot
58 | from omni.isaac.core.utils.types import ArticulationAction
59 | from omni.isaac.core.controllers import BaseController
60 | import numpy as np
61 |
62 | class CoolController(BaseController):
63 | def __init__(self):
64 | super().__init__(name="my_cool_controller")
65 | self._wheel_radius = 3
66 | self._wheel_base = 11.25
67 | return
68 |
69 | def forward(self, command):
70 | joint_velocities = [0.0, 0.0]
71 | joint_velocities[0] = ((2 * command[0]) - (command[1] * self._wheel_base)) / (2 * self._wheel_radius)
72 | joint_velocities[1] = ((2 * command[0]) + (command[1] * self._wheel_base)) / (2 * self._wheel_radius)
73 | return ArticulationAction(joint_velocities=joint_velocities)
74 |
75 | class HelloWorld(BaseSample):
76 | def __init__(self) -> None:
77 | super().__init__()
78 | return
79 |
80 | def setup_scene(self):
81 | world = self.get_world()
82 | world.scene.add_default_ground_plane()
83 | jetbot_robot = world.scene.add(Jetbot(prim_path="/World/Fancy_Robot", name="fancy_robot"))
84 | return
85 |
86 | async def setup_post_load(self):
87 | self._world = self.get_world()
88 | self._jetbot = self._world.scene.get_object("fancy_robot")
89 | self._world.add_physics_callback("sending_actions", callback_fn=self.send_robot_actions)
90 | # Initialize our controller after load and the first reset
91 | self._my_controller = CoolController()
92 | return
93 |
94 | def send_robot_actions(self, step_size):
95 | self._jetbot.apply_wheel_actions(self._my_controller.forward(command=[20.0, np.pi/ 4]))
96 | return
97 | ~~~
98 | 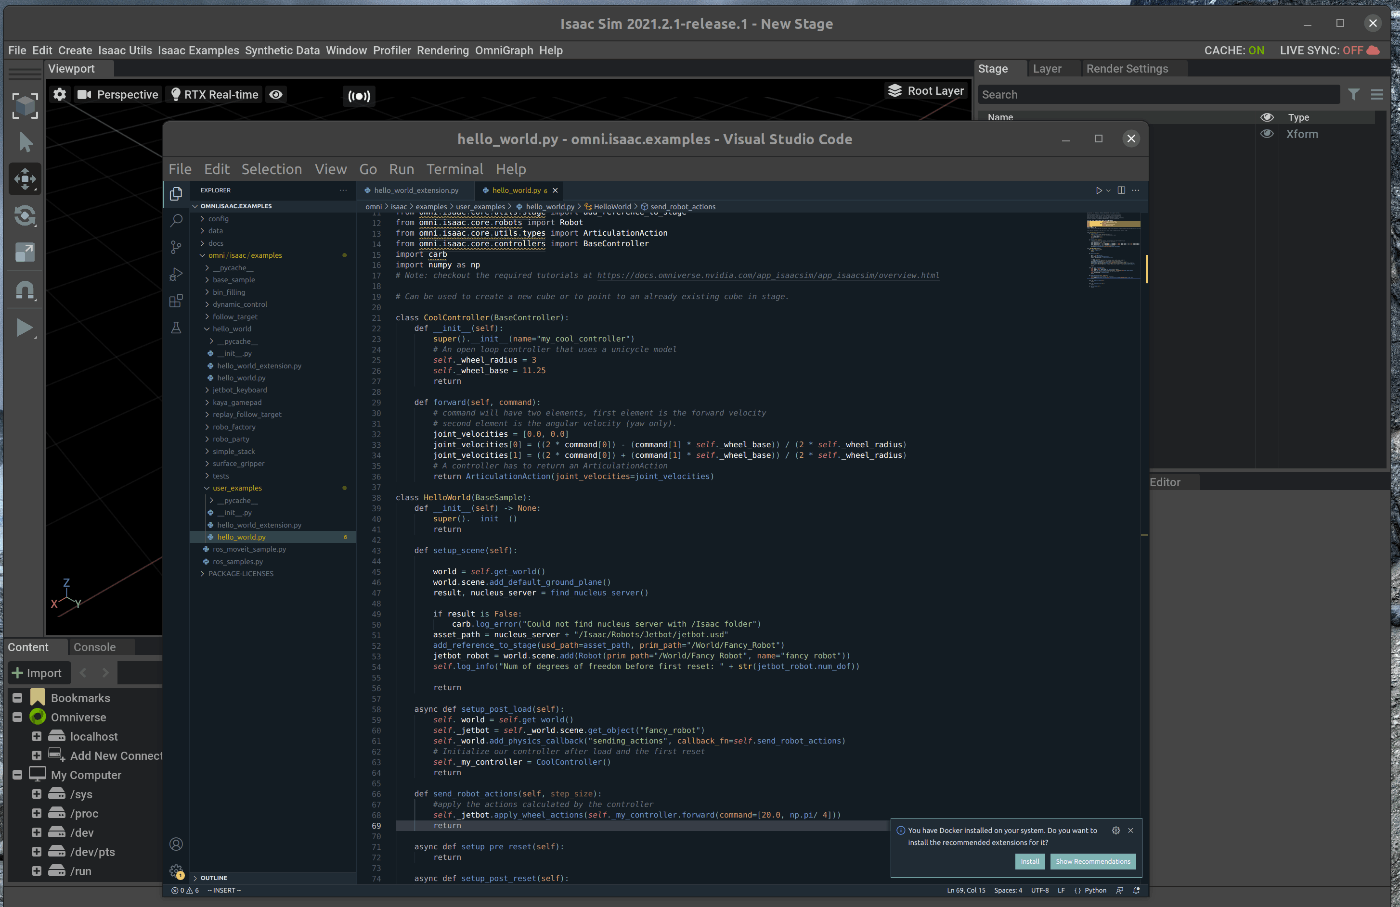
99 |
100 | 追加後、Ctrl+Saveとhot reloadが実行されます。
101 |
102 | メニューバーのIsaac Examples > Awesome Exampleを選択し、Loadを選択すると、ソースコードの変更部分が反映された状態で表示されます。
103 | 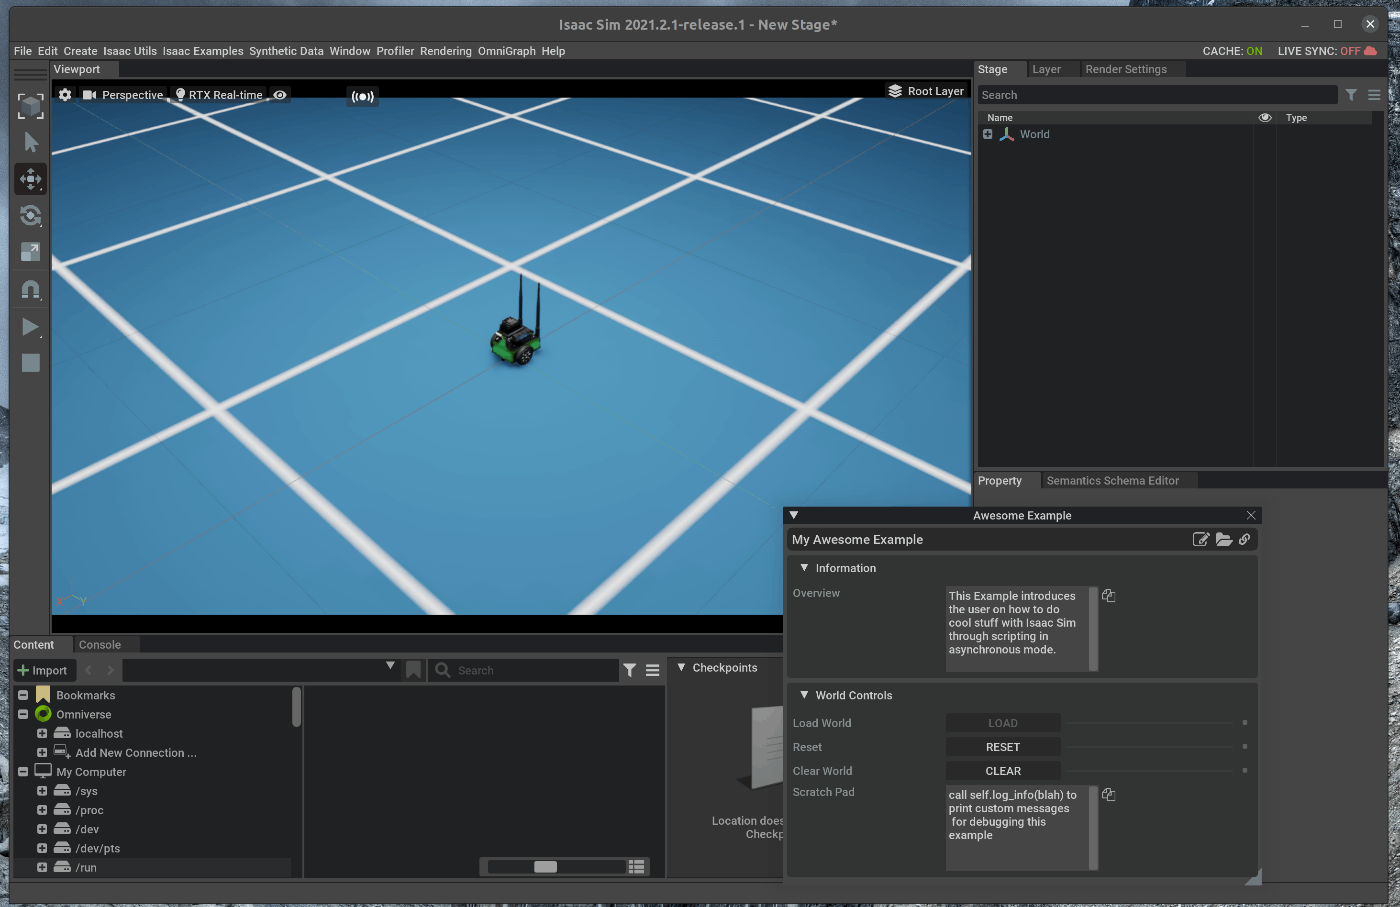
104 |
105 | この状態で、Viewportの左側のPLAYボタンを押すと、Jetbotが円を描きながら移動します。
106 | 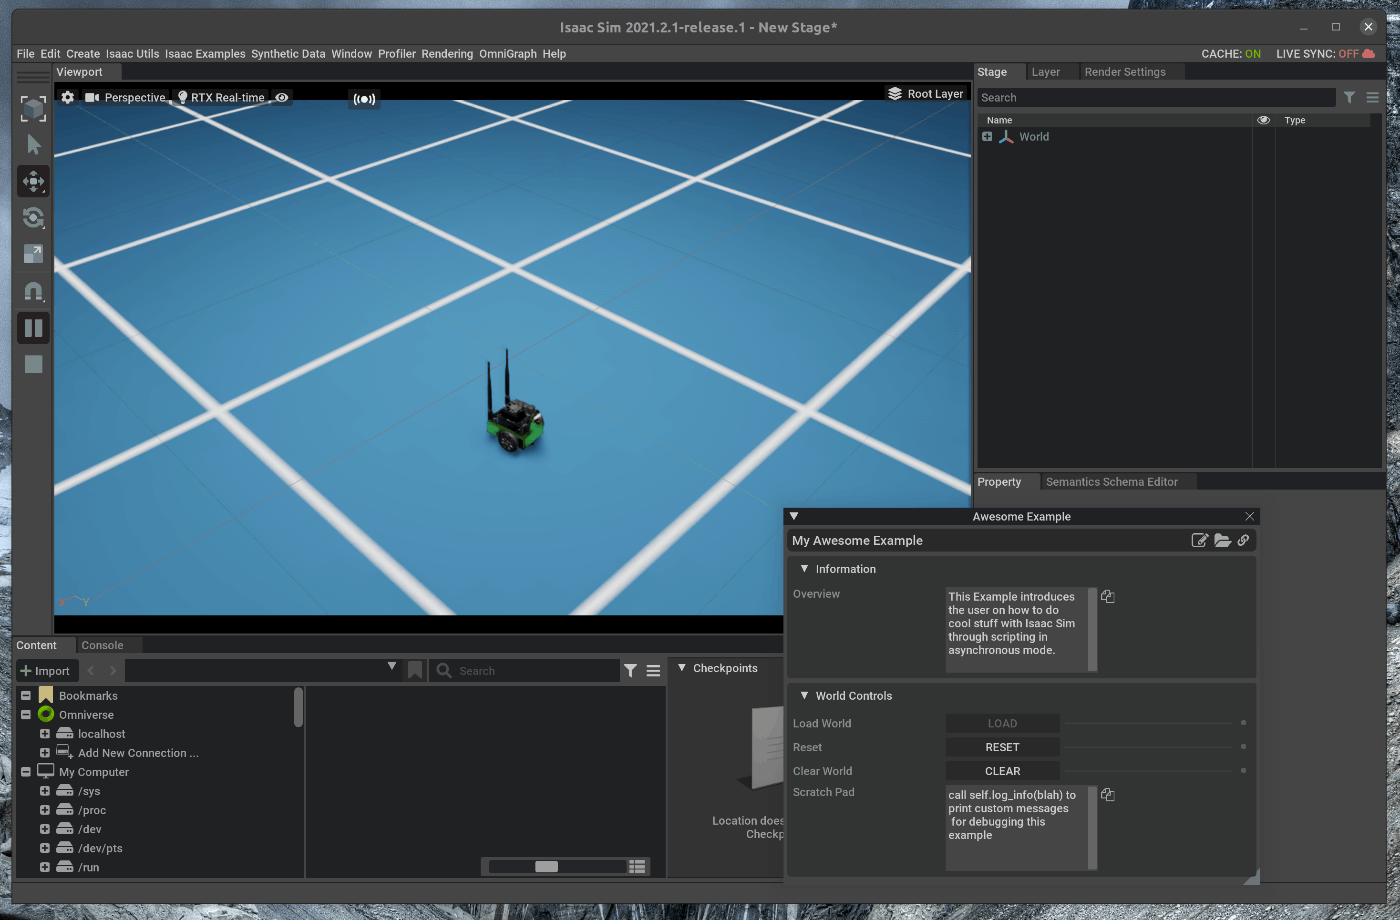
107 |
108 | ## 2.2 Available Controllersの使用
109 |
110 | 汎用的なControllerはクラスとして用意されています。
111 | 今回は、DifferentialControllerクラスを使用し、上記で記述した処理をより容易に実現します。
112 |
113 | hello_world.pyを次の様に編集します。
114 |
115 | ~~~ hello_world.py:Python3
116 | from omni.isaac.examples.base_sample import BaseSample
117 | from omni.isaac.jetbot import Jetbot
118 | from omni.isaac.motion_generation import WheelBasePoseController
119 | from omni.isaac.jetbot.controllers import DifferentialController
120 | import numpy as np
121 |
122 |
123 | class HelloWorld(BaseSample):
124 | def __init__(self) -> None:
125 | super().__init__()
126 | return
127 |
128 | def setup_scene(self):
129 | world = self.get_world()
130 | world.scene.add_default_ground_plane()
131 | jetbot_robot = world.scene.add(Jetbot(prim_path="/World/Fancy_Robot", name="fancy_robot"))
132 | return
133 |
134 | async def setup_post_load(self):
135 | self._world = self.get_world()
136 | self._jetbot = self._world.scene.get_object("fancy_robot")
137 | self._world.add_physics_callback("sending_actions", callback_fn=self.send_robot_actions)
138 | self._my_controller = WheelBasePoseController(name="cool_controller",
139 | open_loop_wheel_controller=DifferentialController(name="open_loop_controller"),
140 | is_holonomic=False)
141 | return
142 |
143 | def send_robot_actions(self, step_size):
144 | position, orientation = self._jetbot.get_world_pose()
145 | self._jetbot.apply_wheel_actions(self._my_controller.forward(start_position=position,
146 | start_orientation=orientation,
147 | goal_position=np.array([80, 80])))
148 | return
149 | ~~~
150 | 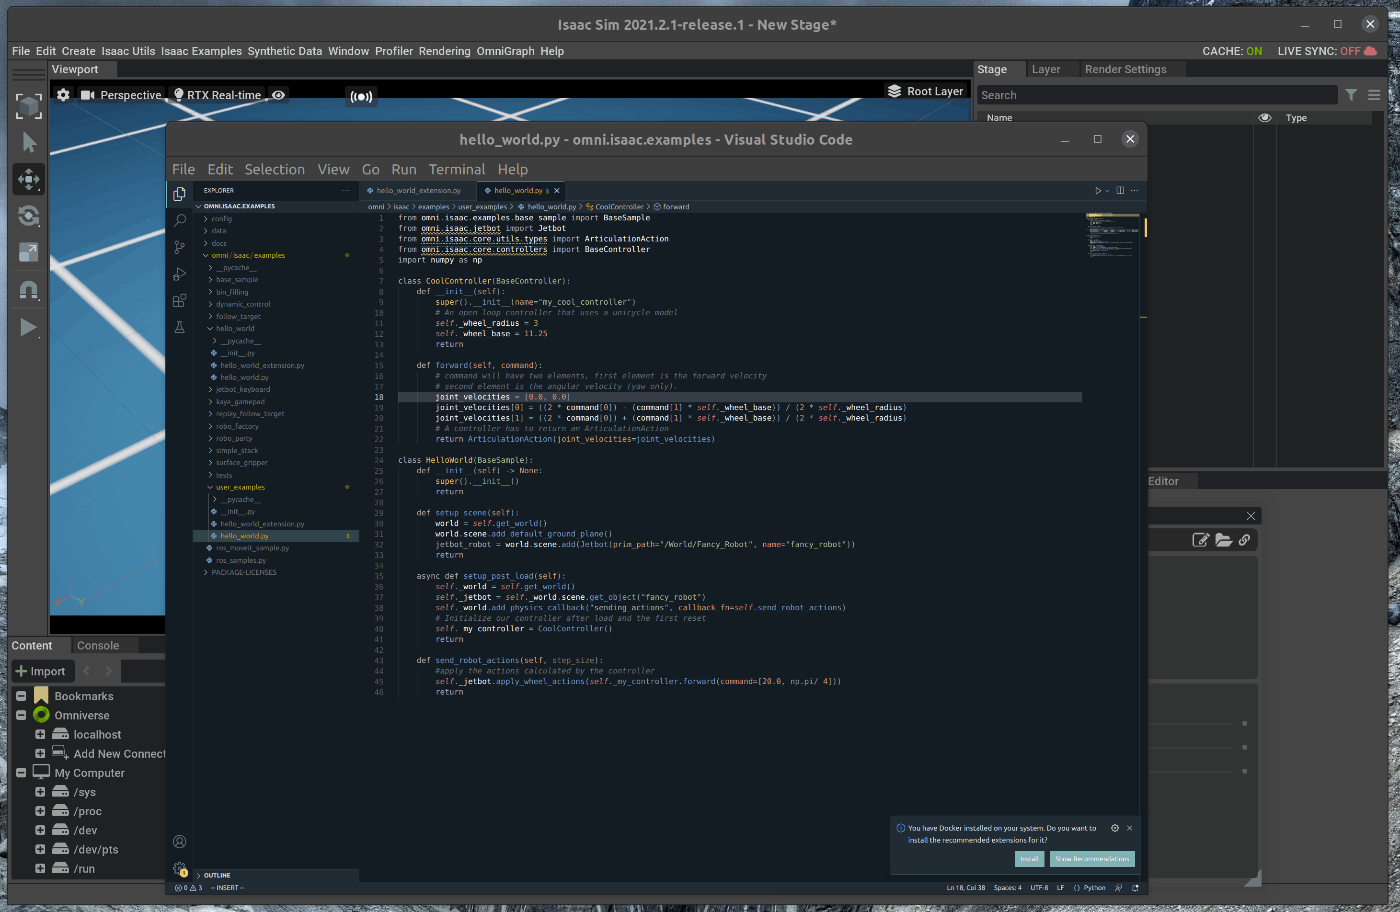
151 |
152 | 追加後、Ctrl+Saveとhot reloadが実行されます。
153 |
154 | メニューバーのIsaac Examples > Awesome Exampleを選択し、Loadを選択すると、ソースコードの変更部分が反映された状態で表示されます。
155 | この状態で、Viewportの左側のPLAYボタンを押すと、Jetbotが回転し、直進します。
156 | 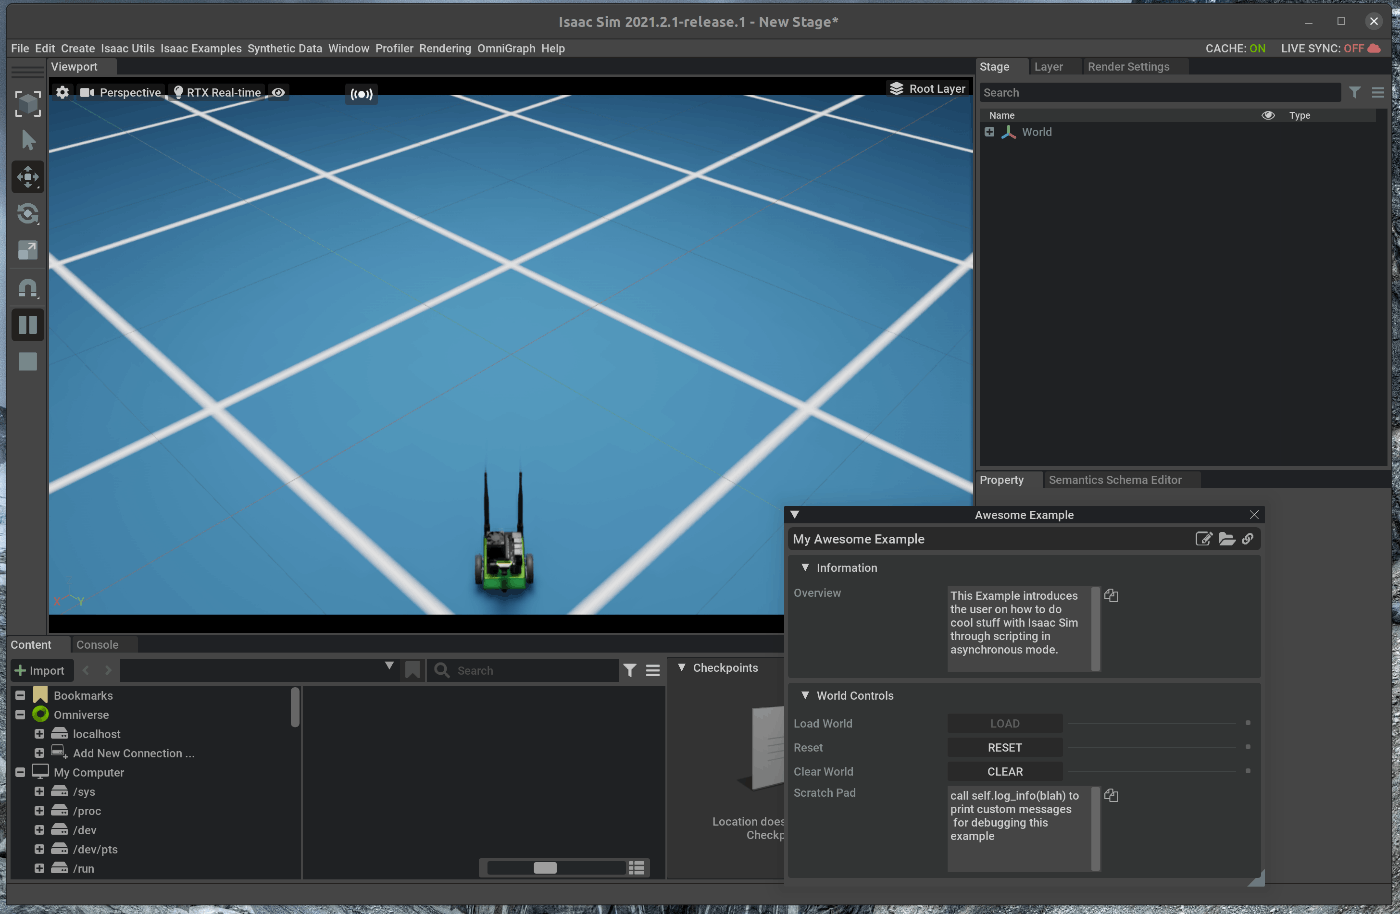
--------------------------------------------------------------------------------
/tutorials/gui/create_simple_robot/2_create_simple_robot.md:
--------------------------------------------------------------------------------
1 |
2 | # 概要
3 | Nvidia Issac simのGUIの機能を使用し、簡単な2輪ロボットのモデルを作成します。
4 |
5 | Issac Simのtutorialに上記の内容が記載されており、この内容に沿って進めます。
6 | https://docs.omniverse.nvidia.com/app_isaacsim/app_isaacsim/tutorial_gui_simple_robot.html
7 |
8 | # 実行環境
9 |
10 | - インストール実行環境
11 |
12 | | unit | specification |
13 | |:-----------------:|:------------------:|
14 | | CPU | i9-11900H |
15 | | GPU | GeForce RTX 3080 Laptop|
16 | | RAM | 32GB |
17 | | OS | Ubuntu 20.04.3 LTS |
18 |
19 | - Nvidia Driverバージョン
20 | - 510.39.01
21 | - Issac simバージョン
22 | - 2021.2.1
23 |
24 |
25 | # 手順
26 |
27 | 大まかな手順は次の通りです。
28 |
29 | 1. 環境設定
30 | 2. 2輪ロボットのモデル作成
31 |
32 |
33 | 以下内容のシーンファイルはこちらからダウンロードできます。(準備中)
34 |
35 | ## 1. 環境設定
36 | こちらのページに記載してある手順を進めます。
37 | https://docs.omniverse.nvidia.com/app_isaacsim/app_isaacsim/tutorial_gui_environment_setup.html
38 |
39 |
40 | ### 1.1 OmniverseからIssac Simを起動する
41 | 
42 |
43 | ### 1.2 シーンを作成する
44 | メニューバーのCreate > Physics > Phisics Sceneを選択します。
45 | 
46 |
47 | シーン作成後、右側にあるStageの中で、作成した”Phisical Scene”を選択します。
48 | 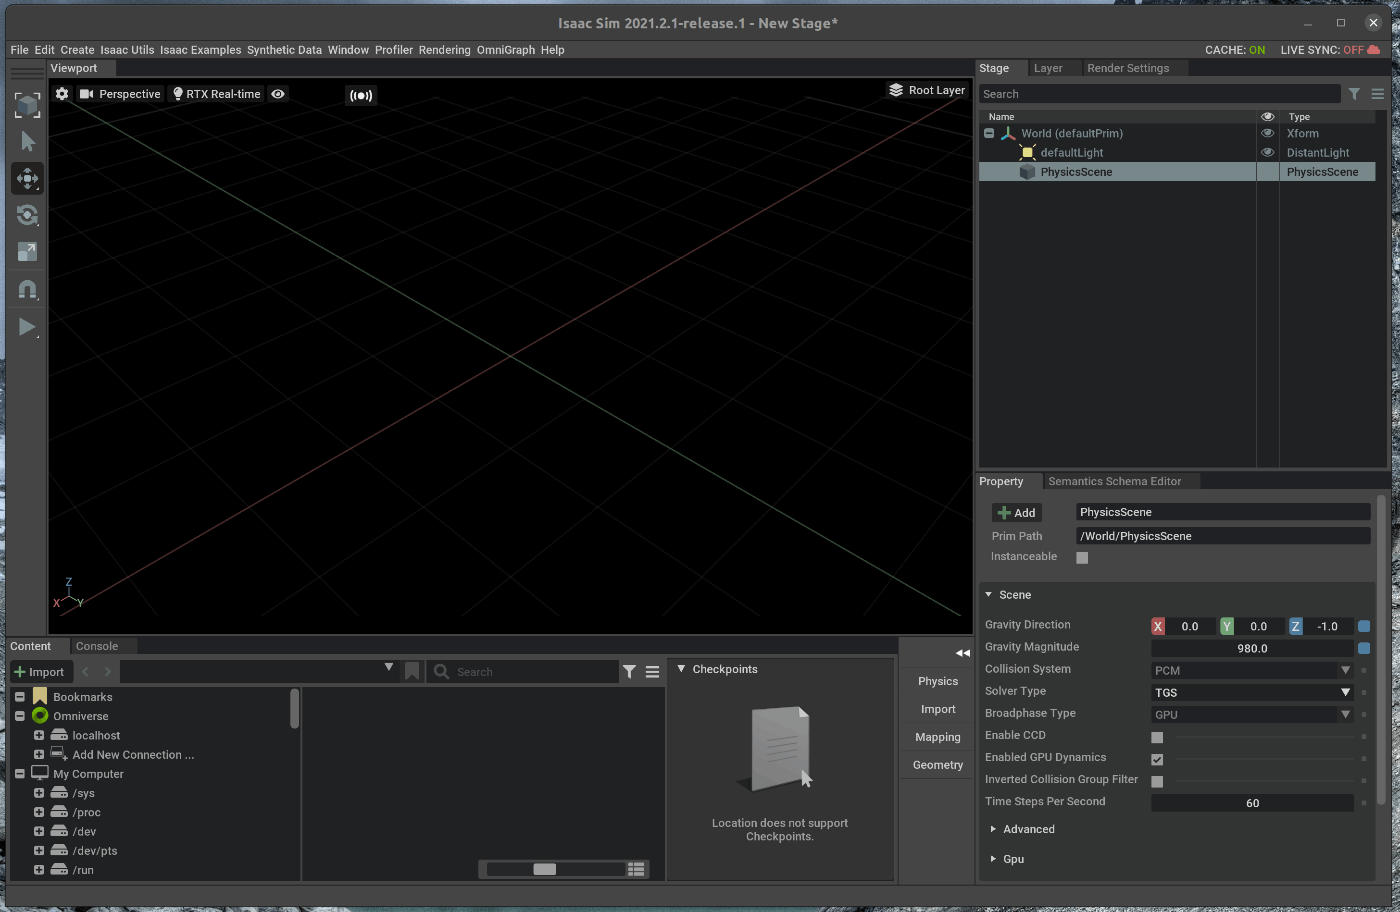
49 |
50 | 選択した状態で、右下にあるPropertyの中から、”Enable GPU dynamics”のチェックを外し、”BoardPhase”をMBPにします。
51 | 
52 |
53 | ここでは、物理演算をGPUからCPUで計算するように変更しています。シミュレーションするロボットが、何百個のBodyで構成されていない限りはGPUを使用する必要はありません。
54 |
55 |
56 | ## 1.3 Groud Planeの追加
57 | 作成したシーンないに、Groud planeを追加します。
58 | メニューバーのCreate > Physics > Ground Planeを選択します。
59 | 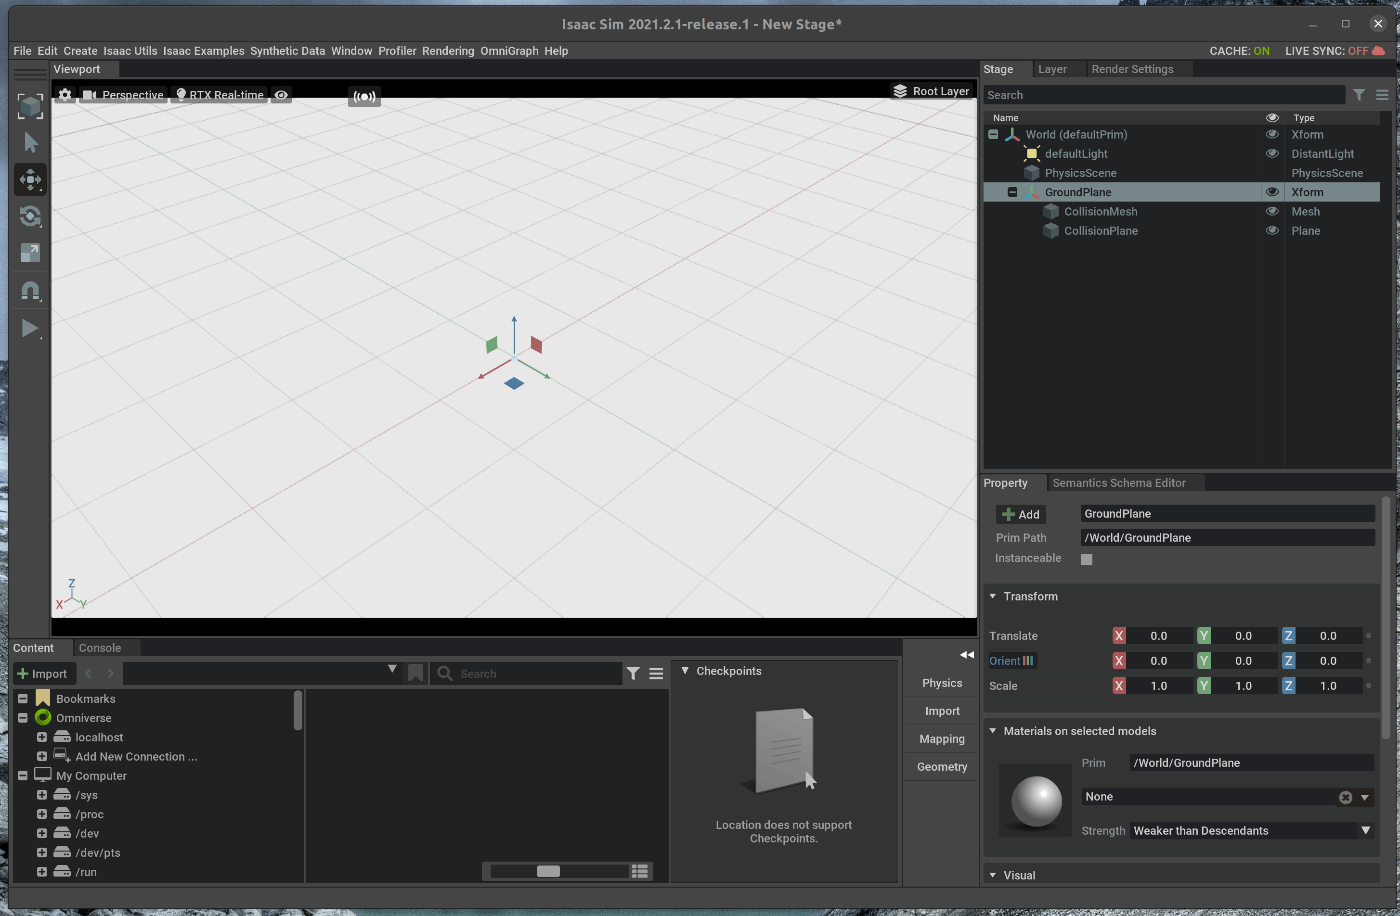
60 |
61 | Groud Planeにグリッドが表示されていない場合には、Viewport上部にあるEyeマークをクリックし、Gridにチェックを入れます。
62 |
63 |
64 | ## 1.4 ライト(光源)の追加
65 | シーン内にライトを追加します。
66 | メニューバーのCreate > Light > Sphere Lightを選択します。
67 | 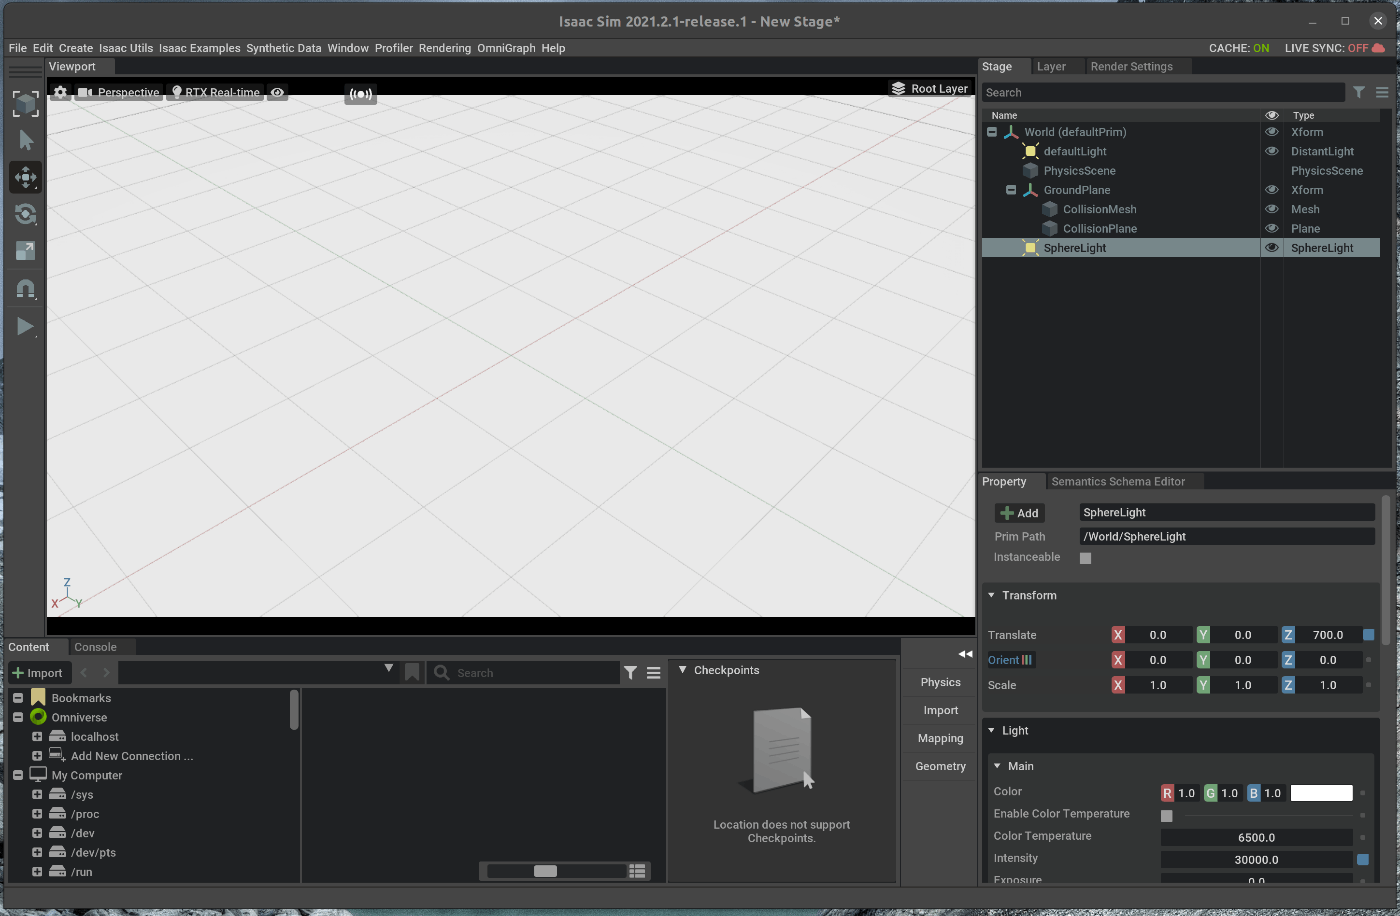
68 |
69 | ライト追加後、右側にあるStageの中で、作成した”Spherelightを選択します。
70 | 選択した状態で、右下にあるPropertyの中から、次の値を変更します。
71 | - TransformのtranslateのZを700にする
72 | - TransformのrotationのX軸とY軸の値をそれぞれ0にする
73 | - MainのColorを任意の色に設定する(左側の現在の設定色部分をクリックすると、色を選択することができます)
74 | - MainのIntensityの値を1e6に設定する
75 | - Raw USD propertiesのShapingのangleを45に設定する
76 | - Raw USD propertiesのsharpingのsoftnessを0.05に設定する
77 |
78 | 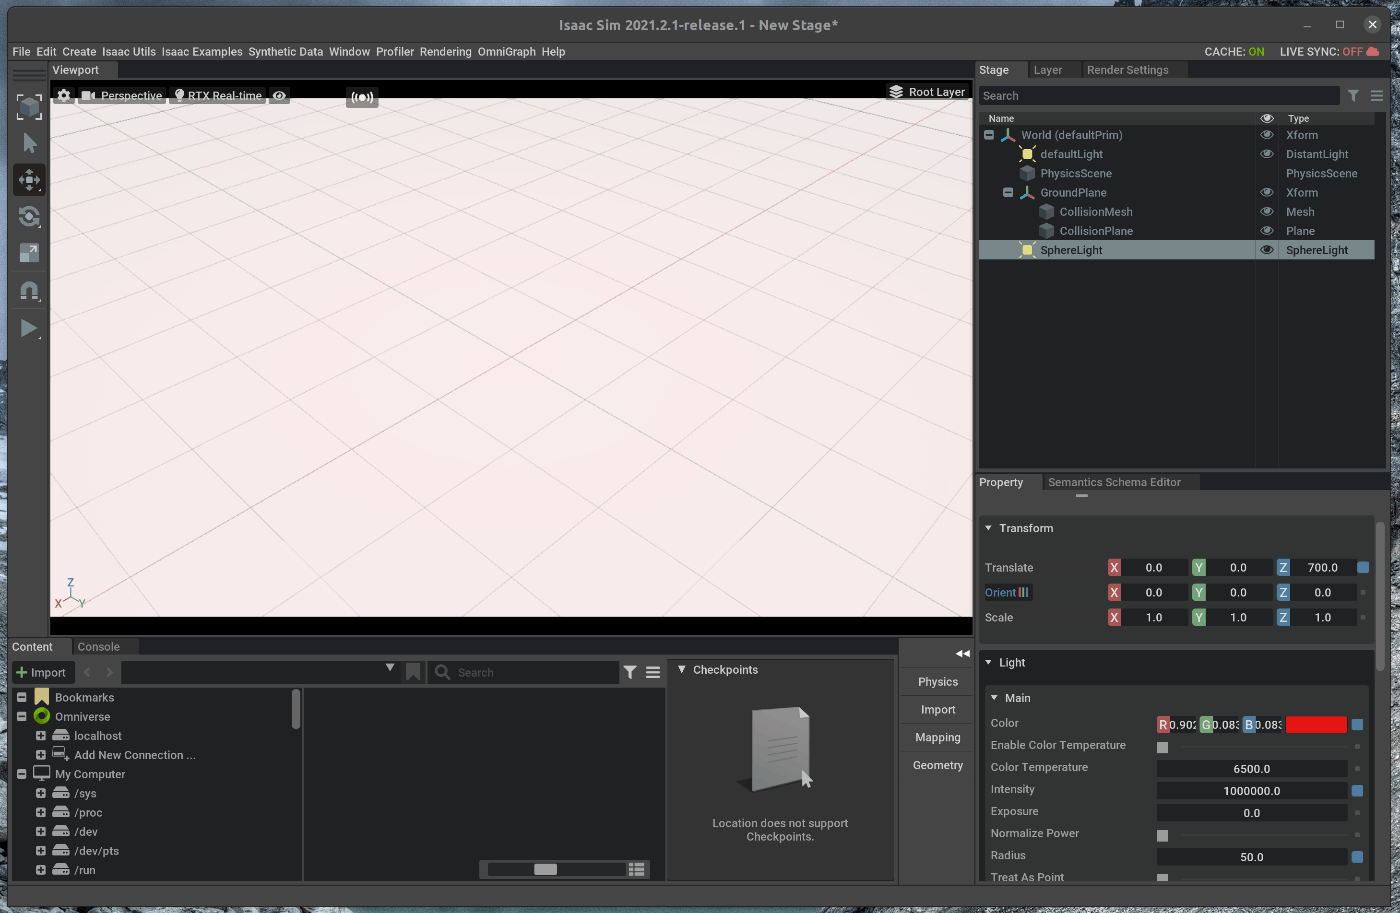
79 | 
80 | 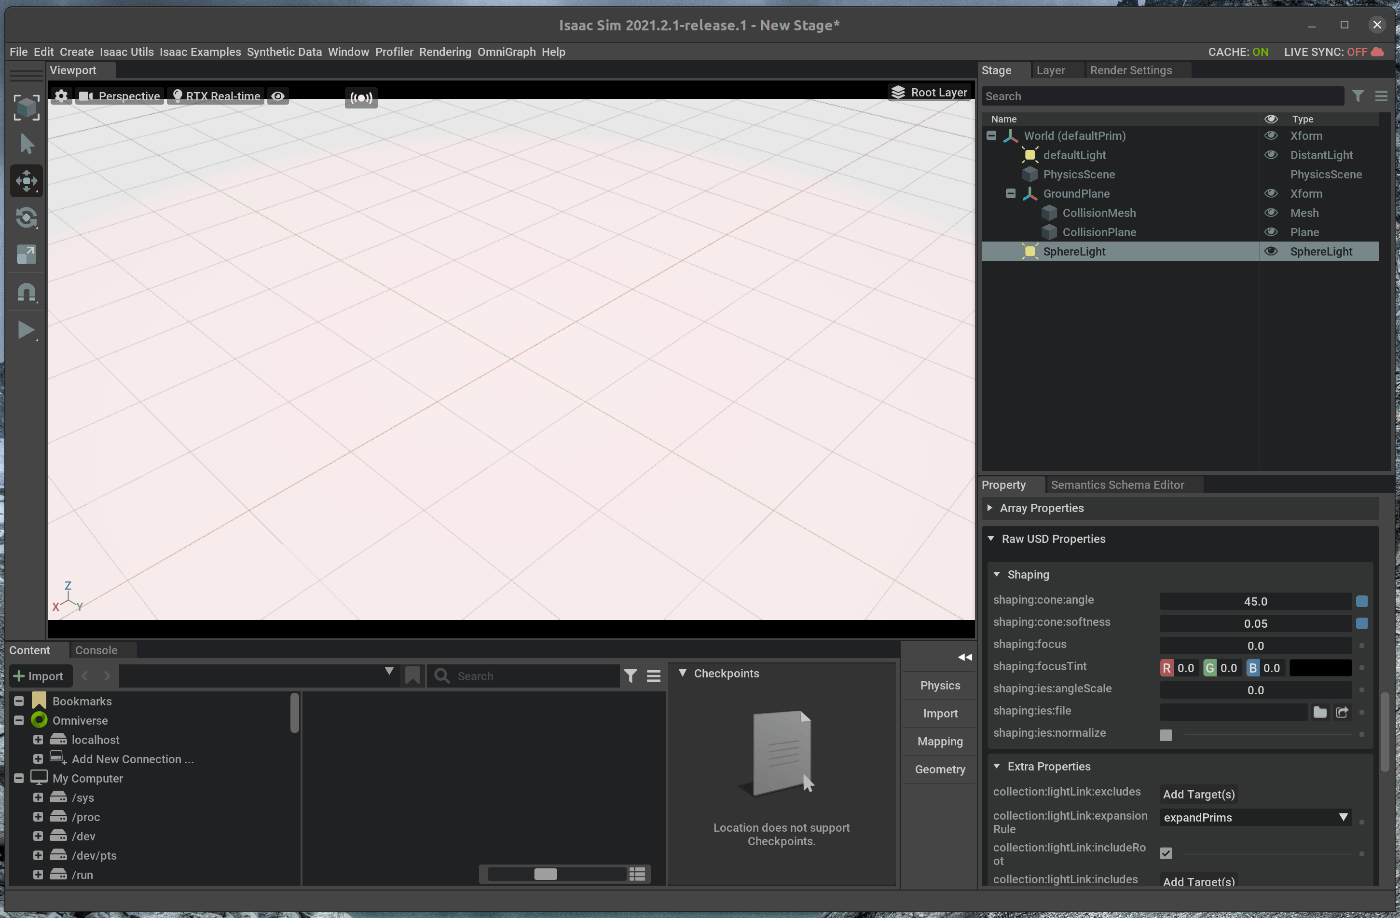
81 |
82 | 上記設定後、右側にあるStageの中で、作成した”defaultlightを選択します。
83 | 選択した状態で、右下にあるPropertyの中から、次の値を変更します。
84 |
85 | - MainのIntensityの値を300に設定する
86 |
87 | 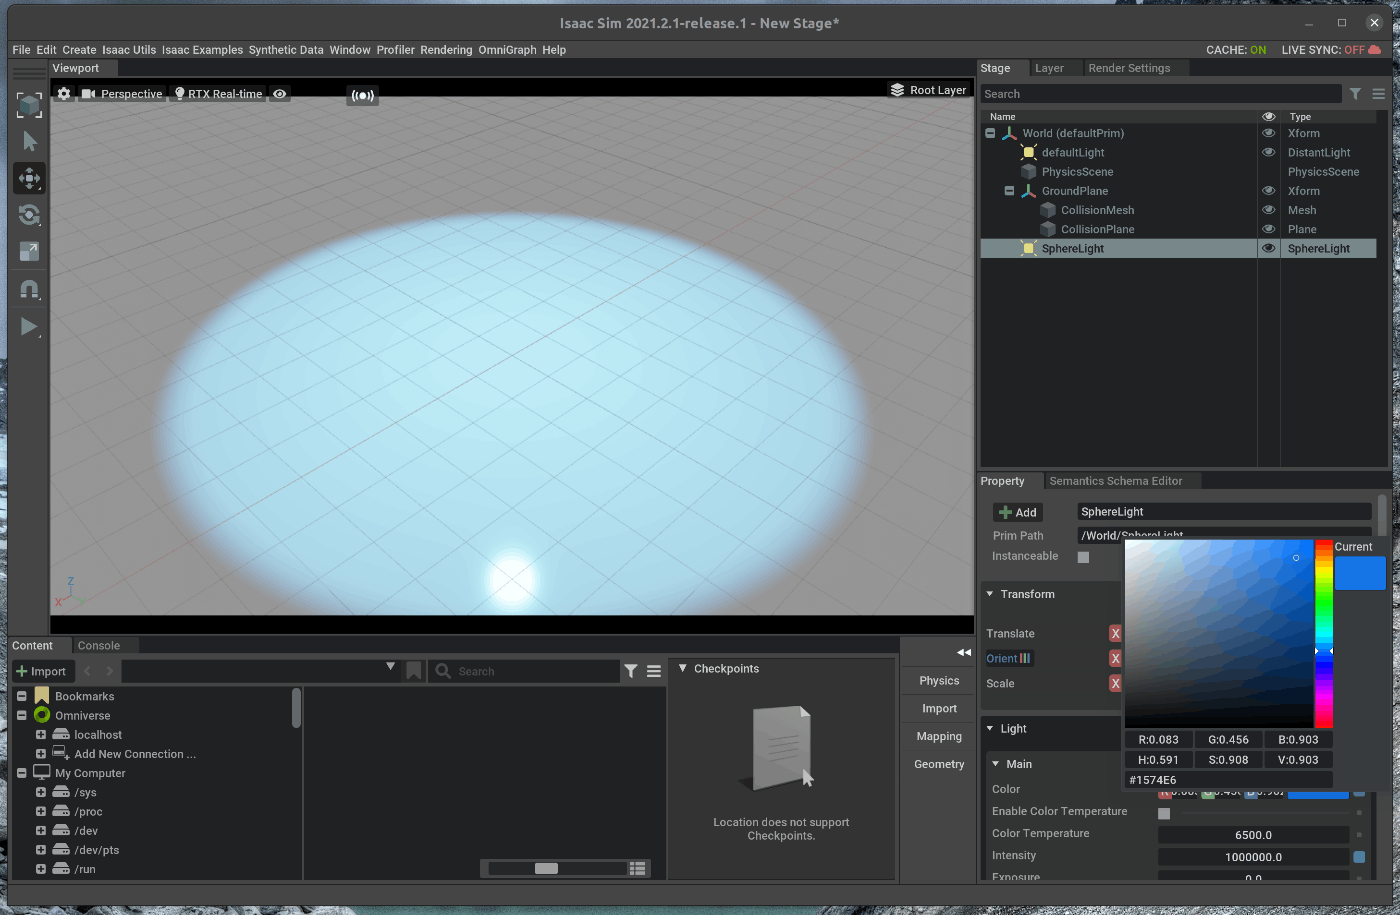
88 |
89 | 上記の手順で環境設定は完了です。
90 |
91 |
92 | ## 2. 2輪ロボットモデルの作成
93 | こちらのページに記載されている手順を進めます。
94 | https://docs.omniverse.nvidia.com/app_isaacsim/app_isaacsim/tutorial_gui_simple_objects.html#isaac-sim-app-tutorial-gui-simple-objects
95 |
96 |
97 | ### 2.1 Rigid Bodyをシーン内に追加する
98 | 2輪ロボットは1つの直方体と、2つの円柱で構成します。
99 | まず、直方体をシーンに追加します。
100 | メニューバーのCreate > Mesh > Cubeを選択します。
101 |
102 | 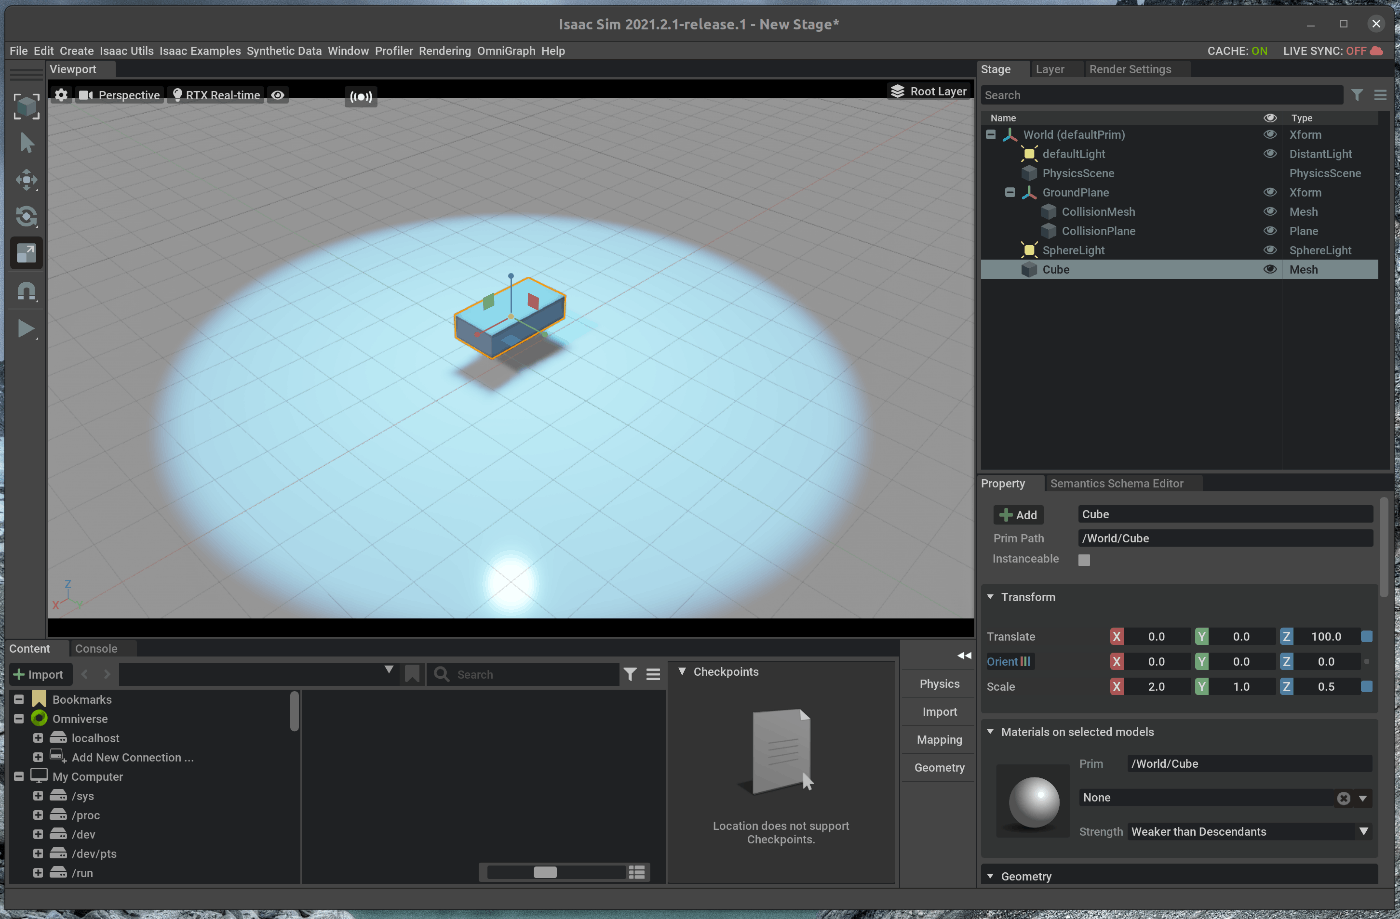
103 | 追加後、右側にあるStageの中で、作成した"Cube"を選択します。
104 | 選択した状態で、右下にあるPropertyの中から、次の値を変更します。
105 | - TransformのtranslateのZを100にする
106 | - TransformのScaleのXを2.0、Zを0.5にする
107 |
108 | 次に2個の円柱を追加します。
109 | メニューバーのCreate > Mesh > Cylinderを選択します。
110 | 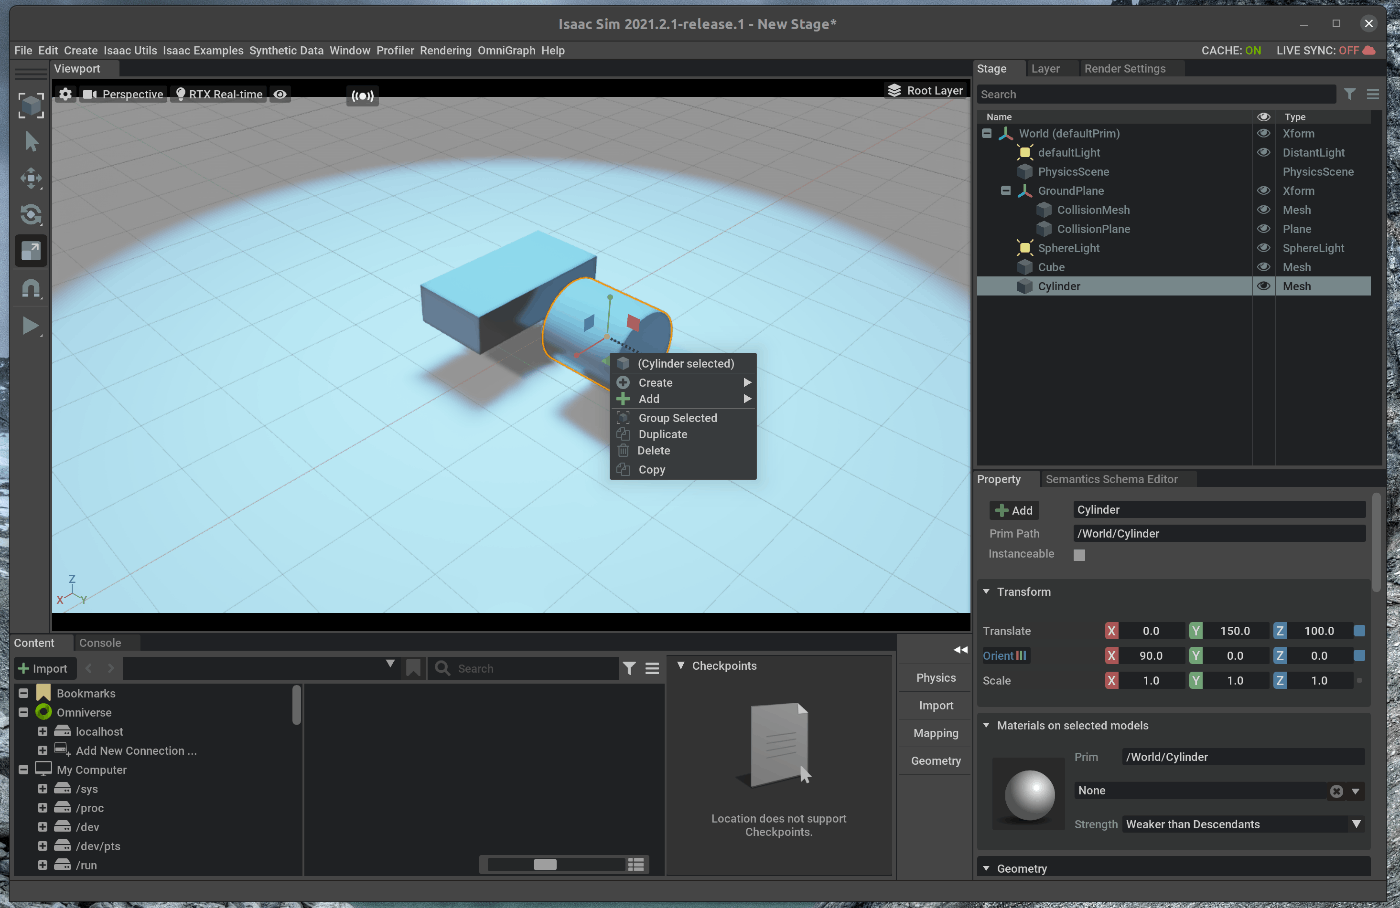
111 | 追加後、右側にあるStageの中で、作成した"Cylinder"を選択します。
112 | 選択した状態で、右下にあるPropertyの中から、次の値を変更します。
113 | - Transformのtranslateのyを150、Zを100にする
114 | - TransformのRotationのXを90にする
115 |
116 | 設定後、右側にあるStageの中で、作成した"Cylinder"を選択し、右クリックします。
117 | 右クリックした時に出てくるウィンドウの中から、”Deplicate”を選択します。
118 |
119 | 複製した"Cylinder"を選択します。
120 | 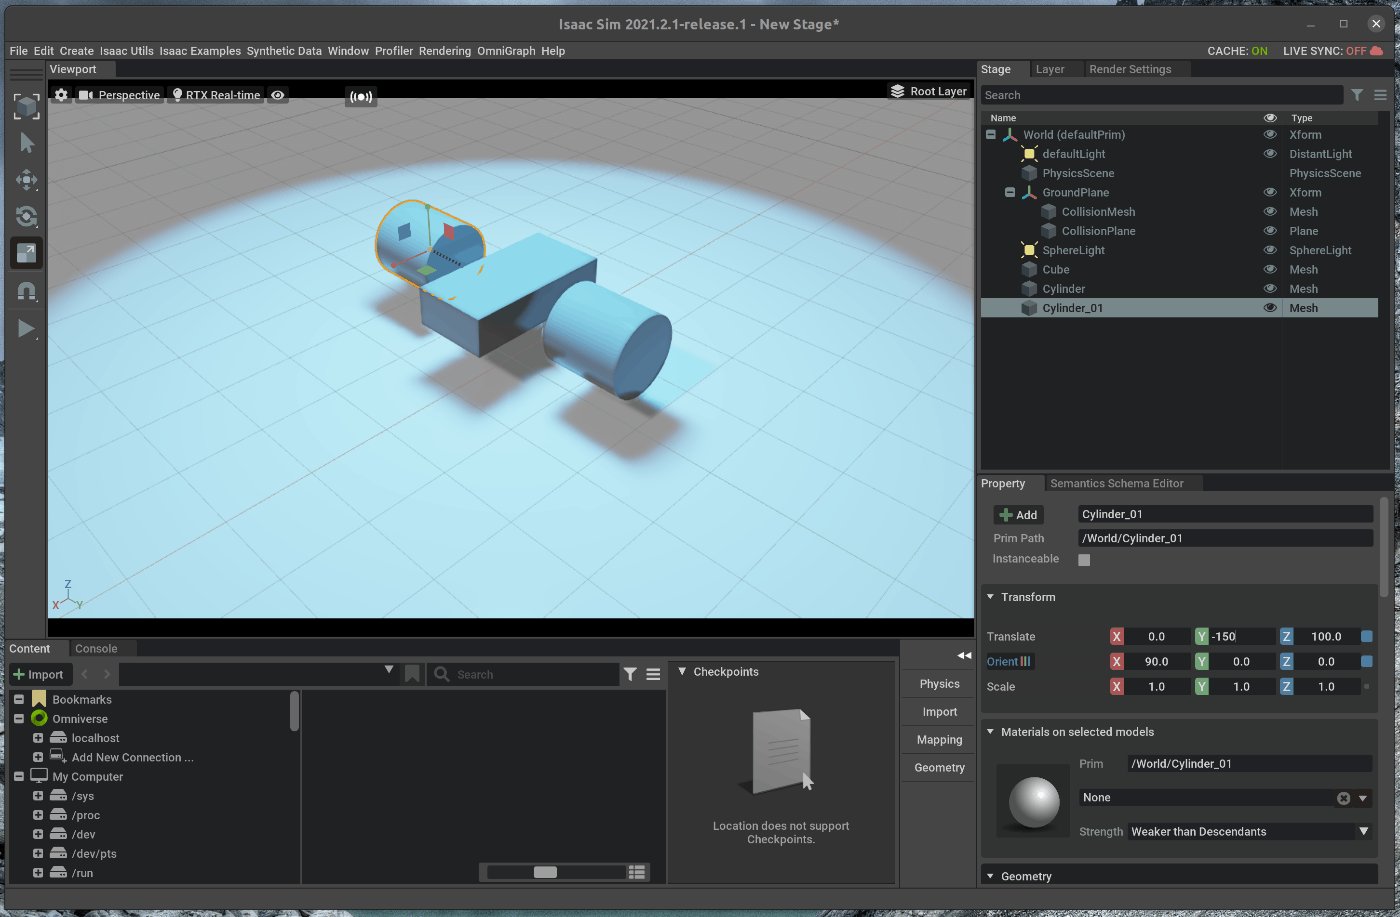
121 | 選択した状態で、右下にあるPropertyの中から、次の値を変更します。
122 | - Transformのtranslateのyを-150にする
123 |
124 |
125 | ### 2.2 物理プロパティの追加
126 | シーン内に追加したオブジェクトに物理プロパティを追加します。
127 | 右側にあるStageの中で、作成した3つのオブジェクトをCtrl+Shiftキーを押しながら選択します。
128 |
129 | 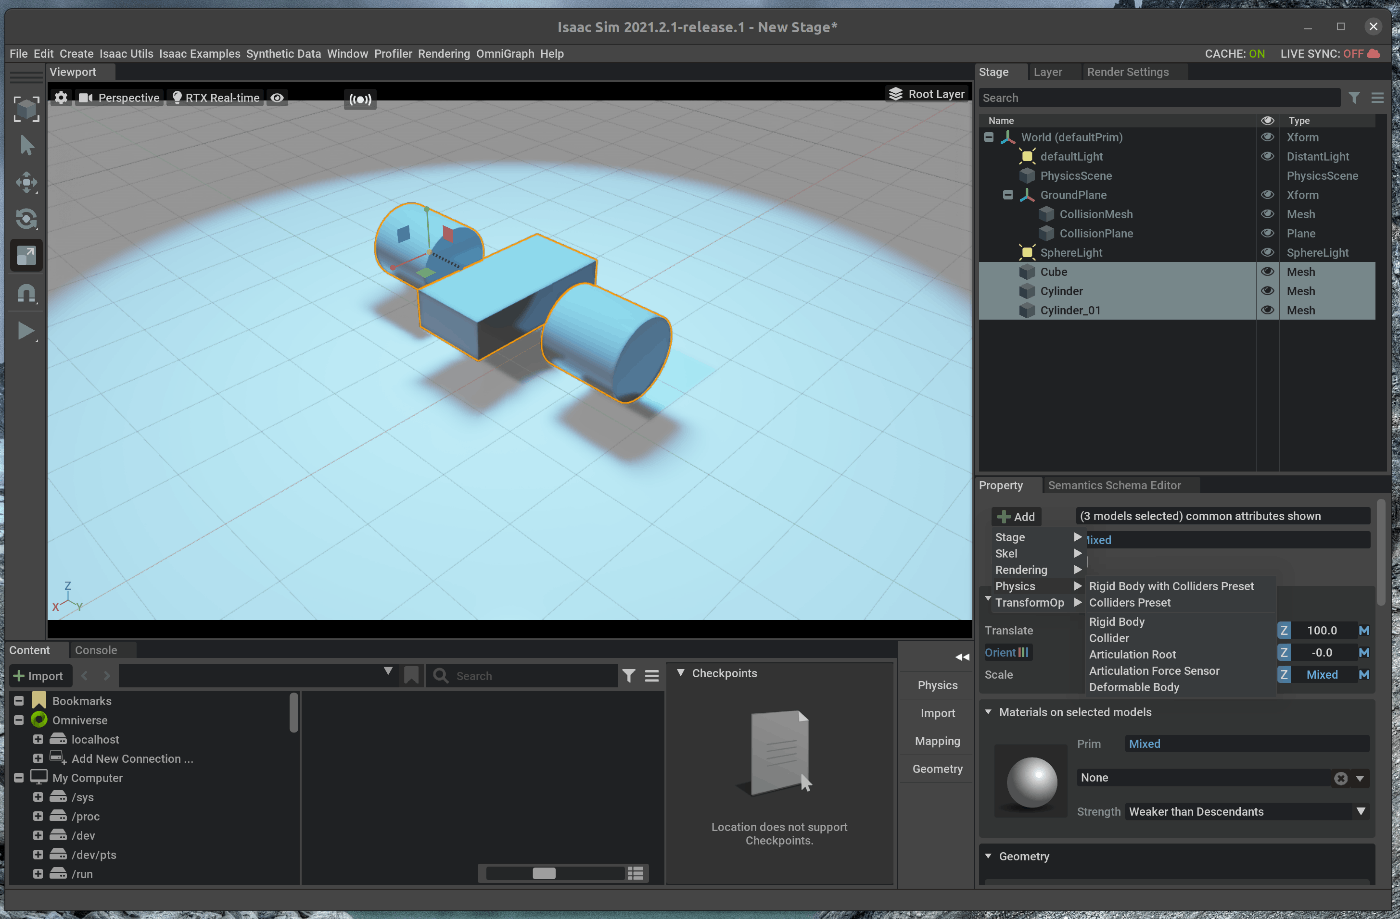
130 |
131 | 選択したまま、右下のPropertyの”+Add”をクリックし、Phisics >Rigid Body with Coliders Presetを選択します。
132 |
133 | 選択すると、それぞれのオブジェクトに重力等の物理プロパティと衝突判定のプロパティが追加されます。
134 |
135 | この状態で、左側のツールバーからStartボタンを押すと、シミュレーションが開始され、オブジェクトに重力が適用されます。
136 | 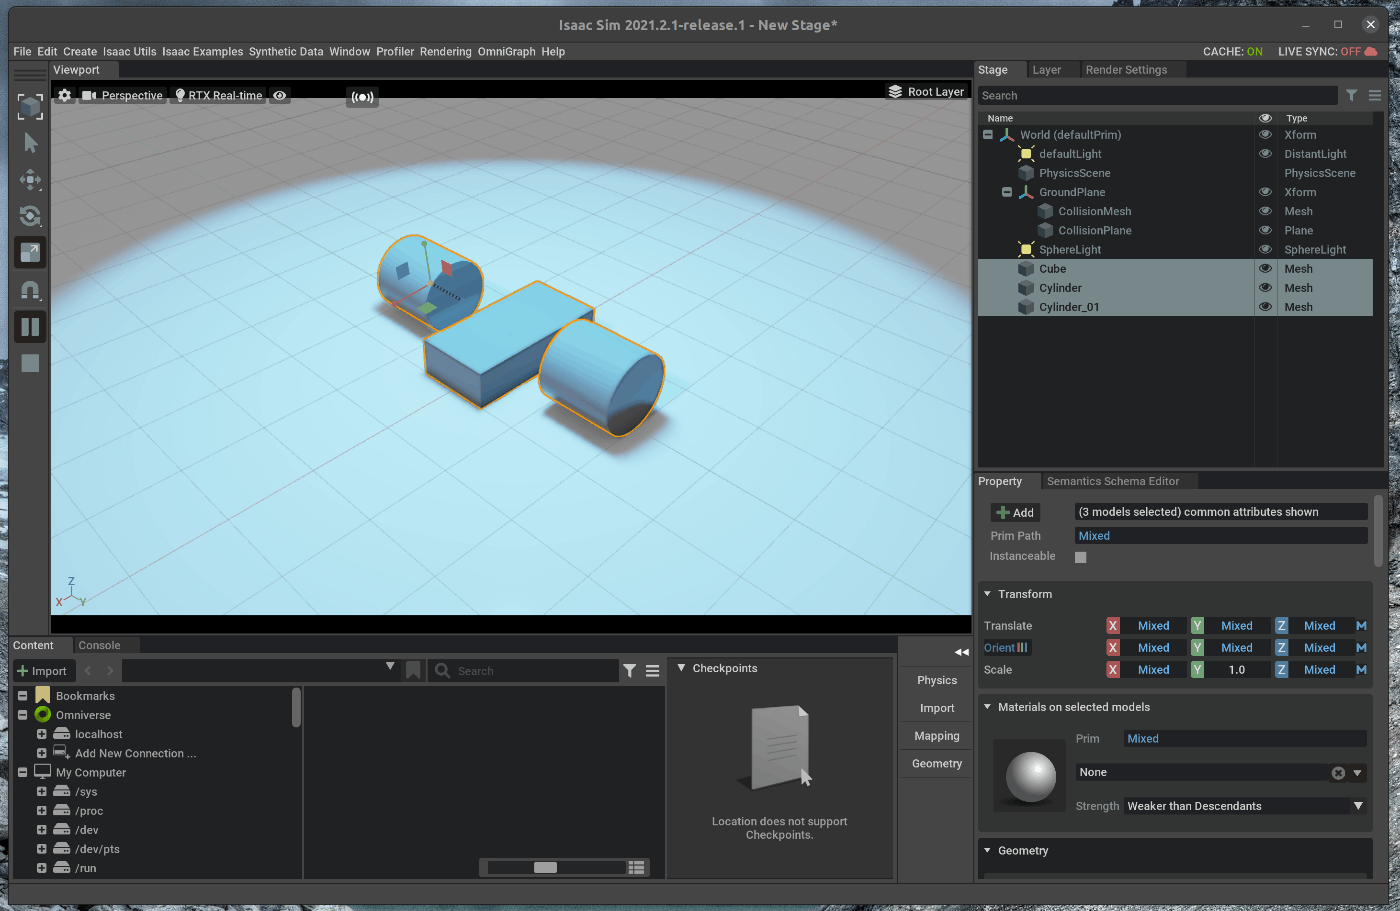
137 | シミュレーションを終了する場合には、Stopボタンを選択します。
138 |
139 | 物理プロパティの削除や、衝突判定用のメッシュの可視化、接触/摩擦プロパティの追加については、tutorialに記載されています。
140 |
141 | [物理プロパティの削除](https://docs.omniverse.nvidia.com/app_isaacsim/app_isaacsim/tutorial_gui_simple_objects.html#adding-physics-properties)
142 | 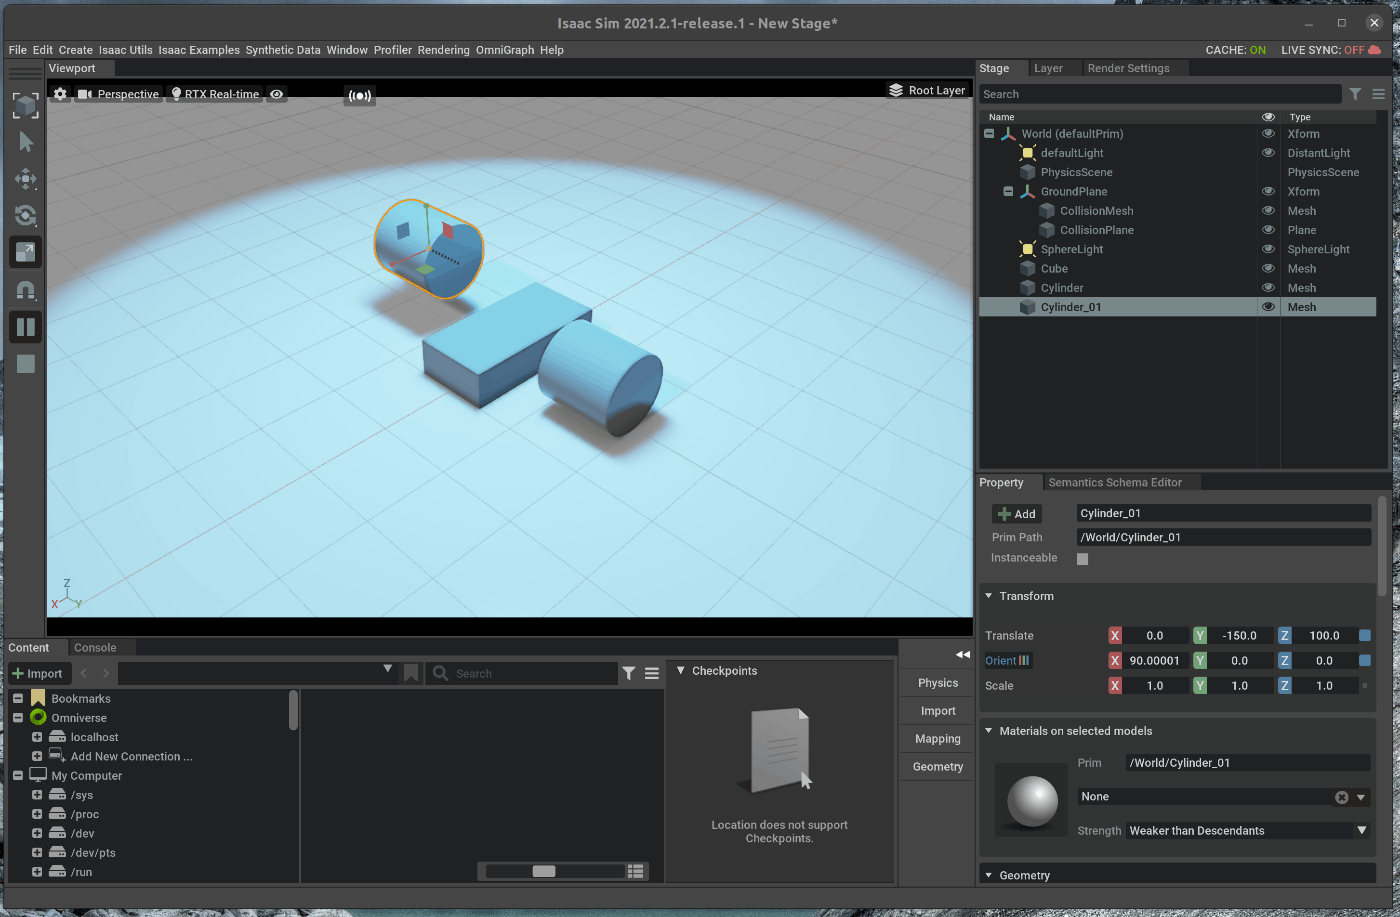
143 |
144 | [衝突判定用のメッシュの可視化](https://docs.omniverse.nvidia.com/app_isaacsim/app_isaacsim/tutorial_gui_simple_objects.html#examine-collision-meshes)
145 | 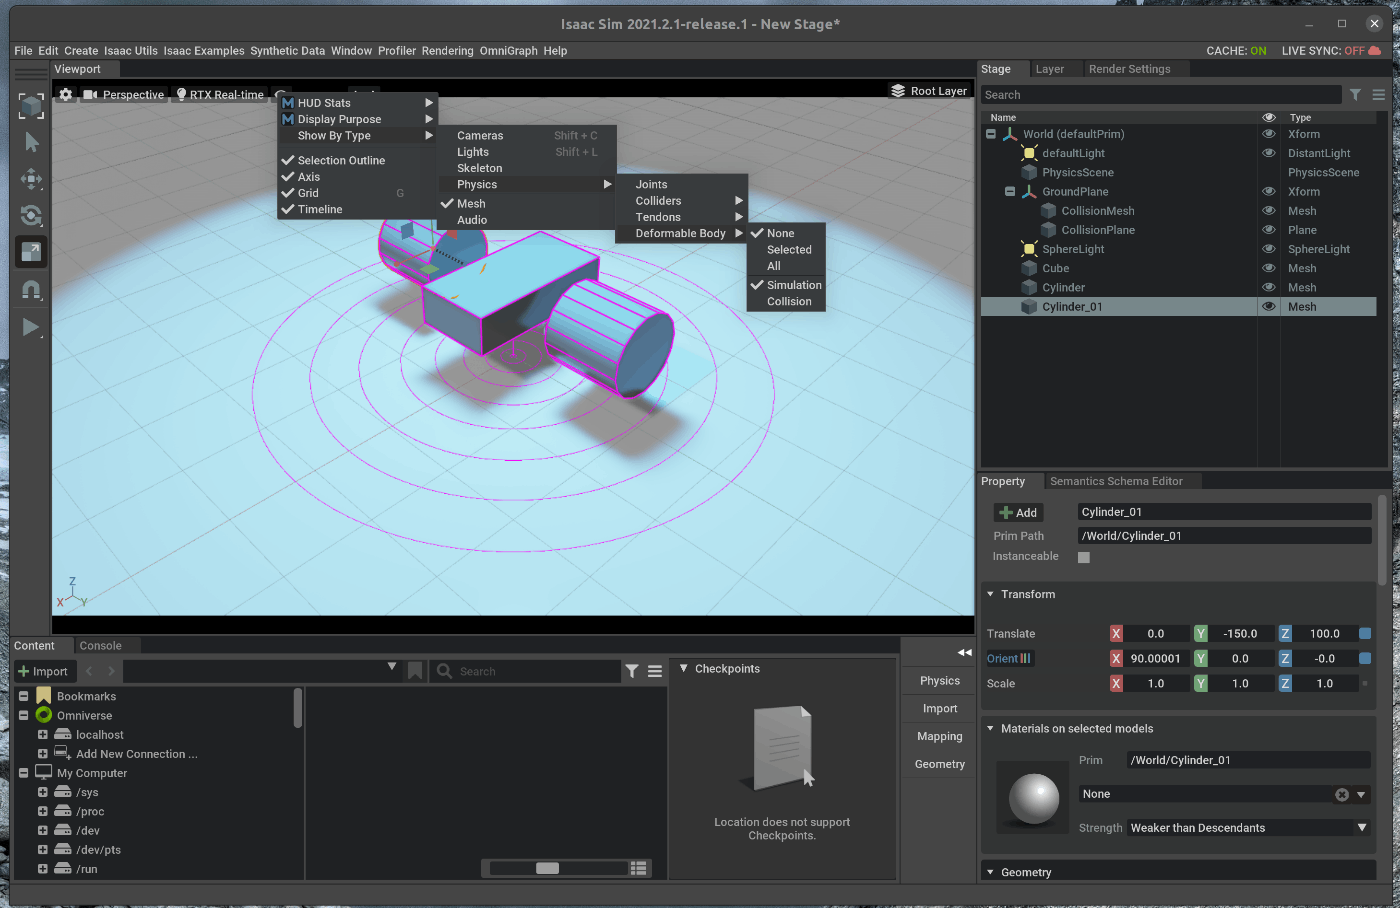
146 | [接触/摩擦プロパティの追加](https://docs.omniverse.nvidia.com/app_isaacsim/app_isaacsim/tutorial_gui_simple_objects.html#adding-contact-and-friction-parameters)
147 |
148 | ## 2.3 マテリアルプロパティの追加
149 | オブジェクトのマテリアル情報を設定するプロパティを追加します。
150 |
151 | メニューバーのCreate > Materials > OmniPBRを選択します。
152 | 上記をもう1回繰り返します。
153 | 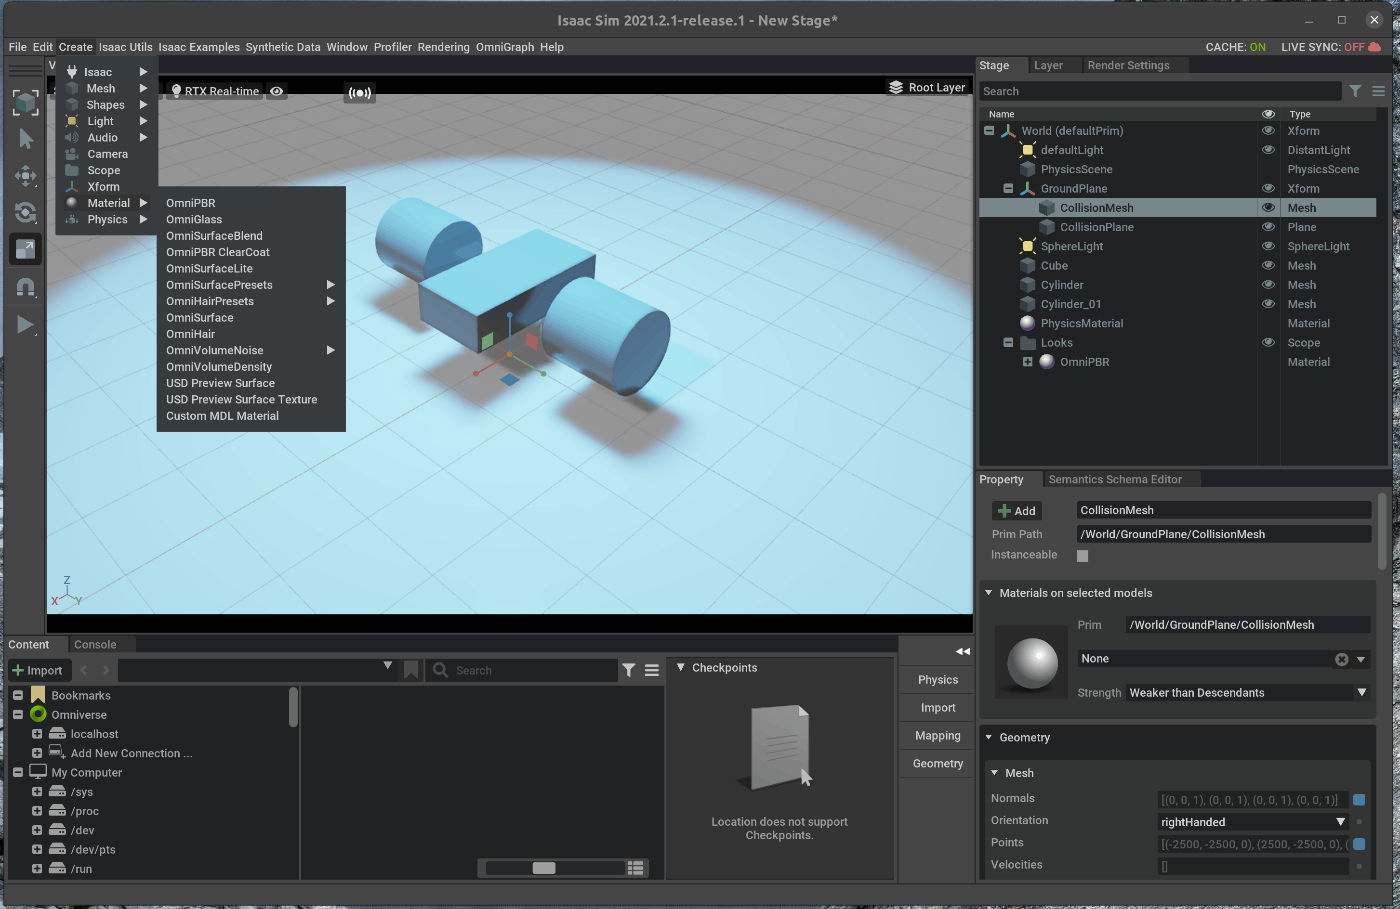
154 |
155 | 右側にあるStageの中で、追加したOmniPBRをそれぞれ右クリックし、renameを選択します。
156 | 名称は次を指定します
157 | - body
158 | - wheel
159 |
160 | 右側にあるStageの中で、直方体のオブジェクトを選択します。
161 | 右下のPropertyの”Materials on selected models”の中のマテリアルの指定を先ほど作成した”body”のパスに変更します。
162 |
163 | 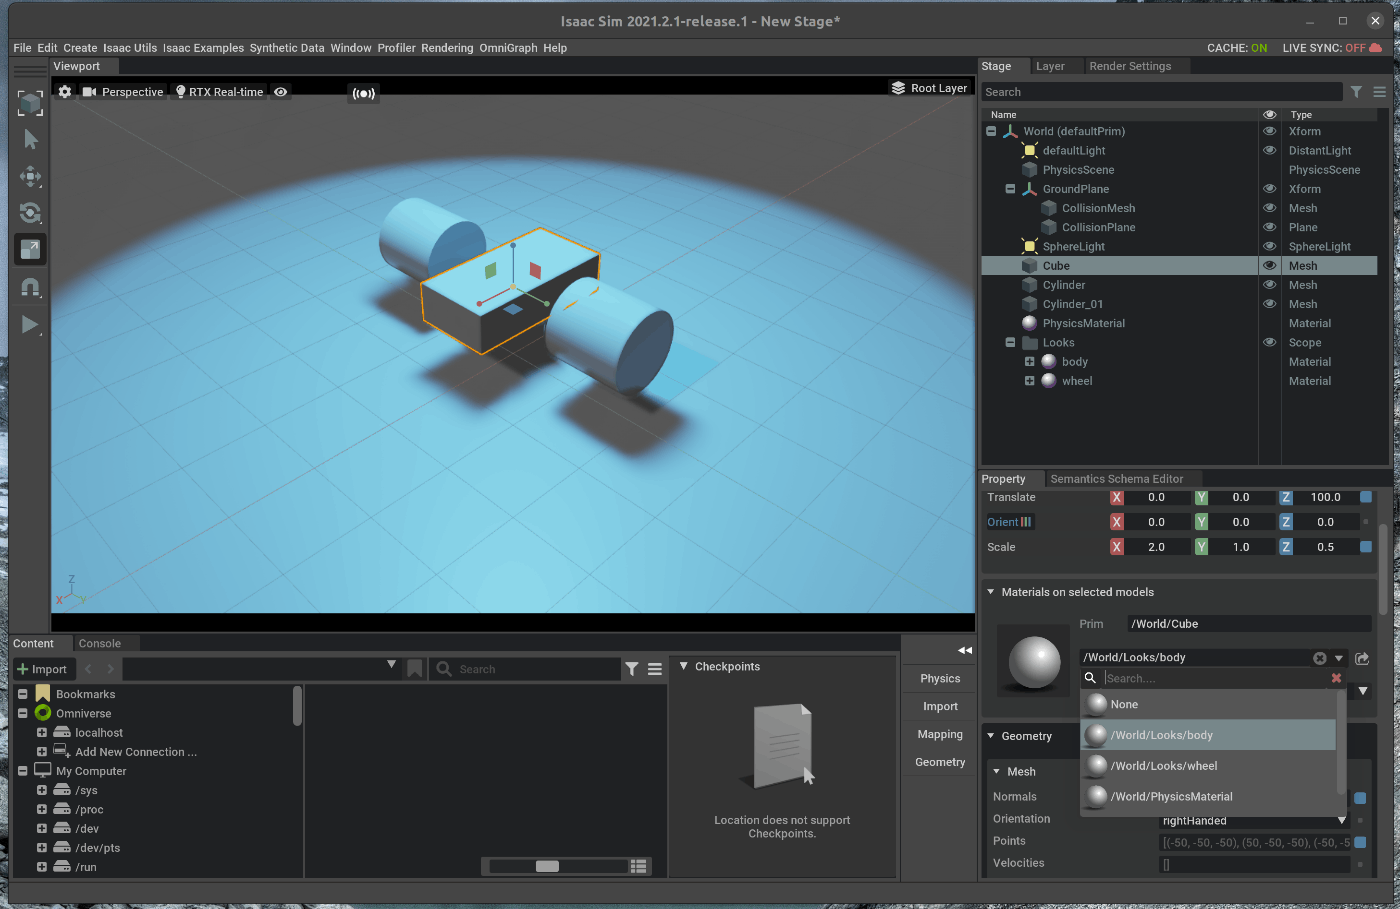
164 |
165 | 右側にあるStageの中で、円柱のオブジェクトを選択します。
166 | 右下のPropertyの”Materials on selected models”の中のマテリアルの指定を先ほど作成した”wheel”のパスに変更します。
167 | もう一方の円柱のオブジェクトに対しても、同様の手順を行います。
168 |
169 | 右側にあるStageの中で、Looks > Bodyを選択します。
170 | 右下のPropertyの” Material and Shader”のAlbedoの中Colorを任意の色に変更します。
171 | 色を変更すると、シーン内の直方体の色が指定した色に変化します。
172 |
173 | 右側にあるStageの中で、Looks > Wheelを選択します。
174 | bodyと同様の手順でオブジェクトの色を任意の色に変更します。
175 |
176 | bodyとwheelの色選択の完了後、右側にあるStageの中で、defaultLightのEyeボタンを入り切りします。
177 | それぞれのオブジェクトに色が設定されていることを確認します。
178 |
179 | 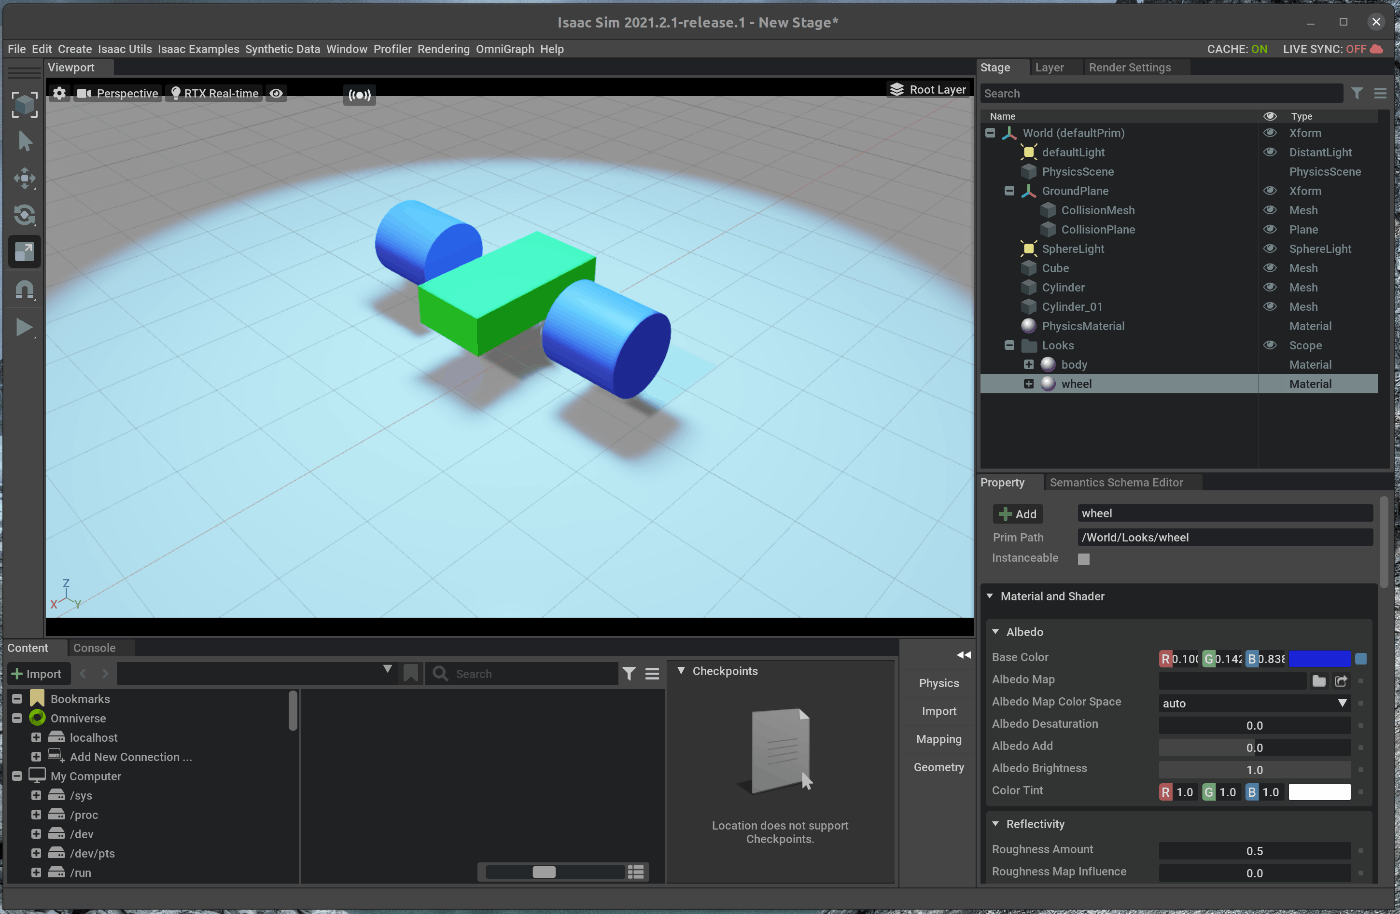
--------------------------------------------------------------------------------
/tutorials/required/hello_robot/9_hello_robot.md:
--------------------------------------------------------------------------------
1 | # 概要
2 | Hello robotのチュートリアルを進めます。
3 | このチュートリアルはmulti robotのチュートリアルの6部の内の2部目です。
4 |
5 | Issac Simのtutorialに上記の内容が記載されており、この内容に沿って進めます。
6 | https://docs.omniverse.nvidia.com/app_isaacsim/app_isaacsim/tutorial_required_hello_robot.html
7 |
8 | # 実行環境
9 |
10 | - インストール実行環境
11 |
12 | | unit | specification |
13 | |:-----------------:|:------------------:|
14 | | CPU | i9-11900H |
15 | | GPU | GeForce RTX 3080 Laptop|
16 | | RAM | 32GB |
17 | | OS | Ubuntu 20.04.3 LTS |
18 |
19 | - Nvidia Driverバージョン
20 | - 510.39.01
21 | - Issac simバージョン
22 | - 2021.2.1
23 |
24 | # 概要
25 |
26 | hello worldのExampleのソースコードに処理を追加し、シーンにNvidia Jetbotを追加します。
27 | Extentsionの機能を用いて、以前作成したAwesome ExampleのコードにNvidia Jetobotを追加します。
28 | 次の手順を進めます。
29 |
30 | 1. Awesome Exampleのソースコードを開く
31 | 2. Nviida Jetbotの処理を追加する
32 |
33 | ## 1. Awesome Exampleのソースコードを開く
34 | ### 1.1 OmniverseからIssac Simを起動する
35 | 
36 |
37 | ### 1.2 Awesome Exampleのソースコードを表示
38 | メニューバーのIsaac Examples > Awesome Exampleを選択します。
39 | 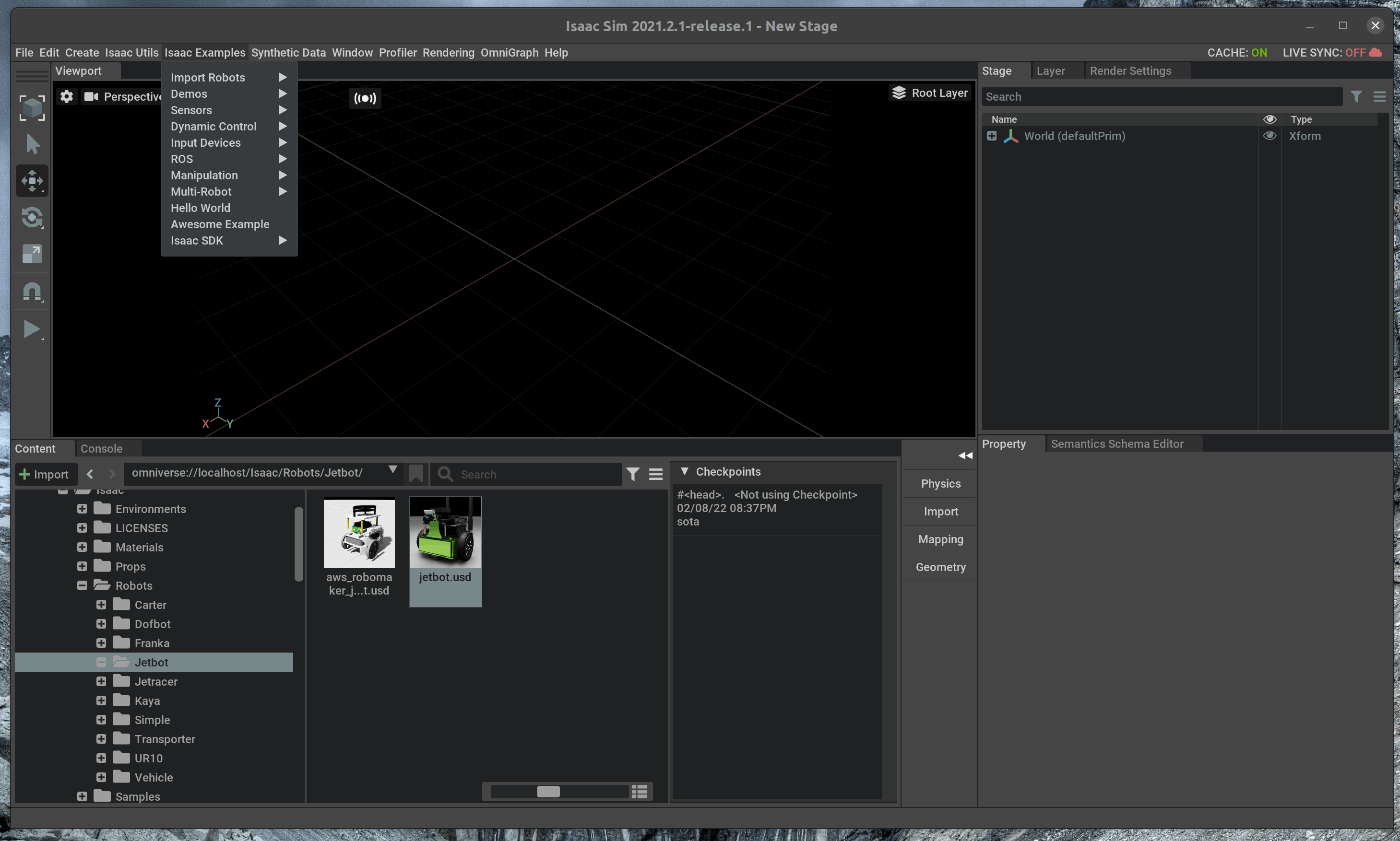
40 |
41 | 次に、Awesome Examplesのウィンドウの右上にある3つのボタンの内、一番左側のOpen Source Codeボタンを選択します。
42 | 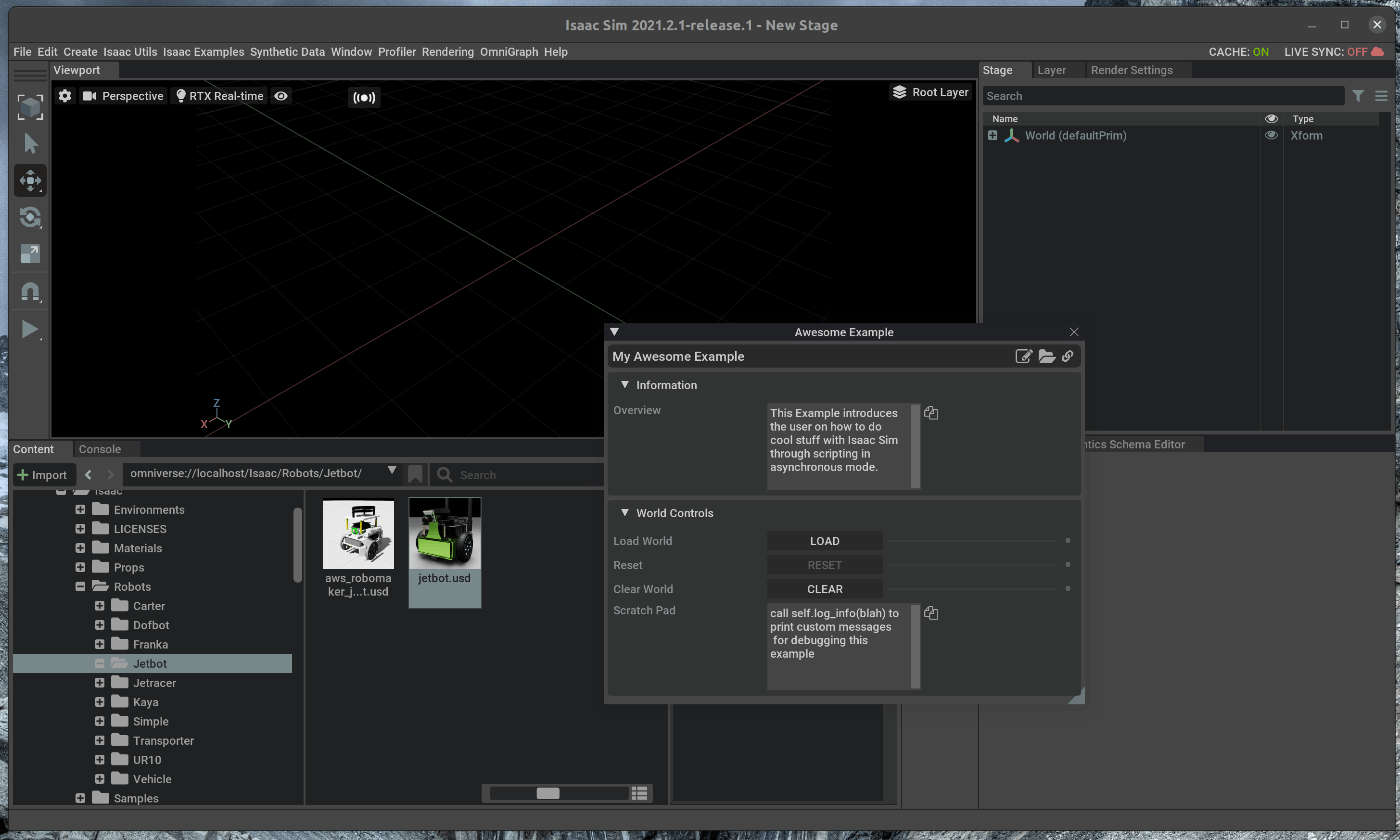
43 |
44 | 選択すると、がVScodeが開き、Hello Worldのソースコードが表示されます。
45 | 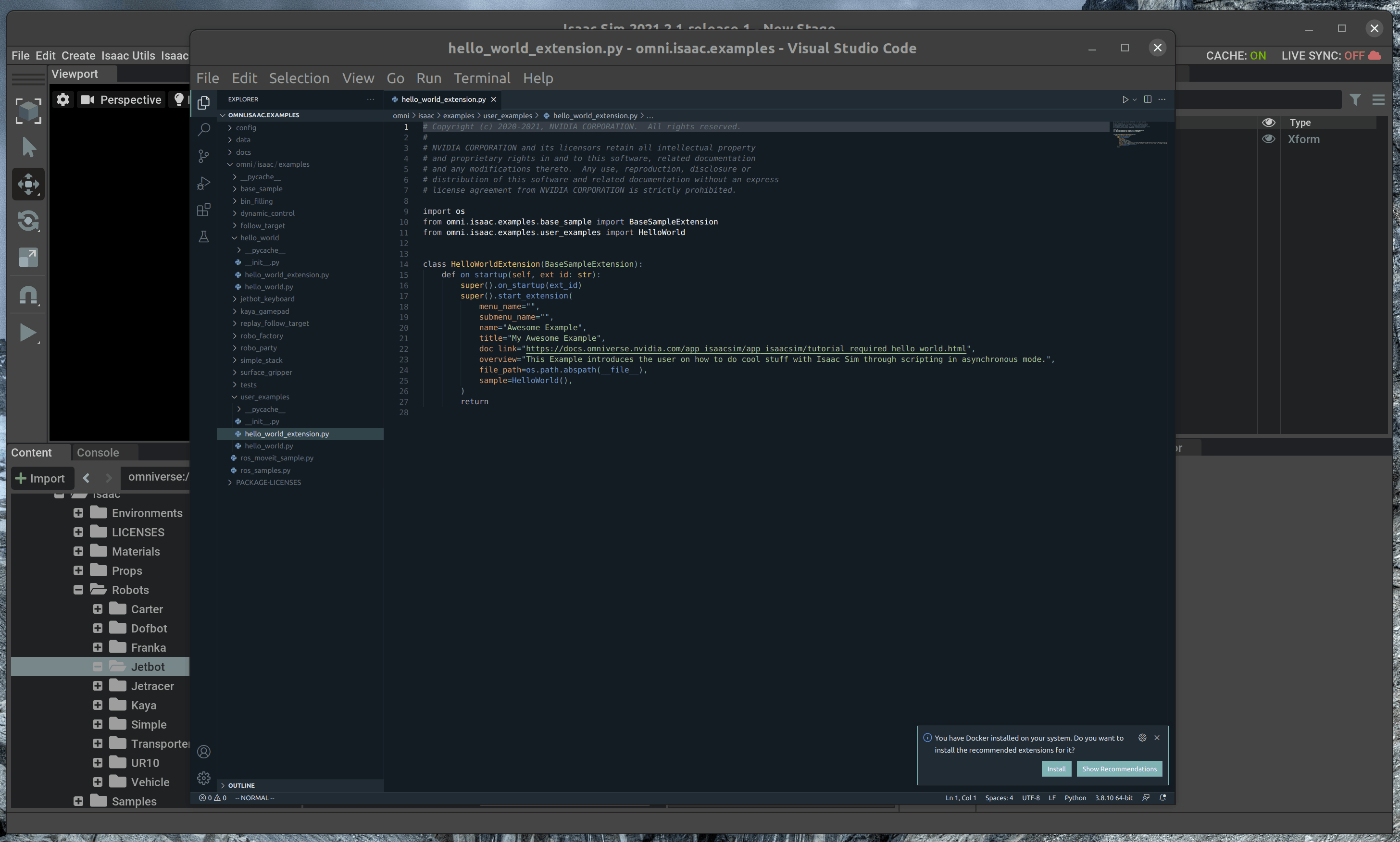
46 |
47 | ## 2. Nvidia Jetbotの処理を追加する
48 | vscode上で、hello_world.pyを編集します。
49 |
50 | ## 2.1 Jetbotの追加
51 | hello_world.pyのsetup_sceneメソッドに次の処理を追加します。
52 |
53 | ~~~ hello_world.py:Python3
54 |
55 | from omni.isaac.examples.base_sample import BaseSample
56 | from omni.isaac.core.utils.nucleus import find_nucleus_server
57 | from omni.isaac.core.utils.stage import add_reference_to_stage
58 | from omni.isaac.core.robots import Robot
59 | import carb
60 |
61 | class HelloWorld(BaseSample):
62 | def __init__(self) -> None:
63 | super().__init__()
64 | return
65 |
66 | def setup_scene(self):
67 | world = self.get_world()
68 | world.scene.add_default_ground_plane()
69 | result, nucleus_server = find_nucleus_server()
70 | if result is False:
71 | carb.log_error("Could not find nucleus server with /Isaac folder")
72 | asset_path = nucleus_server + "/Isaac/Robots/Jetbot/jetbot.usd"
73 | add_reference_to_stage(usd_path=asset_path, prim_path="/World/Fancy_Robot")
74 | jetbot_robot = world.scene.add(Robot(prim_path="/World/Fancy_Robot", name="fancy_robot"))
75 | self.log_info("Num of degrees of freedom before first reset: " + str(jetbot_robot.num_dof)) # prints None
76 | return
77 |
78 | async def setup_post_load(self):
79 | self._world = self.get_world()
80 | self._jetbot = self._world.scene.get_object("fancy_robot")
81 | self.log_info("Num of degrees of freedom after first reset: " + str(self._jetbot.num_dof)) # prints 2
82 | self.log_info("Joint Positions after first reset: " + str(self._jetbot.get_joint_positions()))
83 | returnfrom omni.isaac.examples.base_sample import BaseSample
84 | import numpy as np
85 | # Can be used to create a new cube or to point to an already existing cube in stage.
86 | from omni.isaac.core.objects import DynamicCuboid ## add code
87 |
88 | class HelloWorld(BaseSample):
89 | def __init__(self) -> None:
90 | super().__init__()
91 | return
92 |
93 | def setup_scene(self):
94 | world = self.get_world()
95 | world.scene.add_default_ground_plane()
96 | ## add code
97 | fancy_cube = world.scene.add(
98 | DynamicCuboid(
99 | prim_path="/World/random_cube", # The prim path of the cube in the USD stage
100 | name="fancy_cube", # The unique name used to retrieve the object from the scene later on
101 | position=np.array([0, 0, 100.0]), # Using the current stage units which is cms by default.
102 | size=np.array([50.15, 50.15, 50.15]), # most arguments accept mainly numpy arrays.
103 | color=np.array([0, 0, 1.0]), # RGB channels, going from 0-1
104 | ))
105 | return
106 | ~~~
107 |
108 | 
109 | 追加後、Ctrl+Saveとhot reloadが実行されます。
110 |
111 | メニューバーのIsaac Examples > Awesome Exampleを選択し、Loadを選択すると、ソースコードの変更部分が反映された状態で表示されます。
112 | この状態で、Viewportの左側のPLAYボタンを押すと、Jetbotが重力により落下します。
113 | 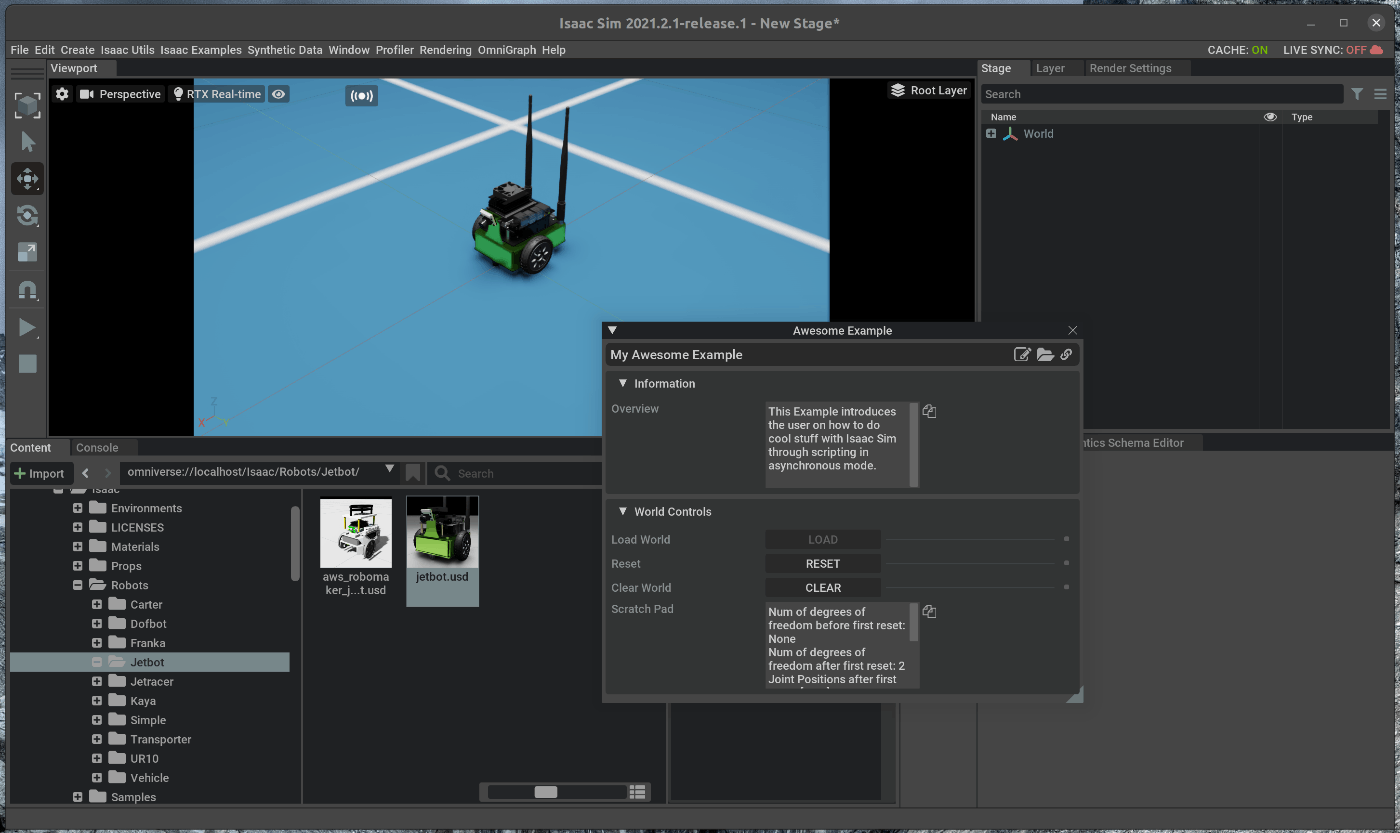
114 |
115 | ## 2.2 Jetbotを動かす
116 | JetbotのJoint部にPD Controllerを追加し、速度制御で動かします。
117 |
118 | cubeの位置と速度をロード字の1回のみ取得する場合には、次の処理を追加します。
119 | hello_world.pyを次の様に編集します。
120 |
121 | ~~~ hello_world.py:Python3
122 | from omni.isaac.examples.base_sample import BaseSample
123 | from omni.isaac.core.utils.nucleus import find_nucleus_server
124 | from omni.isaac.core.utils.stage import add_reference_to_stage
125 | from omni.isaac.core.robots import Robot
126 | from omni.isaac.core.utils.types import ArticulationAction
127 | import carb
128 | import numpy as np
129 |
130 |
131 | class HelloWorld(BaseSample):
132 | def __init__(self) -> None:
133 | super().__init__()
134 | return
135 |
136 | def setup_scene(self):
137 | world = self.get_world()
138 | world.scene.add_default_ground_plane()
139 | result, nucleus_server = find_nucleus_server()
140 | if result is False:
141 | carb.log_error("Could not find nucleus server with /Isaac folder")
142 | asset_path = nucleus_server + "/Isaac/Robots/Jetbot/jetbot.usd"
143 | add_reference_to_stage(usd_path=asset_path, prim_path="/World/Fancy_Robot")
144 | jetbot_robot = world.scene.add(Robot(prim_path="/World/Fancy_Robot", name="fancy_robot"))
145 | return
146 |
147 | async def setup_post_load(self):
148 | self._world = self.get_world()
149 | self._jetbot = self._world.scene.get_object("fancy_robot")
150 | self._jetbot_articulation_controller = self._jetbot.get_articulation_controller()
151 | self._world.add_physics_callback("sending_actions", callback_fn=self.send_robot_actions)
152 | return
153 |
154 |
155 | def send_robot_actions(self, step_size):
156 | self._jetbot_articulation_controller.apply_action(ArticulationAction(joint_positions=None,
157 | joint_efforts=None,
158 | joint_velocities=5 * np.random.rand(2,)))
159 | return
160 | ~~~
161 | 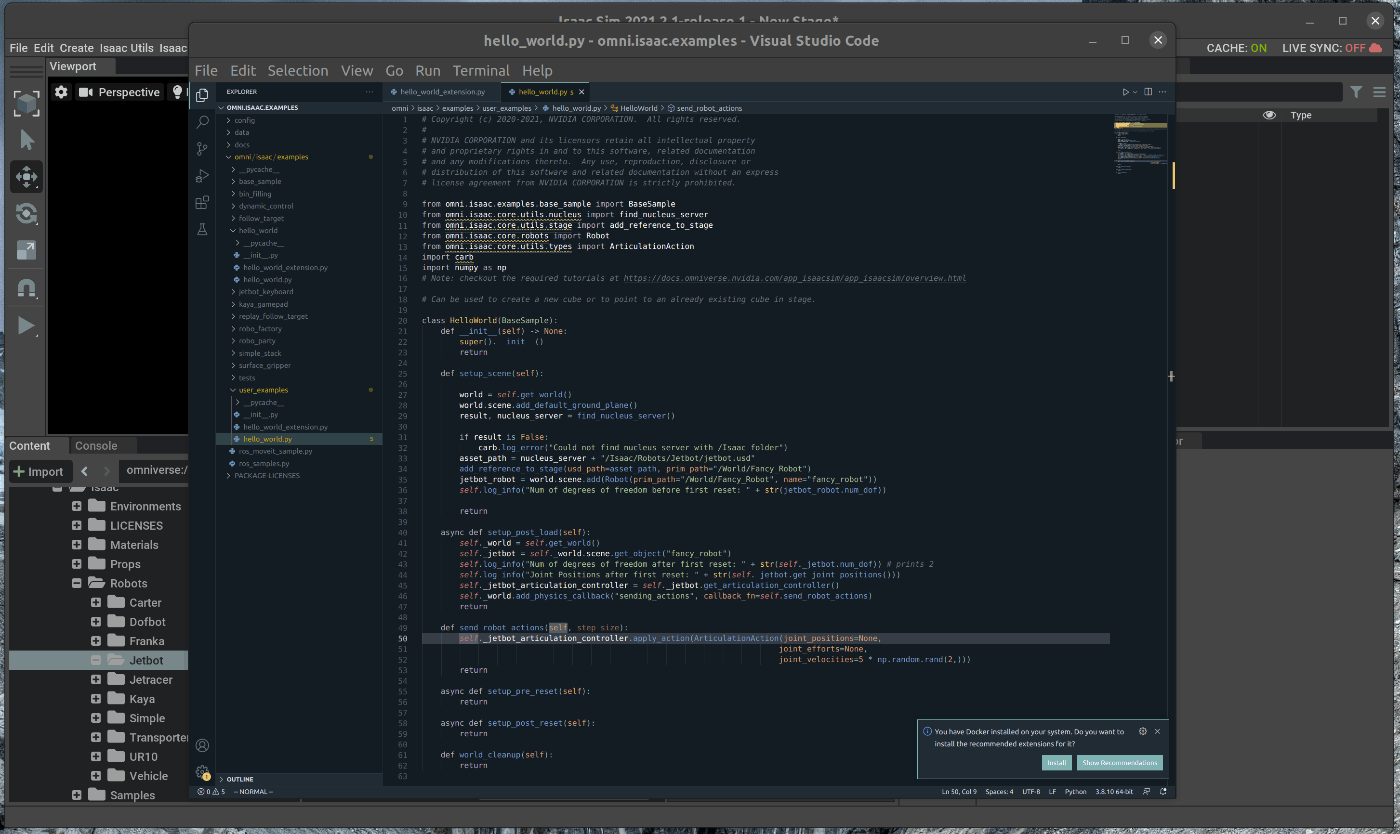
162 |
163 | 追加後、Ctrl+Saveとhot reloadが実行されます。
164 |
165 | メニューバーのIsaac Examples > Awesome Exampleを選択し、Loadを選択すると、ソースコードの変更部分が反映された状態で表示されます。
166 | この状態で、Viewportの左側のPLAYボタンを押すと、Jetbotが直進します。
167 | 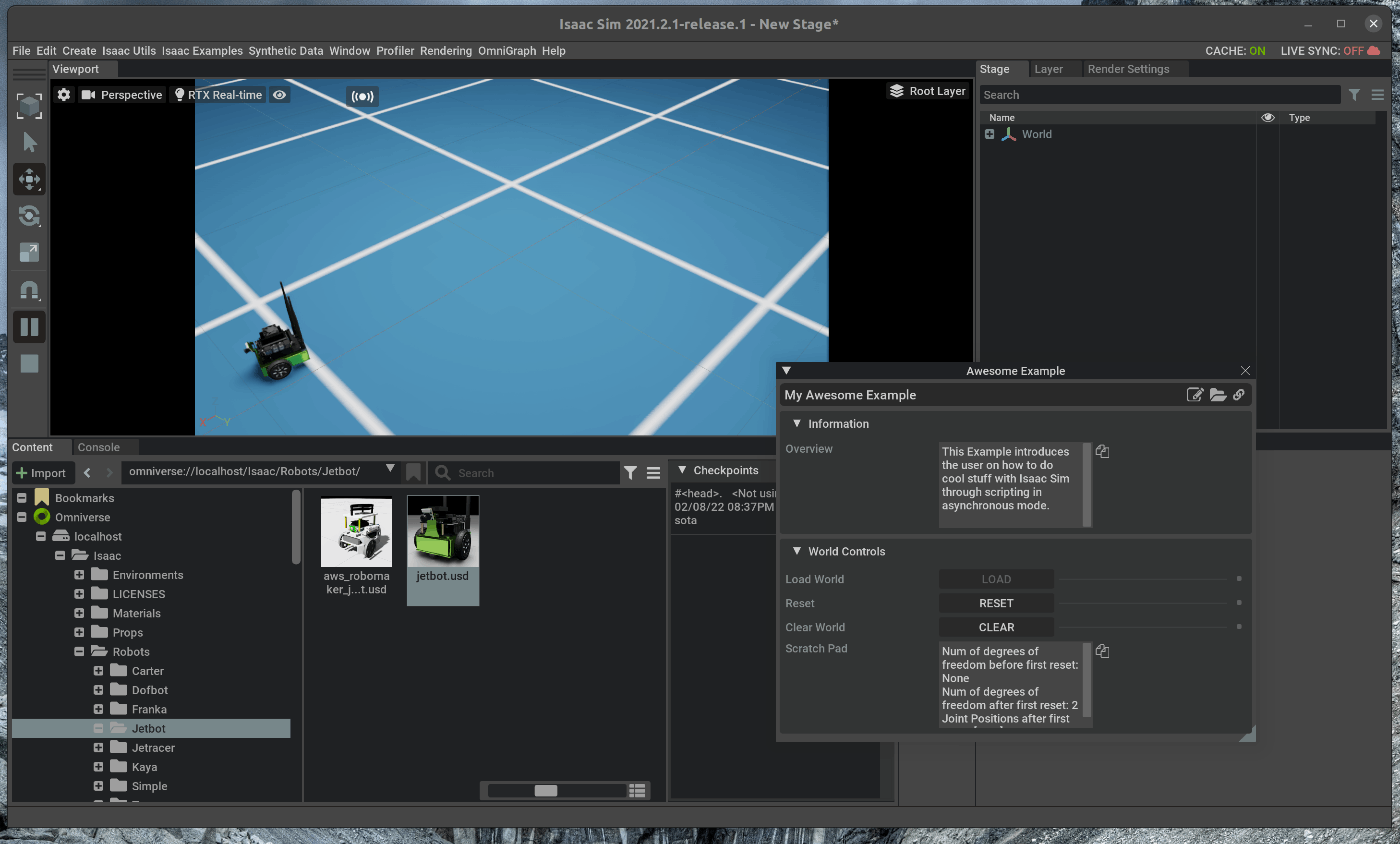
168 |
169 | ## 2.3 Jetbot Classの使用
170 |
171 | Isaac Simでは、カスタマイズ性が高く、シンプルな特定のロボットのExtensionsが用意されています。
172 | Jetbotにおいては、Jetbotのクラスが用意されており、上記で記述した処理をより容易に実現することが可能です。
173 |
174 | hello_world.pyを次の様に編集します。
175 |
176 | ~~~ hello_world.py:Python3
177 | from omni.isaac.examples.base_sample import BaseSample
178 | from omni.isaac.jetbot import Jetbot
179 | from omni.isaac.core.utils.types import ArticulationAction
180 | import numpy as np
181 |
182 |
183 | class HelloWorld(BaseSample):
184 | def __init__(self) -> None:
185 | super().__init__()
186 | return
187 |
188 | def setup_scene(self):
189 | world = self.get_world()
190 | world.scene.add_default_ground_plane()
191 |
192 | jetbot_robot = world.scene.add(Jetbot(prim_path="/World/Fancy_Robot", name="fancy_robot"))
193 | return
194 |
195 | async def setup_post_load(self):
196 | self._world = self.get_world()
197 | self._jetbot = self._world.scene.get_object("fancy_robot")
198 | self._world.add_physics_callback("sending_actions", callback_fn=self.send_robot_actions)
199 | return
200 |
201 |
202 | def send_robot_actions(self, step_size):
203 | self._jetbot.apply_wheel_actions(ArticulationAction(joint_positions=None,
204 | joint_efforts=None,
205 | joint_velocities=5 * np.random.rand(2,)))
206 | return
207 | ~~~
208 | 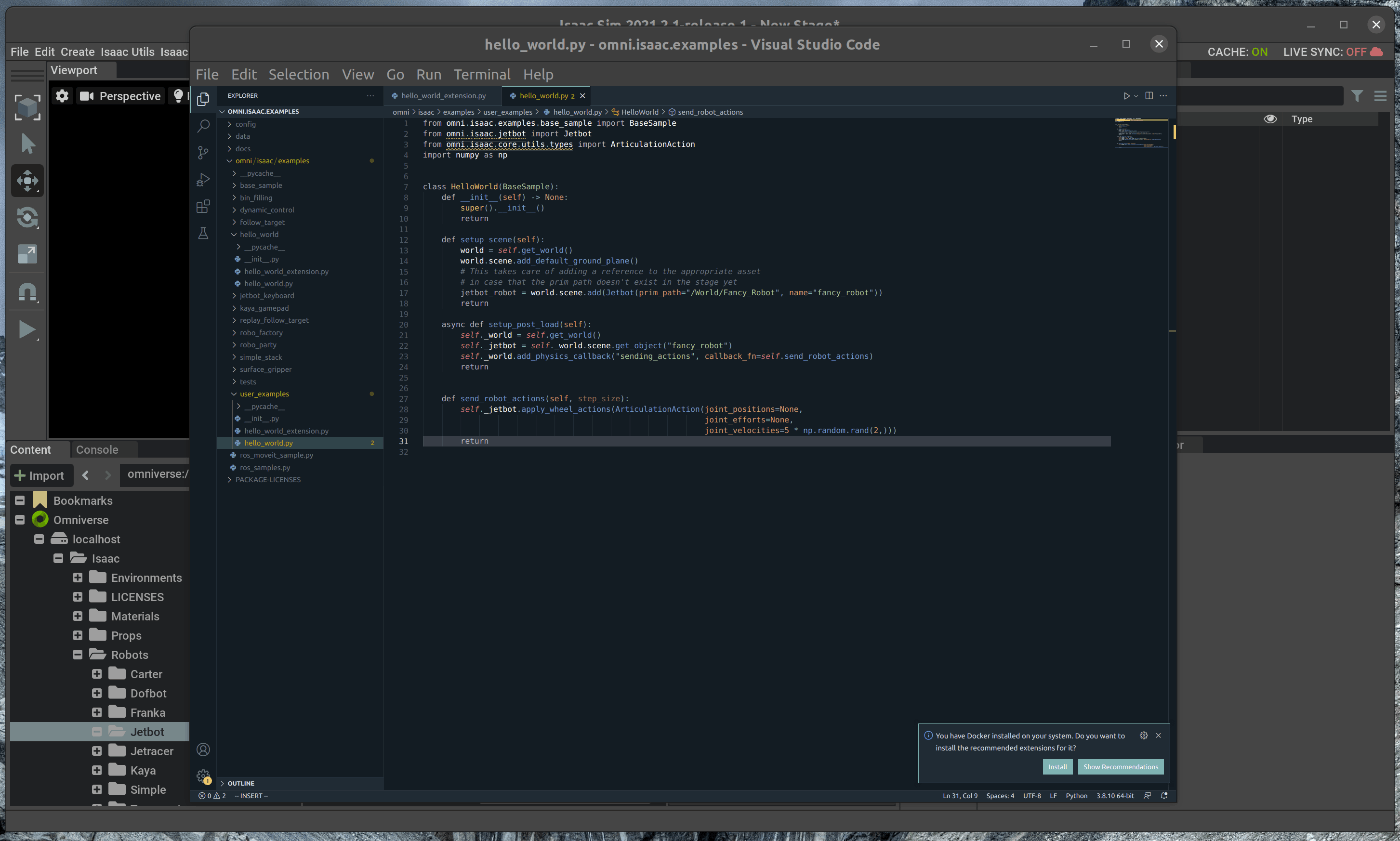
209 | 追加後、Ctrl+Saveとhot reloadが実行されます。
210 |
211 | メニューバーのIsaac Examples > Awesome Exampleを選択し、Loadを選択すると、ソースコードの変更部分が反映された状態で表示されます。
212 | この状態で、Viewportの左側のPLAYボタンを押すと、Jetbotが直進します。
213 | 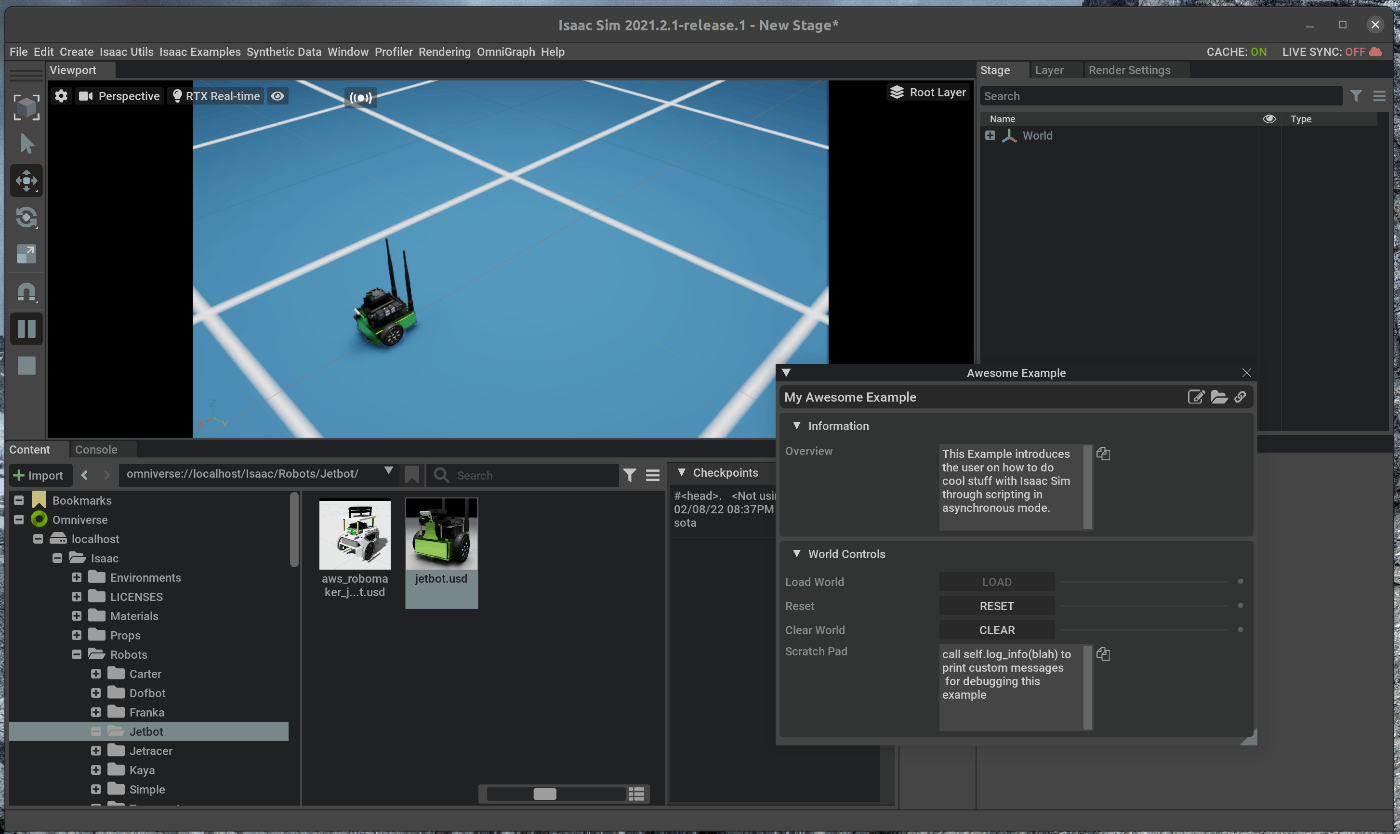
--------------------------------------------------------------------------------
/tutorials/advanced/using_sensors_lidar/15_using_sensor_lidar.md:
--------------------------------------------------------------------------------
1 |
2 | # 概要
3 | シミュレーション内でLIDARを作成します。
4 |
5 | Issac Simのtutorialに上記の内容が記載されており、この内容に沿って進めます。
6 | https://docs.omniverse.nvidia.com/app_isaacsim/app_isaacsim/tutorial_advanced_range_sensor_lidar.html
7 |
8 | # 実行環境
9 |
10 | - インストール実行環境
11 |
12 | | unit | specification |
13 | |:-----------------:|:------------------:|
14 | | CPU | i9-11900H |
15 | | GPU | GeForce RTX 3080 Laptop|
16 | | RAM | 32GB |
17 | | OS | Ubuntu 20.04.3 LTS |
18 |
19 | - Nvidia Driverバージョン
20 | - 510.39.01
21 | - Issac simバージョン
22 | - 2021.2.1
23 |
24 |
25 | # 手順
26 |
27 | GUI上からの操作と、Python APIからシーンにLIDARを追加します。
28 |
29 | 1. LIDARの追加(GUI)
30 | 2. LIDARの追加(Python API)
31 |
32 |
33 | ## 1. LIADRの追加(GUI)
34 | こちらのページに記載してある手順を進めます。
35 | https://docs.omniverse.nvidia.com/app_isaacsim/app_isaacsim/tutorial_advanced_range_sensor_lidar.html#getting-started
36 |
37 | ### 1.1 OmniverseからIssac Simを起動する
38 | 
39 |
40 | ### 1.2 シーンを作成する
41 | メニューバーのCreate > Physics > Phisics Sceneを選択します。
42 | 
43 |
44 |
45 | ### 1.3 LIDARの追加
46 | 作成したシーン内に、LIDARを追加します。
47 | メニューバーのCreate > Isaac > Sensors > LIDAR > Rotatingを選択します。
48 | 
49 |
50 | ## 1.4 LIDARの設定
51 | 追加したLIDARのプロパティを調整します。
52 | 右側にあるStageの中で、追加したLIDARを選択します。
53 | 選択した状態で、右下にあるPropertyの中から、次の値を変更します。
54 |
55 | - Raw USD Propertiesの”drawLines”にチェックを入れ、enableにする
56 | - Raw USD Propertiesの"rotationRate"を1.0にする
57 |
58 | 
59 |
60 | この状態で、Viewportの左側のPLAYボタンを押すと、LIDARが回転します。
61 | また、Raw USD Propertiesの"rotationRate"を0.0にすると、全方向にLIDARのレーザが出力される状態になります。
62 | 
63 |
64 | ### 1.5 オブジェクトの追加
65 |
66 | LIDARセンサは、シーン内に存在するオブジェクトの内、CollisionがEnableになっているオブジェクトを認識します。
67 | シーンにオブジェクトを追加し、LIDARで認識できるようにします。
68 | まず、シーンにCubeを追加します。
69 |
70 | メニューバーのCreate > Mesh > Cubeを選択します。
71 | 
72 |
73 | 右側にあるStageの中で、追加したCubeを選択します。
74 | 選択した状態で、右下にあるPropertyの中から、次の値を変更します。
75 |
76 | - TransformのtranslateのXを200にする
77 | - TransformのtranslateのYを0にする
78 | - TransformのtranslateのZを0にする
79 | 
80 |
81 | 右下のPropertyの”+Add”をクリックし、Physics > Colliderを選択します。
82 | 選択すると、オブジェクトにCollisionのプロパティが追加されます。
83 | 
84 |
85 | この状態で、Viewportの左側のPLAYボタンを押すと、CubeにLIDARのレーザが照射された状態になります。
86 | 
87 |
88 | ### 1.6 オブジェクトにLIDARをアタッチする
89 |
90 | CylinderにLIADRをアタッチします。
91 | Viewport内で右クリックし、Create > Mesh > Cylinderを選択します。
92 | 
93 |
94 | 右側にあるStageの中で、追加したCylinderを選択します。
95 | 選択した状態で、右下にあるPropertyの中から、次の値を変更します。
96 |
97 | - TransformのtranslateのXを0にする
98 | - TransformのtranslateのYを0にする
99 | - TransformのtranslateのZを0にする
100 | 
101 |
102 | 右側のStageタブの中で、LIDARを選択し、Cylinderの下にドラッグアンドドロップで移動させます。
103 | 
104 |
105 | 次に、CylindarとLIDARの相対位置を変更します。
106 | 右側にあるStageの中で、LIDARを選択します。
107 | 選択した状態で、右下にあるPropertyの中から、次の値を変更します。
108 |
109 | - TransformのtranslateのXを50にする
110 | - TransformのtranslateのYを50にする
111 | - TransformのtranslateのZを0にする
112 | 
113 |
114 | この状態で、Viewportの左側のPLAYボタンを押し、Cylindarを移動させると、相対位置を保ったままLIDARも移動します。
115 | 
116 |
117 | ### 1.7 ロボットにLIDARをアタッチする
118 | 前項と同じ手順でロボットにLIDARをアタッチします。
119 | 今回は、CarterのExampleを使用し、CarterにLIDARをアタッチします。
120 | メニューバーのIsaac Examples > Import Robots > Carter URDFを選択します。
121 | 
122 |
123 | メニューバーのCreate > Isaac > Sensors > LIDAR > Rotatingを選択します
124 | 
125 |
126 | 右側のStageタブの中で、LIDARを選択し、/carter/chassis_linkrの下にドラッグアンドドロップで移動させます。
127 | 
128 |
129 | 右側にあるStageの中で、LIDARを選択します。
130 | 選択した状態で、右下にあるPropertyの中から、次の値を変更します。
131 |
132 | - Raw USD Propertiesの”drawLines”にチェックを入れ、enableにする
133 | - Raw USD Propertiesの"rotationRate"を0.0にする
134 | 
135 |
136 | この状態で、Viewportの左側のPLAYボタンを押し、Carterが移動し、LIDARはレーザを照射します。
137 | 
138 |
139 | ## 2. LIDARの追加(Python API)
140 | ## 2.1 LIADRの追加
141 | Python APIから、LIDARを使用します。
142 | メニューバーのFile > Newを選択します。
143 | 次に、メニューバーのWindow > Script Editorを選択します。
144 | 
145 |
146 | Script Editorに次の内容を記述します。
147 |
148 | ~~~ use_lidar.py:Python3
149 | import omni
150 | import asyncio
151 | from omni.isaac.range_sensor import _range_sensor
152 | from pxr import UsdGeom, Gf, UsdPhysics
153 |
154 | stage = omni.usd.get_context().get_stage()
155 | lidarInterface = _range_sensor.acquire_lidar_sensor_interface()
156 | timeline = omni.timeline.get_timeline_interface()
157 |
158 | omni.kit.commands.execute('AddPhysicsSceneCommand',stage = stage, path='/World/PhysicsScene')
159 | lidarPath = "/LidarName"
160 | result, prim = omni.kit.commands.execute(
161 | "RangeSensorCreateLidar",
162 | path=lidarPath,
163 | parent="/World",
164 | min_range=0.4,
165 | max_range=100.0,
166 | draw_points=False,
167 | draw_lines=True,
168 | horizontal_fov=360.0,
169 | vertical_fov=30.0,
170 | horizontal_resolution=0.4,
171 | vertical_resolution=4.0,
172 | rotation_rate=0.0,
173 | high_lod=False,
174 | yaw_offset=0.0,
175 | enable_semantics=False
176 | )
177 |
178 | CubePath = "/World/CubeName"
179 | cubeGeom = UsdGeom.Cube.Define(stage, CubePath)
180 | cubePrim = stage.GetPrimAtPath(CubePath)
181 | cubeGeom.AddTranslateOp().Set(Gf.Vec3f(200.0, 0.0, 0.0))
182 | cubeGeom.CreateSizeAttr(100)
183 | collisionAPI = UsdPhysics.CollisionAPI.Apply(cubePrim)
184 |
185 | async def get_lidar_param():
186 | await omni.kit.app.get_app().next_update_async()
187 | timeline.pause()
188 | depth = lidarInterface.get_linear_depth_data("/World"+lidarPath)
189 | zenith = lidarInterface.get_zenith_data("/World"+lidarPath)
190 | azimuth = lidarInterface.get_azimuth_data("/World"+lidarPath)
191 |
192 | print("depth", depth)
193 | print("zenith", zenith)
194 | print("azimuth", azimuth)
195 |
196 | timeline.play()
197 | asyncio.ensure_future(get_lidar_param())
198 | ~~~
199 |
200 | 記述後、Ctrl+Enterを押すとScriptが実行され、シーン内にLIADRが追加されます。
201 | 
202 |
203 | ## 2.2 PointCloudのSegmentaiton
204 | Depthデータにsematinc labelを追加し、segmentationの結果をPointCloudとして表示させることが可能です。
205 |
206 | Script Editorに次の内容を記述します。
207 |
208 | ~~~ use_lidar.py:Python3
209 | import omni # Provides the core omniverse apis
210 | import asyncio # Used to run sample asynchronously to not block rendering thread
211 | from omni.isaac.range_sensor import _range_sensor # Imports the python bindings to interact with lidar sensor
212 | from pxr import UsdGeom, Gf, UsdPhysics # pxr usd imports used to create cube
213 |
214 | stage = omni.usd.get_context().get_stage() # Used to access Geometry
215 | timeline = omni.timeline.get_timeline_interface() # Used to interact with simulation
216 | lidarInterface = _range_sensor.acquire_lidar_sensor_interface() # Used to interact with the LIDAR
217 |
218 | # These commands are the Python-equavalent of the first half of this tutorial
219 | omni.kit.commands.execute('AddPhysicsSceneCommand',stage = stage, path='/World/PhysicsScene')
220 | lidarPath = "/LidarName"
221 | # Create lidar prim
222 | result, prim = omni.kit.commands.execute(
223 | "RangeSensorCreateLidar",
224 | path=lidarPath,
225 | parent="/World",
226 | min_range=0.4,
227 | max_range=100.0,
228 | draw_points=True,
229 | draw_lines=False,
230 | horizontal_fov=360.0,
231 | vertical_fov=60.0,
232 | horizontal_resolution=0.4,
233 | vertical_resolution=0.4,
234 | rotation_rate=0.0,
235 | high_lod=True,
236 | yaw_offset=0.0,
237 | enable_semantics=True
238 | )
239 | UsdGeom.XformCommonAPI(prim).SetTranslate((200.0, 0.0, 0.0))
240 |
241 | # Create a cube, sphere, add collision and different semantic labels
242 | primType = ["Cube", "Sphere"]
243 | for i in range(2):
244 | prim = stage.DefinePrim("/World/"+primType[i], primType[i])
245 | UsdGeom.XformCommonAPI(prim).SetTranslate((-200.0, -200.0 + i * 400.0, 0.0))
246 | UsdGeom.XformCommonAPI(prim).SetScale((100, 100, 100))
247 | collisionAPI = UsdPhysics.CollisionAPI.Apply(prim)
248 |
249 | # Add semantic label
250 | sem = Semantics.SemanticsAPI.Apply(prim, "Semantics")
251 | sem.CreateSemanticTypeAttr()
252 | sem.CreateSemanticDataAttr()
253 | sem.GetSemanticTypeAttr().Set("class")
254 | sem.GetSemanticDataAttr().Set(primType[i])
255 |
256 | # Get point cloud and semantic id for lidar hit points
257 | async def get_lidar_param():
258 | await asyncio.sleep(1.0)
259 | timeline.pause()
260 | pointcloud = lidarInterface.get_point_cloud_data("/World"+lidarPath)
261 | semantics = lidarInterface.get_semantic_data("/World"+lidarPath)
262 |
263 | print("Point Cloud", pointcloud)
264 | print("Semantic ID", semantics)
265 |
266 | timeline.play()
267 | asyncio.ensure_future(get_lidar_param())
268 | ~~~
269 | 記述後、Ctrl+Enterを押すとScriptが実行され、Cubeの表面にPointCloudが表示されます。
270 |
271 | 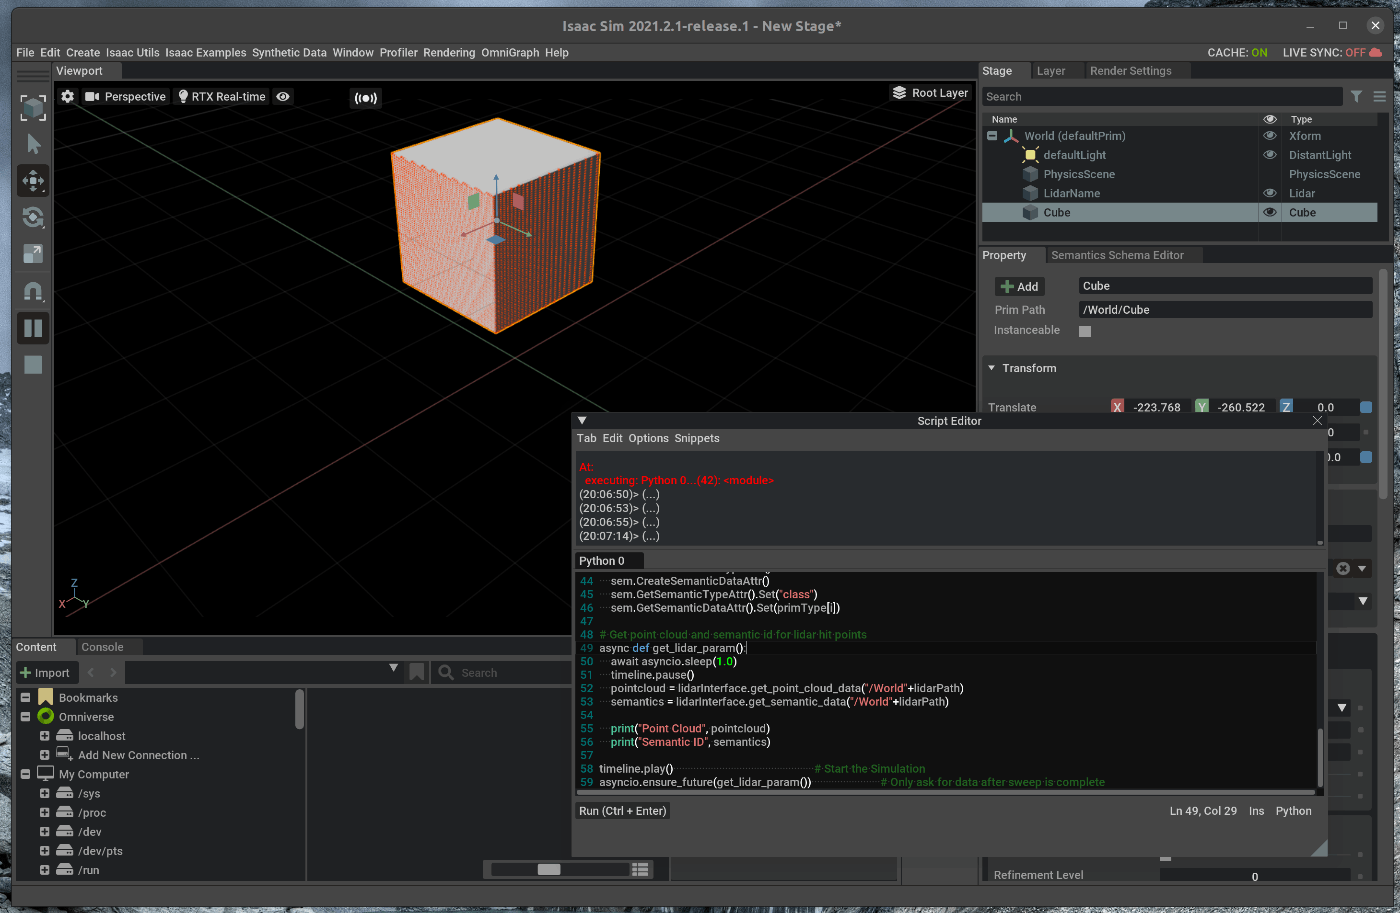
272 |
--------------------------------------------------------------------------------
/README.md:
--------------------------------------------------------------------------------
1 | # isaac_sim_examples
2 | A repository for managing own scene files of Issac Sim.
3 |
4 | ## list of scene file
5 |
6 | ### install
7 | - there is nothing of scene file.
8 | - only exist [article](https://github.com/SOutaHI/issac_sim_examples/blob/main/tutorials/install/1_install.md) of how to install Issac sim in japanese.
9 |
10 | ### tutorial
11 | #### gui
12 | - [2. create simple robot](https://github.com/SOutaHI/issac_sim_examples/blob/main/tutorials/gui/create_simple_robot/2_create_robot.usd)
13 | - exist [article](https://github.com/SOutaHI/issac_sim_examples/blob/main/tutorials/gui/create_simple_robot/2_create_simple_robot.md) in japanese.
14 | - [3. move simple robot](https://github.com/SOutaHI/issac_sim_examples/blob/main/tutorials/gui/move_simple_robot/3_move_robot.usd)
15 | - exist [article](https://github.com/SOutaHI/issac_sim_examples/blob/main/tutorials/gui/move_simple_robot/3_move_robot.md) in japanese.
16 | - [4. add camera](https://github.com/SOutaHI/issac_sim_examples/blob/main/tutorials/gui/add_camera/4_add_camera.md)
17 | - exist [article](https://github.com/SOutaHI/issac_sim_examples/blob/main/tutorials/gui/add_camera/4_add_camera.usd) in japanese.
18 | - [5. script editor](https://github.com/SOutaHI/issac_sim_examples/tree/main/tutorials/gui/script_editor)
19 | - exist [article](https://github.com/SOutaHI/issac_sim_examples/blob/main/tutorials/gui/script_editor/5_script_editor.md) in japanese.
20 | - [33. save custom usd](https://github.com/SOutaHI/isaac_sim_examples/tree/development/tutorials/gui/save_custom_usd)
21 | - exist [article](https://github.com/SOutaHI/isaac_sim_examples/blob/development/tutorials/gui/save_custom_usd/33_save_custom_usd.md) in japanese.
22 | - [34. change object texture](https://github.com/SOutaHI/isaac_sim_examples/tree/development/tutorials/gui/change_object_texture)
23 | - exist [article](https://github.com/SOutaHI/isaac_sim_examples/blob/development/tutorials/gui/change_object_texture/34_change_object_texture.md) in japanese.
24 | - [35. cad importer](https://github.com/SOutaHI/isaac_sim_examples/tree/development/tutorials/gui/cad_importer)
25 | - exist [article](https://github.com/SOutaHI/isaac_sim_examples/blob/development/tutorials/gui/cad_importer/35_cad_importer.md) in japanese.
26 |
27 | - [37. interactive demos](https://github.com/SOutaHI/isaac_sim_examples/tree/development/tutorials/gui/intaractive_demos)
28 | - exist [article](https://github.com/SOutaHI/isaac_sim_examples/blob/development/tutorials/gui/intaractive_demos/37_interactive_demos.md) in japanese.
29 |
30 |
31 |
32 | #### required
33 | - [6. required interface](https://github.com/SOutaHI/issac_sim_examples/blob/main/tutorials/required/required_interface/6_required_interface.usd)
34 | - exist [article](https://github.com/SOutaHI/issac_sim_examples/blob/main/tutorials/required/required_interface/6_required_interface.md) in japanese.
35 | - [7. isaac sim workflows](https://github.com/SOutaHI/issac_sim_examples/blob/main/tutorials/required/isaac_sim_workflow/7_issac_sim_workflows.usd)
36 | - exist [article](https://github.com/SOutaHI/issac_sim_examples/blob/main/tutorials/required/isaac_sim_workflow/7_isaac_sim_workflows.md) in japanese.
37 | - [8. hello world](https://github.com/SOutaHI/issac_sim_examples/blob/main/tutorials/required/hello_world/8_hello_world.usd)
38 | - exist [article](https://github.com/SOutaHI/issac_sim_examples/blob/main/tutorials/required/hello_world/8_hellow_world.md) in japanese.
39 | - [9. Hello Robot](https://github.com/SOutaHI/isaac_sim_examples/tree/development/tutorials/required/hello_robot)
40 | - exist [article](https://github.com/SOutaHI/isaac_sim_examples/blob/development/tutorials/required/hello_robot/9_hello_robot.md) in japanese.
41 | - [10. Adding a Controller](https://github.com/SOutaHI/isaac_sim_examples/tree/development/tutorials/required/adding_controller)
42 | - exist [article](https://github.com/SOutaHI/isaac_sim_examples/blob/development/tutorials/required/adding_controller/10_adding_controller.md) in japanese.
43 |
44 | - [11. Adding a manipulator robot](https://github.com/SOutaHI/isaac_sim_examples/blob/development/tutorials/required/adding_a_manipulator_robot/11_adding_a_manipulator_robots.md)
45 | - exist [article](https://github.com/SOutaHI/isaac_sim_examples/blob/development/tutorials/required/adding_a_manipulator_robot/11_adding_a_manipulator_robot.md) in japanese.
46 |
47 | - [12. Adding a multiple robots](https://github.com/SOutaHI/isaac_sim_examples/tree/development/tutorials/required/adding_multiple_robots)
48 | - exist [article](https://github.com/SOutaHI/isaac_sim_examples/blob/development/tutorials/required/adding_multiple_robots/12_adding_multiple_robots.md) in japanese.
49 |
50 | - [13. multiple tasks](https://github.com/SOutaHI/isaac_sim_examples/tree/development/tutorials/required/mutiple_tasks)
51 | - exist [article](https://github.com/SOutaHI/isaac_sim_examples/blob/development/tutorials/required/mutiple_tasks/13_multiple_tasks.md) in japanese.
52 |
53 | ### advanced
54 | - [14. using input devices](https://github.com/SOutaHI/isaac_sim_examples/tree/development/tutorials/advanced/using_input_devices_keyboard)
55 | - exist [article](https://github.com/SOutaHI/isaac_sim_examples/blob/development/tutorials/advanced/using_input_devices_keyboard/14_using_input_devices_keyboard.md) in japanese.
56 |
57 | - [15. using sensor lidar](https://github.com/SOutaHI/isaac_sim_examples/tree/development/tutorials/advanced/using_sensors_lidar)
58 | - exist [article](https://github.com/SOutaHI/isaac_sim_examples/blob/development/tutorials/advanced/using_sensors_lidar/15_using_sensor_lidar.md) in japanese.
59 |
60 | - [16. using generic range sensor](https://github.com/SOutaHI/isaac_sim_examples/tree/development/tutorials/advanced/using_sensors_generic_range_sensor)
61 | - exist [article](https://github.com/SOutaHI/isaac_sim_examples/blob/development/tutorials/advanced/using_sensors_generic_range_sensor/16_using_sensor_generic_range_sensor.md) in japanese.
62 |
63 | - [36. using contact sensor](https://github.com/SOutaHI/isaac_sim_examples/tree/development/tutorials/advanced/using_contact_sensor)
64 | - exist [article](https://github.com/SOutaHI/isaac_sim_examples/blob/development/tutorials/advanced/using_contact_sensor/36_using_contact_sensor.md) in japanese.
65 |
66 | - [17. occupacy map generation](https://github.com/SOutaHI/isaac_sim_examples/tree/development/tutorials/advanced/occupancy_map_generation)
67 | - exist [article](https://github.com/SOutaHI/isaac_sim_examples/blob/development/tutorials/advanced/occupancy_map_generation/17_occupacy_map_generation.md) in japanese.
68 |
69 | - [18. jupyter notebook](https://github.com/SOutaHI/isaac_sim_examples/tree/development/tutorials/advanced/jupyter_notebook)
70 | - exist [article](https://github.com/SOutaHI/isaac_sim_examples/blob/development/tutorials/advanced/jupyter_notebook/18_jupyter_notebook.md) in japanese.
71 |
72 | - [38. Use Dynamic Control Extension](https://github.com/SOutaHI/isaac_sim_examples/tree/development/tutorials/advanced/dynamic_control)
73 | - exist [article](https://github.com/SOutaHI/isaac_sim_examples/blob/development/tutorials/advanced/dynamic_control/38_dynamic_control.md) in japanese.
74 |
75 |
76 |
77 | ### Replication
78 |
79 | - [19. applying and visualizing semantic data](https://github.com/SOutaHI/isaac_sim_examples/tree/development/tutorials/replicator/applying_and_visualizing_semantic_data)
80 | - exist [article](https://github.com/SOutaHI/isaac_sim_examples/blob/development/tutorials/replicator/applying_and_visualizing_semantic_data/19_applying_and_visualizing_semantic_data.md) in japanese.
81 |
82 | - [20. recording synthetic data](https://github.com/SOutaHI/isaac_sim_examples/tree/development/tutorials/replicator/recording_synthetic_data)
83 | - exist [article](https://github.com/SOutaHI/isaac_sim_examples/blob/development/tutorials/replicator/recording_synthetic_data/20_recording_synthetic_data.md) in japanese.
84 |
85 | - [21. visualize synthetic data](https://github.com/SOutaHI/isaac_sim_examples/tree/development/tutorials/replicator/visualize_synthetic_data)
86 | - exist [article](https://github.com/SOutaHI/isaac_sim_examples/blob/development/tutorials/replicator/visualize_synthetic_data/21_visualize_synthetic_data.md) in japanese.
87 |
88 | - [22. offline dataset generation](https://github.com/SOutaHI/isaac_sim_examples/tree/development/tutorials/replicator/offline_dataset_generation)
89 | - exist [article](https://github.com/SOutaHI/isaac_sim_examples/blob/development/tutorials/replicator/offline_dataset_generation/22_offline_dataset_generation.md) in japanese.
90 |
91 | - [23. Replicator Playgroud](https://github.com/SOutaHI/isaac_sim_examples/tree/development/tutorials/replicator/replicator_playgroud)
92 | - exist [article](https://github.com/SOutaHI/isaac_sim_examples/blob/development/tutorials/replicator/replicator_playgroud/23_replicator_playgroud.md) in japanese.
93 |
94 | - [24. Replicator Composer](https://github.com/SOutaHI/isaac_sim_examples/tree/development/tutorials/replicator/replicator_composer)
95 | - exist [article](https://github.com/SOutaHI/isaac_sim_examples/blob/development/tutorials/replicator/replicator_composer/24_replicator_composer.md) in japanese.
96 |
97 | ### ROS
98 |
99 | - [25. Import and Drive TurtleBot3](https://github.com/SOutaHI/isaac_sim_examples/tree/development/tutorials/ros/import_and_drive_turtlebot3)
100 | - exist [article](https://github.com/SOutaHI/isaac_sim_examples/blob/development/tutorials/ros/import_and_drive_turtlebot3/25_import_and_drive_turtlebot3.md) in japanese.
101 |
102 | - [26. Cameras](https://github.com/SOutaHI/isaac_sim_examples/tree/development/tutorials/ros/cameras)
103 | - exist [article](https://github.com/SOutaHI/isaac_sim_examples/blob/development/tutorials/ros/cameras/26_cameras.md) in japanese.
104 |
105 | - [27. Lidar Sensors](https://github.com/SOutaHI/isaac_sim_examples/tree/development/tutorials/ros/lidar_sensors)
106 | - exist [article](https://github.com/SOutaHI/isaac_sim_examples/blob/development/tutorials/ros/lidar_sensors/27_lidar_sensors.md) in japanese.
107 |
108 | - [28. Transform Trees](https://github.com/SOutaHI/isaac_sim_examples/tree/development/tutorials/ros/transform_trees)
109 | - exist [article](https://github.com/SOutaHI/isaac_sim_examples/blob/development/tutorials/ros/transform_trees/28_transform_trees.md) in japanese.
110 |
111 | - [29. April Tags](https://github.com/SOutaHI/isaac_sim_examples/tree/development/tutorials/ros/april_tags)
112 | - exist [article](https://github.com/SOutaHI/isaac_sim_examples/blob/development/tutorials/ros/april_tags/29_april_tags.md) in japanese.
113 |
114 | - [30. ROS Navigation](https://github.com/SOutaHI/isaac_sim_examples/tree/development/tutorials/ros/ros_navigation)
115 | - exist [article](https://github.com/SOutaHI/isaac_sim_examples/blob/development/tutorials/ros/ros_navigation/30_ros_navigation.md) in japanese.
116 |
117 | - [31. Multiple Robots ROS Navigation](https://github.com/SOutaHI/isaac_sim_examples/tree/development/tutorials/ros/multiple_robots_ros_navigation)
118 | - exist [article](https://github.com/SOutaHI/isaac_sim_examples/blob/development/tutorials/ros/multiple_robots_ros_navigation/31_multiple_robots_ros_navigation.md) in japanese.
119 |
120 | - [32. Moveit Motion Planning Framework](https://github.com/SOutaHI/isaac_sim_examples/tree/development/tutorials/ros/moveit_motion_planning_framework)
121 | - exist [article](https://github.com/SOutaHI/isaac_sim_examples/blob/development/tutorials/ros/moveit_motion_planning_framework/32_moveit_motion_planning_framework.md) in japanese.
122 |
123 |
124 |
125 |
126 |
127 |
128 |
129 |
--------------------------------------------------------------------------------
/tutorials/required/hello_world/8_hellow_world.md:
--------------------------------------------------------------------------------
1 | # 概要
2 | Hello Worldのチュートリアルを進めます。
3 | このチュートリアルはmulti robotのチュートリアルの6部の内の1部目です。
4 |
5 | Issac Simのtutorialに上記の内容が記載されており、この内容に沿って進めます。
6 | https://docs.omniverse.nvidia.com/app_isaacsim/app_isaacsim/tutorial_required_hello_world.html
7 |
8 | # 実行環境
9 |
10 | - インストール実行環境
11 |
12 | | unit | specification |
13 | |:-----------------:|:------------------:|
14 | | CPU | i9-11900H |
15 | | GPU | GeForce RTX 3080 Laptop|
16 | | RAM | 32GB |
17 | | OS | Ubuntu 20.04.3 LTS |
18 |
19 | - Nvidia Driverバージョン
20 | - 510.39.01
21 | - Issac simバージョン
22 | - 2021.2.1
23 |
24 | # 概要
25 |
26 | hellow worldのExampleのソースコードに処理を追加し、シーンにCubeを追加します。
27 | まず、Extentsionの機能を用いて、Cubeを追加します。その後、Standalone Applicationでの実行を試します。
28 | 次の手順を進めます。
29 |
30 | 1. Hello WorldのExampleのソースコードを開く
31 | 2. Cubeの処理を追加する
32 | 3. New Wxampleの追加
33 | 4. Standalone Applicationでの実行
34 |
35 |
36 | ## 1. Hello WorldのExampleのソースコードを開く
37 | ### 1.1 OmniverseからIssac Simを起動する
38 | 
39 |
40 | ### 1.2 Hello Worldのソースコードを表示
41 | メニューバーのIsaac Examples > Hello Worldを選択します。
42 | 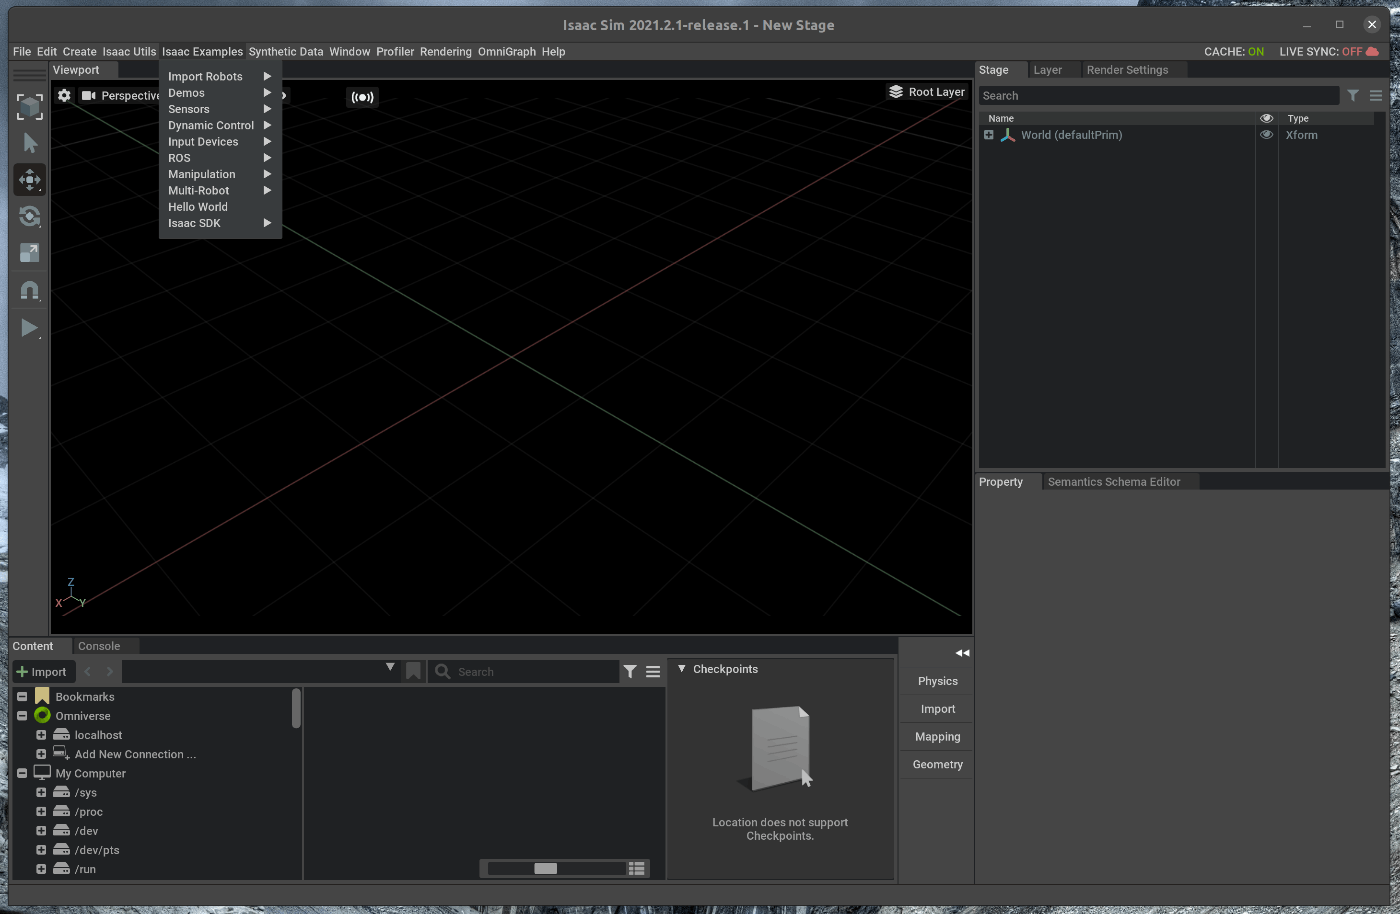
43 | 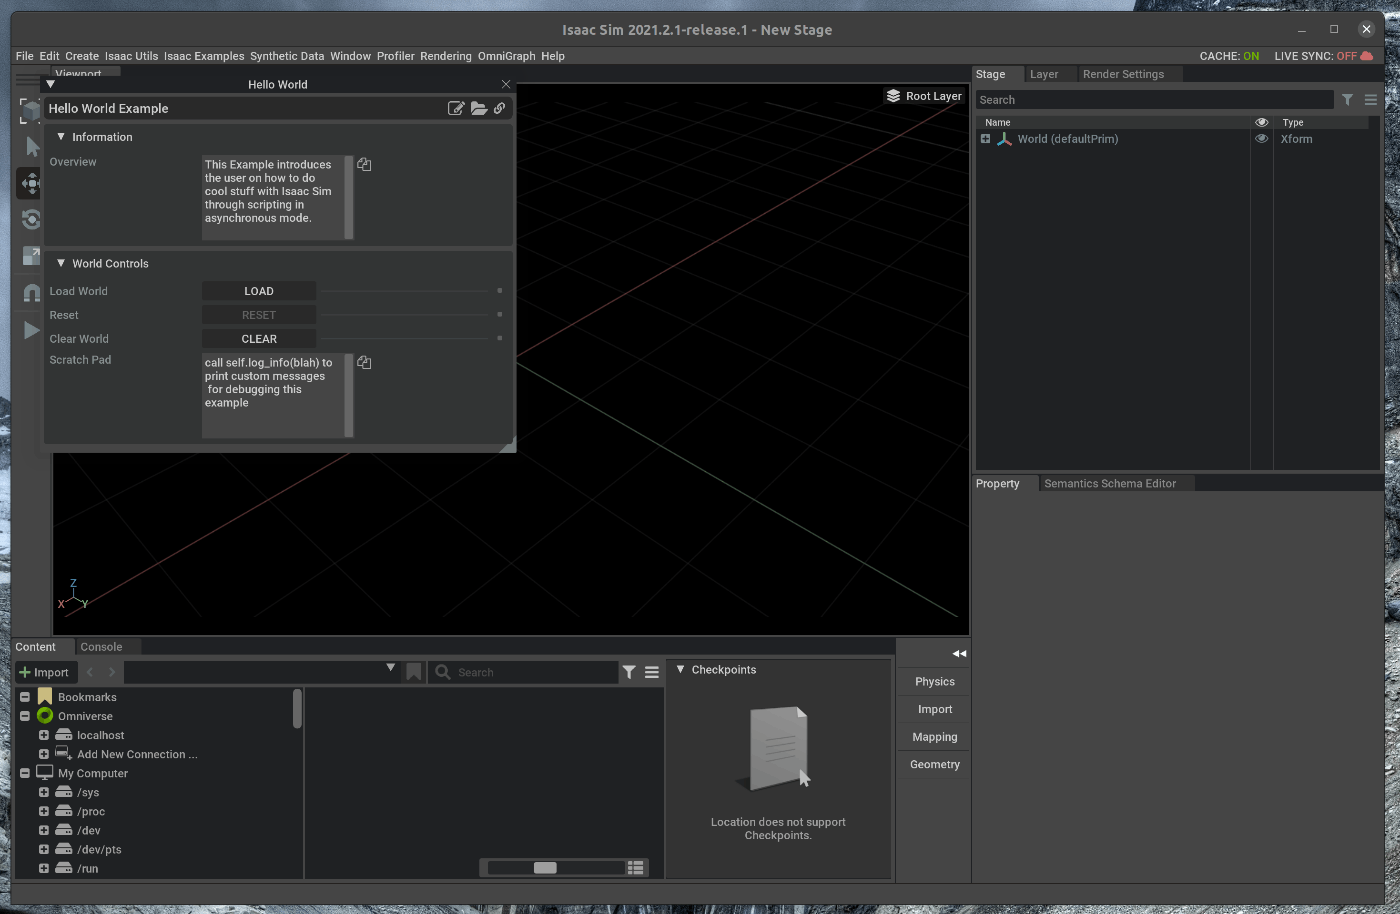
44 |
45 | 次に、Hello Worldのウィンドウの右上にある3つのボタンの内、一番左側のOpen Source Codeボタンを選択します。
46 | 選択すると、がVScodeが開き、Hello Worldのソースコードが表示されます。
47 | 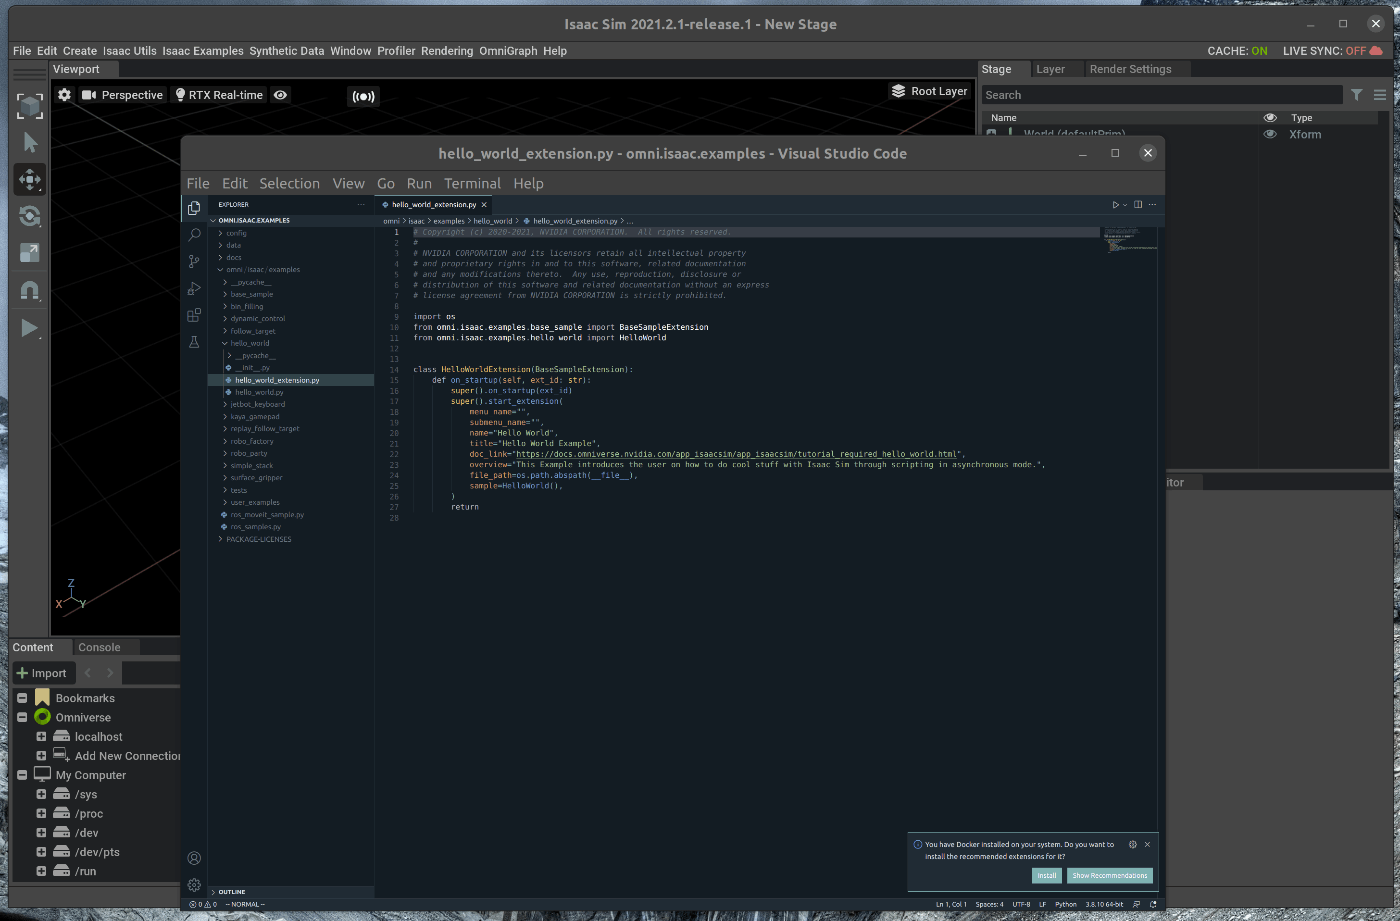
48 |
49 | ## 2. Cubeの処理を追加する
50 | vscode上で、hello_world.pyを編集します。
51 |
52 | ## 2.1 Cubeの追加
53 | hello_world.pyのsetup_sceneメソッドに次の処理を追加します。
54 |
55 | ~~~ hello_world.py:Python3
56 |
57 | from omni.isaac.examples.base_sample import BaseSample
58 | import numpy as np
59 | # Can be used to create a new cube or to point to an already existing cube in stage.
60 | from omni.isaac.core.objects import DynamicCuboid ## add code
61 |
62 | class HelloWorld(BaseSample):
63 | def __init__(self) -> None:
64 | super().__init__()
65 | return
66 |
67 | def setup_scene(self):
68 | world = self.get_world()
69 | world.scene.add_default_ground_plane()
70 | ## add code
71 | fancy_cube = world.scene.add(
72 | DynamicCuboid(
73 | prim_path="/World/random_cube", # The prim path of the cube in the USD stage
74 | name="fancy_cube", # The unique name used to retrieve the object from the scene later on
75 | position=np.array([0, 0, 100.0]), # Using the current stage units which is cms by default.
76 | size=np.array([50.15, 50.15, 50.15]), # most arguments accept mainly numpy arrays.
77 | color=np.array([0, 0, 1.0]), # RGB channels, going from 0-1
78 | ))
79 | return
80 | ~~~
81 | 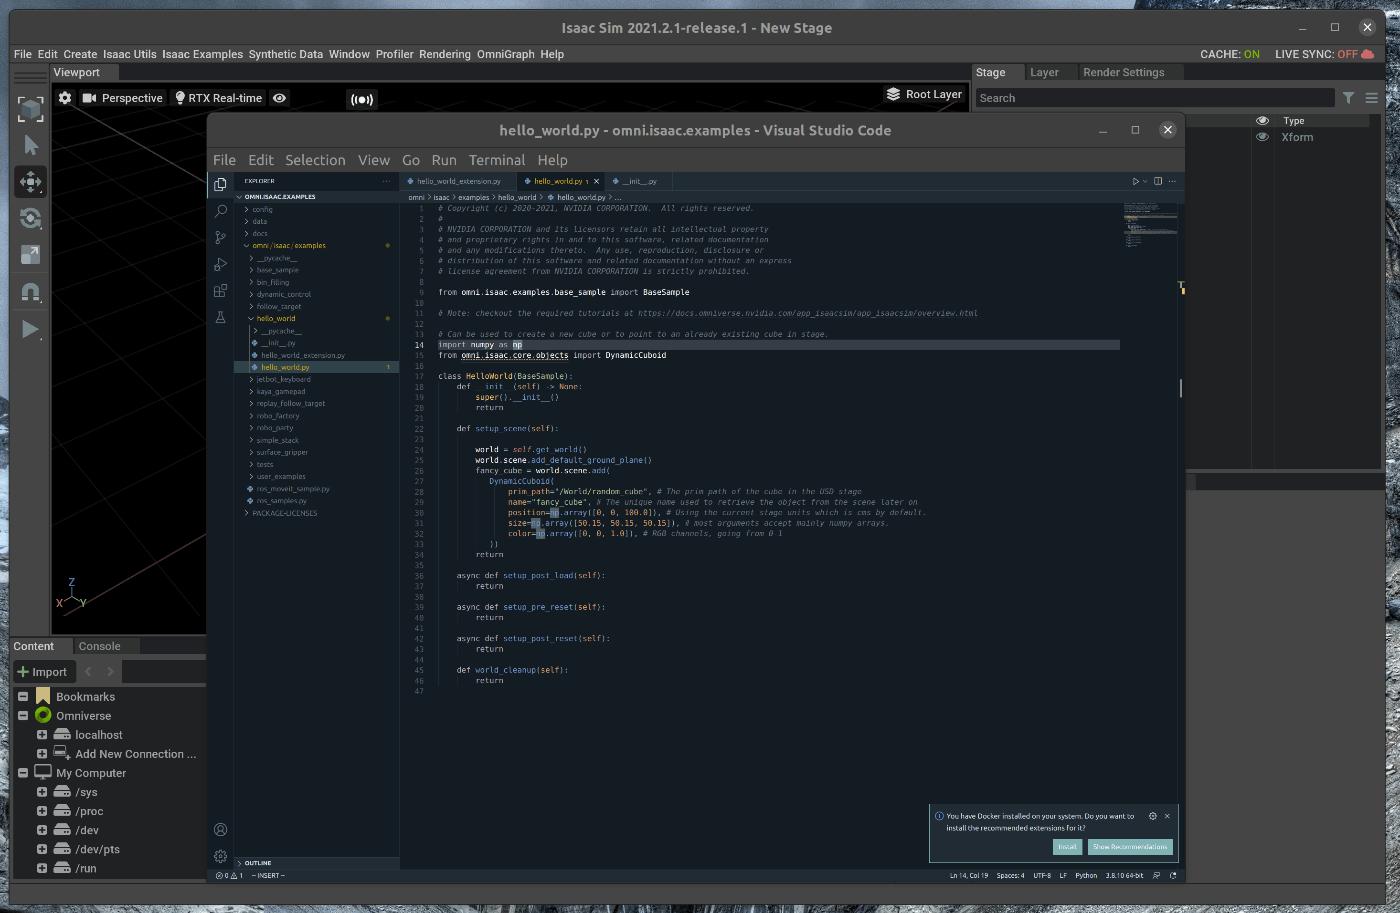
82 |
83 | 追加後、Ctrl+Saveとhot reloadが実行されます。
84 | 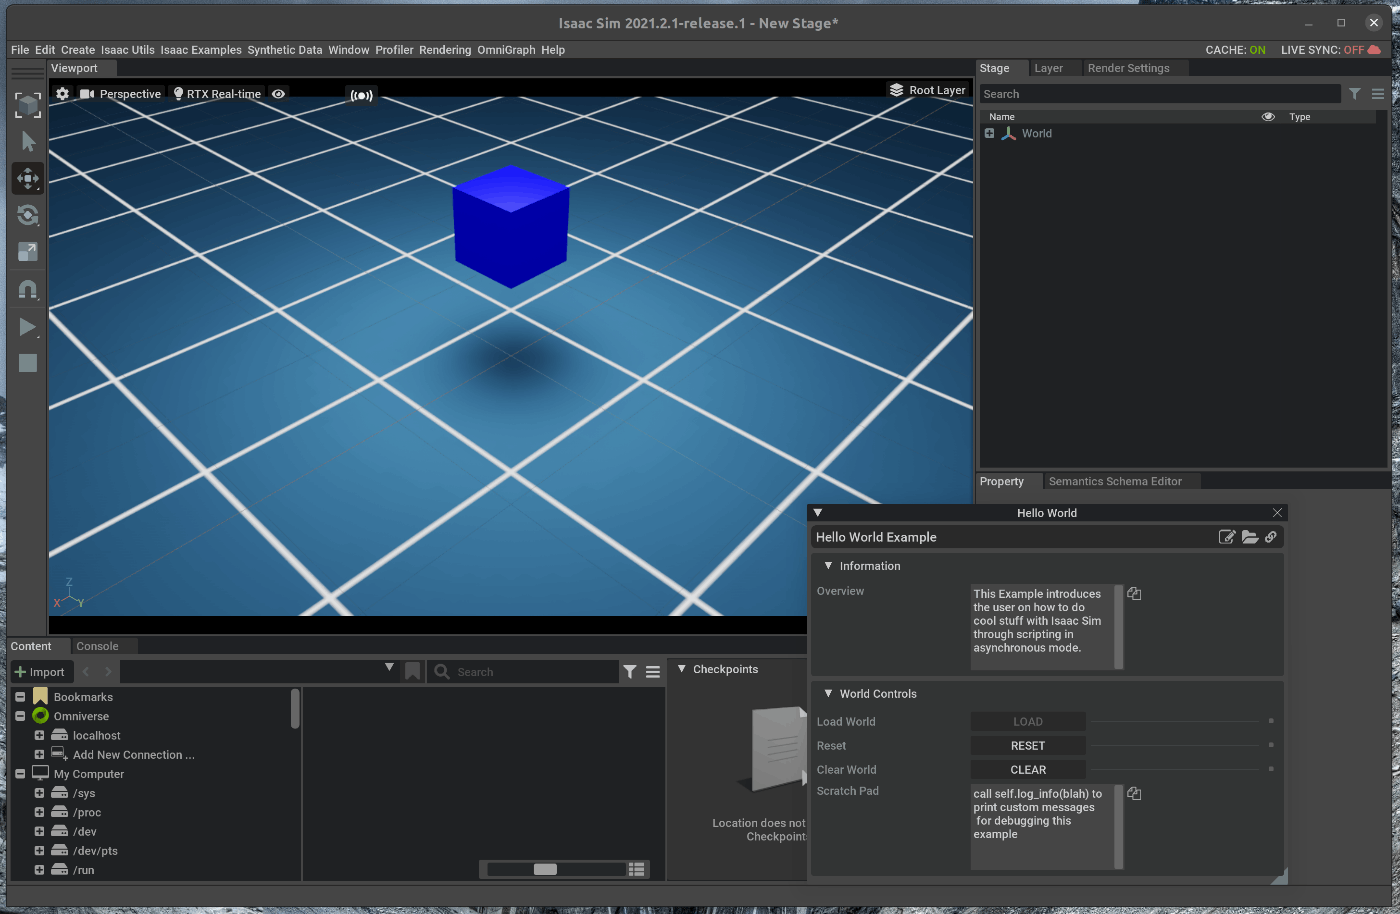
85 |
86 | また、ソースコードを変更している為、メニューバーのIsaac Examples > Hello Worldを選択し、Loadを選択すると、ソースコードの変更部分が反映された状態で表示されます。
87 | この状態で、Viewportの左側のPLAYボタンを押すと、Cubeが重力により落下します。
88 | 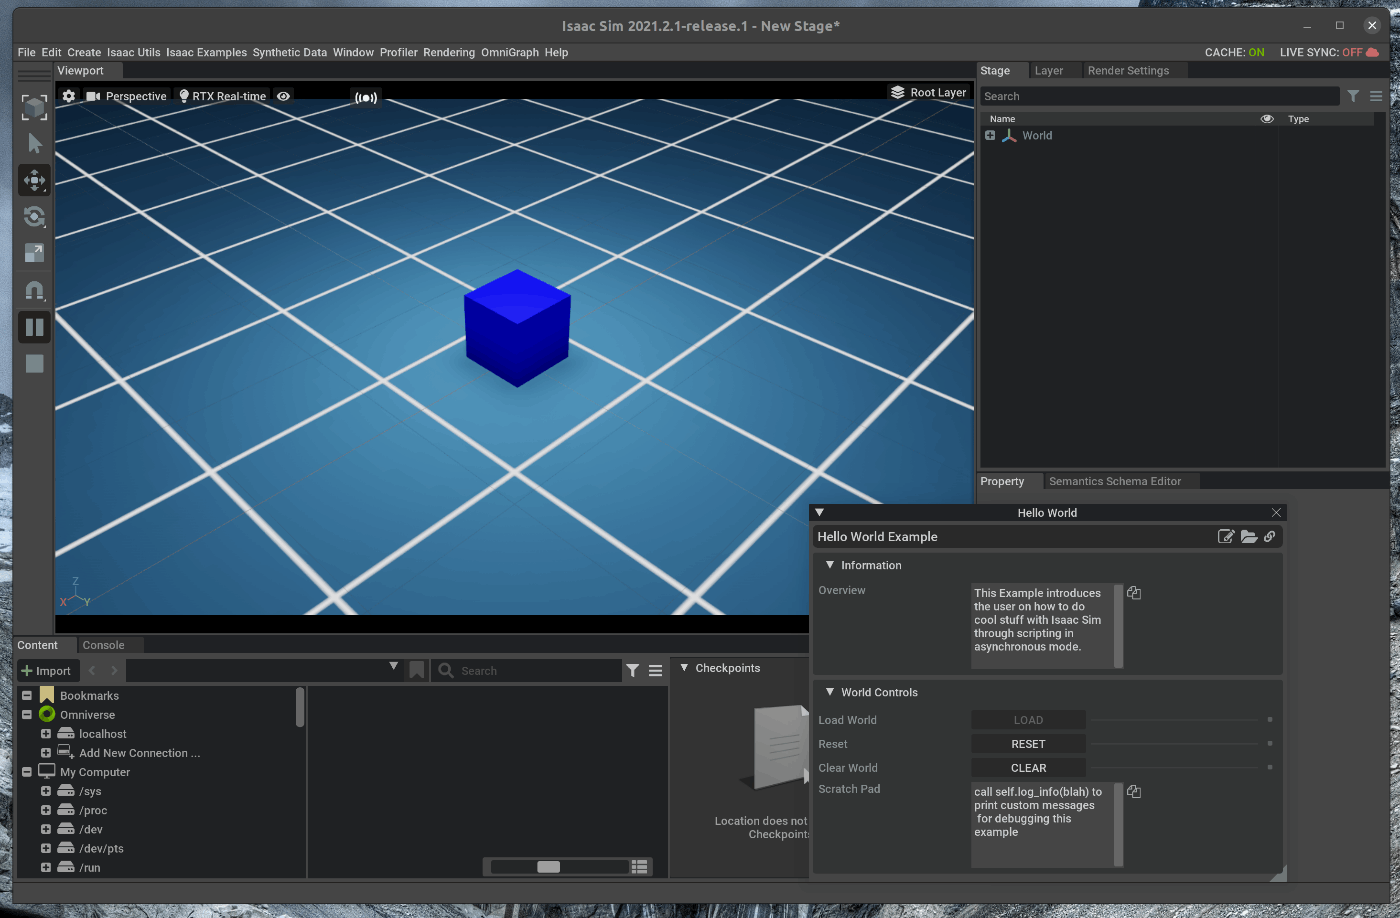
89 |
90 | ## 2.2 Cubeの位置と速度を表示する
91 | ソースコードで、cubeクラスのメソッドを使用して、cubeの位置と速度を表示します。
92 |
93 | cubeの位置と速度をロード字の1回のみ取得する場合には、次の処理を追加します。
94 |
95 | ~~~ hello_world.py:Python3
96 | from omni.isaac.examples.base_sample import BaseSample
97 | import numpy as np
98 | from omni.isaac.core.objects import DynamicCuboid
99 |
100 | class HelloWorld(BaseSample):
101 | def __init__(self) -> None:
102 | super().__init__()
103 | return
104 |
105 | def setup_scene(self):
106 | world = self.get_world()
107 | world.scene.add_default_ground_plane()
108 | fancy_cube = world.scene.add(
109 | DynamicCuboid(
110 | prim_path="/World/random_cube",
111 | name="fancy_cube",
112 | position=np.array([0, 0, 100.0]),
113 | size=np.array([50.15, 50.15, 50.15]),
114 | color=np.array([0, 0, 1.0]),
115 | ))
116 | return
117 |
118 | # Here we assign the class's variables
119 | # this function is called after load button is pressed
120 | # regardless starting from an empty stage or not
121 | # this is called after setup_scene and after
122 | # one physics time step to propagate appropriate
123 | # physics handles which are needed to retrieve
124 | # many physical properties of the different objects
125 | async def setup_post_load(self):
126 | self._world = self.get_world()
127 | self._cube = self._world.scene.get_object("fancy_cube")
128 | ## add code
129 | position, orientation = self._cube.get_world_pose()
130 | linear_velocity = self._cube.get_linear_velocity()
131 | # will be shown on terminal
132 | print("Cube position is : " + str(position))
133 | print("Cube's orientation is : " + str(orientation))
134 | print("Cube's linear velocity is : " + str(linear_velocity))
135 | ##
136 | return
137 | ~~~
138 | 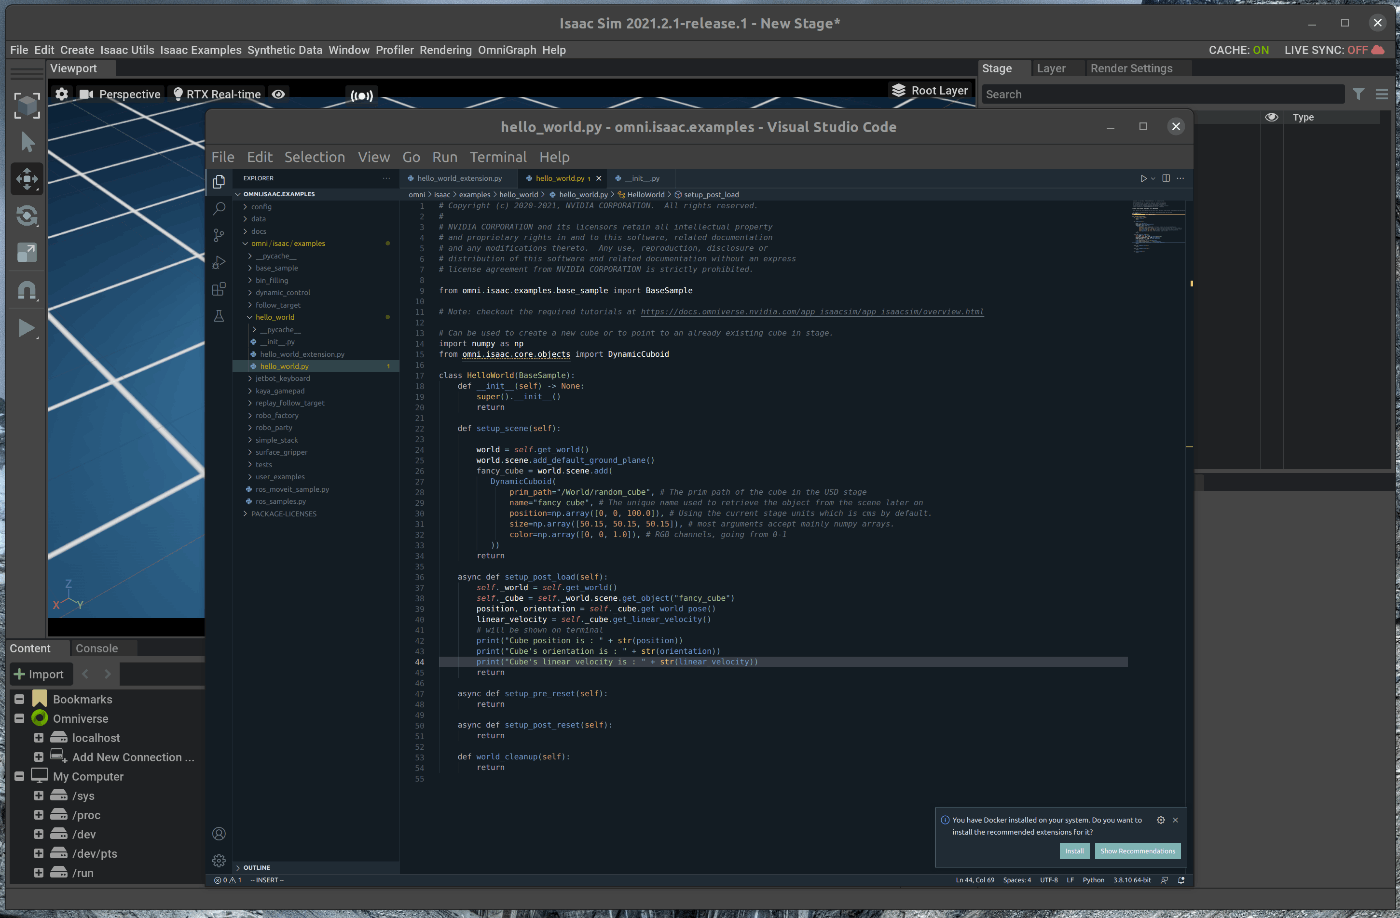
139 |
140 | 取得したcubeの位置と速度はGUiの下部にあるコンソールに表示されます。
141 | 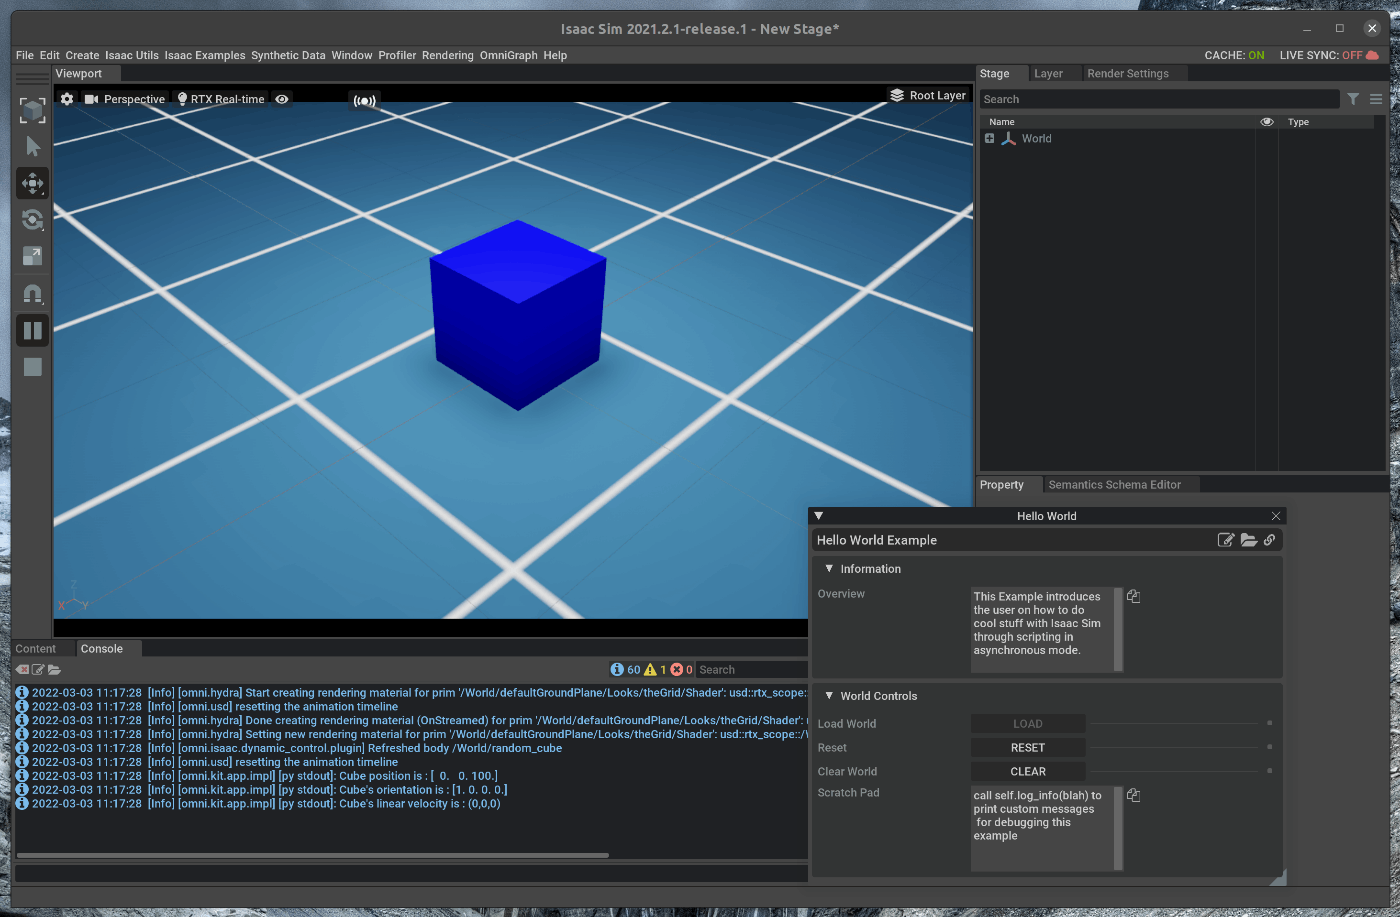
142 |
143 | また、Physics stepごとにcubeの位置と速度を取得する場合には、worldクラスのcallbackメソッドを使用します。
144 | hello_world.pyに次の処理を追加します。
145 |
146 | ~~~ hello_world.py:Python3
147 | from omni.isaac.examples.base_sample import BaseSample
148 | import numpy as np
149 | from omni.isaac.core.objects import DynamicCuboid
150 |
151 | class HelloWorld(BaseSample):
152 | def __init__(self) -> None:
153 | super().__init__()
154 | return
155 |
156 | def setup_scene(self):
157 | world = self.get_world()
158 | world.scene.add_default_ground_plane()
159 | fancy_cube = world.scene.add(
160 | DynamicCuboid(
161 | prim_path="/World/random_cube",
162 | name="fancy_cube",
163 | position=np.array([0, 0, 100.0]),
164 | size=np.array([50.15, 50.15, 50.15]),
165 | color=np.array([0, 0, 1.0]),
166 | ))
167 | return
168 |
169 | async def setup_post_load(self):
170 | self._world = self.get_world()
171 | self._cube = self._world.scene.get_object("fancy_cube")
172 | ## add code
173 | self._world.add_physics_callback("sim_step", callback_fn=self.print_cube_info) #callback names have to be unique
174 | ##
175 | return
176 |
177 | ## add code
178 | # here we define the physics callback to be called before each physics step, all physics callbacks must take
179 | # step_size as an argument
180 | def print_cube_info(self, step_size):
181 | position, orientation = self._cube.get_world_pose()
182 | linear_velocity = self._cube.get_linear_velocity()
183 | # will be shown on terminal
184 | print("Cube position is : " + str(position))
185 | print("Cube's orientation is : " + str(orientation))
186 | print("Cube's linear velocity is : " + str(linear_velocity))
187 | ##
188 | ~~~
189 | 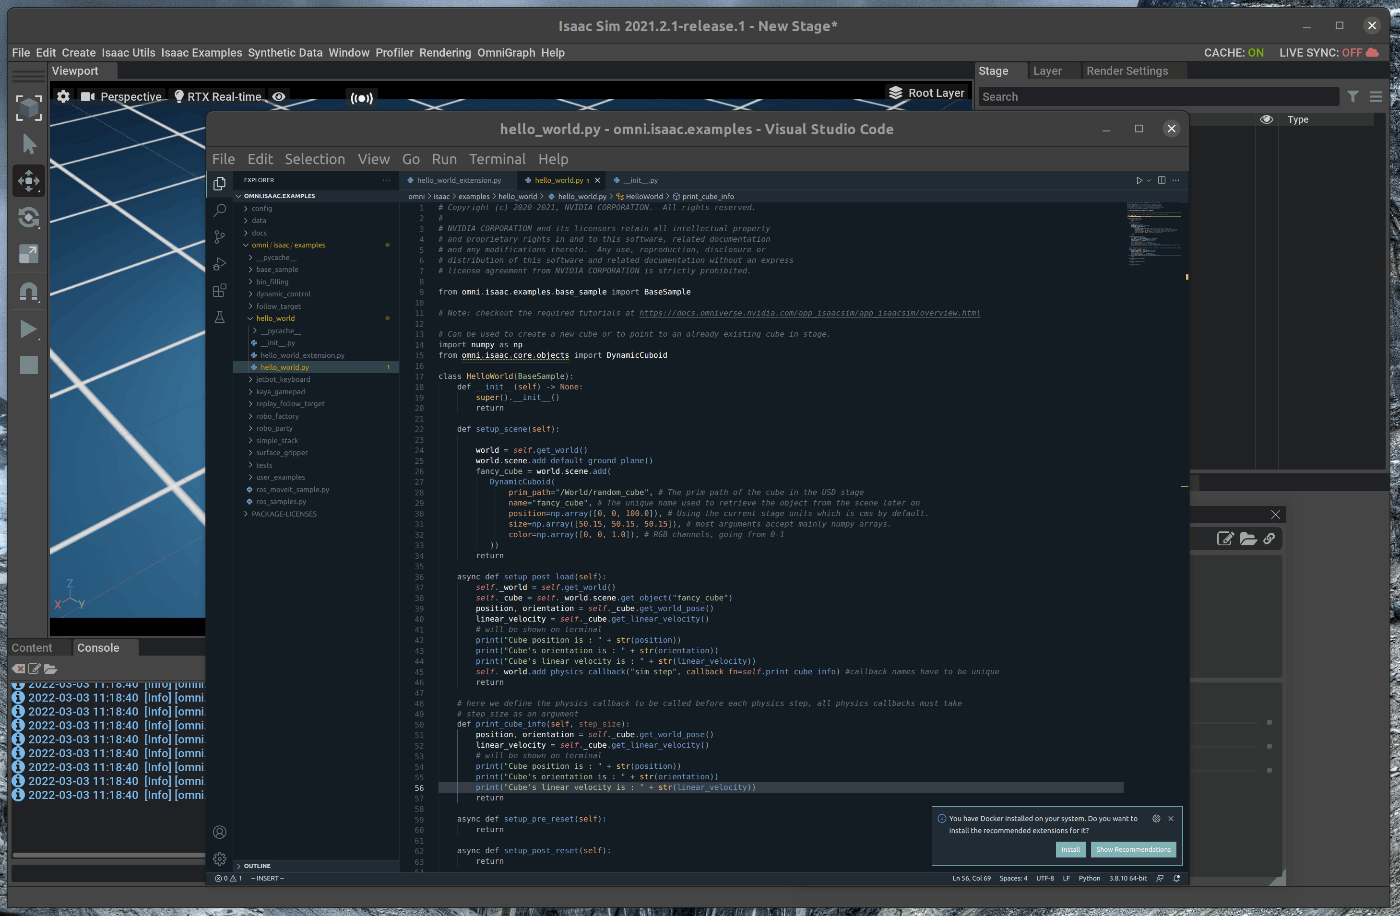
190 |
191 | 取得したcubeの位置と速度はGUiの下部にあるコンソールに表示されます。
192 | 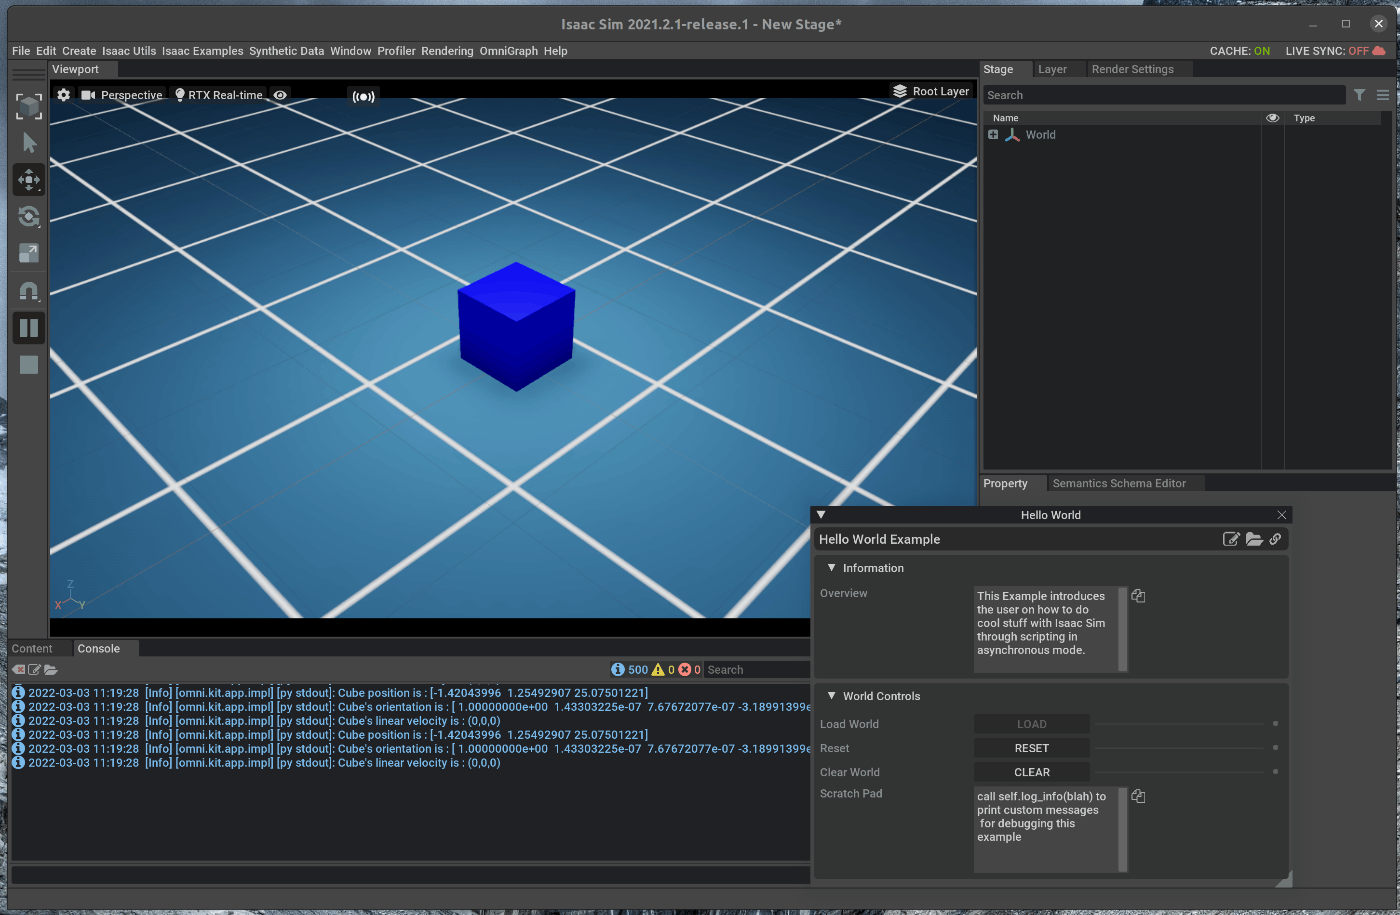
193 |
194 | 3. New Exampleの追加
195 | GUIからロードすることができるExampleを新たに追加します。
196 | ターミナルで次のコマンドを実行します。
197 |
198 | ~~~ command:bash
199 | cd ~/.local/share/ov/pkg/isaac_sim-2021.2.1/
200 | cd extension_examples
201 | cp hello_world/hello_world* user_examples/
202 | ~~~
203 | 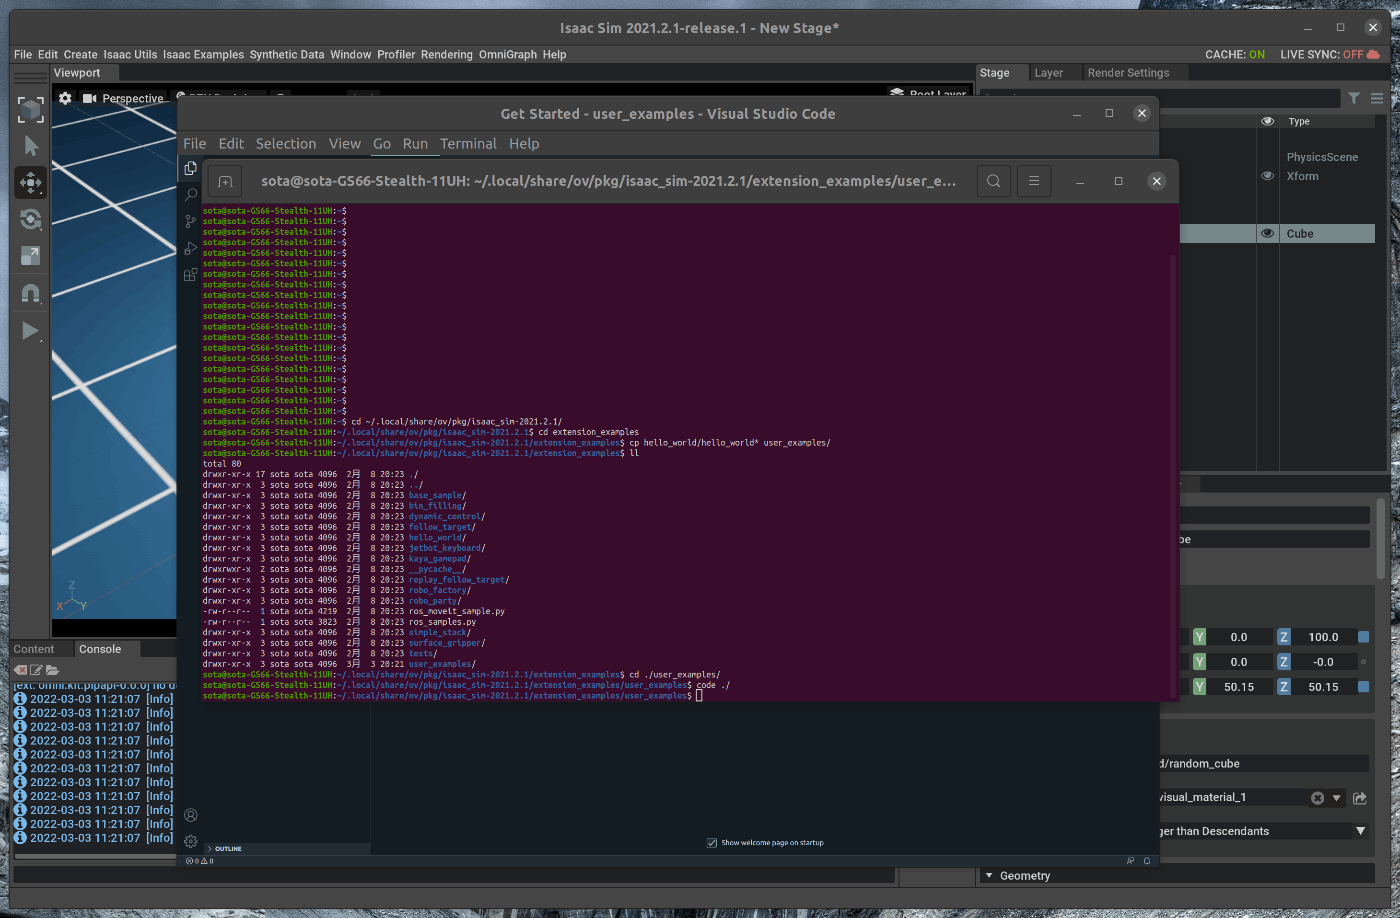
204 |
205 | extension_examples/user_examples/__init__.py に次の2行を追加します。
206 |
207 | ~~~ __init__.py:Python3
208 | from omni.isaac.examples.user_examples.hello_world import HelloWorld
209 | from omni.isaac.examples.user_examples.hello_world_extension import HelloWorldExtension
210 | ~~~
211 |
212 | extension_examples/user_examples/hello_world_extension.py を次の様に編集します。
213 |
214 | ~~~ hello_world_extension.py:Python3
215 | import os
216 | from omni.isaac.examples.base_sample import BaseSampleExtension
217 | ## edit code
218 | from omni.isaac.examples.user_examples import HelloWorld
219 | ##
220 |
221 | class HelloWorldExtension(BaseSampleExtension):
222 | def on_startup(self, ext_id: str):
223 | super().on_startup(ext_id)
224 | super().start_extension(
225 | menu_name="",
226 | submenu_name="",
227 | ## edit code
228 | name="Awesome Example",
229 | title="My Awesome Example",
230 | ##
231 | doc_link="https://docs.omniverse.nvidia.com/app_isaacsim/app_isaacsim/tutorial_required_hello_world.html",
232 | overview="This Example introduces the user on how to do cool stuff with Isaac Sim through scripting in asynchronous mode.",
233 | file_path=os.path.abspath(__file__),
234 | sample=HelloWorld(),
235 | )
236 | return
237 | ~~~
238 | 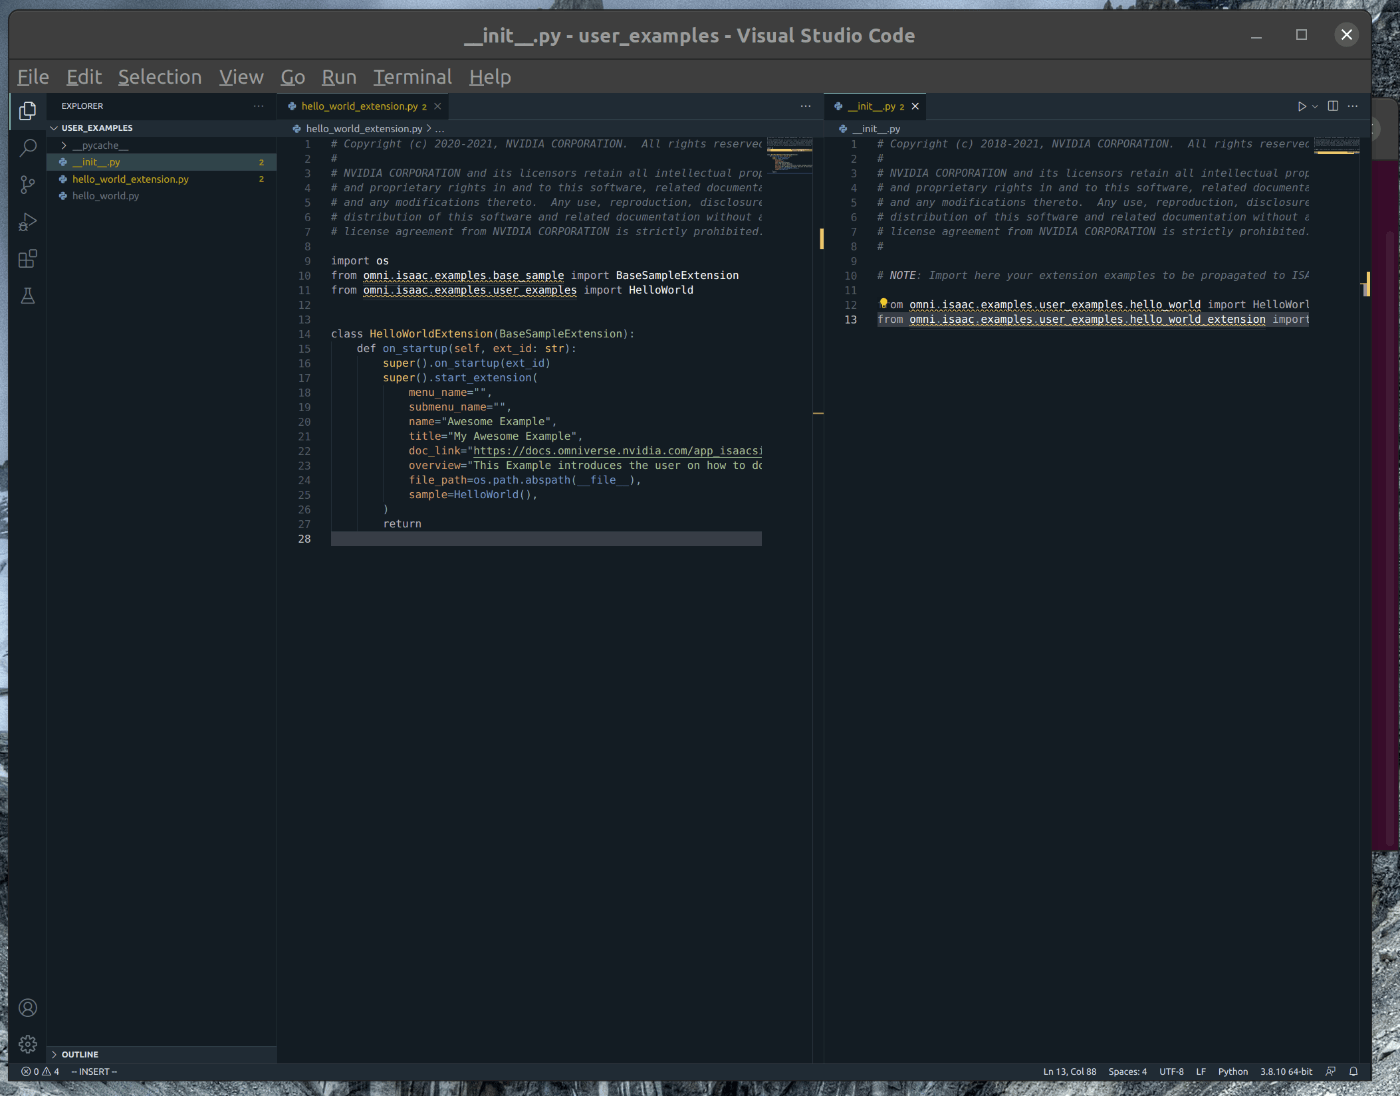
239 |
240 | 追加後、Isaac simを起動し、メニューバーのIsaac Examples > Awesome Exampleを選択します。
241 | 選択すると、Cubeが追加されたシーンが表示されます。
242 | 
243 | 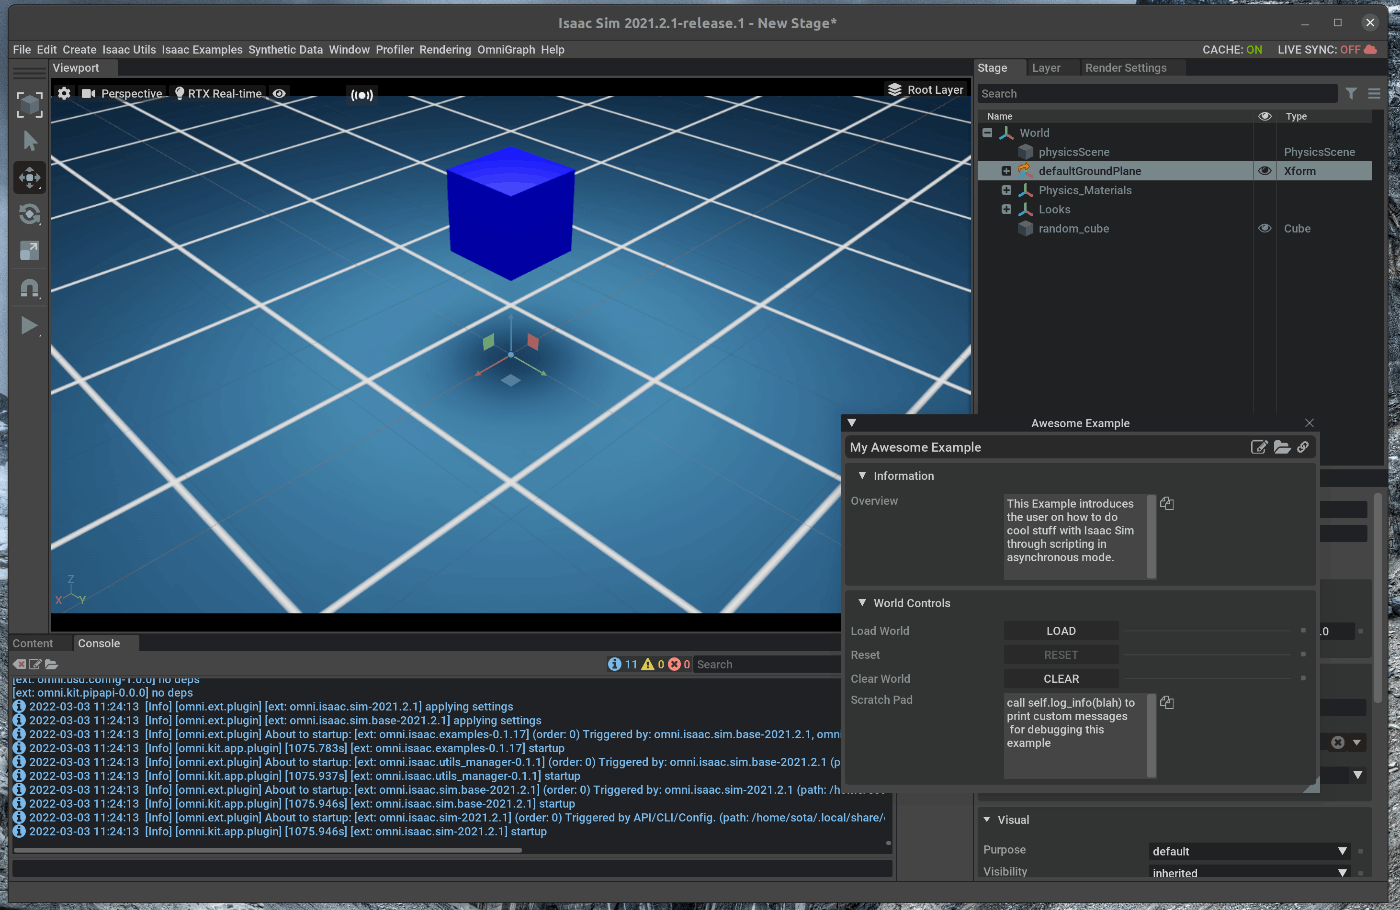
244 | 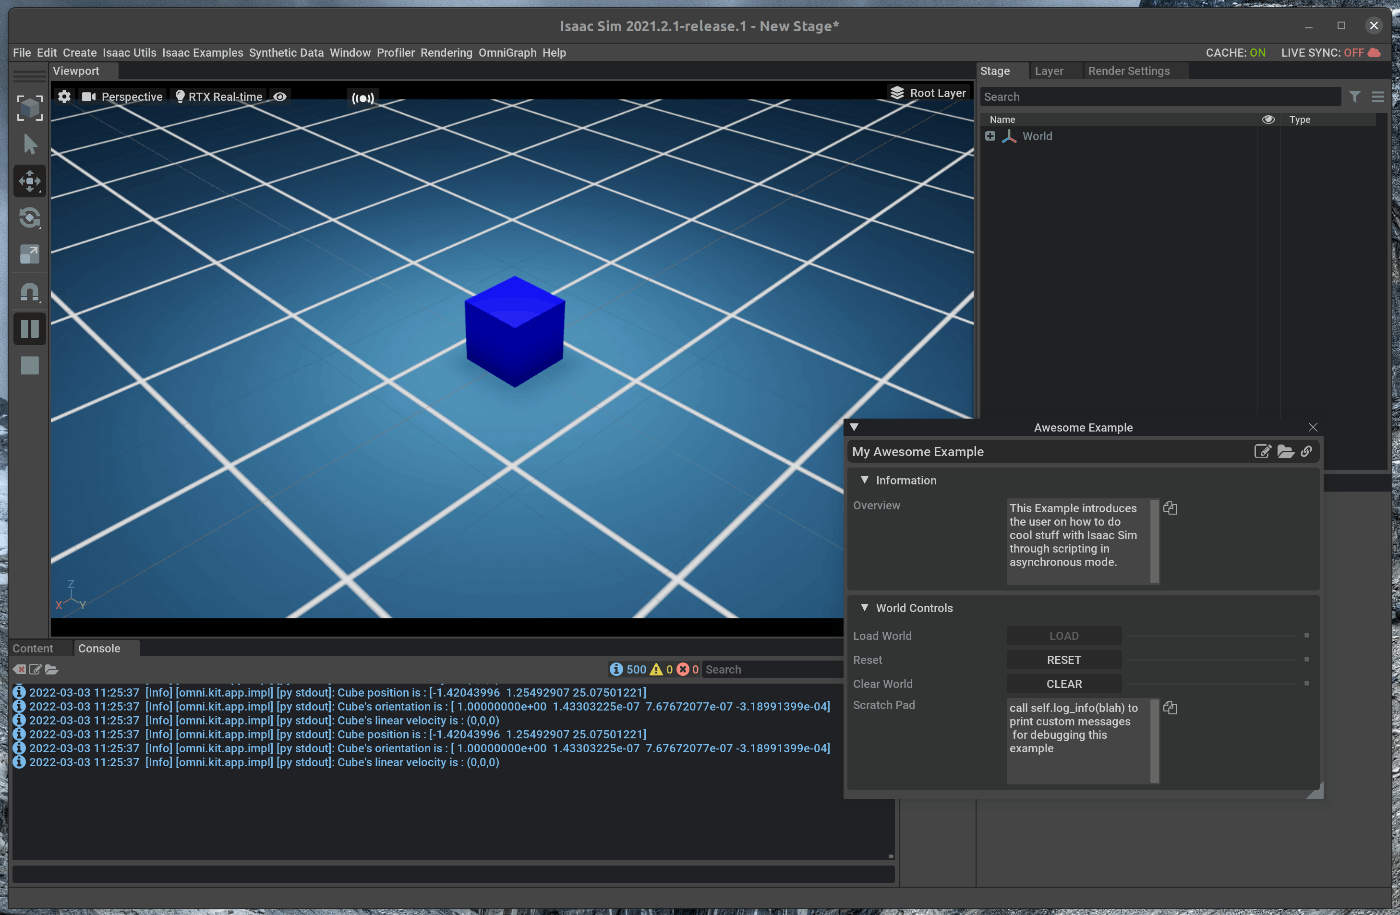
245 |
246 | 4. Standalone Applicationでの実行
247 |
248 | 上記のCubeの追加処理をStandalone Applicationとして実行します。
249 | 任意のPATHにmy_application.pyを作成し、次のコードを記述します。
250 |
251 | ~~~ my=aaplication.py:Python3
252 | #launch Isaac Sim before any other imports
253 | #default first two lines in any standalone application
254 | from omni.isaac.kit import SimulationApp
255 | simulation_app = SimulationApp({"headless": False}) # we can also run as headless.
256 |
257 | from omni.isaac.core import World
258 | from omni.isaac.core.objects import DynamicCuboid
259 | import numpy as np
260 |
261 | world = World(stage_units_in_meters=0.01)
262 | world.scene.add_default_ground_plane()
263 | fancy_cube = world.scene.add(
264 | DynamicCuboid(
265 | prim_path="/World/random_cube",
266 | name="fancy_cube",
267 | position=np.array([0, 0, 100.0]),
268 | size=np.array([50.15, 50.15, 50.15]),
269 | color=np.array([0, 0, 1.0]),
270 | ))
271 | # Resetting the world needs to be called before querying anything related to an articulation specifically.
272 | # Its recommended to always do a reset after adding your assets, for physics handles to be propagated properly
273 | world.reset()
274 | for i in range(500):
275 | position, orientation = fancy_cube.get_world_pose()
276 | linear_velocity = fancy_cube.get_linear_velocity()
277 | # will be shown on terminal
278 | print("Cube position is : " + str(position))
279 | print("Cube's orientation is : " + str(orientation))
280 | print("Cube's linear velocity is : " + str(linear_velocity))
281 | # we have control over stepping physics and rendering in this workflow
282 | # things run in sync
283 | world.step(render=True) # execute one physics step and one rendering step
284 |
285 | simulation_app.close() # close Isaac Sim
286 | ~~~
287 |
288 | ターミナル上で、以下のコマンドを実行します。
289 | ""は、my_application.pyがあるpathに置き換えます。
290 |
291 | ~~~ command:bash
292 |
293 | cd ~/.local/share/ov/pkg/isaac_sim-2021.2.1/
294 | ./python.sh /my_application.py
295 | ~~~
296 | 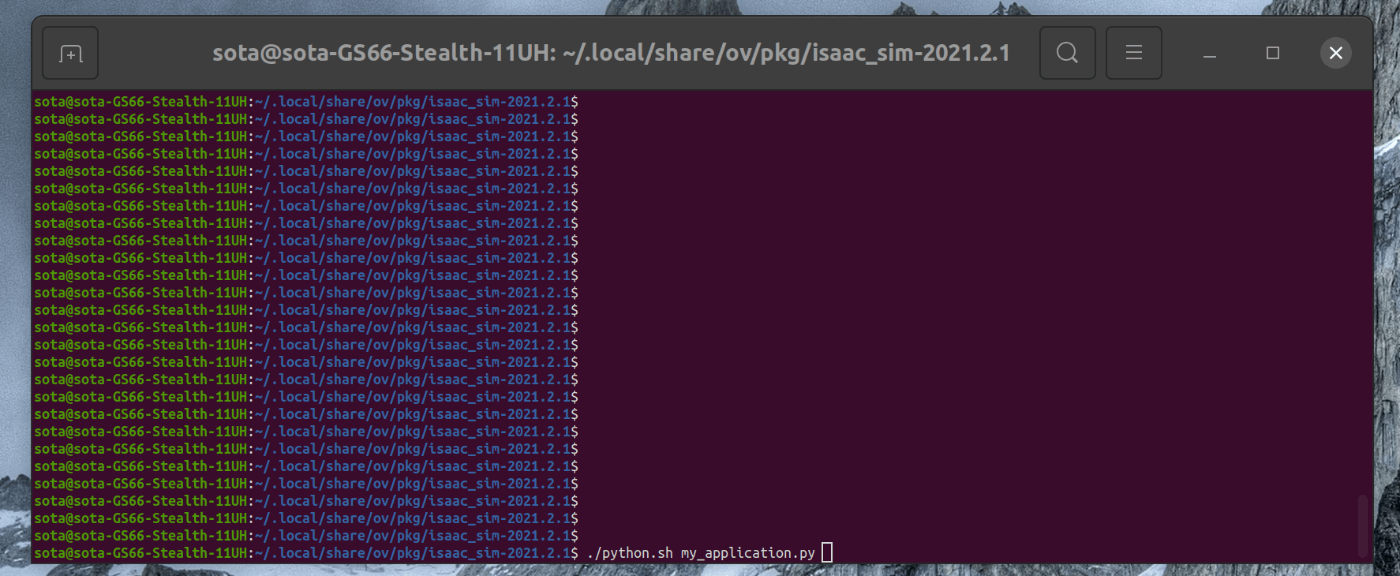
297 |
298 | 実行すると、Isaac simが起動しシーン内にCubeが表示されます。
299 | 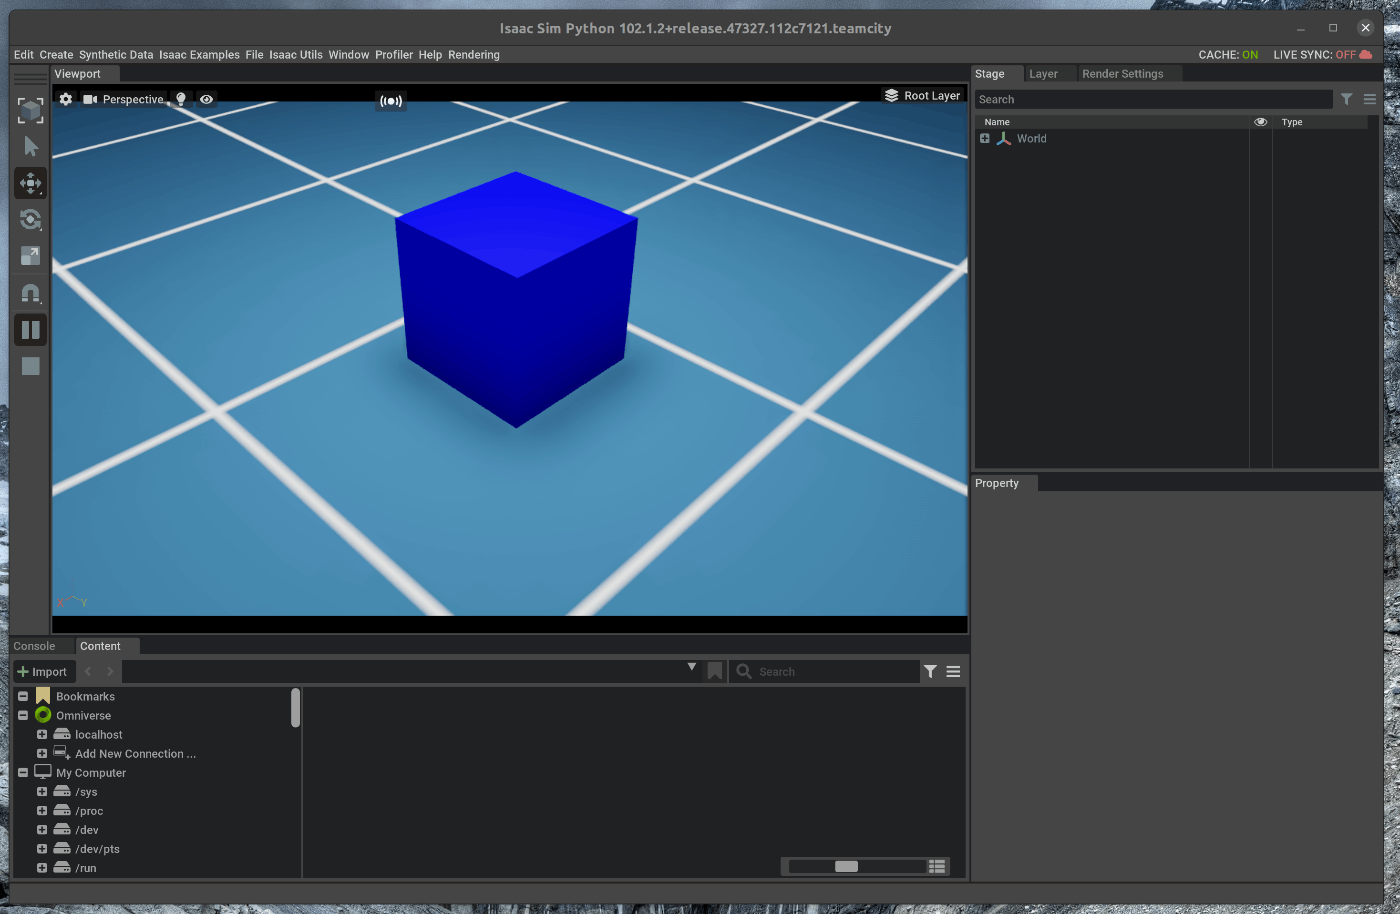
--------------------------------------------------------------------------------
/tutorials/required/adding_a_manipulator_robot/11_adding_a_manipulator_robots.md:
--------------------------------------------------------------------------------
1 | # 概要
2 | Adding a manipulator robotのチュートリアルを進めます。
3 | このチュートリアルはmulti robotのチュートリアルの6部の内の4部目です。
4 |
5 | Issac Simのtutorialに上記の内容が記載されており、この内容に沿って進めます。
6 | https://docs.omniverse.nvidia.com/app_isaacsim/app_isaacsim/tutorial_required_adding_manipulator.html
7 |
8 | # 実行環境
9 |
10 | - インストール実行環境
11 |
12 | | unit | specification |
13 | |:-----------------:|:------------------:|
14 | | CPU | i9-11900H |
15 | | GPU | GeForce RTX 3080 Laptop|
16 | | RAM | 32GB |
17 | | OS | Ubuntu 20.04.3 LTS |
18 |
19 | - Nvidia Driverバージョン
20 | - 510.39.01
21 | - Issac simバージョン
22 | - 2021.2.1
23 |
24 | # 概要
25 |
26 | Jetbotを追加したAwesome worldのExampleのソースコードに処理を追加し、シーンにFrankaを追加します。
27 | また、シーンに追加したFrankaを用いて、CubeをPick-and-Placeするタスクを実行します。
28 | 次の手順を進めます。
29 |
30 | 1. Awesome Exampleのソースコードを開く
31 | 2. Frankaを追加する
32 |
33 | ## 1. Awesome Exampleのソースコードを開く
34 | ### 1.1 OmniverseからIssac Simを起動する
35 | 
36 |
37 | ### 1.2 Awesome Exampleのソースコードを表示
38 | メニューバーのIsaac Examples > Awesome Exampleを選択します。
39 | 
40 |
41 | 次に、Awesome Examplesのウィンドウの右上にある3つのボタンの内、一番左側のOpen Source Codeボタンを選択します。
42 | 
43 |
44 | 選択すると、がVScodeが開き、Hello Worldのソースコードが表示されます。
45 | 
46 |
47 | ## 2. Frankaを追加する
48 | vscode上で、hello_world.pyを編集します。
49 |
50 | ## 2.1 Frankaの追加
51 | シーンにFrankaを追加します。
52 | hello_world.pyのsetup_sceneメソッドに次の処理を追加します。
53 |
54 | ~~~ hello_world.py:Python3
55 | from omni.isaac.examples.base_sample import BaseSample
56 | from omni.isaac.franka import Franka
57 | from omni.isaac.core.objects import DynamicCuboid
58 | import numpy as np
59 |
60 | class HelloWorld(BaseSample):
61 | def __init__(self) -> None:
62 | super().__init__()
63 | return
64 |
65 | def setup_scene(self):
66 | world = self.get_world()
67 | world.scene.add_default_ground_plane()
68 | franka = world.scene.add(Franka(prim_path="/World/Fancy_Franka", name="fancy_franka"))
69 | world.scene.add(
70 | DynamicCuboid(
71 | prim_path="/World/random_cube",
72 | name="fancy_cube",
73 | position=np.array([30, 30, 30]),
74 | size=np.array([5.15, 5.15, 5.15]),
75 | color=np.array([0, 0, 1.0]),
76 | )
77 | )
78 | return
79 | ~~~
80 | 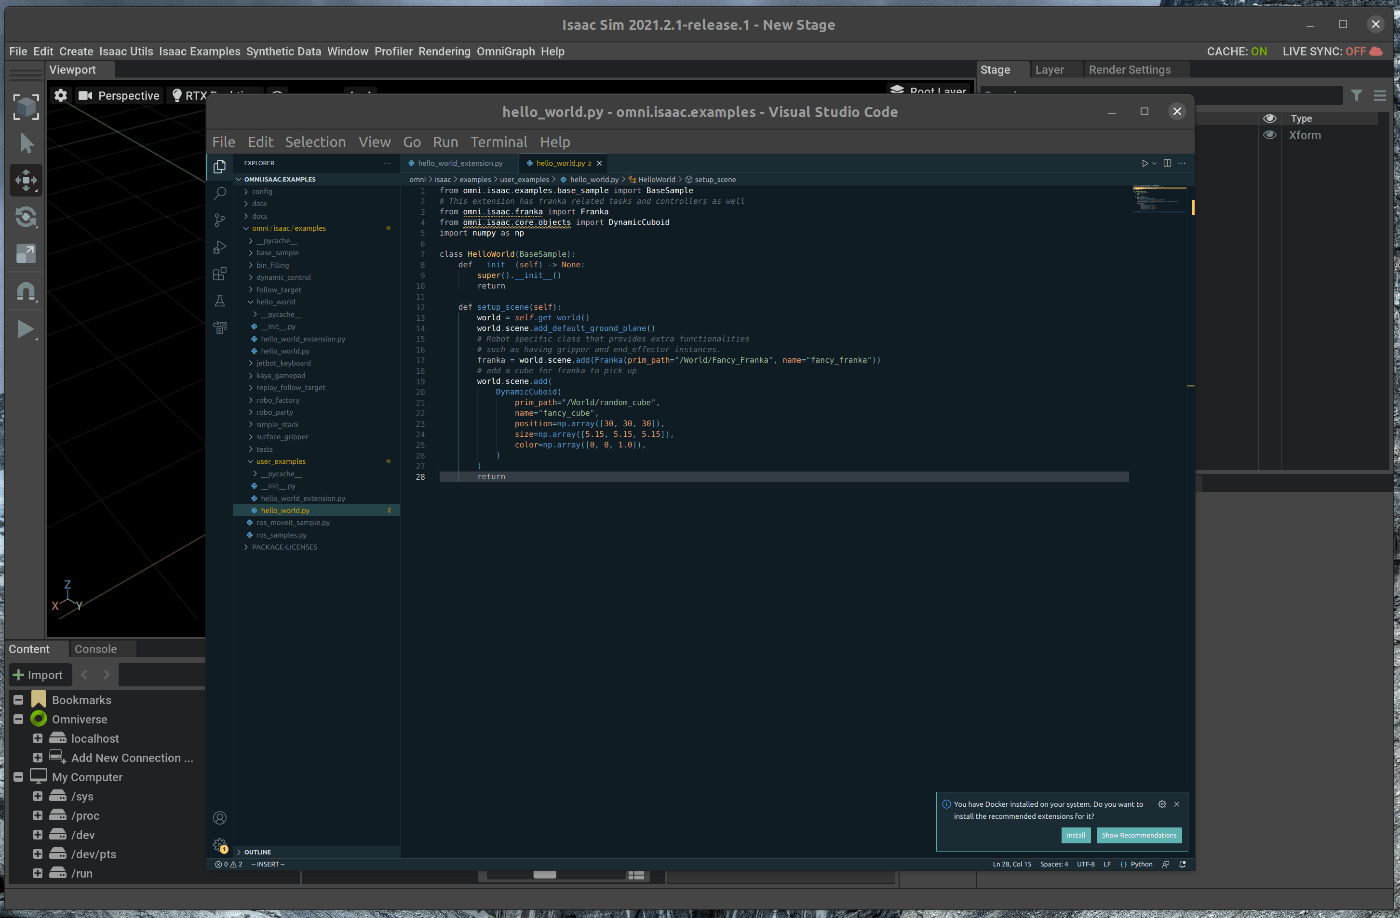
81 |
82 | 追加後、Ctrl+Saveとhot reloadが実行されます。
83 | メニューバーのIsaac Examples > Awesome Exampleを選択し、Loadを選択すると、ソースコードの変更部分が反映された状態で表示されます。
84 | 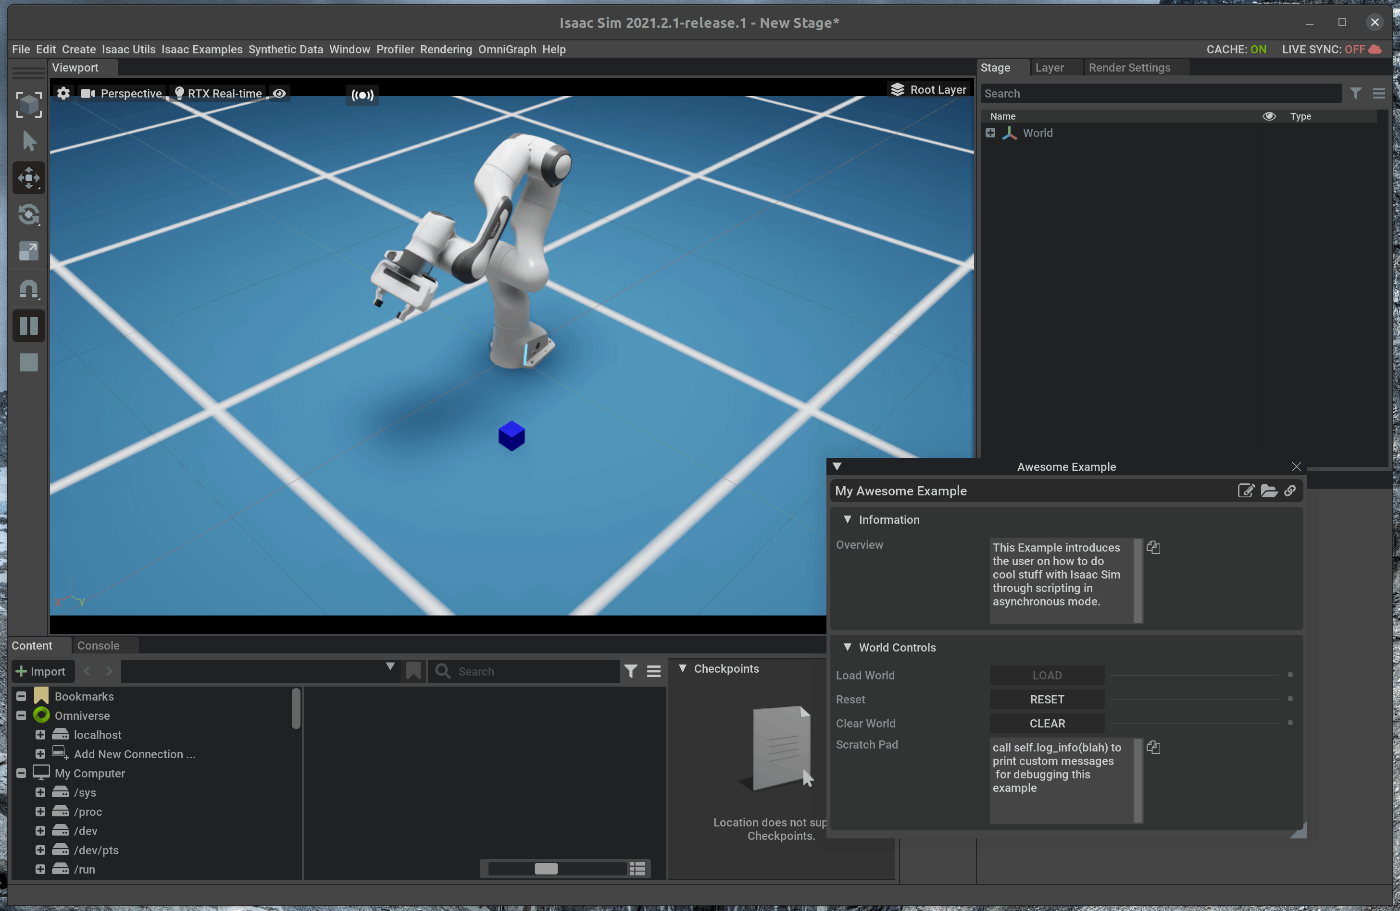
85 |
86 | ## 2.2 PickAndPlace Controllerの追加
87 |
88 | FrankaのクラスのControllerに含まれているPickAndPlace Controllerを追加します。
89 | hello_world.pyを次の様に編集します。
90 |
91 | ~~~ hello_world.py:Python3
92 | from omni.isaac.examples.base_sample import BaseSample
93 | from omni.isaac.franka import Franka
94 | from omni.isaac.core.objects import DynamicCuboid
95 | from omni.isaac.franka.controllers import PickPlaceController
96 | import numpy as np
97 |
98 |
99 | class HelloWorld(BaseSample):
100 | def __init__(self) -> None:
101 | super().__init__()
102 | return
103 |
104 | def setup_scene(self):
105 | world = self.get_world()
106 | world.scene.add_default_ground_plane()
107 | franka = world.scene.add(Franka(prim_path="/World/Fancy_Franka", name="fancy_franka"))
108 | world.scene.add(
109 | DynamicCuboid(
110 | prim_path="/World/random_cube",
111 | name="fancy_cube",
112 | position=np.array([30, 30, 30]),
113 | size=np.array([5.15, 5.15, 5.15]),
114 | color=np.array([0, 0, 1.0]),
115 | )
116 | )
117 | return
118 |
119 | async def setup_post_load(self):
120 | self._world = self.get_world()
121 | self._franka = self._world.scene.get_object("fancy_franka")
122 | self._fancy_cube = self._world.scene.get_object("fancy_cube")
123 | self._controller = PickPlaceController(
124 | name="pick_place_controller",
125 | gripper_dof_indices=self._franka.gripper.dof_indices,
126 | robot_prim_path=self._franka.prim_path,
127 | )
128 | self._world.add_physics_callback("sim_step", callback_fn=self.physics_step)
129 | await self._world.play_async()
130 | return
131 |
132 | async def setup_post_reset(self):
133 | self._controller.reset()
134 | await self._world.play_async()
135 | return
136 |
137 | def physics_step(self, step_size):
138 | cube_position, _ = self._fancy_cube.get_world_pose()
139 | goal_position = np.array([-30, -30, 5.15 / 2.0])
140 | current_joint_positions = self._franka.get_joint_positions()
141 | actions = self._controller.forward(
142 | picking_position=cube_position,
143 | placing_position=goal_position,
144 | current_joint_positions=current_joint_positions,
145 | )
146 | self._franka.apply_action(actions)
147 | if self._controller.is_done():
148 | self._world.pause()
149 | return
150 | ~~~
151 | 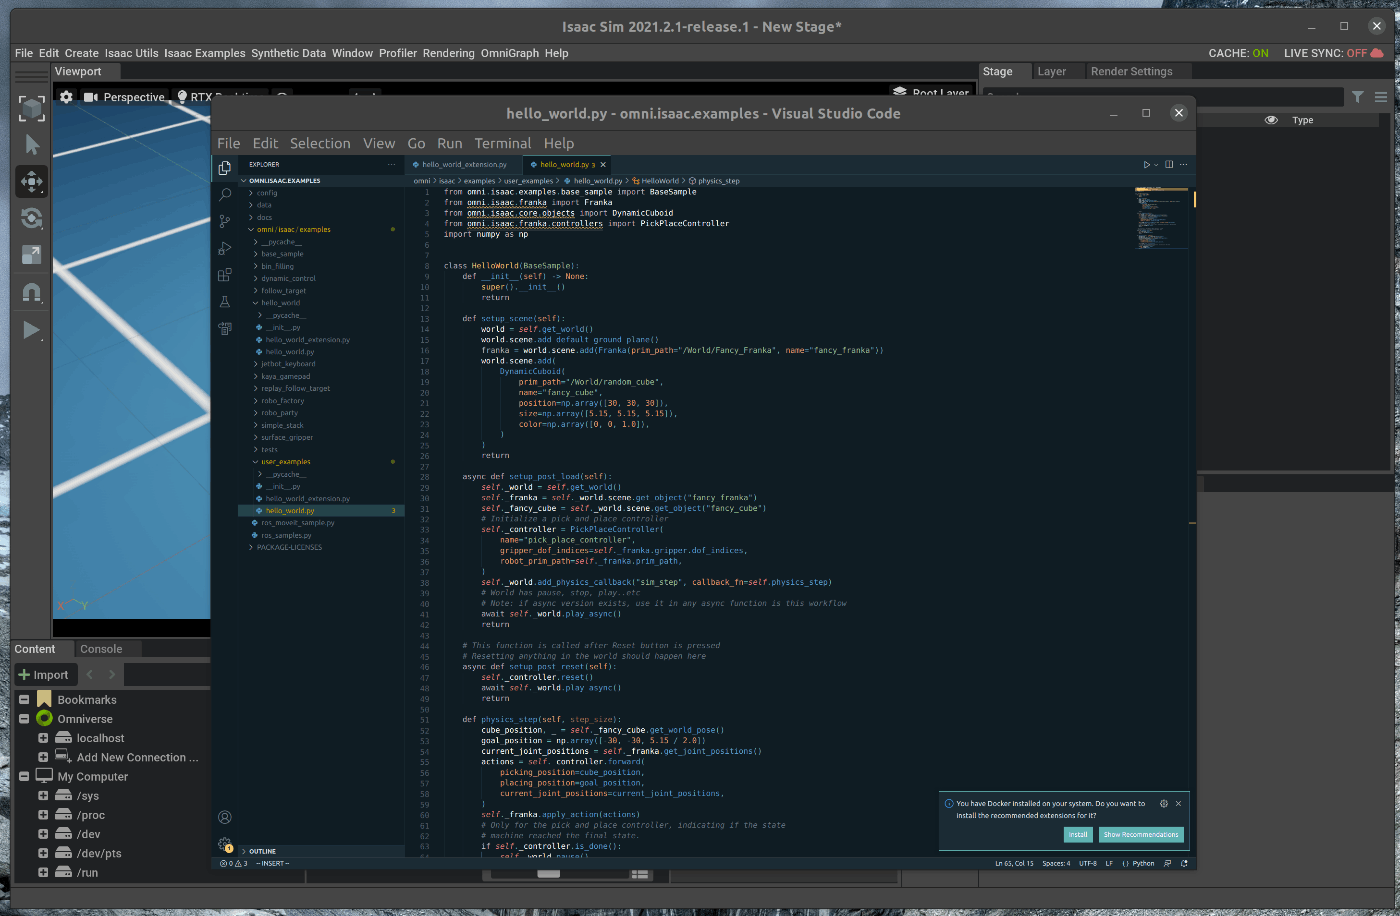
152 |
153 | 追加後、Ctrl+Saveとhot reloadが実行されます。
154 |
155 | メニューバーのIsaac Examples > Awesome Exampleを選択し、Loadを選択すると、ソースコードの変更部分が反映された状態で表示されます。
156 | この状態で、Viewportの左側のPLAYボタンを押すと、FrankatがCubeをPickし、Goal PositionにPlaceします。
157 | 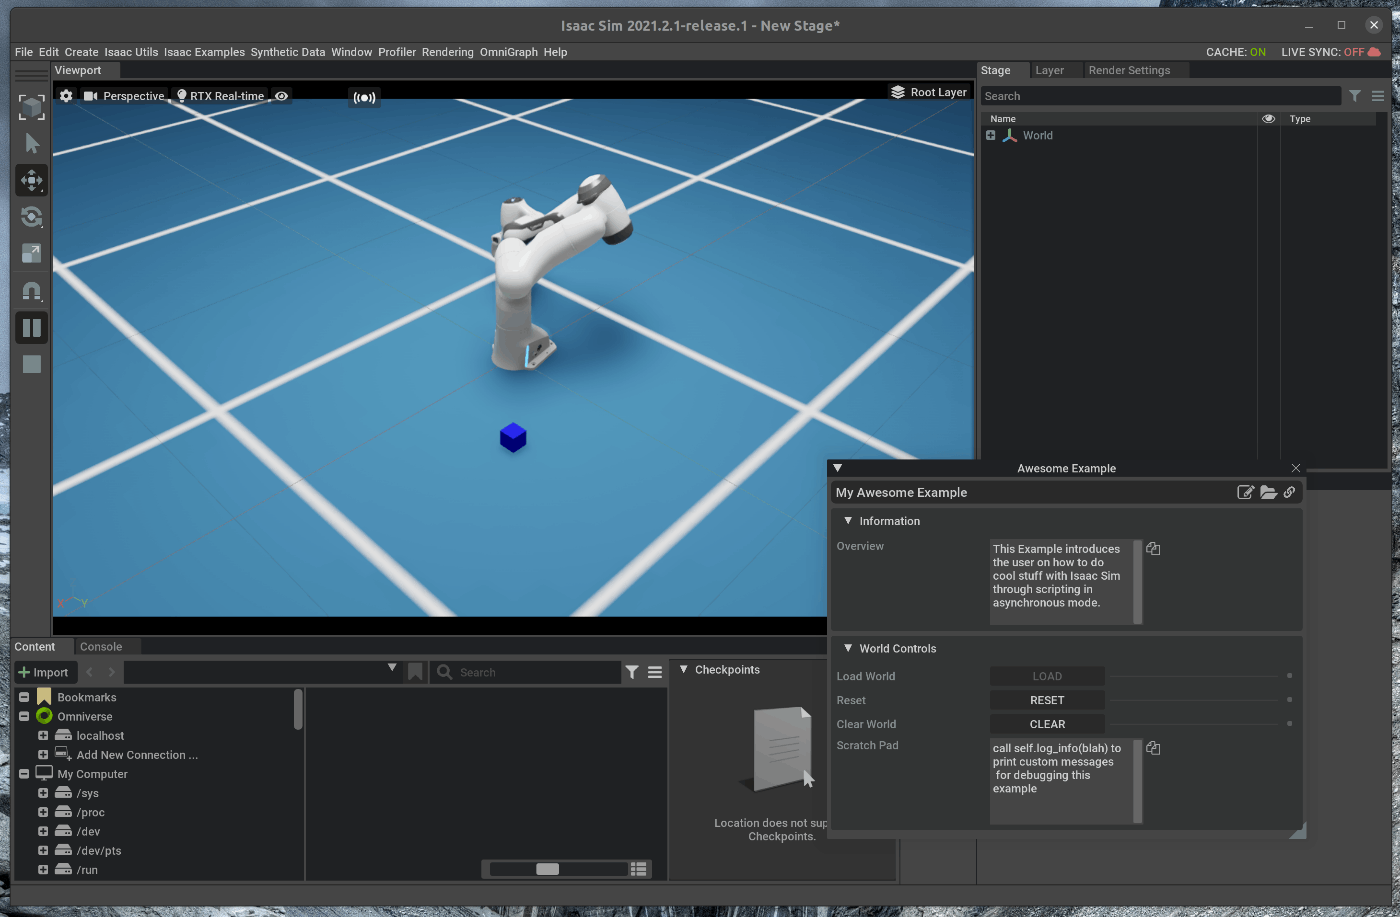
158 | 
159 |
160 | ## 2.3 Taskクラスの使用
161 |
162 | Isaac Simには、Taskクラスがあり、このクラスを継承したクラスを使用することによって、より複雑なシーンを表現することが可能です。
163 | 上記で示したFrakaによるPick and Placeをtaskクラスによって記述します。
164 | hello_world.pyを次の様に編集します。
165 |
166 | ~~~ hello_world.py:Python3
167 | from omni.isaac.examples.base_sample import BaseSample
168 | from omni.isaac.franka import Franka
169 | from omni.isaac.core.objects import DynamicCuboid
170 | from omni.isaac.franka.controllers import PickPlaceController
171 | from omni.isaac.core.tasks import BaseTask
172 | import numpy as np
173 |
174 | class FrankaPlaying(BaseTask):
175 | def __init__(self, name):
176 | super().__init__(name=name, offset=None)
177 | self._goal_position = np.array([-30, -30, 5.15 / 2.0])
178 | self._task_achieved = False
179 | return
180 |
181 | # Here we setup all the assets that we care about in this task.
182 | def set_up_scene(self, scene):
183 | super().set_up_scene(scene)
184 | scene.add_default_ground_plane()
185 | self._cube = scene.add(DynamicCuboid(prim_path="/World/random_cube",
186 | name="fancy_cube",
187 | position=np.array([30, 30, 30]),
188 | size=np.array([5.15, 5.15, 5.15]),
189 | color=np.array([0, 0, 1.0])))
190 | self._franka = scene.add(Franka(prim_path="/World/Fancy_Franka",
191 | name="fancy_franka"))
192 | return
193 |
194 | def get_observations(self):
195 | cube_position, _ = self._cube.get_world_pose()
196 | current_joint_positions = self._franka.get_joint_positions()
197 | observations = {
198 | self._franka.name: {
199 | "joint_positions": current_joint_positions,
200 | },
201 | self._cube.name: {
202 | "position": cube_position,
203 | "goal_position": self._goal_position
204 | }
205 | }
206 | return observations
207 |
208 | def pre_step(self, control_index, simulation_time):
209 | cube_position, _ = self._cube.get_world_pose()
210 | if not self._task_achieved and np.mean(np.abs(self._goal_position - cube_position)) < 2:
211 | self._cube.get_applied_visual_material().set_color(color=np.array([0, 1.0, 0]))
212 | self._task_achieved = True
213 | return
214 |
215 |
216 | class HelloWorld(BaseSample):
217 | def __init__(self) -> None:
218 | super().__init__()
219 | return
220 |
221 | def setup_scene(self):
222 | world = self.get_world()
223 | world.add_task(FrankaPlaying(name="my_first_task"))
224 | return
225 |
226 | async def setup_post_load(self):
227 | self._world = self.get_world()
228 | self._franka = self._world.scene.get_object("fancy_franka")
229 | self._controller = PickPlaceController(
230 | name="pick_place_controller",
231 | gripper_dof_indices=self._franka.gripper.dof_indices,
232 | robot_prim_path=self._franka.prim_path,
233 | )
234 | self._world.add_physics_callback("sim_step", callback_fn=self.physics_step)
235 | await self._world.play_async()
236 | return
237 |
238 | async def setup_post_reset(self):
239 | self._controller.reset()
240 | await self._world.play_async()
241 | return
242 |
243 | def physics_step(self, step_size):
244 | current_observations = self._world.get_observations()
245 | actions = self._controller.forward(
246 | picking_position=current_observations["fancy_cube"]["position"],
247 | placing_position=current_observations["fancy_cube"]["goal_position"],
248 | current_joint_positions=current_observations["fancy_franka"]["joint_positions"],
249 | )
250 | self._franka.apply_action(actions)
251 | if self._controller.is_done():
252 | self._world.pause()
253 | return
254 | ~~~
255 | 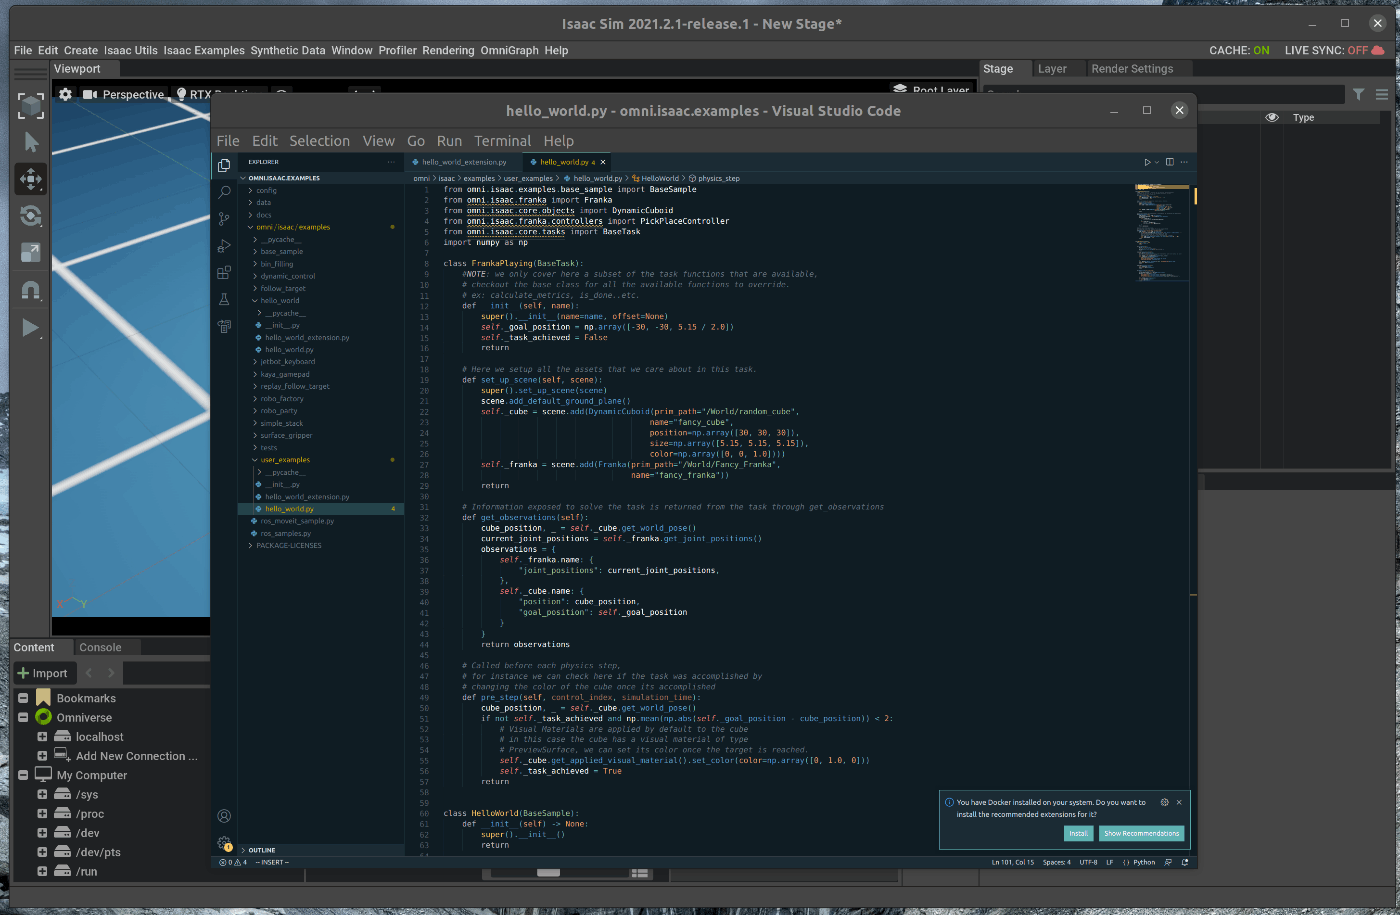
256 |
257 | 追加後、Ctrl+Saveとhot reloadが実行されます。
258 |
259 | メニューバーのIsaac Examples > Awesome Exampleを選択し、Loadを選択すると、ソースコードの変更部分が反映された状態で表示されます。
260 | この状態で、Viewportの左側のPLAYボタンを押すと、FrankatがCubeをPickし、Goal PositionにPlaceします。
261 | 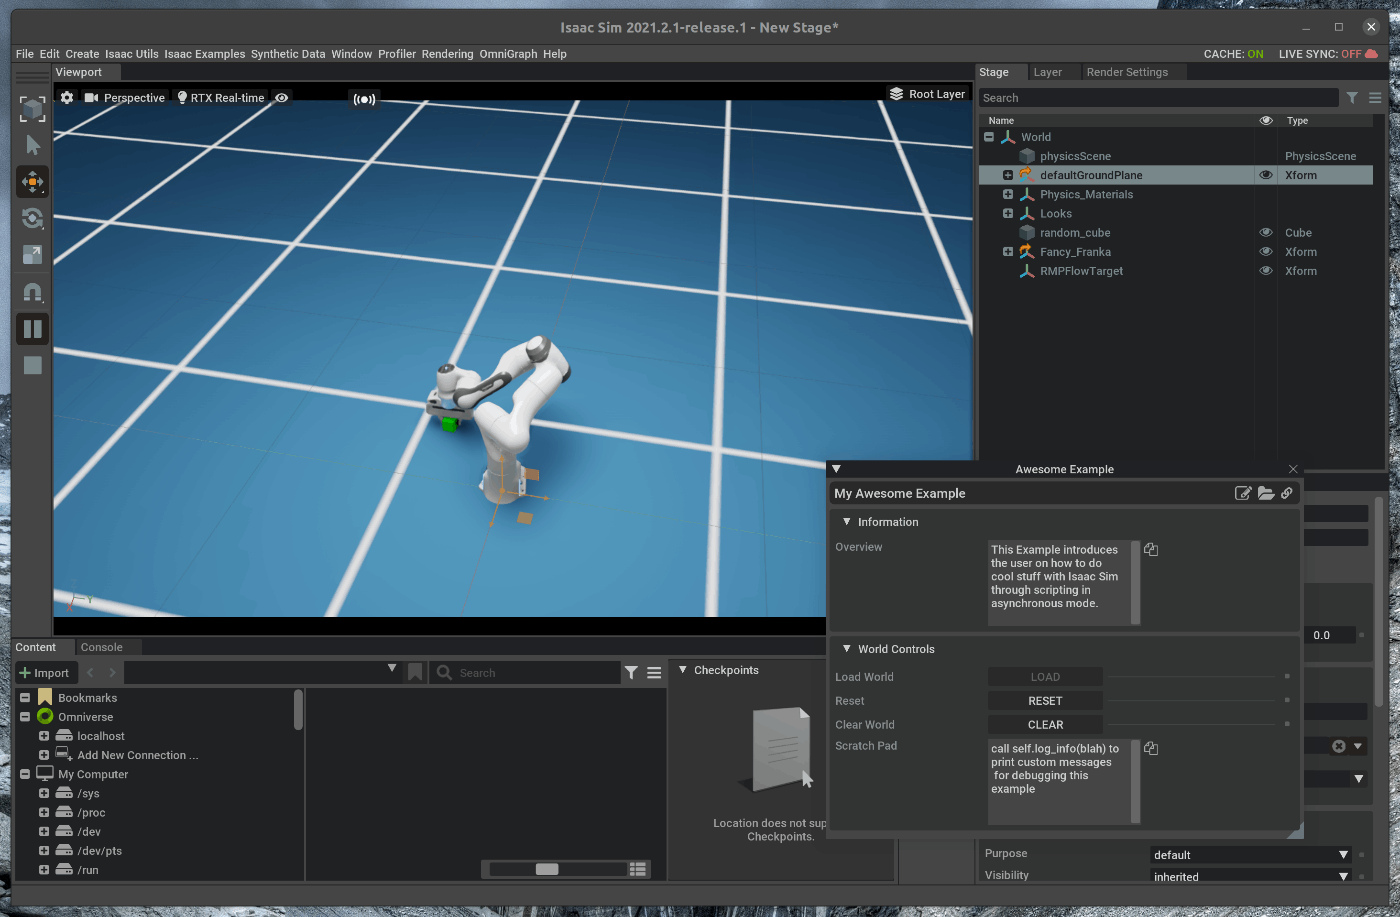
262 |
263 | ## 2.4 PickPlaceクラスの使用
264 |
265 | また、FrankaクラスのTasksの中に、PickPlaceというクラスが存在します。
266 | Frankaが元々持っているクラスを使用するため、ここで記述するコードは上記の2つの方法より少なくなります。
267 | hello_world.pyを次の様に編集します。
268 |
269 | ~~~ hello_world.py:Python3
270 | from omni.isaac.examples.base_sample import BaseSample
271 | from omni.isaac.franka.tasks import PickPlace
272 | from omni.isaac.franka.controllers import PickPlaceController
273 | import numpy as np
274 |
275 | class HelloWorld(BaseSample):
276 | def __init__(self) -> None:
277 | super().__init__()
278 | return
279 |
280 | def setup_scene(self):
281 | world = self.get_world()
282 | world.add_task(PickPlace(name="awesome_task"))
283 | return
284 |
285 | async def setup_post_load(self):
286 | self._world = self.get_world()
287 | task_params = self._world.get_task("awesome_task").get_params()
288 | self._franka = self._world.scene.get_object(task_params["robot_name"]["value"])
289 | self._cube_name = task_params["cube_name"]["value"]
290 | self._controller = PickPlaceController(
291 | name="pick_place_controller",
292 | gripper_dof_indices=self._franka.gripper.dof_indices,
293 | robot_prim_path=self._franka.prim_path,
294 | )
295 | self._world.add_physics_callback("sim_step", callback_fn=self.physics_step)
296 | await self._world.play_async()
297 | return
298 |
299 | async def setup_post_reset(self):
300 | self._controller.reset()
301 | await self._world.play_async()
302 | return
303 |
304 | def physics_step(self, step_size):
305 | current_observations = self._world.get_observations()
306 | actions = self._controller.forward(
307 | picking_position=current_observations[self._cube_name]["position"],
308 | placing_position=current_observations[self._cube_name]["target_position"],
309 | current_joint_positions=current_observations[self._franka.name]["joint_positions"],
310 | )
311 | self._franka.apply_action(actions)
312 | if self._controller.is_done():
313 | self._world.pause()
314 | return
315 | ~~~
316 | 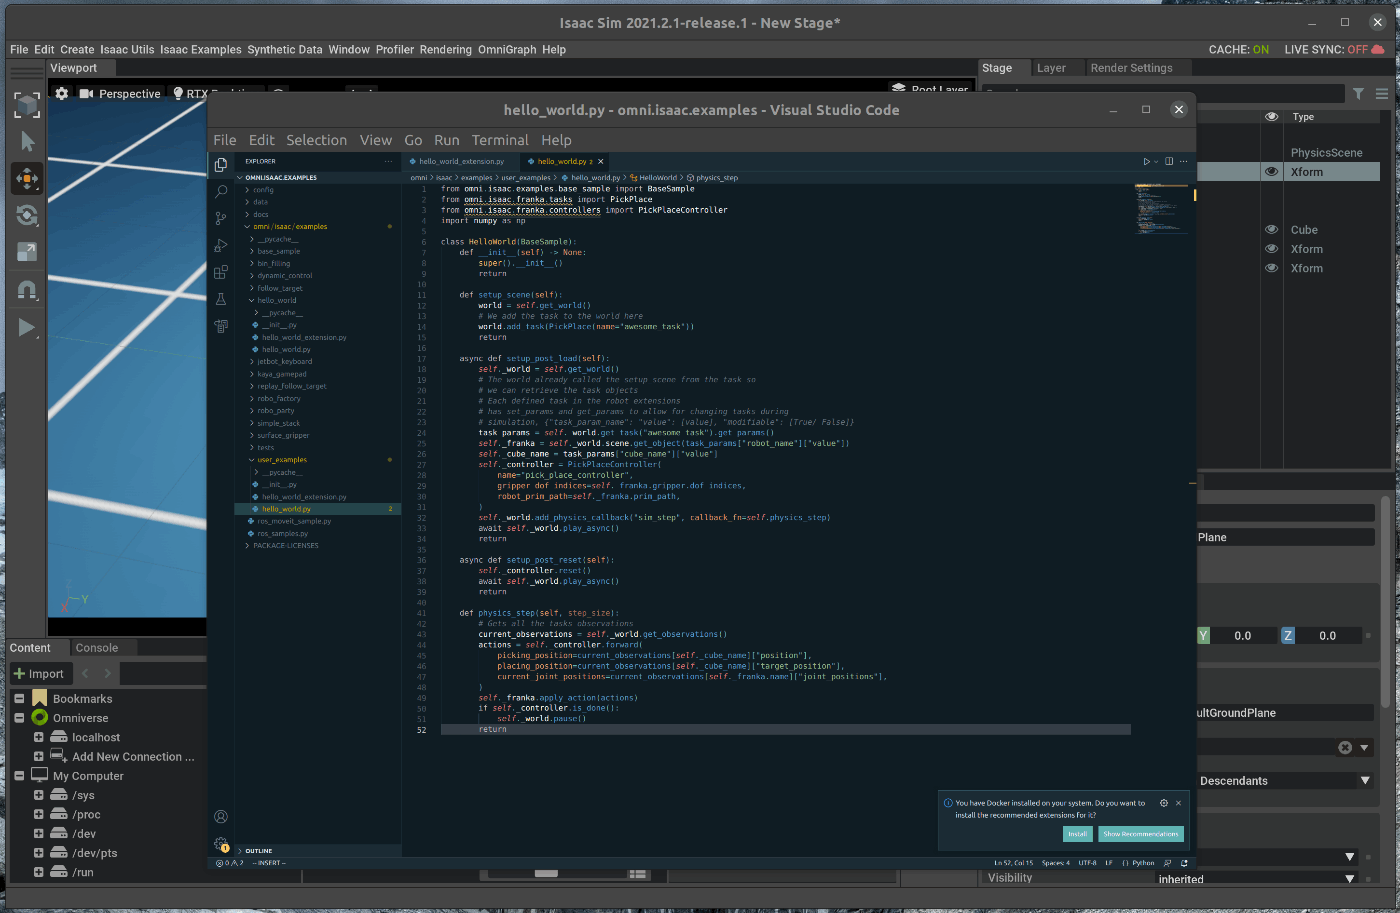
317 |
318 | 追加後、Ctrl+Saveとhot reloadが実行されます。
319 |
320 | メニューバーのIsaac Examples > Awesome Exampleを選択し、Loadを選択すると、ソースコードの変更部分が反映された状態で表示されます。
321 | この状態で、Viewportの左側のPLAYボタンを押すと、FrankatがCubeをPickし、Goal PositionにPlaceします。
322 |
323 | 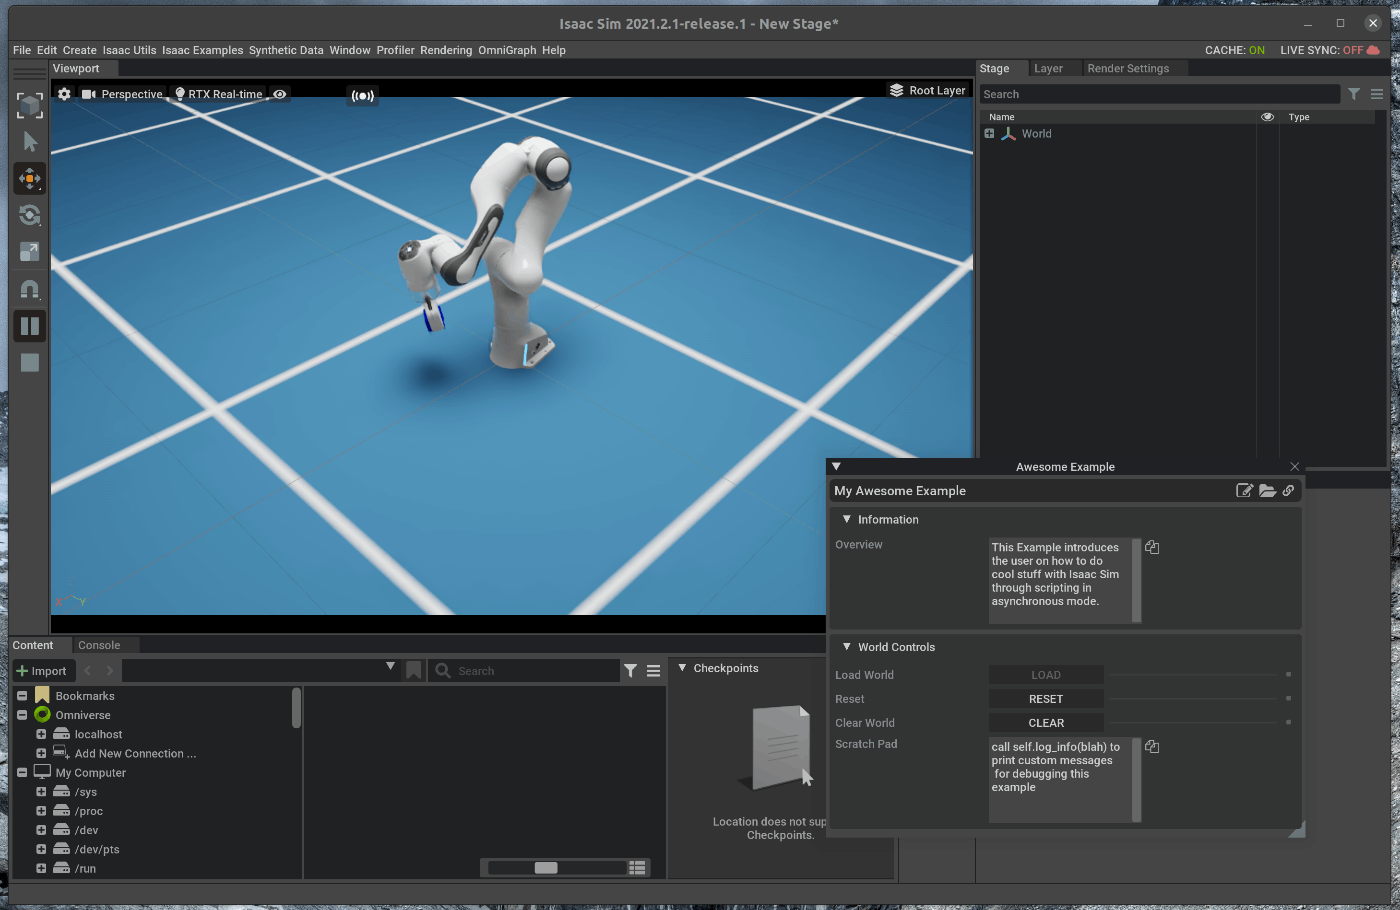
324 |
--------------------------------------------------------------------------------
/tutorials/required/mutiple_tasks/13_multiple_tasks.md:
--------------------------------------------------------------------------------
1 | # 概要
2 | Mutiple tasksのチュートリアルを進めます。
3 | このチュートリアルはmulti robotのチュートリアルの6部の内の6部目です。
4 |
5 | Issac Simのtutorialに上記の内容が記載されており、この内容に沿って進めます。
6 | https://docs.omniverse.nvidia.com/app_isaacsim/app_isaacsim/tutorial_required_multiple_tasks.html
7 |
8 | # 実行環境
9 |
10 | - インストール実行環境
11 |
12 | | unit | specification |
13 | |:-----------------:|:------------------:|
14 | | CPU | i9-11900H |
15 | | GPU | GeForce RTX 3080 Laptop|
16 | | RAM | 32GB |
17 | | OS | Ubuntu 20.04.3 LTS |
18 |
19 | - Nvidia Driverバージョン
20 | - 510.39.01
21 | - Issac simバージョン
22 | - 2021.2.1
23 |
24 | # 概要
25 |
26 | FrankaとJetbotを追加したAwesome worldのExampleのソースコードに処理を追加し、複数のタスクを実行するように編集します。
27 | 次の手順を進めます。
28 |
29 | 1. Awesome Exampleのソースコードを開く
30 | 2. taskをパラメタライズする
31 |
32 | ## 1. Awesome Exampleのソースコードを開く
33 | ### 1.1 OmniverseからIssac Simを起動する
34 | 
35 |
36 | ### 1.2 Awesome Exampleのソースコードを表示
37 | メニューバーのIsaac Examples > Awesome Exampleを選択します。
38 | 
39 |
40 | 次に、Awesome Examplesのウィンドウの右上にある3つのボタンの内、一番左側のOpen Source Codeボタンを選択します。
41 | 
42 |
43 | 選択すると、がVScodeが開き、Hello Worldのソースコードが表示されます。
44 | 
45 |
46 | ## 2. taskをパラメタライズする
47 | vscode上で、hello_world.pyを編集します。
48 |
49 | ## 2.1 offsetパラメータの追加
50 | Offsetパラメータを追加し、タスクのアセットをオフセット分だけ移動させます。
51 | hello_world.pyを次の様に編集します。
52 |
53 | ~~~ hello_world.py:Python3
54 | from omni.isaac.examples.base_sample import BaseSample
55 | from omni.isaac.franka.tasks import PickPlace
56 | from omni.isaac.franka.controllers import PickPlaceController
57 | from omni.isaac.jetbot import Jetbot
58 | from omni.isaac.motion_generation import WheelBasePoseController
59 | from omni.isaac.jetbot.controllers import DifferentialController
60 | from omni.isaac.core.tasks import BaseTask
61 | from omni.isaac.core.utils.types import ArticulationAction
62 | from omni.isaac.core.utils.string import find_unique_string_name # Creates a unique prim path
63 | from omni.isaac.core.utils.prims import is_prim_path_valid # Checks if a prim path is valid
64 | from omni.isaac.core.objects.cuboid import VisualCuboid
65 | import numpy as np
66 |
67 |
68 | class RobotsPlaying(BaseTask):
69 | # Adding offset to move the task objects with and the targets..etc
70 | def __init__(self, name, offset=None):
71 | super().__init__(name=name, offset=offset)
72 | self._task_event = 0
73 | self._jetbot_goal_position = np.array([130, 30, 0]) + self._offset #defined in the base task
74 | self._pick_place_task = PickPlace(cube_initial_position=np.array([10, 30, 5]),
75 | target_position=np.array([70, -30, 5.15 / 2.0]),
76 | offset=offset)
77 | return
78 |
79 | def set_up_scene(self, scene):
80 | super().set_up_scene(scene)
81 | #This will already translate the pick and place assets by the offset
82 | self._pick_place_task.set_up_scene(scene)
83 | # Find a unique scene name
84 | jetbot_name = find_unique_string_name(
85 | intitial_name="fancy_jetbot", is_unique_fn=lambda x: not self.scene.object_exists(x)
86 | )
87 | # Find a unique prim path
88 | jetbot_prim_path = find_unique_string_name(
89 | intitial_name="/World/Fancy_Jetbot", is_unique_fn=lambda x: not is_prim_path_valid(x)
90 | )
91 | self._jetbot = scene.add(Jetbot(prim_path=jetbot_prim_path,
92 | name=jetbot_name,
93 | position=np.array([0, 30, 0])))
94 | self._task_objects[self._jetbot.name] = self._jetbot
95 | pick_place_params = self._pick_place_task.get_params()
96 | self._franka = scene.get_object(pick_place_params["robot_name"]["value"])
97 | current_position, _ = self._franka.get_world_pose()
98 | self._franka.set_world_pose(position=current_position + np.array([100, 0, 0]))
99 | self._franka.set_default_state(position=current_position + np.array([100, 0, 0]))
100 | self._move_task_objects_to_their_frame()
101 | return
102 |
103 | def get_observations(self):
104 | current_jetbot_position, current_jetbot_orientation = self._jetbot.get_world_pose()
105 | observations= {
106 | "task_event": self._task_event,
107 | self._jetbot.name: {
108 | "position": current_jetbot_position,
109 | "orientation": current_jetbot_orientation,
110 | "goal_position": self._jetbot_goal_position
111 | }
112 | }
113 | observations.update(self._pick_place_task.get_observations())
114 | return observations
115 |
116 | def get_params(self):
117 | pick_place_params = self._pick_place_task.get_params()
118 | params_representation = pick_place_params
119 | params_representation["jetbot_name"] = {"value": self._jetbot.name, "modifiable": False}
120 | params_representation["franka_name"] = pick_place_params["robot_name"]
121 | return params_representation
122 |
123 |
124 | def pre_step(self, control_index, simulation_time):
125 | if self._task_event == 0:
126 | current_jetbot_position, _ = self._jetbot.get_world_pose()
127 | if np.mean(np.abs(current_jetbot_position[:2] - self._jetbot_goal_position[:2])) < 4:
128 | self._task_event += 1
129 | self._cube_arrive_step_index = control_index
130 | elif self._task_event == 1:
131 | if control_index - self._cube_arrive_step_index == 200:
132 | self._task_event += 1
133 | return
134 |
135 | def post_reset(self):
136 | self._task_event = 0
137 | return
138 |
139 |
140 | class HelloWorld(BaseSample):
141 | def __init__(self) -> None:
142 | super().__init__()
143 | return
144 |
145 | def setup_scene(self):
146 | world = self.get_world()
147 | world.add_task(RobotsPlaying(name="awesome_task", offset=np.array([0, -100, 0])))
148 | VisualCuboid(prim_path="/new_cube_1",
149 | name="visual_cube",
150 | position=np.array([100, 0, 5]),
151 | size=np.array([10, 10, 10]))
152 | return
153 |
154 | async def setup_post_load(self):
155 | self._world = self.get_world()
156 | task_params = self._world.get_task("awesome_task").get_params()
157 | self._franka = self._world.scene.get_object(task_params["franka_name"]["value"])
158 | self._jetbot = self._world.scene.get_object(task_params["jetbot_name"]["value"])
159 | self._cube_name = task_params["cube_name"]["value"]
160 | self._franka_controller = PickPlaceController(name="pick_place_controller",
161 | gripper_dof_indices=self._franka.gripper.dof_indices,
162 | robot_prim_path=self._franka.prim_path)
163 | self._jetbot_controller = WheelBasePoseController(name="cool_controller",
164 | open_loop_wheel_controller=DifferentialController(name="open_loop_controller"))
165 | self._world.add_physics_callback("sim_step", callback_fn=self.physics_step)
166 | await self._world.play_async()
167 | return
168 |
169 | async def setup_post_reset(self):
170 | self._franka_controller.reset()
171 | self._jetbot_controller.reset()
172 | await self._world.play_async()
173 | return
174 |
175 | def physics_step(self, step_size):
176 | current_observations = self._world.get_observations()
177 | if current_observations["task_event"] == 0:
178 | self._jetbot.apply_wheel_actions(
179 | self._jetbot_controller.forward(
180 | start_position=current_observations[self._jetbot.name]["position"],
181 | start_orientation=current_observations[self._jetbot.name]["orientation"],
182 | goal_position=current_observations[self._jetbot.name]["goal_position"]))
183 | elif current_observations["task_event"] == 1:
184 | self._jetbot.apply_wheel_actions(ArticulationAction(joint_velocities=[-10, -10]))
185 | elif current_observations["task_event"] == 2:
186 | self._jetbot.apply_wheel_actions(ArticulationAction(joint_velocities=[0.0, 0.0]))
187 | actions = self._franka_controller.forward(
188 | picking_position=current_observations[self._cube_name]["position"],
189 | placing_position=current_observations[self._cube_name]["target_position"],
190 | current_joint_positions=current_observations[self._franka.name]["joint_positions"])
191 | self._franka.apply_action(actions)
192 | if self._franka_controller.is_done():
193 | self._world.pause()
194 | return
195 | ~~~
196 | 
197 |
198 | 追加後、Ctrl+Saveとhot reloadが実行されます。
199 |
200 | メニューバーのIsaac Examples > Awesome Exampleを選択し、Loadを選択すると、ソースコードの変更部分が反映された状態で表示されます。
201 | この状態で、Viewportの左側のPLAYボタンを押すと、JetbotがCubeを移動し、FrankaがPickします。
202 | 
203 |
204 | ## 2.2 複数タスクの実行
205 |
206 | offsetパラメータを追加したクラスのインスタンスを複数生成し、複数のタスクを1つのシーン内で実行します。
207 | hello_world.pyを次の様に編集します。
208 |
209 | ~~~ hello_world.py:Python3
210 | from omni.isaac.examples.base_sample import BaseSample
211 | from omni.isaac.franka.tasks import PickPlace
212 | from omni.isaac.franka.controllers import PickPlaceController
213 | from omni.isaac.jetbot import Jetbot
214 | from omni.isaac.motion_generation import WheelBasePoseController
215 | from omni.isaac.jetbot.controllers import DifferentialController
216 | from omni.isaac.core.tasks import BaseTask
217 | from omni.isaac.core.utils.types import ArticulationAction
218 | from omni.isaac.core.utils.string import find_unique_string_name
219 | from omni.isaac.core.utils.prims import is_prim_path_valid
220 | import numpy as np
221 |
222 |
223 | class RobotsPlaying(BaseTask):
224 | def __init__(self, name, offset=None):
225 | super().__init__(name=name, offset=offset)
226 | self._task_event = 0
227 | self._jetbot_goal_position = np.array([np.random.uniform(120, 160), 30, 0]) + self._offset
228 | self._pick_place_task = PickPlace(cube_initial_position=np.array([10, 30, 5]),
229 | target_position=np.array([70, -30, 5.15 / 2.0]),
230 | offset=offset)
231 | return
232 |
233 | def set_up_scene(self, scene):
234 | super().set_up_scene(scene)
235 | self._pick_place_task.set_up_scene(scene)
236 | jetbot_name = find_unique_string_name(
237 | intitial_name="fancy_jetbot", is_unique_fn=lambda x: not self.scene.object_exists(x)
238 | )
239 | jetbot_prim_path = find_unique_string_name(
240 | intitial_name="/World/Fancy_Jetbot", is_unique_fn=lambda x: not is_prim_path_valid(x)
241 | )
242 | self._jetbot = scene.add(Jetbot(prim_path=jetbot_prim_path,
243 | name=jetbot_name,
244 | position=np.array([0, 30, 0])))
245 | self._task_objects[self._jetbot.name] = self._jetbot
246 | pick_place_params = self._pick_place_task.get_params()
247 | self._franka = scene.get_object(pick_place_params["robot_name"]["value"])
248 | current_position, _ = self._franka.get_world_pose()
249 | self._franka.set_world_pose(position=current_position + np.array([100, 0, 0]))
250 | self._franka.set_default_state(position=current_position + np.array([100, 0, 0]))
251 | self._move_task_objects_to_their_frame()
252 | return
253 |
254 | def get_observations(self):
255 | current_jetbot_position, current_jetbot_orientation = self._jetbot.get_world_pose()
256 | observations= {
257 | self.name + "_event": self._task_event, #change task event to make it unique
258 | self._jetbot.name: {
259 | "position": current_jetbot_position,
260 | "orientation": current_jetbot_orientation,
261 | "goal_position": self._jetbot_goal_position
262 | }
263 | }
264 | observations.update(self._pick_place_task.get_observations())
265 | return observations
266 |
267 | def get_params(self):
268 | pick_place_params = self._pick_place_task.get_params()
269 | params_representation = pick_place_params
270 | params_representation["jetbot_name"] = {"value": self._jetbot.name, "modifiable": False}
271 | params_representation["franka_name"] = pick_place_params["robot_name"]
272 | return params_representation
273 |
274 |
275 | def pre_step(self, control_index, simulation_time):
276 | if self._task_event == 0:
277 | current_jetbot_position, _ = self._jetbot.get_world_pose()
278 | if np.mean(np.abs(current_jetbot_position[:2] - self._jetbot_goal_position[:2])) < 4:
279 | self._task_event += 1
280 | self._cube_arrive_step_index = control_index
281 | elif self._task_event == 1:
282 | if control_index - self._cube_arrive_step_index == 200:
283 | self._task_event += 1
284 | return
285 |
286 | def post_reset(self):
287 | self._task_event = 0
288 | return
289 |
290 |
291 | class HelloWorld(BaseSample):
292 | def __init__(self) -> None:
293 | super().__init__()
294 | self._tasks = []
295 | self._num_of_tasks = 3
296 | self._franka_controllers = []
297 | self._jetbot_controllers = []
298 | self._jetbots = []
299 | self._frankas = []
300 | self._cube_names = []
301 | return
302 |
303 | def setup_scene(self):
304 | world = self.get_world()
305 | for i in range(self._num_of_tasks):
306 | world.add_task(RobotsPlaying(name="my_awesome_task_" + str(i), offset=100 * np.array([0, (i * 2) - 3, 0])))
307 | return
308 |
309 | async def setup_post_load(self):
310 | self._world = self.get_world()
311 | for i in range(self._num_of_tasks):
312 | self._tasks.append(self._world.get_task(name="my_awesome_task_" + str(i)))
313 | task_params = self._tasks[i].get_params()
314 | self._frankas.append(self._world.scene.get_object(task_params["franka_name"]["value"]))
315 | self._jetbots.append(self._world.scene.get_object(task_params["jetbot_name"]["value"]))
316 | self._cube_names.append(task_params["cube_name"]["value"])
317 | self._franka_controllers.append(PickPlaceController(name="pick_place_controller",
318 | gripper_dof_indices=self._frankas[i].gripper.dof_indices,
319 | robot_prim_path=self._frankas[i].prim_path,
320 | events_dt=[0.008, 0.002, 0.5, 0.1, 0.05, 0.05, 0.0025, 1, 0.008, 0.08]))
321 | self._jetbot_controllers.append(WheelBasePoseController(name="cool_controller",
322 | open_loop_wheel_controller=
323 | DifferentialController(name="open_loop_controller")))
324 | self._world.add_physics_callback("sim_step", callback_fn=self.physics_step)
325 | await self._world.play_async()
326 | return
327 |
328 | async def setup_post_reset(self):
329 | for i in range(len(self._tasks)):
330 | self._franka_controllers[i].reset()
331 | self._jetbot_controllers[i].reset()
332 | await self._world.play_async()
333 | return
334 |
335 | def physics_step(self, step_size):
336 | current_observations = self._world.get_observations()
337 | for i in range(len(self._tasks)):
338 | if current_observations[self._tasks[i].name + "_event"] == 0:
339 | self._jetbots[i].apply_wheel_actions(
340 | self._jetbot_controllers[i].forward(
341 | start_position=current_observations[self._jetbots[i].name]["position"],
342 | start_orientation=current_observations[self._jetbots[i].name]["orientation"],
343 | goal_position=current_observations[self._jetbots[i].name]["goal_position"]))
344 | elif current_observations[self._tasks[i].name + "_event"] == 1:
345 | self._jetbots[i].apply_wheel_actions(ArticulationAction(joint_velocities=[-10, -10]))
346 | elif current_observations[self._tasks[i].name + "_event"] == 2:
347 | self._jetbots[i].apply_wheel_actions(ArticulationAction(joint_velocities=[0.0, 0.0]))
348 | actions = self._franka_controllers[i].forward(
349 | picking_position=current_observations[self._cube_names[i]]["position"],
350 | placing_position=current_observations[self._cube_names[i]]["target_position"],
351 | current_joint_positions=current_observations[self._frankas[i].name]["joint_positions"])
352 | self._frankas[i].apply_action(actions)
353 | return
354 |
355 | def world_cleanup(self):
356 | self._tasks = []
357 | self._franka_controllers = []
358 | self._jetbot_controllers = []
359 | self._jetbots = []
360 | self._frankas = []
361 | self._cube_names = []
362 | return
363 | ~~~
364 | 
365 |
366 | 追加後、Ctrl+Saveとhot reloadが実行されます。
367 |
368 | メニューバーのIsaac Examples > Awesome Exampleを選択し、Loadを選択すると、ソースコードの変更部分が反映された状態で表示されます。
369 | この状態で、Viewportの左側のPLAYボタンを押すと、JetbotがCubeを移動し、FrankaがPickするtaskが3つ分実行されます。
370 | 
371 | 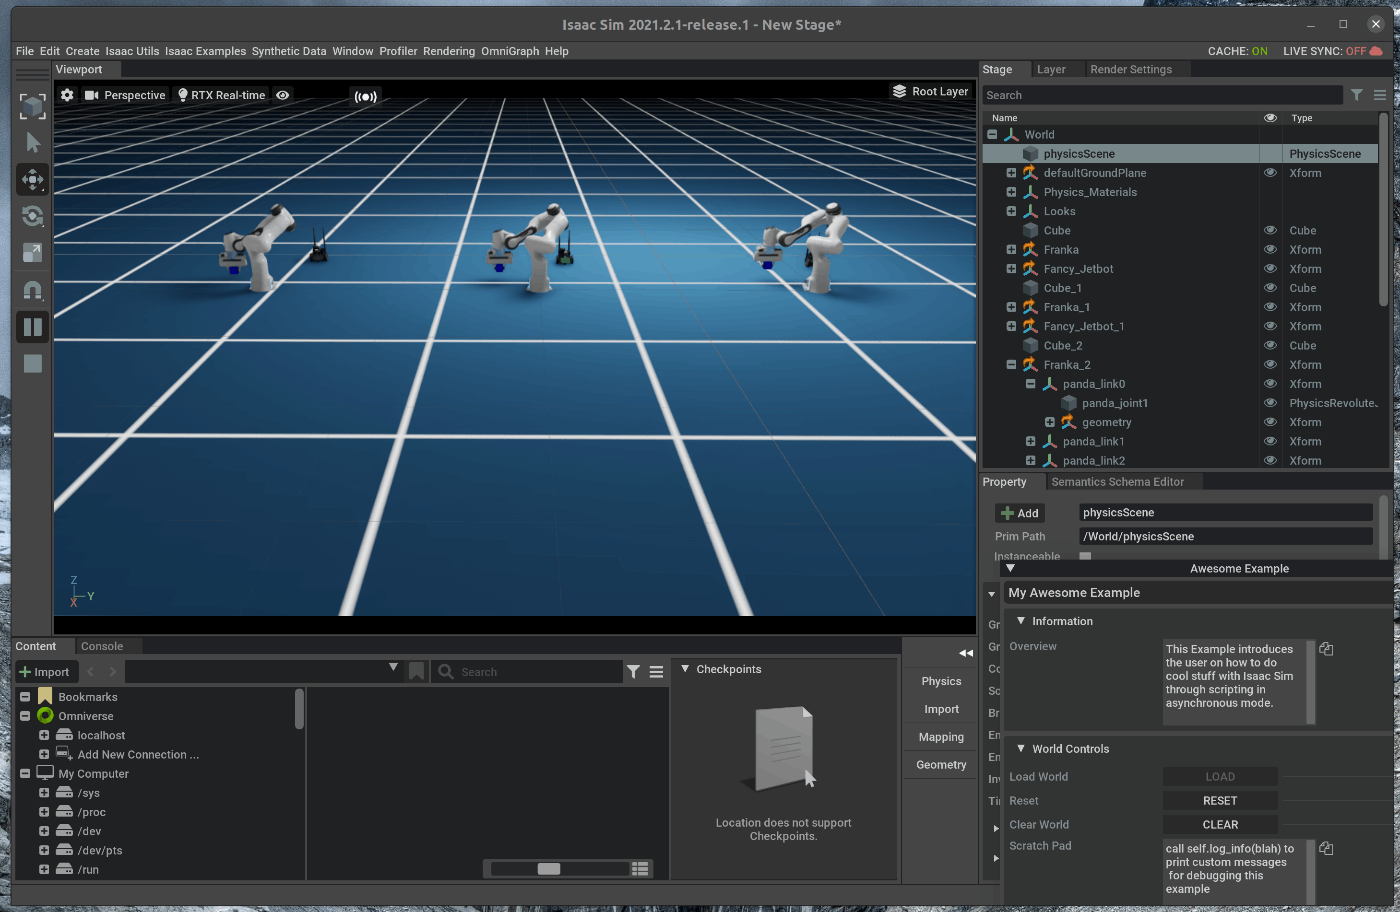
--------------------------------------------------------------------------------
/tutorials/required/adding_multiple_robots/12_adding_multiple_robots.md:
--------------------------------------------------------------------------------
1 | # 概要
2 | Adding Controllerのチュートリアルを進めます。
3 | このチュートリアルはmulti robotのチュートリアルの6部の内の5部目です。
4 |
5 | Issac Simのtutorialに上記の内容が記載されており、この内容に沿って進めます。
6 | https://docs.omniverse.nvidia.com/app_isaacsim/app_isaacsim/tutorial_required_adding_multiple_robots.html
7 |
8 | # 実行環境
9 |
10 | - インストール実行環境
11 |
12 | | unit | specification |
13 | |:-----------------:|:------------------:|
14 | | CPU | i9-11900H |
15 | | GPU | GeForce RTX 3080 Laptop|
16 | | RAM | 32GB |
17 | | OS | Ubuntu 20.04.3 LTS |
18 |
19 | - Nvidia Driverバージョン
20 | - 510.39.01
21 | - Issac simバージョン
22 | - 2021.2.1
23 |
24 | # 概要
25 |
26 | Frankaを追加したAwesome worldのExampleのソースコードに処理を追加し、シーンにNvidia Jetbotを追加します。
27 | 次の手順を進めます。
28 |
29 | 1. Awesome Exampleのソースコードを開く
30 | 2. Nvidia Jetbotを追加する
31 |
32 | ## 1. Awesome Exampleのソースコードを開く
33 | ### 1.1 OmniverseからIssac Simを起動する
34 | 
35 |
36 | ### 1.2 Awesome Exampleのソースコードを表示
37 | メニューバーのIsaac Examples > Awesome Exampleを選択します。
38 | 
39 |
40 | 次に、Awesome Examplesのウィンドウの右上にある3つのボタンの内、一番左側のOpen Source Codeボタンを選択します。
41 | 
42 |
43 | 選択すると、がVScodeが開き、Hello Worldのソースコードが表示されます。
44 | 
45 |
46 | ## 2. Nvidia Jetbotを追加する
47 | vscode上で、hello_world.pyを編集します。
48 |
49 | ## 2.1 Jetbotの追加
50 | Jetbotをシーンに追加します。
51 | hello_world.pyのsetup_sceneメソッドに次の処理を追加します。
52 |
53 | ~~~ hello_world.py:Python3
54 | from omni.isaac.examples.base_sample import BaseSample
55 | from omni.isaac.franka.tasks import PickPlace
56 | from omni.isaac.jetbot import Jetbot
57 | from omni.isaac.core.tasks import BaseTask
58 | import numpy as np
59 |
60 | class RobotsPlaying(BaseTask):
61 | def __init__(
62 | self,
63 | name
64 | ):
65 | super().__init__(name=name, offset=None)
66 | self._jetbot_goal_position = np.array([130, 30, 0])
67 | self._pick_place_task = PickPlace(cube_initial_position=np.array([10, 30, 5]),
68 | target_position=np.array([70, -30, 5.15 / 2.0]))
69 | return
70 |
71 | def set_up_scene(self, scene):
72 | super().set_up_scene(scene)
73 | self._pick_place_task.set_up_scene(scene)
74 | self._jetbot = scene.add(Jetbot(prim_path="/World/Fancy_Jetbot",
75 | name="fancy_jetbot",
76 | position=np.array([0, 30, 0])))
77 | pick_place_params = self._pick_place_task.get_params()
78 | self._franka = scene.get_object(pick_place_params["robot_name"]["value"])
79 | self._franka.set_world_pose(position=np.array([100, 0, 0]))
80 | self._franka.set_default_state(position=np.array([100, 0, 0]))
81 | return
82 |
83 | def get_observations(self):
84 | current_jetbot_position, current_jetbot_orientation = self._jetbot.get_world_pose()
85 | observations= {
86 | self._jetbot.name: {
87 | "position": current_jetbot_position,
88 | "orientation": current_jetbot_orientation,
89 | "goal_position": self._jetbot_goal_position
90 | }
91 | }
92 | return observations
93 |
94 | def get_params(self):
95 | pick_place_params = self._pick_place_task.get_params()
96 | params_representation = pick_place_params
97 | params_representation["jetbot_name"] = {"value": self._jetbot.name, "modifiable": False}
98 | params_representation["franka_name"] = pick_place_params["robot_name"]
99 | return params_representation
100 |
101 |
102 | class HelloWorld(BaseSample):
103 | def __init__(self) -> None:
104 | super().__init__()
105 | return
106 |
107 | def setup_scene(self):
108 | world = self.get_world()
109 | world.add_task(RobotsPlaying(name="awesome_task"))
110 | return
111 | ~~~
112 | 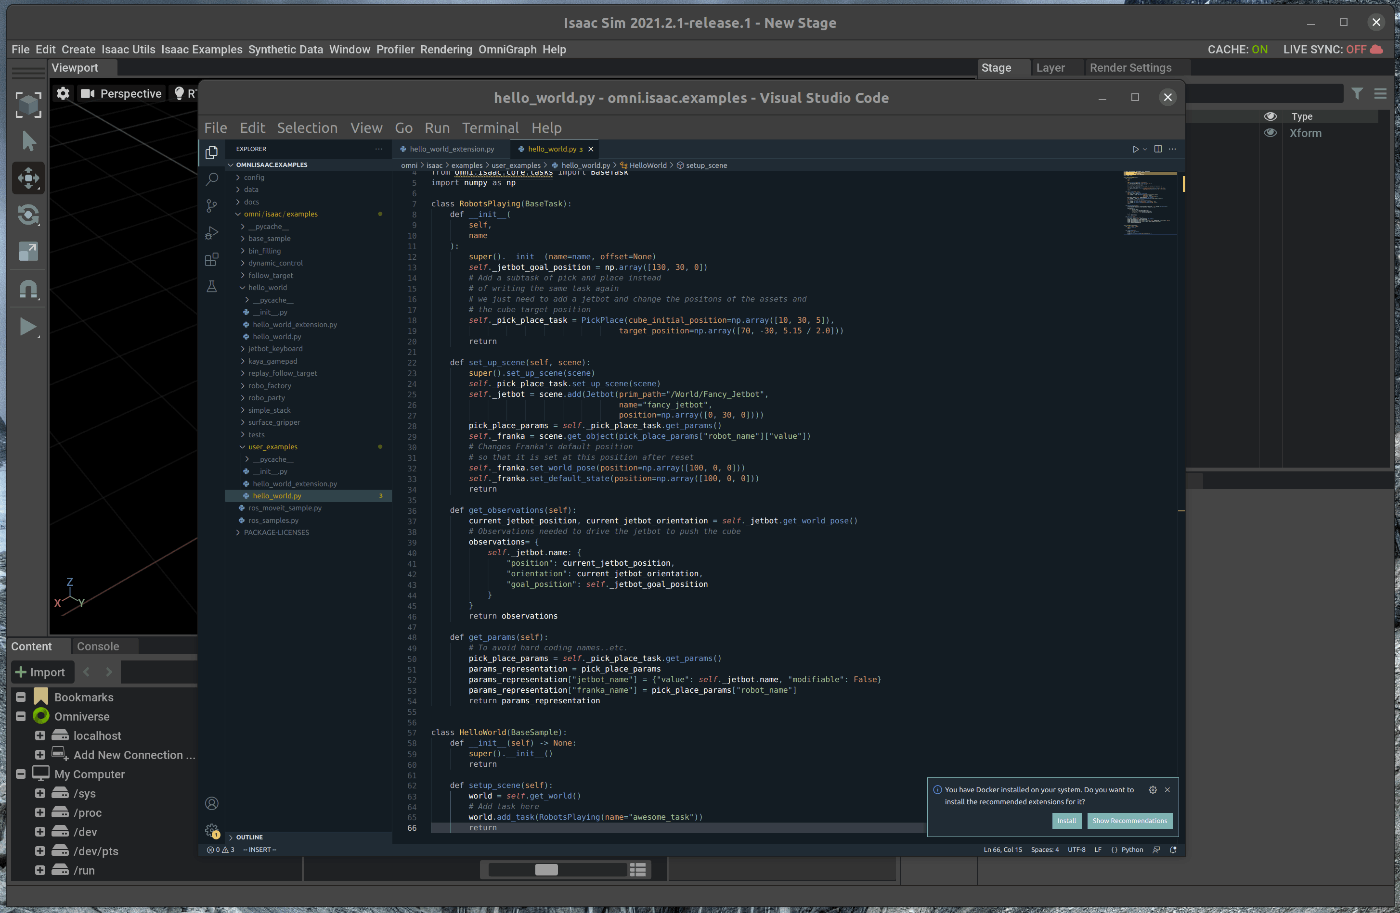
113 |
114 | 追加後、Ctrl+Saveとhot reloadが実行されます。
115 | メニューバーのIsaac Examples > Awesome Exampleを選択し、Loadを選択すると、ソースコードの変更部分が反映された状態で表示されます。
116 | 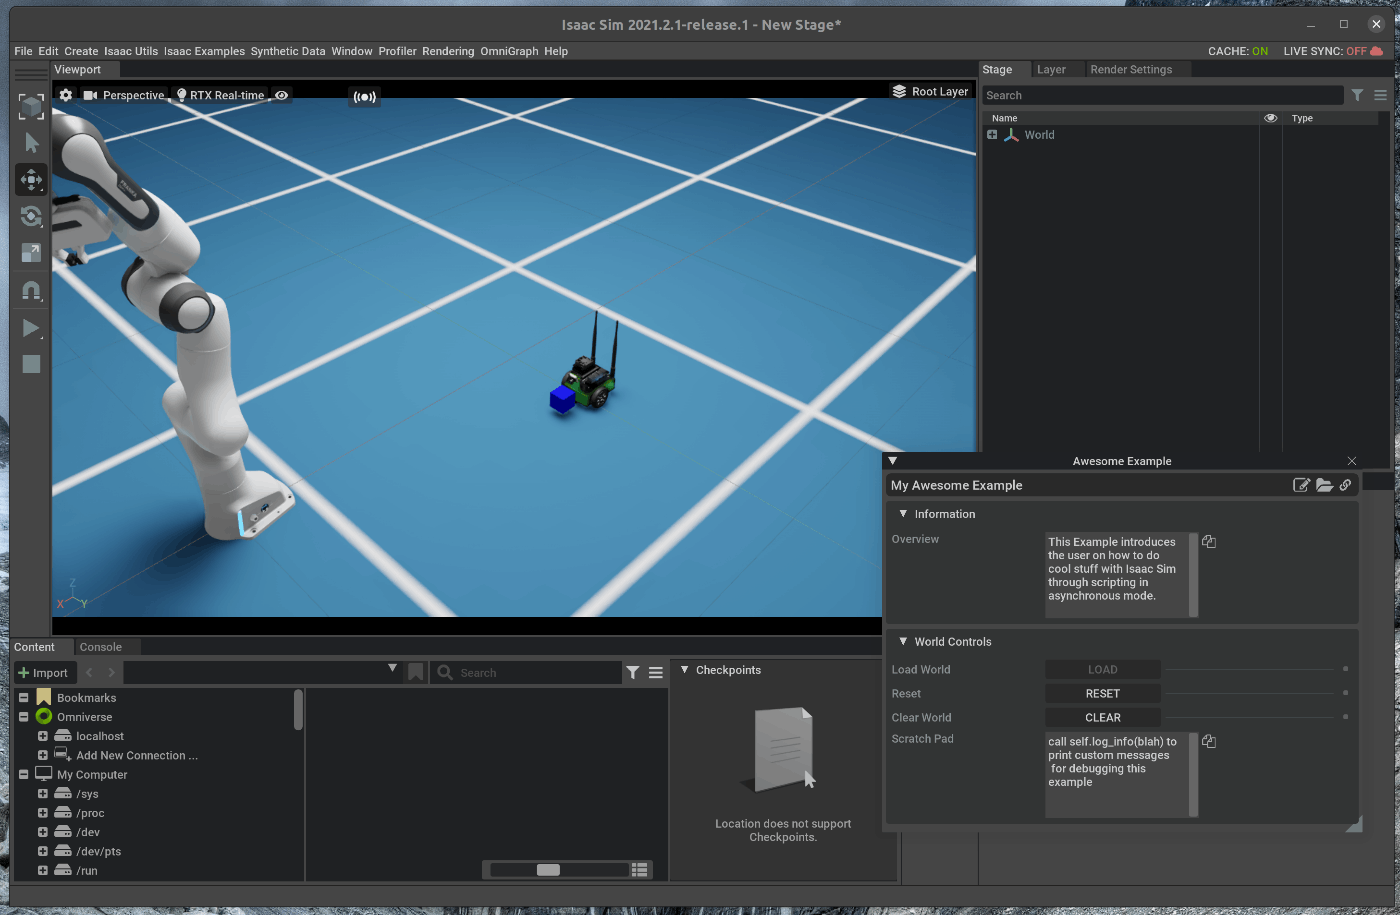
117 |
118 | ## 2.2 Jetbotを用いてCubeを移動させる
119 |
120 | シーンに追加したJetbotでCubeを押し、FrankaがPickする位置まで移動させる処理を追加します。
121 | hello_world.pyを次の様に編集します。
122 |
123 | ~~~ hello_world.py:Python3
124 | from omni.isaac.examples.base_sample import BaseSample
125 | from omni.isaac.franka.tasks import PickPlace
126 | from omni.isaac.jetbot import Jetbot
127 | from omni.isaac.motion_generation import WheelBasePoseController
128 | from omni.isaac.jetbot.controllers import DifferentialController
129 | from omni.isaac.core.tasks import BaseTask
130 | import numpy as np
131 |
132 |
133 | class RobotsPlaying(BaseTask):
134 | def __init__(
135 | self,
136 | name
137 | ):
138 | super().__init__(name=name, offset=None)
139 | self._jetbot_goal_position = np.array([130, 30, 0])
140 | self._pick_place_task = PickPlace(cube_initial_position=np.array([10, 30, 5]),
141 | target_position=np.array([70, -30, 5.15 / 2.0]))
142 | return
143 |
144 | def set_up_scene(self, scene):
145 | super().set_up_scene(scene)
146 | self._pick_place_task.set_up_scene(scene)
147 | self._jetbot = scene.add(Jetbot(prim_path="/World/Fancy_Jetbot",
148 | name="fancy_jetbot",
149 | position=np.array([0, 30, 0])))
150 | pick_place_params = self._pick_place_task.get_params()
151 | self._franka = scene.get_object(pick_place_params["robot_name"]["value"])
152 | self._franka.set_world_pose(position=np.array([100, 0, 0]))
153 | self._franka.set_default_state(position=np.array([100, 0, 0]))
154 | return
155 |
156 | def get_observations(self):
157 | current_jetbot_position, current_jetbot_orientation = self._jetbot.get_world_pose()
158 | observations= {
159 | self._jetbot.name: {
160 | "position": current_jetbot_position,
161 | "orientation": current_jetbot_orientation,
162 | "goal_position": self._jetbot_goal_position
163 | }
164 | }
165 | return observations
166 |
167 | def get_params(self):
168 | pick_place_params = self._pick_place_task.get_params()
169 | params_representation = pick_place_params
170 | params_representation["jetbot_name"] = {"value": self._jetbot.name, "modifiable": False}
171 | params_representation["franka_name"] = pick_place_params["robot_name"]
172 | return params_representation
173 |
174 |
175 | class HelloWorld(BaseSample):
176 | def __init__(self) -> None:
177 | super().__init__()
178 | return
179 |
180 | def setup_scene(self):
181 | world = self.get_world()
182 | world.add_task(RobotsPlaying(name="awesome_task"))
183 | return
184 |
185 | async def setup_post_load(self):
186 | self._world = self.get_world()
187 | task_params = self._world.get_task("awesome_task").get_params()
188 | self._jetbot = self._world.scene.get_object(task_params["jetbot_name"]["value"])
189 | self._cube_name = task_params["cube_name"]["value"]
190 | self._jetbot_controller = WheelBasePoseController(name="cool_controller",
191 | open_loop_wheel_controller=DifferentialController(name="open_loop_controller"))
192 | self._world.add_physics_callback("sim_step", callback_fn=self.physics_step)
193 | await self._world.play_async()
194 | return
195 |
196 | async def setup_post_reset(self):
197 | self._jetbot_controller.reset()
198 | await self._world.play_async()
199 | return
200 |
201 | def physics_step(self, step_size):
202 | current_observations = self._world.get_observations()
203 | self._jetbot.apply_wheel_actions(
204 | self._jetbot_controller.forward(
205 | start_position=current_observations[self._jetbot.name]["position"],
206 | start_orientation=current_observations[self._jetbot.name]["orientation"],
207 | goal_position=current_observations[self._jetbot.name]["goal_position"]))
208 | return
209 | ~~~
210 | 
211 |
212 | 追加後、Ctrl+Saveとhot reloadが実行されます。
213 |
214 | メニューバーのIsaac Examples > Awesome Exampleを選択し、Loadを選択すると、ソースコードの変更部分が反映された状態で表示されます。
215 | この状態で、Viewportの左側のPLAYボタンを押すと、JetbotがCubeを指定の位置に移動させます。
216 | 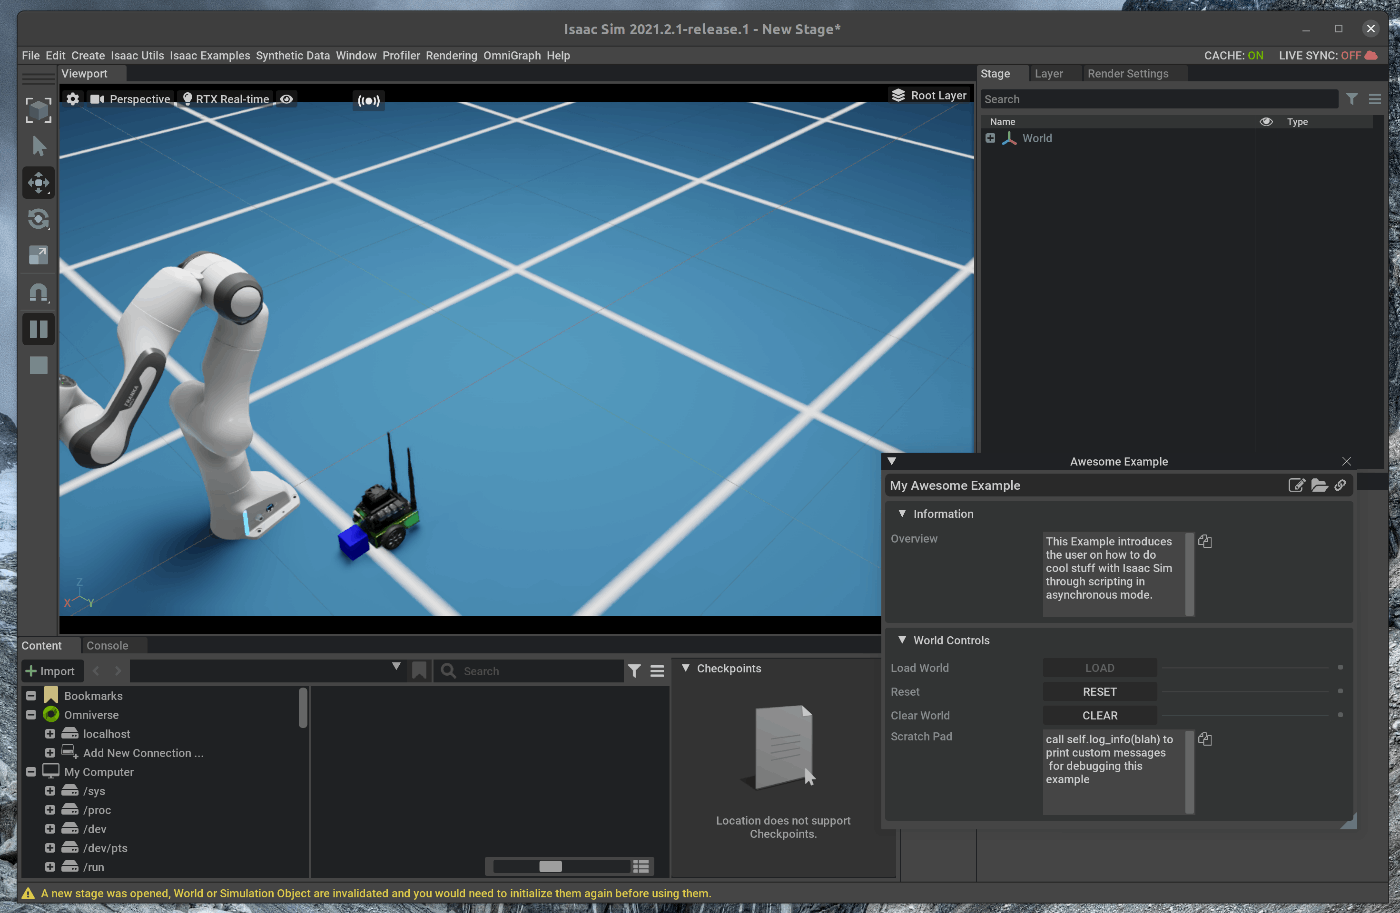
217 |
218 | ## 2.3 Jetbotを元の位置に戻す処理を追加する
219 |
220 | JetbotがCubeを移動させた後、最初の位置に戻る処理を追加します。
221 | hello_world.pyを次の様に編集します。
222 |
223 | ~~~ hello_world.py:Python3
224 | from omni.isaac.examples.base_sample import BaseSample
225 | from omni.isaac.franka.tasks import PickPlace
226 | from omni.isaac.jetbot import Jetbot
227 | from omni.isaac.motion_generation import WheelBasePoseController
228 | from omni.isaac.jetbot.controllers import DifferentialController
229 | from omni.isaac.core.tasks import BaseTask
230 | from omni.isaac.core.utils.types import ArticulationAction
231 | import numpy as np
232 |
233 |
234 | class RobotsPlaying(BaseTask):
235 | def __init__(
236 | self,
237 | name
238 | ):
239 | super().__init__(name=name, offset=None)
240 | self._jetbot_goal_position = np.array([130, 30, 0])
241 | # Add task logic to signal to the robots which task is active
242 | self._task_event = 0
243 | self._pick_place_task = PickPlace(cube_initial_position=np.array([10, 30, 5]),
244 | target_position=np.array([70, -30, 5.15 / 2.0]))
245 | return
246 |
247 | def set_up_scene(self, scene):
248 | super().set_up_scene(scene)
249 | self._pick_place_task.set_up_scene(scene)
250 | self._jetbot = scene.add(Jetbot(prim_path="/World/Fancy_Jetbot",
251 | name="fancy_jetbot",
252 | position=np.array([0, 30, 0])))
253 | pick_place_params = self._pick_place_task.get_params()
254 | self._franka = scene.get_object(pick_place_params["robot_name"]["value"])
255 | self._franka.set_world_pose(position=np.array([100, 0, 0]))
256 | self._franka.set_default_state(position=np.array([100, 0, 0]))
257 | return
258 |
259 | def get_observations(self):
260 | current_jetbot_position, current_jetbot_orientation = self._jetbot.get_world_pose()
261 | observations= {
262 | "task_event": self._task_event,
263 | self._jetbot.name: {
264 | "position": current_jetbot_position,
265 | "orientation": current_jetbot_orientation,
266 | "goal_position": self._jetbot_goal_position
267 | }
268 | }
269 | return observations
270 |
271 | def get_params(self):
272 | pick_place_params = self._pick_place_task.get_params()
273 | params_representation = pick_place_params
274 | params_representation["jetbot_name"] = {"value": self._jetbot.name, "modifiable": False}
275 | params_representation["franka_name"] = pick_place_params["robot_name"]
276 | return params_representation
277 |
278 | def pre_step(self, control_index, simulation_time):
279 | if self._task_event == 0:
280 | current_jetbot_position, _ = self._jetbot.get_world_pose()
281 | if np.mean(np.abs(current_jetbot_position[:2] - self._jetbot_goal_position[:2])) < 4:
282 | self._task_event += 1
283 | self._cube_arrive_step_index = control_index
284 | elif self._task_event == 1:
285 | # Jetbot has 200 time steps to back off from Franka
286 | if control_index - self._cube_arrive_step_index == 200:
287 | self._task_event += 1
288 | return
289 |
290 | def post_reset(self):
291 | self._task_event = 0
292 | return
293 |
294 |
295 |
296 | class HelloWorld(BaseSample):
297 | def __init__(self) -> None:
298 | super().__init__()
299 | return
300 |
301 | def setup_scene(self):
302 | world = self.get_world()
303 | world.add_task(RobotsPlaying(name="awesome_task"))
304 | return
305 |
306 | async def setup_post_load(self):
307 | self._world = self.get_world()
308 | task_params = self._world.get_task("awesome_task").get_params()
309 | self._jetbot = self._world.scene.get_object(task_params["jetbot_name"]["value"])
310 | self._cube_name = task_params["cube_name"]["value"]
311 | self._jetbot_controller = WheelBasePoseController(name="cool_controller",
312 | open_loop_wheel_controller=DifferentialController(name="open_loop_controller"))
313 | self._world.add_physics_callback("sim_step", callback_fn=self.physics_step)
314 | await self._world.play_async()
315 | return
316 |
317 | async def setup_post_reset(self):
318 | self._jetbot_controller.reset()
319 | await self._world.play_async()
320 | return
321 |
322 | def physics_step(self, step_size):
323 | current_observations = self._world.get_observations()
324 | if current_observations["task_event"] == 0:
325 | self._jetbot.apply_wheel_actions(
326 | self._jetbot_controller.forward(
327 | start_position=current_observations[self._jetbot.name]["position"],
328 | start_orientation=current_observations[self._jetbot.name]["orientation"],
329 | goal_position=current_observations[self._jetbot.name]["goal_position"]))
330 | elif current_observations["task_event"] == 1:
331 | self._jetbot.apply_wheel_actions(ArticulationAction(joint_velocities=[-10, -10]))
332 | elif current_observations["task_event"] == 2:
333 | self._jetbot.apply_wheel_actions(ArticulationAction(joint_velocities=[0.0, 0.0]))
334 | return
335 | ~~~
336 | 
337 |
338 | 追加後、Ctrl+Saveとhot reloadが実行されます。
339 |
340 | メニューバーのIsaac Examples > Awesome Exampleを選択し、Loadを選択すると、ソースコードの変更部分が反映された状態で表示されます。
341 | この状態で、Viewportの左側のPLAYボタンを押すと、JetbotがCubeを移動させた後、最初の位置に戻ります。
342 | 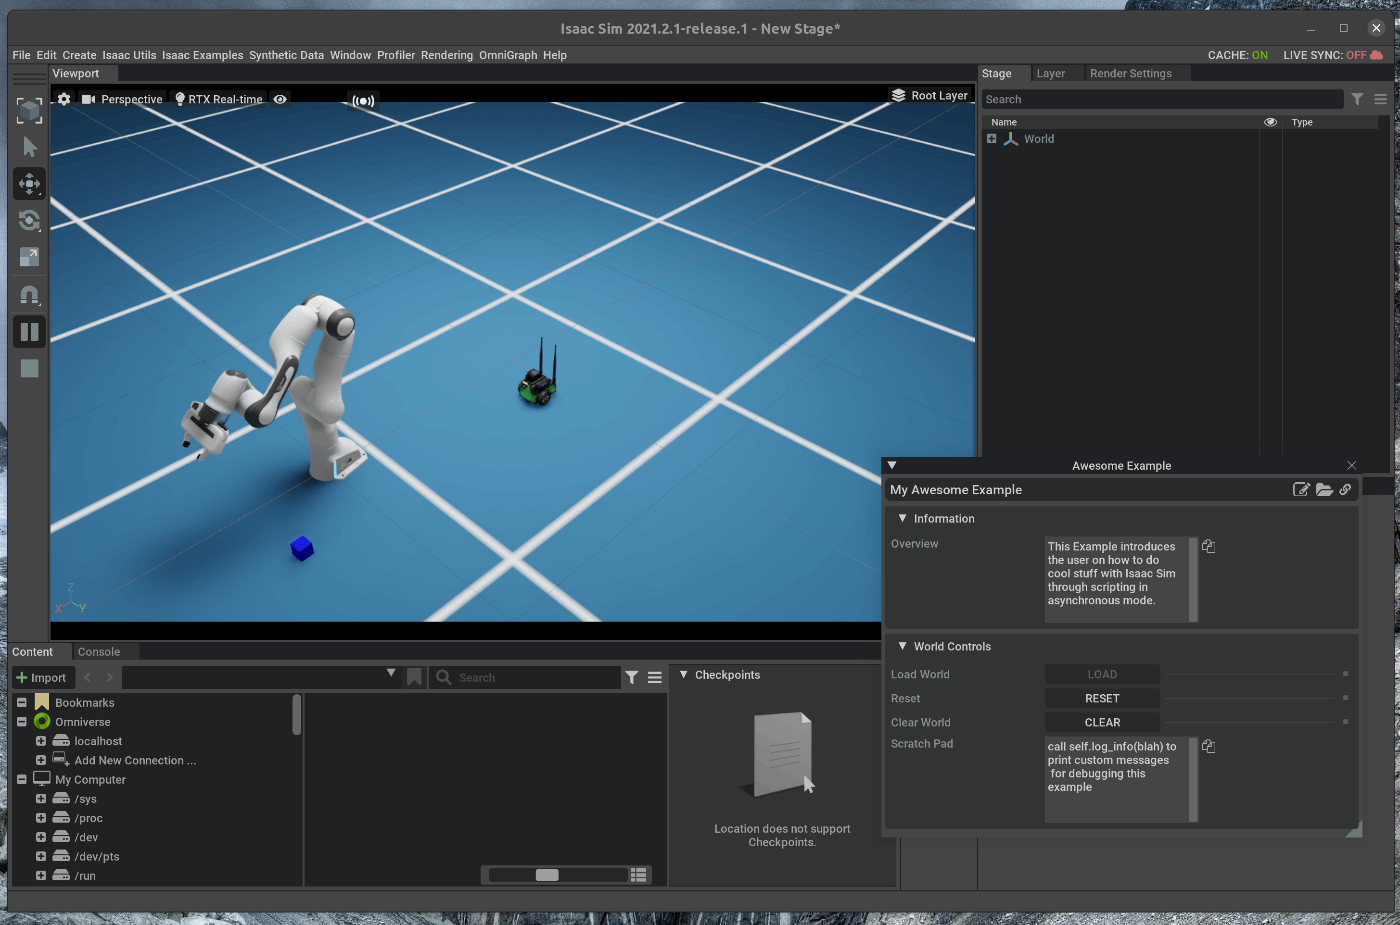
343 |
344 | ## 2.4 FrankaでCubeをPickする
345 |
346 | シーンに追加したJetbotでCubeを押し、FrankaでCubeをPickさせる処理を追加します。
347 | hello_world.pyを次の様に編集します。
348 |
349 | ~~~ hello_world.py:Python3
350 | from omni.isaac.examples.base_sample import BaseSample
351 | from omni.isaac.franka.tasks import PickPlace
352 | from omni.isaac.franka.controllers import PickPlaceController
353 | from omni.isaac.jetbot import Jetbot
354 | from omni.isaac.motion_generation import WheelBasePoseController
355 | from omni.isaac.jetbot.controllers import DifferentialController
356 | from omni.isaac.core.tasks import BaseTask
357 | from omni.isaac.core.utils.types import ArticulationAction
358 | import numpy as np
359 |
360 |
361 | class RobotsPlaying(BaseTask):
362 | def __init__(self, name):
363 | super().__init__(name=name, offset=None)
364 | self._task_event = 0
365 | self._jetbot_goal_position = np.array([130, 30, 0])
366 | self._pick_place_task = PickPlace(cube_initial_position=np.array([10, 30, 5]),
367 | target_position=np.array([70, -30, 5.15 / 2.0]))
368 | return
369 |
370 | def set_up_scene(self, scene):
371 | super().set_up_scene(scene)
372 | self._pick_place_task.set_up_scene(scene)
373 | self._jetbot = scene.add(Jetbot(prim_path="/World/Fancy_Jetbot",
374 | name="fancy_jetbot",
375 | position=np.array([0, 30, 0])))
376 | pick_place_params = self._pick_place_task.get_params()
377 | self._franka = scene.get_object(pick_place_params["robot_name"]["value"])
378 | self._franka.set_world_pose(position=np.array([100, 0, 0]))
379 | self._franka.set_default_state(position=np.array([100, 0, 0]))
380 | return
381 |
382 | def get_observations(self):
383 | current_jetbot_position, current_jetbot_orientation = self._jetbot.get_world_pose()
384 | observations= {
385 | "task_event": self._task_event,
386 | self._jetbot.name: {
387 | "position": current_jetbot_position,
388 | "orientation": current_jetbot_orientation,
389 | "goal_position": self._jetbot_goal_position
390 | }
391 | }
392 | # add the subtask's observations as well
393 | observations.update(self._pick_place_task.get_observations())
394 | return observations
395 |
396 | def get_params(self):
397 | pick_place_params = self._pick_place_task.get_params()
398 | params_representation = pick_place_params
399 | params_representation["jetbot_name"] = {"value": self._jetbot.name, "modifiable": False}
400 | params_representation["franka_name"] = pick_place_params["robot_name"]
401 | return params_representation
402 |
403 |
404 | def pre_step(self, control_index, simulation_time):
405 | if self._task_event == 0:
406 | current_jetbot_position, _ = self._jetbot.get_world_pose()
407 | if np.mean(np.abs(current_jetbot_position[:2] - self._jetbot_goal_position[:2])) < 4:
408 | self._task_event += 1
409 | self._cube_arrive_step_index = control_index
410 | elif self._task_event == 1:
411 | if control_index - self._cube_arrive_step_index == 200:
412 | self._task_event += 1
413 | return
414 |
415 | def post_reset(self):
416 | self._task_event = 0
417 | return
418 |
419 |
420 | class HelloWorld(BaseSample):
421 | def __init__(self) -> None:
422 | super().__init__()
423 | return
424 |
425 | def setup_scene(self):
426 | world = self.get_world()
427 | world.add_task(RobotsPlaying(name="awesome_task"))
428 | return
429 |
430 | async def setup_post_load(self):
431 | self._world = self.get_world()
432 | task_params = self._world.get_task("awesome_task").get_params()
433 | self._franka = self._world.scene.get_object(task_params["franka_name"]["value"])
434 | self._jetbot = self._world.scene.get_object(task_params["jetbot_name"]["value"])
435 | self._cube_name = task_params["cube_name"]["value"]
436 | self._franka_controller = PickPlaceController(name="pick_place_controller",
437 | gripper_dof_indices=self._franka.gripper.dof_indices,
438 | robot_prim_path=self._franka.prim_path)
439 | self._jetbot_controller = WheelBasePoseController(name="cool_controller",
440 | open_loop_wheel_controller=DifferentialController(name="open_loop_controller"))
441 | self._world.add_physics_callback("sim_step", callback_fn=self.physics_step)
442 | await self._world.play_async()
443 | return
444 |
445 | async def setup_post_reset(self):
446 | self._franka_controller.reset()
447 | self._jetbot_controller.reset()
448 | await self._world.play_async()
449 | return
450 |
451 | def physics_step(self, step_size):
452 | current_observations = self._world.get_observations()
453 | if current_observations["task_event"] == 0:
454 | self._jetbot.apply_wheel_actions(
455 | self._jetbot_controller.forward(
456 | start_position=current_observations[self._jetbot.name]["position"],
457 | start_orientation=current_observations[self._jetbot.name]["orientation"],
458 | goal_position=current_observations[self._jetbot.name]["goal_position"]))
459 | elif current_observations["task_event"] == 1:
460 | self._jetbot.apply_wheel_actions(ArticulationAction(joint_velocities=[-10, -10]))
461 | elif current_observations["task_event"] == 2:
462 | self._jetbot.apply_wheel_actions(ArticulationAction(joint_velocities=[0.0, 0.0]))
463 | actions = self._franka_controller.forward(
464 | picking_position=current_observations[self._cube_name]["position"],
465 | placing_position=current_observations[self._cube_name]["target_position"],
466 | current_joint_positions=current_observations[self._franka.name]["joint_positions"])
467 | self._franka.apply_action(actions)
468 | if self._franka_controller.is_done():
469 | self._world.pause()
470 | return
471 | ~~~
472 | 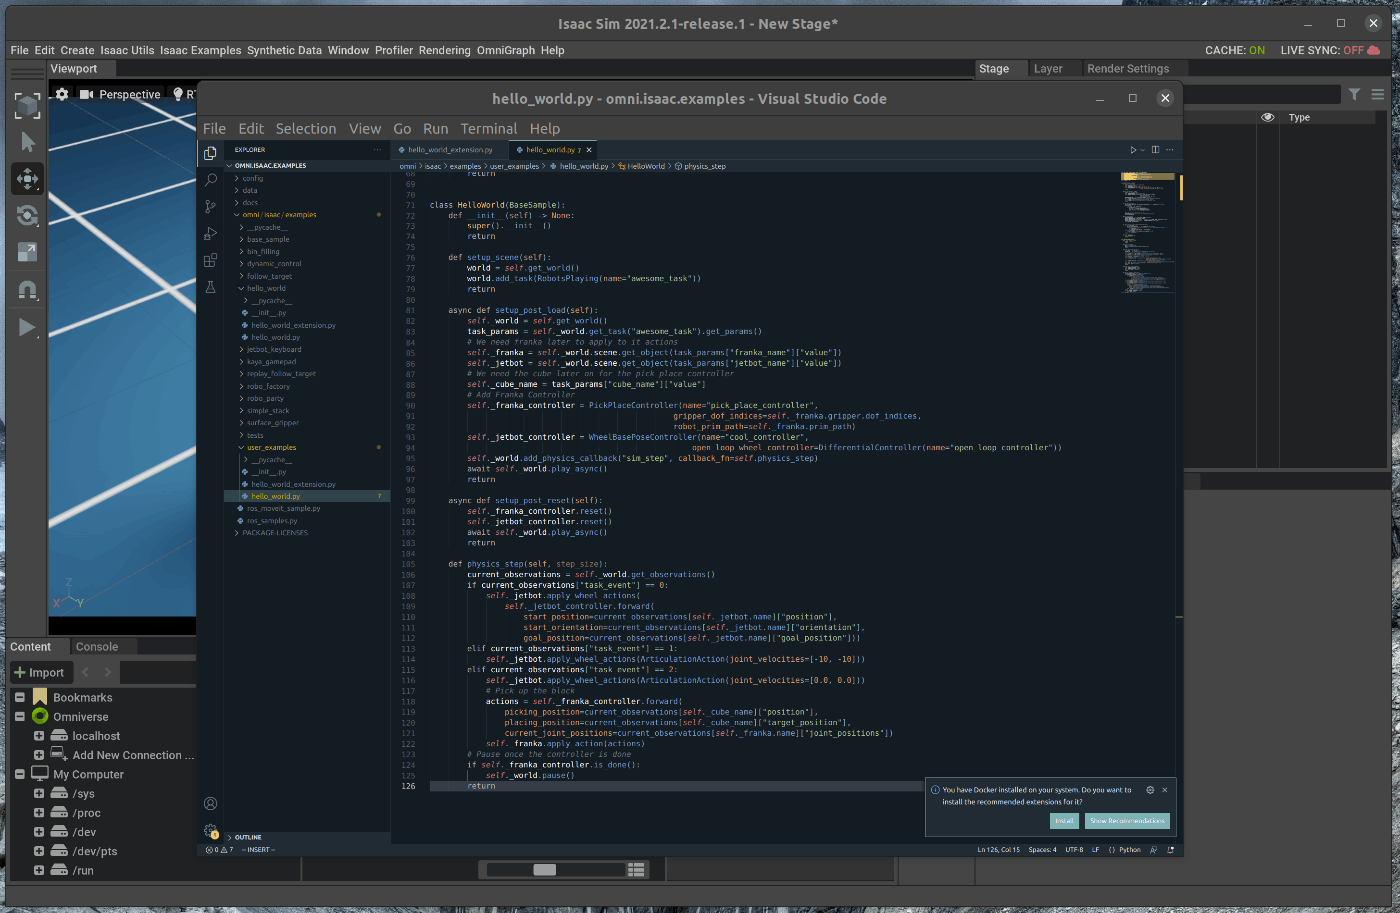
473 |
474 | 追加後、Ctrl+Saveとhot reloadが実行されます。
475 |
476 | メニューバーのIsaac Examples > Awesome Exampleを選択し、Loadを選択すると、ソースコードの変更部分が反映された状態で表示されます。
477 | この状態で、Viewportの左側のPLAYボタンを押すと、JetbotがCubeを移動し、FrankaがPickします。
478 | 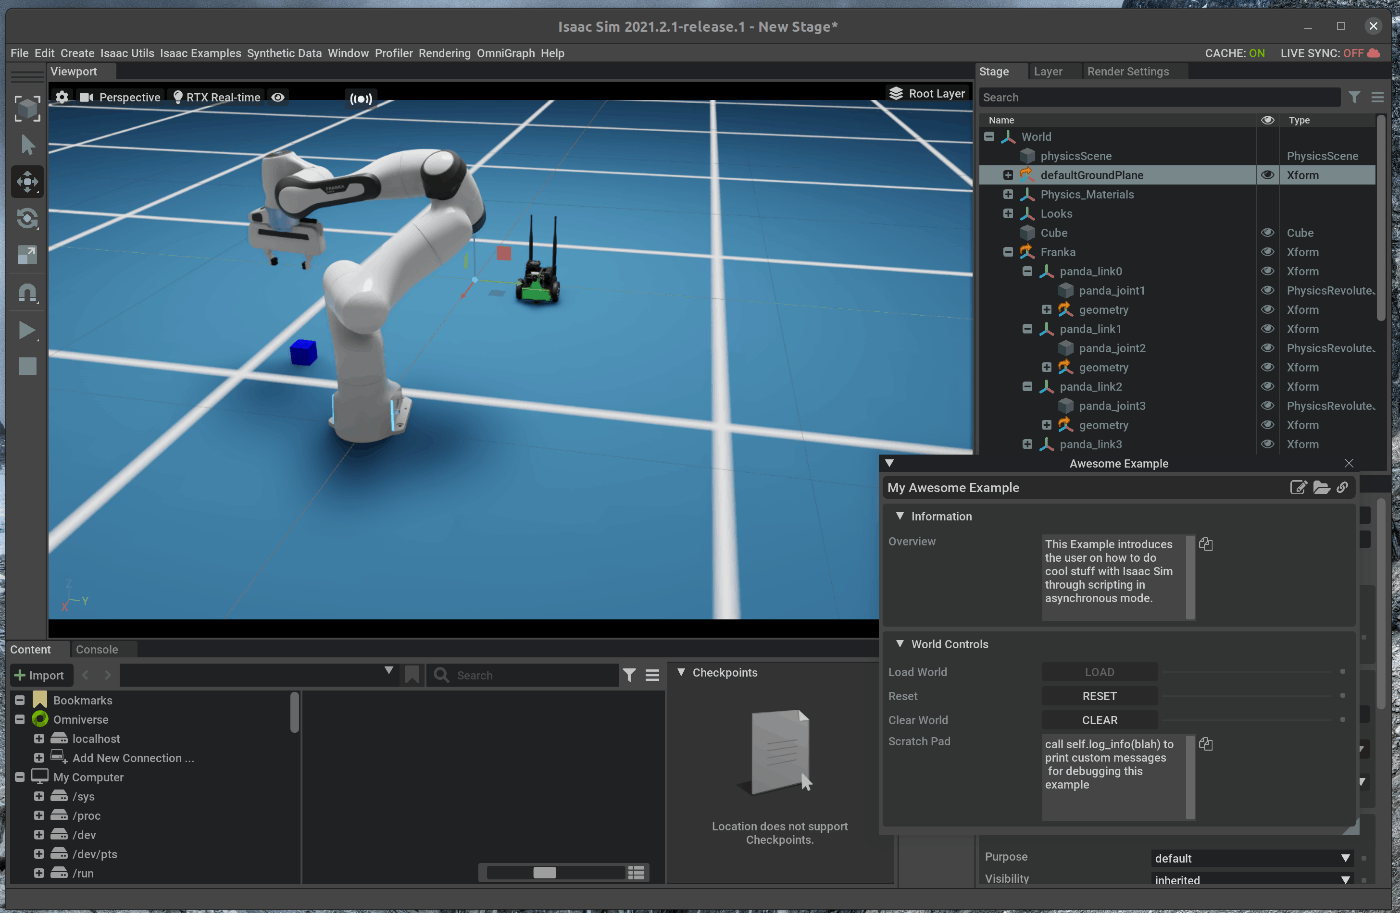
479 |
--------------------------------------------------------------------------------