 18 |
19 | 3. In *MainActivity*, add a Shared Preferences component `sp:sp`.
20 |
21 | 4. Add onStart event and put blocks to set the text of `textview3` and `textview4`.
22 |
23 |
18 |
19 | 3. In *MainActivity*, add a Shared Preferences component `sp:sp`.
20 |
21 | 4. Add onStart event and put blocks to set the text of `textview3` and `textview4`.
22 |
23 | 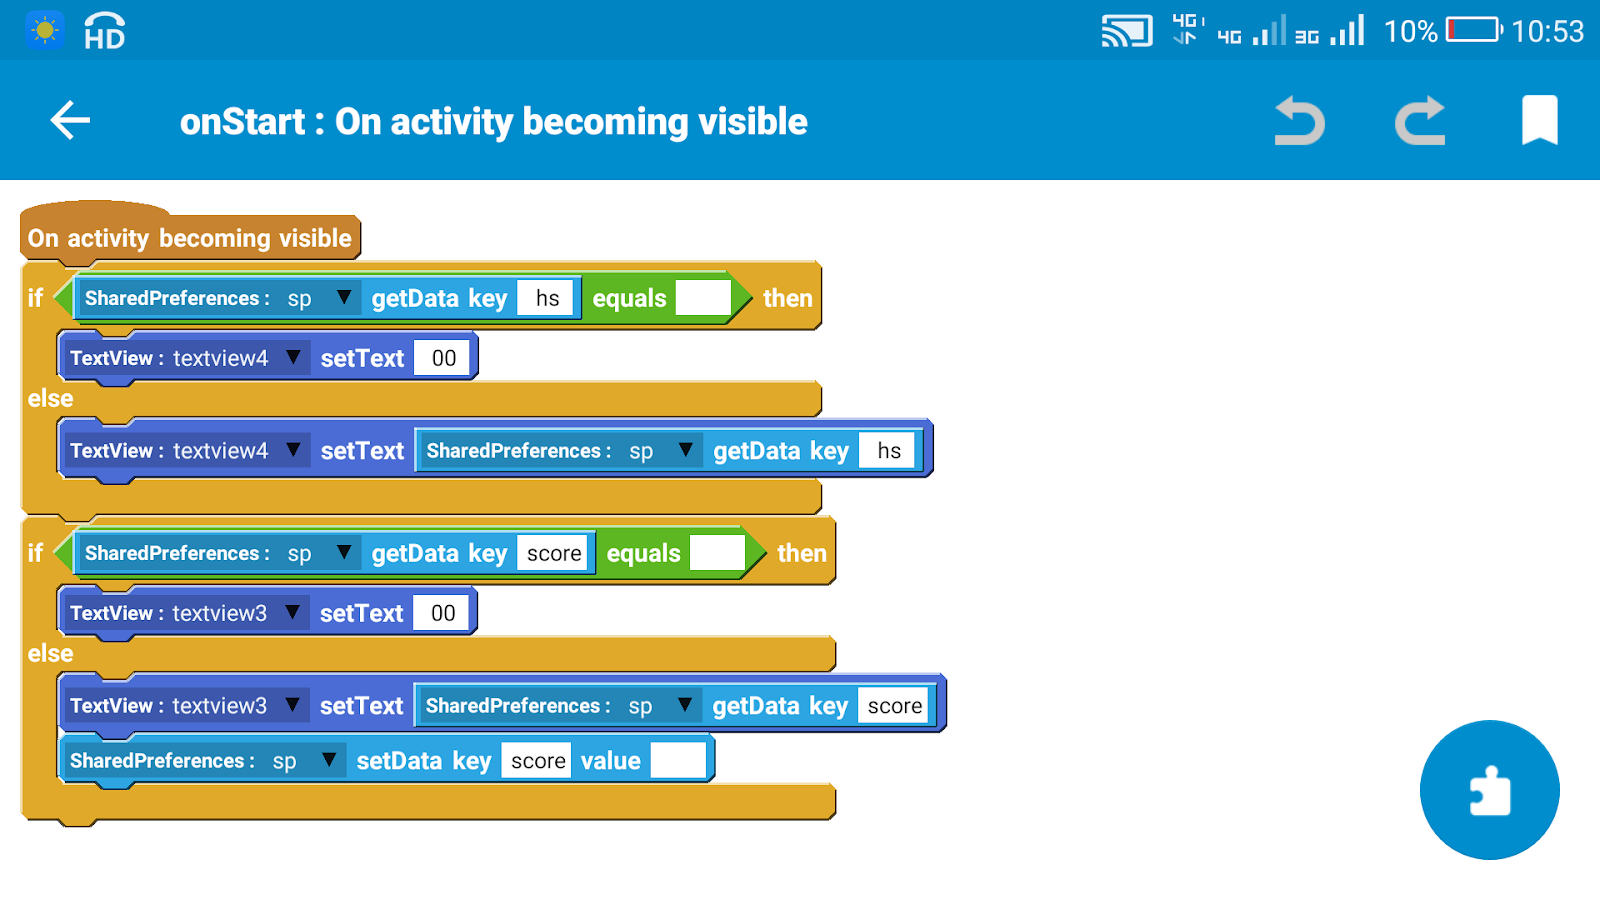 24 |
25 | 7. On *page2.xml* add a LinearV `linear1` with padding 0 and width and height `MATCH_PARENT`.
26 |
27 | 8. In *Page2Activity*, add a Shared Preferences component again `sp:sp`.
28 |
29 | 9. Create a number variable `highscore`.
30 |
31 | 10. In onCreate event of *Page2Activity*, use blocks to set the value of number variable `highscore`, and use codes to create a new GameView and add it to `linear1`, as shown in image below.
32 |
33 |
24 |
25 | 7. On *page2.xml* add a LinearV `linear1` with padding 0 and width and height `MATCH_PARENT`.
26 |
27 | 8. In *Page2Activity*, add a Shared Preferences component again `sp:sp`.
28 |
29 | 9. Create a number variable `highscore`.
30 |
31 | 10. In onCreate event of *Page2Activity*, use blocks to set the value of number variable `highscore`, and use codes to create a new GameView and add it to `linear1`, as shown in image below.
32 |
33 | 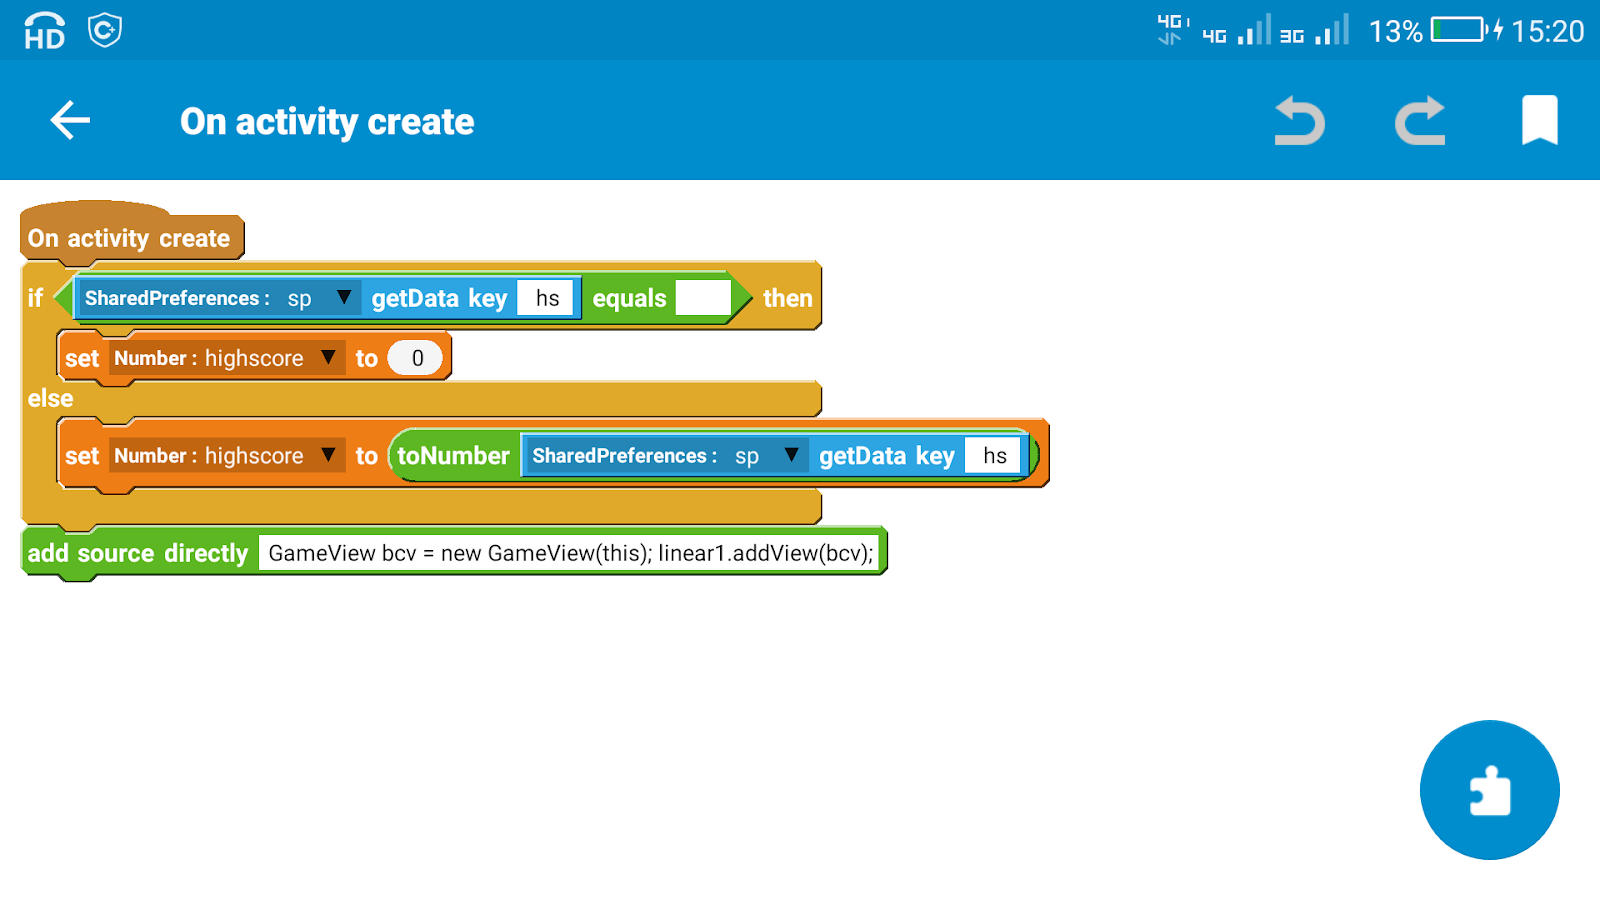 34 |
35 | The code used in the add source directly block is:
36 | ```java
37 | GameView bcv = new GameView(this);
38 | linear1.addView(bcv);
39 | ```
40 |
41 | 11. Create a more block. Name it extra.
42 |
43 |
34 |
35 | The code used in the add source directly block is:
36 | ```java
37 | GameView bcv = new GameView(this);
38 | linear1.addView(bcv);
39 | ```
40 |
41 | 11. Create a more block. Name it extra.
42 |
43 | 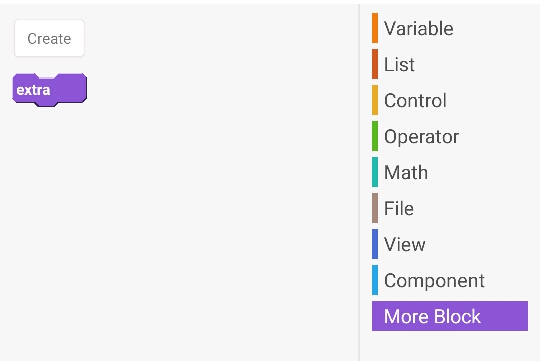 44 |
45 | Now the setup is done, time to start the main process.
46 |
47 | ## Programming
48 |
49 | 12. In the more block extra, use an add source directly block and put codes to create a new View class GameView.
50 |
51 | ```java
52 | }
53 |
54 | public class GameView extends View{
55 | private Paint myPaint;
56 | private int speed=1;
57 | private int time = 0;
58 | private int score = 0;
59 | private int myCarPosition = 0;
60 | private ArrayList
44 |
45 | Now the setup is done, time to start the main process.
46 |
47 | ## Programming
48 |
49 | 12. In the more block extra, use an add source directly block and put codes to create a new View class GameView.
50 |
51 | ```java
52 | }
53 |
54 | public class GameView extends View{
55 | private Paint myPaint;
56 | private int speed=1;
57 | private int time = 0;
58 | private int score = 0;
59 | private int myCarPosition = 0;
60 | private ArrayList
22 |
26 |
27 | ## 3. How to use the Excluded built-in libraries screen?
28 |
29 | Example steps for upgrading the `androidx.activity` built-in library:
30 |
31 | 1. Add the new library version as Local library, e.g. `androidx.activity:activity:1.9.2`. You can use Local library Manager's downloader for that.
32 | 2. Open the Excluded built-in libraries screen of your project and enable the feature. To open it: Open project > press on 3-dot menu / open drawer > Library (at the top of the right drawer) > Excluded built-in libraries
33 | 3. Select the built-in library version of `androidx.activity`, so `activity-1.3.0`, then press save.
34 |
35 | Now Sketchware Pro will add its usual built-in libraries to the project, except for `androidx.activity` of version `1.3.0`. It will add the Local library version of `androidx.activity` and version 1.9.2 instead. This is the only way to "update libraries" unless you modify Sketchware Pro itself.
36 |
37 | **Make sure that Local library dependencies are met, and that you repeat the same exclusion steps above for them!** For example, if you wanted to use the Material Design Components library with Gradle dependency `com.google.android.material:material:1.12.0`, you'd first have to download and save it as Local library, **including sub-dependencies**. Then, for every single new Local library (a dependency of the Material library), exclude the corresponding built-in library (if it exists, some libraries are just new). This is a lot of work, but it's all necessary to avoid crashes and misconfiguration.
38 |
39 | This is for example how to properly update the Material Design Components built-in library:
40 |
41 | Why it doesn't work without the Excluded built-in libraries screen
23 | 24 | When not using the Excluded built-in libraries screen, the .apk file of the project contains two definitions of a library in the .dex files. Android only uses the first definition of a class, and built-in libraries' .dex files are preferred over Local libraries' when Sketchware Pro creates a project .apk file. This is similar to the Java boot classpath and not being able to overwrite core Java classes. 25 |
42 |
43 | 
44 |
45 |
--------------------------------------------------------------------------------
/blog/get-battery-charge.md:
--------------------------------------------------------------------------------
1 | ---
2 | title: Get battery info in Sketchware
3 | description: This post shows how you can detect user's battery charge, status etc.
4 | authors: [nicesapien]
5 | ---
6 |
7 | This post shows how you can detect user's battery charge, status etc.
8 |
9 | Sometimes your app has to start a long process and you need to check if there is enough battery for that. Then you have come to the right place if you want to detect just that.
10 |
11 | To get the percentage of battery charge in an android device, we can use the following code:
12 | ```java
13 | BatteryManager bm=(BatteryManager)getSystemService(BATTERY_SERVICE);
14 |
15 | int battery_percent = bm.getIntProperty(BatteryManager.BATTERY_PROPERTY_CAPACITY);
16 | ```
17 | The result battery_percent is an integer.
18 |
19 |
20 |
21 | If we have a TextView textview1 on our page, to display the battery percentage in textview1 we can use following code:
22 | ```java
23 | textview1.setText(battery_percent + "%");
24 | ```
25 |
26 |
27 | To check if battery status is full or not, following code can be used:
28 | ```java
29 | IntentFilter ifilter = new IntentFilter(Intent.ACTION_BATTERY_CHANGED);
30 |
31 | Intent batteryStatus = registerReceiver(null, ifilter);
32 |
33 | int status = batteryStatus.getIntExtra(BatteryManager.EXTRA_STATUS, -1);
34 |
35 | if(status == BatteryManager.BATTERY_STATUS_FULL) {
36 |
37 | Toast.makeText(getApplicationContext(),"Device is fully charged",Toast.LENGTH_LONG).show(); } else {
38 |
39 | Toast.makeText(getApplicationContext(),"Device is not fully charged",Toast.LENGTH_LONG).show(); }
40 | ```
41 | Apart from BATTERY_STATUS_FULL, other battery status integers which can be detected include
42 |
43 | BATTERY_STATUS_CHARGING
44 |
45 | BATTERY_STATUS_DISCHARGING
46 |
47 | BATTERY_STATUS_FULL
48 |
49 | BATTERY_STATUS_NOT_CHARGING
50 |
51 | BATTERY_STATUS_UNKNOWN
52 |
53 | The codes can be used whenever you want to show the battery percentage. To show it as soon as app starts, put the code in onCreate event. To show it on button click, put the code in Button onClick event, etc.
54 |
55 | To get the battery charging mode, use following code:
56 | ```java
57 | IntentFilter ifilter = new IntentFilter(Intent.ACTION_BATTERY_CHANGED);
58 |
59 | Intent batteryStatus = registerReceiver(null, ifilter);
60 |
61 | int chargePlug = batteryStatus.getIntExtra(BatteryManager.EXTRA_PLUGGED,-1);
62 |
63 | boolean usbCharge = chargePlug == BatteryManager.BATTERY_PLUGGED_USB;
64 |
65 | boolean acCharge = chargePlug == BatteryManager.BATTERY_PLUGGED_AC;
66 |
67 | if(usbCharge){
68 |
69 | Toast.makeText(getApplicationContext(),"Device charging through USB",Toast.LENGTH_LONG).show();
70 |
71 | } else if(acCharge) {
72 |
73 | Toast.makeText(getApplicationContext(),"Device charging through AC",Toast.LENGTH_LONG).show();
74 |
75 | } else {
76 |
77 | Toast.makeText(getApplicationContext(),"Device not charging",Toast.LENGTH_LONG).show();
78 |
79 | }
80 | ```
81 | This code can be used to find out if the device is charging or not.
82 |
83 |
84 |
85 | To get the battery temperature use following code:
86 | ```java
87 | IntentFilter ifilter = new IntentFilter(Intent.ACTION_BATTERY_CHANGED);
88 |
89 | Intent batteryStatus = registerReceiver(null, ifilter);
90 |
91 | int temp = batteryStatus.getIntExtra(BatteryManager.EXTRA_TEMPERATURE,0);
92 |
93 | float tempTwo = ((float) temp) / 10;
94 |
95 | textview1.setText(tempTwo + " °C");
96 | ```
--------------------------------------------------------------------------------
/blog/get-into-android-development.md:
--------------------------------------------------------------------------------
1 | ---
2 | slug: get-into-android-development
3 | title: How to Get into Android Development
4 | authors: [nicesapien]
5 | ---
6 |
7 | Are you interested in creating your own Android apps but don't know where to start? Android development can seem daunting, especially if you don't have a background in programming.
8 |
9 | However, with tools like [Sketchware Pro](https://sketchware.pro) which even beat Android Studio, you can dive into app development without needing to write a single line of code. In this blog post, we'll explore what Android development is, why you should consider it, where to learn about it, and why Sketchware Pro is an excellent choice.
10 |
11 | ## What is Android Development?
12 |
13 | Android development involves creating applications for devices running the Android operating system. These applications can range from simple games and utilities to complex business tools and social media platforms. Android apps are typically written in Java or Kotlin and are developed using an Integrated Development Environment (IDE) like Android Studio.
14 |
15 | ## Why Choose Android Development?
16 |
17 | ### 1. High Demand for Android Developers
18 |
19 | Android is the most widely used mobile operating system in the world, with billions of active devices. This creates a high demand for skilled Android developers who can create innovative and user-friendly apps.
20 |
21 | ### 2. Lucrative Career Opportunities
22 |
23 | The average salary for an Android developer varies depending on experience and location, but it generally ranges from $70,000 to $120,000 per year. Experienced developers can earn even more, especially if they work for top tech companies or create successful apps.
24 |
25 | ### 3. Flexibility and Creativity
26 |
27 | Android development offers a lot of flexibility and creativity. You can work on a wide range of projects, from games to productivity tools, and even create your own apps to solve everyday problems.
28 |
29 | ## Why Use Sketchware Pro?
30 |
31 | ### 1. User-Friendly Interface
32 |
33 | Sketchware Pro is designed with beginners in mind. Its drag-and-drop interface allows you to create Android apps without writing any code. This makes it an excellent choice for those who are new to programming or want to quickly prototype their ideas.
34 |
35 | ### 2. No Coding Required
36 |
37 | With Sketchware Pro, you don't need to learn complex programming languages. You can create functional and visually appealing apps using simple blocks that represent different components and actions.
38 |
39 | ### 3. Community Support
40 |
41 | Sketchware Pro has a large and active community of users who share tips, tutorials, and support. This makes it easier to learn and troubleshoot any issues you might encounter.
42 |
43 | ### 4. Free Forever
44 |
45 | Sketchware Pro is completely free to use and its source code is available on GitHub. This means you can contribute to its development or customize it to suit your needs.
46 |
47 | ## Where to Learn Android Development with Sketchware Pro
48 |
49 | ### Official Sketchware Pro Documentation
50 |
51 | The [official Sketchware Pro website](https://sketchware.pro) provides comprehensive documentation and tutorials to help you get started.
52 |
53 | ## Conclusion
54 |
55 | Sketchware Pro is an excellent tool for anyone looking to get into Android development without prior coding experience. Its intuitive interface and powerful features make it easy to create functional and visually appealing apps. With the high demand for Android developers and the lucrative career opportunities, there's never been a better time to start learning. So why wait? Download Sketchware Pro today and start building your dream app!
56 |
57 | Happy coding! 🎉
58 |
--------------------------------------------------------------------------------
/blog/prevent-virus-detection.md:
--------------------------------------------------------------------------------
1 | ---
2 | slug: false-virus-detection
3 | title: App detected as a virus? Here's what you can do!
4 | authors: [nicesapien, jbk0]
5 | ---
6 |
7 | Some Android systems now ship a built-in virus scanner and most suddenly started flagging some Sketchware Pro-built projects as harmful. Here's what you can do to fix it!
8 |
9 |
10 |
11 | ## Solution
12 |
13 | APK files built by the `Run` button are flagged as "virus", "trojan", or similar harmful sounding terms. However, this is probably caused due to the `testkey` because some virus scanners just identify any app as a virus if its signed using `testkey`. To fix this issue, you can export your project using the Sign/Export menu.
14 | 
15 |
16 |
17 | If your project still gets flagged after installing that .apk file generated by the Sign/Export menu, these are the two most probable reasons for it.
18 |
19 | - You gotta sign your app using [apk-signer](https://play.google.com/store/apps/details?id=com.haibison.apksigner)
20 | - It's a Local library or some other code in your project.
21 |
22 | ## Security vendors to ignore
23 | Sometimes that's not enough. There are a few untrustworthy security vendors that often bring up false-positive scan reports, like MaxSecure or Ikarus. As a general rule of thumb, if only a few (1-4) vendors detect "malware" in your project, they're false positives. Contact them and ask them to re-scan your project's .apk file and/or remove the false-positive detection. **Only do this with a signed, exported .apk file though!** See section [*Solution*](#solution) above for more info.
24 |
25 | ### Success story
26 | For example, Avast had detected `Android:Evo-gen [Trj]` in my demo project's signed and exported .apk file. I filed a false-positive detection form, waited a day or so, and got a mail that they fixed the issue. It used to have 2 detections on VirusTotal.com, [now it has zero](https://www.virustotal.com/gui/file/e079fc195a6365327845fe2f593cb29db68d7b083cc6afc2bdceb2d3345eaa95).
--------------------------------------------------------------------------------
/blog/sketchware-pro-1000-stars.md:
--------------------------------------------------------------------------------
1 | ---
2 | slug: sketchware-pro-1000-stars
3 | title: Sketchware Pro has reached almost 1000 stars on GitHub
4 | authors: [nicesapien]
5 | ---
6 |
7 | Sketchware Pro is a free Android app development platform that allows users to create apps using a block-based programming language. It is a modded version of Sketchware.
8 |
9 | Sketchware Pro has been growing rapidly in popularity and recognition, thanks to the efforts of its talented and passionate modders. The project has reached 800+ stars on GitHub, and is on the verge of reaching 1000 stars soon. This is a remarkable achievement for a community-driven project that started as a hobby.
10 |
11 | To celebrate this milestone, the modders are planning to release a new stable version of Sketchware Pro when they reach 1000 stars. This version will include bug fixes, performance improvements, and new features that will enhance the user experience and functionality of the app.
12 |
13 | However, there is also a rumor that this might be the last version of Sketchware Pro ever. The main modder, jbk0 (JavkhlanK), once said that he would stop working on the project after the next stable release. This is not yet confirmed, but it raises some questions about the future of Sketchware Pro.
14 |
15 | Will this be the end of Sketchware Pro, or will it be the beginning of a new era? Some modders and contributors, such as Remaker, Ilyasse Salama, Hasrat, and some others, are working on a Material Design port of the app, which is expected to arrive soon. This port will give Sketchware Pro a modern and sleek look, as well as some additional features and options. The modders may even consider it to be the main version of the app after its release or completion.
16 |
17 | Whatever happens, Sketchware Pro will always remain a remarkable and innovative app development platform that has inspired and empowered thousands of users around the world. We thank the modders for their hard work and dedication, and we hope that Sketchware Pro will continue to grow and evolve.
18 |
19 | If you want to learn more about Sketchware Pro, you can visit our [Website](/), where you can download the latest version, read the docs, blog, or find links to the official Sketchware Pro Discord server etc. You can also check out this [tutorial](/blog/building-your-first-app.md) that demonstrates how to use Sketchware Pro to create your first, very own android application.
20 |
21 | Sketchware Pro is the ultimate tool for app developers. Try it out today and unleash your creativity! 😊
--------------------------------------------------------------------------------
/blog/sketchware-pro-6-4-0-rc05.md:
--------------------------------------------------------------------------------
1 | ---
2 | slug: sketchware-pro-6-4-0-rc05
3 | title: Sketchware Pro v6.4.0 beta 5 is here, coolest new features
4 | authors: [nicesapien]
5 | ---
6 |
7 | As you might already know, Sketchware Pro's version 6.4.0 rc05 is here. You can download it from our website [here](/download).
8 | Today we'll look at the coolest new things.
9 |
10 |
11 | ### Documentation updated
12 |
13 | At first, they have added links to docs in the app. Although there are more docs on this website, they will not be added.
14 |
15 | ### Java 11 support
16 |
17 | Sketchware Pro now supports Java 11. That means you can now develop more cool and complex apps. It only works in minApi26, sadly.
18 |
19 | ### Syntax highlighting
20 |
21 | Editing Kotlin and XML code was a mess earlier. Now it's getting better and cleaner with syntax highlighting for XML and Kotlin.
22 |
23 | ### Help them improve
24 |
25 | You can now finnaly send crashlogs directly from the app instead of joining there Discord server.
26 |
27 | ### Auto-installer
28 |
29 | If your device has **Root access**, then Sketchware Pro can automatically install compiled apks, instead of opening android's package manager.
30 |
31 | ### Inject just got better
32 |
33 | ou can now use e.g. `tools:replace="android:id"` in a View's inject property to remove android:id from its XML code. This is a replacement for XML Command Blocks that change tiny things like these.
34 |
35 | ### Other features and fixes
36 |
37 | Projects using Google maps work now. bundletool(1.11.3), sora-editor(0.17.2), Firebase Realtime Database(19.3.1), built-in material library(1.6.1), r8(3.3.75), and Kotlinc(1.7.10) also got updated.
38 | You can now add Admob ad units again, some Proguard errors were fixed, Some fixes to projects exported to Android Studio, and moreover, the import AdMob details from another project Button works now.
39 |
40 | This is the highlight of some new updates. [See full here](https://github.com/Sketchware-Pro/Sketchware-Pro/releases/tag/v6.4.0-rc05)
41 |
--------------------------------------------------------------------------------
/blog/webpage-to-pdf-app.md:
--------------------------------------------------------------------------------
1 | ---
2 | slug: webpage-to-pdf-app
3 | title: Building a simple Web page to PDF converter
4 | authors: [nicesapien]
5 | ---
6 |
7 | Wow. See how high I scored in my exam. But if I share this link, everyone would need to login. Hmm... yes! I can share a PDF! But how?
8 |
9 |
10 |
11 | I'd choose building my own app for that. Here we go then.
12 |
13 | To convert a web page on a WebView to PDF in Sketchware, follow the steps given below.
14 | 1. Create a more block named extra in your Sketchware project and put following code in it.
15 | ```java
16 | }
17 |
18 | android.print.PrintJob printJob;
19 |
20 |
21 |
22 | @androidx.annotation.RequiresApi(api = Build.VERSION_CODES.LOLLIPOP)
23 |
24 | private void PrintTheWebPage(WebView webView) {
25 |
26 | android.print.PrintManager printManager = (android.print.PrintManager) this.getSystemService(Context.PRINT_SERVICE);
27 |
28 | String jobName = "My_webpage" + webView.getUrl();
29 |
30 | android.print.PrintDocumentAdapter printAdapter = webView.createPrintDocumentAdapter(jobName);
31 |
32 | assert printManager != null;
33 |
34 | printJob = printManager.print(jobName, printAdapter, new android.print.PrintAttributes.Builder().build());
35 |
36 | }
37 |
38 | {
39 | ```
40 |
41 | 2. Create a which we should click to save the PDF.
42 | 3. Add onClick event of this button and use a Add Source Directly block to put some code:
43 | ```java
44 | if (Build.VERSION.SDK_INT >= Build.VERSION_CODES.LOLLIPOP) {
45 |
46 | PrintTheWebPage(webview1);
47 |
48 | } else {
49 |
50 | showMessage("Not available for device below Android LOLLIPOP");
51 |
52 | }
53 | ```
54 | You may replace the webview ID with yours.
55 |
56 | Done. Now we can Save and RUN the project!
57 | I'm so excited to share my results and see reaction of my friends. What about you?
58 |
--------------------------------------------------------------------------------
/blog/welcome/docusaurus-plushie-banner.jpeg:
--------------------------------------------------------------------------------
https://raw.githubusercontent.com/Sketchware-Pro/Sketchware-Pro-Website/ec066c7e247e820c54e4a367bb98121d7dc2ea90/blog/welcome/docusaurus-plushie-banner.jpeg
--------------------------------------------------------------------------------
/blog/welcome/index.md:
--------------------------------------------------------------------------------
1 | ---
2 | slug: welcome
3 | title: Welcome
4 | authors: [nicesapien]
5 | sidebar_position: 1
6 | ---
7 |
8 | ## Welcome to Sketchware Pro blog!
9 | Thank you for coming here. This is UNOFFICIAL Sketchware Blog.
10 |
11 | ## Content
12 | Mainly simple tutorials. That means, for example, how to develop simple apps, games etc.
13 | Moreover, you will find news about Sketchware and Sketchware Pro.
--------------------------------------------------------------------------------
/docs/blocks/Custom block/_category_.json:
--------------------------------------------------------------------------------
1 | {
2 | "label": "Custom Block",
3 | "position": 39,
4 | "link": {
5 | "type": "generated-index",
6 | "description": "Custom blocks in Sketchware Pro."
7 | }
8 | }
9 |
--------------------------------------------------------------------------------
/docs/blocks/Custom block/assets/creating-block/add-block.png:
--------------------------------------------------------------------------------
https://raw.githubusercontent.com/Sketchware-Pro/Sketchware-Pro-Website/ec066c7e247e820c54e4a367bb98121d7dc2ea90/docs/blocks/Custom block/assets/creating-block/add-block.png
--------------------------------------------------------------------------------
/docs/blocks/Custom block/assets/creating-block/block-manager.png:
--------------------------------------------------------------------------------
https://raw.githubusercontent.com/Sketchware-Pro/Sketchware-Pro-Website/ec066c7e247e820c54e4a367bb98121d7dc2ea90/docs/blocks/Custom block/assets/creating-block/block-manager.png
--------------------------------------------------------------------------------
/docs/blocks/Custom block/assets/creating-block/block-shapes/type-b.png:
--------------------------------------------------------------------------------
https://raw.githubusercontent.com/Sketchware-Pro/Sketchware-Pro-Website/ec066c7e247e820c54e4a367bb98121d7dc2ea90/docs/blocks/Custom block/assets/creating-block/block-shapes/type-b.png
--------------------------------------------------------------------------------
/docs/blocks/Custom block/assets/creating-block/block-shapes/type-c.png:
--------------------------------------------------------------------------------
https://raw.githubusercontent.com/Sketchware-Pro/Sketchware-Pro-Website/ec066c7e247e820c54e4a367bb98121d7dc2ea90/docs/blocks/Custom block/assets/creating-block/block-shapes/type-c.png
--------------------------------------------------------------------------------
/docs/blocks/Custom block/assets/creating-block/block-shapes/type-d.png:
--------------------------------------------------------------------------------
https://raw.githubusercontent.com/Sketchware-Pro/Sketchware-Pro-Website/ec066c7e247e820c54e4a367bb98121d7dc2ea90/docs/blocks/Custom block/assets/creating-block/block-shapes/type-d.png
--------------------------------------------------------------------------------
/docs/blocks/Custom block/assets/creating-block/block-shapes/type-e.png:
--------------------------------------------------------------------------------
https://raw.githubusercontent.com/Sketchware-Pro/Sketchware-Pro-Website/ec066c7e247e820c54e4a367bb98121d7dc2ea90/docs/blocks/Custom block/assets/creating-block/block-shapes/type-e.png
--------------------------------------------------------------------------------
/docs/blocks/Custom block/assets/creating-block/block-shapes/type-f.png:
--------------------------------------------------------------------------------
https://raw.githubusercontent.com/Sketchware-Pro/Sketchware-Pro-Website/ec066c7e247e820c54e4a367bb98121d7dc2ea90/docs/blocks/Custom block/assets/creating-block/block-shapes/type-f.png
--------------------------------------------------------------------------------
/docs/blocks/Custom block/assets/creating-block/block-shapes/type-regular.png:
--------------------------------------------------------------------------------
https://raw.githubusercontent.com/Sketchware-Pro/Sketchware-Pro-Website/ec066c7e247e820c54e4a367bb98121d7dc2ea90/docs/blocks/Custom block/assets/creating-block/block-shapes/type-regular.png
--------------------------------------------------------------------------------
/docs/blocks/Custom block/assets/creating-block/block-shapes/type-string.png:
--------------------------------------------------------------------------------
https://raw.githubusercontent.com/Sketchware-Pro/Sketchware-Pro-Website/ec066c7e247e820c54e4a367bb98121d7dc2ea90/docs/blocks/Custom block/assets/creating-block/block-shapes/type-string.png
--------------------------------------------------------------------------------
/docs/blocks/Custom block/assets/creating-block/create-block-icon.png:
--------------------------------------------------------------------------------
https://raw.githubusercontent.com/Sketchware-Pro/Sketchware-Pro-Website/ec066c7e247e820c54e4a367bb98121d7dc2ea90/docs/blocks/Custom block/assets/creating-block/create-block-icon.png
--------------------------------------------------------------------------------
/docs/blocks/Custom block/assets/creating-block/creating-block.png:
--------------------------------------------------------------------------------
https://raw.githubusercontent.com/Sketchware-Pro/Sketchware-Pro-Website/ec066c7e247e820c54e4a367bb98121d7dc2ea90/docs/blocks/Custom block/assets/creating-block/creating-block.png
--------------------------------------------------------------------------------
/docs/blocks/Custom block/assets/creating-block/developer-tools.png:
--------------------------------------------------------------------------------
https://raw.githubusercontent.com/Sketchware-Pro/Sketchware-Pro-Website/ec066c7e247e820c54e4a367bb98121d7dc2ea90/docs/blocks/Custom block/assets/creating-block/developer-tools.png
--------------------------------------------------------------------------------
/docs/blocks/Custom block/assets/creating-block/fields.png:
--------------------------------------------------------------------------------
https://raw.githubusercontent.com/Sketchware-Pro/Sketchware-Pro-Website/ec066c7e247e820c54e4a367bb98121d7dc2ea90/docs/blocks/Custom block/assets/creating-block/fields.png
--------------------------------------------------------------------------------
/docs/blocks/Custom block/assets/creating-block/open_menu.png:
--------------------------------------------------------------------------------
https://raw.githubusercontent.com/Sketchware-Pro/Sketchware-Pro-Website/ec066c7e247e820c54e4a367bb98121d7dc2ea90/docs/blocks/Custom block/assets/creating-block/open_menu.png
--------------------------------------------------------------------------------
/docs/blocks/Custom block/assets/creating-block/pallette-created.png:
--------------------------------------------------------------------------------
https://raw.githubusercontent.com/Sketchware-Pro/Sketchware-Pro-Website/ec066c7e247e820c54e4a367bb98121d7dc2ea90/docs/blocks/Custom block/assets/creating-block/pallette-created.png
--------------------------------------------------------------------------------
/docs/blocks/Custom block/assets/importing-block/add-block.png:
--------------------------------------------------------------------------------
https://raw.githubusercontent.com/Sketchware-Pro/Sketchware-Pro-Website/ec066c7e247e820c54e4a367bb98121d7dc2ea90/docs/blocks/Custom block/assets/importing-block/add-block.png
--------------------------------------------------------------------------------
/docs/blocks/Custom block/assets/importing-block/block-manager.png:
--------------------------------------------------------------------------------
https://raw.githubusercontent.com/Sketchware-Pro/Sketchware-Pro-Website/ec066c7e247e820c54e4a367bb98121d7dc2ea90/docs/blocks/Custom block/assets/importing-block/block-manager.png
--------------------------------------------------------------------------------
/docs/blocks/Custom block/assets/importing-block/creating-palette.png:
--------------------------------------------------------------------------------
https://raw.githubusercontent.com/Sketchware-Pro/Sketchware-Pro-Website/ec066c7e247e820c54e4a367bb98121d7dc2ea90/docs/blocks/Custom block/assets/importing-block/creating-palette.png
--------------------------------------------------------------------------------
/docs/blocks/Custom block/assets/importing-block/developer-tools.png:
--------------------------------------------------------------------------------
https://raw.githubusercontent.com/Sketchware-Pro/Sketchware-Pro-Website/ec066c7e247e820c54e4a367bb98121d7dc2ea90/docs/blocks/Custom block/assets/importing-block/developer-tools.png
--------------------------------------------------------------------------------
/docs/blocks/Custom block/assets/importing-block/import-block-menu.png:
--------------------------------------------------------------------------------
https://raw.githubusercontent.com/Sketchware-Pro/Sketchware-Pro-Website/ec066c7e247e820c54e4a367bb98121d7dc2ea90/docs/blocks/Custom block/assets/importing-block/import-block-menu.png
--------------------------------------------------------------------------------
/docs/blocks/Custom block/assets/importing-block/import-button-block.png:
--------------------------------------------------------------------------------
https://raw.githubusercontent.com/Sketchware-Pro/Sketchware-Pro-Website/ec066c7e247e820c54e4a367bb98121d7dc2ea90/docs/blocks/Custom block/assets/importing-block/import-button-block.png
--------------------------------------------------------------------------------
/docs/blocks/Custom block/assets/importing-block/menu_icon.png:
--------------------------------------------------------------------------------
https://raw.githubusercontent.com/Sketchware-Pro/Sketchware-Pro-Website/ec066c7e247e820c54e4a367bb98121d7dc2ea90/docs/blocks/Custom block/assets/importing-block/menu_icon.png
--------------------------------------------------------------------------------
/docs/blocks/Custom block/assets/importing-block/open_menu.png:
--------------------------------------------------------------------------------
https://raw.githubusercontent.com/Sketchware-Pro/Sketchware-Pro-Website/ec066c7e247e820c54e4a367bb98121d7dc2ea90/docs/blocks/Custom block/assets/importing-block/open_menu.png
--------------------------------------------------------------------------------
/docs/blocks/Custom block/assets/importing-block/palette-created.png:
--------------------------------------------------------------------------------
https://raw.githubusercontent.com/Sketchware-Pro/Sketchware-Pro-Website/ec066c7e247e820c54e4a367bb98121d7dc2ea90/docs/blocks/Custom block/assets/importing-block/palette-created.png
--------------------------------------------------------------------------------
/docs/blocks/Custom block/assets/importing-block/result.png:
--------------------------------------------------------------------------------
https://raw.githubusercontent.com/Sketchware-Pro/Sketchware-Pro-Website/ec066c7e247e820c54e4a367bb98121d7dc2ea90/docs/blocks/Custom block/assets/importing-block/result.png
--------------------------------------------------------------------------------
/docs/blocks/Custom block/creating-block.md:
--------------------------------------------------------------------------------
1 | ---
2 | title: Creating a custom Block
3 | description: This is a guide for creating blocks in Sketchware Pro.
4 | sidebar_position: 1
5 | tags:
6 | - Blocks
7 | ---
8 | To create a Block in Sketchware Pro, you need to know some terms related to Blocks.
9 |
10 | ## Create a Block in Sketchware Pro
11 | Step 1: Go to Sketchware Pro and click on 3 dots.
12 |
13 | 
14 |
15 |
16 | Step 2: Go to developer tools.
17 |
18 | 
19 |
20 |
21 | Step 3: Select Block manager.
22 |
23 | 
24 |
25 |
26 | Step 4: Click on Add icon.
27 |
28 | 
29 |
30 |
31 | Step 5: Enter a name for the palette name as you want and select a color by clicking on the color icon and then clicking on save.
32 |
33 | 
34 |
35 |
36 | Step 6: Here at the bottom a palette has been created successfully just click it and it will open a new screen.
37 |
38 | 
39 |
40 |
41 | Step 7: Click on add icon.
42 |
43 | 
44 |
45 |
46 | Step 8: Fill in the fields as your need and click on Save.
47 |
48 | 
49 |
50 |
51 | ## Properties
52 | | Field | Explanation | Required |
53 | | --- | --- | --- |
54 | | [Name](#name) | This is a unique name for your Block. Sketchware Pro uses this to identify different Blocks. The name should not be the same as other blocks. | Yes |
55 | | [Type](#type) | Please enter value according to your block code(Eg. Void,If-then,If-else etc). | Yes |
56 | | [Type Name](#type-name) | Read [Type Name](#type-name) | If [Type](#type) is `c` then this field is required. |
57 |
58 | ### Name
59 | This is a unique name for a block in Sketchware Pro. It functions as the ID of the block. When you use a Block in a project, Sketchware Pro uses this property to identify each block and its associated code. The name should not be the same as other blocks to prevent potential errors.
60 | ### Type
61 | Study the data below:
62 | - regular
63 |
64 | 
65 | - c (if block)
66 |
67 | 
68 | - e (if-else block)
69 |
70 | 
71 | - s (String)
72 |
73 | 
74 | - b (Boolean)
75 |
76 | 
77 | - d (Number)
78 |
79 | 
80 | - v (Variable)
81 |
82 | 
83 | - a (Map)
84 |
85 | 
86 | - f (stop block)
87 |
88 | 
89 | - l (List)
90 |
91 | 
92 | - p (Component)
93 |
94 | 
95 |
96 | ### Type Name
97 | This field is required only if the Type Name is `"p"`. It indicates that the block is related to a component defined in the Type Name property.
98 |
99 | ## Design
100 | | Field | Explanation | Required |
101 | | --- | --- | --- |
102 | | Color | This field determines the color of your block. | Yes |
103 | | Block Spec | This property is used to design your block. | Yes |
104 |
105 | ### Color
106 | The color property allows you to set the desired color for your block, enabling customization and enhancing its visual appearance.
107 |
108 | ### Block Spec
109 | The Block Spec is a versatile tool that helps you design and structure block content. It supports various data types such as text, strings, code, numbers, booleans, and more. This empowers you to create customized blocks tailored to your specific requirements. Additionally, you can effortlessly add additional properties to expand the capabilities of the Block Spec, aligning it perfectly with your unique needs.
110 |
111 |
--------------------------------------------------------------------------------
/docs/blocks/Custom block/import-blocks.md:
--------------------------------------------------------------------------------
1 | ---
2 | title: Import custom blocks
3 | description: This is a guide for importing custom blocks in Sketchware Pro.
4 | sidebar_position: 2
5 | tags:
6 | - Blocks
7 | ---
8 | To import blocks in Sketchware Pro you need a block file generated by exporting the block.
9 |
10 | For example, I am going to use [File.json](https://drive.google.com/file/d/1BVXQmYPJ-kHlt70y4j4eZt7TpMlUOhnJ/view?usp=drivesdk) and trying to import block from this file to Sketchware Pro.
11 |
12 | Step 1: Go to Sketchware Pro and click on 3 dots.
13 |
14 | 
15 |
16 |
17 | Step 2: Go to developer tools.
18 |
19 | 
20 |
21 |
22 | Step 3: Select Block manager.
23 |
24 | 
25 |
26 |
27 | Step 4: Click on Add icon.
28 |
29 | 
30 |
31 |
32 | Step 5: Enter a name for the palette name as you want and select a color by clicking on the color icon and then clicking on save.
33 |
34 | 
35 |
36 |
37 | Step 6: Here at the bottom a palette has been created successfully just click it and it will open a new screen.
38 |
39 | 
40 |
41 |
42 | Step 7: Click on the Menu icon.
43 |
44 | 
45 |
46 |
47 | Step 8: Click on Import block. This will open a file selector. Navigate to your block file and then click on Select.
48 |
49 | 
50 |
51 |
52 | Step 9: This will open a popup containing the list of blocks present in that file. Select the block which you want to add then click on Import.
53 |
54 | 
55 |
56 |
57 | Info: Blocks are imported successfully you can check it by the opening project. Below is an image of the imported blocks.
58 |
59 | 
--------------------------------------------------------------------------------
/docs/blocks/List.md:
--------------------------------------------------------------------------------
1 | ---
2 | title: List
3 | description: Documentation for built-in List blocks in Sketchware Pro.
4 | sidebar_position: 2
5 | slug: list
6 | tags:
7 | - Blocks
8 | - Built-in
9 | - List
10 | ---
11 |
12 |
13 | In Sketchware Pro, a List is an interface that represents an ordered collection of elements. It allows for the storage of multiple elements of the same type and provides various methods to manipulate the elements within the list.
14 | # Types of List
15 | ## List Map
16 | This type of list stores multiple maps. Each map can contain key-value pairs, allowing you to store structured data. It's useful for organizing complex data where each item has multiple attributes.
17 | ## List Number
18 | This type of list stores multiple numerical values, including integers (whole numbers) and decimals (floating-point numbers). It's commonly used for storing quantities, scores, or any numerical data in your app.
19 | ## List String
20 | This type of list stores multiple text values or sequences of characters. It's commonly used for storing words, phrases, or sentences in your app, such as names, messages, or any other textual data.
21 |
22 | ### List Number contains ()
23 | Used to check if a particular value/number is present in the list or not. Returns a boolean, true or false.
24 |
25 | ### get at () of List Number
26 | Used to retrieve the element at the specified index in the list.
27 |
28 | ### index () in List Number
29 | Used to check the index of a number. For example, let's say you have a list number with the following values: `42` and `64`. If you use this block by entering `1`, it will return `64`. If you enter `0`, it will return `42`.
30 |
31 | ### add () to List Number
32 | Used to add a number to a list number variable.
33 |
34 | ### insert () at () to List Number
35 | Used to add a number to a specific index in a List Number. For example, let's say you have a list number with the following value: `42` and `64`. If you use this block by `insert (69) at (0) to List Number`, the list number will now be this: `69`,`42`,`64`.
36 |
37 | ### set () at () of List Number
38 | Used to set and/or change the value of a specific index in a list number variable.
39 |
40 | ### sort List Number
41 | Used to sort the elements of the list into ascending order. For example, `69`,`42`,`64` will turn into `42`,`64`,`69` once this block is run.
42 |
43 | ### List String contains []
44 | Used to check whether a specific item is present in a List of Strings. This block essentially checks if the given list contains a particular string. Returns a boolean value of true or false.
45 |
46 | ### index [] in List String
47 | Used to retrieve the index (position) of a specified string within a List of Strings. Returns a number.
48 |
49 | ### get at () of List String
50 | Used to retrieve the value of a specific index (position).
51 |
52 | ### add [] to List String
53 | Used to add a String to a List String variable
54 |
55 | ### insert [] at () to List String
56 | Used to add a String to a specific index (position) in a List String.
57 |
58 | ### set [] at () of List String
59 | Used to set and/or change the value of a specific index in list string variable.
60 |
61 | ### sort List String
62 | Used to sort the items of a list string. For example, `banana`,`orange`,`apple` will change into `apple`,`banana`,`orange`.
63 |
64 | ### List Map contains at () key []
65 | Used to check if a specified key exists within a map at a specific index in a list of maps. Returns a boolean, either true or false.
66 |
67 | ### get value at () key [] of List Map
68 | Used to retrieve the value associated with a specified key in a map at a specific index in a list of maps.
69 |
70 | ### get Map at () of List Map
71 | Used to retrieve the map at a specified index in a list of maps.
72 |
73 | ### add key [] value [] to List Map
74 | Used to add a key-value pair to a map and then add that map to a list of maps.
75 |
76 | ### insert key [] value [] at () to List Map
77 | Used to insert a key-value pair into a map at a specified index within a list of maps.
78 |
79 | ### set key [] value [] at () to List Map
80 | Used to set(edit/change) a key-value pair within a map located at a specific index in a list of maps.
81 |
82 | ### set Map at () of List Map
83 | This block lets you swap out a map with another one in a list. So if you have a list of maps and you want to update the information for a specific item, you use this block to put a new map in its place. It's like changing a card in a deck.
84 |
85 | ### add Map to List Map
86 | This block just adds a new map to the end of a list of maps. It's like adding a new item to the end of a shopping list.
87 |
88 | ### insert Map at () to List Map
89 | This block inserts a map at a specific position into a list of maps. It's like placing a new item in a particular spot in a row of boxes.
90 |
91 | ### get at () of List Map to Map
92 | This block retrieves a map from a specific position in a list of maps and stores it as a standalone map. It's like picking out one item from a row of boxes and putting it aside.
93 |
94 | ### delete Map of List Map
95 | This block removes a map from a list of maps. It's like taking out an item from a row of boxes and discarding it.
96 |
97 | ### sort List Map key [] isNumber {} is Ascending
98 | This block sorts a list of maps. It's like alphabetizing a list of names.
99 |
100 | ### List String addAll from List
101 | used to add all the elements from one list of strings into another list of strings.
102 |
103 | ### length of List
104 | Used to check the index/length of a list.
105 |
106 | ### delete at () of List
107 | Used to delete a specific index/position of a list.
108 |
109 | ### clear List
110 | Used to clear an list entirely.
111 |
112 | ### reverse List
113 | Used to reverse the items in a list. For example, a list with `apple`,`banana`,`orange` will turn into `orange`,`banana`,`apple`.
114 |
115 | ### shuffle List
116 | Randomizes the order of elements within a list. This operation is similar to shuffling a deck of cards, where the cards are rearranged in a random order.
117 |
118 | ### swap List position () with ()
119 | Used to exchange the positions of two elements within a list. This block is helpful when you need to reorder items in a list, for example, to move an item up or down within a list.
120 |
121 | ## Bottom line
122 | That was the explanation for every List block in Sketchware Pro. If you think we missed something, or any information is incorrect, please let us know in our discord server or fix it yourself and open a pull request.
--------------------------------------------------------------------------------
/docs/blocks/Variable.md:
--------------------------------------------------------------------------------
1 | ---
2 | title: Variable
3 | description: Documentation for built-in variable blocks in Sketchware Pro.
4 | sidebar_position: 1
5 | slug: variable
6 | tags:
7 | - Blocks
8 | - Built-in
9 | - Variable
10 | ---
11 |
12 | In Sketchware Pro, variables are containers used to store data temporarily. Think of them as labeled boxes where you can put different types of information, such as numbers, text, or objects.
13 |
14 | # Types of Variables
15 |
16 | ## String
17 | This type of variable is used to store text or sequences of characters, such as words, phrases, or sentences. For example, you might use a string variable to store a user's name or a message to display in your app.
18 | ## Number
19 | Number variables are used to store numerical values, including integers (whole numbers) and decimals (floating-point numbers). You might use number variables to represent quantities, scores, or measurements in your app.
20 | ## Boolean
21 | Boolean variables can only have two possible values: true or false. They're often used to represent conditions or states, such as whether a button is clicked or if a condition is met in your app's logic.
22 | ## Map
23 | Map variables store key-value pairs, where each key is associated with a value. They're useful for storing structured data, like settings, user preferences, or any data that requires a relational structure.
24 |
25 | ### set Boolean to {}
26 | Sets a boolean's value. Can be either true or false.
27 |
28 | ### set Number to ()
29 | Sets a number variable's value. Can be any integer.
30 |
31 | ### Number increase 1
32 | Adds 1 to the value of a number variable.
33 |
34 | ### Number decrease 1
35 | Removes/Decreases the value of a Number variable by 1.
36 |
37 | ### set String to []
38 | Used to give a value to a string variable, can be any string.
39 |
40 | ### Map create new map
41 | Used to initialize a map variable.
42 |
43 | ### Map put key [] value []
44 | Used to assign a value of a string to a key of a map. If the key doesn't already exist, it is automatically created.
45 |
46 | ### Map put key [] value int ()
47 | Used to assign a value of a number or a integer to a key of a map. If the key doesn't already exist, it is automatically created.
48 |
49 | ### Map put key [] value double ()
50 | Used to assign a value of a double to a key of a map. A double is basically just a number but with decimal points, such as `0.69`, `29.48` etc. If the key doesn't already exist, it is automatically created.
51 |
52 | ### Map put key [] value {}
53 | Used to assign a boolean value to a key of a map. Usually true or false.
54 |
55 | ### Map put key [] value Map
56 | Used to assign a value of another map into a key of a map variable.
57 |
58 | ### Map put key [] value List String
59 | Used to assign a value of a [list string](list#list-string) to a key of a map variable.
60 |
61 | ### Map put key [] value List Map
62 | Used to assign a value of a [list map](list#list-map) to a key of a map variable.
63 |
64 | ### Map get key []
65 | Reads the value of a key containing a string value from a map variable.
66 |
67 | ### Map get number key []
68 | Reads the value of a key containing a number value from a map variable.
69 |
70 | ### Map get boolean key []
71 | Reads the value of a key containing a boolean value from a map variable.
72 |
73 | ### Map get Map key
74 | Reads the value of a key containing a value of another map from a map variable.
75 |
76 | ### Map get List String key []
77 | Reads the value of a key containing a value of [list string](list#list-string) from a map variable.
78 |
79 | ### Map get List Map key []
80 | Reads the value of a key containing a value of another [list map](list#list-map) from a map variable.
81 |
82 | ### Map is empty
83 | Returns a boolean value of either true or false. Used to identify if a map has a value or not.
84 |
85 | ### Map contain key []
86 | Used to check if a map contains a specific key. Returns a boolean value.
87 |
88 | ### Map contain value []
89 | Used to check if a map contains a specific value at any point. Returns a boolean value.
90 |
91 | ### Map size
92 | Used to check the length of a map. For example, if a map variable has 3 keys, this will return a number, 3.
93 |
94 | ### Map remove key []
95 | Used to remove a key from a map variable.
96 |
97 | ### Map clear
98 | Clears the data of a map. Removes every key/value pair from it.
99 |
100 | ### Map get all keys to List String
101 | Used to automatically set the value of every key of a map into a [list string](list#list-string) variable.
102 |
103 | ## Bottom line
104 | That was the explanation of every built-in Variable block in Sketchware Pro. If you think some info is wrong or doesn't exist, please let us know in our discord server or simply open a Pull Request in our website's GitHub repository.
--------------------------------------------------------------------------------
/docs/blocks/_category_.json:
--------------------------------------------------------------------------------
1 | {
2 | "label": "Blocks",
3 | "position": 4,
4 | "link": {
5 | "type": "generated-index",
6 | "description": "This is a brief documentation about almost every block in Sketchware Pro. () indicates a number. {} indicates a boolean. [] indicates a string."
7 | }
8 | }
9 |
--------------------------------------------------------------------------------
/docs/blocks/assets/get-started-with-more-block/AddMoreBlock.png:
--------------------------------------------------------------------------------
https://raw.githubusercontent.com/Sketchware-Pro/Sketchware-Pro-Website/ec066c7e247e820c54e4a367bb98121d7dc2ea90/docs/blocks/assets/get-started-with-more-block/AddMoreBlock.png
--------------------------------------------------------------------------------
/docs/blocks/assets/get-started-with-more-block/DoAsShown.png:
--------------------------------------------------------------------------------
https://raw.githubusercontent.com/Sketchware-Pro/Sketchware-Pro-Website/ec066c7e247e820c54e4a367bb98121d7dc2ea90/docs/blocks/assets/get-started-with-more-block/DoAsShown.png
--------------------------------------------------------------------------------
/docs/blocks/assets/get-started-with-more-block/click-on-add-icon.png:
--------------------------------------------------------------------------------
https://raw.githubusercontent.com/Sketchware-Pro/Sketchware-Pro-Website/ec066c7e247e820c54e4a367bb98121d7dc2ea90/docs/blocks/assets/get-started-with-more-block/click-on-add-icon.png
--------------------------------------------------------------------------------
/docs/blocks/assets/get-started-with-more-block/click-on-more-block.png:
--------------------------------------------------------------------------------
https://raw.githubusercontent.com/Sketchware-Pro/Sketchware-Pro-Website/ec066c7e247e820c54e4a367bb98121d7dc2ea90/docs/blocks/assets/get-started-with-more-block/click-on-more-block.png
--------------------------------------------------------------------------------
/docs/blocks/assets/get-started-with-more-block/clickonevent.png:
--------------------------------------------------------------------------------
https://raw.githubusercontent.com/Sketchware-Pro/Sketchware-Pro-Website/ec066c7e247e820c54e4a367bb98121d7dc2ea90/docs/blocks/assets/get-started-with-more-block/clickonevent.png
--------------------------------------------------------------------------------
/docs/blocks/assets/get-started-with-more-block/putMoreBlockOnActivity.png:
--------------------------------------------------------------------------------
https://raw.githubusercontent.com/Sketchware-Pro/Sketchware-Pro-Website/ec066c7e247e820c54e4a367bb98121d7dc2ea90/docs/blocks/assets/get-started-with-more-block/putMoreBlockOnActivity.png
--------------------------------------------------------------------------------
/docs/blocks/assets/get-started-with-more-block/structure.png:
--------------------------------------------------------------------------------
https://raw.githubusercontent.com/Sketchware-Pro/Sketchware-Pro-Website/ec066c7e247e820c54e4a367bb98121d7dc2ea90/docs/blocks/assets/get-started-with-more-block/structure.png
--------------------------------------------------------------------------------
/docs/blocks/get-started-with-more-block.md:
--------------------------------------------------------------------------------
1 | ---
2 | title: More blocks
3 | description: Get started with More Block in Sketchware.
4 | sidebar_position: 38
5 | tags:
6 | - Blocks
7 | ---
8 |
9 | ### More blocks in Sketchware Pro
10 |
11 | More Blocks allow developers to create their own blocks useable in a single activity only. They are usually used when there is a task in the app which has to be run multiple times.
12 |
13 | 
14 |
15 | #### Parameters provided by Sketchware pro
16 |
17 | 1. In Variable
18 | 1. String
19 | 2. Number
20 | 3. Boolean
21 | 4. Map
22 | 5. List Number
23 | 6. List String
24 | 7. List Map
25 | 2. In View
26 | 1. View(All types of view available in layout)
27 | 2. ImageView
28 | 3. TextView
29 | 4. CheckBox
30 | 5. Switch
31 | 6. ListView
32 | 7. Spinner Webview
33 | 8. SeekBar
34 | 9. ProgressBar
35 | 10. CalendarView
36 | 11. RadioButton
37 | 12. RatingBar
38 | 13. VideoView
39 | 14. SearchView
40 | 15. GridView
41 | 16. AutoComplete(EditText)
42 | 17. MultiAutoComplete(EditText)
43 | 18. ViewPager
44 | 19. BadgeView
45 | 3. In Component
46 | 1. Intent
47 | 2. SharedPreferences
48 | 3. Calendar
49 | 4. Vibrator
50 | 5. Timer
51 | 6. Dialog
52 | 7. MediaPlayer
53 | 8. SoundPool
54 | 9. ObjectAnimator
55 | 10. Firebase DB
56 | 11. Firebase Auth
57 | 12. Firebase Storage
58 | 13. Camera
59 | 14. FilePicker
60 | 15. RequestNetwork
61 | 16. TextToSpeech
62 | 17. LocationManager
63 | 18. VideoAd
64 | 19. ProgressDialog
65 | 20. TimePickerDialog.
66 | 21. Notification
67 |
68 | #### More Block types provided by Sketchware provided
69 |
70 | 1. Void(Return nothing)
71 | 2. String
72 | 3. Number
73 | 4. Boolean
74 | 5. Map
75 | 6. List String
76 | 7. List Map
77 | 8. View
78 |
79 | Note: You can't add More Block type rather than above
80 |
81 | ## Get Started
82 |
83 | ### Creating first More Block
84 |
85 | Step 1: Open any project in which you want to create More Block.
86 |
87 | Step 2: Click on Event.
88 |
89 | 
90 |
91 | Step 3: Click on more Block
92 |
93 | 
94 |
95 | Step 4: Click on the add icon
96 |
97 | 
98 |
99 | Info: For example, I am creating a Block that will display a toast message.
100 |
101 | Step 5: Give More Block name as `Toast`, choose more Block type as Void(If not selected), and then click on add.
102 |
103 | 
104 |
105 | Step 6: Open your created More Block and do as follow.
106 |
107 | 
108 |
109 | Step 7: Put this More Block on any part of the activity and then run it.
110 |
111 | Info: I am putting this more block on `onCreate`, So my toast message will be visible when the app starts.
112 | 
113 |
114 | Step 8: Run the project and install the it.
115 |
116 | Info: I placed More Block on `onCreate`, So my toast is visible when the app starts.
117 |
118 | ### Frequently asked questions
119 |
120 | #### Can I place More Block inside a More Block?
121 |
122 | Yes, you can place More Block inside a more block but placing the same block inside itself will give errors.
123 |
124 | #### Where Sketchware pro will add More Block code?
125 |
126 | ```java
127 | package....;
128 | import ....;
129 | ....
130 |
131 | public class MainActivity extends Activity {
132 | @Override
133 | protected void onCreate(Bundle _savedInstanceState) {
134 | super.onCreate(_savedInstanceState);
135 | setContentView(R.layout.main);
136 | initialize(_savedInstanceState);
137 | initializeLogic();
138 | }
139 |
140 | private void initialize(Bundle _savedInstanceState) {
141 | }
142 |
143 | private void initializeLogic() {
144 | _Toast();
145 | }
146 | //More Block code goes here
147 | public void _Toast() {
148 | SketchwareUtil.showMessage(getApplicationContext(), "Type your message here");
149 | }
150 | }
151 | ```
152 |
--------------------------------------------------------------------------------
/docs/components/Google/Firebase/_category_.json:
--------------------------------------------------------------------------------
1 | {
2 | "label": "Firebase",
3 | "position": 2,
4 | "link": {
5 | "type": "generated-index",
6 | "description": "Firebase makes app development a lot easier. Sketchware Pro supports it out of the box."
7 | }
8 | }
9 |
--------------------------------------------------------------------------------
/docs/components/Google/Firebase/cloud-messaging.md:
--------------------------------------------------------------------------------
1 | ---
2 | title: Firebase Cloud Messaging
3 | description: This is a simple and easy guide to use Firebase Cloud Messaging in Sketchware Pro.
4 | sidebar_position: 2
5 | tags:
6 | - Google
7 | - Firebase
8 | ---
9 | # Firebase Cloud Messaging
10 | Welcome! This is a simple and easy guide to use Firebase Cloud Messaging in Sketchware Pro.
11 |
12 | ## What it is
13 | As you might already know, Firebase is developed by Google. It is a service for developers of small apps(but some big ones use it too). It has many features to try, visit [their website](https://firebase.google.com) to see them all. So, basically, **Firebase Cloud Messaging allows app developers to send push notifications to users**. The notification can have a image, title, description and more - just check it in Firebase console.
14 | ## How to use it
15 | First of all, you will probably need to [connect your app to Firebase](connect-to-firebase). Make sure you have downloaded and **install**ed **the latest version of Sketchware Pro.**
16 |
17 | 1. Add the Component
18 |
19 | First, create a new project(or use one you already have). Then, open it and open component manager. From there, click on the `+` button which is on the bottom right of the screen. Then, click on `Cloud Message`. Here enter any name for the component.
20 | 
21 | 2. Compile, run
22 |
23 | Wait, **that's it**? Well, yes! That's true! Implementing Firebase Cloud Messaging is as simple as that!
24 |
25 | ## Component events
26 | ### onCompleteRegister
27 |
28 | | Name | Type | Use |
29 | | ---- | ---- | --- |
30 | | token | string | If you want to target single devices or create device groups, you'll need to access this token |
31 | | success | boolean | Tells whether did the component work or not |
32 | | errorMessage | string | If `success` is false, then it shows the reason why the component didn't work |
33 |
34 | ## Sending a Notification
35 | You can easily send a notification from Firebase console. Check Firebase console and you'll get to know how to send notifications yourself.
--------------------------------------------------------------------------------
/docs/components/Google/Firebase/connect-to-firebase.md:
--------------------------------------------------------------------------------
1 | ---
2 | title: Connecting to Firebase
3 | description: This tutorial explains how to connect Sketchware Pro project to Firebase.
4 | sidebar_position: 1
5 | tags:
6 | - Google
7 | - Firebase
8 | ---
9 |
10 | # Connect Project to Firebase
11 |
12 | This tutorial explains how to connect Sketchware Pro project to Firebase.
13 |
14 | ## Create a Firebase app/project
15 |
16 | First, open [Firebase console](https://console.firebase.google.com/) on your device.
17 |
18 |
19 |
20 | 
21 |
22 |
23 |
24 | Here, you will see a interface like shown above. You can open a existing project(except the demo one), or create a new project by clicking `Create a project`.
25 | After that, click on the Add App button, and select Android from there. Then, you will need to enter the package name of your project(you can find it in Sketchware Pro).
26 | It is written here:
27 | 
28 | In this image, `com.my.newproject29` is the package name of this project. Type this exact same package name in Firebase. Then click on `Next`.
29 |
30 |
31 |
32 | 
33 |
34 |
35 |
36 | On this screen, click on `Download google-services.json`.
37 | After downloading, just close your browser.
38 |
39 | ## Connect to Sketchware Pro project
40 |
41 | Now you will need to open your project in Sketchware Pro.
42 | After opening a project, click on three dots on top right corner.
43 |
44 |
45 |
46 | 
47 |
48 |
49 | Then click on Library option on top.
50 | Select Firebase > import google-services.json
51 | and select the file we just downloaded from Firebase console. Then enable Firebase from the switch.
52 | And that's all! Your app is connected to Firebase! Now you can start using Firebase DB, Auth, Storage, Dynamic Links, Cloud messaging and more.
53 |
54 | ## Frequently asked questions
55 |
56 | ### What is Firebase
57 |
58 | Firebase is backed by Google. Firebase has many services for app developers, like Database, Storage and Authentication, all without need of any server.
59 |
60 | ### Firebase pricing
61 |
62 | For small apps, **Firebase is free to use**, but If you've reached the limits, you can upgrade and pay for only what you use.
63 |
64 | ### Why use Firebase
65 |
66 | There are many reasons to use Firebase, and the main ones are:
67 |
68 | 1. Firebase is fast and secure by using firebase rules.
69 | 2. Firebase works for Android, IOS, and even web.
70 | 3. Firebase is free to use for small applications under [Firebase limit](https://firebase.google.com/pricing).
71 | 4. Firebase is easy to use.
72 | 5. Firebase is developed by google hence you can use Google Analytics and also connect AdMob to firebase.
73 |
--------------------------------------------------------------------------------
/docs/components/Google/Firebase/dynamic-links.md:
--------------------------------------------------------------------------------
1 | ---
2 | title: Firebase Dynamic Links
3 | description: Send your user to the right place in your app. Send them to Play Store if they don't have your app installed.
4 | sidebar_position: 3
5 | tags:
6 | - Google
7 | - Firebase
8 | ---
9 |
10 | # Firebase Dynamic Links
11 | Firebase Dynamic Links allow app developers to send their Android or IOS users to right place in their app using a simple web link. If the app is not installed, redirect the user to Google Play Store on Android, and Apple App Store on iOS. Desktop users will get redirected to your specified website.
12 | :::warning Deprecated
13 | Firebase Dynamic Links is deprecated and should not be adopted in projects that don't already use it. The service will shut down on August 25, 2025. See the [Dynamic Links Deprecation FAQ](https://firebase.google.com/support/dynamic-links-faq) for more information.
14 | :::
15 | ## Configuration - Firebase
16 | First, make sure your Android Sketchware Pro project is [connected to Firebase](connect-to-firebase).
17 |
18 | 1. Open the [Firebase console](http://console.firebase.google.com/).
19 | 2. Open a project.
20 | 3. From the sidebar, select Dynamic Links.
21 | 
22 | 4. Click `Get Started`
23 | 5. It will ask you to type in a dynamic link url. Type one, and take a free domain ending with .page.link.
24 | 6. Then, click on `New Dynamic link`
25 | 7. Enter the needed information.
26 | 8. Copy the Dynamic Link URL.
27 | ## Configuration - Sketchware Pro
28 | 1. Open a Project.
29 | 2. Ensure It is [connected to Firebase](connect-to-firebase).
30 | 3. Open components tab.
31 | 4. Create a new component.
32 | 5. Select `Dynamic links` from the list.
33 | 
34 | 6. Name the component and add it.
35 | 7. Initialize the component by placing this code in onStart event.
36 | ```java
37 | FirebaseDynamicLinks.getInstance().getDynamicLink(MainActivity.this.getIntent()).addOnSuccessListener(MainActivity.this, dyn_onSuccessLink).addOnFailureListener(MainActivity.this, dyn_onFailureLink);
38 | ```
39 | Don't forget to replace `dyn` with your component name, and also, the `MainActivity` with yours.
40 |
41 | 8. Add both events: onFailure and onSuccess, else it will show error.
42 | 
43 | The above code will toast the dynamic link which was opened before your app opened.
44 | ## Component events
45 | ### onSuccess
46 |
47 | | Name | Type | Use |
48 | | ---- | ---- | --- |
49 | | link | string | The dynamic link using which the app was opened |
50 |
51 | ### onFailure
52 |
53 | | Name | Type | Use |
54 | | ---- | ---- | --- |
55 | | errorMessage | string | The reason why it could not process the request, error message |
56 |
--------------------------------------------------------------------------------
/docs/components/Google/Firebase/img/dynamic_links.jpg:
--------------------------------------------------------------------------------
https://raw.githubusercontent.com/Sketchware-Pro/Sketchware-Pro-Website/ec066c7e247e820c54e4a367bb98121d7dc2ea90/docs/components/Google/Firebase/img/dynamic_links.jpg
--------------------------------------------------------------------------------
/docs/components/Google/Firebase/img/dynamic_links_firebase.jpg:
--------------------------------------------------------------------------------
https://raw.githubusercontent.com/Sketchware-Pro/Sketchware-Pro-Website/ec066c7e247e820c54e4a367bb98121d7dc2ea90/docs/components/Google/Firebase/img/dynamic_links_firebase.jpg
--------------------------------------------------------------------------------
/docs/components/Google/Firebase/img/dynlink_onsuccess.jpg:
--------------------------------------------------------------------------------
https://raw.githubusercontent.com/Sketchware-Pro/Sketchware-Pro-Website/ec066c7e247e820c54e4a367bb98121d7dc2ea90/docs/components/Google/Firebase/img/dynlink_onsuccess.jpg
--------------------------------------------------------------------------------
/docs/components/Google/Firebase/img/layout.jpg:
--------------------------------------------------------------------------------
https://raw.githubusercontent.com/Sketchware-Pro/Sketchware-Pro-Website/ec066c7e247e820c54e4a367bb98121d7dc2ea90/docs/components/Google/Firebase/img/layout.jpg
--------------------------------------------------------------------------------
/docs/components/Google/_category_.json:
--------------------------------------------------------------------------------
1 | {
2 | "label": "Google",
3 | "position": 2,
4 | "link": {
5 | "type": "generated-index",
6 | "description": "Android is built by Google, so Google has built many products for Android App developers. Sketchware Pro supports many Google-built tools out of the box."
7 | }
8 | }
9 |
--------------------------------------------------------------------------------
/docs/components/Google/img/admob_fullscreencallback.jpg:
--------------------------------------------------------------------------------
https://raw.githubusercontent.com/Sketchware-Pro/Sketchware-Pro-Website/ec066c7e247e820c54e4a367bb98121d7dc2ea90/docs/components/Google/img/admob_fullscreencallback.jpg
--------------------------------------------------------------------------------
/docs/components/Google/img/admob_showad.jpg:
--------------------------------------------------------------------------------
https://raw.githubusercontent.com/Sketchware-Pro/Sketchware-Pro-Website/ec066c7e247e820c54e4a367bb98121d7dc2ea90/docs/components/Google/img/admob_showad.jpg
--------------------------------------------------------------------------------
/docs/components/Google/img/load_ad.jpg:
--------------------------------------------------------------------------------
https://raw.githubusercontent.com/Sketchware-Pro/Sketchware-Pro-Website/ec066c7e247e820c54e4a367bb98121d7dc2ea90/docs/components/Google/img/load_ad.jpg
--------------------------------------------------------------------------------
/docs/components/Google/interstitial_admob.md:
--------------------------------------------------------------------------------
1 | ---
2 | title: Admob Interstitial Ads
3 | description: This is a simple and easy guide for using Admob Interstitial ads in Sketchware Pro.
4 | sidebar_position: 1
5 | tags:
6 | - Built-in blocks
7 | - Google
8 | slug: admob
9 | ---
10 |
11 | ## What is AdMob?
12 | AdMob is a mobile advertising subsidiary of Google, originally founded by Omar Hamoui. The name AdMob is a portmanteau for "advertising on mobile". It was incorporated on April 10, 2006 while Hamoui was in business school at Wharton School. The company is based in Mountain View, California. [Wikipedia](https://en.m.wikipedia.org/wiki/AdMob)
13 |
14 | ## Why use Admob?
15 | Using AdMob, you can Earn more revenue with your apps.
16 | You work hard on your app. AdMob makes earning revenue easy with in-app ads, actionable insights, and powerful, easy-to-use tools that grow your app business.
17 |
18 | ## Getting started
19 | First, we'll need to connect our app to AdMob. You can view that guide on [Sketchware's official website](https://sketchware-docs.vercel.app/docs/admob-getting-started.html).
20 | ## In-Sketchware configuration
21 |
22 | :::caution
23 |
24 | You will see test ads until you `SIGN APK`.
25 |
26 | :::
27 |
28 |
29 | ### Add Admob component
30 | First, add an AdMob component.
31 |
32 | 
33 |
34 | Give it a name, and click on `Add`.
35 | ### Initialisation
36 | Load the ad in the onCreate event.
37 |
38 | 
39 |
40 | Now add the [onAdLoaded](#oninterstitialadloaded) event, which gets executed when the ad is loaded.
41 | Then you will need to register FullScreen content callbacks.
42 | 
43 |
44 | Now you're done. Show the ad whenever you want to, in onClick, a component event, or anywhere else. Just make sure to follow Admob's guidelines to make sure your account doesn't get suspended.
45 | 
46 |
47 | See? Piece of cake.
48 |
49 | ## Component events
50 | ### onInterstitialAdLoaded
51 | Gets executed when the interstitial ad is successfully loaded.
52 | ### onAdDismissedFullScreenControl
53 | Gets executed when the ad is closed by the user.
54 | ### onInterstitialAdFailedToLoad
55 | When Admob fails to load the ad, this event gets executed.
56 | ### onAdFailedToShowFullScreen
57 | When the ad loads but it fails to display it.
58 | ### onAdShowedFullScreen
59 | When it succeeds to show the ad.
60 | ## Available blocks
61 | ### Load ad
62 | Load the ad. Recommended to add in onCreate event.
63 | 
64 | ### Register Fullscreen Content Callbacks
65 | Registers fullscreen content callbacks. Must add in [onAdLoaded](#oninterstitialadloaded) event.
66 | 
67 | ### Show ad
68 | Shows the fullscreen interstitial ad.
69 | 
--------------------------------------------------------------------------------
/docs/components/_category_.json:
--------------------------------------------------------------------------------
1 | {
2 | "label": "Components",
3 | "position": 5,
4 | "link": {
5 | "type": "generated-index",
6 | "description": "Learn about the components that make up your apps, built with Sketchware Pro."
7 | }
8 | }
9 |
--------------------------------------------------------------------------------
/docs/components/img/layout.jpg:
--------------------------------------------------------------------------------
https://raw.githubusercontent.com/Sketchware-Pro/Sketchware-Pro-Website/ec066c7e247e820c54e4a367bb98121d7dc2ea90/docs/components/img/layout.jpg
--------------------------------------------------------------------------------
/docs/course/_category_.json:
--------------------------------------------------------------------------------
1 | {
2 | "label": "Course",
3 | "position": 2,
4 | "link": {
5 | "type": "generated-index",
6 | "description": "The official, free Sketchware Pro course by NiceSapien! Dive into android development with Sketchware Pro today!"
7 | }
8 | }
9 |
--------------------------------------------------------------------------------
/docs/course/basics/_category_.json:
--------------------------------------------------------------------------------
1 | {
2 | "label": "Basics",
3 | "position": 2,
4 | "link": {
5 | "type": "generated-index",
6 | "description": "The basics of Sketchware Pro. This section is all about understanding and working with it and its user interface. Moreover, you'll create your very first Android App!"
7 | }
8 | }
9 |
--------------------------------------------------------------------------------
/docs/course/basics/component.md:
--------------------------------------------------------------------------------
1 | ---
2 | title: Component
3 | description: Explore what Components in Sketchware Pro and Android are, and what their use is.
4 | sidebar_position: 4
5 | slug: component
6 | ---
7 |
8 | Components are reusable blocks of code that add specific functionality to your app without needing to write the code from scratch. They let you easily integrate features like showing ads, connecting to a server, or playing sounds in your project.
9 |
10 | ## Intent
11 | An intent component is used to take the user to a website, another app, or another page inside your app. Let's begin by adding one.
12 | Open the component section.
13 |
14 | 
15 |
16 | Click the plus icon on the bottom-right to add a component.
17 | Choose Intent; it's the very first component.
18 | Enter a name. I'll set it to `i`.
19 |
20 | 
21 |
22 | Then, click on Add.
23 | The intent component should now appear in the list.
24 |
25 | Now, before we use it, we need a new page, don't we?
26 |
27 | ## What's a page?
28 | A website has different pages for different uses. The same goes for Android apps too. However, unlike websites, Android apps have Activities.
29 | Each activity in an Android app has its own files. The default ones, created by Sketchware Pro, are called *main.xml* and *MainActivity.java*. You drag and drop views, and Sketchware Pro converts them into main.xml. You add blocks, such as toast, and they are converted into MainActivity.java.
30 |
31 | Files ending with `.xml` contain the design for an app or what you add inside the "View" section of Sketchware Pro. Sketchware Pro does the job of converting this design into XML.
32 | On the other hand, files ending with `.java` contain the programmatic code for your app. They contain the code of what's being done behind the scenes. This is what you add inside events. Sketchware Pro converts the blocks into Java code itself.
33 |
34 | ## Creating an Activity
35 | It's time to create a new activity. Go inside the `View` section.
36 | Click on main.xml at the bottom of the screen.
37 |
38 | 
39 |
40 | Click the plus icon.
41 |
42 | 
43 |
44 | Enter the view (activity) name as `page2` and click Add.
45 | Now, instead of one option, you should see two options: main.xml and page2.xml. These are the two pages of your app.
46 | Click on page2.xml.
47 |
48 | Do the setup. Add a Linear (V) layout. Set its width to match_parent. I won't say this again.
49 |
50 | Set the gravity to `center_horizontal` and `center_vertical`. I'll say it again if needed.
51 |
52 | ## Designing the activity
53 | Add a TextView. Set the text size to `30sp`. Set the text style to bold. Set the text to "Welcome to my app!"
54 |
55 | Then, add another TextView below it. Set the text size to `16sp`. Set the gravity to center, both vertically and horizontally.
56 | You can write anything long in it (2-4 lines) or simply copy-paste this text:
57 |
58 | ```
59 | Lorem ipsum dolor sit amet, consectetur adipiscing elit. Cras eleifend risus gravida porta rhoncus. Phasellus vitae congue mauris, in condimentum nulla. Vivamus tortor erat, lacinia auctor eleifend in, commodo non dui.
60 | ```
61 |
62 | What does it mean? What is this Lorem ipsum stuff? It is simply placeholder dummy text. It is used when you're designing an app/program but don't know what to write in the text (yet). Read more and generate Lorem ipsum text at [lipsum.com](https://www.lipsum.com/).
63 |
64 |
65 |
66 | 
67 |
68 |
69 |
70 | This is what page2 should look like by now.
71 | But how does the user get to it? The default activity is main.xml, right?
72 | That's exactly when you use an intent.
73 |
74 | ## Using Intent
75 | Open **main.xml** again.
76 |
77 | Open the onClick event for `button1`.
78 |
79 | 
80 |
81 | Remove the toast block. Open component blocks.
82 | :::info
83 |
84 | You can open component blocks by clicking on the block icon in the bottom-right, and then selecting the second-to-last, blue-colored option: component.
85 |
86 | :::
87 |
88 | 
89 |
90 | From here, scroll down and drag & drop the `intent set screen` block below the `When button1 clicked` block.
91 | Choose intent `i` by clicking on the black arrow. Choose Context `Page2Activity`.
92 |
93 | Then add a `StartActivity intent` block, and choose intent `i`.
94 |
95 | 
96 |
97 | This is what it should look like now.
98 |
99 | Go back and run your app. Install and open it. Try clicking on the button now, and it should take you to `page2`.
100 |
101 | 
102 |
103 |
104 | ## Conclusion
105 | Oh, what a beautiful app you have created! I can't wait to see what kind of amazing apps will you build after learning to use Sketchware Pro. Now then, that was it for today. You can rest now. Come back tomorrow for your first ever project, that's actually useful. Up until now, you've only built basic features that aren't really helping with anything. Next time, you'll also learn how to export your projects and `.apk` files to share them with your friends!
106 |
107 | (Try some features of Sketchware Pro yourself. Maybe you'll find something amazing!?)
--------------------------------------------------------------------------------
/docs/course/basics/event.md:
--------------------------------------------------------------------------------
1 | ---
2 | title: Event
3 | description: What is a event? What does it do? Let's see them in detail.
4 | sidebar_position: 2
5 | slug: event
6 | ---
7 |
8 | A event is a code executed when certain something happens in the app or the user performs an action. It can be when a button is clicked, when the app opens, or even when the app is closed.
9 |
10 | ## Creating a event
11 | It's time to create your first ever event! A event contains the code that is executed when a certain event happens inside your app.
12 | Remember the button we added [last time](view)? We'll give it a use this time. Now well, what should it do? Hmm... How about a simple toast for now?
13 |
14 | ### Button onClick
15 |
16 | Open the `Event` section. Open the `View` section inside the event section from the left of the screen.
17 |
18 |
19 | 
20 |
21 |
22 | 1. Click on `button1` to edit what it does when clicked.
23 | 2. Click the block icon on bottom right.
24 | 3. Click the last second option on bottom right, `Component`, written in blue.
25 | 4. Hold the Toast block on the left. Drag and drop it below the already-added `When button1 clicked` block. It should stick below it.
26 | 5. Click on the white space to edit the message.
27 | 6. Enter anything, such as "Built by `Your name`!"
28 |
29 | 
30 |
31 | 7. You're done. Click the back button and go back to the `View` section.
32 |
33 | ## Conclusion
34 | I hope you got a idea of what views are in a Sketchware Pro/Android app. Next, we'll try running this app on your android phone.
--------------------------------------------------------------------------------
/docs/course/basics/img/add_activity.png:
--------------------------------------------------------------------------------
https://raw.githubusercontent.com/Sketchware-Pro/Sketchware-Pro-Website/ec066c7e247e820c54e4a367bb98121d7dc2ea90/docs/course/basics/img/add_activity.png
--------------------------------------------------------------------------------
/docs/course/basics/img/button1-onclick.png:
--------------------------------------------------------------------------------
https://raw.githubusercontent.com/Sketchware-Pro/Sketchware-Pro-Website/ec066c7e247e820c54e4a367bb98121d7dc2ea90/docs/course/basics/img/button1-onclick.png
--------------------------------------------------------------------------------
/docs/course/basics/img/button_onclick.png:
--------------------------------------------------------------------------------
https://raw.githubusercontent.com/Sketchware-Pro/Sketchware-Pro-Website/ec066c7e247e820c54e4a367bb98121d7dc2ea90/docs/course/basics/img/button_onclick.png
--------------------------------------------------------------------------------
/docs/course/basics/img/events.png:
--------------------------------------------------------------------------------
https://raw.githubusercontent.com/Sketchware-Pro/Sketchware-Pro-Website/ec066c7e247e820c54e4a367bb98121d7dc2ea90/docs/course/basics/img/events.png
--------------------------------------------------------------------------------
/docs/course/basics/img/firstapp.gif:
--------------------------------------------------------------------------------
https://raw.githubusercontent.com/Sketchware-Pro/Sketchware-Pro-Website/ec066c7e247e820c54e4a367bb98121d7dc2ea90/docs/course/basics/img/firstapp.gif
--------------------------------------------------------------------------------
/docs/course/basics/img/firstapp.png:
--------------------------------------------------------------------------------
https://raw.githubusercontent.com/Sketchware-Pro/Sketchware-Pro-Website/ec066c7e247e820c54e4a367bb98121d7dc2ea90/docs/course/basics/img/firstapp.png
--------------------------------------------------------------------------------
/docs/course/basics/img/image.png:
--------------------------------------------------------------------------------
https://raw.githubusercontent.com/Sketchware-Pro/Sketchware-Pro-Website/ec066c7e247e820c54e4a367bb98121d7dc2ea90/docs/course/basics/img/image.png
--------------------------------------------------------------------------------
/docs/course/basics/img/install.png:
--------------------------------------------------------------------------------
https://raw.githubusercontent.com/Sketchware-Pro/Sketchware-Pro-Website/ec066c7e247e820c54e4a367bb98121d7dc2ea90/docs/course/basics/img/install.png
--------------------------------------------------------------------------------
/docs/course/basics/img/intent.png:
--------------------------------------------------------------------------------
https://raw.githubusercontent.com/Sketchware-Pro/Sketchware-Pro-Website/ec066c7e247e820c54e4a367bb98121d7dc2ea90/docs/course/basics/img/intent.png
--------------------------------------------------------------------------------
/docs/course/basics/img/main.png:
--------------------------------------------------------------------------------
https://raw.githubusercontent.com/Sketchware-Pro/Sketchware-Pro-Website/ec066c7e247e820c54e4a367bb98121d7dc2ea90/docs/course/basics/img/main.png
--------------------------------------------------------------------------------
/docs/course/basics/img/page2.png:
--------------------------------------------------------------------------------
https://raw.githubusercontent.com/Sketchware-Pro/Sketchware-Pro-Website/ec066c7e247e820c54e4a367bb98121d7dc2ea90/docs/course/basics/img/page2.png
--------------------------------------------------------------------------------
/docs/course/basics/img/plus.png:
--------------------------------------------------------------------------------
https://raw.githubusercontent.com/Sketchware-Pro/Sketchware-Pro-Website/ec066c7e247e820c54e4a367bb98121d7dc2ea90/docs/course/basics/img/plus.png
--------------------------------------------------------------------------------
/docs/course/basics/img/run.png:
--------------------------------------------------------------------------------
https://raw.githubusercontent.com/Sketchware-Pro/Sketchware-Pro-Website/ec066c7e247e820c54e4a367bb98121d7dc2ea90/docs/course/basics/img/run.png
--------------------------------------------------------------------------------
/docs/course/basics/img/setscreen.png:
--------------------------------------------------------------------------------
https://raw.githubusercontent.com/Sketchware-Pro/Sketchware-Pro-Website/ec066c7e247e820c54e4a367bb98121d7dc2ea90/docs/course/basics/img/setscreen.png
--------------------------------------------------------------------------------
/docs/course/basics/img/startactivity.png:
--------------------------------------------------------------------------------
https://raw.githubusercontent.com/Sketchware-Pro/Sketchware-Pro-Website/ec066c7e247e820c54e4a367bb98121d7dc2ea90/docs/course/basics/img/startactivity.png
--------------------------------------------------------------------------------
/docs/course/basics/img/text.png:
--------------------------------------------------------------------------------
https://raw.githubusercontent.com/Sketchware-Pro/Sketchware-Pro-Website/ec066c7e247e820c54e4a367bb98121d7dc2ea90/docs/course/basics/img/text.png
--------------------------------------------------------------------------------
/docs/course/basics/img/views.png:
--------------------------------------------------------------------------------
https://raw.githubusercontent.com/Sketchware-Pro/Sketchware-Pro-Website/ec066c7e247e820c54e4a367bb98121d7dc2ea90/docs/course/basics/img/views.png
--------------------------------------------------------------------------------
/docs/course/basics/run.md:
--------------------------------------------------------------------------------
1 | ---
2 | title: Running the app
3 | description: You've made your first app. But how do you run it?
4 | sidebar_position: 3
5 | slug: run
6 | ---
7 |
8 | It is finally time to test your app on your Android device. Sketchware Pro will do the job of converting the UI and blocks into working code and converting the code into a functional Android app.
9 |
10 | ## Compiling
11 | Click the `Run` button on the bottom-right corner of the screen.
12 | Sketchware Pro will then start compiling and building your app!
13 |
14 | 
15 |
16 | Sit back and relax while Sketchware Pro does the work.
17 | Once the compilation is complete, give the permission to install third-party apps (that's your app) and click `Install`.
18 |
19 | :::note
20 |
21 | This UI may differ between mobile brands. However, it should be easy to understand. It should look similar to when you installed Sketchware Pro. This screenshot was taken from a Samsung device running One UI 6.1, Android 14.
22 |
23 | :::
24 |
25 | 
26 |
27 | You may see a Play Protect warning after clicking on `Install`. Click on `More Details` and then `Install anyway` or `Install without scanning`.
28 |
29 | Now, click on `Open` or open your app from the home screen.
30 |
31 | ## Trying it out
32 |
33 | Try clicking that neat button.
34 |
35 | 
36 |
37 |
38 | Beautiful, isn't it? That's your very own application, right in front of you. Celebrate with a cup of coffee.
39 |
40 | ## Conclusion
41 | OMG, Sketchware Pro is so cool, right? But what is that component thingy? Let's find out.
42 |
--------------------------------------------------------------------------------
/docs/course/basics/views.md:
--------------------------------------------------------------------------------
1 | ---
2 | title: View
3 | description: What is a view? How do they work? Let's see them in detail.
4 | sidebar_position: 1
5 | slug: view
6 | ---
7 |
8 | A view is a graphical element of your app. It can be a button, text, image etc. Views construct the user interface of an Android app. Before you start programming your app, you must design it.
9 |
10 | ## Understanding views
11 |
12 | 
13 |
14 | On the left side of the screen, we have all the available views. Including Layouts, Widgets, etc.
15 |
16 | ## Building a basic app
17 | ### Linear (V)
18 | It is a good idea to always add a Linear (V) inside your app first. Try to drag and drop it inside of the editor.
19 | It should automatically stick to the left side of the screen, and a few options should've appeared at the bottom of the screen.
20 |
21 | 
22 |
23 | Choose the `width` option. Set it to `match_parent`.
24 | Now it should be filling the entire screen. It is a good idea to add it before anything else so you can position the elements better and change the background.
25 | Now, click on `See All`>`gravity` and check `center_vertical` & `center_horizontal`.
26 | Press the back button to return to the main View editor.
27 |
28 | ### Button
29 |
30 | Now from the left, under Widgets, there should be a Widget called "Button". Drag and drop it into the editor.
31 | It should automatically be placed in the very bottom of the screen since we set the gravity of `linear1` to center horizontally and vertically.
32 | Click `See All` on the bottom of the screen again and scroll down till you see a option called `text`. Set the text to anything. I'll set it to 'Hello World'
33 |
34 | 
35 |
36 | Click Save.
37 |
38 | Now, we've created the button. But it doesn't do anything, right? It just barely sits there alone without any use. Let's make it do something.
--------------------------------------------------------------------------------
/docs/course/beginner/_category_.json:
--------------------------------------------------------------------------------
1 | {
2 | "label": "Notes app",
3 | "position": 3,
4 | "link": {
5 | "type": "generated-index",
6 | "description": "Build your very first project using Sketchware Pro - a simple notes app"
7 | }
8 | }
9 |
--------------------------------------------------------------------------------
/docs/course/beginner/add.md:
--------------------------------------------------------------------------------
1 | ---
2 | title: Add Note
3 | description: This is how you build a feature to allow the user to save new notes in your notes app.
4 | sidebar_position: 3
5 | slug: add-note
6 | ---
7 |
8 | Time to allow the user to add notes to the list.
9 |
10 | ## Design
11 | Add a EditText and a Button above the ListView.
12 | Change button text to `Add Note`.
13 |
14 | Change the edittext hint to `Type note content`.
15 |
16 | 
17 |
18 | Design complete. Time to program.
19 |
20 | ## Programming
21 | Open the onClick event of the button.
22 | (If you don't remember anything, just check the basics again! You've already been taught this.)
23 |
24 | 
25 |
26 | ### Explanation
27 | You may already know, that for a computer, 0 is 1. Which means, counting in computers start from 0. 0 is the first note, 1 is the second, and 2 is the third.
28 | This block adds the content of the EditText in the list of notes as 0th position, which is the first position. If there is another note, it will move to the 1st position and the others will move forward too. Inserting the note at 0 causes it to appear **above** the other, older notes.
29 |
30 | The ListView refreshData block tells the ListView to refresh its contents so the new note appears in the list.
31 |
32 | ## Almost there
33 | You're done with the main part of the app. Try to run and install it. It should be working.
34 |
35 | 
36 |
37 | Email at [hello@sketchware.pro](mailto:hello@sketchware.pro) if you have/had any issues. You can also ask for help in our [Discord](https://discord.gg/xX6aEsnZRt) server.
38 |
39 | But the note-adding feature always being above the list looks ugly indeed. That's why we added the fab: Which will make it visible only when you click it and invisible when you're not adding a note.
40 |
41 | ## Fab Programming
42 | Time to program the fab.
43 | But first, open onCreate event.
44 |
45 | 
46 |
47 | Add setVisible blocks to make the edittext and button `GONE`.
48 | The difference between gone and invisible is that:
49 | Invisible makes the view disappear, but still take its place.
50 | Gone makes the view disappear AND clean the place it took. It disappears and other views adjust into its place.
51 |
52 | Now, open the button onClick event and use set visible blocks to set the button1 and edittext1 to `GONE` and listview1 to `VISIBLE`.
53 |
54 | 
55 |
56 | Do the same in FAB onClick, but set button1 and edittext1 to `VISIBLE` and listview1 to `GONE`.
57 |
58 | 
59 |
60 | :::note
61 |
62 | Only add the set visible blocks in fab onClick, don't add the list blocks!
63 |
64 | :::
65 |
66 | Run the app.
67 |
68 | ## Congratulations
69 | You have successfully created the first project of this course! You're one step closer to achieving your certificate now!
70 | You can move forward to the next project now, but we recommend you to test around this project first and try to add delete projects functionality.
71 | We know that the added notes get deleted after you close the app, but you will know how to fix the issue yourself after completing the course.
--------------------------------------------------------------------------------
/docs/course/beginner/img/add.png:
--------------------------------------------------------------------------------
https://raw.githubusercontent.com/Sketchware-Pro/Sketchware-Pro-Website/ec066c7e247e820c54e4a367bb98121d7dc2ea90/docs/course/beginner/img/add.png
--------------------------------------------------------------------------------
/docs/course/beginner/img/addlist.png:
--------------------------------------------------------------------------------
https://raw.githubusercontent.com/Sketchware-Pro/Sketchware-Pro-Website/ec066c7e247e820c54e4a367bb98121d7dc2ea90/docs/course/beginner/img/addlist.png
--------------------------------------------------------------------------------
/docs/course/beginner/img/btnclick.png:
--------------------------------------------------------------------------------
https://raw.githubusercontent.com/Sketchware-Pro/Sketchware-Pro-Website/ec066c7e247e820c54e4a367bb98121d7dc2ea90/docs/course/beginner/img/btnclick.png
--------------------------------------------------------------------------------
/docs/course/beginner/img/btnclickon.png:
--------------------------------------------------------------------------------
https://raw.githubusercontent.com/Sketchware-Pro/Sketchware-Pro-Website/ec066c7e247e820c54e4a367bb98121d7dc2ea90/docs/course/beginner/img/btnclickon.png
--------------------------------------------------------------------------------
/docs/course/beginner/img/customview.png:
--------------------------------------------------------------------------------
https://raw.githubusercontent.com/Sketchware-Pro/Sketchware-Pro-Website/ec066c7e247e820c54e4a367bb98121d7dc2ea90/docs/course/beginner/img/customview.png
--------------------------------------------------------------------------------
/docs/course/beginner/img/enablefab.png:
--------------------------------------------------------------------------------
https://raw.githubusercontent.com/Sketchware-Pro/Sketchware-Pro-Website/ec066c7e247e820c54e4a367bb98121d7dc2ea90/docs/course/beginner/img/enablefab.png
--------------------------------------------------------------------------------
/docs/course/beginner/img/fabadd.png:
--------------------------------------------------------------------------------
https://raw.githubusercontent.com/Sketchware-Pro/Sketchware-Pro-Website/ec066c7e247e820c54e4a367bb98121d7dc2ea90/docs/course/beginner/img/fabadd.png
--------------------------------------------------------------------------------
/docs/course/beginner/img/fabimage.png:
--------------------------------------------------------------------------------
https://raw.githubusercontent.com/Sketchware-Pro/Sketchware-Pro-Website/ec066c7e247e820c54e4a367bb98121d7dc2ea90/docs/course/beginner/img/fabimage.png
--------------------------------------------------------------------------------
/docs/course/beginner/img/fabonclick.png:
--------------------------------------------------------------------------------
https://raw.githubusercontent.com/Sketchware-Pro/Sketchware-Pro-Website/ec066c7e247e820c54e4a367bb98121d7dc2ea90/docs/course/beginner/img/fabonclick.png
--------------------------------------------------------------------------------
/docs/course/beginner/img/image.png:
--------------------------------------------------------------------------------
https://raw.githubusercontent.com/Sketchware-Pro/Sketchware-Pro-Website/ec066c7e247e820c54e4a367bb98121d7dc2ea90/docs/course/beginner/img/image.png
--------------------------------------------------------------------------------
/docs/course/beginner/img/imagem.png:
--------------------------------------------------------------------------------
https://raw.githubusercontent.com/Sketchware-Pro/Sketchware-Pro-Website/ec066c7e247e820c54e4a367bb98121d7dc2ea90/docs/course/beginner/img/imagem.png
--------------------------------------------------------------------------------
/docs/course/beginner/img/listdes.png:
--------------------------------------------------------------------------------
https://raw.githubusercontent.com/Sketchware-Pro/Sketchware-Pro-Website/ec066c7e247e820c54e4a367bb98121d7dc2ea90/docs/course/beginner/img/listdes.png
--------------------------------------------------------------------------------
/docs/course/beginner/img/listview.png:
--------------------------------------------------------------------------------
https://raw.githubusercontent.com/Sketchware-Pro/Sketchware-Pro-Website/ec066c7e247e820c54e4a367bb98121d7dc2ea90/docs/course/beginner/img/listview.png
--------------------------------------------------------------------------------
/docs/course/beginner/img/notesapp.png:
--------------------------------------------------------------------------------
https://raw.githubusercontent.com/Sketchware-Pro/Sketchware-Pro-Website/ec066c7e247e820c54e4a367bb98121d7dc2ea90/docs/course/beginner/img/notesapp.png
--------------------------------------------------------------------------------
/docs/course/beginner/img/onBindCode.png:
--------------------------------------------------------------------------------
https://raw.githubusercontent.com/Sketchware-Pro/Sketchware-Pro-Website/ec066c7e247e820c54e4a367bb98121d7dc2ea90/docs/course/beginner/img/onBindCode.png
--------------------------------------------------------------------------------
/docs/course/beginner/img/onbind.png:
--------------------------------------------------------------------------------
https://raw.githubusercontent.com/Sketchware-Pro/Sketchware-Pro-Website/ec066c7e247e820c54e4a367bb98121d7dc2ea90/docs/course/beginner/img/onbind.png
--------------------------------------------------------------------------------
/docs/course/beginner/img/oncreat.png:
--------------------------------------------------------------------------------
https://raw.githubusercontent.com/Sketchware-Pro/Sketchware-Pro-Website/ec066c7e247e820c54e4a367bb98121d7dc2ea90/docs/course/beginner/img/oncreat.png
--------------------------------------------------------------------------------
/docs/course/beginner/img/rickroll.png:
--------------------------------------------------------------------------------
https://raw.githubusercontent.com/Sketchware-Pro/Sketchware-Pro-Website/ec066c7e247e820c54e4a367bb98121d7dc2ea90/docs/course/beginner/img/rickroll.png
--------------------------------------------------------------------------------
/docs/course/beginner/img/sellist.png:
--------------------------------------------------------------------------------
https://raw.githubusercontent.com/Sketchware-Pro/Sketchware-Pro-Website/ec066c7e247e820c54e4a367bb98121d7dc2ea90/docs/course/beginner/img/sellist.png
--------------------------------------------------------------------------------
/docs/course/beginner/img/typecontent.png:
--------------------------------------------------------------------------------
https://raw.githubusercontent.com/Sketchware-Pro/Sketchware-Pro-Website/ec066c7e247e820c54e4a367bb98121d7dc2ea90/docs/course/beginner/img/typecontent.png
--------------------------------------------------------------------------------
/docs/course/beginner/list.md:
--------------------------------------------------------------------------------
1 | ---
2 | title: List
3 | description: This is how you build a list of notes in your notes app.
4 | sidebar_position: 2
5 | slug: list
6 | ---
7 |
8 | Now, we need a way to show the list of notes to the user, right?
9 |
10 | ## Fab Image
11 |
12 | 
13 |
14 | Tap on the blue dot on the bottom right of your app(that's the fab), and select the newly added image(add icon). It may appear black in color. That's okay.
15 |
16 | We will add the function of the fab later.
17 |
18 | ## ListView
19 | We use a ListView when we need to display a list of items in our apps. An example is the gmail app on your phone, it shows the list of your emails.
20 |
21 | Our app however, won't show the list of emails, but the list of notes stored by the user.
22 |
23 | 
24 |
25 | Drag in a ListView from under List on the left.
26 | Don't worry, these three are only sample list items. The list will look as you design in the final app.
27 |
28 | ## List Design
29 | It's time to design what each list item will look like!
30 | Click on main.xml on the bottom. We'll call this activity selector now.
31 |
32 | 
33 |
34 | Open the CUSTOM VIEW section and create a new one. Just name it `list`.
35 | Now, a custom activity/view is very different from a normal one. Don't design it like a normal one.
36 |
37 | Drag in a Linear(H).
38 | Place a TextView inside the Linear.
39 |
40 | 
41 |
42 | This is what list.xml should be looking like now. Return to main.xml.
43 |
44 | 
45 |
46 | Click on the ListView. Select the "customView" property and set it to list.
47 |
48 | ## List Program
49 |
50 | 
51 |
52 | Go to Event>View>+ and add the listview1:onBindCustomView event.
53 |
54 | Open the newly added event.
55 | From View blocks, add a TextView setText block.
56 | Then move to List section and drag the [get value at () key [] of [List Map]](/docs/blocks/list#get-value-at--key--of-list-map) block into the white input area of the TextView block.
57 | Then pull in the `position` and `List Map:data` blocks from the default block.
58 | Set the key to `data`.
59 |
60 | 
61 |
62 | This is what the event should look like now.
63 |
64 | Now, open the main screen. Go to Event>Activity and open the onCreate event.
65 | Go to List blocks, click Add list, type in the name "notes" and select Map as the type.
66 |
67 | 
68 |
69 | You should now see even more blocks. Open View blocks.
70 |
71 | 
72 |
73 | Add the above block in the same way.
74 |
75 | ## Explanation
76 |
77 | This might sound complex here, but it's simple. You will understand it yourself later if not here.
78 |
79 | A custom view is a view that loads inside of **another** view. For example here, you created a custom view for the list, however, it will appear in the main activity.
80 | Then, we set `list` as the customView of the ListView. This was to tell the list that it has to load the custom view `list` inside it. Then, that TextView we made - its content can be changed using blocks. So we added onBindCustomView event, which is like the onCreate event of the Custom Activity. We added a get list block there. It's explanation is available [here](/docs/blocks/list#get-value-at--key--of-list-map). This will set the content of the TextView to be the user's note. Since there will be multiple notes, the position block tells what position of the note/list item is being loaded right now. The List Map:data is the variable that contains all the blocks. Later, we tell the ListView that the List Map:data has to take data from the list map `notes` inside the onCreate event.
81 | However, there is no way for the user to store anything the variable `notes`, so we'll do that next.
82 |
83 | Return to the main screen. The ListView is now complete. Time to allow the user to store some notes.
--------------------------------------------------------------------------------
/docs/course/beginner/setup.md:
--------------------------------------------------------------------------------
1 | ---
2 | title: Setup
3 | description: The basic setup for your simple notes app!
4 | sidebar_position: 1
5 | slug: setup
6 | ---
7 |
8 | It's time to setup the new project. Instead of editing your existing project, we'll create a new one. Save the existing one as your legendary first app.
9 |
10 | ## Creating a project
11 | Click the new project button, and fill in the following values:
12 |
13 |
14 |
15 | 
16 |
17 |
18 |
19 | Remember, it is your choice to fill whatever you want. The Application Name will be shown to the users as well. Package Name **has** to contain atleast one dot(.). I've entered com.nicesapien.notes, but you can enter something else such as com.yourname.yourappname as well.
20 | Click on Create Project.
21 |
22 | ## Design
23 |
24 | As you do before, begin by adding a Linear(V).
25 | Set the width to `match_parent`.
26 |
27 | Now, click on main.xml on the bottom of the screen.
28 |
29 | 
30 |
31 | Click on main.xml's image.
32 |
33 | 
34 |
35 | Enable FAB and click SAVE.
36 |
37 | Open main.xml now.
38 |
39 | ## Image Manager
40 |
41 | Click on the three dots on top-left and open the image manager.
42 |
43 | 
44 |
45 | Now, click the download icon on the top.
46 | Open the section: WHITE and search for the add(+) icon.
47 |
48 | 
49 |
50 | Then click on the Save button on the bottom.
51 |
52 | Setup is complete.
--------------------------------------------------------------------------------
/docs/course/click-counter/_category_.json:
--------------------------------------------------------------------------------
1 | {
2 | "label": "Click Counter",
3 | "position": 4,
4 | "link": {
5 | "type": "generated-index",
6 | "description": "Build a app that counts the amount of times you click the screen in a period of time"
7 | }
8 | }
9 |
--------------------------------------------------------------------------------
/docs/course/click-counter/click.md:
--------------------------------------------------------------------------------
1 | ---
2 | title: ClickActivity
3 | description: Creating the ClickActivity for your Click Counter!
4 | sidebar_position: 3
5 | slug: click
6 | ---
7 |
8 | Design click.xml like this:
9 |
10 | 
11 |
12 | ## linear1 onClick
13 | That's right, you can add the onClick event in linear layouts too.
14 |
15 | Add a Number variable named `clicks`. Also, add the exact same Shared Preferences component s:s
16 |
17 | Add the blocks like below in the linear1 onClick event:
18 |
19 | 
20 |
21 | And like below in the onCreate event:
22 |
23 | 
24 |
25 | Your app is now ready. It's kinda trash, so here's a few things you can do to make it better!
26 |
27 | 1. Add a timer: It can be 1 second, 5 seconds, or even 10 seconds!
28 | 2. Replace the linear's onClick with a button's onClick
29 | 3. Show the number of clicks when the user is clicking
30 |
31 | I also suggest you to modify your notes app so the notes are saved using Shared Preferences. As a protip, you'll have to use the `List Map to Json String` and `Json String to List Map` blocks!
--------------------------------------------------------------------------------
/docs/course/click-counter/img/appcompat.gif:
--------------------------------------------------------------------------------
https://raw.githubusercontent.com/Sketchware-Pro/Sketchware-Pro-Website/ec066c7e247e820c54e4a367bb98121d7dc2ea90/docs/course/click-counter/img/appcompat.gif
--------------------------------------------------------------------------------
/docs/course/click-counter/img/click.png:
--------------------------------------------------------------------------------
https://raw.githubusercontent.com/Sketchware-Pro/Sketchware-Pro-Website/ec066c7e247e820c54e4a367bb98121d7dc2ea90/docs/course/click-counter/img/click.png
--------------------------------------------------------------------------------
/docs/course/click-counter/img/error log.png:
--------------------------------------------------------------------------------
https://raw.githubusercontent.com/Sketchware-Pro/Sketchware-Pro-Website/ec066c7e247e820c54e4a367bb98121d7dc2ea90/docs/course/click-counter/img/error log.png
--------------------------------------------------------------------------------
/docs/course/click-counter/img/image.png:
--------------------------------------------------------------------------------
https://raw.githubusercontent.com/Sketchware-Pro/Sketchware-Pro-Website/ec066c7e247e820c54e4a367bb98121d7dc2ea90/docs/course/click-counter/img/image.png
--------------------------------------------------------------------------------
/docs/course/click-counter/img/linearclick.png:
--------------------------------------------------------------------------------
https://raw.githubusercontent.com/Sketchware-Pro/Sketchware-Pro-Website/ec066c7e247e820c54e4a367bb98121d7dc2ea90/docs/course/click-counter/img/linearclick.png
--------------------------------------------------------------------------------
/docs/course/click-counter/img/onclick.png:
--------------------------------------------------------------------------------
https://raw.githubusercontent.com/Sketchware-Pro/Sketchware-Pro-Website/ec066c7e247e820c54e4a367bb98121d7dc2ea90/docs/course/click-counter/img/onclick.png
--------------------------------------------------------------------------------
/docs/course/click-counter/img/oncreate.png:
--------------------------------------------------------------------------------
https://raw.githubusercontent.com/Sketchware-Pro/Sketchware-Pro-Website/ec066c7e247e820c54e4a367bb98121d7dc2ea90/docs/course/click-counter/img/oncreate.png
--------------------------------------------------------------------------------
/docs/course/click-counter/img/oncreateclick.png:
--------------------------------------------------------------------------------
https://raw.githubusercontent.com/Sketchware-Pro/Sketchware-Pro-Website/ec066c7e247e820c54e4a367bb98121d7dc2ea90/docs/course/click-counter/img/oncreateclick.png
--------------------------------------------------------------------------------
/docs/course/click-counter/img/screenshot.png:
--------------------------------------------------------------------------------
https://raw.githubusercontent.com/Sketchware-Pro/Sketchware-Pro-Website/ec066c7e247e820c54e4a367bb98121d7dc2ea90/docs/course/click-counter/img/screenshot.png
--------------------------------------------------------------------------------
/docs/course/click-counter/main.md:
--------------------------------------------------------------------------------
1 | ---
2 | title: MainActivity
3 | description: Creating the MainActivity for your Click Counter!
4 | sidebar_position: 2
5 | slug: main
6 | ---
7 |
8 | It's time to design the home screen of the app!
9 |
10 | ## Designing
11 | Start off by adding 2 TextViews into the home screen and aligning them to the center using gravity of the linear layout.
12 |
13 | Then, add a MaterialButton. This time, we'll be using a Material Button instead of a normal button.
14 |
15 | ### What's a Material Button?
16 | [Material Design](https://material.io) is a design language developed by Google for Android. It's a beautiful, colorful, and accessible design language that Google suggests all apps to use. While it's totally okay to create our own design language, using Material Design is easier. The latest version of Material Design is Material 3, or "Material You". This latest version is the one Sketchware Pro uses.
17 |
18 | A Material Button is a pre-designed button which obviously looks better than a normal button.
19 |
20 |
21 |
22 | 
23 |
24 |
25 |
26 | ## AppCompat
27 | Now, try to `Run` the app.
28 |
29 | 
30 |
31 | Observe the bottom of the screen. An error, huh?
32 |
33 | Click on Show.
34 | Don't understand? No problem. You will, soon.
35 |
36 | But I'll tell you the solution: Enable AppCompat.
37 |
38 | ### What's AppCompat?
39 | AppCompat allows you to add additional features to your app. Most of the big apps use it.
40 |
41 | ### Enabling AppCompat
42 | To enable it, look at the top right of the screen. You'll see a few buttons: Undo, Redo, Save, and More Options(three dots)
43 |
44 | Press the three dots. A drawer with several options will open. Now, click library.
45 |
46 | Hit AppCompat and Design. Enable it.
47 |
48 | 
49 |
50 | :::info
51 |
52 | The mouse pointer you see is a fake to make it easier for you to know where to click, this is actually being done on a mobile.
53 |
54 | :::
55 |
56 | ## Run
57 | Try running the app again! It's gonna work this time. Don't be happy yet though, it's not ready.
58 |
59 | ## onCreate
60 | Open the onCreate event now.
61 |
62 | Add the following blocks:
63 |
64 | 
65 |
66 | Make sure to put a empty space after `High Score: ` and `Last Score: `!
67 |
68 | ## onClick materialbutton1
69 | Add the button's onClick event and a intent component `i`.
70 | Take the user to ClickActivity when the button is clicked.
71 |
72 | 
73 |
74 | Your work on MainActivity is nearly complete. Now, copy onCreate to the onStart event. I'll leave you to figure it out.
75 | Let's move to click.xml
--------------------------------------------------------------------------------
/docs/course/click-counter/setup.md:
--------------------------------------------------------------------------------
1 | ---
2 | title: Setup
3 | description: The basic setup for your Click Counter!
4 | sidebar_position: 1
5 | slug: setup
6 | ---
7 |
8 | Many might call this app easier than the notes app. Many might also call it useless. While both of these terms are true and do actually apply to this project, atleast you'll learn something.
9 |
10 | ## Creating the project
11 | By now, you should probably already know what has to be done when creating a new project. After creating it, make sure to do the basic activity setup - by adding a linear layout.
12 |
13 | ## Creating the second activity
14 | Create another activity - name it `click` (aka click.xml).
15 |
16 | This is the activity where you'll *actually* be hitting your phone's screen like an idiot.
17 |
18 | ## Shared Preferences
19 | Introducing a new component: Shared Preferences.
20 |
21 | This component is used to permanently save some data into the user's device. You might have noticed that the notes app deletes the notes each time you close and open it, right? It's because we weren't saving it into the memory. Shared Preferences help us do exactly that.
22 |
23 | :::info
24 |
25 | Shared Preferences are a good way to store user data. However, if the user uninstalls your app, the data will be cleared. Since the data that we'll be storing is just high scores and they aren't very important, it's safe to use Shared Preferences!
26 |
27 | :::
28 |
29 | Open the components section and add a shared preferences component. But wait, what's this new "Enter file name" thingy?
30 | 
31 |
32 | Just enter `s`. When you have multiple shared preferences and don't want the data to be mixed up, you can enter different file names. Remember: The component name can be anything, but the file name must be same everywhere in order to access the data. Try messing with these names yourself for more precise understanding.
33 |
34 |
35 | Setup is done. Let's move ahead.
--------------------------------------------------------------------------------
/docs/course/cool.md:
--------------------------------------------------------------------------------
1 | ---
2 | title: Cool Things
3 | description: Here are a few cool things to know about Sketchware Pro!
4 | sidebar_position: 5
5 | slug: coolthings
6 | ---
7 |
8 | Here are a few cool resources about Sketchware Pro that you should know about!
9 | (This page is a part of the course)
10 |
11 | ### Top sites about Sketchware or Sketchware Pro
12 | - [Sketchware Pro blog](https://sketchware.pro/blog) - Official
13 | - [Sketchware Help](https://sketchwarehelp.com) - by Sanjeev Kumar
14 | - [Sketchware King](https://sketchwareking.blogspot.com) - by NiceSapien
15 | - [Sketchub blog](https://blog.sketchub.in) - by Sketchub
16 |
17 | ### Top YouTube channels
18 | - [Sanjeev Kumar](https://www.youtube.com/@sketchwarehelp)
19 | - [NiceSapien](https://www.youtube.com/nicesapien)
20 | - [Android Bulb](https://www.youtube.com/@AndroidBulb)(mostly hindi)
21 |
22 | ## Cool Project tutorials
23 | Here are a few cool project tutorials on the official Sketchware Pro blog!
24 |
25 | - [Car Game](/blog/simple-car-game)
26 | - [Web Page to PDF converter](/blog/webpage-to-pdf-app)
27 |
28 | ## Sketchub
29 | Sketchub is the most popular Sketchware(Pro) store - not a merch or shopping store, a project store.
30 | You can download various kinds of projects built by many people. And do you know what's best? They're all free. You can simply download the project and it will appear in your Sketchware Pro project list. Then, you can modify them according to your needs! Check out Sketchub [here](https://sketchub.in). (And yes, you can upload your own projects too!)
31 |
32 | ## Sketchware's history
33 | Sketchware was founded by Sung Woo Park with his team, "Besome", in Korea. It first released in 2016. Due to funding issues, it shut down in 2021. Its last update came out in 2019. A new "Sketchware 2" was promised to be released in 2022, but it never came out. So people started using Sketchware Pro...
34 |
35 | ## Sketchware Pro's history
36 | Sketchware Pro was originally developed by a group of individuals (dubbed, "modders") during the downfall of Sketchware, in hopes of reviving it. It is the one of many attempts of Sketchware revival made by other modding groups. Sketchware Pro is arguably one of the most advanced, active, and oldest Sketchware mods out there. You can view and support our work [here].
37 |
38 | While there has been a lot of controversy regarding Sketchware Pro being the catalyst of Sketchware's downfall, it is still under debate for years with zero resolution. As of now, the creators and developers of Sketchware Pro does not, and have never been asking for incentives to develop it further. We are simply helping people, and that's it :)
39 |
40 | (You can read more at [Iyxan23's blog](https://nurihsanag.my.id/posts/Sketchware-The-History/#when-it-all-began-sketchware))
41 |
42 | ## Learn More
43 | We recommend you see [how json works](https://blog.sketchub.in/2020/05/how-to-use-json-in-sketchware.html) in Sketchware(Pro) since it is used in many apps.
44 |
45 |
46 | We also recommend you to watch YouTube videos, test around on your own, and read articles instead of straight up speedrunning the course! Although it's totally fine to do it, we recommend you do the other stuff first.
--------------------------------------------------------------------------------
/docs/course/img/android8.png:
--------------------------------------------------------------------------------
https://raw.githubusercontent.com/Sketchware-Pro/Sketchware-Pro-Website/ec066c7e247e820c54e4a367bb98121d7dc2ea90/docs/course/img/android8.png
--------------------------------------------------------------------------------
/docs/course/img/certificate.png:
--------------------------------------------------------------------------------
https://raw.githubusercontent.com/Sketchware-Pro/Sketchware-Pro-Website/ec066c7e247e820c54e4a367bb98121d7dc2ea90/docs/course/img/certificate.png
--------------------------------------------------------------------------------
/docs/course/img/image.png:
--------------------------------------------------------------------------------
https://raw.githubusercontent.com/Sketchware-Pro/Sketchware-Pro-Website/ec066c7e247e820c54e4a367bb98121d7dc2ea90/docs/course/img/image.png
--------------------------------------------------------------------------------
/docs/course/img/newproject.png:
--------------------------------------------------------------------------------
https://raw.githubusercontent.com/Sketchware-Pro/Sketchware-Pro-Website/ec066c7e247e820c54e4a367bb98121d7dc2ea90/docs/course/img/newproject.png
--------------------------------------------------------------------------------
/docs/course/img/plusicon.png:
--------------------------------------------------------------------------------
https://raw.githubusercontent.com/Sketchware-Pro/Sketchware-Pro-Website/ec066c7e247e820c54e4a367bb98121d7dc2ea90/docs/course/img/plusicon.png
--------------------------------------------------------------------------------
/docs/course/img/swprocourse_certify.png:
--------------------------------------------------------------------------------
https://raw.githubusercontent.com/Sketchware-Pro/Sketchware-Pro-Website/ec066c7e247e820c54e4a367bb98121d7dc2ea90/docs/course/img/swprocourse_certify.png
--------------------------------------------------------------------------------
/docs/course/intro.md:
--------------------------------------------------------------------------------
1 | ---
2 | title: Introduction
3 | description: The Sketchware Pro course is a free course for complete beginners to dive into the world of programming and android development.
4 | sidebar_position: 1
5 | slug: intro
6 | ---
7 |
8 |
9 | :::warning Course is incomplete
10 |
11 | Hello, while the content of the course is valid, you should know that it is still being written. Taking the course in its current condition will not get you a certificate. Even so, the course has a lot to teach right now aswell! It should be completely written by March 2025.
12 |
13 | :::
14 |
15 |
16 | # Introduction
17 | The Sketchware Pro course is for complete beginners who have never programmed before. This course will walk you from being a complete beginner to a absolute pro, and you will be able to build apps of your own ideas by the end of this course. You will also get a free certificate for completing this free course!
18 |
19 | 
20 |
21 | ## Who am I
22 | Before telling you more about the course, I want to tell you about myself.
23 | I'm NiceSapien. A developer from India. I am the one who created this course. Although I'm primarily a web developer now, my interest in coding and programming was caused by Sketchware. I will be your guide throughout the course.
24 |
25 | ## About the course
26 | Throughout the course, you will learn several new things and features of Sketchware Pro. You will have to complete 4 projects to get your certificate. Once all the projects are made, DM the .swb files to @NiceSapien on [Discord](https://discord.gg/xX6aEsnZRt) or email [certificates@sketchware.pro](mailto:certificates@sketchware.pro) to recieve your certificate!
27 | You can also join the Discord server if you have any questions or need help.
28 |
29 | ## Setup
30 | It's time to begin. All you need is a Android smartphone or tablet to be able to create epic Android apps using Sketchware Pro.
31 |
32 | Here's how to setup Sketchware Pro.
33 | 1. Download it
34 |
35 | Download Sketchware Pro from the [official website](https://sketchware.pro/download)
36 |
37 | If you're on Android 5, 6, or 7, download the Android 5+ version.
38 |
39 |
40 | 
41 |
42 | Other users who use Android 8 or above, download the Android 8+ version.
43 |
44 | 
45 |
46 | 2. Install it
47 |
48 | Open the downloads folder of your device or browser. Tap on the .apk file and click Install. If any warning appears, click Install Anyway. Sketchware Pro is safe to use and its [source code](https://github.com/Sketchware-Pro) is available on GitHub.
49 |
50 | 3. Open and Grant all the permissions
51 |
52 | Once it has been installed, open it and allow it all the permissions, including the access all files one. Sketchware Pro needs storage access to store your projects on your phone to keep them safe.
53 |
54 | **And that's it! Setup is complete!**
55 |
56 | ## Creating a project
57 | :::warning
58 |
59 | This UI may seem different than the actual app. This is because these screenshots were taken before the release of the m3 version. The features and their positions remain the same, though.
60 |
61 | :::
62 | It's time to create your very first project. Click the plus(+) icon on the bottomright corner.
63 |
64 | 
65 |
66 | Now, enter your project details. You don't need to click on advanced settings. We will dive deeper into them later.
67 | For now, enter a name for your project.
68 |
69 | 
70 |
71 | You can also optionally add an icon by clicking on "Tap to change icon".
72 | Click "CREATE APP".
73 |
74 | Once the project has been created, you will see a project designing UI. See the next page to know more about it.
75 |
76 | ## Frequently asked questions
77 | ### Why the ads?
78 | Sketchware Pro itself has no ads. These are only present on the website. We are giving you a full course and a certificate, 100% free. We need money to maintain and keep this website and course up and running. We don't demand any money or donations, we only request you to not use a adblocker🙂
79 |
80 | ### How long is this course?
81 | It completely depends on you. However, on average, people complete it in less than 2 weeks.
82 |
83 | ### Is this worth it?
84 | **Yes**, this course is absolutely worth it. You can learn a lot about Android development, programming & coding, and logical thinking from this course. These are among the most important skills to get a good job as a Software Developer or Engineer.
--------------------------------------------------------------------------------
/docs/intro.md:
--------------------------------------------------------------------------------
1 | ---
2 | title: Introduction
3 | description: Introducing Sketchware Pro! Create Android apps on your smartphone, without writing even a single line of code.
4 | sidebar_position: 1
5 | slug: /
6 | ---
7 |
8 | # Sketchware Pro
9 |
10 | Let's discover **Sketchware Pro in less than 5 minutes**.
11 | You can download Sketchware Pro from [here](/download).
12 | ## What Sketchware Pro is?
13 | Sketchware Pro is the ultimate Android app builder for developers of all skill levels. With its simple drag-and-drop method, you can create stunning apps with ease. And the best part? Sketchware Pro is completely free! That's right, from starting to end, you can build your dream app without spending a dime. And, if you're feeling adventurous, Sketchware Pro is also an open-source project on GitHub, so you can tweak and customize it to your heart's content. So why wait? Start building your dream app today with Sketchware Pro!
14 | From designing to programming, you can create a completely native Android application by simply drag and dropping.
15 |
16 | ### Features
17 |
18 | - Custom Blocks: Sketchware Pro allows users to create, use and share custom blocks.
19 | - Local Library: This feature allows developers to download and use local libraries in their projects.
20 | - No Ads: The Pro version does not contain ads and is free to use.
21 | - Additional Components: There are various extra components added in the pro version such as Google Login, Notification, Phone Auth, Rewarded Video Ad and more.
22 | - Kotlin Code Support: The most significant new feature of this release is Kotlin code support! Compiling Kotlin code still needs an Android 8+ device though, so only the -minApi26 version supports Kotlin.
23 |
24 | ### Completely PC-Independent
25 | From setting up to publishing your first Android application, you can handle all the process without leaving your smartphone.
26 |
27 | ## Sketchware Pro - the rhyming poem
28 | Sketchware Pro, it's the way to go
29 |
30 | With its simple flow, let your ideas grow
31 |
32 | Build stunning apps, without any woes
33 |
34 | Just drag and drop, and watch it take shape like a pro
35 |
36 |
37 |
38 | Create Android apps, with just a tap
39 |
40 | No need to code, no need to unwrap
41 |
42 | With Sketchware Pro, the possibilities are vast
43 |
44 | From games to utilities, your app will outlast
45 |
46 |
47 |
48 | So download Sketchware Pro, and get started today
49 |
50 | Unlock your creativity, and let your imagination play
51 |
52 | Make your app stand out, in every way
53 |
54 | Sketchware Pro, it's the perfect way to slay!
55 |
56 |
57 |
58 |
59 |
60 | ## Wanna contribute to Sketchware Pro?
61 | To contribute to Sketchware Pro, you can follow these steps:
62 |
63 | 1. Fork the Sketchware Pro repository on GitHub.
64 | 2. Clone your forked repository to your local machine.
65 | 3. Make changes to the code on your local machine.
66 | 4. Test your changes to ensure they work as intended.
67 | 5. Commit your changes to your local repository.
68 | 6. Push your changes to your forked repository on GitHub.
69 | 7. Create a pull request to merge your changes into the main Sketchware Pro repository.
70 |
71 | You can also contribute by reporting issues, suggesting new features, and helping to answer questions in the Sketchware Pro community.
72 |
73 | ## Full docs
74 | Click the next button to see more docs, and if you can't find any, there's a search feature present in the website. If you're unable to find any documentation even with search, try finding it on this clone of [official Sketchware docs website](https://sketchware-docs.vercel.app/docs/getting-started.html/).
75 | If you still don't find what you need, please request it to us in our Discord server. The link is mentioned in the website's footer.
76 |
--------------------------------------------------------------------------------
/docs/views/TextView.md:
--------------------------------------------------------------------------------
1 | ---
2 | title: TextView
3 | description: Explained what are TextView in Sketchware pro.
4 | sidebar_position: 2
5 | tags:
6 | - View
7 | ---
8 |
9 | ### Introduction
10 | A TextView is a simple piece of text that can be displayed on the screen in your Sketchware Pro project. You can use a TextView to display messages, labels, or even just plain text. You can also style your TextView to change its appearance.
11 | In this documentation, we'll cover everything you need to know about using TextViews in Sketchware Pro. We'll start with the basics of what a TextView is, and then move on to creating and styling your own TextViews. We'll also share some tips and tricks for using TextViews in your projects. So let's get started!
12 |
13 | ### What is a TextView?
14 | A TextView is one of the most common UI components used in Android development that allows you to display text on the screen. They are often used for labels, descriptions, headings, or any other static text that needs to be displayed.
15 |
16 | ### Creating a TextView In Sketchware Pro.
17 | Creating a TextView In Sketchware Pro, creating a TextView is a straightforward process. Follow these steps:
18 | - Open the project where you want to add the TextView.
19 | - From the components pane on the left-hand side, search for "TextView" as shown in below image and drag it to the layout screen.
20 | 
21 | - Click on the dragged TextView, it will open property editor from there you can customize the TextView's text, color, size, and font.
22 | - The TextView is now ready for use. Styling a TextView In Sketchware Pro, you can easily style the TextView to improve its appearance.
23 |
24 | Here are some of the ways you can style your TextView:
25 | - Change the text color: In the Properties menu, you can change the text color of the TextView under the `text color` property.
26 | - Change the font size: You can adjust the font size of the TextView under the `text size` property.
27 | - Add a background color: You can add a background color to the TextView under the `background color` property of the Properties menu.
28 |
29 | Tips and Tricks Here are some tips and tricks to help you make the most out of using TextViews in Sketchware Pro:
30 | - Use TextViews to display simple text messages, labels, and headings.
31 | - Use different font sizes and styles to create visually appealing design elements.
32 | - Use background colors and text color to draw attention to specific TextViews.
33 | - Use TextViews alongside other components such as Buttons, EditTexts, and ImageViews to create more complex layouts.
34 | - Be mindful of text placement and ensure that the TextViews are readable and easy to understand.
35 |
36 | By mastering TextView, you can create beautiful layouts that can catch the attention of your users. Use the different styles available to make the text stand out, and don't sacrifice readability for the sake of design.
--------------------------------------------------------------------------------
/docs/views/Views.md:
--------------------------------------------------------------------------------
1 | ---
2 | title: What are Views?
3 | description: Explained what are view in Sketchware pro.
4 | sidebar_position: 1
5 | tags:
6 | - View
7 | ---
8 |
9 | In Sketchware Pro, Views are graphical components that are used to create the user interface of an Android app. Views include various visual elements such as Button, TextView, ImageView, and more. They are the building blocks of an app's user interface and allow users to interact with the app's functionalities.
10 |
11 | With Views, you can add, edit, and customize graphical components to create a unique and functional user interface. Views can be customized with various properties such as color, text, font, and behavior. You can also choose from a wide range of options for each View, including layout types, sizes, and styles.
12 |
13 | Overall, Views in Sketchware Pro are an essential tool for creating visually appealing and user-friendly Android apps. They allow you to design and customize the app's user interface with ease, resulting in a better user experience for their audience.
--------------------------------------------------------------------------------
/docs/views/YouTube.md:
--------------------------------------------------------------------------------
1 | ---
2 | title: YouTube Player
3 | description: YouTube player is used to show YouTube videos in your app.
4 | sidebar_position: 3
5 | tags:
6 | - Google
7 | - View
8 | ---
9 | # YouTube Player
10 | YouTube player is used to show YouTube videos in your app.
11 |
12 | :::danger AppCompat required
13 | To use YouTube Player, you must enable AppCompat first, otherwise, you will see an error.
14 | :::
15 |
16 | ## When to use YouTube player
17 | Sometimes you need to show a YouTube video in your app. For example, a new user has registered and they don't know how to use your app. You can make a YouTube video on it and show to users without letting them leave your app.
18 | ## Get Started
19 | First off, you will need to choose a YouTube video that you want to display.
20 | Find the video and copy its sharing URL.
21 | Then the whole URL is not needed. You need the video's ID. To get it, follow these instructions:
22 | Get the url, and remove https://youtu.be/ from it.
23 | For example, a video URL is https://youtu.be/dQw4w9WgXcQ then the ID of this video would be `dQw4w9WgXcQ`
24 |
25 | Now you are done with this part.
26 | ## Implementation
27 | Now its time for implementation.
28 |
29 | 1. First, you will probably need to add a YouTube player in the activity.
30 | 
31 | After adding it you may change the width, height etc.
32 |
33 | 2. Open the onCreate event(or any other event that you want to initialize YouTube player on)
34 | 3. Add YouTube player getLifecycle block and a AddYouTube playerListener VideoID block.
35 | 
36 | 4. Compile & Run the app.
37 |
38 |
39 | That's it. You have successfully implemented YouTube player in your app.
--------------------------------------------------------------------------------
/docs/views/_category_.json:
--------------------------------------------------------------------------------
1 | {
2 | "label": "Views",
3 | "position": 3,
4 | "link": {
5 | "type": "generated-index",
6 | "description": "A guide to the layouts in Sketchware Pro."
7 | }
8 | }
9 |
--------------------------------------------------------------------------------
/docs/views/bottom-navigation.md:
--------------------------------------------------------------------------------
1 | ---
2 | title: Bottom Navigation View
3 | description: Bottom Navigation View is a part of Material Design library. Sketchware Pro supports it out of the box.
4 | sidebar_position: 4
5 | tags:
6 | - Material Design
7 | - Google
8 | - View
9 | ---
10 |
11 | ## Bottom Navigation
12 | Bottom navigation is a common UI design pattern that allows users to navigate between different sections of an app by selecting one of the items on a bar at the bottom of the screen.
13 | Bottom Navigation View is a part of the Material Design library. Sketchware Pro supports it out of the box.
14 |
15 | :::danger AppCompat required
16 | To use Bottom Navigation, you must enable AppCompat first, otherwise, you will see an error.
17 | :::
18 |
19 | ## Using it
20 | First, add it in the bottom of the Activity.
21 | Then open the onCreate event and add this block:
22 | 
23 | Block fields:
24 |
25 | | Name | Type | Use |
26 | | ---- | ---- | --- |
27 | | BottomNavigation view | BottomNavigation | The bottom navigation view you're messing with |
28 | | Item ID | number | The ID of the item. You can set 0 for first item, 1 for second, and so on
29 | | Title | string | Title of the Item |
30 | | Icon | Image | Icon of the item. Add a image in Image manager and select it here |
31 |
32 |
33 | Now open onNavigationItemSelected event.
34 | 
35 | The above code would show a toast saying `First item` when first item is selected, `Second item` when second item is selected, and so on.
36 | ## Events
37 | ### onNavigationItemSelected
38 |
39 | | Name | Type | Use |
40 | | ---- | ---- | --- |
41 | | itemId | number | The item of ID which is currently selected by user |
--------------------------------------------------------------------------------
/docs/views/img/TextView.png:
--------------------------------------------------------------------------------
https://raw.githubusercontent.com/Sketchware-Pro/Sketchware-Pro-Website/ec066c7e247e820c54e4a367bb98121d7dc2ea90/docs/views/img/TextView.png
--------------------------------------------------------------------------------
/docs/views/img/YouTube_view.jpg:
--------------------------------------------------------------------------------
https://raw.githubusercontent.com/Sketchware-Pro/Sketchware-Pro-Website/ec066c7e247e820c54e4a367bb98121d7dc2ea90/docs/views/img/YouTube_view.jpg
--------------------------------------------------------------------------------
/docs/views/img/add_item.jpg:
--------------------------------------------------------------------------------
https://raw.githubusercontent.com/Sketchware-Pro/Sketchware-Pro-Website/ec066c7e247e820c54e4a367bb98121d7dc2ea90/docs/views/img/add_item.jpg
--------------------------------------------------------------------------------
/docs/views/img/codeview_apply.png:
--------------------------------------------------------------------------------
https://raw.githubusercontent.com/Sketchware-Pro/Sketchware-Pro-Website/ec066c7e247e820c54e4a367bb98121d7dc2ea90/docs/views/img/codeview_apply.png
--------------------------------------------------------------------------------
/docs/views/img/codeview_setcode.png:
--------------------------------------------------------------------------------
https://raw.githubusercontent.com/Sketchware-Pro/Sketchware-Pro-Website/ec066c7e247e820c54e4a367bb98121d7dc2ea90/docs/views/img/codeview_setcode.png
--------------------------------------------------------------------------------
/docs/views/img/codeview_setlang.png:
--------------------------------------------------------------------------------
https://raw.githubusercontent.com/Sketchware-Pro/Sketchware-Pro-Website/ec066c7e247e820c54e4a367bb98121d7dc2ea90/docs/views/img/codeview_setlang.png
--------------------------------------------------------------------------------
/docs/views/img/codeview_settheme.png:
--------------------------------------------------------------------------------
https://raw.githubusercontent.com/Sketchware-Pro/Sketchware-Pro-Website/ec066c7e247e820c54e4a367bb98121d7dc2ea90/docs/views/img/codeview_settheme.png
--------------------------------------------------------------------------------
/docs/views/img/onNavigationItemSelected.jpg:
--------------------------------------------------------------------------------
https://raw.githubusercontent.com/Sketchware-Pro/Sketchware-Pro-Website/ec066c7e247e820c54e4a367bb98121d7dc2ea90/docs/views/img/onNavigationItemSelected.jpg
--------------------------------------------------------------------------------
/docs/views/img/youtubeview_order.jpg:
--------------------------------------------------------------------------------
https://raw.githubusercontent.com/Sketchware-Pro/Sketchware-Pro-Website/ec066c7e247e820c54e4a367bb98121d7dc2ea90/docs/views/img/youtubeview_order.jpg
--------------------------------------------------------------------------------
/docusaurus.config.js:
--------------------------------------------------------------------------------
1 | // @ts-check
2 | // Note: type annotations allow type checking and IDEs autocompletion
3 |
4 | const {themes} = require('prism-react-renderer');
5 | const lightCodeTheme = themes.github;
6 | const darkCodeTheme = themes.dracula;
7 |
8 |
9 | /** @type {import('@docusaurus/types').Config} */
10 | const config = {
11 | title: 'Sketchware Pro',
12 | tagline: 'The official documentation for Sketchware Pro.',
13 | url: 'https://docs.sketchware.pro',
14 | baseUrl: '/',
15 | onBrokenLinks: 'warn',
16 | onBrokenMarkdownLinks: 'warn',
17 | favicon: 'img/logo.png',
18 |
19 | // GitHub pages deployment config.
20 | // If you aren't using GitHub pages, you don't need these.
21 | organizationName: 'NiceSapien', // Usually your GitHub org/user name.
22 | projectName: 'Sketchware-Pro-website', // Usually your repo name.
23 |
24 | // Even if you don't use internalization, you can use this field to set useful
25 | // metadata like html lang. For example, if your site is Chinese, you may want
26 | // to replace "en" with "zh-Hans".
27 | i18n: {
28 | defaultLocale: 'en',
29 | locales: ['en'],
30 | },
31 |
32 |
33 | plugins: [
34 | [
35 | '@docusaurus/plugin-client-redirects',
36 | {
37 | fromExtensions: ['html', 'htm'], // /myPage.html -> /myPage
38 | toExtensions: ['exe', 'zip'], // /myAsset -> /myAsset.zip (if latter exists)
39 | redirects: [
40 | // /docs/oldDoc -> /docs/newDoc
41 | {
42 | to: '/docs/components/Google/Firebase/connect-to-firebase',
43 | from: '/docs/connect-to-firebase',
44 | },
45 | {
46 | to: 'https://sketchware.pro/download',
47 | from: '/download',
48 | },
49 | ],
50 | },
51 | ],
52 | ],
53 | presets: [
54 | [
55 | 'classic',
56 | /** @type {import('@docusaurus/preset-classic').Options} */
57 | ({
58 | googleTagManager: {
59 | containerId: 'GTM-NFZPPW6N',
60 | },
61 | docs: {
62 | showLastUpdateAuthor: true,
63 | showLastUpdateTime: true,
64 | sidebarPath: require.resolve('./sidebars.js'),
65 | // Please change this to your repo.
66 | // Remove this to remove the "edit this page" links.
67 | editUrl:
68 | 'https://github.com/Sketchware-Pro/Sketchware-Pro-website/tree/dev/',
69 | },
70 | // blog: true,
71 | blog: {
72 | showReadingTime: true,
73 | // Please change this to your repo.
74 | // Remove this to remove the "edit this page" links.
75 | editUrl:
76 | 'https://github.com/Sketchware-Pro/Sketchware-Pro-website/tree/dev/',
77 | },
78 | theme: {
79 | customCss: require.resolve('./src/css/custom.css'),
80 | },
81 | }),
82 | ],
83 | ],
84 | scripts: [
85 | {
86 | src: 'https://pagead2.googlesyndication.com/pagead/js/adsbygoogle.js?client=ca-pub-2093114452213843',
87 | async: true,
88 | crossorigin: "anonymous",
89 | },
90 | ],
91 | themeConfig:
92 | /** @type {import('@docusaurus/preset-classic').ThemeConfig} */
93 |
94 | ({
95 | /* googleAdsense: {
96 | dataAdClient: 'ca-pub-2093114452213843',
97 | },*/
98 | metadata: [{name: 'keywords', content: 'blog, ide, programming, coding, docs, sketchware, pro, android'}],
99 | navbar: {
100 | title: 'Sketchware Pro',
101 | logo: {
102 | alt: 'Logo',
103 | src: 'img/logo.png',
104 | },
105 | items: [
106 | {
107 | type: 'doc',
108 | docId: 'intro',
109 | position: 'left',
110 | label: 'Docs',
111 | },
112 | {to: 'blog', label: 'Blog', position: 'left'}, // or position: 'right'
113 | {
114 | href: 'https://github.com/Sketchware-Pro/Sketchware-Pro',
115 | label: 'GitHub',
116 | position: 'right',
117 | },
118 | {
119 | href: 'https://discord.gg/QcrNGVGQRV',
120 | label: 'Join us on Discord',
121 | position: 'right',
122 | },
123 | {
124 | href: '/download',
125 | label: 'Download',
126 | position: 'left',
127 | },
128 | ],
129 | },
130 | footer: {
131 | style: 'dark',
132 | links: [
133 | {
134 | title: 'Sketchware Pro',
135 | items: [
136 | {
137 | label: 'Download',
138 | to: '/download',
139 | },
140 | {
141 | label: 'Documentation',
142 | to: '/docs',
143 | },
144 | {
145 | label: 'Blog',
146 | to: '/blog',
147 | }
148 | ],
149 | },
150 | {
151 | title: 'Community',
152 | items: [
153 | {
154 | label: 'Discord',
155 | href: 'https://discord.gg/Dc8ZDBRK5V',
156 | },
157 | {
158 | label: 'Telegram',
159 | href: 'https://t.me/sketchwarepro',
160 | },
161 | {
162 | label: 'GitHub issues',
163 | href: 'https://github.com/Sketchware-Pro/Sketchware-Pro/issues'
164 | },
165 | {
166 | label: 'Github Discussions',
167 | href: 'https://github.com/Sketchware-Pro/Sketchware-Pro/discussions',
168 | },
169 | ],
170 | },
171 | {
172 | title: 'More',
173 | items: [
174 | {
175 | label: 'GitHub',
176 | href: 'https://github.com/Sketchware-Pro/Sketchware-Pro',
177 | },
178 | {
179 | label: 'Website GitHub',
180 | href: 'https://github.com/Sketchware-Pro/Sketchware-Pro-website',
181 | },
182 | {
183 | label: 'Disclaimer',
184 | href: '/about',
185 | },
186 | ],
187 | },
188 | ],
189 | copyright: "Built by NiceSapien.",
190 | },
191 | prism: {
192 | additionalLanguages: ['java'],
193 | theme: lightCodeTheme,
194 | darkTheme: darkCodeTheme,
195 | },
196 | algolia: {
197 | // The application ID provided by Algolia
198 | appId: 'KCVJ3D0QG2',
199 |
200 | // Public API key: it is safe to commit it
201 | apiKey: '5c1048c6a358fa420ff8c7c4da32b4bf',
202 |
203 | indexName: 'sketchware-pro',
204 |
205 | // Optional: see doc section below
206 | contextualSearch: true,
207 |
208 | // Optional: Specify domains where the navigation should occur through window.location instead on history.push. Useful when our Algolia config crawls multiple documentation sites and we want to navigate with window.location.href to them.
209 | externalUrlRegex: 'external\\.com|domain\\.com',
210 |
211 | // Optional: Algolia search parameters
212 | searchParameters: {},
213 |
214 | // Optional: path for search page that enabled by default (`false` to disable it)
215 | searchPagePath: 'search',
216 |
217 | //... other Algolia params
218 | },
219 | }),
220 | };
221 |
222 | module.exports = config;
223 |
--------------------------------------------------------------------------------
/package.json:
--------------------------------------------------------------------------------
1 | {
2 | "name": "website",
3 | "version": "0.0.1",
4 | "private": true,
5 | "scripts": {
6 | "docusaurus": "docusaurus",
7 | "start": "docusaurus start",
8 | "build": "docusaurus build",
9 | "swizzle": "docusaurus swizzle",
10 | "deploy": "docusaurus deploy",
11 | "clear": "docusaurus clear",
12 | "serve": "docusaurus serve",
13 | "write-translations": "docusaurus write-translations",
14 | "write-heading-ids": "docusaurus write-heading-ids"
15 | },
16 | "dependencies": {
17 | "@docusaurus/core": "^3.5.2",
18 | "@docusaurus/plugin-client-redirects": "^3.0.0",
19 | "@docusaurus/preset-classic": "^3.5.2",
20 | "@docusaurus/theme-common": "^3.5.2",
21 | "@mdx-js/react": "^3.0.0",
22 | "clsx": "^1.2.1",
23 | "prism-react-renderer": "^2.1.0",
24 | "react": "^18.2.0",
25 | "react-dom": "^18.2.0"
26 | },
27 | "devDependencies": {
28 | "@docusaurus/module-type-aliases": "^3.0.0"
29 | },
30 | "browserslist": {
31 | "production": [
32 | ">0.5%",
33 | "not dead",
34 | "not op_mini all"
35 | ],
36 | "development": [
37 | "last 1 chrome version",
38 | "last 1 firefox version",
39 | "last 1 safari version"
40 | ]
41 | },
42 | "engines": {
43 | "node": ">=18.0"
44 | }
45 | }
46 |
--------------------------------------------------------------------------------
/sidebars.js:
--------------------------------------------------------------------------------
1 | /**
2 | * Creating a sidebar enables you to:
3 | - create an ordered group of docs
4 | - render a sidebar for each doc of that group
5 | - provide next/previous navigation
6 |
7 | The sidebars can be generated from the filesystem, or explicitly defined here.
8 |
9 | Create as many sidebars as you want.
10 | */
11 |
12 | // @ts-check
13 |
14 | /** @type {import('@docusaurus/plugin-content-docs').SidebarsConfig} */
15 | const sidebars = {
16 | // By default, Docusaurus generates a sidebar from the docs folder structure
17 | tutorialSidebar: [{type: 'autogenerated', dirName: '.'}],
18 |
19 | // But you can create a sidebar manually
20 | /*
21 | tutorialSidebar: [
22 | {
23 | type: 'category',
24 | label: 'Tutorial',
25 | items: ['hello'],
26 | },
27 | ],
28 | */
29 | };
30 | module.exports = sidebars;
31 |
--------------------------------------------------------------------------------
/src/components/HomepageFeatures/index.js:
--------------------------------------------------------------------------------
1 | import React from 'react';
2 | import clsx from 'clsx';
3 | import styles from './styles.module.css';
4 |
5 | const FeatureList = [
6 | {
7 | title: 'Easy to Use',
8 | img: require('@site/static/img/index/woman_laying_down.png').default,
9 | description: (
10 | <>
11 | Sketchware Pro was designed to be easily installed and
12 | used to get your app up and running quickly.
13 |
14 | ),
15 | },
16 | {
17 | title: 'Focus on What Matters',
18 | img: require('@site/static/img/index/focus_on_matter.png').default,
19 | description: (
20 | <>
21 | Sketchware Pro lets you focus on your apps, and we'll do the chores. Go
22 | ahead and get started.
23 |
24 | ),
25 | },
26 | {
27 | title: 'Free Forever',
28 | img: require('@site/static/img/index/free_forever.png').default,
29 | description: (
30 | <>
31 | Sketchware Pro is completely free. Sketchware Pro's source code is available on our GitHub repository.
32 |
33 | ),
34 | },
35 | ];
36 |
37 | function Feature({ img, title, description }) {
38 | return (
39 |
40 |
48 | );
49 | }
50 |
51 | export default function HomepageFeatures() {
52 | return (
53 |
41 |  42 |
42 |
43 |
44 |
47 | {title}
45 |{description}
46 |
55 |
61 |
56 | {FeatureList.map((props, idx) => (
57 |
60 |
14 | }) 21 |
22 |
21 |
22 |
41 | );
42 | }
43 | export default function Home() {
44 | const {siteConfig} = useDocusaurusContext();
45 | return (
46 |
23 |
40 | Build Android Apps quickly, focus on your content
24 | 25 |
26 |
29 | Get Started
30 |
31 |
32 |
33 |
36 | Download Now
37 |
38 |
39 |
50 |
56 |
51 |
54 |
55 | -
30 |
- Teamwork 31 |
- Web development 32 |
- And other stuff 33 |
52 | 53 | _Thank ju_. -------------------------------------------------------------------------------- /src/theme/NotFound.js: -------------------------------------------------------------------------------- 1 | import React from 'react'; 2 | import Translate, {translate} from '@docusaurus/Translate'; 3 | import {PageMetadata} from '@docusaurus/theme-common'; 4 | import Layout from '@theme/Layout'; 5 | import Link from '@docusaurus/Link'; 6 | export default function NotFound() { 7 | return ( 8 | <> 9 |
18 |
42 |
19 |
20 |
26 |
41 |
20 |
23 | Page Not Found
24 |
25 |
26 |
27 |
34 |
37 | You're lost. Please contact the Sketchware Pro team (or NiceSapien) if you think we made a mistake. 38 |
39 | 40 |idk man
8 |