├── .gitbook
└── assets
│ ├── 20160206132837_580.png
│ ├── 20160206132838_567.png
│ ├── 20160206132838_571.png
│ ├── Github.png
│ ├── React.png
│ ├── bg2016011501.png
│ ├── child_main.png
│ ├── flow.png
│ ├── image (1).png
│ ├── image (2) (1).png
│ ├── image (2).png
│ ├── image (3).png
│ ├── image (4).png
│ ├── image.png
│ ├── mobx.png
│ ├── obj1.png
│ ├── section3-1.png
│ ├── setState.jpg
│ ├── this_props_children.png
│ ├── 微信截图_20171230201617.png
│ ├── 微信截图_20171230201653.png
│ ├── 微信截图_20171230202738.png
│ └── 微信截图_20180102170018.png
├── .gitignore
├── INDEX.md
├── LICENSE
├── More
├── BABEL_USE.md
├── NODE_EVN.md
├── README.md
├── TOOLS.md
└── WebPack.md
├── QUESTION.md
├── README.md
├── React-01
├── REACT15_INDEX.md
├── REACT_CHROME.md
├── REACT_COMPONENT.md
├── REACT_CSS_MODEL.md
├── REACT_C_DOL.md
├── REACT_C_REFS.md
├── REACT_JSX.md
├── REACT_PROPS.md
├── REACT_SHENGMING.md
├── REACT_STATE.md
├── REACT_STYLE.md
├── REACT_VDOM.md
├── README.md
├── react-ban-ben.md
├── react-context.md
├── react-ding-ji-api.md
├── react-duo-zu-jian-qian-tao.md
├── react-hooks.md
├── react-hooks
│ └── useeffect.md
├── react-proptypes.md
├── react-react-redux.md
├── react-rong-qi-zu-jian-he-sha-gua-zu-jian.md
├── react-setstate.md
├── react-xu-ni-dom-gai-nian.md
├── react-xu-ni-dom-si-kao.md
├── react-zi-zhi-react-redux.md
└── react-zu-jian-zi-dai.md
├── React-02
├── REACT_HOC.md
├── REACT_HOC
│ ├── dai-li-fang-shi-de-gao-jie-zu-jian.md
│ └── ji-cheng-fang-shi-de-gao-jie-zu-jian.md
├── REACT_MINXI.md
├── REACT_SHIJIAN_TWO.md
└── README.md
├── React-03
└── README.md
├── React-06
├── README.md
├── react-zu-jian-you-hua.md
├── react-zu-jian-you-hua
│ ├── ding-zhi-shouldcomponentupdate.md
│ ├── immutablejscun-zai-de-yi-yi-he-shi-yong.md
│ └── purecomponent.md
├── reacttong-gou.md
└── reduxxing-neng-you-hua.md
├── React-07
└── README.md
├── React-08
├── README.md
├── react-he-bing-reducer.md
├── react-mo-kuai-jie-kou.md
├── react-wen-jian-zu-zhi-fang-shi.md
└── react-wen-ti.md
├── React-09
└── README.md
├── React-10
└── README.md
├── Redux-01
├── Flux
│ ├── README.md
│ ├── mobx.md
│ ├── mobx
│ │ └── mobx-si-xiang.md
│ ├── react-zi-zhi-thunk-zhong-jian-jian.md
│ └── redux-applymiddleware.md
├── REACT_REDUX.md
├── README.md
├── REDUX_AND_REACT.md
├── REDUX_CHROME.md
├── REDUX_CREATE.md
├── REDUX_THUNK.md
├── REDUX_USE.md
├── redux-shi-yong.md
└── redux-zi-zhi-arr-zhong-jian-jian.md
├── Router-01
├── REACT_ROUTER2.md
├── README.md
├── REDUX_ROUTER4.md
├── ROUTER4.md
└── react-router3.md
├── SUMMARY.md
├── assets
├── 20160206132837_580.png
├── 20160206132838_567.png
├── 20160206132838_571.png
├── Github.png
├── bg2016011501.png
├── cd0bb358c45b584743d8ce4991777c42.svg
├── child_main.png
├── flow.png
├── mobx.png
├── setState.jpg
├── this_props_children.png
└── 屏幕快照 2017-12-05 下午10.19.57.png
├── code
├── 01-Redux
│ ├── .gitignore
│ ├── README.md
│ ├── config
│ │ ├── env.js
│ │ ├── jest
│ │ │ ├── cssTransform.js
│ │ │ └── fileTransform.js
│ │ ├── paths.js
│ │ ├── polyfills.js
│ │ ├── webpack.config.dev.js
│ │ ├── webpack.config.prod.js
│ │ └── webpackDevServer.config.js
│ ├── package.json
│ ├── public
│ │ ├── favicon.ico
│ │ ├── index.html
│ │ └── manifest.json
│ ├── scripts
│ │ ├── build.js
│ │ ├── start.js
│ │ └── test.js
│ └── src
│ │ ├── App.jsx
│ │ ├── index.js
│ │ └── index.redux.js
├── 02-Router4
│ ├── .gitignore
│ ├── README.md
│ ├── config
│ │ ├── env.js
│ │ ├── jest
│ │ │ ├── cssTransform.js
│ │ │ └── fileTransform.js
│ │ ├── paths.js
│ │ ├── polyfills.js
│ │ ├── webpack.config.dev.js
│ │ ├── webpack.config.prod.js
│ │ └── webpackDevServer.config.js
│ ├── package.json
│ ├── public
│ │ ├── favicon.ico
│ │ ├── index.html
│ │ └── manifest.json
│ ├── scripts
│ │ ├── build.js
│ │ ├── start.js
│ │ └── test.js
│ └── src
│ │ ├── App.jsx
│ │ ├── Auth.js
│ │ ├── Auth.redux.js
│ │ ├── Dashboard.js
│ │ ├── index.js
│ │ ├── index.redux.js
│ │ └── reducer.js
├── Express
│ ├── .gitignore
│ ├── README.md
│ ├── package.json
│ ├── public
│ │ ├── favicon.ico
│ │ ├── index.html
│ │ └── manifest.json
│ ├── server
│ │ └── server.js
│ └── src
│ │ ├── App.css
│ │ ├── App.js
│ │ ├── App.test.js
│ │ ├── index.css
│ │ ├── index.js
│ │ ├── logo.svg
│ │ └── registerServiceWorker.js
├── MyRedux
│ ├── README.md
│ └── code
│ │ └── my.redux.js
├── app
│ ├── .gitignore
│ ├── README.md
│ ├── config
│ │ ├── env.js
│ │ ├── jest
│ │ │ ├── cssTransform.js
│ │ │ └── fileTransform.js
│ │ ├── paths.js
│ │ ├── polyfills.js
│ │ ├── webpack.config.dev.js
│ │ ├── webpack.config.prod.js
│ │ └── webpackDevServer.config.js
│ ├── package.json
│ ├── public
│ │ ├── favicon.ico
│ │ ├── index.html
│ │ └── manifest.json
│ ├── scripts
│ │ ├── build.js
│ │ ├── start.js
│ │ └── test.js
│ └── src
│ │ ├── App.js
│ │ ├── index.js
│ │ ├── index.redux.js
│ │ └── my.redux.js
└── img
│ ├── 屏幕快照 2017-10-26 上午10.58.39.png
│ ├── 屏幕快照 2017-10-26 下午8.18.17 (2).png
│ ├── 屏幕快照 2017-10-26 下午8.18.17.png
│ ├── 屏幕快照 2017-10-26 下午8.56.46 (2).png
│ ├── 屏幕快照 2017-10-26 下午8.56.46.png
│ ├── 屏幕快照 2017-10-27 上午11.19.48.png
│ ├── 屏幕快照 2017-10-27 上午11.20.57.png
│ ├── 屏幕快照 2017-10-27 下午1.24.52.png
│ ├── 屏幕快照 2017-10-27 下午4.50.21.png
│ ├── 屏幕快照 2017-10-27 下午4.50.33.png
│ ├── 屏幕快照 2017-10-28 下午1.27.15.png
│ ├── 屏幕快照 2017-10-28 下午1.27.32.png
│ ├── 屏幕快照 2017-10-28 下午1.39.00.png
│ ├── 屏幕快照 2017-10-28 下午1.39.01.png
│ ├── 屏幕快照 2017-10-28 下午1.40.24.png
│ ├── 屏幕快照 2017-10-28 下午1.40.26.png
│ ├── 屏幕快照 2017-10-28 下午1.43.56.png
│ ├── 屏幕快照 2017-10-28 下午1.51.13.png
│ ├── 屏幕快照 2017-10-28 下午12.39.17.png
│ ├── 屏幕快照 2017-10-28 下午12.40.09.png
│ ├── 屏幕快照 2017-10-28 下午12.40.53.png
│ ├── 屏幕快照 2017-10-28 下午12.46.32.png
│ ├── 屏幕快照 2017-10-28 下午2.42.05.png
│ ├── 屏幕快照 2017-10-28 下午3.00.32.png
│ ├── 屏幕快照 2017-10-28 下午3.00.33.png
│ ├── 屏幕快照 2017-10-28 下午3.00.39.png
│ └── 屏幕快照 2017-10-28 下午3.17.35.png
├── index.md
├── orgin-code
├── fiber
│ ├── README.md
│ ├── concurrent-yi-bu-xuan-ran.md
│ ├── scheduler.md
│ └── shu-ju-jie-gou.md
├── hooks
│ ├── README.md
│ └── usestate.md
├── jian-shu.md
├── react-10.md
├── shi-jian.md
├── xu-ni-dom
│ ├── README.md
│ ├── react-xu-ni-dom-gai-nian.md
│ └── react-xu-ni-dom-si-kao.md
└── zai-shuo-sheng-ming-zhou-qi.md
├── react-context.md
├── react-ding-ji-api.md
├── react-ji-chu-zhi-shi
├── han-shu-zu-jian
│ ├── README.md
│ ├── react-han-shu-zi-zu-jian.md
│ └── react-hooks
│ │ ├── README.md
│ │ ├── useeffect.md
│ │ └── usestate.md
├── lei-zu-jian
│ ├── README.md
│ ├── react-proptypes.md
│ ├── react-rong-qi-zu-jian-he-sha-gua-zu-jian.md
│ ├── react-setstate.md
│ ├── react-wu-zhuang-tai-zu-jian-yu-purecomponent.md
│ ├── react_c_dol.md
│ ├── react_c_refs.md
│ ├── react_hoc
│ │ ├── README.md
│ │ ├── dai-li-fang-shi-de-gao-jie-zu-jian.md
│ │ └── ji-cheng-fang-shi-de-gao-jie-zu-jian.md
│ ├── react_minxi.md
│ └── react_shijian_two.md
├── react-ban-ben.md
├── react-duo-zu-jian-qian-tao.md
├── react-zu-jian-zi-dai.md
├── react_component.md
├── react_jsx.md
├── react_props.md
├── react_state.md
├── shou-kong-yu-fei-shou-kong-zu-jian.md
├── tools
│ ├── README.md
│ ├── babel_use.md
│ ├── node_evn.md
│ └── webpack.md
├── zu-jian-sheng-ming-zhou-qi
│ ├── README.md
│ └── react_shengming.md
└── zu-jian-yang-shi
│ ├── README.md
│ ├── react_css_model.md
│ └── react_style.md
├── react-portal-chuan-song-men.md
├── ying-yong-zhi-shi
├── react-06
│ ├── README.md
│ ├── react-zu-jian-you-hua
│ │ ├── README.md
│ │ ├── ding-zhi-shouldcomponentupdate.md
│ │ ├── immutablejscun-zai-de-yi-yi-he-shi-yong.md
│ │ └── purecomponent.md
│ ├── reacttong-gou.md
│ └── reduxxing-neng-you-hua.md
├── react-07.md
├── react-08
│ ├── README.md
│ ├── react-he-bing-reducer.md
│ ├── react-mo-kuai-jie-kou.md
│ ├── react-wen-jian-zu-zhi-fang-shi.md
│ └── react-wen-ti.md
└── router-01
│ ├── README.md
│ ├── react_router2.md
│ └── router4
│ ├── README.md
│ └── redux_router4.md
├── yuan-ma
├── fiber
│ ├── README.md
│ └── scheduler.md
├── hooks
│ ├── README.md
│ └── usestate.md
└── react-10.md
└── zhuang-tai-guan-li
├── flux.md
├── immutable.md
├── mobx
├── README.md
└── mobx-si-xiang.md
├── redux_use
├── README.md
├── react-react-redux.md
├── react-zi-zhi-react-redux.md
├── react-zi-zhi-thunk-zhong-jian-jian.md
├── redux-applymiddleware.md
├── redux-shi-yong.md
├── redux-zi-zhi-arr-zhong-jian-jian.md
├── redux_and_react.md
├── redux_chrome.md
├── redux_create.md
└── redux_thunk.md
└── rxjs.md
/.gitbook/assets/20160206132837_580.png:
--------------------------------------------------------------------------------
https://raw.githubusercontent.com/TYRMars/React-StepPitGuide/ee09ad7119b7b1bc17b1a05861036ec1cd257ebe/.gitbook/assets/20160206132837_580.png
--------------------------------------------------------------------------------
/.gitbook/assets/20160206132838_567.png:
--------------------------------------------------------------------------------
https://raw.githubusercontent.com/TYRMars/React-StepPitGuide/ee09ad7119b7b1bc17b1a05861036ec1cd257ebe/.gitbook/assets/20160206132838_567.png
--------------------------------------------------------------------------------
/.gitbook/assets/20160206132838_571.png:
--------------------------------------------------------------------------------
https://raw.githubusercontent.com/TYRMars/React-StepPitGuide/ee09ad7119b7b1bc17b1a05861036ec1cd257ebe/.gitbook/assets/20160206132838_571.png
--------------------------------------------------------------------------------
/.gitbook/assets/Github.png:
--------------------------------------------------------------------------------
https://raw.githubusercontent.com/TYRMars/React-StepPitGuide/ee09ad7119b7b1bc17b1a05861036ec1cd257ebe/.gitbook/assets/Github.png
--------------------------------------------------------------------------------
/.gitbook/assets/React.png:
--------------------------------------------------------------------------------
https://raw.githubusercontent.com/TYRMars/React-StepPitGuide/ee09ad7119b7b1bc17b1a05861036ec1cd257ebe/.gitbook/assets/React.png
--------------------------------------------------------------------------------
/.gitbook/assets/bg2016011501.png:
--------------------------------------------------------------------------------
https://raw.githubusercontent.com/TYRMars/React-StepPitGuide/ee09ad7119b7b1bc17b1a05861036ec1cd257ebe/.gitbook/assets/bg2016011501.png
--------------------------------------------------------------------------------
/.gitbook/assets/child_main.png:
--------------------------------------------------------------------------------
https://raw.githubusercontent.com/TYRMars/React-StepPitGuide/ee09ad7119b7b1bc17b1a05861036ec1cd257ebe/.gitbook/assets/child_main.png
--------------------------------------------------------------------------------
/.gitbook/assets/flow.png:
--------------------------------------------------------------------------------
https://raw.githubusercontent.com/TYRMars/React-StepPitGuide/ee09ad7119b7b1bc17b1a05861036ec1cd257ebe/.gitbook/assets/flow.png
--------------------------------------------------------------------------------
/.gitbook/assets/image (1).png:
--------------------------------------------------------------------------------
https://raw.githubusercontent.com/TYRMars/React-StepPitGuide/ee09ad7119b7b1bc17b1a05861036ec1cd257ebe/.gitbook/assets/image (1).png
--------------------------------------------------------------------------------
/.gitbook/assets/image (2) (1).png:
--------------------------------------------------------------------------------
https://raw.githubusercontent.com/TYRMars/React-StepPitGuide/ee09ad7119b7b1bc17b1a05861036ec1cd257ebe/.gitbook/assets/image (2) (1).png
--------------------------------------------------------------------------------
/.gitbook/assets/image (2).png:
--------------------------------------------------------------------------------
https://raw.githubusercontent.com/TYRMars/React-StepPitGuide/ee09ad7119b7b1bc17b1a05861036ec1cd257ebe/.gitbook/assets/image (2).png
--------------------------------------------------------------------------------
/.gitbook/assets/image (3).png:
--------------------------------------------------------------------------------
https://raw.githubusercontent.com/TYRMars/React-StepPitGuide/ee09ad7119b7b1bc17b1a05861036ec1cd257ebe/.gitbook/assets/image (3).png
--------------------------------------------------------------------------------
/.gitbook/assets/image (4).png:
--------------------------------------------------------------------------------
https://raw.githubusercontent.com/TYRMars/React-StepPitGuide/ee09ad7119b7b1bc17b1a05861036ec1cd257ebe/.gitbook/assets/image (4).png
--------------------------------------------------------------------------------
/.gitbook/assets/image.png:
--------------------------------------------------------------------------------
https://raw.githubusercontent.com/TYRMars/React-StepPitGuide/ee09ad7119b7b1bc17b1a05861036ec1cd257ebe/.gitbook/assets/image.png
--------------------------------------------------------------------------------
/.gitbook/assets/mobx.png:
--------------------------------------------------------------------------------
https://raw.githubusercontent.com/TYRMars/React-StepPitGuide/ee09ad7119b7b1bc17b1a05861036ec1cd257ebe/.gitbook/assets/mobx.png
--------------------------------------------------------------------------------
/.gitbook/assets/obj1.png:
--------------------------------------------------------------------------------
https://raw.githubusercontent.com/TYRMars/React-StepPitGuide/ee09ad7119b7b1bc17b1a05861036ec1cd257ebe/.gitbook/assets/obj1.png
--------------------------------------------------------------------------------
/.gitbook/assets/section3-1.png:
--------------------------------------------------------------------------------
https://raw.githubusercontent.com/TYRMars/React-StepPitGuide/ee09ad7119b7b1bc17b1a05861036ec1cd257ebe/.gitbook/assets/section3-1.png
--------------------------------------------------------------------------------
/.gitbook/assets/setState.jpg:
--------------------------------------------------------------------------------
https://raw.githubusercontent.com/TYRMars/React-StepPitGuide/ee09ad7119b7b1bc17b1a05861036ec1cd257ebe/.gitbook/assets/setState.jpg
--------------------------------------------------------------------------------
/.gitbook/assets/this_props_children.png:
--------------------------------------------------------------------------------
https://raw.githubusercontent.com/TYRMars/React-StepPitGuide/ee09ad7119b7b1bc17b1a05861036ec1cd257ebe/.gitbook/assets/this_props_children.png
--------------------------------------------------------------------------------
/.gitbook/assets/微信截图_20171230201617.png:
--------------------------------------------------------------------------------
https://raw.githubusercontent.com/TYRMars/React-StepPitGuide/ee09ad7119b7b1bc17b1a05861036ec1cd257ebe/.gitbook/assets/微信截图_20171230201617.png
--------------------------------------------------------------------------------
/.gitbook/assets/微信截图_20171230201653.png:
--------------------------------------------------------------------------------
https://raw.githubusercontent.com/TYRMars/React-StepPitGuide/ee09ad7119b7b1bc17b1a05861036ec1cd257ebe/.gitbook/assets/微信截图_20171230201653.png
--------------------------------------------------------------------------------
/.gitbook/assets/微信截图_20171230202738.png:
--------------------------------------------------------------------------------
https://raw.githubusercontent.com/TYRMars/React-StepPitGuide/ee09ad7119b7b1bc17b1a05861036ec1cd257ebe/.gitbook/assets/微信截图_20171230202738.png
--------------------------------------------------------------------------------
/.gitbook/assets/微信截图_20180102170018.png:
--------------------------------------------------------------------------------
https://raw.githubusercontent.com/TYRMars/React-StepPitGuide/ee09ad7119b7b1bc17b1a05861036ec1cd257ebe/.gitbook/assets/微信截图_20180102170018.png
--------------------------------------------------------------------------------
/.gitignore:
--------------------------------------------------------------------------------
1 | # Created by .ignore support plugin (hsz.mobi)
2 | ### Node template
3 | # Logs
4 | logs
5 | *.log
6 | npm-debug.log*
7 | yarn-debug.log*
8 | yarn-error.log*
9 |
10 | # Runtime data
11 | pids
12 | *.pid
13 | *.seed
14 | *.pid.lock
15 |
16 | # Directory for instrumented libs generated by jscoverage/JSCover
17 | lib-cov
18 |
19 | # Coverage directory used by tools like istanbul
20 | coverage
21 |
22 | # nyc test coverage
23 | .nyc_output
24 |
25 | # Grunt intermediate storage (http://gruntjs.com/creating-plugins#storing-task-files)
26 | .grunt
27 |
28 | # Bower dependency directory (https://bower.io/)
29 | bower_components
30 |
31 | # node-waf configuration
32 | .lock-wscript
33 |
34 | # Compiled binary addons (http://nodejs.org/api/addons.html)
35 | build/Release
36 |
37 | # Dependency directories
38 | node_modules/
39 | jspm_packages/
40 |
41 | # Typescript v1 declaration files
42 | typings/
43 |
44 | # Optional npm cache directory
45 | .npm
46 |
47 | # Optional eslint cache
48 | .eslintcache
49 |
50 | # Optional REPL history
51 | .node_repl_history
52 |
53 | # Output of 'npm pack'
54 | *.tgz
55 |
56 | # Yarn Integrity file
57 | .yarn-integrity
58 |
59 | # dotenv environment variables file
60 | .env
61 |
62 | ### macOS template
63 | *.DS_Store
64 | .AppleDouble
65 | .LSOverride
66 |
67 | # Icon must end with two \r
68 | Icon
69 |
70 |
71 | # Thumbnails
72 | ._*
73 |
74 | # Files that might appear in the root of a volume
75 | .DocumentRevisions-V100
76 | .fseventsd
77 | .Spotlight-V100
78 | .TemporaryItems
79 | .Trashes
80 | .VolumeIcon.icns
81 | .com.apple.timemachine.donotpresent
82 |
83 | # Directories potentially created on remote AFP share
84 | .AppleDB
85 | .AppleDesktop
86 | Network Trash Folder
87 | Temporary Items
88 | .apdisk
89 |
90 | .idea
91 | *.xml
92 |
--------------------------------------------------------------------------------
/INDEX.md:
--------------------------------------------------------------------------------
1 | # 前言
2 |
3 | [](https://github.com/TYRMars)
4 |
5 | * 图片来自日本像素画家
6 |
7 | ### 学习知识来源:
8 |
9 | * 慕课网:[React.js入门与案例开发](https://coding.imooc.com/class/83.html)
10 | * 慕课网:[React+Redux+Express开发](https://coding.imooc.com/class/150.html)
11 | * 《React全栈-Redux+Flux+webpack+Babel整合开发》
12 | * 《深入浅出React和Redux》
13 | * [Redux中文文档](http://cn.redux.js.org/)
14 | * [React Router](http://react-guide.github.io/react-router-cn/docs/API.html)
15 | * [React Router 4中文文档](http://618cj.com/react-router4-0路由中文文档api/)
16 |
17 | ## React项目实例
18 |
19 | 我写过的项目,供你参考
20 |
21 | * [React新闻网站项目](https://github.com/TYRMars/React-NewsSys) \| 技术栈 : React15+WebPack1+React-Router2 \| 响应式开发
22 | * [React招聘网站移动端](https://github.com/TYRMars/React-Advertises) \| 技术栈 : React16+Antd+Router4+Redux+axios+Express+MongoDB
23 | * [React教师听课助手前端开发](https://github.com/TYRMars/React-TeacherLinstenAssistant) \| 技术栈 : React16+Antd+Router4+Redux+axios+Express+MongoDB \| 响应式开发
24 | * [React-MarkDown插件](https://github.com/TYRMars/React-MarkDown) \| 采用[marked](https://github.com/chjj/marked)
25 | * [React电商网站](https://github.com/TYRMars/React-MSide-Shop) \| React16,适用于Web-M端商城
26 |
27 | 这些知识都是自己在学习React的时候的一些总结,希望能和大家多多交流
28 |
29 |
--------------------------------------------------------------------------------
/LICENSE:
--------------------------------------------------------------------------------
1 | MIT License
2 |
3 | Copyright (c) 2017 Jonathan Zhang
4 |
5 | Permission is hereby granted, free of charge, to any person obtaining a copy
6 | of this software and associated documentation files (the "Software"), to deal
7 | in the Software without restriction, including without limitation the rights
8 | to use, copy, modify, merge, publish, distribute, sublicense, and/or sell
9 | copies of the Software, and to permit persons to whom the Software is
10 | furnished to do so, subject to the following conditions:
11 |
12 | The above copyright notice and this permission notice shall be included in all
13 | copies or substantial portions of the Software.
14 |
15 | THE SOFTWARE IS PROVIDED "AS IS", WITHOUT WARRANTY OF ANY KIND, EXPRESS OR
16 | IMPLIED, INCLUDING BUT NOT LIMITED TO THE WARRANTIES OF MERCHANTABILITY,
17 | FITNESS FOR A PARTICULAR PURPOSE AND NONINFRINGEMENT. IN NO EVENT SHALL THE
18 | AUTHORS OR COPYRIGHT HOLDERS BE LIABLE FOR ANY CLAIM, DAMAGES OR OTHER
19 | LIABILITY, WHETHER IN AN ACTION OF CONTRACT, TORT OR OTHERWISE, ARISING FROM,
20 | OUT OF OR IN CONNECTION WITH THE SOFTWARE OR THE USE OR OTHER DEALINGS IN THE
21 | SOFTWARE.
22 |
--------------------------------------------------------------------------------
/More/BABEL_USE.md:
--------------------------------------------------------------------------------
1 | # 利用babel把ES6转化为ES5
2 |
3 | * 安装`babel`
4 | * `sudo npm install --save-dev babel-cli babel-preset-env`
5 | * ES6语法,因为很多浏览器还不支持ES6所以需要进行转换
6 |
7 | ```js
8 | add(items){
9 | items.map(item => item + 1)
10 | }
11 | ```
12 |
13 | * 在`package.json`中,通过以下设置来实现转换
14 |
15 | ```
16 | {
17 | ...
18 | "script":{
19 | build:"babel index.js --out --file bundel.js"
20 | }
21 | ...
22 | }
23 | ```
24 |
25 | * 然后通过执行\`npm run build\`,编译成功后就会出现如下,打开\`bundel.js\`\(命名可自己拟定\)
26 |
27 | ```
28 | "use strict"
29 | add(items)(items.map(function(){
30 | return item + 1;
31 | }));
32 | ```
33 |
34 | * 此时就完成了转换!!!
35 | * [ES5浏览器支持](http://kangax.github.io/compat-table/es5/)
36 | * [ES6浏览器支持](http://kangax.github.io/compat-table/es6/)
37 |
38 |
39 |
40 |
--------------------------------------------------------------------------------
/More/NODE_EVN.md:
--------------------------------------------------------------------------------
1 | # NodeJS简介
2 |
3 | 
4 |
5 | * [Node.js®](https://nodejs.org/en/)是一个基于Chrome V8 JavaScript引擎构建的JavaScript运行时。 Node.js使用事件驱动的非阻塞I / O模型,使其轻便且高效。 Node.js的包生态系统,npm,是世界上最大的开源生态系统。
6 | * NPM命令,NPMJS有强大的库,存放着各种必备的开源文件,日常所需的基本上都能通过它找到,并安装。——[NPM.JS](https://www.npmjs.com)
7 |
8 | # NodeJS安装
9 |
10 | * 如果想要稳定开发使用 LTS版
11 | * 如果想要体验NodeJS新功能可以使用 Current版
12 | * 建议使用 LTS版本,因为Current版本更新会删除之前的功能,使用前值得思考一下!!!!!
13 | * `node -v` 检测一下自己Node的版本
14 | * `npm -v` 检测一下自己NPM的版本
15 |
16 | # NPM配置国内源
17 |
18 | * 如果你不会翻墙,或者经常NPM装不上东西,可以试一下国内的NPM镜像
19 | * 这是一个完整 `npmjs.org` 镜像,你可以用此代替官方版本\(只读\),同步频率目前为 `10分钟` 一次以保证尽量与官方服务同步。
20 | * 方法一,定制的 `cnpm` \(gzip 压缩支持\) 命令行工具代替默认的 `npm`
21 | * `$ npm install -g cnpm --registry=https://registry.npm.taobao.org`
22 | * 方法二,直接通过添加 `npm` 参数 `alias` 一个新命令:
23 |
24 | ```shell
25 | alias cnpm="npm --registry=https://registry.npm.taobao.org \
26 | --cache=$HOME/.npm/.cache/cnpm \
27 | --disturl=https://npm.taobao.org/dist \
28 | --userconfig=$HOME/.cnpmrc"
29 |
30 | # Or alias it in .bashrc or .zshrc
31 | $ echo '\n#alias for cnpm\nalias cnpm="npm --registry=https://registry.npm.taobao.org \
32 | --cache=$HOME/.npm/.cache/cnpm \
33 | --disturl=https://npm.taobao.org/dist \
34 | --userconfig=$HOME/.cnpmrc"' >> ~/.zshrc && source ~/.zshrc
35 | ```
36 |
37 | * 使用第一种方法`taobaoNPM`使用的时候写成`$ cnpm install [name]`,就可以安装了!!!
38 | * 使用第二种方法`NPM`按照原来的方法`$ npm install [name]`就可以了!!!
39 | * 如果想了解更多点击->[cnpm](http://blog.parryqiu.com/2016/08/18/ionic_installation)
40 |
41 | # 使用NPM配置React
42 |
43 | * 建立项目后,`cd`到项目目录,用`npm init`做项目的初始化,会在目录下产生一个`package.json`文件
44 | * 然后开始安装React`$ sudo npm install --save react react-dom babelify babel-preset-react`
45 | * 安装完后,项目之下就有了`node_modules`这个文件夹,这个文件夹存放着以后`NPM`安装的文件
46 | * 下一步安装 `$ sudo npm install babel-preset-es2015 --save`
47 | * 全部安装完毕后就会是像我这个`package.json`一样。
48 | * 以下我使用的版本
49 |
50 | ```json
51 | {
52 | "name": "05-01",
53 | "version": "1.0.0",
54 | "description": "",
55 | "main": "index.js",
56 | "scripts": {
57 | "test": "echo \"Error: no test specified\" && exit 1"
58 | },
59 | "author": "",
60 | "license": "ISC",
61 | "dependencies": {
62 | "babel-loader": "^7.0.0",
63 | "babel-preset-react": "^6.24.1",
64 | "babelify": "^7.3.0",
65 | "react": "^15.5.4",
66 | "react-dom": "^15.5.4",
67 | "webpack": "^2.5.1",
68 | "webpack-dev-server": "^2.4.5"
69 | }
70 | }
71 | ```
72 |
73 | * 在说热加载之前,先看一下我遇到过的问题,[React配置必踩坑](http://www.kejiganhuo.tech/?p=374)
74 |
75 | ---
76 |
77 | 
78 |
79 | * 需要注意的 ---- NPM安装的时候最好`$ sudo npm install babel-loader -–save`很多人无法后面webpack无法打包,就是因为没有安装babel加载器。
80 |
81 |
82 |
83 |
--------------------------------------------------------------------------------
/More/README.md:
--------------------------------------------------------------------------------
1 | # axios发送异步请求
2 |
3 | * 端口不一致,配置proxy配置转发
4 | * axios拦截器,统一loading处理
5 | * redux里使用异步数据,渲染页面📃
6 |
7 | ## axios
8 |
9 | * `npm install axios --save`
10 |
--------------------------------------------------------------------------------
/More/TOOLS.md:
--------------------------------------------------------------------------------
1 | # 开发工具 Atom
2 |
3 | 
4 |
5 | * ATOM.Github的地址[ATOM](https://github.com/atom/atom)
6 | * ATOM[下载](https://atom.io)
7 |
8 | # React开发相关Atom插件配置
9 |
10 | * 在Packages中直接安装,这几个比较不错的插件!!!
11 | * atom-ternjs
12 | * atom-beautify
13 | * open-in-browser
14 | * emmet
15 | * file-icons
16 | * highlight-line
17 | * highlight-selected
18 |
19 | ## Create-React-App脚手架常用
20 |
21 | 这是一个React项目的基本构建的脚手架,很适合新手学习使用
22 |
23 | * `npm start`开启调试环境
24 | * `npm install redux --save`安装第三方库redux
25 | * `npm run eject`弹出配置菜单,可以自定义配置webpack
26 | * 扩展`package.json`里的script字段,扩展`npm run`命令
27 |
28 | # JSX样式与CSS的转换
29 |
30 | * CSSToReact工具🔧[Github](https://github.com/staxmanade/CssToReact)
31 | * [Web工具地址](http://staxmanade.com/CssToReact/)
32 |
33 | # 样式框架介绍
34 |
35 | * Material-UI[Material-UI](http://www.material-ui.com)
36 | * 蚂蚁金服[ANT DESIGH](http://ant.design/index-cn)
37 |
38 |
39 |
40 |
--------------------------------------------------------------------------------
/More/WebPack.md:
--------------------------------------------------------------------------------
1 | # WebPack 热加载配置\(上\)
2 |
3 | * 创建index.html
4 |
5 | ```html
6 |
123
7 |
8 | ```
9 |
10 | * (这里会出现一个问题就是关于src中的bundle.js地址的问题,如果是使用`src/bundle.js`就会出现`webpack-server`无法更新的情况,我想原因是在与WebPack配置文件中我们定义了文件读取的绝对路径)
11 | * 在项目目录下建立src文件,用于存放未编译的js与编译好的bundle.js
12 | * 在src/js/目录下建立一个index.js用于存放未编译的js代码
13 |
14 | ```JavaScript
15 | var React = require('react');
16 | var ReactDOM = require('react-dom');
17 |
18 | ReactDOM.render(
19 | hello world !!
,
20 | document.getElementById('example')
21 | );
22 | ```
23 |
24 | * 基本的文档就写好了,下一节是WebPack打包📦
25 |
26 | ---
27 |
28 | # WebPack 热加载配置\(中\)
29 |
30 | * 采用`WebPack2`进行打包
31 | * `WebPack2`安装`sudo npm install -g webpack`
32 | * `WebPack-dev-server`安装`sudo npm install -g webpack-dev-server`
33 | * 全局安装完后进行项目目录下的安装!!!!(安装的时候最好在前面加上sudo,有时权限不够会安装失败)
34 |
35 | ```shell
36 | $ sudo npm install webpack --save
37 | $ sudo npm install webpack-dev-server --save
38 | ```
39 |
40 | * 出现问题可以看[React配置必踩坑](http://www.kejiganhuo.tech/?p=374)!!!
41 | * 在目录文件下建立一个`webpack.config.js`
42 | * 很多参考都是采用`WebPack1`进行打包,对于`webpack2`更新后的讲解很少
43 | * 不过还是可以通过官方文档,加上对`webpack1`的学习,自己还是琢磨出了`webpack2`如何配置,`\(^o^)/~`,如下
44 |
45 | * **WebPack2配置信息**
46 |
47 | ```js
48 | // webpack.config.js
49 | var webpack = require("webpack");
50 | var path = require("path");
51 |
52 | module.exports = {
53 | devtool: 'source-map',
54 | context: path.resolve(__dirname, "src"),
55 | entry: "./js/index.js",
56 | output: {
57 | path: path.resolve(__dirname, "src"),
58 | filename: 'bundle.js' // 打包输出的文件
59 | },
60 | module: {
61 | rules: [{
62 | test: /\.js$/, // test 去判断是否为.js或.jsx,是的话就是进行es6和jsx的编译
63 | exclude: /(node_modules)/,
64 | use: [{
65 | loader: 'babel-loader',
66 | //配置参数;
67 | options: { presets: ['es2015','react'] }
68 | }],
69 | }]
70 | },
71 | };
72 | ```
73 |
74 | #### 接下来运行WebPack打包
75 |
76 | * 在Mac终端中,项目的根目录下,`webpack`进行打包,成功打包后会在src目录下生成bundle.js,在浏览器中查看
77 | * 原本页面上的`123`覆盖成了`hello world !!`
78 |
79 | ---
80 |
81 | # WebPack 热加载配置\(下\)
82 |
83 | #### webpack-dev-server的使用
84 |
85 | * 不用每次都去用`WebPack`一遍
86 | * `webpack -watch`自动监听编译,但是需要手动刷新浏览器
87 | * 如果采用在Mac终端中项目根目录下`webpack-dev-server`这样可以`浏览器中`自动刷新,一边写代码,保存后自动刷新。
88 | * (我发现在webpack2中`http://localhost:8080/`也可以自动加载不用`-hot`,不知道是不是自己的原因,有错误,请指出!!!)
89 |
90 |
91 |
92 |
--------------------------------------------------------------------------------
/QUESTION.md:
--------------------------------------------------------------------------------
1 | # React 问题思考
2 |
3 | React和Redux使用的使用的时候,能不能通过一些方法合并action函数,让它形成一个list。然后再index.js。放置一个入口,就和合并reducer差不多。
4 |
5 |
6 |
7 |
--------------------------------------------------------------------------------
/README.md:
--------------------------------------------------------------------------------
1 | # 封面
2 |
3 | 
4 |
5 |
--------------------------------------------------------------------------------
/React-01/REACT15_INDEX.md:
--------------------------------------------------------------------------------
1 | #
2 |
3 |
4 |
5 |
--------------------------------------------------------------------------------
/React-01/REACT_CHROME.md:
--------------------------------------------------------------------------------
1 | # ReactChrome插件使用
2 |
3 | * Chrome react插件 需要进行翻墙安装!!!
4 | * 另外可以用FireFox进行代替,FireFox不用翻墙也可以安装此插件
5 | * 测试一下这个工具,`src/js/index.js`如下:
6 |
7 | ```javascript
8 | var React = require('react');
9 | var ReactDOM = require('react-dom');
10 |
11 | var ExampleApplication = React.createClass({
12 | render: function() {
13 | var elapsed = Math.round(this.props.elapsed / 100);
14 | var seconds = elapsed / 10 + (elapsed % 10 ? '' : '.0' );
15 | var message =
16 | 'React has been successfully running for ' + seconds + ' seconds.';
17 |
18 | return React.DOM.p(null, message);
19 | }
20 | });
21 |
22 | // Call React.createFactory instead of directly call ExampleApplication({...}) in React.render
23 | var ExampleApplicationFactory = React.createFactory(ExampleApplication);
24 |
25 | var start = new Date().getTime();
26 | setInterval(function() {
27 | ReactDOM.render(
28 | ExampleApplicationFactory({elapsed: new Date().getTime() - start}),
29 | document.getElementById('example')
30 | );
31 | }, 50);
32 | ```
33 |
34 | * `index.html`如下
35 |
36 | ```html
37 | 123
38 |
39 | ```
40 |
41 | * 具体的效果如下
42 |
43 | ---
44 |
45 | 
46 |
47 |
--------------------------------------------------------------------------------
/React-01/REACT_COMPONENT.md:
--------------------------------------------------------------------------------
1 | # React 组件
2 |
3 | * 组件是`React`的基石,所有的`React`应用程序都是基于组件的。
4 | * 之前`React`组件,使用`React.createClass`来进行声明
5 |
6 | ```javascript
7 | var List = React.createClass({
8 | getInitialState: function(){
9 | return['a','b','c']
10 | },
11 | render: function(){
12 | return(...);
13 | }
14 | });
15 | ```
16 |
17 | * `React`官方第一时间就支持了ES6 class 的方法,这种写法可读性更强,一个直观的表现就是不用写`getInitialState`方法了,可以直接在`constructor`里面定义`this.state`的值。所以以后代码采用以下格式。
18 |
19 | ```javascript
20 | import React from 'react';
21 |
22 | class List extends React.components{
23 | constructor(){
24 | super();
25 | this.state = ['a','b','c'];
26 | }
27 | render(){
28 | return(...);
29 | }
30 | }
31 | ```
32 |
33 | * 这一节里测试一下`React`的组件
34 | * 在`src/js/`下创建文件夹`components`创建一个`header.js`
35 | * `header.js`如下
36 |
37 | ```javascript
38 | import React from 'react';
39 | import ReactDOM from 'react-dom';
40 | export default class CompomentHeader extends React.Component{
41 | render(){
42 | return(
43 |
46 | );
47 | }
48 | }
49 | ```
50 |
51 | * `index.js`如下
52 |
53 | ```javascript
54 | var React = require('react');
55 | var ReactDOM = require('react-dom');
56 | import CompomentHeader from './components/header';
57 |
58 | class Index extends React.Component {
59 | render() {
60 | return (
61 |
62 |
63 |
页面主题内容
64 |
65 | );
66 | }
67 | }
68 |
69 | // 入口
70 | ReactDOM.render( < Index / > , document.getElementById('example'));
71 | ```
72 |
73 | ## HTML标签与React组件
74 |
75 | * React可以直接渲染HTML类型的标签,也可以渲染React的组件
76 | * HTML类型的标签第一个字母用小写来写表示。
77 |
78 | ```javascript
79 | import React from 'react';
80 | //当一个标签里面为空的时候,可以直接使用自闭和标签
81 | //注意class是一个JavaScript保留字,所以如果class应该替换成className
82 | let divElement = ;
83 | //等同于
84 | let divElement = React.createElement('div',{className:'foo'});
85 | ```
86 |
87 | * React组件标签第一个字母大写。
88 |
89 | ```javascript
90 | import React from 'react';
91 | class Headline extends React.component{
92 | ...
93 | render(){
94 | //直接return JSX语法
95 | return Hello React
96 | }
97 | }
98 | let Headline = ;
99 | let headline = React.createElement(Headline);
100 | ```
101 |
102 | * `JSX`语法使用第一个字母大小写来区分是一个普通的`HTML`标签还是一个`React`组件
103 | * 注意:因为`JSX`本身是`JavaScript`语法,所以一些`JavaScript`中的保留字要用其他的方式书写,比如第一个例子中`class`要写成`className`
104 |
105 |
--------------------------------------------------------------------------------
/React-01/REACT_CSS_MODEL.md:
--------------------------------------------------------------------------------
1 | # React CSS模块化
2 |
3 | * `"babel-plugin-react-html-attrs": "^2.0.0"`让JSX中`className`能变回原来`class`
4 | * webpack要重新配置
5 |
6 | ```javascript
7 | // webpack.config.js
8 | var webpack = require("webpack");
9 | var path = require("path");
10 |
11 | module.exports = {
12 | devtool: 'source-map',
13 | context: path.resolve(__dirname, "src"),
14 | entry: "./js/index.js",
15 | output: {
16 | path: path.resolve(__dirname, "dist"),
17 | filename: 'bundle.js' // 打包输出的文件
18 | },
19 | module: {
20 | rules: [{
21 | test: /\.js$/, // test 去判断是否为.js或.jsx,是的话就是进行es6和jsx的编译
22 | exclude: /(node_modules)/,
23 | use: [{
24 | loader: 'babel-loader',
25 | //配置参数;
26 | options: {
27 | presets: ['es2015', 'react'],
28 | plugins: ['react-html-attrs']
29 | }
30 | }, ]
31 | },
32 | {
33 | test: /\.css$/,
34 | use: [{
35 | loader: 'style-loader',
36 | }, {
37 | loader: 'css-loader',
38 | options: {
39 | modules: true,
40 | localIdentName: '[path][name]__[local]--[hash:base64:5]'
41 | }
42 | }]
43 | },
44 | ]
45 | },
46 | };
47 | ```
48 |
49 | * 在`src/css`下,创建一个`footer.css`,此`css`设置初衷是为了单独去渲染`footer`,希望`footer.css`不会污染全局,但通常情况下全局引用`css`是会污染全局的,内容如下
50 |
51 | ```css
52 | .miniFooter {
53 | background: #333333;
54 | color: #ffffff;
55 | padding-left: 20px;
56 | padding-top: 3px;
57 | padding-bottom: 3px;
58 | }
59 | .miniFooter h1 {
60 | font-size: 15px;
61 | }
62 | ```
63 |
64 | * 在footer.js下写
65 |
66 | ```javascript
67 | import React from 'react';
68 |
69 | var footerCss = require("../../css/footer.css");//引入css
70 |
71 | export default class CompomentFooter extends React.Component{
72 | render(){
73 | console.log(footerCss);
74 | return(
75 |
78 | );
79 | }
80 | }
81 | ```
82 |
83 | * 因为我们在打包时设置了`localIdentName:'[path][name]__[local]--[hash:base64:5]'`,这地方就是引用css的路径限制。
84 | * 默认情况下,CSS 将所有的类名暴露到全局的选择器作用域中。样式可以在局部作用域中,避免全局作用域的样。详细🔎请查看官方文档[官方文档式](https://doc.webpack-china.org/loaders/css-loader/#scope)
85 | * 所以在浏览器中`console`出了`Object {miniFooter: "css-footer__miniFooter--2W_7G"}`
86 |
87 |
--------------------------------------------------------------------------------
/React-01/REACT_C_DOL.md:
--------------------------------------------------------------------------------
1 | # React 可复用组件
2 |
3 | * 类定义完后,追加属性`propTypes`传入参数`userid:React.PropTypes.number`,规定userid是一个数字型,如果传入字符型和其他的非数字型,都会报错。
4 | * 给页面传入默认值 `const defaultProps ={username:'这是一个默认的用户名'//默认属性设置};`,把定义的`prop`传入 `BodyIndex.defaultProps = defaultProps;`。
5 |
6 | ```js
7 | import React from 'react';
8 | import BodyChild from './bodychild'
9 | const defaultProps = {
10 | username:'这是一个默认的用户名'//默认属性设置
11 | };
12 | export default class BodyIndex extends React.Component {
13 | constructor() {
14 | super(); //调用基类的所有的初始化方法
15 | this.state = {
16 | username: "Parry",
17 | age:20
18 | };//初始化赋值
19 | }
20 | handleChildValueChange(event){
21 | this.setState({age:event.target.value})
22 | }
23 | changeUserInfo(){
24 | this.setState({age:50});
25 | };
26 | render() {
27 | // setTimeout(() => {
28 | // //更改state的时候
29 | // this.setState({username: "IMOOC",age:30})
30 | // }, 4000);
31 | return (
32 |
33 |
页面主题内容
34 |
接收到的父页面属性:userid: {this.props.userid} username: {this.props.username}
35 |
age: {this.state.age}
36 |
37 |
38 | {/*传参数到孙子节点*/}
39 |
40 | )
41 | }
42 | }
43 | BodyIndex.propTypes = {
44 | userid: React.PropTypes.number
45 | };
46 | BodyIndex.defaultProps = defaultProps;
47 | ```
48 |
49 |
50 |
51 |
--------------------------------------------------------------------------------
/React-01/REACT_C_REFS.md:
--------------------------------------------------------------------------------
1 | # 组件Refs
2 |
3 | \(操作DOM的两种方法\)
4 |
5 | * 第一种方式
6 |
7 | ```javascript
8 | var mySubmitButton = document.getElementById('submitButton');
9 | console.log(mySubmitButton);
10 | ReactDOM.findDOMNode(mySubmitButton).style.color = 'red';
11 | //不推荐此方法,有安全隐患,XSS攻击
12 | ```
13 |
14 | * 第二种方法
15 |
16 | ```javascript
17 | console.log(this.refs.submitButton);
18 | this.refs.submitButton.style.color = 'red';
19 | ```
20 |
21 | ### 第二种方法
22 |
23 | ```js
24 |
25 | this.refs.myInput//通过这种方式对DOM进行操作
26 | ```
27 |
28 | * Refs是访问到组件内部DOM节点唯一可靠的方法
29 | * Refs会自动销毁对子组件的引用
30 | * 不要在render或render之前对Refs进行调用
31 | * 不要滥用Refs
32 |
33 | ### 不使用ref
34 |
35 | 可以利用组件状态来同步记录DOM元素的值,这种方法控制住组建不使用ref
36 |
37 | 就是通过DOM事件,DOM事件中有个event,当我们使用事件函数传入event就是当前这个DOM对象,通过这种方式操作会好很多
38 |
39 | ```js
40 | render(){
41 | return (
42 |
43 |
46 |
47 | )
48 | }
49 |
50 | onInputChange(event) {
51 | this.setState({
52 | value: event.target.value
53 | });
54 | }
55 | ```
56 |
57 |
58 |
59 |
--------------------------------------------------------------------------------
/React-01/REACT_JSX.md:
--------------------------------------------------------------------------------
1 | # React JSX
2 |
3 | ## JSX的来历
4 |
5 | * 下面是一段官方文档中的引用,它可以解释JSX这种写法诞生的初衷
6 |
7 | `We strongly believe that components are the right way to separate concerns rather than "templates" and "display logic" . We think that markup and the code that generate it are intimately tied together . Additionally , display logic is often very complex and using template languages to express it becomes cumbersome`
8 |
9 | * 多年以来,在传统的开发中,把模版和功能分离看作是最佳事件的完美例子,翻阅形形色色的框架文档,总有一个模版文件夹里放置了对应的模版文件,然后通过模版引擎处理这些字符,来生成把数据和模版结合起来的字符。而React认为世界是基于组件的,组件自然而然和模版相连,把逻辑和模版分开放置是一种笨重的思路,所以React创造了一种名为JSX的语法格式来架起它们之间的桥梁。
10 |
11 | ## JSX内置表达式
12 |
13 | ### JSX
14 |
15 | * 在render方法中有一种直接把HTML嵌套在JS中的写法,它被称为JSX。这种写法类似XML,它可以定义HTML一样简洁的树状结构。这种语法结合了JavaScript和HTML的优点(我理解模版化我们编写的程序,这就是React的初衷)既可以像平常一样使用HTML,也可以在里面嵌套JavaScript语法,这种👬友好的格式,让开发者更易于阅读和开发。而且,对于组件来说,直接使用类似HTML的格式,也是非常合理的。但是,需要注意的是。JSX和HTML完全不是一回事,JSX只是作为编译器,把类似HTML的结构编译成JavaScript。
16 | * JSX的注释是需要特别注意的,采用`{/*注释*/}`
17 |
18 | **JSX不是必须的**
19 |
20 | * JSX编译器把类似HTML的写法转换成原生的JavaScript方法,并且会将传入的属性转化为对应的对象。它就类似于一种语法糖,把标签类型的写法转换成`React`提供的一个用来创建 ReactElement 的方法
21 |
22 | ```javascript
23 | const MyCompoment;
24 | //input JSX,在JS中直接写成类似HTML的内容,前所未有的感觉,其实它返回的是一个ReactElement
25 | let app = this is my title
26 | //JSX转换后的结果
27 | let app = React.createElement('h1',{title: 'my title'},'this is my title');
28 | ```
29 |
30 |
--------------------------------------------------------------------------------
/React-01/REACT_PROPS.md:
--------------------------------------------------------------------------------
1 | # React Props属性
2 |
3 | ## Props事例
4 |
5 | * index.js代码
6 |
7 | ```javascript
8 | ...
9 | render() {
10 | return (
11 |
12 |
13 |
14 |
15 |
16 | )
17 | }
18 | ...
19 | ```
20 |
21 | * bodyIndex.js代码
22 |
23 | ```javascript
24 | import React from 'react';
25 | export default class BodyIndex extends React.Component {
26 | constructor() {
27 | super(); //调用基类的所有的初始化方法
28 | this.state = {
29 | username: "Parry",
30 | age:20
31 | };//初始化赋值
32 | }
33 | render() {
34 |
35 | setTimeout(() => {
36 | //更改state的时候
37 | this.setState({username: "IMOOC",age:30})
38 | }, 4000);
39 |
40 | return (
41 |
42 |
页面主题内容
43 |
{this.state.username} {this.state.age} {this.props.userid} {this.props.username}
44 |
45 | )
46 | }
47 | }
48 | ```
49 |
50 | * 可以用`Chorme React`组件中查看到,`Props`相当于跨组件传值,而且优点在于不会影响其他模块的值。`Props`对于模块本身来说属于外来属性。
51 |
52 |
--------------------------------------------------------------------------------
/React-01/REACT_STATE.md:
--------------------------------------------------------------------------------
1 | # React State属性
2 |
3 | ## state状态
4 |
5 | * `state` 是组件内部的属性。组件本事是一个`状态机`,它可以在`constructor`中通过`this.state`直接定义它的值,然后根据这些值来渲染不同的UI。当`state`的值发生改变时,可以通过`this.setState`方法让组件再次调用`render`方法,来渲染新的UI。当`state`的值发生改变时,可以通过`this.setState`方法再次调用`render`方法,来渲染新的UI。
6 |
7 | ## state设计原则
8 |
9 | * 什么组件应该有`State`,而且应该遵循最小化`state`的准则?那就是尽量让大多数的组件都是无状态的。为了实现这样的结构,因该尽量把状态分离在一些特定的组件中,来降低组件的复杂程度。最常见的做法就是创建尽力那个多的无状态组件,这些组件唯一要关心的事情就是渲染数据。而在这些组件的外层,应该有一个包含`state`的父级的组件。这个组件用于处理各种事件、交流逻辑、修改`state`、对应的子组件要关心的只是传入的属性而已
10 | * `state` 应该包含什么数据? `state`中应该包含组件的事件回调函数可能引发UI更新的这类数据。在实际的项目中,这些应该是轻量化的JSON数据,应该尽量把数据的表现设计到最小,而更多的数据可以在render方法通过各种计算来得到。这里举一个例子,比如说现在有一个商品列表,还有一个用户已经选购的商品列表,最直观的设计方法如下:
11 |
12 | ```javascript
13 | {
14 | goods:[
15 | {
16 | "id":1,
17 | "name":"paper"
18 | },
19 | {
20 | "id":2,
21 | "name":"pencil"
22 | }
23 | ...
24 | ],
25 | selectedGoods:[
26 | {
27 | "id":1,
28 | "name":"hello world"
29 | }
30 | ],
31 | }
32 | ```
33 |
34 | * 这样做当然可以,但根据最小化设计`state`原则,还是有更好的方法!!!
35 | * `selectedGoods` 的商品就是goods里面的几项,数据是完全一致的,所以说这里只需要保存`ID`,就可以完成同样的功能。所以可以修改成如下。
36 |
37 | ```javascript
38 | selectedGoods:[1,2,3]
39 | ```
40 |
41 | * 在渲染这个组件的时候,只需要把要渲染的条目从goods中取出来就可以了。
42 | * `state`不应该包含什么数据?就像上面的例子所描述的一样,为了达到`state`的最小化,下面👇几种数据不应该包含在`state`中
43 | * 可以由state计算出的数据。就像selectedGoods一样,可以由goods列表计算得出。
44 | * 组件。组件不需要保存到state中,只需要在`render`方法中渲染。
45 | * `props`中的数据。`props`可以看作是组件的数据来源,它不需要保存在`state`中。
46 |
47 | ## state 使用事例
48 |
49 | ```javascript
50 | import React from 'react';
51 | export default class BodyIndex extends React.Component {
52 | constructor() {
53 | super(); //调用基类的所有的初始化方法
54 | this.state = {
55 | username: "Parry",
56 | age:20
57 | };//初始化赋值
58 | }
59 | render() {
60 | setTimeout(() => {
61 | //更改state的时候
62 | this.setState({username: "IMOOC",age:30})
63 | }, 4000);
64 |
65 | return (
66 |
67 |
页面主题内容
68 |
{this.state.username} {this.state.age}
69 |
70 | )
71 | }
72 | }
73 | ```
74 |
75 | * 可以用Chorme React组件中查看到`state`只会在相应的模块中有值,不会影响到其他模块。它属于模块自身属性。
76 |
77 |
--------------------------------------------------------------------------------
/React-01/REACT_STYLE.md:
--------------------------------------------------------------------------------
1 | # React CSS內联式样
2 |
3 | * 通过header.js演示JSX样式控制,直接內联到标签中的style
4 |
5 | ```javascript
6 | import React from 'react';
7 | export default class CompomentHeader extends React.Component{
8 |
9 | render(){
10 | const styleComponentHeader = {
11 | header: {
12 | backgroundColor: "#333333",
13 | color: "#ffffff",
14 | "padding-top": "15px",
15 | paddingBottom: "15px"
16 | }
17 | //还可以定义其他的样式
18 | }
19 | return(
20 |
23 | )
24 | }
25 | }
26 | ```
27 |
28 | * 在`React`上不是很适合此方法,`hover`等一些动画或者伪类,但在移动开发`ReactNative`中会常用。
29 |
30 | **采用原始引用方式**
31 |
32 | * `header`添加为``,并在`index.html`引用相关`css`
33 | * 不好在于污染全局
34 |
35 | ## 09-02
36 |
37 | ### 內联式样中的表达式
38 |
39 | ```javascript
40 | import React from 'react';
41 | export default class CompomentHeader extends React.Component{
42 |
43 | constructor(){
44 | super();
45 | this.state ={
46 | miniHeader:false //默认加载的时候还是高(不是mini)的头部
47 | };
48 | };
49 |
50 | switchHeader(){
51 | this.setState({
52 | miniHeader: !this.state.miniHeader //对state进行取反
53 | });
54 | };
55 |
56 | render(){
57 | const styleComponentHeader = {
58 | header: {
59 | backgroundColor: "#333333",
60 | color: "#ffffff",
61 | "padding-top": (this.state.miniHeader) ? "3px" : "15px",
62 | paddingBottom: (this.state.miniHeader) ? "3px" : "15px"
63 | },
64 | //还可以定义其他的样式
65 | };
66 | return(
67 |
70 | )
71 | }
72 | }
73 | ```
74 |
75 |
--------------------------------------------------------------------------------
/React-01/REACT_VDOM.md:
--------------------------------------------------------------------------------
1 | # React虚拟DOM概念
2 |
3 | ## 虚拟DOM的结构
4 | * 在传统的 Web 应用中,我们往往会把数据的变化实时地更新到用户界面中,于是每次数据的微小变动都会引起 DOM 树的重新渲染。如果当前 DOM 结构较为复杂,频繁的操作很可能会引发性能问题。React 为了解决这个问题,引入了虚拟 DOM 技术。
5 |
6 | 
7 |
8 | * 虚拟 DOM 是一个 JavaScript 的树形结构,包含了 React 元素和模块。组件的 DOM 结构就是映射到对应的虚拟 DOM 上,React 通过渲染虚拟 DOM 到浏览器,使得用户界面得以显示。与此同时,React 在虚拟的 DOM 上实现了一个 diff 算法,当要更新组件的时候,会通过 diff 寻找到要变更的 DOM 节点,再把这个修改更新到浏览器实际的 DOM 节点上,所以在 React 中,当页面发生变化时实际上不是真的渲染整个 DOM
9 | * React 虚拟 DOM 中的诸多如 div 一类的标签与实际 DOM 中的 div 是相互独立的两个概念,它是一个纯粹的 JS 数据结构,它只是提供了一个与 DOM 类似的 Tag 和 API。React 会通过自身的逻辑和算法,转化为真正的 DOM 节点。也正是因为这样的结构,虚拟 DOM 的性能要比原生 DOM 快很多。
10 |
11 | # React 虚拟DOM+components+生命周期的联系
12 | ### React-虚拟DOM分析
13 |
14 | * 从浏览器渲染角度说React为什么会使用虚拟DOM
15 | * 虚拟DOM的原理
16 |
17 | * 以下是综各个资料后的个人理解,如有问题请指出
18 |
19 | #### 从浏览器渲染角度说React
20 |
21 | * 首先要知道`React`是由`Facebook`对现有业务进行改进提升的时候提出来的。`DOM`是很慢的,其元素非常庞大,页面的性能问题鲜有由JS引起的,大部分都是由DOM操作引起的。所有`Facebook`在`React`中引入了页面UI组件化、虚拟DOM,来解决这些问题。
22 | * React.js对常用组建进行了优化,它算是一个components组件库。ReactDom.js是React版本优化的虚拟DOM
23 | * 如果要渲染到最后Display显示,需要经过很长过程,浏览器会先收集到HTML和CSS,对HTML和CSS分别经过Parser剖析器,分别生成DOMTree和CSSRuleTree。 DOM和CSSOM合并后生成Render Tree。
24 | * React.js希望用JSX语言写出HTML和CSS还有页面逻辑混合在一起成为一个component,(在react编写的时候就是通过class继承的react.component这个类),直接通过JS对象的形式生成了`ReactRenderTree`。
25 | * 我觉得这是原型链的🌲树状结构化,`ReactRenderTree`(React生命周期)在通过虚拟DOM(ReactDom.js),首次生成给到浏览器的时候就是一个浏览器直接可以识别的RenderTree,浏览器直接Painting,然后显示在页面上。
26 | * 虚拟的DOM的核心思想是:对复杂的文档DOM结构,提供一种方便的工具,进行最小化地DOM操作
27 |
28 | ##### 当需要重排时Reflow
29 |
30 | * `React`会通过虚拟`DOM`对新生成的DOM和原来的DOM树进行对比,改变页面
31 |
32 | #### 虚拟DOM的原理
33 |
34 | * 虚拟`DOM`类似于(自动化控制的网页生成器)通过`Node`节点`render`生成相对应的网页,但主要功能在于网页更新时候,对于Node节点的更新,虚拟DOM会比较两棵DOM树的区别,保证最小化的DOM操作,使得执行效率得到保证。
35 | * 由于计算两棵树的常规算法是`O(n^3)`级别,DOM结构达到成百个节点在实际项目中很正常,所以需要优化深度遍历的算法。
36 |
37 | ##### React diff 策略
38 |
39 | * `Web UI` 中 `DOM` 节点跨层级的移动操作特别少,可以忽略不计。
40 | * 拥有相同类的两个组件将会生成相似的树形结构,拥有不同类的两个组件将会生成不同的树形结构。
41 | * 对于同一层级的一组子节点,它们可以通过唯一 id 进行区分。
42 | * 基于以上三个前提策略,`React` 分别对 `tree diff`、`component diff` 以及 `element diff` 进行算法优化,事实也证明这三个前提策略是合理且准确的,它保证了整体界面构建的性能。
43 |
44 | * React的局限性,不适合每个页面使用率很低网站,(每个页面页面逻辑不同);
45 |
46 | 
47 |
48 | [知乎-React 源码剖析系列 - 不可思议的 react diff](https://zhuanlan.zhihu.com/p/20346379)
49 |
50 | ### React-生命周期
51 |
52 | * `ReactNode`节点是由JS制作而成,本身是死的,要赋予其活性,就需要像现实事物一样有生命周期。通过生命周期函数,来间接控制事件与DOM的操作!!!
53 | * 为了方便这样的操作React有了JSX这种语法融合了`HTML`和`CSS`,不难看出使用这种语法能极大的提高React性能(从浏览器渲染的角度)
54 |
55 | 
56 |
--------------------------------------------------------------------------------
/React-01/README.md:
--------------------------------------------------------------------------------
1 | # React 基础知识
2 |
3 | ## 
4 |
5 |
--------------------------------------------------------------------------------
/React-01/react-ban-ben.md:
--------------------------------------------------------------------------------
1 | # React 版本
2 |
3 | ## React 17 简介
4 |
5 | 
6 |
7 | ## React 16 简介
8 |
9 | ## React15 简介
10 |
11 | * React 是近期非常热门的一个前端开发框架,其本身作为 MVC 中的 View 层可以用来构建 UI,也可以以插件的形式应用到 Web 应用非 UI 部分的构建中,轻松实现与其他 JS 框架的整合,比如 AngularJS。同时,React 通过对虚拟 DOM 中的微操作来实对现实际 DOM 的局部更新,提高性能。其组件的模块化开发提高了代码的可维护性。单向数据流的特点,让每个模块根据数据量自动更新,让开发者可以只专注于数据部分,改善程序的可预测性。
12 | * Facebook内部用来开发Instagram
13 | * JavaScript MVC框架
14 | * 2013年开源React
15 | * 随后发布React Native
16 | * React Github [React](http://www.github.com/facebook/react)
17 |
18 | ## React版本选择
19 |
20 | * 查看历史版本
21 | * [React历史版本](http://facebook.github.io/react/blog/all.html)
22 | * 安装采用NPM的方法`npm install react`
23 | * 如果要安装在项目目录下`cd react/`下面,然后`npm install react --save`
24 | * 如果想在电脑全局进行安装则`npm install react -g`
25 | * 会自动安装最新的版本
26 |
27 | ## React Starter Pack 下载使用与React初体验
28 |
29 | * 新版的React没有演示文件,使用的`React 15.3.2`
30 | * 在`examples/basic/`下index.html是一个事例可以研究一下,这个地方体现了React在页面上的高性能的优点
31 |
32 | ```javascript
33 | var ExampleApplication = React.createClass({
34 | render: function() {
35 | var elapsed = Math.round(this.props.elapsed / 100);
36 | var seconds = elapsed / 10 + (elapsed % 10 ? '' : '.0' );
37 | var message =
38 | 'React has been successfully running for ' + seconds + ' seconds.';
39 |
40 | return React.DOM.p(null, message);
41 | }
42 | });
43 |
44 | // Call React.createFactory instead of directly call ExampleApplication({...}) in React.render
45 | var ExampleApplicationFactory = React.createFactory(ExampleApplication);
46 |
47 | var start = new Date().getTime();
48 | setInterval(function() {
49 | ReactDOM.render(
50 | ExampleApplicationFactory({elapsed: new Date().getTime() - start}),
51 | document.getElementById('container')
52 | );
53 | }, 50);
54 | ```
55 |
56 |
--------------------------------------------------------------------------------
/React-01/react-ding-ji-api.md:
--------------------------------------------------------------------------------
1 | # React 顶级API
2 |
3 | #### this.props.children
4 |
5 | 通过顶级的API进行操作
6 |
7 |
8 |
9 |
--------------------------------------------------------------------------------
/React-01/react-duo-zu-jian-qian-tao.md:
--------------------------------------------------------------------------------
1 | # React 多组件嵌套
2 |
3 | * `webpack-dev-server`环境运行起来,这里主要是明白了React如何做嵌套
4 | * `src/js/components`下创建`header.js`书写代码✍️
5 |
6 | ```javascript
7 | import React from 'react';
8 | import ReactDOM from 'react-dom';
9 | export default class CompomentHeader extends React.Component{
10 | render(){
11 | return(
12 |
15 | )
16 | }
17 | }
18 | ```
19 |
20 | * `src/js/components`下创建`footer.js`书写代码✍️
21 |
22 | ```javascript
23 | import React from 'react';
24 | export default class CompomentFooter extends React.Component{
25 | render(){
26 | return(
27 |
30 | );
31 | }
32 | }
33 | ```
34 |
35 |
--------------------------------------------------------------------------------
/React-01/react-hooks.md:
--------------------------------------------------------------------------------
1 | # React Hook
2 |
3 | ```
4 | React 16.8.0 是第一个支持 Hook 的版本。升级时,请注意更新所有的 package,包括 React DOM
5 | ```
6 |
7 | _Hook_是 React 16.8 的新增特性。它可以让你在不编写 class 的情况下使用 state 以及其他的 React 特性。
8 |
9 | Hook可以说是React新纪元的开始。
10 |
11 | ```js
12 | import React, { useState } from 'react';
13 |
14 | function Example() {
15 | // 声明一个新的叫做 “count” 的 state 变量
16 | const [count, setCount] = useState(0);
17 |
18 | return (
19 |
20 |
You clicked {count} times
21 |
24 |
25 | );
26 | }
27 | ```
28 |
29 | 组件很难复用状态逻辑,并且复杂的组件难以被理解,尤其是生命周期函数。
30 |
31 |
--------------------------------------------------------------------------------
/React-01/react-hooks/useeffect.md:
--------------------------------------------------------------------------------
1 | # useEffect
2 |
3 | * 每次渲染之后都会执行
4 |
5 | ```js
6 | import React, { userState, useEffect } from 'react'
7 |
8 | const ViewUserName = () => {
9 | const [userName, setUserName ] = userState('');
10 | useEffect(() => {
11 | document.title = `用户-${userName}`;
12 | })
13 | return (
14 | <>
15 | { setUserName(val) }} />
16 | <>
17 | )
18 | }
19 | ```
20 |
21 |
22 |
23 |
--------------------------------------------------------------------------------
/React-01/react-proptypes.md:
--------------------------------------------------------------------------------
1 | # React PropTypes
2 |
3 | React PropType 是React对于组件传入props的数据类型进行检查
4 |
5 | * 注意:`React.PropTypes`自 React v15.5 起已弃用。请使用[`prop-types`](https://www.npmjs.com/package/prop-types)库代替。Context中使用也要注意。
6 |
7 | 通过类型检查保证数据传递的正确性
8 |
9 | ```js
10 | import PropTypes from 'prop-types';
11 | import React from 'react';
12 |
13 | class App extends React.Component{
14 | render(){
15 | return(
16 |
17 | )
18 | }
19 | }
20 | ```
21 |
22 | PropType只适用于开发环境
23 |
24 | ```js
25 | import PropTypes from 'prop-types';
26 |
27 | MyComponent.propTypes = {
28 | // 你可以将属性声明为以下 JS 原生类型
29 | optionalArray: PropTypes.array,
30 | optionalBool: PropTypes.bool,
31 | optionalFunc: PropTypes.func,
32 | optionalNumber: PropTypes.number,
33 | optionalObject: PropTypes.object,
34 | optionalString: PropTypes.string,
35 | optionalSymbol: PropTypes.symbol,
36 |
37 | // 任何可被渲染的元素(包括数字、字符串、子元素或数组)。
38 | optionalNode: PropTypes.node,
39 |
40 | // 一个 React 元素
41 | optionalElement: PropTypes.element,
42 |
43 | // 你也可以声明属性为某个类的实例,这里使用 JS 的
44 | // instanceof 操作符实现。
45 | optionalMessage: PropTypes.instanceOf(Message),
46 |
47 | // 你也可以限制你的属性值是某个特定值之一
48 | optionalEnum: PropTypes.oneOf(['News', 'Photos']),
49 |
50 | // 限制它为列举类型之一的对象
51 | optionalUnion: PropTypes.oneOfType([
52 | PropTypes.string,
53 | PropTypes.number,
54 | PropTypes.instanceOf(Message)
55 | ]),
56 |
57 | // 一个指定元素类型的数组
58 | optionalArrayOf: PropTypes.arrayOf(PropTypes.number),
59 |
60 | // 一个指定类型的对象
61 | optionalObjectOf: PropTypes.objectOf(PropTypes.number),
62 |
63 | // 一个指定属性及其类型的对象
64 | optionalObjectWithShape: PropTypes.shape({
65 | color: PropTypes.string,
66 | fontSize: PropTypes.number
67 | }),
68 |
69 | // 你也可以在任何 PropTypes 属性后面加上 `isRequired`
70 | // 后缀,这样如果这个属性父组件没有提供时,会打印警告信息
71 | requiredFunc: PropTypes.func.isRequired,
72 |
73 | // 任意类型的数据
74 | requiredAny: PropTypes.any.isRequired,
75 |
76 | // 你也可以指定一个自定义验证器。它应该在验证失败时返回
77 | // 一个 Error 对象而不是 `console.warn` 或抛出异常。
78 | // 不过在 `oneOfType` 中它不起作用。
79 | customProp: function(props, propName, componentName) {
80 | if (!/matchme/.test(props[propName])) {
81 | return new Error(
82 | 'Invalid prop `' + propName + '` supplied to' +
83 | ' `' + componentName + '`. Validation failed.'
84 | );
85 | }
86 | },
87 |
88 | // 不过你可以提供一个自定义的 `arrayOf` 或 `objectOf`
89 | // 验证器,它应该在验证失败时返回一个 Error 对象。 它被用
90 | // 于验证数组或对象的每个值。验证器前两个参数的第一个是数组
91 | // 或对象本身,第二个是它们对应的键。
92 | customArrayProp: PropTypes.arrayOf(function(propValue, key, componentName, location, propFullName) {
93 | if (!/matchme/.test(propValue[key])) {
94 | return new Error(
95 | 'Invalid prop `' + propFullName + '` supplied to' +
96 | ' `' + componentName + '`. Validation failed.'
97 | );
98 | }
99 | })
100 | };
101 | ```
102 |
103 |
104 |
105 |
--------------------------------------------------------------------------------
/React-01/react-rong-qi-zu-jian-he-sha-gua-zu-jian.md:
--------------------------------------------------------------------------------
1 | # React 容器组件和展示组件
2 |
3 | * 让一个组件只专注做一件事,如果发现一个组件做的事情太多了,就可以把这个组件拆分成多个组件,让每个组件依然只专注做一件事。
4 |
5 | #### 分析
6 |
7 | Redux框架之下,React组件要完成以下的事情
8 |
9 | * 和Redux Store进行交流,读取Store状态,用于初始化组件的状态,同时还要监听Store的状态改变;当Store状态发生变化时,需要更新组件状态,从而驱动组建重新渲染;但需要更新Store状态时,就要派发action对象;
10 | * 根据当前props和state,渲染出用户界面
11 |
12 | 所以为了让React对于处理数据和显示界面能更加专注。我们可以把其组件进行拆分,让一部分专注于处理数据,让另一部分专注于显示界面。这样在通过嵌套调用。完成之前一个组件的任务。
13 |
14 | #### 第一种组件【容器组件\(Container Component\)】
15 |
16 | 它要专注于处理数据,负责和Redux Store进行交流,用来做状态处理,它是动态的。处于组件嵌套的外层,所以叫做容器组件
17 |
18 | ```js
19 | //容器组件
20 | import React from 'react'
21 | import Counter from './component/counter'
22 | class CounterContainer extends React.Component{
23 | //...addNum,removeNum,value
24 | render(){
25 | return(
26 |
27 |
28 |
29 | )
30 | }
31 | }
32 | ```
33 |
34 | #### 第二种组件【展示组件\(Presentational Component\)】
35 |
36 | 它主要专注于view,它本身是纯函数,通过接收父组件传递过来的props产生结果渲染页面,所以它是无状态的,。处于组件嵌套的内层,所以叫它展示组件
37 |
38 | ```js
39 | //展示组件
40 | import React from 'react'
41 | class Counter extends React.Component{
42 | const {addNum,removeNum,value} = this.props
43 | render(){
44 |
45 |
46 |
47 | {value}
48 |
49 | }
50 | }
51 | export default Counter
52 | ```
53 |
54 | 对于无状态组件还可以进行进一步优化。基于它是一种纯函数思想,传入参数返回处理后的数据。所以可以进行如下改写
55 |
56 | ```js
57 | //展示组件改进
58 | function Counter(props){
59 | const {addNum,removeNum,value} = props;
60 | return({
61 |
62 |
63 |
64 | {value}
65 |
66 | })
67 | }
68 | //另一种写法,写成解构赋值
69 | function Counter({addNum,removeNum,value}){
70 | //直接使用addNum,removeNum,value这些变量
71 | }
72 | ```
73 |
74 | 所以对于`容器组件`也有人称为它为`智能组件`,对于展示`组件`也有人称它为`傻瓜组件`
75 |
76 | ---
77 |
78 |
79 |
80 |
--------------------------------------------------------------------------------
/React-01/react-setstate.md:
--------------------------------------------------------------------------------
1 | # React setState
2 |
3 | 
4 |
5 |
--------------------------------------------------------------------------------
/React-01/react-xu-ni-dom-gai-nian.md:
--------------------------------------------------------------------------------
1 | # React 虚拟DOM概念
2 |
3 | ## 虚拟DOM的结构
4 |
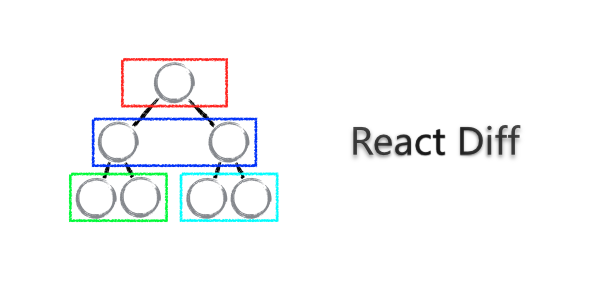
5 | * 在传统的 Web 应用中,我们往往会把数据的变化实时地更新到用户界面中,于是每次数据的微小变动都会引起 DOM 树的重新渲染。如果当前 DOM 结构较为复杂,频繁的操作很可能会引发性能问题。React 为了解决这个问题,引入了虚拟 DOM 技术。
6 |
7 | [](https://camo.githubusercontent.com/f7ef01807667efafed5f2b9d8b9a2fbd0cc8e27f/68747470733a2f2f7777772e69626d2e636f6d2f646576656c6f706572776f726b732f636e2f7765622f313530395f646f6e677975655f72656163742f696e646578363633392e706e67)
8 |
9 | * 虚拟 DOM 是一个 JavaScript 的树形结构,包含了 React 元素和模块。组件的 DOM 结构就是映射到对应的虚拟 DOM 上,React 通过渲染虚拟 DOM 到浏览器,使得用户界面得以显示。与此同时,React 在虚拟的 DOM 上实现了一个 diff 算法,当要更新组件的时候,会通过 diff 寻找到要变更的 DOM 节点,再把这个修改更新到浏览器实际的 DOM 节点上,所以在 React 中,当页面发生变化时实际上不是真的渲染整个 DOM
10 | * React 虚拟 DOM 中的诸多如 div 一类的标签与实际 DOM 中的 div 是相互独立的两个概念,它是一个纯粹的 JS 数据结构,它只是提供了一个与 DOM 类似的 Tag 和 API。React 会通过自身的逻辑和算法,转化为真正的 DOM 节点。也正是因为这样的结构,虚拟 DOM 的性能要比原生 DOM 快很多。
11 |
12 |
--------------------------------------------------------------------------------
/React-01/react-zu-jian-zi-dai.md:
--------------------------------------------------------------------------------
1 | # React 组件Child
2 |
3 | 我们先来看一个例子
4 |
5 | ```javascript
6 | import React from 'react';
7 | import Main from './Main';
8 | import Child from './Child';
9 |
10 | class App extends React.Component {
11 | render() {
12 | return (
13 |
14 |
15 | {(files)=>files?:等待中!!!
}
16 |
17 |
18 | );
19 | }
20 | }
21 |
22 | export default App;
23 | ```
24 |
25 | 在App组件中,其中Main组件中包含了一个Child组件,这个Child组件就是Main组件的子组件。
26 |
27 | 接下来我们看看Main和Child中写了些什么
28 |
29 | * 组件Main
30 |
31 | ```javascript
32 | import React from 'react';
33 |
34 | class Main extends React.Component {
35 | constructor(props) {
36 | super(props)
37 | this.state = {
38 | files:''
39 | }
40 | }
41 | componentDidMount(){
42 | const title = this.props.id
43 | this.setState({files:title})
44 | }
45 | render(){
46 | const children = this.props.children(this.state.files)
47 | return(
48 | {children}
49 | )
50 | }
51 | }
52 |
53 | export default Main
54 | ```
55 |
56 | * 组件Child
57 |
58 | ```javascript
59 | import React from 'react';
60 |
61 | class Child extends React.Component {
62 | constructor(props) {
63 | super(props)
64 | }
65 | render(){
66 | return(
67 |
68 | {this.props.files}
69 |
Child
70 |
71 | )
72 | }
73 | }
74 |
75 | export default Child
76 | ```
77 |
78 | 在这里我通过React的组件Child,来进行操作。可以通过`this.props.children`来得到父组件Main之下的子组件Child
79 |
80 | 在App组件中通过props传递给Main组件一个名为id的参数,使用`?:`进行一个判断如果,files值有传递那就渲染Child,如果没有那就渲染等待中组件
81 |
82 | ```javascript
83 |
84 |
85 | {(files)=>files?:等待中!!!
}
86 |
87 |
88 | ```
89 |
90 | 在Main中接受props传递过来的props。通过处理props,改变state,从而改变传递给子组件的state
91 |
92 | ```javascript
93 | componentDidMount(){
94 | const title = this.props.id
95 | this.setState({files:title})
96 | }
97 | render(){
98 | const children = this.props.children(this.state.files)
99 | return(
100 | {children}
101 | )
102 | }
103 | ```
104 |
105 | 关键的问题是获取子组件,所以就引出了最重要的一环`this.props.children`
106 |
107 | 这里的`this.props.children(this.state.files)`只是获取子组件,而且子组件也不会自动渲染,需要在父组件中渲染一次,所以要`return({children}
)`,这样才能真正渲染出子组件。
108 |
109 | ## this.props.children
110 |
111 | 我们来看看在Main组件中我们能通过`this.props.children`获取什么。
112 |
113 | 它获取到了整个三目运算符判断后的结果为`等待中!!!
`,因为此时还没有进行setState,在经过setState后它就变成了``,这样就可以渲染Main的子组件。如下图
114 |
115 | 
116 |
117 |
--------------------------------------------------------------------------------
/React-02/REACT_HOC.md:
--------------------------------------------------------------------------------
1 | # React 高阶组件\(HOC\)与函数子组件
2 |
3 | ### React高阶组件
4 |
5 | 高阶组件\(Higher Order Component,HOC\)是为React提供一种增强组件功能的开发模式。
6 |
7 | 它是函数形式出现,本身可以称为“`高阶组件工厂函数`”,**高阶组件**是一个函数,它的参数就是要增强功能的组件,然后返回一个新组件作为结果,返回的新组件就是在原有传入组件上挂载了新的功能。
8 |
9 | ###### Example
10 |
11 | ```js
12 | import React from 'react'
13 |
14 | function doingThings (BaseComponent){
15 | return class DoingThingsComponent extends React.Component{
16 | render(){
17 | return(
18 |
22 | )
23 | }
24 | }
25 | }
26 | ```
27 |
28 | **高阶组件**的实现方式可以分为两大类:
29 |
30 | 1. 代理方式的高阶组件
31 | 2. 继承方式的高阶组件
32 |
33 |
34 |
35 |
--------------------------------------------------------------------------------
/React-02/REACT_HOC/dai-li-fang-shi-de-gao-jie-zu-jian.md:
--------------------------------------------------------------------------------
1 | # 代理方式的高阶组件
2 |
3 | 代理方式的高阶组件,特点是返回新组件,直接继承React.Component
4 |
5 | ```javascript
6 | import React from 'react'
7 |
8 | function doingThings (BaseComponent){
9 | return class DoingThingsComponent extends React.Component{
10 | render(){
11 | return(
12 |
16 | )
17 | }
18 | }
19 | }
20 | ```
21 |
22 | 代理方式的高阶组件,下列场景中:
23 |
24 | * 操纵prop;
25 | * 访问ref;
26 | * 抽取状态;
27 | * 包装组件;
28 |
29 | ## 1.操纵prop
30 |
31 | ## 2.访问ref
32 |
33 | ## 3.抽取状态
34 |
35 | ## 4.包装组件
36 |
37 |
--------------------------------------------------------------------------------
/React-02/REACT_HOC/ji-cheng-fang-shi-de-gao-jie-zu-jian.md:
--------------------------------------------------------------------------------
1 | # 继承方式的高阶组件
2 |
3 | 继承方式的高阶组件采用继承关系关联作为参数的组件和返回的组件
4 |
5 | ```javascript
6 | function doingThings (BaseComponent){
7 | return class DoingThingsComponent extends BaseComponent{
8 | render(){
9 | const {user, ...other} = this.props;
10 | this.props = otherProps;
11 | return super.render();
12 | }
13 | }
14 | }
15 | ```
16 |
17 | 继承组件可以应用一下两个场景:
18 |
19 | * 操纵props;
20 | * 操纵函数生命周期
21 |
22 |
--------------------------------------------------------------------------------
/React-02/REACT_MINXI.md:
--------------------------------------------------------------------------------
1 | # React 独立组件间共享 Mixins ⚠
2 |
3 | 不提倡使用,提倡使用HOC高阶组件
4 |
5 | * ES6不支持Mixin,所以需要相插件来进行支持,`npm install --save react-mixin@2`
6 | * 测试一下Mixin是如何运行的
7 | * 在`src/js/components`下创建`mixins.js`
8 |
9 | ```javascript
10 | const MixinLog = {
11 | componentDidMount(){
12 | console.log("MixinLog componentDidMount");//查看Mixin生命周期
13 | }
14 | ,log(){console.log("tyrmars")}
15 | };
16 |
17 | export default MixinLog//向外输出
18 | ```
19 |
20 | * 在bodyIndex.js中
21 |
22 | ```javascript
23 | import React from 'react';
24 | import ReactDOM from 'react-dom';
25 | import BodyChild from './bodychild';
26 | import ReactMixin from 'react-mixin';
27 | import MixinLog from './mixins';
28 | changeUserInfo() {
29 | MixinLog.log();
30 | };
31 | render() {
32 | return(
33 |
34 | )
35 | }
36 | BodyIndex.defaultProps = defaultProps;
37 | ReactMixin(BodyIndex.propTypes,MixinLog);
38 | ```
39 |
40 | * 点击页面上的提交按钮🔘在`console.log`中会出现`MixinLog componentDidMount`和`tyrmars`
41 |
42 |
--------------------------------------------------------------------------------
/React-02/REACT_SHIJIAN_TWO.md:
--------------------------------------------------------------------------------
1 | # React 事件与数据的双向绑定
2 |
3 | * bodyIndex.js代码
4 |
5 | ```javascript
6 | import React from 'react';
7 | import BodyChild from './bodychild'
8 | export default class BodyIndex extends React.Component {
9 | constructor() {
10 | super(); //调用基类的所有的初始化方法
11 | this.state = {
12 | username: "Parry",
13 | age:20
14 | };//初始化赋值
15 | }
16 |
17 | handleChildValueChange(event){
18 | this.setState({age:event.target.value});//取出子页面的值
19 | }
20 |
21 | changeUserInfo(){
22 | this.setState({age:50});
23 | };
24 |
25 | render() {
26 | return (
27 |
28 |
页面主题内容
29 |
{this.state.username} {this.state.age} {this.props.userid} {this.props.username}
30 |
age: {this.state.age}
31 |
32 |
33 |
34 | )
35 | }
36 | }
37 | ```
38 |
39 | * bodychild.js代码
40 |
41 | ```javascript
42 | import React from 'react';
43 | export default class BodyChild extends React.Component{
44 |
45 | render() {
46 | return(
47 |
50 | )
51 | }
52 | }
53 | ```
54 |
55 | * 通过在子页面`BodyChild`设置`props`,子页面`value`改变调用`handleChildValueChange`,传值到父页面`bodyIndex`。也就是说在子页面中通过调用父页面传递过来的事件props进行组件间的参数传递。
56 | * 思考(onChange与onBlur)的对比。
57 | * `ES6`的语法注意
58 | * 函数绑定方法this :`this.forceUpdateHander = this.forceUpdateHander.bind(this)`
59 | * 或者调用时绑定:`onClick={this.changeUserInfo.bind(this,50)}`
60 |
61 |
--------------------------------------------------------------------------------
/React-02/README.md:
--------------------------------------------------------------------------------
1 | # React 进阶知识
2 |
3 | ## 
4 |
5 |
--------------------------------------------------------------------------------
/React-03/README.md:
--------------------------------------------------------------------------------
https://raw.githubusercontent.com/TYRMars/React-StepPitGuide/ee09ad7119b7b1bc17b1a05861036ec1cd257ebe/React-03/README.md
--------------------------------------------------------------------------------
/React-06/README.md:
--------------------------------------------------------------------------------
1 | # React 性能优化
2 |
3 | ## React组件性能优化
4 |
5 | * 传递参数要少传,降低React传递数据的负担。尽量不产生新的数据。
6 | * 组件间性能优化,shouldComponentUpdate函数;PureRender;PureComponent 当组件只接受父组件的props,可以使用(React15.4),减少React组件渲染次数。ImmutableJS,通过不可变的数据结构,直接比较其hash值。
7 |
8 | ## Redux性能优化
9 |
10 | * Reselect中间件的使用,纯函数特点:稳定输入稳定输出
11 |
12 | ## React同构
13 |
14 | * 首屏采用服务端渲染
15 | *
16 |
--------------------------------------------------------------------------------
/React-06/react-zu-jian-you-hua.md:
--------------------------------------------------------------------------------
1 | # React 组件优化
2 |
3 | * 属性传递优化
4 | * 多组件优化
5 | * key
6 |
7 | ### 属性传递
8 |
9 | ##### Example
10 |
11 | ```js
12 | import React from 'react'
13 |
14 | class App extends React.Component{
15 | constructor(props){
16 | super(props)
17 | this.state = {
18 | num:1
19 | }
20 | }
21 | handleClick(){
22 | this.setState({
23 | num:this.state.num+1
24 | })
25 | }
26 | render(){
27 | return(
28 |
29 |
App
30 |
31 |
32 |
33 | )
34 | }
35 | }
36 |
37 | export default App;
38 | ```
39 |
40 | 此处的性能优化点在于`onClick`所触发的函数,是想在JavaScript中,如下
41 |
42 | ```js
43 | 1 == 1 //true
44 | {c:1} == {c:1} //这种情况下是false,因为每次生成的对象,存入到内存的地址是不同的
45 | ```
46 |
47 | 所以在这函数会重复的生成,导致重复render,这个地方就是要优化的点,优化方法如下
48 |
49 | ```js
50 | import React from 'react'
51 |
52 | class App extends React.Component{
53 | constructor(props){
54 | super(props)
55 | this.state = {
56 | num:1
57 | }
58 | this.handleClick = this.handleClick.bind(this)
59 | }
60 | handleClick(){
61 | this.setState({
62 | num:this.state.num+1
63 | })
64 | }
65 | render(){
66 | return(
67 |
68 |
App
69 |
70 |
71 | )
72 | }
73 | }
74 |
75 | export default App;
76 | ```
77 |
78 | 这样就是通过在构造函数里声明。不会在每次render的时候重复生成。这个是因为类通过构造函数实例化,在constructor里进行绑定,只用生成一次,后面就可以直接调用。
79 |
80 | ### 组件数据传递
81 |
82 | ```js
83 | import React from 'react'
84 |
85 | class App extends React.Component {
86 | constructor(props){
87 | super(props)
88 | this.state={
89 | num:1,
90 | title:'tyrmars',
91 | name:'zhang'
92 | }
93 | this.handleClick = this.handleClick.bind(this)
94 | }
95 | handleClick(){
96 | this.setState({
97 | num:this.state.num+1
98 | })
99 | }
100 | render() {
101 | const
102 | return (
103 |
104 |
I am App
105 |
106 |
107 |
108 | )
109 | }
110 | }
111 |
112 | class Demo extends React.Component {
113 | render() {
114 | return (I am Demo
)
115 | }
116 | }
117 |
118 | export default App
119 | ```
120 |
121 | 每次对Demo进行数据传递的时候都会生成一个新的对象
122 |
123 | ```js
124 |
125 | ```
126 |
127 | 传递数据时,不要全部state都传递过去,需要哪些数据传递哪些数据
128 |
129 | ```js
130 |
131 | ```
132 |
133 |
134 |
135 |
--------------------------------------------------------------------------------
/React-06/react-zu-jian-you-hua/ding-zhi-shouldcomponentupdate.md:
--------------------------------------------------------------------------------
1 | # 定制shouldComponentUpdate
2 |
3 | ### 多组件优化
4 |
5 | ```javascript
6 | import React from 'react'
7 |
8 | class App extends React.Component {
9 | constructor(props){
10 | super(props)
11 | this.state={
12 | num:1,
13 | title:'tyrmars',
14 | name:'zhang'
15 | }
16 | this.handleClick = this.handleClick.bind(this)
17 | }
18 | handleClick(){
19 | this.setState({
20 | num:this.state.num+1
21 | })
22 | }
23 | render() {
24 | const
25 | return (
26 |
27 |
I am App
28 |
29 |
30 |
31 | )
32 | }
33 | }
34 |
35 | class Demo extends React.Component {
36 | render() {
37 | return (I am Demo,{this.props.title}
)
38 | }
39 | }
40 |
41 | export default App
42 | ```
43 |
44 | ## React16性能检测
45 |
46 | 通过在浏览器中在链接上加入`/?react_pref`。
47 |
48 | 
49 |
50 | 通过此方法可以在浏览器默认的性能监视器Performance中查看性能改变
51 |
52 | 
53 |
54 | * test
55 |
56 | 通过定制shouldComponentUpdate来减少组件的render从而优化性能
57 |
58 | 主要就是对比现有的props和state与改变后的不同,如果相同就不会再次渲染
59 |
60 | ```javascript
61 | class Demo extends React.Component {
62 | shouldComponentUpdate(nextProps, nextState){
63 | if(nextProps.title === this.props.title){
64 | return false
65 | }
66 | return true
67 | }
68 | render() {
69 | return (I am Demo,{this.props.title}
)
70 | }
71 | }
72 |
73 | export default App
74 | ```
75 |
76 |
--------------------------------------------------------------------------------
/React-06/react-zu-jian-you-hua/purecomponent.md:
--------------------------------------------------------------------------------
1 | # PureComponent
2 |
3 | 还有就是通过使用React.PureComponent来对组件进行优化,这个也是React16官方新加入的,意思类似于纯组件
4 |
5 | 使用的地方一般是在只接收从父组件传递过来数据的组件,也就是只接受props的组件
6 |
7 | ```javascript
8 | class Demo extends React.PureComponent{
9 | //....
10 | }
11 | ```
12 |
13 |
--------------------------------------------------------------------------------
/React-06/reacttong-gou.md:
--------------------------------------------------------------------------------
1 | # React同构
2 |
3 |
--------------------------------------------------------------------------------
/React-06/reduxxing-neng-you-hua.md:
--------------------------------------------------------------------------------
1 | # Redux性能优化
2 |
3 |
--------------------------------------------------------------------------------
/React-07/README.md:
--------------------------------------------------------------------------------
1 | # React 服务端渲染SSR
2 |
3 | ### 服务端渲染介绍
4 |
5 | * 传统的服务端渲染:JSP、smaty、jinja2等
6 | * 浏览器渲染
7 |
8 | ### React服务端渲染主要是浏览器渲染
9 |
10 | * 后端只提供静态资源和接口
11 | * 前端写模板
12 |
13 |
14 |
15 |
--------------------------------------------------------------------------------
/React-08/README.md:
--------------------------------------------------------------------------------
1 | # React 项目应用
2 |
3 | * 文件组织方式
4 | * 模块接口
5 | * 合并reducer
6 | * 其他问题
7 |
8 |
--------------------------------------------------------------------------------
/React-08/react-he-bing-reducer.md:
--------------------------------------------------------------------------------
1 | # React 合并reducer
2 |
3 | 通过一个combineReducers合并所有的reducers
4 |
5 | ```javascript
6 | //合并所有reducer
7 | import { combineReducers } from 'redux'
8 | import { user } from './redux/user.redux'
9 | import { chatuser } from './redux/chatuser.redux'
10 | import { chat } from './redux/chat.redux'
11 |
12 | export default combineReducers({user,chatuser,chat})
13 | ```
14 |
15 | 在index中使用reducers来进行数据管理
16 |
17 | ```javascript
18 | import reducers from './reducer'
19 | const store = createStore(reducers)
20 | ```
21 |
22 |
--------------------------------------------------------------------------------
/React-08/react-mo-kuai-jie-kou.md:
--------------------------------------------------------------------------------
1 | # React 模块接口
2 |
3 |
--------------------------------------------------------------------------------
/React-08/react-wen-jian-zu-zhi-fang-shi.md:
--------------------------------------------------------------------------------
1 | # React 文件组织方式
2 |
3 | ## 常用方式
4 |
5 | * reducer目录包含所有Redux的reducer;
6 | * actions目录包含所有的action构造函数;
7 | * component目录包含所有的展示组件;
8 | * container目录包含所有的容器组件;
9 |
10 |
--------------------------------------------------------------------------------
/React-08/react-wen-ti.md:
--------------------------------------------------------------------------------
1 | # React 问题
2 |
3 | 补全代码,使得如下代码可以实现获取文件夹内文件列表功能(Loading 和 FileList 组件可以不用具体实现,只需补全 Folder 组件的代码):
4 |
5 | ```javascript
6 | /**
7 | * 使用样例:
8 | *
9 | * {(files) => !files
10 | * ?
11 | * : }
12 | *
13 | */
14 |
15 | import React, { Component, PropTypes } from 'react'
16 |
17 | // fetchChildFilesByFolderId 接受一个文件夹 ID 的参数,
18 | // 返回 Promise,即文件列表。
19 | import fetchChildFilesByFolderId from '@shimo/api'
20 |
21 | class Folder extends Component {
22 | constructor(props){
23 | super(props)
24 | this.state = {
25 | files:''
26 | }
27 | }
28 | componentDidMount(){
29 | fetchChildFilesByFolderId(this.props.id)
30 | .then(v => this.setState({files:v}))
31 | }
32 | render(){
33 | const child = this.props.children(this.state.files)
34 | return(
35 | {child}
36 | );
37 | }
38 | }
39 |
40 | Folder.propTypes = {
41 | children: React.PropTypes.element.isRequired
42 | }
43 | ```
44 |
45 |
--------------------------------------------------------------------------------
/React-09/README.md:
--------------------------------------------------------------------------------
https://raw.githubusercontent.com/TYRMars/React-StepPitGuide/ee09ad7119b7b1bc17b1a05861036ec1cd257ebe/React-09/README.md
--------------------------------------------------------------------------------
/React-10/README.md:
--------------------------------------------------------------------------------
1 | # React Buid-React
2 |
3 | 简单实现React
4 |
5 | ```js
6 | /* jsx h */
7 | function h(type,props,...children){
8 | return(type,props,children)
9 | }
10 |
11 | //render 函数
12 | function render(node){
13 | //如果只是一个字符串
14 | if(typeof node === 'string'){
15 | return document.createTextNode(node);
16 | }
17 | //如果是HTML节点形成
18 | const $elem = document.createElement(node.type);
19 | node.children.map(createElement).forEach($elem.appendChild.bind($elem));
20 | return $elem;
21 | }
22 |
23 | //diff 算法
24 | function changed(node_NEW,node_OLD){
25 | return typeof node_OLD !== typeof node_NEW ||
26 | typeof node_OLD === 'string' && node_OLD !== node_NEW ||
27 | node_OLD.type !== node.type
28 | }
29 |
30 | //更新算法
31 | function updateElement($parent,node_NEW,node_OLD,index = 0){
32 |
33 | }
34 |
35 | /* html */
36 | const list = (
37 |
41 | )
42 | /* */
43 | const $root = document.getElementById('root');
44 | $root.appendChild(createElement(list))
45 | ```
46 |
47 |
48 |
49 |
--------------------------------------------------------------------------------
/Redux-01/Flux/README.md:
--------------------------------------------------------------------------------
1 | # Flux
2 |
3 | 
4 |
5 | Facebook在制作React的同时,也同时制作出了新的开发框架Flux。推翻了原有的MVC框架,采用一种新的思维方式来管理数据流。
6 |
7 | 总的来说Flux在管理数据流上更加严格
8 |
9 | ### Flux框架大致包含四个部分
10 |
11 | * Dispatcher,处理动作分发,维持Store之间的依赖关系;
12 | * Store,负责存储数据和处理数据相关逻辑;
13 | * Action,驱动Dispatcher的JS对象;
14 | * View,视图部分,负责显示用户界面。
15 |
16 | ### Flux使用
17 |
18 | 首先在项目下安装Flux
19 |
20 | `npm install flux --save`
21 |
22 | #### 1.Dispatcher
23 |
24 | 首先引入dispatcher类,因为它负责了处理动作的分发
25 |
26 | ```js
27 | import {Dispatcher} from 'flux'
28 | export default new Dispatcher();
29 | ```
30 |
31 | 这样就有了全局唯一的Dispatcher
32 |
33 | #### 2.action
34 |
35 | action可以算是一个纯数据对象
36 |
37 |
--------------------------------------------------------------------------------
/Redux-01/Flux/mobx.md:
--------------------------------------------------------------------------------
1 | # Mobx
2 |
3 | 
4 |
5 |
6 |
7 |
--------------------------------------------------------------------------------
/Redux-01/Flux/mobx/mobx-si-xiang.md:
--------------------------------------------------------------------------------
1 | # MobX思想
2 |
3 | 
4 |
5 |
--------------------------------------------------------------------------------
/Redux-01/Flux/react-zi-zhi-thunk-zhong-jian-jian.md:
--------------------------------------------------------------------------------
1 | # React 自制thunk中间件
2 |
3 | 之前我们已经知道了thunk中间件是实现Redux异步的一种
4 |
5 | ```js
6 | const thunk = ({dispatch,getState})=>next=>action=>{
7 | //如果是函数,执行一下
8 | if(typeof action==='function'){
9 | return action(dispatch,getState)
10 | }
11 | //
12 | return next(action)
13 | }
14 | export default thunk
15 | ```
16 |
17 |
18 |
19 |
--------------------------------------------------------------------------------
/Redux-01/Flux/redux-applymiddleware.md:
--------------------------------------------------------------------------------
1 | # Redux applyMiddleware
2 |
3 | 在之前我们对Redux进行异步操作的时候,使用到了`applyMiddleware(thunk)`中间件机制,它是帮助React扩展其功能的重要方法
4 |
5 | 首先我们要了解什么是中间件
6 |
7 | ## 中间件
8 |
9 | 中间件的特点:
10 |
11 | * 中间件是独立的函数;
12 | * 中间件可以组合使用;
13 | * 中间件有一个统一的接口;
14 |
15 | 独立的函数是指中间件之间不应该有依赖关系,每个中间件应该能被独立使用,并完成一个特定的功能
16 |
17 | ### Redux中间件
18 |
19 | 
20 |
21 |
22 |
23 |
--------------------------------------------------------------------------------
/Redux-01/REACT_REDUX.md:
--------------------------------------------------------------------------------
https://raw.githubusercontent.com/TYRMars/React-StepPitGuide/ee09ad7119b7b1bc17b1a05861036ec1cd257ebe/Redux-01/REACT_REDUX.md
--------------------------------------------------------------------------------
/Redux-01/README.md:
--------------------------------------------------------------------------------
1 | # React 数据分离
2 |
3 | 把处理数据的事情交给别人,让React专注View
4 |
5 |
--------------------------------------------------------------------------------
/Redux-01/REDUX_AND_REACT.md:
--------------------------------------------------------------------------------
1 | # Redux结合React
2 |
3 | ##### `index.js`
4 |
5 | ```js
6 | import React from 'react'
7 | import ReactDom from 'react-dom'
8 | import {createStore} from 'redux'
9 | import {counter} from './index.redux'
10 | import App from './App'
11 |
12 | const store = createStore(counter)
13 |
14 | function render() {
15 | ReactDom.render(,document.getElementById('root'));
16 | }
17 | render();
18 |
19 | store.subscribe(render)
20 | ```
21 |
22 | ##### `App.jsx`
23 |
24 | ```js
25 | import React from 'react'
26 | import {add} from './index.redux'
27 | class App extends React.Component {
28 | render(){
29 | const store = this.props.store
30 | const num = store.getState()
31 | return(
32 |
33 |
展示dedux数据{num}
34 |
35 |
36 | )
37 | }
38 | }
39 |
40 | export default App
41 | ```
42 |
43 | ##### `index.redux.js`
44 |
45 | ```js
46 | //aciton
47 | const ADD = 'add';
48 | const REDUCE = 'reduce';
49 |
50 | // reducer
51 | exports.counter = function (state=0,action) {
52 | switch (action.type) {
53 | case 'add':
54 | return state+1;
55 | case 'reduce':
56 | return state-1;
57 | default:
58 | return 10
59 | }
60 | };
61 |
62 | // action creator
63 | exports.add = function () {
64 | return {type:ADD};
65 | };
66 | exports.reduce = function () {
67 | return {type:REDUCE};
68 | };
69 | ```
70 |
71 | * 此种方式耦合程度太高,为了保证组件的独立性做出如下修改
72 | * index.redux.js封装📦了`add`函数,直接import这个函数
73 | * 通过参数形式传递给App.js
74 |
75 | ```js
76 | import React from 'react'
77 | import ReactDom from 'react-dom'
78 | import {createStore} from 'redux'
79 | import {counter,add} from './index.redux'
80 | import App from './App'
81 |
82 | const store = createStore(counter)//新建一个store
83 |
84 | function render() {
85 | ReactDom.render(,document.getElementById('root'));
86 | //以组件的属性形式传递到组件里面
87 | }
88 | render();
89 |
90 | store.subscribe(render)
91 | //利用subscribe订阅render函数,状态变化时render会重新执行,渲染整个页面
92 | ```
93 |
94 | * App.js通过组件内部接受父组件传递来的数据
95 |
96 | ```js
97 | import React from 'react'
98 |
99 | class App extends React.Component {
100 | // constructor() {
101 | //
102 | // }
103 | render(){
104 | const store = this.props.store
105 | const num = store.getState()//获取初始状态
106 | //获取dispatch方法,获取action
107 | const add = this.props.add
108 | const reduce = this.props.reduce
109 | return(
110 |
111 |
展示dedux数据{num}
112 |
113 |
114 |
115 | )
116 | }
117 | }
118 |
119 | export default App
120 | ```
121 |
122 |
123 |
124 |
--------------------------------------------------------------------------------
/Redux-01/REDUX_CHROME.md:
--------------------------------------------------------------------------------
1 | # Redux Chrome插件使用
2 |
3 | * 🆕新建store的时候判断window.devToolsExtension
4 | * 使用compose结合thunk和winows.devToolsExtension
5 | * 调试窗的redux选项卡,实时看到state
6 |
7 | ```js
8 | import React from 'react'
9 | import ReactDom from 'react-dom'
10 | import thunk from 'redux-thunk'
11 | import {createStore, applyMiddleware ,compose} from 'redux'
12 | import {counter,add,reduce,addAsync} from './index.redux'
13 | import App from './App'
14 |
15 | const store = createStore(counter,compose(
16 | applyMiddleware(thunk),
17 | window.devToolsExtension ? window.devToolsExtension():()=>{}
18 | ))
19 |
20 | function render() {
21 | ReactDom.render(
22 | ,document.getElementById('root'));
23 | }
24 | render();
25 |
26 | store.subscribe(render)
27 | ```
28 |
29 |
30 |
31 |
--------------------------------------------------------------------------------
/Redux-01/REDUX_THUNK.md:
--------------------------------------------------------------------------------
1 | # Redux异步
2 |
3 | 
4 |
5 | * 处理异步、调试工具🔧、更优雅的和react结合
6 | * `Redux`处理异步,需要`redux-thunk`组件\(比较简单的\)
7 | * `npm install redux-devtools-extention`并开启🔛\(调试工具🔧\)
8 | * 使用`react-redux`优雅的链接🔗`react`和`redux`
9 |
10 | ### 处理异步
11 |
12 | * Redux默认只处理同步,异步任务需要`react-thunk`中间件
13 | * `npm install redux-thunk --save`
14 | * 使用`applyMiddleware`开启thunk中间件
15 | * `Action`可以返回函数,使用`dispatch`提交`action`
16 |
17 | ```js
18 | //创建一个异步动作
19 | export function addAsync() {
20 | return dispatch=>{
21 | setTimeout(
22 | ()=>{
23 | dispatch(add())
24 | },2000)
25 | }
26 | }
27 | ```
28 |
29 | * index.js
30 |
31 | ```js
32 | import React from 'react'
33 | import ReactDom from 'react-dom'
34 | import thunk from 'redux-thunk'
35 | import {createStore, applyMiddleware } from 'redux'
36 | import {counter,add,reduce,addAsync} from './index.redux'
37 | import App from './App'
38 |
39 | const store = createStore(counter,applyMiddleware(thunk))
40 |
41 | function render() {
42 | ReactDom.render(,document.getElementById('root'));
43 | }
44 | render();
45 |
46 | store.subscribe(render)
47 | ```
48 |
49 | * index.redux.js
50 |
51 | ```js
52 | const ADD = 'add';
53 | const REDUCE = 'reduce';
54 |
55 | // reducer
56 | export function counter(state=0,action) {
57 | switch (action.type) {
58 | case 'add':
59 | return state+1;
60 | case 'reduce':
61 | return state-1;
62 | default:
63 | return 10
64 | }
65 | };
66 |
67 | //提交action,reducer就会执行
68 |
69 | // action creator
70 | export function add() {
71 | return {type:ADD};
72 | };
73 | export function reduce() {
74 | return {type:REDUCE};
75 | };
76 |
77 | //创建一个异步动作
78 | export function addAsync() {
79 | return dispatch=>{
80 | setTimeout(
81 | ()=>{
82 | dispatch(add())
83 | },2000)
84 | }
85 | }
86 | ```
87 |
88 | * App.js
89 |
90 | ```js
91 | import React from 'react'
92 |
93 | class App extends React.Component {
94 | // constructor() {
95 | //
96 | // }
97 | render(){
98 | const store = this.props.store
99 | const num = store.getState()
100 | const add = this.props.add
101 | const reduce = this.props.reduce
102 | const addAsync = this.props.addAsync
103 | return(
104 |
105 |
展示dedux数据{num}
106 |
107 |
108 |
109 |
110 | )
111 | }
112 | }
113 |
114 | export default App
115 | ```
116 |
117 | ---
118 |
119 |
120 |
121 |
--------------------------------------------------------------------------------
/Redux-01/REDUX_USE.md:
--------------------------------------------------------------------------------
1 | # Redux
2 |
3 | 
4 |
5 | * Redux专注与状态管理、和react解耦
6 | * 单一状态、单向数据流
7 | * 核心概念:`store`、`state`、`action`
8 |
9 | ```
10 | 为什么会出现Redux呢,因为在处理少量数据的时候,可以使用setState
11 | 但是如果,现在有🈶️成千上万的数据,数据的传递就要和组件的显示分开
12 | 所以Redux就是来帮助React来管理数据的,React现在只负责自己的View
13 | ```
14 |
15 | * `store`:📝记录了所有组件的状态\(state\)
16 | * `dispatch`:更改管理实体
17 | * `action`:要更改什么
18 | * `reducer`:这个🈯️指的是要改变的组件,它获取`state`和`action`,生成新的`state`
19 |
20 | ##
21 |
22 |
23 |
24 |
--------------------------------------------------------------------------------
/Redux-01/redux-shi-yong.md:
--------------------------------------------------------------------------------
1 | # Redux使用
2 |
3 | 
4 |
5 | * 通过`reducer`新建`store`,随时通过`store.getState`获取状态
6 | * 需要状态变更,`store.dispatch(action)`来修改状态
7 | * `reducer`函数接受`state`和`action`,🔙返回🆕新的`state`,可以用`store.subscribe`监听每次修改
8 |
9 | ##### `index.js`
10 |
11 | ```js
12 | import {createStore} from 'redux'
13 |
14 | function counter(state=0,action) {
15 | switch (action.type) {
16 | case 'add':
17 | return state+1;
18 | case 'reduce':
19 | return state-1;
20 | default:
21 | return 10
22 | }
23 | }
24 |
25 | //新建store
26 | const store = createStore(counter);
27 | const init = store.getState();
28 | console.log(init);
29 |
30 | //监听
31 | function listener() {
32 | const current = store.getState();
33 | console.log(`现在有的${current}`);
34 | }
35 | store.subscribe(listener)
36 |
37 | //派发事件 传递aciton
38 | store.dispatch({type:'add'});
39 | store.dispatch({type:'reduce'});
40 | store.dispatch({type:'add'});
41 | store.dispatch({type:'add'});
42 | ```
43 |
44 | ## Action
45 |
46 | action 内必须使用一个字符串类型的`type`字段来表示将要执行的动作。多数情况下,`type`会被定义成字符串常量。当应用规模越来越大时,建议使用单独的模块或文件来存放 `action`。
47 |
48 | ## Action创建函数
49 |
50 | **Action 创建函数**就是生成 action 的方法。
51 |
52 | ```js
53 | // action creator
54 |
55 | export function add() {
56 | return {type:ADD};
57 | };
58 | export function reduce() {
59 | return {type:REDUCE};
60 | };
61 | ```
62 |
63 |
64 |
65 |
--------------------------------------------------------------------------------
/Redux-01/redux-zi-zhi-arr-zhong-jian-jian.md:
--------------------------------------------------------------------------------
1 | # 自制Arr中间件
2 |
3 | ```js
4 | const arrMid = ({dispatch, getState}) => next => action => {
5 | //如果是函数,执行一下
6 | if (Array.isArray(action)) {
7 | return action.forEach(v=>dispatch(v))
8 | }
9 | //默认什么都没做,继续执行下一个
10 | return next(action)
11 | }
12 | export default arrMid
13 | ```
14 |
15 |
16 |
17 |
--------------------------------------------------------------------------------
/Router-01/REACT_ROUTER2.md:
--------------------------------------------------------------------------------
1 | # React-Router2
2 |
3 | ## React Router2
4 |
5 | * 由于对于新版的`Router`的不熟悉,这节开始转向`Router2`和`webpack1`,等待`React-Router4`理解后,我会更新这几章
6 | * [Router](https://github.com/ReactTraining/react-router)
7 | * 以上`Router`采用的是`Router2`
8 | * `Router`中文是路由的意思。
9 | * 路由库`React-Router`。它是官方维护的,事实上也是唯一可选的路由库。它通过管理 `URL`,实现组件的切换和状态的变化,开发复杂的应用几乎肯定会用到。
10 |
11 | ### 基本用法
12 |
13 | * `$ npm install react-router`安装`React-Router`,最新的为`React-Router4`。
14 |
15 | ```javascript
16 | import React from 'react';
17 | import ReactDOM from 'react-dom';
18 | import Index from './index';
19 | import ComponentList from './components/list';
20 | import ComponentDetails from './components/details';
21 | import {Router,Route,hashHistory} from 'react-router';
22 |
23 | export default class Root extends React.Component{
24 | render(){
25 | return (
26 | //这里替换了之前的 Index,变成了程序的入口
27 |
28 |
29 |
30 |
31 |
32 |
33 |
34 |
35 |
36 | );
37 | };
38 | }
39 |
40 | ReactDOM.render(, document.getElementById('example'));
41 | ```
42 |
43 | * 跳转时使用``进行跳转
44 |
45 | **使用案例**
46 |
47 | * 在`src/js`创建入口文件`root.js`
48 | * 在webpack中把
49 |
50 | ## React Router参数传递
51 |
52 | * 从`Header`中跳转到`list`传递数值。
53 | * 利用在`root.js`中设置``中`path="list/id:"`。这个为定义的方法
54 | * 在`list`中用`{this.props.params.id}`获取从`Header`路由传递过来的值
55 | * `Header`中使用``````
56 |
57 |
--------------------------------------------------------------------------------
/Router-01/README.md:
--------------------------------------------------------------------------------
1 | # React 路由
2 |
3 | 
4 |
5 |
--------------------------------------------------------------------------------
/Router-01/react-router3.md:
--------------------------------------------------------------------------------
https://raw.githubusercontent.com/TYRMars/React-StepPitGuide/ee09ad7119b7b1bc17b1a05861036ec1cd257ebe/Router-01/react-router3.md
--------------------------------------------------------------------------------
/assets/20160206132837_580.png:
--------------------------------------------------------------------------------
https://raw.githubusercontent.com/TYRMars/React-StepPitGuide/ee09ad7119b7b1bc17b1a05861036ec1cd257ebe/assets/20160206132837_580.png
--------------------------------------------------------------------------------
/assets/20160206132838_567.png:
--------------------------------------------------------------------------------
https://raw.githubusercontent.com/TYRMars/React-StepPitGuide/ee09ad7119b7b1bc17b1a05861036ec1cd257ebe/assets/20160206132838_567.png
--------------------------------------------------------------------------------
/assets/20160206132838_571.png:
--------------------------------------------------------------------------------
https://raw.githubusercontent.com/TYRMars/React-StepPitGuide/ee09ad7119b7b1bc17b1a05861036ec1cd257ebe/assets/20160206132838_571.png
--------------------------------------------------------------------------------
/assets/Github.png:
--------------------------------------------------------------------------------
https://raw.githubusercontent.com/TYRMars/React-StepPitGuide/ee09ad7119b7b1bc17b1a05861036ec1cd257ebe/assets/Github.png
--------------------------------------------------------------------------------
/assets/bg2016011501.png:
--------------------------------------------------------------------------------
https://raw.githubusercontent.com/TYRMars/React-StepPitGuide/ee09ad7119b7b1bc17b1a05861036ec1cd257ebe/assets/bg2016011501.png
--------------------------------------------------------------------------------
/assets/cd0bb358c45b584743d8ce4991777c42.svg:
--------------------------------------------------------------------------------
1 |
--------------------------------------------------------------------------------
/assets/child_main.png:
--------------------------------------------------------------------------------
https://raw.githubusercontent.com/TYRMars/React-StepPitGuide/ee09ad7119b7b1bc17b1a05861036ec1cd257ebe/assets/child_main.png
--------------------------------------------------------------------------------
/assets/flow.png:
--------------------------------------------------------------------------------
https://raw.githubusercontent.com/TYRMars/React-StepPitGuide/ee09ad7119b7b1bc17b1a05861036ec1cd257ebe/assets/flow.png
--------------------------------------------------------------------------------
/assets/mobx.png:
--------------------------------------------------------------------------------
https://raw.githubusercontent.com/TYRMars/React-StepPitGuide/ee09ad7119b7b1bc17b1a05861036ec1cd257ebe/assets/mobx.png
--------------------------------------------------------------------------------
/assets/setState.jpg:
--------------------------------------------------------------------------------
https://raw.githubusercontent.com/TYRMars/React-StepPitGuide/ee09ad7119b7b1bc17b1a05861036ec1cd257ebe/assets/setState.jpg
--------------------------------------------------------------------------------
/assets/this_props_children.png:
--------------------------------------------------------------------------------
https://raw.githubusercontent.com/TYRMars/React-StepPitGuide/ee09ad7119b7b1bc17b1a05861036ec1cd257ebe/assets/this_props_children.png
--------------------------------------------------------------------------------
/assets/屏幕快照 2017-12-05 下午10.19.57.png:
--------------------------------------------------------------------------------
https://raw.githubusercontent.com/TYRMars/React-StepPitGuide/ee09ad7119b7b1bc17b1a05861036ec1cd257ebe/assets/屏幕快照 2017-12-05 下午10.19.57.png
--------------------------------------------------------------------------------
/code/01-Redux/.gitignore:
--------------------------------------------------------------------------------
1 | # See https://help.github.com/ignore-files/ for more about ignoring files.
2 |
3 | # dependencies
4 | /node_modules
5 |
6 | # testing
7 | /coverage
8 |
9 | # production
10 | /build
11 |
12 | # misc
13 | .DS_Store
14 | .env.local
15 | .env.development.local
16 | .env.test.local
17 | .env.production.local
18 |
19 | npm-debug.log*
20 | yarn-debug.log*
21 | yarn-error.log*
22 |
--------------------------------------------------------------------------------
/code/01-Redux/config/jest/cssTransform.js:
--------------------------------------------------------------------------------
1 | 'use strict';
2 |
3 | // This is a custom Jest transformer turning style imports into empty objects.
4 | // http://facebook.github.io/jest/docs/tutorial-webpack.html
5 |
6 | module.exports = {
7 | process() {
8 | return 'module.exports = {};';
9 | },
10 | getCacheKey() {
11 | // The output is always the same.
12 | return 'cssTransform';
13 | },
14 | };
15 |
--------------------------------------------------------------------------------
/code/01-Redux/config/jest/fileTransform.js:
--------------------------------------------------------------------------------
1 | 'use strict';
2 |
3 | const path = require('path');
4 |
5 | // This is a custom Jest transformer turning file imports into filenames.
6 | // http://facebook.github.io/jest/docs/tutorial-webpack.html
7 |
8 | module.exports = {
9 | process(src, filename) {
10 | return `module.exports = ${JSON.stringify(path.basename(filename))};`;
11 | },
12 | };
13 |
--------------------------------------------------------------------------------
/code/01-Redux/config/paths.js:
--------------------------------------------------------------------------------
1 | 'use strict';
2 |
3 | const path = require('path');
4 | const fs = require('fs');
5 | const url = require('url');
6 |
7 | // Make sure any symlinks in the project folder are resolved:
8 | // https://github.com/facebookincubator/create-react-app/issues/637
9 | const appDirectory = fs.realpathSync(process.cwd());
10 | const resolveApp = relativePath => path.resolve(appDirectory, relativePath);
11 |
12 | const envPublicUrl = process.env.PUBLIC_URL;
13 |
14 | function ensureSlash(path, needsSlash) {
15 | const hasSlash = path.endsWith('/');
16 | if (hasSlash && !needsSlash) {
17 | return path.substr(path, path.length - 1);
18 | } else if (!hasSlash && needsSlash) {
19 | return `${path}/`;
20 | } else {
21 | return path;
22 | }
23 | }
24 |
25 | const getPublicUrl = appPackageJson =>
26 | envPublicUrl || require(appPackageJson).homepage;
27 |
28 | // We use `PUBLIC_URL` environment variable or "homepage" field to infer
29 | // "public path" at which the app is served.
30 | // Webpack needs to know it to put the right
10 | ```
11 |
12 | * (这里会出现一个问题就是关于src中的bundle.js地址的问题,如果是使用`src/bundle.js`就会出现`webpack-server`无法更新的情况,我想原因是在与WebPack配置文件中我们定义了文件读取的绝对路径)
13 | * 在项目目录下建立src文件,用于存放未编译的js与编译好的bundle.js
14 | * 在src/js/目录下建立一个index.js用于存放未编译的js代码
15 |
16 | ```javascript
17 | var React = require('react');
18 | var ReactDOM = require('react-dom');
19 |
20 | ReactDOM.render(
21 | hello world !!
,
22 | document.getElementById('example')
23 | );
24 | ```
25 |
26 | * 基本的文档就写好了,下一节是WebPack打包📦
27 |
28 | ## WebPack 热加载配置\(中\)
29 |
30 | * 采用`WebPack2`进行打包
31 | * `WebPack2`安装`sudo npm install -g webpack`
32 | * `WebPack-dev-server`安装`sudo npm install -g webpack-dev-server`
33 | * 全局安装完后进行项目目录下的安装!!!!(安装的时候最好在前面加上sudo,有时权限不够会安装失败)
34 |
35 | ```text
36 | $ sudo npm install webpack --save
37 | $ sudo npm install webpack-dev-server --save
38 | ```
39 |
40 | * 出现问题可以看[React配置必踩坑](http://www.kejiganhuo.tech/?p=374)!!!
41 | * 在目录文件下建立一个`webpack.config.js`
42 | * 很多参考都是采用`WebPack1`进行打包,对于`webpack2`更新后的讲解很少
43 | * 不过还是可以通过官方文档,加上对`webpack1`的学习,自己还是琢磨出了`webpack2`如何配置,`\(^o^)/~`,如下
44 | * **WebPack2配置信息**
45 |
46 | ```javascript
47 | // webpack.config.js
48 | var webpack = require("webpack");
49 | var path = require("path");
50 |
51 | module.exports = {
52 | devtool: 'source-map',
53 | context: path.resolve(__dirname, "src"),
54 | entry: "./js/index.js",
55 | output: {
56 | path: path.resolve(__dirname, "src"),
57 | filename: 'bundle.js' // 打包输出的文件
58 | },
59 | module: {
60 | rules: [{
61 | test: /\.js$/, // test 去判断是否为.js或.jsx,是的话就是进行es6和jsx的编译
62 | exclude: /(node_modules)/,
63 | use: [{
64 | loader: 'babel-loader',
65 | //配置参数;
66 | options: { presets: ['es2015','react'] }
67 | }],
68 | }]
69 | },
70 | };
71 | ```
72 |
73 | ### 接下来运行WebPack打包
74 |
75 | * 在Mac终端中,项目的根目录下,`webpack`进行打包,成功打包后会在src目录下生成bundle.js,在浏览器中查看
76 | * 原本页面上的`123`覆盖成了`hello world !!`
77 |
78 | ## WebPack 热加载配置\(下\)
79 |
80 | ### webpack-dev-server的使用
81 |
82 | * 不用每次都去用`WebPack`一遍
83 | * `webpack -watch`自动监听编译,但是需要手动刷新浏览器
84 | * 如果采用在Mac终端中项目根目录下`webpack-dev-server`这样可以`浏览器中`自动刷新,一边写代码,保存后自动刷新。
85 | * (我发现在webpack2中`http://localhost:8080/`也可以自动加载不用`-hot`,不知道是不是自己的原因,有错误,请指出!!!)
86 |
87 |
--------------------------------------------------------------------------------
/react-ji-chu-zhi-shi/zu-jian-sheng-ming-zhou-qi/README.md:
--------------------------------------------------------------------------------
1 | # 组件生命周期
2 |
3 |
--------------------------------------------------------------------------------
/react-ji-chu-zhi-shi/zu-jian-yang-shi/README.md:
--------------------------------------------------------------------------------
1 | # 组件样式
2 |
3 |
--------------------------------------------------------------------------------
/react-ji-chu-zhi-shi/zu-jian-yang-shi/react_css_model.md:
--------------------------------------------------------------------------------
1 | # CSS模块化
2 |
3 | * `"babel-plugin-react-html-attrs": "^2.0.0"`让JSX中`className`能变回原来`class`
4 | * webpack要重新配置
5 |
6 | ```javascript
7 | // webpack.config.js
8 | var webpack = require("webpack");
9 | var path = require("path");
10 |
11 | module.exports = {
12 | devtool: 'source-map',
13 | context: path.resolve(__dirname, "src"),
14 | entry: "./js/index.js",
15 | output: {
16 | path: path.resolve(__dirname, "dist"),
17 | filename: 'bundle.js' // 打包输出的文件
18 | },
19 | module: {
20 | rules: [{
21 | test: /\.js$/, // test 去判断是否为.js或.jsx,是的话就是进行es6和jsx的编译
22 | exclude: /(node_modules)/,
23 | use: [{
24 | loader: 'babel-loader',
25 | //配置参数;
26 | options: {
27 | presets: ['es2015', 'react'],
28 | plugins: ['react-html-attrs']
29 | }
30 | }, ]
31 | },
32 | {
33 | test: /\.css$/,
34 | use: [{
35 | loader: 'style-loader',
36 | }, {
37 | loader: 'css-loader',
38 | options: {
39 | modules: true,
40 | localIdentName: '[path][name]__[local]--[hash:base64:5]'
41 | }
42 | }]
43 | },
44 | ]
45 | },
46 | };
47 | ```
48 |
49 | * 在`src/css`下,创建一个`footer.css`,此`css`设置初衷是为了单独去渲染`footer`,希望`footer.css`不会污染全局,但通常情况下全局引用`css`是会污染全局的,内容如下
50 |
51 | ```css
52 | .miniFooter {
53 | background: #333333;
54 | color: #ffffff;
55 | padding-left: 20px;
56 | padding-top: 3px;
57 | padding-bottom: 3px;
58 | }
59 | .miniFooter h1 {
60 | font-size: 15px;
61 | }
62 | ```
63 |
64 | * 在footer.js下写
65 |
66 | ```javascript
67 | import React from 'react';
68 |
69 | var footerCss = require("../../css/footer.css");//引入css
70 |
71 | export default class CompomentFooter extends React.Component{
72 | render(){
73 | console.log(footerCss);
74 | return(
75 |
78 | );
79 | }
80 | }
81 | ```
82 |
83 | * 因为我们在打包时设置了`localIdentName:'[path][name]__[local]--[hash:base64:5]'`,这地方就是引用css的路径限制。
84 | * 默认情况下,CSS 将所有的类名暴露到全局的选择器作用域中。样式可以在局部作用域中,避免全局作用域的样。详细🔎请查看官方文档[官方文档式](https://doc.webpack-china.org/loaders/css-loader/#scope)
85 | * 所以在浏览器中`console`出了`Object {miniFooter: "css-footer__miniFooter--2W_7G"}`
86 |
87 |
--------------------------------------------------------------------------------
/react-ji-chu-zhi-shi/zu-jian-yang-shi/react_style.md:
--------------------------------------------------------------------------------
1 | # CSS內联式样
2 |
3 | * 通过header.js演示JSX样式控制,直接內联到标签中的style
4 |
5 | ```javascript
6 | import React from 'react';
7 | export default class CompomentHeader extends React.Component{
8 |
9 | render(){
10 | const styleComponentHeader = {
11 | header: {
12 | backgroundColor: "#333333",
13 | color: "#ffffff",
14 | "padding-top": "15px",
15 | paddingBottom: "15px"
16 | }
17 | //还可以定义其他的样式
18 | }
19 | return(
20 |
23 | )
24 | }
25 | }
26 | ```
27 |
28 | * 在`React`上不是很适合此方法,`hover`等一些动画或者伪类,但在移动开发`ReactNative`中会常用。
29 |
30 | **采用原始引用方式**
31 |
32 | * `header`添加为``,并在`index.html`引用相关`css`
33 | * 不好在于污染全局
34 |
35 | ## 09-02
36 |
37 | ### 內联式样中的表达式
38 |
39 | ```javascript
40 | import React from 'react';
41 | export default class CompomentHeader extends React.Component{
42 |
43 | constructor(){
44 | super();
45 | this.state ={
46 | miniHeader:false //默认加载的时候还是高(不是mini)的头部
47 | };
48 | };
49 |
50 | switchHeader(){
51 | this.setState({
52 | miniHeader: !this.state.miniHeader //对state进行取反
53 | });
54 | };
55 |
56 | render(){
57 | const styleComponentHeader = {
58 | header: {
59 | backgroundColor: "#333333",
60 | color: "#ffffff",
61 | "padding-top": (this.state.miniHeader) ? "3px" : "15px",
62 | paddingBottom: (this.state.miniHeader) ? "3px" : "15px"
63 | },
64 | //还可以定义其他的样式
65 | };
66 | return(
67 |
70 | )
71 | }
72 | }
73 | ```
74 |
75 |
--------------------------------------------------------------------------------
/react-portal-chuan-song-men.md:
--------------------------------------------------------------------------------
1 | # React Portal 传送门
2 |
3 |
--------------------------------------------------------------------------------
/ying-yong-zhi-shi/react-06/README.md:
--------------------------------------------------------------------------------
1 | # 性能优化
2 |
3 | ## React组件性能优化
4 |
5 | * 传递参数要少传,降低React传递数据的负担。尽量不产生新的数据。
6 | * 组件间性能优化,shouldComponentUpdate函数;PureRender;PureComponent 当组件只接受父组件的props,可以使用(React15.4),减少React组件渲染次数。ImmutableJS,通过不可变的数据结构,直接比较其hash值。
7 |
8 | ## Redux性能优化
9 |
10 | * Reselect中间件的使用,纯函数特点:稳定输入稳定输出
11 |
12 | ## React同构
13 |
14 | * 首屏采用服务端渲染
15 | *
16 |
--------------------------------------------------------------------------------
/ying-yong-zhi-shi/react-06/react-zu-jian-you-hua/README.md:
--------------------------------------------------------------------------------
1 | # React 组件优化
2 |
3 | * 属性传递优化
4 | * 多组件优化
5 | * key
6 |
7 | ## 属性传递
8 |
9 | ### Example
10 |
11 | ```javascript
12 | import React from 'react'
13 |
14 | class App extends React.Component{
15 | constructor(props){
16 | super(props)
17 | this.state = {
18 | num:1
19 | }
20 | }
21 | handleClick(){
22 | this.setState({
23 | num:this.state.num+1
24 | })
25 | }
26 | render(){
27 | return(
28 |
29 |
App
30 |
31 |
32 |
33 | )
34 | }
35 | }
36 |
37 | export default App;
38 | ```
39 |
40 | 此处的性能优化点在于`onClick`所触发的函数,是想在JavaScript中,如下
41 |
42 | ```javascript
43 | 1 == 1 //true
44 | {c:1} == {c:1} //这种情况下是false,因为每次生成的对象,存入到内存的地址是不同的
45 | ```
46 |
47 | 所以在这函数会重复的生成,导致重复render,这个地方就是要优化的点,优化方法如下
48 |
49 | ```javascript
50 | import React from 'react'
51 |
52 | class App extends React.Component{
53 | constructor(props){
54 | super(props)
55 | this.state = {
56 | num:1
57 | }
58 | this.handleClick = this.handleClick.bind(this)
59 | }
60 | handleClick(){
61 | this.setState({
62 | num:this.state.num+1
63 | })
64 | }
65 | render(){
66 | return(
67 |
68 |
App
69 |
70 |
71 | )
72 | }
73 | }
74 |
75 | export default App;
76 | ```
77 |
78 | 这样就是通过在构造函数里声明。不会在每次render的时候重复生成。这个是因为类通过构造函数实例化,在constructor里进行绑定,只用生成一次,后面就可以直接调用。
79 |
80 | ## 组件数据传递
81 |
82 | ```javascript
83 | import React from 'react'
84 |
85 | class App extends React.Component {
86 | constructor(props){
87 | super(props)
88 | this.state={
89 | num:1,
90 | title:'tyrmars',
91 | name:'zhang'
92 | }
93 | this.handleClick = this.handleClick.bind(this)
94 | }
95 | handleClick(){
96 | this.setState({
97 | num:this.state.num+1
98 | })
99 | }
100 | render() {
101 | const
102 | return (
103 |
104 |
I am App
105 |
106 |
107 |
108 | )
109 | }
110 | }
111 |
112 | class Demo extends React.Component {
113 | render() {
114 | return (I am Demo
)
115 | }
116 | }
117 |
118 | export default App
119 | ```
120 |
121 | 每次对Demo进行数据传递的时候都会生成一个新的对象
122 |
123 | ```javascript
124 |
125 | ```
126 |
127 | 传递数据时,不要全部state都传递过去,需要哪些数据传递哪些数据
128 |
129 | ```javascript
130 |
131 | ```
132 |
133 |
--------------------------------------------------------------------------------
/ying-yong-zhi-shi/react-06/react-zu-jian-you-hua/ding-zhi-shouldcomponentupdate.md:
--------------------------------------------------------------------------------
1 | # 定制shouldComponentUpdate
2 |
3 | ### 多组件优化
4 |
5 | ```javascript
6 | import React from 'react'
7 |
8 | class App extends React.Component {
9 | constructor(props){
10 | super(props)
11 | this.state={
12 | num:1,
13 | title:'tyrmars',
14 | name:'zhang'
15 | }
16 | this.handleClick = this.handleClick.bind(this)
17 | }
18 | handleClick(){
19 | this.setState({
20 | num:this.state.num+1
21 | })
22 | }
23 | render() {
24 | const
25 | return (
26 |
27 |
I am App
28 |
29 |
30 |
31 | )
32 | }
33 | }
34 |
35 | class Demo extends React.Component {
36 | render() {
37 | return (I am Demo,{this.props.title}
)
38 | }
39 | }
40 |
41 | export default App
42 | ```
43 |
44 | ## React16性能检测
45 |
46 | 通过在浏览器中在链接上加入`/?react_pref`。
47 |
48 | 
49 |
50 | 通过此方法可以在浏览器默认的性能监视器Performance中查看性能改变
51 |
52 | 
53 |
54 | * test
55 |
56 | 通过定制shouldComponentUpdate来减少组件的render从而优化性能
57 |
58 | 主要就是对比现有的props和state与改变后的不同,如果相同就不会再次渲染
59 |
60 | ```javascript
61 | class Demo extends React.Component {
62 | shouldComponentUpdate(nextProps, nextState){
63 | if(nextProps.title === this.props.title){
64 | return false
65 | }
66 | return true
67 | }
68 | render() {
69 | return (I am Demo,{this.props.title}
)
70 | }
71 | }
72 |
73 | export default App
74 | ```
75 |
76 |
--------------------------------------------------------------------------------
/ying-yong-zhi-shi/react-06/react-zu-jian-you-hua/purecomponent.md:
--------------------------------------------------------------------------------
1 | # PureComponent
2 |
3 | 还有就是通过使用React.PureComponent来对组件进行优化,这个也是React16官方新加入的,意思类似于纯组件
4 |
5 | 使用的地方一般是在只接收从父组件传递过来数据的组件,也就是只接受props的组件
6 |
7 | ```javascript
8 | class Demo extends React.PureComponent{
9 | //....
10 | }
11 | ```
12 |
13 |
--------------------------------------------------------------------------------
/ying-yong-zhi-shi/react-06/reacttong-gou.md:
--------------------------------------------------------------------------------
1 | # React同构
2 |
3 |
--------------------------------------------------------------------------------
/ying-yong-zhi-shi/react-06/reduxxing-neng-you-hua.md:
--------------------------------------------------------------------------------
1 | # Redux性能优化
2 |
3 |
--------------------------------------------------------------------------------
/ying-yong-zhi-shi/react-07.md:
--------------------------------------------------------------------------------
1 | # 服务端渲染
2 |
3 | ## 服务端渲染介绍
4 |
5 | * 传统的服务端渲染:JSP、smaty、jinja2等
6 | * 浏览器渲染
7 |
8 | ## React服务端渲染主要是浏览器渲染
9 |
10 | * 后端只提供静态资源和接口
11 | * 前端写模板
12 |
13 |
--------------------------------------------------------------------------------
/ying-yong-zhi-shi/react-08/README.md:
--------------------------------------------------------------------------------
1 | # 项目应用
2 |
3 | * 文件组织方式
4 | * 模块接口
5 | * 合并reducer
6 | * 其他问题
7 |
8 |
--------------------------------------------------------------------------------
/ying-yong-zhi-shi/react-08/react-he-bing-reducer.md:
--------------------------------------------------------------------------------
1 | # React 合并reducer
2 |
3 | 通过一个combineReducers合并所有的reducers
4 |
5 | ```javascript
6 | //合并所有reducer
7 | import { combineReducers } from 'redux'
8 | import { user } from './redux/user.redux'
9 | import { chatuser } from './redux/chatuser.redux'
10 | import { chat } from './redux/chat.redux'
11 |
12 | export default combineReducers({user,chatuser,chat})
13 | ```
14 |
15 | 在index中使用reducers来进行数据管理
16 |
17 | ```javascript
18 | import reducers from './reducer'
19 | const store = createStore(reducers)
20 | ```
21 |
22 |
--------------------------------------------------------------------------------
/ying-yong-zhi-shi/react-08/react-mo-kuai-jie-kou.md:
--------------------------------------------------------------------------------
1 | # React 模块接口
2 |
3 |
--------------------------------------------------------------------------------
/ying-yong-zhi-shi/react-08/react-wen-jian-zu-zhi-fang-shi.md:
--------------------------------------------------------------------------------
1 | # React 文件组织方式
2 |
3 | ## 常用方式
4 |
5 | * reducer目录包含所有Redux的reducer;
6 | * actions目录包含所有的action构造函数;
7 | * component目录包含所有的展示组件;
8 | * container目录包含所有的容器组件;
9 |
10 |
--------------------------------------------------------------------------------
/ying-yong-zhi-shi/react-08/react-wen-ti.md:
--------------------------------------------------------------------------------
1 | # React 问题
2 |
3 | 补全代码,使得如下代码可以实现获取文件夹内文件列表功能(Loading 和 FileList 组件可以不用具体实现,只需补全 Folder 组件的代码):
4 |
5 | ```javascript
6 | /**
7 | * 使用样例:
8 | *
9 | * {(files) => !files
10 | * ?
11 | * : }
12 | *
13 | */
14 |
15 | import React, { Component, PropTypes } from 'react'
16 |
17 | // fetchChildFilesByFolderId 接受一个文件夹 ID 的参数,
18 | // 返回 Promise,即文件列表。
19 | import fetchChildFilesByFolderId from '@shimo/api'
20 |
21 | class Folder extends Component {
22 | constructor(props){
23 | super(props)
24 | this.state = {
25 | files:''
26 | }
27 | }
28 | componentDidMount(){
29 | fetchChildFilesByFolderId(this.props.id)
30 | .then(v => this.setState({files:v}))
31 | }
32 | render(){
33 | const child = this.props.children(this.state.files)
34 | return(
35 | {child}
36 | );
37 | }
38 | }
39 |
40 | Folder.propTypes = {
41 | children: React.PropTypes.element.isRequired
42 | }
43 | ```
44 |
45 |
--------------------------------------------------------------------------------
/ying-yong-zhi-shi/router-01/README.md:
--------------------------------------------------------------------------------
1 | # 路由
2 |
3 | 
4 |
5 |
--------------------------------------------------------------------------------
/ying-yong-zhi-shi/router-01/react_router2.md:
--------------------------------------------------------------------------------
1 | # React-Router2
2 |
3 | ## React Router2
4 |
5 | * 由于对于新版的`Router`的不熟悉,这节开始转向`Router2`和`webpack1`,等待`React-Router4`理解后,我会更新这几章
6 | * [Router](https://github.com/ReactTraining/react-router)
7 | * 以上`Router`采用的是`Router2`
8 | * `Router`中文是路由的意思。
9 | * 路由库`React-Router`。它是官方维护的,事实上也是唯一可选的路由库。它通过管理 `URL`,实现组件的切换和状态的变化,开发复杂的应用几乎肯定会用到。
10 |
11 | ### 基本用法
12 |
13 | * `$ npm install react-router`安装`React-Router`,最新的为`React-Router4`。
14 |
15 | ```javascript
16 | import React from 'react';
17 | import ReactDOM from 'react-dom';
18 | import Index from './index';
19 | import ComponentList from './components/list';
20 | import ComponentDetails from './components/details';
21 | import {Router,Route,hashHistory} from 'react-router';
22 |
23 | export default class Root extends React.Component{
24 | render(){
25 | return (
26 | //这里替换了之前的 Index,变成了程序的入口
27 |
28 |
29 |
30 |
31 |
32 |
33 |
34 |
35 |
36 | );
37 | };
38 | }
39 |
40 | ReactDOM.render(, document.getElementById('example'));
41 | ```
42 |
43 | * 跳转时使用``进行跳转
44 |
45 | **使用案例**
46 |
47 | * 在`src/js`创建入口文件`root.js`
48 | * 在webpack中把
49 |
50 | ## React Router参数传递
51 |
52 | * 从`Header`中跳转到`list`传递数值。
53 | * 利用在`root.js`中设置``中`path="list/id:"`。这个为定义的方法
54 | * 在`list`中用`{this.props.params.id}`获取从`Header`路由传递过来的值
55 | * `Header`中使用``````
56 |
57 |
--------------------------------------------------------------------------------
/yuan-ma/fiber/README.md:
--------------------------------------------------------------------------------
1 | # Fiber
2 |
3 | {% embed url="https://zh-hans.reactjs.org/blog/2015/12/18/react-components-elements-and-instances.html" %}
4 |
5 | {% embed url="https://zh-hans.reactjs.org/docs/reconciliation.html" %}
6 |
7 | {% embed url="https://github.com/reactjs/react-basic" %}
8 |
--------------------------------------------------------------------------------
/yuan-ma/fiber/scheduler.md:
--------------------------------------------------------------------------------
1 | # Scheduler
2 |
3 | React 16 Fiber Scheduler 调度过程
4 |
5 | 
6 |
7 | React 17 Fiber Scheduler 调度过程
8 |
9 | 改成了使用line
10 |
--------------------------------------------------------------------------------
/yuan-ma/react-10.md:
--------------------------------------------------------------------------------
1 | ---
2 | description: 简单实现React
3 | ---
4 |
5 | # SimpleReact
6 |
7 | 简单实现React
8 |
9 | ```javascript
10 | /* jsx h */
11 | function h(type,props,...children){
12 | return(type,props,children)
13 | }
14 |
15 | //render 函数
16 | function render(node){
17 | //如果只是一个字符串
18 | if(typeof node === 'string'){
19 | return document.createTextNode(node);
20 | }
21 | //如果是HTML节点形成
22 | const $elem = document.createElement(node.type);
23 | node.children.map(createElement).forEach($elem.appendChild.bind($elem));
24 | return $elem;
25 | }
26 |
27 | //diff 算法
28 | function changed(node_NEW,node_OLD){
29 | return typeof node_OLD !== typeof node_NEW ||
30 | typeof node_OLD === 'string' && node_OLD !== node_NEW ||
31 | node_OLD.type !== node.type
32 | }
33 |
34 | //更新算法
35 | function updateElement($parent,node_NEW,node_OLD,index = 0){
36 |
37 | }
38 |
39 | /* html */
40 | const list = (
41 |
45 | )
46 | /* */
47 | const $root = document.getElementById('root');
48 | $root.appendChild(createElement(list))
49 | ```
50 |
51 |
--------------------------------------------------------------------------------
/zhuang-tai-guan-li/flux.md:
--------------------------------------------------------------------------------
1 | # Flux
2 |
3 | 
4 |
5 | Facebook在制作React的同时,也同时制作出了新的开发框架Flux。推翻了原有的MVC框架,采用一种新的思维方式来管理数据流。
6 |
7 | 总的来说Flux在管理数据流上更加严格
8 |
9 | ## Flux框架大致包含四个部分
10 |
11 | * Dispatcher,处理动作分发,维持Store之间的依赖关系;
12 | * Store,负责存储数据和处理数据相关逻辑;
13 | * Action,驱动Dispatcher的JS对象;
14 | * View,视图部分,负责显示用户界面。
15 |
16 | ## Flux使用
17 |
18 | 首先在项目下安装Flux
19 |
20 | `npm install flux --save`
21 |
22 | ### 1.Dispatcher
23 |
24 | 首先引入dispatcher类,因为它负责了处理动作的分发
25 |
26 | ```javascript
27 | import {Dispatcher} from 'flux'
28 | export default new Dispatcher();
29 | ```
30 |
31 | 这样就有了全局唯一的Dispatcher
32 |
33 | ### 2.action
34 |
35 | action可以算是一个纯数据对象
36 |
37 |
--------------------------------------------------------------------------------
/zhuang-tai-guan-li/immutable.md:
--------------------------------------------------------------------------------
1 | # immutable
2 |
3 |
--------------------------------------------------------------------------------
/zhuang-tai-guan-li/mobx/README.md:
--------------------------------------------------------------------------------
1 | # Mobx
2 |
3 | 
4 |
5 |
--------------------------------------------------------------------------------
/zhuang-tai-guan-li/mobx/mobx-si-xiang.md:
--------------------------------------------------------------------------------
1 | # Mobx 思想
2 |
3 | 
4 |
5 |
--------------------------------------------------------------------------------
/zhuang-tai-guan-li/redux_use/README.md:
--------------------------------------------------------------------------------
1 | # Redux
2 |
3 | 
4 |
5 | * Redux专注与状态管理、和react解耦
6 | * 单一状态、单向数据流
7 | * 核心概念:`store`、`state`、`action`
8 |
9 | ```text
10 | 为什么会出现Redux呢,因为在处理少量数据的时候,可以使用setState
11 | 但是如果,现在有🈶️成千上万的数据,数据的传递就要和组件的显示分开
12 | 所以Redux就是来帮助React来管理数据的,React现在只负责自己的View
13 | ```
14 |
15 | * `store`:📝记录了所有组件的状态\(state\)
16 | * `dispatch`:更改管理实体
17 | * `action`:要更改什么
18 | * `reducer`:这个🈯️指的是要改变的组件,它获取`state`和`action`,生成新的`state`
19 |
20 |
--------------------------------------------------------------------------------
/zhuang-tai-guan-li/redux_use/react-zi-zhi-thunk-zhong-jian-jian.md:
--------------------------------------------------------------------------------
1 | # Redux 自制thunk中间件
2 |
3 | 之前我们已经知道了thunk中间件是实现Redux异步的一种
4 |
5 | ```javascript
6 | const thunk = ({dispatch,getState})=>next=>action=>{
7 | //如果是函数,执行一下
8 | if(typeof action==='function'){
9 | return action(dispatch,getState)
10 | }
11 | //
12 | return next(action)
13 | }
14 | export default thunk
15 | ```
16 |
17 |
--------------------------------------------------------------------------------
/zhuang-tai-guan-li/redux_use/redux-applymiddleware.md:
--------------------------------------------------------------------------------
1 | # Redux applyMiddleware
2 |
3 | 在之前我们对Redux进行异步操作的时候,使用到了`applyMiddleware(thunk)`中间件机制,它是帮助React扩展其功能的重要方法
4 |
5 | 首先我们要了解什么是中间件
6 |
7 | ## 中间件
8 |
9 | 中间件的特点:
10 |
11 | * 中间件是独立的函数;
12 | * 中间件可以组合使用;
13 | * 中间件有一个统一的接口;
14 |
15 | 独立的函数是指中间件之间不应该有依赖关系,每个中间件应该能被独立使用,并完成一个特定的功能
16 |
17 | ### Redux中间件
18 |
19 | 
20 |
21 |
--------------------------------------------------------------------------------
/zhuang-tai-guan-li/redux_use/redux-shi-yong.md:
--------------------------------------------------------------------------------
1 | # Redux 使用
2 |
3 | 
4 |
5 | * 通过`reducer`新建`store`,随时通过`store.getState`获取状态
6 | * 需要状态变更,`store.dispatch(action)`来修改状态
7 | * `reducer`函数接受`state`和`action`,🔙返回🆕新的`state`,可以用`store.subscribe`监听每次修改
8 |
9 | ### `index.js`
10 |
11 | ```javascript
12 | import {createStore} from 'redux'
13 |
14 | function counter(state=0,action) {
15 | switch (action.type) {
16 | case 'add':
17 | return state+1;
18 | case 'reduce':
19 | return state-1;
20 | default:
21 | return 10
22 | }
23 | }
24 |
25 | //新建store
26 | const store = createStore(counter);
27 | const init = store.getState();
28 | console.log(init);
29 |
30 | //监听
31 | function listener() {
32 | const current = store.getState();
33 | console.log(`现在有的${current}`);
34 | }
35 | store.subscribe(listener)
36 |
37 | //派发事件 传递aciton
38 | store.dispatch({type:'add'});
39 | store.dispatch({type:'reduce'});
40 | store.dispatch({type:'add'});
41 | store.dispatch({type:'add'});
42 | ```
43 |
44 | ## Action
45 |
46 | action 内必须使用一个字符串类型的`type`字段来表示将要执行的动作。多数情况下,`type`会被定义成字符串常量。当应用规模越来越大时,建议使用单独的模块或文件来存放 `action`。
47 |
48 | ## Action创建函数
49 |
50 | **Action 创建函数**就是生成 action 的方法。
51 |
52 | ```javascript
53 | // action creator
54 |
55 | export function add() {
56 | return {type:ADD};
57 | };
58 | export function reduce() {
59 | return {type:REDUCE};
60 | };
61 | ```
62 |
63 |
--------------------------------------------------------------------------------
/zhuang-tai-guan-li/redux_use/redux-zi-zhi-arr-zhong-jian-jian.md:
--------------------------------------------------------------------------------
1 | # Redux 自制arr中间件
2 |
3 | ```javascript
4 | const arrMid = ({dispatch, getState}) => next => action => {
5 | //如果是函数,执行一下
6 | if (Array.isArray(action)) {
7 | return action.forEach(v=>dispatch(v))
8 | }
9 | //默认什么都没做,继续执行下一个
10 | return next(action)
11 | }
12 | export default arrMid
13 | ```
14 |
15 |
--------------------------------------------------------------------------------
/zhuang-tai-guan-li/redux_use/redux_and_react.md:
--------------------------------------------------------------------------------
1 | # Redux 结合React
2 |
3 | ## `index.js`
4 |
5 | ```javascript
6 | import React from 'react'
7 | import ReactDom from 'react-dom'
8 | import {createStore} from 'redux'
9 | import {counter} from './index.redux'
10 | import App from './App'
11 |
12 | const store = createStore(counter)
13 |
14 | function render() {
15 | ReactDom.render(,document.getElementById('root'));
16 | }
17 | render();
18 |
19 | store.subscribe(render)
20 | ```
21 |
22 | ## `App.jsx`
23 |
24 | ```javascript
25 | import React from 'react'
26 | import {add} from './index.redux'
27 | class App extends React.Component {
28 | render(){
29 | const store = this.props.store
30 | const num = store.getState()
31 | return(
32 |
33 |
展示dedux数据{num}
34 |
35 |
36 | )
37 | }
38 | }
39 |
40 | export default App
41 | ```
42 |
43 | ## `index.redux.js`
44 |
45 | ```javascript
46 | //aciton
47 | const ADD = 'add';
48 | const REDUCE = 'reduce';
49 |
50 | // reducer
51 | exports.counter = function (state=0,action) {
52 | switch (action.type) {
53 | case 'add':
54 | return state+1;
55 | case 'reduce':
56 | return state-1;
57 | default:
58 | return 10
59 | }
60 | };
61 |
62 | // action creator
63 | exports.add = function () {
64 | return {type:ADD};
65 | };
66 | exports.reduce = function () {
67 | return {type:REDUCE};
68 | };
69 | ```
70 |
71 | * 此种方式耦合程度太高,为了保证组件的独立性做出如下修改
72 | * index.redux.js封装📦了`add`函数,直接import这个函数
73 | * 通过参数形式传递给App.js
74 |
75 | ```javascript
76 | import React from 'react'
77 | import ReactDom from 'react-dom'
78 | import {createStore} from 'redux'
79 | import {counter,add} from './index.redux'
80 | import App from './App'
81 |
82 | const store = createStore(counter)//新建一个store
83 |
84 | function render() {
85 | ReactDom.render(,document.getElementById('root'));
86 | //以组件的属性形式传递到组件里面
87 | }
88 | render();
89 |
90 | store.subscribe(render)
91 | //利用subscribe订阅render函数,状态变化时render会重新执行,渲染整个页面
92 | ```
93 |
94 | * App.js通过组件内部接受父组件传递来的数据
95 |
96 | ```javascript
97 | import React from 'react'
98 |
99 | class App extends React.Component {
100 | // constructor() {
101 | //
102 | // }
103 | render(){
104 | const store = this.props.store
105 | const num = store.getState()//获取初始状态
106 | //获取dispatch方法,获取action
107 | const add = this.props.add
108 | const reduce = this.props.reduce
109 | return(
110 |
111 |
展示dedux数据{num}
112 |
113 |
114 |
115 | )
116 | }
117 | }
118 |
119 | export default App
120 | ```
121 |
122 |
--------------------------------------------------------------------------------
/zhuang-tai-guan-li/redux_use/redux_chrome.md:
--------------------------------------------------------------------------------
1 | # Redux Chrome插件使用
2 |
3 | * 🆕新建store的时候判断window.devToolsExtension
4 | * 使用compose结合thunk和winows.devToolsExtension
5 | * 调试窗的redux选项卡,实时看到state
6 |
7 | ```javascript
8 | import React from 'react'
9 | import ReactDom from 'react-dom'
10 | import thunk from 'redux-thunk'
11 | import {createStore, applyMiddleware ,compose} from 'redux'
12 | import {counter,add,reduce,addAsync} from './index.redux'
13 | import App from './App'
14 |
15 | const store = createStore(counter,compose(
16 | applyMiddleware(thunk),
17 | window.devToolsExtension ? window.devToolsExtension():()=>{}
18 | ))
19 |
20 | function render() {
21 | ReactDom.render(
22 | ,document.getElementById('root'));
23 | }
24 | render();
25 |
26 | store.subscribe(render)
27 | ```
28 |
29 |
--------------------------------------------------------------------------------
/zhuang-tai-guan-li/redux_use/redux_thunk.md:
--------------------------------------------------------------------------------
1 | # Redux 异步
2 |
3 | 
4 |
5 | * 处理异步、调试工具🔧、更优雅的和react结合
6 | * `Redux`处理异步,需要`redux-thunk`组件\(比较简单的\)
7 | * `npm install redux-devtools-extention`并开启🔛\(调试工具🔧\)
8 | * 使用`react-redux`优雅的链接🔗`react`和`redux`
9 |
10 | ## 处理异步
11 |
12 | * Redux默认只处理同步,异步任务需要`react-thunk`中间件
13 | * `npm install redux-thunk --save`
14 | * 使用`applyMiddleware`开启thunk中间件
15 | * `Action`可以返回函数,使用`dispatch`提交`action`
16 |
17 | ```javascript
18 | //创建一个异步动作
19 | export function addAsync() {
20 | return dispatch=>{
21 | setTimeout(
22 | ()=>{
23 | dispatch(add())
24 | },2000)
25 | }
26 | }
27 | ```
28 |
29 | * index.js
30 |
31 | ```javascript
32 | import React from 'react'
33 | import ReactDom from 'react-dom'
34 | import thunk from 'redux-thunk'
35 | import {createStore, applyMiddleware } from 'redux'
36 | import {counter,add,reduce,addAsync} from './index.redux'
37 | import App from './App'
38 |
39 | const store = createStore(counter,applyMiddleware(thunk))
40 |
41 | function render() {
42 | ReactDom.render(,document.getElementById('root'));
43 | }
44 | render();
45 |
46 | store.subscribe(render)
47 | ```
48 |
49 | * index.redux.js
50 |
51 | ```javascript
52 | const ADD = 'add';
53 | const REDUCE = 'reduce';
54 |
55 | // reducer
56 | export function counter(state=0,action) {
57 | switch (action.type) {
58 | case 'add':
59 | return state+1;
60 | case 'reduce':
61 | return state-1;
62 | default:
63 | return 10
64 | }
65 | };
66 |
67 | //提交action,reducer就会执行
68 |
69 | // action creator
70 | export function add() {
71 | return {type:ADD};
72 | };
73 | export function reduce() {
74 | return {type:REDUCE};
75 | };
76 |
77 | //创建一个异步动作
78 | export function addAsync() {
79 | return dispatch=>{
80 | setTimeout(
81 | ()=>{
82 | dispatch(add())
83 | },2000)
84 | }
85 | }
86 | ```
87 |
88 | * App.js
89 |
90 | ```javascript
91 | import React from 'react'
92 |
93 | class App extends React.Component {
94 | // constructor() {
95 | //
96 | // }
97 | render(){
98 | const store = this.props.store
99 | const num = store.getState()
100 | const add = this.props.add
101 | const reduce = this.props.reduce
102 | const addAsync = this.props.addAsync
103 | return(
104 |
105 |
展示dedux数据{num}
106 |
107 |
108 |
109 |
110 | )
111 | }
112 | }
113 |
114 | export default App
115 | ```
116 |
117 |
--------------------------------------------------------------------------------
/zhuang-tai-guan-li/rxjs.md:
--------------------------------------------------------------------------------
1 | # RXJS
2 |
3 |
4 |
5 | ### RxJS的核心概念
6 |
7 | * Observable 可观察的物件
8 | * 代表一组未来即将产生的事件资料(被观察的物件)
9 | * Observer 观察者物件
10 | * 代表一个用来接收【观察结果】的物件(收到的就是事件资料)
11 | * 观察者物件就是一个物件包含3个含有callback函数的属性(next,error,complete)
12 | * Subscription 订阅物件
13 | * 代表正在执行Observable/Observer的执行个体(可用来来取消订阅)
14 | * Operrators 操作者(运算子)
15 | * 必须拥有函数编程中所定义的纯函数(pure funtion)特性(没有副作用的函数式)
16 | * 主要用来处理一系列的事件资料集合
17 | * 常见的运算子包含 map、filter、concat、flatMap 等
18 |
--------------------------------------------------------------------------------