├── .git-ftp-include
├── .gitpod.yml
├── .gitignore
├── docs
├── .vuepress
│ ├── public
│ │ ├── background.jpg
│ │ ├── favicon.svg
│ │ ├── background.svg
│ │ └── avatar.svg
│ ├── styles
│ │ └── palette.styl
│ └── config.js
├── README.md
└── views
│ ├── Computer
│ ├── Storage_hardware.md
│ ├── C92_Openwrt_DNS_Swap.md
│ └── Windows_WSL_terminal_WebDAV_PartitionBackup.md
│ ├── MCU
│ ├── Linux_board_NFS.md
│ ├── ESP32_Wi-Fi_schedule_HTTP(S).md
│ └── First_Prepare_for_Lanqiao_Cup_MCU_Competition.md
│ ├── Tool
│ └── Frp_Docker_SSH_RDP.md
│ ├── frontEnd
│ ├── Sphinx_GitHub_ReadtheDocs.md
│ ├── vuepress_theme_reco-Github_Actions.md
│ └── VuePress_GithubPages_TravisCI.md
│ └── Hack
│ └── Cheat_engine-Kingdom_rush.md
├── .gitattributes
├── .vscode
└── preview.yml
├── package.json
├── LICENSE
├── .devcontainer
├── Dockerfile
└── devcontainer.json
├── .github
└── workflows
│ └── nodejs.yml
└── README.md
/.git-ftp-include:
--------------------------------------------------------------------------------
1 | !docs/.vuepress/dist
--------------------------------------------------------------------------------
/.gitpod.yml:
--------------------------------------------------------------------------------
1 | tasks:
2 | - name: Dev Server
3 | init: npm install
4 | command: npm run docs:dev
--------------------------------------------------------------------------------
/.gitignore:
--------------------------------------------------------------------------------
1 | node_modules/
2 | docs/.vuepress/dist/
3 | *.log
4 | docs/.vuepress/coverage/
5 | package-lock.json
--------------------------------------------------------------------------------
/docs/.vuepress/public/background.jpg:
--------------------------------------------------------------------------------
https://raw.githubusercontent.com/Tsanfer/vuepress_theme_reco-Github_Actions/HEAD/docs/.vuepress/public/background.jpg
--------------------------------------------------------------------------------
/docs/.vuepress/public/favicon.svg:
--------------------------------------------------------------------------------
1 |
4 |
--------------------------------------------------------------------------------
/.gitattributes:
--------------------------------------------------------------------------------
1 | ###############################################################################
2 | # Set default behavior to automatically normalize line endings.
3 | ###############################################################################
4 | * text=auto
--------------------------------------------------------------------------------
/.vscode/preview.yml:
--------------------------------------------------------------------------------
1 | # .vscode/preview.yml
2 | autoOpen: true # 打开工作空间时是否自动开启所有应用的预览
3 | apps:
4 | - port: 8080 # 应用的端口
5 | run: npm install && npm run docs:dev # 应用的启动命令
6 | root: ./ # 应用的启动目录
7 | name: Tsanfer's blog # 应用名称
8 | description: 个人博客 # 应用描述
9 | autoOpen: true # 打开工作空间时是否自动开启预览(优先级高于根级 autoOpen)
10 |
--------------------------------------------------------------------------------
/docs/.vuepress/styles/palette.styl:
--------------------------------------------------------------------------------
1 | // 默认值
2 | // $accentColor = #3eaf7c // 主题默认颜色
3 | $accentColor = #4285F4 // 主题颜色
4 | $textColor = #2c3e50 // 文本颜色
5 | $borderColor = #eaecef // 边框线颜色
6 | $codeBgColor = #282c34 // 代码块背景色
7 | $backgroundColor = #ffffff // 悬浮块背景色
8 |
--------------------------------------------------------------------------------
/package.json:
--------------------------------------------------------------------------------
1 | {
2 | "scripts": {
3 | "docs:dev": "vuepress dev docs",
4 | "docs:build": "vuepress build docs"
5 | },
6 | "dependencies": {
7 | "@vuepress/plugin-nprogress": "1.9.8",
8 | "vuepress": "1.9.8",
9 | "vuepress-plugin-code-copy": "1.0.6",
10 | "vuepress-plugin-flowchart": "1.5.0",
11 | "vuepress-plugin-reading-progress": "1.0.10",
12 | "vuepress-theme-reco": "1.6.16"
13 | }
14 | }
--------------------------------------------------------------------------------
/docs/README.md:
--------------------------------------------------------------------------------
1 | ---
2 | home: true
3 | bgImage: "/background.svg"
4 | bgImageStyle: { height: "350px" }
5 | ---
6 |
7 |
12 |
--------------------------------------------------------------------------------
/LICENSE:
--------------------------------------------------------------------------------
1 | DO WHAT THE FUCK YOU WANT TO PUBLIC LICENSE
2 | Version 2, December 2004
3 |
4 | Copyright (C) 2020 Tsanfer
5 |
6 | Everyone is permitted to copy and distribute verbatim or modified
7 | copies of this license document, and changing it is allowed as long
8 | as the name is changed.
9 |
10 | DO WHAT THE FUCK YOU WANT TO PUBLIC LICENSE
11 | TERMS AND CONDITIONS FOR COPYING, DISTRIBUTION AND MODIFICATION
12 |
13 | 0. You just DO WHAT THE FUCK YOU WANT TO.
14 |
15 |
--------------------------------------------------------------------------------
/.devcontainer/Dockerfile:
--------------------------------------------------------------------------------
1 | # See here for image contents: https://github.com/microsoft/vscode-dev-containers/tree/v0.236.0/containers/javascript-node/.devcontainer/base.Dockerfile
2 |
3 | # [Choice] Node.js version (use -bullseye variants on local arm64/Apple Silicon): 18, 16, 14, 18-bullseye, 16-bullseye, 14-bullseye, 18-buster, 16-buster, 14-buster
4 | ARG VARIANT="18-bullseye"
5 | FROM mcr.microsoft.com/vscode/devcontainers/javascript-node:0-${VARIANT}
6 |
7 | # [Optional] Uncomment this section to install additional OS packages.
8 | # RUN apt-get update && export DEBIAN_FRONTEND=noninteractive \
9 | # && apt-get -y install --no-install-recommends
10 |
11 | # [Optional] Uncomment if you want to install an additional version of node using nvm
12 | # ARG EXTRA_NODE_VERSION=10
13 | # RUN su node -c "source /usr/local/share/nvm/nvm.sh && nvm install ${EXTRA_NODE_VERSION}"
14 |
15 | # [Optional] Uncomment if you want to install more global node modules
16 | # RUN su node -c "npm install -g "
17 |
--------------------------------------------------------------------------------
/.devcontainer/devcontainer.json:
--------------------------------------------------------------------------------
1 | // For format details, see https://aka.ms/devcontainer.json. For config options, see the README at:
2 | // https://github.com/microsoft/vscode-dev-containers/tree/v0.236.0/containers/javascript-node
3 | {
4 | "name": "Node.js",
5 | "build": {
6 | "dockerfile": "Dockerfile",
7 | // Update 'VARIANT' to pick a Node version: 18, 16, 14.
8 | // Append -bullseye or -buster to pin to an OS version.
9 | // Use -bullseye variants on local arm64/Apple Silicon.
10 | "args": {
11 | "VARIANT": "16"
12 | }
13 | },
14 | // Configure tool-specific properties.
15 | "customizations": {
16 | // Configure properties specific to VS Code.
17 | "vscode": {
18 | // Add the IDs of extensions you want installed when the container is created.
19 | "extensions": ["dbaeumer.vscode-eslint"]
20 | }
21 | },
22 | // Use 'forwardPorts' to make a list of ports inside the container available locally.
23 | // "forwardPorts": [],
24 | // Use 'postCreateCommand' to run commands after the container is created.
25 | "postCreateCommand": "npm install",
26 | // Comment out to connect as root instead. More info: https://aka.ms/vscode-remote/containers/non-root.
27 | "remoteUser": "node"
28 | }
29 |
--------------------------------------------------------------------------------
/docs/.vuepress/public/background.svg:
--------------------------------------------------------------------------------
1 |
--------------------------------------------------------------------------------
/docs/views/Computer/Storage_hardware.md:
--------------------------------------------------------------------------------
1 | ---
2 | title: 常用存储硬件标准
3 | date: 2021-01-21
4 | sidebar: "auto"
5 | categories:
6 | - 计算机
7 | tags:
8 | - 硬件
9 | - 存储设备
10 | ---
11 |
12 | ::: tip
13 | SSD? HDD? SATA? M.2? PCIe? AHCI? NVME? USB?
14 | :::
15 |
16 |
17 |
18 | ## 硬盘
19 |
20 | ### 类型
21 |
22 | #### SSD
23 |
24 | | **颗粒** | | |
25 | | -------- | ----------------- | -------------- |
26 | | 简称 | 全称 | 规格 |
27 | | SLC | Single-Level Cell | 1 bit per cell |
28 | | MLC | Multi-Level Cell | 2 bit per cell |
29 | | TLC | Triple-Level Cell | 3 bit per cell |
30 | | QLC | Quad-Level Cell | 4 bit per cell |
31 |
32 | #### HDD
33 |
34 | RPM (Revolutions per minute)
35 |
36 | - 5400 RPM
37 | - 7200 RPM
38 | - 10000 RPM
39 |
40 | ### 接口
41 |
42 | - SATA
43 | - M.2
44 | - B key / Socket2
45 | - M key / Socket3
46 | - B & M key
47 |
48 | 
49 |
50 | - PCIe
51 |
52 | ### 总线
53 |
54 | | **SATA** | |
55 | | -------- | -------- |
56 | | 版本 | 理论速度 |
57 | | SATA 3.0 | 600MB/S |
58 | | SATA 2.0 | 300MB/S |
59 | | SATA 1.0 | 150MB/S |
60 |
61 | | **PCIe** | | | | | | |
62 | | -------- | ----- | -------- | -------- | -------- | -------- | ---- |
63 | | 版本 | 带宽 | Column 0 | Column 1 | Column 2 | Column 3 | Note |
64 | | | x1 | x2 | x4 | x8 | x16 | |
65 | | 3 | 1GB/s | 2GB/s | 4GB/s | 8GB/s | 16GB/s | 硬盘 |
66 | | 4 | 2GB/s | 4GB/s | 8GB/s | 16GB/s | 32GB/s | 硬盘 |
67 | | 5 | 4GB/s | 8GB/s | 16GB/s | 32GB/s | 64GB/s | |
68 | | 6 | 8GB/s | 16GB/s | 32GB/s | 64GB/s | 128GB/s | |
69 |
70 | ### 协议
71 |
72 | - AHCI
73 | - NVME
74 |
75 | ### 尺寸
76 |
77 | - 2.5 英寸(无需单独供电)
78 | - 3.5 英寸(需单独供电)
79 |
80 | ::: tip
81 | 硬盘速率快慢主要看总线速度
82 | :::
83 |
84 | ---
85 |
86 | ## USB
87 |
88 | ### 物理接口
89 |
90 |
91 |  92 |
92 |  93 |
93 |  94 |
94 |  95 |
96 |
97 | ### 协议
98 |
99 | | **协议** | | |
100 | | -------- | -------------------- | --------------- |
101 | | 协议 | 速度 | 别名 |
102 | | USB 2.0 | 60MB/s | |
103 | | USB 3.0 | 500MB/S (5Gbps) | USB 3.2 Gen 1 |
104 | | USB 3.1 | 1212.12MB/s (10Gbps) | USB 3.2 Gen 2 |
105 | | USB 3.2 | 2424.24MB/s (20Gbps) | USB 3.2 Gen 2x2 |
106 | | USB4 | 5GB/s (40Gbps) | |
107 |
108 | > 本文由[Tsanfer's Blog](https://tsanfer.com) 发布!
109 |
--------------------------------------------------------------------------------
/.github/workflows/nodejs.yml:
--------------------------------------------------------------------------------
1 | # .github/workflows/nodejs.yml
2 |
3 | on: # 触发此文件运行的条件
4 | workflow_dispatch: # 手动
5 | push: # push 时
6 |
7 | name: CI/CD # 此工作流程(workflow)的名字
8 | jobs:
9 | FTP-Deploy-Action:
10 | name: CI&CD # 此任务(job)的名字
11 | runs-on: ubuntu-24.04 # 运行环境
12 | steps:
13 | - uses: actions/checkout@v4 # 切换分支
14 | with:
15 | fetch-depth: 2
16 |
17 | - name: Use Node.js 16
18 | uses: actions/setup-node@v4 # 使用node环境
19 | with:
20 | node-version: 16 # 版本16
21 |
22 | - name: Cache node modules
23 | id: cache # 缓存id
24 | uses: actions/cache@v4
25 | env:
26 | cache-name: cache-node-modules # 缓存名字
27 | with:
28 | path: node_modules # 缓存路径
29 | key: ${{ runner.os }}-build-${{ env.cache-name }}-${{ hashFiles('package.json') }} # 缓存标识
30 |
31 | - name: Install Dependencies
32 | if: steps.cache.outputs.cache-hit != 'true' # 如果没有缓存的话
33 | run: npm install # 安装依赖
34 |
35 | - name: Build project
36 | run: npm run docs:build # 构建项目和生成代码覆盖率报告
37 | env:
38 | LEANCLOUD_APP_ID: ${{ secrets.LEANCLOUD_APP_ID }} # 评 论系统的ID
39 | LEANCLOUD_APP_KEY: ${{ secrets.LEANCLOUD_APP_KEY }} # 评论系统的KEY
40 |
41 | # 如果SFTP-Deploy-Action出现,Dirty repository: Having uncommitted changes. 问题时,使用以下注释步骤解决问题
42 | # - name: reset git
43 | # run: git reset --hard
44 |
45 | # - name: Deploy with Password
46 | # uses: wlixcc/SFTP-Deploy-Action@v1.2.6
47 | # with:
48 | # username: ${{ secrets.FTP_USERNAME }}
49 | # server: ${{ secrets.FTP_SERVER }}
50 | # port: ${{ secrets.FTP_PORT }}
51 | # local_path: './docs/.vuepress/dist/*'
52 | # remote_path: '/upload'
53 | # sftp_only: true
54 | # password: ${{ secrets.FTP_PASSWORD }}
55 | # rsyncArgs: '--exclude=node_modules --exclude=.git --exclude=*.log'
56 | # sftpArgs: '-o ConnectTimeout=5'
57 |
58 | - name: 📂 Sync files
59 | uses: SamKirkland/FTP-Deploy-Action@v4.3.5
60 | with:
61 | # server: ${{ secrets.FTP_IP }}
62 | server: ${{ secrets.FTP_SERVER }}
63 | username: ${{ secrets.FTP_USERNAME }}
64 | password: ${{ secrets.FTP_PASSWORD }}
65 | local-dir: docs/.vuepress/dist/ # 选择哪些文件要部署到服务器,这个选项在这里选了之后,要在.git-ftp-include中添加相应的路径
66 | server-dir: /
67 |
68 | # ftp-server: sftp://${{ secrets.FTP_IP }}/home/www/htdocs # 服务器地址和端口(可以填域名,不过我服务器做了全站加速会导向加速结点的IP,所以只能用服务器的IP)
69 | # ftp-username: ${{ secrets.FTP_USERNAME }} # FTP用户名
70 | # ftp-password: ${{ secrets.FTP_PASSWORD }} # FTP密码
71 | # git-ftp-args: --insecure # (如果是FTP连接的话--insecure不用加)
72 | # local-dir: docs/.vuepress/dist/ # 选择哪些文件要部署到服务器,这个选项在这里选了之后,要在.git-ftp-include中添加相应的路径
73 |
74 | - name: upload-artifact
75 | uses: actions/upload-artifact@v4 #共享或保存action过程中产生的文件
76 | with:
77 | name: static_web_file
78 | path: ./docs/.vuepress/dist/ # or path/to/artifact
79 |
--------------------------------------------------------------------------------
/docs/.vuepress/public/avatar.svg:
--------------------------------------------------------------------------------
1 |
--------------------------------------------------------------------------------
/docs/views/MCU/Linux_board_NFS.md:
--------------------------------------------------------------------------------
1 | ---
2 | title: 设置嵌入式Linux开发板的NFS服务,开机自动挂载NFS服务
3 | date: 2020-03-03
4 | sidebar: "auto"
5 | categories:
6 | - MCU
7 | tags:
8 | - 嵌入式
9 | ---
10 |
11 | ## NFS 简介
12 |
13 | ---
14 |
15 | 网络文件系统 **(NFS,Network File System)** 是一种将远程主机上的分区(目录)经网络挂载到本地系统的一种机制,通过对网络文件系统的支持,用户可以在本地系统上像操作本地分区一样来**远程操作**主机的共享分区(目录)
16 |
17 | 在嵌入式 Linux 的开发过程中,开发者需要在 Linux 服务器上进行所有的软件开发,**交叉编译**,可以通过建立 NFS,把 Linux 服务器上的特定分区共享到待调试的嵌入式目标系统上,就可以直接在嵌入式目标系统上操作 Linux 服务器,同时可以在线对程序进行**调试和修改**,大大的方便了软件的开发。因此,NFS 的是嵌入式 Linux 开发的一个重要的组成部分。
18 |
19 | 嵌入式 Linux 的 NFS 开发环境的实现包括**两个方面**:一是 Linux**服务器端**的 NFS 服务器支持;二是嵌入式目标系统的 NFS**客户端**的支持。因此,NFS 开发环境的建立需要配置 linux 服务器端和嵌入式目标系统端。
20 |
21 | ## 开发环境
22 |
23 | ---
24 |
25 | | | 开发主机 | 开发板 |
26 | | :------: | :--------------------: | :----------------------------------------: |
27 | | 发行版本 | Deepin GNU/Linux 15.11 | Freescale i.MX Release Distro 4.1.15-2.1.0 |
28 | | 内核版本 | 4.15.0-30 | 4.1.15-2.1.0-00171-g7a6e9c2dea71 |
29 |
30 | 设置主机和开发板在同一网段(192.168.0.0/24),主机(192.168.0.1),开发板(192.168.0.2)
31 |
32 | ## 主机设置
33 |
34 | ---
35 |
36 | ### 设置主机静态 IP 地址
37 |
38 | #### 添加有线连接
39 |
40 | | 项目 | 值 |
41 | | -------- | ------------- |
42 | | IP | 192.168.0.1 |
43 | | 子网掩码 | 255.255.255.0 |
44 |
45 | ### 主机开启 NFS 服务
46 |
47 | #### 安装 NFS 服务
48 |
49 | ```bash
50 | sudo apt-get install nfs-kernel-server
51 | ```
52 |
53 | #### 查看用户 ID
54 |
55 | ```bash
56 | id
57 | ```
58 |
59 | 
60 | **记录 UID 和 GID**
61 |
62 | #### 配置 NFS 配置文件
63 |
64 | **添加内容到`/etc/exports`文件末尾**
65 |
66 | ```bash
67 | /home/tsanfer/share
68 | 192.168.0.0/24(rw,sync,all_squash,anonuid=1000,anongid=1000,no_subtree_check)
69 | ```
70 |
71 | > - **/home/tsanfer/share:要共享的开发主机目录**
72 | > - **192.168.0.0/24:配置谁可以访问,其中的/24 是掩码**
73 | > - **rw: 表示客户机的权限,rw 表示可读写**
74 | > - **sync:资料同步写入到内存与硬盘中。**
75 | > - **anonuid=1000:将客户机上的用户映射成指定的本地用户 ID 的用户**
76 | > - **anongid=998: 将客户机上的用户映射成属于指定的本地用户组 ID**
77 | > - **no_subtree_check:不检查子目录权限,默认配置**
78 |
79 | #### 创建共享目录`/home/tsanfer/share`
80 |
81 | #### 更新 exports 配置
82 |
83 | ```bash
84 | sudo exportfs -arv
85 | ```
86 |
87 | > - **-a:全部 mount 或 umount 文件/etc/exports 中的内容。**
88 | > - **-r:重新 mount 文件/etc/exports 中的共享内容。**
89 | > - **-u:umount 目录。**
90 | > - **-v:在 exportfs 的时候,将详细的信息输出到屏幕上。**
91 |
92 | 
93 |
94 | #### 查看 NFS 共享情况
95 |
96 | ```bash
97 | showmount -e
98 | ```
99 |
100 | 
101 |
102 | ## 开发板设置
103 |
104 | ---
105 |
106 | ### 开发板设置静态 IP 地址
107 |
108 | #### 临时设置静态 IP 地址
109 |
110 | ```bash
111 | ifconfig eth0 192.168.0.2
112 | ```
113 |
114 | #### 开机自动设置静态 IP 地址
115 |
116 | **添加内容到`/etc/init.d/rc`文件末尾**
117 |
118 | ```bash
119 | ifconfig eth0 192.168.0.2
120 | ```
121 |
122 | 重新启动后即可生效更改
123 |
124 | #### 查看 IP 地址
125 |
126 | ```bash
127 | ifconfig
128 | ```
129 |
130 | 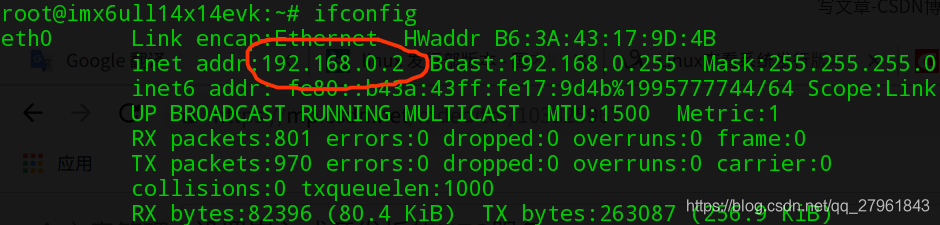
131 |
132 | ### 开发板挂载 NFS 服务
133 |
134 | #### 创建挂载点目录
135 |
136 | `/home/root/share`
137 |
138 | #### 挂载 NFS 文件系统
139 |
140 | #### 临时挂载
141 |
142 | ```bash
143 | mount -o vers=4 192.168.0.1:/home/tsanfer/share /home/root/share
144 | ```
145 |
146 | > - **-o vers=4:表示使用 NFS 文件系统第 4 版本**
147 | > - **192.168.0.1:目标主机的 IP 地址**
148 | > - **/home/tsanfer/share:远端的主机共享目录。**
149 | > - **/home/root/share:本地挂载点,即要把远端共享的目录映射到本地(开发板)的哪个目录**
150 |
151 | #### 开机自动挂载
152 |
153 | **添加内容到`/etc/init.d/rc`文件末尾**
154 |
155 | ```bash
156 | mount -o vers=4 192.168.0.1:/home/tsanfer/share /home/root/share
157 | ```
158 |
159 | 重新启动后即可生效更改
160 |
161 | ## 测试
162 |
163 | - 开发板进行操作:
164 |
165 | ```bash
166 | touch /home/root/share/test_file
167 | ```
168 |
169 | 开发板查看结果
170 | 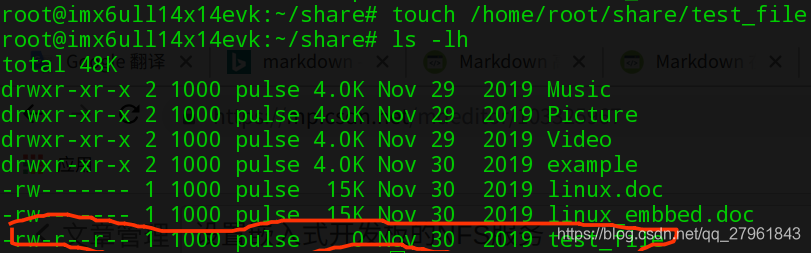
171 |
172 | - 主机查看结果: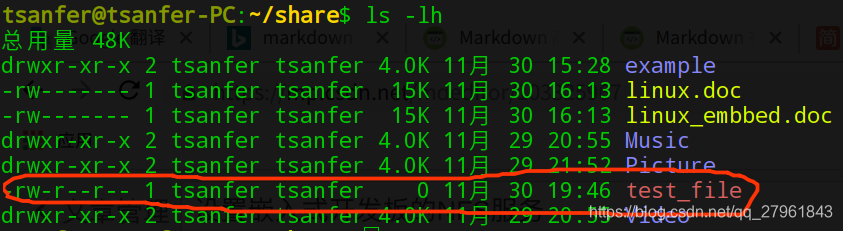
173 |
--------------------------------------------------------------------------------
/docs/.vuepress/config.js:
--------------------------------------------------------------------------------
1 | // docs/.vuepress/config.js
2 |
3 | module.exports = {
4 | // host: "0.0.0.0", // 生成网页地址(本地调试使用)
5 | // port: "22333", // 生成网页端口(本地调试使用)
6 | title: "Tsanfer's Blog", // 显示在左上角的网页名称以及首页在浏览器标签显示的title名称
7 | description: "网络空间无限宽广", // meta 中的描述文字,用于SEO
8 | head: [
9 | ["link", { rel: "icon", href: "/favicon.svg" }], //浏览器的标签栏的网页图标,基地址/docs/.vuepress/public
10 | [
11 | "meta",
12 | {
13 | name: "viewport",
14 | content: "width=device-width,initial-scale=1,user-scalable=no",
15 | },
16 | ], //在移动端,搜索框在获得焦点时会放大
17 | [
18 | 'script async defer', {src: 'http://learn.tsanfer.com:8080/api/application/embed?protocol=http&host=learn.tsanfer.com:8080&token=f077a5ae0d9136e0'}
19 | ]
20 | ],
21 | theme: "reco", //选择主题‘reco’
22 | themeConfig: {
23 | type: "blog", //选择类型博客
24 | fullscreen: true,
25 | blogConfig: {
26 | category: {
27 | location: 2, // 在导航栏菜单中所占的位置,默认2
28 | text: "分类", // 默认 “分类”
29 | },
30 | tag: {
31 | location: 3, // 在导航栏菜单中所占的位置,默认3
32 | text: "标签", // 默认 “标签”
33 | },
34 | socialLinks: [
35 | { icon: "reco-github", link: "https://github.com/Tsanfer" },
36 | { icon: "reco-bilibili", link: "https://space.bilibili.com/12167681" },
37 | { icon: "reco-douban", link: "https://www.douban.com/people/219819109" },
38 | { icon: "reco-twitter", link: "https://twitter.com/a1124851454" },
39 | { icon: "reco-mail", link: "mailto:a1124851454@gmail.com" },
40 | ],
41 | },
42 | nav: [
43 | //导航栏设置
44 | { text: "主页", link: "/", icon: "reco-home" },
45 | {
46 | text: "工具",
47 | icon: "reco-api",
48 | items: [
49 | {
50 | text: "个人网盘",
51 | link: "http://clouddisk.tsanfer.com:8080",
52 | icon: "fa-hard-drive",
53 | },
54 | {
55 | text: "订阅转换器",
56 | link: "http://clouddisk.tsanfer.com:58080",
57 | icon: "fa-right-left",
58 | },
59 | {
60 | text: "目标检测",
61 | link: "http://hpc.tsanfer.com:8000",
62 | icon: "fa-solid fa-object-ungroup",
63 | },
64 | {
65 | text: "在线 XM 音乐播放器",
66 | link: "http://clouddisk.tsanfer.com:8081",
67 | icon: "fa-robot",
68 | },
69 | ],
70 | },
71 | {
72 | text: "联系",
73 | icon: "reco-message",
74 | items: [
75 | {
76 | text: "GitHub",
77 | link: "https://github.com/Tsanfer",
78 | icon: "reco-github",
79 | },
80 | {
81 | text: "CSDN",
82 | link: "https://blog.csdn.net/qq_27961843/",
83 | icon: "reco-csdn",
84 | },
85 | {
86 | text: "BiliBili",
87 | link: "https://space.bilibili.com/12167681",
88 | icon: "reco-bilibili",
89 | },
90 | {
91 | text: "豆瓣",
92 | link: "https://www.douban.com/people/219819109",
93 | icon: "reco-douban",
94 | },
95 | {
96 | text: "网易云音乐",
97 | link: "https://music.163.com/#/user/home?id=69696518",
98 | },
99 | {
100 | text: "QQ",
101 | link: "tencent://message/?uin=1124851454",
102 | icon: "reco-qq",
103 | },
104 | {
105 | text: "Twitter",
106 | link: "https://twitter.com/a1124851454",
107 | icon: "reco-twitter",
108 | },
109 | {
110 | text: "Gmail",
111 | link: "mailto:a1124851454@gmail.com",
112 | icon: "reco-mail",
113 | },
114 | ],
115 | },
116 | ],
117 | sidebar: {
118 | "/views/frontEnd/": [
119 | {
120 | title: "前端", // 必要的
121 | sidebarDepth: 2, // 可选的, 默认值是 1
122 | children: [
123 | "vuepress_theme_reco-Github_Actions",
124 | "VuePress_GithubPages_TravisCI",
125 | "Sphinx_GitHub_ReadtheDocs",
126 | ],
127 | },
128 | ],
129 | "/views/MCU/": [
130 | {
131 | title: "MCU", // 必要的
132 | sidebarDepth: 2, // 可选的, 默认值是 1
133 | children: [
134 | "Linux_board_NFS",
135 | "First_Prepare_for_Lanqiao_Cup_MCU_Competition",
136 | "ESP32_Wi-Fi_schedule_HTTP(S)"
137 | ],
138 | },
139 | ],
140 | "/views/Computer/": [
141 | {
142 | title: "计算机", // 必要的
143 | sidebarDepth: 2, // 可选的, 默认值是 1
144 | children: [
145 | "Storage_hardware",
146 | "Windows_WSL_terminal_WebDAV_PartitionBackup",
147 | "C92_Openwrt_DNS_Swap"
148 | ],
149 | },
150 | ],
151 | "/views/Tool/": [
152 | {
153 | title: "工具", // 必要的
154 | sidebarDepth: 2, // 可选的, 默认值是 1
155 | children: ["Frp_Docker_SSH_RDP"],
156 | },
157 | ],
158 | "/views/Hack/": [
159 | {
160 | text: "Hack",
161 | sidebarDepth: 2,
162 | children: ["Cheat_engine-Kingdom_rush"],
163 | },
164 | ],
165 | },
166 | // displayAllHeaders: true, // 默认值:false
167 | subSidebar: "auto",
168 |
169 | record: "蜀ICP备20005033号-2",
170 | recordLink: "https://beian.miit.gov.cn/",
171 | cyberSecurityRecord: "川公网安备51110202002360号",
172 | cyberSecurityLink: "http://www.beian.gov.cn/",
173 | startYear: "2020", // 项目开始时间,只填写年份
174 | lastUpdated: "最后更新时间", // string | boolean
175 | author: "Tsanfer",
176 | authorAvatar: "/avatar.svg", //作者头像
177 | // mode: "light", //默认显示白天模式
178 | mode: "auto", //默认显示白天模式
179 | smooth: "true", //平滑滚动
180 | // 评论设置
181 | valineConfig: {
182 | appId: process.env.LEANCLOUD_APP_ID,
183 | appKey: process.env.LEANCLOUD_APP_KEY,
184 | },
185 | },
186 | markdown: {
187 | lineNumbers: true, //代码显示行号
188 | }, // 搜索设置
189 | search: true,
190 | searchMaxSuggestions: 10, // 插件
191 | plugins: [
192 | ["flowchart"], // 支持流程图
193 | ["@vuepress/nprogress"], // 加载进度条
194 | ["reading-progress"], // 阅读进度条
195 | ["vuepress-plugin-code-copy", true], //一键复制代码插件
196 | ],
197 | };
198 |
--------------------------------------------------------------------------------
/docs/views/Tool/Frp_Docker_SSH_RDP.md:
--------------------------------------------------------------------------------
1 | ---
2 | title: 使用 Frp 和 Docker 通过远程桌面和 SSH 来远程控制 Windows(反向代理)
3 | date: 2022-01-18
4 | sidebar: "auto"
5 | categories:
6 | - 工具
7 | tags:
8 | - Frp
9 | - 反向代理
10 | - 内网穿透
11 | - Docker
12 | publish: true
13 | ---
14 |
15 | > [最新博客文章链接](https://tsanfer.com/views/Tool/Frp_Docker_SSH_RDP.html)
16 |
17 | ***
18 |
19 | ## 大体思路
20 |
21 | 使用 Docker 容器,在云服务器上部署 Frps 容器来中转流量,在被控制的 Windows 上部署 Frpc 容器来暴露内网的服务,在主控制端的 Windows 上直接运行 Frpc,来连接要访问的服务到本地。
22 |
23 | ||主控制端|中转服务器|被控制端|
24 | |--|--|--|--|
25 | |Frp 类型|Frpc|Frps|Frpc|
26 | |SSH 端口|6000||22|
27 | |远程桌面端口|3390||3389|
28 | |转发 IP|127.0.0.1(本地 IP)||192.168.1.7(容器外部宿主,局域网 IP)|
29 |
30 | ### 用到的东西
31 |
32 | - 反向代理
33 | > 反向代理在电脑网络中是代理服务器的一种。服务器根据客户端的请求,从其关系的一组或多组后端服务器(如Web服务器)上获取资源,然后再将这些资源返回给客户端,客户端只会得知反向代理的IP地址,而不知道在代理服务器后面的服务器集群的存在。
34 | - [Frp](https://gofrp.org/):
35 | > frp 采用 C/S 模式,将服务端部署在具有公网 IP 的机器上,客户端部署在内网或防火墙内的机器上,通过访问暴露在服务器上的端口,反向代理到处于内网的服务。 在此基础上,frp 支持 TCP, UDP, HTTP, HTTPS 等多种协议,提供了加密、压缩,身份认证,代理限速,负载均衡等众多能力。
36 | >
37 | > 
38 |
39 | ## Frp 配置文件
40 |
41 | 主要是参考[官方教程](https://gofrp.org/),根据需要增删内容
42 |
43 | 先是去[官方的 Github 仓库](https://github.com/fatedier/frp/releases)下载相应版本的 Frp 软件,然后解压
44 |
45 | ### 服务器端配置文件
46 |
47 | 记得在云服务器后台,放行相应的端口
48 |
49 | ```ini
50 | # frps.ini
51 |
52 | # 固定段落,用于配置通用参数
53 | [common]
54 | # 服务器监听端口
55 | bind_port = 7000
56 | bind_udp_port = 7000
57 | token = 123456
58 | # 服务器 dashboard
59 | dashboard_port = 7500
60 | dashboard_user = admin
61 | dashboard_pwd = admin
62 | # 每个客户端的连接数量上限
63 | max_pool_count = 5
64 | # kcp 绑定的是 udp 端口,可以和 bind_port 一样(kcp 可能会连接不上)
65 | # kcp_bind_port = 7000
66 | ```
67 |
68 | ### 客户端(被控制端)配置文件
69 |
70 | ```ini
71 | # frpc.ini(被控制端)
72 |
73 | [common]
74 | server_addr = x.x.x.x
75 | server_port = 7000
76 | token = 123456
77 | # 客户端指定,预创建的连接数量
78 | pool_count = 1
79 | # server_port 指定为 frps 的 kcp_bind_port
80 | # server_port = 7000
81 | # 使用kcp协议(kcp 可能会连接不上)
82 | # protocol = kcp
83 | use_encryption = true
84 | use_compression = true
85 |
86 | # 代理名称(必须唯一)
87 | [secure_ssh]
88 | # 协议类型
89 | # stcp 或 sudp 协议可以不在服务器暴露端口,
90 | # 所以可以省略 remote_port 选项
91 | type = stcp
92 | # 安全角色(用于stcp、sudp)(只能填 server 或 visitor)
93 | role = server
94 | # 安全角色密钥
95 | sk = abcdefg
96 | # 指定远程登陆地址为,被控制主机的局域网 IP 地址
97 | #(如果 frpc 没有部署在 docker 上则可使用 127.0.0.1)
98 | local_ip = 192.168.1.7
99 | local_port = 22
100 |
101 | # 远程桌面 tcp 端口
102 | [remote_tcp]
103 | type = stcp
104 | role = server
105 | sk = abcdefg
106 | local_ip = 192.168.1.7
107 | local_port = 3389
108 |
109 | # 远程桌面 udp 端口
110 | [remote_udp]
111 | type = sudp
112 | role = server
113 | sk = abcdefg
114 | local_ip = 192.168.1.7
115 | local_port = 3389
116 | ```
117 |
118 | ### 客户端(主控制端)配置文件
119 |
120 | ```ini
121 | # frpc.ini(主控制的机器)
122 |
123 | [common]
124 | server_addr = x.x.x.x
125 | server_port = 7000
126 | token = 123456
127 | # 本地绑定地址
128 | bind_addr = 127.0.0.1
129 | use_encryption = true
130 | use_compression = true
131 |
132 | [secure_ssh_visitor]
133 | type = stcp
134 | # 要访问的代理名称
135 | server_name = secure_ssh
136 | sk = abcdefg
137 | role = visitor
138 | # 本地绑定端口
139 | bind_port = 6000
140 |
141 | [remote_tcp_visitor]
142 | type = stcp
143 | server_name = remote_tcp
144 | sk = abcdefg
145 | role = visitor
146 | bind_port = 3390
147 |
148 | # UDP 连接可能会卡顿,估计是容易被运营商 QoS
149 | # [remote_udp_visitor]
150 | # type = sudp
151 | # server_name = remote_udp
152 | # sk = abcdefg
153 | # role = visitor
154 | # bind_port = 3390
155 | ```
156 |
157 | ## 其他配置和部署连接
158 |
159 | 在配置时可以用 `docker logs frps` 或 `docker logs frpc` 来查看调试信息
160 |
161 | 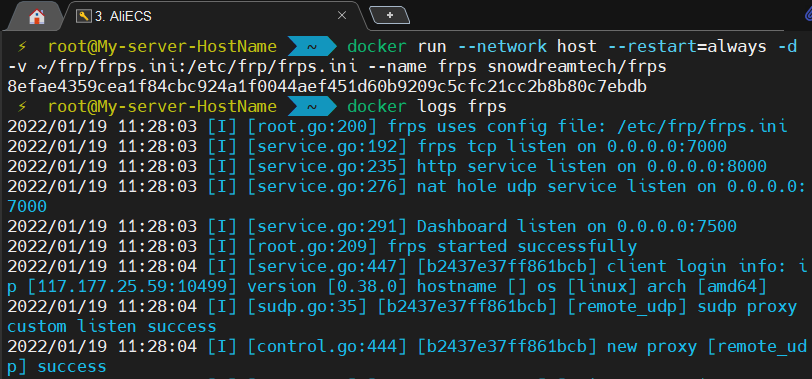
162 |
163 | ### 被控制端本地 SSH 设置
164 |
165 | > [微软官方 | 通过 SSH 进行 PowerShell 远程处理](https://docs.microsoft.com/zh-cn/powershell/scripting/learn/remoting/ssh-remoting-in-powershell-core?view=powershell-7.2)
166 |
167 | 1. 先安装 OpenSSH,最新的 [PowerShell](https://www.microsoft.com/store/productId/9MZ1SNWT0N5D) 里就内置了 OpenSSH,可以直接去 Windows 商店里下载
168 | 2. 将 SSH 默认 shell 改为 powershell.exe
169 |
170 | `New-ItemProperty -Path "HKLM:\SOFTWARE\OpenSSH" -Name DefaultShell -Value "C:\Windows\System32\WindowsPowerShell\v1.0\powershell.exe" -PropertyType String -Force`
171 | 3. 我没有给电脑设置登录密码,所以要开启免密登陆
172 |
173 | 把 `C:\ProgramData\ssh\sshd_config` 中的 `PermitEmptyPasswords` 选项,取消注释并设置为 `PermitEmptyPasswords yes`
174 | 4. 最后再重启 sshd 服务 `Restart-Service sshd`
175 |
176 | ### 配置 Windows 远程桌面
177 |
178 | > [微软官方 | 如何使用远程桌面](https://support.microsoft.com/zh-cn/windows/%E5%A6%82%E4%BD%95%E4%BD%BF%E7%94%A8%E8%BF%9C%E7%A8%8B%E6%A1%8C%E9%9D%A2-5fe128d5-8fb1-7a23-3b8a-41e636865e8c)
179 |
180 | 在被控制的电脑上开启远程桌面,然后在主控制端连接
181 |
182 | ### 部署 Frp
183 |
184 | 在服务器端部署 frps 容器,服务器的配置文件我放在了 `~/frp/frps.ini` 。
185 |
186 | `docker run --network host --restart=always -d -v ~/frp/frps.ini:/etc/frp/frps.ini --name frps snowdreamtech/frps`
187 |
188 | 在客户端(被控制端)部署 frpc 容器,被控制端的配置文件我放在了 `C:\Stand_alone\frp\frpc.ini` 。
189 |
190 | `docker run --network host --restart=always -d -v C:\Stand_alone\frp\frpc.ini:/etc/frp/frpc.ini --name frpc snowdreamtech/frpc`
191 |
192 | ### 连接 Frp
193 |
194 | 在客户端(主控制端)运行 frpc,主控制端的配置文件我放在了 `C:\Stand_alone\frp\frpc.ini` 。
195 |
196 | `C:\Stand_alone\frp\frpc.exe -c C:\Stand_alone\frp\frpc.ini`
197 |
198 | 最后就可以直接访问 SSH(`localhost:6000`) 和远程桌面(`localhost:3389`)了
199 |
200 | 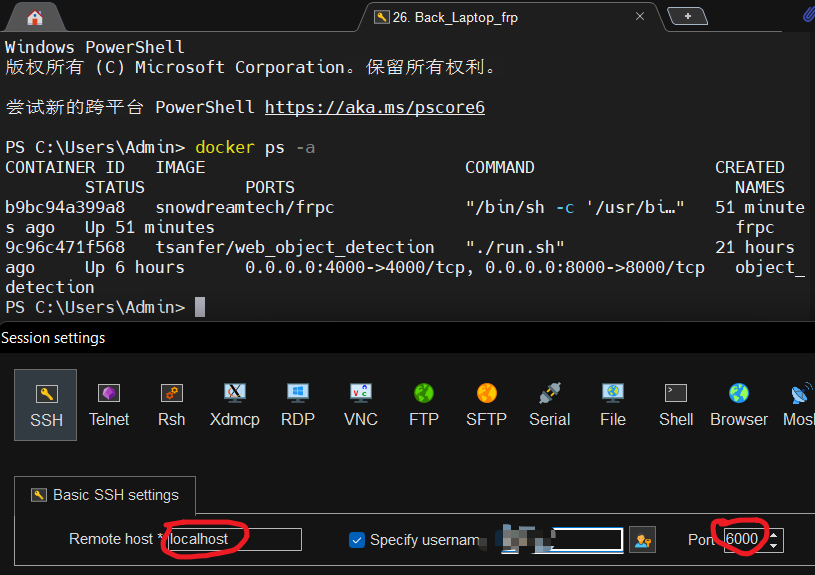
201 |
202 | 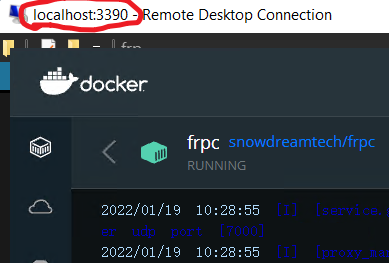
203 |
204 | ## 可替代方案:Sakura Frp
205 |
206 | 如果嫌麻烦,以及不太强调安全的话,可以使用 [Sakura Frp](https://www.natfrp.com/tunnel/)
207 |
208 | 原理和普通的 Frp 一样,不过配置起来更方便。你可以在被控制端直接下载一个 Sakura Frp 官方的启动器,或者用 Frpc 或 Docker 来连接到 Sakura Frp 的服务器。
209 |
210 | 配置的步骤比较简单,直接看官方的教程就行了。
211 |
212 | 我是用的 Docker 方式部署,这里我列一下我自己的配置:
213 |
214 | |节点|成都电信|
215 | |--|--|
216 | |隧道类型|TCP|
217 | |端口|自动生成|
218 | |本地 IP|192.168.1.7|
219 | |访问密码|xxxxxx|
220 | |加密传输|禁用|
221 | |压缩数据|启用|
222 |
223 | 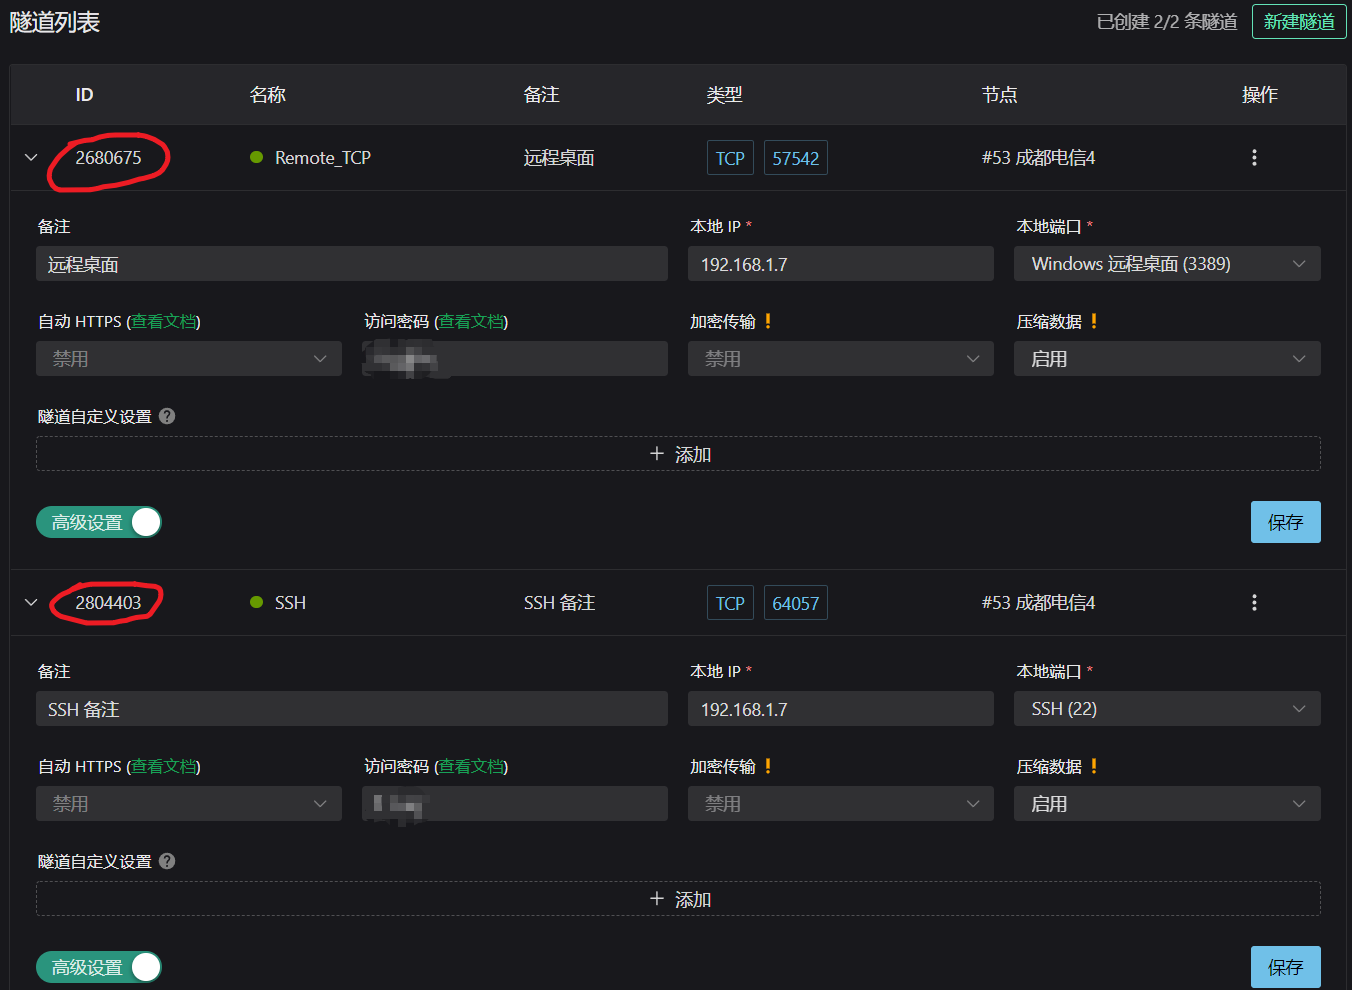
224 |
225 | 被控制端 Docker 的配置
226 |
227 | `docker run -d --restart=always --name=frpc_sakura natfrp/frpc -f abcdefghijklmnop:2680675,2804403 --remote_control yyyyyy`
228 |
229 | - `abcdefghijklmnop` :Sakura Frp 账号的总访问密钥
230 |
231 | - `2680675` :远程桌面的隧道 ID
232 |
233 | - `2804403` :SSH 的隧道 ID
234 |
235 | - `yyyyyy` :设置在 Sakura Frp 官网网页上远程管理隧道的密码(不是访问密码)
236 |
237 | 如果被控制端的 Docker 运行正常的话,官网上的隧道颜色,会由灰色变成绿色。之后就可以在官网上对相应的隧道进行授权,一般就授权本地的 IP 地址。完成过后就可以连接 Sakura Frp 官网的代理服务器的域名和相应端口,来进行远程控制了。如果自己有已备案的域名的话,可以用 DNS 的 CNAME 解析,把自己的域名映射到 Sakura Frp 的代理服务器,方便隧道节点的更换。
238 |
239 | ***
240 |
241 | > 本文由 [Tsanfer's Blog](https://tsanfer.com/) 发布!
242 |
--------------------------------------------------------------------------------
/docs/views/frontEnd/Sphinx_GitHub_ReadtheDocs.md:
--------------------------------------------------------------------------------
1 | ---
2 | title: 创建Sphinx + GitHub + ReadtheDocs托管文档
3 | date: 2020-03-07
4 | sidebar: "auto"
5 | categories:
6 | - 前端
7 | tags:
8 | - Github
9 | - 在线文档
10 | ---
11 |
12 | ::: tip
13 | 在本地配置好 Linux 环境(我用的 WSL),然后配置好 Sphinx 生成文档的样式,最后推送到 Github,并触发 Readthedocs 自动构建、生成在线文档
14 | :::
15 |
16 |
17 |
18 | 🎵🎵🎵🎵🎼🎼🎼🎼🎧🎼🎼🎼🎼🎵🎵🎵🎵
19 |
20 |
24 |
25 | | [Sphinx](https://www.sphinx-doc.org/) | [Github](https://github.com/) | [Readthedocs](https://readthedocs.org/) |
26 | | :-----------------------------------: | :----------------------------------------------------------------------------------------------------------: | :--------------------------------------------------------------------------------------------------: |
27 | | |
28 |
29 | ## 最终效果
30 |
31 | 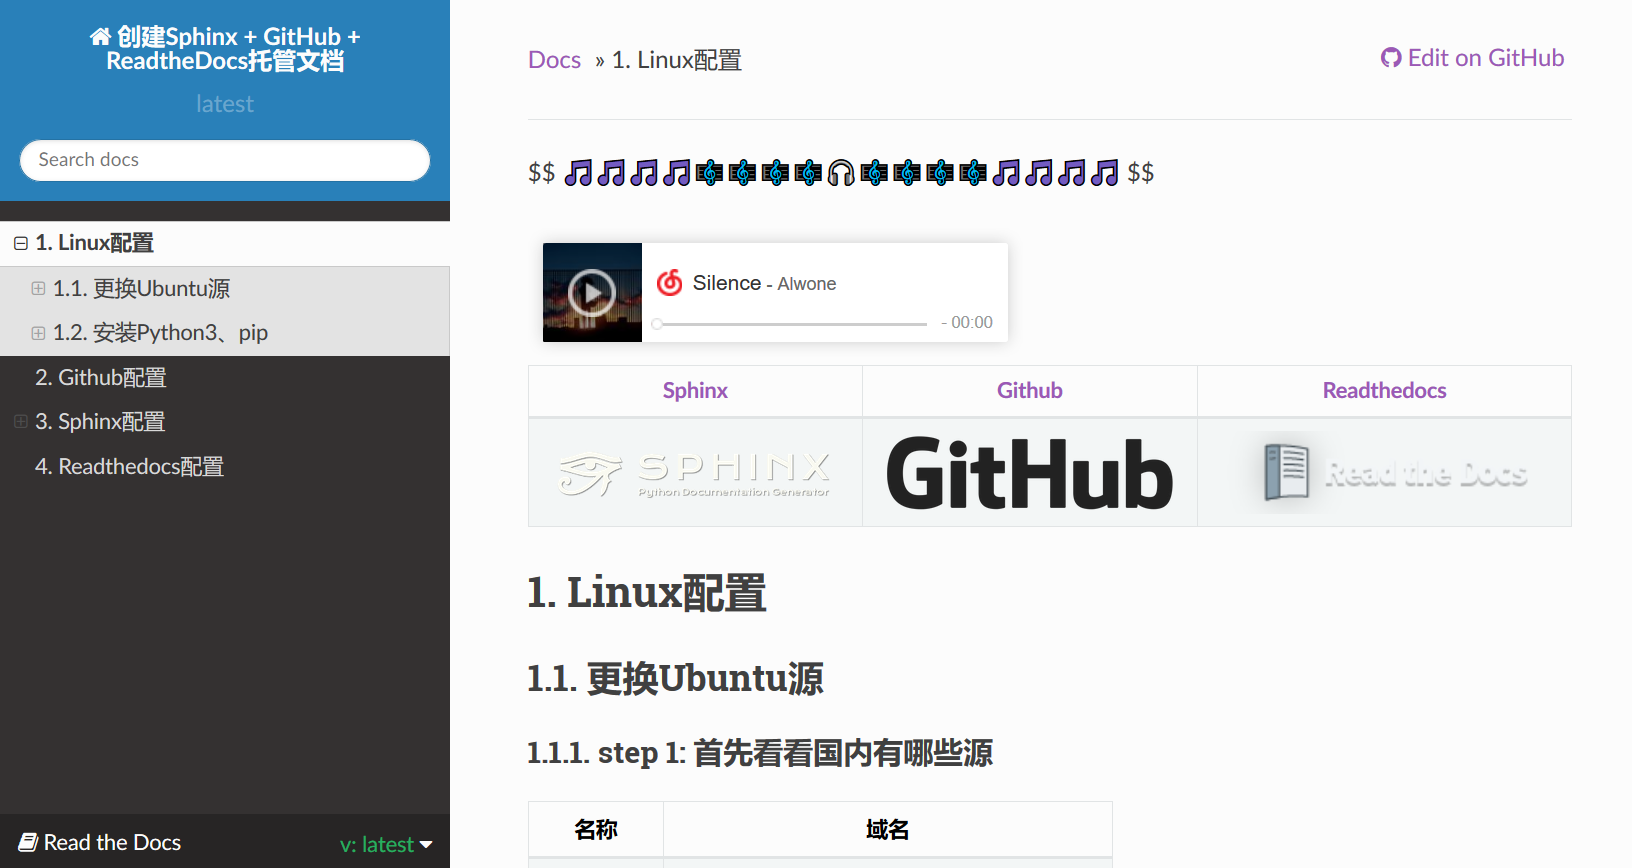
32 |
33 | ## Linux 配置
34 |
35 | > Win10 Ubuntu 子系统路径:`%USERNAME%\AppData\Local\Packages\CanonicalGroupLimited.UbuntuonWindows_79rhkp1fndgsc\LocalState\rootfs`
36 |
37 | ### 更换 Ubuntu 源
38 |
39 | #### step 1: 首先看看国内有哪些源
40 |
41 | | 名称 | 域名 |
42 | | :------: | :-------------------------------------------: |
43 | | 阿里 | `http://mirrors.aliyun.com/ubuntu/` |
44 | | 163 | `http://mirrors.163.com/ubuntu/` |
45 | | 中科大 | `https://mirrors.ustc.edu.cn/ubuntu/` |
46 | | 清华 | `http://mirrors.tuna.tsinghua.edu.cn/ubuntu/` |
47 | | 电子科大 | `http://ubuntu.dormforce.net/ubuntu/` |
48 |
49 | #### step 2: 获取 Ubuntu 代号
50 |
51 | `lsb_release -a`
52 |
53 | Ubuntu 18.04.1,查出来的代号就是 bionic.
54 |
55 | #### step 3: 编辑源
56 |
57 | 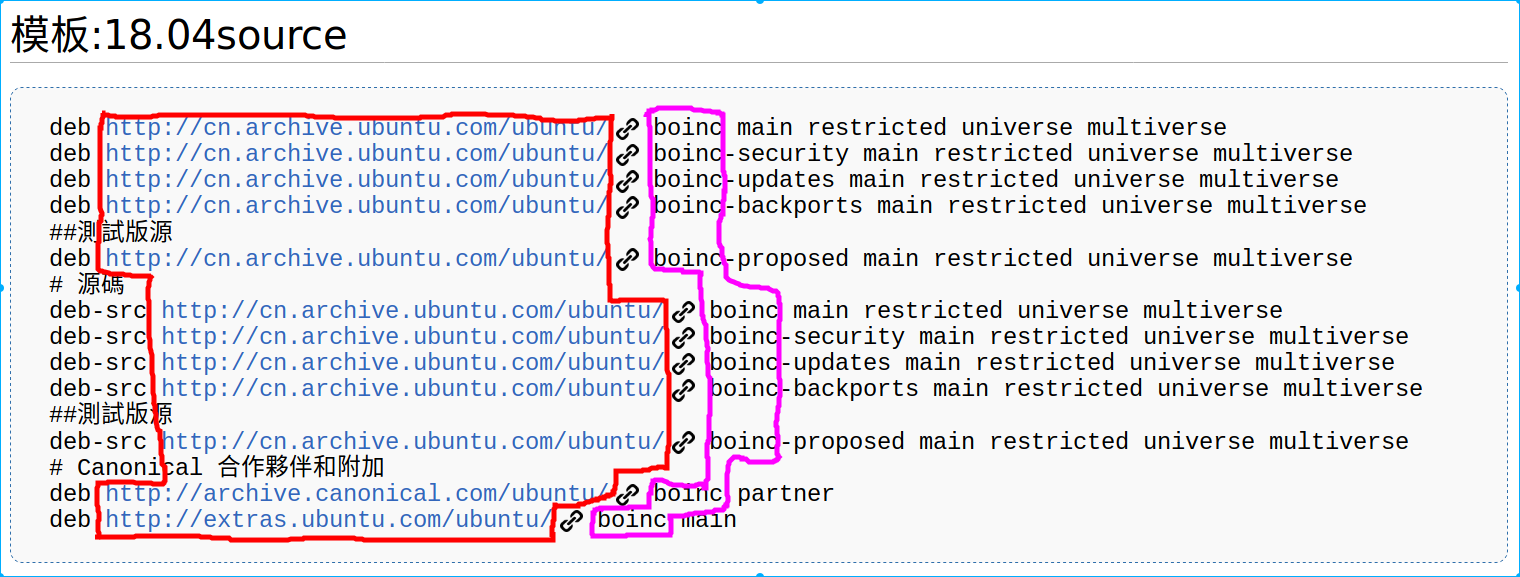
58 |
59 | 红色边框:服务器地址
60 |
61 | 紫色边框:Ubuntu 的代号(Codename)
62 |
63 | #### step 4: 修改源文件 sources.list
64 |
65 | 先备份
66 |
67 | `sudo cp /etc/apt/sources.list /etc/apt/sources.list.bcakup`
68 |
69 | 再修改(如改为 163 源)
70 |
71 | ```bash
72 | #163源
73 | deb http://mirrors.163.com/ubuntu/ bionic main restricted universe multiverse
74 | deb http://mirrors.163.com/ubuntu/ bionic-security main restricted universe multiverse
75 | deb http://mirrors.163.com/ubuntu/ bionic-updates main restricted universe multiverse
76 | deb http://mirrors.163.com/ubuntu/ bionic-proposed main restricted universe multiverse
77 |
78 | ##測試版源
79 | deb http://mirrors.163.com/ubuntu/ bionic-backports main restricted universe multiverse
80 |
81 | # 源碼
82 | deb-src http://mirrors.163.com/ubuntu/ bionic main restricted universe multiverse
83 | deb-src http://mirrors.163.com/ubuntu/ bionic-security main restricted universe multiverse
84 | deb-src http://mirrors.163.com/ubuntu/ bionic-updates main restricted universe multiverse
85 | deb-src http://mirrors.163.com/ubuntu/ bionic-proposed main restricted universe multiverse
86 |
87 | ##測試版源
88 | deb-src http://mirrors.163.com/ubuntu/ bionic-backports main restricted universe multiverse
89 | ```
90 |
91 | #### step 5: 更新软件列表和升级
92 |
93 | 更新软件列表(检测出可更新的软件):
94 |
95 | `sudo apt update`
96 |
97 | 更新软件:
98 |
99 | `sudo apt upgrade`
100 |
101 | ### 安装 Python3、pip
102 |
103 | ```bash
104 | # 安装python3
105 | sudo apt install python3
106 | # 安装pip
107 | sudo apt install python3-pip
108 | ```
109 |
110 | #### 更换 pip 源
111 |
112 | pip 国内的一些镜像
113 |
114 | | 名称 | 域名 |
115 | | :----------: | :------------------------------------------------------: |
116 | | 阿里云 | [阿里云](https://mirrors.aliyun.com/pypi/simple/) |
117 | | 中国科技大学 | [中国科技大学](https://pypi.mirrors.ustc.edu.cn/simple/) |
118 | | 清华大学 | [清华大学](https://pypi.tuna.tsinghua.edu.cn/simple/) |
119 |
120 | 修改 ~/.pip/pip.conf (没有就创建一个), 内容如下:
121 |
122 | ```bash
123 | [global]
124 | index-url = https://pypi.tuna.tsinghua.edu.cn/simple
125 | trusted-host=mirrors.aliyun.com
126 | ```
127 |
128 | ## Github 配置
129 |
130 | 克隆 一个新的公共的空白仓库到本地 `~\Sphinx_GitHub_ReadtheDocs`
131 |
132 | 目录结构:
133 |
134 | ```bash
135 | .
136 | ├── LICENSE
137 | └── README.md
138 | ```
139 |
140 | ## Sphinx 配置
141 |
142 | ### 安装 Sphinx、及其插件
143 |
144 | ```bash
145 | pip3 install sphinx sphinx_rtd_theme recommonmark sphinx-markdown-tables sphinxemoji
146 | ```
147 |
148 | ### 初始化 Sphinx
149 |
150 | ```bash
151 | # 进入Git根目录
152 | cd ~/Sphinx_GitHub_ReadtheDocs
153 | # 开始快速配置sphinx
154 | sphinx-quickstart
155 |
156 | # 选择把源文件和删除文件分开(y)
157 | > Separate source and build directories (y/n) [n]:y
158 | # 项目名称
159 | > Project name: Sphinx_GitHub_ReadtheDocs
160 | # 作者姓名
161 | > Author name(s): Tsanfer
162 | # 版本号
163 | > Project release []: 0.2
164 | # 语言
165 | > Project language [en]: zh_CN
166 | ```
167 |
168 | 目录结构:
169 |
170 | ```bash
171 | .
172 | ├── LICENSE
173 | ├── Makefile
174 | ├── README.md
175 | ├── make.bat
176 | └── source
177 | ├── _static
178 | ├── _templates
179 | ├── conf.py
180 | └── index.rst
181 | ```
182 |
183 | 验证配置是否正确:
184 |
185 | ```bash
186 | cd ~/Sphinx_GitHub_ReadtheDocs
187 | make html
188 | ```
189 |
190 | 浏览器打开`./build/index.html`查看
191 |
192 | ### 配置 Sphinx 主题,插件
193 |
194 | 配置`./source/conf.py`配置文件:
195 |
196 | ```python
197 | # -- General configuration ---------------------------------------------------
198 |
199 | # Add any Sphinx extension module names here, as strings. They can be
200 | # extensions coming with Sphinx (named 'sphinx.ext.*') or your custom
201 | # ones.
202 |
203 | extensions = [
204 | 'recommonmark',
205 | 'sphinx_markdown_tables',
206 | 'sphinxemoji.sphinxemoji',
207 | ]
208 |
209 | # -- Options for HTML output ------------------------------------------------
210 |
211 | # The theme to use for HTML and HTML Help pages. See the documentation for
212 | # a list of builtin themes.
213 | #
214 | html_theme = 'sphinx_rtd_theme'
215 |
216 | # The master toctree document.
217 | master_doc = 'index'
218 | ```
219 |
220 | 添加`./requirements.txt` pip 要求文件(**Readthedocs 配置**时需要用到)
221 |
222 | ```
223 | # markdown suport
224 | recommonmark
225 | # markdown table suport
226 | sphinx-markdown-tables
227 | #emoji
228 | sphinxemoji
229 |
230 | # theme default rtd
231 |
232 | # crate-docs-theme
233 | sphinx-rtd-theme
234 | ```
235 |
236 | ### 更改标题,添加目录,添加文件
237 |
238 | 配置`./source/index.rst`文件:
239 |
240 | ```
241 | 创建Sphinx + GitHub + ReadtheDocs托管文档
242 | =====================================================
243 |
244 | .. toctree::
245 | :maxdepth: 2
246 | :numbered:
247 |
248 | Sphinx_GitHub_ReadtheDocs
249 | ```
250 |
251 | 创建`./source/Sphinx_GitHub_ReadtheDocs.md`文件
252 |
253 | ```md
254 | # here is a test markdown file
255 | ```
256 |
257 | 然后同步到 Github
258 |
259 | ## Readthedocs 配置
260 |
261 | 导入代码库:
262 | 
263 |
264 | 指定 pip 要求文件: `./requirements.txt`
265 | 
266 |
267 | ### 完成
268 |
269 | > 官方 Sphinx + Readthedocs 教程
270 |
271 |
276 |
--------------------------------------------------------------------------------
/docs/views/Computer/C92_Openwrt_DNS_Swap.md:
--------------------------------------------------------------------------------
1 | ---
2 | title: 升腾C92 刷 OpenWrt 作旁路由设置 DNS 服务、扩容分区、设置 swap
3 | date: 2024-02-04
4 | sidebar: "auto"
5 | categories:
6 | - 计算机
7 | tags:
8 | - 系统配置
9 | - OpenWrt
10 | - DNS
11 | - Swap
12 | - BIOS
13 | - DHCP
14 | ---
15 |
16 | > [最新博客文章链接](https://tsanfer.com/views/Computer/C92_Openwrt_DNS_Swap.html)
17 | >
18 |
19 | ---
20 |
21 | *文字更新时间:2024/02/04*
22 |
23 | 一直知道 OpenWrt 经常拿来做软路由软件。最近买了个二手小主机升腾 C92 来做旁路由服务器,其被归为瘦客户机一类,感觉和工控机差不多,现价百元以内。想就着这个机会,了解体验一下 OpenWrt。
24 |
25 | ## 大体思路
26 |
27 | 下载预设置好的固件,制作U盘启动盘,设置好升腾 C92 的 BIOS,刷入 OpenWrt 固件。为了方便局域网设备互联,主路由配置好 IP-MAC 绑定和 DHCP,然后旁路由 OpenWrt 配置 DNS 服务器。最后,扩容 OpenWrt 系统分区,设置 swap 交换分区。
28 |
29 | ### 用到的东西
30 |
31 | > [OpenWrt](https://openwrt.org/):
32 | >
33 | >
34 | > OpenWrt是适用于嵌入式设备的一个Linux发行版。
35 | >
36 | > 相对原厂固件而言,OpenWrt不是一个单一、静态的固件,而是提供了一个可添加软件包的可写的文件系统。这使用户可以自由的选择应用程序和配置,而不必受设备提供商的限制,并且可以使用一些适合某方面应用的软件包来定制你的设备。对于开发者来说,OpenWrt是一个框架,开发者不必麻烦地构建整个固件就能得到想要的应用程序;对于用户来说,这意味着完全定制的能力,与以往不同的方式使用设备,OPKG包含超过3500个软件。 默认使用LuCI作为web交互界面。
37 | >
38 |
39 | | 项目 | 参数 |
40 | | --- | --- |
41 | | 旁路由 | 升腾 C92 |
42 | | OpenWrt 类型 | haiibo/OpenWrt |
43 | | OpenWrt 固件版本 | R24.01.27 |
44 | | CPU 型号 | Intel(R) Celeron(R) CPU J1800 |
45 | | CPU 频率 | 2.41GHz |
46 | | CPU 线程数 | 2C2T |
47 | | CPU 工艺 | 22纳米 |
48 | | CPU TDP | 10 W |
49 | | 内存 | 2G DDR3L 1333MHz |
50 | | 硬盘 | Centerm SSD 14.75GB |
51 | | 网卡 | Intel I211 Gigabit Network Connection |
52 | | 主路由 | 移动 X333 定制路由器 |
53 |
54 | 原版 OpenWrt 不大好用,很多功能都没有预装,要手动配置比较麻烦。于是选择了提前配置好的 OpenWrt 版本,我用的是 [haiibo/OpenWrt](https://github.com/haiibo/OpenWrt),里面集成了 LuCI 面板、Docker 和各种常用插件
55 |
56 | ### 局域网系统拓扑图
57 |
58 | 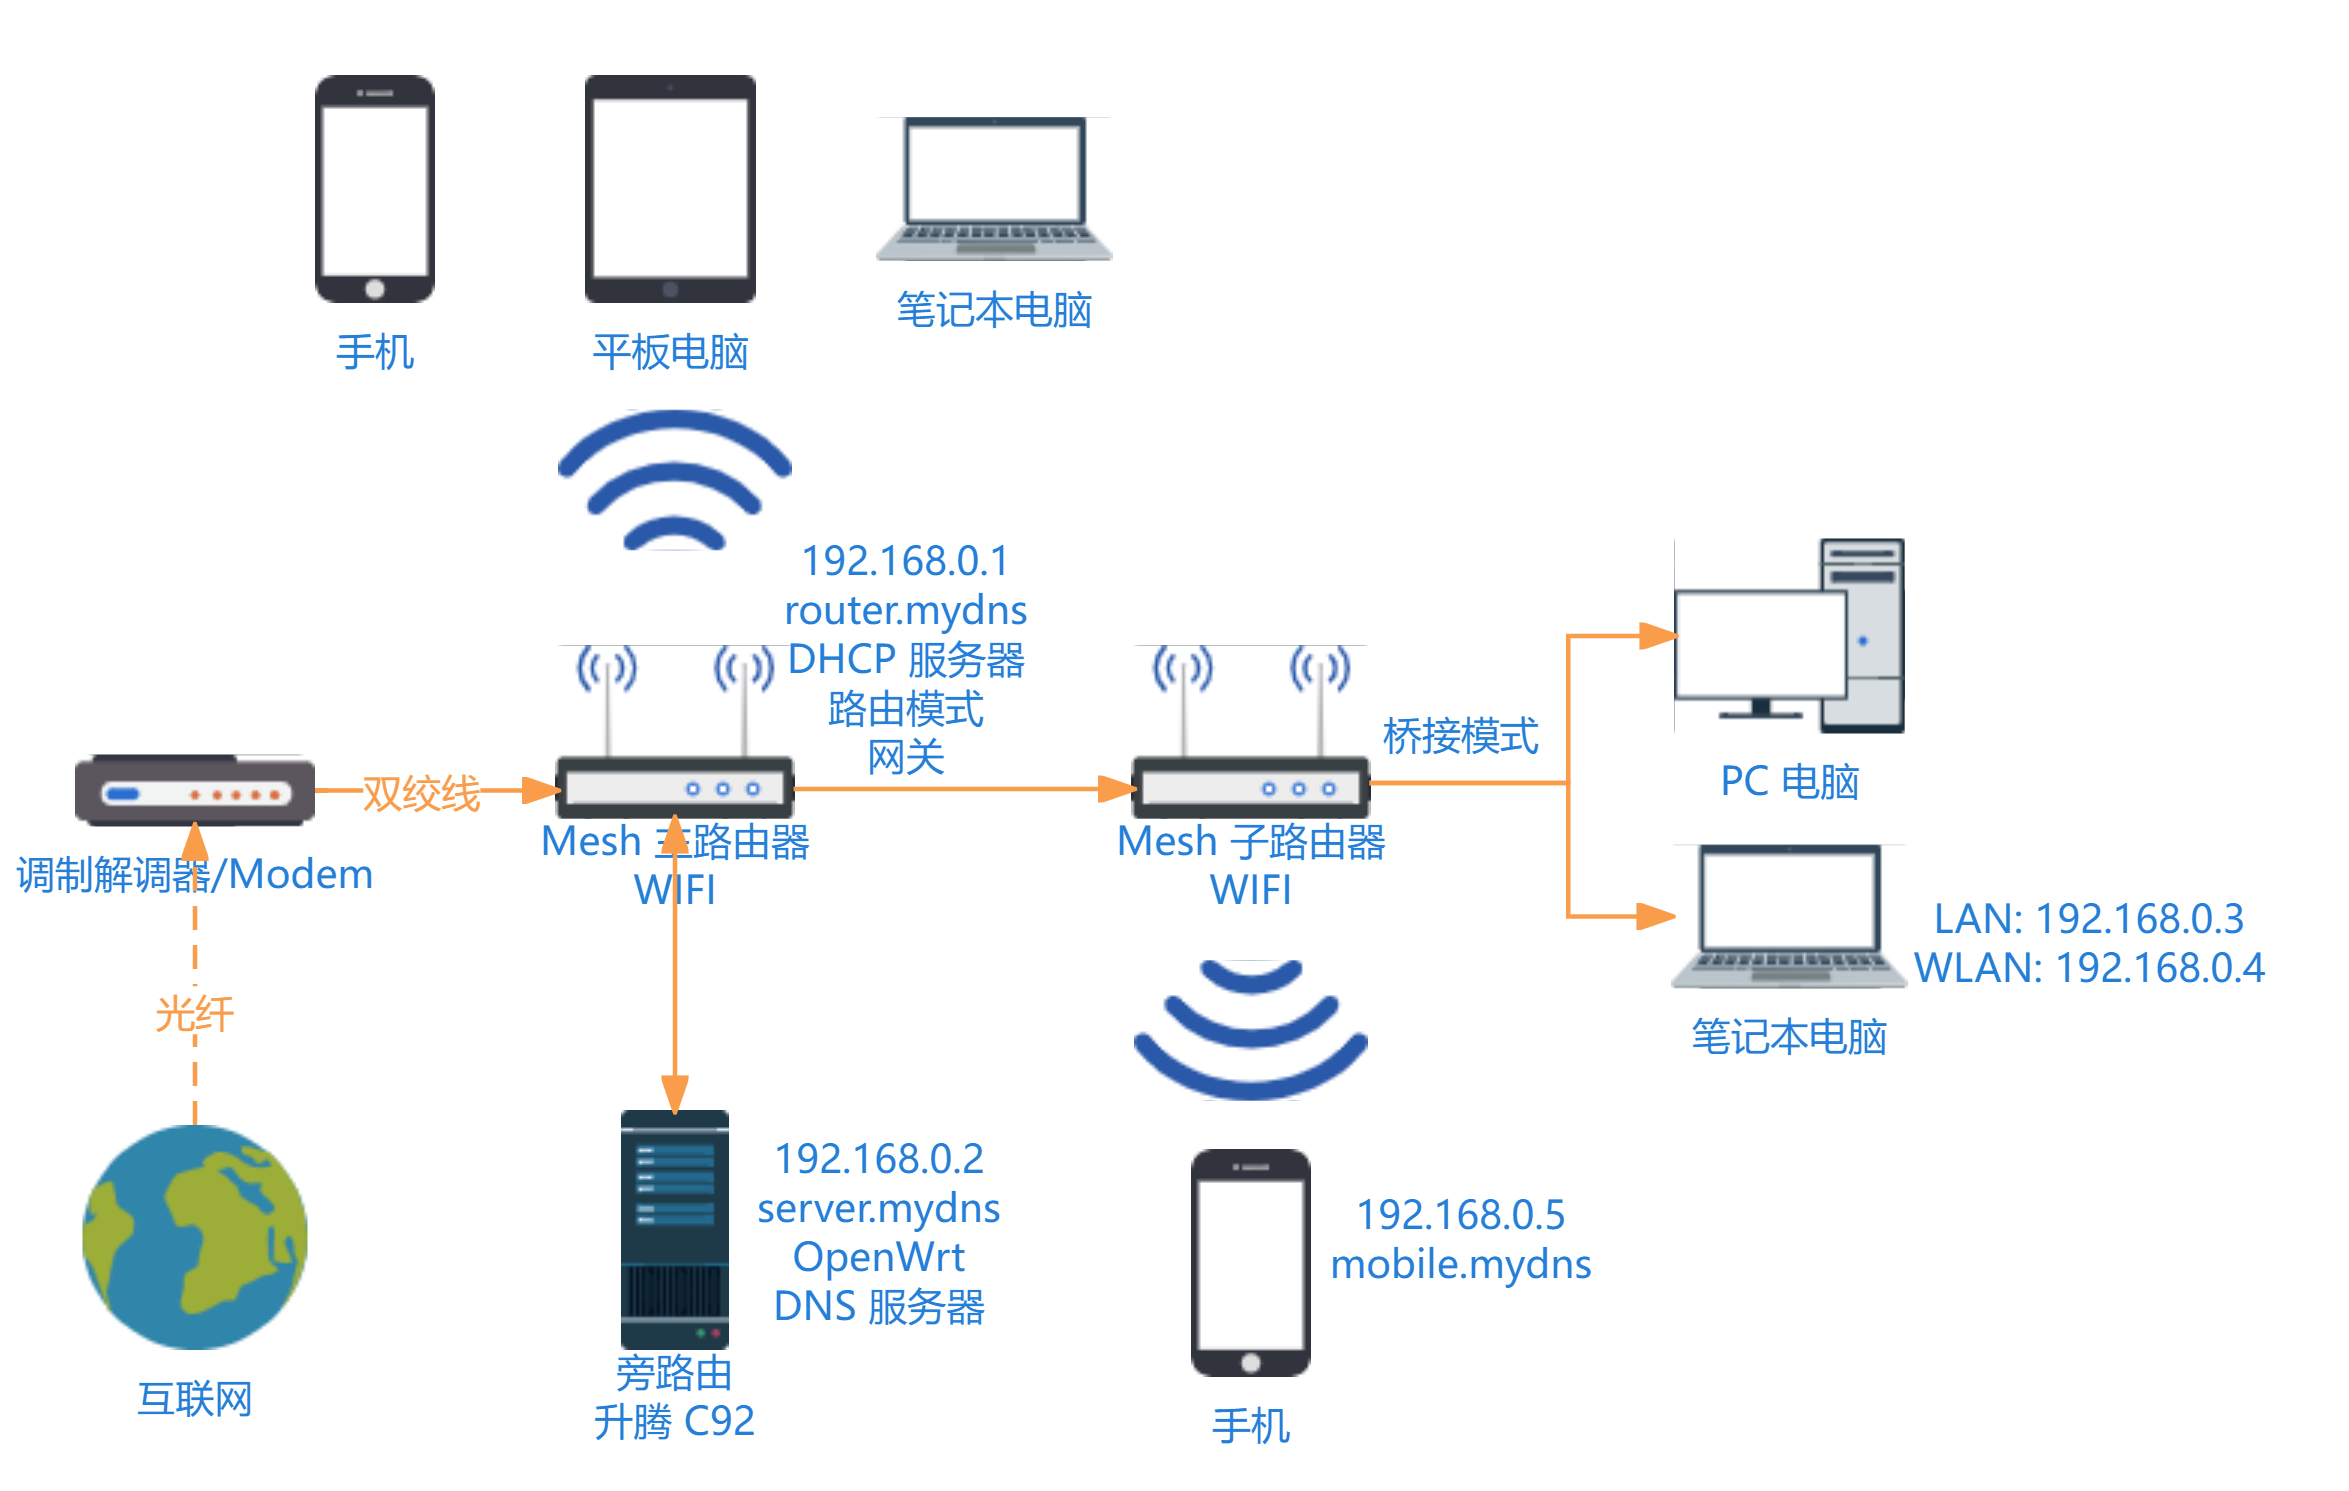
59 | 局域网系统拓扑图
60 |
61 | ---
62 |
63 | ## U盘准备
64 |
65 | ### 制作 Ventoy U盘
66 |
67 | [Ventoy 使用手册](https://www.ventoy.net/cn/doc_start.html)
68 |
69 | Ventoy 版本:1.0.97
70 |
71 | 1. 制作 Ventoy 启动盘:
72 |
73 | 打开 `Ventoy2Disk.exe` ,设置分区类型为 `GPT` 格式(为了让升腾C92能进行 UEFI 引导),找到需要格式化的U盘(注意保存数据),其他默认,安装即可
74 |
75 | 2. 加速镜像搜索过程:
76 |
77 | 在U盘根目录下创建 `Images` 文件夹,需要将镜像文件复制到此文件夹下。
78 |
79 | 打开 `VentoyPlugson.exe` ,启动服务,在打开的网页中选择 **全局控制插件** → **VTOY_DEFAULT_SEARCH_ROOT —— 指定搜索目录** 设置为 Images 的绝对路径(比如:`H:\Images`)
80 |
81 |
82 | ### 下载处理 OpenWrt 镜像
83 |
84 | [镜像 GitHub 仓库](https://github.com/haiibo/OpenWrt/)
85 |
86 | - 方式一(简单):使用预先构建好的固件:
87 |
88 | OpenWrt 仓库 release 版本:R2024-01-27 06:51:01 for X86_64
89 |
90 | 1. 下载 OpenWrt 镜像
91 |
92 | 因为硬件就是一个 x86 的小电脑,所以下载 [x86 版本的 OpenWrt 镜像](https://github.com/haiibo/OpenWrt/releases/tag/X86_64),我使用的是 `openwrt-x86-64-generic-squashfs-combined-efi.img.gz` 类型的镜像(squashfs 是一种用于 Linux 的压缩的只读文件系统,可以还原系统)
93 |
94 | 2. 解压镜像压缩包
95 |
96 | 下载的是镜像的压缩文件,需要解压,实测 7z 解压不了,用 [Gzip](https://gnuwin32.sourceforge.net/packages/gzip.htm) 和 [WinRAR](https://www.win-rar.com/download.html) 可以解压,比如:使用 gzip 解压:
97 |
98 | ```powershell
99 | .\gzip\bin\gzip.exe -dkv .\openwrt-x86-64-generic-squashfs-combined-efi.img.gz
100 | ```
101 |
102 | 等待片刻后,解压得到 .img 后缀的镜像文件
103 |
104 | - 方式二(自定义):自定义构建固件:
105 |
106 | [定制固件步骤](https://github.com/haiibo/OpenWrt#%E5%AE%9A%E5%88%B6%E5%9B%BA%E4%BB%B6-)
107 |
108 | 可以删除一些不用的软件。分区格式可以改为 ext4,方便在装机时,在 PE 系统内进行分区扩容。
109 |
110 |
111 | ### 制作微PE镜像
112 |
113 | [微PE 官网](https://www.wepe.com.cn/)
114 |
115 | 微PE 版本:2.3
116 |
117 | 打开微PE,生成可启动 ISO 镜像,放入U盘 Images 文件夹
118 |
119 | ### 下载硬盘烧录工具
120 |
121 | [physdiskwrite 官网](https://m0n0.ch/wall/physdiskwrite.php)
122 |
123 | physdiskwrite 版本:0.5.3
124 |
125 | 用于烧录系统镜像,放入U盘根目录方便实用
126 |
127 | ### U盘文件结构
128 |
129 | ```
130 | .
131 | ├── Images # 镜像文件夹
132 | │ ├── WePE_64_V2.3.iso # 微PE镜像
133 | │ └── openwrt-x86-64-generic-squashfs-combined-efi.img # OpenWrt镜像
134 | ├── VentoyPlugson.log # Ventoy插件记录
135 | ├── physdiskwrite.exe # 镜像烧录工具
136 | └── ventoy # Ventoy配置文件目录
137 | ├── ventoy.json # Ventoy配置文件
138 | └── ventoy_backup.json # Ventoy配置文件备份
139 | ```
140 |
141 | ---
142 |
143 | ## 安装 OpenWrt
144 |
145 | ### 主板 BIOS 设置
146 |
147 | 我手中的升腾 C92 可以使用 USB 引导,省去了刷 BIOS 的步骤:
148 |
149 | 升腾 C92 进入 BIOS 的方法是开机按 `F2` 键(按 `F12` 可选择启动设备)
150 |
151 | 1. 设置设备引导方式
152 |
153 | 在 BIOS 的 **Advanced** → **CSM Configuration** 中,将 **Boot option filter** 和 **Video** 都设置为 `Legacy only` ,将 **Storage** 设置为 `UEFI only` (如果觉得 Ventoy 镜像选项界面显示异常,看着不舒服的话,可设置为 Legacy only 解决)
154 |
155 | 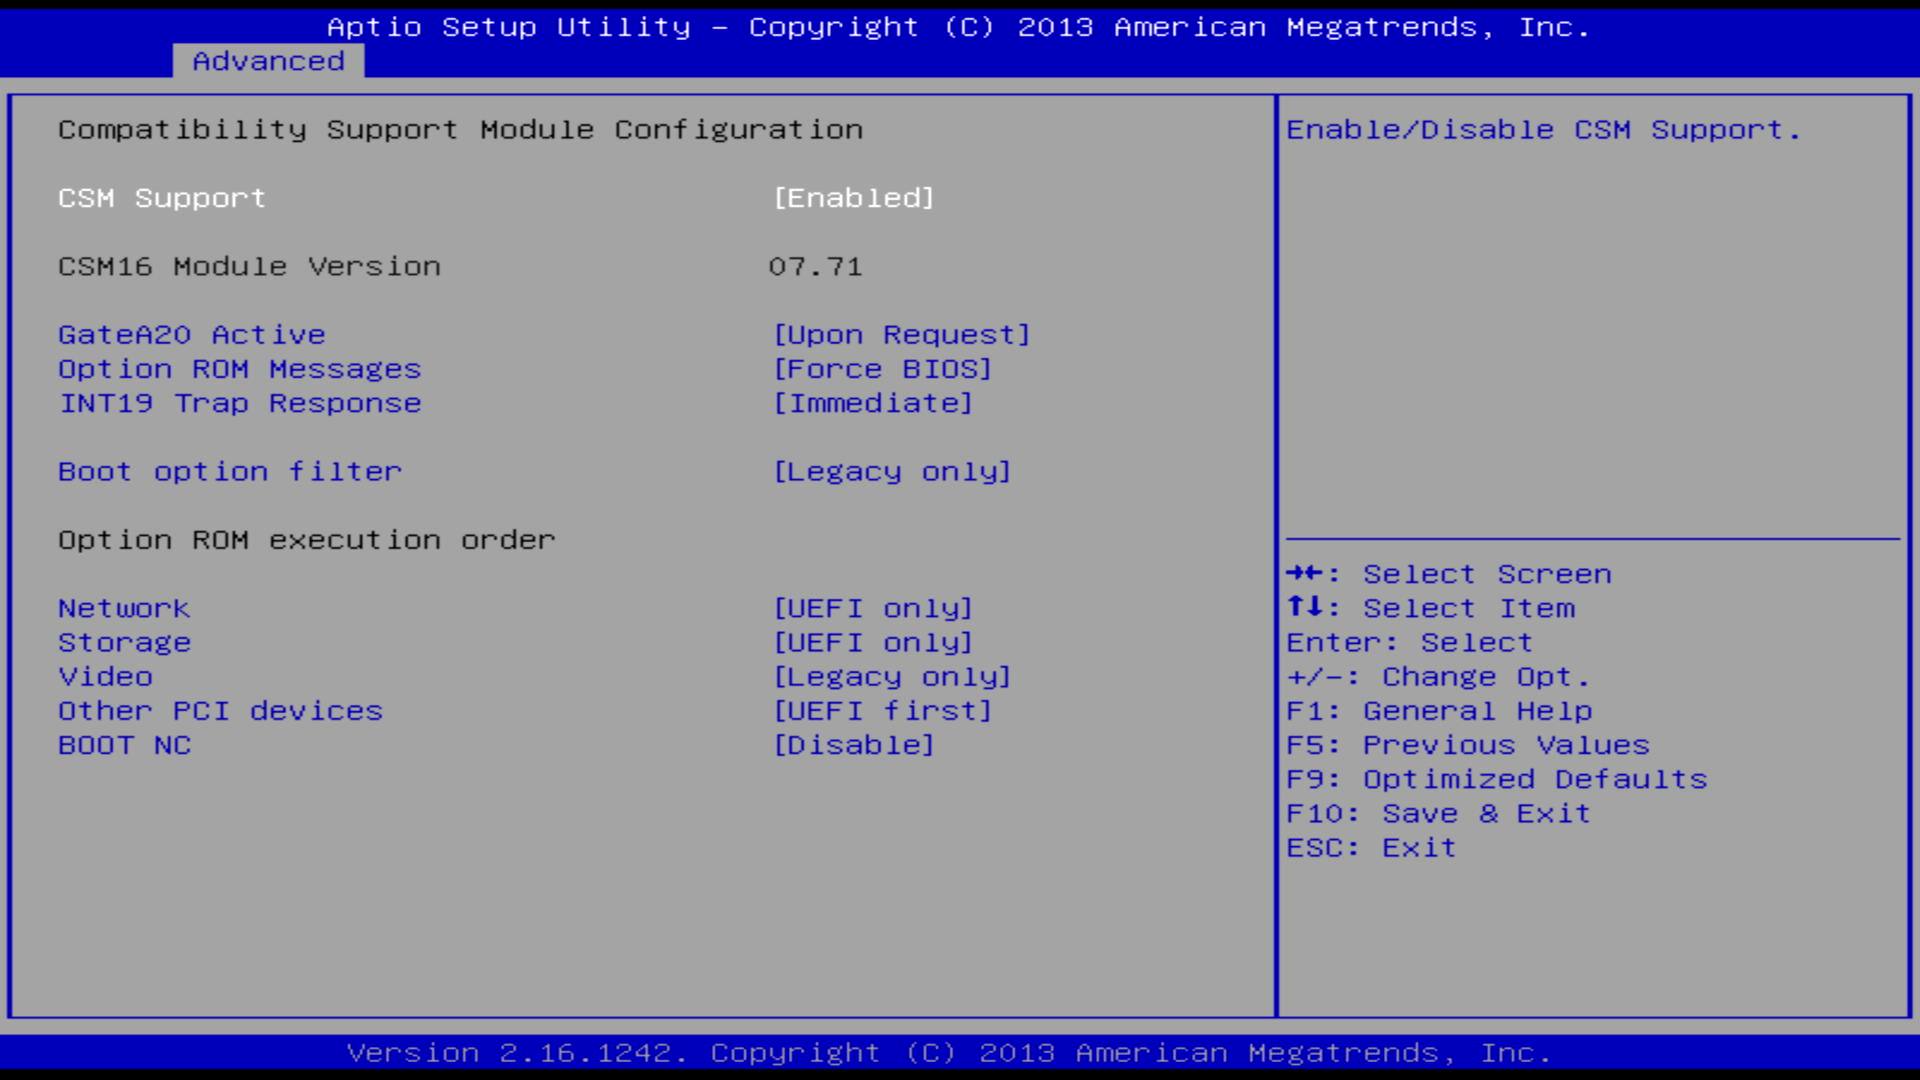
156 | BIOS 内设备引导方式
157 |
158 | 2. 设置 BIOS 设备启动优先级
159 |
160 | 在 BIOS 的 **Boot** → **Boot Option Priorities** 中,将U盘设置为第一启动设备,将硬盘设置为第二启动设备
161 |
162 | 3. 按 `F10` 保存并退出 BIOS
163 |
164 | ### 安装 OpenWrt 镜像到硬盘
165 |
166 | 1. 设置好 BIOS,开机进入 Ventoy 后选择从 WePE 启动 PE 系统
167 | 2. 用硬盘分区工具删除硬盘的所有分区
168 | 3. 烧录镜像:
169 |
170 | 打开命令行,使用 physdiskwrite 烧录 OpenWrt 镜像到硬盘,比如:
171 |
172 | ```
173 | U:\physdiskwrite.exe -u U:\Images\openwrt-x86-64-generic-squashfs-combined-efi.img
174 | ```
175 |
176 | 输入数字选择要烧录到的设备(我这里选择的是 `0` ,烧录到硬盘)
177 |
178 | 4. 关机拔下U盘后再开机
179 |
180 | ---
181 |
182 | ## 初始化配置 OpenWrt
183 |
184 | ### 设置 root 密码
185 |
186 | ```bash
187 | passwd
188 | ```
189 |
190 | ### 设置 OpenWrt IP 地址
191 |
192 | 设置 OpenWrt 的 IP 地址为 DHCP 动态分配:
193 |
194 | ```bash
195 | vim /etc/config/network
196 | ```
197 |
198 | 将其中的 `lan` 相关选项改为 `dhcp` 模式,比如:
199 |
200 | ```
201 | config interface 'lan'
202 | option type 'bridge'
203 | option ifname 'eth0'
204 | option proto 'dhcp'
205 | option ip6assign '60'
206 | ```
207 |
208 | 重启网络:
209 |
210 | ```bash
211 | /etc/init.d/network restart
212 | ```
213 |
214 | 或者通过网页面板在 **网络** → **接口** 中选择 **LAN** → **修改** 选择 **一般配置** → **基本设置** → **协议** 设置为 `DHCP客户端`。
215 |
216 | 然后在路由器中设置好 DHCP 服务,让升腾 C92 能分配到固定的 IP,之后即可通过 IP 地址访问 OpemWrt
217 |
218 | ---
219 |
220 | ## 主路由配置
221 |
222 | 各个路由器厂商,不同的路由器型号,其的后台配置大同小异。此处以我手头上的移动 X333 定制路由器为例,其后台地址、用户名和密码都贴在路由器外壳上。输入后台地址,进入 **高级设置界面**。
223 |
224 | ### IP-MAC 绑定
225 |
226 | **网络服务功能** → **MAC-Based 指定**
227 |
228 | ### DHCP 服务器配置
229 |
230 | 1. 先设置路由器自身的 IP 地址:**局域网** → **IP地址**(比如:`192.168.0.1`)
231 | 2. 后设置 DHCP 服:**网络服务功能** → **DHCP 设置**
232 | - IP池范围:旁路由的IP只能在这个范围内设置(比如:`192.168.0.2` - `192.168.0.254`)(有些路由器可在范围外设置)
233 | - 网关地址:路由器本身 IP(比如:`192.168.0.1`)
234 | - DNS 选项:手动设置 OpenWrt 的 IP 为首选,其他公共 DNS 为次选(比如:首选 `192.168.0.2`,次选 `223.5.5.5`)
235 |
236 | (因为我的手机 MIUI 的传统艺能,不支持 IPv6,所以只好关闭主路由器的 `IPv6` 功能)
237 |
238 |
239 | 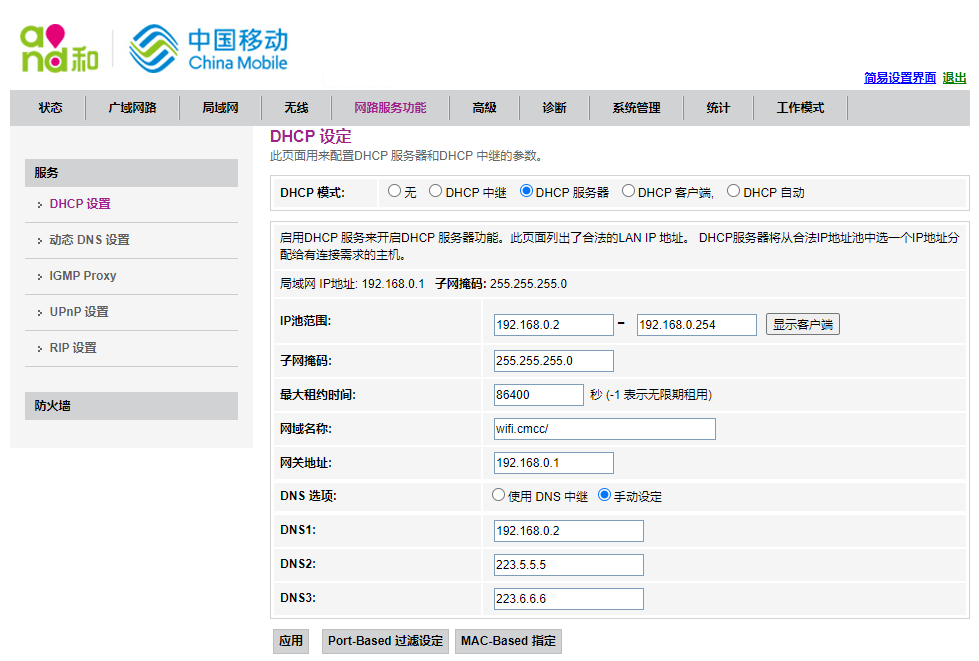
240 | 主路由器 DHCP 设置
241 |
242 | ---
243 |
244 | ## LuCI 面板设置 OpenWrt
245 |
246 | 在同一局域网内其他设备上,浏览器输入 OpenWrt 的 IP 地址,进入 LuCI 面板,以 GUI 的方式继续设置 OpenWrt
247 |
248 | ### DNS 服务器配置
249 |
250 | 比如:要解析 `server.mydns` 到 `192.168.0.2`
251 |
252 | 1. 添加 DNS 顶级域名:
253 |
254 | 在 **网络** → **DHCP/DNS** 中的 **服务器设置** → **基本设置** 中添加 **本地服务器** 和 **本地域名** (比如:本地服务器填 `/mydns/` ,本地域名填 `mydns` )
255 |
256 | 2. 添加主机名:
257 |
258 | 在 **网络** → **主机名** 中进行添加主机名(比如:主机名填 `server` ,IP地址填 `192.168.0.2` )(系统会自动添加自定义挟持域名)
259 |
260 |
261 | ### 磁盘扩容设置 swap 分区
262 |
263 | 此步骤用于 squashfs 格式的分区扩容(使用 overlay),ext4格式的分区扩容可在装机时手动设置。
264 |
265 | 1. 扩展分区
266 | - 方式一:使用[官方分区扩展脚本](https://openwrt.org/docs/guide-user/advanced/expand_root)(扩展根目录),也许需要先手动新建分区。
267 |
268 | ```bash
269 | wget -U "" -O expand-root.sh "https://openwrt.org/_export/code/docs/guide-user/advanced/expand_root?codeblock=0"
270 | . ./expand-root.sh
271 | ```
272 |
273 | - 方式二:手动扩展分区(挂载到根目录下的 overlay 文件夹)
274 |
275 | 使用新的分区替代原有 `/overlay` 的挂载点:
276 |
277 | 这里扩展10G的空间到 /overlay,然后将剩余的磁盘空间都用作 swap 分区。
278 |
279 | 1. 新建 ext4 分区
280 |
281 | 打开 **系统** → **磁盘管理** 找到需要进行操作的磁盘,点击 **修改** 后在空闲空间处新建一个10G的新分区,在 **终止扇区** 处填写 `+10g`,然后再 **格式化** 为 `ext4` 格式(系统会自动挂载新的分区)
282 |
283 | 2. 复制原有 /overlay 内的数据到新分区中:比如:
284 |
285 | ```bash
286 | cp -r /overlay/* /mnt/sda3
287 | ```
288 |
289 |
290 | 打开 **系统** → **挂载点**,添加挂载点,让新的分区(比如:`/dev/sda3`)挂载到 `/overlay` 然后重启生效,需要注意设置 docker, istore, opkg 等软件的根路径,以及下载文件的路径。让扩展到 /overlay 下的分区得到使用。
291 |
292 |
293 | 如果没问题,打开软件包界面,可以发现空闲空间变大了
294 |
295 | 2. 新建 swap 分区
296 |
297 | 操作与新建 ext4 分区类似,终止扇区默认到磁盘尾部,格式选择 `swap`。然后在 **系统** → **挂载点** 处启用 **自动挂载未配置的 Swap 分区**
298 |
299 | 3. 重启
300 |
301 | ---
302 |
303 | 其实后面还有其他的一些功能配置,比如 Docker,下载软件,网盘文件软件等,不过我最后没有继续使用 OpetWrt,而是换成了 Ubuntu,其原因有二:
304 |
305 | 1. 本人水平有限,设置的 swap 功能无法触发(swap 分区使用的空间极少,接近0),导致内存使用率一高系统就会变的卡顿。
306 | 2. 安装 opkg 和 ipk安装包 之外的软件较麻烦,多需要手动进行编译和调试。
307 |
308 | 感觉相比于一般通用的 Linux 发行版来说,OpenWrt 适合在功能较固定的路由器上使用。因为可定制固件,所以适合在硬件受到限制的嵌入式设备上使用。
309 |
310 | ---
311 |
312 | > 本文由 [Tsanfer's Blog](https://tsanfer.com/) 发布!
313 | >
--------------------------------------------------------------------------------
/docs/views/Hack/Cheat_engine-Kingdom_rush.md:
--------------------------------------------------------------------------------
1 | ---
2 | title: 使用 Cheat Engine 修改 Kingdom Rush 中的金钱、生命、星
3 | date: 2022-06-20
4 | categories:
5 | - Hack
6 | tags:
7 | - CheatEngine
8 | - 游戏修改
9 | - 代码注入
10 | - 汇编语言
11 | ---
12 |
13 |
14 |
15 | > [最新博客链接](https://tsanfer.com/views/Hack/Cheat_engine-Kingdom_rush.html)
16 |
17 | 最近想学习一下 CE,刚好看见游戏库里装了 Kingdom Rush 就拿它来研究吧。这里写的东西,需要一些 Cheat Engine 的基础,可以看看教程。
18 |
19 | 这里主要是看写的注释,来理解脚本。(如果什么都不想看,可以直接复制粘贴 CE 自动汇编(AA)脚本)
20 |
21 | > [参考 CE 脚本](https://fearlessrevolution.com/viewtopic.php?t=8107)
22 |
23 | 我学习的链接:
24 |
25 | > [你能学会的 Cheat Engine 零基础入门教程](https://www.bilibili.com/video/BV1nR4y1u7PZ)
26 |
27 | > [Cheat Engine 基础教程 CE Tutorial | Ganlv's Blog](https://ganlvtech.github.io/2018/01/25/cheat-engine-tutorial/#step-9-shared-code-pw-31337157)
28 |
29 | > [CE 教学实例应用-由浅入深学习游戏修改 [全十课]](https://www.bilibili.com/video/BV12W411H7Lb)
30 |
31 | 参考链接:
32 |
33 | > [Cheat Engine 官方 WIKI](https://wiki.cheatengine.org/index.php?title=Main_Page)
34 |
35 | > [x86 汇编指令列表](http://ref.x86asm.net/coder32.html)
36 |
37 | ## 技术理解
38 |
39 | 我对一些用到的技术的简单理解:
40 |
41 | - **代码注入**:在程序运行时,将自己写的代码,替换掉原有的代码
42 | - **AOB**:(Array Of Byte)在内存中搜索特定的一串数据,以决定注入代码的位置
43 | - **人造指针**:单独找个地方,记录变量所在的地址
44 |
45 | ## 数据存储结构
46 |
47 | 数据在内存中的存储结构:
48 |
49 | 
50 |
51 | ## Cheat Engine 相关汇编知识
52 |
53 | **此脚本用到的 CE 汇编指令**:
54 |
55 | > [x86 汇编指令列表](http://ref.x86asm.net/coder32.html)
56 |
57 | | 命令例子 | 功能 |
58 | | ---------------- | ----------------------------------------------------------------------------- |
59 | | mov ebx,0000FFFF | Move,寄存器直接赋值 |
60 | | mov ebx,eax | Move,将右边直接给左边 |
61 | | mov ebx,[eax] | Move,将右边所指的值给左边。[ ]代表括号内的是指针,操作时,操作其指向的内存值 |
62 | | cmp ebx,eax | Compare,比较两寄存器值,若相等则 ZF 位 置 1(左减右) |
63 | | `je
95 |
96 |
97 | ### 协议
98 |
99 | | **协议** | | |
100 | | -------- | -------------------- | --------------- |
101 | | 协议 | 速度 | 别名 |
102 | | USB 2.0 | 60MB/s | |
103 | | USB 3.0 | 500MB/S (5Gbps) | USB 3.2 Gen 1 |
104 | | USB 3.1 | 1212.12MB/s (10Gbps) | USB 3.2 Gen 2 |
105 | | USB 3.2 | 2424.24MB/s (20Gbps) | USB 3.2 Gen 2x2 |
106 | | USB4 | 5GB/s (40Gbps) | |
107 |
108 | > 本文由[Tsanfer's Blog](https://tsanfer.com) 发布!
109 |
--------------------------------------------------------------------------------
/.github/workflows/nodejs.yml:
--------------------------------------------------------------------------------
1 | # .github/workflows/nodejs.yml
2 |
3 | on: # 触发此文件运行的条件
4 | workflow_dispatch: # 手动
5 | push: # push 时
6 |
7 | name: CI/CD # 此工作流程(workflow)的名字
8 | jobs:
9 | FTP-Deploy-Action:
10 | name: CI&CD # 此任务(job)的名字
11 | runs-on: ubuntu-24.04 # 运行环境
12 | steps:
13 | - uses: actions/checkout@v4 # 切换分支
14 | with:
15 | fetch-depth: 2
16 |
17 | - name: Use Node.js 16
18 | uses: actions/setup-node@v4 # 使用node环境
19 | with:
20 | node-version: 16 # 版本16
21 |
22 | - name: Cache node modules
23 | id: cache # 缓存id
24 | uses: actions/cache@v4
25 | env:
26 | cache-name: cache-node-modules # 缓存名字
27 | with:
28 | path: node_modules # 缓存路径
29 | key: ${{ runner.os }}-build-${{ env.cache-name }}-${{ hashFiles('package.json') }} # 缓存标识
30 |
31 | - name: Install Dependencies
32 | if: steps.cache.outputs.cache-hit != 'true' # 如果没有缓存的话
33 | run: npm install # 安装依赖
34 |
35 | - name: Build project
36 | run: npm run docs:build # 构建项目和生成代码覆盖率报告
37 | env:
38 | LEANCLOUD_APP_ID: ${{ secrets.LEANCLOUD_APP_ID }} # 评 论系统的ID
39 | LEANCLOUD_APP_KEY: ${{ secrets.LEANCLOUD_APP_KEY }} # 评论系统的KEY
40 |
41 | # 如果SFTP-Deploy-Action出现,Dirty repository: Having uncommitted changes. 问题时,使用以下注释步骤解决问题
42 | # - name: reset git
43 | # run: git reset --hard
44 |
45 | # - name: Deploy with Password
46 | # uses: wlixcc/SFTP-Deploy-Action@v1.2.6
47 | # with:
48 | # username: ${{ secrets.FTP_USERNAME }}
49 | # server: ${{ secrets.FTP_SERVER }}
50 | # port: ${{ secrets.FTP_PORT }}
51 | # local_path: './docs/.vuepress/dist/*'
52 | # remote_path: '/upload'
53 | # sftp_only: true
54 | # password: ${{ secrets.FTP_PASSWORD }}
55 | # rsyncArgs: '--exclude=node_modules --exclude=.git --exclude=*.log'
56 | # sftpArgs: '-o ConnectTimeout=5'
57 |
58 | - name: 📂 Sync files
59 | uses: SamKirkland/FTP-Deploy-Action@v4.3.5
60 | with:
61 | # server: ${{ secrets.FTP_IP }}
62 | server: ${{ secrets.FTP_SERVER }}
63 | username: ${{ secrets.FTP_USERNAME }}
64 | password: ${{ secrets.FTP_PASSWORD }}
65 | local-dir: docs/.vuepress/dist/ # 选择哪些文件要部署到服务器,这个选项在这里选了之后,要在.git-ftp-include中添加相应的路径
66 | server-dir: /
67 |
68 | # ftp-server: sftp://${{ secrets.FTP_IP }}/home/www/htdocs # 服务器地址和端口(可以填域名,不过我服务器做了全站加速会导向加速结点的IP,所以只能用服务器的IP)
69 | # ftp-username: ${{ secrets.FTP_USERNAME }} # FTP用户名
70 | # ftp-password: ${{ secrets.FTP_PASSWORD }} # FTP密码
71 | # git-ftp-args: --insecure # (如果是FTP连接的话--insecure不用加)
72 | # local-dir: docs/.vuepress/dist/ # 选择哪些文件要部署到服务器,这个选项在这里选了之后,要在.git-ftp-include中添加相应的路径
73 |
74 | - name: upload-artifact
75 | uses: actions/upload-artifact@v4 #共享或保存action过程中产生的文件
76 | with:
77 | name: static_web_file
78 | path: ./docs/.vuepress/dist/ # or path/to/artifact
79 |
--------------------------------------------------------------------------------
/docs/.vuepress/public/avatar.svg:
--------------------------------------------------------------------------------
1 |
--------------------------------------------------------------------------------
/docs/views/MCU/Linux_board_NFS.md:
--------------------------------------------------------------------------------
1 | ---
2 | title: 设置嵌入式Linux开发板的NFS服务,开机自动挂载NFS服务
3 | date: 2020-03-03
4 | sidebar: "auto"
5 | categories:
6 | - MCU
7 | tags:
8 | - 嵌入式
9 | ---
10 |
11 | ## NFS 简介
12 |
13 | ---
14 |
15 | 网络文件系统 **(NFS,Network File System)** 是一种将远程主机上的分区(目录)经网络挂载到本地系统的一种机制,通过对网络文件系统的支持,用户可以在本地系统上像操作本地分区一样来**远程操作**主机的共享分区(目录)
16 |
17 | 在嵌入式 Linux 的开发过程中,开发者需要在 Linux 服务器上进行所有的软件开发,**交叉编译**,可以通过建立 NFS,把 Linux 服务器上的特定分区共享到待调试的嵌入式目标系统上,就可以直接在嵌入式目标系统上操作 Linux 服务器,同时可以在线对程序进行**调试和修改**,大大的方便了软件的开发。因此,NFS 的是嵌入式 Linux 开发的一个重要的组成部分。
18 |
19 | 嵌入式 Linux 的 NFS 开发环境的实现包括**两个方面**:一是 Linux**服务器端**的 NFS 服务器支持;二是嵌入式目标系统的 NFS**客户端**的支持。因此,NFS 开发环境的建立需要配置 linux 服务器端和嵌入式目标系统端。
20 |
21 | ## 开发环境
22 |
23 | ---
24 |
25 | | | 开发主机 | 开发板 |
26 | | :------: | :--------------------: | :----------------------------------------: |
27 | | 发行版本 | Deepin GNU/Linux 15.11 | Freescale i.MX Release Distro 4.1.15-2.1.0 |
28 | | 内核版本 | 4.15.0-30 | 4.1.15-2.1.0-00171-g7a6e9c2dea71 |
29 |
30 | 设置主机和开发板在同一网段(192.168.0.0/24),主机(192.168.0.1),开发板(192.168.0.2)
31 |
32 | ## 主机设置
33 |
34 | ---
35 |
36 | ### 设置主机静态 IP 地址
37 |
38 | #### 添加有线连接
39 |
40 | | 项目 | 值 |
41 | | -------- | ------------- |
42 | | IP | 192.168.0.1 |
43 | | 子网掩码 | 255.255.255.0 |
44 |
45 | ### 主机开启 NFS 服务
46 |
47 | #### 安装 NFS 服务
48 |
49 | ```bash
50 | sudo apt-get install nfs-kernel-server
51 | ```
52 |
53 | #### 查看用户 ID
54 |
55 | ```bash
56 | id
57 | ```
58 |
59 | 
60 | **记录 UID 和 GID**
61 |
62 | #### 配置 NFS 配置文件
63 |
64 | **添加内容到`/etc/exports`文件末尾**
65 |
66 | ```bash
67 | /home/tsanfer/share
68 | 192.168.0.0/24(rw,sync,all_squash,anonuid=1000,anongid=1000,no_subtree_check)
69 | ```
70 |
71 | > - **/home/tsanfer/share:要共享的开发主机目录**
72 | > - **192.168.0.0/24:配置谁可以访问,其中的/24 是掩码**
73 | > - **rw: 表示客户机的权限,rw 表示可读写**
74 | > - **sync:资料同步写入到内存与硬盘中。**
75 | > - **anonuid=1000:将客户机上的用户映射成指定的本地用户 ID 的用户**
76 | > - **anongid=998: 将客户机上的用户映射成属于指定的本地用户组 ID**
77 | > - **no_subtree_check:不检查子目录权限,默认配置**
78 |
79 | #### 创建共享目录`/home/tsanfer/share`
80 |
81 | #### 更新 exports 配置
82 |
83 | ```bash
84 | sudo exportfs -arv
85 | ```
86 |
87 | > - **-a:全部 mount 或 umount 文件/etc/exports 中的内容。**
88 | > - **-r:重新 mount 文件/etc/exports 中的共享内容。**
89 | > - **-u:umount 目录。**
90 | > - **-v:在 exportfs 的时候,将详细的信息输出到屏幕上。**
91 |
92 | 
93 |
94 | #### 查看 NFS 共享情况
95 |
96 | ```bash
97 | showmount -e
98 | ```
99 |
100 | 
101 |
102 | ## 开发板设置
103 |
104 | ---
105 |
106 | ### 开发板设置静态 IP 地址
107 |
108 | #### 临时设置静态 IP 地址
109 |
110 | ```bash
111 | ifconfig eth0 192.168.0.2
112 | ```
113 |
114 | #### 开机自动设置静态 IP 地址
115 |
116 | **添加内容到`/etc/init.d/rc`文件末尾**
117 |
118 | ```bash
119 | ifconfig eth0 192.168.0.2
120 | ```
121 |
122 | 重新启动后即可生效更改
123 |
124 | #### 查看 IP 地址
125 |
126 | ```bash
127 | ifconfig
128 | ```
129 |
130 | 
131 |
132 | ### 开发板挂载 NFS 服务
133 |
134 | #### 创建挂载点目录
135 |
136 | `/home/root/share`
137 |
138 | #### 挂载 NFS 文件系统
139 |
140 | #### 临时挂载
141 |
142 | ```bash
143 | mount -o vers=4 192.168.0.1:/home/tsanfer/share /home/root/share
144 | ```
145 |
146 | > - **-o vers=4:表示使用 NFS 文件系统第 4 版本**
147 | > - **192.168.0.1:目标主机的 IP 地址**
148 | > - **/home/tsanfer/share:远端的主机共享目录。**
149 | > - **/home/root/share:本地挂载点,即要把远端共享的目录映射到本地(开发板)的哪个目录**
150 |
151 | #### 开机自动挂载
152 |
153 | **添加内容到`/etc/init.d/rc`文件末尾**
154 |
155 | ```bash
156 | mount -o vers=4 192.168.0.1:/home/tsanfer/share /home/root/share
157 | ```
158 |
159 | 重新启动后即可生效更改
160 |
161 | ## 测试
162 |
163 | - 开发板进行操作:
164 |
165 | ```bash
166 | touch /home/root/share/test_file
167 | ```
168 |
169 | 开发板查看结果
170 | 
171 |
172 | - 主机查看结果:
173 |
--------------------------------------------------------------------------------
/docs/.vuepress/config.js:
--------------------------------------------------------------------------------
1 | // docs/.vuepress/config.js
2 |
3 | module.exports = {
4 | // host: "0.0.0.0", // 生成网页地址(本地调试使用)
5 | // port: "22333", // 生成网页端口(本地调试使用)
6 | title: "Tsanfer's Blog", // 显示在左上角的网页名称以及首页在浏览器标签显示的title名称
7 | description: "网络空间无限宽广", // meta 中的描述文字,用于SEO
8 | head: [
9 | ["link", { rel: "icon", href: "/favicon.svg" }], //浏览器的标签栏的网页图标,基地址/docs/.vuepress/public
10 | [
11 | "meta",
12 | {
13 | name: "viewport",
14 | content: "width=device-width,initial-scale=1,user-scalable=no",
15 | },
16 | ], //在移动端,搜索框在获得焦点时会放大
17 | [
18 | 'script async defer', {src: 'http://learn.tsanfer.com:8080/api/application/embed?protocol=http&host=learn.tsanfer.com:8080&token=f077a5ae0d9136e0'}
19 | ]
20 | ],
21 | theme: "reco", //选择主题‘reco’
22 | themeConfig: {
23 | type: "blog", //选择类型博客
24 | fullscreen: true,
25 | blogConfig: {
26 | category: {
27 | location: 2, // 在导航栏菜单中所占的位置,默认2
28 | text: "分类", // 默认 “分类”
29 | },
30 | tag: {
31 | location: 3, // 在导航栏菜单中所占的位置,默认3
32 | text: "标签", // 默认 “标签”
33 | },
34 | socialLinks: [
35 | { icon: "reco-github", link: "https://github.com/Tsanfer" },
36 | { icon: "reco-bilibili", link: "https://space.bilibili.com/12167681" },
37 | { icon: "reco-douban", link: "https://www.douban.com/people/219819109" },
38 | { icon: "reco-twitter", link: "https://twitter.com/a1124851454" },
39 | { icon: "reco-mail", link: "mailto:a1124851454@gmail.com" },
40 | ],
41 | },
42 | nav: [
43 | //导航栏设置
44 | { text: "主页", link: "/", icon: "reco-home" },
45 | {
46 | text: "工具",
47 | icon: "reco-api",
48 | items: [
49 | {
50 | text: "个人网盘",
51 | link: "http://clouddisk.tsanfer.com:8080",
52 | icon: "fa-hard-drive",
53 | },
54 | {
55 | text: "订阅转换器",
56 | link: "http://clouddisk.tsanfer.com:58080",
57 | icon: "fa-right-left",
58 | },
59 | {
60 | text: "目标检测",
61 | link: "http://hpc.tsanfer.com:8000",
62 | icon: "fa-solid fa-object-ungroup",
63 | },
64 | {
65 | text: "在线 XM 音乐播放器",
66 | link: "http://clouddisk.tsanfer.com:8081",
67 | icon: "fa-robot",
68 | },
69 | ],
70 | },
71 | {
72 | text: "联系",
73 | icon: "reco-message",
74 | items: [
75 | {
76 | text: "GitHub",
77 | link: "https://github.com/Tsanfer",
78 | icon: "reco-github",
79 | },
80 | {
81 | text: "CSDN",
82 | link: "https://blog.csdn.net/qq_27961843/",
83 | icon: "reco-csdn",
84 | },
85 | {
86 | text: "BiliBili",
87 | link: "https://space.bilibili.com/12167681",
88 | icon: "reco-bilibili",
89 | },
90 | {
91 | text: "豆瓣",
92 | link: "https://www.douban.com/people/219819109",
93 | icon: "reco-douban",
94 | },
95 | {
96 | text: "网易云音乐",
97 | link: "https://music.163.com/#/user/home?id=69696518",
98 | },
99 | {
100 | text: "QQ",
101 | link: "tencent://message/?uin=1124851454",
102 | icon: "reco-qq",
103 | },
104 | {
105 | text: "Twitter",
106 | link: "https://twitter.com/a1124851454",
107 | icon: "reco-twitter",
108 | },
109 | {
110 | text: "Gmail",
111 | link: "mailto:a1124851454@gmail.com",
112 | icon: "reco-mail",
113 | },
114 | ],
115 | },
116 | ],
117 | sidebar: {
118 | "/views/frontEnd/": [
119 | {
120 | title: "前端", // 必要的
121 | sidebarDepth: 2, // 可选的, 默认值是 1
122 | children: [
123 | "vuepress_theme_reco-Github_Actions",
124 | "VuePress_GithubPages_TravisCI",
125 | "Sphinx_GitHub_ReadtheDocs",
126 | ],
127 | },
128 | ],
129 | "/views/MCU/": [
130 | {
131 | title: "MCU", // 必要的
132 | sidebarDepth: 2, // 可选的, 默认值是 1
133 | children: [
134 | "Linux_board_NFS",
135 | "First_Prepare_for_Lanqiao_Cup_MCU_Competition",
136 | "ESP32_Wi-Fi_schedule_HTTP(S)"
137 | ],
138 | },
139 | ],
140 | "/views/Computer/": [
141 | {
142 | title: "计算机", // 必要的
143 | sidebarDepth: 2, // 可选的, 默认值是 1
144 | children: [
145 | "Storage_hardware",
146 | "Windows_WSL_terminal_WebDAV_PartitionBackup",
147 | "C92_Openwrt_DNS_Swap"
148 | ],
149 | },
150 | ],
151 | "/views/Tool/": [
152 | {
153 | title: "工具", // 必要的
154 | sidebarDepth: 2, // 可选的, 默认值是 1
155 | children: ["Frp_Docker_SSH_RDP"],
156 | },
157 | ],
158 | "/views/Hack/": [
159 | {
160 | text: "Hack",
161 | sidebarDepth: 2,
162 | children: ["Cheat_engine-Kingdom_rush"],
163 | },
164 | ],
165 | },
166 | // displayAllHeaders: true, // 默认值:false
167 | subSidebar: "auto",
168 |
169 | record: "蜀ICP备20005033号-2",
170 | recordLink: "https://beian.miit.gov.cn/",
171 | cyberSecurityRecord: "川公网安备51110202002360号",
172 | cyberSecurityLink: "http://www.beian.gov.cn/",
173 | startYear: "2020", // 项目开始时间,只填写年份
174 | lastUpdated: "最后更新时间", // string | boolean
175 | author: "Tsanfer",
176 | authorAvatar: "/avatar.svg", //作者头像
177 | // mode: "light", //默认显示白天模式
178 | mode: "auto", //默认显示白天模式
179 | smooth: "true", //平滑滚动
180 | // 评论设置
181 | valineConfig: {
182 | appId: process.env.LEANCLOUD_APP_ID,
183 | appKey: process.env.LEANCLOUD_APP_KEY,
184 | },
185 | },
186 | markdown: {
187 | lineNumbers: true, //代码显示行号
188 | }, // 搜索设置
189 | search: true,
190 | searchMaxSuggestions: 10, // 插件
191 | plugins: [
192 | ["flowchart"], // 支持流程图
193 | ["@vuepress/nprogress"], // 加载进度条
194 | ["reading-progress"], // 阅读进度条
195 | ["vuepress-plugin-code-copy", true], //一键复制代码插件
196 | ],
197 | };
198 |
--------------------------------------------------------------------------------
/docs/views/Tool/Frp_Docker_SSH_RDP.md:
--------------------------------------------------------------------------------
1 | ---
2 | title: 使用 Frp 和 Docker 通过远程桌面和 SSH 来远程控制 Windows(反向代理)
3 | date: 2022-01-18
4 | sidebar: "auto"
5 | categories:
6 | - 工具
7 | tags:
8 | - Frp
9 | - 反向代理
10 | - 内网穿透
11 | - Docker
12 | publish: true
13 | ---
14 |
15 | > [最新博客文章链接](https://tsanfer.com/views/Tool/Frp_Docker_SSH_RDP.html)
16 |
17 | ***
18 |
19 | ## 大体思路
20 |
21 | 使用 Docker 容器,在云服务器上部署 Frps 容器来中转流量,在被控制的 Windows 上部署 Frpc 容器来暴露内网的服务,在主控制端的 Windows 上直接运行 Frpc,来连接要访问的服务到本地。
22 |
23 | ||主控制端|中转服务器|被控制端|
24 | |--|--|--|--|
25 | |Frp 类型|Frpc|Frps|Frpc|
26 | |SSH 端口|6000||22|
27 | |远程桌面端口|3390||3389|
28 | |转发 IP|127.0.0.1(本地 IP)||192.168.1.7(容器外部宿主,局域网 IP)|
29 |
30 | ### 用到的东西
31 |
32 | - 反向代理
33 | > 反向代理在电脑网络中是代理服务器的一种。服务器根据客户端的请求,从其关系的一组或多组后端服务器(如Web服务器)上获取资源,然后再将这些资源返回给客户端,客户端只会得知反向代理的IP地址,而不知道在代理服务器后面的服务器集群的存在。
34 | - [Frp](https://gofrp.org/):
35 | > frp 采用 C/S 模式,将服务端部署在具有公网 IP 的机器上,客户端部署在内网或防火墙内的机器上,通过访问暴露在服务器上的端口,反向代理到处于内网的服务。 在此基础上,frp 支持 TCP, UDP, HTTP, HTTPS 等多种协议,提供了加密、压缩,身份认证,代理限速,负载均衡等众多能力。
36 | >
37 | > 
38 |
39 | ## Frp 配置文件
40 |
41 | 主要是参考[官方教程](https://gofrp.org/),根据需要增删内容
42 |
43 | 先是去[官方的 Github 仓库](https://github.com/fatedier/frp/releases)下载相应版本的 Frp 软件,然后解压
44 |
45 | ### 服务器端配置文件
46 |
47 | 记得在云服务器后台,放行相应的端口
48 |
49 | ```ini
50 | # frps.ini
51 |
52 | # 固定段落,用于配置通用参数
53 | [common]
54 | # 服务器监听端口
55 | bind_port = 7000
56 | bind_udp_port = 7000
57 | token = 123456
58 | # 服务器 dashboard
59 | dashboard_port = 7500
60 | dashboard_user = admin
61 | dashboard_pwd = admin
62 | # 每个客户端的连接数量上限
63 | max_pool_count = 5
64 | # kcp 绑定的是 udp 端口,可以和 bind_port 一样(kcp 可能会连接不上)
65 | # kcp_bind_port = 7000
66 | ```
67 |
68 | ### 客户端(被控制端)配置文件
69 |
70 | ```ini
71 | # frpc.ini(被控制端)
72 |
73 | [common]
74 | server_addr = x.x.x.x
75 | server_port = 7000
76 | token = 123456
77 | # 客户端指定,预创建的连接数量
78 | pool_count = 1
79 | # server_port 指定为 frps 的 kcp_bind_port
80 | # server_port = 7000
81 | # 使用kcp协议(kcp 可能会连接不上)
82 | # protocol = kcp
83 | use_encryption = true
84 | use_compression = true
85 |
86 | # 代理名称(必须唯一)
87 | [secure_ssh]
88 | # 协议类型
89 | # stcp 或 sudp 协议可以不在服务器暴露端口,
90 | # 所以可以省略 remote_port 选项
91 | type = stcp
92 | # 安全角色(用于stcp、sudp)(只能填 server 或 visitor)
93 | role = server
94 | # 安全角色密钥
95 | sk = abcdefg
96 | # 指定远程登陆地址为,被控制主机的局域网 IP 地址
97 | #(如果 frpc 没有部署在 docker 上则可使用 127.0.0.1)
98 | local_ip = 192.168.1.7
99 | local_port = 22
100 |
101 | # 远程桌面 tcp 端口
102 | [remote_tcp]
103 | type = stcp
104 | role = server
105 | sk = abcdefg
106 | local_ip = 192.168.1.7
107 | local_port = 3389
108 |
109 | # 远程桌面 udp 端口
110 | [remote_udp]
111 | type = sudp
112 | role = server
113 | sk = abcdefg
114 | local_ip = 192.168.1.7
115 | local_port = 3389
116 | ```
117 |
118 | ### 客户端(主控制端)配置文件
119 |
120 | ```ini
121 | # frpc.ini(主控制的机器)
122 |
123 | [common]
124 | server_addr = x.x.x.x
125 | server_port = 7000
126 | token = 123456
127 | # 本地绑定地址
128 | bind_addr = 127.0.0.1
129 | use_encryption = true
130 | use_compression = true
131 |
132 | [secure_ssh_visitor]
133 | type = stcp
134 | # 要访问的代理名称
135 | server_name = secure_ssh
136 | sk = abcdefg
137 | role = visitor
138 | # 本地绑定端口
139 | bind_port = 6000
140 |
141 | [remote_tcp_visitor]
142 | type = stcp
143 | server_name = remote_tcp
144 | sk = abcdefg
145 | role = visitor
146 | bind_port = 3390
147 |
148 | # UDP 连接可能会卡顿,估计是容易被运营商 QoS
149 | # [remote_udp_visitor]
150 | # type = sudp
151 | # server_name = remote_udp
152 | # sk = abcdefg
153 | # role = visitor
154 | # bind_port = 3390
155 | ```
156 |
157 | ## 其他配置和部署连接
158 |
159 | 在配置时可以用 `docker logs frps` 或 `docker logs frpc` 来查看调试信息
160 |
161 | 
162 |
163 | ### 被控制端本地 SSH 设置
164 |
165 | > [微软官方 | 通过 SSH 进行 PowerShell 远程处理](https://docs.microsoft.com/zh-cn/powershell/scripting/learn/remoting/ssh-remoting-in-powershell-core?view=powershell-7.2)
166 |
167 | 1. 先安装 OpenSSH,最新的 [PowerShell](https://www.microsoft.com/store/productId/9MZ1SNWT0N5D) 里就内置了 OpenSSH,可以直接去 Windows 商店里下载
168 | 2. 将 SSH 默认 shell 改为 powershell.exe
169 |
170 | `New-ItemProperty -Path "HKLM:\SOFTWARE\OpenSSH" -Name DefaultShell -Value "C:\Windows\System32\WindowsPowerShell\v1.0\powershell.exe" -PropertyType String -Force`
171 | 3. 我没有给电脑设置登录密码,所以要开启免密登陆
172 |
173 | 把 `C:\ProgramData\ssh\sshd_config` 中的 `PermitEmptyPasswords` 选项,取消注释并设置为 `PermitEmptyPasswords yes`
174 | 4. 最后再重启 sshd 服务 `Restart-Service sshd`
175 |
176 | ### 配置 Windows 远程桌面
177 |
178 | > [微软官方 | 如何使用远程桌面](https://support.microsoft.com/zh-cn/windows/%E5%A6%82%E4%BD%95%E4%BD%BF%E7%94%A8%E8%BF%9C%E7%A8%8B%E6%A1%8C%E9%9D%A2-5fe128d5-8fb1-7a23-3b8a-41e636865e8c)
179 |
180 | 在被控制的电脑上开启远程桌面,然后在主控制端连接
181 |
182 | ### 部署 Frp
183 |
184 | 在服务器端部署 frps 容器,服务器的配置文件我放在了 `~/frp/frps.ini` 。
185 |
186 | `docker run --network host --restart=always -d -v ~/frp/frps.ini:/etc/frp/frps.ini --name frps snowdreamtech/frps`
187 |
188 | 在客户端(被控制端)部署 frpc 容器,被控制端的配置文件我放在了 `C:\Stand_alone\frp\frpc.ini` 。
189 |
190 | `docker run --network host --restart=always -d -v C:\Stand_alone\frp\frpc.ini:/etc/frp/frpc.ini --name frpc snowdreamtech/frpc`
191 |
192 | ### 连接 Frp
193 |
194 | 在客户端(主控制端)运行 frpc,主控制端的配置文件我放在了 `C:\Stand_alone\frp\frpc.ini` 。
195 |
196 | `C:\Stand_alone\frp\frpc.exe -c C:\Stand_alone\frp\frpc.ini`
197 |
198 | 最后就可以直接访问 SSH(`localhost:6000`) 和远程桌面(`localhost:3389`)了
199 |
200 | 
201 |
202 | 
203 |
204 | ## 可替代方案:Sakura Frp
205 |
206 | 如果嫌麻烦,以及不太强调安全的话,可以使用 [Sakura Frp](https://www.natfrp.com/tunnel/)
207 |
208 | 原理和普通的 Frp 一样,不过配置起来更方便。你可以在被控制端直接下载一个 Sakura Frp 官方的启动器,或者用 Frpc 或 Docker 来连接到 Sakura Frp 的服务器。
209 |
210 | 配置的步骤比较简单,直接看官方的教程就行了。
211 |
212 | 我是用的 Docker 方式部署,这里我列一下我自己的配置:
213 |
214 | |节点|成都电信|
215 | |--|--|
216 | |隧道类型|TCP|
217 | |端口|自动生成|
218 | |本地 IP|192.168.1.7|
219 | |访问密码|xxxxxx|
220 | |加密传输|禁用|
221 | |压缩数据|启用|
222 |
223 | 
224 |
225 | 被控制端 Docker 的配置
226 |
227 | `docker run -d --restart=always --name=frpc_sakura natfrp/frpc -f abcdefghijklmnop:2680675,2804403 --remote_control yyyyyy`
228 |
229 | - `abcdefghijklmnop` :Sakura Frp 账号的总访问密钥
230 |
231 | - `2680675` :远程桌面的隧道 ID
232 |
233 | - `2804403` :SSH 的隧道 ID
234 |
235 | - `yyyyyy` :设置在 Sakura Frp 官网网页上远程管理隧道的密码(不是访问密码)
236 |
237 | 如果被控制端的 Docker 运行正常的话,官网上的隧道颜色,会由灰色变成绿色。之后就可以在官网上对相应的隧道进行授权,一般就授权本地的 IP 地址。完成过后就可以连接 Sakura Frp 官网的代理服务器的域名和相应端口,来进行远程控制了。如果自己有已备案的域名的话,可以用 DNS 的 CNAME 解析,把自己的域名映射到 Sakura Frp 的代理服务器,方便隧道节点的更换。
238 |
239 | ***
240 |
241 | > 本文由 [Tsanfer's Blog](https://tsanfer.com/) 发布!
242 |
--------------------------------------------------------------------------------
/docs/views/frontEnd/Sphinx_GitHub_ReadtheDocs.md:
--------------------------------------------------------------------------------
1 | ---
2 | title: 创建Sphinx + GitHub + ReadtheDocs托管文档
3 | date: 2020-03-07
4 | sidebar: "auto"
5 | categories:
6 | - 前端
7 | tags:
8 | - Github
9 | - 在线文档
10 | ---
11 |
12 | ::: tip
13 | 在本地配置好 Linux 环境(我用的 WSL),然后配置好 Sphinx 生成文档的样式,最后推送到 Github,并触发 Readthedocs 自动构建、生成在线文档
14 | :::
15 |
16 |
17 |
18 | 🎵🎵🎵🎵🎼🎼🎼🎼🎧🎼🎼🎼🎼🎵🎵🎵🎵
19 |
20 |
24 |
25 | | [Sphinx](https://www.sphinx-doc.org/) | [Github](https://github.com/) | [Readthedocs](https://readthedocs.org/) |
26 | | :-----------------------------------: | :----------------------------------------------------------------------------------------------------------: | :--------------------------------------------------------------------------------------------------: |
27 | | |
28 |
29 | ## 最终效果
30 |
31 | 
32 |
33 | ## Linux 配置
34 |
35 | > Win10 Ubuntu 子系统路径:`%USERNAME%\AppData\Local\Packages\CanonicalGroupLimited.UbuntuonWindows_79rhkp1fndgsc\LocalState\rootfs`
36 |
37 | ### 更换 Ubuntu 源
38 |
39 | #### step 1: 首先看看国内有哪些源
40 |
41 | | 名称 | 域名 |
42 | | :------: | :-------------------------------------------: |
43 | | 阿里 | `http://mirrors.aliyun.com/ubuntu/` |
44 | | 163 | `http://mirrors.163.com/ubuntu/` |
45 | | 中科大 | `https://mirrors.ustc.edu.cn/ubuntu/` |
46 | | 清华 | `http://mirrors.tuna.tsinghua.edu.cn/ubuntu/` |
47 | | 电子科大 | `http://ubuntu.dormforce.net/ubuntu/` |
48 |
49 | #### step 2: 获取 Ubuntu 代号
50 |
51 | `lsb_release -a`
52 |
53 | Ubuntu 18.04.1,查出来的代号就是 bionic.
54 |
55 | #### step 3: 编辑源
56 |
57 | 
58 |
59 | 红色边框:服务器地址
60 |
61 | 紫色边框:Ubuntu 的代号(Codename)
62 |
63 | #### step 4: 修改源文件 sources.list
64 |
65 | 先备份
66 |
67 | `sudo cp /etc/apt/sources.list /etc/apt/sources.list.bcakup`
68 |
69 | 再修改(如改为 163 源)
70 |
71 | ```bash
72 | #163源
73 | deb http://mirrors.163.com/ubuntu/ bionic main restricted universe multiverse
74 | deb http://mirrors.163.com/ubuntu/ bionic-security main restricted universe multiverse
75 | deb http://mirrors.163.com/ubuntu/ bionic-updates main restricted universe multiverse
76 | deb http://mirrors.163.com/ubuntu/ bionic-proposed main restricted universe multiverse
77 |
78 | ##測試版源
79 | deb http://mirrors.163.com/ubuntu/ bionic-backports main restricted universe multiverse
80 |
81 | # 源碼
82 | deb-src http://mirrors.163.com/ubuntu/ bionic main restricted universe multiverse
83 | deb-src http://mirrors.163.com/ubuntu/ bionic-security main restricted universe multiverse
84 | deb-src http://mirrors.163.com/ubuntu/ bionic-updates main restricted universe multiverse
85 | deb-src http://mirrors.163.com/ubuntu/ bionic-proposed main restricted universe multiverse
86 |
87 | ##測試版源
88 | deb-src http://mirrors.163.com/ubuntu/ bionic-backports main restricted universe multiverse
89 | ```
90 |
91 | #### step 5: 更新软件列表和升级
92 |
93 | 更新软件列表(检测出可更新的软件):
94 |
95 | `sudo apt update`
96 |
97 | 更新软件:
98 |
99 | `sudo apt upgrade`
100 |
101 | ### 安装 Python3、pip
102 |
103 | ```bash
104 | # 安装python3
105 | sudo apt install python3
106 | # 安装pip
107 | sudo apt install python3-pip
108 | ```
109 |
110 | #### 更换 pip 源
111 |
112 | pip 国内的一些镜像
113 |
114 | | 名称 | 域名 |
115 | | :----------: | :------------------------------------------------------: |
116 | | 阿里云 | [阿里云](https://mirrors.aliyun.com/pypi/simple/) |
117 | | 中国科技大学 | [中国科技大学](https://pypi.mirrors.ustc.edu.cn/simple/) |
118 | | 清华大学 | [清华大学](https://pypi.tuna.tsinghua.edu.cn/simple/) |
119 |
120 | 修改 ~/.pip/pip.conf (没有就创建一个), 内容如下:
121 |
122 | ```bash
123 | [global]
124 | index-url = https://pypi.tuna.tsinghua.edu.cn/simple
125 | trusted-host=mirrors.aliyun.com
126 | ```
127 |
128 | ## Github 配置
129 |
130 | 克隆 一个新的公共的空白仓库到本地 `~\Sphinx_GitHub_ReadtheDocs`
131 |
132 | 目录结构:
133 |
134 | ```bash
135 | .
136 | ├── LICENSE
137 | └── README.md
138 | ```
139 |
140 | ## Sphinx 配置
141 |
142 | ### 安装 Sphinx、及其插件
143 |
144 | ```bash
145 | pip3 install sphinx sphinx_rtd_theme recommonmark sphinx-markdown-tables sphinxemoji
146 | ```
147 |
148 | ### 初始化 Sphinx
149 |
150 | ```bash
151 | # 进入Git根目录
152 | cd ~/Sphinx_GitHub_ReadtheDocs
153 | # 开始快速配置sphinx
154 | sphinx-quickstart
155 |
156 | # 选择把源文件和删除文件分开(y)
157 | > Separate source and build directories (y/n) [n]:y
158 | # 项目名称
159 | > Project name: Sphinx_GitHub_ReadtheDocs
160 | # 作者姓名
161 | > Author name(s): Tsanfer
162 | # 版本号
163 | > Project release []: 0.2
164 | # 语言
165 | > Project language [en]: zh_CN
166 | ```
167 |
168 | 目录结构:
169 |
170 | ```bash
171 | .
172 | ├── LICENSE
173 | ├── Makefile
174 | ├── README.md
175 | ├── make.bat
176 | └── source
177 | ├── _static
178 | ├── _templates
179 | ├── conf.py
180 | └── index.rst
181 | ```
182 |
183 | 验证配置是否正确:
184 |
185 | ```bash
186 | cd ~/Sphinx_GitHub_ReadtheDocs
187 | make html
188 | ```
189 |
190 | 浏览器打开`./build/index.html`查看
191 |
192 | ### 配置 Sphinx 主题,插件
193 |
194 | 配置`./source/conf.py`配置文件:
195 |
196 | ```python
197 | # -- General configuration ---------------------------------------------------
198 |
199 | # Add any Sphinx extension module names here, as strings. They can be
200 | # extensions coming with Sphinx (named 'sphinx.ext.*') or your custom
201 | # ones.
202 |
203 | extensions = [
204 | 'recommonmark',
205 | 'sphinx_markdown_tables',
206 | 'sphinxemoji.sphinxemoji',
207 | ]
208 |
209 | # -- Options for HTML output ------------------------------------------------
210 |
211 | # The theme to use for HTML and HTML Help pages. See the documentation for
212 | # a list of builtin themes.
213 | #
214 | html_theme = 'sphinx_rtd_theme'
215 |
216 | # The master toctree document.
217 | master_doc = 'index'
218 | ```
219 |
220 | 添加`./requirements.txt` pip 要求文件(**Readthedocs 配置**时需要用到)
221 |
222 | ```
223 | # markdown suport
224 | recommonmark
225 | # markdown table suport
226 | sphinx-markdown-tables
227 | #emoji
228 | sphinxemoji
229 |
230 | # theme default rtd
231 |
232 | # crate-docs-theme
233 | sphinx-rtd-theme
234 | ```
235 |
236 | ### 更改标题,添加目录,添加文件
237 |
238 | 配置`./source/index.rst`文件:
239 |
240 | ```
241 | 创建Sphinx + GitHub + ReadtheDocs托管文档
242 | =====================================================
243 |
244 | .. toctree::
245 | :maxdepth: 2
246 | :numbered:
247 |
248 | Sphinx_GitHub_ReadtheDocs
249 | ```
250 |
251 | 创建`./source/Sphinx_GitHub_ReadtheDocs.md`文件
252 |
253 | ```md
254 | # here is a test markdown file
255 | ```
256 |
257 | 然后同步到 Github
258 |
259 | ## Readthedocs 配置
260 |
261 | 导入代码库:
262 | 
263 |
264 | 指定 pip 要求文件: `./requirements.txt`
265 | 
266 |
267 | ### 完成
268 |
269 | > 官方 Sphinx + Readthedocs 教程
270 |
271 |
276 |
--------------------------------------------------------------------------------
/docs/views/Computer/C92_Openwrt_DNS_Swap.md:
--------------------------------------------------------------------------------
1 | ---
2 | title: 升腾C92 刷 OpenWrt 作旁路由设置 DNS 服务、扩容分区、设置 swap
3 | date: 2024-02-04
4 | sidebar: "auto"
5 | categories:
6 | - 计算机
7 | tags:
8 | - 系统配置
9 | - OpenWrt
10 | - DNS
11 | - Swap
12 | - BIOS
13 | - DHCP
14 | ---
15 |
16 | > [最新博客文章链接](https://tsanfer.com/views/Computer/C92_Openwrt_DNS_Swap.html)
17 | >
18 |
19 | ---
20 |
21 | *文字更新时间:2024/02/04*
22 |
23 | 一直知道 OpenWrt 经常拿来做软路由软件。最近买了个二手小主机升腾 C92 来做旁路由服务器,其被归为瘦客户机一类,感觉和工控机差不多,现价百元以内。想就着这个机会,了解体验一下 OpenWrt。
24 |
25 | ## 大体思路
26 |
27 | 下载预设置好的固件,制作U盘启动盘,设置好升腾 C92 的 BIOS,刷入 OpenWrt 固件。为了方便局域网设备互联,主路由配置好 IP-MAC 绑定和 DHCP,然后旁路由 OpenWrt 配置 DNS 服务器。最后,扩容 OpenWrt 系统分区,设置 swap 交换分区。
28 |
29 | ### 用到的东西
30 |
31 | > [OpenWrt](https://openwrt.org/):
32 | >
33 | >
34 | > OpenWrt是适用于嵌入式设备的一个Linux发行版。
35 | >
36 | > 相对原厂固件而言,OpenWrt不是一个单一、静态的固件,而是提供了一个可添加软件包的可写的文件系统。这使用户可以自由的选择应用程序和配置,而不必受设备提供商的限制,并且可以使用一些适合某方面应用的软件包来定制你的设备。对于开发者来说,OpenWrt是一个框架,开发者不必麻烦地构建整个固件就能得到想要的应用程序;对于用户来说,这意味着完全定制的能力,与以往不同的方式使用设备,OPKG包含超过3500个软件。 默认使用LuCI作为web交互界面。
37 | >
38 |
39 | | 项目 | 参数 |
40 | | --- | --- |
41 | | 旁路由 | 升腾 C92 |
42 | | OpenWrt 类型 | haiibo/OpenWrt |
43 | | OpenWrt 固件版本 | R24.01.27 |
44 | | CPU 型号 | Intel(R) Celeron(R) CPU J1800 |
45 | | CPU 频率 | 2.41GHz |
46 | | CPU 线程数 | 2C2T |
47 | | CPU 工艺 | 22纳米 |
48 | | CPU TDP | 10 W |
49 | | 内存 | 2G DDR3L 1333MHz |
50 | | 硬盘 | Centerm SSD 14.75GB |
51 | | 网卡 | Intel I211 Gigabit Network Connection |
52 | | 主路由 | 移动 X333 定制路由器 |
53 |
54 | 原版 OpenWrt 不大好用,很多功能都没有预装,要手动配置比较麻烦。于是选择了提前配置好的 OpenWrt 版本,我用的是 [haiibo/OpenWrt](https://github.com/haiibo/OpenWrt),里面集成了 LuCI 面板、Docker 和各种常用插件
55 |
56 | ### 局域网系统拓扑图
57 |
58 | 
59 | 局域网系统拓扑图
60 |
61 | ---
62 |
63 | ## U盘准备
64 |
65 | ### 制作 Ventoy U盘
66 |
67 | [Ventoy 使用手册](https://www.ventoy.net/cn/doc_start.html)
68 |
69 | Ventoy 版本:1.0.97
70 |
71 | 1. 制作 Ventoy 启动盘:
72 |
73 | 打开 `Ventoy2Disk.exe` ,设置分区类型为 `GPT` 格式(为了让升腾C92能进行 UEFI 引导),找到需要格式化的U盘(注意保存数据),其他默认,安装即可
74 |
75 | 2. 加速镜像搜索过程:
76 |
77 | 在U盘根目录下创建 `Images` 文件夹,需要将镜像文件复制到此文件夹下。
78 |
79 | 打开 `VentoyPlugson.exe` ,启动服务,在打开的网页中选择 **全局控制插件** → **VTOY_DEFAULT_SEARCH_ROOT —— 指定搜索目录** 设置为 Images 的绝对路径(比如:`H:\Images`)
80 |
81 |
82 | ### 下载处理 OpenWrt 镜像
83 |
84 | [镜像 GitHub 仓库](https://github.com/haiibo/OpenWrt/)
85 |
86 | - 方式一(简单):使用预先构建好的固件:
87 |
88 | OpenWrt 仓库 release 版本:R2024-01-27 06:51:01 for X86_64
89 |
90 | 1. 下载 OpenWrt 镜像
91 |
92 | 因为硬件就是一个 x86 的小电脑,所以下载 [x86 版本的 OpenWrt 镜像](https://github.com/haiibo/OpenWrt/releases/tag/X86_64),我使用的是 `openwrt-x86-64-generic-squashfs-combined-efi.img.gz` 类型的镜像(squashfs 是一种用于 Linux 的压缩的只读文件系统,可以还原系统)
93 |
94 | 2. 解压镜像压缩包
95 |
96 | 下载的是镜像的压缩文件,需要解压,实测 7z 解压不了,用 [Gzip](https://gnuwin32.sourceforge.net/packages/gzip.htm) 和 [WinRAR](https://www.win-rar.com/download.html) 可以解压,比如:使用 gzip 解压:
97 |
98 | ```powershell
99 | .\gzip\bin\gzip.exe -dkv .\openwrt-x86-64-generic-squashfs-combined-efi.img.gz
100 | ```
101 |
102 | 等待片刻后,解压得到 .img 后缀的镜像文件
103 |
104 | - 方式二(自定义):自定义构建固件:
105 |
106 | [定制固件步骤](https://github.com/haiibo/OpenWrt#%E5%AE%9A%E5%88%B6%E5%9B%BA%E4%BB%B6-)
107 |
108 | 可以删除一些不用的软件。分区格式可以改为 ext4,方便在装机时,在 PE 系统内进行分区扩容。
109 |
110 |
111 | ### 制作微PE镜像
112 |
113 | [微PE 官网](https://www.wepe.com.cn/)
114 |
115 | 微PE 版本:2.3
116 |
117 | 打开微PE,生成可启动 ISO 镜像,放入U盘 Images 文件夹
118 |
119 | ### 下载硬盘烧录工具
120 |
121 | [physdiskwrite 官网](https://m0n0.ch/wall/physdiskwrite.php)
122 |
123 | physdiskwrite 版本:0.5.3
124 |
125 | 用于烧录系统镜像,放入U盘根目录方便实用
126 |
127 | ### U盘文件结构
128 |
129 | ```
130 | .
131 | ├── Images # 镜像文件夹
132 | │ ├── WePE_64_V2.3.iso # 微PE镜像
133 | │ └── openwrt-x86-64-generic-squashfs-combined-efi.img # OpenWrt镜像
134 | ├── VentoyPlugson.log # Ventoy插件记录
135 | ├── physdiskwrite.exe # 镜像烧录工具
136 | └── ventoy # Ventoy配置文件目录
137 | ├── ventoy.json # Ventoy配置文件
138 | └── ventoy_backup.json # Ventoy配置文件备份
139 | ```
140 |
141 | ---
142 |
143 | ## 安装 OpenWrt
144 |
145 | ### 主板 BIOS 设置
146 |
147 | 我手中的升腾 C92 可以使用 USB 引导,省去了刷 BIOS 的步骤:
148 |
149 | 升腾 C92 进入 BIOS 的方法是开机按 `F2` 键(按 `F12` 可选择启动设备)
150 |
151 | 1. 设置设备引导方式
152 |
153 | 在 BIOS 的 **Advanced** → **CSM Configuration** 中,将 **Boot option filter** 和 **Video** 都设置为 `Legacy only` ,将 **Storage** 设置为 `UEFI only` (如果觉得 Ventoy 镜像选项界面显示异常,看着不舒服的话,可设置为 Legacy only 解决)
154 |
155 | 
156 | BIOS 内设备引导方式
157 |
158 | 2. 设置 BIOS 设备启动优先级
159 |
160 | 在 BIOS 的 **Boot** → **Boot Option Priorities** 中,将U盘设置为第一启动设备,将硬盘设置为第二启动设备
161 |
162 | 3. 按 `F10` 保存并退出 BIOS
163 |
164 | ### 安装 OpenWrt 镜像到硬盘
165 |
166 | 1. 设置好 BIOS,开机进入 Ventoy 后选择从 WePE 启动 PE 系统
167 | 2. 用硬盘分区工具删除硬盘的所有分区
168 | 3. 烧录镜像:
169 |
170 | 打开命令行,使用 physdiskwrite 烧录 OpenWrt 镜像到硬盘,比如:
171 |
172 | ```
173 | U:\physdiskwrite.exe -u U:\Images\openwrt-x86-64-generic-squashfs-combined-efi.img
174 | ```
175 |
176 | 输入数字选择要烧录到的设备(我这里选择的是 `0` ,烧录到硬盘)
177 |
178 | 4. 关机拔下U盘后再开机
179 |
180 | ---
181 |
182 | ## 初始化配置 OpenWrt
183 |
184 | ### 设置 root 密码
185 |
186 | ```bash
187 | passwd
188 | ```
189 |
190 | ### 设置 OpenWrt IP 地址
191 |
192 | 设置 OpenWrt 的 IP 地址为 DHCP 动态分配:
193 |
194 | ```bash
195 | vim /etc/config/network
196 | ```
197 |
198 | 将其中的 `lan` 相关选项改为 `dhcp` 模式,比如:
199 |
200 | ```
201 | config interface 'lan'
202 | option type 'bridge'
203 | option ifname 'eth0'
204 | option proto 'dhcp'
205 | option ip6assign '60'
206 | ```
207 |
208 | 重启网络:
209 |
210 | ```bash
211 | /etc/init.d/network restart
212 | ```
213 |
214 | 或者通过网页面板在 **网络** → **接口** 中选择 **LAN** → **修改** 选择 **一般配置** → **基本设置** → **协议** 设置为 `DHCP客户端`。
215 |
216 | 然后在路由器中设置好 DHCP 服务,让升腾 C92 能分配到固定的 IP,之后即可通过 IP 地址访问 OpemWrt
217 |
218 | ---
219 |
220 | ## 主路由配置
221 |
222 | 各个路由器厂商,不同的路由器型号,其的后台配置大同小异。此处以我手头上的移动 X333 定制路由器为例,其后台地址、用户名和密码都贴在路由器外壳上。输入后台地址,进入 **高级设置界面**。
223 |
224 | ### IP-MAC 绑定
225 |
226 | **网络服务功能** → **MAC-Based 指定**
227 |
228 | ### DHCP 服务器配置
229 |
230 | 1. 先设置路由器自身的 IP 地址:**局域网** → **IP地址**(比如:`192.168.0.1`)
231 | 2. 后设置 DHCP 服:**网络服务功能** → **DHCP 设置**
232 | - IP池范围:旁路由的IP只能在这个范围内设置(比如:`192.168.0.2` - `192.168.0.254`)(有些路由器可在范围外设置)
233 | - 网关地址:路由器本身 IP(比如:`192.168.0.1`)
234 | - DNS 选项:手动设置 OpenWrt 的 IP 为首选,其他公共 DNS 为次选(比如:首选 `192.168.0.2`,次选 `223.5.5.5`)
235 |
236 | (因为我的手机 MIUI 的传统艺能,不支持 IPv6,所以只好关闭主路由器的 `IPv6` 功能)
237 |
238 |
239 | 
240 | 主路由器 DHCP 设置
241 |
242 | ---
243 |
244 | ## LuCI 面板设置 OpenWrt
245 |
246 | 在同一局域网内其他设备上,浏览器输入 OpenWrt 的 IP 地址,进入 LuCI 面板,以 GUI 的方式继续设置 OpenWrt
247 |
248 | ### DNS 服务器配置
249 |
250 | 比如:要解析 `server.mydns` 到 `192.168.0.2`
251 |
252 | 1. 添加 DNS 顶级域名:
253 |
254 | 在 **网络** → **DHCP/DNS** 中的 **服务器设置** → **基本设置** 中添加 **本地服务器** 和 **本地域名** (比如:本地服务器填 `/mydns/` ,本地域名填 `mydns` )
255 |
256 | 2. 添加主机名:
257 |
258 | 在 **网络** → **主机名** 中进行添加主机名(比如:主机名填 `server` ,IP地址填 `192.168.0.2` )(系统会自动添加自定义挟持域名)
259 |
260 |
261 | ### 磁盘扩容设置 swap 分区
262 |
263 | 此步骤用于 squashfs 格式的分区扩容(使用 overlay),ext4格式的分区扩容可在装机时手动设置。
264 |
265 | 1. 扩展分区
266 | - 方式一:使用[官方分区扩展脚本](https://openwrt.org/docs/guide-user/advanced/expand_root)(扩展根目录),也许需要先手动新建分区。
267 |
268 | ```bash
269 | wget -U "" -O expand-root.sh "https://openwrt.org/_export/code/docs/guide-user/advanced/expand_root?codeblock=0"
270 | . ./expand-root.sh
271 | ```
272 |
273 | - 方式二:手动扩展分区(挂载到根目录下的 overlay 文件夹)
274 |
275 | 使用新的分区替代原有 `/overlay` 的挂载点:
276 |
277 | 这里扩展10G的空间到 /overlay,然后将剩余的磁盘空间都用作 swap 分区。
278 |
279 | 1. 新建 ext4 分区
280 |
281 | 打开 **系统** → **磁盘管理** 找到需要进行操作的磁盘,点击 **修改** 后在空闲空间处新建一个10G的新分区,在 **终止扇区** 处填写 `+10g`,然后再 **格式化** 为 `ext4` 格式(系统会自动挂载新的分区)
282 |
283 | 2. 复制原有 /overlay 内的数据到新分区中:比如:
284 |
285 | ```bash
286 | cp -r /overlay/* /mnt/sda3
287 | ```
288 |
289 |
290 | 打开 **系统** → **挂载点**,添加挂载点,让新的分区(比如:`/dev/sda3`)挂载到 `/overlay` 然后重启生效,需要注意设置 docker, istore, opkg 等软件的根路径,以及下载文件的路径。让扩展到 /overlay 下的分区得到使用。
291 |
292 |
293 | 如果没问题,打开软件包界面,可以发现空闲空间变大了
294 |
295 | 2. 新建 swap 分区
296 |
297 | 操作与新建 ext4 分区类似,终止扇区默认到磁盘尾部,格式选择 `swap`。然后在 **系统** → **挂载点** 处启用 **自动挂载未配置的 Swap 分区**
298 |
299 | 3. 重启
300 |
301 | ---
302 |
303 | 其实后面还有其他的一些功能配置,比如 Docker,下载软件,网盘文件软件等,不过我最后没有继续使用 OpetWrt,而是换成了 Ubuntu,其原因有二:
304 |
305 | 1. 本人水平有限,设置的 swap 功能无法触发(swap 分区使用的空间极少,接近0),导致内存使用率一高系统就会变的卡顿。
306 | 2. 安装 opkg 和 ipk安装包 之外的软件较麻烦,多需要手动进行编译和调试。
307 |
308 | 感觉相比于一般通用的 Linux 发行版来说,OpenWrt 适合在功能较固定的路由器上使用。因为可定制固件,所以适合在硬件受到限制的嵌入式设备上使用。
309 |
310 | ---
311 |
312 | > 本文由 [Tsanfer's Blog](https://tsanfer.com/) 发布!
313 | >
--------------------------------------------------------------------------------
/docs/views/Hack/Cheat_engine-Kingdom_rush.md:
--------------------------------------------------------------------------------
1 | ---
2 | title: 使用 Cheat Engine 修改 Kingdom Rush 中的金钱、生命、星
3 | date: 2022-06-20
4 | categories:
5 | - Hack
6 | tags:
7 | - CheatEngine
8 | - 游戏修改
9 | - 代码注入
10 | - 汇编语言
11 | ---
12 |
13 |
14 |
15 | > [最新博客链接](https://tsanfer.com/views/Hack/Cheat_engine-Kingdom_rush.html)
16 |
17 | 最近想学习一下 CE,刚好看见游戏库里装了 Kingdom Rush 就拿它来研究吧。这里写的东西,需要一些 Cheat Engine 的基础,可以看看教程。
18 |
19 | 这里主要是看写的注释,来理解脚本。(如果什么都不想看,可以直接复制粘贴 CE 自动汇编(AA)脚本)
20 |
21 | > [参考 CE 脚本](https://fearlessrevolution.com/viewtopic.php?t=8107)
22 |
23 | 我学习的链接:
24 |
25 | > [你能学会的 Cheat Engine 零基础入门教程](https://www.bilibili.com/video/BV1nR4y1u7PZ)
26 |
27 | > [Cheat Engine 基础教程 CE Tutorial | Ganlv's Blog](https://ganlvtech.github.io/2018/01/25/cheat-engine-tutorial/#step-9-shared-code-pw-31337157)
28 |
29 | > [CE 教学实例应用-由浅入深学习游戏修改 [全十课]](https://www.bilibili.com/video/BV12W411H7Lb)
30 |
31 | 参考链接:
32 |
33 | > [Cheat Engine 官方 WIKI](https://wiki.cheatengine.org/index.php?title=Main_Page)
34 |
35 | > [x86 汇编指令列表](http://ref.x86asm.net/coder32.html)
36 |
37 | ## 技术理解
38 |
39 | 我对一些用到的技术的简单理解:
40 |
41 | - **代码注入**:在程序运行时,将自己写的代码,替换掉原有的代码
42 | - **AOB**:(Array Of Byte)在内存中搜索特定的一串数据,以决定注入代码的位置
43 | - **人造指针**:单独找个地方,记录变量所在的地址
44 |
45 | ## 数据存储结构
46 |
47 | 数据在内存中的存储结构:
48 |
49 | 
50 |
51 | ## Cheat Engine 相关汇编知识
52 |
53 | **此脚本用到的 CE 汇编指令**:
54 |
55 | > [x86 汇编指令列表](http://ref.x86asm.net/coder32.html)
56 |
57 | | 命令例子 | 功能 |
58 | | ---------------- | ----------------------------------------------------------------------------- |
59 | | mov ebx,0000FFFF | Move,寄存器直接赋值 |
60 | | mov ebx,eax | Move,将右边直接给左边 |
61 | | mov ebx,[eax] | Move,将右边所指的值给左边。[ ]代表括号内的是指针,操作时,操作其指向的内存值 |
62 | | cmp ebx,eax | Compare,比较两寄存器值,若相等则 ZF 位 置 1(左减右) |
63 | | `je