├── 3D
├── README.md
├── WebGL-3D-Cameras.md
├── WebGL-3D-Perspective.md
└── WebGL-Orthographic-3D.md
├── lighting
├── README.md
├── WebGL-3D-Point-Lighting.md
└── WebGL-3D-Directional-Lighting.md
├── techniques
├── README.md
├── WebGL-Text-Canvas-2D.md
├── WebGL-2D-Matrix-Stack.md
├── WebGL-Text-HTML.md
├── WebGL-2D-DrawImage.md
├── WebGL-Text-Using-a-Texture.md
└── WebGL-Text-Using-a-Glyph-Texture.md
├── fundamentals
├── README.md
├── WebGL-How-It-Works.md
├── WebGL-Shaders-and-GLSL.md
└── WebGL-Fundamentals.md
├── Helper-API-Docs
└── README.md
├── misc
├── README.md
├── WebGL-Animation.md
├── WebGL-and-Alpha.md
├── WebGL-3D-Textures.md
├── WebGL-Boilerplate.md
├── WebGL-2D-vs-3D-libraries.md
├── WebGL-Resizing-the-Canvas.md
├── WebGL-Using-2-or-More-Textures.md
├── WebGL-Setup-And-Installation.md
└── WebGL-Anti-Patterns.md
├── .gitignore
├── image-processing
├── README.md
├── WebGL-Image-Processing.md
└── WebGL-Image-Processing-Continued.md
├── _book
└── .gitignore
├── Structure-and-Organization
├── README.md
├── WebGL-Scene-Graphs.md
├── WebGL-Less-Code-More-Fun.md
└── WebGL-Drawing-Multiple-Things.md
├── 2D-translation
├── README.md
├── WebGL-2D-Scale.md
├── WebGL-2D-Translation.md
└── WebGL-2D-Rotation.md
├── TWGL-A-tiny-WebGL-helper-library
└── README.md
├── 术语
└── README.md
├── README.md
└── SUMMARY.md
/3D/README.md:
--------------------------------------------------------------------------------
1 | # 3D
2 |
3 |
--------------------------------------------------------------------------------
/lighting/README.md:
--------------------------------------------------------------------------------
1 | # Lighting
2 |
3 |
--------------------------------------------------------------------------------
/techniques/README.md:
--------------------------------------------------------------------------------
1 | # Techniques
2 |
3 |
--------------------------------------------------------------------------------
/fundamentals/README.md:
--------------------------------------------------------------------------------
1 | # Fundamentals
2 |
3 |
--------------------------------------------------------------------------------
/3D/WebGL-3D-Cameras.md:
--------------------------------------------------------------------------------
1 | # WebGL 3D - Cameras
2 |
3 |
--------------------------------------------------------------------------------
/Helper-API-Docs/README.md:
--------------------------------------------------------------------------------
1 | # Helper API Docs
2 |
3 |
--------------------------------------------------------------------------------
/misc/README.md:
--------------------------------------------------------------------------------
1 | # Misc
2 |
3 | pre-multiplied alpha
--------------------------------------------------------------------------------
/.gitignore:
--------------------------------------------------------------------------------
1 | .DS_Store
2 | gitPush
3 | *.html
4 | _book/
5 |
--------------------------------------------------------------------------------
/image-processing/README.md:
--------------------------------------------------------------------------------
1 | # Image Processing
2 |
3 |
--------------------------------------------------------------------------------
/_book/.gitignore:
--------------------------------------------------------------------------------
1 | .DS_Store
2 | gitPush
3 | *.html
4 | _book/
5 |
--------------------------------------------------------------------------------
/techniques/WebGL-Text-Canvas-2D.md:
--------------------------------------------------------------------------------
1 | # WebGL Text - Canvas 2D
2 |
3 |
--------------------------------------------------------------------------------
/lighting/WebGL-3D-Point-Lighting.md:
--------------------------------------------------------------------------------
1 | # WebGL 3D - Point Lighting
2 |
3 |
--------------------------------------------------------------------------------
/Structure-and-Organization/README.md:
--------------------------------------------------------------------------------
1 | # Structure and Organization
2 |
3 |
--------------------------------------------------------------------------------
/image-processing/WebGL-Image-Processing.md:
--------------------------------------------------------------------------------
1 | # WebGL Image Processing
2 |
3 |
--------------------------------------------------------------------------------
/2D-translation/README.md:
--------------------------------------------------------------------------------
1 | # 2D translation, rotation, scale, matrix math
2 |
3 |
--------------------------------------------------------------------------------
/Structure-and-Organization/WebGL-Scene-Graphs.md:
--------------------------------------------------------------------------------
1 | # WebGL - Scene Graphs
2 |
3 |
--------------------------------------------------------------------------------
/TWGL-A-tiny-WebGL-helper-library/README.md:
--------------------------------------------------------------------------------
1 | # TWGL, A tiny WebGL helper library
2 |
3 |
--------------------------------------------------------------------------------
/lighting/WebGL-3D-Directional-Lighting.md:
--------------------------------------------------------------------------------
1 | # WebGL 3D - Directional Lighting
2 |
3 |
--------------------------------------------------------------------------------
/Structure-and-Organization/WebGL-Less-Code-More-Fun.md:
--------------------------------------------------------------------------------
1 | # WebGL - Less Code, More Fun
2 |
3 |
--------------------------------------------------------------------------------
/image-processing/WebGL-Image-Processing-Continued.md:
--------------------------------------------------------------------------------
1 | # WebGL Image Processing Continued
2 |
3 |
--------------------------------------------------------------------------------
/Structure-and-Organization/WebGL-Drawing-Multiple-Things.md:
--------------------------------------------------------------------------------
1 | # WebGL - Drawing Multiple Things
2 |
3 |
--------------------------------------------------------------------------------
/misc/WebGL-Animation.md:
--------------------------------------------------------------------------------
https://raw.githubusercontent.com/W3cplus/webgl-fundamentals-zh/HEAD/misc/WebGL-Animation.md
--------------------------------------------------------------------------------
/misc/WebGL-and-Alpha.md:
--------------------------------------------------------------------------------
https://raw.githubusercontent.com/W3cplus/webgl-fundamentals-zh/HEAD/misc/WebGL-and-Alpha.md
--------------------------------------------------------------------------------
/misc/WebGL-3D-Textures.md:
--------------------------------------------------------------------------------
https://raw.githubusercontent.com/W3cplus/webgl-fundamentals-zh/HEAD/misc/WebGL-3D-Textures.md
--------------------------------------------------------------------------------
/misc/WebGL-Boilerplate.md:
--------------------------------------------------------------------------------
https://raw.githubusercontent.com/W3cplus/webgl-fundamentals-zh/HEAD/misc/WebGL-Boilerplate.md
--------------------------------------------------------------------------------
/misc/WebGL-2D-vs-3D-libraries.md:
--------------------------------------------------------------------------------
https://raw.githubusercontent.com/W3cplus/webgl-fundamentals-zh/HEAD/misc/WebGL-2D-vs-3D-libraries.md
--------------------------------------------------------------------------------
/misc/WebGL-Resizing-the-Canvas.md:
--------------------------------------------------------------------------------
https://raw.githubusercontent.com/W3cplus/webgl-fundamentals-zh/HEAD/misc/WebGL-Resizing-the-Canvas.md
--------------------------------------------------------------------------------
/misc/WebGL-Using-2-or-More-Textures.md:
--------------------------------------------------------------------------------
https://raw.githubusercontent.com/W3cplus/webgl-fundamentals-zh/HEAD/misc/WebGL-Using-2-or-More-Textures.md
--------------------------------------------------------------------------------
/术语/README.md:
--------------------------------------------------------------------------------
1 | # 术语
2 |
3 | ## 需要翻译的术语,在**每一章**第一次出现时,在括号中备注英文原文
4 |
5 | | 英文 | 中文 | 备注 |
6 | | ---- | ---- | ---- |
7 | | buffer | 缓冲区 |
8 | | clip space | 裁剪空间 |
9 | | culling | 背面剔除 | 名词译为“背面剔除”,动宾短语译为“剔除背面”。 |
10 | | depth buffer | 深度缓冲区 |
11 | | fragment shader | 片元着色器 |
12 | | orthographic | 正交 |
13 | | projection | 映射 |
14 | | perspective | 透视 |
15 | | rotation | 旋转 |
16 | | translation | 平移 |
17 | | scale | 缩放 |
18 | | vertex shader | 顶点着色器 |
19 |
20 | ## 保留不译
21 |
22 | - attribute
23 | - uniform
24 | - vary
25 |
26 | ## 需要严格遵守的大小写规范
27 |
28 | - WebGL
29 |
--------------------------------------------------------------------------------
/README.md:
--------------------------------------------------------------------------------
1 | # 简介
2 |
3 | ## WebGL Fundamentals
4 |
5 | 这是有关于WebGL的系列教程,根据英文版本[WebGL Fundamentals](http://webglfundamentals.org/)所译。
6 |
7 | **英文官网地址**:[WebGL Fundamentals](http://webglfundamentals.org)
8 |
9 | **Github地址**:[webgl-fundamentals](https://github.com/greggman/webgl-fundamentals)
10 |
11 | ## 中文版本
12 |
13 | ### 克隆项目
14 |
15 | 在你本地服务器目录下使用下面的命令,将项目克隆下来:
16 |
17 | git clone git@github.com:W3cplus/webgl-fundamentals-zh.git
18 |
19 | 或者:
20 |
21 | git clone https://github.com/W3cplus/webgl-fundamentals-zh.git
22 |
23 | ### 安装gitbook
24 |
25 | 在你本地需要先安装GitBook,如果你本地已安装了gitbook,可以忽略这个过程,如果没有安装,可以在你的命令终端执行:
26 |
27 | sudo npm install -g gitbook-cli
28 |
29 | 安装完gitbook之后执行下面的命令
30 |
31 | #通过cd命令进入到项目根目录下面
32 | cd webgl-fundamentals-zh
33 |
34 | #在webgl-fundamentals-zh目录下面执行下面的命令
35 | gitbook init
36 |
37 | #启动gitbook服务
38 | gitbook serve
39 |
40 | 执行完上面的命令之后,在浏览器的地址栏中输入[http://localhost:4000/](http://localhost:4000/)可以正常访问。
41 |
42 | ## 术语
43 |
44 | 有关于一些专业术语,可以查阅“术语”目录下的`README.md`。
45 |
46 | ## 翻译进度
47 |
48 | 翻译正在进行当中,其中各章节已认领:
49 |
50 | - @田淮仁:Fundamentals,Techniques
51 | - @Gloria:3D Lighting
52 | - @x_x:Image Processing和Misc
53 | - @Tail-Go: 2D transition
54 | - @二师兄:Structure and Organization
55 |
56 | @羡辙 大神会将对整个翻译质量做最后的审核。
--------------------------------------------------------------------------------
/SUMMARY.md:
--------------------------------------------------------------------------------
1 | # Summary
2 |
3 | * [简介](README.md)
4 | * [Fundamentals](fundamentals/README.md)
5 | * [WebGL Fundamentals](fundamentals/WebGL-Fundamentals.md)
6 | * [WebGL How It Works](fundamentals/WebGL-How-It-Works.md)
7 | * [WebGL Shaders and GLSL](fundamentals/WebGL-Shaders-and-GLSL.md)
8 | * [Image Processing](image-processing/README.md)
9 | * [WebGL Image Processing](image-processing/WebGL-Image-Processing.md)
10 | * [WebGL Image Processing Continued](image-processing/WebGL-Image-Processing-Continued.md)
11 | * [2D translation, rotation, scale, matrix math](2D-translation/README.md)
12 | * [WebGL 2D Translation](2D-translation/WebGL-2D-Translation.md)
13 | * [WebGL 2D Rotation](2D-translation/WebGL-2D-Rotation.md)
14 | * [WebGL 2D Scale](2D-translation/WebGL-2D-Scale.md)
15 | * [WebGL 2D Matrices](2D-translation/WebGL-2D-Matrices.md)
16 | * [3D](3D/README.md)
17 | * [WebGL - Orthographic 3D](3D/WebGL-Orthographic-3D.md)
18 | * [WebGL 3D Perspective](3D/WebGL-3D-Perspective.md)
19 | * [WebGL 3D - Cameras](3D/WebGL-3D-Cameras.md)
20 | * [Lighting](lighting/README.md)
21 | * [WebGL 3D - Directional Lighting](lighting/WebGL-3D-Directional-Lighting.md)
22 | * [WebGL 3D - Point Lighting](lighting/WebGL-3D-Point-Lighting.md)
23 | * [Structure and Organization](Structure-and-Organization/README.md)
24 | * [WebGL - Less Code, More Fun](Structure-and-Organization/WebGL-Less-Code-More-Fun.md)
25 | * [WebGL - Drawing Multiple Things](Structure-and-Organization/WebGL-Drawing-Multiple-Things.md)
26 | * [WebGL - Scene Graphs](Structure-and-Organization/WebGL-Scene-Graphs.md)
27 | * [Techniques](techniques/README.md)
28 | * [WebGL 2D - DrawImage](techniques/WebGL-2D-DrawImage.md)
29 | * [WebGL 2D - Matrix Stack](techniques/WebGL-2D-Matrix-Stack.md)
30 | * [WebGL Text - HTML](techniques/WebGL-Text-HTML.md)
31 | * [WebGL Text - Canvas 2D](techniques/WebGL-Text-Canvas-2D.md)
32 | * [WebGL Text - Using a Texture](techniques/WebGL-Text-Using-a-Texture.md)
33 | * [WebGL Text - Using a Glyph Texture](techniques/WebGL-Text-Using-a-Glyph-Texture.md)
34 | * [Misc](misc/README.md)
35 | * [WebGL Setup And Installation](misc/WebGL-Setup-And-Installation.md)
36 | * [WebGL Boilerplate](misc/WebGL-Boilerplate.md)
37 | * [WebGL Resizing the Canvas](misc/WebGL-Resizing-the-Canvas.md)
38 | * [WebGL - Animation](misc/WebGL-Animation.md)
39 | * [WebGL 3D - Textures](misc/WebGL-3D-Textures.md)
40 | * [WebGL Using 2 or More Textures](misc/WebGL-Using-2-or-More-Textures.md)
41 | * [WebGL and Alpha](misc/WebGL-and-Alpha.md)
42 | * [WebGL - 2D vs 3D libraries](misc/WebGL-2D-vs-3D-libraries.md)
43 | * [WebGL - Anti-Patterns](misc/WebGL-Anti-Patterns.md)
44 | * [Helper API Docs](Helper-API-Docs/README.md)
45 | * [TWGL, A tiny WebGL helper library](TWGL-A-tiny-WebGL-helper-library/README.md)
46 | * [术语](术语/README.md)
47 | * [github](https://github.com/greggman/webgl-fundamentals)
48 |
49 |
--------------------------------------------------------------------------------
/2D-translation/WebGL-2D-Scale.md:
--------------------------------------------------------------------------------
1 | # WebGL 2D 缩放(Scale)
2 |
3 | This post is a continuation of a series of posts about WebGL. The first started with fundamentals and the previous was about rotating geometry.
4 |
5 | 这篇教程是一系列关于 WebGL 的教程中的一篇。第一篇教程是 WebGL 基础,上一篇教程是 关于旋转几何体。
6 |
7 | Scaling is just as easy as translation.
8 |
9 | We multiply the position by our desired scale. Here are the changes from our previous sample.
10 |
11 | 缩放就像 平移 一样简单。我们只要用我们想要的比例去乘以几何体的坐标。下面的代码是从我们 之前的例子修改而来的。
12 |
13 | ```
14 |
36 | ```
37 |
38 | and we add the JavaScript needed to set the scale when we draw.
39 |
40 | 然后我们添加必要的 JavasScript 代码在我们进行绘制的时候去设置缩放。
41 |
42 | ```
43 | ...
44 | var scaleLocation = gl.getUniformLocation(program, "u_scale");
45 | ...
46 | var scale = [1, 1];
47 | ...
48 | // Draw the scene.
49 | function drawScene() {
50 | // Clear the canvas.
51 | gl.clear(gl.COLOR_BUFFER_BIT);
52 |
53 | // Set the translation.
54 | gl.uniform2fv(translationLocation, translation);
55 |
56 | // Set the rotation.
57 | gl.uniform2fv(rotationLocation, rotation);
58 |
59 | // Set the scale.
60 | gl.uniform2fv(scaleLocation, scale);
61 |
62 | // Draw the rectangle.
63 | gl.drawArrays(gl.TRIANGLES, 0, 18);
64 | }
65 | ```
66 |
67 | And now we have scale. Drag the sliders.
68 |
69 | 现在我们有了缩放。同样是通过拖动滑动器进行缩放。
70 |
71 |
72 |
73 | 点击这里在新窗口查看例子
74 |
75 | One thing to notice is that scaling by a negative value flips our geometry.
76 |
77 | 有一件需要注意的事情是设置一个负数的缩放比例会使得我们的几何体翻转。
78 |
79 | I hope these last 3 posts were helpful in understanding translation, rotation and scale. Next we'll go over the magic that is matrices that combines all 3 of these into a much simpler and often more useful form.
80 |
81 | 我希望这 3 篇文章可以帮助你去理解 平移、旋转、缩放。接下来我们将详细的讲述 具有魔力的矩阵,矩阵可以更加简单的把这三种变换组合在一起,而且通常还会是更加有用的形式。
82 |
83 | > ## Why an 'F'?
84 | >
85 | > The first time I saw someone use an 'F' was on a texture. The 'F' itself is not important. What is important is that you can tell its orientation from any direction. If we used a heart ❤ or a triangle △ for example we couldn't tell if it was flipped horizontally. A circle ○ would be even worse. A colored rectangle would arguably work with different colors on each corner but then you'd have to remember which corner was which. An F's orientation is instantly recognizable.
86 | >
87 | > 
88 | >
89 | > Any shape that you can tell the orientation of would work, I've just used 'F' ever since I was 'F'irst introduced to the idea.
90 | >
91 | > ## 为什么是 “F”?
92 | >
93 | > 我第一次看到某人使用 “F” 是在一个纹理上面。“F” 本身不是那么重要。重要的是你从任意方向都能知道它的指向。如果我们使用心形 ❤ 或者一个三角形 △ 作为例子,如果它们发生水平翻转那我们则无法得知他们的指向是否发生改变。使用圆 ⚪ 更加糟糕。一个为每个角都涂上不同颜色的矩形可以认为是胜任这个工作的,但我们得记住哪个角对应哪个颜色。一个 “F” 的指向可以很直观的识别出来。
94 | >
95 | > 
96 | >
97 | > 任何你可以一看就知道其指向的图形都能胜任这份工作。当我第一次了解到这个概念的时候,我开始使用 “F”。
98 |
--------------------------------------------------------------------------------
/2D-translation/WebGL-2D-Translation.md:
--------------------------------------------------------------------------------
1 | # WebGL 2D 平移(Translation)
2 |
3 | 在开始进入 3D 之前我们先在 2D 停留一段时间。请各位耐心听我说,这篇文章或许对一些同学来说极其浅显,但我还是会用一些篇幅由点到面地加以叙述。
4 |
5 | 这篇文章是由 WebGL Fundamentals 开始的一系列延续的内容。如果你还没有阅读过这一部分,我建议你至少先阅读第一部分,然后再回来这里。
6 |
7 | 平移(Translation)的本质是一些复杂的数学计算,平移的基本意义是“去移动”一些东西。我认为将一个句子从英语翻译(Translation)成日语也符合定义,但在这个情况下,我们只讨论移动(Translation)几何体。使用我们之前在第一篇教程中给出的示例代码你可以通过改变传递给 `setRectangle` 的参数很快地完成矩形的平移。这里给出一个基于之前例子的代码示例。
8 |
9 |
10 | ```
11 | // 首先让我们使用一些变量来存储矩形的宽度、高度和平移量
12 | var translation = [0, 0];
13 | var width = 100;
14 | var height = 30;
15 |
16 | // 然后让我们定义一个函数来重绘所有内容。
17 | // 在我们更新矩形的平移设置后我们可以调用这个函数进行重绘操作。
18 |
19 | // 绘制场景。
20 | function drawScene() {
21 | // 清除 canvas 的内容。
22 | gl.clear(gl.COLOR_BUFFER_BIT);
23 |
24 | // 设置一个矩形
25 | setRectangle(gl, translation[0], translation[1], width, height);
26 |
27 | // 绘制矩形。
28 | gl.drawArrays(gl.TRIANGLES, 0, 6);
29 | }
30 | ```
31 |
32 | 在下面的例子中,我将一对滑动器(slider)与平移的变量绑定在一起,它们会更新 `translation[0]` 和 `translation[1]` 并且每次它们发生改变时都会调用 `drawScene` 函数。通过拖动滑动器去平移矩形。
33 |
34 |
35 |
36 | 点击这里在新窗口查看例子
37 |
38 | 到目前为止,一切都好。但试想一下,假如现在我们想要对更加复杂的形状做同样的事情。
39 |
40 | 假设我们想要去绘制一个如下图所示的由 6 个三角形组成的字母“F”。
41 |
42 |  43 |
44 | 那么,接下来我们得将 `setRectangle` 函数改成像下面的代码那样。
45 |
46 | ```
47 | // 用表示字母“F”的顶点数组填充 buffer
48 | function setGeometry(gl, x, y) {
49 | var width = 100;
50 | var height = 150;
51 | var thickness = 30;
52 | gl.bufferData(
53 | gl.ARRAY_BUFFER,
54 | new Float32Array([
55 | // 左边的一列
56 | x, y,
57 | x + thickness, y,
58 | x, y + height,
59 | x, y + height,
60 | x + thickness, y,
61 | x + thickness, y + height,
62 |
63 | // 上边的一横
64 | x + thickness, y,
65 | x + width, y,
66 | x + thickness, y + thickness,
67 | x + thickness, y + thickness,
68 | x + width, y,
69 | x + width, y + thickness,
70 |
71 | // 中间的一横
72 | x + thickness, y + thickness * 2,
73 | x + width * 2 / 3, y + thickness * 2,
74 | x + thickness, y + thickness * 3,
75 | x + thickness, y + thickness * 3,
76 | x + width * 2 / 3, y + thickness * 2,
77 | x + width * 2 / 3, y + thickness * 3]),
78 | gl.STATIC_DRAW);
79 | }
80 | ```
81 |
82 | 你可以满怀希望的看到这段代码并不能很好的进行拓展。如果我们想要绘制一些有着成百上千条线段的非常复杂的几何体,我们必须写上一些很复杂的代码。除此之外,每一次绘制 JavaScript 都必须更新所有的顶点数据。
83 |
84 | 这里有一个相对简单的方法。只需要上传几何体然后在着色器中进行平移。
85 |
86 | 下面是新的着色器代码
87 |
88 | ```
89 |
104 | ```
105 |
106 | 我们将稍微重构一下代码。使得我们只需要设置一次几何体。
107 |
108 | ```
109 | // Fill the buffer with the values that define a letter 'F'.
110 | function setGeometry(gl) {
111 | gl.bufferData(
112 | gl.ARRAY_BUFFER,
113 | new Float32Array([
114 | // left column
115 | 0, 0,
116 | 30, 0,
117 | 0, 150,
118 | 0, 150,
119 | 30, 0,
120 | 30, 150,
121 |
122 | // top rung
123 | 30, 0,
124 | 100, 0,
125 | 30, 30,
126 | 30, 30,
127 | 100, 0,
128 | 100, 30,
129 |
130 | // middle rung
131 | 30, 60,
132 | 67, 60,
133 | 30, 90,
134 | 30, 90,
135 | 67, 60,
136 | 67, 90]),
137 | gl.STATIC_DRAW);
138 | }
139 | ```
140 |
141 | 然后我们只需要在我们绘制之前更新 `u_translation` 变量就能得到我们想要的平移效果。
142 |
143 | ```
144 | ...
145 | var translationLocation = gl.getUniformLocation(
146 | program, "u_translation");
147 | ...
148 | // Set Geometry.
149 | setGeometry(gl);
150 | ..
151 | // Draw scene.
152 | function drawScene() {
153 | // Clear the canvas.
154 | gl.clear(gl.COLOR_BUFFER_BIT);
155 |
156 | // Set the translation.
157 | gl.uniform2fv(translationLocation, translation);
158 |
159 | // Draw the rectangle.
160 | gl.drawArrays(gl.TRIANGLES, 0, 18);
161 | }
162 | ```
163 |
164 | 注意 `setGeometry` 函数只被调用一次。它不再在 `drawScene` 里面。
165 |
166 | 示例如下。再一次,通过拖动滑动器对几何形体进行平移。
167 |
168 |
169 |
170 | 点击这里在新窗口查看例子
171 |
172 | 现在当我们进行绘制的时候,WebGL 几乎帮我们完成所有的事情。我们所需要的事情只有设置平移变量然后请求绘制。即使我们的几何体有数以万计的顶点,主要的代码也会照常运行。
173 |
174 | 如果你想要,你可以比较一下上面提到的比较复杂的更新所有顶点的 JavaScript 版本和现在的版本。
175 |
176 | 我希望这个例子不会太平淡无奇。在 下一篇文章中我们将开始进入旋转(Rotation)。
177 |
--------------------------------------------------------------------------------
/misc/WebGL-Setup-And-Installation.md:
--------------------------------------------------------------------------------
1 | # WebGL Setup and Installation
2 | # WebGL的设置与安装
3 |
4 | Techincally you don't need anything other than a web browser to do WebGL development. Go to [jsfiddle.net][1] or [jsbin.com][2] or [codepen.io][3] and just start applying the lessons here.
5 |
6 | 从技术上讲,你仅仅需要一个网页浏览器做 WebGL 开发。可以到 [jsfiddle.net][1]、 [jsbin.com][2] 或者 [codepen.io][3] 应用这里的教程内容。
7 |
8 | On all of them you can reference external scripts by adding a tag pair if you want to use external scripts.
9 |
10 | 如果你想使用外部脚本,所有的内容你都可以通过引用外部脚本标签 <script src="..."> 来使用。
11 |
12 | Still, there are limits. WebGL has stronger restrictions than Canvas2D for loading images which means you can't easily access images from around the web for your WebGL work. On top of that it's just faster to work with everything local.
13 |
14 | 不过,这里有限制。WebGL 相对于 Canvas2D 在加载图片方面有更强的约束,这意味着你在 WebGL 开发中不能轻易的访问来自网络的图片。最重要的是,它与本地资源合作会更快。
15 |
16 | Let's assume you want to run and edit the samples on this site. The first thing you should do is download the site. [You can download it here][4].
17 |
18 | 让我们假设你想在这个网站运行和编辑示例代码。首先你应该下载这个网站。[你可以在这里下载][4]。
19 |
20 | ![download][5]
21 |
22 | Unzip the files into some folder.
23 | 在文件夹中解压文件。
24 |
25 | ## Using a small simple easy Web Server
26 | ## 使用一个简单的 Web 服务器
27 |
28 | Next up you should install a small web server. I know "web server" sounds scary but the truth is [web servers are actually extremely simple][6].
29 |
30 | 下一步你应该安装一个小的 web 服务器。我知道“web 服务器”听起来很吓人,但事实是 [web 服务器实际上非常简单][6]。
31 |
32 | If you're on Chrome here's a simple solution. [Here's a small chrome extension that's a web server][7].
33 |
34 | 如果你用 Chrome,有一个简单的解决方法。[这里有一个小的 Web 服务器 chrome 扩展][7]。
35 |
36 | ![chrome extension][8]
37 |
38 | Just point it at the folder where you unzipped the files and click one of the web server URLs.
39 |
40 | 只需点击解压了的文件夹中的文件,单击其中一个 web 服务器的 URL。
41 |
42 | If you're not on chrome or if you don't want to use the extension another way is to use [node.js][9]. Download it, install it, then open a command prompt / console / terminal window. If you're on Windows the installer will add a special "Node Command Prompt" so use that.
43 |
44 | 如果你不是使用 chrome 或者你不想使用扩展,另一种方法是使用 [node.js][9]。下载,安装,然后在命令窗口/控制台/终端窗口中打开 。如果你在 Windows 中安装,将会添加一个特需的 “Node Command Prompt” 以供使用。
45 |
46 | Then install the http-server by typing。
47 |
48 | 然后通过命令行输入安装 http-server。
49 |
50 | ```
51 | npm -g install http-server
52 | ```
53 |
54 | If you're on OSX use
55 | 如果你在 OSX 中使用
56 |
57 | ```
58 | sudo npm -g install http-server
59 | ```
60 |
61 | Once you've done that type
62 |
63 | 安装完成之后输入
64 |
65 | ```
66 | http-server path/to/folder/where/you/unzipped/files
67 | ```
68 |
69 | It should print something like
70 |
71 | 命令窗口应该打印出类似的东西
72 |
73 | ![http-server][10]
74 |
75 | Then in your browser go to http://localhost:8080.
76 |
77 | 然后在你的浏览器中输入 http://localhost:8080。
78 |
79 | If you don't specify a path then http-server will server the current folder.
80 |
81 | 如果你没有指定路径,http-server 将会在指向当前的文件夹。
82 |
83 | ## Using your Browsers Developer Tools
84 | ## 使用你的浏览器开发者工具
85 |
86 | Most browser have extensive developer tools built in.
87 | 大多数的浏览器都内置了开发者工具。
88 |
89 | ![developer tools][11]
90 |
91 | [Docs for Chrome's are here][12], [Firefox's are here][13].
92 | Chrome 的参考文档在这里,Firefox 的在这里。
93 |
94 | Learn how to use them. If nothing else always check the JavaScript console. If there is an issue it will often have an error message. Read the error message closely and you should get a clue where the issue is.
95 |
96 | 学习如果使用它们。如果没有其它的事一直检查 JavaScript 控制台。如果有问题,它会显示错误信息。仔细阅读错误信息,你会得到问题的线索。
97 |
98 | ![chrome console][14]
99 |
100 | ## WebGL Helpers
101 | ## WebGL 助手
102 |
103 | There are various WebGL Inspectors / Helpers. [Here's one for Chrome][15].
104 |
105 | 这里有各种各样的 WebGL 检验员/助手。[这个是 Chrome 的][15]。
106 |
107 | ![WebGL Inspectors / Helper][16]
108 |
109 | They may or may not be helpful. Most of them are designed for animated samples and will capture a frame and let you see all the WebGL calls that made that frame. That's great if you already have something working or if you had something working and it broke. But it's not so great if your issue is during initialization which they don't catch or if you're not using animation, as in drawing something every frame. Still they can be very useful. I'll often click on a draw call, and check the uniforms. If I see a bunch of NaN (NaN = Not a Number) then I can usually track down the code that set that uniform and find the bug.
110 |
111 | 他们可能会也可能不会有帮助。它们中的大多数是专为动画示例的,它们捕获并展示一个调用 WebGL 的框。如果你已经有了一些示例起效了或者有一些示例起效但又失败了,这很好。如果你的问题是在初始化过程中助手不能捕获框架或者是你在绘制框架时没有使用动画,这就不是很好了。但它们任然可以非常有用的。我经常会点击一个调用,以检查 uniforms。如果我看到一堆 NaN(NaN = Not a Number)我就可以跟踪代码,设置 uniform 并找出错误。
112 |
113 | ## Inspect the Code
114 | ## 检查代码
115 |
116 | Also always remember you can inspect the code. You can usually just pick view source
117 |
118 | 永远记住你可以检查代码。你可以选择只查看源码。
119 |
120 | ![helper][17]
121 |
122 | Even if you can't right click a page or if the source is in a separate file you can always view the source in the devtools
123 |
124 | 即使你不能右击页面或者源码是在一个单独的文件中,你仍然可以在开发者工具中查看源码。
125 |
126 | ![devtools][18]
127 |
128 | ## Get Started
129 | ## 开始
130 |
131 | Hopefully that helps you get started. [Now back to the lessons][19].
132 |
133 | 希望这有助于你开始。[现在回到教程][19]。
134 |
135 | [1]: https://jsfiddle.net/
136 | [2]: http://jsbin.com/
137 | [3]: http://codepen.io/
138 | [4]: https://github.com/greggman/webgl-fundamentals/
139 | [5]: http://webglfundamentals.org/webgl/lessons/resources/download-webglfundamentals.gif
140 | [6]: http://games.greggman.com/game/saving-and-loading-files-in-a-web-page/
141 | [7]: https://chrome.google.com/webstore/detail/web-server-for-chrome/ofhbbkphhbklhfoeikjpcbhemlocgigb?hl=en
142 | [8]: http://webglfundamentals.org/webgl/lessons/resources/chrome-webserver.png
143 | [9]: https://nodejs.org/en/
144 | [10]: http://webglfundamentals.org/webgl/lessons/resources/http-server-response.png
145 | [11]: http://webglfundamentals.org/webgl/lessons/resources/chrome-devtools.png
146 | [12]: https://developers.google.com/web/tools/chrome-devtools/
147 | [13]: https://developer.mozilla.org/en-US/docs/Tools
148 | [14]: http://webglfundamentals.org/webgl/lessons/resources/javascript-console.gif
149 | [15]: https://benvanik.github.io/WebGL-Inspector/
150 | [16]: https://benvanik.github.io/WebGL-Inspector/images/screenshots/1-Trace.gif
151 | [17]: http://webglfundamentals.org/webgl/lessons/resources/view-source.gif
152 | [18]: http://webglfundamentals.org/webgl/lessons/resources/devtools-source.gif
153 | [19]: http://webglfundamentals.org/
154 |
--------------------------------------------------------------------------------
/techniques/WebGL-2D-Matrix-Stack.md:
--------------------------------------------------------------------------------
1 | # 使用 WebGL 实现矩阵栈
2 |
3 | 上一篇文章讲解了 [WebGL 2D DrawImage][1]。如果你还没阅读它,我建议你先去查阅一下。
4 | 在上一篇文章中,我们使用 WebGL 去实现了 Canvas 2D 的 `drawImage` 方法。并且,可以去设置截取图片的大小和显示图片的大小。
5 | 我们还没有完成的,就是将图片按照任意一个点进行旋转,缩放。当然,我们可以添加更多的参数来实现这样的功能,比如,至少需要一个旋转中心点,旋转角度和 x,y 的缩放比。不过,幸运的是,这有一个更普遍,有用的方式。Canvas 2D API 使用的是一个矩阵栈,来实现上述功能。该矩阵栈具有的基本函数是 `save`,`restore`,`translate`,`rotate` 和 `scale`。
6 | 实现一个矩阵栈并不是很难。我们可以创建一个栈用来存放矩阵,使用的时候,就用函数去和栈顶的矩阵相乘。平移,旋转或缩放矩阵就是我们之前创建的。
7 | 下面是实现细节。
8 | 首先,有构造函数,`save` 函数,和 `restore` 函数。
9 |
10 | ```
11 | function MatrixStack() {
12 | this.stack = [];
13 |
14 | // 因为该栈是空的,所以需要设置一个初始的栈在里面
15 | this.restore();
16 | }
17 |
18 | // 弹出栈顶的元素,用来恢复到之前保存的矩阵
19 | MatrixStack.prototype.restore = function() {
20 | this.stack.pop();
21 | // 不能让栈为空
22 | if (this.stack.length < 1) {
23 | this.stack[0] = m4.identity();
24 | }
25 | };
26 |
27 | // 放置一个当前矩阵的副本到栈里
28 | MatrixStack.prototype.save = function() {
29 | this.stack.push(this.getCurrentMatrix());
30 | };
31 | ```
32 | 我们需要函数去获取和设置顶部的矩阵
33 | ```
34 | // 得到当前栈顶矩阵的副本
35 | MatrixStack.prototype.getCurrentMatrix = function() {
36 | return this.stack[this.stack.length - 1].slice();
37 | };
38 |
39 | // 让我们设置当前矩阵
40 | MatrixStack.prototype.setCurrentMatrix = function(m) {
41 | return this.stack[this.stack.length - 1] = m;
42 | };
43 | ```
44 | 最后,我们需要使用之前的矩阵函数去实现 `translate`,`rotate` 和 `scale` 函数。
45 |
46 | ```
47 | // 平移矩阵
48 | MatrixStack.prototype.translate = function(x, y, z) {
49 | var m = this.getCurrentMatrix();
50 | this.setCurrentMatrix(m4.translate(m, x, y, z));
51 | };
52 |
53 | // 绕 Z 轴旋转当前矩阵
54 | MatrixStack.prototype.rotateZ = function(angleInRadians) {
55 | var m = this.getCurrentMatrix();
56 | this.setCurrentMatrix(m4.zRotate(m, angleInRadians));
57 | };
58 |
59 | // 缩放矩阵
60 | MatrixStack.prototype.scale = function(x, y, z) {
61 | var m = this.getCurrentMatrix();
62 | this.setCurrentMatrix(m4.scale(m, x, y, z));
63 | };
64 | ```
65 | 这里需要提醒一点,我们使用的是 3D 数学矩阵函数,可以使用 0 来作为 Z 轴的默认平移值,1 作为 Z 轴的默认缩放值。但是,我发现,我已经习惯使用 Canvas 2D 的平面函数,导致经常忘了设置 Z 的参数,所以,为了防止运行错误,我们可以让 Z 轴参数变为可选参数。
66 |
67 | ```
68 | // 平移矩阵
69 | MatrixStack.prototype.translate = function(x, y, z) {
70 | if (z === undefined) {
71 | z = 0;
72 | }
73 | var m = this.getCurrentMatrix();
74 | this.setCurrentMatrix(m4.translate(m, x, y, z));
75 | };
76 |
77 | ...
78 |
79 | // 缩放矩阵
80 | MatrixStack.prototype.scale = function(x, y, z) {
81 | if (z === undefined) {
82 | z = 1;
83 | }
84 | var m = this.getCurrentMatrix();
85 | this.setCurrentMatrix(m4.scale(m, x, y, z));
86 | };
87 | ```
88 | 从[前一篇教程][2]中的 `drawImage`,我们可以找到下列代码
89 | ```
90 | // 该矩阵会从像素值转换到裁剪空间
91 | var matrix = m4.orthographic(0, gl.canvas.width, gl.canvas.height, 0, -1, 1);
92 |
93 | // 该矩阵会移动我们的单元格到 dstX,dstY
94 | matrix = m4.translate(matrix, dstX, dstY, 0);
95 |
96 | // 该矩阵会缩放我们 1 个单位的单元格
97 | // 1 个单位代表着 texWidth,texHeight 单位
98 | matrix = m4.scale(matrix, dstWidth, dstHeight, 1);
99 | ```
100 | 我们需要创建一个矩阵栈
101 |
102 | ```
103 | var matrixStack = new MatrixStack();
104 | ```
105 | 然后,乘以栈顶的矩阵
106 | ```
107 | // 该矩阵会从像素值转换到裁剪空间
108 | var matrix = m4.orthographic(0, gl.canvas.width, gl.canvas.height, 0, -1, 1);
109 |
110 | // 该矩阵会将原点移动到另外一个当前矩阵栈
111 | matrix = m4.multiply(matrix, matrixStack.getCurrentMatrix());
112 |
113 | // 该矩阵会移动我们的单元格到 dstX,dstY
114 | matrix = m4.translate(matrix, dstX, dstY, 0);
115 |
116 | // 该矩阵会缩放 1 个单位的单元格
117 | // 1 个单位代表着 texWidth,texHeight 单位
118 | matrix = m4.scale(matrix, dstWidth, dstHeight, 1);
119 | ```
120 | 现在,我们可以像 Canvas 2D API 一样去使用它了。
121 | 如果你不知道怎样去使用矩阵栈,你可以认为它就是移动和旋转原点。例如,在默认情况下,canvas 2D 的原点是 (0,0) 在左上角。
122 | 假设,我们现在移动该原点到 canvas 的中心,然后在 0,0 位置绘制图片,那么该图片会从 canvas 的中心开始绘制。
123 | 我们用[前一篇文章][3]的例子,然后画一张图。
124 | ```
125 | var textureInfo = loadImageAndCreateTextureInfo('resources/star.jpg');
126 |
127 | function draw(time) {
128 | gl.clear(gl.COLOR_BUFFER_BIT);
129 |
130 | matrixStack.save();
131 | matrixStack.translate(gl.canvas.width / 2, gl.canvas.height / 2);
132 | matrixStack.rotateZ(time);
133 |
134 | drawImage(
135 | textureInfo.texture,
136 | textureInfo.width,
137 | textureInfo.height,
138 | 0, 0);
139 |
140 | matrixStack.restore();
141 | }
142 | ```
143 | 结果是:
144 |
145 | ![定点旋转][4]
146 | [查看网页][5]
147 | 你可以看见,即使我们传递了 0,0 给 `drawImage` 函数,但后面使用了 `matrixStack.translate` 去移动原点到 canvas 的中心,所以,图片都会在中心进行绘制和旋转。
148 | 现在,让我们将旋转中心移动到图片的中心去。
149 |
150 | ```
151 | matrixStack.translate(gl.canvas.width / 2, gl.canvas.height / 2);
152 | matrixStack.rotateZ(time);
153 | matrixStack.translate(textureInfo.width / -2, textureInfo.height / -2);
154 | ```
155 | 现在,图片在 canvas 中心绕着其自身的中心旋转。
156 |
157 | ![中心旋转][6]
158 |
159 | [查看网页][7]
160 | 接下来,让我们在图片的四个角绘制一张图片。
161 |
162 | ```
163 | matrixStack.translate(gl.canvas.width / 2, gl.canvas.height / 2);
164 | matrixStack.rotateZ(time);
165 |
166 | matrixStack.save();
167 | {
168 | matrixStack.translate(textureInfo.width / -2, textureInfo.height / -2);
169 |
170 | drawImage(
171 | textureInfo.texture,
172 | textureInfo.width,
173 | textureInfo.height,
174 | 0, 0);
175 |
176 | }
177 | matrixStack.restore();
178 |
179 | matrixStack.save();
180 | {
181 | // We're at the center of the center image so go to the top/left corner
182 | matrixStack.translate(textureInfo.width / -2, textureInfo.height / -2);
183 | matrixStack.rotateZ(Math.sin(time * 2.2));
184 | matrixStack.scale(0.2, 0.2);
185 | // Now we want the bottom/right corner of the image we're about to draw
186 | matrixStack.translate(-textureInfo.width, -textureInfo.height);
187 |
188 | drawImage(
189 | textureInfo.texture,
190 | textureInfo.width,
191 | textureInfo.height,
192 | 0, 0);
193 |
194 | }
195 | matrixStack.restore();
196 |
197 | matrixStack.save();
198 | {
199 | // We're at the center of the center image so go to the top/right corner
200 | matrixStack.translate(textureInfo.width / 2, textureInfo.height / -2);
201 | matrixStack.rotateZ(Math.sin(time * 2.3));
202 | matrixStack.scale(0.2, 0.2);
203 | // Now we want the bottom/right corner of the image we're about to draw
204 | matrixStack.translate(0, -textureInfo.height);
205 |
206 | drawImage(
207 | textureInfo.texture,
208 | textureInfo.width,
209 | textureInfo.height,
210 | 0, 0);
211 |
212 | }
213 | matrixStack.restore();
214 |
215 | matrixStack.save();
216 | {
217 | // We're at the center of the center image so go to the bottom/left corner
218 | matrixStack.translate(textureInfo.width / -2, textureInfo.height / 2);
219 | matrixStack.rotateZ(Math.sin(time * 2.4));
220 | matrixStack.scale(0.2, 0.2);
221 | // Now we want the top/right corner of the image we're about to draw
222 | matrixStack.translate(-textureInfo.width, 0);
223 |
224 | drawImage(
225 | textureInfo.texture,
226 | textureInfo.width,
227 | textureInfo.height,
228 | 0, 0);
229 |
230 | }
231 | matrixStack.restore();
232 |
233 | matrixStack.save();
234 | {
235 | // We're at the center of the center image so go to the bottom/right corner
236 | matrixStack.translate(textureInfo.width / 2, textureInfo.height / 2);
237 | matrixStack.rotateZ(Math.sin(time * 2.5));
238 | matrixStack.scale(0.2, 0.2);
239 | // Now we want the top/left corner of the image we're about to draw
240 | matrixStack.translate(0, 0); // 0,0 means this line is not really doing anything
241 |
242 | drawImage(
243 | textureInfo.texture,
244 | textureInfo.width,
245 | textureInfo.height,
246 | 0, 0);
247 |
248 | }
249 | matrixStack.restore();
250 | ```
251 | 结果是:
252 |
253 | ![带子图片旋转][8]
254 |
255 | [查看网页][9]
256 | 如果你认为不同的矩阵栈函数,比如 `translate`,`rotateZ`,和 `scale` 是用来移动原点的,那么相似的,我也可以认为设置了旋转中心也是移动了原点,那么当我调用 `drawImage` 时,图片部分是相对于前面的原点吗?
257 | 换句话说,当我使用 400x300 的 canvas 画布,然后调用 `matrixStack.translate(220, 150)`。此时原点的位置在 200,150,并且接下来的都会相对于该点进行绘制。如果我们传入 0,0 参数去调用 `drawImage` ,这是图片相对于现在坐标的进行绘制。
258 |
259 | ![axis绘制坐标][10]
260 | 现在,我们想让旋转中心变为右下角。在这种情况下,原点的位置应该移到哪以至于,当我们调用 `drawImage` 时,我们想要的旋转中心点就是当前原点呢? 当前纹理的右下角的坐标是 `-textureWidth`,`-textureHeight`,所以,现在当我们调用 `drawImage`,使用 0,0参数时,当前纹理就会从这开始绘制并且该位置就是右下角,同样也是前一个坐标的原点。
261 | 无论我们对任意点做过怎样的处理,在被用于矩阵栈之前,这些处理不重要。我们已经对原点做了一系列操作,比如平移,缩放或者旋转,但在我们调用 `drawImage` 之前,原点现在的位置和处理操作是相关的。我们决定将当前原点移去哪,是相对于纹理绘制的位置,如果我们已经对原点的位置处理完了,那么最终的点就是新的起始点。
262 | 你可能注意到,该矩阵栈和我们[以前说的场景图表][12]很类似。一个场景图表包含一个节点树,我们可以遍历这颗树,然后用其父节点去和每个节点相乘。矩阵栈实际就是另外一种同样效果的高效替代版本
263 |
264 | [1]: http://webglfundamentals.org/webgl/lessons/webgl-2d-drawimage.html
265 | [2]: http://webglfundamentals.org/webgl/lessons/webgl-2d-drawimage.html
266 | [3]: http://webglfundamentals.org/webgl/lessons/webgl-2d-drawimage.html
267 | [4]: http://static.zybuluo.com/jimmythr/oiqizkh79clclsepsprxcz00/%E5%AE%9A%E7%82%B9%E6%97%8B%E8%BD%AC.gif
268 | [5]: http://webglfundamentals.org/webgl/webgl-2d-matrixstack-01.html
269 | [6]: http://static.zybuluo.com/jimmythr/k01zrn7m9stbzo9b8ueu3ch4/%E4%B8%AD%E5%BF%83%E6%97%8B%E8%BD%AC.gif
270 | [7]: http://webglfundamentals.org/webgl/webgl-2d-matrixstack-02.html
271 | [8]: http://static.zybuluo.com/jimmythr/9kr0i9zjfxk1w1pobfusabk3/%E5%B8%A6%E5%AD%90%E5%9B%BE%E7%89%87%E6%97%8B%E8%BD%AC.gif
272 | [9]: http://webglfundamentals.org/webgl/webgl-2d-matrixstack-03.html
273 | [10]: http://static.zybuluo.com/jimmythr/fvaovg0dx1oejnwjtw08dk8j/%E5%B1%8F%E5%B9%95%E5%BF%AB%E7%85%A7%202016-10-21%2009.30.40.png
274 | [11]: http://static.zybuluo.com/jimmythr/y6vhf3046mor0u5njho230uh/%E5%B1%8F%E5%B9%95%E5%BF%AB%E7%85%A7%202016-10-21%2009.30.52.png
275 | [12]: http://webglfundamentals.org/webgl/lessons/webgl-scene-graph.html
--------------------------------------------------------------------------------
/2D-translation/WebGL-2D-Rotation.md:
--------------------------------------------------------------------------------
1 | # WebGL 2D 旋转(Rotation)
2 |
3 | This post is a continuation of a series of posts about WebGL. The first started with fundamentals and the previous was about translating geometry.
4 |
5 | 这篇教程是一系列关于 WebGL 的教程中的一篇。第一篇教程是 WebGL 基础,上一篇教程是 关于平移几何体。
6 |
7 | I'm going to admit right up front I have no idea if how I explain this will make sense but what the heck, might as well try. First I want to introduce you to what's called a "unit circle". If you remember your junior high school math (don't go to sleep on me!) a circle has a radius. The radius of a circle is the distance from the center of the circle to the edge. A unit circle is a circle with a radius of 1.0.
8 |
9 | 在开始之前我要先承认一下我不知道该怎么通俗易懂的讲解这个内容,但不管怎么样,我都会尽力去做。首先我想给你介绍一下什么是“单位圆”。如果你还记得你初中数学(别去睡觉啊!)的内容——圆有半径。一个圆的半径是圆心到圆边的距离。单位圆是半径为 1.0 的圆。
10 |
11 | Here's a unit circle.
12 |
13 | 这里有个单位圆。
14 |
15 |
16 |
17 | Notice as you drag the blue handle around the circle the X and Y positions change. Those represent the position of that point on the circle. At the top Y is 1 and X is 0. On the right X is 1 and Y is 0.
18 |
19 | 注意当你拖动在圆上的蓝色控制器,X 和 Y 的值会跟着改变。它们表示这个点在圆上的位置。当这个点在圆的最上面时候 Y 是 1,X 是 0,在最右边的时候 X 是 1,Y 是 0。
20 |
21 | If you remember from basic 3rd grade math if you multiply something by 1 it stays the same. So 123 * 1 = 123. Pretty basic, right? Well, a unit circle, a circle with a radius of 1.0 is also a form of 1. It's a rotating 1. So you can multiply something by this unit circle and in a way it's kind of like multiplying by 1 except magic happens and things rotate.
22 |
23 | 如果你还记得在基础的三年级数学中把某个数乘以 1 之后这个数依然不变,比如 123 * 1 = 123。非常基础,对吧?那么,单位圆——半径为 1.0 的圆也是 1 的一种形式。它是旋转的 1。因此你可以将某个东西乘以这个单位圆,在某种程度上,这与乘以 1 有点类似,除了会发生一些神奇的事情以及事物旋转。
24 |
25 | We're going to take that X and Y value from any point on the unit circle and we'll multiply our geometry by them from our previous sample.
26 |
27 | 我们将从单位圆上的任意一点取得 X 和 Y 的值,然后我们将它们乘以我们 上一篇教程中示例 的几何体。
28 |
29 | Here are the updates to our shader.
30 |
31 | 下面是对我们着色器的更新。
32 |
33 | ```
34 |
54 | ```
55 |
56 | And we update the JavaScript so that we can pass those 2 values in.
57 |
58 | 然后我们更新 Javascript 代码使得我们可以传递那两个参数的值进去。
59 |
60 | ```
61 |
82 | ```
83 |
84 | And here's the result. Drag the handle on the circle to rotate or the sliders to translate.
85 |
86 | 下面是代码运行的结果。拖动圆上的控制器进行选择或者拖动滑动器进行平移。
87 |
88 |
89 |
90 | 点击这里在新窗口查看例子
91 |
92 | Why does it work? Well, look at the math.
93 |
94 | 为什么这段代码能运行?我们先来看一下数学公式。
95 |
96 | ```
97 | rotatedX = a_position.x * u_rotation.y + a_position.y * u_rotation.x;
98 | rotatedY = a_position.y * u_rotation.y - a_position.x * u_rotation.x;
99 | ```
100 |
101 | Let's say you have a rectangle and you want to rotate it. Before you start rotating it the top right corner is at 3.0, 9.0. Let's pick a point on the unit circle 30 degrees clockwise from 12 o'clock.
102 |
103 | 假设你有一个矩形,并且你想旋转它。在你开始旋转它之前,这个矩形右上角的位置为(3.0,9.0)。让我们选择一个在单位圆中从 12 点钟的位置顺时针偏移 30 度的点。
104 |
105 | 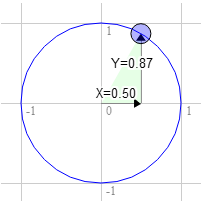
106 |
107 | The position on the circle there is 0.50 and 0.87
108 |
109 | 在圆上这个点的位置为 0.50 和 0.87
110 |
111 | ```
112 | 3.0 * 0.87 + 9.0 * 0.50 = 7.1
113 | 9.0 * 0.87 - 3.0 * 0.50 = 6.3
114 | ```
115 |
116 | That's exactly where we need it to be
117 |
118 | 那刚好是我们所需要的位置
119 |
120 | 
121 |
122 | The same for 60 degrees clockwise
123 |
124 | 顺时针旋转 60 度也是如此
125 |
126 | 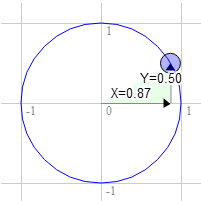
127 |
128 | The position on the circle there is 0.87 and 0.50
129 |
130 | 这里在圆上的位置为 0.87 和 0.50
131 |
132 | ```
133 | 3.0 * 0.50 + 9.0 * 0.87 = 9.3
134 | 9.0 * 0.50 - 3.0 * 0.87 = 1.9
135 | ```
136 |
137 | You can see that as we rotate that point clockwise to the right the X value gets bigger and the Y gets smaller. If we kept going past 90 degrees X would start getting smaller again and Y would start getting bigger. That pattern gives us rotation.
138 |
139 | 你可以看到当我们顺时针向右旋转那个点时,X 的值变得越来越大而 Y 的值变得越来越小。如果我们继续选择超过 90 度,X 的值又开始变小而 Y 的值开始变大。这种模式给了我们旋转。
140 |
141 | There's another name for the points on a unit circle. They're called the sine and cosine. So for any given angle we can just look up the sine and cosine like this.
142 |
143 | 在单位圆上的点有另一个名字。它们被称为正弦和余弦。因为对任意给定的角度,我们可以像这样查找它的正弦和余弦。
144 |
145 | ```
146 | function printSineAndCosineForAnAngle(angleInDegrees) {
147 | var angleInRadians = angleInDegrees * Math.PI / 180;
148 | var s = Math.sin(angleInRadians);
149 | var c = Math.cos(angleInRadians);
150 | console.log("s = " + s + " c = " + c);
151 | }
152 | ```
153 |
154 | If you copy and paste the code into your JavaScript console and type `printSineAndCosignForAngle(30)` you see it prints `s = 0.49 c = 0.87` (note: I rounded off the numbers.)
155 |
156 | 如果你复制粘贴这段代码到你的 JavaScript 控制台并输入 `printSineAndCosignForAngle(30)` 你会看到它显示 `s = 0.49 c = 0.87` (注意:我去掉了数字的尾数)。
157 |
158 | If you put it all together you can rotate your geometry to any angle you desire. Just set the rotation to the sine and cosine of the angle you want to rotate to.
159 |
160 | 如果你将上面的代码整合在一起,你可以按你想要的角度去旋转一个几何体。只需要给 `rotation` (示例代码中的旋转变量)设置你想要旋转的角度的正弦和余弦。
161 |
162 | ```
163 | ...
164 | var angleInRadians = angleInDegrees * Math.PI / 180;
165 | rotation[0] = Math.sin(angleInRadians);
166 | rotation[1] = Math.cos(angleInRadians);
167 | ```
168 |
169 | Here's a version that just has an angle setting. Drag the sliders to translate or rotate.
170 |
171 | 如下是一个有角度设置版本的示例。通过拖动滑动器进行平移或旋转。
172 |
173 |
174 |
175 | 点击这里在新窗口查看例子
176 |
177 | I hope that made some sense. Next up a simpler one. Scale.
178 |
179 | 我希望这还是比较易懂的。接下来是比较简单的一个内容——缩放。
180 |
181 |
182 | > ## What are radians?
183 | >
184 | > Radians are a unit of measurement used with circles, rotation and angles. Just like we can measure distance in inches, yards, meters, etc we can measure angles in degrees or radians.
185 | >
186 | > You're probably aware that math with metric measurements is easier than math with imperial measurements. To go from inches to feet we divide by 12. To go from inches to yards we divide by 36. I don't know about you but I can't divide by 36 in my head. With metric it's much easier. To go from millimeters to centimeters we divide by 10. To go from millimeters to meters we divide by 1000. I **can** divide by 1000 in my head.
187 | >
188 | > Radians vs degrees are similar. Degrees make the math hard. Radians make the math easy. There are 360 degrees in a circle but there are only 2π radians. So a full turn is 2π radians. A half turn is 1π radian. A 1/4 turn, ie 90 degress is 1/2π radians. So if you want to rotate something 90 degrees just use `Math.PI * 0.5`. If you want to rotate it 45 degrees use `Math.PI * 0.25` etc.
189 | >
190 | > Nearly all math involving angles, circles or rotation works very simply if you start thinking in radians. So give it try. Use radians, not degrees except in UI displays.
191 |
192 | > ## 什么是弧度
193 | >
194 | > 弧度是一种用于圆、旋转和角度的测量单位。就像我们可以用英寸、码、米等来测量距离,我们也可以用角度或者弧度来测量一个角。
195 | >
196 | > 你很可能已经意识到在数学中使用公制单位要比使用英制单位要简单很多。从英寸到英尺我们需要除以 12。从英寸到码我们需要除以 36。我不知道你但我不会在脑海里心算除以 36。使用公制单位就要简单很多。从毫米到厘米我们除以 10。从毫米到米我们除以 1000。我 **可以** 心算除以 1000。
197 | >
198 | > 弧度和角度的比较跟这相似。角度使计算变得困难。弧度让计算变得简单。在一个圆中有360度但只有 2π 弧度。所以转一圈是 2π 弧度。半圈是 1π 弧度。四分之一圈,即 90 度是 1/2π 弧度。所以如果你想旋转某个东西 90 度你只需要使用 `Math.PI * 0.5`。以此类推,如果你想旋转 45 度就使用 `Math.PI * 0.25`。
199 | >
200 | > 几乎所有的计算都会涉及角度,如果你开始以弧度为单位进行思考,圆和旋转的原理会非常简单。所以去试一试。除了在用户界面显示时使用角度外,都使用弧度。
201 |
--------------------------------------------------------------------------------
/fundamentals/WebGL-How-It-Works.md:
--------------------------------------------------------------------------------
1 | # WebGL 工作原理
2 |
3 |
4 | 上一节我们主要讲解了[WebGL 的基础][1]。在开始之前,我们来了解一下WebGL 和你的 GPU 底层的工作原理。GPU 主要做了两件事。第一个是转换顶点(或者说 数据流)到裁剪平面中。第二个就是基于前一部分来渲染图像。
5 |
6 | 当你调用:
7 | ```
8 | gl.drawArrays(gl.TRIANGLE, 0, 9);
9 | ```
10 | 后面的 9 代表着“处理9个点”。所以,这里就有9个点被处理了。
11 |
12 | ![GPU process][2]
13 |
14 | 左边是你提供的数据,顶点着色器是你用 [GLSL][3] 写出来的函数。它会在每个顶点被处理时调用。该点的值经过相应的数学运算,转换成为裁剪坐标的值,并且赋值给特殊的变量 `gl_Position`。GPU 会获得该值并保存。
15 |
16 | 当你在画三角形时,前一个部分每次会渲染出3个点,GPU 就可以利用这3个点去画一个三角形。GPU 会找到这3个点在图上对应着的像素点,然后渲染出一个三角形。接着,对于每个像素点,GPU 会调用你的片元着色器,给相应的点加上颜色。片元着色器实际上是通过 gl_FragColor 给每个像素点设置颜色。
17 |
18 | 不过,在我们的例子中,片元着色器并没有区分每一个点的颜色值。当然,办法是有的。我们可以定义 “varyings” 将每一个颜色值通过顶点着色器赋给片元着色器。
19 |
20 | 看一个简单的例子,我们将从顶点着色器计算出的裁剪坐标值传递给片元着色器。
21 |
22 | 然后,画一个简单的三角形。我们修改[前面的例子][4]中的代码,将画 `F` 改为画一个三角形。
23 | ```
24 | // 将三角形的像素值存储在 buffer 中
25 | function setGeometry(gl) {
26 | gl.bufferData(
27 | gl.ARRAY_BUFFER,
28 | new Float32Array([
29 | 0,-100,
30 | 150, 125,
31 | -175, 100]),
32 | gl.STATIC_DRAW);
33 | }
34 | ```
35 | 我们只需要画三个点:
36 | ```
37 | // 画场景
38 | function drawScene() {
39 | ...
40 | // 画几何图形
41 | gl.drawArrays(gl.TRIANGLES,0,3);
42 | }
43 | ```
44 | 在顶点着色器中,我们声明一个 `varying` 将数据传递给片元着色器。
45 | ```
46 | varying vec4 v_color;
47 | ...
48 | void main() {
49 | // 使用 matrix 乘以该位置
50 | gl_Position = vec4((u_matrix * vec3(a_position,1)).xy,0,1);
51 |
52 | // 从 裁剪空间值 转换为 颜色空间值
53 | // 裁剪空间值的范围为 -1.0 到 +1.0
54 | // 颜色空间的值从 0.0 到 1.0
55 | v_color = gl_Position * 0.5 + 0.5;
56 | }
57 | ```
58 | 然后,我们在片元着色器中,声明一个一样的 `varying`。
59 | ```
60 | precision mediump float;
61 |
62 | varying vec4 v_color;
63 |
64 | void main() {
65 | gl_FragColor = v_color;
66 | }
67 | ```
68 |
69 | WebGL 会自动关联在顶点着色器和片元着色器存在的同名 varying。
70 |
71 |
72 | Here's the working version.
73 |
74 | 具体效果,可以[查看网页][5]。
75 |
76 | ![iamge][6]
77 |
78 | 上面例子中,我们可以移动,缩放并且旋转该三角形。注意,因为这个颜色是直接根据裁剪空间来的,而不是根据三角形上的点来的。所以,他们不会随三角形一起移动,而是固定在背景中。
79 |
80 | 想一想,我们只计算了3个点。所以,顶点着色器也只会调用3次,如果这样的话,我们也只能得出3种颜色,但是,我们的三角形却有很多颜色。这就是为什么我们需要一个 varying。
81 |
82 | 在上面的例子中,我们设置了3个点:
83 |
84 | ![vertices][7]
85 |
86 | 我们的顶点着色器使用一个模型去移动,旋转,放缩 并且转化为 裁剪坐标的值。上述变化的默认值分别是:
87 |
88 | - 平移为 200,150
89 | - 旋转为 0
90 | - 放缩为 1,1
91 |
92 | 所以,只有平移有点不同。前面给出的 backbuffer 是 400×300,我们的顶点着色器会将其传递给模型,然后计算出下面3个裁剪坐标。
93 |
94 | ![gl_position][8]
95 |
96 |
97 | 它同样会转换上述值到颜色空间,并且赋值给我们刚才声明的 varying v_color 变量中。
98 |
99 | ![v_color][9]
100 |
101 |
102 | 这三个值被写入 v_color 之后,会添加并且传递给片元着色器去渲染每个点的颜色。v_color 会插入在 v0,v1和v2 之间。
103 |
104 | 整个渲染过程,可以[查看具体网页][10]。
105 |
106 | ![v_color][11]
107 |
108 |
109 | 我们可以传递更多的数据给顶点着色器,同样,也可以传递给片元着色器。 如果我们想画一个矩形,就需要 2 个三角形,2个不同的颜色。在顶点着色器中,我们还需要另外一个 attribute 去传递更多的数据。那么片元着色器也会处理更多的数据。
110 |
111 | ```
112 | attribute vec2 a_position;
113 | attribute vec4 a_color;
114 | ...
115 | varying vec4 v_color;
116 |
117 | void main() {
118 | ...
119 | // 把 attribute 中的颜色值复制到 varying 中
120 | v_color = a_color;
121 | }
122 | ```
123 | 我们现在向 WebGL 提供需要用到的颜色。
124 |
125 | ```
126 | // 找到 vertex data 绑定的位置
127 | var positionLocation = gl.getAttribLocation(program,"a_position");
128 | var colorLocation = gl.getAttribLocation(program,"a_color");
129 | ...
130 | // 创建一个 buffer 去加载颜色值
131 | var buffer = gl.createBuffer();
132 | gl.bindBuffer(gl.ARRAY_BUFFER,buffer);
133 | gl.enableVertexAttribArray(colorLocation);
134 | gl.vertexAttribPointer(colorLocation,4,gl.FLOAT,false,0,0);
135 |
136 | // 设置颜色值
137 | setColors(gl);
138 | ...
139 |
140 | // 给 buffer 填充2个三角形需要用到的颜色值
141 | function setColors(gl) {
142 | // 随机选取2种颜色
143 | var r1 = Math.random();
144 | var b1 = Math.random();
145 | var g1 = Math.random();
146 |
147 | var r2 = Math.random();
148 | var b2 = Math.random();
149 | var g2 = Math.random();
150 |
151 | gl.bufferData(
152 | gl.ARRAY_BUFFER,
153 | new Float32Array(
154 | [ r1,b1,g1,1,
155 | r1,b1,g1,1,
156 | r1,b1,g1,1,
157 | r2,b2,g2,1,
158 | r2,b2,g2,1,
159 | r2,b2,g2,1]),
160 | gl.STATIC_DRAW);
161 | }
162 | ```
163 | [最终的结果][12].
164 |
165 | ![two_triangle][13]
166 |
167 |
168 | 注意,上面我们使用的是两个固定的颜色值。但是,我们是将值赋给 varying,所以,三角形中的颜色值是可以变化的。我们在上面给每个三角形的3个点设置的是相同的颜色值,如果我们设置不同的值,将会看到具体的差值。
169 | ```
170 | // 给 buffer 填充2个三角形需要用到的颜色值
171 | function setColors(gl) {
172 | // 给每个顶点设置不同的颜色
173 | gl.bufferData(
174 | gl.ARRAY_BUFFER,
175 | new Float32Array(
176 | [ Math.random(),Math.random(),Math.random(),1,
177 | Math.random(),Math.random(),Math.random(),1,
178 | Math.random(),Math.random(),Math.random(),1,
179 | Math.random(),Math.random(),Math.random(),1,
180 | Math.random(),Math.random(),Math.random(),1,
181 | Math.random(),Math.random(),Math.random(),1]),
182 | gl.STATIC_DRAW);
183 | }
184 | ```
185 | 现在,我们能看见[不一样的地方][14]。
186 |
187 | ![varying_color][15]
188 |
189 |
190 | 看起来和第一个例子差不多,但是我们了解了使用更多的 attribute 将数据由顶点着色器传递给片元着色器。如果你看了[图像处理的例子][16]的话,你会发现那里用了一个额外的 attribute 去传递纹理坐标。
191 |
192 | ## buffer 和 attribute 做了什么?
193 |
194 | Buffers 用来获取顶点和其他点的数据,并传输给 CPU。 `gl.createBuffer` 创建一个 buffer。 `gl.bindBuffer` 绑定需要处理的 buffer。`gl.bufferData` 将数据拷贝到指定的 buffer。
195 |
196 | 一旦数据在 buffer 中准备好了,我们就需要告诉 WebGL 如何将数据提取出来并且传递给顶点着色器's attributes。
197 |
198 | 为了完成上述过程,首先,我们先要了解 WebGL 把哪些位置赋值给了 attributes。比如,在上面的代码中:
199 |
200 | ```
201 | // 解析 vertex 数据的流向
202 | var positionLocation = gl.getAttribLocation(program,"a_position");
203 | var colorLocation = gl.getAttribLocation(program,"a_color");
204 | ```
205 |
206 | 一旦我们知道了 attribute 的相关位置,就需要调用2个命令。
207 |
208 | ```
209 | gl.enableVertexAttribArray(location);
210 | ```
211 | 这个命令告诉 WebGL,我们通过 buffer 提供的数据。
212 |
213 | ```
214 | gl.vertexAttribPointer(
215 | location,
216 | numComponents,
217 | typeOfData,
218 | normalizeFlag,
219 | strideToNextPieceOfData,
220 | offsetIntoBuffer);
221 | ```
222 |
223 | 这个命令让 WebGL 从刚才通过 `gl.bindBuffer` 绑定的 buffer 中提取数据。该 buffer 包含了每个顶点的组成部分(1 - 4),具体数据的类型是什么 (BYTE, FLOAT, INT, UNSIGNED_SHORT 等等),每个有效数据之间的步长是多少,真实数据在 buffer 中的偏移量是多少。
224 |
225 | 组成每个顶点的数据长度一般都是 1 到 4。
226 |
227 | 如果你使用一个单位大小的 buffer 的单一类型的数据的话,那么步长和偏移量总是 0。步长为 0 意味着 “每个步长包括了数据的类型和大小”。偏移量为 0 意味着数据从 buffer 的起始位开始。将他们设置为其他值而不是 0 来说, 会更复杂,尽管这样做在性能方面有些好处。不过,相对于复杂度来说,这并不值得,除非你是想让 WebGL 受它绝对的限制。
228 |
229 | 我希望上面解决了 buffers 和 attributes 怎样工作的问题。
230 |
231 | 下面,让我们接着学习 [shaders and GLSL][17]。
232 |
233 |
234 | ----------
235 | **补充**
236 |
237 | ## normalizeFlag 在 vertexAttribPointer 中代表什么?
238 |
239 | normalize flag 主要影响所有的非浮点类型。 如果你将它设置为 false, 那么类型的值还是保持不变。BYTE 的大小还是从 -128 到 127,UNSIGNED_BYTE 的大小从 0 到 255, SHORT 的大小从 -32768 到 32767 等等。
240 |
241 | 如果 normalize flag 设置为 true, 那么 BYTE (-128 到 127) 的大小变为 -1.0 到 +1.0,UNSIGNED_BYTE (0 到 255) 的大小变为 0.0 到 +1.0。 SHORT 的大小和 BYTE 一样也是 -1.0 到 +1.0, 不过他比 BYTE 的分辨率更高。
242 |
243 | 归一化数据最常用在颜色值上。颜色值基本上都是从 0.0 到 1.0。 使用浮点数去表达红色,绿色,蓝色和透明度,每个顶点的颜色会花掉 16 bytes 的大小。如果你有更复杂的几何图形的话,那累积下来就很大了。如果,你能用 UNSIGNED_BYTEs 去表达你的颜色值, 比如 0 代表 0.0, 255 代表 1.0。那么,你仅仅只需要 4 bytes 去表达每个点的颜色值,这节省了 75% 的大小。
244 |
245 | 我们来改写一下代码。当我们告诉 WebGL 怎样去提取颜色时,我们需要使用
246 |
247 | ```
248 | gl.vertexAttribPointer(colorLocation, 4, gl.UNSIGNED_BYTE, true, 0, 0);
249 | ```
250 |
251 | 然后, 当我们将颜色值填充到 buffer 里,我们需要使用
252 |
253 | ```
254 | // 填充 2 个三角颜色值到 buffer 里
255 | function setColors(gl) {
256 | // 选取 2 个随机颜色
257 | var r1 = Math.random() * 256; // 0 to 255.99999
258 | var b1 = Math.random() * 256; // these values
259 | var g1 = Math.random() * 256; // will be truncated
260 | var r2 = Math.random() * 256; // when stored in the
261 | var b2 = Math.random() * 256; // Uint8Array
262 | var g2 = Math.random() * 256;
263 |
264 | gl.bufferData(
265 | gl.ARRAY_BUFFER,
266 | new Uint8Array( // Uint8Array
267 | [ r1, b1, g1, 255,
268 | r1, b1, g1, 255,
269 | r1, b1, g1, 255,
270 | r2, b2, g2, 255,
271 | r2, b2, g2, 255,
272 | r2, b2, g2, 255]),
273 | gl.STATIC_DRAW);
274 | }
275 | ```
276 |
277 | 下面是个[实例][18]。
278 |
279 | ![unsigned_colors][19]
280 |
281 | 有问题? [在 stack overflow 上提问][20]。
282 | Issue/Bug? [在 github 上创建 issue][21]。
283 |
284 |
285 | [1]: http://webglfundamentals.org/webgl/lessons/webgl-fundamentals.html
286 | [2]: http://webglfundamentals.org/webgl/lessons/resources/vertex-shader-anim.gif
287 | [3]: http://webglfundamentals.org/webgl/lessons/webgl-shaders-and-glsl.html
288 | [4]: http://webglfundamentals.org/webgl/lessons/webgl-2d-matrices.html
289 | [5]: http://webglfundamentals.org/webgl/webgl-2d-triangle-with-position-for-color.html
290 | [6]: http://static.zybuluo.com/jimmythr/b8vlmbiy0lznx53xb83m0xu8/%E5%B1%8F%E5%B9%95%E5%BF%AB%E7%85%A7%202016-09-25%2019.25.05.png
291 | [7]: http://static.zybuluo.com/jimmythr/adw0jtqkxsnz4uvpa267qjlr/%E5%B1%8F%E5%B9%95%E5%BF%AB%E7%85%A7%202016-09-24%2010.17.12.png
292 | [8]: http://static.zybuluo.com/jimmythr/sauoxvxpqladbt4jz8nvz17g/%E5%B1%8F%E5%B9%95%E5%BF%AB%E7%85%A7%202016-09-24%2010.17.56.png
293 | [9]: http://static.zybuluo.com/jimmythr/pbbjikfwyyt4n6phle3ffyvr/%E5%B1%8F%E5%B9%95%E5%BF%AB%E7%85%A7%202016-09-24%2010.18.34.png
294 | [10]: http://webglfundamentals.org/webgl/lessons/resources/fragment-shader-anim.html
295 | [11]: http://static.zybuluo.com/jimmythr/b79tktap4oxyq449uytkjblu/%E5%B1%8F%E5%B9%95%E5%BF%AB%E7%85%A7%202016-09-25%2019.28.18.png
296 | [12]: http://webglfundamentals.org/webgl/webgl-2d-rectangle-with-2-colors.html
297 | [13]: http://static.zybuluo.com/jimmythr/thbg545hxy5sfvy16ay1080j/%E5%B1%8F%E5%B9%95%E5%BF%AB%E7%85%A7%202016-09-25%2019.29.32.png
298 | [14]: http://webglfundamentals.org/webgl/webgl-2d-rectangle-with-random-colors.html
299 | [15]: http://static.zybuluo.com/jimmythr/54juuw1l3lw5myhc9t258fgt/%E5%B1%8F%E5%B9%95%E5%BF%AB%E7%85%A7%202016-09-25%2019.30.25.png
300 | [16]: http://webglfundamentals.org/webgl/lessons/webgl-image-processing.html
301 | [17]: http://webglfundamentals.org/webgl/lessons/webgl-shaders-and-glsl.html
302 | [18]: http://webglfundamentals.org/webgl/webgl-2d-rectangle-with-2-byte-colors.html
303 | [19]: http://static.zybuluo.com/jimmythr/a9gcqxzknnp7fnh54ht8qpa5/%E5%B1%8F%E5%B9%95%E5%BF%AB%E7%85%A7%202016-09-25%2023.33.00.png
304 | [20]: http://stackoverflow.com/questions/tagged/webgl
305 | [21]: http://github.com/greggman/webgl-fundamentals/issues
--------------------------------------------------------------------------------
/techniques/WebGL-Text-HTML.md:
--------------------------------------------------------------------------------
1 | # WebGL 文本 - HTML
2 |
3 |
4 | This article is a continuation of previous WebGL articles. If you haven't read them I suggest you start there and work your way back.
5 |
6 | 该文章是接着前一篇文章继续讲解。如果你还没阅读[上一篇][1],我建议从那开始。
7 |
8 | A common question is "how to I draw text in WebGL". The first thing to ask yourself is what's your purpose in drawing the text. You're in a browser, the browser displays text. So your first answer should be to use HTML to display text.
9 |
10 | 先问一个常见的问题 “怎样在 WebGL 中绘制文本呢?”。首先,你需要问你自己,为什么要绘制文本。现在运行的环境是浏览器,并且,是由浏览器来显示文本的。所以,你第一个回答应该是使用 HTML 来展示文本。
11 |
12 | Let's do the easiest example first: You just want to draw some text over your WebGL. We might call this a text overlay. Basically this is text that stays in the same position.
13 |
14 | 我们先试一试最简单的办法:如果你仅仅是想在你的 WebGL 上写一些文字,那么我们可以把这个叫做文字浮层。本质上来说,文本还是在原来的位置。
15 |
16 | The simple way is to make an HTML element or elements and use CSS to make them overlap.
17 |
18 | 该方式就是用一个或多个的 HTML 元素,然后使用 CSS 去使他们浮动。
19 |
20 | For example: First make a container and put both a canvas and some HTML to be overlaid inside the container.
21 |
22 | 例如:首先,用一个容器,然后将 canvas 和 HTML 元素平铺在其中。
23 | ```
24 |
43 |
44 | 那么,接下来我们得将 `setRectangle` 函数改成像下面的代码那样。
45 |
46 | ```
47 | // 用表示字母“F”的顶点数组填充 buffer
48 | function setGeometry(gl, x, y) {
49 | var width = 100;
50 | var height = 150;
51 | var thickness = 30;
52 | gl.bufferData(
53 | gl.ARRAY_BUFFER,
54 | new Float32Array([
55 | // 左边的一列
56 | x, y,
57 | x + thickness, y,
58 | x, y + height,
59 | x, y + height,
60 | x + thickness, y,
61 | x + thickness, y + height,
62 |
63 | // 上边的一横
64 | x + thickness, y,
65 | x + width, y,
66 | x + thickness, y + thickness,
67 | x + thickness, y + thickness,
68 | x + width, y,
69 | x + width, y + thickness,
70 |
71 | // 中间的一横
72 | x + thickness, y + thickness * 2,
73 | x + width * 2 / 3, y + thickness * 2,
74 | x + thickness, y + thickness * 3,
75 | x + thickness, y + thickness * 3,
76 | x + width * 2 / 3, y + thickness * 2,
77 | x + width * 2 / 3, y + thickness * 3]),
78 | gl.STATIC_DRAW);
79 | }
80 | ```
81 |
82 | 你可以满怀希望的看到这段代码并不能很好的进行拓展。如果我们想要绘制一些有着成百上千条线段的非常复杂的几何体,我们必须写上一些很复杂的代码。除此之外,每一次绘制 JavaScript 都必须更新所有的顶点数据。
83 |
84 | 这里有一个相对简单的方法。只需要上传几何体然后在着色器中进行平移。
85 |
86 | 下面是新的着色器代码
87 |
88 | ```
89 |
104 | ```
105 |
106 | 我们将稍微重构一下代码。使得我们只需要设置一次几何体。
107 |
108 | ```
109 | // Fill the buffer with the values that define a letter 'F'.
110 | function setGeometry(gl) {
111 | gl.bufferData(
112 | gl.ARRAY_BUFFER,
113 | new Float32Array([
114 | // left column
115 | 0, 0,
116 | 30, 0,
117 | 0, 150,
118 | 0, 150,
119 | 30, 0,
120 | 30, 150,
121 |
122 | // top rung
123 | 30, 0,
124 | 100, 0,
125 | 30, 30,
126 | 30, 30,
127 | 100, 0,
128 | 100, 30,
129 |
130 | // middle rung
131 | 30, 60,
132 | 67, 60,
133 | 30, 90,
134 | 30, 90,
135 | 67, 60,
136 | 67, 90]),
137 | gl.STATIC_DRAW);
138 | }
139 | ```
140 |
141 | 然后我们只需要在我们绘制之前更新 `u_translation` 变量就能得到我们想要的平移效果。
142 |
143 | ```
144 | ...
145 | var translationLocation = gl.getUniformLocation(
146 | program, "u_translation");
147 | ...
148 | // Set Geometry.
149 | setGeometry(gl);
150 | ..
151 | // Draw scene.
152 | function drawScene() {
153 | // Clear the canvas.
154 | gl.clear(gl.COLOR_BUFFER_BIT);
155 |
156 | // Set the translation.
157 | gl.uniform2fv(translationLocation, translation);
158 |
159 | // Draw the rectangle.
160 | gl.drawArrays(gl.TRIANGLES, 0, 18);
161 | }
162 | ```
163 |
164 | 注意 `setGeometry` 函数只被调用一次。它不再在 `drawScene` 里面。
165 |
166 | 示例如下。再一次,通过拖动滑动器对几何形体进行平移。
167 |
168 |
169 |
170 | 点击这里在新窗口查看例子
171 |
172 | 现在当我们进行绘制的时候,WebGL 几乎帮我们完成所有的事情。我们所需要的事情只有设置平移变量然后请求绘制。即使我们的几何体有数以万计的顶点,主要的代码也会照常运行。
173 |
174 | 如果你想要,你可以比较一下上面提到的比较复杂的更新所有顶点的 JavaScript 版本和现在的版本。
175 |
176 | 我希望这个例子不会太平淡无奇。在 下一篇文章中我们将开始进入旋转(Rotation)。
177 |
--------------------------------------------------------------------------------
/misc/WebGL-Setup-And-Installation.md:
--------------------------------------------------------------------------------
1 | # WebGL Setup and Installation
2 | # WebGL的设置与安装
3 |
4 | Techincally you don't need anything other than a web browser to do WebGL development. Go to [jsfiddle.net][1] or [jsbin.com][2] or [codepen.io][3] and just start applying the lessons here.
5 |
6 | 从技术上讲,你仅仅需要一个网页浏览器做 WebGL 开发。可以到 [jsfiddle.net][1]、 [jsbin.com][2] 或者 [codepen.io][3] 应用这里的教程内容。
7 |
8 | On all of them you can reference external scripts by adding a tag pair if you want to use external scripts.
9 |
10 | 如果你想使用外部脚本,所有的内容你都可以通过引用外部脚本标签 <script src="..."> 来使用。
11 |
12 | Still, there are limits. WebGL has stronger restrictions than Canvas2D for loading images which means you can't easily access images from around the web for your WebGL work. On top of that it's just faster to work with everything local.
13 |
14 | 不过,这里有限制。WebGL 相对于 Canvas2D 在加载图片方面有更强的约束,这意味着你在 WebGL 开发中不能轻易的访问来自网络的图片。最重要的是,它与本地资源合作会更快。
15 |
16 | Let's assume you want to run and edit the samples on this site. The first thing you should do is download the site. [You can download it here][4].
17 |
18 | 让我们假设你想在这个网站运行和编辑示例代码。首先你应该下载这个网站。[你可以在这里下载][4]。
19 |
20 | ![download][5]
21 |
22 | Unzip the files into some folder.
23 | 在文件夹中解压文件。
24 |
25 | ## Using a small simple easy Web Server
26 | ## 使用一个简单的 Web 服务器
27 |
28 | Next up you should install a small web server. I know "web server" sounds scary but the truth is [web servers are actually extremely simple][6].
29 |
30 | 下一步你应该安装一个小的 web 服务器。我知道“web 服务器”听起来很吓人,但事实是 [web 服务器实际上非常简单][6]。
31 |
32 | If you're on Chrome here's a simple solution. [Here's a small chrome extension that's a web server][7].
33 |
34 | 如果你用 Chrome,有一个简单的解决方法。[这里有一个小的 Web 服务器 chrome 扩展][7]。
35 |
36 | ![chrome extension][8]
37 |
38 | Just point it at the folder where you unzipped the files and click one of the web server URLs.
39 |
40 | 只需点击解压了的文件夹中的文件,单击其中一个 web 服务器的 URL。
41 |
42 | If you're not on chrome or if you don't want to use the extension another way is to use [node.js][9]. Download it, install it, then open a command prompt / console / terminal window. If you're on Windows the installer will add a special "Node Command Prompt" so use that.
43 |
44 | 如果你不是使用 chrome 或者你不想使用扩展,另一种方法是使用 [node.js][9]。下载,安装,然后在命令窗口/控制台/终端窗口中打开 。如果你在 Windows 中安装,将会添加一个特需的 “Node Command Prompt” 以供使用。
45 |
46 | Then install the http-server by typing。
47 |
48 | 然后通过命令行输入安装 http-server。
49 |
50 | ```
51 | npm -g install http-server
52 | ```
53 |
54 | If you're on OSX use
55 | 如果你在 OSX 中使用
56 |
57 | ```
58 | sudo npm -g install http-server
59 | ```
60 |
61 | Once you've done that type
62 |
63 | 安装完成之后输入
64 |
65 | ```
66 | http-server path/to/folder/where/you/unzipped/files
67 | ```
68 |
69 | It should print something like
70 |
71 | 命令窗口应该打印出类似的东西
72 |
73 | ![http-server][10]
74 |
75 | Then in your browser go to http://localhost:8080.
76 |
77 | 然后在你的浏览器中输入 http://localhost:8080。
78 |
79 | If you don't specify a path then http-server will server the current folder.
80 |
81 | 如果你没有指定路径,http-server 将会在指向当前的文件夹。
82 |
83 | ## Using your Browsers Developer Tools
84 | ## 使用你的浏览器开发者工具
85 |
86 | Most browser have extensive developer tools built in.
87 | 大多数的浏览器都内置了开发者工具。
88 |
89 | ![developer tools][11]
90 |
91 | [Docs for Chrome's are here][12], [Firefox's are here][13].
92 | Chrome 的参考文档在这里,Firefox 的在这里。
93 |
94 | Learn how to use them. If nothing else always check the JavaScript console. If there is an issue it will often have an error message. Read the error message closely and you should get a clue where the issue is.
95 |
96 | 学习如果使用它们。如果没有其它的事一直检查 JavaScript 控制台。如果有问题,它会显示错误信息。仔细阅读错误信息,你会得到问题的线索。
97 |
98 | ![chrome console][14]
99 |
100 | ## WebGL Helpers
101 | ## WebGL 助手
102 |
103 | There are various WebGL Inspectors / Helpers. [Here's one for Chrome][15].
104 |
105 | 这里有各种各样的 WebGL 检验员/助手。[这个是 Chrome 的][15]。
106 |
107 | ![WebGL Inspectors / Helper][16]
108 |
109 | They may or may not be helpful. Most of them are designed for animated samples and will capture a frame and let you see all the WebGL calls that made that frame. That's great if you already have something working or if you had something working and it broke. But it's not so great if your issue is during initialization which they don't catch or if you're not using animation, as in drawing something every frame. Still they can be very useful. I'll often click on a draw call, and check the uniforms. If I see a bunch of NaN (NaN = Not a Number) then I can usually track down the code that set that uniform and find the bug.
110 |
111 | 他们可能会也可能不会有帮助。它们中的大多数是专为动画示例的,它们捕获并展示一个调用 WebGL 的框。如果你已经有了一些示例起效了或者有一些示例起效但又失败了,这很好。如果你的问题是在初始化过程中助手不能捕获框架或者是你在绘制框架时没有使用动画,这就不是很好了。但它们任然可以非常有用的。我经常会点击一个调用,以检查 uniforms。如果我看到一堆 NaN(NaN = Not a Number)我就可以跟踪代码,设置 uniform 并找出错误。
112 |
113 | ## Inspect the Code
114 | ## 检查代码
115 |
116 | Also always remember you can inspect the code. You can usually just pick view source
117 |
118 | 永远记住你可以检查代码。你可以选择只查看源码。
119 |
120 | ![helper][17]
121 |
122 | Even if you can't right click a page or if the source is in a separate file you can always view the source in the devtools
123 |
124 | 即使你不能右击页面或者源码是在一个单独的文件中,你仍然可以在开发者工具中查看源码。
125 |
126 | ![devtools][18]
127 |
128 | ## Get Started
129 | ## 开始
130 |
131 | Hopefully that helps you get started. [Now back to the lessons][19].
132 |
133 | 希望这有助于你开始。[现在回到教程][19]。
134 |
135 | [1]: https://jsfiddle.net/
136 | [2]: http://jsbin.com/
137 | [3]: http://codepen.io/
138 | [4]: https://github.com/greggman/webgl-fundamentals/
139 | [5]: http://webglfundamentals.org/webgl/lessons/resources/download-webglfundamentals.gif
140 | [6]: http://games.greggman.com/game/saving-and-loading-files-in-a-web-page/
141 | [7]: https://chrome.google.com/webstore/detail/web-server-for-chrome/ofhbbkphhbklhfoeikjpcbhemlocgigb?hl=en
142 | [8]: http://webglfundamentals.org/webgl/lessons/resources/chrome-webserver.png
143 | [9]: https://nodejs.org/en/
144 | [10]: http://webglfundamentals.org/webgl/lessons/resources/http-server-response.png
145 | [11]: http://webglfundamentals.org/webgl/lessons/resources/chrome-devtools.png
146 | [12]: https://developers.google.com/web/tools/chrome-devtools/
147 | [13]: https://developer.mozilla.org/en-US/docs/Tools
148 | [14]: http://webglfundamentals.org/webgl/lessons/resources/javascript-console.gif
149 | [15]: https://benvanik.github.io/WebGL-Inspector/
150 | [16]: https://benvanik.github.io/WebGL-Inspector/images/screenshots/1-Trace.gif
151 | [17]: http://webglfundamentals.org/webgl/lessons/resources/view-source.gif
152 | [18]: http://webglfundamentals.org/webgl/lessons/resources/devtools-source.gif
153 | [19]: http://webglfundamentals.org/
154 |
--------------------------------------------------------------------------------
/techniques/WebGL-2D-Matrix-Stack.md:
--------------------------------------------------------------------------------
1 | # 使用 WebGL 实现矩阵栈
2 |
3 | 上一篇文章讲解了 [WebGL 2D DrawImage][1]。如果你还没阅读它,我建议你先去查阅一下。
4 | 在上一篇文章中,我们使用 WebGL 去实现了 Canvas 2D 的 `drawImage` 方法。并且,可以去设置截取图片的大小和显示图片的大小。
5 | 我们还没有完成的,就是将图片按照任意一个点进行旋转,缩放。当然,我们可以添加更多的参数来实现这样的功能,比如,至少需要一个旋转中心点,旋转角度和 x,y 的缩放比。不过,幸运的是,这有一个更普遍,有用的方式。Canvas 2D API 使用的是一个矩阵栈,来实现上述功能。该矩阵栈具有的基本函数是 `save`,`restore`,`translate`,`rotate` 和 `scale`。
6 | 实现一个矩阵栈并不是很难。我们可以创建一个栈用来存放矩阵,使用的时候,就用函数去和栈顶的矩阵相乘。平移,旋转或缩放矩阵就是我们之前创建的。
7 | 下面是实现细节。
8 | 首先,有构造函数,`save` 函数,和 `restore` 函数。
9 |
10 | ```
11 | function MatrixStack() {
12 | this.stack = [];
13 |
14 | // 因为该栈是空的,所以需要设置一个初始的栈在里面
15 | this.restore();
16 | }
17 |
18 | // 弹出栈顶的元素,用来恢复到之前保存的矩阵
19 | MatrixStack.prototype.restore = function() {
20 | this.stack.pop();
21 | // 不能让栈为空
22 | if (this.stack.length < 1) {
23 | this.stack[0] = m4.identity();
24 | }
25 | };
26 |
27 | // 放置一个当前矩阵的副本到栈里
28 | MatrixStack.prototype.save = function() {
29 | this.stack.push(this.getCurrentMatrix());
30 | };
31 | ```
32 | 我们需要函数去获取和设置顶部的矩阵
33 | ```
34 | // 得到当前栈顶矩阵的副本
35 | MatrixStack.prototype.getCurrentMatrix = function() {
36 | return this.stack[this.stack.length - 1].slice();
37 | };
38 |
39 | // 让我们设置当前矩阵
40 | MatrixStack.prototype.setCurrentMatrix = function(m) {
41 | return this.stack[this.stack.length - 1] = m;
42 | };
43 | ```
44 | 最后,我们需要使用之前的矩阵函数去实现 `translate`,`rotate` 和 `scale` 函数。
45 |
46 | ```
47 | // 平移矩阵
48 | MatrixStack.prototype.translate = function(x, y, z) {
49 | var m = this.getCurrentMatrix();
50 | this.setCurrentMatrix(m4.translate(m, x, y, z));
51 | };
52 |
53 | // 绕 Z 轴旋转当前矩阵
54 | MatrixStack.prototype.rotateZ = function(angleInRadians) {
55 | var m = this.getCurrentMatrix();
56 | this.setCurrentMatrix(m4.zRotate(m, angleInRadians));
57 | };
58 |
59 | // 缩放矩阵
60 | MatrixStack.prototype.scale = function(x, y, z) {
61 | var m = this.getCurrentMatrix();
62 | this.setCurrentMatrix(m4.scale(m, x, y, z));
63 | };
64 | ```
65 | 这里需要提醒一点,我们使用的是 3D 数学矩阵函数,可以使用 0 来作为 Z 轴的默认平移值,1 作为 Z 轴的默认缩放值。但是,我发现,我已经习惯使用 Canvas 2D 的平面函数,导致经常忘了设置 Z 的参数,所以,为了防止运行错误,我们可以让 Z 轴参数变为可选参数。
66 |
67 | ```
68 | // 平移矩阵
69 | MatrixStack.prototype.translate = function(x, y, z) {
70 | if (z === undefined) {
71 | z = 0;
72 | }
73 | var m = this.getCurrentMatrix();
74 | this.setCurrentMatrix(m4.translate(m, x, y, z));
75 | };
76 |
77 | ...
78 |
79 | // 缩放矩阵
80 | MatrixStack.prototype.scale = function(x, y, z) {
81 | if (z === undefined) {
82 | z = 1;
83 | }
84 | var m = this.getCurrentMatrix();
85 | this.setCurrentMatrix(m4.scale(m, x, y, z));
86 | };
87 | ```
88 | 从[前一篇教程][2]中的 `drawImage`,我们可以找到下列代码
89 | ```
90 | // 该矩阵会从像素值转换到裁剪空间
91 | var matrix = m4.orthographic(0, gl.canvas.width, gl.canvas.height, 0, -1, 1);
92 |
93 | // 该矩阵会移动我们的单元格到 dstX,dstY
94 | matrix = m4.translate(matrix, dstX, dstY, 0);
95 |
96 | // 该矩阵会缩放我们 1 个单位的单元格
97 | // 1 个单位代表着 texWidth,texHeight 单位
98 | matrix = m4.scale(matrix, dstWidth, dstHeight, 1);
99 | ```
100 | 我们需要创建一个矩阵栈
101 |
102 | ```
103 | var matrixStack = new MatrixStack();
104 | ```
105 | 然后,乘以栈顶的矩阵
106 | ```
107 | // 该矩阵会从像素值转换到裁剪空间
108 | var matrix = m4.orthographic(0, gl.canvas.width, gl.canvas.height, 0, -1, 1);
109 |
110 | // 该矩阵会将原点移动到另外一个当前矩阵栈
111 | matrix = m4.multiply(matrix, matrixStack.getCurrentMatrix());
112 |
113 | // 该矩阵会移动我们的单元格到 dstX,dstY
114 | matrix = m4.translate(matrix, dstX, dstY, 0);
115 |
116 | // 该矩阵会缩放 1 个单位的单元格
117 | // 1 个单位代表着 texWidth,texHeight 单位
118 | matrix = m4.scale(matrix, dstWidth, dstHeight, 1);
119 | ```
120 | 现在,我们可以像 Canvas 2D API 一样去使用它了。
121 | 如果你不知道怎样去使用矩阵栈,你可以认为它就是移动和旋转原点。例如,在默认情况下,canvas 2D 的原点是 (0,0) 在左上角。
122 | 假设,我们现在移动该原点到 canvas 的中心,然后在 0,0 位置绘制图片,那么该图片会从 canvas 的中心开始绘制。
123 | 我们用[前一篇文章][3]的例子,然后画一张图。
124 | ```
125 | var textureInfo = loadImageAndCreateTextureInfo('resources/star.jpg');
126 |
127 | function draw(time) {
128 | gl.clear(gl.COLOR_BUFFER_BIT);
129 |
130 | matrixStack.save();
131 | matrixStack.translate(gl.canvas.width / 2, gl.canvas.height / 2);
132 | matrixStack.rotateZ(time);
133 |
134 | drawImage(
135 | textureInfo.texture,
136 | textureInfo.width,
137 | textureInfo.height,
138 | 0, 0);
139 |
140 | matrixStack.restore();
141 | }
142 | ```
143 | 结果是:
144 |
145 | ![定点旋转][4]
146 | [查看网页][5]
147 | 你可以看见,即使我们传递了 0,0 给 `drawImage` 函数,但后面使用了 `matrixStack.translate` 去移动原点到 canvas 的中心,所以,图片都会在中心进行绘制和旋转。
148 | 现在,让我们将旋转中心移动到图片的中心去。
149 |
150 | ```
151 | matrixStack.translate(gl.canvas.width / 2, gl.canvas.height / 2);
152 | matrixStack.rotateZ(time);
153 | matrixStack.translate(textureInfo.width / -2, textureInfo.height / -2);
154 | ```
155 | 现在,图片在 canvas 中心绕着其自身的中心旋转。
156 |
157 | ![中心旋转][6]
158 |
159 | [查看网页][7]
160 | 接下来,让我们在图片的四个角绘制一张图片。
161 |
162 | ```
163 | matrixStack.translate(gl.canvas.width / 2, gl.canvas.height / 2);
164 | matrixStack.rotateZ(time);
165 |
166 | matrixStack.save();
167 | {
168 | matrixStack.translate(textureInfo.width / -2, textureInfo.height / -2);
169 |
170 | drawImage(
171 | textureInfo.texture,
172 | textureInfo.width,
173 | textureInfo.height,
174 | 0, 0);
175 |
176 | }
177 | matrixStack.restore();
178 |
179 | matrixStack.save();
180 | {
181 | // We're at the center of the center image so go to the top/left corner
182 | matrixStack.translate(textureInfo.width / -2, textureInfo.height / -2);
183 | matrixStack.rotateZ(Math.sin(time * 2.2));
184 | matrixStack.scale(0.2, 0.2);
185 | // Now we want the bottom/right corner of the image we're about to draw
186 | matrixStack.translate(-textureInfo.width, -textureInfo.height);
187 |
188 | drawImage(
189 | textureInfo.texture,
190 | textureInfo.width,
191 | textureInfo.height,
192 | 0, 0);
193 |
194 | }
195 | matrixStack.restore();
196 |
197 | matrixStack.save();
198 | {
199 | // We're at the center of the center image so go to the top/right corner
200 | matrixStack.translate(textureInfo.width / 2, textureInfo.height / -2);
201 | matrixStack.rotateZ(Math.sin(time * 2.3));
202 | matrixStack.scale(0.2, 0.2);
203 | // Now we want the bottom/right corner of the image we're about to draw
204 | matrixStack.translate(0, -textureInfo.height);
205 |
206 | drawImage(
207 | textureInfo.texture,
208 | textureInfo.width,
209 | textureInfo.height,
210 | 0, 0);
211 |
212 | }
213 | matrixStack.restore();
214 |
215 | matrixStack.save();
216 | {
217 | // We're at the center of the center image so go to the bottom/left corner
218 | matrixStack.translate(textureInfo.width / -2, textureInfo.height / 2);
219 | matrixStack.rotateZ(Math.sin(time * 2.4));
220 | matrixStack.scale(0.2, 0.2);
221 | // Now we want the top/right corner of the image we're about to draw
222 | matrixStack.translate(-textureInfo.width, 0);
223 |
224 | drawImage(
225 | textureInfo.texture,
226 | textureInfo.width,
227 | textureInfo.height,
228 | 0, 0);
229 |
230 | }
231 | matrixStack.restore();
232 |
233 | matrixStack.save();
234 | {
235 | // We're at the center of the center image so go to the bottom/right corner
236 | matrixStack.translate(textureInfo.width / 2, textureInfo.height / 2);
237 | matrixStack.rotateZ(Math.sin(time * 2.5));
238 | matrixStack.scale(0.2, 0.2);
239 | // Now we want the top/left corner of the image we're about to draw
240 | matrixStack.translate(0, 0); // 0,0 means this line is not really doing anything
241 |
242 | drawImage(
243 | textureInfo.texture,
244 | textureInfo.width,
245 | textureInfo.height,
246 | 0, 0);
247 |
248 | }
249 | matrixStack.restore();
250 | ```
251 | 结果是:
252 |
253 | ![带子图片旋转][8]
254 |
255 | [查看网页][9]
256 | 如果你认为不同的矩阵栈函数,比如 `translate`,`rotateZ`,和 `scale` 是用来移动原点的,那么相似的,我也可以认为设置了旋转中心也是移动了原点,那么当我调用 `drawImage` 时,图片部分是相对于前面的原点吗?
257 | 换句话说,当我使用 400x300 的 canvas 画布,然后调用 `matrixStack.translate(220, 150)`。此时原点的位置在 200,150,并且接下来的都会相对于该点进行绘制。如果我们传入 0,0 参数去调用 `drawImage` ,这是图片相对于现在坐标的进行绘制。
258 |
259 | ![axis绘制坐标][10]
260 | 现在,我们想让旋转中心变为右下角。在这种情况下,原点的位置应该移到哪以至于,当我们调用 `drawImage` 时,我们想要的旋转中心点就是当前原点呢? 当前纹理的右下角的坐标是 `-textureWidth`,`-textureHeight`,所以,现在当我们调用 `drawImage`,使用 0,0参数时,当前纹理就会从这开始绘制并且该位置就是右下角,同样也是前一个坐标的原点。
261 | 无论我们对任意点做过怎样的处理,在被用于矩阵栈之前,这些处理不重要。我们已经对原点做了一系列操作,比如平移,缩放或者旋转,但在我们调用 `drawImage` 之前,原点现在的位置和处理操作是相关的。我们决定将当前原点移去哪,是相对于纹理绘制的位置,如果我们已经对原点的位置处理完了,那么最终的点就是新的起始点。
262 | 你可能注意到,该矩阵栈和我们[以前说的场景图表][12]很类似。一个场景图表包含一个节点树,我们可以遍历这颗树,然后用其父节点去和每个节点相乘。矩阵栈实际就是另外一种同样效果的高效替代版本
263 |
264 | [1]: http://webglfundamentals.org/webgl/lessons/webgl-2d-drawimage.html
265 | [2]: http://webglfundamentals.org/webgl/lessons/webgl-2d-drawimage.html
266 | [3]: http://webglfundamentals.org/webgl/lessons/webgl-2d-drawimage.html
267 | [4]: http://static.zybuluo.com/jimmythr/oiqizkh79clclsepsprxcz00/%E5%AE%9A%E7%82%B9%E6%97%8B%E8%BD%AC.gif
268 | [5]: http://webglfundamentals.org/webgl/webgl-2d-matrixstack-01.html
269 | [6]: http://static.zybuluo.com/jimmythr/k01zrn7m9stbzo9b8ueu3ch4/%E4%B8%AD%E5%BF%83%E6%97%8B%E8%BD%AC.gif
270 | [7]: http://webglfundamentals.org/webgl/webgl-2d-matrixstack-02.html
271 | [8]: http://static.zybuluo.com/jimmythr/9kr0i9zjfxk1w1pobfusabk3/%E5%B8%A6%E5%AD%90%E5%9B%BE%E7%89%87%E6%97%8B%E8%BD%AC.gif
272 | [9]: http://webglfundamentals.org/webgl/webgl-2d-matrixstack-03.html
273 | [10]: http://static.zybuluo.com/jimmythr/fvaovg0dx1oejnwjtw08dk8j/%E5%B1%8F%E5%B9%95%E5%BF%AB%E7%85%A7%202016-10-21%2009.30.40.png
274 | [11]: http://static.zybuluo.com/jimmythr/y6vhf3046mor0u5njho230uh/%E5%B1%8F%E5%B9%95%E5%BF%AB%E7%85%A7%202016-10-21%2009.30.52.png
275 | [12]: http://webglfundamentals.org/webgl/lessons/webgl-scene-graph.html
--------------------------------------------------------------------------------
/2D-translation/WebGL-2D-Rotation.md:
--------------------------------------------------------------------------------
1 | # WebGL 2D 旋转(Rotation)
2 |
3 | This post is a continuation of a series of posts about WebGL. The first started with fundamentals and the previous was about translating geometry.
4 |
5 | 这篇教程是一系列关于 WebGL 的教程中的一篇。第一篇教程是 WebGL 基础,上一篇教程是 关于平移几何体。
6 |
7 | I'm going to admit right up front I have no idea if how I explain this will make sense but what the heck, might as well try. First I want to introduce you to what's called a "unit circle". If you remember your junior high school math (don't go to sleep on me!) a circle has a radius. The radius of a circle is the distance from the center of the circle to the edge. A unit circle is a circle with a radius of 1.0.
8 |
9 | 在开始之前我要先承认一下我不知道该怎么通俗易懂的讲解这个内容,但不管怎么样,我都会尽力去做。首先我想给你介绍一下什么是“单位圆”。如果你还记得你初中数学(别去睡觉啊!)的内容——圆有半径。一个圆的半径是圆心到圆边的距离。单位圆是半径为 1.0 的圆。
10 |
11 | Here's a unit circle.
12 |
13 | 这里有个单位圆。
14 |
15 |
16 |
17 | Notice as you drag the blue handle around the circle the X and Y positions change. Those represent the position of that point on the circle. At the top Y is 1 and X is 0. On the right X is 1 and Y is 0.
18 |
19 | 注意当你拖动在圆上的蓝色控制器,X 和 Y 的值会跟着改变。它们表示这个点在圆上的位置。当这个点在圆的最上面时候 Y 是 1,X 是 0,在最右边的时候 X 是 1,Y 是 0。
20 |
21 | If you remember from basic 3rd grade math if you multiply something by 1 it stays the same. So 123 * 1 = 123. Pretty basic, right? Well, a unit circle, a circle with a radius of 1.0 is also a form of 1. It's a rotating 1. So you can multiply something by this unit circle and in a way it's kind of like multiplying by 1 except magic happens and things rotate.
22 |
23 | 如果你还记得在基础的三年级数学中把某个数乘以 1 之后这个数依然不变,比如 123 * 1 = 123。非常基础,对吧?那么,单位圆——半径为 1.0 的圆也是 1 的一种形式。它是旋转的 1。因此你可以将某个东西乘以这个单位圆,在某种程度上,这与乘以 1 有点类似,除了会发生一些神奇的事情以及事物旋转。
24 |
25 | We're going to take that X and Y value from any point on the unit circle and we'll multiply our geometry by them from our previous sample.
26 |
27 | 我们将从单位圆上的任意一点取得 X 和 Y 的值,然后我们将它们乘以我们 上一篇教程中示例 的几何体。
28 |
29 | Here are the updates to our shader.
30 |
31 | 下面是对我们着色器的更新。
32 |
33 | ```
34 |
54 | ```
55 |
56 | And we update the JavaScript so that we can pass those 2 values in.
57 |
58 | 然后我们更新 Javascript 代码使得我们可以传递那两个参数的值进去。
59 |
60 | ```
61 |
82 | ```
83 |
84 | And here's the result. Drag the handle on the circle to rotate or the sliders to translate.
85 |
86 | 下面是代码运行的结果。拖动圆上的控制器进行选择或者拖动滑动器进行平移。
87 |
88 |
89 |
90 | 点击这里在新窗口查看例子
91 |
92 | Why does it work? Well, look at the math.
93 |
94 | 为什么这段代码能运行?我们先来看一下数学公式。
95 |
96 | ```
97 | rotatedX = a_position.x * u_rotation.y + a_position.y * u_rotation.x;
98 | rotatedY = a_position.y * u_rotation.y - a_position.x * u_rotation.x;
99 | ```
100 |
101 | Let's say you have a rectangle and you want to rotate it. Before you start rotating it the top right corner is at 3.0, 9.0. Let's pick a point on the unit circle 30 degrees clockwise from 12 o'clock.
102 |
103 | 假设你有一个矩形,并且你想旋转它。在你开始旋转它之前,这个矩形右上角的位置为(3.0,9.0)。让我们选择一个在单位圆中从 12 点钟的位置顺时针偏移 30 度的点。
104 |
105 | 
106 |
107 | The position on the circle there is 0.50 and 0.87
108 |
109 | 在圆上这个点的位置为 0.50 和 0.87
110 |
111 | ```
112 | 3.0 * 0.87 + 9.0 * 0.50 = 7.1
113 | 9.0 * 0.87 - 3.0 * 0.50 = 6.3
114 | ```
115 |
116 | That's exactly where we need it to be
117 |
118 | 那刚好是我们所需要的位置
119 |
120 | 
121 |
122 | The same for 60 degrees clockwise
123 |
124 | 顺时针旋转 60 度也是如此
125 |
126 | 
127 |
128 | The position on the circle there is 0.87 and 0.50
129 |
130 | 这里在圆上的位置为 0.87 和 0.50
131 |
132 | ```
133 | 3.0 * 0.50 + 9.0 * 0.87 = 9.3
134 | 9.0 * 0.50 - 3.0 * 0.87 = 1.9
135 | ```
136 |
137 | You can see that as we rotate that point clockwise to the right the X value gets bigger and the Y gets smaller. If we kept going past 90 degrees X would start getting smaller again and Y would start getting bigger. That pattern gives us rotation.
138 |
139 | 你可以看到当我们顺时针向右旋转那个点时,X 的值变得越来越大而 Y 的值变得越来越小。如果我们继续选择超过 90 度,X 的值又开始变小而 Y 的值开始变大。这种模式给了我们旋转。
140 |
141 | There's another name for the points on a unit circle. They're called the sine and cosine. So for any given angle we can just look up the sine and cosine like this.
142 |
143 | 在单位圆上的点有另一个名字。它们被称为正弦和余弦。因为对任意给定的角度,我们可以像这样查找它的正弦和余弦。
144 |
145 | ```
146 | function printSineAndCosineForAnAngle(angleInDegrees) {
147 | var angleInRadians = angleInDegrees * Math.PI / 180;
148 | var s = Math.sin(angleInRadians);
149 | var c = Math.cos(angleInRadians);
150 | console.log("s = " + s + " c = " + c);
151 | }
152 | ```
153 |
154 | If you copy and paste the code into your JavaScript console and type `printSineAndCosignForAngle(30)` you see it prints `s = 0.49 c = 0.87` (note: I rounded off the numbers.)
155 |
156 | 如果你复制粘贴这段代码到你的 JavaScript 控制台并输入 `printSineAndCosignForAngle(30)` 你会看到它显示 `s = 0.49 c = 0.87` (注意:我去掉了数字的尾数)。
157 |
158 | If you put it all together you can rotate your geometry to any angle you desire. Just set the rotation to the sine and cosine of the angle you want to rotate to.
159 |
160 | 如果你将上面的代码整合在一起,你可以按你想要的角度去旋转一个几何体。只需要给 `rotation` (示例代码中的旋转变量)设置你想要旋转的角度的正弦和余弦。
161 |
162 | ```
163 | ...
164 | var angleInRadians = angleInDegrees * Math.PI / 180;
165 | rotation[0] = Math.sin(angleInRadians);
166 | rotation[1] = Math.cos(angleInRadians);
167 | ```
168 |
169 | Here's a version that just has an angle setting. Drag the sliders to translate or rotate.
170 |
171 | 如下是一个有角度设置版本的示例。通过拖动滑动器进行平移或旋转。
172 |
173 |
174 |
175 | 点击这里在新窗口查看例子
176 |
177 | I hope that made some sense. Next up a simpler one. Scale.
178 |
179 | 我希望这还是比较易懂的。接下来是比较简单的一个内容——缩放。
180 |
181 |
182 | > ## What are radians?
183 | >
184 | > Radians are a unit of measurement used with circles, rotation and angles. Just like we can measure distance in inches, yards, meters, etc we can measure angles in degrees or radians.
185 | >
186 | > You're probably aware that math with metric measurements is easier than math with imperial measurements. To go from inches to feet we divide by 12. To go from inches to yards we divide by 36. I don't know about you but I can't divide by 36 in my head. With metric it's much easier. To go from millimeters to centimeters we divide by 10. To go from millimeters to meters we divide by 1000. I **can** divide by 1000 in my head.
187 | >
188 | > Radians vs degrees are similar. Degrees make the math hard. Radians make the math easy. There are 360 degrees in a circle but there are only 2π radians. So a full turn is 2π radians. A half turn is 1π radian. A 1/4 turn, ie 90 degress is 1/2π radians. So if you want to rotate something 90 degrees just use `Math.PI * 0.5`. If you want to rotate it 45 degrees use `Math.PI * 0.25` etc.
189 | >
190 | > Nearly all math involving angles, circles or rotation works very simply if you start thinking in radians. So give it try. Use radians, not degrees except in UI displays.
191 |
192 | > ## 什么是弧度
193 | >
194 | > 弧度是一种用于圆、旋转和角度的测量单位。就像我们可以用英寸、码、米等来测量距离,我们也可以用角度或者弧度来测量一个角。
195 | >
196 | > 你很可能已经意识到在数学中使用公制单位要比使用英制单位要简单很多。从英寸到英尺我们需要除以 12。从英寸到码我们需要除以 36。我不知道你但我不会在脑海里心算除以 36。使用公制单位就要简单很多。从毫米到厘米我们除以 10。从毫米到米我们除以 1000。我 **可以** 心算除以 1000。
197 | >
198 | > 弧度和角度的比较跟这相似。角度使计算变得困难。弧度让计算变得简单。在一个圆中有360度但只有 2π 弧度。所以转一圈是 2π 弧度。半圈是 1π 弧度。四分之一圈,即 90 度是 1/2π 弧度。所以如果你想旋转某个东西 90 度你只需要使用 `Math.PI * 0.5`。以此类推,如果你想旋转 45 度就使用 `Math.PI * 0.25`。
199 | >
200 | > 几乎所有的计算都会涉及角度,如果你开始以弧度为单位进行思考,圆和旋转的原理会非常简单。所以去试一试。除了在用户界面显示时使用角度外,都使用弧度。
201 |
--------------------------------------------------------------------------------
/fundamentals/WebGL-How-It-Works.md:
--------------------------------------------------------------------------------
1 | # WebGL 工作原理
2 |
3 |
4 | 上一节我们主要讲解了[WebGL 的基础][1]。在开始之前,我们来了解一下WebGL 和你的 GPU 底层的工作原理。GPU 主要做了两件事。第一个是转换顶点(或者说 数据流)到裁剪平面中。第二个就是基于前一部分来渲染图像。
5 |
6 | 当你调用:
7 | ```
8 | gl.drawArrays(gl.TRIANGLE, 0, 9);
9 | ```
10 | 后面的 9 代表着“处理9个点”。所以,这里就有9个点被处理了。
11 |
12 | ![GPU process][2]
13 |
14 | 左边是你提供的数据,顶点着色器是你用 [GLSL][3] 写出来的函数。它会在每个顶点被处理时调用。该点的值经过相应的数学运算,转换成为裁剪坐标的值,并且赋值给特殊的变量 `gl_Position`。GPU 会获得该值并保存。
15 |
16 | 当你在画三角形时,前一个部分每次会渲染出3个点,GPU 就可以利用这3个点去画一个三角形。GPU 会找到这3个点在图上对应着的像素点,然后渲染出一个三角形。接着,对于每个像素点,GPU 会调用你的片元着色器,给相应的点加上颜色。片元着色器实际上是通过 gl_FragColor 给每个像素点设置颜色。
17 |
18 | 不过,在我们的例子中,片元着色器并没有区分每一个点的颜色值。当然,办法是有的。我们可以定义 “varyings” 将每一个颜色值通过顶点着色器赋给片元着色器。
19 |
20 | 看一个简单的例子,我们将从顶点着色器计算出的裁剪坐标值传递给片元着色器。
21 |
22 | 然后,画一个简单的三角形。我们修改[前面的例子][4]中的代码,将画 `F` 改为画一个三角形。
23 | ```
24 | // 将三角形的像素值存储在 buffer 中
25 | function setGeometry(gl) {
26 | gl.bufferData(
27 | gl.ARRAY_BUFFER,
28 | new Float32Array([
29 | 0,-100,
30 | 150, 125,
31 | -175, 100]),
32 | gl.STATIC_DRAW);
33 | }
34 | ```
35 | 我们只需要画三个点:
36 | ```
37 | // 画场景
38 | function drawScene() {
39 | ...
40 | // 画几何图形
41 | gl.drawArrays(gl.TRIANGLES,0,3);
42 | }
43 | ```
44 | 在顶点着色器中,我们声明一个 `varying` 将数据传递给片元着色器。
45 | ```
46 | varying vec4 v_color;
47 | ...
48 | void main() {
49 | // 使用 matrix 乘以该位置
50 | gl_Position = vec4((u_matrix * vec3(a_position,1)).xy,0,1);
51 |
52 | // 从 裁剪空间值 转换为 颜色空间值
53 | // 裁剪空间值的范围为 -1.0 到 +1.0
54 | // 颜色空间的值从 0.0 到 1.0
55 | v_color = gl_Position * 0.5 + 0.5;
56 | }
57 | ```
58 | 然后,我们在片元着色器中,声明一个一样的 `varying`。
59 | ```
60 | precision mediump float;
61 |
62 | varying vec4 v_color;
63 |
64 | void main() {
65 | gl_FragColor = v_color;
66 | }
67 | ```
68 |
69 | WebGL 会自动关联在顶点着色器和片元着色器存在的同名 varying。
70 |
71 |
72 | Here's the working version.
73 |
74 | 具体效果,可以[查看网页][5]。
75 |
76 | ![iamge][6]
77 |
78 | 上面例子中,我们可以移动,缩放并且旋转该三角形。注意,因为这个颜色是直接根据裁剪空间来的,而不是根据三角形上的点来的。所以,他们不会随三角形一起移动,而是固定在背景中。
79 |
80 | 想一想,我们只计算了3个点。所以,顶点着色器也只会调用3次,如果这样的话,我们也只能得出3种颜色,但是,我们的三角形却有很多颜色。这就是为什么我们需要一个 varying。
81 |
82 | 在上面的例子中,我们设置了3个点:
83 |
84 | ![vertices][7]
85 |
86 | 我们的顶点着色器使用一个模型去移动,旋转,放缩 并且转化为 裁剪坐标的值。上述变化的默认值分别是:
87 |
88 | - 平移为 200,150
89 | - 旋转为 0
90 | - 放缩为 1,1
91 |
92 | 所以,只有平移有点不同。前面给出的 backbuffer 是 400×300,我们的顶点着色器会将其传递给模型,然后计算出下面3个裁剪坐标。
93 |
94 | ![gl_position][8]
95 |
96 |
97 | 它同样会转换上述值到颜色空间,并且赋值给我们刚才声明的 varying v_color 变量中。
98 |
99 | ![v_color][9]
100 |
101 |
102 | 这三个值被写入 v_color 之后,会添加并且传递给片元着色器去渲染每个点的颜色。v_color 会插入在 v0,v1和v2 之间。
103 |
104 | 整个渲染过程,可以[查看具体网页][10]。
105 |
106 | ![v_color][11]
107 |
108 |
109 | 我们可以传递更多的数据给顶点着色器,同样,也可以传递给片元着色器。 如果我们想画一个矩形,就需要 2 个三角形,2个不同的颜色。在顶点着色器中,我们还需要另外一个 attribute 去传递更多的数据。那么片元着色器也会处理更多的数据。
110 |
111 | ```
112 | attribute vec2 a_position;
113 | attribute vec4 a_color;
114 | ...
115 | varying vec4 v_color;
116 |
117 | void main() {
118 | ...
119 | // 把 attribute 中的颜色值复制到 varying 中
120 | v_color = a_color;
121 | }
122 | ```
123 | 我们现在向 WebGL 提供需要用到的颜色。
124 |
125 | ```
126 | // 找到 vertex data 绑定的位置
127 | var positionLocation = gl.getAttribLocation(program,"a_position");
128 | var colorLocation = gl.getAttribLocation(program,"a_color");
129 | ...
130 | // 创建一个 buffer 去加载颜色值
131 | var buffer = gl.createBuffer();
132 | gl.bindBuffer(gl.ARRAY_BUFFER,buffer);
133 | gl.enableVertexAttribArray(colorLocation);
134 | gl.vertexAttribPointer(colorLocation,4,gl.FLOAT,false,0,0);
135 |
136 | // 设置颜色值
137 | setColors(gl);
138 | ...
139 |
140 | // 给 buffer 填充2个三角形需要用到的颜色值
141 | function setColors(gl) {
142 | // 随机选取2种颜色
143 | var r1 = Math.random();
144 | var b1 = Math.random();
145 | var g1 = Math.random();
146 |
147 | var r2 = Math.random();
148 | var b2 = Math.random();
149 | var g2 = Math.random();
150 |
151 | gl.bufferData(
152 | gl.ARRAY_BUFFER,
153 | new Float32Array(
154 | [ r1,b1,g1,1,
155 | r1,b1,g1,1,
156 | r1,b1,g1,1,
157 | r2,b2,g2,1,
158 | r2,b2,g2,1,
159 | r2,b2,g2,1]),
160 | gl.STATIC_DRAW);
161 | }
162 | ```
163 | [最终的结果][12].
164 |
165 | ![two_triangle][13]
166 |
167 |
168 | 注意,上面我们使用的是两个固定的颜色值。但是,我们是将值赋给 varying,所以,三角形中的颜色值是可以变化的。我们在上面给每个三角形的3个点设置的是相同的颜色值,如果我们设置不同的值,将会看到具体的差值。
169 | ```
170 | // 给 buffer 填充2个三角形需要用到的颜色值
171 | function setColors(gl) {
172 | // 给每个顶点设置不同的颜色
173 | gl.bufferData(
174 | gl.ARRAY_BUFFER,
175 | new Float32Array(
176 | [ Math.random(),Math.random(),Math.random(),1,
177 | Math.random(),Math.random(),Math.random(),1,
178 | Math.random(),Math.random(),Math.random(),1,
179 | Math.random(),Math.random(),Math.random(),1,
180 | Math.random(),Math.random(),Math.random(),1,
181 | Math.random(),Math.random(),Math.random(),1]),
182 | gl.STATIC_DRAW);
183 | }
184 | ```
185 | 现在,我们能看见[不一样的地方][14]。
186 |
187 | ![varying_color][15]
188 |
189 |
190 | 看起来和第一个例子差不多,但是我们了解了使用更多的 attribute 将数据由顶点着色器传递给片元着色器。如果你看了[图像处理的例子][16]的话,你会发现那里用了一个额外的 attribute 去传递纹理坐标。
191 |
192 | ## buffer 和 attribute 做了什么?
193 |
194 | Buffers 用来获取顶点和其他点的数据,并传输给 CPU。 `gl.createBuffer` 创建一个 buffer。 `gl.bindBuffer` 绑定需要处理的 buffer。`gl.bufferData` 将数据拷贝到指定的 buffer。
195 |
196 | 一旦数据在 buffer 中准备好了,我们就需要告诉 WebGL 如何将数据提取出来并且传递给顶点着色器's attributes。
197 |
198 | 为了完成上述过程,首先,我们先要了解 WebGL 把哪些位置赋值给了 attributes。比如,在上面的代码中:
199 |
200 | ```
201 | // 解析 vertex 数据的流向
202 | var positionLocation = gl.getAttribLocation(program,"a_position");
203 | var colorLocation = gl.getAttribLocation(program,"a_color");
204 | ```
205 |
206 | 一旦我们知道了 attribute 的相关位置,就需要调用2个命令。
207 |
208 | ```
209 | gl.enableVertexAttribArray(location);
210 | ```
211 | 这个命令告诉 WebGL,我们通过 buffer 提供的数据。
212 |
213 | ```
214 | gl.vertexAttribPointer(
215 | location,
216 | numComponents,
217 | typeOfData,
218 | normalizeFlag,
219 | strideToNextPieceOfData,
220 | offsetIntoBuffer);
221 | ```
222 |
223 | 这个命令让 WebGL 从刚才通过 `gl.bindBuffer` 绑定的 buffer 中提取数据。该 buffer 包含了每个顶点的组成部分(1 - 4),具体数据的类型是什么 (BYTE, FLOAT, INT, UNSIGNED_SHORT 等等),每个有效数据之间的步长是多少,真实数据在 buffer 中的偏移量是多少。
224 |
225 | 组成每个顶点的数据长度一般都是 1 到 4。
226 |
227 | 如果你使用一个单位大小的 buffer 的单一类型的数据的话,那么步长和偏移量总是 0。步长为 0 意味着 “每个步长包括了数据的类型和大小”。偏移量为 0 意味着数据从 buffer 的起始位开始。将他们设置为其他值而不是 0 来说, 会更复杂,尽管这样做在性能方面有些好处。不过,相对于复杂度来说,这并不值得,除非你是想让 WebGL 受它绝对的限制。
228 |
229 | 我希望上面解决了 buffers 和 attributes 怎样工作的问题。
230 |
231 | 下面,让我们接着学习 [shaders and GLSL][17]。
232 |
233 |
234 | ----------
235 | **补充**
236 |
237 | ## normalizeFlag 在 vertexAttribPointer 中代表什么?
238 |
239 | normalize flag 主要影响所有的非浮点类型。 如果你将它设置为 false, 那么类型的值还是保持不变。BYTE 的大小还是从 -128 到 127,UNSIGNED_BYTE 的大小从 0 到 255, SHORT 的大小从 -32768 到 32767 等等。
240 |
241 | 如果 normalize flag 设置为 true, 那么 BYTE (-128 到 127) 的大小变为 -1.0 到 +1.0,UNSIGNED_BYTE (0 到 255) 的大小变为 0.0 到 +1.0。 SHORT 的大小和 BYTE 一样也是 -1.0 到 +1.0, 不过他比 BYTE 的分辨率更高。
242 |
243 | 归一化数据最常用在颜色值上。颜色值基本上都是从 0.0 到 1.0。 使用浮点数去表达红色,绿色,蓝色和透明度,每个顶点的颜色会花掉 16 bytes 的大小。如果你有更复杂的几何图形的话,那累积下来就很大了。如果,你能用 UNSIGNED_BYTEs 去表达你的颜色值, 比如 0 代表 0.0, 255 代表 1.0。那么,你仅仅只需要 4 bytes 去表达每个点的颜色值,这节省了 75% 的大小。
244 |
245 | 我们来改写一下代码。当我们告诉 WebGL 怎样去提取颜色时,我们需要使用
246 |
247 | ```
248 | gl.vertexAttribPointer(colorLocation, 4, gl.UNSIGNED_BYTE, true, 0, 0);
249 | ```
250 |
251 | 然后, 当我们将颜色值填充到 buffer 里,我们需要使用
252 |
253 | ```
254 | // 填充 2 个三角颜色值到 buffer 里
255 | function setColors(gl) {
256 | // 选取 2 个随机颜色
257 | var r1 = Math.random() * 256; // 0 to 255.99999
258 | var b1 = Math.random() * 256; // these values
259 | var g1 = Math.random() * 256; // will be truncated
260 | var r2 = Math.random() * 256; // when stored in the
261 | var b2 = Math.random() * 256; // Uint8Array
262 | var g2 = Math.random() * 256;
263 |
264 | gl.bufferData(
265 | gl.ARRAY_BUFFER,
266 | new Uint8Array( // Uint8Array
267 | [ r1, b1, g1, 255,
268 | r1, b1, g1, 255,
269 | r1, b1, g1, 255,
270 | r2, b2, g2, 255,
271 | r2, b2, g2, 255,
272 | r2, b2, g2, 255]),
273 | gl.STATIC_DRAW);
274 | }
275 | ```
276 |
277 | 下面是个[实例][18]。
278 |
279 | ![unsigned_colors][19]
280 |
281 | 有问题? [在 stack overflow 上提问][20]。
282 | Issue/Bug? [在 github 上创建 issue][21]。
283 |
284 |
285 | [1]: http://webglfundamentals.org/webgl/lessons/webgl-fundamentals.html
286 | [2]: http://webglfundamentals.org/webgl/lessons/resources/vertex-shader-anim.gif
287 | [3]: http://webglfundamentals.org/webgl/lessons/webgl-shaders-and-glsl.html
288 | [4]: http://webglfundamentals.org/webgl/lessons/webgl-2d-matrices.html
289 | [5]: http://webglfundamentals.org/webgl/webgl-2d-triangle-with-position-for-color.html
290 | [6]: http://static.zybuluo.com/jimmythr/b8vlmbiy0lznx53xb83m0xu8/%E5%B1%8F%E5%B9%95%E5%BF%AB%E7%85%A7%202016-09-25%2019.25.05.png
291 | [7]: http://static.zybuluo.com/jimmythr/adw0jtqkxsnz4uvpa267qjlr/%E5%B1%8F%E5%B9%95%E5%BF%AB%E7%85%A7%202016-09-24%2010.17.12.png
292 | [8]: http://static.zybuluo.com/jimmythr/sauoxvxpqladbt4jz8nvz17g/%E5%B1%8F%E5%B9%95%E5%BF%AB%E7%85%A7%202016-09-24%2010.17.56.png
293 | [9]: http://static.zybuluo.com/jimmythr/pbbjikfwyyt4n6phle3ffyvr/%E5%B1%8F%E5%B9%95%E5%BF%AB%E7%85%A7%202016-09-24%2010.18.34.png
294 | [10]: http://webglfundamentals.org/webgl/lessons/resources/fragment-shader-anim.html
295 | [11]: http://static.zybuluo.com/jimmythr/b79tktap4oxyq449uytkjblu/%E5%B1%8F%E5%B9%95%E5%BF%AB%E7%85%A7%202016-09-25%2019.28.18.png
296 | [12]: http://webglfundamentals.org/webgl/webgl-2d-rectangle-with-2-colors.html
297 | [13]: http://static.zybuluo.com/jimmythr/thbg545hxy5sfvy16ay1080j/%E5%B1%8F%E5%B9%95%E5%BF%AB%E7%85%A7%202016-09-25%2019.29.32.png
298 | [14]: http://webglfundamentals.org/webgl/webgl-2d-rectangle-with-random-colors.html
299 | [15]: http://static.zybuluo.com/jimmythr/54juuw1l3lw5myhc9t258fgt/%E5%B1%8F%E5%B9%95%E5%BF%AB%E7%85%A7%202016-09-25%2019.30.25.png
300 | [16]: http://webglfundamentals.org/webgl/lessons/webgl-image-processing.html
301 | [17]: http://webglfundamentals.org/webgl/lessons/webgl-shaders-and-glsl.html
302 | [18]: http://webglfundamentals.org/webgl/webgl-2d-rectangle-with-2-byte-colors.html
303 | [19]: http://static.zybuluo.com/jimmythr/a9gcqxzknnp7fnh54ht8qpa5/%E5%B1%8F%E5%B9%95%E5%BF%AB%E7%85%A7%202016-09-25%2023.33.00.png
304 | [20]: http://stackoverflow.com/questions/tagged/webgl
305 | [21]: http://github.com/greggman/webgl-fundamentals/issues
--------------------------------------------------------------------------------
/techniques/WebGL-Text-HTML.md:
--------------------------------------------------------------------------------
1 | # WebGL 文本 - HTML
2 |
3 |
4 | This article is a continuation of previous WebGL articles. If you haven't read them I suggest you start there and work your way back.
5 |
6 | 该文章是接着前一篇文章继续讲解。如果你还没阅读[上一篇][1],我建议从那开始。
7 |
8 | A common question is "how to I draw text in WebGL". The first thing to ask yourself is what's your purpose in drawing the text. You're in a browser, the browser displays text. So your first answer should be to use HTML to display text.
9 |
10 | 先问一个常见的问题 “怎样在 WebGL 中绘制文本呢?”。首先,你需要问你自己,为什么要绘制文本。现在运行的环境是浏览器,并且,是由浏览器来显示文本的。所以,你第一个回答应该是使用 HTML 来展示文本。
11 |
12 | Let's do the easiest example first: You just want to draw some text over your WebGL. We might call this a text overlay. Basically this is text that stays in the same position.
13 |
14 | 我们先试一试最简单的办法:如果你仅仅是想在你的 WebGL 上写一些文字,那么我们可以把这个叫做文字浮层。本质上来说,文本还是在原来的位置。
15 |
16 | The simple way is to make an HTML element or elements and use CSS to make them overlap.
17 |
18 | 该方式就是用一个或多个的 HTML 元素,然后使用 CSS 去使他们浮动。
19 |
20 | For example: First make a container and put both a canvas and some HTML to be overlaid inside the container.
21 |
22 | 例如:首先,用一个容器,然后将 canvas 和 HTML 元素平铺在其中。
23 | ```
24 |
25 |
26 |
27 |
Time:
28 |
Angle:
29 |
30 |