├── .github
├── ISSUE_TEMPLATE
│ ├── bug_report.md
│ ├── documentation_report.md
│ └── feature_request.md
└── workflows
│ ├── doc.yml
│ ├── mirror.yml
│ └── templating.yml
├── .gitignore
├── CHANGELOG.md
├── License.md
├── Notes.md
├── README-zh.md
├── README.md
├── ansible.cfg
├── docs
├── .vuepress
│ ├── config.js
│ ├── images
│ │ └── logo.ico
│ ├── nav
│ │ ├── en.js
│ │ └── zh.js
│ ├── public
│ │ └── favicon.ico
│ ├── sidebar
│ │ ├── en.js
│ │ └── zh.js
│ └── styles
│ │ ├── index.styl
│ │ ├── override.styl
│ │ ├── palette.styl
│ │ └── style.styl
├── README.md
├── admin-mysql.md
├── admin-runtime.md
├── admin-services.md
├── else-faq.md
├── else-troubleshooting.md
├── package.json
├── solution-backup.md
├── solution-https.md
├── solution-more.md
├── solution-smtp.md
├── solution-upgrade.md
├── stack-accounts.md
├── stack-components.md
├── stack-deployment.md
├── stack-installation.md
└── zh
│ ├── README.md
│ ├── admin-mysql.md
│ ├── admin-runtime.md
│ ├── admin-services.md
│ ├── else-faq.md
│ ├── else-troubleshooting.md
│ ├── package.json
│ ├── solution-backup.md
│ ├── solution-https.md
│ ├── solution-more.md
│ ├── solution-smtp.md
│ ├── solution-upgrade.md
│ ├── stack-accounts.md
│ ├── stack-components.md
│ ├── stack-deployment.md
│ └── stack-installation.md
├── nextcloud.yml
├── requirements.yml
├── roles
├── CHANGELOG.md
├── License.md
├── README.md
└── nextcloud
│ ├── Notes.md
│ ├── defaults
│ └── main.yml
│ ├── handlers
│ └── main.yml
│ ├── meta
│ └── main.yml
│ ├── tasks
│ └── main.yml
│ └── templates
│ └── occ
├── variables.json
└── vars
└── main.yml
/.github/ISSUE_TEMPLATE/bug_report.md:
--------------------------------------------------------------------------------
1 | ---
2 | name: Bug report
3 | about: Report a bug encountered while using websoft9's product
4 | labels: bug
5 | ---
6 |
7 | **Describe the bug**
8 |
9 | A clear and concise description of what the bug is.
10 |
11 | ## Deployment method
12 |
13 | - [ ] subscription image from MarketPlace of Cloud
14 | - [ ] All-in-one Installer
15 | - [ ] ansible-playbook cli
16 | - [ ] mcloud
17 | - [ ] create instance from private image
18 |
19 | ## Bug source
20 |
21 | - [ ] Bugs from installation
22 | - [ ] Bugs from first use
23 | - [ ] Other (You should describe it)
24 |
25 | ## System Environment
26 |
27 | **Application Version**
28 |
29 | e.g v4.5
30 |
31 | **OS**
32 |
33 | - [ ] Ubuntu18.x
34 | - [ ] Ubuntu20.x
35 | - [ ] CentOS7.x
36 | - [ ] CentOS8.x
37 | - [ ] AmazonLinux2
38 | - [ ] OracleLinux7.8
39 | - [ ] OracleLinux8.2
40 | - [ ] Other (You should describe it)
41 |
42 | **Cloud PlatForm**
43 |
44 | - [ ] Azure
45 | - [ ] Aws
46 | - [ ] 阿里云
47 | - [ ] 腾讯云
48 | - [ ] 华为云
49 | - [ ] AlibabaCloud
50 | - [ ] HUWEICloud
51 | - [ ] Other (You should describe it)
52 |
53 |
54 | ## Bug reproduce
55 |
56 | Steps to reproduce the behavior:
57 |
58 | 1. Go to '...'
59 | 2. Click on '....'
60 | 3. Scroll down to '....'
61 | 4. See error
62 |
63 | ## Bug reports
64 |
65 | ### Bug Context
66 |
67 | Bug context includes bug error, error logs and service status, it is very important for resolving issue
68 |
69 | ```
70 | # bug error
71 | (paste here)
72 |
73 | # service status
74 | (paste here)
75 |
76 | # error logs
77 | (paste here)
78 | ```
79 |
80 | ### Bug Screenshot
81 |
82 | paste screenshot here
83 |
84 | ## Your suggestion
85 |
86 | **The reason of Bug**
87 |
88 | You can describe the reason if you have found it
89 |
90 | **Your solution for Bug**
91 |
92 | You can describe your solution here
93 |
94 | **Additional context**
95 |
96 | You can add any other context about the problem here.
97 |
--------------------------------------------------------------------------------
/.github/ISSUE_TEMPLATE/documentation_report.md:
--------------------------------------------------------------------------------
1 | ---
2 | name: Documentation report
3 | about: improve current Documentation
4 | labels: documentation
5 | ---
6 |
7 |
8 | ## Language
9 |
10 | - [ ] Chinese
11 | - [ ] English
12 |
13 | ## Content error
14 |
15 | Provide us with documentation errors, e.g spelling mistake, wrong screenshot, code syntax error.
16 |
17 | * URL:
18 | * Description:
19 | * Screenshot
20 |
21 | ## Content optimization
22 |
23 | Provide us with content optimization, e.g easy to read, simplify the steps, step by step, precise expression.
24 |
25 | * URL:
26 | * Description:
27 |
28 | ## New content
29 |
30 | Describe important content what do you think is important in this documentation.
31 |
32 | **What content do you want to add?**
33 |
34 | (describe here)
35 |
36 | **Steps for the content**
37 |
38 | 1. Go to '...'
39 | 2. Click on '....'
40 | 3. Scroll down to '....'
41 | 4. Modify file '....'
42 |
--------------------------------------------------------------------------------
/.github/ISSUE_TEMPLATE/feature_request.md:
--------------------------------------------------------------------------------
1 | ---
2 | name: Feature request
3 | about: Suggest an idea for this project
4 | title: ''
5 | labels: 'enhancement'
6 | assignees: ''
7 |
8 | ---
9 |
10 | **What type of your feature request?**
11 |
12 | - [ ] Add new features
13 | - [ ] Improve current features
14 |
15 | **Is your feature request related to a problem? Please describe.**
16 | A clear and concise description of what the problem is. Ex. I'm always frustrated when [...]
17 |
18 | **Describe the solution you'd like**
19 | A clear and concise description of what you want to happen.
20 |
21 | **Describe alternatives you've considered**
22 | A clear and concise description of any alternative solutions or features you've considered.
23 |
24 | **Additional context**
25 | Add any other context or screenshots about the feature request here.
26 |
--------------------------------------------------------------------------------
/.github/workflows/doc.yml:
--------------------------------------------------------------------------------
1 | name: Docs Build and Upload
2 |
3 | on:
4 | push:
5 | paths: docs/**
6 |
7 | jobs:
8 | build:
9 | runs-on: ubuntu-latest
10 | steps:
11 | - uses: actions/checkout@master
12 |
13 | - name: npm install vuepress
14 | run: |
15 | sudo npm install -g vuepress
16 |
17 | - name: vuepress build
18 | run: |
19 | cd docs
20 | sudo vuepress build
21 | env:
22 | CI: true
23 |
24 | # to azure blob
25 | - name: debug
26 | run: ls
27 | - uses: bacongobbler/azure-blob-storage-upload@v1.2.0
28 | with:
29 | source_dir: docs/html
30 | container_name: $web
31 | connection_string: ${{ secrets.Azure_blob }}
32 | extra_args: '--destination-path docs'
33 | sync: false
34 |
--------------------------------------------------------------------------------
/.github/workflows/mirror.yml:
--------------------------------------------------------------------------------
1 | name: Mirror to Gitee Repo
2 |
3 | # on: [ push, delete, create ]
4 | on:
5 | push:
6 | branches:
7 | - main
8 |
9 | jobs:
10 | git-mirror:
11 | runs-on: ubuntu-latest
12 | steps:
13 | - name: Configure Private Key
14 | env:
15 | SSH_PRIVATE_KEY: ${{ secrets.GITEE_PRIVATE_KEY }}
16 | run: |
17 | mkdir -p ~/.ssh
18 | echo "$SSH_PRIVATE_KEY" > ~/.ssh/id_rsa
19 | chmod 600 ~/.ssh/id_rsa
20 | echo "StrictHostKeyChecking no" >> ~/.ssh/config
21 | - name: Push Mirror
22 | env:
23 | # SOURCE_REPO: 'https://github.com/mgithubTestOrg/giteeMirror.git'
24 | SOURCE_REPO: 'https://github.com/${{ github.repository }}.git'
25 | # DESTINATION_REPO: 'git@gitee.com:mgithubTestOrg/giteeMirror.git'
26 | # DESTINATION_REPO: 'git@gitee.com:${{ github.repository }}.git'
27 | DESTINATION_REPO: 'git@gitee.com:websoft9/${{ github.event.repository.name }}.git'
28 | BASE_REPO: 'https://github.com/${{ github.repository }}'
29 | run: |
30 | git clone "$SOURCE_REPO" && cd `basename "$BASE_REPO"`
31 | git config --global user.name "${{ github.actor }}"
32 | git config --global user.email "xxx@websoft9.com"
33 |
34 | git remote set-url --push origin "$DESTINATION_REPO"
35 | git push origin main --force
36 |
37 | git checkout dev
38 | if [ -f "requirements.yml" ];then
39 | sed -i 's/github/gitee/g' requirements.yml
40 | git add requirements.yml
41 | git commit -m "Make requirements.yml compatible with gitee"
42 | fi
43 | git push origin dev --force
44 |
45 | git checkout main
46 |
47 | git fetch -p origin
48 | git for-each-ref --format 'delete %(refname)' refs/pull | git update-ref --stdin
49 | git push origin main --force
50 |
51 | if [ -f "requirements.yml" ];then
52 | sed -i 's/github/gitee/g' requirements.yml
53 | git add requirements.yml
54 | git commit -m "Make requirements.yml compatible with gitee"
55 | fi
56 | git push origin main --force
--------------------------------------------------------------------------------
/.github/workflows/templating.yml:
--------------------------------------------------------------------------------
1 | name: Template ansible-README by variables.json
2 |
3 | on:
4 | repository_dispatch:
5 | push:
6 | paths: variables.json
7 |
8 | jobs:
9 | build:
10 | runs-on: ubuntu-latest
11 | steps:
12 | - uses: actions/checkout@master
13 |
14 | - name: npm install jinjia2-cli
15 | run: |
16 | wget -N https://raw.githubusercontent.com/Websoft9/ansible-template/main/README.jinja2 -O template_README.jinja2
17 | wget -N https://raw.githubusercontent.com/Websoft9/ansible-template/main/README-zh.jinja2 -O template_README-zh.jinja2
18 | pip install jinja2-cli
19 | jinja2 template_README-zh.jinja2 variables.json > README-zh.md
20 | jinja2 template_README.jinja2 variables.json > README.md
21 | rm -f template_README.jinja2 template_README-zh.jinja2
22 |
23 | - uses: stefanzweifel/git-auto-commit-action@v4
24 | with:
25 | commit_message: Templating README
26 |
--------------------------------------------------------------------------------
/.gitignore:
--------------------------------------------------------------------------------
1 | *.retry
2 | /.vscode
3 | hosts
4 | node_modules
5 |
--------------------------------------------------------------------------------
/CHANGELOG.md:
--------------------------------------------------------------------------------
1 | # CHANGELOG
2 |
3 | ## Release nextcloud-v23.0.01 2021-12-09
4 | ### Fixes and Enhancements
5 | - skip wizard, update to v23.0.0
6 |
7 | ## Release nextcloud-v22.0-1 2021-7-20
8 | ### Fixes and Enhancements
9 | - skip wizard, update to v22.0 #8
10 |
11 | ## Release nextcloud-v20.0.5-1 2021-7-9
12 | ### Fixes and Enhancements
13 | - 19.0.3 to 20.0.0 #2
14 |
--------------------------------------------------------------------------------
/License.md:
--------------------------------------------------------------------------------
1 | This program is released under LGPL-3.0 and with the additional Terms:
2 | It is not allowed to publish free or paid image based on this program in any Cloud platform's Marketplace.
3 |
4 | GNU LESSER GENERAL PUBLIC LICENSE
5 | Version 3, 29 June 2007
6 |
7 | Copyright (C) 2007 Free Software Foundation, Inc.
8 | Everyone is permitted to copy and distribute verbatim copies
9 | of this license document, but changing it is not allowed.
10 |
11 |
12 | This version of the GNU Lesser General Public License incorporates
13 | the terms and conditions of version 3 of the GNU General Public
14 | License, supplemented by the additional permissions listed below.
15 |
16 | 0. Additional Definitions.
17 |
18 | As used herein, "this License" refers to version 3 of the GNU Lesser
19 | General Public License, and the "GNU GPL" refers to version 3 of the GNU
20 | General Public License.
21 |
22 | "The Library" refers to a covered work governed by this License,
23 | other than an Application or a Combined Work as defined below.
24 |
25 | An "Application" is any work that makes use of an interface provided
26 | by the Library, but which is not otherwise based on the Library.
27 | Defining a subclass of a class defined by the Library is deemed a mode
28 | of using an interface provided by the Library.
29 |
30 | A "Combined Work" is a work produced by combining or linking an
31 | Application with the Library. The particular version of the Library
32 | with which the Combined Work was made is also called the "Linked
33 | Version".
34 |
35 | The "Minimal Corresponding Source" for a Combined Work means the
36 | Corresponding Source for the Combined Work, excluding any source code
37 | for portions of the Combined Work that, considered in isolation, are
38 | based on the Application, and not on the Linked Version.
39 |
40 | The "Corresponding Application Code" for a Combined Work means the
41 | object code and/or source code for the Application, including any data
42 | and utility programs needed for reproducing the Combined Work from the
43 | Application, but excluding the System Libraries of the Combined Work.
44 |
45 | 1. Exception to Section 3 of the GNU GPL.
46 |
47 | You may convey a covered work under sections 3 and 4 of this License
48 | without being bound by section 3 of the GNU GPL.
49 |
50 | 2. Conveying Modified Versions.
51 |
52 | If you modify a copy of the Library, and, in your modifications, a
53 | facility refers to a function or data to be supplied by an Application
54 | that uses the facility (other than as an argument passed when the
55 | facility is invoked), then you may convey a copy of the modified
56 | version:
57 |
58 | a) under this License, provided that you make a good faith effort to
59 | ensure that, in the event an Application does not supply the
60 | function or data, the facility still operates, and performs
61 | whatever part of its purpose remains meaningful, or
62 |
63 | b) under the GNU GPL, with none of the additional permissions of
64 | this License applicable to that copy.
65 |
66 | 3. Object Code Incorporating Material from Library Header Files.
67 |
68 | The object code form of an Application may incorporate material from
69 | a header file that is part of the Library. You may convey such object
70 | code under terms of your choice, provided that, if the incorporated
71 | material is not limited to numerical parameters, data structure
72 | layouts and accessors, or small macros, inline functions and templates
73 | (ten or fewer lines in length), you do both of the following:
74 |
75 | a) Give prominent notice with each copy of the object code that the
76 | Library is used in it and that the Library and its use are
77 | covered by this License.
78 |
79 | b) Accompany the object code with a copy of the GNU GPL and this license
80 | document.
81 |
82 | 4. Combined Works.
83 |
84 | You may convey a Combined Work under terms of your choice that,
85 | taken together, effectively do not restrict modification of the
86 | portions of the Library contained in the Combined Work and reverse
87 | engineering for debugging such modifications, if you also do each of
88 | the following:
89 |
90 | a) Give prominent notice with each copy of the Combined Work that
91 | the Library is used in it and that the Library and its use are
92 | covered by this License.
93 |
94 | b) Accompany the Combined Work with a copy of the GNU GPL and this license
95 | document.
96 |
97 | c) For a Combined Work that displays copyright notices during
98 | execution, include the copyright notice for the Library among
99 | these notices, as well as a reference directing the user to the
100 | copies of the GNU GPL and this license document.
101 |
102 | d) Do one of the following:
103 |
104 | 0) Convey the Minimal Corresponding Source under the terms of this
105 | License, and the Corresponding Application Code in a form
106 | suitable for, and under terms that permit, the user to
107 | recombine or relink the Application with a modified version of
108 | the Linked Version to produce a modified Combined Work, in the
109 | manner specified by section 6 of the GNU GPL for conveying
110 | Corresponding Source.
111 |
112 | 1) Use a suitable shared library mechanism for linking with the
113 | Library. A suitable mechanism is one that (a) uses at run time
114 | a copy of the Library already present on the user's computer
115 | system, and (b) will operate properly with a modified version
116 | of the Library that is interface-compatible with the Linked
117 | Version.
118 |
119 | e) Provide Installation Information, but only if you would otherwise
120 | be required to provide such information under section 6 of the
121 | GNU GPL, and only to the extent that such information is
122 | necessary to install and execute a modified version of the
123 | Combined Work produced by recombining or relinking the
124 | Application with a modified version of the Linked Version. (If
125 | you use option 4d0, the Installation Information must accompany
126 | the Minimal Corresponding Source and Corresponding Application
127 | Code. If you use option 4d1, you must provide the Installation
128 | Information in the manner specified by section 6 of the GNU GPL
129 | for conveying Corresponding Source.)
130 |
131 | 5. Combined Libraries.
132 |
133 | You may place library facilities that are a work based on the
134 | Library side by side in a single library together with other library
135 | facilities that are not Applications and are not covered by this
136 | License, and convey such a combined library under terms of your
137 | choice, if you do both of the following:
138 |
139 | a) Accompany the combined library with a copy of the same work based
140 | on the Library, uncombined with any other library facilities,
141 | conveyed under the terms of this License.
142 |
143 | b) Give prominent notice with the combined library that part of it
144 | is a work based on the Library, and explaining where to find the
145 | accompanying uncombined form of the same work.
146 |
147 | 6. Revised Versions of the GNU Lesser General Public License.
148 |
149 | The Free Software Foundation may publish revised and/or new versions
150 | of the GNU Lesser General Public License from time to time. Such new
151 | versions will be similar in spirit to the present version, but may
152 | differ in detail to address new problems or concerns.
153 |
154 | Each version is given a distinguishing version number. If the
155 | Library as you received it specifies that a certain numbered version
156 | of the GNU Lesser General Public License "or any later version"
157 | applies to it, you have the option of following the terms and
158 | conditions either of that published version or of any later version
159 | published by the Free Software Foundation. If the Library as you
160 | received it does not specify a version number of the GNU Lesser
161 | General Public License, you may choose any version of the GNU Lesser
162 | General Public License ever published by the Free Software Foundation.
163 |
164 | If the Library as you received it specifies that a proxy can decide
165 | whether future versions of the GNU Lesser General Public License shall
166 | apply, that proxy's public statement of acceptance of any version is
167 | permanent authorization for you to choose that version for the
168 | Library.
169 |
--------------------------------------------------------------------------------
/Notes.md:
--------------------------------------------------------------------------------
1 | ## Installation
2 | [Nextcloud Admin Manuals](https://docs.nextcloud.com/)
3 |
--------------------------------------------------------------------------------
/README-zh.md:
--------------------------------------------------------------------------------
1 |
2 | # Nextcloud 自动化安装与部署
3 |
4 | [English](/README.md) | [简体中文](/README-zh.md)
5 |
6 | 本项目是由 [Websoft9](https://www.websoft9.com) 研发的 [Nextcloud](https://nextcloud.com/) 自动化安装程序,开发语言是 Ansible。使用本项目,只需要用户在 Linux 上运行一条命令,即可自动化安装 Nextcloud,并预配置必要项,让原本复杂的安装和与配置过程变得没有任何技术门槛。
7 |
8 | ## 配置要求
9 |
10 | 安装本项目,确保符合如下的条件:
11 |
12 | | 条件 | 详情 | 备注 |
13 | | ------------ | ------------ | ----- |
14 | | 操作系统 | CentOS7.x, Ubuntu20.04, Amazon Linux2| 可选 |
15 | | 公有云| AWS, Azure, 阿里云, 华为云, 腾讯云 | 可选 |
16 | | 私有云| KVM, VMware, VirtualBox, OpenStack | 可选 |
17 | | 服务器配置 | 最低2核6G,存储20GB以上,Swap分区2GB以上 | 建议采用按量100M带宽 |
18 |
19 | 更多请见: [官方 System requirement](https://docs.nextcloud.com/server/18/admin_manual/installation/source_installation.html)。
20 |
21 | ## 组件
22 |
23 | 包含的核心组件为:Nextcloud, Apache/Nginx, MySQL, PHP, ONLYOFFICE Document Server, Docker
24 |
25 | 更多请见: [参数表](/docs/zh/stack-components.md)。
26 |
27 | ## 安装指南
28 |
29 | 以 root 用户登录 Linux,运行下面的**一键自动化安装命令**即可启动自动化部署。若没有 root 用户,请以其他用户登录 Linux 后运行 `sudo su -` 命令提升为 root 权限,然后再运行下面的脚本。
30 |
31 | ```
32 | wget -N https://ghproxy.com/https://raw.githubusercontent.com/Websoft9/ansible-linux/main/scripts/install.sh; bash install.sh -r nextcloud
33 | ```
34 |
35 | 脚本后启动,就开始了自动化安装,必要时需要用户做出交互式选择,然后耐心等待直至安装成功。
36 |
37 | **安装中的注意事项:**
38 |
39 | 1. 操作不慎或网络发生变化,可能会导致SSH连接被中断,安装就会失败,此时请重新安装
40 | 2. 安装缓慢、停滞不前或无故中断,主要是网络不通(或网速太慢)导致的下载问题,此时请重新安装
41 |
42 | 多种原因导致无法顺利安装,请使用我们在公有云上发布的 [Nextcloud 镜像](https://apps.websoft9.com/nextcloud) 的部署方式。
43 |
44 |
45 | ## 文档
46 |
47 | 文档链接:https://support.websoft9.com/docs/nextcloud/zh
48 |
49 | ## License
50 |
51 | 本项目是开源项目,采用 LGPL3.0 开源协议。补充条款:不允许在公有云的云市场上售卖通过本项目安装后直接或间接制作的镜像。
52 |
53 | ## FAQ
54 |
55 | #### 本项目安装的是 Nextcloud 最新版吗?
56 |
57 | 本项目通过下载可执行二进制包解压安装,请通过[官方URL](https://download.nextcloud.com/server/releases/)页面查看版本号。
58 | 我们会定期检查[Release版本](https://github.com/Websoft9/ansible-nextcloud/releases),更新并测试此项目,以保证用户可以顺利安装所需的Nextcloud版本。
59 |
60 | #### 命令脚本部署与镜像部署有什么区别?
61 |
62 | 请参考:[镜像部署-vs-脚本部署](https://support.websoft9.com/docs/faq/zh/bz-product.html#镜像部署-vs-脚本部署)
63 |
64 | #### 本项目支持在 Ansible Tower 上运行吗
65 | 支持
66 |
67 |
--------------------------------------------------------------------------------
/README.md:
--------------------------------------------------------------------------------
1 | # Nextcloud Cloud Installer
2 |
3 | 
4 |
5 | ## Introduction
6 |
7 | [English](/README.md) | [简体中文](/README-zh.md)
8 |
9 | **Nextcloud Cloud Installer**, developed by [Websoft9](https://www.websoft9.com), is an automatic installation program of [Nextcloud](https://nextcloud.com/) based on Ansible and shell. It helps user install Nextcloud and pre-configure required items automatically and users only need to run a command on Linux. It simplifies the complicated installation and initialization process.
10 |
11 | ## System Requirement
12 |
13 | System Requirement to install this repository are as following:
14 |
15 | | Conditions | Details | Notes |
16 | | ------------------- | --------------------------------| -------------------- |
17 | | Operating System | CentOS7.x, Ubuntu20.04, Amazon Linux2 | Optional |
18 | | Public Cloud | AWS, Azure, Alibaba Cloud, HUAWEI ClOUD, Tencent Cloud | Optional |
19 | | Private Cloud | KVM, VMware, VirtualBox, OpenStack | Optional |
20 | | Server Configuration | vCPU no less than 2 core, Memory no less than 6 GIB, Storage no less than 20 GB, Swap no less than 2GB |Bandwidth no less than 100M|
21 |
22 | To learn more information, please view [Installation & Configuration](https://docs.nextcloud.com/server/18/admin_manual/installation/source_installation.html).
23 |
24 | ## Ecosystem
25 |
26 | Core components of this repository: Nextcloud, Apache/Nginx, MySQL, PHP, ONLYOFFICE Document Server, Docker
27 |
28 | Learn more about [Parameters](/docs/stack-components.md).
29 |
30 | ## Installation
31 |
32 | You can install it by thi Cloud Installer solution all in one. In addition, you can deploy image published on major Cloud Platform by Websoft9.
33 |
34 | #### All-in-one Installer
35 |
36 | Run the automatic installation script with **root** authority to start the installation. If necessary, users need to make interactive choices, and then wait patiently until the installation is successful.
37 |
38 | ```
39 | $ sudo su -
40 | $ wget -N https://raw.githubusercontent.com/Websoft9/ansible-linux/main/scripts/install.sh; bash install.sh -r nextcloud
41 | ```
42 |
43 | If the network is broken or blocked, SSH will be interrupted and the installation will fail. Please reinstall.
44 |
45 | #### Image on Cloud
46 |
47 | Follow our [Nextcloud image](https://apps.websoft9.com/nextcloud) for installation on major Cloud Platform.
48 |
49 | ## Documentation
50 |
51 | **[Administrator Guide](https://support.websoft9.com/docs/nextcloud)**
52 |
53 | ## License
54 |
55 | [LGPL-3.0](/License.md), Additional Terms: It is not allowed to publish free or paid image based on this repository in any Cloud platform's Marketplace.
56 |
57 | Copyright (c) 2016-present, Websoft9
58 |
59 | This program provided by Websoft9 contains a series of software with separate copyright notices and license terms. Your use of the source code for the software included is subject to the terms and conditions of its own license.
60 |
61 | ## FAQ
62 |
63 | #### How to install and view the latest release?
64 |
65 | This repository install way is Isntallation for download binaries files , you can view the version from [Official URL](https://download.nextcloud.com/server/releases/).
66 | We will check [Release version](https://github.com/Websoft9/ansible-nextcloud/releases) regularly. Update and test this project to ensure that users can successfully install the required version of Nextcloud.
67 |
68 | #### Can I run this repository on Ansible Tower?
69 |
70 | Yes.
71 |
72 | #### Although the results of the deploy by image are consistent with the results of deploy by script, what is the difference between the two deployment methods?
73 |
74 | Suggest you read the document [Deploy by Image vs Deploy by Script](https://support.websoft9.com/docs/faq/bz-product.html#deployment-comparison).
75 |
76 |
--------------------------------------------------------------------------------
/ansible.cfg:
--------------------------------------------------------------------------------
1 | [defaults]
2 | roles_path = ./roles/
3 | host_key_checking = False
4 | display_skipped_hosts = False
5 | interpreter_python=auto
6 | timeout = 60
7 | forks = 10
8 |
--------------------------------------------------------------------------------
/docs/.vuepress/config.js:
--------------------------------------------------------------------------------
1 | module.exports = {
2 |
3 | //针对不同项目,需要修改的参数有:base,title,description,repo以及nav,sidebar 文件夹下的导航js文件
4 |
5 | base: '/docs/nextcloud/',
6 | dest: 'html/nextcloud',
7 |
8 | head: [
9 | ['link', { rel: 'icon', href: '/favicon.ico' }]
10 | ],
11 |
12 | //vuepress多语言,区别于主题多语言
13 | locales: {
14 | '/': {
15 | lang: 'en-US', // 将会被设置为 的 lang 属性
16 | title: 'Nextcloud Administrator Guide',
17 | description: 'You can get the Installation of Image,Administrator,Configuration of the Nextcloud from this documentation.'
18 | },
19 | '/zh/': {
20 | lang: 'zh-CN',
21 | title: 'Nextcloud 管理员手册',
22 | description: '本文档由 Websoft9 公司提供,用于指导用户学习 Nextcloud 的安装部署与基本运维技术,包括:部署、初始化安装、环境配置、HTTPS、SMTP、备份升级和连接云服务器操作等基本操作。'
23 | }
24 | },
25 |
26 | themeConfig: {
27 |
28 | //Basic configuration
29 | displayAllHeaders: false, // 默认值:false
30 | activeHeaderLinks: true, // 默认值:true
31 | displayAllHeaders: false, // 默认值:false
32 | sidebar: 'auto', // 默认值:false
33 |
34 | //Github
35 | repo: 'Websoft9/ansible-nextcloud',
36 | editLinks: true,
37 | docsDir: 'docs',
38 | docsBranch: 'main',
39 |
40 | //主题多语言
41 | locales: {
42 | '/': {
43 | label: 'English',
44 | selectText: 'Languages',
45 | editLinkText: 'Edit this page on GitHub',
46 | lastUpdated: 'Last Updated',
47 | serviceWorker: {
48 | updatePopup: {
49 | message: "New content is available.",
50 | buttonText: "Refresh"
51 | }
52 | },
53 |
54 | //top-menu
55 | nav: require('./nav/en'),
56 | //left-menu
57 | sidebar:require('./sidebar/en'),
58 | },
59 |
60 | '/zh/': {
61 | label: '中文',
62 | selectText: '语言',
63 | editLinkText: '在Github上编辑',
64 | lastUpdated: 'Last Updated',
65 | serviceWorker: {
66 | updatePopup: {
67 | message: "此文档有可用的更新",
68 | buttonText: "刷新"
69 | }
70 | },
71 |
72 | //页眉
73 | nav: require('./nav/zh'),
74 | //侧边栏导航
75 | sidebar: require('./sidebar/zh'),
76 |
77 | },
78 |
79 | },
80 | }
81 | }
--------------------------------------------------------------------------------
/docs/.vuepress/images/logo.ico:
--------------------------------------------------------------------------------
https://raw.githubusercontent.com/Websoft9Archive/ansible-nextcloud/f089f3ace917097a5db6dc24aec35a097298a18f/docs/.vuepress/images/logo.ico
--------------------------------------------------------------------------------
/docs/.vuepress/nav/en.js:
--------------------------------------------------------------------------------
1 | module.exports = [
2 | { text: 'Home', link: '/' },
3 | { text: 'Support', link: 'https://support.websoft9.com' },
4 | ]
--------------------------------------------------------------------------------
/docs/.vuepress/nav/zh.js:
--------------------------------------------------------------------------------
1 | module.exports = [
2 | { text: '首页', link: '/zh/' },
3 | { text: '支持', link: 'https://support.websoft9.com/' },
4 | ]
--------------------------------------------------------------------------------
/docs/.vuepress/public/favicon.ico:
--------------------------------------------------------------------------------
https://raw.githubusercontent.com/Websoft9Archive/ansible-nextcloud/f089f3ace917097a5db6dc24aec35a097298a18f/docs/.vuepress/public/favicon.ico
--------------------------------------------------------------------------------
/docs/.vuepress/sidebar/en.js:
--------------------------------------------------------------------------------
1 | module.exports = [
2 | {
3 | title: 'Getting Started',
4 | collapsable: false,
5 | children: [
6 | '/',
7 | '/stack-deployment',
8 | '/stack-installation',
9 | '/stack-components',
10 | '/stack-accounts',
11 | ['https://support.websoft9.com/docs/faq/tech-instance.html','Cloud Server'],
12 | ]
13 | },
14 | {
15 | title: 'Best Practices',
16 | collapsable: false,
17 | children: [
18 | '/solution-smtp',
19 | '/solution-https',
20 | '/solution-backup',
21 | '/solution-upgrade',
22 | '/solution-more',
23 | ]
24 | },
25 |
26 | {
27 | title: 'Administrator',
28 | collapsable: false,
29 | children: [
30 | '/admin-services',
31 | '/admin-mysql',
32 | '/admin-runtime',
33 | ['https://support.websoft9.com/docs/linux/admin-practices.html','Linux'],
34 | ]
35 | },
36 |
37 | {
38 | title: 'Other',
39 | collapsable: false,
40 | children: [
41 | '/else-faq',
42 | '/else-troubleshooting',
43 | ]
44 | },
45 |
46 | ]
47 |
--------------------------------------------------------------------------------
/docs/.vuepress/sidebar/zh.js:
--------------------------------------------------------------------------------
1 | module.exports = [
2 | {
3 | title: '开始',
4 | collapsable: false,
5 | children: [
6 | '/zh/',
7 | '/zh/stack-deployment',
8 | '/zh/stack-installation',
9 | '/zh/stack-components',
10 | '/zh/stack-accounts',
11 | ['https://support.websoft9.com/docs/faq/zh/tech-instance.html','云服务器'],
12 | ]
13 | },
14 |
15 | {
16 | title: '实践指南',
17 | collapsable: false,
18 | children: [
19 | '/zh/solution-smtp',
20 | '/zh/solution-https',
21 | '/zh/solution-backup',
22 | '/zh/solution-upgrade',
23 | '/zh/solution-more',
24 | ]
25 | },
26 |
27 | {
28 | title: '配置参考',
29 | collapsable: false,
30 | children: [
31 | '/zh/admin-services',
32 | '/zh/admin-mysql',
33 | '/zh/admin-runtime',
34 | ['https://support.websoft9.com/docs/linux/zh/admin-practices.html','Linux'],
35 | ]
36 | },
37 |
38 | {
39 | title: '其他',
40 | collapsable: false,
41 | children: [
42 | '/zh/else-faq',
43 | '/zh/else-troubleshooting',
44 | ]
45 | },
46 |
47 | ]
--------------------------------------------------------------------------------
/docs/.vuepress/styles/index.styl:
--------------------------------------------------------------------------------
1 | // placeholder for test, dont't remove it.
2 |
3 | //.content {
4 | // font-size 30px;
5 | //}
6 |
7 | pre.vue-container
8 | border-left-width: .5rem;
9 | border-left-style: solid;
10 | border-color: #42b983;
11 | border-radius: 0px;
12 | & > code
13 | font-size: 14px !important;
14 | & > p
15 | margin: -5px 0 -20px 0;
16 | code
17 | background-color: #42b983 !important;
18 | padding: 3px 5px;
19 | border-radius: 3px;
20 | color #000
21 | em
22 | color #808080
23 | font-weight light
24 |
25 |
--------------------------------------------------------------------------------
/docs/.vuepress/styles/override.styl:
--------------------------------------------------------------------------------
1 | $textColor = red
2 | $accentColor = #3eaf7c
3 | $textColor = #2c3e50
4 | $borderColor = #eaecef
5 | $codeBgColor = #282c34
--------------------------------------------------------------------------------
/docs/.vuepress/styles/palette.styl:
--------------------------------------------------------------------------------
1 | // placeholder for test, dont't remove it.
2 |
3 | //$accentColor = #f00
4 |
--------------------------------------------------------------------------------
/docs/.vuepress/styles/style.styl:
--------------------------------------------------------------------------------
1 | #my-style {}
--------------------------------------------------------------------------------
/docs/README.md:
--------------------------------------------------------------------------------
1 | ---
2 | home: false
3 | ---
4 |
5 | # Overview
6 |
7 | This documentation is provided by [Websoft9](https://www.websoft9.com/). It can help users to acquire skills of Nextcloud Deployment, Installation, Configuration, HTTPS, SMTP, Backup, Upgrade, Connect Instance and more.
8 |
9 | [Nextcloud](https://nextcloud.com) is the next generation open source Enterprise File Sync and Share started by ownCloud inventor Frank Karlitschek and a dozen experienced open source entrepreneurs and engineers to empower users to take back control over their data and communication.
10 |
11 | 
12 |
13 | ## Demo
14 |
15 | Visit [Nextcloud Official Online Demo](https://try.nextcloud.com/) now.
16 |
17 | ## Improve
18 |
19 | To take more users' need into consideration, we're continuing to improve the documentation.
20 | If you have any good idea, please don't hesitate to **Edit this page on GitHub** to give us feedback, and welcome you to fork this documentation on [Github](https://github.com/Websoft9/ansible-nextcloud)
21 |
22 | ## Scope
23 |
24 | We have published the image library on the major Cloud Platforms and offered English and Chinese documents for guidance. Global users can get and use it with great convenience.
--------------------------------------------------------------------------------
/docs/admin-mysql.md:
--------------------------------------------------------------------------------
1 | # MySQL
2 |
3 | Nextcloud deployment package includes MySQL and Web-GUI tool phpMyAdmin for MySQL management.
4 |
5 | Follow the steps below to use it:
6 |
7 | 1. Login Cloud Console, make sure the **TCP:80** port is allowed on **[Inbound of Security Group Rule](https://support.websoft9.com/docs/faq/tech-instance.html)**
8 | 2. Use the Chrome or FireFox to access URL *http://Internet IP/phpmyamdin*
9 | 
10 | 3. Enter username and password of MySQL. ([Don't know password?](/stack-accounts.md))
11 | 4. Start to manage MySQL now.
12 | 
13 |
14 | > View *[MySQL guide](https://support.websoft9.com/docs/mysql/admin-phpmyadmin.html)* provided by Websoft9 to learn more skills of MySQL, including: how to change password, create user, import/export data, open or close remote access, configure log and so on.
15 |
--------------------------------------------------------------------------------
/docs/admin-runtime.md:
--------------------------------------------------------------------------------
1 | # PHP Runtime
2 |
3 | ## Guide
4 |
5 | The environment components that support Nextcloud running include: PHP, MySQL, Apache or Nginx, etc. Please check the corresponding manuals according to different deployment packages to complete more configurations.
6 |
7 | | Deployment package | items| docs |
8 | | --- | --- | --- |
9 | | Nextcloud(LAMP) | Apache+MySQL+PHP on Linux | *[LAMP administrator guide](https://support.websoft9.com/docs/lamp)* |
10 | | Nextcloud(LEMP)| Nginx+MySQL+PHP on Linux |*[LEMP administrator guide](https://support.websoft9.com/docs/lnmp)*|
11 |
12 | ## What's PHP Runtime?
13 |
14 | In addition to using the default settings of the Nextcloud deployment package, you may need to do more on the server:
15 |
16 | - Modify PHP configuration file (php.ini)
17 | - Add new Nextcloud or PHP application
18 | - Configure the SSL/HTTPS
19 | - Modify the root directory
20 | - Bind Domain Name
21 | ...
22 |
23 | To complete these tasks, you need to refer to [Environmental Guidelines](/admin-runtime.md#guide)
24 |
25 | In addition, you may think about how Nextcloud works in these environments? Please refer to the hierarchy diagram below.
26 |
27 | 
--------------------------------------------------------------------------------
/docs/admin-services.md:
--------------------------------------------------------------------------------
1 | # Start or Stop the Services
2 |
3 | These commands are required when you use the Nextcloud of Websoft9.
4 |
5 | ### Apache
6 |
7 | ```shell
8 | #For Centos&Redhat
9 | sudo systemctl start httpd
10 | sudo systemctl stop httpd
11 | sudo systemctl restart httpd
12 | sudo systemctl status httpd
13 |
14 | #For Ubuntu&Debian
15 | sudo systemctl start apache2
16 | sudo systemctl stop apache2
17 | sudo systemctl restart apache2
18 | sudo systemctl status apache2
19 | ```
20 |
21 | ### Nginx
22 |
23 | ```shell
24 | sudo systemctl start nginx
25 | sudo systemctl stop nginx
26 | sudo systemctl restart nginx
27 | sudo systemctl status nginx
28 | ```
29 |
30 | ### PHP-FPM
31 | ```shell
32 | systemctl start php-fpm
33 | systemctl stop php-fpm
34 | systemctl restart php-fpm
35 | systemctl status php-fpm
36 | ```
37 |
38 | ### MySQL
39 |
40 | ```shell
41 | sudo systemctl start mysql
42 | sudo systemctl stop mysql
43 | sudo systemctl restart mysql
44 | sudo systemctl status mysql
45 | ```
46 |
47 | ### Redis
48 | ```shell
49 | sudo systemctl start redis
50 | sudo systemctl stop redis
51 | sudo systemctl restart redis
52 | sudo systemctl status redis
53 | ```
54 |
55 | ### Docker
56 | ```shell
57 | sudo systemctl start docker
58 | sudo systemctl stop docker
59 | sudo systemctl restart docker
60 | sudo systemctl status docker
61 | ```
62 |
63 | ### phpMyAdmin on Docker
64 | ```shell
65 | sudo docker inspect phpmyadmin
66 | sudo docker start phpmyadmin
67 | sudo docker restart phpmyadmin
68 | sudo docker stop phpmyadmin
69 | sudo docker rm phpmyadmin
70 | ```
71 |
72 | ### ONLYOFFICE Document Server on Docker
73 | ```shell
74 | sudo docker inspect onlyofficedocumentserver
75 | sudo docker start onlyofficedocumentserver
76 | sudo docker restart onlyofficedocumentserver
77 | sudo docker stop onlyofficedocumentserver
78 | sudo docker rm onlyofficedocumentserver
79 | ```
80 |
--------------------------------------------------------------------------------
/docs/else-faq.md:
--------------------------------------------------------------------------------
1 | # FAQ
2 |
3 | #### Nextcloud support multi-language?
4 |
5 | Yes.
6 |
7 | #### What is the relationship between Nextcloud and ownCloud?
8 |
9 | Nextcloud is a branch project started by ownCloud inventor Frank Karlitschek and a dozen experienced open source entrepreneurs and engineers, similar to the relationship between MariaDB and MySQL.
10 |
11 |
12 | #### What is the default character set?
13 |
14 | UTF-8
15 |
16 | #### Does Nextcloud provide a client?
17 |
18 | Yes, includes: Nextcloud Desktop Client, Nextcloud Android App, Nextcloud iOS App
19 |
20 | #### Nextcloud can integrate external storage?
21 |
22 | Yes.
23 |
24 | #### How can Nextcloud view & edit file online?
25 |
26 | You should complete the [OnlyOffice setting](/solution-more.md#nextcloud-preview-and-edit) on your Nextcloud.
27 |
28 | #### What the difference between the Nextcloud(LAMP) and Nextcloud(LEMP) ?
29 |
30 | LAMP is using Apache as Web Server for your Nextcloud.
31 | LEMP is using Nginx as Web Server for your Nextcloud.
32 |
33 | #### Can I use the RDS of Cloud Provider for Nextcloud?
34 |
35 | You can use the RDS for Nextcloud if you need, and just need to modify the [database configuration](/stack-components.html#nextcloud) section in the wp-config.php
36 |
37 | #### Where is the database connection configuration of Nextcloud?
38 |
39 | Database configuration information is in *config.php* in the [Nextcloud installation directory](/stack-components.md#nextcloud)
40 |
41 | #### If there is no domain name, can I deploy Nextcloud?
42 |
43 | Yes, access Nextcloud by *http://Internet IP*
44 |
45 | #### What is the password for the database root user?
46 |
47 | The password is stored in the server related file: `/credentials/password.txt`
48 |
49 | #### Is there a web-base GUI database management tool?
50 |
51 | Yes, phpMyAdmin is on it, access by *http://Internet IP/phpmyadmin*
52 |
53 | #### How to disable phpMyAdmin access?
54 |
55 | Edit the [phpMyAdmin configuration file](/stack-components.md#phpmyadmin), replace `Require all granted` with `Require ip 192.160.1.0`, then restart Apache service.
56 |
57 | #### Can I configure this Nextcloud if I don't understand the Linux command?
58 |
59 | Yes, you can use GUI tool WinSCP to start Nextcloud, no commands.
60 |
61 | #### Do I need to change the owner(group) for the files which I upload by SFTP?
62 |
63 | No, you don't need to change them because LAMP/LNMP was set to change automatically.
64 |
65 | #### How to modify the path of Nextcloud?
66 |
67 | Example application's path is: */data/wwwroot/nextcloud*, you can modify it by [vhost configuration file](/stack-components.md#apache)
68 |
69 | #### How to delete 9Panel?
70 |
71 | Please delete all files in 9Panel */data/apps/9panel* and keep an empty 9Panel folder
72 |
73 | #### How to change the permissions of filesystem?
74 |
75 | Change owner(group) or permissions like below:
76 |
77 | ```shell
78 | #for Nextcloud(LAMP)
79 | chown -R apache.apache /data/wwwroot
80 | #for Nextcloud(LEMP)
81 | chown -R nginx.nginx /data/wwwroot
82 |
83 |
84 | find /data/wwwroot -type d -exec chmod 750 {} \;
85 | find /data/wwwroot -type f -exec chmod 640 {} \;
86 | ```
87 |
88 | #### Can I deploy multiple sites on the Nextcloud(LAMP) or Nextcloud(LEMP) ?
89 |
90 | Websoft9 Nextcloud stack supports the deployment of multiple applications (websites), but different environments have different operating methods.
91 |
92 | * [Add new site on Nextcloud on LAMP](https://support.websoft9.com/docs/lamp/solution-deployment.html#deploy-second-application)
93 | * [Add new site on Nextcloud on LEMP](https://support.websoft9.com/docs/lnmp/solution-deployment.html#deploy-second-application)
94 |
95 |
96 | #### What's the difference between Deployment and Installation?
97 |
98 | - Deployment is a process of installing and configuring a series of software to the server in a different order, which is a complex system engineering.
99 | - Installation is the process of starting the initial wizard to complete configuration after the application is prepared.
100 | - Installation is simpler than deployment.
101 |
102 | #### What's Cloud Platform?
103 |
104 | Cloud platform refers to platform manufacturers that provide cloud computing services, such as: **Azure, AWS, Alibaba Cloud, HUAWEI CLOUD, Tencent Cloud**, etc.
105 |
106 | #### What is the difference between Instance, Cloud Server, Virtual Machine, ECS, EC2, CVM, and VM?
107 |
108 | No difference. All refer to cloud servers. They are the different terminology used by manufacturers.
--------------------------------------------------------------------------------
/docs/else-troubleshooting.md:
--------------------------------------------------------------------------------
1 | # Troubleshooting
2 |
3 | If you're having trouble with running Nextcloud, here is a quick guide to solve most common problems.
4 |
5 | > Most faults about the Instance is closely related to the Instance provider, Cloud Platform. Provided you're sure the fault is caused by Cloud Platform, refer to [Cloud Platform Documentation](https://support.websoft9.com/docs/faq/tech-instance.html).
6 |
7 | #### Nextcloud Redirects Error?
8 |
9 | Check your `.htaccess` file in your application root directory, make sure there is no any cycle redirects settings
10 |
11 | #### After the domain configuration, find page layout confusion or the picture cannot be displayed?
12 |
13 | This problem occurs if you install through IP, and then bind the domain name. To solve it, please change the IP address to the domain name in Nextcloud [Confuguration file](/stack-components.html#nextcloud).
14 |
15 | #### When install plug-in, is there an error "you don't have permission to access /admin/index.php"?
16 |
17 | Change DOSPageCount 2 into DOSPageCount 12 in /etc/httpd/conf.d/mod_evasive.conf
18 |
19 | #### Can't connect database after change the password of database?
20 |
21 | This problem occurs if you complete Nextcloud installation wizard, then change the password of database by phpMyAdmin. To solve it, please change the password of corresponding database in Nextcloud [Confuguration file](/stack-components.html#nextcloud).
22 |
23 | #### Can't start Apache httpd service?
24 |
25 | Please locate the reason by analyzing the log file: */var/log/httpd*
26 |
27 | #### Can't start the database service?
28 |
29 | Insufficient disk space and memory, incorrect configuration file may cause the failure to start the service.
30 |
31 | It is recommended to first check through the command.
32 |
33 | ```shell
34 | # view disk space
35 | df -lh
36 |
37 | # view memory rate
38 | free -lh
39 | ```
40 |
41 |
42 |
--------------------------------------------------------------------------------
/docs/package.json:
--------------------------------------------------------------------------------
1 | {
2 | "dependencies": {
3 | "@vuepress/shared-utils": "^1.0.2"
4 | }
5 | }
6 |
--------------------------------------------------------------------------------
/docs/solution-backup.md:
--------------------------------------------------------------------------------
1 | ---
2 | sidebarDepth: 3
3 | ---
4 |
5 | # Backup & Restore
6 |
7 | ## Why
8 |
9 | Users with experience in Cloud Server operation and maintenance understand the necessity of backup. It's impossible for IT systems to maintain 100% stability for a long time. The truth is that any system may fail, but only the probability of failure and the degree of harm differs.
10 |
11 | When a failure occurs, we may first turn to a professional for help, but unfortunately, some failure cannot be solved as quickly as we expected, and even it's insoluble.
12 |
13 | Obviously, a backup is necessary when comes to a failure. The existing backup file helps to repair the failed system, which means the huge loss due to irrecoverability can be avoided.
14 |
15 | > Remember to develop the habit of backup. It's a great and useful way to help repair and recovery.
16 |
17 | ## How
18 |
19 | As there are four objects on the server to back up, including **operating system, environment software, database and application**. and each object may have unpredictable failures that cannot be solved as expected, we suggest to take the following two necessary backup measures:
20 |
21 | ### Automation Backup for Instance
22 |
23 | Automation backup for Instance is completed based on **Snapshot** or **Cloud Server Backup Service** on your Cloud Platform. A snapshot is a full, read-only copy of a disk, which backs up the data of a disk at a certain point in time and can have a key recovery. You can take a snapshot of an OS or data disk to use as a backup, or to troubleshoot instance issues.
24 |
25 | View the following list about this kind of backup.
26 |
27 | ```
28 | - Backup scope: All data on a disk including operating system, software environment, database and applications
29 | - Backup effect: Very Good
30 | - Backup frequency: Automatic backup per hour/day/week as you need
31 | - Recovery method: One key recovery on Cloud platform
32 | - Skill requirement: Very easy
33 | - Automation or Manual: Fully automated backup after setting strategy
34 | ```
35 |
36 | Different Cloud Platform's snapshot settings slightly differ. Refer to [Cloud platform backup solution](https://support.websoft9.com/docs/faq/tech-instance.html).
37 |
38 | ### Manual backup for application
39 |
40 | Manual backups for applications is to achieve a minimized backup scheme by **Exporting source code and database of application**.
41 |
42 | View the following list about this kind of backup.
43 |
44 | ```
45 | - Backup scope: Source code and database of application
46 | - Backup effect: Good
47 | - Backup frequency: You can operate when you need
48 | - Recovery method: Import
49 | - Skill requirement: Easy
50 | - Automation: Manual
51 | ```
52 | The general steps for manual backup are as follows:
53 |
54 | 1. Compress and download the entire */data/wwwroot/nextcloud* directory by SFTP
55 | 2. Compress and download the entire */data/wwwroot/nextcloud/data* directory by SFTP
56 | 3. Export Nextcloud's database by [phpMyAdmin](/admin-mysql.md)
57 | 
58 | 4. Put source code file, data file and database file in the same folder and name it according to the date.
59 | 5. Backup is completed.
60 |
61 | ### Nextcloud online backup
62 |
63 | This section provides Nextcloud online backup solution.
64 |
65 | 1. Log in Nextcloud console as administrator, install **[OwnBackup](https://apps.nextcloud.com/apps/ownbackup)**
66 | 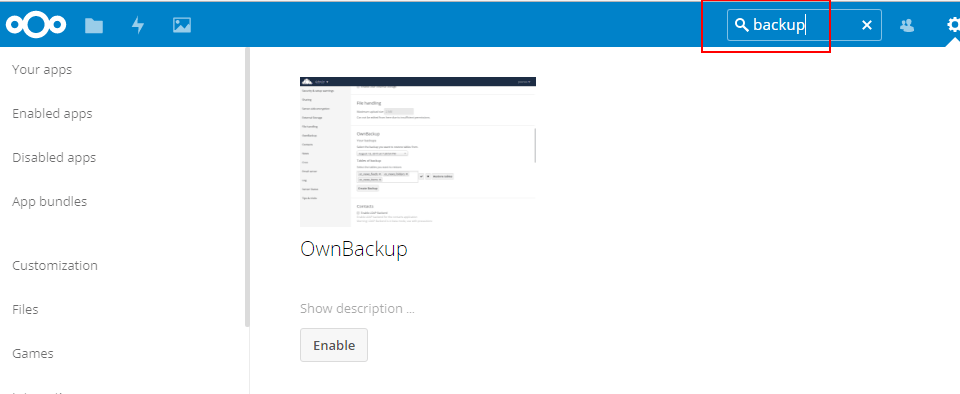
67 | 2. Go to【Admin】>【OwnBackup】, start backup, and you can restore it.
68 | 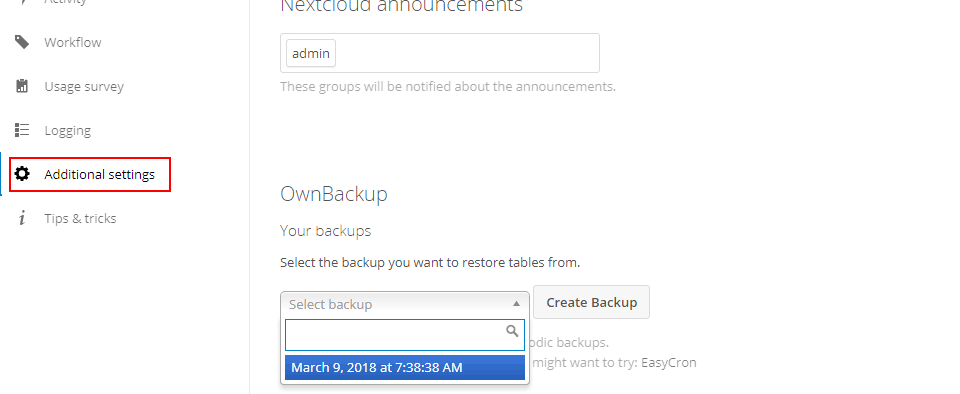
--------------------------------------------------------------------------------
/docs/solution-https.md:
--------------------------------------------------------------------------------
1 | # SSL/HTTPS
2 |
3 | Before setting, you have to complete binding domain and make sure you can access by HTTP.
4 |
5 | Nextcloud deployment package has installed the SSL module of Nginx and open Certificate Authority **[Let's Encrypt](https://letsencrypt.org/)** for you to configure the HTTPS quickly.
6 |
7 | > Except for the vhost configuration file, HTTPS settings do not need to modify any other files in Nginx.
8 |
9 | ## Quick configuration
10 |
11 | If you want to use a free certificate, just run the one command `certbot` on your instance to start the HTTPS deployment.
12 | ```
13 | sudo certbot
14 | ```
15 |
16 | If you have applied for a commercial certificate, complete the HTTPS configuration in just three steps:
17 | ### For Nextcloud (LAMP)
18 |
19 | LAMP means that **Apache** for Web Server
20 |
21 | 1. Upload your certificate to the directory of your instance: */data/cert*
22 | 2. Edit the vhost configuration file: */etc/httpd/conf.d/vhost.conf*
23 | 3. Insert the **HTTPS template** segment `--` into `vhost.conf`
24 | ``` text
25 | #-----HTTPS template start------------
26 |
27 | ServerName nextcloud.yourdomain.com
28 | DocumentRoot "/data/wwwroot/nextcloud"
29 | #ErrorLog "logs/nextcloud.yourdomain.com-error_log"
30 | #CustomLog "logs/nextcloud.yourdomain.com-access_log" common
31 |
32 | Options Indexes FollowSymlinks
33 | AllowOverride All
34 | Require all granted
35 |
36 | SSLEngine on
37 | SSLCertificateFile /data/cert/nextcloud.yourdomain.com.crt
38 | SSLCertificateKeyFile /data/cert/nextcloud.yourdomain.com.key
39 |
40 | #-----HTTPS template end------------
41 | ```
42 | 4. Modify ServerName, SSLCertificateFile, SSLCertificateKeyFile
43 | 5. Save it and [Restart Apache service](/admin-services.md#apache)
44 |
45 | ### For Nextcloud (LEMP)
46 |
47 | LEMP means that **Nginx** for Web Server
48 |
49 | 1. Upload your certificate to the directory of your instance: */data/cert*
50 | 2. Edit the vhost configuration file: */etc/nginx/conf.d/default.conf*
51 | 3. Insert the **HTTPS template** into Nextcloud's *server{ }* already existing
52 | ``` text
53 | #-----HTTPS template start------------
54 | listen 443 ssl;
55 | ssl_certificate /data/cert/xxx.crt;
56 | ssl_certificate_key /data/cert/xxx.key;
57 | ssl_session_timeout 5m;
58 | ssl_protocols TLSv1 TLSv1.1 TLSv1.2;
59 | ssl_ciphers ECDHE-RSA-AES128-GCM-SHA256:HIGH:!aNULL:!MD5:!RC4:!DHE;
60 | ssl_prefer_server_ciphers on;
61 | #-----HTTPS template end------------
62 | ```
63 | 4. Modify ssl_certificate, ssl_certificate_key
64 | 5. Save it and [Restart Nginx service](/admin-services.md#nginx)
65 |
66 | ## Special Guide
67 |
68 | If failed to set HTTPS by taking the above steps, please refer to the [HTTPS Special Guide](https://support.websoft9.com/docs/faq/tech-https.html#nginx) provided by Websoft9 for details on configuring HTTPS pre-conditions, HTTPS configuration segment templates, precautions, detailed steps, and troubleshooting.
--------------------------------------------------------------------------------
/docs/solution-more.md:
--------------------------------------------------------------------------------
1 | # More
2 |
3 | Each of the following solutions has been proved to be effective and we hope it helpful to you.
4 |
5 | ## Domain binding
6 |
7 | The precondition for **Domain binding** is the **Domain resolution** for Nextcloud Instance has been completed.
8 |
9 | Considering the server security and subsequent maintenance, the **Domain Binding** step is necessary.
10 |
11 | Nextcloud domain name binding steps:
12 |
13 | 1. Connect your Cloud Server by SFTP tool.
14 | 2. Modify [vhost configuration file](/stack-components.md#apache), change the domain name item for you
15 | ```text
16 | #### Nextcloud (LAMP) bind domain ####
17 |
18 |
19 | ServerName nextcloud.mydomain.com # modify it for you
20 | DocumentRoot "/data/wwwroot/Nextcloud"
21 | ...
22 |
23 | #### Nextcloud (LEMP) bind domain ####
24 |
25 | server {
26 | listen 80;
27 | server_name nextcloud.example.com; # modify it for you
28 | ...
29 |
30 | ```
31 | 3. Save it and restart [Web Service](/admin-services.md#apache)
32 |
33 |
34 | ## Nextcloud change domain
35 |
36 | You can change the domain of Nextcloud by the following steps:
37 |
38 | 1. Complete the new **Domain resolution and Domain binding**.
39 | 2. Modify [Nextcloud configuration file](/stack-components.html#nextcloud)
40 | ```
41 | 'overwrite.cli.url' => 'nextcloud.yourdomain.com', # Set it to your new domain
42 | ```
43 | 3. [Restart PHP-FPM service](/admin-services.html#php-fpm).
44 |
45 | ## Nextcloud language
46 |
47 | Log in nextcloud, go to【Personal】>【Personal Info】 and set your language.
48 |
49 | 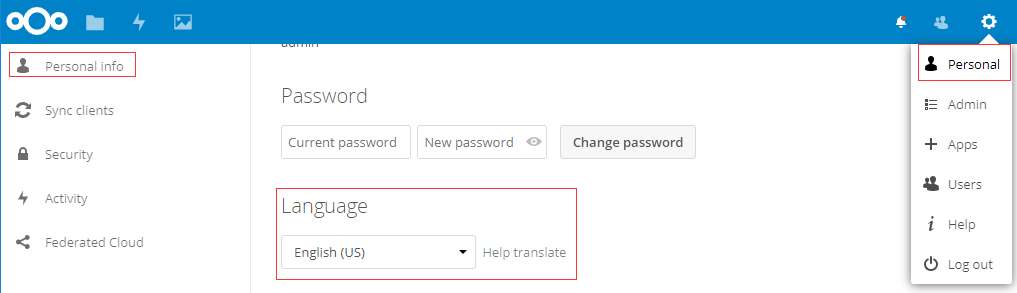
50 |
51 | ## Nextcloud install apps
52 |
53 | Nextcloud integrated [Marketplace](https://marketplace.nextcloud.com/) that have lots of extensions(apps). Steps for installing apps as as follows:
54 |
55 | 1. Log in Nextcloud, go to【Apps】>【App bundles】, search the apps you want.
56 |
57 | 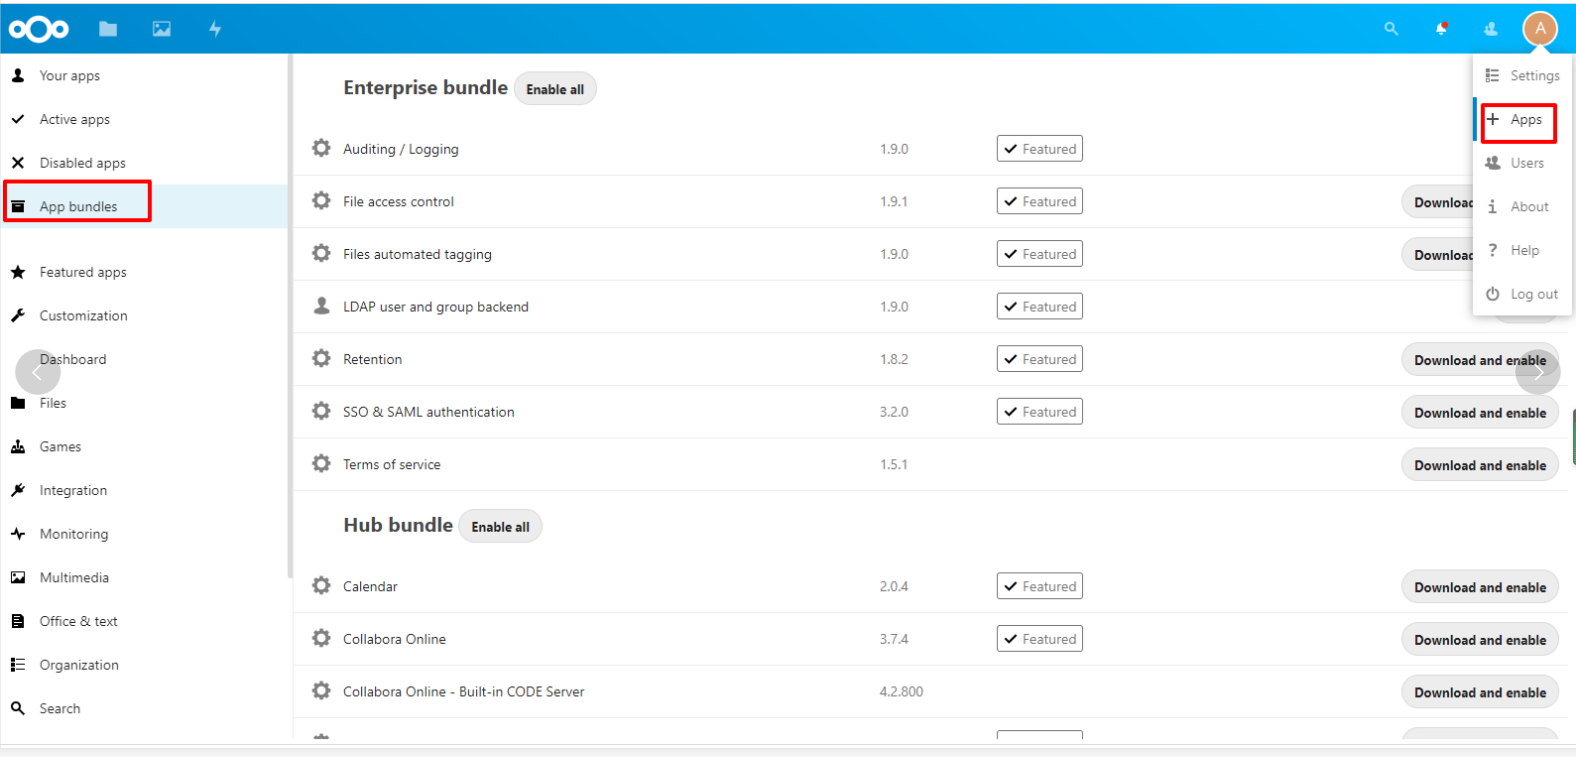
58 | 2. Install it online.
59 |
60 | ## Nextcloud LDAP
61 |
62 | Refer to *[User Authentication with LDAP](https://docs.nextcloud.com/server/latest/admin_manual/configuration_user/user_auth_ldap.html)*
63 |
64 | ## Nextcloud CLI-OCC
65 |
66 | Nextcloud's occ command (Nextcloud console) is Nextcloud's command-line interface. You can perform many common server operations with occ, such as installing and upgrading Nextcloud, managing users, encryption, passwords, LDAP setting, and more.
67 |
68 | ## Nextcloud external storage
69 |
70 | The External Storage Support application enables you to mount external storage services and devices as secondary Nextcloud storage devices. You may also allow users to mount their own external storage services.
71 |
72 | 1. Log in Nextcloud console, enable **External storage support** application.
73 | 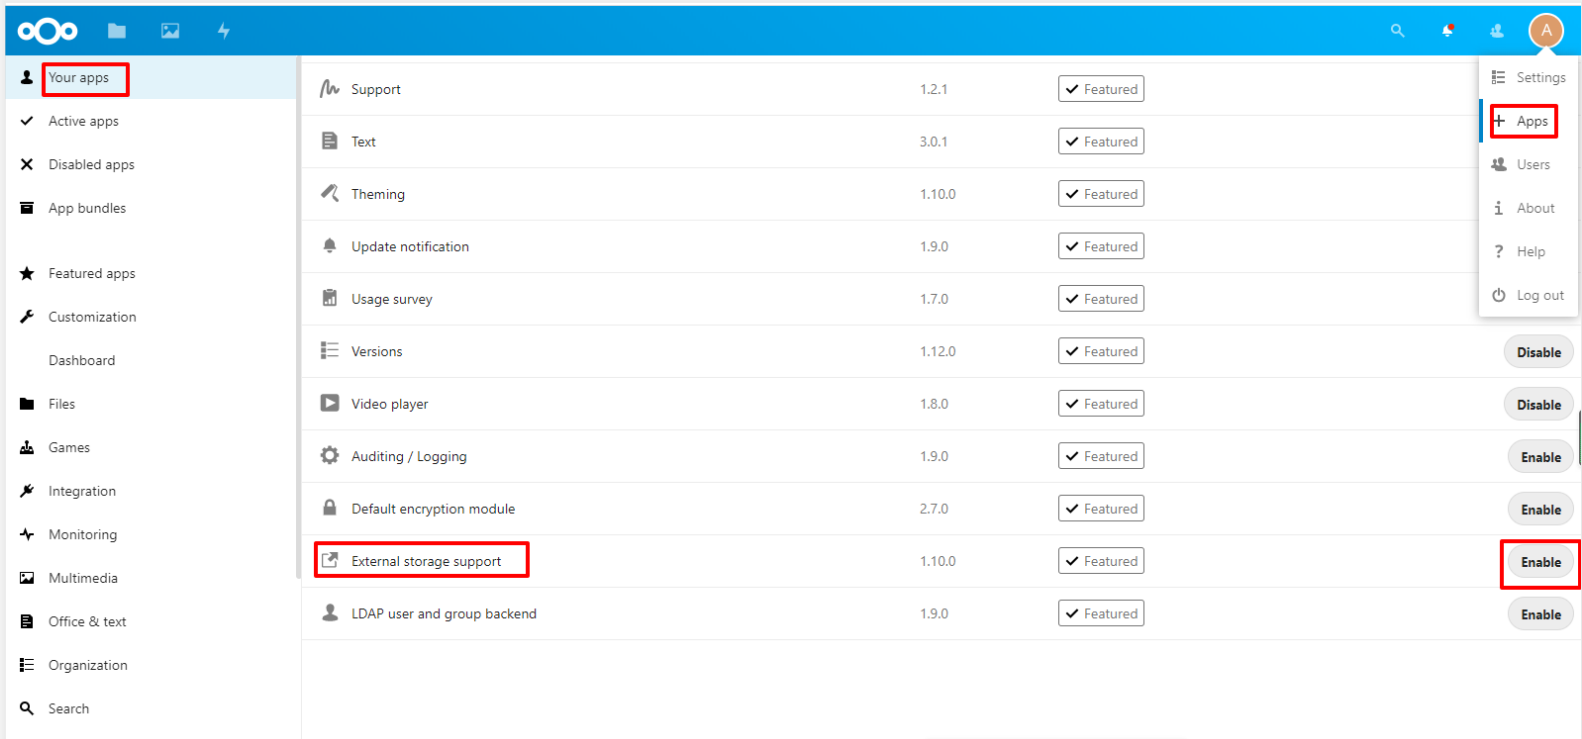
74 |
75 | 2. Open【Admin】>【External Storage】, select an external storage service.
76 | 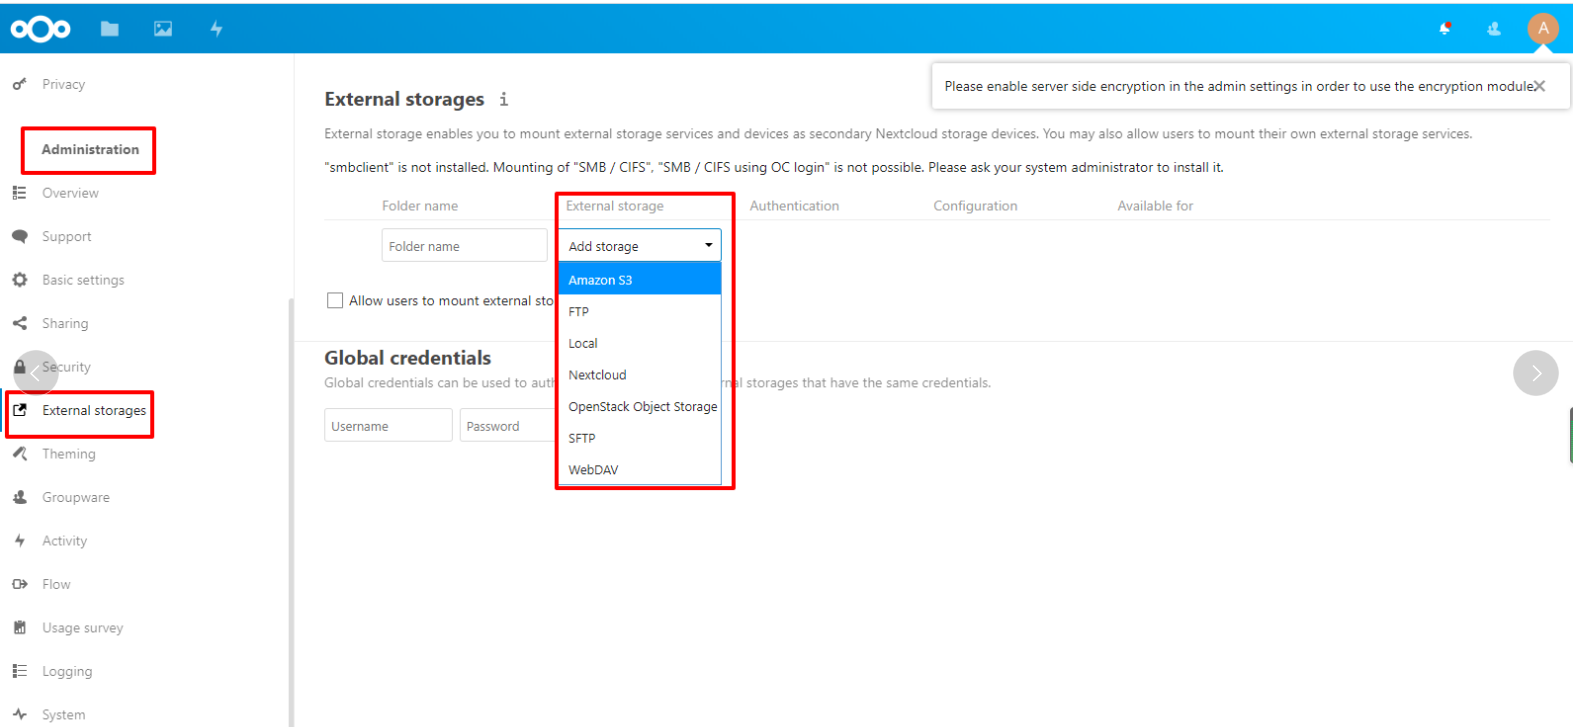
77 |
78 | 3. Set it.
79 | 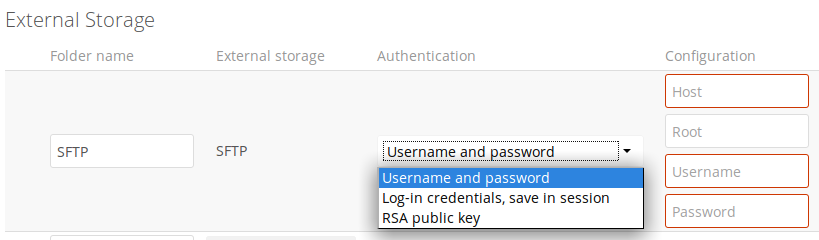
80 |
81 | For more details, please refer to [External Storage](https://docs.nextcloud.com/server/latest/admin_manual/configuration_files/external_storage_configuration_gui.html).
82 |
83 | ## Nextcloud transfer
84 |
85 | Nextcloud source code and data is stored in system disk by default, you can transfer them to data disk or Object storage:
86 |
87 | ### to data disk
88 |
89 | 1. Purchase a data disk from Cloud Platform, then **attach** it to Nextcloud Server.
90 |
91 | 2. Use SFTP tool to connect Server and stop service.
92 | ```
93 | systemctl stop httpd
94 | ```
95 |
96 | 3. Create a new folder */data/wwwroot/nextcloud2*
97 |
98 | 4. Initialize data disk, and **mount** it to *nextcloud2* folder.
99 |
100 | 5. Copy all files in */data/wwwroot/nextcloud* to */data/wwwroot/nextcloud2* .
101 | 6. Modify the Nextcloud directory in [vhost configuration file](/stack-components.html#apache).
102 |
103 | 7. Start the service.
104 | ```
105 | systemctl start httpd
106 | ```
107 |
108 | ### to Object storage
109 |
110 | 1. Purchase Object storage from Cloud Platform, then create a new **bucket**.
111 |
112 | 2. Use SFTP tool to connect Server and stop service.
113 | ```
114 | systemctl stop httpd
115 | ```
116 |
117 | 3. Create a new folder */data/wwwroot/nextcloud2*.
118 | 4. Then **mount** it to *nextcloud2* folder
119 | 5. Copy all files in */data/wwwroot/nextcloud* to */data/wwwroot/nextcloud2*
120 | 6. Modify the Nextcloud directory in [vhost configuration file](/zh/stack-components.html#apache)
121 | 7. Start the service
122 | ```
123 | systemctl start httpd
124 | ```
125 | 8. Set the object storage to boot automatically. (Different cloud platform need different operations)
126 |
127 | > The **mount** command is very difficult for users, and there is a risk of copy failure if the data exceeds 10G.
128 |
129 |
130 | ## Nextcloud preview and edit
131 |
132 | Nextcloud can't preview and edit Office document itself, you need to integrate Document Server service for Nextcloud to implement this function:
133 |
134 | 1. Enable the **TCP:9002** port on **[Inbound of Security Group Rule](https://support.websoft9.com/docs/faq/tech-instance.html)**
135 | 2. Log in to Nextcloud console, go to 【Apps】page
136 | 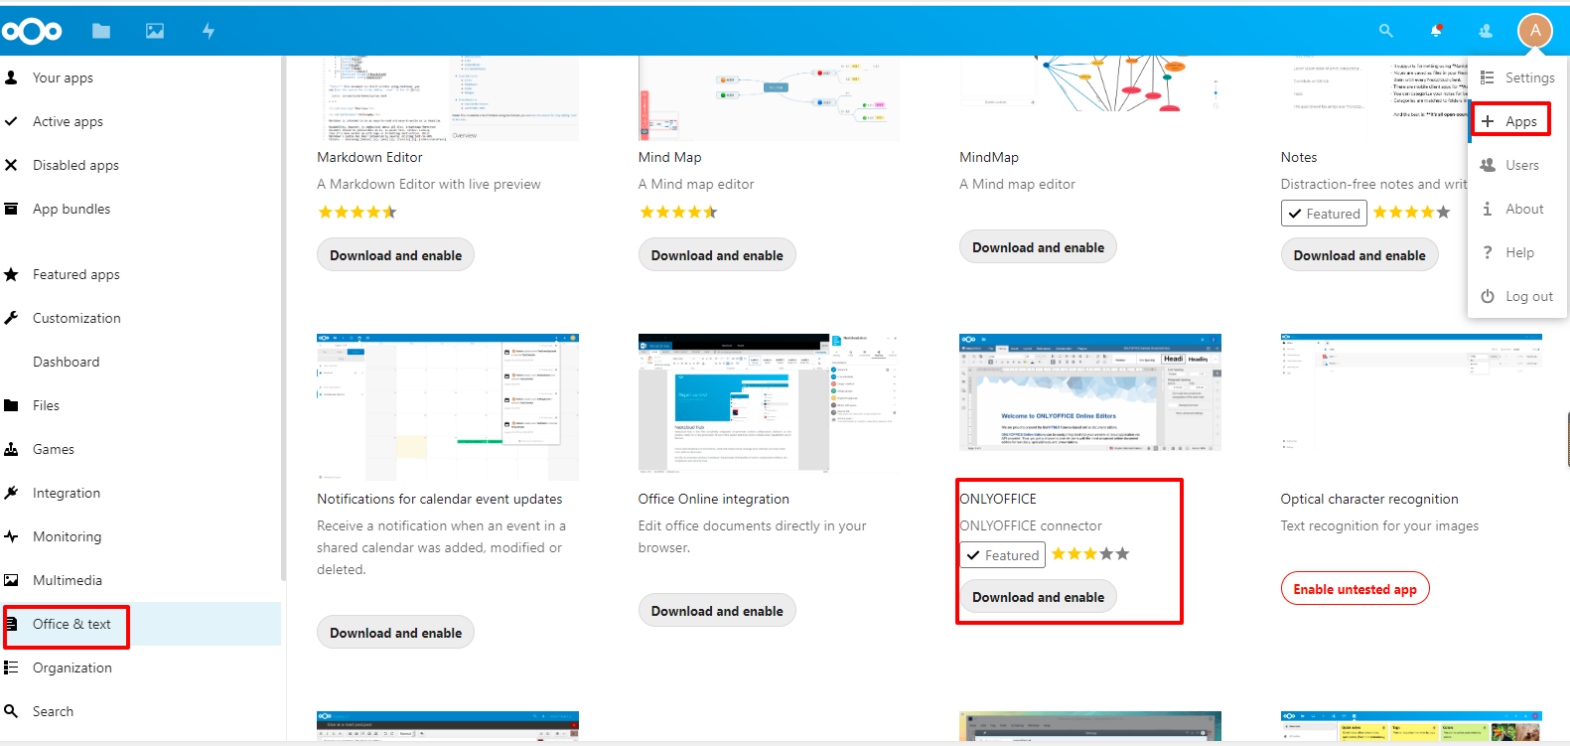
137 | 3. Find the app【ONLYOFFICE】 and install it
138 | 4. Set the 【ONLYOFFICE】
139 | 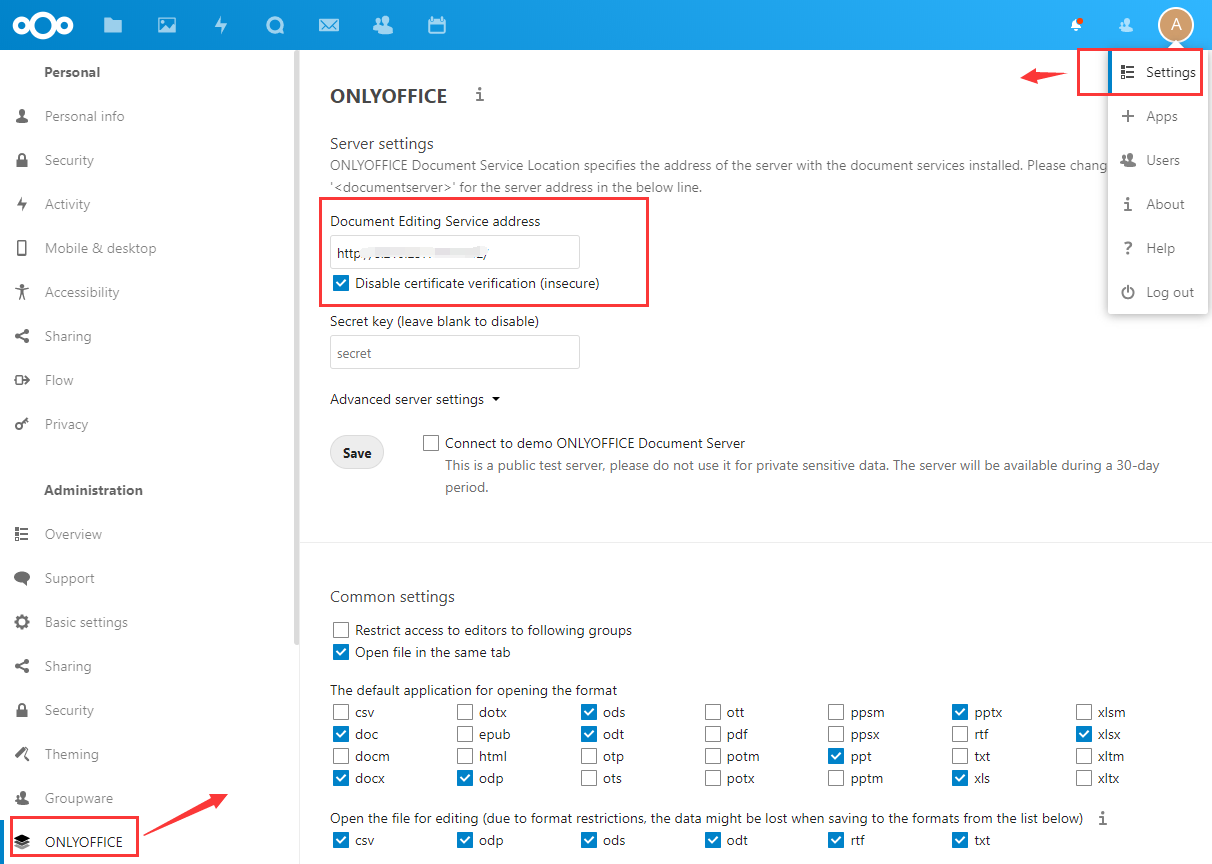
140 | > The smear in the figure should be modified to **Internet IP**
141 | 5. Refresh the Nextcloud, test the preview and edit function of documentation.
142 |
143 | ## Mobile apps
144 |
145 | Steps for using Nextcloud mobile apps are as follows:
146 | 1. [Download](https://nextcloud.com/install) mobile apps.
147 | 2. [Connect](https://docs.nextcloud.com/android/) to your Nextcloud server.
148 |
--------------------------------------------------------------------------------
/docs/solution-smtp.md:
--------------------------------------------------------------------------------
1 | # SMTP
2 |
3 | With lots of users' practice and feedback, the most recommended way is using the **third-party SMTP service** to send the email.
4 |
5 | > Do not try to install **Sendmail** or other Mail server software on your Cloud Server for sending mail, because it has great difficulty in maintenance.
6 |
7 | Taking **SendGrid's SMTP Service** as an example, refer to the following steps to configure sending mail for Nextcloud:
8 |
9 | 1. Log in SendGrid console, prepare your SMTP settings like the follow sample.
10 | ```
11 | SMTP host: smtp.sendgrid.net
12 | SMTP port: 25 or 587 for unencrypted/TLS email, 465 for SSL-encrypted email
13 | SMTP Authentication: must be checked
14 | SMTP Encryption: must SSL
15 | SMTP username: websoft9smpt
16 | SMTP password: #fdfwwBJ8f
17 | ```
18 | 2. Log in Nextcloud console as administrator, go to 【Admin】>【Additianal settings】>【Email server】, select SMTP for send mode
19 | 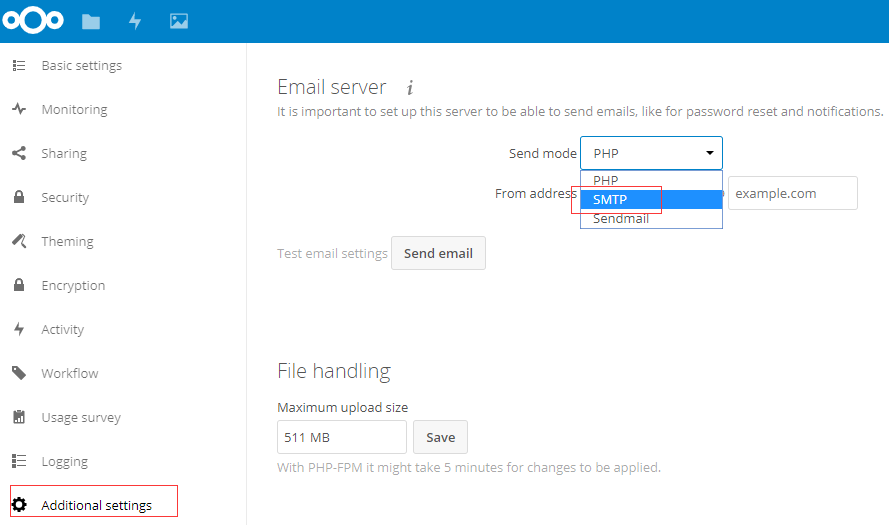
20 |
21 | 3. Fill in the suitable smtp configuration
22 | 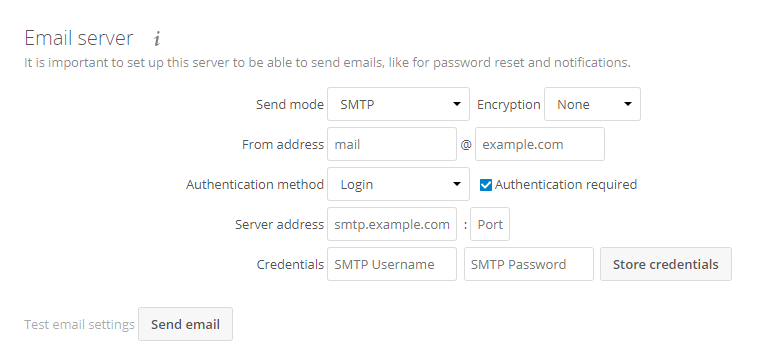
23 |
24 | 4. Click "Send email" to test your SMTP settings
25 |
26 |
27 | More SMTP Service (Gmail, Hotmail, QQ mail, Yahoo mail, SendGrid and so on) settings or Issues with SMTP, please refer to Websoft9's *[SMTP Guide](https://support.websoft9.com/docs/faq/tech-smtp.html)*.
--------------------------------------------------------------------------------
/docs/solution-upgrade.md:
--------------------------------------------------------------------------------
1 | # Update & Upgrade
2 |
3 | Updates and upgrades are one of the maintenance tasks for system. Like buildings without maintenance for a long time, programs without upgrading will age faster, lose functionality until they are unavailable.
4 |
5 | Get to know the differences between the terms **Update** and **Upgrade** ([Extended reading](https://support.websoft9.com/docs/faq/tech-upgrade.html#update-vs-upgrade)).
6 | - Patching operating system is **Update**, while Ubuntu16.04 to Ubuntu18.04 is **Upgrade**.
7 | - MySQL5.6.25 to MySQL5.6.30 is **Update**, yet MySQL5.6 to MySQL5.7 is **Upgrade**.
8 |
9 | Maintenance for Nextcloud includes the following two tasks:
10 |
11 | - System update (Operating System and Runtime)
12 | - Nextcloud upgrade
13 |
14 | ## System Update
15 |
16 | Run an update command to complete the system update:
17 |
18 | ``` shell
19 | #For Centos&Redhat
20 | yum update -y
21 |
22 | #For Ubuntu&Debian
23 | apt update && apt upgrade -y
24 | ```
25 | > This deployment package is pre-configured with a scheduled task for automatic updates. If you want to remove the automatic update, please delete the corresponding Cron
26 |
27 | ## Nextcloud Upgrade
28 |
29 | Nextcloud provides a user-friendly upgrade (update) portal. You can complete the update of the main version and APP plug-in according to the update prompt of the system.
30 | > Before upgrade, take a necessary snapshot of the instance in case of the upgrade failed.
31 |
32 | ### Core Upgrade
33 |
34 | Upgrades between core and APP plug-in are different. For core upgrade, take the following steps:
35 |
36 | 1. Log in Nextcloud console, go to【Admin】>【Basic Settings】, click the【Open Updater】button when there is a new version.
37 | 
38 |
39 | 2. Go to Updater.
40 | 
41 |
42 | 3. Check the upgrade requirement, then click 【Start update】
43 |
44 | 4. The system enters the automatic upgrade process. As the download and upgrade process is relatively long, please be patient.
45 |
46 | ### Apps Upgrade
47 |
48 | Steps for APPs upgrade are as follows:
49 |
50 | 1. Log in Nextcloud console, go to 【Apps】, find the apps that need upgrade.
51 | 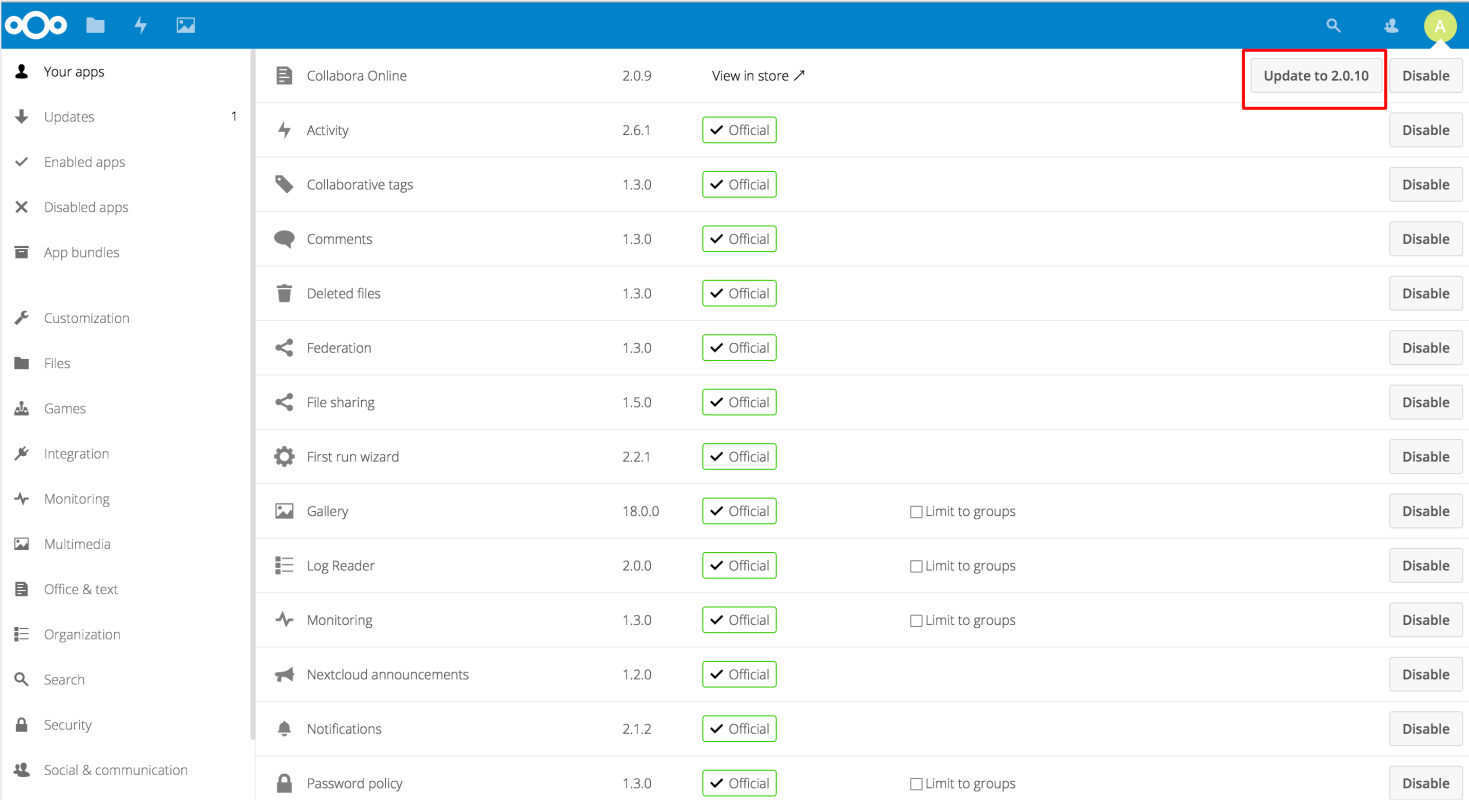
52 |
53 | 2. Click 【Update】 button, wait for some minutes.
54 |
55 | 3. Complete all updates until all apps are up to date.
56 |
57 | > During the upgrade process, If some problem occur, for example, unable to download upgrade package, or no read and write access, please check the network connection or ensure Nextcloud directory has read and write access.
--------------------------------------------------------------------------------
/docs/stack-accounts.md:
--------------------------------------------------------------------------------
1 | # Username and Password
2 |
3 | Use the **SSH** to connect your Server and run the command `sudo cat /credentials/password.txt` to get the username and password of this deployment solution.
4 |
5 | 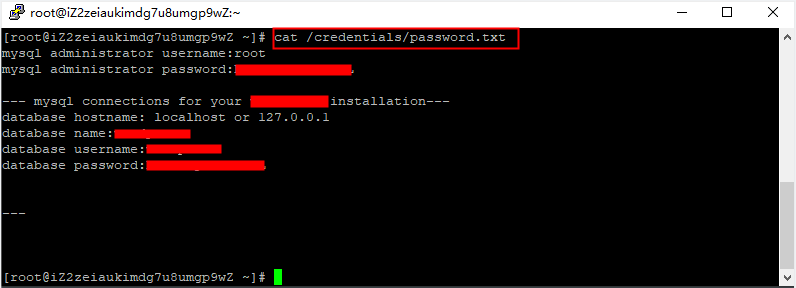
6 |
7 | Here are the required username and passwords for this application installation and configuration.
8 |
9 | ## Nextcloud
10 |
11 | Administrator account is set by yourself at the time of Nextcloud installation wizard
12 |
13 | ## MySQL
14 |
15 | * Administrator username: *`root`*
16 | * Administrator password: stored in the file of your server instance: */credentials/password.txt*.
17 |
18 | > If you want to log in MySQL, refer to [MySQL Web interface Management](/admin-mysql.md)
19 |
20 | ## Linux
21 |
22 | * Host Name: Internet IP or Public IP of your Instance
23 | * Connect by: Online SSH on Cloud Console or SFTP/SSH client tools
24 | * Password: It was set by yourself when created instance.
25 | * Username: Different Cloud Platform has differences
26 | | Cloud Platform | OS | Administrator Username | Other |
27 | | --- | --- | --- | --- |
28 | | Azure | ALL | It was set by yourself when created instance. | [How to enable root access?](https://support.websoft9.com/docs/azure/server-login.html#sample2-enable-the-root-username) |
29 | | AWS | CentOS | centos | [How to enable root access?](https://support.websoft9.com/docs/aws/server-login.html#sample2-enable-the-root-username) |
30 | | AWS | Amazon Linux | ec2-user | [How to enable root access?](https://support.websoft9.com/docs/aws/server-login.html#sample2-enable-the-root-username) |
31 | | AWS | Ubuntu | ubuntu | [How to enable root access?](https://support.websoft9.com/docs/aws/server-login.html#sample2-enable-the-root-username) |
32 | | Alibaba Cloud, HUAWEI CLOUD, Tencent Cloud | ALL | root ||
33 |
34 | If don't remember the password of Linux, you should reset password on Cloud Console
--------------------------------------------------------------------------------
/docs/stack-components.md:
--------------------------------------------------------------------------------
1 | # Parameters
2 |
3 | The Nextcloud deployment package contains a sequence software (referred to as "components") required for Nextcloud to run. Below list the important information, such as the component name, installation directory path, configuration file path, port, version, etc.
4 |
5 | ## Path
6 |
7 | ### Nextcloud
8 |
9 | Nextcloud installation directory: */data/wwwroot/nextcloud*
10 | Nextcloud configuration file: */data/wwwroot/nextcloud/config/config.php*
11 |
12 | > Nextcloud configuration file contains database connection configuration. If you change username and password of MySQL, remember to make corresponding modification in this file.
13 |
14 | ### PHP
15 |
16 | PHP configuration file: */etc/php.ini*
17 | PHP Modules configurations directory: */etc/php.d*
18 |
19 | ### Apache
20 |
21 | Nextcloud on LAMP, the Web Server is Apache
22 |
23 | Apache vhost configuration file: */etc/httpd/conf.d/vhost.conf*
24 | Apache main configuration file: */etc/httpd/conf/httpd.conf*
25 | Apache logs file: */var/log/httpd*
26 | Apache module configuration file: */etc/httpd/conf.modules.d/00-base.conf*
27 |
28 | ### Nginx
29 |
30 | Nextcloud on LEMP, the Web Server is Nginx
31 |
32 | Nginx vhost configuration file: */etc/nginx/sites-available/default.conf*
33 | Nginx main configuration file: */etc/nginx/nginx.conf*
34 | Nginx logs file: */var/log/nginx/*
35 |
36 | ### MYSQL
37 |
38 | MySQL installation directory: */usr/local/mysql*
39 | MySQL data directory: */data/mysql*
40 | MySQL configuration file: */etc/my.cnf*
41 | MySQL Web Management URL: *http://Internet IP/phpmyadmin*, [get credential](/stack-accounts.md)
42 |
43 | ### phpMyAdmin
44 |
45 | phpMyAdmin installation directory: */data/apps/phpmyadmin*
46 | phpMyAdmin configuration file: */data/apps/phpmyadmin/config.inc.php*
47 | phpMyAdmin vhost configuration file: */etc/httpd/conf.d/phpMyAdmin.conf* or */etc/nginx/php.conf*
48 |
49 | ### Redis
50 |
51 | Redis configuration file: */etc/redis.conf*
52 | Redis data directory: */var/lib/redis*
53 | Redis logs file: */var/log/redis/redis.log*
54 |
55 | ### Docker
56 |
57 | These tools installed on Docker for you:
58 |
59 | #### OnlyOffice Document Server
60 |
61 | OnlyOffice Document Server directory:*/data/apps/onlyofficedocumentserver*
62 | OnlyOffice Document Server docker compose file:*/data/apps/onlyofficedocumentserver/docker-compose.yml*
63 |
64 | #### phpMyAdmin
65 |
66 | phpMyAdmin directory:*/data/apps/phpmyadmin*
67 | phpMyAdmin docker compose file:*/data/apps/phpmyadmin/docker-compose.yml*
68 |
69 | ## Ports
70 |
71 | You can control (open or shut down) ports by **[Security Group Setting](https://support.websoft9.com/docs/faq/tech-instance.html)** of your Cloud Server to decide whether the port can be accessed from Internet.
72 |
73 | These ports should be opened for this application:
74 |
75 | | Name | Number | Use | Necessity |
76 | | --- | --- | --- | --- |
77 | | TCP | 80 | HTTP requests for Nextcloud | Required |
78 | | TCP | 443 | HTTP requests for Nextcloud | Optional |
79 | | TCP | 3306 | Remote connect to MySQL | Optional |
80 | | TCP | 9002 | OnlyOffice Document Server on Docker | Optional |
81 | | TCP | 9090 | phpMyAdmin on Docker | Optional |
82 |
83 | ## Version
84 |
85 | You can see the version on product pages of Marketplace. However, after being deployed to your server, the components will be updated automatically, resulting in a certain change in the version number. Therefore, run the command on the server to view the exact version number.
86 |
87 |
88 | ```shell
89 | # Check all components version
90 | sudo cat /data/logs/install_version.txt
91 |
92 | # Linux Version
93 | lsb_release -a
94 |
95 | # PHP Version
96 | php -v
97 |
98 | # List Installed PHP Modules
99 | php -m
100 |
101 | # Apache version on Centos
102 | httpd -v
103 |
104 | # Apache version on Ubuntu
105 | apache2 -v
106 |
107 | # List Installed Apache Modules
108 | apachectl -M
109 |
110 | # Nginx version
111 | nginx -v
112 |
113 | # List Installed Nginx Modules
114 | nginx -V
115 |
116 | # MySQL version:
117 | mysql -V
118 |
119 | # Redis version
120 | redis-server -v
121 |
122 | # Dokcer:
123 | docker --version
124 | ```
--------------------------------------------------------------------------------
/docs/stack-deployment.md:
--------------------------------------------------------------------------------
1 | # Deployment
2 |
3 | **Deployment is to copy the pre-installed Nextcloud package online to your Cloud Server**.
4 | For example, after the user subscribe Nextcloud on the Cloud Platform, the Platform will automatically copy the Nextcloud to the corresponding Cloud Server.
5 |
6 | - If Nextcloud has been deployed, go to [Initial Installation](/stack-installation.md) to complete the operation.
7 | - If not, first you need to deploy Nextcloud to your cloud server.
8 |
9 | We offer two deployment schemes for Nextcloud and deployment results are the same.
10 |
11 | ## Deploy by Image
12 |
13 | **Deploy by Image** means starting instance based on Nextcloud images. **Nextcloud Image** provide OS and software environment needed for Nextcloud.
14 |
15 | For users with experience with cloud servers, deploy by image equates to "one-click deployment".
16 |
17 | Websoft9 published [Nextcloud image](https://apps.websoft9.com/nextcloud) on Cloud Platform, and there are three methods to deploy:
18 |
19 | * When **Create New Instance** , select the Nextcloud image as the system boot template.
20 | * When you **Subscribe Nextcloud** on Marketplace, the system will promote you to create a new instance for this image in the meantime.
21 | * When **Re-install OS** for you instance, you can replace the existing image with a Nextcloud image.
22 |
23 | ## Deploy by Script
24 |
25 | **Deploy by Script** means running a script on your cloud instance to pull pre-installed package online to your instance and configure it at the same time.
26 |
27 | Websoft9 provide the [Nextcloud ansible automation script](https://github.com/Websoft9/ansible-nextcloud) on Github. If you are familiar with Ansible, you can deploy the Nextcloud to the instance automatically.
28 |
29 | ## Comparison
30 |
31 | No matter you **deploy by image** or **deploy by script**, the results are the same. So, what's the difference between the two deployment methods?
32 |
33 | Suggest you read the document [Deploy by Image vs Deploy by Script](https://support.websoft9.com/docs/faq/bz-product.html#deployment-comparison)
--------------------------------------------------------------------------------
/docs/stack-installation.md:
--------------------------------------------------------------------------------
1 | # Initial Installation
2 |
3 | If you have completed the Nextcloud deployment on Cloud Platform, follow the steps below to start a quick use.
4 |
5 | ## Preparation
6 |
7 | 1. Get the **Internet IP** on your Cloud Platform.
8 | 2. Check **[Inbound of Security Group Rule](https://support.websoft9.com/docs/faq/tech-instance.html)** of Cloud Console to ensure the **TCP:80** and **TCP:9002** is allowed.
9 | 3. Make a domain resolution on your DNS Console if you want to use domain for Nextcloud.
10 |
11 | ## Nextcloud Installation Wizard
12 |
13 | 1. Use local Chrome or Firefox to access the URL *https://domain* or *https://Internet IP*.
14 |
15 | 2. Create administrator account, then set 【Storage & Database】, suggest you select 【MySQL】.
16 |
17 | 3. Configure the MySQL database connection. ([Don't know password?](/stack-accounts.html#mysql))
18 | 
19 |
20 | 4. Click 【Finish Setup】and complete the installation.
21 | 
22 |
23 | 5. Begin your actions on Nextcloud Console.
24 | 
25 |
26 | 6. Go to Marketplace to get more extensions
27 | 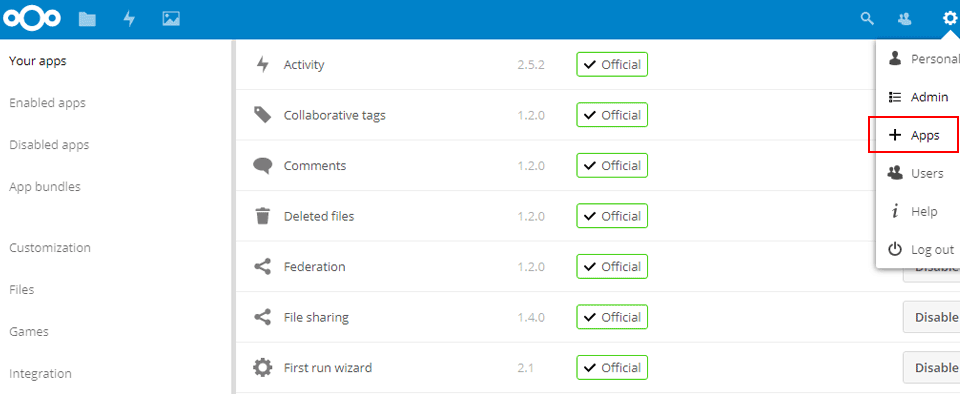
28 |
29 | 7. Access URL *https://Internet IP:9002* to check if **OnlyOffice Document Server** has been installed.
30 | 
31 |
32 | 8. Complete [Nextcloud preview and edit](/solution-more.md#nextcloud-preview-and-edit) settings. (Optional)
33 |
34 | > Refer to [Nextcloud admin_manual](https://docs.nextcloud.com/server/latest/admin_manual/) to get more details.
35 |
36 | ## Q&A
37 |
38 | #### Can't visit the start page of Nextcloud?
39 |
40 | Your TCP:80 of Security Group Rules is not allowed, so there's no response from Chrome or Firefox.
41 |
42 | #### Which database does this Nextcloud package use?
43 |
44 | MySQL
45 |
46 | #### Can I use Cloud vendor's RDS as database for Nextcloud?
47 |
48 | Yes.
49 |
50 | #### Can I use Object storage for Nextcloud?
51 |
52 | Yes, but it need additional configuration.
53 |
54 | #### Can I have online document editing and preview in Nextcloud?
55 |
56 | Some images are pre installed with OnlyOffice Document Server, which enables online document editing and preview through configuration.
57 |
--------------------------------------------------------------------------------
/docs/zh/README.md:
--------------------------------------------------------------------------------
1 | ---
2 | home: false
3 | ---
4 |
5 | # 关于
6 |
7 | 本文档由 [Websoft9](https://www.websoft9.com/) 公司提供,用于指导用户学习 Nextcloud 的安装部署与基本运维技术,包括:Nextcloud部署、初始化安装、环境配置、HTTPS、SMTP、备份升级和连接云服务器操作等基本操作。
8 |
9 | [Nextcloud](https://nextcloud.com) 是 ownCloud 创始人发起的分支项目,是一款用于自建私有网盘的云存储开源软件,采用PHP+MySQL开发,提供了PC、IOS和Android三个同步客户端支持多种设备访问,用户可以很方便地与服务器上存储的文件、日程安排、通讯录、书签等重要数据保持同步,还支持其他同步来源:Amazon S3、Dropbox、FTP、Google Drive、OpenStack Object Storage、SMB、WebDAV、SFTP。
10 |
11 | 
12 |
13 | ---
14 |
15 | ## 演示
16 |
17 | Nextcloud 官网提供了演示环境,您可以直接[访问演示地址](https://try.nextcloud.com/)
18 |
19 | > 免责说明:此处仅提供 Nextcloud 官方的演示地址,不保证与 Websoft9 镜像功能完全一致,若演示过程中若需要填写个人资料、获取Cookie、显示广告等,这些都是官方行为,由此产生的安全问题与我司无关。若您在演示中进行了付费,即表明您愿意接受官方提供的付费服务,由此产生的可能存在的商业纠纷与我们司无关。
20 |
21 | ## 改进
22 |
23 | 本文档会持续改进,广泛吸收用户的需求。
24 | 如果您有好的想法,请点击页面下方”在Github上编辑“ 给我们反馈,欢迎Fork我们在[Github上的项目](https://github.com/Websoft9/ansible-nextcloud)。
25 |
26 | ## 赞助
27 |
28 | Websoft9是一个为开源而生的平台,一直在致力于简化全球优质开源软件的安装部署,并提供简单实用的管理员指南。如果您能够给与我们一些赞助,我想一切将变得更加美好。
29 |
30 | [我要捐赠](https://www.websoft9.com/aboutus/donate)
31 |
32 | ## 合作
33 |
34 | Websoft9提供的镜像库已经发布主流云平台,并提供中英文文档,全球云用户均可方便使用。
--------------------------------------------------------------------------------
/docs/zh/admin-mysql.md:
--------------------------------------------------------------------------------
1 | # MySQL
2 |
3 | Nextcloud 预装包中内置 MySQL 及可视化数据库管理工具 `phpMyadmin` ,使用请参考如下步骤:
4 |
5 | 1. 登录云控制台,[开启服务器安全组80端口](https://support.websoft9.com/docs/faq/zh/tech-instance.html)
6 | 2. 本地浏览器 Chrome 或 Firefox 访问:*http://服务器公网IP/phpmyadmin*,进入phpMyAdmin
7 | 
8 | 3. 输入数据库用户名和密码([不知道密码?](/zh/stack-accounts.md))
9 | 4. 开始管理数据库
10 | 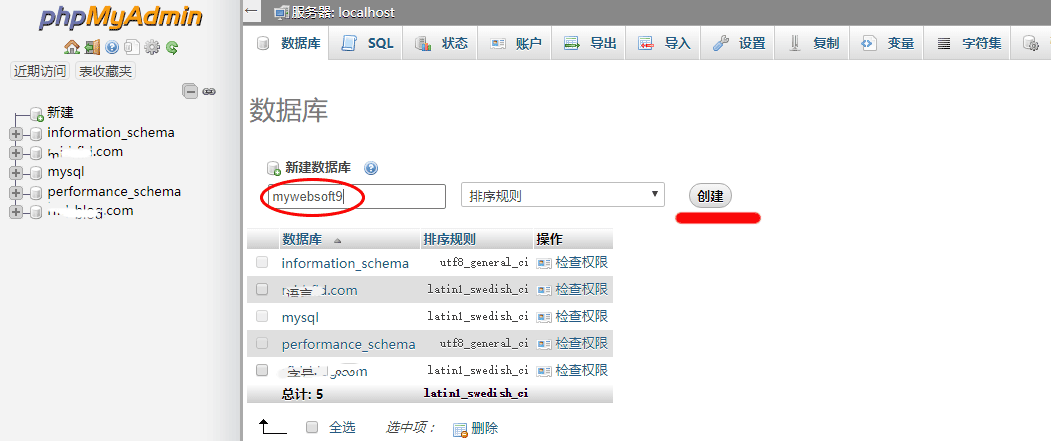
11 |
12 | > 阅读Websoft9提供的 [《MySQL教程》](https://support.websoft9.com/docs/mysql/zh/admin-phpmyadmin.html) ,掌握更多的MySQL实用技能:修改密码、导入/导出数据、创建用户、开启或关闭远程访问、日志配置等
--------------------------------------------------------------------------------
/docs/zh/admin-runtime.md:
--------------------------------------------------------------------------------
1 | # 环境配置
2 |
3 | ## 指南
4 |
5 | 支撑 Nextcloud 运行的环境组件包括:PHP, MySQL, Apache or Nginx等,请根据不同的部署包分别查看对应的手册,完成更多配置。
6 |
7 | | 部署包名称 | 说明| 参考项 |
8 | | --- | --- | --- |
9 | | Nextcloud(LAMP) | Apache+MySQL+PHP on Linux | [《LAMP管理员手册》](https://support.websoft9.com/docs/lamp/zh) |
10 | | Nextcloud(LNMP)| Nginx+MySQL+PHP on Linux |[《LNMP管理员手册》](https://support.websoft9.com/docs/lnmp/zh)|
11 |
12 | ## 环境是什么?
13 |
14 | 除了使用 Nextcloud 部署包的默认设置之外,你可能需要在服务器上完成更多任务:
15 |
16 | - 修改PHP配置文件
17 | - 增加更多网站
18 | - 配置HTTPS证书等
19 | - 修改网站路径
20 | - 绑定域名
21 | - ...
22 |
23 | 完成这些任务,你都需要参考[环境指南](/zh/admin-runtime.md#指南)
24 |
25 | 另外,你可能会思考,Nextcloud 是如何在这些环境下运行的呢? 请参考下图的层次结构图
26 |
27 | 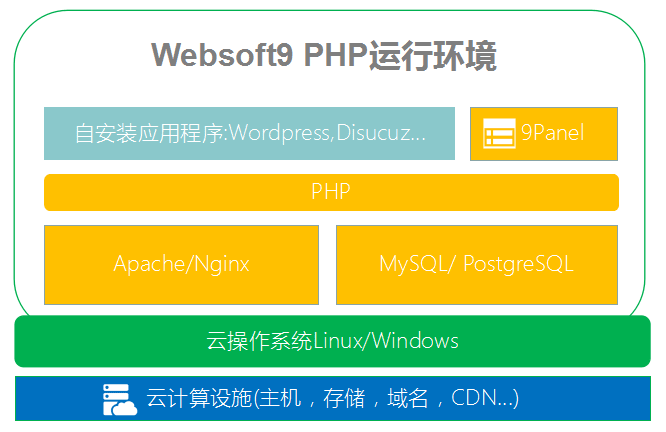
28 |
29 |
30 |
--------------------------------------------------------------------------------
/docs/zh/admin-services.md:
--------------------------------------------------------------------------------
1 | # 服务启停
2 |
3 | 使用由Websoft9提供的 Nextcloud 部署方案,可能需要用到的服务如下:
4 |
5 | ### Apache
6 |
7 | ```shell
8 | #For Centos&Redhat
9 | sudo systemctl start httpd
10 | sudo systemctl stop httpd
11 | sudo systemctl restart httpd
12 | sudo systemctl status httpd
13 |
14 | #For Ubuntu&Debian
15 | sudo systemctl start apache2
16 | sudo systemctl stop apache2
17 | sudo systemctl restart apache2
18 | sudo systemctl status apache2
19 | ```
20 |
21 | ### Nginx
22 |
23 | ```shell
24 | sudo systemctl start nginx
25 | sudo systemctl stop nginx
26 | sudo systemctl restart nginx
27 | sudo systemctl status nginx
28 | ```
29 |
30 | ### PHP-FPM
31 | ```shell
32 | systemctl start php-fpm
33 | systemctl stop php-fpm
34 | systemctl restart php-fpm
35 | systemctl status php-fpm
36 | ```
37 |
38 | ### MySQL
39 |
40 | ```shell
41 | sudo systemctl start mysql
42 | sudo systemctl stop mysql
43 | sudo systemctl restart mysql
44 | sudo systemctl status mysql
45 | ```
46 |
47 | ### Redis
48 | ```shell
49 | sudo systemctl start redis
50 | sudo systemctl stop redis
51 | sudo systemctl restart redis
52 | sudo systemctl status redis
53 | ```
54 |
55 | ### Docker
56 | ```shell
57 | sudo systemctl start docker
58 | sudo systemctl stop docker
59 | sudo systemctl restart docker
60 | sudo systemctl status docker
61 | ```
62 |
63 | ### phpMyAdmin on Docker
64 | ```shell
65 | sudo docker inspect phpmyadmin
66 | sudo docker start phpmyadmin
67 | sudo docker restart phpmyadmin
68 | sudo docker stop phpmyadmin
69 | sudo docker rm phpmyadmin
70 | ```
71 |
72 | ### ONLYOFFICE Document Server on Docker
73 | ```shell
74 | sudo docker inspect onlyofficedocumentserver
75 | sudo docker start onlyofficedocumentserver
76 | sudo docker restart onlyofficedocumentserver
77 | sudo docker stop onlyofficedocumentserver
78 | sudo docker rm onlyofficedocumentserver
79 | ```
80 |
--------------------------------------------------------------------------------
/docs/zh/else-faq.md:
--------------------------------------------------------------------------------
1 | # FAQ
2 |
3 | #### Nextcloud 支持多语言吗?
4 |
5 | 支持多语言(包含中文)
6 |
7 | #### Nextcloud 与 ownCloud 有什么关系?
8 |
9 | Nextcloud 是由 ownCloud 创始人带来开源社区其他人创建的一个分支项目,类似 MariaDB 与 MySQL 的关系
10 |
11 | #### Nextcloud 是否提供客户端?
12 |
13 | 有。包括:Nextcloud Desktop Client, Nextcloud Android App, Nextcloud iOS App
14 |
15 | #### Nextcloud 自身能够预览和编辑 Office 文档吗?
16 |
17 | 不可以,需要连接第三方的文档编辑和服务才可以,[设置参考](/zh/solution-more.html#nextcloud-文件预览与编辑)
18 |
19 | #### Nextcloud 支持集成外部存储吗?
20 |
21 | 支持多种主流外部存储服务
22 |
23 | #### Nextcloud(LAMP),Nextcloud(LNMP)等商品括号中的 LAMP,LNMP 是什么意思?
24 |
25 | LAMP和LNMP代表支持 Nextcloud 运行所对应的基础环境,具体参考[环境说明](/zh/admin-runtime.html)
26 |
27 | #### 是否可以使用云平台的 RDS 作为 Nextcloud 的数据库?
28 |
29 | 可以,修改 [Nextcloud 配置文件](/zh/stack-components.html#nextcloud) 即可
30 |
31 | #### Nextcloud能在Windows服务器上运行吗?
32 |
33 | 可以,但是我们推荐在运行 Nextcloud 效率更高的 Linux 服务器上运行
34 |
35 | #### Nextcloud数据库连接配置信息在哪里?
36 |
37 | 数据库配置信息 [Nextcloud 配置文件](/zh/stack-components.html#nextcloud)中
38 |
39 | #### 如果没有域名是否可以部署 Nextcloud?
40 |
41 | 可以,访问`http://服务器公网IP` 即可
42 |
43 | #### 数据库 root 用户对应的密码是多少?
44 |
45 | 密码存放在服务器相关文件中:`/credentials/password.txt`
46 |
47 | #### 是否有可视化的数据库管理工具?
48 |
49 | 有,内置phpMyAdmin,访问地址:http://服务器公网IP/phpmyadmin
50 |
51 | #### 如何禁止phpMyAdmin访问?
52 |
53 | 连接服务器,编辑 phpMyAdmin 配置文件,将其中的 Require all granted 更改为 Require ip 192.160.1.0,然后重启 Apache 服务
54 |
55 | #### 是否可以修改 Nextcloud 的源码路径?
56 |
57 | 可以,通过修改 [虚拟主机配置文件](/zh/stack-components.md#nextcloud)中相关参数
58 |
59 | #### 如何修改上传的文件权限?
60 |
61 | ```shell
62 | #Nextcloud(LAMP)
63 | chown -R apache.apache /data/wwwroot
64 |
65 | #Nextcloud(LNMP)
66 | chown -R nginx.nginx /data/wwwroot
67 |
68 | find /data/wwwroot -type d -exec chmod 750 {} \;
69 | find /data/wwwroot -type f -exec chmod 640 {} \;
70 | ```
71 | #### 部署和安装有什么区别?
72 |
73 | 部署是将一序列软件按照不同顺序,先后安装并配置到服务器的过程,是一个复杂的系统工程。
74 | 安装是将单一的软件拷贝到服务器之后,启动安装向导完成初始化配置的过程。
75 | 安装相对于部署来说更简单一些。
76 |
77 | #### 云平台是什么意思?
78 |
79 | 云平台指提供云计算服务的平台厂家,例如:Azure,AWS,阿里云,华为云,腾讯云等
80 |
81 | #### 实例,云服务器,虚拟机,ECS,EC2,CVM,VM有什么区别?
82 |
83 | 没有区别,只是不同厂家所采用的专业术语,实际上都是云服务器
--------------------------------------------------------------------------------
/docs/zh/else-troubleshooting.md:
--------------------------------------------------------------------------------
1 | # 故障处理
2 |
3 | 此处收集使用 Nextcloud 过程中最常见的故障,供您参考
4 |
5 | > 大部分故障与云平台密切相关,如果你可以确认故障的原因是云平台造成的,请参考[云平台文档](https://support.websoft9.com/docs/faq/zh/tech-instance.html)
6 |
7 | #### Nextcloud 重定向错误?
8 |
9 | 多语言下,重定向错误比较常见。例如:打开您的Nextcloud商店中文版会出现重定向
10 |
11 | 处理办法:
12 | 1. 分析网站根目录下的 `.htaccess` 文件,看看有没有死循环规则
13 | 2. 进入后台先删除中文,然后再重新导入中文。重新导入的时候,Nextcloud会自动生成伪静态规则,覆盖您网站根目录的 `.htaccess` 文件
14 |
15 | #### 域名配置后,会出现“页面布局混乱或图片无法显示”?
16 |
17 | 如果先通过 IP 安装,再绑定域名,就会出现这个问题,请分别打开 Nextcloud 的[配置文件](/zh/stack-components.html#nextcloud),将其中的IP地址改成域名。
18 |
19 | #### 安装插件,显示403权限不足,错误"you dont have permession to access /admin/index.php"
20 |
21 | 修改文件:/etc/httpd/conf.d/mod\_evasive.conf 中 DOSPageCount 2 改为 DOSPageCount 12
22 |
23 | #### 修改了数据库密码 Nextcloud 不能访问?
24 |
25 | 若已完成 Nextcloud 安装向导,再通过 phpMyAdmin 修改数据库密码,Nextcloud 就会连不上数据库
26 |
27 | 需要修改 [Nextcloud 配置文件](/zh/stack-components.html#nextcloud) 对应的数据库 password 参数即可。
28 |
29 | #### Apache httpd 服务无法启动?
30 |
31 | 请通过分析日志文件定位原因: */var/log/httpd*
32 |
33 | #### 数据库服务无法启动
34 |
35 | 数据库服务无法启动最常见的问题包括:磁盘空间不足,内存不足,配置文件错误。
36 | 建议先通过命令进行排查
37 |
38 | ```shell
39 | # 查看磁盘空间
40 | df -lh
41 |
42 | # 查看内存使用
43 | free -lh
44 | ```
45 |
46 |
--------------------------------------------------------------------------------
/docs/zh/package.json:
--------------------------------------------------------------------------------
1 | {
2 | "dependencies": {
3 | "@vuepress/shared-utils": "^1.0.2"
4 | }
5 | }
6 |
--------------------------------------------------------------------------------
/docs/zh/solution-backup.md:
--------------------------------------------------------------------------------
1 | ---
2 | sidebarDepth: 3
3 | ---
4 |
5 | # 备份恢复
6 |
7 | ## 为什么?
8 |
9 | 有服务器运维经验的用户都明白一个道理:“信息系统根本无法长时间保持100%稳定的状态,任何系统都可能会出现故障,只是故障出现的概率不同、危害程度不同而已”。
10 |
11 | 1. 工作几天的成果被误删了,怎么恢复?
12 | 2. 网站被黑客攻击面目全非,能复原吗?
13 | 3. 网站内容被改得乱七八糟,想要恢复到一个正常状态?
14 |
15 | 当故障发生之时,我们首先是寻求专业人士的帮助,快速诊断并处理故障,但不幸的是,有些故障无法在期望的时间周期内顺利的解决,甚至是无法解决。
16 |
17 | 显然,有一个备份及其重要,它可以保证出现故障之时可以通过已有的备份文件将系统恢复到正常的状态,意味着可以避免由于无法恢复而造成的巨大损失。
18 |
19 | > 一定要养成备份的习惯,切莫存在侥幸心理
20 |
21 | ## 怎样做?
22 |
23 | 从具体的备份对象上看,由于服务器上存在:**操作系统、运行环境、数据库和应用程序**四个备份对象,每个对象都有可能出现不可预期、不可如期解决的故障。
24 |
25 | 基于备份对象的性质,我们认为如下两种备份措施是必要的:
26 |
27 | ### 全局自动备份
28 |
29 | 所有的云平台都提供了全局自动备份功能,基本原理是基于**磁盘快照**:快照是针对于服务器的磁盘来说的,它可以记录磁盘在指定时间点的数据,将其全部备份起来,并可以实现一键恢复。
30 |
31 | ```
32 | - 备份范围: 将操作系统、运行环境、数据库和应用程序
33 | - 备份效果: 非常好
34 | - 备份频率: 按小时、天、周备份均可
35 | - 恢复方式: 云平台一键恢复
36 | - 技能要求:非常容易
37 | - 自动化:设置策略后全自动备份
38 | ```
39 |
40 | 不同云平台的自动备份方案有一定的差异,详情参考 [云平台备份方案](https://support.websoft9.com/docs/faq/zh/tech-instance.html)
41 |
42 | ### 程序手工备份
43 |
44 | 程序手工本地备份是通过**下载应用程序源码和导出数据库文件**实现最小化的备份方案。
45 |
46 | 下面以列表的方式介绍这种备份:
47 | ```
48 | - 备份范围: 数据库和应用程序
49 | - 备份效果: 一般
50 | - 备份频率: 一周最低1次,备份保留30天
51 | - 恢复方式: 重新导入
52 | - 技能要求:非常容易
53 | - 自动化:无
54 | ```
55 | 通用的手动备份操作步骤如下:
56 |
57 | 1. 通过 WinSCP 将网站源码目录(*/data/wwwroot/nextcloud*)**压缩后**再完整的下载到本地
58 | 1. 通过 WinSCP 将网站数据目录(*/data/wwwroot/nextcloud/data*)**压缩后**再完整的下载到本地
59 | 2. 通过 phpMyAdmin 导出 Nextcloud 数据库
60 | 
61 | 3. 将程序文件、数据文件和数据库文件放到同一个文件夹,根据日期命名
62 | 4. 备份工作完成
63 |
64 | ### Nextcloud 后台备份
65 |
66 | Nextcloud 后台提供在线备份功能
67 |
68 | 1. 登录 Nextcloud 后台,安装 **[OwnBackup](https://apps.nextcloud.com/apps/ownbackup)** 插件
69 | 
70 | 2. 打开:【Admin】>【Additional settings】>【OwnBackup】,开始备份
71 | 
--------------------------------------------------------------------------------
/docs/zh/solution-https.md:
--------------------------------------------------------------------------------
1 | # SSL/HTTPS
2 |
3 | 网站完成域名绑定且可以通过HTTP访问之后,方可设置HTTPS。
4 |
5 | Nextcloud 预装包,已安装Web服务器 SSL 模块和公共免费证书方案 [Let's Encrypt](https://letsencrypt.org/) ,并完成预配置。
6 |
7 | > 除了虚拟主机配置文件之外,HTTPS设置无需修改Nginx任何文件
8 |
9 | ## 快速参考
10 |
11 | 如果你想使用免费证书,只需在服务器中运行一条命令`certbot`就可以启动证书部署
12 |
13 | 如果你已经申请了商业证书,只需三个步骤,即可完成HTTPS配置
14 |
15 | ### Nextcloud(LAMP)
16 |
17 | Nextcloud(LAMP) 即运行环境采用 **Apache** 作为 Web Server
18 |
19 | 1. 将申请的证书、 证书链文件和秘钥文件上传到 */data/cert* 目录
20 | 2. 打开虚拟主机配置文件: */etc/httpd/conf.d/vhost.conf*
21 | 3. 将如下的 **HTTPS 配置段模板** `--` 插入到`vhost.conf` 文件中
22 | ``` text
23 | #-----HTTPS template start------------
24 |
25 | ServerName nextcloud.yourdomain.com
26 | DocumentRoot "/data/wwwroot/nextcloud"
27 | #ErrorLog "logs/nextcloud.yourdomain.com-error_log"
28 | #CustomLog "logs/nextcloud.yourdomain.com-access_log" common
29 |
30 | Options Indexes FollowSymlinks
31 | AllowOverride All
32 | Require all granted
33 |
34 | SSLEngine on
35 | SSLCertificateFile /data/cert/nextcloud.yourdomain.com.crt
36 | SSLCertificateKeyFile /data/cert/nextcloud.yourdomain.com.key
37 |
38 | #-----HTTPS template end------------
39 | ```
40 | 4. 修改 ServerName, SSLCertificateFile, SSLCertificateKeyFile等参数的值
41 | 5. 保存, [重启 Apache 服务](/admin-services.md#apache)
42 |
43 | ### Nextcloud(LEMP)
44 |
45 | Nextcloud(LEMP) 即运行环境采用 **Nginx** 作为 Web Server
46 |
47 | 1. 将申请的证书、 证书链文件和秘钥文件上传到 */data/cert* 目录
48 | 2. 打开虚拟主机配置文件:*/etc/nginx/conf.d/default.conf* ,插入**HTTPS 配置段** 到 Nextcloud 的 *server{ }* 中
49 | ``` text
50 | #-----HTTPS template start------------
51 | listen 443 ssl;
52 | ssl_certificate /data/cert/xxx.crt;
53 | ssl_certificate_key /data/cert/xxx.key;
54 | ssl_session_timeout 5m;
55 | ssl_protocols TLSv1 TLSv1.1 TLSv1.2;
56 | ssl_ciphers ECDHE-RSA-AES128-GCM-SHA256:HIGH:!aNULL:!MD5:!RC4:!DHE;
57 | ssl_prefer_server_ciphers on;
58 | #-----HTTPS template end------------
59 | ```
60 | 3. 修改 ssl_certificate, ssl_certificate_key 的值
61 | 4. 保存,[重启 Nginx 服务](/zh/admin-services.html#nginx)
62 |
63 | ## 详细指南
64 |
65 | 若参考上面的**简易步骤**仍无法成功设置 HTTPS 访问,请阅读由 Websoft9 提供的 [《HTTPS 专题指南》](https://support.websoft9.com/docs/faq/zh/tech-https.html#nginx)
66 |
67 | HTTPS专题指南方案包括:HTTPS 前置条件、HTTPS 配置段模板、注意事项、详细步骤以及故障诊断等具体方案。
--------------------------------------------------------------------------------
/docs/zh/solution-more.md:
--------------------------------------------------------------------------------
1 | # 更多...
2 |
3 | 下面每一个方案,都经过实践证明行之有效,希望能够对你有帮助
4 |
5 | ## 域名绑定
6 |
7 | 绑定域名的前置条件是:已经完成域名解析(登录域名控制台,增加一个A记录指向服务器公网IP)
8 |
9 | 完成域名解析后,从服务器安全和后续维护考量,需要完成**域名绑定**:
10 |
11 | Nextcloud 域名绑定操作步骤:
12 |
13 | 1. 使用 SFTP 工具登录云服务器
14 | 2. 修改 [虚拟机主机配置文件](/zh/stack-components.html#apache),将其中的域名相关的值
15 | ```text
16 | #### Nextcloud(LAMP) bind domain ####
17 |
18 |
19 | ServerName www.mydomain.com # 修改成您的实际域名
20 | DocumentRoot "/data/wwwroot/nextcloud"
21 | ...
22 |
23 | #### Nextcloud(LNMP) bind domain ####
24 |
25 | server {
26 | listen 80;
27 | server_name nextcloud.example.com; # 修改成您的实际域名
28 | ...
29 |
30 | ```
31 | 3. 保存配置文件,[重启服务](/zh/admin-services.html#apache)
32 |
33 | ## Nextcloud 更换域名
34 |
35 | 如果 Nextcloud 需要更换域名,具体操作如下:
36 |
37 | 1. 完成新的域名解析和域名绑定
38 | 2. 修改 [Nextcloud 配置文件](/zh/stack-components.html#nextcloud)中的域名值
39 | ```
40 | 'overwrite.cli.url' => 'nextcloud.yourdomain.com', # 修改为新域名
41 | ```
42 | 2. [重启 PHP-FPM 服务](/zh/admin-services.html#php-fpm)后生效
43 |
44 | ## Nextcloud 设置语言
45 |
46 | 登录 Nextcloud,在后台 【个人】>【个人信息】中设置语言
47 |
48 | 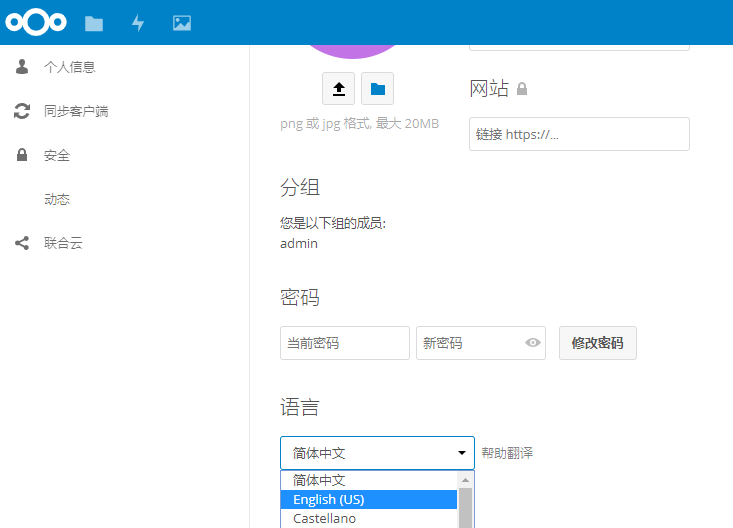
49 |
50 | ## Nextcloud 安装扩展
51 |
52 | Nextcloud 后台集成了 [Marketplace](https://apps.nextcloud.com) 大量的扩展(也叫apps),下面介绍如何安装它们
53 |
54 | 1. 登录 Nextcloud,在后台 【应用】>【应用软件包】中寻找所需的应用
55 | 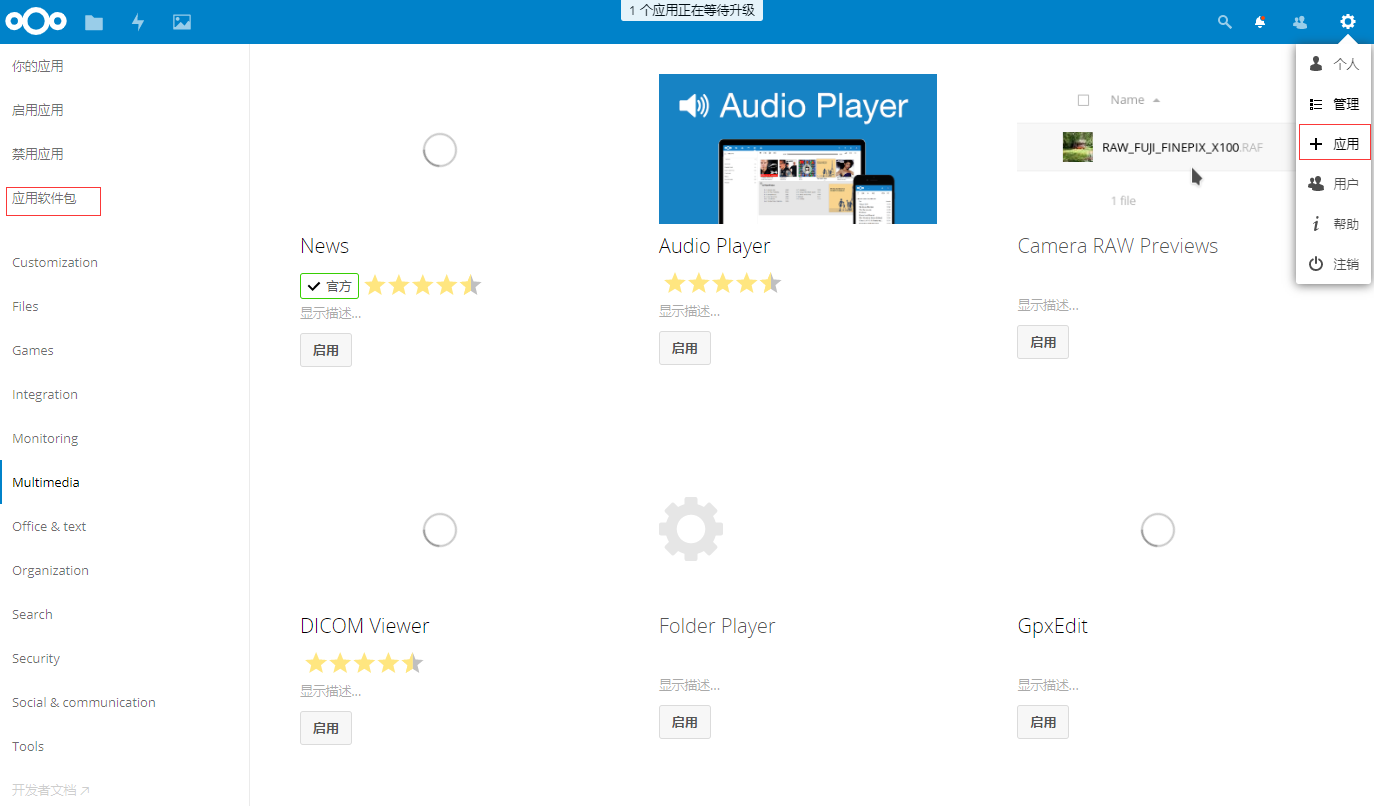
56 | 2. 在线安装它
57 |
58 | ## Nextcloud 集成 LDAP
59 |
60 | 当企业网盘与多个人使用的时候,用户需要与内部域控集成,以保证用户可以通过Windows账号集成。
61 |
62 | Nextcloud提供了 LDAP 集成工具,具体参考官方方案:*[User Authentication with LDAP](https://docs.nextcloud.com/server/latest/admin_manual/configuration_user/user_auth_ldap.html)*
63 |
64 | ## Nextcloud 命令行工具-OCC
65 |
66 | OCC命令是 Nextcloud 的命令行界面。您可以使用OCC执行许多常见的服务器操作,例如安装和升级 Nextcloud,管理用户,加密,密码,LDAP设置等。
67 |
68 | ## Nextcloud 连接外部存储
69 |
70 | Nextcloud 支持多种流行的企业存储服务,具体使用步骤如下:
71 |
72 | 1. 登录 Nextcloud 后台,安装 **External storage support** 扩展
73 | 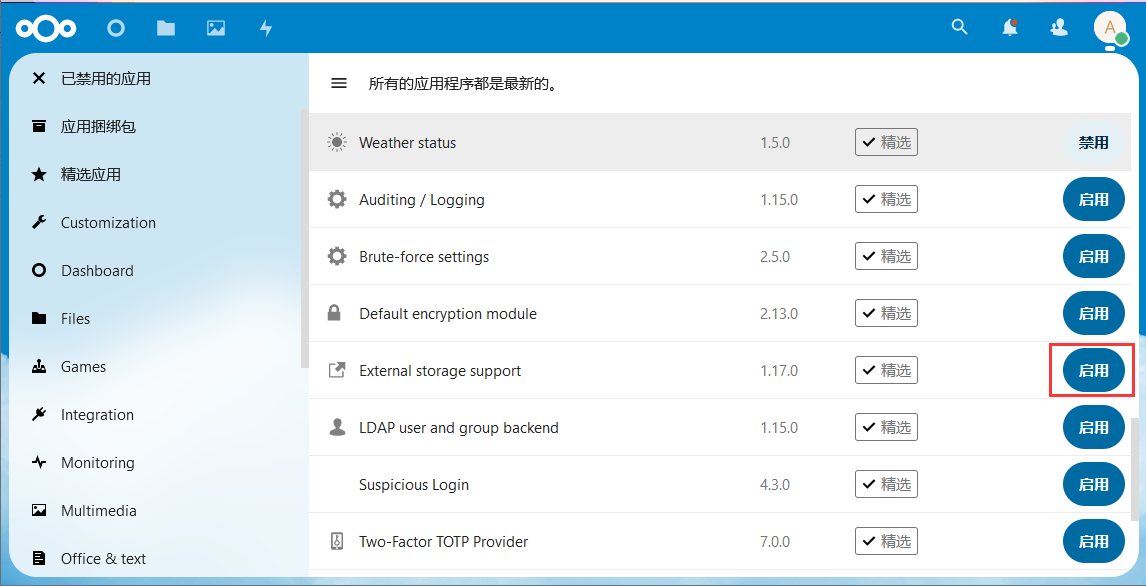
74 |
75 | 2. 打开:【Admin】>【Add storage】>【External Storage】,选择一个外部存储服务
76 | 
77 |
78 | 3. 根据实际情况进行设置
79 | 
80 |
81 | 更多详情参考官方文档:[External Storage](https://docs.nextcloud.com/server/latest/admin_manual/configuration_files/external_storage_configuration_gui.html)
82 |
83 | ## Nextcloud 数据转移
84 |
85 | Nextcloud 的程序和数据文件默认均存在系统盘,你要转移到数据盘(或对象存储),步骤如下:
86 |
87 | ### 转移到数据盘
88 |
89 | 1. 在服务器所在的云平台上购买数据盘,并**挂载**到 Nextcloud 服务器
90 | 2. 使用 SFTP 工具连接服务器,停止服务
91 | ```
92 | systemctl stop httpd
93 | ```
94 | 3. 新建一个 */data/wwwroot/nextcloud2* 文件夹
95 | 4. 初始化数据盘,并将数据盘 **mount** 到新建的 *nextcloud2* 文件夹
96 | 5. 将 */data/wwwroot/nextcloud* 下的数据全部拷贝到 */data/wwwroot/nextcloud2*
97 | 6. 修改 Nextcloud [虚拟主机配置文件](/zh/stack-components.html#apache) 的路径
98 | 7. 启动服务后生效
99 | ```
100 | systemctl start httpd
101 | ```
102 |
103 | ### 转移到对象存储
104 |
105 | 1. 在服务器所在的云平台上购买对象存储,新建一个 **bucket**
106 | 2. 使用 SFTP 工具连接服务器,停止服务
107 | ```
108 | systemctl stop httpd
109 | ```
110 | 3. 新建一个 */data/wwwroot/nextcloud2* 文件夹
111 | 4. 将对象存储的 bucket **mount** 到新建的 *nextcloud2* 文件夹
112 | 5. 将 */data/wwwroot/nextcloud* 下的数据全部拷贝到 */data/wwwroot/nextcloud2*
113 | 6. 修改 Nextcloud [虚拟主机配置文件](/zh/stack-components.html#apache) 的路径
114 | 7. 启动服务后生效
115 | ```
116 | systemctl start httpd
117 | ```
118 | 8. 设置对象存储开机自动挂载(不同云平台操作不同)
119 |
120 | > 以上两种数据转移方案中,**mount** 操作对新手来说是几乎是不可能独立完成的任务。另外,如果转移的数据超过10G,会存在拷贝失败的风险
121 |
122 | ## Nextcloud 文件预览与编辑
123 |
124 | Nextcloud 自身是不能对 Office 文件进行预览或编辑的,需要集成外部的 Office 文档编辑和预览服务才可以具备这样的功能。
125 |
126 | Websoft9 提供的 Nextcloud 部署包内置了 OnlyOffice Document Server(Docker版) ,此软件为 Nextcloud 提供文档预览与编辑服务,具体设置步骤如下:
127 |
128 | 1. 在云控制台安全组中,检查 **TCP:9002** 端口是否开启
129 |
130 | 2. 使用本地电脑浏览器测试文档服务是否可用:打开网址:*http://服务器公网IP:9002*,会看到 OnlyOffice Document Server 正在运行的提示
131 | 
132 |
133 | > 如果计划使用 HTTPS 访问 OnlyOffice Document Server,需给它绑定域名并设置 HTTPS
134 |
135 | 3. 登录到 Nextcloud ,单击右上角上角齿轮图标,点击【应用】
136 | 
137 |
138 | 4. 找到【ONLYOFFICE】插件,安装它
139 |
140 | > 可能因为服务器位于中国大陆地区,网络原因在上述第 3 步不能显示应用列表,需手动安装 ONLYOffice 插件:
141 | > - 可以到 Nextcloud [官方应用商店](https://apps.nextcloud.com/apps/onlyoffice/releases?platform=22#22)下载
142 | > - 下载到本地后,解压,通过FTP上传到服务器 Nextcloud 应用目录:/data/wwwroot/nextcloud/apps
143 | > - 登录Nextcloud后台,进入应用中心,启用 ONLYOffice 即可进入下一步操作,开启文档在线预览和编辑
144 | > 
145 |
146 | 5. 安装完成后,找到**设置**页面,对 ONLYOFFICE 进行如图所示的设置([参考官方文档](https://api.onlyoffice.com/editors/nextcloud))
147 | 
148 |
149 | > 图中涂抹处应修改为**服务器公网IP**
150 |
151 | 6. 返回到首页,刷新或重新登录,然后单击 Office 文件即可在线预览和编辑。
152 |
153 | 如果连接 ONLYOFFICE 时,Nextcloud 强制要求 ONLYOFFICE 需配置 HTTPS,请参考:[OnlyOffice Document Server 域名绑定和 HTTPS](http://support.websoft9.com/docs/onlyoffice/zh/solution-documentserver.html#域名绑定) 相关章节。
154 |
155 | ## 使用移动端
156 |
157 | Nextcloud 支持移动端,使用步骤如下:
158 | 1. [下载](https://nextcloud.com/install)移动端
159 | 2. [设置](https://docs.nextcloud.com/android/)移动端到服务器的连接
160 |
--------------------------------------------------------------------------------
/docs/zh/solution-smtp.md:
--------------------------------------------------------------------------------
1 | # SMTP
2 |
3 | 大量用户实践反馈,使用**第三方 SMTP 服务发送邮件**是一种最稳定可靠的方式。
4 |
5 | 请勿在服务器上安装sendmail等邮件系统,因为邮件系统的路由配置受制与域名、防火墙、路由等多种因素制约,非常不稳定,且不易维护、诊断故障很困难。
6 |
7 | 下面以**网易邮箱**为例,提供设置 Nextcloud 发邮件的步骤:
8 |
9 | 1. 在网易邮箱管理控制台获取 SMTP 相关参数
10 | ```
11 | SMTP host: smtp.163.com
12 | SMTP port: 465 or 994 for SSL-encrypted email
13 | SMTP Authentication: must be checked
14 | SMTP Encryption: must SSL
15 | SMTP username: websoft9@163.com
16 | SMTP password: #wwBJ8 //此密码不是邮箱密码,是需要通过163邮箱后台设置去获取的授权码
17 | ```
18 | 2. 登录 Nextcloud 后,点击齿轮图标,打开【个人】设置页面,填写发件邮箱地址
19 | 
20 |
21 | 3. 点击【其他设置】>【电子邮件服务器】,依次填写 SMTP 信息
22 | 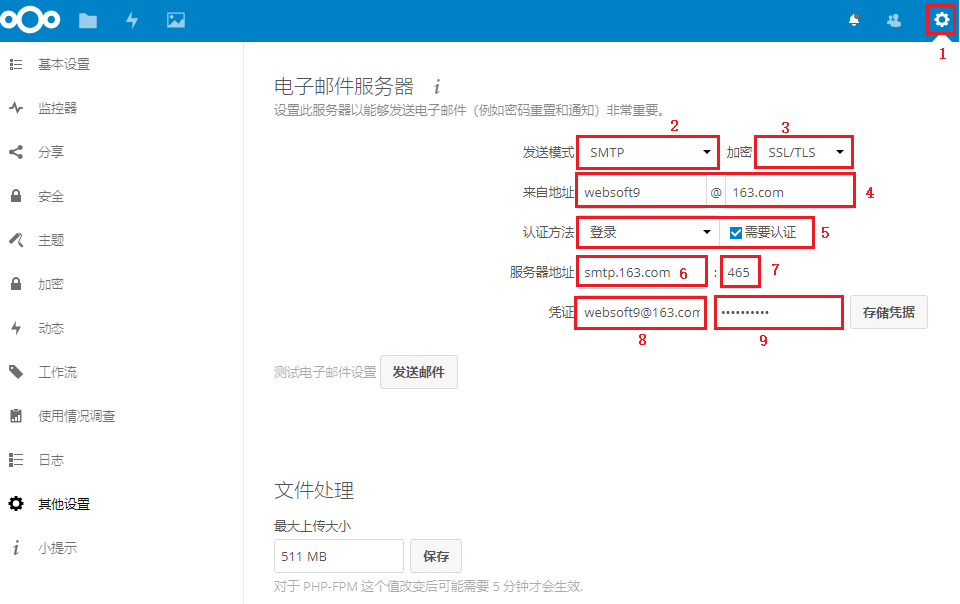
23 |
24 | * 发送模式选择“SMTP”,加密方式选择“SSL/TLS”;
25 | * 输入发送方邮箱地址;
26 | * 认证方式选择“登录”,并勾选“需要认证”选项;
27 | * 输入SMTP服务器地址和SMTP服务器的端口号;
28 | * 输入和发件人邮箱一致的邮箱地址;
29 | * 输入该邮箱地址的SMTP服务的授权码或密码;
30 | * 存储凭据;
31 |
32 | 3. 点击“发送邮件”即可测试SMTP是否设置正确。
33 |
34 | > 更多邮箱设置(QQ邮箱,阿里云邮箱,Gmail,Hotmail等)以及无法发送邮件等故障之诊断,请参考由Websoft9提供的 [SMTP 专题指南](https://support.websoft9.com/docs/faq/zh/tech-smtp.html)
--------------------------------------------------------------------------------
/docs/zh/solution-upgrade.md:
--------------------------------------------------------------------------------
1 | # 更新升级
2 |
3 | 网站技术日新月异,**更新升级**是维护工作之一,长时间不升级的程序,就如长时间不维护的建筑物一样,会加速老化、功能逐渐缺失直至无法使用。
4 |
5 | 这里注意更新与升级这两词的差异([延伸阅读](https://support.websoft9.com/docs/faq/zh/tech-upgrade.html#更新-vs-升级)),例如:
6 |
7 | - 操作系统打个补丁常称之为**更新**,Ubuntu16.04 变更为 Ubuntu18.04,称之为**升级**
8 | - MySQL5.6.25-->MySQL5.6.30 常称之为**更新**,MySQL5.6->MySQL5.7 称之为**升级**
9 |
10 | Nextcloud 完整的更新升级包括:系统级更新(操作系统和运行环境)和 Nextcloud 程序升级两种类型
11 |
12 | ## 系统级更新
13 |
14 | 运行一条更新命令,即可完成系统级更新:
15 |
16 | ``` shell
17 | #For Centos&Redhat
18 | yum update -y
19 |
20 | #For Ubuntu&Debian
21 | apt update && apt upgrade -y
22 | ```
23 | > 本部署包已预配置一个用于自动更新的计划任务。如果希望去掉自动更新,请删除对应的Cron
24 |
25 |
26 | ## Nextcloud 自助升级
27 |
28 | Nextcloud 提供了非常人性化的升级功能,根据系统的更新提示既可以完成主版本、插件的更新。
29 |
30 | > 在升级之前请做好服务器的快照备份,这个是必须的步骤,因为谁都无法保证升级100%成功。
31 |
32 | ### 主程序升级
33 |
34 | 主程序升级与插件升级略有差异,具体参考如下:
35 |
36 | 1. 登录 Nextcloud 后台,进入【管理】>【基本设置】,若有更新请点击【打开更新管理器】按钮
37 | 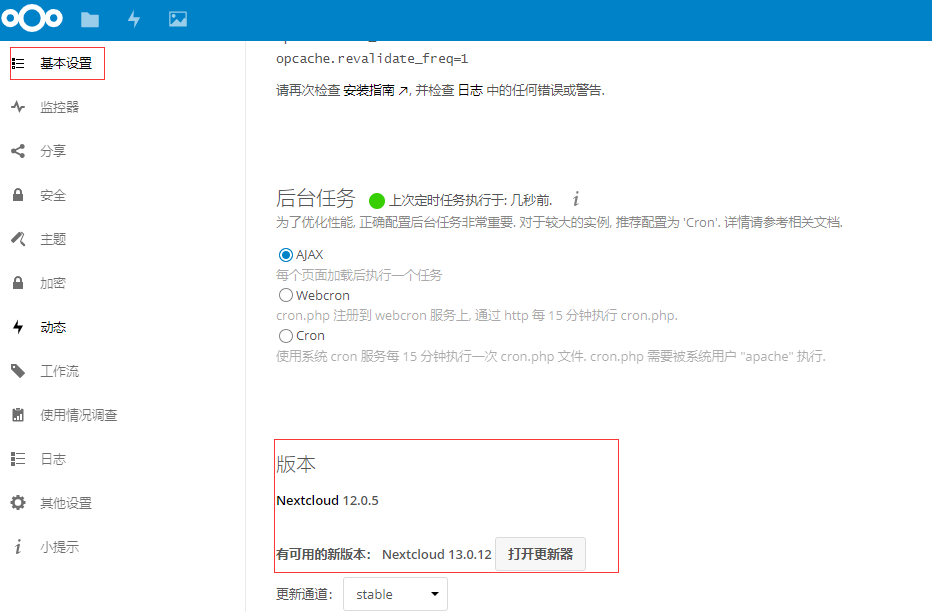
38 |
39 | 2. 进入 Updater(更新管理器)
40 | 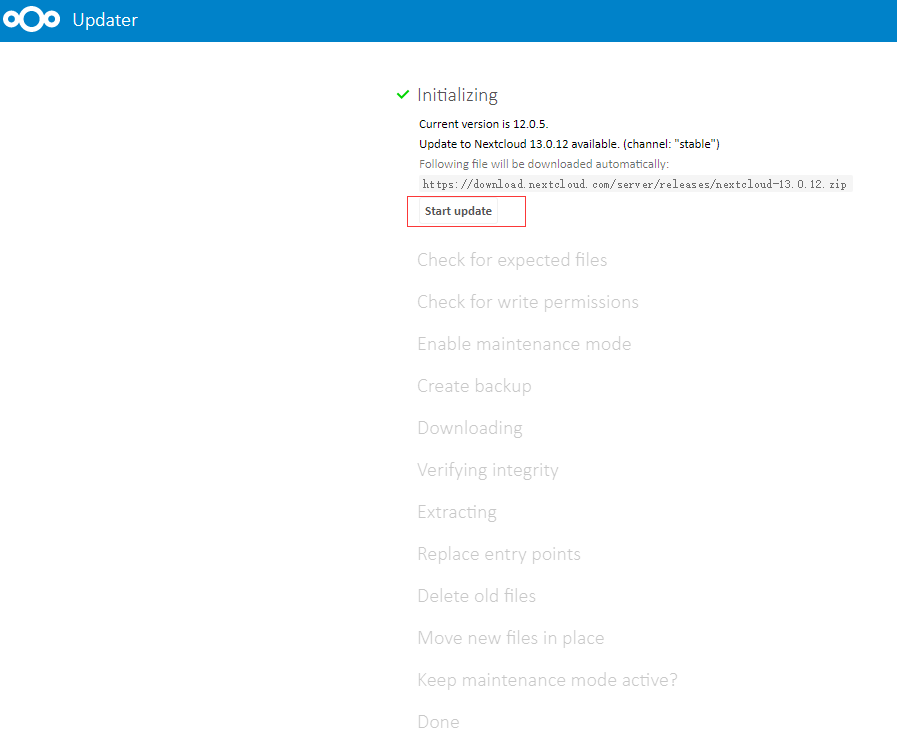
41 |
42 | 3. 点击【Start update】开始更新
43 |
44 | 4. 系统进入自动化升级过程,下载和升级过程比较长,请耐心等待
45 |
46 | > 由于升级过程会下载最新版本,Nextcloud的下载服务器在国外,若下载不成功,需要不定期尝试
47 |
48 | ### 插件升级
49 |
50 | 升级步骤参加如下:
51 |
52 | 1. 登录 Nextcloud 后台,进入【应用】,在应用列表中找到需更新的应用
53 | 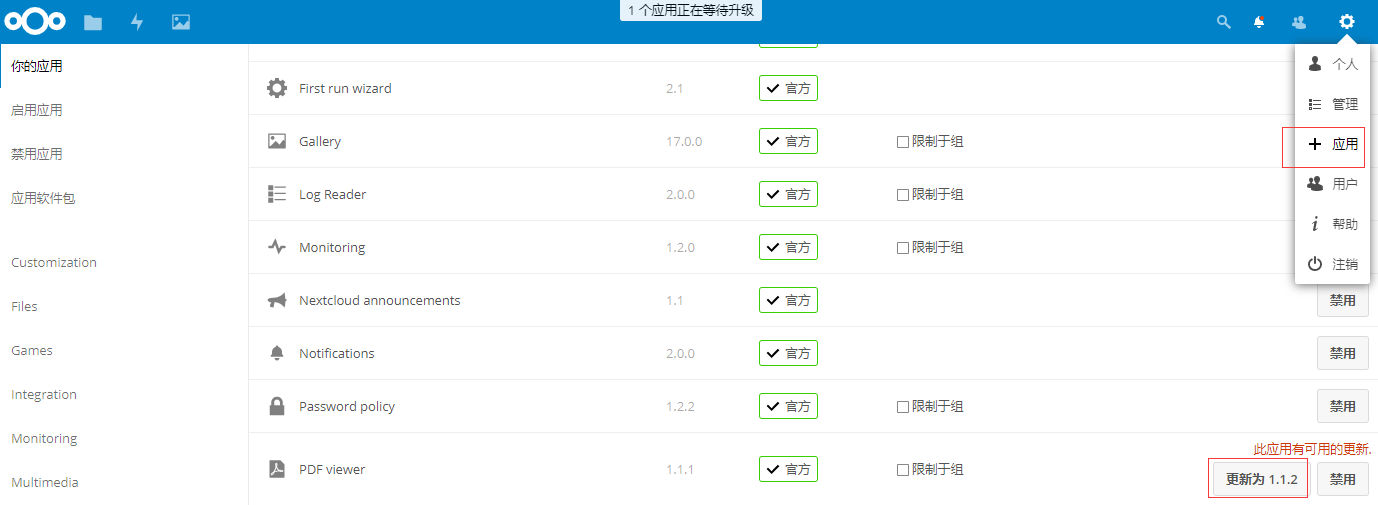
54 |
55 | 2. 点击【更新】按钮,耐心等待更新
56 |
57 | 3. 所有更新完成后,更新清单会显示“所有应用都是最新的”
58 |
59 | > 如果升级过程出现问题,例如:无法下载升级包/没有读写权限,请确保网络是通的/Nextcloud目录具有读写权限
60 |
61 |
62 | ## Nextcloud 手工升级
63 |
64 | 有时候由于网络问题,上面的基于升级界面的升级会由于网络下载速度太慢,导致升级失败。
65 |
66 | 此时,可以考虑采用如下的手工升级方案:
67 |
68 | 1. 将 Nextcloud 的 data, config, apps 目录临时复制到服务器其他目录下
69 |
70 | 2. 上传 Nextcloud 安装目录下的所有文件
71 | ```
72 | rm -rf /data/wwwroot/nextcloud/*
73 | ```
74 | 3. 将本地下载的 Nextcloud 源码(除 config, apps 目录之外)上传到 /data/wwwroot/nextcloud 目录
75 |
76 | 4. 将第1步备份的几个目录还原到 */data/wwwroot/nextcloud* 中
77 |
78 | 5. 使用 *php occ* 命令进行升级处理
79 | ```
80 | cd /data/wwwroot/nextcloud
81 | php occ upgrade
82 | ```
83 |
84 | 6. 登录到 Nextcloud 后台界面,启用所需的插件
85 |
86 | 7. 手工升级完成
--------------------------------------------------------------------------------
/docs/zh/stack-accounts.md:
--------------------------------------------------------------------------------
1 | # 账号密码
2 |
3 | 通过**SSH**连接云服务器,运行 `sudo cat /credentials/password.txt` 命令,查看所有相关账号和密码。
4 |
5 | 
6 |
7 | 下面列出可能需要用到的几组账号密码:
8 |
9 | ## Nextcloud
10 |
11 | 在初始化安装的时候由用户自行设置
12 |
13 | ## MySQL
14 |
15 | * 管理员账号:*`root`*
16 | * 管理员密码:存储在您的服务器指定文件中( */credentials/password.txt* )
17 |
18 | > 需要登录MySQL,请参考 [MySQL可视化管理](/zh/admin-mysql.md)
19 |
20 | ## Linux
21 |
22 | * 主机地址:服务公网IP地址
23 | * 连接方式:云控制台在线SSH 或 SFTP客户端工具 或 SSH客户端工具
24 | * 管理员密码:创建服务器的时候自行设置,若不记得密码需要通过云控制台重置。
25 | * 管理员账号:不同的云平台有一定的差异
26 | | 云平台 | 系统 | 管理员账号名称 | 其他|
27 | | --- | --- | --- | --- |
28 | | Azure | 所有 | 创建服务器的时候自行设置 | [如何开启root账户?](https://support.websoft9.com/docs/azure/zh/server-login.html#示例2:启用系统root账号) |
29 | | AWS | CentOS | centos | [如何开启root账户?](https://support.websoft9.com/docs/aws/zh/server-login.html#示例2:启用系统root账号) |
30 | | AWS | AmazonLinux | ec2-user | [如何开启root账户?](https://support.websoft9.com/docs/aws/zh/server-login.html#示例2:启用系统root账号) |
31 | | AWS | Ubuntu | ubuntu | [如何开启root账户?](https://support.websoft9.com/docs/aws/zh/server-login.html#示例2:启用系统root账号) |
32 | | 阿里云,华为云,腾讯云 | 所有 | root | |
--------------------------------------------------------------------------------
/docs/zh/stack-components.md:
--------------------------------------------------------------------------------
1 | # 参数
2 |
3 | Nextcloud 预装包包含 Nextcloud 运行所需一序列支撑软件(简称为“组件”),下面列出主要组件名称、安装路径、配置文件地址、端口、版本等重要的信息。
4 |
5 | ## 路径
6 |
7 | ### Nextcloud
8 |
9 | Nextcloud 安装目录: */data/wwwroot/nextcloud*
10 | Nextcloud 配置文件: */data/wwwroot/nextcloud/config/config.php*
11 |
12 | > Nextcloud 配置文件中包含数据库连接信息,更改了 MySQL 数据库账号密码,此处也需要对应修改
13 |
14 | ### PHP
15 |
16 | PHP 配置文件: */etc/php.ini*
17 | PHP Modules 配置文件目录: */etc/php.d*
18 |
19 | ### Apache
20 |
21 | Nextcloud on LAMP, the Web Server is Apache
22 |
23 | Apache 虚拟主机配置文件:*/etc/httpd/conf.d/vhost.conf*
24 | Apache 主配置文件: */etc/httpd/conf/httpd.conf*
25 | Apache 日志文件: */var/log/httpd*
26 | Apache 模块配置文件: */etc/httpd/conf.modules.d/00-base.conf*
27 |
28 | ### Nginx
29 |
30 | Nextcloud on LEMP, the Web Server is Nginx
31 |
32 | Nginx 虚拟主机配置文件:*/etc/nginx/sites-available/default.conf*
33 | Nginx 主配置文件: */etc/nginx/nginx.conf*
34 | Nginx 日志文件: */var/log/nginx/*
35 |
36 | ### MYSQL
37 |
38 | MySQL 安装路径: */usr/local/mysql*
39 | MySQL 数据文件 */data/mysql*
40 | MySQL 配置文件: */etc/my.cnf*
41 | MySQL 可视化管理地址: *http://服务器公网IP/phpmyadmin*,用户名和密码请见 [账号密码](/zh/stack-accounts.md) 章节。
42 |
43 | ### phpMyAdmin
44 |
45 | phpMyAdmin 安装目录: */data/apps/phpmyadmin*
46 | phpMyAdmin 配置文件: */data/apps/phpmyadmin/config.inc.php*
47 | phpMyAdmin 虚拟主机配置文件: */etc/httpd/conf.d/phpMyAdmin.conf* or */etc/nginx/php.conf*
48 |
49 | ### Docker
50 |
51 | 基于 Docker 安装了如下辅助工具:
52 |
53 | #### OnlyOffice Document Server
54 |
55 | OnlyOffice Document Server 目录:*/data/apps/onlyofficedocumentserver*
56 | phpMyAdmin 容器编排文件:*/data/apps/onlyofficedocumentserver/docker-compose.yml*
57 |
58 | #### phpMyAdmin
59 |
60 | phpMyAdmin 目录:*/data/apps/phpmyadmin*
61 | phpMyAdmin 容器编排文件:*/data/apps/phpmyadmin/docker-compose.yml*
62 |
63 | ### Redis
64 |
65 | Redis 配置文件: */etc/redis.conf*
66 | Redis 数据目录: */var/lib/redis*
67 | Redis 日志文件: */var/log/redis/redis.log*
68 |
69 |
70 | ## 端口号
71 |
72 | 在云服务器中,通过 **[安全组设置](https://support.websoft9.com/docs/faq/zh/tech-instance.html)** 来控制(开启或关闭)端口是否可以被外部访问。
73 |
74 | 本应用建议开启的端口如下:
75 |
76 | | 名称 | 端口号 | 用途 | 必要性 |
77 | | --- | --- | --- | --- |
78 | | TCP | 80 | 通过 HTTP 访问 Nextcloud | 必须 |
79 | | TCP | 443 | 通过 HTTPS 访问 Nextcloud | 可选 |
80 | | TCP | 3306 | 远程连接 MySQL | 可选 |
81 | | TCP | 9002 | OnlyOffice Document Server on Docker | 可选 |
82 | | TCP | 9090 | phpMyAdmin on Docker | 可选 |
83 |
84 | ## 版本号
85 |
86 | 组件版本号可以通过云市场商品页面查看。但部署到您的服务器之后,组件会自动进行更新导致版本号有一定的变化,故精准的版本号请通过在服务器上运行命令查看:
87 |
88 | ```shell
89 | # Check all components version
90 | sudo cat /data/logs/install_version.txt
91 |
92 | # Linux Version
93 | lsb_release -a
94 |
95 | # PHP Version
96 | php -v
97 |
98 | # List Installed PHP Modules
99 | php -m
100 |
101 | # Apache version on Centos
102 | httpd -v
103 |
104 | # Apache version on Ubuntu
105 | apache2 -v
106 |
107 | # List Installed Apache Modules
108 | apachectl -M
109 |
110 | # Nginx version
111 | nginx -v
112 |
113 | # List Installed Nginx Modules
114 | nginx -V
115 |
116 | # MySQL version:
117 | mysql -V
118 |
119 | # Redis version
120 | redis-server -v
121 |
122 | # Dokcer:
123 | docker --version
124 | ```
--------------------------------------------------------------------------------
/docs/zh/stack-deployment.md:
--------------------------------------------------------------------------------
1 | # 部署
2 |
3 | **部署就是将 Nextcloud 预装环境在线复制到你的云服务器中**。例如:用户在云平台购买 Nextcloud 之后,云平台就会自动将 Nextcloud 复制到对应的云服务器。
4 |
5 | - 如果已经部署 Nextcloud,请进入[初始化安装](/zh/stack-installation.md) ,完成相关操作。
6 | - 如果没有部署 Nextcloud,需要先将 Nextcloud 部署到您的云服务器。
7 |
8 | 我们提供了两种 Nextcloud 部署方案,部署过程是全自动化的,用户启动部署后,等待结果即可:
9 |
10 | ## 镜像一键部署
11 |
12 | **镜像部署**就是用户基于镜像来创建云服务器,从而获得与镜像一致的系统环境。**镜像**是指云服务器可选择的运行环境模板,一般包括操作系统和预装的软件。
13 |
14 | 对有云服务器使用经验的用户来说,镜像部署可以等同于“一键部署”。
15 |
16 | 我们在主流的云平台上发布了 [Nextcloud 镜像](https://apps.websoft9.com/nextcloud)供用户使用。云平台一般支持三种镜像部署方式:
17 |
18 | * 在 **选购新服务器** 的时候,找到并选取 Nextcloud 镜像作为服务器启动环境
19 | * 在 **云市场(Marketplace)** 的 Nextcloud 商品页面直接购买镜像
20 | * 对于已有服务器,通过 **更换镜像(重装系统)** 的操作,将已有镜像替换为 Nextcloud 镜像。
21 |
22 | ## 脚本自动化部署
23 |
24 | **脚本部署**是指在云服务器上运行一段脚本程序,它会**自动地**将预装包在线下载到云服务器,并完成预配置
25 |
26 | 我们在 Github上发布了 [Nextcloud 自动化部署脚本](https://github.com/Websoft9/ansible-nextcloud),脚本基于 Ansible 编写。只要熟悉 Ansible,便可以实现 **无人值守(全自动化)** 的方式将 Nextcloud 部署到服务器。
27 |
28 | ## 对比
29 |
30 | 虽然通过镜像部署与脚本部署的结果一致,这两种部署方式有什么差异或优劣呢?:
31 |
32 | 建议立即阅读 [《镜像部署 vs 脚本部署》](https://support.websoft9.com/docs/faq/zh/bz-product.html#镜像部署-vs-脚本部署)
--------------------------------------------------------------------------------
/docs/zh/stack-installation.md:
--------------------------------------------------------------------------------
1 | # 初始化安装
2 |
3 | 在云服务器上部署 Nextcloud 预装包之后,请参考下面的步骤快速入门。
4 |
5 | ## 准备
6 |
7 | 1. 在云控制台获取您的 **服务器公网IP地址**
8 | 2. 在云控制台安全组中,检查 **Inbound(入)规则** 下的 **TCP:80** 和 **TCP:9002** 端口是否开启
9 | 3. 若想用域名访问 Nextcloud,请先到 **域名控制台** 完成一个域名解析
10 |
11 | ## Nextcloud 安装向导
12 |
13 | 1. 使用本地电脑的 Chrome 或 Firefox 浏览器访问网址:*http://域名* 或 *http://服务器公网IP*, 进入引导首页
14 |
15 | 2. 系统首先要求设置一个管理员账号,选择 Nextcloud 的数据库存储方式,建议选择【MySQL】
16 |
17 | 3. 填写 MySQL 数据库连接信息([不知道账号密码?](/zh/stack-accounts.html#mysql))
18 | 
19 |
20 | 4. 点击“Flish Setup”,完成安装,获得安装成功的提示
21 | 
22 |
23 | 5. 关闭弹窗,开始体验后台
24 | 
25 |
26 | 6. 进入Marketplace,扩展更多的功能
27 | 
28 |
29 | 7. 浏览器访问网址:*https://Internet IP:9002* 查看是否安装 **OnlyOffice Document Server**
30 | 
31 |
32 | 8. [设置文档预览与编辑](/zh/solution-more.md#nextcloud-文件预览与编辑)功能(非必要)
33 |
34 | > 需要了解更多 Nextcloud 的使用,请参考官方文档:[Nextcloud admin_manual](https://docs.nextcloud.com/server/latest/admin_manual/)
35 |
36 | ## 常见问题
37 |
38 | #### 浏览器打开IP地址,无法访问 Nextcloud(白屏没有结果)?
39 |
40 | 您的服务器对应的安全组80端口没有开启(入规则),导致浏览器无法访问到服务器的任何内容
41 |
42 | #### 本部署包采用的哪个数据库来存储 Nextcloud 数据?
43 |
44 | 是MySQL
45 |
46 | #### 是否可以采用云厂商提供的 RDS 来存储 Nextcloud 数据?
47 |
48 | 可以
49 |
50 | #### Nextcloud 是否支持采用对象存储作为网盘使用?
51 |
52 | 支持,但需要额外配置
53 |
54 | #### Nextcloud 是否支持在线文档编辑与预览?
55 |
56 | 部分镜像预装了 OnlyOffice Document Server,可以通过配置实现在线文档编辑与预览
--------------------------------------------------------------------------------
/nextcloud.yml:
--------------------------------------------------------------------------------
1 | - name: Nextcloud
2 | hosts: all
3 | become: yes
4 | become_method: sudo
5 | vars_files:
6 | - vars/main.yml
7 | vars_prompt:
8 | - name: 'webs_selection'
9 | prompt: "\nWhich Web-Server do you want to use? [ 1/2 ] \n\n
10 | 1: Apache\n
11 | 2: Nginx\n"
12 | private: no
13 | default: 1
14 |
15 | vars:
16 |
17 | webs_select:
18 | '1': 'apache'
19 | '2': 'nginx'
20 |
21 | infrastructure_select:
22 | '1': 'LAMP'
23 | '2': 'LNMP'
24 |
25 | nextcloud_webs: "{{webs_select[webs_selection]}}"
26 | w9panel_webs: "{{webs_select[webs_selection]}}"
27 | w9panel_set_infrastructure: "{{infrastructure_select[webs_selection]}}"
28 | w9panel_set_apps:
29 | - Nextcloud
30 |
31 | pre_tasks:
32 | - debug:
33 | msg: NextCloud will be installed on {{w9panel_set_infrastructure}}, OS is {{ansible_distribution}}
34 |
35 | roles:
36 | - {role: role_common, tags: "role_common"}
37 | - {role: role_cloud, tags: "role_cloud"}
38 | - {role: role_apache, when: nextcloud_webs == 'apache', tags: "role_apache"}
39 | - {role: role_nginx, when: nextcloud_webs == 'nginx', tags: "role_nginx"}
40 | - {role: role_mysql, tags: "role_mysql"}
41 | - {role: role_php, tags: "role_php"}
42 | - {role: role_inotify_watch, tags: "role_inotify_watch"}
43 | - {role: role_docker, tags: "role_docker"}
44 | - {role: role_9panel, tags: "role_9panel"}
45 | - {role: role_redis, tags: "role_redis"}
46 | - {role: role_docker, tags: "role_docker"}
47 | - {role: nextcloud, tags: "nextcloud"}
48 | - {role: role_init, tags: "role_init"}
49 | - {role: role_preend, tags: "role_preend"}
50 | - {role: role_end, tags: "role_end"}
--------------------------------------------------------------------------------
/requirements.yml:
--------------------------------------------------------------------------------
1 | # 根据需求添加相对应的role
2 | - src: http://github.com/websoft9/role_common
3 |
4 | - src: http://github.com/websoft9/role_cloud
5 |
6 | - src: http://github.com/websoft9/role_apache
7 |
8 | - src: http://github.com/websoft9/role_redis
9 |
10 | - src: http://github.com/websoft9/role_nginx
11 |
12 | - src: http://github.com/websoft9/role_mysql
13 |
14 | - src: http://github.com/websoft9/role_php
15 |
16 | - src: http://github.com/websoft9/role_inotify_watch
17 |
18 | - src: http://github.com/websoft9/role_init
19 |
20 | - src: http://github.com/websoft9/role_preend
21 |
22 | - src: http://github.com/websoft9/role_end
23 |
24 | - src: http://github.com/websoft9/role_docker
25 |
26 | - src: http://github.com/websoft9/role_9panel
27 |
--------------------------------------------------------------------------------
/roles/CHANGELOG.md:
--------------------------------------------------------------------------------
1 | # CHANGELOG
2 |
3 | ## Release nextcloud-v20.0.5 2021-1-22
4 | ### Fixes and Enhancements
5 | - 19.0.3 to 20.0.3 #2
6 |
--------------------------------------------------------------------------------
/roles/License.md:
--------------------------------------------------------------------------------
1 | This program is released under LGPL-3.0 and with the additional Terms:
2 | It is not allowed to publish free or paid image based on this program in any Cloud platform's Marketplace.
3 |
4 | GNU LESSER GENERAL PUBLIC LICENSE
5 | Version 3, 29 June 2007
6 |
7 | Copyright (C) 2007 Free Software Foundation, Inc.
8 | Everyone is permitted to copy and distribute verbatim copies
9 | of this license document, but changing it is not allowed.
10 |
11 |
12 | This version of the GNU Lesser General Public License incorporates
13 | the terms and conditions of version 3 of the GNU General Public
14 | License, supplemented by the additional permissions listed below.
15 |
16 | 0. Additional Definitions.
17 |
18 | As used herein, "this License" refers to version 3 of the GNU Lesser
19 | General Public License, and the "GNU GPL" refers to version 3 of the GNU
20 | General Public License.
21 |
22 | "The Library" refers to a covered work governed by this License,
23 | other than an Application or a Combined Work as defined below.
24 |
25 | An "Application" is any work that makes use of an interface provided
26 | by the Library, but which is not otherwise based on the Library.
27 | Defining a subclass of a class defined by the Library is deemed a mode
28 | of using an interface provided by the Library.
29 |
30 | A "Combined Work" is a work produced by combining or linking an
31 | Application with the Library. The particular version of the Library
32 | with which the Combined Work was made is also called the "Linked
33 | Version".
34 |
35 | The "Minimal Corresponding Source" for a Combined Work means the
36 | Corresponding Source for the Combined Work, excluding any source code
37 | for portions of the Combined Work that, considered in isolation, are
38 | based on the Application, and not on the Linked Version.
39 |
40 | The "Corresponding Application Code" for a Combined Work means the
41 | object code and/or source code for the Application, including any data
42 | and utility programs needed for reproducing the Combined Work from the
43 | Application, but excluding the System Libraries of the Combined Work.
44 |
45 | 1. Exception to Section 3 of the GNU GPL.
46 |
47 | You may convey a covered work under sections 3 and 4 of this License
48 | without being bound by section 3 of the GNU GPL.
49 |
50 | 2. Conveying Modified Versions.
51 |
52 | If you modify a copy of the Library, and, in your modifications, a
53 | facility refers to a function or data to be supplied by an Application
54 | that uses the facility (other than as an argument passed when the
55 | facility is invoked), then you may convey a copy of the modified
56 | version:
57 |
58 | a) under this License, provided that you make a good faith effort to
59 | ensure that, in the event an Application does not supply the
60 | function or data, the facility still operates, and performs
61 | whatever part of its purpose remains meaningful, or
62 |
63 | b) under the GNU GPL, with none of the additional permissions of
64 | this License applicable to that copy.
65 |
66 | 3. Object Code Incorporating Material from Library Header Files.
67 |
68 | The object code form of an Application may incorporate material from
69 | a header file that is part of the Library. You may convey such object
70 | code under terms of your choice, provided that, if the incorporated
71 | material is not limited to numerical parameters, data structure
72 | layouts and accessors, or small macros, inline functions and templates
73 | (ten or fewer lines in length), you do both of the following:
74 |
75 | a) Give prominent notice with each copy of the object code that the
76 | Library is used in it and that the Library and its use are
77 | covered by this License.
78 |
79 | b) Accompany the object code with a copy of the GNU GPL and this license
80 | document.
81 |
82 | 4. Combined Works.
83 |
84 | You may convey a Combined Work under terms of your choice that,
85 | taken together, effectively do not restrict modification of the
86 | portions of the Library contained in the Combined Work and reverse
87 | engineering for debugging such modifications, if you also do each of
88 | the following:
89 |
90 | a) Give prominent notice with each copy of the Combined Work that
91 | the Library is used in it and that the Library and its use are
92 | covered by this License.
93 |
94 | b) Accompany the Combined Work with a copy of the GNU GPL and this license
95 | document.
96 |
97 | c) For a Combined Work that displays copyright notices during
98 | execution, include the copyright notice for the Library among
99 | these notices, as well as a reference directing the user to the
100 | copies of the GNU GPL and this license document.
101 |
102 | d) Do one of the following:
103 |
104 | 0) Convey the Minimal Corresponding Source under the terms of this
105 | License, and the Corresponding Application Code in a form
106 | suitable for, and under terms that permit, the user to
107 | recombine or relink the Application with a modified version of
108 | the Linked Version to produce a modified Combined Work, in the
109 | manner specified by section 6 of the GNU GPL for conveying
110 | Corresponding Source.
111 |
112 | 1) Use a suitable shared library mechanism for linking with the
113 | Library. A suitable mechanism is one that (a) uses at run time
114 | a copy of the Library already present on the user's computer
115 | system, and (b) will operate properly with a modified version
116 | of the Library that is interface-compatible with the Linked
117 | Version.
118 |
119 | e) Provide Installation Information, but only if you would otherwise
120 | be required to provide such information under section 6 of the
121 | GNU GPL, and only to the extent that such information is
122 | necessary to install and execute a modified version of the
123 | Combined Work produced by recombining or relinking the
124 | Application with a modified version of the Linked Version. (If
125 | you use option 4d0, the Installation Information must accompany
126 | the Minimal Corresponding Source and Corresponding Application
127 | Code. If you use option 4d1, you must provide the Installation
128 | Information in the manner specified by section 6 of the GNU GPL
129 | for conveying Corresponding Source.)
130 |
131 | 5. Combined Libraries.
132 |
133 | You may place library facilities that are a work based on the
134 | Library side by side in a single library together with other library
135 | facilities that are not Applications and are not covered by this
136 | License, and convey such a combined library under terms of your
137 | choice, if you do both of the following:
138 |
139 | a) Accompany the combined library with a copy of the same work based
140 | on the Library, uncombined with any other library facilities,
141 | conveyed under the terms of this License.
142 |
143 | b) Give prominent notice with the combined library that part of it
144 | is a work based on the Library, and explaining where to find the
145 | accompanying uncombined form of the same work.
146 |
147 | 6. Revised Versions of the GNU Lesser General Public License.
148 |
149 | The Free Software Foundation may publish revised and/or new versions
150 | of the GNU Lesser General Public License from time to time. Such new
151 | versions will be similar in spirit to the present version, but may
152 | differ in detail to address new problems or concerns.
153 |
154 | Each version is given a distinguishing version number. If the
155 | Library as you received it specifies that a certain numbered version
156 | of the GNU Lesser General Public License "or any later version"
157 | applies to it, you have the option of following the terms and
158 | conditions either of that published version or of any later version
159 | published by the Free Software Foundation. If the Library as you
160 | received it does not specify a version number of the GNU Lesser
161 | General Public License, you may choose any version of the GNU Lesser
162 | General Public License ever published by the Free Software Foundation.
163 |
164 | If the Library as you received it specifies that a proxy can decide
165 | whether future versions of the GNU Lesser General Public License shall
166 | apply, that proxy's public statement of acceptance of any version is
167 | permanent authorization for you to choose that version for the
168 | Library.
169 |
--------------------------------------------------------------------------------
/roles/README.md:
--------------------------------------------------------------------------------
1 | #### About
2 |
3 | you can run the command in your root directory of Ansible project to pull all roles defined in requirements.yml
4 | ```
5 | ansible-galaxy install -r requirements.yml -f
6 | ```
7 |
--------------------------------------------------------------------------------
/roles/nextcloud/Notes.md:
--------------------------------------------------------------------------------
1 | ## 注意事项
2 |
3 | 1. 上传/下载文件大小(后台可设置)
4 | 1. opcache 设置
5 | ```
6 | opcache.enable=1
7 | opcache.enable_cli=1
8 | opcache.interned_strings_buffer=8
9 | opcache.max_accelerated_files=10000
10 | opcache.memory_consumption=128
11 | opcache.save_comments=1
12 | opcache.revalidate_freq=1
13 | ```
14 |
15 | 3. apache vhost 需要设置 头部 Header set Referrer-Policy "no-referrer"
16 | 3. 默认内置配置文件 配置好 redis 和 默认开启SMTP的SSL/TLS
17 |
--------------------------------------------------------------------------------
/roles/nextcloud/defaults/main.yml:
--------------------------------------------------------------------------------
1 | #Web服务器:apache | nginx,通过交互式选择获取
2 | nextcloud_webs: apache
3 |
4 | nextcloud_vhost_dir: /etc/httpd/vhost
5 | nextcloud_vhost_src: vhost.conf
6 | nextcloud_service: httpd
7 | nextcloud_owner: apache
8 |
9 | nextcloud_db_name: "nextcloud"
10 | nextcloud_db_user: "root"
11 | nextcloud_db_password: "123456"
12 | nextcloud_name: "nextcloud"
13 | nextcloud_title: "NextCloud"
14 | nextcloud_admin_user: "admin"
15 | nextcloud_admin_password: "admin"
16 | #下载链接需定期维护
17 | nextcloud_download_url: "https://download.nextcloud.com/server/releases/latest.zip"
18 |
19 |
--------------------------------------------------------------------------------
/roles/nextcloud/handlers/main.yml:
--------------------------------------------------------------------------------
https://raw.githubusercontent.com/Websoft9Archive/ansible-nextcloud/f089f3ace917097a5db6dc24aec35a097298a18f/roles/nextcloud/handlers/main.yml
--------------------------------------------------------------------------------
/roles/nextcloud/meta/main.yml:
--------------------------------------------------------------------------------
1 | ---
2 | dependencies: []
3 |
4 | galaxy_info:
5 | author:
6 | description:
7 | company:
8 | license:
9 | min_ansible_version:
10 | platforms:
11 | - name: EL
12 | versions:
13 | - 7
14 | - name: Ubuntu
15 | versions:
16 | - 18.04
17 |
18 | galaxy_tags:
19 |
20 |
--------------------------------------------------------------------------------
/roles/nextcloud/tasks/main.yml:
--------------------------------------------------------------------------------
1 | ---
2 | #引入PHP运行环境元数据,并初始化
3 |
4 | - include_vars: roles/role_php/vars/php_runtime_meta.yml
5 |
6 | #Create var for this playbook
7 | - set_fact:
8 | nextcloud_vhost_dir: "{{php_runtime_meta[ansible_os_family][nextcloud_webs].vhost_dir}}"
9 | nextcloud_vhost_src: "{{php_runtime_meta[ansible_os_family][nextcloud_webs].vhost_src}}"
10 | nextcloud_service: "{{php_runtime_meta[ansible_os_family][nextcloud_webs].service}}"
11 | nextcloud_owner: "{{php_runtime_meta[ansible_os_family][nextcloud_webs].owner}}"
12 | nextcloud_db_password: "{{mysql_root_password}}"
13 |
14 | - debug:
15 | msg: runtime {{ nextcloud_vhost_dir }}, {{nextcloud_vhost_src}}, {{nextcloud_service}}, {{nextcloud_owner}}, {{nextcloud_webs}}, {{ansible_distribution}}
16 |
17 | # NextCloud
18 | - name: Remove extra dir
19 | shell: |
20 | rm -rf /data/wwwroot/*{{nextcloud_name}}*
21 |
22 | - name: Download NextCloud
23 | shell: |
24 | cd /data/wwwroot
25 | wget {{nextcloud_download_url}} --no-check-certificate
26 | unzip latest.zip
27 | # unarchive:
28 | # src: "{{nextcloud_download_url}}"
29 | # dest: /data/wwwroot
30 | # remote_src: yes
31 |
32 | - name: Rename dir name
33 | shell: cd /data/wwwroot; if [ ! -d "{{nextcloud_name}}" ]; then mv *{{nextcloud_name}}* {{nextcloud_name}}; fi
34 |
35 | - name: Create the occ Helper Script
36 | template:
37 | src: occ
38 | dest: /usr/bin/occ
39 | mode: u+x,g+x,o+x
40 |
41 | - name: Change directory ownership and group ownership
42 | shell: chown -R {{nextcloud_owner}}:{{nextcloud_owner}} /data/wwwroot
43 |
44 | - name: Install NextCloud (Automaticall generate configuration files)
45 | shell: |
46 | occ maintenance:install \
47 | --database "mysql" \
48 | --database-name "{{nextcloud_db_name}}" \
49 | --database-user "{{nextcloud_db_user}}" \
50 | --database-pass "{{nextcloud_db_password}}" \
51 | --admin-user "{{nextcloud_admin_user}}" \
52 | --admin-pass "{{nextcloud_admin_password}}"
53 |
54 | - name: Configure public_ip as NextCloud Domains
55 | shell: |
56 | public_ip=`wget -O - https://download.websoft9.com/ansible/get_ip.sh | bash`
57 | occ config:system:set trusted_domains 1 --value="$public_ip"
58 |
59 | - name: Configure Caching and File Locking
60 | shell: |
61 | occ config:system:set \
62 | memcache.local \
63 | --value '\OC\Memcache\Redis'
64 | occ config:system:set \
65 | memcache.locking \
66 | --value '\OC\Memcache\Redis'
67 | occ config:system:set \
68 | redis host\
69 | --value='127.0.0.1'
70 | occ config:system:set \
71 | redis port\
72 | --value=6379
73 |
74 | - name: Set Up a NextCloud cron Job
75 | cron:
76 | name: "Nextcloud cron"
77 | minute: "*/5"
78 | hour: "*"
79 | day: "*"
80 | month: "*"
81 | weekday: "*"
82 | user: "{{nextcloud_owner}}"
83 | job: "php -f /data/wwwroot/nextcloud/cron.php"
84 |
85 | # 系统通用
86 |
87 | - name: Permission directory
88 | shell: |
89 | find /data/wwwroot -type d -exec chmod 750 {} \;
90 | find /data/wwwroot -not -type d -exec chmod 640 {} \;
91 |
92 | # 根据不同的基础环境分别处理
93 |
94 | - block:
95 | - name: change owner&group
96 | shell: chown -R {{nextcloud_owner}}:{{nextcloud_owner}} /data/wwwroot
97 |
98 | - name: restart Apache or Nginx
99 | service: name={{nextcloud_service}} state=restarted enabled=yes
100 |
101 | - name: restart php-fpm
102 | service: name=php-fpm state=restarted
103 |
104 | - name: Check nextcloud version
105 | shell: >
106 | sudo echo "nextcloud version:" $(cat /data/wwwroot/nextcloud/version.php |grep OC_VersionString |awk -F "'" '{print $2}') |sudo tee -a /data/logs/install_version.txt
107 |
--------------------------------------------------------------------------------
/roles/nextcloud/templates/occ:
--------------------------------------------------------------------------------
1 | #! /bin/bash
2 |
3 | cd /data/wwwroot/nextcloud
4 | sudo -u {{nextcloud_owner}} /usr/bin/php /data/wwwroot/nextcloud/occ "$@"
--------------------------------------------------------------------------------
/variables.json:
--------------------------------------------------------------------------------
1 | {
2 | "name": "nextcloud",
3 | "trademark": "Nextcloud",
4 | "official_url": "https://nextcloud.com/",
5 | "support_os": "CentOS7.x, Ubuntu20.04, Amazon Linux2",
6 | "requirements_cpu": "2",
7 | "requirements_memory": "6",
8 | "requirements_Bandwidth": "100",
9 | "requirements_disk": "20",
10 | "requirements_swap": "2",
11 | "requirements_configure_url": "https://docs.nextcloud.com/server/18/admin_manual/installation/source_installation.html",
12 | "components": "Nextcloud, Apache/Nginx, MySQL, PHP, ONLYOFFICE Document Server, Docker",
13 | "install_way": {
14 | "en": "Isntallation for download binaries files ",
15 | "zh": "下载可执行二进制包解压安装"
16 | },
17 | "install_url": "https://download.nextcloud.com/server/releases/"
18 | }
19 |
--------------------------------------------------------------------------------
/vars/main.yml:
--------------------------------------------------------------------------------
1 | # Global
2 | region: "0"
3 |
4 | mysql_remote: True
5 | mysql_version: "8.0"
6 | mysql_root_password: "123456"
7 |
8 | php_version: "7.4"
9 |
10 | apache_certbot: True
11 | apache_appname: "nextcloud"
12 | apache_vhost_mode: "www"
13 |
14 | nginx_certbot: True
15 | nginx_appname: "nextcloud"
16 | nginx_vhost_mode: "www"
17 |
18 | docker_applications:
19 | - onlyofficedocs
20 | - phpmyadmin
21 |
22 | mysql_databases:
23 | - name: nextcloud
24 |
25 | mysql_users:
26 | - name: nextcloud
27 | priv: 'nextcloud.*:ALL'
28 |
29 | # init all users password for MySQL
30 | init_db:
31 | mysql:
32 | admin: root
33 | users: ["nextcloud"]
34 | password: "123456"
35 | config_paths:
36 | - /data/wwwroot/nextcloud/config/config.php
37 |
38 | init_application:
39 | nextcloud:
40 | username: admin
41 | password: "admin"
42 | commands:
43 | - sudo echo -e "$new_password\n$new_password\n" | occ user:resetpassword admin
44 | - public_ip=`wget -O - https://download.websoft9.com/ansible/get_ip.sh | bash`
45 | - occ config:system:set trusted_domains 1 --value="$public_ip"
46 |
--------------------------------------------------------------------------------