 3 |
4 | [](./1-voice-user-interface.md)[](./2-lambda-function.md)[](./3-connect-vui-to-code.md)[](./4-testing.md)[](./5-customization.md)[](./6-publication.md)
5 |
6 | ## Setting up Your Alexa Skill in the Developer Console
7 |
8 | 1. Go to the **[Alexa Developer Console](https://developer.amazon.com/alexa/console/ask)**. Enter your account credentials and click the **Sign In** button.
9 | (If you don't already have an account, you will be able to create a new one for free.)
10 |
11 | 1. Once you have signed in, select the **Create Skill** button near the top-right of the list of your Alexa Skills.
12 |
13 | 1. Give your new skill a **Name**, for example, 'Color Picker'. This is the name that will be shown in the Alexa Skills Store, and the name your users will refer to.
14 |
15 | 1. Select the Default Language. This tutorial will presume you have selected 'English (US)'. Click the **Next** button at the top right.
16 |
17 | 1. Select **Other** under the *'Choose a type of experience'* section.
18 |
19 | 1. Select the **Custom** model under the *'Choose a model'* section.
20 |
21 | 1. Select **Provision your own** under the *'Hosting services'* section. Click the **Next** button at the top right.
22 |
23 | 1. Choose **Start from scratch** from the *Templates* section and click the **Next** button at the top right.
24 |
25 | 1. Review your selections and click the **Create Skill** button at the top right.
26 |
27 | 1. **Build the Interaction Model for your skill**
28 | 1. On the left hand navigation panel, select the **JSON Editor** tab under **Interaction Model**. In the textfield provided, replace any existing code with the code provided in the [Interaction Model](../models/en-US.json). Click **Save**.
29 | 2. If you want to change the skill invocation name, select the **Invocations** tab on the left hand navigation panel. Select **Skill Invocation Name** and enter a **Skill Invocation Name**. This is the name that your users will need to say to start your skill. In this case, it's preconfigured to be ‘my color picker'.
30 | 3. Click **Save** and then **Build skill**.
31 |
32 | **Note:** You should notice that **Intents** and **Slot Types** will auto populate based on the JSON Interaction Model that you have now applied to your skill. Feel free to explore the changes here, to learn about **Intents**, **Slots**, and **Utterances** open our [technical documentation in a new tab](https://developer.amazon.com/docs/custom-skills/create-intents-utterances-and-slots.html?&sc_category=Owned&sc_channel=RD&sc_campaign=Evangelism2018&sc_publisher=github&sc_content=Survey&sc_detail=quiz-game-python-V2_GUI-1&sc_funnel=Convert&sc_country=WW&sc_medium=Owned_RD_Evangelism2018_github_Survey_quiz-game-python-V2_GUI-1_Convert_WW_beginnersdevs&sc_segment=beginnersdevs).
33 |
34 | 11. **Optional:** Select a custom intent by expanding the **Intents** from the left side navigation panel. Add some more sample utterances for your newly generated intents. Think of all the different ways that a user could request to make a specific intent happen. A few examples are provided. Be sure to click **Save** and **Build skill** after you're done making changes here.
35 |
36 | 12. If your interaction model builds successfully, proceed to the next step. If not, you should see an error. Try to resolve the errors. In our next step of this guide, we will be creating our Lambda function in the AWS developer console, but keep this browser tab open, because we will be returning here on [Page #3: Connect VUI to Code](./3-connect-vui-to-code.md).
37 |
38 | If you get an error from your interaction model, check through this list:
39 |
40 | * **Did you copy & paste the provided code correctly?**
41 | * **Did you accidentally add any characters to the Interaction Model?**
42 |
43 | [](./2-lambda-function.md)
44 |
--------------------------------------------------------------------------------
/instructions/2-lambda-function.md:
--------------------------------------------------------------------------------
1 | # Build An Alexa Color Picker Skill using ASK Python SDK
2 |
3 |
4 | [](./1-voice-user-interface.md)[](./2-lambda-function.md)[](./3-connect-vui-to-code.md)[](./4-testing.md)[](./5-customization.md)[](./6-publication.md)
5 |
6 | ## Setting Up A Lambda Function Using Amazon Web Services
7 |
8 | In the [first step of this guide](1-voice-user-interface.md), we built the Voice User Interface (VUI) for our Alexa skill. On this page, we will be creating a Lambda function using [Amazon Web Services](http://aws.amazon.com). You can [read more about what a Lambda function is](http://aws.amazon.com/lambda), but for the purposes of this guide, what you need to know is that Lambda is where our code lives. When a user asks Alexa to use our skill, it is our Lambda function that interprets the appropriate interaction, and provides the conversation back to the user.
9 |
10 | 1. Go to http://aws.amazon.com and sign in to the console. If you don't already have an account, you will need to create one. [Check out this quick walkthrough for setting up a new AWS account](https://alexa.design/create-aws-account).
11 |
12 | [](https://console.aws.amazon.com/console/home)
13 |
14 | 2. Choose **Services** at the top of the screen, and type "Lambda" in the search box. You can also find it in the list of services. It is in the **Compute** section.
15 |
16 | [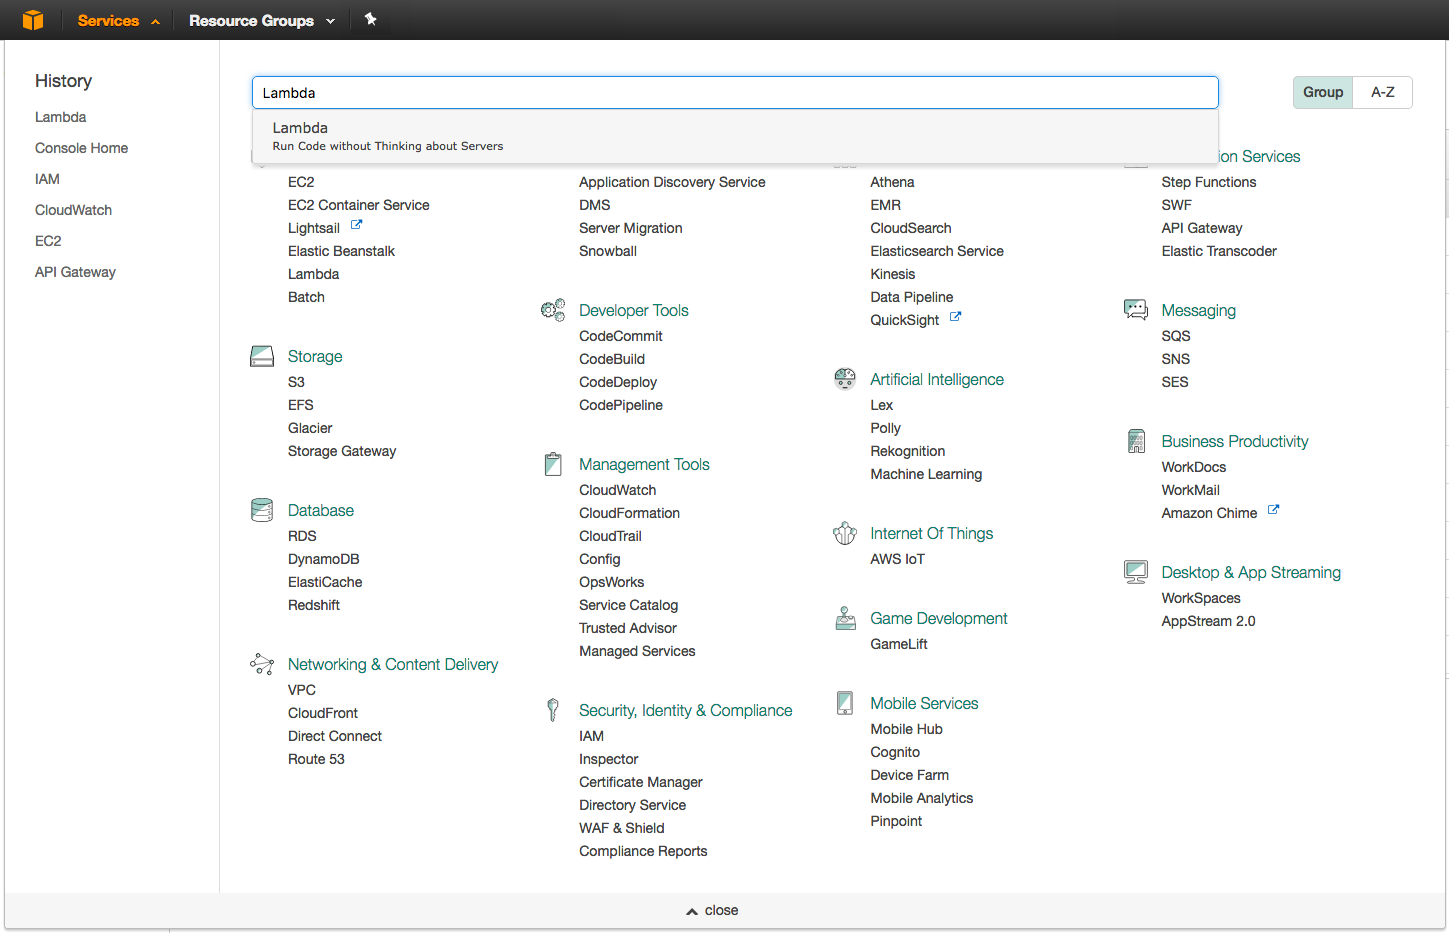](https://console.aws.amazon.com/lambda/home)
17 |
18 | 3. Check your **AWS region**. Lambda only works with the Alexa Skills Kit in four regions: US East (N. Virginia), EU (Ireland), US West (Oregon) and Asia Pacific (Tokyo). Make sure you choose the region closest to your customers.
19 |
20 | 
21 |
22 | 4. Click the **Create function** button. It should be near the top of your screen.
23 |
24 | 
25 |
26 | 5. Click on **Author from scratch**. We will configure our Lambda function next.
27 | 1. These values will only ever be visible to you, but make sure that you name your function something meaningful. "samplePythonColorPicker" is sufficient if you don't have another idea for a name.
28 |
29 | 2. From the "Runtime" dropdown select the python version your system supports. This tutorial and sample code works with either Python 3.7 or 3.9. To check the python version, try the following command in a terminal
30 | ```
31 | $ python --version
32 | Python 2.7.10
33 | ```
34 |
35 | 3. **Change default execution role**. From the “Execution role” section you can select “Create a new role with basic Lambda permissions”. For more details, we have a [detailed walkthrough for setting up your first role for Lambda](https://alexa.design/create-lambda-role).
36 |
37 | 4. Click **Create function**.
38 |
39 | 6. **Configure your trigger**. Expand the ‘Function overview’ window and click on **+ Add trigger**. There are many different AWS services that can trigger a Lambda function, but for the purposes of this guide, we need to select "Alexa" from the drop-down menu.
40 |
41 | Once you have selected Alexa Skills Kit, scroll down and find the Skill ID verification section. Although you will want to paste your skill's ID in the Skill ID field, however for this tutorial, click Disable. Click the orange **Add** button in the lower right.
42 |
43 | 7. **Finish configuring your function**. We have provided the code for this skill [here](../lambda/py). To properly upload this code to Lambda, you'll need to perform the following:
44 |
45 | 1. This skill uses the [ASK SDK for Python](https://github.com/alexa/alexa-skills-kit-sdk-for-python) for development. The skill code is provided in the [lambda_function.py](../lambda/py/lambda_function.py), and the dependencies are mentioned in [requirements.txt](../lambda/py/requirements.txt). Download the contents of the [lambda/py](../lambda/py) folder.
46 | 2. On your system, navigate to the lambda folder and install the dependencies in a new folder called “skill_env” using the following command:
47 |
48 | ```
49 | pip install -r py/requirements.txt -t skill_env
50 | ```
51 |
52 | 3. Copy the contents of the `lambda/py` folder into the `skill_env` folder.
53 |
54 | ```
55 | cp -r py/* skill_env/
56 | ```
57 |
58 | 4. Zip the contents of the `skill_env` folder. Remember to zip the **contents** of the folder and **NOT** the folder itself.
59 | 5. On the AWS Lambda console, navigate to the **Code** tab and click on the **Upload from** button. Select “.zip file” from the drop-down menu to upload the zip created in the previous step and click on **Save**.
60 |
61 | *(Optional)* Follow the ASK Python SDK [Getting Started](https://alexa-skills-kit-python-sdk.readthedocs.io/en/latest/GETTING_STARTED.html#adding-the-ask-sdk-for-python-to-your-project) documentation, to check alternative ways of installing the sdk and deploying to AWS Lambda console.
62 |
63 | 8. (Optional) Click the **Test** tab and select ‘Create new event’.
64 |
65 | 1. Type `LaunchRequest` into the 'Event Name' field.
66 | 2. Select 'Alexa Start Session' from the 'Event Template' dropdown.
67 | 3. Click the ‘Save’ button at the bottom of the page
68 | 4. Click the **Test** button at the top of the page.
69 | 5. You should see a light green box with the message: *Execution result: succeeded* at the top of the page.
70 |
71 | 9. As a final step, copy the **ARN** value from the top right corner of the screen. You will need this value in the next section of this guide.
72 |
73 | [](3-connect-vui-to-code.md)
74 |
--------------------------------------------------------------------------------
/instructions/3-connect-vui-to-code.md:
--------------------------------------------------------------------------------
1 | # Build An Alexa Color Picker Skill using ASK Python SDK
2 |
3 |
4 | [](./1-voice-user-interface.md)[](./2-lambda-function.md)[](./3-connect-vui-to-code.md)[](./4-testing.md)[](./5-customization.md)[](./6-publication.md)
5 |
6 | ## Connecting Your Voice User Interface To Your Lambda Function
7 |
8 | On [page #1](./1-voice-user-interface.md) of this guide, we created a voice user interface for the intents and utterances we expect from our users. On [page #2](./2-lambda-function.md), we created a Lambda function that contains all of our logic for the skill. On this page, we need to connect those two pieces together.
9 |
10 | 1. Go back to the **[Amazon Developer Portal](https://developer.amazon.com/edw/home.html#/skills/list)** and select your skill from the list. You may still have a browser tab open if you started at the beginning of this tutorial.
11 |
12 | 2. Select the **Endpoint** tab on the left side navigation panel.
13 |
14 | 3. Select the **AWS Lambda ARN** option for your endpoint. You have the ability to host your code anywhere that you would like, but for the purposes of simplicity and frugality, we are using AWS Lambda. ([Read more about Hosting Your Own Custom Skill Web Service](https://developer.amazon.com/public/solutions/alexa/alexa-skills-kit/docs/developing-an-alexa-skill-as-a-web-service).) With the AWS Free Tier, you get 1,000,000 free requests per month, up to 3.2 million seconds of compute time per month. Learn more at https://aws.amazon.com/free/. In addition, Amazon now offers [AWS Promotional Credits for developers who have live Alexa skills that incur costs on AWS related to those skills](https://developer.amazon.com/alexa-skills-kit/alexa-aws-credits).
15 |
16 | 4. Paste your Lambda's ARN (Amazon Resource Name) into the textbox provided for **Default Region**.
17 |
18 | 5. Click the **Save** button at the top of the main panel.
19 |
20 | 6. Click the **Next** button below to continue to page #4 of this guide.
21 |
22 |
3 |
4 | [](./1-voice-user-interface.md)[](./2-lambda-function.md)[](./3-connect-vui-to-code.md)[](./4-testing.md)[](./5-customization.md)[](./6-publication.md)
5 |
6 | ## Setting up Your Alexa Skill in the Developer Console
7 |
8 | 1. Go to the **[Alexa Developer Console](https://developer.amazon.com/alexa/console/ask)**. Enter your account credentials and click the **Sign In** button.
9 | (If you don't already have an account, you will be able to create a new one for free.)
10 |
11 | 1. Once you have signed in, select the **Create Skill** button near the top-right of the list of your Alexa Skills.
12 |
13 | 1. Give your new skill a **Name**, for example, 'Color Picker'. This is the name that will be shown in the Alexa Skills Store, and the name your users will refer to.
14 |
15 | 1. Select the Default Language. This tutorial will presume you have selected 'English (US)'. Click the **Next** button at the top right.
16 |
17 | 1. Select **Other** under the *'Choose a type of experience'* section.
18 |
19 | 1. Select the **Custom** model under the *'Choose a model'* section.
20 |
21 | 1. Select **Provision your own** under the *'Hosting services'* section. Click the **Next** button at the top right.
22 |
23 | 1. Choose **Start from scratch** from the *Templates* section and click the **Next** button at the top right.
24 |
25 | 1. Review your selections and click the **Create Skill** button at the top right.
26 |
27 | 1. **Build the Interaction Model for your skill**
28 | 1. On the left hand navigation panel, select the **JSON Editor** tab under **Interaction Model**. In the textfield provided, replace any existing code with the code provided in the [Interaction Model](../models/en-US.json). Click **Save**.
29 | 2. If you want to change the skill invocation name, select the **Invocations** tab on the left hand navigation panel. Select **Skill Invocation Name** and enter a **Skill Invocation Name**. This is the name that your users will need to say to start your skill. In this case, it's preconfigured to be ‘my color picker'.
30 | 3. Click **Save** and then **Build skill**.
31 |
32 | **Note:** You should notice that **Intents** and **Slot Types** will auto populate based on the JSON Interaction Model that you have now applied to your skill. Feel free to explore the changes here, to learn about **Intents**, **Slots**, and **Utterances** open our [technical documentation in a new tab](https://developer.amazon.com/docs/custom-skills/create-intents-utterances-and-slots.html?&sc_category=Owned&sc_channel=RD&sc_campaign=Evangelism2018&sc_publisher=github&sc_content=Survey&sc_detail=quiz-game-python-V2_GUI-1&sc_funnel=Convert&sc_country=WW&sc_medium=Owned_RD_Evangelism2018_github_Survey_quiz-game-python-V2_GUI-1_Convert_WW_beginnersdevs&sc_segment=beginnersdevs).
33 |
34 | 11. **Optional:** Select a custom intent by expanding the **Intents** from the left side navigation panel. Add some more sample utterances for your newly generated intents. Think of all the different ways that a user could request to make a specific intent happen. A few examples are provided. Be sure to click **Save** and **Build skill** after you're done making changes here.
35 |
36 | 12. If your interaction model builds successfully, proceed to the next step. If not, you should see an error. Try to resolve the errors. In our next step of this guide, we will be creating our Lambda function in the AWS developer console, but keep this browser tab open, because we will be returning here on [Page #3: Connect VUI to Code](./3-connect-vui-to-code.md).
37 |
38 | If you get an error from your interaction model, check through this list:
39 |
40 | * **Did you copy & paste the provided code correctly?**
41 | * **Did you accidentally add any characters to the Interaction Model?**
42 |
43 | [](./2-lambda-function.md)
44 |
--------------------------------------------------------------------------------
/instructions/2-lambda-function.md:
--------------------------------------------------------------------------------
1 | # Build An Alexa Color Picker Skill using ASK Python SDK
2 |
3 |
4 | [](./1-voice-user-interface.md)[](./2-lambda-function.md)[](./3-connect-vui-to-code.md)[](./4-testing.md)[](./5-customization.md)[](./6-publication.md)
5 |
6 | ## Setting Up A Lambda Function Using Amazon Web Services
7 |
8 | In the [first step of this guide](1-voice-user-interface.md), we built the Voice User Interface (VUI) for our Alexa skill. On this page, we will be creating a Lambda function using [Amazon Web Services](http://aws.amazon.com). You can [read more about what a Lambda function is](http://aws.amazon.com/lambda), but for the purposes of this guide, what you need to know is that Lambda is where our code lives. When a user asks Alexa to use our skill, it is our Lambda function that interprets the appropriate interaction, and provides the conversation back to the user.
9 |
10 | 1. Go to http://aws.amazon.com and sign in to the console. If you don't already have an account, you will need to create one. [Check out this quick walkthrough for setting up a new AWS account](https://alexa.design/create-aws-account).
11 |
12 | [](https://console.aws.amazon.com/console/home)
13 |
14 | 2. Choose **Services** at the top of the screen, and type "Lambda" in the search box. You can also find it in the list of services. It is in the **Compute** section.
15 |
16 | [](https://console.aws.amazon.com/lambda/home)
17 |
18 | 3. Check your **AWS region**. Lambda only works with the Alexa Skills Kit in four regions: US East (N. Virginia), EU (Ireland), US West (Oregon) and Asia Pacific (Tokyo). Make sure you choose the region closest to your customers.
19 |
20 | 
21 |
22 | 4. Click the **Create function** button. It should be near the top of your screen.
23 |
24 | 
25 |
26 | 5. Click on **Author from scratch**. We will configure our Lambda function next.
27 | 1. These values will only ever be visible to you, but make sure that you name your function something meaningful. "samplePythonColorPicker" is sufficient if you don't have another idea for a name.
28 |
29 | 2. From the "Runtime" dropdown select the python version your system supports. This tutorial and sample code works with either Python 3.7 or 3.9. To check the python version, try the following command in a terminal
30 | ```
31 | $ python --version
32 | Python 2.7.10
33 | ```
34 |
35 | 3. **Change default execution role**. From the “Execution role” section you can select “Create a new role with basic Lambda permissions”. For more details, we have a [detailed walkthrough for setting up your first role for Lambda](https://alexa.design/create-lambda-role).
36 |
37 | 4. Click **Create function**.
38 |
39 | 6. **Configure your trigger**. Expand the ‘Function overview’ window and click on **+ Add trigger**. There are many different AWS services that can trigger a Lambda function, but for the purposes of this guide, we need to select "Alexa" from the drop-down menu.
40 |
41 | Once you have selected Alexa Skills Kit, scroll down and find the Skill ID verification section. Although you will want to paste your skill's ID in the Skill ID field, however for this tutorial, click Disable. Click the orange **Add** button in the lower right.
42 |
43 | 7. **Finish configuring your function**. We have provided the code for this skill [here](../lambda/py). To properly upload this code to Lambda, you'll need to perform the following:
44 |
45 | 1. This skill uses the [ASK SDK for Python](https://github.com/alexa/alexa-skills-kit-sdk-for-python) for development. The skill code is provided in the [lambda_function.py](../lambda/py/lambda_function.py), and the dependencies are mentioned in [requirements.txt](../lambda/py/requirements.txt). Download the contents of the [lambda/py](../lambda/py) folder.
46 | 2. On your system, navigate to the lambda folder and install the dependencies in a new folder called “skill_env” using the following command:
47 |
48 | ```
49 | pip install -r py/requirements.txt -t skill_env
50 | ```
51 |
52 | 3. Copy the contents of the `lambda/py` folder into the `skill_env` folder.
53 |
54 | ```
55 | cp -r py/* skill_env/
56 | ```
57 |
58 | 4. Zip the contents of the `skill_env` folder. Remember to zip the **contents** of the folder and **NOT** the folder itself.
59 | 5. On the AWS Lambda console, navigate to the **Code** tab and click on the **Upload from** button. Select “.zip file” from the drop-down menu to upload the zip created in the previous step and click on **Save**.
60 |
61 | *(Optional)* Follow the ASK Python SDK [Getting Started](https://alexa-skills-kit-python-sdk.readthedocs.io/en/latest/GETTING_STARTED.html#adding-the-ask-sdk-for-python-to-your-project) documentation, to check alternative ways of installing the sdk and deploying to AWS Lambda console.
62 |
63 | 8. (Optional) Click the **Test** tab and select ‘Create new event’.
64 |
65 | 1. Type `LaunchRequest` into the 'Event Name' field.
66 | 2. Select 'Alexa Start Session' from the 'Event Template' dropdown.
67 | 3. Click the ‘Save’ button at the bottom of the page
68 | 4. Click the **Test** button at the top of the page.
69 | 5. You should see a light green box with the message: *Execution result: succeeded* at the top of the page.
70 |
71 | 9. As a final step, copy the **ARN** value from the top right corner of the screen. You will need this value in the next section of this guide.
72 |
73 | [](3-connect-vui-to-code.md)
74 |
--------------------------------------------------------------------------------
/instructions/3-connect-vui-to-code.md:
--------------------------------------------------------------------------------
1 | # Build An Alexa Color Picker Skill using ASK Python SDK
2 |
3 |
4 | [](./1-voice-user-interface.md)[](./2-lambda-function.md)[](./3-connect-vui-to-code.md)[](./4-testing.md)[](./5-customization.md)[](./6-publication.md)
5 |
6 | ## Connecting Your Voice User Interface To Your Lambda Function
7 |
8 | On [page #1](./1-voice-user-interface.md) of this guide, we created a voice user interface for the intents and utterances we expect from our users. On [page #2](./2-lambda-function.md), we created a Lambda function that contains all of our logic for the skill. On this page, we need to connect those two pieces together.
9 |
10 | 1. Go back to the **[Amazon Developer Portal](https://developer.amazon.com/edw/home.html#/skills/list)** and select your skill from the list. You may still have a browser tab open if you started at the beginning of this tutorial.
11 |
12 | 2. Select the **Endpoint** tab on the left side navigation panel.
13 |
14 | 3. Select the **AWS Lambda ARN** option for your endpoint. You have the ability to host your code anywhere that you would like, but for the purposes of simplicity and frugality, we are using AWS Lambda. ([Read more about Hosting Your Own Custom Skill Web Service](https://developer.amazon.com/public/solutions/alexa/alexa-skills-kit/docs/developing-an-alexa-skill-as-a-web-service).) With the AWS Free Tier, you get 1,000,000 free requests per month, up to 3.2 million seconds of compute time per month. Learn more at https://aws.amazon.com/free/. In addition, Amazon now offers [AWS Promotional Credits for developers who have live Alexa skills that incur costs on AWS related to those skills](https://developer.amazon.com/alexa-skills-kit/alexa-aws-credits).
15 |
16 | 4. Paste your Lambda's ARN (Amazon Resource Name) into the textbox provided for **Default Region**.
17 |
18 | 5. Click the **Save** button at the top of the main panel.
19 |
20 | 6. Click the **Next** button below to continue to page #4 of this guide.
21 |
22 | 23 |
 24 |
--------------------------------------------------------------------------------
/instructions/4-testing.md:
--------------------------------------------------------------------------------
1 | # Build An Alexa Color Picker Skill using ASK Python SDK
2 |
3 |
4 | [](./1-voice-user-interface.md)[](./2-lambda-function.md)[](./3-connect-vui-to-code.md)[](./4-testing.md)[](./5-customization.md)[](./6-publication.md)
5 |
6 | ## Testing Your Alexa Skill
7 |
8 | So far, we have [created a Voice User Interface](./1-voice-user-interface.md) and [a Lambda function](./2-lambda-function.md), and [connected the two together](./3-connect-vui-to-code.md). Your skill is now ready to test.
9 |
10 | 1. Go back to the **[Amazon Developer Portal](https://developer.amazon.com/edw/home.html#/skills/list)** and select your skill from the list. You may still have a browser tab open if you started at the beginning of this tutorial.
11 |
12 | 2. Open the **Test** Pane, by selecting the **Test** tab from the top navigation menu.
13 |
14 | 3. Enable Testing by selecting “Development” from the drop-down menu next to **Test is disabled for this skill**. It should be underneath the top navigation menu.
15 |
16 | 4. To validate that your skill is working as expected, invoke your skill from the **Alexa Simulator**. You can either type or click and hold the mic from the input box to use your voice.
17 | 1. Type "Open" followed by the invocation name you gave your skill in [Step 1](./1-voice-user-interface.md). For example, "Open my color picker".
18 | 2. Use your voice by clicking and holding the **mic** on the side panel and saying "Open" followed by the invocation name you gave your skill.
19 | 3. If you've forgotten the invocation name for your skill, revisit the **Build** tab on the top navigation menu and select Invocation from the sidebar to review it.
20 |
21 | 5. Ensure your skill works the way that you designed it to.
22 | * After you interact with the Alexa Simulator, you should see the Skill I/O **JSON Input** and **JSON Output** boxes get populated with JSON data. You can also view the **Device Log** to trace your steps.
23 | * If it's not working as expected, you can dig into the JSON to see exactly what Alexa is sending and receiving from the endpoint. If something is broken, AWS Lambda offers an additional testing tool to help you troubleshoot your skill.
24 |
25 | 6. **Configure a test event in AWS Lambda.** Now that you are familiar with the **request** and **response** boxes in the Service Simulator, it's important for you to know that you can use your **requests** to directly test your Lambda function every time you update it. To do this:
26 | 1. Enter an utterance in the service simulator, and copy the generated Lambda Request for the next step.
27 |
28 | 2. Open your Lambda function in AWS and go to the **Test* tab.
29 |
30 | 3. Select “Create new event”. Choose "Alexa Start Session" as the Event Template from the dropdown list. You can choose any test event in the list, as they are just templated event requests, but using "Alexa Start Session" is an easy one to remember.
31 |
32 |
24 |
--------------------------------------------------------------------------------
/instructions/4-testing.md:
--------------------------------------------------------------------------------
1 | # Build An Alexa Color Picker Skill using ASK Python SDK
2 |
3 |
4 | [](./1-voice-user-interface.md)[](./2-lambda-function.md)[](./3-connect-vui-to-code.md)[](./4-testing.md)[](./5-customization.md)[](./6-publication.md)
5 |
6 | ## Testing Your Alexa Skill
7 |
8 | So far, we have [created a Voice User Interface](./1-voice-user-interface.md) and [a Lambda function](./2-lambda-function.md), and [connected the two together](./3-connect-vui-to-code.md). Your skill is now ready to test.
9 |
10 | 1. Go back to the **[Amazon Developer Portal](https://developer.amazon.com/edw/home.html#/skills/list)** and select your skill from the list. You may still have a browser tab open if you started at the beginning of this tutorial.
11 |
12 | 2. Open the **Test** Pane, by selecting the **Test** tab from the top navigation menu.
13 |
14 | 3. Enable Testing by selecting “Development” from the drop-down menu next to **Test is disabled for this skill**. It should be underneath the top navigation menu.
15 |
16 | 4. To validate that your skill is working as expected, invoke your skill from the **Alexa Simulator**. You can either type or click and hold the mic from the input box to use your voice.
17 | 1. Type "Open" followed by the invocation name you gave your skill in [Step 1](./1-voice-user-interface.md). For example, "Open my color picker".
18 | 2. Use your voice by clicking and holding the **mic** on the side panel and saying "Open" followed by the invocation name you gave your skill.
19 | 3. If you've forgotten the invocation name for your skill, revisit the **Build** tab on the top navigation menu and select Invocation from the sidebar to review it.
20 |
21 | 5. Ensure your skill works the way that you designed it to.
22 | * After you interact with the Alexa Simulator, you should see the Skill I/O **JSON Input** and **JSON Output** boxes get populated with JSON data. You can also view the **Device Log** to trace your steps.
23 | * If it's not working as expected, you can dig into the JSON to see exactly what Alexa is sending and receiving from the endpoint. If something is broken, AWS Lambda offers an additional testing tool to help you troubleshoot your skill.
24 |
25 | 6. **Configure a test event in AWS Lambda.** Now that you are familiar with the **request** and **response** boxes in the Service Simulator, it's important for you to know that you can use your **requests** to directly test your Lambda function every time you update it. To do this:
26 | 1. Enter an utterance in the service simulator, and copy the generated Lambda Request for the next step.
27 |
28 | 2. Open your Lambda function in AWS and go to the **Test* tab.
29 |
30 | 3. Select “Create new event”. Choose "Alexa Start Session" as the Event Template from the dropdown list. You can choose any test event in the list, as they are just templated event requests, but using "Alexa Start Session" is an easy one to remember.
31 |
32 |  33 |
34 | 4. Type in an **Event Name** into the “Event name” dialog box. Delete the contents of the code editor, and paste the Lambda request you copied above into the code editor. The Event Name is only visible to you. Name your test event something descriptive and memorable. For our example, we entered an event name as "startSession". Additionally, by copying and pasting your Lambda Request from the service simulator, you can test different utterances and skill events beyond the pre-populated templates in Lambda.
35 |
36 |
33 |
34 | 4. Type in an **Event Name** into the “Event name” dialog box. Delete the contents of the code editor, and paste the Lambda request you copied above into the code editor. The Event Name is only visible to you. Name your test event something descriptive and memorable. For our example, we entered an event name as "startSession". Additionally, by copying and pasting your Lambda Request from the service simulator, you can test different utterances and skill events beyond the pre-populated templates in Lambda.
35 |
36 |  37 |
38 | 5. Click the **Save** button.
39 |
40 | 6. Click the **Test** button to execute the "startSession" test event.
41 |
42 | This gives you visibility into four things:
43 |
44 | * **Your response, listed in the "Execution Result."**
45 |
46 |
37 |
38 | 5. Click the **Save** button.
39 |
40 | 6. Click the **Test** button to execute the "startSession" test event.
41 |
42 | This gives you visibility into four things:
43 |
44 | * **Your response, listed in the "Execution Result."**
45 |
46 |  47 |
48 | * **A Summary of the statistics for your request.** This includes things like duration, resources, and memory used.
49 |
50 |
47 |
48 | * **A Summary of the statistics for your request.** This includes things like duration, resources, and memory used.
49 |
50 |  51 |
52 | * **Log output.** By effectively using print() or python logger statements in your Lambda code, you can track what is happening inside your function, and help to figure out what is happening when something goes wrong. You will find the log to be incredibly valuable as you move into more advanced skills.
53 |
54 |
51 |
52 | * **Log output.** By effectively using print() or python logger statements in your Lambda code, you can track what is happening inside your function, and help to figure out what is happening when something goes wrong. You will find the log to be incredibly valuable as you move into more advanced skills.
53 |
54 |  55 |
56 | * **A link to your [CloudWatch](https://console.aws.amazon.com/cloudwatch/home?region=us-east-1#logs:) logs for this function.** This will show you **all** of the responses and log statements from every user interaction. This is very useful, especially when you are testing your skill from a device with your voice. (It is the "[Click here](https://console.aws.amazon.com/cloudwatch/home?region=us-east-1#logs:)" link in the Log Output description.)
57 |
58 | 7. **Other testing methods to consider:**
59 |
60 | * [Echosim.io](https://echosim.io) - a browser-based Alexa skill testing tool that makes it easy to test your skills without carrying a physical device everywhere you go.
61 | * [Unit Testing with Alexa](https://alexa.design/testing-using-postman) - a modern approach to unit testing your Alexa skills with [Postman](http://getpostman.com) and [Amazon API Gateway](http://aws.amazon.com/apigateway).
62 |
63 | 8. If your sample skill is working properly, you can now customize your skill.
64 |
65 |
55 |
56 | * **A link to your [CloudWatch](https://console.aws.amazon.com/cloudwatch/home?region=us-east-1#logs:) logs for this function.** This will show you **all** of the responses and log statements from every user interaction. This is very useful, especially when you are testing your skill from a device with your voice. (It is the "[Click here](https://console.aws.amazon.com/cloudwatch/home?region=us-east-1#logs:)" link in the Log Output description.)
57 |
58 | 7. **Other testing methods to consider:**
59 |
60 | * [Echosim.io](https://echosim.io) - a browser-based Alexa skill testing tool that makes it easy to test your skills without carrying a physical device everywhere you go.
61 | * [Unit Testing with Alexa](https://alexa.design/testing-using-postman) - a modern approach to unit testing your Alexa skills with [Postman](http://getpostman.com) and [Amazon API Gateway](http://aws.amazon.com/apigateway).
62 |
63 | 8. If your sample skill is working properly, you can now customize your skill.
64 |
65 |  66 |
--------------------------------------------------------------------------------
/instructions/5-customization.md:
--------------------------------------------------------------------------------
1 | # Build An Alexa Color Picker Skill using ASK Python SDK
2 |
3 |
4 | [](./1-voice-user-interface.md)[](./2-lambda-function.md)[](./3-connect-vui-to-code.md)[](./4-testing.md)[](./5-customization.md)[](./6-publication.md)
5 |
6 | ## Customization / Next Steps
7 |
8 | At this point, you should have a working copy of our Color Picker skill. In order to make it your own, you will need to customize it with some responses that you create. Here are the things you will need to change:
9 |
10 | 1. Update your **sample utterances**. You need to update this list of utterances for a robust voice experience. **Remember that if you are creating this skill for another language other than English, your sample utterances need to be written in that language, not English.
11 |
12 | 1. Click the **Save** button when you have completed.
13 |
14 | 3. **New sentences to respond to your users**. There are several sentences and responses that you will want to customize for your skill.
15 |
16 | 1. Go back to your copy of [lambda_function.py](../lambda/py/lambda_function.py).
17 |
18 | 2. Look for lines like this: **speech_text = "Welcome to the Alexa Skills Kit color session sample”**. These are strings that hold phrases for Alexa to respond with. Customize them to make it as varied and conversational as time allows.
19 |
20 | 3. Continue through lambda_function.py until you reach the bottom of the file. This will ensure that you cover each of the Alexa responses that you need to update.
21 |
22 | 4. **New language.** If you are creating this skill for another language other than English, you will need to make sure Alexa's responses are also in that language.
23 |
24 | * For example, if you are creating your skill in German, every single response that Alexa makes has to be in German. You can't use English responses or your skill will fail certification.
25 |
26 | 5. When you have replaced the data in **`lambda_function.py`**, you need to upload the latest data into Lambda. Copy the updated contents into the ``skill_env`` folder, zip the contents of the ``skill_env`` folder and upload it to AWS Lambda as discussed in the "**Finish configuring your function**" step in [Lambda setup documentation](./2-lambda-function.md). Test your skill through the Alexa Simulator on the developer portal, with the updated changes.
27 |
28 | 6. Once you have made the updates listed on this page, you can click the **Distribution** tab in the top navigation to move on to Publishing and Certification of your skill.
29 |
30 |
66 |
--------------------------------------------------------------------------------
/instructions/5-customization.md:
--------------------------------------------------------------------------------
1 | # Build An Alexa Color Picker Skill using ASK Python SDK
2 |
3 |
4 | [](./1-voice-user-interface.md)[](./2-lambda-function.md)[](./3-connect-vui-to-code.md)[](./4-testing.md)[](./5-customization.md)[](./6-publication.md)
5 |
6 | ## Customization / Next Steps
7 |
8 | At this point, you should have a working copy of our Color Picker skill. In order to make it your own, you will need to customize it with some responses that you create. Here are the things you will need to change:
9 |
10 | 1. Update your **sample utterances**. You need to update this list of utterances for a robust voice experience. **Remember that if you are creating this skill for another language other than English, your sample utterances need to be written in that language, not English.
11 |
12 | 1. Click the **Save** button when you have completed.
13 |
14 | 3. **New sentences to respond to your users**. There are several sentences and responses that you will want to customize for your skill.
15 |
16 | 1. Go back to your copy of [lambda_function.py](../lambda/py/lambda_function.py).
17 |
18 | 2. Look for lines like this: **speech_text = "Welcome to the Alexa Skills Kit color session sample”**. These are strings that hold phrases for Alexa to respond with. Customize them to make it as varied and conversational as time allows.
19 |
20 | 3. Continue through lambda_function.py until you reach the bottom of the file. This will ensure that you cover each of the Alexa responses that you need to update.
21 |
22 | 4. **New language.** If you are creating this skill for another language other than English, you will need to make sure Alexa's responses are also in that language.
23 |
24 | * For example, if you are creating your skill in German, every single response that Alexa makes has to be in German. You can't use English responses or your skill will fail certification.
25 |
26 | 5. When you have replaced the data in **`lambda_function.py`**, you need to upload the latest data into Lambda. Copy the updated contents into the ``skill_env`` folder, zip the contents of the ``skill_env`` folder and upload it to AWS Lambda as discussed in the "**Finish configuring your function**" step in [Lambda setup documentation](./2-lambda-function.md). Test your skill through the Alexa Simulator on the developer portal, with the updated changes.
27 |
28 | 6. Once you have made the updates listed on this page, you can click the **Distribution** tab in the top navigation to move on to Publishing and Certification of your skill.
29 |
30 | 31 |
 32 |
--------------------------------------------------------------------------------
/instructions/6-publication.md:
--------------------------------------------------------------------------------
1 | # Build An Alexa Color Picker Skill using ASK Python SDK
2 |
3 |
4 | [](./1-voice-user-interface.md)[](./2-lambda-function.md)[](./3-connect-vui-to-code.md)[](./4-testing.md)[](./5-customization.md)[](./6-publication.md)
5 |
6 | ## Get Your Skill Certified and Published
7 |
8 | We are almost done! The last step is to add the metadata that your skill will use in the [Skill Store](http://amazon.com/skills). This page will walk you through the remaining steps to launch your skill!
9 |
10 | 1. Select the **Distribution** tab from the top navigation menu.
11 |
12 | 2. Fill out the form fields per the guidance on the screen. Hover over the question mark icons for details regarding each respective field. **Fields marked with an Asterisk, are required!**
13 | * Take the time to get these right so that your skill will pass certification!
14 |
15 | 3. **Write your skill descriptions.**
16 |
17 | * **Spend some time coming up with an enticing, succinct description.** This is one of the few places you have an opportunity to attract new users, so make the most of it! These descriptions show up in the list of skills available in the [Alexa app](http://alexa.amazon.com/spa/index.html#skills) and the [skills store](http://www.amazon.com/skills).
18 |
19 | 4. For your example phrases, **come up with the three most exciting ways** a user can talk to your skill.
20 |
21 | * Make sure that each of your example phrases are a **perfect match with one of your Sample Utterances.** Incorrect example phrases are one of the most common reasons that skills fail certification, so we have provided a short list of things to consider as you write your example phrases:
22 |
23 | | Common Failure Points for Example Phrases |
24 | | ----------------------------------------- |
25 | | Example phrases **must** adhere to the [supported phrases](https://developer.amazon.com/public/solutions/alexa/alexa-skills-kit/docs/supported-phrases-to-begin-a-conversation?&sc_category=Owned&sc_channel=RD&sc_campaign=Evangelism2018&sc_publisher=github&sc_content=Survey&sc_detail=howto-nodejs-V2_GUI-6&sc_funnel=Convert&sc_country=WW&sc_medium=Owned_RD_Evangelism2018_github_Survey_howto-nodejs-V2_GUI-6_Convert_WW_beginnersdevs&sc_segment=beginnersdevs). |
26 | | Example phrases **must** be based on sample utterances specified in your Intent Schema. |
27 | | Your first example phrase **must** include a wake word and your invocation name. |
28 | | Example phrases **must** provide a contextual response. |
29 |
30 | * Choose three example phrases that are likely to be the most common ways that users will attempt to interact with your skill. Make sure that each of them works well, and provides an excellent user experience.
31 |
32 | 5. Choose the most appropriate category for your skill.
33 |
34 | 6. Provide a comprehensive list of **keywords** for users that are searching for new skills. This is an optional field, and searching the [Alexa app](http://alexa.amazon.com) or the [skill store](http://www.amazon.com/skills) will also find the words in your Skill Name and descriptions, so you don't need to overdo it. That being said, if there are words that you want users to find your skill with, you should include them here. Separate the keywords with commas.
35 |
36 | 7. **Privacy Policy URL.** This is an optional field, and should not be required for this How TO skill sample. You can leave it blank.
37 |
38 | 8. **Terms of Use URL.** This is also optional, and you can leave it blank.
39 |
40 | 9. **Create your skill's icons.** You need two sizes of your icon: 108x108px and 512x512px.
41 |
42 | * Make sure you have the rights to the icons you create. Please don't violate any trademarks or copyrights.
43 | * You can use the **Alexa skill icon builder [tool](https://developer.amazon.com/docs/tools/icon-builder.html).**
44 | * If you don't have software to make icons, try one of these free options:
45 |
46 | * [GIMP](https://www.gimp.org/) (Windows/Mac/Linux)
47 | * [Canva](https://www.canva.com/) (Web)
48 | * [Paint.NET](http://www.getpaint.net/index.html) (Windows)
49 | * [Inkscape](http://inkscape.org) (Windows/Mac/Linux)
50 | * [Iconion](http://iconion.com/) (Windows/Mac)
51 |
52 | * To make it easier to get started, we've created blank versions of these icons in both sizes for many formats:
53 |
54 | * [PSD](https://m.media-amazon.com/images/G/01/mobile-apps/dex/alexa/alexa-skills-kit/tutorials/general/icon-templates/psd._TTH_.zip)
55 | * [PNG](https://m.media-amazon.com/images/G/01/mobile-apps/dex/alexa/alexa-skills-kit/tutorials/general/icon-templates/png._TTH_.zip)
56 | * [GIF](https://m.media-amazon.com/images/G/01/mobile-apps/dex/alexa/alexa-skills-kit/tutorials/general/icon-templates/gif._TTH_.zip)
57 | * [PDF](https://m.media-amazon.com/images/G/01/mobile-apps/dex/alexa/alexa-skills-kit/tutorials/general/icon-templates/pdf._TTH_.zip)
58 | * [JPG](https://m.media-amazon.com/images/G/01/mobile-apps/dex/alexa/alexa-skills-kit/tutorials/general/icon-templates/jpg._TTH_.zip)
59 | * [SVG](https://m.media-amazon.com/images/G/01/mobile-apps/dex/alexa/alexa-skills-kit/tutorials/general/icon-templates/svg._TTH_.zip)
60 | * [PDN](https://m.media-amazon.com/images/G/01/mobile-apps/dex/alexa/alexa-skills-kit/tutorials/general/icon-templates/pdn._TTH_.zip) - for [Paint.NET](http://www.getpaint.net/index.html)
61 | * [XCF](https://m.media-amazon.com/images/G/01/mobile-apps/dex/alexa/alexa-skills-kit/tutorials/general/icon-templates/xcf._TTH_.zip) - for [GIMP](https://www.gimp.org/)
62 |
63 | 10. When you're ready, click **Save and Continue** at the bottom of the screen to move onto **Privacy & Compliance**
64 |
65 | 11. * **Does this skill allow users to make purchases or spend real money?** For this skill, the answer is no. For future skills, make sure you answer this appropriately.
66 |
67 | * **Does this skill use Alexa Shopping Actions?** Again, for this skill, the answer is no.
68 |
69 | * **Does this Alexa skill collect users' personal information? (e.g., anything that can identify the user)** Again, for this skill, the answer is no. If you do collect information about a user, such as names, email addresses, phone numbers, and so forth, ensure that you answer Yes to this question.
70 | * Answering "yes" to this question will also require you to provide a link to your Privacy Policy at the bottom of the page.
71 |
72 | * **Is this skill directed to or does it target children under the age of 13?** Because you customized this skill with data you provided, it is possible that you created a skill that targets children under the age of 13. For this skill, the answer is **no** because it doesn't target a specific age group.
73 | * Factors to consider in determining if this skill is directed to children under 13 include:
74 | * Subject matter of the skill
75 | * Presence of child-oriented activities and incentives
76 | * Type of language used in the skill
77 | * Music and other audio content in the skill
78 | * How the skill is described and marketed
79 | * Intended audience for the skill
80 |
81 | If you're not sure, please see the [FTC's COPPA Guidance and FAQ](https://www.ftc.gov/tips-advice/business-center/guidance/complying-coppa-frequently-asked-questions) for more information.
82 |
83 | 12. **Export Compliance.** Be certain that you agree with all of the conditions. If you do, make sure to check this box, as Amazon requires this permission to distribute your skill around the globe.
84 |
85 | 13. **Provide testing instructions.** Testing instructions give you an opportunity to explain your skill, and any special or possibly confusing features, to the certification team. A value is required in this box.
86 |
87 | * Since this skill is not using Account Linking, you don’t need to provide ‘Username’ and ‘Password’ for testing the skill.
88 |
89 | * Since you are using our Sample, make sure to add a sentence to your Testing Instructions referencing the Sample you used. For example:
90 |
91 | ```
92 | This was built using the Color Picker Sample.
93 | ```
94 |
95 | This will let the testing team understand what you're providing them, and should decrease the testing time required.
96 |
97 | **Note:** More details on certification are [available here.](https://alexa.design/certification)
98 |
99 | 14. Click **Save and Continue** at the bottom of the screen to move onto **Availability**
100 |
101 | 15. * Can your skill be used by everyone or is it targeted to select businesses?For this skill, the answer is Public.
102 |
103 | * **Beta Test** If you want your skill to be beta tested by others, before publishing it to public.
104 |
105 | * **Skill availability in regions** Can Amazon distribute your skill in all regions or you use some region specific features in your skill. For this skill, the answer is all countries.
106 |
107 | 16. If you feel that your skill is ready for certification, click the **Save and Continue** button at the bottom of the page.
108 |
109 | 17. Run through the **Validation**, **Functional Test** and work on any fixes that are suggested during the initial review.
110 |
111 | 18. Once you are good with the tests, click the **Submission** tab and **Submit for review** button.
112 |
113 | 19. **You're done with your submission!** Here are a few things you might need to know:
114 |
115 | * **Certification can take several days to complete.** Please be patient. It takes time because we want to get it right.
116 |
117 | * **Did something go wrong?** The evangelists team run [online office hours every Tuesday from 9-10am Pacific Time](https://alexa.design/officehours). They can help answer any questions you might have.
118 |
119 | * **Want the coolest t-shirt you've ever seen?** Every month, we create a brand-new Alexa Developer t-shirt or hoodie, and send them out to developers that published a skill that month. [You can get yours here if you live in the US](https://developer.amazon.com/alexa-skills-kit/alexa-developer-skill-promotion?&sc_category=Owned&sc_channel=RD&sc_campaign=Evangelism2018&sc_publisher=github&sc_content=Survey&sc_detail=fact-nodejs-V2_GUI-6&sc_funnel=Convert&sc_country=WW&sc_medium=Owned_RD_Evangelism2018_github_Survey_fact-nodejs-V2_GUI-6_Convert_WW_beginnersdevs&sc_segment=beginnersdevs), [here for the UK](https://developer.amazon.com/en-gb/alexa-skills-kit/alexa-developer-skill-promotion?&sc_category=Owned&sc_channel=RD&sc_campaign=Evangelism2018&sc_publisher=github&sc_content=Survey&sc_detail=fact-nodejs-V2_GUI-6&sc_funnel=Convert&sc_country=WW&sc_medium=Owned_RD_Evangelism2018_github_Survey_fact-nodejs-V2_GUI-6_Convert_WW_beginnersdevs&sc_segment=beginnersdevs), [here for Germany](https://developer.amazon.com/de-de/alexa-skills-kit/alexa-developer-skill-promotion?&sc_category=Owned&sc_channel=RD&sc_campaign=Evangelism2018&sc_publisher=github&sc_content=Survey&sc_detail=fact-nodejs-V2_GUI-6&sc_funnel=Convert&sc_country=WW&sc_medium=Owned_RD_Evangelism2018_github_Survey_fact-nodejs-V2_GUI-6_Convert_WW_beginnersdevs&sc_segment=beginnersdevs), [here for India](https://developer.amazon.com/alexa-skills-kit/alexa-developer-skill-promotion-india?&sc_category=Owned&sc_channel=RD&sc_campaign=Evangelism2018&sc_publisher=github&sc_content=Survey&sc_detail=fact-nodejs-V2_GUI-6&sc_funnel=Convert&sc_country=WW&sc_medium=Owned_RD_Evangelism2018_github_Survey_fact-nodejs-V2_GUI-6_Convert_WW_beginnersdevs&sc_segment=beginnersdevs), [here for Japan](https://developer.amazon.com/ja/alexa-skills-kit/alexa-developer-skill-promotion?&sc_category=Owned&sc_channel=RD&sc_campaign=Evangelism2018&sc_publisher=github&sc_content=Survey&sc_detail=fact-nodejs-V2_GUI-6&sc_funnel=Convert&sc_country=WW&sc_medium=Owned_RD_Evangelism2018_github_Survey_fact-nodejs-V2_GUI-6_Convert_WW_beginnersdevs&sc_segment=beginnersdevs), [here for France](https://developer.amazon.com/fr/alexa-skills-kit/alexa-developer-skill-promotion?&sc_category=Owned&sc_channel=RD&sc_campaign=Evangelism2018&sc_publisher=github&sc_content=Survey&sc_detail=fact-nodejs-V2_GUI-6&sc_funnel=Convert&sc_country=WW&sc_medium=Owned_RD_Evangelism2018_github_Survey_fact-nodejs-V2_GUI-6_Convert_WW_beginnersdevs&sc_segment=beginnersdevs), and [here for Australia](https://developer.amazon.com/anz/alexa-skills-kit/alexa-developer-skill-promotion?&sc_category=Owned&sc_channel=RD&sc_campaign=Evangelism2018&sc_publisher=github&sc_content=Survey&sc_detail=fact-nodejs-V2_GUI-6&sc_funnel=Convert&sc_country=WW&sc_medium=Owned_RD_Evangelism2018_github_Survey_fact-nodejs-V2_GUI-6_Convert_WW_beginnersdevs&sc_segment=beginnersdevs).
120 |
--------------------------------------------------------------------------------
/instructions/lambda-role.md:
--------------------------------------------------------------------------------
1 | # Setting Up Your First Lambda Role
2 |
3 | If you're reading this page, you're probably setting up your first role for a Lambda function. While it's an easy process, we want to make sure you understand all of the "whys" that go into this process.
4 |
5 | 1. **Choose "Create a custom role" from the Role dropdown.** This will launch a new tab in your browser, so make sure that popups are enabled when you attempt this.
6 |
7 | 
8 |
9 | 2. **You are now creating a new IAM role.** IAM stands for Identity and Access Management. ([You can read more about IAM here.](http://docs.aws.amazon.com/IAM/latest/UserGuide/introduction.html)) By creating this role, you are enabling your Lambda function to be able to create Amazon CloudWatch logs for your function. ([You can read more about managing permissions with IAM roles here.](https://docs.aws.amazon.com/lambda/latest/dg/intro-permission-model.html#lambda-intro-execution-role))
10 |
11 | 3. **You don't need to make any changes. Click the Allow button in the bottom right corner.**
12 |
13 | 
14 |
15 | 4. **This should close the new tab, and populate your Lambda function appropriately.** If your "Lambda function handler and role" section doesn't look like the screenshot below, try refreshing your page and selecting your new role from the "existing role" dropdown.
16 |
17 | 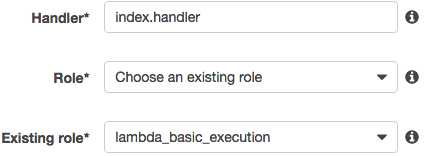
18 |
19 | 5. **You can now return to what you were doing.**
20 |
--------------------------------------------------------------------------------
/lambda/py/lambda_function.py:
--------------------------------------------------------------------------------
1 | # -*- coding: utf-8 -*-
2 |
3 | # This is a Color Picker Alexa Skill.
4 | # The skill serves as a simple sample on how to use
5 | # session attributes.
6 |
7 | import logging
8 |
9 | from ask_sdk_core.skill_builder import SkillBuilder
10 | from ask_sdk_core.utils import is_request_type, is_intent_name
11 | from ask_sdk_core.handler_input import HandlerInput
12 | from ask_sdk_model import Response
13 | from ask_sdk_model.ui import SimpleCard
14 |
15 |
16 | skill_name = "My Color Session"
17 | help_text = ("Please tell me your favorite color. You can say "
18 | "my favorite color is red")
19 |
20 | color_slot_key = "COLOR"
21 | color_slot = "Color"
22 |
23 | sb = SkillBuilder()
24 |
25 | logger = logging.getLogger(__name__)
26 | logger.setLevel(logging.INFO)
27 |
28 |
29 | @sb.request_handler(can_handle_func=is_request_type("LaunchRequest"))
30 | def launch_request_handler(handler_input):
31 | """Handler for Skill Launch."""
32 | # type: (HandlerInput) -> Response
33 | speech = "Welcome to the Alexa Skills Kit color session sample."
34 |
35 | handler_input.response_builder.speak(
36 | speech + " " + help_text).ask(help_text)
37 | return handler_input.response_builder.response
38 |
39 |
40 | @sb.request_handler(can_handle_func=is_intent_name("AMAZON.HelpIntent"))
41 | def help_intent_handler(handler_input):
42 | """Handler for Help Intent."""
43 | # type: (HandlerInput) -> Response
44 | handler_input.response_builder.speak(help_text).ask(help_text)
45 | return handler_input.response_builder.response
46 |
47 |
48 | @sb.request_handler(
49 | can_handle_func=lambda handler_input:
50 | is_intent_name("AMAZON.CancelIntent")(handler_input) or
51 | is_intent_name("AMAZON.StopIntent")(handler_input))
52 | def cancel_and_stop_intent_handler(handler_input):
53 | """Single handler for Cancel and Stop Intent."""
54 | # type: (HandlerInput) -> Response
55 | speech_text = "Goodbye!"
56 |
57 | return handler_input.response_builder.speak(speech_text).response
58 |
59 |
60 | @sb.request_handler(can_handle_func=is_request_type("SessionEndedRequest"))
61 | def session_ended_request_handler(handler_input):
62 | """Handler for Session End."""
63 | # type: (HandlerInput) -> Response
64 | return handler_input.response_builder.response
65 |
66 |
67 | @sb.request_handler(can_handle_func=is_intent_name("WhatsMyColorIntent"))
68 | def whats_my_color_handler(handler_input):
69 | """Check if a favorite color has already been recorded in
70 | session attributes. If yes, provide the color to the user.
71 | If not, ask for favorite color.
72 | """
73 | # type: (HandlerInput) -> Response
74 | if color_slot_key in handler_input.attributes_manager.session_attributes:
75 | fav_color = handler_input.attributes_manager.session_attributes[
76 | color_slot_key]
77 | speech = "Your favorite color is {}. Goodbye!!".format(fav_color)
78 | handler_input.response_builder.set_should_end_session(True)
79 | else:
80 | speech = "I don't think I know your favorite color. " + help_text
81 | handler_input.response_builder.ask(help_text)
82 |
83 | handler_input.response_builder.speak(speech)
84 | return handler_input.response_builder.response
85 |
86 |
87 | @sb.request_handler(can_handle_func=is_intent_name("MyColorIsIntent"))
88 | def my_color_handler(handler_input):
89 | """Check if color is provided in slot values. If provided, then
90 | set your favorite color from slot value into session attributes.
91 | If not, then it asks user to provide the color.
92 | """
93 | # type: (HandlerInput) -> Response
94 | slots = handler_input.request_envelope.request.intent.slots
95 |
96 | if color_slot in slots:
97 | fav_color = slots[color_slot].value
98 | handler_input.attributes_manager.session_attributes[
99 | color_slot_key] = fav_color
100 | speech = ("Now I know that your favorite color is {}. "
101 | "You can ask me your favorite color by saying, "
102 | "what's my favorite color ?".format(fav_color))
103 | reprompt = ("You can ask me your favorite color by saying, "
104 | "what's my favorite color ?")
105 | else:
106 | speech = "I'm not sure what your favorite color is, please try again"
107 | reprompt = ("I'm not sure what your favorite color is. "
108 | "You can tell me your favorite color by saying, "
109 | "my favorite color is red")
110 |
111 | handler_input.response_builder.speak(speech).ask(reprompt)
112 | return handler_input.response_builder.response
113 |
114 |
115 | @sb.request_handler(can_handle_func=is_intent_name("AMAZON.FallbackIntent"))
116 | def fallback_handler(handler_input):
117 | """AMAZON.FallbackIntent is only available in en-US locale.
118 | This handler will not be triggered except in that locale,
119 | so it is safe to deploy on any locale.
120 | """
121 | # type: (HandlerInput) -> Response
122 | speech = (
123 | "The {} skill can't help you with that. "
124 | "You can tell me your favorite color by saying, "
125 | "my favorite color is red").format(skill_name)
126 | reprompt = ("You can tell me your favorite color by saying, "
127 | "my favorite color is red")
128 | handler_input.response_builder.speak(speech).ask(reprompt)
129 | return handler_input.response_builder.response
130 |
131 |
132 | def convert_speech_to_text(ssml_speech):
133 | """convert ssml speech to text, by removing html tags."""
134 | # type: (str) -> str
135 | s = SSMLStripper()
136 | s.feed(ssml_speech)
137 | return s.get_data()
138 |
139 |
140 | @sb.global_response_interceptor()
141 | def add_card(handler_input, response):
142 | """Add a card by translating ssml text to card content."""
143 | # type: (HandlerInput, Response) -> None
144 | response.card = SimpleCard(
145 | title=skill_name,
146 | content=convert_speech_to_text(response.output_speech.ssml))
147 |
148 |
149 | @sb.global_response_interceptor()
150 | def log_response(handler_input, response):
151 | """Log response from alexa service."""
152 | # type: (HandlerInput, Response) -> None
153 | print("Alexa Response: {}\n".format(response))
154 |
155 |
156 | @sb.global_request_interceptor()
157 | def log_request(handler_input):
158 | """Log request to alexa service."""
159 | # type: (HandlerInput) -> None
160 | print("Alexa Request: {}\n".format(handler_input.request_envelope.request))
161 |
162 |
163 | @sb.exception_handler(can_handle_func=lambda i, e: True)
164 | def all_exception_handler(handler_input, exception):
165 | """Catch all exception handler, log exception and
166 | respond with custom message.
167 | """
168 | # type: (HandlerInput, Exception) -> None
169 | print("Encountered following exception: {}".format(exception))
170 |
171 | speech = "Sorry, there was some problem. Please try again!!"
172 | handler_input.response_builder.speak(speech).ask(speech)
173 |
174 | return handler_input.response_builder.response
175 |
176 |
177 | ######## Convert SSML to Card text ############
178 | # This is for automatic conversion of ssml to text content on simple card
179 | # You can create your own simple cards for each response, if this is not
180 | # what you want to use.
181 |
182 | from six import PY2
183 | try:
184 | from HTMLParser import HTMLParser
185 | except ImportError:
186 | from html.parser import HTMLParser
187 |
188 |
189 | class SSMLStripper(HTMLParser):
190 | def __init__(self):
191 | self.reset()
192 | self.full_str_list = []
193 | if not PY2:
194 | self.strict = False
195 | self.convert_charrefs = True
196 |
197 | def handle_data(self, d):
198 | self.full_str_list.append(d)
199 |
200 | def get_data(self):
201 | return ''.join(self.full_str_list)
202 |
203 | ################################################
204 |
205 |
206 | # Handler to be provided in lambda console.
207 | lambda_handler = sb.lambda_handler()
208 |
--------------------------------------------------------------------------------
/lambda/py/requirements.txt:
--------------------------------------------------------------------------------
1 | ask-sdk-core
2 |
--------------------------------------------------------------------------------
/models/en-US.json:
--------------------------------------------------------------------------------
1 | {
2 | "interactionModel": {
3 | "languageModel": {
4 | "invocationName": "my color picker",
5 | "intents": [
6 | {
7 | "name": "AMAZON.FallbackIntent",
8 | "samples": []
9 | },
10 | {
11 | "name": "AMAZON.CancelIntent",
12 | "samples": []
13 | },
14 | {
15 | "name": "AMAZON.HelpIntent",
16 | "samples": []
17 | },
18 | {
19 | "name": "AMAZON.StopIntent",
20 | "samples": []
21 | },
22 | {
23 | "name": "WhatsMyColorIntent",
24 | "slots": [],
25 | "samples": [
26 | "tell me what is my favorite color",
27 | "whats my favorite color",
28 | "say my color",
29 | "say my favorite color",
30 | "tell me my favorite color",
31 | "what is my favorite color",
32 | "what is my color",
33 | "whats my color"
34 | ]
35 | },
36 | {
37 | "name": "MyColorIsIntent",
38 | "slots": [
39 | {
40 | "name": "Color",
41 | "type": "AMAZON.Color"
42 | }
43 | ],
44 | "samples": [
45 | "My color is {Color}",
46 | "my favorite color is {Color}"
47 | ]
48 | }
49 | ],
50 | "types": []
51 | }
52 | }
53 | }
--------------------------------------------------------------------------------
/skill.json:
--------------------------------------------------------------------------------
1 | {
2 | "manifest": {
3 | "publishingInformation": {
4 | "locales": {
5 | "en-US": {
6 | "summary": "Sample Short Description",
7 | "examplePhrases": [
8 | "Alexa open color picker"
9 | ],
10 | "name": "Color Picker",
11 | "description": "Sample Full Description"
12 | }
13 | },
14 | "isAvailableWorldwide": true,
15 | "testingInstructions": "Sample Testing Instructions.",
16 | "distributionCountries": []
17 | },
18 | "apis": {
19 | "custom": {
20 | "endpoint": {
21 | "sourceDir": "lambda/py",
22 | "uri": "ask-custom-colorpicker-default"
23 | }
24 | }
25 | },
26 | "manifestVersion": "1.0"
27 | }
28 | }
29 |
30 |
--------------------------------------------------------------------------------
32 |
--------------------------------------------------------------------------------
/instructions/6-publication.md:
--------------------------------------------------------------------------------
1 | # Build An Alexa Color Picker Skill using ASK Python SDK
2 |
3 |
4 | [](./1-voice-user-interface.md)[](./2-lambda-function.md)[](./3-connect-vui-to-code.md)[](./4-testing.md)[](./5-customization.md)[](./6-publication.md)
5 |
6 | ## Get Your Skill Certified and Published
7 |
8 | We are almost done! The last step is to add the metadata that your skill will use in the [Skill Store](http://amazon.com/skills). This page will walk you through the remaining steps to launch your skill!
9 |
10 | 1. Select the **Distribution** tab from the top navigation menu.
11 |
12 | 2. Fill out the form fields per the guidance on the screen. Hover over the question mark icons for details regarding each respective field. **Fields marked with an Asterisk, are required!**
13 | * Take the time to get these right so that your skill will pass certification!
14 |
15 | 3. **Write your skill descriptions.**
16 |
17 | * **Spend some time coming up with an enticing, succinct description.** This is one of the few places you have an opportunity to attract new users, so make the most of it! These descriptions show up in the list of skills available in the [Alexa app](http://alexa.amazon.com/spa/index.html#skills) and the [skills store](http://www.amazon.com/skills).
18 |
19 | 4. For your example phrases, **come up with the three most exciting ways** a user can talk to your skill.
20 |
21 | * Make sure that each of your example phrases are a **perfect match with one of your Sample Utterances.** Incorrect example phrases are one of the most common reasons that skills fail certification, so we have provided a short list of things to consider as you write your example phrases:
22 |
23 | | Common Failure Points for Example Phrases |
24 | | ----------------------------------------- |
25 | | Example phrases **must** adhere to the [supported phrases](https://developer.amazon.com/public/solutions/alexa/alexa-skills-kit/docs/supported-phrases-to-begin-a-conversation?&sc_category=Owned&sc_channel=RD&sc_campaign=Evangelism2018&sc_publisher=github&sc_content=Survey&sc_detail=howto-nodejs-V2_GUI-6&sc_funnel=Convert&sc_country=WW&sc_medium=Owned_RD_Evangelism2018_github_Survey_howto-nodejs-V2_GUI-6_Convert_WW_beginnersdevs&sc_segment=beginnersdevs). |
26 | | Example phrases **must** be based on sample utterances specified in your Intent Schema. |
27 | | Your first example phrase **must** include a wake word and your invocation name. |
28 | | Example phrases **must** provide a contextual response. |
29 |
30 | * Choose three example phrases that are likely to be the most common ways that users will attempt to interact with your skill. Make sure that each of them works well, and provides an excellent user experience.
31 |
32 | 5. Choose the most appropriate category for your skill.
33 |
34 | 6. Provide a comprehensive list of **keywords** for users that are searching for new skills. This is an optional field, and searching the [Alexa app](http://alexa.amazon.com) or the [skill store](http://www.amazon.com/skills) will also find the words in your Skill Name and descriptions, so you don't need to overdo it. That being said, if there are words that you want users to find your skill with, you should include them here. Separate the keywords with commas.
35 |
36 | 7. **Privacy Policy URL.** This is an optional field, and should not be required for this How TO skill sample. You can leave it blank.
37 |
38 | 8. **Terms of Use URL.** This is also optional, and you can leave it blank.
39 |
40 | 9. **Create your skill's icons.** You need two sizes of your icon: 108x108px and 512x512px.
41 |
42 | * Make sure you have the rights to the icons you create. Please don't violate any trademarks or copyrights.
43 | * You can use the **Alexa skill icon builder [tool](https://developer.amazon.com/docs/tools/icon-builder.html).**
44 | * If you don't have software to make icons, try one of these free options:
45 |
46 | * [GIMP](https://www.gimp.org/) (Windows/Mac/Linux)
47 | * [Canva](https://www.canva.com/) (Web)
48 | * [Paint.NET](http://www.getpaint.net/index.html) (Windows)
49 | * [Inkscape](http://inkscape.org) (Windows/Mac/Linux)
50 | * [Iconion](http://iconion.com/) (Windows/Mac)
51 |
52 | * To make it easier to get started, we've created blank versions of these icons in both sizes for many formats:
53 |
54 | * [PSD](https://m.media-amazon.com/images/G/01/mobile-apps/dex/alexa/alexa-skills-kit/tutorials/general/icon-templates/psd._TTH_.zip)
55 | * [PNG](https://m.media-amazon.com/images/G/01/mobile-apps/dex/alexa/alexa-skills-kit/tutorials/general/icon-templates/png._TTH_.zip)
56 | * [GIF](https://m.media-amazon.com/images/G/01/mobile-apps/dex/alexa/alexa-skills-kit/tutorials/general/icon-templates/gif._TTH_.zip)
57 | * [PDF](https://m.media-amazon.com/images/G/01/mobile-apps/dex/alexa/alexa-skills-kit/tutorials/general/icon-templates/pdf._TTH_.zip)
58 | * [JPG](https://m.media-amazon.com/images/G/01/mobile-apps/dex/alexa/alexa-skills-kit/tutorials/general/icon-templates/jpg._TTH_.zip)
59 | * [SVG](https://m.media-amazon.com/images/G/01/mobile-apps/dex/alexa/alexa-skills-kit/tutorials/general/icon-templates/svg._TTH_.zip)
60 | * [PDN](https://m.media-amazon.com/images/G/01/mobile-apps/dex/alexa/alexa-skills-kit/tutorials/general/icon-templates/pdn._TTH_.zip) - for [Paint.NET](http://www.getpaint.net/index.html)
61 | * [XCF](https://m.media-amazon.com/images/G/01/mobile-apps/dex/alexa/alexa-skills-kit/tutorials/general/icon-templates/xcf._TTH_.zip) - for [GIMP](https://www.gimp.org/)
62 |
63 | 10. When you're ready, click **Save and Continue** at the bottom of the screen to move onto **Privacy & Compliance**
64 |
65 | 11. * **Does this skill allow users to make purchases or spend real money?** For this skill, the answer is no. For future skills, make sure you answer this appropriately.
66 |
67 | * **Does this skill use Alexa Shopping Actions?** Again, for this skill, the answer is no.
68 |
69 | * **Does this Alexa skill collect users' personal information? (e.g., anything that can identify the user)** Again, for this skill, the answer is no. If you do collect information about a user, such as names, email addresses, phone numbers, and so forth, ensure that you answer Yes to this question.
70 | * Answering "yes" to this question will also require you to provide a link to your Privacy Policy at the bottom of the page.
71 |
72 | * **Is this skill directed to or does it target children under the age of 13?** Because you customized this skill with data you provided, it is possible that you created a skill that targets children under the age of 13. For this skill, the answer is **no** because it doesn't target a specific age group.
73 | * Factors to consider in determining if this skill is directed to children under 13 include:
74 | * Subject matter of the skill
75 | * Presence of child-oriented activities and incentives
76 | * Type of language used in the skill
77 | * Music and other audio content in the skill
78 | * How the skill is described and marketed
79 | * Intended audience for the skill
80 |
81 | If you're not sure, please see the [FTC's COPPA Guidance and FAQ](https://www.ftc.gov/tips-advice/business-center/guidance/complying-coppa-frequently-asked-questions) for more information.
82 |
83 | 12. **Export Compliance.** Be certain that you agree with all of the conditions. If you do, make sure to check this box, as Amazon requires this permission to distribute your skill around the globe.
84 |
85 | 13. **Provide testing instructions.** Testing instructions give you an opportunity to explain your skill, and any special or possibly confusing features, to the certification team. A value is required in this box.
86 |
87 | * Since this skill is not using Account Linking, you don’t need to provide ‘Username’ and ‘Password’ for testing the skill.
88 |
89 | * Since you are using our Sample, make sure to add a sentence to your Testing Instructions referencing the Sample you used. For example:
90 |
91 | ```
92 | This was built using the Color Picker Sample.
93 | ```
94 |
95 | This will let the testing team understand what you're providing them, and should decrease the testing time required.
96 |
97 | **Note:** More details on certification are [available here.](https://alexa.design/certification)
98 |
99 | 14. Click **Save and Continue** at the bottom of the screen to move onto **Availability**
100 |
101 | 15. * Can your skill be used by everyone or is it targeted to select businesses?For this skill, the answer is Public.
102 |
103 | * **Beta Test** If you want your skill to be beta tested by others, before publishing it to public.
104 |
105 | * **Skill availability in regions** Can Amazon distribute your skill in all regions or you use some region specific features in your skill. For this skill, the answer is all countries.
106 |
107 | 16. If you feel that your skill is ready for certification, click the **Save and Continue** button at the bottom of the page.
108 |
109 | 17. Run through the **Validation**, **Functional Test** and work on any fixes that are suggested during the initial review.
110 |
111 | 18. Once you are good with the tests, click the **Submission** tab and **Submit for review** button.
112 |
113 | 19. **You're done with your submission!** Here are a few things you might need to know:
114 |
115 | * **Certification can take several days to complete.** Please be patient. It takes time because we want to get it right.
116 |
117 | * **Did something go wrong?** The evangelists team run [online office hours every Tuesday from 9-10am Pacific Time](https://alexa.design/officehours). They can help answer any questions you might have.
118 |
119 | * **Want the coolest t-shirt you've ever seen?** Every month, we create a brand-new Alexa Developer t-shirt or hoodie, and send them out to developers that published a skill that month. [You can get yours here if you live in the US](https://developer.amazon.com/alexa-skills-kit/alexa-developer-skill-promotion?&sc_category=Owned&sc_channel=RD&sc_campaign=Evangelism2018&sc_publisher=github&sc_content=Survey&sc_detail=fact-nodejs-V2_GUI-6&sc_funnel=Convert&sc_country=WW&sc_medium=Owned_RD_Evangelism2018_github_Survey_fact-nodejs-V2_GUI-6_Convert_WW_beginnersdevs&sc_segment=beginnersdevs), [here for the UK](https://developer.amazon.com/en-gb/alexa-skills-kit/alexa-developer-skill-promotion?&sc_category=Owned&sc_channel=RD&sc_campaign=Evangelism2018&sc_publisher=github&sc_content=Survey&sc_detail=fact-nodejs-V2_GUI-6&sc_funnel=Convert&sc_country=WW&sc_medium=Owned_RD_Evangelism2018_github_Survey_fact-nodejs-V2_GUI-6_Convert_WW_beginnersdevs&sc_segment=beginnersdevs), [here for Germany](https://developer.amazon.com/de-de/alexa-skills-kit/alexa-developer-skill-promotion?&sc_category=Owned&sc_channel=RD&sc_campaign=Evangelism2018&sc_publisher=github&sc_content=Survey&sc_detail=fact-nodejs-V2_GUI-6&sc_funnel=Convert&sc_country=WW&sc_medium=Owned_RD_Evangelism2018_github_Survey_fact-nodejs-V2_GUI-6_Convert_WW_beginnersdevs&sc_segment=beginnersdevs), [here for India](https://developer.amazon.com/alexa-skills-kit/alexa-developer-skill-promotion-india?&sc_category=Owned&sc_channel=RD&sc_campaign=Evangelism2018&sc_publisher=github&sc_content=Survey&sc_detail=fact-nodejs-V2_GUI-6&sc_funnel=Convert&sc_country=WW&sc_medium=Owned_RD_Evangelism2018_github_Survey_fact-nodejs-V2_GUI-6_Convert_WW_beginnersdevs&sc_segment=beginnersdevs), [here for Japan](https://developer.amazon.com/ja/alexa-skills-kit/alexa-developer-skill-promotion?&sc_category=Owned&sc_channel=RD&sc_campaign=Evangelism2018&sc_publisher=github&sc_content=Survey&sc_detail=fact-nodejs-V2_GUI-6&sc_funnel=Convert&sc_country=WW&sc_medium=Owned_RD_Evangelism2018_github_Survey_fact-nodejs-V2_GUI-6_Convert_WW_beginnersdevs&sc_segment=beginnersdevs), [here for France](https://developer.amazon.com/fr/alexa-skills-kit/alexa-developer-skill-promotion?&sc_category=Owned&sc_channel=RD&sc_campaign=Evangelism2018&sc_publisher=github&sc_content=Survey&sc_detail=fact-nodejs-V2_GUI-6&sc_funnel=Convert&sc_country=WW&sc_medium=Owned_RD_Evangelism2018_github_Survey_fact-nodejs-V2_GUI-6_Convert_WW_beginnersdevs&sc_segment=beginnersdevs), and [here for Australia](https://developer.amazon.com/anz/alexa-skills-kit/alexa-developer-skill-promotion?&sc_category=Owned&sc_channel=RD&sc_campaign=Evangelism2018&sc_publisher=github&sc_content=Survey&sc_detail=fact-nodejs-V2_GUI-6&sc_funnel=Convert&sc_country=WW&sc_medium=Owned_RD_Evangelism2018_github_Survey_fact-nodejs-V2_GUI-6_Convert_WW_beginnersdevs&sc_segment=beginnersdevs).
120 |
--------------------------------------------------------------------------------
/instructions/lambda-role.md:
--------------------------------------------------------------------------------
1 | # Setting Up Your First Lambda Role
2 |
3 | If you're reading this page, you're probably setting up your first role for a Lambda function. While it's an easy process, we want to make sure you understand all of the "whys" that go into this process.
4 |
5 | 1. **Choose "Create a custom role" from the Role dropdown.** This will launch a new tab in your browser, so make sure that popups are enabled when you attempt this.
6 |
7 | 
8 |
9 | 2. **You are now creating a new IAM role.** IAM stands for Identity and Access Management. ([You can read more about IAM here.](http://docs.aws.amazon.com/IAM/latest/UserGuide/introduction.html)) By creating this role, you are enabling your Lambda function to be able to create Amazon CloudWatch logs for your function. ([You can read more about managing permissions with IAM roles here.](https://docs.aws.amazon.com/lambda/latest/dg/intro-permission-model.html#lambda-intro-execution-role))
10 |
11 | 3. **You don't need to make any changes. Click the Allow button in the bottom right corner.**
12 |
13 | 
14 |
15 | 4. **This should close the new tab, and populate your Lambda function appropriately.** If your "Lambda function handler and role" section doesn't look like the screenshot below, try refreshing your page and selecting your new role from the "existing role" dropdown.
16 |
17 | 
18 |
19 | 5. **You can now return to what you were doing.**
20 |
--------------------------------------------------------------------------------
/lambda/py/lambda_function.py:
--------------------------------------------------------------------------------
1 | # -*- coding: utf-8 -*-
2 |
3 | # This is a Color Picker Alexa Skill.
4 | # The skill serves as a simple sample on how to use
5 | # session attributes.
6 |
7 | import logging
8 |
9 | from ask_sdk_core.skill_builder import SkillBuilder
10 | from ask_sdk_core.utils import is_request_type, is_intent_name
11 | from ask_sdk_core.handler_input import HandlerInput
12 | from ask_sdk_model import Response
13 | from ask_sdk_model.ui import SimpleCard
14 |
15 |
16 | skill_name = "My Color Session"
17 | help_text = ("Please tell me your favorite color. You can say "
18 | "my favorite color is red")
19 |
20 | color_slot_key = "COLOR"
21 | color_slot = "Color"
22 |
23 | sb = SkillBuilder()
24 |
25 | logger = logging.getLogger(__name__)
26 | logger.setLevel(logging.INFO)
27 |
28 |
29 | @sb.request_handler(can_handle_func=is_request_type("LaunchRequest"))
30 | def launch_request_handler(handler_input):
31 | """Handler for Skill Launch."""
32 | # type: (HandlerInput) -> Response
33 | speech = "Welcome to the Alexa Skills Kit color session sample."
34 |
35 | handler_input.response_builder.speak(
36 | speech + " " + help_text).ask(help_text)
37 | return handler_input.response_builder.response
38 |
39 |
40 | @sb.request_handler(can_handle_func=is_intent_name("AMAZON.HelpIntent"))
41 | def help_intent_handler(handler_input):
42 | """Handler for Help Intent."""
43 | # type: (HandlerInput) -> Response
44 | handler_input.response_builder.speak(help_text).ask(help_text)
45 | return handler_input.response_builder.response
46 |
47 |
48 | @sb.request_handler(
49 | can_handle_func=lambda handler_input:
50 | is_intent_name("AMAZON.CancelIntent")(handler_input) or
51 | is_intent_name("AMAZON.StopIntent")(handler_input))
52 | def cancel_and_stop_intent_handler(handler_input):
53 | """Single handler for Cancel and Stop Intent."""
54 | # type: (HandlerInput) -> Response
55 | speech_text = "Goodbye!"
56 |
57 | return handler_input.response_builder.speak(speech_text).response
58 |
59 |
60 | @sb.request_handler(can_handle_func=is_request_type("SessionEndedRequest"))
61 | def session_ended_request_handler(handler_input):
62 | """Handler for Session End."""
63 | # type: (HandlerInput) -> Response
64 | return handler_input.response_builder.response
65 |
66 |
67 | @sb.request_handler(can_handle_func=is_intent_name("WhatsMyColorIntent"))
68 | def whats_my_color_handler(handler_input):
69 | """Check if a favorite color has already been recorded in
70 | session attributes. If yes, provide the color to the user.
71 | If not, ask for favorite color.
72 | """
73 | # type: (HandlerInput) -> Response
74 | if color_slot_key in handler_input.attributes_manager.session_attributes:
75 | fav_color = handler_input.attributes_manager.session_attributes[
76 | color_slot_key]
77 | speech = "Your favorite color is {}. Goodbye!!".format(fav_color)
78 | handler_input.response_builder.set_should_end_session(True)
79 | else:
80 | speech = "I don't think I know your favorite color. " + help_text
81 | handler_input.response_builder.ask(help_text)
82 |
83 | handler_input.response_builder.speak(speech)
84 | return handler_input.response_builder.response
85 |
86 |
87 | @sb.request_handler(can_handle_func=is_intent_name("MyColorIsIntent"))
88 | def my_color_handler(handler_input):
89 | """Check if color is provided in slot values. If provided, then
90 | set your favorite color from slot value into session attributes.
91 | If not, then it asks user to provide the color.
92 | """
93 | # type: (HandlerInput) -> Response
94 | slots = handler_input.request_envelope.request.intent.slots
95 |
96 | if color_slot in slots:
97 | fav_color = slots[color_slot].value
98 | handler_input.attributes_manager.session_attributes[
99 | color_slot_key] = fav_color
100 | speech = ("Now I know that your favorite color is {}. "
101 | "You can ask me your favorite color by saying, "
102 | "what's my favorite color ?".format(fav_color))
103 | reprompt = ("You can ask me your favorite color by saying, "
104 | "what's my favorite color ?")
105 | else:
106 | speech = "I'm not sure what your favorite color is, please try again"
107 | reprompt = ("I'm not sure what your favorite color is. "
108 | "You can tell me your favorite color by saying, "
109 | "my favorite color is red")
110 |
111 | handler_input.response_builder.speak(speech).ask(reprompt)
112 | return handler_input.response_builder.response
113 |
114 |
115 | @sb.request_handler(can_handle_func=is_intent_name("AMAZON.FallbackIntent"))
116 | def fallback_handler(handler_input):
117 | """AMAZON.FallbackIntent is only available in en-US locale.
118 | This handler will not be triggered except in that locale,
119 | so it is safe to deploy on any locale.
120 | """
121 | # type: (HandlerInput) -> Response
122 | speech = (
123 | "The {} skill can't help you with that. "
124 | "You can tell me your favorite color by saying, "
125 | "my favorite color is red").format(skill_name)
126 | reprompt = ("You can tell me your favorite color by saying, "
127 | "my favorite color is red")
128 | handler_input.response_builder.speak(speech).ask(reprompt)
129 | return handler_input.response_builder.response
130 |
131 |
132 | def convert_speech_to_text(ssml_speech):
133 | """convert ssml speech to text, by removing html tags."""
134 | # type: (str) -> str
135 | s = SSMLStripper()
136 | s.feed(ssml_speech)
137 | return s.get_data()
138 |
139 |
140 | @sb.global_response_interceptor()
141 | def add_card(handler_input, response):
142 | """Add a card by translating ssml text to card content."""
143 | # type: (HandlerInput, Response) -> None
144 | response.card = SimpleCard(
145 | title=skill_name,
146 | content=convert_speech_to_text(response.output_speech.ssml))
147 |
148 |
149 | @sb.global_response_interceptor()
150 | def log_response(handler_input, response):
151 | """Log response from alexa service."""
152 | # type: (HandlerInput, Response) -> None
153 | print("Alexa Response: {}\n".format(response))
154 |
155 |
156 | @sb.global_request_interceptor()
157 | def log_request(handler_input):
158 | """Log request to alexa service."""
159 | # type: (HandlerInput) -> None
160 | print("Alexa Request: {}\n".format(handler_input.request_envelope.request))
161 |
162 |
163 | @sb.exception_handler(can_handle_func=lambda i, e: True)
164 | def all_exception_handler(handler_input, exception):
165 | """Catch all exception handler, log exception and
166 | respond with custom message.
167 | """
168 | # type: (HandlerInput, Exception) -> None
169 | print("Encountered following exception: {}".format(exception))
170 |
171 | speech = "Sorry, there was some problem. Please try again!!"
172 | handler_input.response_builder.speak(speech).ask(speech)
173 |
174 | return handler_input.response_builder.response
175 |
176 |
177 | ######## Convert SSML to Card text ############
178 | # This is for automatic conversion of ssml to text content on simple card
179 | # You can create your own simple cards for each response, if this is not
180 | # what you want to use.
181 |
182 | from six import PY2
183 | try:
184 | from HTMLParser import HTMLParser
185 | except ImportError:
186 | from html.parser import HTMLParser
187 |
188 |
189 | class SSMLStripper(HTMLParser):
190 | def __init__(self):
191 | self.reset()
192 | self.full_str_list = []
193 | if not PY2:
194 | self.strict = False
195 | self.convert_charrefs = True
196 |
197 | def handle_data(self, d):
198 | self.full_str_list.append(d)
199 |
200 | def get_data(self):
201 | return ''.join(self.full_str_list)
202 |
203 | ################################################
204 |
205 |
206 | # Handler to be provided in lambda console.
207 | lambda_handler = sb.lambda_handler()
208 |
--------------------------------------------------------------------------------
/lambda/py/requirements.txt:
--------------------------------------------------------------------------------
1 | ask-sdk-core
2 |
--------------------------------------------------------------------------------
/models/en-US.json:
--------------------------------------------------------------------------------
1 | {
2 | "interactionModel": {
3 | "languageModel": {
4 | "invocationName": "my color picker",
5 | "intents": [
6 | {
7 | "name": "AMAZON.FallbackIntent",
8 | "samples": []
9 | },
10 | {
11 | "name": "AMAZON.CancelIntent",
12 | "samples": []
13 | },
14 | {
15 | "name": "AMAZON.HelpIntent",
16 | "samples": []
17 | },
18 | {
19 | "name": "AMAZON.StopIntent",
20 | "samples": []
21 | },
22 | {
23 | "name": "WhatsMyColorIntent",
24 | "slots": [],
25 | "samples": [
26 | "tell me what is my favorite color",
27 | "whats my favorite color",
28 | "say my color",
29 | "say my favorite color",
30 | "tell me my favorite color",
31 | "what is my favorite color",
32 | "what is my color",
33 | "whats my color"
34 | ]
35 | },
36 | {
37 | "name": "MyColorIsIntent",
38 | "slots": [
39 | {
40 | "name": "Color",
41 | "type": "AMAZON.Color"
42 | }
43 | ],
44 | "samples": [
45 | "My color is {Color}",
46 | "my favorite color is {Color}"
47 | ]
48 | }
49 | ],
50 | "types": []
51 | }
52 | }
53 | }
--------------------------------------------------------------------------------
/skill.json:
--------------------------------------------------------------------------------
1 | {
2 | "manifest": {
3 | "publishingInformation": {
4 | "locales": {
5 | "en-US": {
6 | "summary": "Sample Short Description",
7 | "examplePhrases": [
8 | "Alexa open color picker"
9 | ],
10 | "name": "Color Picker",
11 | "description": "Sample Full Description"
12 | }
13 | },
14 | "isAvailableWorldwide": true,
15 | "testingInstructions": "Sample Testing Instructions.",
16 | "distributionCountries": []
17 | },
18 | "apis": {
19 | "custom": {
20 | "endpoint": {
21 | "sourceDir": "lambda/py",
22 | "uri": "ask-custom-colorpicker-default"
23 | }
24 | }
25 | },
26 | "manifestVersion": "1.0"
27 | }
28 | }
29 |
30 |
--------------------------------------------------------------------------------