I guess you really like me.
9 |
10 |
10 | {% for post in site.categories[cnamex] reversed %}
11 | {% include archive_post.html %}
12 | {% endfor %}
13 |
--------------------------------------------------------------------------------
/blog/clipjump/index.html:
--------------------------------------------------------------------------------
1 | ---
2 | layout: default
3 | cname: clipjump
4 | title: Posts on Clipjump
5 | nod: 1
6 | ---
7 |
8 | {% capture cnamex %}{{ page.cname }}{% endcapture %}
9 |
10 | {% for post in site.categories[cnamex] reversed %}
11 | {% include archive_post.html %}
12 | {% endfor %}
13 |
--------------------------------------------------------------------------------
/projects/clipjump/index.html:
--------------------------------------------------------------------------------
1 | ---
2 | layout: page
3 | title: Clipjump
4 | tagline: v11
5 | desc: Clipjump, The Utlimate Clipboard Manager for Windows
6 | ghlink: https://github.com/aviaryan/Clipjump
7 | ---
8 |
9 | ` tag to create a *streched* container. Then use the `.symbol` class to create the icon and add the message text later. Here is the
56 | code for the following 4 boxes (in screenshot).
57 |
58 | {% highlight html %}
59 |
A kind of a notice box !
60 |
Error message
61 |
A positive/success/completion message
62 |
A warning message
63 | {% endhighlight %}
64 |
65 |
66 |

67 |
68 |
To have the message box not strech to full width of the page, use span instead of div tag.
69 | See the
working example on Raw-Github ! And the
gist's source.
70 | Don't hesitate to ask if you face problems.
71 |
--------------------------------------------------------------------------------
/_posts/gsoc/2016-06-24-s3-for-storage.md:
--------------------------------------------------------------------------------
1 | ---
2 | layout: post
3 | title: Using S3 for cloud storage
4 | category: gsoc
5 | tags: gsoc gsoc16 python
6 | ---
7 |
8 | In this post, I will talk about how we can use the [Amazon S3](docs.aws.amazon.com/AmazonS3/latest/dev/Welcome.html) (Simple Storage Service) for cloud storage.
9 | As you may know, S3 is a no-fuss, super easy cloud storage service based on the IaaS model.
10 | There is no limit on the size of file or the amount of files you can keep on S3, you are only charged for the amount of bandwidth you use.
11 | This makes S3 very popular among enterprises of all sizes and individuals.
12 |
13 | Now let's see how to use S3 in Python. Luckily we have a very nice library called [Boto](http://boto.cloudhackers.com/en/latest/) for it.
14 | Boto is a library developed by the AWS team to provide a Python SDK for the amazon web services.
15 | Using it is very simple and straight-forward. Here is a basic example of uploading a file on S3 using Boto -
16 |
17 | {% highlight python %}
18 | import boto
19 | from boto.s3.key import Key
20 | # connect to the bucket
21 | conn = boto.connect_s3(AWS_ACCESS_KEY_ID, AWS_SECRET_ACCESS_KEY)
22 | bucket = conn.get_bucket(BUCKET_NAME)
23 | # set the key
24 | key = 'key/for/file'
25 | file = '/full/path/to/file'
26 | # create a key to keep track of our file in the storage
27 | k = Key(bucket)
28 | k.key = key
29 | k.set_contents_from_filename(file)
30 | {% endhighlight %}
31 |
32 | The above example uploads a `file` to s3 bucket `BUCKET_NAME`.
33 |
34 | Buckets are containers which store data.
35 | The `key` here is the unique key for an item in the bucket. Every item in the bucket is identified by a unique key assigned to it.
36 | The file can be downloaded from the url `BUCKET_NAME.s3.amazonaws.com/{key}`.
37 | It is therefore essential to choose the key name smartly so that you don't end up overwriting an existing item on the server.
38 |
39 | In the [Open Event project](https://github.com/fossasia/open-event-orga-server/), I thought of a scheme that will allows us to avoid conflicts. It relies on using IDs of items for distinguishing them and goes as follows -
40 |
41 | * When uploading user avatar, key should be 'users/{userId}/avatar'
42 | * When uploading event logo, key should be 'events/{eventId}/logo'
43 | * When uploading audio of session, key should be 'events/{eventId}/sessions/{sessionId}/audio'
44 |
45 | Note that to store user 'avatar', I am setting the key as `/avatar` and not `/avatar.extension`. This is because if user uploads pictures in different formats, we will end up
46 | storing different copies of avatars for the same user. This is nice but it's limitation is that downloading file from the url will give the file without an extension.
47 | So to solve this issue, we can use the Content-Disposition header.
48 |
49 | {% highlight python %}
50 | k.set_contents_from_filename(
51 | file,
52 | headers={
53 | 'Content-Disposition': 'attachment; filename=filename.extension'
54 | }
55 | )
56 | {% endhighlight %}
57 |
58 | So now when someone tries to download the file from that link, they will get the file with an extension instead of a no-extension "Choose what you want to do" file.
59 |
60 | This covers up the basics of using S3 for your Python project. You may explore [Boto's S3 documentation](boto.cloudhackers.com/en/latest/s3_tut.html) to find other interesting
61 | functions like deleting a folder, copy one folder to another and so.
62 |
63 | Also don't forget to have a look at the [awesome documentation](https://github.com/fossasia/open-event-orga-server/blob/master/docs/AMAZON_S3.md)
64 | we wrote for the Open Event project.
65 | It provides a more pictorial and detailed guide on how to setup S3 for your project.
66 |
--------------------------------------------------------------------------------
/_posts/gsoc/2016-08-20-docker-compose-starting.md:
--------------------------------------------------------------------------------
1 | ---
2 | layout: post
3 | title: Getting started with Docker Compose
4 | category: gsoc
5 | tags: gsoc gsoc16 docker
6 | ---
7 |
8 | In this post, I will talk about running multiple containers at once using [Docker Compose](https://github.com/docker/compose).
9 |
10 |
11 | #### The problem ?
12 |
13 | Suppose you have a complex app with Database containers, Redis and what not. How are you going to start the app ?
14 | One way is to write a shell script that starts the containers one by one.
15 |
16 | {% highlight bash %}
17 | docker run postgres:latest --name mydb -d
18 | docker run redis:3-alpine --name myredis -d
19 | docker run myapp -d
20 | {% endhighlight %}
21 |
22 | Now suppose these containers have lots of configurations (links, volumes, ports, environment variables) that they need to function. You will have to write those parameters
23 | in the shell script.
24 |
25 | {% highlight bash %}
26 | docker network create myapp_default
27 | docker run postgres:latest --name db -d -p 5432:5432 --net myapp_default
28 | docker run redis:3-alpine --name redis -d -p 6379:6379 --net myapp_default \
29 | -v redis:/var/lib/redis/data
30 | docker run myapp -d -p 5000:5000 --net myapp_default -e SOMEVAR=value --link db:db \
31 | --link redis:redis -v storage:/myapp/static
32 | {% endhighlight %}
33 |
34 | Won't it get un-manageable ? Won't it be great if we had a cleaner way to running multiple containers. Here comes docker-compose to the rescue.
35 |
36 |
37 | #### Docker compose
38 |
39 | [Docker compose](https://docs.docker.com/compose/) is a python package which does the job of handling multiple containers for an application very elegantly.
40 | The main file of docker-compose is `docker-compose.yml` which is a YAML like syntax file with the settings/components required to run your app.
41 | Once you define that file, you can just do `docker-compose up` to start your app with all the components and settings. Pretty cool, right ?
42 |
43 | So let's see the docker-compose.yml for the fictional app we have considered above.
44 |
45 | {% highlight yaml %}
46 | version: '2'
47 |
48 | services:
49 | db:
50 | image: postgres:latest
51 | ports:
52 | - '5432:5432'
53 |
54 | redis:
55 | image: 'redis:3-alpine'
56 | command: redis-server
57 | volumes:
58 | - 'redis:/var/lib/redis/data'
59 | ports:
60 | - '6379:6379'
61 |
62 | web:
63 | build: .
64 | environment:
65 | SOMEVAR: value
66 | links:
67 | - db:db
68 | - redis:redis
69 | volumes:
70 | - 'storage:/myapp/static'
71 | ports:
72 | - '5000:5000'
73 |
74 | volumes:
75 | redis:
76 | storage:
77 | {% endhighlight %}
78 |
79 | Once this file is in the project's root directory, you can use `docker-compose up` to start the application.
80 | It will run the services in the order in which they have been defined in the YAML file.
81 |
82 | Docker compose has a lot of commands that generally correspond to the parameters that `docker run` accepts.
83 | You can see a full list on the official [docker-compose reference](https://docs.docker.com/compose/compose-file/).
84 |
85 |
86 | #### Conclusion
87 |
88 | It's no doubt that docker-compose is a boon when you have to run complex applications. It personally use Compose in every dockerized application that I write.
89 | In GSoC 16, I dockerized [Open Event](https://github.com/fossasia/open-event-orga-server).
90 | Here is the [docker-compose.yml](https://github.com/fossasia/open-event-orga-server/blob/development/docker-compose.yml) file if you are interested.
91 |
92 | PS - If you liked this post, you might find my [other posts on Docker](http://aviaryan.in/blog/tags.html#docker) interesting. Do take a look and let me know your views.
93 |
94 |
--------------------------------------------------------------------------------
/ahk/functions/ahkini.html:
--------------------------------------------------------------------------------
1 | ---
2 | layout: page
3 | title: AhkIni()
4 | tagline: Fast Ini lib with standard comment-linked support
5 | ghlink: https://github.com/aviaryan/autohotkey-scripts/blob/master/Functions/AhkIni.ahk
6 | ---
7 |
8 |
Ahk Board Topic
9 |
10 | Class to perform Ini reading and writing operations
11 | Created as a complete replacement of the default Ini commands
12 |
13 |
- Much much faster than the default Ini operations.
14 |
- Support for reading/writing linked comments to keys and sections.
15 |
- Same syntax as the default Ini commands.
16 |
17 |
Example of an Ini created through the lib
18 |
19 | {% highlight ini %}
20 | [section1]
21 | ;section1 comment
22 | key1 = hithere_key1
23 | ;keycomment
24 | ;line2
25 | ;line3
26 | key2 = hithere_key2
27 | ;keycomment2
28 | key3 = hithere_key3
29 |
30 | [section2]
31 | ;section2 comment
32 | key1 = hithere2
33 | ;keycomment2
34 | {% endhighlight %}
35 |
36 |
The code
37 | {% highlight autohotkey %}
38 | SetWorkingDir,% A_scriptdir
39 |
40 | Ini := new AhkIni("black2.ini") ;will create new ini if nothing exists
41 |
42 | ini.write("section1", "key1", "hithere_key1", "keycomment`nline2`nline3")
43 | ini.write("section1", "key2", "hithere_key2", "keycomment2", "section1 comment")
44 | ini.write("section1", "key3", "hithere_key3") ;no comment for this key
45 | ini.write("section2", "key1", "hithere2", "keycomment2", "section2 comment")
46 |
47 | msgbox,% ini.read("section1", "key1", key, sec) "`n`n" key "`n`n" sec
48 | msgbox,% "Section1 keys are `n`n" ini.read("section1") ;read the keys in section 1
49 | msgbox,% "Sections in the ini are`n`n" ini.read()
50 | ;ini.delete("section1", "key1") ;delete the above read key
51 |
52 | ini.Save()
53 |
54 | #include, AhkIni.ahk
55 | {% endhighlight %}
56 |
57 |
58 |
59 |
60 |
61 | Methods
62 |
63 |
64 | - New(Inifile)
65 |
Sets a pointer to an Ini settings file.
66 | The Ini file is created if it doesn't exists.
67 |
68 | - .Read(Section="", Key="", Byref Key_com="", ByRef Sec_com="")
69 |
Reads value of the Key contained in a Section to the outputvar.
70 | If the Byref parameters are specified, the linked Key comments (Key_com) and Section comments (Sec_com) are
71 | also read.
72 | If Section="" i.e. the first param is unspecified, the list of sections in the ini will be returned in a fashion similar to the AHK_l
73 | IniRead command.
74 | If Key="" , the list of Keys in the specified Section is returned.
75 |
76 | - .Write(Section, Key, Value, Key_com="", Sec_com="")
77 |
Write values to a key, creating the key and section if necessary.
78 | The params Key_com and Sec_com are for key and section comments.
79 | If these params are omitted, then the original corresponding comment is left unchanged but if
80 | these params are called as a Space (" " or A_space), then the linked comment for the section/key is
81 | deleted and changed to null.
82 |
83 | - .Delete(Section="", Key="")
84 |
Delete keys or sections from the ini.
85 | If Key is omitted , the whole section is deleted.
86 | If Section is omitted , the whole Ini is deleted.
87 |
88 | - .Save()
89 |
Saves the changes made to the Ini made in memory to the file.
90 | Remember to call .Save after making the changes.
91 |
92 |
--------------------------------------------------------------------------------
/ahk/tools/htmltag.html:
--------------------------------------------------------------------------------
1 | ---
2 | layout: page
3 | title: HTMLTag
4 | tagline: v ----
5 | ghlink: https://github.com/aviaryan/autohotkey-scripts/blob/master/Tools/HtmlTag.ahk
6 | ---
7 |
8 |
Ahk Topic
9 |
DOWNLOAD
10 |
HTML Tagger is a tool to add HTML, bb-code and custom tags or wrappings to selected text on the screen.
11 | It is intutive , fast and powerful.
12 |
13 |
14 |
15 |
FEATURES
16 |
17 | - No need for shortcuts, you can fastly cycle between tags/wrappings using a single Ctrl+H
18 | This feature is same as the one innovated in Clipjump.
19 | - Support for unlimited tags/wrappings.
20 |
- Very fast switching through tags/wrappings which can be added/deleted at runtime
21 |
- You can determine where should the cursor be placed after insertion of tags so that it gets easy to append custom
22 | information.
23 |
- Open source and free.
24 |
25 |
26 |
27 |
USAGE
28 |
29 | - Select Text you want to apply tags to.
30 |
- Hold Ctrl, then tap H to cycle between different Items OR tags available
31 |
- Release Ctrl to apply the current selected tag.
32 |
- While holding Ctrl, tap X to cancel Tag operation
33 |
- While holding Ctrl, tap D to delete Tooltip active tag/wrapping item.
34 |
35 | Use Win+H to show a GUI which will enable you to add more tag items to the program.
36 | The item added here is saved in a HTMLTag.ini file for future use.
37 |
38 |
HtmlTag Adder GUI Options
39 |
40 | - LABEL
41 |
The name by which an item will be identified (Shown in Tooltip)
42 | - MASK
43 |
The MASK that you want the program to impose on the selected text.
44 | eg -> <h1>|</h1>
45 | Here | is the Delimiter and will symbolize selected text due to the TEXT POINT Param
46 | - TEXT POINT
47 |
The Delim which you want to be replaced by selected text.
48 | This may seem a useless option as it will more often be 1.
49 | Use TEXT POINT = 0 to make selected Text appear before tag items.
50 |
51 | - CARET INSERTION POINT
52 |
f 0 , Caret (Cursor) is placed at the end of tag after a Tag is applied
53 | If 1 or more, the Caret is placed that many points away from the right of Inserted selected text.
54 | Use Caret=1 to place the Caret right after the selected text tagged by the program.
55 | If you don't understand , better try it.
56 |
57 | - DELIMITER
58 |
The Delimiter used to separate MASK items.
59 | Default = |
60 |
61 |
62 |
63 |
64 |
Include Files
65 |
AhkIni.ahk
66 |
Clipjump Communicator.ahk (OPTIONAL)
67 |
68 |
69 |
Some Examples
70 |
71 | - Commenting text in Autohotkey scripts
72 |
Using Mask = /*|*/ and all other options default, the selected text can be converted into an
73 | Autohotkey Block comment.
74 | - Inserting code in BB-Code Forums (like Autohotkey)
75 |
Using Mask = [c]|[/c] and all other options default
76 | - Commenting text (inline) in Autohotkey
77 |
Using Mask = ;| and all other options default
78 |
79 |
80 |
--------------------------------------------------------------------------------
/_posts/gsoc/2016-06-19-paginated-apis-flask.md:
--------------------------------------------------------------------------------
1 | ---
2 | layout: post
3 | title: Paginated APIs in Flask
4 | category: gsoc
5 | tags: gsoc gsoc16 flask python
6 | ---
7 |
8 | Week 2 of GSoC I had the task of implementing paginated APIs in [Open Event](https://github.com/fossasia/open-event) project.
9 | I was aware that [DRF](www.django-rest-framework.org/) provided such feature in Django so I looked through the Internet to find some library for Flask.
10 | Luckily, I didn't find any so I decided to make my own.
11 |
12 | A paginated API is page-based API. This approach is used as the API data can be very large sometimes and pagination can help to break it into small chunks.
13 | The Paginated API built in the Open Event project looks like this -
14 |
15 | {% highlight json %}
16 | {
17 | "start": 41,
18 | "limit": 20,
19 | "count": 128,
20 | "next": "/api/v2/events/page?start=61&limit=20",
21 | "previous": "/api/v2/events/page?start=21&limit=20",
22 | "results": [
23 | {
24 | "data": "data"
25 | },
26 | {
27 | "data": "data"
28 | }
29 | ]
30 | }
31 | {% endhighlight %}
32 |
33 | Let me explain what the keys in this JSON mean -
34 |
35 | 1. `start` - It is the position from which we want the data to be returned.
36 | 2. `limit` - It is the max number of items to return from that position.
37 | 3. `next` - It is the url for the next page of the query assuming current value of `limit`
38 | 4. `previous` - It is the url for the previous page of the query assuming current value of `limit`
39 | 5. `count` - It is the total count of results available in the dataset. Here as the 'count' is 128, that means you can go maximum till start=121 keeping limit as 20. Also when
40 | you get the page with start=121 and limit=20, 8 items will be returned.
41 | 6. `results` - This is the list of results whose position lies within the bounds specified by the request.
42 |
43 | Now let's see how to implement it. I have simplified the code to make it easier to understand.
44 |
45 | {% highlight python %}
46 | from flask import Flask, abort, request, jsonify
47 | from models import Event
48 |
49 | app = Flask(__name__)
50 |
51 | @app.route('/api/v2/events/page')
52 | def view():
53 | return jsonify(get_paginated_list(
54 | Event,
55 | '/api/v2/events/page',
56 | start=request.args.get('start', 1),
57 | limit=request.args.get('limit', 20)
58 | ))
59 |
60 | def get_paginated_list(klass, url, start, limit):
61 | # check if page exists
62 | results = klass.query.all()
63 | count = len(results)
64 | if (count < start):
65 | abort(404)
66 | # make response
67 | obj = {}
68 | obj['start'] = start
69 | obj['limit'] = limit
70 | obj['count'] = count
71 | # make URLs
72 | # make previous url
73 | if start == 1:
74 | obj['previous'] = ''
75 | else:
76 | start_copy = max(1, start - limit)
77 | limit_copy = start - 1
78 | obj['previous'] = url + '?start=%d&limit=%d' % (start_copy, limit_copy)
79 | # make next url
80 | if start + limit > count:
81 | obj['next'] = ''
82 | else:
83 | start_copy = start + limit
84 | obj['next'] = url + '?start=%d&limit=%d' % (start_copy, limit)
85 | # finally extract result according to bounds
86 | obj['results'] = results[(start - 1):(start - 1 + limit)]
87 | return obj
88 | {% endhighlight %}
89 |
90 | Just to be clear, here I am assuming you are using SQLAlchemy for the database. The `klass` parameter in the above code is the SqlAlchemy db.Model class on which you want
91 | to query upon for the results. The `url` is the base url of the request, here '/api/v2/events/page' and it used in setting the *previous* and *next* urls.
92 | Other things should be clear from the code.
93 |
94 | So this was how to implement your very own Paginated API framework in Flask (should say Python). I hope you found this post interesting.
95 |
96 | Until next time.
97 |
98 | Ciao
99 |
--------------------------------------------------------------------------------
/_posts/gsoc/2016-07-15-celery-flask-using.md:
--------------------------------------------------------------------------------
1 | ---
2 | layout: post
3 | title: Setting up Celery with Flask
4 | category: gsoc
5 | tags: gsoc gsoc16 celery flask
6 | ---
7 |
8 | In this article, I will explain how to use Celery with a Flask application.
9 | Celery requires a broker to run. The most famous of the brokers is Redis.
10 | So to start using Celery with Flask, first we will have to setup the Redis broker.
11 |
12 | Redis can be downloaded from their site [http://redis.io](http://redis.io).
13 | I wrote a script that simplifies downloading, building and running the redis server.
14 |
15 | {% highlight bash %}
16 | #!/bin/bash
17 | # This script downloads and runs redis-server.
18 | # If redis has been already downloaded, it just runs it
19 | if [ ! -d redis-3.2.1/src ]; then
20 | wget http://download.redis.io/releases/redis-3.2.1.tar.gz
21 | tar xzf redis-3.2.1.tar.gz
22 | rm redis-3.2.1.tar.gz
23 | cd redis-3.2.1
24 | make
25 | else
26 | cd redis-3.2.1
27 | fi
28 | src/redis-server
29 | {% endhighlight %}
30 |
31 | When the above script is ran from the first time, the redis folder doesn\'t exist so it downloads the same, builds it and then runs it.
32 | In subsequent runs, it will skip the downloading and building part and just run the server.
33 |
34 | Now that the redis server is running, we will have to install its Python counterpart.
35 |
36 | {% highlight bash %}
37 | pip install redis
38 | {% endhighlight %}
39 |
40 | After the redis broker is set, now its time to setup the celery extension.
41 | First install celery by using `pip install celery`.
42 | Then we need to setup celery in the flask app definition.
43 |
44 | {% highlight python %}
45 | # in app.py
46 | def make_celery(app):
47 | # set redis url vars
48 | app.config['CELERY_BROKER_URL'] = environ.get('REDIS_URL', 'redis://localhost:6379/0')
49 | app.config['CELERY_RESULT_BACKEND'] = app.config['CELERY_BROKER_URL']
50 | # create context tasks in celery
51 | celery = Celery(app.import_name, broker=app.config['CELERY_BROKER_URL'])
52 | celery.conf.update(app.config)
53 | TaskBase = celery.Task
54 | class ContextTask(TaskBase):
55 | abstract = True
56 | def __call__(self, *args, **kwargs):
57 | with app.app_context():
58 | return TaskBase.__call__(self, *args, **kwargs)
59 | celery.Task = ContextTask
60 | return celery
61 |
62 | celery = make_celery(current_app)
63 | {% endhighlight %}
64 |
65 | Now that Celery is setup on our project, let's define a sample task.
66 |
67 | {% highlight python %}
68 | @app.route('/task')
69 | def view():
70 | background_task.delay(*args, **kwargs)
71 | return 'OK'
72 |
73 | @celery.task
74 | def background_task(*args, **kwargs):
75 | # code
76 | # more code
77 | {% endhighlight %}
78 |
79 | Now to run the celery workers, execute
80 |
81 | {% highlight bash %}
82 | celery worker -A app.celery
83 | {% endhighlight %}
84 |
85 | That should be all. Now to run our little project, we can execute the following script.
86 |
87 | {% highlight bash %}
88 | bash run_redis.sh & # to run redis
89 | celery worker -A app.celery & # to run celery workers
90 | python app.py
91 | {% endhighlight %}
92 |
93 | If you are wondering how to run the same on Heroku, just use the free [heroku-redis](https://elements.heroku.com/addons/heroku-redis) extension.
94 | It will start the redis server on heroku. Then to run the workers and app, set the Procfile as -
95 |
96 | {% highlight yaml %}
97 | web: sh heroku.sh
98 | {% endhighlight %}
99 |
100 | Then set the heroku.sh as -
101 |
102 | {% highlight bash %}
103 | #!/bin/bash
104 | celery worker -A app.celery &
105 | gunicorn app:app
106 | {% endhighlight %}
107 |
108 |
109 | That's a basic guide on how to run a Flask app with Celery and Redis.
110 | If you want more information on this topic, please see my post
111 | [Ideas on Using Celery in Flask for background tasks](http://aviaryan.in/blog/gsoc/celery-flask-good-ideas.html).
112 |
--------------------------------------------------------------------------------
/_posts/gsoc/2016-07-02-jwt-intro.md:
--------------------------------------------------------------------------------
1 | ---
2 | layout: post
3 | title: Introduction to JWT
4 | category: gsoc
5 | tags: gsoc gsoc16
6 | ---
7 |
8 | In this post, I will try to explain what is JWT, what are its advantages and why you should be using it.
9 |
10 | [JWT](https://jwt.io) stands for JSON Web Tokens. Let me explain what each word means.
11 |
12 | 1. Tokens - Token is in tech terms a piece of data (claim) which gives access to certain piece of information and allows certain actions.
13 | 2. Web - Web here means that it was designed to be used on the web i.e. web projects.
14 | 3. JSON - JSON means that the token can contain json data. In JWT, the json is first serialized and then [Base64 encoded](https://en.wikipedia.org/wiki/Base64).
15 |
16 | A JWT looks like a random sequence of strings separated by 2 dots. The `yyyyy` part which you see below has the Base64 encoded form of json data mentioned earlier.
17 |
18 | {% highlight bash %}
19 | xxxxx.yyyyy.zzzzz
20 | {% endhighlight %}
21 | The 3 parts in order are -
22 |
23 | * Header - Header is the base64 encoded json which contains hashing algorithm on which the token is secured.
24 | * Payload - Payload is the base64 encoded json data which needs to be shared through the token.
25 | The json can include some default keys like `iss` (issuer), `exp` (expiration time), `sub` (subject) etc. Particularly `exp` here is the interesting one as it allows specifying
26 | expiry time of the token.
27 |
28 | At this point you might be thinking that how is JWT secure if all we are doing is base64 encoding payload. After all, there are easy ways to decode base64.
29 | This is where the 3rd part (zzzzz) is used.
30 |
31 | * Signature - Signature is a hashed string made up by the first two parts of the token (header and payload) and a `secret`. The secret should be kept confidential to the owner
32 | who is authenticating using JWT. This is how the signature is created. (assuming HMACSHA256 as the algorithm)
33 |
34 | {% highlight python %}
35 | HMACSHA256(
36 | xxxxx + "." + yyyyy,
37 | secret)
38 | {% endhighlight %}
39 |
40 | #### How to use JWT for authentication
41 |
42 | Once you realize it, the idea of JWT is quite simple. To use JWT for authentication, what you do is you make the client POST their username and password to a certain url.
43 | If the combination is correct, you return a JWT including `username` in the "Payload". So the payload looks like -
44 |
45 | {% highlight json %}
46 | {
47 | "username": "john.doe"
48 | }
49 | {% endhighlight %}
50 |
51 | Once the client has this JWT, they can send the same in Header when accessing protected routes. The server can read the JWT from the header and verify its correctness by matching the signature (zzzzz part) with the encoded hash created using header+payload and secret (generated signature).
52 | If the strings match, it means that the JWT is valid and therefore the request can be given access to the routes.
53 | BTW, you won't have to go through such a deal for using JWT for authentication, there are already a handful of [libraries](https://jwt.io/#libraries-io) that can do these for
54 | you.
55 |
56 |
57 | #### Why use JWT over auth tokens ?
58 |
59 | As you might have noticed in the previous section, JWT has a payload field that can contain any type of information.
60 | If you include `username` in it, you will be able to identify the user just by validating the JWT and there will be no need to read from the database unlike typical tokens which require a database read cycle to get the claimed user.
61 | Now if you go ahead and include permission informations in JWT too (like `'isAdmin': True`), then more database reads can be prevented.
62 | And this optimization comes at no cost at all. So this is why you should be using JWT.
63 |
64 |
65 | We at [Open Event](https://github.com/fossasia/open-event) use JWT for our primary means of authentication. Apart from that, we support basic authentication too.
66 | Read [this post](http://aviaryan.in/blog/gsoc/auth-flask-done-right.html) for some points about that.
67 |
68 | That's it for now. Thanks for reading.
69 |
--------------------------------------------------------------------------------
/assets/css/mojombo.css:
--------------------------------------------------------------------------------
1 | /** https://github.com/mojombo/tpw/blob/master/css/syntax.css **/
2 | .highlight pre { background: rgb(241, 241, 241); padding: 10px 15px;}
3 | .highlight .c { color: #999988; font-style: italic } /* Comment */
4 | .highlight .err { color: #a61717; background-color: #e3d2d2 } /* Error */
5 | .highlight .k { font-weight: bold } /* Keyword */
6 | .highlight .o { font-weight: bold } /* Operator */
7 | .highlight .cm { color: #999988; font-style: italic } /* Comment.Multiline */
8 | .highlight .cp { color: #999999; font-weight: bold } /* Comment.Preproc */
9 | .highlight .c1 { color: #999988; font-style: italic } /* Comment.Single */
10 | .highlight .cs { color: #999999; font-weight: bold; font-style: italic } /* Comment.Special */
11 | .highlight .gd { color: #000000; background-color: #ffdddd } /* Generic.Deleted */
12 | .highlight .gd .x { color: #000000; background-color: #ffaaaa } /* Generic.Deleted.Specific */
13 | .highlight .ge { font-style: italic } /* Generic.Emph */
14 | .highlight .gr { color: #aa0000 } /* Generic.Error */
15 | .highlight .gh { color: #999999 } /* Generic.Heading */
16 | .highlight .gi { color: #000000; background-color: #ddffdd } /* Generic.Inserted */
17 | .highlight .gi .x { color: #000000; background-color: #aaffaa } /* Generic.Inserted.Specific */
18 | .highlight .go { color: #888888 } /* Generic.Output */
19 | .highlight .gp { color: #555555 } /* Generic.Prompt */
20 | .highlight .gs { font-weight: bold } /* Generic.Strong */
21 | .highlight .gu { color: #aaaaaa } /* Generic.Subheading */
22 | .highlight .gt { color: #aa0000 } /* Generic.Traceback */
23 | .highlight .kc { font-weight: bold } /* Keyword.Constant */
24 | .highlight .kd { font-weight: bold } /* Keyword.Declaration */
25 | .highlight .kp { font-weight: bold } /* Keyword.Pseudo */
26 | .highlight .kr { font-weight: bold } /* Keyword.Reserved */
27 | .highlight .kt { color: #445588; font-weight: bold } /* Keyword.Type */
28 | .highlight .m { color: #009999 } /* Literal.Number */
29 | .highlight .s { color: #d14 } /* Literal.String */
30 | .highlight .na { color: #008080 } /* Name.Attribute */
31 | .highlight .nb { color: #0086B3 } /* Name.Builtin */
32 | .highlight .nc { color: #445588; font-weight: bold } /* Name.Class */
33 | .highlight .no { color: #008080 } /* Name.Constant */
34 | .highlight .ni { color: #800080 } /* Name.Entity */
35 | .highlight .ne { color: #990000; font-weight: bold } /* Name.Exception */
36 | .highlight .nf { color: #990000; font-weight: bold } /* Name.Function */
37 | .highlight .nn { color: #555555 } /* Name.Namespace */
38 | .highlight .nt { color: #000080 } /* Name.Tag */
39 | .highlight .nv { color: #008080 } /* Name.Variable */
40 | .highlight .ow { font-weight: bold } /* Operator.Word */
41 | .highlight .w { color: #bbbbbb } /* Text.Whitespace */
42 | .highlight .mf { color: #009999 } /* Literal.Number.Float */
43 | .highlight .mh { color: #009999 } /* Literal.Number.Hex */
44 | .highlight .mi { color: #009999 } /* Literal.Number.Integer */
45 | .highlight .mo { color: #009999 } /* Literal.Number.Oct */
46 | .highlight .sb { color: #d14 } /* Literal.String.Backtick */
47 | .highlight .sc { color: #d14 } /* Literal.String.Char */
48 | .highlight .sd { color: #d14 } /* Literal.String.Doc */
49 | .highlight .s2 { color: #d14 } /* Literal.String.Double */
50 | .highlight .se { color: #d14 } /* Literal.String.Escape */
51 | .highlight .sh { color: #d14 } /* Literal.String.Heredoc */
52 | .highlight .si { color: #d14 } /* Literal.String.Interpol */
53 | .highlight .sx { color: #d14 } /* Literal.String.Other */
54 | .highlight .sr { color: #009926 } /* Literal.String.Regex */
55 | .highlight .s1 { color: #d14 } /* Literal.String.Single */
56 | .highlight .ss { color: #990073 } /* Literal.String.Symbol */
57 | .highlight .bp { color: #999999 } /* Name.Builtin.Pseudo */
58 | .highlight .vc { color: #008080 } /* Name.Variable.Class */
59 | .highlight .vg { color: #008080 } /* Name.Variable.Global */
60 | .highlight .vi { color: #008080 } /* Name.Variable.Instance */
61 | .highlight .il { color: #009999 } /* Literal.Number.Integer.Long */
--------------------------------------------------------------------------------
/_posts/gsoc/2016-08-04-dynamic-marshal-restplus.md:
--------------------------------------------------------------------------------
1 | ---
2 | layout: post
3 | title: Dynamically marshalling output in Flask Restplus
4 | category: gsoc
5 | tags: gsoc gsoc16 flask-restplus flask
6 | ---
7 |
8 | Do you use [Flask-Restplus](https://github.com/noirbizarre/flask-restplus) ? Have you felt the need of dynamically modifying API output according to condition.
9 | If yes, then this post is for you.
10 |
11 | In this post, I will show how to use decorators to restrict GET API output. So let's start.
12 |
13 | This is the basic code to create an API. Here we have created a `get_speaker` API to get a single item from Speaker model.
14 |
15 | {% highlight python %}
16 | from flask_restplus import Resource, Model, fields, Namespace
17 | from models import Speaker
18 |
19 | api = Namespace('speakers', description='Speakers', path='/')
20 |
21 | SPEAKER = Model('Name', {
22 | 'id': fields.Integer(),
23 | 'name': fields.String(),
24 | 'phone': fields.String()
25 | })
26 |
27 | class DAO:
28 | def get(speaker_id):
29 | return Speaker.query.get(speaker_id)
30 |
31 | @api.route('/speakers/
')
32 | class Speaker(Resource):
33 | @api.doc('get_speaker')
34 | @api.marshal_with(SPEAKER)
35 | def get(self, speaker_id):
36 | """Fetch a speaker given its id"""
37 | return DAO.get(speaker_id)
38 | {% endhighlight %}
39 |
40 | Now our need is to change the returned API data according to some condition. Like if user is authenticated then only return `phone` field of the SPEAKER model.
41 | One way to do this is to create condition statements in `get` method that marshals the output according to the situation. But if there are lots of methods which require this,
42 | then this is not a good way.
43 |
44 | So let's create a decorator which can change the `marshal` decorator at runtime. It will accept parameters as which models to marshal in case of authenticated and non-authenticated cases.
45 |
46 | {% highlight python %}
47 | from flask_login import current_user
48 | from flask_restplus import marshal_with
49 |
50 | def selective_marshal_with(fields, fields_private):
51 | """
52 | Selective response marshalling. Doesn't update apidoc.
53 | """
54 | def decorator(func):
55 | @wraps(func)
56 | def wrapper(*args, **kwargs):
57 | if current_user.is_authenticated:
58 | model = fields
59 | else:
60 | model = fields_private
61 | func2 = marshal_with(model)(func)
62 | return func2(*args, **kwargs)
63 | return wrapper
64 | return decorator
65 | {% endhighlight %}
66 |
67 | The above code adds a wrapper over the API function which checks if the user is authenticated. If the user is authenticated, `fields` model is used for marshalling else
68 | `fields_private` is used for marshalling.
69 |
70 | So let's create the private model for `SPEAKER`. We will call it `SPEAKER_PRIVATE`.
71 |
72 | {% highlight python %}
73 | from flask_restplus import Model, fields
74 |
75 | SPEAKER_PRIVATE = Model('NamePrivate', {
76 | 'id': fields.Integer(),
77 | 'name': fields.String()
78 | })
79 | {% endhighlight %}
80 |
81 | The final step is attaching the `selective_marshal_with` decorator to the get() method.
82 |
83 | {% highlight python %}
84 | @api.route('/speakers/')
85 | class Speaker(Resource):
86 | @api.doc('get_speaker', model=SPEAKER)
87 | @selective_marshal_with(SPEAKER, SPEAKER_PRIVATE)
88 | def get(self, speaker_id):
89 | """Fetch a speaker given its id"""
90 | return DAO.get(speaker_id)
91 | {% endhighlight %}
92 |
93 | You will notice that I removed `@api.marshal_with(SPEAKER)`. This was to disable automatic marshalling of output by flask-restplus. To compensate for this, I have added
94 | `model=SPEAKER` in `api.doc`. It will not auto-marshal the output but will still show the swagger documentation.
95 |
96 | That concludes this. The get method will now switch `marshal` field w.r.t to the authentication level of the user.
97 | As you may notice, the `selective_marhsal_with` function is generic and can be used with other models and APIs too.
98 |
--------------------------------------------------------------------------------
/_posts/gsoc/2016-08-16-docker-using-alpine.md:
--------------------------------------------------------------------------------
1 | ---
2 | layout: post
3 | title: Small Docker images using Alpine Linux
4 | category: gsoc
5 | tags: gsoc gsoc16 docker
6 | ---
7 |
8 | Everyone likes optimization, small file sizes and such.. Won't it be great if you are able to reduce your Docker image sizes by a factor of 2 or more.
9 | Say hello to [Alpine Linux](https://hub.docker.com/_/alpine/).
10 | It is a minimal Linux distro weighing just 5 MBs. It also has basic linux tools and a nice package manager APK. APK is quite stable and has a considerable amount of
11 | packages.
12 |
13 | {% highlight bash %}
14 | apk add python gcc
15 | {% endhighlight %}
16 |
17 | In this post, my main motto is how to squeeze the best out of AlpineLinux to create the smallest possible Docker image. So let's start.
18 |
19 |
20 | ### Step 1: Use AlpineLinux based images
21 |
22 | Ok, I know that's obvious but just for the sake of completeness of this article, I will state that prefer using Alpine based images wherever possible.
23 | [Python](https://hub.docker.com/_/python/) and Redis have their official Alpine based images whereas NodeJS has good unoffical Alpine-based images.
24 | Same goes for Postgres, Ruby and other popular environments.
25 |
26 |
27 | ### Step 2: Install only needed dependencies
28 |
29 | Prefer installing select dependencies over installing a package that contains lots of them. For example, prefer installing `gcc` and development libraries over buildpacks.
30 | You can find listing of Alpine packages on their [website](https://pkgs.alpinelinux.org/packages).
31 |
32 | **Pro Tip** - A great list of Debian v/s Alpine development packages is at [alpine-buildpack-deps](https://hub.docker.com/r/praekeltfoundation/alpine-buildpack-deps/) Docker Hub page (scroll down to Packages). It is a very complete list and you will always find the dependency you are looking for.
33 |
34 |
35 | ### Step 3: Delete build dependencies after use
36 |
37 | Build dependencies are required by components/libraries to build native extensions for the platform. Once the build is done, they are not needed.
38 | So you should delete the build-dependencies after their job is complete. Have a look at the following snippet.
39 |
40 | {% highlight bash %}
41 | RUN apk add --virtual build-dependencies gcc python-dev linux-headers musl-dev postgresql-dev \
42 | && pip install -r requirements.txt \
43 | && apk del build-dependencies
44 | {% endhighlight %}
45 |
46 | I am using `--virtual` to give a label to the pacakages installed on that instance and then when `pip install` is done, I am deleting them.
47 |
48 |
49 | ### Step 4: Remove cache
50 |
51 | Cache can take up lots of un-needed space. So always run `apk add` with `--no-cache` parameter.
52 |
53 | {% highlight bash %}
54 | RUN apk add --no-cache package1 package2
55 | {% endhighlight %}
56 |
57 | If you are using npm for manaing project dependencies and bower for managing frontend dependencies, it is recommended to clear their cache too.
58 |
59 | {% highlight bash %}
60 | RUN npm cache clean && bower cache clean
61 | {% endhighlight %}
62 |
63 |
64 | ### Step 5: Learn from the experts
65 |
66 | Each and every image on Docker Hub is open source, meaning that it's Dockerfile is freely available. Since the official images are made as efficient as possible,
67 | it's easy to find great tricks on how to achieve optimum performance and compact size in them. So when viewing an image on DockerHub, don't forget to peek into its
68 | Dockerfile, it helps more than you can imagine.
69 |
70 |
71 | ## Conclusion
72 |
73 | That's all I have for now. I will keep you updated on new tips if I find any. In my personal experience, I found AlpineLinux to be worth using.
74 | I tried deploying [Open Event Server](https://github.com/fossasia/open-event-orga-server) on Alpine but faced some issues so ended up creating a Dockerfile
75 | using [debain:jessie](https://hub.docker.com/_/debian/).
76 | But for small projects, I would recommend Alpine.
77 | On large and complex projects however, you may face issues with Alpine at times. That maybe due to lack of packages, lack of library support or some other thing.
78 | But it's not impossible to overcome those issues so if you try hard enough, you can get your app running on Alpine.
79 |
--------------------------------------------------------------------------------
/_posts/gsoc/2016-07-25-open-event-import-export-algo.md:
--------------------------------------------------------------------------------
1 | ---
2 | layout: post
3 | title: Import/Export feature of Open Event - Challenges
4 | category: gsoc
5 | tags: gsoc gsoc16
6 | ---
7 |
8 | We have developed a nice import/export feature as a part of our GSoC project [Open Event](https://github.com/fossasia/open-event).
9 | It allows user to export an event and then further import it back.
10 |
11 | Event contains data like tracks, sessions, microlocations etc.
12 | When I was developing the basic part of this feature, it was a challenge on how to export and then further import the same data.
13 | I was in need of a format that completely stores data and is recognized by the current system.
14 | This is when I decided to use the APIs.
15 |
16 | API documentation of Open Event project is at [http://open-event.herokuapp.com/api/v2](http://open-event.herokuapp.com/api/v2). We have a considerably rich API covering most
17 | aspects of the system.
18 | For the export, I adopted this very simple technique.
19 |
20 | 1. Call the corresponding GET APIs (tracks, sessions etc) for a database model internally.
21 | 2. Save the data in separate json files.
22 | 3. Zip them all and done.
23 |
24 | This was very simple and convenient. Now the real challenge came of importing the event from the data exported.
25 | As exported data was nothing but json, we could have created the event back by sending the data back as POST request.
26 | But this was not that easy because the data formats are not exactly the same for GET and POST requests.
27 |
28 | Example -
29 |
30 | Sessions GET --
31 |
32 | {% highlight json %}
33 | {
34 | "speakers": [
35 | {
36 | "id": 1,
37 | "name": "Jay Sean"
38 | }
39 | ],
40 | "track": {
41 | "id": 1,
42 | "name": "Warmups"
43 | }
44 | }
45 | {% endhighlight %}
46 |
47 | Sessions POST --
48 |
49 | {% highlight json %}
50 | {
51 | "speaker_ids": [1],
52 | "track_id": 1
53 | }
54 | {% endhighlight %}
55 |
56 | So the exported data can only be imported when it has been converted to POST form. Luckily, the only change between POST and GET APIs was of the related attributes where
57 | dictionary in GET was replaced with just the ID in POST/PUT.
58 | So when importing I had to make it so such that the dicts are converted to their POST counterparts. For this, all that I had to do was to list all dict-type keys
59 | and extract the `id` key from them.
60 | I defined a global variable as the following listing all dict keys and then wrote a function to extract the ids and convert the keys.
61 |
62 | {% highlight python %}
63 | RELATED_FIELDS = {
64 | 'sessions': [
65 | ('track', 'track_id', 'tracks'),
66 | ('speakers', 'speaker_ids', 'speakers'),
67 | ]
68 | }
69 | {% endhighlight %}
70 |
71 |
72 | #### Second challenge
73 |
74 | Now I realized that there was even a tougher problem, and that was how to re-create the relations.
75 | In the above json, you must have realized that a session can be related to speaker(s) and track. These relations are managed using the IDs of the items.
76 | When an event is imported, the IDs are bound to change and so the old IDs will become outdated i.e. a track which was at ID 62 when exported can be at ID 92 when it is imported.
77 | This will cause the relationships to break.
78 | So to counter this problem, I did the following -
79 |
80 | 1. Import items in a specific order, independent first
81 | 2. Store a map of old IDs v/s new IDs.
82 | 3. When dependent items are to be created, get new ID from the map and relate with it.
83 |
84 | Let me explain the above -
85 |
86 | The first step was to import/re-create the independent items first. Here independent items are tracks and speakers, and the dependent item is session.
87 | Now while creating the independent items, store their new IDs after create. Create a map of old ids v/s new ids and store it.
88 | This map will hold a clue to *what became what* after they were recreated from the json.
89 | Now the key final step is that when dependent items are to be created, find the indepedent *related* keys in their json using the above defined *RELATED_FIELDS* listing.
90 | Once they are found, extract their IDs and find the new ID corresponding to their old ID.
91 | Link the new ID with the dependent item and that would be all.
92 |
93 | This post covers the main challenges I faced when developing the import/export feature and how I overcame them.
94 | I hope it will provide some help when you are dealing with similar problems.
95 |
96 |
--------------------------------------------------------------------------------
/_posts/2018-05-11-introducing-chattt.md:
--------------------------------------------------------------------------------
1 | ---
2 | layout: post
3 | title: "Introducing Chattt - an open source CLI chat client"
4 | tags: open-source project github
5 | ---
6 |
7 |
8 |  9 |
10 |
11 | So the past 2 months I was slowly working on my hobby project called "Chattt" and I just did the [v0.2](https://github.com/aviaryan/chattt/releases/tag/v0.2.0) release recently. It's quite ready for public use now so I thought I should share it with everyone.
12 |
13 | ## So what is Chattt?
14 |
15 | Chattt is an open source terminal based chat system. Its selling point is that it is very simple to use and it doesn't require much technical knowledge. I created it because I always wanted to have a simpler chat system that worked right from the terminal. I know you might say, "IRC does the same thing" but the thing is that I have always found IRC too complex. But that could be because I haven't given it much of a shot.
16 |
17 | Well whatever be the reason here, I went ahead and did this project. I even published it on `npm`. Here is how you can install and use it.
18 |
19 | ```sh
20 | $ npm install -g chattt
21 | $ chattt
22 | ```
23 | Once installed, it's ready to use. The video below shows a demo.
24 |
25 |
26 |
27 |
28 |
29 |
30 | ## The Development
31 |
32 | Chattt was developed entirely in **JavaScript**(JS) which also happens to be my new favorite language. I had to create two GitHub repositories for it since it required both a [backend](https://github.com/aviaryan/chattt-backend) and a [frontend](https://github.com/aviaryan/chattt) part.
33 |
34 | The backend part of Chattt is an ExpressJS server using [socket.io](http://socket.io/) for interacting with chat clients i.e. the Chattt CLI instances. For those who don't know, `socket.io` is a convenient library for using web sockets in your projects. Chattt uses the same concept to implement its core i.e. the chatting feature.
35 |
36 | I also needed a place to host the backend. Since it was just a hobby project and I wasn't too sure about its success, I didn't want to spend money on a compute server. But then I learned about [Glitch](https://glitch.com/) which allows hosting of NodeJS projects for free. I gave it a try and after a few attempts, I was able to host [chattt's backend on it](https://glitch.com/edit/#!/chattt).
37 |
38 | Coming to the frontend part, I had to make a CLI for Chattt. This was a real challenge for me because a CLI chat application requires a very dynamic command-line interface i.e. the command line window should update-in-place. I didn't know how to do such a thing. But then I stumbled upon [blessed](https://github.com/chjj/blessed), a terminal interface library which allowed me to do just that. So excited, I started learning how to use it. Now this was quite challenging since blessed's documentation was massive and I didn't understand the keywords used there (since I hadn't done CLI programming before). But then I came upon [gitter-cli](https://github.com/RodrigoEspinosa/gitter-cli) which was an open-source CLI chat client for [Gitter](https://gitter.im/) and it also used the `blessed` library. So after going through its codebase, I was able to pick up `blessed`'s concepts better and this helped me to finally develop the chattt's user interface(UI).
39 |
40 | Connecting the UI with the backend to display chats was fairly easy once we had the UI so I won't be talking about that. But in the end, I think I did an impressive job on the UI, the result of which it looks like this now.
41 |
42 |
43 |
9 |
10 |
11 | So the past 2 months I was slowly working on my hobby project called "Chattt" and I just did the [v0.2](https://github.com/aviaryan/chattt/releases/tag/v0.2.0) release recently. It's quite ready for public use now so I thought I should share it with everyone.
12 |
13 | ## So what is Chattt?
14 |
15 | Chattt is an open source terminal based chat system. Its selling point is that it is very simple to use and it doesn't require much technical knowledge. I created it because I always wanted to have a simpler chat system that worked right from the terminal. I know you might say, "IRC does the same thing" but the thing is that I have always found IRC too complex. But that could be because I haven't given it much of a shot.
16 |
17 | Well whatever be the reason here, I went ahead and did this project. I even published it on `npm`. Here is how you can install and use it.
18 |
19 | ```sh
20 | $ npm install -g chattt
21 | $ chattt
22 | ```
23 | Once installed, it's ready to use. The video below shows a demo.
24 |
25 |
26 |
27 |
28 |
29 |
30 | ## The Development
31 |
32 | Chattt was developed entirely in **JavaScript**(JS) which also happens to be my new favorite language. I had to create two GitHub repositories for it since it required both a [backend](https://github.com/aviaryan/chattt-backend) and a [frontend](https://github.com/aviaryan/chattt) part.
33 |
34 | The backend part of Chattt is an ExpressJS server using [socket.io](http://socket.io/) for interacting with chat clients i.e. the Chattt CLI instances. For those who don't know, `socket.io` is a convenient library for using web sockets in your projects. Chattt uses the same concept to implement its core i.e. the chatting feature.
35 |
36 | I also needed a place to host the backend. Since it was just a hobby project and I wasn't too sure about its success, I didn't want to spend money on a compute server. But then I learned about [Glitch](https://glitch.com/) which allows hosting of NodeJS projects for free. I gave it a try and after a few attempts, I was able to host [chattt's backend on it](https://glitch.com/edit/#!/chattt).
37 |
38 | Coming to the frontend part, I had to make a CLI for Chattt. This was a real challenge for me because a CLI chat application requires a very dynamic command-line interface i.e. the command line window should update-in-place. I didn't know how to do such a thing. But then I stumbled upon [blessed](https://github.com/chjj/blessed), a terminal interface library which allowed me to do just that. So excited, I started learning how to use it. Now this was quite challenging since blessed's documentation was massive and I didn't understand the keywords used there (since I hadn't done CLI programming before). But then I came upon [gitter-cli](https://github.com/RodrigoEspinosa/gitter-cli) which was an open-source CLI chat client for [Gitter](https://gitter.im/) and it also used the `blessed` library. So after going through its codebase, I was able to pick up `blessed`'s concepts better and this helped me to finally develop the chattt's user interface(UI).
39 |
40 | Connecting the UI with the backend to display chats was fairly easy once we had the UI so I won't be talking about that. But in the end, I think I did an impressive job on the UI, the result of which it looks like this now.
41 |
42 |
43 | 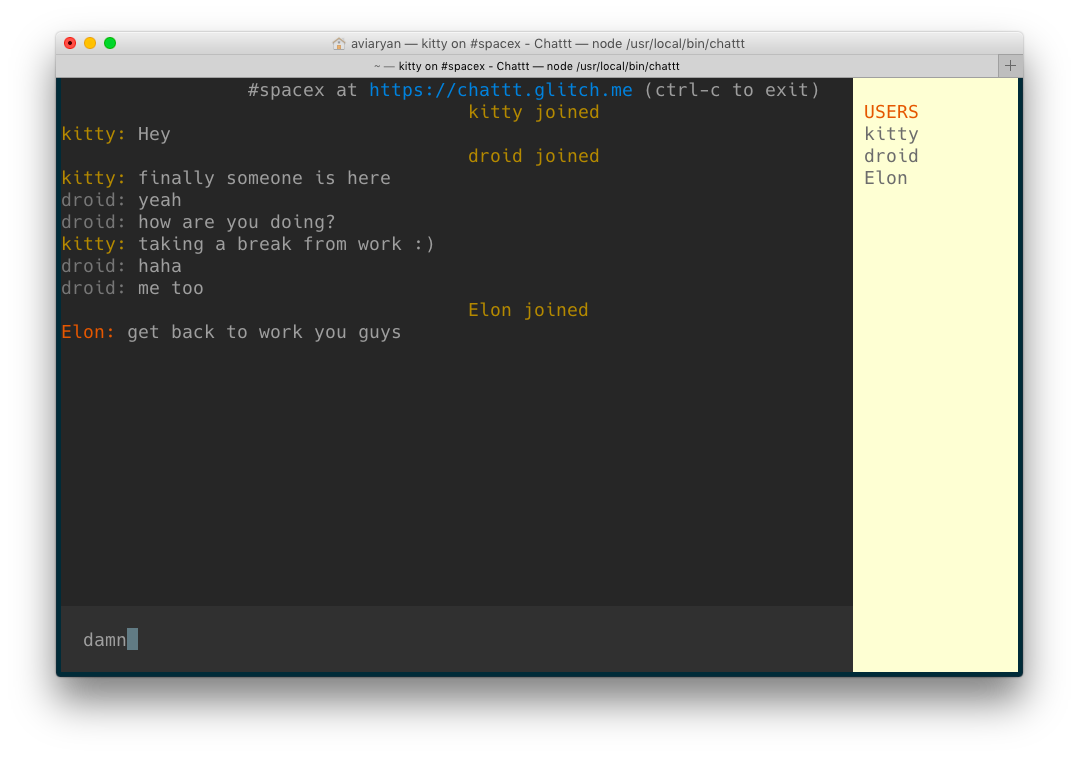 44 |
45 |
46 |
47 | ## What's Next?
48 |
49 | Glad you asked. Chattt is still in an early phase (only `v0.2`) and I plan to add some more features to it. The most notable ones are -
50 |
51 | - Feature to set custom backend server in the client [v0.3]
52 | - Feature to view active user list of a channel before actually joining it [v0.3]
53 |
54 | I also plan to generalize the Chattt frontend to support other chat/communication providers like Telegram and Discord. Many users have suggested me this and I will give it a try after publishing `[v0.3]`. If you don't want to miss on these updates, I would suggest [watching](https://github.com/aviaryan/chattt/watchers) the GitHub repo.
55 |
56 |
57 | ## Conclusion
58 |
59 | Chattt is one of the [many](https://github.com/aviaryan?tab=repositories) "hobby" open source projects of mine. I learned a lot of new things developing it. I would really appreciate if you can share your suggestions and ideas regarding it with me on my Discord (**aviaryan#7504**) or GitHub. Seriously, they mean a lot. And thanks for reading this far. Bye! 😊
60 |
61 | 👋🏻👋🏻👋🏻
62 |
--------------------------------------------------------------------------------
/_posts/gsoc/2016-07-28-downloading-files-from-urls.md:
--------------------------------------------------------------------------------
1 | ---
2 | layout: post
3 | title: Downloading Files from URLs in Python
4 | category: gsoc
5 | tags: gsoc gsoc16 python
6 | ---
7 |
8 | This post is about how to efficiently/correctly download files from URLs using Python.
9 | I will be using the god-send library [requests](docs.python-requests.org/) for it. I will write about methods to correctly download binaries from URLs and set their filenames.
10 |
11 | Let's start with baby steps on how to download a file using requests --
12 |
13 | {% highlight python %}
14 | import requests
15 |
16 | url = 'http://google.com/favicon.ico'
17 | r = requests.get(url, allow_redirects=True)
18 | open('google.ico', 'wb').write(r.content)
19 | {% endhighlight %}
20 |
21 | The above code will download the media at [http://google.com/favicon.ico](http://google.com/favicon.ico) and save it as google.ico.
22 |
23 | Now let's take another example where url is [https://www.youtube.com/watch?v=9bZkp7q19f0](https://www.youtube.com/watch?v=9bZkp7q19f0).
24 | What do you think will happen if the above code is used to download it ?
25 | If you said that a HTML page will be downloaded, you are spot on. This was one of the problems I faced in the Import module of Open Event where I had to download media from
26 | certain links. When the URL linked to a webpage rather than a binary, I had to not download that file and just keep the link as is.
27 | To solve this, what I did was inspecting the headers of the URL. Headers usually contain a `Content-Type` parameter which tells us about the type of data the url is linking to.
28 | A naive way to do it will be -
29 |
30 | {% highlight python %}
31 | r = requests.get(url, allow_redirects=True)
32 | print r.headers.get('content-type')
33 | {% endhighlight %}
34 |
35 | It works but is not the optimum way to do so as it involves downloading the file for checking the header.
36 | So if the file is large, this will do nothing but waste bandwidth.
37 | I looked into the requests documentation and found a better way to do it. That way involved just fetching the headers of a url before actually downloading it.
38 | This allows us to skip downloading files which weren't meant to be downloaded.
39 |
40 | {% highlight python %}
41 | import requests
42 |
43 | def is_downloadable(url):
44 | """
45 | Does the url contain a downloadable resource
46 | """
47 | h = requests.head(url, allow_redirects=True)
48 | header = h.headers
49 | content_type = header.get('content-type')
50 | if 'text' in content_type.lower():
51 | return False
52 | if 'html' in content_type.lower():
53 | return False
54 | return True
55 |
56 | print is_downloadable('https://www.youtube.com/watch?v=9bZkp7q19f0')
57 | # >> False
58 | print is_downloadable('http://google.com/favicon.ico')
59 | # >> True
60 | {% endhighlight %}
61 |
62 | To restrict download by file size, we can get the filesize from the `Content-Length` header and then do suitable comparisons.
63 |
64 | {% highlight python %}
65 | content_length = header.get('content-length', None)
66 | if content_length and content_length > 2e8: # 200 mb approx
67 | return False
68 | {% endhighlight %}
69 |
70 | So using the above function, we can skip downloading urls which don't link to media.
71 |
72 |
73 | #### Getting filename from URL
74 |
75 | We can parse the url to get the filename.
76 | Example - [http://aviaryan.in/images/profile.png](http://aviaryan.in/images/profile.png).
77 |
78 | To extract the filename from the above URL we can write a routine which fetches the last string after backslash (/).
79 |
80 | {% highlight python %}
81 | url = 'http://aviaryan.in/images/profile.png'
82 | if url.find('/'):
83 | print url.rsplit('/', 1)[1]
84 | {% endhighlight %}
85 |
86 | This will be give the filename in some cases correctly. However, there are times when the filename information is not present in the url.
87 | Example, something like `http://url.com/download`. In that case, the `Content-Disposition` header will contain the filename information.
88 | Here is how to fetch it.
89 |
90 | {% highlight python %}
91 | import requests
92 | import re
93 |
94 | def get_filename_from_cd(cd):
95 | """
96 | Get filename from content-disposition
97 | """
98 | if not cd:
99 | return None
100 | fname = re.findall('filename=(.+)', cd)
101 | if len(fname) == 0:
102 | return None
103 | return fname[0]
104 |
105 |
106 | url = 'http://google.com/favicon.ico'
107 | r = requests.get(url, allow_redirects=True)
108 | filename = get_filename_from_cd(r.headers.get('content-disposition'))
109 | open(filename, 'wb').write(r.content)
110 | {% endhighlight %}
111 |
112 | The url-parsing code in conjuction with the above method to get filename from `Content-Disposition` header will work for most of the cases.
113 | Use them and test the results.
114 |
115 | These are my 2 cents on downloading files using requests in Python. Let me know of other tricks I might have overlooked.
116 |
--------------------------------------------------------------------------------
/_posts/gsoc/2016-08-11-dockerfile-basic.md:
--------------------------------------------------------------------------------
1 | ---
2 | layout: post
3 | title: Writing your first Dockerfile
4 | category: gsoc
5 | tags: gsoc gsoc16 docker
6 | ---
7 |
8 | In this tutorial, I will show you how to write your first `Dockerfile`.
9 | I got to learn Docker because I had to implement a [Docker](http://docker.com) deployment for our GSoC project [Open Event Server](https://github.com/aviaryan/open-event-orga-server).
10 |
11 | First up, what is Docker ?
12 | Basically saying, Docker is an open platform for people to build, ship and run applications anytime and anywhere. Using Docker, your app will be able to run on any
13 | platform that supports Docker. And the best part is, it will run in the same way on different platforms i.e. no cross-platform issues.
14 | So you build your app for the platform you are most comfortable with and then deploy it anywhere.
15 | This is the fundamental advantage of Docker and why it was created.
16 |
17 | So let's start our dive into Docker.
18 |
19 | Docker works using Dockerfile ([example](https://github.com/fossasia/open-event-orga-server/blob/master/Dockerfile)), a file which specifies how Docker is supposed to build your application.
20 | It contains the steps Docker is supposed to follow to package your app. Once that is done, you can send this packaged app to anyone and they can run it on their system with
21 | no problems.
22 |
23 | Let's start with the project structure. You will have to keep `Dockerfile` at the root of your project. A basic project will look as follows -
24 |
25 | {% highlight bash %}
26 | - app.py
27 | - Dockerfile
28 | - requirements.txt
29 | - some_app_folder/
30 | - some_file
31 | - some_file
32 | {% endhighlight %}
33 |
34 | Dockerfile starts with a base image that decides on which image your app should be built upon. Basically "Images" are nothing but apps.
35 | So for example you want your run your application in Ubuntu 14.04 VM, you use [ubuntu:14.04](https://hub.docker.com/_/ubuntu/) as the base image.
36 |
37 | {% highlight bash %}
38 | FROM ubuntu:14.04
39 | MAINTAINER Your Name
40 | {% endhighlight %}
41 |
42 | These are usually the first two lines of a Dockerfile and they specify the base image and Dockerfile maintainer respectively.
43 | You can look into [Docker Hub](https://hub.docker.com/) for more base images.
44 |
45 | Now that we have started our Dockerfile, it's time to do something. Now think, if you are trying to run your app on a new system of Ubuntu, what will be the first step you
46 | will do... You update the package lists.
47 |
48 | {% highlight bash %}
49 | RUN apt-get update
50 | {% endhighlight %}
51 |
52 | You may possibly want to update the packages too.
53 |
54 | {% highlight bash %}
55 | RUN apt-get update
56 | RUN apt-get upgrade -y
57 | {% endhighlight %}
58 |
59 | Let's explain what's happening. `RUN` is a Docker command which instructs to run something on the shell. Here we are running `apt-get update` followed by `apt-get upgrade -y`
60 | on the shell. There is no need for `sudo` as Docker already runs commands with root user previledges.
61 |
62 | The next thing you will want to do now is to put your application inside the container (your Ubuntu VM). `COPY` command is just for that.
63 |
64 | {% highlight bash %}
65 | RUN mkdir -p /myapp
66 | WORKDIR /myapp
67 | COPY . .
68 | {% endhighlight %}
69 |
70 | Right now we were at the root of the ubuntu instance i.e. in parallel with /var, /home, /root etc. You surely don't want to copy your files there.
71 | So we create a 'myapp' directory and set it as WORKDIR (project's directory). From now on, all commands will run inside it.
72 |
73 | Now that copying the app has been done, you may want to install it's requirements.
74 |
75 | {% highlight bash %}
76 | RUN apt-get install -y python python-setuptools python-pip
77 | RUN pip install -r requirements.txt
78 | {% endhighlight %}
79 |
80 | You might be thinking why am I installing Python here. Isn't it present by default !? Well let me tell you that base image 'ubuntu' is not the Ubuntu you are used with. It just contains the bare essentials, not stuff like python, gcc, ruby etc. So you will have to install it on your own.
81 |
82 | Similarly if you are installing some Python package that requires gcc, it will not work. When you are struck in a issue like that, try googling the error message and most
83 | likely you will find an answer. :grinning:
84 |
85 | The last thing remaining now is to run your app. With this, your Dockerfile is complete.
86 |
87 | {% highlight bash %}
88 | CMD python app.py
89 | {% endhighlight %}
90 |
91 |
92 | #### Building the app
93 |
94 | To build the app run the following command.
95 |
96 | {% highlight bash %}
97 | docker build -t myapp .
98 | {% endhighlight %}
99 |
100 | Then to run the app, execute `docker run myapp`.
101 |
102 |
103 | #### Where to go next
104 |
105 | Refer to the [official Dockerfile reference](https://docs.docker.com/engine/reference/builder/) to learn more Dockerfile commands.
106 | Also you may find my post on [using Travis to test Docker applications](http://aviaryan.in/blog/gsoc/docker-test.html) interesting if you want to automate testing of your Docker application.
107 |
108 | I will write more blog posts on Docker as I learn more. I hope you found this one useful.
109 |
110 |
--------------------------------------------------------------------------------
/_posts/gsoc/2016-06-06-auth-flask-done-right.md:
--------------------------------------------------------------------------------
1 | ---
2 | layout: post
3 | title: REST API Authentication in Flask
4 | category: gsoc
5 | tags: gsoc gsoc16 flask python
6 | ---
7 |
8 | Recently I had the challenge of restricting unauthorized personnel from accessing some views in Flask.
9 | Sure the naive way will be asking the username and password in the json itself and checking the records in the database. The request will be something like this-
10 |
11 | {% highlight json %}
12 | {
13 | "username": "open_event_user",
14 | "password": "password"
15 | }
16 | {% endhighlight %}
17 |
18 | But I wanted to do something better. So I looked up around the Internet and found that it is possible to accept Basic authorization credentials in Flask (sadly it isn't documented).
19 | For those who don't know what Basic authorization is a way to send plain `username:password` combo as header in a request after obscuring them with base64 encoding.
20 | So for the above username and password, the corresponding header will be -
21 |
22 | {% highlight json %}
23 | {
24 | "Authorization": "Basic b3Blbl9ldmVudF91c2VyOnBhc3N3b3Jk"
25 | }
26 | {% endhighlight %}
27 | where the hashed string is base64 encoded form of string "open\_event\_user:password".
28 |
29 | Now back to the topic, so the next job is to validate the views by checking the Basic auth credentials in header and call `abort()` if credentials are missing or wrong.
30 | For this, we can easily create a helper function that aborts a view if there is something wrong with the credentials.
31 |
32 | {% highlight python %}
33 | from flask import request, Flask, abort
34 | from models import UserModel
35 |
36 | app = Flask(__name__)
37 |
38 | def validate_auth():
39 | auth = request.authorization
40 | if not auth: # no header set
41 | abort(401)
42 | user = UserModel.query.filter_by(username=auth.username).first()
43 | if user is None or user.password != auth.password:
44 | abort(401)
45 |
46 | @app.route('/view')
47 | def my_view():
48 | validate_auth()
49 | # stuff on success
50 | # more stuff
51 | {% endhighlight %}
52 |
53 | This works but wouldn't it be nice if we could specify `validate_auth` function as a decorator.
54 | This will give us the advantage of only having to set it once in a model view with all auth-required methods. Right ? So here we go
55 |
56 | {% highlight python %}
57 | def requires_auth(f):
58 | @wraps(f)
59 | def decorated(*args, **kwargs):
60 | auth = request.authorization
61 | if not auth: # no header set
62 | abort(401)
63 | user = UserModel.query.filter_by(username=auth.username).first()
64 | if user is None or user.password != auth.password:
65 | abort(401)
66 | return f(*args, **kwargs)
67 | return decorated
68 |
69 | @app.route('/view')
70 | @requires_auth
71 | def my_view():
72 | # stuff on success
73 | # more stuff
74 | {% endhighlight %}
75 | I renamed the function from validate\_auth to requires\_auth because it suits the context better.
76 |
77 | At this point, the above code may look perfect but it doesn't work when you are accessing the API through Swagger web UI.
78 | This is because it is not possible to set base64 encoded authorization header from the swagger UI.
79 | For those who are wondering "what the hell is swagger", I will define Swagger as a tool for API based projects which creates a nice web UI to live-test the API and
80 | also exports a schema of the API that can be used to understand API definitions.
81 |
82 | Now how do we get `requires_auth` to work when a request is sent through swagger UI ? It was a little tricky and took me a couple of hours but I finally got it.
83 | The trick therefore is to check for active sessions when there are no authorization headers set (as in the case of swagger UI).
84 | If an active session is found, it means that the user is authenticated.
85 | Here I would like to suggest using Flask-Login extension which makes session and login management a child's play.
86 | Always use it if your flask project deals with login, user accounts and stuff.
87 |
88 | Now back to the task in hand, here is how we can set the `requires_auth` function to check for existing sessions.
89 |
90 | {% highlight python %}
91 | from flask import request, abort, g
92 | from flask.ext import login
93 |
94 | def requires_auth(f):
95 | @wraps(f)
96 | def decorated(*args, **kwargs):
97 | auth = request.authorization
98 | if not auth: # no header set
99 | if login.current_user.is_authenticated: # check active session
100 | g.user = login.current_user
101 | return f(*args, **kwargs)
102 | else:
103 | abort(401)
104 | user = UserModel.query.filter_by(username=auth.username).first()
105 | if user is None or user.password != auth.password:
106 | abort(401)
107 | g.user = user
108 | return f(*args, **kwargs)
109 | return decorated
110 | {% endhighlight %}
111 |
112 | Pretty easy right !! Also notice that I am saving the user who was currently authenticated in flask's global variable `g`.
113 | Now the authenticated user can be accessed from views as `g.user`. Cool, isn't it ?
114 | Now if there is a need to add a more secure form of authorization like 'Token' based, you can easily update the `requires_auth` decorator to get the same results.
115 |
116 | I hope this article provided valuable insight into managing REST API authorizations in Flask. I will keep posting more awesome things I learn in my GSoC journey.
117 |
118 | That's it. Sayonara.
119 |
--------------------------------------------------------------------------------
/_posts/2016-10-17-first-gsoc-story.md:
--------------------------------------------------------------------------------
1 | ---
2 | layout: post
3 | title: My GSoC 2016 Story
4 | tags: gsoc gsoc16
5 | ---
6 |
7 | Google Summer of Code is probably the most prestigious internship that a college undergrad can get into these days. Millions of students over the world apply and only a thousand are selected. I too wanted to give it a shot.
8 |
9 | By the end of February this year (26th to be exact), we had the organizations list for GSoC.
10 | I was not confident in my abilities so I didn't want to send in a proposal. But I thought that if somehow my proposal got selected, my life will undergo a big change. I knew a guy who had had 2 successful GSoCs and he was flying towards a great career. So at last I pulled up the courage to work on sending a proposal for GSoC. This all happened as late as 20th March. I only had 6 days to send the proposal. So I started looking through the list of organizations and FOSSASIA's project sparkled my eye. I went in and checked that it was a Python project.
11 | As I was quite familiar in Python, I decided to give this project a try. I downloaded the project and after 4 hours of hard (hair-pulling) work, I was able to run it. I ran the system live, found some bugs and sent patches for them.
12 |
13 | After I got comfortable with the project, I decided to submit a proposal for it. There were around 10 other guys working on that project and were probably trying for GSoC so my chances looked pretty thin. But I still wrote the proposal. The first draft took me around 24 hours to prepare. (non-stop, not joking)
14 |
15 | After that I sent the proposal and prayed for the best. Infact I had very low hopes that I would get selected. 26th of April was the D-Day. I was sitting on my laptop and refreshing the page continuously to see the result. At one time, the page changed and there was a prompt "Avi, you have to fill a tax form". This was the moment I realized that the impossible might have happened. I checked clearly and yes, I was selected.
16 |
17 | Coding period began on 26th May. Infact we had to do some coding before that. I was in the REST API team and I had to work in the backend part of the application. I started the GSoC by starting to learn Flask. Then I learned other things like Flask-restplus and started to work on the project. Every day at 9 am in the morning we were required to submit a scrum consisting of all the activities we did yesterday and everything that we planned to do today. I had to send scrums continuously from 27th Apr to 26th August and Sunday was not off, so this daily ritual got somewhat frustrating by the end of the program. My daily routine comprised of waking up at 830 am and then working on the daily scrum. Then I would watch One Piece or start doing the day's work. By the end of the day, I would try to do the work I had planned for today and then go to bed by 12.
18 |
19 | I followed almost the same routine for 3 months so this got a bit boring. But the midterm evaluations came on 27th June and I was paid half of the stipend sum. This boosted my spirits and I was again, back to *committing*. There were times when I ran into issues but generally they were not godly impossible and I was able to solve them within a day. I was learning and trying new things every day. Among the new things that I learned, I can confidently include Docker, Flask, REST API design, Deployments, Writing modular code, Unit testing, Background task queues (Celery) etc.
20 |
21 | Mario and Justin, who were mentors for the project showed me how to successfully manage a project being developed by a remote team consisting of no less than 6 members. It was a great experience. It was for the first time that I had really made a software in teams. I believe this skill and this experience will be highly essential for my career.
22 |
23 | I did all the tasks assigned to me successfully and I guess I was one of the favorites of our mentor. (shameless self-appreciation) So I was pretty sure that I would qualify the program. The result came on 30th Aug and yay, I had passed. Now officially I had a Google tag on my name.
24 | This was so awesome, I updated my profiles on social networking sites showcasing my summer achievement. My name was also displayed on college's website and it is still on display now. That was just great. Before GSoC, I was nothing more a tech lover who had taken a bad decision and so had to be content with a new college like IIITV, but now as I was officially a Google Intern; everyone knew that I was onto something and that everything will be alright.
25 |
26 | I will like to dedicate this GSoC to my parents who were very supportive when I told them I am going to try getting a *Google Internship*. They would call me many times a day and ask me how my progress was going. So once I got selected for GSoC, I called them in the midnight despite that it would disturb their sleep. Interestingly, they didn't know the stipend attached to GSoC and so when I first casually told them about it (on Whatsapp), they became text-less (pun intended). My GSoC experience was great, I was at my home the whole time of the coding period and it was so memorable. I will try GSoC again, probably in some other organization and try to keep the pocket money coming.
27 |
28 | In the end, I would like to suggest every student reading this to attempt GSoC atleast once.
29 | It doesn't matter if you are a *ninja* developer or not, just try looking into the projects list and you will find something interesting. Writing a good proposal is an art in itself (Remember I took 24 hrs to write a 10 page document). And if you get selected, working in teams and writing maintainable, testable and clean code will be a great habit you will inculcate.
30 |
31 |
44 |
45 |
46 |
47 | ## What's Next?
48 |
49 | Glad you asked. Chattt is still in an early phase (only `v0.2`) and I plan to add some more features to it. The most notable ones are -
50 |
51 | - Feature to set custom backend server in the client [v0.3]
52 | - Feature to view active user list of a channel before actually joining it [v0.3]
53 |
54 | I also plan to generalize the Chattt frontend to support other chat/communication providers like Telegram and Discord. Many users have suggested me this and I will give it a try after publishing `[v0.3]`. If you don't want to miss on these updates, I would suggest [watching](https://github.com/aviaryan/chattt/watchers) the GitHub repo.
55 |
56 |
57 | ## Conclusion
58 |
59 | Chattt is one of the [many](https://github.com/aviaryan?tab=repositories) "hobby" open source projects of mine. I learned a lot of new things developing it. I would really appreciate if you can share your suggestions and ideas regarding it with me on my Discord (**aviaryan#7504**) or GitHub. Seriously, they mean a lot. And thanks for reading this far. Bye! 😊
60 |
61 | 👋🏻👋🏻👋🏻
62 |
--------------------------------------------------------------------------------
/_posts/gsoc/2016-07-28-downloading-files-from-urls.md:
--------------------------------------------------------------------------------
1 | ---
2 | layout: post
3 | title: Downloading Files from URLs in Python
4 | category: gsoc
5 | tags: gsoc gsoc16 python
6 | ---
7 |
8 | This post is about how to efficiently/correctly download files from URLs using Python.
9 | I will be using the god-send library [requests](docs.python-requests.org/) for it. I will write about methods to correctly download binaries from URLs and set their filenames.
10 |
11 | Let's start with baby steps on how to download a file using requests --
12 |
13 | {% highlight python %}
14 | import requests
15 |
16 | url = 'http://google.com/favicon.ico'
17 | r = requests.get(url, allow_redirects=True)
18 | open('google.ico', 'wb').write(r.content)
19 | {% endhighlight %}
20 |
21 | The above code will download the media at [http://google.com/favicon.ico](http://google.com/favicon.ico) and save it as google.ico.
22 |
23 | Now let's take another example where url is [https://www.youtube.com/watch?v=9bZkp7q19f0](https://www.youtube.com/watch?v=9bZkp7q19f0).
24 | What do you think will happen if the above code is used to download it ?
25 | If you said that a HTML page will be downloaded, you are spot on. This was one of the problems I faced in the Import module of Open Event where I had to download media from
26 | certain links. When the URL linked to a webpage rather than a binary, I had to not download that file and just keep the link as is.
27 | To solve this, what I did was inspecting the headers of the URL. Headers usually contain a `Content-Type` parameter which tells us about the type of data the url is linking to.
28 | A naive way to do it will be -
29 |
30 | {% highlight python %}
31 | r = requests.get(url, allow_redirects=True)
32 | print r.headers.get('content-type')
33 | {% endhighlight %}
34 |
35 | It works but is not the optimum way to do so as it involves downloading the file for checking the header.
36 | So if the file is large, this will do nothing but waste bandwidth.
37 | I looked into the requests documentation and found a better way to do it. That way involved just fetching the headers of a url before actually downloading it.
38 | This allows us to skip downloading files which weren't meant to be downloaded.
39 |
40 | {% highlight python %}
41 | import requests
42 |
43 | def is_downloadable(url):
44 | """
45 | Does the url contain a downloadable resource
46 | """
47 | h = requests.head(url, allow_redirects=True)
48 | header = h.headers
49 | content_type = header.get('content-type')
50 | if 'text' in content_type.lower():
51 | return False
52 | if 'html' in content_type.lower():
53 | return False
54 | return True
55 |
56 | print is_downloadable('https://www.youtube.com/watch?v=9bZkp7q19f0')
57 | # >> False
58 | print is_downloadable('http://google.com/favicon.ico')
59 | # >> True
60 | {% endhighlight %}
61 |
62 | To restrict download by file size, we can get the filesize from the `Content-Length` header and then do suitable comparisons.
63 |
64 | {% highlight python %}
65 | content_length = header.get('content-length', None)
66 | if content_length and content_length > 2e8: # 200 mb approx
67 | return False
68 | {% endhighlight %}
69 |
70 | So using the above function, we can skip downloading urls which don't link to media.
71 |
72 |
73 | #### Getting filename from URL
74 |
75 | We can parse the url to get the filename.
76 | Example - [http://aviaryan.in/images/profile.png](http://aviaryan.in/images/profile.png).
77 |
78 | To extract the filename from the above URL we can write a routine which fetches the last string after backslash (/).
79 |
80 | {% highlight python %}
81 | url = 'http://aviaryan.in/images/profile.png'
82 | if url.find('/'):
83 | print url.rsplit('/', 1)[1]
84 | {% endhighlight %}
85 |
86 | This will be give the filename in some cases correctly. However, there are times when the filename information is not present in the url.
87 | Example, something like `http://url.com/download`. In that case, the `Content-Disposition` header will contain the filename information.
88 | Here is how to fetch it.
89 |
90 | {% highlight python %}
91 | import requests
92 | import re
93 |
94 | def get_filename_from_cd(cd):
95 | """
96 | Get filename from content-disposition
97 | """
98 | if not cd:
99 | return None
100 | fname = re.findall('filename=(.+)', cd)
101 | if len(fname) == 0:
102 | return None
103 | return fname[0]
104 |
105 |
106 | url = 'http://google.com/favicon.ico'
107 | r = requests.get(url, allow_redirects=True)
108 | filename = get_filename_from_cd(r.headers.get('content-disposition'))
109 | open(filename, 'wb').write(r.content)
110 | {% endhighlight %}
111 |
112 | The url-parsing code in conjuction with the above method to get filename from `Content-Disposition` header will work for most of the cases.
113 | Use them and test the results.
114 |
115 | These are my 2 cents on downloading files using requests in Python. Let me know of other tricks I might have overlooked.
116 |
--------------------------------------------------------------------------------
/_posts/gsoc/2016-08-11-dockerfile-basic.md:
--------------------------------------------------------------------------------
1 | ---
2 | layout: post
3 | title: Writing your first Dockerfile
4 | category: gsoc
5 | tags: gsoc gsoc16 docker
6 | ---
7 |
8 | In this tutorial, I will show you how to write your first `Dockerfile`.
9 | I got to learn Docker because I had to implement a [Docker](http://docker.com) deployment for our GSoC project [Open Event Server](https://github.com/aviaryan/open-event-orga-server).
10 |
11 | First up, what is Docker ?
12 | Basically saying, Docker is an open platform for people to build, ship and run applications anytime and anywhere. Using Docker, your app will be able to run on any
13 | platform that supports Docker. And the best part is, it will run in the same way on different platforms i.e. no cross-platform issues.
14 | So you build your app for the platform you are most comfortable with and then deploy it anywhere.
15 | This is the fundamental advantage of Docker and why it was created.
16 |
17 | So let's start our dive into Docker.
18 |
19 | Docker works using Dockerfile ([example](https://github.com/fossasia/open-event-orga-server/blob/master/Dockerfile)), a file which specifies how Docker is supposed to build your application.
20 | It contains the steps Docker is supposed to follow to package your app. Once that is done, you can send this packaged app to anyone and they can run it on their system with
21 | no problems.
22 |
23 | Let's start with the project structure. You will have to keep `Dockerfile` at the root of your project. A basic project will look as follows -
24 |
25 | {% highlight bash %}
26 | - app.py
27 | - Dockerfile
28 | - requirements.txt
29 | - some_app_folder/
30 | - some_file
31 | - some_file
32 | {% endhighlight %}
33 |
34 | Dockerfile starts with a base image that decides on which image your app should be built upon. Basically "Images" are nothing but apps.
35 | So for example you want your run your application in Ubuntu 14.04 VM, you use [ubuntu:14.04](https://hub.docker.com/_/ubuntu/) as the base image.
36 |
37 | {% highlight bash %}
38 | FROM ubuntu:14.04
39 | MAINTAINER Your Name
40 | {% endhighlight %}
41 |
42 | These are usually the first two lines of a Dockerfile and they specify the base image and Dockerfile maintainer respectively.
43 | You can look into [Docker Hub](https://hub.docker.com/) for more base images.
44 |
45 | Now that we have started our Dockerfile, it's time to do something. Now think, if you are trying to run your app on a new system of Ubuntu, what will be the first step you
46 | will do... You update the package lists.
47 |
48 | {% highlight bash %}
49 | RUN apt-get update
50 | {% endhighlight %}
51 |
52 | You may possibly want to update the packages too.
53 |
54 | {% highlight bash %}
55 | RUN apt-get update
56 | RUN apt-get upgrade -y
57 | {% endhighlight %}
58 |
59 | Let's explain what's happening. `RUN` is a Docker command which instructs to run something on the shell. Here we are running `apt-get update` followed by `apt-get upgrade -y`
60 | on the shell. There is no need for `sudo` as Docker already runs commands with root user previledges.
61 |
62 | The next thing you will want to do now is to put your application inside the container (your Ubuntu VM). `COPY` command is just for that.
63 |
64 | {% highlight bash %}
65 | RUN mkdir -p /myapp
66 | WORKDIR /myapp
67 | COPY . .
68 | {% endhighlight %}
69 |
70 | Right now we were at the root of the ubuntu instance i.e. in parallel with /var, /home, /root etc. You surely don't want to copy your files there.
71 | So we create a 'myapp' directory and set it as WORKDIR (project's directory). From now on, all commands will run inside it.
72 |
73 | Now that copying the app has been done, you may want to install it's requirements.
74 |
75 | {% highlight bash %}
76 | RUN apt-get install -y python python-setuptools python-pip
77 | RUN pip install -r requirements.txt
78 | {% endhighlight %}
79 |
80 | You might be thinking why am I installing Python here. Isn't it present by default !? Well let me tell you that base image 'ubuntu' is not the Ubuntu you are used with. It just contains the bare essentials, not stuff like python, gcc, ruby etc. So you will have to install it on your own.
81 |
82 | Similarly if you are installing some Python package that requires gcc, it will not work. When you are struck in a issue like that, try googling the error message and most
83 | likely you will find an answer. :grinning:
84 |
85 | The last thing remaining now is to run your app. With this, your Dockerfile is complete.
86 |
87 | {% highlight bash %}
88 | CMD python app.py
89 | {% endhighlight %}
90 |
91 |
92 | #### Building the app
93 |
94 | To build the app run the following command.
95 |
96 | {% highlight bash %}
97 | docker build -t myapp .
98 | {% endhighlight %}
99 |
100 | Then to run the app, execute `docker run myapp`.
101 |
102 |
103 | #### Where to go next
104 |
105 | Refer to the [official Dockerfile reference](https://docs.docker.com/engine/reference/builder/) to learn more Dockerfile commands.
106 | Also you may find my post on [using Travis to test Docker applications](http://aviaryan.in/blog/gsoc/docker-test.html) interesting if you want to automate testing of your Docker application.
107 |
108 | I will write more blog posts on Docker as I learn more. I hope you found this one useful.
109 |
110 |
--------------------------------------------------------------------------------
/_posts/gsoc/2016-06-06-auth-flask-done-right.md:
--------------------------------------------------------------------------------
1 | ---
2 | layout: post
3 | title: REST API Authentication in Flask
4 | category: gsoc
5 | tags: gsoc gsoc16 flask python
6 | ---
7 |
8 | Recently I had the challenge of restricting unauthorized personnel from accessing some views in Flask.
9 | Sure the naive way will be asking the username and password in the json itself and checking the records in the database. The request will be something like this-
10 |
11 | {% highlight json %}
12 | {
13 | "username": "open_event_user",
14 | "password": "password"
15 | }
16 | {% endhighlight %}
17 |
18 | But I wanted to do something better. So I looked up around the Internet and found that it is possible to accept Basic authorization credentials in Flask (sadly it isn't documented).
19 | For those who don't know what Basic authorization is a way to send plain `username:password` combo as header in a request after obscuring them with base64 encoding.
20 | So for the above username and password, the corresponding header will be -
21 |
22 | {% highlight json %}
23 | {
24 | "Authorization": "Basic b3Blbl9ldmVudF91c2VyOnBhc3N3b3Jk"
25 | }
26 | {% endhighlight %}
27 | where the hashed string is base64 encoded form of string "open\_event\_user:password".
28 |
29 | Now back to the topic, so the next job is to validate the views by checking the Basic auth credentials in header and call `abort()` if credentials are missing or wrong.
30 | For this, we can easily create a helper function that aborts a view if there is something wrong with the credentials.
31 |
32 | {% highlight python %}
33 | from flask import request, Flask, abort
34 | from models import UserModel
35 |
36 | app = Flask(__name__)
37 |
38 | def validate_auth():
39 | auth = request.authorization
40 | if not auth: # no header set
41 | abort(401)
42 | user = UserModel.query.filter_by(username=auth.username).first()
43 | if user is None or user.password != auth.password:
44 | abort(401)
45 |
46 | @app.route('/view')
47 | def my_view():
48 | validate_auth()
49 | # stuff on success
50 | # more stuff
51 | {% endhighlight %}
52 |
53 | This works but wouldn't it be nice if we could specify `validate_auth` function as a decorator.
54 | This will give us the advantage of only having to set it once in a model view with all auth-required methods. Right ? So here we go
55 |
56 | {% highlight python %}
57 | def requires_auth(f):
58 | @wraps(f)
59 | def decorated(*args, **kwargs):
60 | auth = request.authorization
61 | if not auth: # no header set
62 | abort(401)
63 | user = UserModel.query.filter_by(username=auth.username).first()
64 | if user is None or user.password != auth.password:
65 | abort(401)
66 | return f(*args, **kwargs)
67 | return decorated
68 |
69 | @app.route('/view')
70 | @requires_auth
71 | def my_view():
72 | # stuff on success
73 | # more stuff
74 | {% endhighlight %}
75 | I renamed the function from validate\_auth to requires\_auth because it suits the context better.
76 |
77 | At this point, the above code may look perfect but it doesn't work when you are accessing the API through Swagger web UI.
78 | This is because it is not possible to set base64 encoded authorization header from the swagger UI.
79 | For those who are wondering "what the hell is swagger", I will define Swagger as a tool for API based projects which creates a nice web UI to live-test the API and
80 | also exports a schema of the API that can be used to understand API definitions.
81 |
82 | Now how do we get `requires_auth` to work when a request is sent through swagger UI ? It was a little tricky and took me a couple of hours but I finally got it.
83 | The trick therefore is to check for active sessions when there are no authorization headers set (as in the case of swagger UI).
84 | If an active session is found, it means that the user is authenticated.
85 | Here I would like to suggest using Flask-Login extension which makes session and login management a child's play.
86 | Always use it if your flask project deals with login, user accounts and stuff.
87 |
88 | Now back to the task in hand, here is how we can set the `requires_auth` function to check for existing sessions.
89 |
90 | {% highlight python %}
91 | from flask import request, abort, g
92 | from flask.ext import login
93 |
94 | def requires_auth(f):
95 | @wraps(f)
96 | def decorated(*args, **kwargs):
97 | auth = request.authorization
98 | if not auth: # no header set
99 | if login.current_user.is_authenticated: # check active session
100 | g.user = login.current_user
101 | return f(*args, **kwargs)
102 | else:
103 | abort(401)
104 | user = UserModel.query.filter_by(username=auth.username).first()
105 | if user is None or user.password != auth.password:
106 | abort(401)
107 | g.user = user
108 | return f(*args, **kwargs)
109 | return decorated
110 | {% endhighlight %}
111 |
112 | Pretty easy right !! Also notice that I am saving the user who was currently authenticated in flask's global variable `g`.
113 | Now the authenticated user can be accessed from views as `g.user`. Cool, isn't it ?
114 | Now if there is a need to add a more secure form of authorization like 'Token' based, you can easily update the `requires_auth` decorator to get the same results.
115 |
116 | I hope this article provided valuable insight into managing REST API authorizations in Flask. I will keep posting more awesome things I learn in my GSoC journey.
117 |
118 | That's it. Sayonara.
119 |
--------------------------------------------------------------------------------
/_posts/2016-10-17-first-gsoc-story.md:
--------------------------------------------------------------------------------
1 | ---
2 | layout: post
3 | title: My GSoC 2016 Story
4 | tags: gsoc gsoc16
5 | ---
6 |
7 | Google Summer of Code is probably the most prestigious internship that a college undergrad can get into these days. Millions of students over the world apply and only a thousand are selected. I too wanted to give it a shot.
8 |
9 | By the end of February this year (26th to be exact), we had the organizations list for GSoC.
10 | I was not confident in my abilities so I didn't want to send in a proposal. But I thought that if somehow my proposal got selected, my life will undergo a big change. I knew a guy who had had 2 successful GSoCs and he was flying towards a great career. So at last I pulled up the courage to work on sending a proposal for GSoC. This all happened as late as 20th March. I only had 6 days to send the proposal. So I started looking through the list of organizations and FOSSASIA's project sparkled my eye. I went in and checked that it was a Python project.
11 | As I was quite familiar in Python, I decided to give this project a try. I downloaded the project and after 4 hours of hard (hair-pulling) work, I was able to run it. I ran the system live, found some bugs and sent patches for them.
12 |
13 | After I got comfortable with the project, I decided to submit a proposal for it. There were around 10 other guys working on that project and were probably trying for GSoC so my chances looked pretty thin. But I still wrote the proposal. The first draft took me around 24 hours to prepare. (non-stop, not joking)
14 |
15 | After that I sent the proposal and prayed for the best. Infact I had very low hopes that I would get selected. 26th of April was the D-Day. I was sitting on my laptop and refreshing the page continuously to see the result. At one time, the page changed and there was a prompt "Avi, you have to fill a tax form". This was the moment I realized that the impossible might have happened. I checked clearly and yes, I was selected.
16 |
17 | Coding period began on 26th May. Infact we had to do some coding before that. I was in the REST API team and I had to work in the backend part of the application. I started the GSoC by starting to learn Flask. Then I learned other things like Flask-restplus and started to work on the project. Every day at 9 am in the morning we were required to submit a scrum consisting of all the activities we did yesterday and everything that we planned to do today. I had to send scrums continuously from 27th Apr to 26th August and Sunday was not off, so this daily ritual got somewhat frustrating by the end of the program. My daily routine comprised of waking up at 830 am and then working on the daily scrum. Then I would watch One Piece or start doing the day's work. By the end of the day, I would try to do the work I had planned for today and then go to bed by 12.
18 |
19 | I followed almost the same routine for 3 months so this got a bit boring. But the midterm evaluations came on 27th June and I was paid half of the stipend sum. This boosted my spirits and I was again, back to *committing*. There were times when I ran into issues but generally they were not godly impossible and I was able to solve them within a day. I was learning and trying new things every day. Among the new things that I learned, I can confidently include Docker, Flask, REST API design, Deployments, Writing modular code, Unit testing, Background task queues (Celery) etc.
20 |
21 | Mario and Justin, who were mentors for the project showed me how to successfully manage a project being developed by a remote team consisting of no less than 6 members. It was a great experience. It was for the first time that I had really made a software in teams. I believe this skill and this experience will be highly essential for my career.
22 |
23 | I did all the tasks assigned to me successfully and I guess I was one of the favorites of our mentor. (shameless self-appreciation) So I was pretty sure that I would qualify the program. The result came on 30th Aug and yay, I had passed. Now officially I had a Google tag on my name.
24 | This was so awesome, I updated my profiles on social networking sites showcasing my summer achievement. My name was also displayed on college's website and it is still on display now. That was just great. Before GSoC, I was nothing more a tech lover who had taken a bad decision and so had to be content with a new college like IIITV, but now as I was officially a Google Intern; everyone knew that I was onto something and that everything will be alright.
25 |
26 | I will like to dedicate this GSoC to my parents who were very supportive when I told them I am going to try getting a *Google Internship*. They would call me many times a day and ask me how my progress was going. So once I got selected for GSoC, I called them in the midnight despite that it would disturb their sleep. Interestingly, they didn't know the stipend attached to GSoC and so when I first casually told them about it (on Whatsapp), they became text-less (pun intended). My GSoC experience was great, I was at my home the whole time of the coding period and it was so memorable. I will try GSoC again, probably in some other organization and try to keep the pocket money coming.
27 |
28 | In the end, I would like to suggest every student reading this to attempt GSoC atleast once.
29 | It doesn't matter if you are a *ninja* developer or not, just try looking into the projects list and you will find something interesting. Writing a good proposal is an art in itself (Remember I took 24 hrs to write a 10 page document). And if you get selected, working in teams and writing maintainable, testable and clean code will be a great habit you will inculcate.
30 |
31 |
32 | First published in Cynosure, IIITV's annual magazine
33 |
34 |
--------------------------------------------------------------------------------
/ahk/tools/stealfunc.html:
--------------------------------------------------------------------------------
1 | ---
2 | layout: page
3 | title: StealFunc
4 | tagline: v 0.12
5 | ghlink: https://github.com/aviaryan/autohotkey-scripts/blob/master/Tools/stealFuncfromLib.ahk
6 | ---
7 |
8 | Autohotkey.com Topic
9 | AhkScript Topic
10 | DOWNLOAD
11 |
12 |
13 | StealFunc is a function-oriented script (tool) to extract only the required functions from an ahk library .
14 | It recursively processes the library file to only extract functions that are minimally needed.
15 | From v0.1 , it has feature to scan a autohotkey script snippet and extract the foreign functions that are used in that script from another given script.
16 |
17 | The script is presented as a function.
18 |
19 |
20 | {% highlight autohotkey %}
21 | return_script := stealFunc(function_list, function_file, is_list)
22 | ;EXAMPLE
23 | Clipboard := stealFunc("Gdip_Startup`nGdip_SetBitmaptoClipboard`nGdip_CreateBitmapFromFile`nGdip_DisposeImage", "path_to_gdip_lib", 1)
24 | {% endhighlight %}
25 | The first parameter 'function_list' stores a list of functions or a working ahk script snippet whose used function are to be extracted.
26 | The second parameter 'function_file' is the file from which functions are going to be extracted.
27 | The third parameter 'is_list' should be 1 if 'function_list' has a list of functions or 0 otherwise.
28 |
29 | The script also has a gui added for user convenience and can be commented out anytime.
30 | Below are the screenshots of the GUI in action.
31 | 
32 | 
33 |
34 |
35 | function_list
36 | As said above, function_list can be a list OR a valid snippet of an Autohotkey script.
37 | EXAMPLE for function_list as a list -
38 | {% highlight autohotkey %}
39 | t =
40 | (
41 | Gdip_Startup
42 | Gdip_CreateBitmapFromFile
43 | Gdip_DisposeImage
44 | Gdip_shutdown
45 | gdip_setbitmaptoclipboard
46 | )
47 | output := stealFunc(t, "S:\Portables\AutoHotkey\My Scripts\ClipStep\lib\Gdip_All.ahk", 1) ; t is a list so is_list=1
48 | gui, add, edit, h600 w800 +multi, % output
49 | gui, show
50 | {% endhighlight %}
51 |
52 |
53 | EXAMPLE for function_list as a snippet -
54 | {% highlight autohotkey %}
55 | ;Gdip_SetImagetoClipboard()
56 | ;Sets some Image to Clipboard
57 |
58 | Gdip_SetImagetoClipboard( pImage ){
59 | ;Sets some Image file to Clipboard
60 | PToken := Gdip_Startup()
61 | pBitmap := Gdip_CreateBitmapFromFile(pImage)
62 | Gdip_SetBitmaptoClipboard(pBitmap)
63 | Gdip_DisposeImage( pBitmap )
64 | Gdip_Shutdown( PToken)
65 | }
66 |
67 | ;Gdip_CaptureClipboard()
68 | ; Captures Clipboard to file
69 |
70 | Gdip_CaptureClipboard(file, quality){
71 | PToken := Gdip_Startup()
72 | pBitmap := Gdip_CreateBitmapFromClipboard()
73 | Gdip_SaveBitmaptoFile(pBitmap, file, quality)
74 | Gdip_DisposeImage( pBitmap )
75 | Gdip_Shutdown( PToken)
76 | }
77 | {% endhighlight %}
78 | The above valid code can serve as a input in the function_list parameter when you change the 3rd parameter is_list to 0.
79 | The stealFunc function scans through the snippet and lists the used User-defined functions.
80 | It then finds them in the Input script file (here the Gdip.ahk) and copies them out if they are found. It rescans and rescans all the
81 | gdip.ahk functions so that the functions they are dependent on are also
82 | extracted.
83 | The Snippet can be any valid AHK Script and the stealFunc function will always scan it and find the used functions in the Input script file.
84 |
85 |
86 |
87 | Example 2
88 | Using the richEdit library, I am running the following code.
89 | {% highlight autohotkey %}
90 | Gui, +LastFound
91 | hwnd := WinExist()
92 | hRichEdit := RichEdit_Add(hwnd, 5, 5, 200, 300)
93 | Gui, Show, w210 h310
94 | return
95 | {% endhighlight %}
96 | With stealFunc, you can extract only the function from the lib which are required to run RichEdit_Add. So the code goes -
97 |
98 | {% highlight autohotkey %}
99 | t =
100 | (
101 | Gui, +LastFound
102 | hwnd := WinExist()
103 | hRichEdit := RichEdit_Add(hwnd, 5, 5, 200, 300)
104 | Gui, Show, w210 h310
105 | return
106 | )
107 | output := stealFunc(t, "C:\Users\Avi\Desktop\RichEdit.ahk", 0) ; is_list = 0
108 | gui, add, edit, h600 w800 +multi, % output
109 | gui, show
110 | {% endhighlight %}
111 | The output you get is of 74 lines, much less than 2100 lines.
112 |
113 |
114 |
115 | Example 3
116 | {% highlight autohotkey %}
117 | t =
118 | (
119 | curvolume := va_getmastervolume()
120 | va_setmastervolume(100.0)
121 | SAPI.Speak(Speech)
122 | va_setmastervolume(curvolume)
123 | )
124 | {% endhighlight %}
125 | Using VA (VistaAudio), the following code steals the minimal function needed for the above code to work.
126 | {% highlight autohotkey %}
127 | output := stealFunc(t, "S:\Portables\AutoHotkey\My Scripts\Comuntiy Packages\VA-2.2\VA.ahk", 0) ; not list so is_list=0
128 | gui, add, edit, h600 w800 +multi, % output
129 | gui, show
130 | {% endhighlight %}
131 | The output is 158 lined, certainly better than 880 lines.
132 |
133 |
134 |
Comments and bugs are appreciated!
--------------------------------------------------------------------------------
/_posts/gsoc/2016-06-12-restplus-validation-custom-fields.md:
--------------------------------------------------------------------------------
1 | ---
2 | layout: post
3 | title: Better fields and validation in Flask Restplus
4 | category: gsoc
5 | tags: gsoc gsoc16 flask flask-restplus python
6 | ---
7 |
8 | We at [Open Event Server](https://github.com/fossasia/open-event-orga-server) project are using [flask-restplus](http://flask-restplus.readthedocs.io) for API.
9 | Apart from auto-generating of Swagger specification, another great plus point of restplus is how easily
10 | we can set input and output models and the same is automatically shown in Swagger UI.
11 | We can also auto-validate the input in POST/PUT requests to make sure that we get what we want.
12 |
13 | {% highlight python %}
14 | @api.expect(EVENT_POST, validate=True)
15 | def put(self, id):
16 | """Modify object at id"""
17 | pass
18 | {% endhighlight %}
19 |
20 | As can be seen above, the `validate` param for `namespace.expect` decorator allows us to auto-validate the input payloads.
21 | This used to work well until one day I realized there were a few problems.
22 |
23 | 1. When a field was defined as say for example `field.Integer`, then it will accept only Integer values, not even `null`.
24 | 2. If there is a string field and it has `required` param set to True, then also it is possible to set empty string as its value and the in-built validator won't catch it.
25 | 3. Even if I somehow managed to [hack my way](https://github.com/noirbizarre/flask-restplus/issues/179#issuecomment-224544238) to support `null` in field,
26 | it will also support null even if required=True.
27 | 4. We had no control on what error message was returned.
28 |
29 | {% highlight python %}
30 | EVENT = api.model('Event', {
31 | 'id': fields.Integer,
32 | 'name': fields.String(required=True)
33 | })
34 | {% endhighlight %}
35 |
36 | Specially problem #1 was a huge one as it questioned the whole foundation of the API.
37 | So we realized it will be better if we don't use `namespace.expect` and use a custom validator.
38 | For custom validator, we first had to create custom fields that this validator can benefit from. Luckily flask-restplus comes with a great API for creating custom fields.
39 | So we quickly created custom fields for all common fields (Integer, String) and more specific fields like Email, Uri and Color.
40 | Creating these specific fields were a huge advantage as now we can show proper example for each field types in the Swagger UI.
41 |
42 | {% highlight python %}
43 | class Email(fields.String):
44 | """
45 | Email field
46 | """
47 | __schema_type__ = 'string'
48 | __schema_format__ = 'email'
49 | __schema_example__ = 'email@domain.com'
50 | {% endhighlight %}
51 |
52 | Consider the above code; now when we use `Email` as a field for a value, then the example shown for it in Swagger UI will be 'email@domain.com'. Quite cool, right?
53 |
54 | Now we needed a way to validate these fields. For that, what we did was to create a `validate` method in each of the field-classes.
55 | This `validate` method would get the value and check if it was valid. Consider the following code -
56 |
57 | {% highlight python %}
58 | import re
59 | EMAIL_REGEX = re.compile(r'\S+@\S+\.\S+')
60 |
61 | class Email():
62 | def validate(self, value):
63 | if not value:
64 | return False if self.required else True
65 | if not EMAIL_REGEX.match(value):
66 | return False
67 | return True
68 | {% endhighlight %}
69 |
70 | Once each of the field had their validate methods, we created a `validate_payload()` function that uses the API model and compares it with the payload.
71 | It will first check if all required keys are present in the payload or not.
72 | When that is true, it finally validates each field's value using their field's class `validate` method.
73 |
74 | {% highlight python %}
75 | from flask import abort
76 | from flask_restplus import fields
77 | from custom_fields import CustomField
78 |
79 | def validate_payload(payload, api_model):
80 | # check if any reqd fields are missing in payload
81 | for key in api_model:
82 | if api_model[key].required and key not in payload:
83 | abort(400, 'Required field \'%s\' missing' % key)
84 | # check payload
85 | for key in payload:
86 | field = api_model[key]
87 | if isinstance(field, fields.List):
88 | field = field.container
89 | data = payload[key]
90 | else:
91 | data = [payload[key]]
92 | if isinstance(field, CustomField) and hasattr(field, 'validate'):
93 | for i in data:
94 | if not field.validate(i):
95 | abort(400, 'Validation of \'%s\' field failed' % key)
96 | {% endhighlight %}
97 |
98 | The `CustomField` is the base class that each of the custom fields mentioned above inherit. So checking if `field` was an instance of `CustomField` is enough to know if it is
99 | a custom field or not.
100 | Other thing that may look weird in the above code is use of `fields.List`. If you look closely, I have added this to support custom fields inside lists.
101 | So if you have used a custom field in a list, it will also work too. But obviously, this only supports single level lists for now.
102 | The thing is we didn't needed more than that so I let it go. :stuck_out_tongue_winking_eye:
103 |
104 | This basically sums up how we are validating input payloads at Open Event. Of course this is very basic but we will keep on improving it as the project progresses.
105 | Stay tuned to [opev blog](http://opev.wordpress.com) if you want to be in touch with the progress of the project.
106 |
107 | Links to full code at the time of writing this post are -
108 |
109 | 1. [Custom Fields](https://github.com/fossasia/open-event-orga-server/blob/2bb118147a56e6cfc7d3ed7a01d28efd2da6467b/open_event/api/custom_fields.py)
110 | 2. [Validate Payload](https://github.com/fossasia/open-event-orga-server/blob/2bb118147a56e6cfc7d3ed7a01d28efd2da6467b/open_event/api/helpers.py#L135)
111 |
112 |
113 | I hope you found this post useful. Thanks for reading.
114 |
--------------------------------------------------------------------------------
/ahk/index.html:
--------------------------------------------------------------------------------
1 | ---
2 | title: AutoHotkey Projects
3 | tagline: My AutoHotkey scripts and functions
4 | layout: page
5 | ghlink: https://github.com/aviaryan/autohotkey-scripts
6 | ---
7 |
8 | Scripts
9 | Functions
10 | Others
11 | Scripts for Games
12 |
13 |
14 |
15 |
16 | -
17 | Clipjump - Multiple Clipboard Manager
18 | Ahk Topic
19 | Official Site
20 | Github
21 | Sourceforge
22 |
23 | -
24 | Sublime 4 Autohotkey - A Autohotkey based patch for ST
25 | Ahk Topic
26 | Official Site
27 | Github
28 |
29 |
30 | -
31 | LaunchQ - Fast, Simple, Productive All-in-one Launcher
32 | Ahk Topic
33 | Official Site
34 |
35 |
36 | -
37 | Goto functions, lables, hotkeys and hotstrings in any editor
38 | Ahk Topic
39 |
40 |
41 | -
42 | stealFunc - Steal only the minimally needed functions from lib rather than including the whole.
43 | AhkScript Topic
44 | Autohotkey.com Topic
45 | Documentation
46 |
47 |
48 | -
49 | Smart F1 Command Help for any programming language in any editor
50 | Ahk Topic
51 |
52 |
53 | -
54 | FigletGUI - GUI for ASCII text art creator Figlet
55 | Webpage
56 |
57 |
58 | -
59 | Extreme Screen Clipper - Capture Screenshots, resize, crop and save them as an image file instantly
60 | Ahk Topic
61 | Official Site
62 |
63 |
64 | -
65 | Html Tagger - Tag/Wrap selected text into HTML, BB-code or Custom. A very flexible script
66 | Ahk Topic
67 | Site
68 |
69 |
70 | -
71 | Sublime Text Autocomplete Adder - Add Auto-completions in Sublime Text with a GUI and Duplicates Filter
72 | Ahk Topic
73 | Official Site
74 |
75 |
76 | -
77 | Autohotkey Updater - Check the registered or selected version of Autohotkey for updates
78 | Ahk Topic
79 |
80 |
81 | - Exe2ahk gui - It is a Gui based version of exe2ahk.exe for Ahk Basic
82 | Site
83 |
84 |
85 |
86 |
87 |
88 |
89 |
90 |
91 | -
92 | Scientific Maths() - A high-precision mathematics library
93 | Ahk Topic
94 | Documentation
95 |
96 |
97 | -
98 | AhkIni() - Super fast Ini Library with ini-comment(s) support.
99 | Ahk Topic
100 | Documentation
101 |
102 |
103 | -
104 | Encrypt() - Powerful Password-protected string encryption
105 | Ahk Topic
106 |
107 |
108 | -
109 | talk() - Inter-script Communication Provider
110 | Ahk Topic
111 |
112 |
113 | -
114 | Hparse() - Convert standard windows shortcuts to Autohotkey compatible shortcuts
115 | Ahk Topic
116 |
117 | -
118 | GroupSort() - Sort (arrange) multiple Inter-related lists together with advanced features
119 | Ahk Topic
120 |
121 |
122 | -
123 | centres() - Function to calculate all centres of a triangle
124 | Ahkscript Topic
125 |
126 |
127 | -
128 | Miscellanous Functions() - A library of my random useful functions
129 | Download
130 |
131 |
132 | -
133 | DayofDate() - Gives day name (like Sunday) of a requested date
134 | Ahk Topic
135 |
136 |
137 | -
138 | Timed Hotstrings - Create hotstrings that expire when not typed within a time span
139 | Ahk Post
140 |
141 |
142 |
143 |
144 |
145 |
146 |
147 |
148 |
149 | -
150 | Sublime Text Autohotkey Package - ST Autohotkey package available on Github
151 | Github
152 |
153 |
154 | -
155 | Syntax Highlighter for AutoHotkey with Zenburn Theme
156 | Github
157 |
158 |
159 |
160 |
161 |
162 |
163 |
164 |
165 | -
166 | Avis Counter Strike Bot Creator - GUI based Bot profiles editor for Counter Strike
167 | Official Site
168 | GameBanana
169 |
--------------------------------------------------------------------------------
/_posts/2017-06-07-tabs-ftw.md:
--------------------------------------------------------------------------------
1 | ---
2 | layout: post
3 | title: "Tabs v/s Spaces: An analysis on why tabs are better"
4 | tags: coding
5 | ---
6 |
7 |
8 |

10 |
58 |
59 | {% if page.title == "Home" %}
60 |
61 |
62 |

74 |
75 |
76 |
77 |

79 |
80 |
81 | Hi! 👋,
82 | I am Avi. I like making stuff and I am planning to start my own business💰 soon enough.
83 | These days, I work 💼 part-time ✈️ with Udacity and
Toptal.
84 | I have worked with Google (gsoc) and appbase.io in the past.
85 |
86 |
87 |
88 |
89 |
90 |
93 |
94 |
95 | {% else %}
96 |
99 | {% endif %}
100 |
101 |
102 |
103 |
127 |
128 |
129 |
130 |
135 |
136 | {% if page.title != "Home" %}
137 |
138 |
139 |
140 |
141 | {{ page.title }}
142 |
143 |
144 |
145 | {% if layout.rtype == "post" %}
146 | by {{ site.author.fullname }}
147 | |
148 | {{ page.date | date: "%b %d, %Y" }}
149 | {% else %}
150 | {{ page.tagline }}{% endif %}
151 |
152 |
153 |
154 |
155 |
156 | {{ content }}
157 |
158 |
159 | {% if layout.rtype == "post" %}
160 | {% if page.nod == null %}
161 | {% include disqus_notauto.html %}
162 |
163 | {% endif %}
164 | {% elsif layout.rtype == "page" %}
165 | {% if page.nod == null %}
166 | {% include disqus_notauto.html %}
167 | {% endif %}
168 | {% endif %}
169 |
170 |
171 |
175 |
176 |
177 |
178 | {% endif %}
179 |
180 |
181 |
9 | ChangeLog
10 |
11 | List
12 |
- SM_Solve(expression, ahk=false)
13 |
- SM_Add(number1, number2)
14 |
- SM_Multiply(number1, number2)
15 |
- SM_Divide(number1, number2, length=10)
16 |
- SM_UniquePmt(series, Index)
17 |
- SM_fact(number)
18 |
- SM_Greater(number1, number2, trueforequal)
19 |
- SM_Prefect(number)
20 |
- SM_Pow(number, Power)
21 |
- SM_Mod(Dividend, Divisor)
22 |
- SM_Round(number, Decimals)
23 |
- SM_Floor(Number)
24 |
- SM_Ceil(Number)
25 |
- SM_ToExp(Number, decimals)
26 |
- SM_FromExp(sci_number)
27 |
- SM_e(N, auto=true)
28 |
- SM_Number2base(N, base=16)
29 |
- SM_Base2Number(H, base=16)
30 |
31 |
32 |
33 |
34 |
35 | - Solves a Mathematical expression in a string . The
ahk param is to make SM_Solve() use the AutoHotkey's +-*/ instead of its own. Enable it if you are
36 | sure that the calculation you are doing can be calculated with AHK only. It may give faster results.
37 | - SM_Solve() supports infinetly large numbers and its +-/* is powered by the respective custom functions (SM_Add, SM_Multiply, SM_Divide).
38 |
- It supports functions (default and user-defined) , expressions inside expressions and nesting via (...) brackets.
39 |
- You can use ^ or ** calulate power and ! to calculate factorial on the go.
40 |
- Scientific notation numbers can also be used as they are in the function.
41 |
- SM_Solve() solves expressions in the traditional left-to-right format for the operators +-*/ and not in the BODMAS format. Use nesting to achieve your desired
42 | results.
43 |
- Use p or c for Permuation or Combination. (4c2 * 5c3)
44 |
- Users are highly recommended to use this function to solve expressions rather than using the individual functions in this library.
45 |
- Users are recommended to use Nesting via (...) brackets wherever necessary.
46 |
47 |
48 | {% highlight autohotkey %}
49 | msgbox % SM_Solve("4 + ( 2*( 3+(4-2)*round(2.5) ) ) + (5c2)**(4c3)")
50 | msgbox % "The gravity on earth is: " SM_Solve("(6.67e-11 * 5.978e24) / 6.378e6^2")
51 |
52 | var = sqrt(10!) - ( 2**5 + 5*8 )
53 | msgbox,% SM_Solve(var)
54 | ;In the above example, var has the equation.
55 | {% endhighlight %}
56 |
57 |
58 | - You can also use global variables inside SM_Solve() . These variables must be surrounded by % to make SM_Solve() see them as variables.
59 | Below is an example to demonstrate the purpose.
60 |
61 |
62 | {% highlight autohotkey %}
63 | global h := "6.6260695729e-34"
64 | global c := "299792458"
65 | global lemda := "5400e-10"
66 |
67 | msgbox % ans := SM_Solve("%h%*%c%\%lemda%") ;note the %..% here
68 |
69 | msgbox % SM_ToExp(ans) ;converting to Exponential form
70 | {% endhighlight %}
71 |
72 | - To use functions with alphabetic identifiers such as e, c or p , enclose them with %...% . See the following example -
73 | {% highlight autohotkey %}
74 | msgbox % SM_Solve(" %sin(1.59)% e %log(1000)% ")
75 | ;The above is equal to sin(1.59) e (log(1000))
76 | ;that is - sin(1.59) * 10^log(1000)
77 |
78 | msgbox % SM_Solve( " 4^sin(3.14) + 5c%log(100)% + %sin(1.59)%e%log(1000)% + log(1000)! " )
79 | ;As you see , the identifiers ^ and ! dont require functions in %....% , though you can always use the %...% if you wish.
80 | {% endhighlight %}
81 |
82 |
83 |
84 |
85 |
86 |
87 | - Adds two infinetly large numbers . Supports decimal and negatives.
88 |
- Please feed numbers into the function as strings (See below)
89 |
90 | {% highlight autohotkey %}
91 | number1 = 3292389200000000000382398232309.239230923092302390239230
92 | number2 = 239209239230290239239049349309403434.34930909090
93 | Msgbox,% SM_Add(number1 ,number2)
94 | Msgbox,% SM_Add(number1, "-" number2) ;Notice the use of "-" to subtract
95 |
96 | ;Notice the use of = in place of :=
97 | {% endhighlight %}
98 |
99 |
100 |
101 | - Feed large numbers as Strings
102 |
- Better recommended to keep the
length param of SM_Divide as 10 which is default. If you want more preciseness you can move it to anything.
103 | - SM_Divide() has smartround which means something like 0.000000003433423 with a length 3 will not give 0.000 but 0.00000000343
104 |
105 | {% highlight autohotkey %}
106 | MsgBox,% SM_Divide("434343455677690909087534208967834434444.5656", "8989998989898909090909009909090909090908656454520", 10)
107 | msgbox,% SM_Divide("22","7",100) ;--- 100 Decimal places
108 | MsgBox,% SM_Multiply("111111111111111111111111111111111111111111.111","55555555555555555555555555555555555555555555.555")
109 | {% endhighlight %}
110 |
111 |
112 | - Gives unique Permuation for a given Index where Index < No of Permutations
113 |
- Make Index = All to list down all possible permutations
114 |
115 | {% highlight autohotkey %}
116 | msgbox,% SM_UniquePMT("avi,annat,koiaur,aurkoi", "All") ;no of permutation = 24
117 | msgbox,% SM_UniquePMT("abd", 3);no of permutation = 6
118 | {% endhighlight %}
119 |
120 | SM_fact(number)
121 | Returns factorial of any natural number
122 |
123 | {% highlight autohotkey %}
124 | msgbox % SM_fact(50)
125 | {% endhighlight %}
126 |
127 | SM_Greater(number1, number2, trueforequal=true)
128 | Returns 1 (true) if number1 is greater than number2
129 | If 'trueforequal' is true , it returns 1 also when number1 = number2
130 |
131 | {% highlight autohotkey %}
132 | msgbox % SM_Greater("2382938239832923", "23923892323232.23923323", true)
133 |
134 | if SM_Greater("23923892323", "23823923923")
135 | msgbox True
136 | else
137 | msgbox False
138 | {% endhighlight %}
139 |
140 | SM_Prefect(number)
141 | Returns a number in perfect form removing all extra zeroes and decimals
142 |
143 | {% highlight autohotkey %}
144 | msgbox % SM_Prefect("00.0022323238230000")
145 | {% endhighlight %}
146 |
147 | SM_Pow(number, Power)
148 | Returns 'number' to the power 'Power'
149 | Suitable for large numbers.
150 |
151 | {% highlight autohotkey %}
152 | msgbox % SM_Pow("121", 20)
153 |
154 | if SM_Greater(SM_Pow("123", 10) , "23823923923")
155 | msgbox True
156 | else
157 | msgbox False
158 | {% endhighlight %}
159 |
160 | SM_Mod(number1, number2)
161 | Mod of number1 with respect to number2
162 |
163 | {% highlight autohotkey %}
164 | msgbox % SM_Mod("122304393493", "232434")
165 |
166 | if ( SM_Mod("1202323023923023022", 2) == "0" )
167 | msgbox, The number is even
168 | else
169 | msgbox, The number is odd
170 | {% endhighlight %}
171 |
172 | SM_Round(number, decimals)
173 | Rounds a number to the specified decimal numbers.
174 | Doesnt't support negative value of decimals i.e. no trimming before decimal is supported.
175 |
176 | {% highlight autohotkey %}
177 | msgbox % SM_Round("23023923023920332.239239232323129", 5)
178 | {% endhighlight %}
179 |
180 | SM_Floor(number) || SM_Ceil(number)
181 | Returns Floor() || Ceil() of a number.
182 | To know about these functions, see Autohotkey help file
183 |
184 | {% highlight autohotkey %}
185 | msgbox % SM_Floor("2323023902323.210")
186 | msgbox % SM_Ceil("-23023023.23")
187 | {% endhighlight %}
188 |
189 | SM_ToExp(number, decimals)
190 | Returns any number in exponential form like
191 | 1.6e9
192 | The decimals param rounds of the the scientific number to have as many decimals you like.
193 |
194 | {% highlight autohotkey %}
195 | msgbox % SM_ToExp("994556989569454.2334423723900")
196 | ;returns --
197 | ;9.9455698956945423344237239e14
198 | {% endhighlight %}
199 |
200 | SM_FromExp(sci_num)
201 | Converts a number from scientific number format to a real number.
202 |
203 | {% highlight autohotkey %}
204 | Msgbox % SM_fromexp("6.45423e10")
205 | ;64542300000
206 | {% endhighlight %}
207 |
208 | SM_e(N, auto=1)
209 | Returns 'e' (exponential factor) to the power 'N' . auto = 1 enables smart rounding for faster results . Call auto as false (0) for totally accurate results. (may be slow).
210 |
211 | {% highlight autohotkey %}
212 | msgbox % SM_e(10)
213 | ;Returns --
214 | ;22026.46579480710259971265343113213982666963239374053579059805991564763081440882382141001251466332787884202070175527338097612546879579978525390625
215 | {% endhighlight %}
216 |
217 | SM_Number2Base(N, base=16)
SM_Base2Number(H, base=16)
218 | SM_Number2Base converts number N to base base
219 | SM_Base2Number converts number H in base base to a real number (which is in base 10).
220 |
221 | {% highlight autohotkey %}
222 | msgbox % t:=SM_Number2Base("10485761048", 2) ;base 2
223 | msgbox % f:=SM_Number2base("10485761048", 32) ;base 32
224 | ;now convert them back to numbers
225 | msgbox % SM_Base2Number(t, 2) "`n" SM_Base2Number(f, 32)
226 | {% endhighlight %}
227 |
228 |
--------------------------------------------------------------------------------
/LICENSE:
--------------------------------------------------------------------------------
1 | Apache License
2 | Version 2.0, January 2004
3 | http://www.apache.org/licenses/
4 |
5 | TERMS AND CONDITIONS FOR USE, REPRODUCTION, AND DISTRIBUTION
6 |
7 | 1. Definitions.
8 |
9 | "License" shall mean the terms and conditions for use, reproduction,
10 | and distribution as defined by Sections 1 through 9 of this document.
11 |
12 | "Licensor" shall mean the copyright owner or entity authorized by
13 | the copyright owner that is granting the License.
14 |
15 | "Legal Entity" shall mean the union of the acting entity and all
16 | other entities that control, are controlled by, or are under common
17 | control with that entity. For the purposes of this definition,
18 | "control" means (i) the power, direct or indirect, to cause the
19 | direction or management of such entity, whether by contract or
20 | otherwise, or (ii) ownership of fifty percent (50%) or more of the
21 | outstanding shares, or (iii) beneficial ownership of such entity.
22 |
23 | "You" (or "Your") shall mean an individual or Legal Entity
24 | exercising permissions granted by this License.
25 |
26 | "Source" form shall mean the preferred form for making modifications,
27 | including but not limited to software source code, documentation
28 | source, and configuration files.
29 |
30 | "Object" form shall mean any form resulting from mechanical
31 | transformation or translation of a Source form, including but
32 | not limited to compiled object code, generated documentation,
33 | and conversions to other media types.
34 |
35 | "Work" shall mean the work of authorship, whether in Source or
36 | Object form, made available under the License, as indicated by a
37 | copyright notice that is included in or attached to the work
38 | (an example is provided in the Appendix below).
39 |
40 | "Derivative Works" shall mean any work, whether in Source or Object
41 | form, that is based on (or derived from) the Work and for which the
42 | editorial revisions, annotations, elaborations, or other modifications
43 | represent, as a whole, an original work of authorship. For the purposes
44 | of this License, Derivative Works shall not include works that remain
45 | separable from, or merely link (or bind by name) to the interfaces of,
46 | the Work and Derivative Works thereof.
47 |
48 | "Contribution" shall mean any work of authorship, including
49 | the original version of the Work and any modifications or additions
50 | to that Work or Derivative Works thereof, that is intentionally
51 | submitted to Licensor for inclusion in the Work by the copyright owner
52 | or by an individual or Legal Entity authorized to submit on behalf of
53 | the copyright owner. For the purposes of this definition, "submitted"
54 | means any form of electronic, verbal, or written communication sent
55 | to the Licensor or its representatives, including but not limited to
56 | communication on electronic mailing lists, source code control systems,
57 | and issue tracking systems that are managed by, or on behalf of, the
58 | Licensor for the purpose of discussing and improving the Work, but
59 | excluding communication that is conspicuously marked or otherwise
60 | designated in writing by the copyright owner as "Not a Contribution."
61 |
62 | "Contributor" shall mean Licensor and any individual or Legal Entity
63 | on behalf of whom a Contribution has been received by Licensor and
64 | subsequently incorporated within the Work.
65 |
66 | 2. Grant of Copyright License. Subject to the terms and conditions of
67 | this License, each Contributor hereby grants to You a perpetual,
68 | worldwide, non-exclusive, no-charge, royalty-free, irrevocable
69 | copyright license to reproduce, prepare Derivative Works of,
70 | publicly display, publicly perform, sublicense, and distribute the
71 | Work and such Derivative Works in Source or Object form.
72 |
73 | 3. Grant of Patent License. Subject to the terms and conditions of
74 | this License, each Contributor hereby grants to You a perpetual,
75 | worldwide, non-exclusive, no-charge, royalty-free, irrevocable
76 | (except as stated in this section) patent license to make, have made,
77 | use, offer to sell, sell, import, and otherwise transfer the Work,
78 | where such license applies only to those patent claims licensable
79 | by such Contributor that are necessarily infringed by their
80 | Contribution(s) alone or by combination of their Contribution(s)
81 | with the Work to which such Contribution(s) was submitted. If You
82 | institute patent litigation against any entity (including a
83 | cross-claim or counterclaim in a lawsuit) alleging that the Work
84 | or a Contribution incorporated within the Work constitutes direct
85 | or contributory patent infringement, then any patent licenses
86 | granted to You under this License for that Work shall terminate
87 | as of the date such litigation is filed.
88 |
89 | 4. Redistribution. You may reproduce and distribute copies of the
90 | Work or Derivative Works thereof in any medium, with or without
91 | modifications, and in Source or Object form, provided that You
92 | meet the following conditions:
93 |
94 | (a) You must give any other recipients of the Work or
95 | Derivative Works a copy of this License; and
96 |
97 | (b) You must cause any modified files to carry prominent notices
98 | stating that You changed the files; and
99 |
100 | (c) You must retain, in the Source form of any Derivative Works
101 | that You distribute, all copyright, patent, trademark, and
102 | attribution notices from the Source form of the Work,
103 | excluding those notices that do not pertain to any part of
104 | the Derivative Works; and
105 |
106 | (d) If the Work includes a "NOTICE" text file as part of its
107 | distribution, then any Derivative Works that You distribute must
108 | include a readable copy of the attribution notices contained
109 | within such NOTICE file, excluding those notices that do not
110 | pertain to any part of the Derivative Works, in at least one
111 | of the following places: within a NOTICE text file distributed
112 | as part of the Derivative Works; within the Source form or
113 | documentation, if provided along with the Derivative Works; or,
114 | within a display generated by the Derivative Works, if and
115 | wherever such third-party notices normally appear. The contents
116 | of the NOTICE file are for informational purposes only and
117 | do not modify the License. You may add Your own attribution
118 | notices within Derivative Works that You distribute, alongside
119 | or as an addendum to the NOTICE text from the Work, provided
120 | that such additional attribution notices cannot be construed
121 | as modifying the License.
122 |
123 | You may add Your own copyright statement to Your modifications and
124 | may provide additional or different license terms and conditions
125 | for use, reproduction, or distribution of Your modifications, or
126 | for any such Derivative Works as a whole, provided Your use,
127 | reproduction, and distribution of the Work otherwise complies with
128 | the conditions stated in this License.
129 |
130 | 5. Submission of Contributions. Unless You explicitly state otherwise,
131 | any Contribution intentionally submitted for inclusion in the Work
132 | by You to the Licensor shall be under the terms and conditions of
133 | this License, without any additional terms or conditions.
134 | Notwithstanding the above, nothing herein shall supersede or modify
135 | the terms of any separate license agreement you may have executed
136 | with Licensor regarding such Contributions.
137 |
138 | 6. Trademarks. This License does not grant permission to use the trade
139 | names, trademarks, service marks, or product names of the Licensor,
140 | except as required for reasonable and customary use in describing the
141 | origin of the Work and reproducing the content of the NOTICE file.
142 |
143 | 7. Disclaimer of Warranty. Unless required by applicable law or
144 | agreed to in writing, Licensor provides the Work (and each
145 | Contributor provides its Contributions) on an "AS IS" BASIS,
146 | WITHOUT WARRANTIES OR CONDITIONS OF ANY KIND, either express or
147 | implied, including, without limitation, any warranties or conditions
148 | of TITLE, NON-INFRINGEMENT, MERCHANTABILITY, or FITNESS FOR A
149 | PARTICULAR PURPOSE. You are solely responsible for determining the
150 | appropriateness of using or redistributing the Work and assume any
151 | risks associated with Your exercise of permissions under this License.
152 |
153 | 8. Limitation of Liability. In no event and under no legal theory,
154 | whether in tort (including negligence), contract, or otherwise,
155 | unless required by applicable law (such as deliberate and grossly
156 | negligent acts) or agreed to in writing, shall any Contributor be
157 | liable to You for damages, including any direct, indirect, special,
158 | incidental, or consequential damages of any character arising as a
159 | result of this License or out of the use or inability to use the
160 | Work (including but not limited to damages for loss of goodwill,
161 | work stoppage, computer failure or malfunction, or any and all
162 | other commercial damages or losses), even if such Contributor
163 | has been advised of the possibility of such damages.
164 |
165 | 9. Accepting Warranty or Additional Liability. While redistributing
166 | the Work or Derivative Works thereof, You may choose to offer,
167 | and charge a fee for, acceptance of support, warranty, indemnity,
168 | or other liability obligations and/or rights consistent with this
169 | License. However, in accepting such obligations, You may act only
170 | on Your own behalf and on Your sole responsibility, not on behalf
171 | of any other Contributor, and only if You agree to indemnify,
172 | defend, and hold each Contributor harmless for any liability
173 | incurred by, or claims asserted against, such Contributor by reason
174 | of your accepting any such warranty or additional liability.
175 |
176 | END OF TERMS AND CONDITIONS
177 |
178 | APPENDIX: How to apply the Apache License to your work.
179 |
180 | To apply the Apache License to your work, attach the following
181 | boilerplate notice, with the fields enclosed by brackets "{}"
182 | replaced with your own identifying information. (Don't include
183 | the brackets!) The text should be enclosed in the appropriate
184 | comment syntax for the file format. We also recommend that a
185 | file or class name and description of purpose be included on the
186 | same "printed page" as the copyright notice for easier
187 | identification within third-party archives.
188 |
189 | Copyright {yyyy} {name of copyright owner}
190 |
191 | Licensed under the Apache License, Version 2.0 (the "License");
192 | you may not use this file except in compliance with the License.
193 | You may obtain a copy of the License at
194 |
195 | http://www.apache.org/licenses/LICENSE-2.0
196 |
197 | Unless required by applicable law or agreed to in writing, software
198 | distributed under the License is distributed on an "AS IS" BASIS,
199 | WITHOUT WARRANTIES OR CONDITIONS OF ANY KIND, either express or implied.
200 | See the License for the specific language governing permissions and
201 | limitations under the License.
202 |
203 |
--------------------------------------------------------------------------------
 11 |
12 |
11 |
12 | 
 11 |
12 | The Caps-lock ON and OFF icons are distributed as single icon files so you can edit them to suit your visual aesthetics.
13 | You can download this tool from [my dropbox](http://pastebin.com/raw/LnibQhqn) or see the source on [github](https://github.com/aviaryan/autohotkey-scripts/tree/master/Tools/capslockstatus)
14 |
15 |
11 |
12 | The Caps-lock ON and OFF icons are distributed as single icon files so you can edit them to suit your visual aesthetics.
13 | You can download this tool from [my dropbox](http://pastebin.com/raw/LnibQhqn) or see the source on [github](https://github.com/aviaryan/autohotkey-scripts/tree/master/Tools/capslockstatus)
14 |
15 |  21 |
22 |
21 |
22 |  26 |
26 |  30 |
30 |  42 |
43 |
42 |
43 |