├── .gitignore
├── .readthedocs.yaml
├── .vscode
└── settings.json
├── Makefile
├── README.md
├── conf.py
├── index.rst
├── make.bat
├── requirements.txt
└── source
├── .readthdocs.yaml
├── Authentication_Authorization_Accounting
├── Certificates
│ ├── content.md
│ └── index.rst
├── Dot1X
│ ├── content.md
│ └── index.rst
├── HotSpot
│ ├── Hotspot_customisation.md
│ ├── content.md
│ └── index.rst
├── PPP_AAA
│ ├── content.md
│ └── index.rst
├── RADIUS
│ ├── content.md
│ └── index.rst
├── User
│ ├── content.md
│ └── index.rst
├── User_Manager
│ ├── content.md
│ └── index.rst
└── index.rst
├── Bridging_and_Switching
├── Bridging_and_Switching_Case_Studies
│ ├── Basic_VLAN_switching.md
│ ├── Bridge_IGMP_MLD_snooping.md
│ ├── Bridge_VLAN_Table.md
│ ├── CRS1xx_2xx_series_switches_examples.md
│ ├── CRS3xx_CRS5xx_CCR2116_CCR2216_VLANs_with_Bonds.md
│ ├── Controller_Bridge_and_Port_Extender.md
│ ├── Layer2_misconfiguration.md
│ ├── Loop_Protect.md
│ ├── Spanning_Tree_Protocol.md
│ ├── WMM_and_VLAN_priority.md
│ ├── Wireless_VLAN_Trunk.md
│ └── index.rst
├── CRS1xx_2xx_series_switches
│ ├── content.md
│ └── index.rst
├── CRS3xx_CRS5xx_CCR2116_CCR2216_switch_chip_features
│ ├── content.md
│ └── index.rst
├── L3_Hardware_Offloading
│ ├── content.md
│ └── index.rst
├── Switch_Chip_Features
│ ├── content.md
│ └── index.rst
├── VLAN
│ ├── content.md
│ └── index.rst
├── VXLAN
│ ├── content.md
│ └── index.rst
├── content.md
└── index.rst
├── Diagnostics_monitoring_and_troubleshooting
├── Bandwidth_Test
│ ├── content.md
│ └── index.rst
├── Detect_Internet
│ ├── content.md
│ └── index.rst
├── Dynamic_DNS
│ ├── content.md
│ └── index.rst
├── Graphing
│ ├── content.md
│ └── index.rst
├── Health
│ ├── content.md
│ └── index.rst
├── IP_Scan
│ ├── content.md
│ └── index.rst
├── Interface_stats_and_monitor-traffic
│ ├── content.md
│ └── index.rst
├── Log
│ ├── content.md
│ └── index.rst
├── Netwatch
│ ├── content.md
│ └── index.rst
├── Packet_Sniffer
│ ├── content.md
│ └── index.rst
├── Ping
│ ├── content.md
│ └── index.rst
├── Profiler
│ ├── content.md
│ └── index.rst
├── Resource
│ ├── content.md
│ └── index.rst
├── SNMP
│ ├── content.md
│ └── index.rst
├── Speed_Test
│ ├── content.md
│ └── index.rst
├── Torch
│ ├── content.md
│ └── index.rst
├── Traceroute
│ ├── content.md
│ └── index.rst
├── Traffic_Flow
│ ├── content.md
│ └── index.rst
├── Traffic_Generator
│ ├── content.md
│ └── index.rst
├── Watchdog
│ ├── content.md
│ └── index.rst
└── index.rst
├── Extended_features
├── Container
│ ├── Container-ThingsBoard_MQTT_HTTP_server.md
│ ├── Container-freeradius_server.md
│ ├── content.md
│ └── index.rst
├── ROSE-storage
│ ├── content.md
│ └── index.rst
├── SMB
│ ├── content.md
│ └── index.rst
├── UPS
│ ├── content.md
│ └── index.rst
├── Wake_on_LAN
│ ├── content.md
│ └── index.rst
└── index.rst
├── Firewall_and_Quality_of_Service
├── Address-lists
│ ├── content.md
│ └── index.rst
├── Connection_tracking
│ ├── content.md
│ └── index.rst
├── Filter
│ ├── content.md
│ └── index.rst
├── Firewall_and_QoS_Case_Studies
│ ├── Basic_Concepts.md
│ ├── Connection_rate.md
│ ├── Packet_Flow_in_RouterOS.md
│ ├── SYN_DoS_DDoS_Protection.md
│ ├── Securing_your_router
│ │ ├── Bruteforce_prevention.md
│ │ ├── Building_Advanced_Firewall.md
│ │ ├── Building_Your_First_Firewall.md
│ │ ├── Port_knocking.md
│ │ ├── content.md
│ │ └── index.rst
│ ├── content.md
│ └── index.rst
├── IP_packing
│ ├── content.md
│ └── index.rst
├── Kid_Control
│ ├── content.md
│ └── index.rst
├── Layer7
│ ├── content.md
│ └── index.rst
├── Mangle
│ ├── content.md
│ └── index.rst
├── NAT
│ ├── content.md
│ └── index.rst
├── Queues
│ ├── HTB_Hierarchical_Token_Bucket.md
│ ├── PCQ_example.md
│ ├── QoS_with_Switch_Chip.md
│ ├── Queue_Burst.md
│ ├── Queue_size.md
│ ├── content.md
│ └── index.rst
├── RAW
│ ├── content.md
│ └── index.rst
├── UPnP
│ ├── content.md
│ └── index.rst
└── index.rst
├── Getting_started
├── Backup
│ ├── content.md
│ └── index.rst
├── Cloud_Hosted_Router
│ ├── CHR_ProxMox_installation.md
│ ├── CHR_Vultr_installation.md
│ ├── content.md
│ └── index.rst
├── Configuration_Management
│ ├── Default_configurations.md
│ ├── content.md
│ └── index.rst
├── Console
│ ├── content.md
│ └── index.rst
├── First_Time_Configuration
│ ├── content.md
│ └── index.rst
├── Netinstall
│ ├── content.md
│ └── index.rst
├── Reset_Button
│ ├── content.md
│ └── index.rst
├── RouterBOOT
│ ├── content.md
│ └── index.rst
├── RouterOS_license_keys
│ ├── content.md
│ └── index.rst
├── Software_Specifications
│ ├── Feature_support_based_on_architecture.md
│ ├── content.md
│ └── index.rst
├── Supout.rif
│ ├── content.md
│ └── index.rst
├── Upgrading_and_installation
│ ├── Packages.md
│ ├── content.md
│ └── index.rst
├── Upgrading_to_v7
│ ├── content.md
│ └── index.rst
└── index.rst
├── Hardware
├── Disks
│ ├── content.md
│ └── index.rst
├── Grounding
│ ├── content.md
│ └── index.rst
├── LCD_Touchscreen
│ ├── content.md
│ └── index.rst
├── LEDs
│ ├── content.md
│ └── index.rst
├── MTU_in_RouterOS
│ ├── content.md
│ └── index.rst
├── Peripherals
│ ├── content.md
│ └── index.rst
├── PoE-Out
│ ├── content.md
│ └── index.rst
├── Ports
│ ├── content.md
│ └── index.rst
├── Product_Naming
│ ├── content.md
│ └── index.rst
├── RouterBOARD
│ ├── content.md
│ └── index.rst
└── index.rst
├── High_Availability_Solutions
├── Bonding
│ ├── content.md
│ └── index.rst
├── HA_Case_Studies
│ ├── Bonding_Examples.md
│ ├── VRRP_Configuration_Examples.md
│ └── index.rst
├── Load_Balancing
│ ├── Bonding_Load_Balancing.md
│ ├── Failover_WAN_Backup.md
│ ├── Firewall_Marking.md
│ ├── Per_connection_classifier.md
│ ├── content.md
│ └── index.rst
├── Multi-chassis_Link_Aggregation_Group
│ ├── content.md
│ └── index.rst
├── VRRP
│ ├── content.md
│ └── index.rst
└── index.rst
├── IPv4_and_IPv6_Fundamentals
├── IP_Addressing
│ ├── content.md
│ └── index.rst
├── IP_Pools
│ ├── content.md
│ └── index.rst
├── IP_Routing
│ ├── content.md
│ └── index.rst
├── IP_Settings
│ ├── content.md
│ └── index.rst
├── IPv6_Neighbor_Discovery
│ ├── content.md
│ └── index.rst
├── content.md
└── index.rst
├── Internet_of_Things
├── Bluetooth
│ ├── Bluetooth_tag-tracking_using_MQTT_and_ThingsBoard.md
│ ├── content.md
│ └── index.rst
├── GPIO
│ ├── content.md
│ └── index.rst
├── Lora
│ ├── General_Properties.md
│ ├── Step_by_step_installation.md
│ ├── The_Things_Network.md
│ ├── The_Things_Stack.md
│ └── index.rst
├── MQTT
│ ├── MQTT_and_ThingsBoard_configuration.md
│ ├── content.md
│ └── index.rst
└── index.rst
├── Management_tools
├── API
│ ├── Python3_Example.md
│ ├── content.md
│ └── index.rst
├── Branding
│ ├── content.md
│ └── index.rst
├── Command_Line_Interface
│ ├── content.md
│ └── index.rst
├── Flashfig
│ ├── content.md
│ └── index.rst
├── MAC_server
│ ├── content.md
│ └── index.rst
├── MikroTik_mobile_app
│ ├── content.md
│ └── index.rst
├── Quick_Set
│ ├── content.md
│ └── index.rst
├── REST_API
│ ├── content.md
│ └── index.rst
├── RoMON
│ ├── content.md
│ └── index.rst
├── SSH
│ ├── content.md
│ └── index.rst
├── Serial_Console
│ ├── content.md
│ └── index.rst
├── TR-069
│ ├── content.md
│ └── index.rst
├── Webfig
│ ├── content.md
│ └── index.rst
├── Winbox
│ ├── content.md
│ └── index.rst
└── index.rst
├── Mobile_Networking
├── GPS
│ ├── GPS-tracking_using_HTTP_POST.md
│ ├── GPS-tracking_using_MQTT_and_ThingsBoard.md
│ ├── content.md
│ └── index.rst
├── LTE
│ ├── content.md
│ └── index.rst
├── PPP
│ ├── content.md
│ └── index.rst
├── SMS
│ ├── content.md
│ └── index.rst
└── index.rst
├── Multi_Protocol_Label_Switching
├── EXP_bit_behaviour
│ ├── content.md
│ └── index.rst
├── LDP
│ ├── content.md
│ └── index.rst
├── MPLS_Case_Studies
│ ├── content.md
│ └── index.rst
├── MPLS_MTU_Forwarding_and_Label_Bindings
│ ├── content.md
│ └── index.rst
├── MPLS_Reference
│ ├── content.md
│ └── index.rst
├── Mpls_Overview
│ ├── content.md
│ └── index.rst
├── Traffic_Eng
│ ├── content.md
│ └── index.rst
├── VPLS
│ ├── content.md
│ └── index.rst
└── index.rst
├── Network_Management
├── ARP
│ ├── content.md
│ └── index.rst
├── Cloud
│ ├── content.md
│ └── index.rst
├── DHCP
│ ├── content.md
│ └── index.rst
├── DNS
│ ├── content.md
│ └── index.rst
├── Proxy
│ ├── content.md
│ └── index.rst
└── index.rst
├── Routing
├── BGP
│ ├── content.md
│ └── index.rst
├── Moving_from_ROSv6_to_v7_with_examples
│ ├── content.md
│ └── index.rst
├── Multicast
│ ├── Group_Management_Protocol.md
│ ├── IGMP_Proxy.md
│ ├── PIM-SM.md
│ ├── content.md
│ └── index.rst
├── OSPF
│ ├── content.md
│ └── index.rst
├── Policy_Routing
│ ├── content.md
│ └── index.rst
├── RIP
│ ├── content.md
│ └── index.rst
├── RPKI
│ ├── content.md
│ └── index.rst
├── Route_Selection_and_Filters
│ ├── content.md
│ └── index.rst
├── Routing_Debugging_Tools
│ ├── content.md
│ └── index.rst
├── Routing_Protocol_Multi-core_Support
│ ├── content.md
│ └── index.rst
├── Routing_Protocol_Overview
│ ├── content.md
│ └── index.rst
├── Routing_Reference
│ ├── content.md
│ └── index.rst
├── Virtual_Routing_and_Forwarding
│ ├── content.md
│ └── index.rst
└── index.rst
├── Scripts
├── Example
│ ├── content.md
│ └── index.rst
├── content.md
└── index.rst
├── System_Information_and_Utilities
├── Clock
│ ├── content.md
│ └── index.rst
├── Device-mode
│ ├── content.md
│ └── index.rst
├── E-mail
│ ├── content.md
│ └── index.rst
├── Fetch
│ ├── content.md
│ └── index.rst
├── Files_and_Backups
│ ├── content.md
│ └── index.rst
├── Identity
│ ├── content.md
│ └── index.rst
├── Interface_Lists
│ ├── content.md
│ └── index.rst
├── NTP
│ ├── content.md
│ └── index.rst
├── Neighbor_discovery
│ ├── content.md
│ └── index.rst
├── Note
│ ├── content.md
│ └── index.rst
├── Partitions
│ ├── content.md
│ └── index.rst
├── Precision_Time_Protocol
│ ├── content.md
│ └── index.rst
├── Scheduler
│ ├── content.md
│ └── index.rst
├── Services
│ ├── content.md
│ └── index.rst
├── TFTP
│ ├── content.md
│ └── index.rst
└── index.rst
├── Virtual_Private_Networks
├── 6to4
│ ├── content.md
│ └── index.rst
├── EoIP
│ ├── content.md
│ └── index.rst
├── GRE
│ ├── content.md
│ └── index.rst
├── IPIP
│ ├── content.md
│ └── index.rst
├── IPsec
│ ├── IKEv2_EAP_between_NordVPN_and_RouterOS.md
│ ├── content.md
│ └── index.rst
├── L2TP
│ ├── LAC_and_LNS_setup_with_Cisco_as_LAC.md
│ ├── content.md
│ └── index.rst
├── OpenVPN
│ ├── content.md
│ └── index.rst
├── PPPoE
│ ├── IPv6_PD_over_PPP.md
│ ├── MLPPP_over_single_and_multiple_links.md
│ ├── content.md
│ └── index.rst
├── PPTP
│ ├── content.md
│ └── index.rst
├── SSTP
│ ├── content.md
│ └── index.rst
├── WireGuard
│ ├── content.md
│ └── index.rst
├── ZeroTier
│ ├── content.md
│ └── index.rst
└── index.rst
├── Wired_Connections
├── Ethernet
│ ├── content.md
│ └── index.rst
├── PWR_Line
│ ├── content.md
│ └── index.rst
└── index.rst
├── Wireless
├── CAPsMAN
│ ├── AP_Controller.md
│ ├── content.md
│ └── index.rst
├── HWMPplus
│ ├── content.md
│ └── index.rst
├── Interworking_Profiles
│ ├── content.md
│ └── index.rst
├── Nv2
│ ├── content.md
│ └── index.rst
├── Spectral_scan
│ ├── content.md
│ └── index.rst
├── W60G
│ ├── Distance_guide.md
│ ├── Fail-over_PtMP_CLI_example.md
│ ├── Fail-over_PtP_CLI_example.md
│ ├── Fail-over_PtP_GUI_example.md
│ ├── PtP_CLI_example.md
│ ├── PtP_GUI_example.md
│ ├── content.md
│ └── index.rst
├── WifiWave2
│ ├── content.md
│ └── index.rst
├── Wireless_Case_Studies
│ ├── CAPsMAN_with_VLANs.md
│ ├── Enterprise_wireless_security_with_User_Manager_v5.md
│ ├── VLANs_on_Wireless.md
│ ├── Wireless_Station_Modes.md
│ ├── Wireless_Troubleshooting.md
│ ├── content.md
│ └── index.rst
├── Wireless_Interface
│ ├── content.md
│ └── index.rst
└── index.rst
├── api.rst
├── conf.py
├── index.rst
└── translation.md
/.gitignore:
--------------------------------------------------------------------------------
1 |
2 | # Created by https://www.toptal.com/developers/gitignore/api/python,jupyternotebooks
3 | # Edit at https://www.toptal.com/developers/gitignore?templates=python,jupyternotebooks
4 |
5 | ### JupyterNotebooks ###
6 | # gitignore template for Jupyter Notebooks
7 | # website: http://jupyter.org/
8 |
9 | .ipynb_checkpoints
10 | */.ipynb_checkpoints/*
11 |
12 | # IPython
13 | profile_default/
14 | ipython_config.py
15 |
16 | # Remove previous ipynb_checkpoints
17 | # git rm -r .ipynb_checkpoints/
18 |
19 | ### Python ###
20 | # Byte-compiled / optimized / DLL files
21 | __pycache__/
22 | *.py[cod]
23 | *$py.class
24 |
25 | # C extensions
26 | *.so
27 |
28 | # Distribution / packaging
29 | .Python
30 | build/
31 | develop-eggs/
32 | dist/
33 | downloads/
34 | eggs/
35 | .eggs/
36 | lib/
37 | lib64/
38 | parts/
39 | sdist/
40 | var/
41 | wheels/
42 | share/python-wheels/
43 | *.egg-info/
44 | .installed.cfg
45 | *.egg
46 | MANIFEST
47 |
48 | # PyInstaller
49 | # Usually these files are written by a python script from a template
50 | # before PyInstaller builds the exe, so as to inject date/other infos into it.
51 | *.manifest
52 | *.spec
53 |
54 | # Installer logs
55 | pip-log.txt
56 | pip-delete-this-directory.txt
57 |
58 | # Unit test / coverage reports
59 | htmlcov/
60 | .tox/
61 | .nox/
62 | .coverage
63 | .coverage.*
64 | .cache
65 | nosetests.xml
66 | coverage.xml
67 | *.cover
68 | *.py,cover
69 | .hypothesis/
70 | .pytest_cache/
71 | cover/
72 |
73 | # Translations
74 | *.mo
75 | *.pot
76 |
77 | # Django stuff:
78 | *.log
79 | local_settings.py
80 | db.sqlite3
81 | db.sqlite3-journal
82 |
83 | # Flask stuff:
84 | instance/
85 | .webassets-cache
86 |
87 | # Scrapy stuff:
88 | .scrapy
89 |
90 | # Sphinx documentation
91 | _build/
92 |
93 | # PyBuilder
94 | .pybuilder/
95 | target/
96 |
97 | # Jupyter Notebook
98 |
99 | # IPython
100 |
101 | # pyenv
102 | # For a library or package, you might want to ignore these files since the code is
103 | # intended to run in multiple environments; otherwise, check them in:
104 | # .python-version
105 |
106 | # pipenv
107 | # According to pypa/pipenv#598, it is recommended to include Pipfile.lock in version control.
108 | # However, in case of collaboration, if having platform-specific dependencies or dependencies
109 | # having no cross-platform support, pipenv may install dependencies that don't work, or not
110 | # install all needed dependencies.
111 | #Pipfile.lock
112 |
113 | # PEP 582; used by e.g. github.com/David-OConnor/pyflow
114 | __pypackages__/
115 |
116 | # Celery stuff
117 | celerybeat-schedule
118 | celerybeat.pid
119 |
120 | # SageMath parsed files
121 | *.sage.py
122 |
123 | # Environments
124 | .env
125 | .venv
126 | env/
127 | venv/
128 | ENV/
129 | env.bak/
130 | venv.bak/
131 |
132 | # Spyder project settings
133 | .spyderproject
134 | .spyproject
135 |
136 | # Rope project settings
137 | .ropeproject
138 |
139 | # mkdocs documentation
140 | /site
141 |
142 | # mypy
143 | .mypy_cache/
144 | .dmypy.json
145 | dmypy.json
146 |
147 | # Pyre type checker
148 | .pyre/
149 |
150 | # pytype static type analyzer
151 | .pytype/
152 |
153 | # Cython debug symbols
154 | cython_debug/
155 |
156 | # End of https://www.toptal.com/developers/gitignore/api/python,jupyternotebooks
157 |
--------------------------------------------------------------------------------
/.readthedocs.yaml:
--------------------------------------------------------------------------------
1 | # Read the Docs configuration file for Sphinx projects
2 | # See https://docs.readthedocs.io/en/stable/config-file/v2.html for details
3 |
4 | # Required
5 | version: 2
6 |
7 | # Set the OS, Python version and other tools you might need
8 | build:
9 | os: ubuntu-22.04
10 | tools:
11 | python: "3.12"
12 | # You can also specify other tool versions:
13 | # nodejs: "20"
14 | # rust: "1.70"
15 | # golang: "1.20"
16 |
17 | # Build documentation in the "docs/" directory with Sphinx
18 | sphinx:
19 | configuration: ./conf.py
20 | # You can configure Sphinx to use a different builder, for instance use the dirhtml builder for simpler URLs
21 | #builder: "html"
22 | # Fail on all warnings to avoid broken references
23 | #fail_on_warning: true
24 |
25 | # Optionally build your docs in additional formats such as PDF and ePub
26 | # formats:
27 | # - pdf
28 | # - epub
29 |
30 | # Optional but recommended, declare the Python requirements required
31 | # to build your documentation
32 | # See https://docs.readthedocs.io/en/stable/guides/reproducible-builds.html
33 | python:
34 | install:
35 | - requirements: ./requirements.txt
36 |
--------------------------------------------------------------------------------
/.vscode/settings.json:
--------------------------------------------------------------------------------
1 | {
2 | "MicroPython.executeButton": [
3 | {
4 | "text": "▶",
5 | "tooltip": "运行",
6 | "alignment": "left",
7 | "command": "extension.executeFile",
8 | "priority": 3.5
9 | }
10 | ],
11 | "MicroPython.syncButton": [
12 | {
13 | "text": "$(sync)",
14 | "tooltip": "同步",
15 | "alignment": "left",
16 | "command": "extension.execute",
17 | "priority": 4
18 | }
19 | ],
20 | "python.autoComplete.extraPaths": [
21 | "/home/leon/.vscode-insiders/extensions/rt-thread.rt-thread-micropython-1.0.11/microExamples/code-completion"
22 | ],
23 | "python.linting.pylintArgs": [
24 | "--init-hook",
25 | "import sys; sys.path.append('/home/leon/.vscode-insiders/extensions/rt-thread.rt-thread-micropython-1.0.11/microExamples/code-completion')"
26 | ],
27 | "python.analysis.extraPaths": [
28 | "/home/leon/.vscode-insiders/extensions/rt-thread.rt-thread-micropython-1.0.11/microExamples/code-completion"
29 | ],
30 | "svn.ignoreMissingSvnWarning": true,
31 | "esbonio.sphinx.confDir": "${workspaceFolder}\\source",
32 | "[python]": {
33 | "editor.defaultFormatter": "ms-python.autopep8"
34 | },
35 | "python.formatting.provider": "none",
36 | "restructuredtext.pythonRecommendation.disabled": true
37 | }
--------------------------------------------------------------------------------
/Makefile:
--------------------------------------------------------------------------------
1 | # Minimal makefile for Sphinx documentation
2 | #
3 |
4 | # You can set these variables from the command line, and also
5 | # from the environment for the first two.
6 | SPHINXOPTS ?=
7 | SPHINXBUILD ?= sphinx-build
8 | SOURCEDIR = source
9 | BUILDDIR = build
10 |
11 | # Put it first so that "make" without argument is like "make help".
12 | help:
13 | @$(SPHINXBUILD) -M help "$(SOURCEDIR)" "$(BUILDDIR)" $(SPHINXOPTS) $(O)
14 |
15 | .PHONY: help Makefile
16 |
17 | # Catch-all target: route all unknown targets to Sphinx using the new
18 | # "make mode" option. $(O) is meant as a shortcut for $(SPHINXOPTS).
19 | %: Makefile
20 | @$(SPHINXBUILD) -M $@ "$(SOURCEDIR)" "$(BUILDDIR)" $(SPHINXOPTS) $(O)
21 |
--------------------------------------------------------------------------------
/README.md:
--------------------------------------------------------------------------------
1 | # RouterOS7.6中文使用文档
2 |
3 | =======================================
4 |
5 | 这里的所有中文文档都是本人利用业余时间进行翻译整理,如有不当之处,请见谅。
6 |
7 | 喜欢的请前往下面地址阅读:
8 |
9 | https://mikrotik-doc-cn.readthedocs.io/zh/latest/
10 |
--------------------------------------------------------------------------------
/conf.py:
--------------------------------------------------------------------------------
1 | '''
2 | Author: be-engineer 41234995@qq.com
3 | Date: 2023-10-22 16:39:13
4 | LastEditors: be-engineer 41234995@qq.com
5 | LastEditTime: 2023-10-22 22:54:41
6 | FilePath: /MikroTik-doc-cn/conf.py
7 | Description: 这是默认设置,请设置`customMade`, 打开koroFileHeader查看配置 进行设置: https://github.com/OBKoro1/koro1FileHeader/wiki/%E9%85%8D%E7%BD%AE
8 | '''
9 | # Configuration file for the Sphinx documentation builder.
10 | #
11 | # For the full list of built-in configuration values, see the documentation:
12 | # https://www.sphinx-doc.org/en/master/usage/configuration.html
13 |
14 | # -- Project information -----------------------------------------------------
15 | # https://www.sphinx-doc.org/en/master/usage/configuration.html#project-information
16 |
17 | project = 'RouterOS7.6 中文使用手册'
18 | copyright = '2023, be-engineer'
19 | author = 'be-engineer'
20 | release = '7.x'
21 |
22 | # -- General configuration ---------------------------------------------------
23 | # https://www.sphinx-doc.org/en/master/usage/configuration.html#general-configuration
24 |
25 | extensions = [
26 | # 'myst_parser',
27 | # 'recommonmark',
28 | 'sphinx_mdinclude',
29 | # 'sphinxcontrib-markdown',
30 | # 'sphinx.ext.mathjax',
31 | 'sphinx.ext.duration',
32 | 'sphinx.ext.doctest',
33 | 'sphinx.ext.autodoc',
34 | 'sphinx.ext.autosummary',
35 | 'sphinx_markdown_tables',
36 | # 'sphinxnotes.strike'
37 | ]
38 |
39 | templates_path = ['_templates']
40 | exclude_patterns = []
41 |
42 | # root_doc = 'index'
43 | language = 'zh_CN'
44 |
45 | # -- Options for HTML output -------------------------------------------------
46 | # https://www.sphinx-doc.org/en/master/usage/configuration.html#options-for-html-output
47 |
48 | html_theme = 'sphinx_rtd_theme'
49 | html_static_path = ['_static']
50 |
--------------------------------------------------------------------------------
/index.rst:
--------------------------------------------------------------------------------
1 |
2 | RouterOS 中文手册
3 | ===============================
4 |
5 | 本中文手册并非官方发行,都是自己利用业余时间进行翻译整理,如有错误和不当之处,请见谅。
6 |
7 | 原版文档地址为:https://help.mikrotik.com/docs/display/ROS/RouterOS
8 |
9 | github地址:https://github.com/be-engineer/MikroTik-doc-cn 喜欢的请不吝加颗小星星吧
10 |
11 | 友情链接:
12 | -----------------
13 |
14 | 1. 偶然发现一个 `pve7.3中文帮助`_ 还没细看,感觉不错,喜欢的也请给他们一个赞
15 |
16 | .. _`pve7.3中文帮助`: https://pve-doc-cn.readthedocs.io/zh_CN/latest/
17 |
18 | 2. RouterOS 7.6修改内容,了解新版本增加了哪些功能。 `What's new in V7.6`_
19 |
20 | .. _`What's new in V7.6`: https://mikrotik.com/download/changelogs/stable-release-tree
21 |
22 |
23 | 简介
24 | ------------------------------------------------
25 | RouterOS是一种路由操作系统,是基于Linux核心开发,兼容x86 PC的路由软件,通过该软件可以把标准PC电脑变成专业路由器,RouterOS软件的开发和应用不断的更新和发展,软件经历了多次更新和改进,其功能在不断增强和完善。特别在无线、认证、策略路由、带宽控制和防火墙过滤等功能上有着非常突出的功能,其极高的性价比,受到许多网络人士的青睐。
26 |
27 | RouterOS官网文档非常齐全,而且详细,但是只有英文版本,为了方便更多的人学习和了解RouterOS的功能和使用方法,本人新建了这个项目,把官方网站上的文档翻译为中文,希望能对大家有所帮助。
28 |
29 | .. mdinclude:: source/translation.md
30 |
31 |
32 | .. toctree::
33 | :maxdepth: 1
34 |
35 | source/Getting_started/index.rst
36 | source/Authentication_Authorization_Accounting/index.rst
37 | source/Bridging_and_Switching/index.rst
38 | source/Diagnostics_monitoring_and_troubleshooting/index.rst
39 | source/Extended_features/index.rst
40 | source/Firewall_and_Quality_of_Service/index.rst
41 | source/Hardware/index.rst
42 | source/High_Availability_Solutions/index.rst
43 | source/Internet_of_Things/index.rst
44 | source/IPv4_and_IPv6_Fundamentals/index.rst
45 | source/Management_tools/index.rst
46 | source/Mobile_Networking/index.rst
47 | source/Network_Management/index.rst
48 | source/Routing/index.rst
49 | source/Scripts/index.rst
50 | source/Multi_Protocol_Label_Switching/index.rst
51 | source/System_Information_and_Utilities/index.rst
52 | source/Virtual_Private_Networks/index.rst
53 | source/Wired_Connections/index.rst
54 | source/Wireless/index.rst
--------------------------------------------------------------------------------
/make.bat:
--------------------------------------------------------------------------------
1 | @ECHO OFF
2 |
3 | pushd %~dp0
4 |
5 | REM Command file for Sphinx documentation
6 |
7 | if "%SPHINXBUILD%" == "" (
8 | set SPHINXBUILD=sphinx-build
9 | )
10 | set SOURCEDIR=source
11 | set BUILDDIR=build
12 |
13 | if "%1" == "" goto help
14 |
15 | %SPHINXBUILD% >NUL 2>NUL
16 | if errorlevel 9009 (
17 | echo.
18 | echo.The 'sphinx-build' command was not found. Make sure you have Sphinx
19 | echo.installed, then set the SPHINXBUILD environment variable to point
20 | echo.to the full path of the 'sphinx-build' executable. Alternatively you
21 | echo.may add the Sphinx directory to PATH.
22 | echo.
23 | echo.If you don't have Sphinx installed, grab it from
24 | echo.http://sphinx-doc.org/
25 | exit /b 1
26 | )
27 |
28 | %SPHINXBUILD% -M %1 %SOURCEDIR% %BUILDDIR% %SPHINXOPTS% %O%
29 | goto end
30 |
31 | :help
32 | %SPHINXBUILD% -M help %SOURCEDIR% %BUILDDIR% %SPHINXOPTS% %O%
33 |
34 | :end
35 | popd
36 |
--------------------------------------------------------------------------------
/requirements.txt:
--------------------------------------------------------------------------------
1 | # sphinx==7.1.2
2 | sphinx_markdown_tables == 0.0.17
3 | markdown >= 3.0.1
4 | recommonmark == 0.7.1
5 | sphinx_rtd_theme == 1.0.0
6 | sphinx_mdinclude == 0.5.3
--------------------------------------------------------------------------------
/source/.readthdocs.yaml:
--------------------------------------------------------------------------------
1 | # .readthedocs.yaml
2 | # Read the Docs configuration file
3 | # See https://docs.readthedocs.io/en/stable/config-file/v2.html for details
4 |
5 | # Required
6 | version: 2
7 |
8 | # Set the version of Python and other tools you might need
9 | build:
10 | os: ubuntu-22.04
11 | tools:
12 | python: "3.11"
13 | # You can also specify other tool versions:
14 | # nodejs: "19"
15 | # rust: "1.64"
16 | # golang: "1.19"
17 |
18 | # Build documentation in the docs/ directory with Sphinx
19 | sphinx:
20 | configuration: source/conf.py
21 |
22 | # If using Sphinx, optionally build your docs in additional formats such as PDF
23 | formats:
24 | - pdf
25 | - epub
26 |
27 | # Optionally declare the Python requirements required to build your docs
28 | python:
29 | install:
30 | - requirements: ./requirements.txt
31 |
--------------------------------------------------------------------------------
/source/Authentication_Authorization_Accounting/Certificates/index.rst:
--------------------------------------------------------------------------------
1 | 证书
2 | ===============================
3 |
4 | .. toctree::
5 | :maxdepth: 2
6 |
7 | content.md
8 |
9 |
10 |
--------------------------------------------------------------------------------
/source/Authentication_Authorization_Accounting/Dot1X/index.rst:
--------------------------------------------------------------------------------
1 | Dot1X
2 | ===============================
3 |
4 | .. toctree::
5 | :maxdepth: 2
6 |
7 | content.md
8 |
9 |
10 |
--------------------------------------------------------------------------------
/source/Authentication_Authorization_Accounting/HotSpot/index.rst:
--------------------------------------------------------------------------------
1 | 热点
2 | ===============================
3 |
4 | .. toctree::
5 | :maxdepth: 2
6 |
7 | content.md
8 | Hotspot_customisation.md
9 |
10 |
--------------------------------------------------------------------------------
/source/Authentication_Authorization_Accounting/PPP_AAA/index.rst:
--------------------------------------------------------------------------------
1 | PPP AAA
2 | ===============================
3 |
4 | .. toctree::
5 | :maxdepth: 2
6 |
7 | content.md
8 |
9 |
10 |
--------------------------------------------------------------------------------
/source/Authentication_Authorization_Accounting/RADIUS/index.rst:
--------------------------------------------------------------------------------
1 | RADIUS
2 | ===============================
3 |
4 | .. toctree::
5 | :maxdepth: 2
6 |
7 | content.md
8 |
9 |
10 |
--------------------------------------------------------------------------------
/source/Authentication_Authorization_Accounting/User/index.rst:
--------------------------------------------------------------------------------
1 | 用户
2 | ===============================
3 |
4 | .. toctree::
5 | :maxdepth: 2
6 |
7 | content.md
8 |
9 |
10 |
--------------------------------------------------------------------------------
/source/Authentication_Authorization_Accounting/User_Manager/index.rst:
--------------------------------------------------------------------------------
1 | 用户管理器
2 | ===============================
3 |
4 | .. toctree::
5 | :maxdepth: 2
6 |
7 | content.md
8 |
9 |
10 |
--------------------------------------------------------------------------------
/source/Authentication_Authorization_Accounting/index.rst:
--------------------------------------------------------------------------------
1 |
2 | 认证、授权、计费
3 | ===============================
4 |
5 | .. toctree::
6 | :maxdepth: 1
7 |
8 | Certificates/index.rst
9 | Dot1X/index.rst
10 | HotSpot/index.rst
11 | PPP_AAA/index.rst
12 | RADIUS/index.rst
13 | User/index.rst
14 | User_Manager/index.rst
15 |
16 |
17 |
18 |
--------------------------------------------------------------------------------
/source/Bridging_and_Switching/Bridging_and_Switching_Case_Studies/Loop_Protect.md:
--------------------------------------------------------------------------------
1 | # 环路保护
2 |
3 | 环路保护功能可以通过发送环路保护协议数据包来防止第二层环路,并在接口收到源自自身的环路保护数据包时关闭它们。该功能的工作原理是将收到的环路保护数据包的源MAC地址与启用环路保护的接口的MAC地址进行对比。如果发现匹配,环路保护将禁用收到环路保护数据包的接口。日志消息会警告这个事件,接口被系统标记为循环保护。RouterOS的环路保护功能可以用在桥接的接口上,也可以用在RouterBoard交换芯片中设置为交换的以太网接口上。
4 |
5 | 环路保护在以太网、VLAN、EoIP、VxLAN接口上工作,其数据包以EtherType 0x9003进行封装。
6 | 系统支持调整环路保护包的发送间隔和接口禁用时间。配置改变或禁用时间过期,会重置接口上的环路保护。
7 |
8 | !!!tip 尽管环路保护可以在添加到网桥的接口上工作,但仍然建议使用(R/M)STP而不是环路保护,因为(R/M)STP与大多数交换机兼容,STP变体提供更多的配置选项来微调你的网络。
9 |
10 | **Sub-menu:** `/interface ethernet /interface vlan /interface eoip /interface eoipv6 /interface vxlan`
11 |
12 | | 属性 | 说明 |
13 | | --------------------------------------------------------------------------------------------------------------------------------------------------------------------------- | ------------------------------------------------------------- |
14 | | **loop-protect** (_on \| off \| default_; Default: **default**) | 在选定的接口上启用或禁用环路保护。 **默认** 为禁用。 |
15 | | **loop-protect-send-interval** (_time interval_; Default: **5s**) | 设置在选定的接口上发送环路保护数据包的频率。 |
16 | | **loop-protect-disable-time** (_time interval \| 0_; Default: **5m**) | 设置当检测到环路时,所选接口被禁用的时间。 **0** - 代表永久。 |
17 |
18 | **只读属性**
19 |
20 | | 属性 | 说明 |
21 | | ------------------------------------------------- | ----------------------------------------------------------------------------------------------------------------------------------------------------------------------------------------------- |
22 | | **loop-protect-status** (_on \| off \| disable_) |
- **on** - 循环保护功能已打开,接口正在发送和监听循环保护数据包。
- **off** - 循环保护功能已关闭
- **disable** - 环路保护功能打开时,接口已收到环路保护数据包,并禁用自己以防止环路。 |
23 |
--------------------------------------------------------------------------------
/source/Bridging_and_Switching/Bridging_and_Switching_Case_Studies/Wireless_VLAN_Trunk.md:
--------------------------------------------------------------------------------
1 | # 无线VLAN聚合
2 |
3 | 一个非常常见的任务是在无线点对点(PtP)链路上只转发某一组VLAN。自RouterOS v6.41以来,这可以通过网桥VLAN过滤来实现,并且应该用它来代替任何其他方法(包括桥接VLAN接口)。比如要通过无线链路转发到2个不同的VLAN,所有其他的VLAN ID应该被丢弃。VLAN 10是互联网流量,而VLAN 99是管理流量。下面是网络拓扑结构。
4 |
5 | 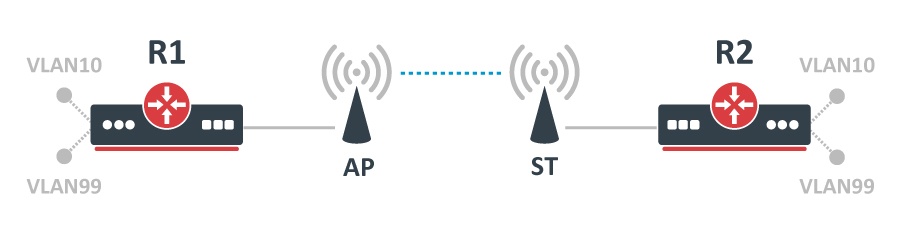
6 |
7 | ## 配置
8 |
9 | 首先在 **AP** 和 **ST** 上创建一个新的网桥,并向其添加 **ether1** 和 **wlan1** 端口。
10 |
11 | ```shell
12 | /interface bridge
13 | add name=bridge protocol-mode=none
14 | /interface bridge port
15 | add bridge=bridge interface=ether1
16 | add bridge=bridge interface=wlan1
17 |
18 | ```
19 |
20 | 如果需要的话,可以启用 RSTP,但一般来说,PtP 链接不需要 RSTP,因为不应该发生环路。
21 |
22 | 为了安全起见,应该启用入站过滤,因为你只希望有标记的流量,可以设置网桥过滤掉所有未标记的流量。在 **AP** 和 **ST** 上进行如下操作。
23 |
24 | ```shell
25 | /interface bridge port
26 | set [find where interface=ether1 or interface=wlan1] frame-types=admit-only-vlan-tagged ingress-filtering=yes
27 |
28 | ```
29 |
30 | 设置网桥VLAN表。由于 VLAN99 是管理流量,那么需要允许这个 VLAN ID 能够访问网桥接口,否则,当你试图访问设备时,流量就会被丢弃。VLAN10 不需要访问网桥,因为它只是被转发到另一端。为了实现这样的功能,在 **AP** 和 **ST** 的网桥 VLAN 表中加入这些项。
31 |
32 | ```shell
33 | /interface bridge vlan
34 | add bridge=bridge tagged=ether1,wlan1 vlan-ids=10
35 | add bridge=bridge tagged=ether1,wlan1,bridge vlan-ids=99
36 |
37 | ```
38 |
39 | 可以限制允许从哪些接口访问设备。例如, 如果不希望设备从 `wlan1` 被访问, 那么可以从相应的网桥 VLAN 项中删除该接口。
40 |
41 | 对于有 [硬件卸载VLAN过滤](https://help.mikrotik.com/docs/display/ROS/Bridging+and+Switching#BridgingandSwitching-BridgeHardwareOffloading) 和无线接口支持的设备(如RB4011带RTL8367交换芯片,或LtAP带MT7621交换芯片),需要更加注意。如果不允许VLAN访问CPU,从HW卸载端口到无线的数据包可以被过滤掉。可以通过将网桥接口添加为VLAN成员(类似于VLAN99的例子)或禁用网桥端口的HW卸载来允许某个VLAN的CPU访问。
42 |
43 | 所有设备(**R1**,**R2**,**AP,** 和 **ST**)都需要创建一个VLAN接口,以便能够通过特定的VLAN ID访问设备。对于 **AP** 和 **ST** 来说,在网桥接口之上创建VLAN接口,并给它分配一个IP地址。
44 |
45 | ```shell
46 | /interface vlan
47 | add interface=bridge name=MGMT vlan-id=99
48 | /ip address
49 | add address=192.168.99.X/24 interface=MGMT
50 |
51 | ```
52 |
53 | 对于 **R1** 和 **R2** 做同样的事情,但创建VLAN接口的接口可能会改变,这取决于设置。
54 |
55 | ```shell
56 | /interface vlan
57 | add interface=ether1 name=MGMT vlan-id=99
58 | /ip address
59 | add address=192.168.99.X/24 interface=MGMT
60 |
61 | ```
62 |
63 | 要允许更多的VLAN被转发,只需要在网桥VLAN表中指定更多的VLAN ID,可以指定多个用coma甚至VLAN范围划分的VLAN。
64 |
65 | 在 **AP** 上设置无线链接。
66 |
67 | ```shell
68 | /interface wireless security-profiles
69 | add authentication-types=wpa2-psk mode=dynamic-keys name=wlan_sec wpa2-pre-shared-key=use_a_long_password_here
70 | /interface wireless
71 | set wlan1 band=5ghz-a/n/ac channel-width=20/40/80mhz-Ceee disabled=no mode=bridge scan-list=5180 security-profile=wlan_sec ssid=ptp_test
72 |
73 | ```
74 |
75 | 在 **ST** 上设置无线链接。
76 |
77 | ```shell
78 | /interface wireless security-profiles
79 | add authentication-types=wpa2-psk mode=dynamic-keys name=wlan_sec wpa2-pre-shared-key=use_a_long_password_here
80 | /interface wireless
81 | set wlan1 band=5ghz-a/n/ac channel-width=20/40/80mhz-Ceee disabled=no mode=station-bridge scan-list=5180 security-profile=wlan_sec ssid=ptp_test
82 |
83 | ```
84 |
85 | 对于每一种类型的设置,都有不同的要求,对于PtP链接,通常使用NV2无线协议。可以在 [NV2手册](https://wiki.mikrotik.com/wiki/Manual:Nv2 "Manual:Nv2") 上阅读更多关于NV2的信息。
86 |
87 | 当链接设置好后,可以在 **AP** 和 **ST** 上启用网桥VLAN过滤。
88 |
89 | ```shell
90 | /interface bridge
91 | set bridge vlan-filtering=yes
92 |
93 | ```
94 |
95 | 在启用 VLAN 过滤之前,请仔细检查网桥 VLAN 表。错误配置的网桥VLAN表会导致设备无法访问,可能需要重置配置。
96 |
--------------------------------------------------------------------------------
/source/Bridging_and_Switching/Bridging_and_Switching_Case_Studies/index.rst:
--------------------------------------------------------------------------------
1 | 桥接和交换案例研究
2 | ===============================
3 |
4 | .. toctree::
5 | :maxdepth: 2
6 |
7 | Basic_VLAN_switching.md
8 | Bridge_IGMP_MLD_snooping.md
9 | Bridge_VLAN_Table.md
10 | Controller_Bridge_and_Port_Extender.md
11 | CRS1xx_2xx_series_switches_examples.md
12 | CRS3xx_CRS5xx_CCR2116_CCR2216_VLANs_with_Bonds.md
13 | Layer2_misconfiguration.md
14 | Loop_Protect.md
15 | Spanning_Tree_Protocol.md
16 | Wireless_VLAN_Trunk.md
17 | WMM_and_VLAN_priority.md
18 |
19 |
20 |
--------------------------------------------------------------------------------
/source/Bridging_and_Switching/CRS1xx_2xx_series_switches/index.rst:
--------------------------------------------------------------------------------
1 | CRS1xx/2xx系列交换机
2 | ===============================
3 |
4 | .. toctree::
5 | :maxdepth: 2
6 |
7 | content.md
8 |
9 |
10 |
--------------------------------------------------------------------------------
/source/Bridging_and_Switching/CRS3xx_CRS5xx_CCR2116_CCR2216_switch_chip_features/index.rst:
--------------------------------------------------------------------------------
1 | CRS3xx, CRS5xx, CCR2116, CCR2216交换芯片特性
2 | ======================================================
3 |
4 | .. toctree::
5 | :maxdepth: 2
6 |
7 | content.md
8 |
9 |
10 |
--------------------------------------------------------------------------------
/source/Bridging_and_Switching/L3_Hardware_Offloading/index.rst:
--------------------------------------------------------------------------------
1 | L3硬件卸载
2 | ===============================
3 |
4 | .. toctree::
5 | :maxdepth: 2
6 |
7 | content.md
8 |
9 |
10 |
--------------------------------------------------------------------------------
/source/Bridging_and_Switching/Switch_Chip_Features/index.rst:
--------------------------------------------------------------------------------
1 | 交换芯片特性
2 | ===============================
3 |
4 | .. toctree::
5 | :maxdepth: 2
6 |
7 | content.md
8 |
9 |
10 |
--------------------------------------------------------------------------------
/source/Bridging_and_Switching/VLAN/index.rst:
--------------------------------------------------------------------------------
1 | VLAN
2 | ===============================
3 |
4 | .. toctree::
5 | :maxdepth: 2
6 |
7 | content.md
8 |
9 |
10 |
--------------------------------------------------------------------------------
/source/Bridging_and_Switching/VXLAN/index.rst:
--------------------------------------------------------------------------------
1 | VXLAN
2 | ===============================
3 |
4 | .. toctree::
5 | :maxdepth: 2
6 |
7 | content.md
8 |
9 |
10 |
--------------------------------------------------------------------------------
/source/Bridging_and_Switching/index.rst:
--------------------------------------------------------------------------------
1 | 网桥和交换
2 | ===============================
3 |
4 |
5 | .. toctree::
6 | :maxdepth: 1
7 |
8 | content.md
9 | CRS3xx_CRS5xx_CCR2116_CCR2216_switch_chip_features/index.rst
10 | L3_Hardware_Offloading/index.rst
11 | CRS1xx_2xx_series_switches/index.rst
12 | Switch_Chip_Features/index.rst
13 | VLAN/index.rst
14 | VXLAN/index.rst
15 | Bridging_and_Switching_Case_Studies/index.rst
16 |
17 |
--------------------------------------------------------------------------------
/source/Diagnostics_monitoring_and_troubleshooting/Bandwidth_Test/index.rst:
--------------------------------------------------------------------------------
1 |
2 | 带宽测试
3 | ===============================
4 |
5 | .. toctree::
6 | :maxdepth: 2
7 |
8 | content.md
9 |
10 |
11 |
12 |
13 |
14 |
--------------------------------------------------------------------------------
/source/Diagnostics_monitoring_and_troubleshooting/Detect_Internet/content.md:
--------------------------------------------------------------------------------
1 | # 介绍
2 |
3 | 互联网探测是一个工具,它把监测的接口分类为以下状态-- **互联网**、**WAN**、**LAN**、**未知** 和 **无链接**。
4 |
5 | ## 状态
6 |
7 | 子菜单显示由 _detect-interface-list_ 参数定义的所有监测接口的状态。
8 |
9 | `interface/detect-internet/state/print`
10 |
11 | ## LAN
12 |
13 | 所有二层接口最初都有这种状态。
14 |
15 | ## WAN
16 |
17 | 任何L3隧道和LTE接口最初都会有这个状态。在以下情况下,二层接口可以获得这种状态:
18 |
19 | - 一个接口在主路由表里有一个到8.8.8.8的活动路由。
20 | - 一个接口从DHCP获得(或已经获得)一个地址(如果DHCP服务器也在DHCP服务器接口上运行Detect Internet则不适用)。
21 |
22 | 广域网接口只有在链路状态改变时才能回到局域网状态。局域网接口在1小时后被锁定为局域网,然后只在链路状态改变时才改变。
23 |
24 | ## 互联网
25 |
26 | 能够使用UDP协议端口30000到达cloud.mikrotik.com的 _WAN_ 接口可以获得这种状态。每分钟都会检查可达性。如果3分钟内没有到达云端,状态就会退回到 **WAN**。
27 |
28 | ### 配置
29 |
30 | `/interface detect-internet`
31 |
32 | | 属性 | 说明 |
33 | | ----------------------------------------------------------------- | ------------------------------------------ |
34 | | **detect-interface-list** (_interface list_; Default: **none**) | 列表中的所有接口都被Detect Internet监控。 |
35 | | **internet-interface-list** (_interface list_; Default: **none**) | 有互联网状态的接口将被动态地添加到列表中。 |
36 | | **lan-interface-list** (_interface list_; Default: **none**) | 有Lan状态的接口将被动态地添加到列表中。 |
37 | | **wan-interface-list** (_interface list_; Default: **none**) | 有Wan状态的接口将被动态地添加到列表中。 |
38 |
39 | ```shell
40 | [admin@MikroTik] > interface/detect-internet/print
41 | detect-interface-list: none
42 | lan-interface-list: none
43 | wan-interface-list: none
44 | internet-interface-list: none
45 | [admin@MikroTik] > interface/detect-internet/set internet-interface-list=all wan-interface-list=all lan-interface-list=all detect-interface-list=all
46 | [admin@MikroTik] > interface/detect-internet/state/print
47 | Columns: NAME, STATE, STATE-CHANGE-TIME, CLOUD-RTT
48 | # NAME STATE STATE-CHANGE-TIME CLO
49 | 0 ether1 internet dec/22/2020 13:46:18 5ms
50 | ```
51 |
--------------------------------------------------------------------------------
/source/Diagnostics_monitoring_and_troubleshooting/Detect_Internet/index.rst:
--------------------------------------------------------------------------------
1 |
2 | 互联网探测
3 | ===============================
4 |
5 | .. toctree::
6 | :maxdepth: 2
7 |
8 | content.md
9 |
10 |
11 |
12 |
13 |
--------------------------------------------------------------------------------
/source/Diagnostics_monitoring_and_troubleshooting/Dynamic_DNS/content.md:
--------------------------------------------------------------------------------
1 | # 介绍
2 |
3 | `/tool dns-update`
4 |
5 | **标准:** `RFC 2136, RFC 3007`
6 |
7 | 服务器有一个区域需要更新
8 |
9 | ## 属性
10 |
11 | | 属性 | 说明 |
12 | | ---------------------------------- | -------------------------------------------- |
13 | | **address** (_IP_; Default: ) | 定义与域名相关的IP地址。 |
14 | | **dns-server** (_IP_; Default: ) | 发送更新的DNS服务器。 |
15 | | **key** (_string_; Default: ) | 访问服务器的授权密钥。 |
16 | | **key-name** (_string_; Default: ) | 访问服务器的授权密钥名称(比如一个用户名)。 |
17 | | **name** (_string_; Default: ) | 和IP地址关联的名称。 |
18 | | **ttl** (_integer_; Default: ) | 项目的生存时间(以秒为单位)。 |
19 | | **zone** (_string_; Default: ) | 更新域名的DNS区域。 |
20 |
21 | 路由器上的系统时间与DNS服务器的时间不能相差超过5分钟。否则DNS服务器会忽略这个请求。
22 |
23 | ## 例子
24 |
25 | 告诉 23.34.45.56 DNS 服务器将 myzone.com 区域中的 mydomain 名称与 68.42.14.4 IP 地址联系起来,指定密钥的名称为 dns-update-key,实际的密钥更新:
26 |
27 | ```shell
28 | [admin@MikroTik] tool> dns-update dns-server=23.34.45.56 name=mydomain \
29 | \... zone=myzone.com address=68.42.14.4 key-name=dns-update-key key=update
30 | ```
31 |
--------------------------------------------------------------------------------
/source/Diagnostics_monitoring_and_troubleshooting/Dynamic_DNS/index.rst:
--------------------------------------------------------------------------------
1 |
2 | 动态DNS
3 | ===============================
4 |
5 | .. toctree::
6 | :maxdepth: 2
7 |
8 | content.md
9 |
10 |
11 |
12 |
13 |
--------------------------------------------------------------------------------
/source/Diagnostics_monitoring_and_troubleshooting/Graphing/content.md:
--------------------------------------------------------------------------------
1 | 图形化是一种工具,用于监测不同时间的RouterOS参数,并将收集到的数据放在图表中。
2 | 可观看 [关于此功能的视频](https://youtu.be/FTQEnDZVHNc)。
3 |
4 | 图表工具可以显示以下内容。
5 |
6 | - Routerboard的健康状况(电压和温度)
7 | - 资源使用情况(CPU、内存和磁盘使用情况)
8 | - 通过接口传输的流量
9 | - 通过简单队列传输的流量
10 |
11 | 图表由两部分组成 - 第一部分收集信息,另一部分在网页上显示数据。要访问图表,请输入https://[Router_IP_address]/graphs/,在Web浏览器中选择一个图表显示。
12 |
13 | 内存图表的例子。
14 |
15 | 
16 |
17 | ## 配置
18 |
19 | 配置在"/tool graphing "菜单下完成,默认是禁用的。可以在各自的子菜单中配置接口、资源和简单队列的图表。
20 |
21 | 如果简单队列的目标地址被设置为0.0.0.0/0,即使允许地址设置为特定地址,每个人也都能访问队列图表。这是因为默认情况下,队列图表也可以从目标地址访问。
22 |
23 | ## 在WinBox中的图表
24 |
25 | Winbox允许查看与网页上相同的信息。打开 **Tools->Graphing** 窗口。双击想看图表的条目。
26 |
27 | 下面的图片显示了WinBox的内存使用图表。
28 |
29 | 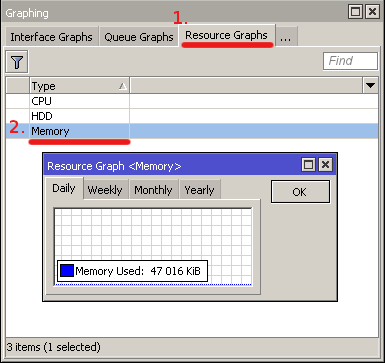
--------------------------------------------------------------------------------
/source/Diagnostics_monitoring_and_troubleshooting/Graphing/index.rst:
--------------------------------------------------------------------------------
1 |
2 | 图表
3 | ===============================
4 |
5 | .. toctree::
6 | :maxdepth: 1
7 |
8 | content.md
9 |
10 |
11 |
12 |
13 |
--------------------------------------------------------------------------------
/source/Diagnostics_monitoring_and_troubleshooting/Health/content.md:
--------------------------------------------------------------------------------
1 | # 概述
2 |
3 | 支持监控的硬件会显示不同的硬件状态信息,如温度、电压、电流、风扇速度等。
4 |
5 | 以CCR1072-1G-8S+设备为例。
6 |
7 | ```shell
8 | cpu-overtemp-check: yes
9 | cpu-overtemp-threshold: 100C
10 | cpu-overtemp-startup-delay: 1m
11 | cpu-temperature: 46C
12 | power-consumption: 62.9W
13 | board-temperature1: 31C
14 | board-temperature2: 34C
15 | psu1-voltage: 12.1V
16 | psu2-voltage: 0V
17 | psu1-current: 5.2A
18 | psu2-current: 0A
19 | fan1-speed: 6375RPM
20 | fan2-speed: 6436RPM
21 | fan3-speed: 6375RPM
22 | fan4-speed: 6467RPM
23 | ```
24 |
25 | **警告:** 关于RouterBOARD产品的功能可用性,请查看 [mikrotik.com](https://mikrotik.com/products)
26 |
27 | ## 电压
28 |
29 | 支持电压监控的路由器会显示供电电压值。在CLI/Winbox中显示为伏特。在脚本/API/SNMP中,是dV或CLI/Winbox中显示的值乘以10。
30 |
31 | **注:** 有PEXT和PoE电源输入的路由器使用PEXT进行校准,因此,由于额外的以太网保护链,PoE上显示的值可能低于输入电压。
32 |
33 | **注意:** 如果旧版本的CRS112、CRS210和CRS109设备使用PoE供电--健康状况仅显示正确的电压,最高为26.7V。如果使用更高的电压--健康状况将显示恒定的16V。
34 |
35 | ## 温度
36 |
37 | 支持温度监控的路由器会显示温度。在CLI/Winbox中显示摄氏度。使用脚本/API/SNMP,这个值将在CLI/Winbox中显示,并乘以10。根据设备的不同,有各种温度传感器。这些传感器可能指的是:Cpu-温度、pcb-温度、sfp-温度。设备测试的环境温度范围可以在 [mikrotik.com](https://mikrotik.com/products) 的规格描述中找到。测试的环境温度范围是指设备可以被实际使用的温度。它和报告系统健康监测的温度 **不一样!**
38 |
39 | ## 风扇控制和行为
40 |
41 | `/system health set`
42 |
43 | 使用这个菜单,用户能够控制TILE架构 [设备](https://mikrotik.com/download) 上的风扇行为。目前,对于其他RouterBOARD设备,没有 **no** 选项手动控制风扇行为。
44 |
45 | **注意:** 从6.45.5版本开始,改进了风扇的稳定性。
46 |
47 | 有三个参数可能会影响风扇行为。PoE-out功耗、SFP温度和CPU温度。一旦其中一个参数超过了阈值,风扇就会启动。
48 |
49 | ### PoE-out功耗
50 |
51 | 如果设备有PoE-out,那么风扇的转速将发生变化,如下所述。
52 |
53 | | PoE-out负载 | RPM % of max FAN speed (**DC** fans) |
54 | | ----------- | ------------------------------------ |
55 | | 0%..24% | FAN speed 0% |
56 | | 25%..46% | FAN speed 25% |
57 | | 47%..70% | FAN speed 50% |
58 | | 71%..92% | FAN speed 75% |
59 | | 93%.. | FAN speed 100% |
60 |
61 | 对于带有 **PWM** 风扇的设备,速度将从9...88%线性增加或减少(注意:低于100W时风扇RPM=0)。
62 |
63 | ### CPU和SFP温度
64 |
65 | 如果CPU或SFP温度超过58C,风扇将开始旋转。温度越高,风扇的转速越快。对于带有PWM风扇的设备,当CPU或SFP温度超过58C时,风扇将线性增加其RPM,以尽可能地保持温度在58C。对于有直流风扇的设备,当CPU或SFP的温度超过58C时,风扇将开始旋转,默认情况下是以更高转速,可能会导致设备冷却到风扇完全关闭。之后温度可能慢慢上升到58℃,风扇将再次打开。有一个例外。S+RJ10模块的温度阈值为65C才触发风扇。由于这是一个较高的温度阈值,风扇将以较高的初始速度开始旋转以冷却设备。
66 |
67 | **注意:** 所有读数都是近似值,不是100%的精确。目的是让用户了解可能发生的故障。
68 |
--------------------------------------------------------------------------------
/source/Diagnostics_monitoring_and_troubleshooting/Health/index.rst:
--------------------------------------------------------------------------------
1 |
2 | 健康
3 | ===============================
4 |
5 | .. toctree::
6 | :maxdepth: 2
7 |
8 | content.md
9 |
10 |
11 |
12 |
13 |
--------------------------------------------------------------------------------
/source/Diagnostics_monitoring_and_troubleshooting/IP_Scan/content.md:
--------------------------------------------------------------------------------
1 | # 概述
2 |
3 | IP扫描工具允许用户根据网络前缀扫描网络,或通过设置一个接口来监听。无论哪种方式,该工具都会从网络中收集某些数据。
4 |
5 | - address - 网络设备的IP地址。
6 | - mac-address - 网络设备的MAC地址。
7 | - time - 找到网络设备时的响应时间。
8 | - DNS - 网络设备的DNS名称。
9 | - SNMP - 设备的SNMP名称。
10 | - NET-BIOS - 设备的NET-BIOS名称,如果设备有通告的话。
11 |
12 | 使用IP扫描工具时,用户必须选择想要扫描的内容。
13 |
14 | - 某些IPv4前缀 - 工具将尝试扫描所有的IP地址或地址设置。
15 | - 路由器的接口 - 工具将尝试监听 "经过"的数据包,并在发现问题时尝试比较结果。
16 |
17 | 可以同时设置,但结果是不确定的!
18 |
19 | ## 快速实例
20 |
21 | 在下面的例子中,将扫描10.155.126.0/24网络上的设备。
22 |
23 | ```shell
24 | [admin@MikroTik] > /tool ip-scan address-range=10.155.126.1-10.155.126.255
25 | Columns: ADDRESS, MAC-ADDRESS, TIMe, SNMP
26 | ADDRESS MAC-ADDRESS TIM SNMP
27 | 10.155.126.1 E4:8D:8C:1C:D3:18 2ms CCR1036-8G-2S+
28 | 10.155.126.251 2ms
29 | 10.155.126.151 E4:8D:8C:49:49:DB 1ms
30 | 10.155.126.153 6C:3B:6B:48:0E:8B 1ms 750Gr3
31 | 10.155.126.249 CC:2D:E0:8D:01:88 0ms CRS328-24P-4S+
32 | 10.155.126.250 B8:69:F4:B3:1B:D2 0ms
33 | 10.155.126.252 6C:3B:6B:ED:83:69 0ms
34 | 10.155.126.253 6C:3B:6B:ED:81:83 0ms
35 | ```
36 |
--------------------------------------------------------------------------------
/source/Diagnostics_monitoring_and_troubleshooting/IP_Scan/index.rst:
--------------------------------------------------------------------------------
1 | IP扫描
2 | ===============================
3 |
4 | .. toctree::
5 | :maxdepth: 2
6 |
7 | content.md
8 |
9 |
10 |
11 |
12 |
--------------------------------------------------------------------------------
/source/Diagnostics_monitoring_and_troubleshooting/Interface_stats_and_monitor-traffic/index.rst:
--------------------------------------------------------------------------------
1 | 接口统计和监视器流量
2 | ===============================
3 |
4 | .. toctree::
5 | :maxdepth: 2
6 |
7 | content.md
8 |
9 |
10 |
11 |
12 |
--------------------------------------------------------------------------------
/source/Diagnostics_monitoring_and_troubleshooting/Log/index.rst:
--------------------------------------------------------------------------------
1 | 日志
2 | ===============================
3 |
4 | .. toctree::
5 | :maxdepth: 2
6 |
7 | content.md
8 |
9 |
10 |
11 |
12 |
--------------------------------------------------------------------------------
/source/Diagnostics_monitoring_and_troubleshooting/Netwatch/index.rst:
--------------------------------------------------------------------------------
1 | NetWatch
2 | ===============================
3 |
4 | .. toctree::
5 | :maxdepth: 2
6 |
7 | content.md
8 |
9 |
10 |
11 |
12 |
--------------------------------------------------------------------------------
/source/Diagnostics_monitoring_and_troubleshooting/Packet_Sniffer/index.rst:
--------------------------------------------------------------------------------
1 | 包嗅探
2 | ===============================
3 |
4 | .. toctree::
5 | :maxdepth: 2
6 |
7 | content.md
8 |
9 |
10 |
11 |
12 |
--------------------------------------------------------------------------------
/source/Diagnostics_monitoring_and_troubleshooting/Ping/index.rst:
--------------------------------------------------------------------------------
1 | Ping
2 | ===============================
3 |
4 | .. toctree::
5 | :maxdepth: 2
6 |
7 | content.md
8 |
9 |
10 |
11 |
12 |
--------------------------------------------------------------------------------
/source/Diagnostics_monitoring_and_troubleshooting/Profiler/content.md:
--------------------------------------------------------------------------------
1 | # 概述
2 |
3 | 分析器工具显示RouterOS中运行的每个进程的CPU使用率。有助于确定哪个进程在使用大部分的CPU资源。
4 | 可观看 [关于此功能的视频](https://youtu.be/BkRaW14p8_s)。
5 |
6 | `[admin@MikroTik] > /tool/profile`。
7 |
8 | 在多核系统上,该工具允许指定每个核的CPU使用情况。
9 |
10 | "CPU "参数允许指定整数,代表一个或两个核心的预定义值 **全部** 和 **总计:**
11 |
12 | - total - 设置为显示所有核心使用量的总和。
13 | - all -设置为分别显示每个可用内核的CPU使用情况。
14 |
15 | 在下面的例子中,可以看一下这两个预定义值。
16 |
17 | ```shell
18 | [admin@MikroTik] > /tool/profile cpu=all
19 | NAME CPU USAGE
20 | ethernet 1 0%
21 | kvm 0 0%
22 | kvm 1 4.5%
23 | management 0 0%
24 | management 1 0.5%
25 | idle 0 100%
26 | idle 1 93%
27 | profiling 0 0%
28 | profiling 1 2%
29 |
30 | [admin@MikroTik] > /tool profile cpu=total
31 | NAME CPU USAGE
32 | ethernet all 0%
33 | console all 0%
34 | kvm all 2.7%
35 | management all 0%
36 | idle all 97.2%
37 | profiling all 0%
38 | bridging all 0%
39 | ```
40 |
41 | ## 分类器
42 |
43 | 配置文件在几个分类器中对过程进行分类。其中大多数是显而易见的,不需要详细解释。
44 |
45 | - backup
46 | - bfd
47 | - bgp
48 | - bridging
49 | - btest
50 | - certificate
51 | - console
52 | - dhcp
53 | - disk
54 | - dns
55 | - dude
56 | - e-mail
57 | - eoip
58 | - ethernet
59 | - fetcher
60 | - firewall
61 | - firewall-mgmt
62 | - flash
63 | - ftp
64 | - gps
65 | - graphing
66 | - gre
67 | - health
68 | - hotspot
69 | - idle
70 | - igmp-proxy
71 | - internet-detect
72 | - ip-pool
73 | - ipsec
74 | - isdn
75 | - kvm
76 | - l2tp
77 | - l7-matcher
78 | - ldp
79 | - logging
80 | - m3p
81 | - management
82 | - mme
83 | - mpls
84 | - networking
85 | - ntp
86 | - ospf
87 | - ovpn
88 | - p2p-matcher
89 | - pim
90 | - ppp
91 | - pppoe
92 | - pptp
93 | - profiling
94 | - queue-mgmt
95 | - queuing
96 | - radius
97 | - radv
98 | - rip
99 | - routing
100 | - serial
101 | - sniffing
102 | - snmp
103 | - socks
104 | - ssh
105 | - ssl
106 | - sstp
107 | - synchronous
108 | - telnet
109 | - tftp
110 | - traffic-accounting
111 | - traffic-flow
112 | - upnp
113 | - usb
114 | - user-manager
115 | - web-proxy
116 | - winbox
117 | - wireless
118 | - www
119 |
--------------------------------------------------------------------------------
/source/Diagnostics_monitoring_and_troubleshooting/Profiler/index.rst:
--------------------------------------------------------------------------------
1 | 分析器
2 | ===============================
3 |
4 | .. toctree::
5 | :maxdepth: 2
6 |
7 | content.md
8 |
9 |
10 |
11 |
12 |
--------------------------------------------------------------------------------
/source/Diagnostics_monitoring_and_troubleshooting/Resource/index.rst:
--------------------------------------------------------------------------------
1 | 资源
2 | ===============================
3 |
4 | .. toctree::
5 | :maxdepth: 2
6 |
7 | content.md
8 |
9 |
10 |
11 |
12 |
--------------------------------------------------------------------------------
/source/Diagnostics_monitoring_and_troubleshooting/SNMP/index.rst:
--------------------------------------------------------------------------------
1 | SNMP
2 | ===============================
3 |
4 | .. toctree::
5 | :maxdepth: 2
6 |
7 | content.md
8 |
9 |
10 |
11 |
12 |
--------------------------------------------------------------------------------
/source/Diagnostics_monitoring_and_troubleshooting/Speed_Test/content.md:
--------------------------------------------------------------------------------
1 | # 介绍
2 |
3 | 速度测试是一个简单的测试工具,用于测量从一个MikroTik设备到另一个设备的ping、jitter、TCP和UDP的吞吐率。“Speed-test "命令基于Ping工具和带宽测试。为了使用这个命令--需要访问带宽测试服务器。
4 |
5 | ## 一般接口属性
6 |
7 | 速度测试基于五个可配置的属性。
8 |
9 | - address - 主机 IP 地址。
10 | - connection-count - 如果一个设备有超过20个核,将使用核数(默认为20)。
11 | - password - 远程设备的密码。
12 | - test-duration - 每次测试的持续时间( _默认:5次测试*10秒持续时间+每次测试之间的1秒停顿=55秒_ )。
13 | - user - 远程设备的用户名。
14 |
15 | ## 配置实例
16 |
17 | 带宽和速度测试要在设备间进行,而不是在本地设备上进行以确保模拟真实的情况,避免产生的流量不会使被测设备的CPU过载(DUT)。
18 |
19 | 从设备A(192.168.88.1)到设备B(192.168.88.2)进行一个简单的测试。
20 |
21 | ```shell
22 | [admin@MikroTik] > /tool/speed-test address=192.168.88.1
23 | status: done
24 | time-remaining: 0s
25 | ping-min-avg-max: 541us / 609us / 3.35ms
26 | jitter-min-avg-max: 0s / 76us / 2.76ms
27 | loss: 0% (0/100)
28 | tcp-download: 921Mbps local-cpu-load:30%
29 | tcp-upload: 920Mbps local-cpu-load:30% remote-cpu-load:25%
30 | udp-download: 917Mbps local-cpu-load:6% remote-cpu-load:21%
31 | udp-upload: 916Mbps local-cpu-load:20% remote-cpu-load:6%
32 | ```
33 |
34 | 如果测试期间任何设备的CPU利用率达到100%,就会出现警告信息。
35 |
36 | ```shell
37 | [admin@MikroTik]] > /tool/speed-test address=192.168.88.1
38 | ;;; results can be limited by cpu, note that traffic generation/termination
39 | performance might not be representative of forwarding performance
40 | status: done
41 | time-remaining: 0s
42 | ping-min-avg-max: 541us / 609us / 3.35ms
43 | jitter-min-avg-max: 0s / 76us / 2.76ms
44 | loss: 0% (0/100)
45 | tcp-download: 721Mbps local-cpu-load:78%
46 | tcp-upload: 820Mbps local-cpu-load:100% remote-cpu-load:84%
47 | udp-download: 906Mbps local-cpu-load:10% remote-cpu-load:54%
48 | udp-upload: 895Mbps local-cpu-load:55% remote-cpu-load:12%
49 | ```
50 |
51 | "test-duration"参数允许改变全部5项测试的持续时间:
52 |
53 | - Ping test with 50ms delay
54 | - TCP receive
55 | - TCP send
56 | - UDP receive
57 | - UDP send
58 |
--------------------------------------------------------------------------------
/source/Diagnostics_monitoring_and_troubleshooting/Speed_Test/index.rst:
--------------------------------------------------------------------------------
1 | 速度测试
2 | ===============================
3 |
4 | .. toctree::
5 | :maxdepth: 2
6 |
7 | content.md
8 |
9 |
10 |
11 |
12 |
--------------------------------------------------------------------------------
/source/Diagnostics_monitoring_and_troubleshooting/Torch/content.md:
--------------------------------------------------------------------------------
1 | # 概述
2 |
3 | MikroTik Torch是一个实时流量监测工具,可用于监测通过接口的流量。
4 | 请观看 [关于此功能的视频](https://youtu.be/45E2uwI3xhc)。
5 |
6 | 出现在Torch中的流量是在它被防火墙过滤之前。意味着能够看到可能被防火墙规则丢弃的数据包。
7 |
8 | `[admin@MikroTik] > /tool/torch`
9 |
10 | 可以通过以下分类监控流量:
11 |
12 | - source address (IPv4 and IPv6);
13 | - destination address (IPv4 and IPv6);
14 | - port;
15 | - protocol;
16 | - mac-protocol;
17 | - VLAN ID;
18 | - mac-address;
19 | - DSCP;
20 |
21 | MikroTik Torch会显示所选择的协议以及特定接口上每个协议的TX/RX速率。
22 |
23 | 启用了客户端对客户端转发的无线客户端之间的单播流量在Torch工具中是不可见的。启用硬件卸载桥接处理的数据包也不可见(未知的单播、广播和一些多播流量将对Torch工具可见)。
24 |
--------------------------------------------------------------------------------
/source/Diagnostics_monitoring_and_troubleshooting/Torch/index.rst:
--------------------------------------------------------------------------------
1 | Torch
2 | ===============================
3 |
4 | .. toctree::
5 | :maxdepth: 2
6 |
7 | content.md
8 |
9 |
10 |
11 |
12 |
--------------------------------------------------------------------------------
/source/Diagnostics_monitoring_and_troubleshooting/Traceroute/content.md:
--------------------------------------------------------------------------------
1 | # 概述
2 |
3 | **Sub-menu:** `/tool traceroute`
4 |
5 | **Traceroute** 显示数据包到达远程主机所经过的路由器列表。**traceroute** 或 **tracepath** 工具几乎在所有类Unix操作系统上都可以使用,**tracert** 在Microsoft Windows操作系统上可用。
6 |
7 | Traceroute基于TTL值和ICMP "超时 "消息。IP头中的TTL值用来避免路由循环。如果TTL值为零,数据包将被丢弃,发生这种情况时,ICMP超时消息将发回给发送者。
8 |
9 | 初始traceroute TTL值被设置为1,当下一个路由器发现一个TTL=1的数据包时,它将TTL值设置为0,并以ICMP "超时 "消息回应来源。该消息让源头知道,数据包一跳穿越了特定的路由器,下一次TTL值将增加1,以此类推。通常情况下,在通往目的地的路径中,每个路由器都会将TTL字段递减一个单位TTL值直至为0。
10 |
11 | 用这个命令,可以看到数据包是如何在网络中传输的,以及它在哪里可能出现故障或速度变慢。利用这些信息,可以确定导致网络问题或故障的计算机、路由器、交换机或其他网络设备。
12 |
13 | ## 快速示例
14 |
15 | ```shell
16 | [admin@MikroTik] > tool traceroute 10.255.255.1
17 | ADDRESS STATUS
18 | 1 10.0.1.17 2ms 1ms 1ms
19 | 2 10.255.255.1 5ms 1ms 1ms
20 | [admin@MikroTik] >
21 | ```
22 |
--------------------------------------------------------------------------------
/source/Diagnostics_monitoring_and_troubleshooting/Traceroute/index.rst:
--------------------------------------------------------------------------------
1 | 路由跟踪
2 | ===============================
3 |
4 | .. toctree::
5 | :maxdepth: 2
6 |
7 | content.md
8 |
9 |
10 |
11 |
12 |
--------------------------------------------------------------------------------
/source/Diagnostics_monitoring_and_troubleshooting/Traffic_Flow/index.rst:
--------------------------------------------------------------------------------
1 | 数据流
2 | ===============================
3 |
4 | .. toctree::
5 | :maxdepth: 2
6 |
7 | content.md
8 |
9 |
10 |
11 |
12 |
--------------------------------------------------------------------------------
/source/Diagnostics_monitoring_and_troubleshooting/Traffic_Generator/index.rst:
--------------------------------------------------------------------------------
1 | 流量发生器
2 | ===============================
3 |
4 | .. toctree::
5 | :maxdepth: 2
6 |
7 | content.md
8 |
9 |
10 |
11 |
12 |
--------------------------------------------------------------------------------
/source/Diagnostics_monitoring_and_troubleshooting/Watchdog/content.md:
--------------------------------------------------------------------------------
1 | # 概述
2 |
3 | **Sub-menu:** `/system watchdog`
4 |
5 | 这个菜单允许配置系统重新启动,如果特定的IP地址没有反应,或者当它检测到软件已经锁定时。这种检测有两种方式。
6 |
7 | - 软件看门狗定时器(大多由硬件故障引起)设备可以通过重启来恢复自己。
8 | - Ping看门狗可以监测到与特定IP地址的连接并触发重启功能。
9 |
10 | **注意:** 这是两个不同的看门狗功能,有各自的设置。默认情况下,软件看门狗被启用,ping看门狗被禁用。可以通过指定一个IP地址来启用ping看门狗,可以取消Watchdog Timer选项来禁用软件看门狗。
11 |
12 | ## 属性
13 |
14 | | 属性 | 说明 |
15 | | -------------------------------------------------------------------- | ------------------------------------------------------------------------------------------------------------------------------------------------------- |
16 | | **auto-send-supout** (_yes \| no_; Default: **no**) | 输出文件自动生成后,可以通过电子邮件发送。 |
17 | | **auto-supout** (_yes \| no_; Default:**yes**) | 当软件发生故障时,会自动生成一个名为 "autosupout.rif "的文件。之前的 "autosupout.rif "文件被重命名为 "autosupout.old.rif"。 |
18 | | **no-ping-delay** (_time_; Default: 5m) | 在试图到达监视地址之前要等待多长时间。 |
19 | | **ping-timeout** (_time_; Default: 60s) | 设备被ping 6次的时间间隔(在 "no-ping-delay "之后)。 |
20 | | **send-email-from** (_string_; Default: ) | 发送支持输出文件的电子邮件地址。如果没有设置,则使用/tool电子邮件中设置的值。 |
21 | | **send-email-to** (_string_; Default: ) | 发送支持输出文件的电子邮件地址。 |
22 | | **send-smtp-server** (_string_; Default: ) | 发送支持输出文件的SMTP服务器地址。如果没有设置,则使用/tool电子邮件中设置的值。 |
23 | | **watch-address** (_IP_; Default: ) | 系统将重启,如果连续6次ping到给定的IP地址都失败。如果设置为无,该功能将禁用。默认情况下,如果设置了watch-address并且无法到达,路由器将每6分钟重启一次。 |
24 | | **watchdog-timer** (_yes \| no_; Default: **yes**) | 如果系统一分钟内没有反应,是否重启。 |
25 |
26 | ## 快速例子
27 |
28 | 使系统产生一个支持输出文件,并在软件崩溃的情况下通过192.0.2.1自动发送至support@example.com。
29 |
30 | ```shell
31 | [admin@MikroTik] system/watchdog/ set auto-send-supout=yes \
32 | \... send-to-email=support@example.com send-smtp-server=192.0.2.1
33 | [admin@MikroTik] system watchdog> print
34 | watch-address: none
35 | watchdog-timer: yes
36 | no-ping-delay: 5m
37 | automatic-supout: yes
38 | auto-send-supout: yes
39 | send-smtp-server: 192.0.2.1
40 | send-email-to: support@example.com
41 | ```
42 |
--------------------------------------------------------------------------------
/source/Diagnostics_monitoring_and_troubleshooting/Watchdog/index.rst:
--------------------------------------------------------------------------------
1 | 看门狗
2 | ===============================
3 |
4 | .. toctree::
5 | :maxdepth: 2
6 |
7 | content.md
8 |
9 |
10 |
11 |
12 |
--------------------------------------------------------------------------------
/source/Diagnostics_monitoring_and_troubleshooting/index.rst:
--------------------------------------------------------------------------------
1 | 诊断、监测和故障排除
2 | ===============================
3 |
4 | .. toctree::
5 | :maxdepth: 1
6 |
7 | Bandwidth_Test/index.rst
8 | Detect_Internet/index.rst
9 | Dynamic_DNS/index.rst
10 | Graphing/index.rst
11 | Health/index.rst
12 | Interface_stats_and_monitor-traffic/index.rst
13 | IP_Scan/index.rst
14 | Log/index.rst
15 | Netwatch/index.rst
16 | Packet_Sniffer/index.rst
17 | Ping/index.rst
18 | Profiler/index.rst
19 | Resource/index.rst
20 | SNMP/index.rst
21 | Speed_Test/index.rst
22 | Torch/index.rst
23 | Traceroute/index.rst
24 | Traffic_Flow/index.rst
25 | Traffic_Generator/index.rst
26 | Watchdog/index.rst
27 |
--------------------------------------------------------------------------------
/source/Extended_features/Container/index.rst:
--------------------------------------------------------------------------------
1 | 容器
2 | ===============================
3 |
4 | .. toctree::
5 | :maxdepth: 2
6 |
7 | content.md
8 | Container-freeradius_server.md
9 | Container-ThingsBoard_MQTT_HTTP_server.md
10 |
11 |
--------------------------------------------------------------------------------
/source/Extended_features/ROSE-storage/index.rst:
--------------------------------------------------------------------------------
1 | ROSE存储
2 | ===============================
3 |
4 | .. toctree::
5 | :maxdepth: 2
6 |
7 | content.md
8 |
9 |
--------------------------------------------------------------------------------
/source/Extended_features/SMB/index.rst:
--------------------------------------------------------------------------------
1 | SMB
2 | ===============================
3 |
4 | .. toctree::
5 | :maxdepth: 2
6 |
7 | content.md
8 |
9 |
--------------------------------------------------------------------------------
/source/Extended_features/UPS/index.rst:
--------------------------------------------------------------------------------
1 | UPS
2 | ===============================
3 |
4 | .. toctree::
5 | :maxdepth: 2
6 |
7 | content.md
8 |
9 |
--------------------------------------------------------------------------------
/source/Extended_features/Wake_on_LAN/content.md:
--------------------------------------------------------------------------------
1 | # 介绍
2 |
3 | **Sub-menu:** `/tool wol`
4 |
5 | 局域网唤醒工具可以向选择的任何MAC地址发送一个特定的帧(Magic Packet)。如果目标设备支持局域网唤醒,它会从睡眠或关机状态唤醒。目前不支持安全的WoL。要使 "局域网唤醒"功能发挥作用,对目标计算机有特定的硬件和软件要求。
6 |
7 | ## 属性描述
8 |
9 | | 属性 | 说明 |
10 | | ----------------------------------- | ---------------------------- |
11 | | **interface** (_string; Default:_ ) | 哪个接口要发送Magic Packet。 |
12 | | **mac** (_MAC_; Default: ) | 目标计算机的MAC地址。 |
13 |
14 | ## 应用实例
15 |
16 | 该命令只需要MAC地址参数,然后根据ARP表,Magic Packet将被发送至特定接口。
17 |
18 | `/tool wol mac=FE:4B:71:05:EA:8B`
19 |
--------------------------------------------------------------------------------
/source/Extended_features/Wake_on_LAN/index.rst:
--------------------------------------------------------------------------------
1 | 网络唤醒
2 | ===============================
3 |
4 | .. toctree::
5 | :maxdepth: 2
6 |
7 | content.md
8 |
9 |
--------------------------------------------------------------------------------
/source/Extended_features/index.rst:
--------------------------------------------------------------------------------
1 | 扩展特性
2 | ===============================
3 |
4 | .. toctree::
5 | :maxdepth: 1
6 |
7 | Container/index.rst
8 | ROSE-storage/index.rst
9 | SMB/index.rst
10 | UPS/index.rst
11 | Wake_on_LAN/index.rst
12 |
--------------------------------------------------------------------------------
/source/Firewall_and_Quality_of_Service/Address-lists/content.md:
--------------------------------------------------------------------------------
1 | # 概述
2 |
3 | `/ip firewall address-list`
4 |
5 | 防火墙地址列表允许用户创建IP地址列表,这些地址在一个共同的名称下组合在一起。然后防火墙过滤器、mangle和NAT可以使用这些地址列表来匹配数据包。
6 |
7 | 地址列表记录也可以通过NAT、Mangle和过滤器中的action=add-src-to-address-list或action=add-dst-to-address-list项目动态更新。
8 |
9 | 具有_add-src-to-address-list_或_add-dst-to-address-list_动作的防火墙规则在穿透模式下工作,匹配的数据包将传递到下一个防火墙规则。
10 |
11 | ## 属性
12 |
13 | | 属性 | 说明 |
14 | | --------------------------------------------------------------------------- | -------------------------------------------------------------------------------------------------------------------------------------- |
15 | | **address** (_DNS Name \| IP address/netmask \| IP-IP_; Default: ) | 要添加到地址列表或DNS名称中的单个IP地址或IP范围。例如,可以输入'192.168.0.0-192.168.1.255',保存时自动修改输入的条目为192.168.0.0/23。 |
16 | | **list** (_string_; Default: ) | 添加IP地址的地址列表名称 |
17 | | **timeout** (_time_; Default: ) | 地址将从地址列表中删除的时间。如果没有指定超时,地址将永远保存在地址列表中。 |
18 |
19 | 如果没有指定超时参数,地址将永远保存在列表中。如果指定了超时,那么该地址将被保存在RAM上,并在系统重启后被删除。
20 |
21 | 例子
22 |
23 | 下面的例子创建了一个连接到路由器23号端口(telnet)的动态地址列表,并在5分钟内丢弃所有来自他们的进一步通信。此外,地址列表还包含一个静态地址列表项192.0.34.166/32([www.example.com](http://www.example.com)):
24 |
25 | `/ip firewall address-list add list=drop_traffic address=192.0.34.166/32`
26 |
27 | ```shell
28 | /ip firewall address-list print
29 | Flags: X - disabled, D - dynamic
30 | # LIST ADDRESS
31 | 0 drop_traffic 192.0.34.166
32 | ```
33 |
34 | ```shell
35 | /ip firewall mangle add action=add-src-to-address-list address-list=drop_traffic address-list-timeout=5m chain=prerouting dst-port=23 protocol=tcp
36 | /ip firewall filter add action=drop chain=input src-address-list=drop_traffic
37 | ```
38 |
39 | ```shell
40 | /ip firewall address-list print
41 | Flags: X - disabled, D - dynamic
42 | # LIST ADDRESS
43 | 0 drop_traffic 192.0.34.166
44 | 1 D drop_traffic 1.1.1.1
45 | 2 D drop_traffic 10.5.11.8
46 | ```
47 |
48 | 从最后一条打印命令的输出可以看出,地址列表中出现了两个新的动态条目(标记为 "D "状态)。拥有这些IP地址的主机试图初始化一个到路由器的telnet会话,随后被过滤规则丢弃。
49 |
--------------------------------------------------------------------------------
/source/Firewall_and_Quality_of_Service/Address-lists/index.rst:
--------------------------------------------------------------------------------
1 | 地址列表
2 | ===============================
3 |
4 | .. toctree::
5 | :maxdepth: 2
6 |
7 | content.md
8 |
9 |
--------------------------------------------------------------------------------
/source/Firewall_and_Quality_of_Service/Connection_tracking/index.rst:
--------------------------------------------------------------------------------
1 | 连接跟踪
2 | ===============================
3 |
4 |
5 | .. toctree::
6 | :maxdepth: 2
7 |
8 | content.md
9 |
10 |
--------------------------------------------------------------------------------
/source/Firewall_and_Quality_of_Service/Filter/index.rst:
--------------------------------------------------------------------------------
1 | 过滤器
2 | ===============================
3 |
4 | .. toctree::
5 | :maxdepth: 2
6 |
7 | content.md
8 |
9 |
--------------------------------------------------------------------------------
/source/Firewall_and_Quality_of_Service/Firewall_and_QoS_Case_Studies/SYN_DoS_DDoS_Protection.md:
--------------------------------------------------------------------------------
1 | # SYN Dos和DDoS保护介绍
2 |
3 | 拒绝服务(DoS)或分布式拒绝服务(DDoS)攻击是一种恶意尝试,通过用大量的互联网流量淹没目标或周围的基础设施来破坏目标服务器、服务或网络的正常通信。有几种类型的DDoS攻击,例如,HTTP泛滥、SYN泛滥、DNS放大等。
4 |
5 | 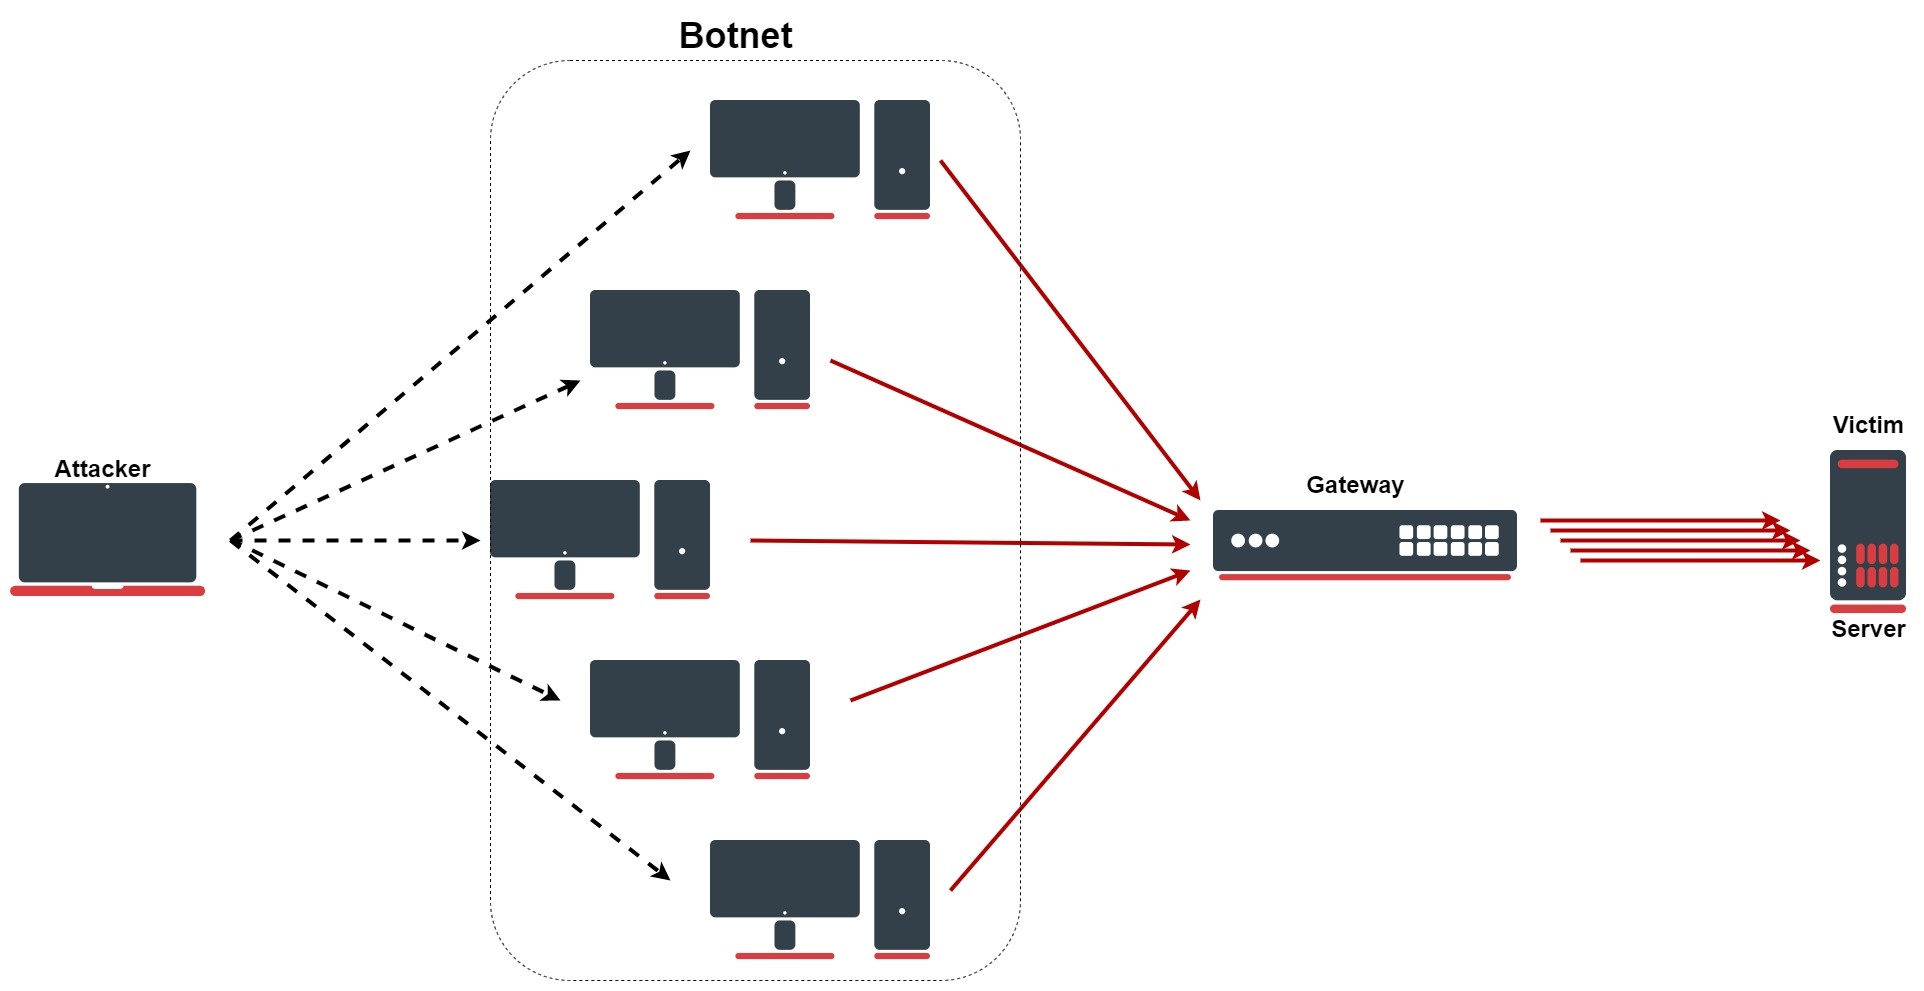
6 |
7 | ## 对DDoS的保护
8 |
9 | ## 配置行
10 |
11 | ```shell
12 | /ip firewall address-list
13 | add list=ddos-attackers
14 | add list=ddos-targets
15 | /ip firewall filter
16 | add action=return chain=detect-ddos dst-limit=32,32,src-and-dst-addresses/10s
17 | add action=add-dst-to-address-list address-list=ddos-targets address-list-timeout=10m chain=detect-ddos
18 | add action=add-src-to-address-list address-list=ddos-attackers address-list-timeout=10m chain=detect-ddos
19 | /ip firewall raw
20 | add action=drop chain=prerouting dst-address-list=ddos-targets src-address-list=ddos-attackers
21 | ```
22 |
23 | ## 配置解释
24 |
25 | 首先把每个新连接发送到检测DDoS的特定防火墙链。
26 |
27 | `/ip/firewall/filter/ add chain =forward connection-state =new action =jump jump-target =detect-ddos`
28 |
29 | 在新创建的链中,添加以下带有 "dst-limit"参数的规则。参数的书写格式如下。**dst-limit=** **count[/time],burst,mode[/expire]** . 根据目的地和源地址流来匹配32个数据包,每10秒更新一次,有32个数据包突发。这个规则会一直工作到超过给定速率。
30 |
31 | `/ip/firewall/filter/ add chain =detect-ddos dst-limit =32,32,src-and-dst-addresses/10s action =return`。
32 |
33 | 到目前为止,所有的合法流量都通过 "action=return",但在DoS/DDoS的情况下,"dst-limit "缓冲区将被填满,规则就不会 "捕获 "任何新的流量。下面是下一个规则,用来处理攻击问题。从创建一个攻击者和受害者的列表开始到丢弃这个列表。
34 |
35 | `ip /firewall/address-list/ add list =ddos-attackers`
36 |
37 | `ip /firewall/address-list/ add list =ddos-targets`
38 |
39 | `ip /firewall/raw/ add chain =prerouting action =drop src-address-list =ddos-attackers dst-address-list =ddos-targets`
40 |
41 | 通过防火墙过滤器,在 "DDoS-攻击者"列表中添加攻击者,在 "ddos-目标"列表中添加受害者:
42 |
43 | `/ip/firewall/filter/`
44 |
45 | `add action =add-dst-to-address-list address-list =ddos-targets address-list-timeout =10m chain =detect-ddos`
46 |
47 | `add action =add-src-to-address-list address-list =ddos-attackers address-list-timeout =10m chain =detect-ddos`
48 |
49 | ## SYN攻击
50 |
51 | ## SYN泛滥
52 |
53 | SYN泛滥是DoS攻击的一种形式,攻击者向目标系统发送连续的SYN请求,试图消耗足够的服务器资源,使系统对合法流量没有反应。幸运的是,在RouterOS中,有专门针对这种攻击的功能。
54 |
55 | `/ip/settings/ set tcp-syncookies =yes`
56 |
57 | 该功能的工作原理是发送包含一个小的加密哈希值的ACK包,响应的客户端会将其作为SYN-ACK包的一部分回传。如果内核在回复包中没有看到这个 "cookie",它会认为这个连接是假的,并丢弃。
58 |
59 | ## SYN-ACK泛滥
60 |
61 | SYN-ACK泛滥是一种攻击方法,包括以高速向目标服务器发送欺骗性的SYN-ACK数据包。服务器需要大量的资源不按顺序地处理这些数据包(不按照正常的SYN、SYN-ACK、ACK的TCP三方握手机制),可能会忙于处理攻击流量,以至于无法处理合法流量,因此攻击者达到了DoS/DDoS状态。在RouterOS中,可以从前面提到的例子中配置类似的规则,但更具体的是针对SYN-ACK泛滥:
62 |
63 | `/ip/firewall/filter add action =return chain =detect-ddos dst-limit =32,32,src-and-dst-addresses/10s protocol =tcp tcp-flags =syn,ack`
64 |
--------------------------------------------------------------------------------
/source/Firewall_and_Quality_of_Service/Firewall_and_QoS_Case_Studies/Securing_your_router/Bruteforce_prevention.md:
--------------------------------------------------------------------------------
1 | # 预防暴力攻击
2 |
3 | 下面是一个防御ssh端口暴力攻击的例子。请注意,ssh允许每个连接有3次登录尝试,而且登录成功后地址列表不会被清除,所以可能不小心把自己列入黑名单。
4 |
5 | ```shell
6 | /ip firewall filter
7 | add action =add-src-to-address-list address-list =bruteforce_blacklist address-list-timeout =1d chain =input comment =Blacklist connection-state =new dst-port =22 protocol =tcp src-address-list =connection3
8 | add action =add-src-to-address-list address-list =connection3 address-list-timeout =1h chain =input comment = "Third attempt" connection-state =new dst-port =22 protocol =tcp src-address-list =connection2,!secured
9 | add action =add-src-to-address-list address-list =connection2 address-list-timeout =15m chain =input comment = "Second attempt" connection-state =new dst-port =22 protocol =tcp src-address-list =connection1
10 | add action =add-src-to-address-list address-list =connection1 address-list-timeout =5m chain =input comment = "First attempt" connection-state =new dst-port =22 protocol =tcp
11 | add action =accept chain =input dst-port =22 protocol =tcp src-address-list =!bruteforce_blacklist
12 | ```
13 |
14 | 如果所有三个列表的超时都保持在1分钟-connection1/2/3-那么某人每分钟可以进行9次猜测,这样每5分钟最多可以进行3次猜测。
15 |
--------------------------------------------------------------------------------
/source/Firewall_and_Quality_of_Service/Firewall_and_QoS_Case_Studies/Securing_your_router/Port_knocking.md:
--------------------------------------------------------------------------------
1 | # Port knocking
2 |
3 | 所有可用的公共IP地址不断被机器人和shodan.io等服务进行端口扫描,任何人都可以利用这些信息进行暴力攻击和执行任何已知的漏洞。Port knocking是一种经济有效的防御方式,它不暴露任何端口,只是监听连接尝试-如果端口连接尝试的序列正确,客户端就被认为是安全的,并被添加到绕过WAN防火墙规则的安全地址列表中。
4 |
5 | ## 设置实例
6 |
7 | 假设已经设置了一个防火墙,可以丢弃来自WAN口的所有连接尝试,因此需要在这之前添加额外的规则。
8 | 首先创建一个防火墙规则,在一个给定的端口上进行监听,并将连接的源IP添加到地址列表中-这是第一次敲门。
9 |
10 | `add action =add-src-to-address-list address-list =888 address-list-timeout =30s chain =input dst-port =888 in-interface-list =WAN protocol =tcp`
11 |
12 | 然后添加一个规则,在另一个端口做同样的事情,但只批准已经在第一个列表中的IP。可以重复这个步骤,次数不限。
13 |
14 | `add action =add-src-to-address-list address-list =555 address-list-timeout =30s chain =input dst-port =555 in-interface-list =WAN protocol =tcp src-address-list =888`
15 |
16 | 最后一次敲击将添加到一个IP列表中,该列表是可信的,任何输入都被接受。
17 |
18 | `add action =add-src-to-address-list address-list =secured address-list-timeout =30m chain =input dst-port =222 in-interface-list =WAN protocol =tcp src-address-list =555`
19 | `add action =accept chain =input in-interface-list =WAN src-address-list =secured`
20 |
21 | ## 敲击以获得访问权
22 |
23 | 为了从广域网访问电路板,可以用一个端口敲击客户端,一个简单的单行bash和nmap就可以完成工作。
24 |
25 | `for x in 888,555,222; do nmap -p $x -Pn xx.xx.xx.xx; done`
26 |
27 | ## 黑名单
28 |
29 | 除非使用大量的敲击,否则简单的端口扫描可能会意外地以正确的顺序触发正确的端口,所以建议添加一个黑名单。
30 |
31 | 在防火墙堆栈的最顶端为黑名单添加一个丢弃规则。
32 |
33 | `add action =drop chain =input disabled =yes in-interface-list =WAN src-address-list =blacklist`
34 |
35 | 然后将可疑的IP添加到黑名单中。
36 |
37 | 不好的端口 - 是那些永远不被信任的用户使用的端口,有很高的超时惩罚。
38 |
39 | `add action =add-src-to-address-list address-list =blacklist address-list-timeout =1000m chain =input disabled =yes dst-port =666 in-interface-list =WAN protocol =tcp`
40 |
41 | 这些端口大大降低了端口扫描的速度,以至于没有意义,但绝不会长时间锁定一个真正的用户。这包括除 "敲门"端口以外的每一个端口,关键是源IP不在安全列表中,因此这些端口在成功敲门后可以使用。
42 |
43 | `add action =add-src-to-address-list address-list =blacklist address-list-timeout =1m chain =input disabled =yes dst-port =21,22,23,8291,10000-60000 in-interface-list =WAN protocol =tcp src-address-list =!secured`
44 |
45 | ## 为每一次敲门使用一个口令
46 |
47 | 可以更进一步在每次敲门时发送一个密码。
48 |
49 | 警告
50 |
51 | 第7层规则是非常耗费资源的。除非你知道自己在做什么,否则不要使用。
52 |
53 | 点击打开代码块
54 |
55 | 然后创建一个可以在敲门规则上请求的layer7重码检查。
56 |
57 | ```shell
58 | /ip firewall layer7-protocol add name=pass regexp="^passphrase/$"
59 | /ip firewall filter
60 | add action=add-src-to-address-list address-list=888 address-list-timeout=30s chain=input dst-port=888 in-interface-list=WAN protocol=udp layer7-protocol=pass
61 | ```
62 |
--------------------------------------------------------------------------------
/source/Firewall_and_Quality_of_Service/Firewall_and_QoS_Case_Studies/Securing_your_router/content.md:
--------------------------------------------------------------------------------
1 | # 概述
2 |
3 | 以下步骤是关于如何用配置好的 [强大防火墙规则](https://help.mikrotik.com/docs/display/ROS/Building+Your+First+Firewall) 来额外保护设备的建议。
4 |
5 | ## RouterOS版本
6 |
7 | 首先要升级RouterOS版本。一些旧版本有某些弱点或漏洞已经被修复。保持设备最新以确保安全。在Winbox或Webfig中点击 "检查更新"进行升级。建议关注 [安全公告博客](https://blog.mikrotik.com/) 上的公告了解新的安全问题。
8 |
9 | ## 访问路由器
10 |
11 | ### 访问用户名
12 |
13 | 把默认的用户名 _admin_ 改成一个不同的名字。如果有人直接访问你的路由器,一个自定义的名字有助于保护对你路由器的访问。
14 |
15 | `/user add name =myname password =mypassword group =full`
16 | `/user disable admin`
17 |
18 | ### 访问密码
19 |
20 | MikroTik路由器需要配置密码,建议使用密码生成工具来创建安全且不重复的密码。安全的密码意思是:
21 |
22 | - 至少12个字符。
23 | - 包括数字、符号、大写和小写字母。
24 | - 不是字典中的字或字典中字的组合。
25 |
26 | `/user set myname password = "!={Ba3N!" 40TуX+GvKBz?jTLIUcx /,"`
27 |
28 | ### RouterOS MAC访问
29 |
30 | RouterOS有内置的选项,可以方便地对网络设备进行管理访问。在生产网络中应关闭特定的服务。**MAC-Telnet, MAC-Winbox,** 和 **MAC-Ping:**
31 |
32 | `/tool mac-server set allowed-interface-list =none`
33 |
34 | `/tool mac-server mac-winbox set allowed-interface-list =none`
35 |
36 | `/tool mac-server ping set enabled =no`
37 |
38 | ### 邻居发现
39 |
40 | MikroTik邻居发现协议用于显示和识别网络中的其他MikroTik路由器,禁用所有接口上的邻居发现。
41 |
42 | `/ip neighbor discovery-settings set discover-interface-list =none`
43 |
44 | ### 带宽服务器
45 |
46 | 带宽服务器用于测试两个MikroTik路由器之间的吞吐量。在生产环境中禁用它。
47 |
48 | `/tool bandwidth-server set enabled =no`
49 |
50 | ### DNS 缓存
51 |
52 | 路由器可能启用了 DNS 缓存,它减少了客户端对远程服务器的 DNS 请求的解析时间。如果路由器不需要 DNS 缓存,或者其他路由器用于这种目的,请禁用它。
53 |
54 | `/ip dns set allow-remote-requests =no`
55 |
56 | ### 其他客户端服务
57 |
58 | RouterOS可能启用了其他服务(默认的RouterOS配置中被禁用)。MikroTik缓存代理、socks、UPnP和云服务。
59 |
60 | `/ip proxy set enabled =no`
61 |
62 | `/ip socks set enabled =no`
63 |
64 | `/ip upnp set enabled =no`
65 |
66 | `/ip cloud set ddns-enabled =no update-time =no`
67 |
68 | 更安全的SSH访问
69 |
70 | 可以用这个命令启用更严格的SSH设置(添加aes-128-ctr,不允许hmac sha1和带sha1的组)。
71 |
72 | `/ip ssh set strong-crypto =yes`
73 |
74 | ## 路由器接口
75 |
76 | ### 以太网/SFP接口
77 |
78 | 禁用路由器上所有未使用的接口是一个很好的做法,减少对路由器的非法访问。
79 |
80 | `/interface print`
81 |
82 | `/interface set X disabled =yes`
83 |
84 | 其中**X**是未使用的接口数量。
85 |
86 | ### LCD
87 |
88 | 有些RouterBOARD有一个LCD模块,用于提供信息,设置一个pin码或禁用:
89 |
90 | `/lcd/pin/ set pin-number =3659 hide-pin-number =yes`
91 |
--------------------------------------------------------------------------------
/source/Firewall_and_Quality_of_Service/Firewall_and_QoS_Case_Studies/Securing_your_router/index.rst:
--------------------------------------------------------------------------------
1 | 路由器安全
2 | ===============================
3 |
4 | .. toctree::
5 | :maxdepth: 2
6 |
7 | content.md
8 | Building_Your_First_Firewall.md
9 | Building_Advanced_Firewall.md
10 | Port_knocking.md
11 | Bruteforce_prevention.md
12 |
--------------------------------------------------------------------------------
/source/Firewall_and_Quality_of_Service/Firewall_and_QoS_Case_Studies/content.md:
--------------------------------------------------------------------------------
1 | # 概述
2 |
3 | 防火墙实施有状态(通过利用连接跟踪)和无状态数据包过滤,从而提供用于管理进出和通过路由器的数据流的安全功能。它与网络地址转换 (NAT) 一起用作防止未经授权访问直接连接的网络和路由器本身的工具,以及用于传出流量的过滤器。
4 | 防火墙里总共有四种功能--Filter,NAT,mangle和RAW。
5 |
6 | **注意** 四种功能对数据包处理的顺序为RAW,NAT,mangle,Filter。
7 |
--------------------------------------------------------------------------------
/source/Firewall_and_Quality_of_Service/Firewall_and_QoS_Case_Studies/index.rst:
--------------------------------------------------------------------------------
1 | 防火墙和QoS案例研究
2 | ===============================
3 |
4 | .. toctree::
5 | :maxdepth: 2
6 |
7 | content.md
8 | Basic_Concepts.md
9 | Packet_Flow_in_RouterOS.md
10 | Securing_your_router/index.rst
11 | SYN_DoS_DDoS_Protection.md
12 | Connection_rate.md
13 |
--------------------------------------------------------------------------------
/source/Firewall_and_Quality_of_Service/IP_packing/index.rst:
--------------------------------------------------------------------------------
1 | IP打包
2 | ===============================
3 |
4 | .. toctree::
5 | :maxdepth: 2
6 |
7 | content.md
8 |
9 |
--------------------------------------------------------------------------------
/source/Firewall_and_Quality_of_Service/Kid_Control/content.md:
--------------------------------------------------------------------------------
1 | # 概述
2 |
3 | **Sub-menu:** `/ip kid-control`
4 |
5 | "儿童控制 "是一种家长控制功能,用于限制局域网设备的互联网连接。
6 |
7 | ## 属性描述
8 |
9 | 在这个菜单中,可以为每个孩子创建一个配置文件,并限制互联网的访问。
10 |
11 | | 属性 | 说明 |
12 | | -------------------------------------------------------------------- | ------------------------------------------------------ |
13 | | **name** (_string_) | 孩子的资料名称 |
14 | | **mon,tue,wed,tu,fri,sat,sun** (_time_) | 一周中的每一天。选择一天中的时间,这时允许互联网访问。 |
15 | | **disabled** (_yes \| no_) | 是否启用限制功能 |
16 | | **rate-limit** (_string_) | 流量的最大可用速率。 |
17 | | **tur-mon,tur-tue,tur-wed,tur-thu,tur-fri,tur-sat,tur-sun** (_time_) | 无限时速率。选择一天中的时间,这时上网无限制。 |
18 |
19 | 无时间限制的速率比速率限制参数有更高的优先权。
20 |
21 | ## 设备
22 |
23 | **Sub-menu:** `/ip kid-control device`
24 |
25 | 如果有多个设备连接到互联网(手机、平板电脑、游戏机、电视等),该子菜单会包含信息。设备是通过ARP表中检索的MAC地址来识别的,IP地址从那里获取。
26 |
27 | | 属性 | 说明 |
28 | | --------------------------------- | ------------------------------ |
29 | | **name** (_string_) | 设备名称 |
30 | | **mac-address** (_string_) | 设备mac-address |
31 | | **user** (_string_) | 将设备附加到哪个配置文件中 |
32 | | **reset-counters** (_[id, name]_) | 重置字节数增加和减少的计数器。 |
33 |
34 | ## 应用例子
35 |
36 | 以下例子将限制Peters手机的访问。
37 |
38 | - 禁止在周一、周三和周五访问互联网
39 | - 允许在以下时间段无限制上网。
40 | - 星期二
41 | - 星期四11:00-22:00
42 | - 周日15:00-22:00
43 | - 周六18:30-21:00,Peters移动电话的带宽限制为3Mbps。
44 |
45 | `[admin@MikroTik] > /ip kid-control add name =Peter mon = "" tur-tue = "00:00-24h" wed = "" tur-thu = "11:00-22:00" fri = "" sat = "18:30-22:00" tur-sun = "15h-21h" rate-limit =3M`
46 |
47 | `[admin@MikroTik] > /ip kid-control device add name =Mobile-phone user =Peter mac-address =FF:FF:FF:ED:83:63`
48 |
49 | 互联网访问限制是通过添加动态防火墙过滤规则或简单的队列规则实现的。下面是防火墙过滤规则的例子:
50 |
51 | ```shell
52 | [admin@MikroTik] > /ip firewall filter print
53 | 1 D ;;; Mobile-phone, kid-control
54 | chain =forward action =reject src-address =192.168.88.254
55 | 2 D ;;; Mobile-phone, kid-control
56 | chain =forward action =reject dst-address =192.168.88.254
57 | ```
58 |
59 | 动态创建的简单队列:
60 |
61 | ```shell
62 | [admin@MikroTik] > /queue simple print
63 | Flags : X - disabled, I - invalid, D - dynamic
64 | 1 D ;;; Mobile-phone, kid-control
65 | name = "queue1" target =192.168.88.254/32 parent =none packet-marks = "" priority =8/8 queue =default-small/default-small limit-at =3M/3M max-limit =3M/3M burst-limit =0/0
66 | burst-threshold =0/0 burst-time =0s/0s bucket-size =0.1/0.1
67 | ```
68 |
69 | 可以监控特定设备的数据使用量:
70 |
71 | ```shell
72 | [admin@MikroTik] > /ip kid-control device print stats
73 | Flags : X - disabled, D - dynamic, B - blocked, L - limited, I - inactive
74 | 1 BI Mobile-phone 30s 0bps 0bps 3438.1KiB 8.9KiB
75 | ```
76 |
77 | 也可以 **暂停** 所有的限制,然后在你想要的时候 **恢复** 它们:
78 |
79 | ```shell
80 | [admin@MikroTik] > /ip kid-control pause Peter
81 | [admin@MikroTik] > /ip kid-control print
82 | Flags : X - disabled, P - paused, B - blocked, L - rate-limited
83 | 0 PB Peter 15h-21h 11h-22h 18 :30h-22h
84 | ```
85 |
--------------------------------------------------------------------------------
/source/Firewall_and_Quality_of_Service/Kid_Control/index.rst:
--------------------------------------------------------------------------------
1 | 儿童控制
2 | ===============================
3 |
4 | .. toctree::
5 | :maxdepth: 2
6 |
7 | content.md
8 |
9 |
--------------------------------------------------------------------------------
/source/Firewall_and_Quality_of_Service/Layer7/content.md:
--------------------------------------------------------------------------------
1 | # 概述
2 |
3 | Layer7 协议是一种在 ICMP/TCP/UDP 流中搜索模式的方法。
4 |
5 | L7 匹配器非常耗费资源。 仅对非常特定的流量使用此功能。 不建议 L7 匹配器用于一般流量,例如阻止网页。 这几乎永远不会正常工作,设备将耗尽其资源来捕获所有流量。 用其他功能通过 URL去 阻止网页。
6 |
7 | L7 匹配器收集连接的前 **10 个数据包** 或连接的前 **2KB** 并在收集的数据中搜索模式。 如果在收集的数据中未找到该模式,匹配器会停止进一步检查。 分配的内存被释放,协议被认为是 **未知**。 要考虑到大量连接会增加内存和 CPU 使用率。 为避免这种情况,请添加常规防火墙匹配器以减少重复发给第 7 层过滤器的数据量。
8 |
9 | 另一个要求是 layer7 匹配器必须看到两个方向的流量(传入和传出)。 为了满足这个要求,应该在 **forward** 链中设置 l7 规则。 如果在 **input/prerouting** 链中设置了规则,则 **必须** 在 **output/postrouting** 链中设置相同的规则,否则,收集的数据可能不完整,导致 错误匹配的模式。
10 |
11 | 第 7 层匹配器不区分大小写!
12 |
13 | 可以在 [l7-filter 项目页面](http://l7-filter.sourceforge.net/protocols) 上找到与 RouterOS 兼容的示例 L7 模式。
14 |
15 | 在某些情况下无法执行第 7 层正则表达式时,RouterOS 会记录_topic=firewall, warning_ 并在消息中说明问题的错误信息!
16 | ## 属性
17 |
18 | `/ip firewall layer7-protocol`
19 |
20 | | 属性 | 说明 |
21 | | --------------------------------- | ------------------------------------------------------------------------------------------------------------- |
22 | | **name**(_string_;Default:) | 防火墙规则中配置使用的 l7 模式的描述名称。 请参阅示例 [>>](https://wiki.mikrotik.com/wiki/L7#Examples "L7")。 |
23 | | **regexp**(_string_;Default:) | POSIX 兼容的正则表达式作为匹配模式。 |
24 |
25 | ## 例子
26 |
27 | ### 简单的 L7示例
28 |
29 | 首先,将 Regexp 字符串添加到协议菜单,定义要查找的字符串。 在这个例子中,用一个模式来匹配 RDP 数据包。
30 |
31 | `/ip firewall layer7-protocol`
32 | `add name =rdp regexp = "rdpdr.*cliprdr.*rdpsnd"`
33 |
34 | 然后使用防火墙中定义的协议。
35 |
36 | ```shell
37 | /ip firewall filter
38 |
39 | add action =accept chain =forward comment = "" disabled =no port =80 protocol =tcp
40 | add action =accept chain =forward comment = "" disabled =no port =443 protocol =tcp
41 | addaction =accept chain =forward comment = "" disabled =no layer7-protocol =\
42 | rdp protocol =tcp
43 | ```
44 |
45 | 正如在 l7 规则之前看到的那样,添加了几个常规规则来匹配已知流量,从而减少内存使用。
46 |
47 | ### 输入链中的L7
48 |
49 | 在这个例子中,尝试匹配连接到路由器的 telnet 协议。
50 |
51 | `/ip firewall layer7-protocol add comment = "" name =telnet regexp = "^\\xff[\\xfb-\\xfe].\\xff[\\xfb-\\xfe].\\xff[\\xfb-\\xfe]"`
52 |
53 | 请注意,需要两个方向,这就是为什么还需要输出链中的 l7 规则来查看传出数据包。
54 |
55 | ```shell
56 | /ip firewall filter
57 | add action =accept chain =input comment = "" disabled =no layer7-protocol =telnet \
58 | protocol =tcp
59 | add action =passthrough chain =output comment = "" disabled =no layer7-protocol =telnet \
60 | protocol =tcp
61 | ```
62 |
63 | ### Youtube 匹配器
64 |
65 | 当用户登录时,youtube 使用 HTTPS,意味着 L7 无法匹配此流量。 只能匹配未加密的 HTTP。
66 |
67 | `/ip firewall layer7-protocol`
68 | `add name =youtube regexp = "(GET \\/videoplayback\\\?|GET \\/crossdomain\\.xml)"`
69 |
--------------------------------------------------------------------------------
/source/Firewall_and_Quality_of_Service/Layer7/index.rst:
--------------------------------------------------------------------------------
1 | 网络唤醒
2 | ===============================
3 |
4 | .. toctree::
5 | :maxdepth: 2
6 |
7 | content.md
8 |
9 |
--------------------------------------------------------------------------------
/source/Firewall_and_Quality_of_Service/Mangle/index.rst:
--------------------------------------------------------------------------------
1 | mangle
2 | ===============================
3 |
4 | .. toctree::
5 | :maxdepth: 2
6 |
7 | content.md
8 |
9 |
--------------------------------------------------------------------------------
/source/Firewall_and_Quality_of_Service/NAT/index.rst:
--------------------------------------------------------------------------------
1 | NAT
2 | ===============================
3 |
4 | .. toctree::
5 | :maxdepth: 2
6 |
7 | content.md
8 |
9 |
--------------------------------------------------------------------------------
/source/Firewall_and_Quality_of_Service/Queues/PCQ_example.md:
--------------------------------------------------------------------------------
1 | # PCQ 示例
2 |
3 | Per Connection Queue (PCQ) 是一种排队规则,可用于动态均衡或调整多个用户的流量,只需很少的管理。 可以将PCQ场景分为三大类:多个用户的带宽均等分配、用户之间的特定带宽均等分配和用户之间未知带宽的均等分配。
4 |
5 | ## 多个用户的带宽相等
6 |
7 | 当要为多个用户均衡带宽 [并设置最大限制] 时,使用 PCQ 类型队列。 这里将设置 64kbps 下载和 32kbps 上传限制。
8 |
9 | 
10 |
11 | 有两种方法可以做到这一点:使用 mangle 和队列树,或者使用简单队列。
12 |
13 | 1. 用 packet-marks upload/download 标记所有数据包:(假设 ether1-WAN 是互联网的公共接口,ether2-LAN 是客户端连接的本地接口):
14 |
15 | ```shell
16 | /ip firewall mangle add chain =prerouting action =mark-packet
17 |
18 | in-interface =ether2-LAN new-packet-mark =client_upload
19 |
20 | /ip firewall mangle add chain =prerouting action =mark-packet
21 |
22 | in-interface =ether1-WAN new-packet-mark =client_download
23 | ```
24 |
25 | 2. 设置两种 PCQ 队列类型 - 一种用于下载,一种用于上传。 _dst-address_ 是用户下载流量的分类器,_src-address_ 是上传流量的分类器:
26 |
27 | `/queue type add name = "PCQ_download" kind =pcq pcq-rate =64000 pcq-classifier =dst-address`
28 |
29 | `/queue type add name = "PCQ_upload" kind =pcq pcq-rate =32000 pcq-classifier =src-address`
30 |
31 | 3、最后需要两条队列规则,一条用于下载,一条用于上传:
32 |
33 | `/queue tree add parent =global queue =PCQ_download packet-mark =client_download`
34 |
35 | `/queue tree add parent =global queue =PCQ_upload packet-mark =client_upload`
36 |
37 | 如果不喜欢使用 mangle 和队列树,可以跳过第 1 步,执行第 2 步,第 3 步将创建一个简单的队列,如下所示:
38 |
39 | `/queue simple add target =192.168.0.0/24 queue =PCQ_upload/PCQ_download`
40 |
--------------------------------------------------------------------------------
/source/Firewall_and_Quality_of_Service/Queues/Queue_size.md:
--------------------------------------------------------------------------------
1 | # 队列大小例子
2 |
3 | 创建这个例子是为了强调队列大小对由特定队列排队的流量的影响。
4 |
5 | 在Mikrotik RouterOS中,队列大小可以在"/queue type "菜单中指定。每种队列类型都有不同的选项来指定队列大小(pfifo-limit、bfifo-limit、pcq-limit、pcq-total-limit、red-limit),所有的原则都是一样的-队列大小是决定是否应该丢弃包或安排在以后的时间的主要选项。
6 |
7 | 在实时环境中,这个过程是连续发生的,没有任何停顿、步骤或中断,为了作为一个例子来展示,我们把它分成几个步骤,在这些步骤中,有可能确切地知道每一步将有多少数据包被接收/传送出去。
8 |
9 | 我们不会讨论TCP和掉包重传的具体细节-只将这些数据包视为简单的UDP流。
10 |
11 | 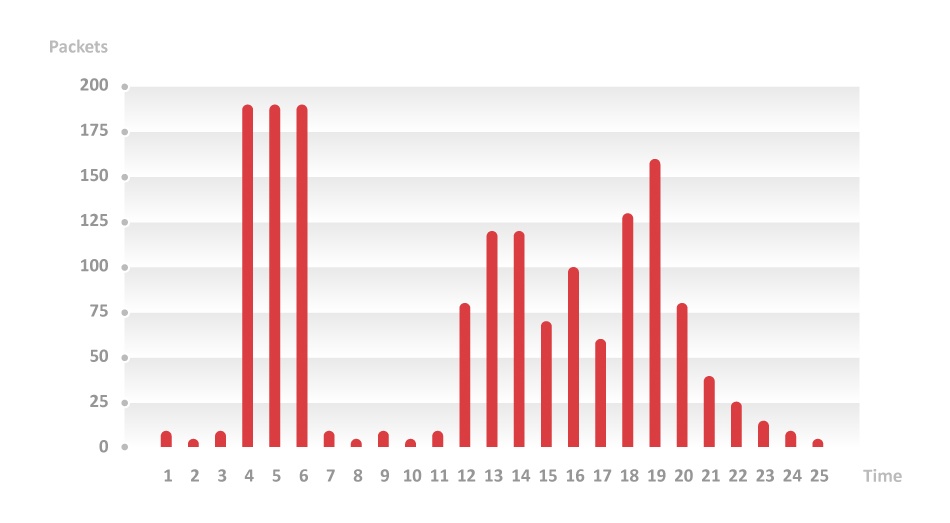
12 |
13 | 正如上图中看到的,有 **25 个步骤**,在此时间范围内总共有 **1610 个传入数据包**。
14 |
15 | ## 100% 整形
16 |
17 | 当超过限制的每个数据包都将丢弃时,队列是 100% 整形。 这样所有没有丢弃的包都会立即送出。
18 |
19 | 在示例中应用 **max-limit=100 包每步** 限制:
20 |
21 | 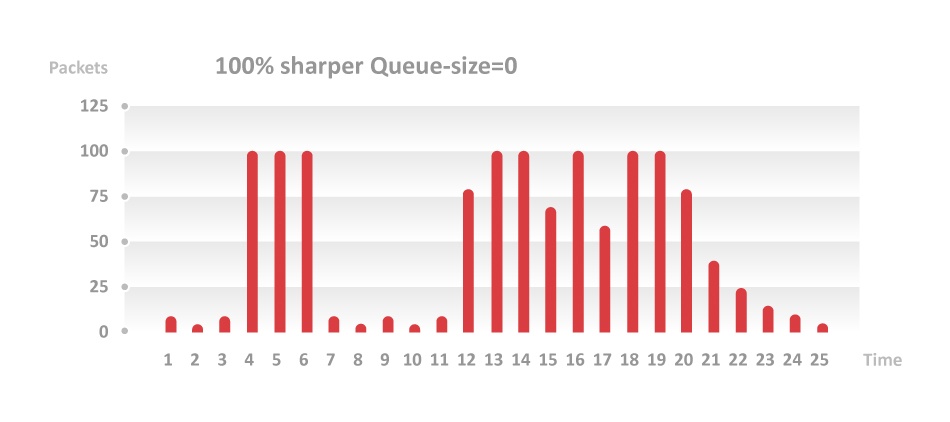
22 |
23 | 由于这种限制,1610 个数据包中只有 1250 个能够通过队列(**22.4% 数据包丢弃**),但所有数据包都没有延迟到达。
24 |
25 | ## 100% 调度
26 |
27 | 当没有丢失数据包时,队列是 100% 调度的,所有数据包都会排队并在第一时间发送。
28 |
29 | 在每一步中,队列必须先将前面步骤中排队的数据包发送出去,然后将这一步的数据包发送出去,这样才能保持正确的数据包顺序。
30 |
31 | 将再次使用相同的限制(**每步 100 个数据包**)。
32 |
33 | 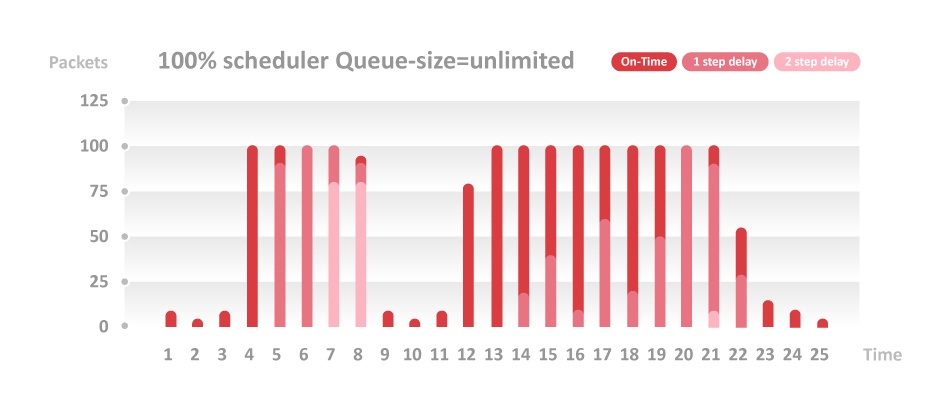
34 |
35 | 没有丢包,但是 630 **(39,1%) 数据包有 1 步延迟**,另外 170 **(10,6%) 数据包有 2 步延迟**。 (delay = latency)
36 |
37 | ## 默认小队列类型
38 |
39 | 没有丢包,但是 630 **(39,1%) 数据包有 1 步延迟**,另外 170 **(10,6%) 数据包有 2 步延迟**。 (delay = latency)
40 |
41 | ## 默认小队列类型
42 |
43 | 当队列同时使用这两个方式(整形和调度)时,也可以选择中间方式。 默认情况下,RouterOS 中的大多数队列大小为 10。
44 |
45 | 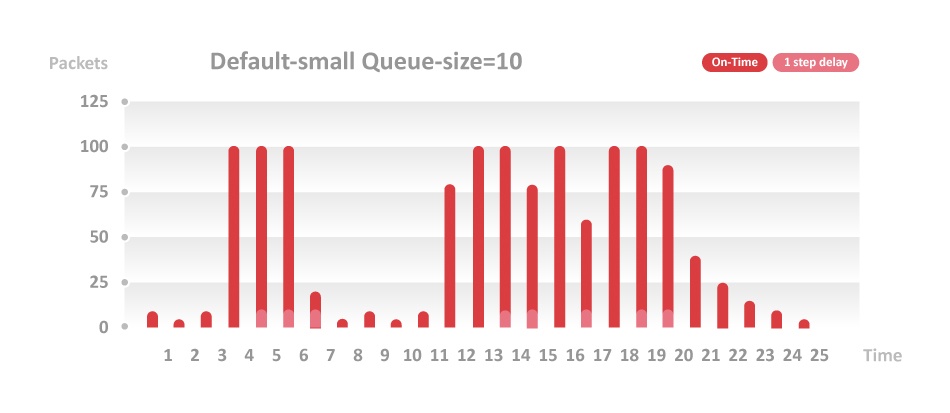
46 |
47 | 有 320 **(19,9%) 数据包被丢弃**,80 **(5,0%) 数据包有 1 步延迟**。
48 |
49 | ## 默认队列类型
50 |
51 | RouterOS 中另一个常用的队列大小是 50。
52 |
53 | 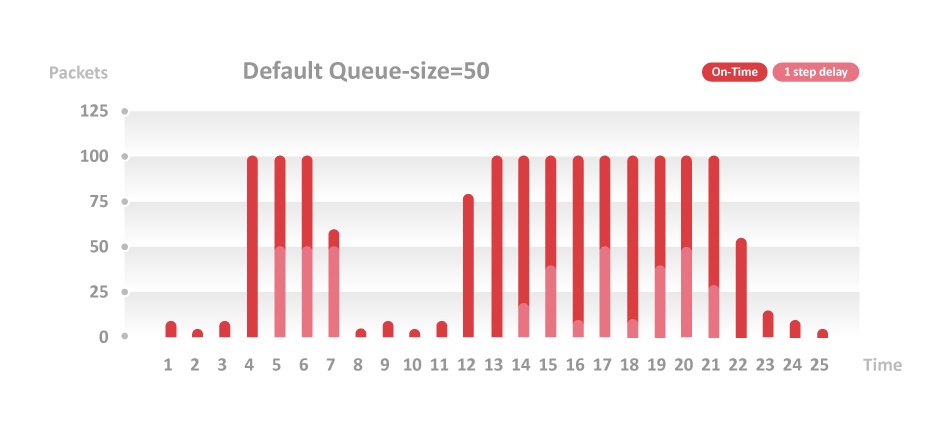
54 |
55 | 有 190 **(11.8%) 数据包被丢弃**,400 **(24.8%) 数据包有 1 步延迟**。
56 |
--------------------------------------------------------------------------------
/source/Firewall_and_Quality_of_Service/Queues/index.rst:
--------------------------------------------------------------------------------
1 | 队列
2 | ===============================
3 |
4 | .. toctree::
5 | :maxdepth: 2
6 |
7 | content.md
8 | HTB_Hierarchical_Token_Bucket.md
9 | Queue_size.md
10 | Queue_Burst.md
11 | PCQ_example.md
12 | QoS_with_Switch_Chip.md
13 |
--------------------------------------------------------------------------------
/source/Firewall_and_Quality_of_Service/RAW/index.rst:
--------------------------------------------------------------------------------
1 | RAW
2 | ===============================
3 |
4 | .. toctree::
5 | :maxdepth: 2
6 |
7 | content.md
8 |
9 |
--------------------------------------------------------------------------------
/source/Firewall_and_Quality_of_Service/UPnP/index.rst:
--------------------------------------------------------------------------------
1 | UPnP
2 | ===============================
3 |
4 | .. toctree::
5 | :maxdepth: 2
6 |
7 | content.md
8 |
9 |
--------------------------------------------------------------------------------
/source/Firewall_and_Quality_of_Service/index.rst:
--------------------------------------------------------------------------------
1 | 防火墙和QoS
2 | ===============================
3 |
4 | .. toctree::
5 | :maxdepth: 1
6 |
7 | Filter/index.rst
8 | Kid_Control/index.rst
9 | Mangle/index.rst
10 | NAT/index.rst
11 | Connection_tracking/index.rst
12 | Queues/index.rst
13 | RAW/index.rst
14 | UPnP/index.rst
15 | Firewall_and_QoS_Case_Studies/index.rst
16 | Address-lists/index.rst
17 | Layer7/index.rst
18 | IP_packing/index.rst
19 |
20 |
21 |
--------------------------------------------------------------------------------
/source/Getting_started/Backup/content.md:
--------------------------------------------------------------------------------
1 | # 概述
2 |
3 | RouterOS 备份功能可以保存当前设备的配置,然后可以在相同或不同的设备(具有相同的型号名称/编号)上重新应用。这非常有用,因为它允许毫不费力地恢复设备的配置或在备份设备上重新应用相同的配置。系统的备份文件还包含设备的 MAC 地址,这些地址也会在加载备份文件时恢复。
4 |
5 | > 如果路由器上安装了 The Dude 和 user-manager,则系统备份不包含这些服务的配置,因此应注意单独保存这些服务的配置。如果要保存配置,请使用提供的工具保存/导出配置。
6 |
7 | > 系统备份包含设备及其配置的敏感信息,请考虑加密备份文件并将备份文件保存在安全的地方。
8 |
9 | ## 保存备份
10 |
11 | **Sub-menu:** `/system backup save`
12 |
13 | | 属性 | 说明 |
14 | | ------------------------------------------------------------------------------------ | ---------------------------------------------------------------------------------------------------------- |
15 | | dont-encrypt (yes \| no; Default: no) | 禁用备份文件加密。注意,由于RouterOS v6.43没有提供密码 ,备份文件不会加密。 |
16 | | encryption (aes-sha256 \| rc4; Default: aes-sha256) | 用于加密备份文件的加密算法。注意,这不认为是一种安全的加密方法,仅出于与旧 RouterOS 版本兼容的原因才可用。 |
17 | | name (string; Default: [identity]-[date]-[time].backup) | 备份文件名。 |
18 | | password (string; Default: ) | 备份文件的密码。注意,由于RouterOS v6.43没有提供密码 ,备份文件不会加密。 |
19 |
20 | > 如果在早于 v6.43 的 RouterOS 版本中未提供密码,则备份文件将使用当前用户的密码加密,除非使用了 dont-encrypted 属性或当前用户的密码为空。
21 |
22 | 备份文件将保存在 `/file` 菜单下,可以使用 FTP 或 Winbox 下载。
23 |
24 | ## 载入备份
25 |
26 | 载入没有密码的备份:
27 |
28 | `[admin@MikroTik] > system` `/backup/load name=auto-before-reset.backup password=""`
29 |
30 | | 属性 | 说明 |
31 | | ---------------------------------- | ------------------ |
32 | | **name** (_string_; Default: ) | 备份文件名 |
33 | | **password** (_string_; Default: ) | 加密备份文件的密码 |
34 |
35 | ### 示例
36 |
37 | 将路由器的配置保存到文件test并加上密码:
38 |
39 | `[admin@MikroTik] >` `/system backup save name=test password=`
40 |
41 | `Configuration backup saved`
42 |
43 | `[admin@MikroTik] >` `/system backup`
44 |
45 | 查看保存在路由器上的文件:
46 |
47 | `[admin@MikroTik] >` `/` `file` `print`
48 |
49 | `0 test.backup backup 12567 sep` `/08/2018 21:07:50`
50 |
51 | `[admin@MikroTik] >`
52 |
53 | 加载保存的备份文件test:
54 |
55 | `[admin@MikroTik] >` `/system backup load name=test`
56 |
57 | `password` `: `
58 |
59 | `Restore` `and` `reboot? [y` `/N]: y`
60 |
61 | `Restoring system configuration`
62 |
63 | `System configuration restored, rebooting now`
64 |
65 | ## 云备份
66 |
67 | 从 RouterOS v6.44 开始,可以将设备的备份文件安全地存储在 MikroTik 的云服务器上,请在 [IP/Cloud](https://help.mikrotik.com/docs/display/ROS/Cloud) 页面上阅读更多信息。
68 |
--------------------------------------------------------------------------------
/source/Getting_started/Backup/index.rst:
--------------------------------------------------------------------------------
1 | 备份
2 | ===============================
3 |
4 | .. toctree::
5 | :maxdepth: 2
6 |
7 | content.md
8 |
9 |
10 |
--------------------------------------------------------------------------------
/source/Getting_started/Cloud_Hosted_Router/CHR_ProxMox_installation.md:
--------------------------------------------------------------------------------
1 | # CHR ProxMox安装
2 |
3 | - 根据需要使用系统盘和其他设备创建新的guest。
4 |
5 | - 然后必须在 ProxMox 主机上手动上传 CHR 磁盘(qcow 格式)。
6 |
7 | - 使用 _scp_ 或任何其他类似工具,因为它用 SSH 进行上传,不需要任何额外配置。
8 |
9 | - 将文件复制到服务器然后手动编辑 VM 的 .conf 文件或替换之前创建的用于引导客户机的系统映像文件。
10 |
11 | - ProxMox 上的本地存储位于 _/var/lib/vz_ 目录中。 应该有一个名为 _images_ 的子目录,其中包含每个 VM 的目录(以 VM 编号命名)。 可以直接在那里复制文件。
12 |
13 | - 要将现有文件添加到 VM,可直接编辑 VM 的 .conf 文件。 在 _/etc/pve/qemu-server/_ 中查找带有 VM 编号后跟 .conf 的文件。
14 |
15 | **注意:** 创建第二个测试 VM 是个好主意,这样你就可以参考它的 .conf 文件以确保语法正确
16 |
17 | ## 替代方法
18 |
19 | - 通过 ProxMox Web GUI 创建基本虚拟机。
20 | - 确保 VM 存储在本地(这样就不需要使用 LVM 配置,并且磁盘映像可以稍后移动到 LVM 或其他需要的存储)。
21 | - 通过 SSH 登录 ProxMox 主机并导航到 VM 映像目录。 默认本地存储位于:_var/lib/vz/images/(VM\_ID)_
22 | - 通过 scp、wget 或任何其他工具将 CHR 原始映像(.img 文件)下载到此目录中。
23 | - 现在使用 qemu-img 工具将 CHR 原始映像转换为 qcow2 格式:
24 |
25 | `qemu-img convert -f raw -O qcow2 chr-6.40.3.img vm-(VM_ID)-disk-1.qcow2`
26 |
27 | ## Bash 脚本方法
28 |
29 | 如果有权访问 ProxMox 主机,还可以通过 BASH 脚本快速创建 CHR VM。 下面是一个例子。
30 |
31 | 脚本的作用:
32 |
33 | - 将 tmp 文件存储在:_/root/temp_ 目录中。
34 | - 从 MikroTik 下载页面下载原始映像存档。
35 | - 将映像文件转换为 qcow 格式。
36 | - 创建依附到 MGMT 网桥的基本 VM。
37 |
38 | ```shell
39 | #!/bin/bash
40 |
41 | #vars
42 | version="nil"
43 | vmID="nil"
44 |
45 | echo "############## Start of Script ##############
46 |
47 | ## Checking if temp dir is available..."
48 | if [ -d /root/temp ]
49 | then
50 | echo "-- Directory exists!"
51 | else
52 | echo "-- Creating temp dir!"
53 | mkdir /root/temp
54 | fi
55 | # Ask user for version
56 | echo "## Preparing for image download and VM creation!"
57 | read -p "Please input CHR version to deploy (6.38.2, 6.40.1, etc):" version
58 | # Check if image is available and download if needed
59 | if [ -f /root/temp/chr-$version.img ]
60 | then
61 | echo "-- CHR image is available."
62 | else
63 | echo "-- Downloading CHR $version image file."
64 | cd /root/temp
65 | echo "---------------------------------------------------------------------------"
66 | wget https://download.mikrotik.com/routeros/$version/chr-$version.img.zip
67 | unzip chr-$version.img.zip
68 | echo "---------------------------------------------------------------------------"
69 | fi
70 | # List already existing VM's and ask for vmID
71 | echo "== Printing list of VM's on this hypervisor!"
72 | qm list
73 | echo ""
74 | read -p "Please Enter free vm ID to use:" vmID
75 | echo ""
76 | # Create storage dir for VM if needed.
77 | if [ -d /var/lib/vz/images/$vmID ]
78 | then
79 | echo "-- VM Directory exists! Ideally try another vm ID!"
80 | read -p "Please Enter free vm ID to use:" vmID
81 | else
82 | echo "-- Creating VM image dir!"
83 | mkdir /var/lib/vz/images/$vmID
84 | fi
85 | # Creating qcow2 image for CHR.
86 | echo "-- Converting image to qcow2 format "
87 | qemu-img convert \
88 | -f raw \
89 | -O qcow2 \
90 | /root/temp/chr-$version.img \
91 | /var/lib/vz/images/$vmID/vm-$vmID-disk-1.qcow2
92 | # Creating VM
93 | echo "-- Creating new CHR VM"
94 | qm create $vmID \
95 | --name chr-$version \
96 | --net0 virtio,bridge=vmbr0 \
97 | --bootdisk virtio0 \
98 | --ostype l26 \
99 | --memory 256 \
100 | --onboot no \
101 | --sockets 1 \
102 | --cores 1 \
103 | --virtio0 local:$vmID/vm-$vmID-disk-1.qcow2
104 | echo "############## End of Script ##############"
105 |
106 | ```
107 |
108 | **提示**
109 |
110 | - 用于从 Windows 格式中清除 BASH 脚本的有用片段,如果在 Windows 工作站上编辑它可能会干扰脚本:
111 |
112 | ```shell
113 | sed -i -e 's/\r$//' *.sh
114 | ```
115 |
--------------------------------------------------------------------------------
/source/Getting_started/Cloud_Hosted_Router/CHR_Vultr_installation.md:
--------------------------------------------------------------------------------
1 | # CHR Vultr 安装
2 |
3 | Vultr 拥有超过 [20 个数据中心位置](https://www.vultr.com/features/datacenter-locations/),你可以选择部署 MikroTik CHR 以获得最佳[速率和延迟](https:// nj-us-ping.vultr.com/)。
4 | 按照以下步骤在 Vultr 上安装 MikroTik CHR。
5 |
6 | ## 第一步:在救援模式下部署服务器
7 |
8 | 在此步骤中,用 SystemRescue(一个可启动的 Linux ISO)在 Vultr 上部署一个新服务器。
9 |
10 | 1. [部署](https://my.vultr.com/deploy/) 一个新的[云计算](https://www.vultr.com/products/cloud-compute/)实例。
11 | 2. 根据需要选择性能最佳的位置。 可以使用 Vultr 的 [network-looking glass](https://nj-us-ping.vultr.com/) 来测试任何位置的速率和延迟。
12 | 3. 在 **Server Image** 中选择 **ISO Library** 选项卡。
13 | 4. 选择 **SystemRescue x64**。
14 | 5. 根据要求选择具有[足够带宽限额](https://www.vultr.com/resources/faq/?query=bandwidth#bandwidthcalculation) 的服务器。
15 | 6. 给服务器一个主机名和标签,然后单击**立即部署**。
16 |
17 | 服务器完成部署后,继续下一步。
18 |
19 | ## 第二步:将CHR映像写入磁盘
20 |
21 | 1. 在网络浏览器中,导航至 [MikroTik 下载页面](https://mikrotik.com/download)。
22 | 2. 找到最新的 Stable RAW CHR 磁盘映像。 Vultr 需要版本 **7.2.3 Stable** 或更高版本。
23 | 3. 右击软盘图标复制网址。 现在不要下载映像,在稍后的步骤中下载到服务器。
24 |
25 | 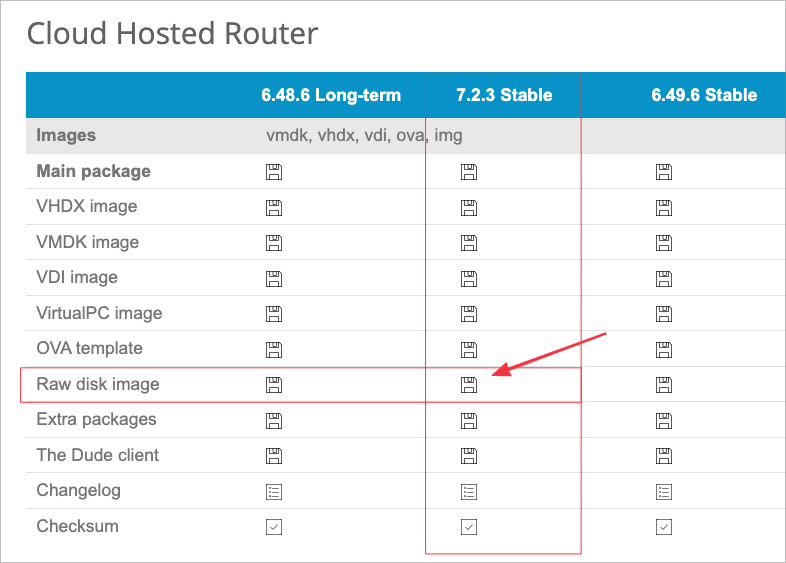
26 | 4. 导航至 [Vultr 客户门户](https://my.vultr.com/) 中的服务器信息页面。
27 | 5. 连接到 [网络控制台](https://www.vultr.com/docs/vultr-web-console-faq/)。
28 | 
29 | 6. 在 Web 控制台中,使用 wget 将 CHR 映像下载到服务器。 如果把下载 URL 复制到剪贴板,则可以用 Web 控制台 [发送到服务器](https://www.vultr.com/docs/vultr-web-console-faq/)。
30 |
31 | 在以下示例中用你的版本替换 x.x.x。
32 |
33 | `# wget https://download.mikrotik.com/routeros/x.x.x/chr-x.x.x.img.zip`
34 |
35 | 7. 解压缩下载的文件。
36 |
37 | `# unzip chr-x.x.x.img.zip`
38 |
39 | 8. 使用dd 将MikroTik CHR 映像写入服务器的磁盘。
40 |
41 | `# dd if=chr-x.x.x.img of=/dev/vda`
42 |
43 | - **if** 是上一步中解压缩的映像。
44 | - **of** 是服务器的磁盘:/dev/vda。
45 |
46 | 这个过程需要几分钟; 完成后继续下一步。
47 |
48 | ## 第三步:连接到 MikroTik CHR
49 |
50 | 1. 导航至服务器的 [设置页面](https://my.vultr.com/)。
51 | 2. 选择 **Custom ISO** 菜单,然后单击 **Remove ISO**。 服务器会重新启动。
52 | 3. 连接到 [网络控制台](https://www.vultr.com/docs/vultr-web-console-faq/)。
53 | 4. 以管理员身份登录。 因为没有设置密码,所以出现提示时按 **Enter**。
54 | 5. 查看软件许可证,然后选择一个新的强密码。
55 | 6. 关闭 web 控制台,然后在本地计算机上打开一个终端。
56 | 7. 以管理员身份通过 SSH 访问服务器的 IP 地址。
57 | 8. 输入上一步设置的强密码。
58 |
59 | 这样就完成了基本安装。 请 [保护你的 MicroTik CHR 路由器](https://wiki.mikrotik.com/wiki/Manual:Securing_Your_Router) 并查阅 [文档](https://help.mikrotik.com/docs/display/ROS/Getting+started) 来配置服务器以供生产使用。
60 |
--------------------------------------------------------------------------------
/source/Getting_started/Cloud_Hosted_Router/index.rst:
--------------------------------------------------------------------------------
1 | 云托管路由器
2 | ===============================
3 |
4 |
5 | .. toctree::
6 | :maxdepth: 2
7 |
8 | content.md
9 | CHR_ProxMox_installation.md
10 | CHR_Vultr_installation.md
11 |
12 |
--------------------------------------------------------------------------------
/source/Getting_started/Configuration_Management/Default_configurations.md:
--------------------------------------------------------------------------------
1 | ## 默认配置
2 | 所有 MikroTik 设备都带有某种默认配置。 根据电路板类型,有几种不同的配置:
3 |
4 | 可以运行命令“/system default-configuration print”来查看确切应用的默认配置命令。
5 |
6 | ### CPE 路由器
7 |
8 | 在这种类型的配置中,路由器被配置为无线客户端设备。 WAN接口是一个**无线**接口。 WAN 口已配置 DHCP 客户端,受 IP 防火墙保护,禁用 MAC 发现/连接。
9 |
10 | 使用此类型配置的路由器列表:
11 |
12 | - RB 711,911,912,921,922 - with level3 license
13 | - SXT
14 | - QRT
15 | - SEXTANT
16 | - LHG
17 | - LDF
18 | - DISCl
19 | - Groove
20 | - Metal
21 |
22 | ### LTE CPE AP路由器
23 |
24 | 此配置类型适用于同时具有 LTE 和无线接口的路由器。 LTE 接口被视为受防火墙保护的 WAN 端口,并且禁用 MAC 发现/连接。 WAN口的IP地址是自动获取的。 无线配置为接入点并与所有可用的以太网端口桥接。
25 |
26 | - wAP LTE Kit
27 | - SXT LTE
28 | - LtAP 4G kit
29 | - LtAP LTE kit
30 |
31 | ### AP 路由器
32 |
33 | 这种类型的配置适用于家庭接入点路由器,开箱即用,无需额外配置(路由器密码和无线密钥除外)
34 |
35 | 第一个以太网始终配置为 WAN 端口(受防火墙保护,启用 DHCP 客户端并禁用 MAC 连接/发现)。 其他以太网端口和无线接口被添加到具有 192.168.88.1/24 地址设置和配置 DHCP 服务器的本地 LAN 网桥。 对于双频路由器,一个无线配置为 5 GHz 接入点,另一个配置为 2.4 GHz 接入点。
36 |
37 | 使用此类配置的路由器列表:
38 |
39 | - RB 450,751,850,951,953,2011,3011,4011
40 | - hEX,PowerBox
41 | - mAP
42 | - wAP,wAP R (没有LTE卡)
43 | - hAP
44 | - cAP
45 | - OmniTIK
46 | - CRS系列具有无线接口
47 |
48 | ### PTP 桥
49 |
50 | 带无线接口的桥接以太网。 桥接接口上设置了默认 IP 地址 192.168.88.1/24。 有两种选择——作为 CPE 和作为 AP。 对于 CPE 无线接口设置为“station-bridge”模式,对于 AP 使用“bridge”模式。
51 |
52 | 使用此类配置的路由器列表:
53 |
54 | - DynaDish - as CPE
55 | - Wireless Wire kit
56 | - wAP 60G - 具有level3授权
57 |
58 | ### WISP 桥
59 |
60 | 配置与 AP 模式下的 PTP 桥接器相同,只是无线模式设置为 ap_bridge 用于 PTMP 设置。 可以直接使用MAC地址访问路由器。 如果设备连接到启用了 DHCP 服务器的网络,则在桥接接口上配置的 DHCP 客户端将获得 IP 地址,可用于访问路由器。
61 |
62 | 使用此类配置的路由器列表:
63 |
64 | - RB 911,912,921,922 - with Level4 license
65 | - Groove A, RB 711 A
66 | - BaseBox, NetBox
67 | - mANTBox, NetMetal
68 | - wAP 60G AP - 具有level4授权
69 | - LtAP
70 |
71 | ### 交换
72 |
73 | 此配置利用交换芯片功能来配置基本交换。 将所有以太网端口添加到交换机组,并在主端口上设置默认 IP 地址 192.168.88.1/24。
74 |
75 | 使用此类配置的路由器列表:
76 |
77 | - FiberBox
78 | - CRS 没有无线接口
79 |
80 | ### 仅IP
81 |
82 | 当没有找到具体的配置时,在ether1或combo1或sfp1上设置IP地址192.168.88.1/24。
83 |
84 | 使用此类配置的路由器列表:
85 |
86 | - RB 411,433,435,493,800,M11,M33,1100
87 | - CCR
88 |
89 | ### CAP
90 |
91 | 当设备需要用作由 [CAPsMAN](https://help.mikrotik.com/docs/display/ROS/CAPsMAN) 控制的无线客户端设备时,会使用此类配置。
92 |
93 | 加载 CAP 默认配置时,ether1 被视为配置了 DHCP 客户端的管理端口。 所有其他以太网接口都被桥接并且 wlan1 被设置为由 CAPsMAN 管理。
94 |
95 | 要加载 CAP 配置,请参阅 [重置按钮手册](https://help.mikrotik.com/docs/display/ROS/Reset+Button)。
96 |
--------------------------------------------------------------------------------
/source/Getting_started/Configuration_Management/index.rst:
--------------------------------------------------------------------------------
1 | 配置管理
2 | ===============================
3 |
4 | .. toctree::
5 | :maxdepth: 2
6 |
7 | content.md
8 | Default_configurations.md
9 |
10 |
--------------------------------------------------------------------------------
/source/Getting_started/Console/index.rst:
--------------------------------------------------------------------------------
1 | 控制台
2 | ===============================
3 |
4 |
5 | .. toctree::
6 | :maxdepth: 2
7 |
8 | content.md
9 |
10 |
11 |
--------------------------------------------------------------------------------
/source/Getting_started/First_Time_Configuration/index.rst:
--------------------------------------------------------------------------------
1 | 首次配置
2 | ===============================
3 |
4 |
5 | .. toctree::
6 | :maxdepth: 2
7 |
8 | content.md
9 |
10 |
11 |
--------------------------------------------------------------------------------
/source/Getting_started/Netinstall/index.rst:
--------------------------------------------------------------------------------
1 | 网络安装
2 | ===============================
3 |
4 | .. toctree::
5 | :maxdepth: 2
6 |
7 | content.md
8 |
9 |
10 |
--------------------------------------------------------------------------------
/source/Getting_started/Reset_Button/content.md:
--------------------------------------------------------------------------------
1 | # 介绍
2 |
3 | 如果硬件是 RouterBOARD,则只能通过重新安装路由器操作系统或使用重置按钮(或跳线孔)来重置 RouterOS 密码。 对于 X86(CHR) 设备,只有完全重装才能清除密码以及其他配置。 对于 RouterBOARD 设备,有多种方法,具体取决于设备型号。
4 |
5 | 如果你仍然可以访问你的路由器并希望恢复其默认配置,那可以按下面操作:
6 |
7 | - 从命令行界面运行命令 **“/system reset-configuration”**;
8 |
9 | - 从图形用户界面中的 **System -> Reset Configuration** 菜单执行此操作;
10 |
11 | ## 使用复位按钮
12 |
13 | RouterBOARD 设备配有一个多功能的复位按钮:
14 |
15 | - **RouterBOOT备份加载器**
16 | 通电前按住此按钮,通电三秒后松开,加载备份引导加载程序。 如果设备因 RouterBOOT 升级失败而无法运行则可能需要这样做。 当使用备份加载程序启动设备时,你可以在 RouterBOARD 设置中将 RouterOS 设置为 _force backup loader_,这样有机会从“.fwf”文件重新安装失败的 RouterBOOT(总共 **3 秒**)
17 |
18 | - **重置 RouterOS 配置**
19 | 按住此按钮直到 LED 灯开始闪烁,松开按钮将 RouterOS 配置重置为默认值。
20 |
21 | - **启用 CAP 模式**
22 | 要将此设备连接到由 CAPsMAN 管理的无线网络,再按住按钮 5 秒钟,LED 常亮,然后松开以打开 CAPs 模式。
23 |
24 | - **在网络安装模式下启动 RouterBOARD**
25 | 继续按住按钮 5 秒直到 LED 熄灭,然后松开按钮让 RouterBOARD 寻找 Netinstall 服务器。 也可以简单地按住按钮,直到设备出现在 Windows 的 Netinstall 程序中。
26 |
27 | > 也可以在不运行备份加载器的情况下执行前三个功能,只需在通电后立即按下按钮即可。 可能需要另一个人的帮助才能按下按钮并同时插入电源!
28 |
29 | ## 如何重置配置
30 |
31 | 1) 拔下设备电源;
32 |
33 | 2) 通电后立即按住按钮;
34 |
35 | _注意:按住按钮直到 LED 开始闪烁;_
36 |
37 | 3) 松开按钮清除配置;
38 |
39 | > 如果等到 LED 停止闪烁才松开按钮 - 这将改为启动 Netinstall 模式,重新安装 RouterOS。
40 |
41 | 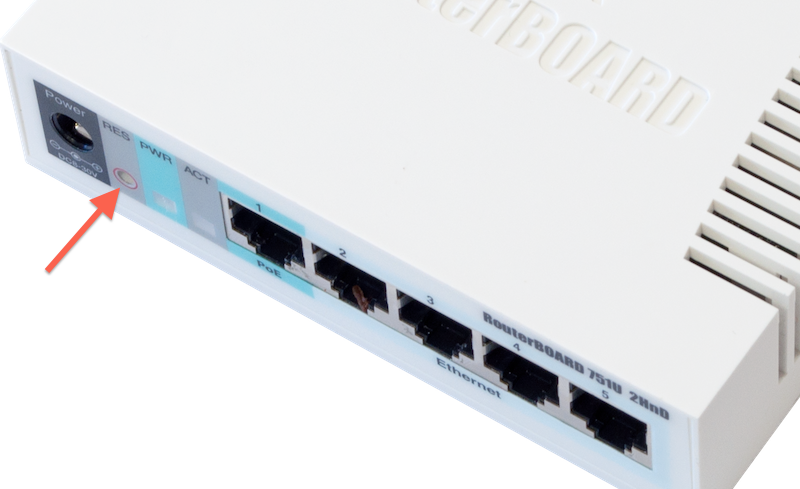
42 |
43 | ## 跳线复位
44 |
45 | 所有 RouterBOARD 还配备了复位跳线。 有些设备可能需要打开外壳,RB750/RB951/RB751 在外壳的一个橡胶脚下有跳线。
46 |
47 | 用金属螺丝刀短路跳线,然后启动电路板直到配置被清除:
48 | 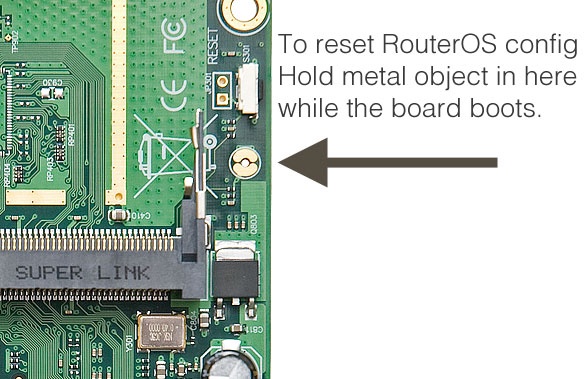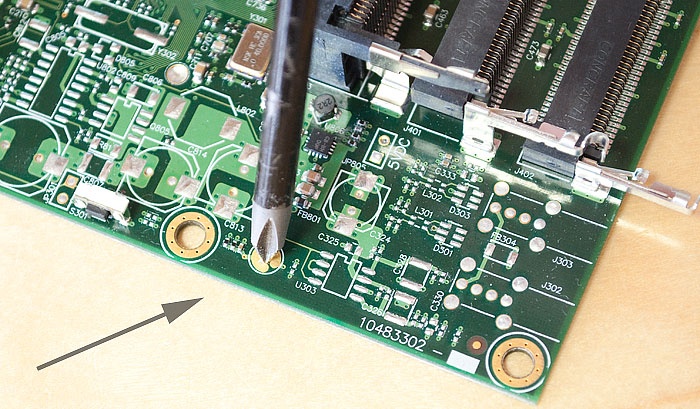
49 |
50 | ## 旧型号的跳线重置
51 |
52 | **下面** 的图显示了 RB133C 等较旧 RouterBOARD 上复位跳线的位置:
53 |
54 | 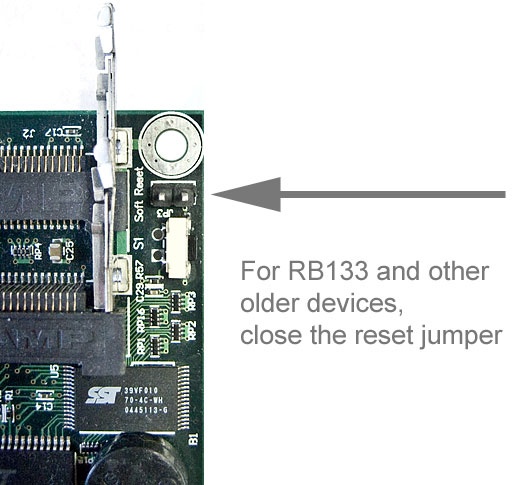
55 |
56 | 重置配置后不要忘记断开跳线,否则每次重启都会重置!
57 |
--------------------------------------------------------------------------------
/source/Getting_started/Reset_Button/index.rst:
--------------------------------------------------------------------------------
1 | 复位按键
2 | ===============================
3 |
4 | .. toctree::
5 | :maxdepth: 2
6 |
7 | content.md
8 |
9 |
10 |
--------------------------------------------------------------------------------
/source/Getting_started/RouterBOOT/index.rst:
--------------------------------------------------------------------------------
1 | 路由器启动
2 | ===============================
3 |
4 | .. toctree::
5 | :maxdepth: 2
6 |
7 | content.md
8 |
9 |
10 |
--------------------------------------------------------------------------------
/source/Getting_started/RouterOS_license_keys/index.rst:
--------------------------------------------------------------------------------
1 | RouterOS 许可证密钥
2 | ===============================
3 |
4 |
5 | .. toctree::
6 | :maxdepth: 2
7 |
8 | content.md
9 |
10 |
11 |
--------------------------------------------------------------------------------
/source/Getting_started/Software_Specifications/Feature_support_based_on_architecture.md:
--------------------------------------------------------------------------------
1 | # 基于架构的特性支持
2 |
3 | 所有设备都支持相同的功能,但有一些例外,如下表所示:
4 |
5 | | 架构 | 不支持 | 独家支持 |
6 | | ------ | ------------------------------------------------------------ | ------------------- | --- |
7 | | ARM | | Zerotier, Container |
8 | | ARM64 | | Zerotier, Container |
9 | | MIPSBE | Zerotier, Dude server | |
10 | | MMIPS | Zerotier | | |
11 | | SMIPS | Zerotier, DOT1X, BGP, MPLS, PIMSM, Dude server, User manager | |
12 | | TILE | Zerotier | |
13 | | PPC | Zerotier, Dude server | |
14 | | X86 PC | Zerotier, Cloud | Container |
15 | | CHR VM | | |
16 |
17 | 除了功能之外,根据设备的特定型号,硬件功能也存在一些差异。对于这些差异,请参阅以下文章:
18 |
19 | - WiFi Wave2 [https://help.mikrotik.com/docs/display/ROS/WifiWave2](https://help.mikrotik.com/docs/display/ROS/WifiWave2)
20 | - L3 Hardware offloading [https://help.mikrotik.com/docs/display/ROS/L3+Hardware+Offloading#L3HardwareOffloading-L3HWDeviceSupport](https://help.mikrotik.com/docs/display/ROS/L3+Hardware+Offloading#L3HardwareOffloading-L3HWDeviceSupport)
21 | - PTP [https://help.mikrotik.com/docs/display/ROS/Precision+Time+Protocol](https://help.mikrotik.com/docs/display/ROS/Precision+Time+Protocol)
22 | - Switch chip features [https://help.mikrotik.com/docs/display/ROS/Switch+Chip+Features](https://help.mikrotik.com/docs/display/ROS/Switch+Chip+Features)
23 |
--------------------------------------------------------------------------------
/source/Getting_started/Software_Specifications/index.rst:
--------------------------------------------------------------------------------
1 | 软件规范
2 | ===============================
3 |
4 | .. toctree::
5 | :maxdepth: 2
6 |
7 | content.md
8 | Feature_support_based_on_architecture.md
9 |
10 |
11 |
--------------------------------------------------------------------------------
/source/Getting_started/Supout.rif/content.md:
--------------------------------------------------------------------------------
1 | # 什么是supout.rif文件?
2 |
3 | 支持文件用于调试 MikroTik RouterOS 并更快地解决支持问题。 MikroTik Router的所有信息都保存在一个二进制文件中,该文件保存在路由器中,可以使用FTP从路由器上下载。 如果需要,你还可以在具有闪存类型内存或外部存储驱动器的设备上的“/flash”文件夹中生成文件,方法是指定文件“name=flash/supout.rif”的完整路径。 你可以在你的 [Mikrotik 帐户](https://www.mikrotik.com/) 中查看此文件的内容,只需单击左侧栏中的“Supout.rif 查看器”并上传文件。
4 |
5 | 此文件包含你的所有路由器配置、日志和一些其他详细信息,可帮助 MikroTik 支持人员解决你的问题。 该文件不包含敏感信息或路由器密码。
6 |
7 | ## 创建支持输出文件
8 |
9 | ### Winbox
10 |
11 | 要在 Winbox 中生成此文件,请单击“Make Supout.rif”。
12 |
13 | 要将文件保存到你的计算机,请用鼠标右键单击文件并选择“Download”获取文件,或者只需将文件拖到桌面即可。
14 |
15 | 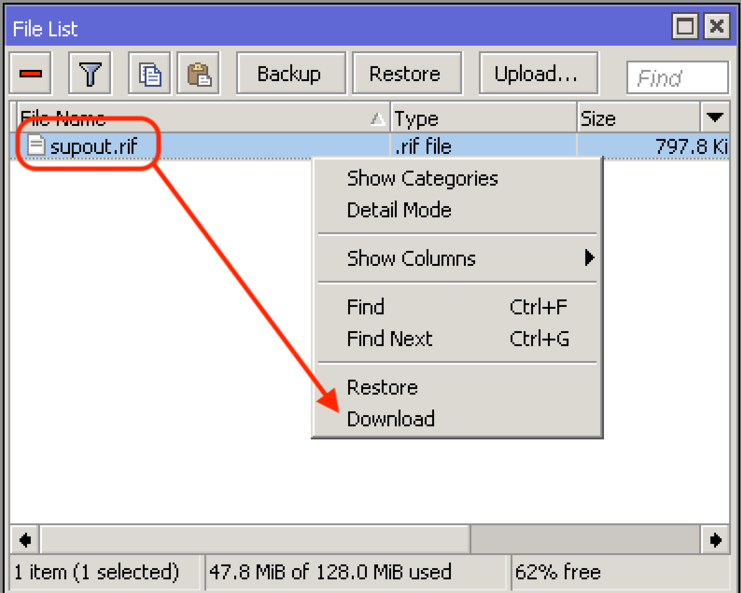
16 |
17 | ### Webfig
18 |
19 | 要在 Webfig 中生成此文件,请单击“制作 Supout.rif”,然后单击“Download”下载到你的计算机。
20 |
21 | 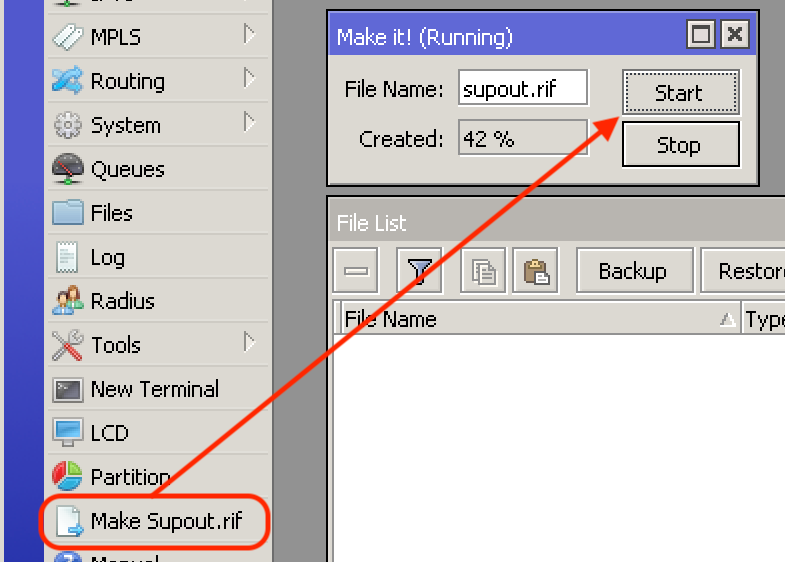
22 |
23 | 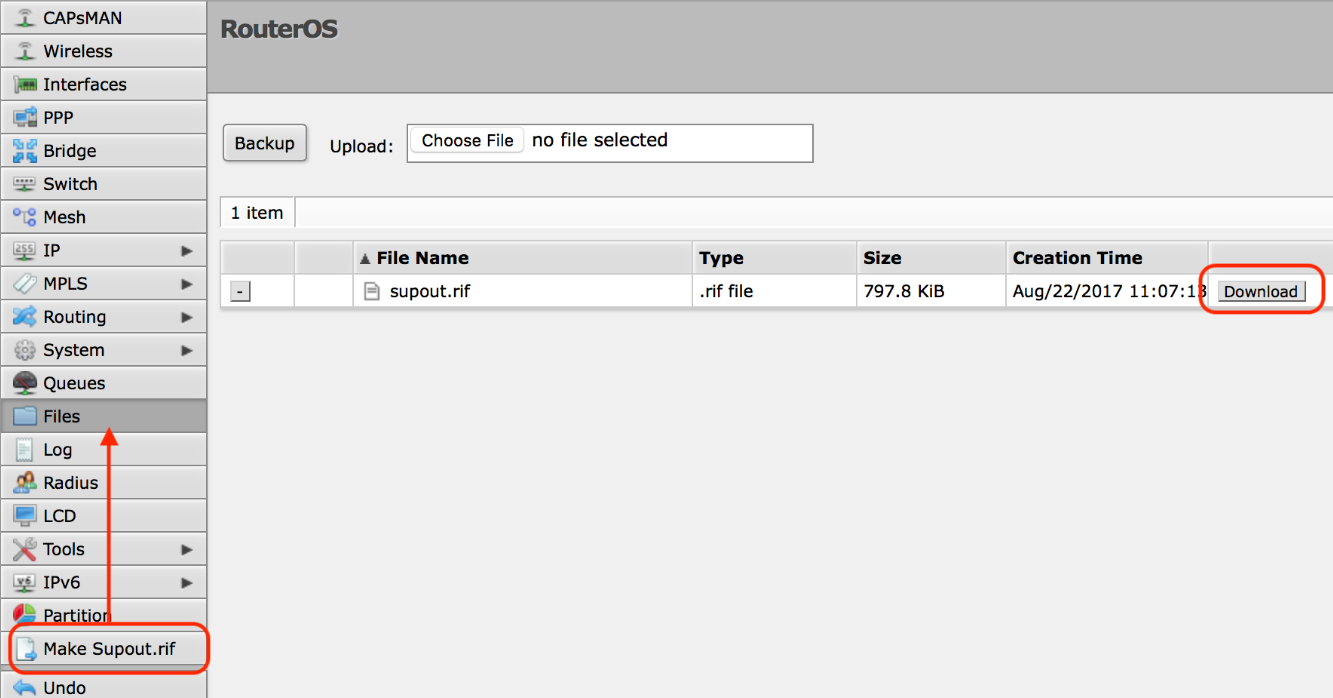
24 |
25 | ### 控制台
26 |
27 | 要生成此文件,请在命令行中键入:
28 |
29 | `/system sup-out put name =supout.rif`
30 |
--------------------------------------------------------------------------------
/source/Getting_started/Supout.rif/index.rst:
--------------------------------------------------------------------------------
1 | supout.rif文件
2 | ===============================
3 |
4 | .. toctree::
5 | :maxdepth: 2
6 |
7 | content.md
8 |
9 |
10 |
--------------------------------------------------------------------------------
/source/Getting_started/Upgrading_and_installation/index.rst:
--------------------------------------------------------------------------------
1 | 升级和安装
2 | ===============================
3 |
4 |
5 | .. toctree::
6 | :maxdepth: 2
7 |
8 | content.md
9 | Packages.md
10 |
11 |
--------------------------------------------------------------------------------
/source/Getting_started/Upgrading_to_v7/index.rst:
--------------------------------------------------------------------------------
1 | 升级到V7
2 | ===============================
3 |
4 | .. toctree::
5 | :maxdepth: 2
6 |
7 | content.md
8 |
9 |
10 |
--------------------------------------------------------------------------------
/source/Getting_started/index.rst:
--------------------------------------------------------------------------------
1 | 入门 - RouterOS - MikroTik文档
2 | ===============================
3 |
4 | RouterOS是一个基于Linux内核的独立操作系统。它为MikroTik硬件设备提供动力,但也可用于虚拟机。
5 | 如果你正在阅读本文档并且之前没有使用 RouterOS 的经验,请使用左侧的菜单来了解 RouterOS 的第一步。连接到设备的不同方法在 `管理工具`_ 部分讨论。
6 |
7 |
8 | .. _管理工具: https://help.mikrotik.com/docs/display/ROS/Management+tools
9 |
10 |
11 | .. toctree::
12 | :maxdepth: 1
13 |
14 | Software_Specifications/index.rst
15 | First_Time_Configuration/index.rst
16 | Upgrading_and_installation/index.rst
17 | Configuration_Management/index.rst
18 | Console/index.rst
19 | Reset_Button/index.rst
20 | Backup/index.rst
21 | Netinstall/index.rst
22 | Supout.rif/index.rst
23 | RouterOS_license_keys/index.rst
24 | Cloud_Hosted_Router/index.rst
25 | Upgrading_to_v7/index.rst
26 | RouterBOOT/index.rst
27 |
28 |
29 |
--------------------------------------------------------------------------------
/source/Hardware/Disks/index.rst:
--------------------------------------------------------------------------------
1 | 硬盘
2 | ========================
3 |
4 | .. toctree::
5 | :maxdepth: 2
6 |
7 | content.md
--------------------------------------------------------------------------------
/source/Hardware/Grounding/content.md:
--------------------------------------------------------------------------------
1 | # 介绍
2 |
3 | 屏蔽电缆安装设施(塔和桅杆)以及天线和路由器本身必须正确接地,所有外部天线电缆上必须安装避雷器(靠近天线或天线本身),防止设备损坏和人员受伤。注意,如果不接地,避雷器不会有任何效果。
4 |
5 | 使用带有抗腐蚀接头的1 AWG(直径7mm)电线接地。一定要检查使用的接地设施是否确实是功能性的(而不是在一些场地上存在的装饰性接地)。对于较小的设备,可以使用更细的电线。
6 |
7 | 1. 只应该用屏蔽和户外使用的以太网电缆,磁屏蔽层要通过屏蔽RJ-45连接器或焊接到RJ45或接地线的额外电线接地。
8 | 2. 接地线应连接到RouterBOARD(到电路板固定在室外箱体上的安装点),此线连接到塔的底部,与塔的连接符合标准。天线接地线连接在RouterBOARD户外箱附近,此线可与RouterBOARD接地线相同。
9 | 3. 不建议使用以太网端口防雷器,因为大多数防雷器不适合用于PoE(它们会缩短PoE供电)。如果使用保护器,可以放置在室外机箱上,在那里连接RouterBOARD和接地垫。
10 |
11 | 户外机箱上的接地线连接螺丝示例。
12 |
13 | 
14 |
15 | 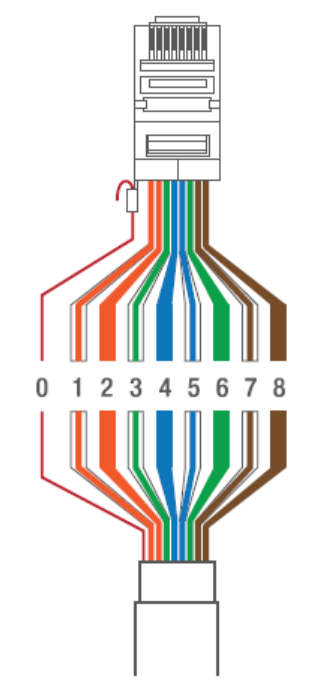
16 |
17 | ## RouterBOARD设备的ESD保护
18 |
19 | 1. 三个箭头标志以太网端口内部的接地,屏蔽电缆通过金属以太网连接器把屏蔽层连接到这两个接地引脚。
20 | 2. 中间的箭头指向端口内的金属板,将接地引脚连接到电路板上。板子需要在安装孔处接地(当你把板子安装在机箱内时,把接地线放在螺丝上)。任何电涌都会从接地引脚到接地板,再到电路板,然后再到接地。
21 | 3. 两个独立的箭头显示了电路板上的ESD保护芯片-在没有屏蔽线的情况下,用来保护CPU和电路板的其他部分。
22 |
23 | 如果只用屏蔽线,而不把板子接地,保护效果就不太好。需要做这两件事才能成功。可能的方法见下文,建议采用方案1。
24 |
25 | 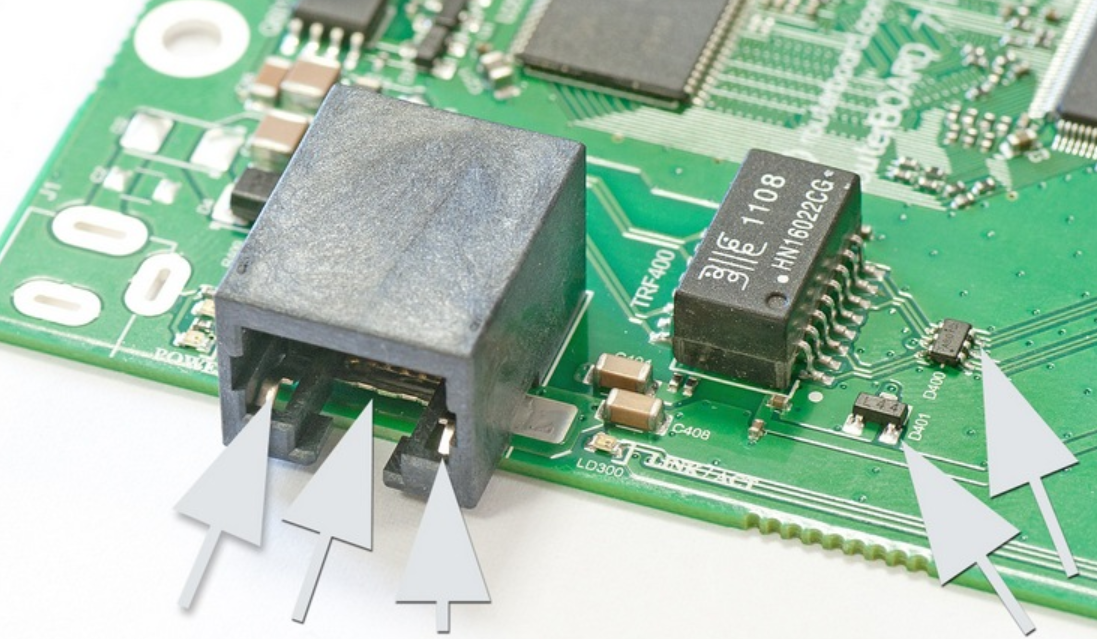
26 |
27 | ## RouterBOARD接地
28 |
29 | 有两种方法,其中一种更有效。
30 |
31 | 有屏蔽的PoE连接器:
32 |
33 | 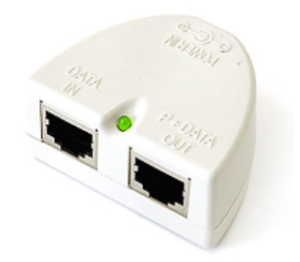
34 |
35 | 1. **用屏蔽电缆+板子接地**。如果把接地连接到RB711的安装点(或SXT门内的安装环),不一定要在屏蔽电缆的另一端对设备进行接地。只要使用屏蔽电缆就可以了。也不需要特殊的PoE。这是防止所有ESD的最佳选择。
36 | 2. **只用屏蔽电缆**。如果不能把RB711/SXT/本身接地,可以把屏蔽电缆另一端的设备(交换机、路由器等)接地。如果要用PoE,则需要用连接器周围有金属屏蔽的注入器,因为它可以用屏蔽电缆。不建议用这种方法,最好将电路板本身也接地(选项1)。
37 |
38 | ## 上述方法的说明
39 |
40 | 方法1(屏蔽电缆+设备接地):
41 |
42 | 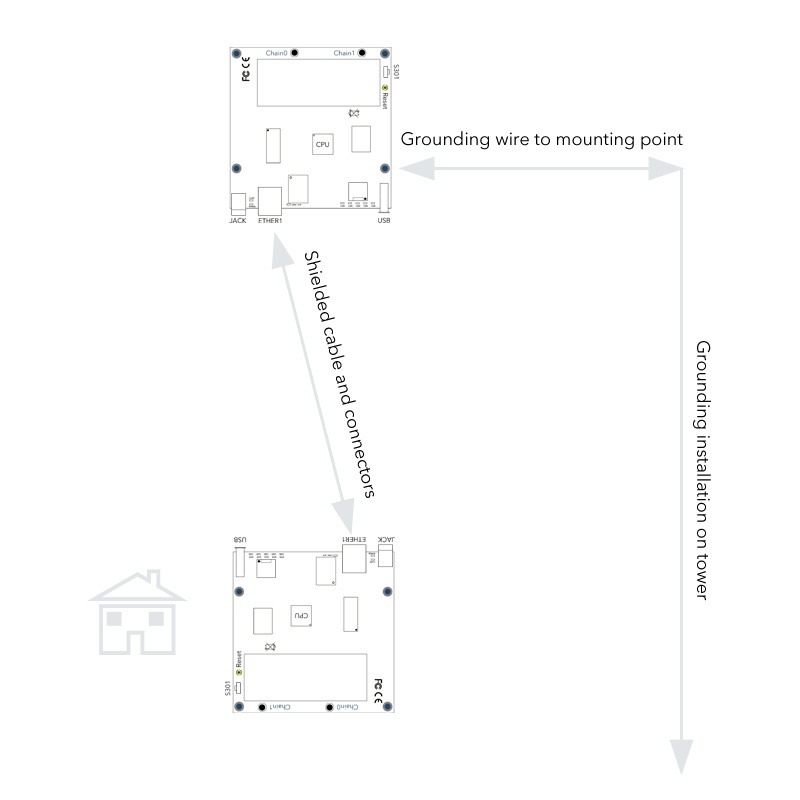
43 |
44 | 方法2(只有屏蔽电缆):
45 |
46 | 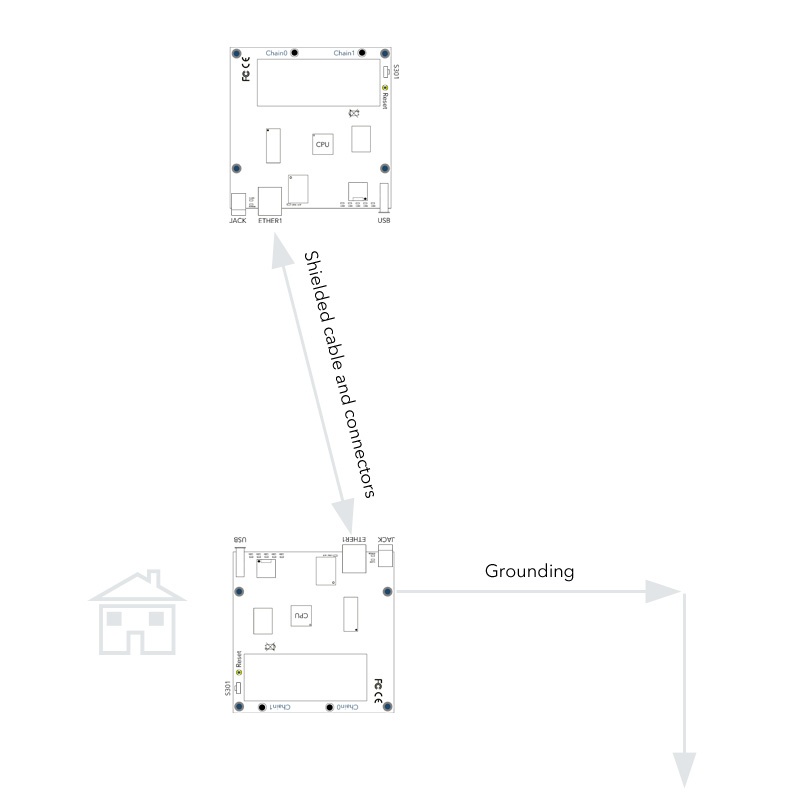
47 |
48 | 如果PSE为MikroTik设备供电,不该把正极连接到PE上使用。否则可能会造成短路,伤害你和设备。
49 |
50 | 即使不把室外的无线设备接地,而只使用屏蔽电缆,仍然应该把所连接的设备在室内接地。例如,交换机、路由器板或PC。
51 |
--------------------------------------------------------------------------------
/source/Hardware/Grounding/index.rst:
--------------------------------------------------------------------------------
1 | 接地
2 | ========================
3 |
4 | .. toctree::
5 | :maxdepth: 2
6 |
7 | content.md
--------------------------------------------------------------------------------
/source/Hardware/LCD_Touchscreen/index.rst:
--------------------------------------------------------------------------------
1 | LCD触摸屏
2 | ========================
3 |
4 | .. toctree::
5 | :maxdepth: 2
6 |
7 | content.md
--------------------------------------------------------------------------------
/source/Hardware/LEDs/index.rst:
--------------------------------------------------------------------------------
1 | LED
2 | ========================
3 |
4 | .. toctree::
5 | :maxdepth: 2
6 |
7 | content.md
--------------------------------------------------------------------------------
/source/Hardware/MTU_in_RouterOS/index.rst:
--------------------------------------------------------------------------------
1 | RouterOS的MTU
2 | ========================
3 |
4 | .. toctree::
5 | :maxdepth: 2
6 |
7 | content.md
--------------------------------------------------------------------------------
/source/Hardware/Peripherals/index.rst:
--------------------------------------------------------------------------------
1 | 外设
2 | ========================
3 |
4 | .. toctree::
5 | :maxdepth: 2
6 |
7 | content.md
--------------------------------------------------------------------------------
/source/Hardware/PoE-Out/index.rst:
--------------------------------------------------------------------------------
1 | PoE-OUT
2 | ========================
3 |
4 | .. toctree::
5 | :maxdepth: 2
6 |
7 | content.md
--------------------------------------------------------------------------------
/source/Hardware/Ports/index.rst:
--------------------------------------------------------------------------------
1 | 端口
2 | ========================
3 |
4 | .. toctree::
5 | :maxdepth: 2
6 |
7 | content.md
--------------------------------------------------------------------------------
/source/Hardware/Product_Naming/index.rst:
--------------------------------------------------------------------------------
1 | 产品命名
2 | ========================
3 |
4 | .. toctree::
5 | :maxdepth: 2
6 |
7 | content.md
--------------------------------------------------------------------------------
/source/Hardware/RouterBOARD/index.rst:
--------------------------------------------------------------------------------
1 | RouterBOARD
2 | ========================
3 |
4 | .. toctree::
5 | :maxdepth: 2
6 |
7 | content.md
--------------------------------------------------------------------------------
/source/Hardware/index.rst:
--------------------------------------------------------------------------------
1 | 硬件
2 | =====================
3 |
4 | .. toctree::
5 | :maxdepth: 2
6 |
7 | Disks/index.rst
8 | Grounding/index.rst
9 | LCD_Touchscreen/index.rst
10 | LEDs/index.rst
11 | MTU_in_RouterOS/index.rst
12 | Peripherals/index.rst
13 | PoE-Out/index.rst
14 | Ports/index.rst
15 | Product_Naming/index.rst
16 | RouterBOARD/index.rst
17 |
--------------------------------------------------------------------------------
/source/High_Availability_Solutions/Bonding/index.rst:
--------------------------------------------------------------------------------
1 | 绑定
2 | =====================
3 |
4 | .. toctree::
5 | :maxdepth: 1
6 |
7 | content.md
--------------------------------------------------------------------------------
/source/High_Availability_Solutions/HA_Case_Studies/Bonding_Examples.md:
--------------------------------------------------------------------------------
1 | # 在两个无线链路上绑定EoIP隧道
2 |
3 | 这是把多个网络接口聚合到一个管道的例子。特别展示了如何聚合多个虚拟(EoIP)接口获得最大吞吐量(MT),并强调了可用性。
4 |
5 | ## 网络图
6 |
7 | 两个路由器R1和R2通过多跳无线链路相互连接。两边的无线接口都有IP地址。
8 |
9 | 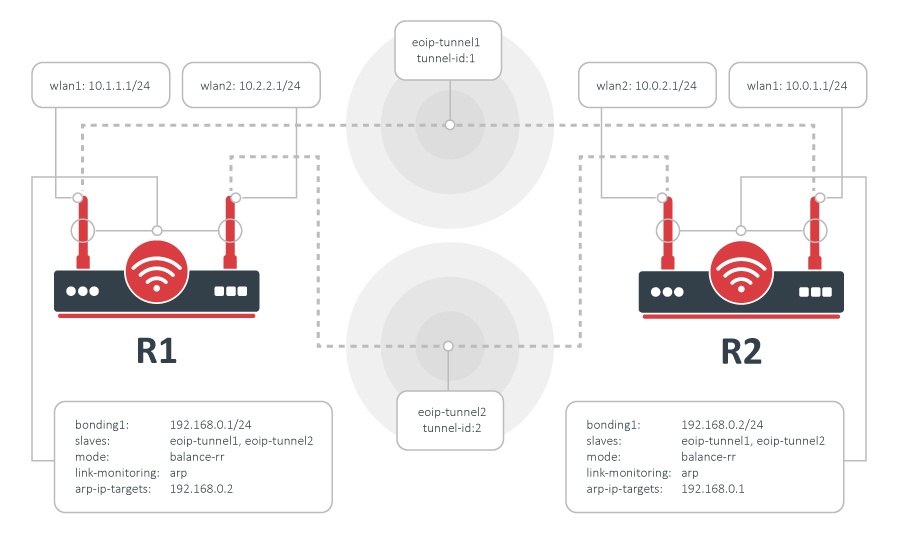
10 |
11 | ## 开始使用
12 |
13 | 绑定只能用于OSI第二层(以太网级别)的连接。因此需要在每个无线链接上创建EoIP接口。方法如下:
14 |
15 | 在路由器R1上:
16 |
17 | `[admin@MikroTik] > /interface eoip add remote-address =10.0.1.1/24 tunnel-id =1 [admin@MikroTik] > /interface eoip add remote-address =10.0.2.1/24 tunnel-id =2`
18 |
19 | 在路由器R2上:
20 |
21 | `[admin@MikroTik] > /interface eoip add remote-address =10.1.1.1/24 tunnel-id =1 [admin@MikroTik] > /interface eoip add remote-address =10.2.2.1/24 tunnel-id =2`
22 |
23 | 第二步是添加一个绑定接口,并指定EoIP接口为从机:
24 |
25 | R1:
26 |
27 | `[admin@MikroTik] > / interface bonding add slaves =eoip-tunnel1,eoip-tunnel2 mode =balance-rr`
28 |
29 | R2:
30 |
31 | `[admin@MikroTik] > / interface bonding add slaves =eoip-tunnel1,eoip-tunnel2 mode =balance-rr`
32 |
33 | 最后一步是为绑定接口添加IP地址:
34 |
35 | R1:
36 |
37 | `[admin@MikroTik] > / ip address add address 192.168.0.1/24 interface =bonding1`
38 |
39 | R2:
40 |
41 | `[admin@MikroTik] > / ip address add address 192.168.0.2/24 interface =bonding1`
42 |
43 | ## 测试配置
44 |
45 | 现在,两台路由器能用192.168.0.0/24网络的地址互相通信。为了验证绑定接口的功能,执行以下操作:
46 |
47 | R1:
48 |
49 | `[admin@MikroTik] > /interface monitor-traffic eoip-tunnel1,eoip-tunnel2`
50 |
51 | R2:
52 |
53 | `[admin@MikroTik] > /tool bandwidth-test 192.168.0.1 direction=transmit`
54 |
55 | 应该看到,流量在两个EoIP接口上被平均分配。:
56 |
57 | ```shell
58 | [admin@MikroTik] > /int monitor-traffic eoip-tunnel1,eoip-tunnel2
59 | received-packets-per-second : 685 685
60 | received-bits-per-second : 8.0Mbps 8.0Mbps
61 | sent-packets-per-second : 21 20
62 | sent-bits-per-second : 11.9kbps 11.0kbps
63 | received-packets-per-second : 898 899
64 | received-bits-per-second : 10.6Mbps 10.6Mbps
65 | sent-packets-per-second : 20 21
66 | sent-bits-per-second : 11.0kbps 11.9kbps
67 | received-packets-per-second : 975 975
68 | received-bits-per-second : 11.5Mbps 11.5Mbps
69 | sent-packets-per-second : 22 22
70 | sent-bits-per-second : 12.4kbps 12.3kbps
71 | received-packets-per-second : 980 980
72 | received-bits-per-second : 11.6Mbps 11.6Mbps
73 | sent-packets-per-second : 21 21
74 | sent-bits-per-second : 11.9kbps 11.8kbps
75 | received-packets-per-second : 977 977
76 | received-bits-per-second : 11.6Mbps 11.5Mbps
77 | sent-packets-per-second : 21 21
78 | sent-bits-per-second : 11.9kbps 11.8kbps
79 | -- [Q quit|D dump|C-z pause]
80 | ```
81 |
82 | ## 链路监控
83 |
84 | 很容易注意到,在上面的配置中,只要任何一条链路出现故障,绑定接口的吞吐量就会崩溃。这是因为没有进行链路监控,因此,绑定驱动程序不知道基础链路的问题。在大多数绑定配置中,启用链接监控是必须的。要启用ARP链路监控,请执行以下操作:
85 |
86 | R1:
87 |
88 | `[admin@MikroTik] > / interface bonding set bonding1 link-monitoring =arp arp-ip-targets =192.168.0.2`
89 |
90 | R2:
91 |
92 | `[admin@MikroTik] > / interface bonding set bonding1 link-monitoring =arp arp-ip-targets =192.168.0.1`
93 |
--------------------------------------------------------------------------------
/source/High_Availability_Solutions/HA_Case_Studies/index.rst:
--------------------------------------------------------------------------------
1 | HA案例研究
2 | =====================
3 |
4 | .. toctree::
5 | :maxdepth: 2
6 |
7 | Bonding_Examples.md
8 | VRRP_Configuration_Examples.md
--------------------------------------------------------------------------------
/source/High_Availability_Solutions/Load_Balancing/Bonding_Load_Balancing.md:
--------------------------------------------------------------------------------
1 | # 绑定负载均衡概述
2 |
3 | Bonding is a technology that allows the aggregation of multiple ethernet-like interfaces into a single virtual link, thus getting higher data rates and providing failover.
4 |
5 | 
6 |
7 | ## 配置实例
8 |
9 | 假设在每个路由器上有两个以太网接口(SW1和SW2),希望在这两个路由器之间获得最大的速率。为了实现这一点,请按以下步骤:
10 |
11 | 1. 确保接口上没有IP地址,这些接口将被设为绑定接口。
12 | 2. 在SW1上添加绑定接口和IP地址:
13 |
14 | `/interface bonding add mode =802.3ad slaves =ether1,ether2 name =bond1`
15 |
16 | `/ip address add address =172.16.0.1/24 interface =bond1`
17 |
18 | 3. 在SW2做同样的设置:
19 |
20 | `/interface bonding add mode =802.3ad slaves =ether1,ether2 name =bond1`
21 |
22 | `/ip address add address =172.16.0.2/24 interface =bond1`
23 |
24 | 4. 从Router1测试连接:
25 |
26 | ```shell
27 | [admin@Router1] > ping 172.16.0.2
28 | SEQ HOST SIZE TTL TIME STATUS
29 | 0 172.16.0.2 56 64 0ms
30 | 1 172.16.0.2 56 64 0ms
31 | 2 172.16.0.2 56 64 0ms
32 | sent =3 received =3 packet-loss =0% min-rtt =0ms avg-rtt =0ms max-rtt =0ms
33 | ```
34 |
35 | The bonding interface has to be configured on both hosts and needs a couple of seconds to get connectivity with its peers.
36 |
37 | ## 平衡模式
38 |
39 | ## 802.3ad
40 |
41 | 802.3ad模式是一个IEEE标准,也叫LACP(链路聚合控制协议)。包括聚合体的自动配置,要对交换机进行最小配置。标准规定,帧将按顺序传送,连接不应出现数据包的错误排序。标准还规定,聚合中的所有设备必须以相同的速度和双工模式运行。
42 |
43 | LACP根据散列的协议头信息在活动端口之间平衡出站流量,接受来自任何活动端口的入站流量。哈希值包括以太网源和目标地址,如果有的话,还包括VLAN标签,以及IPv4/IPv6源和目标地址。如何计算取决于传输哈希策略参数。不建议使用ARP链路监控,因为LACP对等设备上的发送散列策略,ARP回复可能只到达一个从属端口。可能导致不平衡的传输流量,所以推荐使用MII链路监控。
44 |
45 | ## balance-xor
46 |
47 | 这种模式根据散列的协议头信息在活动端口之间平衡出站流量,接受来自任何活动端口的入站流量。该模式和 [LACP](https://wiki.mikrotik.com/wiki/Manual:Interface/Bonding#802.3ad) 非常相似,只是没有标准化,与 **layer-3-and-4** 的哈希策略一起工作。该模式可以和静态链路聚合组(LAG)接口一起工作。
48 |
49 | ## 其他信息
50 |
51 | 更多信息 [Bonding in RouterOS!](https://help.mikrotik.com/docs/display/ROS/Bonding)
52 |
--------------------------------------------------------------------------------
/source/High_Availability_Solutions/Load_Balancing/Failover_WAN_Backup.md:
--------------------------------------------------------------------------------
1 | 不要忘了添加带有路由标记的路由
2 |
3 | # 故障转移介绍
4 |
5 | 在这篇文章中研究另一种使用递归路由和路由部分的作用域进行故障转移的高级方法。当一条路由(无论是静态还是动态学习的)的下一跳没有直接连接到本地路由器时,就会出现递归路由。有必要限制一组可用于查找直接下一跳的路由。例如,RIP或OSPF路由的Nexthop值应该是可以直接到达的,应该只使用连接的路由来查询。这是用范围和目标范围属性实现的。
6 |
7 | ## 配置概述
8 |
9 | 假设有以下设置:网关设备有两个公共网络上行链路。然后将流量分为两部分,一部分名称为 "ISP1",另一部分为 "ISP2",相应地通过ether1和ether2。在这个设置中,要监控两台主机。主机1和主机2。使用IP为8.8.8.8(Host1)和8.8.4.4(Host2)的谷歌DNS服务器,不一定专门使用这些地址。
10 |
11 | 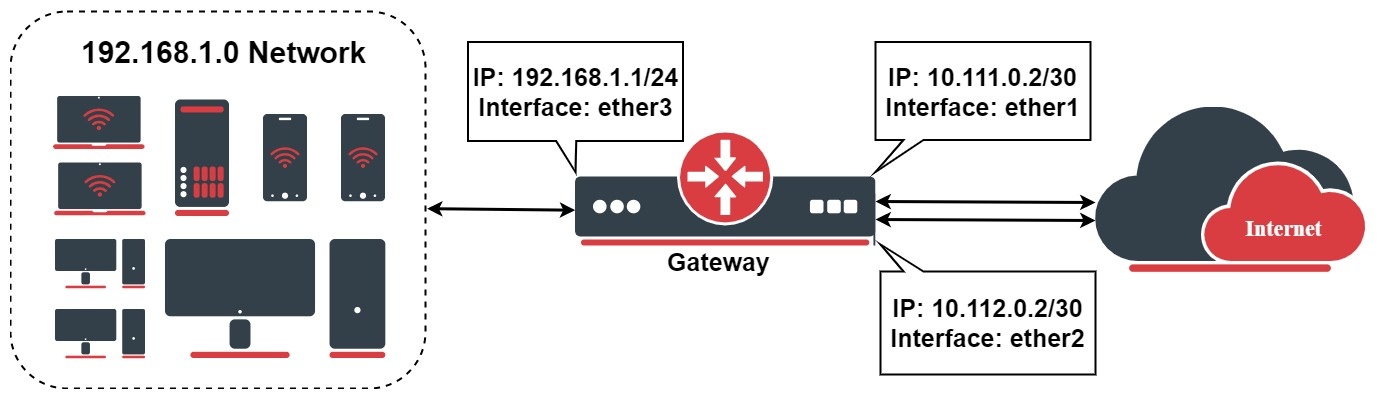
12 |
13 | 在详细的例子说明之前,在一个设置中,在公共IP后面有私有IP地址,要配置源NAT:
14 |
15 | `/ip/firewall/nat`
16 |
17 | `add chain =srcnat action =masquerade out-interface =ether1`
18 |
19 | `add chain =srcnat action =masquerade out-interface =ether2`
20 |
21 | 从配置路由表和防火墙混合规则开始标记流量,当进入路由部分时,将预先配置好一切。
22 |
23 | `/routing/table`
24 |
25 | `add fib name =to_ISP1`
26 |
27 | `add fib name =to_ISP2`
28 |
29 | `/ip/firewall/mangle`
30 |
31 | `add chain =output connection-state =new connection-mark =no-mark action =mark-connection new-connection-mark =ISP1_conn out-interface =ether1`
32 |
33 | `add chain =output connection-mark =ISP1_conn action =mark-routing new-routing-mark =to_ISP1 out-interface =ether1`
34 |
35 | `add chain =output connection-state =new connection-mark =no-mark action =mark-connection new-connection-mark =ISP2_conn out-interface =ether2`
36 |
37 | `add chain =output connection-mark =ISP2_conn action =mark-routing new-routing-mark =to_ISP2 out-interface =ether2`
38 |
39 | 把路由配置分成三部分。首先在路由部分将Host1和Host2配置为目标地址。
40 |
41 | `/ip/route/`
42 |
43 | `add dst-address =8.8.8.8 scope =10 gateway =10.111.0.1`
44 |
45 | `add dst-address =8.8.4.4 scope =10 gateway =10.112.0.1`
46 |
47 | 现在配置将递归解析路由,只有在用ping可以到达时才会被激活。
48 |
49 | `/ip/route/`
50 |
51 | `add distance =1 gateway =8.8.8.8 routing-table =to_ISP1 target-scope =11 check-gateway =ping`
52 |
53 | `add distance =2 gateway =8.8.4.4 routing-table =to_ISP1 target-scope =11 check-gateway =ping`
54 |
55 | 为第二个网关配置类似的递归路由:
56 |
57 | `/ip/route/`
58 |
59 | `add distance =1 gateway =8.8.4.4 routing-table =to_ISP2 target-scope =11 check-gateway =ping`
60 |
61 | `add distance =2 gateway =8.8.8.8 routing-table =to_ISP2 target-scope =11 check-gateway =ping`
62 |
63 | ## 添加多个主机
64 |
65 | 在主机1和主机2失效时,相应的链接被认为是失效的。在本节中,使用两个额外的主机作为冗余。在这个例子中使用OpenDNS服务器Host1B(208.67.222.222)和Host2B(208.67.220.220):
66 |
67 | `/ip/route`
68 |
69 | `add dst-address =8.8.8.8 gateway =10.111.0.1 scope =10`
70 |
71 | `add dst-address =208.67.222.222 gateway =10.111.0.1 scope =10`
72 |
73 | `add dst-address =8.8.4.4 gateway =10.112.0.1 scope =10`
74 |
75 | `add dst-address =208.67.220.220 gateway =10.112.0.1 scope =10`
76 |
77 | 然后为 "虚拟 "跳数创建目的地,以便在进一步的路由中使用。用10.10.10.1和10.20.20.2作为例子,可以用不同的地址,但要确保它们不会覆盖设置中其他配置的IP地址。
78 |
79 | `/ip/route`
80 |
81 | `add dst-address =10.10.10.1 gateway =8.8.8.8 scope =10 target-scope =11 check-gateway =ping`
82 |
83 | `add dst-address =10.10.10.1 gateway =208.67.222.222 scope =10 target-scope =11 check-gateway =ping`
84 |
85 | `add dst-address =10.20.20.2 gateway =8.8.4.4 scope =10 target-scope =11 check-gateway =ping`
86 |
87 | `add dst-address =10.20.20.2 gateway =208.67.220.220 scope =10 target-scope =11 check-gateway =ping`
88 |
89 | 不要忘记添加带有路由标记的路由:
90 |
91 | `/ip/route`
92 |
93 | `add distance =1 gateway =10.10.10.1 routing-table =to_ISP1 target-scope =12`
94 |
95 | `add distance =2 gateway =10.20.20.2 routing-table =to_ISP1 target-scope =12`
96 |
97 | `add distance =1 gateway =10.20.20.2 routing-table =to_ISP2 target-scope =12`
98 |
99 | `add distance =2 gateway =10.10.10.1 routing-table =to_ISP2 target-scope =12`
100 |
--------------------------------------------------------------------------------
/source/High_Availability_Solutions/Load_Balancing/content.md:
--------------------------------------------------------------------------------
1 | # 介绍
2 |
3 | 网络负载均衡是在不使用BGP等路由协议的情况下,在两个或多个广域网链路上平衡流量的能力。
4 |
5 | 负载均衡的目的是将流量分散到多个链路上,以获得更好的链路使用率。可以在每个数据包或每个连接的基础上进行。
6 |
7 |
8 | | Method | Per-connection | Per-packet |
9 | | ------------------------------------------------------------ | -------------- | ---------- |
10 | | With the Firewall features - Firewall marking | **Yes** | **Yes** |
11 | | With the Firewall features - ECMP (Equal Cost Multi-Path) | **Yes** | No |
12 | | With the Firewall features - PCC (Per Connection Classifier) | **Yes** | No |
13 | | With the Firewall features - Nth | **Yes** | **Yes** |
14 | | Bonding | No | **Yes** |
15 | | OSPF | **Yes** | No |
16 | | BGP | **Yes** | No |
17 |
18 | ## 路由故障转移
19 |
20 | 这个例子解释了如何使用多个网关,当第一个网关发生故障时由另一个网关接管。首先是添加网关。为第二个网关配置更大的 **距离** 值,为第一个网关配置 **check-gateway** 。
21 |
22 | ```shell
23 | /ip route add gateway=192.168.1.1 distance=1 check-gateway=ping
24 | /ip route add gateway=192.168.2.1 distance=2
25 | ```
26 |
27 | 从第一个网关开始,因为它的距离较小(默认为1);_check-gateway_ 确保正常。当ping失败时,它禁用第一个网关,第二个网关会接管,当第一个网关恢复时,将恢复其功能。
28 |
--------------------------------------------------------------------------------
/source/High_Availability_Solutions/Load_Balancing/index.rst:
--------------------------------------------------------------------------------
1 | 负载均衡
2 | =====================
3 |
4 | .. toctree::
5 | :maxdepth: 2
6 |
7 | content.md
8 | Failover_WAN_Backup.md
9 | Firewall_Marking.md
10 | Bonding_Load_Balancing.md
11 | Per_connection_classifier.md
12 |
--------------------------------------------------------------------------------
/source/High_Availability_Solutions/Multi-chassis_Link_Aggregation_Group/index.rst:
--------------------------------------------------------------------------------
1 | 多机箱连接聚合组
2 | =====================
3 |
4 | .. toctree::
5 | :maxdepth: 2
6 |
7 | content.md
--------------------------------------------------------------------------------
/source/High_Availability_Solutions/VRRP/index.rst:
--------------------------------------------------------------------------------
1 | VRRP
2 | =====================
3 |
4 | .. toctree::
5 | :maxdepth: 2
6 |
7 | content.md
--------------------------------------------------------------------------------
/source/High_Availability_Solutions/index.rst:
--------------------------------------------------------------------------------
1 | 高可用性方案
2 | =====================
3 |
4 | .. toctree::
5 | :maxdepth: 2
6 |
7 | Bonding/index.rst
8 | HA_Case_Studies/index.rst
9 | Load_Balancing/index.rst
10 | Multi-chassis_Link_Aggregation_Group/index.rst
11 | VRRP/index.rst
12 |
--------------------------------------------------------------------------------
/source/IPv4_and_IPv6_Fundamentals/IP_Addressing/index.rst:
--------------------------------------------------------------------------------
1 | IP寻址
2 | ===============================
3 |
4 | .. toctree::
5 | :maxdepth: 2
6 |
7 | content.md
8 |
9 |
10 |
--------------------------------------------------------------------------------
/source/IPv4_and_IPv6_Fundamentals/IP_Pools/index.rst:
--------------------------------------------------------------------------------
1 | IP地址池
2 | ===============================
3 |
4 | .. toctree::
5 | :maxdepth: 2
6 |
7 | content.md
8 |
9 |
10 |
--------------------------------------------------------------------------------
/source/IPv4_and_IPv6_Fundamentals/IP_Routing/index.rst:
--------------------------------------------------------------------------------
1 | IP路由
2 | ===============================
3 |
4 | .. toctree::
5 | :maxdepth: 2
6 |
7 | content.md
8 |
9 |
10 |
--------------------------------------------------------------------------------
/source/IPv4_and_IPv6_Fundamentals/IP_Settings/index.rst:
--------------------------------------------------------------------------------
1 | IP设置
2 | ===============================
3 |
4 | .. toctree::
5 | :maxdepth: 2
6 |
7 | content.md
8 |
9 |
10 |
--------------------------------------------------------------------------------
/source/IPv4_and_IPv6_Fundamentals/IPv6_Neighbor_Discovery/index.rst:
--------------------------------------------------------------------------------
1 | IPV6邻居发现
2 | ===============================
3 |
4 | .. toctree::
5 | :maxdepth: 2
6 |
7 | content.md
8 |
9 |
10 |
--------------------------------------------------------------------------------
/source/IPv4_and_IPv6_Fundamentals/index.rst:
--------------------------------------------------------------------------------
1 | IPV4和IPV6基础
2 | ===============================
3 |
4 | .. toctree::
5 | :maxdepth: 1
6 |
7 | content.md
8 | IP_Addressing/index.rst
9 | IPv6_Neighbor_Discovery/index.rst
10 | IP_Pools/index.rst
11 | IP_Routing/index.rst
12 | IP_Settings/index.rst
13 |
14 |
15 |
16 |
17 |
18 |
--------------------------------------------------------------------------------
/source/Internet_of_Things/Bluetooth/index.rst:
--------------------------------------------------------------------------------
1 | 蓝牙
2 | ===============================
3 |
4 | .. toctree::
5 | :maxdepth: 2
6 |
7 | content.md
8 | Bluetooth_tag-tracking_using_MQTT_and_ThingsBoard.md
9 |
10 |
11 |
--------------------------------------------------------------------------------
/source/Internet_of_Things/GPIO/index.rst:
--------------------------------------------------------------------------------
1 | GPIO
2 | ===============================
3 |
4 | .. toctree::
5 | :maxdepth: 2
6 |
7 | content.md
8 |
9 |
10 |
--------------------------------------------------------------------------------
/source/Internet_of_Things/Lora/Step_by_step_installation.md:
--------------------------------------------------------------------------------
1 | ## LoRa卡的安装
2 |
3 | 本指南将以LtAP LTE套件为例进行说明。
4 |
5 | 打开路由器外壳,卸下所有的螺丝,小心地将上机箱移到左侧,因为LTE天线是连接在机箱的内侧。
6 |
7 |
8 |
9 | 
10 |
11 |
12 |
13 | 将R11e-LoRa卡插入mini-PCIe插槽,将两颗螺丝钉套在螺纹件上。
14 |
15 |
16 |
17 | 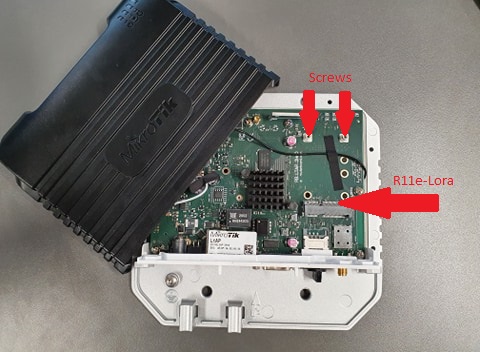
18 |
19 |
20 |
21 | 把天线连接到卡上(UFL连接器)
22 |
23 | 也可以使用UFL → SMA电缆,因为LtAP的外壳有一个专门的插槽。
24 |
25 |
26 |
27 | 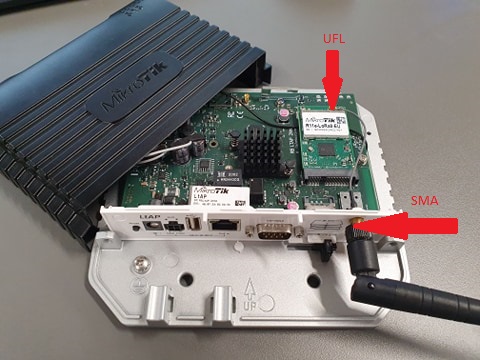
28 |
29 |
30 |
31 | 前面的步骤完成后,就可以关闭路由器外壳,继续进行配置。
32 |
33 | ## 配置
34 |
35 | ### GUI设置
36 |
37 | 通过Winbox或WebFig连接到你的路由器。
38 |
39 | Winbox可以在下面的链接中下载:
40 |
41 | [https://mikrotik.com/download](https://mikrotik.com/download)
42 |
43 |
44 |
45 | 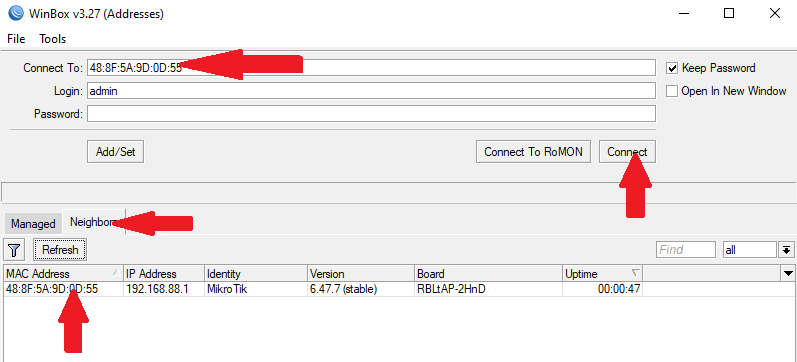
46 |
47 |
48 |
49 | 强烈建议将RouterOS版本升级到最新的可用版本。安装新版本将执行重启。
50 |
51 |
52 |
53 | 
54 |
55 |
56 |
57 | 为路由器结构和rOS版本下载额外的软件包。可以在Winbox窗口的顶部或系统→资源→架构名称中看到你的路由器架构类型。
58 |
59 | [https://mikrotik.com/download](https://mikrotik.com/download)
60 |
61 |
62 |
63 | 
64 |
65 |
66 |
67 | 一旦下载并解压了软件包,将LoRa软件包上传到你的路由器,可以通过拖放来完成。上传完成后,它应该出现在文件夹中,重新启动你的路由器(系统→重启)安装该软件包。
68 |
69 |
70 |
71 | 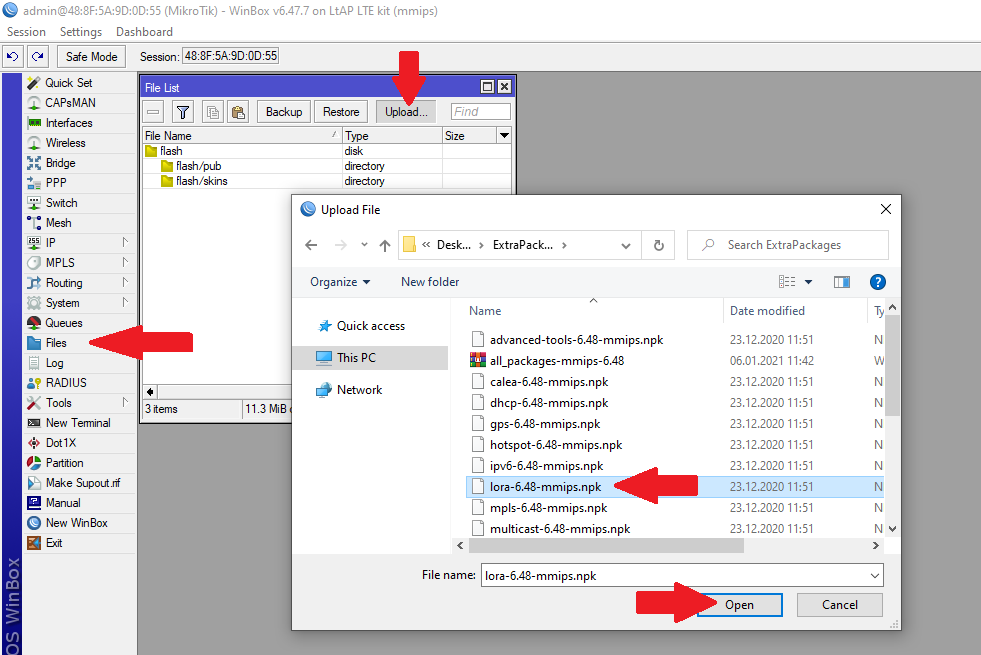
72 |
73 |
74 |
75 | 重启后,软件包应该在软件包列表中可见。
76 |
77 |
78 |
79 | 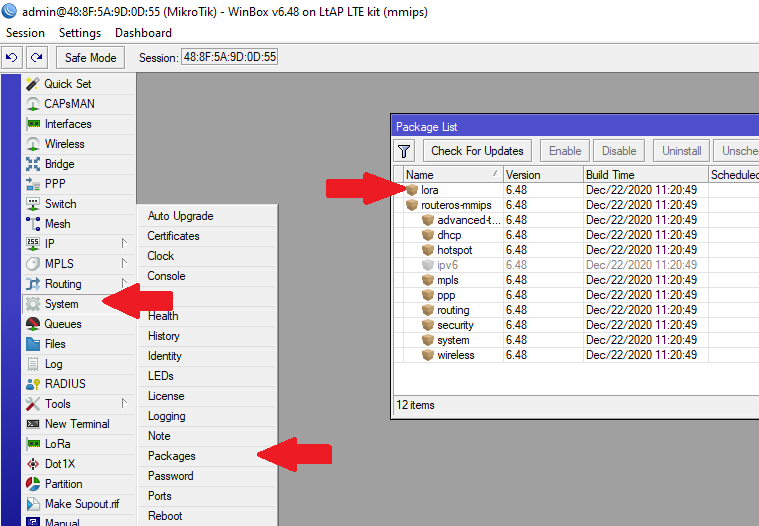
80 |
81 |
82 |
83 | 检查LoRa网关是否已经初始化,如果没有,检查USB类型是否设置为Mini-PCIe。
84 |
85 |
86 |
87 | 
88 |
89 |
90 |
91 | 网关显示出来后选择它,选择默认网络服务器,或者添加自己的网络服务器并启用它。
92 |
93 |
94 |
95 | 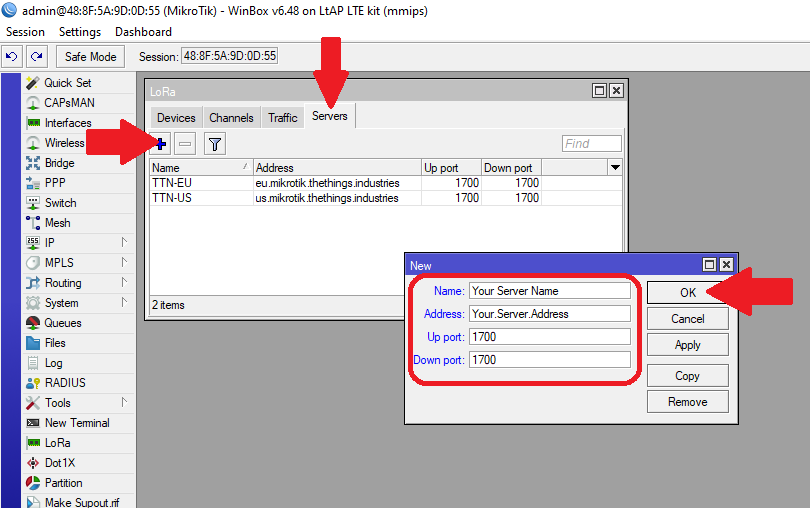
96 |
97 |
98 |
99 | 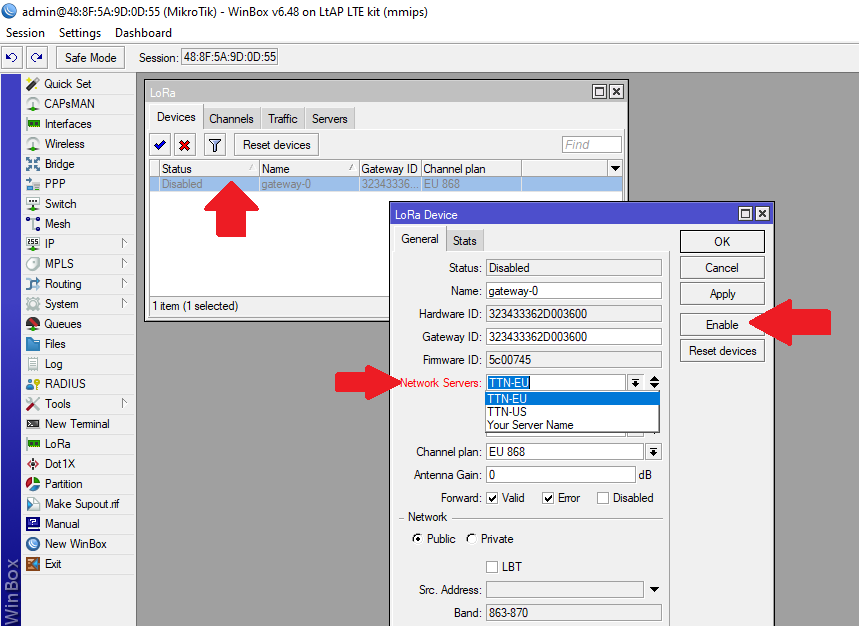
100 |
101 |
102 |
103 | 导航到流量选项卡,监测周围节点发送的请求。
104 |
105 |
106 |
107 | 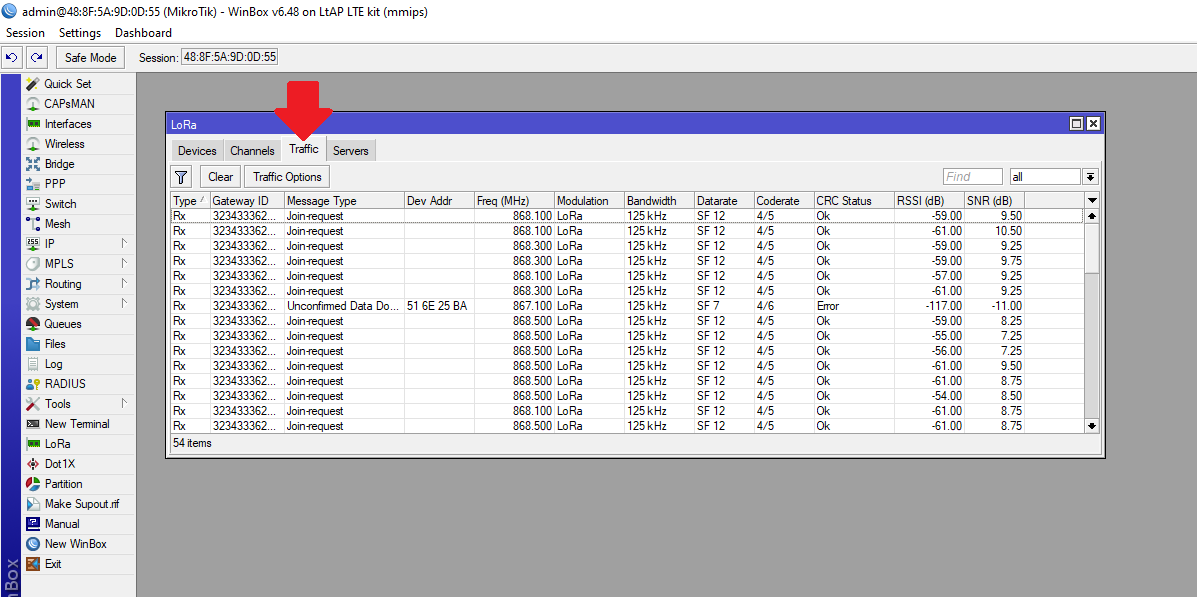
108 |
109 |
110 |
111 | LoRa mini-PCIe卡的基本安装和配置到此结束。有关其他设置,请查看: [General Properties](https://help.mikrotik.com/docs/display/ROS/General+Properties)
112 |
113 |
--------------------------------------------------------------------------------
/source/Internet_of_Things/Lora/The_Things_Network.md:
--------------------------------------------------------------------------------
1 | # 物联网
2 |
3 | 一旦在路由器上安装了lora软件包,并在 [The Things Network](https://thethingsnetwork.org) 上创建了一个账户,就可以设置运行中的网关了
4 |
5 | - 登录你的账户,进入控制台并选择网关
6 |
7 | 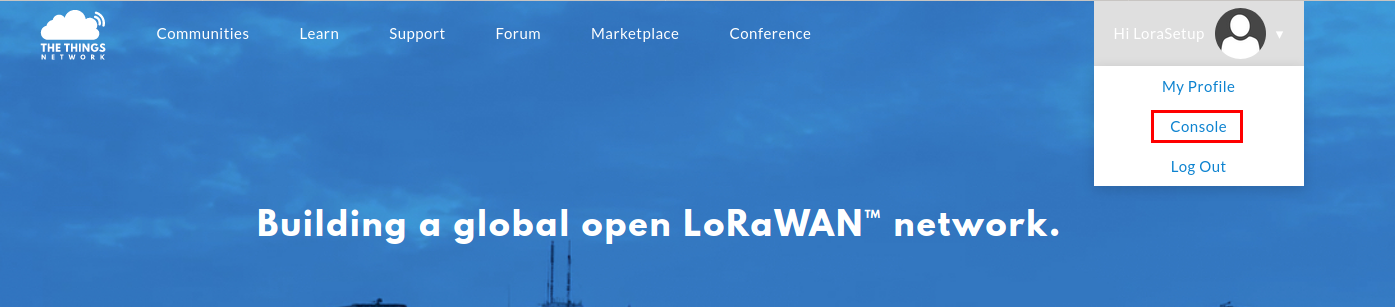
8 |
9 |
10 |
11 | - 选择 __注册网关_ 并填写空白。网关EUI可以在lora界面中找到
12 |
13 | 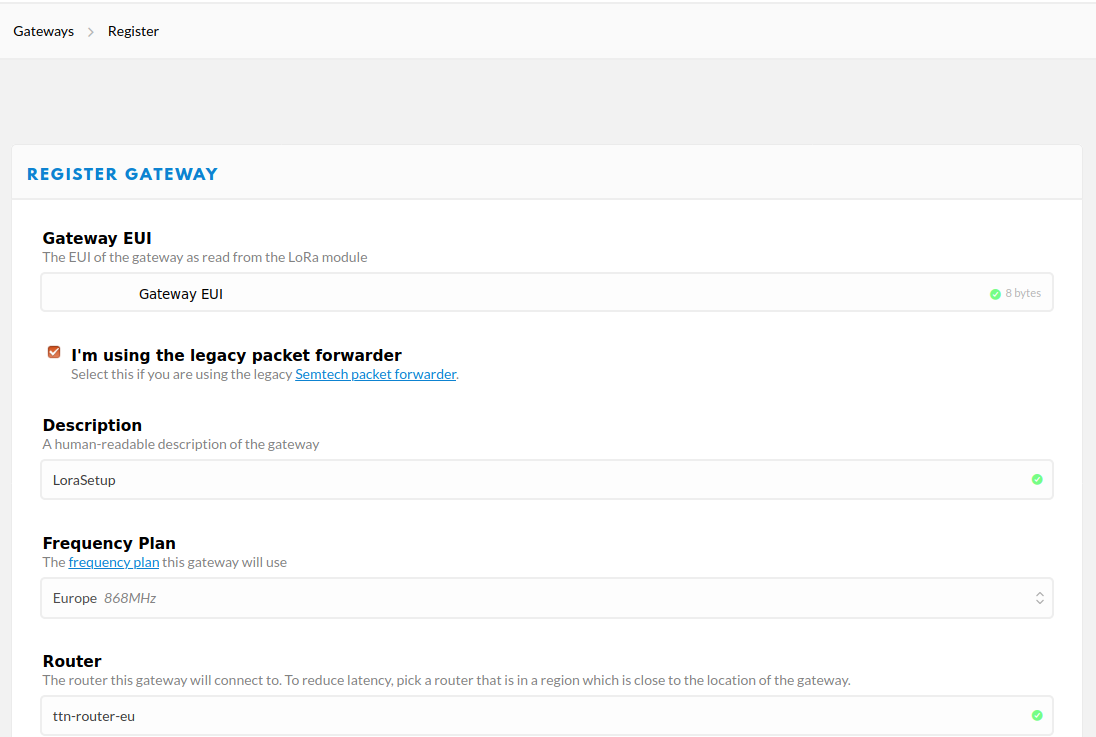
14 |
15 |
16 |
17 | - 必须手动添加网络服务器,或者可以把路由器升级到稳定版本 **6.48.2**,服务器将自动添加(强烈建议)。
18 |
19 |
20 | [https://wiki.mikrotik.com/wiki/Manual:Upgrading\_RouterOS](https://wiki.mikrotik.com/wiki/Manual:Upgrading_RouterOS)
21 |
22 | 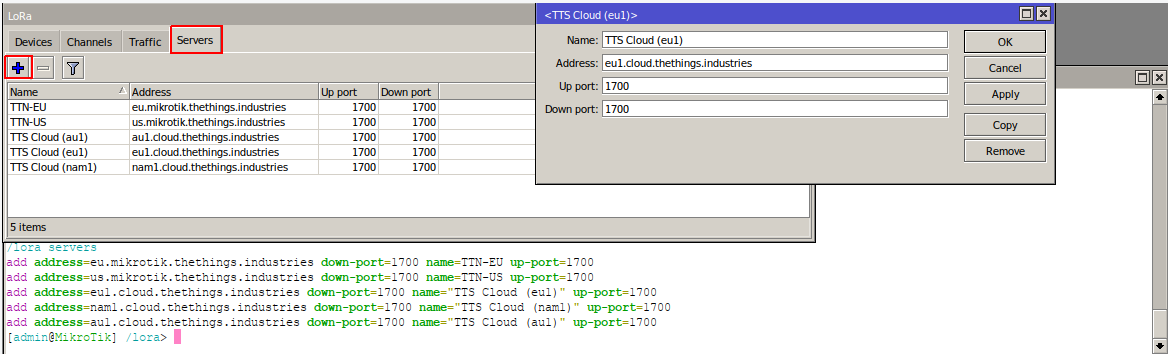
23 |
24 |
25 |
26 | ```shell
27 | /lora servers
28 |
29 | add address=eu1.cloud.thethings.industries down-port=1700 name="TTS Cloud (eu1)" up-port=1700
30 | add address=nam1.cloud.thethings.industries down-port=1700 name="TTS Cloud (nam1)" up-port=1700
31 | add address=au1.cloud.thethings.industries down-port=1700 name="TTS Cloud (au1)" up-port=1700
32 | ```
33 |
34 |
35 |
36 | 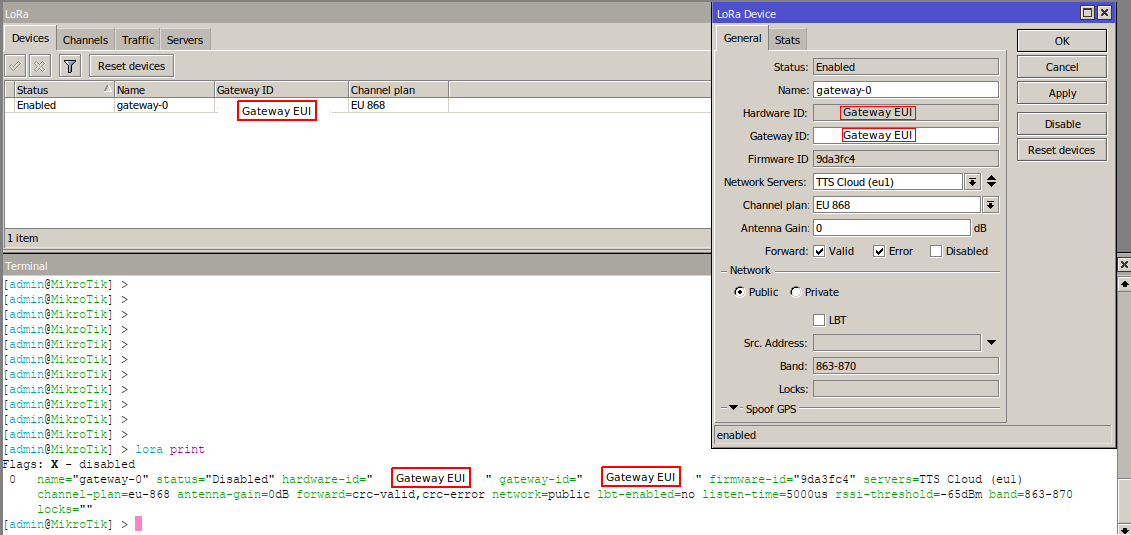
37 |
38 | - 都填好后,按页面底部的注册网关。如果已经按照前面的步骤进行了相应的设置,应该看到lora网关已经连接上了。
39 |
40 | 
41 |
42 | - 一切都设置好了,现在有一个工作的lora网关。可以在流量部分监控传入的数据包
43 |
44 | 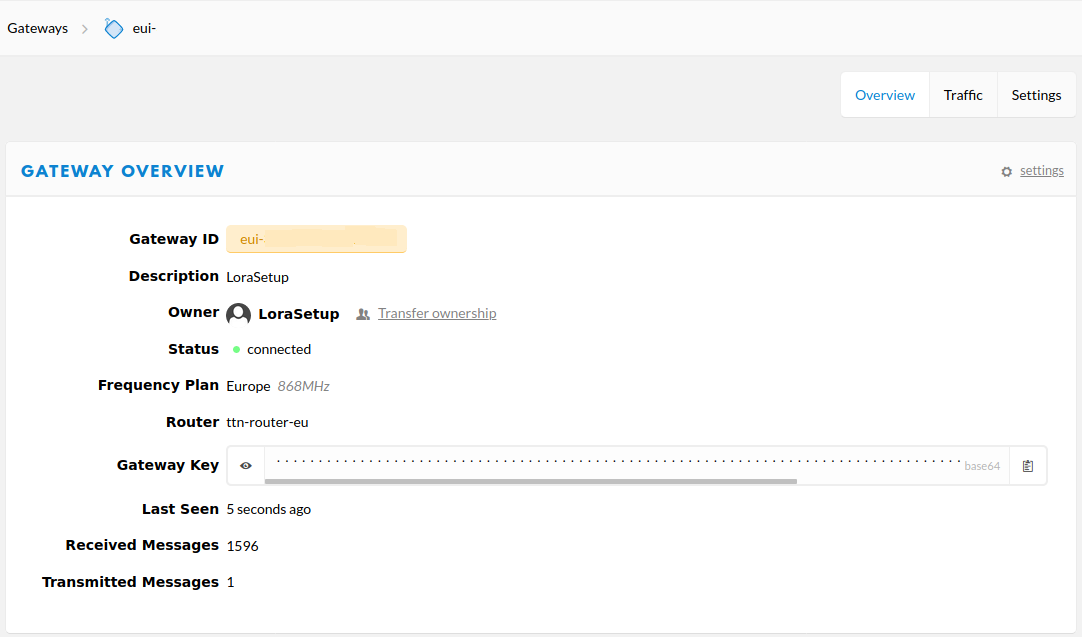
45 |
46 | 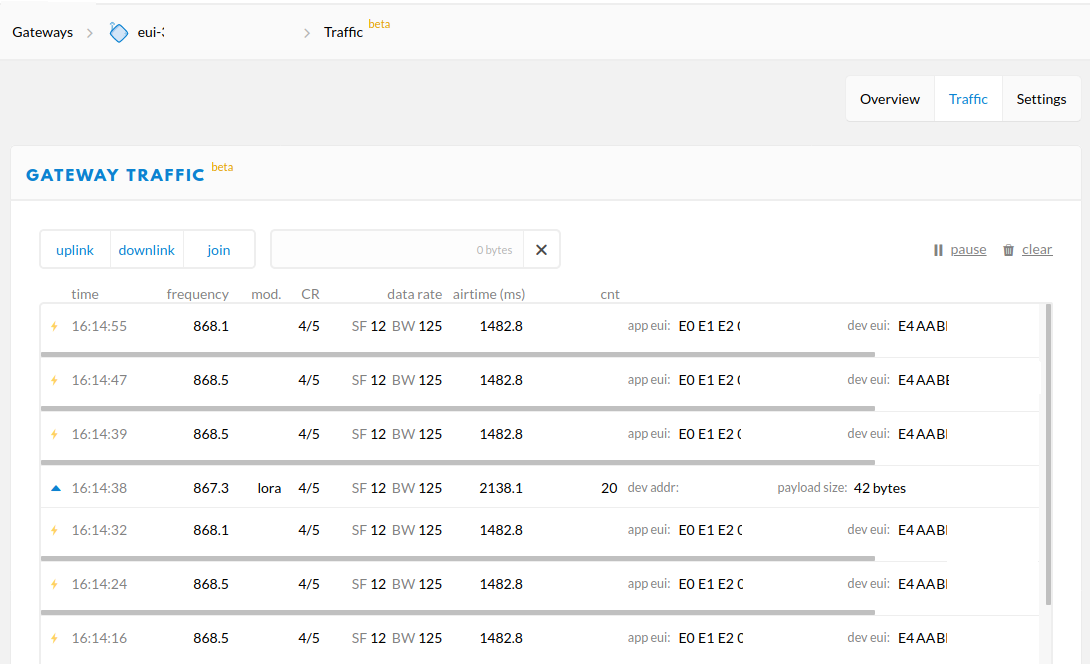
47 |
48 |
49 |
50 | 今年晚些时候,The Things Network将迁移到一个新版本的网络服务器,称为 [The Things Stack](https://console.cloud.thethings.network/)。
51 |
--------------------------------------------------------------------------------
/source/Internet_of_Things/Lora/The_Things_Stack.md:
--------------------------------------------------------------------------------
1 |
2 | # The Things Stack
3 |
4 | [The Things Stack](https://console.cloud.thethings.network/) 是The Things网络的一个新版本。
5 |
6 | 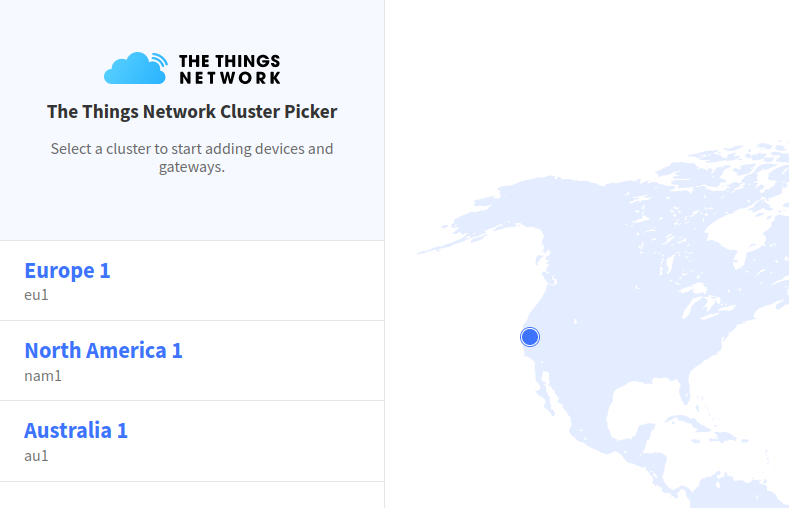
7 |
8 |
9 |
10 | 选择你所在的地区,用The Things网络账户或其他凭证登录
11 |
12 | 登录后注册一个网关
13 |
14 |
15 |
16 | 
17 |
18 |
19 |
20 | 填写空白,确保网关服务器地址与路由器中设置的一致。例子: [The Things Network](https://help.mikrotik.com/docs/display/ROS/The+Things+Network)
21 |
22 |
23 |
24 | 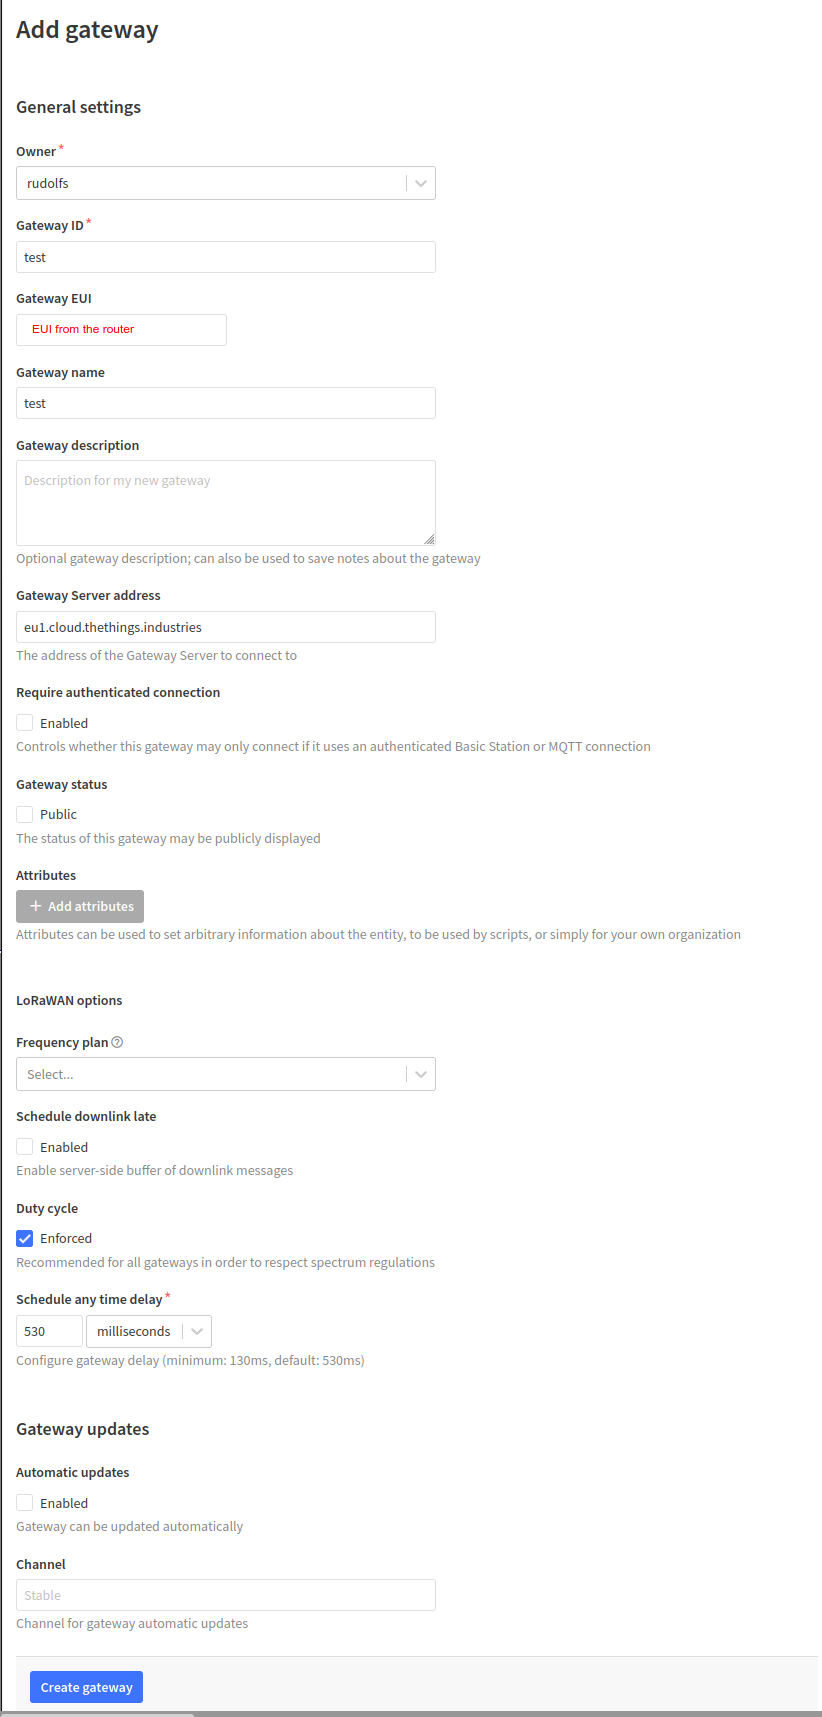
25 |
26 |
27 |
28 | 如果填写都正确, 那么在很短的时间内就可以看到网关在线,并且有实时数据进入。
29 |
30 |
31 |
32 | 
33 |
34 |
35 |
36 | 有关其他信息,请查看 [文档页](https://www.thethingsindustries.com/docs/getting-started/)
--------------------------------------------------------------------------------
/source/Internet_of_Things/Lora/index.rst:
--------------------------------------------------------------------------------
1 | Lora
2 | ===============================
3 |
4 | .. toctree::
5 | :maxdepth: 2
6 |
7 | General_Properties.md
8 | Step_by_step_installation.md
9 | The_Things_Network.md
10 | The_Things_Stack.md
11 |
12 |
13 |
14 |
--------------------------------------------------------------------------------
/source/Internet_of_Things/MQTT/index.rst:
--------------------------------------------------------------------------------
1 | MQTT
2 | ===============================
3 |
4 | .. toctree::
5 | :maxdepth: 2
6 |
7 | content.md
8 | MQTT_and_ThingsBoard_configuration.md
9 |
10 |
11 |
--------------------------------------------------------------------------------
/source/Internet_of_Things/index.rst:
--------------------------------------------------------------------------------
1 | 物联网
2 | ===============================
3 |
4 | .. toctree::
5 | :maxdepth: 1
6 |
7 | Bluetooth/index.rst
8 | GPIO/index.rst
9 | Lora/index.rst
10 | MQTT/index.rst
11 |
12 |
13 |
14 |
15 |
--------------------------------------------------------------------------------
/source/Management_tools/API/index.rst:
--------------------------------------------------------------------------------
1 | API
2 | ===============================
3 |
4 | .. toctree::
5 | :maxdepth: 2
6 |
7 | content.md
8 | Python3_Example.md
9 |
10 |
11 |
--------------------------------------------------------------------------------
/source/Management_tools/Branding/content.md:
--------------------------------------------------------------------------------
1 | # 品牌建设
2 |
3 | RouterOS允许在品牌包的帮助下进行轻微的系统定制。这是一个特殊的系统包,可以从你的 [mikrotik.com账户](https://mikrotik.com/client/) 中的账户部分 "品牌制作者 "中生成。生成的文件将有一个.dpk扩展名,可以通过所有与.npk包相同的方式安装。生成的软件包可以安装在任何RouterOS版本中。要在设备上安装软件包,你只需要上传它并重新启动路由器,也可以使用Netinstall工具达到同样的效果。
4 |
5 | ## ASCII标志
6 |
7 | 这是登录到命令行界面时显示的文字标识,即Telnet、SSH、Winbox终端。可以在浏览器中创建ASCII标志,或者从任何其他纯文本编辑器中复制。请确保它不比品牌制作页面中的表格宽,否则你的标志会被扭曲。
8 |
9 | ## 默认网页
10 |
11 | 可以定制默认的RouterOS信息页面,它在访问路由器IP地址时显示,设备上设置有密码。制作HTML文件时,可以用这些变量:
12 |
13 | - %version%将改变为路由器的当前版本
14 | - %host%将改为路由器的IP地址。在Telnet链接中使用这些变量,或者在文件头中使用这些变量。
15 |
16 | 该文件必须命名为 "index2.html"。确保使用正确嵌套的HTML,使页面与所有浏览器兼容。也可以上传图片或JavaScript文件,它们必须引用到与索引文件相同的路径,不能使用自定义的文件夹名称。
17 |
18 | 如果只想改变MikroTik的标志,而不上传整个HTML文件,默认的图片名称是mikrotik\_logo.png,上传同名的另一个文件,将覆盖原文件。
19 |
20 | ## 其他值
21 |
22 | - **路由器名称**:这是RouterOS的身份,只能是一个词,不要用空格或特殊字符。
23 | - **公司URL**:这是连接到MikroTik设备时出现在控制台中的值。
24 | - **手册URL**:文件链接,在网络界面的Webfig中用一个按钮打开。
25 | - **LCD标识**:这将显示在配备LCD屏幕的设备上。对标志的要求:宽度不超过160px,高度不超过72px。CCR系列有白色(0xffffff)背景,2011系列有黑色(0x000000)背景。
26 | - **Default configuration**: 请注意,当使用默认配置文件时,在简单安装软件包时,配置会被追加,但在使用系统重置后,只有文件中的配置会被使用,所有其他标准的默认配置在重置时不会被使用。该文件必须是一个文本/rsc文件,每行有一条RouterOS命令。你可以使用从控制台导出的文件作为起点,但我们建议只留下你想运行的确切命令。这个配置即使在RouterOS重置后也会被保留。
27 | - **Skins**: 必须在 "skin"目录中上传一个文件 your_file/name.json。
28 |
29 | 为了将特定的皮肤应用于特定的用户组,不需要登录路由器来做这件事。可以通过上传 "默认 "配置文件来做品牌建设。
30 | 或者在重启后为用户组手动设置皮肤。
31 |
32 | - **自定义文件**: RouterOS 6.48.3及以上版本也支持上传自定义文件,它们将被简单地复制到一个名为 "branding "的文件夹中,并可在RouterOS内部访问。
--------------------------------------------------------------------------------
/source/Management_tools/Branding/index.rst:
--------------------------------------------------------------------------------
1 | 品牌
2 | ===============================
3 |
4 | .. toctree::
5 | :maxdepth: 2
6 |
7 | content.md
8 |
9 |
10 |
--------------------------------------------------------------------------------
/source/Management_tools/Command_Line_Interface/index.rst:
--------------------------------------------------------------------------------
1 | 命令行接口
2 | ===============================
3 |
4 | .. toctree::
5 | :maxdepth: 2
6 |
7 | content.md
8 |
9 |
10 |
--------------------------------------------------------------------------------
/source/Management_tools/Flashfig/index.rst:
--------------------------------------------------------------------------------
1 | Flashfig
2 | ===============================
3 |
4 | .. toctree::
5 | :maxdepth: 2
6 |
7 | content.md
8 |
9 |
10 |
--------------------------------------------------------------------------------
/source/Management_tools/MAC_server/index.rst:
--------------------------------------------------------------------------------
1 | MAC服务器
2 | ===============================
3 |
4 | .. toctree::
5 | :maxdepth: 2
6 |
7 | content.md
8 |
9 |
10 |
--------------------------------------------------------------------------------
/source/Management_tools/MikroTik_mobile_app/content.md:
--------------------------------------------------------------------------------
1 | # 概述
2 |
3 | 该应用可用于Android和iOS操作系统,是配置新设备的好方法,它为新路由器的最基本设置提供了一个简单和用户友好的设置界面。它还有一个高级菜单,供更有经验的用户使用。
4 |
5 | ## 下载应用程序
6 |
7 | MikroTik应用程序可在App Store和Google Play上下载,请参见网页 [软件部分](https://mikrotik.com/mobile_app) 获取下载链接或扫描QR码。
8 |
9 | 使用MikroTik智能手机应用程序在现场配置路由器,或者为MikroTik家庭接入点应用最基本的初始设置。
10 |
11 | ## 应用程序快速入门
12 |
13 | - 扫描二维码,选择喜欢的操作系统;
14 |
15 | - 安装并连接到您的无线网络;
16 |
17 | - 打开应用程序,默认情况下,IP地址和用户名已经输入;
18 |
19 | - 点击 "连接 "建立连接;
20 |
21 | - 选择快速设置,应用程序将引导你在几个简单的步骤中完成所有的基本配置设置。
--------------------------------------------------------------------------------
/source/Management_tools/MikroTik_mobile_app/index.rst:
--------------------------------------------------------------------------------
1 | MikroTik移动app
2 | ===============================
3 |
4 | .. toctree::
5 | :maxdepth: 2
6 |
7 | content.md
8 |
9 |
10 |
--------------------------------------------------------------------------------
/source/Management_tools/Quick_Set/content.md:
--------------------------------------------------------------------------------
1 | # 概述
2 |
3 | **Quickset** 是一个简单的配置向导页面,只需点击几下就能准备好路由器。它是用户在网络浏览器中打开默认IP地址192.168.88.1时看到的第一个屏幕。
4 |
5 | Quickset适用于所有有某种出厂默认配置的设备。没有配置的设备必须通过手工配置。最受欢迎和推荐的模式是HomeAP(或HomeAP dual,取决于设备)。这种Quickset模式为家庭用户提供了最简单的术语和最常见的选项。
6 |
7 | ## 模式
8 |
9 | 根据路由器的型号,不同的Quickset模式在Quickset下拉菜单中可用:
10 |
11 | - **CAP**: 受控接入点,一个AP设备,将由一个集中的CAPsMAN服务器管理。只有在设置了CAPsMAN服务器时才使用。
12 | - **CPE**: 客户端设备,连接到一个接入点(AP)设备。提供扫描所在地区的AP设备的选项。
13 | - **HomeAP**: 大多数家庭用户的默认接入点配置页面。提供较少的选项和简化的术语。
14 | - **HomeAP dual**: 双频设备(2GHz/5GHz)。大多数家庭用户的默认接入点配置页面。提供较少的选项和简化的术语。
15 | - **Home Mesh**: 为建立更大的WiFi网络而设。启用路由器中的CAPsMAN服务器,并将本地WiFi接口置于CAPsMAN控制之下。只需按下复位按钮启动其他MikroTik WiFi AP,它们就会加入这个HomeMesh网络(详情请见其快速指南)。
16 | - **PTP Bridge AP**: 当需要在同一网络中透明地将两个远程地点互连在一起时,将一个设备设置为这种模式,而另一个设备设置为下一个(PTP桥接CPE)模式。
17 | - **PTP Bridge CPE**: 当你需要在同一网络中透明地将两个远程地点互连在一起时,将一个设备设置为该模式,另一个设备设置为前一个(PTP桥接AP)模式。
18 | - **WISP AP**: 与HomeAP模式类似,但提供更多高级选项,并使用行业标准术语,如SSID和WPA。
19 |
20 | ## HomeAP
21 |
22 | 如果想快速配置一个家庭接入点,应该使用该模式。
23 |
24 | ### 无线
25 |
26 | 在本节中设置无线网络:
27 |
28 | - **网络名称**: 智能手机如何使用网络?在这里设置任何喜欢的名称。在HomeAP dual中,可以将2GHz(传统)和5GHz(现代)网络设置为相同或不同的名称(见FAQ)。可以用喜欢的任何名称,任何格式。
29 | - **频率**: 通常可以选择 "自动",这样的话,路由器会扫描环境,并选择占用最少的频率通道(做一次)。如果需要做实验,可以使用自定义选择。
30 | - **波段**: 通常情况下,将此设为默认值(2GHz b/g/n和5GHz A/N/AC)。
31 | - **使用访问列表(ACL)**: 如果想根据用户的MAC(硬件)地址来限制谁可以连接到你的AP,请启用这个选项。要使用这个选项,首先需要允许这些客户端连接,然后使用下面的按钮 "复制到ACL"。把选定的客户复制到访问列表中。在建立了一个访问列表(ACL)之后,启用这个选项,禁止其他任何人尝试连接到设备。通常情况下可以不管,因为无线密码已经提供了必要的限制。
32 | - **WiFi密码**: 这是最重要的选项。设置一个安全的密码,对无线通信进行加密。
33 | - **WPS接受**: 使用这个按钮可以授予支持WPS连接模式的特定设备的访问权。对打印机和其他难以输入密码的外围设备很有用。首先在你的客户设备中启动WPS模式,然后一旦点击这里的WPS按钮就可以允许上述设备。按钮的工作时间为几秒钟,并在每个客户的基础上操作。
34 | - **客人网络**: 对那些不需要知道你的主要WiFi密码的住家客人很有用。在这个选项中为他们设置一个单独的密码。重要的是! 访客用户将不能访问你局域网中的其他设备和其他访客设备。这种模式启用了网桥过滤器来防止这种情况。
35 | - **无线客户端**: 这个表格显示了当前连接的客户设备(他们的MAC地址,如果他们在你的访问列表中,他们最后使用的IP地址,他们连接了多长时间,他们的信号水平(dBm)和柱状图)。
36 |
37 | ### 互联网
38 |
39 | - **端口**: 选择哪个端口与ISP(互联网)调制解调器相连。通常是Eth1。
40 | - **地址获取**: 选择ISP是如何给你提供IP地址的。请向服务提供商询问这个问题和其他选项(IP地址、网络掩码、网关)。
41 | - **MAC地址**: 通常不改,除非ISP把你锁定在一个特定的MAC地址上,而你又把路由器换成了一个新的地址。
42 | - **防火墙路由器**: 为路由器和网络启用安全防火墙。一定要确保选择这个框,这样就不可能从互联网端口访问该设备。
43 | - **MAC服务器/MAC Winbox**: 允许在MAC地址模式下从LAN端口与Winbox utility [https://mt.lv/winbox](https://mt.lv/winbox) 连接。在IP模式不可用时,对调试和恢复很有用。仅限高级使用。
44 | - **发现**: 允许设备通过型号名称从其他RouterOS设备上识别。
45 |
46 | ### 本地网络
47 |
48 | - **IP地址**: 大多可以用默认的192.168.88.1,除非路由器在另一个路由器后面。为避免IP冲突,可改为192.168.89.1或类似的地址。
49 | - **网络掩码**: 在大多数情况下可以用255.255.255.0。
50 | - **桥接所有LAN端口**: 允许设备相互通信,即使电视是通过以太网电缆连接的,但电脑是通过WiFi连接的。
51 | - **DHCP服务器**: 通常情况下,希望在家庭网络中自动配置IP地址,所以将DHCP设置打开并保持在默认状态。
52 | - **NAT**: 只有当ISP为路由器和本地网络提供了一个公共IP地址时,才把它关掉。如果没有,请将NAT打开。
53 | - **UPnP**: 这个选项为支持的程序和设备(如NAS磁盘和点对点工具)启用自动端口转发(有些人称之为 "向本地网络开放端口")。小心使用,因为这个选项有时会在不知情的情况下将内部设备暴露在互联网上。只有在特别需要时才启用。
54 |
55 | ### VPN
56 |
57 | 如果想从互联网访问本地网络和路由器,使用安全的VPN隧道。这个选项给你一个连接的域名,并启用PPTP和L2TP/IPsec(推荐第二种)。用户名是 "vpn",可以指定自己的密码。需要做的就是启用它,然后在笔记本电脑或手机中提供地址、用户名和密码,当连接到VPN时,将有一个安全的加密连接到家庭网络。旅行时也很有用-你能够通过安全线路浏览互联网,就像从家里连接一样。这也有助于避免一些国家设置的地理限制。
58 |
59 | ### 系统
60 |
61 | - **检查更新**: 始终确保设备是最新的。检查是否有更新的RouterOS版本并安装。
62 | - **密码**: 设置设备配置页面本身的密码。确保没有人可以访问路由器配置页面并改变设置。
63 |
64 | ## FAQ
65 |
66 | 问:Quickset与Webfig标签有什么不同,那里会出现一大堆新菜单?
67 |
68 | 答:"Quickset"是为那些只需要在短时间内启动和运行他们的设备的新用户准备的。它在一个地方提供最常用的选项。如果需要更多的选项,根本不要使用任何Quickset设置,点击 "Webfig "打开高级配置界面。全部功能都被解锁了。
69 |
70 | 问:我可以同时使用Quickset和Webfig吗?虽然不冲突的设置可以这样配置,但不建议把这些菜单混在一起。
71 |
72 | 答:如果你要使用Quickset,请只使用Quickset,反之亦然。
73 |
74 | 问:路由器和网桥模式的区别是什么?
75 |
76 | 答:网桥模式将所有的接口加入到网桥中,允许转发第二层的数据包(就像一个集线器/交换机)。在路由器模式下,数据包是通过使用IP地址和IP路由在第三层转发的(作为一个路由器)。
77 |
78 | 问:在HomeAP模式下,2GHz和5GHz的网络名称应该相同,还是不同?
79 |
80 | 答:如果你希望你的所有客户设备,如电视、电话、游戏机,都能自动选择最佳的首选网络,请将名称设置为相同。如果你想让客户端设备使用更快的5GHz 802.11ac连接,请将名称设置为唯一。
81 |
82 | 问:我可以创建一个没有安全设置的AP--没有密码,或者在使用QuickSet时连接到这样的AP吗?
83 |
84 | 答:QuickSet默认使用WPA2预共享密钥。这意味着最小密码长度为8个符号,设备只能连接到WPA2安全的AP或作为AP本身。对于没有安全设置的配置,你需要使用WinBox、Webfig或控制台进行手动配置。
--------------------------------------------------------------------------------
/source/Management_tools/Quick_Set/index.rst:
--------------------------------------------------------------------------------
1 | 快速设置
2 | ===============================
3 |
4 | .. toctree::
5 | :maxdepth: 2
6 |
7 | content.md
8 |
9 |
10 |
--------------------------------------------------------------------------------
/source/Management_tools/REST_API/index.rst:
--------------------------------------------------------------------------------
1 | RESET API
2 | ===============================
3 |
4 | .. toctree::
5 | :maxdepth: 2
6 |
7 | content.md
8 |
9 |
10 |
--------------------------------------------------------------------------------
/source/Management_tools/RoMON/index.rst:
--------------------------------------------------------------------------------
1 | RoMON
2 | ===============================
3 |
4 | .. toctree::
5 | :maxdepth: 2
6 |
7 | content.md
8 |
9 |
10 |
--------------------------------------------------------------------------------
/source/Management_tools/SSH/index.rst:
--------------------------------------------------------------------------------
1 | SSH
2 | ===============================
3 |
4 | .. toctree::
5 | :maxdepth: 2
6 |
7 | content.md
8 |
9 |
10 |
--------------------------------------------------------------------------------
/source/Management_tools/Serial_Console/index.rst:
--------------------------------------------------------------------------------
1 | 串行控制台
2 | ===============================
3 |
4 | .. toctree::
5 | :maxdepth: 2
6 |
7 | content.md
8 |
9 |
10 |
--------------------------------------------------------------------------------
/source/Management_tools/TR-069/index.rst:
--------------------------------------------------------------------------------
1 | TR-069
2 | ===============================
3 |
4 | .. toctree::
5 | :maxdepth: 2
6 |
7 | content.md
8 |
9 |
10 |
--------------------------------------------------------------------------------
/source/Management_tools/Webfig/index.rst:
--------------------------------------------------------------------------------
1 | Webfig
2 | ===============================
3 |
4 | .. toctree::
5 | :maxdepth: 2
6 |
7 | content.md
8 |
9 |
10 |
--------------------------------------------------------------------------------
/source/Management_tools/Winbox/index.rst:
--------------------------------------------------------------------------------
1 | Winbox
2 | ===============================
3 |
4 | .. toctree::
5 | :maxdepth: 2
6 |
7 | content.md
8 |
9 |
10 |
--------------------------------------------------------------------------------
/source/Management_tools/index.rst:
--------------------------------------------------------------------------------
1 | 管理工具
2 | ===============================
3 |
4 | .. toctree::
5 | :maxdepth: 1
6 |
7 | API/index.rst
8 | Branding/index.rst
9 | Command_Line_Interface/index.rst
10 | MAC_server/index.rst
11 | MikroTik_mobile_app/index.rst
12 | Quick_Set/index.rst
13 | REST_API/index.rst
14 | RoMON/index.rst
15 | Serial_Console/index.rst
16 | SSH/index.rst
17 | TR-069/index.rst
18 | Webfig/index.rst
19 | Winbox/index.rst
20 | Flashfig/index.rst
21 |
22 |
23 |
24 |
25 |
26 |
--------------------------------------------------------------------------------
/source/Mobile_Networking/GPS/GPS-tracking_using_HTTP_POST.md:
--------------------------------------------------------------------------------
1 | 下面文章解释了如何使用RouterOS的GPS功能和脚本来创建一个简单的车辆跟踪系统。
2 |
3 | # 方法
4 |
5 | 这种方法使用RouterOS Fetch工具的HTTP POST功能。允许你从RouterOS命令行向网络服务器发送任何类型的数据。可以使用脚本,用变量来填充POST数据。发布的数据写入一个SQLITE3数据库(如果文件不存在会自动创建),然后,从数据库中读取,并将其加入Leaflet.js的PolyLine数组。这是一个概念验证的例子,没有认证、安全或错误处理。
6 |
7 | # 要求
8 |
9 | - 选择的网络服务器
10 | - PHP
11 | - PHP的SQLite3模块
12 | - 带有工作的GPS模块的RouterOS设备
13 | - RouterOS v6.40rc30或以上版本
14 | - 在RouterOS中设置GPS格式为 **dd**。
15 |
16 | # RouterOS脚本
17 |
18 | 可以在Scheduler工具中运行这个脚本,间隔时间为1s,让坐标每1秒发送一次。
19 |
20 | ```shell
21 | {
22 | :global lat
23 | :global lon
24 | /system gps monitor once do={
25 | :set $lat $("latitude")
26 | :set $lon $("longitude")
27 | }
28 | tool fetch mode=http url="http://YOURSERVER.com/index.php" port=80 http-method=post http-data=("{\"lat\":\"" . $lat . "\",\"lon\":\"" . $lon . "\"}") http-header-field="Content-Type: application/json"
29 | :put ("{\"lat\":\"" . $lat . "\",\"lon\":\"" . $lon . "\"}")
30 | }
31 | ```
32 |
33 | # index.php文件
34 |
35 | 在index.php文件旁边创建一个名为 **sqlite_db** 的空目录。用 **chmod -R a+w sqlite_db/** 确保该目录和文件可以写入。
36 |
37 | ```php
38 | querySingle($src);
49 | if (count($res)==0){
50 | $db->exec('CREATE TABLE coordinates (latitude TEXT, longitude TEXT, time TIMESTAMP DEFAULT CURRENT_TIMESTAMP, added TIMESTAMP DEFAULT CURRENT_TIMESTAMP ) ');
51 | }
52 |
53 | $regex = '/^(|\-)([0-9]{2,3}\.[0-9]{0,8})$/';
54 |
55 | if (preg_match($regex,$data->lat) && preg_match($regex,$data->lon) )
56 | {
57 | $lat = $data->lat;
58 | $lon = $data->lon;
59 | }
60 | $ins = 'INSERT INTO coordinates (latitude,longitude) VALUES (\''.SQLite3::escapeString($lat).'\',\''.SQLite3::escapeString($lon).'\')';
61 | $db->exec($ins);
62 | die();
63 | }
64 | ?>
65 |
66 |
67 |
68 |
69 |
70 |
71 |
72 |
73 |
74 |
93 |
94 |
95 | ```
96 |
97 | # 结果
98 |
99 | 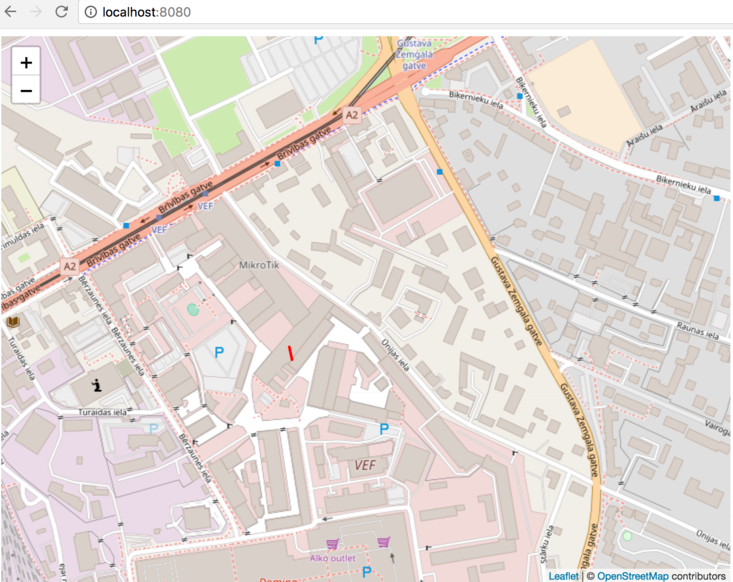
--------------------------------------------------------------------------------
/source/Mobile_Networking/GPS/index.rst:
--------------------------------------------------------------------------------
1 | GPS
2 | ===============================
3 |
4 | .. toctree::
5 | :maxdepth: 2
6 |
7 | content.md
8 | GPS-tracking_using_HTTP_POST.md
9 | GPS-tracking_using_MQTT_and_ThingsBoard.md
10 |
11 |
12 |
13 |
--------------------------------------------------------------------------------
/source/Mobile_Networking/LTE/index.rst:
--------------------------------------------------------------------------------
1 | LTE
2 | ===============================
3 |
4 | .. toctree::
5 | :maxdepth: 2
6 |
7 | content.md
8 |
9 |
10 |
--------------------------------------------------------------------------------
/source/Mobile_Networking/PPP/content.md:
--------------------------------------------------------------------------------
1 | # 概述
2 |
3 | 点对点协议(PPP)提供了一种在点对点链接上传输多协议数据包的标准方法。RouterOS中的PPP是基于 [RFC 1661标准](https://tools.ietf.org/html/rfc1661)
4 |
5 | # 介绍
6 |
7 | PPP的基本目的是在数据链路层的点对点链接上传输第三层数据包。 两个对等体之间的数据包被认为是按顺序传送的。
8 |
9 | PPP是由三个主要部分组成的:
10 |
11 | 1. 一种封装多协议数据报的方法。
12 | 2. 用于建立、配置和测试数据链路连接的链路控制协议(LCP)。
13 | 3. 用于建立和配置不同网络层协议的网络控制协议(NCP)系列。
14 |
15 | 在RouterOS中详细的PPP数据包处理,可以在 [数据包流程图](https://help.mikrotik.com/docs/display/ROS/Packet+Flow+in+RouterOS) 中查看。
16 |
17 | ## PPP客户端
18 |
19 | `/interface ppp-client`
20 |
21 | ## PPP客户端例子
22 |
23 | 这是一个如何使用LTE调制解调器的裸露串行端口添加客户端的例子。
24 |
25 | `/interface ppp-client add apn=yourapn dial-on-demand=no disabled=no port=usb2`
26 |
27 | 按需拨号应该设置为 "no"获得连续的连接。
28 |
29 | ## PPP服务器
30 |
31 | `/interface ppp-server`
--------------------------------------------------------------------------------
/source/Mobile_Networking/PPP/index.rst:
--------------------------------------------------------------------------------
1 | PPP
2 | ===============================
3 |
4 | .. toctree::
5 | :maxdepth: 2
6 |
7 | content.md
8 |
9 |
10 |
--------------------------------------------------------------------------------
/source/Mobile_Networking/SMS/index.rst:
--------------------------------------------------------------------------------
1 | SMS
2 | ===============================
3 |
4 | .. toctree::
5 | :maxdepth: 2
6 |
7 | content.md
8 |
9 |
10 |
--------------------------------------------------------------------------------
/source/Mobile_Networking/index.rst:
--------------------------------------------------------------------------------
1 | 移动网络
2 | ===============================
3 |
4 | .. toctree::
5 | :maxdepth: 1
6 |
7 | GPS/index.rst
8 | LTE/index.rst
9 | PPP/index.rst
10 | SMS/index.rst
11 |
12 |
13 |
14 |
15 |
16 |
17 |
--------------------------------------------------------------------------------
/source/Multi_Protocol_Label_Switching/EXP_bit_behaviour/content.md:
--------------------------------------------------------------------------------
1 | # 概述
2 |
3 | 当在报文上附加MPLS标签时,报文长度增加32比特(4字节)。这32位分解如下:
4 |
5 | - 标签值本身(20位)
6 | - EXP(“实验”)字段(3位)
7 | - 生存域时间(8位)
8 | - 栈底字段(1位)
9 |
10 | MPLS标准没有规定“实验”位的使用,但最常见的用途是承载QoS信息,类似于VLAN标签中的802.1q优先级。注意,EXP字段只有3位,因此它只能携带0到7的值,允许有8个流量类。
11 |
12 | # EXP在RouterOS中的字段处理
13 |
14 | 当RouterOS收到一个MPLS报文时,它会将该报文的“入站优先级”设置为顶部标签内的优先级。注意,“入站优先级”并不是包头中的一个字段,它可以认为是路由器在处理数据包时分配给数据包的额外标记。当RouterOS标记MPLS报文时,它将EXP位设置为分配给该报文的“优先级”(而不是“入站优先级”!)。当RouterOS交换MPLS报文时,“入站优先级”自动复制为“优先级”,这样常规的MPLS交换就可以在整个标签交换路径上交换优先级信息。
15 |
16 | 关于“入站优先级”和“优先级”处理的其他信息也见于 [WMM和VLAN优先级](https://help.mikrotik.com/docs/display/ROS/WMM+and+VLAN+priority)。
17 |
18 | 因此EXP字段发生的情况取决于对数据包采取的操作:
19 |
20 | - 如果数据包是MPLS交换的(通过从数据包中弹出标签并推送新标签),新标签中的EXP字段将与接收到的标签中的EXP字段相同,因为:
21 | - RouterOS将入站优先级设置为接收标签中的EXP位
22 | 切换自动将“优先级”设置为“入站优先级”
23 | - RouterOS给报文贴上新的标签,并将其EXP位设置为priority值。
24 | - 如果数据包是通过倒数第二跳跳交换的MPLS(收到的标签被弹出,没有新的标签被推送),收到的优先级的EXP字段保留在数据包的“优先级”字段中,并且可能被其他MAC协议使用,例如WMM或802.1q VLAN,例如:
25 | - RouterOS将入站优先级设置为接收标签中的EXP位
26 | 切换自动将“优先级”设置为“入站优先级”
27 | - 在VLAN接口上,RouterOS将报文切换到下一跳(不推送标签)
28 | - VLAN接口将VLAN头中的802.1q优先级设置为报文的“priority”值。
29 |
30 | 请注意,倒数第二跳弹出会丢失在最后一跳的标签交换路径上携带的QoS信息。如果不希望出现这种情况,则应该通过对标签交换路径中的最后一跳使用显式NULL标签而不是隐式NULL标签来禁用倒数第二跳弹出行为。对最后一跳使用显式NULL标签是MPLS TE隧道的默认行为。
31 |
32 | - 如果数据包应该通过标签交换路径发送(第一个标签将被推送到数据包上),EXP位将被设置为“优先级”的值,这反过来可以使用防火墙规则或其他方法(例如,从IP报头中的DSCP字段)来正确设置
33 | - 如果接收到本地处理的数据包,则将“入站优先级”设置为接收到的数据包的EXP字段,因此可以用来更新数据包的DSCP字段,或者使用防火墙规则将“入站优先级”设置为“优先级”
--------------------------------------------------------------------------------
/source/Multi_Protocol_Label_Switching/EXP_bit_behaviour/index.rst:
--------------------------------------------------------------------------------
1 | VPLS多协议标签交换
2 | ===============================
3 |
4 | .. toctree::
5 | :maxdepth: 2
6 |
7 | content.md
8 |
9 |
10 |
--------------------------------------------------------------------------------
/source/Multi_Protocol_Label_Switching/LDP/index.rst:
--------------------------------------------------------------------------------
1 | LDP
2 | ===============================
3 |
4 | .. toctree::
5 | :maxdepth: 2
6 |
7 | content.md
8 |
9 |
10 |
--------------------------------------------------------------------------------
/source/Multi_Protocol_Label_Switching/MPLS_Case_Studies/content.md:
--------------------------------------------------------------------------------
1 | 无内容
--------------------------------------------------------------------------------
/source/Multi_Protocol_Label_Switching/MPLS_Case_Studies/index.rst:
--------------------------------------------------------------------------------
1 | MPLS案例学习
2 | ===============================
3 |
4 | .. toctree::
5 | :maxdepth: 2
6 |
7 | content.md
8 |
9 |
10 |
--------------------------------------------------------------------------------
/source/Multi_Protocol_Label_Switching/MPLS_MTU_Forwarding_and_Label_Bindings/index.rst:
--------------------------------------------------------------------------------
1 | MPLS MTU转发和标签绑定
2 | ===============================
3 |
4 | .. toctree::
5 | :maxdepth: 2
6 |
7 | content.md
8 |
9 |
10 |
--------------------------------------------------------------------------------
/source/Multi_Protocol_Label_Switching/MPLS_Reference/content.md:
--------------------------------------------------------------------------------
1 | 无内容
--------------------------------------------------------------------------------
/source/Multi_Protocol_Label_Switching/MPLS_Reference/index.rst:
--------------------------------------------------------------------------------
1 | MPLS参考
2 | ===============================
3 |
4 | .. toctree::
5 | :maxdepth: 2
6 |
7 | content.md
8 |
9 |
10 |
--------------------------------------------------------------------------------
/source/Multi_Protocol_Label_Switching/Mpls_Overview/content.md:
--------------------------------------------------------------------------------
1 | # 概述
2 |
3 | MPLS即多协议标签交换。它在某种程度上取代了IP路由——数据包转发决策(出接口和下一跳路由器)不再基于IP报头(通常是目的地址)和路由表中的字段,而是基于附加在数据包上的标签。这种方法加快了转发过程,因为与路由查找(查找最长匹配前缀)相比,下一跳查找变得非常简单。
4 |
5 | 转发过程的效率是MPLS的主要优点,但必须考虑到MPLS转发不允许对网络层(如IP)报头进行处理,因此不能对MPLS转发的报文进行NAT、过滤等基于网络层的操作。任何基于网络层的操作都应该在MPLS云的入口或出口上进行,首选的方式是入口——这样,例如,无论如何都要被丢弃的流量不会通过MPLS骨干网传输。
6 |
7 | 在最简单的形式中,MPLS可以被认为是改进的路由-标签通过LDP协议分发给活动路由,并且标记的数据包采用与未标记时相同的路径。如果路由器使用从下一跳接收到标签的路由来路由未标记的数据包,在数据包上加上标签,并将其发送到下一跳,则会使MPLS沿着其路径进一步交换。当路由器收到带有标签的数据包时,将其与从特定路由的下一跳收到的标签进行更改,并将数据包发送到下一跳。标签交换路径可确保数据传输到MPLS云出口点。MPLS的应用就是基于标签交换路径这一MPLS基本概念。
8 |
9 | 另一种建立标签交换路径的方法是通过RSVP-TE协议建立流量工程隧道(traffic engineering tunnel)。流量工程隧道允许显式路由lsp和基于约束的路径选择(其中约束是接口属性和可用带宽)。
10 |
11 | 考虑到MPLS的复杂性、引入的新协议和应用,以及MPLS在路由/桥接网络中增加的概念差异,建议在生产网络中实现MPLS之前,先深入了解MPLS的概念。一些建议的阅读材料:
12 |
13 | - 多协议标签交换 [http://en.wikipedia.org/wiki/Multiprotocol_Label_Switching](http://en.wikipedia.org/wiki/Multiprotocol_Label_Switching)
14 | - RFC3031多协议标签交换架构 [http://www.ietf.org/rfc/rfc3031.txt](http://www.ietf.org/rfc/rfc3031.txt)
15 | - Luc De Ghein的MPLS基础知识 [http://www.amazon.com/MPLS-Fundamentals-Luc-Ghein/dp/1587051974](http://www.amazon.com/MPLS-Fundamentals-Luc-Ghein/dp/1587051974)
16 |
17 | SMIPS设备(hAP lite、hAP lite TC和hAP mini)不支持该特性。
18 |
19 | # 支持的功能
20 |
21 | 目前,Routeros支持以下MPLS相关功能:
22 |
23 | - MPLS随着倒数第二个跳跃的支持而切换
24 | - IPv4和IPv6的静态本地标签绑定
25 | - IPv4和IPv6的静态远程标签绑定
26 | - IPv4和IPv6的标签分销协议(RFC 3036,RFC 5036和RFC 7552)
27 | - 下游未经请求的标签通告
28 | - 独立标签分布控制
29 | - 自由标签保留
30 | - 有针对性的会议建立
31 | - 可选循环检测
32 | - ECMP支持
33 | - 虚拟私人LAN服务
34 | - VPLS LDP信号(RFC 4762)
35 | - Cisco样式静态VPLS pseudowires(RFC 4447 FEC类型0x80)
36 | - VPLS伪片碎片和重新组装(RFC 4623)
37 | - 基于VPLS MP-BGP的自动发现和信号传导(RFC 4761)
38 | - Cisco VPLS基于BGP的自动发现(Draft-iETF-L2VPN-SIGNALING-08)
39 | - 支持基于BGP的VPLS多个进口/出口路线目标扩展社区(均为RFC 4761和DRAFT-EITF-L2VPN-SIGNALING-08)
40 | - RSVP-TE隧道
41 | - 隧道头
42 | - 显式路径
43 | - TE隧道的OSPF扩展
44 | - CSPF路径选择
45 | - te隧道上VPL和MPLS IP VPN流量的转发
46 | - 入口TE隧道速率限制和自动保留带宽调整,[TE隧道带宽控制](https://wiki.mikrotik.com/wiki/TE_tunnel_auto_bandwidth)
47 | - 所有隧道带宽设置均已指定并以每秒位显示
48 | - 基于MP-BGP的MPLS IP VPN
49 | - 基于MP-BGP的MPLS VPN
50 | - MPLS TE的OSPF扩展
51 | - 支持OSPF作为CE-PE协议
52 | - 指定VRF的ping和traceroute
53 | - 控制MPL中的网络层TTL传播
54 | - RIP作为CE-PE协议
55 | - VRF BGP实例重新分布设置
56 |
57 | **routeros还没有的MPLS功能:**
58 |
59 | - LDP功能:
60 | - 按需标签通告
61 | - 订购的标签分布控制
62 | - 保守标签保留率
63 | - TE功能
64 | - 快速路线
65 | - 链接/节点保护
66 | - 支持BGP作为标签分布协议
--------------------------------------------------------------------------------
/source/Multi_Protocol_Label_Switching/Mpls_Overview/index.rst:
--------------------------------------------------------------------------------
1 | MPLS概述
2 | ===============================
3 |
4 | .. toctree::
5 | :maxdepth: 2
6 |
7 | content.md
8 |
9 |
10 |
--------------------------------------------------------------------------------
/source/Multi_Protocol_Label_Switching/Traffic_Eng/index.rst:
--------------------------------------------------------------------------------
1 | 流量引擎
2 | ===============================
3 |
4 | .. toctree::
5 | :maxdepth: 2
6 |
7 | content.md
8 |
9 |
10 |
--------------------------------------------------------------------------------
/source/Multi_Protocol_Label_Switching/VPLS/index.rst:
--------------------------------------------------------------------------------
1 | VPLS
2 | ===============================
3 |
4 | .. toctree::
5 | :maxdepth: 2
6 |
7 | content.md
8 |
9 |
10 |
--------------------------------------------------------------------------------
/source/Multi_Protocol_Label_Switching/index.rst:
--------------------------------------------------------------------------------
1 | MPLS
2 | ===============================
3 |
4 | .. toctree::
5 | :maxdepth: 1
6 |
7 | Mpls_Overview/index.rst
8 | MPLS_MTU_Forwarding_and_Label_Bindings/index.rst
9 | EXP_bit_behaviour/index.rst
10 | LDP/index.rst
11 | VPLS/index.rst
12 | Traffic_Eng/index.rst
13 | MPLS_Reference/index.rst
14 | MPLS_Case_Studies/index.rst
15 |
--------------------------------------------------------------------------------
/source/Network_Management/ARP/index.rst:
--------------------------------------------------------------------------------
1 | ARP
2 | ===============================
3 |
4 | .. toctree::
5 | :maxdepth: 2
6 |
7 | content.md
8 |
9 |
10 |
--------------------------------------------------------------------------------
/source/Network_Management/Cloud/index.rst:
--------------------------------------------------------------------------------
1 | Cloud
2 | ===============================
3 |
4 | .. toctree::
5 | :maxdepth: 2
6 |
7 | content.md
8 |
9 |
10 |
--------------------------------------------------------------------------------
/source/Network_Management/DHCP/index.rst:
--------------------------------------------------------------------------------
1 | DHCP
2 | ===============================
3 |
4 | .. toctree::
5 | :maxdepth: 2
6 |
7 | content.md
8 |
9 |
10 |
--------------------------------------------------------------------------------
/source/Network_Management/DNS/index.rst:
--------------------------------------------------------------------------------
1 | DNS
2 | ===============================
3 |
4 | .. toctree::
5 | :maxdepth: 2
6 |
7 | content.md
8 |
9 |
10 |
--------------------------------------------------------------------------------
/source/Network_Management/Proxy/index.rst:
--------------------------------------------------------------------------------
1 | Proxy
2 | ===============================
3 |
4 | .. toctree::
5 | :maxdepth: 2
6 |
7 | content.md
8 |
9 |
10 |
--------------------------------------------------------------------------------
/source/Network_Management/index.rst:
--------------------------------------------------------------------------------
1 | 网络管理
2 | ===============================
3 |
4 | .. toctree::
5 | :maxdepth: 1
6 |
7 | ARP/index.rst
8 | Cloud/index.rst
9 | DNS/index.rst
10 | DHCP/index.rst
11 | Proxy/index.rst
12 |
13 |
14 |
15 |
16 |
17 |
18 |
--------------------------------------------------------------------------------
/source/Routing/BGP/index.rst:
--------------------------------------------------------------------------------
1 | BPG
2 | ===============================
3 |
4 | .. toctree::
5 | :maxdepth: 2
6 |
7 | content.md
8 |
9 |
10 |
--------------------------------------------------------------------------------
/source/Routing/Moving_from_ROSv6_to_v7_with_examples/index.rst:
--------------------------------------------------------------------------------
1 | 从ROSv6迁移到v7的例子
2 | ===============================
3 |
4 | .. toctree::
5 | :maxdepth: 2
6 |
7 | content.md
8 |
9 |
10 |
--------------------------------------------------------------------------------
/source/Routing/Multicast/Group_Management_Protocol.md:
--------------------------------------------------------------------------------
1 | ## 组播协议介绍
2 |
3 | 组管理协议允许任何接口成为组播流的接收器。允许在不使用专门的IGMP或MLD客户端的情况下测试组播路由和交换设置。该选项从RouterOS v7.4开始提供,支持IGMP v1, v2, v3和MLD v1, v2协议。
4 |
5 | 接口默认使用的是IGMP v3和MLD v2。如果收到IGMP v1、v2或MLD v1查询,接口将退回到适当的版本。一旦在接口上创建了组管理协议,将发送一个不请自来的成员报告(加入)数据包,并响应查询信息。如果配置被删除或禁用,接口将发送一个离开消息。
6 |
7 | # 配置选项
8 |
9 |
10 | 本节介绍组管理协议的配置选项。
11 |
12 | **Sub-menu:** `/routing gmp`
13 |
14 | | 属性 | 说明 |
15 | | ------------------------------------------------------- | ------------------------------------------------------------------------------------------------------------------------ |
16 | | **groups** (_IPv4 \| IPv6_; Default: ) | 接口要使用的组播组地址,支持多个组地址。 |
17 | | **interfaces** (_name_; Default: ) | 接口的名称,支持多个接口和接口列表。 |
18 | | **exclude** (Default: ) | 设置 "exclude"时,接口期望拒绝来自配置的 "sources "的组播数据。不使用此选项时,接口将为配置的 "source"发出特定源的连接。 |
19 | | **sources** (_IPv4 \| IPv6_; Default: ) | 接口使用的源地址列表,支持多个源地址。当IGMPv3或MLDv2协议激活时,此设置会产生影响。 |
20 |
21 | # 例子
22 |
23 |
24 | 这个例子显示了如何在接口上配置一个简单的多播监听器。
25 |
26 | 首先,在接口上添加一个IP地址:
27 |
28 | ```shell
29 | /ip address
30 | add address=192.168.10.10/24 interface=ether1 network=192.168.10.0
31 | ```
32 |
33 | 然后在同一接口上配置组管理协议:
34 |
35 | ```shell
36 | /routing gmp
37 | add groups=229.1.1.1 interfaces=ether1
38 | ```
39 |
40 | 现在就可以检查你的组播网络了,看看路由器或交换机是否创建了适当的组播转发条目,以及接口上是否收到了组播数据(查看接口统计,或使用 [Packet Sniffer](https://help.mikrotik.com/docs/display/ROS/Packet+Sniffer) 和 [Torch](https://help.mikrotik.com/docs/display/ROS/Torch))。
--------------------------------------------------------------------------------
/source/Routing/Multicast/content.md:
--------------------------------------------------------------------------------
https://raw.githubusercontent.com/be-engineer/MikroTik-doc-cn/2556b8d3f3ed3f7b415e9749b202cba4c3d5e84f/source/Routing/Multicast/content.md
--------------------------------------------------------------------------------
/source/Routing/Multicast/index.rst:
--------------------------------------------------------------------------------
1 | 组播
2 | ===============================
3 |
4 | .. toctree::
5 | :maxdepth: 2
6 |
7 | content.md
8 | Group_Management_Protocol.md
9 | IGMP_Proxy.md
10 | PIM-SM.md
11 |
12 |
13 |
--------------------------------------------------------------------------------
/source/Routing/OSPF/index.rst:
--------------------------------------------------------------------------------
1 | OSPF
2 | ===============================
3 |
4 | .. toctree::
5 | :maxdepth: 2
6 |
7 | content.md
8 |
9 |
10 |
--------------------------------------------------------------------------------
/source/Routing/Policy_Routing/index.rst:
--------------------------------------------------------------------------------
1 | 策略路由
2 | ===============================
3 |
4 | .. toctree::
5 | :maxdepth: 2
6 |
7 | content.md
8 |
9 |
10 |
--------------------------------------------------------------------------------
/source/Routing/RIP/index.rst:
--------------------------------------------------------------------------------
1 | RIP
2 | ===============================
3 |
4 | .. toctree::
5 | :maxdepth: 2
6 |
7 | content.md
8 |
9 |
10 |
--------------------------------------------------------------------------------
/source/Routing/RPKI/content.md:
--------------------------------------------------------------------------------
1 |
9 | # 概述
10 |
11 | RouterOS实现了 [RFC8210](https://tools.ietf.org/html/rfc8210) 中定义的到路由器协议的RPKI (Resource Public Key Infrastructure)。RTR是一种非常轻量级的低内存占用协议,用于从RPKI验证器可靠地获取前缀验证数据。
12 | 关于RPKI和如何设置验证器的更多信息可以在RIPE博客中找到:
13 | [https://blog.apnic.net/2019/10/28/how-to-installing-an-rpki-validator/](https://blog.apnic.net/2019/10/28/how-to-installing-an-rpki-validator/)
14 |
15 | # 基本示例
16 |
17 | 假设网络上有自己的RTR服务器,IP地址为192.168.1.1:
18 |
19 | `/routing/bgp/rpki
20 | add group=myRpkiGroup address=192.168.1.1 port=8282 refresh-interval=20`
21 |
22 | 如果连接建立,并且从验证器接收到数据库,可以检查前缀的有效性:
23 |
24 | ```shell
25 | [admin@rack1_b33_CCR1036] /routing> rpki-check group=myRpkiGroup prfx=70.132.18.0/24 origin-as=16509
26 | valid
27 | ```
28 |
29 | 现在,路由过滤器可以使用缓存的数据库来根据RPKI有效性接受拒绝前缀。首先需要设置一个过滤器规则,该规则定义哪个RPKI组执行验证。之后,过滤器准备好匹配来自RPKI数据库的状态。Status可以有三个值:
30 |
31 | - **valid** -数据库中有记录且原始AS有效。
32 | - **invalid** -数据库中有记录,源AS无效。
33 | - **unknown** -数据库中没有前缀AS和原始AS的信息。
34 | - **unverified** -当RPKI组的所有RPKI会话都没有同步过数据库时设置。此值可用于处理RPKI的总故障。
35 |
36 | ```shell
37 | /routing/filter/rule
38 | add chain=bgp_in rule="rpki-verify myRpkiGroup"
39 | add chain=bgp_in rule="if (rpki invalid) { reject } else { accept }"
40 | ```
41 |
42 | # 配置选项
43 |
44 | **Sub-Menu:** `/routing/rpki`
45 |
46 |
47 | | 属性 | 说明 |
48 | | ---------------------------------------------------------- | ------------------------------------------------------------------- |
49 | | **address** (_IPv4/6_) mandatory | RTR服务器地址 |
50 | | **disabled**(_yes\| no_;Default:**no**) | 是否忽略该项。 |
51 | | **expire-interval** (_integer [600..172800]_;Default:7200) | 时间间隔[s]轮询数据在验证器没有进行有效的后续更新时被认为是有效的。 |
52 | | **group** (_string_) mandatory | 数据库被分配给的组名。 |
53 | | **port** (_integer [0..65535]_;Default:323) | 连接端口号 |
54 | | **preference** (_integer [0..4294967295]_;Default:0) | 如果有多个RTR源,则优先级号表示更优先的RTR源。越少越好。 |
55 | | **refresh-interval** (_integer [1..86400]_;Default:3600) | 从验证器轮询最新数据的时间间隔[s] |
56 | | **retry-interval** (_integer [1..7200]_;Default:600) | 验证器轮询失败后重试的时间间隔[s]。 |
57 | | **vrf** (_name_;Default:main) | 用于绑定连接的VRF表名。 |
--------------------------------------------------------------------------------
/source/Routing/RPKI/index.rst:
--------------------------------------------------------------------------------
1 | RPKI
2 | ===============================
3 |
4 | .. toctree::
5 | :maxdepth: 2
6 |
7 | content.md
8 |
9 |
10 |
--------------------------------------------------------------------------------
/source/Routing/Route_Selection_and_Filters/index.rst:
--------------------------------------------------------------------------------
1 | 路由选择和过滤器
2 | ===============================
3 |
4 | .. toctree::
5 | :maxdepth: 2
6 |
7 | content.md
8 |
9 |
10 |
--------------------------------------------------------------------------------
/source/Routing/Routing_Debugging_Tools/index.rst:
--------------------------------------------------------------------------------
1 | 路由调试工具
2 | ===============================
3 |
4 | .. toctree::
5 | :maxdepth: 2
6 |
7 | content.md
8 |
9 |
10 |
--------------------------------------------------------------------------------
/source/Routing/Routing_Protocol_Multi-core_Support/index.rst:
--------------------------------------------------------------------------------
1 | 路由协议和多核支持
2 | ===============================
3 |
4 | .. toctree::
5 | :maxdepth: 2
6 |
7 | content.md
8 |
9 |
10 |
--------------------------------------------------------------------------------
/source/Routing/Routing_Protocol_Overview/index.rst:
--------------------------------------------------------------------------------
1 | 路由协议概述
2 | ===============================
3 |
4 | .. toctree::
5 | :maxdepth: 2
6 |
7 | content.md
8 |
9 |
10 |
--------------------------------------------------------------------------------
/source/Routing/Routing_Reference/content.md:
--------------------------------------------------------------------------------
1 | # 路由参考
2 |
3 | `/routing/id`
4 |
5 | 全局Router ID选举配置。ID可以显式配置,也可以设置为从路由器的一个IP地址中选出。
6 |
7 | 对于每个VRF表,RouterOS添加动态ID实例,从属于特定VRF的一个IP地址中选择ID:
8 |
9 | ```shell
10 | [admin@rack1_b33_CCR1036] /routing/id> print
11 | Flags: D - DYNAMIC, I - INACTIVE
12 | Columns: NAME, DYNAMIC-ID, SELECT-DYNAMIC-ID, SELECT-FROM-VRF
13 | # NAME DYNAMIC-ID SELECT-D SELE
14 | 0 D main 111.111.111.2 only-vrf main
15 | ```
16 |
17 | ## 配置选项
18 |
19 | | 属性 | 说明 |
20 | | ------------------------------------------------------------------------------------------------- | ------------------------------------------------------------------------------------------------------------------------------------------------------------------------------------------------------------------------------------------------------------------------------------ |
21 | | **comment** (_string_) | |
22 | | **disabled** (_yes \| no_) | 没有用ID引用。 |
23 | | **id**(_IP_) | 参数显式设置Router id。如果没有显式指定ID,则可以从路由器上配置的IP地址中选择一个。参见参数select-dynamic-id和select-from-vrf。 |
24 | | **name** (_string_) | 引用名 |
25 | | **select-dynamic-id**(_any \| lowest \| only-active \| only-loopback \| only-static \| only-vrf_) | 说明在选举ID时用的IP地址:
- any - 在路由器上找到的任何地址都可以被选为router ID。
- lowest - 选择最低的IP地址。
- only-active - 只从主IP地址中选择。
- only-loopback -只从loopback地址中选择ID。
- only- VRF - 只从选定的VRF中选择ID。与select-from-vrf属性一起工作。 |
26 | | **select-from-vrf** (_name_) | 选择IP地址进行ID选举的VRF。 |
27 |
28 | **只读属性**
29 |
30 | | 属性 | 说明 |
31 | | -------------------------- | ------------------------------------------------ |
32 | | **dynamic** (_yes \| no_) | |
33 | | **dynamic-id** (_IP_) | 当前选择的ID。 |
34 | | **inactive** (_yes \| no_) | 如果获取有效ID有问题,那么项目可以变为inactive。 |
--------------------------------------------------------------------------------
/source/Routing/Routing_Reference/index.rst:
--------------------------------------------------------------------------------
1 | 路由参考
2 | ===============================
3 |
4 | .. toctree::
5 | :maxdepth: 2
6 |
7 | content.md
8 |
9 |
10 |
--------------------------------------------------------------------------------
/source/Routing/Virtual_Routing_and_Forwarding/index.rst:
--------------------------------------------------------------------------------
1 | 虚拟路由和转发
2 | ===============================
3 |
4 | .. toctree::
5 | :maxdepth: 2
6 |
7 | content.md
8 |
9 |
10 |
--------------------------------------------------------------------------------
/source/Routing/index.rst:
--------------------------------------------------------------------------------
1 | 路由
2 | ===============================
3 |
4 | .. toctree::
5 | :maxdepth: 1
6 |
7 | Routing_Protocol_Overview/index.rst
8 | Moving_from_ROSv6_to_v7_with_examples/index.rst
9 | Routing_Protocol_Multi-core_Support/index.rst
10 | Policy_Routing/index.rst
11 | Virtual_Routing_and_Forwarding/index.rst
12 | OSPF/index.rst
13 | RIP/index.rst
14 | BGP/index.rst
15 | RPKI/index.rst
16 | Route_Selection_and_Filters/index.rst
17 | Multicast/index.rst
18 | Routing_Debugging_Tools/index.rst
19 | Routing_Reference/index.rst
20 |
21 |
22 |
23 |
24 |
25 |
26 |
27 |
--------------------------------------------------------------------------------
/source/Scripts/Example/index.rst:
--------------------------------------------------------------------------------
1 | 脚本示例
2 | ===============================
3 |
4 | .. toctree::
5 | :maxdepth: 2
6 |
7 | content.md
8 |
9 |
10 |
--------------------------------------------------------------------------------
/source/Scripts/index.rst:
--------------------------------------------------------------------------------
1 | 脚本
2 | ===============================
3 |
4 | .. toctree::
5 | :maxdepth: 1
6 |
7 | content.md
8 | Example/index.rst
9 |
10 |
--------------------------------------------------------------------------------
/source/System_Information_and_Utilities/Clock/content.md:
--------------------------------------------------------------------------------
1 | # 介绍
2 |
3 | RouterOS使用来自TZ数据库的数据,该数据库中的大部分时区都包含在内,并且具有相同的名称。由于路由器上的本地时间主要用于时间戳和与时间相关的配置,而不是用于历史日期计算,因此不包括过去年份的时区信息。目前只包括2005年以后的资料。
4 |
5 | 以下设置可在/system clock控制台路径和system > clock WinBox窗口的Time选项卡中进行。
6 |
7 | 启动日期和时间为jan/02/1970 00:00:00 [+|-]gmt-offset。
8 |
9 | # 属性
10 |
11 | | 属性 | 说明 |
12 | | ----------------------------------------------------------------------------- | ------------------------------------------------------------------------------------------------------------------------------------------------------------------------------------------------------------------------------------------------------------------------------------------ |
13 | | **time** (_HH:MM:SS);_ | _HH_ - 小时 00..24, _MM_ - 分钟 00..59, _SS_ - 秒 00..59 |
14 | | **date** (_mmm/DD/YYYY);_ | _mmm_ - 月, 为 _jan_, _feb_, _mar_, _apr_, _may_, _jun_, _jul_, _aug_, _sep_, _oct_, _nov_, _dec_ 之一, _DD_ - 日期, 00..31, _YYYY_ - 年, 1970..2037: **date** 和 **time** 显示路由器上当前的本地时间。这些值可以用 **set** 命令进行调整。但是,本地时间不能导出,也不与其他配置一起存储。 |
15 | | **time-zone-name** (_manual_, or name of time zone; default value: _manual_); | 时区名称。和RouterOS中的大多数文本值一样,该值区分大小写。特殊值手动应用 [手动配置的GMT偏移](https://wiki.mikrotik.com/wiki/Manual:System/Time#Manual_time_zone_configuration),默认值为 _00:00_,没有夏令时。 |
16 | | **time-zone-autodetect** (_yes_ or _no_; default: yes); | 从v6.27开始提供的特性。如果启用,将自动设置时区。 |
17 |
18 | 在新安装的RouterOS和重置配置后,默认启用Time-zone-autodetect。根据路由器的公共IP地址和我们的云服务器数据库检测时区。从RouterOS v6.43开始,你的设备将使用 [cloud2.mikrotik.com](http://cloud2.mikrotik.com) 与MikroTik的云服务器进行通信。旧版本将使用 [cloud.mikrotik.com](http://cloud.mikrotik.com) 与MikroTik的云服务器进行通信。
19 |
20 | 配置
21 |
22 | ## 活动时区信息
23 |
24 | - **dst-active** (_yes_ 或 _no_>;只读属性):当当前时区的夏令时处于激活状态时,该属性的值为 _yes_。
25 | - **gmt-offset** ([+|-] HH: MM -小时和分钟的偏移;只读属性):这是在应用基本时区偏移量和现行夏令时偏移量之后,系统使用的GMT偏移量的当前值。
26 |
27 | ## 手动配置时区
28 |
29 | 这些设置可在 **/system clock manual** 控制台路径和“system > clock”WinBox窗口的“manual Time Zone”选项卡中看到。这些设置只有当 **time-zone-name**\= _manual_ 时才可用。只能手动配置单个夏令时时段。
30 |
31 | - **time-zone** , **dst-delta** ([+|-]HH:MM -以小时和分钟为单位的时间偏移量,前导加号可选;默认值:_+00:00_):当夏令时未激活时,使用GMT偏移量 **时区**。当夏令时有效时,使用GMT偏移量 **时区** + **DST-delta** 。
32 | - **dst-start** , **dst-end** (_mmm/DD/YYYY HH:MM: SS_ -日期和时间,在 **set** 命令中可以省略日期或时间;默认值:_jan/01/1970 00:00:00_):夏令时开始和结束的本地时间。
--------------------------------------------------------------------------------
/source/System_Information_and_Utilities/Clock/index.rst:
--------------------------------------------------------------------------------
1 | Clock
2 | ===============================
3 |
4 | .. toctree::
5 | :maxdepth: 2
6 |
7 | content.md
8 |
9 |
10 |
--------------------------------------------------------------------------------
/source/System_Information_and_Utilities/Device-mode/index.rst:
--------------------------------------------------------------------------------
1 | 设备模式
2 | ===============================
3 |
4 | .. toctree::
5 | :maxdepth: 2
6 |
7 | content.md
8 |
9 |
10 |
--------------------------------------------------------------------------------
/source/System_Information_and_Utilities/E-mail/index.rst:
--------------------------------------------------------------------------------
1 | E-mail
2 | ===============================
3 |
4 | .. toctree::
5 | :maxdepth: 2
6 |
7 | content.md
8 |
9 |
10 |
--------------------------------------------------------------------------------
/source/System_Information_and_Utilities/Fetch/index.rst:
--------------------------------------------------------------------------------
1 | 获取
2 | ===============================
3 |
4 | .. toctree::
5 | :maxdepth: 2
6 |
7 | content.md
8 |
9 |
10 |
--------------------------------------------------------------------------------
/source/System_Information_and_Utilities/Files_and_Backups/content.md:
--------------------------------------------------------------------------------
1 | # 文件
2 |
3 | 文件菜单显示路由器上的所有用户空间文件。可以查看和编辑文件内容或删除文件。从RouterOS 7.9beta2开始可以创建文件。RouterOS上传“.Npk”包后,文件菜单也会显示包的特定信息,例如,架构,构建日期和时间等。
4 |
5 | ```shell
6 | [admin@MikroTik] > file print detail
7 | 0 name="routeros-mipsbe-6.45.7.npk" type="package" size=11.5MiB creation-time=oct/29/2019 11:36:15
8 | package-name="routeros-mipsbe" package-version="6.45.7" package-build-time=oct/24/2019 08:44:35
9 | package-architecture="mips"
10 |
11 | 1 name="flash" type="directory" creation-time=jan/01/1970 02:00:03
12 |
13 | 2 name="flash/skins" type="directory" creation-time=jan/01/1970 02:00:04
14 |
15 | 3 name="flash/rw" type="directory" creation-time=sep/06/2019 14:01:16
16 |
17 | 4 name="flash/rw/pckg" type="directory" creation-time=sep/06/2019 14:01:16
18 | ```
19 |
20 | 创建新文件(RouterOS 7.9beta2中增加的命令):
21 |
22 | `[admin@MikroTik] > file add name=lala`
23 |
24 | 如果设备的文件列表中有一个名为“flash”的目录,您希望在系统重启/电源周期后保留的文件必须存储在该目录中。因为它之外的任何东西都保存在RAM磁盘中,并且在重新启动时将丢失。这并不包括.npk升级文件,因为它们将在系统丢弃RAM驱动器内容之前由升级过程应用。
25 |
26 | 对于带有NAND闪存的多核设备(例如CCR系列路由器,rb4011g), RouterOS使用回写,将文件更改缓存到RAM存储器中,而不是直接将其写入闪存介质中。文件更改将在绝对必要时存储在闪存上,写入可以延迟40秒。这有助于减少CPU占用,从而获得更好的性能。但是,当设备突然断电时,可能会导致空文件或零长度文件,因为文件没有完全保存在闪存上。
27 |
28 | ## 属性
29 |
30 | | 属性 | 说明 |
31 | | ------------------------------------- | ------------------------------------------------ |
32 | | **contents** (_string_; Default: ) | 文件的实际内容 |
33 | | **create-time** (_time_) | 文件创建的时间 |
34 | | **name** (_string_) | 文件名称 |
35 | | **package-Architecture** (_string_) | 构建包的架构。只适用于RouterOS“.Npk”文件 |
36 | | **package- build -time** (_string_) | 包被构建的时间。只适用于RouterOS".Npk”文件 |
37 | | **package-Name** (_string_) | 配置文件的可安装包名。只适用于RouterOS".Npk”文件 |
38 | | **package-version** (_string_) | 可安装包的版本。只适用于RouterOS".Npk”文件 |
39 | | **size** (_integer_) | 文件大小 |
40 | | **file type** (_string_) | 文件类型。对于文件夹,文件类型为 _directory_ |
41 |
42 | # 备份
43 |
44 | RouterOS备份功能允许您保存当前设备的配置,然后可以在相同或不同的相同型号上重新应用这些配置。这非常有用,因为它允许您毫不费力地恢复设备的配置或在备份设备上重新应用相同的配置。系统备份文件中还包含设备的MAC地址,在加载备份文件时也会恢复设备的MAC地址。
45 |
46 | 如果路由器上安装了The Dude和user-manager,那么系统备份将不包含这些服务的配置。因此,在保存这些服务中的配置时应格外小心,例如配置导出。
47 |
48 | 系统备份包含有关您的设备及其配置的敏感信息,请始终考虑加密备份文件并将备份文件保存在安全的地方。
49 |
50 | 要保存备份,请配置以下信息:
51 |
52 | ```shell
53 | [admin@MikroTik] > system backup save name=/flash/backup1 password=StrongPass encryption=aes-sha256
54 | Saving system configuration
55 | Configuration backup saved
56 | ```
57 |
58 | 请注意,在带有闪存的设备上,在实际备份名称之前使用“/flash/”。如上所述,保存在flash文件夹外的备份将在重新启动或重新上电后删除:
59 |
60 | ```shell
61 | [admin@MikroTik] > system backup save name=backup2 password=StrongPass encryption=aes-sha256
62 | Saving system configuration
63 | Configuration backup saved
64 | [admin@MikroTik] > file print detail
65 | 0 name="flash" type="directory" creation-time=jan/01/1970 02:00:03
66 |
67 | 1 name="flash/skins" type="directory" creation-time=jan/01/1970 02:00:04
68 |
69 | 2 name="flash/rw" type="directory" creation-time=sep/06/2019 14:01:16
70 |
71 | 3 name="flash/rw/pckg" type="directory" creation-time=sep/06/2019 14:01:16
72 |
73 | 4 name="backup2.backup" type="backup" size=22.4KiB creation-time=oct/29/2019 11:40:33
74 |
75 | 5 name="flash/backup1.backup" type="backup" size=22.4KiB creation-time=oct/29/2019 11:40:11
76 | ```
77 |
78 | 要加载备份,只需配置以下内容:
79 |
80 | ```shell
81 | [admin@MikroTik] > system backup load name=/flash/backup1 password=StrongPass
82 | Restore and reboot? [y/N]:
83 | Y
84 | ```
--------------------------------------------------------------------------------
/source/System_Information_and_Utilities/Files_and_Backups/index.rst:
--------------------------------------------------------------------------------
1 | 文件和备份
2 | ===============================
3 |
4 | .. toctree::
5 | :maxdepth: 2
6 |
7 | content.md
8 |
9 |
10 |
--------------------------------------------------------------------------------
/source/System_Information_and_Utilities/Identity/content.md:
--------------------------------------------------------------------------------
1 | # 概述
2 |
3 | 设置系统标识为系统向网络中的其他路由器标识自己,以及访问DHCP、邻居发现和默认无线SSID等服务提供唯一的标识名称。默认的系统标识设置为“microtik”。
4 |
5 | 系统标识的最大字符长度为64
6 |
7 | # 配置
8 |
9 | 在RouterOS中设置系统标识。
10 |
11 | ```shell
12 | [admin@MikroTik] > /system identity set name=New_Identity
13 | [admin@New_Identity] >
14 | ```
15 |
16 | 当前系统标识总是显示在登录的帐户名之后,并使用print命令:
17 |
18 | ```shell
19 | [admin@New_Identity] /system identity>print
20 | name: New_Identity
21 | [admin@New_Identity] /system identity>
22 | ```
23 |
24 | ## SNMP
25 |
26 | 也可以通过SNMP set命令修改路由器的系统标识:
27 |
28 | `snmpset -c public -v 1 192.168.0.0 1.3.6.1.2.1.1.5.0 s New_Identity`
29 |
30 | _snmpset_ - 基于Linux的SNMP应用程序,用于SNMP SET请求来设置网络实体上的信息;
31 |
32 | - _public_ - 路由器的团体名;
33 | - _192.168.0.0_ - 路由器的IP地址;
34 | - _1.3.6.1.2.1.1.5.0_ - 路由器标识的SNMP值;
--------------------------------------------------------------------------------
/source/System_Information_and_Utilities/Identity/index.rst:
--------------------------------------------------------------------------------
1 | 身份
2 | ===============================
3 |
4 | .. toctree::
5 | :maxdepth: 2
6 |
7 | content.md
8 |
9 |
10 |
--------------------------------------------------------------------------------
/source/System_Information_and_Utilities/Interface_Lists/content.md:
--------------------------------------------------------------------------------
1 | # 概述
2 |
3 | 允许定义一组接口,以便在不同的基于接口的配置部分(如邻居发现、防火墙、网桥和Internet检测)中更容易地管理接口。
4 |
5 | # 列表
6 |
7 | **Sub-menu:** `/interface list `
8 |
9 | 此菜单包含有关路由器上所有可用接口列表的信息。预定义列表有三个: _all_(包含所有接口)、_none_(不包含接口)、_dynamic_ (包含动态接口)和 _static_ (包含静态接口)。也可以创建额外的接口列表。
10 |
11 | | 属性 | 说明 |
12 | | ---------------------- | -------------------------------------------------------------- |
13 | | **name** (_string_) | 接口列表名称 |
14 | | **include** (_string_) | 定义包含在列表中的成员的接口列表。可以添加多个以逗号分隔的列表 |
15 | | **exclude** (_string_) | 定义从列表中排除成员的接口列表。可以添加多个以逗号分隔的列表 |
16 |
17 |
18 | Members are added to the interface list in the following order:
19 |
20 | 1. include members are added to the interface list
21 | 2. exclude members are removed from the list
22 | 3. Statically configured members are added to the list
23 |
24 | # 成员
25 |
26 | **Sub-menu:** `/interface list member`
27 |
28 | 该子菜单包含每个接口列表中静态配置的接口成员的信息。注意,通过include和exclude语句动态添加的接口不会在此子菜单中表示。
29 |
30 | | 属性 | 说明 |
31 | | ------------------------ | ------------ |
32 | | **interface** (_string_) | 接口名称 |
33 | | **list** (_string_) | 接口列表名称 |
--------------------------------------------------------------------------------
/source/System_Information_and_Utilities/Interface_Lists/index.rst:
--------------------------------------------------------------------------------
1 | 接口列表
2 | ===============================
3 |
4 | .. toctree::
5 | :maxdepth: 2
6 |
7 | content.md
8 |
9 |
10 |
--------------------------------------------------------------------------------
/source/System_Information_and_Utilities/NTP/index.rst:
--------------------------------------------------------------------------------
1 | NTP
2 | ===============================
3 |
4 | .. toctree::
5 | :maxdepth: 2
6 |
7 | content.md
8 |
9 |
10 |
--------------------------------------------------------------------------------
/source/System_Information_and_Utilities/Neighbor_discovery/index.rst:
--------------------------------------------------------------------------------
1 | 邻居发现
2 | ===============================
3 |
4 | .. toctree::
5 | :maxdepth: 2
6 |
7 | content.md
8 |
9 |
10 |
--------------------------------------------------------------------------------
/source/System_Information_and_Utilities/Note/content.md:
--------------------------------------------------------------------------------
1 | ## 概述
2 |
3 | `/system note`
4 |
5 |
6 | 系统说明功能允许分配任意文本说明或消息,显示在每次登录后的横幅。例如,可以通过这种方式在系统管理员之间分发警告,或者描述特定路由器的实际功能。 要配置系统记录,可以在路由器的FTP服务器上上传一个名为
7 | **sys-note.txt** 的纯文本文件,或者,另外,在此菜单中编辑设置
8 |
9 | ## 属性
10 |
11 | | 属性 | 说明 |
12 | | ----------------------------------------------- | ---------------------------- |
13 | | **note** (_string_;Default:) | 将被显示的说明 |
14 | | **show-at-login** (_yes \| no_;Default:**yes**) | 是否在每次登录时显示系统提示 |
15 |
16 |
17 |
18 | ## 例子
19 |
20 | 可以使用嵌入式文本编辑器(_/system note edit note_)添加多行注释,例如,将ASCII艺术添加到家用路由器:
21 |
22 |
23 |
24 | ```
25 | system/note/set note=
26 | ```
27 |
28 | ```shell
29 |
30 | .&
31 | @& @&
32 | @@ @#
33 | @@&
34 | , @@@ .
35 | @@@@@@@@@@@@@@@@@
36 | @@@
37 | @@@
38 | @@@
39 | ,@ @@@ &
40 | @@@@ @@@ @@@@
41 | @@ @@@ @(
42 | &@@ @@@ @@@
43 | @@@@@ @@@ &@@@&
44 | &@@@@@@@@@@@@@@@&
45 | @@@@@
46 | ```
--------------------------------------------------------------------------------
/source/System_Information_and_Utilities/Note/index.rst:
--------------------------------------------------------------------------------
1 | 注释
2 | ===============================
3 |
4 | .. toctree::
5 | :maxdepth: 2
6 |
7 | content.md
8 |
9 |
10 |
--------------------------------------------------------------------------------
/source/System_Information_and_Utilities/Partitions/content.md:
--------------------------------------------------------------------------------
1 | # 概述
2 |
3 | 在ARM、ARM64、MIPS、TILE和PowerPC RouterBOARD类型的设备上支持分区。
4 |
5 | 可以对NAND闪存进行分区,允许在每个分区上安装自己的操作系统,并指定主分区和备用分区。
6 |
7 | 如果一个分区由于某种原因(升级失败、引入了有问题的配置、软件问题)而失败,则会引导下一个分区。这可以用作交互式备份,在其中保留经过验证的工作安装,并仅升级某些辅助分区。如果您升级了配置,并且它被证明是好的,您可以使用“保存配置”按钮将其复制到其他分区。
8 |
9 | NAND的重新分区需要最新的引导加载程序版本
10 |
11 | 最小分区大小:
12 |
13 | - 在MIPS上为32MB
14 | - PowerPC上为40MB
15 | - TILE上为48MB
16 |
17 | 允许的最大分区数是8。
18 |
19 | ```shell
20 | [admin@1009up] > /partitions/print
21 | Flags: A - ACTIVE; R - RUNNING
22 | Columns: NAME, FALLBACK-TO, VERSION, SIZE
23 | # NAME FALL VERSION SIZE
24 | 0 AR part0 next RouterOS v7.1beta4 Dec/15/2020 15:55:11 128MiB
25 | ```
26 |
27 | # 命令
28 |
29 | | 属性 | 说明 |
30 | | ----------------------------------------- | ---------------------------------------------------------------- |
31 | | **repartition** (_integer_) | 将重启路由器并重新格式化NAND,只留下活动分区。 |
32 | | **copy-to** (_\_) | 将运行的操作系统克隆到指定分区。以前存储在分区上的数据将被擦除。 |
33 | | **save-config-to** (_\_) | 在指定分区上克隆 **running-config** 。其他的不动。 |
34 | | **restore-config-from** (_\_) | 从指定分区复制配置到运行的分区 |
35 |
36 | # 属性
37 |
38 | | 属性 | 属性 |
39 | | --------------------------------------------------------------------------------- | ----------------------------------------------------------------------------------------------------------------- |
40 | | **name** (_string_; Default: ) | 分区名称 |
41 | | **fallback-to** (_etherboot \| next \| \_; Default: **next**) | 如果活动分区启动失败怎么办:
- **etherboot** -切换到etherboot
- **next** -尝试下一个分区
- 回退到指定分区 |
42 |
43 | **只读属性**
44 |
45 | | 属性 | 说明 |
46 | | ------------------------- | ---------------------------- |
47 | | **active** (_yes \| no_) | 分区激活 |
48 | | **running** (_yes\| no_) | 当前正在运行的分区 |
49 | | **size** (_integer[MiB]_) | 分区大小 |
50 | | **version** (_string_) | 分区上安装的当前RouterOS版本 |
--------------------------------------------------------------------------------
/source/System_Information_and_Utilities/Partitions/index.rst:
--------------------------------------------------------------------------------
1 | 分区
2 | ===============================
3 |
4 | .. toctree::
5 | :maxdepth: 2
6 |
7 | content.md
8 |
9 |
10 |
--------------------------------------------------------------------------------
/source/System_Information_and_Utilities/Precision_Time_Protocol/index.rst:
--------------------------------------------------------------------------------
1 | 精确时间协议
2 | ===============================
3 |
4 | .. toctree::
5 | :maxdepth: 2
6 |
7 | content.md
8 |
9 |
10 |
--------------------------------------------------------------------------------
/source/System_Information_and_Utilities/Scheduler/index.rst:
--------------------------------------------------------------------------------
1 | 时间计划
2 | ===============================
3 |
4 | .. toctree::
5 | :maxdepth: 2
6 |
7 | content.md
8 |
9 |
10 |
--------------------------------------------------------------------------------
/source/System_Information_and_Utilities/Services/index.rst:
--------------------------------------------------------------------------------
1 | 服务
2 | ===============================
3 |
4 | .. toctree::
5 | :maxdepth: 2
6 |
7 | content.md
8 |
9 |
10 |
--------------------------------------------------------------------------------
/source/System_Information_and_Utilities/TFTP/index.rst:
--------------------------------------------------------------------------------
1 | TFTP
2 | ===============================
3 |
4 | .. toctree::
5 | :maxdepth: 2
6 |
7 | content.md
8 |
9 |
10 |
--------------------------------------------------------------------------------
/source/System_Information_and_Utilities/index.rst:
--------------------------------------------------------------------------------
1 | 系统信息和实用工具
2 | ===============================
3 |
4 | .. toctree::
5 | :maxdepth: 1
6 |
7 | Clock/index.rst
8 | Device-mode/index.rst
9 | E-mail/index.rst
10 | Fetch/index.rst
11 | Files_and_Backups/index.rst
12 | Identity/index.rst
13 | Interface_Lists/index.rst
14 | Neighbor_discovery/index.rst
15 | Note/index.rst
16 | NTP/index.rst
17 | Partitions/index.rst
18 | Precision_Time_Protocol/index.rst
19 | Scheduler/index.rst
20 | Services/index.rst
21 | TFTP/index.rst
22 |
--------------------------------------------------------------------------------
/source/Virtual_Private_Networks/6to4/index.rst:
--------------------------------------------------------------------------------
1 | 6to4
2 | ===============================
3 |
4 | .. toctree::
5 | :maxdepth: 2
6 |
7 | content.md
8 |
9 |
10 |
--------------------------------------------------------------------------------
/source/Virtual_Private_Networks/EoIP/index.rst:
--------------------------------------------------------------------------------
1 | EoIP
2 | ===============================
3 |
4 | .. toctree::
5 | :maxdepth: 2
6 |
7 | content.md
8 |
9 |
10 |
--------------------------------------------------------------------------------
/source/Virtual_Private_Networks/GRE/index.rst:
--------------------------------------------------------------------------------
1 | GRE
2 | ===============================
3 |
4 | .. toctree::
5 | :maxdepth: 2
6 |
7 | content.md
8 |
9 |
10 |
--------------------------------------------------------------------------------
/source/Virtual_Private_Networks/IPIP/index.rst:
--------------------------------------------------------------------------------
1 | IPIP
2 | ===============================
3 |
4 | .. toctree::
5 | :maxdepth: 2
6 |
7 | content.md
8 |
9 |
10 |
--------------------------------------------------------------------------------
/source/Virtual_Private_Networks/IPsec/index.rst:
--------------------------------------------------------------------------------
1 | IPsec
2 | ===============================
3 |
4 | .. toctree::
5 | :maxdepth: 2
6 |
7 | content.md
8 | IKEv2_EAP_between_NordVPN_and_RouterOS.md
9 |
10 |
11 |
--------------------------------------------------------------------------------
/source/Virtual_Private_Networks/L2TP/index.rst:
--------------------------------------------------------------------------------
1 | L2TP
2 | ===============================
3 |
4 | .. toctree::
5 | :maxdepth: 2
6 |
7 | content.md
8 | LAC_and_LNS_setup_with_Cisco_as_LAC.md
9 |
10 |
11 |
--------------------------------------------------------------------------------
/source/Virtual_Private_Networks/OpenVPN/index.rst:
--------------------------------------------------------------------------------
1 | OpenVPN
2 | ===============================
3 |
4 | .. toctree::
5 | :maxdepth: 2
6 |
7 | content.md
8 |
9 |
10 |
--------------------------------------------------------------------------------
/source/Virtual_Private_Networks/PPPoE/IPv6_PD_over_PPP.md:
--------------------------------------------------------------------------------
1 | # 概述
2 |
3 | 本示例介绍PPPoE server和client使用IPv6 Prefix Delegation的配置过程。
4 |
5 | IPv6前缀可以通过PPP接口进行委派。当客户端连接时,PPP会自动添加动态 [DHCPv6-PD服务器](https://help.mikrotik.com/docs/display/ROS/DHCP#DHCP-DHCPv6Server) 。这允许在PPP接口上运行DHCPv6客户端。
6 |
7 | ## 配置
8 |
9 | ## 服务器
10 |
11 | 使用“PPP配置文件”下的dhcpv6-pd-pool参数开启PPP- pd功能。PPP将使用指定的 [IPv6池](https://help.mikrotik.com/docs/display/ROS/IP+Pools#IPPools-IPv6Pool) 创建动态DHCP服务器。
12 |
13 | 因此,第一步是添加IPv6池:
14 |
15 | `/ipv6 pool
16 | add name=myPool prefix=2001:db8:7501:ff00::/60 prefix-length=62`
17 |
18 | 现在可以配置PPP配置文件并添加PPPoE服务器
19 |
20 | ```shell
21 | /ppp profile set default dhcpv6-pd-pool=myPool
22 |
23 | /interface pppoe-server server
24 | add service-name=test interface=ether1
25 | ```
26 |
27 | ## 客户端
28 |
29 | 在客户端需要建立PPPoE客户端接口,并在其上运行DHCP客户端。
30 |
31 | ```shell
32 | /interface pppoe-client
33 | add name=client-test interface=ether1 user=a1 service-name=test
34 |
35 | /ipv6 dhcp-client
36 | add interface=client-test pool-name=ppp-test pool-prefix-length=64
37 | ```
38 |
39 | ## 测试状态
40 |
41 | 在服务器端检查是否添加了动态DHCP服务器,是否为特定客户端绑定了前缀。
42 |
43 | ```shell
44 | [admin@RB1100] /ipv6 dhcp-server> print
45 | Flags: D - dynamic, X - disabled, I - invalid
46 | # NAME INTERFACE ADDRESS-POOL LEASE-TIME
47 | 0 D myPool 3d
48 |
49 | [admin@RB1100] /ipv6 dhcp-server binding> print
50 | Flags: X - disabled, D - dynamic
51 | # ADDRESS DU IAID SER.. STATUS
52 | 1 D 2001:db8:7501:ff04::/62 247 print
59 | Flags: D - dynamic, X - disabled, I - invalid
60 | # INTERFACE STATUS PREFIX EXPIRES-AFTER
61 | 0 client-test bound 2001:db8:7501:ff04::/62 2d23h18m17s
62 |
63 | [admin@x86-test] /ipv6 pool> print
64 | Flags: D - dynamic
65 | # NAME PREFIX PREFIX-LENGTH
66 | 0 D ppp-test 2001:db8:7501:ff04::/62 64
67 | ```
--------------------------------------------------------------------------------
/source/Virtual_Private_Networks/PPPoE/MLPPP_over_single_and_multiple_links.md:
--------------------------------------------------------------------------------
1 | # 概述
2 |
3 | **Standards:** `RFC 1990`
4 |
5 | 多链路点对点协议(Multi-Link Point to Point Protocol, MP, Multi-Link PPP, MultiPPP或MLPPP)是一种跨多个逻辑数据链路拆分、重组和排序数据的方法。
6 |
7 | 在一对设备上有多个DSL链路的情况下,使用多链路PPP可以通过“拓宽两个设备之间的管道”来提高性能,而无需采用更新、更昂贵的技术。
8 |
9 | 大的数据包实际上被分割成比特,并在所有逻辑数据链路上均匀发送。这是在没有带宽损失的情况下立即完成的。重要的是要理解链接的另一端需要使用相同的协议来重新组合数据。
10 |
11 | Multilink基于 [LCP](https://wiki.mikrotik.com/index.php?title=LCP&action=edit&redlink=1 "LCP(page does not exist)") 选项协商,允许向其对等方表明它能够组合多个物理链路。
12 |
13 | # MLPPP单链路
14 |
15 | 通常,由于开销的原因,PPP链路上发送的数据包大小会减小。MP可用于在单个ppp链路上发送和接收全帧。为了使它工作,多链路协议使用额外的LCP配置选项 **多链路最大接收重构单元(MRRU)**
16 |
17 | 为了在单链路上启用多链路PPP,必须指定MRRU(最大接收重构单元)选项。如果双方都支持此功能,则不需要调整MSS(在防火墙管理中)。研究表明,MRRU对CPU的消耗比每个客户端2条规则要少。MRRU允许将数据包分成多个通道,从而增加可能的MTU和MRU(最多65535字节)。
18 |
19 | 在Windows下,它可以在网络标签,设置按钮,“协商多链路为单链路连接”中启用。他们的MRRU编码是1614。
20 |
21 | 当启用MPPE加密时,MTU将减少4个字节才能正常工作
22 |
23 | ## 配置示例
24 |
25 | 配置与Windows客户端兼容的pppoe server,并使能MRRU。
26 |
27 | ```shell
28 | [admin@RB800] /interface pppoe-server server> add service-name=myPPP interface=ether1 mrru=1614
29 | [admin@RB800] /interface pppoe-server server> print
30 | Flags: X - disabled
31 | 0 service-name="myPPP" interface=ether1 max-mtu=1480 max-mru=1480 mrru=1614
32 | authentication=pap,chap,mschap1,mschap2 keepalive-timeout=10 one-session-per-host=no
33 | max-sessions=0 default-profile=default
34 | ```
35 |
36 | 简而言之,标准PPP链路-只需在两端指定MRRU即可。
37 |
38 | # MLPPP多链路
39 |
40 | MLPPP over multiple links允许在多个物理连接上创建一条PPP链路。所有PPP链路必须来自同一服务器(服务器必须支持MLPPP over多链路),所有PPP链路必须具有相同的用户名和密码。
41 |
42 | 要启用MLPPP,您只需要创建PPP客户端并指定多个接口而不是单个接口。RouterOS只支持MLPPP客户端。目前没有可用的MLPPP服务器支持。
43 |
44 | ## 配置示例
45 |
46 | 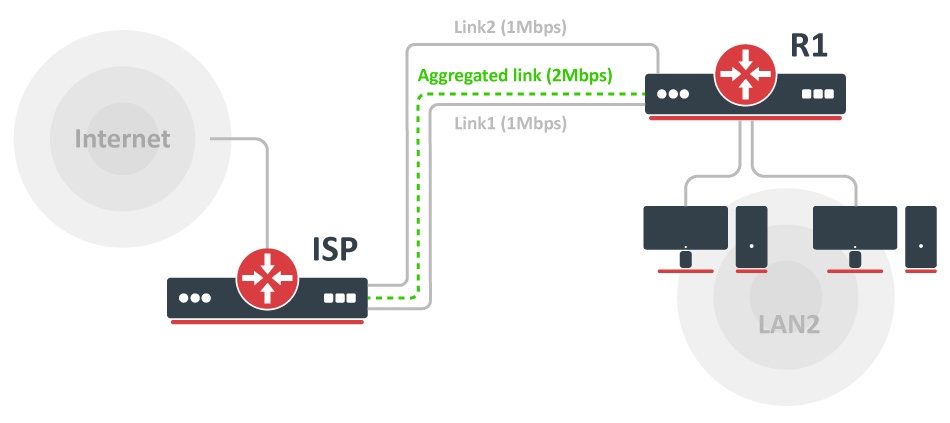
47 |
48 | ISP给它的客户提供两条物理链路(DSL线),每条1Mbps。为了获得2Mbps的聚合管道,必须设置MLPPP。考虑ISP路由器被预配置为支持MLPPP。
49 |
50 | 路由器R1上的配置如下:
51 |
52 | ```shell
53 | /interface pppoe-client
54 | add service-name=ISP interface=ether1,ether2 user=xxx password=yyy disabled=no \
55 | add-default-route=yes use-peer-dns=yes
56 | ```
57 |
58 | ```shell
59 | [admin@RB800] /interface pppoe-client> print
60 | Flags: X - disabled, R - running
61 | 0 name="pppoe-out1" max-mtu=1480 max-mru=1480 mrru=disabled interface=ether1,ether2
62 | user="xxx" password="yyy" profile=default service-name="ISP" ac-name="" add-default-route=yes
63 | dial-on-demand=no use-peer-dns=yes allow=pap,chap,mschap1,mschap2
64 | ```
65 |
66 | 现在,当PPPoE客户端连接时,可以设置其余的配置,本地网络地址,启用DNS请求,设置伪装和防火墙
67 |
68 | ```shell
69 | /ip address add address=192.168.88.1/24 interface=local
70 |
71 | /ip dns set allow-remote-request=yes
72 |
73 | /ip firewall nat
74 | add chain=src-nat action=masquerade out-interface=pppoe-out1
75 |
76 | /ip firewall filter
77 | add chain=input connection-state=invalid action=drop \
78 | comment="Drop Invalid connections"
79 | add chain=input connection-state=established action=accept \
80 | comment="Allow Established connections"
81 | add chain=input protocol=icmp action=accept \
82 | comment="Allow ICMP"
83 | add chain=input src-address=192.168.88.0/24 action=accept \
84 | in-interface=!pppoe-out1
85 | add chain=input action=drop comment="Drop everything else"
86 | ```
87 |
88 | 有关更高级的路由器和客户保护,请查看 [防火墙示例](https://help.mikrotik.com/docs/display/ROS/Filter) 。
--------------------------------------------------------------------------------
/source/Virtual_Private_Networks/PPPoE/index.rst:
--------------------------------------------------------------------------------
1 | PPPoE
2 | ===============================
3 |
4 | .. toctree::
5 | :maxdepth: 2
6 |
7 | content.md
8 | IPv6_PD_over_PPP.md
9 | MLPPP_over_single_and_multiple_links.md
10 |
11 |
12 |
--------------------------------------------------------------------------------
/source/Virtual_Private_Networks/PPTP/index.rst:
--------------------------------------------------------------------------------
1 | PPTP
2 | ===============================
3 |
4 | .. toctree::
5 | :maxdepth: 2
6 |
7 | content.md
8 |
9 |
10 |
--------------------------------------------------------------------------------
/source/Virtual_Private_Networks/SSTP/content.md:
--------------------------------------------------------------------------------
1 | # 概述
2 |
3 | SSTP (Secure Socket Tunneling Protocol)是一种通过TLS通道传输PPP隧道的协议。在TCP端口443上使用TLS允许SSTP通过几乎所有的防火墙和代理服务器。
4 |
5 | # 介绍
6 |
7 | 看看SSTP的连接机制:
8 |
9 |
10 | 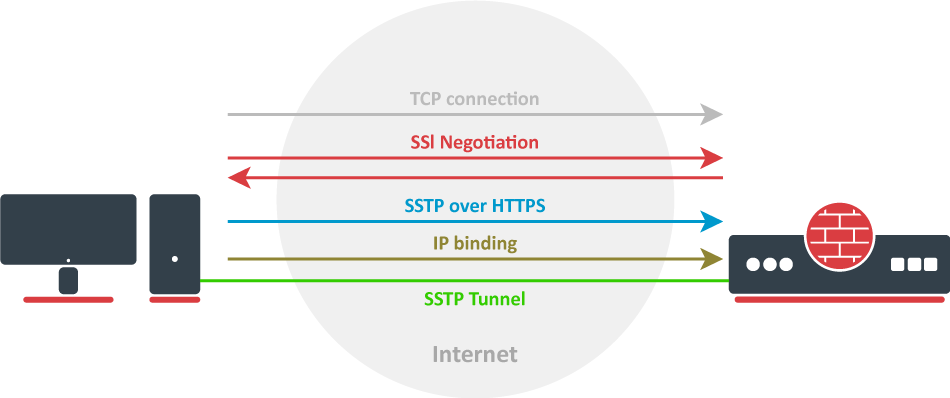
11 |
12 | 1. 从客户端到服务器建立TCP连接(默认端口443);
13 | 2. SSL验证服务器证书。如果证书有效,则建立连接,否则将拒绝连接。(但请参见下文注释);
14 | 3. 客户端在HTTPS会话中发送SSTP控制报文,建立双方的SSTP状态机;
15 | 4. 基于SSTP的PPP协商。客户端向服务器端进行认证,并在SSTP接口绑定IP地址;
16 |
17 | SSTP隧道已经建立,可以进行报文封装;
18 |
19 | 从v5.0beta2开始,SSTP不需要证书就可以操作,并且可以使用任何可用的身份验证类型。这个功能将只在两个microtik路由器之间工作,因为它不符合微软的标准。否则,要建立安全隧道 **mschap** 身份验证和来自同一链的客户端/服务器证书应该使用。
20 |
21 | # 证书
22 |
23 | 为了建立一个安全的SSTP隧道,需要使用证书。在服务器上,身份验证仅由username和password完成,但在客户端上,服务器使用服务器证书进行身份验证。它也被客户端用来加密绑定SSL和PPP认证,这意味着客户端通过SSTP连接发送一个特殊的值给服务器,这个值来自于PPP认证和服务器证书过程中产生的密钥数据,这允许服务器检查两个通道是否安全。
24 |
25 | 如果SSTP客户端在Windows PC上,那么在使用自签名证书时建立安全SSTP隧道的唯一方法是在SSTP服务器上导入“server”证书,并在Windows PC上在 [受信任的根](https://technet.microsoft.com/en-us/library/dd458982.aspx) 中添加CA证书。
26 |
27 | 如果您的服务器证书是由Windows已经知道的CA颁发的,那么Windows客户端将无需向受信任的根导入任何额外的证书即可工作。
28 |
29 | 如果证书被SSTP使用,RSA密钥长度必须至少为472位。较短的密钥被认为是安全威胁。
30 |
31 |
32 |
33 | 在RouterOS客户端上也可以进行类似的配置,导入CA证书并启用verify-server-certificate选项。在这种情况下,中间人攻击是不可能的。
34 |
35 | 在两个microtik路由器之间,也可以通过根本不使用证书来建立不安全的隧道。在这种情况下,通过SSTP隧道的数据使用匿名DH,很容易实现中间人攻击。此场景不兼容Windows客户端。
36 |
37 | 还可以通过使用客户端证书添加额外的授权来创建安全的SSTP隧道。配置要求如下:
38 |
39 | - 服务器端和客户端证书
40 | - 在服务器端和客户端启用验证选项
41 |
42 | 这种情况对于Windows客户机也是不可能的,因为没有办法在Windows上设置客户机证书。
43 |
44 | 证书错误消息
45 |
46 | 当SSL握手失败时,您将看到以下证书错误之一:
47 |
48 | - **证书尚未生效** - notBefore证书日期在当前时间之后;
49 | - **证书已过期** -证书有效期在当前时间之前;
50 | - **无效证书用途** -所提供的证书不能用于指定的用途;
51 | - **自己签名的证书链** -证书链可以使用不可信的证书建立,但无法在本地找到根
52 | - **无法在本地获取颁发者证书** - CA证书未在本地导入;
53 | - **cserver的IP地址与证书不匹配** -启用了服务器地址验证,但证书中提供的地址与服务器地址不匹配;
54 |
55 | # 快速示例
56 |
57 | 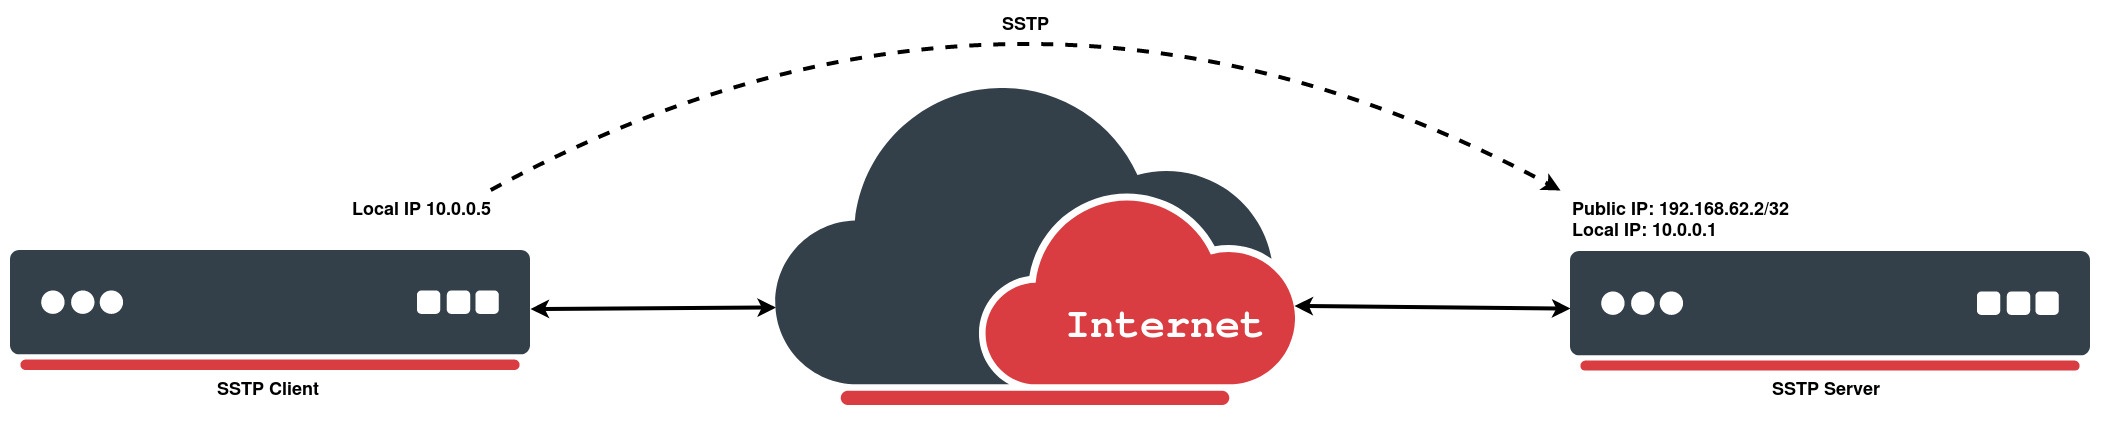
58 |
59 | ## SSTP客户端
60 |
61 | 在下面的配置示例中,e将创建一个不使用证书的简单SSTP客户端:
62 |
63 | ```shell
64 | [admin@MikroTik > interface sstp-client add connect-to=192.168.62.2 disabled=no name=sstp-out1 password=StrongPass profile=default-encryption user=MT-User
65 | [admin@MikroTik > interface sstp-client print
66 | Flags: X - disabled; R - running
67 | 0 R name="sstp-out1" max-mtu=1500 max-mru=1500 mrru=disabled connect-to=192.168.62.2:443
68 | http-proxy=0.0.0.0:443 certificate=none verify-server-certificate=no
69 | verify-server-address-from-certificate=yes user="MT-User" password="StrongPass"
70 | profile=default-encryption keepalive-timeout=60 add-default-route=no dial-on-demand=no
71 | authentication=pap,chap,mschap1,mschap2 pfs=no tls-version=any
72 | ```
73 |
74 | ## SSTP服务器
75 |
76 | 为特定用户配置PPP密码,然后简单地启用SSTP服务器:
77 |
78 | ```shell
79 | [admin@MikroTik] > ppp secret add local-address=10.0.0.1 name=MT-User password=StrongPass remote-address=10.0.0.5 service=sstp
80 | [admin@MikroTik] > interface sstp-server server set default-profile=default-encryption enabled=yes
81 | [admin@MikroTik] > interface sstp-server server print
82 | enabled: yes
83 | port: 443
84 | max-mtu: 1500
85 | max-mru: 1500
86 | mrru: disabled
87 | keepalive-timeout: 60
88 | default-profile: default-encryption
89 | authentication: pap,chap,mschap1,mschap2
90 | certificate: none
91 | verify-client-certificate: no
92 | pfs: no
93 | tls-version: any
94 | ```
--------------------------------------------------------------------------------
/source/Virtual_Private_Networks/SSTP/index.rst:
--------------------------------------------------------------------------------
1 | SSTP
2 | ===============================
3 |
4 | .. toctree::
5 | :maxdepth: 2
6 |
7 | content.md
8 |
9 |
10 |
--------------------------------------------------------------------------------
/source/Virtual_Private_Networks/WireGuard/index.rst:
--------------------------------------------------------------------------------
1 | WireGuard
2 | ===============================
3 |
4 | .. toctree::
5 | :maxdepth: 2
6 |
7 | content.md
8 |
9 |
10 |
--------------------------------------------------------------------------------
/source/Virtual_Private_Networks/ZeroTier/index.rst:
--------------------------------------------------------------------------------
1 | ZeroTier
2 | ===============================
3 |
4 | .. toctree::
5 | :maxdepth: 2
6 |
7 | content.md
8 |
9 |
10 |
--------------------------------------------------------------------------------
/source/Virtual_Private_Networks/index.rst:
--------------------------------------------------------------------------------
1 | 虚拟私有网络
2 | ===============================
3 |
4 | .. toctree::
5 | :maxdepth: 1
6 |
7 | 6to4/index.rst
8 | EoIP/index.rst
9 | GRE/index.rst
10 | IPIP/index.rst
11 | IPsec/index.rst
12 | L2TP/index.rst
13 | OpenVPN/index.rst
14 | PPPoE/index.rst
15 | PPTP/index.rst
16 | SSTP/index.rst
17 | WireGuard/index.rst
18 | ZeroTier/index.rst
19 |
20 |
--------------------------------------------------------------------------------
/source/Wired_Connections/Ethernet/index.rst:
--------------------------------------------------------------------------------
1 | 以太网
2 | ===============================
3 |
4 | .. toctree::
5 | :maxdepth: 2
6 |
7 | content.md
8 |
9 |
10 |
--------------------------------------------------------------------------------
/source/Wired_Connections/PWR_Line/index.rst:
--------------------------------------------------------------------------------
1 | Power Line
2 | ===============================
3 |
4 | .. toctree::
5 | :maxdepth: 2
6 |
7 | content.md
8 |
9 |
10 |
--------------------------------------------------------------------------------
/source/Wired_Connections/index.rst:
--------------------------------------------------------------------------------
1 | 有线连接
2 | ===============================
3 |
4 | .. toctree::
5 | :maxdepth: 1
6 |
7 | Ethernet/index.rst
8 | PWR_Line/index.rst
9 |
--------------------------------------------------------------------------------
/source/Wireless/CAPsMAN/index.rst:
--------------------------------------------------------------------------------
1 | CAPsMAN
2 | ===============================
3 |
4 | .. toctree::
5 | :maxdepth: 2
6 |
7 | content.md
8 | AP_Controller.md
9 |
10 |
11 |
--------------------------------------------------------------------------------
/source/Wireless/HWMPplus/index.rst:
--------------------------------------------------------------------------------
1 | Mesh
2 | ===============================
3 |
4 | .. toctree::
5 | :maxdepth: 2
6 |
7 | content.md
8 |
9 |
10 |
--------------------------------------------------------------------------------
/source/Wireless/Interworking_Profiles/index.rst:
--------------------------------------------------------------------------------
1 | 互通配置文件
2 | ===============================
3 |
4 | .. toctree::
5 | :maxdepth: 2
6 |
7 | content.md
8 |
9 |
10 |
--------------------------------------------------------------------------------
/source/Wireless/Nv2/index.rst:
--------------------------------------------------------------------------------
1 | Nv2
2 | ===============================
3 |
4 | .. toctree::
5 | :maxdepth: 2
6 |
7 | content.md
8 |
9 |
10 |
--------------------------------------------------------------------------------
/source/Wireless/Spectral_scan/content.md:
--------------------------------------------------------------------------------
1 | # 介绍
2 |
3 | 频谱扫描可以扫描无线网卡支持的所有频率,并直接在控制台中绘制它们。确切的频率范围取决于卡片。r52n上允许的范围:[4790;6085]、[2182;2549]。
4 |
5 | 无线网卡可以为任何20mhz宽信道生成4us长的频谱快照。这被认为是一个单一的光谱样本。
6 |
7 | 为了提高数据质量,频谱以10mhz的频率增量扫描,这意味着在每个特定频率下(考虑20mhz宽的样本)的采样覆盖率增加了一倍。
8 |
9 | 目前,不支持Atheros 802.11ac芯片(例如QCA98xx, IPQ-4018)。请参阅 [https://mikrotik.com/products](https://mikrotik.com/products) 确定您设备上的无线芯片。
10 |
11 | # 控制台
12 |
13 | ## 光谱历史
14 |
15 | 
16 |
17 | `/interface wireless spectral-history `
18 |
19 |
20 |
21 | 阴谋声谱图。图例和频率标尺每24行印一次。标尺中的数字对应于其最左边字符位置的值。在不同范围内的功率值被打印为具有相同前景和背景颜色的不同颜色的字符,因此可以复制和粘贴该命令的终端输出。
22 |
23 | - _value_ - 选择绘制在输出上的值。“interference”是特殊的,因为它显示检测到的干扰源(受“classiy -samples”参数的影响)而不是功率读数,并且不能使声音;
24 | - _interval_ - 打印谱线的时间间隔;
25 | - _duration_ - 在指定时间后终止命令。违约是无限期的;
26 | - _buckets_ - 在谱图的每一行显示多少个值。该值受终端中列数的限制。如果使用“audible”,减少这个值是有用的;
27 | - _average-samples_ - 在每个频率上拍摄的4us光谱快照的数量,并计算它们的平均和最大能量。(默认10);
28 | - _classify-samples_ - 在每个频率下拍摄并经过干扰分类算法处理的光谱快照个数。一般来说,越多的样本越有机会发现某些类型的干扰(默认为50);
29 | - _range_
30 | - 2.4ghz - 扫描整个2.4ghz频段;
31 | - 5ghz - 扫描整个5ghz频段;
32 | - 电流通道 - 仅扫描电流通道(20或40 MHz宽);
33 | - range - 扫描的特定范围;
34 |
35 | - _audible=yes_ -播放打印出来的每一行。字里行间有短暂的沉默。每条线从左到右播放,频率越高,谱图中的值越高。
36 |
37 | ## 光谱扫描
38 |
39 | 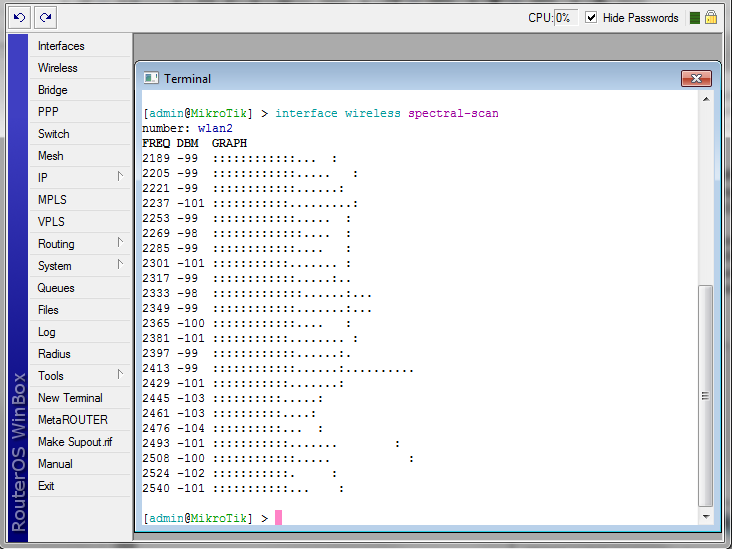
40 |
41 | `/interface wireless spectral-scan `
42 |
43 | 连续监测光谱数据。该命令使用与'spectral-history'相同的数据源,因此共享许多参数。
44 |
45 | 每一行显示一个谱图桶——频率、功率平均值的数值和字符图形条。柱状图显示平均功率值,字符为“:”,平均峰值保持率为“”。的字符。Maximum显示为单个浮动':'字符。
46 |
47 | - _show-interference_ - 增加一列显示检测到的干扰源;
48 |
49 | 可能分类干扰的类型:
50 |
51 | - Bluetooth-headset
52 | - Bluetooth-stereo
53 | - cordless-phone
54 | - microwave-oven
55 | - CWA
56 | - video-bridge
57 | - wifi
58 |
59 | # Dude
60 |
61 | Dude是一个免费的网络监控和管理程序,由MikroTik。你可以在这里 [下载](http://www.mikrotik.com/thedude.php)。
62 |
63 | Dude具有内置功能,可以通过支持的无线网卡从任何RouterOS设备运行图形化频谱扫描。只需在您的Dude地图中选择此设备,右键单击并选择工具->光谱扫描。
64 |
65 | 
66 |
67 | 这将打开具有各种选项和不同视图模式的光谱扫描GUI:
68 |
69 | 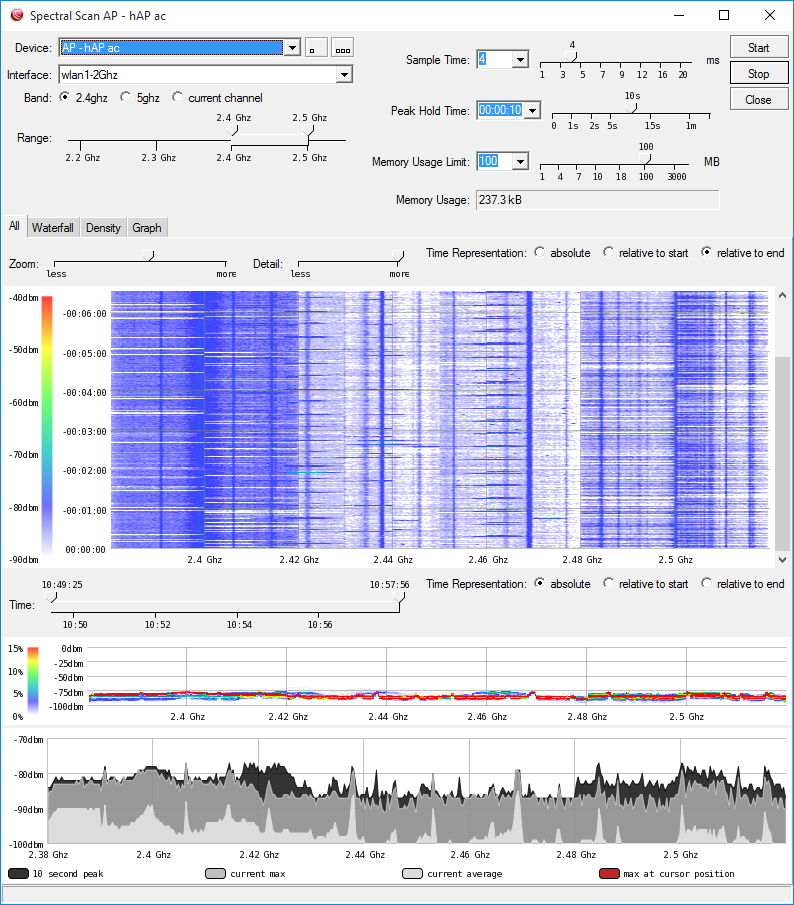
--------------------------------------------------------------------------------
/source/Wireless/Spectral_scan/index.rst:
--------------------------------------------------------------------------------
1 | 频谱扫描
2 | ===============================
3 |
4 | .. toctree::
5 | :maxdepth: 2
6 |
7 | content.md
8 |
9 |
10 |
--------------------------------------------------------------------------------
/source/Wireless/W60G/Distance_guide.md:
--------------------------------------------------------------------------------
1 | # 距离指南
2 |
3 | 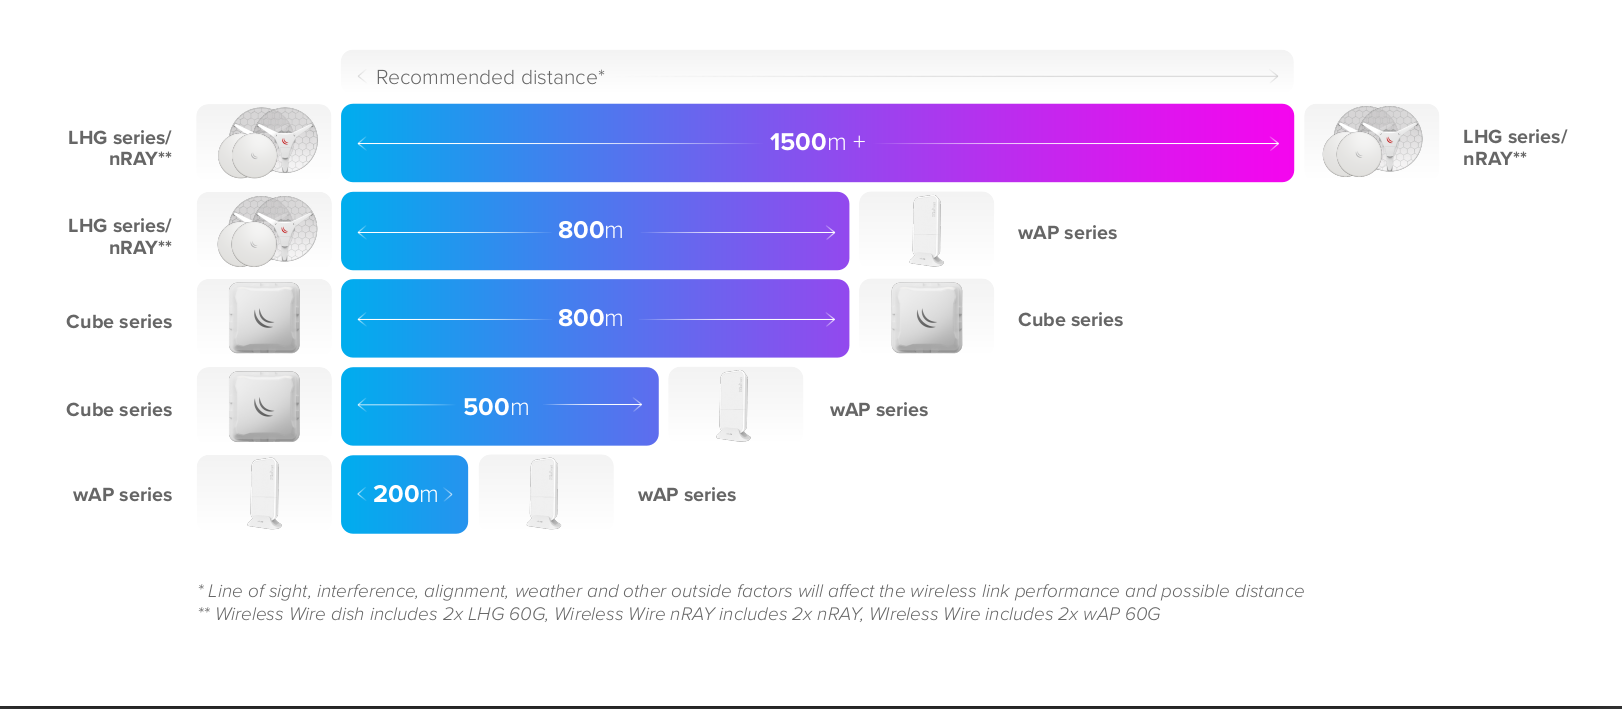
4 |
5 |
6 | 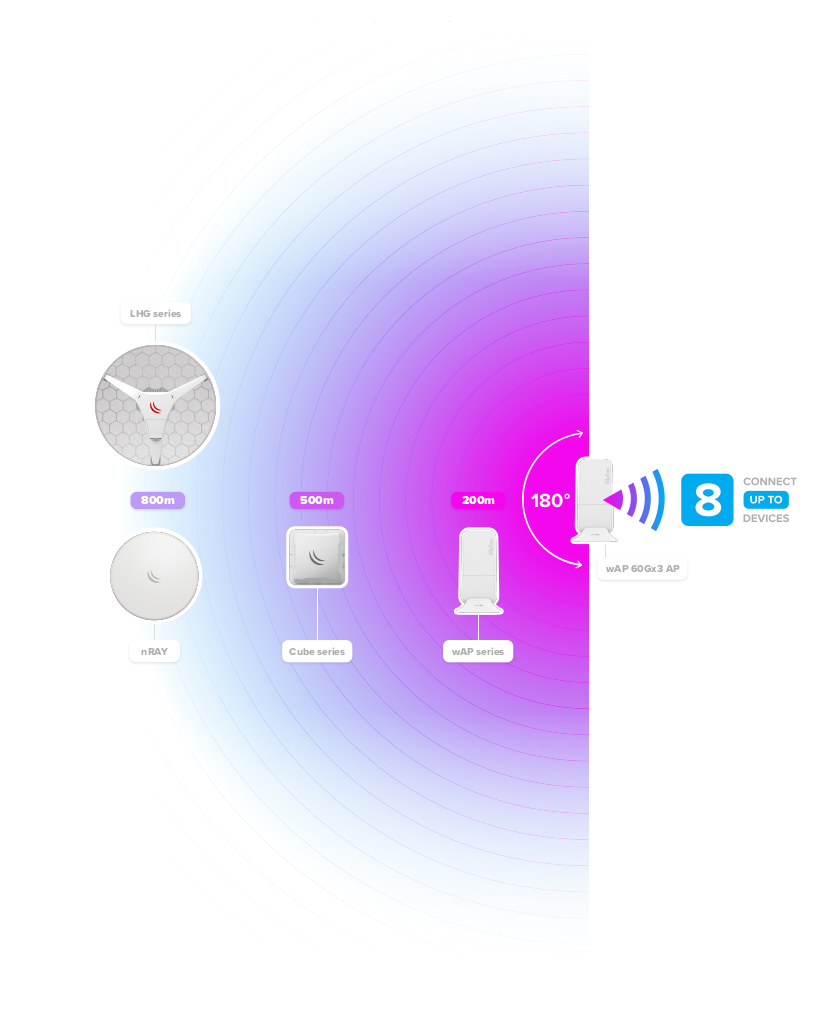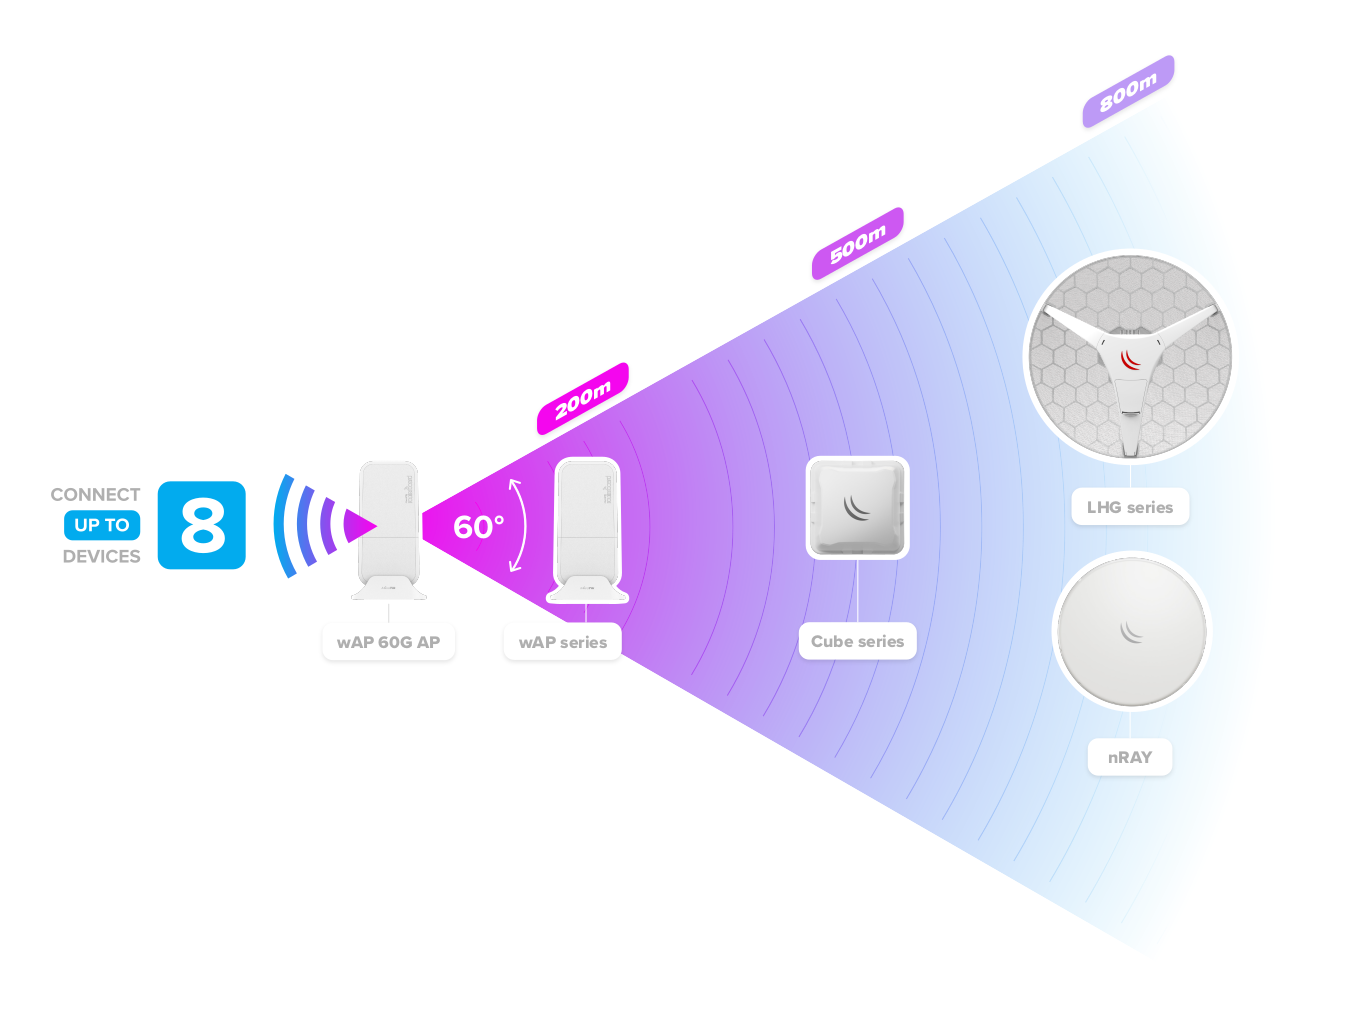
7 |
8 | 对于点到多点作为AP设备,需要具有4级或更高的许可级别。
9 |
10 | | 产品代码 | 许可级别 | 产品说明链接 |
11 | | ----------------- | -------- | --------------------------------------------------------------------- |
12 | | Cube-60ad | 3 | [Cube Lite60](https://mikrotik.com/product/cube_lite60) |
13 | | CubeG-5ac60ad | 3 | [Cube 60G ac](https://mikrotik.com/product/cube_60g_ac) |
14 | | CubeG-5ac60adpair | 3 | [Wireless Wire Cube](https://mikrotik.com/product/wireless_wire_cube) |
15 | | LHG-60ad | 3 | [LHG Lite60](https://mikrotik.com/product/lhg_lite60) |
16 | | LHGG-60ad | 3 | [LHG 60G](https://mikrotik.com/product/lhg_60g) |
17 | | LHGG-60adkit | 3 | [Wireless Wire Dish](https://mikrotik.com/product/wireless_wire_dish) |
18 | | nRAYG-60adpair | 3 | [Wireless Wire nRAY](https://mikrotik.com/product/wireless_wire_nray) |
19 | | wAPG-60ad | 3 | [wAP 60G](https://mikrotik.com/product/wap_60g) |
20 | | wAPG-60adkit | 3 | [Wireless Wire](https://mikrotik.com/product/wireless_wire) |
21 | | wAPG-60ad-A | **4** | [wAP 60G AP](https://mikrotik.com/product/wap_60g_ap) |
22 | | wAPG-60ad-SA | **4** | [wAP 60Gx3 AP](https://mikrotik.com/product/wap_60gx3_ap) |
23 | | CubeG-5ac60ay | **4** | [Cube 60Pro ac](https://mikrotik.com/product/cube_60pro_ac) |
24 | | CubeG-5ac60ay-SA | **4** | [CubeSA 60Pro ac](https://mikrotik.com/product/cubesa_60pro_ac) |
--------------------------------------------------------------------------------
/source/Wireless/W60G/index.rst:
--------------------------------------------------------------------------------
1 | W60G
2 | ===============================
3 |
4 | .. toctree::
5 | :maxdepth: 2
6 |
7 | content.md
8 | Distance_guide.md
9 | Fail-over_PtMP_CLI_example.md
10 | Fail-over_PtP_CLI_example.md
11 | Fail-over_PtP_GUI_example.md
12 | PtP_CLI_example.md
13 | PtP_GUI_example.md
14 |
15 |
16 |
--------------------------------------------------------------------------------
/source/Wireless/WifiWave2/index.rst:
--------------------------------------------------------------------------------
1 | WifiWave2
2 | ===============================
3 |
4 | .. toctree::
5 | :maxdepth: 2
6 |
7 | content.md
8 |
9 |
10 |
--------------------------------------------------------------------------------
/source/Wireless/Wireless_Case_Studies/VLANs_on_Wireless.md:
--------------------------------------------------------------------------------
1 | # 概述
2 |
3 | vlan提供了将设备隔离到不同的Layer2段的可能性,同时仍然使用相同的Layer1介质。这在您希望分离不同类型的用户设备的设置中非常有用。此功能对于无线设置也非常有用,因为您可以使用防火墙隔离不同的虚拟ap并限制对某些服务或网络的访问。下面是在同一设备上设置两个接入点的示例,将它们隔离到不同的vlan中。当您拥有Guest AP和Work AP时,这种情况非常常见。
4 |
5 | **例子**
6 |
7 | 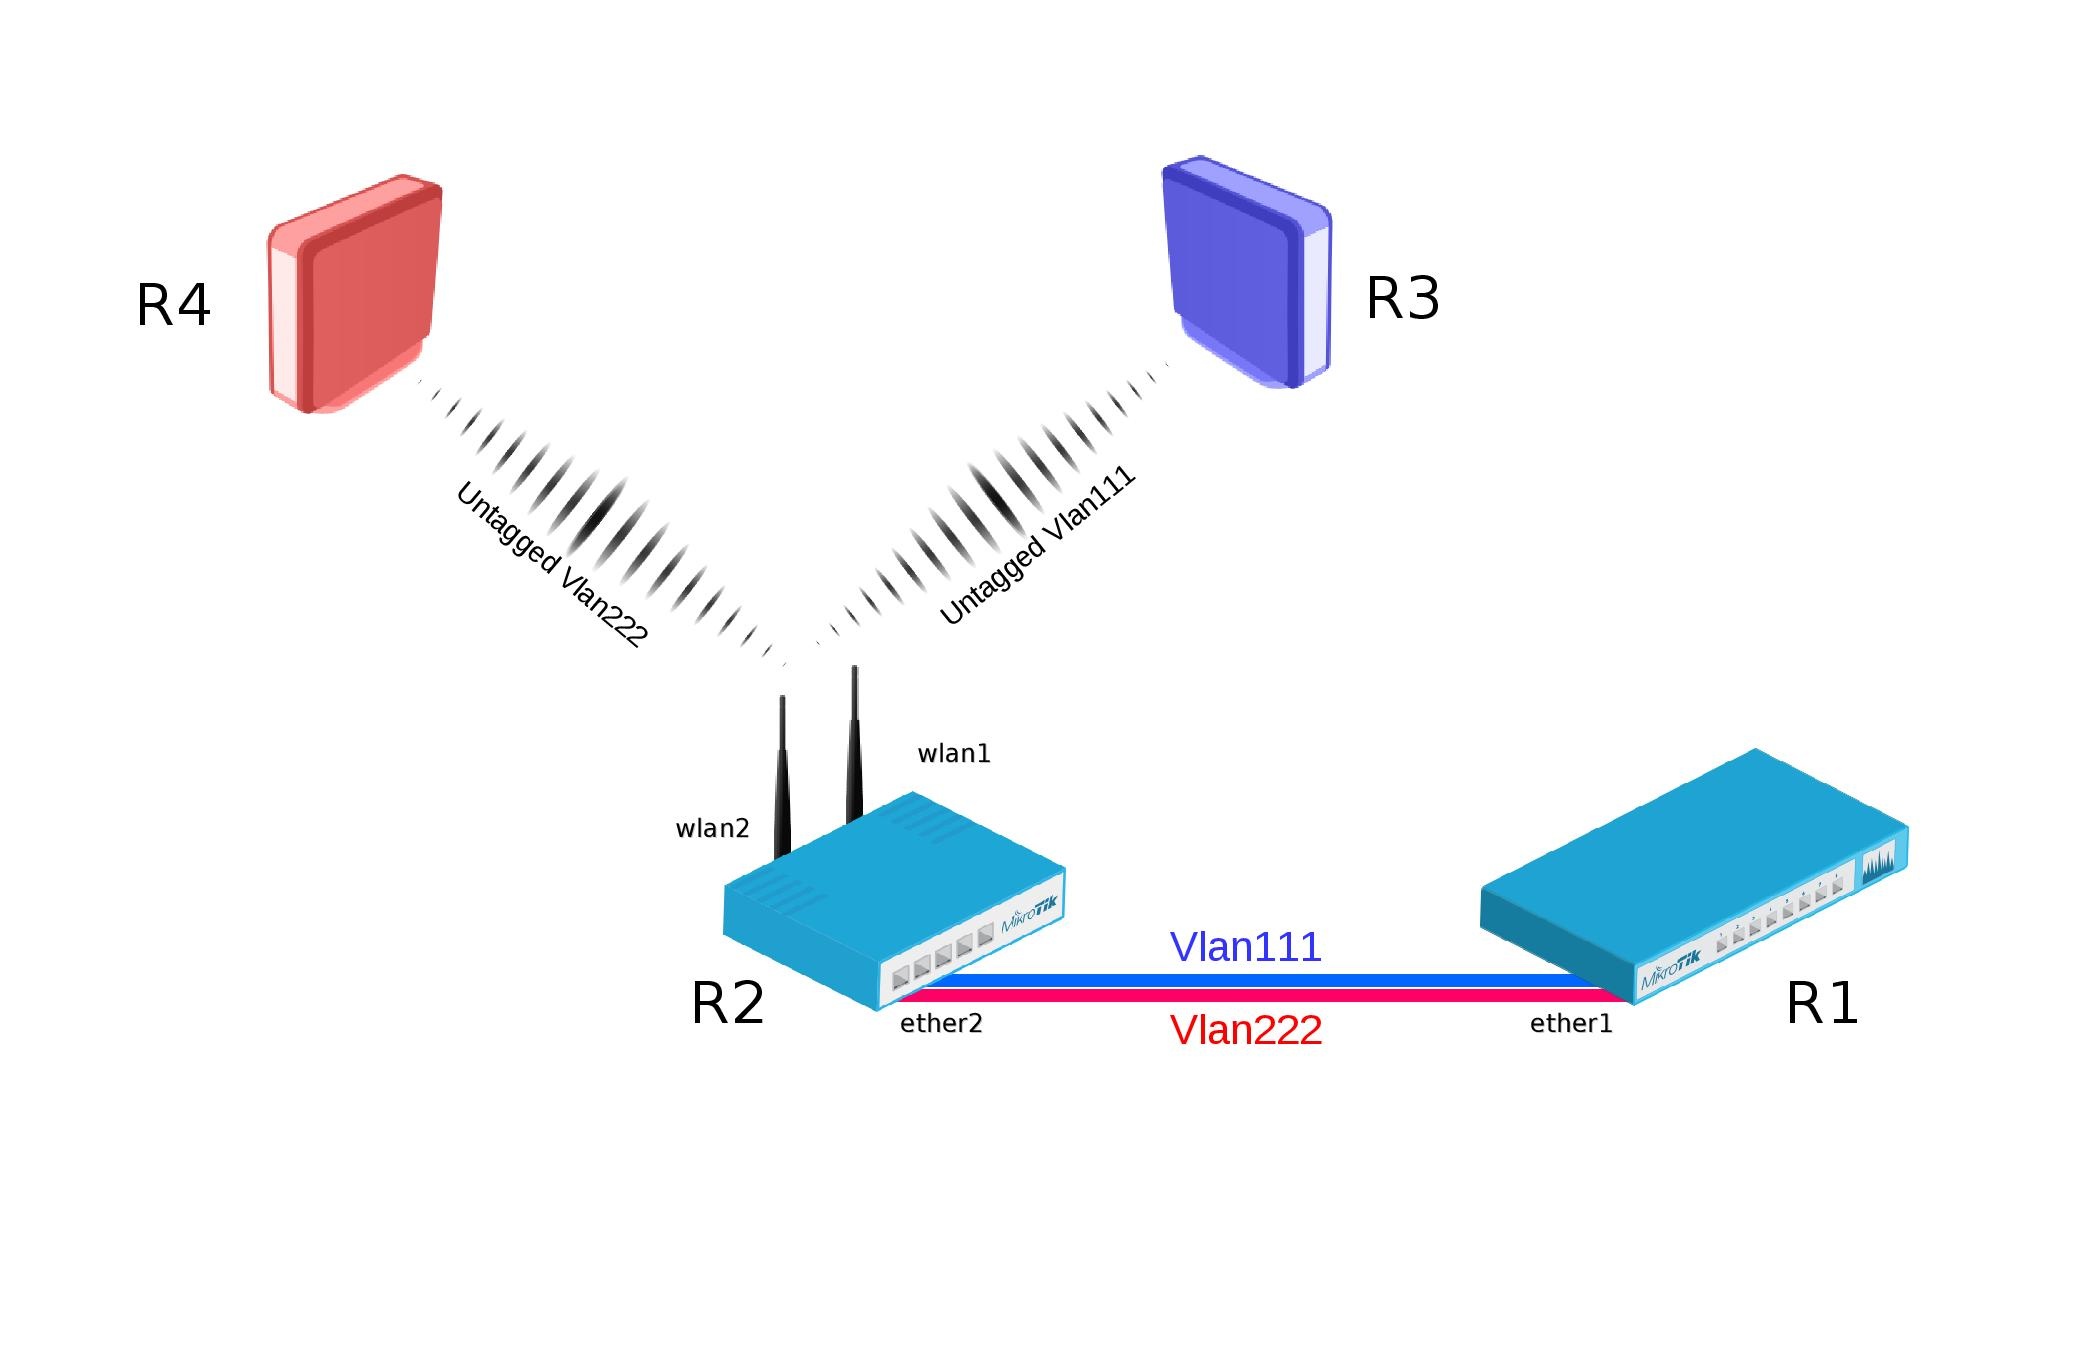
8 |
9 | [网桥VLAN过滤](https://help.mikrotik.com/docs/display/ROS/Bridging+and+Switching#BridgingandSwitching-BridgeVLANFiltering) 自RouterOS v6.41起,在网桥内提供VLAN感知的二层转发和VLAN标签修改功能。
10 |
11 | **R1:**
12 |
13 | - 在以太网接口上添加必要的VLAN接口,使其成为VLAN trunk端口。在VLAN接口上添加ip地址。
14 |
15 | ```shell
16 | [admin@R1] >
17 | /interface vlan
18 | add interface=ether1 name=vlan111 vlan-id=111
19 | add interface=ether1 name=vlan222 vlan-id=222
20 |
21 | /ip address
22 | add address=192.168.1.1/24 interface=vlan111
23 | add address=192.168.2.1/24 interface=vlan222
24 | ```
25 |
26 |
27 |
28 | **R2:**
29 |
30 | - 在wlan1接口下添加VirtualAP,并分别为wlan1和wlan2创建无线安全配置文件
31 |
32 | ```shell
33 | [admin@R2] >
34 | /interface bridge
35 | add fast-forward=no name=bridge1 vlan-filtering=yes
36 |
37 | /interface bridge port
38 | add bridge=bridge1 interface=ether2
39 | add bridge=bridge1 interface=wlan1
40 | add bridge=bridge1 interface=wlan2
41 | /interface bridge vlan
42 | add bridge=bridge1 tagged=ether2,wlan1 vlan-ids=111
43 | add bridge=bridge1 tagged=ether2,wlan2 vlan-ids=222
44 | ```
45 |
46 |
47 | 重要的是将wlan1、wlan2的vlan模式设置为“use-tag”。
48 |
49 |
50 | - 创建_vlan-filtering=yes_的桥
51 | - 添加必要的桥接端口
52 | - 在 _interface bridge vlan_ section下添加 _tagged_ 接口,并配置正确的 _vlan-ids_
53 |
54 | ```shell
55 | [admin@R2] >
56 | /interface bridge
57 | add fast-forward=no name=bridge1 vlan-filtering=yes
58 |
59 | /interface bridge port
60 | add bridge=bridge1 interface=ether2
61 | add bridge=bridge1 interface=wlan1
62 | add bridge=bridge1 interface=wlan2
63 | /interface bridge vlan
64 | add bridge=bridge1 tagged=ether2,wlan1 vlan-ids=111
65 | add bridge=bridge1 tagged=ether2,wlan2 vlan-ids=222
66 | ```
67 |
68 |
69 | 一些设备有内置的交换芯片,可以在以太网端口之间以线速性能交换数据包。网桥VLAN过滤禁用硬件卸载(除了在CRS3xx系列交换机上),这将阻止数据包的交换,这不会影响无线接口,因为通过它们的流量无论如何都不能卸载到交换芯片上。
70 |
71 | 在此设置中不需要VLAN过滤,但出于安全原因强烈建议使用。在某些情况下,不进行VLAN过滤可以转发未知的VLAN id。禁用VLAN过滤确实具有性能优势。
72 |
73 |
74 |
75 | **R3:**
76 |
77 | - 在wlan1接口添加IP地址。
78 | - 创建兼容R2 wlan1的无线安全配置文件。
79 |
80 | ```shell
81 | [admin@R3] >
82 | /ip address
83 | add address=192.168.1.3/24 interface=wlan1
84 |
85 | /interface wireless
86 | set [ find default-name=wlan1 ] disabled=no security-profile=vlan111
87 | ```
88 |
89 | **R4:**
90 |
91 | - 在wlan1接口添加IP地址。
92 | - 创建兼容R2 wlan2的无线安全配置文件。
93 |
94 | ```shell
95 | [admin@R4] >
96 | /ip address
97 | add address=192.168.2.4/24 interface=wlan1
98 |
99 | /interface wireless
100 | set [ find default-name=wlan1 ] disabled=no security-profile=vlan222
101 | ```
--------------------------------------------------------------------------------
/source/Wireless/Wireless_Case_Studies/index.rst:
--------------------------------------------------------------------------------
1 | 无线案例学习
2 | ===============================
3 |
4 | .. toctree::
5 | :maxdepth: 2
6 |
7 | content.md
8 | Enterprise_wireless_security_with_User_Manager_v5.md
9 | VLANs_on_Wireless.md
10 | Wireless_Station_Modes.md
11 | Wireless_Troubleshooting.md
12 | CAPsMAN_with_VLANs.md
13 |
14 |
15 |
--------------------------------------------------------------------------------
/source/Wireless/Wireless_Interface/index.rst:
--------------------------------------------------------------------------------
1 | 无线接口
2 | ===============================
3 |
4 | .. toctree::
5 | :maxdepth: 2
6 |
7 | content.md
8 |
9 |
10 |
--------------------------------------------------------------------------------
/source/Wireless/index.rst:
--------------------------------------------------------------------------------
1 | 无线
2 | ===============================
3 |
4 | .. toctree::
5 | :maxdepth: 1
6 |
7 | CAPsMAN/index.rst
8 | Wireless_Interface/index.rst
9 | WifiWave2/index.rst
10 | HWMPplus/index.rst
11 | Nv2/index.rst
12 | Interworking_Profiles/index.rst
13 | W60G/index.rst
14 | Wireless_Case_Studies/index.rst
15 | Spectral_scan/index.rst
16 |
17 |
--------------------------------------------------------------------------------
/source/api.rst:
--------------------------------------------------------------------------------
1 | .. API
2 | .. ===
3 |
4 | .. .. autosummary::
5 | .. :toctree: generated
6 |
7 | .. lumache
8 |
--------------------------------------------------------------------------------
/source/conf.py:
--------------------------------------------------------------------------------
1 | # Configuration file for the Sphinx documentation builder.
2 | #
3 | # For the full list of built-in configuration values, see the documentation:
4 | # https://www.sphinx-doc.org/en/master/usage/configuration.html
5 |
6 | # -- Project information -----------------------------------------------------
7 | # https://www.sphinx-doc.org/en/master/usage/configuration.html#project-information
8 |
9 | project = 'RouterOS7.6 中文使用手册'
10 | copyright = '2023, be-engineer'
11 | author = 'be-engineer'
12 | release = '7.x'
13 |
14 | # -- General configuration ---------------------------------------------------
15 | # https://www.sphinx-doc.org/en/master/usage/configuration.html#general-configuration
16 |
17 | extensions = [
18 | # 'myst_parser',
19 | # 'recommonmark',
20 | 'sphinx_mdinclude',
21 | #'sphinxcontrib-markdown',
22 | # 'sphinx.ext.mathjax',
23 | 'sphinx_markdown_tables'
24 | # 'sphinxnotes.strike'
25 | ]
26 |
27 | templates_path = ['_templates']
28 | exclude_patterns = []
29 |
30 | # root_doc = 'index'
31 | language = 'zh_CN'
32 |
33 | # -- Options for HTML output -------------------------------------------------
34 | # https://www.sphinx-doc.org/en/master/usage/configuration.html#options-for-html-output
35 |
36 | html_theme = 'sphinx_rtd_theme'
37 | html_static_path = ['_static']
38 |
--------------------------------------------------------------------------------
/source/index.rst:
--------------------------------------------------------------------------------
1 |
2 | RouterOS 中文手册
3 | ===============================
4 |
5 | 本中文手册并非官方发行,都是自己利用业余时间进行翻译整理,如有错误和不当之处,请见谅。
6 |
7 | 原版文档地址为:https://help.mikrotik.com/docs/display/ROS/RouterOS
8 |
9 | github地址:https://github.com/be-engineer/MikroTik-doc-cn 喜欢的请不吝加颗小星星吧
10 |
11 | 友情链接:
12 | -----------------
13 |
14 | 1. 偶然发现一个 `pve7.3中文帮助`_ 还没细看,感觉不错,喜欢的也请给他们一个赞
15 |
16 | .. _`pve7.3中文帮助`: https://pve-doc-cn.readthedocs.io/zh_CN/latest/
17 |
18 | 2. RouterOS 7.6修改内容,了解新版本增加了哪些功能。 `What's new in V7.6`_
19 |
20 | .. _`What's new in V7.6`: https://mikrotik.com/download/changelogs/stable-release-tree
21 |
22 |
23 | 简介
24 | ------------------------------------------------
25 | RouterOS是一种路由操作系统,是基于Linux核心开发,兼容x86 PC的路由软件,通过该软件可以把标准PC电脑变成专业路由器,RouterOS软件的开发和应用不断的更新和发展,软件经历了多次更新和改进,其功能在不断增强和完善。特别在无线、认证、策略路由、带宽控制和防火墙过滤等功能上有着非常突出的功能,其极高的性价比,受到许多网络人士的青睐。
26 |
27 | RouterOS官网文档非常齐全,而且详细,但是只有英文版本,为了方便更多的人学习和了解RouterOS的功能和使用方法,本人新建了这个项目,把官方网站上的文档翻译为中文,希望能对大家有所帮助。
28 |
29 | .. mdinclude:: translation.md
30 |
31 |
32 | .. toctree::
33 | :maxdepth: 1
34 |
35 | Getting_started/index.rst
36 | Authentication_Authorization_Accounting/index.rst
37 | Bridging_and_Switching/index.rst
38 | Diagnostics_monitoring_and_troubleshooting/index.rst
39 | Extended_features/index.rst
40 | Firewall_and_Quality_of_Service/index.rst
41 | Hardware/index.rst
42 | High_Availability_Solutions/index.rst
43 | Internet_of_Things/index.rst
44 | IPv4_and_IPv6_Fundamentals/index.rst
45 | Management_tools/index.rst
46 | Mobile_Networking/index.rst
47 | Network_Management/index.rst
48 | Routing/index.rst
49 | Multi_Protocol_Label_Switching/index.rst
50 | System_Information_and_Utilities/index.rst
51 | Virtual_Private_Networks/index.rst
52 | Wired_Connections/index.rst
53 | Wireless/index.rst
--------------------------------------------------------------------------------
/source/translation.md:
--------------------------------------------------------------------------------
1 |
9 | # RouterOS官网文档内容以及翻译进度
10 |
11 | | 序号 | 章节 | 贡献人 | 进度 | 完成时间 |
12 | | ---- | ------------------------------------------- | ----------- | ---- | --------------------- |
13 | | 1. | Getting Started | be-engineer | 100% | 2023/01/03~2023/01/08 |
14 | | 2. | Authentication, Authorization, Accounting | be-engineer | 100% | 2023/01/08~2023/01/15 |
15 | | 3. | Bridging and Switching | be-engineer | 100% | 2023/01/15~2023/02/07 |
16 | | 4. | Diagnostics,monitoring and troubleshooting | be-engineer | 100% | 2023/02/07~2023/02/10 |
17 | | 5. | Extended features | be-engineer | 100% | 2023/02/07~2023/02/10 |
18 | | 6. | Firewall and Quality of Service | be-engineer | 100% | 2023/02/09~2023/02/16 |
19 | | 7. | Hardware | be-engineer | 100% | 2023/02/09~2023/02/16 |
20 | | 8. | High Availability Solutions | be-engineer | 100% | 2023/02/20~2023/03/06 |
21 | | 9. | Internet of Things | be-engineer | 100% | 2023/03/10~2023/04/26 |
22 | | 10. | IPv4 and IPv6 Fundamentals | be-engineer | 100% | 2023/04/26~2023/04/26 |
23 | | 11. | Management tools | be-engineer | 100% | 2023/04/26~2023/04/28 |
24 | | 12. | Mobile Networking | be-engineer | 100% | 2023/04/28~2023/04/28 |
25 | | 13. | Network Management | be-engineer | 100% | 2023/05/04~2023/05/05 |
26 | | 14. | Routing | be-engineer | 100% | 2023/05/08~2023/05/12 |
27 | | 15. | Multi Protocol Label Switching (MPLS) | be-engineer | 100% | 2023/05/09~2023/05/15 |
28 | | 16. | System Information and Utilities | be-engineer | 100% | 2023/05/16~2023/05/19 |
29 | | 17. | Virtual Private Networks | be-engineer | 100% | 2023/05/19~2023/05/22 |
30 | | 18. | Wired Connections | be-engineer | 100% | 2023/05/23~2023/05/25 |
31 | | 19. | Wireless | be-engineer | 100% | 2023/05/23~2023/05/29 |
32 | | 20. | Scripts | be-engineer | 100% | 2023/10/22~2023/10/24 |
33 |
--------------------------------------------------------------------------------