├── LAMP Server
├── Selection_001.png
├── Selection_002.png
├── Selection_003.png
├── Selection_004.png
├── Selection_005.png
├── Selection_006.png
├── Selection_007.png
├── Selection_008.png
├── Selection_009.png
├── Selection_010.png
├── Selection_011.png
├── Selection_012.png
├── Selection_013.png
├── Selection_014.png
├── Selection_015.png
├── Selection_016.png
├── Selection_017.png
├── Selection_018.png
├── Selection_019.png
├── Selection_020.png
└── Selection_021.png
├── Installing Kaltura
├── Selection_001.png
├── Selection_002.png
├── Selection_003.png
├── Selection_004.png
├── Selection_005.png
├── Selection_006.png
├── Selection_007.png
├── Selection_008.png
├── Selection_009.png
├── Selection_010.png
├── Selection_011.png
├── Selection_012.png
├── Selection_013.png
├── Selection_014.png
├── Selection_015.png
├── Selection_016.png
├── Selection_017.png
├── Selection_018.png
├── Selection_019.png
├── Selection_020.png
├── Selection_021.png
├── Selection_022.png
├── Selection_023.png
├── Selection_024.png
├── Selection_025.png
├── Selection_026.png
├── Selection_027.png
├── Selection_028.png
├── Selection_029.png
├── Selection_030.png
├── Selection_031.png
├── Selection_032.png
├── Selection_033.png
├── Selection_034.png
├── Selection_035.png
├── Selection_036.png
└── phpinfo()_files
│ ├── info.php
│ └── info(1).php
├── Install_Dell_OMSA_Server_management.png
├── Ampache Streming Server
├── Selection_001.png
├── Selection_002.png
├── Selection_003.png
├── Selection_004.png
├── Selection_005.png
├── Selection_006.png
├── Selection_007.png
├── Selection_008.png
├── Selection_009.png
├── Selection_010.png
├── Selection_011.png
├── Selection_012.png
├── Selection_013.png
├── Selection_014.png
├── Selection_015.png
├── Selection_016.png
├── Selection_017.png
├── Selection_018.png
├── Selection_019.png
├── Selection_020.png
├── Selection_021.png
├── Selection_022.png
├── Selection_023.png
├── Selection_024.png
├── Selection_025.png
├── Selection_026.png
├── Selection_027.png
├── Selection_028.png
├── Selection_029.png
├── Selection_030.png
├── Selection_031.png
├── Selection_032.png
├── Selection_033.png
└── Selection_034.png
├── setup-images
├── setup_amazon_s3_remote_storage.png
├── setting-up-amazon-cloudfront-cdn.png
├── setting_up_amazon_cloudfront_cdn_for_rtmp.png
└── setting_up_amazon_cloudfront_cdn_for_rtmp_1.png
├── Generating-a-Certificate-Signing-Request-(CSR)---Apache-2.x.md
├── Redirect-Http-Request-to-Https.md
├── fix-for-scp:-command-not-found.md
├── Installing-Gnome-IP-Messenger-From-PPA-repository-for-Debian-Systems.md
├── DNS_server_setup_RHEL6
├── masterdns.linuxmental.local
│ ├── forward.linuxmental
│ ├── reverse.linuxmental
│ └── named.conf
└── slavedns.linuxmental.local
│ └── named.conf
├── To-Enable-“setup”-command-in-CentOS-minimal-install.md
├── How_to_setup_Email_notification_for_SUDO_Users_access_in_centos&RHEL.md
├── How-to-Create-a-Backup-Image-of-Whole-Server-in-RHEL,-Centos,-Ubuntu.md
├── README.md
├── Install_Dell_OMSA_Server_management.md
├── How-to-configure-VNC-server-in-RHEL-6.4-For-User-Accounts.md
├── 2-Methods-To-Change-TimeZone-in-Linux.md
├── setting-up-amazon-cloudfront-cdn-rtmp.md
├── Install_OpenvSwitch_in_Linux.md5
├── setup-amazon-S3-remote-storage.md
├── How-to-install-Utorrent-in-ubuntu,-RHEL-,-centos,-mint-Linux-Systems.md
├── how_to_add_a_iphone_flavor_in_trancoding_profile.md
├── How-to-set-a-Login-Banner-in-linux-for-ssh.md
├── How-to-setup-a-DHCP-server-in-RHEL-6.md
├── drop-folder-setup-in-kaltura.md
├── How-to-Backup-the-Remote-Linux-Servers-or-Systems-Using-Rsnapshot.md
├── Linux-modprobe-Command-Examples-to-View,-Install,-Remove-Modules.md
├── How_to_Install_web_analytics_Piwik_in_Centos_6.5_Final.md
├── setting-up-amazon-cloudfront-cdn-http-https.md
├── wowza_live_streaing_RTMP_intergration_with_kaltura_CE5.md
├── Postfix-mail-Centos-6.4.md
├── 5-Steps-to-Setup-User-and-Group-Disk-Quota-on-UNIX---Linux.md
├── 6-Examples-to-Backup-Linux-Using-dd-Command-Including-Disk-to-Disk.md
├── Adding-Centos-6.4-Samba-Server-to-Nagois-Monitoring-Server.md
├── Rpm Commands.md
├── Troubleshooting-Using-dmesg-Command-in-Unix-and-Linux.md
├── Squid-Internet-Filtering-Using-2-Ethernet-Card's-in-Centos.md
├── UNIX-&-Linux-10-Netstat-Command-Examples.md
├── Setting-up-Kaltura-Drop-folder,-Amazon-S3-Remote-storage,CloudFront-CDN-RTMP,RTMPE-Video-Streaming.md
├── Yum_Commands.md
├── Step-by-Step-how-to-setup-a-DNS-Server-in-RHEL-6.2-6.4-6.5-Using-Bind.md
└── Installing Kaltura CE 5 In Centos 6.3.txt
/LAMP Server/Selection_001.png:
--------------------------------------------------------------------------------
https://raw.githubusercontent.com/blackyboy/RedHat-Centos-Common-Stuffs/HEAD/LAMP Server/Selection_001.png
--------------------------------------------------------------------------------
/LAMP Server/Selection_002.png:
--------------------------------------------------------------------------------
https://raw.githubusercontent.com/blackyboy/RedHat-Centos-Common-Stuffs/HEAD/LAMP Server/Selection_002.png
--------------------------------------------------------------------------------
/LAMP Server/Selection_003.png:
--------------------------------------------------------------------------------
https://raw.githubusercontent.com/blackyboy/RedHat-Centos-Common-Stuffs/HEAD/LAMP Server/Selection_003.png
--------------------------------------------------------------------------------
/LAMP Server/Selection_004.png:
--------------------------------------------------------------------------------
https://raw.githubusercontent.com/blackyboy/RedHat-Centos-Common-Stuffs/HEAD/LAMP Server/Selection_004.png
--------------------------------------------------------------------------------
/LAMP Server/Selection_005.png:
--------------------------------------------------------------------------------
https://raw.githubusercontent.com/blackyboy/RedHat-Centos-Common-Stuffs/HEAD/LAMP Server/Selection_005.png
--------------------------------------------------------------------------------
/LAMP Server/Selection_006.png:
--------------------------------------------------------------------------------
https://raw.githubusercontent.com/blackyboy/RedHat-Centos-Common-Stuffs/HEAD/LAMP Server/Selection_006.png
--------------------------------------------------------------------------------
/LAMP Server/Selection_007.png:
--------------------------------------------------------------------------------
https://raw.githubusercontent.com/blackyboy/RedHat-Centos-Common-Stuffs/HEAD/LAMP Server/Selection_007.png
--------------------------------------------------------------------------------
/LAMP Server/Selection_008.png:
--------------------------------------------------------------------------------
https://raw.githubusercontent.com/blackyboy/RedHat-Centos-Common-Stuffs/HEAD/LAMP Server/Selection_008.png
--------------------------------------------------------------------------------
/LAMP Server/Selection_009.png:
--------------------------------------------------------------------------------
https://raw.githubusercontent.com/blackyboy/RedHat-Centos-Common-Stuffs/HEAD/LAMP Server/Selection_009.png
--------------------------------------------------------------------------------
/LAMP Server/Selection_010.png:
--------------------------------------------------------------------------------
https://raw.githubusercontent.com/blackyboy/RedHat-Centos-Common-Stuffs/HEAD/LAMP Server/Selection_010.png
--------------------------------------------------------------------------------
/LAMP Server/Selection_011.png:
--------------------------------------------------------------------------------
https://raw.githubusercontent.com/blackyboy/RedHat-Centos-Common-Stuffs/HEAD/LAMP Server/Selection_011.png
--------------------------------------------------------------------------------
/LAMP Server/Selection_012.png:
--------------------------------------------------------------------------------
https://raw.githubusercontent.com/blackyboy/RedHat-Centos-Common-Stuffs/HEAD/LAMP Server/Selection_012.png
--------------------------------------------------------------------------------
/LAMP Server/Selection_013.png:
--------------------------------------------------------------------------------
https://raw.githubusercontent.com/blackyboy/RedHat-Centos-Common-Stuffs/HEAD/LAMP Server/Selection_013.png
--------------------------------------------------------------------------------
/LAMP Server/Selection_014.png:
--------------------------------------------------------------------------------
https://raw.githubusercontent.com/blackyboy/RedHat-Centos-Common-Stuffs/HEAD/LAMP Server/Selection_014.png
--------------------------------------------------------------------------------
/LAMP Server/Selection_015.png:
--------------------------------------------------------------------------------
https://raw.githubusercontent.com/blackyboy/RedHat-Centos-Common-Stuffs/HEAD/LAMP Server/Selection_015.png
--------------------------------------------------------------------------------
/LAMP Server/Selection_016.png:
--------------------------------------------------------------------------------
https://raw.githubusercontent.com/blackyboy/RedHat-Centos-Common-Stuffs/HEAD/LAMP Server/Selection_016.png
--------------------------------------------------------------------------------
/LAMP Server/Selection_017.png:
--------------------------------------------------------------------------------
https://raw.githubusercontent.com/blackyboy/RedHat-Centos-Common-Stuffs/HEAD/LAMP Server/Selection_017.png
--------------------------------------------------------------------------------
/LAMP Server/Selection_018.png:
--------------------------------------------------------------------------------
https://raw.githubusercontent.com/blackyboy/RedHat-Centos-Common-Stuffs/HEAD/LAMP Server/Selection_018.png
--------------------------------------------------------------------------------
/LAMP Server/Selection_019.png:
--------------------------------------------------------------------------------
https://raw.githubusercontent.com/blackyboy/RedHat-Centos-Common-Stuffs/HEAD/LAMP Server/Selection_019.png
--------------------------------------------------------------------------------
/LAMP Server/Selection_020.png:
--------------------------------------------------------------------------------
https://raw.githubusercontent.com/blackyboy/RedHat-Centos-Common-Stuffs/HEAD/LAMP Server/Selection_020.png
--------------------------------------------------------------------------------
/LAMP Server/Selection_021.png:
--------------------------------------------------------------------------------
https://raw.githubusercontent.com/blackyboy/RedHat-Centos-Common-Stuffs/HEAD/LAMP Server/Selection_021.png
--------------------------------------------------------------------------------
/Installing Kaltura/Selection_001.png:
--------------------------------------------------------------------------------
https://raw.githubusercontent.com/blackyboy/RedHat-Centos-Common-Stuffs/HEAD/Installing Kaltura/Selection_001.png
--------------------------------------------------------------------------------
/Installing Kaltura/Selection_002.png:
--------------------------------------------------------------------------------
https://raw.githubusercontent.com/blackyboy/RedHat-Centos-Common-Stuffs/HEAD/Installing Kaltura/Selection_002.png
--------------------------------------------------------------------------------
/Installing Kaltura/Selection_003.png:
--------------------------------------------------------------------------------
https://raw.githubusercontent.com/blackyboy/RedHat-Centos-Common-Stuffs/HEAD/Installing Kaltura/Selection_003.png
--------------------------------------------------------------------------------
/Installing Kaltura/Selection_004.png:
--------------------------------------------------------------------------------
https://raw.githubusercontent.com/blackyboy/RedHat-Centos-Common-Stuffs/HEAD/Installing Kaltura/Selection_004.png
--------------------------------------------------------------------------------
/Installing Kaltura/Selection_005.png:
--------------------------------------------------------------------------------
https://raw.githubusercontent.com/blackyboy/RedHat-Centos-Common-Stuffs/HEAD/Installing Kaltura/Selection_005.png
--------------------------------------------------------------------------------
/Installing Kaltura/Selection_006.png:
--------------------------------------------------------------------------------
https://raw.githubusercontent.com/blackyboy/RedHat-Centos-Common-Stuffs/HEAD/Installing Kaltura/Selection_006.png
--------------------------------------------------------------------------------
/Installing Kaltura/Selection_007.png:
--------------------------------------------------------------------------------
https://raw.githubusercontent.com/blackyboy/RedHat-Centos-Common-Stuffs/HEAD/Installing Kaltura/Selection_007.png
--------------------------------------------------------------------------------
/Installing Kaltura/Selection_008.png:
--------------------------------------------------------------------------------
https://raw.githubusercontent.com/blackyboy/RedHat-Centos-Common-Stuffs/HEAD/Installing Kaltura/Selection_008.png
--------------------------------------------------------------------------------
/Installing Kaltura/Selection_009.png:
--------------------------------------------------------------------------------
https://raw.githubusercontent.com/blackyboy/RedHat-Centos-Common-Stuffs/HEAD/Installing Kaltura/Selection_009.png
--------------------------------------------------------------------------------
/Installing Kaltura/Selection_010.png:
--------------------------------------------------------------------------------
https://raw.githubusercontent.com/blackyboy/RedHat-Centos-Common-Stuffs/HEAD/Installing Kaltura/Selection_010.png
--------------------------------------------------------------------------------
/Installing Kaltura/Selection_011.png:
--------------------------------------------------------------------------------
https://raw.githubusercontent.com/blackyboy/RedHat-Centos-Common-Stuffs/HEAD/Installing Kaltura/Selection_011.png
--------------------------------------------------------------------------------
/Installing Kaltura/Selection_012.png:
--------------------------------------------------------------------------------
https://raw.githubusercontent.com/blackyboy/RedHat-Centos-Common-Stuffs/HEAD/Installing Kaltura/Selection_012.png
--------------------------------------------------------------------------------
/Installing Kaltura/Selection_013.png:
--------------------------------------------------------------------------------
https://raw.githubusercontent.com/blackyboy/RedHat-Centos-Common-Stuffs/HEAD/Installing Kaltura/Selection_013.png
--------------------------------------------------------------------------------
/Installing Kaltura/Selection_014.png:
--------------------------------------------------------------------------------
https://raw.githubusercontent.com/blackyboy/RedHat-Centos-Common-Stuffs/HEAD/Installing Kaltura/Selection_014.png
--------------------------------------------------------------------------------
/Installing Kaltura/Selection_015.png:
--------------------------------------------------------------------------------
https://raw.githubusercontent.com/blackyboy/RedHat-Centos-Common-Stuffs/HEAD/Installing Kaltura/Selection_015.png
--------------------------------------------------------------------------------
/Installing Kaltura/Selection_016.png:
--------------------------------------------------------------------------------
https://raw.githubusercontent.com/blackyboy/RedHat-Centos-Common-Stuffs/HEAD/Installing Kaltura/Selection_016.png
--------------------------------------------------------------------------------
/Installing Kaltura/Selection_017.png:
--------------------------------------------------------------------------------
https://raw.githubusercontent.com/blackyboy/RedHat-Centos-Common-Stuffs/HEAD/Installing Kaltura/Selection_017.png
--------------------------------------------------------------------------------
/Installing Kaltura/Selection_018.png:
--------------------------------------------------------------------------------
https://raw.githubusercontent.com/blackyboy/RedHat-Centos-Common-Stuffs/HEAD/Installing Kaltura/Selection_018.png
--------------------------------------------------------------------------------
/Installing Kaltura/Selection_019.png:
--------------------------------------------------------------------------------
https://raw.githubusercontent.com/blackyboy/RedHat-Centos-Common-Stuffs/HEAD/Installing Kaltura/Selection_019.png
--------------------------------------------------------------------------------
/Installing Kaltura/Selection_020.png:
--------------------------------------------------------------------------------
https://raw.githubusercontent.com/blackyboy/RedHat-Centos-Common-Stuffs/HEAD/Installing Kaltura/Selection_020.png
--------------------------------------------------------------------------------
/Installing Kaltura/Selection_021.png:
--------------------------------------------------------------------------------
https://raw.githubusercontent.com/blackyboy/RedHat-Centos-Common-Stuffs/HEAD/Installing Kaltura/Selection_021.png
--------------------------------------------------------------------------------
/Installing Kaltura/Selection_022.png:
--------------------------------------------------------------------------------
https://raw.githubusercontent.com/blackyboy/RedHat-Centos-Common-Stuffs/HEAD/Installing Kaltura/Selection_022.png
--------------------------------------------------------------------------------
/Installing Kaltura/Selection_023.png:
--------------------------------------------------------------------------------
https://raw.githubusercontent.com/blackyboy/RedHat-Centos-Common-Stuffs/HEAD/Installing Kaltura/Selection_023.png
--------------------------------------------------------------------------------
/Installing Kaltura/Selection_024.png:
--------------------------------------------------------------------------------
https://raw.githubusercontent.com/blackyboy/RedHat-Centos-Common-Stuffs/HEAD/Installing Kaltura/Selection_024.png
--------------------------------------------------------------------------------
/Installing Kaltura/Selection_025.png:
--------------------------------------------------------------------------------
https://raw.githubusercontent.com/blackyboy/RedHat-Centos-Common-Stuffs/HEAD/Installing Kaltura/Selection_025.png
--------------------------------------------------------------------------------
/Installing Kaltura/Selection_026.png:
--------------------------------------------------------------------------------
https://raw.githubusercontent.com/blackyboy/RedHat-Centos-Common-Stuffs/HEAD/Installing Kaltura/Selection_026.png
--------------------------------------------------------------------------------
/Installing Kaltura/Selection_027.png:
--------------------------------------------------------------------------------
https://raw.githubusercontent.com/blackyboy/RedHat-Centos-Common-Stuffs/HEAD/Installing Kaltura/Selection_027.png
--------------------------------------------------------------------------------
/Installing Kaltura/Selection_028.png:
--------------------------------------------------------------------------------
https://raw.githubusercontent.com/blackyboy/RedHat-Centos-Common-Stuffs/HEAD/Installing Kaltura/Selection_028.png
--------------------------------------------------------------------------------
/Installing Kaltura/Selection_029.png:
--------------------------------------------------------------------------------
https://raw.githubusercontent.com/blackyboy/RedHat-Centos-Common-Stuffs/HEAD/Installing Kaltura/Selection_029.png
--------------------------------------------------------------------------------
/Installing Kaltura/Selection_030.png:
--------------------------------------------------------------------------------
https://raw.githubusercontent.com/blackyboy/RedHat-Centos-Common-Stuffs/HEAD/Installing Kaltura/Selection_030.png
--------------------------------------------------------------------------------
/Installing Kaltura/Selection_031.png:
--------------------------------------------------------------------------------
https://raw.githubusercontent.com/blackyboy/RedHat-Centos-Common-Stuffs/HEAD/Installing Kaltura/Selection_031.png
--------------------------------------------------------------------------------
/Installing Kaltura/Selection_032.png:
--------------------------------------------------------------------------------
https://raw.githubusercontent.com/blackyboy/RedHat-Centos-Common-Stuffs/HEAD/Installing Kaltura/Selection_032.png
--------------------------------------------------------------------------------
/Installing Kaltura/Selection_033.png:
--------------------------------------------------------------------------------
https://raw.githubusercontent.com/blackyboy/RedHat-Centos-Common-Stuffs/HEAD/Installing Kaltura/Selection_033.png
--------------------------------------------------------------------------------
/Installing Kaltura/Selection_034.png:
--------------------------------------------------------------------------------
https://raw.githubusercontent.com/blackyboy/RedHat-Centos-Common-Stuffs/HEAD/Installing Kaltura/Selection_034.png
--------------------------------------------------------------------------------
/Installing Kaltura/Selection_035.png:
--------------------------------------------------------------------------------
https://raw.githubusercontent.com/blackyboy/RedHat-Centos-Common-Stuffs/HEAD/Installing Kaltura/Selection_035.png
--------------------------------------------------------------------------------
/Installing Kaltura/Selection_036.png:
--------------------------------------------------------------------------------
https://raw.githubusercontent.com/blackyboy/RedHat-Centos-Common-Stuffs/HEAD/Installing Kaltura/Selection_036.png
--------------------------------------------------------------------------------
/Install_Dell_OMSA_Server_management.png:
--------------------------------------------------------------------------------
https://raw.githubusercontent.com/blackyboy/RedHat-Centos-Common-Stuffs/HEAD/Install_Dell_OMSA_Server_management.png
--------------------------------------------------------------------------------
/Ampache Streming Server /Selection_001.png:
--------------------------------------------------------------------------------
https://raw.githubusercontent.com/blackyboy/RedHat-Centos-Common-Stuffs/HEAD/Ampache Streming Server /Selection_001.png
--------------------------------------------------------------------------------
/Ampache Streming Server /Selection_002.png:
--------------------------------------------------------------------------------
https://raw.githubusercontent.com/blackyboy/RedHat-Centos-Common-Stuffs/HEAD/Ampache Streming Server /Selection_002.png
--------------------------------------------------------------------------------
/Ampache Streming Server /Selection_003.png:
--------------------------------------------------------------------------------
https://raw.githubusercontent.com/blackyboy/RedHat-Centos-Common-Stuffs/HEAD/Ampache Streming Server /Selection_003.png
--------------------------------------------------------------------------------
/Ampache Streming Server /Selection_004.png:
--------------------------------------------------------------------------------
https://raw.githubusercontent.com/blackyboy/RedHat-Centos-Common-Stuffs/HEAD/Ampache Streming Server /Selection_004.png
--------------------------------------------------------------------------------
/Ampache Streming Server /Selection_005.png:
--------------------------------------------------------------------------------
https://raw.githubusercontent.com/blackyboy/RedHat-Centos-Common-Stuffs/HEAD/Ampache Streming Server /Selection_005.png
--------------------------------------------------------------------------------
/Ampache Streming Server /Selection_006.png:
--------------------------------------------------------------------------------
https://raw.githubusercontent.com/blackyboy/RedHat-Centos-Common-Stuffs/HEAD/Ampache Streming Server /Selection_006.png
--------------------------------------------------------------------------------
/Ampache Streming Server /Selection_007.png:
--------------------------------------------------------------------------------
https://raw.githubusercontent.com/blackyboy/RedHat-Centos-Common-Stuffs/HEAD/Ampache Streming Server /Selection_007.png
--------------------------------------------------------------------------------
/Ampache Streming Server /Selection_008.png:
--------------------------------------------------------------------------------
https://raw.githubusercontent.com/blackyboy/RedHat-Centos-Common-Stuffs/HEAD/Ampache Streming Server /Selection_008.png
--------------------------------------------------------------------------------
/Ampache Streming Server /Selection_009.png:
--------------------------------------------------------------------------------
https://raw.githubusercontent.com/blackyboy/RedHat-Centos-Common-Stuffs/HEAD/Ampache Streming Server /Selection_009.png
--------------------------------------------------------------------------------
/Ampache Streming Server /Selection_010.png:
--------------------------------------------------------------------------------
https://raw.githubusercontent.com/blackyboy/RedHat-Centos-Common-Stuffs/HEAD/Ampache Streming Server /Selection_010.png
--------------------------------------------------------------------------------
/Ampache Streming Server /Selection_011.png:
--------------------------------------------------------------------------------
https://raw.githubusercontent.com/blackyboy/RedHat-Centos-Common-Stuffs/HEAD/Ampache Streming Server /Selection_011.png
--------------------------------------------------------------------------------
/Ampache Streming Server /Selection_012.png:
--------------------------------------------------------------------------------
https://raw.githubusercontent.com/blackyboy/RedHat-Centos-Common-Stuffs/HEAD/Ampache Streming Server /Selection_012.png
--------------------------------------------------------------------------------
/Ampache Streming Server /Selection_013.png:
--------------------------------------------------------------------------------
https://raw.githubusercontent.com/blackyboy/RedHat-Centos-Common-Stuffs/HEAD/Ampache Streming Server /Selection_013.png
--------------------------------------------------------------------------------
/Ampache Streming Server /Selection_014.png:
--------------------------------------------------------------------------------
https://raw.githubusercontent.com/blackyboy/RedHat-Centos-Common-Stuffs/HEAD/Ampache Streming Server /Selection_014.png
--------------------------------------------------------------------------------
/Ampache Streming Server /Selection_015.png:
--------------------------------------------------------------------------------
https://raw.githubusercontent.com/blackyboy/RedHat-Centos-Common-Stuffs/HEAD/Ampache Streming Server /Selection_015.png
--------------------------------------------------------------------------------
/Ampache Streming Server /Selection_016.png:
--------------------------------------------------------------------------------
https://raw.githubusercontent.com/blackyboy/RedHat-Centos-Common-Stuffs/HEAD/Ampache Streming Server /Selection_016.png
--------------------------------------------------------------------------------
/Ampache Streming Server /Selection_017.png:
--------------------------------------------------------------------------------
https://raw.githubusercontent.com/blackyboy/RedHat-Centos-Common-Stuffs/HEAD/Ampache Streming Server /Selection_017.png
--------------------------------------------------------------------------------
/Ampache Streming Server /Selection_018.png:
--------------------------------------------------------------------------------
https://raw.githubusercontent.com/blackyboy/RedHat-Centos-Common-Stuffs/HEAD/Ampache Streming Server /Selection_018.png
--------------------------------------------------------------------------------
/Ampache Streming Server /Selection_019.png:
--------------------------------------------------------------------------------
https://raw.githubusercontent.com/blackyboy/RedHat-Centos-Common-Stuffs/HEAD/Ampache Streming Server /Selection_019.png
--------------------------------------------------------------------------------
/Ampache Streming Server /Selection_020.png:
--------------------------------------------------------------------------------
https://raw.githubusercontent.com/blackyboy/RedHat-Centos-Common-Stuffs/HEAD/Ampache Streming Server /Selection_020.png
--------------------------------------------------------------------------------
/Ampache Streming Server /Selection_021.png:
--------------------------------------------------------------------------------
https://raw.githubusercontent.com/blackyboy/RedHat-Centos-Common-Stuffs/HEAD/Ampache Streming Server /Selection_021.png
--------------------------------------------------------------------------------
/Ampache Streming Server /Selection_022.png:
--------------------------------------------------------------------------------
https://raw.githubusercontent.com/blackyboy/RedHat-Centos-Common-Stuffs/HEAD/Ampache Streming Server /Selection_022.png
--------------------------------------------------------------------------------
/Ampache Streming Server /Selection_023.png:
--------------------------------------------------------------------------------
https://raw.githubusercontent.com/blackyboy/RedHat-Centos-Common-Stuffs/HEAD/Ampache Streming Server /Selection_023.png
--------------------------------------------------------------------------------
/Ampache Streming Server /Selection_024.png:
--------------------------------------------------------------------------------
https://raw.githubusercontent.com/blackyboy/RedHat-Centos-Common-Stuffs/HEAD/Ampache Streming Server /Selection_024.png
--------------------------------------------------------------------------------
/Ampache Streming Server /Selection_025.png:
--------------------------------------------------------------------------------
https://raw.githubusercontent.com/blackyboy/RedHat-Centos-Common-Stuffs/HEAD/Ampache Streming Server /Selection_025.png
--------------------------------------------------------------------------------
/Ampache Streming Server /Selection_026.png:
--------------------------------------------------------------------------------
https://raw.githubusercontent.com/blackyboy/RedHat-Centos-Common-Stuffs/HEAD/Ampache Streming Server /Selection_026.png
--------------------------------------------------------------------------------
/Ampache Streming Server /Selection_027.png:
--------------------------------------------------------------------------------
https://raw.githubusercontent.com/blackyboy/RedHat-Centos-Common-Stuffs/HEAD/Ampache Streming Server /Selection_027.png
--------------------------------------------------------------------------------
/Ampache Streming Server /Selection_028.png:
--------------------------------------------------------------------------------
https://raw.githubusercontent.com/blackyboy/RedHat-Centos-Common-Stuffs/HEAD/Ampache Streming Server /Selection_028.png
--------------------------------------------------------------------------------
/Ampache Streming Server /Selection_029.png:
--------------------------------------------------------------------------------
https://raw.githubusercontent.com/blackyboy/RedHat-Centos-Common-Stuffs/HEAD/Ampache Streming Server /Selection_029.png
--------------------------------------------------------------------------------
/Ampache Streming Server /Selection_030.png:
--------------------------------------------------------------------------------
https://raw.githubusercontent.com/blackyboy/RedHat-Centos-Common-Stuffs/HEAD/Ampache Streming Server /Selection_030.png
--------------------------------------------------------------------------------
/Ampache Streming Server /Selection_031.png:
--------------------------------------------------------------------------------
https://raw.githubusercontent.com/blackyboy/RedHat-Centos-Common-Stuffs/HEAD/Ampache Streming Server /Selection_031.png
--------------------------------------------------------------------------------
/Ampache Streming Server /Selection_032.png:
--------------------------------------------------------------------------------
https://raw.githubusercontent.com/blackyboy/RedHat-Centos-Common-Stuffs/HEAD/Ampache Streming Server /Selection_032.png
--------------------------------------------------------------------------------
/Ampache Streming Server /Selection_033.png:
--------------------------------------------------------------------------------
https://raw.githubusercontent.com/blackyboy/RedHat-Centos-Common-Stuffs/HEAD/Ampache Streming Server /Selection_033.png
--------------------------------------------------------------------------------
/Ampache Streming Server /Selection_034.png:
--------------------------------------------------------------------------------
https://raw.githubusercontent.com/blackyboy/RedHat-Centos-Common-Stuffs/HEAD/Ampache Streming Server /Selection_034.png
--------------------------------------------------------------------------------
/Installing Kaltura/phpinfo()_files/info.php:
--------------------------------------------------------------------------------
https://raw.githubusercontent.com/blackyboy/RedHat-Centos-Common-Stuffs/HEAD/Installing Kaltura/phpinfo()_files/info.php
--------------------------------------------------------------------------------
/Installing Kaltura/phpinfo()_files/info(1).php:
--------------------------------------------------------------------------------
https://raw.githubusercontent.com/blackyboy/RedHat-Centos-Common-Stuffs/HEAD/Installing Kaltura/phpinfo()_files/info(1).php
--------------------------------------------------------------------------------
/setup-images/setup_amazon_s3_remote_storage.png:
--------------------------------------------------------------------------------
https://raw.githubusercontent.com/blackyboy/RedHat-Centos-Common-Stuffs/HEAD/setup-images/setup_amazon_s3_remote_storage.png
--------------------------------------------------------------------------------
/setup-images/setting-up-amazon-cloudfront-cdn.png:
--------------------------------------------------------------------------------
https://raw.githubusercontent.com/blackyboy/RedHat-Centos-Common-Stuffs/HEAD/setup-images/setting-up-amazon-cloudfront-cdn.png
--------------------------------------------------------------------------------
/setup-images/setting_up_amazon_cloudfront_cdn_for_rtmp.png:
--------------------------------------------------------------------------------
https://raw.githubusercontent.com/blackyboy/RedHat-Centos-Common-Stuffs/HEAD/setup-images/setting_up_amazon_cloudfront_cdn_for_rtmp.png
--------------------------------------------------------------------------------
/setup-images/setting_up_amazon_cloudfront_cdn_for_rtmp_1.png:
--------------------------------------------------------------------------------
https://raw.githubusercontent.com/blackyboy/RedHat-Centos-Common-Stuffs/HEAD/setup-images/setting_up_amazon_cloudfront_cdn_for_rtmp_1.png
--------------------------------------------------------------------------------
/Generating-a-Certificate-Signing-Request-(CSR)---Apache-2.x.md:
--------------------------------------------------------------------------------
1 | Generating a Certificate Signing Request (CSR) - Apache 2.x
2 |
3 | ```
4 | openssl req -new -newkey rsa:2048 -nodes -keyout yourdomain.key -out yourdomain.csr
5 | ```
--------------------------------------------------------------------------------
/Redirect-Http-Request-to-Https.md:
--------------------------------------------------------------------------------
1 | Add this in virtualhost of 80
2 |
3 | Edit the file
4 |
5 | ```
6 | vim /etc/httpd/conf/httpd.conf
7 | ```
8 |
9 | And add this in virtualhost
10 |
11 | ```
12 | RewriteEngine On
13 | RewriteCond %{HTTP:X-Forwarded-Proto} !=https
14 | RewriteCond %{REQUEST_URI} !^/health_check
15 | RewriteRule (.*) https://%{HTTP_HOST}%{REQUEST_URI} [L]
16 | ```
--------------------------------------------------------------------------------
/fix-for-scp:-command-not-found.md:
--------------------------------------------------------------------------------
1 | ```
2 | scp: command not found
3 | ```
4 | If we face scp: command not found with Centos minimal Install
5 | we need to install the package **openssh-clients**
6 |
7 | If the Package was not Present we can able to copy files over network using scp and rsync
8 |
9 | ```
10 | # yum install openssh-clients -y
11 | ```
12 |
13 | This will fix the issue to copy file between remote hosts
--------------------------------------------------------------------------------
/Installing-Gnome-IP-Messenger-From-PPA-repository-for-Debian-Systems.md:
--------------------------------------------------------------------------------
1 | Installing Gnome IP Messenger From PPA repository
2 |
3 |
4 | Step 1
5 |
6 | Add the PPA Repository
7 |
8 |
9 | ```
10 |
11 | # sudo add-apt-repository ppa:fossfreedom/g2ipmsg
12 |
13 |
14 | ```
15 |
16 | Step 2
17 |
18 |
19 | Then Update it using command
20 |
21 |
22 | ```
23 |
24 | # sudo apt-get update
25 |
26 |
27 | ```
28 |
29 |
30 | Step 3
31 |
32 |
33 | Then install gnome ip messenger
34 |
35 |
36 | ```
37 |
38 |
39 | # sudo apt-get install g2ipmsg
40 |
41 |
42 | ```
43 |
44 |
45 |
46 | Thats it .....
--------------------------------------------------------------------------------
/DNS_server_setup_RHEL6/masterdns.linuxmental.local/forward.linuxmental:
--------------------------------------------------------------------------------
1 | $TTL 86400
2 | @ IN SOA masterdns.linuxmental.local. root.linuxmental.local. (
3 | 2014051001 ; serial
4 | 3600 ; refresh
5 | 1800 ; retry
6 | 604800 ; expire
7 | 86400 ; minimum
8 | )
9 | @ IN NS masterdns.linuxmental.local.
10 | @ IN NS slavedns.linuxmental.local.
11 | @ IN A 192.168.0.200
12 | @ IN A 192.168.0.201
13 | @ IN A 192.168.0.205
14 | @ IN A 192.168.0.206
15 | @ IN A 192.168.0.207
16 | @ IN A 192.168.0.208
17 | masterdns IN A 192.168.0.200
18 | slavedns IN A 192.168.0.201
19 | node1 IN A 192.168.0.205
20 | node2 IN A 192.168.0.206
21 | node3 IN A 192.168.0.207
22 | node4 IN A 192.168.0.208
23 |
--------------------------------------------------------------------------------
/To-Enable-“setup”-command-in-CentOS-minimal-install.md:
--------------------------------------------------------------------------------
1 | no “setup” command found in CentOS minimal install
2 |
3 | In Minimum Install this will not get install
4 |
5 | If we get below Error, we need to install some packages to get work with setup command
6 |
7 | ```
8 | [root@masterdns ~] setup
9 | -bash: setup: command not found
10 | ```
11 |
12 | Here we can see how to install in minimal install
13 |
14 | ```
15 | yum install setuptool -y
16 | yum install system-config-network* -y
17 | yum install system-config-firewall* -y
18 | yum install system-config-securitylevel-tui -y
19 | yum install system-config-keyboard -y
20 | yum install ntsysv -y
21 | ```
22 |
23 | Now we can use the setup utility, That's it.
24 |
--------------------------------------------------------------------------------
/How_to_setup_Email_notification_for_SUDO_Users_access_in_centos&RHEL.md:
--------------------------------------------------------------------------------
1 | #### How to setup Email notification for SUDO Users access
2 |
3 | Edit the sudoer file using
4 |
5 | ```
6 | # visudo
7 | ```
8 |
9 | Enabled the sudo user and enter the following entry in bottom of the file
10 |
11 |
12 | ```
13 | Defaults mailto = "alertforxxxxxx@gmail.com"
14 | Defaults mailfrom = "root@xxxxxxx.com"
15 | Defaults mail_badpass
16 | Defaults mail_always
17 | Defaults mail_no_user
18 | Defaults mailsub = "*** Command run via sudo on %h ***"
19 | Defaults badpass_message = "Please Provide Correct Password"
20 | Defaults !lecture,tty_tickets,!fqdn,!syslog
21 | Defaults logfile=/var/log/sudo.log
22 | ```
23 |
24 | This will send email's while some user's use sudo command.
25 |
--------------------------------------------------------------------------------
/DNS_server_setup_RHEL6/masterdns.linuxmental.local/reverse.linuxmental:
--------------------------------------------------------------------------------
1 | $TTL 86400
2 | @ IN SOA masterdns.linuxmental.local. root.linuxmental.local. (
3 | 2014051001 ; serial
4 | 3600 ; refresh
5 | 1800 ; retry
6 | 604800 ; expire
7 | 86400 ; minimum
8 | )
9 | @ IN NS masterdns.linuxmental.local.
10 | @ IN NS slavedns.linuxmental.local.
11 | @ IN PTR linuxmental.local.
12 | masterdns IN A 192.168.0.200
13 | slavedns IN A 192.168.0.201
14 | node1 IN A 192.168.0.205
15 | node2 IN A 192.168.0.206
16 | node3 IN A 192.168.0.207
17 | node4 IN A 192.168.0.208
18 | 200 IN PTR masterdns.linuxmental.local.
19 | 201 IN PTR slavedns.linuxmental.local.
20 | 205 IN PTR node1.linuxmental.local.
21 | 206 IN PTR node2.linuxmental.local.
22 | 207 IN PTR node3.linuxmental.local.
23 | 208 IN PTR node4.linuxmental.local.
24 |
--------------------------------------------------------------------------------
/How-to-Create-a-Backup-Image-of-Whole-Server-in-RHEL,-Centos,-Ubuntu.md:
--------------------------------------------------------------------------------
1 | To Create a Whole Backup of a Drive
2 |
3 | ```
4 |
5 | dd if=/dev/vda | ssh babinlonston@192.168.1.100 'gzip - > /home/babinlonston/Desktop/backup.gz'
6 |
7 | ```
8 |
9 | To restore, you have to take the server down and manually image the disk. Perhaps a hard drive swap or something of the sort.
10 | copy data over with a filemanager from a live CD.. grsync is an easy GUI for using rsync
11 |
12 | To place the image on the
13 | [new] drive:
14 |
15 | ```
16 |
17 | gzip -d < image.gz | dd of=/dev/sda2
18 |
19 |
20 | ```
21 |
22 | well to recover, you cannot just do it "live", ie, while the system is running off of that hard disk. You would need to either to boot from a live medium (cd/etc) and do the disk image there, or perhaps pull out the hard drives and put them in another computer.
--------------------------------------------------------------------------------
/README.md:
--------------------------------------------------------------------------------
1 | ### All-Common-Linux-Stuffs
2 |
3 | * In this Repository Common to Linux are stored :octocat:
4 |
5 | * [Setting Time Zone] (https://github.com/blackyboy/RedHat-Centos-Common-Stuffs/blob/master/2-Methods-To-Change-TimeZone-in-Linux.md)
6 | * [User Disk Quota Setting] (https://github.com/blackyboy/RedHat-Centos-Common-Stuffs/blob/master/5-Steps-to-Setup-User-and-Group-Disk-Quota-on-UNIX---Linux.md)
7 | * [Backup Using DD Command] (https://github.com/blackyboy/RedHat-Centos-Common-Stuffs/blob/master/6-Examples-to-Backup-Linux-Using-dd-Command-Including-Disk-to-Disk.md)
8 | * [Remote Server Backup Using Rsnapshot] (https://github.com/blackyboy/RedHat-Centos-Common-Stuffs/blob/master/How-to-Backup-the-Remote-Linux-Servers-or-Systems-Using-Rsnapshot.md) :fire:
9 | * [Setting Login Banner for SSH] (https://github.com/blackyboy/RedHat-Centos-Common-Stuffs/blob/master/How-to-set-a-Login-Banner-in-linux-for-ssh.md)
10 | * [Netstat Commands] (https://github.com/blackyboy/RedHat-Centos-Common-Stuffs/blob/master/UNIX-%26-Linux-10-Netstat-Command-Examples.md)
11 | * [Troubleshooting Using dmesg] (https://github.com/blackyboy/RedHat-Centos-Common-Stuffs/blob/master/Troubleshooting-Using-dmesg-Command-in-Unix-and-Linux.md) :mag_right:
12 | * [ Linux modprobe Command Install,Remove Modules] (https://github.com/blackyboy/RedHat-Centos-Common-Stuffs/blob/master/Linux-modprobe-Command-Examples-to-View%2C-Install%2C-Remove-Modules.md)
13 |
--------------------------------------------------------------------------------
/Install_Dell_OMSA_Server_management.md:
--------------------------------------------------------------------------------
1 | #### Install Dell OMSA Server Management in Centos
2 |
3 | * This setup instruction works with RHEL5, RHEL6, Centos.
4 |
5 | * Set up the Dell OpenManage Repository at http://linux.dell.com/repo/hardware
6 |
7 |
8 | ```
9 | wget -q -O - http://linux.dell.com/repo/hardware/latest/bootstrap.cgi | bash
10 | ```
11 |
12 | * Install OpenManage Server Administrator (OMSA) Using following command
13 |
14 |
15 | ```
16 | yum install srvadmin-all
17 | ```
18 |
19 | * The Above Command will install the following packages, Install defualt location will be under /opt/dell/srvadmin
20 |
21 |
22 | ```
23 | srvadmin-all: Install all OMSA components
24 | srvadmin-base: Install only base OMSA, no web server
25 | srvadmin-webserver: Install Web Interface
26 | srvadmin-storageservices: Install RAID Management
27 | srvadmin-rac4: Install components to manage the Dell Remote Access Card 4
28 | srvadmin-rac5: Install components to manage the Dell Remote Access Card 5
29 | ```
30 |
31 | * Create a softlink for service under /etc/init.d/
32 |
33 |
34 | ```
35 | ln -s /opt/dell/srvadmin/sbin/srvadmin-services.sh srvadmin
36 | ```
37 |
38 | * Start the Service
39 |
40 |
41 | ```
42 | Service srvadmin start
43 | ```
44 |
45 | * Navigate to the any Browser and open access the OMSA
46 |
47 |
48 | ```
49 | https://192.168.1.15:1311
50 | ```
51 |
52 |
53 | * Login using the Username and password of root to manage the server
54 |
55 |
56 | ```
57 | root
58 | admin123$
59 | ```
60 |
61 |
62 |
--------------------------------------------------------------------------------
/DNS_server_setup_RHEL6/slavedns.linuxmental.local/named.conf:
--------------------------------------------------------------------------------
1 | //
2 | // named.conf
3 | //
4 | // Provided by Red Hat bind package to configure the ISC BIND named(8) DNS
5 | // server as a caching only nameserver (as a localhost DNS resolver only).
6 | //
7 | // See /usr/share/doc/bind*/sample/ for example named configuration files.
8 | //
9 |
10 | options {
11 | listen-on port 53 { 127.0.0.1; 192.168.0.201; }; # Slave DNS server's IP
12 | listen-on-v6 port 53 { ::1; };
13 | directory "/var/named";
14 | dump-file "/var/named/data/cache_dump.db";
15 | statistics-file "/var/named/data/named_stats.txt";
16 | memstatistics-file "/var/named/data/named_mem_stats.txt";
17 | allow-query { localhost; 192.168.0.0/24; };
18 | recursion yes;
19 |
20 | dnssec-enable yes;
21 | dnssec-validation yes;
22 | dnssec-lookaside auto;
23 |
24 | /* Path to ISC DLV key */
25 | bindkeys-file "/etc/named.iscdlv.key";
26 | managed-keys-directory "/var/named/dynamic";
27 | };
28 |
29 | logging {
30 | channel default_debug {
31 | file "data/named.run";
32 | severity dynamic;
33 | };
34 | };
35 |
36 | zone "." IN {
37 | type hint;
38 | file "named.ca";
39 | };
40 | zone"linuxmental.local" IN {
41 | type slave;
42 | file "slaves/linuxmental.fwd";
43 | masters { 192.168.0.200; };
44 | };
45 | zone"0.168.192.in-addr.arpa" IN {
46 | type slave;
47 | file "slaves/linuxmental.rev";
48 | masters { 192.168.0.200; };
49 | };
50 | include "/etc/named.rfc1912.zones";
51 | include "/etc/named.root.key";
52 |
--------------------------------------------------------------------------------
/How-to-configure-VNC-server-in-RHEL-6.4-For-User-Accounts.md:
--------------------------------------------------------------------------------
1 | VNC Packages
2 |
3 | 1. Tigervnc - server
4 | 2. Open ssh
5 |
6 | Configuration File
7 |
8 | ```
9 |
10 | # /etc/sysconfig/vncservers
11 |
12 | ```
13 |
14 | Port Number used by VNC server
15 |
16 | Port 5900 , 5901 , 5902
17 |
18 | Install VNC using Command Line
19 |
20 | ```
21 |
22 | # yum install tigervnc* -y
23 |
24 | ```
25 |
26 | To edit the Config file
27 |
28 | ```
29 |
30 | # vim /etc/sysconfig/vncserver
31 |
32 | ```
33 |
34 | Remove the # in Last 2 Lines of the configuration file
35 |
36 | Example :
37 |
38 | ```
39 |
40 | #VNCSERVERS="2:babinlonston"
41 | #VNCSERVERARGS[2]="-geometry 800x600 -nolisten tcp -localhost"
42 |
43 | ```
44 |
45 | Uncomment the # to Activated
46 |
47 | Save the File using command
48 |
49 | ```
50 |
51 | #wq!
52 |
53 | ```
54 |
55 | Switch the user to babinlonston using
56 |
57 | ```
58 |
59 | # su - babinlonston
60 |
61 | ```
62 |
63 | Create a Vnc password as
64 |
65 | ```
66 |
67 | #vncpasswd
68 | Newpass : **********
69 | verifypasswd : **********
70 |
71 | ```
72 |
73 | Restart the service using command
74 |
75 | ```
76 |
77 | # /etc/init.d/vncserver restart
78 |
79 | ```
80 |
81 | Set the VNC server to run in 5 level
82 |
83 | ```
84 |
85 | # chkconfig vncserver on
86 |
87 | ```
88 |
89 | Then Connect to the user babinlonston using the command
90 |
91 | ```
92 |
93 | # vncviewer -via babinlonston@server.example.com localhost:2
94 |
95 | ```
96 |
97 | That's it we can view the user babinlonston's desktop in vnc
98 |
--------------------------------------------------------------------------------
/DNS_server_setup_RHEL6/masterdns.linuxmental.local/named.conf:
--------------------------------------------------------------------------------
1 | //
2 | // named.conf
3 | //
4 | // Provided by Red Hat bind package to configure the ISC BIND named(8) DNS
5 | // server as a caching only nameserver (as a localhost DNS resolver only).
6 | //
7 | // See /usr/share/doc/bind*/sample/ for example named configuration files.
8 | //
9 | options {
10 | listen-on port 53 { 127.0.0.1; 192.168.0.200; }; # Master DNS Server IP
11 | listen-on-v6 port 53 { ::1; };
12 | directory "/var/named";
13 | dump-file "/var/named/data/cache_dump.db";
14 | statistics-file "/var/named/data/named_stats.txt";
15 | memstatistics-file "/var/named/data/named_mem_stats.txt";
16 | allow-query { localhost; 192.168.0.0/24; }; # IP Range of Host's
17 | allow-transfer { localhost; 192.168.0.201; }; # Slave DNS Server's IP
18 | recursion yes;
19 |
20 | dnssec-enable yes;
21 | dnssec-validation yes;
22 | dnssec-lookaside auto;
23 |
24 | /* Path to ISC DLV key */
25 | bindkeys-file "/etc/named.iscdlv.key";
26 | managed-keys-directory "/var/named/dynamic";
27 | };
28 |
29 | logging {
30 | channel default_debug {
31 | file "data/named.run";
32 | severity dynamic;
33 | };
34 | };
35 |
36 | zone "." IN {
37 | type hint;
38 | file "named.ca";
39 | };
40 | zone"linuxmental.local" IN {
41 | type master;
42 | file "forward.linuxmental";
43 | allow-update { none; };
44 | };
45 | zone"1.168.192.in-addr.arpa" IN {
46 | type master;
47 | file "reverse.linuxmental";
48 | allow-update { none; };
49 | };
50 | include "/etc/named.rfc1912.zones";
51 | include "/etc/named.root.key";
52 |
--------------------------------------------------------------------------------
/2-Methods-To-Change-TimeZone-in-Linux.md:
--------------------------------------------------------------------------------
1 | 2 Methods To Change TimeZone in Linux
2 |
3 | For this example, assume that your current timezone is UTC as shown below. You would like to change this to Asia Time.
4 |
5 |
6 | ```
7 |
8 | #date
9 |
10 | Fri Jul 19 18:16:21 IST 2013
11 |
12 | ```
13 |
14 |
15 | On some distributions (for example, CentOS), the timezone is controlled by /etc/localtime file.
16 |
17 | Delete the current localtime file under /etc/ directory
18 |
19 |
20 | ```
21 |
22 | # cd /etc
23 |
24 | #rm localtime
25 |
26 | ```
27 |
28 | All Asia timezones are located under under the /usr/share/zoneinfo/Asia directory as shown below.
29 |
30 |
31 | ```
32 |
33 | # ls /usr/share/zoneinfo/Asia/
34 | India Pakistan Nepal Kolkata Srilanka
35 |
36 | ```
37 |
38 | Note: For other country timezones, browse the /usr/share/zoneinfo directory
39 |
40 |
41 |
42 | Link the Asia file from the above Asia directory to the /etc/localtime directory as shown below.
43 |
44 |
45 | ```
46 |
47 | # date
48 |
49 | Fri Jul 19 18:16:21 IST 2013
50 |
51 |
52 | ```
53 |
54 | Method 2: Change TimeZone Using /etc/timezone File
55 |
56 |
57 | On some distributions (for example, Ubuntu), the timezone is controlled by /etc/timezone file.
58 |
59 | For example, your current timezone might be US Eastern time (New York) as shown below.
60 |
61 |
62 | ```
63 |
64 | # cat /etc/timezone
65 | America/New_York
66 |
67 |
68 | ```
69 | To change this to US Pacific time (Los Angeles), modify the /etc/timezone file as shown below.
70 |
71 |
72 | ```
73 |
74 | # vim /etc/timezone
75 | America/Los_Angeles
76 |
77 | ```
78 |
79 | Also, set the timezone from the command line using the TZ variable.
80 |
81 |
82 | ```
83 |
84 | # export TZ=America/Los_Angeles
85 |
86 |
87 | ```
88 |
89 |
90 |
--------------------------------------------------------------------------------
/setting-up-amazon-cloudfront-cdn-rtmp.md:
--------------------------------------------------------------------------------
1 | ### Setting up Amazon CloudFront CDN for RTMP
2 |
3 | 1. Go to [Amazon Cloudfront CDN Access Panel] (https://console.aws.amazon.com/cloudfront/home)
4 |
5 | 2. Create a new **Distribution** of type **RTMP**, and Origin Domain Name select your bucket from list
6 |
7 | 3. Distribution State want to be **Enabled**
8 |
9 | 4. Click on **Create Distribution**
10 |
11 | 5. Copy your CloudFront RTMP domain name (example: s22xxxxxxxxxxxx.cloudfront.net) for later use.
12 |
13 | 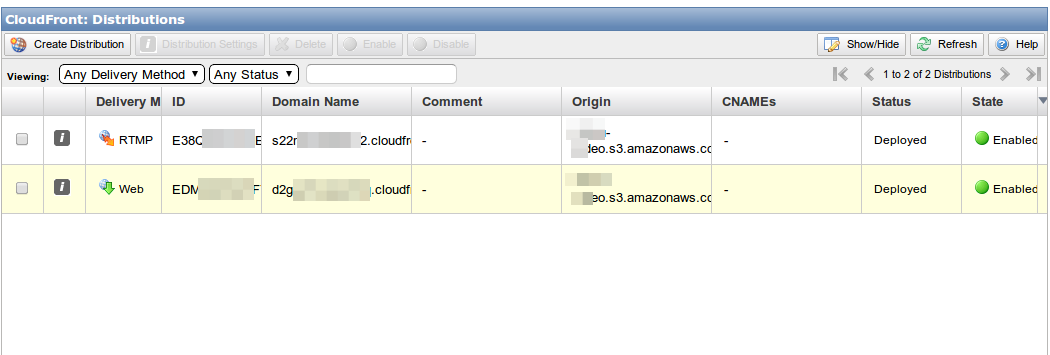
14 |
15 |
16 | Next we need to configure the Remote Storage Profile. In order to do this, we must click on the partner’s left drop-down box (under **Profiles**) and select **Remote Storage**. You should see the **Remote Storage Profiles** page for your publisher (If you haven’t yet set up any remote storage profiles, the list should be empty).
17 |
18 | There was our s3 storage will be listed as we have done in above Step,
19 |
20 | 1. Select action Click **configure**
21 |
22 | 2. Under Delivery Details Below http & https we need to enter the rtmp url of cloudnfront
23 | Prefix must be our Directory which was created in s3 bucket
24 |
25 | Note : There is no slash after /st
26 | Note : There is no slash after /kaltura
27 |
28 | ```
29 | RTMP Delivery Base URL: rtmp://s22xxxxxxxxxxx.cloudfront.net/cfx/st
30 |
31 | RTMP stream URL prefix: /kaltura
32 | ```
33 |
34 | 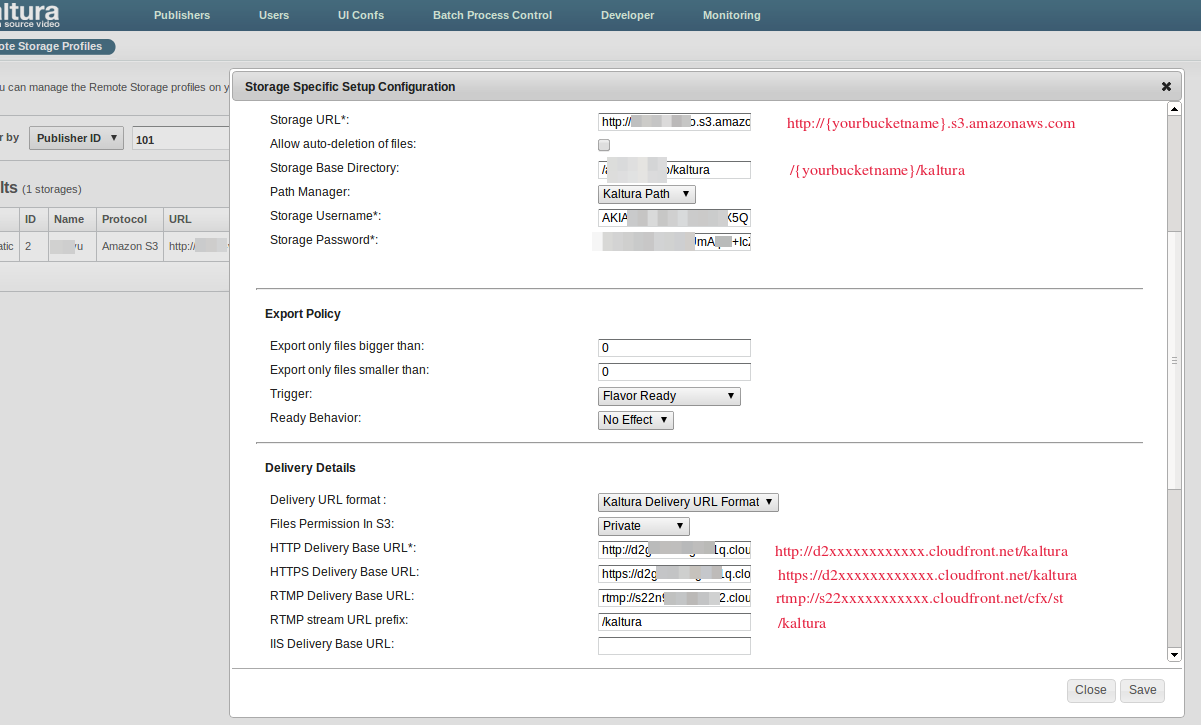
35 |
36 |
37 | 3. Save the Remote Storage Profile
38 |
39 | This will make works both RTMP & RTMPE Video Streaming.
40 |
41 | Bunch of thanks to @jessp01 from Kaltura team for guiding me.
42 |
--------------------------------------------------------------------------------
/Install_OpenvSwitch_in_Linux.md5:
--------------------------------------------------------------------------------
1 | Install OpenvSwitch in Linux
2 |
3 | Open vSwitch is a multilayer virtual switch licensed under the open source. Which has the level of production level quality with VLAN, traffic shapping etc.
4 |
5 | Open VSwitch come in source tar ball we need to build our own RPM from source. To build the RPM package we need to install with below RPM build package and dependecies.
6 |
7 | # yum install make gcc curl wget vim openssl-devel autoconf automake rpm-build libtool redhat-rpm-config python-devel openssl-devel kernel-devel kernel-debug-devel
8 |
9 | Create a rpm build direcoty under root's home.
10 |
11 | # mkdir -p ~/rpmbuild/SOURCES
12 |
13 | Download OpenvSwitch source code from official website. Move the downloaded tar ball to RPM build directory and extract the content.
14 |
15 | # wget http://openvswitch.org/releases/openvswitch-2.5.2.tar.gz
16 |
17 | # cp openvswitch-2.5.2.tar.gz ~/rpmbuild/SOURCES/
18 |
19 | #tar xfz openvswitch-2.5.2.tar.gz
20 |
21 | Replace kernel module to null using sed. Build the RPM using rpmbuild.
22 |
23 | # sed 's/openvswitch-kmod, //g' /root/rpmbuild//SOURCES/openvswitch-2.5.2/rhel/openvswitch.spec > /root/rpmbuild/SOURCES/openvswitch-2.5.2/rhel/openvswitch_no_kmod.spec
24 |
25 | # rpmbuild -bb --nocheck ~/rpmbuild/SOURCES/openvswitch-2.5.2/rhel/openvswitch_no_kmod.spec
26 |
27 | We are ready to install RPM package, Install with required SELinux policy package to restore Policy..
28 |
29 | # yum localinstall rpmbuild/RPMS/x86_64/openvswitch-2.5.2-1.x86_64.rpm
30 |
31 | # yum install policycoreutils-python
32 |
33 | # semanage fcontext -a -t openvswitch_rw_t "/etc/openvswitch(/.*)?"
34 |
35 | # restorecon -Rv /etc/openvswitch
36 |
37 | Start the OpenVSwitch service and check for the status.
38 |
39 | # systemctl status openvswitch.service
40 |
41 | # systemctl start openvswitch.service
42 |
43 | # systemctl status openvswitch.service
44 |
45 | # chkconfig openvswitch on
46 |
47 | To Check installed verion use below command.
48 |
49 | # ovs-vsctl -V
50 |
51 |
--------------------------------------------------------------------------------
/setup-amazon-S3-remote-storage.md:
--------------------------------------------------------------------------------
1 | ### Setup Amazon S3 Remote storage
2 |
3 | To Setup a Remote Storage Following link has the Reference Contents
4 |
5 | Reference URL : [kalturaCE Amazon s3 storage cloudfront cdn setup](http://www.panda-os.com/2012/11/kaltura-ce-amazon-s3-storage-cloudfront-cdn-setup/#.Uy_7KHUW3h_)
6 |
7 | ######Setting up Amazon S3 and getting security credentials
8 |
9 | * To get your Amazon security credentials (assuming you have an account with amazon AWS), go to this link
10 | (https://portal.aws.amazon.com/gp/aws/securityCredentials)
11 |
12 | * To set up your amazon S3 bucket, go to (https://console.aws.amazon.com/s3/home) , create a new bucket, and name it.
13 |
14 | * Inside this bucket, create a folder called **kaltura**
15 |
16 | * Select your new bucket on the left side, click Actions and select **Properties**
17 |
18 | * Add more permissions – **Authenticated Users** – check all boxes.
19 |
20 | * Select the kaltura folder, click **properties**, go to **Permissions**.
21 |
22 | * Add more permissions – Everyone – read and download (you can also right click the folder and select **Make Public**)
23 |
24 | In the Above 6th and 7th Step there is no Permission available, So Just Right click on kaltura Directory and choose **Make Public**
25 |
26 | Then we need to add a bucket Policy for your bucket, Granting Object get Permission to any Anonymous User in Amazon S3 Bucket for reading the file.
27 |
28 | ```
29 | {
30 | "Version":"2012-10-17",
31 | "Statement":[{
32 | "Sid":"AddPerm",
33 | "Effect":"Allow",
34 | "Principal": {
35 | "AWS": "*"
36 | },
37 | "Action":["s3:GetObject"],
38 | "Resource":["arn:aws:s3:::Bucket-name/*"
39 | ]
40 | }
41 | ]
42 | }
43 | ```
44 |
45 | 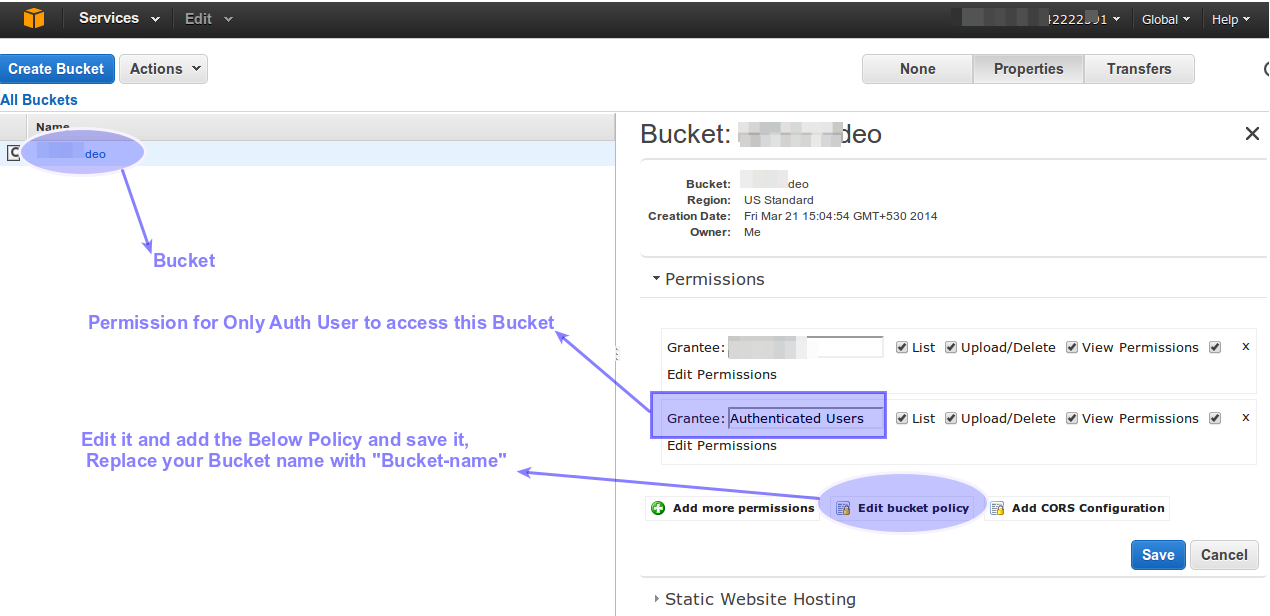
46 |
47 |
48 | If this Policy was not added, We will face clip not found error when ever uploading a new video to kaltura.
49 |
--------------------------------------------------------------------------------
/How-to-install-Utorrent-in-ubuntu,-RHEL-,-centos,-mint-Linux-Systems.md:
--------------------------------------------------------------------------------
1 | How to install and use uTorrent in Ubuntu 12.04, 13.04 in Wen Interface
2 |
3 | Move to download Directory
4 |
5 | ```
6 |
7 | # cd /home/babinlonstonadmin/Downloads
8 |
9 | ```
10 |
11 | Download the utorrent for linux from Utorrent.com
12 |
13 | ```
14 |
15 | #wget http://download.utorrent.com/linux/utorrent-server-3.0-25053.tar.gz
16 |
17 |
18 | ```
19 | OR
20 | Pull from GitHub
21 |
22 | ```
23 |
24 | #git pull https://github.com/babinlonston/All-Common-And-RHEL-Linux-Stuffs/blob/master/utorrent-server-3.0-ubuntu-10.10-27079.tar.gz
25 |
26 | ```
27 |
28 | Next, run the commands below to extract uTorrent files to the /opt directory.
29 |
30 | ```
31 |
32 | # sudo tar xvzf utorrent-server-3.0-25053.tar.gz -C /opt/
33 |
34 | ```
35 |
36 | Then run the commands below to change the permission on uTorrent-server folder.
37 |
38 | ```
39 |
40 | # sudo chmod -R 777 /opt/utorrent-server-v3_0/
41 |
42 | ```
43 |
44 | Next, run the commands below to link uTorrent server to the /user/bin directory.
45 |
46 | ```
47 |
48 | # sudo ln -s /opt/utorrent-server-v3_0/utserver /usr/bin/utserver
49 |
50 | ```
51 |
52 | Finally, run the commands below to start uTorrent.
53 |
54 | ```
55 |
56 | #utserver -settingspath /opt/utorrent-server-v3_0/
57 |
58 | ```
59 |
60 | If you get an error about libssl.so package missing, run the commands below to install it, then try starting it again.
61 |
62 |
63 | ```
64 |
65 | # sudo apt-get install libssl0.9.8:i386
66 |
67 |
68 | ```
69 |
70 | Now that uTorrent server is started, open your web browser (Firefox) and type the address below.
71 |
72 | ```
73 |
74 | http://localhost:8080/gui/
75 |
76 |
77 | ```
78 |
79 |
80 | The username is admin and leave the password field empty.
81 |
82 |
83 | 
84 |
85 |
86 | Enjoy Using utorrent ...
87 |
88 |
89 |
90 |
91 |
--------------------------------------------------------------------------------
/how_to_add_a_iphone_flavor_in_trancoding_profile.md:
--------------------------------------------------------------------------------
1 | How to add a iphone flavor in Trancoding Profile
2 | ===============================================
3 |
4 | ######First we need to Start a Seesion
5 |
6 | * Navigate to **Developer** TAB and enter the client tag ( your **User Secret**: ) from kaltura user **Integration** settings Tab
7 |
8 | * Select Service and Choose **Session:**
9 |
10 | * Select action and Choose **start**
11 |
12 | * Select Secret and paste the string, get it from **Developer** TAB and enter the client tag ( your **Admin Secret**: ) from kaltura user **Integration** settings Tab
13 |
14 | * Select User String and Paste the ( your **User Secret**: )
15 |
16 | * Choose Type as Admin
17 |
18 | * Partner ID want to be your Partner ID which go Going to Create
19 |
20 | * Expiry and Privileges are optional.
21 |
22 | You Will get a KS Seesion like Below
23 |
24 |
25 | ```
26 |
27 | MDE3YWVmNWZlMmY3ODc2NDAxODA2ZDUzODFkMTU3ZDg5NGZjYTVjZnwxMDE7MTAxOzEzOTcxMTM2ODg7MjsxMzk3MDI3Mjg4LjM2MTk7NTA1ZTM2ZTVlMTE5YjQ0Yjk0M2RjN2Y1OGJkY2QwYmQ7Ozs=
28 | 5.1021575927734E-5
29 |
30 | ```
31 |
32 | In above Output, this one is the ks Session ID
33 |
34 |
35 | ```
36 | MDE3YWVmNWZlMmY3ODc2NDAxODA2ZDUzODFkMTU3ZDg5NGZjYTVjZnwxMDE7MTAxOzEzOTcxMTM2ODg7MjsxMzk3MDI3Mjg4LjM2MTk7NTA1ZTM2ZTVlMTE5YjQ0Yjk0M2RjN2Y1OGJkY2QwYmQ7Ozs=
37 | ```
38 |
39 | Copy that KS Session ID for Use while creating new flavour, And start a New Test console
40 |
41 |
42 | * Log in to your admin console, and start a new session in the Developer => Test Console by entering the admin secret key and partner ID of the publisher for which you wish to enable the iPhone format transcoding. You can get your admin secret key by logging into your KMC with the desired publisher and going to Settings => Integration Settings
43 |
44 | * Next, use the flavorParams => Add service (make sure you check the box next to your KS so it is a valid session!) and enter the following into the flavorParams box for the various settings (you have to click on flavorParams for it to open first)
45 |
46 | * flavorParams:name - iphonemp4
47 | * flavorParams:description - iphone mp4 format
48 | * flavorParams:tags - iphone,mp4
49 | * flavorParams:format - mp4
50 | * flavorParams:videoCodec - h264
51 | * flavorParams:audioCodec - AAC
52 | * flavorParams:conversionEngines - 2
53 | * ALL other values should be left BLANK!
54 | You can verify that it has taken by using the flavorParams => List service
55 |
56 | * Then Under Transcoding we can see the Above added format
57 |
58 |
--------------------------------------------------------------------------------
/How-to-set-a-Login-Banner-in-linux-for-ssh.md:
--------------------------------------------------------------------------------
1 | How to set a Login Banner in linux for ssh
2 |
3 |
4 | First we need to create a file in /etc/ or in any were here im going to create inside /etc/
5 |
6 |
7 | 1. First create a file named issue
8 |
9 |
10 | ```
11 |
12 | #sudo vim /etc/issue
13 |
14 | ```
15 |
16 |
17 | 
18 |
19 |
20 |
21 | 2. Then paste your copyright content as u wish ..
22 | Here im using following content
23 |
24 |
25 |
26 | ```
27 | NOTICE TO USERS
28 |
29 |
30 | This computer system is the private property of its owner, whether
31 | individual, corporate or government. It is for authorized use only.
32 | Users (authorized or unauthorized) have no explicit or implicit
33 | expectation of privacy.
34 |
35 | Any or all uses of this system and all files on this system may be
36 | intercepted, monitored, recorded, copied, audited, inspected, and
37 | disclosed to your employer, to authorized site, government, and law
38 | enforcement personnel, as well as authorized officials of government
39 | agencies, both domestic and foreign.
40 |
41 | By using this system, the user consents to such interception, monitoring,
42 | recording, copying, auditing, inspection, and disclosure at the
43 | discretion of such personnel or officials. Unauthorized or improper use
44 | of this system may result in civil and criminal penalties and
45 | administrative or disciplinary action, as appropriate. By continuing to
46 | use this system you indicate your awareness of and consent to these terms
47 | and conditions of use. LOG OFF IMMEDIATELY if you do not agree to the
48 | conditions stated in this warning.
49 |
50 | ****************************************************************************
51 | ```
52 |
53 |
54 | 3. Then Edit the file sshd_config
55 |
56 |
57 |
58 | ```
59 |
60 | # sudo vim/etc/ssh/sshd_config
61 |
62 | ```
63 |
64 |
65 | 
66 |
67 |
68 |
69 | 4. Then Add a line at bottom
70 |
71 |
72 |
73 | ```
74 |
75 | #banner /etc/issue
76 |
77 |
78 | ```
79 |
80 |
81 |
82 | 
83 |
84 |
85 |
86 | save the file and exit
87 |
88 |
89 | 5. Then restart the ssh service
90 |
91 |
92 | ```
93 |
94 | #sudo /etc/init.d/ssh restart
95 |
96 |
97 | ```
98 |
99 |
100 | 
101 |
102 |
103 |
104 |
105 | Then Logout and login again to see the message what u have been saved in the issue file ...
106 | That's it ..
107 |
108 |
109 |
110 |
111 | 
112 |
113 |
114 |
115 |
116 |
--------------------------------------------------------------------------------
/How-to-setup-a-DHCP-server-in-RHEL-6.md:
--------------------------------------------------------------------------------
1 | How to setup a DHCP server in RHEL
2 |
3 | ```
4 | IP Address : 192.168.0.200
5 | Hostname : dhcpserver.linuxzadmin.com
6 | ```
7 |
8 | Operating System:
9 |
10 | ```
11 | # lsb_release -a
12 |
13 | LSB Version: :core-4.0-amd64:core-4.0-noarch:graphics-4.0-amd64:graphics-4.0-noarch:printing-4.0-amd64:printing-4.0-noarch
14 | Distributor ID: RedHatEnterpriseServer
15 | Description: Red Hat Enterprise Linux Server release 6.2 (Santiago)
16 | Release: 6.2
17 | Codename: Santiago
18 | ```
19 |
20 | Here we going to install the dhpcd package
21 |
22 | ```
23 | # yum install dhcp* -y
24 | ```
25 |
26 | Then copy the configuration file from below location to etc/dhcp
27 |
28 | ```
29 | # cp /usr/share/doc/dhcp*/dhcpd.conf.sample /etc/dhcp/
30 | ```
31 |
32 | Rename the file to dhcpd.conf
33 |
34 | ```
35 | # mv /etc/dhcp/dhcpd.conf.sample /etc/dhcp/dhcpd.conf
36 | ```
37 |
38 | Edit the Config file to change the need configuration
39 |
40 | ```
41 | # vim /etc/dhcp/dhcpd.conf
42 | ```
43 | In Line number 7,8 Change the Domain name and Name servers
44 |
45 | ```
46 | option domain-name "linuxzadmin.local";
47 | option domain-name-servers masterdns.linuxzadmin.local, slavedns.linuxzadmin.local;
48 | ```
49 |
50 | In Line number 10, 11 check for the lease time and max lease
51 |
52 | ```
53 | default-lease-time 600;
54 | max-lease-time 7200;
55 | ```
56 |
57 | Enabled the line 18
58 |
59 | ```
60 | authoritative;
61 | ```
62 |
63 | In Line 22 Change the local7 to local6 for logs
64 |
65 | ```
66 | log-facility local6;
67 | ```
68 |
69 | Then we need to edit the file under
70 |
71 | ```
72 | # vim /etc/rsyslog.conf
73 | ```
74 |
75 | Add a New line under local7 in line number 58
76 |
77 | ```
78 | local6.* /var/log/dhcpd.log
79 | ```
80 | Save and Exit the rsyslog.conf and go back to dhcpd.conf
81 |
82 | In Line 32 Add the subnet of network we need to enabled DHCP and Add the Range of IP, Comment the Router
83 |
84 | ```
85 | subnet 192.168.0.0 netmask 255.255.255.0 {
86 | range 192.168.0.205 192.168.0.210;
87 | # option routers rtr-239-0-1.example.org, rtr-239-0-2.example.org;
88 | }
89 | ```
90 |
91 | Add the Fixed IP and Hostname for the Client machine in Fixed IP sections if you already have a valid DNS server
92 |
93 | ```
94 | host node1 {
95 | hardware ethernet 52:54:00:17:3B:C7;
96 | fixed-address node1.linuxzadmin.local;
97 | }
98 |
99 | host node2 {
100 | hardware ethernet 52:54:00:1B:86:E0;
101 | fixed-address node2.linuxzadmin.local;
102 | }
103 |
104 | host node3 {
105 | hardware ethernet 52:54:00:DE:73:FD;
106 | fixed-address node3.linuxzadmin.local;
107 | }
108 | ```
109 |
110 | Then Start the DHCP Service
111 |
112 | ```
113 | # service dhcpd restart
114 | ```
115 | Make the Service Runnable in Multi Level's
116 |
117 | ```
118 | # chkconfig dhcpd on
119 | # chkconfig --list dhcpd
120 | ```
121 |
122 | That's it we have Setup-ed a DHCP Server in RHEL Server.
123 |
124 |
--------------------------------------------------------------------------------
/drop-folder-setup-in-kaltura.md:
--------------------------------------------------------------------------------
1 | Setting up a Drop folder in Kaltura
2 | ====================================
3 |
4 | ######After Creating a Publisher in Kaltura
5 |
6 | * Creat a Transcoding Profile ( I have created in my name as blackyboy transcoding
7 |
8 | * Then Configure DropBox for Publisher by choosing configure in Drop menu
9 |
10 | * And Tick the check box, Content Ingestion - **Drop Folder/s (config)**
11 |
12 | * Then Click on configure and change the settings.
13 |
14 | Note your Publisher ID from user's list ( My Publisher ID 102) and Create using Type : Local
15 |
16 | Drop Folder Name: our Wish ( Here i have used blackyboy)
17 |
18 | Description: As our Wish (This is blackyboy's Drop)
19 |
20 | * Conversion Profile ID: Choose your created name Here from Drop list
21 |
22 | * Drop Folder Storage Path: /opt/kaltura/web/content/blackyboy (or) any folder name
23 |
24 | Check file size every (seconds): 10
25 |
26 | * Choose Manual Deletion if you Don't want to delete the Source.
27 |
28 | Save it ... that't it in KMC side..
29 |
30 | -------------------------------------------------------------------------
31 |
32 | ### Then in Terminal
33 |
34 | * Create a directory named as you have mentioned here (Drop Folder Storage Path: /opt/kaltura/web/content/blackyboy)
35 |
36 | ```
37 | Eg : mkdir /opt/kaltura/web/content/blackyboy
38 | ```
39 |
40 | * Then add a user for FTP
41 |
42 | ```
43 | # useradd -d /opt/kaltura/web/content/blackyboy blackyboy ( home Dir of this blackyboy user is /opt/kaltura/web/content/blackyboy )
44 | ```
45 | (skel file error will be display, we don't need a bash profile so don't mind the error)
46 |
47 | Create a password for the user which we have created for Drop
48 |
49 | ```
50 | # passwd blackyboy
51 |
52 | New passwd: ********
53 | Con Passwd: ********
54 | ```
55 |
56 | * Add the user blackyboy to apache & kaltura Group
57 | Only kaltura Group is Enough
58 |
59 | ```
60 | # usermod -a -G apache,kaltura blackyboy
61 |
62 | ```
63 |
64 | * Navigate to directory
65 |
66 | ```
67 | # cd /opt/kaltura/web/content
68 | ```
69 |
70 | * Change the Ownership of blackyboy
71 |
72 | ```
73 | # chown blackyboy:kaltura blackyboy/
74 |
75 | ```
76 | Note : Here i have setuped for sftp because ftp is not secured one, If we need ftp just 2 more step to be added in above steps, those are
77 |
78 | ```
79 | # usermod -a -G ftp,kaltura blackyboy
80 |
81 | ```
82 |
83 | And at last we need to restart the vsftpd Service
84 |
85 | ```
86 | # /etc/init.d/vsftpd restart
87 | ```
88 |
89 | * Login the sftp from filezilla
90 |
91 | And upload a video file, it will be uploaded to **/opt/kaltura/web/content/blackyboy**
92 |
93 | After Completing upload it wait's for 10 seconds and it will move to KMC Content TAB and Start to convert it Using Transcoding profile Which we have created.
94 |
95 | We can see the Progress of uploading from (Drop folder) Under Content TAB
96 |
97 | That's it ..
98 |
99 |
100 |
--------------------------------------------------------------------------------
/How-to-Backup-the-Remote-Linux-Servers-or-Systems-Using-Rsnapshot.md:
--------------------------------------------------------------------------------
1 | How to Backup the Remote Linux Servers or Systems Using Rsnapshot
2 |
3 |
4 | For this we have to Setup a non password login for Root
5 |
6 | Only the root can perform a full backup cos only root have the administrative Privilage to access all files what ever we need to backup
7 |
8 | 1. Setup a KeyBased Authentication
9 |
10 | ```
11 |
12 | #ssh-keygen
13 |
14 | ```
15 |
16 | Create a New Key and Copy to the remote machine Using Command
17 |
18 | ```
19 |
20 | #ssh-copy-id -i ~/.ssh/id_rsa.pub
21 |
22 | ```
23 |
24 | To remote Host using Command
25 |
26 | ```
27 |
28 | # ssh-copy-id -i ~/.ssh/id_rsa.pub sysadmin@192.168.1.77
29 |
30 | ```
31 |
32 | It will ask for the Password for the machine 192.168.1.77 , give the password to Authenticate
33 |
34 | Install the utility Rsnapshot
35 |
36 | ```
37 |
38 | # apt-get install rsnapshot
39 |
40 |
41 | ```
42 |
43 | Edit the configuration file of the Rsnapshot
44 |
45 | Note : Here in Configuration file Never Use the Spacebar key only u have to use the TAB Key if u need to give any spaces
46 |
47 | ```
48 |
49 | # vim /etc/rsnapshot.conf
50 |
51 | ```
52 |
53 | In the Line no:27
54 |
55 | Change the Directory if u need were to save the Backup by Default
56 |
57 | The Current Backup folder is under
58 |
59 | ```
60 |
61 | #snapshot_root /var/cache/rsnapshot/
62 |
63 |
64 | ```
65 |
66 | If u need to change this default location to some were / as folder named backups
67 |
68 | ```
69 |
70 | #snapshot_root /backups
71 |
72 |
73 | ```
74 |
75 | Then Enable the Line no:57
76 |
77 | ```
78 |
79 | # cmd_ssh /usr/bin/ssh
80 |
81 |
82 | ```
83 |
84 | >Note : If this line Enabled only we can took backup over ssh if not we can't took backup over ssh .
85 |
86 |
87 | If u need to change the time when need to backup
88 | Look at the line no:97,98,99,100
89 |
90 | ```
91 |
92 | # retain hourly 6
93 |
94 | ```
95 |
96 | If You Need to backup the Localhosts directory Such as /home/, /etc/, /usr/local
97 | uncomment line no:230,231,232
98 |
99 | If u Don't want to took backup those Directories Comment the line with #
100 |
101 | Then if we need to took backup from 192.168.1.77 machine to my machine 192.168.1.99 set the command as below the Example in line no:241
102 |
103 |
104 | ```
105 |
106 | backup root@192.168.1.77:/etc/ /backup
107 |
108 |
109 | ```
110 |
111 | This Command will backup the Directory /etc from 192.168.1.77 to /backup in 192.168.1.99
112 |
113 | Save the configuration file using
114 |
115 | ```
116 |
117 | # wq!
118 |
119 |
120 | ```
121 |
122 | Test the rsnapshot configuration
123 |
124 | ```
125 |
126 | # rsnapshot configtest
127 |
128 |
129 | ```
130 |
131 | It want to give u back a result as syntax ok
132 |
133 | if so the test was sucess
134 |
135 | To know the location of rsnapshot where is use command
136 |
137 | ```
138 |
139 | # whereis rsnapshot
140 |
141 | ```
142 |
143 | If we need to backup the remote system 192.168.1.77 by mean time
144 |
145 | Use command
146 |
147 | ```
148 |
149 | # /usr/bin/rsnapshot/hourly
150 |
151 |
152 | ```
153 |
154 | For Automate backup using cronjob, Setup a Cronjob for rsnapshot
155 |
156 |
157 | This will create a cron job for current user
158 |
159 |
160 | ```
161 |
162 | #crontab -e
163 |
164 | ```
165 |
166 |
167 | In Cron job we need to define the entry by how it want to backup by hourly or by daily
168 |
169 |
170 | ```
171 |
172 | 0 5 * * * /usr/bin/rsnapshot hourly
173 |
174 |
175 | ```
176 |
177 | this will backup hourly
178 |
179 |
180 |
--------------------------------------------------------------------------------
/Linux-modprobe-Command-Examples-to-View,-Install,-Remove-Modules.md:
--------------------------------------------------------------------------------
1 | Linux modprobe Command Examples to View, Install, Remove Modules
2 |
3 | modprobe utility is used to add loadable modules to the Linux kernel. You can also view and remove modules using modprobe command.
4 |
5 | Linux maintains /lib/modules/$(uname-r) directory for modules and its configuration files (except /etc/modprobe.conf and /etc/modprobe.d).
6 |
7 | In Linux kernel 2.6, the .ko modules are used instead of .o files since that has additional information that the kernel uses to load the modules. The example in this article are done with using modprobe on Ubuntu.
8 |
9 | 1. List Available Kernel Modules
10 |
11 | modprobe -l will display all available modules as shown below.
12 |
13 |
14 | ```
15 |
16 | $ modprobe -l | less
17 |
18 | ```
19 |
20 | The Output will be like this
21 |
22 | ```
23 |
24 | kernel/drivers/ata/pata_artop.ko
25 | kernel/drivers/ata/pata_atiixp.ko
26 | kernel/drivers/ata/pata_atp867x.ko
27 | kernel/drivers/ata/pata_cmd64x.ko
28 | kernel/drivers/ata/pata_cs5520.ko
29 | kernel/drivers/ata/pata_cs5530.ko
30 | kernel/drivers/ata/pata_cs5536.ko
31 | kernel/drivers/ata/pata_cypress.ko
32 | kernel/drivers/ata/pata_efar.ko
33 |
34 | ```
35 |
36 | 2. List Currently Loaded Modules
37 |
38 | While the above modprobe command shows all available modules, lsmod command will display all modules that are currently loaded in the Linux kernel.
39 |
40 |
41 | ```
42 |
43 | $ lsmod | less
44 |
45 | ```
46 |
47 | The Output will be like this
48 |
49 | ```
50 |
51 | Module Size Used by
52 | nls_utf8 12557 1
53 | udf 94317 1
54 | crc_itu_t 12707 1 udf
55 | nf_nat 25891 2 ipt_MASQUERADE,iptable_nat
56 | nf_conntrack_ipv4 19716 3 iptable_nat,nf_nat
57 | nf_defrag_ipv4 12729 1 nf_conntrack_ipv4
58 |
59 | ```
60 |
61 | 3. Install New modules into Linux Kernel
62 |
63 | In order to insert a new module into the kernel, execute the modprobe command with the module name.
64 |
65 | Following example loads vmhgfs module to Linux kernel on Ubuntu.
66 |
67 | ```
68 |
69 | $ sudo modprobe vmhgfs
70 |
71 | ```
72 |
73 | Once a module is loaded, verify it using lsmod command as shown below.
74 |
75 | ```
76 |
77 | $ lsmod | grep vmhgfs
78 | vmhgfs 50772 0
79 |
80 | ```
81 |
82 | The module files are with .ko extension. If you like to know the full file location of a specific Linux kernel module, use modprobe command and do a grep of the module name as shown below.
83 |
84 |
85 | ```
86 |
87 | $ modprobe | grep vmhgfs
88 | misc/vmhgfs.ko
89 |
90 | $ cd /lib/modules/2.6.31-14-generic/misc
91 |
92 | $ ls vmhgfs*
93 | vmhgfs.ko
94 |
95 | ```
96 |
97 | > Note: You can also use insmod for installing new modules into the Linux kernel.
98 |
99 |
100 |
101 | 4. Load New Modules with the Different Name to Avoid Conflicts
102 |
103 | Consider, in some cases you are supposed to load a new module but with the same module name another module got already loaded for different purposes.
104 |
105 | If for some strange reasons, the module name you are trying to load into the kernel is getting used (with the same name) by a different module, then you can load the new module using a different name.
106 |
107 | To load a module with a different name, use the modprobe option -o as shown below.
108 |
109 | ```
110 |
111 | $ sudo modprobe vmhgfs -o vm_hgfs
112 |
113 | $ lsmod | grep vm_hgfs
114 | vm_hgfs 50772 0
115 |
116 | ```
117 |
118 | 5. Remove the Currently Loaded Module
119 |
120 | If you’ve loaded a module to Linux kernel for some testing purpose, you might want to unload (remove) it from the kernel.
121 |
122 | Use modprobe -r option to unload a module from the kernel as shown below.
123 |
124 | ```
125 |
126 | modprobe -r vmhgfs
127 |
128 | ```
129 |
130 |
131 | ***
132 |
--------------------------------------------------------------------------------
/How_to_Install_web_analytics_Piwik_in_Centos_6.5_Final.md:
--------------------------------------------------------------------------------
1 | #### How to Install web analytics Piwik in Centos 6.5 Final.
2 |
3 | * Piwik is a open source web analytics software that gives you valuable insights of website’s visitors, This works same as the Google Analytics works. It Totally free, No Data Storage limits are there, Its have Community Supports, Its Available in mobile too, We can Access it from any were over the internet, The Dashboard gives us many features Such as Visitors Location, City, Browers Used, IP Address, Operating systems Used, Its a Real time Analytics.
4 |
5 | * We can add this to Some of the CMS such as Drupal, Joomla, Wordpress etc..
6 |
7 | * Download the piwik from Following URL
8 |
9 | Download : http://piwik.org/download/
10 |
11 | * Operating system What Im Using is:
12 |
13 | ```
14 | [root@monitoring ~]# lsb_release -a
15 | Distributor ID: CentOS
16 | Description: CentOS release 6.5 (Final)
17 | Release: 6.5
18 | Codename: Final
19 | ```
20 |
21 | * Login to the Centos Machine which we need to install the analytics
22 |
23 | ```
24 | # ssh root@192.168.1.254
25 | ```
26 |
27 |
28 | * Navigate to the Default Document root of Apache
29 |
30 | ```
31 | # cd /var/www/
32 | ```
33 |
34 | * Create a Directory and navigate to the created Directory
35 |
36 | ```
37 | # mkdir analytics && cd analytics
38 |
39 | # pwd
40 | /var/www/analytics
41 | ```
42 |
43 | * Install the Dependencies Packages if we have not install before for piwik installation
44 | Note: The package Requierd mysqli and mbstring extensions
45 |
46 |
47 | ```
48 | # yum install php-pdo php-mysqli -y
49 |
50 | # yum install php-mbstring -y
51 | ```
52 |
53 | * Download the package from
54 |
55 | ```
56 | # wget http://builds.piwik.org/piwik-latest.zip
57 | ```
58 |
59 | * Unzip and remove the zip file if we Don't need in future
60 |
61 |
62 | ```
63 | # unzip piwik-latest.zip
64 |
65 | # rm -rf piwik-latest.zip
66 | ```
67 |
68 | * Move the Extracted file from piwik to analytics Directory
69 |
70 | ```
71 | # mv piwik/* .
72 | ```
73 |
74 | * Change the Permission for the config Directory to get change the Changes while Done in the Installation time.
75 |
76 |
77 | ```
78 | # chmod a+w config/
79 | ```
80 |
81 | * Then We need to Create the Database and User for the piwik
82 | Login to MySQL Using
83 |
84 |
85 | ```
86 | # mysql -u root -p
87 | ```
88 |
89 | * List the Database Already have
90 |
91 | ```
92 | mysql> show databases;
93 | +--------------------+
94 | | Database |
95 | +--------------------+
96 | | information_schema |
97 | | dbopenfire |
98 | | mysql |
99 | +--------------------+
100 | 3 rows in set (0.03 sec)
101 | ```
102 |
103 | * Create a Database PIWIKI and Create a User PIWIKIUSER and Create a Password for the User and grant Privileges to the user
104 |
105 |
106 | ```
107 | mysql> CREATE DATABASE PIWIKI;
108 | Query OK, 1 row affected (0.00 sec)
109 |
110 | mysql> CREATE USER PIWIKIUSER@localhost;
111 | Query OK, 0 rows affected (0.02 sec)
112 |
113 | mysql> SET PASSWORD FOR PIWIKIUSER@localhost= PASSWORD("admin123$");
114 | Query OK, 0 rows affected (0.00 sec)
115 |
116 | mysql> GRANT ALL PRIVILEGES ON PIWIKI.* TO PIWIKIUSER@localhost IDENTIFIED BY 'admin123$';
117 | Query OK, 0 rows affected (0.02 sec)
118 |
119 | mysql> FLUSH PRIVILEGES;
120 | Query OK, 0 rows affected (0.00 sec)
121 | ```
122 |
123 |
124 | * List the Database and Confirm the Creation
125 |
126 |
127 | ```
128 | mysql> show databases;
129 | +--------------------+
130 | | Database |
131 | +--------------------+
132 | | information_schema |
133 | | PIWIKI |
134 | | dbopenfire |
135 | | mysql |
136 | +--------------------+
137 | 4 rows in set (0.00 sec)
138 | ```
139 |
140 | * Logout using \q
141 |
142 | Then Navigate to the 192.168.1.15/analytics in any web Browser for future Installtion Step by Step.
143 |
--------------------------------------------------------------------------------
/setting-up-amazon-cloudfront-cdn-http-https.md:
--------------------------------------------------------------------------------
1 | ### Setting up Amazon CloudFront CDN Http & Https (Progressive Download)
2 |
3 | * Go to [Amazon Cloud front Console] (https://console.aws.amazon.com/cloudfront/home)
4 |
5 | * Create a new **Distribution** of type **Web**, and Origin Domain Name select your bucket from list
6 |
7 | * Under Viewer Protocol Policy: Choose **HTTP and HTTPS**
8 |
9 | * Select your bucket as the origin ID, and decide wether you want logging or not.
10 |
11 | * Click on **Create Distribution**
12 |
13 | * Copy your CloudFront domain name (example: d2xxxxxxxxxxxx.cloudfront.net) for later use.
14 |
15 |
16 | ### Setting up the Remote Storage Profile in the Admin Console
17 |
18 | First, you must enable the necessary configuration options for your partner:
19 |
20 | * Find your partner in the list of partners, click on the right drop down box and select **Configure**
21 |
22 | * Under **Remote Storage Policy**, set Delivery Policy to “Remote Storage Only”
23 |
24 | * Check the **Delete exported storage** checkbox.
25 |
26 | * Under Enable/Disable Features, make sure that **Remote Storage** is checked.
27 |
28 | * Click **Save**.
29 |
30 | Next we must configure the Remote Storage Profile. In order to do this, we must click on the partner’s left drop-down box (under **Profiles**) and select **Remote Storage**. You should see the **Remote Storage Profiles** page for your publisher (If you haven’t yet set up any remote storage profiles, the list should be empty).
31 |
32 | (Assuming that you have already set up an S3 bucket, and that you have an Access Key ID and a Secret Access Key)
33 |
34 | * Create a new profile by writing your publisher id in the right **Publisher ID** input box and clicking **Create New**.
35 |
36 | * Give a name to your **Remote Storage** (for example "Amazon S3")
37 |
38 | * For **Storage URL** type http://{yourbucketname}.s3.amazonaws.com (replace {yourbucketname} with your bucket name on S3)
39 |
40 | * In **Storage Base Directory**, write “/{yourbucketname}/kaltura” (keep in mind the leading slash, and change yourbucketname to your bucket name)
41 |
42 | * **Storage Username** – enter your amazon aws api Access Key ID
43 |
44 | * **Storage Password** – paste your amazon aws api Secret Access Key
45 |
46 | * Under HTTP Delivery Base URL, type “http://{your amazon cloudfront domain}/kaltura” – replace {your amazon cloudfront domain} with the cloudfront domain you created in the previous section).
47 |
48 | ```
49 | HTTP Delivery Base URL*: http://d2xxxxxxxxxxxx.cloudfront.net/kaltura
50 | HTTPS Delivery Base URL: https://d2xxxxxxxxxxxx.cloudfront.net/kaltura
51 |
52 | ```
53 |
54 | 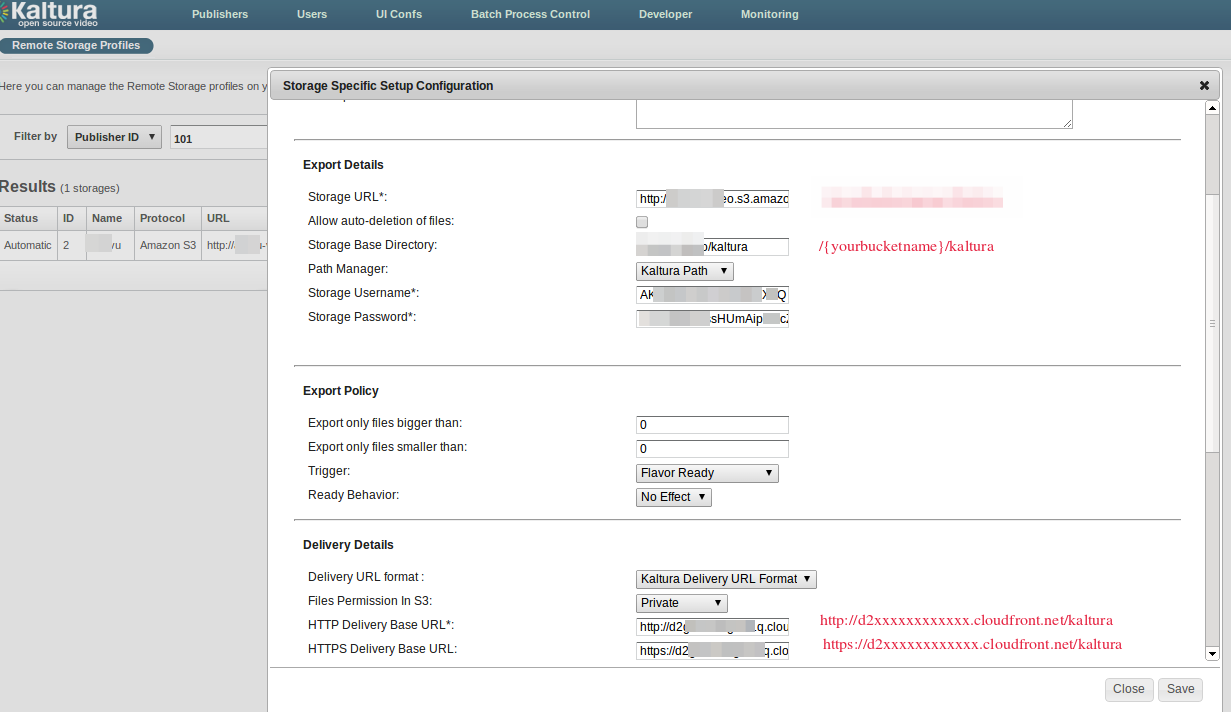
55 |
56 |
57 | * Save the new Remote Storage Profile
58 |
59 | Add a crossdomain.xml file
60 | Create a crossdomain.xml file in the root of your S3 bucket
61 |
62 | ```
63 |
64 |
65 |
66 |
67 |
68 | ```
69 |
70 | Final Step – Enable the remote storage profile
71 |
72 | * Click on the dropdown box next to your new storage profile in the Remote Storage Profiles page in Kaltura Admin Console
73 |
74 | * Select **Export Automatically** and then click **OK**
75 |
76 | * You will receive the confirmation that your storage was autoed :)
77 |
78 | Test your new configuration
79 | You can go ahead and test your new configuration. Upload a new video in the KMC, let it convert, and wait for it to get distributed. After that, try to play the entry and analyse it in your favorite sniffer. You should see that the movies are being downloaded from your cloudfront CDN, look for flv and mp4 files.
80 |
--------------------------------------------------------------------------------
/wowza_live_streaing_RTMP_intergration_with_kaltura_CE5.md:
--------------------------------------------------------------------------------
1 | Step by Step for Intergration and streaming
2 |
3 | ```
4 | # yum update -y
5 |
6 | # yum install java* -y
7 |
8 | # wget http://www.wowza.com/downloads/WowzaMediaServer-3-6-4/WowzaMediaServer-3.6.4.rpm.bin
9 |
10 | # chmod +x WowzaMediaServer-3.6.4.rpm.bin
11 |
12 | # cd /usr/local/WowzaMediaServer/bin/
13 |
14 | # ./startup.sh
15 |
16 | # service WowzaMediaServer status
17 |
18 | # service WowzaMediaServer start
19 |
20 | # mkdir -p /usr/local/WowzaMediaServer/conf/oflaDemo
21 |
22 | # mkdir -p /usr/local/WowzaMediaServer/applications/oflaDemo
23 |
24 | # cp /usr/local/WowzaMediaServer/conf/vod/Application.xml /usr/local/WowzaMediaServer/conf/oflaDemo/Application.xml
25 |
26 | # vim /usr/local/WowzaMediaServer/conf/oflaDemo/Application.xml
27 |
28 | # ln -s /opt/kaltura/web/content /opt/kaltura/web/content/webcam
29 |
30 | # ln -s /opt/kaltura/web/content /usr/local/WowzaMediaServer/content
31 |
32 | # vim /opt/kaltura/app/batch/batches/Provision/Engines/KProvisionEngineAkamai.php
33 | ```
34 | From line 91 to 123 comment using /*$flashLiveStreamInfo upto 123 line */
35 |
36 | just use /* at starting and at end */
37 |
38 | Add these Line's Below 123 line
39 |
40 | ```
41 | // code added by babin
42 | $data->streamID = 'livestream';
43 | $data->backupStreamID = $data->streamID;
44 | $data->streamName = $job->entryId . '_%i@' . $data->streamID;
45 | $data->rtmp = 'rtmp://198.19.76.41:1935/live';
46 | $data->primaryBroadcastingUrl = 'rtmp://198.19.76.41:1935/live';
47 | $data->secondaryBroadcastingUrl = 'rtmp://198.19.76.41:1935/live';
48 | $data->encoderUsername = '';
49 | ```
50 |
51 | Edit the file
52 |
53 | ```
54 | # vim /opt/kaltura/app/alpha/apps/kaltura/modules/extwidget/actions/streamclipperAction.class.php
55 |
56 | ```
57 |
58 | Comment the line 23 using //
59 |
60 |
61 | ```
62 | // $streamer = $entry->getStreamUrl();
63 | ```
64 |
65 | Below this add the line
66 |
67 | ```
68 | $streamer = 'rtmp://198.19.76.41:1935/live';
69 |
70 | ```
71 | Restart the Service
72 |
73 | ```
74 | service WowzaMediaServer restart
75 | ```
76 |
77 | Then Edit the File
78 |
79 | ```
80 | vim /opt/kaltura/app/alpha/config/kConfLocal.php
81 |
82 | ```
83 |
84 | Replace the 18th line with ip address and port number as shown below
85 | Instead of hostname put the ip and port
86 |
87 | ```
88 | "rtmp_url" => "198.19.76.41:1935/oflaDemo",
89 |
90 | ```
91 |
92 | Edit the file
93 |
94 | ```
95 | # vim /opt/kaltura/app/alpha/apps/kaltura/modules/extwidget/actions/playManifestAction.class.php
96 |
97 | ```
98 |
99 | In Line 593 comment using // and paste below as
100 |
101 | ```
102 | $baseUrl = "rtmp://198.19.76.41:1935/oflaDemo";
103 | ```
104 |
105 | Command from 608 to 612 using //
106 |
107 | This all need to commented
108 |
109 | ```
110 | /* @var $flavorAsset flavorAsset */
111 |
112 | // $urlManager->setClipTo($this->clipTo);
113 | // $urlManager->setFileExtension($flavorAsset->getFileExt());
114 | // $urlManager->setProtocol(StorageProfile::PLAY_FORMAT_RTMP);
115 | // $url = $urlManager->getFlavorAssetUrl($flavorAsset);
116 | ```
117 | Then Below this Enter the following content
118 | From 617 to 625
119 |
120 | ```
121 | $key = $flavorAsset->getSyncKey(flavorAsset::FILE_SYNC_FLAVOR_ASSET_SUB_TYPE_ASSET);
122 | $fileSync = kFileSyncUtils::getLocalFileSyncForKey($key);
123 | if(!$fileSync)
124 | continue;
125 |
126 | $urlManager->setClipTo($this->clipTo);
127 | $urlManager->setFileExtension($flavorAsset->getFileExt());
128 | $urlManager->setProtocol(StorageProfile::PLAY_FORMAT_RTMP);
129 | $url = $urlManager->getFileSyncUrl($fileSync);
130 | ```
131 |
132 | Edit the file
133 |
134 | ```
135 | vim /opt/kaltura/web/content/uiconf/kaltura/samplekit/kcw_2.6.4/kcw_samplekit.xml
136 |
137 | ```
138 |
139 | Replace the 25 line with ip as below shown
140 |
141 | ```
142 | rtmp://198.191.76.41:1935/oflaDemo
143 |
144 | ```
145 |
146 |
147 |
--------------------------------------------------------------------------------
/Postfix-mail-Centos-6.4.md:
--------------------------------------------------------------------------------
1 | Here we going to see about basic SMTP Configuration
2 | Here I'm using Postfix to install and configure to send mail from Centos server to any other Server's
3 |
4 |
5 | Distribution I'm using is Centos 6.4
6 |
7 | ```
8 | [root@Centosserver ~]# cat /etc/redhat-release
9 | CentOS release 6.4 (Final)
10 | ```
11 | Scenario
12 |
13 | ```
14 | Pacakge ---> postfix
15 | script ---> /etc/init.d/postfix
16 | Config File ---> /etc/postfix/main.cf
17 | Config File ---> /etc/postfix/master.cf
18 | Port No ---> 25
19 | Queue Directory ---> /var/spool/postfix
20 | ```
21 |
22 | Step 1:
23 |
24 | Install the postfix Pacakge
25 |
26 | ```
27 | # yum install postfix
28 | ```
29 |
30 | Step 2:
31 |
32 | Edit the Configuration file of Postfix using vim editor
33 |
34 | ```
35 | # vim /etc/postfix/main.cf
36 |
37 | ```
38 | Uncomment and Replace the Hostname in Line 75
39 |
40 | ```
41 | myhostname = Centosserver.example.com
42 | ```
43 |
44 | In Line 98 Uncomment and Don't need to do changes there.
45 |
46 | ```
47 | myorigin = $myhostname
48 | ```
49 |
50 | In Line 113, Uncomment.
51 | UnCommenting this line will make it to receive mail from all networks
52 |
53 | ```
54 | inet_interfaces = all
55 | ```
56 |
57 | In Line 116 Comment with #
58 | Here we Commenting With # Because we need to Receive mails from all hosts, If this not uncommented, Only
59 | localhost mails can recive
60 |
61 | ```
62 | #inet_interfaces = localhost
63 | ```
64 |
65 | In Line 264, Uncomment and add the Network Range were Our Server Located
66 |
67 | ```
68 | mynetworks = 168.100.189.0/28, 127.0.0.0/8, 192.168.0.0/24
69 |
70 | ```
71 | Here i Have added 192.168.0.0/24 for tutorial Puropose
72 |
73 | In Line 426, uncomment
74 |
75 | ```
76 | mail_spool_directory = /var/spool/mail
77 |
78 | ```
79 | This is the mail Qeue Directory
80 |
81 |
82 | Check the Configuration Once more:
83 |
84 | ```
85 | myhostname = Centosserver.example.com
86 | myorigin = $myhostname
87 | inet_interfaces = all
88 | #inet_interfaces = localhost
89 | mynetworks = 168.100.189.0/28, 127.0.0.0/8, 192.168.0.0/24
90 | mail_spool_directory = /var/spool/mail
91 | ```
92 |
93 | Step 3:
94 |
95 | Restart the Postfix Server
96 |
97 | ```
98 | # /etc/init.d/postfix restart
99 | ```
100 |
101 | step 5:
102 |
103 | Add a user to check wether mail is working
104 |
105 | ```
106 | [root@Centosserver ~]# useradd user1
107 | [root@Centosserver ~]# passwd user1
108 | ```
109 |
110 | step 6:
111 |
112 | Send a mail from Root user to user1
113 |
114 | To send a mail
115 | Just type as mail and then address were we need to send
116 | Type the Subject and Content and for sending the mail just put a .(dot) and press enter, mail will be send
117 |
118 | ```
119 | eg :
120 |
121 | [root@Centosserver ~]# mail user1@Centosserver.example.com
122 | Subject: Linux Mental mail setup
123 | Hi this is a test mail from Centosserver root user to user1
124 | .
125 | EOT
126 | ```
127 |
128 | Step 7:
129 |
130 | ```
131 | su - user1
132 |
133 | ```
134 | To check mail just type as mail, if so You will get like this below
135 |
136 | Output:
137 |
138 | ```
139 | [root@Centosserver ~]# su - user1
140 | [user1@Centosserver ~]$ mail
141 | Heirloom Mail version 12.4 7/29/08. Type ? for help.
142 | "/var/spool/mail/user1": 1 message 1 new
143 | >N 1 root Thu Dec 5 18:27 18/687 "Linux Mental mail setup"
144 | &
145 | ```
146 |
147 | Choose 1 and press enter to read the mail
148 |
149 | ```
150 | output:
151 | From root@Centosserver.example.com Thu Dec 5 18:27:50 2013
152 | Return-Path:
153 | X-Original-To: user1@Centosserver.example.com
154 | Delivered-To: user1@Centosserver.example.com
155 | Date: Thu, 05 Dec 2013 18:27:50 +0530
156 | To: user1@Centosserver.example.com
157 | Subject: Linux Mental mail setup
158 | User-Agent: Heirloom mailx 12.4 7/29/08
159 | Content-Type: text/plain; charset=us-ascii
160 | From: root@Centosserver.example.com (root)
161 | Status: R
162 |
163 | Hi this is a test mail from linux mental root user to user1
164 |
165 | &
166 | ```
167 |
168 | That's it...
169 |
170 |
--------------------------------------------------------------------------------
/5-Steps-to-Setup-User-and-Group-Disk-Quota-on-UNIX---Linux.md:
--------------------------------------------------------------------------------
1 |
2 |
3 | On Linux, you can setup disk quota using one of the following methods:
4 |
5 |
6 | 1. File system base disk quota allocation
7 | 2. User or group based disk quota allocation
8 |
9 |
10 | On the user or group based quota, following are three important factors to consider:
11 |
12 |
13 | 1. Hard limit – For example, if you specify 2GB as hard limit, user will not be able to create new files after 2GB
14 | 2. Soft limit – For example, if you specify 1GB as soft limit, user will get a warning message “disk quota exceeded”, once they reach 1GB limit. But, they’ll still be able to create new files until they reach the hard limit
15 | 3. Grace Period – For example, if you specify 10 days as a grace period, after user reach their hard limit, they would be allowed additional 10 days to create new files. In that time period, they should try to get back to the quota limit.
16 |
17 |
18 | 1. Enable quota check on filesystem
19 |
20 | First, you should specify which filesystem are allowed for quota check.
21 |
22 | Modify the /etc/fstab, and add the keyword usrquota and grpquota to the corresponding filesystem that you would like to monitor.
23 |
24 | The following example indicates that both user and group quota check is enabled on /home filesystem
25 |
26 | ```
27 |
28 | # cat /etc/fstab
29 | LABEL=/home /home ext2 defaults,usrquota,grpquota 1 2
30 |
31 | ```
32 |
33 | Reboot the server after the above change.
34 |
35 | ***
36 |
37 | 2. Initial quota check on Linux filesystem using quotacheck
38 |
39 | Once you’ve enabled disk quota check on the filesystem, collect all quota information initially as shown below.
40 |
41 | ```
42 |
43 | # quotacheck -avug
44 | quotacheck: Scanning /dev/sda3 [/home] done
45 | quotacheck: Checked 5182 directories and 31566 files
46 | quotacheck: Old file not found.
47 | quotacheck: Old file not found.
48 |
49 | ```
50 |
51 | In the above command:
52 |
53 | a: Check all quota-enabled filesystem
54 | v: Verbose mode
55 | u: Check for user disk quota
56 | g: Check for group disk quota
57 |
58 | ***
59 |
60 |
61 | 3. Assign disk quota to a user using edquota command
62 |
63 | Use the edquota command as shown below, to edit the quota information for a specific user.
64 |
65 | For example, to change the disk quota for user ‘ramesh’, use edquota command, which will open the soft, hard limit values in an editor as shown below.
66 |
67 | ```
68 |
69 | # edquota babinlonston
70 |
71 | Disk quotas for user ramesh (uid 500):
72 | Filesystem blocks soft hard inodes soft hard
73 | /dev/sda3 1419352 0 0 1686 0 0
74 |
75 |
76 | ```
77 |
78 | Once the edquota command opens the quota settings for the specific user in a editor, you can set the following limits:
79 |
80 | soft and hard limit for disk quota size for the particular user.
81 | soft and hard limit for the total number of inodes that are allowed for the particular user.
82 |
83 |
84 | ***
85 |
86 |
87 | 4. Report the disk quota usage for users and group using repquota
88 |
89 | Use the repquota command as shown below to report the disk quota usage for the users and groups.
90 |
91 |
92 | ```
93 |
94 |
95 | # repquota /home
96 |
97 | ```
98 |
99 |
100 | Report for user quotas on device /dev/sda3
101 | Block grace time: 7days; Inode grace time: 7days
102 |
103 | ```
104 | Block limits File limits
105 | User used soft hard grace used soft hard grace
106 | ----------------------------------------------------------------------
107 | root -- 566488 0 0 5401 0 0
108 | nobody -- 1448 0 0 30 0 0
109 | ramesh -- 1419352 0 0 1686 0 0
110 | john -- 26604 0 0 172 0 0
111 |
112 | ```
113 |
114 |
115 | ***
116 |
117 | 5. Add quotacheck to daily cron job
118 |
119 | Add the quotacheck to the daily cron job. Create a quotacheck file as shown below under the /etc/cron.daily directory, that will run the quotacheck command everyday. This will send the output of the quotacheck command to root email address.
120 |
121 |
122 | ```
123 |
124 |
125 | # cat /etc/cron.daily/quotacheck
126 | quotacheck -avug
127 |
128 | ```
129 |
--------------------------------------------------------------------------------
/6-Examples-to-Backup-Linux-Using-dd-Command-Including-Disk-to-Disk.md:
--------------------------------------------------------------------------------
1 |
2 |
3 | Data loss will be costly. At the very least, critical data loss will have a financial impact on companies of all sizes. In some cases, it can cost your job. I’ve seen cases where sysadmins learned this in the hard way.
4 |
5 | There are several ways to backup a Linux system, including rsync and rsnapshot that we discussed a while back.
6 |
7 | This article provides 6 practical examples on using dd command to backup the Linux system. dd is a powerful UNIX utility, which is used by the Linux kernel makefiles to make boot images. It can also be used to copy data. Only superuser can execute dd command.
8 |
9 | Example 1. Backup Entire Harddisk
10 |
11 | To backup an entire copy of a hard disk to another hard disk connected to the same system, execute the dd command as shown below. In this dd command example, the UNIX device name of the source hard disk is /dev/hda, and device name of the target hard disk is /dev/hdb.
12 |
13 | ```
14 |
15 | # dd if=/dev/sda of=/dev/sdb
16 |
17 | ```
18 |
19 | “if” represents inputfile, and “of” represents output file. So the exact copy of /dev/sda will be available in /dev/sdb.
20 |
21 | If there are any errors, the above command will fail. If you give the parameter “conv=noerror” then it will continue to copy if there are read errors.
22 |
23 | Input file and output file should be mentioned very carefully, if you mention source device in the target and vice versa, you might loss all your data.
24 |
25 |
26 | In the copy of hard drive to hard drive using dd command given below, sync option allows you to copy everything using synchronized I/O.
27 |
28 |
29 | ```
30 |
31 | # dd if=/dev/sda of=/dev/sdb conv=noerror,sync
32 |
33 | ```
34 |
35 | Example 2. Create an Image of a Hard Disk
36 |
37 |
38 | Instead of taking a backup of the hard disk, you can create an image file of the hard disk and save it in other storage devices.There are many advantages to backing up your data to a disk image, one being the ease of use. This method is typically faster than other types of backups, enabling you to quickly restore data following an unexpected catastrophe.
39 |
40 |
41 | ```
42 |
43 | # dd if=/dev/hda of=~/hdadisk.img
44 |
45 | ```
46 |
47 | The above creates the image of a harddisk /dev/hda. Refer our earlier article How to view initrd.image for more details.
48 |
49 |
50 | Example 3. Restore using Hard Disk Image
51 |
52 |
53 | To restore a hard disk with the image file of an another hard disk, use the following dd command example.
54 |
55 |
56 | ```
57 |
58 | # dd if=hdadisk.img of=/dev/hdb
59 |
60 |
61 | ```
62 |
63 | The image file hdadisk.img file, is the image of a /dev/hda, so the above command will restore the image of /dev/hda to /dev/hdb.
64 |
65 |
66 | Example 5. Backup a Partition
67 |
68 |
69 | You can use the device name of a partition in the input file, and in the output either you can specify your target path or image file as shown in the dd command example below.
70 |
71 | ```
72 |
73 | # dd if=/dev/hda1 of=~/partition1.img
74 |
75 | ```
76 |
77 | Example 6. CDROM Backup
78 |
79 |
80 |
81 | dd command allows you to create an iso file from a source file. So we can insert the CD and enter dd command to create an iso file of a CD content.
82 |
83 |
84 | ```
85 |
86 | # dd if=/dev/cdrom of=tgsservice.iso bs=2048
87 |
88 | ```
89 |
90 |
91 | dd command reads one block of input and process it and writes it into an output file. You can specify the block size for input and output file. In the above dd command example, the parameter “bs” specifies the block size for the both the input and output file. So dd uses 2048bytes as a block size in the above command.
92 |
93 |
94 | Note: If CD is auto mounted, before creating an iso image using dd command, its always good if you unmount the CD device to avoid any unnecessary access to the CD ROM.
95 |
96 |
97 |
98 |
99 | To backup my Linux partitions, I combine dd and gzip, e.g. to back up my Ubuntu root partition which is on /dev/sda5:
100 |
101 | ```
102 |
103 | dd if=/dev/sda5 bs=4096 | gzip -c > sda5-root.img.gz
104 |
105 |
106 | ```
107 |
108 | Performance of the compression can be improved by creating & deleting a file from /dev/zero before doing the backup, e.g.
109 |
110 | ```
111 |
112 | dd if=/dev/zero of=zero.bin bs=4096
113 |
114 |
115 | ```
116 |
117 |
118 |
119 |
--------------------------------------------------------------------------------
/Adding-Centos-6.4-Samba-Server-to-Nagois-Monitoring-Server.md:
--------------------------------------------------------------------------------
1 | Adding Centos 6.4 Samba Server to Nagois Monitoring Server
2 |
3 | Install NRPE on Clients (Nagios Clients)
4 |
5 |
6 | ```
7 |
8 | #rpm -Uvh http://dl.fedoraproject.org/pub/epel/6/x86_64/epel-release-6-8.noarch.rpm
9 |
10 | #rpm -Uvh http://rpms.famillecollet.com/enterprise/remi-release-6.rpm
11 |
12 | #yum -y install nagios nagios-plugins-all nrpe
13 |
14 | #chkconfig nrpe on
15 |
16 |
17 | ```
18 |
19 |
20 |
21 | -------------------------------------------------------------------------
22 |
23 |
24 |
25 | This next step is where you get to specify any manual commands that Monitoring server
26 | can send via NRPE to these client hosts.
27 |
28 | Make sure to change allowed_hosts to your own values.
29 |
30 | ```
31 |
32 | #vim /etc/nagios/nrpe.cfg
33 |
34 | ```
35 |
36 |
37 |
38 | -------------------------------------------------------------------------
39 |
40 |
41 |
42 | ```
43 |
44 | log_facility=daemon
45 | pid_file=/var/run/nrpe/nrpe.pid
46 | server_port=5666
47 | nrpe_user=nrpe
48 | nrpe_group=nrpe
49 | allowed_hosts=198.211.117.251
50 | dont_blame_nrpe=1
51 | debug=0
52 | command_timeout=60
53 | connection_timeout=300
54 | include_dir=/etc/nrpe.d/
55 | command[check_users]=/usr/lib64/nagios/plugins/check_users -w 5 -c 10
56 | command[check_load]=/usr/lib64/nagios/plugins/check_load -w 15,10,5 -c 30,25,20
57 | command[check_disk]=/usr/lib64/nagios/plugins/check_disk -w 20% -c 10% -p /dev/sda1,sda2,sda3
58 | command[check_zombie_procs]=/usr/lib64/nagios/plugins/check_procs -w 5 -c 10 -s Z
59 | command[check_total_procs]=/usr/lib64/nagios/plugins/check_procs -w 150 -c 200
60 | command[check_procs]=/usr/lib64/nagios/plugins/check_procs -w $ARG1$ -c $ARG2$ -s $ARG3$
61 |
62 |
63 | ```
64 |
65 |
66 |
67 | -------------------------------------------------------------------------
68 |
69 | We should also setup firewall rules to allow connections from our
70 | Monitoring server to those clients and drop everyone else:
71 |
72 |
73 | ```
74 |
75 | iptables -N NRPE
76 | iptables -I INPUT -s 0/0 -p tcp --dport 5666 -j NRPE
77 | iptables -I NRPE -s 198.211.117.251 -j ACCEPT
78 | iptables -A NRPE -s 0/0 -j DROP
79 |
80 | ```
81 |
82 | Save the Iptables Entires
83 |
84 |
85 | ```
86 |
87 | # /etc/init.d/iptables save
88 |
89 | ```
90 |
91 |
92 | Start the nrpe Service as Below :
93 |
94 | ```
95 |
96 | # service nrpe start
97 |
98 | ```
99 |
100 |
101 | Add Server Configuration on monitoring Server
102 |
103 | ```
104 |
105 | #sudo vim /etc/nagios3/conf.d/sambafileserver_nagios2.cfg
106 |
107 |
108 | ```
109 |
110 | -------------------------------------------------------------------------
111 |
112 | Add the following lines
113 |
114 |
115 | ```
116 |
117 | define host {
118 | use generic-host
119 | host_name sambafileserver
120 | alias sambafileserver
121 | address 192.168.1.15
122 | }
123 |
124 | define service{
125 | use generic-service ; Name of service template to use
126 | host_name sambafileserver
127 | service_description HTTP-Server
128 | check_command check_http
129 | }
130 |
131 | define service{
132 | use generic-service ; Name of service template to use
133 | host_name sambafileserver
134 | service_description Disk Space
135 | check_command check_all_disks!20%!10%
136 | }
137 |
138 | define service{
139 | use generic-service ; Name of service template to use
140 | host_name sambafileserver
141 | service_description Current Users
142 | check_command check_users!20!50
143 | }
144 |
145 | define service{
146 | use generic-service ; Name of service template to use
147 | host_name sambafileserver
148 | service_description Total Processes
149 | check_command check_procs!250!400
150 | }
151 |
152 | define service {
153 | use generic-service ; Name of service template to use
154 | host_name sambafileserver
155 | service_description PING
156 | check_command check_ping!100.0,20%!500.0,60%
157 | }
158 |
159 | define service {
160 | use generic-service ; Name of service template to use
161 | host_name sambafileserver
162 | service_description SSH
163 | check_command check_ssh
164 | notifications_enabled 0
165 | }
166 | define service{
167 | use generic-service ; Name of service template to use
168 | host_name sambafileserver
169 | service_description Current Load
170 | check_command check_load!5.0!4.0!3.0!10.0!6.0!4.0
171 | }
172 |
173 |
174 | ```
175 |
176 |
177 |
178 | -------------------------------------------------------------------
179 |
180 |
181 |
182 | Finally, after you are done adding all the client configurations,
183 | you should set folder permissions correctly and restart Nagios on your Monitoring Server:
184 |
185 |
186 |
187 | ```
188 |
189 | # chown -R nagios. /etc/nagios
190 |
191 | # service nagios restart
192 |
193 |
194 | ```
195 |
196 |
197 |
198 | -------------------------------------------------------------------
199 |
200 |
201 |
202 | Open the browser and Entire Your Nagios Servers Ip/nagois3 version (http://192.168.1.20/nagios3)
203 | And entire Your User as nagiosadmin
204 | Password as ur Given ..
205 |
206 |
207 | -------------------------------------------------------------------
208 |
209 |
210 |
--------------------------------------------------------------------------------
/Rpm Commands.md:
--------------------------------------------------------------------------------
1 | RPM = Red Hat Package manager or RPM Package Manager
2 | Rpm is a Installation package which Used to get install in Redhat distributions
3 | Mostly RPM were used in rhel systems, RPM can be build with sign verified, And same used in fedora, centos operating systems too.
4 |
5 | Modes Of RPM Commands
6 |
7 | ```
8 | Install = i #i Used to Install the package
9 | Erase = e #e used to remove the package
10 | Upgrade = U #U Used to Upgrade the Package
11 | Verify = v #v Used to verify the pcakge
12 | Query = q #q Used to Query about package
13 | Hash = h #h Print 50 hash marks while package archive is unpacked
14 |
15 | ```
16 | 1. To Query all packages, Means Searching the Installed RPM Packages
17 |
18 | ```
19 | [root@server ~]# rpm -q -a
20 |
21 |
22 | OR
23 |
24 | [root@server ~]# rpm -qa
25 | ```
26 |
27 | 2. To Get the Installed Specified Package
28 |
29 | ```
30 | [root@server ~]# rpm -qa httpd
31 | httpd-2.2.15-15.el6.x86_64
32 |
33 | OR
34 |
35 | [root@server ~]# rpm -q -a httpd
36 | httpd-2.2.15-15.el6.x86_64
37 | ```
38 |
39 | 3. To Show the installed package Information in RPM
40 |
41 | ```
42 | [root@server ~]# rpm -q -i httpd
43 |
44 |
45 | Output:
46 |
47 | Name : httpd Relocations: (not relocatable)
48 | Version : 2.2.15 Vendor: Red Hat, Inc.
49 | Release : 15.el6 Build Date: Thursday 06 October 2011 08:37:25 PM IST
50 | Install Date: Monday 18 November 2013 01:47:26 AM IST Build Host: x86-005.build.bos.redhat.com
51 | Group : System Environment/Daemons Source RPM: httpd-2.2.15-15.el6.src.rpm
52 | Size : 3061330 License: ASL 2.0
53 | Signature : RSA/8, Tuesday 08 November 2011 09:20:50 PM IST, Key ID 199e2f91fd431d51
54 | Packager : Red Hat, Inc.
55 | URL : http://httpd.apache.org/
56 | Summary : Apache HTTP Server
57 | Description :
58 | The Apache HTTP Server is a powerful, efficient, and extensible
59 | web server.
60 | ```
61 |
62 | 4. To Show were ever the files Created While specific package get installed.
63 |
64 | ```
65 | [root@server ~]# rpm -q -l httpd
66 |
67 | Output:
68 | [root@server ~]# rpm -q -l httpd
69 | /etc/httpd
70 | /etc/httpd/conf
71 | /etc/httpd/conf.d
72 | /etc/httpd/conf.d/README
73 | /etc/httpd/conf.d/welcome.conf
74 | /etc/httpd/conf/httpd.conf
75 | /etc/httpd/conf/magic
76 | ```
77 |
78 | 5. To Show the Only Configuration files
79 |
80 | ```
81 | [root@server ~]# rpm -q -c httpd
82 |
83 | OR
84 |
85 | [root@server ~]# rpm -q --configfiles httpd
86 |
87 | Output:
88 | [root@server ~]# rpm -q -c httpd
89 | /etc/httpd/conf.d/welcome.conf
90 | /etc/httpd/conf/httpd.conf
91 | /etc/httpd/conf/magic
92 | /etc/logrotate.d/httpd
93 | /etc/sysconfig/httpd
94 | /var/www/error/HTTP_BAD_GATEWAY.html.var
95 | ```
96 |
97 | 6. To Query the Installed Docs releated to a Specific Pacakge
98 |
99 | ```
100 | [root@server ~]# rpm -qd httpd
101 |
102 | OR
103 |
104 | [root@server ~]# rpm -q --docfiles httpd
105 |
106 | Output:
107 | [root@server ~]# rpm -qd httpd
108 | /usr/share/doc/httpd-2.2.15/ABOUT_APACHE
109 | /usr/share/doc/httpd-2.2.15/CHANGES
110 | /usr/share/doc/httpd-2.2.15/LICENSE
111 | /usr/share/doc/httpd-2.2.15/NOTICE
112 | /usr/share/doc/httpd-2.2.15/README
113 | /usr/share/doc/httpd-2.2.15/VERSIONING
114 | ```
115 |
116 | 7. To see the actions of Installation of Particular package.
117 |
118 | ```
119 | [root@server ~]# rpm -q --scripts httpd
120 |
121 | Output:
122 | [root@server ~]# rpm -q --scripts httpd
123 | preinstall scriptlet (using /bin/sh):
124 | # Add the "apache" user
125 | getent group apache >/dev/null || groupadd -g 48 -r apache
126 | getent passwd apache >/dev/null || \
127 | useradd -r -u 48 -g apache -s /sbin/nologin \
128 | -d /var/www -c "Apache" apache
129 | exit 0
130 | ```
131 | 8. To Check RPM Signature for a Package
132 |
133 | [root@server ~]# rpm --checksig epel-release-6-8.noarch.rpm
134 |
135 | Output:
136 | [root@server ~]# rpm --checksig epel-release-6-8.noarch.rpm
137 | epel-release-6-8.noarch.rpm: RSA sha1 ((MD5) PGP) md5 NOT OK (MISSING KEYS: (MD5) PGP#0608b895)
138 | ```
139 |
140 | 9. To Install a Pacakge
141 |
142 | ```
143 | [root@server ~]# rpm -ivh epel-release-6-8.noarch.rpm
144 |
145 | Output:
146 | [root@server ~]# rpm -ivh epel-release-6-8.noarch.rpm
147 | warning: epel-release-6-8.noarch.rpm: Header V3 RSA/SHA256 Signature, key ID 0608b895: NOKEY
148 | Preparing... ########################################### [100%]
149 | package epel-release-6-8.noarch is already installed
150 | ```
151 |
152 | 10. To Display the recently Installed Pacakges
153 |
154 | ```
155 | [root@server ~]# rpm -qa --last | less
156 |
157 | Ouput:
158 | epel-release-6-8.noarch Thursday 05 December 2013 08:11:11 AM UTC
159 | mysql-server-5.1.71-1.el6.x86_64 Wednesday 04 December 2013 06:49:16 AM UTC
160 | perl-DBI-1.609-4.el6.x86_64 Wednesday 04 December 2013 06:49:15 AM UTC
161 | perl-DBD-MySQL-4.013-3.el6.x86_64 Wednesday 04 December 2013 06:49:15 AM UTC
162 | zlib-1.2.3-29.el6.i686 Wednesday 04 December 2013 06:49:06 AM UTC
163 | ncurses-libs-5.7-3.20090208.el6.i686 Wednesday 04 December 2013 06:49:06 AM UTC
164 | bzip2-libs-1.0.5-7.el6_0.i686 Wednesday 04 December 2013 06:49:06 AM UTC
165 | ```
166 |
167 | 11. To Upgrade a Package Use command
168 |
169 | ```
170 | [root@server ~]# rpm -Uvh epel-release-6-8.noarch.rpm
171 | ```
172 |
173 | 12. Query a File and get the info about file belongs to Which package
174 |
175 | ```
176 | [root@server ~]# rpm -qf /usr/bin/rpmdb
177 |
178 | Output:
179 | [root@server ~]# rpm -qf /usr/bin/rpmdb
180 | rpm-4.8.0-32.el6.x86_64
181 | ```
182 |
183 | 13. To List all Files Inside a RPM Package
184 |
185 | ```
186 | #[root@server ~]# rpm -qlp epel-release-6-8.noarch.rpm
187 |
188 | ```
189 | Ouput:
190 | ```
191 | [root@server ~]# rpm -qlp epel-release-6-8.noarch.rpm
192 | warning: epel-release-6-8.noarch.rpm: Header V3 RSA/SHA256 Signature, key ID 0608b895: NOKEY
193 | /etc/pki/rpm-gpg/RPM-GPG-KEY-EPEL-6
194 | /etc/rpm/macros.ghc-srpm
195 | /etc/yum.repos.d/epel-testing.repo
196 | /etc/yum.repos.d/epel.repo
197 | /usr/share/doc/epel-release-6
198 | /usr/share/doc/epel-release-6/GPL
199 | ```
200 |
201 | 14. Importing RPM GPG Key to Verify the Packages
202 |
203 | ```
204 | [root@server ~]# rpm --import /etc/pki/rpm-gpg/RPM-GPG-KEY-CentOS-6
205 |
206 | ```
207 |
208 | 15. To List all Imported keys Use command
209 |
210 | ```
211 | [root@server ~]# rpm -qa gpg-pubkey*
212 |
213 | Output:
214 | [root@server ~]# rpm -qa gpg-pubkey*
215 | gpg-pubkey-c105b9de-4e0fd3a3
216 | ```
217 |
218 | 16. To Remove a Package
219 |
220 | ```
221 | [root@server ~]# rpm -ev epel-release-6-8.noarch
222 |
223 | ```
224 |
225 | 17. To verify all pacakges
226 |
227 | ```
228 | [root@server lib]# rpm -Va
229 |
230 | Output:
231 | [root@server ~]# rpm -Va
232 | S.5....T. c /etc/httpd/conf/httpd.conf
233 | ..5....T. c /usr/lib64/security/classpath.security
234 | S.5....T. c /etc/postfix/main.cf
235 | ```
236 |
237 | 18. To know More About RPM commands
238 |
239 | ```
240 | man rpm
241 | ```
242 |
--------------------------------------------------------------------------------
/Troubleshooting-Using-dmesg-Command-in-Unix-and-Linux.md:
--------------------------------------------------------------------------------
1 | Troubleshooting Using dmesg Command in Unix and Linux
2 |
3 |
4 |
5 |
6 | During system bootup process, kernel gets loaded into the memory and it controls the entire system.
7 |
8 | When the system boots up, it prints number of messages on the screen that displays information about the hardware devices that the kernel detects during boot process.
9 |
10 | These messages are available in kernel ring buffer and whenever the new message comes the old message gets overwritten. You could see all those messages after the system bootup using the dmesg command.
11 |
12 |
13 | 1. View the Boot Messages
14 |
15 | By executing the dmesg command, you can view the hardwares that are detected during bootup process and it’s configuration details. There are lot of useful information displayed in dmesg. Just browse through them line by line and try to understand what it means. Once you have an idea of the kind of messages it displays, you might find it helpful for troubleshooting, when you encounter an issue.
16 |
17 |
18 | ```
19 |
20 | # dmesg | more
21 |
22 |
23 | ```
24 |
25 |
26 | The Out put Will be like this
27 |
28 |
29 | ```
30 |
31 | [ 0.000000] KERNEL supported cpus:
32 | [ 0.000000] Intel GenuineIntel
33 | [ 0.000000] AMD AuthenticAMD
34 | [ 0.000000] Centaur CentaurHauls
35 | [ 0.000000] BIOS-provided physical RAM map:
36 | [ 0.000000] BIOS-e820: 0000000000000000 - 000000000009d000 (usable)
37 | [ 0.000000] BIOS-e820: 000000000009d000 - 00000000000a0000 (reserved)
38 | [ 0.000000] BIOS-e820: 00000000000ce000 - 00000000000d4000 (reserved)
39 | [ 0.000000] BIOS-e820: 00000000000e0000 - 0000000000100000 (reserved)
40 | [ 0.000000] BIOS-e820: 0000000000100000 - 00000000cff90000 (usable)
41 | [ 0.000000] BIOS-e820: 00000000cff90000 - 00000000cffab000 (ACPI data)
42 | [ 0.000000] BIOS-e820: 00000000cffab000 - 00000000cffcf000 (ACPI NVS)
43 | [ 0.000000] BIOS-e820: 00000000cffcf000 - 00000000e0000000 (reserved)
44 | [ 0.000000] BIOS-e820: 00000000f8000000 - 00000000fc000000 (reserved)
45 | [ 0.000000] BIOS-e820: 00000000fec00000 - 00000000fec10000 (reserved)
46 | [ 0.000000] BIOS-e820: 00000000fee00000 - 00000000fee01000 (reserved)
47 | [ 0.000000] BIOS-e820: 00000000ff000000 - 0000000100000000 (reserved)
48 | [ 0.000000] BIOS-e820: 0000000100000000 - 000000010e000000 (usable)
49 | [ 0.000000] BIOS-e820: 000000010e000000 - 0000000110000000 (reserved)
50 | [ 0.000000] NX (Execute Disable) protection: active
51 | [ 0.000000] SMBIOS 2.5 present.
52 | [ 0.000000] DMI: LENOVO INVALID/LENOVO, BIOS 5CKT67AUS 09/25/2010
53 | [ 0.000000] e820 update range: 0000000000000000 - 0000000000010000 (usable) ==> (reserved)
54 | [ 0.000000] e820 remove range: 00000000000a0000 - 0000000000100000 (usable)
55 | [ 0.000000] No AGP bridge found
56 | [ 0.000000] last_pfn = 0x10e000 max_arch_pfn = 0x400000000
57 | [ 0.000000] MTRR default type: uncachable
58 |
59 |
60 | ```
61 |
62 |
63 | 2. View Available System Memory
64 |
65 |
66 | You can also view the available memory from the dmesg messages as shown below.
67 |
68 |
69 | ```
70 |
71 | # dmesg | grep Memory
72 |
73 |
74 | ```
75 |
76 |
77 | The Output will be like this
78 |
79 |
80 |
81 | ```
82 |
83 | [ 0.000000] initial memory mapped : 0 - 20000000
84 | [ 0.000000] Base memory trampoline at [ffff880000098000] 98000 size 20480
85 | [ 0.000000] init_memory_mapping: 0000000000000000-00000000cff90000
86 | [ 0.000000] init_memory_mapping: 0000000100000000-000000010e000000
87 | [ 0.000000] PM: Registered nosave memory: 000000000009d000 - 00000000000a0000
88 | [ 0.000000] PM: Registered nosave memory: 00000000000a0000 - 00000000000ce000
89 | [ 0.000000] PM: Registered nosave memory: 00000000000ce000 - 00000000000d4000
90 | [ 0.000000] PM: Registered nosave memory: 00000000000d4000 - 00000000000e0000
91 | [ 0.000000] PM: Registered nosave memory: 00000000000e0000 - 0000000000100000
92 | [ 0.000000] PM: Registered nosave memory: 00000000cff90000 - 00000000cffab000
93 | [ 0.000000] PM: Registered nosave memory: 00000000cffab000 - 00000000cffcf000
94 | [ 0.000000] PM: Registered nosave memory: 00000000cffcf000 - 00000000e0000000
95 | [ 0.000000] PM: Registered nosave memory: 00000000e0000000 - 00000000f8000000
96 | [ 0.000000] PM: Registered nosave memory: 00000000f8000000 - 00000000fc000000
97 | [ 0.000000] PM: Registered nosave memory: 00000000fc000000 - 00000000fec00000
98 | [ 0.000000] PM: Registered nosave memory: 00000000fec00000 - 00000000fec10000
99 | [ 0.000000] PM: Registered nosave memory: 00000000fec10000 - 00000000fee00000
100 | [ 0.000000] PM: Registered nosave memory: 00000000fee00000 - 00000000fee01000
101 | [ 0.000000] PM: Registered nosave memory: 00000000fee01000 - 00000000ff000000
102 | [ 0.000000] PM: Registered nosave memory: 00000000ff000000 - 0000000100000000
103 | [ 0.000000] please try 'cgroup_disable=memory' option if you don't want memory cgroups
104 | [ 0.009595] Initializing cgroup subsys memory
105 | [ 0.368377] Freeing initrd memory: 13912k freed
106 | [ 0.503612] agpgart-intel 0000:00:00.0: detected 131072K stolen memory
107 | [ 1.164451] Freeing unused kernel memory: 924k freed
108 | [ 1.168764] Freeing unused kernel memory: 1592k freed
109 | [ 1.172101] Freeing unused kernel memory: 1188k freed
110 |
111 |
112 | ```
113 |
114 |
115 | 3.View Ethernet Link Status (UP/DOWN)
116 |
117 |
118 | ```
119 |
120 | # dmesg | grep eth
121 |
122 |
123 | ```
124 |
125 | The Output Will be like this ...
126 |
127 |
128 | ```
129 | [ 0.228209] ACPI Error: Method parse/execution failed [\_SB_.PCI0._OSC] (Node ffff88010762e0a0), AE_ALREADY_EXISTS (20110623/psparse-536)
130 | [ 0.228215] ACPI: Marking method _OSC as Serialized because of AE_ALREADY_EXISTS error
131 | [ 0.231247] ACPI Error: Method parse/execution failed [\_SB_.PCI0._OSC] (Node ffff88010762e0a0), AE_ALREADY_EXISTS (20110623/psparse-536)
132 | [ 0.231291] ACPI Error: Method parse/execution failed [\_SB_.PCI0._OSC] (Node ffff88010762e0a0), AE_ALREADY_EXISTS (20110623/psparse-536)
133 | [ 0.236100] i2c-core: driver [aat2870] using legacy suspend method
134 | [ 0.236101] i2c-core: driver [aat2870] using legacy resume method
135 | [ 1.422304] e1000e 0000:00:19.0: eth0: (PCI Express:2.5GT/s:Width x1) 1c:6f:65:04:dd:8b
136 | [ 1.422307] e1000e 0000:00:19.0: eth0: Intel(R) PRO/1000 Network Connection
137 | [ 1.422372] e1000e 0000:00:19.0: eth0: MAC: 8, PHY: 8, PBA No: FFFFFF-0FF
138 | [ 5.631816] ADDRCONF(NETDEV_UP): eth0: link is not ready
139 | [ 10.921326] device eth0 entered promiscuous mode
140 | [ 11.072479] ADDRCONF(NETDEV_UP): eth0: link is not ready
141 | [ 12.592898] e1000e: eth0 NIC Link is Up 100 Mbps Full Duplex, Flow Control: Rx/Tx
142 | [ 12.592902] e1000e 0000:00:19.0: eth0: 10/100 speed: disabling TSO
143 | [ 12.593232] ADDRCONF(NETDEV_CHANGE): eth0: link becomes ready
144 | [ 12.593285] br0: port 1(eth0) entering forwarding state
145 | [ 12.593291] br0: port 1(eth0) entering forwarding state
146 | [ 21.600027] br0: port 1(eth0) entering forwarding state
147 | [ 23.472020] eth0: no IPv6 routers present
148 |
149 |
150 | ```
151 |
152 |
153 | 5. Clear Messages in dmesg Buffer
154 |
155 |
156 | Sometimes you might want to clear the dmesg messages before your next reboot. You can clear the dmesg buffer as shown below.
157 |
158 |
159 | ```
160 |
161 | # dmesg -c
162 |
163 | # dmesg
164 |
165 |
166 | ```
167 |
168 |
169 |
170 |
--------------------------------------------------------------------------------
/Squid-Internet-Filtering-Using-2-Ethernet-Card's-in-Centos.md:
--------------------------------------------------------------------------------
1 | There are 2 Ethernet card's
2 |
3 | 1. eth0 with 192.168.1.0/24 connected to ISP router @ 192.168.1.1, Assigned With IP 192.168.1.15
4 |
5 | 2. eth1 with network 198.168.0.0/24 DHCP server for local network here, or With Static IP's, 192.168.0.15
6 |
7 | 3. iptable with the basic rules including the squid3 redirect rules to redirects.
8 |
9 | 4. Both Ethernet card's need to Assign With Static IP Address in differnet network.
10 |
11 | Create the list of Blocked files under
12 |
13 | ```
14 | # vim /etc/squid/blockedsites.squid
15 | ```
16 |
17 | Enter the needed sites need to get block
18 |
19 | ```
20 | .facebook.com
21 | .skypeassets.com
22 | .maalaimalar.com
23 | .ui.skype.com
24 | .twitter.com
25 | .ndtv.com
26 | ```
27 |
28 | Create the list of Blocked Keywords
29 |
30 | ```
31 | # vim /etc/squid/blockkeywords.squid
32 | ```
33 | porn
34 |
35 | Create the list of Blocked IP's
36 |
37 | ```
38 | # vim /etc/squid/blockip.squid
39 | ```
40 |
41 | 192.168.0.212
42 |
43 | Create the list of Allowed IP's
44 |
45 | ```
46 | # vim /etc/squid/allowip.squid
47 | ```
48 |
49 | 192.168.0.10
50 |
51 | Edit the Configuration file and Enter the Below Rule's
52 |
53 | ```
54 | # vim /etc/squid/squid.conf
55 | ```
56 |
57 | Change to the Respective Needed Rules
58 |
59 | ```
60 | #########################################################################
61 | ##### Restricting Web Access By Time #####
62 | acl home_network src 192.168.0.0/24
63 | acl business_hours time M T W H F A 08:45-22:00
64 | acl RestrictedHost src 192.168.0.221
65 | # Restricting Web Access By Time
66 | http_access deny RestrictedHost
67 | http_access allow home_network business_hours
68 | #########################################################################
69 | acl blockregexurl url_regex -i .facebook.com gtalk.google.com talkx.l.google.com .facebook.com .mail.gmail.com .skype.com
70 | http_access deny blockregexurl
71 | #########################################################################
72 | ##### Block Using Mac Address #####
73 | #acl badmac arp E3:40:F8:01:B7:54
74 | #http_access deny badmac
75 | #########################################################################
76 | #### Block Using Port of Specific IP ####
77 | #acl block_port port 1234
78 | #acl no_block_port_ip src 192.168.1.36
79 | #http_access deny block_port !no_block_port_ip
80 | #http_access allow all
81 | #########################################################################
82 | #####Restricting Access to specific web sites#####
83 | # ACL blocksites
84 | acl blocksites dstdomain "/etc/squid/blockedsites.squid"
85 | # Deny access to blocksites ACL
86 | http_access deny blocksites
87 | #########################################################################
88 | # ACL blockkeywords
89 | acl blockkeywords url_regex -i "/etc/squid/blockkeywords.squid"
90 | # Deny access to blockkeywords ACL
91 | http_access deny blockkeywords
92 | #########################################################################
93 | ##### Restricting Access to specific Ipaddress #####
94 | # ACL blockip
95 | acl blockip src "/etc/squid/blockip.squid"
96 | # Deny access to blockip ACL
97 | http_access deny blockip
98 | #########################################################################
99 | # ACL allowip
100 | acl allowip src "/etc/squid/allowip.squid"
101 | http_access allow allowip
102 | #########################################################################
103 | ##### Restricting Download size #####
104 | #Restrict download size
105 | #reply_body_max_size 100 MB all
106 | #########################################################################
107 | ##### facebook Rule ######
108 | acl fb dstdomain .facebook.com
109 | acl officetime time M T W H F A 9:30-18:00
110 | # Facebook Restriction
111 | http_reply_access deny fb officetime
112 | http_access deny CONNECT fb officetime
113 | #########################################################################
114 | ###### Hotmail MSN Block######
115 | acl msn url_regex messenger.hotmail.com
116 | # Yahoo! Messenger
117 | acl ym dstdomain .messenger.yahoo.com .psq.yahoo.com
118 | acl ym dstdomain .us.il.yimg.com .msg.yahoo.com .pager.yahoo.com
119 | acl ym dstdomain .rareedge.com .ytunnelpro.com .chat.yahoo.com
120 | acl ym dstdomain .voice.yahoo.com
121 | acl ymregex url_regex yupdater.yim ymsgr myspaceim
122 | acl ym dstdomain .skype.com .imvu.com
123 | # Yahoo Messenger
124 | http_access deny ym
125 | http_access deny ymregex
126 | #########################################################################
127 | ##### MSN Imagine messenger Restriction#####
128 | acl messenger_site dstdomain .imagine-msn.com/messenger
129 | ##### Google Talk Restriction #####
130 | acl messenger_site dstdomain .talk.google.com
131 | ##### Google talk ssl Restriction #####
132 | acl messenger_site dstdomain talkx.l.google.com:443
133 | acl gtalk dstdomain gtalk.google.com talkx.l.google.com
134 | ##### Ebuddy Messenger Restrcition #####
135 | acl messenger_site dstdomain .ebuddy.com
136 | http_access deny messenger_site
137 | #########################################################################
138 | #### Skype Messenger Block #####
139 | # Skype
140 | acl numeric_IPs dstdom_regex ^(([0-9]+\.[0-9]+\.[0-9]+\.[0-9]+)|(\[([0-9af]+)?:([0-9af:]+)?:([0-9af]+)?\])):443
141 | acl Skype_UA browser ^skype
142 | acl validUserAgent browser \S+
143 | # Skype Restriction
144 | http_access deny numeric_IPS
145 | http_access deny Skype_UA
146 | http_access deny !validUserAgent
147 | ###########################################################################
148 | # Hostname
149 | visible_hostname sambafileserver
150 | ###########################################################################
151 | # Squid normally listens to port 3128
152 | http_port 3128 intercept
153 | ###########################################################################
154 | ```
155 |
156 | Then add the iptables to the proxy server
157 | Create a .sh file and save this and execute using sh
158 |
159 | ```
160 | # vim iptables.sh
161 | ```
162 |
163 | Enter the Script in created sh file
164 |
165 | ```
166 | #! /bin/sh
167 | #just for the sake of turning the networks off and on... not sure if it would work turning them back on only at the end of script ?
168 | ifconfig eth0 down;
169 | ifconfig eth1 down;
170 | ifconfig lo down;
171 | ifconfig lo up;
172 | ifconfig eth0 up;
173 | ifconfig eth1 up;
174 | ifup eth0;
175 | ifup eth1;
176 | #I seemed to have some issues with the routing table so i thought I throw in a check up :
177 | route add 127.0.0.1 dev lo;
178 | route add -net 127.0.0.0/8 dev lo;
179 | route add -net 192.168.0.0/24 dev eth1;
180 | route add 192.168.1.0 dev eth0;
181 | route add default gw 192.168.1.1;
182 | # turn fowarding off while configuring iptables :
183 | sysctl net/ipv4/ip_forward=0
184 | iptables -F
185 | iptables -X
186 | iptables -P INPUT DROP
187 | iptables -P OUTPUT DROP
188 | iptables -P FORWARD ACCEPT
189 | iptables -t nat -F
190 | iptables -t nat -X
191 | iptables -t mangle -F
192 | iptables -t mangle -X
193 | #And on again once the policies are set
194 | sysctl net/ipv4/ip_forward=1
195 | #redirect port 80 on lan card and masquerade on wan card :
196 | iptables -t nat -A POSTROUTING -o eth0 -j MASQUERADE
197 | iptables -t nat -A PREROUTING -i eth1 -p tcp --dport 80 -j REDIRECT --to-port 3128
198 | #accept all packets in lo and protect against spoofing :
199 | iptables -A INPUT -i lo -j ACCEPT
200 | iptables -A OUTPUT -o lo -j ACCEPT
201 | iptables -A INPUT -i !lo -s 127.0.0.0/8 -j DROP
202 | iptables -A FORWARD -i !lo -s 127.0.0.0/8 -j DROP
203 | #accept only established input but all output on WAN card
204 | iptables -A OUTPUT -o eth0 -m state --state NEW,ESTABLISHED,RELATED -j ACCEPT
205 | iptables -A INPUT -i eth0 -m state --state ESTABLISHED,RELATED -j ACCEPT
206 | #just forget the invalid packets :
207 | iptables -A OUTPUT -o eth0 -m state --state INVALID -j DROP
208 | iptables -A INPUT -i eth0 -m state --state INVALID -j DROP
209 | #not sure whether to put this before or after spoofing protection ?
210 | iptables -A INPUT -i eth1 -j ACCEPT
211 | iptables -A OUTPUT -o eth1 -j ACCEPT
212 | #against spoofing on LAN card input :
213 | iptables -A INPUT -i !eth1 -s 192.168.0.0/24 -j DROP
214 | iptables -A FORWARD -i !eth1 -s 192.168.0.0/24 -j DROP
215 |
216 | ```
217 |
218 | Then Execute the the script using
219 |
220 | ```
221 | # sh iptables.sh
222 |
223 | ```
224 |
225 | To see the iptables use command
226 |
227 | ```
228 | # iptables -L
229 | ```
230 |
231 | Save the iptables using
232 |
233 | ```
234 | # iptables-save > /root/iptables_save.ip
235 | ```
236 |
237 | If not make the iptables Script to execute after every reboot by adding it in rc file
238 |
239 | ```
240 | # vim /etc/rc.local
241 |
242 | sh /root/iptables.sh
243 | ```
244 |
245 | Then Change the IP for Client machines with rage of 192.168.0.1, gateway to Proxy IPaddress
246 |
247 | eg:
248 | ```
249 | address 192.168.0.99
250 | network 192.168.0.0
251 | netmask 255.255.255.0
252 | broadcast 192.168.0.255
253 | gateway 192.168.0.15
254 | ```
255 |
256 | That's it..
257 |
--------------------------------------------------------------------------------
/UNIX-&-Linux-10-Netstat-Command-Examples.md:
--------------------------------------------------------------------------------
1 |
2 |
3 | Netstat command displays various network related information such as network connections, routing tables, interface statistics, masquerade connections, multicast memberships etc.,
4 |
5 |
6 | In this article, let us review 10 practical unix netstat command examples.
7 |
8 |
9 | 1. List All Ports (both listening and non listening ports)
10 |
11 |
12 | List all ports using netstat -a
13 |
14 | ```
15 |
16 | # netstat -a | more
17 |
18 | ```
19 |
20 | Active Internet connections (servers and established)
21 |
22 | ```
23 |
24 | Proto Recv-Q Send-Q Local Address Foreign Address State
25 | tcp 0 0 localhost:30037 *:* LISTEN
26 | udp 0 0 *:bootpc *:*
27 |
28 | ```
29 |
30 |
31 | Active UNIX domain sockets (servers and established)
32 |
33 | ```
34 |
35 | Proto RefCnt Flags Type State I-Node Path
36 | unix 2 [ ACC ] STREAM LISTENING 6135 /tmp/.X11-unix/X0
37 | unix 2 [ ACC ] STREAM LISTENING 5140 /var/run/acpid.socket
38 |
39 | ```
40 |
41 | List all tcp ports using netstat -at
42 |
43 | ```
44 |
45 | # netstat -at
46 |
47 | ```
48 |
49 | Active Internet connections (servers and established)
50 |
51 | ```
52 | Proto Recv-Q Send-Q Local Address Foreign Address State
53 | tcp 0 0 localhost:30037 *:* LISTEN
54 | tcp 0 0 localhost:ipp *:* LISTEN
55 | tcp 0 0 *:smtp *:* LISTEN
56 | tcp6 0 0 localhost:ipp [::]:* LISTEN
57 | List all udp ports using netstat -au
58 |
59 | ```
60 |
61 | ***
62 |
63 |
64 | ```
65 |
66 | # netstat -au
67 |
68 | ```
69 |
70 |
71 | Active Internet connections (servers and established)
72 |
73 | ```
74 |
75 | Proto Recv-Q Send-Q Local Address Foreign Address State
76 | udp 0 0 *:bootpc *:*
77 | udp 0 0 *:49119 *:*
78 | udp 0 0 *:mdns *:*
79 |
80 | ```
81 |
82 | 2. List Sockets which are in Listening State
83 |
84 | List only listening ports using netstat -l
85 |
86 | ```
87 |
88 | # netstat -l
89 |
90 | ```
91 |
92 | Active Internet connections (only servers)
93 |
94 | ```
95 |
96 | Proto Recv-Q Send-Q Local Address Foreign Address State
97 | tcp 0 0 localhost:ipp *:* LISTEN
98 | tcp6 0 0 localhost:ipp [::]:* LISTEN
99 | udp 0 0 *:49119 *:*
100 | List only listening TCP Ports using netstat -lt
101 |
102 | ```
103 |
104 | ***
105 |
106 | ```
107 |
108 | # netstat -lt
109 |
110 |
111 | ```
112 |
113 | Active Internet connections (only servers)
114 |
115 | ```
116 |
117 | Proto Recv-Q Send-Q Local Address Foreign Address State
118 | tcp 0 0 localhost:30037 *:* LISTEN
119 | tcp 0 0 *:smtp *:* LISTEN
120 | tcp6 0 0 localhost:ipp [::]:* LISTEN
121 | List only listening UDP Ports using netstat -lu
122 |
123 | ```
124 | ***
125 |
126 | ```
127 |
128 | # netstat -lu
129 |
130 | ```
131 |
132 | Active Internet connections (only servers)
133 |
134 | ```
135 |
136 | Proto Recv-Q Send-Q Local Address Foreign Address State
137 | udp 0 0 *:49119 *:*
138 | udp 0 0 *:mdns *:*
139 | List only the listening UNIX Ports using netstat -lx
140 |
141 | ```
142 |
143 | ***
144 |
145 |
146 | ```
147 |
148 | # netstat -lx
149 |
150 | ```
151 |
152 | Active UNIX domain sockets (only servers)
153 |
154 | ```
155 |
156 | Proto RefCnt Flags Type State I-Node Path
157 | unix 2 [ ACC ] STREAM LISTENING 6294 private/maildrop
158 | unix 2 [ ACC ] STREAM LISTENING 6203 public/cleanup
159 | unix 2 [ ACC ] STREAM LISTENING 6302 private/ifmail
160 | unix 2 [ ACC ] STREAM LISTENING 6306 private/bsmtp
161 |
162 | ```
163 |
164 | 3. Show the statistics for each protocol
165 |
166 | Show statistics for all ports using netstat -s
167 |
168 | ```
169 |
170 | # netstat -s
171 |
172 | ```
173 |
174 | Output as :
175 |
176 |
177 | ```
178 |
179 | Ip:
180 | 11150 total packets received
181 | 1 with invalid addresses
182 | 0 forwarded
183 | 0 incoming packets discarded
184 | 11149 incoming packets delivered
185 | 11635 requests sent out
186 | Icmp:
187 | 0 ICMP messages received
188 | 0 input ICMP message failed.
189 | Tcp:
190 | 582 active connections openings
191 | 2 failed connection attempts
192 | 25 connection resets received
193 | Udp:
194 | 1183 packets received
195 | 4 packets to unknown port received.
196 |
197 | Show statistics for TCP (or) UDP ports using netstat -st (or) -su
198 |
199 | ```
200 |
201 | ***
202 |
203 | ```
204 |
205 | # netstat -st
206 |
207 | # netstat -su
208 |
209 |
210 | ```
211 |
212 |
213 | 4. Display PID and program names in netstat output using netstat -p
214 |
215 | netstat -p option can be combined with any other netstat option. This will add the “PID/Program Name” to the netstat output. This is very useful while debugging to identify which program is running on a particular port.
216 |
217 |
218 | ```
219 |
220 | # netstat -pt
221 |
222 | ```
223 |
224 | Active Internet connections (w/o servers)
225 |
226 | ```
227 |
228 | Proto Recv-Q Send-Q Local Address Foreign Address State PID/Program name
229 | tcp 1 0 ramesh-laptop.loc:47212 192.168.185.75:www CLOSE_WAIT 2109/firefox
230 | tcp 0 0 ramesh-laptop.loc:52750 lax:www ESTABLISHED 2109/firefox
231 |
232 |
233 | ```
234 |
235 |
236 | 5. Don’t resolve host, port and user name in netstat output
237 |
238 | When you don’t want the name of the host, port or user to be displayed, use netstat -n option. This will display in numbers, instead of resolving the host name, port name, user name.
239 |
240 | This also speeds up the output, as netstat is not performing any look-up.
241 |
242 |
243 | ```
244 |
245 |
246 | # netstat -an
247 |
248 |
249 | ```
250 |
251 | If you don’t want only any one of those three items ( ports, or hosts, or users ) to be resolved, use following commands.
252 |
253 |
254 | ```
255 |
256 | # netsat -a --numeric-ports
257 |
258 | # netsat -a --numeric-hosts
259 |
260 | # netsat -a --numeric-users
261 |
262 |
263 | ```
264 |
265 | 6. Print netstat information continuously
266 |
267 |
268 | netstat will print information continuously every few seconds.
269 |
270 | ```
271 |
272 | # netstat -c
273 |
274 | ```
275 |
276 | Active Internet connections (w/o servers)
277 |
278 | ```
279 |
280 | Proto Recv-Q Send-Q Local Address Foreign Address State
281 | tcp 0 0 ramesh-laptop.loc:36130 101-101-181-225.ama:www ESTABLISHED
282 | tcp 1 1 ramesh-laptop.loc:52564 101.11.169.230:www CLOSING
283 | tcp 0 0 ramesh-laptop.loc:43758 server-101-101-43-2:www ESTABLISHED
284 | tcp 1 1 ramesh-laptop.loc:42367 101.101.34.101:www CLOSING
285 |
286 | ```
287 |
288 |
289 | 7. Find the non supportive Address families in your system
290 |
291 | ```
292 |
293 | netstat --verbose
294 |
295 | ```
296 |
297 | At the end, you will have something like this.
298 |
299 |
300 | ```
301 | netstat: no support for `AF IPX' on this system.
302 | netstat: no support for `AF AX25' on this system.
303 | netstat: no support for `AF X25' on this system.
304 | netstat: no support for `AF NETROM' on this system.
305 |
306 | ```
307 |
308 | 8. Display the kernel routing information using netstat -r
309 |
310 |
311 | ```
312 |
313 | # netstat -r
314 |
315 | ```
316 |
317 | Kernel IP routing table
318 |
319 | ```
320 |
321 | Destination Gateway Genmask Flags MSS Window irtt Iface
322 | 192.168.1.0 * 255.255.255.0 U 0 0 0 eth2
323 | link-local * 255.255.0.0 U 0 0 0 eth2
324 | default 192.168.1.1 0.0.0.0 UG 0 0 0 eth2
325 |
326 |
327 | ```
328 |
329 |
330 | Note: Use netstat -rn to display routes in numeric format without resolving for host-names.
331 |
332 | 9. Find out on which port a program is running
333 |
334 | ```
335 |
336 | # netstat -ap | grep ssh
337 |
338 | ```
339 |
340 | (Not all processes could be identified, non-owned process info
341 | will not be shown, you would have to be root to see it all.)
342 |
343 | ```
344 |
345 | tcp 1 0 dev-db:ssh 101.174.100.22:39213 CLOSE_WAIT -
346 | tcp 1 0 dev-db:ssh 101.174.100.22:57643 CLOSE_WAIT -
347 |
348 |
349 | ```
350 |
351 | Find out which process is using a particular port:
352 |
353 | ```
354 |
355 | # netstat -an | grep ':80'
356 |
357 | ```
358 |
359 | 10. Show the list of network interfaces
360 |
361 | ```
362 |
363 | # netstat -i
364 |
365 | ```
366 |
367 | Kernel Interface table
368 |
369 | ```
370 |
371 | Iface MTU Met RX-OK RX-ERR RX-DRP RX-OVR TX-OK TX-ERR TX-DRP TX-OVR Flg
372 | eth0 1500 0 0 0 0 0 0 0 0 0 BMU
373 | eth2 1500 0 26196 0 0 0 26883 6 0 0 BMRU
374 | lo 16436 0 4 0 0 0 4 0 0 0 LRU
375 |
376 | ```
377 |
378 | Display extended information on the interfaces (similar to ifconfig) using netstat -ie
379 |
380 | ```
381 |
382 | # netstat -ie
383 |
384 | ```
385 |
386 | Kernel Interface table
387 |
388 | ```
389 | eth0 Link encap:Ethernet HWaddr 00:10:40:11:11:11
390 | UP BROADCAST MULTICAST MTU:1500 Metric:1
391 | RX packets:0 errors:0 dropped:0 overruns:0 frame:0
392 | TX packets:0 errors:0 dropped:0 overruns:0 carrier:0
393 | collisions:0 txqueuelen:1000
394 | RX bytes:0 (0.0 B) TX bytes:0 (0.0 B)
395 | Memory:f6ae0000-f6b00000
396 |
397 | ```
398 |
399 |
400 |
401 |
--------------------------------------------------------------------------------
/Setting-up-Kaltura-Drop-folder,-Amazon-S3-Remote-storage,CloudFront-CDN-RTMP,RTMPE-Video-Streaming.md:
--------------------------------------------------------------------------------
1 | ### Setting up a Drop Folder
2 |
3 | After Creating a Publisher in Kaltura
4 |
5 | 1. Creat a Transcoding Profile ( I have created in my name as blackyboy transcoding
6 |
7 | 2. Then Configure DropBox for Publisher by choosing configure in Drop menu
8 |
9 | 3. And Tick the check box, Content Ingestion - Drop Folder/s (config)
10 |
11 | 4. Then Click on configure and change the settings.
12 |
13 | Note your Publisher ID from user's list ( My Publisher ID 102) and Create using Type : Local
14 |
15 | Drop Folder Name: our Wish ( Here i have used blackyboy)
16 |
17 | Description: As our Wish (This is blackyboy's Drop)
18 |
19 | 5. Conversion Profile ID: Choose your created name Here from Drop list
20 |
21 | 6. Drop Folder Storage Path: /opt/kaltura/web/content/blackyboy (or) any folder name
22 |
23 | Check file size every (seconds): 10
24 |
25 | 7. Choose Manual Deletion if you Don't want to delete the Source.
26 |
27 | Save it ... that't it in KMC side..
28 |
29 | -------------------------------------------------------------------------
30 |
31 | ### Then in Terminal
32 |
33 | 1. Create a directory named as you have mentioned here (Drop Folder Storage Path: /opt/kaltura/web/content/blackyboy)
34 |
35 | ```
36 | Eg : mkdir /opt/kaltura/web/content/blackyboy
37 | ```
38 |
39 | 2. Then add a user for FTP
40 |
41 | ```
42 | # useradd -d /opt/kaltura/web/content/blackyboy blackyboy ( home Dir of this blackyboy user is /opt/kaltura/web/content/blackyboy )
43 | ```
44 | (skel file error will be display, we don't need a bash profile so don't mind the error)
45 |
46 | Create a password for the user which we have created for Drop
47 |
48 | ```
49 | # passwd blackyboy
50 |
51 | New passwd: ********
52 | Con Passwd: ********
53 | ```
54 |
55 | 3. Add the user blackyboy to apache & kaltura Group
56 | Only kaltura Group is Enough
57 |
58 | ```
59 | # usermod -a -G apache,kaltura blackyboy
60 |
61 | ```
62 |
63 | 4.Navigate to directory
64 |
65 | ```
66 | # cd /opt/kaltura/web/content
67 | ```
68 |
69 | 5. Change the Ownership of blackyboy
70 |
71 | ```
72 | # chown blackyboy:kaltura blackyboy/
73 |
74 | ```
75 | Note : Here i have setuped for sftp because ftp is not secured one, If we need ftp just 2 more step to be added in above steps, those are
76 |
77 | ```
78 | # usermod -a -G ftp,kaltura blackyboy
79 |
80 | ```
81 |
82 | And at last we need to restart the vsftpd Service
83 |
84 | ```
85 | # /etc/init.d/vsftpd restart
86 | ```
87 |
88 | 6. Login the sftp from filezilla
89 |
90 | And upload a video file, it will be uploaded to /opt/kaltura/web/content/blackyboy
91 |
92 | After Completing upload it wait's for 10 seconds and it will move to KMC Content TAB and Start to convert it Using Transcoding profile Which we have created.
93 |
94 | We can see the Progress of uploading from (Drop folder) Under Content TAB
95 |
96 | That's it ..
97 |
98 | Which we have uploaded from filezilla will be converted and stored in S3, if we follow the below step's
99 |
100 |
101 | ### Setup Amazon S3 Remote storage
102 |
103 | TO Setup a Remote storage i used the following Link, Some content's are added by me too
104 |
105 | Reference URL : [kalturaCE Amazon s3 storage cloudfront cdn setup](http://www.panda-os.com/2012/11/kaltura-ce-amazon-s3-storage-cloudfront-cdn-setup/#.Uy_7KHUW3h_)
106 |
107 | Setting up Amazon S3 and getting security credentials
108 |
109 | 1. To get your Amazon security credentials (assuming you have an account with amazon AWS), go to this link https://portal.aws.amazon.com/gp/aws/securityCredentials
110 |
111 | 2. To set up your amazon S3 bucket, go to https://console.aws.amazon.com/s3/home , create a new bucket, and name it.
112 |
113 | 3. Inside this bucket, create a folder called “kaltura”
114 |
115 | 4. Select your new bucket on the left side, click Actions and select “Properties”
116 |
117 | 5. Add more permissions – Authenticated Users – check all boxes.
118 |
119 | 6. Select the kaltura folder, click properties, go to Permissions.
120 |
121 | 7. Add more permissions – Everyone – read and download (you can also right click the folder and select “Make Public”)
122 |
123 | In the Above 6th and 7th Step there is no Permission available, So Just Right click on kaltura Directory and choose "Make Public"
124 |
125 | Then we need to add a bucket Policy for your bucket, Granting Object get Permission to any Anonymous User in Amazon S3 Bucket for reading the file.
126 |
127 | ```
128 | {
129 | "Version":"2012-10-17",
130 | "Statement":[{
131 | "Sid":"AddPerm",
132 | "Effect":"Allow",
133 | "Principal": {
134 | "AWS": "*"
135 | },
136 | "Action":["s3:GetObject"],
137 | "Resource":["arn:aws:s3:::Bucket-name/*"
138 | ]
139 | }
140 | ]
141 | }
142 | ```
143 |
144 |
145 | 
146 |
147 |
148 | If this Policy was not added, We will face clip not found error when ever uploading a new video to kaltura.
149 |
150 | ### Setting up Amazon CloudFront CDN
151 |
152 | 1. Go to https://console.aws.amazon.com/cloudfront/home
153 |
154 | 2. Create a new “Distribution” of type “Web”, and Origin Domain Name select your bucket from list
155 |
156 | 3. Under Viewer Protocol Policy: Choose HTTP and HTTPS
157 |
158 | 4. Select your bucket as the origin ID, and decide wether you want logging or not.
159 |
160 | 5. Click on Create Distribution
161 |
162 | 6. Copy your CloudFront domain name (example: d2xxxxxxxxxxxx.cloudfront.net) for later use.
163 |
164 |
165 | ### Setting up the Remote Storage Profile in the Admin Console
166 | First, you must enable the necessary configuration options for your partner:
167 |
168 | 1. Find your partner in the list of partners, click on the right drop down box and select “Configure”
169 |
170 | 2. Under “Remote Storage Policy”, set Delivery Policy to “Remote Storage Only”
171 |
172 | 3. Check the “Delete exported storage” checkbox.
173 |
174 | 4. Under Enable/Disable Features, make sure that “Remote Storage” is checked.
175 |
176 | 5. Click “Save”.
177 |
178 | Next we must configure the Remote Storage Profile. In order to do this, we must click on the partner’s left drop-down box (under “Profiles”) and select “Remote Storage”. You should see the “Remote Storage Profiles” page for your publisher (If you haven’t yet set up any remote storage profiles, the list should be empty).
179 |
180 | (Assuming that you have already set up an S3 bucket, and that you have an Access Key ID and a Secret Access Key)
181 |
182 | 1. Create a new profile by writing your publisher id in the right “Publisher ID” input box and clicking “Create New”.
183 |
184 | 2. Give a name to your Remote Storage (for example “Amazon S3″)
185 |
186 | 3. For “Storage URL” type http://{yourbucketname}.s3.amazonaws.com (replace {yourbucketname} with your bucket name on S3)
187 |
188 | 4. In Storage Base Directory, write “/{yourbucketname}/kaltura” (keep in mind the leading slash, and change yourbucketname to your bucket name)
189 |
190 | 5. Storage Username – enter your amazon aws api Access Key ID
191 |
192 | 6. Storage Password – paste your amazon aws api Secret Access Key
193 |
194 | 7. Under HTTP Delivery Base URL, type “http://{your amazon cloudfront domain}/kaltura” – replace {your amazon cloudfront domain} with the cloudfront domain you created in the previous section).
195 |
196 | ```
197 | eg : HTTP Delivery Base URL*: http://d2xxxxxxxxxxxx.cloudfront.net/kaltura
198 | HTTPS Delivery Base URL: https://d2xxxxxxxxxxxx.cloudfront.net/kaltura
199 | ```
200 |
201 | 
202 |
203 |
204 | 8. Save the new Remote Storage Profile
205 |
206 | Add a crossdomain.xml file
207 | Create a crossdomain.xml file in the root of your S3 bucket
208 |
209 | ```
210 |
211 |
212 |
213 |
214 |
215 | ```
216 |
217 | [Crossdoman.xml](https://github.com/blackyboy/Ubuntu-Linux-Stuffs/blob/master/kaltura-setup/crossdomain.xml)
218 |
219 |
220 | Final Step – Enable the remote storage profile
221 |
222 | 1. Click on the dropdown box next to your new storage profile in the Remote Storage Profiles page in Kaltura Admin Console
223 |
224 | 2. Select “Export Automatically” and then click “OK”
225 |
226 | 3. You will receive the confirmation that your storage was autoed :)
227 |
228 | Test your new configuration
229 | You can go ahead and test your new configuration. Upload a new video in the KMC, let it convert, and wait for it to get distributed. After that, try to play the entry and analyse it in your favorite sniffer. You should see that the movies are being downloaded from your cloudfront CDN, look for flv and mp4 files.
230 |
231 | ### Setting up Amazon CloudFront CDN for RTMP
232 |
233 | 1. Go to https://console.aws.amazon.com/cloudfront/home
234 |
235 | 2. Create a new “Distribution” of type “RTMP”, and Origin Domain Name select your bucket from list
236 |
237 | 3. Distribution State want to be Enabled
238 |
239 | 4. Click on Create Distribution
240 |
241 | 5. Copy your CloudFront RTMP domain name (example: s22xxxxxxxxxxxx.cloudfront.net) for later use.
242 |
243 | 
244 |
245 | Next we need to configure the Remote Storage Profile. In order to do this, we must click on the partner’s left drop-down box (under “Profiles”) and select “Remote Storage”. You should see the “Remote Storage Profiles” page for your publisher (If you haven’t yet set up any remote storage profiles, the list should be empty).
246 |
247 | There was our s3 storage will be listed as we have done in above Step,
248 |
249 | 1. Select action Click configure
250 |
251 | 2. Under Delivery Details Below http & https we need to enter the rtmp url of cloudnfront
252 | Prefix must be our Directory which was created in s3 bucket
253 | Note : There is no slash after /st
254 | Note : There is no slash after /kaltura
255 |
256 | ```
257 | RTMP Delivery Base URL: rtmp://s22xxxxxxxxxxx.cloudfront.net/cfx/st
258 |
259 | RTMP stream URL prefix: /kaltura
260 | ```
261 | 
262 |
263 | 3. Save the Remote Storage Profile
264 |
265 | This will make works both RTMP & RTMPE Video Streaming Happy Streaming.
266 |
267 |
268 | Bunch of thanks to jessp01 from Kaltura team for guiding me.
269 |
--------------------------------------------------------------------------------
/Yum_Commands.md:
--------------------------------------------------------------------------------
1 | Here we going to see about yum commands
2 | what is yum ? yum is a package installer; yum Actually called as yellow dog update manager
3 | yum is an interactive, rpm based, package manager. It can automatically perform system updates, including dependency analysis and obsolete pro-cessing based on "repository" metadata. It can also perform installa-tion of new packages
4 |
5 | 1. To install a package Using yum command, here I'm installing nmap a small Network scanner tool
6 |
7 | ```
8 | [root@server ~]# yum install nmap
9 | ```
10 | 2. To list the Installed and Available Packages
11 |
12 | ```
13 | [root@server ~]# yum list
14 |
15 | ```
16 |
17 | There are many packages and we can't see in one fixed page, so for viewing all package we need to use the less command
18 |
19 | ```
20 | [root@server ~]# yum list | less
21 |
22 | ```
23 |
24 | This will give us a scroll view
25 |
26 | 3. If we need to see the Source Pacakges Which all Available for installation
27 | This below command will give us all packages are available in Source were we going to get from.
28 |
29 | ```
30 | [root@server ~]# yum list available
31 | ```
32 |
33 | 4 . To view the Installed packages, this will show the packages which all installed in our Server/system
34 |
35 | ```
36 | [root@server ~]# yum list installed
37 |
38 | ```
39 | 5 . Yum Search Command :
40 |
41 | Here I Need to Install iSCSI pacakge for client, I don't Remember the package name But i know it's start with iSCSI, For installing the package we need full name, So i need to search the correct package in this Situation we can use search command
42 |
43 | ```
44 | # [root@server ~]# yum search iSCSI
45 |
46 | Loaded plugins: product-id, refresh-packagekit, security, subscription-manager
47 | Updating certificate-based repositories.
48 | ===================================N/S Matched: iSCSI===================================
49 | iscsi-initiator-utils.x86_64 : iSCSI daemon and utility programs
50 |
51 | Name and summary matches only, use "search all" for everything.
52 | ```
53 |
54 | here i Have Used iSCSI, But it will search and give us the package and its related.
55 |
56 |
57 | 6. If we need to see any Particular Pacakge Information.
58 | Here I'm Gathering info for iSCSI client package
59 |
60 | ```
61 | # yum info iscsi-initiator-utils.x86_64
62 | ```
63 | Output :
64 | ```
65 | [root@server ~]# yum info iscsi-initiator-utils.x86_64
66 | Loaded plugins: product-id, refresh-packagekit, security, subscription-manager
67 | Updating certificate-based repositories.
68 | Installed Packages
69 | Name : iscsi-initiator-utils
70 | Arch : x86_64
71 | Version : 6.2.0.872
72 | Release : 34.el6
73 | Size : 2.2 M
74 | Repo : installed
75 | From repo : anaconda-RedHatEnterpriseLinux-201111171049.x86_64
76 | Summary : iSCSI daemon and utility programs
77 | URL : http://www.open-iscsi.org
78 | License : GPLv2+
79 | Description : The iscsi package provides the server daemon for the iSCSI protocol,
80 | : as well as the utility programs used to manage it. iSCSI is a protocol
81 | : for distributed disk access using SCSI commands sent over Internet
82 | : Protocol networks.
83 | ```
84 | 7. If we need to install a pacakge without asking a comfirmation y/n Option, Use command -y
85 |
86 | ```
87 | [root@server ~]# yum install iscsi-initiator-utils.x86_64 -y
88 |
89 | ```
90 |
91 | 8. To Remove a Package, Here I'm removing nmap Utility
92 |
93 | ```
94 | [root@server ~]# yum remove nmap
95 |
96 | or
97 |
98 | [root@server ~]# yum erase nmap
99 |
100 | ```
101 | Output:
102 |
103 | ```
104 | [root@server ~]# yum remove nmap
105 | Loaded plugins: product-id, refresh-packagekit, security, subscription-manager
106 | Updating certificate-based repositories.
107 | Setting up Remove Process
108 | Resolving Dependencies
109 | --> Running transaction check
110 | ---> Package nmap.x86_64 2:5.21-4.el6 will be erased
111 | --> Finished Dependency Resolution
112 |
113 | Dependencies Resolved
114 |
115 | ============================================================================================================================================================================
116 | Package Arch Version Repository Size
117 | ============================================================================================================================================================================
118 | Removing:
119 | nmap x86_64 2:5.21-4.el6 @package 7.3 M
120 |
121 | Transaction Summary
122 | ============================================================================================================================================================================
123 | Remove 1 Package(s)
124 |
125 | Installed size: 7.3 M
126 | Is this ok [y/N]:
127 |
128 | ```
129 |
130 | 9. To Update the Server/system use command
131 |
132 | ```
133 | [root@server ~]# yum update
134 |
135 | ```
136 |
137 | 10. To list the yum packages Group
138 |
139 | ```
140 | [root@server ~]# yum grouplist
141 |
142 | ```
143 |
144 | output :
145 |
146 | ```
147 | Loaded plugins: product-id, refresh-packagekit, security, subscription-manager
148 | Updating certificate-based repositories.
149 | Setting up Group Process
150 | Installed Groups:
151 | Additional Development
152 | Base
153 | Client management tools
154 | Debugging Tools
155 | Desktop
156 | Desktop Debugging and Performance Tools
157 | Desktop Platform
158 | Dial-up Networking Support
159 | Directory Client
160 | E-mail server
161 | FCoE Storage Client
162 | FTP server
163 | Fonts
164 | ```
165 |
166 | 11. To View the Pacakages Which all Available inside the Group
167 |
168 | ```
169 | [root@server ~]# yum groupinfo Desktop
170 |
171 | ```
172 |
173 | Output:
174 |
175 | ```
176 | [root@server ~]# yum groupinfo Desktop
177 | Loaded plugins: product-id, refresh-packagekit, security, subscription-manager
178 | Updating certificate-based repositories.
179 | Setting up Group Process
180 |
181 | Group: Desktop
182 | Description: A minimal desktop that can also be used as a thin client.
183 | Mandatory Packages:
184 | NetworkManager
185 | NetworkManager-gnome
186 | alsa-plugins-pulseaudio
187 | at-spi
188 | control-center
189 | dbus
190 | gdm
191 | ```
192 |
193 | 12. To install a Group of pacakges
194 |
195 | ```
196 | [root@server ~]# yum groupinstall directory-client
197 |
198 | [root@server ~]# yum groupinstall directory-client
199 | Loaded plugins: product-id, refresh-packagekit, security, subscription-manager
200 | Updating certificate-based repositories.
201 | Setting up Group Process
202 | Package 3:ypbind-1.20.4-29.el6.x86_64 already installed and latest version
203 | Package ipa-client-2.1.3-9.el6.x86_64 already installed and latest version
204 | Package oddjob-mkhomedir-0.30-5.el6.x86_64 already installed and latest version
205 | Package sssd-1.5.1-66.el6.x86_64 already installed and latest version
206 | ```
207 |
208 | Here i have already installed, so what it showing as already installed
209 |
210 | 13. If we need to Update a Group of Pacakges we can update using
211 |
212 | ```
213 | # yum groupupdate directory-client
214 |
215 | ```
216 |
217 | 14. To Remove the Group of package use command
218 |
219 | ```
220 | [root@server ~]# yum groupremove directory-client
221 |
222 | Or
223 |
224 | [root@server ~]# yum grouperase directory-client
225 |
226 | ```
227 | Output:
228 |
229 | ```
230 | [root@server ~]# yum grouperase directory-client
231 | Loaded plugins: product-id, refresh-packagekit, security, subscription-manager
232 | Updating certificate-based repositories.
233 | Setting up Group Process
234 | Resolving Dependencies
235 | --> Running transaction check
236 | ---> Package certmonger.x86_64 0:0.50-3.el6 will be erased
237 | ---> Package ipa-client.x86_64 0:2.1.3-9.el6 will be erased
238 | ---> Package krb5-workstation.x86_64 0:1.9-22.el6 will be erased
239 | ---> Package oddjob-mkhomedir.x86_64 0:0.30-5.el6 will be erased
240 | ---> Package pam_krb5.x86_64 0:2.3.11-9.el6 will be erased
241 | ---> Package sssd.x86_64 0:1.5.1-66.el6 will be erased
242 | ---> Package ypbind.x86_64 3:1.20.4-29.el6 will be erased
243 | --> Processing Dependency: ypbind for package: yp-tools-2.9-12.el6.x86_64
244 | --> Running transaction check
245 | ---> Package yp-tools.x86_64 0:2.9-12.el6 will be erased
246 | --> Finished Dependency Resolution
247 |
248 | ```
249 |
250 | 15. If we need to install a Package After Updating
251 |
252 | ```
253 | # yum update -y && yum install nmap -y
254 |
255 | ```
256 | This will update first and next it will install the nmap package
257 | This is what we call chain command Using (&&)
258 |
259 | 16. To Display the Packages Which all not installed from RHEL Source or from Centos Source
260 |
261 | ```
262 | [root@media ~]# yum list extras
263 | ```
264 | output:
265 | ```
266 | [root@media ~]# yum list extras
267 | Loaded plugins: fastestmirror
268 | Loading mirror speeds from cached hostfile
269 | * base: centos.sonn.com
270 | * extras: centos.mirror.ndchost.com
271 | * updates: linux.mirrors.es.net
272 | Extra Packages
273 | libblkid.x86_64 2.17.2-12.9.el6_4.3 @updates
274 | libcom_err.x86_64 1.41.12-14.el6_4.2 @updates
275 | libdrm.x86_64 2.4.39-1.el6 @base
276 | libgcc.x86_64 4.4.7-3.el6 installed
277 | libgcrypt.x86_64 1.4.5-9.el6_2.2 installed
278 | libnl.x86_64 1.1.4-1.el6_4 @updates
279 | libss.x86_64 1.41.12-14.el6_4.2 @updates
280 | libstdc++.x86_64 4.4.7-3.el6 installed
281 | libuuid.x86_64 2.17.2-12.9.el6_4.3 @updates
282 | ```
283 | 17. To Display the Current Repository We using, Use Command
284 | ```
285 | [root@media ~]# yum repolist
286 |
287 | Output:
288 | [root@media ~]# yum repolist
289 | Loaded plugins: fastestmirror
290 | Loading mirror speeds from cached hostfile
291 | * base: centos.sonn.com
292 | * extras: centos.mirror.ndchost.com
293 | * updates: linux.mirrors.es.net
294 | repo id repo name status
295 | base CentOS-6 - Base 6,367
296 | extras CentOS-6 - Extras 13
297 | updates CentOS-6 - Updates 60
298 | repolist: 6,440
299 | ```
300 | 18. To Display all Repository
301 | ```
302 | [root@media ~]# yum repolist all
303 |
304 | Output:
305 | [root@media ~]# yum repolist all
306 | Loaded plugins: fastestmirror
307 | Loading mirror speeds from cached hostfile
308 | * base: centos.sonn.com
309 | * extras: centos.mirror.ndchost.com
310 | * updates: linux.mirrors.es.net
311 | repo id repo name status
312 | C6.0-base CentOS-6.0 - Base disabled
313 | C6.0-centosplus CentOS-6.0 - CentOSPlus disabled
314 | C6.0-contrib CentOS-6.0 - Contrib disabled
315 | C6.0-extras CentOS-6.0 - Extras disabled
316 | C6.0-updates CentOS-6.0 - Updates disabled
317 | C6.1-base CentOS-6.1 - Base disabled
318 | C6.1-centosplus CentOS-6.1 - CentOSPlus disabled
319 | C6.1-contrib CentOS-6.1 - Contrib disabled
320 | C6.1-extras CentOS-6.1 - Extras disabled
321 | C6.1-updates CentOS-6.1 - Updates disabled
322 | C6.2-base CentOS-6.2 - Base disabled
323 | C6.2-centosplus CentOS-6.2 - CentOSPlus disabled
324 | C6.2-contrib CentOS-6.2 - Contrib disabled
325 | C6.2-extras CentOS-6.2 - Extras disabled
326 | C6.2-updates CentOS-6.2 - Updates disabled
327 | C6.3-base CentOS-6.3 - Base disabled
328 | C6.3-centosplus CentOS-6.3 - CentOSPlus disabled
329 | C6.3-contrib CentOS-6.3 - Contrib disabled
330 | C6.3-extras CentOS-6.3 - Extras disabled
331 | C6.3-updates CentOS-6.3 - Updates disabled
332 | base CentOS-6 - Base enabled: 6,367
333 | c6-media CentOS-6 - Media disabled
334 | centosplus CentOS-6 - Plus disabled
335 | contrib CentOS-6 - Contrib disabled
336 | debug CentOS-6 - Debuginfo disabled
337 | extras CentOS-6 - Extras enabled: 13
338 | updates CentOS-6 - Updates enabled: 60
339 | repolist: 6,440
340 | ```
341 | 19. Running Yum Command Using Shell
342 | ```
343 | [root@media ~]# yum shell
344 | ```
345 | Then Type the command we need to execute
346 | Here I'm Getting info of nmap Package
347 | ```
348 | > info nmap
349 | Loading mirror speeds from cached hostfile
350 | * base: centos.mirror.freedomvoice.com
351 | * extras: centos.mirror.ndchost.com
352 | * updates: linux.mirrors.es.net
353 | Available Packages
354 | Name : nmap
355 | Arch : x86_64
356 | Epoch : 2
357 | Version : 5.51
358 | Release : 3.el6
359 | Size : 2.7 M
360 | Repo : base
361 | Summary : Network exploration tool and security scanner
362 | URL : http://nmap.org/
363 | License : GPLv2 and LGPLv2+ and GPLv2+ and BSD
364 | Description : Nmap is a utility for network exploration or security auditing. It supports
365 | : ping scanning (determine which hosts are up), many port scanning techniques
366 | : (determine what services the hosts are offering), and TCP/IP fingerprinting
367 | : (remote host operating system identification). Nmap also offers flexible target
368 | : and port specification, decoy scanning, determination of TCP sequence
369 | : predictability characteristics, reverse-identd scanning, and more. In addition
370 | : to the classic command-line nmap executable, the Nmap suite includes a flexible
371 | : data transfer, redirection, and debugging tool (netcat utility ncat), a utility
372 | : for comparing scan results (ndiff), and a packet generation and response analysis
373 | : tool (nping).
374 | ```
375 | 20. Installing Packages from Disabled Repository using enablerepo
376 | ```
377 | # yum --enablerepo=epel install nmap
378 | ```
379 | Output:
380 | ```
381 | [root@media ~]# yum --enablerepo=epel install nmap
382 | Loaded plugins: fastestmirror
383 | Loading mirror speeds from cached hostfile
384 | epel/metalink | 14 kB 00:00
385 | * base: centos.sonn.com
386 | * epel: linux.mirrors.es.net
387 | * extras: centos.mirror.ndchost.com
388 | * updates: linux.mirrors.es.net
389 | epel | 4.2 kB 00:00
390 | epel/primary_db | 5.7 MB 00:00
391 | Setting up Install Process
392 | Resolving Dependencies
393 | --> Running transaction check
394 | ---> Package nmap.x86_64 2:5.51-3.el6 will be installed
395 | --> Processing Dependency: libpcap.so.1()(64bit) for package: 2:nmap-5.51-3.el6.x86_64
396 | --> Running transaction check
397 | ---> Package libpcap.x86_64 14:1.4.0-1.20130826git2dbcaa1.el6 will be installed
398 | --> Finished Dependency Resolution
399 | ```
400 | 21. If Packages in Local and we need to install it Use command
401 |
402 | Here My rpm packages are Located under /home/user/nmap.rpm
403 |
404 | ```
405 | # yum localinstall /home/user/*.rpm
406 | ```
407 |
408 | This will install all packages Inside the /home/user/ Directory
409 |
410 | 22. If we need to know what the Use of Specified Package
411 |
412 | ```
413 | [root@media ~]# yum provides nmap
414 | ```
415 | Output:
416 | ```
417 | [root@media ~]# yum provides nmap
418 | Loaded plugins: fastestmirror
419 | Loading mirror speeds from cached hostfile
420 | * base: centos.sonn.com
421 | * extras: centos.mirror.ndchost.com
422 | * updates: linux.mirrors.es.net
423 | 2:nmap-5.51-3.el6.x86_64 : Network exploration tool and security scanner
424 | Repo : base
425 | Matched from:
426 | ```
427 | 23. While Installing Packages, If we need to Exclude some packages Use command
428 | ```
429 | # yum install nmap --exclude libpcap
430 | ```
431 | This will Exclude the Particular Which we need to exclude
432 |
433 | 24. To cleanup any cached packages in any enabled repository's cache directory.
434 | ```
435 | # yum clean packages
436 | ```
437 | 25. To cleanup xml metadata which chaced from repository
438 | ```
439 | # yum clean metadata
440 | ```
441 | 26. To clear any caches from any repository
442 | ```
443 | # yum clean all
444 | ```
445 | 27. To check Update using YUM
446 | ```
447 | # yum check-update
448 | ```
449 | 28. To Generate the metadata cache
450 | ```
451 | # yum makecache
452 | ```
453 | 29. To Downgrade a Version of Some Softwares
454 | ```
455 | [root@media tmp]# yum downgrade pidgin
456 | ```
457 | This will Downgrade the version of pidgin
458 |
459 | 30. To know More About Yum Command
460 | ```
461 | # man yum
462 | ```
463 |
--------------------------------------------------------------------------------
/Step-by-Step-how-to-setup-a-DNS-Server-in-RHEL-6.2-6.4-6.5-Using-Bind.md:
--------------------------------------------------------------------------------
1 | Step by Step how to setup a DNS Server in RHEL 6.2/6.4/6.5 Using Bind
2 |
3 | What is DNS Server ?
4 |
5 | DNS = Domain Naming Service (or) Domain Name System
6 | DNS will resolve the host name for the particular IP address.
7 |
8 |
9 | Here Im Using RHEL Server to Setup the DNS Server using BIND
10 |
11 | ```
12 | [root@masterdns ~]# lsb_release -a
13 | LSB Version: :core-4.0-amd64:core-4.0-noarch:graphics-4.0-amd64:graphics-4.0-noarch:printing-4.0-amd64:printing-4.0-noarch
14 | Distributor ID: RedHatEnterpriseServer
15 | Description: Red Hat Enterprise Linux Server release 6.2 (Santiago)
16 | Release: 6.2
17 | Codename: Santiago
18 | ```
19 |
20 | Primary DNS Server (or) Master DNS Server:
21 |
22 | ```
23 | IP Address : 192.168.0.200
24 | Hostname : masterdns.linuxzadmin.local
25 | ```
26 |
27 | Secondary DNS Server (or) Slave DNS Server:
28 |
29 | ```
30 | IP Address : 192.168.0.201
31 | Hostname : slavedns.linuxzadmin.local
32 | ```
33 |
34 | Nodes Machines :
35 |
36 | ```
37 | IP Address : 192.168.0.205 ## Hostname : node1.linuxzadmin.local
38 | IP Address : 192.168.0.206 ## Hostname : node2.linuxzadmin.local
39 | IP Address : 192.168.0.207 ## Hostname : node3.linuxzadmin.local
40 | IP Address : 192.168.0.208 ## Hostname : node4.linuxzadmin.local
41 | ```
42 |
43 | 1. Primary DNS Server (or) Master DNS Server :
44 |
45 | ```
46 | [root@masterdns ~]# yum install bind* -y
47 | ```
48 |
49 | 2. Then Edit the Configuration of name server
50 |
51 | ```
52 | [root@masterdns ~]# vim /etc/named.conf
53 |
54 | //
55 | // named.conf
56 | //
57 | // Provided by Red Hat bind package to configure the ISC BIND named(8) DNS
58 | // server as a caching only nameserver (as a localhost DNS resolver only).
59 | //
60 | // See /usr/share/doc/bind*/sample/ for example named configuration files.
61 | //
62 | options {
63 | listen-on port 53 { 127.0.0.1; 192.168.0.200; }; # Master DNS Servers IP
64 | listen-on-v6 port 53 { ::1; };
65 | directory "/var/named";
66 | dump-file "/var/named/data/cache_dump.db";
67 | statistics-file "/var/named/data/named_stats.txt";
68 | memstatistics-file "/var/named/data/named_mem_stats.txt";
69 | allow-query { localhost; 192.168.0.0/24; }; # IP Range of Hosts
70 | allow-transfer { localhost; 192.168.0.201; }; # Slave DNS Servers IP
71 | recursion yes;
72 |
73 | dnssec-enable yes;
74 | dnssec-validation yes;
75 | dnssec-lookaside auto;
76 |
77 | /* Path to ISC DLV key */
78 | bindkeys-file "/etc/named.iscdlv.key";
79 | managed-keys-directory "/var/named/dynamic";
80 | };
81 |
82 | logging {
83 | channel default_debug {
84 | file "data/named.run";
85 | severity dynamic;
86 | };
87 | };
88 |
89 | zone "." IN {
90 | type hint;
91 | file "named.ca";
92 | };
93 | zone"linuxzadmin.local" IN {
94 | type master;
95 | file "forward.linuxzadmin";
96 | allow-update { none; };
97 | };
98 | zone"0.168.192.in-addr.arpa" IN {
99 | type master;
100 | file "reverse.linuxzadmin";
101 | allow-update { none; };
102 | };
103 | include "/etc/named.rfc1912.zones";
104 | include "/etc/named.root.key";
105 | ```
106 |
107 | Save and Exit the named.conf using wq!
108 |
109 |
110 | 3. Creat the Forward and Reserve Zone files as mentioned in named.conf
111 |
112 | ### FORWARD ZONE :
113 | ------------
114 |
115 | a.) Create a Forward Zone file under /var/named in the name of forward.linuxzadmin
116 |
117 | There are Sample files under the /var/named/ Directory, Just make a Copy of that file and modify it as our need
118 |
119 |
120 | b.) Make a Copy of sample file as below
121 |
122 | ```
123 | [root@masterdns ~]# cp /var/named/named.localhost /var/named/forward.linuxzadmin
124 | ```
125 |
126 | c.) Edit the file forward.linuxzadmin
127 |
128 | ```
129 | [root@masterdns ~]# vim /var/named/forward.linuxzadmin
130 |
131 |
132 | $TTL 86400
133 | @ IN SOA masterdns.linuxzadmin.local. root.linuxzadmin.local. (
134 | 2014051001 ; serial
135 | 3600 ; refresh
136 | 1800 ; retry
137 | 604800 ; expire
138 | 86400 ; minimum
139 | )
140 | @ IN NS masterdns.linuxzadmin.local.
141 | @ IN NS slavedns.linuxzadmin.local.
142 | @ IN A 192.168.0.200
143 | @ IN A 192.168.0.201
144 | @ IN A 192.168.0.205
145 | @ IN A 192.168.0.206
146 | @ IN A 192.168.0.207
147 | @ IN A 192.168.0.208
148 | masterdns IN A 192.168.0.200
149 | slavedns IN A 192.168.0.201
150 | node1 IN A 192.168.0.205
151 | node2 IN A 192.168.0.206
152 | node3 IN A 192.168.0.207
153 | node4 IN A 192.168.0.208
154 | ```
155 |
156 | ### RESERVE ZONE:
157 | ------------
158 |
159 | a.) Create a Reserver Zone file under /var/named in the name of reverse.linuxzadmin
160 |
161 | There are Sample files under the /var/named/ Directory, Just make a Copy of that file and modify it as our need
162 |
163 | b.) Make a Copy of sample file as below
164 |
165 | ```
166 | [root@masterdns ~]# cp /var/named/named.loopback /var/named/reverse.linuxzadmin
167 |
168 | ````
169 |
170 | c.) Edit the file reverse.linuxzadmin
171 |
172 | ```
173 | [root@masterdns ~]# vim /var/named/reverse.linuxzadmin
174 |
175 |
176 | $TTL 86400
177 | @ IN SOA masterdns.linuxzadmin.local. root.linuxzadmin.local. (
178 | 2014051001 ; serial
179 | 3600 ; refresh
180 | 1800 ; retry
181 | 604800 ; expire
182 | 86400 ; minimum
183 | )
184 | @ IN NS masterdns.linuxzadmin.local.
185 | @ IN NS slavedns.linuxzadmin.local.
186 | @ IN PTR linuxzadmin.local.
187 | masterdns IN A 192.168.0.200
188 | slavedns IN A 192.168.0.201
189 | node1 IN A 192.168.0.205
190 | node2 IN A 192.168.0.206
191 | node3 IN A 192.168.0.207
192 | node4 IN A 192.168.0.208
193 | 200 IN PTR masterdns.linuxzadmin.local.
194 | 201 IN PTR slavedns.linuxzadmin.local.
195 | 205 IN PTR node1.linuxzadmin.local.
196 | 206 IN PTR node2.linuxzadmin.local.
197 | 207 IN PTR node3.linuxzadmin.local.
198 | 208 IN PTR node4.linuxzadmin.local.
199 | ```
200 |
201 | 5. The files we created was in root group
202 | We need to change those files to named group
203 |
204 | Here we can see the files which have the root group
205 |
206 | a.) List the files and see the permissions and group of those created zone files
207 |
208 | ```
209 | [root@masterdns ~]# ls -l /var/named/
210 | total 40
211 | drwxr-x---. 6 root named 4096 May 10 19:33 chroot
212 | drwxrwx---. 2 named named 4096 Nov 16 2011 data
213 | drwxrwx---. 2 named named 4096 Nov 16 2011 dynamic
214 | -rw-r-----. 1 root root 550 May 10 20:19 forward.linuxzadmin
215 | -rw-r-----. 1 root named 1892 Feb 18 2008 named.ca
216 | -rw-r-----. 1 root named 152 Dec 15 2009 named.empty
217 | -rw-r-----. 1 root named 152 Jun 21 2007 named.localhost
218 | -rw-r-----. 1 root named 168 Dec 15 2009 named.loopback
219 | -rw-r-----. 1 root root 676 May 10 20:35 reverse.linuxzadmin
220 | drwxrwx---. 2 named named 4096 Nov 16 2011 slaves
221 | ```
222 |
223 | b.) Change the group to named using below Command
224 |
225 | ```
226 | [root@masterdns ~]# chgrp named /var/named/forward.linuxzadmin
227 | [root@masterdns ~]# chgrp named /var/named/reverse.linuxzadmin
228 | ```
229 |
230 | Here we can see the Output now which changed to named group
231 |
232 | ```
233 | [root@masterdns ~]# ls -l /var/named/
234 | total 40
235 | drwxr-x---. 6 root named 4096 May 10 19:33 chroot
236 | drwxrwx---. 2 named named 4096 Nov 16 2011 data
237 | drwxrwx---. 2 named named 4096 Nov 16 2011 dynamic
238 | -rw-r-----. 1 root named 550 May 10 20:19 forward.linuxzadmin
239 | -rw-r-----. 1 root named 1892 Feb 18 2008 named.ca
240 | -rw-r-----. 1 root named 152 Dec 15 2009 named.empty
241 | -rw-r-----. 1 root named 152 Jun 21 2007 named.localhost
242 | -rw-r-----. 1 root named 168 Dec 15 2009 named.loopback
243 | -rw-r-----. 1 root named 676 May 10 20:35 reverse.linuxzadmin
244 | drwxrwx---. 2 named named 4096 Nov 16 2011 slaves
245 | ```
246 |
247 | c.) Then we need to check the Context of the files under
248 |
249 | ```
250 | [root@masterdns ~]# ls -lZd /etc/named.conf
251 | -rw-r-----. root named system_u:object_r:named_conf_t:s0 /etc/named.conf
252 |
253 | /etc/named.conf
254 | /var/named/forward.linuxzadmin
255 | /var/named/reverse.linuxzadmin
256 | ```
257 |
258 | It want to be in the context of named_conf_t
259 |
260 | If its Different than this then we need to restore the context using
261 |
262 | ```
263 | # restorecon /etc/named.conf
264 | ```
265 |
266 | 6. Now we need to Check for the Error in the conf file and Zone file
267 |
268 | ```
269 | [root@masterdns ~]# named-checkconf /etc/named.conf
270 |
271 | [root@masterdns ~]# named-checkzone linuxzadmin.local /var/named/forward.linuxzadmin
272 | zone linuxzadmin.local/IN: loaded serial 2014051001
273 | OK
274 |
275 | [root@masterdns ~]# named-checkzone 0.168.192.in-addr.arpa /var/named/reverse.linuxzadmin
276 | zone 0.168.192.in-addr.arpa/IN: loaded serial 2014051001
277 | OK
278 | ```
279 |
280 | 7. Start the DNS Service
281 |
282 | ```
283 | [root@masterdns ~]# service named restart
284 | Stopping named: [ OK ]
285 | Starting named: [ OK ]
286 | ```
287 |
288 | 8. Make the named Service in runlevels
289 |
290 | ```
291 | [root@masterdns ~]# chkconfig named on
292 |
293 | [root@masterdns ~]# chkconfig --list named
294 | named 0:off 1:off 2:on 3:on 4:on 5:on 6:off
295 | ```
296 |
297 | 9. Deploy iptables Rules to allow DNS service
298 |
299 | Add the iptables rules
300 |
301 |
302 | ```
303 | iptables -A INPUT -i lo -j ACCEPT
304 | iptables -A INPUT -m state --state ESTABLISHED,RELATED -j ACCEPT
305 | iptables -A INPUT -p tcp -m state --state NEW -m tcp --dport 22 -j ACCEPT
306 | iptables -A INPUT -p tcp -m state --state NEW -m tcp --dport 53 -j ACCEPT
307 | iptables -A INPUT -p udp -m state --state NEW -m udp --dport 53 -j ACCEPT
308 | iptables -A INPUT -j DROP
309 | ```
310 |
311 | Save the iptables Using
312 |
313 | ```
314 | [root@masterdns ~]# service iptables save
315 | iptables: Saving firewall rules to /etc/sysconfig/iptables:[ OK ]
316 | ```
317 |
318 | Restart the iptables Service Using
319 |
320 |
321 | ```
322 | [root@masterdns ~]# service iptables restart
323 | iptables: Flushing firewall rules: [ OK ]
324 | iptables: Setting chains to policy ACCEPT: filter [ OK ]
325 | iptables: Unloading modules: [ OK ]
326 | iptables: Applying firewall rules: [ OK ]
327 | ```
328 |
329 | Make it to run in multi run levels
330 |
331 | ```
332 | [root@masterdns ~]# chkconfig iptables on
333 |
334 | [root@masterdns ~]# chkconfig --list iptables
335 | iptables 0:off 1:off 2:on 3:on 4:on 5:on 6:off
336 | ```
337 |
338 | 10. Check the DNS server using Dig Command
339 |
340 |
341 | ```
342 | [root@masterdns ~]# dig masterdns.linuxzadmin.local
343 |
344 | ; <<>> DiG 9.7.3-P3-RedHat-9.7.3-8.P3.el6 <<>> masterdns.linuxzadmin.local
345 | ;; global options: +cmd
346 | ;; Got answer:
347 | ;; ->>HEADER<<- opcode: QUERY, status: NOERROR, id: 41316
348 | ;; flags: qr aa rd ra; QUERY: 1, ANSWER: 1, AUTHORITY: 2, ADDITIONAL: 1
349 |
350 | ;; QUESTION SECTION:
351 | ;masterdns.linuxzadmin.local. IN A
352 |
353 | ;; ANSWER SECTION:
354 | masterdns.linuxzadmin.local. 86400 IN A 192.168.0.200
355 |
356 | ;; AUTHORITY SECTION:
357 | linuxzadmin.local. 86400 IN NS masterdns.linuxzadmin.local.
358 | linuxzadmin.local. 86400 IN NS slavedns.linuxzadmin.local.
359 |
360 | ;; ADDITIONAL SECTION:
361 | slavedns.linuxzadmin.local. 86400 IN A 192.168.0.201
362 |
363 | ;; Query time: 0 msec
364 | ;; SERVER: 192.168.0.200#53(192.168.0.200)
365 | ;; WHEN: Sat May 10 23:07:10 2014
366 | ;; MSG SIZE rcvd: 114
367 | ```
368 |
369 | 11. Check for the Available Hosts in DNS
370 |
371 |
372 | ```
373 | [root@masterdns ~]# nslookup linuxzadmin.local
374 | Server: 192.168.0.200
375 | Address: 192.168.0.200#53
376 |
377 | Name: linuxzadmin.local
378 | Address: 192.168.0.207
379 | Name: linuxzadmin.local
380 | Address: 192.168.0.208
381 | Name: linuxzadmin.local
382 | Address: 192.168.0.200
383 | Name: linuxzadmin.local
384 | Address: 192.168.0.201
385 | Name: linuxzadmin.local
386 | Address: 192.168.0.205
387 | Name: linuxzadmin.local
388 | Address: 192.168.0.206
389 | ```
390 |
391 | Now we Need to Setup the Slave DNS server
392 |
393 |
394 | ### Secondary DNS server (or) Slave DNS Server
395 |
396 | 1. Host Deployed with RHEL Server
397 |
398 | ```
399 | [root@slavedns ~]# lsb_release -a
400 | LSB Version: :core-4.0-amd64:core-4.0-noarch:graphics-4.0-amd64:graphics-4.0-noarch:printing-4.0-amd64:printing-4.0-noarch
401 | Distributor ID: RedHatEnterpriseServer
402 | Description: Red Hat Enterprise Linux Server release 6.2 (Santiago)
403 | Release: 6.2
404 | Codename: Santiago
405 | ```
406 |
407 | 2. Insatall the BIND package in Server
408 |
409 | ```
410 | [root@slavedns ~]# yum install bind* -y
411 | ```
412 |
413 | 3. Edit the named.conf to add the configuration
414 |
415 | ```
416 | [root@slavedns ~]# vim /etc/named.conf
417 |
418 |
419 | //
420 | // named.conf
421 | //
422 | // Provided by Red Hat bind package to configure the ISC BIND named(8) DNS
423 | // server as a caching only nameserver (as a localhost DNS resolver only).
424 | //
425 | // See /usr/share/doc/bind*/sample/ for example named configuration files.
426 | //
427 |
428 | options {
429 | listen-on port 53 { 127.0.0.1; 192.168.0.201; }; # Slave DNS server's IP
430 | listen-on-v6 port 53 { ::1; };
431 | directory "/var/named";
432 | dump-file "/var/named/data/cache_dump.db";
433 | statistics-file "/var/named/data/named_stats.txt";
434 | memstatistics-file "/var/named/data/named_mem_stats.txt";
435 | allow-query { localhost; 192.168.0.0/24; };
436 | recursion yes;
437 |
438 | dnssec-enable yes;
439 | dnssec-validation yes;
440 | dnssec-lookaside auto;
441 |
442 | /* Path to ISC DLV key */
443 | bindkeys-file "/etc/named.iscdlv.key";
444 | managed-keys-directory "/var/named/dynamic";
445 | };
446 |
447 | logging {
448 | channel default_debug {
449 | file "data/named.run";
450 | severity dynamic;
451 | };
452 | };
453 |
454 | zone "." IN {
455 | type hint;
456 | file "named.ca";
457 | };
458 | zone"linuxzadmin.local" IN {
459 | type slave;
460 | file "slaves/linuxzadmin.fwd";
461 | masters { 192.168.0.200; };
462 | };
463 | zone"0.168.192.in-addr.arpa" IN {
464 | type slave;
465 | file "slaves/linuxzadmin.rev";
466 | masters { 192.168.0.200; };
467 | };
468 | include "/etc/named.rfc1912.zones";
469 | include "/etc/named.root.key";
470 | ```
471 |
472 | 4. Start the named Service and make it to Run in Multi Runlevels
473 |
474 | ```
475 | [root@slavedns ~]# service named start
476 | Starting named: [ OK ]
477 |
478 | [root@slavedns ~]# chkconfig named on
479 |
480 | [root@slavedns ~]# chkconfig --list named
481 | named 0:off 1:off 2:on 3:on 4:on 5:on 6:off
482 | ```
483 |
484 | 5. We Don't need to Create the Zone file here, If will be resolved from Master Server While we Start the Named Service
485 |
486 | ```
487 | [root@slavedns ~]# ls -l /var/named/slaves/
488 | total 8
489 | -rw-r--r--. 1 named named 634 May 10 23:35 linuxzadmin.fwd
490 | -rw-r--r--. 1 named named 773 May 10 23:35 linuxzadmin.rev
491 | ```
492 |
493 | 6. Here we can Check the Both File's
494 |
495 | ```
496 | [root@slavedns ~]# cat /var/named/slaves/linuxzadmin.fwd
497 | $ORIGIN .
498 | $TTL 86400 ; 1 day
499 | linuxzadmin.local IN SOA masterdns.linuxzadmin.local. root.linuxzadmin.local. (
500 | 2014051001 ; serial
501 | 3600 ; refresh (1 hour)
502 | 1800 ; retry (30 minutes)
503 | 604800 ; expire (1 week)
504 | 86400 ; minimum (1 day)
505 | )
506 | NS slavedns.linuxzadmin.local.
507 | NS masterdns.linuxzadmin.local.
508 | A 192.168.0.200
509 | A 192.168.0.201
510 | A 192.168.0.205
511 | A 192.168.0.206
512 | A 192.168.0.207
513 | A 192.168.0.208
514 | $ORIGIN linuxzadmin.local.
515 | masterdns A 192.168.0.200
516 | node1 A 192.168.0.205
517 | node2 A 192.168.0.206
518 | node3 A 192.168.0.207
519 | node4 A 192.168.0.208
520 | slavedns A 192.168.0.201
521 | ```
522 |
523 | This is the Out put of linuxzadmin.rev
524 |
525 | ```
526 | [root@slavedns ~]# cat /var/named/slaves/linuxzadmin.rev
527 | $ORIGIN .
528 | $TTL 86400 ; 1 day
529 | 0.168.192.in-addr.arpa IN SOA masterdns.linuxzadmin.local. root.linuxzadmin.local. (
530 | 2014051001 ; serial
531 | 3600 ; refresh (1 hour)
532 | 1800 ; retry (30 minutes)
533 | 604800 ; expire (1 week)
534 | 86400 ; minimum (1 day)
535 | )
536 | NS slavedns.linuxzadmin.local.
537 | NS masterdns.linuxzadmin.local.
538 | PTR linuxzadmin.local.
539 | $ORIGIN 0.168.192.in-addr.arpa.
540 | 200 PTR masterdns.linuxzadmin.local.
541 | 201 PTR slavedns.linuxzadmin.local.
542 | 205 PTR node1.linuxzadmin.local.
543 | 206 PTR node2.linuxzadmin.local.
544 | 207 PTR node3.linuxzadmin.local.
545 | 208 PTR node4.linuxzadmin.local.
546 | masterdns A 192.168.0.200
547 | node1 A 192.168.0.205
548 | node2 A 192.168.0.206
549 | node3 A 192.168.0.207
550 | node4 A 192.168.0.208
551 | slavedns A 192.168.0.201
552 | ```
553 |
554 | 7. Check the DNS Server using dig from Slave Server
555 |
556 | ```
557 | [root@slavedns ~]# dig masterdns.linuxzadmin.local
558 |
559 | ; <<>> DiG 9.7.3-P3-RedHat-9.7.3-8.P3.el6 <<>> masterdns.linuxzadmin.local
560 | ;; global options: +cmd
561 | ;; Got answer:
562 | ;; ->>HEADER<<- opcode: QUERY, status: NOERROR, id: 11178
563 | ;; flags: qr aa rd ra; QUERY: 1, ANSWER: 1, AUTHORITY: 2, ADDITIONAL: 1
564 |
565 | ;; QUESTION SECTION:
566 | ;masterdns.linuxzadmin.local. IN A
567 |
568 | ;; ANSWER SECTION:
569 | masterdns.linuxzadmin.local. 86400 IN A 192.168.0.200
570 |
571 | ;; AUTHORITY SECTION:
572 | linuxzadmin.local. 86400 IN NS masterdns.linuxzadmin.local.
573 | linuxzadmin.local. 86400 IN NS slavedns.linuxzadmin.local.
574 |
575 | ;; ADDITIONAL SECTION:
576 | slavedns.linuxzadmin.local. 86400 IN A 192.168.0.201
577 |
578 | ;; Query time: 2 msec
579 | ;; SERVER: 192.168.0.200#53(192.168.0.200)
580 | ;; WHEN: Sat May 10 23:42:03 2014
581 | ;; MSG SIZE rcvd: 114
582 | ```
583 |
584 | ### Client Side :
585 |
586 |
587 | 8. Now we Need to Assign the Name Server for the Node's in our network to get assigned a host name from DNS server.
588 |
589 |
590 | Use the Setup Command and assign the Primary and Secondary DNS server's
591 | We Don't need to Assing the hostname
592 |
593 | a.) Just Assign the IP, Subnet, Gateway, PDNS, SDNS
594 |
595 | b.) Restart the Network and Check the hostname
596 |
597 |
598 | c.) Here i have not changed the hostname
599 |
600 |
601 | ```
602 | [root@node1 ~]# cat /etc/sysconfig/network
603 | NETWORKING=yes
604 | HOSTNAME=localhost.localdomain
605 | ```
606 |
607 | d.) Here we can see the hostname Assigned from the DNS server
608 |
609 | ```
610 | [root@node1 ~]# hostname
611 | node1.linuxzadmin.local
612 | ```
613 |
614 | e.) If we need to check the DNS just do a Dig
615 |
616 |
617 | ```
618 | [root@node1 ~]# dig masterdns.linuxzadmin.local
619 |
620 | ; <<>> DiG 9.7.3-P3-RedHat-9.7.3-8.P3.el6 <<>> masterdns.linuxzadmin.local
621 | ;; global options: +cmd
622 | ;; Got answer:
623 | ;; ->>HEADER<<- opcode: QUERY, status: NOERROR, id: 51788
624 | ;; flags: qr aa rd ra; QUERY: 1, ANSWER: 1, AUTHORITY: 2, ADDITIONAL: 1
625 |
626 | ;; QUESTION SECTION:
627 | ;masterdns.linuxzadmin.local. IN A
628 |
629 | ;; ANSWER SECTION:
630 | masterdns.linuxzadmin.local. 86400 IN A 192.168.0.200
631 |
632 | ;; AUTHORITY SECTION:
633 | linuxzadmin.local. 86400 IN NS slavedns.linuxzadmin.local.
634 | linuxzadmin.local. 86400 IN NS masterdns.linuxzadmin.local.
635 |
636 | ;; ADDITIONAL SECTION:
637 | slavedns.linuxzadmin.local. 86400 IN A 192.168.0.201
638 |
639 | ;; Query time: 1 msec
640 | ;; SERVER: 192.168.0.200#53(192.168.0.200)
641 | ;; WHEN: Sat May 10 23:58:32 2014
642 | ;; MSG SIZE rcvd: 114
643 | ```
644 |
645 | 9. If we need to flush the DNS Server Caches Use Below Command
646 |
647 | ```
648 | # yum install nscd
649 | # nscd -i hosts
650 | ```
651 |
652 | That's it we have a DNS server now in RHEL Server
653 |
654 |
--------------------------------------------------------------------------------
/Installing Kaltura CE 5 In Centos 6.3.txt:
--------------------------------------------------------------------------------
1 | Installing Kaltura CE 5 In Centos 6.3
2 |
3 |
4 | Kaltura provides different services like Streaming, Transcoding, Advertising, GeoIP, Syndication, Distribution, Security, Monitoring and more. You can easily integrate Kaltura with different Content Management Systems and Learning Management Systems like WordPress, Joomla, Drupal, Moodle, Sakai, Blackboard, Microsoft Sharepoint.
5 |
6 |
7 | Now let me explain about how to install kaltura in CentOS Here i chose community edition for installtion. Before going to install Kaltura CE 5 you need to satisfy the prerequisites of Hardware and Software Requirements.
8 |
9 | ### Hardware Specifications
10 |
11 | The Hardware requirements should vary according to the expected usage estimations. The minimum requirements to install Kaltura is as follow is
12 |
13 |
14 | ```
15 |
16 | 1 GB RAM
17 | 2GHz + Dual Core Processor (preferably Multi-Core Intel based)
18 | 5 GB Free Hard disk Space [ It depends upon the usage, but 5 GB is enough for the installation ]
19 |
20 | ```
21 |
22 |
23 | ### Software Specifications
24 |
25 |
26 | ```
27 | Web Server ( Apache )
28 | Database Server ( MySQL )
29 | Mail Server ( SMTP / Postfix )
30 | Application Packages ( Java, PHP )
31 | Monitoring ( Xymon – This is optional)
32 | Kaltura CE ( Main Application in tar file)
33 | ```
34 |
35 |
36 |
37 | First we need to update the Server
38 |
39 | ```
40 | # yum install update
41 |
42 | ```
43 |
44 |
45 | Install the gcc compiler
46 |
47 |
48 | ```
49 | # yum install gcc* -y
50 | # yum install vim make rsync
51 | ```
52 |
53 |
54 | ### Install Apache server
55 |
56 |
57 | ```
58 |
59 | # yum install httpd* -y
60 | # yum install httpd-devel -y
61 |
62 | ```
63 |
64 |
65 | Enable the modules in Apache.conf file at follwing lines
66 |
67 |
68 |
69 | ```
70 |
71 | # 190 LoadModule rewrite_module modules/mod_rewrite.so
72 | # 173 LoadModule headers_module modules/mod_headers.so
73 | # 171 LoadModule expires_module modules/mod_expires.so
74 | # 212 LoadModule filter_module modules/mod_filter.so
75 | # 172 LoadModule deflate_module modules/mod_deflate.so
76 | # 168 LoadModule env_module modules/mod_env.so
77 | # 191 LoadModule proxy_module modules/mod_proxy.so
78 |
79 | ```
80 |
81 | Save and Exit from the apache.conf
82 |
83 |
84 | By Default There will be no file_cache module in apache we need to install it using Compiling
85 |
86 | To get it use this below Link
87 |
88 |
89 | ```
90 |
91 | wget http://olex.openlogic.com/content/openlogic/apache/2.2.15/openlogic-apache-2.2.15-all-src-1.zip
92 |
93 | ```
94 |
95 | Unzip it under any were
96 |
97 | ```
98 |
99 | # unzip openlogic-apache-2.2.15-all-src-1.zip
100 |
101 |
102 | ```
103 |
104 | Open the Directory
105 |
106 |
107 | ```
108 |
109 | # cd apache-2.2.15-src/modules/cache/
110 |
111 |
112 | ```
113 |
114 | Install the module file_cache using Below Command
115 |
116 |
117 | ```
118 | # apxs -i -a -c mod_file_cache.c
119 |
120 |
121 | ```
122 |
123 |
124 | If not Its Help to install Use the below Script to get install all gcc
125 |
126 |
127 | ```
128 | #!/bin/sh -e
129 |
130 | if [ `id -u` -ne 0 ];then
131 | echo "You need to be root for this."
132 | exit 1
133 | fi
134 | if [ `which yum 2>/dev/null` ];then
135 | TOOL=yum
136 | DEV_PACK=httpd-devel
137 | APACHE_VER=`rpm -q httpd --queryformat %{version}`
138 | elif [ `which apt-get 2>/dev/null` ];then
139 | TOOL=apt-get
140 | DEV_PACK=apache2-dev
141 | APACHE_VER=`dpkg -l apache2|grep ii|awk -F " " '{print $3}'|awk -F "-" '{print $1}'`
142 | fi
143 | TMPDIR=/tmp/compile_mod_cache_file.$$
144 | mkdir -p $TMPDIR
145 | $TOOL install $DEV_PACK wget gcc
146 | wget http://archive.apache.org/dist/httpd/httpd-$APACHE_VER.tar.gz -O $TMPDIR/httpd-$APACHE_VER.tar.gz
147 | tar zxf $TMPDIR/httpd-$APACHE_VER.tar.gz -C $TMPDIR/
148 | cd $TMPDIR/httpd-$APACHE_VER/modules/cache
149 | if [ `which apxs2 2>/dev/null` ];then
150 | APXS_BIN=apxs2
151 | else
152 | APXS_BIN=apxs
153 | fi
154 | $APXS_BIN -i -a -c mod_file_cache.c
155 | echo "Should I delete $TMPDIR? [y|n]"
156 | read ANS
157 | if [ "$ANS" = 'Y' -o "$ANS" = 'y' ];then
158 | rm -rf $TMPDIR
159 | fi
160 | ```
161 |
162 | Save it as script.sh then Chmod 777 and Execute as ./script.sh
163 |
164 |
165 |
166 | Verify its Added or not by Opening the httpd.conf Configuration file
167 |
168 | Below Line 215 as
169 |
170 |
171 | ```
172 | # cat /etc/httpd/conf/httpd.conf
173 | # 216 LoadModule file_cache_module /usr/lib64/httpd/modules/mod_file_cache.so
174 |
175 |
176 | ```
177 |
178 |
179 | Restart the Apache
180 |
181 |
182 | ```
183 |
184 | # /etc/init.d/httpd start
185 |
186 | ```
187 |
188 |
189 | ### PHP Installation
190 |
191 |
192 | PHP 5.2.x/PHP 5.3.x are supported.
193 | Both php and php-cli must Need to Installed.
194 | The following php extensions should be included and enabled:
195 | fileinfo, bc, calander, date, filter, zlib, hash, mbstring, openssl, pcre, Gd, Curl, Memcache, Mysql, Mysqli, Exif, ftp, iconv, json, Session, apc (recommended), spl, DOM, SimpleXML, xml, xsl, ctype, ssh2
196 |
197 |
198 |
199 | ```
200 |
201 | # yum install php php-cli php-devel php-gd php-mbstring php-xml php-pecl-memcache.x86_64 php-pecl-memcached
202 |
203 | ```
204 |
205 |
206 | Check Which Modules are installed For PHP Using command
207 |
208 |
209 | ```
210 |
211 | # php -m
212 |
213 | ```
214 |
215 |
216 | If its not Available there we need to install it one by one manually
217 | As im Doing here below
218 |
219 |
220 | ```
221 | # yum install libtool
222 | # yum install php-bcmath
223 | # yum install memcached
224 | # yum install php-mysql
225 | # yum install ImageMagick
226 | # yum install php-pecl-memcache
227 | # yum install php-xml
228 | # yum install fileinfo bc calander date filter zlib hash mbstring openssl pcre Gd Curl Memcache Mysql Mysqli
229 | # yum install php-cli.x86_64 php-common.x86_64 php-dba.x86_64 php-devel.x86_64 php-embedded.x86_64 php-enchant.x86_64 php-fpm.x86_64 php-gd.x86_64 php-imap.x86_64 php-intl.x86_64 php-ldap.x86_64 php-mbstring.x86_64
230 | # pecl install apc
231 | ```
232 |
233 |
234 | But Need to Follow Some Steps For Enabling SSH2 and APC
235 |
236 | Follow This Step to Get install SSH2 Module For Php
237 |
238 | Firstly, we’re going to install the dependencies:
239 |
240 |
241 |
242 | ```
243 | yum install gcc php-devel php-pear libssh2 libssh2-devel
244 |
245 | ```
246 |
247 | These will allow us to build the SSH2 extension using pecl.
248 |
249 |
250 | ```
251 | pecl install -f ssh2
252 |
253 | ```
254 |
255 | After running that command, it should stop at a line like
256 |
257 |
258 | ```
259 | .........done: 26,223 bytes
260 | 6 source files, building
261 | running: phpize
262 | Configuring for:
263 | PHP Api Version: 20090626
264 | Zend Module Api No: 20090626
265 | Zend Extension Api No: 220090626
266 | libssh2 prefix? [autodetect] :
267 |
268 | ```
269 |
270 | All you have to do is hit Enter and it should detect the proper path. Once the install is completed, you just have to tell PHP to load the extension when it boots.
271 |
272 | ```
273 | touch /etc/php.d/ssh2.ini
274 | echo extension=ssh2.so > /etc/php.d/ssh2.ini
275 | ```
276 |
277 | Now restart your webserver and test to see if the changes took effect.
278 | And Chek The Module Installed
279 |
280 |
281 | ```
282 | /etc/init.d/httpd restart
283 | php -m | grep ssh2
284 |
285 | ```
286 |
287 |
288 | First, we need the pecl command so we can download and install APC from the repositories.
289 |
290 | Do to so, we execute the following command:
291 |
292 |
293 | ```
294 | # yum install pcre-devel
295 |
296 | # yum install php-pear
297 |
298 | ```
299 |
300 |
301 | But, this will not run on its own, we need the following package for the phpize command:
302 |
303 |
304 | ```
305 | # yum install php-devel
306 |
307 | ```
308 |
309 | We also need the apxs command, which is installed via the following package:
310 |
311 | ```
312 |
313 | # yum install httpd-devel
314 |
315 | ```
316 | Now we have all the software we need, so we install apc via the pecl command:
317 |
318 |
319 | ```
320 |
321 | # pecl install apc
322 |
323 |
324 | ```
325 |
326 | Once that finishes, we need to enable apc in Apache's configuration. the following command should do this for us.
327 |
328 |
329 | ```
330 |
331 | echo "extension=apc.so" > /etc/php.d/apc.ini
332 |
333 |
334 | ```
335 |
336 |
337 | Then we restart Apache:
338 |
339 |
340 | ```
341 |
342 | /etc/init.d/httpd start
343 |
344 | ```
345 |
346 | Output Should Be Like this If not u not Done ...
347 |
348 |
349 | ```
350 | [root@kaltura ~]# php -m
351 | [PHP Modules]
352 | apc
353 | bcmath
354 | bz2
355 | calendar
356 | Core
357 | ctype
358 | curl
359 | date
360 | dba
361 | dom
362 | enchant
363 | ereg
364 | exif
365 | fileinfo
366 | filter
367 | ftp
368 | gd
369 | gettext
370 | gmp
371 | hash
372 | iconv
373 | imap
374 | intl
375 | json
376 | ldap
377 | libxml
378 | mbstring
379 | memcache
380 | mysql
381 | mysqli
382 | openssl
383 | pcntl
384 | pcre
385 | PDO
386 | pdo_mysql
387 | pdo_sqlite
388 | Phar
389 | readline
390 | Reflection
391 | session
392 | shmop
393 | SimpleXML
394 | sockets
395 | SPL
396 | sqlite3
397 | ssh2
398 | standard
399 | tokenizer
400 | wddx
401 | xml
402 | xmlreader
403 | xmlwriter
404 | xsl
405 | zip
406 | zlib
407 |
408 | [Zend Modules]
409 | ```
410 |
411 |
412 | Create a File info.php under www/hmtl to see weather all the php extensions were installed Properly
413 |
414 |
415 | ```
416 |
417 | # vim /var/www/html/info.php
418 |
419 | ```
420 |
421 |
422 | Then Add these Codes to Get all php infos
423 |
424 |
425 | ```
426 |
427 |
428 | ```
429 |
430 | Verify that the following settings within the php.ini file are set on each server (for both php and php-cli)
431 |
432 |
433 |
434 | For PHP 5.3: Verify that request_order parameter includes C, G and P (recommended: "CGP")
435 | In Line 682
436 |
437 |
438 |
439 | ```
440 |
441 | # vim /etc/php.ini
442 |
443 | # request_order = "CGP"
444 |
445 |
446 | ```
447 |
448 |
449 | For PHP 5.2: Verify that variables_order parameter in php.ini includes C, G and P.
450 |
451 |
452 | Please verify that date.timezone parameter is set to the right timezone.
453 |
454 | Have a lot for ur location Time Zone in php
455 |
456 |
457 | ```
458 |
459 | http://php.net/manual/en/timezones.asia.php
460 |
461 | ```
462 |
463 | Change in Line number 946
464 |
465 |
466 | ```
467 |
468 | date.timezone = Asia/Calcutta
469 |
470 | ```
471 |
472 | And change Longitude and Latitude too With Value
473 |
474 |
475 | ```
476 | date.default_latitude = 28.40
477 | date.default_longitude = 77.13
478 |
479 | ```
480 |
481 |
482 | ### MSQL Installation
483 |
484 | MySQL 5.1.37 or higher
485 |
486 | Install mysql and its Depencies , Already many of them were installed
487 |
488 |
489 | ```
490 |
491 | # yum install mysql mysql-server mysql-devel
492 |
493 | ```
494 |
495 |
496 | Please verify that mysql server character set is UTF8.
497 |
498 | ```
499 | # vim /etc/my.cnf
500 |
501 | ```
502 |
503 | Give The Entry in these headings
504 |
505 |
506 | ```
507 | [mysqld]
508 | character-set-server = utf8
509 |
510 | [client]
511 | default-character-set=utf8
512 |
513 | ```
514 |
515 |
516 | The following settings should be added to the my.cnf file
517 |
518 |
519 |
520 | ```
521 | lower_case_table_names = 1
522 | thread_stack = 262144
523 | open_files_limit = 20000
524 |
525 | ```
526 |
527 | Then Restart the mysql to take effect
528 |
529 |
530 | ```
531 |
532 | # /etc/init.d/mysqld restart
533 |
534 |
535 | ```
536 |
537 |
538 | Output Will be like this
539 |
540 |
541 | ```
542 | Stopping mysqld: [ OK ]
543 | Initializing MySQL database: Installing MySQL system tables...
544 | OK
545 | Filling help tables...
546 | OK
547 |
548 | To start mysqld at boot time you have to copy
549 | support-files/mysql.server to the right place for your system
550 |
551 | PLEASE REMEMBER TO SET A PASSWORD FOR THE MySQL root USER !
552 | To do so, start the server, then issue the following commands:
553 |
554 | /usr/bin/mysqladmin -u root password 'new-password'
555 | /usr/bin/mysqladmin -u root -h kaltura.example.com password 'new-password'
556 |
557 | Alternatively you can run:
558 | /usr/bin/mysql_secure_installation
559 |
560 | which will also give you the option of removing the test
561 | databases and anonymous user created by default. This is
562 | strongly recommended for production servers.
563 |
564 | ```
565 |
566 | After all Mysql Entry the Conf File looks like this
567 |
568 |
569 | ```
570 |
571 | [mysqld]
572 | character-set-server = utf8
573 | lower_case_table_names = 1
574 | thread_stack = 262144
575 | open_files_limit = 20000
576 | datadir=/var/lib/mysql
577 | socket=/var/lib/mysql/mysql.sock
578 | user=mysql
579 | # Disabling symbolic-links is recommended to prevent assorted security risks
580 | symbolic-links=0
581 |
582 | [client]
583 | default-character-set=utf8
584 |
585 | [mysqld_safe]
586 | log-error=/var/log/mysqld.log
587 | pid-file=/var/run/mysqld/mysqld.pid
588 |
589 | ```
590 |
591 | ### Set MySQL password
592 |
593 |
594 | ```
595 |
596 | # /usr/bin/mysqladmin -u root password 'admin123$'
597 |
598 |
599 | ```
600 |
601 |
602 | You can login mysql by using the following command
603 |
604 |
605 | ```
606 |
607 | # mysql -u root -p
608 |
609 | ```
610 |
611 | These Packages Want to be installed
612 |
613 |
614 | ```
615 |
616 | # yum install curl
617 | # yum install memcached
618 | # yum install memcached libmemcached libmemcached-devel php-pecl-memcache python-memcached.noarch perl-Cache-Memcached.noarch
619 | # yum install ImageMagick ImageMagick-perl
620 | # yum install ImageMagick-c++ ImageMagick-c++-devel ImageMagick-devel ImageMagick-perl ImageMagick autotrace
621 |
622 | ```
623 |
624 |
625 |
626 | ### 32-bit packages required on 64-bit servers
627 |
628 |
629 | Some of the binaries that are in use by the Kaltura Platform are available in a 32-bit compiled version only. To enable these binaries,
630 | the following packages (or equivalents per Linus Distribution) may be required on a 64-bit server
631 |
632 |
633 |
634 | ```
635 |
636 | # yum install glibc.i686 , ncurses-libs, zlib-1.2.x , freetype , bzip2-libs
637 |
638 | # yum install zlib.i686
639 |
640 | ```
641 |
642 | ### Java Runtime Environment Installation
643 |
644 |
645 |
646 | Here we can Find
647 |
648 |
649 | ```
650 |
651 | http://www.oracle.com/technetwork/java/javase/downloads/java-archive-downloads-javase7-521261.html
652 |
653 | ```
654 |
655 |
656 | Download this Using Wget
657 |
658 |
659 | ```
660 |
661 | # wget http://download.oracle.com/otn/java/jdk/7u21-b11/jre-7u21-linux-x64.rpm?AuthParam=1377177239_311418c441de9add2ec7f76b92ad6904
662 |
663 | ```
664 |
665 | Then Change the Extension using move
666 |
667 |
668 | ```
669 |
670 | # mv jre-7u21-linux-x64.rpm\?AuthParam\=1377177239_311418c441de9add2ec7f76b92ad6904 jre-7u21-linux-x64.rpm
671 |
672 | ```
673 |
674 |
675 | Then Install using rpm command
676 |
677 | ```
678 | # rpm -vh jre-7u21-linux-x64.rpm
679 | ```
680 |
681 |
682 | Output Will be like this
683 |
684 |
685 |
686 | ```
687 | rpm: --hash (-h) may only be specified during package installation
688 | [root@kaltura ~]# rpm -ivh jre-7u21-linux-x64.rpm
689 | Preparing... ########################################### [100%]
690 | 1:jre ########################################### [100%]
691 | Unpacking JAR files...
692 | rt.jar...
693 | jsse.jar...
694 | charsets.jar...
695 | localedata.jar...
696 |
697 | ```
698 |
699 | ### Pentaho data integration
700 |
701 |
702 | The pentaho data integration package (version 3.2) is required for the analytics module. It should be downloaded and extracted to the/usr/local/pentaho/pdi directory
703 |
704 |
705 | Create the /usr/local/pentaho/ directory
706 |
707 |
708 | ```
709 |
710 | # mkdir /usr/local/pentaho/
711 |
712 | ```
713 |
714 | Change to the/usr/local/pentaho/directory
715 |
716 |
717 | ```
718 | # cd /usr/local/pentaho/
719 |
720 | ```
721 |
722 |
723 | Download the pentaho data-integration package.
724 |
725 |
726 |
727 | ```
728 |
729 | #wget http://sourceforge.net/projects/pentaho/files/Data%20Integration/3.2.0-stable/pdi-ce-3.2.0-stable.tar.gz/download
730 |
731 | ```
732 |
733 |
734 | Extract the pentaho data-integration package.
735 |
736 |
737 |
738 | ```
739 |
740 | # tar -xvfz pdi-ce-3.2.0-stable.tar.gz -C /usr/local/pentaho
741 |
742 |
743 | ```
744 |
745 |
746 | Rename the data-integration root directory into pdi.
747 |
748 |
749 | ```
750 |
751 | # mv data-integration pdi
752 |
753 |
754 | ```
755 |
756 |
757 | Mail Server Setup
758 |
759 | Install MTA in server
760 |
761 |
762 | ```
763 |
764 | # yum install postfix
765 |
766 | ```
767 |
768 |
769 |
770 | ### Xymon – Monitoring Tool
771 |
772 |
773 |
774 | Download Xymon from sourceforge
775 |
776 |
777 | ```
778 |
779 | # wget http://sourceforge.net/projects/xymon/files/latest/download
780 |
781 | ```
782 |
783 | Xymon requires rrdtools and pcre. So install those packages before to proceed
784 |
785 |
786 | ```
787 |
788 | # yum install rrdtool rrdtool-devel rrdtool-tcl rrdtool-ruby rrdtool-python rrdtool-php rrdtool-perl pcre pcre-static pcre-devel mingw32-pcre.noarch
789 |
790 | ```
791 |
792 | Extract it using tar -zxvf
793 |
794 |
795 | After completing this installation start the xymon installation. You can install Xymon by simple steps
796 |
797 |
798 | ```
799 |
800 | # ./configure
801 | # make
802 | # make install
803 |
804 | ```
805 |
806 | During the installation it will prompt you many queries, give the proper answer else the installation process will exit
807 |
808 |
809 |
810 | Disable SELinux
811 |
812 |
813 |
814 | ```
815 |
816 | # vim /etc/sysconfig/selinux
817 |
818 |
819 | ```
820 |
821 | Change the selinux from enforcing to disabled
822 |
823 |
824 | ```
825 |
826 | # selinux = disabled
827 |
828 | ```
829 |
830 | We Have to restart the server if selinux Disable option need to take effect
831 |
832 | Then after the restart to check weather the selinux was disabled use command
833 |
834 |
835 | ```
836 |
837 | # sestatus
838 |
839 | ```
840 |
841 | Then Download the kaltura CE From Official Website
842 |
843 |
844 |
845 | ```
846 |
847 | # wget http://www.kaltura.org/releases/kalturaCE/29044
848 |
849 | ```
850 |
851 |
852 | Then Extract it using tar
853 |
854 |
855 |
856 | ```
857 |
858 | # tar -xzvf kalturaCE_v5.0.0.tgz
859 |
860 | ```
861 |
862 | Navigate to the extracted Directory for installation
863 |
864 |
865 | ```
866 |
867 | # cd kalturaCE_v5.0.0
868 |
869 | ```
870 |
871 | Run the php Installation Script as follow
872 |
873 |
874 | ```
875 | # # php install.php
876 |
877 | ```
878 |
879 | Its Started For Setup Here u can see the Step by step below
880 |
881 |
882 | ```
883 |
884 | Thank you for installing Kaltura Video Platform - Community Edition
885 |
886 | A previous installation attempt has been detected, do you want to use the input you provided during you last installation? (Y/n)
887 | > n
888 |
889 | In order to improve Kaltura Community Edition, we would like your permission to send system data to Kaltura.
890 | This information will be used exclusively for improving our software and our service quality. I agree (Y/n)
891 | > y
892 |
893 | If you wish, please provide your email address so that we can offer you future assistance (leave empty to pass)
894 | > babinlonston@blabla.com
895 |
896 | Please provide the following information:
897 |
898 | The following apachectl script has been detected: /usr/sbin/apachectl. Do you want to use this script to run your Kaltura application? Leave empty to use or provide a pathname to an alternative apachectl script on your server.
899 | >
900 |
901 | The following PHP binary has been detected: /usr/bin/php. Do you want to use this script to run your Kaltura application? Leave empty to use or provide a pathname to an alternative PHP binary on your server.
902 | >
903 |
904 | Full target directory path for Kaltura application (leave empty for /opt/kaltura)
905 | >
906 |
907 | Please enter the domain name/virtual hostname that will be used for the Kaltura server (without http://)
908 | > 192.168.1.3
909 |
910 | Your primary system administrator email address
911 | > babinlonston@blabla.com
912 |
913 | The password you want to set for your primary administrator
914 | > admin123$
915 |
916 | Database host (leave empty for 'localhost')
917 | >
918 |
919 | Database port (leave empty for '3306')
920 | >
921 |
922 | Database username (with create & write privileges)
923 | > root
924 |
925 | Database password (leave empty for no password)
926 | > admin123$
927 |
928 | The URL to your xymon/hobbit monitoring location. Xymon is an optional installation. Leave empty to set manually later
929 | Examples:
930 | http://www.xymondomain.com/xymon/
931 | http://www.xymondomain.com/hobbit/
932 | > http://192.168.1.3/xymon
933 |
934 |
935 | Verifing prerequisites
936 |
937 | Checking for leftovers from a previous installation
938 |
939 | Installation is now ready to begin. Start installation now? (Y/n)
940 | > y
941 |
942 | Copying application files to /opt/kaltura
943 | current working dir is /root/kalturaCE_v5.0.0
944 | Copying binaries for linux 64bit
945 | Replacing configuration tokens in files
946 | Changing permissions of directories and files
947 | Creating and initializing 'kaltura' database
948 | Creating and initializing 'kaltura_sphinx_log' database
949 | Creating data warehouse
950 | Creating Dynamic Enums
951 | Configure sphinx
952 | Populate sphinx tables
953 | Changing permissions of directories and files
954 | Creating system symbolic links
955 | Deploying uiconfs in order to configure the application
956 | Creating the uninstaller
957 | Running the generate script
958 | Running the batch manager
959 | Running the sphinx search deamon
960 | Executing sphinx dameon
961 | Executing in background nohup /opt/kaltura/app/plugins/sphinx_search/scripts/watch.daemon.onprem.sh
962 | Executing in background chkconfig sphinx_watch.sh on
963 | Changing permissions of directories and files
964 | Post installation email cannot be sent
965 |
966 | Installation Completed Successfully.
967 | Your Kaltura Admin Console credentials:
968 | System Admin user: babinlonston@blabla.com
969 | System Admin password: admin123$
970 |
971 | Please keep this information for future use.
972 |
973 | To start using Kaltura, please complete the following steps:
974 | 1. Add the following line to your /etc/hosts file:
975 | 127.0.0.1 192.168.1.3
976 | 2. Add the following line to your Apache configurations file (Usually called httpd.conf or apache2.conf):
977 | Include /opt/kaltura/app/configurations/apache/my_kaltura.conf
978 | 3. Restart apache
979 | 4. Browse to your Kaltura start page at: http://192.168.1.3/start
980 |
981 | ```
982 |
983 | ***
984 |
985 | That's it
986 |
987 | After installation we can see the Home page of Kaltura Like this below
988 |
989 |
990 | ***
991 |
992 | ### Troubleshooting Database
993 |
994 |
995 | IF This Error Recived For Database
996 |
997 | ```
998 | Issue:- ERROR 1045 (28000): Access denied for user 'root'@'localhost' (using password: NO)
999 | ```
1000 |
1001 | Stop the Database
1002 |
1003 | ```
1004 |
1005 | # /etc/init.d/mysqld stop
1006 |
1007 | ```
1008 |
1009 | Then Skip the tables
1010 |
1011 |
1012 | ```
1013 |
1014 | # mysqld_safe --skip-grant-tables &
1015 |
1016 |
1017 | ```
1018 |
1019 |
1020 | Starting mysqld daemon with databases from /var/lib/mysql
1021 |
1022 |
1023 | ```
1024 |
1025 | # mysql -u root
1026 |
1027 |
1028 | ```
1029 |
1030 |
1031 | See the Databases
1032 |
1033 |
1034 | ```
1035 |
1036 | # show databases;
1037 |
1038 | ```
1039 |
1040 |
1041 |
1042 | choose the database Which we need to change
1043 |
1044 |
1045 | ```
1046 |
1047 | # use mysql;
1048 |
1049 |
1050 | ```
1051 |
1052 |
1053 | Then change the password
1054 | Here i Have used password as admin123$
1055 |
1056 |
1057 | ```
1058 |
1059 | mysql> update user set password=PASSWORD("admin123$") where User='root';
1060 |
1061 | ```
1062 |
1063 |
1064 | Then Flush it
1065 |
1066 |
1067 | ```
1068 |
1069 | # flush privileges;
1070 |
1071 |
1072 | ```
1073 |
1074 |
1075 | Quit from the Mysql Databse
1076 |
1077 |
1078 | ```
1079 | \q or quit
1080 |
1081 | ```
1082 |
1083 |
1084 | Then Restart the Mysql Service
1085 |
1086 |
1087 |
1088 | ```
1089 |
1090 | # /etc/init.d/mysql restart
1091 |
1092 | ```
1093 |
1094 |
1095 | Then Login With Created Password >>>> admin123$
1096 |
1097 |
1098 |
1099 | ```
1100 |
1101 | # mysql -u root -p
1102 |
1103 | ```
1104 |
1105 |
1106 | Enter Password :
1107 |
1108 |
1109 |
1110 | Give ur password and get login
1111 |
1112 |
1113 | ### Setting Up SSL Certificate for Kaltura
1114 |
1115 |
1116 | For an SSL encrypted web server you will need a few things. Depending on your install you may or may not have OpenSSL and mod_ssl, Apache's interface to OpenSSL. Use yum to get them if you need them.
1117 |
1118 |
1119 | ```
1120 |
1121 | # yum install mod_ssl openssl
1122 |
1123 | ```
1124 |
1125 | Yum will either tell you they are installed or will install them for you.
1126 |
1127 |
1128 | ### Generate a self-signed certificate
1129 |
1130 |
1131 | Using OpenSSL we will generate a self-signed certificate. If you are using this on a production server you are probably likely to want a key from Trusted Certificate Authority, but if you are just using this on a personal site or for testing purposes a self-signed certificate is fine. To create the key you will need to be root so you can either su to root or use sudo in front of the commands
1132 |
1133 |
1134 | ```
1135 | # Generate private key
1136 | openssl genrsa -out ca.key 1024
1137 |
1138 | # Generate CSR
1139 | openssl req -new -key ca.key -out ca.csr
1140 |
1141 | # Generate Self Signed Key
1142 | openssl x509 -req -days 365 -in ca.csr -signkey ca.key -out ca.crt
1143 |
1144 | # Copy the files to the correct locations
1145 | cp ca.crt /etc/pki/tls/certs
1146 | cp ca.key /etc/pki/tls/private/ca.key
1147 | cp ca.csr /etc/pki/tls/private/ca.csr
1148 |
1149 | ```
1150 |
1151 |
1152 | Then we need to update the Apache SSL configuration file
1153 |
1154 |
1155 | ```
1156 |
1157 | vi +/SSLCertificateFile /etc/httpd/conf.d/ssl.conf
1158 |
1159 |
1160 | ```
1161 |
1162 | Change the paths to match where the Key file is stored. If you've used the method above it will be
1163 |
1164 |
1165 | ```
1166 |
1167 | SSLCertificateFile /etc/pki/tls/certs/ca.crt
1168 |
1169 |
1170 | ```
1171 |
1172 |
1173 | Then set the correct path for the Certificate Key File a few lines below. If you've followed the instructions above it is:
1174 |
1175 |
1176 | ```
1177 |
1178 | SSLCertificateKeyFile /etc/pki/tls/private/ca.key
1179 |
1180 | ```
1181 |
1182 |
1183 | Quit and save the file and then restart Apache
1184 |
1185 |
1186 |
1187 | ```
1188 |
1189 | /etc/init.d/httpd restart
1190 |
1191 |
1192 | ```
1193 |
1194 |
1195 |
1196 | All being well you should now be able to connect over https to your server and see a default Centos page. As the certificate is self signed browsers will generally ask you whether you want to accept the certificate. Firefox 3 won't let you connect at all but you can override this.
1197 |
1198 |
1199 |
1200 | Edit the ssl.conf file
1201 |
1202 |
1203 | ```
1204 |
1205 | # vim /etc/httpd/conf.d/ssl.conf
1206 |
1207 |
1208 | ```
1209 |
1210 | Enable This Two Lines
1211 |
1212 |
1213 | ```
1214 |
1215 | # LoadModule ssl_module modules/mod_ssl.so
1216 |
1217 | # Listen 443
1218 |
1219 | # SSLCertificateFile /etc/pki/tls/certs/ca.crt
1220 |
1221 | # SSLCertificateKeyFile /etc/pki/tls/private/ca.key
1222 |
1223 |
1224 | ```
1225 |
1226 |
1227 | Then Edit the httpd configuration in
1228 |
1229 |
1230 |
1231 | ```
1232 |
1233 | # vim /etc/httpd/conf/httpd.conf
1234 |
1235 | ```
1236 |
1237 |
1238 | Add this Two Lines below Line number 222
1239 | If we need only https we need to Comment the my_kaltura.conf line With #
1240 |
1241 |
1242 | ```
1243 | # Include /opt/kaltura/app/configurations/apache/my_kaltura.conf
1244 | # Include /opt/kaltura/app/configurations/apache/my_kaltura_https.conf
1245 |
1246 | ```
1247 |
1248 | Navigate to Kaltura httpd Configuration Directory
1249 |
1250 |
1251 | ```
1252 |
1253 | # /opt/kaltura/app/configurations/apache
1254 |
1255 | ```
1256 |
1257 |
1258 | Copy the File my_kaltura.conf and rename its to https
1259 |
1260 |
1261 | ```
1262 |
1263 | # cp my_kaltura.conf my_kaltura_https.conf
1264 |
1265 | ```
1266 |
1267 |
1268 | Edit the File my_kaltura_https
1269 |
1270 |
1271 | ```
1272 |
1273 | # vim my_kaltura_https.conf
1274 |
1275 | ```
1276 |
1277 | Create a new Kaltura virtual host
1278 | in my_kaltura_https.conf
1279 | Add All Below Contents in virtual Host
1280 |
1281 |
1282 |
1283 | ```
1284 |
1285 | # NameVirtualHost *:443
1286 |
1287 | to
1288 |
1289 |
1290 | SSLEngine On
1291 | SSLCertificateFile /etc/pki/tls/certs/ca.crt
1292 | SSLCertificateKeyFile /etc/pki/tls/private/ca.key
1293 | ```
1294 |
1295 | Find the following lines by searching for “http” and change the http in the following lines to https
1296 |
1297 | ```
1298 |
1299 | RewriteRule .* https://my-kaltura-site.com/kmc
1300 | RewriteRule ^$ https://my-kaltura-site.com
1301 |
1302 | ```
1303 | Restart apache
1304 |
1305 | ```
1306 |
1307 | # /etc/init.d/httpd restart
1308 |
1309 | ```
1310 | ------------------------------------------------------------------------------------------------
1311 |
1312 |
--------------------------------------------------------------------------------