 44 |
45 | ### Obtaining Test BNB tokens
46 |
47 | Once BNB Smart Chain Test Network has been added to MetaMask, navigate to the [BNB Smart Chain Faucet](https://testnet.binance.org/faucet-smart) to receive test tokens. Tokens are needed to pay for gas fees to deploy and interact with the smart contract. On the faucet page, paste your MetaMask wallet address. Then, click submit and the faucet will send you some test BNBs.
48 | 
49 |
50 | ## Write down a Storage Smart Contract
51 |
52 | You need to write down all the required functions that you want to implement in your storage smart contract. A general storage smart contract has the following functions:
53 |
54 | - `Store()`: store value in variables
55 | - `retrieve()`: returns the stored value
56 |
57 | The ChainIDE team has prepared a simple storage smart contract that includes all the required functions; you may use this built-in template and add/delete functions according to your requirements.
58 |
59 | Visit the [ChainIDE site](https://chainide.com/) and click on "Try Now".
60 |
61 | 
62 |
63 | Then, click on "New Project" and select "BNB Chain", and "Storage".
64 |
65 | 
66 |
67 | Now, you can see the template contract, **Storage.sol**, that includes all the required functions.
68 |
69 | ## Compile a Storage Smart Contract
70 |
71 | After you have completed your smart contract, it is time to compile it. To compile, navigate to the "Compile", module, choose an appropriate compiler version according to your source code, and press the "Compile" button. An ABI and bytecode for the source code generate upon successful compilation. If there are some errors in your source code, they will be displayed under the output panel in the "Logger module". You may need to carefully read the error, resolve it accordingly and compile the contract again.
72 |
73 | Note down the compiler version and the license for your source code as it would be needed when you verify your smart contract on the BNB Smart Chain Test Network.
74 |
75 | 
76 |
77 | ## Deploy a Storage Smart Contract
78 |
79 | After successful compilation, it's time to deploy your compiled storage smart contract to the BNB Smart Chain Test Network. For that, you need to have a MetaMask installed, the BNB Smart Chain Test Network added to your wallet, and some testnet tokens to pay for the transaction fee.
80 |
81 | Navigate to the "Deploy & Interaction" module and choose the smart contract that you want to deploy among the compiled smart contracts and click the "deploy" button. For this tutorial, the `Storage` smart contract will be deployed.
82 |
83 | 
84 |
85 | ## Create a Flattened File using Flattener Library
86 |
87 | To verify a smart contract that imports other smart contracts, we need to create a flattened file, a flattened file including all the source code of imported contracts in a single file. To create a flattened file, you need to add a "Flattener" plug-in.
88 |
89 | 
90 |
91 | Once the Flatterner plug-in is activated, you'll be able to access it as a separate module as shown in the figure below. Choose the compiled file, and click on the flatten button to create a flattened file, once the flattened file is created, it will be automatically copied to the clipboard, you may paste it to a file and save it for later usage.
92 |
93 | 
94 |
95 | If you want to save the flattened file, click the save button, and a flattened file will be saved in the current repository.
96 |
97 | 
98 |
99 | The saved flattened file can be accessed under the explorer module.
100 |
101 | 
102 |
103 | ## Verify a Smart Contract
104 |
105 | To verify a smart contract, you need to visit [BNB Smart Chain Explorer](https://bscscan.com/) and search for the deployed smart contract using the contract address.
106 |
107 | 
108 |
109 | Click on the "verify and publish" link shown under the contract section.
110 |
111 | 
112 |
113 | Once you click on the verify and publish link, you will be asked for the following:
114 |
115 | - Contract Address: The address of a deployed smart contract that you want to verify
116 | - Compiler Type: Either you want to verify a single file or multiple files
117 | - Compiler Version: The compiler version that you used to compile the smart contract
118 | - License: Open-source license type that you used for your source code
119 |
120 | 
121 |
122 | After that, you need to paste the flattened file that you created in step 5, and your smart contract will be verified.
123 |
124 | 
125 |
126 | If there are no issues with your smart contract, it would be verified, and you'll be able to see an image similar to the one that is shown below.
127 |
128 | 
129 |
130 | 
131 | Congratulations, you have successfully deployed your smart contract to the blockchain and verified it, now it's time to interact with your deployed smart contract.
132 |
133 | ## Contract Interaction
134 |
135 | After successful deployment and verification. All the functions in the deployed smart contract can be seen in the "INTERACT" panel. In our scenario, we have two functions, `Store()` that is used to store the value to the blockchain, and `Retrieve()` to retrieve stored data from the blockchain.
136 |
137 | 
138 |
139 |
140 | ## Conclusion
141 | This tutorial guided you through the basics of creating and deploying a simple smart contract using the Chain IDE. It also provides step-by-step guide on how to verify your deployed smart contract. This tutorial uses testnet, however, the exact same instructions and sequence will work on the mainnet as well.
142 |
--------------------------------------------------------------------------------
/04-Deploying-Smart-Contracts-Using-IDEs/hardhat.md:
--------------------------------------------------------------------------------
1 |
2 | # Using Hardhat for Deploying Smart Contracts on BSC
3 |
4 | In this tutorial, we explain step-by-step how to create, compile and deploy a simple smart contract on the BSC Testnet using Hardhat.
5 |
6 | ## What is Hardhat
7 |
8 | Hardhat is a development environment to compile, deploy, test, and debug your smart contract.
9 |
10 | ## Setting up the development environment
11 |
12 | There are a few technical requirements before we start.
13 |
14 | ### Pre-requisites
15 |
16 | There are a few technical requirements before we start as listed below:
17 |
18 | - [Node.js v10+ LTS and npm](https://nodejs.org/en/) (comes with Node)
19 | - [Git](https://git-scm.com/)
20 | - Create an empty project ```npm init --yes```
21 | - Once your project is ready, run ```npm install --save-dev hardhat``` to install Hardhat.
22 | - Install hardhat toolbox ```npm install @nomicfoundation/hardhat-toolbox```
23 | - To use your local installation of Hardhat, you need to use `npx` to run it (i.e. `npx hardhat`).
24 |
25 | ## Create A Project
26 |
27 | - To create your Hardhat project run ```npx hardhat``` in your project folder to intialize your project.
28 | - Select ```Create an empty hardhat.config.js``` with your keyboard and hit enter.
29 |
30 | ```
31 | $ npx hardhat
32 | 888 888 888 888 888
33 | 888 888 888 888 888
34 | 888 888 888 888 888
35 | 8888888888 8888b. 888d888 .d88888 88888b. 8888b. 888888
36 | 888 888 "88b 888P" d88" 888 888 "88b "88b 888
37 | 888 888 .d888888 888 888 888 888 888 .d888888 888
38 | 888 888 888 888 888 Y88b 888 888 888 888 888 Y88b.
39 | 888 888 "Y888888 888 "Y88888 888 888 "Y888888 "Y888
40 |
41 | Welcome to Hardhat v2.10.1
42 |
43 | √ What do you want to do? · Create a JavaScript project
44 | √ Hardhat project root: · Project-Directory
45 | √ Do you want to add a .gitignore? (Y/n) · y
46 |
47 | You need to install these dependencies to run the sample project:
48 | npm WARN config global `--global`, `--local` are deprecated. Use `--location=global` instead.
49 | npm install --save-dev "hardhat@^2.10.1" "@nomicfoundation/hardhat-toolbox@^1.0.1"
50 |
51 | Project created
52 |
53 | See the README.md file for some example tasks you can run
54 |
55 | Give Hardhat a star on Github if you're enjoying it!
56 |
57 | https://github.com/NomicFoundation/hardhat
58 | ```
59 |
60 | When Hardhat is run, it searches for the closest ```hardhat.config.js``` file starting from the current working directory. This file normally lives in the root of your project and an empty ```hardhat.config.js``` is enough for Hardhat to work. The entirety of your setup is contained in this file.
61 |
62 |
63 | ## Create Smart Contract
64 |
65 | You can write your own smart contract or download the [BEP20 token smart contract template](https://github.com/bnb-chain/bsc-genesis-contract/blob/master/contracts/bep20_template/BEP20Token.template), place it in the ```contracts``` directory of your project and remane it as ```BEP20Token.sol```.
66 |
67 | ## Configure Hardhat for BSC
68 |
69 | - Go to ```hardhat.config.js```
70 | - Update the config with bsc-network-crendentials.
71 |
72 | ```js
73 | require("@nomicfoundation/hardhat-toolbox");
74 |
75 | const { mnemonic } = require('./secrets.json');
76 |
77 | // This is a sample Hardhat task. To learn how to create your own go to
78 | // https://hardhat.org/guides/create-task.html
79 | task("accounts", "Prints the list of accounts", async () => {
80 | const accounts = await ethers.getSigners();
81 |
82 | for (const account of accounts) {
83 | console.log(account.address);
84 | }
85 | });
86 |
87 | // You need to export an object to set up your config
88 | // Go to https://hardhat.org/config/ to learn more
89 |
90 | /**
91 | * @type import('hardhat/config').HardhatUserConfig
92 | */
93 | module.exports = {
94 | defaultNetwork: "mainnet",
95 | networks: {
96 | localhost: {
97 | url: "http://127.0.0.1:8545"
98 | },
99 | hardhat: {
100 | },
101 | testnet: {
102 | url: "https://data-seed-prebsc-1-s1.binance.org:8545",
103 | chainId: 97,
104 | gasPrice: 20000000000,
105 | accounts: {mnemonic: mnemonic}
106 | },
107 | mainnet: {
108 | url: "https://bsc-dataseed.binance.org/",
109 | chainId: 56,
110 | gasPrice: 20000000000,
111 | accounts: {mnemonic: mnemonic}
112 | }
113 | },
114 | solidity: {
115 | version: "0.8.9",
116 | settings: {
117 | optimizer: {
118 | enabled: true
119 | }
120 | }
121 | },
122 | paths: {
123 | sources: "./contracts",
124 | tests: "./test",
125 | cache: "./cache",
126 | artifacts: "./artifacts"
127 | },
128 | mocha: {
129 | timeout: 20000
130 | }
131 | };
132 |
133 | ```
134 |
135 | :::note
136 | It requires mnemonic to be passed in for Provider, this is the seed phrase for the account you'd like to deploy from. Create a new `secrets.json` file in root directory and enter your 12 word mnemonic seed phrase to get started. To get the seedwords from metamask wallet you can go to Metamask Settings, then from the menu choose Security and Privacy where you will see a button that says reveal seed words.
137 | ```
138 | Sample secrets.json
139 |
140 | {
141 | "mnemonic": "Your_12_Word_MetaMask_Seed_Phrase"
142 | }
143 | ```
144 | :::
145 |
146 | ## Compile Smart Contract
147 |
148 | To compile a Hardhat project, change to the root of the directory where the project is located and then type the following into a terminal:
149 |
150 | ```
151 | npx hardhat compile
152 | ```
153 |
154 | ## Deploy Smart Contract on BSC Network
155 |
156 | - Copy and paste the following content into the ```scripts/deploy.js``` file.
157 |
158 | ```js
159 | async function main() {
160 | const [deployer] = await ethers.getSigners();
161 |
162 | console.log("Deploying contracts with the account:", deployer.address);
163 |
164 | console.log("Account balance:", (await deployer.getBalance()).toString());
165 |
166 | const Token = await ethers.getContractFactory("BEP20Token");
167 | const token = await Token.deploy();
168 |
169 | console.log("Token address:", token.address);
170 | }
171 |
172 | main()
173 | .then(() => process.exit(0))
174 | .catch((error) => {
175 | console.error(error);
176 | process.exit(1);
177 | });
178 |
179 | ```
180 |
181 | - Run this command in root of the project directory:
182 |
183 | ```js
184 | $ npx hardhat run --network testnet scripts/deploy.js
185 | ```
186 | - Sample Output
187 |
188 | ```
189 | $ npx hardhat run --network testnet scripts/deploy.js
190 | Deploying contracts with the account: 0x27cf2CEAcdedce834f1673005Ed1C60efA63c081
191 | Account balance: 100721709119999208161
192 | Token address: 0xbF39886B4F91F5170934191b0d96Dd277147FBB2
193 | ```
194 | > Remember your address, transaction_hash and other details provided would differ, Above is just to provide an idea of structure.
195 |
196 | **Congratulations!** You have successfully deployed BEP20 Smart Contract. Now you can interact with the Smart Contract.
197 |
198 | You can check the deployment status here:
44 |
45 | ### Obtaining Test BNB tokens
46 |
47 | Once BNB Smart Chain Test Network has been added to MetaMask, navigate to the [BNB Smart Chain Faucet](https://testnet.binance.org/faucet-smart) to receive test tokens. Tokens are needed to pay for gas fees to deploy and interact with the smart contract. On the faucet page, paste your MetaMask wallet address. Then, click submit and the faucet will send you some test BNBs.
48 | 
49 |
50 | ## Write down a Storage Smart Contract
51 |
52 | You need to write down all the required functions that you want to implement in your storage smart contract. A general storage smart contract has the following functions:
53 |
54 | - `Store()`: store value in variables
55 | - `retrieve()`: returns the stored value
56 |
57 | The ChainIDE team has prepared a simple storage smart contract that includes all the required functions; you may use this built-in template and add/delete functions according to your requirements.
58 |
59 | Visit the [ChainIDE site](https://chainide.com/) and click on "Try Now".
60 |
61 | 
62 |
63 | Then, click on "New Project" and select "BNB Chain", and "Storage".
64 |
65 | 
66 |
67 | Now, you can see the template contract, **Storage.sol**, that includes all the required functions.
68 |
69 | ## Compile a Storage Smart Contract
70 |
71 | After you have completed your smart contract, it is time to compile it. To compile, navigate to the "Compile", module, choose an appropriate compiler version according to your source code, and press the "Compile" button. An ABI and bytecode for the source code generate upon successful compilation. If there are some errors in your source code, they will be displayed under the output panel in the "Logger module". You may need to carefully read the error, resolve it accordingly and compile the contract again.
72 |
73 | Note down the compiler version and the license for your source code as it would be needed when you verify your smart contract on the BNB Smart Chain Test Network.
74 |
75 | 
76 |
77 | ## Deploy a Storage Smart Contract
78 |
79 | After successful compilation, it's time to deploy your compiled storage smart contract to the BNB Smart Chain Test Network. For that, you need to have a MetaMask installed, the BNB Smart Chain Test Network added to your wallet, and some testnet tokens to pay for the transaction fee.
80 |
81 | Navigate to the "Deploy & Interaction" module and choose the smart contract that you want to deploy among the compiled smart contracts and click the "deploy" button. For this tutorial, the `Storage` smart contract will be deployed.
82 |
83 | 
84 |
85 | ## Create a Flattened File using Flattener Library
86 |
87 | To verify a smart contract that imports other smart contracts, we need to create a flattened file, a flattened file including all the source code of imported contracts in a single file. To create a flattened file, you need to add a "Flattener" plug-in.
88 |
89 | 
90 |
91 | Once the Flatterner plug-in is activated, you'll be able to access it as a separate module as shown in the figure below. Choose the compiled file, and click on the flatten button to create a flattened file, once the flattened file is created, it will be automatically copied to the clipboard, you may paste it to a file and save it for later usage.
92 |
93 | 
94 |
95 | If you want to save the flattened file, click the save button, and a flattened file will be saved in the current repository.
96 |
97 | 
98 |
99 | The saved flattened file can be accessed under the explorer module.
100 |
101 | 
102 |
103 | ## Verify a Smart Contract
104 |
105 | To verify a smart contract, you need to visit [BNB Smart Chain Explorer](https://bscscan.com/) and search for the deployed smart contract using the contract address.
106 |
107 | 
108 |
109 | Click on the "verify and publish" link shown under the contract section.
110 |
111 | 
112 |
113 | Once you click on the verify and publish link, you will be asked for the following:
114 |
115 | - Contract Address: The address of a deployed smart contract that you want to verify
116 | - Compiler Type: Either you want to verify a single file or multiple files
117 | - Compiler Version: The compiler version that you used to compile the smart contract
118 | - License: Open-source license type that you used for your source code
119 |
120 | 
121 |
122 | After that, you need to paste the flattened file that you created in step 5, and your smart contract will be verified.
123 |
124 | 
125 |
126 | If there are no issues with your smart contract, it would be verified, and you'll be able to see an image similar to the one that is shown below.
127 |
128 | 
129 |
130 | 
131 | Congratulations, you have successfully deployed your smart contract to the blockchain and verified it, now it's time to interact with your deployed smart contract.
132 |
133 | ## Contract Interaction
134 |
135 | After successful deployment and verification. All the functions in the deployed smart contract can be seen in the "INTERACT" panel. In our scenario, we have two functions, `Store()` that is used to store the value to the blockchain, and `Retrieve()` to retrieve stored data from the blockchain.
136 |
137 | 
138 |
139 |
140 | ## Conclusion
141 | This tutorial guided you through the basics of creating and deploying a simple smart contract using the Chain IDE. It also provides step-by-step guide on how to verify your deployed smart contract. This tutorial uses testnet, however, the exact same instructions and sequence will work on the mainnet as well.
142 |
--------------------------------------------------------------------------------
/04-Deploying-Smart-Contracts-Using-IDEs/hardhat.md:
--------------------------------------------------------------------------------
1 |
2 | # Using Hardhat for Deploying Smart Contracts on BSC
3 |
4 | In this tutorial, we explain step-by-step how to create, compile and deploy a simple smart contract on the BSC Testnet using Hardhat.
5 |
6 | ## What is Hardhat
7 |
8 | Hardhat is a development environment to compile, deploy, test, and debug your smart contract.
9 |
10 | ## Setting up the development environment
11 |
12 | There are a few technical requirements before we start.
13 |
14 | ### Pre-requisites
15 |
16 | There are a few technical requirements before we start as listed below:
17 |
18 | - [Node.js v10+ LTS and npm](https://nodejs.org/en/) (comes with Node)
19 | - [Git](https://git-scm.com/)
20 | - Create an empty project ```npm init --yes```
21 | - Once your project is ready, run ```npm install --save-dev hardhat``` to install Hardhat.
22 | - Install hardhat toolbox ```npm install @nomicfoundation/hardhat-toolbox```
23 | - To use your local installation of Hardhat, you need to use `npx` to run it (i.e. `npx hardhat`).
24 |
25 | ## Create A Project
26 |
27 | - To create your Hardhat project run ```npx hardhat``` in your project folder to intialize your project.
28 | - Select ```Create an empty hardhat.config.js``` with your keyboard and hit enter.
29 |
30 | ```
31 | $ npx hardhat
32 | 888 888 888 888 888
33 | 888 888 888 888 888
34 | 888 888 888 888 888
35 | 8888888888 8888b. 888d888 .d88888 88888b. 8888b. 888888
36 | 888 888 "88b 888P" d88" 888 888 "88b "88b 888
37 | 888 888 .d888888 888 888 888 888 888 .d888888 888
38 | 888 888 888 888 888 Y88b 888 888 888 888 888 Y88b.
39 | 888 888 "Y888888 888 "Y88888 888 888 "Y888888 "Y888
40 |
41 | Welcome to Hardhat v2.10.1
42 |
43 | √ What do you want to do? · Create a JavaScript project
44 | √ Hardhat project root: · Project-Directory
45 | √ Do you want to add a .gitignore? (Y/n) · y
46 |
47 | You need to install these dependencies to run the sample project:
48 | npm WARN config global `--global`, `--local` are deprecated. Use `--location=global` instead.
49 | npm install --save-dev "hardhat@^2.10.1" "@nomicfoundation/hardhat-toolbox@^1.0.1"
50 |
51 | Project created
52 |
53 | See the README.md file for some example tasks you can run
54 |
55 | Give Hardhat a star on Github if you're enjoying it!
56 |
57 | https://github.com/NomicFoundation/hardhat
58 | ```
59 |
60 | When Hardhat is run, it searches for the closest ```hardhat.config.js``` file starting from the current working directory. This file normally lives in the root of your project and an empty ```hardhat.config.js``` is enough for Hardhat to work. The entirety of your setup is contained in this file.
61 |
62 |
63 | ## Create Smart Contract
64 |
65 | You can write your own smart contract or download the [BEP20 token smart contract template](https://github.com/bnb-chain/bsc-genesis-contract/blob/master/contracts/bep20_template/BEP20Token.template), place it in the ```contracts``` directory of your project and remane it as ```BEP20Token.sol```.
66 |
67 | ## Configure Hardhat for BSC
68 |
69 | - Go to ```hardhat.config.js```
70 | - Update the config with bsc-network-crendentials.
71 |
72 | ```js
73 | require("@nomicfoundation/hardhat-toolbox");
74 |
75 | const { mnemonic } = require('./secrets.json');
76 |
77 | // This is a sample Hardhat task. To learn how to create your own go to
78 | // https://hardhat.org/guides/create-task.html
79 | task("accounts", "Prints the list of accounts", async () => {
80 | const accounts = await ethers.getSigners();
81 |
82 | for (const account of accounts) {
83 | console.log(account.address);
84 | }
85 | });
86 |
87 | // You need to export an object to set up your config
88 | // Go to https://hardhat.org/config/ to learn more
89 |
90 | /**
91 | * @type import('hardhat/config').HardhatUserConfig
92 | */
93 | module.exports = {
94 | defaultNetwork: "mainnet",
95 | networks: {
96 | localhost: {
97 | url: "http://127.0.0.1:8545"
98 | },
99 | hardhat: {
100 | },
101 | testnet: {
102 | url: "https://data-seed-prebsc-1-s1.binance.org:8545",
103 | chainId: 97,
104 | gasPrice: 20000000000,
105 | accounts: {mnemonic: mnemonic}
106 | },
107 | mainnet: {
108 | url: "https://bsc-dataseed.binance.org/",
109 | chainId: 56,
110 | gasPrice: 20000000000,
111 | accounts: {mnemonic: mnemonic}
112 | }
113 | },
114 | solidity: {
115 | version: "0.8.9",
116 | settings: {
117 | optimizer: {
118 | enabled: true
119 | }
120 | }
121 | },
122 | paths: {
123 | sources: "./contracts",
124 | tests: "./test",
125 | cache: "./cache",
126 | artifacts: "./artifacts"
127 | },
128 | mocha: {
129 | timeout: 20000
130 | }
131 | };
132 |
133 | ```
134 |
135 | :::note
136 | It requires mnemonic to be passed in for Provider, this is the seed phrase for the account you'd like to deploy from. Create a new `secrets.json` file in root directory and enter your 12 word mnemonic seed phrase to get started. To get the seedwords from metamask wallet you can go to Metamask Settings, then from the menu choose Security and Privacy where you will see a button that says reveal seed words.
137 | ```
138 | Sample secrets.json
139 |
140 | {
141 | "mnemonic": "Your_12_Word_MetaMask_Seed_Phrase"
142 | }
143 | ```
144 | :::
145 |
146 | ## Compile Smart Contract
147 |
148 | To compile a Hardhat project, change to the root of the directory where the project is located and then type the following into a terminal:
149 |
150 | ```
151 | npx hardhat compile
152 | ```
153 |
154 | ## Deploy Smart Contract on BSC Network
155 |
156 | - Copy and paste the following content into the ```scripts/deploy.js``` file.
157 |
158 | ```js
159 | async function main() {
160 | const [deployer] = await ethers.getSigners();
161 |
162 | console.log("Deploying contracts with the account:", deployer.address);
163 |
164 | console.log("Account balance:", (await deployer.getBalance()).toString());
165 |
166 | const Token = await ethers.getContractFactory("BEP20Token");
167 | const token = await Token.deploy();
168 |
169 | console.log("Token address:", token.address);
170 | }
171 |
172 | main()
173 | .then(() => process.exit(0))
174 | .catch((error) => {
175 | console.error(error);
176 | process.exit(1);
177 | });
178 |
179 | ```
180 |
181 | - Run this command in root of the project directory:
182 |
183 | ```js
184 | $ npx hardhat run --network testnet scripts/deploy.js
185 | ```
186 | - Sample Output
187 |
188 | ```
189 | $ npx hardhat run --network testnet scripts/deploy.js
190 | Deploying contracts with the account: 0x27cf2CEAcdedce834f1673005Ed1C60efA63c081
191 | Account balance: 100721709119999208161
192 | Token address: 0xbF39886B4F91F5170934191b0d96Dd277147FBB2
193 | ```
194 | > Remember your address, transaction_hash and other details provided would differ, Above is just to provide an idea of structure.
195 |
196 | **Congratulations!** You have successfully deployed BEP20 Smart Contract. Now you can interact with the Smart Contract.
197 |
198 | You can check the deployment status here:  23 |
24 | ## Writing the Smart Contract
25 |
26 | - Create a new file, name it ```HelloWorld.sol```, and copy the contract code given below
27 |
28 | ```
29 | // SPDX-License-Identifier: MIT
30 | pragma solidity ^0.8.15;
31 | contract HelloWorld {
32 | function sayHelloWorld() public pure returns (string memory) {
33 | return "Hello World";
34 | }
35 | }
36 | ```
37 |
38 | The first line, `pragma solidity ^0.8.15` specifies that the source code is for a Solidity version greater than 0.8.15. [Pragmas](https://solidity.readthedocs.io/en/latest/layout-of-source-files.html#pragma) are common instructions for compilers about how to treat the source code (e.g., pragma once).
39 |
40 | A contract in the sense of Solidity is a collection of code (its functions) and data (its state) that resides at a specific address on the Ethereum blockchain. Learn more about the [constructor](https://solidity.readthedocs.io/en/latest/contracts.html#constructor) and [memory](https://solidity.readthedocs.io/en/latest/introduction-to-smart-contracts.html#storage-memory-and-the-stack) in the docs.
41 |
42 | ## Compile Smart Contract
43 |
44 | - Step1: Click button to switch to compile page.
45 |
46 | - Step2: Select the appropriate compiler version, 0.8.15 in our case.
47 |
48 | - Step3: Enable "Auto compile" and "Optimization" from Advanced Configurations,
49 |
50 | - Step4: Select "HelloWorld" from the contract drop-down menu.
51 |
52 | - Step5: Click "ABI" to copy the contract ABI and save it.
53 |
54 |
23 |
24 | ## Writing the Smart Contract
25 |
26 | - Create a new file, name it ```HelloWorld.sol```, and copy the contract code given below
27 |
28 | ```
29 | // SPDX-License-Identifier: MIT
30 | pragma solidity ^0.8.15;
31 | contract HelloWorld {
32 | function sayHelloWorld() public pure returns (string memory) {
33 | return "Hello World";
34 | }
35 | }
36 | ```
37 |
38 | The first line, `pragma solidity ^0.8.15` specifies that the source code is for a Solidity version greater than 0.8.15. [Pragmas](https://solidity.readthedocs.io/en/latest/layout-of-source-files.html#pragma) are common instructions for compilers about how to treat the source code (e.g., pragma once).
39 |
40 | A contract in the sense of Solidity is a collection of code (its functions) and data (its state) that resides at a specific address on the Ethereum blockchain. Learn more about the [constructor](https://solidity.readthedocs.io/en/latest/contracts.html#constructor) and [memory](https://solidity.readthedocs.io/en/latest/introduction-to-smart-contracts.html#storage-memory-and-the-stack) in the docs.
41 |
42 | ## Compile Smart Contract
43 |
44 | - Step1: Click button to switch to compile page.
45 |
46 | - Step2: Select the appropriate compiler version, 0.8.15 in our case.
47 |
48 | - Step3: Enable "Auto compile" and "Optimization" from Advanced Configurations,
49 |
50 | - Step4: Select "HelloWorld" from the contract drop-down menu.
51 |
52 | - Step5: Click "ABI" to copy the contract ABI and save it.
53 |
54 |  55 |
56 | ## Configure MetaMask and Fund Your Account
57 |
58 | Now, We have to deploy our smart contract on BNB Smart Chain Network. For that, we have to connect to Web3 world, this can be done by many services like MetaMask, Brave, Portis etc. We will be using MetaMask. Please follow this [tutorial to setup a Metamask Account](wallet/metamask.md) for configuring the MetaMask wallet to use with BSC.
59 |
60 |
61 | - Open Metamask and select Custom RPC from the networks dropdown
62 |
63 | - Go to setting page
64 |
65 |
55 |
56 | ## Configure MetaMask and Fund Your Account
57 |
58 | Now, We have to deploy our smart contract on BNB Smart Chain Network. For that, we have to connect to Web3 world, this can be done by many services like MetaMask, Brave, Portis etc. We will be using MetaMask. Please follow this [tutorial to setup a Metamask Account](wallet/metamask.md) for configuring the MetaMask wallet to use with BSC.
59 |
60 |
61 | - Open Metamask and select Custom RPC from the networks dropdown
62 |
63 | - Go to setting page
64 |
65 |  66 |
67 | - Add a new network
68 |
69 |
66 |
67 | - Add a new network
68 |
69 |  70 |
71 | * Testnet
72 | * [RPC URLs](./rpc.md)
73 | * ChainID: 97
74 | * Symbol: BNB
75 | * Block Explorer: https://testnet.bscscan.com
76 |
77 | * Mainnet
78 | * [RPC URLs](./rpc.md)
79 | * ChainID: 56
80 | * Symbol: BNB
81 | * Block Explorer: https://bscscan.com
82 |
83 | - Go ahead and click save
84 | - Copy your address from Metamask
85 |
86 | - Head over to [Faucet](https://testnet.binance.org/faucet-smart) and request test BNB
87 |
88 | ## Deploy Smart Contract
89 |
90 | Follow the following steps to deploy the HelloWorld smart contract on the BNB Smart Chain Testnet.
91 |
92 |
70 |
71 | * Testnet
72 | * [RPC URLs](./rpc.md)
73 | * ChainID: 97
74 | * Symbol: BNB
75 | * Block Explorer: https://testnet.bscscan.com
76 |
77 | * Mainnet
78 | * [RPC URLs](./rpc.md)
79 | * ChainID: 56
80 | * Symbol: BNB
81 | * Block Explorer: https://bscscan.com
82 |
83 | - Go ahead and click save
84 | - Copy your address from Metamask
85 |
86 | - Head over to [Faucet](https://testnet.binance.org/faucet-smart) and request test BNB
87 |
88 | ## Deploy Smart Contract
89 |
90 | Follow the following steps to deploy the HelloWorld smart contract on the BNB Smart Chain Testnet.
91 |
92 |  93 |
94 | - Step1: Navigate to the Deployment Page.
95 | - Step2: Select Injected Provider in the Environment dropdown
96 | - Step3: Confirm the Connection Request on the MetaMask notification.
97 |
98 |
93 |
94 | - Step1: Navigate to the Deployment Page.
95 | - Step2: Select Injected Provider in the Environment dropdown
96 | - Step3: Confirm the Connection Request on the MetaMask notification.
97 |
98 | 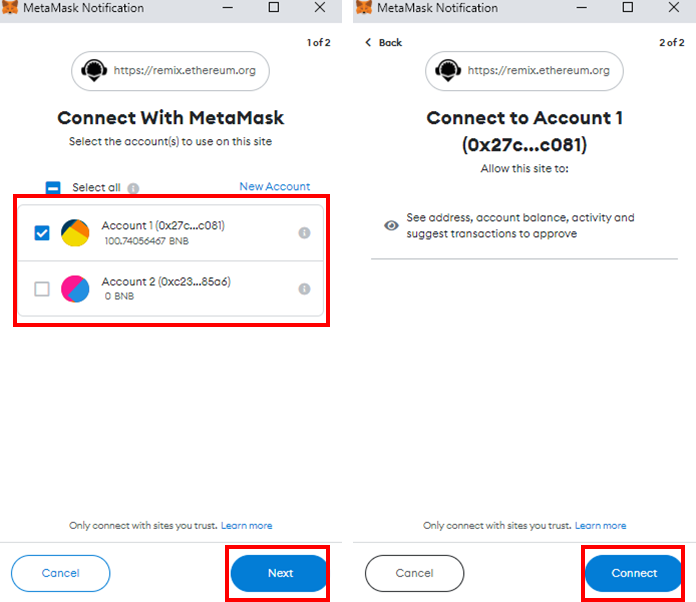 99 |
100 | - Step4: Once Metamask is connected to Remix, click on the "Deploy" button which would generate another metamask popup that requires transaction confirmation.
101 |
102 |
99 |
100 | - Step4: Once Metamask is connected to Remix, click on the "Deploy" button which would generate another metamask popup that requires transaction confirmation.
101 |
102 |  103 |
104 | **Congratulations!** You have successfully deployed a simple Smart Contract on the BSC Testnet. Now you can interact with the Smart Contract. Check the deployment status here:
103 |
104 | **Congratulations!** You have successfully deployed a simple Smart Contract on the BSC Testnet. Now you can interact with the Smart Contract. Check the deployment status here: Biography
24 | 25 |
25 | Born around 427 BCE in Athens, Greece, Plato was one of the most important and enduring philosophers of the ancient world. His father, Ariston, was descended from Athenian nobility, while his mother, Perictione, came from a prominent and wealthy family. This aristocratic background undoubtedly influenced Plato's views on the role of the philosophers and the nature of the ideal society.
26 | 27 |From an early age, Plato showed a deep interest in philosophy and the pursuit of knowledge. He was a pupil of the great philosopher Socrates, who had a profound impact on Plato's thinking. Socrates' method of questioning and exploring fundamental ideas was an important part of Plato's education and would later become a cornerstone of his own philosophical method.
28 | 29 |After Socrates' execution in 399 BCE, Plato traveled around the Mediterranean, absorbing the teachings of other philosophers as well as engaging in political activities. In 387 BCE, he returned to Athens and founded the Academy, an institution dedicated to the study of philosophy, mathematics, and science. The Academy would become a center of learning that attracted some of the greatest philosophers and thinkers of the ancient world, including Aristotle, who would later become one of Plato's most famous pupils.
30 | 31 |It was at the Academy that Plato wrote most of his philosophical works, which he composed in the form of dialogues. These dialogues explored a wide range of topics, including ethics, justice, and the nature of reality. Many of them feature Socrates as the main character, serving as a mouthpiece for Plato's ideas. Some of the most famous dialogues include The Republic, an exploration of the ideal society, and The Symposium, a meditation on love and desire.
32 | 33 |Plato continued to lead the Academy and write dialogues until his death in 347 BCE. His influence on Western philosophy cannot be overstated. The works of Plato have been studied and analyzed for millennia, and his ideas on metaphysics, ethics, and the nature of reality continue to be debated by philosophers today.
34 | 35 |Accomplishments
38 |Plato's accomplishments include:
39 |-
40 |
- Establishing the Academy, one of the earliest known 41 | institutions of higher learning. 42 |
- Contributing to the development of Western philosophy through 43 | his dialogues. 44 |
- Formulating the theory of forms, which postulated that 45 | abstract ideas represent the true reality behind the physical world. 46 |
- Influencing numerous philosophers and thinkers throughout 47 | history, shaping the course of philosophy and intellectual thought. 48 |
Famous Quotes
53 |54 |58 |"Wise men speak because they have something to say; fools 55 | because they have to say something."
56 | 57 |
59 |62 |"Courage is knowing what not to fear."
60 | 61 |
Personal Story
66 |Plato's personal story is one of intellectual pursuit and 67 | philosophical exploration. As a young man, he became a devoted disciple of 68 | Socrates and was greatly influenced by his mentor's teachings and ideas. 69 | Plato witnessed Socrates' trial and subsequent execution, which had a 70 | profound impact on his philosophical views and the nature of justice.
71 |After Socrates' death, Plato founded the Academy, a center of 72 | learning and philosophical inquiry. The Academy attracted students from 73 | various backgrounds and became a hub for intellectual discussions and 74 | debates. Plato dedicated his life to the pursuit of truth, knowledge, and 75 | the betterment of society through philosophical contemplation and 76 | education.
77 |