├── labbuildr
├── Readme1st.txt
├── defaults.json.example
├── changes.txt
├── deletefiles.txt
├── update.ps1
├── docker_env.ps1
├── template
│ ├── WS_1709.template
│ ├── WS_Preview_RS4.template
│ ├── WS_Preview_17035.template
│ ├── ScaleIOVM_2nics.template
│ ├── UnityVSA.template
│ ├── Nested_ESXi6.5U1_Appliance_Template_v1.0.template
│ ├── Nested_ESXi6.5d_Appliance_Template_v1.0.template
│ └── Nested_ESXi6.0u3_Appliance_Template_v1.0.template
├── profile.ps1
├── install-ansible.ps1
├── install-aptcache.ps1
├── install-geonas.ps1
├── install-vcsa.ps1
├── install-photonos.ps1
├── install-esxiova.ps1
├── install-centos.ps1
└── install-coreos.ps1
├── docs
├── Solutionpacks
│ ├── install-ansible.ps1.md
│ ├── install-hadoop.ps1.md
│ ├── install-esxi.ps1.md
│ ├── install-VCSA.ps1.md
│ ├── install-ubuntu.ps1.md
│ ├── install-esxiova.ps1.md
│ ├── install-nve.ps1.md
│ ├── install-scaleiosvm.ps1.md
│ ├── install-ecs3.ps1.md
│ ├── install-ecs.ps1.md
│ ├── install-centos.ps1.md
│ ├── install-coprhd.ps1.md
│ ├── install-cloudboost.ps1.md
│ ├── install-mesos.ps1-with-rexray.md
│ ├── install-unity-falcon.ps1.md
│ ├── install-centos4viprsrm.md
│ ├── install-cloudarray.ps1.md
│ ├── ubuntu-bakery.ps1.md
│ └── install-unity.ps1.md
├── Scenarios
│ ├── exchange_noip_networker.md
│ ├── Install labbuildr on linux.md
│ ├── Build A Domain Controller.md
│ ├── networker_betas.md
│ └── SCOM_ESI_Options.md
├── appendix
│ ├── helpful_commands.md
│ ├── unity.md
│ ├── the_backup_bear_lab.md
│ ├── SCVMM_1711_S2D_2016_1711.md
│ ├── master_table.md
│ ├── multi-host.md
│ ├── networker_cloudboost.md
│ ├── Creating_a_Windows_Master.md
│ └── common_docker_registry.md
├── index.md
├── labbuildr on linux and osx.md
└── student_guide.md
├── profile.ps1
├── header-mkdocs.yml
├── .gitattributes
├── README.md
└── .gitignore
/labbuildr/Readme1st.txt:
--------------------------------------------------------------------------------
https://raw.githubusercontent.com/bottkars/labbuildr/HEAD/labbuildr/Readme1st.txt
--------------------------------------------------------------------------------
/labbuildr/defaults.json.example:
--------------------------------------------------------------------------------
https://raw.githubusercontent.com/bottkars/labbuildr/HEAD/labbuildr/defaults.json.example
--------------------------------------------------------------------------------
/docs/Solutionpacks/install-ansible.ps1.md:
--------------------------------------------------------------------------------
1 | tbd
2 |
3 | ## install-ansible installs a Standard ansible host on CentOS7
--------------------------------------------------------------------------------
/labbuildr/changes.txt:
--------------------------------------------------------------------------------
1 | changes:
2 | changes will be posted on #labbuildr #slack channel (http://codecommunity.emccode.com)
--------------------------------------------------------------------------------
/docs/Scenarios/exchange_noip_networker.md:
--------------------------------------------------------------------------------
1 | # Using labbuildr to create a DAG without Administrative Access Point ( and integrate Networker )
2 |
--------------------------------------------------------------------------------
/docs/appendix/helpful_commands.md:
--------------------------------------------------------------------------------
1 | ## helpful commands
2 |
3 |
4 |
--------------------------------------------------------------------------------
/docs/appendix/unity.md:
--------------------------------------------------------------------------------
1 |
2 | Install a Unity all in Falcon or greater
3 |
4 |
--------------------------------------------------------------------------------
/profile.ps1:
--------------------------------------------------------------------------------
1 | Write-Warning "you reached emergency update mode, patching to new labbuildr Distro Version"
2 | $Filecopy = Copy-Item ./labbuildr/build-lab.ps1 -Force -Destination ./build-lab.ps1 -ErrorAction SilentlyContinue
3 | ./build-lab.ps1 -update -Force
4 |
--------------------------------------------------------------------------------
/docs/Scenarios/Install labbuildr on linux.md:
--------------------------------------------------------------------------------
1 | labbuildr on linux can be installed using from PSGallery powershell install-script method
2 |
3 | ```Powershell
4 | install-script install-labbuildr
5 | install-labbuildr.ps1
6 | ```
7 |
8 | see this video for details [video](https://youtu.be/Dtv3XCUuOgs)
--------------------------------------------------------------------------------
/header-mkdocs.yml:
--------------------------------------------------------------------------------
1 | site_name: labbuildr Documentation
2 | repo_url: https://github.com/bottkars/labbuildr
3 | site_author: Karsten Bott
4 | theme: readthedocs
5 |
6 | copyright: "labbuildr
7 | is licensed under the MIT license"
8 | pages:
9 | - Home: index.md
10 | - Installation: installation.md
11 | # - Examples: Examples.md
12 | - Solutionpacks:
13 | - Scenarios:
14 |
--------------------------------------------------------------------------------
/docs/appendix/the_backup_bear_lab.md:
--------------------------------------------------------------------------------
1 | ## this one goes to my friend preston, aka @backupbear
2 |
3 |
4 | ## install labbuildr and create a sql lab ...
5 |
6 |
7 | 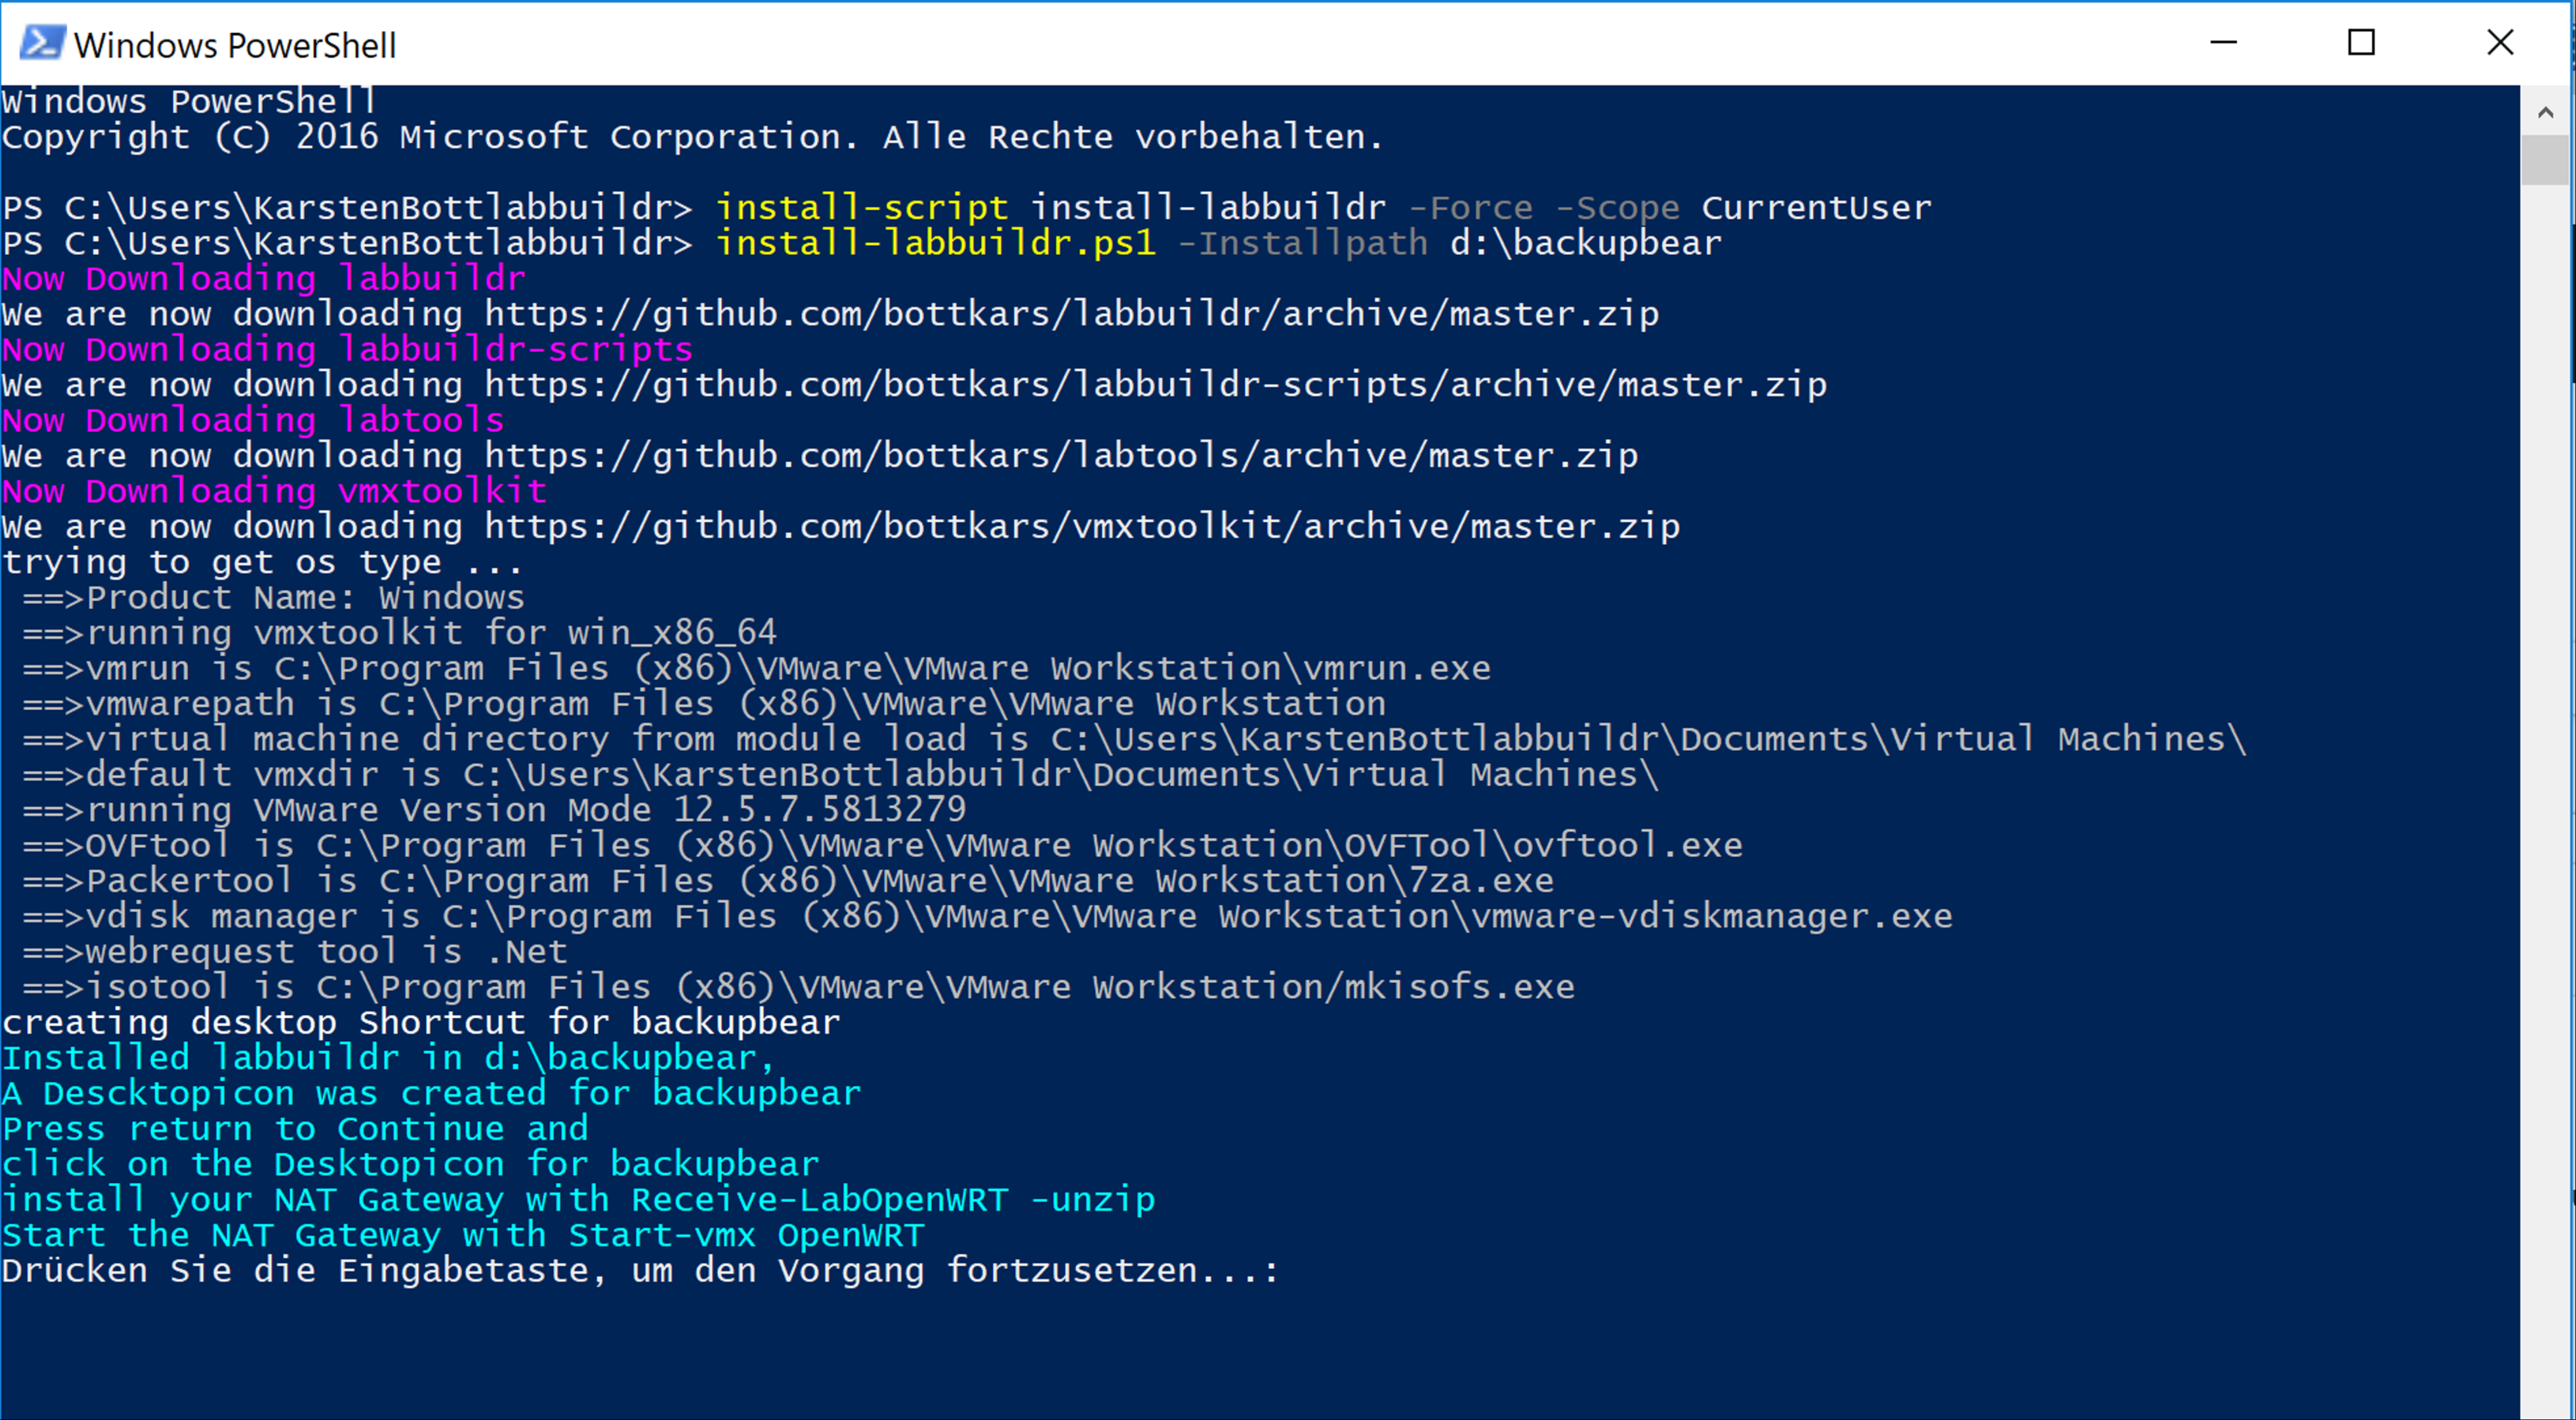
8 | 
9 | 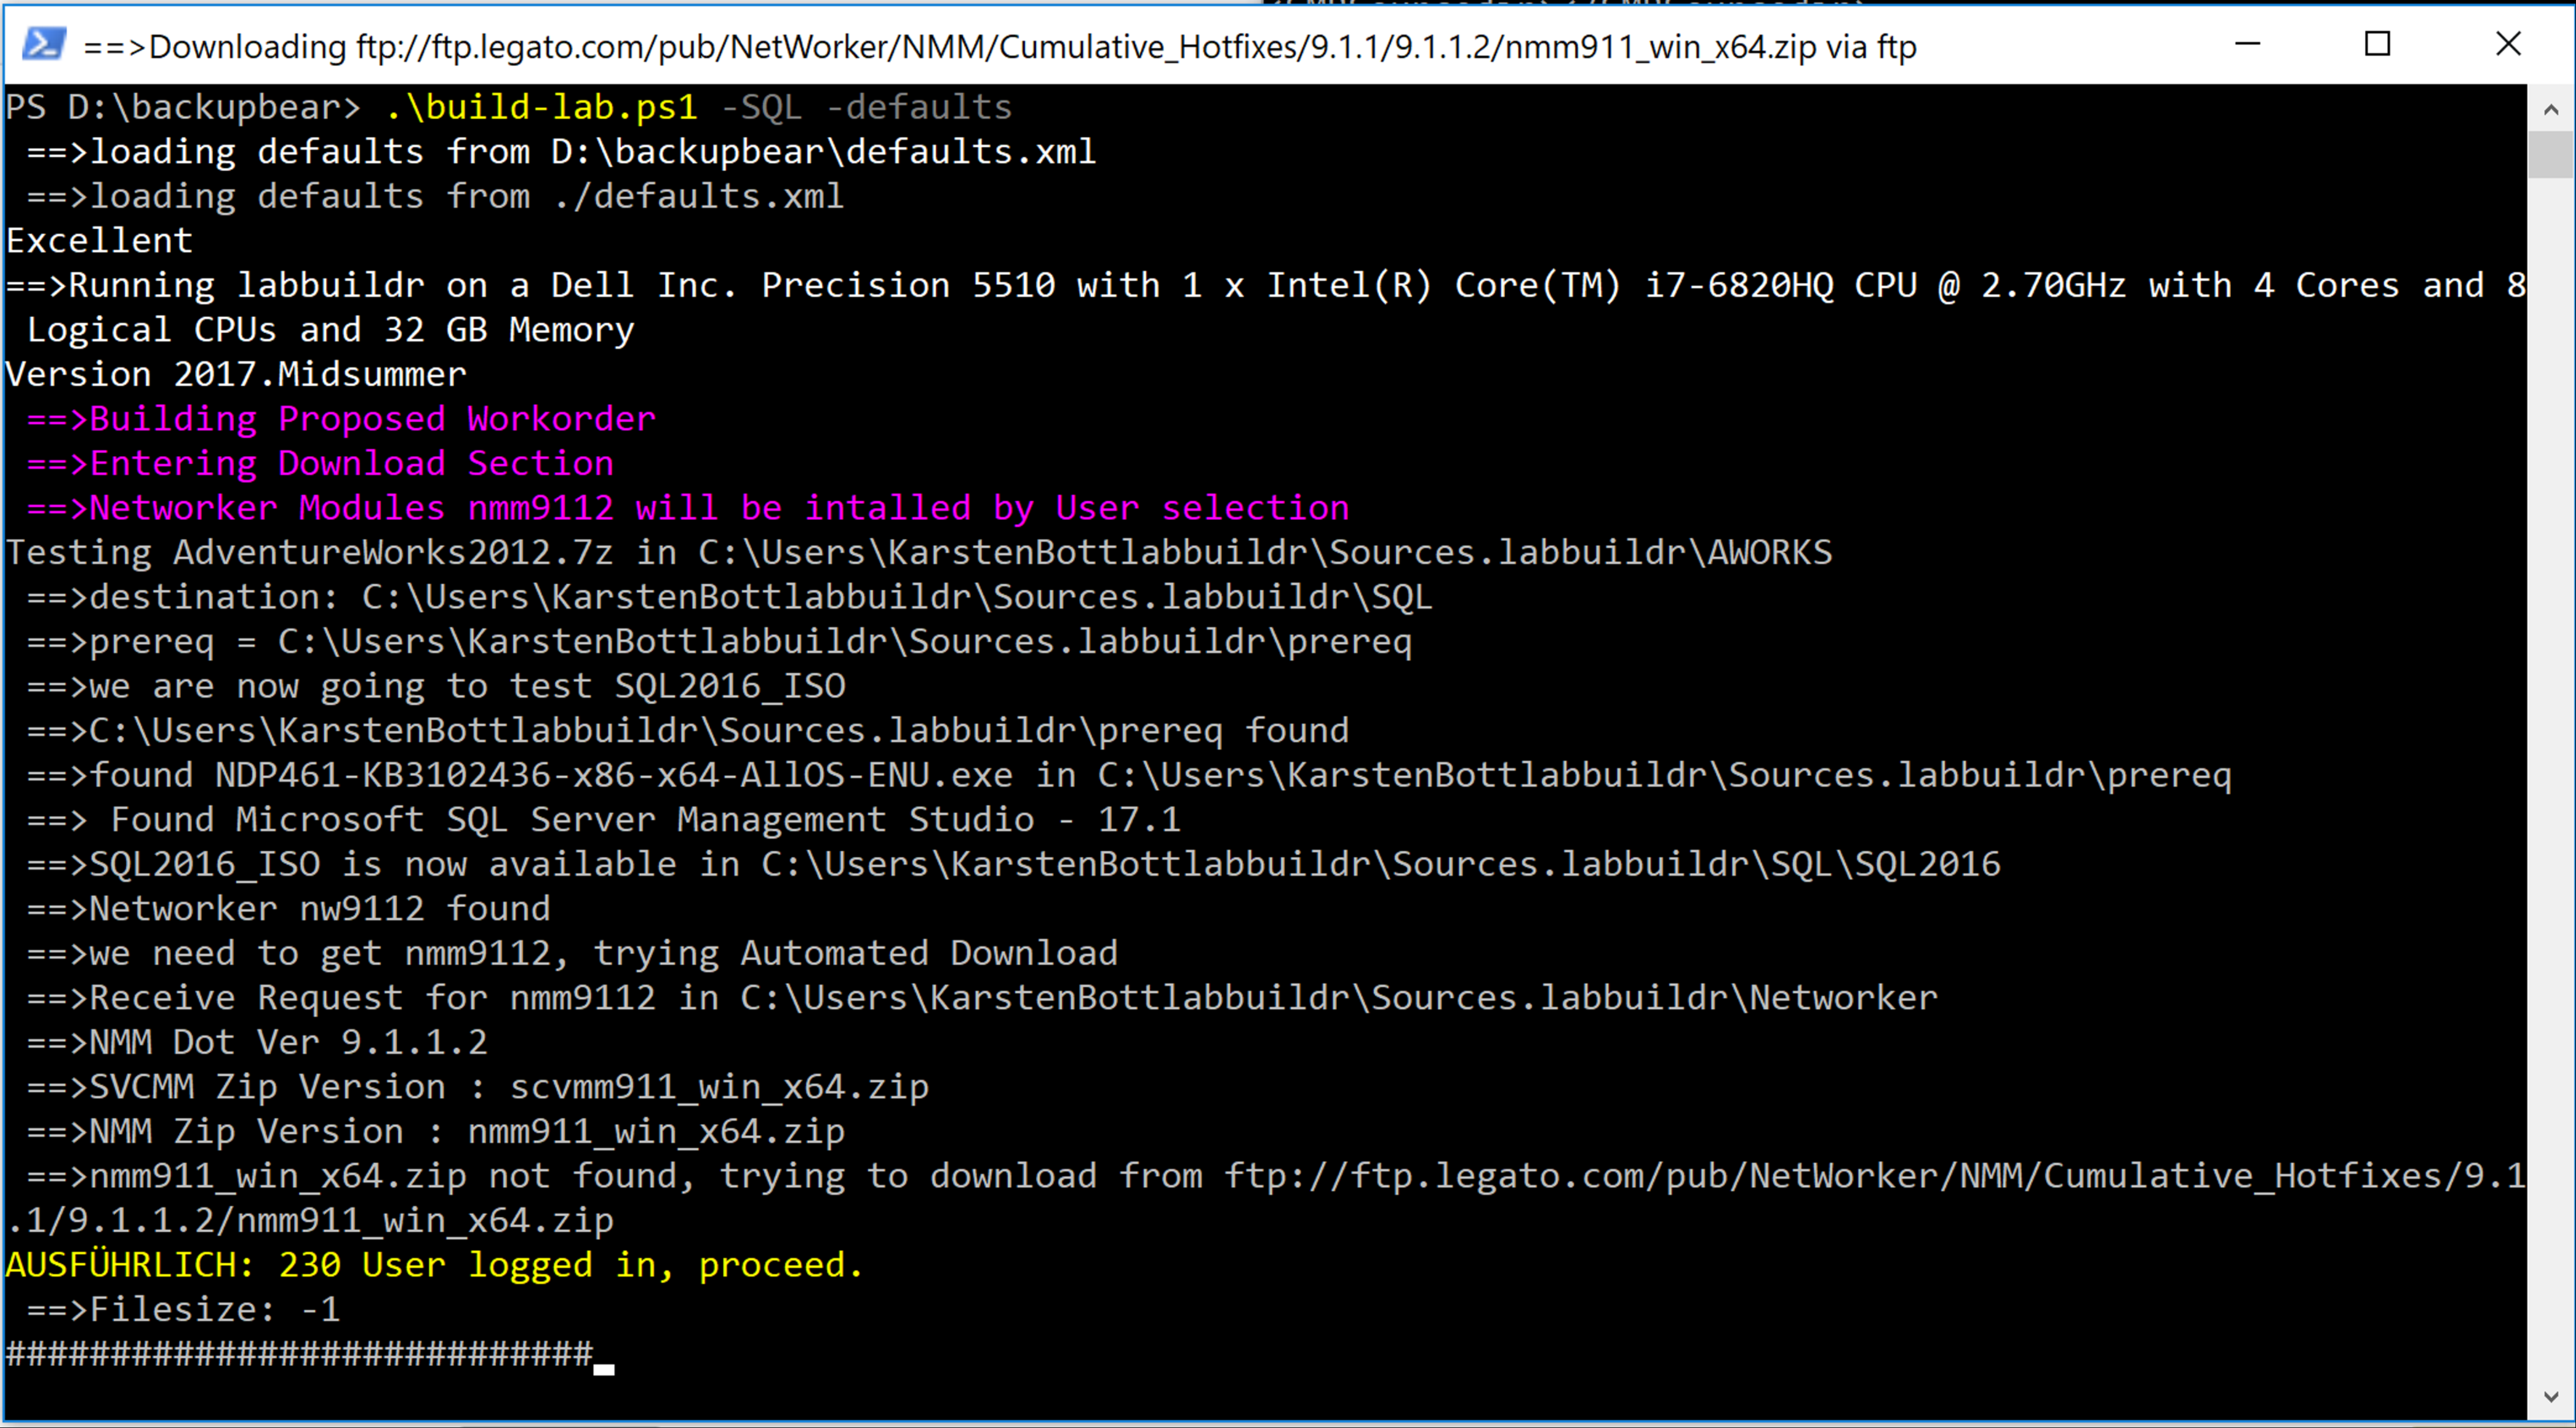
10 |
11 |
12 |
13 |
--------------------------------------------------------------------------------
/labbuildr/deletefiles.txt:
--------------------------------------------------------------------------------
1 | ./scaleio.ps1
2 | ./viprmaster/viprmaster.ovf
3 | ./Disks
4 | ./labbuildr.ps1
5 | ./helper
6 | ./viprmaster
7 | ./import-viprova.ps1
8 | ./install-scaleio.ps1
9 | ./get-*.ps1
10 | ./install-isi8.ps1
11 | ./install-rdostack.ps1
12 | ./Install/
13 | ./install-isi.ps1
14 | ./install-ave73.ps1
15 | ./install-mesosdev.ps1
16 | ./install-centos4scaleio.ps1
17 | ./start-scenario.ps1
18 | ./*-scenario.ps1
19 | ./Scripts
20 | ./install-dockerhost.ps1
21 | ./deletefiles.txt
22 | ./SIOToolkit
23 | ./install-openstack.ps1
24 | ./labbuildr/
25 | ./defaults.xml
26 | ./defaults.xml.example
27 | ./template/*.vmx
--------------------------------------------------------------------------------
/docs/Scenarios/Build A Domain Controller.md:
--------------------------------------------------------------------------------
1 | ## This guide describes how to build a Domaincontroller with labbuildr
2 |
3 | ```Powershell
4 | .\build-lab.ps1 [-DConly] [-defaults] [-Toolsupdate] [-Master ] [-Masterpath