this.pre = e} style={{ background: 'transparent' }}>{this.props.code}
30 | );
31 | }
32 | }
33 |
34 | export default HighlightCode;
--------------------------------------------------------------------------------
/en/Simple_Tutorial/Create_Collection.md:
--------------------------------------------------------------------------------
1 | #### Create collection
2 |
3 | Now we have a Project, we can create a Collection for this project.
4 |
5 | Collection is a group of many requests with the same property,
6 | it include folder, so the requests can be organized into folder.
7 |
8 | Collection is the unit when run Schedule or Stress Test.
9 |
10 | Create a Collection:
11 |
12 | 1. Go to Collection module.
13 |
14 | 2. Click `create collection` button as below.
15 |
16 | 3. Enter name `Sample Collection` and select Project `SampleAPI` that we create previously.
17 |
18 | 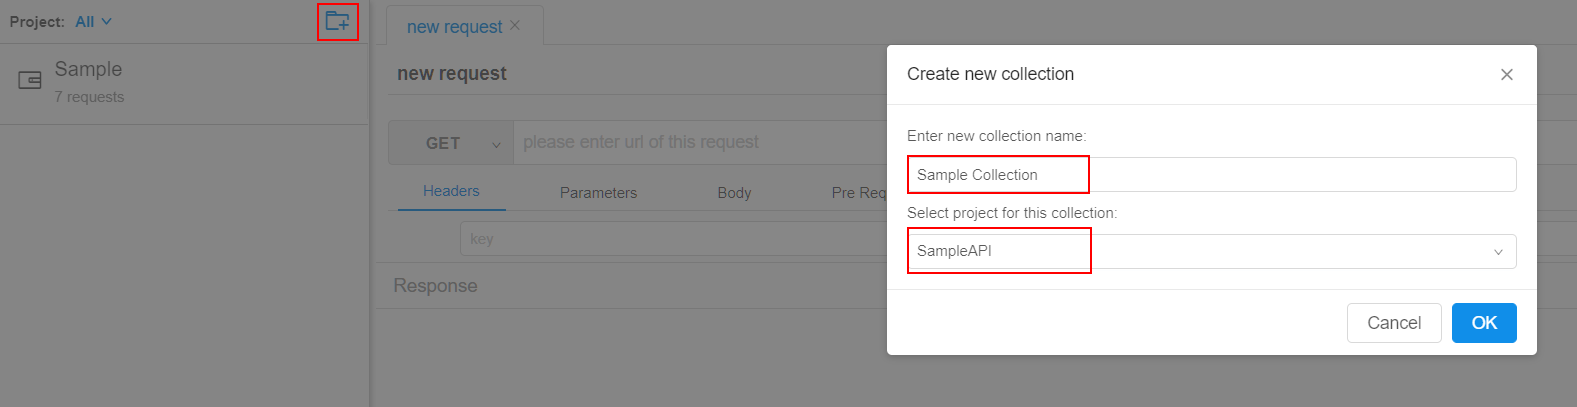
19 |
20 | After this collection is created, each of project's member can get it with their account.
21 |
22 | #### Collection other options
23 |
24 | 1. Create folder
25 |
26 | 2. Common Pre Request Script, refer to [Script](../Script/Common_Pre_Script.md)
27 |
28 | 3. Request Strict SSL: All requests of this collection will check SSL cert if this option is checked.
29 |
30 | 4. Request Follow Redirect: All request of this collection will follow http 3** redirect if this option is checked.
--------------------------------------------------------------------------------
/api/src/services/web_socket_service.ts:
--------------------------------------------------------------------------------
1 | import * as WS from 'ws';
2 | import * as http from 'http';
3 | import { ScheduleOnDemandService } from './schedule_on_demand_service';
4 | import { WebSocketHandler } from './base/web_socket_handler';
5 | import { StressTestWSService } from './stress_test_ws_service';
6 |
7 | export class WebSocketService {
8 |
9 | private wsServer: WS.Server;
10 |
11 | private routes: { [key: string]: { new(): WebSocketHandler } } = {};
12 |
13 | constructor(server: http.Server) {
14 | this.wsServer = new WS.Server({ server });
15 | this.use('/schedule', ScheduleOnDemandService);
16 | this.use('/stresstest', StressTestWSService);
17 | }
18 |
19 | use(path: string, handler: { new(): WebSocketHandler }) {
20 | this.routes[path] = handler;
21 | }
22 |
23 | start() {
24 | this.wsServer.on('connection', (socket, req) => {
25 | const route = this.routes[req.url];
26 | if (!route) {
27 | socket.close(1000, `no handler for ${req.url}`);
28 | return;
29 | }
30 | new route().handle(socket);
31 | });
32 | }
33 | }
--------------------------------------------------------------------------------
/client/src/common/interfaces/postman_v1.ts:
--------------------------------------------------------------------------------
1 | import { DtoRecord } from './dto_record';
2 | import { DtoEnvironment } from './dto_environment';
3 | import { DtoVariable } from './dto_variable';
4 | import { DataMode } from '../enum/data_mode';
5 |
6 | export interface PostmanAllV1 {
7 |
8 | collections: PostmanCollectionV1[];
9 |
10 | environments: PostmanEnvironments[];
11 | }
12 |
13 | export interface PostmanCollectionV1 {
14 |
15 | id: string;
16 |
17 | name: string;
18 |
19 | description: string;
20 |
21 | commonPreScript: string;
22 |
23 | folders: PostmanRecord[];
24 |
25 | requests: PostmanRecord[];
26 | }
27 |
28 | export interface PostmanRecord extends DtoRecord {
29 |
30 | tests: string;
31 |
32 | folder: string;
33 |
34 | rawModeData: string;
35 |
36 | dataMode: DataMode & string;
37 |
38 | data: any;
39 |
40 | preRequestScript: string;
41 |
42 | order: string[];
43 | }
44 |
45 | export interface PostmanEnvironments extends DtoEnvironment {
46 |
47 | values: PostmanEnv[];
48 | }
49 |
50 | export interface PostmanEnv extends DtoVariable {
51 |
52 | enabled: boolean;
53 |
54 | type: string;
55 | }
--------------------------------------------------------------------------------
/.github/ISSUE_TEMPLATE/security-issue-report.md:
--------------------------------------------------------------------------------
1 | ---
2 | name: Security Issue report (提交安全性问题)
3 | about: File a security issue report.
4 |
5 | ---
6 |
7 | **1. Describe the Security Issue as detailed as possible `(问题描述)`**
8 | A clear and concise description of what the bug is (请详细描述问题)
9 |
10 | **2. Steps to reproduce the problem `(重现步骤)`:**
11 | Clear and concise reproduction instructions are important for us to be able to triage your issue in a timely manner (简洁清晰的重现步骤能够帮助我们更迅速地定位问题所在)
12 |
13 | **3. What is the expected behavior `(期望表现)`?**
14 | Please describe the expected behavior (请描述期望表现)
15 |
16 | **4. Did this work before `(之前是否正常)`?**
17 | [Yes/No/NaN] [是,否,之前没用过]
18 |
19 | **5. Environment `(环境)`:**
20 | - Hitchhiker Version (Hitchhiker版本): [e.g. V0.14]
21 | - Use Docker or Installation Package (使用Docker还是安装包): [e.g. Docker/Installation Package]
22 | - Node Version (If you use the installation package) (如果使用安装包的Node版本): [e.g. 8.11.3]
23 | - Server OS (部署的系统): [e.g. Ubuntu, Windows, MacOS]
24 | - Browser (浏览器): [e.g. Chrome, Firefox, Safari]
25 |
26 | **6. Additional Information (e.g. Screenshots, Links) `(补充信息,截图,链接等)`**
27 | Add any other context about the problem here (补充具体的上下文信息)
28 |
--------------------------------------------------------------------------------
/cn/Variable/Param_Var.md:
--------------------------------------------------------------------------------
1 | Parameters变量是在Request的Parameters tab下定义的。
2 | 它可以让你把多个Request合并成一个,减少维护成本。
3 |
4 | 例如, 有一个API: `http://httpbin.org/get?boy={{boy}}&girl={{girl}}`, 可以看到API里有2个参数。
5 | 现在在Parameters里面加上如下对象,表示每个参数各有3个不同的值:
6 |
7 | ```json
8 | {
9 | "boy": ["tom", "jerry", "mike"],
10 | "girl": ["lucy", "lily", "cristina"]
11 | }
12 | ```
13 |
14 | 结果,选`OneToOne`的话我们可以得到3个Request:
15 | ```
16 | http://httpbin.org/get?boy=tom&girl=lucy
17 | http://httpbin.org/get?boy=jerry&girl=lily
18 | http://httpbin.org/get?boy=mike&girl=cristina
19 | ```
20 | 选`ManyToMany`的话就会有9个Request:
21 | ```
22 | http://httpbin.org/get?boy=tom&girl=lucy
23 | http://httpbin.org/get?boy=tom&girl=lily
24 | http://httpbin.org/get?boy=tom&girl=cristina
25 | http://httpbin.org/get?boy=jerry&girl=lucy
26 | http://httpbin.org/get?boy=jerry&girl=lily
27 | http://httpbin.org/get?boy=jerry&girl=cristina
28 | http://httpbin.org/get?boy=mike&girl=lucy
29 | http://httpbin.org/get?boy=mike&girl=lily
30 | http://httpbin.org/get?boy=mike&girl=cristina
31 | ```
32 |
33 | 而所有的这个Request只存在一个Request里。
34 |
35 | 我们可以同时请求这些不同参数的Request,也可以选择其中一个来请求。
36 |
37 | 
--------------------------------------------------------------------------------
/client/src/modules/login/style/index.less:
--------------------------------------------------------------------------------
1 | @import '../../../style/colors.less';
2 |
3 | .login-page{
4 | background: @panel-background-deep-dark;
5 | height: 100%;
6 | font-family: "Segoe UI", Arial, "Microsoft YaHei", -apple-system, BlinkMacSystemFont, "PingFang SC", "Hiragino Sans GB", "Helvetica Neue", Helvetica, "Helvetica Neue For Number", sans-serif;
7 | }
8 |
9 | .login-page-desc-title{
10 | font-size: 60px;
11 | color: white;
12 | margin-bottom: 24px;
13 | }
14 |
15 | .login-page-desc-content{
16 | font-size: 26px;
17 | color: rgba(255,255,255,0.6);
18 | }
19 |
20 | .login-page .login-page-form {
21 | width: 450px;
22 | background-color: white;
23 | padding: 48px 36px;
24 | border-radius: 6px;
25 | div{
26 | font-size: 15px;
27 | }
28 | }
29 |
30 | .login-panel-form-forgot {
31 | float: right;
32 | }
33 |
34 | .login-page-form-button {
35 | width: 100%;
36 | height: 44px;
37 | font-size: 18px;
38 | margin: 16px 0px 12px 0px;
39 | }
40 |
41 | .login-page-form-input{
42 | height: 40px;
43 | }
44 |
45 | .login-page-loading{
46 | position: absolute;
47 | top: calc(40% - 50px);
48 | left: calc(50% - 50px);
49 | }
--------------------------------------------------------------------------------
/cn/Stress/README.md:
--------------------------------------------------------------------------------
1 | Hitchhiker 现在有两种压力测试方式,一个基于Go的 [Hitchhiker-Node](https://github.com/brookshi/Hitchhiker-Node), 另一个是基于Nodejs的,内置在Server里。
2 |
3 | #### 为什么会有两种:
4 |
5 | 最开始Hitchhiker的脚本功能并不复杂,不支持js库,async/await,以及文件读取保存等,而Go很适合做这种高并发的程序,做了下调查后,使用otto做为js解释器,是可以运行当前的脚本逻辑的,所以选用了Go做压力测试的节点,早期是够用的。
6 |
7 | 后来Hitchhiker开始支持更多复杂的脚本功能,比如自定义js库这一项,因为npm里的很多js库都调用了Node的库,目前的Go以及otto满足不了这种需求,除非再加一个Node进程来执行脚本,这样过于复杂且不如直接使用Node来写,所以综合考虑后还是使用Nodejs重写了压力测试点。
8 |
9 | #### 两种方法的优劣:
10 |
11 | Go的高并发以及goroutine让写起这种压力程序时非常之轻松,性能也很有保障,缺点还是在于Hitchhiker的脚本是js,所以Go执行起来比较费劲,也因此Go的程序不支持Hitchiker脚本的高级特性。
12 |
13 | Nodejs写这种压力测试程序就比较费劲,需要自己管理多进程,以及进程间通信,好在Hitchhiker Server也是基于Nodejs的,所以可以重用请求处理的逻辑,而且Api的压力测试本质上是高IO的,所以Nodejs的性能也很不错。不过Nodejs的程序目前还不支持分布式,稍后会加上去,主体功能已经完成。
14 |
15 | 稍微比较了下两者的性能,在单机上基本旗鼓相当。
16 |
17 | #### 后续:
18 |
19 | 目前是以基于Nodejs的版本为默认的,Go的暂时会停止维护,除非Go有了基于Node的js解释器,那时再考虑移回来。
20 |
21 | #### 用法
22 |
23 | 和Schedule一样,Stress Test运行的单位也是Collection,同样可以对Request进行排序,然后设置压力相关的参数,如并发数,请求次数等来模拟用户的真实场景。
24 |
25 | 下面来一步步创建一个Stress Test:
26 |
27 | 1. [创建一个Stress Test](Create_Stress.md).
28 |
29 | 2. [运行一个压力点](Node.md). Go的需要这么做,Nodejs的就不需要了。类型选择参考:[configuration](../installation/configuration.md)里的Stress Type
30 |
31 | 3. [运行](Run.md).
--------------------------------------------------------------------------------
/api/src/controllers/stress_controller.ts:
--------------------------------------------------------------------------------
1 | import { GET, POST, PUT, DELETE, BodyParam, PathParam, BaseController } from 'webapi-router';
2 | import { ResObject } from '../interfaces/res_object';
3 | import * as Koa from 'koa';
4 | import { DtoStress } from '../common/interfaces/dto_stress';
5 | import { StressService } from '../services/stress_service';
6 |
7 | export default class StressController extends BaseController {
8 |
9 | @POST('/stress')
10 | async createNew(ctx: Koa.Context, @BodyParam stress: DtoStress): Promise