├── .gitignore
├── README.md
├── _config.yml
├── aws
└── aws-volume-types.md
├── baking
├── apple-pie.md
├── banana-bread.md
├── best-chocolate-chip-cookies.md
├── great-pumpkin-pie.jpg
├── great-pumpkin-pie.md
└── perfect-pie-crust.md
├── bash
├── a-generalized-single-instance-script.md
├── bash-shell-prompts.md
├── dont-do-grep-wc-l.md
├── groot.md
├── md5sum-of-a-path.md
├── pipefail.md
├── prompt-statement-variables.md
└── ring-the-audio-bell.md
├── consul
├── ingress-gateways.md
└── ingress-gateways.png
├── containers
└── non-privileged-containers-based-on-the-scratch-image.md
├── est
├── approximate-with-powers.md
├── ballpark-io-performance-figures.md
├── calculating-iops.md
├── littles-law.md
├── pi-seconds-is-a-nanocentury.md
└── rule-of-72.md
├── gardening
└── cotyledon-leaves.md
├── git
└── global-git-ignore.md
├── go
├── a-high-performance-go-cache.md
├── check-whether-a-file-exists.md
├── generating-hash-of-a-path.md
├── opentelemetry-tracer.md
└── using-error-groups.md
├── history
├── geological-eons-and-eras.md
└── the-late-bronze-age-collapse.md
├── kubernetes
└── installing-ssl-certs.md
├── linux
├── create-cron-without-an-editor.md
├── creating-a-linux-service-with-systemd.md
├── lastlog.md
├── socat.md
└── sparse-files.md
├── mac
├── installing-flock-on-mac.md
└── osascript.md
├── misc
├── buttons-1.jpg
├── buttons-2.jpg
├── buttons.md
├── chestertons-fence.md
├── convert-youtube-video-to-zoom-background.md
├── hugo-quickstart.md
├── new-gdocs.md
├── new-gdocs.png
├── voronoi-diagram.md
└── voronoi-diagram.png
├── software-architecture
├── hexagonal-architecture.md
└── hexagonal-architecture.png
├── ssh
├── break-out-of-a-stuck-session.md
└── exit-on-network-interruptions.md
├── team
├── amazon-leadership-principles.md
├── never-attribute-to-stupidity-that-which-is-adequately-explained-by-opportunity-cost.md
└── stay-out-of-the-critical-path.md
├── terraform
├── custom-validation-rules.md
├── plugin-basics.md
├── provider-plugin-development.md
├── rest-provider.md
└── time-provider.md
├── things-to-add.md
├── tls+ssl
├── dissecting-an-ssl-cert.md
├── use-vault-as-a-ca.md
└── use-vault-as-a-ca.png
└── vocabulary
├── sealioning.md
└── sealioning.png
/.gitignore:
--------------------------------------------------------------------------------
1 | .vscode
2 |
--------------------------------------------------------------------------------
/README.md:
--------------------------------------------------------------------------------
1 | # Today I Learned
2 |
3 | A place for me to write down all of the little things I learn every day. This serves largely as a way for me to remember little things I'd otherwise have to keep looking up.
4 |
5 | Many of these will be technical. Many of these will not.
6 |
7 | Behold my periodic learnings, and judge me for my ignorance.
8 |
9 | ## Tech and Team
10 |
11 | "Worky" things. Mostly (or entirely) technical and team leadership learnings.
12 |
13 | ### AWS
14 |
15 | * [Amazon EBS volume type details](aws/aws-volume-types.md) (21 March 2021)
16 |
17 | ### Bash
18 |
19 | * [Bash shell prompts](bash/bash-shell-prompts.md) (6 May 2020)
20 | * [Bash shell prompt statement variables](bash/prompt-statement-variables.md) (6 May 2020)
21 | * [Move to the root of a Git directory](bash/groot.md) (6 May 2020)
22 | * [One-liner to calculate the md5sum of a Linux path](bash/md5sum-of-a-path.md) (7 May 2020)
23 | * [Safer bash scripts with `set -euxo pipefail`](bash/pipefail.md) (14 May 2020)
24 | * [Ring the audio bell](bash/ring-the-audio-bell.md) (18 May 2020)
25 | * [Don't do `grep | wc -l`](bash/dont-do-grep-wc-l.md) (25 May 2020)
26 | * [A generalized single-instance bash script](bash/a-generalized-single-instance-script.md) (23 June 2020)
27 |
28 | ### Calculations and Estimations
29 |
30 | * [Approximate with powers](est/approximate-with-powers.md) (25 May 2020)
31 | * [Ballpark I/O performance figures](est/ballpark-io-performance-figures.md) (25 May 2020)
32 | * [Little's Law](est/littles-law.md) (25 May 2020)
33 | * [Rule of 72](est/rule-of-72.md) (25 May 2020)
34 | * [Calculating IOPS](est/calculating-iops.md) (21 June 2020)
35 | * [π seconds is a nanocentury](est/pi-seconds-is-a-nanocentury.md) (22 June 2020)
36 |
37 | ### Consul
38 |
39 | * [Ingress Gateways](consul/ingress-gateways.md) (18 June 2020)
40 |
41 | ### Containers
42 |
43 | * [Non-privileged containers based on the scratch image](containers/non-privileged-containers-based-on-the-scratch-image.md) (15 June 2020)
44 |
45 | ### Git
46 |
47 | * [Using core.excludesFile to define a global git ignore](git/global-git-ignore.md) (26 June 2020)
48 |
49 | ### Go
50 |
51 | * [Check whether a file exists](go/check-whether-a-file-exists.md) (27 April 2020)
52 | * [Generate a hash from files in a path](go/generating-hash-of-a-path.md) (27 April 2020)
53 | * [Ristretto: a high-performance Go cache](go/a-high-performance-go-cache.md) (13 June 2020)
54 | * [OpenTelemetry: Tracer](go/opentelemetry-tracer.md) (29 June 2020)
55 | * [Using error groups in Go](go/using-error-groups.md) (29 June 2020)
56 |
57 | ### Kubernetes
58 |
59 | * [Install TLS certificates as a Kubernetes secret](kubernetes/installing-ssl-certs.md) (29 April 2020)
60 |
61 | ### Linux
62 |
63 | * [Create a cron job using bash without the interactive editor](linux/create-cron-without-an-editor.md) (7 May 2020)
64 | * [Create a Linux service with systemd](linux/creating-a-linux-service-with-systemd.md) (8 May 2020)
65 | * [The socat (SOcket CAT) command](linux/socat.md) (15 May 2020)
66 | * [The lastlog utility](linux/lastlog.md) (23 May 2020)
67 | * [Sparse files](linux/sparse-files.md) (23 May 2020)
68 |
69 | ### Mac
70 |
71 | * [The osascript command is a thing](mac/osascript.md) (18 May 2020)
72 | * [Installing flock(1) on Mac](mac/installing-flock-on-mac.md) (21 June 2020)
73 |
74 | ### Miscellaneous
75 |
76 | * [Install and set up the Hugo static site generator](misc/hugo-quickstart.md) (7 June 2020)
77 | * [Chesterton's Fence](misc/chestertons-fence.md) (27 May 2020)
78 | * [Easily Create New Google Docs/Sheets/Forms/Slideshows](misc/new-gdocs.md) (22 September 2020)
79 |
80 | ### SSH
81 |
82 | * [Break out of a stuck SSH session](ssh/break-out-of-a-stuck-session.md) (30 April 2020)
83 | * [Exit SSH automatically on network interruptions](ssh/exit-on-network-interruptions.md) (30 April 2020)
84 |
85 | ### Software Architecture
86 |
87 | * [Hexagonal architecture](software-architecture/hexagonal-architecture.md) (30 May 2020)
88 |
89 | ### Team
90 |
91 | * [Amazon leadership principles](team/amazon-leadership-principles.md) (3 May 2020)
92 | * [Never attribute to stupidity that which is adequately explained by opportunity cost](team/never-attribute-to-stupidity-that-which-is-adequately-explained-by-opportunity-cost.md) (4 May 2020)
93 | * [Stop writing code and engineering in the critical path](team/stay-out-of-the-critical-path.md) (3 May 2020)
94 |
95 | ### Terraform
96 |
97 | * [Custom Terraform module variable validation rules](terraform/custom-validation-rules.md) (20 May 2020)
98 | * [Terraform plugin basics](terraform/plugin-basics.md) (3 May 2020)
99 | * [Terraform provider plugin development](terraform/provider-plugin-development.md) (3 May 2020)
100 | * [Terraform provider for generic REST APIs](terraform/rest-provider.md) (26 June 2020)
101 | * [Terraform provider for time](terraform/time-provider.md) (15 June 2020)
102 |
103 | ### TLS/SSL
104 |
105 | * [Anatomy of a TLS+SSL certificate](tls+ssl/dissecting-an-ssl-cert.md) (6 May 2020)
106 | * [Using Hashicorp Vault to build a certificate authority (CA)](tls+ssl/use-vault-as-a-ca.md) (6 May 2020)
107 |
108 | ## Non-Technical Things
109 |
110 | Non-work things: baking, gardening, and random cool trivia.
111 |
112 | ### Baking
113 |
114 | * [Banana bread recipe - 2lb loaf (Bread Machine)](baking/banana-bread.md) (23 April 2020)
115 | * [Perfect Pie Crust](baking/perfect-pie-crust.md) (7 March 2021)
116 | * [The Best Chocolate Chip Cookie Recipe Ever](baking/best-chocolate-chip-cookies.md) (9 May 2020)
117 | * [Apple Pie](baking/apple-pie.md) (12 October 2021)
118 | * [The Great Pumpkin Pie Recipe](baking/great-pumpkin-pie.md) (12 October 2021)
119 |
120 | ### Gardening
121 |
122 | * [Why are the cotyledon leaves on a tomato plant falling off?](gardening/cotyledon-leaves.md) (5 May 2020)
123 |
124 | ### History
125 |
126 | * [The Late Bronze Age collapse](history/the-late-bronze-age-collapse.md) (17 May 2020)
127 | * [Geological eons and eras](history/geological-eons-and-eras.md) (1 June 2020)
128 |
129 | ### Miscellaneous
130 |
131 | * ["Button up" vs "button down"](misc/buttons.md) (6 May 2021)
132 | * [Converting a YouTube video to a Zoom background](misc/convert-youtube-video-to-zoom-background.md) (23 April 2020)
133 | * [Voronoi diagram](misc/voronoi-diagram.md) (17 June 2020)
134 |
135 | ### Services
136 |
137 | * [Ephemeral, trivially revocable cards that pass-through to your actual card (privacy.com)](https://privacy.com/) (21 May 2020)
138 |
139 | ### Vocabulary
140 |
141 | * [Sealioning](vocabulary/sealioning.md) (13 May 2020)
142 |
--------------------------------------------------------------------------------
/_config.yml:
--------------------------------------------------------------------------------
1 | theme: jekyll-theme-architect
--------------------------------------------------------------------------------
/aws/aws-volume-types.md:
--------------------------------------------------------------------------------
1 | # Amazon EBS Volume Types
2 |
3 | *Source: [Amazon EBS volume types](https://docs.aws.amazon.com/AWSEC2/latest/UserGuide/ebs-volume-types.html)*
4 |
5 | Amazon EBS provides the following volume types, which differ in performance characteristics and price, so that you can tailor your storage performance and cost to the needs of your applications. The volumes types fall into these categories:
6 |
7 | * Solid state drives (SSD) — Optimized for transactional workloads involving frequent read/write operations with small I/O size, where the dominant performance attribute is IOPS.
8 |
9 | * Hard disk drives (HDD) — Optimized for large streaming workloads where the dominant performance attribute is throughput.
10 |
11 | * Previous generation — Hard disk drives that can be used for workloads with small datasets where data is accessed infrequently and performance is not of primary importance. We recommend that you consider a current generation volume type instead.
12 |
13 | There are several factors that can affect the performance of EBS volumes, such as instance configuration, I/O characteristics, and workload demand. To fully use the IOPS provisioned on an EBS volume, use EBS-optimized instances. For more information about getting the most out of your EBS volumes, see Amazon EBS volume performance on Linux instances.
14 |
15 | ## Solid state drives (SSD)
16 |
17 | The SSD-backed volumes provided by Amazon EBS fall into these categories:
18 |
19 | * General Purpose SSD — Provides a balance of price and performance. We recommend these volumes for most workloads.
20 |
21 | * Provisioned IOPS SSD — Provides high performance for mission-critical, low-latency, or high-throughput workloads.
22 |
23 | The following is a summary of the use cases and characteristics of SSD-backed volumes. For information about the maximum IOPS and throughput per instance, see [Amazon EBS–optimized instances](https://docs.aws.amazon.com/AWSEC2/latest/UserGuide/ebs-optimized.html).
24 |
25 | ### General Purpose SSD
26 |
27 | #### `gp2`
28 |
29 | * **Durability:** 99.8% - 99.9%
30 | * **Use cases:** low-latency interactive apps; development and test environments
31 | * **Volume size:** 1 GiB - 16 TiB
32 | * **IOPS per volume (16 KiB I/O):** 3 IOPS per GiB of volume size (100 IOPS at 33.33 GiB and below to 16,000 IOPS at 5,334 GiB and above)
33 | * **Throughput per volume:** 250 MiB/s
34 | * **Amazon EBS Multi-attach supported?** No
35 | * **Boot volume supported?** Yes
36 |
37 | #### `gp3`
38 |
39 | * **Durability:** 99.8% - 99.9%
40 | * **Use cases:** low-latency interactive apps; development and test environments
41 | * **Volume size:** 1 GiB - 16 TiB
42 | * **IOPS per volume (16 KiB I/O):** 3,000 IOPS base; can be increased up to 16,000 IOPS (see below)
43 | * **Throughput per volume:** 125 MiB/s base; can be increased up to 1,000 MiB/s (see below)
44 | * **Amazon EBS Multi-attach supported?** No
45 | * **Boot volume supported?** Yes
46 |
47 | The maximum ratio of provisioned IOPS to provisioned volume size is 500 IOPS per GiB. The maximum ratio of provisioned throughput to provisioned IOPS is .25 MiB/s per IOPS. The following volume configurations support provisioning either maximum IOPS or maximum throughput:
48 |
49 | * 32 GiB or larger: 500 IOPS/GiB x 32 GiB = 16,000 IOPS
50 | * 8 GiB or larger and 4,000 IOPS or higher: 4,000 IOPS x 0.25 MiB/s/IOPS = 1,000 MiB/s
51 |
52 |
53 | ### Provisioned IOPS SSD
54 |
55 | #### `io1`
56 |
57 | * **Durability:** 99.8% - 99.9% durability
58 | * **Use cases:** Workloads that require sustained IOPS performance or more than 16,000 IOPS; I/O-intensive database workloads
59 | * **Volume size:** 4 GiB - 16 TiB
60 | * **IOPS per volume (16 KiB I/O):** 64,000 (see note 2)
61 | * **Throughput per volume:** 1,000 MiB/s
62 | * **Amazon EBS Multi-attach supported?** Yes
63 | * **Boot volume supported?** Yes
64 |
65 | Note 2: Maximum IOPS and throughput are guaranteed only on Instances built on the Nitro System provisioned with more than 32,000 IOPS. Other instances guarantee up to 32,000 IOPS and 500 MiB/s. io1 volumes that were created before December 6, 2017 and that have not been modified since creation might not reach full performance unless you modify the volume.
66 |
67 | #### `io2`
68 |
69 | * **Durability:** 99.999% durability
70 | * **Use cases:** Workloads that require sustained IOPS performance or more than 16,000 IOPS; I/O-intensive database workloads
71 | * **Volume size:** 4 GiB - 16 TiB
72 | * **IOPS per volume (16 KiB I/O):** 64,000 (see note 3)
73 | * **Throughput per volume:** 1,000 MiB/s
74 | * **Amazon EBS Multi-attach supported?** Yes
75 | * **Boot volume supported?** Yes
76 |
77 | Note 3: Maximum IOPS and throughput are guaranteed only on Instances built on the Nitro System provisioned with more than 32,000 IOPS. Other instances guarantee up to 32,000 IOPS and 500 MiB/s. io1 volumes that were created before December 6, 2017 and that have not been modified since creation might not reach full performance unless you modify the volume.
78 |
79 | #### `io2 Block Express` (in opt-in preview only as of March 2021)
80 |
81 | * **Durability:** 99.999% durability
82 | * **Use cases:** Workloads that require sub-millisecond latency, and sustained IOPS performance or more than 64,000 IOPS or 1,000 MiB/s of throughput
83 | * **Volume size:** 4 GiB - 64 TiB
84 | * **IOPS per volume (16 KiB I/O):** 256,000
85 | * **Throughput per volume:** 4,000 MiB/s
86 | * **Amazon EBS Multi-attach supported?** No
87 | * **Boot volume supported?** Yes
88 |
--------------------------------------------------------------------------------
/baking/apple-pie.md:
--------------------------------------------------------------------------------
1 | # Apple Pie
2 |
3 | _Source: Modified from [A Taste of Home: Apple Pie](https://www.tasteofhome.com/recipes/apple-pie/)_
4 |
5 | The original recipe produces a pie that's delicious, but runny and somewhat underdone. Replacing flour with ground tapioca sufficiently thickens the filling, increasing the baking time and temperature ensures an adequate bake.
6 |
7 | ## Ingredients
8 |
9 | * 1/2 cup **sugar**
10 | * 1/2 cup packed **brown sugar**
11 | * 3 tablespoons **ground tapioca**
12 | * 1 teaspoon **cinnamon**
13 | * 1/4 teaspoon **ginger**
14 | * 1/4 teaspoon **nutmeg**
15 | * 6 to 7 cups thinly sliced peeled **tart apples** (Granny Smith, maybe some sweet, crisp apples like Golden Delicious thrown in, work great)
16 | * 1 tablespoon **lemon juice**
17 | * **Dough for double-crust pie** ([this recipe](perfect-pie-crust.md) works great)
18 | * 1 tablespoon **butter**
19 | * 1 large **egg**
20 | * Additional **sugar**
21 |
22 | ## Directions
23 |
24 | 1. Preheat oven to 425°F (218°C).
25 |
26 | 2. In a small bowl, combine sugars, flour and spices; set aside.
27 |
28 | 3. In a large bowl, toss apples with lemon juice. Add sugar mixture; toss to coat.
29 |
30 | 4. On a lightly floured surface, roll one half of dough to a 12-inch circle; transfer to a 9-in. pie plate. Trim even with rim.
31 |
32 | 5. Add filling; dot with butter.
33 |
34 | 6. Roll remaining dough to a 1/8-in.-thick circle. Place over filling. Trim, seal and flute edge. Cut slits in top.
35 |
36 | 7. Beat egg until foamy; brush over crust. Sprinkle with sugar. Cover edge loosely with foil.
37 |
38 | 8. Bake at 425°F (218°C) for 20-25 minutes.
39 |
40 | 9. Reduce temperature to 350°F (176°C); Remove foil; bake until crust is golden brown and filling is bubbly, 30-50 minutes longer. Cool on a wire rack.
41 |
--------------------------------------------------------------------------------
/baking/banana-bread.md:
--------------------------------------------------------------------------------
1 | # Banana Bread Recipe - 2lb Loaf (Bread Machine)
2 |
3 | _Source: modified from https://breaddad.com/bread-machine-banana-bread/_
4 |
5 | ## Ingredients
6 |
7 | * 1/2 Cup – Milk (warm)
8 | * 2 – Eggs (beaten)
9 | * 8 Tablespoons – Butter (softened)
10 | * 1 Teaspoon – Vanilla Extract
11 | * 3 – Bananas (Ripe), Medium Sized (mashed)
12 | * 1 Cup – White Granulated Sugar
13 | * 2 Cups – Flour (all-purpose)
14 | * 1/2 Teaspoon – Salt
15 | * 2 Teaspoons – Baking Powder (aluminum free)
16 | * 1 Teaspoon – Baking Soda
17 | * 1/2 Cup - Chopped Walnuts
18 |
19 | ## Instructions
20 |
21 | * Prep Time – 10 minutes
22 | * Baking Time – 1:40 hours
23 | * Bread Machine Setting – Quick Bread
24 | * Beat the eggs.
25 | * Mash bananas with a fork.
26 | * Soften the butter in microwave.
27 | * Pour the milk into the bread pan and then add the other ingredients (except the walnuts). Try to follow the order of the ingredients listed above so that liquid ingredients are placed in the bread pan first and the dry ingredients second. Be aware that the bread pan should be removed from the bread machine before you start to add any ingredients. This helps to avoid spilling any material inside the bread machine.
28 | * Put the bread pan (with all of the ingredients) back into the bread machine and close the bread machine lid.
29 | * Start the machine after checking the settings (i.e. make sure it is on the quick bread setting).
30 | * Add chopped walnuts when the machine stops after the first kneading.
31 | When the bread machine has finished baking the bread, remove the bread pan and place it on a wooden cutting board. Let the bread stay within the bread pan (bread loaf container) for 10 minutes before you remove it from the bread pan. Use oven mitts when removing the bread pan because it will be very hot!
32 | After removing the bread from the bread pan, place the bread on a cooling rack. Use oven mitts when removing the bread.
33 | Don’t forget to remove the mixing paddle if it is stuck in the bread. Use oven mitts as the mixing paddle could be hot.
34 | You should allow the banana bread to completely cool before cutting. This can take up to 2 hours. Otherwise, the banana bread will break (crumble) more easily when cut.
35 |
36 |
--------------------------------------------------------------------------------
/baking/best-chocolate-chip-cookies.md:
--------------------------------------------------------------------------------
1 | # The Best Chocolate Chip Cookie Recipe Ever
2 |
3 | _Source: [Joy Food Sunshine: The Best Chocolate Chip Cookie Recipe Ever](https://joyfoodsunshine.com/the-most-amazing-chocolate-chip-cookies/)_
4 |
5 | This is the best chocolate chip cookie recipe ever. No funny ingredients, no chilling time, etc. Just a simple, straightforward, amazingly delicious, doughy yet still fully cooked, chocolate chip cookie that turns out perfectly every single time!
6 |
7 | ## How to make easy cookies from scratch
8 |
9 | Like I said, these cookies are crazy easy, however here are a few notes.
10 |
11 | 1. **Soften butter.** If you are planning on making these, take the butter out of the fridge first thing in the morning so it’s ready to go when you need it.
12 |
13 | 2. **Measure the flour correctly.** Be sure to use a measuring cup made for dry ingredients (NOT a pyrex liquid measuring cup). There has been some controversy on how to measure flour. I personally use the scoop and shake method and always have (gasp)! It’s easier and I have never had that method fail me. Many of you say that the only way to measure flour is to scoop it into the measuring cup and level with a knife. I say, measure it the way _**you**_ always do. Just make sure that the dough matches the consistency of the dough in the photos in this post.
14 |
15 | 3. **Use LOTS of chocolate chips.** Do I really need to explain this?!
16 |
17 | 4. **DO NOT over-bake these chocolate chip cookies!** I explain this more below, but these chocolate chip cookies will not look done when you pull them out of the oven, and that is GOOD.
18 |
19 | ## How do you make gooey chocolate chip cookies?
20 |
21 | The trick to making this best chocolate chip cookie recipe gooey is to not over-bake them. At the end of the baking time, these chocolate chip cookies **won’t look done** but they are.
22 |
23 | These chocolate chip cookies will look a little doughy when you remove them from the oven, and thats **good**. They will set up as they sit on the cookie sheet for a few minutes.
24 |
25 | ## Ingredients
26 |
27 | * 1 cup salted butter softened
28 | * 1 cup white (granulated) sugar
29 | * 1 cup light brown sugar packed
30 | * 2 tsp pure vanilla extract
31 | * 2 large eggs
32 | * 3 cups all-purpose flour
33 | * 1 tsp baking soda
34 | * 1/2 tsp baking powder
35 | * 1 tsp sea salt
36 | * 2 cups chocolate chips (or chunks, or chopped chocolate)
37 |
38 | ### Notes
39 |
40 | * When you remove the cookies from the oven they will still look doughy. THIS is the secret that makes these cookies so absolutely amazing! Please, I beg you, do NOT overbake!
41 | * Butter. If you use unsalted butter, increase the salt to 1 1/2 tsp total.
42 | * Some people have said they think the cookies are too salty. Please be sure to use natural Sea Salt (not iodized table salt). If you are concerned about saltiness start with 1/2 tsp salt and adjust to your tastes.
43 |
44 | ## Instructions
45 |
46 | 1. Preheat oven to 375 degrees F. Line a baking pan with parchment paper and set aside.
47 | 2. In a separate bowl mix flour, baking soda, salt, baking powder. Set aside.
48 | 3. Cream together butter and sugars until combined.
49 | 4. Beat in eggs and vanilla until fluffy.
50 | 5. Mix in the dry ingredients until combined.
51 | 6. Add 12 oz package of chocolate chips and mix well.
52 | 7. Roll 2-3 tbs (depending on how large you like your cookies) of dough at a time into balls and place them evenly spaced on your prepared cookie sheets. (alternately, use a small cookie scoop to make your cookies).
53 | 8. Bake in preheated oven for approximately 8-10 minutes. Take them out when they are just BARELY starting to turn brown.
54 | 9. Let them sit on the baking pan for 2 minutes before removing to cooling rack.
55 |
--------------------------------------------------------------------------------
/baking/great-pumpkin-pie.jpg:
--------------------------------------------------------------------------------
https://raw.githubusercontent.com/clockworksoul/today-i-learned/1257079ee89defd9da4c261fd30d7d4a85f8ceb7/baking/great-pumpkin-pie.jpg
--------------------------------------------------------------------------------
/baking/great-pumpkin-pie.md:
--------------------------------------------------------------------------------
1 | # The Great Pumpkin Pie Recipe
2 |
3 | _Source: Combination of [Sally's Baking Addition: The Great Pumpkin Pie Recipe](https://sallysbakingaddiction.com/the-great-pumpkin-pie-recipe/) and [The Perfect Pie](https://smile.amazon.com/Perfect-Pie-Ultimate-Classic-Galettes/dp/1945256915/ref=sr_1_1_)_
4 |
5 |  6 |
7 | * Prep Time: 45 minutes
8 | * Cook Time: 65 minutes
9 | * Total Time: Overnight (14 hours - includes time for pie dough and cranberries)
10 | * Yield: serves 8-10; 1 cup sugared cranberries
11 |
12 | ## Description
13 |
14 | _Bursting with flavor, this pumpkin pie recipe is my very favorite. It’s rich, smooth, and tastes incredible on my homemade pie crust and served with whipped cream. The pie crust leaves are purely for decor, you can leave those off of the pie and only make 1 pie crust. You can also leave off the sugared cranberries._
15 |
16 | ## Ingredients
17 |
18 | ### Sugared Cranberries
19 |
20 | * 1 cup (120g) **fresh cranberries**
21 | * 2 cups (400g) **granulated sugar**, divided
22 | * 1 cup (240ml) **water**
23 |
24 | ### Pumpkin Pie
25 |
26 | * 1 recipe [double-crust pie dough](perfect-pie-crust.md) (full recipe makes 2 crusts: 1 for bottom, 1 for leaf decor)
27 | * Egg wash: 1 **large egg** beaten with 1 Tablespoon **whole milk**
28 | * 1 cup (240ml) **heavy cream**
29 | * 1/4 cup (60ml) **whole milk**
30 | * 3 **large eggs** plus 2 **large yolks**
31 | * 1 teaspoon **vanilla extract**
32 | * One 15oz can (about 2 cups; 450g) **pumpkin puree**
33 | * 1 cup drained candied **sweet potatoes or yams**
34 | * 3/4 cup (5 1/4 ounces) **sugar**
35 | * 1/4 cup **maple syrup**
36 | * 1 teaspoon table **salt**
37 | * 2 teaspoons ground or freshly grated **ginger**
38 | * 1/2 teaspoon ground **cinnamon**
39 | * 1/4 teaspoon ground **nutmeg**
40 | * 1/8 teaspoon ground **cloves**
41 | * 1/8 teaspoon fresh ground **black pepper** (seriously!)
42 |
43 |
83 |
84 | ## Instructions
85 |
86 | ### Sugared Cranberries (Optional)
87 |
88 | 1. Place cranberries in a large bowl; set aside.
89 |
90 | 2. In a medium saucepan, bring 1 cup of sugar and the water to a boil and whisk until the sugar has dissolved. Remove pan from the heat and allow to cool for 5 minutes.
91 |
92 | 3. Pour sugar syrup over the cranberries and stir. Let the cranberries sit at room temperature or in the refrigerator for 6 hours or overnight (ideal). You’ll notice the sugar syrup is quite thick after this amount of time.
93 |
94 | 4. Drain the cranberries from the syrup and pour 1 cup of sugar on top. Toss the cranberries, coating them all the way around.
95 |
96 | 5. Pour the sugared cranberries on a parchment paper or silicone baking mat-lined baking sheet and let them dry for at least 2 hours at room temperature or in the refrigerator.
97 |
98 | 6. Cover tightly and store in the refrigerator for up to 3 days.
99 |
100 | You’ll have extra, but they’re great for eating or as garnish on other dishes.
101 |
102 | ### Prepare the Crust
103 |
104 | 1. Roll half of the 2-crust dough into a 12-inch circle on floured counter. Loosely roll dough around rolling pin and gently unroll it onto 9-inch pie plate, letting excess dough hang over edge. Ease dough into plate by gently lifting edge of dough with your hand while pressing into plate bottom with your other hand.
105 |
106 | 2. Trim overhang to 1/2 inch beyond lip of plate. Tuck overhang under itself; folded edge should be flush with edge of plate. Crimp dough evenly around edge of plate.
107 | Crimp the edges with a fork or flute the edges with your fingers, if desired. Wrap dough-lined plate loosely in plastic wrap and refrigerate until firm, about 30 minutes.
108 |
109 | ### Pie Crust Leaves (Optional)
110 |
111 | If you're using a store bought or have only a single-crust's amount of dough, skip this step.
112 |
113 | 1. On a floured work surface, roll out one of the balls of chilled dough to about 1/8 inch thickness (the shape doesn’t matter).
114 |
115 | 2. Using leaf cookie cutters, cut into shapes.
116 |
117 | 3. Brush each lightly with the beaten egg + milk mixture.
118 |
119 | 4. Cut leaf veins into leaves using a sharp knife, if desired.
120 |
121 | 5. Place onto a parchment paper or silicone baking mat-lined baking sheet and bake at 350°F (177°C) for 10 minutes or until lightly browned. Remove and set aside to cool before decorating pie.
122 |
123 | ### The Pie Proper
124 |
125 | 1. Adjust oven rack to middle position and heat to 375°F (190°C).
126 |
127 | 2. Brush edges of chilled pie shell lightly with egg wash mixture. Line with double layer of aluminum foil, covering edges to prevent burning, and fill with pie weights. Bake on foil-lined rimmed baking sheet for 10-15 minutes.
128 |
129 | 3. Remove foil and weights, rotate sheet, and continue to bake crust until golden brown and crisp, 10 to 15 minutes longer. Transfer sheet to wire rack. (The crust must still be warm when filling is added).
130 |
131 | 4. While crust is baking, whisk cream, milk, eggs and yolks, and vanilla together in bowl; set aside. Bring pumpkin, sweet potatoes, sugar, maple syrup, ginger, salt, cinnamon, and nutmeg to simmer in large saucepan over medium heat and cook, stirring constantly and mashing sweet potatoes against sides of saucepan, until thick and shiny, 15 to 20 minutes.
132 |
133 | 5. Remove saucepan from heat and whisk in cream mixture until fully incorporated.
134 |
135 | 6. Strain mixture through fine-mesh strainer into bowl, using back of ladle or spatula to press solids through strainer.
136 |
137 | 7. Whisk mixture, then, with pie still on sheet, pour into warm crust. Bake the pie until the center is almost set, about 55-60 minutes. A small part of the center will be wobbly – that’s ok. After 25 minutes of baking, be sure to cover the edges of the crust with aluminum foil or use a pie crust shield to prevent the edges from getting too brown. Check for doneness at minute 50, and then 55, and then 60, etc.
138 |
139 | 8. Once done, transfer the pie to a wire rack and allow to cool completely for at least 4 hours. Decorate with sugared cranberries and pie crust leaves (see note). You’ll definitely have leftover cranberries – they’re tasty for snacking. Serve pie with whipped cream if desired. Cover leftovers tightly and store in the refrigerator for up to 5 days.
140 |
141 | ## Notes
142 |
143 | 1. **Make Ahead & Freezing Instructions:** Pumpkin pie freezes well, up to 3 months. Thaw overnight in the refrigerator before serving. Pie crust dough freezes well for up to 3 months. Thaw overnight in the refrigerator before using. If decorating your pie with sugared cranberries, start them the night before. You’ll also begin the pie crust the night before as well (the dough needs at least 2 hours to chill; overnight is best). The filling can be made the night before as well. In fact, I prefer it that way. It gives the spices, pumpkin, and brown sugar flavors a chance to infuse and blend. It’s awesome. Cover and refrigerate overnight. No need to bring to room temperature before baking.
144 |
145 | 1. **Cranberries:** Use fresh cranberries, not frozen. The sugar syrup doesn’t coat evenly on the frozen berries, leaving you with rather ugly and some very plain shriveled cranberries.
146 |
147 | 1. **Pumpkin:** Canned pumpkin is best in this pumpkin pie recipe. If using fresh pumpkin puree, lightly blot it before adding to remove some moisture; the bake time may also be longer.
148 |
149 | 1. **Spices:** Instead of ground ginger and nutmeg, you can use 2 teaspoons of pumpkin pie spice. Be sure to still add 1/2 teaspoon cinnamon.
150 |
151 | 1. **Pie Crust:** No matter if you’re using homemade crust or store-bought crust, pre-bake the crust (The Pie Proper; steps 1-3). You can use graham cracker crust if you’d like, but the slices may get a little messy. Pre-bake for 10 minutes just as you do with regular pie crust in this recipe. No need to use pie weights if using a cookie crust.
152 |
153 | 1. **Mini Pumpkin Pies:** Many have asked about a mini version. Here are my mini pumpkin pies. They’re pretty easy– no blind baking the crust!
154 |
155 |
156 |
157 |
158 |
159 |
160 |
161 |
162 |
163 |
164 |
165 |
166 |
167 |
168 |
169 |
--------------------------------------------------------------------------------
/baking/perfect-pie-crust.md:
--------------------------------------------------------------------------------
1 | # Homemade Buttery Flaky Pie Crust
2 |
3 | _Source: [Sally's Baking Addition: Homemade Buttery Flaky Pie Crust](https://sallysbakingaddiction.com/baking-basics-homemade-buttery-flaky-pie-crust/)_
4 |
5 | * Prep Time: 15 minutes
6 | * Yield: 2 pie crusts
7 |
8 | This recipe provides enough for a double crust pie. If you only need one crust, you can cut the recipe in half, or freeze the other half.
9 |
10 | ## Ingredients
11 |
12 | * 2 1/2 cups (315g) **all-purpose flour** (spoon & leveled)
13 | * 1 teaspoon **salt**
14 | * 2 tablespoons **sugar**
15 | * 6 tablespoons (90g) **unsalted butter**, chilled and cubed
16 | * 3/4 cup (148g) **vegetable shortening**, chilled
17 | * 1/2 cup of **ice water**, plus extra as needed
18 |
19 | ## Instructions
20 |
21 | 1. Mix the flour and salt together in a large bowl. Add the butter and shortening.
22 |
23 | 2. Using a pastry cutter ([the one I own](https://smile.amazon.com/gp/product/B07D471TC8/ref=ppx_yo_dt_b_search_asin_title)) or two forks, cut the butter and shortening into the mixture until it resembles coarse meal (pea-sized bits with a few larger bits of fat is OK). A pastry cutter makes this step very easy and quick.
24 |
25 | 3. Measure 1/2 cup (120ml) of water in a cup. Add ice. Stir it around. From that, measure 1/2 cup (120ml) of water– since the ice has melted a bit. Drizzle the cold water in, 1 Tablespoon (15ml) at a time, and stir with a rubber spatula or wooden spoon after every Tablespoon (15ml) added. Do not add any more water than you need to. Stop adding water when the dough begins to form large clumps. I always use about 1/2 cup (120ml) of water and a little more in dry winter months (up to 3/4 cup).
26 |
27 | 4. Transfer the pie dough to a floured work surface. The dough should come together easily and should not feel overly sticky. Using floured hands, fold the dough into itself until the flour is fully incorporated into the fats. Form it into a ball. Divide dough in half. Flatten each half into 1-inch thick discs using your hands.
28 |
29 | 5. Wrap each tightly in plastic wrap. Refrigerate for at least 2 hours (and up to 5 days).
30 |
31 | 6. When rolling out the chilled pie dough discs to use in your pie, always use gentle force with your rolling pin. Start from the center of the disc and work your way out in all directions, turning the dough with your hands as you go. Visible specks of butter and fat in the dough are perfectly normal and expected!
32 |
33 | 7. Proceed with the pie per your recipe’s instructions.
34 |
35 | ## Notes
36 |
37 | 1. **Make Ahead & Freezing Instructions:** Prepare the pie dough through step 4 and freeze the discs for up to 3 months. Thaw overnight in the refrigerator before using in your pie recipe.
38 |
39 | 2. **Salt:** I use and strongly recommend regular table salt. If using kosher salt, use 1 and 1/2 teaspoons.
40 |
--------------------------------------------------------------------------------
/bash/a-generalized-single-instance-script.md:
--------------------------------------------------------------------------------
1 | # A generalized single-instance bash script
2 |
3 | _Source: [Przemyslaw Pawelczyk](https://gist.github.com/przemoc/571091)_
4 |
5 | An excellent generalized script that ensures that only one instance of the script can run at a time.
6 |
7 | It does the following:
8 |
9 | * Sets an [exit trap](http://redsymbol.net/articles/bash-exit-traps/) so the lock is always released (via `_prepare_locking`)
10 | * Obtains an [exclusive file lock](https://en.wikipedia.org/wiki/File_locking) on `$LOCKFILE` or immediately fail (via `exlock_now`)
11 | * Executes any additional custom logic
12 |
13 | ```bash
14 | #!/usr/bin/env bash
15 |
16 | set -euo pipefail
17 |
18 | # This script will do the following:
19 | #
20 | # - Set an exit trap so the lock is always released (via _prepare_locking)
21 | # - Obtain an exclusive lock on $LOCKFILE or immediately fail (via exlock_now)
22 | # - Execute any additional logic
23 | #
24 | # If this script is run while another has a lock it will exit with status 1.
25 |
26 | ### HEADER ###
27 | readonly LOCKFILE="/tmp/$(basename $0).lock" # source has "/var/lock/`basename $0`"
28 | readonly LOCKFD=99
29 |
30 | # PRIVATE
31 | _lock() { flock -$1 $LOCKFD; }
32 | _no_more_locking() { _lock u; _lock xn && rm -f $LOCKFILE; }
33 | _prepare_locking() { eval "exec $LOCKFD>\"$LOCKFILE\""; trap _no_more_locking EXIT; }
34 |
35 | # ON START
36 | _prepare_locking
37 |
38 | # PUBLIC
39 | exlock_now() { _lock xn; } # obtain an exclusive lock immediately or fail
40 | exlock() { _lock x; } # obtain an exclusive lock
41 | shlock() { _lock s; } # obtain a shared lock
42 | unlock() { _lock u; } # drop a lock
43 |
44 | ### BEGIN OF SCRIPT ###
45 |
46 | # Simplest example is avoiding running multiple instances of script.
47 | exlock_now || exit 1
48 |
49 | # All script logic goes below.
50 | #
51 | # Remember! Lock file is removed when one of the scripts exits and it is
52 | # the only script holding the lock or lock is not acquired at all.
53 | ```
--------------------------------------------------------------------------------
/bash/bash-shell-prompts.md:
--------------------------------------------------------------------------------
1 | # Bash Shell: Take Control of PS1, PS2, PS3, PS4 and PROMPT_COMMAND
2 |
3 | _Source: https://www.thegeekstuff.com/2008/09/bash-shell-take-control-of-ps1-ps2-ps3-ps4-and-prompt_command/_
4 |
5 | Your interaction with Linux Bash shell will become very pleasant if you use PS1, PS2, PS3, PS4, and PROMPT_COMMAND effectively. PS stands for prompt statement. This article will give you a jumpstart on the Linux command prompt environment variables using simple examples.
6 |
7 | ## PS1 – Default interaction prompt
8 |
9 | The default interactive prompt on your Linux can be modified as shown below to something useful and informative. In the following example, the default PS1 was `\s-\v\$`, which displays the shell name and the version number. Let us change this default behavior to display the username, hostname and current working directory name as shown below.
10 |
11 | ```bash
12 | -bash-3.2$ export PS1="\u@\h \w> "
13 |
14 | ramesh@dev-db ~> cd /etc/mail
15 | ramesh@dev-db /etc/mail>
16 | ```
17 |
18 | Prompt changed to "username@hostname current-dir>" format.
19 |
20 | The following PS1 codes are used in this example:
21 |
22 | * `\u` – Username
23 | * `\h` – Hostname
24 | * `\w` – Full pathname of current directory. Please note that when you are in the home directory, this will display only `~` as shown above
25 | * Note that there is a space at the end in the value of PS1. Personally, I prefer a space at the end of the prompt for better readability.
26 |
27 | Make this setting permanent by adding export `PS1="\u@\h \w> "` to either `.bash_profile` (Mac) or `.bashrc` (Linux/WSL).
28 |
29 | ## PS2 – Continuation interactive prompt
30 |
31 | A very long Unix command can be broken down to multiple line by giving `\` at the end of the line. The default interactive prompt for a multi-line command is "> ". Let us change this default behavior to display `continue->` by using PS2 environment variable as shown below.
32 |
33 | ```
34 | ramesh@dev-db ~> myisamchk --silent --force --fast --update-state \
35 | > --key_buffer_size=512M --sort_buffer_size=512M \
36 | > --read_buffer_size=4M --write_buffer_size=4M \
37 | > /var/lib/mysql/bugs/*.MYI
38 | ```
39 |
40 | This uses the default ">" for continuation prompt.
41 |
42 | ```
43 | ramesh@dev-db ~> export PS2="continue-> "
44 |
45 | ramesh@dev-db ~> myisamchk --silent --force --fast --update-state \
46 | continue-> --key_buffer_size=512M --sort_buffer_size=512M \
47 | continue-> --read_buffer_size=4M --write_buffer_size=4M \
48 | continue-> /var/lib/mysql/bugs/*.MYI
49 | ```
50 |
51 | This uses the modified "continue-> " for continuation prompt.
52 |
53 | I found it very helpful and easy to read, when I break my long commands into multiple lines using \. I have also seen others who don’t like to break-up long commands. What is your preference? Do you like breaking up long commands into multiple lines?
54 |
55 | ## PS3 – Prompt used by "select" inside shell script
56 |
57 | You can define a custom prompt for the select loop inside a shell script, using the PS3 environment variable, as explained below.
58 |
59 | ### Shell script and output WITHOUT PS3
60 |
61 | ```
62 | ramesh@dev-db ~> cat ps3.sh
63 |
64 | select i in mon tue wed exit
65 | do
66 | case $i in
67 | mon) echo "Monday";;
68 | tue) echo "Tuesday";;
69 | wed) echo "Wednesday";;
70 | exit) exit;;
71 | esac
72 | done
73 |
74 | ramesh@dev-db ~> ./ps3.sh
75 |
76 | 1) mon
77 | 2) tue
78 | 3) wed
79 | 4) exit
80 | #? 1
81 | Monday
82 | #? 4
83 | ```
84 |
85 | This displays the default "#?" for select command prompt.
86 |
87 | ### Shell script and output WITH PS3
88 |
89 | ```
90 | ramesh@dev-db ~> cat ps3.sh
91 |
92 | PS3="Select a day (1-4): "
93 | select i in mon tue wed exit
94 | do
95 | case $i in
96 | mon) echo "Monday";;
97 | tue) echo "Tuesday";;
98 | wed) echo "Wednesday";;
99 | exit) exit;;
100 | esac
101 | done
102 |
103 | ramesh@dev-db ~> ./ps3.sh
104 | 1) mon
105 | 2) tue
106 | 3) wed
107 | 4) exit
108 | Select a day (1-4): 1
109 | Monday
110 | Select a day (1-4): 4
111 | ```
112 |
113 | This displays the modified "Select a day (1-4): " for select command prompt.
114 |
115 | ## PS4 – Used by "set -x" to prefix tracing output
116 |
117 | The PS4 shell variable defines the prompt that gets displayed, when you execute a shell script in debug mode as shown below.
118 |
119 | ### Shell script and output WITHOUT PS4
120 |
121 | ```
122 | ramesh@dev-db ~> cat ps4.sh
123 |
124 | set -x
125 | echo "PS4 demo script"
126 | ls -l /etc/ | wc -l
127 | du -sh ~
128 |
129 | ramesh@dev-db ~> ./ps4.sh
130 |
131 | ++ echo 'PS4 demo script'
132 | PS4 demo script
133 | ++ ls -l /etc/
134 | ++ wc -l
135 | 243
136 | ++ du -sh /home/ramesh
137 | 48K /home/ramesh
138 | ```
139 |
140 | This displays the default "++" while tracing the output using `set -x`.
141 |
142 | ### Shell script and output WITH PS4
143 |
144 | The PS4 defined below in the ps4.sh has the following two codes:
145 |
146 | * `$0` – indicates the name of script
147 | * `$LINENO` – displays the current line number within the script
148 |
149 | ```
150 | ramesh@dev-db ~> cat ps4.sh
151 |
152 | export PS4='$0.$LINENO+ '
153 | set -x
154 | echo "PS4 demo script"
155 | ls -l /etc/ | wc -l
156 | du -sh ~
157 |
158 | ramesh@dev-db ~> ./ps4.sh
159 | ../ps4.sh.3+ echo 'PS4 demo script'
160 | PS4 demo script
161 | ../ps4.sh.4+ ls -l /etc/
162 | ../ps4.sh.4+ wc -l
163 | 243
164 | ../ps4.sh.5+ du -sh /home/ramesh
165 | 48K /home/ramesh
166 | ```
167 |
168 | This displays the modified "{script-name}.{line-number}+" while tracing the output using `set -x`.
169 |
170 | ## PROMPT_COMMAND
171 |
172 | Bash shell executes the content of the `PROMPT_COMMAND` just before displaying the PS1 variable.
173 |
174 | ```
175 | ramesh@dev-db ~> export PROMPT_COMMAND="date +%k:%m:%S"
176 | 22:08:42
177 | ramesh@dev-db ~>
178 | ```
179 |
180 | This displays the `PROMPT_COMMAND` and PS1 output on different lines.
181 |
182 | If you want to display the value of `PROMPT_COMMAND` in the same line as the PS1, use the `echo -n` as shown below:
183 |
184 | ```
185 | ramesh@dev-db ~> export PROMPT_COMMAND="echo -n [$(date +%k:%m:%S)]"
186 | [22:08:51]ramesh@dev-db ~>
187 | ```
188 |
189 | This displays the PROMPT_COMMAND and PS1 output on the same line.
--------------------------------------------------------------------------------
/bash/dont-do-grep-wc-l.md:
--------------------------------------------------------------------------------
1 | # Don't do `grep | wc -l`
2 |
3 | _Source: [Useless Use of Cat Award](http://porkmail.org/era/unix/award.html)_
4 |
5 | There is actually a whole class of "Useless Use of (something) | grep (something) | (something)" problems but this one usually manifests itself in scripts riddled by useless backticks and pretzel logic.
6 |
7 | Anything that looks like:
8 |
9 | ```bash
10 | something | grep '..*' | wc -l
11 | ```
12 |
13 | can usually be rewritten like something along the lines of
14 |
15 | ```bash
16 | something | grep -c . # Notice that . is better than '..*'
17 | ```
18 |
19 | or even (if all we want to do is check whether something produced any non-empty output lines)
20 |
21 | ```bash
22 | something | grep . >/dev/null && ...
23 | ```
24 |
25 | (or `grep -q` if your grep has that).
26 |
27 | ## Addendum
28 |
29 | `grep -c` can actually solve a large class of problems that `grep | wc -l` can't.
30 |
31 | If what interests you is the count for each of a group of files, then the only way to do it with `grep | wc -l` is to put a loop round it. So where I had this:
32 |
33 | ```bash
34 | grep -c "^~h" [A-Z]*/hmm[39]/newMacros
35 | ```
36 |
37 | the naive solution using `wc -l` would have been...
38 |
39 | ```bash
40 | for f in [A-Z]*/hmm[39]/newMacros; do
41 | # or worse, for f in `ls [A-Z]*/hmm[39]/newMacros` ...
42 | echo -n "$f:"
43 | # so that we know which file's results we're looking at
44 | grep "^~h" "$f" | wc -l
45 | # gag me with a spoon
46 | done
47 | ```
48 |
49 | ...and notice that we also had to fiddle to get the output in a convenient form.
50 |
--------------------------------------------------------------------------------
/bash/groot.md:
--------------------------------------------------------------------------------
1 | # Move to the Root of a Git Directory
2 |
3 | _Source: My friend Alex Novak_
4 |
5 | ```bash
6 | cd `git rev-parse --show-toplevel`
7 | ```
8 |
9 | I keep this aliased as `groot` and use it very frequently when moving through a codebase.
10 |
--------------------------------------------------------------------------------
/bash/md5sum-of-a-path.md:
--------------------------------------------------------------------------------
1 | # Bash One-Liner to Calculate the md5sum of a Path in Linux
2 |
3 | To compute the md5sum of an entire path in Linux, we `tar` the directory in question and pipe the product to `md5sum`.
4 |
5 | Note in this example that I specifically exclude the `.git` directory, which I've found can vary between runs even if there's no change to the repository contents.
6 |
7 | ```bash
8 | $ tar --exclude='.git' -cf - "${SOME_DIR}" 2> /dev/null | md5sum
9 | 851ce98b3e97b42c1b01dd26e23e2efa -
10 | ```
11 |
--------------------------------------------------------------------------------
/bash/pipefail.md:
--------------------------------------------------------------------------------
1 | # Safer Bash Scripts With `set -euxo pipefail`
2 |
3 | _Source: [Safer bash scripts with 'set -euxo pipefail'](https://vaneyckt.io/posts/safer_bash_scripts_with_set_euxo_pipefail/)_
4 |
5 | The bash shell comes with several builtin commands for modifying the behavior of the shell itself. We are particularly interested in the `set` builtin, as this command has several options that will help us write safer scripts. I hope to convince you that it’s a really good idea to add `set -euxo pipefail` to the beginning of all your future bash scripts.
6 |
7 | ## `set -e`
8 |
9 | The `-e` option will cause a bash script to exit immediately when a command fails.
10 |
11 | This is generally a vast improvement upon the default behavior where the script just ignores the failing command and continues with the next line. This option is also smart enough to not react on failing commands that are part of conditional statements.
12 |
13 | You can append a command with `|| true` for those rare cases where you don’t want a failing command to trigger an immediate exit.
14 |
15 | ### Before
16 |
17 | ```bash
18 | #!/bin/bash
19 |
20 | # 'foo' is a non-existing command
21 | foo
22 | echo "bar"
23 |
24 | # output
25 | # ------
26 | # line 4: foo: command not found
27 | # bar
28 | #
29 | # Note how the script didn't exit when the foo command could not be found.
30 | # Instead it continued on and echoed 'bar'.
31 | ```
32 |
33 | ### After
34 |
35 | ```bash
36 | #!/bin/bash
37 | set -e
38 |
39 | # 'foo' is a non-existing command
40 | foo
41 | echo "bar"
42 |
43 | # output
44 | # ------
45 | # line 5: foo: command not found
46 | #
47 | # This time around the script exited immediately when the foo command wasn't found.
48 | # Such behavior is much more in line with that of higher-level languages.
49 | ```
50 |
51 | ### Any command returning a non-zero exit code will cause an immediate exit
52 |
53 | ```bash
54 | #!/bin/bash
55 | set -e
56 |
57 | # 'ls' is an existing command, but giving it a nonsensical param will cause
58 | # it to exit with exit code 1
59 | $(ls foobar)
60 | echo "bar"
61 |
62 | # output
63 | # ------
64 | # ls: foobar: No such file or directory
65 | #
66 | # I'm putting this in here to illustrate that it's not just non-existing commands
67 | # that will cause an immediate exit.
68 | ```
69 |
70 | ### Preventing an immediate exit
71 |
72 | ```bash
73 | #!/bin/bash
74 | set -e
75 |
76 | foo || true
77 | $(ls foobar) || true
78 | echo "bar"
79 |
80 | # output
81 | # ------
82 | # line 4: foo: command not found
83 | # ls: foobar: No such file or directory
84 | # bar
85 | #
86 | # Sometimes we want to ensure that, even when 'set -e' is used, the failure of
87 | # a particular command does not cause an immediate exit. We can use '|| true' for this.
88 | ```
89 |
90 | ### Failing commands in a conditional statement will not cause an immediate exit
91 |
92 | ```bash
93 | #!/bin/bash
94 | set -e
95 |
96 | # we make 'ls' exit with exit code 1 by giving it a nonsensical param
97 | if ls foobar; then
98 | echo "foo"
99 | else
100 | echo "bar"
101 | fi
102 |
103 | # output
104 | # ------
105 | # ls: foobar: No such file or directory
106 | # bar
107 | #
108 | # Note that 'ls foobar' did not cause an immediate exit despite exiting with
109 | # exit code 1. This is because the command was evaluated as part of a
110 | # conditional statement.
111 | ```
112 |
113 | That’s all for `set -e`. However, `set -e` by itself is far from enough. We can further improve upon the behavior created by `set -e` by combining it with `set -o pipefail`. Let’s have a look at that next.
114 |
115 | ## `set -o pipefail`
116 |
117 | The bash shell normally only looks at the exit code of the last command of a pipeline. This behavior is not ideal as it causes the `-e` option to only be able to act on the exit code of a pipeline’s last command. This is where `-o pipefail` comes in. This particular option sets the exit code of a pipeline to that of the rightmost command to exit with a non-zero status, or to zero if all commands of the pipeline exit successfully.
118 |
119 | ### Before
120 |
121 | ```bash
122 | #!/bin/bash
123 | set -e
124 |
125 | # 'foo' is a non-existing command
126 | foo | echo "a"
127 | echo "bar"
128 |
129 | # output
130 | # ------
131 | # a
132 | # line 5: foo: command not found
133 | # bar
134 | #
135 | # Note how the non-existing foo command does not cause an immediate exit, as
136 | # it's non-zero exit code is ignored by piping it with '| echo "a"'.
137 | ```
138 |
139 | ### After
140 |
141 | ```bash
142 | #!/bin/bash
143 | set -eo pipefail
144 |
145 | # 'foo' is a non-existing command
146 | foo | echo "a"
147 | echo "bar"
148 |
149 | # output
150 | # ------
151 | # a
152 | # line 5: foo: command not found
153 | #
154 | # This time around the non-existing foo command causes an immediate exit, as
155 | # '-o pipefail' will prevent piping from causing non-zero exit codes to be ignored.
156 | ```
157 |
158 | This section hopefully made it clear that `-o pipefail` provides an important improvement upon just using `-e` by itself. However, as we shall see in the next section, we can still do more to make our scripts behave like higher-level languages.
159 |
160 | ## `set -u`
161 |
162 | This option causes the bash shell to treat unset variables as an error and exit immediately. Unset variables are a common cause of bugs in shell scripts, so having unset variables cause an immediate exit is often highly desirable behavior.
163 |
164 | ### Before
165 |
166 | ```bash
167 | #!/bin/bash
168 | set -eo pipefail
169 |
170 | echo $a
171 | echo "bar"
172 |
173 | # output
174 | # ------
175 | #
176 | # bar
177 | #
178 | # The default behavior will not cause unset variables to trigger an immediate exit.
179 | # In this particular example, echoing the non-existing $a variable will just cause
180 | # an empty line to be printed.
181 | ```
182 |
183 | ### After
184 |
185 | ```bash
186 | #!/bin/bash
187 | set -euo pipefail
188 |
189 | echo "$a"
190 | echo "bar"
191 |
192 | # output
193 | # ------
194 | # line 5: a: unbound variable
195 | #
196 | # Notice how 'bar' no longer gets printed. We can clearly see that '-u' did indeed
197 | # cause an immediate exit upon encountering an unset variable.
198 | ```
199 |
200 | ### Dealing with `${a:-b}` variable assignments
201 |
202 | Sometimes you’ll want to use a [`${a:-b}` variable assignment](https://unix.stackexchange.com/questions/122845/using-a-b-for-variable-assignment-in-scripts/122878) to ensure a variable is assigned a default value of b when a is either empty or undefined. The `-u` option is smart enough to not cause an immediate exit in such a scenario.
203 |
204 | ```bash
205 | #!/bin/bash
206 | set -euo pipefail
207 |
208 | DEFAULT=5
209 | RESULT=${VAR:-$DEFAULT}
210 | echo "$RESULT"
211 |
212 | # output
213 | # ------
214 | # 5
215 | #
216 | # Even though VAR was not defined, the '-u' option realizes there's no need to cause
217 | # an immediate exit in this scenario as a default value has been provided.
218 | ```
219 |
220 | ### Using conditional statements that check if variables are set
221 |
222 | Sometimes you want your script to not immediately exit when an unset variable is encountered. A common example is checking for a variable’s existence inside an `if` statement.
223 |
224 | ```bash
225 | #!/bin/bash
226 | set -euo pipefail
227 |
228 | if [ -z "${MY_VAR:-}" ]; then
229 | echo "MY_VAR was not set"
230 | fi
231 |
232 | # output
233 | # ------
234 | # MY_VAR was not set
235 | #
236 | # In this scenario we don't want our program to exit when the unset MY_VAR variable
237 | # is evaluated. We can prevent such an exit by using the same syntax as we did in the
238 | # previous example, but this time around we specify no default value.
239 | ```
240 |
241 | This section has brought us a lot closer to making our bash shell behave like higher-level languages. While `-euo pipefail` is great for the early detection of all kinds of problems, sometimes it won’t be enough. This is why in the next section we’ll look at an option that will help us figure out those really tricky bugs that you encounter every once in a while.
242 |
243 | ## `set -x`
244 |
245 | The `-x` option causes bash to print each command before executing it.
246 |
247 | This can be a great help when trying to debug a bash script failure. Note that arguments get expanded before a command gets printed, which will cause our logs to contain the actual argument values that were present at the time of execution!
248 |
249 | ```bash
250 | #!/bin/bash
251 | set -euxo pipefail
252 |
253 | a=5
254 | echo $a
255 | echo "bar"
256 |
257 | # output
258 | # ------
259 | # + a=5
260 | # + echo 5
261 | # 5
262 | # + echo bar
263 | # bar
264 | ```
265 |
266 | That’s it for the `-x` option. It’s pretty straightforward, but can be a great help for debugging.
267 |
268 | ## `set -E`
269 |
270 | Traps are pieces of code that fire when a bash script catches certain signals. Aside from the usual signals (e.g. `SIGINT`, `SIGTERM`, ...), traps can also be used to catch special bash signals like `EXIT`, `DEBUG`, `RETURN`, and `ERR`. However, reader Kevin Gibbs pointed out that using `-e` without `-E` will cause an `ERR` trap to not fire in certain scenarios.
271 |
272 | ### Before
273 |
274 | ```bash
275 | #!/bin/bash
276 | set -euo pipefail
277 |
278 | trap "echo ERR trap fired!" ERR
279 |
280 | myfunc()
281 | {
282 | # 'foo' is a non-existing command
283 | foo
284 | }
285 |
286 | myfunc
287 | echo "bar"
288 |
289 | # output
290 | # ------
291 | # line 9: foo: command not found
292 | #
293 | # Notice that while '-e' did indeed cause an immediate exit upon trying to execute
294 | # the non-existing foo command, it did not case the ERR trap to be fired.
295 | ```
296 |
297 | ### After
298 |
299 | ```bash
300 | #!/bin/bash
301 | set -Eeuo pipefail
302 |
303 | trap "echo ERR trap fired!" ERR
304 |
305 | myfunc()
306 | {
307 | # 'foo' is a non-existing command
308 | foo
309 | }
310 |
311 | myfunc
312 | echo "bar"
313 |
314 | # output
315 | # ------
316 | # line 9: foo: command not found
317 | # ERR trap fired!
318 | #
319 | # Not only do we still have an immediate exit, we can also clearly see that the
320 | # ERR trap was actually fired now.
321 | ```
322 |
323 | The documentation states that `-E` needs to be set if we want the `ERR` trap to be inherited by shell functions, command substitutions, and commands that are executed in a subshell environment. The `ERR` trap is normally not inherited in such cases.
324 |
--------------------------------------------------------------------------------
/bash/prompt-statement-variables.md:
--------------------------------------------------------------------------------
1 | # Bash Shell Prompt Statement Variables
2 |
3 | _Source: https://ss64.com/bash/syntax-prompt.html_
4 |
5 | There are several variables that can be set to control the appearance of the bash command prompt: PS1, PS2, PS3, PS4 and PROMPT_COMMAND the contents are executed just as if they had been typed on the command line.
6 |
7 | * `PS1` – Default interactive prompt (this is the variable most often customized)
8 | * `PS2` – Continuation interactive prompt (when a long command is broken up with \ at the end of the line) default=">"
9 | * `PS3` – Prompt used by `select` loop inside a shell script
10 | * `PS4` – Prompt used when a shell script is executed in debug mode (`set -x` will turn this on) default ="++"
11 | * `PROMPT_COMMAND` - If this variable is set and has a non-null value, then it will be executed just before the PS1 variable.
12 |
13 | Set your prompt by changing the value of the PS1 environment variable, as follows:
14 |
15 | ```
16 | $ export PS1="My simple prompt> "
17 | >
18 | ```
19 |
20 | This change can be made permanent by placing the `export` definition in your `~/.bashrc` (or `~/.bash_profile`) file.
21 |
22 | ## Special prompt variable characters
23 |
24 | ```
25 | \d The date, in "Weekday Month Date" format (e.g., "Tue May 26").
26 |
27 | \h The hostname, up to the first . (e.g. deckard)
28 | \H The hostname. (e.g. deckard.SS64.com)
29 |
30 | \j The number of jobs currently managed by the shell.
31 |
32 | \l The basename of the shell's terminal device name.
33 |
34 | \s The name of the shell, the basename of $0 (the portion following
35 | the final slash).
36 |
37 | \t The time, in 24-hour HH:MM:SS format.
38 | \T The time, in 12-hour HH:MM:SS format.
39 | \@ The time, in 12-hour am/pm format.
40 |
41 | \u The username of the current user.
42 |
43 | \v The version of Bash (e.g., 2.00)
44 |
45 | \V The release of Bash, version + patchlevel (e.g., 2.00.0)
46 |
47 | \w The current working directory.
48 | \W The basename of $PWD.
49 |
50 | \! The history number of this command.
51 | \# The command number of this command.
52 |
53 | \$ If you are not root, inserts a "$"; if you are root, you get a "#" (root uid = 0)
54 |
55 | \nnn The character whose ASCII code is the octal value nnn.
56 |
57 | \n A newline.
58 | \r A carriage return.
59 | \e An escape character (typically a color code).
60 | \a A bell character.
61 | \\ A backslash.
62 |
63 | \[ Begin a sequence of non-printing characters. (like color escape sequences). This
64 | allows bash to calculate word wrapping correctly.
65 |
66 | \] End a sequence of non-printing characters.
67 | ```
68 |
69 | Using single quotes instead of double quotes when exporting your PS variables is recommended, it makes the prompt a tiny bit faster to evaluate plus you can then do an echo $PS1 to see the current prompt settings.
70 |
71 | ## Color Codes (ANSI Escape Sequences)
72 |
73 | ### Foreground colors
74 |
75 | Normal (non-bold) is the default, so the `0;` prefix is optional.
76 |
77 | ```
78 | \e[0;30m = Dark Gray
79 | \e[1;30m = Bold Dark Gray
80 | \e[0;31m = Red
81 | \e[1;31m = Bold Red
82 | \e[0;32m = Green
83 | \e[1;32m = Bold Green
84 | \e[0;33m = Yellow
85 | \e[1;33m = Bold Yellow
86 | \e[0;34m = Blue
87 | \e[1;34m = Bold Blue
88 | \e[0;35m = Purple
89 | \e[1;35m = Bold Purple
90 | \e[0;36m = Turquoise
91 | \e[1;36m = Bold Turquoise
92 | \e[0;37m = Light Gray
93 | \e[1;37m = Bold Light Gray
94 | ```
95 |
96 | ### Background colors
97 |
98 | ```
99 | \e[40m = Dark Gray
100 | \e[41m = Red
101 | \e[42m = Green
102 | \e[43m = Yellow
103 | \e[44m = Blue
104 | \e[45m = Purple
105 | \e[46m = Turquoise
106 | \e[47m = Light Gray
107 | ```
108 |
109 | Examples
110 |
111 | Set a prompt like: `[username@hostname:~/CurrentWorkingDirectory]$`
112 |
113 | `export PS1='[\u@\h:\w]\$ '`
114 |
115 | Set a prompt in color. Note the escapes for the non printing characters [ ]. These ensure that readline can keep track of the cursor position correctly.
116 |
117 | `export PS1='\[\e[31m\]\u@\h:\w\[\e[0m\] '`
118 |
--------------------------------------------------------------------------------
/bash/ring-the-audio-bell.md:
--------------------------------------------------------------------------------
1 | # Ring the audio bell in bash
2 |
3 | In many shells, the `\a` character will trigger the audio bell.
4 |
5 | Example:
6 |
7 | ```bash
8 | $ echo -n $'\a'
9 | ```
10 |
11 | You can also use `tput`, since `/a` doesn't work in some shells:
12 |
13 | ```bash
14 | $ tput bel
15 | ```
16 |
--------------------------------------------------------------------------------
/consul/ingress-gateways.md:
--------------------------------------------------------------------------------
1 | # Ingress Gateways in HashiCorp Consul 1.8
2 |
3 | _Source: [Ingress Gateways in HashiCorp Consul 1.8](https://www.hashicorp.com/blog/ingress-gateways-in-hashicorp-consul-1-8/), [HashiCorp Learn](https://learn.hashicorp.com/consul/developer-mesh/ingress-gateways)_
4 |
5 | Consul ingress gateways provide an easy and secure way for external services to communicate with services inside the Consul service mesh.
6 |
7 | 
8 |
9 | Using the Consul CLI or our Consul Kubernetes Helm chart you can easily set up multiple instances of ingress gateways and configure and secure traffic flows natively via our Layer 7 routing and intentions features.
10 |
11 | # Overview
12 |
13 | Applications that reside outside of a service mesh often need to communicate with applications within the mesh. This is typically done by providing a gateway that allows the traffic to the upstream service. Consul 1.8 allows us to create an ingress solution without us having to roll our own.
14 |
15 | # Using Ingress Gateways on VMs
16 |
17 | Let’s take a look at how Ingress Gateways work in practice. First, let’s register our Ingress Gateway on port 8888:
18 |
19 | ```bash
20 | $ consul connect envoy -gateway=ingress -register -service ingress-gateway \
21 | -address '{{ GetInterfaceIP "eth0" }}:8888'
22 | ```
23 |
24 | Next, let’s create and apply an ingress-gateway [configuration entry](https://www.consul.io/docs/agent/config-entries/ingress-gateway) that defines a set of listeners that expose the desired backing services:
25 |
26 | ```hcl
27 | Kind = "ingress-gateway"
28 | Name = "ingress-gateway"
29 | Listeners = [
30 | {
31 | Port = 80
32 | Protocol = "http"
33 | Services = [
34 | {
35 | Name = "api"
36 | }
37 | ]
38 | }
39 | ]
40 | ```
41 |
42 | With the ingress gateway now configured to listen for a service on port 80, we can now route traffic destined for specific paths to that specific service listening on port 80 of the gateway via a [service-router](https://www.consul.io/docs/agent/config-entries/service-router) config entry:
43 |
44 | ```hcl
45 | Kind = "service-router"
46 | Name = "api"
47 | Routes = [
48 | {
49 | Match {
50 | HTTP {
51 | PathPrefix = "/api_service1"
52 | }
53 | }
54 |
55 | Destination {
56 | Service = "api_service1"
57 | }
58 | },
59 | {
60 | Match {
61 | HTTP {
62 | PathPrefix = "/api_service2"
63 | }
64 | }
65 |
66 | Destination {
67 | Service = "api_service2"
68 | }
69 | }
70 | ]
71 | ```
72 |
73 | Finally, to secure traffic from the Ingress Gateway, we can also then define intentions to allow the Ingress Gateway to communicate to specific upstream services:
74 |
75 | ```bash
76 | $ consul intention create -allow ingress-gateway api_service1
77 | $ consul intention create -allow ingress-gateway api_service2
78 | ```
79 |
80 | Since Consul also specializes in Service Discovery, we can also discovery gateways for Ingress Gateway enabled services via DNS using [built-in subdomains](https://www.consul.io/docs/agent/dns#ingress-service-lookups):
81 |
82 | ```bash
83 | $ dig @127.0.0.1 -p 8600 api_service1.ingress... ANY
84 | $ dig @127.0.0.1 -p 8600 api_service2.ingress... ANY
85 | ```
86 |
--------------------------------------------------------------------------------
/consul/ingress-gateways.png:
--------------------------------------------------------------------------------
https://raw.githubusercontent.com/clockworksoul/today-i-learned/1257079ee89defd9da4c261fd30d7d4a85f8ceb7/consul/ingress-gateways.png
--------------------------------------------------------------------------------
/containers/non-privileged-containers-based-on-the-scratch-image.md:
--------------------------------------------------------------------------------
1 | # Non-privileged containers based on the scratch image
2 |
3 | _Source: [Non-privileged containers based on the scratch image](https://medium.com/@lizrice/non-privileged-containers-based-on-the-scratch-image-a80105d6d341)_
4 |
5 | ## Multi-stage builds give us the power
6 |
7 | Here’s a Dockerfile that gives us what we’re looking for.
8 |
9 | ```dockerfile
10 | FROM ubuntu:latest
11 | RUN useradd -u 10001 scratchuser
12 |
13 | FROM scratch
14 | COPY dosomething /dosomething
15 | COPY --from=0 /etc/passwd /etc/passwd
16 | USER scratchuser
17 |
18 | ENTRYPOINT ["/dosomething"]
19 | ```
20 |
21 | Building from this Dockerfile starts FROM an Ubuntu base image, and creates a new user called _scratchuser_. See that second `FROM` command? That’s the start of the next stage in the multi-stage build, this time working from the scratch base image (which contains nothing).
22 |
23 | Into that empty file system we copy a binary called `dosomething` — it’s a trivial Go app that simply sleeps for a while.
24 |
25 | ```go
26 | package main
27 |
28 | import "time"
29 |
30 | func main() {
31 | time.Sleep(500 * time.Second)
32 | }
33 | ```
34 |
35 | We also copy over the `/etc/passwd` file from the first stage of the build into the new image. This has `scratchuser` in it.
36 |
37 | This is all we need to be able to transition to `scratchuser` before starting the dosomething executable.
38 |
--------------------------------------------------------------------------------
/est/approximate-with-powers.md:
--------------------------------------------------------------------------------
1 | # Approximate with powers
2 |
3 | _Source: [robertovitillo.com](https://robertovitillo.com/back-of-the-envelope-estimation-hacks/) (Check out [his book](https://leanpub.com/systemsmanual)!)_
4 |
5 | Using powers of 2 or 10 makes multiplications very easy as in logarithmic space, multiplications become additions.
6 |
7 | For example, let’s say you have 800K users watching videos in UHD at 12 Mbps. A machine in your Content Delivery Network can egress at 1 Gbps. How many machines do you need?
8 |
9 | Approximating 800K with 10^6 and 12 Mbps with 10^7 yields:
10 |
11 | ```
12 | 1e6 * 1e7 bps
13 | --------------- = 1e(6+7-9) = 1e4 = 10,000
14 | 1e9 bps
15 | ```
16 |
17 | Summing 6 to 7 and subtracting 9 from it is much easier than trying to get to the exact answer:
18 |
19 | ```
20 | 0.8M * 12M bps
21 | --------------- = 9,600
22 | 10000 Mbps
23 | ```
24 |
25 | That's pretty close.
26 |
--------------------------------------------------------------------------------
/est/ballpark-io-performance-figures.md:
--------------------------------------------------------------------------------
1 | # Ballpark I/O performance figures
2 |
3 | _Source: [robertovitillo.com](https://robertovitillo.com/back-of-the-envelope-estimation-hacks/) (Check out [his book](https://leanpub.com/systemsmanual)!)_
4 |
5 | What’s important are not the exact numbers per se but their relative differences in terms of orders of magnitude.
6 |
7 | The goal of estimation is not to get a correct answer, but to get one in the right ballpark.
8 |
9 | ## Know your numbers
10 |
11 | How fast can you read data from the disk? How quickly from the network? You should be familiar with ballpark performance figures of your components.
12 |
13 | | Storage | IOPS | MB/s (random) | MB/s (sequential) |
14 | |------------------------|-------------|---------------|-------------------|
15 | | Mechanical hard drives | 100 | 10 | 50 |
16 | | SSD | 10000 | 100 | 500 |
17 |
18 | | Network | Throughput (Megabits/sec) | Throughput (Megabytes/sec) |
19 | |-----------------------|---------------------------|----------------------------|
20 | | Wired ethernet | 1000 - 10000 | 100 - 1000 |
21 | | Typical home network | 100 | 10 |
22 | | Typical EC2 allowance | 10000 | 1000 |
23 | | AWS inter-AZ | 25000 | 3000 |
24 | | AWS inter-region | 100 | 10 |
25 |
--------------------------------------------------------------------------------
/est/calculating-iops.md:
--------------------------------------------------------------------------------
1 | # Calculating IOPS from Latency
2 |
3 | IOPS stands for input/output operations per second. It represents how quickly a given storage device or medium can read and write commands in every second.
4 |
5 | It is calulated as:
6 |
7 | ```IOPS = 1000 milliseconds / (Average Seek Time + Average Latency)```
8 |
9 | Generally a HDD will have an IOPS range of 55-180, while a SSD will have an IOPS from 3,000 – 40,000.
10 |
11 | ## HDD
12 |
13 | For HDD with spinning disks, this is dependent rotational speed, in which average latency is the time it takes the disk platter to spin halfway around.
14 |
15 | It is calculated by dividing 60 seconds by the Rotational Speed of the disk, then dividing that result by 2 and multiplying everything by 1,000 milliseconds:
16 |
17 | ```
18 | IOPS = ((60 / RPM)/2) * 1000
19 | ```
20 |
21 | ## SSD
22 |
23 | There's no spinning disk, so as a rule of thumb you can just plug in 0.1 ms as the average latency.
24 |
--------------------------------------------------------------------------------
/est/littles-law.md:
--------------------------------------------------------------------------------
1 | # Little’s Law
2 |
3 | _Source: [robertovitillo.com](https://robertovitillo.com/back-of-the-envelope-estimation-hacks/) (Check out [his book](https://leanpub.com/systemsmanual)!)_
4 |
5 | A queue can be modeled with three parameters:
6 |
7 | * the average rate at which new items arrive, λ
8 | * the average time an item spends in the queue, W
9 | * and the average number of items in the queue, L
10 |
11 | Lots of things can be modeled as queues. A web service can be seen as a queue, for example. The request rate is the rate at which new items arrive. The time it takes for a request to be processed is the time an item spends in the queue. Finally, the number of concurrently processed requests is the number of items in the queue.
12 |
13 | Wouldn’t it be great if you could derive one of the three parameters from the other two? It turns out there is a law that relates these three quantities to one another! It’s called [Little’s Law](https://en.wikipedia.org/wiki/Little%27s_law):
14 |
15 | ```
16 | L = λ * W
17 | ```
18 |
19 | What it says is that the average number of items in the queue equals the average rate at which new items arrive, multiplied by the average time an item spends in the queue.
20 |
21 | Let’s try it out. Let’s say you have a service that takes on average 100ms to process a request. It’s currently receiving about two million requests per second (rps). How many requests are being processed concurrently?
22 |
23 | ```
24 | requests = 2e6 requests/s * 1e-1 s = 2e5
25 | ```
26 |
27 | The service is processing 200K requests concurrently. If each request is CPU heavy and requires a thread, then we will need about 200K threads.
28 |
29 | If we are using 8 core machines, then to keep up, we will need about 25K machines.
30 |
--------------------------------------------------------------------------------
/est/pi-seconds-is-a-nanocentury.md:
--------------------------------------------------------------------------------
1 | # π seconds is a nanocentury
2 |
3 | _Source: [Bumper Sticker Computer Science](http://www.bowdoin.edu/~ltoma/teaching/cs340/spring05/coursestuff/Bentley_BumperSticker.pdf)_
4 |
5 | There are 31.54 million seconds in a year.
6 |
7 | ...which equals: 3.154e9 seconds / 1 century
8 |
9 | ...which equals: 3.154 seconds / 1e-9 century
10 |
11 | ...which approximately equals π seconds per nanocentury.
12 |
13 | So _π seconds is approximately (to within half a percent) a nanocentury._
14 |
--------------------------------------------------------------------------------
/est/rule-of-72.md:
--------------------------------------------------------------------------------
1 | # The Rule of 72
2 |
3 | _Source: [robertovitillo.com](https://robertovitillo.com/back-of-the-envelope-estimation-hacks/) (Check out [his book](https://leanpub.com/systemsmanual)!)_
4 |
5 | [The rule of 72](https://web.stanford.edu/class/ee204/TheRuleof72.html) is a method to estimate how long it will take for a quantity to double if it grows at a certain percentage rate.
6 |
7 | ```
8 | time = 72 / rate
9 | ```
10 |
11 | For example, let’s say the traffic to your web service is increasing by approximately 10% weekly, how long will it take to double?
12 |
13 | ```
14 | time = 72 / 10 = 7.2
15 | ```
16 |
17 | It will take approximately 7 weeks for the traffic to double.
18 |
19 | If you combine the rule of 72 with the powers of two, then you can quickly find out how long it will take for a quantity to increase by several orders of magnitudes.
20 |
--------------------------------------------------------------------------------
/gardening/cotyledon-leaves.md:
--------------------------------------------------------------------------------
1 | # Why Are the Cotyledon Leaves on a Tomato Plant Falling Off?
2 |
3 | _Source: https://homeguides.sfgate.com/cotyledon-leaves-tomato-plant-falling-off-56902.html_
4 |
5 | Starting seeds indoors for a summer garden is an act of faith -- in biology and your own ability to manipulate the indoor environment successfully. Once the raggedy little "true" leaves begin to unfold, the moon-shaped baby leaves, called cotyledons, may drop off. Fear not -- these leaves have finished their job and are making way for adult growth on the plant's stalk.
6 |
7 | ## Cotyledon Facts
8 |
9 | Seeds are embryonic plants, complete with roots, stem and branches (or rather, radicles, hypocotyls and plumules). They also hold two fleshy seed leaves called cotyledons that will inflate with water as the seed germinates and pull the stem upward as the seedling's root grows deeper. Once above ground, the cotyledons unfold so the plumule can begin to grow into branches and leaves to support the plant's mature growth, flowers and fruits. The cotyledons' job is finished once the adult, or "true," leaves unfold and begin their task of photosynthesis.
10 |
11 | ## Early Growth
12 |
13 | The section of the stalk above ground but below the cotyledon becomes very thick and bumpy as the plant's branches and leaves unfold. If the ground is dry or the roots are cramped, these bumps may grow into aerial roots to gather moisture. Roots may also grow under the cotyledons, pushing the fleshy little seed leaves away, much as baby teeth are displaced by adult teeth. If top growth is leggy, gardeners plant seedlings as deep as the cotyledons -- or as far up the stem as the first set of true leaves -- to allow the plant to start more roots to draw nitrogen from the soil.
14 |
15 | ## Failing Cotyledons
16 |
17 | Because it is a storage organ, the cotyledon is an inefficient provider for the adult plant, so it will shrivel and fall away from the plant as shade from the growing plant covers it, either because of senescence or because it is being edged out by an emerging root. When cotyledons fall away after several branches of true leaves have formed, it means that the plant has passed from the seedling stage to the mature stage of its growth and adult leaves have taken over. If, however, the plant gets too much water and falls victim to a fungal disease known as "damping off," the cotyledons may fold before the adult leaves have a chance to deploy.
18 |
19 | ## Garden Planting
20 |
21 | Loss of seed leaves typically occurs when plants have acclimated to their surroundings in the garden. If you've started plants four to six weeks before the last frost date and taken them out a day at a time before finally planting them when the soil temperature reaches 60 to 70 degrees Fahrenheit, the cotyledons should fall off within a week or two. If, however, you jump the start and plant tomatoes when soil temperature is in the 50s, the plants may go temporarily dormant and start actively growing until only after the soil warms up. In that case, the cotyledons might hang on for several weeks until they become obsolescent and fade.
22 |
--------------------------------------------------------------------------------
/git/global-git-ignore.md:
--------------------------------------------------------------------------------
1 | # Using core.excludesFile to define a global git ignore
2 |
3 | _Source: The [`gitignore` documentation](https://git-scm.com/docs/gitignore)_
4 |
5 | The `core.excludesFile` git configuration variable can be used to define an arbitrary file location (`~/.gitignore` in this example) that contains patterns for git to always ignore.
6 |
7 | Example usage:
8 |
9 | ```
10 | $ git config --global core.excludesFile ~/.gitignore
11 | ```
12 |
--------------------------------------------------------------------------------
/go/a-high-performance-go-cache.md:
--------------------------------------------------------------------------------
1 | # Ristretto: A High-Performance Go Cache
2 |
3 | _Source: [Introducing Ristretto](https://dgraph.io/blog/post/introducing-ristretto-high-perf-go-cache/), [Github](https://github.com/dgraph-io/dgraph)_
4 |
5 | It all started with needing a memory-bound, concurrent Go cache in Dgraph.
6 |
7 | Specifically, they were unable to find a cache that met the following requirements:
8 |
9 | * Concurrent
10 | * High cache-hit ratio
11 | * Memory-bounded (limit to configurable max memory usage)
12 | * Scale well as the number of cores and goroutines increases
13 | * Scale well under non-random key access distribution (e.g. Zipf).
14 |
15 | They assembled a team to build a high-performance cache based on [Caffeine](http://highscalability.com/blog/2016/1/25/design-of-a-modern-cache.html), a high-performance cache written in Java, used by many Java-based databases, like Cassandra, HBase, and Neo4j.
16 |
17 | ## Usage
18 |
19 | Full documentation can be found on [Github](https://github.com/dgraph-io/dgraph).
20 |
21 | ### Example
22 |
23 | ```go
24 | func main() {
25 | cache, err := ristretto.NewCache(&ristretto.Config{
26 | NumCounters: 1e7, // number of keys to track frequency of (10M).
27 | MaxCost: 1 << 30, // maximum cost of cache (1GB).
28 | BufferItems: 64, // number of keys per Get buffer.
29 | })
30 | if err != nil {
31 | panic(err)
32 | }
33 |
34 | // set a value with a cost of 1
35 | cache.Set("key", "value", 1)
36 |
37 | // wait for value to pass through buffers
38 | time.Sleep(10 * time.Millisecond)
39 |
40 | value, found := cache.Get("key")
41 | if !found {
42 | panic("missing value")
43 | }
44 | fmt.Println(value)
45 | cache.Del("key")
46 | }
47 | ```
48 |
--------------------------------------------------------------------------------
/go/check-whether-a-file-exists.md:
--------------------------------------------------------------------------------
1 | # Checking Whether a File Exists
2 |
3 | _Source: from https://golangr.com/file-exists/_
4 |
5 | I didn't just learn this, but for some reason I always have to look this idiom up.
6 |
7 | ## Example
8 |
9 | The following Go code will check if the specified file exists or not:
10 |
11 | ```go
12 | package main
13 |
14 | import "fmt"
15 | import "os"
16 |
17 | func main() {
18 |
19 | if _, err := os.Stat("file-exists.go"); err == nil {
20 | fmt.Printf("File exists\n");
21 | } else {
22 | fmt.Printf("File does not exist\n");
23 | }
24 | }
25 | ```
26 |
27 | ## Error Checking
28 |
29 | If you want to check if a file exists before continuing the program:
30 |
31 | ```go
32 | package main
33 |
34 | import "fmt"
35 | import "os"
36 |
37 | func main() {
38 |
39 | if _, err := os.Stat("file-exists2.file"); os.IsNotExist(err) {
40 | fmt.Printf("File does not exist\n");
41 | }
42 |
43 | // continue program
44 | }
45 | ```
46 |
--------------------------------------------------------------------------------
/go/generating-hash-of-a-path.md:
--------------------------------------------------------------------------------
1 | # Generating a Hash From Files in a Path
2 |
3 | _Source: https://github.com/sger/go-hashdir/blob/master/hashdir.go (Heavily modified)_
4 |
5 | The `Walk` method from `path/filepath` walks the file tree rooted at root, calling `walkFn` for each file or directory in the tree, including root. All errors that arise visiting files and directories are filtered by `walkFn`. The files are walked in lexical order, which makes the output deterministic but means that for very large directories Walk can be inefficient. Walk does not follow symbolic links.
6 |
7 | ```go
8 | package main
9 |
10 | import (
11 | "crypto/sha256"
12 | "encoding/hex"
13 | "io"
14 | "os"
15 | "path/filepath"
16 | )
17 |
18 | // Create hash value with local path and a hash algorithm
19 | func Create(path string, hashAlgorithm string) (string, error) {
20 | hash := sha256.New()
21 |
22 | walkFn := func(path string, info os.FileInfo, err error) error {
23 | if err != nil {
24 | return nil
25 | }
26 |
27 | // Ignore directories
28 | if info.IsDir() {
29 | return nil
30 | }
31 |
32 | // Open the file for reading
33 | file, err := os.Open(path)
34 | if err != nil {
35 | return err
36 | }
37 |
38 | // Make sure the file is closed when the function returns
39 | defer file.Close()
40 |
41 | // Copy the file in the hash interface and check for any error
42 | if _, err := io.Copy(hash, file); err != nil {
43 | return "", err
44 | }
45 |
46 | return nil
47 | }
48 |
49 | // Walk through the path, and generate a hash from each file.
50 | err = filepath.Walk(path, walkFn)
51 |
52 | if err != nil {
53 | return "", nil
54 | }
55 |
56 | bytes := hash.Sum(nil)
57 | encoded := hex.EncodeToString(hashInBytes)
58 | }
59 |
60 | ```
61 |
--------------------------------------------------------------------------------
/go/opentelemetry-tracer.md:
--------------------------------------------------------------------------------
1 | # OpenTelemetry: Tracer
2 |
3 | _Source: [[1]](https://opentelemetry.io/)[[2]](https://github.com/open-telemetry/opentelemetry-go/blob/master/README.md)[[3]](https://docs.google.com/presentation/d/1nVhLIyqn_SiDo78jFHxnMdxYlnT0b7tYOHz3Pu4gzVQ/edit?usp=sharing)_
4 |
5 | OpenTelemetry provides a single set of APIs, libraries, agents, and collector services to capture distributed traces and metrics from your application. You can analyze them using Prometheus, Jaeger, and other observability tools.
6 |
7 | ## Tracer
8 |
9 | A Tracer is responsible for tracking the currently active span.
10 |
11 | ## Quickstart
12 |
13 | Below is a brief example of importing OpenTelemetry, initializing a `tracer` and creating some simple spans.
14 |
15 | ```go
16 | package main
17 |
18 | import (
19 | "context"
20 | "log"
21 |
22 | "go.opentelemetry.io/otel/api/global"
23 | "go.opentelemetry.io/otel/exporters/trace/stdout"
24 | sdktrace "go.opentelemetry.io/otel/sdk/trace"
25 | )
26 |
27 | func initTracer() {
28 | exporter, err := stdout.NewExporter(stdout.Options{PrettyPrint: true})
29 | if err != nil {
30 | log.Fatal(err)
31 | }
32 |
33 | tp, err := sdktrace.NewProvider(sdktrace.WithConfig(sdktrace.Config{DefaultSampler: sdktrace.AlwaysSample()}),
34 | sdktrace.WithSyncer(exporter))
35 | if err != nil {
36 | log.Fatal(err)
37 | }
38 |
39 | global.SetTraceProvider(tp)
40 | }
41 |
42 | func main() {
43 | initTracer()
44 |
45 | tracer := global.Tracer("ex.com/basic")
46 |
47 | tracer.WithSpan(context.Background(), "foo",
48 | func(ctx context.Context) error {
49 | tracer.WithSpan(ctx, "bar",
50 | func(ctx context.Context) error {
51 | tracer.WithSpan(ctx, "baz",
52 | func(ctx context.Context) error {
53 | return nil
54 | },
55 | )
56 | return nil
57 | },
58 | )
59 | return nil
60 | },
61 | )
62 | }
63 | ```
64 |
65 | ## TraceProvider
66 |
67 | A global provider can have a TraceProvider registered.
68 | Use the TraceProvider to create a named tracer.
69 |
70 | ```go
71 | // Register your provider in your init code
72 | tp, err := sdktrace.NewProvider(...)
73 | global.SetTraceProvider(tp)
74 |
75 | // Create the named tracer
76 | tracer = global.TraceProvider().Tracer("workshop/main")
77 | ```
78 |
79 | ## OTel API - Tracer methods & when to call
80 |
81 | ```go
82 | // This method returns a child of the current span, and makes it current.
83 | tracer.Start(ctx, name, options)
84 |
85 | // Starts a new span, sets it to be active in the context, executes the wrapped
86 | // body and closes the span before returning the execution result.
87 | tracer.WithSpan(name, func() {...})
88 |
89 | // Used to access & add information to the current span
90 | trace.SpanFromContext(ctx)
91 | ```
92 | ## OTel API - Span methods, & when to call
93 |
94 | ```go
95 | // Adds structured annotations (e.g. "logs") about what is currently happening.
96 | span.AddEvent(ctx, msg)
97 |
98 | // Adds a structured, typed attribute to the current span. This may include a user id, a build id, a user-agent, etc.
99 | span.SetAttributes(core.Key(key).String(value)...)
100 |
101 | // Often used with defer, fires when the unit of work is complete and the span can be sent
102 | span.End()
103 | ```
104 |
105 | ## Code examples
106 |
107 | ### Start/End
108 |
109 | ```go
110 | func (m Model) persist(ctx context.Context) {
111 | tr := global.TraceProvider().Tracer("me")
112 | ctx, span := tr.Start(ctx, "persist")
113 | defer span.End()
114 |
115 | // Persist the model to the database...
116 | [...]
117 | }
118 | ```
119 |
120 | ### WithSpan
121 |
122 | Takes a context, span name, and the function to be called.
123 |
124 | ```go
125 | ret, err := tracer.WithSpan(ctx, "operation",
126 | func(ctx context.Context) (int, error) {
127 | // Your function here
128 | [...]
129 | return 0, nil
130 | }
131 | )
132 | ```
133 |
134 | ### CurrentSpan & Span
135 |
136 | ```go
137 | // Get the current span
138 | sp := trace.SpanFromContext(ctx)
139 |
140 | // Update the span status
141 | sp.SetStatus(codes.OK)
142 |
143 | // Add events
144 | sp.AddEvent(ctx, "foo")
145 |
146 | // Add attributes
147 | sp.SetAttributes(
148 | key.New("ex.com/foo").String("yes"))
149 | ```
150 |
151 |
152 |
153 |
--------------------------------------------------------------------------------
/go/using-error-groups.md:
--------------------------------------------------------------------------------
1 | # Using error groups in Go
2 |
3 | _Source: [[1]](https://godoc.org/golang.org/x/sync/errgroup#WithContext)[[2]](https://www.oreilly.com/content/run-strikingly-fast-parallel-file-searches-in-go-with-sync-errgroup/)[[3]](https://bionic.fullstory.com/why-you-should-be-using-errgroup-withcontext-in-golang-server-handlers/)_
4 |
5 | The `golang.org/x/sync/errgroup` package provides synchronization, error propagation, and Context cancelation for groups of goroutines working on subtasks of a common task.
6 |
7 | Most interestingly, it provides the `Group` type, which represents an _error group_: a collection of goroutines working on subtasks that are part of the same overall task.
8 |
9 | ## `errgroup.Group`
10 |
11 | The `Group` type represents a collection of goroutines working on subtasks that are part of the same overall task.
12 |
13 | It has two attached methods: `Go()` and `Wait()`.
14 |
15 | ### Go()
16 |
17 | ```go
18 | func (g *Group) Go(f func() error)
19 | ```
20 |
21 | `Go()` calls the given function in a new goroutine.
22 |
23 | The first call to return a non-nil error cancels the group; its error will be returned by `Wait()`.
24 |
25 | ### Wait()
26 |
27 | ```go
28 | func (g *Group) Wait() error
29 | ```
30 |
31 | `Wait()` blocks until all function calls from the `Go()` method have returned, then returns the first non-nil error (if any) from them.
32 |
33 | ## Creating an `errgroup.Group`
34 |
35 | An error group can be created in one of two ways: with or without a `Context`.
36 |
37 | ### With context
38 |
39 | A `Group` can be created using the `WithContext()` function, which returns a new `Group` and an associated `Context` derived from its `ctx` parameter.
40 |
41 | The derived `Context` is canceled the first time a function passed to `Go()` returns a non-nil error or the first time `Wait()` returns, whichever occurs first.
42 |
43 | ```go
44 | func WithContext(ctx context.Context) (*Group, context.Context)
45 | ```
46 |
47 | ### A zero Group
48 |
49 | A zero `Group` is valid and does not cancel on error.
50 |
51 | ```go
52 | g := new(errgroup.Group)
53 | ```
54 |
55 | or simply
56 |
57 | ```go
58 | g := &errgroup.Group{}
59 | ```
60 |
61 | ## Using `errgroup.Group`
62 |
63 | You can use a `Group` as follows:
64 |
65 | 1. Create the `Group`, ideally using a `Context`.
66 | 2. Pass the `Group` one or more functions of type `func() error` to the `Go()` method to execute concurrently.
67 | 3. Call `Wait()` method, which blocks until one of the functions has an error or all functions complete.
68 |
69 | ### Generation 1: Serial Service Calls
70 |
71 | ```go
72 | func main() {
73 | err := SendRequestToService()
74 | if err != nil {
75 | log.Fatal(err)
76 | }
77 | }
78 | ```
79 |
80 | ### Generation 2: Using an error group
81 |
82 | ```go
83 | func main() {
84 | g, ctx := errgroup.WithContext(context.Background())
85 |
86 | g.Go(func() error {
87 | return SendRequestToService()
88 | })
89 |
90 | err := g.Wait()
91 | if err != nil {
92 | // Note that ctx is automatically canceled!
93 | log.Fatal(err)
94 | }
95 | }
96 | ```
97 |
--------------------------------------------------------------------------------
/history/geological-eons-and-eras.md:
--------------------------------------------------------------------------------
1 | # Geological Eons and Eras
2 |
3 | ## [Phanerozoic Eon](https://en.wikipedia.org/wiki/Phanerozoic) (541 Mya to present)
4 |
5 | The Phanerozoic Eon is the current geologic eon in the geologic time scale, and the one during which abundant animal and plant life has existed. It covers 541 million years to the present, and began with the Cambrian Period when animals first developed hard shells preserved in the fossil record
6 |
7 | ### [Cenozoic Era](https://en.wikipedia.org/wiki/Cenozoic) (66 Mya to present)
8 |
9 | The Cenozoic (meaning "new life") Era is the current and most recent of the three geological eras of the Phanerozoic Eon. It follows the Mesozoic Era and extends from 66 million years ago to the present day. It is generally believed to have started on the first day of the Cretaceous–Paleogene extinction event when an asteroid hit the Earth.
10 |
11 | The Cenozoic is also known as the **Age of Mammals**, because the extinction of many groups allowed mammals to greatly diversify so that large mammals dominated the Earth. The continents also moved into their current positions during this era.
12 |
13 | ### [Mesozoic Era](https://en.wikipedia.org/wiki/Mesozoic) (252 to 66 Mya)
14 |
15 | The Mesozoic ("middle life") Era is an interval of geological time from about 252 to 66 million years ago. It is also called the **Age of Reptiles**.
16 |
17 | The era began in the wake of the Permian–Triassic extinction event, the largest well-documented mass extinction in Earth's history, and ended with the Cretaceous–Paleogene extinction event, another mass extinction whose victims included the non-avian dinosaurs.
18 |
19 | #### [Cretaceous Period](https://en.wikipedia.org/wiki/Cretaceous) (145 to 66 Mya)
20 |
21 | The Cretaceous is a geological period that lasted from about 145 to 66 million years ago. It is the third and final period of the Mesozoic Era, as well as the longest. The name is derived from the Latin creta, "chalk". It is usually abbreviated K, for its German translation Kreide.
22 |
23 | The Cretaceous was a period with a relatively warm climate, resulting in high eustatic sea levels that created numerous shallow inland seas. These oceans and seas were populated with now-extinct marine reptiles, ammonites and rudists, while dinosaurs continued to dominate on land. During this time, new groups of mammals and birds, as well as flowering plants, appeared.
24 |
25 | The Cretaceous (along with the Mesozoic) ended with the Cretaceous–Paleogene extinction event, a large mass extinction in which many groups, including non-avian dinosaurs, pterosaurs and large marine reptiles died out. The end of the Cretaceous is defined by the abrupt Cretaceous–Paleogene boundary (K–Pg boundary), a geologic signature associated with the mass extinction which lies between the Mesozoic and Cenozoic eras.
26 |
27 | #### [Jurassic Period](https://en.wikipedia.org/wiki/Jurassic) (201.3 to 56 Mya)
28 |
29 | The Jurassic is a geologic period and system that spanned 56 million years from the end of the Triassic Period 201.3 million years ago to the beginning of the Cretaceous Period 145 Mya. The start of the period was marked by the major Triassic–Jurassic extinction event.
30 |
31 | On land, the fauna transitioned from the Triassic fauna, dominated by both dinosauromorph and crocodylomorph archosaurs, to one dominated by dinosaurs alone. The first birds also appeared during the Jurassic, having evolved from a branch of theropod dinosaurs. Other major events include the appearance of the earliest lizards, and the evolution of therian mammals, including primitive placentals. Crocodilians made the transition from a terrestrial to an aquatic mode of life. The oceans were inhabited by marine reptiles such as ichthyosaurs and plesiosaurs, while pterosaurs were the dominant flying vertebrates.
32 |
33 | #### [Triassic Period](https://en.wikipedia.org/wiki/Triassic) (251.9 to 50.6 Mya)
34 |
35 | The Triassic is a geologic period and system which spans 50.6 million years from the end of the Permian Period 251.9 million years ago, to the beginning of the Jurassic Period 201.3 Mya.
36 |
37 | The Triassic began in the wake of the Permian–Triassic extinction event, which left the Earth's biosphere impoverished; it was well into the middle of the Triassic before life recovered its former diversity. Therapsids and archosaurs were the chief terrestrial vertebrates during this time. A specialized subgroup of archosaurs, called dinosaurs, first appeared in the Late Triassic but did not become dominant until the succeeding Jurassic Period.
38 |
39 | The first true mammals, themselves a specialized subgroup of therapsids, also evolved during this period, as well as the first flying vertebrates, the pterosaurs, who, like the dinosaurs, were a specialized subgroup of archosaurs. The vast supercontinent of Pangaea existed until the mid-Triassic, after which it began to gradually rift into two separate landmasses, Laurasia to the north and Gondwana to the south.
40 |
41 | The global climate during the Triassic was mostly hot and dry, with deserts spanning much of Pangaea's interior. However, the climate shifted and became more humid as Pangaea began to drift apart. The end of the period was marked by yet another major mass extinction, the Triassic–Jurassic extinction event, that wiped out many groups and allowed dinosaurs to assume dominance in the Jurassic.
42 |
43 | ### [Paleozoic Era](https://en.wikipedia.org/wiki/Paleozoic) (541 to 252 Mya)
44 |
45 | The Paleozoic ("ancient life") Era is the earliest of three geologic eras of the Phanerozoic Eon. It is the longest of the Phanerozoic eras, lasting from 541 to 252 million years ago.
46 |
47 | The Paleozoic was a time of dramatic geological, climatic, and evolutionary change, including the Cambrian explosion,. Arthropods, mollusks, fish, amphibians, synapsids and diapsids all evolved during the Paleozoic.
48 |
49 | The Paleozoic Era ended with the largest extinction event in the history of Earth, the Permian–Triassic extinction event. The effects of this catastrophe were so devastating that it took life on land 30 million years into the Mesozoic Era to recover. Recovery of life in the sea may have been much faster.
50 |
51 | ## [Proterozoic Eon](https://en.wikipedia.org/wiki/Proterozoic) (2,500 to 541 Mya)
52 |
53 | The Proterozoic ("earlier life") is a geological eon spanning the time from the appearance of oxygen in Earth's atmosphere to just before the proliferation of complex life on the Earth. It extended from 2500 Mya to 541 Mya.
54 |
55 | The well-identified events of this eon were the transition to an oxygenated atmosphere during the Paleoproterozoic; several glaciations, which produced the hypothesized Snowball Earth during the Cryogenian Period in the late Neoproterozoic Era; and the Ediacaran Period (635 to 541 Ma) which is characterized by the evolution of abundant soft-bodied multicellular organisms and provides us with the first obvious fossil evidence of life on earth.
56 |
57 | ### [Neoproterozoic](https://en.wikipedia.org/wiki/Neoproterozoic) (1,000 to 541 Mya)
58 |
59 | 1,000 to 541 million years ago
60 |
61 | ### [Mesoproterozoic](https://en.wikipedia.org/wiki/Mesoproterozoic) (1,600 to 1,000 Mya)
62 |
63 | 1,600 to 1,000 million years ago
64 |
65 | ### [Paleoproterozoic](https://en.wikipedia.org/wiki/Paleoproterozoic) (2,500 to 1,600 Mya)
66 |
67 | 2,500 to 1,600 million years ago
68 |
69 | ## [Archean Eon](https://en.wikipedia.org/wiki/Archean) (4,000 to 2,500 Mya)
70 |
71 | The Archean Eon is one of the four geologic eons of Earth history, occurring 4 to 2.5 billion years ago. During the Archean, the Earth's crust had cooled enough to allow the formation of continents and life began its development.
72 |
73 | ### [Neoarchean](https://en.wikipedia.org/wiki/Neoarchean) (2,800 to 2,500 Mya)
74 |
75 | 2,800 to 2,500 million years ago
76 |
77 | ### [Mesoarchean](https://en.wikipedia.org/wiki/Mesoarchean) (3,200 to 2,800 Mya)
78 |
79 | 3,200 to 2,800 million years ago
80 |
81 | ### [Paleoarchean](https://en.wikipedia.org/wiki/Paleoarchean) (3,600 to 3,200 Mya)
82 |
83 | 3,600 to 3,200 million years ago
84 |
85 | ### [Eoarchean](https://en.wikipedia.org/wiki/Eoarchean) (4,000 to 3,600 Mya)
86 |
87 | 4,000 to 3,600 million years ago
88 |
89 | ## [Hadean Eon](https://en.wikipedia.org/wiki/Hadean) (4,000 to 4,600 Mya)
90 |
91 | The Hadean is a geologic eon of the Earth pre-dating the Archean. It began with the formation of the Earth about 4.6 billion years ago and ended, as defined by the International Commission on Stratigraphy (ICS), 4 billion years ago.
92 |
--------------------------------------------------------------------------------
/history/the-late-bronze-age-collapse.md:
--------------------------------------------------------------------------------
1 | # The Late Bronze Age Collapse
2 |
3 | The [Late Bronze Age collapse](https://en.wikipedia.org/wiki/Late_Bronze_Age_collapse) was a sudden and nearly complete collapse of virtually all of the complex civilizations of the Eastern Mediterranean region in the half-century between about 1200 and 1150 BC, including:
4 |
5 | * The Mycenaean kingdoms
6 | * The Kassite dynasty of Babylonia
7 | * The Hittite Empire in Anatolia and the Levant
8 | * The Egyptian Empire
9 | * Ugarit and the Amorite states in the Levant
10 | * The Luwian states of western Asia Minor
11 |
12 | Most of these collapsed utterly and completely, disappearing without a trace and leaving only ruins behind: Mycenae, the Hittites, Ugarit, and others. A few of the largest and most powerful states -- particularly Egypt, Assyria, and Elam -- survived, but in a diminished and weakened form.
13 |
14 | Excavations of the surviving ruins almost always uncover layers of ash, bronze arrowheads, and human remains left where they fell, suggesting sudden and violent destruction at the hands of an invading force. The few surviving records of the time implicate a confederation of minor actors of the time -- termed the Sea Peoples -- whose identity is unclear to this day.
15 |
--------------------------------------------------------------------------------
/kubernetes/installing-ssl-certs.md:
--------------------------------------------------------------------------------
1 | # Installing TLS Certificates as a Kubernetes Secret
2 |
3 | _Source: Pieced this together myself_
4 |
5 | I always forget this.
6 |
7 | In this example I install TLS certificates as [Kubernetes secret resources](https://kubernetes.io/docs/concepts/configuration/secret/) into the `ambassador` namespace.
8 |
9 | ## The Certificate Files
10 |
11 | First, gather your certificates. You will need two files:
12 |
13 | * A PEM-encoded public key certificate (called `tls.crt` in this example)
14 | * The private key associated with given certificate (called `tls.key` in this example)
15 |
16 | ## Delete Existing Certificates
17 |
18 | If a previous version of the certs already exist, delete them first.
19 |
20 | In this example our secret is named `ambassador-certs`.
21 |
22 | ```bash
23 | kubectl -n ambassador delete secret ambassador-certs
24 | ```
25 |
26 | ## Install the New Certificates
27 |
28 | Now we can use the `kubectl create secret tls` command (yes, that whole thing is one particularly obscure command) to install the certificates into the `ambassador` namespace:
29 |
30 | ```bash
31 | kubectl -n ambassador create secret tls ambassador-certs --key ./tls.key --cert ./tls.crt
32 | ```
33 |
--------------------------------------------------------------------------------
/linux/create-cron-without-an-editor.md:
--------------------------------------------------------------------------------
1 | # How to Create a Cron Job Using Bash Without the Interactive Editor
2 |
3 | _Source: [Stack Overflow](https://stackoverflow.com/questions/878600/how-to-create-a-cron-job-using-bash-automatically-without-the-interactive-editor)_
4 |
5 | To create a cron job without using the interactive editor, you do one of the following:
6 |
7 | ### Generate and install a new crontab file
8 |
9 | 1. Write out the current crontab to a file
10 |
11 | We use `crontab -l`, which lists the current crontab jobs.
12 |
13 | ```bash
14 | crontab -l > mycron
15 | ```
16 |
17 | 2. Append the new cron to the file
18 |
19 | ```bash
20 | echo "00 09 * * 1-5 echo hello" >> mycron
21 | ```
22 |
23 | 3. Install the new cron file
24 |
25 | ```bash
26 | crontab mycron
27 | ```
28 |
29 | 4. Clean up
30 |
31 | ```bash
32 | rm crontab
33 | ```
34 |
35 | ### As a one-liner
36 |
37 | Alternatively, you can do this in a one liner by piping your modified cron file to `crontab -` as follows:
38 |
39 | ```bash
40 | crontab -l | { cat; echo "0 0 0 0 0 some entry"; } | crontab -
41 | ```
42 |
43 | Broken down:
44 |
45 | * `crontab -l` lists the current crontab jobs
46 | * In a subshell, `cat` prints the `crontab -l` output and echos the new command
47 | * The entire output is piped to `crontab -` which installs it as a new crontab.
48 |
--------------------------------------------------------------------------------
/linux/creating-a-linux-service-with-systemd.md:
--------------------------------------------------------------------------------
1 | # Creating a Linux Service with systemd
2 |
3 | _Sources: [[1]](https://medium.com/@benmorel/creating-a-linux-service-with-systemd-611b5c8b91d6), [[2]](https://www.freedesktop.org/software/systemd/man/systemd.unit.html)_
4 |
5 | # The Program
6 |
7 | For the purposes of this example, we'll start a toy echo server on port 80 using `socat`.
8 |
9 | Let’s start it:
10 |
11 | ```bash
12 | $ socat -v tcp-l:8080,fork exec:"/bin/cat"
13 | ```
14 |
15 | And test it in another terminal:
16 |
17 | ```
18 | $ nc 127.0.0.1 8080
19 |
20 | Hello world!
21 | Hello world!
22 | ```
23 |
24 | Cool, it works. Now we want this script to run at all times, be restarted in case of a failure (unexpected exit), and even survive server restarts. That’s where systemd comes into play.
25 |
26 | ## Turning It Into a Service
27 |
28 | Let’s create a file called `/etc/systemd/system/echo.service`:
29 |
30 | ```
31 | [Unit]
32 | Description=Echo service
33 | After=network.target
34 | StartLimitIntervalSec=0
35 |
36 | [Service]
37 | Type=simple
38 | Restart=always
39 | RestartSec=1
40 | User=ubuntu
41 | ExecStart=/usr/bin/env socat -v tcp-l:8080,fork exec:"/bin/cat"
42 |
43 | [Install]
44 | WantedBy=multi-user.target
45 | ```
46 |
47 | Of course you'll want to set your actual username after `User=`.
48 |
49 | That’s it.
50 |
51 | ## Starting The Service
52 |
53 | We can now start the service:
54 |
55 | ```bash
56 | $ systemctl start echo
57 | ```
58 |
59 | And automatically get it to start on boot:
60 |
61 | ```bash
62 | $ systemctl enable echo
63 | ```
64 |
65 | ## Going further
66 |
67 | Now that your service (hopefully) works, it may be important to dive a bit deeper into the configuration options, and ensure that it will always work as you expect it to.
68 |
69 | ### Starting in the right order
70 |
71 | You may have wondered what the `After=` directive did. It simply means that your service must be started after the network is ready. For example, if your program expects MySQL to be up and running you could add:
72 |
73 | ```
74 | After=mysqld.service
75 | ```
76 |
77 | ### Restarting on exit
78 |
79 | By default, systemd does not restart your service if the program exits for whatever reason. This is usually not what you want for a service that must be always available, so we’re instructing it to always restart on exit:
80 |
81 | ```
82 | Restart=always
83 | ```
84 |
85 | You could also use `on-failure` to only restart if the exit status is not `0`.
86 |
87 | By default, systemd attempts a restart after 100ms. You can specify the number of seconds to wait before attempting a restart, using:
88 |
89 | ```
90 | RestartSec=1
91 | ```
92 |
93 | ### Avoiding the Start Limit Trap
94 |
95 | By default, when you configure `Restart=always` as we did, systemd gives up restarting your service if it fails to start more than 5 times within a 10 seconds interval. Forever.
96 |
97 | There are two `[Unit]` configuration options responsible for this:
98 |
99 | ```
100 | StartLimitBurst=5
101 | StartLimitIntervalSec=10
102 | ```
103 |
104 | The `RestartSec` directive also has an impact on the outcome: if you set it to restart after 3 seconds, then you can never reach 5 failed retries within 10 seconds.
105 |
106 | The simple fix that always works is to set `StartLimitIntervalSec=0`. This way, systemd will attempt to restart your service forever.
107 | It’s a good idea to set `RestartSec` to at least 1 second though, to avoid putting too much stress on your server when things start going wrong.
108 |
109 | As an alternative, you can leave the default settings, and ask systemd to restart your server if the start limit is reached, using `StartLimitAction=reboot`.
110 |
111 | ## Is that really it?
112 |
113 | That’s all it takes to create a Linux service with systemd: writing a small configuration file that references your long-running program.
114 |
115 | Systemd has been the default init system in RHEL/CentOS, Fedora, Ubuntu, Debian and others for several years now, so chances are that your server is ready to host your homebrew services.
116 |
--------------------------------------------------------------------------------
/linux/lastlog.md:
--------------------------------------------------------------------------------
1 | # Lastlog
2 |
3 | The `lastlog` utility formats and prints the contents of the last login log file, `/var/log/lastlog` (which is a usually a very sparse file), including the login name, port, and last login date and time.
4 |
5 | It is similar in functionality to the BSD program `last`, also included in linux distributions; however, `last` parses a different binary database file (`/var/log/wtmp` and `/var/log/btmp`).
6 |
7 | ## Usage
8 |
9 | Lastlog prints its output in column format with login-name, port, and last-login-time of each and every user on the system mentioned in that order. The users are sorted by default according to the order in `/etc/passwd` However, it can also be used to modify the records kept in `/var/log/lastlog`.
10 |
11 | ```bash
12 | $ lastlog
13 | Username Port From Latest
14 | root **Never logged in**
15 | user tty3 Sun Jan 14 16:29:24 +0130 2019
16 | ```
--------------------------------------------------------------------------------
/linux/socat.md:
--------------------------------------------------------------------------------
1 | # `socat`
2 |
3 | _Sources: [`socat`](https://medium.com/@copyconstruct/socat-29453e9fc8a6) by Cindy Sridharan; also [[1]](https://blog.travismclarke.com/post/socat-tutorial/), [[2]](https://linux.die.net/man/1/socat)_
4 |
5 | `socat` (**SO**cket **CAT**) is a network utility similar to `netcat` that allows data transfer between two addresses by establishing two bidirectional byte streams and transferring data between them.
6 |
7 | An address, in this context, can include:
8 |
9 | * A network socket
10 | * Any file descriptor
11 | * Unix domain datagram or stream socket
12 | * TCP and UDP (over both IPv4 and IPv6)
13 | * SOCKS 4/4a over IPv4/IPv6, SCTP, PTY, datagram and stream sockets
14 | * Named and unnamed pipes
15 | * Raw IP sockets
16 | * OpenSSL
17 | * Any arbitrary network device (on Linux)
18 |
19 | ## Usage
20 |
21 | The simplest `socat` invocation would be:
22 |
23 | ```bash
24 | socat [options]
25 | ```
26 |
27 | A more concrete example would be:
28 |
29 | ```bash
30 | socat -d -d - TCP4:www.example.com:80
31 | ```
32 |
33 | where `-d -d` would be the command options, `-` would be the first address and `TCP4:www.example.com:80` would be the second address.
34 |
35 | 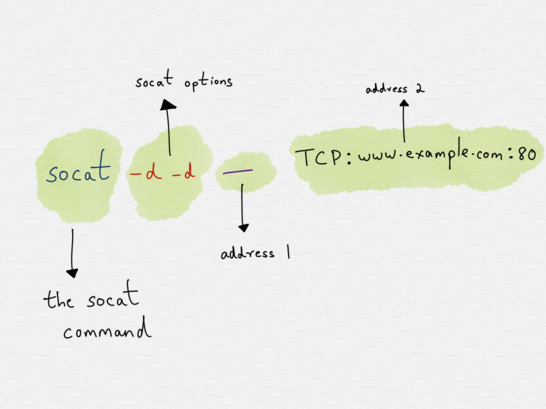
36 |
37 | This might seem like a lot to take in (and the examples in [the man page](http://www.dest-unreach.org/socat/doc/socat.html#ADDRESS_TCP_LISTEN) are, if anything, even more inscrutable), so let’s break each component down a bit more.
38 |
39 | Let’s first start with the address, since the address is the cornerstone aspect of `socat`.
40 |
41 | ## Addresses
42 |
43 | In order to understand `socat` it’s important to understand what addresses are and how they work.
44 |
45 | The address is something that the user provides via the command line. Invoking `socat` without any addresses results in something like:
46 |
47 | ```bash
48 | ~: socat
49 | 2020/05/25 12:38:20 socat[36392] E exactly 2 addresses required (there are 0); use option "-h" for help
50 | ```
51 |
52 | An address comprises of three components:
53 |
54 | * The address _type_, followed by a `:`
55 | * Zero or more required address _parameters_ separated by `:`
56 | * Zero or more address _options_ separated by `,`
57 |
58 | 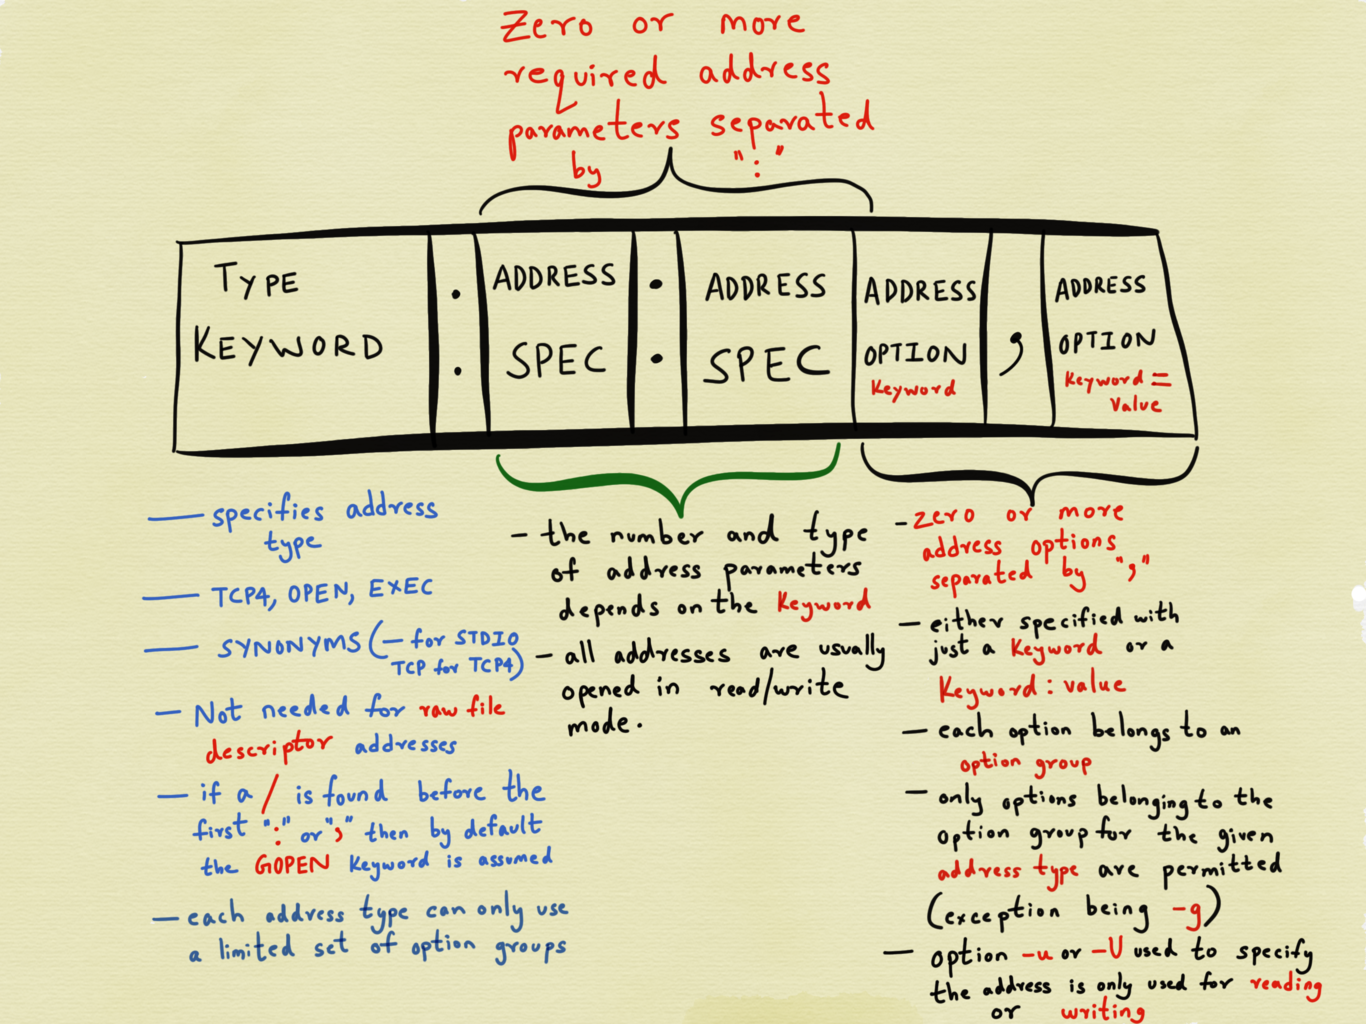
59 |
60 | ## Type
61 |
62 | The _type_ is used to specify the kind of address we need.
63 |
64 | Popular options are `TCP4`, `CREATE`, `EXEC`, `GOPEN`, `STDIN`, `STDOUT`, `PIPE`, `PTY`, `UDP4` etc, where the names are pretty self-explanatory.
65 |
66 | However, in the example we saw in the previous section, a `socat` command was represented as
67 |
68 | ```bash
69 | socat -d -d - TCP4:www.example.com:80
70 | ```
71 |
72 | where `-` was said to be one of the two addresses. This doesn’t look like a fully formed address that adheres to the aforementioned convention.
73 |
74 | This is because certain address types have aliases. `-` is one such alias used to represent `STDIO`. Another alias is `TCP` which stands for TCPv4. The manpage of `socat` lists all other aliases.
75 |
76 | ## Parameters
77 |
78 | Immediately after the type comes zero or more required address parameters separated by `:`.
79 |
80 | The number of address _parameters_ depends on the address _type_.
81 |
82 | The address _type_ `TCP4` requires a _server specification_ and a _port specification_ (number or service name). A valid address with _type_ `TCP4` established with port `80` of host `www.example.com` would be `TCP:www.example.com:80`.
83 |
84 | 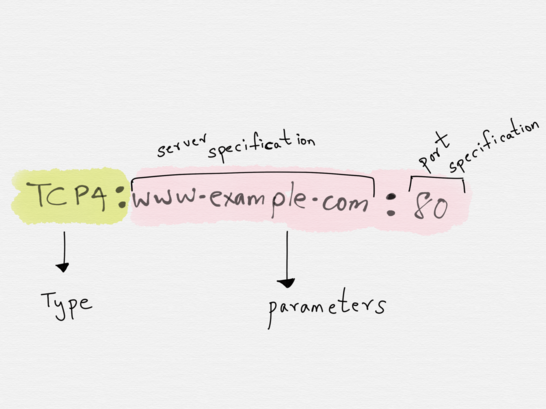
85 |
86 | Another example of an address would be `UDP_RECVFROM:9125` which creates a UDP socket on port 9125, receives one packet from an unspecified peer and may send one or more answer packets to that peer.
87 |
88 | The address _type_ (like `TCP` or `UDP_RECVFROM`) is sometimes optional. Address specifications starting with a number are assumed to be of type `FD` (raw file descriptor) addresses. Similarly, if a `/` is found before the first `:` or `,` then the address type is assumed to be `GOPEN` (generic file open).
89 |
90 | 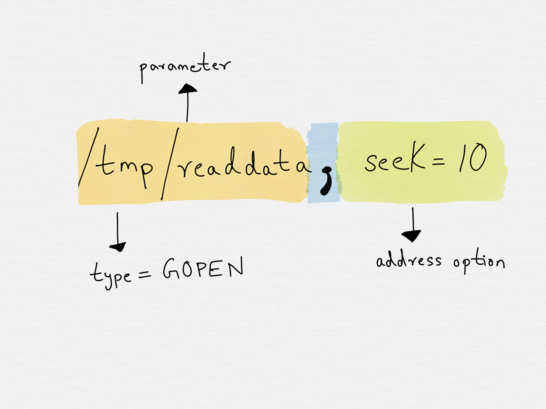
91 |
92 | ## Address Options
93 |
94 | Address parameters can be further enhanced with _options_, which govern how the opening of the address is done or what the properties of the resulting byte streams will be.
95 |
96 | Options are specified after address parameters and they are separated from the last address parameter by a `,` (the `,` indicates when the address parameters end and when the options begin).
97 |
98 | Options can be specified either directly or with an `option_name=value` pair.
99 |
100 | Extending the previous example, we can specify the option `retry=5` on the address to specify the number of times the connection to `www.example.com` will be retried.
101 |
102 | ```
103 | TCP:www.example.com:80,retry=5
104 | ```
105 |
106 | Similarly, the following address allows one to set up a TCP listening socket and fork a child process to handle all incoming client connections.
107 |
108 | ```
109 | TCP4-LISTEN:www.example.com:80,fork
110 | ```
111 |
112 | Each _option_ belongs to one _option group_. Every address type has a set of option groups, and only options belonging to the option groups for the given address type are permitted. It is not, for example, possible to apply options reserved for sockets to regular files.
113 |
114 | ~[Address options have a many-to-1 mapping with option groups.](https://miro.medium.com/max/1400/1*c903Tb2lJCiNlhuJNhGxtA.png)
115 |
116 | For example, the `creat` option belongs to the `OPEN` option group. The `creat` option can only be used with those address types (`GOPEN`, `OPEN` and `PIPE`) that have `OPEN` as a part of their option group set.
117 |
118 | The `OPEN` option group allows for the setting of flags with the `open()` system call. Using `creat` as an option on an address of type `OPEN` sets the `O_CREAT` flag when `open()` is invoked.
119 |
120 | ## Unidirectional and Bidirectional Streams
121 |
122 | Now that we have a slightly better understanding of what addresses are, let’s see how data is transferred between the two addresses.
123 |
124 | For the first stream, the first address acts as the data source and the second address is the data sink. For the second byte stream, the second address is the data source and the first address is the data sink.
125 |
126 | Invoking `socat` with `-u` ensures that the first address can only be used for _reading_ and the second address can only be used for _writing_.
127 |
128 | In the following example,
129 |
130 | ```bash
131 | socat -u STDIN STDOUT
132 | ```
133 |
134 | the first address (`STDIN`) is only used for _reading_ data and the second address (`STDOUT`) is only used for _writing_ data. This can be verified by looking at what `socat` prints out when it is invoked:
135 |
136 | ```bash
137 | $ socat -u STDIN STDOUT
138 | 2018/10/14 14:18:15 socat[22736] N using stdin for reading
139 | 2018/10/14 14:18:15 socat[22736] N using stdout for writing
140 | ...
141 | ```
142 |
143 | 
144 |
145 | Whereas invoking `socat STDIN STDOUT` opens both the addresses for reading and writing.
146 |
147 | ```bash
148 | $ socat STDIN STDOUT
149 | 2018/10/14 14:19:48 socat[22739] N using stdin for reading and writing
150 | 2018/10/14 14:19:48 socat[22739] N using stdout for reading and writing
151 | ```
152 |
153 | 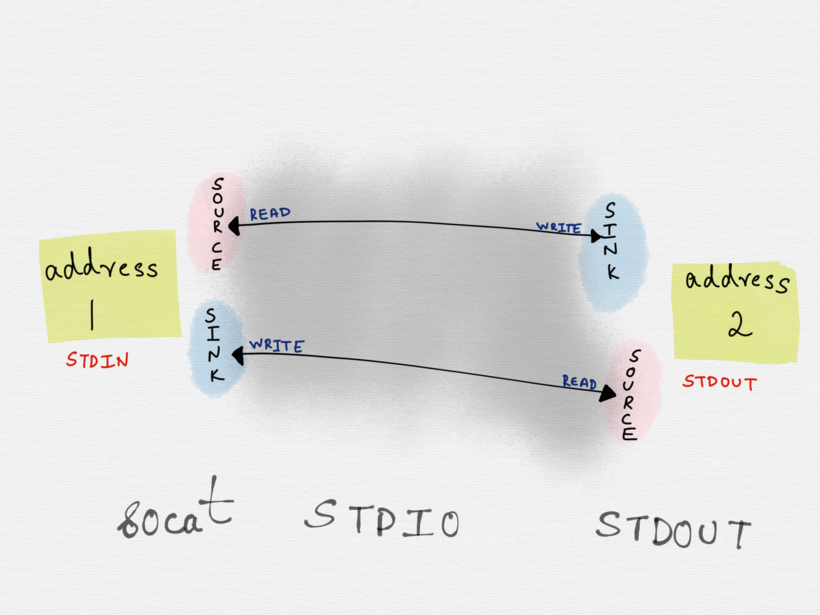
154 |
155 | ## Single Address Specification and Dual Addresses
156 |
157 | An address of the sort we’ve seen until now that conforms to the aforementioned format is known as a `single address specification`:
158 |
159 | ```bash
160 | socat -d -d - TCP4:www.example.com:80
161 | ```
162 |
163 | Constructing a `socat` command with _**two single address specifications**_ ends up establishing _two unidirectional byte streams_ between the two addresses.
164 |
165 | 
166 |
167 |
168 |
169 | In this case, the first address can write data to the second address and the second address would write data back to the first address. However, it’s possible that we might not want the second address to write data back to the first address (`STDIO`, in this case), but instead we might want it to write the data to a different address (a file, for example) instead.
170 |
171 | Two _single addresses specifications_ can be combined with `!!` to form a _dual type address_ for one byte stream. Here, the first address is used by `socat` for reading data, and the second address for writing data.
172 |
173 | 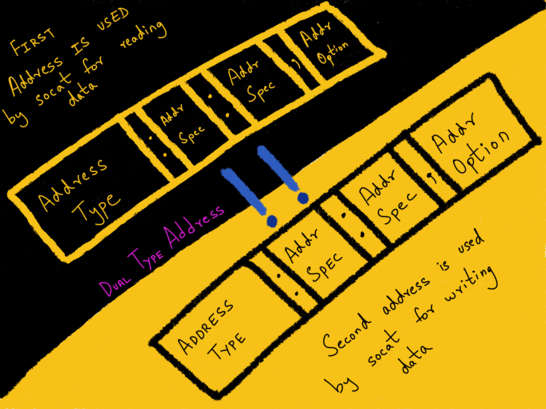
174 |
175 | ```bash
176 | socat -d -d READLINE\!\!OPEN:file.txt,creat,trunc SYSTEM:'read stdin; echo $stdin'
177 | ```
178 |
179 | In this example, the first address is a _dual address specification_ (`READLINE!!OPEN:file.txt,creat,trunc`), where data is being read from a source (`READLINE`) and written to a different sink (`OPEN:file.txt,creat,trunc`).
180 |
181 | Here, `socat` reads the input from `READLINE`, transfers it to the second address (`SYSTEM` — which forks a child process, executes the shell command specified).
182 |
183 | The second address returns data back to a different sink of the first address — in this example it’s `OPEN:file.txt,creat,trunc`.
184 |
185 | 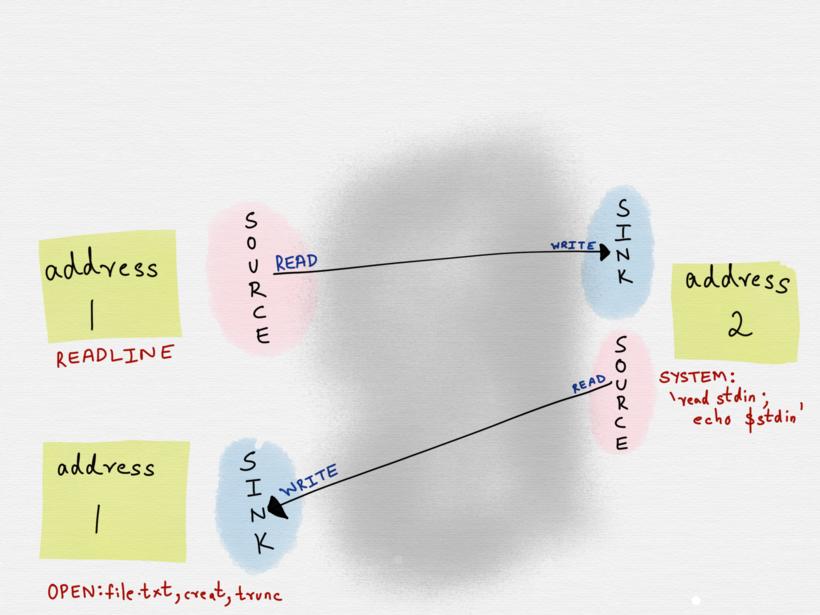
186 |
187 | This was a fairly trivial example where only one of the two addresses was a dual address specification. It’s possible that both of the addresses might be dual address specifications.
188 |
189 | ## Address Options Versus `socat` Options
190 |
191 | It’s important to understand that the options that apply to an address, which shaping how the address behaves, are different from invoking `socat` itself with specific options, which govern how the `socat` tool itself behaves.
192 |
193 | We’ve already seen previously that adding the option `-u` to `socat` ensures that the first address is only opened for reading and the second address for writing.
194 |
195 | Another useful option to know about is the `-d` option, which can be used with `socat` to print warning messages, in addition to fatal and error messages.
196 |
197 | Invoking socat with `-d -d` will print the fatal, error, warning, _and_ notice messages. I usually have `socat` aliased to `socat -d -d` in my dotfiles.
198 |
199 | Similarly, if one invokes `socat -h` or `socat -hh`, you will be presented with a wall of information that can be a little overwhelming and not all of which is required for getting started.
200 |
201 | ## Cheatsheet
202 |
203 | _Source: [Socat Cheatsheet](https://blog.travismclarke.com/post/socat-tutorial/) by Travis Clarke_
204 |
205 | There are also a _ton_ of examples on the [`socat` man page](http://www.dest-unreach.org/socat/doc/socat.html#EXAMPLES).
206 |
207 | ### Server/Client communication
208 |
209 | #### Create an echo server
210 |
211 | ##### Server
212 |
213 | ```bash
214 | socat -v tcp-l:8080,fork exec:"/bin/cat"
215 | ```
216 |
217 | ##### Client
218 |
219 | ```bash
220 | socat TCP:localhost:8080 -
221 | ```
222 |
223 | #### Create a simple client/server TCP connection
224 |
225 | ##### Server
226 |
227 | ```bash
228 | socat TCP-LISTEN:8800,reuseaddr,pf=ip4,fork -
229 | ```
230 |
231 | ##### Client
232 |
233 | ```bash
234 | socat TCP:localhost:8800 -
235 | ```
236 |
237 | #### Create a client/server TCP connection over TLS/SSL
238 |
239 | ##### Server
240 |
241 | ```bash
242 | socat OPENSSL-LISTEN:4443,reuseaddr,pf=ip4,fork,cert=$HOME/tmp/server.pem,cafile=$HOME/tmp/client.pem -
243 | ```
244 |
245 | ##### Client
246 |
247 | ```bash
248 | socat OPENSSL:localhost:4443,verify=0,cert=$HOME/tmp/client.pem,cafile=$HOME/tmp/server.pem -
249 | ```
250 |
251 | ### UNIX domain socket communication
252 |
253 | #### Create a UNIX domain socket for IPC (inter-process communication) with a **single (bi-directional)** endpoint
254 |
255 | ##### Server
256 |
257 | ```bash
258 | socat UNIX-LISTEN:/usr/local/var/run/test/test.sock -
259 | ```
260 |
261 | ##### Client
262 |
263 | ```bash
264 | socat UNIX-CONNECT:/usr/local/var/run/test/test.sock -
265 | ```
266 |
267 | #### Create a UNIX domain socket for IPC (inter-process communication) with **multiple (bi-directional)** endpoints
268 |
269 | ##### Server
270 |
271 | ```bash
272 | socat UNIX-LISTEN:/usr/local/var/run/test/test.sock,fork -
273 | ```
274 |
275 | ##### Client
276 |
277 | ```bash
278 | socat UNIX-CONNECT:/usr/local/var/run/test/test.sock -
279 | ```
280 |
281 | #### Create UNIX domain sockets for IPC (inter-process communication) and save the communication output to file
282 |
283 | ##### Server
284 |
285 | ```bash
286 | socat UNIX-LISTEN:/usr/local/var/run/test/test.sock,fork - >> $HOME/tmp/socketoutput.txt
287 | ```
288 |
289 | ##### Client
290 |
291 | ```bash
292 | socat UNIX-CONNECT:/usr/local/var/run/test/test.sock -
293 | ```
294 |
295 | ### Command execution
296 |
297 | #### Execute shell commands on a remote server (i.e. basic ssh client)
298 |
299 | ##### Server
300 |
301 | ```bash
302 | socat TCP-LISTEN:1234 EXEC:/bin/bash
303 | ```
304 |
305 | ##### Client
306 |
307 | ```bash
308 | socat TCP:localhost:1234 -
309 | ```
310 |
311 | ### Tunneling�
312 |
313 | #### Create an encrypted tunnel between a local computer and a remote machine to relay services created through an SSH protocol connection
314 |
315 | ##### Server
316 |
317 | ```bash
318 | socat TCP-LISTEN:54321,reuseaddr,fork TCP:remote.server.com:22
319 | ```
320 |
321 | ##### Client
322 |
323 | ```bash
324 | ssh root@localhost -p 54321
325 | ```
326 |
327 | #### Create a virtual point-to-point IP link through a TUN network device
328 |
329 | Mac OS X: requires the [TunTap](http://tuntaposx.sourceforge.net/) kernel extensions.
330 |
331 | ##### Server
332 |
333 | ```bash
334 | socat /dev/tun0 -
335 | ```
336 |
337 | ##### Client
338 |
339 | ```bash
340 | ifconfig tun0 10.0.0.2 10.0.0.3
341 | ping 10.0.0.3
342 | ```
343 |
--------------------------------------------------------------------------------
/linux/sparse-files.md:
--------------------------------------------------------------------------------
1 | # Sparse Files
2 |
3 | A sparse file is a type of file that attempts to use file system space more efficiently when the file itself is partially empty.
4 |
5 | This is done by writing metadata representing the empty blocks to disk instead of the actual "empty" space which makes up the block, using less disk space.
6 |
7 | The full block size is written to disk as the actual size only when the block contains "real" (non-empty) data.
8 |
9 | The `/var/log/lastlog` is a typical example of a very sparse file.
10 |
11 | ## Detection
12 | The `-s` option of the `ls` command shows the occupied space in blocks.
13 |
14 | ```bash
15 | $ ls -lhs
16 | ```
17 |
18 | ## More Reading
19 |
20 | * [Stackoverflow: What is a sparse file and why do we need it?](https://stackoverflow.com/questions/43126760/what-is-a-sparse-file-and-why-do-we-need-it)
--------------------------------------------------------------------------------
/mac/installing-flock-on-mac.md:
--------------------------------------------------------------------------------
1 | # Installing flock(1) on Mac
2 |
3 | MacOS neither ships with `flock(1)` nor includes it in its developer toolset.
4 |
5 | There's a nifty Mac version on Github though: https://github.com/discoteq/flock.
6 |
7 | Install using Homebrew:
8 |
9 | ```
10 | brew tap discoteq/discoteq
11 | brew install flock
12 | ```
13 |
--------------------------------------------------------------------------------
/mac/osascript.md:
--------------------------------------------------------------------------------
1 | # osascript
2 |
3 | _Source: https://ss64.com/osx/osascript.html_
4 |
5 | Execute AppleScripts and other OSA language scripts. Executes the given script file, or standard input if none is given. Scripts can be plain text or compiled scripts. osascript was designed for use with AppleScript, but will work with any Open Scripting Architecture (OSA) language.
6 |
7 | Syntax
8 |
9 | osascript [-l language] [-e command] [-s flags] [programfile]
10 |
11 | Options
12 |
13 | -e command
14 | Enter one line of a script. If -e is given, osascript will not
15 | look for a filename in the argument list. Multiple -e commands can
16 | be given to build up a multi-line script. Because most scripts use
17 | characters that are special to many shell programs (e.g., Apple-
18 | Script uses single and double quote marks, `(', `)', and `*'),
19 | the command will have to be correctly quoted and escaped to
20 | get it past the shell intact.
21 |
22 | -l language
23 | Override the language for any plain text files. Normally, plain
24 | text files are compiled as AppleScript.
25 |
26 | -s flags
27 | Modify the output style. The flags argument is a string consisting
28 | of any of the modifier characters e, h, o, and s. Multiple modi-
29 | fiers can be concatenated in the same string, and multiple -s
30 |
31 | options can be specified. The modifiers come in exclusive pairs;
32 | if conflicting modifiers are specified, the last one takes prece-
33 | dence. The meanings of the modifier characters are as follows:
34 |
35 | h Print values in human-readable form (default).
36 | s Print values in recompilable source form.
37 |
38 | osascript normally prints its results in human-readable form:
39 | strings do not have quotes around them, characters are not
40 | escaped, braces for lists and records are omitted, etc. This is
41 | generally more useful, but can introduce ambiguities. For exam-
42 | ple, the lists `{"foo", "bar"}' and `{{"foo", {"bar"}}}' would
43 | both be displayed as `foo, bar'. To see the results in an unam-
44 | biguous form that could be recompiled into the same value, use
45 | the s modifier.
46 |
47 | e Print script errors to stderr (default).
48 | o Print script errors to stdout.
49 |
50 | osascript normally prints script errors to stderr, so downstream
51 | clients only see valid results. When running automated tests,
52 | however, using the o modifier lets you distinguish script
53 | errors, which you care about matching, from other diagnostic
54 | output, which you don't.
55 |
56 | `osascript` in macOS 10.0 would translate `\r` characters in the output to `\n` and provided `c` and `r` modifiers for the `-s` option to change this. osascript now always leaves the output alone; pipe through tr if necessary.
57 |
58 | For multi-line AppleScript you can use ¬ as a new line continuation character, press Option-L to enter this into your text editor.
59 |
60 | Examples
61 |
62 | Open $HOME in Finder
63 |
64 | `osascript -e "tell application \"Finder\" to open (\"${HOME}\" as POSIX file)"`
65 |
66 | Display a notificaton:
67 |
68 | `osascript -e 'display notification "hello world!"'`
69 |
70 | Display a notification with title:
71 |
72 | `osascript -e 'display notification "hello world!" with title "This is the title"'`
73 |
74 | Open or switch to Safari:
75 |
76 | `$ osascript -e 'tell app "Safari" to activate'`
77 |
78 | Close safari:
79 |
80 | `$ osascript -e 'quit app "safari.app"'`
81 |
82 | Empty the trash:
83 |
84 | `$ osascript -e 'tell application "Finder" to empty trash'`
85 |
86 | Set the output volume to 50%
87 |
88 | `$ sudo osascript -e 'set volume output volume 50'`
89 |
90 | Input volume and Alert volume can also be set from 0 to 100%:
91 |
92 | `$ sudo osascript -e 'set volume input volume 40'`
93 |
94 | `$ sudo osascript -e 'set volume alert volume 75'`
95 |
96 | Mute the output volume (True/False):
97 |
98 | `$ osascript -e 'set volume output muted TRUE'`
99 |
100 | Shut down without asking for confirmation:
101 |
102 | `$ osascript -e 'tell app "System Events" to shut down'`
103 |
104 | Restart without asking for confirmation:
105 |
106 | `$ osascript -e 'tell app "System Events" to restart'`
107 |
--------------------------------------------------------------------------------
/misc/buttons-1.jpg:
--------------------------------------------------------------------------------
https://raw.githubusercontent.com/clockworksoul/today-i-learned/1257079ee89defd9da4c261fd30d7d4a85f8ceb7/misc/buttons-1.jpg
--------------------------------------------------------------------------------
/misc/buttons-2.jpg:
--------------------------------------------------------------------------------
https://raw.githubusercontent.com/clockworksoul/today-i-learned/1257079ee89defd9da4c261fd30d7d4a85f8ceb7/misc/buttons-2.jpg
--------------------------------------------------------------------------------
/misc/buttons.md:
--------------------------------------------------------------------------------
1 | _Source: My friend Jeff Goldschrafe told me ([verified here](https://www.primermagazine.com/2020/learn/button-up-vs-button-down-shirt-difference))_
2 |
3 | # "Button up" vs "button down" shirts
4 |
5 | There is a difference!
6 |
7 | * A ***button up shirt*** buttons up the front of the body all the way.
8 |
9 | * A ***button down shirt*** has buttons on the collar points that you can, well, button down.
10 |
11 | 
12 |
13 | 
14 |
--------------------------------------------------------------------------------
/misc/chestertons-fence.md:
--------------------------------------------------------------------------------
1 | # Chesterton's Fence
2 |
3 | _Source: [Wikipedia: Chesterton's Fence](https://en.wikipedia.org/wiki/Wikipedia:Chesterton%27s_fence)_
4 |
5 | Don't remove something until you know why it was put up in the first place.
6 |
7 | ## Background
8 |
9 | Chesterton's fence is the principle that reforms should not be made until the reasoning behind the existing state of affairs is understood. The quotation is from G. K. Chesterton's 1929 book The Thing, in the chapter entitled "The Drift from Domesticity":
10 |
11 | > In the matter of reforming things, as distinct from deforming them, there is one plain and simple principle; a principle which will probably be called a paradox. There exists in such a case a certain institution or law; let us say, for the sake of simplicity, a fence or gate erected across a road. The more modern type of reformer goes gaily up to it and says, "I don't see the use of this; let us clear it away." To which the more intelligent type of reformer will do well to answer: "If you don't see the use of it, I certainly won't let you clear it away. Go away and think. Then, when you can come back and tell me that you do see the use of it, I may allow you to destroy it."
12 |
13 | Chesterton's admonition should first be understood within his own historical context, as a response to certain socialists and reformers of his time (e.g. George Bernard Shaw).
14 |
15 | ## See also
16 |
17 | * [Chesterton’s Fence: A Lesson in Second Order Thinking](https://fs.blog/2020/03/chestertons-fence/)
18 | * [The Fallacy Of Chesterton’s Fence](https://abovethelaw.com/2014/01/the-fallacy-of-chestertons-fence/?rf=1)
19 |
--------------------------------------------------------------------------------
/misc/convert-youtube-video-to-zoom-background.md:
--------------------------------------------------------------------------------
1 | # Converting a YouTube video to a Zoom background
2 |
3 | Fun fact: Zoom doesn't seem to have a maximum video size, so go ahead and add whatever videos you like.
4 |
5 | Important: busy backgrounds can be distracting to others. Please be respectful and keep your video background choices subtle.
6 |
7 | ## Choose Your Video
8 |
9 | For copyright reasons, you may have difficulty downloading videos with music in them.
10 |
11 | Example: https://www.youtube.com/watch?v=d0tU18Ybcvk
12 |
13 | If you have any specific start or stop times, note them.
14 |
15 | ## Find a YouTube (mp4) download site
16 |
17 | There are a [wealth of YouTube download sites on the Internet](https://www.google.com/search?q=youtube+downloader) that let you to transcode YouTube videos into other formats. Choose any one you like, but be sure that it supports mp4 format.
18 |
19 | I like https://www.clipconverter.cc/ because it supports start and stop timestamps.
20 |
21 | ## Do the thing
22 |
23 | Use your transcoder site of choice to convert your video, and download the resulting mp4, ideally to a dedicated directory for Zoom wallpapers.
24 |
25 | Be sure to choose a meaningful name so you can find it later!
26 |
27 | ## Add the background to Zoom
28 |
29 | 1. Zoom -> Preferences -> Virtual Background
30 |
31 | 2. Click the [+] and select "Add Video"
32 |
33 | 3. Select your newly downloaded video.
34 |
35 | ## Enjoy!
36 |
37 | Your new video is now in your backgrounds library. Enjoy!
38 |
39 |
40 |
--------------------------------------------------------------------------------
/misc/hugo-quickstart.md:
--------------------------------------------------------------------------------
1 | # Hugo Quickstart
2 |
3 | _Source: [Hugo Quickstart](https://gohugo.io/getting-started/quick-start/)_
4 |
5 | The following are the steps I used to get [Hugo](https://gohugo.io) started. They're close, but not identical, to the ones on the [official quickstart page](https://gohugo.io/getting-started/quick-start/).
6 |
7 | ## Step 1: Install Hugo
8 |
9 | ```bash
10 | go get github.com/gohugoio/hugo
11 | ```
12 |
13 | ```bash
14 | hugo version
15 | ```
16 |
17 | ## Step 2: Create a New Site
18 |
19 | ```bash
20 | hugo new site very-serio.us
21 | ```
22 |
23 | ## Step 3: Add a Theme
24 |
25 | See [themes.gohugo.io](https://themes.gohugo.io/) for a list of themes to consider. This quickstart uses the beautiful [Ananke](https://themes.gohugo.io/gohugo-theme-ananke/) theme.
26 |
27 | First, download the theme from GitHub and add it to your site’s theme directory:
28 |
29 | ```bash
30 | cd very-serio.us
31 | git init
32 | git submodule add https://github.com/budparr/gohugo-theme-ananke.git themes/ananke
33 | ```
34 |
35 | Then, add the theme to the site configuration:
36 |
37 | ```bash
38 | echo 'theme = "ananke"' >> config.toml
39 | ```
40 |
41 | ## Step 4: Add Some Content
42 |
43 | ```bash
44 | hugo new posts/my-first-post.md
45 | ```
46 |
47 | ## Step 5: Start the Hugo server
48 |
49 | Now, start the Hugo server with drafts enabled:
50 |
51 | ```bash
52 | $ hugo server -D
53 |
54 | | EN
55 | +------------------+----+
56 | Pages | 10
57 | Paginator pages | 0
58 | Non-page files | 0
59 | Static files | 3
60 | Processed images | 0
61 | Aliases | 1
62 | Sitemaps | 1
63 | Cleaned | 0
64 |
65 | Total in 11 ms
66 | Watching for changes in /Users/bep/quickstart/{content,data,layouts,static,themes}
67 | Watching for config changes in /Users/bep/quickstart/config.toml
68 | Environment: "development"
69 | Serving pages from memory
70 | Running in Fast Render Mode. For full rebuilds on change: hugo server --disableFastRender
71 | Web Server is available at http://localhost:1313/ (bind address 127.0.0.1)
72 | Press Ctrl+C to stop
73 | ```
74 |
75 | Navigate to your new site at http://localhost:1313/.
76 |
77 | Feel free to edit or add new content and simply refresh in browser to see changes quickly (You might need to force refresh in webbrowser, something like Ctrl-R usually works).
78 |
79 | ## Step 6: Customize the Theme
80 |
81 | Your new site already looks great, but you will want to tweak it a little before you release it to the public.
82 |
83 | ### Site Configuration
84 |
85 | Open up `config.toml` in a text editor:
86 |
87 | ```
88 | baseURL = "https://example.org/"
89 | languageCode = "en-us"
90 | title = "My New Hugo Site"
91 | theme = "ananke"
92 | ```
93 |
94 | ## Step 7: Build static pages
95 |
96 | It is simple. Just call:
97 |
98 | ```bash
99 | hugo -D
100 | ```
101 |
102 | Output will be in `./public/` directory by default (`-d`/`--destination` flag to change it, or set `publishdir` in the config file).
103 |
104 | Drafts do not get deployed; once you finish a post, update the header of the post to say draft: `false`. More info [here](https://gohugo.io/getting-started/usage/#draft-future-and-expired-content).
--------------------------------------------------------------------------------
/misc/new-gdocs.md:
--------------------------------------------------------------------------------
1 | # Easily Create New Google {Docs|Sheets|Forms|Slideshows}
2 |
3 | _Source: My friend and manager, Jeff Goldschrafe_
4 |
5 | There's a nifty `.new` TLD that lets you easily create new new GSuite artifacts, for easy bookmarking:
6 |
7 | * Google Doc: https://doc.new
8 | * Google Sheets: https://sheet.new
9 | * Google Form: https://form.new
10 | * Google Slideshow: https://slide.new
11 |
12 | ## Neat, huh?
13 |
14 | 
--------------------------------------------------------------------------------
/misc/new-gdocs.png:
--------------------------------------------------------------------------------
https://raw.githubusercontent.com/clockworksoul/today-i-learned/1257079ee89defd9da4c261fd30d7d4a85f8ceb7/misc/new-gdocs.png
--------------------------------------------------------------------------------
/misc/voronoi-diagram.md:
--------------------------------------------------------------------------------
1 | # Voronoi diagram
2 |
3 | _Source: [Wikipedia](https://en.wikipedia.org/wiki/Voronoi_diagram)_
4 |
5 | 
6 |
7 | A Voronoi diagram is a partition of a plane into regions close to each of a given set of objects.
8 |
9 | In the simplest case, these objects are just finitely many points in the plane (called _seeds_).
10 |
11 | For each seed there is a corresponding region consisting of all points of the plane closer to that seed than to any other. These regions are called _Voronoi cells_.
12 |
--------------------------------------------------------------------------------
/misc/voronoi-diagram.png:
--------------------------------------------------------------------------------
https://raw.githubusercontent.com/clockworksoul/today-i-learned/1257079ee89defd9da4c261fd30d7d4a85f8ceb7/misc/voronoi-diagram.png
--------------------------------------------------------------------------------
/software-architecture/hexagonal-architecture.md:
--------------------------------------------------------------------------------
1 | # Hexagonal Architecture
2 |
3 | _Sources: [1](https://web.archive.org/web/20180822100852/http://alistair.cockburn.us/Hexagonal+architecture), [2](https://eskavision.com/hexagonal-architecture/), [3](https://jmgarridopaz.github.io/content/hexagonalarchitecture.html), [4](https://en.wikipedia.org/wiki/Hexagonal_architecture_(software)), [5](https://beyondxscratch.com/2017/08/19/decoupling-your-technical-code-from-your-business-logic-with-the-hexagonal-architecture-hexarch/)_
4 |
5 | Hexagonal architecture is a software architectural pattern that uses the principles of _loose coupling_ to allow inputs and outputs to be easily connected.
6 |
7 | It could be said that hexagonal archiecture is simply [_inversion of control_](https://en.wikipedia.org/wiki/Inversion_of_control) taken to its logical conclusion.
8 |
9 | I'll explain.
10 |
11 | Hexagonal architecture can be described as an architecture built around the principle of inversion of control, in which a program only knows about a component as an abstraction, passing the control of the functionality to the implentation.
12 |
13 | ## The Name
14 |
15 | The name "hexagonal architecture" doesn't actually mean anything. It's a silly name that has nothing to do with the implementation. This actually confused me for a while because I kept trying to find the connection between the name and the implementation that didn't exist.
16 |
17 | Seriously, the [original author of hexagonal architecture](https://web.archive.org/web/20180822100852/http://alistair.cockburn.us/Hexagonal+architecture) chose this shape simply because it allowed enough space to illustrate all the components.
18 |
19 | ## The Architecture
20 |
21 | The guiding principle of hexagonal architecture is that functionalities should be represented by abstractions into which specific implementations can be [injected](https://en.wikipedia.org/wiki/Dependency_injection).
22 |
23 | Using this principle, an application might be structured so that it could be run by different kinds of clients (humans, tests cases, other applications, etc.), and it could be tested in isolation from external devices of the real world that the application depends on (databases, servers, other applications, etc.).
24 |
25 | This can be illustrated by breaking the architecture down as follows:
26 |
27 | * The **hexagon** represents the application itself. It contains the business logic, but no _direct_ references to any technology, framework or real world device.
28 | * The **drivers** can be anything that triggers an interaction with the application, such as a user.
29 | * The **driven actors** can be anything the application triggers an interaction with, such as a database.
30 |
31 | 
32 |
33 | ### The Hexagon
34 |
35 | Inside the hexagon we just have the things that are important for the business problem that the application is trying to solve. It can be whatever you want.
36 |
37 | ### The Actors
38 |
39 | Outside the hexagon we have the "actors": any real world thing that the application interacts with, including humans, devices, or other applications.
40 |
41 | As mentioned above, there are two kinds of actors:
42 |
43 | * _Driver actors_ can be anything that triggers an interaction with the application. Drivers are the users (either humans or devices) of the application.
44 | * _Driven actors_ can be anything the application triggers an interaction with. A driven actor provides some functionality needed by the application for implementing the business logic.
45 |
46 | ### Ports and Adaptors
47 |
48 | _Ports_ are the places where different kinds of actors can "plug in".
49 |
50 | _Adapters_ are the software components -- implementations -- that can "plug into" a particular kind of ports.
51 |
52 | For example, your application might have a "logging port", into which a "logging adapter" might plug. One logging adapter might write to a local file, while another might stream to a cloud-based data store.
53 |
54 | ### Architecture Summary
55 |
56 | As we have seen, the elements of the architecture are:
57 |
58 | * The Hexagon ==> the application
59 | * Driver Ports ==> API offered by the application
60 | * Driven Ports ==> SPI required by the application
61 |
62 | * Actors ==> environment devices that interact with the application
63 | * Drivers ==> application users (either humans or hardware/software devices)
64 | * Driven Actors ==> provide services required by the application
65 |
66 | * Adapters ==> adapt specific technology to the application
67 | * Driver Adapters ==> use the drivers ports
68 | * Driven Adapters ==> implement the driven ports
69 |
70 | ## A Basic Implementation
71 |
72 | ### Domain
73 |
74 | ```go
75 | type Book struct {
76 | Id int
77 | Name string
78 | }
79 | ```
80 |
81 | ### Driven Port
82 |
83 | In this example, we have a port for interacting with our data repository. In this example, it specifies a single method that accepts a
84 |
85 | ```go
86 | type BookRepository interface {
87 | FindById(id int) (Book, error)
88 | }
89 | ```
90 |
91 | ### Database Driven Port Adapter
92 |
93 | A driven adapter implements a driven port interface, converting the technology agnostic methods of the port into specific technology methods.
94 |
95 | This example implicitly implements `BookRepository` by satisfying its `FindById` contract.
96 |
97 | ```go
98 | type DatabaseBookRepository struct {
99 | configs data.DatabaseConfigs
100 | db *sql.DB
101 | }
102 |
103 | func (a *DatabaseBookRepository) FindById(id) (Book, error) {
104 | db, err := a.connect("books")
105 | defer db.Close()
106 | if err != nil {
107 | return Book{}, err
108 | }
109 |
110 | query := "SELECT name FROM books WHERE id=$1"
111 | book := Book{Id:id}
112 | err = db.QueryRow(query, id).Scan(&book.Name)
113 | if err != nil {
114 | return book, err
115 | }
116 |
117 | return book, nil
118 | }
119 | ```
120 |
--------------------------------------------------------------------------------
/software-architecture/hexagonal-architecture.png:
--------------------------------------------------------------------------------
https://raw.githubusercontent.com/clockworksoul/today-i-learned/1257079ee89defd9da4c261fd30d7d4a85f8ceb7/software-architecture/hexagonal-architecture.png
--------------------------------------------------------------------------------
/ssh/break-out-of-a-stuck-session.md:
--------------------------------------------------------------------------------
1 | # Break Out of a Stuck SSH Session
2 |
3 | _Source: https://smallstep.com/blog/ssh-tricks-and-tips/#exit-stuck-sessions_
4 |
5 | SSH sessions can often hang due to network interruptions, a program that gets out of control, or one of those terminal escape sequences that lock keyboard input.
6 |
7 | `ssh` includes the escape character `~` by default. The command `~`. closes an open connection and brings you back to the terminal. (You can only enter escape sequences on a new line.) `~?` lists all of the commands you can use during a session. On international keyboards, you may need to press the `~` key twice to send the `~` character.
8 |
--------------------------------------------------------------------------------
/ssh/exit-on-network-interruptions.md:
--------------------------------------------------------------------------------
1 | # Exit SSH Automatically on Network Interruptions
2 |
3 | _Source: https://smallstep.com/blog/ssh-tricks-and-tips/#exit-stuck-sessions_
4 |
5 | SSH sessions can often hang due to network interruptions, a program that gets out of control, or one of those terminal escape sequences that lock keyboard input.
6 |
7 | To configure your SSH to automatically exit stuck sessions, add the following to your `.ssh/config`:
8 |
9 | ```
10 | ServerAliveInterval 5
11 | ServerAliveCountMax 1
12 | ```
13 |
14 | `ssh` will check the connection by sending an echo to the remote host every `ServerAliveInterval` seconds. If more than `ServerAliveCountMax` echoes are sent without a response, `ssh` will timeout and exit.
15 |
--------------------------------------------------------------------------------
/team/amazon-leadership-principles.md:
--------------------------------------------------------------------------------
1 | # Amazon Leadership Principles
2 |
3 | _Source: https://www.amazon.jobs/en/principles_
4 |
5 | ## Customer Obsession
6 |
7 | Leaders start with the customer and work backwards. They work vigorously to earn and keep customer trust. Although leaders pay attention to competitors, they obsess over customers.
8 |
9 | ## Ownership
10 |
11 | Leaders are owners. They think long term and don’t sacrifice long-term value for short-term results. They act on behalf of the entire company, beyond just their own team. They never say "that’s not my job".
12 |
13 | ## Invent and Simplify
14 |
15 | Leaders expect and require innovation and invention from their teams and always find ways to simplify. They are externally aware, look for new ideas from everywhere, and are not limited by "not invented here". As we do new things, we accept that we may be misunderstood for long periods of time.
16 |
17 | ## Are Right, A Lot
18 |
19 | Leaders are right a lot. They have strong judgment and good instincts. They seek diverse perspectives and work to disconfirm their beliefs.
20 |
21 | ## Learn and Be Curious
22 |
23 | Leaders are never done learning and always seek to improve themselves. They are curious about new possibilities and act to explore them.
24 |
25 | ## Hire and Develop the Best
26 |
27 | Leaders raise the performance bar with every hire and promotion. They recognize exceptional talent, and willingly move them throughout the organization. Leaders develop leaders and take seriously their role in coaching others. We work on behalf of our people to invent mechanisms for development like Career Choice.
28 |
29 | ## Insist on the Highest Standards
30 |
31 | Leaders have relentlessly high standards — many people may think these standards are unreasonably high. Leaders are continually raising the bar and drive their teams to deliver high quality products, services, and processes. Leaders ensure that defects do not get sent down the line and that problems are fixed so they stay fixed.
32 |
33 | ## Think Big
34 |
35 | Thinking small is a self-fulfilling prophecy. Leaders create and communicate a bold direction that inspires results. They think differently and look around corners for ways to serve customers.
36 |
37 | ## Bias for Action
38 |
39 | Speed matters in business. Many decisions and actions are reversible and do not need extensive study. We value calculated risk taking.
40 |
41 | ## Frugality
42 |
43 | Accomplish more with less. Constraints breed resourcefulness, self-sufficiency, and invention. There are no extra points for growing headcount, budget size, or fixed expense.
44 |
45 | ## Earn Trust
46 |
47 | Leaders listen attentively, speak candidly, and treat others respectfully. They are vocally self-critical, even when doing so is awkward or embarrassing. Leaders do not believe their or their team’s body odor smells of perfume. They benchmark themselves and their teams against the best.
48 |
49 | ## Dive Deep
50 |
51 | Leaders operate at all levels, stay connected to the details, audit frequently, and are skeptical when metrics and anecdote differ. No task is beneath them.
52 |
53 | ## Have Backbone; Disagree and Commit
54 |
55 | Leaders are obligated to respectfully challenge decisions when they disagree, even when doing so is uncomfortable or exhausting. Leaders have conviction and are tenacious. They do not compromise for the sake of social cohesion. Once a decision is determined, they commit wholly.
56 |
57 | ## Deliver Results
58 |
59 | Leaders focus on the key inputs for their business and deliver them with the right quality and in a timely fashion. Despite setbacks, they rise to the occasion and never settle.
60 |
61 | _(from https://www.amazon.jobs/en/principles)_
62 |
--------------------------------------------------------------------------------
/team/never-attribute-to-stupidity-that-which-is-adequately-explained-by-opportunity-cost.md:
--------------------------------------------------------------------------------
1 | # Never Attribute to Stupidity That Which Is Adequately Explained by Opportunity Cost
2 |
3 | _Source: https://erikbern.com/2020/03/10/never-attribute-to-stupidity-that-which-is-adequately-explained-by-opportunity-cost.html_
4 |
5 | [Hanlon's razor](https://en.wikipedia.org/wiki/Hanlon%27s_razor) is a classic aphorism I'm sure you have heard before: _Never attribute to malice that which can be adequately explained by stupidity_.
6 |
7 | I've found that neither malice nor stupidity is the most common reason when you don't understand why something is in a certain way. Instead, the root cause is probably just that _they didn't have time yet_. This happens all the time at startups (maybe a bit less at big companies, for reasons I'll get back to).
8 |
9 | Some examples of things I hear all the time:
10 |
11 | * I don't understand why team X isn't working on _feature idea_ Y. It's such an obvious thing to do!
12 |
13 | * Why is _bug_ Z still present? Hasn't it been known for a really long time? I don't understand why they aren't fixing it?
14 |
15 | * I don't get why HR team still doesn't offer _perk_ W. So many other companies have that!
16 |
17 | * I've told my manager that we need a process for _thing_ V but it still hasn't happened!
18 |
19 | Of course, why these things never happened is that something else was more important. Quoting Wikipedia on [Opportunity cost](https://en.wikipedia.org/wiki/Opportunity_cost):
20 |
21 | >When an option is chosen from alternatives, the opportunity cost is the "cost" incurred by not enjoying the benefit associated with the best alternative choice. The New Oxford American Dictionary defines it as "the loss of potential gain from other alternatives when one alternative is chosen." In simple terms, opportunity cost is the benefit not received as a result of not selecting the next best option.
22 |
23 | Thus I've started telling people: _Never attribute to stupidity that which is adequately explained by opportunity cost_.
24 |
--------------------------------------------------------------------------------
/team/stay-out-of-the-critical-path.md:
--------------------------------------------------------------------------------
1 | # Stop Writing Code and Engineering in the Critical Path
2 |
3 | _Source: https://charity.wtf/2019/01/04/engineering-management-the-pendulum-or-the-ladder/_
4 |
5 | There is an enormous demand for technical engineering leaders — far more demand than supply. The most common hackaround is to pair a people manager (who can speak the language and knows the concepts, but stopped engineering ages ago) with a tech lead, and make them collaborate to co-lead the team. This unwieldy setup often works pretty well.
6 |
7 | But most of those people managers didn’t want or expect to end up sidelined in this way when they were told to stop engineering.
8 |
9 | If you want to be a pure people manager and not do engineering work, and don’t want to climb the ladder or can’t find a ladder to climb, more power to you. I don’t know that I’ve met many of these people in my life. I have met a lot of people in this situation by accident, and they are always kinda angsty and unhappy about it. Don’t let yourself become this person by accident. Please.
10 |
11 | Which brings me to my next point.
12 |
13 | ## You Will Be Advised to Stop Writing Code or Engineering
14 |
15 | ✨ **FUCK THAT.** ✨
16 |
17 | Everybody’s favorite hobby is hassling new managers about whether or not they’ve stopped writing code yet, and not letting up until they say that they have. This is a terrible, horrible, no-good VERY bad idea that seems like it must originally have been a botched repeating of the correct advice, which is:
18 |
19 | ## Stop Writing Code and Engineering in the Critical Path
20 |
21 | Can you spot the difference? It’s very subtle. Let’s run a quick test:
22 |
23 | * Authoring a feature? ⛔️
24 | * Covering on-call when someone needs a break? ✅
25 | * Diving on the biggest project after a post mortem? ⛔️
26 | * Code reviews? ✅
27 | * Picking up a p2 bug that’s annoying but never seems to become top priority? ✅
28 | * Insisting that all commits be gated on their approval? ⛔️
29 | * Cleaning up the monitoring checks and writing a library to generate coverage? ✅
30 |
31 | The more you can keep your hands warm, the more effective you will be as a coach and a leader. You’ll have a richer instinct for what people need and want from you and each other, which will help you keep a light touch. You will write better reviews and resolve technical disputes with more authority. You will also slow the erosion and geriatric creep of your own technical chops.
32 |
33 | I firmly believe every line manager should either be in the on call rotation or pinch hit liberally and regularly, but that’s a different post.
34 |
35 |
--------------------------------------------------------------------------------
/terraform/custom-validation-rules.md:
--------------------------------------------------------------------------------
1 | # Terraform Custom Variable Validation Rules
2 |
3 | _Sources: [[1]](https://github.com/hashicorp/terraform/issues/2847#issuecomment-573252616), [[2]](https://www.terraform.io/docs/configuration/variables.html#custom-validation-rules)_
4 |
5 | _**Note: As of today (25 May 2020) this feature is considered experimental and is subject to breaking changes even in minor releases. We welcome your feedback, but cannot recommend using this feature in production modules yet.**_
6 |
7 | In Terraform, a module author can specify arbitrary custom validation rules for a particular variable using a `validation` block nested within the corresponding `variable` block:
8 |
9 | ```hcl
10 | variable "image_id" {
11 | type = string
12 | description = "The id of the machine image (AMI) to use for the server."
13 |
14 | validation {
15 | condition = length(var.image_id) > 4 && substr(var.image_id, 0, 4) == "ami-"
16 | error_message = "The image_id value must be a valid AMI id, starting with \"ami-\"."
17 | }
18 | }
19 | ```
20 |
21 | The `condition` argument:
22 |
23 | * Must use the value of the variable,
24 | * Must return `true` if the value is valid, or `false` if it is invalid,
25 | * May refer only to the variable that the condition applies to, and
26 | * Must not produce errors.
27 |
28 | If the failure of an expression is the basis of the validation decision, use [the `can` function](https://www.terraform.io/docs/configuration/functions/can.html) to detect such errors. For example:
29 |
30 | ```hcl
31 | variable "image_id" {
32 | type = string
33 | description = "The id of the machine image (AMI) to use for the server."
34 |
35 | validation {
36 | # regex(...) fails if it cannot find a match
37 | condition = can(regex("^ami-", var.image_id))
38 | error_message = "The image_id value must be a valid AMI id, starting with \"ami-\"."
39 | }
40 | }
41 | ```
42 |
43 | If `condition` evaluates to `false`, Terraform will produce an error message that includes the sentences given in `error_message`. The error message string should be at least one full sentence explaining the constraint that failed, using a sentence structure similar to the above examples.
44 |
45 | This is an experimental language feature that currently requires an explicit opt-in using the experiment keyword `variable_validation`:
46 |
47 | ```hcl
48 | terraform {
49 | experiments = [variable_validation]
50 | }
51 | ```
52 |
--------------------------------------------------------------------------------
/terraform/plugin-basics.md:
--------------------------------------------------------------------------------
1 | # Terraform Plugin Basics
2 |
3 | _Sources: https://www.terraform.io/docs/plugins/basics.html_
4 |
5 | This page documents the basics of how the plugin system in Terraform works, and how to setup a basic development environment for plugin development if you're writing a Terraform plugin.
6 |
7 | ## How it Works
8 |
9 | Terraform providers and provisioners are provided via plugins. Each plugin exposes an implementation for a specific service, such as AWS, or provisioner, such as bash.
10 |
11 | Plugins are executed as a separate process and communicate with the main Terraform binary over an RPC interface.
12 |
13 | More details are available in [Plugin Internals](https://www.terraform.io/docs/internals/internal-plugins.html).
14 |
15 | ## Installing Plugins
16 |
17 | The provider plugins distributed by HashiCorp are automatically installed by `terraform init`. Third-party plugins (both providers and provisioners) can be manually installed into the user plugins directory, located at `%APPDATA%\terraform.d\plugins` on Windows and `~/.terraform.d/plugins` on other systems.
18 |
19 | For more information, see:
20 |
21 | * [Configuring Providers](https://www.terraform.io/docs/configuration/providers.html)
22 | * [Configuring Providers: Third-party Plugins](https://www.terraform.io/docs/configuration/providers.html#third-party-plugins)
23 |
24 | For developer-centric documentation, see:
25 |
26 | * [How Terraform Works: Plugin Discovery](https://www.terraform.io/docs/extend/how-terraform-works.html#discovery)
27 |
28 | ## Developing a Teraform Plugin
29 |
30 | Developing a plugin is simple. The only knowledge necessary to write a plugin is basic command-line skills and basic knowledge of the [Go programming language](https://golang.org/).
31 |
32 | Create a new Go project. The name of the project should either begin with `provider-` or `provisioner-`, depending on what kind of plugin it will be. The repository name will, by default, be the name of the binary produced by go install for your plugin package.
33 |
34 | With the package directory made, create a `main.go` file. This project will be a binary so the package is "main":
35 |
36 | ```go
37 | package main
38 |
39 | import (
40 | "github.com/hashicorp/terraform/plugin"
41 | )
42 |
43 | func main() {
44 | plugin.Serve(new(MyPlugin))
45 | }
46 | ```
47 |
48 | The name `MyPlugin` is a placeholder for the struct type that represents your plugin's implementation. This must implement either `terraform.ResourceProvider` or `terraform.ResourceProvisioner`, depending on the plugin type.
49 |
50 | To test your plugin, the easiest method is to copy your terraform binary to `$GOPATH/bin` and ensure that this copy is the one being used for testing. `terraform init` will search for plugins within the same directory as the `terraform` binary, and `$GOPATH/bin` is the directory into which `go install` will place the plugin executable.
51 |
52 | Next Page: [Terraform Provider Plugin Development](provider-plugin-development.md)
53 |
--------------------------------------------------------------------------------
/terraform/provider-plugin-development.md:
--------------------------------------------------------------------------------
1 | # Terraform Provider Plugin Development
2 |
3 | _Source: https://www.terraform.io/docs/plugins/provider.html_
4 |
5 | A provider in Terraform is responsible for the lifecycle of a resource: create, read, update, delete. An example of a provider is AWS, which can manage resources of type `aws_instance`, `aws_eip`, `aws_elb`, etc.
6 |
7 | The primary reasons to care about provider plugins are:
8 |
9 | * You want to add a new resource type to an existing provider.
10 |
11 | * You want to write a completely new provider for managing resource types in a system not yet supported.
12 |
13 | * You want to write a completely new provider for custom, internal systems such as a private inventory management system.
14 |
15 | If you're interested in provider development, then read on. The remainder of this page will assume you're familiar with [plugin basics](plugin-basics.md) and that you already have a basic development environment setup.
16 |
17 | ## Provider Plugin Codebases
18 |
19 | _(Note: These `$GOPATH` instructions are dated. Update them to use `go mod`)_
20 |
21 | Provider plugins live outside of the Terraform core codebase in their own source code repositories. The official set of provider plugins released by HashiCorp (developed by both HashiCorp staff and community contributors) all live in repositories in the terraform-providers organization on GitHub, but third-party plugins can be maintained in any source code repository.
22 |
23 | When developing a provider plugin, it is recommended to use a common `GOPATH` that includes both the core Terraform repository and the repositories of any providers being changed. This makes it easier to use a locally-built terraform executable and a set of locally-built provider plugins together without further configuration.
24 |
25 | For example, to download both Terraform and the `template` provider into `GOPATH`:
26 |
27 | ```
28 | $ go get github.com/hashicorp/terraform
29 | $ go get github.com/terraform-providers/terraform-provider-template
30 | ```
31 |
32 | These two packages are both "main" packages that can be built into separate executables with `go install`:
33 |
34 | ```
35 | $ go install github.com/hashicorp/terraform
36 | $ go install github.com/terraform-providers/terraform-provider-template
37 | ```
38 |
39 | After running the above commands, both Terraform core and the template provider will both be installed in the current `GOPATH` and `$GOPATH/bin` will contain both terraform and terraform-provider-template executables. This `terraform` executable will find and use the template provider plugin alongside it in the bin directory in preference to downloading and installing an official release.
40 |
41 | When constructing a new provider from scratch, it's recommended to follow a similar repository structure as for the existing providers, with the main package in the repository root and a library package in a subdirectory named after the provider. For more information, see [Writing Custom Providers](https://www.terraform.io/docs/extend/writing-custom-providers.html) in the [Extending Terraform](https://www.terraform.io/docs/extend/index.html) section.
42 |
43 | When making changes only to files within the provider repository, it is not necessary to re-build the main Terraform executable. Note that some packages from the Terraform repository are used as library dependencies by providers, such as `github.com/hashicorp/terraform/helper/schema`; it is recommended to use govendor to create a local vendor copy of the relevant packages in the provider repository, as can be seen in the repositories within the terraform-providers GitHub organization.
44 |
45 | ## Low-Level Interface
46 |
47 | The interface you must implement for providers is [ResourceProvider](https://www.terraform.io/docs/plugins/provider.html).
48 |
49 | This interface is extremely low level, however, and we don't recommend you implement it directly. Implementing the interface directly is error prone, complicated, and difficult.
50 |
51 | Instead, we've developed some higher level libraries to help you out with developing providers. These are the same libraries we use in our own core providers.
52 |
53 | ## helper/schema
54 |
55 | The `helper/schema` library is a framework we've built to make creating providers extremely easy. This is the same library we use to build most of the core providers.
56 |
57 | To give you an idea of how productive you can become with this framework: we implemented the Google Cloud provider in about 6 hours of coding work. This isn't a simple provider, and we did have knowledge of the framework beforehand, but it goes to show how expressive the framework can be.
58 |
59 | The GoDoc for `helper/schema` can be [found here](https://godoc.org/github.com/hashicorp/terraform/helper/schema). This is API-level documentation but will be extremely important for you going forward.
60 |
61 | ## Provider
62 |
63 | The first thing to do in your plugin is to create the schema.Provider structure. This structure implements the `ResourceProvider` interface. We recommend creating this structure in a function to make testing easier later. Example:
64 |
65 | ```go
66 | func Provider() *schema.Provider {
67 | return &schema.Provider{
68 | ...
69 | }
70 | }
71 | ```
72 |
73 | Within the schema.Provider, you should initialize all the fields. They are documented within the godoc, but a brief overview is here as well:
74 |
75 | * `Schema` - This is the configuration schema for the provider itself. You should define any API keys, etc. here. Schemas are covered below.
76 |
77 | * `ResourcesMap` - The map of resources that this provider supports. All keys are resource names and the values are the schema.Resource structures implementing this resource.
78 |
79 | * `ConfigureFunc` - This function callback is used to configure the provider. This function should do things such as initialize any API clients, validate API keys, etc. The interface{} return value of this function is the meta parameter that will be passed into all resource CRUD functions. In general, the returned value is a configuration structure or a client.
80 |
81 | As part of the unit tests, you should call `InternalValidate`. This is used to verify the structure of the provider and all of the resources, and reports an error if it is invalid. An example test is shown below:
82 |
83 | ```go
84 | func TestProvider(t *testing.T) {
85 | if err := Provider().(*schema.Provider).InternalValidate(); err != nil {
86 | t.Fatalf("err: %s", err)
87 | }
88 | }
89 | ```
90 |
91 | Having this unit test will catch a lot of beginner mistakes as you build your provider.
92 |
93 | ## Resources
94 |
95 | Next, you'll want to create the resources that the provider can manage. These resources are put into the ResourcesMap field of the provider structure. Again, we recommend creating functions to instantiate these. An example is shown below.
96 |
97 | ```go
98 | func resourceComputeAddress() *schema.Resource {
99 | return &schema.Resource {
100 | ...
101 | }
102 | }
103 | ```
104 |
105 | Resources are described using the [schema.Resource](https://godoc.org/github.com/hashicorp/terraform/helper/schema#Resource) structure. This structure has the following fields:
106 |
107 | * `Schema` - The configuration schema for this resource. Schemas are covered in more detail below.
108 |
109 | * `Create`, `Read`, `Update`, and `Delete` - These are the callback functions that implement CRUD operations for the resource. The only optional field is Update. If your resource doesn't support update, then you may keep that field nil.
110 |
111 | * `Importer` - If this is non-`nil`, then this resource is [importable](https://www.terraform.io/docs/import/importability.html). It is recommended to implement this.
112 |
113 | The CRUD operations in more detail, along with their contracts:
114 |
115 | * `Create` - This is called to create a new instance of the resource. Terraform guarantees that an existing ID is not set on the resource data. That is, you're working with a new resource. Therefore, you are responsible for calling `SetId` on your schema.`ResourceData` using a value suitable for your resource. This ensures whatever resource state you set on `schema.ResourceData` will be persisted in local state. If you neglect to `SetId`, no resource state will be persisted.
116 |
117 | * `Read` - This is called to resync the local state with the remote state. Terraform guarantees that an existing ID will be set. This ID should be used to look up the resource. Any remote data should be updated into the local data. **No changes to the remote resource are to be made.** If the resource is no longer present, calling SetId with an empty string will signal its removal.
118 |
119 | * `Update` - This is called to update properties of an existing resource. Terraform guarantees that an existing ID will be set. Additionally, the only changed attributes are guaranteed to be those that support update, as specified by the schema. Be careful to read about partial states below.
120 |
121 | * `Delete` - This is called to delete the resource. Terraform guarantees an existing ID will be set.
122 |
123 | * `Exists` - This is called to verify a resource still exists. It is called prior to `Read`, and lowers the burden of `Read` to be able to assume the resource exists. `false` should be returned if the resources is no longer present, which has the same effect as calling `SetId("")` from `Read` (i.e. removal of the resource data from state).
124 |
125 | ## Schemas
126 |
127 | Both providers and resources require a schema to be specified. The schema is used to define the structure of the configuration, the types, etc. It is very important to get correct.
128 |
129 | In both provider and resource, the schema is a `map[string]*schema.Schema`. The key of this map is the configuration key, and the value is a schema for the value of that key.
130 |
131 | Schemas are incredibly powerful, so this documentation page won't attempt to cover the full power of them. Instead, the API docs should be referenced which cover all available settings.
132 |
133 | We recommend viewing schemas of existing or similar providers to learn best practices. A good starting place is the [core Terraform providers](https://github.com/terraform-providers).
134 |
135 | ## Resource Data
136 |
137 | The parameter to provider configuration as well as all the CRUD operations on a resource is a [schema.ResourceData](https://godoc.org/github.com/hashicorp/terraform/helper/schema#ResourceData). This structure is used to query configurations as well as to set information about the resource such as its ID, connection information, and computed attributes.
138 |
139 | The API documentation covers `ResourceData` well, as well as the core providers in Terraform.
140 |
141 | **Partial state** deserves a special mention. Occasionally in Terraform, create or update operations are not atomic; they can fail halfway through. As an example, when creating an AWS security group, creating the group may succeed, but creating all the initial rules may fail. In this case, it is incredibly important that Terraform record the correct partial state so that a subsequent `terraform apply` fixes this resource.
142 |
143 | Most of the time, partial state is not required. When it is, it must be specifically enabled. An example is shown below:
144 |
145 | ```go
146 | func resourceUpdate(d *schema.ResourceData, meta interface{}) error {
147 | // Enable partial state mode
148 | d.Partial(true)
149 |
150 | if d.HasChange("tags") {
151 | // If an error occurs, return with an error,
152 | // we didn't finish updating
153 | if err := updateTags(d, meta); err != nil {
154 | return err
155 | }
156 |
157 | d.SetPartial("tags")
158 | }
159 |
160 | if d.HasChange("name") {
161 | if err := updateName(d, meta); err != nil {
162 | return err
163 | }
164 |
165 | d.SetPartial("name")
166 | }
167 |
168 | // We succeeded, disable partial mode
169 | d.Partial(false)
170 |
171 | return nil
172 | }
173 | ```
174 |
175 | In the example above, it is possible that setting the `tags` succeeds, but setting the name fails. In this scenario, we want to make sure that only the state of the `tags` is updated. To do this the `Partial` and `SetPartial` functions are used.
176 |
177 | `Partial` toggles partial-state mode. When disabled, all changes are merged into the state upon result of the operation. When enabled, only changes enabled with `SetPartial` are merged in.
178 |
179 | `SetPartial` tells Terraform what state changes to adopt upon completion of an operation. You should call `SetPartial` with every key that is safe to merge into the state. The parameter to `SetPartial` is a prefix, so if you have a nested structure and want to accept the whole thing, you can just specify the prefix.
180 |
--------------------------------------------------------------------------------
/terraform/rest-provider.md:
--------------------------------------------------------------------------------
1 | # Terraform provider for generic REST APIs
2 |
3 | _Source: [Github](https://github.com/Mastercard/terraform-provider-restapi)_
4 |
5 | The Terraform provider for generic REST APIs allows you to interact with APIs that may not yet have a first-class provider available.
6 |
7 | There are a few requirements about how the API must work for this provider to be able to do its thing:
8 |
9 | * The API is expected to support the following HTTP methods:
10 | * POST: create an object
11 | * GET: read an object
12 | * PUT: update an object
13 | * DELETE: remove an object
14 |
15 | * An "object" in the API has a unique identifier the API will return
16 |
17 | * Objects live under a distinct path such that for the path `/api/v1/things`...
18 | * POST on `/api/v1/things` creates a new object
19 | * GET, PUT and DELETE on `/api/v1/things/{id}` manages an existing object
20 |
21 | Full documentation is available at https://github.com/Mastercard/terraform-provider-restapi.
22 |
23 | ## Examples
24 |
25 | In this example, we are using the `fakeserver` available with this provider to create and manage imaginary users in [an imaginary API server defined here](https://github.com/Mastercard/terraform-provider-restapi/tree/master/fakeserver).
26 |
27 | ### Start and initialize the dummy `fakeserver`
28 |
29 | To use this example fully, start up `fakeserver` and add some dummy data.
30 |
31 | ```bash
32 | $ curl 127.0.0.1:8080/api/objects -X POST -d '{ "id": "8877", "first": "John", "last": "Doe" }'
33 | $ curl 127.0.0.1:8080/api/objects -X POST -d '{ "id": "4433", "first": "Dave", "last": "Roe" }'
34 | ```
35 |
36 | After running `terraform apply`, you will now see three objects in the API server:
37 |
38 | ```bash
39 | $ curl 127.0.0.1:8080/api/objects | jq
40 | ```
41 |
42 | ### Configure the provider
43 |
44 | ```hcl
45 | provider "restapi" {
46 | uri = "http://127.0.0.1:8080/"
47 | debug = true
48 | write_returns_object = true
49 | }
50 | ```
51 |
52 | ### `GET` an object via a data source
53 |
54 | This will make information about the user named "John Doe" available by finding him by first name.
55 |
56 | ```hcl
57 | data "restapi_object" "John" {
58 | path = "/api/objects"
59 | search_key = "first"
60 | search_value = "John"
61 | }
62 | ```
63 |
64 | ### Add an object via `terraform import`
65 |
66 | You can import the existing Dave Roe resource from a file by executing:
67 |
68 | ```bash
69 | $ terraform import restapi_object.Dave /api/objects/4433
70 | ```
71 |
72 | ### Manage it here, too!
73 |
74 | The `import` will pull in Dave Roe, but the subsequent `terraform apply` will change the record to "Dave Boe"
75 |
76 | ```hcl
77 | resource "restapi_object" "Dave" {
78 | path = "/api/objects"
79 | data = "{ \"id\": \"4433\", \"first\": \"Dave\", \"last\": \"Boe\" }"
80 | }
81 | ```
82 |
83 | ### Add a resource
84 |
85 | This will ADD the user named "Foo" as a managed resource
86 |
87 | ```hcl
88 | resource "restapi_object" "Foo" {
89 | path = "/api/objects"
90 | data = "{ \"id\": \"1234\", \"first\": \"Foo\", \"last\": \"Bar\" }"
91 | }
92 | ```
93 |
94 | ### Variable interpolation
95 |
96 | Congrats to Jane and John! They got married. Give them the same last name by using variable interpolation
97 |
98 | ```hcl
99 | resource "restapi_object" "Jane" {
100 | path = "/api/objects"
101 | data = "{ \"id\": \"7788\", \"first\": \"Jane\", \"last\": \"${data.restapi_object.John.api_data.last}\" }"
102 | }
103 | ```
104 |
--------------------------------------------------------------------------------
/terraform/time-provider.md:
--------------------------------------------------------------------------------
1 | # Terraform Time Provider
2 |
3 | _Source: [The Terraform Docs](https://www.terraform.io/docs/providers/time/index.html)_
4 |
5 | The time provider is used to interact with time-based resources. The provider itself has no configuration options.
6 |
7 | ## Resource "Triggers"
8 |
9 | Certain time resources, only perform actions during specific lifecycle actions:
10 |
11 | * `time_offset`: Saves base timestamp into Terraform state only when created.
12 | * `time_sleep`: Sleeps when created and/or destroyed.
13 | * `time_static`: Saves base timestamp into Terraform state only when created.
14 |
15 | These resources provide an optional map argument called `triggers` that can be populated with arbitrary key/value pairs. When the keys or values of this argument are updated, Terraform will re-perform the desired action, such as updating the base timestamp or sleeping again.
16 |
17 | For example:
18 |
19 | ```hcl
20 | resource "time_static" "ami_update" {
21 | triggers = {
22 | # Save the time each switch of an AMI id
23 | ami_id = data.aws_ami.example.id
24 | }
25 | }
26 |
27 | resource "aws_instance" "server" {
28 | # Read the AMI id "through" the time_static resource to ensure that
29 | # both will change together.
30 | ami = time_static.ami_update.triggers.ami_id
31 |
32 | tags = {
33 | AmiUpdateTime = time_static.ami_update.rfc3339
34 | }
35 |
36 | # ... (other aws_instance arguments) ...
37 | }
38 | ```
39 |
40 | `triggers` are _not_ treated as sensitive attributes; a value used for `triggers` will be displayed in Terraform UI output as plaintext.
41 |
42 | To force a these actions to reoccur without updating `triggers`, the `terraform taint` command can be used to produce the action on the next run.
43 |
--------------------------------------------------------------------------------
/things-to-add.md:
--------------------------------------------------------------------------------
1 | # Stuff I Want To Add (So I Don't Forget)
2 |
3 | * [Some of these Linux productivity tools](https://www.usenix.org/sites/default/files/conference/protected-files/lisa19_maheshwari.pdf) (20 May 2020)
4 |
5 | * [Mocking time and testing event loops in Go](https://dmitryfrank.com/articles/mocking_time_in_go) (24 May 2020)
6 |
7 | * [Useless Use of Cat Award](http://porkmail.org/era/unix/award.html) (25 May 2020)
8 | * `cat`
9 | * `echo`
10 | * `kill -9`
11 | * `grep | awk and grep | sed`
12 | * Backticks
13 |
14 | * Thoughts on Scrum [[1]](https://softwareengineering.stackexchange.com/questions/410482/how-do-i-prevent-scrum-from-turning-great-developers-into-average-developers)[[2]](https://iism.org/article/agile-scrum-is-not-working-51) (26 May 2020)
15 |
16 | * [Datadog Datagram Format and Shell Usage](https://docs.datadoghq.com/developers/dogstatsd/datagram_shell/?tab=metrics#send-metrics-and-events-using-dogstatsd-and-the-shell) (28 May 2020)
17 |
18 | * [Understanding gRPC, OpenAPI and REST and when to use them](https://cloud.google.com/blog/products/api-management/understanding-grpc-openapi-and-rest-and-when-to-use-them) (29 May 2020)
19 |
20 | * [Stop Taking Regular Notes; Use a Zettelkasten Instead](https://eugeneyan.com/2020/04/05/note-taking-zettelkasten/) (2 June 2020)
21 |
22 | * [Qualified immunity is bullshit](https://theappeal.org/qualified-immunity-explained/) (5 June 2020)
23 |
24 | * [Repairing and recovering broken git repositories](https://git.seveas.net/repairing-and-recovering-broken-git-repositories.html) (6 June 2020)
25 |
26 | * https://tpaschalis.github.io/goroutines-size/ (8 June 2020)
27 |
28 | * [Instrumentation in Go](https://gbws.io/articles/instrumentation-in-go/) (9 June 2020)
29 |
30 | * https://medium.com/@teivah/go-and-cpu-caches-af5d32cc5592 (10 June 2020)
31 |
32 | * https://acesounderglass.com/2020/06/10/what-to-write-down-when-youre-reading-to-learn/ (12 June 2020)
33 |
34 | * https://josebrowne.com/on-coding-ego-and-attention/ (17 June 2020)
35 |
36 | * [Modern Python Dictionaries](hgttps://www.youtube.com/watch?v=npw4s1QTmPg) (17 June 2020)
37 |
38 | * https://www.reddit.com/r/golang/comments/h8yqql/just_found_that_golang_has_a_gopher_design_guide/ (19 June 2020)
39 |
40 | * https://www.ted.com/talks/lucy_hone_3_secrets_of_resilient_people?rss=172BB350-0205 (19 June 2020)
41 |
42 | * [Programming Pearls](http://www.bowdoin.edu/~ltoma/teaching/cs340/spring05/coursestuff/Bentley_BumperSticker.pdf) (22 June 2020)
43 |
44 | * https://aws.amazon.com/kendra/ (25 June 2020)
45 |
46 | * Cache-oblivious algorithms [[1]](https://en.m.wikipedia.org/wiki/Cache-oblivious_algorithm)[[2]](https://jiahai-feng.github.io/posts/cache-oblivious-algorithms/) (28 June 2020)
47 |
48 | * JSON Resume [[1]](https://jsonresume.org)[[2]](https://github.com/jsonresume) (28 June 2020)
49 |
50 | * Open Telemetry [[1]](https://opentelemetry.io/)[[2]](https://github.com/open-telemetry/opentelemetry-go/blob/master/README.md)[[3]](https://docs.google.com/presentation/d/1nVhLIyqn_SiDo78jFHxnMdxYlnT0b7tYOHz3Pu4gzVQ/edit?usp=sharing) (29 June 2020)
51 |
52 | * https://github.com/google/pprof (29 June 2020)
53 |
54 | * https://golangcode.com/how-to-run-go-tests-with-coverage-percentage/ (6 July 2020)
55 |
56 | * https://www.hashicorp.com/blog/custom-variable-validation-in-terraform-0-13/ (7 July 2020)
57 |
58 | * https://gohugo.io/templates/internal/#google-analytics (7 July 2020)
59 |
60 | * https://arslan.io/2020/07/07/using-go-analysis-to-fix-your-source-code/ (7 July 2020)
61 |
62 | * https://github.com/gruntwork-io/terratest/pull/569 (8 July 2020)
63 |
64 | * [Optional values in Terraform objects](https://www.terraform.io/docs/configuration/attr-as-blocks.html#arbitrary-expressions-with-argument-syntax) (8 July 2020)
65 |
66 | * How did I not know about `open .` on a Mac before? (Alvaro pointed it out to me) (10 July 2020)
67 |
68 | * `pushd` and `popd` (13 July 2020)
69 |
70 | * https://wulymammoth.github.io/posts/shell-shock/ (16 July 2020)
71 |
72 | * https://medium.com/learning-the-go-programming-language/writing-modular-go-programs-with-plugins-ec46381ee1a9 (21 July 2020)
73 |
74 | * https://golang.org/pkg/net/#FileListener (22 July 2020)
75 |
76 | * https://www.aboutmonica.com/blog/how-to-create-a-github-profile-readme (26 July 2020)
77 |
78 | * https://linux.die.net/man/1/mktemp (31 July 2020)
79 |
80 | * https://blog.quigley.codes/useful-cli-tools/ (21 September 2020)
81 |
82 | * https://aws.amazon.com/solutions/implementations/aws-perspective/ (22 September 2020)
83 |
84 | * https://github.com/mingrammer/diagrams (diagrams in Python) (22 September 2020)
85 |
86 | * https://github.com/blushft/go-diagrams (diagrams in Go) (27 September 2020)
87 |
88 | * https://medium.com/golangspec/tags-in-golang-3e5db0b8ef3e (4 October 2020)
89 |
90 | * https://explainshell.com/ (8 October 2020)
91 |
92 | * https://learning.oreilly.com/answers/search/ (8 October 2020)
93 |
94 | * https://backstage.io/ (8 October 2020)
95 |
96 | * https://www.home-assistant.io/ as a replacement for IFTTT (8 October 2020)
97 |
98 | * https://github.com/ulid/spec as UUIDs with timestamps? (8 October 2020)
99 |
100 | * https://wa.aws.amazon.com/index.en.html AWS Well-Architected Framework exists (8 October 2020)
101 |
102 | * https://twitter.com/mjos_crypto/status/1057196529847558147?lang=en Meetings at Antarctica's Troll Base are held in "Troll Time" (22 October 2020)
103 |
104 | * MacOS has been using an antique version of Bash from 2007, because that's the last version shipped under GPL2. Later versions use GPL3, which Apple won't ship with. Since MacOS Catalina (released on October 7, 2019) the default shell has been Zsh, which uses the MIT license. (3 November 2020)
105 |
106 | * https://tldp.org/LDP/abs/html/process-sub.html (3 November 2020) -- Add this to the list of things I should have known before but never bothered picking up.
107 |
108 | * https://www.merriam-webster.com/dictionary/acronym -- Acronyms must be pronounceable. Who knew? (14 January 2021)
109 |
110 | * https://warisboring.com/the-british-perfected-the-art-of-brewing-tea-inside-an-armored-vehicle/ (25 Feb 2021)
111 |
112 | * `pre-commit` has an `autoupdate` subcommand! (9 March 2021)
113 |
114 | * The `dd` command [[1]](https://linuxconfig.org/how-dd-command-works-in-linux-with-examples)[[2]](https://youtu.be/UeAKTjx_eKA) (21 March 2021)
115 |
116 | * Syncing a git fork with its upstream repo [[1]](https://docs.github.com/en/github/collaborating-with-pull-requests/working-with-forks/syncing-a-fork)[[2]](https://raw.githubusercontent.com/github/docs/main/content/github/collaborating-with-pull-requests/working-with-forks/syncing-a-fork.md)[[3]](https://gist.github.com/clockworksoul/1029ce118194d8662d4e8b7d21652f00) (27 July 2021)
117 |
118 | * Creating a Git plugin is fun and easy! [[1]](https://gist.github.com/clockworksoul/1029ce118194d8662d4e8b7d21652f00) (3 August 2021)
119 |
120 | * Slack formatting with blocks [[1]](https://api.slack.com/block-kit) (1 Nov 2021)
121 | * Maybe something about setting colors and titles and how tempermental the results can be?
122 |
123 | * Image processing in Go [[1]](https://golangdocs.com/golang-image-processing) (12 Nov 2021)
124 |
125 | * [Sumer](https://en.wikipedia.org/wiki/Sumer), [Assyria](https://en.wikipedia.org/wiki/Assyria), and other ancient cultures ([Maykop Culture](https://en.wikipedia.org/wiki/Maykop_culture), [Cucuteni-Trypillia Culture](https://en.wikipedia.org/wiki/Cucuteni%E2%80%93Trypillia_culture), etc) (15 Nov 2021) - Maybe put together a timeline?
126 |
127 | * RabbitMQ [quorum queues](https://www.rabbitmq.com/quorum-queues.html) (what are the pros/cons/failure modes?) (23 Nov 2021)
128 |
129 | * The bash `<<<` operator [is a thing](https://www.gnu.org/software/bash/manual/html_node/Redirections.html) (10 Jan 2022)
130 |
131 | * Mermaid [is a thing](https://mermaid-js.github.io/ ) (9 Feb 2022)
132 |
133 | * `nping` (part of nmap suite) [is a thing](https://nmap.org/nping/) (23 Feb 2022)
134 |
135 | * Prometheus supports [envvar expansion in external labels](https://prometheus.io/docs/prometheus/latest/feature_flags/#expand-environment-variables-in-external-labels) [1](https://www.lisenet.com/2021/use-external-labels-with-prometheus-alerts/) (30 Jan 2023)
136 |
--------------------------------------------------------------------------------
/tls+ssl/dissecting-an-ssl-cert.md:
--------------------------------------------------------------------------------
1 | # Dissecting a TLS/SSL Certificate
2 |
3 | _Sources: [[1]](https://jvns.ca/blog/2017/01/31/whats-tls/), [[2]](https://en.wikipedia.org/wiki/Transport_Layer_Security), [[3]](https://en.wikipedia.org/wiki/X.509)_
4 |
5 | Yes, I already knew most of this, but [this article](https://jvns.ca/blog/2017/01/31/whats-tls/) inspired me to collect it all in one place for posterity. Plus, I always have to look up those `openssl` commands.
6 |
7 | ## What are SSL and TLS?
8 |
9 | Transport Layer Security (TLS), and its now-deprecated predecessor, Secure Sockets Layer (SSL), are cryptographic protocols designed to provide communications security over a computer network.
10 |
11 | There are several versions of these protocols, but in a nutshell newer versions of SSL are called TLS (the version after SSL 3.0 is TLS 1.0).
12 |
13 | | Protocol | Published | Status |
14 | | -------- |-------------|-------------------------------|
15 | | SSL 1.0 | Unpublished | Unpublished |
16 | | SSL 2.0 | 1995 | Deprecated in 2011 (RFC 6176) |
17 | | SSL 3.0 | 1996 | Deprecated in 2015 (RFC 7568) |
18 | | TLS 1.0 | 1999 | Deprecated in 2020 |
19 | | TLS 1.1 | 2006 | Deprecated in 2020 |
20 | | TLS 1.2 | 2008 | |
21 | | TLS 1.3 | 2018 | |
22 |
23 | ## What's a Certificate?
24 |
25 | Suppose I'm checking my email at `https://mail.google.com`
26 |
27 | `mail.google.com` is running a HTTPS server on port 443. I want to make sure that I'm **actually** talking to `mail.google.com` and not some other random server on the internet owned by EVIL PEOPLE.
28 |
29 | So, let's start by using `openssl` to look at `mail.google.com`'s certificate: `openssl s_client -connect mail.google.com:443`
30 |
31 | This is going to print a bunch of stuff, but we'll just focus on the certificate:
32 |
33 | ```bash
34 | $ openssl s_client -connect mail.google.com:443
35 |
36 | ...
37 |
38 | -----BEGIN CERTIFICATE-----
39 | MIIFoTCCBImgAwIBAgIRAPv4g2bpCUCICAAAAAA9N2AwDQYJKoZIhvcNAQELBQAw
40 | QjELMAkGA1UEBhMCVVMxHjAcBgNVBAoTFUdvb2dsZSBUcnVzdCBTZXJ2aWNlczET
41 | MBEGA1UEAxMKR1RTIENBIDFPMTAeFw0yMDA0MjgwNzM4MzhaFw0yMDA3MjEwNzM4
42 | MzhaMGkxCzAJBgNVBAYTAlVTMRMwEQYDVQQIEwpDYWxpZm9ybmlhMRYwFAYDVQQH
43 | Ew1Nb3VudGFpbiBWaWV3MRMwEQYDVQQKEwpHb29nbGUgTExDMRgwFgYDVQQDEw9t
44 | YWlsLmdvb2dsZS5jb20wggEiMA0GCSqGSIb3DQEBAQUAA4IBDwAwggEKAoIBAQC/
45 | Vh6R70i2kH+4L4PMJoeq2U+RTs/KVDeb9VEoIOnJsvjgrkMNjd7+Eedi5kJCA2YQ
46 | orwXneg/CcBZ6QyO162spibTg3GJ2cp5DurHmjzSE7g+Wh5zBeQ3QkoKfGhoBH7/
47 | 45zCDh9MbsbvD4n7VLGtY1UtOSZ4PUtwWNZqUP088PcnAqsauUqSJEM/IbPDGnQC
48 | shTj6f+SGy5VJP/EIo7VjtEAkExLSkUxjHA4v5qBrdqaZBCtu929JDzyi99CJX/h
49 | tZNYqwNTNnT4Ck6Aeb9C6O0zCdYwWFYy8mQFMR9dWJhfqmS3uH/1nydOdJ0TomLU
50 | 9qIlEvno9ezYpQNpQ3V1AgMBAAGjggJpMIICZTAOBgNVHQ8BAf8EBAMCBaAwEwYD
51 | VR0lBAwwCgYIKwYBBQUHAwEwDAYDVR0TAQH/BAIwADAdBgNVHQ4EFgQUs5UKtiHr
52 | TgXXPIBncjedM/YTbuwwHwYDVR0jBBgwFoAUmNH4bhDrz5vsYJ8YkBug630J/Ssw
53 | ZAYIKwYBBQUHAQEEWDBWMCcGCCsGAQUFBzABhhtodHRwOi8vb2NzcC5wa2kuZ29v
54 | Zy9ndHMxbzEwKwYIKwYBBQUHMAKGH2h0dHA6Ly9wa2kuZ29vZy9nc3IyL0dUUzFP
55 | MS5jcnQwLAYDVR0RBCUwI4IPbWFpbC5nb29nbGUuY29tghBpbmJveC5nb29nbGUu
56 | Y29tMCEGA1UdIAQaMBgwCAYGZ4EMAQICMAwGCisGAQQB1nkCBQMwLwYDVR0fBCgw
57 | JjAkoCKgIIYeaHR0cDovL2NybC5wa2kuZ29vZy9HVFMxTzEuY3JsMIIBBgYKKwYB
58 | BAHWeQIEAgSB9wSB9ADyAHcAsh4FzIuizYogTodm+Su5iiUgZ2va+nDnsklTLe+L
59 | kF4AAAFxv/AlWQAABAMASDBGAiEApsxkN5iBlmXYyD2y880uDUXwP1lophOidTdY
60 | 379yOh4CIQDPKU+xij8S5iZeJXHQF3cKaPyGOTncaufuutOWhzUC5gB3AF6nc/nf
61 | VsDntTZIfdBJ4DJ6kZoMhKESEoQYdZaBcUVYAAABcb/wJXgAAAQDAEgwRgIhALF7
62 | sFGN3YIkG2J7t2Vj7zjr7O2CDEXe57LPADdzf3lvAiEAkuYej2F4MO7PyoWzOas0
63 | zyaXOy+ae8dmFP2fbVm2yG0wDQYJKoZIhvcNAQELBQADggEBAJP3SOUtKRqCa2da
64 | 51FRgTm9voyohA7g67QjumDEXrgZJSY+fn7tHG7ggo3xfVMpcFdOGe8ZzIFOs1C1
65 | b+F2gEaDLKTYOUZgX4UtQZG8REWLXbqaj6E+Jck1+18Oz+m4gdy7h8Qb/YQ6ET2a
66 | BdHBYeV9SsMhhys5i6mwwVfLdbeHeitTNo88riHfV6bYO1AbJ1xFpNi9PJWSXkhV
67 | V30oox8QVfec6isUGrbiph0MbwN5eSasyRr4HcoWM6nntzabVk3m1leFb7UVMlwv
68 | 0whXtscmqsMHTtv/rjBr7Nxk4aTho1OFYE7+P4N+uI99OngaO0XgOFLRO7VooHGg
69 | DAmf19A=
70 | -----END CERTIFICATE-----
71 |
72 | ...
73 | ```
74 |
75 | We're looking at [X.509](https://en.wikipedia.org/wiki/X.509), a standard format for describing public key certificates.
76 |
77 | Our next mission is to parse this certificate. We do that by piping the data to `openssl x509`:
78 |
79 | ```bash
80 | $ openssl s_client -connect mail.google.com:443 | openssl x509 -in /dev/stdin -text -noout
81 |
82 | depth=2 OU = GlobalSign Root CA - R2, O = GlobalSign, CN = GlobalSign
83 | verify return:1
84 | depth=1 C = US, O = Google Trust Services, CN = GTS CA 1O1
85 | verify return:1
86 | depth=0 C = US, ST = California, L = Mountain View, O = Google LLC, CN = mail.google.com
87 | verify return:1
88 | Certificate:
89 | Data:
90 | Version: 3 (0x2)
91 | Serial Number:
92 | fb:f8:83:66:e9:09:40:88:08:00:00:00:00:3d:37:60
93 | Signature Algorithm: sha256WithRSAEncryption
94 | Issuer: C=US, O=Google Trust Services, CN=GTS CA 1O1
95 | Validity
96 | Not Before: Apr 28 07:38:38 2020 GMT
97 | Not After : Jul 21 07:38:38 2020 GMT
98 | Subject: C=US, ST=California, L=Mountain View, O=Google LLC, CN=mail.google.com
99 | Subject Public Key Info:
100 | Public Key Algorithm: rsaEncryption
101 | Public-Key: (2048 bit)
102 | Modulus:
103 | 00:bf:56:1e:91:ef:48:b6:90:7f:b8:2f:83:cc:26:
104 | 87:aa:d9:4f:91:4e:cf:ca:54:37:9b:f5:51:28:20:
105 | ... ...
106 | 62:d4:f6:a2:25:12:f9:e8:f5:ec:d8:a5:03:69:43:
107 | 75:75
108 | Exponent: 65537 (0x10001)
109 | X509v3 extensions:
110 | ... ...
111 |
112 | X509v3 Subject Alternative Name:
113 | DNS:mail.google.com, DNS:inbox.google.com
114 | Signature Algorithm: sha256WithRSAEncryption
115 | 93:f7:48:e5:2d:29:1a:82:6b:67:5a:e7:51:51:81:39:bd:be:
116 | 8c:a8:84:0e:e0:eb:b4:23:ba:60:c4:5e:b8:19:25:26:3e:7e:
117 | ... ...
118 | 8f:7d:3a:78:1a:3b:45:e0:38:52:d1:3b:b5:68:a0:71:a0:0c:
119 | 09:9f:d7:d0
120 | ```
121 |
122 | Some of the most useful bits (to us) are:
123 |
124 | * The `Subject` section contains the "common name": `CN=mail.google.com`. Counterintuitively you should ignore this field and look at the "subject alternative name" field instead.
125 | * The `Validity` section includes a valid date range with an expiration date. This example expires Jul 21 07:38:38 2020 GMT.
126 | * The `X509v3 Subject Alternative Name` section has the list of domains that this certificate works for. This is `mail.google.com` and `inbox.google.com`.
127 | * The `Subject Public Key Info` section tells us the **public key** that we're going to use to communicate with `mail.google.com`. [Public key cryptography](https://en.wikipedia.org/wiki/Public-key_cryptography) is fascinating, but it's outside the scope of this summary.
128 | * The signature, which can be used to verify the authenticity of the certificate. Without this, anybody could simply issue a certificate for any domain they wanted!
129 |
130 | ## Certificate Signing
131 |
132 | Every certificate on the internet is basically two parts put together:
133 |
134 | 1. The certificate proper, containing the public key, the domain(s) and dates it's valid for, and so on.
135 | 2. A signature by some trusted authority. Essentially a cryptographic stamp of authenticity.
136 |
137 | Most OS distributions include a number of certificates -- public [CA certificates](https://en.wikipedia.org/wiki/Certificate_authority) -- that computer trusts to sign other certificates. In Linux these can be found in `/etc/ssl/certs`. On Mac these are installed in the OS X Keychain and harder to find. Aside: to install these in a Linux Docker container, you'll need to do `apt-get install ca-certificates`.
138 |
139 | On my computer I have 267 of these certificates:
140 |
141 | ```bash
142 | $ ls -1 /etc/ssl/certs/ | wc -l
143 | 267
144 | ```
145 |
146 | If any one of them signed a `mail.google.com` certificate, my computer would accept it as authentic. However, if some random person -- who's public key won't be among the 267 trusted entities on my computer -- signed a certificate, my computer would reject the certificate.
147 |
148 | The `mail.google.com` certificate is:
149 |
150 | * `C = US, ST = California, L = Mountain View, O = Google LLC, CN = mail.google.com`
151 | * Which is signed by a "Google Trust Services" certificate
152 | * Which is signed by a "GlobalSign Root CA - R2" certificate
153 |
154 | I have an `GlobalSign_Root_CA_-_R2.pem` file on my computer, which is probably why my computer trusts this certificate.
155 |
156 | ## What Does Getting a Certificate Issued Look Like?
157 |
158 | So when you get a certificate issued, basically how it works is:
159 |
160 | 1. You generate a [public/private key pair](https://en.wikipedia.org/wiki/Public-key_cryptography) for your certificate:
161 |
162 | 1. The public key will contain your domain, expiration, and other public information.
163 | 2. The private key for your certificate is exactly that. Keep it safe. You'll use this key every time you establish an SSL connection.
164 |
165 | 2. You pay a certificate authority (CA) that other computers trust to sign your certificate for you. Certificate authorities are supposed to have integrity, so they are supposed to actually make sure that when they sign certificates, the person they give the certificate to actually owns the domain.
166 |
167 | 3. You install your signed certificate and use it to prove that you are really you.
168 |
--------------------------------------------------------------------------------
/tls+ssl/use-vault-as-a-ca.md:
--------------------------------------------------------------------------------
1 | # Use Hashicorp Vault to Build Your Own Certificate Authority (CA)
2 |
3 | _Source: https://learn.hashicorp.com/vault/secrets-management/sm-pki-engine_
4 |
5 | Vault's PKI secrets engine can dynamically generate X.509 certificates on demand. This allows services to acquire certificates without going through the usual manual process of generating a private key and Certificate Signing Request (CSR), submitting to a CA, and then waiting for the verification and signing process to complete.
6 |
7 | ### Challenge
8 |
9 | Organizations should protect their website; however, the Traditional PKI process workflow takes a long time which motivates organizations to create certificates which do not expire for a year or more.
10 |
11 | ### Solution
12 |
13 | Use Vault to create X509 certificates for usage in MTLS or other arbitrary PKI encryption. While this can be used to create web server certificates. If users do not import the CA chains, the browser will complain about self-signed certificates.
14 |
15 | Creating PKI certificates is generally a cumbersome process using traditional tools like openssl or even more advanced frameworks like CFSSL. These tools also require a human component to verify certificate distribution meets organizational security policies.
16 |
17 | Vault PKI secrets engine makes this a lot simpler. The PKI secrets engine can be an Intermediate-Only certificate authority which potentially allows for higher levels of security.
18 |
19 | 1. Store CA outside the Vault (air gapped)
20 | 2. Create CSRs for the intermediates
21 | 3. Sign CSR outside Vault and import intermediate
22 | 4. Issue leaf certificates from the Intermediate CA
23 |
24 | ## Prerequisites
25 |
26 | To perform the tasks described in this guide, you need to have a Vault environment. Refer to the [Getting Started](https://learn.hashicorp.com/vault/getting-started/install) guide to install Vault.
27 |
28 | Or you can use the [Vault Playground](https://www.katacoda.com/hashicorp/scenarios/vault-playground) environment.
29 |
30 | ### Policy requirements
31 |
32 | NOTE: For the purpose of this guide, you can use `root` token to work with Vault. However, it is recommended that root tokens are only used for just enough initial setup or in emergencies. As a best practice, use tokens with appropriate set of policies based on your role in the organization.
33 |
34 | To perform all tasks demonstrated in this guide, your policy must include the following permissions:
35 |
36 | ```
37 | # Enable secrets engine
38 | path "sys/mounts/*" {
39 | capabilities = [ "create", "read", "update", "delete", "list" ]
40 | }
41 |
42 | # List enabled secrets engine
43 | path "sys/mounts" {
44 | capabilities = [ "read", "list" ]
45 | }
46 |
47 | # Work with pki secrets engine
48 | path "pki*" {
49 | capabilities = [ "create", "read", "update", "delete", "list", "sudo" ]
50 | }
51 | ```
52 |
53 | If you are not familiar with policies, complete the policies guide.
54 |
55 | ## Scenario Introduction
56 |
57 | In this guide, you are going to first generate a self-signed root certificate. Then you are going to generate an intermediate certificate which is signed by the root. Finally, you are going to generate a certificate for the `test.example.com` domain.
58 |
59 | Each step will be illustrated in using the CLI commands. See the original source for API calls with cURL or the Web UI.
60 |
61 | 
62 |
63 | In this guide, you will perform the following:
64 |
65 | 1. Generate Root CA
66 | 2. Generate Intermediate CA
67 | 3. Create a Role
68 | 4. Request Certificates
69 | 5. Revoke Certificates
70 | 6. Remove Expired Certificates
71 |
72 | ## Step 1: Generate Root CA
73 |
74 | In this step, you are going to generate a self-signed root certificate using PKI secrets engine.
75 |
76 | 1. First, enable the `pki` secrets engine at the `pki` path.
77 |
78 | ```bash
79 | $ vault secrets enable pki
80 | ```
81 |
82 | 2. Tune the `pki` secrets engine to issue certificates with a maximum time-to-live (TTL) of 87600 hours.
83 |
84 | ```bash
85 | $ vault secrets tune -max-lease-ttl=87600h pki
86 | ```
87 |
88 | 3. Generate the _root_ certificate and save the certificate in CA_cert.crt.
89 |
90 | ```bash
91 | $ vault write -field=certificate pki/root/generate/internal \
92 | common_name="example.com" \
93 | ttl=87600h > CA_cert.crt
94 | ```
95 |
96 | This generates a new self-signed CA certificate and private key. Vault will _automatically_ revoke the generated root at the end of its lease period (TTL); the CA certificate will sign its own Certificate Revocation List (CRL).
97 |
98 | 4. Configure the CA and CRL URLs.
99 |
100 | ```bash
101 | $ vault write pki/config/urls \
102 | issuing_certificates="http://127.0.0.1:8200/v1/pki/ca" \
103 | crl_distribution_points="http://127.0.0.1:8200/v1/pki/crl"
104 | ```
105 |
106 | ## Step 2: Generate Intermediate CA
107 |
108 | Now, you are going to create an intermediate CA using the root CA you regenerated in the previous step.
109 |
110 | 1. First, enable the pki secrets engine at the pki_int path.
111 |
112 | ```bash
113 | $ vault secrets enable -path=pki_int pki
114 | ```
115 |
116 | 2. Tune the `pki_int` secrets engine to issue certificates with a maximum time-to-live (TTL) of 43800 hours.
117 |
118 | ```bash
119 | $ vault secrets tune -max-lease-ttl=43800h pki_int
120 | ```
121 |
122 | 3. Execute the following command to generate an intermediate and save the CSR as `pki_intermediate.csr`.
123 |
124 | ```bash
125 | $ vault write -format=json pki_int/intermediate/generate/internal \
126 | common_name="example.com Intermediate Authority" \
127 | | jq -r '.data.csr' > pki_intermediate.csr
128 | ```
129 |
130 | 4. Sign the intermediate certificate with the root certificate and save the generated certificate as `intermediate.cert.pem`.
131 |
132 | ```bash
133 | $ vault write -format=json pki/root/sign-intermediate csr=@pki_intermediate.csr \
134 | format=pem_bundle ttl="43800h" \
135 | | jq -r '.data.certificate' > intermediate.cert.pem
136 | ```
137 |
138 | 5. Once the CSR is signed and the root CA returns a certificate, it can be imported back into Vault.
139 |
140 | ```bash
141 | $ vault write pki_int/intermediate/set-signed certificate=@intermediate.cert.pem
142 | ```
143 |
144 | ## Step 3: Create a Role
145 |
146 | A role is a logical name that maps to a policy used to generate those credentials. It allows [configuration parameters](https://www.vaultproject.io/api-docs/secret/pki#create-update-role) to control certificate common names, alternate names, the key uses that they are valid for, and more.
147 |
148 | Here are a few noteworthy parameters:
149 |
150 | | Param | Description |
151 | | -------------------- |---------------|
152 | | `allowed_domains` | Specifies the domains of the role (used with allow_bare_domains and allow-subdomains options) |
153 | | `allow_bare_domains` | Specifies if clients can request certificates matching the value of the actual domains themselves |
154 | | `allow_subdomains` | Specifies if clients can request certificates with CNs that are subdomains of the CNs allowed by the other role options (NOTE: This includes wildcard subdomains.) |
155 | | `allow_glob_domains` | Allows names specified in allowed_domains to contain glob patterns (e.g. ftp*.example.com) |
156 |
157 | In this step, you are going to create a role named `example-dot-com`.
158 |
159 | Create a role named `example-dot-com` which allows subdomains.
160 |
161 | ```bash
162 | $ vault write pki_int/roles/example-dot-com \
163 | allowed_domains="example.com" \
164 | allow_subdomains=true \
165 | max_ttl="720h"
166 | ```
167 |
168 | ## Step 4: Request Certificates
169 |
170 | Keep certificate lifetimes short to align with Vault's philosophy of short-lived secrets.
171 |
172 | Execute the following command to request a new certificate for the `test.example.com` domain based on the `example-dot-com` role.
173 |
174 | ```bash
175 | $ vault write pki_int/issue/example-dot-com common_name="test.example.com" ttl="24h"
176 |
177 | Key Value
178 | --- -----
179 | certificate -----BEGIN CERTIFICATE-----
180 | MIIDwzCCAqugAwIBAgIUTQABMCAsXjG6ExFTX8201xKVH4IwDQYJKoZIhvcNAQEL
181 | BQAwGjEYMBYGA1UEAxMPd3d3LmV4YW1wbGUuY29tMB4XDTE4MDcyNDIxMTMxOVoX
182 | ...
183 |
184 | -----END CERTIFICATE-----
185 | issuing_ca -----BEGIN CERTIFICATE-----
186 | MIIDQTCCAimgAwIBAgIUbMYp39mdj7dKX033ZjK18rx05x8wDQYJKoZIhvcNAQEL
187 | ...
188 |
189 | -----END CERTIFICATE-----
190 | private_key -----BEGIN RSA PRIVATE KEY-----
191 | MIIEowIBAAKCAQEAte1fqy2Ekj+EFqKV6N5QJlBgMo/U4IIxwLZI6a87yAC/rDhm
192 | W58liadXrwjzRgWeqVOoCRr/B5JnRLbyIKBVp6MMFwZVkynEPzDmy0ynuomSfJkM
193 | ...
194 |
195 | -----END RSA PRIVATE KEY-----
196 | private_key_type rsa
197 | serial_number 4d:00:01:30:20:2c:5e:31:ba:13:11:53:5f:cd:b4:d7:12:95:1f:82
198 | ```
199 |
200 | The response contains the PEM-encoded private key, key type and certificate serial number.
201 |
202 | ## Step 5: Revoke Certificates
203 |
204 | If a certificate must be revoked, you can easily perform the revocation action which will cause the CRL to be regenerated. When the CRL is regenerated, any expired certificates are removed from the CRL.
205 |
206 | In certain circumstances, you may wish to revoke an issued certificate.
207 |
208 | To revoke a certificate, execute the following command.
209 |
210 | ```bash
211 | $ vault write pki_int/revoke serial_number=
212 | ```
213 |
214 | Example:
215 |
216 | ```bash
217 | $ vault write pki_int/revoke \
218 | serial_number="48:97:82:dd:f0:d3:d9:7e:53:25:ba:fd:f6:77:3e:89:e5:65:cc:e7"
219 | Key Value
220 | --- -----
221 | revocation_time 1532539632
222 | revocation_time_rfc3339 2018-07-25T17:27:12.165206399Z
223 | ```
224 |
225 | ## Step 6: Remove Expired Certificates
226 |
227 | Keep the storage backend and CRL by periodically removing certificates that have expired and are past a certain buffer period beyond their expiration time.
228 |
229 | To remove revoked certificate and clean the CRL.
230 |
231 | ```bash
232 | $ vault write pki_int/tidy tidy_cert_store=true tidy_revoked_certs=true
233 | ```
234 |
--------------------------------------------------------------------------------
/tls+ssl/use-vault-as-a-ca.png:
--------------------------------------------------------------------------------
https://raw.githubusercontent.com/clockworksoul/today-i-learned/1257079ee89defd9da4c261fd30d7d4a85f8ceb7/tls+ssl/use-vault-as-a-ca.png
--------------------------------------------------------------------------------
/vocabulary/sealioning.md:
--------------------------------------------------------------------------------
1 | # Sealioning
2 |
3 | _Source: Lauren told me about this. Also:
4 | [[1]](https://en.wikipedia.org/wiki/Sealioning), [[2]](https://www.forbes.com/sites/marshallshepherd/2019/03/07/sealioning-is-a-common-trolling-tactic-on-social-media-what-is-it), [[3]](https://www.urbandictionary.com/define.php?term=Sealioning)._
5 |
6 | **Sealioning** is a type of trolling or harassment which consists of pursuing people with persistent requests for evidence or repeated questions, while maintaining a pretense of civility and sincerity. It may take the form of "incessant, bad-faith invitations to engage in debate".
7 |
8 | ## Origins and history
9 |
10 | The term originated with a 2014 strip of the webcomic Wondermark by David Malki, where a character expresses a dislike of sea lions and a sea lion intrudes to repeatedly ask the character to explain. "Sea lion" was quickly verbed, the term gained popularity as a way to describe online trolling, and it was used to describe some of the behavior of those participating in the Gamergate controversy.
11 |
12 | 
13 |
--------------------------------------------------------------------------------
/vocabulary/sealioning.png:
--------------------------------------------------------------------------------
https://raw.githubusercontent.com/clockworksoul/today-i-learned/1257079ee89defd9da4c261fd30d7d4a85f8ceb7/vocabulary/sealioning.png
--------------------------------------------------------------------------------
6 |
7 | * Prep Time: 45 minutes
8 | * Cook Time: 65 minutes
9 | * Total Time: Overnight (14 hours - includes time for pie dough and cranberries)
10 | * Yield: serves 8-10; 1 cup sugared cranberries
11 |
12 | ## Description
13 |
14 | _Bursting with flavor, this pumpkin pie recipe is my very favorite. It’s rich, smooth, and tastes incredible on my homemade pie crust and served with whipped cream. The pie crust leaves are purely for decor, you can leave those off of the pie and only make 1 pie crust. You can also leave off the sugared cranberries._
15 |
16 | ## Ingredients
17 |
18 | ### Sugared Cranberries
19 |
20 | * 1 cup (120g) **fresh cranberries**
21 | * 2 cups (400g) **granulated sugar**, divided
22 | * 1 cup (240ml) **water**
23 |
24 | ### Pumpkin Pie
25 |
26 | * 1 recipe [double-crust pie dough](perfect-pie-crust.md) (full recipe makes 2 crusts: 1 for bottom, 1 for leaf decor)
27 | * Egg wash: 1 **large egg** beaten with 1 Tablespoon **whole milk**
28 | * 1 cup (240ml) **heavy cream**
29 | * 1/4 cup (60ml) **whole milk**
30 | * 3 **large eggs** plus 2 **large yolks**
31 | * 1 teaspoon **vanilla extract**
32 | * One 15oz can (about 2 cups; 450g) **pumpkin puree**
33 | * 1 cup drained candied **sweet potatoes or yams**
34 | * 3/4 cup (5 1/4 ounces) **sugar**
35 | * 1/4 cup **maple syrup**
36 | * 1 teaspoon table **salt**
37 | * 2 teaspoons ground or freshly grated **ginger**
38 | * 1/2 teaspoon ground **cinnamon**
39 | * 1/4 teaspoon ground **nutmeg**
40 | * 1/8 teaspoon ground **cloves**
41 | * 1/8 teaspoon fresh ground **black pepper** (seriously!)
42 |
43 |
83 |
84 | ## Instructions
85 |
86 | ### Sugared Cranberries (Optional)
87 |
88 | 1. Place cranberries in a large bowl; set aside.
89 |
90 | 2. In a medium saucepan, bring 1 cup of sugar and the water to a boil and whisk until the sugar has dissolved. Remove pan from the heat and allow to cool for 5 minutes.
91 |
92 | 3. Pour sugar syrup over the cranberries and stir. Let the cranberries sit at room temperature or in the refrigerator for 6 hours or overnight (ideal). You’ll notice the sugar syrup is quite thick after this amount of time.
93 |
94 | 4. Drain the cranberries from the syrup and pour 1 cup of sugar on top. Toss the cranberries, coating them all the way around.
95 |
96 | 5. Pour the sugared cranberries on a parchment paper or silicone baking mat-lined baking sheet and let them dry for at least 2 hours at room temperature or in the refrigerator.
97 |
98 | 6. Cover tightly and store in the refrigerator for up to 3 days.
99 |
100 | You’ll have extra, but they’re great for eating or as garnish on other dishes.
101 |
102 | ### Prepare the Crust
103 |
104 | 1. Roll half of the 2-crust dough into a 12-inch circle on floured counter. Loosely roll dough around rolling pin and gently unroll it onto 9-inch pie plate, letting excess dough hang over edge. Ease dough into plate by gently lifting edge of dough with your hand while pressing into plate bottom with your other hand.
105 |
106 | 2. Trim overhang to 1/2 inch beyond lip of plate. Tuck overhang under itself; folded edge should be flush with edge of plate. Crimp dough evenly around edge of plate.
107 | Crimp the edges with a fork or flute the edges with your fingers, if desired. Wrap dough-lined plate loosely in plastic wrap and refrigerate until firm, about 30 minutes.
108 |
109 | ### Pie Crust Leaves (Optional)
110 |
111 | If you're using a store bought or have only a single-crust's amount of dough, skip this step.
112 |
113 | 1. On a floured work surface, roll out one of the balls of chilled dough to about 1/8 inch thickness (the shape doesn’t matter).
114 |
115 | 2. Using leaf cookie cutters, cut into shapes.
116 |
117 | 3. Brush each lightly with the beaten egg + milk mixture.
118 |
119 | 4. Cut leaf veins into leaves using a sharp knife, if desired.
120 |
121 | 5. Place onto a parchment paper or silicone baking mat-lined baking sheet and bake at 350°F (177°C) for 10 minutes or until lightly browned. Remove and set aside to cool before decorating pie.
122 |
123 | ### The Pie Proper
124 |
125 | 1. Adjust oven rack to middle position and heat to 375°F (190°C).
126 |
127 | 2. Brush edges of chilled pie shell lightly with egg wash mixture. Line with double layer of aluminum foil, covering edges to prevent burning, and fill with pie weights. Bake on foil-lined rimmed baking sheet for 10-15 minutes.
128 |
129 | 3. Remove foil and weights, rotate sheet, and continue to bake crust until golden brown and crisp, 10 to 15 minutes longer. Transfer sheet to wire rack. (The crust must still be warm when filling is added).
130 |
131 | 4. While crust is baking, whisk cream, milk, eggs and yolks, and vanilla together in bowl; set aside. Bring pumpkin, sweet potatoes, sugar, maple syrup, ginger, salt, cinnamon, and nutmeg to simmer in large saucepan over medium heat and cook, stirring constantly and mashing sweet potatoes against sides of saucepan, until thick and shiny, 15 to 20 minutes.
132 |
133 | 5. Remove saucepan from heat and whisk in cream mixture until fully incorporated.
134 |
135 | 6. Strain mixture through fine-mesh strainer into bowl, using back of ladle or spatula to press solids through strainer.
136 |
137 | 7. Whisk mixture, then, with pie still on sheet, pour into warm crust. Bake the pie until the center is almost set, about 55-60 minutes. A small part of the center will be wobbly – that’s ok. After 25 minutes of baking, be sure to cover the edges of the crust with aluminum foil or use a pie crust shield to prevent the edges from getting too brown. Check for doneness at minute 50, and then 55, and then 60, etc.
138 |
139 | 8. Once done, transfer the pie to a wire rack and allow to cool completely for at least 4 hours. Decorate with sugared cranberries and pie crust leaves (see note). You’ll definitely have leftover cranberries – they’re tasty for snacking. Serve pie with whipped cream if desired. Cover leftovers tightly and store in the refrigerator for up to 5 days.
140 |
141 | ## Notes
142 |
143 | 1. **Make Ahead & Freezing Instructions:** Pumpkin pie freezes well, up to 3 months. Thaw overnight in the refrigerator before serving. Pie crust dough freezes well for up to 3 months. Thaw overnight in the refrigerator before using. If decorating your pie with sugared cranberries, start them the night before. You’ll also begin the pie crust the night before as well (the dough needs at least 2 hours to chill; overnight is best). The filling can be made the night before as well. In fact, I prefer it that way. It gives the spices, pumpkin, and brown sugar flavors a chance to infuse and blend. It’s awesome. Cover and refrigerate overnight. No need to bring to room temperature before baking.
144 |
145 | 1. **Cranberries:** Use fresh cranberries, not frozen. The sugar syrup doesn’t coat evenly on the frozen berries, leaving you with rather ugly and some very plain shriveled cranberries.
146 |
147 | 1. **Pumpkin:** Canned pumpkin is best in this pumpkin pie recipe. If using fresh pumpkin puree, lightly blot it before adding to remove some moisture; the bake time may also be longer.
148 |
149 | 1. **Spices:** Instead of ground ginger and nutmeg, you can use 2 teaspoons of pumpkin pie spice. Be sure to still add 1/2 teaspoon cinnamon.
150 |
151 | 1. **Pie Crust:** No matter if you’re using homemade crust or store-bought crust, pre-bake the crust (The Pie Proper; steps 1-3). You can use graham cracker crust if you’d like, but the slices may get a little messy. Pre-bake for 10 minutes just as you do with regular pie crust in this recipe. No need to use pie weights if using a cookie crust.
152 |
153 | 1. **Mini Pumpkin Pies:** Many have asked about a mini version. Here are my mini pumpkin pies. They’re pretty easy– no blind baking the crust!
154 |
155 |
156 |
157 |
158 |
159 |
160 |
161 |
162 |
163 |
164 |
165 |
166 |
167 |
168 |
169 |
--------------------------------------------------------------------------------
/baking/perfect-pie-crust.md:
--------------------------------------------------------------------------------
1 | # Homemade Buttery Flaky Pie Crust
2 |
3 | _Source: [Sally's Baking Addition: Homemade Buttery Flaky Pie Crust](https://sallysbakingaddiction.com/baking-basics-homemade-buttery-flaky-pie-crust/)_
4 |
5 | * Prep Time: 15 minutes
6 | * Yield: 2 pie crusts
7 |
8 | This recipe provides enough for a double crust pie. If you only need one crust, you can cut the recipe in half, or freeze the other half.
9 |
10 | ## Ingredients
11 |
12 | * 2 1/2 cups (315g) **all-purpose flour** (spoon & leveled)
13 | * 1 teaspoon **salt**
14 | * 2 tablespoons **sugar**
15 | * 6 tablespoons (90g) **unsalted butter**, chilled and cubed
16 | * 3/4 cup (148g) **vegetable shortening**, chilled
17 | * 1/2 cup of **ice water**, plus extra as needed
18 |
19 | ## Instructions
20 |
21 | 1. Mix the flour and salt together in a large bowl. Add the butter and shortening.
22 |
23 | 2. Using a pastry cutter ([the one I own](https://smile.amazon.com/gp/product/B07D471TC8/ref=ppx_yo_dt_b_search_asin_title)) or two forks, cut the butter and shortening into the mixture until it resembles coarse meal (pea-sized bits with a few larger bits of fat is OK). A pastry cutter makes this step very easy and quick.
24 |
25 | 3. Measure 1/2 cup (120ml) of water in a cup. Add ice. Stir it around. From that, measure 1/2 cup (120ml) of water– since the ice has melted a bit. Drizzle the cold water in, 1 Tablespoon (15ml) at a time, and stir with a rubber spatula or wooden spoon after every Tablespoon (15ml) added. Do not add any more water than you need to. Stop adding water when the dough begins to form large clumps. I always use about 1/2 cup (120ml) of water and a little more in dry winter months (up to 3/4 cup).
26 |
27 | 4. Transfer the pie dough to a floured work surface. The dough should come together easily and should not feel overly sticky. Using floured hands, fold the dough into itself until the flour is fully incorporated into the fats. Form it into a ball. Divide dough in half. Flatten each half into 1-inch thick discs using your hands.
28 |
29 | 5. Wrap each tightly in plastic wrap. Refrigerate for at least 2 hours (and up to 5 days).
30 |
31 | 6. When rolling out the chilled pie dough discs to use in your pie, always use gentle force with your rolling pin. Start from the center of the disc and work your way out in all directions, turning the dough with your hands as you go. Visible specks of butter and fat in the dough are perfectly normal and expected!
32 |
33 | 7. Proceed with the pie per your recipe’s instructions.
34 |
35 | ## Notes
36 |
37 | 1. **Make Ahead & Freezing Instructions:** Prepare the pie dough through step 4 and freeze the discs for up to 3 months. Thaw overnight in the refrigerator before using in your pie recipe.
38 |
39 | 2. **Salt:** I use and strongly recommend regular table salt. If using kosher salt, use 1 and 1/2 teaspoons.
40 |
--------------------------------------------------------------------------------
/bash/a-generalized-single-instance-script.md:
--------------------------------------------------------------------------------
1 | # A generalized single-instance bash script
2 |
3 | _Source: [Przemyslaw Pawelczyk](https://gist.github.com/przemoc/571091)_
4 |
5 | An excellent generalized script that ensures that only one instance of the script can run at a time.
6 |
7 | It does the following:
8 |
9 | * Sets an [exit trap](http://redsymbol.net/articles/bash-exit-traps/) so the lock is always released (via `_prepare_locking`)
10 | * Obtains an [exclusive file lock](https://en.wikipedia.org/wiki/File_locking) on `$LOCKFILE` or immediately fail (via `exlock_now`)
11 | * Executes any additional custom logic
12 |
13 | ```bash
14 | #!/usr/bin/env bash
15 |
16 | set -euo pipefail
17 |
18 | # This script will do the following:
19 | #
20 | # - Set an exit trap so the lock is always released (via _prepare_locking)
21 | # - Obtain an exclusive lock on $LOCKFILE or immediately fail (via exlock_now)
22 | # - Execute any additional logic
23 | #
24 | # If this script is run while another has a lock it will exit with status 1.
25 |
26 | ### HEADER ###
27 | readonly LOCKFILE="/tmp/$(basename $0).lock" # source has "/var/lock/`basename $0`"
28 | readonly LOCKFD=99
29 |
30 | # PRIVATE
31 | _lock() { flock -$1 $LOCKFD; }
32 | _no_more_locking() { _lock u; _lock xn && rm -f $LOCKFILE; }
33 | _prepare_locking() { eval "exec $LOCKFD>\"$LOCKFILE\""; trap _no_more_locking EXIT; }
34 |
35 | # ON START
36 | _prepare_locking
37 |
38 | # PUBLIC
39 | exlock_now() { _lock xn; } # obtain an exclusive lock immediately or fail
40 | exlock() { _lock x; } # obtain an exclusive lock
41 | shlock() { _lock s; } # obtain a shared lock
42 | unlock() { _lock u; } # drop a lock
43 |
44 | ### BEGIN OF SCRIPT ###
45 |
46 | # Simplest example is avoiding running multiple instances of script.
47 | exlock_now || exit 1
48 |
49 | # All script logic goes below.
50 | #
51 | # Remember! Lock file is removed when one of the scripts exits and it is
52 | # the only script holding the lock or lock is not acquired at all.
53 | ```
--------------------------------------------------------------------------------
/bash/bash-shell-prompts.md:
--------------------------------------------------------------------------------
1 | # Bash Shell: Take Control of PS1, PS2, PS3, PS4 and PROMPT_COMMAND
2 |
3 | _Source: https://www.thegeekstuff.com/2008/09/bash-shell-take-control-of-ps1-ps2-ps3-ps4-and-prompt_command/_
4 |
5 | Your interaction with Linux Bash shell will become very pleasant if you use PS1, PS2, PS3, PS4, and PROMPT_COMMAND effectively. PS stands for prompt statement. This article will give you a jumpstart on the Linux command prompt environment variables using simple examples.
6 |
7 | ## PS1 – Default interaction prompt
8 |
9 | The default interactive prompt on your Linux can be modified as shown below to something useful and informative. In the following example, the default PS1 was `\s-\v\$`, which displays the shell name and the version number. Let us change this default behavior to display the username, hostname and current working directory name as shown below.
10 |
11 | ```bash
12 | -bash-3.2$ export PS1="\u@\h \w> "
13 |
14 | ramesh@dev-db ~> cd /etc/mail
15 | ramesh@dev-db /etc/mail>
16 | ```
17 |
18 | Prompt changed to "username@hostname current-dir>" format.
19 |
20 | The following PS1 codes are used in this example:
21 |
22 | * `\u` – Username
23 | * `\h` – Hostname
24 | * `\w` – Full pathname of current directory. Please note that when you are in the home directory, this will display only `~` as shown above
25 | * Note that there is a space at the end in the value of PS1. Personally, I prefer a space at the end of the prompt for better readability.
26 |
27 | Make this setting permanent by adding export `PS1="\u@\h \w> "` to either `.bash_profile` (Mac) or `.bashrc` (Linux/WSL).
28 |
29 | ## PS2 – Continuation interactive prompt
30 |
31 | A very long Unix command can be broken down to multiple line by giving `\` at the end of the line. The default interactive prompt for a multi-line command is "> ". Let us change this default behavior to display `continue->` by using PS2 environment variable as shown below.
32 |
33 | ```
34 | ramesh@dev-db ~> myisamchk --silent --force --fast --update-state \
35 | > --key_buffer_size=512M --sort_buffer_size=512M \
36 | > --read_buffer_size=4M --write_buffer_size=4M \
37 | > /var/lib/mysql/bugs/*.MYI
38 | ```
39 |
40 | This uses the default ">" for continuation prompt.
41 |
42 | ```
43 | ramesh@dev-db ~> export PS2="continue-> "
44 |
45 | ramesh@dev-db ~> myisamchk --silent --force --fast --update-state \
46 | continue-> --key_buffer_size=512M --sort_buffer_size=512M \
47 | continue-> --read_buffer_size=4M --write_buffer_size=4M \
48 | continue-> /var/lib/mysql/bugs/*.MYI
49 | ```
50 |
51 | This uses the modified "continue-> " for continuation prompt.
52 |
53 | I found it very helpful and easy to read, when I break my long commands into multiple lines using \. I have also seen others who don’t like to break-up long commands. What is your preference? Do you like breaking up long commands into multiple lines?
54 |
55 | ## PS3 – Prompt used by "select" inside shell script
56 |
57 | You can define a custom prompt for the select loop inside a shell script, using the PS3 environment variable, as explained below.
58 |
59 | ### Shell script and output WITHOUT PS3
60 |
61 | ```
62 | ramesh@dev-db ~> cat ps3.sh
63 |
64 | select i in mon tue wed exit
65 | do
66 | case $i in
67 | mon) echo "Monday";;
68 | tue) echo "Tuesday";;
69 | wed) echo "Wednesday";;
70 | exit) exit;;
71 | esac
72 | done
73 |
74 | ramesh@dev-db ~> ./ps3.sh
75 |
76 | 1) mon
77 | 2) tue
78 | 3) wed
79 | 4) exit
80 | #? 1
81 | Monday
82 | #? 4
83 | ```
84 |
85 | This displays the default "#?" for select command prompt.
86 |
87 | ### Shell script and output WITH PS3
88 |
89 | ```
90 | ramesh@dev-db ~> cat ps3.sh
91 |
92 | PS3="Select a day (1-4): "
93 | select i in mon tue wed exit
94 | do
95 | case $i in
96 | mon) echo "Monday";;
97 | tue) echo "Tuesday";;
98 | wed) echo "Wednesday";;
99 | exit) exit;;
100 | esac
101 | done
102 |
103 | ramesh@dev-db ~> ./ps3.sh
104 | 1) mon
105 | 2) tue
106 | 3) wed
107 | 4) exit
108 | Select a day (1-4): 1
109 | Monday
110 | Select a day (1-4): 4
111 | ```
112 |
113 | This displays the modified "Select a day (1-4): " for select command prompt.
114 |
115 | ## PS4 – Used by "set -x" to prefix tracing output
116 |
117 | The PS4 shell variable defines the prompt that gets displayed, when you execute a shell script in debug mode as shown below.
118 |
119 | ### Shell script and output WITHOUT PS4
120 |
121 | ```
122 | ramesh@dev-db ~> cat ps4.sh
123 |
124 | set -x
125 | echo "PS4 demo script"
126 | ls -l /etc/ | wc -l
127 | du -sh ~
128 |
129 | ramesh@dev-db ~> ./ps4.sh
130 |
131 | ++ echo 'PS4 demo script'
132 | PS4 demo script
133 | ++ ls -l /etc/
134 | ++ wc -l
135 | 243
136 | ++ du -sh /home/ramesh
137 | 48K /home/ramesh
138 | ```
139 |
140 | This displays the default "++" while tracing the output using `set -x`.
141 |
142 | ### Shell script and output WITH PS4
143 |
144 | The PS4 defined below in the ps4.sh has the following two codes:
145 |
146 | * `$0` – indicates the name of script
147 | * `$LINENO` – displays the current line number within the script
148 |
149 | ```
150 | ramesh@dev-db ~> cat ps4.sh
151 |
152 | export PS4='$0.$LINENO+ '
153 | set -x
154 | echo "PS4 demo script"
155 | ls -l /etc/ | wc -l
156 | du -sh ~
157 |
158 | ramesh@dev-db ~> ./ps4.sh
159 | ../ps4.sh.3+ echo 'PS4 demo script'
160 | PS4 demo script
161 | ../ps4.sh.4+ ls -l /etc/
162 | ../ps4.sh.4+ wc -l
163 | 243
164 | ../ps4.sh.5+ du -sh /home/ramesh
165 | 48K /home/ramesh
166 | ```
167 |
168 | This displays the modified "{script-name}.{line-number}+" while tracing the output using `set -x`.
169 |
170 | ## PROMPT_COMMAND
171 |
172 | Bash shell executes the content of the `PROMPT_COMMAND` just before displaying the PS1 variable.
173 |
174 | ```
175 | ramesh@dev-db ~> export PROMPT_COMMAND="date +%k:%m:%S"
176 | 22:08:42
177 | ramesh@dev-db ~>
178 | ```
179 |
180 | This displays the `PROMPT_COMMAND` and PS1 output on different lines.
181 |
182 | If you want to display the value of `PROMPT_COMMAND` in the same line as the PS1, use the `echo -n` as shown below:
183 |
184 | ```
185 | ramesh@dev-db ~> export PROMPT_COMMAND="echo -n [$(date +%k:%m:%S)]"
186 | [22:08:51]ramesh@dev-db ~>
187 | ```
188 |
189 | This displays the PROMPT_COMMAND and PS1 output on the same line.
--------------------------------------------------------------------------------
/bash/dont-do-grep-wc-l.md:
--------------------------------------------------------------------------------
1 | # Don't do `grep | wc -l`
2 |
3 | _Source: [Useless Use of Cat Award](http://porkmail.org/era/unix/award.html)_
4 |
5 | There is actually a whole class of "Useless Use of (something) | grep (something) | (something)" problems but this one usually manifests itself in scripts riddled by useless backticks and pretzel logic.
6 |
7 | Anything that looks like:
8 |
9 | ```bash
10 | something | grep '..*' | wc -l
11 | ```
12 |
13 | can usually be rewritten like something along the lines of
14 |
15 | ```bash
16 | something | grep -c . # Notice that . is better than '..*'
17 | ```
18 |
19 | or even (if all we want to do is check whether something produced any non-empty output lines)
20 |
21 | ```bash
22 | something | grep . >/dev/null && ...
23 | ```
24 |
25 | (or `grep -q` if your grep has that).
26 |
27 | ## Addendum
28 |
29 | `grep -c` can actually solve a large class of problems that `grep | wc -l` can't.
30 |
31 | If what interests you is the count for each of a group of files, then the only way to do it with `grep | wc -l` is to put a loop round it. So where I had this:
32 |
33 | ```bash
34 | grep -c "^~h" [A-Z]*/hmm[39]/newMacros
35 | ```
36 |
37 | the naive solution using `wc -l` would have been...
38 |
39 | ```bash
40 | for f in [A-Z]*/hmm[39]/newMacros; do
41 | # or worse, for f in `ls [A-Z]*/hmm[39]/newMacros` ...
42 | echo -n "$f:"
43 | # so that we know which file's results we're looking at
44 | grep "^~h" "$f" | wc -l
45 | # gag me with a spoon
46 | done
47 | ```
48 |
49 | ...and notice that we also had to fiddle to get the output in a convenient form.
50 |
--------------------------------------------------------------------------------
/bash/groot.md:
--------------------------------------------------------------------------------
1 | # Move to the Root of a Git Directory
2 |
3 | _Source: My friend Alex Novak_
4 |
5 | ```bash
6 | cd `git rev-parse --show-toplevel`
7 | ```
8 |
9 | I keep this aliased as `groot` and use it very frequently when moving through a codebase.
10 |
--------------------------------------------------------------------------------
/bash/md5sum-of-a-path.md:
--------------------------------------------------------------------------------
1 | # Bash One-Liner to Calculate the md5sum of a Path in Linux
2 |
3 | To compute the md5sum of an entire path in Linux, we `tar` the directory in question and pipe the product to `md5sum`.
4 |
5 | Note in this example that I specifically exclude the `.git` directory, which I've found can vary between runs even if there's no change to the repository contents.
6 |
7 | ```bash
8 | $ tar --exclude='.git' -cf - "${SOME_DIR}" 2> /dev/null | md5sum
9 | 851ce98b3e97b42c1b01dd26e23e2efa -
10 | ```
11 |
--------------------------------------------------------------------------------
/bash/pipefail.md:
--------------------------------------------------------------------------------
1 | # Safer Bash Scripts With `set -euxo pipefail`
2 |
3 | _Source: [Safer bash scripts with 'set -euxo pipefail'](https://vaneyckt.io/posts/safer_bash_scripts_with_set_euxo_pipefail/)_
4 |
5 | The bash shell comes with several builtin commands for modifying the behavior of the shell itself. We are particularly interested in the `set` builtin, as this command has several options that will help us write safer scripts. I hope to convince you that it’s a really good idea to add `set -euxo pipefail` to the beginning of all your future bash scripts.
6 |
7 | ## `set -e`
8 |
9 | The `-e` option will cause a bash script to exit immediately when a command fails.
10 |
11 | This is generally a vast improvement upon the default behavior where the script just ignores the failing command and continues with the next line. This option is also smart enough to not react on failing commands that are part of conditional statements.
12 |
13 | You can append a command with `|| true` for those rare cases where you don’t want a failing command to trigger an immediate exit.
14 |
15 | ### Before
16 |
17 | ```bash
18 | #!/bin/bash
19 |
20 | # 'foo' is a non-existing command
21 | foo
22 | echo "bar"
23 |
24 | # output
25 | # ------
26 | # line 4: foo: command not found
27 | # bar
28 | #
29 | # Note how the script didn't exit when the foo command could not be found.
30 | # Instead it continued on and echoed 'bar'.
31 | ```
32 |
33 | ### After
34 |
35 | ```bash
36 | #!/bin/bash
37 | set -e
38 |
39 | # 'foo' is a non-existing command
40 | foo
41 | echo "bar"
42 |
43 | # output
44 | # ------
45 | # line 5: foo: command not found
46 | #
47 | # This time around the script exited immediately when the foo command wasn't found.
48 | # Such behavior is much more in line with that of higher-level languages.
49 | ```
50 |
51 | ### Any command returning a non-zero exit code will cause an immediate exit
52 |
53 | ```bash
54 | #!/bin/bash
55 | set -e
56 |
57 | # 'ls' is an existing command, but giving it a nonsensical param will cause
58 | # it to exit with exit code 1
59 | $(ls foobar)
60 | echo "bar"
61 |
62 | # output
63 | # ------
64 | # ls: foobar: No such file or directory
65 | #
66 | # I'm putting this in here to illustrate that it's not just non-existing commands
67 | # that will cause an immediate exit.
68 | ```
69 |
70 | ### Preventing an immediate exit
71 |
72 | ```bash
73 | #!/bin/bash
74 | set -e
75 |
76 | foo || true
77 | $(ls foobar) || true
78 | echo "bar"
79 |
80 | # output
81 | # ------
82 | # line 4: foo: command not found
83 | # ls: foobar: No such file or directory
84 | # bar
85 | #
86 | # Sometimes we want to ensure that, even when 'set -e' is used, the failure of
87 | # a particular command does not cause an immediate exit. We can use '|| true' for this.
88 | ```
89 |
90 | ### Failing commands in a conditional statement will not cause an immediate exit
91 |
92 | ```bash
93 | #!/bin/bash
94 | set -e
95 |
96 | # we make 'ls' exit with exit code 1 by giving it a nonsensical param
97 | if ls foobar; then
98 | echo "foo"
99 | else
100 | echo "bar"
101 | fi
102 |
103 | # output
104 | # ------
105 | # ls: foobar: No such file or directory
106 | # bar
107 | #
108 | # Note that 'ls foobar' did not cause an immediate exit despite exiting with
109 | # exit code 1. This is because the command was evaluated as part of a
110 | # conditional statement.
111 | ```
112 |
113 | That’s all for `set -e`. However, `set -e` by itself is far from enough. We can further improve upon the behavior created by `set -e` by combining it with `set -o pipefail`. Let’s have a look at that next.
114 |
115 | ## `set -o pipefail`
116 |
117 | The bash shell normally only looks at the exit code of the last command of a pipeline. This behavior is not ideal as it causes the `-e` option to only be able to act on the exit code of a pipeline’s last command. This is where `-o pipefail` comes in. This particular option sets the exit code of a pipeline to that of the rightmost command to exit with a non-zero status, or to zero if all commands of the pipeline exit successfully.
118 |
119 | ### Before
120 |
121 | ```bash
122 | #!/bin/bash
123 | set -e
124 |
125 | # 'foo' is a non-existing command
126 | foo | echo "a"
127 | echo "bar"
128 |
129 | # output
130 | # ------
131 | # a
132 | # line 5: foo: command not found
133 | # bar
134 | #
135 | # Note how the non-existing foo command does not cause an immediate exit, as
136 | # it's non-zero exit code is ignored by piping it with '| echo "a"'.
137 | ```
138 |
139 | ### After
140 |
141 | ```bash
142 | #!/bin/bash
143 | set -eo pipefail
144 |
145 | # 'foo' is a non-existing command
146 | foo | echo "a"
147 | echo "bar"
148 |
149 | # output
150 | # ------
151 | # a
152 | # line 5: foo: command not found
153 | #
154 | # This time around the non-existing foo command causes an immediate exit, as
155 | # '-o pipefail' will prevent piping from causing non-zero exit codes to be ignored.
156 | ```
157 |
158 | This section hopefully made it clear that `-o pipefail` provides an important improvement upon just using `-e` by itself. However, as we shall see in the next section, we can still do more to make our scripts behave like higher-level languages.
159 |
160 | ## `set -u`
161 |
162 | This option causes the bash shell to treat unset variables as an error and exit immediately. Unset variables are a common cause of bugs in shell scripts, so having unset variables cause an immediate exit is often highly desirable behavior.
163 |
164 | ### Before
165 |
166 | ```bash
167 | #!/bin/bash
168 | set -eo pipefail
169 |
170 | echo $a
171 | echo "bar"
172 |
173 | # output
174 | # ------
175 | #
176 | # bar
177 | #
178 | # The default behavior will not cause unset variables to trigger an immediate exit.
179 | # In this particular example, echoing the non-existing $a variable will just cause
180 | # an empty line to be printed.
181 | ```
182 |
183 | ### After
184 |
185 | ```bash
186 | #!/bin/bash
187 | set -euo pipefail
188 |
189 | echo "$a"
190 | echo "bar"
191 |
192 | # output
193 | # ------
194 | # line 5: a: unbound variable
195 | #
196 | # Notice how 'bar' no longer gets printed. We can clearly see that '-u' did indeed
197 | # cause an immediate exit upon encountering an unset variable.
198 | ```
199 |
200 | ### Dealing with `${a:-b}` variable assignments
201 |
202 | Sometimes you’ll want to use a [`${a:-b}` variable assignment](https://unix.stackexchange.com/questions/122845/using-a-b-for-variable-assignment-in-scripts/122878) to ensure a variable is assigned a default value of b when a is either empty or undefined. The `-u` option is smart enough to not cause an immediate exit in such a scenario.
203 |
204 | ```bash
205 | #!/bin/bash
206 | set -euo pipefail
207 |
208 | DEFAULT=5
209 | RESULT=${VAR:-$DEFAULT}
210 | echo "$RESULT"
211 |
212 | # output
213 | # ------
214 | # 5
215 | #
216 | # Even though VAR was not defined, the '-u' option realizes there's no need to cause
217 | # an immediate exit in this scenario as a default value has been provided.
218 | ```
219 |
220 | ### Using conditional statements that check if variables are set
221 |
222 | Sometimes you want your script to not immediately exit when an unset variable is encountered. A common example is checking for a variable’s existence inside an `if` statement.
223 |
224 | ```bash
225 | #!/bin/bash
226 | set -euo pipefail
227 |
228 | if [ -z "${MY_VAR:-}" ]; then
229 | echo "MY_VAR was not set"
230 | fi
231 |
232 | # output
233 | # ------
234 | # MY_VAR was not set
235 | #
236 | # In this scenario we don't want our program to exit when the unset MY_VAR variable
237 | # is evaluated. We can prevent such an exit by using the same syntax as we did in the
238 | # previous example, but this time around we specify no default value.
239 | ```
240 |
241 | This section has brought us a lot closer to making our bash shell behave like higher-level languages. While `-euo pipefail` is great for the early detection of all kinds of problems, sometimes it won’t be enough. This is why in the next section we’ll look at an option that will help us figure out those really tricky bugs that you encounter every once in a while.
242 |
243 | ## `set -x`
244 |
245 | The `-x` option causes bash to print each command before executing it.
246 |
247 | This can be a great help when trying to debug a bash script failure. Note that arguments get expanded before a command gets printed, which will cause our logs to contain the actual argument values that were present at the time of execution!
248 |
249 | ```bash
250 | #!/bin/bash
251 | set -euxo pipefail
252 |
253 | a=5
254 | echo $a
255 | echo "bar"
256 |
257 | # output
258 | # ------
259 | # + a=5
260 | # + echo 5
261 | # 5
262 | # + echo bar
263 | # bar
264 | ```
265 |
266 | That’s it for the `-x` option. It’s pretty straightforward, but can be a great help for debugging.
267 |
268 | ## `set -E`
269 |
270 | Traps are pieces of code that fire when a bash script catches certain signals. Aside from the usual signals (e.g. `SIGINT`, `SIGTERM`, ...), traps can also be used to catch special bash signals like `EXIT`, `DEBUG`, `RETURN`, and `ERR`. However, reader Kevin Gibbs pointed out that using `-e` without `-E` will cause an `ERR` trap to not fire in certain scenarios.
271 |
272 | ### Before
273 |
274 | ```bash
275 | #!/bin/bash
276 | set -euo pipefail
277 |
278 | trap "echo ERR trap fired!" ERR
279 |
280 | myfunc()
281 | {
282 | # 'foo' is a non-existing command
283 | foo
284 | }
285 |
286 | myfunc
287 | echo "bar"
288 |
289 | # output
290 | # ------
291 | # line 9: foo: command not found
292 | #
293 | # Notice that while '-e' did indeed cause an immediate exit upon trying to execute
294 | # the non-existing foo command, it did not case the ERR trap to be fired.
295 | ```
296 |
297 | ### After
298 |
299 | ```bash
300 | #!/bin/bash
301 | set -Eeuo pipefail
302 |
303 | trap "echo ERR trap fired!" ERR
304 |
305 | myfunc()
306 | {
307 | # 'foo' is a non-existing command
308 | foo
309 | }
310 |
311 | myfunc
312 | echo "bar"
313 |
314 | # output
315 | # ------
316 | # line 9: foo: command not found
317 | # ERR trap fired!
318 | #
319 | # Not only do we still have an immediate exit, we can also clearly see that the
320 | # ERR trap was actually fired now.
321 | ```
322 |
323 | The documentation states that `-E` needs to be set if we want the `ERR` trap to be inherited by shell functions, command substitutions, and commands that are executed in a subshell environment. The `ERR` trap is normally not inherited in such cases.
324 |
--------------------------------------------------------------------------------
/bash/prompt-statement-variables.md:
--------------------------------------------------------------------------------
1 | # Bash Shell Prompt Statement Variables
2 |
3 | _Source: https://ss64.com/bash/syntax-prompt.html_
4 |
5 | There are several variables that can be set to control the appearance of the bash command prompt: PS1, PS2, PS3, PS4 and PROMPT_COMMAND the contents are executed just as if they had been typed on the command line.
6 |
7 | * `PS1` – Default interactive prompt (this is the variable most often customized)
8 | * `PS2` – Continuation interactive prompt (when a long command is broken up with \ at the end of the line) default=">"
9 | * `PS3` – Prompt used by `select` loop inside a shell script
10 | * `PS4` – Prompt used when a shell script is executed in debug mode (`set -x` will turn this on) default ="++"
11 | * `PROMPT_COMMAND` - If this variable is set and has a non-null value, then it will be executed just before the PS1 variable.
12 |
13 | Set your prompt by changing the value of the PS1 environment variable, as follows:
14 |
15 | ```
16 | $ export PS1="My simple prompt> "
17 | >
18 | ```
19 |
20 | This change can be made permanent by placing the `export` definition in your `~/.bashrc` (or `~/.bash_profile`) file.
21 |
22 | ## Special prompt variable characters
23 |
24 | ```
25 | \d The date, in "Weekday Month Date" format (e.g., "Tue May 26").
26 |
27 | \h The hostname, up to the first . (e.g. deckard)
28 | \H The hostname. (e.g. deckard.SS64.com)
29 |
30 | \j The number of jobs currently managed by the shell.
31 |
32 | \l The basename of the shell's terminal device name.
33 |
34 | \s The name of the shell, the basename of $0 (the portion following
35 | the final slash).
36 |
37 | \t The time, in 24-hour HH:MM:SS format.
38 | \T The time, in 12-hour HH:MM:SS format.
39 | \@ The time, in 12-hour am/pm format.
40 |
41 | \u The username of the current user.
42 |
43 | \v The version of Bash (e.g., 2.00)
44 |
45 | \V The release of Bash, version + patchlevel (e.g., 2.00.0)
46 |
47 | \w The current working directory.
48 | \W The basename of $PWD.
49 |
50 | \! The history number of this command.
51 | \# The command number of this command.
52 |
53 | \$ If you are not root, inserts a "$"; if you are root, you get a "#" (root uid = 0)
54 |
55 | \nnn The character whose ASCII code is the octal value nnn.
56 |
57 | \n A newline.
58 | \r A carriage return.
59 | \e An escape character (typically a color code).
60 | \a A bell character.
61 | \\ A backslash.
62 |
63 | \[ Begin a sequence of non-printing characters. (like color escape sequences). This
64 | allows bash to calculate word wrapping correctly.
65 |
66 | \] End a sequence of non-printing characters.
67 | ```
68 |
69 | Using single quotes instead of double quotes when exporting your PS variables is recommended, it makes the prompt a tiny bit faster to evaluate plus you can then do an echo $PS1 to see the current prompt settings.
70 |
71 | ## Color Codes (ANSI Escape Sequences)
72 |
73 | ### Foreground colors
74 |
75 | Normal (non-bold) is the default, so the `0;` prefix is optional.
76 |
77 | ```
78 | \e[0;30m = Dark Gray
79 | \e[1;30m = Bold Dark Gray
80 | \e[0;31m = Red
81 | \e[1;31m = Bold Red
82 | \e[0;32m = Green
83 | \e[1;32m = Bold Green
84 | \e[0;33m = Yellow
85 | \e[1;33m = Bold Yellow
86 | \e[0;34m = Blue
87 | \e[1;34m = Bold Blue
88 | \e[0;35m = Purple
89 | \e[1;35m = Bold Purple
90 | \e[0;36m = Turquoise
91 | \e[1;36m = Bold Turquoise
92 | \e[0;37m = Light Gray
93 | \e[1;37m = Bold Light Gray
94 | ```
95 |
96 | ### Background colors
97 |
98 | ```
99 | \e[40m = Dark Gray
100 | \e[41m = Red
101 | \e[42m = Green
102 | \e[43m = Yellow
103 | \e[44m = Blue
104 | \e[45m = Purple
105 | \e[46m = Turquoise
106 | \e[47m = Light Gray
107 | ```
108 |
109 | Examples
110 |
111 | Set a prompt like: `[username@hostname:~/CurrentWorkingDirectory]$`
112 |
113 | `export PS1='[\u@\h:\w]\$ '`
114 |
115 | Set a prompt in color. Note the escapes for the non printing characters [ ]. These ensure that readline can keep track of the cursor position correctly.
116 |
117 | `export PS1='\[\e[31m\]\u@\h:\w\[\e[0m\] '`
118 |
--------------------------------------------------------------------------------
/bash/ring-the-audio-bell.md:
--------------------------------------------------------------------------------
1 | # Ring the audio bell in bash
2 |
3 | In many shells, the `\a` character will trigger the audio bell.
4 |
5 | Example:
6 |
7 | ```bash
8 | $ echo -n $'\a'
9 | ```
10 |
11 | You can also use `tput`, since `/a` doesn't work in some shells:
12 |
13 | ```bash
14 | $ tput bel
15 | ```
16 |
--------------------------------------------------------------------------------
/consul/ingress-gateways.md:
--------------------------------------------------------------------------------
1 | # Ingress Gateways in HashiCorp Consul 1.8
2 |
3 | _Source: [Ingress Gateways in HashiCorp Consul 1.8](https://www.hashicorp.com/blog/ingress-gateways-in-hashicorp-consul-1-8/), [HashiCorp Learn](https://learn.hashicorp.com/consul/developer-mesh/ingress-gateways)_
4 |
5 | Consul ingress gateways provide an easy and secure way for external services to communicate with services inside the Consul service mesh.
6 |
7 | 
8 |
9 | Using the Consul CLI or our Consul Kubernetes Helm chart you can easily set up multiple instances of ingress gateways and configure and secure traffic flows natively via our Layer 7 routing and intentions features.
10 |
11 | # Overview
12 |
13 | Applications that reside outside of a service mesh often need to communicate with applications within the mesh. This is typically done by providing a gateway that allows the traffic to the upstream service. Consul 1.8 allows us to create an ingress solution without us having to roll our own.
14 |
15 | # Using Ingress Gateways on VMs
16 |
17 | Let’s take a look at how Ingress Gateways work in practice. First, let’s register our Ingress Gateway on port 8888:
18 |
19 | ```bash
20 | $ consul connect envoy -gateway=ingress -register -service ingress-gateway \
21 | -address '{{ GetInterfaceIP "eth0" }}:8888'
22 | ```
23 |
24 | Next, let’s create and apply an ingress-gateway [configuration entry](https://www.consul.io/docs/agent/config-entries/ingress-gateway) that defines a set of listeners that expose the desired backing services:
25 |
26 | ```hcl
27 | Kind = "ingress-gateway"
28 | Name = "ingress-gateway"
29 | Listeners = [
30 | {
31 | Port = 80
32 | Protocol = "http"
33 | Services = [
34 | {
35 | Name = "api"
36 | }
37 | ]
38 | }
39 | ]
40 | ```
41 |
42 | With the ingress gateway now configured to listen for a service on port 80, we can now route traffic destined for specific paths to that specific service listening on port 80 of the gateway via a [service-router](https://www.consul.io/docs/agent/config-entries/service-router) config entry:
43 |
44 | ```hcl
45 | Kind = "service-router"
46 | Name = "api"
47 | Routes = [
48 | {
49 | Match {
50 | HTTP {
51 | PathPrefix = "/api_service1"
52 | }
53 | }
54 |
55 | Destination {
56 | Service = "api_service1"
57 | }
58 | },
59 | {
60 | Match {
61 | HTTP {
62 | PathPrefix = "/api_service2"
63 | }
64 | }
65 |
66 | Destination {
67 | Service = "api_service2"
68 | }
69 | }
70 | ]
71 | ```
72 |
73 | Finally, to secure traffic from the Ingress Gateway, we can also then define intentions to allow the Ingress Gateway to communicate to specific upstream services:
74 |
75 | ```bash
76 | $ consul intention create -allow ingress-gateway api_service1
77 | $ consul intention create -allow ingress-gateway api_service2
78 | ```
79 |
80 | Since Consul also specializes in Service Discovery, we can also discovery gateways for Ingress Gateway enabled services via DNS using [built-in subdomains](https://www.consul.io/docs/agent/dns#ingress-service-lookups):
81 |
82 | ```bash
83 | $ dig @127.0.0.1 -p 8600 api_service1.ingress... ANY
84 | $ dig @127.0.0.1 -p 8600 api_service2.ingress... ANY
85 | ```
86 |
--------------------------------------------------------------------------------
/consul/ingress-gateways.png:
--------------------------------------------------------------------------------
https://raw.githubusercontent.com/clockworksoul/today-i-learned/1257079ee89defd9da4c261fd30d7d4a85f8ceb7/consul/ingress-gateways.png
--------------------------------------------------------------------------------
/containers/non-privileged-containers-based-on-the-scratch-image.md:
--------------------------------------------------------------------------------
1 | # Non-privileged containers based on the scratch image
2 |
3 | _Source: [Non-privileged containers based on the scratch image](https://medium.com/@lizrice/non-privileged-containers-based-on-the-scratch-image-a80105d6d341)_
4 |
5 | ## Multi-stage builds give us the power
6 |
7 | Here’s a Dockerfile that gives us what we’re looking for.
8 |
9 | ```dockerfile
10 | FROM ubuntu:latest
11 | RUN useradd -u 10001 scratchuser
12 |
13 | FROM scratch
14 | COPY dosomething /dosomething
15 | COPY --from=0 /etc/passwd /etc/passwd
16 | USER scratchuser
17 |
18 | ENTRYPOINT ["/dosomething"]
19 | ```
20 |
21 | Building from this Dockerfile starts FROM an Ubuntu base image, and creates a new user called _scratchuser_. See that second `FROM` command? That’s the start of the next stage in the multi-stage build, this time working from the scratch base image (which contains nothing).
22 |
23 | Into that empty file system we copy a binary called `dosomething` — it’s a trivial Go app that simply sleeps for a while.
24 |
25 | ```go
26 | package main
27 |
28 | import "time"
29 |
30 | func main() {
31 | time.Sleep(500 * time.Second)
32 | }
33 | ```
34 |
35 | We also copy over the `/etc/passwd` file from the first stage of the build into the new image. This has `scratchuser` in it.
36 |
37 | This is all we need to be able to transition to `scratchuser` before starting the dosomething executable.
38 |
--------------------------------------------------------------------------------
/est/approximate-with-powers.md:
--------------------------------------------------------------------------------
1 | # Approximate with powers
2 |
3 | _Source: [robertovitillo.com](https://robertovitillo.com/back-of-the-envelope-estimation-hacks/) (Check out [his book](https://leanpub.com/systemsmanual)!)_
4 |
5 | Using powers of 2 or 10 makes multiplications very easy as in logarithmic space, multiplications become additions.
6 |
7 | For example, let’s say you have 800K users watching videos in UHD at 12 Mbps. A machine in your Content Delivery Network can egress at 1 Gbps. How many machines do you need?
8 |
9 | Approximating 800K with 10^6 and 12 Mbps with 10^7 yields:
10 |
11 | ```
12 | 1e6 * 1e7 bps
13 | --------------- = 1e(6+7-9) = 1e4 = 10,000
14 | 1e9 bps
15 | ```
16 |
17 | Summing 6 to 7 and subtracting 9 from it is much easier than trying to get to the exact answer:
18 |
19 | ```
20 | 0.8M * 12M bps
21 | --------------- = 9,600
22 | 10000 Mbps
23 | ```
24 |
25 | That's pretty close.
26 |
--------------------------------------------------------------------------------
/est/ballpark-io-performance-figures.md:
--------------------------------------------------------------------------------
1 | # Ballpark I/O performance figures
2 |
3 | _Source: [robertovitillo.com](https://robertovitillo.com/back-of-the-envelope-estimation-hacks/) (Check out [his book](https://leanpub.com/systemsmanual)!)_
4 |
5 | What’s important are not the exact numbers per se but their relative differences in terms of orders of magnitude.
6 |
7 | The goal of estimation is not to get a correct answer, but to get one in the right ballpark.
8 |
9 | ## Know your numbers
10 |
11 | How fast can you read data from the disk? How quickly from the network? You should be familiar with ballpark performance figures of your components.
12 |
13 | | Storage | IOPS | MB/s (random) | MB/s (sequential) |
14 | |------------------------|-------------|---------------|-------------------|
15 | | Mechanical hard drives | 100 | 10 | 50 |
16 | | SSD | 10000 | 100 | 500 |
17 |
18 | | Network | Throughput (Megabits/sec) | Throughput (Megabytes/sec) |
19 | |-----------------------|---------------------------|----------------------------|
20 | | Wired ethernet | 1000 - 10000 | 100 - 1000 |
21 | | Typical home network | 100 | 10 |
22 | | Typical EC2 allowance | 10000 | 1000 |
23 | | AWS inter-AZ | 25000 | 3000 |
24 | | AWS inter-region | 100 | 10 |
25 |
--------------------------------------------------------------------------------
/est/calculating-iops.md:
--------------------------------------------------------------------------------
1 | # Calculating IOPS from Latency
2 |
3 | IOPS stands for input/output operations per second. It represents how quickly a given storage device or medium can read and write commands in every second.
4 |
5 | It is calulated as:
6 |
7 | ```IOPS = 1000 milliseconds / (Average Seek Time + Average Latency)```
8 |
9 | Generally a HDD will have an IOPS range of 55-180, while a SSD will have an IOPS from 3,000 – 40,000.
10 |
11 | ## HDD
12 |
13 | For HDD with spinning disks, this is dependent rotational speed, in which average latency is the time it takes the disk platter to spin halfway around.
14 |
15 | It is calculated by dividing 60 seconds by the Rotational Speed of the disk, then dividing that result by 2 and multiplying everything by 1,000 milliseconds:
16 |
17 | ```
18 | IOPS = ((60 / RPM)/2) * 1000
19 | ```
20 |
21 | ## SSD
22 |
23 | There's no spinning disk, so as a rule of thumb you can just plug in 0.1 ms as the average latency.
24 |
--------------------------------------------------------------------------------
/est/littles-law.md:
--------------------------------------------------------------------------------
1 | # Little’s Law
2 |
3 | _Source: [robertovitillo.com](https://robertovitillo.com/back-of-the-envelope-estimation-hacks/) (Check out [his book](https://leanpub.com/systemsmanual)!)_
4 |
5 | A queue can be modeled with three parameters:
6 |
7 | * the average rate at which new items arrive, λ
8 | * the average time an item spends in the queue, W
9 | * and the average number of items in the queue, L
10 |
11 | Lots of things can be modeled as queues. A web service can be seen as a queue, for example. The request rate is the rate at which new items arrive. The time it takes for a request to be processed is the time an item spends in the queue. Finally, the number of concurrently processed requests is the number of items in the queue.
12 |
13 | Wouldn’t it be great if you could derive one of the three parameters from the other two? It turns out there is a law that relates these three quantities to one another! It’s called [Little’s Law](https://en.wikipedia.org/wiki/Little%27s_law):
14 |
15 | ```
16 | L = λ * W
17 | ```
18 |
19 | What it says is that the average number of items in the queue equals the average rate at which new items arrive, multiplied by the average time an item spends in the queue.
20 |
21 | Let’s try it out. Let’s say you have a service that takes on average 100ms to process a request. It’s currently receiving about two million requests per second (rps). How many requests are being processed concurrently?
22 |
23 | ```
24 | requests = 2e6 requests/s * 1e-1 s = 2e5
25 | ```
26 |
27 | The service is processing 200K requests concurrently. If each request is CPU heavy and requires a thread, then we will need about 200K threads.
28 |
29 | If we are using 8 core machines, then to keep up, we will need about 25K machines.
30 |
--------------------------------------------------------------------------------
/est/pi-seconds-is-a-nanocentury.md:
--------------------------------------------------------------------------------
1 | # π seconds is a nanocentury
2 |
3 | _Source: [Bumper Sticker Computer Science](http://www.bowdoin.edu/~ltoma/teaching/cs340/spring05/coursestuff/Bentley_BumperSticker.pdf)_
4 |
5 | There are 31.54 million seconds in a year.
6 |
7 | ...which equals: 3.154e9 seconds / 1 century
8 |
9 | ...which equals: 3.154 seconds / 1e-9 century
10 |
11 | ...which approximately equals π seconds per nanocentury.
12 |
13 | So _π seconds is approximately (to within half a percent) a nanocentury._
14 |
--------------------------------------------------------------------------------
/est/rule-of-72.md:
--------------------------------------------------------------------------------
1 | # The Rule of 72
2 |
3 | _Source: [robertovitillo.com](https://robertovitillo.com/back-of-the-envelope-estimation-hacks/) (Check out [his book](https://leanpub.com/systemsmanual)!)_
4 |
5 | [The rule of 72](https://web.stanford.edu/class/ee204/TheRuleof72.html) is a method to estimate how long it will take for a quantity to double if it grows at a certain percentage rate.
6 |
7 | ```
8 | time = 72 / rate
9 | ```
10 |
11 | For example, let’s say the traffic to your web service is increasing by approximately 10% weekly, how long will it take to double?
12 |
13 | ```
14 | time = 72 / 10 = 7.2
15 | ```
16 |
17 | It will take approximately 7 weeks for the traffic to double.
18 |
19 | If you combine the rule of 72 with the powers of two, then you can quickly find out how long it will take for a quantity to increase by several orders of magnitudes.
20 |
--------------------------------------------------------------------------------
/gardening/cotyledon-leaves.md:
--------------------------------------------------------------------------------
1 | # Why Are the Cotyledon Leaves on a Tomato Plant Falling Off?
2 |
3 | _Source: https://homeguides.sfgate.com/cotyledon-leaves-tomato-plant-falling-off-56902.html_
4 |
5 | Starting seeds indoors for a summer garden is an act of faith -- in biology and your own ability to manipulate the indoor environment successfully. Once the raggedy little "true" leaves begin to unfold, the moon-shaped baby leaves, called cotyledons, may drop off. Fear not -- these leaves have finished their job and are making way for adult growth on the plant's stalk.
6 |
7 | ## Cotyledon Facts
8 |
9 | Seeds are embryonic plants, complete with roots, stem and branches (or rather, radicles, hypocotyls and plumules). They also hold two fleshy seed leaves called cotyledons that will inflate with water as the seed germinates and pull the stem upward as the seedling's root grows deeper. Once above ground, the cotyledons unfold so the plumule can begin to grow into branches and leaves to support the plant's mature growth, flowers and fruits. The cotyledons' job is finished once the adult, or "true," leaves unfold and begin their task of photosynthesis.
10 |
11 | ## Early Growth
12 |
13 | The section of the stalk above ground but below the cotyledon becomes very thick and bumpy as the plant's branches and leaves unfold. If the ground is dry or the roots are cramped, these bumps may grow into aerial roots to gather moisture. Roots may also grow under the cotyledons, pushing the fleshy little seed leaves away, much as baby teeth are displaced by adult teeth. If top growth is leggy, gardeners plant seedlings as deep as the cotyledons -- or as far up the stem as the first set of true leaves -- to allow the plant to start more roots to draw nitrogen from the soil.
14 |
15 | ## Failing Cotyledons
16 |
17 | Because it is a storage organ, the cotyledon is an inefficient provider for the adult plant, so it will shrivel and fall away from the plant as shade from the growing plant covers it, either because of senescence or because it is being edged out by an emerging root. When cotyledons fall away after several branches of true leaves have formed, it means that the plant has passed from the seedling stage to the mature stage of its growth and adult leaves have taken over. If, however, the plant gets too much water and falls victim to a fungal disease known as "damping off," the cotyledons may fold before the adult leaves have a chance to deploy.
18 |
19 | ## Garden Planting
20 |
21 | Loss of seed leaves typically occurs when plants have acclimated to their surroundings in the garden. If you've started plants four to six weeks before the last frost date and taken them out a day at a time before finally planting them when the soil temperature reaches 60 to 70 degrees Fahrenheit, the cotyledons should fall off within a week or two. If, however, you jump the start and plant tomatoes when soil temperature is in the 50s, the plants may go temporarily dormant and start actively growing until only after the soil warms up. In that case, the cotyledons might hang on for several weeks until they become obsolescent and fade.
22 |
--------------------------------------------------------------------------------
/git/global-git-ignore.md:
--------------------------------------------------------------------------------
1 | # Using core.excludesFile to define a global git ignore
2 |
3 | _Source: The [`gitignore` documentation](https://git-scm.com/docs/gitignore)_
4 |
5 | The `core.excludesFile` git configuration variable can be used to define an arbitrary file location (`~/.gitignore` in this example) that contains patterns for git to always ignore.
6 |
7 | Example usage:
8 |
9 | ```
10 | $ git config --global core.excludesFile ~/.gitignore
11 | ```
12 |
--------------------------------------------------------------------------------
/go/a-high-performance-go-cache.md:
--------------------------------------------------------------------------------
1 | # Ristretto: A High-Performance Go Cache
2 |
3 | _Source: [Introducing Ristretto](https://dgraph.io/blog/post/introducing-ristretto-high-perf-go-cache/), [Github](https://github.com/dgraph-io/dgraph)_
4 |
5 | It all started with needing a memory-bound, concurrent Go cache in Dgraph.
6 |
7 | Specifically, they were unable to find a cache that met the following requirements:
8 |
9 | * Concurrent
10 | * High cache-hit ratio
11 | * Memory-bounded (limit to configurable max memory usage)
12 | * Scale well as the number of cores and goroutines increases
13 | * Scale well under non-random key access distribution (e.g. Zipf).
14 |
15 | They assembled a team to build a high-performance cache based on [Caffeine](http://highscalability.com/blog/2016/1/25/design-of-a-modern-cache.html), a high-performance cache written in Java, used by many Java-based databases, like Cassandra, HBase, and Neo4j.
16 |
17 | ## Usage
18 |
19 | Full documentation can be found on [Github](https://github.com/dgraph-io/dgraph).
20 |
21 | ### Example
22 |
23 | ```go
24 | func main() {
25 | cache, err := ristretto.NewCache(&ristretto.Config{
26 | NumCounters: 1e7, // number of keys to track frequency of (10M).
27 | MaxCost: 1 << 30, // maximum cost of cache (1GB).
28 | BufferItems: 64, // number of keys per Get buffer.
29 | })
30 | if err != nil {
31 | panic(err)
32 | }
33 |
34 | // set a value with a cost of 1
35 | cache.Set("key", "value", 1)
36 |
37 | // wait for value to pass through buffers
38 | time.Sleep(10 * time.Millisecond)
39 |
40 | value, found := cache.Get("key")
41 | if !found {
42 | panic("missing value")
43 | }
44 | fmt.Println(value)
45 | cache.Del("key")
46 | }
47 | ```
48 |
--------------------------------------------------------------------------------
/go/check-whether-a-file-exists.md:
--------------------------------------------------------------------------------
1 | # Checking Whether a File Exists
2 |
3 | _Source: from https://golangr.com/file-exists/_
4 |
5 | I didn't just learn this, but for some reason I always have to look this idiom up.
6 |
7 | ## Example
8 |
9 | The following Go code will check if the specified file exists or not:
10 |
11 | ```go
12 | package main
13 |
14 | import "fmt"
15 | import "os"
16 |
17 | func main() {
18 |
19 | if _, err := os.Stat("file-exists.go"); err == nil {
20 | fmt.Printf("File exists\n");
21 | } else {
22 | fmt.Printf("File does not exist\n");
23 | }
24 | }
25 | ```
26 |
27 | ## Error Checking
28 |
29 | If you want to check if a file exists before continuing the program:
30 |
31 | ```go
32 | package main
33 |
34 | import "fmt"
35 | import "os"
36 |
37 | func main() {
38 |
39 | if _, err := os.Stat("file-exists2.file"); os.IsNotExist(err) {
40 | fmt.Printf("File does not exist\n");
41 | }
42 |
43 | // continue program
44 | }
45 | ```
46 |
--------------------------------------------------------------------------------
/go/generating-hash-of-a-path.md:
--------------------------------------------------------------------------------
1 | # Generating a Hash From Files in a Path
2 |
3 | _Source: https://github.com/sger/go-hashdir/blob/master/hashdir.go (Heavily modified)_
4 |
5 | The `Walk` method from `path/filepath` walks the file tree rooted at root, calling `walkFn` for each file or directory in the tree, including root. All errors that arise visiting files and directories are filtered by `walkFn`. The files are walked in lexical order, which makes the output deterministic but means that for very large directories Walk can be inefficient. Walk does not follow symbolic links.
6 |
7 | ```go
8 | package main
9 |
10 | import (
11 | "crypto/sha256"
12 | "encoding/hex"
13 | "io"
14 | "os"
15 | "path/filepath"
16 | )
17 |
18 | // Create hash value with local path and a hash algorithm
19 | func Create(path string, hashAlgorithm string) (string, error) {
20 | hash := sha256.New()
21 |
22 | walkFn := func(path string, info os.FileInfo, err error) error {
23 | if err != nil {
24 | return nil
25 | }
26 |
27 | // Ignore directories
28 | if info.IsDir() {
29 | return nil
30 | }
31 |
32 | // Open the file for reading
33 | file, err := os.Open(path)
34 | if err != nil {
35 | return err
36 | }
37 |
38 | // Make sure the file is closed when the function returns
39 | defer file.Close()
40 |
41 | // Copy the file in the hash interface and check for any error
42 | if _, err := io.Copy(hash, file); err != nil {
43 | return "", err
44 | }
45 |
46 | return nil
47 | }
48 |
49 | // Walk through the path, and generate a hash from each file.
50 | err = filepath.Walk(path, walkFn)
51 |
52 | if err != nil {
53 | return "", nil
54 | }
55 |
56 | bytes := hash.Sum(nil)
57 | encoded := hex.EncodeToString(hashInBytes)
58 | }
59 |
60 | ```
61 |
--------------------------------------------------------------------------------
/go/opentelemetry-tracer.md:
--------------------------------------------------------------------------------
1 | # OpenTelemetry: Tracer
2 |
3 | _Source: [[1]](https://opentelemetry.io/)[[2]](https://github.com/open-telemetry/opentelemetry-go/blob/master/README.md)[[3]](https://docs.google.com/presentation/d/1nVhLIyqn_SiDo78jFHxnMdxYlnT0b7tYOHz3Pu4gzVQ/edit?usp=sharing)_
4 |
5 | OpenTelemetry provides a single set of APIs, libraries, agents, and collector services to capture distributed traces and metrics from your application. You can analyze them using Prometheus, Jaeger, and other observability tools.
6 |
7 | ## Tracer
8 |
9 | A Tracer is responsible for tracking the currently active span.
10 |
11 | ## Quickstart
12 |
13 | Below is a brief example of importing OpenTelemetry, initializing a `tracer` and creating some simple spans.
14 |
15 | ```go
16 | package main
17 |
18 | import (
19 | "context"
20 | "log"
21 |
22 | "go.opentelemetry.io/otel/api/global"
23 | "go.opentelemetry.io/otel/exporters/trace/stdout"
24 | sdktrace "go.opentelemetry.io/otel/sdk/trace"
25 | )
26 |
27 | func initTracer() {
28 | exporter, err := stdout.NewExporter(stdout.Options{PrettyPrint: true})
29 | if err != nil {
30 | log.Fatal(err)
31 | }
32 |
33 | tp, err := sdktrace.NewProvider(sdktrace.WithConfig(sdktrace.Config{DefaultSampler: sdktrace.AlwaysSample()}),
34 | sdktrace.WithSyncer(exporter))
35 | if err != nil {
36 | log.Fatal(err)
37 | }
38 |
39 | global.SetTraceProvider(tp)
40 | }
41 |
42 | func main() {
43 | initTracer()
44 |
45 | tracer := global.Tracer("ex.com/basic")
46 |
47 | tracer.WithSpan(context.Background(), "foo",
48 | func(ctx context.Context) error {
49 | tracer.WithSpan(ctx, "bar",
50 | func(ctx context.Context) error {
51 | tracer.WithSpan(ctx, "baz",
52 | func(ctx context.Context) error {
53 | return nil
54 | },
55 | )
56 | return nil
57 | },
58 | )
59 | return nil
60 | },
61 | )
62 | }
63 | ```
64 |
65 | ## TraceProvider
66 |
67 | A global provider can have a TraceProvider registered.
68 | Use the TraceProvider to create a named tracer.
69 |
70 | ```go
71 | // Register your provider in your init code
72 | tp, err := sdktrace.NewProvider(...)
73 | global.SetTraceProvider(tp)
74 |
75 | // Create the named tracer
76 | tracer = global.TraceProvider().Tracer("workshop/main")
77 | ```
78 |
79 | ## OTel API - Tracer methods & when to call
80 |
81 | ```go
82 | // This method returns a child of the current span, and makes it current.
83 | tracer.Start(ctx, name, options)
84 |
85 | // Starts a new span, sets it to be active in the context, executes the wrapped
86 | // body and closes the span before returning the execution result.
87 | tracer.WithSpan(name, func() {...})
88 |
89 | // Used to access & add information to the current span
90 | trace.SpanFromContext(ctx)
91 | ```
92 | ## OTel API - Span methods, & when to call
93 |
94 | ```go
95 | // Adds structured annotations (e.g. "logs") about what is currently happening.
96 | span.AddEvent(ctx, msg)
97 |
98 | // Adds a structured, typed attribute to the current span. This may include a user id, a build id, a user-agent, etc.
99 | span.SetAttributes(core.Key(key).String(value)...)
100 |
101 | // Often used with defer, fires when the unit of work is complete and the span can be sent
102 | span.End()
103 | ```
104 |
105 | ## Code examples
106 |
107 | ### Start/End
108 |
109 | ```go
110 | func (m Model) persist(ctx context.Context) {
111 | tr := global.TraceProvider().Tracer("me")
112 | ctx, span := tr.Start(ctx, "persist")
113 | defer span.End()
114 |
115 | // Persist the model to the database...
116 | [...]
117 | }
118 | ```
119 |
120 | ### WithSpan
121 |
122 | Takes a context, span name, and the function to be called.
123 |
124 | ```go
125 | ret, err := tracer.WithSpan(ctx, "operation",
126 | func(ctx context.Context) (int, error) {
127 | // Your function here
128 | [...]
129 | return 0, nil
130 | }
131 | )
132 | ```
133 |
134 | ### CurrentSpan & Span
135 |
136 | ```go
137 | // Get the current span
138 | sp := trace.SpanFromContext(ctx)
139 |
140 | // Update the span status
141 | sp.SetStatus(codes.OK)
142 |
143 | // Add events
144 | sp.AddEvent(ctx, "foo")
145 |
146 | // Add attributes
147 | sp.SetAttributes(
148 | key.New("ex.com/foo").String("yes"))
149 | ```
150 |
151 |
152 |
153 |
--------------------------------------------------------------------------------
/go/using-error-groups.md:
--------------------------------------------------------------------------------
1 | # Using error groups in Go
2 |
3 | _Source: [[1]](https://godoc.org/golang.org/x/sync/errgroup#WithContext)[[2]](https://www.oreilly.com/content/run-strikingly-fast-parallel-file-searches-in-go-with-sync-errgroup/)[[3]](https://bionic.fullstory.com/why-you-should-be-using-errgroup-withcontext-in-golang-server-handlers/)_
4 |
5 | The `golang.org/x/sync/errgroup` package provides synchronization, error propagation, and Context cancelation for groups of goroutines working on subtasks of a common task.
6 |
7 | Most interestingly, it provides the `Group` type, which represents an _error group_: a collection of goroutines working on subtasks that are part of the same overall task.
8 |
9 | ## `errgroup.Group`
10 |
11 | The `Group` type represents a collection of goroutines working on subtasks that are part of the same overall task.
12 |
13 | It has two attached methods: `Go()` and `Wait()`.
14 |
15 | ### Go()
16 |
17 | ```go
18 | func (g *Group) Go(f func() error)
19 | ```
20 |
21 | `Go()` calls the given function in a new goroutine.
22 |
23 | The first call to return a non-nil error cancels the group; its error will be returned by `Wait()`.
24 |
25 | ### Wait()
26 |
27 | ```go
28 | func (g *Group) Wait() error
29 | ```
30 |
31 | `Wait()` blocks until all function calls from the `Go()` method have returned, then returns the first non-nil error (if any) from them.
32 |
33 | ## Creating an `errgroup.Group`
34 |
35 | An error group can be created in one of two ways: with or without a `Context`.
36 |
37 | ### With context
38 |
39 | A `Group` can be created using the `WithContext()` function, which returns a new `Group` and an associated `Context` derived from its `ctx` parameter.
40 |
41 | The derived `Context` is canceled the first time a function passed to `Go()` returns a non-nil error or the first time `Wait()` returns, whichever occurs first.
42 |
43 | ```go
44 | func WithContext(ctx context.Context) (*Group, context.Context)
45 | ```
46 |
47 | ### A zero Group
48 |
49 | A zero `Group` is valid and does not cancel on error.
50 |
51 | ```go
52 | g := new(errgroup.Group)
53 | ```
54 |
55 | or simply
56 |
57 | ```go
58 | g := &errgroup.Group{}
59 | ```
60 |
61 | ## Using `errgroup.Group`
62 |
63 | You can use a `Group` as follows:
64 |
65 | 1. Create the `Group`, ideally using a `Context`.
66 | 2. Pass the `Group` one or more functions of type `func() error` to the `Go()` method to execute concurrently.
67 | 3. Call `Wait()` method, which blocks until one of the functions has an error or all functions complete.
68 |
69 | ### Generation 1: Serial Service Calls
70 |
71 | ```go
72 | func main() {
73 | err := SendRequestToService()
74 | if err != nil {
75 | log.Fatal(err)
76 | }
77 | }
78 | ```
79 |
80 | ### Generation 2: Using an error group
81 |
82 | ```go
83 | func main() {
84 | g, ctx := errgroup.WithContext(context.Background())
85 |
86 | g.Go(func() error {
87 | return SendRequestToService()
88 | })
89 |
90 | err := g.Wait()
91 | if err != nil {
92 | // Note that ctx is automatically canceled!
93 | log.Fatal(err)
94 | }
95 | }
96 | ```
97 |
--------------------------------------------------------------------------------
/history/geological-eons-and-eras.md:
--------------------------------------------------------------------------------
1 | # Geological Eons and Eras
2 |
3 | ## [Phanerozoic Eon](https://en.wikipedia.org/wiki/Phanerozoic) (541 Mya to present)
4 |
5 | The Phanerozoic Eon is the current geologic eon in the geologic time scale, and the one during which abundant animal and plant life has existed. It covers 541 million years to the present, and began with the Cambrian Period when animals first developed hard shells preserved in the fossil record
6 |
7 | ### [Cenozoic Era](https://en.wikipedia.org/wiki/Cenozoic) (66 Mya to present)
8 |
9 | The Cenozoic (meaning "new life") Era is the current and most recent of the three geological eras of the Phanerozoic Eon. It follows the Mesozoic Era and extends from 66 million years ago to the present day. It is generally believed to have started on the first day of the Cretaceous–Paleogene extinction event when an asteroid hit the Earth.
10 |
11 | The Cenozoic is also known as the **Age of Mammals**, because the extinction of many groups allowed mammals to greatly diversify so that large mammals dominated the Earth. The continents also moved into their current positions during this era.
12 |
13 | ### [Mesozoic Era](https://en.wikipedia.org/wiki/Mesozoic) (252 to 66 Mya)
14 |
15 | The Mesozoic ("middle life") Era is an interval of geological time from about 252 to 66 million years ago. It is also called the **Age of Reptiles**.
16 |
17 | The era began in the wake of the Permian–Triassic extinction event, the largest well-documented mass extinction in Earth's history, and ended with the Cretaceous–Paleogene extinction event, another mass extinction whose victims included the non-avian dinosaurs.
18 |
19 | #### [Cretaceous Period](https://en.wikipedia.org/wiki/Cretaceous) (145 to 66 Mya)
20 |
21 | The Cretaceous is a geological period that lasted from about 145 to 66 million years ago. It is the third and final period of the Mesozoic Era, as well as the longest. The name is derived from the Latin creta, "chalk". It is usually abbreviated K, for its German translation Kreide.
22 |
23 | The Cretaceous was a period with a relatively warm climate, resulting in high eustatic sea levels that created numerous shallow inland seas. These oceans and seas were populated with now-extinct marine reptiles, ammonites and rudists, while dinosaurs continued to dominate on land. During this time, new groups of mammals and birds, as well as flowering plants, appeared.
24 |
25 | The Cretaceous (along with the Mesozoic) ended with the Cretaceous–Paleogene extinction event, a large mass extinction in which many groups, including non-avian dinosaurs, pterosaurs and large marine reptiles died out. The end of the Cretaceous is defined by the abrupt Cretaceous–Paleogene boundary (K–Pg boundary), a geologic signature associated with the mass extinction which lies between the Mesozoic and Cenozoic eras.
26 |
27 | #### [Jurassic Period](https://en.wikipedia.org/wiki/Jurassic) (201.3 to 56 Mya)
28 |
29 | The Jurassic is a geologic period and system that spanned 56 million years from the end of the Triassic Period 201.3 million years ago to the beginning of the Cretaceous Period 145 Mya. The start of the period was marked by the major Triassic–Jurassic extinction event.
30 |
31 | On land, the fauna transitioned from the Triassic fauna, dominated by both dinosauromorph and crocodylomorph archosaurs, to one dominated by dinosaurs alone. The first birds also appeared during the Jurassic, having evolved from a branch of theropod dinosaurs. Other major events include the appearance of the earliest lizards, and the evolution of therian mammals, including primitive placentals. Crocodilians made the transition from a terrestrial to an aquatic mode of life. The oceans were inhabited by marine reptiles such as ichthyosaurs and plesiosaurs, while pterosaurs were the dominant flying vertebrates.
32 |
33 | #### [Triassic Period](https://en.wikipedia.org/wiki/Triassic) (251.9 to 50.6 Mya)
34 |
35 | The Triassic is a geologic period and system which spans 50.6 million years from the end of the Permian Period 251.9 million years ago, to the beginning of the Jurassic Period 201.3 Mya.
36 |
37 | The Triassic began in the wake of the Permian–Triassic extinction event, which left the Earth's biosphere impoverished; it was well into the middle of the Triassic before life recovered its former diversity. Therapsids and archosaurs were the chief terrestrial vertebrates during this time. A specialized subgroup of archosaurs, called dinosaurs, first appeared in the Late Triassic but did not become dominant until the succeeding Jurassic Period.
38 |
39 | The first true mammals, themselves a specialized subgroup of therapsids, also evolved during this period, as well as the first flying vertebrates, the pterosaurs, who, like the dinosaurs, were a specialized subgroup of archosaurs. The vast supercontinent of Pangaea existed until the mid-Triassic, after which it began to gradually rift into two separate landmasses, Laurasia to the north and Gondwana to the south.
40 |
41 | The global climate during the Triassic was mostly hot and dry, with deserts spanning much of Pangaea's interior. However, the climate shifted and became more humid as Pangaea began to drift apart. The end of the period was marked by yet another major mass extinction, the Triassic–Jurassic extinction event, that wiped out many groups and allowed dinosaurs to assume dominance in the Jurassic.
42 |
43 | ### [Paleozoic Era](https://en.wikipedia.org/wiki/Paleozoic) (541 to 252 Mya)
44 |
45 | The Paleozoic ("ancient life") Era is the earliest of three geologic eras of the Phanerozoic Eon. It is the longest of the Phanerozoic eras, lasting from 541 to 252 million years ago.
46 |
47 | The Paleozoic was a time of dramatic geological, climatic, and evolutionary change, including the Cambrian explosion,. Arthropods, mollusks, fish, amphibians, synapsids and diapsids all evolved during the Paleozoic.
48 |
49 | The Paleozoic Era ended with the largest extinction event in the history of Earth, the Permian–Triassic extinction event. The effects of this catastrophe were so devastating that it took life on land 30 million years into the Mesozoic Era to recover. Recovery of life in the sea may have been much faster.
50 |
51 | ## [Proterozoic Eon](https://en.wikipedia.org/wiki/Proterozoic) (2,500 to 541 Mya)
52 |
53 | The Proterozoic ("earlier life") is a geological eon spanning the time from the appearance of oxygen in Earth's atmosphere to just before the proliferation of complex life on the Earth. It extended from 2500 Mya to 541 Mya.
54 |
55 | The well-identified events of this eon were the transition to an oxygenated atmosphere during the Paleoproterozoic; several glaciations, which produced the hypothesized Snowball Earth during the Cryogenian Period in the late Neoproterozoic Era; and the Ediacaran Period (635 to 541 Ma) which is characterized by the evolution of abundant soft-bodied multicellular organisms and provides us with the first obvious fossil evidence of life on earth.
56 |
57 | ### [Neoproterozoic](https://en.wikipedia.org/wiki/Neoproterozoic) (1,000 to 541 Mya)
58 |
59 | 1,000 to 541 million years ago
60 |
61 | ### [Mesoproterozoic](https://en.wikipedia.org/wiki/Mesoproterozoic) (1,600 to 1,000 Mya)
62 |
63 | 1,600 to 1,000 million years ago
64 |
65 | ### [Paleoproterozoic](https://en.wikipedia.org/wiki/Paleoproterozoic) (2,500 to 1,600 Mya)
66 |
67 | 2,500 to 1,600 million years ago
68 |
69 | ## [Archean Eon](https://en.wikipedia.org/wiki/Archean) (4,000 to 2,500 Mya)
70 |
71 | The Archean Eon is one of the four geologic eons of Earth history, occurring 4 to 2.5 billion years ago. During the Archean, the Earth's crust had cooled enough to allow the formation of continents and life began its development.
72 |
73 | ### [Neoarchean](https://en.wikipedia.org/wiki/Neoarchean) (2,800 to 2,500 Mya)
74 |
75 | 2,800 to 2,500 million years ago
76 |
77 | ### [Mesoarchean](https://en.wikipedia.org/wiki/Mesoarchean) (3,200 to 2,800 Mya)
78 |
79 | 3,200 to 2,800 million years ago
80 |
81 | ### [Paleoarchean](https://en.wikipedia.org/wiki/Paleoarchean) (3,600 to 3,200 Mya)
82 |
83 | 3,600 to 3,200 million years ago
84 |
85 | ### [Eoarchean](https://en.wikipedia.org/wiki/Eoarchean) (4,000 to 3,600 Mya)
86 |
87 | 4,000 to 3,600 million years ago
88 |
89 | ## [Hadean Eon](https://en.wikipedia.org/wiki/Hadean) (4,000 to 4,600 Mya)
90 |
91 | The Hadean is a geologic eon of the Earth pre-dating the Archean. It began with the formation of the Earth about 4.6 billion years ago and ended, as defined by the International Commission on Stratigraphy (ICS), 4 billion years ago.
92 |
--------------------------------------------------------------------------------
/history/the-late-bronze-age-collapse.md:
--------------------------------------------------------------------------------
1 | # The Late Bronze Age Collapse
2 |
3 | The [Late Bronze Age collapse](https://en.wikipedia.org/wiki/Late_Bronze_Age_collapse) was a sudden and nearly complete collapse of virtually all of the complex civilizations of the Eastern Mediterranean region in the half-century between about 1200 and 1150 BC, including:
4 |
5 | * The Mycenaean kingdoms
6 | * The Kassite dynasty of Babylonia
7 | * The Hittite Empire in Anatolia and the Levant
8 | * The Egyptian Empire
9 | * Ugarit and the Amorite states in the Levant
10 | * The Luwian states of western Asia Minor
11 |
12 | Most of these collapsed utterly and completely, disappearing without a trace and leaving only ruins behind: Mycenae, the Hittites, Ugarit, and others. A few of the largest and most powerful states -- particularly Egypt, Assyria, and Elam -- survived, but in a diminished and weakened form.
13 |
14 | Excavations of the surviving ruins almost always uncover layers of ash, bronze arrowheads, and human remains left where they fell, suggesting sudden and violent destruction at the hands of an invading force. The few surviving records of the time implicate a confederation of minor actors of the time -- termed the Sea Peoples -- whose identity is unclear to this day.
15 |
--------------------------------------------------------------------------------
/kubernetes/installing-ssl-certs.md:
--------------------------------------------------------------------------------
1 | # Installing TLS Certificates as a Kubernetes Secret
2 |
3 | _Source: Pieced this together myself_
4 |
5 | I always forget this.
6 |
7 | In this example I install TLS certificates as [Kubernetes secret resources](https://kubernetes.io/docs/concepts/configuration/secret/) into the `ambassador` namespace.
8 |
9 | ## The Certificate Files
10 |
11 | First, gather your certificates. You will need two files:
12 |
13 | * A PEM-encoded public key certificate (called `tls.crt` in this example)
14 | * The private key associated with given certificate (called `tls.key` in this example)
15 |
16 | ## Delete Existing Certificates
17 |
18 | If a previous version of the certs already exist, delete them first.
19 |
20 | In this example our secret is named `ambassador-certs`.
21 |
22 | ```bash
23 | kubectl -n ambassador delete secret ambassador-certs
24 | ```
25 |
26 | ## Install the New Certificates
27 |
28 | Now we can use the `kubectl create secret tls` command (yes, that whole thing is one particularly obscure command) to install the certificates into the `ambassador` namespace:
29 |
30 | ```bash
31 | kubectl -n ambassador create secret tls ambassador-certs --key ./tls.key --cert ./tls.crt
32 | ```
33 |
--------------------------------------------------------------------------------
/linux/create-cron-without-an-editor.md:
--------------------------------------------------------------------------------
1 | # How to Create a Cron Job Using Bash Without the Interactive Editor
2 |
3 | _Source: [Stack Overflow](https://stackoverflow.com/questions/878600/how-to-create-a-cron-job-using-bash-automatically-without-the-interactive-editor)_
4 |
5 | To create a cron job without using the interactive editor, you do one of the following:
6 |
7 | ### Generate and install a new crontab file
8 |
9 | 1. Write out the current crontab to a file
10 |
11 | We use `crontab -l`, which lists the current crontab jobs.
12 |
13 | ```bash
14 | crontab -l > mycron
15 | ```
16 |
17 | 2. Append the new cron to the file
18 |
19 | ```bash
20 | echo "00 09 * * 1-5 echo hello" >> mycron
21 | ```
22 |
23 | 3. Install the new cron file
24 |
25 | ```bash
26 | crontab mycron
27 | ```
28 |
29 | 4. Clean up
30 |
31 | ```bash
32 | rm crontab
33 | ```
34 |
35 | ### As a one-liner
36 |
37 | Alternatively, you can do this in a one liner by piping your modified cron file to `crontab -` as follows:
38 |
39 | ```bash
40 | crontab -l | { cat; echo "0 0 0 0 0 some entry"; } | crontab -
41 | ```
42 |
43 | Broken down:
44 |
45 | * `crontab -l` lists the current crontab jobs
46 | * In a subshell, `cat` prints the `crontab -l` output and echos the new command
47 | * The entire output is piped to `crontab -` which installs it as a new crontab.
48 |
--------------------------------------------------------------------------------
/linux/creating-a-linux-service-with-systemd.md:
--------------------------------------------------------------------------------
1 | # Creating a Linux Service with systemd
2 |
3 | _Sources: [[1]](https://medium.com/@benmorel/creating-a-linux-service-with-systemd-611b5c8b91d6), [[2]](https://www.freedesktop.org/software/systemd/man/systemd.unit.html)_
4 |
5 | # The Program
6 |
7 | For the purposes of this example, we'll start a toy echo server on port 80 using `socat`.
8 |
9 | Let’s start it:
10 |
11 | ```bash
12 | $ socat -v tcp-l:8080,fork exec:"/bin/cat"
13 | ```
14 |
15 | And test it in another terminal:
16 |
17 | ```
18 | $ nc 127.0.0.1 8080
19 |
20 | Hello world!
21 | Hello world!
22 | ```
23 |
24 | Cool, it works. Now we want this script to run at all times, be restarted in case of a failure (unexpected exit), and even survive server restarts. That’s where systemd comes into play.
25 |
26 | ## Turning It Into a Service
27 |
28 | Let’s create a file called `/etc/systemd/system/echo.service`:
29 |
30 | ```
31 | [Unit]
32 | Description=Echo service
33 | After=network.target
34 | StartLimitIntervalSec=0
35 |
36 | [Service]
37 | Type=simple
38 | Restart=always
39 | RestartSec=1
40 | User=ubuntu
41 | ExecStart=/usr/bin/env socat -v tcp-l:8080,fork exec:"/bin/cat"
42 |
43 | [Install]
44 | WantedBy=multi-user.target
45 | ```
46 |
47 | Of course you'll want to set your actual username after `User=`.
48 |
49 | That’s it.
50 |
51 | ## Starting The Service
52 |
53 | We can now start the service:
54 |
55 | ```bash
56 | $ systemctl start echo
57 | ```
58 |
59 | And automatically get it to start on boot:
60 |
61 | ```bash
62 | $ systemctl enable echo
63 | ```
64 |
65 | ## Going further
66 |
67 | Now that your service (hopefully) works, it may be important to dive a bit deeper into the configuration options, and ensure that it will always work as you expect it to.
68 |
69 | ### Starting in the right order
70 |
71 | You may have wondered what the `After=` directive did. It simply means that your service must be started after the network is ready. For example, if your program expects MySQL to be up and running you could add:
72 |
73 | ```
74 | After=mysqld.service
75 | ```
76 |
77 | ### Restarting on exit
78 |
79 | By default, systemd does not restart your service if the program exits for whatever reason. This is usually not what you want for a service that must be always available, so we’re instructing it to always restart on exit:
80 |
81 | ```
82 | Restart=always
83 | ```
84 |
85 | You could also use `on-failure` to only restart if the exit status is not `0`.
86 |
87 | By default, systemd attempts a restart after 100ms. You can specify the number of seconds to wait before attempting a restart, using:
88 |
89 | ```
90 | RestartSec=1
91 | ```
92 |
93 | ### Avoiding the Start Limit Trap
94 |
95 | By default, when you configure `Restart=always` as we did, systemd gives up restarting your service if it fails to start more than 5 times within a 10 seconds interval. Forever.
96 |
97 | There are two `[Unit]` configuration options responsible for this:
98 |
99 | ```
100 | StartLimitBurst=5
101 | StartLimitIntervalSec=10
102 | ```
103 |
104 | The `RestartSec` directive also has an impact on the outcome: if you set it to restart after 3 seconds, then you can never reach 5 failed retries within 10 seconds.
105 |
106 | The simple fix that always works is to set `StartLimitIntervalSec=0`. This way, systemd will attempt to restart your service forever.
107 | It’s a good idea to set `RestartSec` to at least 1 second though, to avoid putting too much stress on your server when things start going wrong.
108 |
109 | As an alternative, you can leave the default settings, and ask systemd to restart your server if the start limit is reached, using `StartLimitAction=reboot`.
110 |
111 | ## Is that really it?
112 |
113 | That’s all it takes to create a Linux service with systemd: writing a small configuration file that references your long-running program.
114 |
115 | Systemd has been the default init system in RHEL/CentOS, Fedora, Ubuntu, Debian and others for several years now, so chances are that your server is ready to host your homebrew services.
116 |
--------------------------------------------------------------------------------
/linux/lastlog.md:
--------------------------------------------------------------------------------
1 | # Lastlog
2 |
3 | The `lastlog` utility formats and prints the contents of the last login log file, `/var/log/lastlog` (which is a usually a very sparse file), including the login name, port, and last login date and time.
4 |
5 | It is similar in functionality to the BSD program `last`, also included in linux distributions; however, `last` parses a different binary database file (`/var/log/wtmp` and `/var/log/btmp`).
6 |
7 | ## Usage
8 |
9 | Lastlog prints its output in column format with login-name, port, and last-login-time of each and every user on the system mentioned in that order. The users are sorted by default according to the order in `/etc/passwd` However, it can also be used to modify the records kept in `/var/log/lastlog`.
10 |
11 | ```bash
12 | $ lastlog
13 | Username Port From Latest
14 | root **Never logged in**
15 | user tty3 Sun Jan 14 16:29:24 +0130 2019
16 | ```
--------------------------------------------------------------------------------
/linux/socat.md:
--------------------------------------------------------------------------------
1 | # `socat`
2 |
3 | _Sources: [`socat`](https://medium.com/@copyconstruct/socat-29453e9fc8a6) by Cindy Sridharan; also [[1]](https://blog.travismclarke.com/post/socat-tutorial/), [[2]](https://linux.die.net/man/1/socat)_
4 |
5 | `socat` (**SO**cket **CAT**) is a network utility similar to `netcat` that allows data transfer between two addresses by establishing two bidirectional byte streams and transferring data between them.
6 |
7 | An address, in this context, can include:
8 |
9 | * A network socket
10 | * Any file descriptor
11 | * Unix domain datagram or stream socket
12 | * TCP and UDP (over both IPv4 and IPv6)
13 | * SOCKS 4/4a over IPv4/IPv6, SCTP, PTY, datagram and stream sockets
14 | * Named and unnamed pipes
15 | * Raw IP sockets
16 | * OpenSSL
17 | * Any arbitrary network device (on Linux)
18 |
19 | ## Usage
20 |
21 | The simplest `socat` invocation would be:
22 |
23 | ```bash
24 | socat [options]
25 | ```
26 |
27 | A more concrete example would be:
28 |
29 | ```bash
30 | socat -d -d - TCP4:www.example.com:80
31 | ```
32 |
33 | where `-d -d` would be the command options, `-` would be the first address and `TCP4:www.example.com:80` would be the second address.
34 |
35 | 
36 |
37 | This might seem like a lot to take in (and the examples in [the man page](http://www.dest-unreach.org/socat/doc/socat.html#ADDRESS_TCP_LISTEN) are, if anything, even more inscrutable), so let’s break each component down a bit more.
38 |
39 | Let’s first start with the address, since the address is the cornerstone aspect of `socat`.
40 |
41 | ## Addresses
42 |
43 | In order to understand `socat` it’s important to understand what addresses are and how they work.
44 |
45 | The address is something that the user provides via the command line. Invoking `socat` without any addresses results in something like:
46 |
47 | ```bash
48 | ~: socat
49 | 2020/05/25 12:38:20 socat[36392] E exactly 2 addresses required (there are 0); use option "-h" for help
50 | ```
51 |
52 | An address comprises of three components:
53 |
54 | * The address _type_, followed by a `:`
55 | * Zero or more required address _parameters_ separated by `:`
56 | * Zero or more address _options_ separated by `,`
57 |
58 | 
59 |
60 | ## Type
61 |
62 | The _type_ is used to specify the kind of address we need.
63 |
64 | Popular options are `TCP4`, `CREATE`, `EXEC`, `GOPEN`, `STDIN`, `STDOUT`, `PIPE`, `PTY`, `UDP4` etc, where the names are pretty self-explanatory.
65 |
66 | However, in the example we saw in the previous section, a `socat` command was represented as
67 |
68 | ```bash
69 | socat -d -d - TCP4:www.example.com:80
70 | ```
71 |
72 | where `-` was said to be one of the two addresses. This doesn’t look like a fully formed address that adheres to the aforementioned convention.
73 |
74 | This is because certain address types have aliases. `-` is one such alias used to represent `STDIO`. Another alias is `TCP` which stands for TCPv4. The manpage of `socat` lists all other aliases.
75 |
76 | ## Parameters
77 |
78 | Immediately after the type comes zero or more required address parameters separated by `:`.
79 |
80 | The number of address _parameters_ depends on the address _type_.
81 |
82 | The address _type_ `TCP4` requires a _server specification_ and a _port specification_ (number or service name). A valid address with _type_ `TCP4` established with port `80` of host `www.example.com` would be `TCP:www.example.com:80`.
83 |
84 | 
85 |
86 | Another example of an address would be `UDP_RECVFROM:9125` which creates a UDP socket on port 9125, receives one packet from an unspecified peer and may send one or more answer packets to that peer.
87 |
88 | The address _type_ (like `TCP` or `UDP_RECVFROM`) is sometimes optional. Address specifications starting with a number are assumed to be of type `FD` (raw file descriptor) addresses. Similarly, if a `/` is found before the first `:` or `,` then the address type is assumed to be `GOPEN` (generic file open).
89 |
90 | 
91 |
92 | ## Address Options
93 |
94 | Address parameters can be further enhanced with _options_, which govern how the opening of the address is done or what the properties of the resulting byte streams will be.
95 |
96 | Options are specified after address parameters and they are separated from the last address parameter by a `,` (the `,` indicates when the address parameters end and when the options begin).
97 |
98 | Options can be specified either directly or with an `option_name=value` pair.
99 |
100 | Extending the previous example, we can specify the option `retry=5` on the address to specify the number of times the connection to `www.example.com` will be retried.
101 |
102 | ```
103 | TCP:www.example.com:80,retry=5
104 | ```
105 |
106 | Similarly, the following address allows one to set up a TCP listening socket and fork a child process to handle all incoming client connections.
107 |
108 | ```
109 | TCP4-LISTEN:www.example.com:80,fork
110 | ```
111 |
112 | Each _option_ belongs to one _option group_. Every address type has a set of option groups, and only options belonging to the option groups for the given address type are permitted. It is not, for example, possible to apply options reserved for sockets to regular files.
113 |
114 | ~[Address options have a many-to-1 mapping with option groups.](https://miro.medium.com/max/1400/1*c903Tb2lJCiNlhuJNhGxtA.png)
115 |
116 | For example, the `creat` option belongs to the `OPEN` option group. The `creat` option can only be used with those address types (`GOPEN`, `OPEN` and `PIPE`) that have `OPEN` as a part of their option group set.
117 |
118 | The `OPEN` option group allows for the setting of flags with the `open()` system call. Using `creat` as an option on an address of type `OPEN` sets the `O_CREAT` flag when `open()` is invoked.
119 |
120 | ## Unidirectional and Bidirectional Streams
121 |
122 | Now that we have a slightly better understanding of what addresses are, let’s see how data is transferred between the two addresses.
123 |
124 | For the first stream, the first address acts as the data source and the second address is the data sink. For the second byte stream, the second address is the data source and the first address is the data sink.
125 |
126 | Invoking `socat` with `-u` ensures that the first address can only be used for _reading_ and the second address can only be used for _writing_.
127 |
128 | In the following example,
129 |
130 | ```bash
131 | socat -u STDIN STDOUT
132 | ```
133 |
134 | the first address (`STDIN`) is only used for _reading_ data and the second address (`STDOUT`) is only used for _writing_ data. This can be verified by looking at what `socat` prints out when it is invoked:
135 |
136 | ```bash
137 | $ socat -u STDIN STDOUT
138 | 2018/10/14 14:18:15 socat[22736] N using stdin for reading
139 | 2018/10/14 14:18:15 socat[22736] N using stdout for writing
140 | ...
141 | ```
142 |
143 | 
144 |
145 | Whereas invoking `socat STDIN STDOUT` opens both the addresses for reading and writing.
146 |
147 | ```bash
148 | $ socat STDIN STDOUT
149 | 2018/10/14 14:19:48 socat[22739] N using stdin for reading and writing
150 | 2018/10/14 14:19:48 socat[22739] N using stdout for reading and writing
151 | ```
152 |
153 | 
154 |
155 | ## Single Address Specification and Dual Addresses
156 |
157 | An address of the sort we’ve seen until now that conforms to the aforementioned format is known as a `single address specification`:
158 |
159 | ```bash
160 | socat -d -d - TCP4:www.example.com:80
161 | ```
162 |
163 | Constructing a `socat` command with _**two single address specifications**_ ends up establishing _two unidirectional byte streams_ between the two addresses.
164 |
165 | 
166 |
167 |
168 |
169 | In this case, the first address can write data to the second address and the second address would write data back to the first address. However, it’s possible that we might not want the second address to write data back to the first address (`STDIO`, in this case), but instead we might want it to write the data to a different address (a file, for example) instead.
170 |
171 | Two _single addresses specifications_ can be combined with `!!` to form a _dual type address_ for one byte stream. Here, the first address is used by `socat` for reading data, and the second address for writing data.
172 |
173 | 
174 |
175 | ```bash
176 | socat -d -d READLINE\!\!OPEN:file.txt,creat,trunc SYSTEM:'read stdin; echo $stdin'
177 | ```
178 |
179 | In this example, the first address is a _dual address specification_ (`READLINE!!OPEN:file.txt,creat,trunc`), where data is being read from a source (`READLINE`) and written to a different sink (`OPEN:file.txt,creat,trunc`).
180 |
181 | Here, `socat` reads the input from `READLINE`, transfers it to the second address (`SYSTEM` — which forks a child process, executes the shell command specified).
182 |
183 | The second address returns data back to a different sink of the first address — in this example it’s `OPEN:file.txt,creat,trunc`.
184 |
185 | 
186 |
187 | This was a fairly trivial example where only one of the two addresses was a dual address specification. It’s possible that both of the addresses might be dual address specifications.
188 |
189 | ## Address Options Versus `socat` Options
190 |
191 | It’s important to understand that the options that apply to an address, which shaping how the address behaves, are different from invoking `socat` itself with specific options, which govern how the `socat` tool itself behaves.
192 |
193 | We’ve already seen previously that adding the option `-u` to `socat` ensures that the first address is only opened for reading and the second address for writing.
194 |
195 | Another useful option to know about is the `-d` option, which can be used with `socat` to print warning messages, in addition to fatal and error messages.
196 |
197 | Invoking socat with `-d -d` will print the fatal, error, warning, _and_ notice messages. I usually have `socat` aliased to `socat -d -d` in my dotfiles.
198 |
199 | Similarly, if one invokes `socat -h` or `socat -hh`, you will be presented with a wall of information that can be a little overwhelming and not all of which is required for getting started.
200 |
201 | ## Cheatsheet
202 |
203 | _Source: [Socat Cheatsheet](https://blog.travismclarke.com/post/socat-tutorial/) by Travis Clarke_
204 |
205 | There are also a _ton_ of examples on the [`socat` man page](http://www.dest-unreach.org/socat/doc/socat.html#EXAMPLES).
206 |
207 | ### Server/Client communication
208 |
209 | #### Create an echo server
210 |
211 | ##### Server
212 |
213 | ```bash
214 | socat -v tcp-l:8080,fork exec:"/bin/cat"
215 | ```
216 |
217 | ##### Client
218 |
219 | ```bash
220 | socat TCP:localhost:8080 -
221 | ```
222 |
223 | #### Create a simple client/server TCP connection
224 |
225 | ##### Server
226 |
227 | ```bash
228 | socat TCP-LISTEN:8800,reuseaddr,pf=ip4,fork -
229 | ```
230 |
231 | ##### Client
232 |
233 | ```bash
234 | socat TCP:localhost:8800 -
235 | ```
236 |
237 | #### Create a client/server TCP connection over TLS/SSL
238 |
239 | ##### Server
240 |
241 | ```bash
242 | socat OPENSSL-LISTEN:4443,reuseaddr,pf=ip4,fork,cert=$HOME/tmp/server.pem,cafile=$HOME/tmp/client.pem -
243 | ```
244 |
245 | ##### Client
246 |
247 | ```bash
248 | socat OPENSSL:localhost:4443,verify=0,cert=$HOME/tmp/client.pem,cafile=$HOME/tmp/server.pem -
249 | ```
250 |
251 | ### UNIX domain socket communication
252 |
253 | #### Create a UNIX domain socket for IPC (inter-process communication) with a **single (bi-directional)** endpoint
254 |
255 | ##### Server
256 |
257 | ```bash
258 | socat UNIX-LISTEN:/usr/local/var/run/test/test.sock -
259 | ```
260 |
261 | ##### Client
262 |
263 | ```bash
264 | socat UNIX-CONNECT:/usr/local/var/run/test/test.sock -
265 | ```
266 |
267 | #### Create a UNIX domain socket for IPC (inter-process communication) with **multiple (bi-directional)** endpoints
268 |
269 | ##### Server
270 |
271 | ```bash
272 | socat UNIX-LISTEN:/usr/local/var/run/test/test.sock,fork -
273 | ```
274 |
275 | ##### Client
276 |
277 | ```bash
278 | socat UNIX-CONNECT:/usr/local/var/run/test/test.sock -
279 | ```
280 |
281 | #### Create UNIX domain sockets for IPC (inter-process communication) and save the communication output to file
282 |
283 | ##### Server
284 |
285 | ```bash
286 | socat UNIX-LISTEN:/usr/local/var/run/test/test.sock,fork - >> $HOME/tmp/socketoutput.txt
287 | ```
288 |
289 | ##### Client
290 |
291 | ```bash
292 | socat UNIX-CONNECT:/usr/local/var/run/test/test.sock -
293 | ```
294 |
295 | ### Command execution
296 |
297 | #### Execute shell commands on a remote server (i.e. basic ssh client)
298 |
299 | ##### Server
300 |
301 | ```bash
302 | socat TCP-LISTEN:1234 EXEC:/bin/bash
303 | ```
304 |
305 | ##### Client
306 |
307 | ```bash
308 | socat TCP:localhost:1234 -
309 | ```
310 |
311 | ### Tunneling�
312 |
313 | #### Create an encrypted tunnel between a local computer and a remote machine to relay services created through an SSH protocol connection
314 |
315 | ##### Server
316 |
317 | ```bash
318 | socat TCP-LISTEN:54321,reuseaddr,fork TCP:remote.server.com:22
319 | ```
320 |
321 | ##### Client
322 |
323 | ```bash
324 | ssh root@localhost -p 54321
325 | ```
326 |
327 | #### Create a virtual point-to-point IP link through a TUN network device
328 |
329 | Mac OS X: requires the [TunTap](http://tuntaposx.sourceforge.net/) kernel extensions.
330 |
331 | ##### Server
332 |
333 | ```bash
334 | socat /dev/tun0 -
335 | ```
336 |
337 | ##### Client
338 |
339 | ```bash
340 | ifconfig tun0 10.0.0.2 10.0.0.3
341 | ping 10.0.0.3
342 | ```
343 |
--------------------------------------------------------------------------------
/linux/sparse-files.md:
--------------------------------------------------------------------------------
1 | # Sparse Files
2 |
3 | A sparse file is a type of file that attempts to use file system space more efficiently when the file itself is partially empty.
4 |
5 | This is done by writing metadata representing the empty blocks to disk instead of the actual "empty" space which makes up the block, using less disk space.
6 |
7 | The full block size is written to disk as the actual size only when the block contains "real" (non-empty) data.
8 |
9 | The `/var/log/lastlog` is a typical example of a very sparse file.
10 |
11 | ## Detection
12 | The `-s` option of the `ls` command shows the occupied space in blocks.
13 |
14 | ```bash
15 | $ ls -lhs
16 | ```
17 |
18 | ## More Reading
19 |
20 | * [Stackoverflow: What is a sparse file and why do we need it?](https://stackoverflow.com/questions/43126760/what-is-a-sparse-file-and-why-do-we-need-it)
--------------------------------------------------------------------------------
/mac/installing-flock-on-mac.md:
--------------------------------------------------------------------------------
1 | # Installing flock(1) on Mac
2 |
3 | MacOS neither ships with `flock(1)` nor includes it in its developer toolset.
4 |
5 | There's a nifty Mac version on Github though: https://github.com/discoteq/flock.
6 |
7 | Install using Homebrew:
8 |
9 | ```
10 | brew tap discoteq/discoteq
11 | brew install flock
12 | ```
13 |
--------------------------------------------------------------------------------
/mac/osascript.md:
--------------------------------------------------------------------------------
1 | # osascript
2 |
3 | _Source: https://ss64.com/osx/osascript.html_
4 |
5 | Execute AppleScripts and other OSA language scripts. Executes the given script file, or standard input if none is given. Scripts can be plain text or compiled scripts. osascript was designed for use with AppleScript, but will work with any Open Scripting Architecture (OSA) language.
6 |
7 | Syntax
8 |
9 | osascript [-l language] [-e command] [-s flags] [programfile]
10 |
11 | Options
12 |
13 | -e command
14 | Enter one line of a script. If -e is given, osascript will not
15 | look for a filename in the argument list. Multiple -e commands can
16 | be given to build up a multi-line script. Because most scripts use
17 | characters that are special to many shell programs (e.g., Apple-
18 | Script uses single and double quote marks, `(', `)', and `*'),
19 | the command will have to be correctly quoted and escaped to
20 | get it past the shell intact.
21 |
22 | -l language
23 | Override the language for any plain text files. Normally, plain
24 | text files are compiled as AppleScript.
25 |
26 | -s flags
27 | Modify the output style. The flags argument is a string consisting
28 | of any of the modifier characters e, h, o, and s. Multiple modi-
29 | fiers can be concatenated in the same string, and multiple -s
30 |
31 | options can be specified. The modifiers come in exclusive pairs;
32 | if conflicting modifiers are specified, the last one takes prece-
33 | dence. The meanings of the modifier characters are as follows:
34 |
35 | h Print values in human-readable form (default).
36 | s Print values in recompilable source form.
37 |
38 | osascript normally prints its results in human-readable form:
39 | strings do not have quotes around them, characters are not
40 | escaped, braces for lists and records are omitted, etc. This is
41 | generally more useful, but can introduce ambiguities. For exam-
42 | ple, the lists `{"foo", "bar"}' and `{{"foo", {"bar"}}}' would
43 | both be displayed as `foo, bar'. To see the results in an unam-
44 | biguous form that could be recompiled into the same value, use
45 | the s modifier.
46 |
47 | e Print script errors to stderr (default).
48 | o Print script errors to stdout.
49 |
50 | osascript normally prints script errors to stderr, so downstream
51 | clients only see valid results. When running automated tests,
52 | however, using the o modifier lets you distinguish script
53 | errors, which you care about matching, from other diagnostic
54 | output, which you don't.
55 |
56 | `osascript` in macOS 10.0 would translate `\r` characters in the output to `\n` and provided `c` and `r` modifiers for the `-s` option to change this. osascript now always leaves the output alone; pipe through tr if necessary.
57 |
58 | For multi-line AppleScript you can use ¬ as a new line continuation character, press Option-L to enter this into your text editor.
59 |
60 | Examples
61 |
62 | Open $HOME in Finder
63 |
64 | `osascript -e "tell application \"Finder\" to open (\"${HOME}\" as POSIX file)"`
65 |
66 | Display a notificaton:
67 |
68 | `osascript -e 'display notification "hello world!"'`
69 |
70 | Display a notification with title:
71 |
72 | `osascript -e 'display notification "hello world!" with title "This is the title"'`
73 |
74 | Open or switch to Safari:
75 |
76 | `$ osascript -e 'tell app "Safari" to activate'`
77 |
78 | Close safari:
79 |
80 | `$ osascript -e 'quit app "safari.app"'`
81 |
82 | Empty the trash:
83 |
84 | `$ osascript -e 'tell application "Finder" to empty trash'`
85 |
86 | Set the output volume to 50%
87 |
88 | `$ sudo osascript -e 'set volume output volume 50'`
89 |
90 | Input volume and Alert volume can also be set from 0 to 100%:
91 |
92 | `$ sudo osascript -e 'set volume input volume 40'`
93 |
94 | `$ sudo osascript -e 'set volume alert volume 75'`
95 |
96 | Mute the output volume (True/False):
97 |
98 | `$ osascript -e 'set volume output muted TRUE'`
99 |
100 | Shut down without asking for confirmation:
101 |
102 | `$ osascript -e 'tell app "System Events" to shut down'`
103 |
104 | Restart without asking for confirmation:
105 |
106 | `$ osascript -e 'tell app "System Events" to restart'`
107 |
--------------------------------------------------------------------------------
/misc/buttons-1.jpg:
--------------------------------------------------------------------------------
https://raw.githubusercontent.com/clockworksoul/today-i-learned/1257079ee89defd9da4c261fd30d7d4a85f8ceb7/misc/buttons-1.jpg
--------------------------------------------------------------------------------
/misc/buttons-2.jpg:
--------------------------------------------------------------------------------
https://raw.githubusercontent.com/clockworksoul/today-i-learned/1257079ee89defd9da4c261fd30d7d4a85f8ceb7/misc/buttons-2.jpg
--------------------------------------------------------------------------------
/misc/buttons.md:
--------------------------------------------------------------------------------
1 | _Source: My friend Jeff Goldschrafe told me ([verified here](https://www.primermagazine.com/2020/learn/button-up-vs-button-down-shirt-difference))_
2 |
3 | # "Button up" vs "button down" shirts
4 |
5 | There is a difference!
6 |
7 | * A ***button up shirt*** buttons up the front of the body all the way.
8 |
9 | * A ***button down shirt*** has buttons on the collar points that you can, well, button down.
10 |
11 | 
12 |
13 | 
14 |
--------------------------------------------------------------------------------
/misc/chestertons-fence.md:
--------------------------------------------------------------------------------
1 | # Chesterton's Fence
2 |
3 | _Source: [Wikipedia: Chesterton's Fence](https://en.wikipedia.org/wiki/Wikipedia:Chesterton%27s_fence)_
4 |
5 | Don't remove something until you know why it was put up in the first place.
6 |
7 | ## Background
8 |
9 | Chesterton's fence is the principle that reforms should not be made until the reasoning behind the existing state of affairs is understood. The quotation is from G. K. Chesterton's 1929 book The Thing, in the chapter entitled "The Drift from Domesticity":
10 |
11 | > In the matter of reforming things, as distinct from deforming them, there is one plain and simple principle; a principle which will probably be called a paradox. There exists in such a case a certain institution or law; let us say, for the sake of simplicity, a fence or gate erected across a road. The more modern type of reformer goes gaily up to it and says, "I don't see the use of this; let us clear it away." To which the more intelligent type of reformer will do well to answer: "If you don't see the use of it, I certainly won't let you clear it away. Go away and think. Then, when you can come back and tell me that you do see the use of it, I may allow you to destroy it."
12 |
13 | Chesterton's admonition should first be understood within his own historical context, as a response to certain socialists and reformers of his time (e.g. George Bernard Shaw).
14 |
15 | ## See also
16 |
17 | * [Chesterton’s Fence: A Lesson in Second Order Thinking](https://fs.blog/2020/03/chestertons-fence/)
18 | * [The Fallacy Of Chesterton’s Fence](https://abovethelaw.com/2014/01/the-fallacy-of-chestertons-fence/?rf=1)
19 |
--------------------------------------------------------------------------------
/misc/convert-youtube-video-to-zoom-background.md:
--------------------------------------------------------------------------------
1 | # Converting a YouTube video to a Zoom background
2 |
3 | Fun fact: Zoom doesn't seem to have a maximum video size, so go ahead and add whatever videos you like.
4 |
5 | Important: busy backgrounds can be distracting to others. Please be respectful and keep your video background choices subtle.
6 |
7 | ## Choose Your Video
8 |
9 | For copyright reasons, you may have difficulty downloading videos with music in them.
10 |
11 | Example: https://www.youtube.com/watch?v=d0tU18Ybcvk
12 |
13 | If you have any specific start or stop times, note them.
14 |
15 | ## Find a YouTube (mp4) download site
16 |
17 | There are a [wealth of YouTube download sites on the Internet](https://www.google.com/search?q=youtube+downloader) that let you to transcode YouTube videos into other formats. Choose any one you like, but be sure that it supports mp4 format.
18 |
19 | I like https://www.clipconverter.cc/ because it supports start and stop timestamps.
20 |
21 | ## Do the thing
22 |
23 | Use your transcoder site of choice to convert your video, and download the resulting mp4, ideally to a dedicated directory for Zoom wallpapers.
24 |
25 | Be sure to choose a meaningful name so you can find it later!
26 |
27 | ## Add the background to Zoom
28 |
29 | 1. Zoom -> Preferences -> Virtual Background
30 |
31 | 2. Click the [+] and select "Add Video"
32 |
33 | 3. Select your newly downloaded video.
34 |
35 | ## Enjoy!
36 |
37 | Your new video is now in your backgrounds library. Enjoy!
38 |
39 |
40 |
--------------------------------------------------------------------------------
/misc/hugo-quickstart.md:
--------------------------------------------------------------------------------
1 | # Hugo Quickstart
2 |
3 | _Source: [Hugo Quickstart](https://gohugo.io/getting-started/quick-start/)_
4 |
5 | The following are the steps I used to get [Hugo](https://gohugo.io) started. They're close, but not identical, to the ones on the [official quickstart page](https://gohugo.io/getting-started/quick-start/).
6 |
7 | ## Step 1: Install Hugo
8 |
9 | ```bash
10 | go get github.com/gohugoio/hugo
11 | ```
12 |
13 | ```bash
14 | hugo version
15 | ```
16 |
17 | ## Step 2: Create a New Site
18 |
19 | ```bash
20 | hugo new site very-serio.us
21 | ```
22 |
23 | ## Step 3: Add a Theme
24 |
25 | See [themes.gohugo.io](https://themes.gohugo.io/) for a list of themes to consider. This quickstart uses the beautiful [Ananke](https://themes.gohugo.io/gohugo-theme-ananke/) theme.
26 |
27 | First, download the theme from GitHub and add it to your site’s theme directory:
28 |
29 | ```bash
30 | cd very-serio.us
31 | git init
32 | git submodule add https://github.com/budparr/gohugo-theme-ananke.git themes/ananke
33 | ```
34 |
35 | Then, add the theme to the site configuration:
36 |
37 | ```bash
38 | echo 'theme = "ananke"' >> config.toml
39 | ```
40 |
41 | ## Step 4: Add Some Content
42 |
43 | ```bash
44 | hugo new posts/my-first-post.md
45 | ```
46 |
47 | ## Step 5: Start the Hugo server
48 |
49 | Now, start the Hugo server with drafts enabled:
50 |
51 | ```bash
52 | $ hugo server -D
53 |
54 | | EN
55 | +------------------+----+
56 | Pages | 10
57 | Paginator pages | 0
58 | Non-page files | 0
59 | Static files | 3
60 | Processed images | 0
61 | Aliases | 1
62 | Sitemaps | 1
63 | Cleaned | 0
64 |
65 | Total in 11 ms
66 | Watching for changes in /Users/bep/quickstart/{content,data,layouts,static,themes}
67 | Watching for config changes in /Users/bep/quickstart/config.toml
68 | Environment: "development"
69 | Serving pages from memory
70 | Running in Fast Render Mode. For full rebuilds on change: hugo server --disableFastRender
71 | Web Server is available at http://localhost:1313/ (bind address 127.0.0.1)
72 | Press Ctrl+C to stop
73 | ```
74 |
75 | Navigate to your new site at http://localhost:1313/.
76 |
77 | Feel free to edit or add new content and simply refresh in browser to see changes quickly (You might need to force refresh in webbrowser, something like Ctrl-R usually works).
78 |
79 | ## Step 6: Customize the Theme
80 |
81 | Your new site already looks great, but you will want to tweak it a little before you release it to the public.
82 |
83 | ### Site Configuration
84 |
85 | Open up `config.toml` in a text editor:
86 |
87 | ```
88 | baseURL = "https://example.org/"
89 | languageCode = "en-us"
90 | title = "My New Hugo Site"
91 | theme = "ananke"
92 | ```
93 |
94 | ## Step 7: Build static pages
95 |
96 | It is simple. Just call:
97 |
98 | ```bash
99 | hugo -D
100 | ```
101 |
102 | Output will be in `./public/` directory by default (`-d`/`--destination` flag to change it, or set `publishdir` in the config file).
103 |
104 | Drafts do not get deployed; once you finish a post, update the header of the post to say draft: `false`. More info [here](https://gohugo.io/getting-started/usage/#draft-future-and-expired-content).
--------------------------------------------------------------------------------
/misc/new-gdocs.md:
--------------------------------------------------------------------------------
1 | # Easily Create New Google {Docs|Sheets|Forms|Slideshows}
2 |
3 | _Source: My friend and manager, Jeff Goldschrafe_
4 |
5 | There's a nifty `.new` TLD that lets you easily create new new GSuite artifacts, for easy bookmarking:
6 |
7 | * Google Doc: https://doc.new
8 | * Google Sheets: https://sheet.new
9 | * Google Form: https://form.new
10 | * Google Slideshow: https://slide.new
11 |
12 | ## Neat, huh?
13 |
14 | 
--------------------------------------------------------------------------------
/misc/new-gdocs.png:
--------------------------------------------------------------------------------
https://raw.githubusercontent.com/clockworksoul/today-i-learned/1257079ee89defd9da4c261fd30d7d4a85f8ceb7/misc/new-gdocs.png
--------------------------------------------------------------------------------
/misc/voronoi-diagram.md:
--------------------------------------------------------------------------------
1 | # Voronoi diagram
2 |
3 | _Source: [Wikipedia](https://en.wikipedia.org/wiki/Voronoi_diagram)_
4 |
5 | 
6 |
7 | A Voronoi diagram is a partition of a plane into regions close to each of a given set of objects.
8 |
9 | In the simplest case, these objects are just finitely many points in the plane (called _seeds_).
10 |
11 | For each seed there is a corresponding region consisting of all points of the plane closer to that seed than to any other. These regions are called _Voronoi cells_.
12 |
--------------------------------------------------------------------------------
/misc/voronoi-diagram.png:
--------------------------------------------------------------------------------
https://raw.githubusercontent.com/clockworksoul/today-i-learned/1257079ee89defd9da4c261fd30d7d4a85f8ceb7/misc/voronoi-diagram.png
--------------------------------------------------------------------------------
/software-architecture/hexagonal-architecture.md:
--------------------------------------------------------------------------------
1 | # Hexagonal Architecture
2 |
3 | _Sources: [1](https://web.archive.org/web/20180822100852/http://alistair.cockburn.us/Hexagonal+architecture), [2](https://eskavision.com/hexagonal-architecture/), [3](https://jmgarridopaz.github.io/content/hexagonalarchitecture.html), [4](https://en.wikipedia.org/wiki/Hexagonal_architecture_(software)), [5](https://beyondxscratch.com/2017/08/19/decoupling-your-technical-code-from-your-business-logic-with-the-hexagonal-architecture-hexarch/)_
4 |
5 | Hexagonal architecture is a software architectural pattern that uses the principles of _loose coupling_ to allow inputs and outputs to be easily connected.
6 |
7 | It could be said that hexagonal archiecture is simply [_inversion of control_](https://en.wikipedia.org/wiki/Inversion_of_control) taken to its logical conclusion.
8 |
9 | I'll explain.
10 |
11 | Hexagonal architecture can be described as an architecture built around the principle of inversion of control, in which a program only knows about a component as an abstraction, passing the control of the functionality to the implentation.
12 |
13 | ## The Name
14 |
15 | The name "hexagonal architecture" doesn't actually mean anything. It's a silly name that has nothing to do with the implementation. This actually confused me for a while because I kept trying to find the connection between the name and the implementation that didn't exist.
16 |
17 | Seriously, the [original author of hexagonal architecture](https://web.archive.org/web/20180822100852/http://alistair.cockburn.us/Hexagonal+architecture) chose this shape simply because it allowed enough space to illustrate all the components.
18 |
19 | ## The Architecture
20 |
21 | The guiding principle of hexagonal architecture is that functionalities should be represented by abstractions into which specific implementations can be [injected](https://en.wikipedia.org/wiki/Dependency_injection).
22 |
23 | Using this principle, an application might be structured so that it could be run by different kinds of clients (humans, tests cases, other applications, etc.), and it could be tested in isolation from external devices of the real world that the application depends on (databases, servers, other applications, etc.).
24 |
25 | This can be illustrated by breaking the architecture down as follows:
26 |
27 | * The **hexagon** represents the application itself. It contains the business logic, but no _direct_ references to any technology, framework or real world device.
28 | * The **drivers** can be anything that triggers an interaction with the application, such as a user.
29 | * The **driven actors** can be anything the application triggers an interaction with, such as a database.
30 |
31 | 
32 |
33 | ### The Hexagon
34 |
35 | Inside the hexagon we just have the things that are important for the business problem that the application is trying to solve. It can be whatever you want.
36 |
37 | ### The Actors
38 |
39 | Outside the hexagon we have the "actors": any real world thing that the application interacts with, including humans, devices, or other applications.
40 |
41 | As mentioned above, there are two kinds of actors:
42 |
43 | * _Driver actors_ can be anything that triggers an interaction with the application. Drivers are the users (either humans or devices) of the application.
44 | * _Driven actors_ can be anything the application triggers an interaction with. A driven actor provides some functionality needed by the application for implementing the business logic.
45 |
46 | ### Ports and Adaptors
47 |
48 | _Ports_ are the places where different kinds of actors can "plug in".
49 |
50 | _Adapters_ are the software components -- implementations -- that can "plug into" a particular kind of ports.
51 |
52 | For example, your application might have a "logging port", into which a "logging adapter" might plug. One logging adapter might write to a local file, while another might stream to a cloud-based data store.
53 |
54 | ### Architecture Summary
55 |
56 | As we have seen, the elements of the architecture are:
57 |
58 | * The Hexagon ==> the application
59 | * Driver Ports ==> API offered by the application
60 | * Driven Ports ==> SPI required by the application
61 |
62 | * Actors ==> environment devices that interact with the application
63 | * Drivers ==> application users (either humans or hardware/software devices)
64 | * Driven Actors ==> provide services required by the application
65 |
66 | * Adapters ==> adapt specific technology to the application
67 | * Driver Adapters ==> use the drivers ports
68 | * Driven Adapters ==> implement the driven ports
69 |
70 | ## A Basic Implementation
71 |
72 | ### Domain
73 |
74 | ```go
75 | type Book struct {
76 | Id int
77 | Name string
78 | }
79 | ```
80 |
81 | ### Driven Port
82 |
83 | In this example, we have a port for interacting with our data repository. In this example, it specifies a single method that accepts a
84 |
85 | ```go
86 | type BookRepository interface {
87 | FindById(id int) (Book, error)
88 | }
89 | ```
90 |
91 | ### Database Driven Port Adapter
92 |
93 | A driven adapter implements a driven port interface, converting the technology agnostic methods of the port into specific technology methods.
94 |
95 | This example implicitly implements `BookRepository` by satisfying its `FindById` contract.
96 |
97 | ```go
98 | type DatabaseBookRepository struct {
99 | configs data.DatabaseConfigs
100 | db *sql.DB
101 | }
102 |
103 | func (a *DatabaseBookRepository) FindById(id) (Book, error) {
104 | db, err := a.connect("books")
105 | defer db.Close()
106 | if err != nil {
107 | return Book{}, err
108 | }
109 |
110 | query := "SELECT name FROM books WHERE id=$1"
111 | book := Book{Id:id}
112 | err = db.QueryRow(query, id).Scan(&book.Name)
113 | if err != nil {
114 | return book, err
115 | }
116 |
117 | return book, nil
118 | }
119 | ```
120 |
--------------------------------------------------------------------------------
/software-architecture/hexagonal-architecture.png:
--------------------------------------------------------------------------------
https://raw.githubusercontent.com/clockworksoul/today-i-learned/1257079ee89defd9da4c261fd30d7d4a85f8ceb7/software-architecture/hexagonal-architecture.png
--------------------------------------------------------------------------------
/ssh/break-out-of-a-stuck-session.md:
--------------------------------------------------------------------------------
1 | # Break Out of a Stuck SSH Session
2 |
3 | _Source: https://smallstep.com/blog/ssh-tricks-and-tips/#exit-stuck-sessions_
4 |
5 | SSH sessions can often hang due to network interruptions, a program that gets out of control, or one of those terminal escape sequences that lock keyboard input.
6 |
7 | `ssh` includes the escape character `~` by default. The command `~`. closes an open connection and brings you back to the terminal. (You can only enter escape sequences on a new line.) `~?` lists all of the commands you can use during a session. On international keyboards, you may need to press the `~` key twice to send the `~` character.
8 |
--------------------------------------------------------------------------------
/ssh/exit-on-network-interruptions.md:
--------------------------------------------------------------------------------
1 | # Exit SSH Automatically on Network Interruptions
2 |
3 | _Source: https://smallstep.com/blog/ssh-tricks-and-tips/#exit-stuck-sessions_
4 |
5 | SSH sessions can often hang due to network interruptions, a program that gets out of control, or one of those terminal escape sequences that lock keyboard input.
6 |
7 | To configure your SSH to automatically exit stuck sessions, add the following to your `.ssh/config`:
8 |
9 | ```
10 | ServerAliveInterval 5
11 | ServerAliveCountMax 1
12 | ```
13 |
14 | `ssh` will check the connection by sending an echo to the remote host every `ServerAliveInterval` seconds. If more than `ServerAliveCountMax` echoes are sent without a response, `ssh` will timeout and exit.
15 |
--------------------------------------------------------------------------------
/team/amazon-leadership-principles.md:
--------------------------------------------------------------------------------
1 | # Amazon Leadership Principles
2 |
3 | _Source: https://www.amazon.jobs/en/principles_
4 |
5 | ## Customer Obsession
6 |
7 | Leaders start with the customer and work backwards. They work vigorously to earn and keep customer trust. Although leaders pay attention to competitors, they obsess over customers.
8 |
9 | ## Ownership
10 |
11 | Leaders are owners. They think long term and don’t sacrifice long-term value for short-term results. They act on behalf of the entire company, beyond just their own team. They never say "that’s not my job".
12 |
13 | ## Invent and Simplify
14 |
15 | Leaders expect and require innovation and invention from their teams and always find ways to simplify. They are externally aware, look for new ideas from everywhere, and are not limited by "not invented here". As we do new things, we accept that we may be misunderstood for long periods of time.
16 |
17 | ## Are Right, A Lot
18 |
19 | Leaders are right a lot. They have strong judgment and good instincts. They seek diverse perspectives and work to disconfirm their beliefs.
20 |
21 | ## Learn and Be Curious
22 |
23 | Leaders are never done learning and always seek to improve themselves. They are curious about new possibilities and act to explore them.
24 |
25 | ## Hire and Develop the Best
26 |
27 | Leaders raise the performance bar with every hire and promotion. They recognize exceptional talent, and willingly move them throughout the organization. Leaders develop leaders and take seriously their role in coaching others. We work on behalf of our people to invent mechanisms for development like Career Choice.
28 |
29 | ## Insist on the Highest Standards
30 |
31 | Leaders have relentlessly high standards — many people may think these standards are unreasonably high. Leaders are continually raising the bar and drive their teams to deliver high quality products, services, and processes. Leaders ensure that defects do not get sent down the line and that problems are fixed so they stay fixed.
32 |
33 | ## Think Big
34 |
35 | Thinking small is a self-fulfilling prophecy. Leaders create and communicate a bold direction that inspires results. They think differently and look around corners for ways to serve customers.
36 |
37 | ## Bias for Action
38 |
39 | Speed matters in business. Many decisions and actions are reversible and do not need extensive study. We value calculated risk taking.
40 |
41 | ## Frugality
42 |
43 | Accomplish more with less. Constraints breed resourcefulness, self-sufficiency, and invention. There are no extra points for growing headcount, budget size, or fixed expense.
44 |
45 | ## Earn Trust
46 |
47 | Leaders listen attentively, speak candidly, and treat others respectfully. They are vocally self-critical, even when doing so is awkward or embarrassing. Leaders do not believe their or their team’s body odor smells of perfume. They benchmark themselves and their teams against the best.
48 |
49 | ## Dive Deep
50 |
51 | Leaders operate at all levels, stay connected to the details, audit frequently, and are skeptical when metrics and anecdote differ. No task is beneath them.
52 |
53 | ## Have Backbone; Disagree and Commit
54 |
55 | Leaders are obligated to respectfully challenge decisions when they disagree, even when doing so is uncomfortable or exhausting. Leaders have conviction and are tenacious. They do not compromise for the sake of social cohesion. Once a decision is determined, they commit wholly.
56 |
57 | ## Deliver Results
58 |
59 | Leaders focus on the key inputs for their business and deliver them with the right quality and in a timely fashion. Despite setbacks, they rise to the occasion and never settle.
60 |
61 | _(from https://www.amazon.jobs/en/principles)_
62 |
--------------------------------------------------------------------------------
/team/never-attribute-to-stupidity-that-which-is-adequately-explained-by-opportunity-cost.md:
--------------------------------------------------------------------------------
1 | # Never Attribute to Stupidity That Which Is Adequately Explained by Opportunity Cost
2 |
3 | _Source: https://erikbern.com/2020/03/10/never-attribute-to-stupidity-that-which-is-adequately-explained-by-opportunity-cost.html_
4 |
5 | [Hanlon's razor](https://en.wikipedia.org/wiki/Hanlon%27s_razor) is a classic aphorism I'm sure you have heard before: _Never attribute to malice that which can be adequately explained by stupidity_.
6 |
7 | I've found that neither malice nor stupidity is the most common reason when you don't understand why something is in a certain way. Instead, the root cause is probably just that _they didn't have time yet_. This happens all the time at startups (maybe a bit less at big companies, for reasons I'll get back to).
8 |
9 | Some examples of things I hear all the time:
10 |
11 | * I don't understand why team X isn't working on _feature idea_ Y. It's such an obvious thing to do!
12 |
13 | * Why is _bug_ Z still present? Hasn't it been known for a really long time? I don't understand why they aren't fixing it?
14 |
15 | * I don't get why HR team still doesn't offer _perk_ W. So many other companies have that!
16 |
17 | * I've told my manager that we need a process for _thing_ V but it still hasn't happened!
18 |
19 | Of course, why these things never happened is that something else was more important. Quoting Wikipedia on [Opportunity cost](https://en.wikipedia.org/wiki/Opportunity_cost):
20 |
21 | >When an option is chosen from alternatives, the opportunity cost is the "cost" incurred by not enjoying the benefit associated with the best alternative choice. The New Oxford American Dictionary defines it as "the loss of potential gain from other alternatives when one alternative is chosen." In simple terms, opportunity cost is the benefit not received as a result of not selecting the next best option.
22 |
23 | Thus I've started telling people: _Never attribute to stupidity that which is adequately explained by opportunity cost_.
24 |
--------------------------------------------------------------------------------
/team/stay-out-of-the-critical-path.md:
--------------------------------------------------------------------------------
1 | # Stop Writing Code and Engineering in the Critical Path
2 |
3 | _Source: https://charity.wtf/2019/01/04/engineering-management-the-pendulum-or-the-ladder/_
4 |
5 | There is an enormous demand for technical engineering leaders — far more demand than supply. The most common hackaround is to pair a people manager (who can speak the language and knows the concepts, but stopped engineering ages ago) with a tech lead, and make them collaborate to co-lead the team. This unwieldy setup often works pretty well.
6 |
7 | But most of those people managers didn’t want or expect to end up sidelined in this way when they were told to stop engineering.
8 |
9 | If you want to be a pure people manager and not do engineering work, and don’t want to climb the ladder or can’t find a ladder to climb, more power to you. I don’t know that I’ve met many of these people in my life. I have met a lot of people in this situation by accident, and they are always kinda angsty and unhappy about it. Don’t let yourself become this person by accident. Please.
10 |
11 | Which brings me to my next point.
12 |
13 | ## You Will Be Advised to Stop Writing Code or Engineering
14 |
15 | ✨ **FUCK THAT.** ✨
16 |
17 | Everybody’s favorite hobby is hassling new managers about whether or not they’ve stopped writing code yet, and not letting up until they say that they have. This is a terrible, horrible, no-good VERY bad idea that seems like it must originally have been a botched repeating of the correct advice, which is:
18 |
19 | ## Stop Writing Code and Engineering in the Critical Path
20 |
21 | Can you spot the difference? It’s very subtle. Let’s run a quick test:
22 |
23 | * Authoring a feature? ⛔️
24 | * Covering on-call when someone needs a break? ✅
25 | * Diving on the biggest project after a post mortem? ⛔️
26 | * Code reviews? ✅
27 | * Picking up a p2 bug that’s annoying but never seems to become top priority? ✅
28 | * Insisting that all commits be gated on their approval? ⛔️
29 | * Cleaning up the monitoring checks and writing a library to generate coverage? ✅
30 |
31 | The more you can keep your hands warm, the more effective you will be as a coach and a leader. You’ll have a richer instinct for what people need and want from you and each other, which will help you keep a light touch. You will write better reviews and resolve technical disputes with more authority. You will also slow the erosion and geriatric creep of your own technical chops.
32 |
33 | I firmly believe every line manager should either be in the on call rotation or pinch hit liberally and regularly, but that’s a different post.
34 |
35 |
--------------------------------------------------------------------------------
/terraform/custom-validation-rules.md:
--------------------------------------------------------------------------------
1 | # Terraform Custom Variable Validation Rules
2 |
3 | _Sources: [[1]](https://github.com/hashicorp/terraform/issues/2847#issuecomment-573252616), [[2]](https://www.terraform.io/docs/configuration/variables.html#custom-validation-rules)_
4 |
5 | _**Note: As of today (25 May 2020) this feature is considered experimental and is subject to breaking changes even in minor releases. We welcome your feedback, but cannot recommend using this feature in production modules yet.**_
6 |
7 | In Terraform, a module author can specify arbitrary custom validation rules for a particular variable using a `validation` block nested within the corresponding `variable` block:
8 |
9 | ```hcl
10 | variable "image_id" {
11 | type = string
12 | description = "The id of the machine image (AMI) to use for the server."
13 |
14 | validation {
15 | condition = length(var.image_id) > 4 && substr(var.image_id, 0, 4) == "ami-"
16 | error_message = "The image_id value must be a valid AMI id, starting with \"ami-\"."
17 | }
18 | }
19 | ```
20 |
21 | The `condition` argument:
22 |
23 | * Must use the value of the variable,
24 | * Must return `true` if the value is valid, or `false` if it is invalid,
25 | * May refer only to the variable that the condition applies to, and
26 | * Must not produce errors.
27 |
28 | If the failure of an expression is the basis of the validation decision, use [the `can` function](https://www.terraform.io/docs/configuration/functions/can.html) to detect such errors. For example:
29 |
30 | ```hcl
31 | variable "image_id" {
32 | type = string
33 | description = "The id of the machine image (AMI) to use for the server."
34 |
35 | validation {
36 | # regex(...) fails if it cannot find a match
37 | condition = can(regex("^ami-", var.image_id))
38 | error_message = "The image_id value must be a valid AMI id, starting with \"ami-\"."
39 | }
40 | }
41 | ```
42 |
43 | If `condition` evaluates to `false`, Terraform will produce an error message that includes the sentences given in `error_message`. The error message string should be at least one full sentence explaining the constraint that failed, using a sentence structure similar to the above examples.
44 |
45 | This is an experimental language feature that currently requires an explicit opt-in using the experiment keyword `variable_validation`:
46 |
47 | ```hcl
48 | terraform {
49 | experiments = [variable_validation]
50 | }
51 | ```
52 |
--------------------------------------------------------------------------------
/terraform/plugin-basics.md:
--------------------------------------------------------------------------------
1 | # Terraform Plugin Basics
2 |
3 | _Sources: https://www.terraform.io/docs/plugins/basics.html_
4 |
5 | This page documents the basics of how the plugin system in Terraform works, and how to setup a basic development environment for plugin development if you're writing a Terraform plugin.
6 |
7 | ## How it Works
8 |
9 | Terraform providers and provisioners are provided via plugins. Each plugin exposes an implementation for a specific service, such as AWS, or provisioner, such as bash.
10 |
11 | Plugins are executed as a separate process and communicate with the main Terraform binary over an RPC interface.
12 |
13 | More details are available in [Plugin Internals](https://www.terraform.io/docs/internals/internal-plugins.html).
14 |
15 | ## Installing Plugins
16 |
17 | The provider plugins distributed by HashiCorp are automatically installed by `terraform init`. Third-party plugins (both providers and provisioners) can be manually installed into the user plugins directory, located at `%APPDATA%\terraform.d\plugins` on Windows and `~/.terraform.d/plugins` on other systems.
18 |
19 | For more information, see:
20 |
21 | * [Configuring Providers](https://www.terraform.io/docs/configuration/providers.html)
22 | * [Configuring Providers: Third-party Plugins](https://www.terraform.io/docs/configuration/providers.html#third-party-plugins)
23 |
24 | For developer-centric documentation, see:
25 |
26 | * [How Terraform Works: Plugin Discovery](https://www.terraform.io/docs/extend/how-terraform-works.html#discovery)
27 |
28 | ## Developing a Teraform Plugin
29 |
30 | Developing a plugin is simple. The only knowledge necessary to write a plugin is basic command-line skills and basic knowledge of the [Go programming language](https://golang.org/).
31 |
32 | Create a new Go project. The name of the project should either begin with `provider-` or `provisioner-`, depending on what kind of plugin it will be. The repository name will, by default, be the name of the binary produced by go install for your plugin package.
33 |
34 | With the package directory made, create a `main.go` file. This project will be a binary so the package is "main":
35 |
36 | ```go
37 | package main
38 |
39 | import (
40 | "github.com/hashicorp/terraform/plugin"
41 | )
42 |
43 | func main() {
44 | plugin.Serve(new(MyPlugin))
45 | }
46 | ```
47 |
48 | The name `MyPlugin` is a placeholder for the struct type that represents your plugin's implementation. This must implement either `terraform.ResourceProvider` or `terraform.ResourceProvisioner`, depending on the plugin type.
49 |
50 | To test your plugin, the easiest method is to copy your terraform binary to `$GOPATH/bin` and ensure that this copy is the one being used for testing. `terraform init` will search for plugins within the same directory as the `terraform` binary, and `$GOPATH/bin` is the directory into which `go install` will place the plugin executable.
51 |
52 | Next Page: [Terraform Provider Plugin Development](provider-plugin-development.md)
53 |
--------------------------------------------------------------------------------
/terraform/provider-plugin-development.md:
--------------------------------------------------------------------------------
1 | # Terraform Provider Plugin Development
2 |
3 | _Source: https://www.terraform.io/docs/plugins/provider.html_
4 |
5 | A provider in Terraform is responsible for the lifecycle of a resource: create, read, update, delete. An example of a provider is AWS, which can manage resources of type `aws_instance`, `aws_eip`, `aws_elb`, etc.
6 |
7 | The primary reasons to care about provider plugins are:
8 |
9 | * You want to add a new resource type to an existing provider.
10 |
11 | * You want to write a completely new provider for managing resource types in a system not yet supported.
12 |
13 | * You want to write a completely new provider for custom, internal systems such as a private inventory management system.
14 |
15 | If you're interested in provider development, then read on. The remainder of this page will assume you're familiar with [plugin basics](plugin-basics.md) and that you already have a basic development environment setup.
16 |
17 | ## Provider Plugin Codebases
18 |
19 | _(Note: These `$GOPATH` instructions are dated. Update them to use `go mod`)_
20 |
21 | Provider plugins live outside of the Terraform core codebase in their own source code repositories. The official set of provider plugins released by HashiCorp (developed by both HashiCorp staff and community contributors) all live in repositories in the terraform-providers organization on GitHub, but third-party plugins can be maintained in any source code repository.
22 |
23 | When developing a provider plugin, it is recommended to use a common `GOPATH` that includes both the core Terraform repository and the repositories of any providers being changed. This makes it easier to use a locally-built terraform executable and a set of locally-built provider plugins together without further configuration.
24 |
25 | For example, to download both Terraform and the `template` provider into `GOPATH`:
26 |
27 | ```
28 | $ go get github.com/hashicorp/terraform
29 | $ go get github.com/terraform-providers/terraform-provider-template
30 | ```
31 |
32 | These two packages are both "main" packages that can be built into separate executables with `go install`:
33 |
34 | ```
35 | $ go install github.com/hashicorp/terraform
36 | $ go install github.com/terraform-providers/terraform-provider-template
37 | ```
38 |
39 | After running the above commands, both Terraform core and the template provider will both be installed in the current `GOPATH` and `$GOPATH/bin` will contain both terraform and terraform-provider-template executables. This `terraform` executable will find and use the template provider plugin alongside it in the bin directory in preference to downloading and installing an official release.
40 |
41 | When constructing a new provider from scratch, it's recommended to follow a similar repository structure as for the existing providers, with the main package in the repository root and a library package in a subdirectory named after the provider. For more information, see [Writing Custom Providers](https://www.terraform.io/docs/extend/writing-custom-providers.html) in the [Extending Terraform](https://www.terraform.io/docs/extend/index.html) section.
42 |
43 | When making changes only to files within the provider repository, it is not necessary to re-build the main Terraform executable. Note that some packages from the Terraform repository are used as library dependencies by providers, such as `github.com/hashicorp/terraform/helper/schema`; it is recommended to use govendor to create a local vendor copy of the relevant packages in the provider repository, as can be seen in the repositories within the terraform-providers GitHub organization.
44 |
45 | ## Low-Level Interface
46 |
47 | The interface you must implement for providers is [ResourceProvider](https://www.terraform.io/docs/plugins/provider.html).
48 |
49 | This interface is extremely low level, however, and we don't recommend you implement it directly. Implementing the interface directly is error prone, complicated, and difficult.
50 |
51 | Instead, we've developed some higher level libraries to help you out with developing providers. These are the same libraries we use in our own core providers.
52 |
53 | ## helper/schema
54 |
55 | The `helper/schema` library is a framework we've built to make creating providers extremely easy. This is the same library we use to build most of the core providers.
56 |
57 | To give you an idea of how productive you can become with this framework: we implemented the Google Cloud provider in about 6 hours of coding work. This isn't a simple provider, and we did have knowledge of the framework beforehand, but it goes to show how expressive the framework can be.
58 |
59 | The GoDoc for `helper/schema` can be [found here](https://godoc.org/github.com/hashicorp/terraform/helper/schema). This is API-level documentation but will be extremely important for you going forward.
60 |
61 | ## Provider
62 |
63 | The first thing to do in your plugin is to create the schema.Provider structure. This structure implements the `ResourceProvider` interface. We recommend creating this structure in a function to make testing easier later. Example:
64 |
65 | ```go
66 | func Provider() *schema.Provider {
67 | return &schema.Provider{
68 | ...
69 | }
70 | }
71 | ```
72 |
73 | Within the schema.Provider, you should initialize all the fields. They are documented within the godoc, but a brief overview is here as well:
74 |
75 | * `Schema` - This is the configuration schema for the provider itself. You should define any API keys, etc. here. Schemas are covered below.
76 |
77 | * `ResourcesMap` - The map of resources that this provider supports. All keys are resource names and the values are the schema.Resource structures implementing this resource.
78 |
79 | * `ConfigureFunc` - This function callback is used to configure the provider. This function should do things such as initialize any API clients, validate API keys, etc. The interface{} return value of this function is the meta parameter that will be passed into all resource CRUD functions. In general, the returned value is a configuration structure or a client.
80 |
81 | As part of the unit tests, you should call `InternalValidate`. This is used to verify the structure of the provider and all of the resources, and reports an error if it is invalid. An example test is shown below:
82 |
83 | ```go
84 | func TestProvider(t *testing.T) {
85 | if err := Provider().(*schema.Provider).InternalValidate(); err != nil {
86 | t.Fatalf("err: %s", err)
87 | }
88 | }
89 | ```
90 |
91 | Having this unit test will catch a lot of beginner mistakes as you build your provider.
92 |
93 | ## Resources
94 |
95 | Next, you'll want to create the resources that the provider can manage. These resources are put into the ResourcesMap field of the provider structure. Again, we recommend creating functions to instantiate these. An example is shown below.
96 |
97 | ```go
98 | func resourceComputeAddress() *schema.Resource {
99 | return &schema.Resource {
100 | ...
101 | }
102 | }
103 | ```
104 |
105 | Resources are described using the [schema.Resource](https://godoc.org/github.com/hashicorp/terraform/helper/schema#Resource) structure. This structure has the following fields:
106 |
107 | * `Schema` - The configuration schema for this resource. Schemas are covered in more detail below.
108 |
109 | * `Create`, `Read`, `Update`, and `Delete` - These are the callback functions that implement CRUD operations for the resource. The only optional field is Update. If your resource doesn't support update, then you may keep that field nil.
110 |
111 | * `Importer` - If this is non-`nil`, then this resource is [importable](https://www.terraform.io/docs/import/importability.html). It is recommended to implement this.
112 |
113 | The CRUD operations in more detail, along with their contracts:
114 |
115 | * `Create` - This is called to create a new instance of the resource. Terraform guarantees that an existing ID is not set on the resource data. That is, you're working with a new resource. Therefore, you are responsible for calling `SetId` on your schema.`ResourceData` using a value suitable for your resource. This ensures whatever resource state you set on `schema.ResourceData` will be persisted in local state. If you neglect to `SetId`, no resource state will be persisted.
116 |
117 | * `Read` - This is called to resync the local state with the remote state. Terraform guarantees that an existing ID will be set. This ID should be used to look up the resource. Any remote data should be updated into the local data. **No changes to the remote resource are to be made.** If the resource is no longer present, calling SetId with an empty string will signal its removal.
118 |
119 | * `Update` - This is called to update properties of an existing resource. Terraform guarantees that an existing ID will be set. Additionally, the only changed attributes are guaranteed to be those that support update, as specified by the schema. Be careful to read about partial states below.
120 |
121 | * `Delete` - This is called to delete the resource. Terraform guarantees an existing ID will be set.
122 |
123 | * `Exists` - This is called to verify a resource still exists. It is called prior to `Read`, and lowers the burden of `Read` to be able to assume the resource exists. `false` should be returned if the resources is no longer present, which has the same effect as calling `SetId("")` from `Read` (i.e. removal of the resource data from state).
124 |
125 | ## Schemas
126 |
127 | Both providers and resources require a schema to be specified. The schema is used to define the structure of the configuration, the types, etc. It is very important to get correct.
128 |
129 | In both provider and resource, the schema is a `map[string]*schema.Schema`. The key of this map is the configuration key, and the value is a schema for the value of that key.
130 |
131 | Schemas are incredibly powerful, so this documentation page won't attempt to cover the full power of them. Instead, the API docs should be referenced which cover all available settings.
132 |
133 | We recommend viewing schemas of existing or similar providers to learn best practices. A good starting place is the [core Terraform providers](https://github.com/terraform-providers).
134 |
135 | ## Resource Data
136 |
137 | The parameter to provider configuration as well as all the CRUD operations on a resource is a [schema.ResourceData](https://godoc.org/github.com/hashicorp/terraform/helper/schema#ResourceData). This structure is used to query configurations as well as to set information about the resource such as its ID, connection information, and computed attributes.
138 |
139 | The API documentation covers `ResourceData` well, as well as the core providers in Terraform.
140 |
141 | **Partial state** deserves a special mention. Occasionally in Terraform, create or update operations are not atomic; they can fail halfway through. As an example, when creating an AWS security group, creating the group may succeed, but creating all the initial rules may fail. In this case, it is incredibly important that Terraform record the correct partial state so that a subsequent `terraform apply` fixes this resource.
142 |
143 | Most of the time, partial state is not required. When it is, it must be specifically enabled. An example is shown below:
144 |
145 | ```go
146 | func resourceUpdate(d *schema.ResourceData, meta interface{}) error {
147 | // Enable partial state mode
148 | d.Partial(true)
149 |
150 | if d.HasChange("tags") {
151 | // If an error occurs, return with an error,
152 | // we didn't finish updating
153 | if err := updateTags(d, meta); err != nil {
154 | return err
155 | }
156 |
157 | d.SetPartial("tags")
158 | }
159 |
160 | if d.HasChange("name") {
161 | if err := updateName(d, meta); err != nil {
162 | return err
163 | }
164 |
165 | d.SetPartial("name")
166 | }
167 |
168 | // We succeeded, disable partial mode
169 | d.Partial(false)
170 |
171 | return nil
172 | }
173 | ```
174 |
175 | In the example above, it is possible that setting the `tags` succeeds, but setting the name fails. In this scenario, we want to make sure that only the state of the `tags` is updated. To do this the `Partial` and `SetPartial` functions are used.
176 |
177 | `Partial` toggles partial-state mode. When disabled, all changes are merged into the state upon result of the operation. When enabled, only changes enabled with `SetPartial` are merged in.
178 |
179 | `SetPartial` tells Terraform what state changes to adopt upon completion of an operation. You should call `SetPartial` with every key that is safe to merge into the state. The parameter to `SetPartial` is a prefix, so if you have a nested structure and want to accept the whole thing, you can just specify the prefix.
180 |
--------------------------------------------------------------------------------
/terraform/rest-provider.md:
--------------------------------------------------------------------------------
1 | # Terraform provider for generic REST APIs
2 |
3 | _Source: [Github](https://github.com/Mastercard/terraform-provider-restapi)_
4 |
5 | The Terraform provider for generic REST APIs allows you to interact with APIs that may not yet have a first-class provider available.
6 |
7 | There are a few requirements about how the API must work for this provider to be able to do its thing:
8 |
9 | * The API is expected to support the following HTTP methods:
10 | * POST: create an object
11 | * GET: read an object
12 | * PUT: update an object
13 | * DELETE: remove an object
14 |
15 | * An "object" in the API has a unique identifier the API will return
16 |
17 | * Objects live under a distinct path such that for the path `/api/v1/things`...
18 | * POST on `/api/v1/things` creates a new object
19 | * GET, PUT and DELETE on `/api/v1/things/{id}` manages an existing object
20 |
21 | Full documentation is available at https://github.com/Mastercard/terraform-provider-restapi.
22 |
23 | ## Examples
24 |
25 | In this example, we are using the `fakeserver` available with this provider to create and manage imaginary users in [an imaginary API server defined here](https://github.com/Mastercard/terraform-provider-restapi/tree/master/fakeserver).
26 |
27 | ### Start and initialize the dummy `fakeserver`
28 |
29 | To use this example fully, start up `fakeserver` and add some dummy data.
30 |
31 | ```bash
32 | $ curl 127.0.0.1:8080/api/objects -X POST -d '{ "id": "8877", "first": "John", "last": "Doe" }'
33 | $ curl 127.0.0.1:8080/api/objects -X POST -d '{ "id": "4433", "first": "Dave", "last": "Roe" }'
34 | ```
35 |
36 | After running `terraform apply`, you will now see three objects in the API server:
37 |
38 | ```bash
39 | $ curl 127.0.0.1:8080/api/objects | jq
40 | ```
41 |
42 | ### Configure the provider
43 |
44 | ```hcl
45 | provider "restapi" {
46 | uri = "http://127.0.0.1:8080/"
47 | debug = true
48 | write_returns_object = true
49 | }
50 | ```
51 |
52 | ### `GET` an object via a data source
53 |
54 | This will make information about the user named "John Doe" available by finding him by first name.
55 |
56 | ```hcl
57 | data "restapi_object" "John" {
58 | path = "/api/objects"
59 | search_key = "first"
60 | search_value = "John"
61 | }
62 | ```
63 |
64 | ### Add an object via `terraform import`
65 |
66 | You can import the existing Dave Roe resource from a file by executing:
67 |
68 | ```bash
69 | $ terraform import restapi_object.Dave /api/objects/4433
70 | ```
71 |
72 | ### Manage it here, too!
73 |
74 | The `import` will pull in Dave Roe, but the subsequent `terraform apply` will change the record to "Dave Boe"
75 |
76 | ```hcl
77 | resource "restapi_object" "Dave" {
78 | path = "/api/objects"
79 | data = "{ \"id\": \"4433\", \"first\": \"Dave\", \"last\": \"Boe\" }"
80 | }
81 | ```
82 |
83 | ### Add a resource
84 |
85 | This will ADD the user named "Foo" as a managed resource
86 |
87 | ```hcl
88 | resource "restapi_object" "Foo" {
89 | path = "/api/objects"
90 | data = "{ \"id\": \"1234\", \"first\": \"Foo\", \"last\": \"Bar\" }"
91 | }
92 | ```
93 |
94 | ### Variable interpolation
95 |
96 | Congrats to Jane and John! They got married. Give them the same last name by using variable interpolation
97 |
98 | ```hcl
99 | resource "restapi_object" "Jane" {
100 | path = "/api/objects"
101 | data = "{ \"id\": \"7788\", \"first\": \"Jane\", \"last\": \"${data.restapi_object.John.api_data.last}\" }"
102 | }
103 | ```
104 |
--------------------------------------------------------------------------------
/terraform/time-provider.md:
--------------------------------------------------------------------------------
1 | # Terraform Time Provider
2 |
3 | _Source: [The Terraform Docs](https://www.terraform.io/docs/providers/time/index.html)_
4 |
5 | The time provider is used to interact with time-based resources. The provider itself has no configuration options.
6 |
7 | ## Resource "Triggers"
8 |
9 | Certain time resources, only perform actions during specific lifecycle actions:
10 |
11 | * `time_offset`: Saves base timestamp into Terraform state only when created.
12 | * `time_sleep`: Sleeps when created and/or destroyed.
13 | * `time_static`: Saves base timestamp into Terraform state only when created.
14 |
15 | These resources provide an optional map argument called `triggers` that can be populated with arbitrary key/value pairs. When the keys or values of this argument are updated, Terraform will re-perform the desired action, such as updating the base timestamp or sleeping again.
16 |
17 | For example:
18 |
19 | ```hcl
20 | resource "time_static" "ami_update" {
21 | triggers = {
22 | # Save the time each switch of an AMI id
23 | ami_id = data.aws_ami.example.id
24 | }
25 | }
26 |
27 | resource "aws_instance" "server" {
28 | # Read the AMI id "through" the time_static resource to ensure that
29 | # both will change together.
30 | ami = time_static.ami_update.triggers.ami_id
31 |
32 | tags = {
33 | AmiUpdateTime = time_static.ami_update.rfc3339
34 | }
35 |
36 | # ... (other aws_instance arguments) ...
37 | }
38 | ```
39 |
40 | `triggers` are _not_ treated as sensitive attributes; a value used for `triggers` will be displayed in Terraform UI output as plaintext.
41 |
42 | To force a these actions to reoccur without updating `triggers`, the `terraform taint` command can be used to produce the action on the next run.
43 |
--------------------------------------------------------------------------------
/things-to-add.md:
--------------------------------------------------------------------------------
1 | # Stuff I Want To Add (So I Don't Forget)
2 |
3 | * [Some of these Linux productivity tools](https://www.usenix.org/sites/default/files/conference/protected-files/lisa19_maheshwari.pdf) (20 May 2020)
4 |
5 | * [Mocking time and testing event loops in Go](https://dmitryfrank.com/articles/mocking_time_in_go) (24 May 2020)
6 |
7 | * [Useless Use of Cat Award](http://porkmail.org/era/unix/award.html) (25 May 2020)
8 | * `cat`
9 | * `echo`
10 | * `kill -9`
11 | * `grep | awk and grep | sed`
12 | * Backticks
13 |
14 | * Thoughts on Scrum [[1]](https://softwareengineering.stackexchange.com/questions/410482/how-do-i-prevent-scrum-from-turning-great-developers-into-average-developers)[[2]](https://iism.org/article/agile-scrum-is-not-working-51) (26 May 2020)
15 |
16 | * [Datadog Datagram Format and Shell Usage](https://docs.datadoghq.com/developers/dogstatsd/datagram_shell/?tab=metrics#send-metrics-and-events-using-dogstatsd-and-the-shell) (28 May 2020)
17 |
18 | * [Understanding gRPC, OpenAPI and REST and when to use them](https://cloud.google.com/blog/products/api-management/understanding-grpc-openapi-and-rest-and-when-to-use-them) (29 May 2020)
19 |
20 | * [Stop Taking Regular Notes; Use a Zettelkasten Instead](https://eugeneyan.com/2020/04/05/note-taking-zettelkasten/) (2 June 2020)
21 |
22 | * [Qualified immunity is bullshit](https://theappeal.org/qualified-immunity-explained/) (5 June 2020)
23 |
24 | * [Repairing and recovering broken git repositories](https://git.seveas.net/repairing-and-recovering-broken-git-repositories.html) (6 June 2020)
25 |
26 | * https://tpaschalis.github.io/goroutines-size/ (8 June 2020)
27 |
28 | * [Instrumentation in Go](https://gbws.io/articles/instrumentation-in-go/) (9 June 2020)
29 |
30 | * https://medium.com/@teivah/go-and-cpu-caches-af5d32cc5592 (10 June 2020)
31 |
32 | * https://acesounderglass.com/2020/06/10/what-to-write-down-when-youre-reading-to-learn/ (12 June 2020)
33 |
34 | * https://josebrowne.com/on-coding-ego-and-attention/ (17 June 2020)
35 |
36 | * [Modern Python Dictionaries](hgttps://www.youtube.com/watch?v=npw4s1QTmPg) (17 June 2020)
37 |
38 | * https://www.reddit.com/r/golang/comments/h8yqql/just_found_that_golang_has_a_gopher_design_guide/ (19 June 2020)
39 |
40 | * https://www.ted.com/talks/lucy_hone_3_secrets_of_resilient_people?rss=172BB350-0205 (19 June 2020)
41 |
42 | * [Programming Pearls](http://www.bowdoin.edu/~ltoma/teaching/cs340/spring05/coursestuff/Bentley_BumperSticker.pdf) (22 June 2020)
43 |
44 | * https://aws.amazon.com/kendra/ (25 June 2020)
45 |
46 | * Cache-oblivious algorithms [[1]](https://en.m.wikipedia.org/wiki/Cache-oblivious_algorithm)[[2]](https://jiahai-feng.github.io/posts/cache-oblivious-algorithms/) (28 June 2020)
47 |
48 | * JSON Resume [[1]](https://jsonresume.org)[[2]](https://github.com/jsonresume) (28 June 2020)
49 |
50 | * Open Telemetry [[1]](https://opentelemetry.io/)[[2]](https://github.com/open-telemetry/opentelemetry-go/blob/master/README.md)[[3]](https://docs.google.com/presentation/d/1nVhLIyqn_SiDo78jFHxnMdxYlnT0b7tYOHz3Pu4gzVQ/edit?usp=sharing) (29 June 2020)
51 |
52 | * https://github.com/google/pprof (29 June 2020)
53 |
54 | * https://golangcode.com/how-to-run-go-tests-with-coverage-percentage/ (6 July 2020)
55 |
56 | * https://www.hashicorp.com/blog/custom-variable-validation-in-terraform-0-13/ (7 July 2020)
57 |
58 | * https://gohugo.io/templates/internal/#google-analytics (7 July 2020)
59 |
60 | * https://arslan.io/2020/07/07/using-go-analysis-to-fix-your-source-code/ (7 July 2020)
61 |
62 | * https://github.com/gruntwork-io/terratest/pull/569 (8 July 2020)
63 |
64 | * [Optional values in Terraform objects](https://www.terraform.io/docs/configuration/attr-as-blocks.html#arbitrary-expressions-with-argument-syntax) (8 July 2020)
65 |
66 | * How did I not know about `open .` on a Mac before? (Alvaro pointed it out to me) (10 July 2020)
67 |
68 | * `pushd` and `popd` (13 July 2020)
69 |
70 | * https://wulymammoth.github.io/posts/shell-shock/ (16 July 2020)
71 |
72 | * https://medium.com/learning-the-go-programming-language/writing-modular-go-programs-with-plugins-ec46381ee1a9 (21 July 2020)
73 |
74 | * https://golang.org/pkg/net/#FileListener (22 July 2020)
75 |
76 | * https://www.aboutmonica.com/blog/how-to-create-a-github-profile-readme (26 July 2020)
77 |
78 | * https://linux.die.net/man/1/mktemp (31 July 2020)
79 |
80 | * https://blog.quigley.codes/useful-cli-tools/ (21 September 2020)
81 |
82 | * https://aws.amazon.com/solutions/implementations/aws-perspective/ (22 September 2020)
83 |
84 | * https://github.com/mingrammer/diagrams (diagrams in Python) (22 September 2020)
85 |
86 | * https://github.com/blushft/go-diagrams (diagrams in Go) (27 September 2020)
87 |
88 | * https://medium.com/golangspec/tags-in-golang-3e5db0b8ef3e (4 October 2020)
89 |
90 | * https://explainshell.com/ (8 October 2020)
91 |
92 | * https://learning.oreilly.com/answers/search/ (8 October 2020)
93 |
94 | * https://backstage.io/ (8 October 2020)
95 |
96 | * https://www.home-assistant.io/ as a replacement for IFTTT (8 October 2020)
97 |
98 | * https://github.com/ulid/spec as UUIDs with timestamps? (8 October 2020)
99 |
100 | * https://wa.aws.amazon.com/index.en.html AWS Well-Architected Framework exists (8 October 2020)
101 |
102 | * https://twitter.com/mjos_crypto/status/1057196529847558147?lang=en Meetings at Antarctica's Troll Base are held in "Troll Time" (22 October 2020)
103 |
104 | * MacOS has been using an antique version of Bash from 2007, because that's the last version shipped under GPL2. Later versions use GPL3, which Apple won't ship with. Since MacOS Catalina (released on October 7, 2019) the default shell has been Zsh, which uses the MIT license. (3 November 2020)
105 |
106 | * https://tldp.org/LDP/abs/html/process-sub.html (3 November 2020) -- Add this to the list of things I should have known before but never bothered picking up.
107 |
108 | * https://www.merriam-webster.com/dictionary/acronym -- Acronyms must be pronounceable. Who knew? (14 January 2021)
109 |
110 | * https://warisboring.com/the-british-perfected-the-art-of-brewing-tea-inside-an-armored-vehicle/ (25 Feb 2021)
111 |
112 | * `pre-commit` has an `autoupdate` subcommand! (9 March 2021)
113 |
114 | * The `dd` command [[1]](https://linuxconfig.org/how-dd-command-works-in-linux-with-examples)[[2]](https://youtu.be/UeAKTjx_eKA) (21 March 2021)
115 |
116 | * Syncing a git fork with its upstream repo [[1]](https://docs.github.com/en/github/collaborating-with-pull-requests/working-with-forks/syncing-a-fork)[[2]](https://raw.githubusercontent.com/github/docs/main/content/github/collaborating-with-pull-requests/working-with-forks/syncing-a-fork.md)[[3]](https://gist.github.com/clockworksoul/1029ce118194d8662d4e8b7d21652f00) (27 July 2021)
117 |
118 | * Creating a Git plugin is fun and easy! [[1]](https://gist.github.com/clockworksoul/1029ce118194d8662d4e8b7d21652f00) (3 August 2021)
119 |
120 | * Slack formatting with blocks [[1]](https://api.slack.com/block-kit) (1 Nov 2021)
121 | * Maybe something about setting colors and titles and how tempermental the results can be?
122 |
123 | * Image processing in Go [[1]](https://golangdocs.com/golang-image-processing) (12 Nov 2021)
124 |
125 | * [Sumer](https://en.wikipedia.org/wiki/Sumer), [Assyria](https://en.wikipedia.org/wiki/Assyria), and other ancient cultures ([Maykop Culture](https://en.wikipedia.org/wiki/Maykop_culture), [Cucuteni-Trypillia Culture](https://en.wikipedia.org/wiki/Cucuteni%E2%80%93Trypillia_culture), etc) (15 Nov 2021) - Maybe put together a timeline?
126 |
127 | * RabbitMQ [quorum queues](https://www.rabbitmq.com/quorum-queues.html) (what are the pros/cons/failure modes?) (23 Nov 2021)
128 |
129 | * The bash `<<<` operator [is a thing](https://www.gnu.org/software/bash/manual/html_node/Redirections.html) (10 Jan 2022)
130 |
131 | * Mermaid [is a thing](https://mermaid-js.github.io/ ) (9 Feb 2022)
132 |
133 | * `nping` (part of nmap suite) [is a thing](https://nmap.org/nping/) (23 Feb 2022)
134 |
135 | * Prometheus supports [envvar expansion in external labels](https://prometheus.io/docs/prometheus/latest/feature_flags/#expand-environment-variables-in-external-labels) [1](https://www.lisenet.com/2021/use-external-labels-with-prometheus-alerts/) (30 Jan 2023)
136 |
--------------------------------------------------------------------------------
/tls+ssl/dissecting-an-ssl-cert.md:
--------------------------------------------------------------------------------
1 | # Dissecting a TLS/SSL Certificate
2 |
3 | _Sources: [[1]](https://jvns.ca/blog/2017/01/31/whats-tls/), [[2]](https://en.wikipedia.org/wiki/Transport_Layer_Security), [[3]](https://en.wikipedia.org/wiki/X.509)_
4 |
5 | Yes, I already knew most of this, but [this article](https://jvns.ca/blog/2017/01/31/whats-tls/) inspired me to collect it all in one place for posterity. Plus, I always have to look up those `openssl` commands.
6 |
7 | ## What are SSL and TLS?
8 |
9 | Transport Layer Security (TLS), and its now-deprecated predecessor, Secure Sockets Layer (SSL), are cryptographic protocols designed to provide communications security over a computer network.
10 |
11 | There are several versions of these protocols, but in a nutshell newer versions of SSL are called TLS (the version after SSL 3.0 is TLS 1.0).
12 |
13 | | Protocol | Published | Status |
14 | | -------- |-------------|-------------------------------|
15 | | SSL 1.0 | Unpublished | Unpublished |
16 | | SSL 2.0 | 1995 | Deprecated in 2011 (RFC 6176) |
17 | | SSL 3.0 | 1996 | Deprecated in 2015 (RFC 7568) |
18 | | TLS 1.0 | 1999 | Deprecated in 2020 |
19 | | TLS 1.1 | 2006 | Deprecated in 2020 |
20 | | TLS 1.2 | 2008 | |
21 | | TLS 1.3 | 2018 | |
22 |
23 | ## What's a Certificate?
24 |
25 | Suppose I'm checking my email at `https://mail.google.com`
26 |
27 | `mail.google.com` is running a HTTPS server on port 443. I want to make sure that I'm **actually** talking to `mail.google.com` and not some other random server on the internet owned by EVIL PEOPLE.
28 |
29 | So, let's start by using `openssl` to look at `mail.google.com`'s certificate: `openssl s_client -connect mail.google.com:443`
30 |
31 | This is going to print a bunch of stuff, but we'll just focus on the certificate:
32 |
33 | ```bash
34 | $ openssl s_client -connect mail.google.com:443
35 |
36 | ...
37 |
38 | -----BEGIN CERTIFICATE-----
39 | MIIFoTCCBImgAwIBAgIRAPv4g2bpCUCICAAAAAA9N2AwDQYJKoZIhvcNAQELBQAw
40 | QjELMAkGA1UEBhMCVVMxHjAcBgNVBAoTFUdvb2dsZSBUcnVzdCBTZXJ2aWNlczET
41 | MBEGA1UEAxMKR1RTIENBIDFPMTAeFw0yMDA0MjgwNzM4MzhaFw0yMDA3MjEwNzM4
42 | MzhaMGkxCzAJBgNVBAYTAlVTMRMwEQYDVQQIEwpDYWxpZm9ybmlhMRYwFAYDVQQH
43 | Ew1Nb3VudGFpbiBWaWV3MRMwEQYDVQQKEwpHb29nbGUgTExDMRgwFgYDVQQDEw9t
44 | YWlsLmdvb2dsZS5jb20wggEiMA0GCSqGSIb3DQEBAQUAA4IBDwAwggEKAoIBAQC/
45 | Vh6R70i2kH+4L4PMJoeq2U+RTs/KVDeb9VEoIOnJsvjgrkMNjd7+Eedi5kJCA2YQ
46 | orwXneg/CcBZ6QyO162spibTg3GJ2cp5DurHmjzSE7g+Wh5zBeQ3QkoKfGhoBH7/
47 | 45zCDh9MbsbvD4n7VLGtY1UtOSZ4PUtwWNZqUP088PcnAqsauUqSJEM/IbPDGnQC
48 | shTj6f+SGy5VJP/EIo7VjtEAkExLSkUxjHA4v5qBrdqaZBCtu929JDzyi99CJX/h
49 | tZNYqwNTNnT4Ck6Aeb9C6O0zCdYwWFYy8mQFMR9dWJhfqmS3uH/1nydOdJ0TomLU
50 | 9qIlEvno9ezYpQNpQ3V1AgMBAAGjggJpMIICZTAOBgNVHQ8BAf8EBAMCBaAwEwYD
51 | VR0lBAwwCgYIKwYBBQUHAwEwDAYDVR0TAQH/BAIwADAdBgNVHQ4EFgQUs5UKtiHr
52 | TgXXPIBncjedM/YTbuwwHwYDVR0jBBgwFoAUmNH4bhDrz5vsYJ8YkBug630J/Ssw
53 | ZAYIKwYBBQUHAQEEWDBWMCcGCCsGAQUFBzABhhtodHRwOi8vb2NzcC5wa2kuZ29v
54 | Zy9ndHMxbzEwKwYIKwYBBQUHMAKGH2h0dHA6Ly9wa2kuZ29vZy9nc3IyL0dUUzFP
55 | MS5jcnQwLAYDVR0RBCUwI4IPbWFpbC5nb29nbGUuY29tghBpbmJveC5nb29nbGUu
56 | Y29tMCEGA1UdIAQaMBgwCAYGZ4EMAQICMAwGCisGAQQB1nkCBQMwLwYDVR0fBCgw
57 | JjAkoCKgIIYeaHR0cDovL2NybC5wa2kuZ29vZy9HVFMxTzEuY3JsMIIBBgYKKwYB
58 | BAHWeQIEAgSB9wSB9ADyAHcAsh4FzIuizYogTodm+Su5iiUgZ2va+nDnsklTLe+L
59 | kF4AAAFxv/AlWQAABAMASDBGAiEApsxkN5iBlmXYyD2y880uDUXwP1lophOidTdY
60 | 379yOh4CIQDPKU+xij8S5iZeJXHQF3cKaPyGOTncaufuutOWhzUC5gB3AF6nc/nf
61 | VsDntTZIfdBJ4DJ6kZoMhKESEoQYdZaBcUVYAAABcb/wJXgAAAQDAEgwRgIhALF7
62 | sFGN3YIkG2J7t2Vj7zjr7O2CDEXe57LPADdzf3lvAiEAkuYej2F4MO7PyoWzOas0
63 | zyaXOy+ae8dmFP2fbVm2yG0wDQYJKoZIhvcNAQELBQADggEBAJP3SOUtKRqCa2da
64 | 51FRgTm9voyohA7g67QjumDEXrgZJSY+fn7tHG7ggo3xfVMpcFdOGe8ZzIFOs1C1
65 | b+F2gEaDLKTYOUZgX4UtQZG8REWLXbqaj6E+Jck1+18Oz+m4gdy7h8Qb/YQ6ET2a
66 | BdHBYeV9SsMhhys5i6mwwVfLdbeHeitTNo88riHfV6bYO1AbJ1xFpNi9PJWSXkhV
67 | V30oox8QVfec6isUGrbiph0MbwN5eSasyRr4HcoWM6nntzabVk3m1leFb7UVMlwv
68 | 0whXtscmqsMHTtv/rjBr7Nxk4aTho1OFYE7+P4N+uI99OngaO0XgOFLRO7VooHGg
69 | DAmf19A=
70 | -----END CERTIFICATE-----
71 |
72 | ...
73 | ```
74 |
75 | We're looking at [X.509](https://en.wikipedia.org/wiki/X.509), a standard format for describing public key certificates.
76 |
77 | Our next mission is to parse this certificate. We do that by piping the data to `openssl x509`:
78 |
79 | ```bash
80 | $ openssl s_client -connect mail.google.com:443 | openssl x509 -in /dev/stdin -text -noout
81 |
82 | depth=2 OU = GlobalSign Root CA - R2, O = GlobalSign, CN = GlobalSign
83 | verify return:1
84 | depth=1 C = US, O = Google Trust Services, CN = GTS CA 1O1
85 | verify return:1
86 | depth=0 C = US, ST = California, L = Mountain View, O = Google LLC, CN = mail.google.com
87 | verify return:1
88 | Certificate:
89 | Data:
90 | Version: 3 (0x2)
91 | Serial Number:
92 | fb:f8:83:66:e9:09:40:88:08:00:00:00:00:3d:37:60
93 | Signature Algorithm: sha256WithRSAEncryption
94 | Issuer: C=US, O=Google Trust Services, CN=GTS CA 1O1
95 | Validity
96 | Not Before: Apr 28 07:38:38 2020 GMT
97 | Not After : Jul 21 07:38:38 2020 GMT
98 | Subject: C=US, ST=California, L=Mountain View, O=Google LLC, CN=mail.google.com
99 | Subject Public Key Info:
100 | Public Key Algorithm: rsaEncryption
101 | Public-Key: (2048 bit)
102 | Modulus:
103 | 00:bf:56:1e:91:ef:48:b6:90:7f:b8:2f:83:cc:26:
104 | 87:aa:d9:4f:91:4e:cf:ca:54:37:9b:f5:51:28:20:
105 | ... ...
106 | 62:d4:f6:a2:25:12:f9:e8:f5:ec:d8:a5:03:69:43:
107 | 75:75
108 | Exponent: 65537 (0x10001)
109 | X509v3 extensions:
110 | ... ...
111 |
112 | X509v3 Subject Alternative Name:
113 | DNS:mail.google.com, DNS:inbox.google.com
114 | Signature Algorithm: sha256WithRSAEncryption
115 | 93:f7:48:e5:2d:29:1a:82:6b:67:5a:e7:51:51:81:39:bd:be:
116 | 8c:a8:84:0e:e0:eb:b4:23:ba:60:c4:5e:b8:19:25:26:3e:7e:
117 | ... ...
118 | 8f:7d:3a:78:1a:3b:45:e0:38:52:d1:3b:b5:68:a0:71:a0:0c:
119 | 09:9f:d7:d0
120 | ```
121 |
122 | Some of the most useful bits (to us) are:
123 |
124 | * The `Subject` section contains the "common name": `CN=mail.google.com`. Counterintuitively you should ignore this field and look at the "subject alternative name" field instead.
125 | * The `Validity` section includes a valid date range with an expiration date. This example expires Jul 21 07:38:38 2020 GMT.
126 | * The `X509v3 Subject Alternative Name` section has the list of domains that this certificate works for. This is `mail.google.com` and `inbox.google.com`.
127 | * The `Subject Public Key Info` section tells us the **public key** that we're going to use to communicate with `mail.google.com`. [Public key cryptography](https://en.wikipedia.org/wiki/Public-key_cryptography) is fascinating, but it's outside the scope of this summary.
128 | * The signature, which can be used to verify the authenticity of the certificate. Without this, anybody could simply issue a certificate for any domain they wanted!
129 |
130 | ## Certificate Signing
131 |
132 | Every certificate on the internet is basically two parts put together:
133 |
134 | 1. The certificate proper, containing the public key, the domain(s) and dates it's valid for, and so on.
135 | 2. A signature by some trusted authority. Essentially a cryptographic stamp of authenticity.
136 |
137 | Most OS distributions include a number of certificates -- public [CA certificates](https://en.wikipedia.org/wiki/Certificate_authority) -- that computer trusts to sign other certificates. In Linux these can be found in `/etc/ssl/certs`. On Mac these are installed in the OS X Keychain and harder to find. Aside: to install these in a Linux Docker container, you'll need to do `apt-get install ca-certificates`.
138 |
139 | On my computer I have 267 of these certificates:
140 |
141 | ```bash
142 | $ ls -1 /etc/ssl/certs/ | wc -l
143 | 267
144 | ```
145 |
146 | If any one of them signed a `mail.google.com` certificate, my computer would accept it as authentic. However, if some random person -- who's public key won't be among the 267 trusted entities on my computer -- signed a certificate, my computer would reject the certificate.
147 |
148 | The `mail.google.com` certificate is:
149 |
150 | * `C = US, ST = California, L = Mountain View, O = Google LLC, CN = mail.google.com`
151 | * Which is signed by a "Google Trust Services" certificate
152 | * Which is signed by a "GlobalSign Root CA - R2" certificate
153 |
154 | I have an `GlobalSign_Root_CA_-_R2.pem` file on my computer, which is probably why my computer trusts this certificate.
155 |
156 | ## What Does Getting a Certificate Issued Look Like?
157 |
158 | So when you get a certificate issued, basically how it works is:
159 |
160 | 1. You generate a [public/private key pair](https://en.wikipedia.org/wiki/Public-key_cryptography) for your certificate:
161 |
162 | 1. The public key will contain your domain, expiration, and other public information.
163 | 2. The private key for your certificate is exactly that. Keep it safe. You'll use this key every time you establish an SSL connection.
164 |
165 | 2. You pay a certificate authority (CA) that other computers trust to sign your certificate for you. Certificate authorities are supposed to have integrity, so they are supposed to actually make sure that when they sign certificates, the person they give the certificate to actually owns the domain.
166 |
167 | 3. You install your signed certificate and use it to prove that you are really you.
168 |
--------------------------------------------------------------------------------
/tls+ssl/use-vault-as-a-ca.md:
--------------------------------------------------------------------------------
1 | # Use Hashicorp Vault to Build Your Own Certificate Authority (CA)
2 |
3 | _Source: https://learn.hashicorp.com/vault/secrets-management/sm-pki-engine_
4 |
5 | Vault's PKI secrets engine can dynamically generate X.509 certificates on demand. This allows services to acquire certificates without going through the usual manual process of generating a private key and Certificate Signing Request (CSR), submitting to a CA, and then waiting for the verification and signing process to complete.
6 |
7 | ### Challenge
8 |
9 | Organizations should protect their website; however, the Traditional PKI process workflow takes a long time which motivates organizations to create certificates which do not expire for a year or more.
10 |
11 | ### Solution
12 |
13 | Use Vault to create X509 certificates for usage in MTLS or other arbitrary PKI encryption. While this can be used to create web server certificates. If users do not import the CA chains, the browser will complain about self-signed certificates.
14 |
15 | Creating PKI certificates is generally a cumbersome process using traditional tools like openssl or even more advanced frameworks like CFSSL. These tools also require a human component to verify certificate distribution meets organizational security policies.
16 |
17 | Vault PKI secrets engine makes this a lot simpler. The PKI secrets engine can be an Intermediate-Only certificate authority which potentially allows for higher levels of security.
18 |
19 | 1. Store CA outside the Vault (air gapped)
20 | 2. Create CSRs for the intermediates
21 | 3. Sign CSR outside Vault and import intermediate
22 | 4. Issue leaf certificates from the Intermediate CA
23 |
24 | ## Prerequisites
25 |
26 | To perform the tasks described in this guide, you need to have a Vault environment. Refer to the [Getting Started](https://learn.hashicorp.com/vault/getting-started/install) guide to install Vault.
27 |
28 | Or you can use the [Vault Playground](https://www.katacoda.com/hashicorp/scenarios/vault-playground) environment.
29 |
30 | ### Policy requirements
31 |
32 | NOTE: For the purpose of this guide, you can use `root` token to work with Vault. However, it is recommended that root tokens are only used for just enough initial setup or in emergencies. As a best practice, use tokens with appropriate set of policies based on your role in the organization.
33 |
34 | To perform all tasks demonstrated in this guide, your policy must include the following permissions:
35 |
36 | ```
37 | # Enable secrets engine
38 | path "sys/mounts/*" {
39 | capabilities = [ "create", "read", "update", "delete", "list" ]
40 | }
41 |
42 | # List enabled secrets engine
43 | path "sys/mounts" {
44 | capabilities = [ "read", "list" ]
45 | }
46 |
47 | # Work with pki secrets engine
48 | path "pki*" {
49 | capabilities = [ "create", "read", "update", "delete", "list", "sudo" ]
50 | }
51 | ```
52 |
53 | If you are not familiar with policies, complete the policies guide.
54 |
55 | ## Scenario Introduction
56 |
57 | In this guide, you are going to first generate a self-signed root certificate. Then you are going to generate an intermediate certificate which is signed by the root. Finally, you are going to generate a certificate for the `test.example.com` domain.
58 |
59 | Each step will be illustrated in using the CLI commands. See the original source for API calls with cURL or the Web UI.
60 |
61 | 
62 |
63 | In this guide, you will perform the following:
64 |
65 | 1. Generate Root CA
66 | 2. Generate Intermediate CA
67 | 3. Create a Role
68 | 4. Request Certificates
69 | 5. Revoke Certificates
70 | 6. Remove Expired Certificates
71 |
72 | ## Step 1: Generate Root CA
73 |
74 | In this step, you are going to generate a self-signed root certificate using PKI secrets engine.
75 |
76 | 1. First, enable the `pki` secrets engine at the `pki` path.
77 |
78 | ```bash
79 | $ vault secrets enable pki
80 | ```
81 |
82 | 2. Tune the `pki` secrets engine to issue certificates with a maximum time-to-live (TTL) of 87600 hours.
83 |
84 | ```bash
85 | $ vault secrets tune -max-lease-ttl=87600h pki
86 | ```
87 |
88 | 3. Generate the _root_ certificate and save the certificate in CA_cert.crt.
89 |
90 | ```bash
91 | $ vault write -field=certificate pki/root/generate/internal \
92 | common_name="example.com" \
93 | ttl=87600h > CA_cert.crt
94 | ```
95 |
96 | This generates a new self-signed CA certificate and private key. Vault will _automatically_ revoke the generated root at the end of its lease period (TTL); the CA certificate will sign its own Certificate Revocation List (CRL).
97 |
98 | 4. Configure the CA and CRL URLs.
99 |
100 | ```bash
101 | $ vault write pki/config/urls \
102 | issuing_certificates="http://127.0.0.1:8200/v1/pki/ca" \
103 | crl_distribution_points="http://127.0.0.1:8200/v1/pki/crl"
104 | ```
105 |
106 | ## Step 2: Generate Intermediate CA
107 |
108 | Now, you are going to create an intermediate CA using the root CA you regenerated in the previous step.
109 |
110 | 1. First, enable the pki secrets engine at the pki_int path.
111 |
112 | ```bash
113 | $ vault secrets enable -path=pki_int pki
114 | ```
115 |
116 | 2. Tune the `pki_int` secrets engine to issue certificates with a maximum time-to-live (TTL) of 43800 hours.
117 |
118 | ```bash
119 | $ vault secrets tune -max-lease-ttl=43800h pki_int
120 | ```
121 |
122 | 3. Execute the following command to generate an intermediate and save the CSR as `pki_intermediate.csr`.
123 |
124 | ```bash
125 | $ vault write -format=json pki_int/intermediate/generate/internal \
126 | common_name="example.com Intermediate Authority" \
127 | | jq -r '.data.csr' > pki_intermediate.csr
128 | ```
129 |
130 | 4. Sign the intermediate certificate with the root certificate and save the generated certificate as `intermediate.cert.pem`.
131 |
132 | ```bash
133 | $ vault write -format=json pki/root/sign-intermediate csr=@pki_intermediate.csr \
134 | format=pem_bundle ttl="43800h" \
135 | | jq -r '.data.certificate' > intermediate.cert.pem
136 | ```
137 |
138 | 5. Once the CSR is signed and the root CA returns a certificate, it can be imported back into Vault.
139 |
140 | ```bash
141 | $ vault write pki_int/intermediate/set-signed certificate=@intermediate.cert.pem
142 | ```
143 |
144 | ## Step 3: Create a Role
145 |
146 | A role is a logical name that maps to a policy used to generate those credentials. It allows [configuration parameters](https://www.vaultproject.io/api-docs/secret/pki#create-update-role) to control certificate common names, alternate names, the key uses that they are valid for, and more.
147 |
148 | Here are a few noteworthy parameters:
149 |
150 | | Param | Description |
151 | | -------------------- |---------------|
152 | | `allowed_domains` | Specifies the domains of the role (used with allow_bare_domains and allow-subdomains options) |
153 | | `allow_bare_domains` | Specifies if clients can request certificates matching the value of the actual domains themselves |
154 | | `allow_subdomains` | Specifies if clients can request certificates with CNs that are subdomains of the CNs allowed by the other role options (NOTE: This includes wildcard subdomains.) |
155 | | `allow_glob_domains` | Allows names specified in allowed_domains to contain glob patterns (e.g. ftp*.example.com) |
156 |
157 | In this step, you are going to create a role named `example-dot-com`.
158 |
159 | Create a role named `example-dot-com` which allows subdomains.
160 |
161 | ```bash
162 | $ vault write pki_int/roles/example-dot-com \
163 | allowed_domains="example.com" \
164 | allow_subdomains=true \
165 | max_ttl="720h"
166 | ```
167 |
168 | ## Step 4: Request Certificates
169 |
170 | Keep certificate lifetimes short to align with Vault's philosophy of short-lived secrets.
171 |
172 | Execute the following command to request a new certificate for the `test.example.com` domain based on the `example-dot-com` role.
173 |
174 | ```bash
175 | $ vault write pki_int/issue/example-dot-com common_name="test.example.com" ttl="24h"
176 |
177 | Key Value
178 | --- -----
179 | certificate -----BEGIN CERTIFICATE-----
180 | MIIDwzCCAqugAwIBAgIUTQABMCAsXjG6ExFTX8201xKVH4IwDQYJKoZIhvcNAQEL
181 | BQAwGjEYMBYGA1UEAxMPd3d3LmV4YW1wbGUuY29tMB4XDTE4MDcyNDIxMTMxOVoX
182 | ...
183 |
184 | -----END CERTIFICATE-----
185 | issuing_ca -----BEGIN CERTIFICATE-----
186 | MIIDQTCCAimgAwIBAgIUbMYp39mdj7dKX033ZjK18rx05x8wDQYJKoZIhvcNAQEL
187 | ...
188 |
189 | -----END CERTIFICATE-----
190 | private_key -----BEGIN RSA PRIVATE KEY-----
191 | MIIEowIBAAKCAQEAte1fqy2Ekj+EFqKV6N5QJlBgMo/U4IIxwLZI6a87yAC/rDhm
192 | W58liadXrwjzRgWeqVOoCRr/B5JnRLbyIKBVp6MMFwZVkynEPzDmy0ynuomSfJkM
193 | ...
194 |
195 | -----END RSA PRIVATE KEY-----
196 | private_key_type rsa
197 | serial_number 4d:00:01:30:20:2c:5e:31:ba:13:11:53:5f:cd:b4:d7:12:95:1f:82
198 | ```
199 |
200 | The response contains the PEM-encoded private key, key type and certificate serial number.
201 |
202 | ## Step 5: Revoke Certificates
203 |
204 | If a certificate must be revoked, you can easily perform the revocation action which will cause the CRL to be regenerated. When the CRL is regenerated, any expired certificates are removed from the CRL.
205 |
206 | In certain circumstances, you may wish to revoke an issued certificate.
207 |
208 | To revoke a certificate, execute the following command.
209 |
210 | ```bash
211 | $ vault write pki_int/revoke serial_number=
212 | ```
213 |
214 | Example:
215 |
216 | ```bash
217 | $ vault write pki_int/revoke \
218 | serial_number="48:97:82:dd:f0:d3:d9:7e:53:25:ba:fd:f6:77:3e:89:e5:65:cc:e7"
219 | Key Value
220 | --- -----
221 | revocation_time 1532539632
222 | revocation_time_rfc3339 2018-07-25T17:27:12.165206399Z
223 | ```
224 |
225 | ## Step 6: Remove Expired Certificates
226 |
227 | Keep the storage backend and CRL by periodically removing certificates that have expired and are past a certain buffer period beyond their expiration time.
228 |
229 | To remove revoked certificate and clean the CRL.
230 |
231 | ```bash
232 | $ vault write pki_int/tidy tidy_cert_store=true tidy_revoked_certs=true
233 | ```
234 |
--------------------------------------------------------------------------------
/tls+ssl/use-vault-as-a-ca.png:
--------------------------------------------------------------------------------
https://raw.githubusercontent.com/clockworksoul/today-i-learned/1257079ee89defd9da4c261fd30d7d4a85f8ceb7/tls+ssl/use-vault-as-a-ca.png
--------------------------------------------------------------------------------
/vocabulary/sealioning.md:
--------------------------------------------------------------------------------
1 | # Sealioning
2 |
3 | _Source: Lauren told me about this. Also:
4 | [[1]](https://en.wikipedia.org/wiki/Sealioning), [[2]](https://www.forbes.com/sites/marshallshepherd/2019/03/07/sealioning-is-a-common-trolling-tactic-on-social-media-what-is-it), [[3]](https://www.urbandictionary.com/define.php?term=Sealioning)._
5 |
6 | **Sealioning** is a type of trolling or harassment which consists of pursuing people with persistent requests for evidence or repeated questions, while maintaining a pretense of civility and sincerity. It may take the form of "incessant, bad-faith invitations to engage in debate".
7 |
8 | ## Origins and history
9 |
10 | The term originated with a 2014 strip of the webcomic Wondermark by David Malki, where a character expresses a dislike of sea lions and a sea lion intrudes to repeatedly ask the character to explain. "Sea lion" was quickly verbed, the term gained popularity as a way to describe online trolling, and it was used to describe some of the behavior of those participating in the Gamergate controversy.
11 |
12 | 
13 |
--------------------------------------------------------------------------------
/vocabulary/sealioning.png:
--------------------------------------------------------------------------------
https://raw.githubusercontent.com/clockworksoul/today-i-learned/1257079ee89defd9da4c261fd30d7d4a85f8ceb7/vocabulary/sealioning.png
--------------------------------------------------------------------------------