└── README.md
/README.md:
--------------------------------------------------------------------------------
1 |
2 | # 为什么选择搬瓦工VPS
3 |
4 | 之前购买了不同商家的云服务器,有阿里云的VPS,也有腾讯云VPS,还有亚马逊的VPS,最后觉得最好用的还是搬瓦工VPS。
5 |
6 | 相比较而言性价比高,而且搬瓦工是国外的,你懂的,没有什么审核限制,一般来说,使用搬瓦工搭建一个自己的 VPN 来访问 Google 查询资料,看看文献什么的速度还是很快的。
7 |
8 | # 搬瓦工优惠码
9 |
10 | 很多人不知道,搬[搬瓦工官网](https://www.bwh8.net/aff.php?aff=32874)隐藏了一个彩蛋,就是隐藏了优惠码,这个优惠码可以省掉一些费用,比如一年 19 刀的VPS,使用优惠码的时候只需 18 刀多一点,简直不能再划算了。
11 |
12 | 点击进入[搬瓦工官网](https://www.bwh8.net/aff.php?aff=32874)进行注册就可以了,注册完之后可以选择以下可以获取优惠码的服务器,如果是个人使用的话,我觉得最便宜的已经很够用了,每个月500G的流量基本用不完的。
13 |
14 | | 搬瓦工配置 | 搬瓦工费用 | 优惠链接|
15 | | ------ | ------ | ------ |
16 | |*SPECIAL 10G KVM PROMO V3 - LOS ANGELES - CN2 *
SSD硬盘: 10 GB RAID-10
RAM内存: 512 MB
CPU处理器: 1x Intel Xeon
Transfer流量: 500 GB/月
连接速度: 1 Gigabit
洛杉矶机房,CN2路线,使用中国的直线路线,速度加快 | $29.99 /年 | [点击进入](https://www.bwh8.net/aff.php?aff=32874&pid=56) |
17 | | *20G KVM – PROMO*
SSD硬盘: 20 GB RAID-10
RAM内存: 1024 MB
CPU处理器: 2x Intel Xeon
Transfer流量: 1 TB/mo
连接速度: 1 Gigabit
Multiple locations| $49.99/年 | [点击进入](https://www.bwh8.net/aff.php?aff=32874&pid=44)|
18 | | *40G KVM – PROMO*
SSD硬盘: 40 GB RAID-10
RAM内存: 2 GB
CPU处理器: 3x Intel Xeon
Transfer流量: 2 TB/mo
连接速度: 1 Gigabit
Multiple locations| $99.99/年 | [点击进入](https://www.bwh8.net/aff.php?aff=32874&pid=45) |
19 | | *80G KVM – PROMO*
SSD硬盘: 80 GB RAID-10
RAM内存: 4 GB
CPU处理器: 4x Intel Xeon
Transfer流量: 3 TB/mo
连接速度: 1 Gigabit
Multiple locations| $19.99/月 | [点击进入](https://www.bwh8.net/aff.php?aff=32874&pid=46) |
20 | | *160G KVM – PROMO*
SSD硬盘: 160 GB RAID-10
RAM内存: 8 GB
CPU处理器: 5x Intel Xeon
Transfer流量: 4 TB/mo
连接速度: 1 Gigabit
Multiple locations| $39.99/月 | [点击进入](https://www.bwh8.net/aff.php?aff=32874&pid=47) |
21 | | *3200G KVM – PROMO*
SSD硬盘: 320 GB RAID-10
RAM内存: 16 GB
CPU处理器: 6x Intel Xeon
Transfer流量: 5 TB/mo
连接速度: 1 Gigabit
Multiple locations| $79.99/月 | [点击进入](https://www.bwh8.net/aff.php?aff=32874&pid=48) |
22 |
23 |
24 |
25 | 当你进到这个页面的时候呢,别急着点击「Add to Cart」添加到购物车,这里面暗藏着一个优惠码,很多人不知道,使用浏览器查看源代码,
26 | chrome浏览器的话按F12,然后搜索「code」,你会发现有一个 「Try this promo code: xxxx 」,这个xxxx就是优惠码,你把他复制下来,待会有用。
27 |
28 | 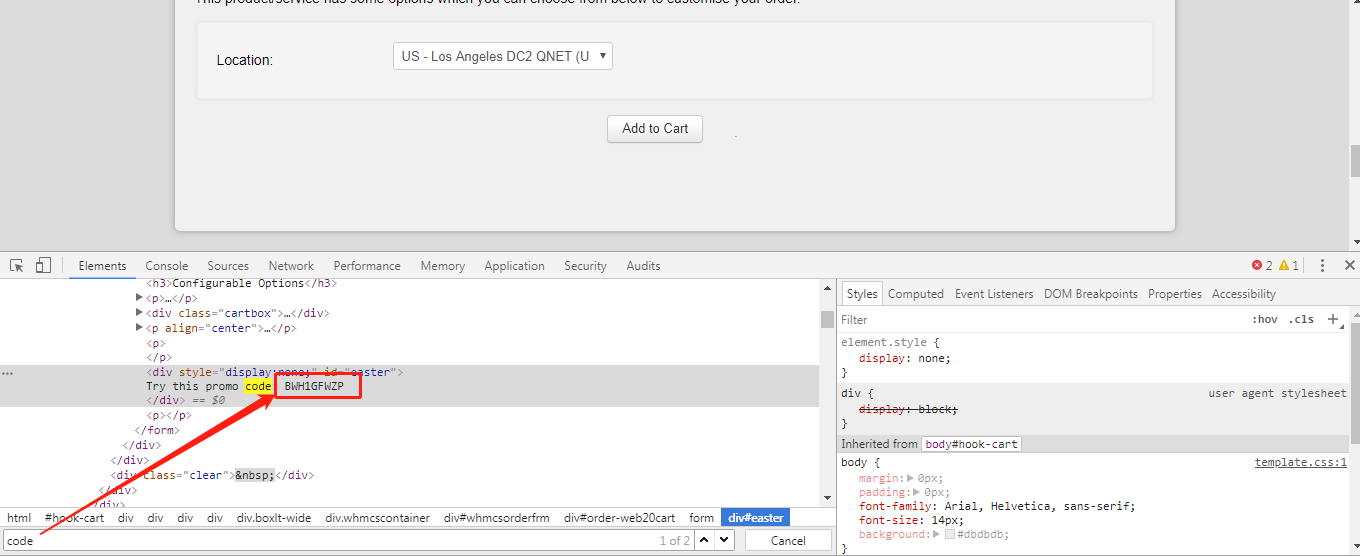
29 |
30 | 页面的 Location 就是选择服务器的地址,到时访问谷歌的时候会显示你当前访问的地址。好了,我们点击「Add to Cart」。
31 |
32 | 接下来,进入结算页面,我们刚才复制的优惠码就派上用场了,将你刚刚复制的优惠码复制进去然后点击 「Validate Code」,看!是不是优惠了!一般人不知道这种操作:
33 |
34 | 
35 |
36 | 接着点击「CheckOut」完成付款即可。付款的时候选择 Alipay 就可以使用支付宝付款。
37 |
38 | # 连接到搬瓦工
39 |
40 | 购买完毕后你就拥有一台你自己的服务器了,接着点击Services下的MyServices,可以看到你的服务器:
41 |
42 | 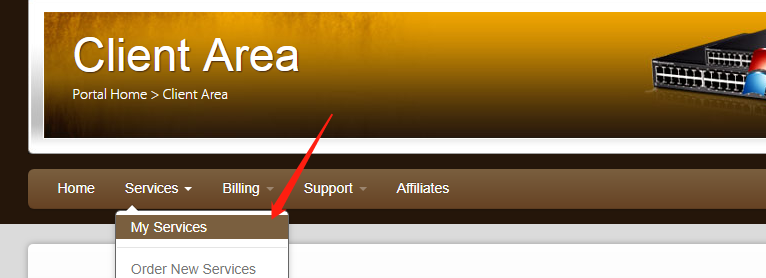
43 |
44 | 我们点击「KiwiVM Control Panel」进入管理界面:
45 |
46 | 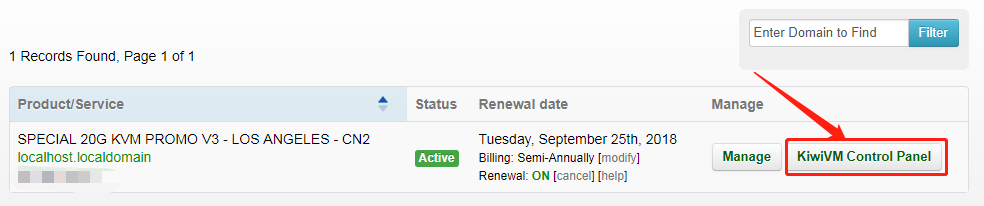
47 |
48 | 可以看到你服务器的信息:
49 |
50 | 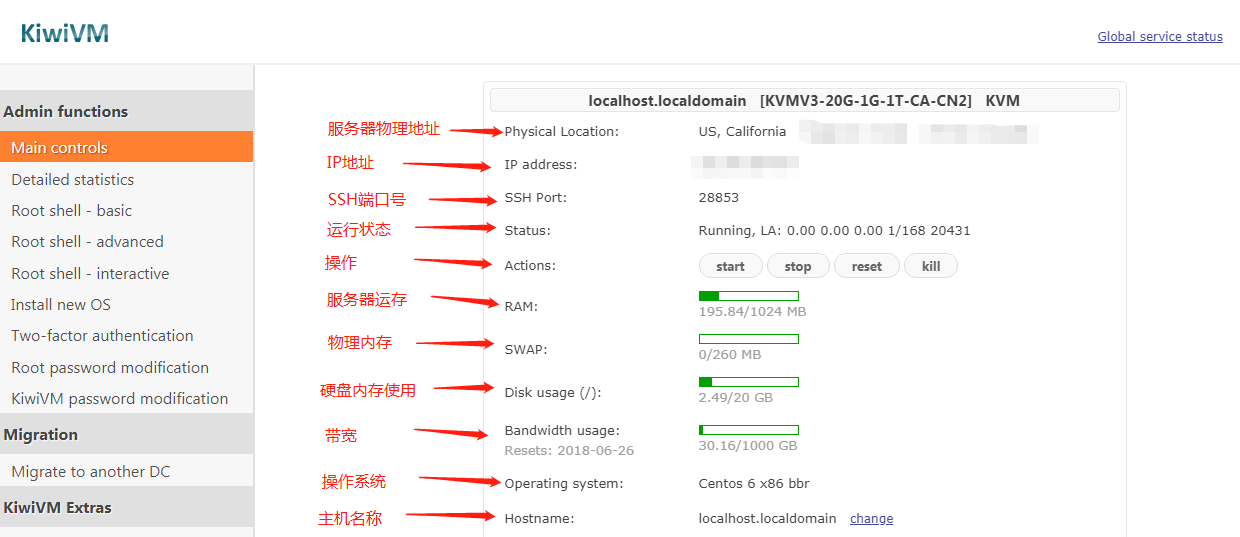
51 |
52 | 一般来说,菜单下方有一个 openvpn 的快速安装方式,但是据说很容易被强,所以现在不推荐使用这种方式搭建自己的VPN。
53 |
54 | # 使用搬瓦工搭建shadowsocks
55 |
56 |
57 | 有了搬瓦工服务器的IP地址和端口,我们就可以连接了:
58 |
59 | 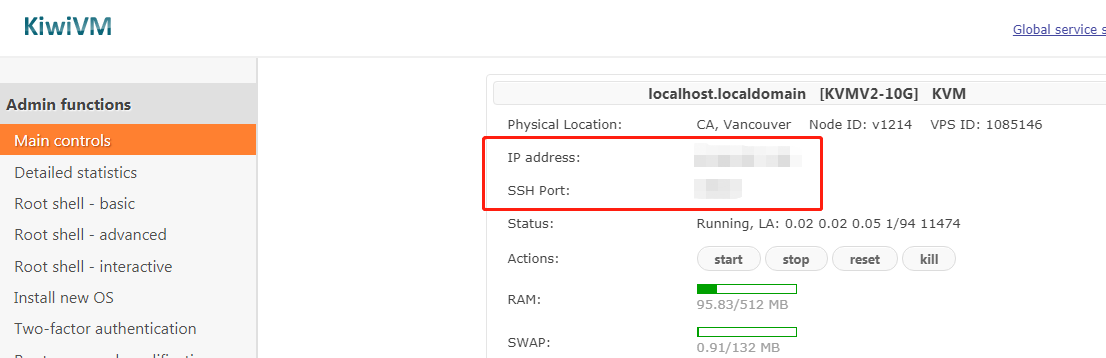
60 |
61 | 账号是root,密码可以在这里获取:
62 |
63 | 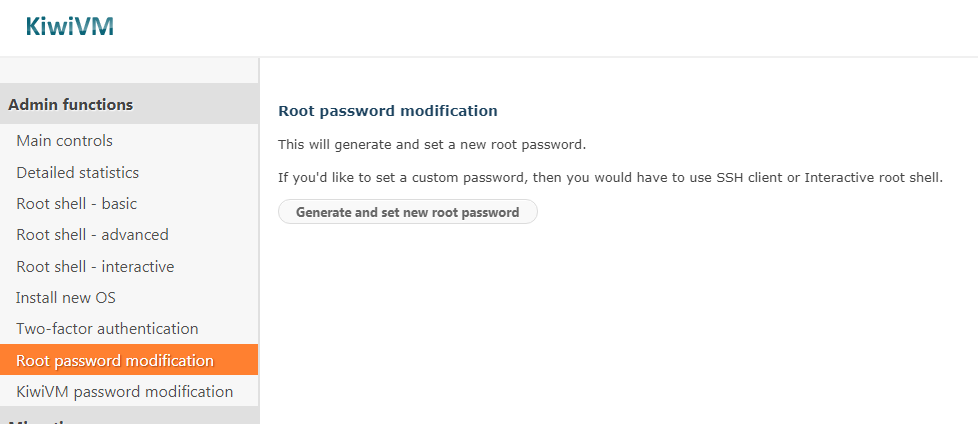
64 |
65 | 远程连接工具我一直用的是 [SecureCRT](https://www.vandyke.com/products/securecrt/) , 当然你也可以使用其它的 SSH 工具。
66 | 破解版的SecureCRT可以在百度网盘这里获取:
67 |
68 | - 链接: https://pan.baidu.com/s/11W4WHjCjmiNw6einQNrcPg
69 | - 提取码: tyux
70 |
71 | 连接到你的搬瓦工服务器之后,接下来几个命令让你快速搭建一个属于自己的ss服务器:
72 |
73 | 1. 搬瓦工安装 wget
74 | ```
75 | yum install wget
76 | ```
77 | 2. 搬瓦工执行安装shadowsocks
78 | ```
79 | wget –no-check-certificate -O shadowsocks.sh https://raw.githubusercontent.com/teddysun/shadowsocks_install/master/shadowsocks.sh
80 | ```
81 | 3. 搬瓦工获取shadowsocks.sh读取权限
82 | ```
83 | chmod +x shadowsocks.sh
84 | ```
85 | 4. 设置密码和端口号
86 | 当你输入`./shadowsocks.sh 2>&1 | tee shadowsocks.log`后就可以设置密码和端口号了:
87 |
88 | 
89 |
90 | 5. 选择加密方式
91 | 设置完密码和端口号之后,我们选择加密方式,这里选择 7:
92 |
93 | 
94 |
95 | 接着按任意键进行安装。
96 |
97 | 6. 安装完成
98 | 等一会之后,就安装完成了,它会给你显示你需要连接vpn的信息:
99 |
100 | 
101 |
102 | 可以看到需要连接ss的ip地址,密码,端口,和加密方式。
103 |
104 | 将这些信息保存起来,那么这时候你就可以使用它们来科学上网啦。
105 |
106 |
107 | # 使用Shadowsocks
108 |
109 | 打开 Shadowsocks 客户端,输入ip地址,密码,端口,和加密方式。接着点击确定,右下角会有个小飞机按钮,右键-->启动代理。
110 |
111 | 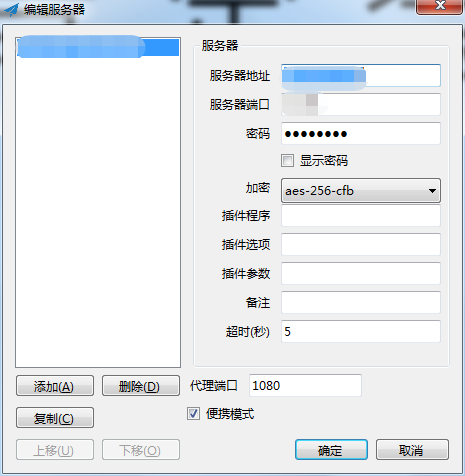
112 |
113 | 这时候就可以科学上网了。
114 |
115 | 访问以下 Youtube 和 Google 试试看,速度还可以的:
116 | 
117 | 
118 |
119 |
120 | # 使用BBR加速器
121 |
122 | 让访问速度加速,飞起来!使用 BBR 加速工具。
123 |
124 | ## 安装 BBR
125 |
126 | wget --no-check-certificate https://github.com/teddysun/across/raw/master/bbr.sh
127 |
128 | ## 获取读写权限
129 |
130 | chmod +x bbr.sh
131 |
132 | ## 启动BBR安装
133 |
134 | ./bbr.sh
135 |
136 | 接着按任意键,开始安装,坐等一会。安装完成一会之后它会提示我们是否重新启动vps,我们输入 y 确定重启服务器。
137 |
138 | 重新启动之后,输入 `lsmod | grep bbr` 如果看到 tcp_bbr 就说明 BBR 已经启动了。
139 |
140 | 再访问一下 Youtube,1080p 超高清,很顺畅不卡顿!
141 |
142 | 
143 |
144 |
145 | # 相关文章
146 |
147 | - [购买搬瓦工VPS省钱攻略:获取搬瓦工优惠码](https://wistbean.github.io/banwagong-coupon.html)
148 | - [使用搬瓦工快速搭建自己的VPN](https://wistbean.github.io/banwagong-vpn.html)
149 | - [CentOS快速搭建一个属于自己的IPsec/L2TP VPN](https://wistbean.github.io/ipsec,l2tp_vpn.html)
150 |
--------------------------------------------------------------------------------