 89 | >
90 | > -SCRUM: A Breathtakingly Breif and Agile Introduction
91 |
92 | Remember, the stories should capture user needs. You don't have to make them too granular since stories will eventually get broken down into tasks.
93 |
94 | 4. Select the most immediate user stories (probably ones on the smaller end of your list at this point), and convert each one to an "issue". Make sure they meet I-N-V-E-S-T and have a strong definition of done. You only have to do this for a handful of well-defined issues at the top of your stack, not for the ill defined ones at the bottom of the stack. You can deal with those during your next storytime meeting.
95 | 1. convert the "note" to an "issue" (you can hit the `...` at the top right side of the card)
96 | 2. use a checklist to make sure they meet I-N-V-E-S-T
97 | 3. add one or more definitions of done (this can be text or a checklist)
98 |
--------------------------------------------------------------------------------
/git/03-ssh.md:
--------------------------------------------------------------------------------
1 | # Git: SSH
2 |
3 | In order to write code locally on our computer and be able to push to GitHub (or pull from GitHub) daily without constantly having to enter a username and password each time, we're going to set up **SSH keys**.
4 |
5 | > SSH keys come in pairs, a public key that gets shared with services like GitHub, and a private key that is stored only on your computer. If the keys match, you're granted access.
6 | >
7 | > The cryptography behind SSH keys ensures that no one can reverse engineer your private key from the public one.
8 | >
9 | > source: https://jdblischak.github.io/2014-09-18-chicago/novice/git/05-sshkeys.html
10 |
11 |
12 | ## Setup
13 |
14 | The following steps are a simplification of the steps found in [GitHub's documentation](https://docs.github.com/en/free-pro-team@latest/github/authenticating-to-github/connecting-to-github-with-ssh). If you prefer, feel free to follow the steps at that link. Otherwise, for a simplified experience continue on below!
15 |
16 | ### Simplified Setup Steps
17 |
18 | 1. **Step 1:** Check to see if you already have keys.
19 |
20 | Run the following command.
21 |
22 | ```
23 | ls -al ~/.ssh/
24 | ```
25 |
26 | If you see any output, that probably means you already have a public and private SSH key. If you have keys, you will most likely you will have two files, one named `id_rsa` (that contains your private key) and `id_rsa.pub` (that contains your public key).
27 |
28 | _**sidenote**: Those files may also be named something like: `id_ecdsa.pub` or `id_ed25519.pub`. That just means you're using a different encryption algorithm to generate your keys. You can learn [more about that here](https://medium.com/risan/upgrade-your-ssh-key-to-ed25519-c6e8d60d3c54) if you chose to. Or, don't worry about it and power on!_
29 |
30 |
31 | If you already have keys, continue to step 3. Otherwise, read on!
32 |
33 | 2. **Step 2:** Create new SSH keys.
34 |
35 | Run the following comamnd, but makes sure to replace `your_email@example.com` with your own email address. Use the same email address you used to sign up to GitHub with.
36 |
37 | ```
38 | ssh-keygen -t rsa -b 4096 -C "your_email@example.com"
39 | ```
40 |
41 | You may then see a prompt like the one below. Just hit enter to save the key in the default location.
42 |
43 | ```
44 | Enter file in which to save the key (/Users/mehtad/.ssh/id_rsa):
45 | ```
46 |
47 | After that, the system will prompt you to enter a passphrase. We're **not** going to use a passphrase here, so just go ahead and leave that blank and hit enter twice.
48 |
49 | ```
50 | Enter passphrase (empty for no passphrase):
51 | Enter same passphrase again:
52 | ```
53 |
54 | Finally you should see some randomart that looks like this
55 |
56 | ```
57 | Your identification has been saved in /Users/mehtad/.ssh/id_rsa.
58 | Your public key has been saved in /Users/mehtad/.ssh/id_rsa.pub.
59 | The key fingerprint is:
60 | SHA256:2AazdvCBP8d1li9tF8cszM2KbtjPe7iwfCK8gUgzIGY your_email@example.com
61 | The key's randomart image is:
62 | +---[RSA 4096]----+
63 | | |
64 | | . o * |
65 | | E . = . . B.*|
66 | | o . . X o . + =o|
67 | | B S o . o =|
68 | | o * + + o.|
69 | | . ..o = . |
70 | | o+.=o .|
71 | | .ooo=+ |
72 | +----[SHA256]-----+
73 | ```
74 |
75 | 3. **Step 3:** Add your key to GitHub
76 |
77 | Run the following command to view your public key
78 |
79 | ```
80 | cat ~/.ssh/id_rsa.pub
81 | ```
82 |
83 |
84 | Navigate to https://github.com/settings/keys and hit "New SSH key". Paste the SSH key from the last command into the text box as shown below and then hit "Add SSH key". Make sure you copy paste exactly. The key will likely start with ssh_rsa and end with your email address. You can give the key a title like "My Macbook Pro" so you know which computer this key comes from.
85 |
86 | 
87 |
88 | 4. **Step 4:** Verify that it worked!
89 |
90 | Run the following command to test your computer's SSH connection to GitHub
91 |
92 | ```
93 | ssh -T git@github.com
94 | ```
95 |
96 | If the connection is successful, you will see a message like this
97 |
98 | ```
99 | > Hi username! You've successfully authenticated, but GitHub does not
100 | > provide shell access.
101 | ```
102 |
103 | ### Recap: What did we just do?
104 |
105 | We just created a public/private SSH Key pair. There is now a folder on your computer called `.ssh` *(it is a hidden folder, hidden folders have names that start with `.`)*. You can run this command to see the files in that folder.
106 |
107 | ```
108 | ls -al ~/.ssh/
109 | ```
110 |
111 | `id_rsa.pub` contains your **public key**, you can see what that looks like by running:
112 |
113 | ```
114 | cat ~/.ssh/id_rsa.pub
115 | ```
116 |
117 | `id_rsa` contains your **private key**, you can see what that looks like by running:
118 |
119 | ```
120 | cat ~/.ssh/id_rsa
121 | ```
122 |
123 | This public and private key pair are mathematically linked. As the name suggests, you can share your **public key** far and wide, but must keep your **private key** safe and secure. Since you have shared your public key with GitHub, your computer can encrypt files with your private key and send them to GitHub. Since GitHub has your public key, it can match that file and verify that it is coming from you. Your computer can now securely communicate with GitHub without needing a username and password every time.
124 |
125 | # Encryption (an aside)
126 |
127 | Want to know more about what you just did? Check out the Encryption Lesson, we'll likely get to this later in class.
128 |
129 | https://github.com/code4policy/modules/blob/master/security/encryption.md
130 |
--------------------------------------------------------------------------------
/git/06-branching.md:
--------------------------------------------------------------------------------
1 | # Git: Branching
2 |
3 | ## Why branches?
4 |
5 | When using Git, branches are a part of your everyday development process. Git branches are effectively a pointer to a snapshot of your changes. When you want to add a new feature or fix a bug—no matter how big or how small—you spawn a new branch to encapsulate your changes. This makes it harder for unstable code to get merged into the main code base, and it gives you the chance to clean up your future's history before merging it into the main branch.
6 |
7 | There are many different use cases for branches ranging from the aforementioned "feature branches", "release branches", dev/test/qa branches, and more.
8 |
9 | ## How do branches work?
10 |
11 | When creating a new repository, git by default starts with a `master` branch which is what we have been using until now. When we create branches, we are branching *off of* the most recent commit on the master branch.
12 |
13 | 
14 |
15 | The diagram above visualizes a repository with two isolated lines of development, one for a little feature, and one for a longer-running feature. By developing them in branches, it’s not only possible to work on both of them in parallel, but it also keeps the main master branch free from questionable code.
16 |
17 | After developing a feature, it needs to be merged back into the master branch. We will do this using a [Pull Request](https://help.github.com/articles/about-pull-requests/).
18 |
19 | ## How does merging work?
20 |
21 | 
22 |
23 | When creating a branch, the head of the branch splits off of a common base as seen in the picture above. This is why we refer to Git as a *non-linear workflow*. There are three new commits on the feature branch and 2 new commits directly on the master branch.
24 |
25 | 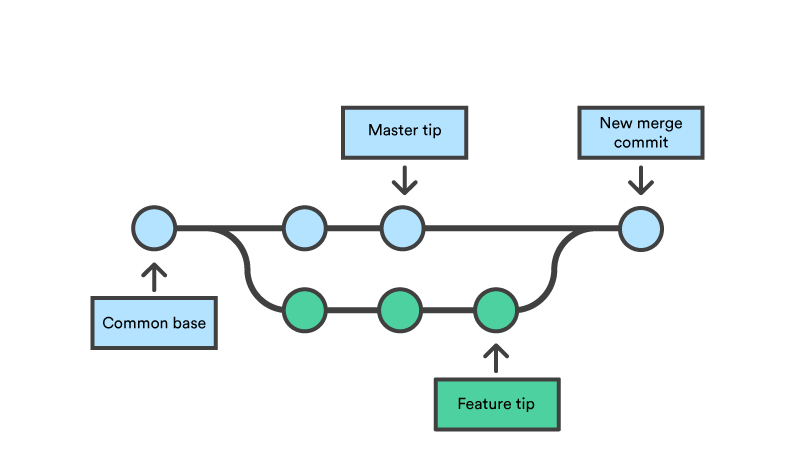
26 |
27 | When come time to merge, the difference between the 2 new commits on the master branch and the new code in the feature branch is resolved in what is referred to as a **merge commit**. Git tries to be as smart as possible when merging code but occasionally there are changes that cannot automatically be merged. This is when we run into a **merge conflict**. We will talk more about this in detail.
28 |
29 | Sources:
30 |
31 | - https://www.atlassian.com/git/tutorials/using-branches
32 | - https://www.atlassian.com/git/tutorials/using-branches/git-merge
33 |
34 | ## Pull Requests
35 |
36 | While there are other ways to merge branches, we will be using pull requests. When using the [shared repository model](https://help.github.com/articles/about-collaborative-development-models/) (one repository, multiple collaborators),
37 |
38 | - **base**: almost always the master branch. this is where you are merging on to
39 | - **compare**: this is your feature branch. this is where you are merging from
40 |
41 | 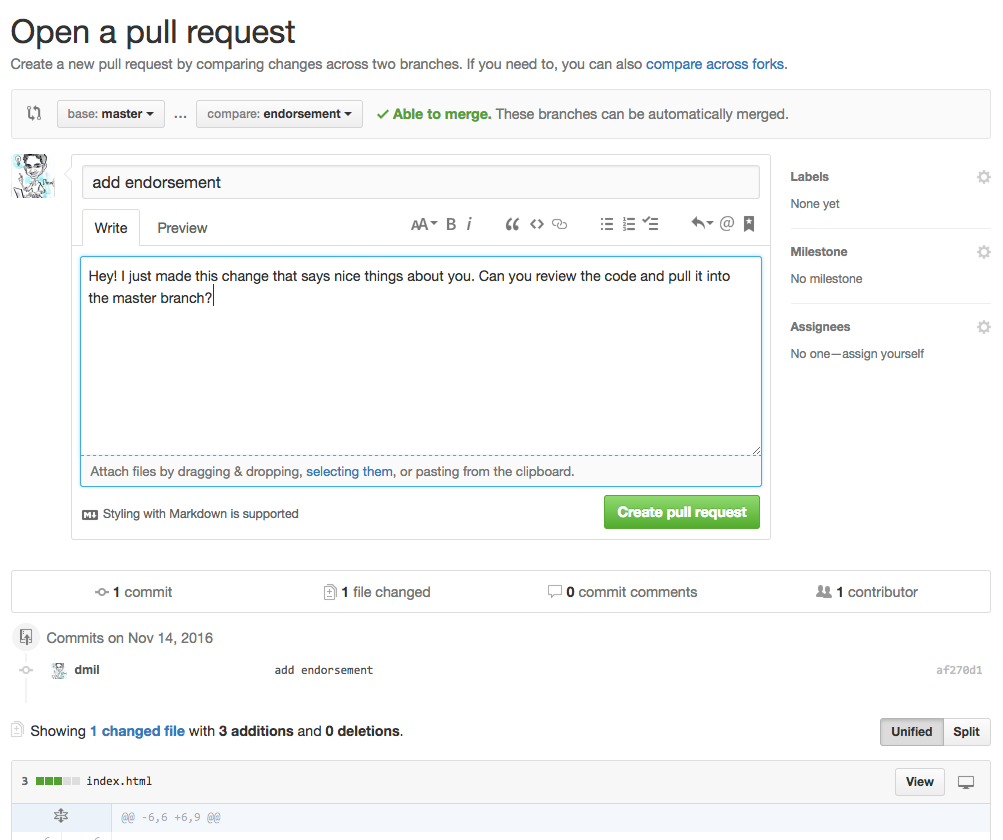
42 |
43 | In this screenshot, I am creating a Pull Request from the `endorsement` branch (compare) to the `master` branch (base). Note that this pull request has 1 commit.
44 |
45 | ## Commands
46 |
47 | #### List Branches
48 |
49 | ```
50 | git branch
51 | ```
52 |
53 | #### Create (and switch to) a new branch
54 |
55 | The `-b` flag creates a new branch.
56 |
57 | ```
58 | git checkout -b
89 | >
90 | > -SCRUM: A Breathtakingly Breif and Agile Introduction
91 |
92 | Remember, the stories should capture user needs. You don't have to make them too granular since stories will eventually get broken down into tasks.
93 |
94 | 4. Select the most immediate user stories (probably ones on the smaller end of your list at this point), and convert each one to an "issue". Make sure they meet I-N-V-E-S-T and have a strong definition of done. You only have to do this for a handful of well-defined issues at the top of your stack, not for the ill defined ones at the bottom of the stack. You can deal with those during your next storytime meeting.
95 | 1. convert the "note" to an "issue" (you can hit the `...` at the top right side of the card)
96 | 2. use a checklist to make sure they meet I-N-V-E-S-T
97 | 3. add one or more definitions of done (this can be text or a checklist)
98 |
--------------------------------------------------------------------------------
/git/03-ssh.md:
--------------------------------------------------------------------------------
1 | # Git: SSH
2 |
3 | In order to write code locally on our computer and be able to push to GitHub (or pull from GitHub) daily without constantly having to enter a username and password each time, we're going to set up **SSH keys**.
4 |
5 | > SSH keys come in pairs, a public key that gets shared with services like GitHub, and a private key that is stored only on your computer. If the keys match, you're granted access.
6 | >
7 | > The cryptography behind SSH keys ensures that no one can reverse engineer your private key from the public one.
8 | >
9 | > source: https://jdblischak.github.io/2014-09-18-chicago/novice/git/05-sshkeys.html
10 |
11 |
12 | ## Setup
13 |
14 | The following steps are a simplification of the steps found in [GitHub's documentation](https://docs.github.com/en/free-pro-team@latest/github/authenticating-to-github/connecting-to-github-with-ssh). If you prefer, feel free to follow the steps at that link. Otherwise, for a simplified experience continue on below!
15 |
16 | ### Simplified Setup Steps
17 |
18 | 1. **Step 1:** Check to see if you already have keys.
19 |
20 | Run the following command.
21 |
22 | ```
23 | ls -al ~/.ssh/
24 | ```
25 |
26 | If you see any output, that probably means you already have a public and private SSH key. If you have keys, you will most likely you will have two files, one named `id_rsa` (that contains your private key) and `id_rsa.pub` (that contains your public key).
27 |
28 | _**sidenote**: Those files may also be named something like: `id_ecdsa.pub` or `id_ed25519.pub`. That just means you're using a different encryption algorithm to generate your keys. You can learn [more about that here](https://medium.com/risan/upgrade-your-ssh-key-to-ed25519-c6e8d60d3c54) if you chose to. Or, don't worry about it and power on!_
29 |
30 |
31 | If you already have keys, continue to step 3. Otherwise, read on!
32 |
33 | 2. **Step 2:** Create new SSH keys.
34 |
35 | Run the following comamnd, but makes sure to replace `your_email@example.com` with your own email address. Use the same email address you used to sign up to GitHub with.
36 |
37 | ```
38 | ssh-keygen -t rsa -b 4096 -C "your_email@example.com"
39 | ```
40 |
41 | You may then see a prompt like the one below. Just hit enter to save the key in the default location.
42 |
43 | ```
44 | Enter file in which to save the key (/Users/mehtad/.ssh/id_rsa):
45 | ```
46 |
47 | After that, the system will prompt you to enter a passphrase. We're **not** going to use a passphrase here, so just go ahead and leave that blank and hit enter twice.
48 |
49 | ```
50 | Enter passphrase (empty for no passphrase):
51 | Enter same passphrase again:
52 | ```
53 |
54 | Finally you should see some randomart that looks like this
55 |
56 | ```
57 | Your identification has been saved in /Users/mehtad/.ssh/id_rsa.
58 | Your public key has been saved in /Users/mehtad/.ssh/id_rsa.pub.
59 | The key fingerprint is:
60 | SHA256:2AazdvCBP8d1li9tF8cszM2KbtjPe7iwfCK8gUgzIGY your_email@example.com
61 | The key's randomart image is:
62 | +---[RSA 4096]----+
63 | | |
64 | | . o * |
65 | | E . = . . B.*|
66 | | o . . X o . + =o|
67 | | B S o . o =|
68 | | o * + + o.|
69 | | . ..o = . |
70 | | o+.=o .|
71 | | .ooo=+ |
72 | +----[SHA256]-----+
73 | ```
74 |
75 | 3. **Step 3:** Add your key to GitHub
76 |
77 | Run the following command to view your public key
78 |
79 | ```
80 | cat ~/.ssh/id_rsa.pub
81 | ```
82 |
83 |
84 | Navigate to https://github.com/settings/keys and hit "New SSH key". Paste the SSH key from the last command into the text box as shown below and then hit "Add SSH key". Make sure you copy paste exactly. The key will likely start with ssh_rsa and end with your email address. You can give the key a title like "My Macbook Pro" so you know which computer this key comes from.
85 |
86 | 
87 |
88 | 4. **Step 4:** Verify that it worked!
89 |
90 | Run the following command to test your computer's SSH connection to GitHub
91 |
92 | ```
93 | ssh -T git@github.com
94 | ```
95 |
96 | If the connection is successful, you will see a message like this
97 |
98 | ```
99 | > Hi username! You've successfully authenticated, but GitHub does not
100 | > provide shell access.
101 | ```
102 |
103 | ### Recap: What did we just do?
104 |
105 | We just created a public/private SSH Key pair. There is now a folder on your computer called `.ssh` *(it is a hidden folder, hidden folders have names that start with `.`)*. You can run this command to see the files in that folder.
106 |
107 | ```
108 | ls -al ~/.ssh/
109 | ```
110 |
111 | `id_rsa.pub` contains your **public key**, you can see what that looks like by running:
112 |
113 | ```
114 | cat ~/.ssh/id_rsa.pub
115 | ```
116 |
117 | `id_rsa` contains your **private key**, you can see what that looks like by running:
118 |
119 | ```
120 | cat ~/.ssh/id_rsa
121 | ```
122 |
123 | This public and private key pair are mathematically linked. As the name suggests, you can share your **public key** far and wide, but must keep your **private key** safe and secure. Since you have shared your public key with GitHub, your computer can encrypt files with your private key and send them to GitHub. Since GitHub has your public key, it can match that file and verify that it is coming from you. Your computer can now securely communicate with GitHub without needing a username and password every time.
124 |
125 | # Encryption (an aside)
126 |
127 | Want to know more about what you just did? Check out the Encryption Lesson, we'll likely get to this later in class.
128 |
129 | https://github.com/code4policy/modules/blob/master/security/encryption.md
130 |
--------------------------------------------------------------------------------
/git/06-branching.md:
--------------------------------------------------------------------------------
1 | # Git: Branching
2 |
3 | ## Why branches?
4 |
5 | When using Git, branches are a part of your everyday development process. Git branches are effectively a pointer to a snapshot of your changes. When you want to add a new feature or fix a bug—no matter how big or how small—you spawn a new branch to encapsulate your changes. This makes it harder for unstable code to get merged into the main code base, and it gives you the chance to clean up your future's history before merging it into the main branch.
6 |
7 | There are many different use cases for branches ranging from the aforementioned "feature branches", "release branches", dev/test/qa branches, and more.
8 |
9 | ## How do branches work?
10 |
11 | When creating a new repository, git by default starts with a `master` branch which is what we have been using until now. When we create branches, we are branching *off of* the most recent commit on the master branch.
12 |
13 | 
14 |
15 | The diagram above visualizes a repository with two isolated lines of development, one for a little feature, and one for a longer-running feature. By developing them in branches, it’s not only possible to work on both of them in parallel, but it also keeps the main master branch free from questionable code.
16 |
17 | After developing a feature, it needs to be merged back into the master branch. We will do this using a [Pull Request](https://help.github.com/articles/about-pull-requests/).
18 |
19 | ## How does merging work?
20 |
21 | 
22 |
23 | When creating a branch, the head of the branch splits off of a common base as seen in the picture above. This is why we refer to Git as a *non-linear workflow*. There are three new commits on the feature branch and 2 new commits directly on the master branch.
24 |
25 | 
26 |
27 | When come time to merge, the difference between the 2 new commits on the master branch and the new code in the feature branch is resolved in what is referred to as a **merge commit**. Git tries to be as smart as possible when merging code but occasionally there are changes that cannot automatically be merged. This is when we run into a **merge conflict**. We will talk more about this in detail.
28 |
29 | Sources:
30 |
31 | - https://www.atlassian.com/git/tutorials/using-branches
32 | - https://www.atlassian.com/git/tutorials/using-branches/git-merge
33 |
34 | ## Pull Requests
35 |
36 | While there are other ways to merge branches, we will be using pull requests. When using the [shared repository model](https://help.github.com/articles/about-collaborative-development-models/) (one repository, multiple collaborators),
37 |
38 | - **base**: almost always the master branch. this is where you are merging on to
39 | - **compare**: this is your feature branch. this is where you are merging from
40 |
41 | 
42 |
43 | In this screenshot, I am creating a Pull Request from the `endorsement` branch (compare) to the `master` branch (base). Note that this pull request has 1 commit.
44 |
45 | ## Commands
46 |
47 | #### List Branches
48 |
49 | ```
50 | git branch
51 | ```
52 |
53 | #### Create (and switch to) a new branch
54 |
55 | The `-b` flag creates a new branch.
56 |
57 | ```
58 | git checkout -b Our Demonstration Website
87 | Learn more about our team 88 | 89 | 90 | ``` 91 | 92 | 93 | Here is a sample `our-team/index.html`: 94 | 95 | ```html 96 | 97 | 98 | 99 |About Us!
103 | 104 | 105 | ``` 106 | 107 | 4. Everyone should clone the repository. 108 | 109 | ``` 110 | git clone git@github.com:XXXXX/demo-website.git 111 | ``` 112 | 113 | 5. All team members, should create branches titled `add-member-Our Demonstration Website
105 | Learn more about our team 106 | 107 | 108 | ``` 109 | 110 | 111 | Here is a sample `our-team/index.html`: 112 | 113 | ```html 114 | 115 | 116 | 117 |About Us!
121 | 122 | 123 | ``` 124 | 125 | 5. Everyone else should pull these changes. 126 | 127 | ``` 128 | git pull 129 | ``` 130 | 131 | 6. All team members, should create branches titled `add-member-About Us!
152 | 160 | 161 | 162 | ``` 163 | 164 | 9. All team members should checkout the master branch and pull the latest code. 165 | 166 | ``` 167 | git checkout master 168 | git pull 169 | ``` 170 | 171 | Your repository and website should look something like this: 172 | - https://github.com/AlJohri/our-website 173 | - http://aljohri.com/our-website/ 174 | -------------------------------------------------------------------------------- /commandline/03-redirection.md: -------------------------------------------------------------------------------- 1 | # Command Line 3 2 | 3 | ## Redirection & Piping 4 | 5 | ##### Redirecting output to file: `>` 6 | 7 | ``` 8 | command > filename 9 | ``` 10 | 11 | Takes the output of `command` and saves it in `filename`. This will overwrite the file if it already exists. 12 | 13 | ##### Redirecting output and appending to file: `>>` 14 | 15 | ``` 16 | command >> filename 17 | ``` 18 | 19 | Takes the output of `command` and appends it to the end of the content of `filename`. This will create the file if it does not yet exist. 20 | 21 | ##### Piping: `|` 22 | 23 | ``` 24 | command1 | command2 25 | ``` 26 | 27 | Pipes the results from `command1` as input to `command2`, and then the results of `command2` are printed to the console. 28 | 29 | ## Lets see how it works 30 | 31 | First, lets install a new command `fortune` 32 | - mac: `brew install fortune` 33 | - ubuntu: `sudo apt-get install fortune` 34 | 35 | 1. Redirect: 36 | ``` 37 | fortune > wisething.txt 38 | ``` 39 | 2. Pipe 40 | ``` 41 | fortune | cowsay 42 | ``` 43 | 3. Pipe then Redirect 44 | ``` 45 | fortune | cowsay > wisecow.txt 46 | ``` 47 | 48 | ## ❇️ Example: Redirection 49 | 50 | 1. Redirect a fact about planet mars into the mars.txt. 51 | 52 | ``` 53 | echo "Mars is dusty." > ~/Development/universe/solar_system/planets/mars.txt 54 | ``` 55 | 56 | 2. Add another mars fact to mars.txt. 57 | 58 | ``` 59 | echo "Mars has an 687 day year." >> ~/Development/universe/solar_system/planets/mars.txt 60 | ``` 61 | 62 | 3. Cat the contents of mars.txt. 63 | 64 | ``` 65 | cat ~/Development/universe/solar_system/planets/mars.txt 66 | ``` 67 | 68 | 4. Make sure there is at least one newline at the end of `mars.txt`. 69 | 70 | You can check if there is a newline at the end of the file if there is no `%` sign that appears at the end of the file. 71 | 72 |  73 | 74 | In this screenshot, the first example with the `%` at the end has no newline. The latter example does. 75 | 76 | ## ❇️ Example: piping 77 | 78 | Count the number of characters in the string "hello world" using `wc`. 79 | 80 | ``` 81 | echo "hello world" | wc -c 82 | ``` 83 | 84 | Count the number of lines in the file `mars.txt` 85 | 86 | ``` 87 | cat ~/Development/universe/solar_system/planets/mars.txt | wc -l 88 | ``` 89 | 90 | Count the number of characters in the first line of `mars.txt` 91 | 92 | ``` 93 | cat ~/Development/universe/solar_system/planets/mars.txt | head -n 1 | wc -c 94 | ``` 95 | 96 | ## ➡️ Try It 97 | 98 | Count the number of characters in `mars.txt` 99 | Count the number of characters in the last line of `mars.txt` 100 | 101 | 102 | ## ❇️ Example: piping 103 | 104 | Count number of **folders** in the `universe` folder. 105 | 106 | ``` 107 | cd ~/Development/universe 108 | find . -type d | wc -l 109 | ``` 110 | 111 | ## ➡️ Try It 112 | 113 | Count number of **files** in the `universe` folder. 114 | 115 | ## Slackcat 116 | 117 | Lets install a new command-line tool. On macOS use `brew install slackcat`. For linux, see the bottom of this page https://github.com/vektorlab/slackcat for instructions. 118 | 119 | Configure slackcat by running this command and following the instructions in your web browser: 120 | 121 | ``` 122 | slackcat --configure 123 | ``` 124 | 125 | ## ❇️ Example 126 | 127 | Let's use slackchat to send a simple message to the `#scratchwork` channel. 128 | 129 | ``` 130 | echo "hello world" | slackcat -c scratchwork 131 | ``` 132 | 133 | ## ➡️ Try It 134 | 135 | Notice how the message is being sent as a snippet. Figure out how to send a normal, non-snippet, message using slackcat. 136 | 137 | 140 | 141 | ## ➡️ Try It 142 | 143 | 1. Count the total number of files and folders in the `~/Development/universe/` directory and send this to the person sitting next to you using slackcat. Use only one line and piping. You can use the `--noop` flag to first test it out without sending the message, then you can remove it to send the message. (hint: start with `tree`) 144 | 145 | 149 | 150 | 2. In the `~/Development/universe` directory, run `ls`, pipe the output of that into slackcat and send it to the `#scratchwork` channel. This time, make sure to send it as a snippet. 151 | 152 | 156 | 157 | ## ❇️ Example: piping and redirection 158 | 159 | House Office Expenditure Data: https://projects.propublica.org/represent/expenditures 160 | 161 | 1. Let's start a new directory for the house expenditure data. 162 | 163 | ``` 164 | cd ~/Development 165 | mkdir house-expenditure 166 | cd house-expenditure 167 | ``` 168 | 169 | 4. Download the Q2 2017 expenditure detail data and pipe it into a file. 170 | 171 | ``` 172 | curl "https://projects.propublica.org/congress/assets/staffers/2017Q2-house-disburse-detail.csv" > 2017Q2-house-disburse-detail.csv 173 | ``` 174 | 175 | 5. Print the header (first line) of this file. 176 | 177 | ``` 178 | head -n 1 2017Q2-house-disburse-detail.csv 179 | ``` 180 | 181 | 6. Print the last 12 lines of this file. 182 | 183 | ``` 184 | tail -n 12 2017Q2-house-disburse-detail.csv 185 | ``` 186 | 187 | 7. Count the number of lines in this file. 188 | 189 | ``` 190 | cat 2017Q2-house-disburse-detail.csv | wc -l 191 | ``` 192 | 193 | 8. Count the number of rows in this file that contains the word "technology" (case insensitive) 194 | 195 | ``` 196 | cat 2017Q2-house-disburse-detail.csv | grep -i technology | wc -l 197 | ``` 198 | 199 | 9. Return only the rows containing the word "technology" and redirect the output into a file. Keep the header. 200 | 201 | ``` 202 | head -1 2017Q2-house-disburse-detail.csv > technology.csv 203 | cat 2017Q2-house-disburse-detail.csv | grep -i technology >> technology.csv 204 | ``` 205 | 206 | 10. Grep a word of your choice and send the first 5 lines to #scratchwork channel on slack. 207 | 208 | ``` 209 | cat 2017Q2-house-disburse-detail.csv | grep -i technology | head -n 5 | slackcat --filename technology.csv -c scratchwork 210 | ``` 211 | -------------------------------------------------------------------------------- /web/04-frontend-stack.md: -------------------------------------------------------------------------------- 1 | # Front-End Stack 2 | 3 | We'll be leaning on Mozilla's tutorials to learn the basics of HTML, CSS, and JavaScript. This is your standard front-end stack for the browser. But first, some information about websites and how they work: 4 | 5 | https://projects.propublica.org/graphics/images/data-institute/presentations/how-websites-work.pdf 6 | 7 | ## HTML 8 | 9 | * Tutorial: [https://developer.mozilla.org/en-US/docs/Learn/Getting_started_with_the_web/HTML_basics](https://developer.mozilla.org/en-US/docs/Learn/Getting_started_with_the_web/HTML_basics) 10 | 11 | ## CSS 12 | * Tutorial: [https://developer.mozilla.org/en-US/docs/Learn/Getting_started_with_the_web/CSS_basics](https://developer.mozilla.org/en-US/docs/Learn/Getting_started_with_the_web/CSS_basics) 13 | 14 | ### Addendum: Attributes - Class vs ID 15 | 16 | The `class` and `id` attributes are particularly important. These are what the CSS is going to latch onto in order to identify which elements should receive the same styles, and they are what the JavaScript will latch onto in order to determine which element it should assign a behavior to. 17 | 18 | 19 | ## ❇️ Example 20 | 21 | 1. Lets try this by adding a few more paragraphs of text. You can generate dummy text at https://www.lipsum.com/. 5 paragraphs should be enough. 22 | 23 | 2. Lets put each one of the paragraphs in a pararaph tag. 24 | 25 | 3. Between the paragraphs of lorem ipsum, lets add some more paragraph tags, but lets make these what we'd call a pullquote. Notice that the paragraphs that are quotes have an attribute `class=quote` and the first one has an attribute `id=mainquote`. 26 | 27 | 28 | ```html 29 |Lorem ipsum dolor sit amet, consectetur adipiscing elit. Cras semper tellus quis est lacinia, non consectetur urna consequat. Aliquam sed finibus ipsum. Suspendisse nec euismod nibh. Donec id orci risus. Aliquam erat volutpat. Praesent in sem diam. Nam rutrum dui vitae ante scelerisque gravida. In eget erat sed tellus dignissim tincidunt eget non eros. Nulla facilisi. Aenean arcu tellus, gravida sed ex ut, pellentesque dapibus erat. Duis quis quam eget diam rhoncus euismod.
30 | 31 |"Web development is cool" - Bill Joe Smith
32 | 33 |Vestibulum vel sodales augue, quis rhoncus augue. Mauris id ligula turpis. Nulla facilisis massa sed pretium ornare. Class aptent taciti sociosqu ad litora torquent per conubia nostra, per inceptos himenaeos. Nunc nunc elit, euismod quis enim sed, hendrerit posuere dui. Aenean tempus lacinia turpis non molestie. Nullam imperdiet nibh erat, non aliquet nulla congue ac. Pellentesque habitant morbi tristique senectus et netus et malesuada fames ac turpis egestas. Donec feugiat enim vitae tempus euismod. Curabitur cursus eget orci vitae interdum. Sed varius luctus massa sit amet rhoncus. Morbi eget massa quis nibh tempor varius sit amet non felis.
34 | 35 |"Web development is cool" - Bill Joe Smith
36 | 37 |In eget nisi pulvinar, dapibus enim vel, molestie eros. Donec facilisis odio sed massa pharetra cursus. Nullam felis ipsum, semper vitae hendrerit in, iaculis id enim. Mauris non consequat augue. Donec a placerat sem. Aenean lacus nibh, ullamcorper eu lacus quis, facilisis pretium quam. Donec pellentesque, metus at auctor dignissim, ligula purus tincidunt mi, sit amet eleifend tellus nulla vitae orci. Donec eget ipsum sem. In laoreet ac risus quis tristique. Suspendisse felis odio, cursus id sapien non, tincidunt euismod enim. Praesent in nisi justo. Mauris in bibendum elit. In hac habitasse platea dictumst.
38 | 39 |Sed quis egestas nunc. Donec dignissim scelerisque posuere. Maecenas eu ipsum justo. Fusce id dui lectus. Nulla aliquet pharetra aliquam. Class aptent taciti sociosqu ad litora torquent per conubia nostra, per inceptos himenaeos. Nam eu tincidunt quam, lacinia imperdiet massa. Duis sed vestibulum odio.
40 | 41 |"JavaScript is the language of web browsers" - John Doe
42 | 43 |Sed scelerisque commodo odio, ut consectetur arcu sodales in. Curabitur vitae rhoncus arcu. Mauris hendrerit rhoncus diam sit amet hendrerit. Suspendisse potenti. Aenean semper rhoncus mi, non semper urna porta nec. Quisque condimentum est et ultricies aliquam. Etiam et eros in dolor tempus maximus eu id turpis. Aliquam ac leo sed ligula tincidunt vulputate. Suspendisse sagittis et mauris in euismod. Integer suscipit sapien sit amet nunc finibus, sed faucibus dui dictum. Phasellus ac velit nisi.
44 | ``` 45 | 46 | 4. Make all the quotes red. Commit and push the change. 47 | 5. Make the mainquote retain all of the styles from the regular quote, but also give it a border. 48 | 49 | ## JavaScript 50 | 51 | * Tutorial: [https://developer.mozilla.org/en-US/docs/Learn/Getting_started_with_the_web/JavaScript_basics](https://developer.mozilla.org/en-US/docs/Learn/Getting_started_with_the_web/JavaScript_basics) (do Hello World only) 52 | 53 | * You have done some javascript in your terminal window for homework (http://jsforcats.com/) 54 | * Introducing Alerts 55 | 56 | ```javascript 57 | alert('Warning, this is a popup alert!!!'); 58 | ``` 59 | 60 | running that in the console window will make a JavaScript alert pop up. 61 | 62 | * Introducing Events 63 | 64 | We don't want that to happen as soon as you load the page though, so lets assign it an event. Lets make the image pop open an alert when you click on the fox. 65 | 66 | 67 | ```javascript 68 | // Define a Function 69 | function sayOuch() { 70 | alert('Ouch! Stop poking me!'); 71 | } 72 | 73 | // Use a CSS selector to identify an element 74 | var foxImage = document.querySelector('img'); 75 | 76 | // Assign the function to the onclick event on that element 77 | foxImage.onclick = sayOuch; 78 | ``` 79 | 80 | ### Bonus 81 | Add two buttons to your page, one to show the fox and one to hide it. 82 | 83 | ### Super duper bonus 84 | Make those into one button that toggles show/hide of the fox 85 | 86 | ## A note about style 87 | 88 | There are lots of tools online to help you select a color pallate: 89 | 90 | * https://www.google.com/search?q=css+color+palette&spell=1&sa=X&ved=0ahUKEwiWg_fZ28bYAhXHzIMKHVDICKoQvwUIJigA&biw=834&bih=639 91 | * https://www.w3schools.com/colors/colors_picker.asp 92 | 93 | Also, you can modify CSS in the browser window if you just want to see what a change might look like without actually making the change. 94 | -------------------------------------------------------------------------------- /git/08-forking.md: -------------------------------------------------------------------------------- 1 | # Git: Forking 2 | 3 | ## Key Terms 4 | 5 | * **fork** - make a copy of a remote repo on GitHub from one account to another. 6 | * **pull request** - ask the upstream maintainer to pull in changes from origin. 7 | * **upstream** - the name for a remote read-only repository 8 | * **origin** - the name for a remote read-and-write repository 9 | 10 | ## A Typical Setup for Forked Code 11 |  12 | 13 | ## Branching vs Forking 14 | 15 | * **Branching** is a feature of Git, you've used branching already 16 | * **Forking** is a feature of GitHub 17 | * A fork is a personal copy of another user's repository that lives on your account. Forks allow you to freely make changes to a project without affecting the original. Forks remain attached to the original, allowing you to submit a pull request to the original's author to update with your changes. You can also keep your fork up to date by pulling in updates from the original. - [GitHub Glossary](https://help.github.com/articles/github-glossary/) 18 | * When you fork a repository, you get all of the branches the other person posted on GitHub 19 | * Pull requests however, don't acknowledge forks since they are a feature of GitHub and not Git. So while you can colloquially say "I'm issuing a pull request from my fork to yours", really what you're saying is "I'm issuing a pull request from the master branch of my fork to the master branch of your fork". You can actually issue a pull request from any branch in your forked repository to any branch in the original repository. 20 | 21 |  22 | 23 | Here is a good example repository that makes use of issues and pull requests: https://github.com/openelections/ 24 | 25 | 26 | ## ❇️ Example (shorter - no local repository) 27 | 28 | 1. Step 1: Fork my repository [`dmil/simple-website`](https://github.com/dmil/simple-website). 29 | 30 | 2. Go to Settings > GitHub Pages and select the "master" branch as the source. Wait a few seconds and then go to http://`your-username`.github.io/simple-website to make sure github pages is set up correctly. 31 | 32 | 3. Normally I'd clone the forked repository locally onto my computer, push changes to the fork, then issue a pull request. For the sake of time lets cut that step out. Make **one** small edit in your fork of this code **directly in GitHub**. 33 | 34 | 4. Create a pull request. Note that this time we are creating pull request across repositories instead of just across branches within the same repository. The `base` will be `dmil/simple-website/master` while the `compare` will be `your-username/simple-website/master`. 35 | 36 | 5. Compare your website http://`your-username`.github.io/simple-website to mine: http://dhrumilmehta.com/simple-website/ 37 | 38 | 6. I will now merge your pull requests and we can see what changes you all make to the website over time. There's a good chance we may run into some merge conflicts as well. 39 | 40 | ## ❇️ Example (Longer) 41 | 42 | 1. Step 1: Fork my repository [`dmil/simple-website`](https://github.com/dmil/simple-website). 43 | 44 | 2. Go to Settings > GitHub Pages and select the "master" branch as the source. Wait a few seconds and then go to http://`your-username`.github.io/simple-website to make sure github pages is set up correctly. 45 | 46 | 3. Clone the forked repository to your Development folder. 47 | 48 | ``` 49 | git clone git@github.com:XXXX/XXXX.git 50 | ``` 51 | 52 | 4. Create a feature branch with your name. 53 | 54 | ``` 55 | git checkout -bEndorsements
103 |You are a really cool person. - Dhrumil
104 | ``` 105 | 4. Commit this endorsement and push it to your fork.. 106 | 5. Issue a pull request back to that person's github repo. 107 | 108 | ## Pull Requests and Issues in the Wild 109 | 110 | - https://github.com/tj/git-extras/pull/356 111 | - https://github.com/powmedia/backbone-forms/issues/537 112 | - https://github.com/powmedia/backbone-forms/pull/538 113 | 114 | ## ➡️ Try It 115 | 116 | Make an issue on my simple-website repository: https://github.com/dmil/simple-website 117 | 118 | --------------------------------------------------------------------------------