├── .gitignore
├── _readme
└── tinkercad-from-nodejs.png
├── package.json
├── node_to_arduino.ino
├── app.js
├── index.html
└── README.md
/.gitignore:
--------------------------------------------------------------------------------
1 | .DS_Store
2 | package-lock.json
3 | node_modules/
4 |
--------------------------------------------------------------------------------
/_readme/tinkercad-from-nodejs.png:
--------------------------------------------------------------------------------
https://raw.githubusercontent.com/codeadamca/arduino-from-nodejs/HEAD/_readme/tinkercad-from-nodejs.png
--------------------------------------------------------------------------------
/package.json:
--------------------------------------------------------------------------------
1 | {
2 | "name": "basic-socket",
3 | "version": "0.0.1",
4 | "description": "Communication between HTML/JavaScript and Arduino",
5 | "dependencies": {
6 | "socket.io": "^2.0.4",
7 | "serialport": "^9.0.1"
8 | }
9 | }
10 |
--------------------------------------------------------------------------------
/node_to_arduino.ino:
--------------------------------------------------------------------------------
1 | /*
* This file receives a Serial value of "1" or "0" and changes the light based on
* that value.
*/
// Define the port for the LED
int lightPin = 2;
void setup()
{
// Initialize the light pin
pinMode(lightPin, OUTPUT);
// Initialize the Serial
Serial.begin(9600);
}
void loop() {
// CHeck to see if Serial data is being received
if (Serial.available() > 0) {
// Create a new string variable to receive Serial data
String receivedString = "";
// Loop through received data and append to the receivedString variable
while (Serial.available() > 0) {
receivedString += char(Serial.read ());
}
// Print received Serial data
Serial.println(receivedString);
// Change LED status based on received data
if(receivedString == "1")
digitalWrite(lightPin,HIGH);
else
digitalWrite(lightPin,LOW);
}
}
--------------------------------------------------------------------------------
/app.js:
--------------------------------------------------------------------------------
1 | var http = require('http');
2 | var fs = require('fs');
3 | var index = fs.readFileSync( 'index.html');
4 |
5 | var SerialPort = require('serialport');
6 | const parsers = SerialPort.parsers;
7 |
8 | const parser = new parsers.Readline({
9 | delimiter: '\r\n'
10 | });
11 |
12 | var port = new SerialPort('/dev/tty.wchusbserialfa1410',{
13 | baudRate: 9600,
14 | dataBits: 8,
15 | parity: 'none',
16 | stopBits: 1,
17 | flowControl: false
18 | });
19 |
20 | port.pipe(parser);
21 |
22 | var app = http.createServer(function(req, res) {
23 | res.writeHead(200, {'Content-Type': 'text/html'});
24 | res.end(index);
25 | });
26 |
27 | var io = require('socket.io').listen(app);
28 |
29 | io.on('connection', function(socket) {
30 |
31 | socket.on('lights',function(data){
32 |
33 | console.log( data );
34 |
35 | port.write( data.status );
36 |
37 | });
38 |
39 | });
40 |
41 | app.listen(3000);
42 |
--------------------------------------------------------------------------------
/index.html:
--------------------------------------------------------------------------------
1 |
2 |
3 |
4 |
5 | Communicating from Node.js to an Arduino
6 |
7 |
8 |
9 |
10 |
11 |
12 |
Communicating from Node.js to an Arduino
13 |
14 |
15 |
16 |
17 |
34 |
35 |
36 |
37 |
--------------------------------------------------------------------------------
/README.md:
--------------------------------------------------------------------------------
1 | # Communicating Between a Node.js Server and an Arduino
2 |
3 | This tutorial will walkthrough the process of creating a web interface to control an Arduino. The web interface will include an on and off button that will turn a light on and off on a USB connected Arduino.
4 |
5 | ## HTML and JavaScript
6 |
7 | Create an HTML file called `index.html`. Add the following code:
8 |
9 | ```javascript
10 |
11 |
12 |
13 |
14 | Communicating from Node.js to an Arduino
15 |
16 |
17 |
18 |
19 |
20 |
Communicating from Node.js to an Arduino
21 |
22 |
23 |
24 |
25 |
38 |
39 |
40 |
41 | ```
42 |
43 | The above code creates a webpage with two buttons. When the buttons are clicked they use JavaScript and Socket.io to send a one or zero message to the Node.js server.
44 |
45 | ## Node.js Server
46 |
47 | Before we setup the Node.js server we need to know the name of the serialport your Arduino is attached to. You can find the name of your serialport, it will look something like `/dev/tty.wchusbserialfa1410`. On a Mac using the Terminal and entering the following command:
48 |
49 | ```sh
50 | ls /dev/{tty,cu}.*
51 | ```
52 |
53 | On a PC you can use the command line and the following command:
54 |
55 | ```sh
56 | chgport
57 | ```
58 |
59 | On a Windows machine the `chgport` command would result in the following:
60 |
61 | ```sh
62 | AUX = \DosDevices\COM1
63 | COM1 = \Device\Serial0
64 | COM3 = \Device\Serial2
65 | ```
66 |
67 | My Node.js will require the use of `COM3` as the serialport string.
68 |
69 | If you're not sure which one is your Arduino, just disconnet your Arduino and execute the cpommand again and take note of which port is no longer on the list.
70 |
71 | Or you can find the name in [Arduino Create](https://create.arduino.cc/editor) in the drop down menu used to select your Arduino.
72 |
73 | Create a file called `app.js` and add the following code:
74 |
75 | ```javascript
76 | var http = require('http');
77 | var fs = require('fs');
78 | var index = fs.readFileSync( 'index.html');
79 |
80 | var SerialPort = require('serialport');
81 | const parsers = SerialPort.parsers;
82 |
83 | const parser = new parsers.Readline({
84 | delimiter: '\r\n'
85 | });
86 |
87 | var port = new SerialPort('/dev/tty.wchusbserialfa1410',{
88 | baudRate: 9600,
89 | dataBits: 8,
90 | parity: 'none',
91 | stopBits: 1,
92 | flowControl: false
93 | });
94 |
95 | port.pipe(parser);
96 |
97 | var app = http.createServer(function(req, res) {
98 | res.writeHead(200, {'Content-Type': 'text/html'});
99 | res.end(index);
100 | });
101 |
102 | var io = require('socket.io').listen(app);
103 |
104 | io.on('connection', function(socket) {
105 |
106 | socket.on('lights',function(data){
107 |
108 | console.log( data );
109 | port.write( data.status );
110 |
111 | });
112 |
113 | });
114 |
115 | app.listen(3000);
116 | ```
117 |
118 | The above code uses Socket.io to listen for a message from the HTML/JavaScript webpage and then simply passes on the message to the connected Arduino.
119 |
120 | > [!Note]
121 | > Make sure to change the name of the serialport.
122 |
123 | ## The Arduino
124 |
125 | Using [Arduino Create](https://create.arduino.cc/editor) create the following sketch and upload it to your Arduino.
126 |
127 | ```cpp
128 | int lightPin = 2;
129 |
130 | void setup()
131 | {
132 | pinMode(lightPin, OUTPUT);
133 | Serial.begin(9600);
134 | }
135 |
136 | void loop() {
137 |
138 | if (Serial.available() > 0) {
139 |
140 | String receivedString = "";
141 |
142 | while (Serial.available() > 0) {
143 | receivedString += char(Serial.read ());
144 | }
145 |
146 | Serial.println(receivedString);
147 |
148 | if(receivedString == "1")
149 | digitalWrite(lightPin,HIGH);
150 | else
151 | digitalWrite(lightPin,LOW);
152 |
153 | }
154 |
155 | }
156 | ```
157 |
158 | The previous code will listen to the serialport for an incoming message. Once a message is received, if the message is a one the light will turn on, if the message is a zero the light will turn off.
159 |
160 | > [View the Arduino code on Arduino Create](https://create.arduino.cc/editor/professoradam/af5288bf-00cc-406c-844e-f20485fa2df8/preview)
161 |
162 | You will need to setup the following circuit using your Arduino:
163 |
164 | 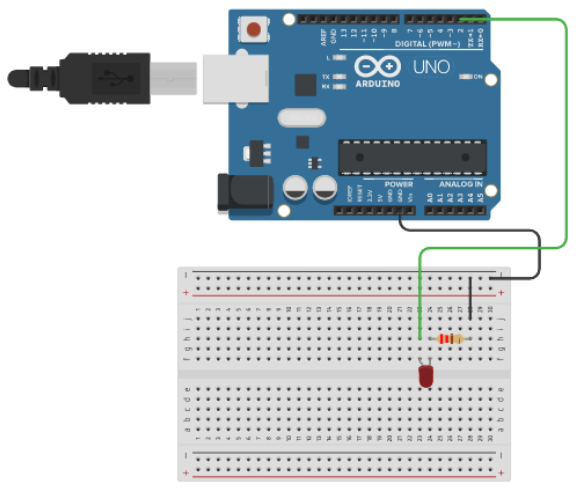
165 |
166 | > [View the Circuit on Tinkercad](https://www.tinkercad.com/things/h0C03Xahv9R)
167 |
168 | ## Launch Application
169 |
170 | 1. Using [Arduino Create](https://create.arduino.cc/editor) upload the sketch to your Arduino.
171 | 2. Using the Terminal start your Node.js app using `node app.js`.
172 | 3. Open up a browser and enter the URL `http://localhost:3000/`.
173 | 4. Using your browser push the on and off buttons and watch your Arduino for a changing light.
174 |
175 | > Full tutorial URL:
176 | > https://codeadam.ca/learning/arduino-from-nodejs.html
177 |
178 | ***
179 |
180 | ## Repo Resources
181 |
182 | * [Visual Studio Code](https://code.visualstudio.com/) (or any code editor)
183 | * [Arduino Create](https://create.arduino.cc/editor)
184 | * [SerialPort NPM](https://www.npmjs.com/package/serialport)
185 | * [Socket.io](https://socket.io/)
186 |
187 |
188 |
189 |
190 |
191 |
192 |
--------------------------------------------------------------------------------