├── media
├── simple_ui.webp
├── bsd.svg
├── raw.svg
├── socket.svg
├── frame.svg
├── stack.svg
└── mongoose.svg
├── LICENSE
└── README.md
/media/simple_ui.webp:
--------------------------------------------------------------------------------
https://raw.githubusercontent.com/cpq/embedded-network-programming-guide/HEAD/media/simple_ui.webp
--------------------------------------------------------------------------------
/LICENSE:
--------------------------------------------------------------------------------
1 | MIT License
2 |
3 | Copyright (c) 2023 Sergey Lyubka
4 |
5 | Permission is hereby granted, free of charge, to any person obtaining a copy
6 | of this software and associated documentation files (the "Software"), to deal
7 | in the Software without restriction, including without limitation the rights
8 | to use, copy, modify, merge, publish, distribute, sublicense, and/or sell
9 | copies of the Software, and to permit persons to whom the Software is
10 | furnished to do so, subject to the following conditions:
11 |
12 | The above copyright notice and this permission notice shall be included in all
13 | copies or substantial portions of the Software.
14 |
15 | THE SOFTWARE IS PROVIDED "AS IS", WITHOUT WARRANTY OF ANY KIND, EXPRESS OR
16 | IMPLIED, INCLUDING BUT NOT LIMITED TO THE WARRANTIES OF MERCHANTABILITY,
17 | FITNESS FOR A PARTICULAR PURPOSE AND NONINFRINGEMENT. IN NO EVENT SHALL THE
18 | AUTHORS OR COPYRIGHT HOLDERS BE LIABLE FOR ANY CLAIM, DAMAGES OR OTHER
19 | LIABILITY, WHETHER IN AN ACTION OF CONTRACT, TORT OR OTHERWISE, ARISING FROM,
20 | OUT OF OR IN CONNECTION WITH THE SOFTWARE OR THE USE OR OTHER DEALINGS IN THE
21 | SOFTWARE.
22 |
--------------------------------------------------------------------------------
/media/bsd.svg:
--------------------------------------------------------------------------------
1 |
2 |
3 |
4 |
--------------------------------------------------------------------------------
/media/raw.svg:
--------------------------------------------------------------------------------
1 |
2 |
3 |
4 |
--------------------------------------------------------------------------------
/media/socket.svg:
--------------------------------------------------------------------------------
1 |
2 |
3 |
4 |
--------------------------------------------------------------------------------
/media/frame.svg:
--------------------------------------------------------------------------------
1 |
2 |
3 |
4 |
--------------------------------------------------------------------------------
/media/stack.svg:
--------------------------------------------------------------------------------
1 |
2 |
3 |
4 |
--------------------------------------------------------------------------------
/media/mongoose.svg:
--------------------------------------------------------------------------------
1 |
2 |
3 |
4 |
--------------------------------------------------------------------------------
/README.md:
--------------------------------------------------------------------------------
1 | # Embedded network programming guide
2 |
3 | [](https://opensource.org/licenses/MIT)
4 |
5 | This guide is written for embedded developers who work on connected products.
6 | That includes microcontroller based systems that operate in bare metal or
7 | RTOS mode, as well as microprocessor based systems which run embedded Linux.
8 |
9 | ## Prerequisites
10 |
11 | All fundamental concepts are explained in details, so the guide should be
12 | understood by a reader with no prior networking knowledge.
13 |
14 | A reader is expected to be familiar with microcontroller C programming - for
15 | that matter, I recommend reading my [bare metal programming
16 | guide](https://github.com/cpq/bare-metal-programming-guide). I will be using
17 | Ethernet-enabled Nucleo-H743ZI board throughout this guide. Examples for other
18 | architectures are summarized in a table below - this list will expand with
19 | time. Regardless, for the best experience I recommend Nucleo-H743ZI to get the
20 | most from this guide: [buy it on
21 | Mouser](https://www.mouser.ie/ProductDetail/STMicroelectronics/NUCLEO-H743ZI2?qs=lYGu3FyN48cfUB5JhJTnlw%3D%3D).
22 |
23 | ## Network stack explained
24 |
25 | ### Network frame structure
26 |
27 | When any two devices communicate, they exchange discrete pieces of data called
28 | frames. Frames can be sent over the wire (like Ethernet) or over the air (like
29 | WiFi or Cellular). Frames differ in size, and typically range from couple of
30 | dozen bytes to a 1.5Kb. Each frame consists of a sequence of protocol headers
31 | followed by user data:
32 |
33 | 
34 |
35 | The purpose of the headers is as follows:
36 |
37 | **MAC (Media Access Control) header** is only 3 fields: destination MAC
38 | address, source MAC addresses, and an upper level protocol. MAC addresses are
39 | 6-byte unique addresses of the network cards, e.g. `42:ef:15:c8:29:a1`.
40 | Protocol is usually 0x800, which means that the next header is IP. MAC header
41 | handles addressing in the local network (LAN).
42 |
43 |
44 | **IP (Internet Protocol) header** has many fields, but the most important are:
45 | destination IP address, source IP address, and upper level protocol. IP
46 | addresses are 4-bytes, e.g. `209.85.202.102`, and they identify a machine
47 | on the Internet, so their purpose is similar to phone numbers. The upper level
48 | protocol is usually 6 (TCP) or 17 (UDP). IP header handles global addressing.
49 |
50 | **TCP or UDP header** has many fields, but the most important are destination
51 | port and source ports. On one device, there can be many network applications,
52 | for example, many open tabs in a browser. Port number identifies
53 | an application.
54 |
55 | **Application protocol** depends on the target application. For example, there
56 | are servers on the Internet that can tell an accurate current time. If you want
57 | to send data to those servers, the application protocol must SNTP (Simple
58 | Network Time Protocol). If you want to talk to a web server, the protocol must
59 | be HTTP. There are other protocols, like DNS, MQTT, etc, each having their own
60 | headers, followed by the application data.
61 |
62 | Install [Wireshark](https://www.wireshark.org/) tool to observe network
63 | frames. It helps to identify issues quickly, and looks like this:
64 |
65 | 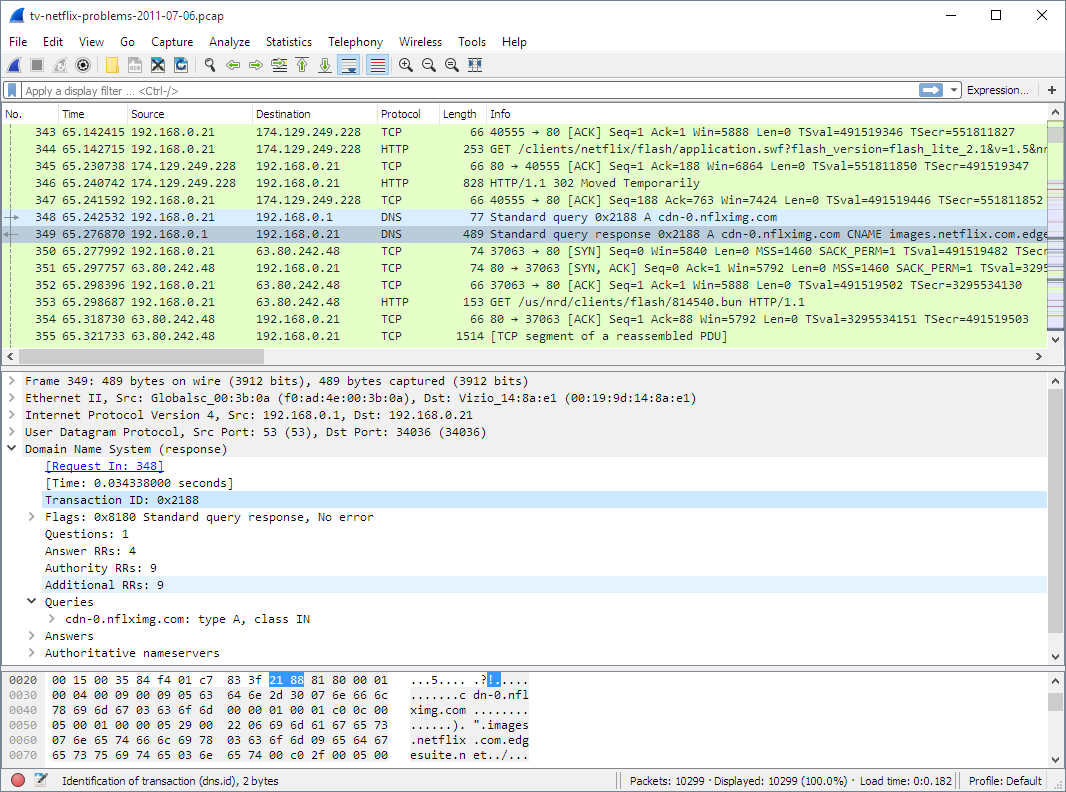
66 |
67 | The structure of a frame described above, makes it possible to accurately
68 | deliver a frame to the correct device and application over the Internet. When a
69 | frame arrives to a device, a software that handles that frame (a network
70 | stack), is organised in four layers.
71 |
72 | ### Network stack architecture
73 |
74 | 
75 |
76 | Layer 1: **Driver layer**, only reads and writes frames from/to network hardware
77 | Layer 2: **TCP/IP stack**, parses protocol headers and handles IP and TCP/UDP
78 | Layer 3: **Network Library**, parses application protocols like DNS, MQTT, HTTP
79 | Layer 4: **Application** - Web dashboard, smart sensor, etc
80 |
81 |
82 | ### DNS request example
83 |
84 | Let's provide an example. In order to show your this guide on the Github, your
85 | browser first needs to find out the IP address of the Github's machine. For
86 | that, it should make a DNS (Domain Name System) request to one of the DNS
87 | servers. Here's how your browser and the network stack work for that case:
88 |
89 | 
90 |
91 | **1.** Your browser (an application) asks from the lower layer (library), "what
92 | IP address `github.com` has?". The lower layer (layer 3, a library layer - in
93 | this case, it is a C library) provides an API function `gethostbyname()`
94 | that returns an IP address for a given host name. So everything said below,
95 | essentially describes how `gethostbyname()` works.
96 |
97 | **2.** The library layer gets the name `github.com` and creates a properly
98 | formatted, binary DNS request: `struct dns_request`. Then it calls an API
99 | function `sendto()` provided by the TCP/IP stack layer (layer 2), to send that
100 | request over UDP to the DNS server. The IP of the DNS server is known to the library
101 | from the workstation settings. The UDP port is also known - port 53, a standard
102 | port for DNS.
103 |
104 | **3.** The TCP/IP stack's `sendto()` function receives a chunk of data to send.
105 | it contains DNS request, but `sendto()` does not know that and does not care
106 | about that. All it knows is that this is the piece of user data that needs to
107 | be delievered over UDP to a certain IP address (IP address of a DNS server) on
108 | port 53. Hence TCP/IP stack prepends UDP, IP, and MAC headers
109 | to the user data to form a frame. Then it calls API function `send_frame()`
110 | provided by the driver layer, layer 1.
111 |
112 | **4.** A driver's `send_frame()` function transmits a frame over the wire or
113 | over the air, the frame travels to the destination DNS server. A chain of
114 | Internet routers pass that frame from one to another, until a frame finally hits
115 | DNS server's network card.
116 |
117 | **5.** A network card on the DNS server gets a frame and generates a hardware
118 | interrupt, invoking interrupt handler. It is part of a driver - layer 1. It
119 | calls a function `recv_frame()` that reads a frame from the card, and passes
120 | it up by calling `ethernet_input()` function provided by the TCP/IP stack
121 |
122 | **6.** TCP/IP stack parses the frame, and finds out that it is for the UDP port
123 | 53, which is a DNS port number. TCP/IP stack finds an application that listens
124 | on UDP port 53, which is a DNS server application, and wakes up its `recv()`
125 | call. So, DNS server application that is blocked on a `recv()` call, receives
126 | a chunk of data - which is a DNS request. A library routine parses that request
127 | by extracting a host name, and passes that parsed DNS request to the application.
128 |
129 |
130 | **7.** A DNS server application receives DNS request: "someone wants an
131 | IP address for `github.com`". Then the application layer looks at its
132 | configuration, figures out "Oh, it's me who is responsible for the github.com
133 | domain, and this is the IP address I should respond with". The application
134 | extracts an IP address from the configuration, and calls a library function
135 | "get this IP, wrap into a DNS response, and send back". And the response
136 | travels all the way back in the reverse order.
137 |
138 | ### BSD socket API
139 |
140 | The communication between layers are done via a function calls. So, each
141 | layer has its own API, which upper and lower levels can call. They are not
142 | standardized, so each implementation provides their own set of functions.
143 | However, on OSes like Windows/Mac/Linux/UNIX, a driver and TCP/IP layers are
144 | implemented in kernel, and TCP/IP layer provides a standard API to the
145 | userland which is called a "BSD socket API":
146 |
147 | 
148 |
149 | This is done becase kernel code does not implement application level protocols
150 | like MQTT, HTTP, etc, - so it let's user application to implement them in
151 | userland. So, a library layer and an application layer reside in userland.
152 | Some library level routines are provided in C standard library, like
153 | DNS resolution function `gethostbyname()`, but that DNS library functions
154 | are probably the only ones that are provided by OS. For other protocols,
155 | many libraries exist that provide HTTP, MQTT, Websocket, SSH, API. Some
156 | applications don't use any external libraries: they use BSD socket API
157 | directly and implement library layer manually. Usually that is done when
158 | application decides to use some custom protocol.
159 |
160 | Embedded systems very often use TCP/IP stacks that provide the same BSD API as
161 | mainstream OSes do. For example, lwIP (LightWeight IP) TCP/IP stack, Keil's MDK
162 | TCP/IP stack, Zephyr RTOS TCP/IP stack - all provide BSD socket API. Thus let's
163 | review the most important BSD API stack functions:
164 |
165 | - `socket(protocol)` - creates a connection descriptor and assigns an integer ID for it, a "socket"
166 | - `bind(sock, addr)` - assigns a local IP:PORT for a listening socket
167 | - `accept(sock, addr)` - creates a new socket, assigns local IP:PORT
168 | and remote IP:PORT (incoming)
169 | - `connect(sock, addr)` - assigns local IP:PORT and remote IP:PORT for
170 | a socket (outgoing)
171 | - `send(sock, buf, len)` - sends data
172 | - `recv(sock, buf, len)` - receives data
173 | - `close(sock)` - closes a socket
174 |
175 | Some implementations do not implement BSD socket API, and there are perfectly
176 | good reasons for that. Examples for such implementation is lwIP raw API,
177 | and Mongoose Library.
178 |
179 | ### TCP echo server implemented with socket API
180 |
181 | Let me demonstrate the two approaches (using socket and non-socket API) on a simple
182 | TCP echo server example. TCP echo server is a simple application that
183 | listens on a TCP port, receives data from clients that connect to that port,
184 | and writes (echoes) that data back to the client. That means, this application
185 | does not use any application protocol on top of TCP, thus it does not need
186 | a library layer. Let's see how this application would look like written
187 | with a BSD socket API. First, a TCP listener should bind to a port, and
188 | for every connected client, spawn a new thread that would handle it. A thread
189 | function that sends/receives data, looks something like this:
190 |
191 | ```c
192 | void handle_new_connection(int sock) {
193 | char buf[20];
194 | for (;;) {
195 | ssize_t len = recv(sock, buf, sizeof(buf), 0); // Receive data from remote
196 | if (len <= 0) break; // Error! Exit the loop
197 | send(sock, buf, len); // Success. Echo data back
198 | }
199 | close(sock); // Close socket, stop thread
200 | }
201 | ```
202 |
203 | Note that `recv()` function blocks until it receives some data from the client.
204 | Then, `send()` also blocks until is sends requested data back to the client.
205 | That means that this code cannot run in a bare metal implementation, because
206 | `recv()` would block the whole firmware. For this to work, an RTOS is required.
207 | A TCP/IP stack should run in a separate RTOS task, and both `send()` and
208 | `recv()` functions are implemented using an RTOS queue API, providing a
209 | blocking way to pass data from one task to another. Overall, this is how an
210 | embedded receive path looks like with socket API:
211 |
212 | 
213 |
214 | The `send()` part would work in the reverse direction. Note that this approach
215 | requires TCP/IP stack implement data buffering for each socket, because
216 | an application consumes received data not immediately, but after some time,
217 | when RTOS queue delivers data. Note that using non-blocking sockets and
218 | `select()/poll()` changes things that instead of many application tasks,
219 | there is only one application task, but the mechanism stays the same.
220 |
221 | Therefore this approach with socket API has
222 | the following major characteristics:
223 |
224 | 1. It uses queues for exchanging data between TCP/IP stack and
225 | application tasks, which consumes both RAM and time
226 | 2. TCP/IP stack buffers received and sent data for each socket. Note that
227 | the app/library layer may also buffer data - for example, buffering a full
228 | HTTP request before it can be processed. So the same data goes through
229 | two buffering "zones" - TCP/IP stack, and library/app
230 |
231 | That means, socket API implementation takes extra time for data to be processed,
232 | and takes extra RAM for double-buffering in the TCP/IP stack.
233 |
234 | ### TCP echo server with non-socket (callback) API
235 |
236 | Now let's see how the same approach works without BSD socket API. Several
237 | implementations, including lwIP and Mongoose Library, provide callback API to
238 | the TCP/IP stack. Here is how TCP echo server would look like written using
239 | Mongoose API:
240 |
241 | ```c
242 | // This callback function is called for various network events, MG_EV_*
243 | void event_handler(struct mg_connection *c, int ev, void *ev_data, void *fn_data) {
244 | if (ev == MG_EV_READ) {
245 | // MG_EV_READ means that new data got buffered in the c->recv buffer
246 | mg_send(c, c->recv.buf, c->recv.len); // Send back the data we received
247 | c->recv.len = 0; // Discard received data
248 | }
249 | }
250 | ```
251 |
252 | In this case, all functions are non-blocking, that means that data exchange
253 | between TCP/IP stack and an app can be implemented via direct function calls.
254 | This is how receive path looks like:
255 |
256 | 
257 |
258 | As you can see, in this case TCP/IP stack provides a callback API which
259 | a library or application layer can use to receive data directly. No need
260 | to send it over a queue. A library/app layer can buffer data, and that's
261 | the only place where buffering takes place. This approach wins for
262 | memory usage and performance. A firmware developer should use
263 | a proprietary callback API instead of BSD socket API.
264 |
265 | lwIP TCP/IP stack, for example, provides both socket and non-socket (raw) API,
266 | and raw API is more efficient in terms of RAM and performance. However
267 | developers rarely use raw API, because it is not trivial to understand and use
268 | compared to the socket API. The API of the Mongoose Library shown above
269 | is designed to be simple and easy to understand. API design can make things
270 | very easy or very difficult, so it is important to have a good API.
271 |
272 | ## Implementing layers 1,2,3 - making ping work
273 |
274 | ### Development environment and tools
275 |
276 | Now let's make our hands dirty and implement a working network stack on
277 | a microcontroller board. I will be using
278 | [Mongoose Library](https://github.com/cesanta/mongoose) for all examples
279 | further on, for the following reasons:
280 |
281 | - Mongoose is very easy to integrate: just by copying two files,
282 | [mongoose.c]() and [mongoose.h]()
283 | - Mongoose has a built-in drivers, TCP/IP stack, HTTP/MQTT/Websocket library,
284 | and TLS 1.3 all in one, so it does not need any other software to create
285 | a network-enabled application
286 | - Mongoose provides a simple, polished callback API designed specifically
287 | for embedded developers
288 |
289 | The diagram below shows Mongoose architecture. As you can see, Mongoose can
290 | use external TCP/IP stack and TLS libraries, as well as built-in ones. In the
291 | following example, we are going to use only a built-in functionality, so we
292 | won't need any other software.
293 |
294 | 
295 |
296 | All source code in this guide is MIT licensed, however Mongoose
297 | is licensed under a dual GPLv2/commercial license.
298 | I will be using a Nucleo board from ST Microelectronics, and there are several choices for the
299 | development environment:
300 | - Use Cube IDE provided by ST: [install Cube](https://www.st.com/en/development-tools/stm32cubeide.html)
301 | - Use Keil from ARM: [install Keil](https://www.keil.com/)
302 | - Use make + GCC compiler, no IDE: follow [this guide](https://mongoose.ws/documentation/tutorials/tools/)
303 |
304 | Here, I am going to use Cube IDE. In the templates, however, both Keil and
305 | make examples are provided, too. So, in order to proceed, install Cube IDE
306 | on your workstation, and plug in Nucleo board to your workstation.
307 |
308 | ### Skeleton firmware
309 |
310 | Note: this and the following sections has a Youtube helper video recorded:
311 | https://www.youtube.com/watch?v=lKYM4b8TZts
312 |
313 | The first step would be to create a minimal, skeleton firmware that does
314 | nothing but logs messages to the serial console. Once we've done that, we'll
315 | add networking functionality on top of it. The table below summarises
316 | peripherals for various boards:
317 |
318 |
319 | | Board | UART, TX, RX | Ethernet | LED |
320 | | ---------------- | --------------- | ------------------------------------- | -------------- |
321 | | STM32H747I-DISCO | USART1, A9, A10 | A1, A2, A7, C1, C4, C5, G12, G11, G13 | I12, I13, I14 |
322 | | STM32H573I-DK | USART1, A9, A10 | A1, A2, A7, C1, C4, C5, G12, G11, G13 | I8, I9, F1 |
323 | | Nucleo-H743ZI | USART3, D8, D9 | A1, A2, A7, C1, C4, C5, B13, G11, G13 | B0, E1, B14 |
324 | | Nucleo-H723ZG | USART3, D8, D9 | A1, A2, A7, C1, C4, C5, B13, G11, G13 | B0, E1, B14 |
325 | | Nucleo-H563ZI | USART3, D8, D9 | A1, A2, A7, C1, C4, C5, B15, G11, G13 | B0, F4, G4 |
326 | | Nucleo-F746ZG | USART3, D8, D9 | A1, A2, A7, C1, C4, C5, B13, G11, G13 | B0, B7, B14 |
327 | | Nucleo-F756ZG | USART3, D8, D9 | A1, A2, A7, C1, C4, C5, B13, G11, G13 | B0, B7, B14 |
328 | | Nucleo-F429ZI | USART3, D8, D9 | A1, A2, A7, C1, C4, C5, B13, G11, G13 | B0, B7, B14 |
329 |
330 | **Step 1.** Start Cube IDE. Choose File / New / STM32 project
331 | **Step 2.** In the "part number" field, type the microcontroller name,
332 | for example "H743ZI". That should narrow down
333 | the MCU/MPU list selection in the bottom right corner to a single row.
334 | Click on the row at the bottom right, then click on the Next button
335 | **Step 3.** In the project name field, type any name, click Finish.
336 | Answer "yes" if a pop-up dialog appears
337 | **Step 4.** A configuration window appears. Click on Clock configuration tab.
338 | Find a field with a system clock value. Type the maximum value, hit enter,
339 | answer "yes" on auto-configuration question, wait until configured
340 | **Step 5.** Switch to the Pinout tab, Connectivity, then enable the UART controller
341 | and pins (see table above), choose "Asynchronous mode"
342 | **Step 6.** Click on Connectivity / ETH, Choose Mode / RMII, verify that the
343 | configured pins are like in the table above - if not, change pins
344 | **Step 7.** Lookup the LED GPIO from the peripherals table, and configure it
345 | for output. Click on the corresponding pin, select "GPIO output"
346 | **Step 8.** Click Ctrl+S to save the configuration. This generates the code
347 | and opens main.c file
348 | **Step 9.** Navigate to the `main()` function and add some logging to the
349 | `while` loop. Make sure to insert your code between the "USER CODE" comments,
350 | because CubeIDE will preserve it during code regeneration:
351 | ```c
352 | /* USER CODE BEGIN WHILE */
353 | while (1)
354 | {
355 | printf("Tick: %lu\r\n", HAL_GetTick());
356 | HAL_Delay(500);
357 | ```
358 | **Step 10.** Redirect `printf()` to the UART. Note the UART global variable
359 | generated by Cube at the beginning of `main.c` - typically it is
360 | `UART_HandleTypeDef huart3;`. Copy it, open `syscalls.c`, find function
361 | `_write()` and modify it the following way :
362 | ```c
363 | #include "main.h"
364 |
365 | __attribute__((weak)) int _write(int file, char *ptr, int len) {
366 | if (file == 1 || file == 2) {
367 | extern UART_HandleTypeDef huart3;
368 | HAL_UART_Transmit(&huart3, (unsigned char *) ptr, len, 999);
369 | }
370 | return len;
371 | }
372 | ```
373 | **Step 11.** Click on "Run" button to flash this firmware to the board.
374 | **Step 12.** Attach a serial monitor tool (e.g. putty on Windows, or
375 | `cu -l COMPORT -s 115200` on Mac/Linux) and observe UART logs:
376 | ```
377 | Tick: 90358
378 | Tick: 90860
379 | ...
380 | ```
381 | Our skeleton firmware is ready!
382 |
383 | ### Integrate Mongoose
384 |
385 | Now it's time to implement a functional TCP/IP stack. We'll use Mongoose
386 | Library for that. To integrate it, we need to copy two files into our source tree.
387 |
388 | **Step 1**. Open https://github.com/cesanta/mongoose in your browser, click on "mongoose.h". Click on "Raw" button, and copy file contents into clipboard.
389 | In the CubeIDE, right click on Core/Inc, choose New/File in the menu, type
390 | "mongoose.h", paste the file content and save.
391 | **Step 2**. Repeat for "mongoose.c". On Github, copy `mongoose.c` contents
392 | to the clipboard. In the CubeIDE, right click on Core/Src, choose New/File
393 | in the menu, type "mongoose.c", paste the file content and save.
394 | **Step 3**. Right click on Core/Inc, choose New/File in the menu, type
395 | "mongoose_custom.h", and paste the following contents:
396 | ```c
397 | #pragma once
398 |
399 | // See https://mongoose.ws/documentation/#build-options
400 | #define MG_ARCH MG_ARCH_NEWLIB
401 |
402 | #define MG_ENABLE_TCPIP 1 // Enables built-in TCP/IP stack
403 | #define MG_ENABLE_CUSTOM_MILLIS 1 // We must implement mg_millis()
404 | #define MG_ENABLE_DRIVER_STM32H 1 // On STM32Fxx series, use MG_ENABLE_DRIVER_STM32F
405 | ```
406 | **Step 4**. Implement Layer 1 (driver), 2 (TCP/IP stack) and 3 (library) in
407 | our code. Open `main.c`. Add `#include "mongoose.h"` at the top:
408 | ```c
409 | /* USER CODE BEGIN Includes */
410 | #include "mongoose.h"
411 | /* USER CODE END Includes */
412 | ```
413 | **Step 5**. Before `main()`, define function `mg_millis()` that returns
414 | an uptime in milliseconds. It will be used by Mongoose Library for the time
415 | keeping:
416 | ```c
417 | /* USER CODE BEGIN 0 */
418 | uint64_t mg_millis(void) {
419 | return HAL_GetTick();
420 | }
421 | /* USER CODE END 0 */
422 | ```
423 | **Step 6**. Navigate to `main()` function and change the code around `while`
424 | loop this way:
425 | ```c
426 | /* USER CODE BEGIN WHILE */
427 | struct mg_mgr mgr;
428 | mg_mgr_init(&mgr);
429 | mg_log_set(MG_LL_DEBUG);
430 |
431 | // On STM32Fxx, use _stm32f suffix instead of _stm32h
432 | struct mg_tcpip_driver_stm32h_data driver_data = {.mdc_cr = 4};
433 | struct mg_tcpip_if mif = {.mac = {2, 3, 4, 5, 6, 7},
434 | // Uncomment below for static configuration:
435 | // .ip = mg_htonl(MG_U32(192, 168, 0, 223)),
436 | // .mask = mg_htonl(MG_U32(255, 255, 255, 0)),
437 | // .gw = mg_htonl(MG_U32(192, 168, 0, 1)),
438 | .driver = &mg_tcpip_driver_stm32h,
439 | .driver_data = &driver_data};
440 | NVIC_EnableIRQ(ETH_IRQn);
441 | mg_tcpip_init(&mgr, &mif);
442 |
443 | while (1) {
444 | mg_mgr_poll(&mgr, 0);
445 | /* USER CODE END WHILE */
446 | ```
447 |
448 | **Step 7**. Connect your board to the Ethernet. Flash firmware. In the serial
449 | log, you should see something like this:
450 | ```
451 | bb8 3 mongoose.c:14914:mg_tcpip_driv Link is 100M full-duplex
452 | bbd 1 mongoose.c:4676:onstatechange Link up
453 | bc2 3 mongoose.c:4776:tx_dhcp_discov DHCP discover sent. Our MAC: 02:03:04:05:06:07
454 | c0e 3 mongoose.c:4755:tx_dhcp_reques DHCP req sent
455 | c13 2 mongoose.c:4882:rx_dhcp_client Lease: 86400 sec (86403)
456 | c19 2 mongoose.c:4671:onstatechange READY, IP: 192.168.2.76
457 | c1e 2 mongoose.c:4672:onstatechange GW: 192.168.2.1
458 | c24 2 mongoose.c:4673:onstatechange MAC: 02:03:04:05:06:07
459 | ```
460 | If you don't, and see DHCP requests message like this:
461 | ```
462 | 130b0 3 mongoose.c:4776:tx_dhcp_discov DHCP discover sent. Our MAC: 02:03:04:05:06:07
463 | 13498 3 mongoose.c:4776:tx_dhcp_discov DHCP discover sent. Our MAC: 02:03:04:05:06:07
464 | ...
465 | ```
466 | The most common cause for this is you have your Ethernet pins wrong. Click
467 | on the `.ioc` file, go to the Ethernet configuration, and double-check the
468 | Ethernet pins against the table above.
469 |
470 | **Step 8**. Open terminal/command prompt, and run a `ping` command against
471 | the IP address of your board:
472 | ```sh
473 | $ ping 192.168.2.76
474 | PING 192.168.2.76 (192.168.2.76): 56 data bytes
475 | 64 bytes from 192.168.2.76: icmp_seq=0 ttl=64 time=9.515 ms
476 | 64 bytes from 192.168.2.76: icmp_seq=1 ttl=64 time=1.012 ms
477 | ```
478 |
479 | Now, we have a functional network stack running on our board. Layers 1,2,3
480 | are implemented. It's time to create an application - a simple web server,
481 | hence implement layer 4.
482 |
483 | ## Implementing layer 4 - a simple web server
484 |
485 | Let's add a very simple web server that responds "ok" to any HTTP request.
486 |
487 | **Step 1**. After the `mg_tcpip_init()` call, add this line that creates HTTP listener
488 | with `fn` event handler function:
489 | ```c
490 | mg_http_listen(&mgr, "http://0.0.0.0:80", fn, NULL);
491 | ```
492 | **Step 2**. Before the `mg_millis()` function, add the `fn` event handler function:
493 | ```c
494 | static void fn(struct mg_connection *c, int ev, void *ev_data) {
495 | if (ev == MG_EV_HTTP_MSG) {
496 | struct mg_http_message *hm = ev_data; // Parsed HTTP request
497 | mg_http_reply(c, 200, "", "ok\r\n");
498 | }
499 | }
500 | ```
501 | That's it! Flash the firmware. Open your browser, type board's IP address and
502 | see the "ok" message.
503 |
504 | Note that the [mg_http_reply()](https://mongoose.ws/documentation/#mg_http_reply)
505 | function is very versatile: it cat create formatted output, like printf
506 | on steroids. See [mg_snprintf()](https://mongoose.ws/documentation/#mg_snprintf-mg_vsnprintf)
507 | for the supported format specifiers: most of them are standard printf, but
508 | there are two non-standard: `%m` and `%M` that accept custom formatting
509 | function - and this way, Mongoose's printf can print virtually anything.
510 | For example, JSON strings. That said, with the aid of `mg_http_reply()`,
511 | we can generate HTTP responses of arbitrary complexity.
512 |
513 | So, how the whole flow works? Here is how. When a browser connects,
514 | an Ethernet IRQ handler (layer 1) kicks in. It is defined by Mongoose, and activated by
515 | the `#define MG_ENABLE_DRIVER_STM32H 1` line in the `mongoose_custom.h`: [ETH_IRQHandler](https://github.com/cesanta/mongoose/blob/68e2cd9b296733c9aea8b3401ab946dd25de9c0e/src/drivers/stm32h.c#L252). Other environments, like CubeIDE, implement `ETH_IRQHandler`
516 | and activate it when you select "Enable Ethernet interrupt" in the Ethernet
517 | configuration. To avoid clash with Cube, we did not activate Ethernet interrupt.
518 |
519 | IRQ handler reads frame from the DMA, copies that frame to the Mongoose's
520 | [receive queue](https://github.com/cesanta/mongoose/blob/68e2cd9b296733c9aea8b3401ab946dd25de9c0e/src/net_builtin.h#L30), and exits.
521 | That receive queue is special, it is a thread-safe
522 | single-producer-single-consumer non-blocking queue, so an IRQ handler, being
523 | executed in any context, can safely write to it.
524 |
525 | The `mg_poll()` function in the infinite `while()` loop constantly
526 | verifies, whether we receive any data in the receive queue. When it detects
527 | a frame in the receive queue, it extracts that frame, passes it on to the
528 | [mg_tcp_rx()](https://github.com/cesanta/mongoose/blob/68e2cd9b296733c9aea8b3401ab946dd25de9c0e/src/net_builtin.c#L800) function - which is an etry point to the layer 2 TCP/IP stack.
529 |
530 |
531 | That `mg_tcp_rx()` function parses headers, starting from Ethernet header,
532 | and when it detects that a received frame belongs to one of the Mongoose
533 | TCP or UDP connections, it copies frame payload to the connection's `c->recv`
534 | buffer and [calls `MG_EV_READ` event](https://github.com/cesanta/mongoose/blob/68e2cd9b296733c9aea8b3401ab946dd25de9c0e/src/net_builtin.c#L687).
535 |
536 |
537 | At this point, processing leaves layer 2 and enters layer 3 - a library layer.
538 | Mongoose's HTTP event handlers catches `MG_EV_READ`, parses received data,
539 | and when it detects that the full HTTP message is buffered, it [sends the
540 | `MG_EV_HTTP_MSG` with parsed HTTP message](https://github.com/cesanta/mongoose/blob/68e2cd9b296733c9aea8b3401ab946dd25de9c0e/src/http.c#L1033) to the application - layer 4.
541 |
542 | And this is where our event handler function `fn()` gets called. Our code is
543 | simple - we catch `MG_EV_HTTP_MSG` event, and use Mongoose's API function
544 | `mg_http_reply()` to craft a simple HTTP response:
545 | ```
546 | HTTP/1.1 200 OK
547 | Content-Length: 4
548 |
549 | ok
550 | ```
551 |
552 | This response goes to Mongoose's `c->send` output buffer, and `mg_mgr_poll()`
553 | drains that data to the browser, [splitting the response by frames](https://github.com/cesanta/mongoose/blob/68e2cd9b296733c9aea8b3401ab946dd25de9c0e/src/net_builtin.c#L587-L588)
554 | in layer 2, then passing to the layer 1. An Ethernet driver's output function [mg_tcpip_driver_stm32h_tx()](https://github.com/cesanta/mongoose/blob/68e2cd9b296733c9aea8b3401ab946dd25de9c0e/src/drivers/stm32h.c#L208) sends those frames back to the browser.
555 |
556 | This is how Mongoose Library works.
557 |
558 | Other implementations, like Zephyr, Amazon FreeRTOS-TCP, Azure, lwIP, work in
559 | a similar way. They implement BSD socket layer so it is a bit more complicated
560 | cause it includes an extra socket layer, but the principle is the same.
561 |
562 | ## Implementing Web UI
563 |
564 | Using `mg_http_reply()` function is nice, but it's very good for creating
565 | custom responses. It is not suitable for serving files. And the standard way
566 | to build a web UI is to split it into two parts:
567 | - a static part, which consists of directory with `index.html`, CSS,
568 | JavaScript and image files,
569 | - a dynamic part, which serves REST API
570 |
571 | So instead of using `mg_http_reply()` and responding with "ok" to any request,
572 | let's create a directory with `index.html` file and serve that directory.
573 | Mongoose has API function `mg_http_serve_dir()` for that. Let's change the
574 | event handler code to use that function:
575 |
576 | ```c
577 | static void fn(struct mg_connection *c, int ev, void *ev_data) {
578 | if (ev == MG_EV_HTTP_MSG) {
579 | struct mg_http_message *hm = ev_data; // Parsed HTTP request
580 | struct mg_http_serve_opts opts = {.root_dir = "/web_root"};
581 | mg_http_serve_dir(c, hm, &opts);
582 | }
583 | }
584 | ```
585 |
586 | Build it and get build error "undefined reference to 'mkdir'". This is because
587 | `mg_http_serve_dir()` function tries to use a default POSIX filesystem to
588 | read files from directory `/web_root`, and our firmware does not have support
589 | for the POSIX filesystem.
590 |
591 | What are the possibilities here? First, we can implement POSIX filesystem,
592 | by using an internal or external flash memory. Then we can copy our `web_root`
593 | directory there, and our code will start to work. This is the hard way.
594 |
595 | The easy way is to use a so-called embedded filesystem, by
596 | transforming all files in the web directory into C arrays, and compiling them
597 | into the firmware binary. This way, all UI files are simply hardcoded into the
598 | firmware binary, and there is no need to implement a "real" filesystem:
599 |
600 | **Step 1**. Tell `mg_http_serve_dir()` to use packed filesystem:
601 | ```c
602 | struct mg_http_serve_opts opts = {.root_dir = "/web_root", .fs = &mg_fs_packed};
603 | ```
604 | **Step 2**. Enable packed filesystem, and disable POSIX filesystem in `mongoose_custom.h`:
605 | ```c
606 | #define MG_ENABLE_PACKED_FS 1
607 | #define MG_ENABLE_POSIX_FS 0
608 | ```
609 | **Step 3**. Create a new file `Core/Src/packed_fs.c`. Go to https://mongoose.ws/ui-pack/,
610 | review UI files. Copy/paste the contents of generated `packed_fs.c`, save.
611 |
612 | Build the firmware - and now it should build with no errors.
613 |
614 | Let's review what that UI packer does. As you can see, it has 3 files, which
615 | implement a very simple Web UI with LED control. The `index.html` file
616 | loads `main.js` file, which defines a button click handler. When a button
617 | gets clicked, it makes a request to the `api/led/toggle` URL, and when
618 | than request completes, it makes another request to `api/led/get` URL,
619 | and sets the status span element to the result of the request.
620 |
621 | The tool has a preview window, and if any of the files are changed,
622 | it automatically refreshes preview and regenerates packed_fs.c. The packed_fs.c
623 | is a simple C file, which contains three C arrays, representing three files
624 | we have, and two helper functions `mg_unlist()` and `mg_unpack()`, used by
625 | Mongoose:
626 | - the `mg_unlist()` function allows to scan the whole "filesystem" and get names of every file,
627 | - the `mg_unpack()` function returns file contents, size, and modification time for a given file.
628 |
629 | Mongoose provides a command line utility [pack.c](https://github.com/cesanta/mongoose/blob/master/test/pack.c)
630 | to generate `packed_fs.c` automatically during the build. The example of that
631 | is a [Makefile](https://github.com/cesanta/mongoose/blob/f883504d2d44d24cae1ca6c9f88ce780ab36f59b/examples/device-dashboard/Makefile#L38-L43)
632 | for device dashboard example in Mongoose repository, which not only packs,
633 | but also compresses files to minimise their size. But here, we'll use the
634 | web tool because it is visual and makes it easy to understand the flow.
635 |
636 | The static HTML is extremely simple. There 3 files: `index.html`, `style.css`
637 | and `main.js`. The `index.html` references, or loads, the other two:
638 |
639 | **index.html:**
640 | ```html
641 |
642 |
643 |
644 |
645 |
646 |
647 |
648 |
My Device
649 | LED status:
650 | 0
651 |
652 |
653 |
654 |
655 |
656 | ```
657 |
658 | **style.css:**
659 | ```css
660 | .main { margin: 1em; }
661 | #status { display: inline-block; width: 2em; }
662 | ```
663 |
664 | The Javascript code in the `main.js` file installs an event handler on button
665 | click, so when a user clicks on a button, JS code makes HTTP requests -
666 | I'll comment down below how it all works together:
667 |
668 | **main.js:**
669 | ```javascript
670 | var getStatus = ev => fetch('api/led/get')
671 | .then(r => r.json())
672 | .then(r => { document.getElementById('status').innerHTML = r; });
673 |
674 | var toggle = ev => fetch('api/led/toggle')
675 | .then(r => getStatus());
676 |
677 | document.getElementById('btn').onclick = toggle;
678 | ```
679 |
680 | Now, let's flash the firmware. Go to the IP address in the browser - and
681 | now we see the Web UI with a button! Click on the button, and see that nothing
682 | happens! The LED does not turn on and off. Open developer tools and see that
683 | on every click, a browser makes "toggle" and "get" requests which return 404
684 | error - not found. Let's implement those API calls.
685 |
686 | Change the event handler in the following way:
687 | ```c
688 | static void fn(struct mg_connection *c, int ev, void *ev_data) {
689 | if (ev == MG_EV_HTTP_MSG) {
690 | struct mg_http_message *hm = (struct mg_http_message *) ev_data;
691 | if (mg_http_match_uri(hm, "/api/led/get")) {
692 | mg_http_reply(c, 200, "", "%d\n", HAL_GPIO_ReadPin(GPIOB, GPIO_PIN_0));
693 | } else if (mg_http_match_uri(hm, "/api/led/toggle")) {
694 | HAL_GPIO_TogglePin(GPIOB, GPIO_PIN_0); // Can be different on your board
695 | mg_http_reply(c, 200, "", "true\n");
696 | } else {
697 | struct mg_http_serve_opts opts = {.root_dir = "/web_root", .fs = &mg_fs_packed};
698 | mg_http_serve_dir(c, hm, &opts);
699 | }
700 | }
701 | }
702 | ```
703 |
704 | Note the `mg_http_match_uri()` checks. There, we are making different responses
705 | to different URLs. On `/api/led/get` URL request, we're responding with
706 | LED status, and on `/api/led/toggle` request, we're toggling the pin and
707 | responding with `true`.
708 |
709 | Build and flash this firmware. Refresh the page in the browser. Click on the
710 | button - and now, LED toggle works! If we open developer tools in the browser,
711 | we can see the sequence of the network requests made by the browser.
712 |
713 | 
714 |
715 | Below is the diagram of the interaction between the browser and the device,
716 | with explanations of every step:
717 |
718 | 
719 |
720 | This is the flow for the Web UI of any complexity. Now, it is just a matter of
721 | creating a professional UI interface using any suitable JS/CSS framework, and
722 | extending the event handler function with the API calls that that UI invokes.
723 | That's all it takes.
724 |
725 | ## Implementing Device Dashboard
726 |
727 | Let me show you how to repeat everything we did in Cube - in the make + GCC
728 | environment in one minute. Navigate to https://mongoose.ws/demo/?clear=1
729 | This simple web tool creates a make project completely in your browser.
730 | Choose the board, the "simple project". You can download the project to your
731 | workstation and build manually. But we'll build in a browser - click on Build
732 | button. That zips the projects and sends it to mongoose.ws site, which has
733 | ARM GCC pre-installed. It simply runs `make`, creates firmware binary, and
734 | sends that binary back to your browser. Now you can download that binary,
735 | or flash it directly from your browser.
736 |
737 | The "simple" project repeats what we've already done in Cube, with one
738 | important difference - it also implements TLS. In other words, it can serve
739 | both HTTP and HTTPS. Note that the binary size is less than 60 Kb! We will
740 | cover TLS later, as it needs a separate discussion.
741 |
742 | Now, let's click on "Start Over" button and build "Web UI Dashboard" project.
743 | It follows absolutely the same flow as "simple" project, just the Web UI is
744 | significantly more versatile, built with Preact JS framework and Tailwind CSS
745 | framework. The event handler function moved into a separate file, `net.c`,
746 | and supports many API calls required by Web UI - to show dashboard stats,
747 | settings, and firmware update. By the way, the firmware update is completely
748 | functional - but I won't cover it here, as it is a big topic on itself.
749 | I won't cover the process of static UI creation in React, as there are tons
750 | of very good tutorials on that. But if you want me to cover that, join our
751 | Discord server and let me know.
752 |
753 | What I'll do is to move that UI into the Cube project of ours.
754 |
755 | **Step 1.** Copy net.c, net.h, packed_fs.c into the Cube project
756 | **Step 2.** Add the following `include "net.h"` at the top of the main.c file
757 | **Step 3.** Comment out `mg_http_listen(...)` call, add `web_init()` call
758 | **Step 4.** Open net.h, modify HTTP_URL port 8000 to port 80
759 |
760 | Rebuild, reflash, refresh your browser. We have a functional versatile
761 | Web UI device dashboard reference running!
762 |
763 | ## Device management using MQTT protocol
764 |
765 |
766 | ## Enabling TLS
767 |
768 | ## Talking to AWS IoT and Microsoft Azure services
769 |
770 | ## About me
771 |
772 | I am Sergey Lyubka, an engineer and entrepreneur. I hold a MSc in Physics from
773 | Kyiv State University, Ukraine. I am a director and a co-founder at Cesanta - a
774 | technology company based in Dublin, Ireland. Cesanta develops embedded
775 | solutions:
776 |
777 | - https://mongoose.ws - an open source HTTP/MQTT/Websocket network library
778 | - https://vcon.io - a remote firmware update / serial monitor framework
779 |
780 | You are welcome to register for
781 | [my free webinar on embedded network programming](https://mongoose.ws/webinars/)
782 |
--------------------------------------------------------------------------------