├── LICENSE
├── README.md
├── all
└── README.md
├── images
├── bubbleSort.gif
├── digit.png
├── digit_m_n.png
├── digit_n.png
├── digit_n_more.png
├── insertSort.gif
├── mergeSort.gif
├── quickSort.gif
└── selectSort.gif
├── ppt
└── GMTC
│ ├── 董韬-Flutter:最新进展和未来展望.pdf
│ └── 郑叶飞(圆心)- 前端路上的思考.pdf
└── regex
└── README.md
/LICENSE:
--------------------------------------------------------------------------------
1 | MIT License
2 |
3 | Copyright (c) 2019 daily-interview
4 |
5 | Permission is hereby granted, free of charge, to any person obtaining a copy
6 | of this software and associated documentation files (the "Software"), to deal
7 | in the Software without restriction, including without limitation the rights
8 | to use, copy, modify, merge, publish, distribute, sublicense, and/or sell
9 | copies of the Software, and to permit persons to whom the Software is
10 | furnished to do so, subject to the following conditions:
11 |
12 | The above copyright notice and this permission notice shall be included in all
13 | copies or substantial portions of the Software.
14 |
15 | THE SOFTWARE IS PROVIDED "AS IS", WITHOUT WARRANTY OF ANY KIND, EXPRESS OR
16 | IMPLIED, INCLUDING BUT NOT LIMITED TO THE WARRANTIES OF MERCHANTABILITY,
17 | FITNESS FOR A PARTICULAR PURPOSE AND NONINFRINGEMENT. IN NO EVENT SHALL THE
18 | AUTHORS OR COPYRIGHT HOLDERS BE LIABLE FOR ANY CLAIM, DAMAGES OR OTHER
19 | LIABILITY, WHETHER IN AN ACTION OF CONTRACT, TORT OR OTHERWISE, ARISING FROM,
20 | OUT OF OR IN CONNECTION WITH THE SOFTWARE OR THE USE OR OTHER DEALINGS IN THE
21 | SOFTWARE.
22 |
--------------------------------------------------------------------------------
/README.md:
--------------------------------------------------------------------------------
1 | # fe-interview
2 |
3 | [](../../commits/master)
4 | [](https://github.com/daily-interview/fe-interview/stargazers)
5 | [](https://github.com/daily-interview/fe-interview/network)
6 | [](https://github.com/daily-interview/fe-interview/blob/master/LICENSE)
7 |
8 | 不积跬步,无以至千里,不积小流,无以成江海。 ——— 荀子 《劝学》
9 |
10 | ---
11 |
12 | - 不要以工作忙为借口而荒废了自己,请记住“学如逆水行舟,不进则退”。
13 | - 坚持每天花10分钟左右学习。每天进步一点点,成功就会在眼前。
14 | - 不要等到火烧眉毛狂刷题,平时多烧香,面试才不慌。
15 | > 每天坚持学习,才能遇见更好的自己!
16 |
17 | ## 来了就留个 :feet:吧,star一下证明你来过 :stuck_out_tongue_closed_eyes:
18 |
19 | > 如果对您对此项目有兴趣,可以点 "Star" 支持一下 谢谢! ^_^
20 |
21 | > 如有问题请直接在 Issues 中参与讨论,欢迎 PR 👍
22 |
23 | > 传送门1:[vue2-admin-grace优雅的后台管理系统](https://github.com/artdong/vue-admin)
24 |
25 | > 传送门2:[ionic3自定义组件及常用例子](https://github.com/artdong/ionic3-awesome)
26 |
27 | > 传送门3:[react-org-tree组织树组件](https://github.com/artdong/react-org-tree)
28 |
29 | > 传送门4:[一步一步实现Promise,符合Promises/A+ 规范](https://github.com/artdong/promise)
30 |
31 |
32 | ## 今日面试题 —— 第64天
33 |
34 | - [js] [js实现普通数组去重&json数组去重
35 | ](https://github.com/daily-interview/fe-interview/issues/65)
36 |
37 | > 欢迎在 [**Issues**](https://github.com/daily-interview/fe-interview/issues) 和朋友们一同讨论学习!
38 |
39 | ## 历史面试题
40 |
41 | - [js] [介绍一下 JS 的基本数据类型。](https://github.com/daily-interview/fe-interview/issues/1)
42 |
43 | - [js] [js实现几种常见排序算法。( 手写 )](https://github.com/daily-interview/fe-interview/issues/2)
44 |
45 | - [css] [有哪几种常用的清除浮动方法?](https://github.com/daily-interview/fe-interview/issues/3)
46 |
47 | - [js] [Object.assign 是浅拷贝还是深拷贝?实现深拷贝的方法有哪些?](https://github.com/daily-interview/fe-interview/issues/4)
48 |
49 | - [js] [promise和setTimeout执行顺序是怎样的?](https://github.com/daily-interview/fe-interview/issues/5)
50 |
51 | - [ts] [说一说Typescript中的泛型的作用及使用场景。](https://github.com/daily-interview/fe-interview/issues/6)
52 |
53 | - [http] [说说你对http和https的理解](https://github.com/daily-interview/fe-interview/issues/7)
54 |
55 | - [js] [说说你对 Promise 的理解](https://github.com/daily-interview/fe-interview/issues/8)
56 |
57 | - [js] [说一下对bind,call,apply三个函数的认识,自己实现一下bind方法](https://github.com/daily-interview/fe-interview/issues/9)
58 |
59 | - [css] [说说对 BFC(Block formatting contexts) 的理解](https://github.com/daily-interview/fe-interview/issues/10)
60 |
61 | ......
62 |
63 | - [js] [图片懒加载原理及如何实现](https://github.com/daily-interview/fe-interview/issues/51)
64 |
65 | - [js] [JS获取url参数的方法](https://github.com/daily-interview/fe-interview/issues/52)
66 |
67 | - [js] [手写实现一个合乎规范的Promise](https://github.com/daily-interview/fe-interview/issues/53)
68 |
69 | - [js] [requestAnimationFrame原理及兼容性封装](https://github.com/daily-interview/fe-interview/issues/54)
70 |
71 | - [webpack优化] [用过HappyPack吗?HappyPack有什么优点?](https://github.com/daily-interview/fe-interview/issues/55)
72 |
73 | - [webpack配置] [webpack配置路径别名](https://github.com/daily-interview/fe-interview/issues/57)
74 |
75 | - [webpack配置] [webpack添加路径别名后,vscode不能智能提示,如何解决?](https://github.com/daily-interview/fe-interview/issues/58)
76 |
77 | - [js] [如何只用两行代码实现判断js中所有数据类型?](https://github.com/daily-interview/fe-interview/issues/59)
78 |
79 | - [js] [不用window.open打开新窗口](https://github.com/daily-interview/fe-interview/issues/60)
80 |
81 | ---
82 |
83 | #### 常用工具网站
84 |
85 | `浏览器兼容性查询`:https://caniuse.com
86 |
87 | `url编码解码`:https://tool.oschina.net/encode?type=4
88 |
89 | `json格式化/校验`:http://www.bejson.com
90 |
91 | #### 欢迎关注微信公众号`全栈弄潮儿` ,获取更多学习资源及技术文章等
92 |
93 | * 微信公众号二维码,扫一扫或者搜索"全栈弄潮儿"即可关注
94 |
95 |
96 |  97 |
97 |
98 |
99 | #### 程序员专属工具箱(微信小程序)
100 |
101 |
102 |  103 |
103 |
104 |
105 | #### 薅羊毛,大额红包码
106 |
107 |
108 |  109 |
109 |
110 |
111 | #### 打赏,请作者喝一杯咖啡
112 |
113 |
114 |  115 |
115 |
116 |
--------------------------------------------------------------------------------
/all/README.md:
--------------------------------------------------------------------------------
1 | # fe-interview
2 |
3 | [](../../commits/master)
4 | [](https://github.com/daily-interview/fe-interview/stargazers)
5 | [](https://github.com/daily-interview/fe-interview/network)
6 | [](https://github.com/daily-interview/fe-interview/blob/master/LICENSE)
7 |
8 | ## 所有面试题
9 |
10 | 1、 [js] [介绍一下 JS 的基本数据类型。](https://github.com/daily-interview/fe-interview/issues/1)
11 |
12 | ```
13 | JS 7 种基本数据类型(原始类型),即 (Undefined、Null、Boolean、Number 、String) + (Symbol、BigInt)和 3种引用数据类型:对象(Object)、数组(Array)、函数(Function)。
14 |
15 | 基本类型值:指的是保存在栈内存中的简单数据段。
16 |
17 | 引用类型值:指的是那些保存在堆内存中的对象。变量中保存的实际上只是一个指针,这个指针指向内存堆中实际的值。
18 |
19 | > 注:Symbol 是 ES6 引入了一种新的原始数据类型,表示独一无二的值; BigInt即是第七种基本类型,V8引擎v6.7 默认启用对 BigInt 的支持。
20 |
21 | Symbol用法
22 |
23 | 语法
24 |
25 | Symbol (value)
26 |
27 | eg.
28 |
29 | ```
30 | let a=Symbol ("welcome");
31 | console.log(a); //输出 Symbol(welcome)
32 | ```
33 |
34 | BigInt用法
35 |
36 | 语法
37 |
38 | BigInt(value) || 数字后面加n;
39 |
40 | eg.
41 |
42 | ```
43 | let b1 = BigInt(10);
44 | let b2 = 10n;
45 | console.log(b1,b2); //输出 10n 10n
46 | ```
47 | ```
48 |
49 | 2、 [js] [js实现几种常见排序算法。( 手写 )](https://github.com/daily-interview/fe-interview/issues/2)
50 |
51 |
52 | 冒泡排序:
53 |
54 | 
55 |
56 | ```javascript
57 | const arr = [3, 44, 38, 5, 47, 15, 36, 26, 27, 2, 46, 4, 19, 50, 48];
58 |
59 | function bubbleSort(arr) {
60 | let len = arr.length;
61 | if(len >= 1) {
62 | for(let i = 0;i < len - 1; i++) {
63 | for(let j = 0;j < len - 1 - i; j++) {
64 | if(arr[j] > arr[j + 1]) {
65 | let temp = arr[j + 1];
66 | arr[j + 1] = arr[j];
67 | arr[j] = temp;
68 | }
69 | }
70 | }
71 |
72 | }
73 | return arr;
74 | }
75 |
76 | console.log(bubbleSort(arr));
77 | ```
78 |
79 | 冒泡排序优化版:
80 |
81 | ```javascript
82 | const arr = [3, 44, 38, 5, 47, 15, 36, 26, 27, 2, 46, 4, 19, 50, 48];
83 |
84 | function bubbleSort(arr) {
85 | let len = arr.length;
86 | let lastExchangeIndex = 0;
87 | //无序数列的边界,每次比较只需要比到这里为止
88 | let sortBorder = len - 1;
89 | if(len >= 1) {
90 | for(let i = 0;i < len; i++) {
91 | //有序标记,每一轮的初始是true
92 | let isSorted = true;
93 | for(let j = 0;j < sortBorder - i; j++) {
94 | if(arr[j] > arr[j + 1]) {
95 | let temp = arr[j + 1];
96 | arr[j + 1] = arr[j];
97 | arr[j] = temp;
98 | //有元素交换,所以不是有序,标记变为false
99 | isSorted = false;
100 | //把无序数列的边界更新为最后一次交换元素的位置
101 | lastExchangeIndex = j;
102 | }
103 | }
104 | sortBorder = lastExchangeIndex;
105 | if(isSorted) { //有序,跳出循环
106 | break;
107 | }
108 | }
109 |
110 | }
111 | return arr;
112 | }
113 |
114 | console.log(bubbleSort(arr));
115 | ```
116 |
117 | 选择排序:
118 |
119 | 
120 |
121 | ```javacript
122 | const arr=[3,44,38,5,47,15,36,26,27,2,46,4,19,50,48];
123 |
124 | function selectionSort(arr) {
125 | let len = arr.length;
126 | let minIndex, temp;
127 | for (let i = 0; i < len - 1; i++) {
128 | minIndex = i;
129 | for (let j = i + 1; j < len; j++) {
130 | if (arr[j] < arr[minIndex]) {
131 | // 寻找最小的数
132 | minIndex = j;
133 | // 将最小数的索引保存
134 | }
135 | }
136 | temp = arr[i];
137 | arr[i] = arr[minIndex];
138 | arr[minIndex] = temp;
139 | }
140 | return arr;
141 | }
142 |
143 | console.log(selectionSort(arr));
144 | ```
145 |
146 | 选择排序优化版:
147 |
148 | ```javascript
149 | const arr = [3, 44, 38, 5, 47, 15, 36, 26, 27, 2, 46, 4, 19, 50, 48];
150 |
151 | function selectionSort(arr) {
152 | let len = arr.length;
153 | let left = 0;
154 | let right = len - 1;
155 | while (left < right) {
156 | let max = left;//记录无序区最大元素下标
157 | let min = left;//记录无序区最小元素下标
158 | let j = 0;
159 | for (j = left + 1; j <= right; j++) {
160 | //找最大元素下标
161 | if (arr[j] < arr[min])
162 | {
163 | min = j;
164 | }
165 | //找最小元素下标
166 | if (arr[j] > arr[max])
167 | {
168 | max = j;
169 | }
170 | }
171 | //最小值如果是第一个则没有必要交换
172 | if (min != left) {
173 | let tmp = arr[left];
174 | arr[left] = arr[min];
175 | arr[min] = tmp;
176 | }
177 | //这里很重要,如果最大元素下标是left,前面已经和最小元素交换了,此时最大元素下标应该是min
178 | if (max == left) {
179 | max = min;
180 | }
181 | //最大值如果是最后一个则没必要交换
182 | if (max != right) {
183 | let tmp = arr[right];
184 | arr[right] = arr[max];
185 | arr[max] = tmp;
186 | }
187 | left++;
188 | right--;
189 | }
190 | return arr;
191 | }
192 |
193 | console.log(selectionSort(arr));
194 | ```
195 |
196 | 插入排序:
197 |
198 | 
199 |
200 | ```javacript
201 | const arr=[3,44,38,5,47,15,36,26,27,2,46,4,19,50,48];
202 |
203 | function insertSort(arr) {
204 | const len = arr.length;
205 | let preIndex, current;
206 | for (let i = 1; i < len; i++) {
207 | preIndex = i - 1;
208 | current = arr[i];
209 | while (preIndex >= 0 && arr[preIndex] > current) {
210 | arr[preIndex + 1] = arr[preIndex];
211 | preIndex--;
212 | }
213 | arr[preIndex + 1] = current;
214 | }
215 | return arr;
216 | }
217 |
218 | console.log(insertSort(arr));
219 | ```
220 |
221 | 3、 [css] [有哪几种常用的清除浮动方法?](https://github.com/daily-interview/fe-interview/issues/3)
222 |
223 | - 父级元素添加伪元素
224 | ```css
225 | .clear-float:after {
226 | content: '';
227 | display: block;
228 | clear: both;
229 | }
230 | ```
231 | - 在与浮动元素平级的最后面添加新元素 div.clear
232 | ```css
233 | .clear {
234 | clear: both;
235 | }
236 | ```
237 | - 在父级元素添加样式 overflow: auto; 或者 overflow: hidden; 会存在兼容性问题。
238 |
239 | 4、 [js] [Object.assign 是浅拷贝还是深拷贝?实现深拷贝的方法有哪些?](https://github.com/daily-interview/fe-interview/issues/4)
240 |
241 | > Object.assign() 方法用于将所有可枚举属性的值从一个或多个源对象复制到目标对象。它将返回目标对象。
242 |
243 | - 如果目标对象中的属性具有相同的键,则属性将被源对象中的属性覆盖。后面的源对象的属性将类似地覆盖前面的源对象的属性。
244 |
245 | - Object.assign 方法只会拷贝源对象自身的并且可枚举的属性到目标对象。该方法使用源对象的[[Get]]和目标对象的[[Set]],所以它会调用相关 getter 和 setter。因此,它分配属性,而不仅仅是复制或定义新的属性。如果合并源包含getter,这可能使其不适合将新属性合并到原型中。为了将属性定义(包括其可枚举性)复制到原型,应使用Object.getOwnPropertyDescriptor()和Object.defineProperty() 。
246 |
247 | - String类型和 Symbol 类型的属性都会被拷贝。
248 |
249 | - 在出现错误的情况下,例如,如果属性不可写,会引发TypeError,如果在引发错误之前添加了任何属性,则可以更改target对象。
250 |
251 | - Object.assign 不会在那些source对象值为 `null `或 `undefined` 的时候抛出错误。
252 |
253 | - 针对**深拷贝**,需要使用其他办法,因为 Object.assign()拷贝的是属性值。假如源对象的属性值是一个对象的引用,那么它也只指向那个引用。也就是说,如果对象的属性值为简单类型(如string, number),通过Object.assign({},srcObj);得到的新对象为`深拷贝`;如果属性值为对象或其它引用类型,那对于这个对象而言其实是`浅拷贝`的。
254 |
255 | ## 深拷贝的几种实现方法
256 |
257 | ### JSON.stringify 和 JSON.parse
258 |
259 | >用 JSON.stringify 把对象转换成字符串,再用 JSON.parse 把字符串转换成新的对象。
260 |
261 | 可以转成 JSON 格式的对象才能使用这种方法,如果对象中包含 function 或 RegExp 这些就不能用这种方法了。
262 |
263 | ```
264 | //通过js的内置对象JSON来进行数组对象的深拷贝
265 | function deepClone(obj) {
266 | let _obj = JSON.stringify(obj);
267 | let objClone = JSON.parse(_obj);
268 | return objClone;
269 | }
270 | ```
271 |
272 | ### Object.assign()拷贝
273 |
274 | 当对象中只有一级属性,没有二级属性的时候,此方法为深拷贝,但是对象中有对象的时候,此方法,在二级属性以后就是浅拷贝。
275 |
276 | ### 通过jQuery的extend方法实现深拷贝
277 |
278 | ```
279 | let $ = require('jquery');
280 | let obj1 = {
281 | a: 1,
282 | b: {
283 | f: {
284 | g: 1
285 | }
286 | },
287 | c: [1, 2, 3]
288 | };
289 | let obj2 = $.extend(true, {}, obj1);
290 | ```
291 |
292 | ### lodash.cloneDeep()实现深拷贝
293 |
294 | ```
295 | let _ = require('lodash');
296 | let obj1 = {
297 | a: 1,
298 | b: { f: { g: 1 } },
299 | c: [1, 2, 3]
300 | };
301 | let obj2 = _.cloneDeep(obj1);
302 | ```
303 |
304 | ### 使用递归的方式实现深拷贝
305 |
306 | ```
307 | function _deepClone(source) {
308 | let target;
309 | if (typeof source === 'object') {
310 | target = Array.isArray(source) ? [] : {}
311 | for (let key in source) {
312 | if (source.hasOwnProperty(key)) {
313 | if (typeof source[key] !== 'object') {
314 | target[key] = source[key]
315 | } else {
316 | target[key] = _deepClone(source[key])
317 | }
318 | }
319 | }
320 | } else {
321 | target = source
322 | }
323 | return target
324 | }
325 | ```
326 |
327 | 5、 [js] [promise和setTimeout执行顺序是怎样的?](https://github.com/daily-interview/fe-interview/issues/5)
328 |
329 | 写出下列程序运行结果并做出解释:
330 |
331 | ```javascript
332 | setTimeout(function(){
333 | console.log(1);
334 | },0);
335 |
336 | new Promise(function(resolve) {
337 | console.log(2)
338 | for(let i=0; i<10000 ; i++ ) {
339 | i==9999 && resolve();
340 | }
341 | console.log(3)
342 | }).then(function(){
343 | console.log(4)
344 | });
345 | console.log(5);
346 | ```
347 |
348 | 这个就涉及到**事件循环(Event Loop)**
349 | > JS运行时,对代码执行顺序的一个算法(任务调度算法)
350 |
351 | JS 分类:同步任务和异步任务
352 | JS 的执行机制:
353 | - 首先判断JS代码是同步还是异步,同步就进入主线程,异步就进入 event table
354 | - 异步任务在 event table 中注册函数,当满足触发条件后,被推入event queue
355 | - 同步任务进入主线程后一直执行,直到主线程空闲时,才回去 event queue 中查看是否有可执行的异步任务,如果有就推入主线程
356 |
357 | event loop 里有维护两个不同的异步任务队列
358 | - macro Tasks(宏任务):script(整体代码), setTimeout, setInterval, setImmediate, I/O, UI rendering
359 | - micro Tasks(微任务):process.nextTick, Promise(浏览器实现的原生Promise), Object.observe, MutationObserver, MessageChannel
360 |
361 | 每次执行一段代码(一个script标签)都是一个 macroTask
362 | 执行流程:
363 | - event loop 开始
364 | - 从macro Tasks 队列抽取一个任务,执行
365 | - micro Tasks 清空队列执行,若有任务不可执行,推入下一轮 micro Tasks
366 | - 结束 event loop
367 |
368 | 浏览器执行代码的过程如下整个流程
369 | 
370 |
371 | 那么回到题目上去,就是
372 | ```js
373 | setTimeout(function(){
374 | console.log(1); // 1-放入宏任务队列,7-执行下一轮事件循环,宏任务输出1
375 | },0);
376 |
377 | new Promise(function(resolve) {
378 | console.log(2); // 2-同步输出 2
379 | for(let i=0; i<10000 ; i++ ) {
380 | i==9999 && resolve();
381 | }
382 | console.log(3); // 4-同步输出 3
383 | }).then(function(){
384 | console.log(4); // 3-放入微任务队列,6-回到微任务队列,执行剩余的微任务,输出4
385 | });
386 | console.log(5); // 5-同步输出 5
387 | ```
388 |
389 | 6、 [ts] [说一说Typescript中的泛型的作用及使用场景。](https://github.com/daily-interview/fe-interview/issues/6)
390 |
391 | ## 什么是TypeScript
392 |
393 | > TypeScript是由Microsoft Corporation开发和维护的面向对象的编程语言。它是JavaScript的超集,包含所有元素。
394 |
395 | > TypeScript完全遵循OOPS概念,在TSC(TypeScript编译器)的帮助下,我们可以将Typescript代码(.ts文件)转换为JavaScript(.js文件)。
396 |
397 | ## 为什么要使用TypeScript
398 |
399 | > TypeScript的设计目的应该是解决JavaScript的“痛点”:弱类型和没有命名空间,导致很难模块化,不适合开发大型程序。另外它还提供了一些语法糖来帮助大家更方便地实践面向对象的编程。
400 |
401 | - TypeScript简化了JavaScript代码,使其更易于阅读和调试。
402 |
403 | - TypeScript是开源的。
404 |
405 | - TypeScript为JavaScript IDE和实践提供了高效的开发工具,例如静态检查。
406 |
407 | - 使用TypeScript,我们可以比普通的JavaScript做出巨大的改进。
408 |
409 | - TypeScript为我们提供了ES6(ECMAScript 6)的所有优点,以及更高的工作效率。
410 |
411 | - TypeScript可以帮助我们避免开发人员通过类型检查代码编写JavaScript时经常遇到的痛苦错误。
412 |
413 | - 强大的类型系统,包括泛型。
414 |
415 | - TypeScript代码可以按照ES5和ES6标准进行编译,以支持最新的浏览器。
416 |
417 | - 支持静态类型。
418 |
419 | - TypeScript将节省开发人员的时间。
420 |
421 | ## 什么是泛型
422 |
423 | 泛型的本质是参数化类型,通俗的将就是所操作的数据类型被指定为一个参数,这种参数类型可以用在类、接口和方法的创建中,分别成为泛型类,泛型接口、泛型方法。
424 |
425 | > TypeScript中的泛型跟java中的泛型基本类似。
426 |
427 | ## 为什么使用泛型
428 |
429 | TypeScript 中不建议使用 any 类型,不能保证类型安全,调试时缺乏完整的信息。
430 |
431 | TypeScript可以使用泛型来创建`可重用`的组件。支持当前数据类型,同时也能支持未来的数据类型。扩展灵活。可以在编译时发现你的类型错误,从而保证了类型安全。
432 |
433 | ## 泛型的使用
434 |
435 | 使用泛型可以创建泛型函数、泛型接口,泛型类
436 |
437 | 1.使用泛型变量
438 |
439 | ```
440 | // 泛型变量的使用
441 | function identity(arg:T):T{
442 | console.log(typeof arg);
443 | return arg;
444 | }
445 | let output1=identity('myString');
446 | let output2=identity('myString');
447 | let output3:number=identity(100);
448 | let output4:number=identity(200);
449 | ```
450 |
451 | ```
452 | // 使用集合的泛型
453 | function loggingIdentity(arg:Array):Array{
454 | console.log(arg.length);
455 | return arg;
456 | }
457 | loggingIdentity([1,2,3]);
458 | ```
459 |
460 | 2.定义泛型函数
461 |
462 | ```
463 | // 泛型函数
464 | function identity(arg:T):T{
465 | return arg;
466 | }
467 | let myIdentity:{(arg:T):T}=identity;
468 | ```
469 |
470 | 3.定义泛型接口
471 |
472 | ```
473 | // 泛型接口
474 | interface GenericIdentityFn {
475 | (arg: T): T;
476 | }
477 | function identity(arg: T): T {
478 | return arg;
479 | }
480 | let myIdentity: GenericIdentityFn = identity;
481 | ```
482 |
483 | 4.定义泛型类
484 |
485 | ```
486 | // 泛型类
487 | class GenericNumber{
488 | zeroValue:T;
489 | add:(x:T,y:T)=>T;
490 | }
491 | let myGenericNumber=new GenericNumber();
492 | myGenericNumber.zeroValue=0;
493 | myGenericNumber.add=function(x,y){return x+y;};
494 | console.info(myGenericNumber.add(2,5));
495 | let stringNumberic=new GenericNumber();
496 | stringNumberic.zeroValue='abc';
497 | stringNumberic.add=function(x,y){return `${x}--${y}`};
498 | console.info(stringNumberic.add('张三丰','诸葛亮'));
499 | ```
500 |
501 | 7、 [http] [说说你对http和https的理解](https://github.com/daily-interview/fe-interview/issues/7)
502 |
503 | ## 什么是HTTP?
504 |
505 | > 超文本传输协议,是一个基于请求与响应,无状态的,应用层的协议,常基于TCP/IP协议传输数据,互联网上应用最为广泛的一种网络协议,所有的WWW文件都必须遵守这个标准。设计HTTP的初衷是为了提供一种发布和接收HTML页面的方法。
506 |
507 | ## 什么是HTTPS?
508 |
509 | > HTTPS是一种通过计算机网络进行安全通信的传输协议,经由HTTP进行通信,利用SSL/TLS建立全信道,加密数据包。HTTPS使用的主要目的是提供对网站服务器的身份认证,同时保护交换数据的隐私与完整性。
510 |
511 | PS:TLS是传输层加密协议,前身是SSL协议,由网景公司1995年发布,有时候两者不区分。
512 |
513 | ## 什么是TLS/SSL?
514 |
515 | > TLS/SSL全称安全传输层协议Transport Layer Security, 是介于TCP和HTTP之间的一层安全协议,不影响原有的TCP协议和HTTP协议,所以使用HTTPS基本上不需要对HTTP页面进行太多的改造。
516 |
517 | SSL有三种不同类型,需要了解下:
518 |
519 | - 扩展验证型(EV)SSL证书,适用于大企业,像银行,证券网站都会使用这个证书,信任等级,安全等级是最高的。
520 |
521 | - 组织验证型(OV)SSL证书,适用于企业网站,需要验证企业身份,安全等级比DV高些
522 |
523 | - 域名验证型(DV)SSL证书 ,适用于个人网站,一般验证下网站信息就可以通过,很多免费版本
524 |
525 | ## 如果获取SSL证书?
526 |
527 | 一般分为三种价位的:贵的,便宜的,免费的
528 |
529 | - 贵的(上千甚至上万的价):Symantec、globalsign、comodo、geotrust,除非大企业需要,中小企业网站没必要购买
530 |
531 | - 便宜的(大概50美元上下):godday,RapaidSSL,Comodo positiveSSL
532 |
533 | - 免费的:Let's Encrypt(比较推荐),Wosign,GlobeSSL
534 |
535 | ## HTTP特点
536 |
537 | - 支持客户/服务器模式。(C/S模式)
538 |
539 | - 简单快速:客户向服务器请求服务时,只需传送请求方法和路径。请求方法常用的有GET、HEAD、POST。每种方法规定了客户与服务器联系的类型不同。由于HTTP协议简单,使得HTTP服务器的程序规模小,因而通信速度很快。
540 |
541 | - 灵活:HTTP允许传输任意类型的数据对象。正在传输的类型由Content-Type加以标记。
542 |
543 | - 无连接:无连接的含义是限制每次连接只处理一个请求。服务器处理完客户的请求,并收到客户的应答后,即断开连接。采用这种方式可以节省传输时间。
544 |
545 | - 无状态:HTTP协议是无状态协议。无状态是指协议对于事务处理没有记忆能力。缺少状态意味着如果后续处理需要前面的信息,则它必须重传,这样可能导致每次连接传送的数据量增大。另一方面,在服务器不需要先前信息时它的应答就较快
546 |
547 | ## HTTPS特点
548 |
549 | - 内容加密:采用混合加密技术,中间者无法直接查看明文内容
550 |
551 | - 验证身份:通过证书认证客户端访问的是自己的服务器
552 |
553 | - 保护数据完整性:防止传输的内容被中间人冒充或者篡改
554 |
555 | ## HTTPS和HTTP的区别主要如下:
556 |
557 | - HTTP 的URL 以http:// 开头,而HTTPS 的URL 以https:// 开头
558 |
559 | - HTTP 是不安全的,而 HTTPS 是安全的
560 |
561 | - HTTP 标准端口是80 ,而 HTTPS 的标准端口是443
562 |
563 | - HTTP 无法加密,而HTTPS 对传输的数据进行加密
564 |
565 | - HTTP无需证书,而HTTPS 需要CA机构(如Wosign)的颁发的SSL证书
566 |
567 | ## 总结
568 |
569 | > HTTP + 加密 + 认证 + 完整性保护 = HTTPS
570 |
571 | 8、 [js] [说说你对 Promise 的理解](https://github.com/daily-interview/fe-interview/issues/8)
572 |
573 | ## Promise 核心
574 |
575 | - Promise 概括来说是对异步的执行结果的描述对象。(这句话的理解很重要)
576 | - Promise 规范中规定了,promise 的状态只有3种:
577 | - pending
578 | - fulfilled
579 | - rejected
580 | Promise 的状态一旦改变则不会再改变。
581 | - Promise 规范中还规定了 Promise 中必须有 then 方法,这个方法也是实现异步的链式操作的基本。
582 |
583 | ## ES6 Promise细节
584 |
585 | - Promise 构造器中必须传入函数,否则会抛出错误。(没有执行器还怎么做异步操作。。。)
586 | - Promise.prototype上的 catch(onrejected) 方法是 then(null,onrejected) 的别名,并且会处理链之前的任何的reject。
587 | - Promise.prototype 上的 then和 catch 方法总会返回一个全新的 Promise 对象。
588 | - 如果传入构造器的函数中抛出了错误,该 promise 对象的[[PromiseStatus]]会赋值为 rejected,并且[[PromiseValue]]赋值为 Error 对象。
589 | - then 中的回调如果抛出错误,返回的 promise 对象的[[PromiseStatus]]会赋值为 rejected,并且[[PromiseValue]]赋值为 Error 对象。
590 | - then 中的回调返回值会影响 then 返回的 promise 对象。
591 |
592 | ## Promise优点
593 |
594 | - Promise最大的好处是在异步执行的流程中,把执行代码和处理结果的代码清晰地分离了。
595 |
596 | 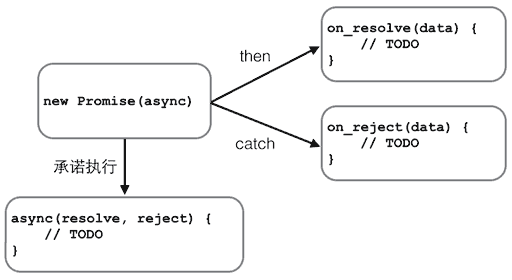
597 |
598 | - 解决回调地狱(Callback Hell)问题
599 |
600 | Promise还可以做更多的事情,比如,有若干个异步任务,需要先做任务1,如果成功后再做任务2,任何任务失败则不再继续并执行错误处理函数。
601 |
602 | 要串行执行这样的异步任务,不用Promise需要写一层一层的嵌套代码。有了Promise,我们只需要简单地写:
603 |
604 | ```
605 | job1.then(job2).then(job3).catch(handleError);
606 | ```
607 |
608 | > 其中,job1、job2和job3都是Promise对象。
609 |
610 | - Promise.all()并行执行异步任务
611 |
612 | - Promise.race()获得先返回的结果即可
613 |
614 | >eg.同时向两个URL读取用户的个人信息,只需要获得先返回的结果即可。
615 |
616 | ## Promise如何解决这两个问题
617 |
618 | - 解决可读性的问题
619 |
620 | 这一点不用多说,用过Promise的人很容易明白。Promise的应用相当于给了你一张可以把解题思路清晰记录下来的草稿纸,你不在需要用脑子去记忆执行顺序。
621 |
622 | - 解决信任问题
623 |
624 | Promise并没有取消控制反转,而是把反转出去的控制再反转一次,也就是反转了控制反转。
625 |
626 | 这种机制有点像事件的触发。它与普通的回调的方式的区别在于,普通的方式,回调成功之后的操作直接写在了回调函数里面,而这些操作的调用由第三方控制。在Promise的方式中,回调只负责成功之后的通知,而回调成功之后的操作放在了then的回调里面,由Promise精确控制。
627 |
628 | Promise有这些特征:只能决议一次,决议值只能有一个,决议之后无法改变。任何then中的回调也只会被调用一次。Promise的特征保证了Promise可以解决信任问题。
629 |
630 | 对于回调过早的问题,由于Promise只能是异步的,所以不会出现异步的同步调用。即便是在决议之前的错误,也是异步的,并不是会产生同步(调用过早)的困扰。
631 | ```
632 | let a = new Promise((resolve, reject) => {
633 | let b = 1 + c; // ReferenceError: c is not defined,错误会在下面的a打印出来之后报出。
634 | resolve(true);
635 | })
636 | console.log(1, a);
637 | a.then(res => {
638 | console.log(2, res);
639 | })
640 | .catch(err => {
641 | console.log(err);
642 | })
643 | ```
644 | 对于回调过晚或没有调用的问题,Promise本身不会回调过晚,只要决议了,它就会按照规定运行。至于服务器或者网络的问题,并不是Promise能解决的,一般这种情况会使用Promise的竞态APIPromise.race加一个超时的时间:
645 | ```
646 | function timeoutPromise(delay) {
647 | return new Promise(function(resolve, reject) {
648 | setTimeout(function() {
649 | reject("Timeout!");
650 | }, delay);
651 | });
652 | }
653 |
654 | Promise.race([doSomething(), timeoutPromise(3000)])
655 | .then(...)
656 | .catch(...);
657 | ```
658 | 对于回调次数太少或太多的问题,由于Promise只能被决议一次,且决议之后无法改变,所以,即便是多次回调,也不会影响结果,决议之后的调用都会被忽略。
659 |
660 |
661 | 9、 [js] [说一下对bind,call,apply三个函数的认识,自己实现一下bind方法](https://github.com/daily-interview/fe-interview/issues/9)
662 |
663 | 粗略讲一下,希望大佬们能补充下。
664 |
665 | 首先这三个方法都是用来改变函数的 this 的绑定(指向)的。
666 | 它们的用法如下:
667 | ```js
668 | func.apply(thisArg, [argsArray])
669 |
670 | fun.call(thisArg, arg1, arg2, ...)
671 |
672 | function.bind(thisArg[, arg1[, arg2[, ...]]])
673 | ```
674 |
675 | 区别:
676 | - call 和 apply 的区别在于传参的形式不一样,apply 的参数形式是数组或类数组对象,call 的参数形式则是一个个排列的参数值;
677 |
678 | - bind 返回的是原函数的拷贝,并拥有指定的 this 值和初始参数;而 call 和 apply 都是直接返回原函数的返回值,或 undefined;即 bind 是需要手动去调用的,而 apply 和 call 都是立即自动执行。
679 |
680 | 实现 bind 方法可以参考 [MDN bind polyfill](https://developer.mozilla.org/zh-CN/docs/Web/JavaScript/Reference/Global_Objects/Function/bind#Compatibility)
681 |
682 | 或者
683 |
684 | ```js
685 | const bind = (fn, context, ...boundArgs) => (...args) => fn.apply(context, [...boundArgs, ...args]);
686 | ```
687 |
688 |
689 | 10、 [css] [说说对 BFC(Block formatting contexts) 的理解](https://github.com/daily-interview/fe-interview/issues/10)
690 |
691 | ## BFC是什么?
692 |
693 | - BFC(Block Formatting Context)即“块级格式化上下文”
694 |
695 | - IFC(Inline Formatting Context)即“行内格式化上下文”
696 |
697 | - BFC是W3C CSS 2.1 规范中的一个概念,它决定了元素如何对其内容进行定位,以及与其他元素的关系和相互作用。当涉及到可视化布局的时候,Block Formatting Context提供了一个独立的渲染区域(作用范围或者盒子),HTML元素在这个独立的渲染区域中按照一定规则进行布局。并且与这个渲染区域外部毫不相干。
698 |
699 | ## 如何产生BFC
700 |
701 | - 浮动元素:float 除 none 以外的值。
702 | - 绝对定位元素:position (absolute、fixed)。
703 | - display 为 inline-block、table-cells、flex。
704 | - overflow 除了 visible 以外的值。
705 |
706 |
707 | 11、 [js] [什么是函数节流和函数防抖?应用场景是怎么样的?](https://github.com/daily-interview/fe-interview/issues/11)
708 |
709 | ## 防抖debounce
710 |
711 | 防抖(Debounce): 多次触发,只在最后一次触发时,执行目标函数。
712 |
713 | 函数防抖就是,延迟一段时间再执行函数,如果这段时间内又触发了该函数,则延迟重新计算。
714 |
715 | ### 应用场景
716 |
717 | (1)通过监听某些事件完成对应的需求,比如:
718 |
719 | - 通过监听 scroll 事件,检测滚动位置,根据滚动位置显示返回顶部按钮
720 | - 通过监听 resize 事件,对某些自适应页面调整DOM的渲染(通过CSS实现的自适应不再此范围内)
721 | - 通过监听 keyup 事件,监听文字输入并调用接口进行模糊匹配
722 |
723 | (2)其他场景
724 |
725 | - 表单组件输入内容验证
726 | - 防止多次点击导致表单多次提交
727 | - search模糊搜索,用户在不断输入值时,用防抖来节约请求资源
728 | ......
729 |
730 | ### 简单实现
731 | ```
732 | function debounce(fn, wait) {
733 | let t;
734 | return () => {
735 | let context = this;
736 | let args = arguments;
737 | if (t) clearTimeout(t);
738 | t= setTimeout(() => {
739 | fn.apply(context, args);
740 | }, wait)
741 | }
742 | }
743 | ```
744 | ### 完整实现
745 |
746 | ```
747 | function debounce(func, wait, immediate) {
748 | let time;
749 | let debounced = function() {
750 | let context = this;
751 | if(time) clearTimeout(time);
752 |
753 | if(immediate) {
754 | let callNow = !time;
755 | if(callNow) func.apply(context, arguments);
756 | time = setTimeout(
757 | ()=>{time = null} //见注解
758 | , wait)
759 | } else {
760 | time = setTimeout(
761 | ()=>{func.apply(context, arguments)}
762 | , wait)
763 | }
764 | };
765 |
766 | debounced.cancel = function() {
767 | clearTimeout(time);
768 | time = null;
769 | };
770 | return debounced;
771 | }
772 | ```
773 |
774 | // underscore.js debounce
775 |
776 | ```
777 | //
778 | // Returns a function, that, as long as it continues to be invoked, will not
779 | // be triggered. The function will be called after it stops being called for
780 | // N milliseconds. If `immediate` is passed, trigger the function on the
781 | // leading edge, instead of the trailing.
782 |
783 | _.debounce = function(func, wait, immediate) {
784 | var timeout, args, context, timestamp, result;
785 |
786 | // 处理时间
787 | var later = function() {
788 | var last = _.now() - timestamp;
789 |
790 | if (last < wait && last >= 0) {
791 | timeout = setTimeout(later, wait - last); // 10ms 6ms 4ms
792 | } else {
793 | timeout = null;
794 | if (!immediate) {
795 | result = func.apply(context, args);
796 | if (!timeout) context = args = null;
797 | }
798 | }
799 | };
800 | ```
801 |
802 | ## 节流 throttle
803 |
804 | 节流(Throttle):函数间隔一段时间后才能再触发,避免某些函数触发频率过高,比如滚动条滚动事件触发的函数。
805 |
806 | ### 应用场景
807 |
808 | - 鼠标不断点击触发,mousedown(单位时间内只触发一次)
809 | - 监听滚动事件,比如是否滑到底部自动加载更多
810 |
811 | ```
812 | ### 简单实现
813 | function throttle (fn, wait, mustRun) {
814 | let start = new Date()
815 | let timeout
816 | return () => {
817 | // 在返回的函数内部保留上下文和参数
818 | let context = this;
819 | let args = arguments;
820 | let current = new Date();
821 |
822 | clearTimeout(timeout);
823 |
824 | let remaining = current - start;
825 | // 达到了指定触发时间,触发该函数
826 | if (remaining > mustRun) {
827 | fn.apply(context, args);
828 | start = current;
829 | } else {
830 | // 否则wait时间后触发,闭包保留一个timeout实例
831 | timeout = setTimeout(fn, wait);
832 | }
833 | }
834 | }
835 | ```
836 | ### 完整实现
837 |
838 | ```
839 | function throttle(func, wait, options) {
840 | let time, context, args, result;
841 | let previous = 0;
842 | if (!options) options = {};
843 |
844 | let later = function () {
845 | previous = options.leading === false ? 0 : new Date().getTime();
846 | time = null;
847 | func.apply(context, args);
848 | if (!time) context = args = null;
849 | };
850 |
851 | let throttled = function () {
852 | let now = new Date().getTime();
853 | if (!previous && options.leading === false) previous = now;
854 | let remaining = wait - (now - previous);
855 | context = this;
856 | args = arguments;
857 | if (remaining <= 0 || remaining > wait) {
858 | if (time) {
859 | clearTimeout(time);
860 | time = null;
861 | }
862 | previous = now;
863 | func.apply(context, args);
864 | if (!time) context = args = null;
865 | } else if (!time && options.trailing !== false) {
866 | time = setTimeout(later, remaining);
867 | }
868 | };
869 | return throttled;
870 | }
871 | ```
872 |
873 | // underscore.js throttle
874 |
875 | ```
876 | // Returns a function, that, when invoked, will only be triggered at most once
877 | // during a given window of time. Normally, the throttled function will run
878 | // as much as it can, without ever going more than once per `wait` duration;
879 | // but if you'd like to disable the execution on the leading edge, pass
880 | // `{leading: false}`. To disable execution on the trailing edge, ditto.
881 |
882 | _.throttle = function(func, wait, options) {
883 | var context, args, result;
884 | var timeout = null;
885 | var previous = 0;
886 | if (!options) options = {};
887 | var later = function() {
888 | previous = options.leading === false ? 0 : _.now();
889 | timeout = null;
890 | result = func.apply(context, args);
891 | if (!timeout) context = args = null;
892 | };
893 | return function() {
894 | var now = _.now();
895 | if (!previous && options.leading === false) previous = now;
896 | var remaining = wait - (now - previous);
897 | context = this;
898 | args = arguments;
899 | if (remaining <= 0 || remaining > wait) {
900 | if (timeout) {
901 | clearTimeout(timeout);
902 | timeout = null;
903 | }
904 | previous = now;
905 | result = func.apply(context, args);
906 | if (!timeout) context = args = null;
907 | } else if (!timeout && options.trailing !== false) {
908 | timeout = setTimeout(later, remaining);
909 | }
910 | return result;
911 | };
912 | };
913 | ```
914 |
915 | [详情见我的简书-js防抖函数、节流函数实现, 以及在react项目中的使用](https://www.jianshu.com/p/38be6513992f)
916 |
917 |
918 | 12、 [css] [css中position属性值有哪些?各有什么特点。](https://github.com/daily-interview/fe-interview/issues/12)
919 |
920 | position 属性介绍
921 |
922 | (1)position 属性自 CSS2 起就有了,该属性规定元素的定位类型。所有主流浏览器都支持 position 属性。
923 |
924 | (2)position 的可选值有四个:static、relative、absolute、fixed。下面分别进行介绍。(其实还有个 inherit,不过这个是 IE 特有的,这里就不做讨论)
925 |
926 | ## static
927 |
928 | position: static(默认值)
929 |
930 | 1,基本介绍
931 | (1)static 是默认值。表示没有定位,或者说不算具有定位属性。
932 | (2)如果元素 position 属性值为 static(或者未设 position 属性),该元素出现在正常的流中(忽略 top, bottom, left, right 或者 z-index 声明)。
933 |
934 | 2,使用样例
935 |
936 | css:
937 | ```
938 |
945 | ```
946 | html:
947 | ```
948 |
949 |
950 | ````
951 |
952 | 我们不设置元素的 postion 属性值,那么默认的显示效果如下:
953 |
954 | [点我预览](https://artdong.github.io/blog/2018/07/23/css-position)
955 |
956 | ## relative
957 |
958 | 1,基本介绍
959 |
960 | (1)relative 生成相对定位的元素,相对于其正常位置进行定位。
961 | (2)相对定位完成的过程如下:
962 |
963 | 首先按默认方式(static)生成一个元素(并且元素像层一样浮动了起来)。
964 | 然后相对于以前的位置移动,移动的方向和幅度由 left、right、top、bottom 属性确定,偏移前的位置保留不动。
965 |
966 |
967 | 2,样例代码
968 |
969 | 下面代码将文本输入框 position 设置为 relative(相对定位),并且相对于默认的位置向右、向上分别移动 15 个像素。
970 |
971 | css:
972 | ```
973 | div {
974 | width: 200px;
975 | height: 100px;
976 | background-color: #C9FFFF;
977 | }
978 |
979 | input {
980 | position: relative;
981 | left: 15px;
982 | top: -15px;
983 | }
984 | ```
985 | html:
986 | ```
987 |
988 |
989 | ```
990 |
991 | 运行效果如下:
992 |
993 | [点我预览](https://artdong.github.io/blog/2018/07/23/css-position)
994 |
995 | ## absolute
996 |
997 | 1,基本介绍
998 |
999 | (1)absolute 生成绝对定位的元素。
1000 | (2)绝对定位的元素使用 left、right、top、bottom 属性相对于其最接近的一个具有定位属性的父元素进行绝对定位。
1001 | (3)如果不存在这样的父元素,则相对于 body 元素,即相对于浏览器窗口。
1002 |
1003 | 2,样例代码
1004 |
1005 | 下面代码让标题元素相对于它的父容器做绝对定位(注意父容器 position 要设置为 relative)。
1006 | 同时通过 top 属性让标题元素上移,使其覆盖在父容器的上边框。
1007 | 最后通过 left 和 margin-left 配合实现这个绝对定位元素的水平居中。
1008 |
1009 | css:
1010 | ```
1011 | #box {
1012 | width: 200px;
1013 | height: 100px;
1014 | -webkit-box-flex:1;
1015 | border: 1px solid #28AE65;
1016 | border-radius:6px;
1017 | padding: 20px;
1018 | position: relative;
1019 | font-size: 12px;
1020 | }
1021 |
1022 | #title {
1023 | background: #FFFFFF;
1024 | color: #28AE65;
1025 | font-size: 15px;
1026 | text-align: center;
1027 | width: 70px;
1028 | height: 20px;
1029 | line-height: 20px;
1030 | position: absolute;
1031 | top: -10px;
1032 | left: 50%;
1033 | margin-left: -35px;
1034 | }
1035 | ```
1036 | html:
1037 | ```
1038 |
1039 |
标题
1040 | 欢迎访问我的博客
1041 |
1067 | - 数据
- 数据
- 数据
- 数据
- 数据
- 数据
1068 | - 数据
- 数据
- 数据
- 数据
- 数据
- 数据
1069 | - 数据
- 数据
- 数据
- 数据
- 数据
- 数据
1070 | - 数据
- 数据
- 数据
- 数据
- 数据
- 数据
1071 |
1072 |
1073 | ```
1074 | (2)可以看到不管滚动条如何滚动,输入框始终处于窗口的最下方。
1075 |
1076 | [点我预览]( https://artdong.github.io/blog/2018/07/23/css-position)
1077 |
1078 |
1079 | 13、 [js] [谈一谈你对this指针的理解](https://github.com/daily-interview/fe-interview/issues/13)
1080 |
1081 | ## 为什么要用this
1082 |
1083 | > this提供了一种更优雅的方法来隐式`传递`一个对象的引用,因此可以将API设计得更加简洁并且易于复用。
1084 |
1085 | ## 什么是 this
1086 |
1087 | > this 就是一个指针,指向我们调用函数的对象。
1088 |
1089 | ## this的值由什么决定
1090 |
1091 | > this的值并不是由函数定义放在哪个对象里面决定,而是函数执行时由谁来唤起决定。
1092 |
1093 | ## 什么是执行上下文
1094 |
1095 | > 执行上下文 是语言规范中的一个概念,用通俗的话讲,大致等同于函数的执行“环境”。具体的有:变量作用域(和 作用域链条,闭包里面来自外部作用域的变量),函数参数,以及 this 对象的值。
1096 |
1097 | 现在起,我们专注于查明 this 关键词到底指向哪。因此,我们现在要思考的就一个问题:
1098 |
1099 | - 是什么调用函数?是哪个对象调用了函数?
1100 |
1101 | 为了理解这个关键概念,我们来测一下下面的代码。
1102 |
1103 | ```
1104 | let person = {
1105 | name: "Jay",
1106 | greet: function() {
1107 | console.log("hello, " + this.name);
1108 | }
1109 | };
1110 | person.greet();
1111 | ```
1112 |
1113 | 谁调用了 greet 函数?是 person 这个对象对吧?在 greet() 调用的左边是一个 person 对象,那么 this 关键词就指向 person,this.name 就等于 "Jay"。现在,还是用上面的例子,我加点料:
1114 |
1115 | ```
1116 | let greet = person.greet; // 将函数引用存起来;
1117 | greet(); // 调用函数
1118 | ```
1119 |
1120 | 你觉得在这种情况下控制台会输出什么?“Jay”?undefined?还是别的?
1121 |
1122 | 正确答案是 undefined。这说明this 的值并不是由函数定义放在哪个对象里面决定,而是函数执行时由谁来唤起决定。
1123 |
1124 | ## 思考题
1125 |
1126 | 找出 this 的指向
1127 |
1128 | ```
1129 | let name = "Jay Global";
1130 | let person = {
1131 | name: 'Jay Person',
1132 | details: {
1133 | name: 'Jay Details',
1134 | print: function() {
1135 | return this.name;
1136 | }
1137 | },
1138 | print: function() {
1139 | return this.name;
1140 | }
1141 | };
1142 | console.log(person.details.print()); // ?
1143 | console.log(person.print()); // ?
1144 | let name1 = person.print;
1145 | let name2 = person.details;
1146 | console.log(name1()); // ?
1147 | console.log(name2.print()) // ?
1148 | ```
1149 |
1150 | ## 词法作用域
1151 |
1152 | > 词法作用域也就是在词法阶段定义的作用域,也就是说词法作用域在代码书写时就已经确定了。箭头函数就是遵循词法作用域。
1153 |
1154 | ## this 和 箭头函数
1155 |
1156 | 在 ES6 里面,不管你喜欢与否,箭头函数被引入了进来。对于那些还没用惯箭头函数或者新学 JavaScript 的人来说,当箭头函数和 this 关键词混合使用时会发生什么,这个点可能会给你带来小小的困惑和蛋蛋的忧伤。
1157 |
1158 | 当涉及到 this 关键词,箭头函数 和 普通函数 主要的不同是什么?
1159 |
1160 | > 箭头函数按词法作用域来绑定它的上下文,所以 this 实际上会引用到原来的上下文。
1161 |
1162 | ## 思考题
1163 |
1164 | 找出this指向
1165 |
1166 | ```
1167 | let object = {
1168 | data: [1,2,3],
1169 | dataDouble: [1,2,3],
1170 | double: function() {
1171 | console.log("this inside of outerFn double()");
1172 | console.log(this);
1173 | return this.data.map(function(item) {
1174 | console.log(this); // 这里的 this 是什么??
1175 | return item * 2;
1176 | });
1177 | },
1178 | doubleArrow: function() {
1179 | console.log("this inside of outerFn doubleArrow()");
1180 | console.log(this);
1181 | return this.dataDouble.map(item => {
1182 | console.log(this); // 这里的 this 是什么??
1183 | return item * 2;
1184 | });
1185 | }
1186 | };
1187 | object.double();
1188 | object.doubleArrow();
1189 | ```
1190 |
1191 | 14、 [js] [你遇到过跨域问题吗?跨域请求资源的方式有哪些?](https://github.com/daily-interview/fe-interview/issues/14)
1192 |
1193 | ## 什么是跨域
1194 |
1195 | > 在JavaScript中,有一个很重要的安全性限制,被称为“Same-Origin Policy”(同源策略)。它是一种约定,由Netscape公司1995年引入浏览器,是浏览器最核心也最基本的安全功能,如果缺少了同源策略,浏览器很容易受到XSS、CSFR等攻击。所谓同源是指"协议+域名+端口"三者相同,即便两个不同的域名指向同一个ip地址,也非同源。
1196 |
1197 | ## 常用的几种跨域解决方案:
1198 |
1199 | - JSONP
1200 | - CORS策略
1201 | - Nginx代理跨域
1202 |
1203 | ## 跨域的原理解析及实现方法
1204 |
1205 | 1. 通过JSONP(JSON with padding)跨域
1206 |
1207 | > 通常为了减轻web服务器的负载,我们把js、css,img等静态资源分离到另一台独立域名的服务器上,在html页面中再通过相应的标签从不同域名下加载静态资源,而被浏览器允许,基于此原理,我们可以通过动态创建script,再请求一个带参网址实现跨域通信。
1208 |
1209 | > 而jsonp就是利用了script标签的src属性是没有跨域的限制的,从而达到跨域访问的目的。因此它的最基本原理就是:动态添加一个
1227 | ```
1228 |
1229 | 服务端返回如下(返回时即执行全局函数):
1230 |
1231 | ```
1232 | handleCallback({"status": true, "user": "admin"})
1233 | ```
1234 |
1235 | 后端node.js代码示例:
1236 |
1237 | ```
1238 | let querystring = require('querystring');
1239 | let http = require('http');
1240 | let server = http.createServer();
1241 |
1242 | server.on('request', function(req, res) {
1243 | var params = qs.parse(req.url.split('?')[1]);
1244 | let fn = params.callback;
1245 |
1246 | // jsonp返回设置
1247 | res.writeHead(200, { 'Content-Type': 'text/javascript' });
1248 | res.write(fn + '(' + JSON.stringify(params) + ')');
1249 |
1250 | res.end();
1251 | });
1252 |
1253 | server.listen('3000');
1254 | console.log('Server is running at port 3000...');
1255 | ```
1256 |
1257 | JSONP的不足之处:
1258 |
1259 | - 只能使用get方法,不能使用post方法:我们知道 script,link, img 等等标签引入外部资源,都是 get 请求的,那么就决定了 jsonp 一定是 get 的。但有时候我们使用的 post 请求也成功,为啥呢?这是因为当我们指定dataType:'jsonp',不论你指定:type:"post" 或者type:"get",其实质上进行的都是 get 请求!
1260 |
1261 | - 没有关于 JSONP 调用的错误处理。如果动态脚本插入有效,就执行调用;如果无效,就静默失败。失败是没有任何提示的。例如,不能从服务器捕捉到 404 错误,也不能取消或重新开始请求。不过,等待一段时间还没有响应的话,就不用理它了。
1262 |
1263 | 2. CORS策略
1264 |
1265 | - 原理:
1266 |
1267 | CORS是一个W3C标准,全称是"跨域资源共享"(Cross-origin resource sharing)。它允许浏览器向跨源服务器,发出XMLHttpRequest请求,从而克服了AJAX只能同源使用的限制。它为Web服务器定义了一种方式,允许网页从不同的域访问其资源.
1268 | CORS系统定义了一种浏览器和服务器交互的方式来确定是否允许跨域请求。 它是一个妥协,有更大的灵活性,但比起简单地允许所有这些的要求来说更加安全。
1269 |
1270 | - 实现方法:
1271 |
1272 | CORS需要浏览器和服务器同时支持。目前,所有浏览器都支持该功能,IE浏览器不能低于IE10(IE8/9需要使用XDomainRequest对象来支持CORS)。
1273 |
1274 | 整个CORS通信过程,都是浏览器自动完成,不需要用户参与。对于开发者来说,CORS通信与同源的AJAX通信没有差别,代码完全一样。浏览器一旦发现AJAX请求跨源,就会自动添加一些附加的头信息,有时还会多出一次附加的请求,但用户不会有感觉。
1275 |
1276 | - 前端[www.domain1.com]设置:
1277 |
1278 | 原生ajax
1279 |
1280 | // 前端设置是否带cookie
1281 | xhr.withCredentials = true;
1282 |
1283 | 示例代码:
1284 |
1285 | ```
1286 | let xhr = new XMLHttpRequest(); // IE8/9需用window.XDomainRequest兼容
1287 |
1288 | // 前端设置是否带cookie
1289 | xhr.withCredentials = true;
1290 |
1291 | xhr.open('post', 'http://www.domain2.com:3000/login', true);
1292 | xhr.setRequestHeader('Content-Type', 'application/x-www-form-urlencoded');
1293 | xhr.send('user=admin');
1294 |
1295 | xhr.onreadystatechange = function() {
1296 | if (xhr.readyState == 4 && xhr.status == 200) {
1297 | alert(xhr.responseText);
1298 | }
1299 | };
1300 | ```
1301 |
1302 | - Nodejs后台示例:
1303 |
1304 | ```
1305 | let http = require('http');
1306 | let server = http.createServer();
1307 | let qs = require('querystring');
1308 |
1309 | server.on('request', function(req, res) {
1310 | let postData = '';
1311 |
1312 | // 数据块接收中
1313 | req.addListener('data', function(chunk) {
1314 | postData += chunk;
1315 | });
1316 |
1317 | // 数据接收完毕
1318 | req.addListener('end', function() {
1319 | postData = qs.parse(postData);
1320 |
1321 | // 跨域后台设置
1322 | res.writeHead(200, {
1323 | 'Access-Control-Allow-Credentials': 'true', // 后端允许发送Cookie
1324 | 'Access-Control-Allow-Origin': 'http://www.domain1.com', // 允许访问的域(协议+域名+端口)
1325 | /*
1326 | * 此处设置的cookie还是domain2的而非domain1,因为后端也不能跨域写cookie(nginx反向代理可以实现),
1327 | * 但只要domain1中写入一次cookie认证,后面的跨域接口都能从domain2中获取cookie,从而实现所有的接口都能跨域访问
1328 | */
1329 | 'Set-Cookie': 'l=a123456;Path=/;Domain=www.domain2.com;HttpOnly' // HttpOnly的作用是让js无法读取cookie
1330 | });
1331 |
1332 | res.write(JSON.stringify(postData));
1333 | res.end();
1334 | });
1335 | });
1336 |
1337 | server.listen('3000');
1338 | console.log('Server is running at port 3000...');
1339 | ```
1340 |
1341 | - CORS策略的优缺点:
1342 |
1343 | > 优点:
1344 |
1345 | 1. CORS支持所有类型的HTTP请求。
1346 |
1347 | 2. 使用CORS,开发者可以使用普通的XMLHttpRequest发起请求和获得数据,比起JSONP有更好的错误处理。
1348 |
1349 | > 缺点: 兼容性方面相对差一点,ie10或以上才支持
1350 |
1351 | 3. nginx代理跨域
1352 |
1353 | - nginx配置解决iconfont跨域
1354 |
1355 | 浏览器跨域访问js、css、img等常规静态资源被同源策略许可,但iconfont字体文件(eot|otf|ttf|woff|svg)例外,此时可在nginx的静态资源服务器中加入以下配置。
1356 |
1357 | ```
1358 | location / {
1359 | add_header Access-Control-Allow-Origin *;
1360 | }
1361 | ```
1362 |
1363 | - nginx反向代理接口跨域
1364 |
1365 | 跨域原理: 同源策略是浏览器的安全策略,不是HTTP协议的一部分。服务器端调用HTTP接口只是使用HTTP协议,不会执行JS脚本,不需要同源策略,也就不存在跨越问题。
1366 |
1367 | 实现思路:通过nginx配置一个代理服务器(域名与domain1相同,端口不同)做跳板机,反向代理访问domain2接口,并且可以顺便修改cookie中domain信息,方便当前域cookie写入,实现跨域登录。
1368 |
1369 | nginx具体配置:
1370 |
1371 | ```
1372 | #proxy服务器
1373 | server {
1374 | listen 81;
1375 | server_name www.domain1.com;
1376 |
1377 | location / {
1378 | proxy_pass http://www.domain2.com:3000; #反向代理
1379 | proxy_cookie_domain www.domain2.com www.domain1.com; #修改cookie里域名
1380 | index index.html index.htm;
1381 |
1382 | # 当用webpack-dev-server等中间件代理接口访问nignx时,此时无浏览器参与,故没有同源限制,下面的跨域配置可不启用
1383 | add_header Access-Control-Allow-Origin http://www.domain1.com; #当前端只跨域不带cookie时,可为*
1384 | add_header Access-Control-Allow-Credentials true;
1385 | }
1386 | }
1387 | ```
1388 |
1389 | 1.) 前端代码示例:
1390 |
1391 | ```
1392 | let xhr = new XMLHttpRequest();
1393 |
1394 | // 前端开关:浏览器是否读写cookie
1395 | xhr.withCredentials = true;
1396 |
1397 | // 访问nginx中的代理服务器
1398 | xhr.open('get', 'http://www.domain1.com:81/?user=admin', true);
1399 | xhr.send();
1400 | ```
1401 |
1402 | 2.) Nodejs后台示例:
1403 |
1404 | ```
1405 | let http = require('http');
1406 | let server = http.createServer();
1407 | let qs = require('querystring');
1408 |
1409 | server.on('request', function(req, res) {
1410 | let params = qs.parse(req.url.substring(2));
1411 |
1412 | // 向前台写cookie
1413 | res.writeHead(200, {
1414 | 'Set-Cookie': 'l=a123456;Path=/;Domain=www.domain2.com;HttpOnly' // HttpOnly:脚本无法读取
1415 | });
1416 |
1417 | res.write(JSON.stringify(params));
1418 | res.end();
1419 | });
1420 |
1421 | server.listen('3000');
1422 | console.log('Server is running at port 3000...');
1423 | ```
1424 |
1425 | 15、 [http] [什么是强缓存和协商缓存?](https://github.com/daily-interview/fe-interview/issues/15)
1426 |
1427 | ## 什么是浏览器缓存
1428 |
1429 | 浏览器缓存(Brower Caching)是浏览器在本地磁盘对用户最近请求过的文档进行存储,当访问者再次访问同一页面时,浏览器就可以直接从本地磁盘加载文档。
1430 |
1431 | ## 为什么要使用浏览器缓存
1432 |
1433 | 1.减少了冗余的数据传输,节省了网费
1434 |
1435 | 2.减少了服务器的负担,大大提升了网站的性能
1436 |
1437 | 3.加快了客户端加载网页的速度
1438 |
1439 | 4.更好的用户体验
1440 |
1441 | ## 浏览器缓存类型
1442 |
1443 | > 浏览器缓存主要有两类:缓存协商和彻底缓存,也有称之为协商缓存和强缓存。
1444 |
1445 | 1.强缓存:强制缓存整体流程比较简单,就是在第一次访问服务器取到数据之后,在过期时间之内不会再去重复请求。实现这个流程的核心就是如何知道当前时间是否超过了过期时间。
1446 |
1447 | > 强制缓存的过期时间通过第一次访问服务器时返回的响应头获取。在 http 1.0 和 http 1.1 版本中通过不同的响应头字段实现。
1448 |
1449 | - http 1.0
1450 |
1451 | 在 http 1.0 版本中,强制缓存通过 Expires 响应头来实现。 expires 表示未来资源会过期的时间。也就是说,当发起请求的时间超过了 expires 设定的时间,即表示资源缓存时间到期,会发送请求到服务器重新获取资源。而如果发起请求的时间在 expires 限定的时间之内,浏览器会直接读取本地缓存数据库中的信息(from memory or from disk),两种方式根据浏览器的策略随机获取。
1452 |
1453 | - http 1.1
1454 |
1455 | 在 http 1.1 版本中,强制缓存通过 Cache-Control 响应头来实现。Cache-Control 拥有多个值:
1456 |
1457 | private:客户端可以缓存
1458 | public:客户端和代理服务器均可缓存;
1459 | max-age=xxx:缓存的资源将在 xxx 秒后过期;
1460 | no-cache:需要使用协商缓存来验证是否过期;
1461 | no-store:不可缓存
1462 |
1463 | 最常用的字段就是 max-age=xxx ,表示缓存的资源将在 xxx 秒后过期。一般来说,为了兼容,两个版本的强制缓存都会被实现。
1464 |
1465 | > 强制缓存只有首次请求才会跟服务器通信,读取缓存资源时不会发出任何请求,资源的 Status 状态码为 200,资源的 Size 为 from memory 或者 from disk ,http 1.1 版本的实现优先级会高于 http 1.0 版本的实现。
1466 |
1467 | 2.协商缓存:协商缓存与强制缓存的不同之处在于,协商缓存每次读取数据时都需要跟服务器通信,并且会增加缓存标识。在第一次请求服务器时,服务器会返回资源,并且返回一个资源的缓存标识,一起存到浏览器的缓存数据库。当第二次请求资源时,浏览器会首先将缓存标识发送给服务器,服务器拿到标识后判断标识是否匹配,如果不匹配,表示资源有更新,服务器会将新数据和新的缓存标识一起返回到浏览器;如果缓存标识匹配,表示资源没有更新,并且返回 304 状态码,浏览器就读取本地缓存服务器中的数据。
1468 |
1469 | 在 http 协议的 1.0 和 1.1 版本中也有不同的实现方式。
1470 |
1471 | - http 1.0
1472 |
1473 | 在 http 1.0 版本中,第一次请求资源时服务器通过 Last-Modified 来设置响应头的缓存标识,并且把资源最后修改的时间作为值填入,然后将资源返回给浏览器。在第二次请求时,浏览器会首先带上 If-Modified-Since 请求头去访问服务器,服务器会将 If-Modified-Since 中携带的时间与资源修改的时间匹配,如果时间不一致,服务器会返回新的资源,并且将 Last-Modified 值更新,作为响应头返回给浏览器。如果时间一致,表示资源没有更新,服务器返回 304 状态码,浏览器拿到响应状态码后从本地缓存数据库中读取缓存资源。
1474 |
1475 | 这种方式有一个弊端,就是当服务器中的资源增加了一个字符,后来又把这个字符删掉,本身资源文件并没有发生变化,但修改时间发生了变化。当下次请求过来时,服务器也会把这个本来没有变化的资源重新返回给浏览器。
1476 |
1477 | - http 1.1
1478 |
1479 | 在 http 1.1 版本中,服务器通过 Etag 来设置响应头缓存标识。Etag 的值由服务端生成。在第一次请求时,服务器会将资源和 Etag 一并返回给浏览器,浏览器将两者缓存到本地缓存数据库。在第二次请求时,浏览器会将 Etag 信息放到 If-None-Match 请求头去访问服务器,服务器收到请求后,会将服务器中的文件标识与浏览器发来的标识进行对比,如果不相同,服务器返回更新的资源和新的 Etag ,如果相同,服务器返回 304 状态码,浏览器读取缓存。
1480 |
1481 | > 协商缓存每次请求都会与服务器交互,第一次是拿数据和标识的过程,第二次开始,就是浏览器询问服务器资源是否有更新的过程。每次请求都会传输数据,如果命中缓存,则资源的 Status 状态码为 304 而不是 200 。同样的,一般来讲为了兼容,两个版本的协商缓存都会被实现,http 1.1 版本的实现优先级会高于 http 1.0 版本的实现。
1482 |
1483 | > 两者的共同点是,都是从客户端缓存中读取资源;区别是强缓存不会发请求,协商缓存会发请求。
1484 |
1485 |
1486 | 16、 [js] [了解js闭包吗?谈谈你对js闭包的理解。](https://github.com/daily-interview/fe-interview/issues/16)
1487 |
1488 | ## 什么是闭包
1489 |
1490 | MDN的解释:闭包是`函数`和`声明该函数的词法环境`的组合。
1491 |
1492 | 简单讲,闭包就是指有权访问另一个函数作用域中的变量的函数。
1493 |
1494 | 它由两部分构成:函数,以及创建该函数的环境。环境由闭包创建时在作用域中的所有局部变量组成。
1495 |
1496 | 理解闭包的关键在于:外部函数调用之后其变量对象本应该被销毁,但闭包的存在使我们仍然可以访问外部函数的变量对象,这就是闭包的重要概念。
1497 |
1498 | ## 如何产生一个闭包函数
1499 |
1500 | > 创建闭包最常见方式,就是在一个函数内部创建另一个函数。
1501 |
1502 | ```
1503 | function outer() {
1504 | let name = "hello"; // 闭包创建时所能访问的局部变量
1505 | function sayHello() { // 闭包函数
1506 | alert(name);
1507 | }
1508 | return sayHello; // 返回闭包函数
1509 | }
1510 |
1511 | let myFunc = outer();
1512 | myFunc();
1513 | ```
1514 |
1515 | > 闭包的作用域链包含着它自己的作用域,以及包含它的函数的作用域和全局作用域。
1516 |
1517 | outer有了myFunc的引用,内存一直得不到释放,咋办呢?这样的函数多了是不是会造成内存溢出?
1518 | 手动释放一下:
1519 |
1520 | ```
1521 | myFunc = null;
1522 | ```
1523 |
1524 | ## 闭包的注意事项(如何防止内存泄漏)
1525 |
1526 | 通常,函数的作用域及其所有变量都会在函数执行结束后被销毁。但是,在创建了一个闭包以后,这个函数的作用域就会一直保存到闭包不存在为止。
1527 |
1528 | ```
1529 | function makeAdder(x) {
1530 | return function(y) {
1531 | return x + y;
1532 | };
1533 | }
1534 |
1535 | let add5 = makeAdder(5);
1536 | let add10 = makeAdder(10);
1537 |
1538 | console.log(add5(2)); // 7
1539 | console.log(add10(2)); // 12
1540 |
1541 | add5 = null;
1542 | add10 = null;
1543 | ```
1544 |
1545 | add5 和 add10 都是闭包。它们共享相同的函数定义,但是保存了不同的词法环境。在 add5 的环境中,x 为 5。而在 add10 中,x 则为 10。
1546 |
1547 | 最后通过 null 释放了 add5 和 add10 对闭包的引用。
1548 |
1549 | 在javascript中,如果一个对象不再被引用,那么这个对象就会被垃圾回收机制回收;
1550 |
1551 | 如果两个对象互相引用,而不再被第3者所引用,那么这两个互相引用的对象也会被回收。
1552 |
1553 | ## 闭包中的this对象
1554 |
1555 | ```
1556 | let name = "window";
1557 | let obj = {
1558 | name: 'object',
1559 | getName: function() {
1560 | return function() {
1561 | return this.name;
1562 | }
1563 | }
1564 | }
1565 | obj.getName()(); // window
1566 | ```
1567 |
1568 | 在上面这段代码中,obj.getName()()实际上是在全局作用域中调用了匿名函数,this指向了window。
1569 | window才是匿名函数功能执行的环境。
1570 |
1571 | 如果想使this指向外部函数的执行环境,可以这样改写:
1572 |
1573 | ```
1574 | let name = "window";
1575 | let obj = {
1576 | name: 'object',
1577 | getName: function() {
1578 | var that = this;
1579 | return function() {
1580 | return that.name;
1581 | }
1582 | }
1583 | }
1584 | obj.getName()();
1585 | ```
1586 |
1587 | ## 函数内部的定时器
1588 |
1589 | 当函数内部的定时器引用了外部函数的变量对象时,该变量对象不会被销毁。
1590 |
1591 | ```
1592 | (function() {
1593 | let a = 0;
1594 | setInterval(function(){
1595 | console.log(a++);
1596 | }, 1000)
1597 | })()
1598 | ```
1599 |
1600 | ## 闭包的用途
1601 |
1602 | - 模拟块级作用域
1603 |
1604 | ```
1605 | var isShow = true;
1606 | if(isShow){
1607 | var a=1000;
1608 | console.log(a);
1609 | }
1610 | console.log(a); // 在if定义的变量在外部可以访问
1611 | ```
1612 |
1613 | ```
1614 | (function(){ // a在外部就不认识啦
1615 | var isShow = true;
1616 | if(isShow){
1617 | var a=10000;
1618 | console.log(a);
1619 | }
1620 | })();
1621 | console.log(a); // 报错,无法访问
1622 | ```
1623 |
1624 | - 让变量的值始终保持在内存中,对结果进行缓存
1625 |
1626 | ```
1627 | function fn(){
1628 | let count = 0;
1629 | return function(){
1630 | count++;
1631 | return count;
1632 | }
1633 | }
1634 | let add=fn();
1635 | add(); // 1
1636 | add(); // 2
1637 | add(); // 3
1638 | ```
1639 |
1640 | - 封装工具函数
1641 |
1642 | ```
1643 | let counter = (function(){
1644 | let privateCounter = 0; // 私有变量
1645 | function change(val){
1646 | privateCounter += val;
1647 | }
1648 | return {
1649 | increment:function(){ // 三个闭包共享一个词法环境
1650 | change(1);
1651 | },
1652 | decrement:function(){
1653 | change(-1);
1654 | },
1655 | value:function(){
1656 | return privateCounter;
1657 | }
1658 | };
1659 | })();
1660 |
1661 | counter.value(); // 0
1662 | counter.increment();
1663 | counter.value(); // 1
1664 | ```
1665 |
1666 | 17、 [nodejs] [用过nginx吗?nginx负载均衡如何实现?](https://github.com/daily-interview/fe-interview/issues/17)
1667 |
1668 | ## 什么是nginx?
1669 |
1670 | Nginx("engine x")是一款是由俄罗斯的程序设计师Igor Sysoev所开发高性能的Web和反向代理服务器,也是一个 IMAP/POP3/SMTP 代理服务器。
1671 |
1672 | 在高连接并发的情况下,Nginx是Apache服务器不错的替代品。
1673 |
1674 | ## nginx服务器基本特征
1675 |
1676 | - 处理静态文件,索引文件以及自动索引;打开文件描述符缓冲
1677 | - 无缓存的反向代理加速,简单的负载均衡和容错
1678 | - FastCGI,简单的负载均衡和容错
1679 | - 模块化的结构。包括gzipping, byte ranges, chunked responses,以及 SSI-filter等filter。如果由FastCGI或 其它代理服务器处理单页中存在的多个SSI,则这项处理可以并行运行,而不需要相互等待
1680 | - 支持SSL 和 TLSSNI
1681 |
1682 | ## nginx常用功能
1683 |
1684 | 1、Http代理,反向代理:作为web服务器最常用的功能之一,尤其是反向代理。
1685 |
1686 | Nginx在做反向代理时,提供性能稳定,并且能够提供配置灵活的转发功能。Nginx可以根据不同的正则匹配,采取不同的转发策略,比如图片文件结尾的走文件服务器,动态页面走web服务器,只要你正则写的没问题,又有相对应的服务器解决方案,你就可以随心所欲的玩。并且Nginx对返回结果进行错误页跳转,异常判断等。如果被分发的服务器存在异常,他可以将请求重新转发给另外一台服务器,然后自动去除异常服务器。
1687 |
1688 | 2、负载均衡
1689 |
1690 | Nginx的负载均衡是通过upstream实现的。
1691 |
1692 | eg.
1693 |
1694 | ```
1695 | upstream test.aaa {
1696 | ip_hash; ## 调度算法
1697 | server 192.168.1.10:80;
1698 | server 192.168.1.11:80 down;
1699 | server 192.168.1.12:8009 max_fails=3 fail_timeout=20s;
1700 | server 192.168.1.13:8080;
1701 | }
1702 | server {
1703 | listen 80;
1704 | server_name localhost;
1705 | location / {
1706 | proxy_pass http://test.aaa;
1707 | }
1708 | }
1709 | ```
1710 |
1711 | upstream 支持的负载均衡算法:
1712 |
1713 | - 轮询(默认)
1714 |
1715 | > 每个请求按时间顺序逐一分配到不同的后端服务器,如果后端某台服务器宕机,故障系统被自动剔除,使用户访问不受影响。
1716 |
1717 | - weight
1718 |
1719 | > 指定轮询几率,weight和访问比率成正比,用于后端服务器性能不均的情况。
1720 |
1721 | - fair(第三方)
1722 |
1723 | > 按后端服务器的响应时间来分配请求,响应时间短的优先分配。Nginx本身是不支持fair的,如果需要使用这种调度算法,必须下载Nginx的upstream_fair模块。
1724 |
1725 | - url_hash(第三方)
1726 |
1727 | > 按访问URL的hash结果来分配请求,使每个URL定向到同一个后端服务器,后端服务器为缓存时比较适用。另外,在upstream中加入hash语句后,server语句不能写入weight等其他参数。Nginx本身是不支持url_hash的,如果需要使用这种调度算法,必须安装Nginx 的hash软件包。
1728 |
1729 | upstream 支持的状态参数
1730 |
1731 | - down,表示当前的server暂时不参与负载均衡。
1732 | - backup,预留的备份机器。当其他所有的非backup机器出现故障或者忙的时候,才会请求backup机器,因此这台机器的压力最轻。
1733 | - max_fails,允许请求失败的次数,默认为1。当超过最大次数时,返回proxy_next_upstream 模块定义的错误。
1734 | - fail_timeout,在经历了max_fails次失败后,暂停服务的时间。max_fails可以和fail_timeout一起使用。
1735 |
1736 | > 注,当负载调度算法为ip_hash时,后端服务器在负载均衡调度中的状态不能是weight和backup。
1737 |
1738 | 3、web缓存
1739 |
1740 | Nginx可以对不同的文件做不同的缓存处理,配置灵活,并且支持FastCGI_Cache,主要用于对FastCGI的动态程序进行缓存。配合着第三方的ngx_cache_purge,对制定的URL缓存内容可以的进行增删管理。
1741 |
1742 | 18、 [h5] [如果图片加载失败,如何做统一处理及优化?](https://github.com/daily-interview/fe-interview/issues/18)
1743 |
1744 | ## 项目中遇到的问题
1745 |
1746 | 在实际项目中,不可避免的会遇到在页面中加载大量图片,但可能由于网络问题,或者图片文件缺失等问题,导致图片不能正常展示。
1747 |
1748 | 我们希望有一种降级处理的方式,可以在图片加载失败后显示一张我们预先设定好的默认图片。
1749 |
1750 | ## 如何解决
1751 |
1752 | > 监听图片的 error 事件
1753 |
1754 | 由于图片加载失败后,会抛出一个 error 事件,我们可以通过监听 error 事件的方式来对图片进行降级处理。
1755 |
1756 | ```
1757 |  1758 | let img = document.getElementById('img');
1759 | img.addEventListener('error',function(e){
1760 | e.target.src = '//xxx/default.png'; // 为当前图片设定默认图
1761 | })
1762 | ```
1763 |
1764 | 这种方式,确实实现了对异常图片的降级处理,但每张图片都需要通过 JS 进行获取,并且监听 error 事件,对于大量图片的情况并不适用。
1765 |
1766 | 为此,我们可以使用内联事件来监听 error 事件
1767 |
1768 | ```
1769 |
1770 | ```
1771 |
1772 | 我们可以看到,完全不需要单独去写 JS 的监听,我们就实现了异常图片的降级处理,但这种方式还不够好,因为我们仍然需要手动的向 img 标签中添加内联事件,在实际开发过程中,很难保证每张图片都不漏写。
1773 |
1774 | ## 优化方案
1775 |
1776 | > 通过在全局监听的方式,来对异常图片做降级处理
1777 |
1778 | DOM2级事件规定事件流包含三个阶段:
1779 |
1780 | 事件捕获阶段
1781 | 处于目标阶段
1782 | 事件冒泡阶段
1783 |
1784 | 首先发生的是事件捕获,为截获事件提供了机会。然后是实际的目标接收到的事件。最后一个阶段是冒泡阶段。
1785 |
1786 | 我们上文中的监听图片自身的 error 事件,实际上在事件流中是处于目标阶段。
1787 |
1788 | 对于 img 的 error 事件来说,是无法冒泡的,但是是可以捕获的,我们的实现如下:
1789 |
1790 | ```
1791 | window.addEventListener('error',function(e){
1792 | // 当前异常是由图片加载异常引起的
1793 | if( e.target.tagName.toUpperCase() === 'IMG' ){
1794 | e.target.src = '//xxx/default.jpg';
1795 | }
1796 | },true)
1797 | ```
1798 | 最后,我们在思考一个问题,当网络出现异常的时候,必然会出现什么网络图片都无法加载的情况,这样就会导致我们监听的 error 事件。被无限触发,所以我们可以设定一个计数器,当达到期望的错误次数时停止对图片赋予默认图片的操作,改为提供一个Base64的图片。
1799 |
1800 | 实现起来也很简单,如下:
1801 |
1802 | ```
1803 | window.addEventListener('error',function(e){
1804 | let target = e.target, // 当前dom节点
1805 | tagName = target.tagName,
1806 | count = Number(target.dataset.count ) || 0, // 以失败的次数,默认为0
1807 | max= 3; // 总失败次数,此时设定为3
1808 | // 当前异常是由图片加载异常引起的
1809 | if( tagName.toUpperCase() === 'IMG' ){
1810 | if(count >= max){
1811 | target.src = 'data:image/jpeg;base64,/9j/4AAQSkZJRgABAQEAYABgAAD//AK3/ALYH+5hX6FV5N4Y/5GHwx/vyf+iJa9ZrysPhoYVShDZu/potDmwWFhhIzhT2bv6aLQ//Z';
1812 | }else{
1813 | target.dataset.count = count + 1;
1814 | target.src = '//xxx/default.jpg';
1815 | }
1816 | }
1817 | },true)
1818 | ```
1819 |
1820 | 19、 [js] [从输入URL到页面加载完成发生了什么?](https://github.com/daily-interview/fe-interview/issues/19)
1821 |
1822 | ## 从输入 URL 到页面加载完成的过程
1823 |
1824 | - 首先通过DNS解析获得网址的对应IP地址,如果这一步做了智能 DNS 解析的话,会提供访问速度最快的 IP 地址。
1825 |
1826 | - 接下来是 TCP 握手 (3次握手4次挥手),应用层会下发数据给传输层,这里 TCP 协议会指明两端的端口号,然后下发给网络层。网络层中的 IP 协议会确定 IP 地址,并且指示了数据传输中如何跳转路由器。然后包会再被封装到数据链路层的数据帧结构中,最后就是物理层面的传输了。
1827 |
1828 | - TCP 握手结束后会进行 TLS 握手,然后就开始正式的传输数据。
1829 |
1830 | - 数据在进入服务端之前,可能还会先经过负责负载均衡的服务器,它的作用就是将请求合理的分发到多台服务器上,这时假设服务端会响应一个 HTML 文件。
1831 |
1832 | - 首先浏览器会判断状态码是什么,如果是 200 那就继续解析,如果 400 或 500 的话就会报错,如果 300 的话会进行重定向,这里会有个重定向计数器,避免过多次的重定向,超过次数也会报错。
1833 |
1834 | - 浏览器开始解析文件,如果是 gzip 格式的话会先解压一下,然后通过文件的编码格式知道该如何去解码文件。
1835 |
1836 | - 文件解码成功后会正式开始渲染流程,先会根据 HTML 构建 DOM 树,有 CSS 的话会去构建 CSSOM 树。如果遇到 script 标签的话,会判断是否存在 async 或者 defer ,前者会并行进行下载并执行 JS,后者会先下载文件,然后等待 HTML 解析完成后顺序执行,如果以上都没有,就会阻塞住渲染流程直到 JS 执行完毕。遇到文件下载的会去下载文件,这里如果使用 HTTP 2.0 协议的话会极大的提高多图的下载效率。
1837 |
1838 | - 初始的 HTML 被完全加载和解析后会触发 DOMContentLoaded 事件。
1839 |
1840 | - CSSOM 树和 DOM 树构建完成后会开始生成 Render 树,这一步就是确定页面元素的布局、样式等等诸多方面的东西。
1841 |
1842 | - 在生成 Render 树的过程中,浏览器就开始调用 GPU 绘制,合成图层,将内容显示在屏幕上。
1843 |
--------------------------------------------------------------------------------
/images/bubbleSort.gif:
--------------------------------------------------------------------------------
https://raw.githubusercontent.com/daily-interview/fe-interview/7478498bddc433cdeca76e3d4c533da84771d08a/images/bubbleSort.gif
--------------------------------------------------------------------------------
/images/digit.png:
--------------------------------------------------------------------------------
https://raw.githubusercontent.com/daily-interview/fe-interview/7478498bddc433cdeca76e3d4c533da84771d08a/images/digit.png
--------------------------------------------------------------------------------
/images/digit_m_n.png:
--------------------------------------------------------------------------------
https://raw.githubusercontent.com/daily-interview/fe-interview/7478498bddc433cdeca76e3d4c533da84771d08a/images/digit_m_n.png
--------------------------------------------------------------------------------
/images/digit_n.png:
--------------------------------------------------------------------------------
https://raw.githubusercontent.com/daily-interview/fe-interview/7478498bddc433cdeca76e3d4c533da84771d08a/images/digit_n.png
--------------------------------------------------------------------------------
/images/digit_n_more.png:
--------------------------------------------------------------------------------
https://raw.githubusercontent.com/daily-interview/fe-interview/7478498bddc433cdeca76e3d4c533da84771d08a/images/digit_n_more.png
--------------------------------------------------------------------------------
/images/insertSort.gif:
--------------------------------------------------------------------------------
https://raw.githubusercontent.com/daily-interview/fe-interview/7478498bddc433cdeca76e3d4c533da84771d08a/images/insertSort.gif
--------------------------------------------------------------------------------
/images/mergeSort.gif:
--------------------------------------------------------------------------------
https://raw.githubusercontent.com/daily-interview/fe-interview/7478498bddc433cdeca76e3d4c533da84771d08a/images/mergeSort.gif
--------------------------------------------------------------------------------
/images/quickSort.gif:
--------------------------------------------------------------------------------
https://raw.githubusercontent.com/daily-interview/fe-interview/7478498bddc433cdeca76e3d4c533da84771d08a/images/quickSort.gif
--------------------------------------------------------------------------------
/images/selectSort.gif:
--------------------------------------------------------------------------------
https://raw.githubusercontent.com/daily-interview/fe-interview/7478498bddc433cdeca76e3d4c533da84771d08a/images/selectSort.gif
--------------------------------------------------------------------------------
/ppt/GMTC/董韬-Flutter:最新进展和未来展望.pdf:
--------------------------------------------------------------------------------
https://raw.githubusercontent.com/daily-interview/fe-interview/7478498bddc433cdeca76e3d4c533da84771d08a/ppt/GMTC/董韬-Flutter:最新进展和未来展望.pdf
--------------------------------------------------------------------------------
/ppt/GMTC/郑叶飞(圆心)- 前端路上的思考.pdf:
--------------------------------------------------------------------------------
https://raw.githubusercontent.com/daily-interview/fe-interview/7478498bddc433cdeca76e3d4c533da84771d08a/ppt/GMTC/郑叶飞(圆心)- 前端路上的思考.pdf
--------------------------------------------------------------------------------
/regex/README.md:
--------------------------------------------------------------------------------
1 | > 通配符
2 |
3 | ^:匹配所有以指定正则表达式开始的行。
4 | $:匹配所有以指定正则表达式结束的行。
5 |
6 | i 执行对大小写不敏感的匹配。
7 | g 执行全局匹配(查找所有匹配而非在找到第一个匹配后停止)。
8 | m 执行多行匹配。
9 |
10 | [abc] 查找方括号之间的任何字符。
11 | [0-9] 查找任何从 0 至 9 的数字。
12 | (x|y) 查找任何以 | 分隔的选项。
13 |
14 | exec() 方法是一个正则表达式方法。
15 |
16 | exec() 方法用于检索字符串中的正则表达式的匹配。
17 |
18 | test() 方法是一个正则表达式方法。
19 |
20 | test() 方法用于检测一个字符串是否匹配某个模式,如果字符串中含有匹配的文本,则返回 true,否则返回 false。
21 |
22 | > 常用正则表达式
23 |
24 | 1. 数字:^[0-9]*$
25 |
26 | 
27 |
28 | 2. n位数字:^\d{n}$
29 |
30 | 
31 |
32 | 3. 至少n位数字:^\d{n,}$
33 |
34 | 
35 |
36 | 4. m~n位的数字:^\d{m,n}$
37 |
38 | 
39 |
40 | 5. 非零的正整数:^[1-9]\d*$
--------------------------------------------------------------------------------
1758 | let img = document.getElementById('img');
1759 | img.addEventListener('error',function(e){
1760 | e.target.src = '//xxx/default.png'; // 为当前图片设定默认图
1761 | })
1762 | ```
1763 |
1764 | 这种方式,确实实现了对异常图片的降级处理,但每张图片都需要通过 JS 进行获取,并且监听 error 事件,对于大量图片的情况并不适用。
1765 |
1766 | 为此,我们可以使用内联事件来监听 error 事件
1767 |
1768 | ```
1769 |
1770 | ```
1771 |
1772 | 我们可以看到,完全不需要单独去写 JS 的监听,我们就实现了异常图片的降级处理,但这种方式还不够好,因为我们仍然需要手动的向 img 标签中添加内联事件,在实际开发过程中,很难保证每张图片都不漏写。
1773 |
1774 | ## 优化方案
1775 |
1776 | > 通过在全局监听的方式,来对异常图片做降级处理
1777 |
1778 | DOM2级事件规定事件流包含三个阶段:
1779 |
1780 | 事件捕获阶段
1781 | 处于目标阶段
1782 | 事件冒泡阶段
1783 |
1784 | 首先发生的是事件捕获,为截获事件提供了机会。然后是实际的目标接收到的事件。最后一个阶段是冒泡阶段。
1785 |
1786 | 我们上文中的监听图片自身的 error 事件,实际上在事件流中是处于目标阶段。
1787 |
1788 | 对于 img 的 error 事件来说,是无法冒泡的,但是是可以捕获的,我们的实现如下:
1789 |
1790 | ```
1791 | window.addEventListener('error',function(e){
1792 | // 当前异常是由图片加载异常引起的
1793 | if( e.target.tagName.toUpperCase() === 'IMG' ){
1794 | e.target.src = '//xxx/default.jpg';
1795 | }
1796 | },true)
1797 | ```
1798 | 最后,我们在思考一个问题,当网络出现异常的时候,必然会出现什么网络图片都无法加载的情况,这样就会导致我们监听的 error 事件。被无限触发,所以我们可以设定一个计数器,当达到期望的错误次数时停止对图片赋予默认图片的操作,改为提供一个Base64的图片。
1799 |
1800 | 实现起来也很简单,如下:
1801 |
1802 | ```
1803 | window.addEventListener('error',function(e){
1804 | let target = e.target, // 当前dom节点
1805 | tagName = target.tagName,
1806 | count = Number(target.dataset.count ) || 0, // 以失败的次数,默认为0
1807 | max= 3; // 总失败次数,此时设定为3
1808 | // 当前异常是由图片加载异常引起的
1809 | if( tagName.toUpperCase() === 'IMG' ){
1810 | if(count >= max){
1811 | target.src = 'data:image/jpeg;base64,/9j/4AAQSkZJRgABAQEAYABgAAD//AK3/ALYH+5hX6FV5N4Y/5GHwx/vyf+iJa9ZrysPhoYVShDZu/potDmwWFhhIzhT2bv6aLQ//Z';
1812 | }else{
1813 | target.dataset.count = count + 1;
1814 | target.src = '//xxx/default.jpg';
1815 | }
1816 | }
1817 | },true)
1818 | ```
1819 |
1820 | 19、 [js] [从输入URL到页面加载完成发生了什么?](https://github.com/daily-interview/fe-interview/issues/19)
1821 |
1822 | ## 从输入 URL 到页面加载完成的过程
1823 |
1824 | - 首先通过DNS解析获得网址的对应IP地址,如果这一步做了智能 DNS 解析的话,会提供访问速度最快的 IP 地址。
1825 |
1826 | - 接下来是 TCP 握手 (3次握手4次挥手),应用层会下发数据给传输层,这里 TCP 协议会指明两端的端口号,然后下发给网络层。网络层中的 IP 协议会确定 IP 地址,并且指示了数据传输中如何跳转路由器。然后包会再被封装到数据链路层的数据帧结构中,最后就是物理层面的传输了。
1827 |
1828 | - TCP 握手结束后会进行 TLS 握手,然后就开始正式的传输数据。
1829 |
1830 | - 数据在进入服务端之前,可能还会先经过负责负载均衡的服务器,它的作用就是将请求合理的分发到多台服务器上,这时假设服务端会响应一个 HTML 文件。
1831 |
1832 | - 首先浏览器会判断状态码是什么,如果是 200 那就继续解析,如果 400 或 500 的话就会报错,如果 300 的话会进行重定向,这里会有个重定向计数器,避免过多次的重定向,超过次数也会报错。
1833 |
1834 | - 浏览器开始解析文件,如果是 gzip 格式的话会先解压一下,然后通过文件的编码格式知道该如何去解码文件。
1835 |
1836 | - 文件解码成功后会正式开始渲染流程,先会根据 HTML 构建 DOM 树,有 CSS 的话会去构建 CSSOM 树。如果遇到 script 标签的话,会判断是否存在 async 或者 defer ,前者会并行进行下载并执行 JS,后者会先下载文件,然后等待 HTML 解析完成后顺序执行,如果以上都没有,就会阻塞住渲染流程直到 JS 执行完毕。遇到文件下载的会去下载文件,这里如果使用 HTTP 2.0 协议的话会极大的提高多图的下载效率。
1837 |
1838 | - 初始的 HTML 被完全加载和解析后会触发 DOMContentLoaded 事件。
1839 |
1840 | - CSSOM 树和 DOM 树构建完成后会开始生成 Render 树,这一步就是确定页面元素的布局、样式等等诸多方面的东西。
1841 |
1842 | - 在生成 Render 树的过程中,浏览器就开始调用 GPU 绘制,合成图层,将内容显示在屏幕上。
1843 |
--------------------------------------------------------------------------------
/images/bubbleSort.gif:
--------------------------------------------------------------------------------
https://raw.githubusercontent.com/daily-interview/fe-interview/7478498bddc433cdeca76e3d4c533da84771d08a/images/bubbleSort.gif
--------------------------------------------------------------------------------
/images/digit.png:
--------------------------------------------------------------------------------
https://raw.githubusercontent.com/daily-interview/fe-interview/7478498bddc433cdeca76e3d4c533da84771d08a/images/digit.png
--------------------------------------------------------------------------------
/images/digit_m_n.png:
--------------------------------------------------------------------------------
https://raw.githubusercontent.com/daily-interview/fe-interview/7478498bddc433cdeca76e3d4c533da84771d08a/images/digit_m_n.png
--------------------------------------------------------------------------------
/images/digit_n.png:
--------------------------------------------------------------------------------
https://raw.githubusercontent.com/daily-interview/fe-interview/7478498bddc433cdeca76e3d4c533da84771d08a/images/digit_n.png
--------------------------------------------------------------------------------
/images/digit_n_more.png:
--------------------------------------------------------------------------------
https://raw.githubusercontent.com/daily-interview/fe-interview/7478498bddc433cdeca76e3d4c533da84771d08a/images/digit_n_more.png
--------------------------------------------------------------------------------
/images/insertSort.gif:
--------------------------------------------------------------------------------
https://raw.githubusercontent.com/daily-interview/fe-interview/7478498bddc433cdeca76e3d4c533da84771d08a/images/insertSort.gif
--------------------------------------------------------------------------------
/images/mergeSort.gif:
--------------------------------------------------------------------------------
https://raw.githubusercontent.com/daily-interview/fe-interview/7478498bddc433cdeca76e3d4c533da84771d08a/images/mergeSort.gif
--------------------------------------------------------------------------------
/images/quickSort.gif:
--------------------------------------------------------------------------------
https://raw.githubusercontent.com/daily-interview/fe-interview/7478498bddc433cdeca76e3d4c533da84771d08a/images/quickSort.gif
--------------------------------------------------------------------------------
/images/selectSort.gif:
--------------------------------------------------------------------------------
https://raw.githubusercontent.com/daily-interview/fe-interview/7478498bddc433cdeca76e3d4c533da84771d08a/images/selectSort.gif
--------------------------------------------------------------------------------
/ppt/GMTC/董韬-Flutter:最新进展和未来展望.pdf:
--------------------------------------------------------------------------------
https://raw.githubusercontent.com/daily-interview/fe-interview/7478498bddc433cdeca76e3d4c533da84771d08a/ppt/GMTC/董韬-Flutter:最新进展和未来展望.pdf
--------------------------------------------------------------------------------
/ppt/GMTC/郑叶飞(圆心)- 前端路上的思考.pdf:
--------------------------------------------------------------------------------
https://raw.githubusercontent.com/daily-interview/fe-interview/7478498bddc433cdeca76e3d4c533da84771d08a/ppt/GMTC/郑叶飞(圆心)- 前端路上的思考.pdf
--------------------------------------------------------------------------------
/regex/README.md:
--------------------------------------------------------------------------------
1 | > 通配符
2 |
3 | ^:匹配所有以指定正则表达式开始的行。
4 | $:匹配所有以指定正则表达式结束的行。
5 |
6 | i 执行对大小写不敏感的匹配。
7 | g 执行全局匹配(查找所有匹配而非在找到第一个匹配后停止)。
8 | m 执行多行匹配。
9 |
10 | [abc] 查找方括号之间的任何字符。
11 | [0-9] 查找任何从 0 至 9 的数字。
12 | (x|y) 查找任何以 | 分隔的选项。
13 |
14 | exec() 方法是一个正则表达式方法。
15 |
16 | exec() 方法用于检索字符串中的正则表达式的匹配。
17 |
18 | test() 方法是一个正则表达式方法。
19 |
20 | test() 方法用于检测一个字符串是否匹配某个模式,如果字符串中含有匹配的文本,则返回 true,否则返回 false。
21 |
22 | > 常用正则表达式
23 |
24 | 1. 数字:^[0-9]*$
25 |
26 | 
27 |
28 | 2. n位数字:^\d{n}$
29 |
30 | 
31 |
32 | 3. 至少n位数字:^\d{n,}$
33 |
34 | 
35 |
36 | 4. m~n位的数字:^\d{m,n}$
37 |
38 | 
39 |
40 | 5. 非零的正整数:^[1-9]\d*$
--------------------------------------------------------------------------------
 1758 | let img = document.getElementById('img');
1759 | img.addEventListener('error',function(e){
1760 | e.target.src = '//xxx/default.png'; // 为当前图片设定默认图
1761 | })
1762 | ```
1763 |
1764 | 这种方式,确实实现了对异常图片的降级处理,但每张图片都需要通过 JS 进行获取,并且监听 error 事件,对于大量图片的情况并不适用。
1765 |
1766 | 为此,我们可以使用内联事件来监听 error 事件
1767 |
1768 | ```
1769 |
1758 | let img = document.getElementById('img');
1759 | img.addEventListener('error',function(e){
1760 | e.target.src = '//xxx/default.png'; // 为当前图片设定默认图
1761 | })
1762 | ```
1763 |
1764 | 这种方式,确实实现了对异常图片的降级处理,但每张图片都需要通过 JS 进行获取,并且监听 error 事件,对于大量图片的情况并不适用。
1765 |
1766 | 为此,我们可以使用内联事件来监听 error 事件
1767 |
1768 | ```
1769 |