├── doc_img
├── explorer.png
└── regedit1.png
├── asio.md
├── README.md
└── inf_launch_ext.ps1
/doc_img/explorer.png:
--------------------------------------------------------------------------------
https://raw.githubusercontent.com/darekasan/inf_launch_ext/HEAD/doc_img/explorer.png
--------------------------------------------------------------------------------
/doc_img/regedit1.png:
--------------------------------------------------------------------------------
https://raw.githubusercontent.com/darekasan/inf_launch_ext/HEAD/doc_img/regedit1.png
--------------------------------------------------------------------------------
/asio.md:
--------------------------------------------------------------------------------
1 | # ASIO出力について(書きかけ)
2 | 長くなりそうなのでREADMEから分けました。ASIOで出力するために必要な条件や、サウンドカード周りのお話を書きます。
3 |
4 | ## ASIO
5 |
6 | 簡単に言うと「WASAPI」や「DirectSound」とは別のオーディオ出力の規格です。オーディオ制作向けのオーディオインターフェースに広く採用され、一部のUSBDAC等のオーディオ機器でも対応しています。
7 | もともとがプロ向けの規格ということもあり、オーディオデバイスが持つ本来の性能を発揮できるほか、環境によってはWASAPI排他モード以上の低遅延や安定性を確保できる可能性があります。
8 |
9 | ちなみに、ASIO対応のオーディオインターフェースでWASAPI排他モードのときに雑音しか鳴らない場合はバッファサイズを128samples以下にするといいらしい。[@db_chinpei](https://twitter.com/db_chinpei/status/1291380630236749824)氏
10 |
11 | ## Xonar AEについて
12 |
13 | ASUS製の内蔵サウンドカード(PCIe接続)です。PCIe接続ではありますが、カード上のUSBホストチップを介して接続するので実質USBオーディオです。
14 | コナミ謹製ゲーミングPCであるARESPEARに採用されており、INFINITASの隠されたASIO出力モードはARESPEAR及びXonar AEのために搭載されているものと推測されます。
15 | Xonar AEが搭載されているPCであれば、inf_launch_extでASIO出力を選ぶだけでASIOで音を出すことができます。
16 |
17 | ## Xonar AE以外
18 |
19 | Xonar AE以外のサウンドカードでも、レジストリを書き換えて他のASIOドライバーを「XONAR SOUND CARD(64)」に偽装するとINFINITASが読み込んでくれます。
20 | 運良くXonar AEと同じデータフォーマットに対応していれば正常に音が鳴り、そうでない場合は雑音しか出ません。
21 | 私の環境(Xonar AE)では44.1khzで24bit(ASIOSTInt24LSB)でレイテンシが8ms(352sample)でした。サンプリングレートとビット深度が合っていれば問題ないらしい(要検証)。
22 |
23 | 持ってるデバイスが対応してるフォーマットは[ASIO caps](https://web.archive.org/web/20190409235618/http://otachan.com:80/ASIO%20caps.html)で調べましょう。
24 | ビット深度などの設定がASIOコントロールパネルにある場合もあるようなので、ASIO capsやDAWなどから開いて確認してみましょう。
25 |
26 | ### レジストリを書き換える
27 |
28 | レジストリエディタの使い方は自分で調べてください。
29 | レジストリエディタで「HKEY_LOCAL_MACHINE\SOFTWARE\ASIO」を開くと、インストールされているASIOドライバーの名前が表示されると思います。
30 | 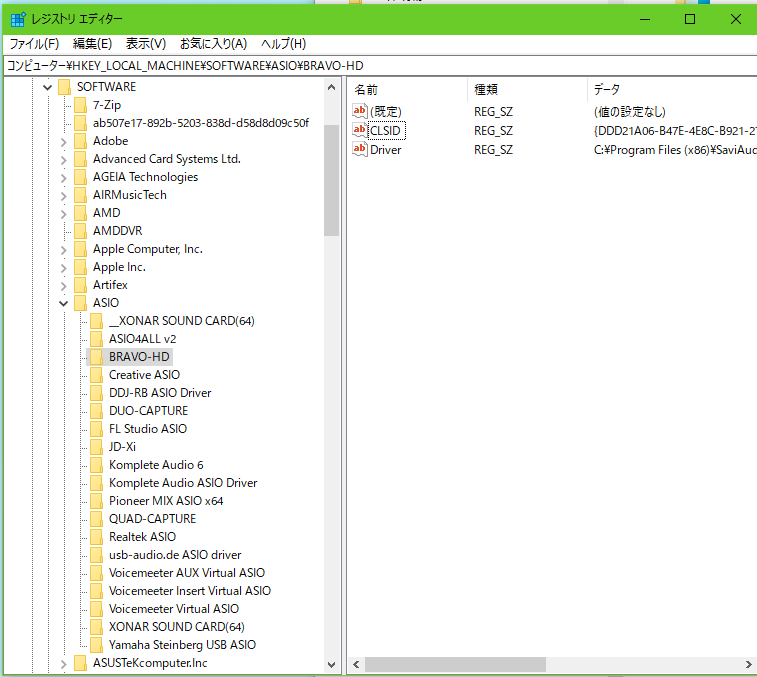
31 | ここでは「BRAVO-HD」をINFINITASから使えるようにしてみます。他のASIOドライバーを偽装させるときはここを読み替えてください。
32 |
33 | まず、キー「ASIO」の中にキーを作成します。名前は「XONAR SOUND CARD(64)」とします。
34 | ※既に「XONAR SOUND CARD(64)」が存在する場合は既存のキーの名前を「_XONAR SOUND CARD(64)」などにしてよけておきます(削除・上書きしてしまうと元に戻す時に困ります!)。
35 |
36 | 作成したキーに値を2つ追加します。CLSIDのデータには「BRAVO-HD」のCLSIDを書いておきます。
37 | |名前|種類|データ|
38 | |----|----|----|
39 | |CLSID|REG_SZ(文字列値)|(ここにBRAVO-HDのCLSID)|
40 | |Description|REG_SZ(文字列値)|XONAR SOUND CARD(64)|
41 |
42 | これでinf_launch_extでASIOを選ぶと、INFINITASがBRAVO-HDを使ってくれるはずです。データフォーマット不一致などによる**大音量の雑音に備えて音量は予め絞っておきましょう。**
43 |
44 | 前述の通り、運が良けりゃ音が出ます。音が出なかったり「オーディオデバイス作成失敗」で起動できなかったりした場合は仕様と設定を確認しましょう。
45 |
46 |
47 |
48 | ## サウンドカード
49 | 同じチップを採用する別の製品のドライバを流用することでASIOが使えるパターンがあるようです。情報求む!
50 | ドライバーの入手先や設定方法、ハマったところなども書くとよき。
51 | |サウンドカード|ドライバ|動作|備考|
52 | |----|----|----|----|
53 | |Realtek HD Audio|?|?|設定にコツがいるみたい?|
54 | |Pioneer LX-89|公式|OK|AVアンプ ASIOコンパネでビット深度24bit指定 [@db_chinpei](https://twitter.com/db_chinpei/status/1295021180718444544/)氏|
55 | |エレコム EHP-AHR192|[DS-200 ソフトウェア・パッケージ](https://www.soundfort.jp/download/)|OK|バッファサイズ3msで安定動作 SA9123チップ microUSB(OTG)接続 [CSスレpart679 >>353](https://medaka.5ch.net/test/read.cgi/otoge/1596990646/353)|
56 | |MOTU 828mk2FW|公式|OK|FireWire接続|
57 | |SoundBlaster X-Fi XtremeGamer|公式|?|PCI接続|
58 | |NI Komplete Audio 6無印|公式|NG||
59 | |Roland DUO-CAPTURE|公式|NG||
60 | |Roland UA-25|公式|?|Win10では要inf書き換え&署名無効|
61 | |Roland UA-101|公式|NG|[@db_chinpei](https://twitter.com/db_chinpei/status/1295021180718444544/)氏|
62 | |Roland JD-Xi|公式|?|USBオーディオ付きのシンセ|
63 | |Griffin iMic|[非公式](https://www.usb-audio.com/download/)|NG||
64 |
65 |
66 | ## 遅延について
67 | いくつかのサウンドカードでASIO/排他/共有の3つのモードで遅延を検証したそうです。環境構築の参考にしてみては?
68 | 特にXonar AEの結果は興味深いです。
69 |
70 | [https://twitter.com/db_chinpei/status/1297600581758926848](https://twitter.com/db_chinpei/status/1297600581758926848)
71 | [https://twitter.com/db_chinpei/status/1304114822133420033](https://twitter.com/db_chinpei/status/1304114822133420033)
72 |
--------------------------------------------------------------------------------
/README.md:
--------------------------------------------------------------------------------
1 | # inf_launch_ext
2 | INFINITASの起動オプションをいじる
3 |
4 | For USTA(Korean) Version:
5 | [Coldlapse/inf_launch_ext_kr](https://github.com/Coldlapse/inf_launch_ext_kr)
6 |
7 | ## 2025/09/25追記
8 |
9 | INFINITASをSteamに非Steamゲームとして追加するための機能を追加しました。詳細は後述。
10 |
11 | 複数あったインストール時のオプションを1つに絞りました。INFINITASのインストール先にコピーして実行するのが既定の動作となります。
12 |
13 | 新機能を使う場合は再度インストールしてください。
14 |
15 | ## 2023/09/21追記
16 |
17 | IIDXから離れてて最近の動向追えてないしメンテナンスもしてないので、もっと良いソリューションがあるかもです。
18 |
19 | 素晴らしい機能拡張版フォークたち
20 |
21 | - [kinetic-flow/infzoom](https://github.com/kinetic-flow/infzoom)
22 | - プレー画面を拡大できる!
23 | - [chinimuruhi/infzoom-for-special-k](https://github.com/chinimuruhi/infzoom-for-special-k/)
24 | - 外部ツール使用でウィンドウ/ボーダーレスでも120FPS出るみたいです
25 |
26 | ## 注意
27 |
28 | このスクリプトを使用することによって生じる問題等の責任を一切負いません
29 | このスクリプトを作成するにあたってゲーム本体の改造やリバースエンジニアリング等の利用規約違反となる行為は行っていませんが、なにがあるかわからないので自己責任にて使用してください。
30 | なお、作者及びこのスクリプトはKonami Amusementと一切関係ありません。
31 |
32 | これはランチャーの代わりにこのスクリプトを立ち上げるようにレジストリを変更します。
33 | **スクリプトファイルを削除する前に必ずアンインストール方法をお読みください。**
34 |
35 | ## なにこれ
36 |
37 | INFINITASの起動ページからランチャーではなくこのスクリプトを起動するようにし、コマンドラインオプションを付け加えてゲームを起動できるようにするツールです。
38 |
39 | できること
40 | - 通常のランチャーの起動
41 | - ランチャーを介さずゲーム本体を起動
42 | - ASIO出力やウィンドウモードを使用して起動
43 | - ウィンドウサイズの変更、ボーダーレス化
44 | - Steamからの起動
45 | - 前回の設定の読み込み
46 |
47 | ## ASIO出力について
48 |
49 | ARESPEARに採用されていることでも知られるASUS Xonar AEならこのスクリプトでASIOを使うことができます。WASAPI排他モードを超える低遅延や安定性を期待できそうです。
50 | それ以外でもある条件を満たせば使えます。詳しくは[ASIOについて](https://github.com/darekasan/inf_launch_ext/blob/master/asio.md)を参照。
51 |
52 | ## インストール
53 |
54 | #### 1 [inf_launch_ext.ps1](https://github.com/darekasan/inf_launch_ext/blob/master/inf_launch_ext.ps1)をダウンロード
55 |
56 | どこでもいいです。
57 |
58 | #### 2 PowerShellを管理者として開く
59 |
60 | ダウンロードしたフォルダで「ファイル > Windows PowerShellを開く > Windows PowerShellを管理者として開く」とするとそのフォルダがカレントディレクトリになるので楽です。
61 | 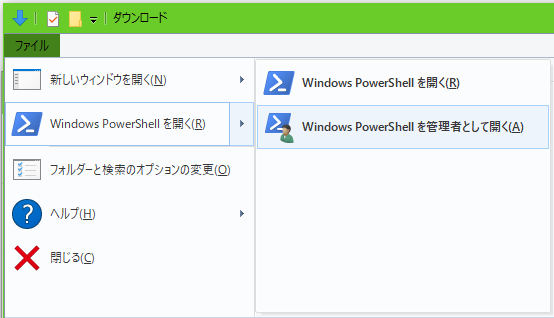
62 | ※「ダウンロード」「デスクトップ」「ドキュメント」の直下では選択できないことがあるので、その場合はフォルダを作成してそこに入れるなどして対処しましょう。もちろん、別の方法でPowerShellを立ち上げて実行してもOKです。
63 |
64 | #### 3 PowerShell実行ポリシーを変更(スクリプトの実行に必要です)
65 |
66 | ```
67 | PS C:\Users\darekasan\Downloads> Set-ExecutionPolicy Bypass
68 | ```
69 | ※Bypassにしたくない人はダウンロードしたあとにスクリプトファイルのプロパティを開いて、「このファイルへのアクセスはブロックされます」を「許可する」にチェックを入れてあげればRemoteSignedでも動きます。
70 |
71 | #### 4 スクリプトを実行
72 |
73 | ```
74 | PS C:\Users\darekasan\Downloads> .\inf_launch_ext.ps1
75 | currently command: "C:\Games\beatmania IIDX INFINITAS\\launcher\modules\bm2dx_launcher.exe" "%1"
76 |
77 | script path: C:\Users\darekasan\Downloads\inf_launch_ext.ps1
78 | game path: C:\Games\beatmania IIDX INFINITAS\
79 |
80 | 0 : revert to default
81 | 1 : copy script file to game directory and set to new script path
82 | number->:
83 | ```
84 | 「1」と入力してEnter。done.と表示されたら閉じます
85 | スクリプトファイルがINFINITASのインストール先にコピーされ、bm2dxinfのURLスキームのコマンドがランチャーではなくこのスクリプトに変更されます。
86 |
87 | ## 使用方法
88 |
89 | いつもどおりWebページから起動すると、オプション選択画面が表示されるので数字を入力してEnterキーを押します。
90 | アップデートが必要なときは0を選んでランチャーを起動します。
91 | ```
92 | Please select option.
93 | 0 : Launcher
94 | 1 : Normal
95 | 2 : Normal + window mode
96 | 3 : ASIO
97 | 4 : ASIO + window mode
98 | 5 : Run from Steam
99 | number(last time: 2):
100 | ```
101 | なにも指定しないでEnterを押すと前回起動時のオプションで起動します。
102 | もし、bm2dx.exeのプロパティの互換性タブで「管理者としてこのプログラムを実行する」にチェックを入れているなら外してください。うまく動きません。
103 |
104 | ### ウィンドウモードの使い方
105 |
106 | ウィンドウモードでは実行中にウィンドウの位置やサイズの変更、ボーダーレス化などの設定が行えます。
107 | 120Hzで出力可能なモニターを使っている場合(144Hzなども含む)はWindowsのディスプレイ設定でリフレッシュレートを「120Hz」にしたほうがよさげです。
108 | ```
109 | window mode setting
110 | example:
111 | window size -> 1280x720
112 | window position -> 100,100
113 | Press enter key to switch to Borderless window.
114 | : 854x480
115 | : 10,10
116 | :
117 | ```
118 | ウィンドウのサイズや位置の指定はそれぞれ「1280x720」「100,100」といった書式で行うことができます。
119 | 何も入力せずEnterを押すとボーダーレスウィンドウになります。これらの設定は次回起動時に引き継がれます。
120 |
121 | ボーダーレスウィンドウをモニターの解像度と同じ大きさにすると「排他じゃないイマドキのフルスクリーン」にできていい感じ。
122 |
123 | ### Steamから起動する方法
124 |
125 | INFINITASを非Steamゲームとして追加し、Steamオーバーレイや入力のリマップなどの機能が使えるようになりました。上級者向けの機能です。
126 |
127 | ブラウザでゲーム起動クリック→inf_launch_ext→InfProxy.exe→(SteamのURLスキーム)→Steam→InfProxy.exe→inf_launch_ext→INFINITAS という仕組みになっています。
128 |
129 | Webページから起動して「5 : Run from Steam」を選ぶと初期設定に入り、INFINITASのインストール先にInfProxy.exeが作成されます。このInfProxy.exeを非SteamゲームとしてSteamに追加してください。そして、デスクトップにショートカットを作成して、ショートカットのプロパティを開き「steam://rungameid/」から始まるURLをコピーしてinf_launch_extに貼り付けると初期設定が完了し、Steam経由でinf_launch_extを起動します。
130 |
131 | 次回以降は「5 : Run from Steam」を選ぶと、Steam経由でinf_launch_extが再び起動します。
132 |
133 | ## アンインストール
134 |
135 | **この手順を踏まずにスクリプトファイルを削除してしまうとランチャーが起動できなくなって詰みます。**
136 | 「1 : copy script file to game directory and set to new script path」を選んでインストールした場合はINFINITASのインストール先(C:\Games\beatmania IIDX INFINITASとか)にスクリプトファイルがあるはずです。
137 | 管理者権限のPowerShellでスクリプトを実行して、「0 : revert to default」を選ぶとレジストリを元に戻します。
138 | それが済んだらinf_launch_ext.ps1とconfig.jsonを削除しても大丈夫です。
139 |
140 | ※どうにもならなくなったときはお手数ですがINFINITASを再インストールしてください。
141 |
142 | ## 既知の問題
143 |
144 | - ウィンドウサイズを縦横整数倍以外にすると汚い(補間処理がないため)
145 | 補間処理を入れようと思うと間に挟まってレンダリング結果横取りして別のウィンドウに表示するくらいしか方法が無いので、気になる方は~~DxWndとかで窓化したほうがいいです。~~ DxWndは64bitバイナリ非対応なので新INFINITASじゃ使えないんですね
146 | - 導入がむずい
147 | 「何をやってるのか全然わからん」って人は手を出さないほうが無難?
148 | - 120FPS出ない
149 | - 外部ツール要る模様
150 |
--------------------------------------------------------------------------------
/inf_launch_ext.ps1:
--------------------------------------------------------------------------------
1 | # INFINITASのレジストリ インストール先の取得に使う
2 | $InfRegistry = "HKLM:\SOFTWARE\KONAMI\beatmania IIDX INFINITAS"
3 |
4 | # ゲーム本体のパス 通常はレジストリから取得
5 | #$InfPath = "C:\Games\beatmania IIDX INFINITAS\"
6 | $InfPath = Get-ItemPropertyValue -LiteralPath $InfRegistry -Name "InstallDir"
7 | $InfExe = Join-Path $InfPath "\game\app\bm2dx.exe"
8 | $InfLauncher = Join-Path $InfPath "\launcher\modules\bm2dx_launcher.exe"
9 | cd $InfPath | Out-Null
10 |
11 | # bm2dxinf:// のレジストリ
12 | $InfOpen = "HKCR:bm2dxinf\shell\open\command\"
13 |
14 | # このスクリプトのフルパス
15 | $ScriptPath = $MyInvocation.MyCommand.Path
16 |
17 | # 設定ファイル
18 | $ConfigJson = Join-Path $PSScriptRoot "config.json"
19 |
20 | # InfProxy用argsファイル
21 | $InfProxyArgs = Join-Path $InfPath "args.txt"
22 |
23 | # InfProxy.exeのパス
24 | $InfProxyPath = Join-Path $InfPath "InfProxy.exe"
25 | $InfProxySrcPath = Join-Path $InfPath "InfProxy.cs"
26 |
27 | $Config = @{
28 | "Option"="0"
29 | "WindowWidth"="1280"
30 | "WindowHeight"="720"
31 | "WindowPositionX"="0"
32 | "WindowPositionY"="0"
33 | "Borderless"=$false
34 | "SteamUrl"="steam://rungameid/"
35 | }
36 |
37 | # ウィンドウスタイル(調べてもよくわかんなかった)
38 | $WSDefault = 348651520
39 | $WSBorderless = 335544320
40 |
41 | # Win32API関数の定義
42 | Add-Type @"
43 | using System;
44 | using System.Runtime.InteropServices;
45 |
46 | public class Win32Api {
47 | [DllImport("user32.dll")]
48 | public static extern int MoveWindow(IntPtr hWnd, int X, int Y, int nWidth, int nHeight, bool bRepaint);
49 |
50 | [DllImport("user32.dll")]
51 | public static extern int SetWindowLong(IntPtr hWnd, int nIndex, long dwLong);
52 |
53 | [DllImport("user32.dll")]
54 | public static extern long GetWindowLong(IntPtr hWnd, int nIndex);
55 |
56 | [DllImport("user32.dll")]
57 | internal static extern bool GetWindowRect(IntPtr hwnd, out RECT lpRect);
58 |
59 | [DllImport("user32.dll")]
60 | internal static extern bool GetClientRect(IntPtr hwnd, out RECT lpRect);
61 |
62 | [StructLayout(LayoutKind.Sequential)]
63 | internal struct RECT
64 | {
65 | public int left, top, right, bottom;
66 | }
67 |
68 | // 外枠の大きさを考慮したウィンドウサイズ変更
69 | public static void MoveWindow2(IntPtr hndl, int x, int y, int w, int h, bool isBl){
70 | if(isBl){
71 | MoveWindow(hndl, x, y, w, h, true);
72 | }else{
73 | RECT cRect = new RECT();
74 | RECT wRect = new RECT();
75 |
76 | GetClientRect(hndl, out cRect);
77 | GetWindowRect(hndl, out wRect);
78 |
79 | int cWidth = cRect.right - cRect.left;
80 | int cHeight = cRect.bottom - cRect.top;
81 |
82 | int wWidth = wRect.right - wRect.left;
83 | int wHeight = wRect.bottom - wRect.top;
84 |
85 | int newW = w + (wWidth - cWidth);
86 | int newH = h + (wHeight - cHeight);
87 |
88 | MoveWindow(hndl, x, y, newW, newH, true);
89 | }
90 |
91 | }
92 |
93 | }
94 | "@
95 |
96 |
97 | $InfProxySrc = @"
98 | using System;
99 | using System.Diagnostics;
100 | using System.IO;
101 | using Microsoft.Win32;
102 |
103 | namespace InfProxy
104 | {
105 | internal class Program
106 | {
107 | static void Main(string[] args)
108 | {
109 | var installDir = Registry.GetValue(@"HKEY_LOCAL_MACHINE\SOFTWARE\KONAMI\beatmania IIDX INFINITAS", "InstallDir", "").ToString();
110 | var myArgs = File.ReadAllText(installDir + "args.txt");
111 |
112 | var psi = new ProcessStartInfo();
113 | psi.Arguments = string.Format(@"-file ""{0}inf_launch_ext.ps1"" {1}", installDir, myArgs);
114 | psi.WorkingDirectory = installDir;
115 | psi.FileName = string.Format("PowerShell.exe");
116 | Process.Start(psi);
117 | }
118 | }
119 | }
120 | "@
121 |
122 | function Save-Config() {
123 | $Config | ConvertTo-Json | Out-File -FilePath $ConfigJson -Encoding utf8
124 | }
125 |
126 | function Start-Exe($exe, $workDir, $arg){
127 | $info = New-Object System.Diagnostics.ProcessStartInfo
128 | $info.FileName = $exe
129 | $info.WorkingDirectory = $workDir
130 | $info.Arguments = $arg
131 | $info.UseShellExecute = $false
132 |
133 | $p = New-Object System.Diagnostics.Process
134 | $p.StartInfo = $info
135 |
136 | $p.Start() | Out-Null
137 |
138 | return $p
139 | }
140 |
141 | function Switch-Borderless($isBl){
142 | if ($isBl) {
143 | [Win32Api]::SetWindowLong($handle, -16, $WSBorderless) | Out-Null
144 | }else{
145 | [Win32Api]::SetWindowLong($handle, -16, $WSDefault) | Out-Null
146 | }
147 | }
148 |
149 |
150 | # 引数を指定しなかったときにレジストリ変更
151 | if ([string]::IsNullOrEmpty($Args[0])) {
152 | New-PSDrive -Name HKCR -PSProvider Registry -Root HKEY_CLASSES_ROOT | Out-Null
153 | $val = Get-ItemPropertyValue -LiteralPath $InfOpen -Name "(default)"
154 |
155 | echo("currently command: " + $val)
156 | echo ""
157 | echo("script path: " + $ScriptPath)
158 | echo("game path: " + $InfPath)
159 | echo ""
160 |
161 | echo "0 : revert to default"
162 | echo "1 : copy script file to game directory and set to new script path"
163 | $num = Read-Host "number->"
164 |
165 | switch ($num) {
166 | 0 {
167 | $val = """${InfLauncher}"" ""%1"""
168 | }
169 | 1 {
170 | $NewScriptPath = Join-Path $InfPath "inf_launch_ext.ps1"
171 | Copy-Item $ScriptPath $NewScriptPath
172 | $val = """powershell"" ""-file"" ""${NewScriptPath}"" ""%1"""
173 | }
174 | Default {
175 | exit
176 | }
177 | }
178 | Set-ItemProperty $InfOpen -name "(default)" -value $val
179 | echo "done. Press enter key to exit."
180 | Read-Host
181 | exit
182 | }
183 |
184 | # ゲームを起動するためのもの ここから
185 | # 設定ファイルを読み込む
186 | if(Test-Path $ConfigJson){
187 | $Config = @{}
188 | (ConvertFrom-Json (Get-Content $ConfigJson -Encoding utf8 -Raw )).psobject.properties | Foreach { $Config[$_.Name] = $_.Value }
189 | }
190 |
191 |
192 | # ゲーム本体に渡す引数
193 | $InfArgs = ""
194 |
195 | # 引数からトークンを拾う
196 | $Args[0] -match "tk=(.{64})" | Out-Null
197 | $InfArgs += " -t "+$Matches[1]
198 |
199 | # トライアルモードなら--trialをつける
200 | if ($Args[0].Contains("trial")) {
201 | $InfArgs += " --trial"
202 | }
203 |
204 | echo "Please select option."
205 | echo "0 : Launcher"
206 | echo "1 : Normal"
207 | echo "2 : Normal + window mode"
208 | echo "3 : ASIO"
209 | echo "4 : ASIO + window mode"
210 | echo "5 : Run from Steam"
211 |
212 | $num = Read-Host "number(last time: $($Config["Option"]))"
213 | if([string]::IsNullOrEmpty($num)){
214 | $num=$Config["Option"]
215 | }
216 |
217 | switch ($num) {
218 | 0 {
219 | Start-Process -FilePath $InfLauncher -ArgumentList $Args[0]
220 | exit
221 | }
222 | 1 {
223 |
224 | }
225 | 2 {
226 | $InfArgs += " -w"
227 | }
228 | 3 {
229 | $InfArgs += " --asio"
230 | }
231 | 4 {
232 | $InfArgs += " -w"
233 | $InfArgs += " --asio"
234 | }
235 | 5 {
236 | # InfProxy.exeが存在しない場合ビルドする
237 | if(!(Test-Path $InfProxyPath)){
238 | echo "InfProxy.exe is not found."
239 | echo "Now building InfProxy.exe..."
240 | $InfProxySrc | Out-File -FilePath $InfProxySrcPath
241 | C:\Windows\Microsoft.NET\Framework64\v4.0.30319\csc.exe .\InfProxy.cs | Out-Null
242 | echo ""
243 | echo "This is a path for InfProxy."
244 | echo $InfProxyPath
245 | echo "Add InfProxy as a non-Steam game in your Steam client."
246 | echo "Then create a shortcut for InfProxy on your desktop and get the URL."
247 | echo ""
248 | $Config["SteamUrl"] = Read-Host "Steam app URL(optional)"
249 | Save-Config
250 | }
251 | $Args[0] | Out-File -FilePath $InfProxyArgs
252 | rundll32.exe url.dll,FileProtocolHandler $Config["SteamUrl"]
253 | exit
254 | }
255 | Default {
256 | exit
257 | }
258 | }
259 |
260 | # 設定を保存
261 | $Config["Option"] = [string]$num
262 | Save-Config
263 |
264 | # INFINITASを起動
265 | $p = Start-Exe($InfExe,"",""""+$InfArgs+"""")
266 |
267 | # ウィンドウモードのとき
268 | if($InfArgs.Contains("-w")){
269 | # ウィンドウ作成まで待つ
270 | $p.WaitForInputIdle() | Out-Null
271 |
272 | # ウィンドウハンドルの取得
273 | $handle = $p.MainWindowHandle
274 |
275 | # 前回の位置と大きさにする
276 | Switch-Borderless($Config["Borderless"])
277 | [Win32Api]::MoveWindow2($handle, $Config["WindowPositionX"], $Config["WindowPositionY"], $Config["WindowWidth"], $Config["WindowHeight"], $Config["Borderless"])
278 |
279 | echo ""
280 | echo "window mode setting"
281 | echo "example:"
282 | echo "window size -> 1280x720"
283 | echo "window position -> 100,100"
284 | echo "Press enter key to switch to Borderless window."
285 |
286 | while($true){
287 | $inputStr=Read-Host " "
288 | if([string]::IsNullOrEmpty($inputStr)){
289 | $Config["Borderless"] = (-Not $Config["Borderless"])
290 | }elseif($inputStr.Contains("x")){
291 | $val = $inputStr.Split('x')
292 | $Config["WindowWidth"]=$val[0]
293 | $Config["WindowHeight"]=$val[1]
294 | }elseif($inputStr.Contains(",")){
295 | $val = $inputStr.Split(',')
296 | $Config["WindowPositionX"]=$val[0]
297 | $Config["WindowPositionY"]=$val[1]
298 | }
299 |
300 | # ボーダーレス化
301 | Switch-Borderless($Config["Borderless"])
302 |
303 | # 位置とサイズを反映
304 | [Win32Api]::MoveWindow2($handle, $Config["WindowPositionX"], $Config["WindowPositionY"], $Config["WindowWidth"], $Config["WindowHeight"], $Config["Borderless"])
305 |
306 | # 設定ファイルに書き込む
307 | Save-Config
308 | }
309 | }
310 |
311 |
312 |
313 |
314 |
--------------------------------------------------------------------------------