├── dockerfiles
├── erlang.cookie
├── Dockerfile
├── startrabbit.sh
└── rabbitmq.config
├── imgs
├── 1.png
├── rpc.png
├── seq.png
├── amqp.png
├── policies.png
├── routing.png
├── topics.png
├── broadcast.png
├── management.png
├── workqueue.png
├── performance.png
├── federated_cluster.png
├── message-chains-1.png
└── federated_broadcast.png
├── docker_rabbitmq.sh
├── README.md
└── rabbitmq使用心得.md
/dockerfiles/erlang.cookie:
--------------------------------------------------------------------------------
1 | ERLANGCOOKIE
--------------------------------------------------------------------------------
/imgs/1.png:
--------------------------------------------------------------------------------
https://raw.githubusercontent.com/dengyuankai272/rabbitmq-server-cluster/HEAD/imgs/1.png
--------------------------------------------------------------------------------
/imgs/rpc.png:
--------------------------------------------------------------------------------
https://raw.githubusercontent.com/dengyuankai272/rabbitmq-server-cluster/HEAD/imgs/rpc.png
--------------------------------------------------------------------------------
/imgs/seq.png:
--------------------------------------------------------------------------------
https://raw.githubusercontent.com/dengyuankai272/rabbitmq-server-cluster/HEAD/imgs/seq.png
--------------------------------------------------------------------------------
/imgs/amqp.png:
--------------------------------------------------------------------------------
https://raw.githubusercontent.com/dengyuankai272/rabbitmq-server-cluster/HEAD/imgs/amqp.png
--------------------------------------------------------------------------------
/imgs/policies.png:
--------------------------------------------------------------------------------
https://raw.githubusercontent.com/dengyuankai272/rabbitmq-server-cluster/HEAD/imgs/policies.png
--------------------------------------------------------------------------------
/imgs/routing.png:
--------------------------------------------------------------------------------
https://raw.githubusercontent.com/dengyuankai272/rabbitmq-server-cluster/HEAD/imgs/routing.png
--------------------------------------------------------------------------------
/imgs/topics.png:
--------------------------------------------------------------------------------
https://raw.githubusercontent.com/dengyuankai272/rabbitmq-server-cluster/HEAD/imgs/topics.png
--------------------------------------------------------------------------------
/imgs/broadcast.png:
--------------------------------------------------------------------------------
https://raw.githubusercontent.com/dengyuankai272/rabbitmq-server-cluster/HEAD/imgs/broadcast.png
--------------------------------------------------------------------------------
/imgs/management.png:
--------------------------------------------------------------------------------
https://raw.githubusercontent.com/dengyuankai272/rabbitmq-server-cluster/HEAD/imgs/management.png
--------------------------------------------------------------------------------
/imgs/workqueue.png:
--------------------------------------------------------------------------------
https://raw.githubusercontent.com/dengyuankai272/rabbitmq-server-cluster/HEAD/imgs/workqueue.png
--------------------------------------------------------------------------------
/imgs/performance.png:
--------------------------------------------------------------------------------
https://raw.githubusercontent.com/dengyuankai272/rabbitmq-server-cluster/HEAD/imgs/performance.png
--------------------------------------------------------------------------------
/imgs/federated_cluster.png:
--------------------------------------------------------------------------------
https://raw.githubusercontent.com/dengyuankai272/rabbitmq-server-cluster/HEAD/imgs/federated_cluster.png
--------------------------------------------------------------------------------
/imgs/message-chains-1.png:
--------------------------------------------------------------------------------
https://raw.githubusercontent.com/dengyuankai272/rabbitmq-server-cluster/HEAD/imgs/message-chains-1.png
--------------------------------------------------------------------------------
/imgs/federated_broadcast.png:
--------------------------------------------------------------------------------
https://raw.githubusercontent.com/dengyuankai272/rabbitmq-server-cluster/HEAD/imgs/federated_broadcast.png
--------------------------------------------------------------------------------
/dockerfiles/Dockerfile:
--------------------------------------------------------------------------------
1 | FROM rabbitmq:3.5.3
2 | MAINTAINER slv slv@ilegendsoft.com
3 |
4 | RUN mkdir /opt/rabbit
5 | ADD startrabbit.sh /opt/rabbit/
6 | ADD rabbitmq.config /etc/rabbitmq/
7 | ADD erlang.cookie /var/lib/rabbitmq/.erlang.cookie
8 |
9 | RUN chmod a+x /opt/rabbit/startrabbit.sh
10 | RUN chmod u+rw /etc/rabbitmq/rabbitmq.config
11 |
12 | RUN rabbitmq-plugins enable --offline rabbitmq_mqtt rabbitmq_stomp rabbitmq_management rabbitmq_management_agent rabbitmq_management_visualiser rabbitmq_federation rabbitmq_federation_management sockjs
13 |
14 | EXPOSE 5672
15 | EXPOSE 15672
16 | EXPOSE 25672
17 | EXPOSE 4369
18 | EXPOSE 9100
19 | EXPOSE 9101
20 | EXPOSE 9102
21 | EXPOSE 9103
22 | EXPOSE 9104
23 | EXPOSE 9105
24 |
25 | CMD /opt/rabbit/startrabbit.sh
--------------------------------------------------------------------------------
/docker_rabbitmq.sh:
--------------------------------------------------------------------------------
1 | #!/bin/sh
2 | IMAGE=ilegendsoft/rabbitmq-server-cluster
3 |
4 | docker pull $IMAGE
5 |
6 | # if first server:
7 | docker run -d -p 5672:5672 -p 15672:15672 -e RABBITMQ_NODENAME=rabbit -e RABBITMQ_SERVER_START_ARGS="-rabbit cluster_nodes {['rabbit@host1','rabbit@host2'],disc}" --name rabbitmq-server-cluster --net="host" $IMAGE
8 |
9 | # elif cluster server on other host:
10 | #docker run -d -p 5672:5672 -p 15672:15672 -e RABBITMQ_NODENAME=rabbit -e CLUSTERED=true -e CLUSTER_WITH=zclouddev1 -e CLUSTER_NODENAME=rabbit --name rabbitmq-server-cluster --net="host" $IMAGE
11 |
12 | # else cluster server on same host:
13 | #docker run -d -p 5673:5673 -p 15673:15673 -e RABBITMQ_NODENAME=rabbit2 -e CLUSTERED=true -e CLUSTER_WITH=boot2docker -e CLUSTER_NODENAME=rabbit -e RABBITMQ_DIST_PORT=25673 -e RABBITMQ_NODE_PORT=5673 -e RABBITMQ_SERVER_START_ARGS="-rabbitmq_management listener [{port,15673}]" --name rabbitmq-server-cluster2 --net="host" $IMAGE
--------------------------------------------------------------------------------
/README.md:
--------------------------------------------------------------------------------
1 | # rabbitmq-server-cluster
2 | rabbitmq server cluster docker image
3 |
4 | ## introduction
5 | This is a project about how to build a rabbitmq cluster docker image.
6 |
7 | ## how to use it
8 | * ensure you have installed docker
9 | * `docker build -t ilegendsoft/rabbitmq-server-cluster dockerfiles/`
10 | * execute `docker_rabbitmq.sh`
11 | * `docker ps` or login [http://host1:15672/](http://host1:15672/) with admin/admin to check status.
12 |
13 | ## configuration
14 | * `dockerfiles/Dockerfile`:Dockerfile
15 | * `dockerfiles/erlang.cookie`:Rabbitmq cluster nodes' cookie need to be same.
16 | * `dockerfiles/rabbitmq.config`:some rabbitmq's configuration, such as user, memory, disk, and so on.
17 | * `dockerfiles/startrabbit.sh`:CMD in Dockerfile
18 |
19 | * `docker_rabbitmq.sh`:start the container
20 | `docker run -d -p 5672:5672 -p 15672:15672 -e RABBITMQ_NODENAME=rabbit -e RABBITMQ_USE_LONGNAME=true -e RABBITMQ_SERVER_START_ARGS="-rabbit cluster_nodes {['rabbit@host1','rabbit@host2'],disc}" --name rabbitmq-server-cluster --net="host" $IMAGE`
21 |
22 |
23 | ***host1,host2 are your cluster nodes' hostnames, you can add more than two.***
24 |
--------------------------------------------------------------------------------
/dockerfiles/startrabbit.sh:
--------------------------------------------------------------------------------
1 | #!/bin/bash
2 | chown rabbitmq:rabbitmq /var/lib/rabbitmq/.erlang.cookie
3 | chmod 400 /var/lib/rabbitmq/.erlang.cookie
4 |
5 | RABBITMQ_NODENAME=$RABBITMQ_NODENAME /usr/sbin/rabbitmq-server
6 |
7 | # if [ -z "$CLUSTERED" ]; then
8 | # # if not clustered then start it normally as if it is a single server
9 | # RABBITMQ_NODENAME=$RABBITMQ_NODENAME /usr/sbin/rabbitmq-server
10 | # else
11 | # if [ -z "$CLUSTER_WITH" -o -z "$CLUSTER_NODENAME" ]; then
12 | # # If clustered, but cluster with is not specified then again start normally, could be the first server in the
13 | # # cluster
14 | # RABBITMQ_NODENAME=$RABBITMQ_NODENAME /usr/sbin/rabbitmq-server
15 | # else
16 | # RABBITMQ_NODENAME=$RABBITMQ_NODENAME /usr/sbin/rabbitmq-server -detached
17 | # /usr/sbin/rabbitmqctl stop_app
18 | # if [ -z "$RAM_NODE" ]; then
19 | # /usr/sbin/rabbitmqctl join_cluster $CLUSTER_NODENAME@$CLUSTER_WITH
20 | # else
21 | # /usr/sbin/rabbitmqctl join_cluster --ram $CLUSTER_NODENAME@$CLUSTER_WITH
22 | # fi
23 | # /usr/sbin/rabbitmqctl start_app
24 | # # /usr/sbin/rabbitmq-plugins enable rabbitmq_mqtt rabbitmq_stomp rabbitmq_management rabbitmq_management_agent rabbitmq_management_visualiser rabbitmq_federation rabbitmq_federation_management sockjs
25 |
26 | # # Tail to keep the a foreground process active..
27 | # #tail -f /var/log/rabbitmq/rabbit\@$HOSTNAME.log
28 | # tail -f /etc/hosts
29 | # fi
30 | # fi
31 |
32 |
--------------------------------------------------------------------------------
/rabbitmq使用心得.md:
--------------------------------------------------------------------------------
1 | 
2 |
3 | # RabbitMQ在分布式系统中的应用
4 |
5 | 由于之前做的项目中需要在多个节点之间**可靠地**通信,所以废弃了之前使用的Redis pub/sub(因为集群有单点问题,且有诸多限制),改用了RabbitMQ。
6 | 使用期间得到不少收获,也踩了不少坑,所以在此分享下心得。(简单了解下RabbitMQ? [点这里](#other))
7 |
8 | ### 怎么保证可靠性的?
9 |
10 | RabbitMQ提供了几种特性,牺牲了一点性能代价,提供了可靠性的保证。
11 |
12 | * 持久化
13 | 当RabbitMQ退出时,默认会将消息和队列都清除,所以需要在**第一次**声明队列和发送消息时指定其持久化属性为true,这样RabbitMQ会将队列、消息和状态存到RabbitMQ本地的数据库,重启后会恢复。
14 | java:
15 |
16 | durable=true
17 | channel.queueDeclare("task_queue", durable, false, false, null); // 队列
18 | channel.basicPublish("", "task_queue",
19 | MessageProperties.PERSISTENT_TEXT_PLAIN,
20 | message.getBytes()); // 消息
21 |
22 | 注:当声明的队列已经存在时,尝试重新定义它的durable是不生效的。
23 |
24 | * 接收应答
25 | 客户端接收消息的模式默认是自动应答,但是通过设置autoAck为false可以让客户端主动应答消息。当客户端拒绝此消息或者未应答便断开连接时,就会使得此消息重新入队(在版本2.7.0以前是到重新加入到队尾,2.7.0及以后是保留消息在队列中的原来位置)。
26 | java:
27 |
28 | autoAck = false;
29 | requeue = true;
30 | channel.basicConsume(queue, autoAck, callback);
31 | channel.basicAck();//应答
32 | channel.basicReject(deliveryTag, requeue); // 拒绝
33 | channel.basicRecover(requeue); // 恢复
34 |
35 | * 发送确认
36 | 默认情况下,发送端不关注发出去的消息是否被消费掉了。可设置channel为confirm模式,所有发送的消息都会被确认一次,用户可以自行根据server发回的确认消息查看状态。详细介绍见:[confirms](http://www.rabbitmq.com/confirms.html)
37 | java:
38 |
39 | channel.confirmSelect(); // 进入confirm模式
40 | // do publish messages... 每条消息都会被编号,从1开始
41 | channel.getNextPublishSeqNo() // 查看下一条要发送的消息的序号
42 | channel.waitForConfirms(); // 等待所有消息发送并确认
43 |
44 | * 事务:和confirm模式不能同时使用,而且会带来大量的多余开销,导致吞吐量下降很多,故而不推荐。
45 | java:
46 |
47 | channel.txSelect();
48 | try {
49 | // do something...
50 | channel.txCommit();
51 | } catch (e){
52 | channel.txRollback();
53 | }
54 |
55 | * 消息队列的高可用(主备模式)
56 | 相比于路由和绑定,可以视为是共享于所有的节点的,消息队列默认只存在于第一次声明它的节点上,这样一旦这个节点挂了,这个队列中未处理的消息就没有了。
57 |
幸好,RabbitMQ提供了将它备份到其他节点的机制,任何时候都有一个master负责处理请求,其他slaves负责备份,当master挂掉,会将最早创建的那个slave提升为master。
58 | 命令:
59 | `rabbitmqctl set_policy ha-all "^ha\." '{"ha-mode":"all"}'`:设置所有以'ha'开头的queue在所有节点上拥有备份。[详细语法点这里](http://www.rabbitmq.com/ha.html);
60 | 也可以在界面上配置。
61 |
62 | 注:由于exclusive类型的队列会在client和server连接断开时被删掉,所以对它设置持久化属性和备份都是没有意义的。
63 |
64 | * 顺序保证
65 | 直接上图好了:
66 | 
67 |
68 | ### 一些需要注意的地方
69 |
70 | * 集群配置:
71 | 一个集群中多个节点共享一份.erlang.cookie文件;若是没有启用RABBITMQ_USE_LONGNAME,需要在每个节点的hosts文件中指定其他节点的地址,不然会找不到其他集群中的节点。
72 |
73 | * 脑裂(网络分区):
74 | RabbitMQ集群对于网络分区的处理和忍受能力不太好,推荐使用[federation](#federation)或者shovel插件去解决。
75 |
但是,情况已经发生了,怎么去解决呢?放心,还是有办法恢复的。
76 |
当网络断断续续时,会使得节点之间的通信断掉,进而造成集群被分隔开的情况。
77 |
这样,每个小集群之后便只处理各自本地的连接和消息,从而导致数据不同步。当重新恢复网络连接时,它们彼此都认为是对方挂了-_-||,便可以判断出有网络分区出现了。但是RabbitMQ默认是忽略掉不处理的,造成两个节点继续各自为政(路由,绑定关系,队列等可以独立地创建删除,甚至主备队列也会每一方拥有自己的master)。
78 |
可以更改配置使得连接恢复时,会根据配置自动恢复:
79 |
80 | * ignore:默认,不做任何处理
81 | * pause-minority:断开连接时,判断当前节点是否属于少数派(节点数少于或者等于一半),如果是,则暂停直到恢复连接。
82 | * {pause_if_all_down, [nodes], ignore | autoheal}:断开连接时,判断当前集群中节点是否有节点在nodes中,如果有,则继续运行,否则暂停直到恢复连接。这种策略下,当恢复连接时,可能会有多个分区存活,所以,最后一个参数决定它们怎么合并。
83 | * autoheal:当恢复连接时,选择客户端连接数最多的节点状态为主,重启其他节点。
84 |
85 | 配置:[集群配置](#cluster)
86 |
87 | * 多次ack
88 | 客户端多次应答同一条消息,会使得该客户端收不到后续消息。
89 |
90 | ### 结合Docker使用
91 | 集群版本的实现:详见我自己写的一个例子[rabbitmq-server-cluster](https://github.com/dengyuankai272/rabbitmq-server-cluster)
92 |
93 | ### 消息队列中间件的比较
94 |
95 | * RabbitMQ:
96 |
97 | * 优点:支持很多协议如:AMQP,XMPP,STMP,STOMP;灵活的路由;成熟稳定的集群方案;负载均衡;数据持久化等。
98 | * 缺点:速度较慢;比较重量级,安装需要依赖Erlang环境。
99 |
100 | * Redis:
101 |
102 | * 优点:比较轻量级,易上手
103 | * 缺点:单点问题,功能单一
104 |
105 | * Kafka:
106 |
107 | * 优点:高吞吐;分布式;快速持久化;负载均衡;轻量级
108 | * 缺点:极端情况下会丢消息
109 |
110 | 最后附一张网上截取的测试结果:
111 |
112 | 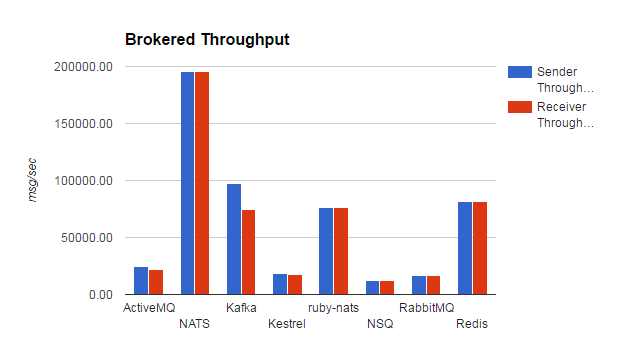
113 |
114 | 更多性能参数见:[http://www.rabbitmq.com/blog/2012/04/25/rabbitmq-performance-measurements-part-2/](http://www.rabbitmq.com/blog/2012/04/25/rabbitmq-performance-measurements-part-2/)
115 |
116 | 如果有兴趣简单了解下RabbitMQ的简单介绍,可以继续往下看~
117 |
118 | # 简介
119 |
120 | ## 几个重要的概念
121 |
122 | * Virtual Host: 包含若干个Exchange和Queue,表示一个节点;
123 | * Exchange: 接受客户端发送的消息,并根据Binding将消息路由给服务器中的队列,Exchange分为direct, fanout, topic三种。
124 | * Binding: 连接Exchange和Queue,包含路由规则。
125 | * Queue: 消息队列,存储还未被消费的消息。
126 | * Message: Header+Body
127 | * Channel: 通道,执行AMQP的命令;一个连接可创建多个通道以节省资源。
128 |
129 | ## Client
130 | RabbitMQ官方实现了很多热门语言的客户端,就不一一列举啦,以java为例,直接开始正题:
131 |
132 | * 建立连接:
133 |
134 | ConnectionFactory factory = new ConnectionFactory();
135 | factory.setHost("localhost");
136 | 可以加上断开重试机制:
137 |
138 | factory.setAutomaticRecoveryEnabled(true);
139 | factory.setNetworkRecoveryInterval(10000);
140 | 创建连接和通道:
141 |
142 | Connection connection = factory.newConnection();
143 | Channel channel = connection.createChannel();
144 |
145 | * 一对一:一个生产者,一个消费者
146 |
147 | 
148 |
149 | 生产者:
150 |
151 | channel.queueDeclare(QUEUE_NAME, false, false, false, null);
152 | channel.basicPublish("", QUEUE_NAME, null, message.getBytes());
153 |
154 | 消费者:
155 |
156 | Consumer consumer = new DefaultConsumer(channel) {
157 | @Override
158 | public void handleDelivery(String consumerTag, Envelope envelope, AMQP.BasicProperties properties, byte[] body)
159 | throws IOException {
160 | String message = new String(body, "UTF-8");
161 | System.out.println(" [x] Received '" + message + "'");
162 | }
163 | };
164 | channel.basicConsume(QUEUE_NAME, autoAck, consumer);
165 |
166 | * 一对多:一个生产者,多个消费者
167 |
168 | 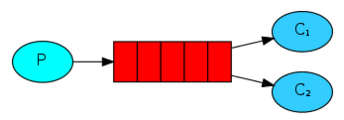
169 |
170 | 代码同上,只不过会有多个消费者,消息会轮序发给各个消费者。
171 | 如果设置了autoAck=false,那么可以实现公平分发(即对于某个特定的消费者,每次最多只发送指定条数的消息,直到其中一条消息应答后,再发送下一条)。需要在消费者中加上:
172 |
173 | int prefetchCount = 1;
174 | channel.basicQos(prefetchCount);
175 | 其他同上。
176 |
177 | * 广播
178 |
179 | 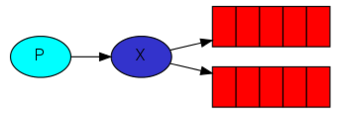
180 |
181 | 生产者:
182 |
183 | channel.exchangeDeclare(EXCHANGE_NAME, "fanout");
184 | String queueName = channel.queueDeclare().getQueue();
185 | channel.queueBind(queueName, EXCHANGE_NAME, "");
186 | channel.basicPublish(EXCHANGE_NAME, "", null, message.getBytes());
187 |
188 | 消费者同上。
189 |
190 | * Routing: 指定路由规则
191 |
192 | 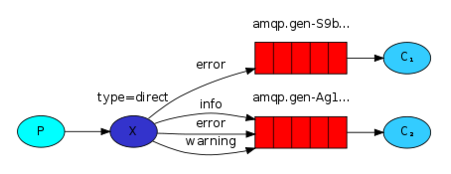
193 |
194 | 生产者:
195 |
196 | String queueName = channel.queueDeclare().getQueue();
197 | channel.queueBind(queueName, EXCHANGE_NAME, routingKey);
198 | channel.basicPublish(EXCHANGE_NAME, routingKey, null, message.getBytes());
199 | 消费者同上。
200 |
201 | * Topics: 支持通配符的Routing
202 |
203 | 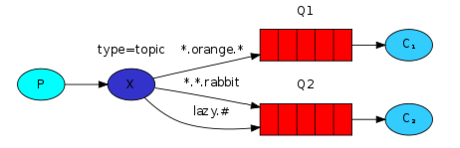
204 |
205 | *可以表示一个单词
206 | #可以表示一个或多个单词
207 |
208 | 生产者:
209 |
210 | channel.exchangeDeclare(EXCHANGE_NAME, "topic");
211 | String queueName = channel.queueDeclare().getQueue();
212 | channel.queueBind(queueName, EXCHANGE_NAME, bindingKey);
213 | 消费者同上。
214 |
215 | * RPC
216 |
217 | 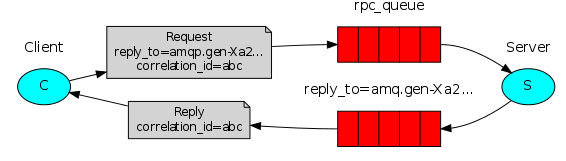
218 |
219 | 其实就是一对一模式的一种用法:
220 | 首先,客户端发送一条消息到服务端声明的队列,消息属性中包含reply_to和correlation_id
221 |
222 | - reply_to 是客户端创建的消息的队列,用来接收远程调用结果
223 | - correlation_id 是消息的标识,服务端回应的消息属性中会带上以便知道是哪条消息的结果。
224 |
225 | 然后,服务端接收到消息,处理,并返回一条结果到reply_to队列中,
226 |
227 | 最终,客户端接收到返回消息,继续向下处理。
228 |
229 |
230 | ## Server
231 | 支持各大主流操作系统,这里以Unix为例介绍下常用配置和命令:
232 |
233 | ### 安装
234 | 由于RabbitMQ是依赖于Erlang的,所以得首先安装最近版本的Erlang。
235 |
236 | 单点的安装比较简单,下载解压即可。[下载地址](http://www.rabbitmq.com/download.html)
237 |
238 | * 配置:(一般的,用默认的即可。)
239 | * $RABBITMQ_HOME/etc/rabbitmq/rabbitmq-env.conf: 环境变量默认配置(也可在启动脚本中设置,且以启动命令中的配置为准)。常用的有:
240 | * RABBITMQ_NODENAME:节点名称,默认是rabbit@$HOSTNAME。
241 | * RABBITMQ_NODE_PORT:协议端口号,默认5672。
242 | * RABBITMQ_SERVER_START_ARGS:覆盖rabbitmq.config中的一些配置。
243 |
244 | * $RABBITMQ_HOME/etc/rabbitmq/rabbitmq.config: 核心组件,插件,erlang服务等配置,常用的有:
245 | * disk_free_limit:队列持久化等信息都是存到RabbitMQ本地的数据库中的,默认限制50000000(也就是最多只让它使用50M空间啦,不够可以上调,也支持空闲空间百分比的配置)。要是超标了,它就罢工了……
246 | * vm_memory_high_watermark:内存使用,默认0.4(最多让它使用40%的内存,超标罢工)
247 |
248 | 注:若启动失败了,可以在启动日志中查看到具体的错误信息。
249 |
250 | * 命令:
251 | * `$RABBITMQ_HOME/sbin/rabbitmq-server`:启动脚本,会打印出配置文件,插件,集群等信息;加上-detached为后台启动;
252 | * `/sbin/rabbitmqctl status`:查看启动状态
253 | * `/sbin/rabbitmqctl add_user admin admin`:添加新用户admin,密码admin;默认只有一个guest用户,但只限本机访问。
254 | * `/sbin/rabbitmqctl set_user_tags admin administrator`:将admin设置为管理员权限
255 | * `/sbin/rabbitmqctl set_permissions -p / admin ".*" ".*" ".*"` 赋予admin所有权限
256 | * `/sbin/rabbitmqctl stop`:关闭
257 |
258 | ### 集群
259 |
260 | 集群节点共享所有的状态和数据,如:用户、路由、绑定等信息(队列有点特殊,虽然从所有节点都可达,但是只存在于第一次声明它的那个节点上,解决方案:[消息队列的高可用](#ha));每个节点都可以接收连接,处理数据。
261 |
262 | 集群节点有两种,disc:默认,信息存在本地数据库;ram:加入集群时,添加--ram参数,信息存在内存,可提高性能。
263 |
264 | * 配置:(一般的,用默认的即可。)
265 | * $RABBITMQ_HOME/etc/rabbitmq/rabbitmq-env.conf:
266 | * RABBITMQ_USE_LONGNAME:默认false,(默认的,RABBITMQ_NODENAME中@后面的$HOSTNAME是主机名,所以需要集群中每个节点的hosts文件包含其他节点主机名到地址的映射。但是如果设置为true,就可以定义RABBITMQ_NODENAME中的$HOSTNAME为域名了)
267 | * RABBITMQ_DIST_PORT:集群端口号,默认RABBITMQ_NODE_PORT + 20000
268 | * $RABBITMQ_HOME/etc/rabbitmq/rabbitmq.config:
269 | * cluster_nodes:设置后,在启动时会尝试自动连接加入的节点并组成集群。
270 | * cluster_partition_handling:[网络分区的处理](#cluster_partion)。
271 |
272 | 更多详细的配置见:[配置](http://www.rabbitmq.com/configure.html)
273 |
274 | * 命令
275 | * `rabbitmqctl stop_app`
276 | * `rabbitmqctl join_cluster [--ram] nodename@hostname`:将当前节点加入到集群中;默认是以disc节点加入集群,加上--ram为ram节点。
277 | * `rabbitmqctl start_app`
278 | * `rabbitmqctl cluster_status`:查看集群状态
279 |
280 | 注:如果加入集群失败,可先查看
281 |
282 | * 每个节点的$HOME/.erlang.cookie内容一致;
283 | * 如果hostname是主机名,那么此hostname和地址的映射需要加入hosts文件中;
284 | * 如果使用的是域名,那么需要设置RABBITMQ_USE_LONGNAME为true。
285 |
286 | 注:docker版集群的见:[rabbitmq-server-cluster](https://github.com/dengyuankai272/rabbitmq-server-cluster)
287 |
288 | ## 高级
289 |
290 | ### AMQP协议简介
291 | RabbitMQ原生支持AMQP 0-9-1并扩展实现了了一些常用的功能:[AMQP 0-9-1](http://www.rabbitmq.com/amqp-0-9-1-reference.html)
292 |
293 | 包含三层:
294 |
295 | * 模型层: 最高层,提供了客户端调用的命令,如:queue.declare,basic.ack,consume等。
296 | * 会话层:将命令从客户端传递给服务器,再将服务器的应答传递给客户端,会话层为这个传递过程提供可靠性、同步机制和错误处理。
297 | * 传输层:主要传输二进制数据流,提供帧的处理、信道复用、错误检测和数据表示。
298 |
299 | 
300 |
301 | 注:其他协议的支持见:[RabbitMQ支持的协议](http://www.rabbitmq.com/protocols.html)
302 |
303 | ### 常用插件
304 |
305 | #### 管理界面(神器)
306 | 启动后,执行`rabbitmq-plugins enable rabbitmq_management`->
307 | 访问[http://localhost:15672](http://localhost:15672)->查看节点状态,队列信息等等,甚至可以动态配置消息队列的主备策略,如下图:
308 |
309 | 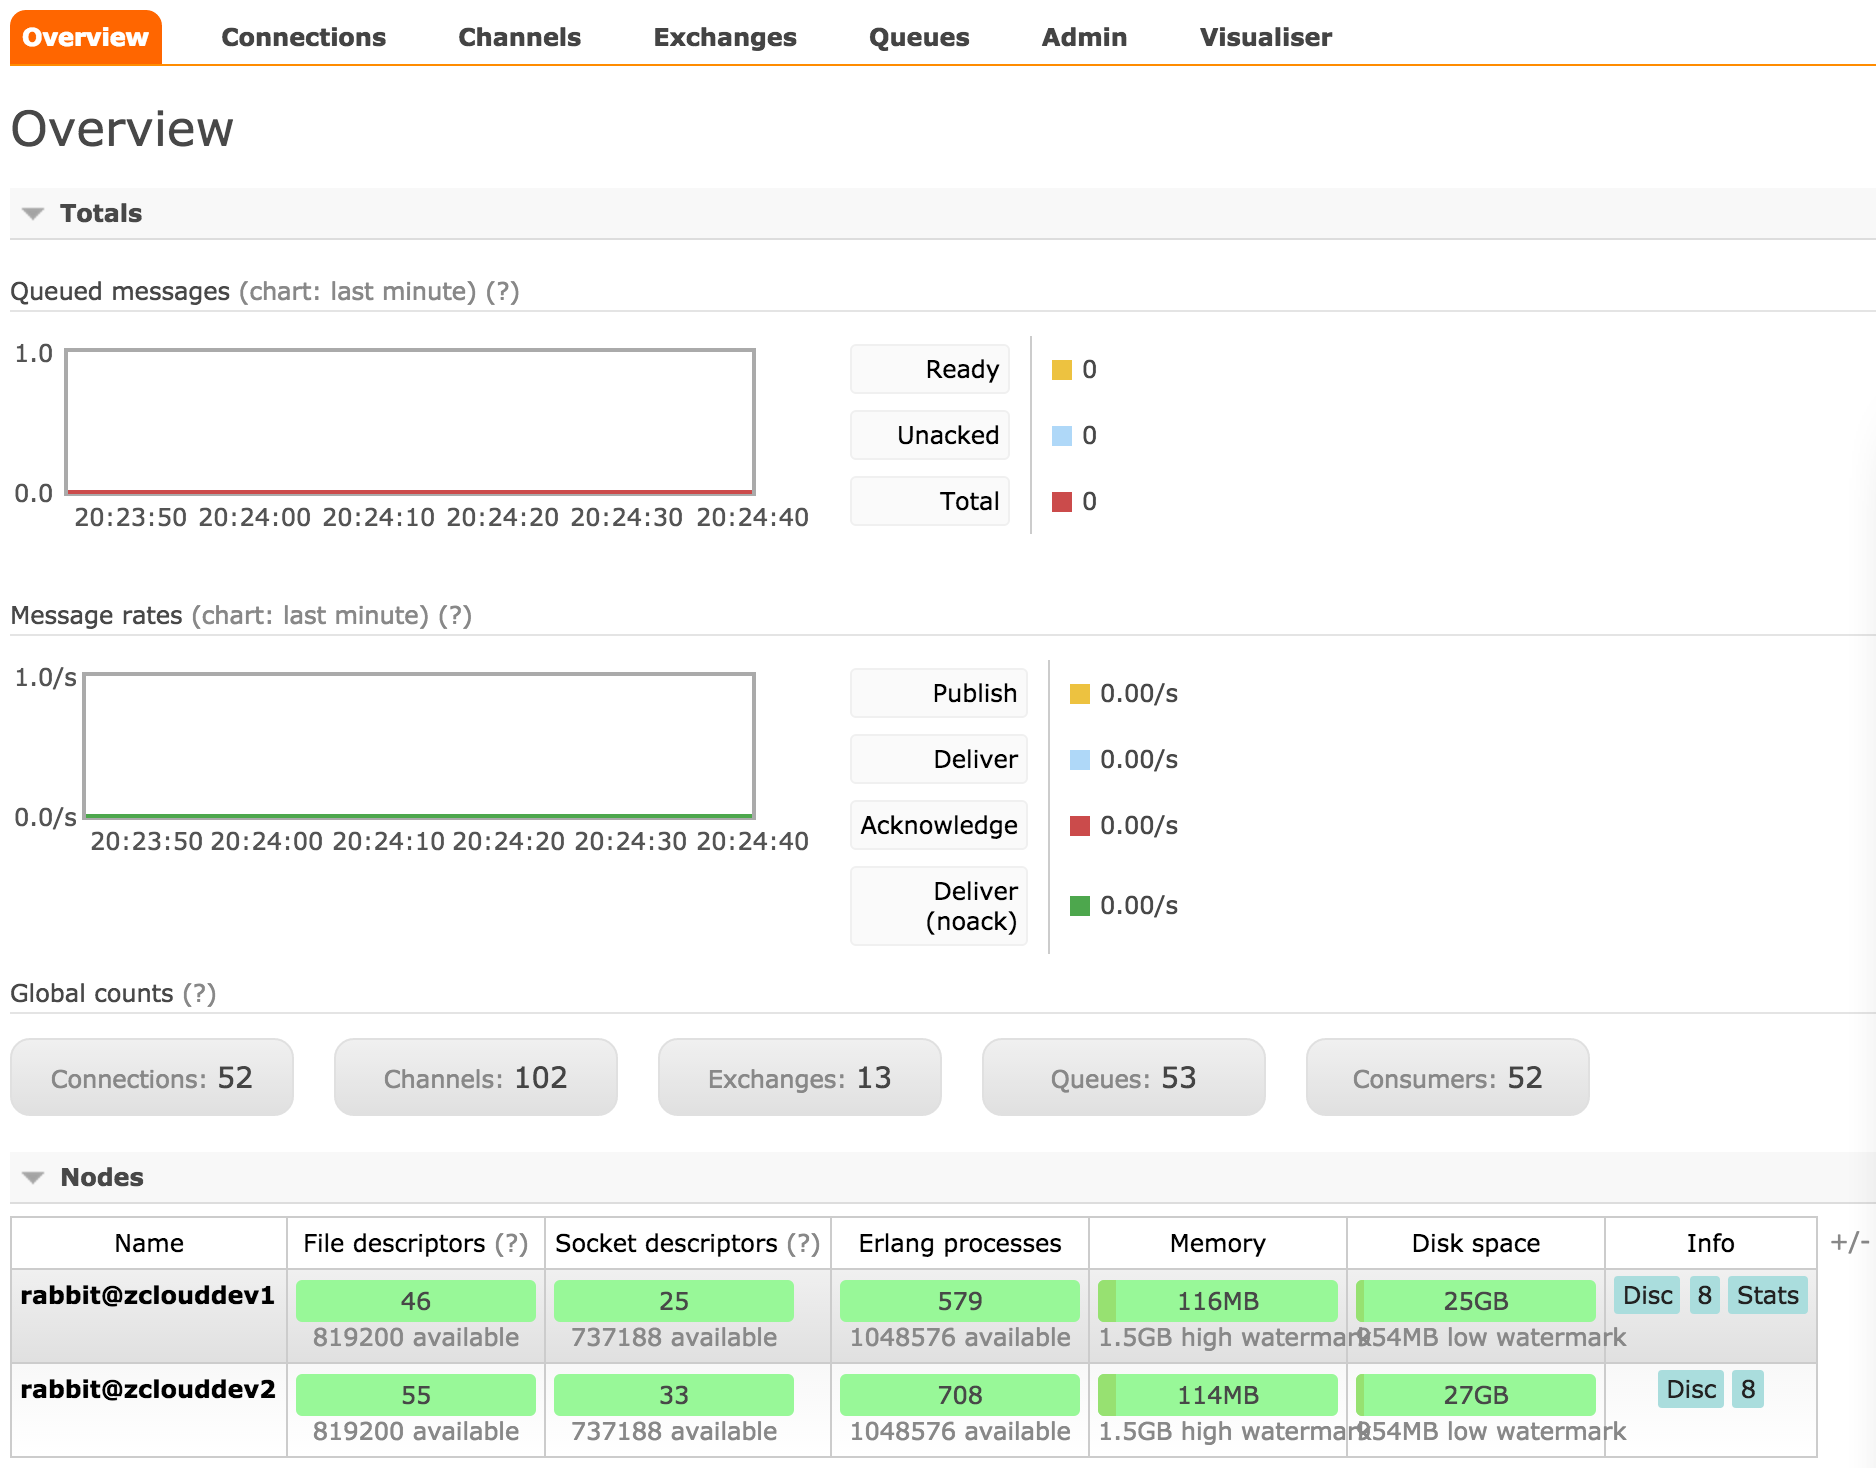
310 |
311 | #### Federation
312 |
313 | 启用Federation插件,使得不同集群的节点之间可以传递消息,从而模拟出类似集群的效果。这样可以有几点好处:
314 |
315 | * 松耦合:联合在一起的不同集群可以有各自的用户,权限等信息,无需一致;此外,这些集群的RabbitMQ和Erlang的版本可以不一致。
316 | * 远程网络连接友好:由于通信是遵循AMQP协议的,故而对断断续续的网络连接容忍度高。
317 | * 自定义:可以自主选择哪些组件启用federation。
318 |
319 | 几个概念:
320 |
321 | * Upstreams: 定义上游节点信息,如:
322 | `rabbitmqctl set_parameter federation-upstream my-upstream '{"uri":"amqp://server-name","expires":3600000}'` 定义一个my-upstream
323 | * uri是其上游节点的地址,多个upstream的节点无需在同一集群中。
324 | * expires表示断开连接3600000ms后其上游节点会缓存消息。
325 |
326 | * Upstream sets: 多个Upstream的集合;默认有个`all`,会将所有的Upstream加进去。
327 |
328 | * Policies: 定义哪些exchanges,queues关联到哪个Upstream或者Upstream set,如:
329 | `rabbitmqctl set_policy --apply-to exchanges federate-me "^amq\." '{"federation-upstream-set":"all"}'` 将此节点所有以amq.开头的exchange联合到上游节点的同名exchange。
330 |
331 | 注:
332 |
333 | * 由于下游节点的exchange可以继续作为其他节点的上游,故可设置成循环,广播等形式。
334 | * 通过max_hops参数控制传递层数。
335 | * 模拟集群,可以将多个节点两两互连,并设置max_hops=1。
336 |
337 | 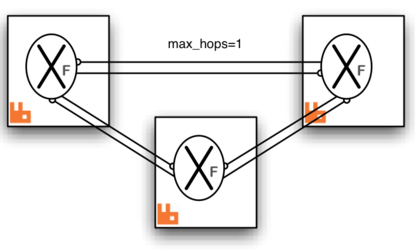
338 | 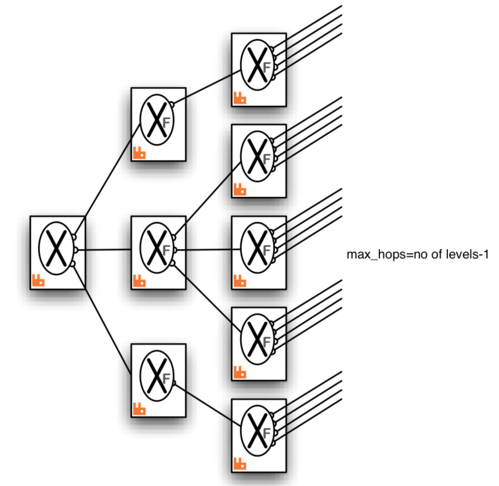
339 |
340 | `rabbitmq-plugins enable rabbitmq_federation`
341 | 如果启用了管理界面,可以添加:
342 | `rabbitmq-plugins enable rabbitmq_federation_management`
343 | 这样就可以在界面配置Upstream和Policy了。
344 |
345 | 注:如果在一个集群中使用federation,需要该集群每个节点都启用Federation插件
346 |
347 | 注:更多插件请见:[插件](http://www.rabbitmq.com/plugins.html)
348 |
--------------------------------------------------------------------------------
/dockerfiles/rabbitmq.config:
--------------------------------------------------------------------------------
1 | %% -*- mode: erlang -*-
2 | %% ----------------------------------------------------------------------------
3 | %% RabbitMQ Sample Configuration File.
4 | %%
5 | %% See http://www.rabbitmq.com/configure.html for details.
6 | %% ----------------------------------------------------------------------------
7 | [
8 | {rabbit,
9 | [%%
10 | %% Network Connectivity
11 | %% ====================
12 | %%
13 |
14 | %% By default, RabbitMQ will listen on all interfaces, using
15 | %% the standard (reserved) AMQP port.
16 | %%
17 | %% {tcp_listeners, [5672]},
18 |
19 | %% To listen on a specific interface, provide a tuple of {IpAddress, Port}.
20 | %% For example, to listen only on localhost for both IPv4 and IPv6:
21 | %%
22 | %% {tcp_listeners, [{"127.0.0.1", 5672},
23 | %% {"::1", 5672}]},
24 |
25 | %% SSL listeners are configured in the same fashion as TCP listeners,
26 | %% including the option to control the choice of interface.
27 | %%
28 | %% {ssl_listeners, [5671]},
29 |
30 | %% Maximum time for AMQP 0-8/0-9/0-9-1 handshake (after socket connection
31 | %% and SSL handshake), in milliseconds.
32 | %%
33 | %% {handshake_timeout, 10000},
34 |
35 | %% Log levels (currently just used for connection logging).
36 | %% One of 'debug', 'info', 'warning', 'error' or 'none', in decreasing
37 | %% order of verbosity. Defaults to 'info'.
38 | %%
39 | %% {log_levels, [{connection, info}, {channel, info}]},
40 |
41 | %% Set to 'true' to perform reverse DNS lookups when accepting a
42 | %% connection. Hostnames will then be shown instead of IP addresses
43 | %% in rabbitmqctl and the management plugin.
44 | %%
45 | %% {reverse_dns_lookups, true},
46 |
47 | %%
48 | %% Security / AAA
49 | %% ==============
50 | %%
51 |
52 | %% The default "guest" user is only permitted to access the server
53 | %% via a loopback interface (e.g. localhost).
54 | %% {loopback_users, [<<"guest">>]},
55 | %%
56 | %% Uncomment the following line if you want to allow access to the
57 | %% guest user from anywhere on the network.
58 | %% {loopback_users, []},
59 | {loopback_users, []},
60 |
61 | %% Configuring SSL.
62 | %% See http://www.rabbitmq.com/ssl.html for full documentation.
63 | %%
64 | %% {ssl_options, [{cacertfile, "/path/to/testca/cacert.pem"},
65 | %% {certfile, "/path/to/server/cert.pem"},
66 | %% {keyfile, "/path/to/server/key.pem"},
67 | %% {verify, verify_peer},
68 | %% {fail_if_no_peer_cert, false}]},
69 |
70 | %% Choose the available SASL mechanism(s) to expose.
71 | %% The two default (built in) mechanisms are 'PLAIN' and
72 | %% 'AMQPLAIN'. Additional mechanisms can be added via
73 | %% plugins.
74 | %%
75 | %% See http://www.rabbitmq.com/authentication.html for more details.
76 | %%
77 | %% {auth_mechanisms, ['PLAIN', 'AMQPLAIN']},
78 |
79 | %% Select an authentication database to use. RabbitMQ comes bundled
80 | %% with a built-in auth-database, based on mnesia.
81 | %%
82 | %% {auth_backends, [rabbit_auth_backend_internal]},
83 |
84 | %% Configurations supporting the rabbitmq_auth_mechanism_ssl and
85 | %% rabbitmq_auth_backend_ldap plugins.
86 | %%
87 | %% NB: These options require that the relevant plugin is enabled.
88 | %% See http://www.rabbitmq.com/plugins.html for further details.
89 |
90 | %% The RabbitMQ-auth-mechanism-ssl plugin makes it possible to
91 | %% authenticate a user based on the client's SSL certificate.
92 | %%
93 | %% To use auth-mechanism-ssl, add to or replace the auth_mechanisms
94 | %% list with the entry 'EXTERNAL'.
95 | %%
96 | %% {auth_mechanisms, ['EXTERNAL']},
97 |
98 | %% The rabbitmq_auth_backend_ldap plugin allows the broker to
99 | %% perform authentication and authorisation by deferring to an
100 | %% external LDAP server.
101 | %%
102 | %% For more information about configuring the LDAP backend, see
103 | %% http://www.rabbitmq.com/ldap.html.
104 | %%
105 | %% Enable the LDAP auth backend by adding to or replacing the
106 | %% auth_backends entry:
107 | %%
108 | %% {auth_backends, [rabbit_auth_backend_ldap]},
109 |
110 | %% This pertains to both the rabbitmq_auth_mechanism_ssl plugin and
111 | %% STOMP ssl_cert_login configurations. See the rabbitmq_stomp
112 | %% configuration section later in this file and the README in
113 | %% https://github.com/rabbitmq/rabbitmq-auth-mechanism-ssl for further
114 | %% details.
115 | %%
116 | %% To use the SSL cert's CN instead of its DN as the username
117 | %%
118 | %% {ssl_cert_login_from, common_name},
119 |
120 | %% SSL handshake timeout, in milliseconds.
121 | %%
122 | %% {ssl_handshake_timeout, 5000},
123 |
124 | %%
125 | %% Default User / VHost
126 | %% ====================
127 | %%
128 |
129 | %% On first start RabbitMQ will create a vhost and a user. These
130 | %% config items control what gets created. See
131 | %% http://www.rabbitmq.com/access-control.html for further
132 | %% information about vhosts and access control.
133 | %%
134 | %% {default_vhost, <<"/">>},
135 | {default_user, <<"admin">>},
136 | {default_pass, <<"admin">>},
137 | {default_permissions, [<<".*">>, <<".*">>, <<".*">>]},
138 |
139 | %% Tags for default user
140 | %%
141 | %% For more details about tags, see the documentation for the
142 | %% Management Plugin at http://www.rabbitmq.com/management.html.
143 | %%
144 | {default_user_tags, [administrator]},
145 |
146 | %%
147 | %% Additional network and protocol related configuration
148 | %% =====================================================
149 | %%
150 |
151 | %% Set the default AMQP heartbeat delay (in seconds).
152 | %%
153 | %% {heartbeat, 600},
154 |
155 | %% Set the max permissible size of an AMQP frame (in bytes).
156 | %%
157 | %% {frame_max, 131072},
158 |
159 | %% Set the max permissible number of channels per connection.
160 | %% 0 means "no limit".
161 | %%
162 | %% {channel_max, 128},
163 |
164 | %% Customising Socket Options.
165 | %%
166 | %% See (http://www.erlang.org/doc/man/inet.html#setopts-2) for
167 | %% further documentation.
168 | %%
169 | %% {tcp_listen_options, [binary,
170 | %% {packet, raw},
171 | %% {reuseaddr, true},
172 | %% {backlog, 128},
173 | %% {nodelay, true},
174 | %% {exit_on_close, false}]},
175 |
176 | %%
177 | %% Resource Limits & Flow Control
178 | %% ==============================
179 | %%
180 | %% See http://www.rabbitmq.com/memory.html for full details.
181 |
182 | %% Memory-based Flow Control threshold.
183 | %%
184 | %% {vm_memory_high_watermark, 0.4},
185 | {vm_memory_high_watermark, 0.2},
186 |
187 | %% Fraction of the high watermark limit at which queues start to
188 | %% page message out to disc in order to free up memory.
189 | %%
190 | %% Values greater than 0.9 can be dangerous and should be used carefully.
191 | %%
192 | %% {vm_memory_high_watermark_paging_ratio, 0.5},
193 |
194 | %% Set disk free limit (in bytes). Once free disk space reaches this
195 | %% lower bound, a disk alarm will be set - see the documentation
196 | %% listed above for more details.
197 | %%
198 | %% {disk_free_limit, 50000000},
199 | {disk_free_limit, 1000000000}
200 |
201 | %% Alternatively, we can set a limit relative to total available RAM.
202 | %%
203 | %% Values lower than 1.0 can be dangerous and should be used carefully.
204 | %% {disk_free_limit, {mem_relative, 2.0}},
205 |
206 | %%
207 | %% Misc/Advanced Options
208 | %% =====================
209 | %%
210 | %% NB: Change these only if you understand what you are doing!
211 | %%
212 |
213 | %% To announce custom properties to clients on connection:
214 | %%
215 | %% {server_properties, []},
216 |
217 | %% How to respond to cluster partitions.
218 | %% See http://www.rabbitmq.com/partitions.html for further details.
219 | %%
220 | %% {cluster_partition_handling, ignore},
221 |
222 | %% Make clustering happen *automatically* at startup - only applied
223 | %% to nodes that have just been reset or started for the first time.
224 | %% See http://www.rabbitmq.com/clustering.html#auto-config for
225 | %% further details.
226 | %%
227 | %% {cluster_nodes, {['rabbit@my.host.com'], disc}},
228 | %% {cluster_nodes, {['rabbit@ip-10-20-22-11','rabbit@ip-10-20-20-12'], disc}}
229 | %% {cluster_nodes, {['rabbit@boot2docker','rabbit2@boot2docker'], disc}}
230 |
231 | %% Interval (in milliseconds) at which we send keepalive messages
232 | %% to other cluster members. Note that this is not the same thing
233 | %% as net_ticktime; missed keepalive messages will not cause nodes
234 | %% to be considered down.
235 | %%
236 | %% {cluster_keepalive_interval, 10000},
237 |
238 | %% Set (internal) statistics collection granularity.
239 | %%
240 | %% {collect_statistics, none},
241 |
242 | %% Statistics collection interval (in milliseconds).
243 | %%
244 | %% {collect_statistics_interval, 5000},
245 |
246 | %% Explicitly enable/disable hipe compilation.
247 | %%
248 | %% {hipe_compile, true},
249 |
250 | %% Timeout used when waiting for Mnesia tables in a cluster to
251 | %% become available.
252 | %%
253 | %% {mnesia_table_loading_timeout, 30000},
254 |
255 | %% Size in bytes below which to embed messages in the queue index. See
256 | %% http://www.rabbitmq.com/persistence-conf.html
257 | %%
258 | %% {queue_index_embed_msgs_below, 4096}
259 |
260 | ]},
261 |
262 | %% ----------------------------------------------------------------------------
263 | %% Advanced Erlang Networking/Clustering Options.
264 | %%
265 | %% See http://www.rabbitmq.com/clustering.html for details
266 | %% ----------------------------------------------------------------------------
267 | {kernel,
268 | [%% Sets the net_kernel tick time.
269 | %% Please see http://erlang.org/doc/man/kernel_app.html and
270 | %% http://www.rabbitmq.com/nettick.html for further details.
271 | %%
272 | %% {net_ticktime, 60}
273 | ]},
274 |
275 | %% ----------------------------------------------------------------------------
276 | %% RabbitMQ Management Plugin
277 | %%
278 | %% See http://www.rabbitmq.com/management.html for details
279 | %% ----------------------------------------------------------------------------
280 |
281 | {rabbitmq_management,
282 | [%% Pre-Load schema definitions from the following JSON file. See
283 | %% http://www.rabbitmq.com/management.html#load-definitions
284 | %%
285 | %% {load_definitions, "/path/to/schema.json"},
286 |
287 | %% Log all requests to the management HTTP API to a file.
288 | %%
289 | %% {http_log_dir, "/path/to/access.log"},
290 |
291 | %% Change the port on which the HTTP listener listens,
292 | %% specifying an interface for the web server to bind to.
293 | %% Also set the listener to use SSL and provide SSL options.
294 | %%
295 | %% {listener, [{port, 12345},
296 | %% {ip, "127.0.0.1"},
297 | %% {ssl, true},
298 | %% {ssl_opts, [{cacertfile, "/path/to/cacert.pem"},
299 | %% {certfile, "/path/to/cert.pem"},
300 | %% {keyfile, "/path/to/key.pem"}]}]},
301 |
302 | %% One of 'basic', 'detailed' or 'none'. See
303 | %% http://www.rabbitmq.com/management.html#fine-stats for more details.
304 | %% {rates_mode, basic},
305 |
306 | %% Configure how long aggregated data (such as message rates and queue
307 | %% lengths) is retained. Please read the plugin's documentation in
308 | %% http://www.rabbitmq.com/management.html#configuration for more
309 | %% details.
310 | %%
311 | %% {sample_retention_policies,
312 | %% [{global, [{60, 5}, {3600, 60}, {86400, 1200}]},
313 | %% {basic, [{60, 5}, {3600, 60}]},
314 | %% {detailed, [{10, 5}]}]}
315 | ]},
316 |
317 | %% ----------------------------------------------------------------------------
318 | %% RabbitMQ Shovel Plugin
319 | %%
320 | %% See http://www.rabbitmq.com/shovel.html for details
321 | %% ----------------------------------------------------------------------------
322 |
323 | {rabbitmq_shovel,
324 | [{shovels,
325 | [%% A named shovel worker.
326 | %% {my_first_shovel,
327 | %% [
328 |
329 | %% List the source broker(s) from which to consume.
330 | %%
331 | %% {sources,
332 | %% [%% URI(s) and pre-declarations for all source broker(s).
333 | %% {brokers, ["amqp://user:password@host.domain/my_vhost"]},
334 | %% {declarations, []}
335 | %% ]},
336 |
337 | %% List the destination broker(s) to publish to.
338 | %% {destinations,
339 | %% [%% A singular version of the 'brokers' element.
340 | %% {broker, "amqp://"},
341 | %% {declarations, []}
342 | %% ]},
343 |
344 | %% Name of the queue to shovel messages from.
345 | %%
346 | %% {queue, <<"your-queue-name-goes-here">>},
347 |
348 | %% Optional prefetch count.
349 | %%
350 | %% {prefetch_count, 10},
351 |
352 | %% when to acknowledge messages:
353 | %% - no_ack: never (auto)
354 | %% - on_publish: after each message is republished
355 | %% - on_confirm: when the destination broker confirms receipt
356 | %%
357 | %% {ack_mode, on_confirm},
358 |
359 | %% Overwrite fields of the outbound basic.publish.
360 | %%
361 | %% {publish_fields, [{exchange, <<"my_exchange">>},
362 | %% {routing_key, <<"from_shovel">>}]},
363 |
364 | %% Static list of basic.properties to set on re-publication.
365 | %%
366 | %% {publish_properties, [{delivery_mode, 2}]},
367 |
368 | %% The number of seconds to wait before attempting to
369 | %% reconnect in the event of a connection failure.
370 | %%
371 | %% {reconnect_delay, 2.5}
372 |
373 | %% ]} %% End of my_first_shovel
374 | ]}
375 | %% Rather than specifying some values per-shovel, you can specify
376 | %% them for all shovels here.
377 | %%
378 | %% {defaults, [{prefetch_count, 0},
379 | %% {ack_mode, on_confirm},
380 | %% {publish_fields, []},
381 | %% {publish_properties, [{delivery_mode, 2}]},
382 | %% {reconnect_delay, 2.5}]}
383 | ]},
384 |
385 | %% ----------------------------------------------------------------------------
386 | %% RabbitMQ Stomp Adapter
387 | %%
388 | %% See http://www.rabbitmq.com/stomp.html for details
389 | %% ----------------------------------------------------------------------------
390 |
391 | {rabbitmq_stomp,
392 | [%% Network Configuration - the format is generally the same as for the broker
393 |
394 | %% Listen only on localhost (ipv4 & ipv6) on a specific port.
395 | %% {tcp_listeners, [{"127.0.0.1", 61613},
396 | %% {"::1", 61613}]},
397 |
398 | %% Listen for SSL connections on a specific port.
399 | %% {ssl_listeners, [61614]},
400 |
401 | %% Additional SSL options
402 |
403 | %% Extract a name from the client's certificate when using SSL.
404 | %%
405 | %% {ssl_cert_login, true},
406 |
407 | %% Set a default user name and password. This is used as the default login
408 | %% whenever a CONNECT frame omits the login and passcode headers.
409 | %%
410 | %% Please note that setting this will allow clients to connect without
411 | %% authenticating!
412 | %%
413 | %% {default_user, [{login, "guest"},
414 | %% {passcode, "guest"}]},
415 |
416 | %% If a default user is configured, or you have configured use SSL client
417 | %% certificate based authentication, you can choose to allow clients to
418 | %% omit the CONNECT frame entirely. If set to true, the client is
419 | %% automatically connected as the default user or user supplied in the
420 | %% SSL certificate whenever the first frame sent on a session is not a
421 | %% CONNECT frame.
422 | %%
423 | %% {implicit_connect, true}
424 | ]},
425 |
426 | %% ----------------------------------------------------------------------------
427 | %% RabbitMQ MQTT Adapter
428 | %%
429 | %% See https://github.com/rabbitmq/rabbitmq-mqtt/blob/stable/README.md
430 | %% for details
431 | %% ----------------------------------------------------------------------------
432 |
433 | {rabbitmq_mqtt,
434 | [%% Set the default user name and password. Will be used as the default login
435 | %% if a connecting client provides no other login details.
436 | %%
437 | %% Please note that setting this will allow clients to connect without
438 | %% authenticating!
439 | %%
440 | %% {default_user, <<"guest">>},
441 | %% {default_pass, <<"guest">>},
442 |
443 | %% Enable anonymous access. If this is set to false, clients MUST provide
444 | %% login information in order to connect. See the default_user/default_pass
445 | %% configuration elements for managing logins without authentication.
446 | %%
447 | %% {allow_anonymous, true},
448 |
449 | %% If you have multiple chosts, specify the one to which the
450 | %% adapter connects.
451 | %%
452 | %% {vhost, <<"/">>},
453 |
454 | %% Specify the exchange to which messages from MQTT clients are published.
455 | %%
456 | %% {exchange, <<"amq.topic">>},
457 |
458 | %% Specify TTL (time to live) to control the lifetime of non-clean sessions.
459 | %%
460 | %% {subscription_ttl, 1800000},
461 |
462 | %% Set the prefetch count (governing the maximum number of unacknowledged
463 | %% messages that will be delivered).
464 | %%
465 | %% {prefetch, 10},
466 |
467 | %% TCP/SSL Configuration (as per the broker configuration).
468 | %%
469 | %% {tcp_listeners, [1883]},
470 | %% {ssl_listeners, []},
471 |
472 | %% TCP/Socket options (as per the broker configuration).
473 | %%
474 | %% {tcp_listen_options, [binary,
475 | %% {packet, raw},
476 | %% {reuseaddr, true},
477 | %% {backlog, 128},
478 | %% {nodelay, true}]}
479 | ]},
480 |
481 | %% ----------------------------------------------------------------------------
482 | %% RabbitMQ AMQP 1.0 Support
483 | %%
484 | %% See https://github.com/rabbitmq/rabbitmq-amqp1.0/blob/stable/README.md
485 | %% for details
486 | %% ----------------------------------------------------------------------------
487 |
488 | {rabbitmq_amqp1_0,
489 | [%% Connections that are not authenticated with SASL will connect as this
490 | %% account. See the README for more information.
491 | %%
492 | %% Please note that setting this will allow clients to connect without
493 | %% authenticating!
494 | %%
495 | %% {default_user, "guest"},
496 |
497 | %% Enable protocol strict mode. See the README for more information.
498 | %%
499 | %% {protocol_strict_mode, false}
500 | ]},
501 |
502 | %% ----------------------------------------------------------------------------
503 | %% RabbitMQ LDAP Plugin
504 | %%
505 | %% See http://www.rabbitmq.com/ldap.html for details.
506 | %%
507 | %% ----------------------------------------------------------------------------
508 |
509 | {rabbitmq_auth_backend_ldap,
510 | [%%
511 | %% Connecting to the LDAP server(s)
512 | %% ================================
513 | %%
514 |
515 | %% Specify servers to bind to. You *must* set this in order for the plugin
516 | %% to work properly.
517 | %%
518 | %% {servers, ["your-server-name-goes-here"]},
519 |
520 | %% Connect to the LDAP server using SSL
521 | %%
522 | %% {use_ssl, false},
523 |
524 | %% Specify the LDAP port to connect to
525 | %%
526 | %% {port, 389},
527 |
528 | %% LDAP connection timeout, in milliseconds or 'infinity'
529 | %%
530 | %% {timeout, infinity},
531 |
532 | %% Enable logging of LDAP queries.
533 | %% One of
534 | %% - false (no logging is performed)
535 | %% - true (verbose logging of the logic used by the plugin)
536 | %% - network (as true, but additionally logs LDAP network traffic)
537 | %%
538 | %% Defaults to false.
539 | %%
540 | %% {log, false},
541 |
542 | %%
543 | %% Authentication
544 | %% ==============
545 | %%
546 |
547 | %% Pattern to convert the username given through AMQP to a DN before
548 | %% binding
549 | %%
550 | %% {user_dn_pattern, "cn=${username},ou=People,dc=example,dc=com"},
551 |
552 | %% Alternatively, you can convert a username to a Distinguished
553 | %% Name via an LDAP lookup after binding. See the documentation for
554 | %% full details.
555 |
556 | %% When converting a username to a dn via a lookup, set these to
557 | %% the name of the attribute that represents the user name, and the
558 | %% base DN for the lookup query.
559 | %%
560 | %% {dn_lookup_attribute, "userPrincipalName"},
561 | %% {dn_lookup_base, "DC=gopivotal,DC=com"},
562 |
563 | %% Controls how to bind for authorisation queries and also to
564 | %% retrieve the details of users logging in without presenting a
565 | %% password (e.g., SASL EXTERNAL).
566 | %% One of
567 | %% - as_user (to bind as the authenticated user - requires a password)
568 | %% - anon (to bind anonymously)
569 | %% - {UserDN, Password} (to bind with a specified user name and password)
570 | %%
571 | %% Defaults to 'as_user'.
572 | %%
573 | %% {other_bind, as_user},
574 |
575 | %%
576 | %% Authorisation
577 | %% =============
578 | %%
579 |
580 | %% The LDAP plugin can perform a variety of queries against your
581 | %% LDAP server to determine questions of authorisation. See
582 | %% http://www.rabbitmq.com/ldap.html#authorisation for more
583 | %% information.
584 |
585 | %% Set the query to use when determining vhost access
586 | %%
587 | %% {vhost_access_query, {in_group,
588 | %% "ou=${vhost}-users,ou=vhosts,dc=example,dc=com"}},
589 |
590 | %% Set the query to use when determining resource (e.g., queue) access
591 | %%
592 | %% {resource_access_query, {constant, true}},
593 |
594 | %% Set queries to determine which tags a user has
595 | %%
596 | %% {tag_queries, []}
597 | ]}
598 | ].
599 |
--------------------------------------------------------------------------------