├── _config.yml
├── imgs
├── 1.png
├── 2.png
├── file-loader-demo.png
└── require.ensure-demo.png
├── LICENSE
└── README.md
/_config.yml:
--------------------------------------------------------------------------------
1 | theme: jekyll-theme-cayman
--------------------------------------------------------------------------------
/imgs/1.png:
--------------------------------------------------------------------------------
https://raw.githubusercontent.com/diamont1001/webpack-summary/HEAD/imgs/1.png
--------------------------------------------------------------------------------
/imgs/2.png:
--------------------------------------------------------------------------------
https://raw.githubusercontent.com/diamont1001/webpack-summary/HEAD/imgs/2.png
--------------------------------------------------------------------------------
/imgs/file-loader-demo.png:
--------------------------------------------------------------------------------
https://raw.githubusercontent.com/diamont1001/webpack-summary/HEAD/imgs/file-loader-demo.png
--------------------------------------------------------------------------------
/imgs/require.ensure-demo.png:
--------------------------------------------------------------------------------
https://raw.githubusercontent.com/diamont1001/webpack-summary/HEAD/imgs/require.ensure-demo.png
--------------------------------------------------------------------------------
/LICENSE:
--------------------------------------------------------------------------------
1 | The MIT License (MIT)
2 |
3 | Copyright (c) 2016 材主
4 |
5 | Permission is hereby granted, free of charge, to any person obtaining a copy
6 | of this software and associated documentation files (the "Software"), to deal
7 | in the Software without restriction, including without limitation the rights
8 | to use, copy, modify, merge, publish, distribute, sublicense, and/or sell
9 | copies of the Software, and to permit persons to whom the Software is
10 | furnished to do so, subject to the following conditions:
11 |
12 | The above copyright notice and this permission notice shall be included in all
13 | copies or substantial portions of the Software.
14 |
15 | THE SOFTWARE IS PROVIDED "AS IS", WITHOUT WARRANTY OF ANY KIND, EXPRESS OR
16 | IMPLIED, INCLUDING BUT NOT LIMITED TO THE WARRANTIES OF MERCHANTABILITY,
17 | FITNESS FOR A PARTICULAR PURPOSE AND NONINFRINGEMENT. IN NO EVENT SHALL THE
18 | AUTHORS OR COPYRIGHT HOLDERS BE LIABLE FOR ANY CLAIM, DAMAGES OR OTHER
19 | LIABILITY, WHETHER IN AN ACTION OF CONTRACT, TORT OR OTHERWISE, ARISING FROM,
20 | OUT OF OR IN CONNECTION WITH THE SOFTWARE OR THE USE OR OTHER DEALINGS IN THE
21 | SOFTWARE.
22 |
--------------------------------------------------------------------------------
/README.md:
--------------------------------------------------------------------------------
1 | # Webpack学习总结 #
2 | webpack, 更优秀的前端模块依赖管理工具。
3 |
4 | ## What is webpack ##
5 | ### 网上介绍 ###
6 | webpack是近期最火的一款模块加载器兼打包工具,它能把各种资源,例如JS(含JSX)、coffee、样式(含less/sass)、图片等都作为模块来使用和处理。
7 | 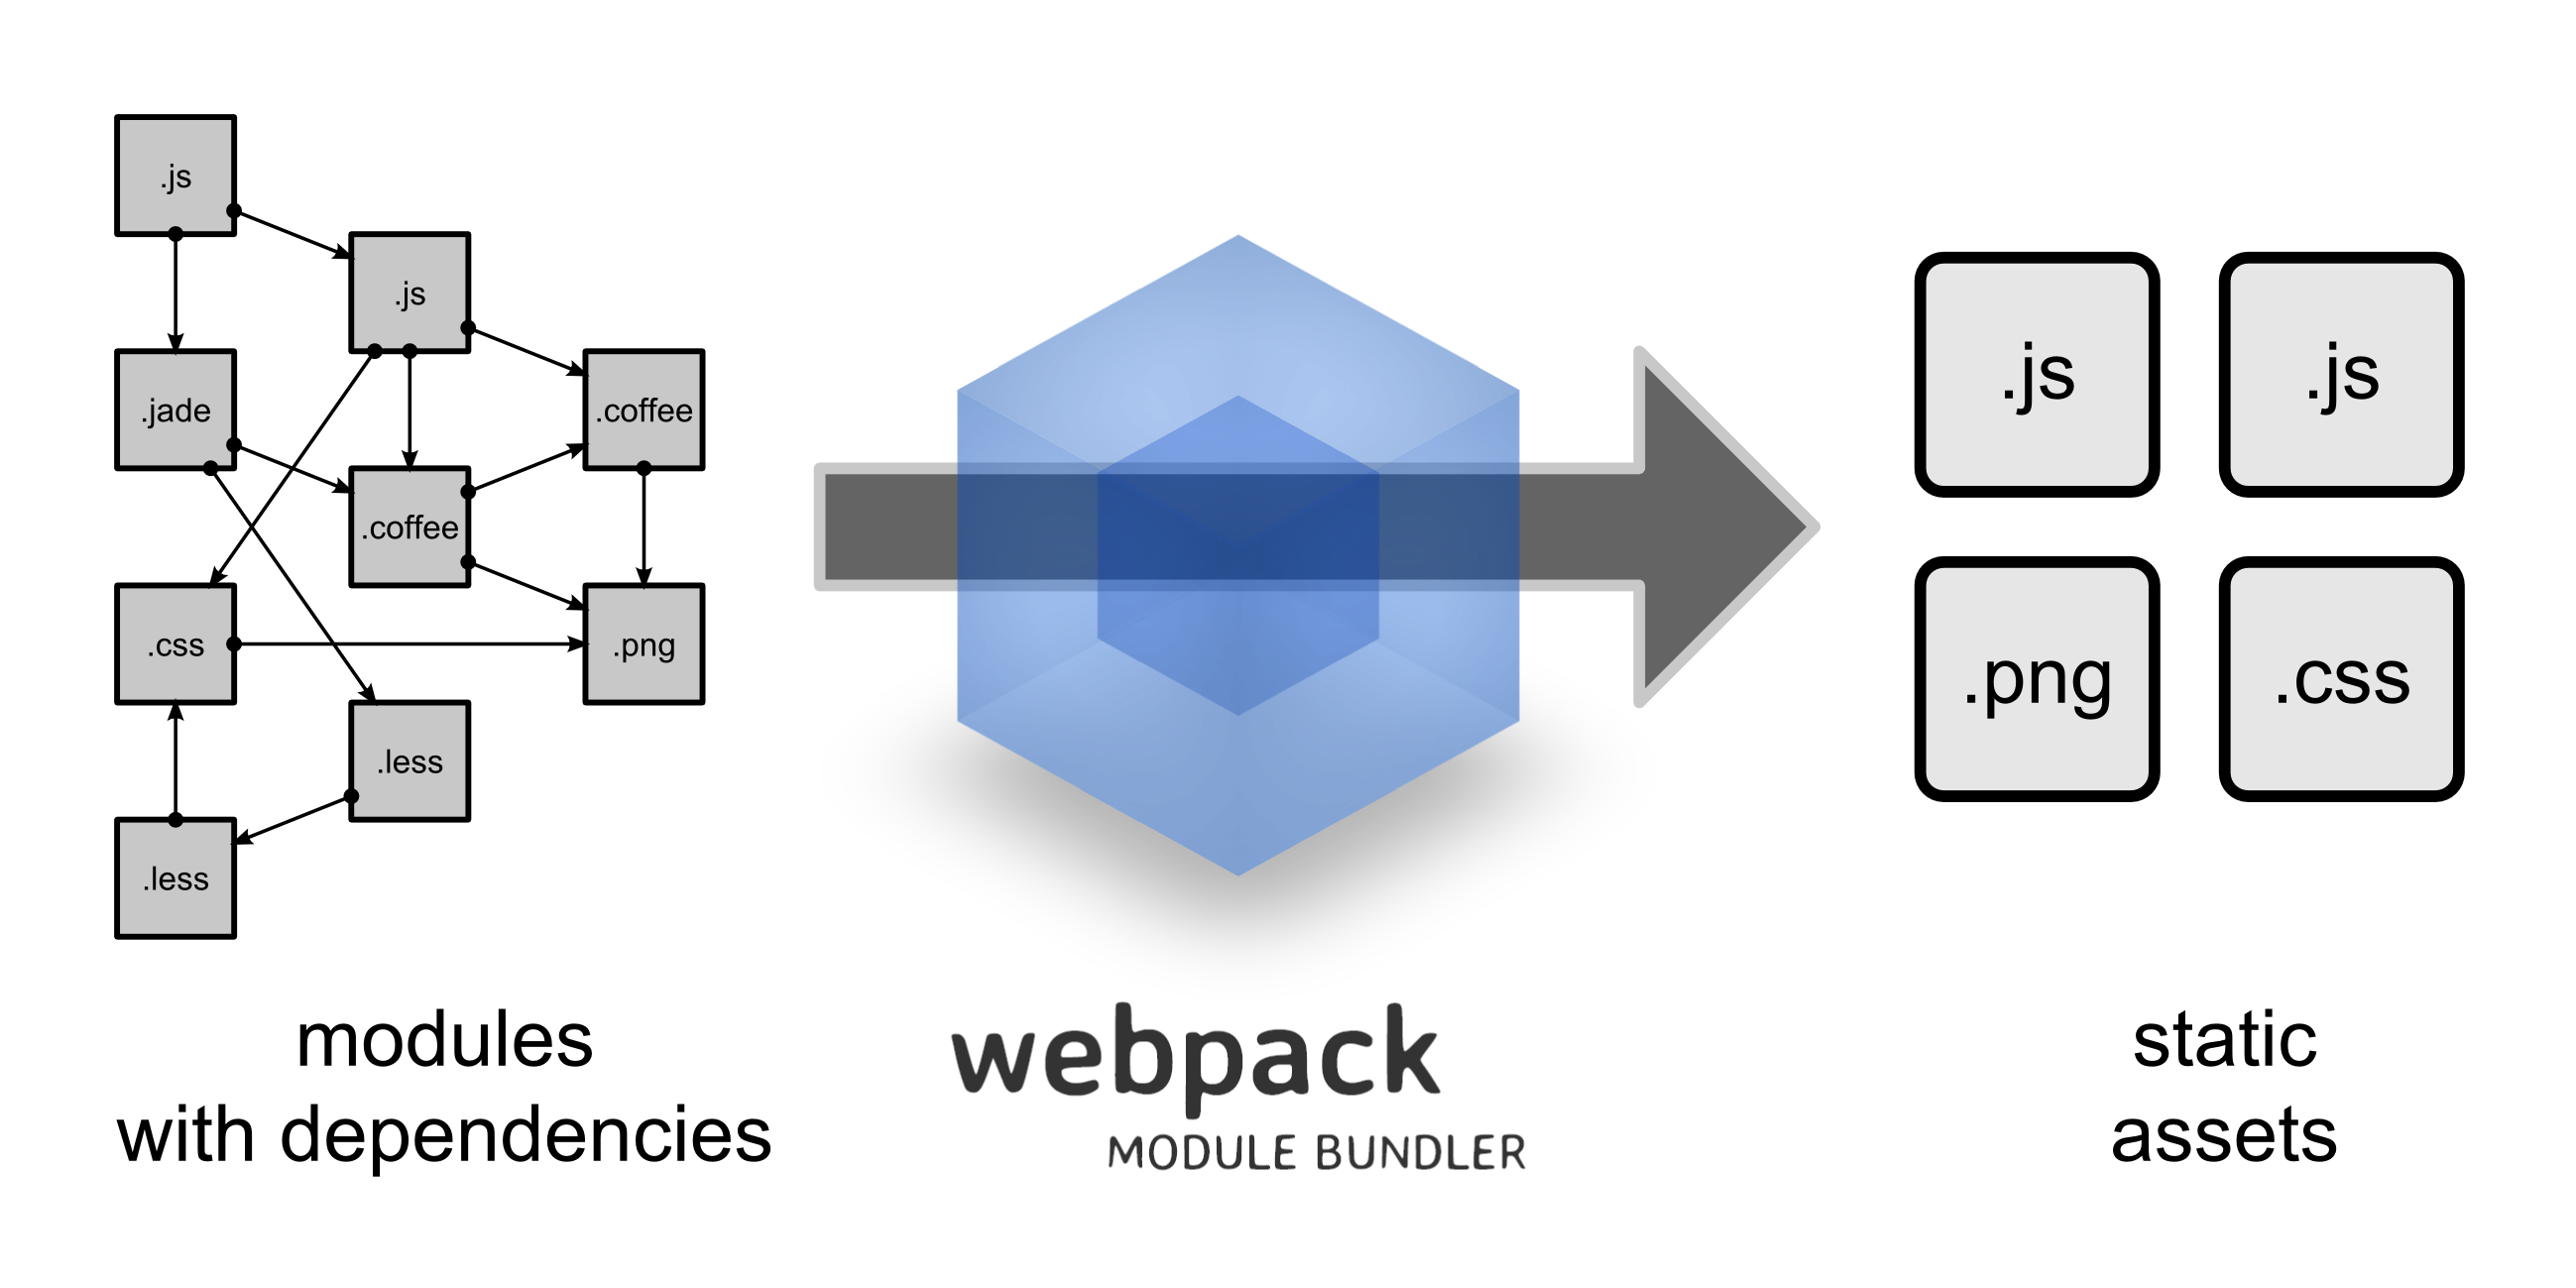
8 |
9 | ### require ###
10 | 模块依赖,一招搞定
11 |
12 | require("./lib.js");
13 | require("./style.css");
14 | require("./style.less");
15 | require("./template.jade");
16 | require("./image.png");
17 |
18 | 在 Webpack 当中, 所有的资源都被当作是模块。
19 |
20 | ### 加载器 ###
21 | 对应各种不同文件类型的资源,Webpack有对应的模块loader
22 |
23 | module: {
24 | //加载器配置
25 | loaders: [
26 | //.css 文件使用 style-loader 和 css-loader 来处理
27 | { test: /\.css$/, loader: 'style-loader!css-loader' },
28 | //.js 文件使用 jsx-loader 来编译处理
29 | { test: /\.js$/, loader: 'jsx-loader?harmony' },
30 | //.scss 文件使用 style-loader、css-loader 和 sass-loader 来编译处理
31 | { test: /\.scss$/, loader: 'style!css!sass?sourceMap'},
32 | //图片文件使用 url-loader 来处理,小于8kb的直接转为base64
33 | { test: /\.(png|jpg)$/, loader: 'url-loader?limit=8192'}
34 | ]
35 | }
36 |
37 | ## webpack的优势 ##
38 | 1. webpack 是以 commonJS 的形式来书写脚本滴,但对 AMD/CMD 的支持也很全面,方便旧项目进行代码迁移
39 | 2. 所有静态资源都可以被当成模块引用,而不仅仅是JS了
40 | 3. 开发便捷,能替代部分 grunt/gulp 的工作,比如打包、压缩混淆、图片转base64等
41 | 4. 扩展性强,插件机制完善,特别是支持 React 热插拔(见 react-hot-loader )的功能让人眼前一亮
42 |
43 | 以 AMD/CMD 模式来说,鉴于模块是异步加载的,所以我们常规需要使用 define 函数来帮我们搞回调:
44 |
45 | define(['package/lib'], function(lib){
46 | function foo(){
47 | lib.log('hello world!');
48 | }
49 | return {
50 | foo: foo
51 | };
52 | });
53 |
54 | 另外为了可以兼容 commonJS 的写法,我们也可以将 define 这么写:
55 |
56 | define(function (require, exports, module){
57 | var module1 = require("module1");
58 | var module2 = require("module2");
59 |
60 | module1.sayHello();
61 | module2.sayHi();
62 |
63 | exports.helloWorld = function (){
64 | module1.sayHello();
65 | module2.sayHi();
66 | };
67 | });
68 |
69 | 然而对 webpack 来说,我们可以直接在上面书写 commonJS 形式的语法,无须任何 define (毕竟最终模块都打包在一起,webpack 也会最终自动加上自己的加载器):
70 |
71 | var module1 = require("module1");
72 | var module2 = require("module2");
73 |
74 | module1.sayHello();
75 | module2.sayHi();
76 |
77 | exports.helloWorld = function (){
78 | module1.sayHello();
79 | module2.sayHi();
80 | };
81 |
82 | 不过即使你保留了之前 define 的写法也是可以滴,毕竟 webpack 的兼容性相当出色,方便你旧项目的模块直接迁移过来。
83 |
84 | ## 安装使用 ##
85 | ### 安装webpack ##
86 | 首先确保机子上已安装node.js,然后通过npm安装webpack
87 |
88 | ```$
89 | npm install webpack -g
90 | ```
91 |
92 | ### 启动命令 ###
93 |
94 | 切换到有 webpack.config.js 的目录然后运行
95 |
96 | ```$
97 | webpack // 执行一次开发的编译
98 | webpack -p // 针对发布环境编译(压缩代码)
99 | webpack -w // 进行开发过程持续的增量编译(飞快地!)
100 | webpack -d // 生成map映射文件,告知哪些模块被最终打包到哪里了
101 | webpack --config XXX.js //使用另一份配置文件(比如webpack.config2.js)来打包
102 | ```
103 | #### 插件的安装 ###
104 | 所有的加载器都需要通过 npm 来加载,并建议查阅它们对应的 readme 来看看如何使用
105 |
106 | npm install url-loader --save-dev
107 |
108 | 如果目录没有package.json,则需要先init一下,再运行`npm install`命令
109 |
110 | npm init
111 | npm install url-loader --save-dev
112 |
113 | ### 配置文件(webpack.config.js) ###
114 | 每个项目下都必须配置有一个 webpack.config.js
115 | - plugins 插件项
116 | - entry 页面入口文件配置
117 | - output 对应输出项配置(即入口文件最终要生成什么名字的文件、存放到哪里)
118 | - module.loaders 最关键的一块,配置每一种文件需要使用什么加载器来处理(多个loader之间用"!"连接)
119 |
120 | ### 通用配置文件例子 ###
121 |
122 | // webpack.config.js
123 | var webpack = require('webpack');
124 | var commonsPlugin = new webpack.optimize.CommonsChunkPlugin(/* chunkName= */'common', /* filename= */'common.js'); // 分析以下模块的共用代码, 单独打一个包到common.js
125 | var ExtractTextPlugin = require("extract-text-webpack-plugin"); // 单独打包CSS
126 | var HtmlWebpackPlugin = require('html-webpack-plugin'); // Html文件处理
127 |
128 | module.exports = {
129 | entry: {
130 | Detail: './modules/app/detail.js',
131 | Home: './modules/app/home.js'
132 | },
133 | output: {
134 | path: './build', // This is where images & js will go
135 | //publicPath: 'http://m.pp.cn/ppaweb/test/build/', // This is used to generate URLs to e.g. images
136 | publicPath: '/ppaweb/example/build/', // This is used to generate URLs to e.g. images
137 | filename: '[name].js',
138 | chunkFilename: "[id].chunk.js?[hash:8]"
139 | },
140 | plugins: [
141 | commonsPlugin,
142 | new ExtractTextPlugin('[name].css', {allChunks: true}), // 单独打包CSS
143 |
144 | // 全局变量
145 | new webpack.DefinePlugin({
146 | //__DEV__: JSON.stringify(JSON.parse(process.env.BUILD_DEV||'false')) //通过环境变量设置
147 | __DEV__: 'false' // 开发调试时把它改为true
148 | }),
149 |
150 | /**
151 | * HTML文件编译,自动引用JS/CSS
152 | *
153 | * filename - 输出文件名,相对路径output.path
154 | * template - HTML模板,相对配置文件目录
155 | * chunks - 只包含指定的文件(打包后输出的JS/CSS),不指定的话,它会包含生成的所有js和css文件
156 | * excludeChunks - 排除指定的文件(打包后输出的JS/CSS),比如:excludeChunks: ['dev-helper']
157 | * hash
158 | */
159 | new HtmlWebpackPlugin({filename: 'views/home.html', template: 'views/home.html', chunks: ['common', 'Home'], hash: true}),
160 | new HtmlWebpackPlugin({filename: 'views/detail.html', template: 'views/detail.html', chunks: ['common', 'Detail'], hash: true})
161 | ],
162 |
163 | module: {
164 | loaders: [
165 | {
166 | test: /\.js$/, loader: 'babel-loader', // ES6
167 | exclude: /(node_modules|bower_components|ppaweb\\libs\\webpack)/
168 | },
169 | // CSS,LESS打包进JS
170 | { test: /\.css$/, loader: 'style-loader!css-loader' },
171 | { test: /\.less$/, loader: 'style-loader!css-loader!less-loader' }, // use ! to chain loaders
172 | // CSS,LESS单独打包
173 | //{ test: /\.css$/, loader: ExtractTextPlugin.extract("style-loader", "css-loader") },
174 | //{ test: /\.less$/, loader: ExtractTextPlugin.extract('style-loader', 'css-loader!less-loader') },
175 |
176 | { test: /\.tpl$/, loader: 'ejs'}, // artTemplate/ejs 's tpl
177 | {
178 | test: /\.(png|jpg|gif)$/,
179 | loader: 'url-loader',
180 | query: {
181 | name: '[path][name].[ext]?[hash:8]',
182 | limit: 8192 // inline base64 URLs for <=8k images, direct URLs for the rest
183 | }
184 | }
185 | ]
186 | },
187 | resolve: {
188 | alias: {
189 | 'lib0': '../../../ppaweb/libs/webpack', // 从module调用webpack上的公共lib库路径简写
190 | 'lib1': '../../../../ppaweb/libs/webpack', // 从module的子文件夹调用webpack上的公共lib库路径简写
191 | 'lib2': '../../../../../ppaweb/libs/webpack' // 从module的两层子文件夹调用webpack上的公共lib库路径简写
192 | },
193 | // 现在可以写 require('file') 代替 require('file.coffee')
194 | extensions: ['', '.js', '.json', '.coffee']
195 | }
196 | };
197 |
198 | 具体可以参考:[webpack-demo的配置项](https://github.com/diamont1001/webpack-demo/blob/master/example1/webpack.config.js)
199 |
200 | ## Webpack常用功能 ##
201 | ### JS里:CSS及图片引用 ###
202 |
203 | require('./bootstrap.css');
204 | require('./myapp.less');
205 |
206 | var img = document.createElement('img');
207 | img.src = require('./glyph.png');
208 |
209 | - Synchronous
210 | - CSS和LESS会被打包到JS
211 | - 图片可能被转化成 base64 格式的 dataUrl
212 |
213 | ```
214 | module: {
215 | loaders: [
216 | //图片文件使用 url-loader 来处理,小于8kb的直接转为base64
217 | { test: /\.(png|jpg)$/, loader: 'url-loader?limit=8192'}
218 | ]
219 | }
220 | ```
221 |
222 | ### LESS/CSS里:图片引用 ###
223 |
224 | background-image: url("./logo.png");
225 |
226 | 根据配置“url-loader?limit=xxx”来决定把图片转换成base64还是图片链接形式引用。
227 |
228 | module: {
229 | loaders: [
230 | //图片文件使用 url-loader 来处理,小于8kb的直接转为base64
231 | { test: /\.(png|jpg)$/, loader: 'url-loader?limit=8192'}
232 | ]
233 | }
234 |
235 | ### LESS/CSS里:@ import 路径问题 ###
236 | LESS里可以通过`@import mixin.less`进行模块化开发,可以在import的路径前面加上~,表示路径以模块处理,支持alias。
237 |
238 | `tnpm i @ali/pp-libs --save-dev`
239 |
240 | ```
241 | # index.less
242 | @import '@ali/pp-libs/libs/base/reset.less';
243 | ```
244 |
245 | ### CSS能单独打包 ###
246 | 有时候可能希望项目的样式能不要被打包到脚本中,而是独立出来作为.css,然后在页面中以标签引入。这时候我们需要 `extract-text-webpack-plugin` 来帮忙。
247 |
248 | 只需两步:
249 |
250 | 1. 插件安装
251 |
252 | `npm install extract-text-webpack-plugin --save-dev`
253 |
254 | 2. 配置文件webpack.config.js
255 |
256 | ```
257 | var ExtractTextPlugin = require("extract-text-webpack-plugin");
258 |
259 | ……
260 |
261 | plugins: [
262 | // 目标文件名规则[name].css
263 | new ExtractTextPlugin('[name].css', {allChunks: true})
264 | ],
265 | module: {
266 | loaders: [
267 | { test: /\.css$/, loader: ExtractTextPlugin.extract("style-loader", "css-loader") },
268 | { test: /\.less$/, loader: ExtractTextPlugin.extract('style-loader', 'css-loader!less-loader') },
269 | ]
270 | },
271 | ```
272 |
273 | ### 公共代码自动抽离 ###
274 | 提取多个页面之间的公共模块,并将该模块打包为 common.js
275 |
276 | `A.js, B.js => a.js, b.js, common.js`
277 |
278 | // 分析以下模块的共用代码, 单独打一个包到common.js
279 | var commonsPlugin = new webpack.optimize.CommonsChunkPlugin(/*chunkName=*/'common', /*filename=*/'common.js');
280 |
281 | plugins: [
282 | commonsPlugin
283 | ],
284 |
285 | 记得要在HTML手动引入common.js
286 |
287 | ### 自定义公共模块提取 ###
288 | 上面是自动在所有入口的js中提取公共代码,并打包为common.js。
289 |
290 | 有时候我们希望能更加个性化一些,比如我希望:
291 |
292 | `A.js+C.js => AC-common.js`
293 |
294 | `B.js+D.js => BD-common.js`
295 |
296 | 我们可以这样配:
297 |
298 | ```
299 | module.exports = {
300 | entry: {
301 | A: "./a.js",
302 | B: "./b.js",
303 | C: "./c.js",
304 | D: "./d.js",
305 | E: "./e.js"
306 | },
307 | output: {
308 | filename: "[name].js"
309 | },
310 | plugins: [
311 | new CommonsChunkPlugin("AC-commons.js", ["A", "C"]),
312 | new CommonsChunkPlugin("BD-commons.js", ["B", "D"])
313 | ]
314 | };
315 |
316 | // `,所以并不想在其他js里再打包进入一遍
488 |
489 | ```js
490 | // webpack.config.js
491 | ...
492 | {
493 | externals: {
494 | "zepto": "Zepto" // 引用时直接 var x = require('zepto');
495 | }
496 | }
497 | ```
498 |
499 | ```js
500 | // index.js
501 | var $ = require('zepto');
502 | ```
503 |
504 | 编译后会这样
505 | ```js
506 | var $ = window.Zepto;
507 | ```
508 |
509 | ## Webpack模块编写 ##
510 | ### 模块框架 ###
511 |
512 | // var $ = require('zepto');
513 | // require('./index.less');
514 |
515 | !(function () {
516 |
517 | var module1 = (function () {
518 | var _e = {};
519 |
520 | _e.test = function () {
521 | // do something here
522 | };
523 |
524 | return _e;
525 | })();
526 |
527 | module.exports = module1
528 |
529 | })();
530 |
531 | ### 模块/组件打包 ###
532 | 模块/组件一般会发布到NPM或者其他地方提供给他人使用的,这里可以使用libraryTarget字段来控制webpack打包后输出为模块/组件。
533 |
534 | ```js
535 | // webpack.config.js
536 |
537 | module.exports = {
538 | entry: {
539 | pca: './src/main.js'
540 | },
541 | output: {
542 | path: './dist',
543 | filename: '[name].js',
544 | libraryTarget: 'umd', // 组件采用UMD格式打包
545 | library: 'jUtils' // 组件库的名称,这个得写,不写的话会全部方法挂载到 window 对象的
546 | },
547 |
548 | module: {
549 | loaders: [
550 | {
551 | test: /\.js$/, loader: 'babel-loader',
552 | exclude: /(node_modules|libs)/
553 | }
554 | ]
555 | }
556 | };
557 | ```
558 |
559 | 这样,打包后发布到npm,别人就可以直接 `npm install xxx` 来安装后,可以 `var a = require('xxx');` 来使用了。
560 |
561 | 当然因为使用了 'umd' 模式,所以也可以直接