├── quickstart_etl
├── assets
│ ├── __init__.py
│ └── hackernews.py
└── __init__.py
├── quickstart_etl_tests
├── __init__.py
└── test_assets.py
├── setup.cfg
├── dagster_cloud.yaml
├── pyproject.toml
├── setup.py
├── .gitignore
├── .github
└── workflows
│ ├── deploy.yml
│ └── branch_deployments.yml
└── README.md
/quickstart_etl/assets/__init__.py:
--------------------------------------------------------------------------------
1 |
--------------------------------------------------------------------------------
/quickstart_etl_tests/__init__.py:
--------------------------------------------------------------------------------
1 |
2 |
--------------------------------------------------------------------------------
/quickstart_etl_tests/test_assets.py:
--------------------------------------------------------------------------------
1 |
2 |
--------------------------------------------------------------------------------
/setup.cfg:
--------------------------------------------------------------------------------
1 | [metadata]
2 | name = quickstart_etl
3 |
--------------------------------------------------------------------------------
/dagster_cloud.yaml:
--------------------------------------------------------------------------------
1 | locations:
2 | - location_name: quickstart_etl
3 | code_source:
4 | package_name: quickstart_etl
5 |
--------------------------------------------------------------------------------
/pyproject.toml:
--------------------------------------------------------------------------------
1 | [build-system]
2 | requires = ["setuptools"]
3 | build-backend = "setuptools.build_meta"
4 |
5 | [tool.dagster]
6 | module_name = "quickstart_etl"
--------------------------------------------------------------------------------
/setup.py:
--------------------------------------------------------------------------------
1 | from setuptools import find_packages, setup
2 |
3 | setup(
4 | name="quickstart_etl",
5 | packages=find_packages(exclude=["quickstart_etl_tests"]),
6 | install_requires=[
7 | "dagster",
8 | "dagster-cloud",
9 | "boto3",
10 | "pandas",
11 | "matplotlib",
12 | "textblob",
13 | "tweepy",
14 | "wordcloud",
15 | ],
16 | extras_require={"dev": ["dagit", "pytest"]},
17 | )
18 |
--------------------------------------------------------------------------------
/quickstart_etl/__init__.py:
--------------------------------------------------------------------------------
1 | from dagster import (
2 | Definitions,
3 | ScheduleDefinition,
4 | define_asset_job,
5 | load_assets_from_package_module,
6 | )
7 |
8 | from . import assets
9 |
10 | daily_refresh_schedule = ScheduleDefinition(
11 | job=define_asset_job(name="all_assets_job"), cron_schedule="0 0 * * *"
12 | )
13 |
14 | defs = Definitions(
15 | assets=load_assets_from_package_module(assets), schedules=[daily_refresh_schedule]
16 | )
17 |
--------------------------------------------------------------------------------
/.gitignore:
--------------------------------------------------------------------------------
1 | # Byte-compiled / optimized / DLL files
2 | __pycache__/
3 | *.py[cod]
4 | *$py.class
5 |
6 | # C extensions
7 | *.so
8 |
9 | # Distribution / packaging
10 | .Python
11 | build/
12 | develop-eggs/
13 | dist/
14 | downloads/
15 | eggs/
16 | .eggs/
17 | lib/
18 | lib64/
19 | parts/
20 | sdist/
21 | var/
22 | wheels/
23 | pip-wheel-metadata/
24 | share/python-wheels/
25 | *.egg-info/
26 | .installed.cfg
27 | *.egg
28 | MANIFEST
29 |
30 | # PyInstaller
31 | # Usually these files are written by a python script from a template
32 | # before PyInstaller builds the exe, so as to inject date/other infos into it.
33 | *.manifest
34 | *.spec
35 |
36 | # Installer logs
37 | pip-log.txt
38 | pip-delete-this-directory.txt
39 |
40 | # Unit test / coverage reports
41 | htmlcov/
42 | .tox/
43 | .nox/
44 | .coverage
45 | .coverage.*
46 | .cache
47 | nosetests.xml
48 | coverage.xml
49 | *.cover
50 | *.py,cover
51 | .hypothesis/
52 | .pytest_cache/
53 |
54 | # Translations
55 | *.mo
56 | *.pot
57 |
58 | # Django stuff:
59 | *.log
60 | local_settings.py
61 | db.sqlite3
62 | db.sqlite3-journal
63 |
64 | # Flask stuff:
65 | instance/
66 | .webassets-cache
67 |
68 | # Scrapy stuff:
69 | .scrapy
70 |
71 | # Sphinx documentation
72 | docs/_build/
73 |
74 | # PyBuilder
75 | target/
76 |
77 | # Jupyter Notebook
78 | .ipynb_checkpoints
79 |
80 | # IPython
81 | profile_default/
82 | ipython_config.py
83 |
84 | # pyenv
85 | .python-version
86 |
87 | # pipenv
88 | # According to pypa/pipenv#598, it is recommended to include Pipfile.lock in version control.
89 | # However, in case of collaboration, if having platform-specific dependencies or dependencies
90 | # having no cross-platform support, pipenv may install dependencies that don't work, or not
91 | # install all needed dependencies.
92 | #Pipfile.lock
93 |
94 | # PEP 582; used by e.g. github.com/David-OConnor/pyflow
95 | __pypackages__/
96 |
97 | # Celery stuff
98 | celerybeat-schedule
99 | celerybeat.pid
100 |
101 | # SageMath parsed files
102 | *.sage.py
103 |
104 | # Environments
105 | .env
106 | .venv
107 | env/
108 | venv/
109 | ENV/
110 | env.bak/
111 | venv.bak/
112 |
113 | # Spyder project settings
114 | .spyderproject
115 | .spyproject
116 |
117 | # Rope project settings
118 | .ropeproject
119 |
120 | # mkdocs documentation
121 | /site
122 |
123 | # mypy
124 | .mypy_cache/
125 | .dmypy.json
126 | dmypy.json
127 |
128 | # Pyre type checker
129 | .pyre/
130 |
--------------------------------------------------------------------------------
/.github/workflows/deploy.yml:
--------------------------------------------------------------------------------
1 | name: Serverless Prod Deployment
2 | on:
3 | push:
4 | branches:
5 | - "main"
6 | - "master"
7 | concurrency:
8 | # Cancel in-progress deploys to main branch
9 | group: ${{ github.ref }}
10 | cancel-in-progress: true
11 | env:
12 | DAGSTER_CLOUD_URL: ${{ secrets.DAGSTER_CLOUD_URL }}
13 | DAGSTER_CLOUD_API_TOKEN: ${{ secrets.DAGSTER_CLOUD_API_TOKEN }}
14 | ENABLE_FAST_DEPLOYS: 'true'
15 |
16 | jobs:
17 | dagster_cloud_default_deploy:
18 | name: Dagster Serverless Deploy
19 | runs-on: ubuntu-20.04
20 | outputs:
21 | build_info: ${{ steps.parse-workspace.outputs.build_info }}
22 |
23 | steps:
24 | - name: Parse cloud workspace
25 | if: env.ENABLE_FAST_DEPLOYS != 'true'
26 | id: parse-workspace
27 | uses: dagster-io/dagster-cloud-action/actions/utils/parse_workspace@v0.1
28 | with:
29 | dagster_cloud_file: dagster_cloud.yaml
30 |
31 | - name: Checkout
32 | if: env.ENABLE_FAST_DEPLOYS == 'true'
33 | uses: actions/checkout@v3
34 | with:
35 | ref: ${{ github.head_ref }}
36 | path: project-repo
37 |
38 | - name: Build and deploy Python executable
39 | if: env.ENABLE_FAST_DEPLOYS == 'true'
40 | uses: dagster-io/dagster-cloud-action/actions/build_deploy_python_executable@pex-v0.1
41 | with:
42 | dagster_cloud_file: "$GITHUB_WORKSPACE/project-repo/dagster_cloud.yaml"
43 | build_output_dir: "$GITHUB_WORKSPACE/build"
44 | python_version: "3.8"
45 | env:
46 | GITHUB_TOKEN: ${{ secrets.GITHUB_TOKEN }}
47 |
48 | dagster_cloud_docker_deploy:
49 | name: Dagster Serverless Docker Deploy
50 | runs-on: ubuntu-20.04
51 | if: needs.dagster_cloud_default_deploy.outputs.build_info
52 | needs: dagster_cloud_default_deploy
53 | strategy:
54 | fail-fast: false
55 | matrix:
56 | location: ${{ fromJSON(needs.dagster_cloud_default_deploy.outputs.build_info) }}
57 | steps:
58 | - name: Checkout
59 | uses: actions/checkout@v3
60 | with:
61 | ref: ${{ github.head_ref }}
62 | - name: Build and deploy to Dagster Cloud serverless
63 | uses: dagster-io/dagster-cloud-action/actions/serverless_prod_deploy@v0.1
64 | with:
65 | dagster_cloud_api_token: ${{ secrets.DAGSTER_CLOUD_API_TOKEN }}
66 | location: ${{ toJson(matrix.location) }}
67 | # Uncomment to pass through Github Action secrets as a JSON string of key-value pairs
68 | # env_vars: ${{ toJson(secrets) }}
69 | organization_id: ${{ secrets.ORGANIZATION_ID }}
70 | env:
71 | GITHUB_TOKEN: ${{ secrets.GITHUB_TOKEN }}
72 |
73 |
--------------------------------------------------------------------------------
/.github/workflows/branch_deployments.yml:
--------------------------------------------------------------------------------
1 | name: Serverless Branch Deployments
2 | on:
3 | pull_request:
4 | types: [opened, synchronize, reopened, closed]
5 | concurrency:
6 | # Cancel in-progress runs on same branch
7 | group: ${{ github.ref }}
8 | cancel-in-progress: true
9 | env:
10 | DAGSTER_CLOUD_URL: ${{ secrets.DAGSTER_CLOUD_URL }}
11 | DAGSTER_CLOUD_API_TOKEN: ${{ secrets.DAGSTER_CLOUD_API_TOKEN }}
12 | ENABLE_FAST_DEPLOYS: 'true'
13 |
14 | jobs:
15 | dagster_cloud_default_deploy:
16 | name: Dagster Serverless Deploy
17 | runs-on: ubuntu-20.04
18 | outputs:
19 | build_info: ${{ steps.parse-workspace.outputs.build_info }}
20 |
21 | steps:
22 | - name: Parse cloud workspace
23 | if: env.ENABLE_FAST_DEPLOYS != 'true'
24 | id: parse-workspace
25 | uses: dagster-io/dagster-cloud-action/actions/utils/parse_workspace@v0.1
26 | with:
27 | dagster_cloud_file: dagster_cloud.yaml
28 |
29 | - name: Checkout
30 | if: env.ENABLE_FAST_DEPLOYS == 'true'
31 | uses: actions/checkout@v3
32 | with:
33 | ref: ${{ github.head_ref }}
34 | path: project-repo
35 |
36 | - name: Build and deploy Python executable
37 | if: env.ENABLE_FAST_DEPLOYS == 'true'
38 | uses: dagster-io/dagster-cloud-action/actions/build_deploy_python_executable@pex-v0.1
39 | with:
40 | dagster_cloud_file: "$GITHUB_WORKSPACE/project-repo/dagster_cloud.yaml"
41 | build_output_dir: "$GITHUB_WORKSPACE/build"
42 | python_version: "3.8"
43 | env:
44 | GITHUB_TOKEN: ${{ secrets.GITHUB_TOKEN }}
45 |
46 | dagster_cloud_docker_deploy:
47 | name: Dagster Serverless Docker Deploy
48 | runs-on: ubuntu-20.04
49 | if: needs.dagster_cloud_default_deploy.outputs.build_info
50 | needs: dagster_cloud_default_deploy
51 | strategy:
52 | fail-fast: false
53 | matrix:
54 | location: ${{ fromJSON(needs.dagster_cloud_default_deploy.outputs.build_info) }}
55 | steps:
56 | - name: Checkout
57 | uses: actions/checkout@v3
58 | with:
59 | ref: ${{ github.head_ref }}
60 | - name: Build and deploy to Dagster Cloud serverless
61 | uses: dagster-io/dagster-cloud-action/actions/serverless_branch_deploy@v0.1
62 | with:
63 | dagster_cloud_api_token: ${{ secrets.DAGSTER_CLOUD_API_TOKEN }}
64 | location: ${{ toJson(matrix.location) }}
65 | # Uncomment to pass through Github Action secrets as a JSON string of key-value pairs
66 | # env_vars: ${{ toJson(secrets) }}
67 | organization_id: ${{ secrets.ORGANIZATION_ID }}
68 | env:
69 | GITHUB_TOKEN: ${{ secrets.GITHUB_TOKEN }}
70 |
71 |
--------------------------------------------------------------------------------
/quickstart_etl/assets/hackernews.py:
--------------------------------------------------------------------------------
1 | import base64
2 | from io import BytesIO
3 | from typing import List
4 |
5 | import matplotlib.pyplot as plt
6 | import pandas as pd
7 | import requests
8 | from wordcloud import STOPWORDS, WordCloud
9 |
10 | from dagster import MetadataValue, OpExecutionContext, asset
11 |
12 |
13 | @asset(group_name="hackernews", compute_kind="HackerNews API")
14 | def hackernews_topstory_ids() -> List[int]:
15 | """
16 | Get up to 500 top stories from the HackerNews topstories endpoint.
17 |
18 | API Docs: https://github.com/HackerNews/API#new-top-and-best-stories
19 | """
20 | newstories_url = "https://hacker-news.firebaseio.com/v0/topstories.json"
21 | top_500_newstories = requests.get(newstories_url).json()
22 | return top_500_newstories
23 |
24 |
25 | @asset(group_name="hackernews", compute_kind="HackerNews API")
26 | def hackernews_topstories(
27 | context: OpExecutionContext, hackernews_topstory_ids: List[int]
28 | ) -> pd.DataFrame:
29 | """
30 | Get items based on story ids from the HackerNews items endpoint. It may take 1-2 minutes to fetch all 500 items.
31 |
32 | API Docs: https://github.com/HackerNews/API#items
33 | """
34 |
35 | results = []
36 | for item_id in hackernews_topstory_ids:
37 | item = requests.get(f"https://hacker-news.firebaseio.com/v0/item/{item_id}.json").json()
38 | results.append(item)
39 | if len(results) % 20 == 0:
40 | context.log.info(f"Got {len(results)} items so far.")
41 |
42 | df = pd.DataFrame(results)
43 |
44 | # Dagster supports attaching arbitrary metadata to asset materializations. This metadata will be
45 | # shown in the run logs and also be displayed on the "Activity" tab of the "Asset Details" page in the UI.
46 | # This metadata would be useful for monitoring and maintaining the asset as you iterate.
47 | # Read more about in asset metadata in https://docs.dagster.io/concepts/assets/software-defined-assets#recording-materialization-metadata
48 | context.add_output_metadata(
49 | {
50 | "num_records": len(df),
51 | "preview": MetadataValue.md(df.head().to_markdown()),
52 | }
53 | )
54 | return df
55 |
56 |
57 | @asset(group_name="hackernews", compute_kind="Plot")
58 | def hackernews_topstories_word_cloud(
59 | context: OpExecutionContext, hackernews_topstories: pd.DataFrame
60 | ) -> bytes:
61 | """
62 | Exploratory analysis: Generate a word cloud from the current top 500 HackerNews top stories.
63 | Embed the plot into a Markdown metadata for quick view.
64 |
65 | Read more about how to create word clouds in http://amueller.github.io/word_cloud/.
66 | """
67 | stopwords = set(STOPWORDS)
68 | stopwords.update(["Ask", "Show", "HN"])
69 | titles_text = " ".join([str(item) for item in hackernews_topstories["title"]])
70 | titles_cloud = WordCloud(stopwords=stopwords, background_color="white").generate(titles_text)
71 |
72 | # Generate the word cloud image
73 | plt.figure(figsize=(8, 8), facecolor=None)
74 | plt.imshow(titles_cloud, interpolation="bilinear")
75 | plt.axis("off")
76 | plt.tight_layout(pad=0)
77 |
78 | # Save the image to a buffer and embed the image into Markdown content for quick view
79 | buffer = BytesIO()
80 | plt.savefig(buffer, format="png")
81 | image_data = base64.b64encode(buffer.getvalue())
82 | md_content = f"})"
83 |
84 | # Attach the Markdown content as metadata to the asset
85 | # Read about more metadata types in https://docs.dagster.io/_apidocs/ops#metadata-types
86 | context.add_output_metadata({"plot": MetadataValue.md(md_content)})
87 |
88 | return image_data
89 |
--------------------------------------------------------------------------------
/README.md:
--------------------------------------------------------------------------------
1 | # Dagster starter kit
2 |
3 | This example is a starter kit for building a daily ETL pipeline. At a high level, this project shows how to ingest data from external sources, explore and transform the data, and materialize outputs that help visualize the data.
4 |
5 | *New to Dagster? Learn what Dagster is [in Concepts](https://docs.dagster.io/concepts) or [in the hands-on Tutorials](https://docs.dagster.io/tutorial).*
6 |
7 | This guide covers:
8 | - [Dagster starter kit](#dagster-starter-kit)
9 | - [Introduction](#introduction)
10 | - [Getting started](#getting-started)
11 | - [Option 1: Deploying it on Dagster Cloud](#option-1-deploying-it-on-dagster-cloud)
12 | - [Option 2: Running it locally](#option-2-running-it-locally)
13 | - [Step 1: Materializing assets](#step-1-materializing-assets)
14 | - [Step 2: Viewing and monitoring assets](#step-2-viewing-and-monitoring-assets)
15 | - [Step 3: Scheduling a daily job](#step-3-scheduling-a-daily-job)
16 | - [(Optional) Running daemon locally](#optional-running-daemon-locally)
17 | - [Learning more](#learning-more)
18 | - [Changing the code locally](#changing-the-code-locally)
19 | - [Using environment variables and secrets](#using-environment-variables-and-secrets)
20 | - [Adding new Python dependencies](#adding-new-python-dependencies)
21 | - [Testing](#testing)
22 |
23 |
24 | ## Introduction
25 |
26 | This starter kit includes:
27 | - Basics of creating, connecting, and testing [assets](https://docs.dagster.io/concepts/assets/software-defined-assets) in Dagster.
28 | - Convenient ways to organize and monitor assets, e.g. [grouping assets](https://docs.dagster.io/concepts/assets/software-defined-assets#grouping-assets), [recording asset metadata](https://docs.dagster.io/concepts/assets/software-defined-assets#recording-materialization-metadata), etc.
29 | - A [schedule](https://docs.dagster.io/concepts/partitions-schedules-sensors/schedules) defined to run a job that generates assets daily.
30 | - [Scaffolded project layout](https://docs.dagster.io/getting-started/create-new-project) that helps you to quickly get started with everything set up.
31 |
32 |
33 | In this project, we're building an analytical pipeline that explores popular topics on HackerNews.
34 |
35 |
36 |  37 |
37 |
38 |
39 | This project:
40 |
41 | - Fetches data from [HackerNews](https://github.com/HackerNews/API) APIs.
42 | - Transforms the collected data using [Pandas](http://pandas.pydata.org/pandas-docs/stable/).
43 | - Creates a [word cloud](https://github.com/amueller/word_cloud) based on trending HackerNews stories to visualize popular topics on HackerNews.
44 |
45 | ## Getting started
46 |
47 | ### Option 1: Deploying it on Dagster Cloud
48 |
49 | The easiest way to spin up your Dagster project is to use [Dagster Cloud Serverless](https://docs.dagster.io/dagster-cloud/deployment/serverless). It provides out-of-the-box CI/CD and native branching that make development and deployment easy.
50 |
51 | Check out [Dagster Cloud](https://dagster.io/cloud) to get started.
52 |
53 | ### Option 2: Running it locally
54 |
55 | Bootstrap your own Dagster project with this example:
56 |
57 | ```bash
58 | dagster project from-example --name my-dagster-project --example quickstart_etl
59 | ```
60 |
61 | First, install your Dagster code as a Python package. By using the `--editable` flag, pip will install in ["editable mode"](https://pip.pypa.io/en/latest/topics/local-project-installs/#editable-installs) so that as you develop, local code changes will automatically apply. Check out [Dagster Installation](https://docs.dagster.io/getting-started/install) for more information.
62 |
63 | ```bash
64 | pip install -e ".[dev]"
65 | ```
66 |
67 | Then, start the Dagit web server:
68 |
69 | ```bash
70 | dagit
71 | ```
72 |
73 | Open http://localhost:3000 with your browser to see the project.
74 |
75 | ## Step 1: Materializing assets
76 |
77 | With the starter project loaded in your browser, click the icon in the top-left corner of the page to expand the navigation. You'll see both jobs and assets listed in the left nav.
78 |
79 |
80 | 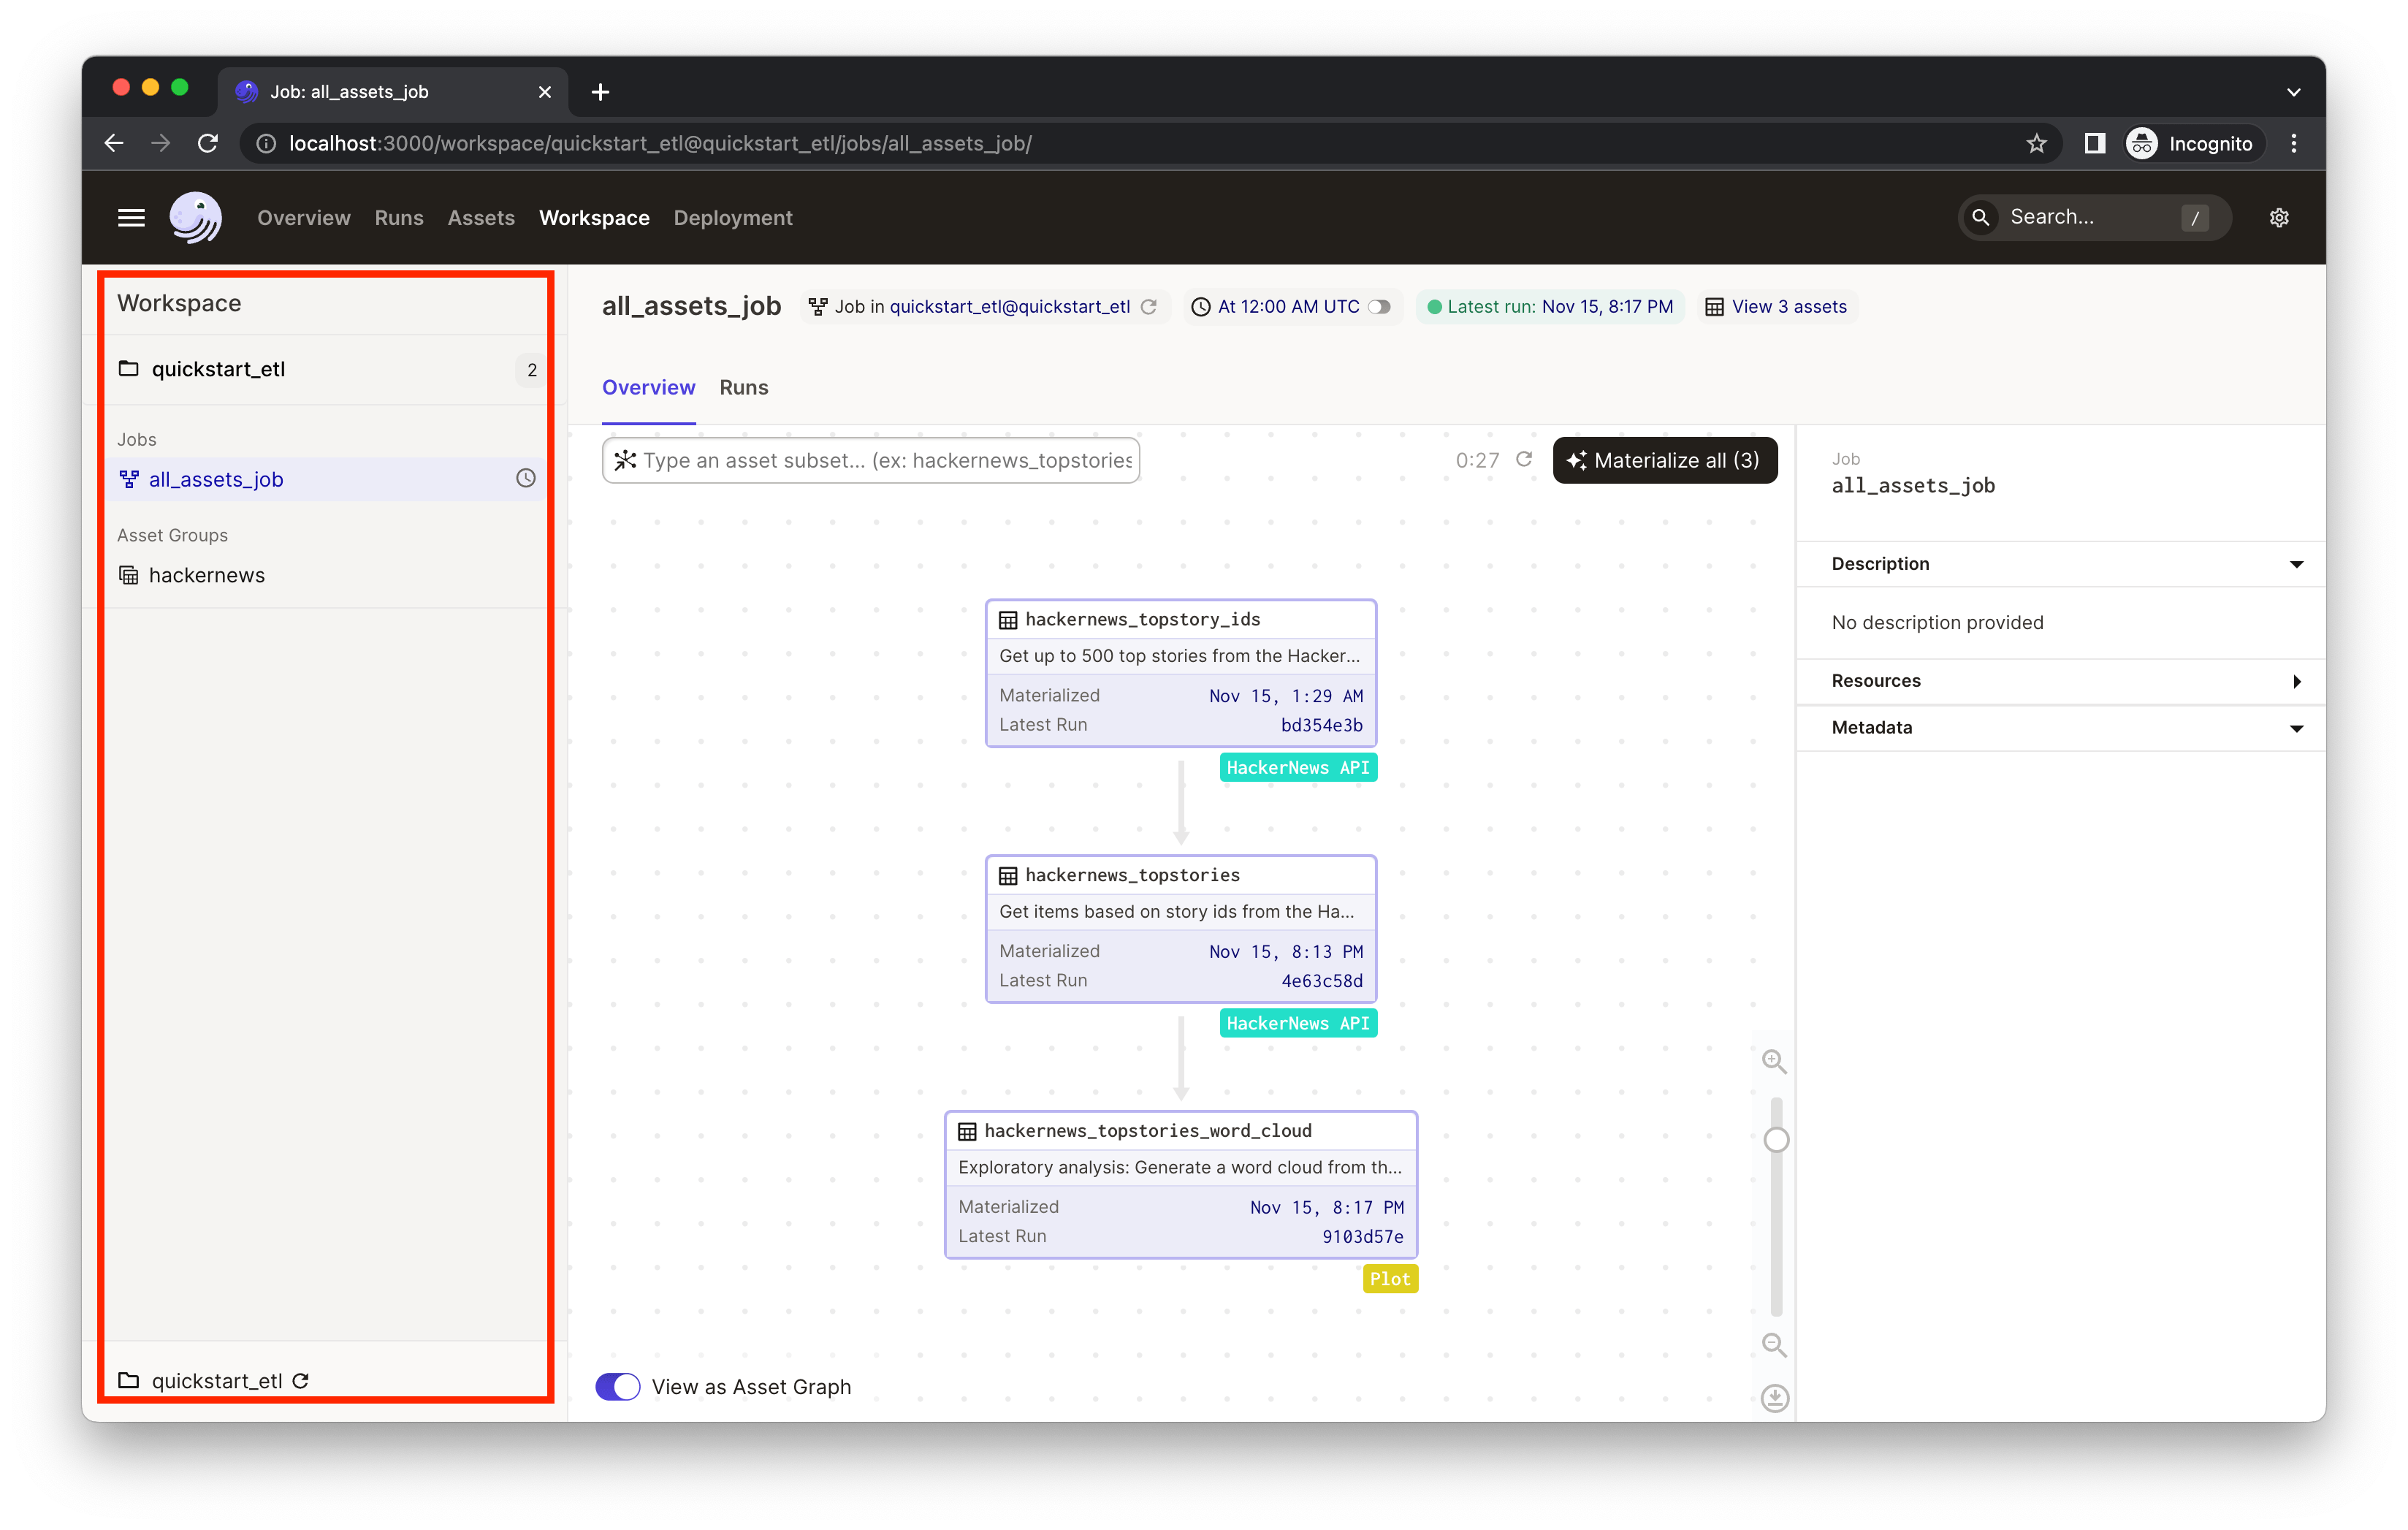 81 |
81 |
82 |
83 | Click on the `hackernews` asset group to view the HackerNews assets and their relationship.
84 |
85 | An asset is a software object that models a data asset, which can be a file in your filesystem, a table in a database, or a data report. The assets in the `hackernews` asset group ingest the current trending 500 HackerNews stories and plots a word cloud out of the collected stories to visualize the popular topics on HackerNews. You'll see three assets with different tags:
86 |
87 | - `hackernews_topstory_ids` fetches a list of top story ids from a HackerNews endpoint.
88 | - `hackernews_topstories` takes the list of ids and pulls the story details from HackerNews based on the ids.
89 | - `hackernews_stories_word_cloud` visualizes the trending topics in a word cloud.
90 |
91 | Dagster visualizes upstream and downstream dependencies vertically. Assets below other assets connected by arrows implies a dependency relationship. So we can tell from the UI that the asset `hackernews_topstories` depends on `hackernews_topstory_ids` (i.e. `hackernews_topstories` takes `hackernews_topstory_ids`'s output as an input) and `hackernews_stories_word_cloud` depends on `hackernews_topstories`.
92 |
93 | All three assets are defined [in `quickstart_etl/assets/hackernews.py`](./quickstart_etl/assets/hackernews.py). Typically, you'll define assets by annotating ordinary Python functions with the [`@asset`](https://docs.dagster.io/concepts/assets/software-defined-assets#a-basic-software-defined-asset) decorator.
94 |
95 | This project also comes with ways to better organize the assets:
96 |
97 | - **Labeling/tagging.** You'll find the assets are tagged with different [labels/badges], such as `HackerNews API` and `Plot`. This is defined in code via the `compute_kind` argument to the `@asset` decorator. It can be any string value that represents the kind of computation that produces the asset and will be displayed in the UI as a badge on the asset. This can help us quickly understand the data logic from a bird's eye view.
98 | - **Grouping assets**. We've also assigned all three assets to the group `hackernews`, which is accomplished by providing the `group_name` argument to the `@asset` decorator. Grouping assets can help keep assets organized as your project grows. Learn about asset grouping [here](https://docs.dagster.io/concepts/assets/software-defined-assets#assigning-assets-to-groups).
99 | - **Adding descriptions.** In the asset graph, the UI also shows the description of each asset. You can specify the description of an asset in the `description` argument to `@asset`. When the argument is not provided and the decorated function has a docstring, Dagster will use the docstring as the description. In this example, the UI is using the docstrings as the descriptions.
100 |
101 |
102 | Now that we've got a basic understanding of Dagster assets, let's materialize them.
103 |
104 |
105 | 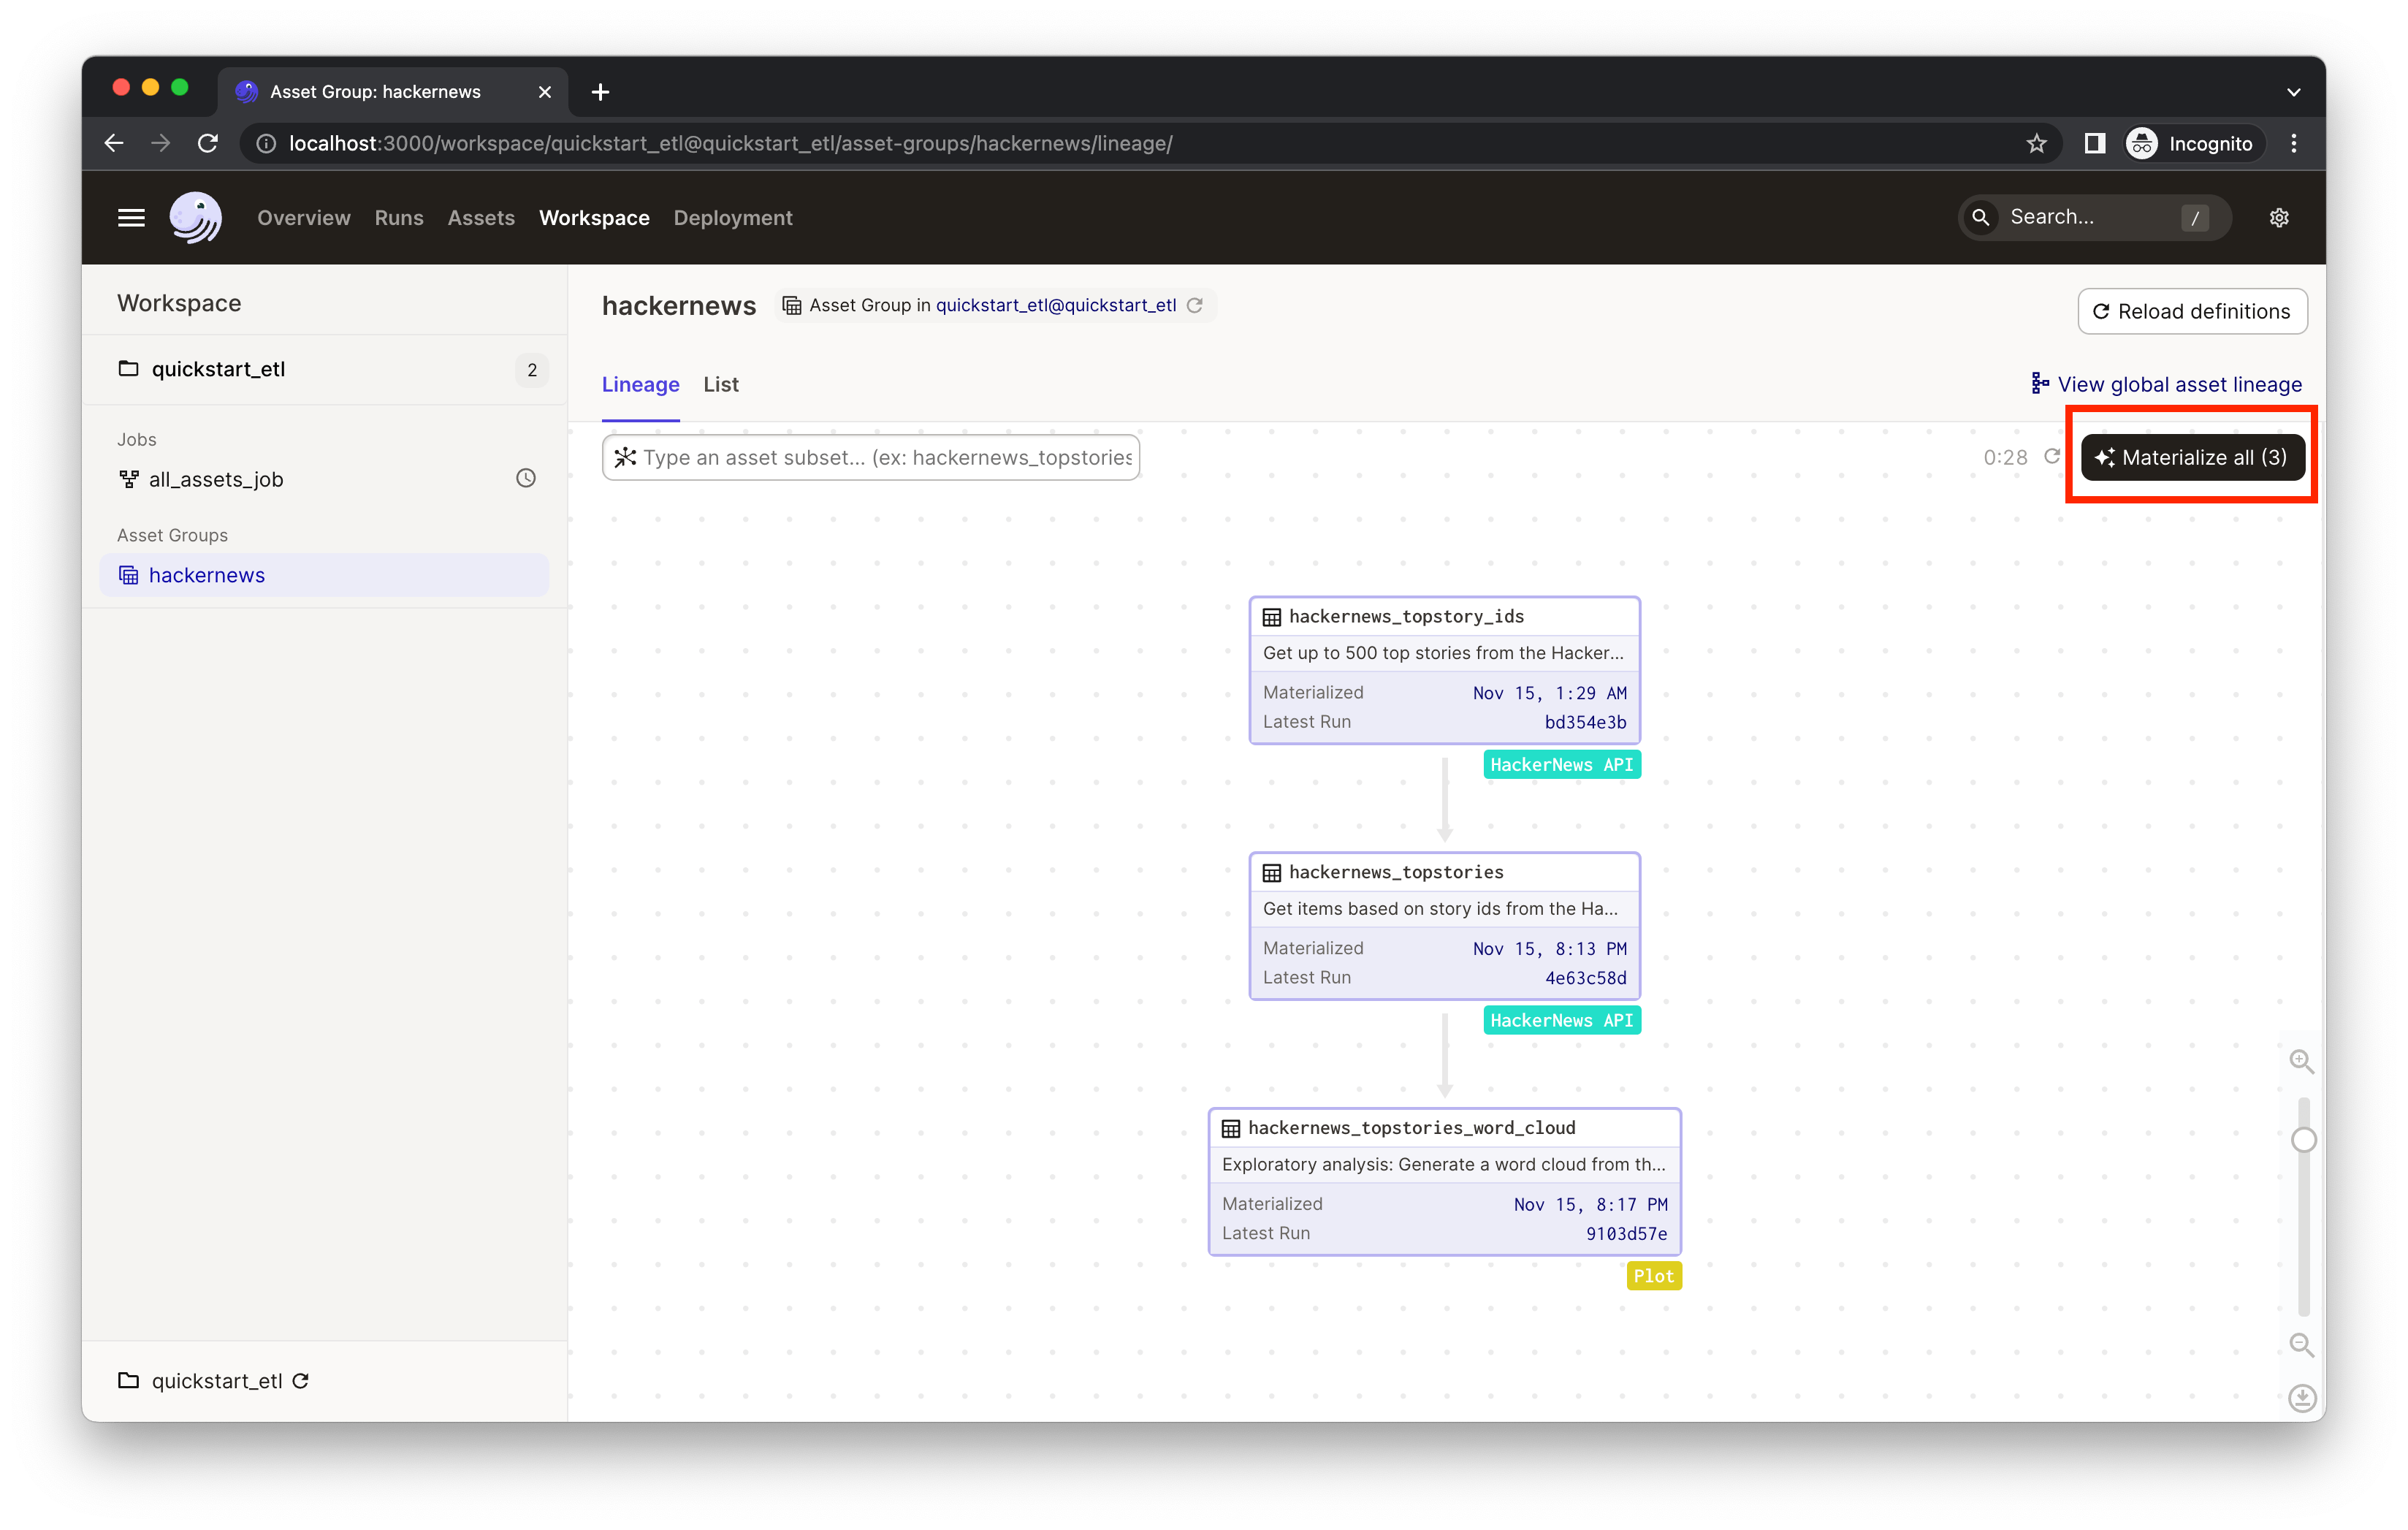 106 |
106 |
107 |
108 | Click **Materialize all** to kick off a Dagster run which will pull info from the external APIs and move the data through assets.
109 |
110 | As you iterate, some assets may become outdated. To refresh them, you can select a subset of assets to run instead of re-running the entire pipeline. This allows us to avoid unnecessary re-runs of expensive computations, only re-materializing the assets that need to be updated. If assets take a long time to run or interact with APIs with restrictive rate limits, selectively re-materializing assets will come in handy.
111 |
112 |
113 | 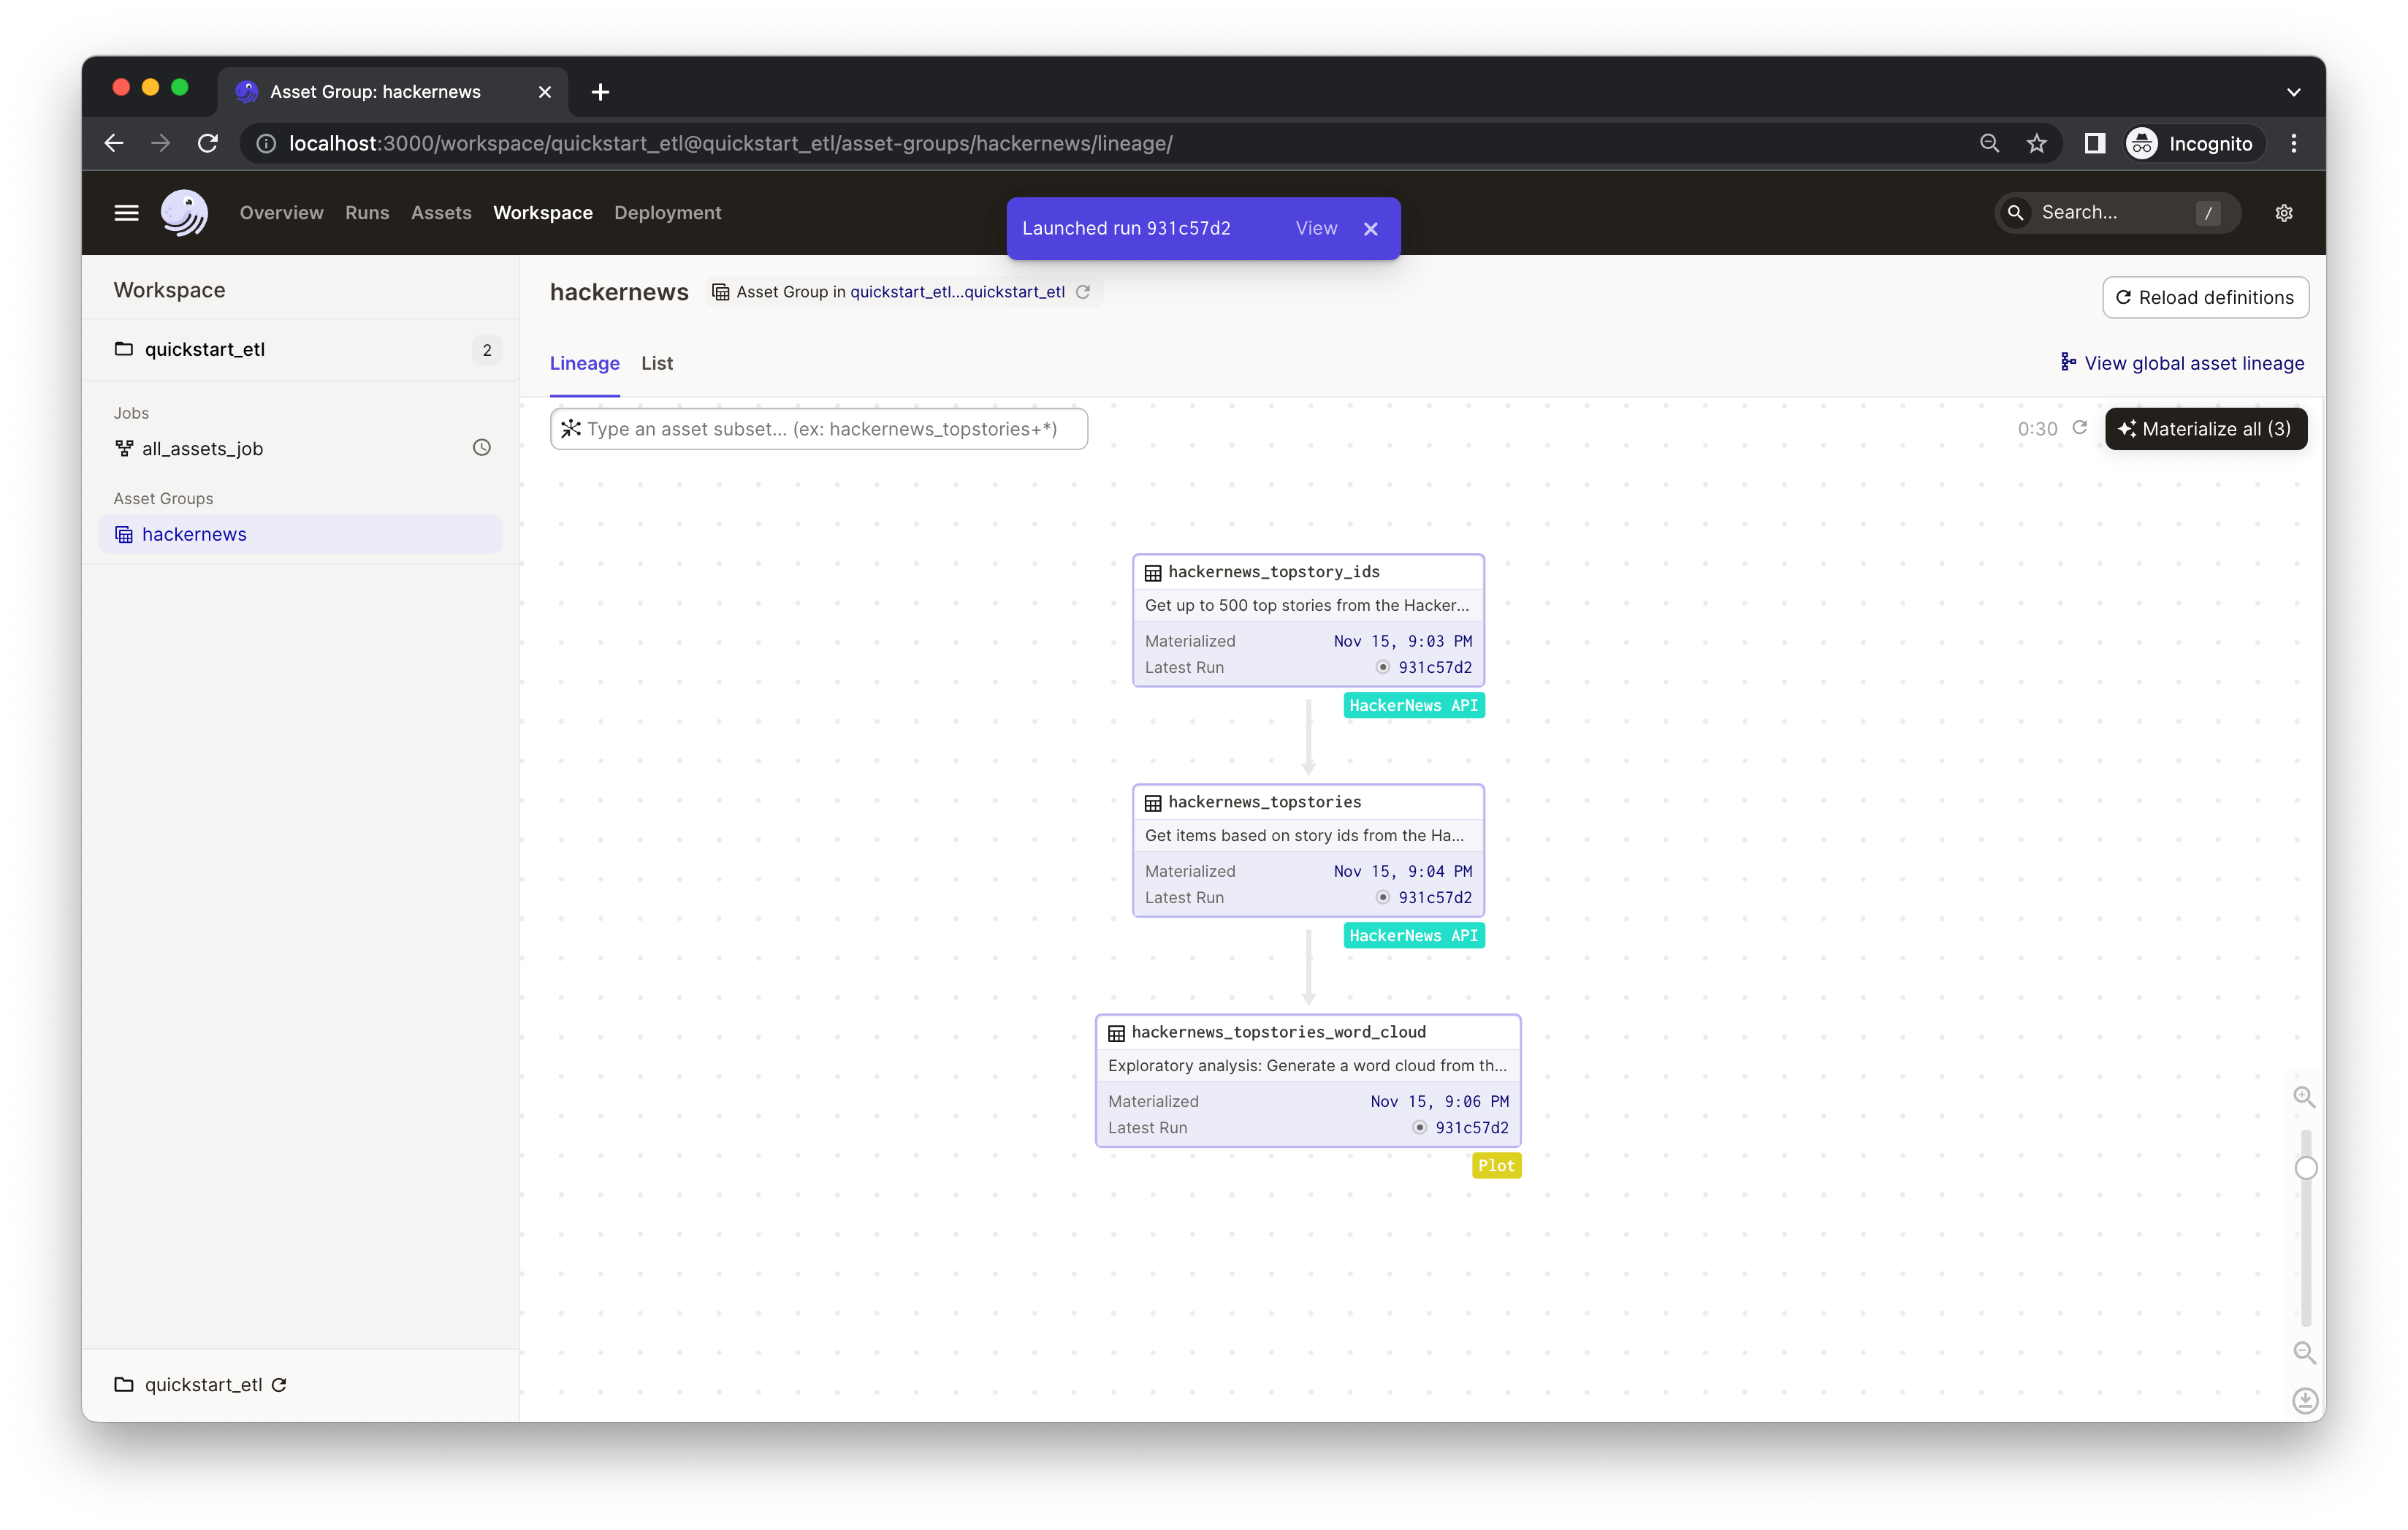 114 |
114 |
115 |
116 | You'll see an indicator pop up with the launched run ID. Click **View** to monitor the run in real-time. This will open a new tab in your browser:
117 |
118 |
119 | 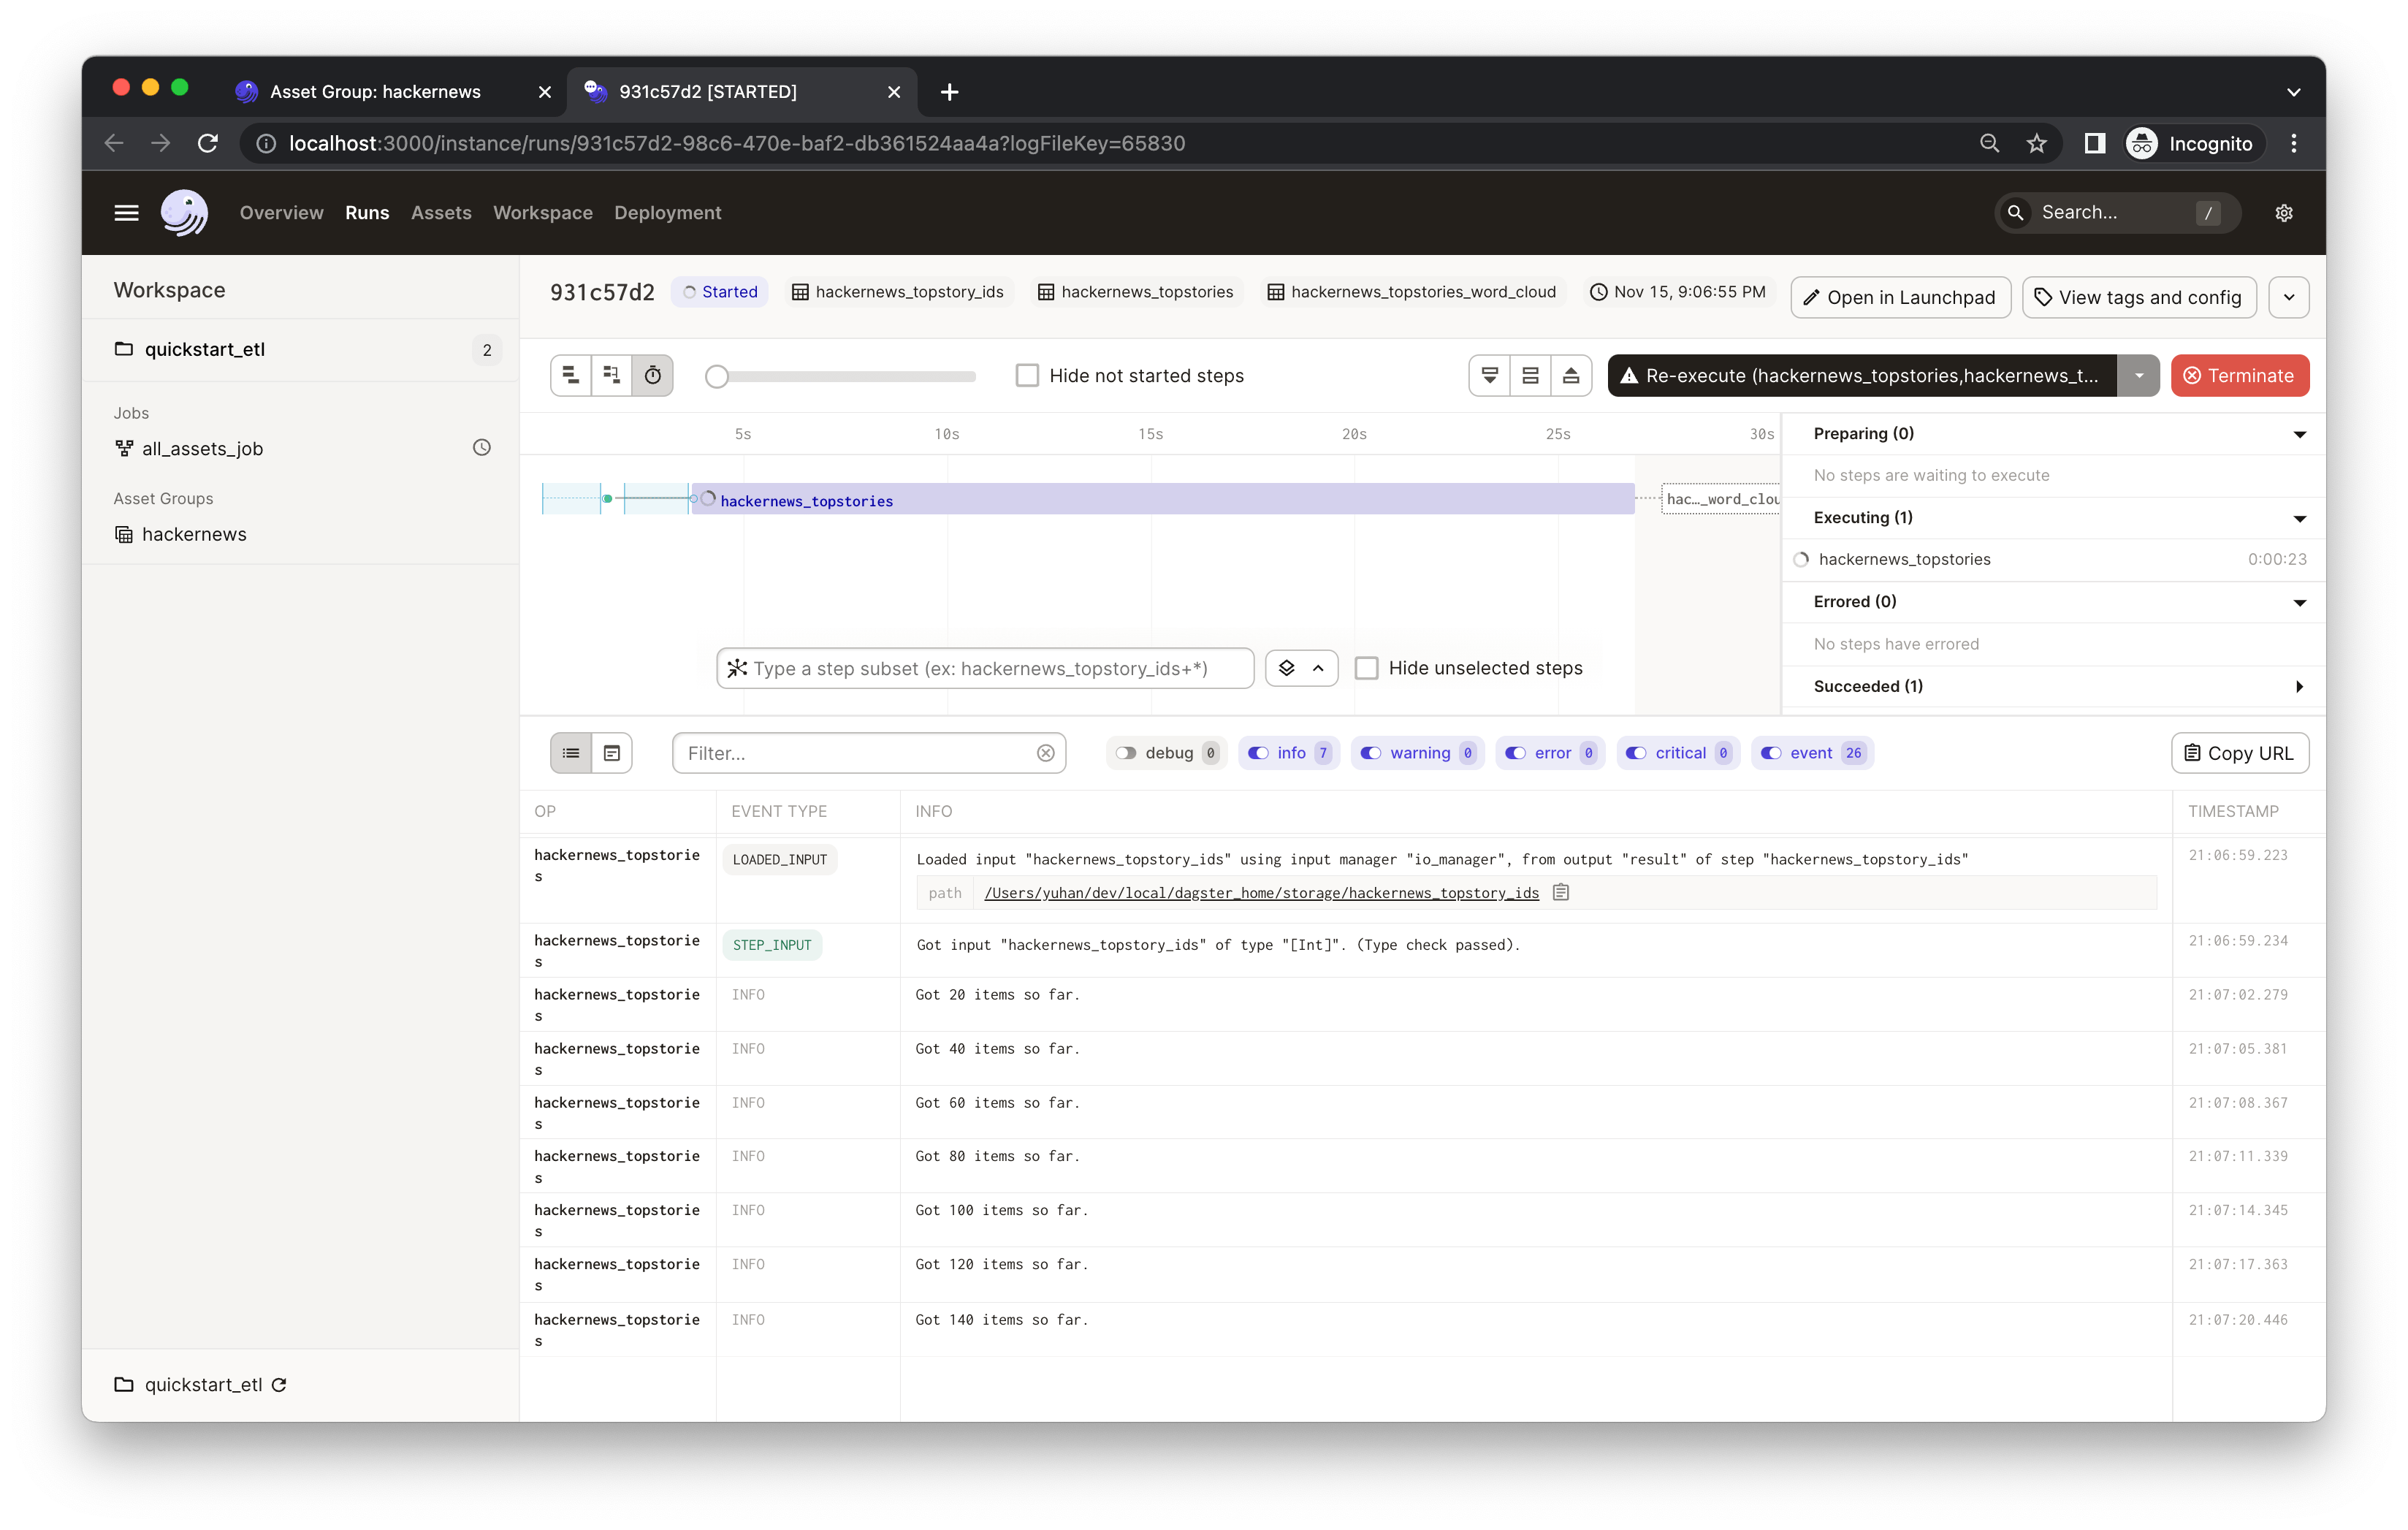 120 |
120 |
121 |
122 | The process will run for a bit. While it's running, you should see the real-time compute logs printed in the UI. *(It may take 1-2 minutes to fetch all top 500 stories from HackerNews in the `hackernews_topstories` step).*
123 |
124 | ## Step 2: Viewing and monitoring assets
125 |
126 | When you materialize an asset, the object returned by your asset function is saved. Dagster makes it easy to save these results to disk, to blob storage, to a database, or to any other system. In this example the assets are saved to the file system. In addition to the asset materialization, your asset functions can also generate metadata that is directly visible in Dagster. To view the materialization details and metadata, click on the "ASSET_MATERIALIZATION" event. In this example, the `hackernews_stories_word_cloud` asset materializes a plot that is saved to disk, but we also add the plot as metadata to make it visible in Dagster.
127 |
128 |
129 | 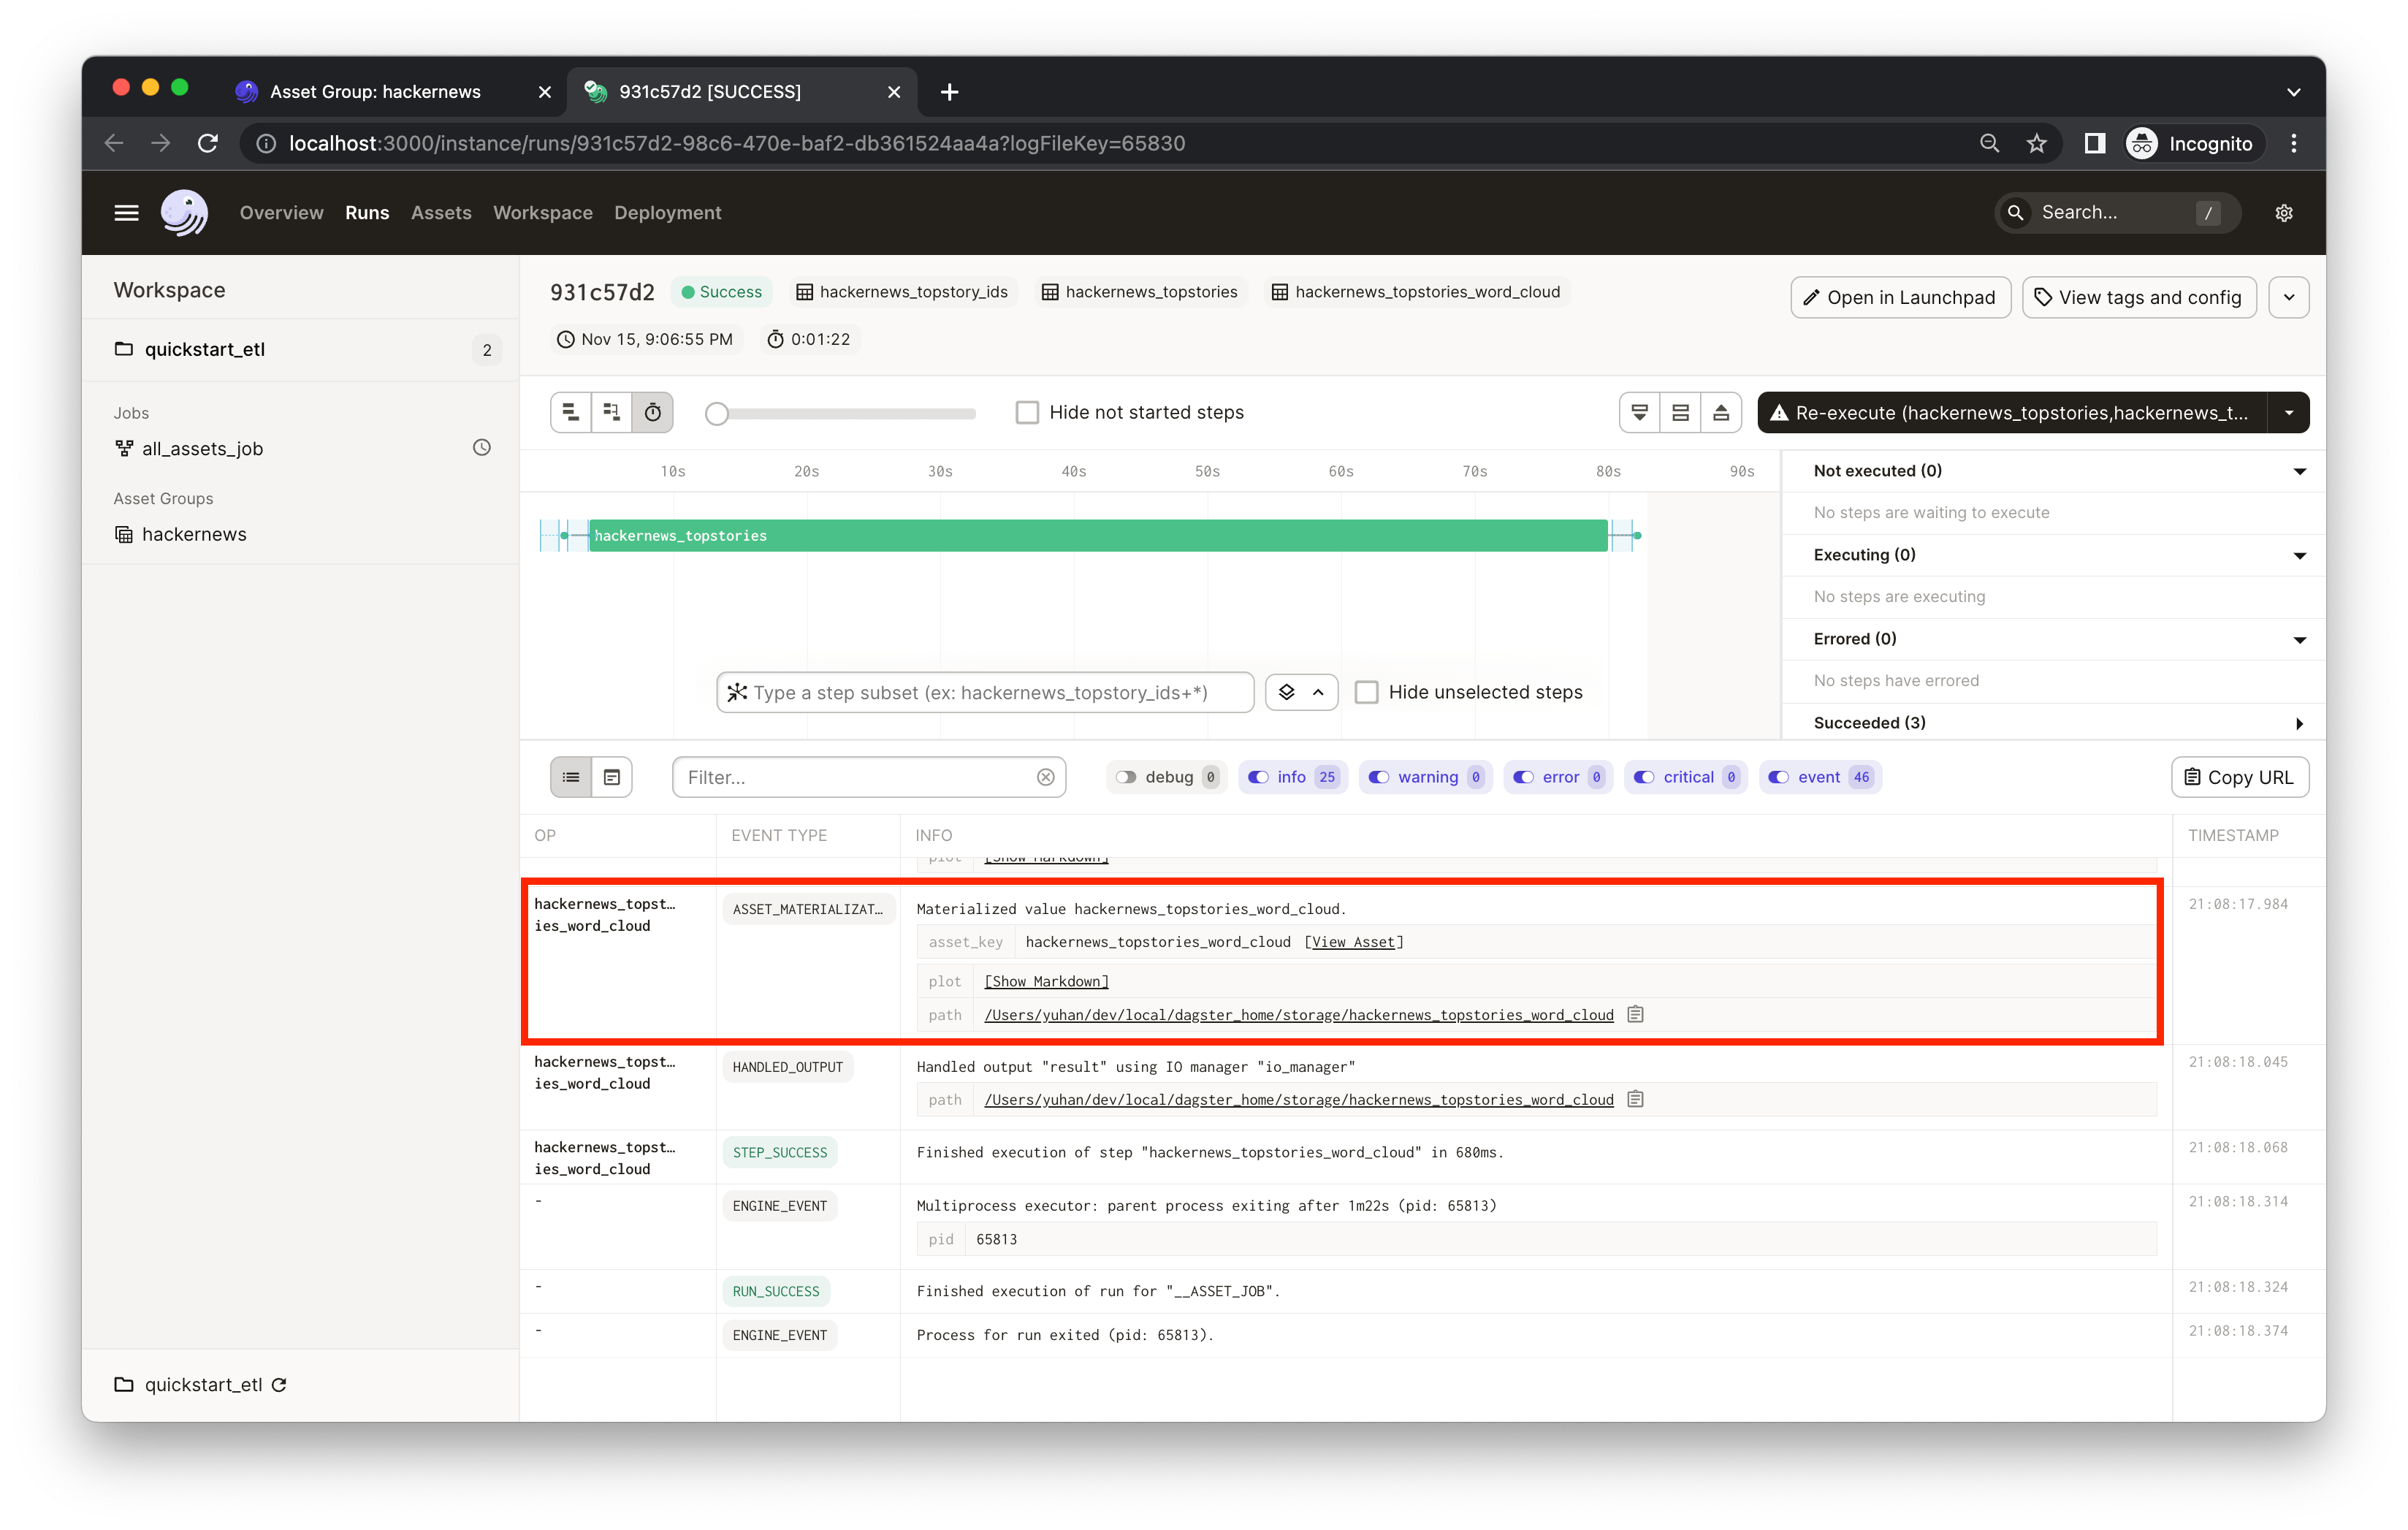 130 |
130 |
131 |
132 | Click **Show Markdown**. You'll see a word cloud of the top 500 HackerNews story titles generated by the `hackernews_topstories_word_cloud` asset:
133 |
134 |
135 |  136 |
136 |
137 |
138 | The metadata is recorded in the `hackernews_topstories_word_cloud` asset [in `quickstart_etl/assets/hackernews.py`](./quickstart_etl/assets/hackernews.py). Dagster supports attaching arbitrary [metadata](https://docs.dagster.io/_apidocs/ops#dagster.MetadataValue) to asset materializations. This metadata is also be displayed on the **Activity** tab of the **Asset Details** page in the UI or in the **Asset Lineage** view after selecting an asset. From the compute logs of a run, you can click the **View Asset** to go to the **Asset Details** page.
139 |
140 |
141 |  142 |
142 |
143 |
144 | This metadata would be useful for monitoring and maintaining the asset as you iterate. Similarly, we've also recorded some metadata in the `hackernews_topstories` asset. You can filter the compute logs by typing the asset name (e.g. `hackernews_topstories`) or the event type (e.g. `type:ASSET_MATERIALIZATION`) in the **Log Filter** input box:
145 |
146 |
147 | 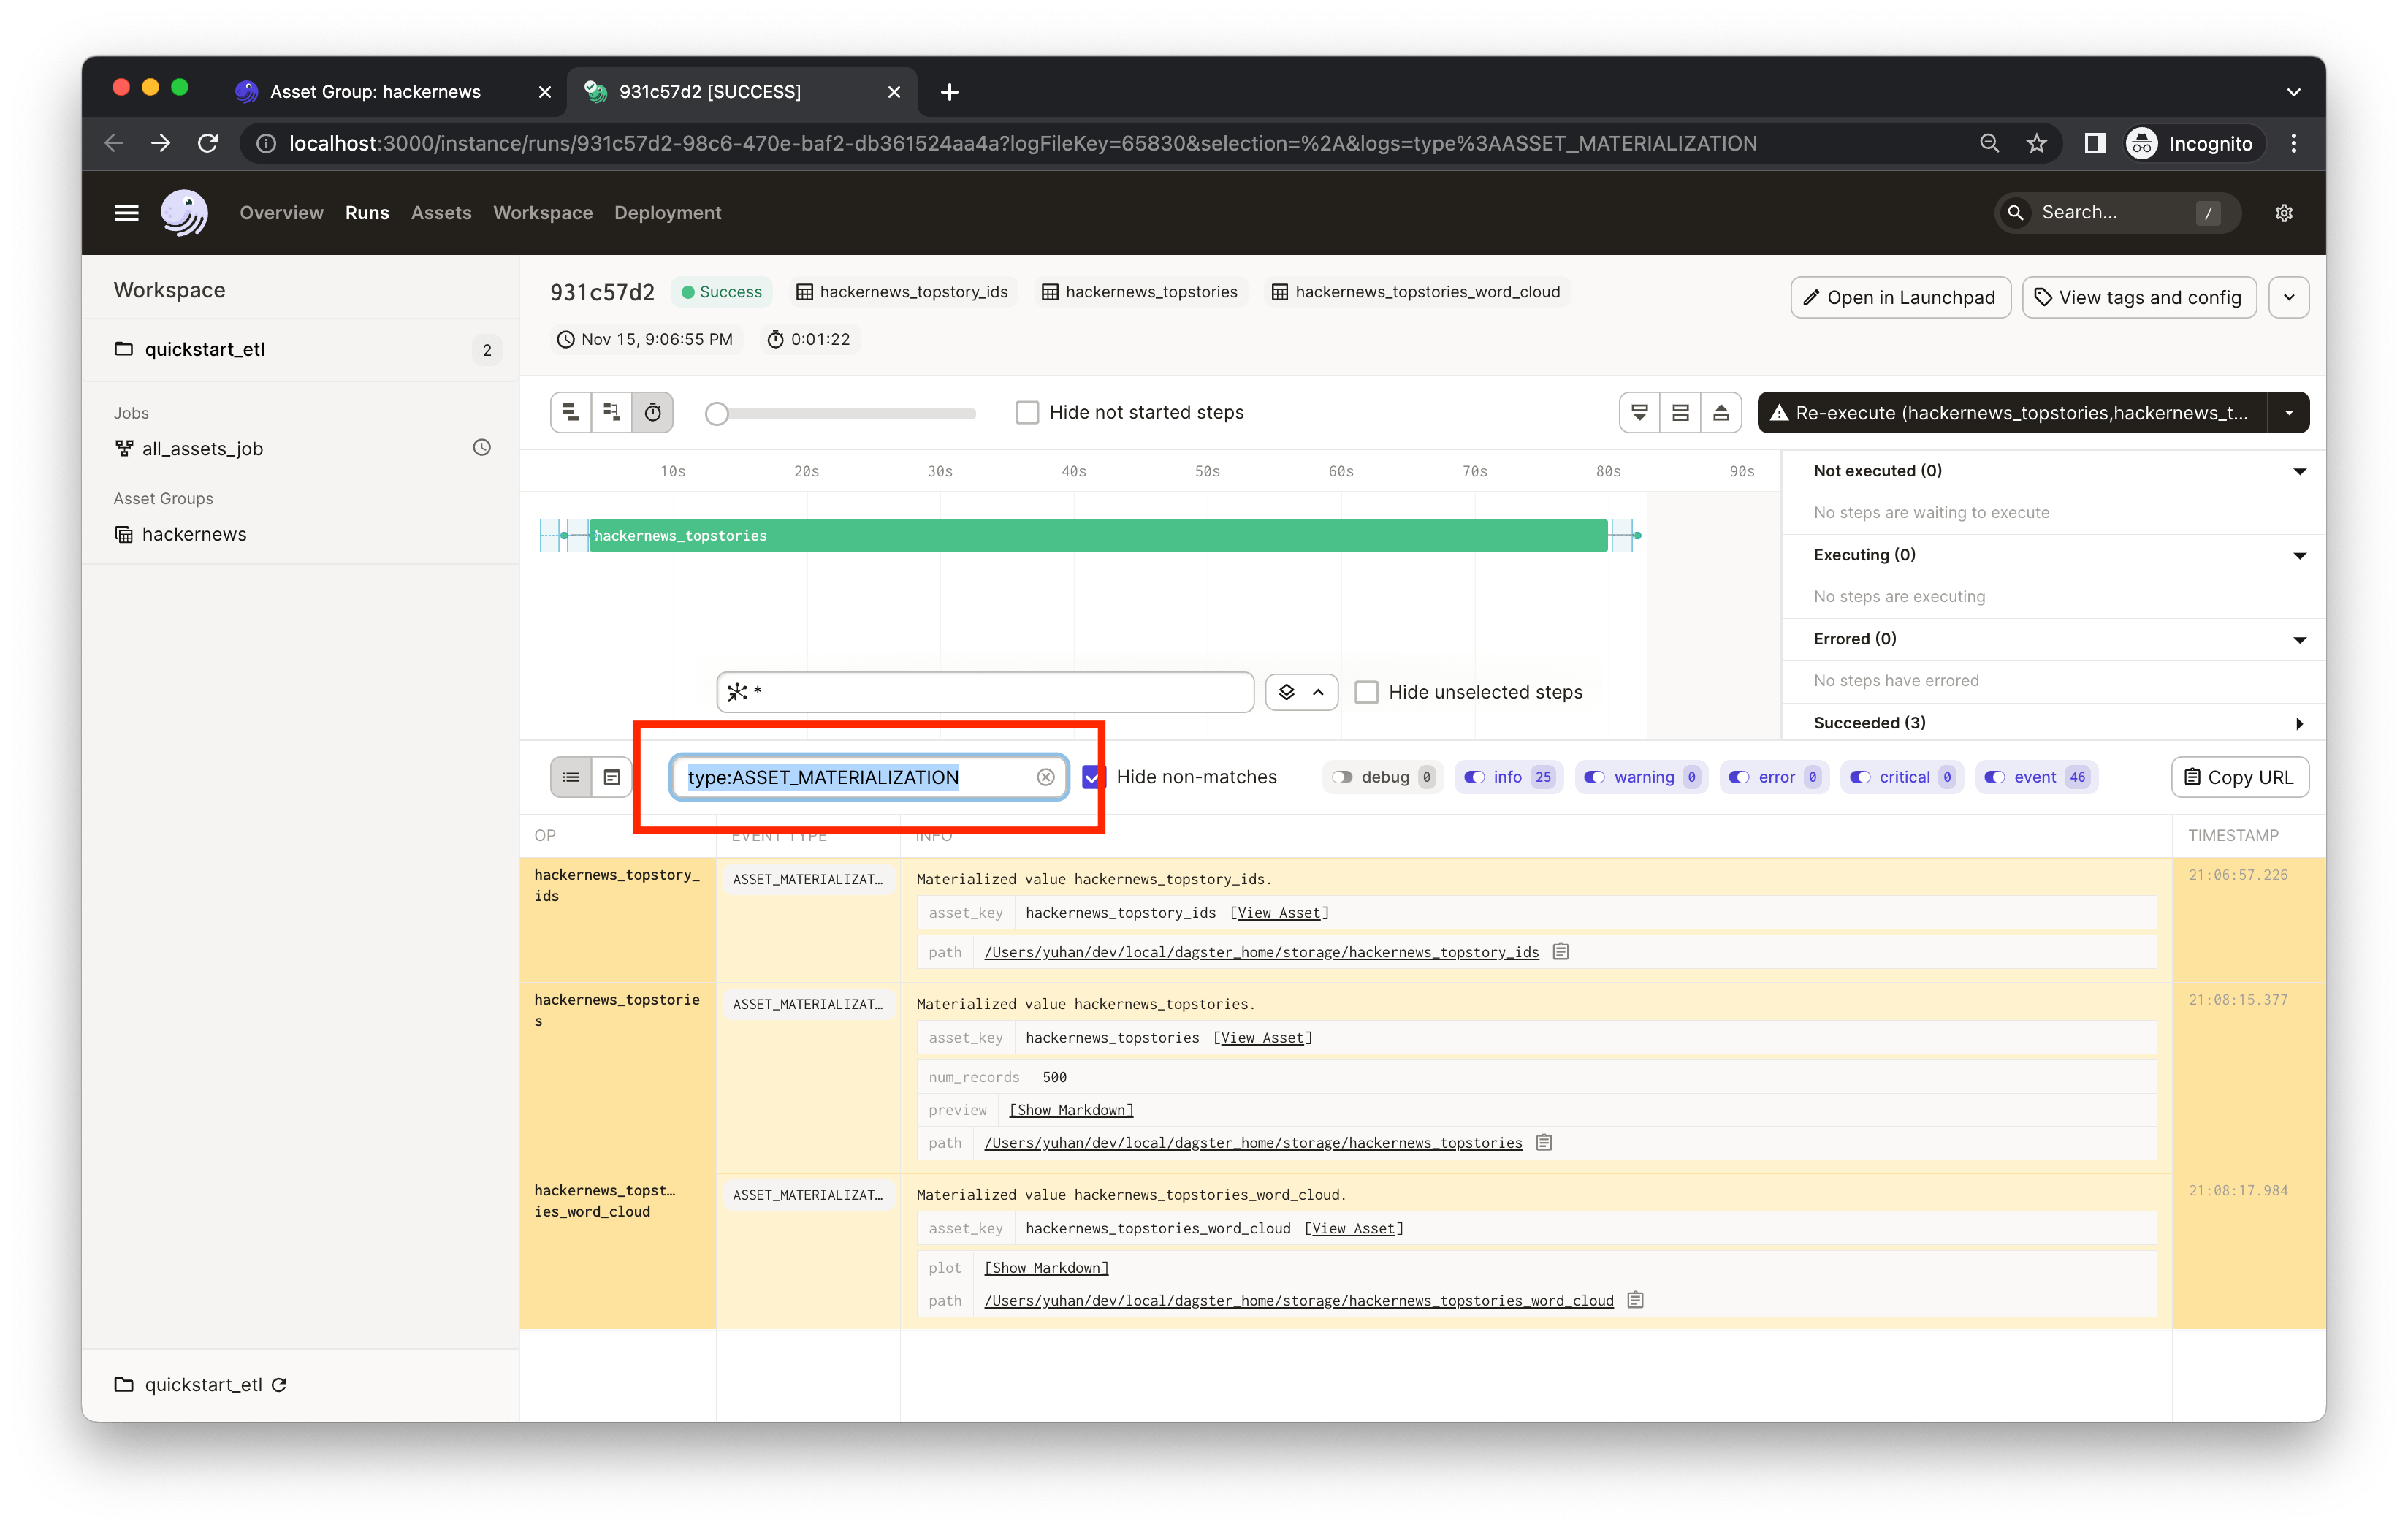 148 |
148 |
149 |
150 | In the results, you'll see that the `hackernews_topstories` asset has two metadata entries: `num_records` and `preview`. Both are defined [in `quickstart_etl/assets/hackernews.py`](./quickstart_etl/assets/hackernews.py), in which we record the first five rows of the output Pandas DataFrame in the `preview` metadata entry using the Markdown type. This could help debug and keep your assets easily monitored. Click **Show Markdown** to view a preview of the output data frame:
151 |
152 |
153 | 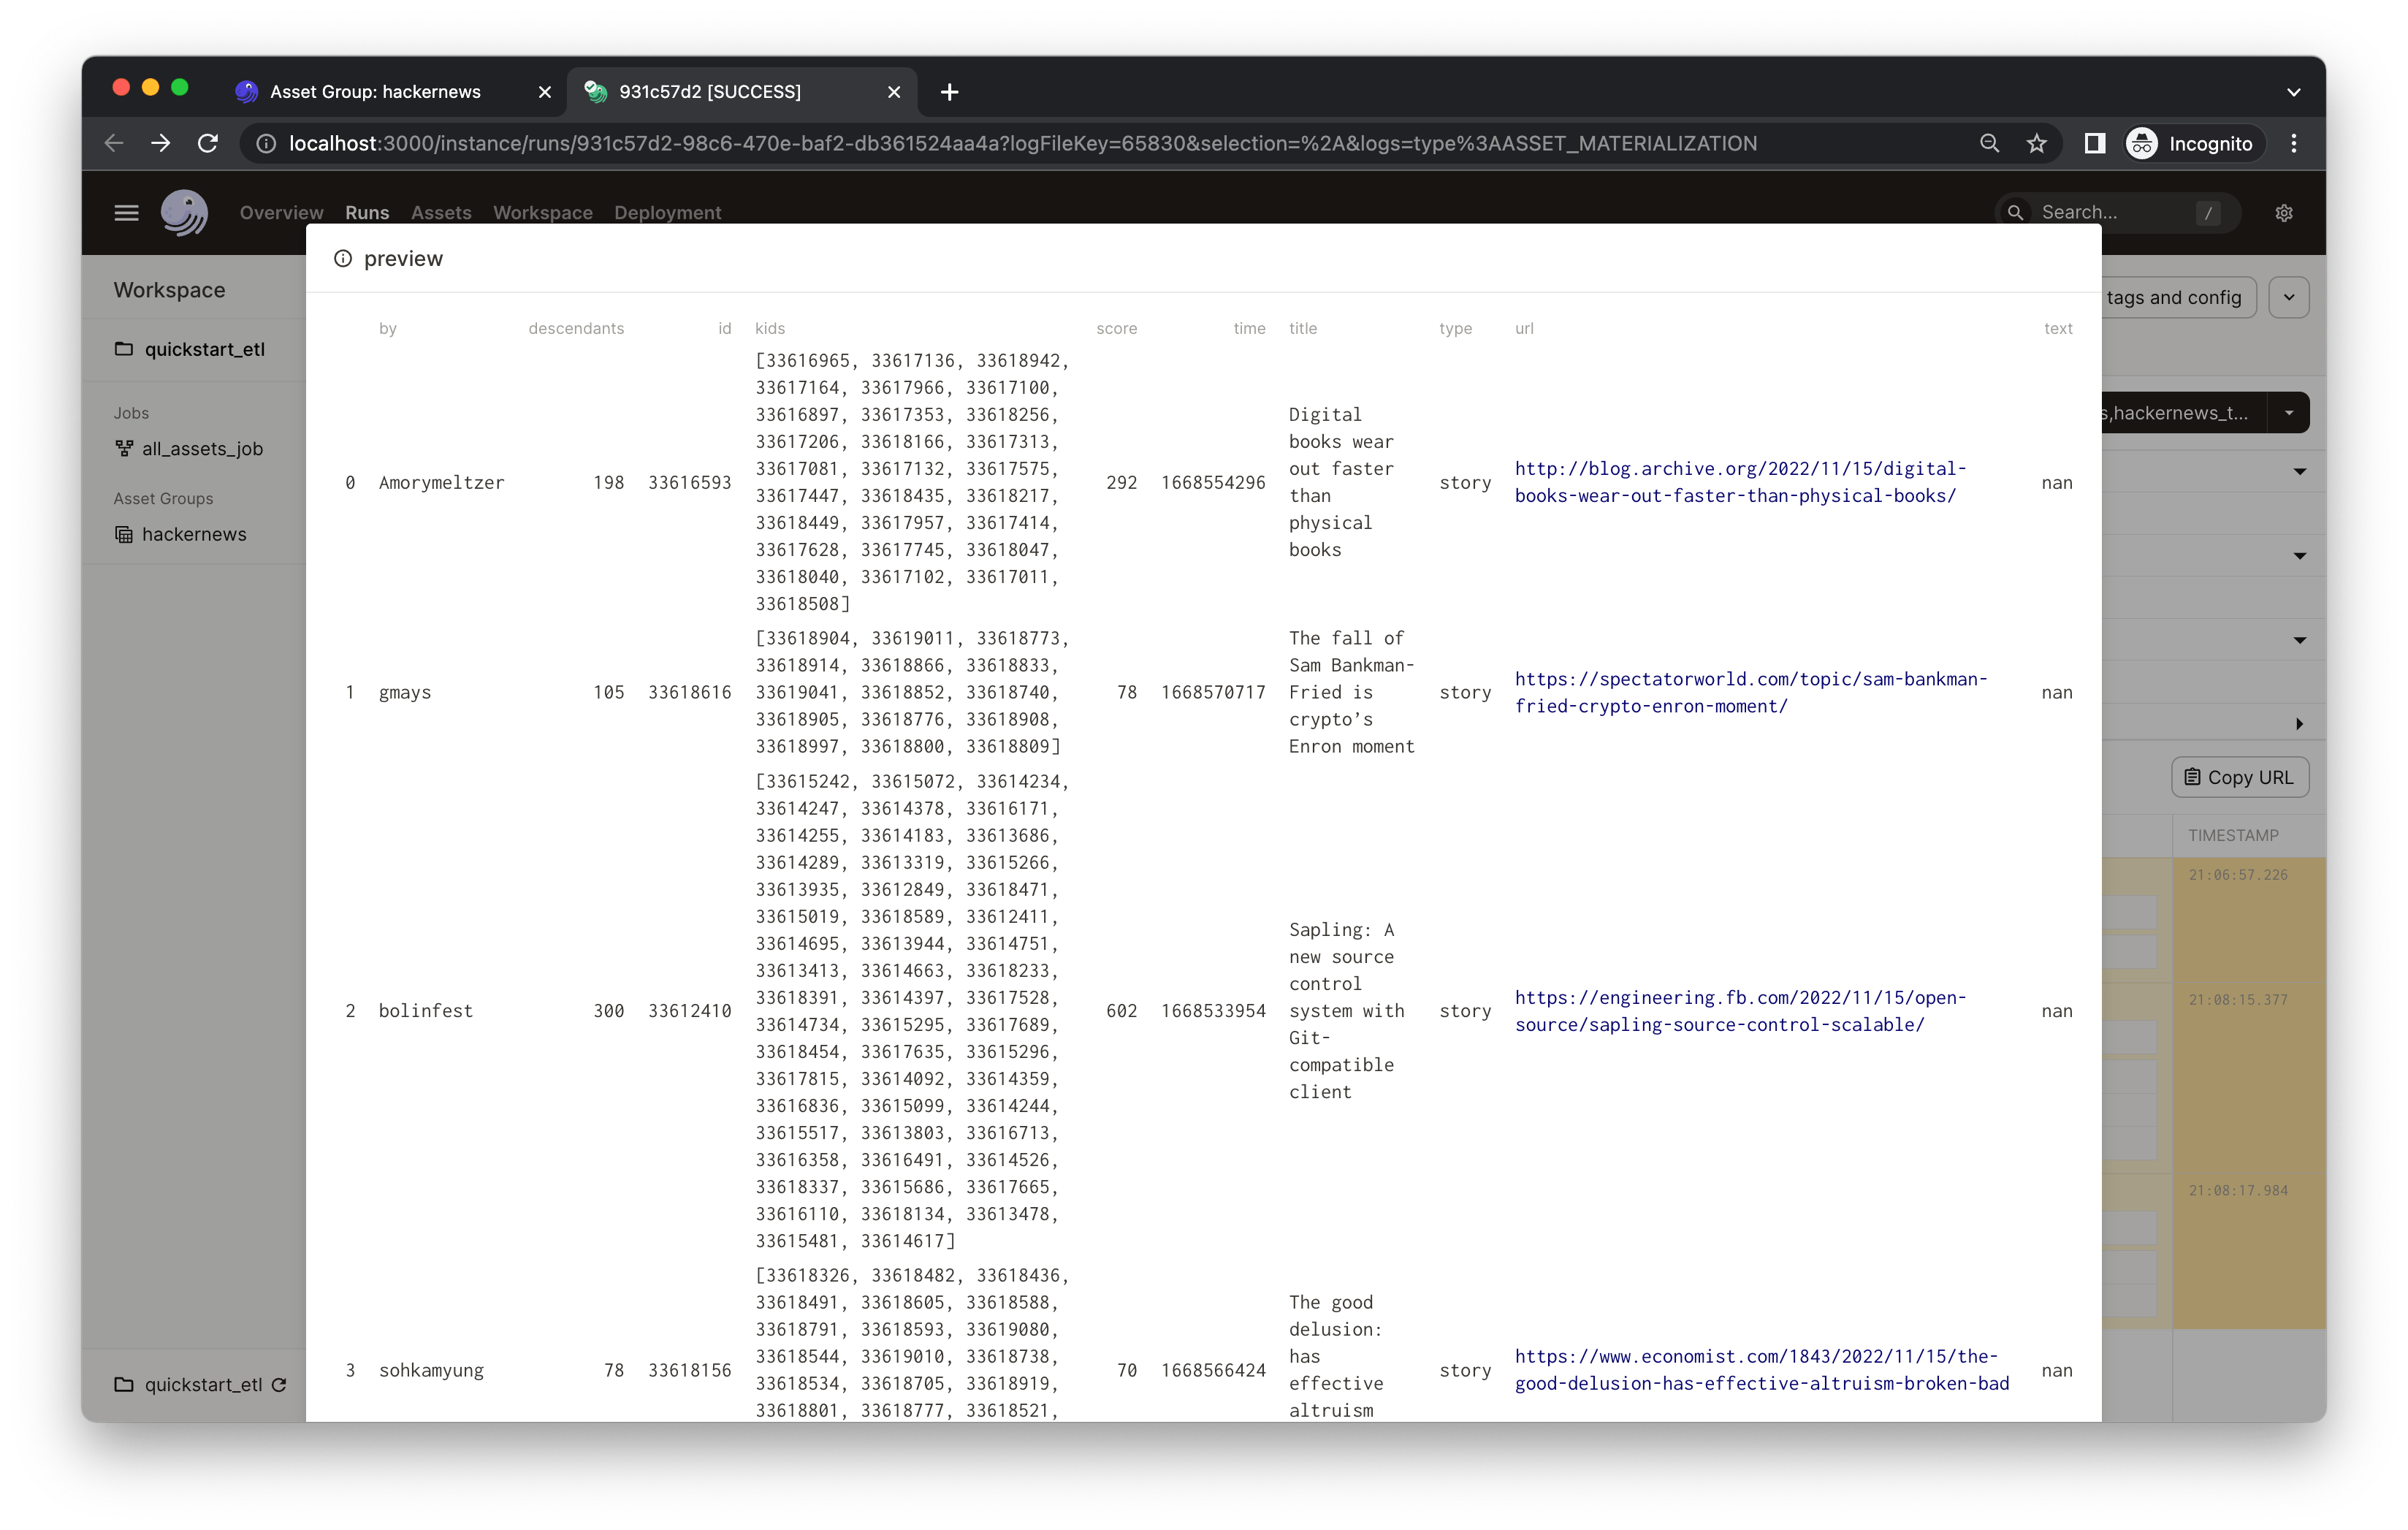 154 |
154 |
155 |
156 | Note: You'll find a `path` metadata attached to every asset. This is because assets are, by default, materialized to pickle files on your local filesystem. In most projects, your assets will be materialized to a production system and you can fully customize the I/O using [I/O managers](https://docs.dagster.io/concepts/io-management/io-managers).
157 |
158 | ## Step 3: Scheduling a daily job
159 |
160 | Finally, let's refresh our plots every day so we can monitor popular topics over time. To do so, we can use [schedules](https://docs.dagster.io/concepts/partitions-schedules-sensors/schedules#schedules).
161 |
162 | We've defined a daily schedule and job in [`quickstart_etl/__init__.py`](./quickstart_etl/__init__.py) for all assets that are defined in the [`quickstart_etl/assets/`](./quickstart_etl/assets) module.
163 |
164 | Now, let's turn on the daily schedule within Dagster.
165 |
166 | 1. In the left nav, it indicates the `all_assets_job` has a schedule associated with it but it's currently off. Clicking "all_assets_job" in the left nav will bring you to the job definition page.
167 | 2. Mouse over the schedule indicator on the top of the page to navigate to the individual schedule page for more info about the schedule.
168 |
169 |
170 | 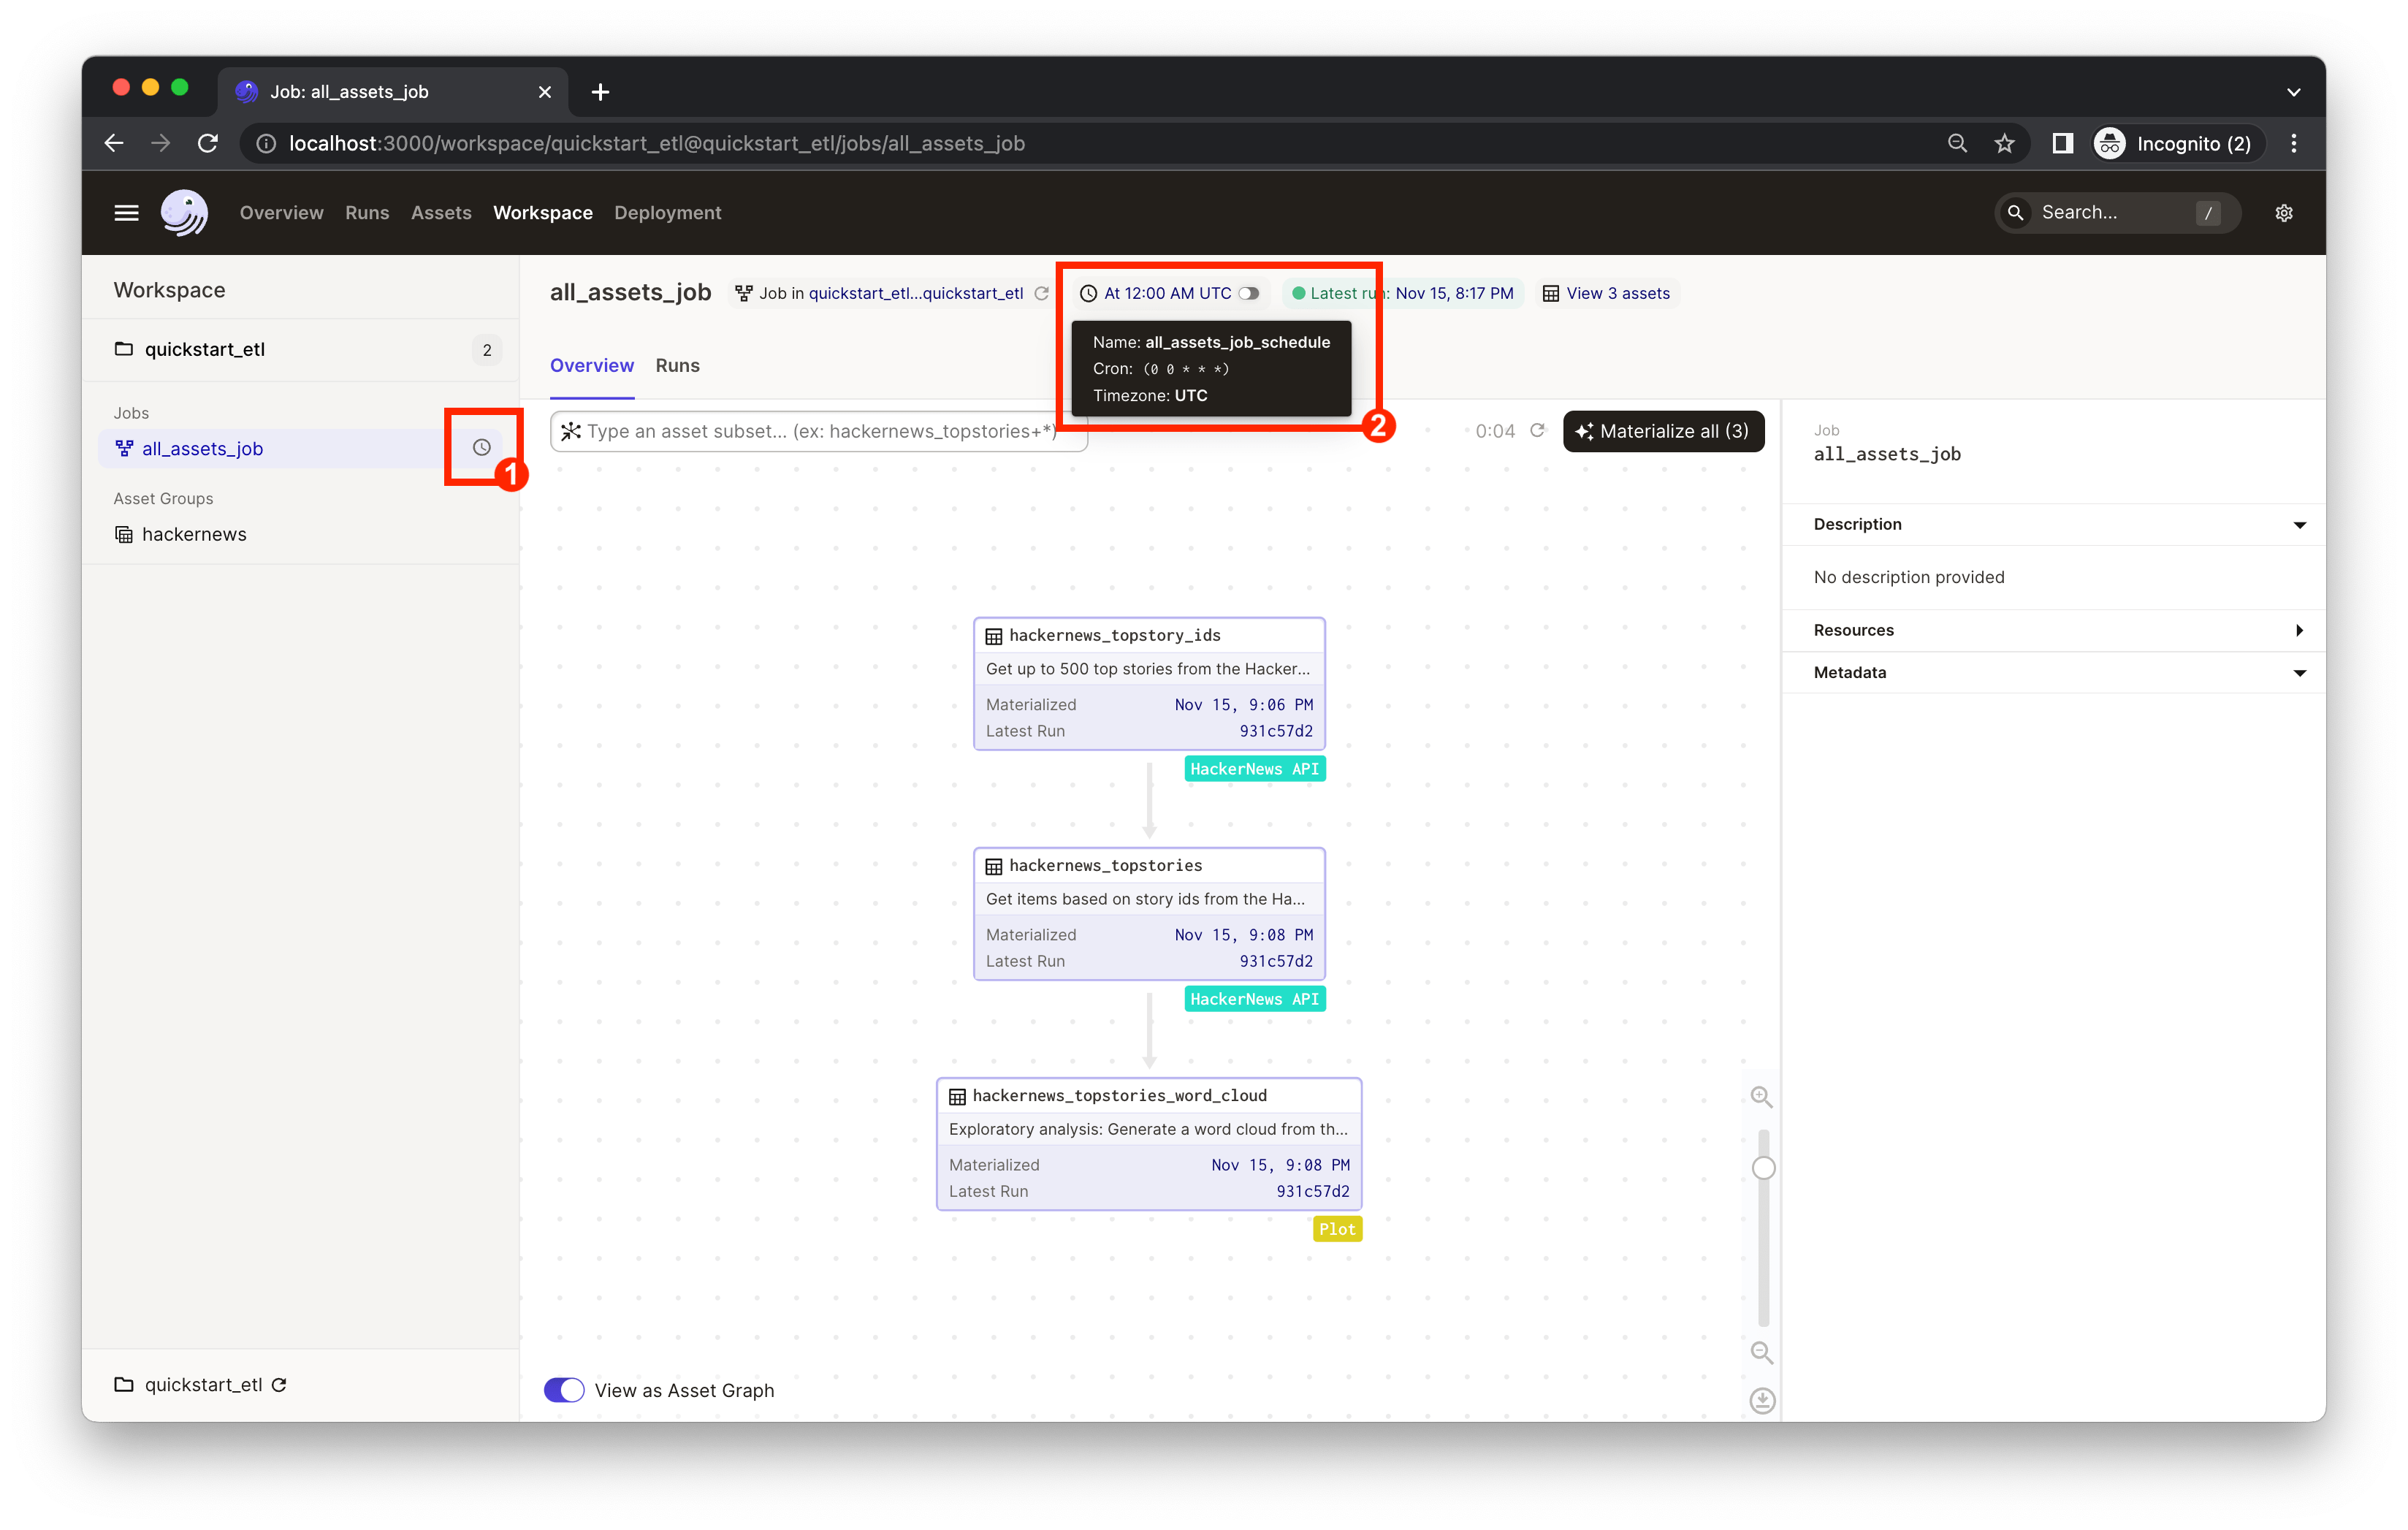 171 |
171 |
172 |
173 | You can now turn on the schedule switch to set up the daily job we defined in [quickstart_etl/__init__.py](./quickstart_etl/__init__.py).
174 |
175 |
176 |  177 |
177 |
178 |
179 | ### (Optional) Running daemon locally
180 |
181 | If you're running Dagster locally, you will see a warning that your daemon isn’t running.
182 |
183 |
184 |  185 |
185 |
186 |
187 | 👈 Expand to learn how to set up a local daemon
188 |
189 | If you want to enable Dagster [schedules](https://docs.dagster.io/concepts/partitions-schedules-sensors/schedules) for your jobs, start the [Dagster daemon](https://docs.dagster.io/deployment/dagster-daemon) process in the same folder as your `workspace.yaml` file, but in a different shell or terminal.
190 |
191 | The `$DAGSTER_HOME` environment variable must be set to a directory for the daemon to work. Note: using directories within `/tmp` may cause issues. See [Dagster Instance default local behavior](https://docs.dagster.io/deployment/dagster-instance#default-local-behavior) for more details.
192 |
193 | In this case, go to the project root directory and run:
194 | ```bash
195 | dagster-daemon run
196 | ```
197 |
198 | Once your Dagster daemon is running, the schedules that are turned on will start running.
199 |
200 |
201 | 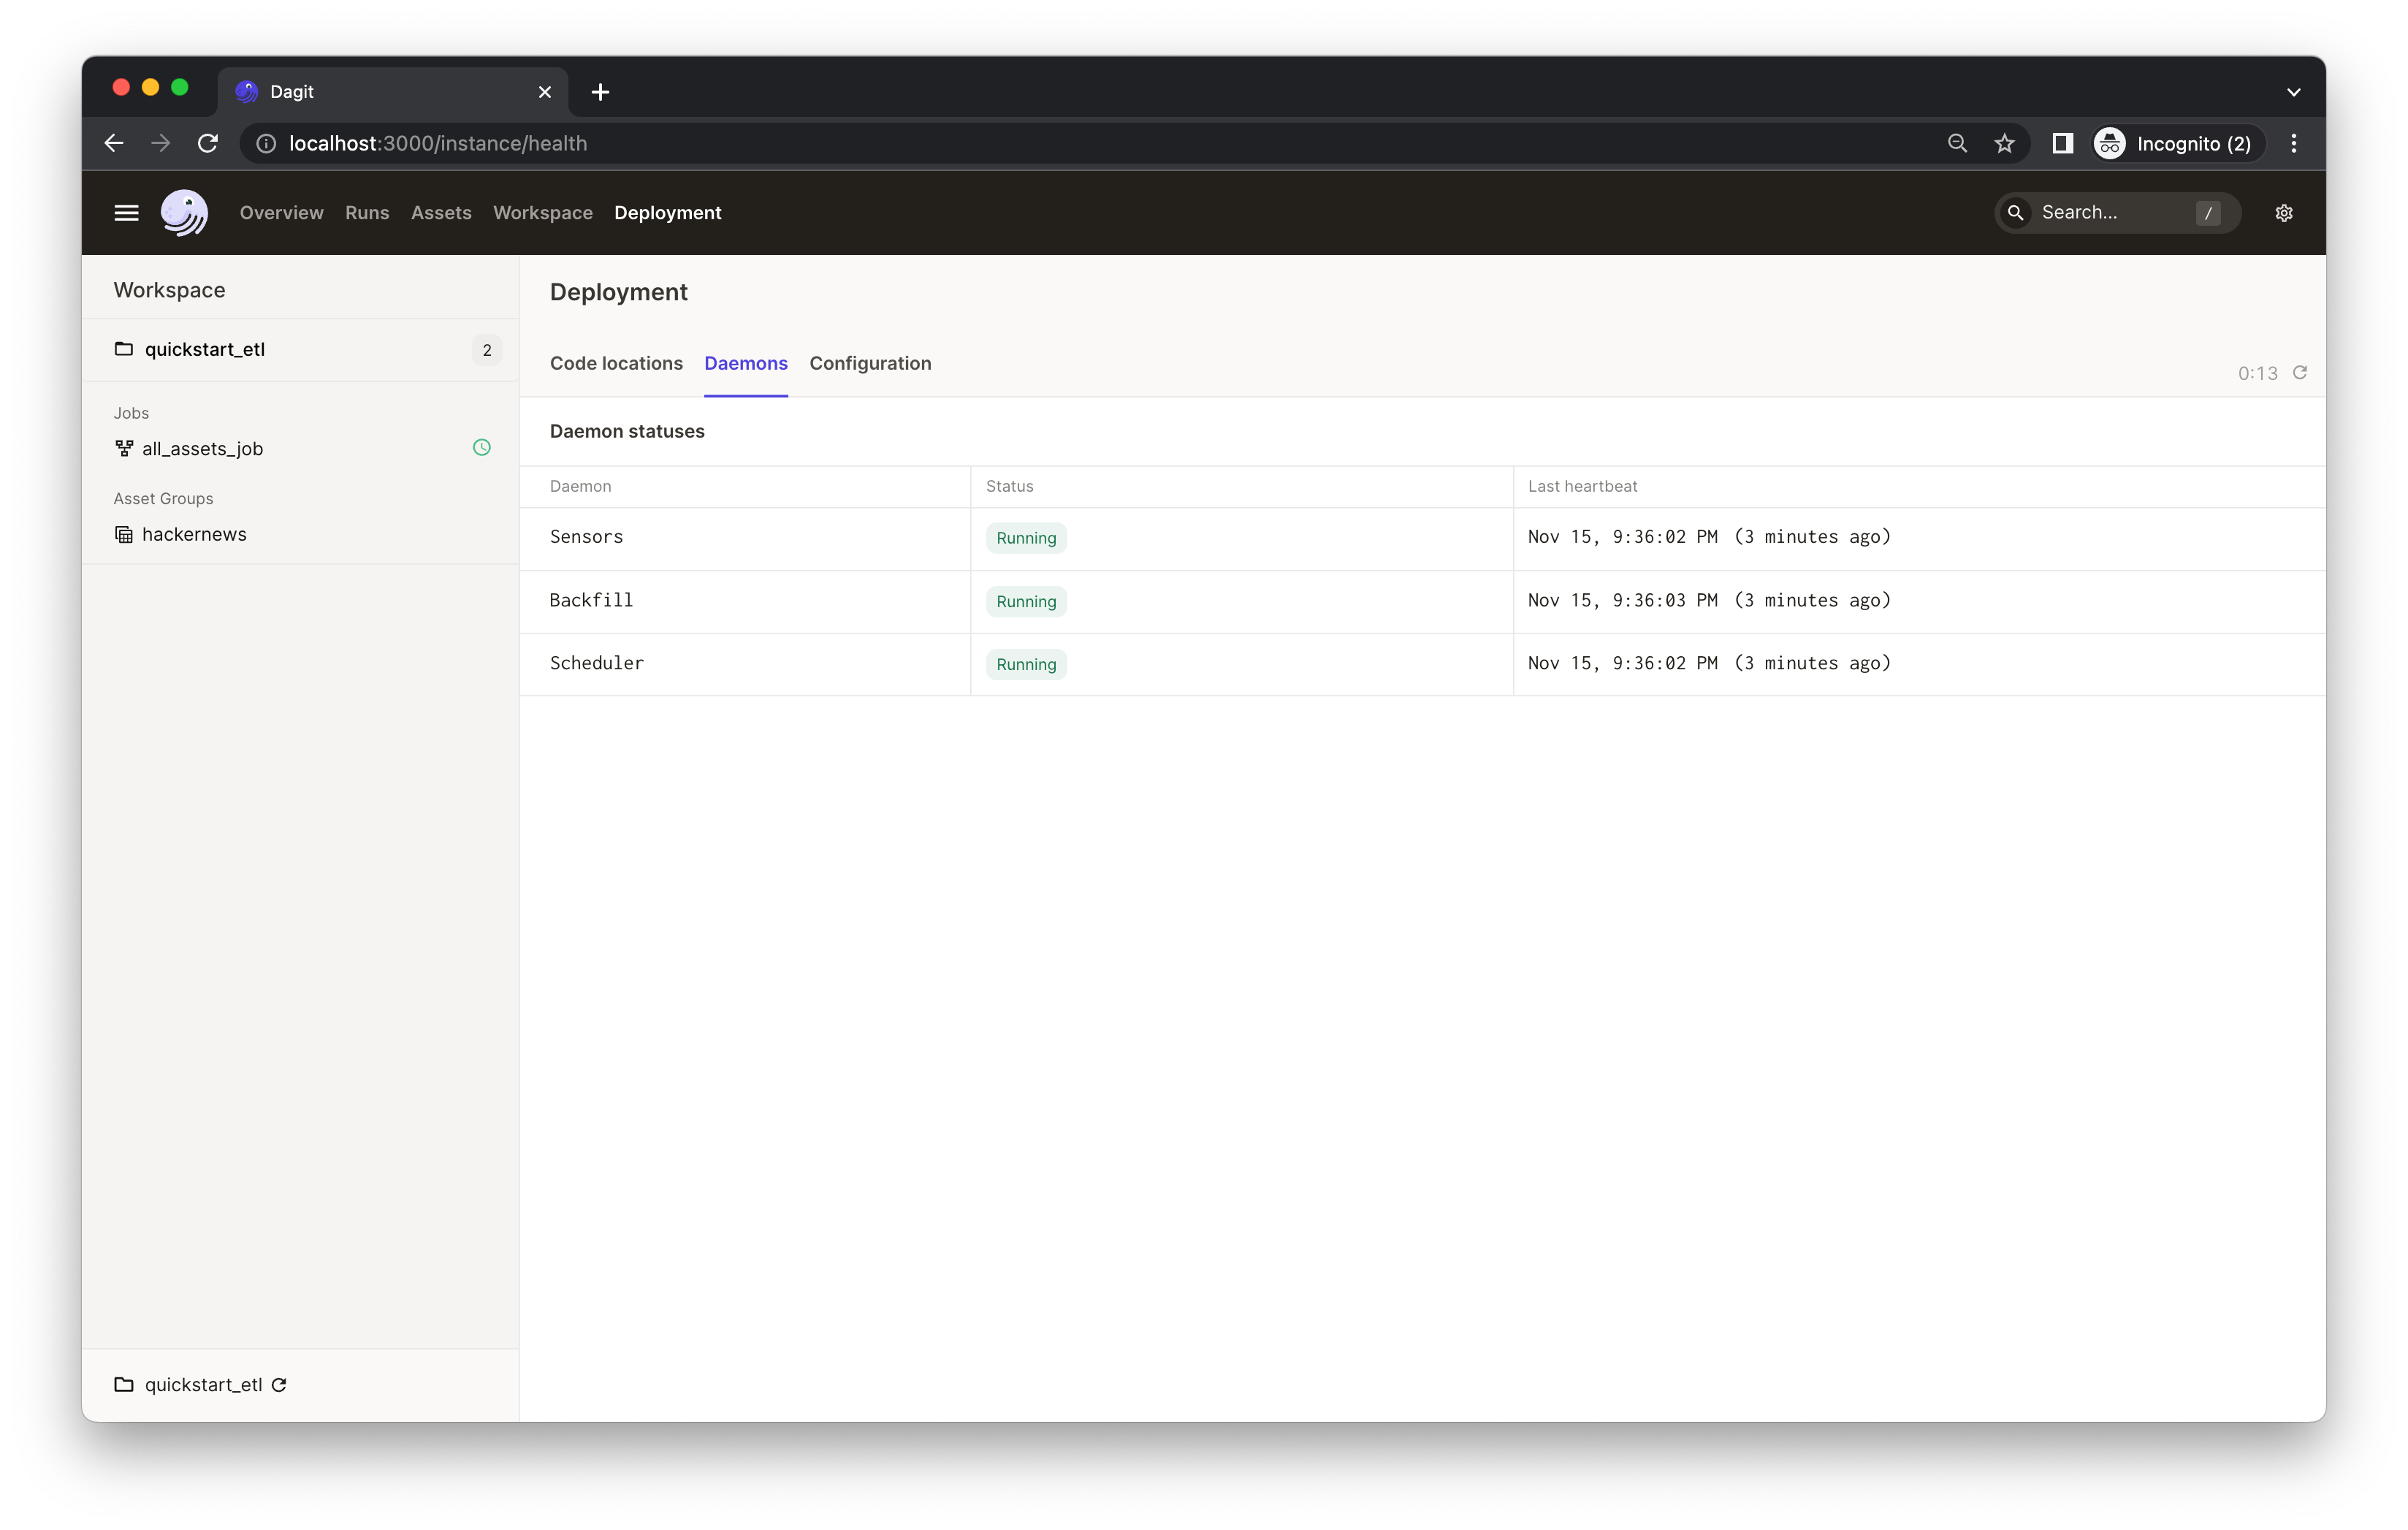 202 |
202 |
203 |
204 |
207 |
208 |
209 | Congratulations 🎉 You now have a daily job running in production!
210 |
211 | ---
212 | ## Learning more
213 |
214 | ### Changing the code locally
215 |
216 | When developing pipelines locally, be sure to click the **Reload definition** button in the Dagster UI after you change the code. This ensures that Dagster picks up the latest changes you made.
217 |
218 | You can reload the code using the **Deployment** page:
219 | 👈 Expand to view the screenshot
220 |
221 |
222 | 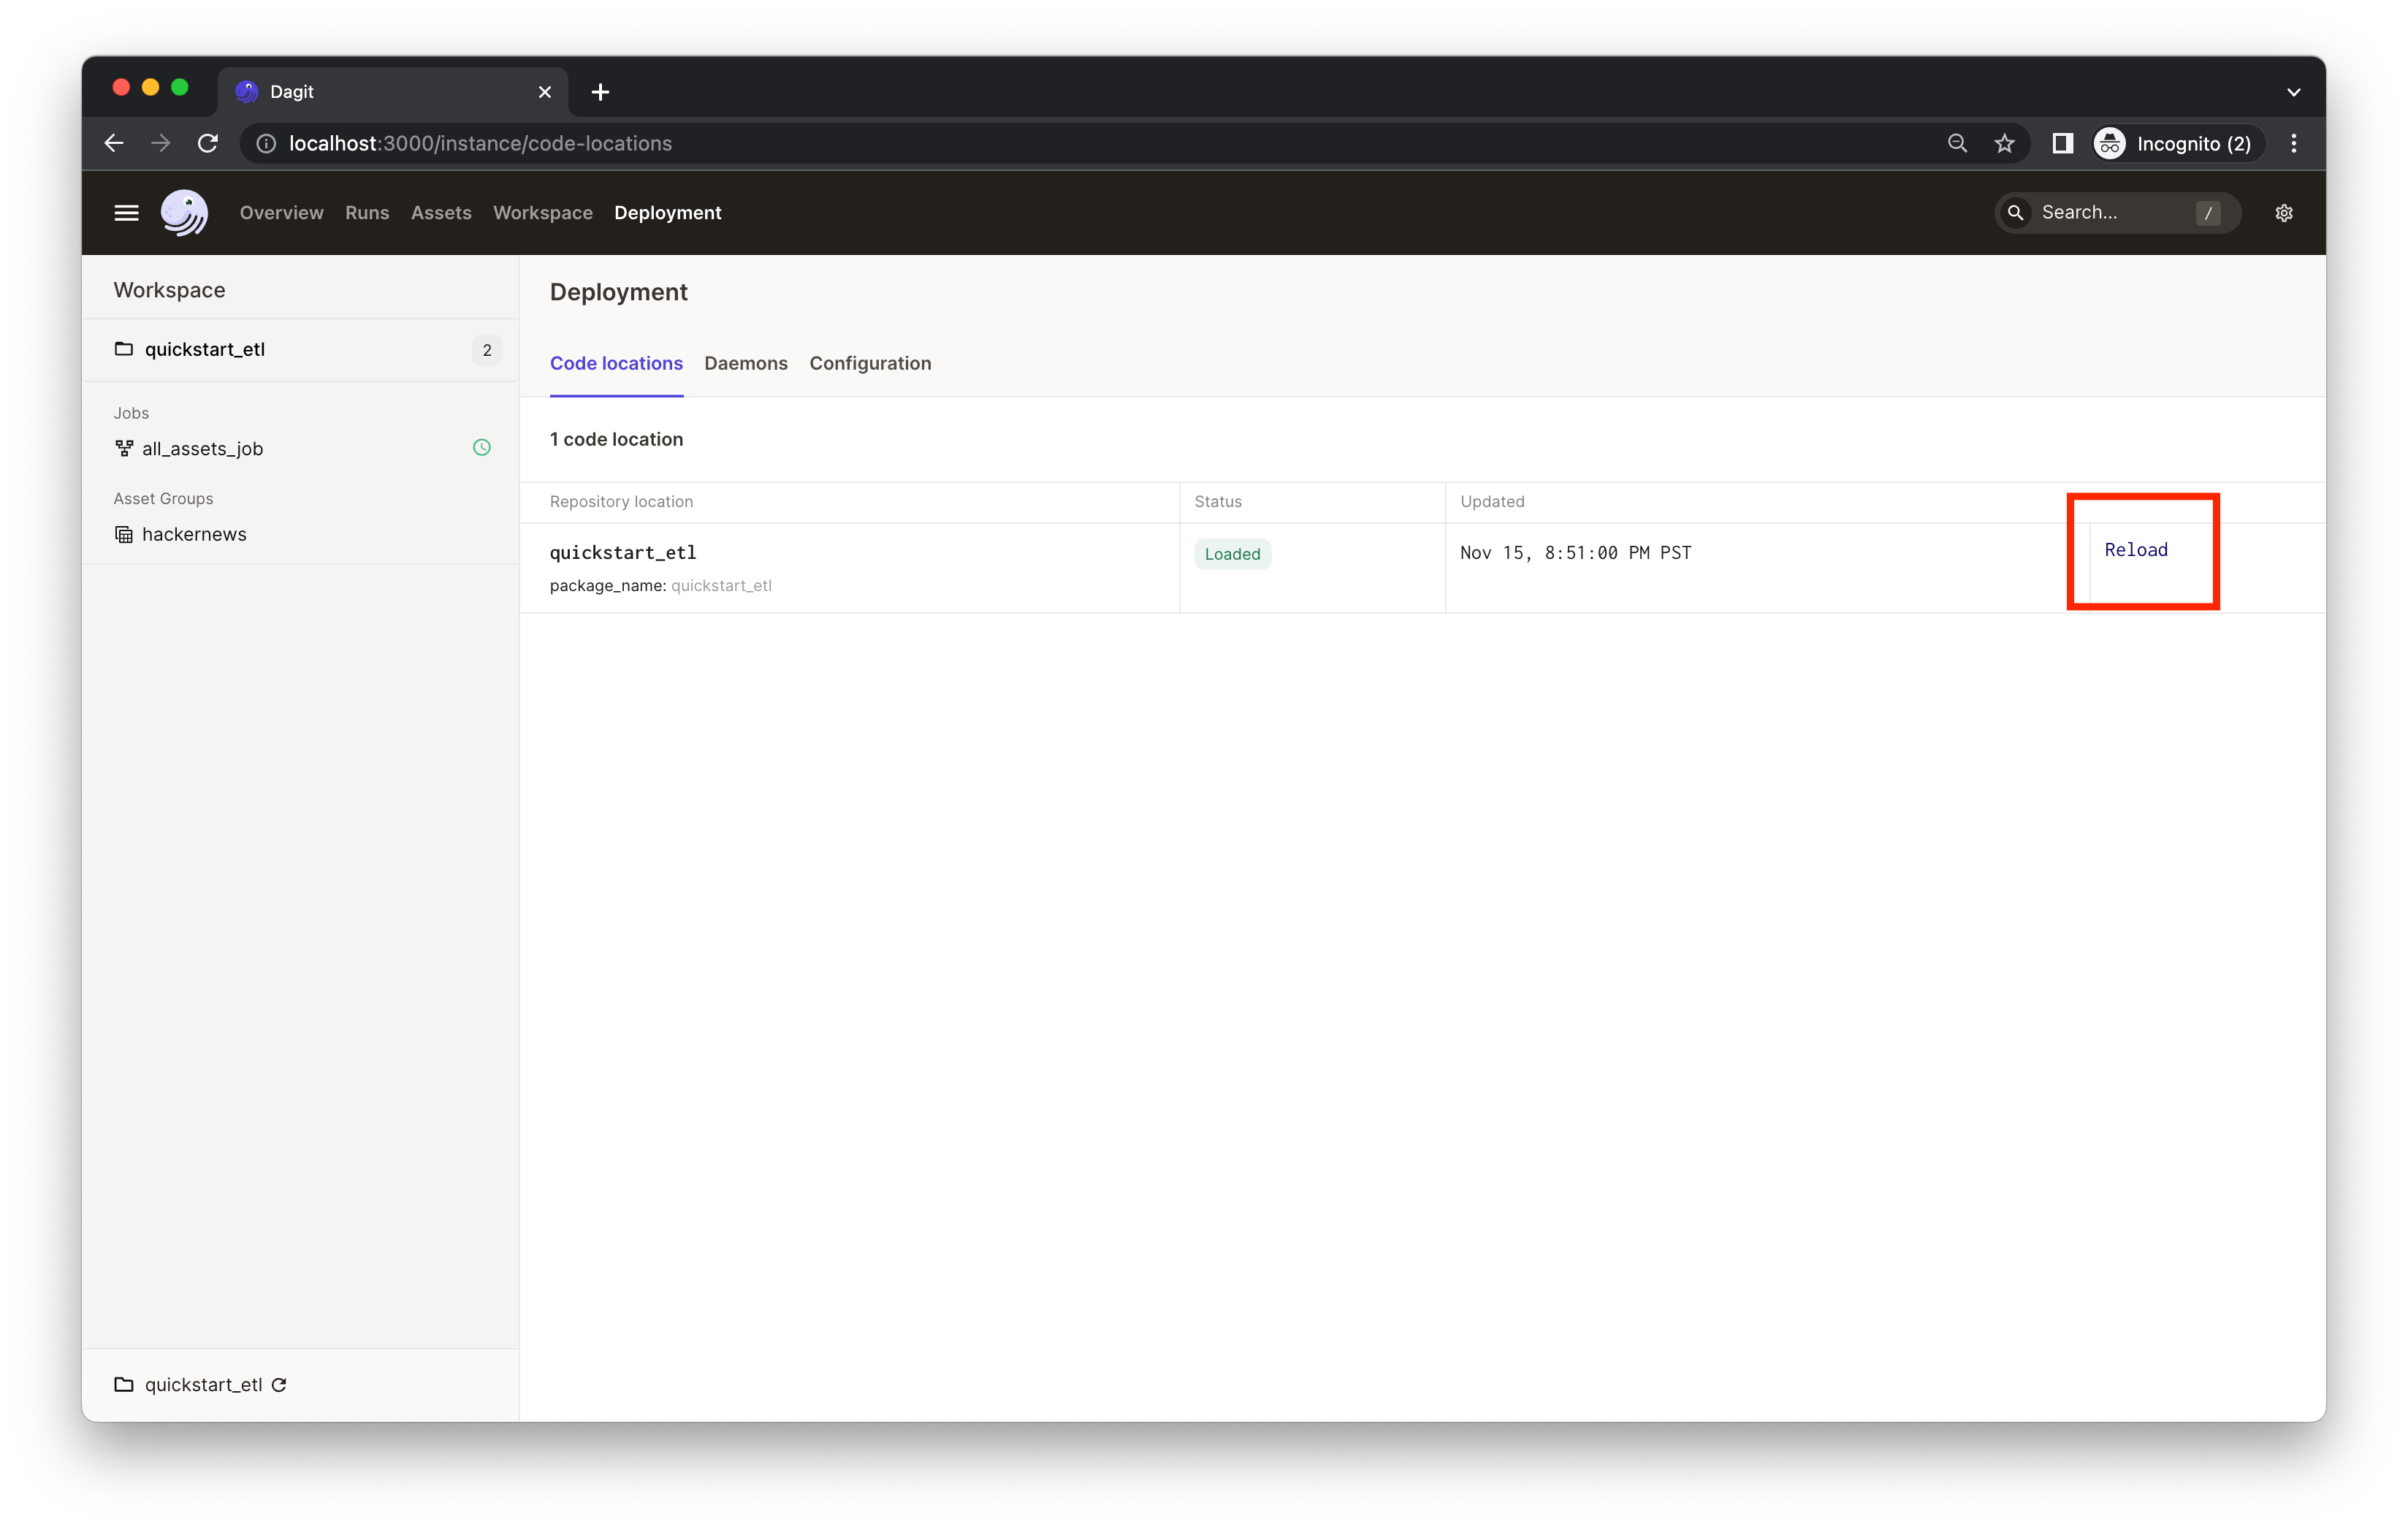 223 |
223 |
224 |
225 | 👈 Expand to view the screenshot
229 |
230 |
231 |  232 |
232 |
233 |
234 |