├── docs
├── .gitignore
├── _config.yml
├── _includes
│ ├── footer.md
│ ├── header.md
│ └── nav.html
├── assets
│ └── css
│ │ └── style.scss
├── diagram.md
├── index.md
├── services.md
├── variables.md
├── controllers.md
└── installation.md
├── businesslogic
├── resources
│ └── img
│ │ └── diagram.png
├── console
│ └── controllers
│ │ └── ExampleConsoleController.php
├── services
│ └── Example.php
├── variables
│ └── BusinessLogicVariable.php
├── BusinessLogic.php
└── controllers
│ └── ExampleController.php
├── LICENSE.md
└── README.md
/docs/.gitignore:
--------------------------------------------------------------------------------
1 | .idea
2 | .DS_Store
3 |
--------------------------------------------------------------------------------
/docs/_config.yml:
--------------------------------------------------------------------------------
1 | theme: jekyll-theme-cayman
--------------------------------------------------------------------------------
/docs/_includes/footer.md:
--------------------------------------------------------------------------------
1 | ---
2 |
3 | {% include nav.html %}
4 |
--------------------------------------------------------------------------------
/docs/_includes/header.md:
--------------------------------------------------------------------------------
1 | {% include nav.html %}
2 |
3 | ---
4 |
--------------------------------------------------------------------------------
/businesslogic/resources/img/diagram.png:
--------------------------------------------------------------------------------
https://raw.githubusercontent.com/doublesecretagency/craft-businesslogic/HEAD/businesslogic/resources/img/diagram.png
--------------------------------------------------------------------------------
/docs/assets/css/style.scss:
--------------------------------------------------------------------------------
1 | ---
2 | ---
3 |
4 | @import "{{ site.theme }}";
5 |
6 | .main-content {
7 | padding: 1.5rem 6rem 0.5rem;
8 | }
9 |
10 | .page-header {
11 | padding: 1rem 2rem;
12 | .project-name {
13 | display: none;
14 | }
15 | .project-tagline {
16 | margin-top: 1rem;
17 | font-size: 2.1rem;
18 | opacity: 0.8;
19 | }
20 | }
21 |
22 | .site-footer {
23 | display: none;
24 | }
25 |
26 | .nav {
27 | margin: 1.5rem;
28 | text-align: center;
29 | font-weight: bold;
30 | }
31 |
32 | .highlight .err {
33 | background-color: transparent;
34 | }
35 |
--------------------------------------------------------------------------------
/businesslogic/console/controllers/ExampleConsoleController.php:
--------------------------------------------------------------------------------
1 |
2 | Overview •
3 | Installation •
4 | Diagram
5 | ||
6 | Variables •
7 | Controllers •
8 | Services
9 |
10 |
--------------------------------------------------------------------------------
/docs/diagram.md:
--------------------------------------------------------------------------------
1 | {% include header.md %}
2 |
3 | # The Anatomy of a Module
4 |
5 | Modules and plugins come in various shapes and sizes. This diagram simply illustrates the _most common_ components, and how they all tie together.
6 |
7 | 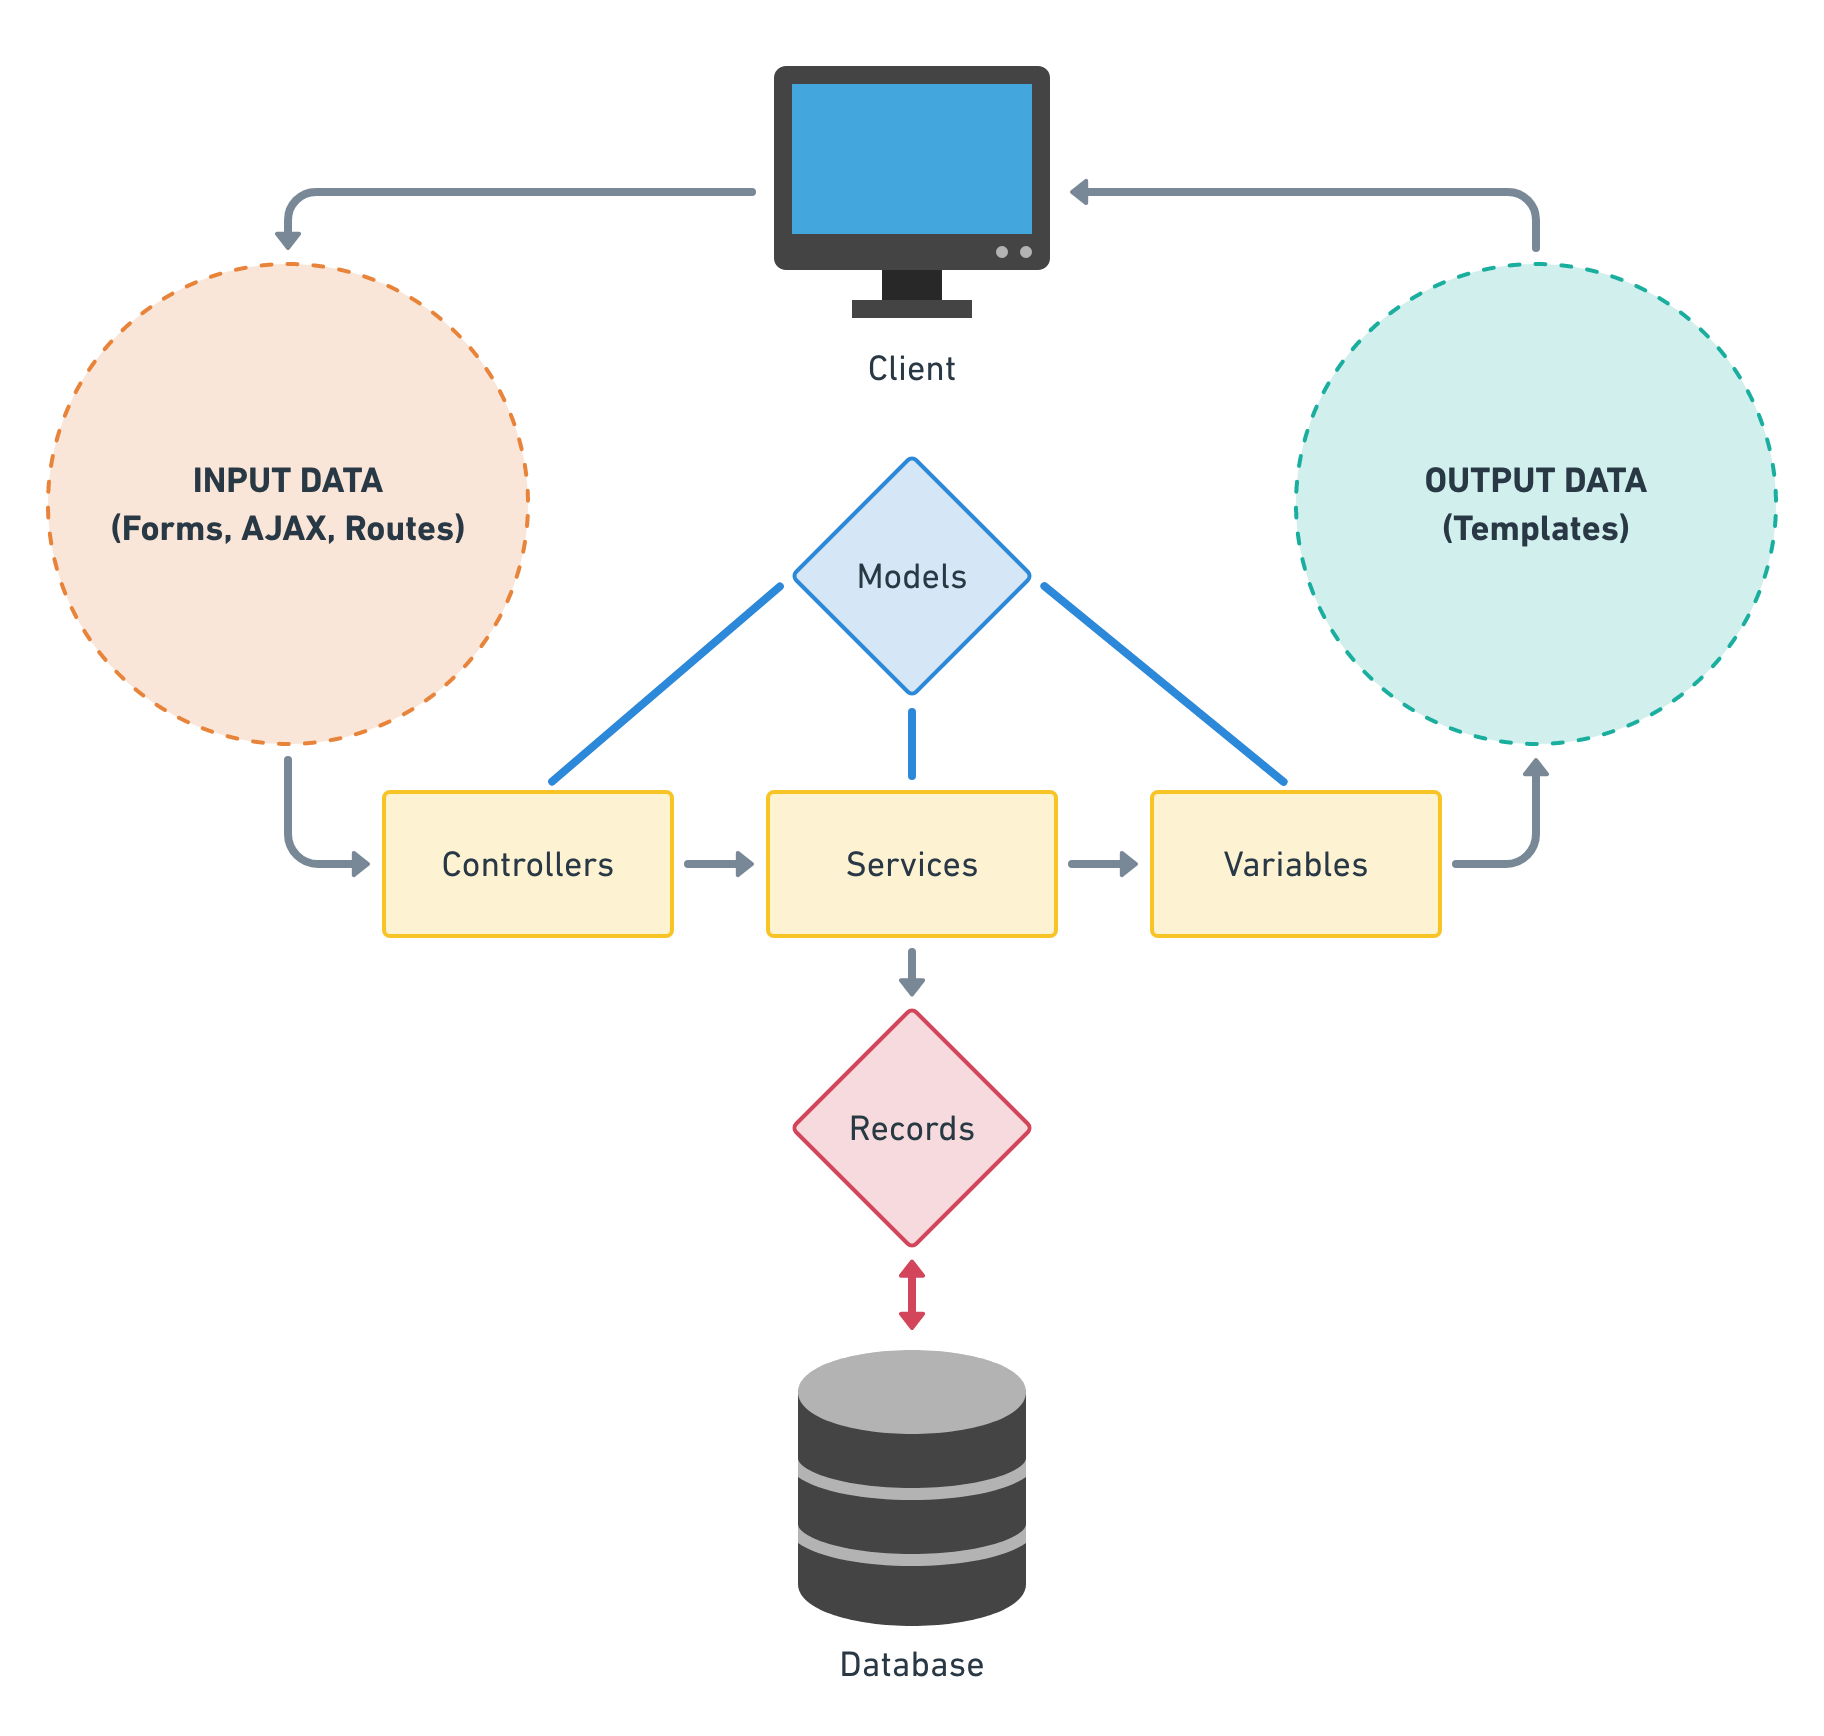
8 |
9 | **Controllers** receive data input from the front-end, whereas **variables** output data into your Twig templates. **Services** do most of the complex work in between.
10 |
11 | **Models** and **records** (not included in this module template) are more traditional objects, containing data about a specific "thing". Records are designed to read & write rows to the database, whereas models are simply useful containers for passing objects around between components.
12 |
13 | {% include footer.md %}
14 |
--------------------------------------------------------------------------------
/LICENSE.md:
--------------------------------------------------------------------------------
1 | The MIT License (MIT)
2 |
3 | Copyright (c) Double Secret Agency
4 |
5 | Permission is hereby granted, free of charge, to any person obtaining a copy
6 | of this software and associated documentation files (the "Software"), to deal
7 | in the Software without restriction, including without limitation the rights
8 | to use, copy, modify, merge, publish, distribute, sublicense, and/or sell
9 | copies of the Software, and to permit persons to whom the Software is
10 | furnished to do so, subject to the following conditions:
11 |
12 | The above copyright notice and this permission notice shall be included in all
13 | copies or substantial portions of the Software.
14 |
15 | THE SOFTWARE IS PROVIDED "AS IS", WITHOUT WARRANTY OF ANY KIND, EXPRESS OR
16 | IMPLIED, INCLUDING BUT NOT LIMITED TO THE WARRANTIES OF MERCHANTABILITY,
17 | FITNESS FOR A PARTICULAR PURPOSE AND NONINFRINGEMENT. IN NO EVENT SHALL THE
18 | AUTHORS OR COPYRIGHT HOLDERS BE LIABLE FOR ANY CLAIM, DAMAGES OR OTHER
19 | LIABILITY, WHETHER IN AN ACTION OF CONTRACT, TORT OR OTHERWISE, ARISING FROM,
20 | OUT OF OR IN CONNECTION WITH THE SOFTWARE OR THE USE OR OTHER DEALINGS IN THE
21 | SOFTWARE.
--------------------------------------------------------------------------------
/businesslogic/services/Example.php:
--------------------------------------------------------------------------------
1 | example->exampleService()
39 | *
40 | */
41 | public function exampleService()
42 | {
43 | return "I've got your data right here!";
44 | }
45 |
46 | }
47 |
--------------------------------------------------------------------------------
/businesslogic/variables/BusinessLogicVariable.php:
--------------------------------------------------------------------------------
1 | getRequest()->getIsConsoleRequest()) {
41 | $this->controllerNamespace = 'modules\\businesslogic\\console\\controllers';
42 | }
43 |
44 | // Register services
45 | $this->setComponents([
46 | 'example' => Example::class,
47 | ]);
48 |
49 | // Register variables
50 | Event::on(
51 | CraftVariable::class,
52 | CraftVariable::EVENT_INIT,
53 | function (Event $event) {
54 | $variable = $event->sender;
55 | $variable->set('businessLogic', BusinessLogicVariable::class);
56 | }
57 | );
58 |
59 | }
60 |
61 | }
62 |
--------------------------------------------------------------------------------
/docs/index.md:
--------------------------------------------------------------------------------
1 | {% include header.md %}
2 |
3 | # Overview
4 |
5 | Craft 3 introduced the concept of a **module**, which didn't previously exist in Craft 2. Back then, custom business logic was simply packaged into a unique plugin, and tossed into the `/plugins` directory alongside all of your other plugins.
6 |
7 | But now, the branches have diverged. In Craft 3, a plugin is (almost always) something that was downloaded via the Plugin Store. Plugins are broadly purposed, to accommodate the needs of many sites instead of just one. Gone are the days of adding a custom plugin alongside your other downloaded plugins.
8 |
9 | Instead, you'll want to install a module to accommodate your site's custom business logic. For all intents and purposes, a module is nearly identical to a plugin in Craft 3. While the architecture between the two is very similar, there are distinct pros & cons of using a module instead of a plugin.
10 |
11 | ## Pros
12 |
13 | - **It is more integral to your site.** While the rest of your plugins are more ephemeral (the files can be destroyed and replaced), a module is as tightly tied to your project as any of your Twig templates. You'll likely keep your `vendor` folder ignored by Git, but your `modules` folder will be fully committed.
14 | - **It can't be disabled and/or uninstalled.** Which is probably a good thing, if the logic is integral to your site working properly.
15 |
16 | ## Cons
17 |
18 | - **It's harder to share with other projects.** Not impossible, but harder. However, that's usually a non-issue for custom business logic, where the functionality is geared _specifically_ to the needs of just one particular site.
19 | - **There's no native "Settings" page or CP section.** Most modules won't need these things anyway. And if you do, creating your own CP section or "Settings" page isn't too bad.
20 |
21 | It's worth noting that the architecture of this Business Logic Module is designed to _exactly_ match the standard architecture of a plugin. You could theoretically use this module template to develop a plugin, just as easily as you can with a module.
22 |
23 | {% include footer.md %}
24 |
--------------------------------------------------------------------------------
/docs/services.md:
--------------------------------------------------------------------------------
1 | {% include header.md %}
2 |
3 | # Services
4 |
5 | Your service methods are a blank slate. What they do, and how they do it, are 100% up to you. While this component is the easiest to describe, it is ultimately the most open and flexible piece of the module puzzle.
6 |
7 | ```php
8 | public function myFunction()
9 | {
10 | return "This can return literally anything.";
11 | }
12 | ```
13 |
14 | You can call a service method from any other PHP file. In fact, it's very common for other components to frequently refer back to service methods, in order to lighten the load for other, more specialized tasks.
15 |
16 | ```php
17 | BusinessLogic::$instance->myServices->myFunction()
18 | ```
19 |
20 | For example, it's extremely common for variable methods to simply serve as a wrapper for a service method. This allows you to call up some complex PHP logic from a Twig template, with the variable method acting as the middleman.
21 |
22 | Similarly, you can (and often will) call a service method from within a controller action. This allows the controller action to focus on its core task, responding to a request from the front-end.
23 |
24 | ## Why use a service method
25 |
26 | You can use service method methods for whatever you like, but these are some of the best reasons for doing so:
27 |
28 | 1. **Your logic is very complex.** Any logic more than a few lines long is a reasonable candidate for being moved to a service method.
29 | 2. **You need to write to the database.** If you have a need to write to the database, or interact with records in any meaningful way, then the best place to do so is within a service method.
30 | 3. **You want the logic to be reusable.** You may have a chunk of code which needs to be called from separate places (ie: multiple controller actions). This makes the logic a good candidate for being offloaded to a service method.
31 | 4. **You want to access the logic from an external plugin or module.** Putting your logic in a service method makes it more easily available from other places.
32 |
33 | ---
34 |
35 | It's impossible to cover every scenario for service methods. Within the context of PHP, the possibilities are endless!
36 |
37 | {% include footer.md %}
38 |
--------------------------------------------------------------------------------
/docs/variables.md:
--------------------------------------------------------------------------------
1 | {% include header.md %}
2 |
3 | {% raw %}
4 | # Variables
5 |
6 | The absolute simplest part of the module puzzle is the variable file. It allows you to quickly and easily render a value from PHP into a Twig template. The implementation can be as complex as you need or want it to be, but ultimately it's just a very simple tool for outputting a value to Twig.
7 |
8 | Before you dive too deep, it's worth noting that many variable methods (especially the more complex ones) are simply wrappers for a related service method...
9 |
10 | ```php
11 | public function myFunction($myVariable)
12 | {
13 | return BusinessLogic::$instance->myServices->myFunction($myVariable);
14 | }
15 | ```
16 |
17 | You certainly don't _need_ to refer to a service method. If you want, all of your processing can be done within the variable method itself. But if you intend to write complex logic, or interact with records in a meaningful way, it's _highly_ recommended that you offload that logic to a services method.
18 |
19 | ---
20 |
21 | ## Basic example
22 |
23 | In its simplest form, a variable method can simply return a static value.
24 |
25 | ```php
26 | public function helloWorld()
27 | {
28 | return "Hello World";
29 | }
30 | ```
31 |
32 | ```twig
33 | {# Outputs "Hello World" #}
34 | {{ craft.businessLogic.helloWorld }}
35 | ```
36 |
37 | ## Intermediate example
38 |
39 | More often, you'll use the variable to perform a simple task in PHP. Think of it like a Twig macro, but with all of the capabilities of PHP at your fingertips.
40 |
41 | ```php
42 | public function add($a, $b)
43 | {
44 | return $a + $b;
45 | }
46 | ```
47 |
48 | ```twig
49 | {# Outputs "7" #}
50 | {{ craft.businessLogic.add(3, 4) }}
51 | ```
52 |
53 | You can also `set` the returned value, and use it for more complicated purposes...
54 |
55 | ```twig
56 | {% set firstNumber = craft.businessLogic.add(3, 4) %}
57 | {% set secondNumber = craft.businessLogic.add(5, 6) %}
58 |
59 | {# Adds 7 + 11, outputs "18" #}
60 | {{ firstNumber + secondNumber }}
61 | ```
62 |
63 | ## Expert example
64 |
65 | It's worth mentioning that a variable method can return **any type**. The examples above show how to get a string or number, but you could also use variables to get an array or object!
66 |
67 | ```php
68 | public function authorEntries($userId)
69 | {
70 | $entries = \craft\elements\Entry::find()
71 | ->authorId($userId)
72 | ->all();
73 | }
74 | ```
75 |
76 | ```twig
77 | {# Get an array of entries written by the current user #}
78 | {% set entries = craft.businessLogic.authorEntries(currentUser.id) %}
79 | ```
80 |
81 | ---
82 |
83 | How you use the variable is completely up to you. Remember, if the logic gets too complex, offload it to a service method!
84 | {% endraw %}
85 |
86 | {% include footer.md %}
87 |
--------------------------------------------------------------------------------
/docs/controllers.md:
--------------------------------------------------------------------------------
1 | {% include header.md %}
2 |
3 | # Controllers
4 |
5 | The job of a controller is to listen for a request from the front-end, take the appropriate action, and return (or redirect) with its response. It serves as a reactionary mechanism for front-end calls.
6 |
7 | Controllers are full of `actions`, which are the methods that specifically handle requests. A method _must_ begin with the prefix "action" in order to handle a request from the front-end.
8 |
9 | There are three main purposes for a controller action...
10 |
11 | 1. Handle a form submission.
12 | 2. Handle an AJAX call.
13 | 3. Handle a complex routing maneuver.
14 |
15 | ## Forms
16 |
17 | Craft has a series of standard controller actions built in, and all forms in the control panel submit to those pre-defined actions. It's possible for you to submit to those same controller actions from a front-end form... indeed, this is what Craft advises when you need to manage [entries](https://docs.craftcms.com/v3/dev/examples/entry-form.html) or [users](https://docs.craftcms.com/v3/dev/examples/user-profile-form.html) from the front-end.
18 |
19 | But if you need to create a form which handles custom behavior, you'll want it to submit to a custom form action. Submitting your form to a custom controller action allows you to manage the submitted data in any way that you want. This might be a good solution for submitting data that goes beyond a simple entry or user submission.
20 |
21 | ## AJAX
22 |
23 | Similarly, you can handle data submitted via an AJAX call. It's possible for you to require that the data was submitted in JSON format, and/or return the response in JSON as well. What you do with the data is entirely up to you.
24 |
25 | ## Routes
26 |
27 | Occasionally, you may want to trigger some fancy behavior while navigating between two pages on the front-end. It's possible to route directly to a controller action, perform some custom PHP behavior, then continue on (or be redirected) to your final destination. If the route logic does not redirect to another URL, it can end by rendering a Twig template with some newly-declared variable values.
28 |
29 | ## Console controllers
30 |
31 | Console controllers allow you to trigger controller actions via your own custom Craft console commands, for things like scheduled tasks run by CRON. They work in a similar way to web controllers but live in `console/controllers` and are run via command line, e.g. `./craft businesslogic/example-console/example`.
32 |
33 | ---
34 |
35 | ## Anonymous requests
36 |
37 | By default, a user must be logged into Craft to ping a controller action. That doesn't inherently mean they need to be an _admin_, just that they need to be a logged in user of any kind.
38 |
39 | However, it's possible to circumvent this and allow anonymous users to reach these controller actions. By setting the [`$allowAnonymous` property](https://docs.craftcms.com/api/v3/craft-web-controller.html#allowanonymous), you can allow anonymous access to specific (or all) controller actions.
40 |
41 | ---
42 |
43 | As always, you may want to offload some of your logic to service methods if the controller action becomes too complex. Let the controller focus on handling the request, and process the heavy duty logic elsewhere!
44 |
45 | {% include footer.md %}
46 |
--------------------------------------------------------------------------------
/README.md:
--------------------------------------------------------------------------------
1 | **Want to learn how modules work?** Check out the [complete documentation...](https://doublesecretagency.github.io/craft-businesslogic)
2 |
3 | ---
4 |
5 | # Business Logic module template for Craft CMS
6 |
7 | _It's a module about nothing..._
8 |
9 | ## Uhh... what?
10 |
11 | When building a Craft website for your clients, you may find that you occasionally need to write some quick PHP to solve a problem. The good news... Craft lets you write any PHP you want via a custom plugin or module! The bad news... Putting together a module just to write some simple business logic can be kind of a pain, and the effort often feels like overkill.
12 |
13 | ## What do you mean by "business logic"?
14 |
15 | The term **business logic** is common in the software world... It basically means, "any processing logic which is unique to this specific company".
16 |
17 | It's a boring topic, so [I'll let Wikipedia explain it...](https://en.wikipedia.org/wiki/Business_logic)
18 |
19 | ## So really, what does this module do?
20 |
21 | It does whatever you want it to do. It's a very simple **template**, designed to give you the basic tools you need to create a quick PHP-based interaction with the rest of your website. What you write inside this module is entirely up to you, and we expect that every website will have its own unique implementation. Go nuts!
22 |
23 | ## What's included?
24 |
25 | ### Variables
26 |
27 | If you just need to pull some data into your template, or want to run a quick process before handing an array (or string, or whatever) back to your template, then variables might be the way to go! [More about Variables...](https://doublesecretagency.github.io/craft-businesslogic/variables)
28 |
29 | ### Controllers
30 |
31 | You might need a submitted form to do something special, or have an AJAX call with some simple back-end logic to sort out. Putting that stuff into a controller will let you work your magic behind the scenes. [More about Controllers...](https://doublesecretagency.github.io/craft-businesslogic/controllers)
32 |
33 | ### Services
34 |
35 | No serious module is complete without a services layer. When things start to get a little crazy with your business logic, try moving large chunks of it to the services file. And if you decide that you need to create any records (or interact with the database at all), then you'll definitely want to put that logic into the services file! [More about Services...](https://doublesecretagency.github.io/craft-businesslogic/services)
36 |
37 | ## What _isn't_ included?
38 |
39 | Field Types, Records, Models, Element Types... Basically anything that seems unnecessary for the vast majority of business logic needs. If you're capable of determining that your business logic requires something as complex as an Element Type, we figure that you're smart enough to know how to build it from scratch.
40 |
41 | ***
42 |
43 | ## How to Install
44 |
45 | For complete installation instructions, check out [the docs...](https://doublesecretagency.github.io/craft-businesslogic/installation)
46 |
47 | ***
48 |
49 | ## Fork Me!
50 |
51 | Think this template can be improved? Go ahead and fork it! Pull requests are welcome, just keep a few simple goals in mind...
52 |
53 | - This module is designed to be ultra **simple**!
54 | - Only the basic needs of business logic need to be met... If a developer requires something more complex, it's assumed that they are capable enough to add those features.
55 | - Documentation is important! The components of this plugin should explain what they do, so any Craft noob can figure out how to shove some quick PHP in there and be on their merry way.
56 |
57 | ***
58 |
59 | Thanks for checking it out! And feel free to also grab [our favorite plugin of all time...](https://github.com/mattstauffer/happybrad)
60 |
--------------------------------------------------------------------------------
/businesslogic/controllers/ExampleController.php:
--------------------------------------------------------------------------------
1 |
48 | *
49 | * The action path follows this format:
50 | *
51 | * business-logic//
52 | *
53 | * In this case, the handles should be kebab-cased, and omit "Controller" and "action" (respectively).
54 | *
55 | */
56 | public function actionExampleFormSubmit()
57 | {
58 | $this->requirePostRequest();
59 | $request = Craft::$app->getRequest();
60 | $lorem = $request->getBodyParam('lorem');
61 | $ipsum = $request->getBodyParam('ipsum');
62 | // ... whatever you want to do with the submitted data...
63 | $this->redirect('thank/you/page');
64 | }
65 |
66 | /**
67 | * When you need AJAX, this is how to do it.
68 | *
69 | * HOW TO USE IT
70 | * In your front-end JavaScript, POST your AJAX call like this:
71 | *
72 | * // example uses jQuery
73 | * $.post('actions/business-logic/example/example-ajax' ...
74 | *
75 | * Or if your module is doing something within the control panel,
76 | * you've got a built-in function available which Craft provides:
77 | *
78 | * Craft.postActionRequest('business-logic/example/example-ajax' ...
79 | *
80 | */
81 | public function actionExampleAjax()
82 | {
83 | $this->requirePostRequest();
84 | $this->requireAcceptsJson();
85 | $request = Craft::$app->getRequest();
86 | $lorem = $request->getBodyParam('lorem');
87 | $ipsum = $request->getBodyParam('ipsum');
88 | // ... whatever your AJAX does...
89 | $response = ['response' => 'Round trip via AJAX!'];
90 | return $this->asJson($response);
91 | }
92 |
93 | /**
94 | * Routing lets you set extra variables when you load a Twig template.
95 | *
96 | * HOW TO USE IT
97 | * Put this in your config/routes.php file:
98 | *
99 | * 'your/route' => 'business-logic/example/example-route'
100 | *
101 | * Optionally, you can specify dynamic parameters as part of the route:
102 | *
103 | * 'your/route//' => 'business-logic/example/example-route'
104 | *
105 | * If you specify dynamic parameters, pass those values directly into your function.
106 | * The variable names must match the specified tokens.
107 | *
108 | * actionExampleRoute($lorem, $ipsum)
109 | *
110 | */
111 | public function actionExampleRoute()
112 | {
113 | // ... whatever your route accomplishes...
114 | $twigVariable = 'I added this with a route!';
115 | return $this->renderTemplate('your/destination/template', [
116 | 'twigVariable' => $twigVariable
117 | ]);
118 | }
119 |
120 | }
121 |
--------------------------------------------------------------------------------
/docs/installation.md:
--------------------------------------------------------------------------------
1 | {% include header.md %}
2 |
3 | # Installation
4 |
5 | Installing a module in Craft 3 is a little more complex than installing a plugin in Craft 2. You can't simply add the folder in the right place and move on, there is a small amount of additional configuration required.
6 |
7 | ## Step 1: Add the files
8 |
9 | 1. Download this repo and unzip it.
10 | 2. Move the entire `businesslogic` folder into your `modules` directory.
11 |
12 | If you put everything in the right place, it should look like this:
13 |
14 | ```
15 | modules/
16 | businesslogic/
17 | controllers/
18 | resources/
19 | services/
20 | variables/
21 | BusinessLogic.php
22 | ```
23 |
24 | 💡 **Tip:** Need multiple modules? Just make a copy of the whole `businesslogic` folder and change the name! Make sure you consistently change all the naming and namespaces throughout your duplicate module.
25 |
26 | ## Step 2: Add to config
27 |
28 | There are three places you _could_ do this, but it's only necessary in one. Which one you choose depends on how you are using the module.
29 |
30 | - `config/web.php` - If you only intend to use the module for _web requests_, you can add it here.
31 | - `config/console.php` - If you only intend to use the module for _console requests_, you can add it here.
32 | - `config/app.php` - **This is the most likely place to add it.** The `app.php` file comes with Craft by default, and applies to _all scenarios_ where you may want to be using a custom module.
33 |
34 | Once you've determined which config file you want to use, add these settings...
35 |
36 | ```php
37 | use modules\businesslogic\BusinessLogic;
38 |
39 | return [
40 | 'modules' => [
41 | 'businesslogic' => BusinessLogic::class,
42 | ],
43 | 'bootstrap' => [
44 | 'businesslogic',
45 | ]
46 | ];
47 | ```
48 |
49 | If this is going to be your only module, you can **replace** the existing config settings with the ones shown above.
50 |
51 | ## Step 3: Add to Composer
52 |
53 | Lastly, double-check that your `composer.json` file includes the following `autoload` settings...
54 |
55 | ```javascript
56 | "autoload": {
57 | "psr-4": {
58 | "modules\\": "modules/"
59 | }
60 | },
61 | ```
62 |
63 | It should already look like this if you haven't changed anything, since this is how it's configured in a default Craft install.
64 |
65 | Once you've done all of these things, you will want to update the Composer autoload mapping. Via command line, navigate to your project's root and enter this command...
66 |
67 | ```
68 | composer dump-autoload -a
69 | ```
70 |
71 | This will rebuild Composer's autoload mapping, allowing it to recognize your new module.
72 |
73 | ## Testing
74 |
75 | Once you've got everything set up, you'll want to make sure it's wired up properly. As a simple test, we're going to hide the "All Entries" option from the Entries index page. (Don't worry, you can remove this test code afterwards!)
76 |
77 | Open up the following file:
78 |
79 | ```
80 | modules/businesslogic/BusinessLogic.php
81 | ```
82 |
83 | Put these lines near the top of the file...
84 |
85 | ```php
86 | use craft\elements\Entry;
87 | use craft\events\RegisterElementSourcesEvent;
88 | ```
89 |
90 | And put this in the existing `init` method...
91 |
92 | ```php
93 | // Modify entry sources
94 | Event::on(
95 | Entry::class,
96 | Entry::EVENT_REGISTER_SOURCES,
97 | function(RegisterElementSourcesEvent $event) {
98 | if ($event->context === 'index') {
99 | // Remove "All Entries" nav option
100 | foreach ($event->sources as $i => $source) {
101 | if (isset($source['key']) && ('*' == $source['key'])) {
102 | unset($event->sources[$i]);
103 | }
104 | }
105 | }
106 | }
107 | );
108 | ```
109 |
110 | Finally, visit the Entries section in your control panel. If everything is working properly, the "All Entries" nav option will be gone! You will only see direct links to each individual section.
111 |
112 | This change should take place immediately. Other than refreshing your browser, no other action should be necessary.
113 |
114 | ---
115 |
116 | Assuming everything has gone according to plan, take a look at the rest of this Wiki for more information on using your new module. And if things _didn't_ go according to plan, hop over to the [Craft Discord](https://craftcms.com/discord) channel and start asking questions!
117 |
118 | **Happy coding!** 🍺
119 |
120 | {% include footer.md %}
121 |
--------------------------------------------------------------------------------