├── .gitignore
├── LICENSE
├── Lectures
├── 01-ClassOverview.pptx
├── 02-Scoping.pptx
├── 03-casestudies.pptx
├── 04-data.pptx
├── 05-data-discussion.pptx
├── 06-data-exploration.pptx
├── 07-formulation-and-baselines.pptx
├── 08-formulation-discussion.pptx
├── 09-Machine-Learning-Pipelines.pptx
├── 10-model-selection-and-validation-part-1.pptx
├── 11-model-selection-and-validation-part-2.pptx
├── 12-features-and-imputation.pptx
├── 13-features-discussion.pptx
├── 13b-triage.pptx
├── 14-ml-modeling-in-practice.pptx
├── 15-ml-in-practice-and-model-selection-part-3.pptx
├── 16-interpretability-part-1.pptx
├── 17-interpretability-part-2.pptx
├── 17b-EthicsOverview.pptx
├── 18-ethics-bias-fairness-part-1.pptx
├── 19-ethics-bias-fairness-part-2.pptx
├── 20-other-ml-ethics-issues.pptx
├── 21-causal-inference.pptx
├── triage-overview.pptx
└── triage_tech_session.pptx
├── README.md
├── Readings
└── PDF
│ ├── AkinfaderinImputation.md
│ ├── AmeisenBaseline.md
│ ├── BruceExploratory.md
│ ├── CaruanaGAM.pdf
│ ├── CelisFairConstraint.pdf
│ ├── ChouldechovaFosterCare.pdf
│ ├── GonfalonieriDeployment.md
│ ├── HardtEqualityOpportunity.pdf
│ ├── HuqRacialEquity.pdf
│ ├── KoenPipeline.md
│ ├── KumarWaterMains.pdf
│ ├── LiuTransductiveTopK.pdf
│ ├── LundbergHyboxaemia.pdf
│ ├── ObermeyerBias.pdf
│ ├── PearlCausality.pdf
│ ├── PerlichLeakage.pdf
│ ├── PlumbMAPLE.pdf
│ ├── PotashLead.pdf
│ ├── RawlsJustice.pdf
│ ├── RehmanDengue.pdf
│ ├── RibeiroLIME.pdf
│ ├── RileyPitfalls.pdf
│ ├── RobertsCV.pdf
│ ├── RudinInterpretable.pdf
│ ├── RudinSecrets.pdf
│ ├── StaporEvaluating.pdf
│ ├── UstunRudinINFORMS.pdf
│ ├── VergeHCAlgo.pdf
│ └── VermaFairnessDefn.pdf
├── img
├── abhishek-parikh_400x400.jpeg
├── adunmore.jpeg
├── amartyab.jpg
├── himil.jpg
├── kit_rodolfa.png
└── riyaz_panjwani.jpeg
├── project
├── final_project_presentation.md
├── final_project_report.md
├── proposal.md
└── readme.md
├── scripts
├── README.md
└── vpn-to-cmu.sh
└── techhelp
├── 94889_preliminary_exercise.ipynb
├── README.md
├── building_features_in_triage.md
├── class_db_pointers.md
├── dbeaver_instructions.pdf
├── handling_secrets.md
├── img
├── jupyter-login.png
├── jupyter-new-nb.png
├── jupyter-shutdown.png
└── jupyter-terminal.png
├── infrastructure_quickstart.md
├── jupyter_setup.md
├── models_over_time.ipynb
├── pipelines_session.pptx
├── python_sql_tech_session.ipynb
├── remote-workflow
├── img
│ ├── 10718-workflow.png
│ ├── bash-absolute-path.png
│ ├── bash-anatomy.png
│ ├── bash-nano-save.png
│ ├── bash-nano.png
│ ├── bash-pwd.png
│ ├── class_editor.png
│ ├── class_infra.png
│ ├── class_jupyter.png
│ ├── class_ssh.png
│ ├── jupyter-notebook-kernel.png
│ ├── jupyter-port-selection.png
│ ├── jupyter-token.png
│ ├── jupyter_kernel.png
│ ├── vscode-changed-interpreter.png
│ ├── vscode-click-find.png
│ ├── vscode-connect-to-host.png
│ ├── vscode-enter-login.png
│ ├── vscode-enter-venv-path.png
│ ├── vscode-file-menu.png
│ ├── vscode-open-connect-to-host.png
│ ├── vscode-open-folder.png
│ ├── vscode-remote-diagram.png
│ ├── vscode-remote-ssh-install.png
│ ├── vscode-run-python.png
│ ├── vscode-select-folder.png
│ ├── vscode-select-host.png
│ ├── vscode-select-interpreter-path.png
│ ├── vscode-select-interpreter.png
│ ├── vscode-select-python.png
│ ├── vscode-ssh-connected.png
│ └── vscode-update-config.png
└── remote-workflow.md
├── sklearn.md
├── tableau.md
├── tech_session_1_initial_setup.pdf
├── tech_session_3_git_sql.pdf
├── tech_session_template.sql
├── triage_config_templates
├── bills_triage_config.yaml
└── mcrt_triage_config.yaml
├── visualize_timechops_example.ipynb
├── visualize_timechops_example_updated.ipynb
└── windows_wsl_guide.md
/.gitignore:
--------------------------------------------------------------------------------
1 | ~$*
2 | .DS_Store
3 | *.xcf
4 | *.drawio
5 | techhelp/.ipynb_checkpoints/*
6 |
--------------------------------------------------------------------------------
/LICENSE:
--------------------------------------------------------------------------------
1 | MIT License
2 |
3 | Copyright (c) 2019 Data Science for Social Good
4 |
5 | Permission is hereby granted, free of charge, to any person obtaining a copy
6 | of this software and associated documentation files (the "Software"), to deal
7 | in the Software without restriction, including without limitation the rights
8 | to use, copy, modify, merge, publish, distribute, sublicense, and/or sell
9 | copies of the Software, and to permit persons to whom the Software is
10 | furnished to do so, subject to the following conditions:
11 |
12 | The above copyright notice and this permission notice shall be included in all
13 | copies or substantial portions of the Software.
14 |
15 | THE SOFTWARE IS PROVIDED "AS IS", WITHOUT WARRANTY OF ANY KIND, EXPRESS OR
16 | IMPLIED, INCLUDING BUT NOT LIMITED TO THE WARRANTIES OF MERCHANTABILITY,
17 | FITNESS FOR A PARTICULAR PURPOSE AND NONINFRINGEMENT. IN NO EVENT SHALL THE
18 | AUTHORS OR COPYRIGHT HOLDERS BE LIABLE FOR ANY CLAIM, DAMAGES OR OTHER
19 | LIABILITY, WHETHER IN AN ACTION OF CONTRACT, TORT OR OTHERWISE, ARISING FROM,
20 | OUT OF OR IN CONNECTION WITH THE SOFTWARE OR THE USE OR OTHER DEALINGS IN THE
21 | SOFTWARE.
22 |
--------------------------------------------------------------------------------
/Lectures/01-ClassOverview.pptx:
--------------------------------------------------------------------------------
https://raw.githubusercontent.com/dssg/mlforpublicpolicylab/d94c464f8a97c0b74cc94a889d88474ed718a3ba/Lectures/01-ClassOverview.pptx
--------------------------------------------------------------------------------
/Lectures/02-Scoping.pptx:
--------------------------------------------------------------------------------
https://raw.githubusercontent.com/dssg/mlforpublicpolicylab/d94c464f8a97c0b74cc94a889d88474ed718a3ba/Lectures/02-Scoping.pptx
--------------------------------------------------------------------------------
/Lectures/03-casestudies.pptx:
--------------------------------------------------------------------------------
https://raw.githubusercontent.com/dssg/mlforpublicpolicylab/d94c464f8a97c0b74cc94a889d88474ed718a3ba/Lectures/03-casestudies.pptx
--------------------------------------------------------------------------------
/Lectures/04-data.pptx:
--------------------------------------------------------------------------------
https://raw.githubusercontent.com/dssg/mlforpublicpolicylab/d94c464f8a97c0b74cc94a889d88474ed718a3ba/Lectures/04-data.pptx
--------------------------------------------------------------------------------
/Lectures/05-data-discussion.pptx:
--------------------------------------------------------------------------------
https://raw.githubusercontent.com/dssg/mlforpublicpolicylab/d94c464f8a97c0b74cc94a889d88474ed718a3ba/Lectures/05-data-discussion.pptx
--------------------------------------------------------------------------------
/Lectures/06-data-exploration.pptx:
--------------------------------------------------------------------------------
https://raw.githubusercontent.com/dssg/mlforpublicpolicylab/d94c464f8a97c0b74cc94a889d88474ed718a3ba/Lectures/06-data-exploration.pptx
--------------------------------------------------------------------------------
/Lectures/07-formulation-and-baselines.pptx:
--------------------------------------------------------------------------------
https://raw.githubusercontent.com/dssg/mlforpublicpolicylab/d94c464f8a97c0b74cc94a889d88474ed718a3ba/Lectures/07-formulation-and-baselines.pptx
--------------------------------------------------------------------------------
/Lectures/08-formulation-discussion.pptx:
--------------------------------------------------------------------------------
https://raw.githubusercontent.com/dssg/mlforpublicpolicylab/d94c464f8a97c0b74cc94a889d88474ed718a3ba/Lectures/08-formulation-discussion.pptx
--------------------------------------------------------------------------------
/Lectures/09-Machine-Learning-Pipelines.pptx:
--------------------------------------------------------------------------------
https://raw.githubusercontent.com/dssg/mlforpublicpolicylab/d94c464f8a97c0b74cc94a889d88474ed718a3ba/Lectures/09-Machine-Learning-Pipelines.pptx
--------------------------------------------------------------------------------
/Lectures/10-model-selection-and-validation-part-1.pptx:
--------------------------------------------------------------------------------
https://raw.githubusercontent.com/dssg/mlforpublicpolicylab/d94c464f8a97c0b74cc94a889d88474ed718a3ba/Lectures/10-model-selection-and-validation-part-1.pptx
--------------------------------------------------------------------------------
/Lectures/11-model-selection-and-validation-part-2.pptx:
--------------------------------------------------------------------------------
https://raw.githubusercontent.com/dssg/mlforpublicpolicylab/d94c464f8a97c0b74cc94a889d88474ed718a3ba/Lectures/11-model-selection-and-validation-part-2.pptx
--------------------------------------------------------------------------------
/Lectures/12-features-and-imputation.pptx:
--------------------------------------------------------------------------------
https://raw.githubusercontent.com/dssg/mlforpublicpolicylab/d94c464f8a97c0b74cc94a889d88474ed718a3ba/Lectures/12-features-and-imputation.pptx
--------------------------------------------------------------------------------
/Lectures/13-features-discussion.pptx:
--------------------------------------------------------------------------------
https://raw.githubusercontent.com/dssg/mlforpublicpolicylab/d94c464f8a97c0b74cc94a889d88474ed718a3ba/Lectures/13-features-discussion.pptx
--------------------------------------------------------------------------------
/Lectures/13b-triage.pptx:
--------------------------------------------------------------------------------
https://raw.githubusercontent.com/dssg/mlforpublicpolicylab/d94c464f8a97c0b74cc94a889d88474ed718a3ba/Lectures/13b-triage.pptx
--------------------------------------------------------------------------------
/Lectures/14-ml-modeling-in-practice.pptx:
--------------------------------------------------------------------------------
https://raw.githubusercontent.com/dssg/mlforpublicpolicylab/d94c464f8a97c0b74cc94a889d88474ed718a3ba/Lectures/14-ml-modeling-in-practice.pptx
--------------------------------------------------------------------------------
/Lectures/15-ml-in-practice-and-model-selection-part-3.pptx:
--------------------------------------------------------------------------------
https://raw.githubusercontent.com/dssg/mlforpublicpolicylab/d94c464f8a97c0b74cc94a889d88474ed718a3ba/Lectures/15-ml-in-practice-and-model-selection-part-3.pptx
--------------------------------------------------------------------------------
/Lectures/16-interpretability-part-1.pptx:
--------------------------------------------------------------------------------
https://raw.githubusercontent.com/dssg/mlforpublicpolicylab/d94c464f8a97c0b74cc94a889d88474ed718a3ba/Lectures/16-interpretability-part-1.pptx
--------------------------------------------------------------------------------
/Lectures/17-interpretability-part-2.pptx:
--------------------------------------------------------------------------------
https://raw.githubusercontent.com/dssg/mlforpublicpolicylab/d94c464f8a97c0b74cc94a889d88474ed718a3ba/Lectures/17-interpretability-part-2.pptx
--------------------------------------------------------------------------------
/Lectures/17b-EthicsOverview.pptx:
--------------------------------------------------------------------------------
https://raw.githubusercontent.com/dssg/mlforpublicpolicylab/d94c464f8a97c0b74cc94a889d88474ed718a3ba/Lectures/17b-EthicsOverview.pptx
--------------------------------------------------------------------------------
/Lectures/18-ethics-bias-fairness-part-1.pptx:
--------------------------------------------------------------------------------
https://raw.githubusercontent.com/dssg/mlforpublicpolicylab/d94c464f8a97c0b74cc94a889d88474ed718a3ba/Lectures/18-ethics-bias-fairness-part-1.pptx
--------------------------------------------------------------------------------
/Lectures/19-ethics-bias-fairness-part-2.pptx:
--------------------------------------------------------------------------------
https://raw.githubusercontent.com/dssg/mlforpublicpolicylab/d94c464f8a97c0b74cc94a889d88474ed718a3ba/Lectures/19-ethics-bias-fairness-part-2.pptx
--------------------------------------------------------------------------------
/Lectures/20-other-ml-ethics-issues.pptx:
--------------------------------------------------------------------------------
https://raw.githubusercontent.com/dssg/mlforpublicpolicylab/d94c464f8a97c0b74cc94a889d88474ed718a3ba/Lectures/20-other-ml-ethics-issues.pptx
--------------------------------------------------------------------------------
/Lectures/21-causal-inference.pptx:
--------------------------------------------------------------------------------
https://raw.githubusercontent.com/dssg/mlforpublicpolicylab/d94c464f8a97c0b74cc94a889d88474ed718a3ba/Lectures/21-causal-inference.pptx
--------------------------------------------------------------------------------
/Lectures/triage-overview.pptx:
--------------------------------------------------------------------------------
https://raw.githubusercontent.com/dssg/mlforpublicpolicylab/d94c464f8a97c0b74cc94a889d88474ed718a3ba/Lectures/triage-overview.pptx
--------------------------------------------------------------------------------
/Lectures/triage_tech_session.pptx:
--------------------------------------------------------------------------------
https://raw.githubusercontent.com/dssg/mlforpublicpolicylab/d94c464f8a97c0b74cc94a889d88474ed718a3ba/Lectures/triage_tech_session.pptx
--------------------------------------------------------------------------------
/Readings/PDF/AkinfaderinImputation.md:
--------------------------------------------------------------------------------
1 | # [Click Here for the Reading](https://medium.com/ibm-data-science-experience/missing-data-conundrum-exploration-and-imputation-techniques-9f40abe0fd87)
2 |
--------------------------------------------------------------------------------
/Readings/PDF/AmeisenBaseline.md:
--------------------------------------------------------------------------------
1 | # [Click Here for the Reading](https://blog.insightdatascience.com/always-start-with-a-stupid-model-no-exceptions-3a22314b9aaa)
2 |
--------------------------------------------------------------------------------
/Readings/PDF/BruceExploratory.md:
--------------------------------------------------------------------------------
1 | # [Click Here for the Reading](https://learning.oreilly.com/library/view/practical-statistics-for/9781491952955/ch01.html#EDA)
2 |
--------------------------------------------------------------------------------
/Readings/PDF/CaruanaGAM.pdf:
--------------------------------------------------------------------------------
https://raw.githubusercontent.com/dssg/mlforpublicpolicylab/d94c464f8a97c0b74cc94a889d88474ed718a3ba/Readings/PDF/CaruanaGAM.pdf
--------------------------------------------------------------------------------
/Readings/PDF/CelisFairConstraint.pdf:
--------------------------------------------------------------------------------
https://raw.githubusercontent.com/dssg/mlforpublicpolicylab/d94c464f8a97c0b74cc94a889d88474ed718a3ba/Readings/PDF/CelisFairConstraint.pdf
--------------------------------------------------------------------------------
/Readings/PDF/ChouldechovaFosterCare.pdf:
--------------------------------------------------------------------------------
https://raw.githubusercontent.com/dssg/mlforpublicpolicylab/d94c464f8a97c0b74cc94a889d88474ed718a3ba/Readings/PDF/ChouldechovaFosterCare.pdf
--------------------------------------------------------------------------------
/Readings/PDF/GonfalonieriDeployment.md:
--------------------------------------------------------------------------------
1 | # [Click Here for the Reading](https://towardsdatascience.com/why-is-machine-learning-deployment-hard-443af67493cd)
2 |
--------------------------------------------------------------------------------
/Readings/PDF/HardtEqualityOpportunity.pdf:
--------------------------------------------------------------------------------
https://raw.githubusercontent.com/dssg/mlforpublicpolicylab/d94c464f8a97c0b74cc94a889d88474ed718a3ba/Readings/PDF/HardtEqualityOpportunity.pdf
--------------------------------------------------------------------------------
/Readings/PDF/HuqRacialEquity.pdf:
--------------------------------------------------------------------------------
https://raw.githubusercontent.com/dssg/mlforpublicpolicylab/d94c464f8a97c0b74cc94a889d88474ed718a3ba/Readings/PDF/HuqRacialEquity.pdf
--------------------------------------------------------------------------------
/Readings/PDF/KoenPipeline.md:
--------------------------------------------------------------------------------
1 | # [Click Here for the Reading](https://towardsdatascience.com/architecting-a-machine-learning-pipeline-a847f094d1c7)
2 |
--------------------------------------------------------------------------------
/Readings/PDF/KumarWaterMains.pdf:
--------------------------------------------------------------------------------
https://raw.githubusercontent.com/dssg/mlforpublicpolicylab/d94c464f8a97c0b74cc94a889d88474ed718a3ba/Readings/PDF/KumarWaterMains.pdf
--------------------------------------------------------------------------------
/Readings/PDF/LiuTransductiveTopK.pdf:
--------------------------------------------------------------------------------
https://raw.githubusercontent.com/dssg/mlforpublicpolicylab/d94c464f8a97c0b74cc94a889d88474ed718a3ba/Readings/PDF/LiuTransductiveTopK.pdf
--------------------------------------------------------------------------------
/Readings/PDF/LundbergHyboxaemia.pdf:
--------------------------------------------------------------------------------
https://raw.githubusercontent.com/dssg/mlforpublicpolicylab/d94c464f8a97c0b74cc94a889d88474ed718a3ba/Readings/PDF/LundbergHyboxaemia.pdf
--------------------------------------------------------------------------------
/Readings/PDF/ObermeyerBias.pdf:
--------------------------------------------------------------------------------
https://raw.githubusercontent.com/dssg/mlforpublicpolicylab/d94c464f8a97c0b74cc94a889d88474ed718a3ba/Readings/PDF/ObermeyerBias.pdf
--------------------------------------------------------------------------------
/Readings/PDF/PearlCausality.pdf:
--------------------------------------------------------------------------------
https://raw.githubusercontent.com/dssg/mlforpublicpolicylab/d94c464f8a97c0b74cc94a889d88474ed718a3ba/Readings/PDF/PearlCausality.pdf
--------------------------------------------------------------------------------
/Readings/PDF/PerlichLeakage.pdf:
--------------------------------------------------------------------------------
https://raw.githubusercontent.com/dssg/mlforpublicpolicylab/d94c464f8a97c0b74cc94a889d88474ed718a3ba/Readings/PDF/PerlichLeakage.pdf
--------------------------------------------------------------------------------
/Readings/PDF/PlumbMAPLE.pdf:
--------------------------------------------------------------------------------
https://raw.githubusercontent.com/dssg/mlforpublicpolicylab/d94c464f8a97c0b74cc94a889d88474ed718a3ba/Readings/PDF/PlumbMAPLE.pdf
--------------------------------------------------------------------------------
/Readings/PDF/PotashLead.pdf:
--------------------------------------------------------------------------------
https://raw.githubusercontent.com/dssg/mlforpublicpolicylab/d94c464f8a97c0b74cc94a889d88474ed718a3ba/Readings/PDF/PotashLead.pdf
--------------------------------------------------------------------------------
/Readings/PDF/RawlsJustice.pdf:
--------------------------------------------------------------------------------
https://raw.githubusercontent.com/dssg/mlforpublicpolicylab/d94c464f8a97c0b74cc94a889d88474ed718a3ba/Readings/PDF/RawlsJustice.pdf
--------------------------------------------------------------------------------
/Readings/PDF/RehmanDengue.pdf:
--------------------------------------------------------------------------------
https://raw.githubusercontent.com/dssg/mlforpublicpolicylab/d94c464f8a97c0b74cc94a889d88474ed718a3ba/Readings/PDF/RehmanDengue.pdf
--------------------------------------------------------------------------------
/Readings/PDF/RibeiroLIME.pdf:
--------------------------------------------------------------------------------
https://raw.githubusercontent.com/dssg/mlforpublicpolicylab/d94c464f8a97c0b74cc94a889d88474ed718a3ba/Readings/PDF/RibeiroLIME.pdf
--------------------------------------------------------------------------------
/Readings/PDF/RileyPitfalls.pdf:
--------------------------------------------------------------------------------
https://raw.githubusercontent.com/dssg/mlforpublicpolicylab/d94c464f8a97c0b74cc94a889d88474ed718a3ba/Readings/PDF/RileyPitfalls.pdf
--------------------------------------------------------------------------------
/Readings/PDF/RobertsCV.pdf:
--------------------------------------------------------------------------------
https://raw.githubusercontent.com/dssg/mlforpublicpolicylab/d94c464f8a97c0b74cc94a889d88474ed718a3ba/Readings/PDF/RobertsCV.pdf
--------------------------------------------------------------------------------
/Readings/PDF/RudinInterpretable.pdf:
--------------------------------------------------------------------------------
https://raw.githubusercontent.com/dssg/mlforpublicpolicylab/d94c464f8a97c0b74cc94a889d88474ed718a3ba/Readings/PDF/RudinInterpretable.pdf
--------------------------------------------------------------------------------
/Readings/PDF/RudinSecrets.pdf:
--------------------------------------------------------------------------------
https://raw.githubusercontent.com/dssg/mlforpublicpolicylab/d94c464f8a97c0b74cc94a889d88474ed718a3ba/Readings/PDF/RudinSecrets.pdf
--------------------------------------------------------------------------------
/Readings/PDF/StaporEvaluating.pdf:
--------------------------------------------------------------------------------
https://raw.githubusercontent.com/dssg/mlforpublicpolicylab/d94c464f8a97c0b74cc94a889d88474ed718a3ba/Readings/PDF/StaporEvaluating.pdf
--------------------------------------------------------------------------------
/Readings/PDF/UstunRudinINFORMS.pdf:
--------------------------------------------------------------------------------
https://raw.githubusercontent.com/dssg/mlforpublicpolicylab/d94c464f8a97c0b74cc94a889d88474ed718a3ba/Readings/PDF/UstunRudinINFORMS.pdf
--------------------------------------------------------------------------------
/Readings/PDF/VergeHCAlgo.pdf:
--------------------------------------------------------------------------------
https://raw.githubusercontent.com/dssg/mlforpublicpolicylab/d94c464f8a97c0b74cc94a889d88474ed718a3ba/Readings/PDF/VergeHCAlgo.pdf
--------------------------------------------------------------------------------
/Readings/PDF/VermaFairnessDefn.pdf:
--------------------------------------------------------------------------------
https://raw.githubusercontent.com/dssg/mlforpublicpolicylab/d94c464f8a97c0b74cc94a889d88474ed718a3ba/Readings/PDF/VermaFairnessDefn.pdf
--------------------------------------------------------------------------------
/img/abhishek-parikh_400x400.jpeg:
--------------------------------------------------------------------------------
https://raw.githubusercontent.com/dssg/mlforpublicpolicylab/d94c464f8a97c0b74cc94a889d88474ed718a3ba/img/abhishek-parikh_400x400.jpeg
--------------------------------------------------------------------------------
/img/adunmore.jpeg:
--------------------------------------------------------------------------------
https://raw.githubusercontent.com/dssg/mlforpublicpolicylab/d94c464f8a97c0b74cc94a889d88474ed718a3ba/img/adunmore.jpeg
--------------------------------------------------------------------------------
/img/amartyab.jpg:
--------------------------------------------------------------------------------
https://raw.githubusercontent.com/dssg/mlforpublicpolicylab/d94c464f8a97c0b74cc94a889d88474ed718a3ba/img/amartyab.jpg
--------------------------------------------------------------------------------
/img/himil.jpg:
--------------------------------------------------------------------------------
https://raw.githubusercontent.com/dssg/mlforpublicpolicylab/d94c464f8a97c0b74cc94a889d88474ed718a3ba/img/himil.jpg
--------------------------------------------------------------------------------
/img/kit_rodolfa.png:
--------------------------------------------------------------------------------
https://raw.githubusercontent.com/dssg/mlforpublicpolicylab/d94c464f8a97c0b74cc94a889d88474ed718a3ba/img/kit_rodolfa.png
--------------------------------------------------------------------------------
/img/riyaz_panjwani.jpeg:
--------------------------------------------------------------------------------
https://raw.githubusercontent.com/dssg/mlforpublicpolicylab/d94c464f8a97c0b74cc94a889d88474ed718a3ba/img/riyaz_panjwani.jpeg
--------------------------------------------------------------------------------
/project/final_project_presentation.md:
--------------------------------------------------------------------------------
1 | # Final Project Presentation
2 |
3 | **NOTE: Presentations will take place during class on Wednesday, December 1. Please upload your slides on canvas before the presentation.**
4 |
5 | Each team will have 10 minutes for their presentation (plus 3 minutes for questions). We will need to be strict on the timing to make sure everyone has enough time to present:
6 |
7 | ## Timing
8 | Practice your timing before and have a plan for the last 30 seconds. If you're out of time, what do you want to say in the last 30 seconds?
9 |
10 | ## Content
11 | The presentation should be clear, well-organized, and **at an appropriate level of depth for the decision-makers relevant to your project (as opposed to ML experts)**
12 |
13 | ## Suggested Structure
14 |
15 | 1. What problem are you solving and why is it important? Be specific about goals, potential policy impact, and efficiency/equity/effectiveness trade-offs (1 minute)
16 | 1. What data did you use? (1 minute)
17 | 1. Machine Learning Formulation, Analysis, and Evaluation - described in a way that makes sense to decision-makers (4 minutes)
18 | - formulation of the problem
19 | - what are your rows, what are your labels, what are your features
20 | - how did you validate - training/validation splits, evaluation metrics, sensible baseline
21 | - results – performance, important features, and bias audit
22 | 1. Caveats: based on the limitations of your data or analysis (2 minutes)
23 | 1. Policy Recommendations: concrete recommendations based on your analysis (1 minutes)
24 | 1. Future Work (1 minute)
25 |
26 | # Evaluation Criteria
27 |
28 | - Goals/Context:
29 | - The project has clear and actionable policy goals.
30 | - The use of this project in a policy setting is well described.
31 | - The project is well motivated and achieves the policy goals described.
32 | - Thoughtful consideration of balancing equity, efficiency, and effectiveness, as well as other potential ethical issues and mitigation strategies.
33 | - Data:
34 | - The data description and data exploration shows that the data used is relevant and sufficient for the problem.
35 | - Analysis: The analysis is done correctly and is evaluated appropriately
36 | - The machine learning models used are appropriate for the task and well-justified. All of the methods appropriate for the task and covered in class should be used.
37 | - The evaluation methodology is appropriate for the task and matches the operational use of this analysis/models.
38 | - Training and validation set (and process) is well described.
39 | - The correct metrics are being optimized for and optimizing for those metrics achieve the policy goals described.
40 | - Results:
41 | - Evaluation results are described for every train/validate set, metric, and models used
42 | - Performance is compared against a sensible baseline that reflects what a decision-maker might do in the absence of a machine learning model.
43 | - The selection of the final model recommended for use is well described
44 | - The model interpretation is done well.
45 | - Models are audited for bias and fairness (motivated by the correct bias and fairness metrics and groups of interest) and results provided.
46 | - Policy Recommendations:
47 | - Concrete and actionable policy recommendations are provided based on the results of the analysis
48 | - Caveats:
49 | - Caveats of the project and recommendations are provided to a policy audience based on the limitations of the data and/or the analysis.
50 | - Future recommendations on how to improve the analysis are provided
51 |
52 |
--------------------------------------------------------------------------------
/project/final_project_report.md:
--------------------------------------------------------------------------------
1 | # Final Project Report
2 |
3 | **Due: December 9, 11:59pm EST**
4 |
5 | The final project report should be approximately 10-15 pages in length (excluding appendix and references) and cover the following topics:
6 |
7 | 1. Executive Summary: Succinctly describe the project, results, and recommendations. The executive summary should not exceed 1 page in length.
8 | 1. Background and Introduction: This section motivates the problem, explains why it's important, why should we care, and the potential impact if it's solved.
9 | 1. Related work: What's been done before in this area (both using and ML and without) and why your work is different or better.
10 | 1. Problem formulation and Overview of your solution
11 | 1. Data Description, including briefly highlighting any data exploration that informed important formulation/modeling choices.
12 | 1. Details of your solution: methods, tools, analysis you did, model types and hyperparameters used, features. This section of the report should also include a link to well-documented code in your group’s course github repository.
13 | 1. Evaluation: results, plots (for example precision recall k curves, other types of results), important features, and bias audit of the models you built.
14 | 1. Discussion of the results: what did you learn from looking at the results about the data, problem, and solution.
15 | 1. Brief (1-2 paragraph) design of a field trial to evaluate the accuracy of the model you built and selected in practice, as well as its ability to help the organization achieve its goals. It's not enough to say we'll do an A/B test or a randomized trial.
16 | 1. Policy Recommendations based on your analysis/models
17 | 1. Limitations, caveats, future work to improve on what you've done.
18 |
19 | ## Appendix
20 | Please include the following details in an appendix so we can better evaluate the work you've done and not just evaluate the outputs:
21 |
22 | - Your triage configuration file -- be sure it's well-commented describing in words what each piece (temporal, cohort, label, features) is doing along with any underlying assumptions. This should include:
23 | - Exact definition of label: 1) how did you decide from the database what was a positive example and negative example. 2) over what time
24 | - List of *all* features generated
25 | - Model grid used: models and hyper-parameters. You can give the grid or a list of all model-hyperparameter combinations
26 | - Separately, include a list of train/validation sets (table with the dates)
27 | - The temporal graph of your primary evaluation metric (precision at k) for each validation set for all the models in the grid (line color by model type) - it's the slide from Update 6
28 | - Criteria used to select top models (mean precision at k for example)
29 | - For those top 5 models + smart baseline, please provide:
30 | - What are they
31 | - PR_k graphs of top models as well as
32 | - List of feature importance of *all* features
33 | - Cross-tabs for ~10 most different features
34 | - Bias metrics that are relevant to your problem scope
35 |
36 | ## Github Repo
37 | The Github repo should be documented in two ways:
38 |
39 | 1. Instructions on the structure of the repository, what files are there, and how one should run your code (installing any packages for example)
40 | 1. The relevant code files should be documented.
41 |
42 |
43 | # Evaluation Criteria
44 |
45 | ## Final Project Report
46 |
47 | - Goals/Context:
48 | - The project has clear and actionable policy goals.
49 | - The use of this project in a policy setting is well described.
50 | - The project is well motivated and achieves the policy goals described.
51 | - Thoughtful consideration of balancing equity, efficiency, and effectiveness, as well as other potential ethical issues and mitigation strategies.
52 | - Previous work in this area is described and covered well.
53 | - Data:
54 | - The data used is relevant for the problem, over a long enough period to solve this problem
55 | - Data exploration is described well
56 | - Analysis: The analysis is done correctly and is evaluated appropriately
57 | - The machine learning models used are appropriate for the task and well-justified. All of the methods appropriate for the task and covered in class should be used.
58 | - The evaluation methodology is appropriate for the task and matches the operational use of this analysis/models.
59 | - Each training and validation set (and the generation process) is well described.
60 | - The correct metrics are being optimized for and optimizing for those metrics achieve the policy goals described.
61 | - Results:
62 | - Evaluation results are described in detail for every train/validate set, metric, and models used
63 | - Performance is compared against a sensible baseline that reflects what a decision maker might do in the absence of a machine learning model.
64 | - The selection of the final model recommended for use is well described
65 | - The model interpretation is done well.
66 | - Models are audited for bias and fairness (motivated by the correct bias and fairness metrics and groups of interest) and results provided.
67 | - Policy Recommendations and Field Trial Design:
68 | - Suggested field trial design is appropriate to assess both the performance of the model and impact of program outcomes, as well as accounting for potential nuances of feasibility or ethical constraints (e.g., withholding services, etc.)
69 | - Concrete and actionable policy recommendations are provided based on the results of the analysis
70 | - Caveats:
71 | - Caveats of the project and recommendations are provided to a policy audience based on the limitations of the data and/or the analysis.
72 | - Future recommendations on how to improve the analysis are provided
73 | - Appendix:
74 | - The additional information in the appendix is correct
75 | - The additional information in the appendix is correct supports and justifies the results provided in the report
76 |
77 | ## Code and Repo
78 |
79 | - The repository is well-structured and well-documented.
80 | - Usage and installation instructions are clear.
81 | - Code is well-organized and documented.
82 | - Code is reproducible, extensible, and modular.
83 |
--------------------------------------------------------------------------------
/project/proposal.md:
--------------------------------------------------------------------------------
1 | ## Project Proposal
2 | The proposal should be 4-5 pages (pdf) and should contain:
3 |
4 | - Background and Goals
5 | - what is the problem you're solving?
6 | - why is it important?
7 | - what impact will your solution have?
8 | - who cares about this problem?
9 | - who will take action based on your work
10 | - what are the policy goals you care about (efficiency, equity, effectiveness,…)? How will you decide on tradeoffs across these goals?
11 | - How this problem is solved today/previously
12 | - What interventions exist/will exist
13 | - What data do you have and what additional data will you need?
14 | - **Important: You should do data exploration and provide descriptive stats to show that you have enough relevant data to solve this problem**
15 | - What analysis are you proposing to do?
16 | - What is the ML problem? What are some possible outcome variables (labels) that you might use?
17 | - How will you validate it in the class project? What metrics will you use? Why will those metrics achieve the goal you described above?
18 | - What additional validation will need to be done later?
19 | - What are some ethical considerations here around privacy, equity, transparency, and accountability? How do you plan on dealing with them?
20 | - Caveats (due to data limitations, analysis limitations, time limitations, etc.)
21 | - Policy recommendations: what kind of recommendations do you hope to give to policymakers based on this analysis/project. How will you validate whether what you are proposing will have the desired impact?
22 | - **Appendix:** Include a completed [scoping worksheet](http://www.datasciencepublicpolicy.org/wp-content/uploads/2020/07/ProjectScopingWorksheetBlank.pdf) for your project as an appendix to your proposal (not included in the page limit)
23 |
24 |
--------------------------------------------------------------------------------
/project/readme.md:
--------------------------------------------------------------------------------
1 |
2 |
--------------------------------------------------------------------------------
/scripts/README.md:
--------------------------------------------------------------------------------
1 | #Some useful scripts
2 |
3 | [connect to vpn script](vpn-to-cmu.sh): If you're on a mac and want to connect to vpn (lazily) through the command line
4 |
--------------------------------------------------------------------------------
/scripts/vpn-to-cmu.sh:
--------------------------------------------------------------------------------
1 | /opt/cisco/anyconnect/bin/vpn -s connect vpn.cmu.edu << "EOF"
2 | 1
3 | YOUR_ANDREW_ID
4 | YOUR_ANDREW_ID_PASSWORD
5 |
--------------------------------------------------------------------------------
/techhelp/94889_preliminary_exercise.ipynb:
--------------------------------------------------------------------------------
1 | {
2 | "cells": [
3 | {
4 | "cell_type": "markdown",
5 | "metadata": {
6 | "colab_type": "text",
7 | "id": "view-in-github"
8 | },
9 | "source": [
10 | " "
11 | ]
12 | },
13 | {
14 | "cell_type": "markdown",
15 | "metadata": {
16 | "id": "Zw1i3ELeKDLD"
17 | },
18 | "source": [
19 | "# 94889 Preliminary Exercise\n",
20 | "\n",
21 | "## Overview\n",
22 | "\n",
23 | "The purpose of this exercise is to provide a assessment on a few of the technical skills you'll need in Machine Learning for Public Policy Lab (94-889) and help us make sure everyone coming in has the necessary pre-requisites including python, data analysis, databases/sql, and machine learning. \n",
24 | "\n",
25 | "Feel free to use any references (previous class notes, google, stackoverflow, etc) you would like, but please complete the exercise on your own to ensure the work reflects your experience. **Completing this notebook should take you under 3 hours** -- if you're finding you need to take significantly more time on, you may find it difficult to contribute to the project work in the class.\n",
26 | "\n",
27 | "## Problem Background\n",
28 | "\n",
29 | "This notebook makes use of a sample of the data provided by [DonorsChoose](https://www.donorschoose.org/) to the [2014 KDD Cup](https://www.kaggle.com/c/kdd-cup-2014-predicting-excitement-at-donors-choose/data). Public schools in the United States face large disparities in funding, often resulting in teachers and staff members filling these gaps by purchasing classroom supplies out of their own pockets. DonorsChoose is an online crowdfunding platform that tries to help alleviate this financial burden on teachers by allowing them to seek funding for projects and resources from the community (projects can include classroom basics like books and markers, larger items like lab equipment or musical instruments, specific experiences like field trips or guest speakers). Projects on DonorsChoose expire after 4 months, and if the target funding level isn't reached, the project receives no funding. Since its launch in 2000, the platform has helped fund over 2 million projects at schools across the US, but about 1/3 of the projects that are posted nevertheless fail to meet their goal and go unfunded.\n",
30 | "\n",
31 | "### The Modeling Problem\n",
32 | "\n",
33 | "For the purposes of this exercise, we'll imagine that DonorsChoose has hired a digital content expert who will review projects and help teachers improve their postings and increase their chances of reaching their funding threshold. Because this individualized review is a labor-intensive process, the digital content expert has time to review and support only 10% of the projects posted to the platform on a given day. \n",
34 | "\n",
35 | "You are a data scientist working with DonorsChoose, and your task is to help this content expert focus their limited resources on projects that most need the help. As such, you want to build a model to identify projects that are least likely to be fully funded before they expire and pass them off to the digital content expert for review.\n"
36 | ]
37 | },
38 | {
39 | "cell_type": "markdown",
40 | "metadata": {
41 | "id": "BjRBddip6lPI"
42 | },
43 | "source": [
44 | "# Getting Set Up\n",
45 | "\n",
46 | "Running the code below will create a local postgres 11 database for you and import the sampled donors choose data. Don't worry about the details of that and you shouldn't need to touch any of the code here aside from running it. Below, we'll talk about how to access the database from within the notebook to run queries."
47 | ]
48 | },
49 | {
50 | "cell_type": "code",
51 | "execution_count": null,
52 | "metadata": {
53 | "id": "iY8dwqamIIQc"
54 | },
55 | "outputs": [],
56 | "source": [
57 | "# Install and start postgresql-11 server\n",
58 | "!sudo apt-get -y -qq update\n",
59 | "!wget --quiet -O - https://www.postgresql.org/media/keys/ACCC4CF8.asc | sudo apt-key add -\n",
60 | "!echo \"deb http://apt.postgresql.org/pub/repos/apt/ `lsb_release -cs`-pgdg main\" |sudo tee /etc/apt/sources.list.d/pgdg.list\n",
61 | "!sudo apt-get -y -qq update\n",
62 | "!sudo apt-get -y -qq install postgresql-11 postgresql-client-11\n",
63 | "!sudo service postgresql start\n",
64 | "\n",
65 | "# Setup a password `postgres` for username `postgres`\n",
66 | "!sudo -u postgres psql -U postgres -c \"ALTER USER postgres PASSWORD 'postgres';\"\n",
67 | "\n",
68 | "# Setup a database with name `donors_choose` to be used\n",
69 | "!sudo -u postgres psql -U postgres -c 'DROP DATABASE IF EXISTS donors_choose;'\n",
70 | "\n",
71 | "!sudo -u postgres psql -U postgres -c 'CREATE DATABASE donors_choose;'\n",
72 | "\n",
73 | "# Environment variables for connecting to the database\n",
74 | "%env DEMO_DATABASE_NAME=donors_choose\n",
75 | "%env DEMO_DATABASE_HOST=localhost\n",
76 | "%env DEMO_DATABASE_PORT=5432\n",
77 | "%env DEMO_DATABASE_USER=postgres\n",
78 | "%env DEMO_DATABASE_PASS=postgres"
79 | ]
80 | },
81 | {
82 | "cell_type": "code",
83 | "execution_count": null,
84 | "metadata": {
85 | "id": "ImdiugfVIXcq"
86 | },
87 | "outputs": [],
88 | "source": [
89 | "# Download sampled DonorsChoose data and load it into our postgres server\n",
90 | "!curl -s -OL https://dsapp-public-data-migrated.s3.us-west-2.amazonaws.com/donors_sampled_20210920_v3.dmp\n",
91 | "!PGPASSWORD=$DEMO_DATABASE_PASS pg_restore -h $DEMO_DATABASE_HOST -p $DEMO_DATABASE_PORT -d $DEMO_DATABASE_NAME -U $DEMO_DATABASE_USER -O -j 8 donors_sampled_20210920_v3.dmp"
92 | ]
93 | },
94 | {
95 | "cell_type": "code",
96 | "execution_count": null,
97 | "metadata": {
98 | "id": "Uj114AFLIpug"
99 | },
100 | "outputs": [],
101 | "source": [
102 | "!pip install SQLAlchemy==1.3.18 PyYAML==6.0 psycopg2-binary==2.9.3"
103 | ]
104 | },
105 | {
106 | "cell_type": "code",
107 | "execution_count": null,
108 | "metadata": {
109 | "id": "ZIZEHiMpANsU"
110 | },
111 | "outputs": [],
112 | "source": [
113 | "import pandas as pd\n",
114 | "pd.set_option('display.max_columns', None)"
115 | ]
116 | },
117 | {
118 | "cell_type": "code",
119 | "execution_count": null,
120 | "metadata": {
121 | "id": "JRYwIn-UJI6t"
122 | },
123 | "outputs": [],
124 | "source": [
125 | "from sqlalchemy.engine.url import URL\n",
126 | "from sqlalchemy import create_engine\n",
127 | "\n",
128 | "db_url = URL(\n",
129 | " 'postgres',\n",
130 | " host='localhost',\n",
131 | " username='postgres',\n",
132 | " database='donors_choose',\n",
133 | " password='postgres',\n",
134 | " port=5432,\n",
135 | " )\n",
136 | "\n",
137 | "db_engine = create_engine(db_url)"
138 | ]
139 | },
140 | {
141 | "cell_type": "markdown",
142 | "metadata": {
143 | "id": "9t7vS9VfKJm_"
144 | },
145 | "source": [
146 | "# Querying the Database\n",
147 | "\n",
148 | "The code block above used the `sqlalchemy` module to create a connection to the database called `db_engine`. An easy way to run SQL queries against this database is to use the `read_sql` command provided by `pandas`. For instance, if you run the example below, it should return the number of projects in the sampled dataset (16,480):"
149 | ]
150 | },
151 | {
152 | "cell_type": "code",
153 | "execution_count": null,
154 | "metadata": {
155 | "id": "fEpuSoSdJUN2"
156 | },
157 | "outputs": [],
158 | "source": [
159 | "pd.read_sql(\"SELECT COUNT(*) FROM data.projects\", db_engine)"
160 | ]
161 | },
162 | {
163 | "cell_type": "markdown",
164 | "metadata": {
165 | "id": "UECOSNF-8pTs"
166 | },
167 | "source": [
168 | "You can find some more details about the dataset on the [KDD Cup page](https://www.kaggle.com/c/kdd-cup-2014-predicting-excitement-at-donors-choose/data), but here is a quick description of the four main source tables:\n",
169 | "- `data.projects` contains information about each project that was posted on the site, including IDs for the project, school, and teacher, as well as the total amount being requested (note that projects can also request additional \"optional support\" but don't need to reach this higher bar to be funded)\n",
170 | "- `data.essays` has project titles and descriptions\n",
171 | "- `data.resources` has information about the specific resources being requested\n",
172 | "- `data.donations` contains details about each donation that was received by a project (when it came in, the amount, whether it was from another teacher, etc.)"
173 | ]
174 | },
175 | {
176 | "cell_type": "markdown",
177 | "metadata": {
178 | "id": "7bLEVeYa8IGY"
179 | },
180 | "source": [
181 | "## Want other packages?\n",
182 | "If you need to install any other python modules for your analysis, you can easily do so from a code block by prefixing your `pip install` command with an `!` character. For instance:\n",
183 | "```\n",
184 | "!pip install PyYAML\n",
185 | "```"
186 | ]
187 | },
188 | {
189 | "cell_type": "markdown",
190 | "metadata": {
191 | "id": "IIRe2r2tKNJI"
192 | },
193 | "source": [
194 | "# QUESTION 1\n",
195 | "\n",
196 | "**(A)** Write a query to return the school id, title, date posted, and total asking price for the latest posted project from each school in New York."
197 | ]
198 | },
199 | {
200 | "cell_type": "code",
201 | "execution_count": null,
202 | "metadata": {
203 | "id": "108ogvgOJrpF"
204 | },
205 | "outputs": [],
206 | "source": []
207 | },
208 | {
209 | "cell_type": "markdown",
210 | "metadata": {
211 | "id": "OozrlP8dN7zG"
212 | },
213 | "source": [
214 | "**(B)** Write a query to return the top 10 cities in terms of projects that got fully funded (Hint: You'll need to join a couple of tables here to figure out the amount donated to a project)"
215 | ]
216 | },
217 | {
218 | "cell_type": "code",
219 | "execution_count": null,
220 | "metadata": {
221 | "id": "108ogvgOJrpF"
222 | },
223 | "outputs": [],
224 | "source": []
225 | },
226 | {
227 | "cell_type": "markdown",
228 | "metadata": {
229 | "id": "OozrlP8dN7zG"
230 | },
231 | "source": [
232 | "**(C)** Create a scatter plot of the number of resources requested vs fraction of the total ask amount that was funded across all projects in New Hampshire. (Hint: You'll need to join a couple of tables here to figure out the amount donated to a project)"
233 | ]
234 | },
235 | {
236 | "cell_type": "code",
237 | "execution_count": null,
238 | "metadata": {
239 | "id": "n4LFpsrLMePc"
240 | },
241 | "outputs": [],
242 | "source": []
243 | },
244 | {
245 | "cell_type": "markdown",
246 | "metadata": {
247 | "id": "6y7NI6XAS-96"
248 | },
249 | "source": [
250 | "# Question 2\n",
251 | "\n",
252 | "For this question, you'll develop a model to help DonorsChoose identify 10% of projects to have their digital content expert review that are at highest risk of failing to reach their funding goal. In order to intervene early in the process, DonorsChoose wants to identify these projects to help immediately upon being posted to the site.\n",
253 | "\n",
254 | "Build and evaluate the performance of a handful of machine learning models for this task. **Be sure to use comments or text blocks to discuss the choices and assumptions you're making along the way.** Note that you don't need to explore an extensive model space here -- building 3 or 4 models should be fine for the purposes of this exercise. Feel free to use any python packages available (such as sklearn) for this.\n",
255 | "\n",
256 | "Make sure to read the context provided in Problem Background section above to make design choices that match the goal and needs of the organization and explain how and why you set up the problem in the way that you decide to do."
257 | ]
258 | },
259 | {
260 | "cell_type": "code",
261 | "execution_count": null,
262 | "metadata": {
263 | "id": "sJDDm0HjpcXy"
264 | },
265 | "outputs": [],
266 | "source": []
267 | },
268 | {
269 | "cell_type": "markdown",
270 | "metadata": {
271 | "id": "_KZZU6auTDxT"
272 | },
273 | "source": [
274 | "# Question 3\n",
275 | "\n",
276 | "Write a one-paragraph discussion of your results for a non-technical decision-maker with any recommendations for deployment or next steps. What are the policy recommendations you would make to them?"
277 | ]
278 | },
279 | {
280 | "cell_type": "markdown",
281 | "metadata": {
282 | "id": "HwEBiLvIDMtw"
283 | },
284 | "source": []
285 | },
286 | {
287 | "cell_type": "markdown",
288 | "metadata": {
289 | "id": "XP2k3Z--DNju"
290 | },
291 | "source": [
292 | "# Submission\n",
293 | "\n",
294 | "To submit your exercise, please **save a copy** of this notebook containing your code and outputs (you can save it either to google drive or github, but make sure the course staff will have read permissions to access it).\n",
295 | "\n",
296 | "Include a link to your copy of the notebook when you fill out [this survey](https://datascience.wufoo.com/forms/fall-2023-ml-for-public-policy-lab-survey/) along with your other details.\n",
297 | "\n",
298 | "Thank you and we're looking forward to a great semester in 94889!"
299 | ]
300 | },
301 | {
302 | "cell_type": "code",
303 | "execution_count": null,
304 | "metadata": {},
305 | "outputs": [],
306 | "source": []
307 | }
308 | ],
309 | "metadata": {
310 | "colab": {
311 | "collapsed_sections": [],
312 | "include_colab_link": true,
313 | "name": "94889_preliminary_exercise.ipynb",
314 | "provenance": []
315 | },
316 | "kernelspec": {
317 | "display_name": "Python 3 (ipykernel)",
318 | "language": "python",
319 | "name": "python3"
320 | },
321 | "language_info": {
322 | "codemirror_mode": {
323 | "name": "ipython",
324 | "version": 3
325 | },
326 | "file_extension": ".py",
327 | "mimetype": "text/x-python",
328 | "name": "python",
329 | "nbconvert_exporter": "python",
330 | "pygments_lexer": "ipython3",
331 | "version": "3.9.16"
332 | }
333 | },
334 | "nbformat": 4,
335 | "nbformat_minor": 1
336 | }
337 |
--------------------------------------------------------------------------------
/techhelp/README.md:
--------------------------------------------------------------------------------
1 | # Tech Setup
2 |
3 | 1. Make sure you are on cmu vpn (Full VPN group)
4 | 2. Connect to class server: mlpolicylab.dssg.io (command line/terminal/putty) : type `ssh your_andrew_id@server.mlpolicylab.dssg.io`
5 | 3. Connect to database server: mlpolicylab.db.dssg.io If you're on the server, type `psql -h database.mlpolicylab.dssg.io -U YOUR_ANDREW_ID group_students_database`
6 | 4. Setting up dbeaver or dbvisualizer (a visual ide to the database) [instructions are here](https://github.com/dssg/mlforpublicpolicylab/raw/master/techhelp/dbeaver_instructions.pdf)
7 |
8 | **Detailed instructions** are [available here](infrastructure_quickstart.md) and will be covered at the first Wednesday tech
9 |
10 | **Tech Session Materials:**
11 | - **[Slides from week 1 tech session - getting set up](https://docs.google.com/presentation/d/1000fsCMmJ6duWJDdGrOwQpuoR1DQnfIfg3aodAzbVtE/edit#slide=id.g27781b3f361_0_13)**
12 | - **[Materials from week 2 tech session - remote workflows](https://github.com/dssg/mlforpublicpolicylab/blob/master/techhelp/remote-workflow/remote-workflow.md)**
13 | - **[Slides from week 3 tech session - git](https://docs.google.com/presentation/d/1xhVaWl_paTed4F7A11Y3nwXZclpaAvSxA01iXwMuESM/edit#slide=id.p)**
14 | - **[Notebook for week 4 Python + SQL Tech Session](python_sql_tech_session.ipynb)**
15 |
16 | ## ssh
17 | `ssh your_andrew_id@server.mlpolicylab.dssg.io`
18 |
19 | ssh is what you'll use to connect to the class server, which is where you will do all the work. You will need to give us your **public** ssh key, using the instructions we sent, and then you'll be good to go. Based on which operating system you're using, you can google for which tool is the best (command line, terminal, putty, etc.)
20 |
21 | ## Linux Command Line (Bash)
22 | If you're not too familiar with working at the command line, we have a quick overview and intro [here](https://dssg.github.io/hitchhikers-guide/curriculum/setup/command-line-tools/)
23 |
24 | A couple of quick pointers that might be helpful:
25 | - One of the most useful linux utilities is `screen` (or tmux), which allows you to create sessions that persist even when disconnect from ssh. This can be handy for things like long-running jobs, notebook servers, or even just to guard against your internet connection dropping and losing your work. Here's a quick [video intro](https://www.youtube.com/watch?v=3txYaF_IVZQ) with the basics and a more [in-depth tutorial](https://linuxize.com/post/how-to-use-linux-screen/) (note that screen is already installed, so you can ignore those details).
26 | - Everyone is sharing the resources of the course server and it can be a good idea to keep an eye on memory and processor usage (both to know if you're hogging resources with your processes and understand how the load looks before starting a job). A good way to do so is with the utility [htop](https://www.deonsworld.co.za/2012/12/20/understanding-and-using-htop-monitor-system-resources/), which provides a visual representation of this information (to open htop just type `htop` at the command prompt and to exit, you can simply hit the `q` key)
27 | - Each group should have their own folder on the server, in `/data/groups/{group name}`. For example, `/data/groups/bills1`
28 | - We've set up a shared python virtual environment for each group. This will automatically activate when you navigate to `/data/groups/{group_name}`. Or, manually activate it with `source /data/groups/{group_name}/dssg_env/bin/activate`.
29 | - When you first navigate to `/data/groups/{group_name}` you'll get a message prompting you to run `direnv allow`. Run this command to allow the automatic virtual environment switching.
30 |
31 | ## github
32 | We'll use github to collaborate on the code all semester. You will have a project repository based on your projhect assignment.
33 |
34 | ### common (extremely simple) workflow
35 |
36 | - When you start working:
37 | - The first time, clone an existing repo: `git clone`
38 | - Every time you want to start working, get changes since last time: `git pull`
39 | - Add new files: `git add` or make changes to existing files
40 | - Make a local checkpoint: `git commit`
41 | - Pull any new remote updates from your teammates (`git pull`) then push to the remote repository: `git push`
42 |
43 | A [more advanced cheatsheet](https://gist.github.com/jedmao/5053440). Another useful tutorial is [here](https://dssg.github.io/hitchhikers-guide/curriculum/setup/git-and-github/basic_git_tutorial/) and you might want to check out [this interactive walk-through](https://learngitbranching.js.org/) (however some of the concepts it focuses on go beyond what you'll need for class)
44 |
45 | ## PostgreSQL
46 | If you're not too familiar with SQL or would like a quick review, we have an overview and intro [here](https://dssg.github.io/hitchhikers-guide/curriculum/software/basic_sql/).
47 |
48 | Additionally, check out these [notes and tips about using the course database](class_db_pointers.md).
49 |
50 | ## psql
51 | PSQL is a command line tool to connect to the postgresql databvase server we're using for class. You will bneed to be on the server through assh first and then type `psql -h database.mlpolicylab.dssg.io -U YOUR_ANDREW_ID databasename` where `databasename` is the database for your project that you will receive after your project assignment. To test it you can use `psql -h mlpolicylab.db.dssg.io -U YOUR_ANDREW_ID group_students_database` - make sure to change `YOUR_ANDREW_ID`
52 |
53 | A couple quick usage pointers:
54 | - `\dn` will list the schemas in the database you're connected to
55 | - `\dt {schema_name}.*` will list the tables in schema `{schema_name}`
56 | - `\d {schema_name}.{table_name}` will list the columns of table `{schema_name}.{table_name}`
57 | - `\x` can be used to enter "extended display mode" to view results in a tall, key-value format
58 | - For cleaner display of wide tables, you can launch `psql` using: `PAGER='less -S' psql -h mlpolicylab.db.dssg.io -U YOUR_ANDREW_ID databasename` (then use the left and right arrows to navigate columns of wide results)
59 | - `\?` will show help about psql meta-commands
60 | - `\q` will exit
61 |
62 | ## dbeaver
63 | dbeaver is a free tool that gives you a slightly nicer and visual interface to the database. [Instructions for installing and set up are here](https://github.com/dssg/mlforpublicpolicylab/raw/master/techhelp/dbeaver_instructions.pdf)
64 |
65 | ## Connecting to the database from python
66 | The `sqlalchemy` module provides an interface to connect to a postgres database from python (you'll also need to install `psycopg2` in order to talk to postgres specifically). You'll can install it in your virtualenv with:
67 | ```
68 | pip install psycopg2-binary sqlalchemy
69 | ```
70 | (Note that `psycopg2-binary` comes packaged with its dependencies, so you should install it rather than the base `psycopg2` module)
71 |
72 | A simple usage pattern might look like:
73 | ```python
74 | from sqlalchemy import create_engine
75 |
76 | # read parameters from a secrets file, don't hard-code them!
77 | db_params = get_secrets('db')
78 | engine = create_engine('postgresql://{user}:{password}@{host}:{port}/{dbname}'.format(
79 | host=db_params['host'],
80 | port=db_params['port'],
81 | dbname=db_params['dbname'],
82 | user=db_params['user'],
83 | password=db_params['password']
84 | ))
85 | result_set = engine.execute("SELECT * FROM your_table LIMIT 100;")
86 | for record in result_set:
87 | process_record(record)
88 |
89 | # Close communication with the database
90 | engine.dispose()
91 | ```
92 |
93 | If you're changing data in the database, note that you may need to use `engine.execute("COMMIT")` to ensure that changes persist.
94 |
95 | Note that the engine object can also be used with other utilities that interact with the database, such as ohio or pandas (though the latter can be very inefficient/slow)
96 |
97 | **For a more detailed walk-through of using python and postgresql together, check out the [Python+SQL tech session notebook](python_sql_tech_session.ipynb)**
98 |
99 | ## Jupyter Notebooks
100 | Although not a good environment for running your ML pipeline and models, jupyter notebooks can be useful for exploratory data analysis as well as visualizing modeling results. Since the data needs to stay in the AWS environment, you'll need to do so by running a notebook server on the remote machine and creating an SSH tunnel (because the course server can only be accessed via the SSH protocol) so you can access it via your local browser.
101 |
102 | One important note: **be sure to explicitly shut down the kernels when you're done working with a notebook** as "zombie" notebook sessions can end up using up a lot of processed!
103 |
104 | You can find some details about using jupyter with the class server [here](jupyter_setup.md)
105 |
106 | ## Handling Secrets
107 | You'll need access to various secrets (such as database credentials) in your code, but keeping these secrets out of the code itself is an important part of keeping your infrastructure and data secure. You can find a few tips about different ways to do so [here](handling_secrets.md)
108 |
109 | ## Triage Pointers
110 | We'll be using `triage` as a machine learning pipeline tool for this class. Below are a couple of links to resources that you might find helpful as you explore and use `triage` for your project:
111 | - An [example experiment configuration](https://github.com/dssg/triage/blob/master/example/config/experiment.yaml), with lots of detailed comments about the various parameters and options available
112 | - The [triage documentation site](https://dssg.github.io/triage/), in particular the [deeper look at triage](https://dssg.github.io/triage/dirtyduck/triage_intro/) and [experiment configuration](https://dssg.github.io/triage/experiments/experiment-config/) pages
113 | - The [triage homepage](http://www.datasciencepublicpolicy.org/projects/triage/) has some high-level details about the project and links out to a few example previous projects we've done that might be helpful
114 |
115 | Also, here are a few tips as you're working on your project:
116 | - Start simple and build your configuration file up iteratively. For initial runs, focus on a smaller number of training/validation splits, features, model types, etc.
117 | - If you want to perform some basic checks on your experiment configuration file without actually running the model grid, you can use `experiment.validate()` to do so. There are some details in the [documentation here](https://dssg.github.io/triage/experiments/running/#validating-an-experiment)
118 | - Because storing entity-level predictions for every model configuration you run can be costly, you might want to consider running with `save_predictions=False` at first, then adding predictions later only for models of interest.
119 | - Generally you can use any classification model offered by `sklearn` as well as anything with an `sklearn`-style API. Triage also provides a couple of useful built-in model types including some [baseline models](https://github.com/dssg/triage/tree/master/src/triage/component/catwalk/baselines) and [classifiers](https://github.com/dssg/triage/tree/master/src/triage/component/catwalk/estimators)
120 | - [Example jupyter notebook](visualize_timechops_example.ipynb) to visualize the training and validation splits computed by triage's Timechop component.
121 |
122 |
--------------------------------------------------------------------------------
/techhelp/building_features_in_triage.md:
--------------------------------------------------------------------------------
1 | # Tips on Feature Creation in Triage
2 |
3 | ## Some example config files with feature definitions
4 |
5 | 1. [medical early warning system](https://github.com/dssg/ckdwarning/blob/main/triage_config_files/ckd_1yr.yaml)
6 | 2. [donors choose](https://github.com/dssg/donors-choose/blob/master/donors-choose-config.yaml)
7 | 3. [education project](https://github.com/dssg/el-salvador-mined-public/tree/master/experiments)
8 | 4. [hiv retention](https://github.com/dssg/hiv-retention-public/blob/master/pipeline_UCM/configs/ucm_triage3_retention.yml)
9 |
10 | Keep in mind that some odf the examples above may use an earlier version of Triage so you may need to tweak the feature configs a little bit.
11 |
12 |
13 | ## creating typical categorical features
14 | ```
15 | categoricals_imputation:
16 | max:
17 | type: 'null_category'
18 |
19 |
20 | - # sex
21 | column: sex
22 | choice_query: select distinct sex from clean.demporaphics
23 | metrics:
24 | - max
25 |
26 | - # urban/rural - using a subset of values manually specified
27 | column: locality_type
28 | choices: [urban, rural]
29 | metrics:
30 | - max
31 |
32 |
33 | categoricals:
34 | - # top 50 diagnosis
35 | column: 'dx'
36 | choice_query: |
37 | SELECT DISTINCT dx
38 | FROM (
39 | SELECT dx,
40 | count(*)
41 | FROM clean.diagnosis
42 | GROUP BY dx order by count(*) desc limit 50
43 | ) AS code_counts
44 |
45 | metrics:
46 | - 'max'
47 | - 'count'
48 |
49 | ```
50 |
51 | ## Creating "Age" feature
52 | ### be careful about feature_start_date
53 |
54 | ```
55 | - # demographics
56 | prefix: 'demos'
57 | from_obj: |
58 | (select entity_id, sex,race,birth_date,zip_code,
59 | greatest(birth_date,'2011-01-01') as dob from clean.demographics) as dems
60 | knowledge_date_column: 'dob'
61 |
62 | aggregates:
63 | - # age in years
64 | quantity:
65 | age: "extract(year from age('{collate_date}'::date, birth_date::date))"
66 | metrics:
67 | - 'max'
68 | ```
69 |
70 | ## Creating other temporal features
71 |
72 |
73 | ### days since last event
74 |
75 | ```
76 | -
77 | prefix: 'days_since'
78 | from_obj: "(SELECT * FROM staging.entity_all_events) AS events"
79 | knowledge_date_column: 'event_date'
80 | aggregates:
81 |
82 | - # days since last event
83 | quantity:
84 | last_event: "'{collate_date}'::DATE - event_date"
85 | metrics: ['min']
86 |
87 |
88 |
89 | - # days since last event of a certain type
90 | quantity:
91 | last_event_of_type_X: case when event_type='X' then ('{collate_date}'::DATE - event_end_date::DATE) end
92 | metrics:
93 | metrics: ['min']
94 |
95 | intervals: ['50y']
96 |
97 |
98 | ```
99 |
100 |
101 |
102 |
103 |
--------------------------------------------------------------------------------
/techhelp/class_db_pointers.md:
--------------------------------------------------------------------------------
1 | # Some pointers for using the course database
2 |
3 | Each group has their own database, named `{group_name}_database`. For example, team bills1 has `bills1_database`. Log in the same way you log into group_students_database:
4 | ```bash
5 | psql -h database.mlpolicylab.dssg.io -U {andrewid} -d {group_name}_database
6 | ```
7 | Or, if using DBeaver, simply update the Database field to your group's database name.
8 |
9 | ## Access and permissions
10 | Within your group database, you'll find several schemas (depending on your particular project). Most of these schemas are read-only in order to avoid accidentally modifying or overwriting the raw data for the project, but you should be able to write to the `sketch` schema as well as create new schemas to help organize your project work. You can run the following query to get more information on permissions:
11 | ```sql
12 | SELECT *
13 | FROM information_schema.role_table_grants
14 | ```
15 |
16 | ### Creating new schemas
17 | When you create a new schema, you'll want to be sure to grant permissions to everyone in your group, which can be done by granting privileges to your group name, for instance:
18 | ```sql
19 | CREATE SCHEMA my_new_schema;
20 | GRANT ALL ON SCHEMA my_new_schema TO {group_name};
21 | ```
22 | (replacing `{group_name}` with your group name, such as `bills1`)
23 |
24 | ### Creating new tables
25 | Likewise, when you create a new table, you'll want to grant permissions to everyone in your group:
26 | ```sql
27 | CREATE TABLE my_schema.my_new_table (
28 | some_column_name INT,
29 | some_other_column VARCHAR,
30 | );
31 | GRANT ALL ON my_schema.my_new_table TO {group_name};
32 | ```
33 | (replacing `{group_name}` with your group name, such as `bills1`)
34 |
35 | ## Query Performance
36 | Most of these projects use moderately large data. While postgres can work with this type of structured data very efficiently if your queries and tables are properly optimized, if they aren't, some queries can be painfully slow. A few pointers:
37 | - Especially when creating relatively large tables, using [appropriate indices](https://www.postgresqltutorial.com/postgresql-indexes/postgresql-create-index/) will vastly improve accessing data and joining to the table
38 | - For large, complex queries, subqueries are typically less performant that [CTEs](http://www.craigkerstiens.com/2013/11/18/best-postgres-feature-youre-not-using/) or building up pieces with temporary tables (which, in turn, can be indexed as well)
39 | - Be sure you're making use of the relational nature of the database; often, if you find yourself doing a large number of small queries in a loop to do the same thing to different slices of the data, you could likely optimize by reworking this into a single query that works on everything at once.
40 | - Pandas is very, very bad at moving large amounts of data into databases from python -- take a look at [Ohio](https://github.com/dssg/ohio) for a more efficient option.
41 |
42 | ### Killing hung or run-away queries
43 | If you think one of your queries has hung (or is taking far longer or too many resources than it should), you can run the following query to confirm that it is still running:
44 | ```sql
45 | SELECT * FROM pg_stat_activity;
46 | ```
47 | If you need to kill your query, you can note down the PID from that result and then use:
48 | ```sql
49 | SELECT pg_cancel_backend({PID});
50 | ```
51 | To kill it (it's a good idea to check `pg_stat_activity` again to ensure it's been killed). Sometimes that may not work, and you need to use the more aggressive:
52 | ```sql
53 | SELECT pg_terminate_backend({PID});
54 | ```
55 |
56 | ### Remember to close your database connections
57 | It's always a good practice to close out your database connections explicitly, both for database software (such as dbeaver) as well as `psycopg2` connections from python (e.g., make sure you run `cursor.close()` as well as `connection.close` after running all your queries).
58 |
--------------------------------------------------------------------------------
/techhelp/dbeaver_instructions.pdf:
--------------------------------------------------------------------------------
https://raw.githubusercontent.com/dssg/mlforpublicpolicylab/d94c464f8a97c0b74cc94a889d88474ed718a3ba/techhelp/dbeaver_instructions.pdf
--------------------------------------------------------------------------------
/techhelp/handling_secrets.md:
--------------------------------------------------------------------------------
1 | # Some Tips for Handling Secrets
2 | Keeping secrets (such as database passwords, API credentials, etc) out of your code is important to ensure the security your systems and data. While there are many approaches to doing so, two simple options are making use of environment variables and using secret config files.
3 |
4 | ## Option 1: Environment Variables
5 | Environment variables you set at the bash command line are available to your code running in that environment and a good option for keeping secrets out of your code itself. You can set environment variables at the command line by assigning them with an `=` sign (avoid any spaces around the `=`) and check their value using `echo` and placing a `$` before the variable name:
6 |
7 | ```bash
8 | you@server:~$ FOO="HELLO WORLD"
9 | you@server:~$ echo $FOO
10 | HELLO WORLD
11 | ```
12 |
13 | In python, you can access these using the built-in `os` module, for instance if you had your database password stored in the `PGPASSWORD` environment variable:
14 |
15 | ```python
16 | import os
17 |
18 | db_pass = os.getenv('PGPASSWORD')
19 | ```
20 |
21 | If you don't want to set the environment variables by hand every time you start a new terminal session, you could also store them in a shell script that would load them up when run, for instance, you might have a file called `environment.sh` with contents:
22 |
23 | ```bash
24 | export FOO="HELLO WORLD"
25 | export BAR="BAZ"
26 | ```
27 |
28 | Importantly, you'll need to **restrict the access to this file**: store it somewhere only you can access (e.g., your home directory), avoid committing it to a git repository, and change the permissions so only you can view it using `chmod 600 {filename}`.
29 |
30 | Once you've created that file, any time you want to load the environment variables, you can simply run its contents as a shell script using `source`. For instance, if the file was named `environment.sh`:
31 |
32 | ```bash
33 | you@server:~$ source environment.sh
34 | ```
35 |
36 | ## Option 2: Secrets Config File
37 |
38 | A second option involves storing your secrets in a config file that can be read by your programs (any number of formats is reasonable: yaml, json, even plain text). For instance, you might create a file called `secrets.yaml` with contents such as:
39 |
40 | ```yaml
41 | db:
42 | host: database.mlpolicylab.dssg.io
43 | port: 5432
44 | dbname: group_students_database
45 | user: andrewid
46 | password: 12345
47 | web_resource:
48 | api_key: 23b53ca9845f70424ad08f958c94b275
49 | ```
50 |
51 | Then, you can access your secrets within your code with the appropriate loading utility, such as (here, the `yaml` module is not built-in, but comes from the package `PyYAML`):
52 |
53 | ```python
54 | import yaml
55 |
56 | with open('path/to/secrets.yaml', 'r') as f:
57 | # loads contents of secrets.yaml into a python dictionary
58 | secret_config = yaml.safe_load(f.read())
59 | ```
60 |
61 | This can be an easy way to feed secrets into your programs, but you'll need to **ensure these secrets don't accidentally get committed to github**. You could either provide the path to config file as an input parameter to your program (in which case, you could keep the secrets file somewhere entirely outside of the git repo, such as your home directory) or have it live in some expected location within the structure of the github repo, but use a `.gitignore` file to avoid committing the secrets file itself.
62 |
63 | To do so, edit (or create) your `.gitignore` file at the top level of your repo to add (in the example where the secrets are contained in `secrets.yaml`):
64 |
65 | ```
66 | # ignore secrets config
67 | secrets.yaml
68 | ```
69 |
70 | Make sure you've added and committed the `.gitignore` file to your repo, and then you should be able to confirm that your secrets file isn't being tracked with `git status`.
71 |
--------------------------------------------------------------------------------
/techhelp/img/jupyter-login.png:
--------------------------------------------------------------------------------
https://raw.githubusercontent.com/dssg/mlforpublicpolicylab/d94c464f8a97c0b74cc94a889d88474ed718a3ba/techhelp/img/jupyter-login.png
--------------------------------------------------------------------------------
/techhelp/img/jupyter-new-nb.png:
--------------------------------------------------------------------------------
https://raw.githubusercontent.com/dssg/mlforpublicpolicylab/d94c464f8a97c0b74cc94a889d88474ed718a3ba/techhelp/img/jupyter-new-nb.png
--------------------------------------------------------------------------------
/techhelp/img/jupyter-shutdown.png:
--------------------------------------------------------------------------------
https://raw.githubusercontent.com/dssg/mlforpublicpolicylab/d94c464f8a97c0b74cc94a889d88474ed718a3ba/techhelp/img/jupyter-shutdown.png
--------------------------------------------------------------------------------
/techhelp/img/jupyter-terminal.png:
--------------------------------------------------------------------------------
https://raw.githubusercontent.com/dssg/mlforpublicpolicylab/d94c464f8a97c0b74cc94a889d88474ed718a3ba/techhelp/img/jupyter-terminal.png
--------------------------------------------------------------------------------
/techhelp/infrastructure_quickstart.md:
--------------------------------------------------------------------------------
1 | ## Reaching the Course Server
2 | We have created an ubuntu linux server that you'll be able to use for your project work at `server.mlpolicylab.dssg.io` –– you should be able to reach it via SSH with the private key corresponding to the public key you provided us and using your Andrew ID as your username.
3 |
4 | NOTE: The course infrastructure is **only accessible from the CMU VPN (or on campus)**. When logging onto the VPN, be sure to use the **Full VPN** option in order to be able to reach the class server.
5 |
6 | Once connected, here are a couple of commands you could run and expected output to verify that you're on the server (only type the commands after the "$" prompt and the output is shown on the next line):
7 | ```
8 | andrewid@mlpolicylab-94889:~$ hostname
9 | mlpolicylab-94889
10 |
11 | andrewid@mlpolicylab-94889:~$ pwd
12 | /home/{andrew_id}
13 | ```
14 |
15 | ## Reaching the Course Database
16 | Most of the data for the course projects will be provided in a postgres database. Once you're connected to the server, you can reach the database using the psql command line utility. The database server is at `database.mlpolicylab.dssg.io` and your username is again your Andrew ID. Here's an example of connecting to the database:
17 | ```
18 | andrewid@mlpolicylab-94889:~$ PAGER='less -S' psql -h database.mlpolicylab.dssg.io -U {YOUR_ANDREW_ID} group_students_database
19 | psql (11.6 (Ubuntu 11.6-1.pgdg18.04+1), server 11.5)
20 | SSL connection (protocol: TLSv1.2, cipher: ECDHE-RSA-AES256-GCM-SHA384, bits: 256, compression: off)
21 | Type "help" for help.
22 |
23 | group_students_database=> SELECT 1+1 AS foo;
24 | foo
25 | -----
26 | 2
27 | (1 row)
28 |
29 | group_students_database=> SELECT CURRENT_USER;
30 | current_user
31 | --------------
32 | {your_andrew_id}
33 | (1 row)
34 |
35 | group_students_database=> \q
36 | ```
37 | Here, we're connecting to an empty `group_students_database` for the time being, but once the teams are formed, we'll follow up with instructions on connecting to a team database populated with some data.
38 |
39 | Your password for the database can be found in the `.pgpass` file in your home directory (it's everything after the last colon). While you can only reach the database from the course server, you can use a local SQL client like [dbeaver](https://dbeaver.io/) or [datagrip](https://www.jetbrains.com/datagrip/) by establishing an SSH tunnel through the server (see details below).
40 |
41 | ## Using dbeaver
42 | One option for connecting to the database from your local machine is to use [dbeaver](https://dbeaver.io/) (other SQL interpreters are fine as well, but this one has a free community edition that is relatively easy to get up and running with).
43 |
44 | A couple of pointers on getting set up:
45 |
46 | - To get started, you may need to install a different SSH package called "SSHJ" -- under the Help menu, choose "Install new Software" then search for SSHJ and install the package (you'll need to restart dbeaver) Note that sometimes the setup works out of the box without this.
47 | - You'll need to connect via an SSH tunnel, so when you set up your database connection, look for the SSH tab and set up the tunnel to `server.mlpolicylab.dssg.io` with your Andrew ID and private key file (choosing "public key" as the authentication method)
48 | - If you installed it, be sure to choose SSHJ as the method under advanced
49 | - Then you can test your SSH tunnel by clicking the button below (you might need to make your window larger to see it)
50 | - Once your tunnel is working, under the general tab you can set up your database connection using `database.mlpolicylab.dssg.io` for the server, your Andrew ID, and the password from your `.pgpass` file on the server (everything after the last colon). The database name should be your group database (for now, `group_students_database` but you'll need to change to your group database once that's assigned)
51 | - Click the button to test the full connection and if that works finish setting up the database
52 | - Once done, in the left pane you'll be able to browse the database structure and in the right pane run SQL queries (you may need to create a new SQL editor)
53 |
54 | ## Github
55 | You should have received an invite to the "Machine Learning Public Policy Class" github team in the DSSG organization based on the github user id you created. Currently, this team has access to [one repository](https://github.com/dssg/test-mlpolicylab-private) that you can use to test your configuration, but we'll be creating separate repositories for each project team to work on once those are set up. Here's what you'll need to do:
56 |
57 | - Add your **public ssh** key to your github account following the [instructions here](https://help.github.com/en/enterprise/2.17/user/github/authenticating-to-github/adding-a-new-ssh-key-to-your-github-account) (this can be the same one you use to connect to the server or a new one)
58 |
59 | - Copy the corresponding **private key** to the server -- it needs to live in `~/.ssh/` with "600" permissions. Here's how you might do that:
60 | - on your local machine: `scp {/path/to/your/key_file} your_andrew_id@server.mlpolicylab.dssg.io:~/.ssh/`
61 | - then, on the course server: `chmod 600 ~/.ssh/{key_file}`
62 |
63 | - Make sure you key is registered with the SSH agent:
64 | - on the course server: `eval "$(ssh-agent -s)"`
65 | - then: `ssh-add ~/.ssh/{key_file}`
66 |
67 | - Check that everything is correct so far by connecting to github:
68 | - on the course server: `ssh git@github.com`
69 |
70 | - (if all is well, you should get a message recognizing your git username saying you have successfully authenticated)
71 |
72 | - Configure the github CLI. On the course server:
73 | - `git config --global user.name "Your name here"`
74 | - `git config --global user.email "your_email@example.com"`
75 | - `git config --global color.ui true`
76 | - `git config --global push.default current`
77 |
78 | - Clone the private test repo. On the course server:
79 | - `git clone git@github.com:dssg/test-mlpolicylab-private.git`
80 |
81 | - Finally, confirm that you've cloned the repo by printing out the README file:
82 | - on the course server: `cat test-mlpolicylab-private/README.md`
83 |
84 | Once you have that working, your github access should be all set for the course.
85 |
86 | ## Jupyter Notebook
87 | You may want to use jupyter notebooks for some data exploration and visualization throughout the course. Since the data needs to stay in the AWS environment, you'll need to do so by running a notebook server on the remote machine and creating a tunnel so you can access it via your local browser. Let's test that out:
88 | On the course server, you'll want to choose an open port for your notebook server (so you can consistently access it in the same place). You can see the ports currently in use with:
89 | ```
90 | ss -lntu
91 | ```
92 | Choose a port number **between 1024 and 65535** that is **NOT** on that list.
93 |
94 | Then, start your notebook server using:
95 | ```
96 | jupyter notebook --no-browser --port {YOUR_PORT}
97 | ```
98 | Note that this will print out a message indicating that the server is starting and giving you a token you can use to access it.
99 |
100 | Now, **on your local machine**, you'll need to set up an SSH tunnel to connect to the server:
101 | ```
102 | ssh -N -L localhost:8888:localhost:{YOUR_PORT} {YOUR_ANDREW_ID}@server.mlpolicylab.dssg.io
103 | ```
104 | Note that if you already have a local notebook server running, you may need to choose a different port than 8888 to map to, but we'll assume this is open here. Also, you may need to specify the "-i" parameter to provide the path to your private key file. If you're on windows, you may need to do this using PuTTY -- [see the instructions here](https://docs.bitnami.com/bch/faq/get-started/access-ssh-tunnel/)
105 |
106 | Finally, open a browser of your choice on your local machine and navigate to http://localhost:8888/ and you should get a jupyter notebook login page asking for the token that was generated when you started the server (if this doesn't work, you might also try http://0.0.0.0:8888/ or http://127.0.0.1:8888/ ). If this is successful, you should see a directory listing where you started the notebook server on the remote server allowing you to create new python files.
107 |
108 | Again, there's not too much more to do for the moment beyond confirming that you can connect, so at this point you can go ahead and kill the notebook server on the course server and the tunnel on your local machine (control-C should work for both).
109 |
110 | Anyway, once you can do all that, you should be in good shape for most of the technical resources you'll need for class! Please feel free to ping us on slack in the **#help** channel if you run into trouble with any of the steps here, and we'll be cover all of these details in the Wednesday tech session as well.
111 |
112 |
--------------------------------------------------------------------------------
/techhelp/jupyter_setup.md:
--------------------------------------------------------------------------------
1 | # Using Jupyter Notebooks
2 |
3 | ## tl;dr
4 | 1. start jupyter server on the server from your project directory and select a port number **between 1024 and 65535** (more details below if you get an error)
5 | ```bash
6 | cd /data/groups/{group-name}/
7 | jupyter notebook --no-browser --port {YOUR_PORT}
8 | ```
9 |
10 | Take note of token once the command finishes running. it will be in a string similar to ``[I 04:14:21.181 NotebookApp] http://localhost8:888/?token=65d0e5010af61874004ddeea962cd727992a593b82bc4e1b``
11 |
12 | 2. Set up an SSH tunnel to connect to the server from your laptop:
13 |
14 | ```bash
15 | ssh -N -L localhost:8888:localhost:{YOUR_PORT} {YOUR_ANDREW_ID}@server.mlpolicylab.dssg.io
16 | ```
17 |
18 | 3. Open browser on laptop and type in http://localhost:8888/ and enter token from step 1. Make sure to select the kernel with your group name when creating a notebook
19 |
20 | ## Before you get started
21 |
22 | Although not a good environment for running your ML pipeline and models, jupyter notebooks can be useful for exploratory data analysis as well as visualizing modeling results. Since the data needs to stay in the AWS environment, you'll need to do so by running a notebook server on the remote machine and creating an SSH tunnel (because the course server can only be accessed via the SSH protocol) so you can access it via your local browser.
23 |
24 | One important note: **be sure to explicitly shut down the kernels when you're done working with a notebook** (you can do this from the notebook directory listing: see the figure below) as "zombie" notebook sessions can end up using up a lot of resources!
25 |
26 | 
27 |
28 | ## Starting up the server
29 | On the course server, you'll want to choose an open port for your notebook server (so you can consistently access it in the same place). You can see the ports currently in use with:
30 | ```bash
31 | ss -lntu
32 | ```
33 | Choose a port number **between 1024 and 65535** that is **NOT** on that list.
34 |
35 | Next, you'll actually start the notebook server -- you may want to consider doing this in a `screen` session to ensure the keep ther server persistent (see the [linux command line section of the tech setup readme](https://github.com/dssg/mlforpublicpolicylab/tree/master/techhelp#linux-command-line-bash) for details). Make sure you're in your group's python virtualenv and start your notebook server, for instance using:
36 | ```bash
37 | cd /data/groups/{group-name}/
38 | jupyter notebook --no-browser --port {YOUR_PORT}
39 | ```
40 | or
41 | ```bash
42 | source /data/groups/{group-name}/dssg_env/bin/activate
43 | jupyter notebook --no-browser --port {YOUR_PORT}
44 | ```
45 | Your group name is bills1, schools1, etc.
46 |
47 | Note that whatever directory you're in when you start the server is where your notebooks will be stored. Starting the server will print out a message indicating that the server is starting and giving you a token you can use to access it, which looks something like this:
48 |
49 | 
50 |
51 | Take note of the token (outlined with the red box in the image), as you'll need this to log in.
52 |
53 | ## Accessing the server from your browser
54 | Now, on your local machine, you'll need to set up an SSH tunnel to connect to the server:
55 |
56 | ```bash
57 | ssh -N -L localhost:8888:localhost:{YOUR_PORT} {YOUR_ANDREW_ID}@server.mlpolicylab.dssg.io
58 | ```
59 |
60 | Note that if you already have a local notebook server running, you may need to choose a different port than 8888 to map to, but we'll assume this is open here. Also, you may need to specify the "-i" parameter to provide the path to your private key file. If you're on windows, you may need to do this using PuTTY -- [see the instructions here](https://docs.bitnami.com/bch/faq/get-started/access-ssh-tunnel/)
61 |
62 | Running this command won't look like it did anything because it's just opening a connection between your machine and the course server to route traffic to the local port (here, 8888) to the port you choose for your notebook server on the class server. **You'll need to keep this terminal/putty session open to maintain the tunnel**
63 |
64 | Finally, open a browser of your choice on your local machine and navigate to http://localhost:8888/ and you should get a jupyter notebook login page asking for the token that was generated when you started the server (if this doesn't work, you might also try http://0.0.0.0:8888/ or http://127.0.0.1:8888/ ):
65 |
66 | 
67 |
68 | If you successfully log in, you should see a directory listing where you started the notebook server on the remote server allowing you to create new python files.
69 |
70 | ## Shutting down
71 | You'll need to do two things to shut down your notebook server:
72 | 1. Kill the notebook server on the remote machine (return to the terminal/screen window where the server is running and type control-C then `y` when prompted if you reall want to shut down)
73 | 1. Close the SSH tunnel on your local machine: on linux/macos, you can do so by running `ps aux | grep {YOUR_PORT}` to find the process id (PID) then using `kill {PID}`, or alternatively closing the terminal session you used to start it. With putty or powershell on windows, you should simply be able to close the window where you started the tunnel.
74 |
--------------------------------------------------------------------------------
/techhelp/pipelines_session.pptx:
--------------------------------------------------------------------------------
https://raw.githubusercontent.com/dssg/mlforpublicpolicylab/d94c464f8a97c0b74cc94a889d88474ed718a3ba/techhelp/pipelines_session.pptx
--------------------------------------------------------------------------------
/techhelp/python_sql_tech_session.ipynb:
--------------------------------------------------------------------------------
1 | {
2 | "cells": [
3 | {
4 | "cell_type": "markdown",
5 | "metadata": {},
6 | "source": [
7 | "# Python + SQL Tech Session\n",
8 | "\n",
9 | "Today we'll be covering:\n",
10 | "1. Connecting to the database from python\n",
11 | "1. Using templated SQL in python\n",
12 | "1. getting data into and out of postgres efficiently\n",
13 | "1. Advanced SQL\n",
14 | " - CTEs (WITH clauses)\n",
15 | " - window functions\n",
16 | " - indices / check plan\n",
17 | " - temp tables\n",
18 | "\n",
19 | "### Some initial setup\n",
20 | "Requirements:\n",
21 | "- You should have a database.yaml file in your home directory with your credentials - please check if it's there.\n",
22 | "\n",
23 | "Downloading the materials we'll need:\n",
24 | "1. SSH to the class server\n",
25 | "2. Go to your working directory in your project folder using `cd your_working_directory` (/mnt/data/......)\n",
26 | "3. Download the notebook: `wget https://raw.githubusercontent.com/dssg/mlforpublicpolicylab/master/techhelp/python_sql_tech_session.ipynb`\n",
27 | "4. Download the sql template example: `wget https://raw.githubusercontent.com/dssg/mlforpublicpolicylab/master/techhelp/tech_session_template.sql`\n",
28 | "5. Take a look at the sql template: `less tech_session_template.sql` (Type `q` to exit)\n",
29 | "\n",
30 | "\n",
31 | "\n"
32 | ]
33 | },
34 | {
35 | "cell_type": "markdown",
36 | "metadata": {},
37 | "source": [
38 | "## Import packages"
39 | ]
40 | },
41 | {
42 | "cell_type": "code",
43 | "execution_count": null,
44 | "metadata": {},
45 | "outputs": [],
46 | "source": [
47 | "import matplotlib.pyplot as plt\n",
48 | "import pandas as pd\n",
49 | "from sqlalchemy import create_engine\n",
50 | "import yaml\n",
51 | "\n",
52 | "import ohio.ext.pandas"
53 | ]
54 | },
55 | {
56 | "cell_type": "markdown",
57 | "metadata": {},
58 | "source": [
59 | "## TOPIC 1: Connect to the database from python"
60 | ]
61 | },
62 | {
63 | "cell_type": "code",
64 | "execution_count": null,
65 | "metadata": {},
66 | "outputs": [],
67 | "source": [
68 | "with open('database.yaml', 'r') as f:\n",
69 | " db_params = yaml.safe_load(f)\n",
70 | "\n",
71 | "db_params['db'] = 'group_students_database'\n",
72 | "engine = create_engine('postgresql://{user}:{password}@{host}:{port}/{dbname}'.format(\n",
73 | " host=db_params['host'],\n",
74 | " port=db_params['port'],\n",
75 | " dbname=db_params['db'],\n",
76 | " user=db_params['user'],\n",
77 | " password=db_params['pass'] \n",
78 | "))\n"
79 | ]
80 | },
81 | {
82 | "cell_type": "markdown",
83 | "metadata": {},
84 | "source": [
85 | "We're connected to a database with data from the DonorsChoose organization. It has a few useful tables:\n",
86 | "- `donorschoose.projects` -- general information about projects\n",
87 | "- `donorschoose.resources` -- detailed information about requested resources\n",
88 | "- `donorschoose.essays` -- project titles and descriptions\n",
89 | "- `donorschoose.donations` -- separate record for each donation to a project\n",
90 | "\n",
91 | "There's also a `sketch` schema you can use to create tables in"
92 | ]
93 | },
94 | {
95 | "cell_type": "markdown",
96 | "metadata": {},
97 | "source": [
98 | "### Simple select statement with sqlalchemy engine"
99 | ]
100 | },
101 | {
102 | "cell_type": "code",
103 | "execution_count": null,
104 | "metadata": {},
105 | "outputs": [],
106 | "source": [
107 | "sql = \"SELECT projectid, schoolid, resource_type FROM donorschoose.projects LIMIT 3\"\n",
108 | "\n",
109 | "result_set = engine.execute(sql)\n",
110 | "for rec in result_set:\n",
111 | " print(rec)"
112 | ]
113 | },
114 | {
115 | "cell_type": "markdown",
116 | "metadata": {},
117 | "source": [
118 | "### Pandas will give a little cleaner output"
119 | ]
120 | },
121 | {
122 | "cell_type": "code",
123 | "execution_count": null,
124 | "metadata": {},
125 | "outputs": [],
126 | "source": [
127 | "sql = \"SELECT projectid, schoolid, resource_type FROM donorschoose.projects LIMIT 3\"\n",
128 | "\n",
129 | "pd.read_sql(sql, engine)"
130 | ]
131 | },
132 | {
133 | "cell_type": "markdown",
134 | "metadata": {},
135 | "source": [
136 | "## Simple Table Manipulation with sqlalchemy (we'll do something more efficient below)\n",
137 | "\n",
138 | "Let's create a little table to track your stocks of halloween candy (fill in your andrew id below)"
139 | ]
140 | },
141 | {
142 | "cell_type": "code",
143 | "execution_count": null,
144 | "metadata": {},
145 | "outputs": [],
146 | "source": [
147 | "andrew_id = # FILL IN YOUR andrew_id HERE!\n",
148 | "candy_table = '{}_candy'.format(andrew_id)\n",
149 | "table_schema = 'sketch'"
150 | ]
151 | },
152 | {
153 | "cell_type": "markdown",
154 | "metadata": {},
155 | "source": [
156 | "Execute an appropriate CREATE statement"
157 | ]
158 | },
159 | {
160 | "cell_type": "code",
161 | "execution_count": null,
162 | "metadata": {},
163 | "outputs": [],
164 | "source": [
165 | "create_sql = '''CREATE TABLE IF NOT EXISTS {}.{} (\n",
166 | " candy_type varchar NULL,\n",
167 | " amount int,\n",
168 | " units varchar\n",
169 | ");'''.format(table_schema, candy_table)\n",
170 | "\n",
171 | "engine.execute(create_sql)"
172 | ]
173 | },
174 | {
175 | "cell_type": "markdown",
176 | "metadata": {},
177 | "source": [
178 | "**IMPORTANT NOTE**: Statements that modify the state of the database will not be physically reflected until we tell the connection to commit these changes. If you went into DBeaver now, you still wouldn't see this new table!"
179 | ]
180 | },
181 | {
182 | "cell_type": "code",
183 | "execution_count": null,
184 | "metadata": {},
185 | "outputs": [],
186 | "source": [
187 | "engine.execute(\"COMMIT\")"
188 | ]
189 | },
190 | {
191 | "cell_type": "markdown",
192 | "metadata": {},
193 | "source": [
194 | "Now let's insert a few records (again note that we have to **commit** for the records to show up):"
195 | ]
196 | },
197 | {
198 | "cell_type": "code",
199 | "execution_count": null,
200 | "metadata": {},
201 | "outputs": [],
202 | "source": [
203 | "insert_sql = '''INSERT INTO {}.{}\n",
204 | " (candy_type, amount, units)\n",
205 | " VALUES(%s, %s, %s);\n",
206 | "'''.format(table_schema, candy_table)\n",
207 | "\n",
208 | "records_to_insert = [('snickers', 10, 'bars'), ('candy corn', 5, 'bags'), ('peanut butter cups', 15, 'cups')]\n",
209 | "\n",
210 | "for record in records_to_insert:\n",
211 | " engine.execute(insert_sql, record)\n",
212 | "\n",
213 | "engine.execute(\"COMMIT\")"
214 | ]
215 | },
216 | {
217 | "cell_type": "markdown",
218 | "metadata": {},
219 | "source": [
220 | "Let's look at the results:"
221 | ]
222 | },
223 | {
224 | "cell_type": "code",
225 | "execution_count": null,
226 | "metadata": {},
227 | "outputs": [],
228 | "source": [
229 | "sql = \"SELECT * FROM {}.{}\".format(table_schema, candy_table)\n",
230 | "\n",
231 | "pd.read_sql(sql, engine)"
232 | ]
233 | },
234 | {
235 | "cell_type": "markdown",
236 | "metadata": {},
237 | "source": [
238 | "Clean up: drop the table and commit:"
239 | ]
240 | },
241 | {
242 | "cell_type": "code",
243 | "execution_count": null,
244 | "metadata": {},
245 | "outputs": [],
246 | "source": [
247 | "drop_sql = \"DROP TABLE {}.{}\".format(table_schema, candy_table)\n",
248 | "\n",
249 | "engine.execute(drop_sql)\n",
250 | "engine.execute(\"COMMIT\")"
251 | ]
252 | },
253 | {
254 | "cell_type": "markdown",
255 | "metadata": {},
256 | "source": [
257 | "## TOPIC 2: Using Templated SQL\n",
258 | "\n",
259 | "Templating SQL statements and filling them in dynamically with python can be very helpful as you're transforming data for your projects, for instance, creating features, labels, and matrices for different temporal validation splits in your data.\n",
260 | "\n",
261 | "We've actually been doing a little bit of this already (e.g., filling in table names and insert values above), but let's look at a couple of examples in more detail with the donors choose data. Suppose we wanted to look at the sets of projects posted on a few given days:"
262 | ]
263 | },
264 | {
265 | "cell_type": "code",
266 | "execution_count": null,
267 | "metadata": {},
268 | "outputs": [],
269 | "source": [
270 | "sql_template = \"\"\"\n",
271 | "SELECT projectid, resource_type, poverty_level, date_posted\n",
272 | "FROM donorschoose.projects\n",
273 | "WHERE date_posted::DATE = '{}'::DATE\n",
274 | "\"\"\"\n",
275 | "\n",
276 | "results = []\n",
277 | "for dt in ['2014-05-01', '2014-04-15', '2014-04-01']:\n",
278 | " sql = sql_template.format(dt)\n",
279 | " results.append(pd.read_sql(sql, engine))\n"
280 | ]
281 | },
282 | {
283 | "cell_type": "markdown",
284 | "metadata": {},
285 | "source": [
286 | "Do some quick checks:\n",
287 | "1. How many result sets did we get back?\n",
288 | "1. Look at the first few results of one of the sets, are they all on the right date?\n",
289 | "1. How many projects were posted on each of these days?"
290 | ]
291 | },
292 | {
293 | "cell_type": "code",
294 | "execution_count": null,
295 | "metadata": {},
296 | "outputs": [],
297 | "source": [
298 | "# Number of result sets"
299 | ]
300 | },
301 | {
302 | "cell_type": "code",
303 | "execution_count": null,
304 | "metadata": {},
305 | "outputs": [],
306 | "source": [
307 | "# First few records of one set"
308 | ]
309 | },
310 | {
311 | "cell_type": "code",
312 | "execution_count": null,
313 | "metadata": {},
314 | "outputs": [],
315 | "source": [
316 | "# Number of projects on each date"
317 | ]
318 | },
319 | {
320 | "cell_type": "markdown",
321 | "metadata": {},
322 | "source": [
323 | "#### Some simple data visualization\n",
324 | "\n",
325 | "We won't go into detail here, but just to provide a quick example. See the matplot (or seaborn) documentation for more plot types and examples."
326 | ]
327 | },
328 | {
329 | "cell_type": "code",
330 | "execution_count": null,
331 | "metadata": {},
332 | "outputs": [],
333 | "source": [
334 | "ix = 0\n",
335 | "df = results[ix].groupby('resource_type')['projectid'].count().reset_index()\n",
336 | "dt = results[ix]['date_posted'].max()\n",
337 | "\n",
338 | "fig, ax = plt.subplots()\n",
339 | "ax.bar('resource_type', 'projectid', data=df)\n",
340 | "ax.set_title('Counts by resource type for %s' % dt)\n",
341 | "ax.set_ylabel('Number of Projects')\n",
342 | "plt.show()"
343 | ]
344 | },
345 | {
346 | "cell_type": "markdown",
347 | "metadata": {},
348 | "source": [
349 | "### Templated SQL stored in a file\n",
350 | "\n",
351 | "If your queries get long or complex, you might want to move them out to separate files to keep your code a bit cleaner. We've provided an example to work with in `tech_session_template.sql` -- let's read that in here.\n",
352 | "\n",
353 | "Note that here we're just making use of basic python templating here, but if you want to use more complex logic in your templates, check out packages like [Jinja2](https://jinja.palletsprojects.com/en/2.11.x/)"
354 | ]
355 | },
356 | {
357 | "cell_type": "code",
358 | "execution_count": null,
359 | "metadata": {},
360 | "outputs": [],
361 | "source": [
362 | "# Read the template file\n",
363 | "with open('tech_session_template.sql', 'r') as f:\n",
364 | " sql_template = f.read()\n",
365 | "\n",
366 | "# Look at the contents:\n",
367 | "print(sql_template)"
368 | ]
369 | },
370 | {
371 | "cell_type": "markdown",
372 | "metadata": {},
373 | "source": [
374 | "**Looks like we'll need a few parameters:**\n",
375 | "- table_schema\n",
376 | "- table_name\n",
377 | "- state_list\n",
378 | "- start_dt\n",
379 | "- end_dt\n",
380 | "\n",
381 | "Notice as well that we've explicitly encoded all of these columns by hand, but you might want to think about how you might construct the sets of columns for one-hot encoded categoricals programmatically from the data, as well as the other types of features we've discussed (like aggregations in different time windows)..."
382 | ]
383 | },
384 | {
385 | "cell_type": "code",
386 | "execution_count": null,
387 | "metadata": {},
388 | "outputs": [],
389 | "source": [
390 | "table_schema = 'donorschoose'\n",
391 | "table_name = 'projects'\n",
392 | "state_list = ['CA', 'NY', 'PA']\n",
393 | "start_dt = '2014-03-14'\n",
394 | "end_dt = '2014-04-30'\n",
395 | "\n",
396 | "sql = sql_template.format(\n",
397 | " table_schema=table_schema,\n",
398 | " table_name=table_name,\n",
399 | " state_list=state_list,\n",
400 | " start_dt=start_dt,\n",
401 | " end_dt=end_dt\n",
402 | ")\n",
403 | "\n",
404 | "# Let's take a look...\n",
405 | "print(sql)"
406 | ]
407 | },
408 | {
409 | "cell_type": "markdown",
410 | "metadata": {},
411 | "source": [
412 | "**Looks like the square brackets in that state list will generate an error!**\n",
413 | "\n",
414 | "Let's try formatting it before doing the templating:"
415 | ]
416 | },
417 | {
418 | "cell_type": "code",
419 | "execution_count": null,
420 | "metadata": {},
421 | "outputs": [],
422 | "source": [
423 | "def list_to_string(l, dtype='string'):\n",
424 | " if dtype=='string':\n",
425 | " return ','.join([\"'%s'\" % elm for elm in l])\n",
426 | " else:\n",
427 | " return ','.join([\"%s\" % elm for elm in l])\n",
428 | "\n",
429 | "\n",
430 | "state_list = list_to_string(['CA', 'NY', 'PA'])\n",
431 | "\n",
432 | "print(state_list)"
433 | ]
434 | },
435 | {
436 | "cell_type": "code",
437 | "execution_count": null,
438 | "metadata": {},
439 | "outputs": [],
440 | "source": [
441 | "sql = sql_template.format(\n",
442 | " table_schema=table_schema,\n",
443 | " table_name=table_name,\n",
444 | " state_list=state_list,\n",
445 | " start_dt=start_dt,\n",
446 | " end_dt=end_dt\n",
447 | ")\n",
448 | "\n",
449 | "# Let's take a look...\n",
450 | "print(sql)"
451 | ]
452 | },
453 | {
454 | "cell_type": "markdown",
455 | "metadata": {},
456 | "source": [
457 | "**Looks better!** Let's try running it now..."
458 | ]
459 | },
460 | {
461 | "cell_type": "code",
462 | "execution_count": null,
463 | "metadata": {},
464 | "outputs": [],
465 | "source": [
466 | "df = pd.read_sql(sql, engine)\n",
467 | "\n",
468 | "df.head(10)"
469 | ]
470 | },
471 | {
472 | "cell_type": "markdown",
473 | "metadata": {},
474 | "source": [
475 | "## TOPIC 3: Getting data into and out of postgres efficiently\n",
476 | "\n",
477 | "At the command line, one very efficient way of getting data into postgres is to stream it to a `COPY` statement on `STDIN`, this might look something like:\n",
478 | "```\n",
479 | "cat my_file.csv | psql -h database.mlpolicylab.dssg.io {group_database} -c \"COPY {schema}.{table} FROM STDIN CSV HEADER\"\n",
480 | "```\n",
481 | "(more details in the [postgres documentation](https://www.postgresql.org/docs/11/sql-copy.html))\n",
482 | "\n",
483 | "Similarly, you can use the `\\copy` command from within `psql` itself -- you can find [documentation here](https://www.postgresql.org/docs/11/app-psql.html) (seach for \"\\copy\").\n",
484 | "\n",
485 | "For today, we'll focus on a package called `ohio` that provides efficient tools for moving data between postgres and python. `ohio` provides interfaces for both `pandas` dataframes and `numpy` arrays, but we'll focus on the `pandas` tools here, which are provided via `import ohio.ext.pandas` (see the [docs for the numpy examples](https://github.com/dssg/ohio#extensions-for-numpy))\n",
486 | "\n",
487 | "Note that `ohio` is dramatically more efficient than the built-in `df.to_sql()` (see the benchmarking graph below). The pandas function tries to be agnostic about SQL flavor by inserting data row-by-row, while `ohio` uses postgres-specific copy functionality to move the data much more quickly (and with lower memory overhead as well):\n",
488 | "\n",
489 | "\n",
490 | "\n",
491 | "Let's try it out by re-creating our halloween candy table."
492 | ]
493 | },
494 | {
495 | "cell_type": "code",
496 | "execution_count": null,
497 | "metadata": {},
498 | "outputs": [],
499 | "source": [
500 | "andrew_id = # FILL IN YOUR andrew_id HERE!\n",
501 | "candy_table = '{}_candy'.format(andrew_id)\n",
502 | "table_schema = 'sketch'"
503 | ]
504 | },
505 | {
506 | "cell_type": "code",
507 | "execution_count": null,
508 | "metadata": {},
509 | "outputs": [],
510 | "source": [
511 | "create_sql = '''CREATE TABLE IF NOT EXISTS {}.{} (\n",
512 | " candy_type varchar NULL,\n",
513 | " amount int,\n",
514 | " units varchar\n",
515 | ");'''.format(table_schema, candy_table)\n",
516 | "\n",
517 | "engine.execute(create_sql)\n",
518 | "engine.execute(\"COMMIT\")"
519 | ]
520 | },
521 | {
522 | "cell_type": "markdown",
523 | "metadata": {},
524 | "source": [
525 | "### Inserting data with df.pg_copy_to()"
526 | ]
527 | },
528 | {
529 | "cell_type": "code",
530 | "execution_count": null,
531 | "metadata": {},
532 | "outputs": [],
533 | "source": [
534 | "df = pd.DataFrame({\n",
535 | " 'candy_type': ['snickers', 'cookies', 'candy apples', 'peanut butter cups', 'candy corn'],\n",
536 | " 'amount': [1,1,2,3,5],\n",
537 | " 'units': ['bars', 'cookies', 'apples', 'cups', 'bags']\n",
538 | "})\n",
539 | "\n",
540 | "# The ohio package adds a `pg_copy_to` method to your dataframes...\n",
541 | "df.pg_copy_to(candy_table, engine, schema=table_schema, index=False, if_exists='append')"
542 | ]
543 | },
544 | {
545 | "cell_type": "markdown",
546 | "metadata": {},
547 | "source": [
548 | "### Reading data with pd.DataFrame.pg_copy_from()\n",
549 | "\n",
550 | "We can read the data from the table we just created using `pg_copy_from`:"
551 | ]
552 | },
553 | {
554 | "cell_type": "code",
555 | "execution_count": null,
556 | "metadata": {},
557 | "outputs": [],
558 | "source": [
559 | "result_df = pd.DataFrame.pg_copy_from(candy_table, engine, schema=table_schema)\n",
560 | "\n",
561 | "result_df"
562 | ]
563 | },
564 | {
565 | "cell_type": "markdown",
566 | "metadata": {},
567 | "source": [
568 | "Note that `pg_copy_from` can accept a query as well:"
569 | ]
570 | },
571 | {
572 | "cell_type": "code",
573 | "execution_count": null,
574 | "metadata": {},
575 | "outputs": [],
576 | "source": [
577 | "sql = \"\"\"\n",
578 | "SELECT\n",
579 | " CASE WHEN candy_type IN ('snickers', 'cookies', 'peanut butter cups') THEN 'has chocolate' ELSE 'non-chocolate' END AS chocolate_flag,\n",
580 | " SUM(amount) AS total_number\n",
581 | "FROM {}.{}\n",
582 | "GROUP BY 1\n",
583 | "\"\"\".format(table_schema, candy_table)\n",
584 | "\n",
585 | "result_df = pd.DataFrame.pg_copy_from(sql, engine)\n",
586 | "\n",
587 | "result_df"
588 | ]
589 | },
590 | {
591 | "cell_type": "markdown",
592 | "metadata": {},
593 | "source": [
594 | "## TOPIC 4: Advanced SQL\n",
595 | "\n",
596 | "Finally for today, we want to talk about a few more advanced SQL functions that will likely be helpful as you're starting to prepare your features and training/test matrices. We **strongly encourage** you to do as much of that data manipulation as you can in the database, as postgres is well-optimized for this sort of work. The functions here should help make that work a bit easier as well.\n",
597 | "\n",
598 | "The idea here is to give you an overview of some of the things that are possible that you might want to explore further. You can find a more in-depth [tutorial here](https://dssg.github.io/hitchhikers-guide/curriculum/2_data_exploration_and_analysis/advanced_sql/), with links out to additional documentation as well."
599 | ]
600 | },
601 | {
602 | "cell_type": "markdown",
603 | "metadata": {},
604 | "source": [
605 | "### CTEs (WITH clauses)\n",
606 | "\n",
607 | "Common table expressions (CTEs), also known as WITH clauses, are a better alternative to subqueries both in terms of code readability as well as (in some cases) performance improvements. They can allow you to break up a complex query into consituent parts, making the logic of your code a little easier to follow.\n",
608 | "\n",
609 | "By way of example, suppose we wanted to calculate the fraction of different types of projects (based on their requested type of resource) that were fully funded in MD in January 2013. Here's how we might do that with CTEs:"
610 | ]
611 | },
612 | {
613 | "cell_type": "code",
614 | "execution_count": null,
615 | "metadata": {},
616 | "outputs": [],
617 | "source": [
618 | "sql = \"\"\"\n",
619 | "WITH md_projects AS (\n",
620 | " SELECT *\n",
621 | " FROM donorschoose.projects\n",
622 | " WHERE school_state='MD'\n",
623 | " AND date_posted::DATE BETWEEN '2013-01-01'::DATE AND '2013-01-31'::DATE\n",
624 | ")\n",
625 | ", total_donations AS (\n",
626 | " SELECT p.projectid, COALESCE(SUM(d.donation_total), 0) AS total_amount\n",
627 | " FROM md_projects p\n",
628 | " LEFT JOIN donorschoose.donations d USING(projectid)\n",
629 | " GROUP BY 1\n",
630 | ")\n",
631 | ", fully_funded AS (\n",
632 | " SELECT p.*, td.total_amount,\n",
633 | " CASE WHEN td.total_amount > p.total_price_excluding_optional_support THEN 1 ELSE 0 END AS funded_flag\n",
634 | " FROM md_projects p\n",
635 | " LEFT JOIN total_donations td USING(projectid)\n",
636 | ")\n",
637 | "SELECT resource_type, COUNT(*) AS num_projects, AVG(funded_flag) AS frac_funded\n",
638 | "FROM fully_funded\n",
639 | "GROUP BY 1\n",
640 | "ORDER BY 3 DESC\n",
641 | "\"\"\"\n",
642 | "\n",
643 | "pd.read_sql(sql, engine)"
644 | ]
645 | },
646 | {
647 | "cell_type": "code",
648 | "execution_count": null,
649 | "metadata": {},
650 | "outputs": [],
651 | "source": [
652 | "### HANDS-ON: For all the MD projects posted in January 2013 that received any donations\n",
653 | "### what is the average fraction of donations coming from teachers by resource type?\n",
654 | "### (note: the donations table has a boolean `is_teacher_acct` column that will be useful)\n",
655 | "\n",
656 | "sql = \"\"\"\n",
657 | "\n",
658 | "\"\"\"\n",
659 | "\n",
660 | "pd.read_sql(sql, engine)"
661 | ]
662 | },
663 | {
664 | "cell_type": "markdown",
665 | "metadata": {},
666 | "source": [
667 | "### Analytic (Window) Functions\n",
668 | "\n",
669 | "Postgres provides powerful functionality for calculating complex metrics such as within-group aggregates, running averages, etc., called \"window functions\" (because they operate over a defined window of the data relative to a given row):\n",
670 | "- They are similar to aggregate functions, but instead of operating on groups of rows to produce a single row, they act on rows related to the current row to produce the same amount of rows.\n",
671 | "- There are several window functions like `row_number`, `rank`, `ntile`, `lag`, `lead`, `first_value`, `last_value`, `nth_value`.\n",
672 | "- And you can use any aggregation functions: `sum`, `count`, `avg`, `json_agg`, `array_agg`, etc\n",
673 | "\n",
674 | "Supposed we want to answer a couple questions:\n",
675 | "- What fraction of all projects in MD are posted by each schoolid?\n",
676 | "- What is the most recently posted project for each school in MD?\n",
677 | "- Calculate a running average of the total ask amount of the 4 most recent projects at a given school (say, `schoolid='ff2695b8b7f3ade678358f6e5c621c1e'`)"
678 | ]
679 | },
680 | {
681 | "cell_type": "code",
682 | "execution_count": null,
683 | "metadata": {},
684 | "outputs": [],
685 | "source": [
686 | "## HANDS-ON: Try answering those questions with SELECT, GROUP BY, HAVING, AND WHERE alone"
687 | ]
688 | },
689 | {
690 | "cell_type": "markdown",
691 | "metadata": {},
692 | "source": [
693 | "Now let's look at how we'd answer these questions with window functions...\n",
694 | "\n",
695 | "**Fraction of projects by school**\n",
696 | "\n",
697 | "Here, we'll group by schools but calculate the number of projects across all schools in MD using:\n",
698 | "\n",
699 | "`SUM(COUNT(*)) OVER ()`\n",
700 | "\n",
701 | "In that statement, `COUNT(*)` is the number of projects at the given school, then we're summing that count across all the aggregated rows with `SUM(.) OVER ()`. There, the `OVER ()` indicates the window across which to take the sum -- in this case, an empty window (that is, `()`) indicates using all records in the table."
702 | ]
703 | },
704 | {
705 | "cell_type": "code",
706 | "execution_count": null,
707 | "metadata": {},
708 | "outputs": [],
709 | "source": [
710 | "result_df = pd.read_sql(\"\"\"\n",
711 | "SELECT schoolid, \n",
712 | " COUNT(*) AS num_projects, \n",
713 | " 1.000*COUNT(*)/SUM(COUNT(*)) OVER () AS frac_at_school\n",
714 | "FROM donorschoose.projects\n",
715 | "WHERE school_state = 'MD'\n",
716 | "GROUP BY 1\n",
717 | "ORDER BY 3 DESC\n",
718 | "\"\"\", engine)\n",
719 | "\n",
720 | "result_df.head()"
721 | ]
722 | },
723 | {
724 | "cell_type": "markdown",
725 | "metadata": {},
726 | "source": [
727 | "**Most recent project by school**\n",
728 | "\n",
729 | "Here, we'll use `row_number` to rank the projects (without ties) within school and by posting date. Note that the window here, `(PARTITION BY schoolid ORDER BY date_posted DESC)` means: within each school id, calculate a row number ordered by the posting date in descending order (so the most recent project by a given school will have `rn=1`, the second most recent will have `rn=2`, and so on).\n",
730 | "\n",
731 | "We do this row number calculation in a CTE, allowing us to pick out the most recent project for each school simply by looking for those with `rn=1` in a subsequent step:"
732 | ]
733 | },
734 | {
735 | "cell_type": "code",
736 | "execution_count": null,
737 | "metadata": {},
738 | "outputs": [],
739 | "source": [
740 | "result_df = pd.read_sql(\"\"\"\n",
741 | "WITH school_rns AS (\n",
742 | " SELECT *, row_number() OVER (PARTITION BY schoolid ORDER BY date_posted::DATE DESC) AS rn\n",
743 | " FROM donorschoose.projects\n",
744 | " WHERE school_state = 'MD'\n",
745 | ")\n",
746 | "SELECT *\n",
747 | "FROM school_rns\n",
748 | "WHERE rn=1\n",
749 | ";\n",
750 | "\"\"\", engine)\n",
751 | "\n",
752 | "result_df.head()"
753 | ]
754 | },
755 | {
756 | "cell_type": "markdown",
757 | "metadata": {},
758 | "source": [
759 | "**Running average of ask from last four projects**\n",
760 | "\n",
761 | "Here, we use postgres's functionality to restrict a window to certain rows relative to the given row. Our window is:\n",
762 | "```\n",
763 | "(PARTITION BY schoolid ORDER BY date_posted ASC ROWS BETWEEN 3 PRECEDING AND CURRENT ROW)\n",
764 | "```\n",
765 | "That is,\n",
766 | "- `PARTITION BY schoolid`: Do the calculation among records at the same school\n",
767 | "- `ORDER BY date_posted ASC`: Order the records by posting date (earliest first)\n",
768 | "- `ROWS BETWEEN 3 PRECEDING AND CURRENT ROW`: Given this ordering, calculate the average across the four most recent rows (including the current row)"
769 | ]
770 | },
771 | {
772 | "cell_type": "code",
773 | "execution_count": null,
774 | "metadata": {},
775 | "outputs": [],
776 | "source": [
777 | "result_df = pd.read_sql(\"\"\"\n",
778 | "SELECT date_posted, projectid, schoolid, total_price_excluding_optional_support AS current_ask,\n",
779 | " AVG(total_price_excluding_optional_support) OVER (\n",
780 | " PARTITION BY schoolid ORDER BY date_posted::DATE ASC\n",
781 | " ROWS BETWEEN 3 PRECEDING AND CURRENT ROW\n",
782 | " ) AS running_avg_ask\n",
783 | "FROM donorschoose.projects\n",
784 | "WHERE schoolid = 'ff2695b8b7f3ade678358f6e5c621c1e'\n",
785 | "ORDER BY date_posted::DATE DESC\n",
786 | ";\n",
787 | "\"\"\", engine)\n",
788 | "\n",
789 | "result_df.head(10)"
790 | ]
791 | },
792 | {
793 | "cell_type": "markdown",
794 | "metadata": {},
795 | "source": [
796 | "**Days since last project was posted**\n",
797 | "\n",
798 | "We can use the `lag()` window function to get the date of the most recent previously-posted project (see also `last_value` for more flexibility):"
799 | ]
800 | },
801 | {
802 | "cell_type": "code",
803 | "execution_count": null,
804 | "metadata": {},
805 | "outputs": [],
806 | "source": [
807 | "result_df = pd.read_sql(\"\"\"\n",
808 | "SELECT date_posted, projectid, schoolid, total_price_excluding_optional_support AS current_ask,\n",
809 | " date_posted::DATE - (lag(date_posted) OVER (PARTITION BY schoolid ORDER BY date_posted::DATE ASC))::DATE AS days_since_last_proj\n",
810 | "FROM donorschoose.projects\n",
811 | "WHERE schoolid = 'ff2695b8b7f3ade678358f6e5c621c1e'\n",
812 | "ORDER BY date_posted::DATE DESC\n",
813 | ";\n",
814 | "\"\"\", engine)\n",
815 | "\n",
816 | "result_df.head(5)"
817 | ]
818 | },
819 | {
820 | "cell_type": "code",
821 | "execution_count": null,
822 | "metadata": {},
823 | "outputs": [],
824 | "source": [
825 | "# What happens when we hit the end of the series?\n",
826 | "result_df.tail(5)"
827 | ]
828 | },
829 | {
830 | "cell_type": "markdown",
831 | "metadata": {},
832 | "source": [
833 | "Notice the `NaN` (will be `NULL` in postgres) for the first record that doesn't have any previously-posted project, so you'd have to think about how you wanted to handle these edge cases in your feature development."
834 | ]
835 | },
836 | {
837 | "cell_type": "markdown",
838 | "metadata": {},
839 | "source": [
840 | "### Indices / Checking the Query Plan\n",
841 | "\n",
842 | "Indices are particularly critical to the performance of postgres queries, especially as the data gets larger. You should think about adding indices to tables based on columns that will frequently be used for joins or filtering rows with `WHERE` clauses.\n",
843 | "\n",
844 | "A useful tool for understanding how the database will treat a given query is checking the query plan by using the `EXPLAIN` keyword before a `SELECT` statement:"
845 | ]
846 | },
847 | {
848 | "cell_type": "code",
849 | "execution_count": null,
850 | "metadata": {},
851 | "outputs": [],
852 | "source": [
853 | "# Eliminate column width truncating\n",
854 | "pd.set_option('display.max_colwidth', None)"
855 | ]
856 | },
857 | {
858 | "cell_type": "code",
859 | "execution_count": null,
860 | "metadata": {},
861 | "outputs": [],
862 | "source": [
863 | "pd.read_sql(\"\"\"\n",
864 | "EXPLAIN SELECT * FROM donorschoose.projects WHERE projectid = '32943bb1063267de6ed19fc0ceb4b9a7'\n",
865 | "\"\"\", engine)"
866 | ]
867 | },
868 | {
869 | "cell_type": "markdown",
870 | "metadata": {},
871 | "source": [
872 | "Notice that picking out a specific project is making use of the index via `Index Scan`.\n",
873 | "\n",
874 | "By contrast, if we select projects for a given school:"
875 | ]
876 | },
877 | {
878 | "cell_type": "code",
879 | "execution_count": null,
880 | "metadata": {},
881 | "outputs": [],
882 | "source": [
883 | "pd.read_sql(\"\"\"\n",
884 | "EXPLAIN SELECT * FROM donorschoose.projects WHERE schoolid = 'ff2695b8b7f3ade678358f6e5c621c1e'\n",
885 | "\"\"\", engine)"
886 | ]
887 | },
888 | {
889 | "cell_type": "markdown",
890 | "metadata": {},
891 | "source": [
892 | "Here, `Seq Scan` tells us that postgres has to scan the entire table to find the right projects, which can be very expensive (especially with joins!). Also note how much higher the overall estimated cost is for this query in the first row here than for the query above.\n",
893 | "\n",
894 | "Likewise for joins, compare the two query plans below:"
895 | ]
896 | },
897 | {
898 | "cell_type": "code",
899 | "execution_count": null,
900 | "metadata": {},
901 | "outputs": [],
902 | "source": [
903 | "pd.read_sql(\"\"\"\n",
904 | "EXPLAIN SELECT * FROM donorschoose.projects JOIN donorschoose.donations USING(projectid)\n",
905 | "\"\"\", engine)"
906 | ]
907 | },
908 | {
909 | "cell_type": "code",
910 | "execution_count": null,
911 | "metadata": {},
912 | "outputs": [],
913 | "source": [
914 | "## NOTE: Please don't actually run this query without the select!!!\n",
915 | "\n",
916 | "pd.read_sql(\"\"\"\n",
917 | "EXPLAIN SELECT * FROM donorschoose.projects p JOIN donorschoose.donations d ON d.donation_timestamp::DATE > p.date_posted::DATE\n",
918 | "\"\"\", engine)"
919 | ]
920 | },
921 | {
922 | "cell_type": "markdown",
923 | "metadata": {},
924 | "source": [
925 | "**CREATING INDICES**\n",
926 | "\n",
927 | "When you need to create indices as you build tables for your project, you can use this syntax:\n",
928 | "\n",
929 | "```\n",
930 | "CREATE INDEX ON {schema}.{table}({column});\n",
931 | "```\n",
932 | "\n",
933 | "Note that you can also specify a list of columns. If the given column (or set of columns) is a unique key for the table, you can get additional gains by declaring it as a primary key instead of simply creating an index:\n",
934 | "\n",
935 | "```\n",
936 | "ALTER TABLE {schema}.{table} ADD PRIMARY KEY ({column});\n",
937 | "```\n",
938 | "\n",
939 | "You can also find a little more documentation of postgres indices [here](https://www.postgresqltutorial.com/postgresql-indexes/postgresql-create-index/)"
940 | ]
941 | },
942 | {
943 | "cell_type": "markdown",
944 | "metadata": {},
945 | "source": [
946 | "### Temporary Tables\n",
947 | "\n",
948 | "Breaking up complex queries with CTEs can make your code much more readable and may provide some performance gains, but further gains can often be realized by creating and indexing temporary tables. \n",
949 | "\n",
950 | "Let's rework one of the CTE examples from above using temporary tables: For all the MD projects posted in January 2013 that received any donations what is the average fraction of donations coming from teachers by resource type?"
951 | ]
952 | },
953 | {
954 | "cell_type": "code",
955 | "execution_count": null,
956 | "metadata": {},
957 | "outputs": [],
958 | "source": [
959 | "andrew_id = # FILL IN YOUR andrew_id HERE!\n",
960 | "\n",
961 | "# Temporary table and index for projects posted by MD schools in Jan 2013\n",
962 | "engine.execute(\"\"\"\n",
963 | "CREATE LOCAL TEMPORARY TABLE tmp_{}_md_projects\n",
964 | " ON COMMIT PRESERVE ROWS\n",
965 | " AS\n",
966 | " SELECT *\n",
967 | " FROM donorschoose.projects\n",
968 | " WHERE school_state='MD'\n",
969 | " AND date_posted::DATE BETWEEN '2013-01-01'::DATE AND '2013-01-31'::DATE\n",
970 | ";\n",
971 | "\"\"\".format(andrew_id))\n",
972 | "engine.execute(\"\"\"CREATE INDEX ON tmp_{}_md_projects(projectid);\"\"\".format(andrew_id))\n",
973 | "engine.execute(\"COMMIT;\")\n",
974 | "\n",
975 | "# Temporary table and index for donations by teachers\n",
976 | "engine.execute(\"\"\"\n",
977 | "CREATE LOCAL TEMPORARY TABLE tmp_{}_teacher_donations\n",
978 | " ON COMMIT PRESERVE ROWS\n",
979 | " AS\n",
980 | " SELECT d.projectid, SUM(CASE WHEN is_teacher_acct::boolean THEN d.donation_total ELSE 0 END)/SUM(d.donation_total) AS teacher_frac\n",
981 | " FROM tmp_{}_md_projects p\n",
982 | " JOIN donorschoose.donations d USING(projectid)\n",
983 | " GROUP BY 1\n",
984 | ";\n",
985 | "\"\"\".format(andrew_id, andrew_id))\n",
986 | "engine.execute(\"\"\"CREATE INDEX ON tmp_{}_teacher_donations(projectid);\"\"\".format(andrew_id))\n",
987 | "engine.execute(\"COMMIT;\")\n",
988 | "\n",
989 | "# Join these two temporary tables to get our result\n",
990 | "pd.read_sql(\"\"\"\n",
991 | "SELECT p.resource_type, AVG(td.teacher_frac) AS avg_teacher_frac\n",
992 | "FROM tmp_{}_md_projects p\n",
993 | "JOIN tmp_{}_teacher_donations td USING(projectid)\n",
994 | "GROUP BY 1\n",
995 | "ORDER BY 2 DESC\n",
996 | "\"\"\".format(andrew_id, andrew_id), engine)\n",
997 | "\n"
998 | ]
999 | },
1000 | {
1001 | "cell_type": "markdown",
1002 | "metadata": {},
1003 | "source": [
1004 | "## Clean Up\n",
1005 | "\n",
1006 | "drop the candy table and commit; dispose of the sqlalchemy engine"
1007 | ]
1008 | },
1009 | {
1010 | "cell_type": "code",
1011 | "execution_count": null,
1012 | "metadata": {},
1013 | "outputs": [],
1014 | "source": [
1015 | "drop_sql = \"DROP TABLE {}.{}\".format(table_schema, candy_table)\n",
1016 | "\n",
1017 | "engine.execute(drop_sql)\n",
1018 | "engine.execute(\"COMMIT\")\n",
1019 | "\n",
1020 | "engine.execute(\"DROP TABLE IF EXISTS tmp_{}_md_projects\".format(andrew_id))\n",
1021 | "engine.execute(\"COMMIT\")\n",
1022 | "\n",
1023 | "engine.execute(\"DROP TABLE IF EXISTS tmp_{}_teacher_donations\".format(andrew_id))\n",
1024 | "engine.execute(\"COMMIT\")\n",
1025 | "\n",
1026 | "engine.dispose()"
1027 | ]
1028 | }
1029 | ],
1030 | "metadata": {
1031 | "kernelspec": {
1032 | "display_name": "Python 3 (ipykernel)",
1033 | "language": "python",
1034 | "name": "python3"
1035 | },
1036 | "language_info": {
1037 | "codemirror_mode": {
1038 | "name": "ipython",
1039 | "version": 3
1040 | },
1041 | "file_extension": ".py",
1042 | "mimetype": "text/x-python",
1043 | "name": "python",
1044 | "nbconvert_exporter": "python",
1045 | "pygments_lexer": "ipython3",
1046 | "version": "3.9.16"
1047 | }
1048 | },
1049 | "nbformat": 4,
1050 | "nbformat_minor": 4
1051 | }
1052 |
--------------------------------------------------------------------------------
/techhelp/remote-workflow/img/10718-workflow.png:
--------------------------------------------------------------------------------
https://raw.githubusercontent.com/dssg/mlforpublicpolicylab/d94c464f8a97c0b74cc94a889d88474ed718a3ba/techhelp/remote-workflow/img/10718-workflow.png
--------------------------------------------------------------------------------
/techhelp/remote-workflow/img/bash-absolute-path.png:
--------------------------------------------------------------------------------
https://raw.githubusercontent.com/dssg/mlforpublicpolicylab/d94c464f8a97c0b74cc94a889d88474ed718a3ba/techhelp/remote-workflow/img/bash-absolute-path.png
--------------------------------------------------------------------------------
/techhelp/remote-workflow/img/bash-anatomy.png:
--------------------------------------------------------------------------------
https://raw.githubusercontent.com/dssg/mlforpublicpolicylab/d94c464f8a97c0b74cc94a889d88474ed718a3ba/techhelp/remote-workflow/img/bash-anatomy.png
--------------------------------------------------------------------------------
/techhelp/remote-workflow/img/bash-nano-save.png:
--------------------------------------------------------------------------------
https://raw.githubusercontent.com/dssg/mlforpublicpolicylab/d94c464f8a97c0b74cc94a889d88474ed718a3ba/techhelp/remote-workflow/img/bash-nano-save.png
--------------------------------------------------------------------------------
/techhelp/remote-workflow/img/bash-nano.png:
--------------------------------------------------------------------------------
https://raw.githubusercontent.com/dssg/mlforpublicpolicylab/d94c464f8a97c0b74cc94a889d88474ed718a3ba/techhelp/remote-workflow/img/bash-nano.png
--------------------------------------------------------------------------------
/techhelp/remote-workflow/img/bash-pwd.png:
--------------------------------------------------------------------------------
https://raw.githubusercontent.com/dssg/mlforpublicpolicylab/d94c464f8a97c0b74cc94a889d88474ed718a3ba/techhelp/remote-workflow/img/bash-pwd.png
--------------------------------------------------------------------------------
/techhelp/remote-workflow/img/class_editor.png:
--------------------------------------------------------------------------------
https://raw.githubusercontent.com/dssg/mlforpublicpolicylab/d94c464f8a97c0b74cc94a889d88474ed718a3ba/techhelp/remote-workflow/img/class_editor.png
--------------------------------------------------------------------------------
/techhelp/remote-workflow/img/class_infra.png:
--------------------------------------------------------------------------------
https://raw.githubusercontent.com/dssg/mlforpublicpolicylab/d94c464f8a97c0b74cc94a889d88474ed718a3ba/techhelp/remote-workflow/img/class_infra.png
--------------------------------------------------------------------------------
/techhelp/remote-workflow/img/class_jupyter.png:
--------------------------------------------------------------------------------
https://raw.githubusercontent.com/dssg/mlforpublicpolicylab/d94c464f8a97c0b74cc94a889d88474ed718a3ba/techhelp/remote-workflow/img/class_jupyter.png
--------------------------------------------------------------------------------
/techhelp/remote-workflow/img/class_ssh.png:
--------------------------------------------------------------------------------
https://raw.githubusercontent.com/dssg/mlforpublicpolicylab/d94c464f8a97c0b74cc94a889d88474ed718a3ba/techhelp/remote-workflow/img/class_ssh.png
--------------------------------------------------------------------------------
/techhelp/remote-workflow/img/jupyter-notebook-kernel.png:
--------------------------------------------------------------------------------
https://raw.githubusercontent.com/dssg/mlforpublicpolicylab/d94c464f8a97c0b74cc94a889d88474ed718a3ba/techhelp/remote-workflow/img/jupyter-notebook-kernel.png
--------------------------------------------------------------------------------
/techhelp/remote-workflow/img/jupyter-port-selection.png:
--------------------------------------------------------------------------------
https://raw.githubusercontent.com/dssg/mlforpublicpolicylab/d94c464f8a97c0b74cc94a889d88474ed718a3ba/techhelp/remote-workflow/img/jupyter-port-selection.png
--------------------------------------------------------------------------------
/techhelp/remote-workflow/img/jupyter-token.png:
--------------------------------------------------------------------------------
https://raw.githubusercontent.com/dssg/mlforpublicpolicylab/d94c464f8a97c0b74cc94a889d88474ed718a3ba/techhelp/remote-workflow/img/jupyter-token.png
--------------------------------------------------------------------------------
/techhelp/remote-workflow/img/jupyter_kernel.png:
--------------------------------------------------------------------------------
https://raw.githubusercontent.com/dssg/mlforpublicpolicylab/d94c464f8a97c0b74cc94a889d88474ed718a3ba/techhelp/remote-workflow/img/jupyter_kernel.png
--------------------------------------------------------------------------------
/techhelp/remote-workflow/img/vscode-changed-interpreter.png:
--------------------------------------------------------------------------------
https://raw.githubusercontent.com/dssg/mlforpublicpolicylab/d94c464f8a97c0b74cc94a889d88474ed718a3ba/techhelp/remote-workflow/img/vscode-changed-interpreter.png
--------------------------------------------------------------------------------
/techhelp/remote-workflow/img/vscode-click-find.png:
--------------------------------------------------------------------------------
https://raw.githubusercontent.com/dssg/mlforpublicpolicylab/d94c464f8a97c0b74cc94a889d88474ed718a3ba/techhelp/remote-workflow/img/vscode-click-find.png
--------------------------------------------------------------------------------
/techhelp/remote-workflow/img/vscode-connect-to-host.png:
--------------------------------------------------------------------------------
https://raw.githubusercontent.com/dssg/mlforpublicpolicylab/d94c464f8a97c0b74cc94a889d88474ed718a3ba/techhelp/remote-workflow/img/vscode-connect-to-host.png
--------------------------------------------------------------------------------
/techhelp/remote-workflow/img/vscode-enter-login.png:
--------------------------------------------------------------------------------
https://raw.githubusercontent.com/dssg/mlforpublicpolicylab/d94c464f8a97c0b74cc94a889d88474ed718a3ba/techhelp/remote-workflow/img/vscode-enter-login.png
--------------------------------------------------------------------------------
/techhelp/remote-workflow/img/vscode-enter-venv-path.png:
--------------------------------------------------------------------------------
https://raw.githubusercontent.com/dssg/mlforpublicpolicylab/d94c464f8a97c0b74cc94a889d88474ed718a3ba/techhelp/remote-workflow/img/vscode-enter-venv-path.png
--------------------------------------------------------------------------------
/techhelp/remote-workflow/img/vscode-file-menu.png:
--------------------------------------------------------------------------------
https://raw.githubusercontent.com/dssg/mlforpublicpolicylab/d94c464f8a97c0b74cc94a889d88474ed718a3ba/techhelp/remote-workflow/img/vscode-file-menu.png
--------------------------------------------------------------------------------
/techhelp/remote-workflow/img/vscode-open-connect-to-host.png:
--------------------------------------------------------------------------------
https://raw.githubusercontent.com/dssg/mlforpublicpolicylab/d94c464f8a97c0b74cc94a889d88474ed718a3ba/techhelp/remote-workflow/img/vscode-open-connect-to-host.png
--------------------------------------------------------------------------------
/techhelp/remote-workflow/img/vscode-open-folder.png:
--------------------------------------------------------------------------------
https://raw.githubusercontent.com/dssg/mlforpublicpolicylab/d94c464f8a97c0b74cc94a889d88474ed718a3ba/techhelp/remote-workflow/img/vscode-open-folder.png
--------------------------------------------------------------------------------
/techhelp/remote-workflow/img/vscode-remote-diagram.png:
--------------------------------------------------------------------------------
https://raw.githubusercontent.com/dssg/mlforpublicpolicylab/d94c464f8a97c0b74cc94a889d88474ed718a3ba/techhelp/remote-workflow/img/vscode-remote-diagram.png
--------------------------------------------------------------------------------
/techhelp/remote-workflow/img/vscode-remote-ssh-install.png:
--------------------------------------------------------------------------------
https://raw.githubusercontent.com/dssg/mlforpublicpolicylab/d94c464f8a97c0b74cc94a889d88474ed718a3ba/techhelp/remote-workflow/img/vscode-remote-ssh-install.png
--------------------------------------------------------------------------------
/techhelp/remote-workflow/img/vscode-run-python.png:
--------------------------------------------------------------------------------
https://raw.githubusercontent.com/dssg/mlforpublicpolicylab/d94c464f8a97c0b74cc94a889d88474ed718a3ba/techhelp/remote-workflow/img/vscode-run-python.png
--------------------------------------------------------------------------------
/techhelp/remote-workflow/img/vscode-select-folder.png:
--------------------------------------------------------------------------------
https://raw.githubusercontent.com/dssg/mlforpublicpolicylab/d94c464f8a97c0b74cc94a889d88474ed718a3ba/techhelp/remote-workflow/img/vscode-select-folder.png
--------------------------------------------------------------------------------
/techhelp/remote-workflow/img/vscode-select-host.png:
--------------------------------------------------------------------------------
https://raw.githubusercontent.com/dssg/mlforpublicpolicylab/d94c464f8a97c0b74cc94a889d88474ed718a3ba/techhelp/remote-workflow/img/vscode-select-host.png
--------------------------------------------------------------------------------
/techhelp/remote-workflow/img/vscode-select-interpreter-path.png:
--------------------------------------------------------------------------------
https://raw.githubusercontent.com/dssg/mlforpublicpolicylab/d94c464f8a97c0b74cc94a889d88474ed718a3ba/techhelp/remote-workflow/img/vscode-select-interpreter-path.png
--------------------------------------------------------------------------------
/techhelp/remote-workflow/img/vscode-select-interpreter.png:
--------------------------------------------------------------------------------
https://raw.githubusercontent.com/dssg/mlforpublicpolicylab/d94c464f8a97c0b74cc94a889d88474ed718a3ba/techhelp/remote-workflow/img/vscode-select-interpreter.png
--------------------------------------------------------------------------------
/techhelp/remote-workflow/img/vscode-select-python.png:
--------------------------------------------------------------------------------
https://raw.githubusercontent.com/dssg/mlforpublicpolicylab/d94c464f8a97c0b74cc94a889d88474ed718a3ba/techhelp/remote-workflow/img/vscode-select-python.png
--------------------------------------------------------------------------------
/techhelp/remote-workflow/img/vscode-ssh-connected.png:
--------------------------------------------------------------------------------
https://raw.githubusercontent.com/dssg/mlforpublicpolicylab/d94c464f8a97c0b74cc94a889d88474ed718a3ba/techhelp/remote-workflow/img/vscode-ssh-connected.png
--------------------------------------------------------------------------------
/techhelp/remote-workflow/img/vscode-update-config.png:
--------------------------------------------------------------------------------
https://raw.githubusercontent.com/dssg/mlforpublicpolicylab/d94c464f8a97c0b74cc94a889d88474ed718a3ba/techhelp/remote-workflow/img/vscode-update-config.png
--------------------------------------------------------------------------------
/techhelp/remote-workflow/remote-workflow.md:
--------------------------------------------------------------------------------
1 | ## Intro to Remote Workflow
2 |
3 | This document will provide you with tools for comfortably using our remote environment (the course server) to develop and test your team's pipeline.
4 | Here's the [cheatsheet](#workflow-cheatsheet).
5 |
6 | ### Basic tools for common tasks
7 |
8 | 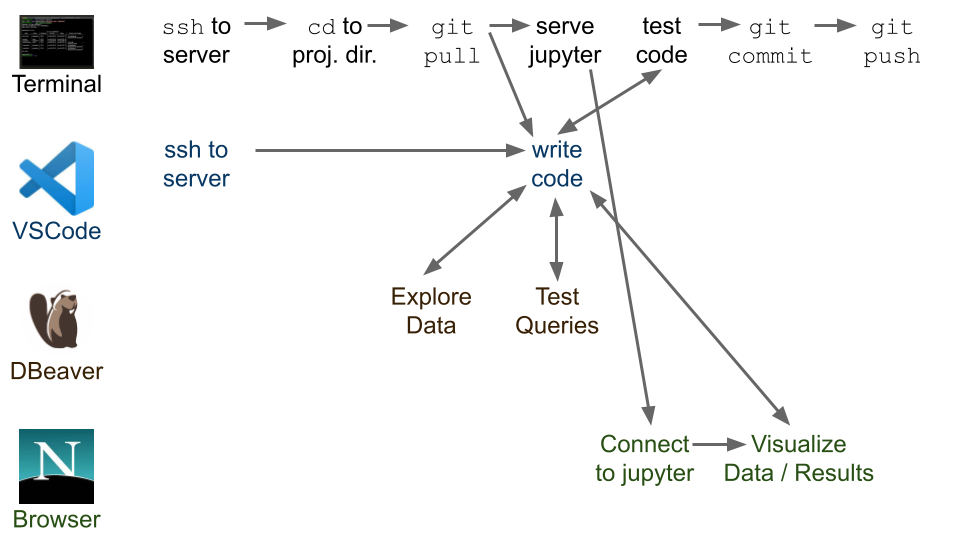
9 |
10 | We're providing setup instructions and support for "good enough" tools for each of the common tasks in the workflow for this class but if you're comfortable with other tools, feel free to use them.
11 |
12 | 1. Writing code:
13 | - Python: This tutorial introduces ``VSCode``, an editor with good Python support, and some tools that make remote development easy.
14 | - However, feel free to use any editor you want (vim, emacs, sublime, pycharm).
15 | - SQL: In other tutorials, we've introduced psql (for writing sql on the server) and DBeaver or DBVisualizer (on your laptop).
16 | 2. Jupyter notebooks:
17 | - For now, the easiest way to use jupyter notebooks is through ``VSCode''
18 | - If you're interested, you can use parts of this tutorial to set up ``Jupyter`` through a browser on your local machine (but we won't go through it).
19 | - Many Python IDEs (such as, Pycharm) have good Jupyter support - feel free to use one of these!
20 | 3. Share code with your team:
21 | - Use the git command line interface to push to your team github repository.
22 | - Many IDEs (including VSCode) have git integration.
23 | 4. Run code:
24 | - Run Python code manually in an SSH terminal, either by pasting code into a Python REPL, or running a Python script.
25 | - Some IDEs (such as VSCode) support remote interpreters, allowing you to run scripts in a python instance on a remote machine (here, the course server).
26 |
27 | ## Recap from last week:
28 |
29 | Let's try repeating what we did last week to get started:
30 |
31 | **1. Make sure you can SSH to the class server**
32 |
33 | Using WSL (on Windows) or terminal (on Mac/Linux), connect to the server via the command below (replacing the parameters in curly brackets (`{...}`) with your info):
34 | ```bash
35 | ssh -i {/path/to/private-key} {andrew_id}@server.mlpolicylab.dssg.io
36 | ```
37 |
38 | Once there, confirm that you're in the right place with the command:
39 | ``echo "$USER@$HOSTNAME"``
40 |
41 | This should return your andrew id at the server hostname (`hyrule`)
42 |
43 | :warning:
44 | If you get something else, let us know.
45 |
46 | **2. Make sure you can reach the class database via DBeaver**
47 |
48 | Using DBeaver (or DBVisualizer), connect to the class database and run:
49 | ```sql
50 | SELECT
51 | 'Hello, my name is '||CURRENT_USER||', and I''m connected to '||current_database()||' via '||application_name
52 | FROM pg_stat_activity
53 | WHERE usename=CURRENT_USER
54 | AND state='active';
55 | ```
56 |
57 | This should output a friendly message identifying you on the database.
58 |
59 | :WARNING:
60 | If you get something else, let us know.
61 |
62 |
63 | **3. Initial setup of VSCode**
64 |
65 | We'll be setting up VSCode as an editor to work with files remotely over SSH during the session. As a first step beforehand, please install VSCode and the Remote-SSH and Microsoft's python extensions using the instructions below.
66 |
67 | 1. [Download and install](https://code.visualstudio.com/Download) VSCode
68 | 2. Install the `Remote - SSH` extension:
69 | 1. Press `ctrl+shift+x` (Linux/Windows) or `⌘+shift+x` (MacOS) to open the extensions menu
70 | 2. Search for and install `Remote - SSH`
71 |
72 | 
73 |
74 | 1. At this time, also search for and install the microsoft `Python` extension.
75 |
76 | ## Agenda
77 |
78 | 
79 |
80 | 1. WSL vs Windows Command Prompt -- What's the difference?
81 | 2. Navigating the course server using the command line
82 | 3. Using VSCode for remote development
83 | 4. Using Jupyter remotely, with SSH tunneling
84 | 5. Remote development concepts - how exactly does all of this work?
85 |
86 |
87 | ## WSL vs Windows Command Prompt -- What's the difference?
88 |
89 | We've asked everyone using windows to install and use `WSL` locally and wanted to take a moment to discuss why we've done so and what the difference is between WSL, the Windows Command Prompt, and PowerShell:
90 |
91 | | | |
92 | |---------|---------|
93 | |  | **Windows Command Prompt** is a commandline interface for interacting with your computer through text commands. It inherits from earlier versions of DOS (Disk Operating System) that Windows ran on top of for many years and has a very different set of commands and syntax than other linux-derived systems
"
11 | ]
12 | },
13 | {
14 | "cell_type": "markdown",
15 | "metadata": {
16 | "id": "Zw1i3ELeKDLD"
17 | },
18 | "source": [
19 | "# 94889 Preliminary Exercise\n",
20 | "\n",
21 | "## Overview\n",
22 | "\n",
23 | "The purpose of this exercise is to provide a assessment on a few of the technical skills you'll need in Machine Learning for Public Policy Lab (94-889) and help us make sure everyone coming in has the necessary pre-requisites including python, data analysis, databases/sql, and machine learning. \n",
24 | "\n",
25 | "Feel free to use any references (previous class notes, google, stackoverflow, etc) you would like, but please complete the exercise on your own to ensure the work reflects your experience. **Completing this notebook should take you under 3 hours** -- if you're finding you need to take significantly more time on, you may find it difficult to contribute to the project work in the class.\n",
26 | "\n",
27 | "## Problem Background\n",
28 | "\n",
29 | "This notebook makes use of a sample of the data provided by [DonorsChoose](https://www.donorschoose.org/) to the [2014 KDD Cup](https://www.kaggle.com/c/kdd-cup-2014-predicting-excitement-at-donors-choose/data). Public schools in the United States face large disparities in funding, often resulting in teachers and staff members filling these gaps by purchasing classroom supplies out of their own pockets. DonorsChoose is an online crowdfunding platform that tries to help alleviate this financial burden on teachers by allowing them to seek funding for projects and resources from the community (projects can include classroom basics like books and markers, larger items like lab equipment or musical instruments, specific experiences like field trips or guest speakers). Projects on DonorsChoose expire after 4 months, and if the target funding level isn't reached, the project receives no funding. Since its launch in 2000, the platform has helped fund over 2 million projects at schools across the US, but about 1/3 of the projects that are posted nevertheless fail to meet their goal and go unfunded.\n",
30 | "\n",
31 | "### The Modeling Problem\n",
32 | "\n",
33 | "For the purposes of this exercise, we'll imagine that DonorsChoose has hired a digital content expert who will review projects and help teachers improve their postings and increase their chances of reaching their funding threshold. Because this individualized review is a labor-intensive process, the digital content expert has time to review and support only 10% of the projects posted to the platform on a given day. \n",
34 | "\n",
35 | "You are a data scientist working with DonorsChoose, and your task is to help this content expert focus their limited resources on projects that most need the help. As such, you want to build a model to identify projects that are least likely to be fully funded before they expire and pass them off to the digital content expert for review.\n"
36 | ]
37 | },
38 | {
39 | "cell_type": "markdown",
40 | "metadata": {
41 | "id": "BjRBddip6lPI"
42 | },
43 | "source": [
44 | "# Getting Set Up\n",
45 | "\n",
46 | "Running the code below will create a local postgres 11 database for you and import the sampled donors choose data. Don't worry about the details of that and you shouldn't need to touch any of the code here aside from running it. Below, we'll talk about how to access the database from within the notebook to run queries."
47 | ]
48 | },
49 | {
50 | "cell_type": "code",
51 | "execution_count": null,
52 | "metadata": {
53 | "id": "iY8dwqamIIQc"
54 | },
55 | "outputs": [],
56 | "source": [
57 | "# Install and start postgresql-11 server\n",
58 | "!sudo apt-get -y -qq update\n",
59 | "!wget --quiet -O - https://www.postgresql.org/media/keys/ACCC4CF8.asc | sudo apt-key add -\n",
60 | "!echo \"deb http://apt.postgresql.org/pub/repos/apt/ `lsb_release -cs`-pgdg main\" |sudo tee /etc/apt/sources.list.d/pgdg.list\n",
61 | "!sudo apt-get -y -qq update\n",
62 | "!sudo apt-get -y -qq install postgresql-11 postgresql-client-11\n",
63 | "!sudo service postgresql start\n",
64 | "\n",
65 | "# Setup a password `postgres` for username `postgres`\n",
66 | "!sudo -u postgres psql -U postgres -c \"ALTER USER postgres PASSWORD 'postgres';\"\n",
67 | "\n",
68 | "# Setup a database with name `donors_choose` to be used\n",
69 | "!sudo -u postgres psql -U postgres -c 'DROP DATABASE IF EXISTS donors_choose;'\n",
70 | "\n",
71 | "!sudo -u postgres psql -U postgres -c 'CREATE DATABASE donors_choose;'\n",
72 | "\n",
73 | "# Environment variables for connecting to the database\n",
74 | "%env DEMO_DATABASE_NAME=donors_choose\n",
75 | "%env DEMO_DATABASE_HOST=localhost\n",
76 | "%env DEMO_DATABASE_PORT=5432\n",
77 | "%env DEMO_DATABASE_USER=postgres\n",
78 | "%env DEMO_DATABASE_PASS=postgres"
79 | ]
80 | },
81 | {
82 | "cell_type": "code",
83 | "execution_count": null,
84 | "metadata": {
85 | "id": "ImdiugfVIXcq"
86 | },
87 | "outputs": [],
88 | "source": [
89 | "# Download sampled DonorsChoose data and load it into our postgres server\n",
90 | "!curl -s -OL https://dsapp-public-data-migrated.s3.us-west-2.amazonaws.com/donors_sampled_20210920_v3.dmp\n",
91 | "!PGPASSWORD=$DEMO_DATABASE_PASS pg_restore -h $DEMO_DATABASE_HOST -p $DEMO_DATABASE_PORT -d $DEMO_DATABASE_NAME -U $DEMO_DATABASE_USER -O -j 8 donors_sampled_20210920_v3.dmp"
92 | ]
93 | },
94 | {
95 | "cell_type": "code",
96 | "execution_count": null,
97 | "metadata": {
98 | "id": "Uj114AFLIpug"
99 | },
100 | "outputs": [],
101 | "source": [
102 | "!pip install SQLAlchemy==1.3.18 PyYAML==6.0 psycopg2-binary==2.9.3"
103 | ]
104 | },
105 | {
106 | "cell_type": "code",
107 | "execution_count": null,
108 | "metadata": {
109 | "id": "ZIZEHiMpANsU"
110 | },
111 | "outputs": [],
112 | "source": [
113 | "import pandas as pd\n",
114 | "pd.set_option('display.max_columns', None)"
115 | ]
116 | },
117 | {
118 | "cell_type": "code",
119 | "execution_count": null,
120 | "metadata": {
121 | "id": "JRYwIn-UJI6t"
122 | },
123 | "outputs": [],
124 | "source": [
125 | "from sqlalchemy.engine.url import URL\n",
126 | "from sqlalchemy import create_engine\n",
127 | "\n",
128 | "db_url = URL(\n",
129 | " 'postgres',\n",
130 | " host='localhost',\n",
131 | " username='postgres',\n",
132 | " database='donors_choose',\n",
133 | " password='postgres',\n",
134 | " port=5432,\n",
135 | " )\n",
136 | "\n",
137 | "db_engine = create_engine(db_url)"
138 | ]
139 | },
140 | {
141 | "cell_type": "markdown",
142 | "metadata": {
143 | "id": "9t7vS9VfKJm_"
144 | },
145 | "source": [
146 | "# Querying the Database\n",
147 | "\n",
148 | "The code block above used the `sqlalchemy` module to create a connection to the database called `db_engine`. An easy way to run SQL queries against this database is to use the `read_sql` command provided by `pandas`. For instance, if you run the example below, it should return the number of projects in the sampled dataset (16,480):"
149 | ]
150 | },
151 | {
152 | "cell_type": "code",
153 | "execution_count": null,
154 | "metadata": {
155 | "id": "fEpuSoSdJUN2"
156 | },
157 | "outputs": [],
158 | "source": [
159 | "pd.read_sql(\"SELECT COUNT(*) FROM data.projects\", db_engine)"
160 | ]
161 | },
162 | {
163 | "cell_type": "markdown",
164 | "metadata": {
165 | "id": "UECOSNF-8pTs"
166 | },
167 | "source": [
168 | "You can find some more details about the dataset on the [KDD Cup page](https://www.kaggle.com/c/kdd-cup-2014-predicting-excitement-at-donors-choose/data), but here is a quick description of the four main source tables:\n",
169 | "- `data.projects` contains information about each project that was posted on the site, including IDs for the project, school, and teacher, as well as the total amount being requested (note that projects can also request additional \"optional support\" but don't need to reach this higher bar to be funded)\n",
170 | "- `data.essays` has project titles and descriptions\n",
171 | "- `data.resources` has information about the specific resources being requested\n",
172 | "- `data.donations` contains details about each donation that was received by a project (when it came in, the amount, whether it was from another teacher, etc.)"
173 | ]
174 | },
175 | {
176 | "cell_type": "markdown",
177 | "metadata": {
178 | "id": "7bLEVeYa8IGY"
179 | },
180 | "source": [
181 | "## Want other packages?\n",
182 | "If you need to install any other python modules for your analysis, you can easily do so from a code block by prefixing your `pip install` command with an `!` character. For instance:\n",
183 | "```\n",
184 | "!pip install PyYAML\n",
185 | "```"
186 | ]
187 | },
188 | {
189 | "cell_type": "markdown",
190 | "metadata": {
191 | "id": "IIRe2r2tKNJI"
192 | },
193 | "source": [
194 | "# QUESTION 1\n",
195 | "\n",
196 | "**(A)** Write a query to return the school id, title, date posted, and total asking price for the latest posted project from each school in New York."
197 | ]
198 | },
199 | {
200 | "cell_type": "code",
201 | "execution_count": null,
202 | "metadata": {
203 | "id": "108ogvgOJrpF"
204 | },
205 | "outputs": [],
206 | "source": []
207 | },
208 | {
209 | "cell_type": "markdown",
210 | "metadata": {
211 | "id": "OozrlP8dN7zG"
212 | },
213 | "source": [
214 | "**(B)** Write a query to return the top 10 cities in terms of projects that got fully funded (Hint: You'll need to join a couple of tables here to figure out the amount donated to a project)"
215 | ]
216 | },
217 | {
218 | "cell_type": "code",
219 | "execution_count": null,
220 | "metadata": {
221 | "id": "108ogvgOJrpF"
222 | },
223 | "outputs": [],
224 | "source": []
225 | },
226 | {
227 | "cell_type": "markdown",
228 | "metadata": {
229 | "id": "OozrlP8dN7zG"
230 | },
231 | "source": [
232 | "**(C)** Create a scatter plot of the number of resources requested vs fraction of the total ask amount that was funded across all projects in New Hampshire. (Hint: You'll need to join a couple of tables here to figure out the amount donated to a project)"
233 | ]
234 | },
235 | {
236 | "cell_type": "code",
237 | "execution_count": null,
238 | "metadata": {
239 | "id": "n4LFpsrLMePc"
240 | },
241 | "outputs": [],
242 | "source": []
243 | },
244 | {
245 | "cell_type": "markdown",
246 | "metadata": {
247 | "id": "6y7NI6XAS-96"
248 | },
249 | "source": [
250 | "# Question 2\n",
251 | "\n",
252 | "For this question, you'll develop a model to help DonorsChoose identify 10% of projects to have their digital content expert review that are at highest risk of failing to reach their funding goal. In order to intervene early in the process, DonorsChoose wants to identify these projects to help immediately upon being posted to the site.\n",
253 | "\n",
254 | "Build and evaluate the performance of a handful of machine learning models for this task. **Be sure to use comments or text blocks to discuss the choices and assumptions you're making along the way.** Note that you don't need to explore an extensive model space here -- building 3 or 4 models should be fine for the purposes of this exercise. Feel free to use any python packages available (such as sklearn) for this.\n",
255 | "\n",
256 | "Make sure to read the context provided in Problem Background section above to make design choices that match the goal and needs of the organization and explain how and why you set up the problem in the way that you decide to do."
257 | ]
258 | },
259 | {
260 | "cell_type": "code",
261 | "execution_count": null,
262 | "metadata": {
263 | "id": "sJDDm0HjpcXy"
264 | },
265 | "outputs": [],
266 | "source": []
267 | },
268 | {
269 | "cell_type": "markdown",
270 | "metadata": {
271 | "id": "_KZZU6auTDxT"
272 | },
273 | "source": [
274 | "# Question 3\n",
275 | "\n",
276 | "Write a one-paragraph discussion of your results for a non-technical decision-maker with any recommendations for deployment or next steps. What are the policy recommendations you would make to them?"
277 | ]
278 | },
279 | {
280 | "cell_type": "markdown",
281 | "metadata": {
282 | "id": "HwEBiLvIDMtw"
283 | },
284 | "source": []
285 | },
286 | {
287 | "cell_type": "markdown",
288 | "metadata": {
289 | "id": "XP2k3Z--DNju"
290 | },
291 | "source": [
292 | "# Submission\n",
293 | "\n",
294 | "To submit your exercise, please **save a copy** of this notebook containing your code and outputs (you can save it either to google drive or github, but make sure the course staff will have read permissions to access it).\n",
295 | "\n",
296 | "Include a link to your copy of the notebook when you fill out [this survey](https://datascience.wufoo.com/forms/fall-2023-ml-for-public-policy-lab-survey/) along with your other details.\n",
297 | "\n",
298 | "Thank you and we're looking forward to a great semester in 94889!"
299 | ]
300 | },
301 | {
302 | "cell_type": "code",
303 | "execution_count": null,
304 | "metadata": {},
305 | "outputs": [],
306 | "source": []
307 | }
308 | ],
309 | "metadata": {
310 | "colab": {
311 | "collapsed_sections": [],
312 | "include_colab_link": true,
313 | "name": "94889_preliminary_exercise.ipynb",
314 | "provenance": []
315 | },
316 | "kernelspec": {
317 | "display_name": "Python 3 (ipykernel)",
318 | "language": "python",
319 | "name": "python3"
320 | },
321 | "language_info": {
322 | "codemirror_mode": {
323 | "name": "ipython",
324 | "version": 3
325 | },
326 | "file_extension": ".py",
327 | "mimetype": "text/x-python",
328 | "name": "python",
329 | "nbconvert_exporter": "python",
330 | "pygments_lexer": "ipython3",
331 | "version": "3.9.16"
332 | }
333 | },
334 | "nbformat": 4,
335 | "nbformat_minor": 1
336 | }
337 |
--------------------------------------------------------------------------------
/techhelp/README.md:
--------------------------------------------------------------------------------
1 | # Tech Setup
2 |
3 | 1. Make sure you are on cmu vpn (Full VPN group)
4 | 2. Connect to class server: mlpolicylab.dssg.io (command line/terminal/putty) : type `ssh your_andrew_id@server.mlpolicylab.dssg.io`
5 | 3. Connect to database server: mlpolicylab.db.dssg.io If you're on the server, type `psql -h database.mlpolicylab.dssg.io -U YOUR_ANDREW_ID group_students_database`
6 | 4. Setting up dbeaver or dbvisualizer (a visual ide to the database) [instructions are here](https://github.com/dssg/mlforpublicpolicylab/raw/master/techhelp/dbeaver_instructions.pdf)
7 |
8 | **Detailed instructions** are [available here](infrastructure_quickstart.md) and will be covered at the first Wednesday tech
9 |
10 | **Tech Session Materials:**
11 | - **[Slides from week 1 tech session - getting set up](https://docs.google.com/presentation/d/1000fsCMmJ6duWJDdGrOwQpuoR1DQnfIfg3aodAzbVtE/edit#slide=id.g27781b3f361_0_13)**
12 | - **[Materials from week 2 tech session - remote workflows](https://github.com/dssg/mlforpublicpolicylab/blob/master/techhelp/remote-workflow/remote-workflow.md)**
13 | - **[Slides from week 3 tech session - git](https://docs.google.com/presentation/d/1xhVaWl_paTed4F7A11Y3nwXZclpaAvSxA01iXwMuESM/edit#slide=id.p)**
14 | - **[Notebook for week 4 Python + SQL Tech Session](python_sql_tech_session.ipynb)**
15 |
16 | ## ssh
17 | `ssh your_andrew_id@server.mlpolicylab.dssg.io`
18 |
19 | ssh is what you'll use to connect to the class server, which is where you will do all the work. You will need to give us your **public** ssh key, using the instructions we sent, and then you'll be good to go. Based on which operating system you're using, you can google for which tool is the best (command line, terminal, putty, etc.)
20 |
21 | ## Linux Command Line (Bash)
22 | If you're not too familiar with working at the command line, we have a quick overview and intro [here](https://dssg.github.io/hitchhikers-guide/curriculum/setup/command-line-tools/)
23 |
24 | A couple of quick pointers that might be helpful:
25 | - One of the most useful linux utilities is `screen` (or tmux), which allows you to create sessions that persist even when disconnect from ssh. This can be handy for things like long-running jobs, notebook servers, or even just to guard against your internet connection dropping and losing your work. Here's a quick [video intro](https://www.youtube.com/watch?v=3txYaF_IVZQ) with the basics and a more [in-depth tutorial](https://linuxize.com/post/how-to-use-linux-screen/) (note that screen is already installed, so you can ignore those details).
26 | - Everyone is sharing the resources of the course server and it can be a good idea to keep an eye on memory and processor usage (both to know if you're hogging resources with your processes and understand how the load looks before starting a job). A good way to do so is with the utility [htop](https://www.deonsworld.co.za/2012/12/20/understanding-and-using-htop-monitor-system-resources/), which provides a visual representation of this information (to open htop just type `htop` at the command prompt and to exit, you can simply hit the `q` key)
27 | - Each group should have their own folder on the server, in `/data/groups/{group name}`. For example, `/data/groups/bills1`
28 | - We've set up a shared python virtual environment for each group. This will automatically activate when you navigate to `/data/groups/{group_name}`. Or, manually activate it with `source /data/groups/{group_name}/dssg_env/bin/activate`.
29 | - When you first navigate to `/data/groups/{group_name}` you'll get a message prompting you to run `direnv allow`. Run this command to allow the automatic virtual environment switching.
30 |
31 | ## github
32 | We'll use github to collaborate on the code all semester. You will have a project repository based on your projhect assignment.
33 |
34 | ### common (extremely simple) workflow
35 |
36 | - When you start working:
37 | - The first time, clone an existing repo: `git clone`
38 | - Every time you want to start working, get changes since last time: `git pull`
39 | - Add new files: `git add` or make changes to existing files
40 | - Make a local checkpoint: `git commit`
41 | - Pull any new remote updates from your teammates (`git pull`) then push to the remote repository: `git push`
42 |
43 | A [more advanced cheatsheet](https://gist.github.com/jedmao/5053440). Another useful tutorial is [here](https://dssg.github.io/hitchhikers-guide/curriculum/setup/git-and-github/basic_git_tutorial/) and you might want to check out [this interactive walk-through](https://learngitbranching.js.org/) (however some of the concepts it focuses on go beyond what you'll need for class)
44 |
45 | ## PostgreSQL
46 | If you're not too familiar with SQL or would like a quick review, we have an overview and intro [here](https://dssg.github.io/hitchhikers-guide/curriculum/software/basic_sql/).
47 |
48 | Additionally, check out these [notes and tips about using the course database](class_db_pointers.md).
49 |
50 | ## psql
51 | PSQL is a command line tool to connect to the postgresql databvase server we're using for class. You will bneed to be on the server through assh first and then type `psql -h database.mlpolicylab.dssg.io -U YOUR_ANDREW_ID databasename` where `databasename` is the database for your project that you will receive after your project assignment. To test it you can use `psql -h mlpolicylab.db.dssg.io -U YOUR_ANDREW_ID group_students_database` - make sure to change `YOUR_ANDREW_ID`
52 |
53 | A couple quick usage pointers:
54 | - `\dn` will list the schemas in the database you're connected to
55 | - `\dt {schema_name}.*` will list the tables in schema `{schema_name}`
56 | - `\d {schema_name}.{table_name}` will list the columns of table `{schema_name}.{table_name}`
57 | - `\x` can be used to enter "extended display mode" to view results in a tall, key-value format
58 | - For cleaner display of wide tables, you can launch `psql` using: `PAGER='less -S' psql -h mlpolicylab.db.dssg.io -U YOUR_ANDREW_ID databasename` (then use the left and right arrows to navigate columns of wide results)
59 | - `\?` will show help about psql meta-commands
60 | - `\q` will exit
61 |
62 | ## dbeaver
63 | dbeaver is a free tool that gives you a slightly nicer and visual interface to the database. [Instructions for installing and set up are here](https://github.com/dssg/mlforpublicpolicylab/raw/master/techhelp/dbeaver_instructions.pdf)
64 |
65 | ## Connecting to the database from python
66 | The `sqlalchemy` module provides an interface to connect to a postgres database from python (you'll also need to install `psycopg2` in order to talk to postgres specifically). You'll can install it in your virtualenv with:
67 | ```
68 | pip install psycopg2-binary sqlalchemy
69 | ```
70 | (Note that `psycopg2-binary` comes packaged with its dependencies, so you should install it rather than the base `psycopg2` module)
71 |
72 | A simple usage pattern might look like:
73 | ```python
74 | from sqlalchemy import create_engine
75 |
76 | # read parameters from a secrets file, don't hard-code them!
77 | db_params = get_secrets('db')
78 | engine = create_engine('postgresql://{user}:{password}@{host}:{port}/{dbname}'.format(
79 | host=db_params['host'],
80 | port=db_params['port'],
81 | dbname=db_params['dbname'],
82 | user=db_params['user'],
83 | password=db_params['password']
84 | ))
85 | result_set = engine.execute("SELECT * FROM your_table LIMIT 100;")
86 | for record in result_set:
87 | process_record(record)
88 |
89 | # Close communication with the database
90 | engine.dispose()
91 | ```
92 |
93 | If you're changing data in the database, note that you may need to use `engine.execute("COMMIT")` to ensure that changes persist.
94 |
95 | Note that the engine object can also be used with other utilities that interact with the database, such as ohio or pandas (though the latter can be very inefficient/slow)
96 |
97 | **For a more detailed walk-through of using python and postgresql together, check out the [Python+SQL tech session notebook](python_sql_tech_session.ipynb)**
98 |
99 | ## Jupyter Notebooks
100 | Although not a good environment for running your ML pipeline and models, jupyter notebooks can be useful for exploratory data analysis as well as visualizing modeling results. Since the data needs to stay in the AWS environment, you'll need to do so by running a notebook server on the remote machine and creating an SSH tunnel (because the course server can only be accessed via the SSH protocol) so you can access it via your local browser.
101 |
102 | One important note: **be sure to explicitly shut down the kernels when you're done working with a notebook** as "zombie" notebook sessions can end up using up a lot of processed!
103 |
104 | You can find some details about using jupyter with the class server [here](jupyter_setup.md)
105 |
106 | ## Handling Secrets
107 | You'll need access to various secrets (such as database credentials) in your code, but keeping these secrets out of the code itself is an important part of keeping your infrastructure and data secure. You can find a few tips about different ways to do so [here](handling_secrets.md)
108 |
109 | ## Triage Pointers
110 | We'll be using `triage` as a machine learning pipeline tool for this class. Below are a couple of links to resources that you might find helpful as you explore and use `triage` for your project:
111 | - An [example experiment configuration](https://github.com/dssg/triage/blob/master/example/config/experiment.yaml), with lots of detailed comments about the various parameters and options available
112 | - The [triage documentation site](https://dssg.github.io/triage/), in particular the [deeper look at triage](https://dssg.github.io/triage/dirtyduck/triage_intro/) and [experiment configuration](https://dssg.github.io/triage/experiments/experiment-config/) pages
113 | - The [triage homepage](http://www.datasciencepublicpolicy.org/projects/triage/) has some high-level details about the project and links out to a few example previous projects we've done that might be helpful
114 |
115 | Also, here are a few tips as you're working on your project:
116 | - Start simple and build your configuration file up iteratively. For initial runs, focus on a smaller number of training/validation splits, features, model types, etc.
117 | - If you want to perform some basic checks on your experiment configuration file without actually running the model grid, you can use `experiment.validate()` to do so. There are some details in the [documentation here](https://dssg.github.io/triage/experiments/running/#validating-an-experiment)
118 | - Because storing entity-level predictions for every model configuration you run can be costly, you might want to consider running with `save_predictions=False` at first, then adding predictions later only for models of interest.
119 | - Generally you can use any classification model offered by `sklearn` as well as anything with an `sklearn`-style API. Triage also provides a couple of useful built-in model types including some [baseline models](https://github.com/dssg/triage/tree/master/src/triage/component/catwalk/baselines) and [classifiers](https://github.com/dssg/triage/tree/master/src/triage/component/catwalk/estimators)
120 | - [Example jupyter notebook](visualize_timechops_example.ipynb) to visualize the training and validation splits computed by triage's Timechop component.
121 |
122 |
--------------------------------------------------------------------------------
/techhelp/building_features_in_triage.md:
--------------------------------------------------------------------------------
1 | # Tips on Feature Creation in Triage
2 |
3 | ## Some example config files with feature definitions
4 |
5 | 1. [medical early warning system](https://github.com/dssg/ckdwarning/blob/main/triage_config_files/ckd_1yr.yaml)
6 | 2. [donors choose](https://github.com/dssg/donors-choose/blob/master/donors-choose-config.yaml)
7 | 3. [education project](https://github.com/dssg/el-salvador-mined-public/tree/master/experiments)
8 | 4. [hiv retention](https://github.com/dssg/hiv-retention-public/blob/master/pipeline_UCM/configs/ucm_triage3_retention.yml)
9 |
10 | Keep in mind that some odf the examples above may use an earlier version of Triage so you may need to tweak the feature configs a little bit.
11 |
12 |
13 | ## creating typical categorical features
14 | ```
15 | categoricals_imputation:
16 | max:
17 | type: 'null_category'
18 |
19 |
20 | - # sex
21 | column: sex
22 | choice_query: select distinct sex from clean.demporaphics
23 | metrics:
24 | - max
25 |
26 | - # urban/rural - using a subset of values manually specified
27 | column: locality_type
28 | choices: [urban, rural]
29 | metrics:
30 | - max
31 |
32 |
33 | categoricals:
34 | - # top 50 diagnosis
35 | column: 'dx'
36 | choice_query: |
37 | SELECT DISTINCT dx
38 | FROM (
39 | SELECT dx,
40 | count(*)
41 | FROM clean.diagnosis
42 | GROUP BY dx order by count(*) desc limit 50
43 | ) AS code_counts
44 |
45 | metrics:
46 | - 'max'
47 | - 'count'
48 |
49 | ```
50 |
51 | ## Creating "Age" feature
52 | ### be careful about feature_start_date
53 |
54 | ```
55 | - # demographics
56 | prefix: 'demos'
57 | from_obj: |
58 | (select entity_id, sex,race,birth_date,zip_code,
59 | greatest(birth_date,'2011-01-01') as dob from clean.demographics) as dems
60 | knowledge_date_column: 'dob'
61 |
62 | aggregates:
63 | - # age in years
64 | quantity:
65 | age: "extract(year from age('{collate_date}'::date, birth_date::date))"
66 | metrics:
67 | - 'max'
68 | ```
69 |
70 | ## Creating other temporal features
71 |
72 |
73 | ### days since last event
74 |
75 | ```
76 | -
77 | prefix: 'days_since'
78 | from_obj: "(SELECT * FROM staging.entity_all_events) AS events"
79 | knowledge_date_column: 'event_date'
80 | aggregates:
81 |
82 | - # days since last event
83 | quantity:
84 | last_event: "'{collate_date}'::DATE - event_date"
85 | metrics: ['min']
86 |
87 |
88 |
89 | - # days since last event of a certain type
90 | quantity:
91 | last_event_of_type_X: case when event_type='X' then ('{collate_date}'::DATE - event_end_date::DATE) end
92 | metrics:
93 | metrics: ['min']
94 |
95 | intervals: ['50y']
96 |
97 |
98 | ```
99 |
100 |
101 |
102 |
103 |
--------------------------------------------------------------------------------
/techhelp/class_db_pointers.md:
--------------------------------------------------------------------------------
1 | # Some pointers for using the course database
2 |
3 | Each group has their own database, named `{group_name}_database`. For example, team bills1 has `bills1_database`. Log in the same way you log into group_students_database:
4 | ```bash
5 | psql -h database.mlpolicylab.dssg.io -U {andrewid} -d {group_name}_database
6 | ```
7 | Or, if using DBeaver, simply update the Database field to your group's database name.
8 |
9 | ## Access and permissions
10 | Within your group database, you'll find several schemas (depending on your particular project). Most of these schemas are read-only in order to avoid accidentally modifying or overwriting the raw data for the project, but you should be able to write to the `sketch` schema as well as create new schemas to help organize your project work. You can run the following query to get more information on permissions:
11 | ```sql
12 | SELECT *
13 | FROM information_schema.role_table_grants
14 | ```
15 |
16 | ### Creating new schemas
17 | When you create a new schema, you'll want to be sure to grant permissions to everyone in your group, which can be done by granting privileges to your group name, for instance:
18 | ```sql
19 | CREATE SCHEMA my_new_schema;
20 | GRANT ALL ON SCHEMA my_new_schema TO {group_name};
21 | ```
22 | (replacing `{group_name}` with your group name, such as `bills1`)
23 |
24 | ### Creating new tables
25 | Likewise, when you create a new table, you'll want to grant permissions to everyone in your group:
26 | ```sql
27 | CREATE TABLE my_schema.my_new_table (
28 | some_column_name INT,
29 | some_other_column VARCHAR,
30 | );
31 | GRANT ALL ON my_schema.my_new_table TO {group_name};
32 | ```
33 | (replacing `{group_name}` with your group name, such as `bills1`)
34 |
35 | ## Query Performance
36 | Most of these projects use moderately large data. While postgres can work with this type of structured data very efficiently if your queries and tables are properly optimized, if they aren't, some queries can be painfully slow. A few pointers:
37 | - Especially when creating relatively large tables, using [appropriate indices](https://www.postgresqltutorial.com/postgresql-indexes/postgresql-create-index/) will vastly improve accessing data and joining to the table
38 | - For large, complex queries, subqueries are typically less performant that [CTEs](http://www.craigkerstiens.com/2013/11/18/best-postgres-feature-youre-not-using/) or building up pieces with temporary tables (which, in turn, can be indexed as well)
39 | - Be sure you're making use of the relational nature of the database; often, if you find yourself doing a large number of small queries in a loop to do the same thing to different slices of the data, you could likely optimize by reworking this into a single query that works on everything at once.
40 | - Pandas is very, very bad at moving large amounts of data into databases from python -- take a look at [Ohio](https://github.com/dssg/ohio) for a more efficient option.
41 |
42 | ### Killing hung or run-away queries
43 | If you think one of your queries has hung (or is taking far longer or too many resources than it should), you can run the following query to confirm that it is still running:
44 | ```sql
45 | SELECT * FROM pg_stat_activity;
46 | ```
47 | If you need to kill your query, you can note down the PID from that result and then use:
48 | ```sql
49 | SELECT pg_cancel_backend({PID});
50 | ```
51 | To kill it (it's a good idea to check `pg_stat_activity` again to ensure it's been killed). Sometimes that may not work, and you need to use the more aggressive:
52 | ```sql
53 | SELECT pg_terminate_backend({PID});
54 | ```
55 |
56 | ### Remember to close your database connections
57 | It's always a good practice to close out your database connections explicitly, both for database software (such as dbeaver) as well as `psycopg2` connections from python (e.g., make sure you run `cursor.close()` as well as `connection.close` after running all your queries).
58 |
--------------------------------------------------------------------------------
/techhelp/dbeaver_instructions.pdf:
--------------------------------------------------------------------------------
https://raw.githubusercontent.com/dssg/mlforpublicpolicylab/d94c464f8a97c0b74cc94a889d88474ed718a3ba/techhelp/dbeaver_instructions.pdf
--------------------------------------------------------------------------------
/techhelp/handling_secrets.md:
--------------------------------------------------------------------------------
1 | # Some Tips for Handling Secrets
2 | Keeping secrets (such as database passwords, API credentials, etc) out of your code is important to ensure the security your systems and data. While there are many approaches to doing so, two simple options are making use of environment variables and using secret config files.
3 |
4 | ## Option 1: Environment Variables
5 | Environment variables you set at the bash command line are available to your code running in that environment and a good option for keeping secrets out of your code itself. You can set environment variables at the command line by assigning them with an `=` sign (avoid any spaces around the `=`) and check their value using `echo` and placing a `$` before the variable name:
6 |
7 | ```bash
8 | you@server:~$ FOO="HELLO WORLD"
9 | you@server:~$ echo $FOO
10 | HELLO WORLD
11 | ```
12 |
13 | In python, you can access these using the built-in `os` module, for instance if you had your database password stored in the `PGPASSWORD` environment variable:
14 |
15 | ```python
16 | import os
17 |
18 | db_pass = os.getenv('PGPASSWORD')
19 | ```
20 |
21 | If you don't want to set the environment variables by hand every time you start a new terminal session, you could also store them in a shell script that would load them up when run, for instance, you might have a file called `environment.sh` with contents:
22 |
23 | ```bash
24 | export FOO="HELLO WORLD"
25 | export BAR="BAZ"
26 | ```
27 |
28 | Importantly, you'll need to **restrict the access to this file**: store it somewhere only you can access (e.g., your home directory), avoid committing it to a git repository, and change the permissions so only you can view it using `chmod 600 {filename}`.
29 |
30 | Once you've created that file, any time you want to load the environment variables, you can simply run its contents as a shell script using `source`. For instance, if the file was named `environment.sh`:
31 |
32 | ```bash
33 | you@server:~$ source environment.sh
34 | ```
35 |
36 | ## Option 2: Secrets Config File
37 |
38 | A second option involves storing your secrets in a config file that can be read by your programs (any number of formats is reasonable: yaml, json, even plain text). For instance, you might create a file called `secrets.yaml` with contents such as:
39 |
40 | ```yaml
41 | db:
42 | host: database.mlpolicylab.dssg.io
43 | port: 5432
44 | dbname: group_students_database
45 | user: andrewid
46 | password: 12345
47 | web_resource:
48 | api_key: 23b53ca9845f70424ad08f958c94b275
49 | ```
50 |
51 | Then, you can access your secrets within your code with the appropriate loading utility, such as (here, the `yaml` module is not built-in, but comes from the package `PyYAML`):
52 |
53 | ```python
54 | import yaml
55 |
56 | with open('path/to/secrets.yaml', 'r') as f:
57 | # loads contents of secrets.yaml into a python dictionary
58 | secret_config = yaml.safe_load(f.read())
59 | ```
60 |
61 | This can be an easy way to feed secrets into your programs, but you'll need to **ensure these secrets don't accidentally get committed to github**. You could either provide the path to config file as an input parameter to your program (in which case, you could keep the secrets file somewhere entirely outside of the git repo, such as your home directory) or have it live in some expected location within the structure of the github repo, but use a `.gitignore` file to avoid committing the secrets file itself.
62 |
63 | To do so, edit (or create) your `.gitignore` file at the top level of your repo to add (in the example where the secrets are contained in `secrets.yaml`):
64 |
65 | ```
66 | # ignore secrets config
67 | secrets.yaml
68 | ```
69 |
70 | Make sure you've added and committed the `.gitignore` file to your repo, and then you should be able to confirm that your secrets file isn't being tracked with `git status`.
71 |
--------------------------------------------------------------------------------
/techhelp/img/jupyter-login.png:
--------------------------------------------------------------------------------
https://raw.githubusercontent.com/dssg/mlforpublicpolicylab/d94c464f8a97c0b74cc94a889d88474ed718a3ba/techhelp/img/jupyter-login.png
--------------------------------------------------------------------------------
/techhelp/img/jupyter-new-nb.png:
--------------------------------------------------------------------------------
https://raw.githubusercontent.com/dssg/mlforpublicpolicylab/d94c464f8a97c0b74cc94a889d88474ed718a3ba/techhelp/img/jupyter-new-nb.png
--------------------------------------------------------------------------------
/techhelp/img/jupyter-shutdown.png:
--------------------------------------------------------------------------------
https://raw.githubusercontent.com/dssg/mlforpublicpolicylab/d94c464f8a97c0b74cc94a889d88474ed718a3ba/techhelp/img/jupyter-shutdown.png
--------------------------------------------------------------------------------
/techhelp/img/jupyter-terminal.png:
--------------------------------------------------------------------------------
https://raw.githubusercontent.com/dssg/mlforpublicpolicylab/d94c464f8a97c0b74cc94a889d88474ed718a3ba/techhelp/img/jupyter-terminal.png
--------------------------------------------------------------------------------
/techhelp/infrastructure_quickstart.md:
--------------------------------------------------------------------------------
1 | ## Reaching the Course Server
2 | We have created an ubuntu linux server that you'll be able to use for your project work at `server.mlpolicylab.dssg.io` –– you should be able to reach it via SSH with the private key corresponding to the public key you provided us and using your Andrew ID as your username.
3 |
4 | NOTE: The course infrastructure is **only accessible from the CMU VPN (or on campus)**. When logging onto the VPN, be sure to use the **Full VPN** option in order to be able to reach the class server.
5 |
6 | Once connected, here are a couple of commands you could run and expected output to verify that you're on the server (only type the commands after the "$" prompt and the output is shown on the next line):
7 | ```
8 | andrewid@mlpolicylab-94889:~$ hostname
9 | mlpolicylab-94889
10 |
11 | andrewid@mlpolicylab-94889:~$ pwd
12 | /home/{andrew_id}
13 | ```
14 |
15 | ## Reaching the Course Database
16 | Most of the data for the course projects will be provided in a postgres database. Once you're connected to the server, you can reach the database using the psql command line utility. The database server is at `database.mlpolicylab.dssg.io` and your username is again your Andrew ID. Here's an example of connecting to the database:
17 | ```
18 | andrewid@mlpolicylab-94889:~$ PAGER='less -S' psql -h database.mlpolicylab.dssg.io -U {YOUR_ANDREW_ID} group_students_database
19 | psql (11.6 (Ubuntu 11.6-1.pgdg18.04+1), server 11.5)
20 | SSL connection (protocol: TLSv1.2, cipher: ECDHE-RSA-AES256-GCM-SHA384, bits: 256, compression: off)
21 | Type "help" for help.
22 |
23 | group_students_database=> SELECT 1+1 AS foo;
24 | foo
25 | -----
26 | 2
27 | (1 row)
28 |
29 | group_students_database=> SELECT CURRENT_USER;
30 | current_user
31 | --------------
32 | {your_andrew_id}
33 | (1 row)
34 |
35 | group_students_database=> \q
36 | ```
37 | Here, we're connecting to an empty `group_students_database` for the time being, but once the teams are formed, we'll follow up with instructions on connecting to a team database populated with some data.
38 |
39 | Your password for the database can be found in the `.pgpass` file in your home directory (it's everything after the last colon). While you can only reach the database from the course server, you can use a local SQL client like [dbeaver](https://dbeaver.io/) or [datagrip](https://www.jetbrains.com/datagrip/) by establishing an SSH tunnel through the server (see details below).
40 |
41 | ## Using dbeaver
42 | One option for connecting to the database from your local machine is to use [dbeaver](https://dbeaver.io/) (other SQL interpreters are fine as well, but this one has a free community edition that is relatively easy to get up and running with).
43 |
44 | A couple of pointers on getting set up:
45 |
46 | - To get started, you may need to install a different SSH package called "SSHJ" -- under the Help menu, choose "Install new Software" then search for SSHJ and install the package (you'll need to restart dbeaver) Note that sometimes the setup works out of the box without this.
47 | - You'll need to connect via an SSH tunnel, so when you set up your database connection, look for the SSH tab and set up the tunnel to `server.mlpolicylab.dssg.io` with your Andrew ID and private key file (choosing "public key" as the authentication method)
48 | - If you installed it, be sure to choose SSHJ as the method under advanced
49 | - Then you can test your SSH tunnel by clicking the button below (you might need to make your window larger to see it)
50 | - Once your tunnel is working, under the general tab you can set up your database connection using `database.mlpolicylab.dssg.io` for the server, your Andrew ID, and the password from your `.pgpass` file on the server (everything after the last colon). The database name should be your group database (for now, `group_students_database` but you'll need to change to your group database once that's assigned)
51 | - Click the button to test the full connection and if that works finish setting up the database
52 | - Once done, in the left pane you'll be able to browse the database structure and in the right pane run SQL queries (you may need to create a new SQL editor)
53 |
54 | ## Github
55 | You should have received an invite to the "Machine Learning Public Policy Class" github team in the DSSG organization based on the github user id you created. Currently, this team has access to [one repository](https://github.com/dssg/test-mlpolicylab-private) that you can use to test your configuration, but we'll be creating separate repositories for each project team to work on once those are set up. Here's what you'll need to do:
56 |
57 | - Add your **public ssh** key to your github account following the [instructions here](https://help.github.com/en/enterprise/2.17/user/github/authenticating-to-github/adding-a-new-ssh-key-to-your-github-account) (this can be the same one you use to connect to the server or a new one)
58 |
59 | - Copy the corresponding **private key** to the server -- it needs to live in `~/.ssh/` with "600" permissions. Here's how you might do that:
60 | - on your local machine: `scp {/path/to/your/key_file} your_andrew_id@server.mlpolicylab.dssg.io:~/.ssh/`
61 | - then, on the course server: `chmod 600 ~/.ssh/{key_file}`
62 |
63 | - Make sure you key is registered with the SSH agent:
64 | - on the course server: `eval "$(ssh-agent -s)"`
65 | - then: `ssh-add ~/.ssh/{key_file}`
66 |
67 | - Check that everything is correct so far by connecting to github:
68 | - on the course server: `ssh git@github.com`
69 |
70 | - (if all is well, you should get a message recognizing your git username saying you have successfully authenticated)
71 |
72 | - Configure the github CLI. On the course server:
73 | - `git config --global user.name "Your name here"`
74 | - `git config --global user.email "your_email@example.com"`
75 | - `git config --global color.ui true`
76 | - `git config --global push.default current`
77 |
78 | - Clone the private test repo. On the course server:
79 | - `git clone git@github.com:dssg/test-mlpolicylab-private.git`
80 |
81 | - Finally, confirm that you've cloned the repo by printing out the README file:
82 | - on the course server: `cat test-mlpolicylab-private/README.md`
83 |
84 | Once you have that working, your github access should be all set for the course.
85 |
86 | ## Jupyter Notebook
87 | You may want to use jupyter notebooks for some data exploration and visualization throughout the course. Since the data needs to stay in the AWS environment, you'll need to do so by running a notebook server on the remote machine and creating a tunnel so you can access it via your local browser. Let's test that out:
88 | On the course server, you'll want to choose an open port for your notebook server (so you can consistently access it in the same place). You can see the ports currently in use with:
89 | ```
90 | ss -lntu
91 | ```
92 | Choose a port number **between 1024 and 65535** that is **NOT** on that list.
93 |
94 | Then, start your notebook server using:
95 | ```
96 | jupyter notebook --no-browser --port {YOUR_PORT}
97 | ```
98 | Note that this will print out a message indicating that the server is starting and giving you a token you can use to access it.
99 |
100 | Now, **on your local machine**, you'll need to set up an SSH tunnel to connect to the server:
101 | ```
102 | ssh -N -L localhost:8888:localhost:{YOUR_PORT} {YOUR_ANDREW_ID}@server.mlpolicylab.dssg.io
103 | ```
104 | Note that if you already have a local notebook server running, you may need to choose a different port than 8888 to map to, but we'll assume this is open here. Also, you may need to specify the "-i" parameter to provide the path to your private key file. If you're on windows, you may need to do this using PuTTY -- [see the instructions here](https://docs.bitnami.com/bch/faq/get-started/access-ssh-tunnel/)
105 |
106 | Finally, open a browser of your choice on your local machine and navigate to http://localhost:8888/ and you should get a jupyter notebook login page asking for the token that was generated when you started the server (if this doesn't work, you might also try http://0.0.0.0:8888/ or http://127.0.0.1:8888/ ). If this is successful, you should see a directory listing where you started the notebook server on the remote server allowing you to create new python files.
107 |
108 | Again, there's not too much more to do for the moment beyond confirming that you can connect, so at this point you can go ahead and kill the notebook server on the course server and the tunnel on your local machine (control-C should work for both).
109 |
110 | Anyway, once you can do all that, you should be in good shape for most of the technical resources you'll need for class! Please feel free to ping us on slack in the **#help** channel if you run into trouble with any of the steps here, and we'll be cover all of these details in the Wednesday tech session as well.
111 |
112 |
--------------------------------------------------------------------------------
/techhelp/jupyter_setup.md:
--------------------------------------------------------------------------------
1 | # Using Jupyter Notebooks
2 |
3 | ## tl;dr
4 | 1. start jupyter server on the server from your project directory and select a port number **between 1024 and 65535** (more details below if you get an error)
5 | ```bash
6 | cd /data/groups/{group-name}/
7 | jupyter notebook --no-browser --port {YOUR_PORT}
8 | ```
9 |
10 | Take note of token once the command finishes running. it will be in a string similar to ``[I 04:14:21.181 NotebookApp] http://localhost8:888/?token=65d0e5010af61874004ddeea962cd727992a593b82bc4e1b``
11 |
12 | 2. Set up an SSH tunnel to connect to the server from your laptop:
13 |
14 | ```bash
15 | ssh -N -L localhost:8888:localhost:{YOUR_PORT} {YOUR_ANDREW_ID}@server.mlpolicylab.dssg.io
16 | ```
17 |
18 | 3. Open browser on laptop and type in http://localhost:8888/ and enter token from step 1. Make sure to select the kernel with your group name when creating a notebook
19 |
20 | ## Before you get started
21 |
22 | Although not a good environment for running your ML pipeline and models, jupyter notebooks can be useful for exploratory data analysis as well as visualizing modeling results. Since the data needs to stay in the AWS environment, you'll need to do so by running a notebook server on the remote machine and creating an SSH tunnel (because the course server can only be accessed via the SSH protocol) so you can access it via your local browser.
23 |
24 | One important note: **be sure to explicitly shut down the kernels when you're done working with a notebook** (you can do this from the notebook directory listing: see the figure below) as "zombie" notebook sessions can end up using up a lot of resources!
25 |
26 | 
27 |
28 | ## Starting up the server
29 | On the course server, you'll want to choose an open port for your notebook server (so you can consistently access it in the same place). You can see the ports currently in use with:
30 | ```bash
31 | ss -lntu
32 | ```
33 | Choose a port number **between 1024 and 65535** that is **NOT** on that list.
34 |
35 | Next, you'll actually start the notebook server -- you may want to consider doing this in a `screen` session to ensure the keep ther server persistent (see the [linux command line section of the tech setup readme](https://github.com/dssg/mlforpublicpolicylab/tree/master/techhelp#linux-command-line-bash) for details). Make sure you're in your group's python virtualenv and start your notebook server, for instance using:
36 | ```bash
37 | cd /data/groups/{group-name}/
38 | jupyter notebook --no-browser --port {YOUR_PORT}
39 | ```
40 | or
41 | ```bash
42 | source /data/groups/{group-name}/dssg_env/bin/activate
43 | jupyter notebook --no-browser --port {YOUR_PORT}
44 | ```
45 | Your group name is bills1, schools1, etc.
46 |
47 | Note that whatever directory you're in when you start the server is where your notebooks will be stored. Starting the server will print out a message indicating that the server is starting and giving you a token you can use to access it, which looks something like this:
48 |
49 | 
50 |
51 | Take note of the token (outlined with the red box in the image), as you'll need this to log in.
52 |
53 | ## Accessing the server from your browser
54 | Now, on your local machine, you'll need to set up an SSH tunnel to connect to the server:
55 |
56 | ```bash
57 | ssh -N -L localhost:8888:localhost:{YOUR_PORT} {YOUR_ANDREW_ID}@server.mlpolicylab.dssg.io
58 | ```
59 |
60 | Note that if you already have a local notebook server running, you may need to choose a different port than 8888 to map to, but we'll assume this is open here. Also, you may need to specify the "-i" parameter to provide the path to your private key file. If you're on windows, you may need to do this using PuTTY -- [see the instructions here](https://docs.bitnami.com/bch/faq/get-started/access-ssh-tunnel/)
61 |
62 | Running this command won't look like it did anything because it's just opening a connection between your machine and the course server to route traffic to the local port (here, 8888) to the port you choose for your notebook server on the class server. **You'll need to keep this terminal/putty session open to maintain the tunnel**
63 |
64 | Finally, open a browser of your choice on your local machine and navigate to http://localhost:8888/ and you should get a jupyter notebook login page asking for the token that was generated when you started the server (if this doesn't work, you might also try http://0.0.0.0:8888/ or http://127.0.0.1:8888/ ):
65 |
66 | 
67 |
68 | If you successfully log in, you should see a directory listing where you started the notebook server on the remote server allowing you to create new python files.
69 |
70 | ## Shutting down
71 | You'll need to do two things to shut down your notebook server:
72 | 1. Kill the notebook server on the remote machine (return to the terminal/screen window where the server is running and type control-C then `y` when prompted if you reall want to shut down)
73 | 1. Close the SSH tunnel on your local machine: on linux/macos, you can do so by running `ps aux | grep {YOUR_PORT}` to find the process id (PID) then using `kill {PID}`, or alternatively closing the terminal session you used to start it. With putty or powershell on windows, you should simply be able to close the window where you started the tunnel.
74 |
--------------------------------------------------------------------------------
/techhelp/pipelines_session.pptx:
--------------------------------------------------------------------------------
https://raw.githubusercontent.com/dssg/mlforpublicpolicylab/d94c464f8a97c0b74cc94a889d88474ed718a3ba/techhelp/pipelines_session.pptx
--------------------------------------------------------------------------------
/techhelp/python_sql_tech_session.ipynb:
--------------------------------------------------------------------------------
1 | {
2 | "cells": [
3 | {
4 | "cell_type": "markdown",
5 | "metadata": {},
6 | "source": [
7 | "# Python + SQL Tech Session\n",
8 | "\n",
9 | "Today we'll be covering:\n",
10 | "1. Connecting to the database from python\n",
11 | "1. Using templated SQL in python\n",
12 | "1. getting data into and out of postgres efficiently\n",
13 | "1. Advanced SQL\n",
14 | " - CTEs (WITH clauses)\n",
15 | " - window functions\n",
16 | " - indices / check plan\n",
17 | " - temp tables\n",
18 | "\n",
19 | "### Some initial setup\n",
20 | "Requirements:\n",
21 | "- You should have a database.yaml file in your home directory with your credentials - please check if it's there.\n",
22 | "\n",
23 | "Downloading the materials we'll need:\n",
24 | "1. SSH to the class server\n",
25 | "2. Go to your working directory in your project folder using `cd your_working_directory` (/mnt/data/......)\n",
26 | "3. Download the notebook: `wget https://raw.githubusercontent.com/dssg/mlforpublicpolicylab/master/techhelp/python_sql_tech_session.ipynb`\n",
27 | "4. Download the sql template example: `wget https://raw.githubusercontent.com/dssg/mlforpublicpolicylab/master/techhelp/tech_session_template.sql`\n",
28 | "5. Take a look at the sql template: `less tech_session_template.sql` (Type `q` to exit)\n",
29 | "\n",
30 | "\n",
31 | "\n"
32 | ]
33 | },
34 | {
35 | "cell_type": "markdown",
36 | "metadata": {},
37 | "source": [
38 | "## Import packages"
39 | ]
40 | },
41 | {
42 | "cell_type": "code",
43 | "execution_count": null,
44 | "metadata": {},
45 | "outputs": [],
46 | "source": [
47 | "import matplotlib.pyplot as plt\n",
48 | "import pandas as pd\n",
49 | "from sqlalchemy import create_engine\n",
50 | "import yaml\n",
51 | "\n",
52 | "import ohio.ext.pandas"
53 | ]
54 | },
55 | {
56 | "cell_type": "markdown",
57 | "metadata": {},
58 | "source": [
59 | "## TOPIC 1: Connect to the database from python"
60 | ]
61 | },
62 | {
63 | "cell_type": "code",
64 | "execution_count": null,
65 | "metadata": {},
66 | "outputs": [],
67 | "source": [
68 | "with open('database.yaml', 'r') as f:\n",
69 | " db_params = yaml.safe_load(f)\n",
70 | "\n",
71 | "db_params['db'] = 'group_students_database'\n",
72 | "engine = create_engine('postgresql://{user}:{password}@{host}:{port}/{dbname}'.format(\n",
73 | " host=db_params['host'],\n",
74 | " port=db_params['port'],\n",
75 | " dbname=db_params['db'],\n",
76 | " user=db_params['user'],\n",
77 | " password=db_params['pass'] \n",
78 | "))\n"
79 | ]
80 | },
81 | {
82 | "cell_type": "markdown",
83 | "metadata": {},
84 | "source": [
85 | "We're connected to a database with data from the DonorsChoose organization. It has a few useful tables:\n",
86 | "- `donorschoose.projects` -- general information about projects\n",
87 | "- `donorschoose.resources` -- detailed information about requested resources\n",
88 | "- `donorschoose.essays` -- project titles and descriptions\n",
89 | "- `donorschoose.donations` -- separate record for each donation to a project\n",
90 | "\n",
91 | "There's also a `sketch` schema you can use to create tables in"
92 | ]
93 | },
94 | {
95 | "cell_type": "markdown",
96 | "metadata": {},
97 | "source": [
98 | "### Simple select statement with sqlalchemy engine"
99 | ]
100 | },
101 | {
102 | "cell_type": "code",
103 | "execution_count": null,
104 | "metadata": {},
105 | "outputs": [],
106 | "source": [
107 | "sql = \"SELECT projectid, schoolid, resource_type FROM donorschoose.projects LIMIT 3\"\n",
108 | "\n",
109 | "result_set = engine.execute(sql)\n",
110 | "for rec in result_set:\n",
111 | " print(rec)"
112 | ]
113 | },
114 | {
115 | "cell_type": "markdown",
116 | "metadata": {},
117 | "source": [
118 | "### Pandas will give a little cleaner output"
119 | ]
120 | },
121 | {
122 | "cell_type": "code",
123 | "execution_count": null,
124 | "metadata": {},
125 | "outputs": [],
126 | "source": [
127 | "sql = \"SELECT projectid, schoolid, resource_type FROM donorschoose.projects LIMIT 3\"\n",
128 | "\n",
129 | "pd.read_sql(sql, engine)"
130 | ]
131 | },
132 | {
133 | "cell_type": "markdown",
134 | "metadata": {},
135 | "source": [
136 | "## Simple Table Manipulation with sqlalchemy (we'll do something more efficient below)\n",
137 | "\n",
138 | "Let's create a little table to track your stocks of halloween candy (fill in your andrew id below)"
139 | ]
140 | },
141 | {
142 | "cell_type": "code",
143 | "execution_count": null,
144 | "metadata": {},
145 | "outputs": [],
146 | "source": [
147 | "andrew_id = # FILL IN YOUR andrew_id HERE!\n",
148 | "candy_table = '{}_candy'.format(andrew_id)\n",
149 | "table_schema = 'sketch'"
150 | ]
151 | },
152 | {
153 | "cell_type": "markdown",
154 | "metadata": {},
155 | "source": [
156 | "Execute an appropriate CREATE statement"
157 | ]
158 | },
159 | {
160 | "cell_type": "code",
161 | "execution_count": null,
162 | "metadata": {},
163 | "outputs": [],
164 | "source": [
165 | "create_sql = '''CREATE TABLE IF NOT EXISTS {}.{} (\n",
166 | " candy_type varchar NULL,\n",
167 | " amount int,\n",
168 | " units varchar\n",
169 | ");'''.format(table_schema, candy_table)\n",
170 | "\n",
171 | "engine.execute(create_sql)"
172 | ]
173 | },
174 | {
175 | "cell_type": "markdown",
176 | "metadata": {},
177 | "source": [
178 | "**IMPORTANT NOTE**: Statements that modify the state of the database will not be physically reflected until we tell the connection to commit these changes. If you went into DBeaver now, you still wouldn't see this new table!"
179 | ]
180 | },
181 | {
182 | "cell_type": "code",
183 | "execution_count": null,
184 | "metadata": {},
185 | "outputs": [],
186 | "source": [
187 | "engine.execute(\"COMMIT\")"
188 | ]
189 | },
190 | {
191 | "cell_type": "markdown",
192 | "metadata": {},
193 | "source": [
194 | "Now let's insert a few records (again note that we have to **commit** for the records to show up):"
195 | ]
196 | },
197 | {
198 | "cell_type": "code",
199 | "execution_count": null,
200 | "metadata": {},
201 | "outputs": [],
202 | "source": [
203 | "insert_sql = '''INSERT INTO {}.{}\n",
204 | " (candy_type, amount, units)\n",
205 | " VALUES(%s, %s, %s);\n",
206 | "'''.format(table_schema, candy_table)\n",
207 | "\n",
208 | "records_to_insert = [('snickers', 10, 'bars'), ('candy corn', 5, 'bags'), ('peanut butter cups', 15, 'cups')]\n",
209 | "\n",
210 | "for record in records_to_insert:\n",
211 | " engine.execute(insert_sql, record)\n",
212 | "\n",
213 | "engine.execute(\"COMMIT\")"
214 | ]
215 | },
216 | {
217 | "cell_type": "markdown",
218 | "metadata": {},
219 | "source": [
220 | "Let's look at the results:"
221 | ]
222 | },
223 | {
224 | "cell_type": "code",
225 | "execution_count": null,
226 | "metadata": {},
227 | "outputs": [],
228 | "source": [
229 | "sql = \"SELECT * FROM {}.{}\".format(table_schema, candy_table)\n",
230 | "\n",
231 | "pd.read_sql(sql, engine)"
232 | ]
233 | },
234 | {
235 | "cell_type": "markdown",
236 | "metadata": {},
237 | "source": [
238 | "Clean up: drop the table and commit:"
239 | ]
240 | },
241 | {
242 | "cell_type": "code",
243 | "execution_count": null,
244 | "metadata": {},
245 | "outputs": [],
246 | "source": [
247 | "drop_sql = \"DROP TABLE {}.{}\".format(table_schema, candy_table)\n",
248 | "\n",
249 | "engine.execute(drop_sql)\n",
250 | "engine.execute(\"COMMIT\")"
251 | ]
252 | },
253 | {
254 | "cell_type": "markdown",
255 | "metadata": {},
256 | "source": [
257 | "## TOPIC 2: Using Templated SQL\n",
258 | "\n",
259 | "Templating SQL statements and filling them in dynamically with python can be very helpful as you're transforming data for your projects, for instance, creating features, labels, and matrices for different temporal validation splits in your data.\n",
260 | "\n",
261 | "We've actually been doing a little bit of this already (e.g., filling in table names and insert values above), but let's look at a couple of examples in more detail with the donors choose data. Suppose we wanted to look at the sets of projects posted on a few given days:"
262 | ]
263 | },
264 | {
265 | "cell_type": "code",
266 | "execution_count": null,
267 | "metadata": {},
268 | "outputs": [],
269 | "source": [
270 | "sql_template = \"\"\"\n",
271 | "SELECT projectid, resource_type, poverty_level, date_posted\n",
272 | "FROM donorschoose.projects\n",
273 | "WHERE date_posted::DATE = '{}'::DATE\n",
274 | "\"\"\"\n",
275 | "\n",
276 | "results = []\n",
277 | "for dt in ['2014-05-01', '2014-04-15', '2014-04-01']:\n",
278 | " sql = sql_template.format(dt)\n",
279 | " results.append(pd.read_sql(sql, engine))\n"
280 | ]
281 | },
282 | {
283 | "cell_type": "markdown",
284 | "metadata": {},
285 | "source": [
286 | "Do some quick checks:\n",
287 | "1. How many result sets did we get back?\n",
288 | "1. Look at the first few results of one of the sets, are they all on the right date?\n",
289 | "1. How many projects were posted on each of these days?"
290 | ]
291 | },
292 | {
293 | "cell_type": "code",
294 | "execution_count": null,
295 | "metadata": {},
296 | "outputs": [],
297 | "source": [
298 | "# Number of result sets"
299 | ]
300 | },
301 | {
302 | "cell_type": "code",
303 | "execution_count": null,
304 | "metadata": {},
305 | "outputs": [],
306 | "source": [
307 | "# First few records of one set"
308 | ]
309 | },
310 | {
311 | "cell_type": "code",
312 | "execution_count": null,
313 | "metadata": {},
314 | "outputs": [],
315 | "source": [
316 | "# Number of projects on each date"
317 | ]
318 | },
319 | {
320 | "cell_type": "markdown",
321 | "metadata": {},
322 | "source": [
323 | "#### Some simple data visualization\n",
324 | "\n",
325 | "We won't go into detail here, but just to provide a quick example. See the matplot (or seaborn) documentation for more plot types and examples."
326 | ]
327 | },
328 | {
329 | "cell_type": "code",
330 | "execution_count": null,
331 | "metadata": {},
332 | "outputs": [],
333 | "source": [
334 | "ix = 0\n",
335 | "df = results[ix].groupby('resource_type')['projectid'].count().reset_index()\n",
336 | "dt = results[ix]['date_posted'].max()\n",
337 | "\n",
338 | "fig, ax = plt.subplots()\n",
339 | "ax.bar('resource_type', 'projectid', data=df)\n",
340 | "ax.set_title('Counts by resource type for %s' % dt)\n",
341 | "ax.set_ylabel('Number of Projects')\n",
342 | "plt.show()"
343 | ]
344 | },
345 | {
346 | "cell_type": "markdown",
347 | "metadata": {},
348 | "source": [
349 | "### Templated SQL stored in a file\n",
350 | "\n",
351 | "If your queries get long or complex, you might want to move them out to separate files to keep your code a bit cleaner. We've provided an example to work with in `tech_session_template.sql` -- let's read that in here.\n",
352 | "\n",
353 | "Note that here we're just making use of basic python templating here, but if you want to use more complex logic in your templates, check out packages like [Jinja2](https://jinja.palletsprojects.com/en/2.11.x/)"
354 | ]
355 | },
356 | {
357 | "cell_type": "code",
358 | "execution_count": null,
359 | "metadata": {},
360 | "outputs": [],
361 | "source": [
362 | "# Read the template file\n",
363 | "with open('tech_session_template.sql', 'r') as f:\n",
364 | " sql_template = f.read()\n",
365 | "\n",
366 | "# Look at the contents:\n",
367 | "print(sql_template)"
368 | ]
369 | },
370 | {
371 | "cell_type": "markdown",
372 | "metadata": {},
373 | "source": [
374 | "**Looks like we'll need a few parameters:**\n",
375 | "- table_schema\n",
376 | "- table_name\n",
377 | "- state_list\n",
378 | "- start_dt\n",
379 | "- end_dt\n",
380 | "\n",
381 | "Notice as well that we've explicitly encoded all of these columns by hand, but you might want to think about how you might construct the sets of columns for one-hot encoded categoricals programmatically from the data, as well as the other types of features we've discussed (like aggregations in different time windows)..."
382 | ]
383 | },
384 | {
385 | "cell_type": "code",
386 | "execution_count": null,
387 | "metadata": {},
388 | "outputs": [],
389 | "source": [
390 | "table_schema = 'donorschoose'\n",
391 | "table_name = 'projects'\n",
392 | "state_list = ['CA', 'NY', 'PA']\n",
393 | "start_dt = '2014-03-14'\n",
394 | "end_dt = '2014-04-30'\n",
395 | "\n",
396 | "sql = sql_template.format(\n",
397 | " table_schema=table_schema,\n",
398 | " table_name=table_name,\n",
399 | " state_list=state_list,\n",
400 | " start_dt=start_dt,\n",
401 | " end_dt=end_dt\n",
402 | ")\n",
403 | "\n",
404 | "# Let's take a look...\n",
405 | "print(sql)"
406 | ]
407 | },
408 | {
409 | "cell_type": "markdown",
410 | "metadata": {},
411 | "source": [
412 | "**Looks like the square brackets in that state list will generate an error!**\n",
413 | "\n",
414 | "Let's try formatting it before doing the templating:"
415 | ]
416 | },
417 | {
418 | "cell_type": "code",
419 | "execution_count": null,
420 | "metadata": {},
421 | "outputs": [],
422 | "source": [
423 | "def list_to_string(l, dtype='string'):\n",
424 | " if dtype=='string':\n",
425 | " return ','.join([\"'%s'\" % elm for elm in l])\n",
426 | " else:\n",
427 | " return ','.join([\"%s\" % elm for elm in l])\n",
428 | "\n",
429 | "\n",
430 | "state_list = list_to_string(['CA', 'NY', 'PA'])\n",
431 | "\n",
432 | "print(state_list)"
433 | ]
434 | },
435 | {
436 | "cell_type": "code",
437 | "execution_count": null,
438 | "metadata": {},
439 | "outputs": [],
440 | "source": [
441 | "sql = sql_template.format(\n",
442 | " table_schema=table_schema,\n",
443 | " table_name=table_name,\n",
444 | " state_list=state_list,\n",
445 | " start_dt=start_dt,\n",
446 | " end_dt=end_dt\n",
447 | ")\n",
448 | "\n",
449 | "# Let's take a look...\n",
450 | "print(sql)"
451 | ]
452 | },
453 | {
454 | "cell_type": "markdown",
455 | "metadata": {},
456 | "source": [
457 | "**Looks better!** Let's try running it now..."
458 | ]
459 | },
460 | {
461 | "cell_type": "code",
462 | "execution_count": null,
463 | "metadata": {},
464 | "outputs": [],
465 | "source": [
466 | "df = pd.read_sql(sql, engine)\n",
467 | "\n",
468 | "df.head(10)"
469 | ]
470 | },
471 | {
472 | "cell_type": "markdown",
473 | "metadata": {},
474 | "source": [
475 | "## TOPIC 3: Getting data into and out of postgres efficiently\n",
476 | "\n",
477 | "At the command line, one very efficient way of getting data into postgres is to stream it to a `COPY` statement on `STDIN`, this might look something like:\n",
478 | "```\n",
479 | "cat my_file.csv | psql -h database.mlpolicylab.dssg.io {group_database} -c \"COPY {schema}.{table} FROM STDIN CSV HEADER\"\n",
480 | "```\n",
481 | "(more details in the [postgres documentation](https://www.postgresql.org/docs/11/sql-copy.html))\n",
482 | "\n",
483 | "Similarly, you can use the `\\copy` command from within `psql` itself -- you can find [documentation here](https://www.postgresql.org/docs/11/app-psql.html) (seach for \"\\copy\").\n",
484 | "\n",
485 | "For today, we'll focus on a package called `ohio` that provides efficient tools for moving data between postgres and python. `ohio` provides interfaces for both `pandas` dataframes and `numpy` arrays, but we'll focus on the `pandas` tools here, which are provided via `import ohio.ext.pandas` (see the [docs for the numpy examples](https://github.com/dssg/ohio#extensions-for-numpy))\n",
486 | "\n",
487 | "Note that `ohio` is dramatically more efficient than the built-in `df.to_sql()` (see the benchmarking graph below). The pandas function tries to be agnostic about SQL flavor by inserting data row-by-row, while `ohio` uses postgres-specific copy functionality to move the data much more quickly (and with lower memory overhead as well):\n",
488 | "\n",
489 | "\n",
490 | "\n",
491 | "Let's try it out by re-creating our halloween candy table."
492 | ]
493 | },
494 | {
495 | "cell_type": "code",
496 | "execution_count": null,
497 | "metadata": {},
498 | "outputs": [],
499 | "source": [
500 | "andrew_id = # FILL IN YOUR andrew_id HERE!\n",
501 | "candy_table = '{}_candy'.format(andrew_id)\n",
502 | "table_schema = 'sketch'"
503 | ]
504 | },
505 | {
506 | "cell_type": "code",
507 | "execution_count": null,
508 | "metadata": {},
509 | "outputs": [],
510 | "source": [
511 | "create_sql = '''CREATE TABLE IF NOT EXISTS {}.{} (\n",
512 | " candy_type varchar NULL,\n",
513 | " amount int,\n",
514 | " units varchar\n",
515 | ");'''.format(table_schema, candy_table)\n",
516 | "\n",
517 | "engine.execute(create_sql)\n",
518 | "engine.execute(\"COMMIT\")"
519 | ]
520 | },
521 | {
522 | "cell_type": "markdown",
523 | "metadata": {},
524 | "source": [
525 | "### Inserting data with df.pg_copy_to()"
526 | ]
527 | },
528 | {
529 | "cell_type": "code",
530 | "execution_count": null,
531 | "metadata": {},
532 | "outputs": [],
533 | "source": [
534 | "df = pd.DataFrame({\n",
535 | " 'candy_type': ['snickers', 'cookies', 'candy apples', 'peanut butter cups', 'candy corn'],\n",
536 | " 'amount': [1,1,2,3,5],\n",
537 | " 'units': ['bars', 'cookies', 'apples', 'cups', 'bags']\n",
538 | "})\n",
539 | "\n",
540 | "# The ohio package adds a `pg_copy_to` method to your dataframes...\n",
541 | "df.pg_copy_to(candy_table, engine, schema=table_schema, index=False, if_exists='append')"
542 | ]
543 | },
544 | {
545 | "cell_type": "markdown",
546 | "metadata": {},
547 | "source": [
548 | "### Reading data with pd.DataFrame.pg_copy_from()\n",
549 | "\n",
550 | "We can read the data from the table we just created using `pg_copy_from`:"
551 | ]
552 | },
553 | {
554 | "cell_type": "code",
555 | "execution_count": null,
556 | "metadata": {},
557 | "outputs": [],
558 | "source": [
559 | "result_df = pd.DataFrame.pg_copy_from(candy_table, engine, schema=table_schema)\n",
560 | "\n",
561 | "result_df"
562 | ]
563 | },
564 | {
565 | "cell_type": "markdown",
566 | "metadata": {},
567 | "source": [
568 | "Note that `pg_copy_from` can accept a query as well:"
569 | ]
570 | },
571 | {
572 | "cell_type": "code",
573 | "execution_count": null,
574 | "metadata": {},
575 | "outputs": [],
576 | "source": [
577 | "sql = \"\"\"\n",
578 | "SELECT\n",
579 | " CASE WHEN candy_type IN ('snickers', 'cookies', 'peanut butter cups') THEN 'has chocolate' ELSE 'non-chocolate' END AS chocolate_flag,\n",
580 | " SUM(amount) AS total_number\n",
581 | "FROM {}.{}\n",
582 | "GROUP BY 1\n",
583 | "\"\"\".format(table_schema, candy_table)\n",
584 | "\n",
585 | "result_df = pd.DataFrame.pg_copy_from(sql, engine)\n",
586 | "\n",
587 | "result_df"
588 | ]
589 | },
590 | {
591 | "cell_type": "markdown",
592 | "metadata": {},
593 | "source": [
594 | "## TOPIC 4: Advanced SQL\n",
595 | "\n",
596 | "Finally for today, we want to talk about a few more advanced SQL functions that will likely be helpful as you're starting to prepare your features and training/test matrices. We **strongly encourage** you to do as much of that data manipulation as you can in the database, as postgres is well-optimized for this sort of work. The functions here should help make that work a bit easier as well.\n",
597 | "\n",
598 | "The idea here is to give you an overview of some of the things that are possible that you might want to explore further. You can find a more in-depth [tutorial here](https://dssg.github.io/hitchhikers-guide/curriculum/2_data_exploration_and_analysis/advanced_sql/), with links out to additional documentation as well."
599 | ]
600 | },
601 | {
602 | "cell_type": "markdown",
603 | "metadata": {},
604 | "source": [
605 | "### CTEs (WITH clauses)\n",
606 | "\n",
607 | "Common table expressions (CTEs), also known as WITH clauses, are a better alternative to subqueries both in terms of code readability as well as (in some cases) performance improvements. They can allow you to break up a complex query into consituent parts, making the logic of your code a little easier to follow.\n",
608 | "\n",
609 | "By way of example, suppose we wanted to calculate the fraction of different types of projects (based on their requested type of resource) that were fully funded in MD in January 2013. Here's how we might do that with CTEs:"
610 | ]
611 | },
612 | {
613 | "cell_type": "code",
614 | "execution_count": null,
615 | "metadata": {},
616 | "outputs": [],
617 | "source": [
618 | "sql = \"\"\"\n",
619 | "WITH md_projects AS (\n",
620 | " SELECT *\n",
621 | " FROM donorschoose.projects\n",
622 | " WHERE school_state='MD'\n",
623 | " AND date_posted::DATE BETWEEN '2013-01-01'::DATE AND '2013-01-31'::DATE\n",
624 | ")\n",
625 | ", total_donations AS (\n",
626 | " SELECT p.projectid, COALESCE(SUM(d.donation_total), 0) AS total_amount\n",
627 | " FROM md_projects p\n",
628 | " LEFT JOIN donorschoose.donations d USING(projectid)\n",
629 | " GROUP BY 1\n",
630 | ")\n",
631 | ", fully_funded AS (\n",
632 | " SELECT p.*, td.total_amount,\n",
633 | " CASE WHEN td.total_amount > p.total_price_excluding_optional_support THEN 1 ELSE 0 END AS funded_flag\n",
634 | " FROM md_projects p\n",
635 | " LEFT JOIN total_donations td USING(projectid)\n",
636 | ")\n",
637 | "SELECT resource_type, COUNT(*) AS num_projects, AVG(funded_flag) AS frac_funded\n",
638 | "FROM fully_funded\n",
639 | "GROUP BY 1\n",
640 | "ORDER BY 3 DESC\n",
641 | "\"\"\"\n",
642 | "\n",
643 | "pd.read_sql(sql, engine)"
644 | ]
645 | },
646 | {
647 | "cell_type": "code",
648 | "execution_count": null,
649 | "metadata": {},
650 | "outputs": [],
651 | "source": [
652 | "### HANDS-ON: For all the MD projects posted in January 2013 that received any donations\n",
653 | "### what is the average fraction of donations coming from teachers by resource type?\n",
654 | "### (note: the donations table has a boolean `is_teacher_acct` column that will be useful)\n",
655 | "\n",
656 | "sql = \"\"\"\n",
657 | "\n",
658 | "\"\"\"\n",
659 | "\n",
660 | "pd.read_sql(sql, engine)"
661 | ]
662 | },
663 | {
664 | "cell_type": "markdown",
665 | "metadata": {},
666 | "source": [
667 | "### Analytic (Window) Functions\n",
668 | "\n",
669 | "Postgres provides powerful functionality for calculating complex metrics such as within-group aggregates, running averages, etc., called \"window functions\" (because they operate over a defined window of the data relative to a given row):\n",
670 | "- They are similar to aggregate functions, but instead of operating on groups of rows to produce a single row, they act on rows related to the current row to produce the same amount of rows.\n",
671 | "- There are several window functions like `row_number`, `rank`, `ntile`, `lag`, `lead`, `first_value`, `last_value`, `nth_value`.\n",
672 | "- And you can use any aggregation functions: `sum`, `count`, `avg`, `json_agg`, `array_agg`, etc\n",
673 | "\n",
674 | "Supposed we want to answer a couple questions:\n",
675 | "- What fraction of all projects in MD are posted by each schoolid?\n",
676 | "- What is the most recently posted project for each school in MD?\n",
677 | "- Calculate a running average of the total ask amount of the 4 most recent projects at a given school (say, `schoolid='ff2695b8b7f3ade678358f6e5c621c1e'`)"
678 | ]
679 | },
680 | {
681 | "cell_type": "code",
682 | "execution_count": null,
683 | "metadata": {},
684 | "outputs": [],
685 | "source": [
686 | "## HANDS-ON: Try answering those questions with SELECT, GROUP BY, HAVING, AND WHERE alone"
687 | ]
688 | },
689 | {
690 | "cell_type": "markdown",
691 | "metadata": {},
692 | "source": [
693 | "Now let's look at how we'd answer these questions with window functions...\n",
694 | "\n",
695 | "**Fraction of projects by school**\n",
696 | "\n",
697 | "Here, we'll group by schools but calculate the number of projects across all schools in MD using:\n",
698 | "\n",
699 | "`SUM(COUNT(*)) OVER ()`\n",
700 | "\n",
701 | "In that statement, `COUNT(*)` is the number of projects at the given school, then we're summing that count across all the aggregated rows with `SUM(.) OVER ()`. There, the `OVER ()` indicates the window across which to take the sum -- in this case, an empty window (that is, `()`) indicates using all records in the table."
702 | ]
703 | },
704 | {
705 | "cell_type": "code",
706 | "execution_count": null,
707 | "metadata": {},
708 | "outputs": [],
709 | "source": [
710 | "result_df = pd.read_sql(\"\"\"\n",
711 | "SELECT schoolid, \n",
712 | " COUNT(*) AS num_projects, \n",
713 | " 1.000*COUNT(*)/SUM(COUNT(*)) OVER () AS frac_at_school\n",
714 | "FROM donorschoose.projects\n",
715 | "WHERE school_state = 'MD'\n",
716 | "GROUP BY 1\n",
717 | "ORDER BY 3 DESC\n",
718 | "\"\"\", engine)\n",
719 | "\n",
720 | "result_df.head()"
721 | ]
722 | },
723 | {
724 | "cell_type": "markdown",
725 | "metadata": {},
726 | "source": [
727 | "**Most recent project by school**\n",
728 | "\n",
729 | "Here, we'll use `row_number` to rank the projects (without ties) within school and by posting date. Note that the window here, `(PARTITION BY schoolid ORDER BY date_posted DESC)` means: within each school id, calculate a row number ordered by the posting date in descending order (so the most recent project by a given school will have `rn=1`, the second most recent will have `rn=2`, and so on).\n",
730 | "\n",
731 | "We do this row number calculation in a CTE, allowing us to pick out the most recent project for each school simply by looking for those with `rn=1` in a subsequent step:"
732 | ]
733 | },
734 | {
735 | "cell_type": "code",
736 | "execution_count": null,
737 | "metadata": {},
738 | "outputs": [],
739 | "source": [
740 | "result_df = pd.read_sql(\"\"\"\n",
741 | "WITH school_rns AS (\n",
742 | " SELECT *, row_number() OVER (PARTITION BY schoolid ORDER BY date_posted::DATE DESC) AS rn\n",
743 | " FROM donorschoose.projects\n",
744 | " WHERE school_state = 'MD'\n",
745 | ")\n",
746 | "SELECT *\n",
747 | "FROM school_rns\n",
748 | "WHERE rn=1\n",
749 | ";\n",
750 | "\"\"\", engine)\n",
751 | "\n",
752 | "result_df.head()"
753 | ]
754 | },
755 | {
756 | "cell_type": "markdown",
757 | "metadata": {},
758 | "source": [
759 | "**Running average of ask from last four projects**\n",
760 | "\n",
761 | "Here, we use postgres's functionality to restrict a window to certain rows relative to the given row. Our window is:\n",
762 | "```\n",
763 | "(PARTITION BY schoolid ORDER BY date_posted ASC ROWS BETWEEN 3 PRECEDING AND CURRENT ROW)\n",
764 | "```\n",
765 | "That is,\n",
766 | "- `PARTITION BY schoolid`: Do the calculation among records at the same school\n",
767 | "- `ORDER BY date_posted ASC`: Order the records by posting date (earliest first)\n",
768 | "- `ROWS BETWEEN 3 PRECEDING AND CURRENT ROW`: Given this ordering, calculate the average across the four most recent rows (including the current row)"
769 | ]
770 | },
771 | {
772 | "cell_type": "code",
773 | "execution_count": null,
774 | "metadata": {},
775 | "outputs": [],
776 | "source": [
777 | "result_df = pd.read_sql(\"\"\"\n",
778 | "SELECT date_posted, projectid, schoolid, total_price_excluding_optional_support AS current_ask,\n",
779 | " AVG(total_price_excluding_optional_support) OVER (\n",
780 | " PARTITION BY schoolid ORDER BY date_posted::DATE ASC\n",
781 | " ROWS BETWEEN 3 PRECEDING AND CURRENT ROW\n",
782 | " ) AS running_avg_ask\n",
783 | "FROM donorschoose.projects\n",
784 | "WHERE schoolid = 'ff2695b8b7f3ade678358f6e5c621c1e'\n",
785 | "ORDER BY date_posted::DATE DESC\n",
786 | ";\n",
787 | "\"\"\", engine)\n",
788 | "\n",
789 | "result_df.head(10)"
790 | ]
791 | },
792 | {
793 | "cell_type": "markdown",
794 | "metadata": {},
795 | "source": [
796 | "**Days since last project was posted**\n",
797 | "\n",
798 | "We can use the `lag()` window function to get the date of the most recent previously-posted project (see also `last_value` for more flexibility):"
799 | ]
800 | },
801 | {
802 | "cell_type": "code",
803 | "execution_count": null,
804 | "metadata": {},
805 | "outputs": [],
806 | "source": [
807 | "result_df = pd.read_sql(\"\"\"\n",
808 | "SELECT date_posted, projectid, schoolid, total_price_excluding_optional_support AS current_ask,\n",
809 | " date_posted::DATE - (lag(date_posted) OVER (PARTITION BY schoolid ORDER BY date_posted::DATE ASC))::DATE AS days_since_last_proj\n",
810 | "FROM donorschoose.projects\n",
811 | "WHERE schoolid = 'ff2695b8b7f3ade678358f6e5c621c1e'\n",
812 | "ORDER BY date_posted::DATE DESC\n",
813 | ";\n",
814 | "\"\"\", engine)\n",
815 | "\n",
816 | "result_df.head(5)"
817 | ]
818 | },
819 | {
820 | "cell_type": "code",
821 | "execution_count": null,
822 | "metadata": {},
823 | "outputs": [],
824 | "source": [
825 | "# What happens when we hit the end of the series?\n",
826 | "result_df.tail(5)"
827 | ]
828 | },
829 | {
830 | "cell_type": "markdown",
831 | "metadata": {},
832 | "source": [
833 | "Notice the `NaN` (will be `NULL` in postgres) for the first record that doesn't have any previously-posted project, so you'd have to think about how you wanted to handle these edge cases in your feature development."
834 | ]
835 | },
836 | {
837 | "cell_type": "markdown",
838 | "metadata": {},
839 | "source": [
840 | "### Indices / Checking the Query Plan\n",
841 | "\n",
842 | "Indices are particularly critical to the performance of postgres queries, especially as the data gets larger. You should think about adding indices to tables based on columns that will frequently be used for joins or filtering rows with `WHERE` clauses.\n",
843 | "\n",
844 | "A useful tool for understanding how the database will treat a given query is checking the query plan by using the `EXPLAIN` keyword before a `SELECT` statement:"
845 | ]
846 | },
847 | {
848 | "cell_type": "code",
849 | "execution_count": null,
850 | "metadata": {},
851 | "outputs": [],
852 | "source": [
853 | "# Eliminate column width truncating\n",
854 | "pd.set_option('display.max_colwidth', None)"
855 | ]
856 | },
857 | {
858 | "cell_type": "code",
859 | "execution_count": null,
860 | "metadata": {},
861 | "outputs": [],
862 | "source": [
863 | "pd.read_sql(\"\"\"\n",
864 | "EXPLAIN SELECT * FROM donorschoose.projects WHERE projectid = '32943bb1063267de6ed19fc0ceb4b9a7'\n",
865 | "\"\"\", engine)"
866 | ]
867 | },
868 | {
869 | "cell_type": "markdown",
870 | "metadata": {},
871 | "source": [
872 | "Notice that picking out a specific project is making use of the index via `Index Scan`.\n",
873 | "\n",
874 | "By contrast, if we select projects for a given school:"
875 | ]
876 | },
877 | {
878 | "cell_type": "code",
879 | "execution_count": null,
880 | "metadata": {},
881 | "outputs": [],
882 | "source": [
883 | "pd.read_sql(\"\"\"\n",
884 | "EXPLAIN SELECT * FROM donorschoose.projects WHERE schoolid = 'ff2695b8b7f3ade678358f6e5c621c1e'\n",
885 | "\"\"\", engine)"
886 | ]
887 | },
888 | {
889 | "cell_type": "markdown",
890 | "metadata": {},
891 | "source": [
892 | "Here, `Seq Scan` tells us that postgres has to scan the entire table to find the right projects, which can be very expensive (especially with joins!). Also note how much higher the overall estimated cost is for this query in the first row here than for the query above.\n",
893 | "\n",
894 | "Likewise for joins, compare the two query plans below:"
895 | ]
896 | },
897 | {
898 | "cell_type": "code",
899 | "execution_count": null,
900 | "metadata": {},
901 | "outputs": [],
902 | "source": [
903 | "pd.read_sql(\"\"\"\n",
904 | "EXPLAIN SELECT * FROM donorschoose.projects JOIN donorschoose.donations USING(projectid)\n",
905 | "\"\"\", engine)"
906 | ]
907 | },
908 | {
909 | "cell_type": "code",
910 | "execution_count": null,
911 | "metadata": {},
912 | "outputs": [],
913 | "source": [
914 | "## NOTE: Please don't actually run this query without the select!!!\n",
915 | "\n",
916 | "pd.read_sql(\"\"\"\n",
917 | "EXPLAIN SELECT * FROM donorschoose.projects p JOIN donorschoose.donations d ON d.donation_timestamp::DATE > p.date_posted::DATE\n",
918 | "\"\"\", engine)"
919 | ]
920 | },
921 | {
922 | "cell_type": "markdown",
923 | "metadata": {},
924 | "source": [
925 | "**CREATING INDICES**\n",
926 | "\n",
927 | "When you need to create indices as you build tables for your project, you can use this syntax:\n",
928 | "\n",
929 | "```\n",
930 | "CREATE INDEX ON {schema}.{table}({column});\n",
931 | "```\n",
932 | "\n",
933 | "Note that you can also specify a list of columns. If the given column (or set of columns) is a unique key for the table, you can get additional gains by declaring it as a primary key instead of simply creating an index:\n",
934 | "\n",
935 | "```\n",
936 | "ALTER TABLE {schema}.{table} ADD PRIMARY KEY ({column});\n",
937 | "```\n",
938 | "\n",
939 | "You can also find a little more documentation of postgres indices [here](https://www.postgresqltutorial.com/postgresql-indexes/postgresql-create-index/)"
940 | ]
941 | },
942 | {
943 | "cell_type": "markdown",
944 | "metadata": {},
945 | "source": [
946 | "### Temporary Tables\n",
947 | "\n",
948 | "Breaking up complex queries with CTEs can make your code much more readable and may provide some performance gains, but further gains can often be realized by creating and indexing temporary tables. \n",
949 | "\n",
950 | "Let's rework one of the CTE examples from above using temporary tables: For all the MD projects posted in January 2013 that received any donations what is the average fraction of donations coming from teachers by resource type?"
951 | ]
952 | },
953 | {
954 | "cell_type": "code",
955 | "execution_count": null,
956 | "metadata": {},
957 | "outputs": [],
958 | "source": [
959 | "andrew_id = # FILL IN YOUR andrew_id HERE!\n",
960 | "\n",
961 | "# Temporary table and index for projects posted by MD schools in Jan 2013\n",
962 | "engine.execute(\"\"\"\n",
963 | "CREATE LOCAL TEMPORARY TABLE tmp_{}_md_projects\n",
964 | " ON COMMIT PRESERVE ROWS\n",
965 | " AS\n",
966 | " SELECT *\n",
967 | " FROM donorschoose.projects\n",
968 | " WHERE school_state='MD'\n",
969 | " AND date_posted::DATE BETWEEN '2013-01-01'::DATE AND '2013-01-31'::DATE\n",
970 | ";\n",
971 | "\"\"\".format(andrew_id))\n",
972 | "engine.execute(\"\"\"CREATE INDEX ON tmp_{}_md_projects(projectid);\"\"\".format(andrew_id))\n",
973 | "engine.execute(\"COMMIT;\")\n",
974 | "\n",
975 | "# Temporary table and index for donations by teachers\n",
976 | "engine.execute(\"\"\"\n",
977 | "CREATE LOCAL TEMPORARY TABLE tmp_{}_teacher_donations\n",
978 | " ON COMMIT PRESERVE ROWS\n",
979 | " AS\n",
980 | " SELECT d.projectid, SUM(CASE WHEN is_teacher_acct::boolean THEN d.donation_total ELSE 0 END)/SUM(d.donation_total) AS teacher_frac\n",
981 | " FROM tmp_{}_md_projects p\n",
982 | " JOIN donorschoose.donations d USING(projectid)\n",
983 | " GROUP BY 1\n",
984 | ";\n",
985 | "\"\"\".format(andrew_id, andrew_id))\n",
986 | "engine.execute(\"\"\"CREATE INDEX ON tmp_{}_teacher_donations(projectid);\"\"\".format(andrew_id))\n",
987 | "engine.execute(\"COMMIT;\")\n",
988 | "\n",
989 | "# Join these two temporary tables to get our result\n",
990 | "pd.read_sql(\"\"\"\n",
991 | "SELECT p.resource_type, AVG(td.teacher_frac) AS avg_teacher_frac\n",
992 | "FROM tmp_{}_md_projects p\n",
993 | "JOIN tmp_{}_teacher_donations td USING(projectid)\n",
994 | "GROUP BY 1\n",
995 | "ORDER BY 2 DESC\n",
996 | "\"\"\".format(andrew_id, andrew_id), engine)\n",
997 | "\n"
998 | ]
999 | },
1000 | {
1001 | "cell_type": "markdown",
1002 | "metadata": {},
1003 | "source": [
1004 | "## Clean Up\n",
1005 | "\n",
1006 | "drop the candy table and commit; dispose of the sqlalchemy engine"
1007 | ]
1008 | },
1009 | {
1010 | "cell_type": "code",
1011 | "execution_count": null,
1012 | "metadata": {},
1013 | "outputs": [],
1014 | "source": [
1015 | "drop_sql = \"DROP TABLE {}.{}\".format(table_schema, candy_table)\n",
1016 | "\n",
1017 | "engine.execute(drop_sql)\n",
1018 | "engine.execute(\"COMMIT\")\n",
1019 | "\n",
1020 | "engine.execute(\"DROP TABLE IF EXISTS tmp_{}_md_projects\".format(andrew_id))\n",
1021 | "engine.execute(\"COMMIT\")\n",
1022 | "\n",
1023 | "engine.execute(\"DROP TABLE IF EXISTS tmp_{}_teacher_donations\".format(andrew_id))\n",
1024 | "engine.execute(\"COMMIT\")\n",
1025 | "\n",
1026 | "engine.dispose()"
1027 | ]
1028 | }
1029 | ],
1030 | "metadata": {
1031 | "kernelspec": {
1032 | "display_name": "Python 3 (ipykernel)",
1033 | "language": "python",
1034 | "name": "python3"
1035 | },
1036 | "language_info": {
1037 | "codemirror_mode": {
1038 | "name": "ipython",
1039 | "version": 3
1040 | },
1041 | "file_extension": ".py",
1042 | "mimetype": "text/x-python",
1043 | "name": "python",
1044 | "nbconvert_exporter": "python",
1045 | "pygments_lexer": "ipython3",
1046 | "version": "3.9.16"
1047 | }
1048 | },
1049 | "nbformat": 4,
1050 | "nbformat_minor": 4
1051 | }
1052 |
--------------------------------------------------------------------------------
/techhelp/remote-workflow/img/10718-workflow.png:
--------------------------------------------------------------------------------
https://raw.githubusercontent.com/dssg/mlforpublicpolicylab/d94c464f8a97c0b74cc94a889d88474ed718a3ba/techhelp/remote-workflow/img/10718-workflow.png
--------------------------------------------------------------------------------
/techhelp/remote-workflow/img/bash-absolute-path.png:
--------------------------------------------------------------------------------
https://raw.githubusercontent.com/dssg/mlforpublicpolicylab/d94c464f8a97c0b74cc94a889d88474ed718a3ba/techhelp/remote-workflow/img/bash-absolute-path.png
--------------------------------------------------------------------------------
/techhelp/remote-workflow/img/bash-anatomy.png:
--------------------------------------------------------------------------------
https://raw.githubusercontent.com/dssg/mlforpublicpolicylab/d94c464f8a97c0b74cc94a889d88474ed718a3ba/techhelp/remote-workflow/img/bash-anatomy.png
--------------------------------------------------------------------------------
/techhelp/remote-workflow/img/bash-nano-save.png:
--------------------------------------------------------------------------------
https://raw.githubusercontent.com/dssg/mlforpublicpolicylab/d94c464f8a97c0b74cc94a889d88474ed718a3ba/techhelp/remote-workflow/img/bash-nano-save.png
--------------------------------------------------------------------------------
/techhelp/remote-workflow/img/bash-nano.png:
--------------------------------------------------------------------------------
https://raw.githubusercontent.com/dssg/mlforpublicpolicylab/d94c464f8a97c0b74cc94a889d88474ed718a3ba/techhelp/remote-workflow/img/bash-nano.png
--------------------------------------------------------------------------------
/techhelp/remote-workflow/img/bash-pwd.png:
--------------------------------------------------------------------------------
https://raw.githubusercontent.com/dssg/mlforpublicpolicylab/d94c464f8a97c0b74cc94a889d88474ed718a3ba/techhelp/remote-workflow/img/bash-pwd.png
--------------------------------------------------------------------------------
/techhelp/remote-workflow/img/class_editor.png:
--------------------------------------------------------------------------------
https://raw.githubusercontent.com/dssg/mlforpublicpolicylab/d94c464f8a97c0b74cc94a889d88474ed718a3ba/techhelp/remote-workflow/img/class_editor.png
--------------------------------------------------------------------------------
/techhelp/remote-workflow/img/class_infra.png:
--------------------------------------------------------------------------------
https://raw.githubusercontent.com/dssg/mlforpublicpolicylab/d94c464f8a97c0b74cc94a889d88474ed718a3ba/techhelp/remote-workflow/img/class_infra.png
--------------------------------------------------------------------------------
/techhelp/remote-workflow/img/class_jupyter.png:
--------------------------------------------------------------------------------
https://raw.githubusercontent.com/dssg/mlforpublicpolicylab/d94c464f8a97c0b74cc94a889d88474ed718a3ba/techhelp/remote-workflow/img/class_jupyter.png
--------------------------------------------------------------------------------
/techhelp/remote-workflow/img/class_ssh.png:
--------------------------------------------------------------------------------
https://raw.githubusercontent.com/dssg/mlforpublicpolicylab/d94c464f8a97c0b74cc94a889d88474ed718a3ba/techhelp/remote-workflow/img/class_ssh.png
--------------------------------------------------------------------------------
/techhelp/remote-workflow/img/jupyter-notebook-kernel.png:
--------------------------------------------------------------------------------
https://raw.githubusercontent.com/dssg/mlforpublicpolicylab/d94c464f8a97c0b74cc94a889d88474ed718a3ba/techhelp/remote-workflow/img/jupyter-notebook-kernel.png
--------------------------------------------------------------------------------
/techhelp/remote-workflow/img/jupyter-port-selection.png:
--------------------------------------------------------------------------------
https://raw.githubusercontent.com/dssg/mlforpublicpolicylab/d94c464f8a97c0b74cc94a889d88474ed718a3ba/techhelp/remote-workflow/img/jupyter-port-selection.png
--------------------------------------------------------------------------------
/techhelp/remote-workflow/img/jupyter-token.png:
--------------------------------------------------------------------------------
https://raw.githubusercontent.com/dssg/mlforpublicpolicylab/d94c464f8a97c0b74cc94a889d88474ed718a3ba/techhelp/remote-workflow/img/jupyter-token.png
--------------------------------------------------------------------------------
/techhelp/remote-workflow/img/jupyter_kernel.png:
--------------------------------------------------------------------------------
https://raw.githubusercontent.com/dssg/mlforpublicpolicylab/d94c464f8a97c0b74cc94a889d88474ed718a3ba/techhelp/remote-workflow/img/jupyter_kernel.png
--------------------------------------------------------------------------------
/techhelp/remote-workflow/img/vscode-changed-interpreter.png:
--------------------------------------------------------------------------------
https://raw.githubusercontent.com/dssg/mlforpublicpolicylab/d94c464f8a97c0b74cc94a889d88474ed718a3ba/techhelp/remote-workflow/img/vscode-changed-interpreter.png
--------------------------------------------------------------------------------
/techhelp/remote-workflow/img/vscode-click-find.png:
--------------------------------------------------------------------------------
https://raw.githubusercontent.com/dssg/mlforpublicpolicylab/d94c464f8a97c0b74cc94a889d88474ed718a3ba/techhelp/remote-workflow/img/vscode-click-find.png
--------------------------------------------------------------------------------
/techhelp/remote-workflow/img/vscode-connect-to-host.png:
--------------------------------------------------------------------------------
https://raw.githubusercontent.com/dssg/mlforpublicpolicylab/d94c464f8a97c0b74cc94a889d88474ed718a3ba/techhelp/remote-workflow/img/vscode-connect-to-host.png
--------------------------------------------------------------------------------
/techhelp/remote-workflow/img/vscode-enter-login.png:
--------------------------------------------------------------------------------
https://raw.githubusercontent.com/dssg/mlforpublicpolicylab/d94c464f8a97c0b74cc94a889d88474ed718a3ba/techhelp/remote-workflow/img/vscode-enter-login.png
--------------------------------------------------------------------------------
/techhelp/remote-workflow/img/vscode-enter-venv-path.png:
--------------------------------------------------------------------------------
https://raw.githubusercontent.com/dssg/mlforpublicpolicylab/d94c464f8a97c0b74cc94a889d88474ed718a3ba/techhelp/remote-workflow/img/vscode-enter-venv-path.png
--------------------------------------------------------------------------------
/techhelp/remote-workflow/img/vscode-file-menu.png:
--------------------------------------------------------------------------------
https://raw.githubusercontent.com/dssg/mlforpublicpolicylab/d94c464f8a97c0b74cc94a889d88474ed718a3ba/techhelp/remote-workflow/img/vscode-file-menu.png
--------------------------------------------------------------------------------
/techhelp/remote-workflow/img/vscode-open-connect-to-host.png:
--------------------------------------------------------------------------------
https://raw.githubusercontent.com/dssg/mlforpublicpolicylab/d94c464f8a97c0b74cc94a889d88474ed718a3ba/techhelp/remote-workflow/img/vscode-open-connect-to-host.png
--------------------------------------------------------------------------------
/techhelp/remote-workflow/img/vscode-open-folder.png:
--------------------------------------------------------------------------------
https://raw.githubusercontent.com/dssg/mlforpublicpolicylab/d94c464f8a97c0b74cc94a889d88474ed718a3ba/techhelp/remote-workflow/img/vscode-open-folder.png
--------------------------------------------------------------------------------
/techhelp/remote-workflow/img/vscode-remote-diagram.png:
--------------------------------------------------------------------------------
https://raw.githubusercontent.com/dssg/mlforpublicpolicylab/d94c464f8a97c0b74cc94a889d88474ed718a3ba/techhelp/remote-workflow/img/vscode-remote-diagram.png
--------------------------------------------------------------------------------
/techhelp/remote-workflow/img/vscode-remote-ssh-install.png:
--------------------------------------------------------------------------------
https://raw.githubusercontent.com/dssg/mlforpublicpolicylab/d94c464f8a97c0b74cc94a889d88474ed718a3ba/techhelp/remote-workflow/img/vscode-remote-ssh-install.png
--------------------------------------------------------------------------------
/techhelp/remote-workflow/img/vscode-run-python.png:
--------------------------------------------------------------------------------
https://raw.githubusercontent.com/dssg/mlforpublicpolicylab/d94c464f8a97c0b74cc94a889d88474ed718a3ba/techhelp/remote-workflow/img/vscode-run-python.png
--------------------------------------------------------------------------------
/techhelp/remote-workflow/img/vscode-select-folder.png:
--------------------------------------------------------------------------------
https://raw.githubusercontent.com/dssg/mlforpublicpolicylab/d94c464f8a97c0b74cc94a889d88474ed718a3ba/techhelp/remote-workflow/img/vscode-select-folder.png
--------------------------------------------------------------------------------
/techhelp/remote-workflow/img/vscode-select-host.png:
--------------------------------------------------------------------------------
https://raw.githubusercontent.com/dssg/mlforpublicpolicylab/d94c464f8a97c0b74cc94a889d88474ed718a3ba/techhelp/remote-workflow/img/vscode-select-host.png
--------------------------------------------------------------------------------
/techhelp/remote-workflow/img/vscode-select-interpreter-path.png:
--------------------------------------------------------------------------------
https://raw.githubusercontent.com/dssg/mlforpublicpolicylab/d94c464f8a97c0b74cc94a889d88474ed718a3ba/techhelp/remote-workflow/img/vscode-select-interpreter-path.png
--------------------------------------------------------------------------------
/techhelp/remote-workflow/img/vscode-select-interpreter.png:
--------------------------------------------------------------------------------
https://raw.githubusercontent.com/dssg/mlforpublicpolicylab/d94c464f8a97c0b74cc94a889d88474ed718a3ba/techhelp/remote-workflow/img/vscode-select-interpreter.png
--------------------------------------------------------------------------------
/techhelp/remote-workflow/img/vscode-select-python.png:
--------------------------------------------------------------------------------
https://raw.githubusercontent.com/dssg/mlforpublicpolicylab/d94c464f8a97c0b74cc94a889d88474ed718a3ba/techhelp/remote-workflow/img/vscode-select-python.png
--------------------------------------------------------------------------------
/techhelp/remote-workflow/img/vscode-ssh-connected.png:
--------------------------------------------------------------------------------
https://raw.githubusercontent.com/dssg/mlforpublicpolicylab/d94c464f8a97c0b74cc94a889d88474ed718a3ba/techhelp/remote-workflow/img/vscode-ssh-connected.png
--------------------------------------------------------------------------------
/techhelp/remote-workflow/img/vscode-update-config.png:
--------------------------------------------------------------------------------
https://raw.githubusercontent.com/dssg/mlforpublicpolicylab/d94c464f8a97c0b74cc94a889d88474ed718a3ba/techhelp/remote-workflow/img/vscode-update-config.png
--------------------------------------------------------------------------------
/techhelp/remote-workflow/remote-workflow.md:
--------------------------------------------------------------------------------
1 | ## Intro to Remote Workflow
2 |
3 | This document will provide you with tools for comfortably using our remote environment (the course server) to develop and test your team's pipeline.
4 | Here's the [cheatsheet](#workflow-cheatsheet).
5 |
6 | ### Basic tools for common tasks
7 |
8 | 
9 |
10 | We're providing setup instructions and support for "good enough" tools for each of the common tasks in the workflow for this class but if you're comfortable with other tools, feel free to use them.
11 |
12 | 1. Writing code:
13 | - Python: This tutorial introduces ``VSCode``, an editor with good Python support, and some tools that make remote development easy.
14 | - However, feel free to use any editor you want (vim, emacs, sublime, pycharm).
15 | - SQL: In other tutorials, we've introduced psql (for writing sql on the server) and DBeaver or DBVisualizer (on your laptop).
16 | 2. Jupyter notebooks:
17 | - For now, the easiest way to use jupyter notebooks is through ``VSCode''
18 | - If you're interested, you can use parts of this tutorial to set up ``Jupyter`` through a browser on your local machine (but we won't go through it).
19 | - Many Python IDEs (such as, Pycharm) have good Jupyter support - feel free to use one of these!
20 | 3. Share code with your team:
21 | - Use the git command line interface to push to your team github repository.
22 | - Many IDEs (including VSCode) have git integration.
23 | 4. Run code:
24 | - Run Python code manually in an SSH terminal, either by pasting code into a Python REPL, or running a Python script.
25 | - Some IDEs (such as VSCode) support remote interpreters, allowing you to run scripts in a python instance on a remote machine (here, the course server).
26 |
27 | ## Recap from last week:
28 |
29 | Let's try repeating what we did last week to get started:
30 |
31 | **1. Make sure you can SSH to the class server**
32 |
33 | Using WSL (on Windows) or terminal (on Mac/Linux), connect to the server via the command below (replacing the parameters in curly brackets (`{...}`) with your info):
34 | ```bash
35 | ssh -i {/path/to/private-key} {andrew_id}@server.mlpolicylab.dssg.io
36 | ```
37 |
38 | Once there, confirm that you're in the right place with the command:
39 | ``echo "$USER@$HOSTNAME"``
40 |
41 | This should return your andrew id at the server hostname (`hyrule`)
42 |
43 | :warning:
44 | If you get something else, let us know.
45 |
46 | **2. Make sure you can reach the class database via DBeaver**
47 |
48 | Using DBeaver (or DBVisualizer), connect to the class database and run:
49 | ```sql
50 | SELECT
51 | 'Hello, my name is '||CURRENT_USER||', and I''m connected to '||current_database()||' via '||application_name
52 | FROM pg_stat_activity
53 | WHERE usename=CURRENT_USER
54 | AND state='active';
55 | ```
56 |
57 | This should output a friendly message identifying you on the database.
58 |
59 | :WARNING:
60 | If you get something else, let us know.
61 |
62 |
63 | **3. Initial setup of VSCode**
64 |
65 | We'll be setting up VSCode as an editor to work with files remotely over SSH during the session. As a first step beforehand, please install VSCode and the Remote-SSH and Microsoft's python extensions using the instructions below.
66 |
67 | 1. [Download and install](https://code.visualstudio.com/Download) VSCode
68 | 2. Install the `Remote - SSH` extension:
69 | 1. Press `ctrl+shift+x` (Linux/Windows) or `⌘+shift+x` (MacOS) to open the extensions menu
70 | 2. Search for and install `Remote - SSH`
71 |
72 | 
73 |
74 | 1. At this time, also search for and install the microsoft `Python` extension.
75 |
76 | ## Agenda
77 |
78 | 
79 |
80 | 1. WSL vs Windows Command Prompt -- What's the difference?
81 | 2. Navigating the course server using the command line
82 | 3. Using VSCode for remote development
83 | 4. Using Jupyter remotely, with SSH tunneling
84 | 5. Remote development concepts - how exactly does all of this work?
85 |
86 |
87 | ## WSL vs Windows Command Prompt -- What's the difference?
88 |
89 | We've asked everyone using windows to install and use `WSL` locally and wanted to take a moment to discuss why we've done so and what the difference is between WSL, the Windows Command Prompt, and PowerShell:
90 |
91 | | | |
92 | |---------|---------|
93 | |  | **Windows Command Prompt** is a commandline interface for interacting with your computer through text commands. It inherits from earlier versions of DOS (Disk Operating System) that Windows ran on top of for many years and has a very different set of commands and syntax than other linux-derived systems
When you're in the Windows Command Prompt, the prompt you'll see will look something like `C:\>` |
94 | |  | **WSL (Windows Subsystem for Linux)** is actually running linux (in our case, a version called Ubuntu) within a virtual machine on your laptop, allowing you to use the full set of common commands and functionality of linux to interact with your Windows machine
When you're in WSL, the command prompt you'll see will look something like `user@machine:/mnt/c/$` |
95 | |  | Finally, **PowerShell** is sort of a hybrid -- native to Windows, but with an interface more like linux, albeit only with a subset of the commands. Generally, we recommend using WSL over PowerShell to allow you to use the full range of linux functionality.
When you're in the Windows Command Prompt, the prompt you'll see will look something like `PS C:\>` |
96 |
97 |
98 | **A couple WSL pitfalls to watch out for:**
99 |
100 | - Slashes go the other way in a path -- `/` in WSL (vs `\` in windows)
101 | - The C drive is located at `/mnt/c/` not `C:\`
102 | - Your user's home directory is in a different place in WSL than it is in windows (because it's inside a virtual machine)
103 |
104 |
105 | ## Living in the command line
106 |
107 | 
108 |
109 | ### Getting started: SSH to the server
110 |
111 | Open up a wsl/*nix terminal and connect to the server with:
112 | ```
113 | ssh -i /path/to/your/private_sssh_key {andrew_id}@server.mlpolicylab.dssg.io
114 | ```
115 |
116 | ### Some key Linux concepts
117 |
118 | #### Linux Paths
119 |
120 | **Absolute paths**:
121 |
122 | An absolute path is a path that starts at a system's root directory.
123 |
124 |
125 | For example, the command `pwd` will print the absolute path to your current directory:
126 |
127 | 
128 |
129 | To refer to a location using an absolute path, specify your path starting with a `/`
130 |
131 | Absolute paths are as unambiguous as possible. However, they're not as convenient as...
132 |
133 | **Relative paths**
134 |
135 | A relative path specifies the path to some folder or file, *relative to* the current location.
136 |
137 | To use a relative path, specify a path *not* starting with a `/`
138 |
139 | An example:
140 | - I start in `/home/krodolfa/mlforpublicpolicylab`
141 | - I use `cd project` (note: doesn't start with `/`)
142 | - I've changed directories to `/home/krodolfa/mlforpublicpolicylab/project`
143 |
144 | 
145 |
146 | **The home directory**
147 |
148 | In Linux, each user has a "home directory". This is the default directory a user enters upon login.
149 |
150 | You can access your home directory with the command `cd ~`.
151 |
152 | You can also specify absolute paths in a similar way:
153 | - My home directory is `/home/krodolfa`
154 | - I can access the folder `mlforpublicpolicylab` stored in my home directory with `cd ~/mlforpublicpolicylab`
155 |
156 | #### Anatomy of a Linux command
157 |
158 | Linux commands share a basic syntax. Let's take a look at one to see how it works:
159 |
160 | ```
161 | ls -l --human-readable ./mlforpublicpolicy
162 | ```
163 |
164 | This command contains four parts:
165 |
166 | `ls`: This is the name of the command we're running. `ls` is a utility that lists the files and folders present in a directory. The command name is always the part that comes first.
167 |
168 | `-l` & `--human-readable`: Both of these are options. Options are used to change the behavior of a command. Options usually start with one or two dashes (one dash for single-character options, two for longer options).
169 |
170 | `-l` tells ls to give detailed descriptions of all the files it lists (including size and permissions). `--human-readable` is self-explanatory: it tells `ls` to make its output easy to read.
171 |
172 | `./mlforpublicpolicylab`: This is the argument. Here, it's a relative path to the folder that we're telling `ls` to list the contents of. Most Linux commands take an argument - often text, or a file or folder to operate on.
173 |
174 | 
175 |
176 | #### Getting help
177 |
178 | Linux makes it easy to get help with a command:
179 |
180 | ```
181 | man {command}
182 | ```
183 |
184 | Opens the manual page for the command in question. Many commands also offer a help menu accessible with `{comand} --help`
185 |
186 | ### Some key command line tools
187 |
188 | At first, it can be tough to do basic things like browsing folders or editing text in the command line. But Linux includes a lot of helpful tools for these kinds of tasks. In this section, we'll show how to use some of these tools to get around the terminal.
189 |
190 | Follow along by executing the commands on the numbered lines.
191 |
192 | 1. Connect to the course server with SSH (if you aren't already)
193 |
194 |
195 | **Getting oriented:**
196 |
197 | Let's start by getting our bearings inside of the filesystem.
198 |
199 | First, let's figure out where we are, with `pwd`:
200 |
201 | `pwd` prints the **absolute path** of the current working directory.
202 |
203 | 2. Print your current working directory: `pwd`
204 |
205 | Next, let's find out what's in our current directory, with `ls`:
206 |
207 | ```bash
208 | ls {some_folder (by default, the working directory)}
209 | ```
210 | lists the files in a directory.
211 |
212 | 3. List the files in your home directory: `ls`
213 |
214 | **Making files**
215 |
216 | Let's start doing some work. Start by using `mkdir` to make a new directory:
217 |
218 | ```bash
219 | mkdir {folder_name}
220 | ```
221 | Creates a new folder
222 |
223 | 4. Make a new directory: `mkdir my_test_dir`
224 |
225 | Now, let's change into our new directory to do some work, with `cd`:
226 |
227 | ```bash
228 | cd {some path}
229 | ```
230 | Changes the working directory
231 |
232 | 5. Move to your new directory: `cd my_test_dir`
233 |
234 | Make a new empty file with `touch`:
235 |
236 | ```bash
237 | touch {file_name}
238 | ```
239 | Create a new file
240 |
241 | 6. Make a new (empty) file: `touch a_test_file`
242 |
243 | **Editing text in the command line**
244 |
245 | Nano is a barebones text editor available on most Linux computers. While it's not as nice to use as something like VSCode, it's still quite convenient for making quick edits from the command line.
246 |
247 | Start Nano like any other command line tool:
248 |
249 | ```bash
250 | nano filename
251 | ```
252 |
253 | 
254 |
255 | You should see something like this. The options along the bottom are keyboard shortcuts for controlling Nano. Here, `^` means `ctrl`. For example `ctrl+x` exits Nano, and `ctrl+w` searches the open file.
256 |
257 | The top part of the screen is the editor. You can move your flashing cursor with your arrow keys.
258 |
259 | If you make changes and exit, Nano will display the following message, asking if you'd like to save. Press `y` to save, `n` to exit without saving, or `ctrl+c` to cancel and continue editing.
260 |
261 | 
262 |
263 |
264 | **Let's try it out:**
265 |
266 | 7. Open the file you created in step 6 with `nano`, and put some text in it:
267 | 1. `nano a_test_file`
268 | 2. Type something you learned in this tech session
269 | 3. press `ctrl+c`, then `y` to save and exit
270 |
271 | Let's use `cat` to make sure our changes worked:
272 |
273 | ```bash
274 | cat {filename}
275 | ```
276 |
277 | Prints the contents of a file (works best with text-based files)
278 |
279 | 8. Print the contents: `cat a_test_file`
280 |
281 | **Moving files**
282 |
283 | Let's learn some tools for manipulating existing files.
284 |
285 | Let's start by copying our text file, with `cp`:
286 |
287 | ```bash
288 | cp {source} {destination}
289 | ```
290 | Copies the file at source to destination.
291 |
292 | 9. Make a copy of your file, named "another_one": `cp a_test_file another_one`
293 |
294 | Now, let's move that new file, with `mv`:
295 |
296 | ```bash
297 | mv {source} {destination}
298 | ```
299 | Moves the file or folder at source to destination.
300 |
301 | 10. Move the copy to your home directory: `mv another_one ~/`
302 |
303 | Finally, let's delete that file with `rm` (turns out we didn't need it after all)
304 |
305 | ```bash
306 | rm {file}
307 | ```
308 | Remove (delete!) a file
309 |
310 | 11. Remove the copy file: `rm ~/another_one`
311 |
312 | ### Background tasks with screen
313 |
314 | In this class, you'll often want to run long-running jobs in the terminal. However, by default, any tasks left running when you log out of ssh will be closed.
315 |
316 | We can get around this with a Linux utility called `screen`. Screen is a "terminal multiplexer". That is, it allows you to keep run multiple terminal sessions, and keep them active even after you've logged off.
317 |
318 | Screen allows us to start a process (like a long-running python script), put it in the background, and log off without cancelling the script
319 |
320 | **Running `screen`**
321 |
322 | 1. Log into the course server with ssh
323 | 2. Open a new screen session:
324 |
325 | ```
326 | $ screen
327 | ```
328 |
329 | You should see a screen with information about `screen` (licensing, a plea for free beer, etc). Press enter to bypass this. This will open a fresh terminal session, with your terminal history should be cleared out.
330 |
331 | 3. Verify that you're in a screen session by listing the open sessions owned by your account:
332 |
333 | ```
334 | $ screen -ls
335 | >There is a screen on:
336 | > 18855.pts-44.ip-10-0-1-213 (09/30/20 18:32:05) (Attached)
337 | >1 Socket in /run/screen/S-adunmore.
338 | ```
339 |
340 | One session is listed. It's labeled as `(Attached)`, which means you're logged into it.
341 |
342 | 4. Let's give our system some work to do. Run the following command, which will start a useless but friendly infinite loop:
343 |
344 | ```
345 | $ while :; do echo "howdy do!"; sleep 1; done
346 | ```
347 |
348 | Note that at this point, you could safely log off of `ssh`. Your loop would still be here when you logged back on.
349 |
350 | 5. Now that your screen session is busy, let's go back to our default session to get some work done.
351 |
352 | pres `ctrl+a`, release those keys, and press `d`.
353 |
354 | You should return to your original terminal prompt.
355 |
356 | 6. Check that your screen session is still there: run `screen -ls` to list open sessions again. This time, the single open session should be labeled as `(Detached)`, which means that you're not viewing it.
357 |
358 | Note the 5-digit number printed at the beginning of the line referring to your screen session. We'll use that number to log back into that session.
359 |
360 | 7. Let's return to our session and kill that loop - we don't need it anymore.
361 |
362 | We'll use `screen -r`. This reattaches the named screen. Use the 5-digit number from step 6 to refer to that session:
363 |
364 | ```
365 | screen -r {screen session number}
366 | ```
367 |
368 | You should now be back in your old terminal session, where that loop has been "howdy"-ing away.
369 |
370 | Press `ctrl-c` to close that loop.
371 |
372 | 8. Now we can close this screen session. Simply type `exit` in the command line.
373 |
374 | This should kill our session and return us to the command prompt. If you'd like, confirm that your session is closed with `screen -ls`.
375 |
376 | **Some notes:**
377 |
378 | - You can name your session, with the `-S` flag:
379 |
380 | ```
381 | $ screen -S some_name
382 | ```
383 |
384 | Once you've assigned a name, you can use it to reattach your screen sessions, which is easier than remembering/looking up a number.
385 |
386 | - You can use `screen` (and any of the utilities introduced here) in your VSCode terminal. Just press `ctrl+c` to exit your python session (if you're in one), and you'll be able to enter these commands just like a regular terminal session.
387 |
388 |
389 |
390 | ## Remote development with VSCode
391 |
392 | 
393 |
394 | ### Why VSCode over SSH?
395 |
396 | In past semesters, many people had trouble running their code on the course server. We heard a lot of questions, like "how do I run code saved on my laptop on the course server?"
397 |
398 | This section will introduce one convenient workflow for developing code on the remote server.
399 |
400 | VSCode is an IDE that provides a lot of useful tools for developing Python, including autocomplete, syntax highlighting, support for virtual environments, and shortcuts to run python files.
401 |
402 | With the VSCode SSH extension, VSCode can access code and other files stored on a remote computer. Furthermore, it can run any code stored on the remote machine.
403 |
404 | 
405 |
406 | This has several advantages:
407 | - You don't have to keep any code stored on your local computer - you only need one copy, stored on the course server
408 | - You don't have to copy code between your computer and the course server. Instead, VSCode lets you edit files where they're stored on the course server.
409 | - VSCode makes it convenient to run code stored on the course server. When you're developing this way, you'll always have access to the database and your group's virtual environment.
410 |
411 | **Note**: This workflow isn't required - it's just one "good enough" approach that we think many of you will find convenient. Please feel free to use other workflows if you're already set up and comfortable with them.
412 |
413 | ### Configuring VSCode SSH
414 | 1. [Download and install](https://code.visualstudio.com/Download) VSCode
415 | 2. Install the `Remote - SSH` extension:
416 | 1. Press `ctrl+shift+x` (Linux/Windows) or `⌘+shift+x` (MacOS) to open the extensions menu
417 | 2. Search for and install `Remote - SSH`
418 |
419 | 
420 |
421 | 1. At this time, also search for and install the microsoft `Python` extension.
422 | 3. Configure our course server as an SSH host:
423 |
424 | With the SSH plugin installed, we can tell VSCode how to log into the server. In this step we'll be entering our connection string and saving it in a file, making it easy to connect in the future.
425 |
426 | 1. Press `ctrl+shift+p` (Linux/Windows) or `⌘+shift+p` (MacOS) to open the command pallette, and select `Remote-SSH: Connect to Host`
427 |
428 | 
429 |
430 | 2. Select `Add New SSH Host...`
431 |
432 | 
433 |
434 | 3. Enter `ssh -i {path to your private key} {andrewid}@server.mlpolicylab.dssg.io`
435 |
436 | 
437 |
438 | 4. Select the first option to store your login config:
439 |
440 | 
441 |
442 | 4. Connect VSCode to the course server:
443 | 1. Connect to the CMU Full VPN
444 | 2. Press `ctrl+shift+p` (Linux/Windows) or `⌘+shift+p` (MacOS) to open the command pallette, and select `Remote-SSH: Connect to Host`
445 |
446 | 
447 |
448 | 3. Select the ssh config we just created: `server.mlpolicylab.dssg.io`
449 |
450 | 
451 |
452 | 4. Enter your private key passcode if VSCode prompts you to (it will open a box at the top of the screen).
453 |
454 | 5. You should be connected to the course server. This should be indicated in the bottom of your VSCode window:
455 | 
456 |
457 | 5. Open a workspace folder:
458 |
459 | Now that VSCode is connected via SSH, you can browse all of the files and folders on the course server. In this step, we select a folder containing some code to edit and test.
460 |
461 | 1. Select the folder menu button
462 |
463 | 
464 |
465 | 2. Select `Open Folder`
466 |
467 | 
468 |
469 | 3. Select a folder to work in
470 |
471 | 
472 |
473 | 6. Select your python virtual environment:
474 |
475 | VSCode can be configured to automatically run python code in a virtual environment. Here, we'll select and activate our group virtual environments.
476 |
477 | 1. Press `ctrl+shift+p` (Linux/Windows) or `⌘+shift+p` (MacOS) to open the command pallette, and select `Python: Select Interpreter`
478 |
479 | 
480 |
481 | 2. Select `Enter interpreter path`
482 |
483 | 
484 |
485 | 3. Select `Find...`
486 |
487 | 
488 |
489 | 4. Enter the path to the python executable in your virtual environment: `/path/to/your/environment/bin/python`.
490 |
491 | If you're using your groups virtual environment, the path will be `/mnt/data/groups/{group_name}/dssg_env/bin/python`
492 |
493 | 
494 |
495 | 5. After a moment, your selected python interpreter should be activated. This should be indicated in the bottom of your VSCode window:
496 |
497 | 
498 |
499 | 7. Run python!
500 | 1. Open the folder menu and select a python file (or press `ctrl+n` (Linux/Windows) or `⌘+n` (MacOS) to create a new one)
501 |
502 | 
503 |
504 | 2. Click the green "play" button at the top of your window. This starts a new terminal session, activates your virtual environment, and runs your python code.
505 |
506 | 
507 |
508 |
509 | ## Remote development with Jupyter
510 |
511 | 
512 |
513 | ### How does it work?
514 |
515 | Conceptually, this similar to how VSCode works over SSH:
516 | - The remote machine (our course server) hosts a jupyter notebook server that does things like loads files, runs python, activates virtual environments
517 | - Your web browser connects to that server and presents a frontend interface for opening, editing, and running notebooks
518 | - These connect using SSH (inside the CMU VPN)
519 |
520 | ### Setting it up
521 | 1. Connect to the CMU VPN
522 | 2. Connect to the course server using SSH
523 | 3. Find an open port on the course server to send your Jupyter traffic through:
524 | 1. In the terminal (on the course server) type `ss -lntu`. This will list all ports
525 | 2. Pick a port number between 1024 and 65535 that is NOT on that list.
526 |
527 | 
528 | (numbers in this box are ports currently in use)
529 |
530 | 4. Change to your group project directory (e.g., `/mnt/data/groups/{group_name}`) to activate your virtual environment (you might need to run `direnv allow` if this is your first time doing so)
531 | 1. If you want to confirm your virtualenv has properly activated, run `which python` -- this should return `/mnt/data/groups/{group_name}/dssg_env/bin/python`. If you get anything different (or nothing at all), your virtualenv hasn't activated correctly!
532 | 5. On the course server, start your notebook server:
533 | 1. In the server terminal (inside SSH), run `jupyter notebook --no-browser --port {your port from step 3}` (note: to ensure this persists, you may want to start your server in a `screen` session as discussed above!)
534 | 2. When the server starts, take note of the URL printed in the server terminal output:
535 |
536 | 
537 | (the token is printed multiple times)
538 | 6. On your local machine, set up an SSH tunnel. This will allow your web browser (on your local computer) to reach your Jupyter notebook server (on the course server):
539 | 1. In a **new local** wsl/*nix terminal (not via ssh): type `ssh -i {path to your private key} -N -L localhost:{your port from step 3}:localhost:{your port from step 3} {andrew_id}@server.mlpolicylab.dssg.io`
540 | 7. Open the notebook on your local machine:
541 | 1. Open a web browser and navigate to URL generated when you started the server, including port and token (e.g., `http://localhost:{your port from step 3}?token={some long token}`). If `localhost` doesn't work, you may want to try `127.0.0.1` or `0.0.0.0` instead.
542 | 2. Note that if you're re-opening jupyter after a while, it may take you to a login page asking you to enter the token generated in step 4.2. Enter that token to proceed.
543 | 
544 | 3. In the next screen (which should be a view of the folders and files in your working directory):
545 | - To create a new notebook, click the `New` dropdown, and select `Python 3`. This will create a new notebook using your group's virtual environment.
546 | - Or you can double click an existing notebook to open it.
547 | 8. **IMPORTANT: Be sure to explicitly shut down the kernels when you're done working with a notebook.** Leaving "zombie" notebook kernels open can use a lot of unneeded resources!
548 |
549 | 
550 |
551 | ### Shutting down
552 | You'll need to do two things to shut down your notebook server:
553 | 1. Kill the notebook server on the remote machine (return to the terminal/screen window where the server is running and type control-C then `y` when prompted if you reall want to shut down)
554 | 1. Close the SSH tunnel on your local machine: on linux/macos/windows wsl, you can do so by running `ps aux | grep {YOUR_PORT}` to find the process id (PID) then using `kill {PID}`, or alternatively closing the terminal session you used to start it. If you're using putty or powershell on windows by any chance, you should simply be able to close the window where you started the tunnel.
555 |
556 |
557 |
558 | ## Understanding the 94889 remote workflow
559 |
560 | 
561 |
562 | ### Your machine is a client
563 |
564 | You can think of your machine "client" in our system. This is because it doesn't do much of the computational heavy lifting. Rather, it views data stored on the database, uses utilities running on the server, and edits and runs code in the server's environment.
565 |
566 | ### SSH tunnelling
567 |
568 | Since our projects involve sensitive, personal data, we keep the course server and database inside of a secure network hosted by Amazon Web Services. The course database and server are the only computers on the network. They cannot talk to computers outside of the network, with two exceptions:
569 | - The course server can access the web (ie to download files from a website or query the census.gov api)
570 | - The course server accepts SSH connections through the CMU VPN
571 |
572 | External computers cannot connect directly to the course server.
573 |
574 | We can use SSH to get inside this network. We use SSH in two main ways:
575 | - We use SSH to access the course server terminal. We can use this to access files stored on the server, and run programs like `python`, `psql`, `nano`, etc.
576 | - We use SSH to open tunnels through the course server, to the course database. An SSH tunnel allows a client computer (ex: your laptop) to connect securely to any application accessible from a remote server (ex: our course server). For example:
577 | - We run Jupyter notebook servers on the course server. We can use an SSH tunnel to open hosted notebooks on our local computers
578 | - The course server can connect to the course database. We can use an SSH tunnel to allow local applications like DBeaver to connect to the course server, via the course server.
579 |
580 | Interested in a deeper dive? Here's an article on [SSH tunneling](https://www.ssh.com/ssh/tunneling/).
581 |
582 |
583 |
584 | 
585 |
586 | **A diagram illustrating the class architecture.**
587 |
588 |
589 | ## Workflow Cheatsheet
590 | Here's a typical workflow to get you started:
591 | 1. ssh to the server
592 | 2. go to your project directory ```cd /mnt/data/groups/mlpolicylab_fall23_mcrt1```
593 | 3. go to your own directory inside where you cloned the github repo ``cd name_of_your_directory```
594 | 4. do a git pull to get updates ```git pull```
595 | 5. open VSCode on your laptop and make sure to connect via the ssh connection to the server
596 | 6. write/edit code
597 | 7. go back to the ssh connection you have open in wsl or termianl. run the code with python (make sure you're in a screen session if it's a long run)
598 | 8. if everything looks good, do a git commit and push
599 |
600 |
--------------------------------------------------------------------------------
/techhelp/sklearn.md:
--------------------------------------------------------------------------------
1 | # scikitlearn
2 |
3 | ### [Video: Quick intro to sklearn](https://youtu.be/QQvoSyqy3G4)
4 | ### [Video: Models and hyperparameters in sklearn](https://youtu.be/t-_0yjjDre4)
5 |
--------------------------------------------------------------------------------
/techhelp/tableau.md:
--------------------------------------------------------------------------------
1 | # Connecting Tableau to the Database
2 |
3 | 1. From your laptop, create an ssh tunnel through the server to the database
4 | `ssh -i yourprivatekey -L 5433:database.mlpolicylab.dssg.io:5432 youusername@server.mlpolicylab.dssg.io`
5 |
6 | 2. On Tableau, choose connect to postgres and use the following settings:
7 | - server: localhost
8 | - port: 5433
9 | - Database: yourdatabasename
10 | - authentication: username and password
11 | - usernamne: yourusername
12 | - password: yourpassword
13 |
--------------------------------------------------------------------------------
/techhelp/tech_session_1_initial_setup.pdf:
--------------------------------------------------------------------------------
https://raw.githubusercontent.com/dssg/mlforpublicpolicylab/d94c464f8a97c0b74cc94a889d88474ed718a3ba/techhelp/tech_session_1_initial_setup.pdf
--------------------------------------------------------------------------------
/techhelp/tech_session_3_git_sql.pdf:
--------------------------------------------------------------------------------
https://raw.githubusercontent.com/dssg/mlforpublicpolicylab/d94c464f8a97c0b74cc94a889d88474ed718a3ba/techhelp/tech_session_3_git_sql.pdf
--------------------------------------------------------------------------------
/techhelp/tech_session_template.sql:
--------------------------------------------------------------------------------
1 | SELECT
2 | projectid,
3 |
4 | total_price_excluding_optional_support,
5 | students_reached,
6 |
7 | school_charter AS charter,
8 | school_magnet AS magnet,
9 | school_year_round AS year_round,
10 | school_nlns AS nlns,
11 | school_kipp AS kipp,
12 | school_charter_ready_promise AS charter_ready,
13 |
14 | CASE WHEN resource_type = 'Books' THEN 1 ELSE 0 END AS resource_books,
15 | CASE WHEN resource_type = 'Technology' THEN 1 ELSE 0 END AS resource_tech,
16 | CASE WHEN resource_type = 'Supplies' THEN 1 ELSE 0 END AS resource_supplies,
17 |
18 | CASE WHEN poverty_level = 'highest poverty' THEN 1 ELSE 0 END AS poverty_highest,
19 | CASE WHEN poverty_level = 'high poverty' THEN 1 ELSE 0 END AS poverty_high,
20 | CASE WHEN poverty_level IN ('moderate poverty', 'low poverty') THEN 1 ELSE 0 END AS poverty_lower
21 |
22 | FROM {table_schema}.{table_name}
23 | WHERE
24 | school_state IN ({state_list})
25 | AND
26 | date_posted::DATE BETWEEN '{start_dt}'::DATE AND '{end_dt}'::DATE
27 | ;
28 |
--------------------------------------------------------------------------------
/techhelp/triage_config_templates/bills_triage_config.yaml:
--------------------------------------------------------------------------------
1 | config_version: 'v8'
2 |
3 | model_comment: 'dev-config'
4 | random_seed: 23895478
5 |
6 | # TIME SPLITTING
7 | # The time window to look at, and how to divide the window into
8 | # train/test splits
9 | temporal_config:
10 | feature_start_time: '2000-01-01' # earliest date included in features
11 | feature_end_time: '2019-05-01' # latest date included in features
12 | label_start_time: '2017-01-01' # earliest date for which labels are avialable
13 | label_end_time: '2019-05-01' # day AFTER last label date (all dates in any model are < this date)
14 | model_update_frequency: '100year' # how frequently to retrain models (using 100year here to just get one split)
15 | training_as_of_date_frequencies: ['1day'] # time between as of dates for same entity in train matrix
16 | test_as_of_date_frequencies: ['1day'] # time between as of dates for same entity in test matrix
17 | max_training_histories: ['0day'] # length of time included in a train matrix
18 | test_durations: ['0day'] # length of time included in a test matrix (0 days will give a single prediction immediately after training end)
19 | label_timespans: ['1year'] # time period across which outcomes are labeled in train matrices
20 |
21 |
22 | # COHORT & LABEL GENERATION
23 | # Labels are configured with a query with placeholders for the 'as_of_date' and 'label_timespan'. You can include a local path to a sql file containing the label query to the 'filepath' key (preferred) or include the query in the 'query' key
24 | #
25 | # The query must return two columns: entity_id and outcome, based on a given as_of_date and label_timespan.
26 | # The as_of_date and label_timespan must be represented by placeholders marked by curly brackets.
27 | #
28 | # In addition to these configuration options, you can pass a name to apply to the label configuration
29 | # that will be present in matrix metadata for each matrix created by this experiment,
30 | # under the 'label_name' key. The default label_name is 'outcome'.
31 | label_config:
32 | query: |
33 | # TODO: FILL IN YOUR QUERY HERE!
34 | # Remember to be careful about the level of indentation for the yaml
35 | # and use the {as_of_date} and {label_timespan} parameters.
36 | #name: # optionally, give your label a name to help track results (uncomment if using)
37 |
38 |
39 | # FEATURE GENERATION
40 | # The aggregate features to generate for each train/test split
41 | feature_aggregations:
42 | -
43 | # prefix given to the resultant tables
44 | prefix: 'events'
45 | # from_obj is usually a source table but can be an expression, such as
46 | # a join (ie 'cool_stuff join other_stuff using (stuff_id)')
47 | from_obj: |
48 | (SELECT bill_id::INT AS entity_id,
49 | event_date AS knowledge_date,
50 | chamber
51 | FROM ml_policy_class.bill_events) AS bill_events
52 | knowledge_date_column: 'knowledge_date'
53 |
54 | # top-level imputation rules that will apply to all aggregates functions
55 | # can also specify categoricals_imputation or array_categoricals_imputation
56 | aggregates_imputation:
57 | all:
58 | type: 'constant'
59 | value: 0
60 |
61 | # Aggregates of numerical columns. Each quantity is a number of some
62 | # sort, and the list of metrics are applied to each quantity
63 | aggregates:
64 | -
65 | quantity:
66 | any: '*'
67 | metrics:
68 | - 'count'
69 | # The time intervals over which to aggregate features
70 | intervals:
71 | - '1 year'
72 | - '5 years'
73 | - 'all'
74 |
75 |
76 | # MODEL SCORING
77 | # How each trained model is scored
78 | #
79 | # Each entry in 'testing_metric_groups' needs a list of one of the metrics defined in
80 | # catwalk.evaluation.ModelEvaluator.available_metrics (contributions welcome!)
81 | # Depending on the metric, either thresholds or parameters
82 | #
83 | # Parameters specify any hyperparameters needed. For most metrics,
84 | # which are simply wrappers of sklearn functions, these
85 | # are passed directly to sklearn.
86 | #
87 | # Thresholds are more specific: The list is dichotomized and only the
88 | # top percentile or top n entities are scored as positive labels
89 | scoring:
90 | testing_metric_groups:
91 | # TODO: FILL IN YOUR TESTING PERFORMANCE METRICS HERE
92 | training_metric_groups:
93 | # TODO: FILL IN YOUR TRAINING PERFORMANCE METRICS HERE
94 |
95 | # INDIVIDUAL IMPORTANCES
96 | individual_importance:
97 | methods: [] # empty list means don't calculate individual importances
98 | # methods: ['uniform']
99 | n_ranks: 5
100 |
101 |
102 | # MODEL GRID PRESETS
103 | # Triage now comes with a set of predefined *recommended* grids
104 | # named: quickstart, small, medium, large
105 | # See the documentation for recommended uses cases for those.
106 | #
107 | model_grid_preset: 'quickstart'
108 |
109 |
--------------------------------------------------------------------------------
/techhelp/triage_config_templates/mcrt_triage_config.yaml:
--------------------------------------------------------------------------------
1 | config_version: 'v8'
2 |
3 | model_comment: 'dev-config'
4 | random_seed: 23895478
5 |
6 | # TIME SPLITTING
7 | # The time window to look at, and how to divide the window into
8 | # train/test splits
9 | temporal_config:
10 | feature_start_time: '2000-01-01' # earliest date included in features
11 | feature_end_time: '2019-05-01' # latest date included in features
12 | label_start_time: '2017-01-01' # earliest date for which labels are avialable
13 | label_end_time: '2019-05-01' # day AFTER last label date (all dates in any model are < this date)
14 | model_update_frequency: '100year' # how frequently to retrain models (using 100year here to just get one split)
15 | training_as_of_date_frequencies: ['1day'] # time between as of dates for same entity in train matrix
16 | test_as_of_date_frequencies: ['1day'] # time between as of dates for same entity in test matrix
17 | max_training_histories: ['0day'] # length of time included in a train matrix
18 | test_durations: ['0day'] # length of time included in a test matrix (0 days will give a single prediction immediately after training end)
19 | label_timespans: ['1year'] # time period across which outcomes are labeled in train matrices
20 |
21 |
22 | # COHORT & LABEL GENERATION
23 | # Labels are configured with a query with placeholders for the 'as_of_date' and 'label_timespan'. You can include a local path to a sql file containing the label query to the 'filepath' key (preferred) or include the query in the 'query' key
24 | #
25 | # The query must return two columns: entity_id and outcome, based on a given as_of_date and label_timespan.
26 | # The as_of_date and label_timespan must be represented by placeholders marked by curly brackets.
27 | #
28 | # In addition to these configuration options, you can pass a name to apply to the label configuration
29 | # that will be present in matrix metadata for each matrix created by this experiment,
30 | # under the 'label_name' key. The default label_name is 'outcome'.
31 | label_config:
32 | query: |
33 | # TODO: FILL IN YOUR QUERY HERE!
34 | # Remember to be careful about the level of indentation for the yaml
35 | # and use the {as_of_date} and {label_timespan} parameters.
36 | #name: # optionally, give your label a name to help track results (uncomment if using)
37 |
38 |
39 | # FEATURE GENERATION
40 | # The aggregate features to generate for each train/test split
41 | feature_aggregations:
42 | -
43 | # prefix given to the resultant tables
44 | prefix: 'bkgs'
45 | # from_obj is usually a source table but can be an expression, such as
46 | # a join (ie 'cool_stuff join other_stuff using (stuff_id)')
47 | from_obj: |
48 | (SELECT c.joid::INT AS entity_id,
49 | i.booking_date AS knowledge_date,
50 | age
51 | FROM cleaned.jocojimsinmatedata i
52 | JOIN raw.jocojococlient c
53 | ON c.source = 'jocoJIMSNameIndex.MNI_NO_0'
54 | AND c.sourceid::INT = i.mni_no::INT) AS bookings
55 | knowledge_date_column: 'knowledge_date'
56 |
57 | # top-level imputation rules that will apply to all aggregates functions
58 | # can also specify categoricals_imputation or array_categoricals_imputation
59 | aggregates_imputation:
60 | all:
61 | type: 'constant'
62 | value: 0
63 |
64 | # Aggregates of numerical columns. Each quantity is a number of some
65 | # sort, and the list of metrics are applied to each quantity
66 | aggregates:
67 | -
68 | quantity:
69 | prior: '*'
70 | metrics:
71 | - 'count'
72 | # The time intervals over which to aggregate features
73 | intervals:
74 | - '1 year'
75 | - '5 years'
76 | - 'all'
77 |
78 |
79 | # MODEL SCORING
80 | # How each trained model is scored
81 | #
82 | # Each entry in 'testing_metric_groups' needs a list of one of the metrics defined in
83 | # catwalk.evaluation.ModelEvaluator.available_metrics (contributions welcome!)
84 | # Depending on the metric, either thresholds or parameters
85 | #
86 | # Parameters specify any hyperparameters needed. For most metrics,
87 | # which are simply wrappers of sklearn functions, these
88 | # are passed directly to sklearn.
89 | #
90 | # Thresholds are more specific: The list is dichotomized and only the
91 | # top percentile or top n entities are scored as positive labels
92 | scoring:
93 | testing_metric_groups:
94 | # TODO: FILL IN YOUR TESTING PERFORMANCE METRICS HERE
95 | training_metric_groups:
96 | # TODO: FILL IN YOUR TRAINING PERFORMANCE METRICS HERE
97 |
98 | # INDIVIDUAL IMPORTANCES
99 | individual_importance:
100 | methods: [] # empty list means don't calculate individual importances
101 | # methods: ['uniform']
102 | n_ranks: 5
103 |
104 |
105 | # MODEL GRID PRESETS
106 | # Triage now comes with a set of predefined *recommended* grids
107 | # named: quickstart, small, medium, large
108 | # See the documentation for recommended uses cases for those.
109 | #
110 | model_grid_preset: 'quickstart'
111 |
112 |
--------------------------------------------------------------------------------
/techhelp/windows_wsl_guide.md:
--------------------------------------------------------------------------------
1 | # Setting up WSL on your Windows Machine
2 |
3 | Newer versions of windows (10, 11) have the option of running a linux environment directly on windows, and we recommend using that as your development environment. You can [learn more about WSL here](https://docs.microsoft.com/en-us/windows/wsl/about).
4 |
5 | First we have to install WSL on Windows. We'll give you the quick installation guide, if you want to customize things, please refer the [detailed installation guide](https://docs.microsoft.com/en-us/windows/wsl/install).
6 |
7 | First, open a PowerShell or a Command Prompt Window as an Administrator. Next, we can see the available Linux distributions for install by using:
8 |
9 | ```
10 | $ wsl --list --online
11 | ```
12 |
13 | Then, you can install the version of Linux you would like to install. We recommend picking one of the Ubuntu distributions and this guide assumes an Ubuntu installation for WSL.
14 |
15 | We can install Ubuntu 20.04 by:
16 |
17 | ```
18 | $ wsl --install -d Ubuntu-20.04
19 | ```
20 |
21 | This will take a few minutes, and will prompt you to provide a UNIX username and a password. Please note that you might have to restart your computer at some point during the installation for things to take full effect.
22 |
23 | Now, you can use Linux from within your Windows machine. You should have a shortcut in your start menu to launch WSL, and when you launch it should open up a CLI.
24 |
25 | Note that this will have no GUI and you'll have to rely on the CLI. If you need to access the file system of WSL through the Windows File Explorer, you can type the following in the address bar of the File Explorer.
26 |
27 | ```
28 | \\wsl.localhost\Ubuntu-20.04
29 | ```
30 |
31 | This will take you to the root folder of the linux file system.
32 |
33 | _Note - Appending `\home\` to the above address will take you to your home directory._
34 |
35 | ## SSH Keys
36 |
37 | To generate SSH keys, we can use the same process as a UNIX system.
38 |
39 | ```
40 | $ ssh-keygen
41 | ```
42 |
43 | This will prompt you to select a location for storing the key, and give you the option to add a passphrase to the key. If you want to use the default locaion (Recommended!) and not use a passphrase, you just have to hit return.
44 |
45 | Then, your keys will be stored in the place your specified. By default,
46 | - there'll be a `.ssh` folder in your home directory
47 | ` ~/.ssh/`
48 | - private key would be named `id_rsa`
49 | - public key would be named `id_rsa.pub`
50 |
51 | You've successfully generated the Keys!
52 |
53 | After having generated the key pair, you should set the correct file permissions for your private key SSH requires that only you, the owner, are able to read/write it, and will give you an error otherwise. You can set the right permissions with this command:
54 | ```
55 | $ chmod 600 path_to_your_private_key
56 | ```
57 | (you'll have to substitute in
58 | the path and name of your private key that you chose during key generation).
59 |
60 |
61 | Note: You will share the public key with us to setup ssh access for the class server.
62 |
63 | ### Making your ssh keys available to local clients installed on Windows
64 |
65 | The keys we just generated are on the "linux machine" on your computer. However, local software such as VSCode and DBeaver are insalled on Windows and they would need access to the ssh keys to connect to the compute server and database. We can do this in two ways:
66 |
67 | **Option A: Find WSL .ssh folder on the Windows filesystem**
68 |
69 | One way to do this is to find the windows file system path for the ssh keys and pointing VSCode and DBeaver there.
70 |
71 | If you used the default path to save the ssh keys, the private key should be located at the following path:
72 |
73 | ```
74 | \\wsl.localhost\Ubuntu-20.04\home\\.ssh\id_rsa
75 | ```
76 |
77 | **Option B: Copy over the keys to Windows**
78 |
79 | The second way to do this is to simply copy the two files over to the default location Windows would store any ssh keys. If you don't have any other ssh keys on your Windows machine already, you can use the following commands:
80 |
81 | ```
82 | # create the default windows folder
83 | $ mkdir /mnt/c//.ssh
84 |
85 | # copy both private and public keys over
86 | $ cp -r ~/.ssh/ /mnt/c//.ssh/
87 | ```
88 |
89 | Then, you can simply point VSCode and Dbeaver to the private key in the Windows file system.
90 |
91 |
92 |
93 |
--------------------------------------------------------------------------------