`).
10 | - This may seem like an odd limitation, but when you think about the fact that JSX is compiled to `React.createElement` calls, it makes sense.
11 | - [React Fragments](https://reactjs.org/docs/fragments.html) let you group a list of children without adding extra nodes to the DOM.
12 |
13 | - Using the **React Fragments API**:
14 |
15 | ```html
16 |
17 |
18 |
19 |
20 |
21 |
33 |
34 | ```
35 |
36 | - You can also use a **React Fragments Element**:
37 |
38 | ```js
39 | const element = (
40 |
41 | Hello
42 | World
43 |
44 | );
45 | ```
46 |
47 | - Since React Fragments is so common, JSX has a **special syntax** for it:
48 |
49 | ```js
50 | const element = (
51 | // open and closing angle brackets
52 | <>
53 | Hello
54 | World
55 |
56 | );
57 | ```
58 |
59 | ## Additional resource
60 |
61 | - [React doc- Fragments](https://reactjs.org/docs/fragments.html)
62 |
--------------------------------------------------------------------------------
/06-react-create-a-simple-reusable-react-component-50d59130.md:
--------------------------------------------------------------------------------
1 | # 06. Create a Simple Reusable React Component
2 |
3 | #### [📹 Video](https://egghead.io/lessons/react-v2-06-create-a-simple-reusable-react-component?pl=a-beginners-guide-to-react-v2-6c4d)
4 |
5 | #### [💻 CodeSandbox](https://codesandbox.io/s/github/kentcdodds/beginners-guide-to-react/tree/codesandbox/06-custom-component?from-embed)
6 |
7 | ## Notes
8 |
9 | - One of the biggest paradigm shifts that React offered to the UI ecosystem was the component model.
10 | - Components let you split the UI into independent, reusable pieces, and think about each piece in isolation.
11 |
12 | ```html
13 |
14 |
15 |
16 |
17 |
18 |
34 |
35 | ```
36 |
37 | - **Rendering** a Component:
38 |
39 | ```js
40 | // capitalized to ensure that babel passes the function rather than the string message
41 | const element = (
42 |
68 |
72 |
73 |
74 |
75 |
76 |
77 |
78 |
79 |
80 |
81 |
97 |
98 |
99 |
100 |
101 |
102 |
--------------------------------------------------------------------------------
/images/logo.png:
--------------------------------------------------------------------------------
https://raw.githubusercontent.com/eggheadio-projects/the-beginners-guide-to-react/faaba841cc0bd228e710af349ca99f0b0f25183b/images/logo.png
--------------------------------------------------------------------------------
/images/react-a-beginners-guide-to-react-introduction-setupsetup.png:
--------------------------------------------------------------------------------
https://raw.githubusercontent.com/eggheadio-projects/the-beginners-guide-to-react/faaba841cc0bd228e710af349ca99f0b0f25183b/images/react-a-beginners-guide-to-react-introduction-setupsetup.png
--------------------------------------------------------------------------------
/images/react-build-and-deploy-a-react-application-with-codesandbox-github-and-netlify-codesandbox.png:
--------------------------------------------------------------------------------
https://raw.githubusercontent.com/eggheadio-projects/the-beginners-guide-to-react/faaba841cc0bd228e710af349ca99f0b0f25183b/images/react-build-and-deploy-a-react-application-with-codesandbox-github-and-netlify-codesandbox.png
--------------------------------------------------------------------------------
/images/react-build-and-deploy-a-react-application-with-codesandbox-github-and-netlify-deploy.png:
--------------------------------------------------------------------------------
https://raw.githubusercontent.com/eggheadio-projects/the-beginners-guide-to-react/faaba841cc0bd228e710af349ca99f0b0f25183b/images/react-build-and-deploy-a-react-application-with-codesandbox-github-and-netlify-deploy.png
--------------------------------------------------------------------------------
/images/react-build-and-deploy-a-react-application-with-codesandbox-github-and-netlify-website.png:
--------------------------------------------------------------------------------
https://raw.githubusercontent.com/eggheadio-projects/the-beginners-guide-to-react/faaba841cc0bd228e710af349ca99f0b0f25183b/images/react-build-and-deploy-a-react-application-with-codesandbox-github-and-netlify-website.png
--------------------------------------------------------------------------------
/images/react-create-a-user-interface-with-react-s-jsx-syntax-babel.png:
--------------------------------------------------------------------------------
https://raw.githubusercontent.com/eggheadio-projects/the-beginners-guide-to-react/faaba841cc0bd228e710af349ca99f0b0f25183b/images/react-create-a-user-interface-with-react-s-jsx-syntax-babel.png
--------------------------------------------------------------------------------
/images/react-install-and-use-react-devtools-devtools.png:
--------------------------------------------------------------------------------
https://raw.githubusercontent.com/eggheadio-projects/the-beginners-guide-to-react/faaba841cc0bd228e710af349ca99f0b0f25183b/images/react-install-and-use-react-devtools-devtools.png
--------------------------------------------------------------------------------
/images/react-install-and-use-react-devtools-devtools2.png:
--------------------------------------------------------------------------------
https://raw.githubusercontent.com/eggheadio-projects/the-beginners-guide-to-react/faaba841cc0bd228e710af349ca99f0b0f25183b/images/react-install-and-use-react-devtools-devtools2.png
--------------------------------------------------------------------------------
/images/react-install-and-use-react-devtools-filter.png:
--------------------------------------------------------------------------------
https://raw.githubusercontent.com/eggheadio-projects/the-beginners-guide-to-react/faaba841cc0bd228e710af349ca99f0b0f25183b/images/react-install-and-use-react-devtools-filter.png
--------------------------------------------------------------------------------
/images/react-install-and-use-react-devtools-profiler.png:
--------------------------------------------------------------------------------
https://raw.githubusercontent.com/eggheadio-projects/the-beginners-guide-to-react/faaba841cc0bd228e710af349ca99f0b0f25183b/images/react-install-and-use-react-devtools-profiler.png
--------------------------------------------------------------------------------
/images/react-install-and-use-react-devtools-twitter.png:
--------------------------------------------------------------------------------
https://raw.githubusercontent.com/eggheadio-projects/the-beginners-guide-to-react/faaba841cc0bd228e710af349ca99f0b0f25183b/images/react-install-and-use-react-devtools-twitter.png
--------------------------------------------------------------------------------
/images/react-understand-the-react-hook-flow-hook-flow.png:
--------------------------------------------------------------------------------
https://raw.githubusercontent.com/eggheadio-projects/the-beginners-guide-to-react/faaba841cc0bd228e710af349ca99f0b0f25183b/images/react-understand-the-react-hook-flow-hook-flow.png
--------------------------------------------------------------------------------
43 | Hello World
44 | Goodbye World
45 |
46 | );
47 | ```
48 |
49 | ## Additional resource
50 |
51 | - [React doc - Components and Props](https://reactjs.org/docs/components-and-props.html)
52 |
--------------------------------------------------------------------------------
/07-react-validate-custom-react-component-props-with-proptypes-9e1b5b13.md:
--------------------------------------------------------------------------------
1 | # 07. Validate Custom React Component Props with PropTypes
2 |
3 | #### [📹 Video](https://egghead.io/lessons/react-v2-07-validate-custom-react-component-props-with-proptypes?pl=a-beginners-guide-to-react-v2-6c4d)
4 |
5 | #### [💻 CodeSandbox](https://codesandbox.io/s/github/kentcdodds/beginners-guide-to-react/tree/codesandbox/07-prop-types?from-embed)
6 |
7 | ## Notes
8 |
9 | - When you create reusable React components, you want to make sure that people use them correctly. The best way to do this is to use TypeScript in your codebase to give you compile-time checking of your code.
10 | - If you’re not using TypeScript, you can still use PropTypes to get runtime validation.
11 |
12 | - **Using PropTypes**:
13 |
14 | ```html
15 |
16 |
17 |
18 |
19 |
20 |
49 |
50 | ```
51 |
52 | - Using **`prop-types`** from unpkg:
53 |
54 | ```html
55 |
56 |
57 |
58 |
59 |
60 |
61 |
83 |
84 | ```
85 |
86 | - PropTypes are not rendered on production. You can also remove PropTypes using the [babel-plugin-transform-react-remove-prop-types](https://www.npmjs.com/package/babel-plugin-transform-react-remove-prop-types).
87 |
88 | ## Additional resource
89 |
90 | - [npm - prop-types](https://www.npmjs.com/package/prop-types])
91 | - [React Docs - Typechecking With PropTypes](https://reactjs.org/docs/typechecking-with-proptypes.html)
92 |
--------------------------------------------------------------------------------
/08-react-understand-and-use-interpolation-in-jsx.md:
--------------------------------------------------------------------------------
1 | # 08. Understand and Use Interpolation in JSX
2 |
3 | #### [📹 Video](https://egghead.io/lessons/react-v2-08-understand-and-use-interpolation-in-jsx?pl=a-beginners-guide-to-react-v2-6c4d)
4 |
5 | #### [💻 CodeSandbox](https://codesandbox.io/s/github/kentcdodds/beginners-guide-to-react/tree/codesandbox/08-jsx-interpolation?from-embed)
6 |
7 | ## Notes
8 |
9 | - **Template literals** are string literals allowing embedded expressions. You can use multi-line strings and string interpolation features with them.
10 |
11 | - Let’s write a React component that has some conditional logic in it to explore the interpolation characteristics of JSX syntax:
12 |
13 | ```html
14 |
15 |
16 |
17 |
18 |
19 |
45 |
46 | ```
47 |
48 | - Inside the curly braces, it's _JavaScript land_, but it's limited to only expressions.
49 | - Interpolation is not unique to React or JavaScript, we also see it in HTML when we use `script` tags or `style` tags.
50 |
51 | ```html
52 |
53 |
54 |
55 |
56 |
57 |
80 |
81 | ```
82 |
83 | ## Additional resource
84 |
85 | - [MDN - Template literals](https://developer.mozilla.org/en-US/docs/Web/JavaScript/Reference/Template_literals)
86 | - [Conditional (ternary) operator](https://developer.mozilla.org/en-US/docs/Web/JavaScript/Reference/Operators/Conditional_Operator)
87 | - [What is JSX? - Kent's Blog](https://kentcdodds.com/blog/what-is-jsx/)
88 |
--------------------------------------------------------------------------------
/09-react-rerender-a-react-application-bea3a0e6.md:
--------------------------------------------------------------------------------
1 | # 09. Rerender a React Application
2 |
3 | #### [📹 Video](https://egghead.io/lessons/react-v2-09-rerender-a-react-application?pl=a-beginners-guide-to-react-v2-6c4d)
4 |
5 | #### [💻 CodeSandbox](https://codesandbox.io/s/github/kentcdodds/beginners-guide-to-react/tree/codesandbox/09-re-render?from-embed)
6 |
7 | ## Notes
8 |
9 | - Updating the DOM is typically the slowest part of the whole process. React only updates what’s necessary.
10 | - React DOM compares the element and its children to the previous one, and only applies the DOM updates necessary to bring the DOM to the desired state.
11 | - When we re-render the entire app with `setInterval` you can see the clock changes without a browser window refresh.
12 |
13 | ```html
14 |
15 |
16 |
17 |
18 |
19 |
36 |
37 | ```
38 |
39 | - The `focus` remains on the selected element because React keeps track of it. React also keeps track of the actual changes within our app so even though we call `ReactDOM.render` every second, it will not refresh every element inside, just the `time` value.
40 |
41 | ```html
42 |
43 |
44 |
45 |
46 |
47 |
64 |
65 | ```
66 |
67 | - Even though we create an element describing the whole UI tree on every tick, only the text node whose contents have changed gets updated by React DOM.
68 |
69 | ## Additional resource
70 |
71 | - [kent's Blog - One simple trick to optimize React re-renders](https://kentcdodds.com/blog/optimize-react-re-renders/)
72 | - [React Docs - Rendering Elements](https://reactjs.org/docs/rendering-elements.html)
73 | - [React Docs - ReactDOM](https://reactjs.org/docs/react-dom.html)
74 |
--------------------------------------------------------------------------------
/10-react-style-react-components-with-classname-and-inline-styles.md:
--------------------------------------------------------------------------------
1 | # 10. Style React Components with className and inline Styles
2 |
3 | #### [📹 Video](https://egghead.io/lessons/react-v2-10-style-react-components-with-classname-and-inline-styles?pl=a-beginners-guide-to-react-v2-6c4d)
4 |
5 | #### [💻 CodeSandbox](https://codesandbox.io/s/github/kentcdodds/beginners-guide-to-react/tree/codesandbox/10-styling?from-embed)
6 |
7 | ## Notes
8 |
9 | - The application layout is only one part of the user interface equation. Another part is **styling**.
10 |
11 | ```html
12 |
13 |
14 |
15 |
16 |
17 |
38 |
67 |
68 | ```
69 |
70 | - One of the most basic ways to style React components is with inline CSS. JSX elements can take a style attribute which takes in an object:
71 |
72 | ```js
73 | const element = (
74 |
75 |
82 | );
83 | ```
84 |
85 | - The style property is wrapped in **two sets of curly braces**, one to interpolate JavaScript and the second to define the object.
86 |
87 | ```js
88 | function Box({ style, size, className = '', ...rest }) {
89 | return (
90 |
95 | );
96 | }
97 | ```
98 |
99 | The next thing we'll do is make a reusable Box component. It would be better if the author could just define a size like `small`, `medium` or `large`. In this example we destructure size instead of `className`. That's why we could replace `className` with a size property that takes in a string:
100 |
101 | ```js
102 | function Box({ style, size, className = '', ...rest }) {
103 | const sizeClassName = size ? `box--${size}` : '';
104 | return (
105 |
110 | );
111 | }
112 |
113 | const element = (
114 |
79 | small lightblue box
80 |
81 |
115 |
116 | small lightblue box
117 |
118 |
119 | medium pink box
120 |
121 |
122 | large orange box
123 |
124 | sizeless box
125 |
126 | );
127 | ```
128 |
129 | ## Additional resource
130 |
131 | - [Tailwind CSS Docs](https://tailwindcss.com)
132 | - [styled-components](https://github.com/styled-components/styled-components)
133 | - [React Docs - Styling and CSS](https://reactjs.org/docs/faq-styling.html)
134 | - [Why do I have to use "className" instead of "class" in ReactJs components done in JSX?](https://www.quora.com/Why-do-I-have-to-use-className-instead-of-class-in-ReactJs-components-done-in-JSX-JSX-is-preprocessed-so-shouldnt-that-conversion-happen-when-JSX-is-converted-to-JavaScript)
135 |
--------------------------------------------------------------------------------
/11-react-use-event-handlers-with-react-bd53256d.md:
--------------------------------------------------------------------------------
1 | # 11. Use Event Handlers with React
2 |
3 | #### [📹 Video](https://egghead.io/lessons/react-v2-11-use-event-handlers-with-react?pl=a-beginners-guide-to-react-v2-6c4d)
4 |
5 | #### [💻 CodeSandbox](https://codesandbox.io/s/github/kentcdodds/beginners-guide-to-react/tree/codesandbox/11-event-handlers?from-embed)
6 |
7 | ## Notes
8 |
9 | - There are a ton of supported events that you can find on the [docs](https://reactjs.org/docs/handling-events.html). Let’s get an introduction to event handlers with React.
10 |
11 | - We still haven’t gotten to state yet, so we’ve implemented our own little way of managing state and re-rendering our component so we can play around with event handlers.
12 |
13 | - One thing you’ll want to know is that events with React are very similar to working with events in regular DOM.
14 |
15 | ```html
16 |
17 |
18 |
19 |
20 |
21 |
68 |
69 | ```
70 |
71 | - React does have an optimization implementation on top of the event system called [SyntheticEvents](https://reactjs.org/docs/events.html), but most of the time you won’t observe any difference with those events from regular DOM events (and you can always get access to the native event using the nativeEvent property).
72 |
73 | ## Additional resource
74 |
75 | - [React Docs - Handling Events](https://reactjs.org/docs/handling-events.html)
76 | - [Kent Livestream](https://www.youtube.com/watch?v=WqFlnolg7mo)
77 | - [React Event Handlers: onClick, onChange ...](https://www.robinwieruch.de/react-event-handler)
78 |
--------------------------------------------------------------------------------
/12-react-manage-state-in-a-react-component-with-the-usestate-hook.md:
--------------------------------------------------------------------------------
1 | # 12. Manage state in a React Component with the useState hook
2 |
3 | #### [📹 Video](https://egghead.io/lessons/react-v2-12-manage-state-in-a-react-component-with-the-usestate-hook?pl=a-beginners-guide-to-react-v2-6c4d)
4 |
5 | #### [💻 CodeSandbox](https://codesandbox.io/s/github/kentcdodds/beginners-guide-to-react/tree/codesandbox/12-state?from-embed)
6 |
7 | ## Notes
8 |
9 | - An application that responds to user input is valuable, but what do we do with that data the user has given us? This is where the **component state** comes in.
10 |
11 | - We need a place to put data that can change in our application, and we need to let React know when that state changes so it can update (or re-render) our app for us.
12 |
13 | - In React, the state is associated with components and when the state changes, the component is updated.
14 |
15 | - To get access to this state and to update it, we use what is called a **React Hook** which allows us to call into React from within our component and let it know that we need to manage some state.
16 |
17 | ```html
18 |
19 |
20 |
21 |
22 |
23 |
49 |
50 | ```
51 |
52 | - In React, states are managed independently from each other. For example:
53 |
54 | ```js
55 | const [name, setName] = React.useState('');
56 | const [name2, setName2] = React.useState('');
57 |
58 | const handleChange = event => setName(event.target.value);
59 | const handleChange2 = event => setName(event.target.value);
60 | // ...
61 |
62 | ;
66 |
67 | ;
71 |
72 | // ...
73 | ```
74 |
75 | - The state can be any type you want – you can `useState` with an array, `useState` an object, a number, a boolean, a string, whatever you need.
76 |
77 | ## Additional resource
78 |
79 | - [Kent's Blog - React Hooks: Array Destructuring Fundamentals](https://kentcdodds.com/blog/react-hooks-array-destructuring-fundamentals)
80 | - [Kent's Blog - 5 Tips to Help You Avoid React Hooks Pitfalls](https://kentcdodds.com/blog/react-hooks-pitfalls)
81 | - [Kent's Blog - React Hooks: Compound Components](https://kentcdodds.com/blog/compound-components-with-react-hooks)
82 | - [React Docs - Hooks at a Glance](https://reactjs.org/docs/hooks-overview.html)
83 |
--------------------------------------------------------------------------------
/13-react-manage-side-effects-in-a-react-component-with-the-useeffect-hook.md:
--------------------------------------------------------------------------------
1 | # 13. Manage side-effects in a React Component with the useEffect hook
2 |
3 | #### [📹 Video](https://egghead.io/lessons/react-v2-13-manage-side-effects-in-a-react-component-with-the-useeffect-hook?pl=a-beginners-guide-to-react-v2-6c4d)
4 |
5 | #### [💻 CodeSandbox](https://codesandbox.io/s/github/kentcdodds/beginners-guide-to-react/tree/codesandbox/13-side-effects?from-embed)
6 |
7 | ## Notes
8 |
9 | - Another piece to the web application puzzle is managing side-effects of our user’s interactions.
10 |
11 | - In this lesson we’ll be interacting with the browser’s **localStorage API**, but this same thing would apply if we’re interacting with a backend server, or the geolocation API, or anything else that needs to happen when the state of our component changes.
12 |
13 | - You’ll learn how to use **React’s useEffect hook** to manage the side-effect of saving state into localStorage, and also how to re-synchronize our application with the stored value in localStorage.
14 |
15 | ```html
16 |
17 |
18 |
19 |
20 |
21 |
53 |
54 | ```
55 |
56 | ## Additional resource
57 |
58 | - [React Docs - useEffect hook](https://reactjs.org/docs/hooks-effect.html)
59 | - [React Docs - API reference](https://reactjs.org/docs/hooks-reference.html#useeffect)
60 | - [Kent's Blog - useEffect vs useLayoutEffect](https://kentcdodds.com/blog/useeffect-vs-uselayouteffect)
61 | - [MDN - Window.localStorage docs](https://developer.mozilla.org/en-US/docs/Web/API/Window/localStorage)
62 |
--------------------------------------------------------------------------------
/14-react-use-a-lazy-initializer-with-usestate.md:
--------------------------------------------------------------------------------
1 | # 14. Use a lazy initializer with useState
2 |
3 | #### [📹 Video](https://egghead.io/lessons/react-v2-14-use-a-lazy-initializer-with-usestate?pl=a-beginners-guide-to-react-v2-6c4d)
4 |
5 | #### [💻 CodeSandbox](https://codesandbox.io/s/github/kentcdodds/beginners-guide-to-react/tree/codesandbox/14-lazy-initialization?from-embed)
6 |
7 | ## Notes
8 |
9 | - Something it's important to recognize is that every time you call the state updater function, that will trigger a re-render of the component that manages that state (the Greeting component in our example).
10 | - This is exactly what we want to have happen, but it can be a problem in some situations and there are some optimizations we can apply for `useState` specifically in the event that it is a problem.
11 |
12 | - In our case, we’re reading into `localStorage` to initialize our state value for the first render of our Greeting component.
13 |
14 | - After that first render, we don’t need to read into localStorage anymore because we’re managing that state in memory now.
15 |
16 | ```html
17 |
18 |
19 |
20 |
21 |
22 |
52 |
53 | ```
54 |
55 | ## Additional resource
56 |
57 | - [Kent's Blog - How to implement useState with useReducer](https://kentcdodds.com/blog/how-to-implement-usestate-with-usereducer)
58 | - [React Docs - Effects Without Cleanup](https://reactjs.org/docs/hooks-effect.html#effects-without-cleanup)
59 |
--------------------------------------------------------------------------------
/15-react-manage-the-useeffect-dependency-array.md:
--------------------------------------------------------------------------------
1 | # 15. Manage the useEffect dependency array
2 |
3 | #### [📹 Video](https://egghead.io/lessons/react-v2-15-manage-the-useeffect-dependency-array?pl=a-beginners-guide-to-react-v2-6c4d)
4 |
5 | #### [💻 CodeSandbox](https://codesandbox.io/s/github/kentcdodds/beginners-guide-to-react/tree/codesandbox/15-effect-deps?from-embed)
6 |
7 | ## Notes
8 |
9 | - Something that’s really important to know about **React’s useEffect** hook is that it eagerly attempts to synchronize the “state of the world” with the state of your application. That means that your effect callback will run every time your component is rendered.
10 |
11 | - Our effect callback is getting called more than it needs to be. **Solution**, add a dependency array so it is updated only when the state it relies on changes.
12 |
13 | ```html
14 |
15 |
16 |
17 |
18 |
19 |
69 |
70 | ```
71 |
72 | ## Additional resource
73 |
74 | - [Kent's Blog - 5 Tips to Help You Avoid React Hooks Pitfalls](https://kentcdodds.com/blog/react-hooks-pitfalls)
75 | - [egghead.io - Handle Deep Object Comparison in React's useEffect hook with the useRef Hook](https://egghead.io/lessons/react-handle-deep-object-comparison-in-react-s-useeffect-hook-with-the-useref-hook)
76 | - [eslint-plugin-react-hooks](https://www.npmjs.com/package/eslint-plugin-react-hooks)
77 | - [React Docs - ESLint Plugin](https://reactjs.org/docs/hooks-rules.html#explanation)
78 |
--------------------------------------------------------------------------------
/16-react-create-reusable-custom-hooks.md:
--------------------------------------------------------------------------------
1 | # 16. Create reusable custom hooks
2 |
3 | #### [📹 Video](https://egghead.io/lessons/react-v2-16-create-reusable-custom-hooks?pl=a-beginners-guide-to-react-v2-6c4d)
4 |
5 | #### [💻 CodeSandbox](https://codesandbox.io/s/github/kentcdodds/beginners-guide-to-react/tree/codesandbox/16-custom-hooks?from-embed)
6 |
7 | ## Notes
8 |
9 | - Let’s imagine a scenario where we want to share our `localStorage` code with other components so other components could synchronize state with `localStorage`.
10 |
11 | - Considering how code reuse works in JavaScript in general, we can simply make a function, put our relevant code in that function, and then call it from the original location. That process works exactly the same with React hooks code, so let’s do that:
12 |
13 | - **Original code**:
14 |
15 | ```js
16 | const [name, setName] = React.useState(
17 | () => window.localStorage.getItem('name') || ''
18 | );
19 |
20 | React.useEffect(() => {
21 | window.localStorage.setItem('name', name);
22 | }, [name]);
23 | ```
24 |
25 | - **Refactor code** to a reusable custom hooks:
26 |
27 | ```js
28 | //
29 | function useLocalStorageState(key, defaultValue = '') {
30 | const [state, setState] = React.useState(
31 | () => window.localStorage.getItem(key) || defaultValue
32 | );
33 |
34 | React.useEffect(() => {
35 | window.localStorage.setItem(key, state);
36 | }, [key, state]);
37 |
38 | return [state, setState];
39 | }
40 | ```
41 |
42 | ```html
43 |
44 |
45 |
46 |
47 |
48 |
85 |
86 | ```
87 |
88 | - When we want to share logic between two JavaScript functions, we extract it to a third function. Both components and Hooks are functions, so this works for them too!
89 | - Building your own Hooks lets you extract component logic into reusable functions.
90 |
91 | ## Additional resource
92 |
93 | - [eslint-plugin-react-hooks](https://www.npmjs.com/package/eslint-plugin-react-hooks)
94 | - [Kent's Blog - The State Reducer Pattern with React Hooks](https://kentcdodds.com/blog/usememo-and-usecallback)
95 | - [React Docs - Building Your Own Hooks](https://reactjs.org/docs/hooks-custom.html)
96 |
--------------------------------------------------------------------------------
/17-react-manipulate-the-dom-with-react-refs-cad5c6be.md:
--------------------------------------------------------------------------------
1 | # 17. Manipulate the DOM with React refs
2 |
3 | #### [📹 Video](https://egghead.io/lessons/react-v2-17-manipulate-the-dom-with-react-refs?pl=a-beginners-guide-to-react-v2-6c4d)
4 |
5 | #### [💻 CodeSandbox](https://codesandbox.io/s/github/kentcdodds/beginners-guide-to-react/tree/codesandbox/17-dom-refs?from-embed)
6 |
7 | ## Notes
8 |
9 | - React is really good at creating and updating DOM elements, but sometimes you need to work with them yourself.
10 | - A common use case for this is when you’re using a third party library that wasn’t built for or with React specifically.
11 | - To do this, we need to have some value that’s associated with our component (like state) to store a reference to the DOM element, but doesn’t trigger re-renders when it’s updated (unlike state). React has something specifically for this and it’s called a ref.
12 |
13 | ```html
14 |
15 |
16 |
17 |
18 |
19 |
20 |
61 |
118 |
119 | ```
120 |
121 | - You create a **ref object with the useRef hook** and that object’s current property is the current value of the ref.
122 | - It can be anything, but if you pass that `ref object` to a component as a prop called `ref`, then React will set the current property to the DOM element it creates so you can reference it and manipulate it in your useEffect hook.
123 |
124 | ## Additional resource
125 |
126 | - [Kent's egghead course - Simplify React Apps with React Hooks](https://egghead.io/courses/simplify-react-apps-with-react-hooks)
127 | - [React Hooks - useRef](https://reactjs.org/docs/hooks-reference.html#useref)
128 | - [Manipulating DOM Elements With React Hook useRef()](https://dev.to/spukas/manipulating-dom-elements-with-react-hook-useref-446c)
129 |
--------------------------------------------------------------------------------
/18-react-understand-the-react-hook-flow.md:
--------------------------------------------------------------------------------
1 | # 18 Understand the React Hook Flow
2 |
3 | #### [📹 Video](https://egghead.io/lessons/react-v2-18-understand-the-react-hook-flow?pl=a-beginners-guide-to-react-v2-6c4d)
4 |
5 | #### [💻 CodeSandbox](https://codesandbox.io/s/github/kentcdodds/beginners-guide-to-react/tree/codesandbox/18-hook-flow?from-embed)
6 |
7 | ## Notes
8 |
9 | - Understanding the order in which React hooks are called can be really helpful in using React hooks effectively.
10 |
11 | - We’ll explore the lifecycle of a function component with hooks with colorful console log statements so we know when one phase starts and when it ends.
12 |
13 | 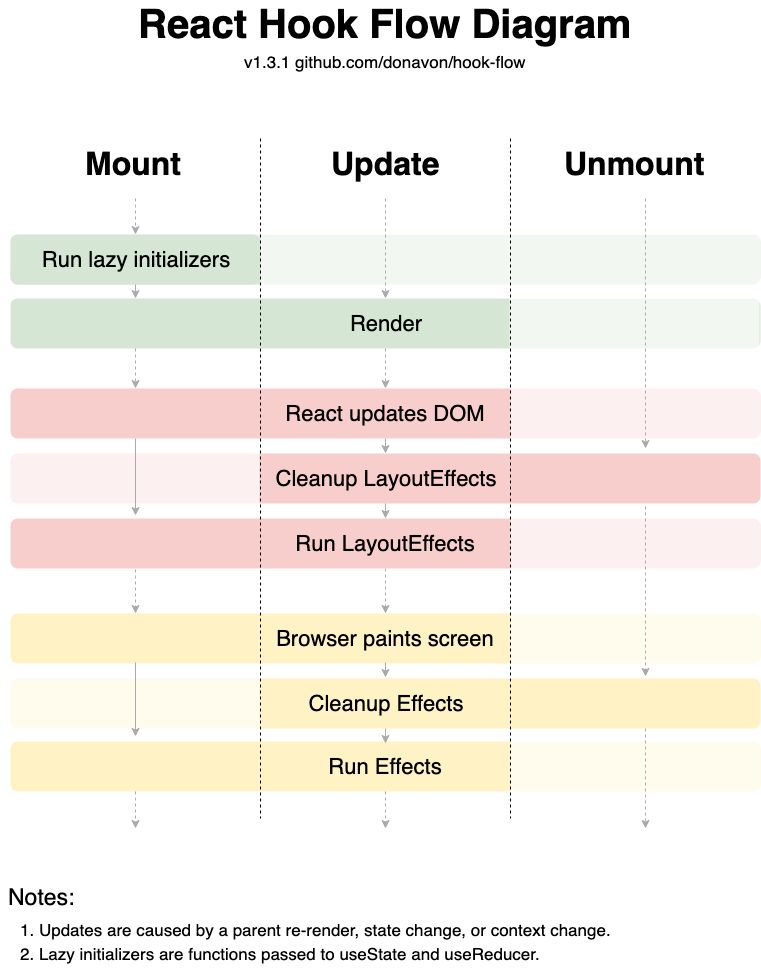
14 |
15 | ```html
16 |
17 |
18 |
19 |
20 |
21 |
148 |
149 | ```
150 |
151 | - Understanding all of this is not critical to your success with using React, and most of the time you won’t need to think about this at all, but understanding it can help you at times.
152 |
153 | ## Additional resource
154 |
155 | - [A flowchart that explains the new lifecycle of a Hooks component](https://github.com/donavon/hook-flow)
156 | - [React Hooks: What's going to happen to my tests?](https://kentcdodds.com/blog/react-hooks-whats-going-to-happen-to-my-tests)
157 | - [Kent's Livestream - React Hooks: Refactor compound components to hooks](https://www.youtube.com/watch?v=415EfGPuhSo)
158 |
--------------------------------------------------------------------------------
/19-react-make-basic-forms-with-react-cfc2ec08.md:
--------------------------------------------------------------------------------
1 | # 19. Make Basic Forms with React
2 |
3 | #### [📹 Video](https://egghead.io/lessons/react-v2-19-make-basic-forms-with-react?pl=a-beginners-guide-to-react-v2-6c4d)
4 |
5 | #### [💻 CodeSandbox](https://codesandbox.io/s/github/kentcdodds/beginners-guide-to-react/tree/codesandbox/19-basic-forms?from-embed)
6 |
7 | ## Notes
8 |
9 | - Forms are a basic building block of the web. Every web application uses form elements as a way to accept input from the user.
10 |
11 | - There are a few things to keep in mind with how forms work on the web and in this lesson we’ll learn about those as well as various ways you can retrieve values from elements in the form as well as a few best practices you should consider when working with form elements on the web.
12 |
13 | ```html
14 |
15 |
16 |
17 |
18 |
19 |
53 |
54 | ```
55 |
56 | - You can learn more about basic forms in the React documentation about Uncontrolled Components.
57 |
58 | ## Additional resource
59 |
60 | - [React Docs - Forms](https://reactjs.org/docs/forms.html)
61 | - [Kent's Blog - Please stop building inaccessible forms](https://kentcdodds.com/blog/please-stop-building-inaccessible-forms-and-how-to-fix-them)
62 | - [Kent's Livestream - Testing a Multi-Page form](https://www.youtube.com/watch?v=9xaJ78qEJCM)
63 |
--------------------------------------------------------------------------------
/20-react-make-dynamic-forms-with-react-d69753ec.md:
--------------------------------------------------------------------------------
1 | # 20. Make Dynamic Forms with React
2 |
3 | #### [📹 Video](https://egghead.io/lessons/react-v2-20-make-dynamic-forms-with-react?pl=a-beginners-guide-to-react-v2-6c4d)
4 |
5 | #### [💻 CodeSandbox](https://codesandbox.io/s/github/kentcdodds/beginners-guide-to-react/tree/codesandbox/20-dynamic-forms?from-embed)
6 |
7 | ## Notes
8 |
9 | - Often, it can be useful to know what the user’s input is as they’re typing it and use that information to change what is rendered. This can be **good for dynamic search** or filter inputs, or triggering changes when a user checks a checkbox, or a myriad of other use cases.
10 | - W’re going to **dynamically show an error message** if the user types something invalid so they don’t have to wait until they submit the form to know they’re doing something wrong.
11 | - To do this we’ll store the input’s value in state and then use that state to derive an error message which will be displayed if there is an error.
12 |
13 | ```html
14 |
15 |
16 |
17 |
18 |
19 |
56 |
57 | ```
58 |
59 | ## Additional resource
60 |
61 | - [Blog post - Making dynamic form inputs with React](https://goshakkk.name/array-form-inputs/)
62 | - [React Docs - Forms](https://reactjs.org/docs/forms.html)
63 | - [Frontend Masters - Test a Form Component Solution](https://frontendmasters.com/courses/testing-react/test-a-form-component-solution/)
64 |
--------------------------------------------------------------------------------
/21-react-controlling-form-values-with-react-4627dd2d.md:
--------------------------------------------------------------------------------
1 | # 21 Controlling Form Values with React
2 |
3 | #### [📹 Video](https://egghead.io/lessons/react-v2-21-controlling-form-values-with-react?pl=a-beginners-guide-to-react-v2-6c4d)
4 |
5 | #### [💻 CodeSandbox](https://codesandbox.io/s/github/kentcdodds/beginners-guide-to-react/tree/codesandbox/21-controlled-forms?from-embed)
6 |
7 | ## Notes
8 |
9 | - There are many situations where you want to **programmatically control the value** of a form field.
10 | - Maybe you want to set the value of one field based on the user’s interactions with another element. Or maybe you want to change the user’s input as they’re typing it.
11 | - In this example, we’ll be preventing the user from typing upper case characters into our field by turning our input from an **“Uncontrolled field”** to a **“Controlled field.”**
12 |
13 | ```html
14 |
15 |
16 |
17 |
18 |
19 |
53 |
54 | ```
55 |
56 | ## Additional resource
57 |
58 | - [React Docs - Forms](https://reactjs.org/docs/forms.html)
59 | - [Frontend Masters - Test a Form Component Solution](https://frontendmasters.com/courses/testing-react/test-a-form-component-solution/)
60 |
--------------------------------------------------------------------------------
/22-react-using-react-error-boundaries-to-handle-errors-in-react-components.md:
--------------------------------------------------------------------------------
1 | # 22. Using React Error Boundaries to handle errors in React Components
2 |
3 | #### [📹 Video](https://egghead.io/lessons/react-v2-22-using-react-error-boundaries-to-handle-errors-in-react-components?pl=a-beginners-guide-to-react-v2-6c4d)
4 |
5 | #### [💻 CodeSandbox](https://codesandbox.io/s/github/kentcdodds/beginners-guide-to-react/tree/codesandbox/22-error-boundaries?from-embed)
6 |
7 | ## Notes
8 |
9 | - There’s a simple way to handle errors in your application using a special kind of component called an Error Boundary. Unfortunately, there is currently no way to create an Error Boundary component with a function and you have to use a class component instead, but we got another lucky break because there’s a terrific open source library we can use called [react-error-boundary](https://github.com/bvaughn/react-error-boundary).
10 |
11 | - Error boundaries are React components that catch JavaScript errors anywhere in their child component tree, log those errors, and display a fallback UI instead of the component tree that crashed.
12 |
13 | - Error boundaries catch errors during rendering, in lifecycle methods, and in constructors of the whole tree below them.
14 |
15 | ```html
16 |
17 |
18 |
19 |
20 |
21 |
22 |
78 |
79 | ```
80 |
81 | - The granularity of error boundaries is up to you. You may wrap top-level route components to display a “Something went wrong” message to the user, just like server-side frameworks often handle crashes.
82 |
83 | ## Additional resource
84 |
85 | - [React Docs - Error Boundaries](https://reactjs.org/docs/error-boundaries.html)
86 | - [egghead lesson - Handle React Suspense Errors with an Error Boundary](https://egghead.io/lessons/react-handle-react-suspense-errors-with-an-error-boundary)
87 | - [repo - react-error-boundary](https://github.com/bvaughn/react-error-boundary)
88 | - [npm - react-error-boundary](https://www.npmjs.com/package/react-error-boundary)
89 |
--------------------------------------------------------------------------------
/23-react-use-the-key-prop-when-rendering-a-list-with-react-12564a86.md:
--------------------------------------------------------------------------------
1 | # 23. Use the key prop when Rendering a List with React
2 |
3 | #### [📹 Video](https://egghead.io/lessons/react-v2-23-use-the-key-prop-when-rendering-a-list-with-react?pl=a-beginners-guide-to-react-v2-6c4d)
4 |
5 | #### [💻 CodeSandbox](https://codesandbox.io/s/github/kentcdodds/beginners-guide-to-react/tree/codesandbox/23-rendering-lists?from-embed)
6 |
7 | ## Notes
8 |
9 | - It doesn’t take long working with React before you want to render a list of items and when you do, you’ll inevitably encounter this console warning: “**Warning**: Each child in a list should have a unique key prop.”
10 | - This warning is pretty simple to silence by providing the bespoke `key` prop, but it is really useful to understand what that warning is about and the bugs that can happen if you do not address the warning properly.
11 | - `Keys` help React identify which items have changed, are added, or are removed. `Keys` should be given to the elements inside the array to give the elements a stable identity:
12 |
13 | ```html
14 |
15 |
16 |
17 |
18 |
19 |
63 |
64 |
124 |
125 | ```
126 |
127 | - You definitely do not want to ignore this warning.
128 | - It's not recommend using indexes for `keys` if the order of items may change. This can negatively impact performance and may cause issues with component state.
129 |
130 | ## Additional resource
131 |
132 | - [React Docs - Recursing On Children](https://reactjs.org/docs/reconciliation.html#recursing-on-children)
133 | - [Kent's Blog - Understanding React's key prop](https://kentcdodds.com/blog/understanding-reacts-key-prop)
134 |
--------------------------------------------------------------------------------
/24-react-lifting-and-colocating-react-state.md:
--------------------------------------------------------------------------------
1 | # 24. Lifting and colocating React State
2 |
3 | #### [📹 Video](https://egghead.io/lessons/react-v2-24-lifting-and-colocating-react-state?pl=a-beginners-guide-to-react-v2-6c4d)
4 |
5 | #### [💻 CodeSandbox](https://codesandbox.io/s/github/kentcdodds/beginners-guide-to-react/tree/codesandbox/24-lifting-and-colocating?from-embed)
6 |
7 | ## Notes
8 |
9 | - A **common question** from React beginners is how to share state between two sibling components.
10 | - **The answer** is to Lift the state which basically amounts to finding the lowest common parent shared between the two components and placing the state management there, and then passing the state and a mechanism for updating that state down into the components that need it.
11 |
12 | - As a community we’re pretty good at doing this and it becomes natural over time. One thing that we typically have trouble remembering to do is to **push state back down** (or colocate state).
13 |
14 | ```html
15 |
16 |
17 |
18 |
19 |
20 |
69 |
70 | ```
71 |
72 | - Lifting state involves writing more “boilerplate” code than two-way binding approaches, but as a benefit, it takes less work to find and isolate bugs.
73 |
74 | ## Additional resource
75 |
76 | [Kent's Blog - State Colocation will make your React app faster](https://kentcdodds.com/blog/state-colocation-will-make-your-react-app-faster)
77 | [Kent's Blog - Application State Management with React](https://kentcdodds.com/blog/application-state-management-with-react)
78 | [React Docs - Lifting State Up](https://reactjs.org/docs/lifting-state-up.html)
79 |
--------------------------------------------------------------------------------
/25-react-make-http-requests-with-react-2fc53967.md:
--------------------------------------------------------------------------------
1 | # 25. Make HTTP Requests with React
2 |
3 | #### [📹 Video](https://egghead.io/lessons/react-v2-25-make-http-requests-with-react?pl=a-beginners-guide-to-react-v2-6c4d)
4 |
5 | #### [💻 CodeSandbox](https://codesandbox.io/s/github/kentcdodds/beginners-guide-to-react/tree/codesandbox/25-http?from-embed)
6 |
7 | ## Notes
8 |
9 | - Most useful React applications involve interacting with a server to load and persist data. To do this on the web, we use **HTTP requests** with the browser’s built-in fetch API.
10 | - HTTP requests like this are inherently asynchronous in nature and **they’re also side-effects** so we’ll need to manage not only starting the request, but also what we should show the user while the request is “in flight.”
11 |
12 | - In this lesson we’ll use a public **GraphQL server**that serves up pokemon data to load information for a given pokemon name. We’ll learn how to fetch that data inside a React.useEffect callback and display the results when the request completes.
13 |
14 | ```html
15 |
16 |
17 |
18 |
19 |
20 |
111 |
112 | ```
113 |
114 | ## Additional resource
115 |
116 | - [egghead courses - GraphQL](https://egghead.io/browse/tools/graphql)
117 | - [React Docs - AJAX and APIs](https://reactjs.org/docs/faq-ajax.html)
118 | - [Kent's Livestream - Testing axios](https://www.youtube.com/watch?v=YJKtzS1jGsI)
119 | - [MDN - An overview of HTTP](https://developer.mozilla.org/en-US/docs/Web/HTTP/Overview)
120 |
--------------------------------------------------------------------------------
/26-react-handle-http-errors-with-react.md:
--------------------------------------------------------------------------------
1 | # 26. Handle HTTP Errors with React
2 |
3 | #### [📹 Video](https://egghead.io/lessons/react-v2-26-handle-http-errors-with-react?pl=a-beginners-guide-to-react-v2-6c4d)
4 |
5 | #### [💻 CodeSandbox](https://codesandbox.io/s/github/kentcdodds/beginners-guide-to-react/tree/codesandbox/26-http-errors?from-embed)
6 |
7 | ## Notes
8 |
9 | - Unfortunately, sometimes a server request fails and we need to display a helpful error message to the user.
10 | - We’ll handle a promise rejection so we can collect that error information, and we’ll also learn how we can best display manage the state of our request so we have a deterministic render method to ensure we always show the user the proper information based on the current state of our React component.
11 |
12 | ```html
13 |
14 |
15 |
16 |
17 |
18 |
124 |
125 | ```
126 |
127 | ## Additional resource
128 |
129 | - [ROBIN WIERUCH - How to fetch data with React Hooks?](https://www.robinwieruch.de/react-hooks-fetch-data)
130 | - [Kent's Blog - How to use React Context effectively](https://kentcdodds.com/blog/how-to-use-react-context-effectively)
131 | - [repo - react-error-boundary](https://github.com/bvaughn/react-error-boundary)
132 |
--------------------------------------------------------------------------------
/27-react-install-and-use-react-devtools.md:
--------------------------------------------------------------------------------
1 | # 27. Install and use React DevTools
2 |
3 | #### [📹 Video](https://egghead.io/lessons/egghead-v2-27-install-and-use-react-devtools?pl=a-beginners-guide-to-react-v2-6c4d)
4 |
5 | ## Notes
6 |
7 | - It’s dangerous to go alone. Here take this: [React DevTools](https://chrome.google.com/webstore/detail/react-developer-tools/fmkadmapgofadopljbjfkapdkoienihi?hl=en)
8 | - The React Developer Tools extension is extremely useful in developing and debugging React applications. In this lesson we’ll get it installed and play around with some of the features. Definitely take some time to play around with the DevTools on your own. You’ll be using these a lot.
9 |
10 | - Installing from Chrome Tools:
11 |
12 | 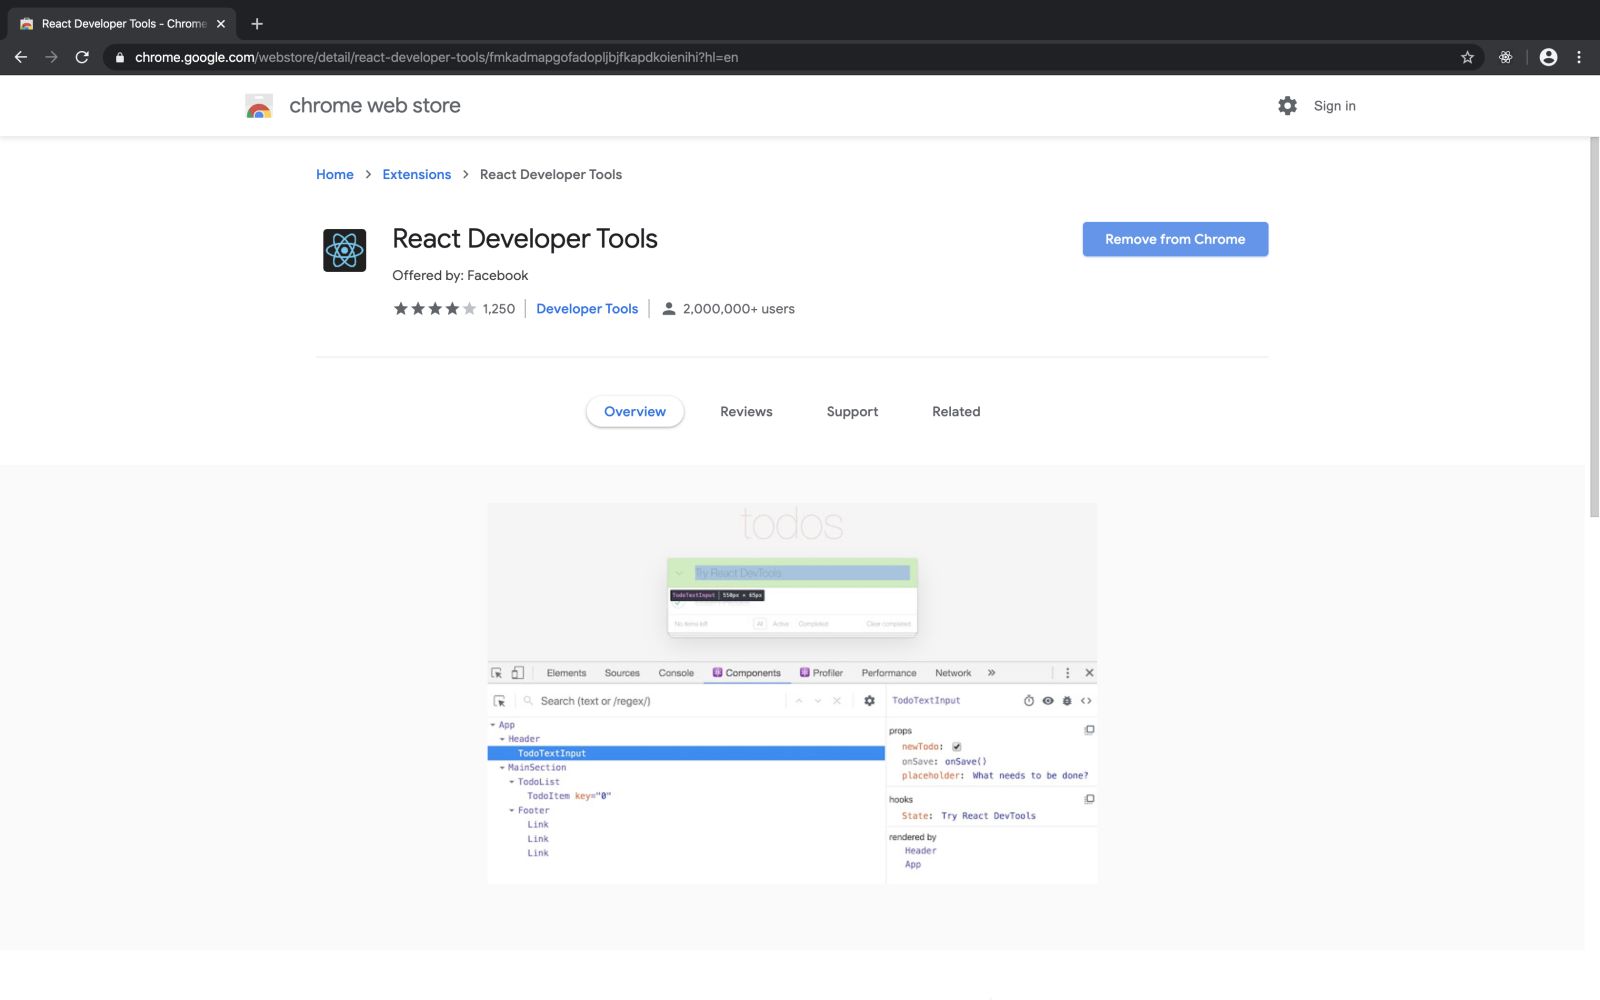
13 |
14 | - Checking for a production build:
15 |
16 | 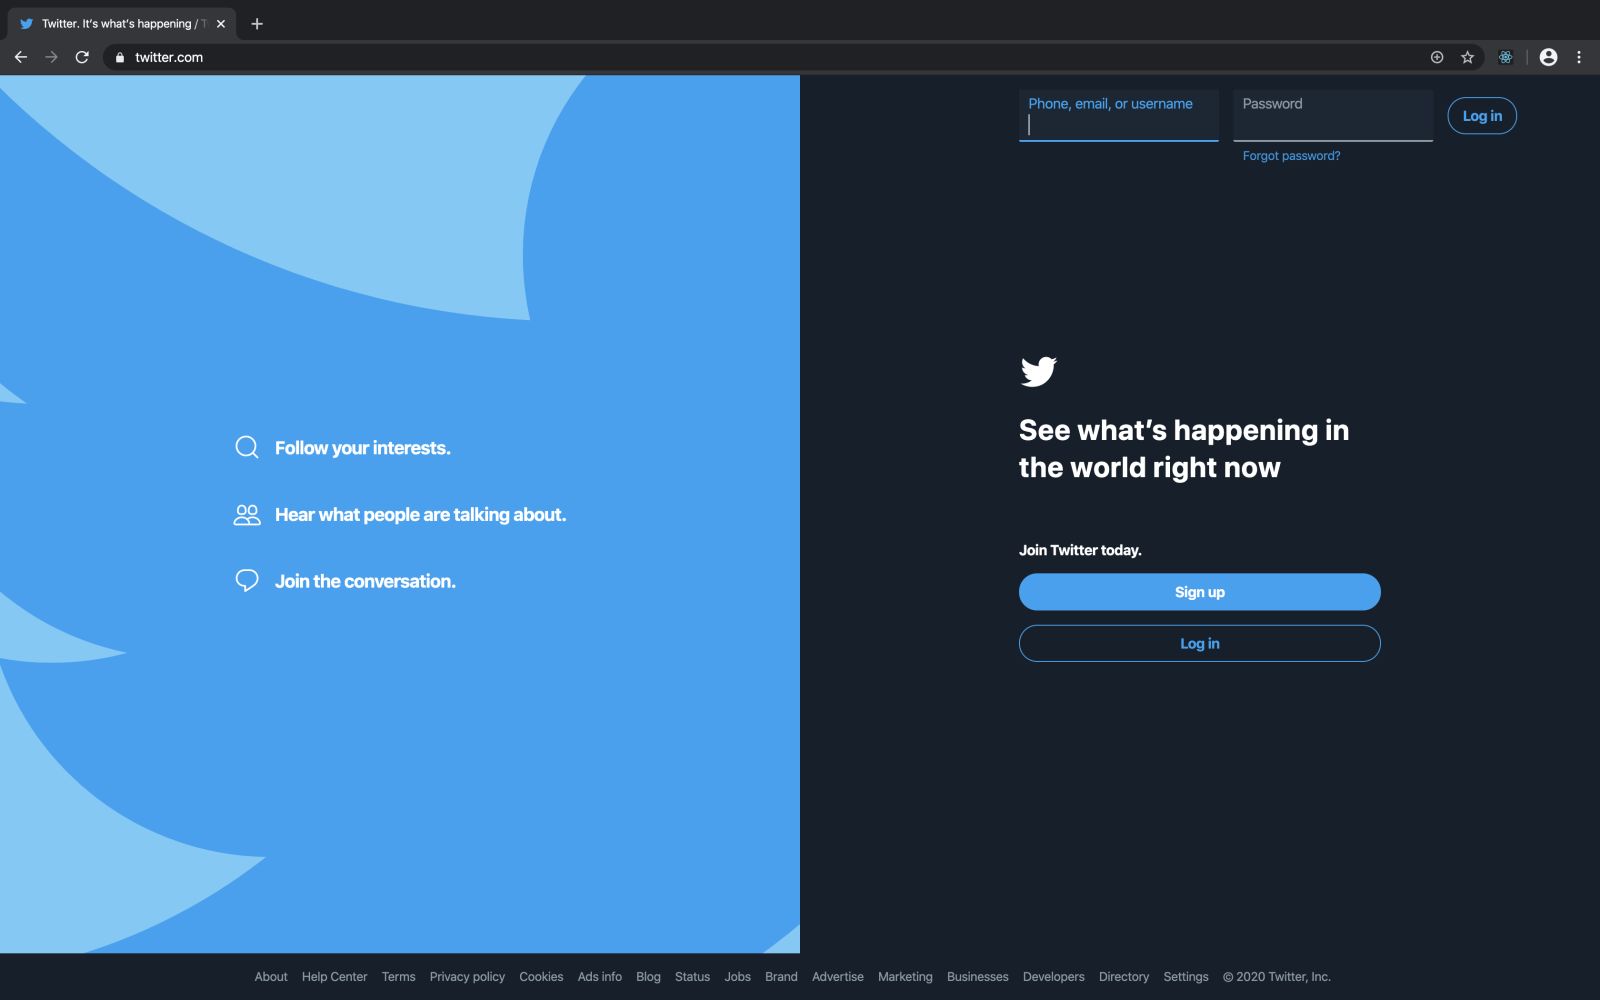
17 |
18 | - Inspecting with dev tools:
19 |
20 | 
21 |
22 | - Theme and filtering:
23 |
24 | 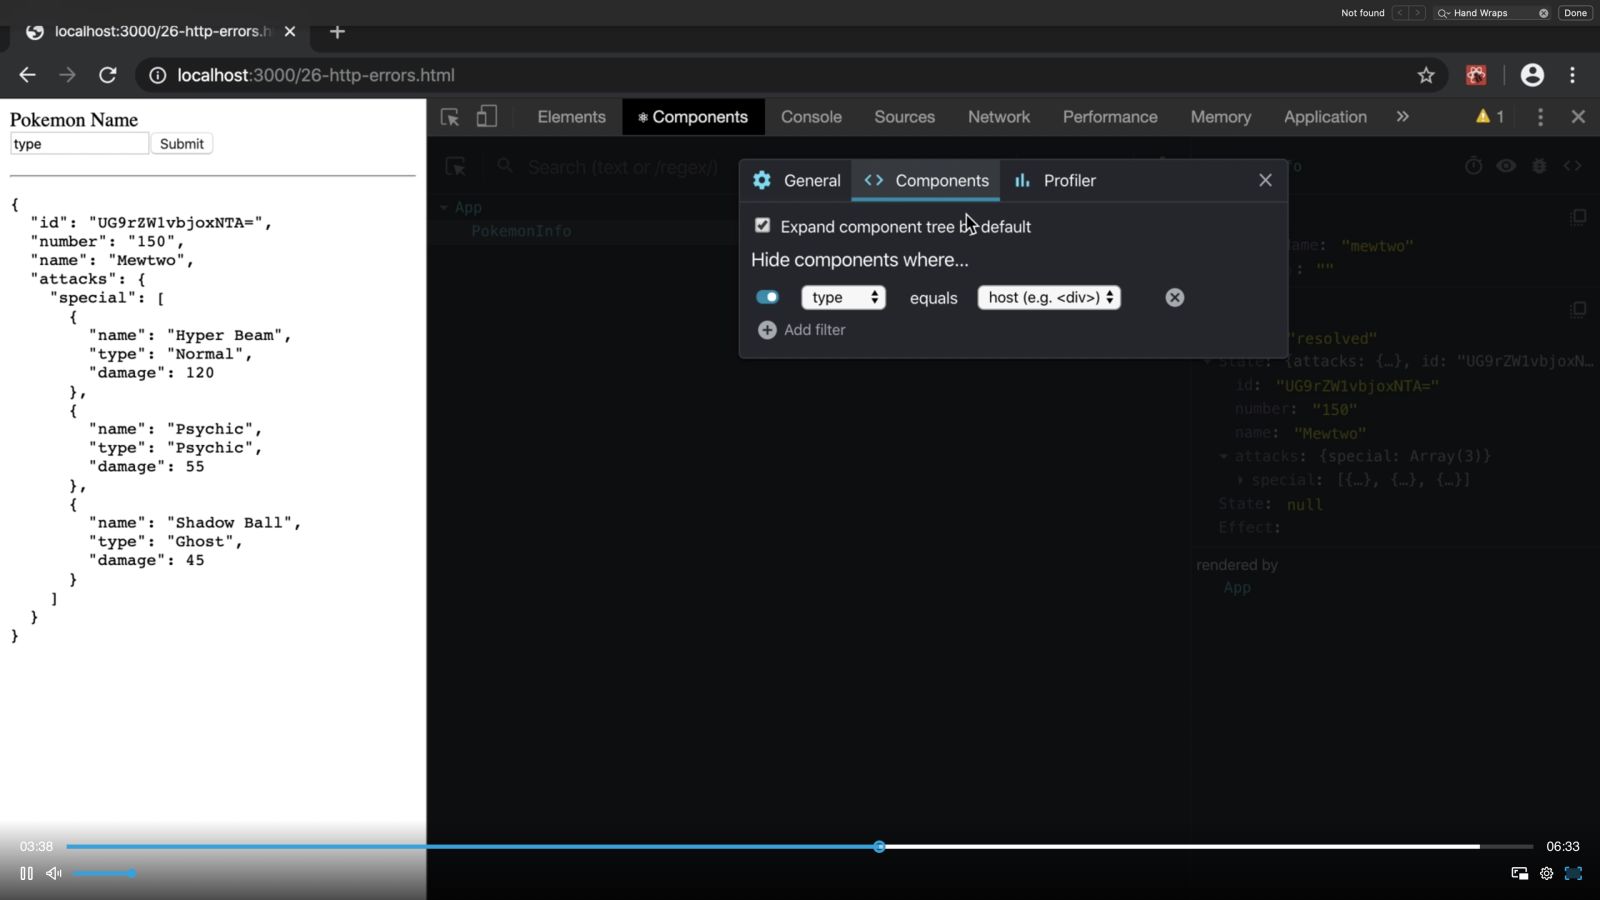
25 |
26 | - Using the profiling:
27 |
28 | 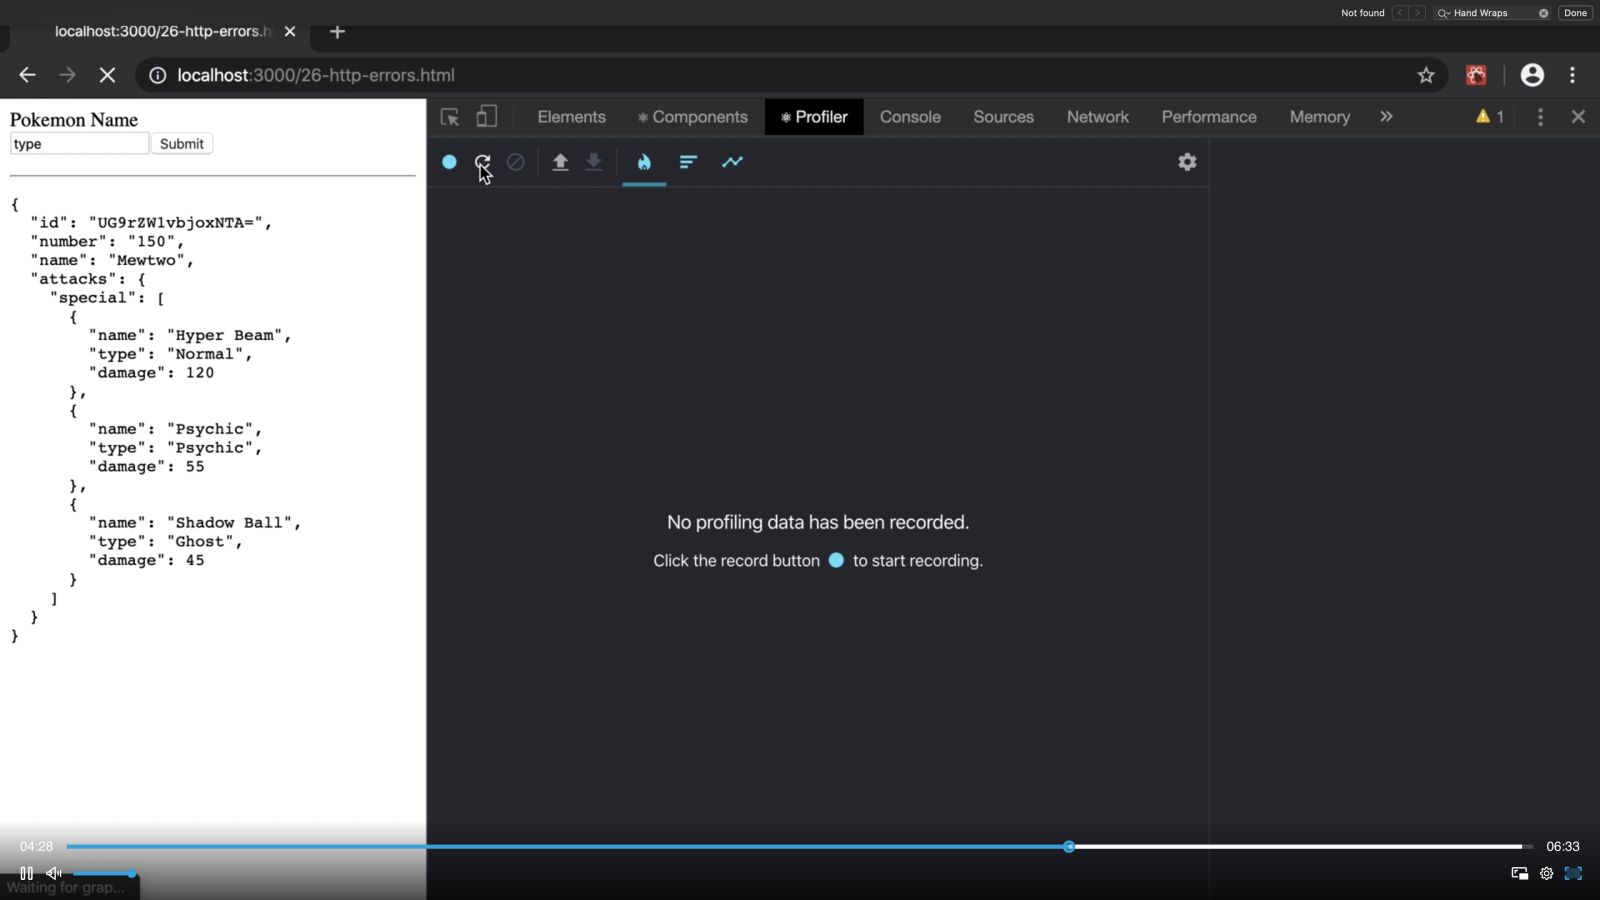
29 |
30 | - It's strongly advised that you install the React DevTools and play around with them so you become familiar with their capabilities and more productive developing React applications.
31 |
32 | ## Additional resource
33 |
34 | - [Kent's Livestream - React DevTools](https://www.youtube.com/watch?v=DQjMiKEwl_E&feature=youtu.be)
35 | - [React Docs - Introducing the New React DevTools](https://reactjs.org/blog/2019/08/15/new-react-devtools.html)
36 | - [Repo - React Developer Tools](https://github.com/bvaughn/react-devtools)
37 |
--------------------------------------------------------------------------------
/28-react-build-and-deploy-a-react-application-with-codesandbox-github-and-netlify.md:
--------------------------------------------------------------------------------
1 | # 28. Build and deploy a React Application
2 |
3 | #### [📹 Video](https://egghead.io/lessons/egghead-v2-28-build-and-deploy-a-react-application-with-codesandbox-github-and-netlify?pl=a-beginners-guide-to-react-v2-6c4d)
4 |
5 | ## Notes
6 |
7 | - Once you've figured out how React works locally in an index.html, you probably want to build an actual application and the best next place to start is by going to [codesandbox.io](codesandbox.io).
8 |
9 | 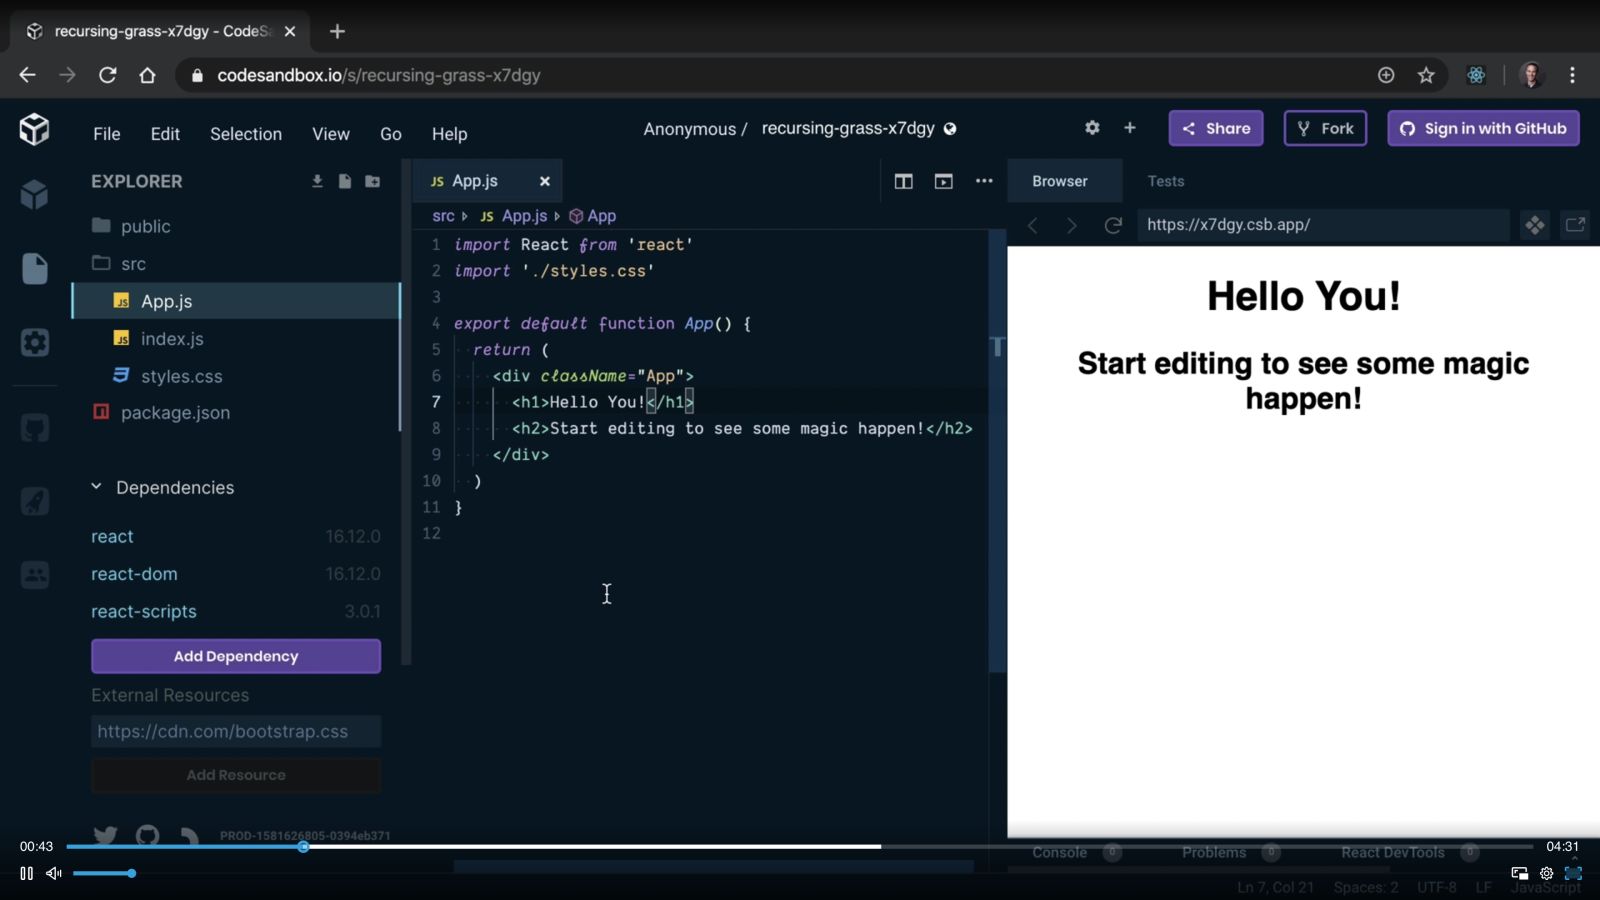
10 |
11 | - There are a ton of things that you can do in CodeSandbox. You can add dependencies from npm, you can add external resources, you can even change your typeface.
12 | - I can create a new repository. Example, CodeSandbox. We'll click Create Repository and CodeSandbox will create a repository on GitHub based on what I have right here.
13 |
14 | 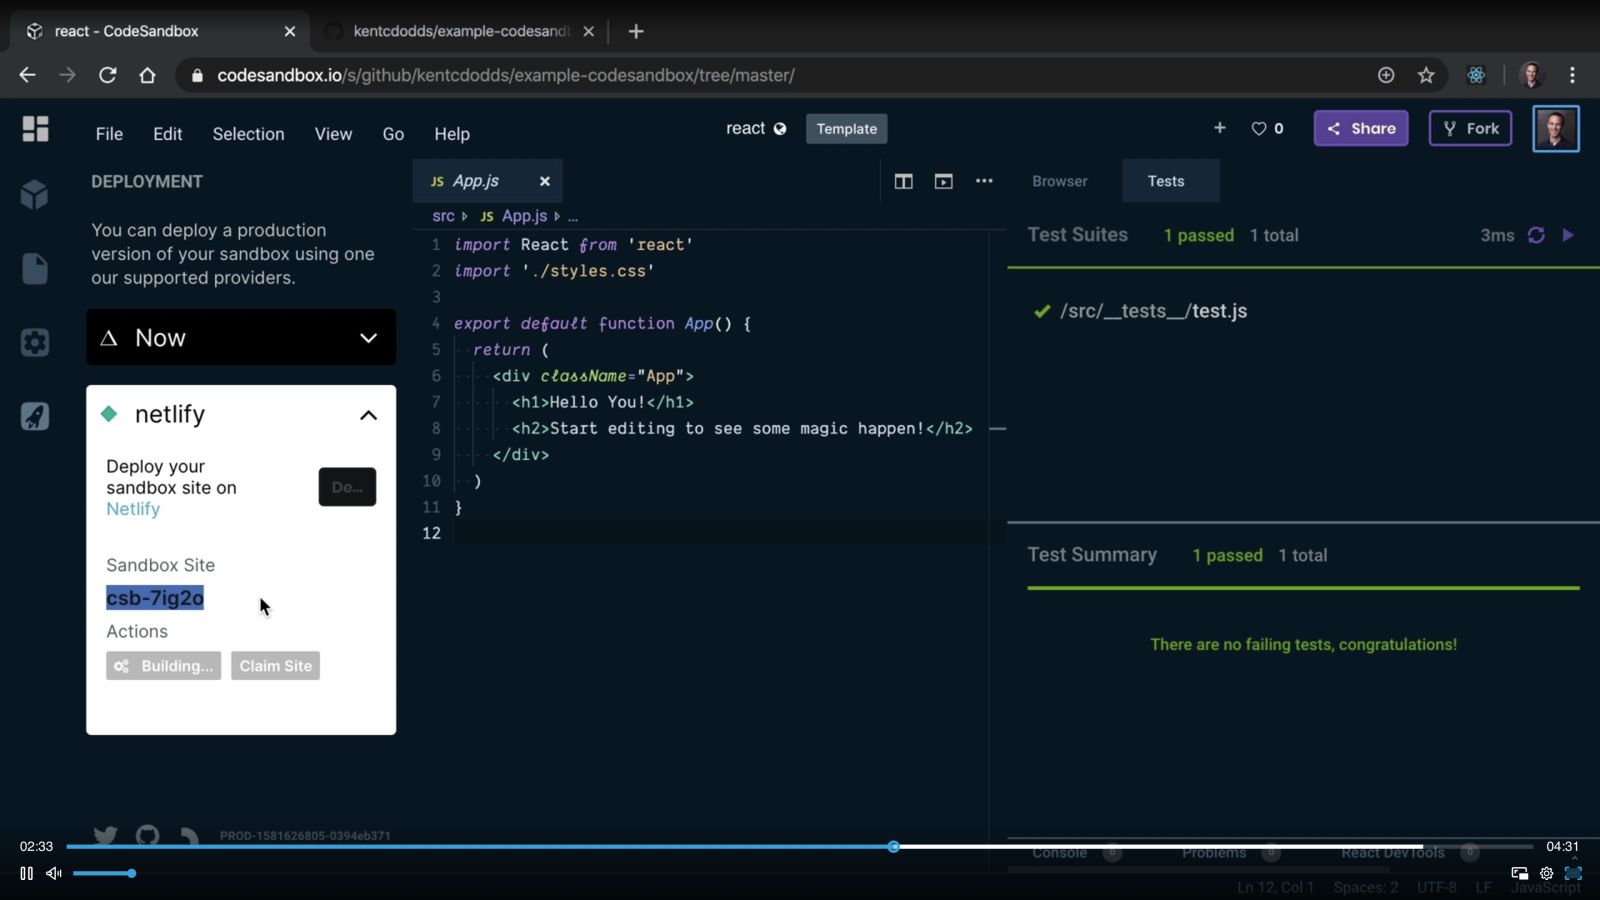
15 |
16 | - You can also deploy with Netlify.
17 |
18 | - Within Netlify, you can even make a custom domain and so you could create an entire application using just CodeSandbox, Netlify, and GitHub.
19 |
20 | 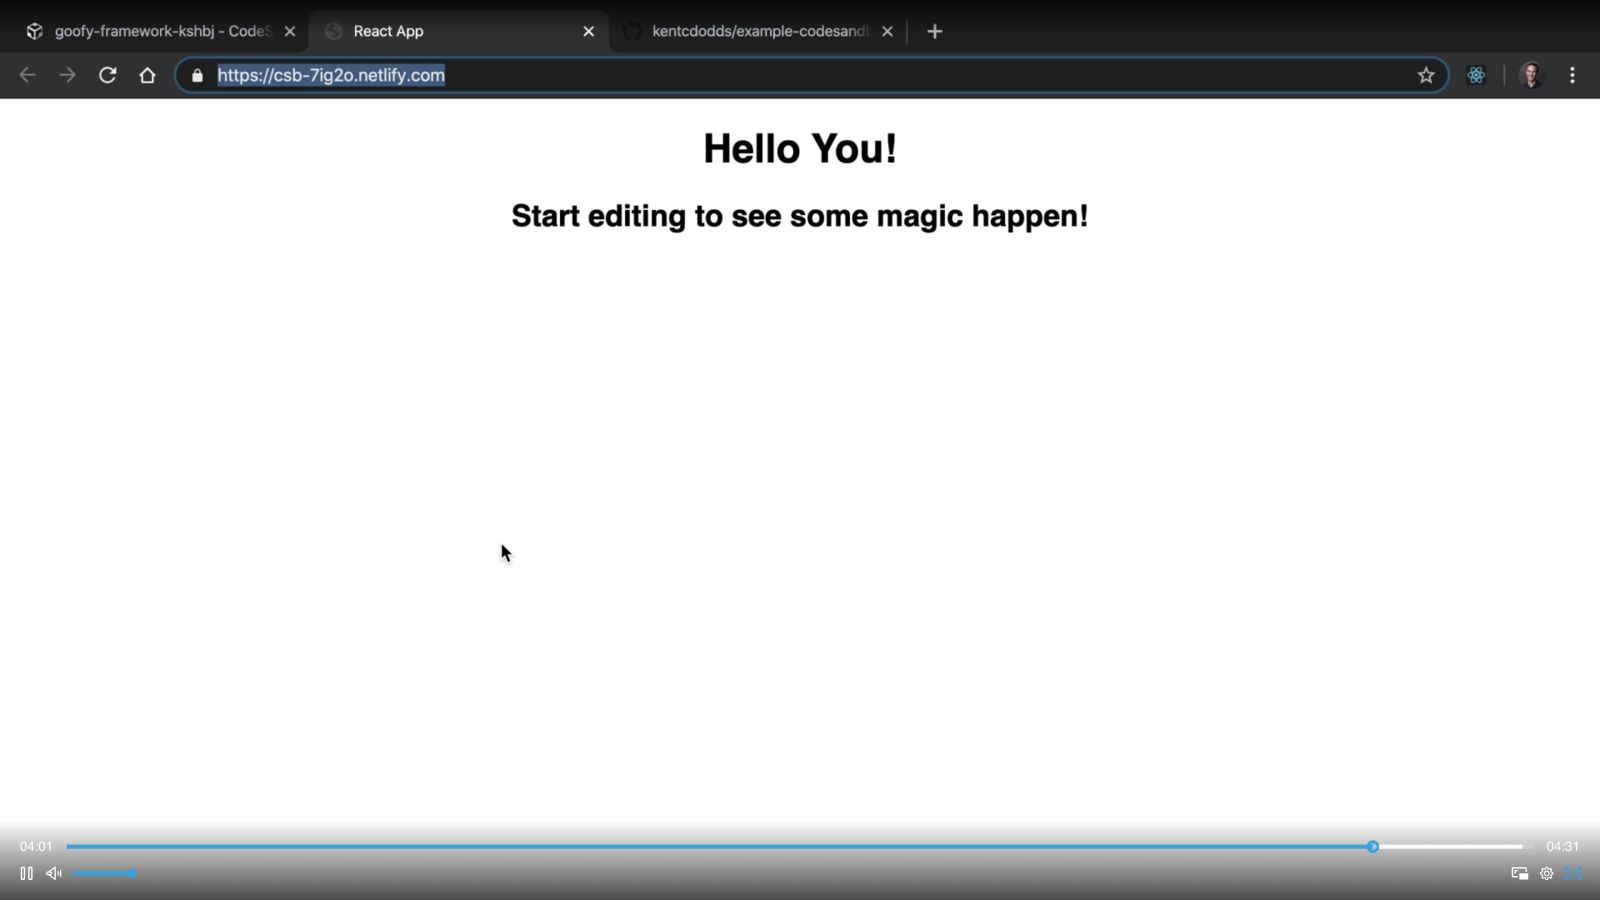
21 |
22 | ## Additional resource
23 |
24 | - [CodeSandbox](https://codesandbox.io)
25 | - [Netlify](https://www.netlify.com)
26 |
--------------------------------------------------------------------------------
/29-react-a-beginners-guide-to-react-outro.md:
--------------------------------------------------------------------------------
1 | # 29. A Beginners Guide to React Outro
2 |
3 | #### [📹 Video](https://egghead.io/lessons/egghead-v2-29-a-beginners-guide-to-react-outro?pl=a-beginners-guide-to-react-v2-6c4d)
4 |
5 | ## Notes
6 |
7 | **Instructor**:
8 |
9 | - [00:00](https://egghead.io/lessons/egghead-v2-29-a-beginners-guide-to-react-outro?pl=a-beginners-guide-to-react-v2-6c4d#t=0) **Did you have a good time?** I had a good time. I hope this gave you the foundation that you need if you're just getting started with React so that you can build upon this and make amazing experiences with React. If you've been using React for a while, and you came here to solidify your understanding of the fundamentals, I hope this did that for you, too.
10 |
11 | - [00:17](https://egghead.io/lessons/egghead-v2-29-a-beginners-guide-to-react-outro?pl=a-beginners-guide-to-react-v2-6c4d#t=17) I'm excited about React because I think that it can make the world a better place by making us more productive in building the applications that we're building for our users. I hope that you take the opportunity to build some amazing experience with this amazing library that we have, that we love, that we call React.
12 |
13 | ## Additional resource
14 |
15 | - [Kent's Website](http://kentcdodds.com/)
16 | - [Egghead](https://egghead.io/)
17 |
--------------------------------------------------------------------------------
/README.md:
--------------------------------------------------------------------------------
1 | DEPRECATED ⚠️ This notes repo has been moved to eggheadio/notes!
2 | 3 |A Beginners Guide to React 2020
4 | 5 | [](#contributors-) 6 | 7 | 8 | 9 |![]()
12 | 13 | 14 | [](#contributors-) 15 | 16 | 17 |
18 | 19 | These notes are intended to be used and studied in tandem with [Kent C. Dodds](https://egghead.io/instructors/kentcdodds)'s [A Beginners Guide to React (2020)](https://egghead.io/courses/the-beginner-s-guide-to-react) course. 20 | 21 | Generally, there is one document for each lesson in the course. Each section contains a link to the video and the code corresponding to that. 22 | 23 | ## Course Goal 24 | 25 | This course is for React newbies and anyone looking to build a solid foundation. It’s designed to teach you everything you need to start building web applications in React. 26 | 27 | ## Table of Contents 28 | 29 | - [00. A Beginners Guide to React Introduction](00-react-a-beginners-guide-to-react-introduction.md) 30 | - [01. Create a User Interface with Vanilla JavaScript and DOM](01-react-create-a-user-interface-with-vanilla-javascript-and-dom.md) 31 | - [02. Create a User Interface with React’s createElement API](02-react-create-a-user-interface-with-react-s-createelement-api.md) 32 | - [03. Create a User Interface with React’s JSX syntax](03-react-create-a-user-interface-with-react-s-jsx-syntax.md) 33 | - [04. Use JSX effectively with React](04-react-use-jsx-effectively-with-react.md) 34 | - [05. Render two elements side-by-side with React Fragments](05-react-render-two-elements-side-by-side-with-react-fragments.md) 35 | - [06. Create a Simple Reusable React Component](06-react-create-a-simple-reusable-react-component-50d59130.md) 36 | - [07. Validate Custom React Component Props with PropTypes](07-react-validate-custom-react-component-props-with-proptypes-9e1b5b13.md) 37 | - [08. Understand and Use Interpolation in JSX](08-react-understand-and-use-interpolation-in-jsx.md) 38 | - [09. Rerender a React Application](09-react-rerender-a-react-application-bea3a0e6.md) 39 | - [10. Style React Components with className and inline Styles](10-react-style-react-components-with-classname-and-inline-styles.md) 40 | - [11. Use Event Handlers with React](11-react-use-event-handlers-with-react-bd53256d.md) 41 | - [12. Manage state in a React Component with the useState hook](12-react-manage-state-in-a-react-component-with-the-usestate-hook.md) 42 | - [13. Manage side-effects in a React Component with the useEffect hook](13-react-manage-side-effects-in-a-react-component-with-the-useeffect-hook.md) 43 | - [14. Use a lazy initializer with useState](14-react-use-a-lazy-initializer-with-usestate.md) 44 | - [15. Manage the useEffect dependency array](15-react-manage-the-useeffect-dependency-array.md) 45 | - [16. Create reusable custom hooks](16-react-create-reusable-custom-hooks.md) 46 | - [17. Manipulate the DOM with React refs](17-react-manipulate-the-dom-with-react-refs-cad5c6be.md) 47 | - [18. Understand the React Hook Flow](18-react-understand-the-react-hook-flow.md) 48 | - [19. Make Basic Forms with React](19-react-make-basic-forms-with-react-cfc2ec08.md) 49 | - [20. Make Dynamic Forms with React](20-react-make-dynamic-forms-with-react-d69753ec.md) 50 | - [21. Controlling Form Values with React](21-react-controlling-form-values-with-react-4627dd2d.md) 51 | - [22. Using React Error Boundaries to handle errors in React Components](22-react-using-react-error-boundaries-to-handle-errors-in-react-components.md) 52 | - [23. Use the key prop when Rendering a List with React](23-react-use-the-key-prop-when-rendering-a-list-with-react-12564a86.md) 53 | - [24. Lifting and colocating React State](24-react-lifting-and-colocating-react-state.md) 54 | - [25. Make HTTP Requests with React](25-react-make-http-requests-with-react-2fc53967.md) 55 | - [26. Handle HTTP Errors with React](26-react-handle-http-errors-with-react.md) 56 | - [27. Install and use React DevTools](27-react-install-and-use-react-devtools.md) 57 | - [28. Build and deploy a React Application with Codesandbox, GitHub, and Netlify](28-react-build-and-deploy-a-react-application-with-codesandbox-github-and-netlify.md) 58 | - [29. A Beginners Guide to React Outro](29-react-a-beginners-guide-to-react-outro.md) 59 | 60 | 61 | ## Contributors ✨ 62 | 63 | Thanks goes to these wonderful people ([emoji key](https://allcontributors.org/docs/en/emoji-key)): 64 | 65 | 66 | 67 | Tom Byrer 🖋 |
70 |
 Lauro Silva 👀🖋 |
83 |  rosaxny 🖋 84 | |
85 |  Koji 🖋 |
86 |
87 |  Amandeep Singh 🖋 |
88 |
89 |  Michael Grinthal 🖋 |
90 |
91 |  Phạm Ngọc Hòa 🖋 |
92 |
93 |
94 |
95 |
96 |