├── Project22.md
├── README.md
├── LICENSE
├── Project5.md
├── Project8.md
├── Project10.md
├── Project20.md
├── Project1.md
├── Project9.md
├── Project11.md
├── Project6.md
├── Project7.md
├── Project4.md
├── Project12.md
├── Project2.md
├── Project19.md
├── Project16.md
├── Project3.md
├── Project14.md
└── Project17.md
/Project22.md:
--------------------------------------------------------------------------------
1 |
2 |
--------------------------------------------------------------------------------
/README.md:
--------------------------------------------------------------------------------
1 | # DevOps-projects
2 | All DevOps related projects
3 |
--------------------------------------------------------------------------------
/LICENSE:
--------------------------------------------------------------------------------
1 | MIT License
2 |
3 | Copyright (c) 2022 Cynthia Okoduwa
4 |
5 | Permission is hereby granted, free of charge, to any person obtaining a copy
6 | of this software and associated documentation files (the "Software"), to deal
7 | in the Software without restriction, including without limitation the rights
8 | to use, copy, modify, merge, publish, distribute, sublicense, and/or sell
9 | copies of the Software, and to permit persons to whom the Software is
10 | furnished to do so, subject to the following conditions:
11 |
12 | The above copyright notice and this permission notice shall be included in all
13 | copies or substantial portions of the Software.
14 |
15 | THE SOFTWARE IS PROVIDED "AS IS", WITHOUT WARRANTY OF ANY KIND, EXPRESS OR
16 | IMPLIED, INCLUDING BUT NOT LIMITED TO THE WARRANTIES OF MERCHANTABILITY,
17 | FITNESS FOR A PARTICULAR PURPOSE AND NONINFRINGEMENT. IN NO EVENT SHALL THE
18 | AUTHORS OR COPYRIGHT HOLDERS BE LIABLE FOR ANY CLAIM, DAMAGES OR OTHER
19 | LIABILITY, WHETHER IN AN ACTION OF CONTRACT, TORT OR OTHERWISE, ARISING FROM,
20 | OUT OF OR IN CONNECTION WITH THE SOFTWARE OR THE USE OR OTHER DEALINGS IN THE
21 | SOFTWARE.
22 |
--------------------------------------------------------------------------------
/Project5.md:
--------------------------------------------------------------------------------
1 | ## Client/Server Architecture Using A MySQL Relational Database Management System
2 | ### TASK – Implement a Client Server Architecture using MySQL Database Management System (DBMS).
3 | #### Steps
4 | 1. Spin up two Linux-based virtual servers (EC2 instances in AWS) and name them: `mysql server` and `mysql client` respectively.
5 | 2. Run `sudo apt update -y` for lastest updates on server.
6 | 
7 |
8 | 3. Next, on **mysql server** install MySQL Server software: `sudo apt install mysql-server -y`
9 | 4. On **mysql client** install MySQL Client software: `sudo apt install mysql-client -y`
10 | 
11 |
12 | 5. Edit Inbound rule on **mysql server** to allow access to **mysql client** traffic. MySQL server uses TCP port 3306 by default. Specify inbound traffic from the IP
13 | of **mysql cient** for extra security.
14 | 
15 |
16 | 6. For **mysql client** to gain remote access to **mysql server** we need to create and database and a user on **mysql server**. To start with run the mysql security
17 | script: `sudo mysql_secure_installation` Follow the prompts and answer appropraitely to finish the process.
18 | 
19 |
20 | 7. Run mysql command: `sudo mysql` This would take you to the mysql prompt (You may be required to input password if you opten for the validate password during
21 | the security script installation)
22 | 8. Next, create the remote user with this following command: `CREATE USER 'remote_user'@'%' IDENTIFIED WITH mysql_native_password BY 'password';`
23 | 
24 |
25 | 9. Create database with: `CREATE DATABASE test_db;`
26 | 10. Then grant privieges to remote_user: `GRANT ALL ON test_db.* TO 'remote_user'@'%' WITH GRANT OPTION;`
27 | 11. . Finally, flush privileges and exit mysql : `FLUSH PRIVILEGES;`
28 | 
29 |
30 | 12. Having created the user and database, configure MySQL server to allow connections from remote hosts. Use the following command: `sudo vi /etc/mysql/mysql.conf.d/mysqld.cnf`
31 | 13. In the text editor, replace the old **Bind-address** from ‘127.0.0.1’ to ‘0.0.0.0’ then save and exit.
32 | 
33 |
34 | 14. Next, we restart mysql with: `sudo systemctl restart mysql`
35 | 15. From **mysql client** connect remotely to **mysql server** Database Engine without using SSH. Using the mysql utility to perform this action type:
36 | `sudo mysql -u remote_user -h 172.31.3.70 -p` and enter `password` for the user password.
37 | 
38 |
39 | 16. This gives us access into the mysql server database engine.
40 | 17. Finally type: `Show databases;` to show the test_db database that was created.
41 | 
42 |
--------------------------------------------------------------------------------
/Project8.md:
--------------------------------------------------------------------------------
1 | # LOAD BALANCER SOLUTION WITH APACHE
2 | 
3 | ### Step 1 Configure Apache As A Load Balancer
4 | 1. Create an Ubuntu Server 20.04 EC2 instance and name it **Project-8-apache-lb**.
5 | 2. Open TCP port 80 on **Project-8-apache-lb** by creating an Inbound Rule in Security Group.
6 | 3. Connect to the server through the SSh terminal and install Apache Load balancer then configure it to point traffic coming to LB to the Web Servers by running the following:
7 | ```
8 | sudo apt update
9 | sudo apt install apache2 -y
10 | sudo apt-get install libxml2-dev
11 | ```
12 | 4. Enable the following and restart the service:
13 | ```
14 | sudo a2enmod rewrite
15 | sudo a2enmod proxy
16 | sudo a2enmod proxy_balancer
17 | sudo a2enmod proxy_http
18 | sudo a2enmod headers
19 | sudo a2enmod lbmethod_bytraffic
20 |
21 | sudo systemctl restart apache2
22 | ```
23 | 5. Ensure Apache2 is up and running: `sudo systemctl status apache2`
24 | 
25 |
26 | 7. Next, configure load balancing in the default config file: `sudo vi /etc/apache2/sites-available/000-default.conf`
27 | 8. In the config file add and save the following configuration into this section **** making sure to enter the IP of the webservers
28 | ```
29 |
30 | BalancerMember http://172.31.95.40:80 loadfactor=5 timeout=1
31 | BalancerMember http://172.31.89.249:80 loadfactor=5 timeout=1
32 | ProxySet lbmethod=bytraffic
33 | # ProxySet lbmethod=byrequests
34 |
35 |
36 | ProxyPreserveHost On
37 | ProxyPass / balancer://mycluster/
38 | ProxyPassReverse / balancer://mycluster/
39 | ```
40 | 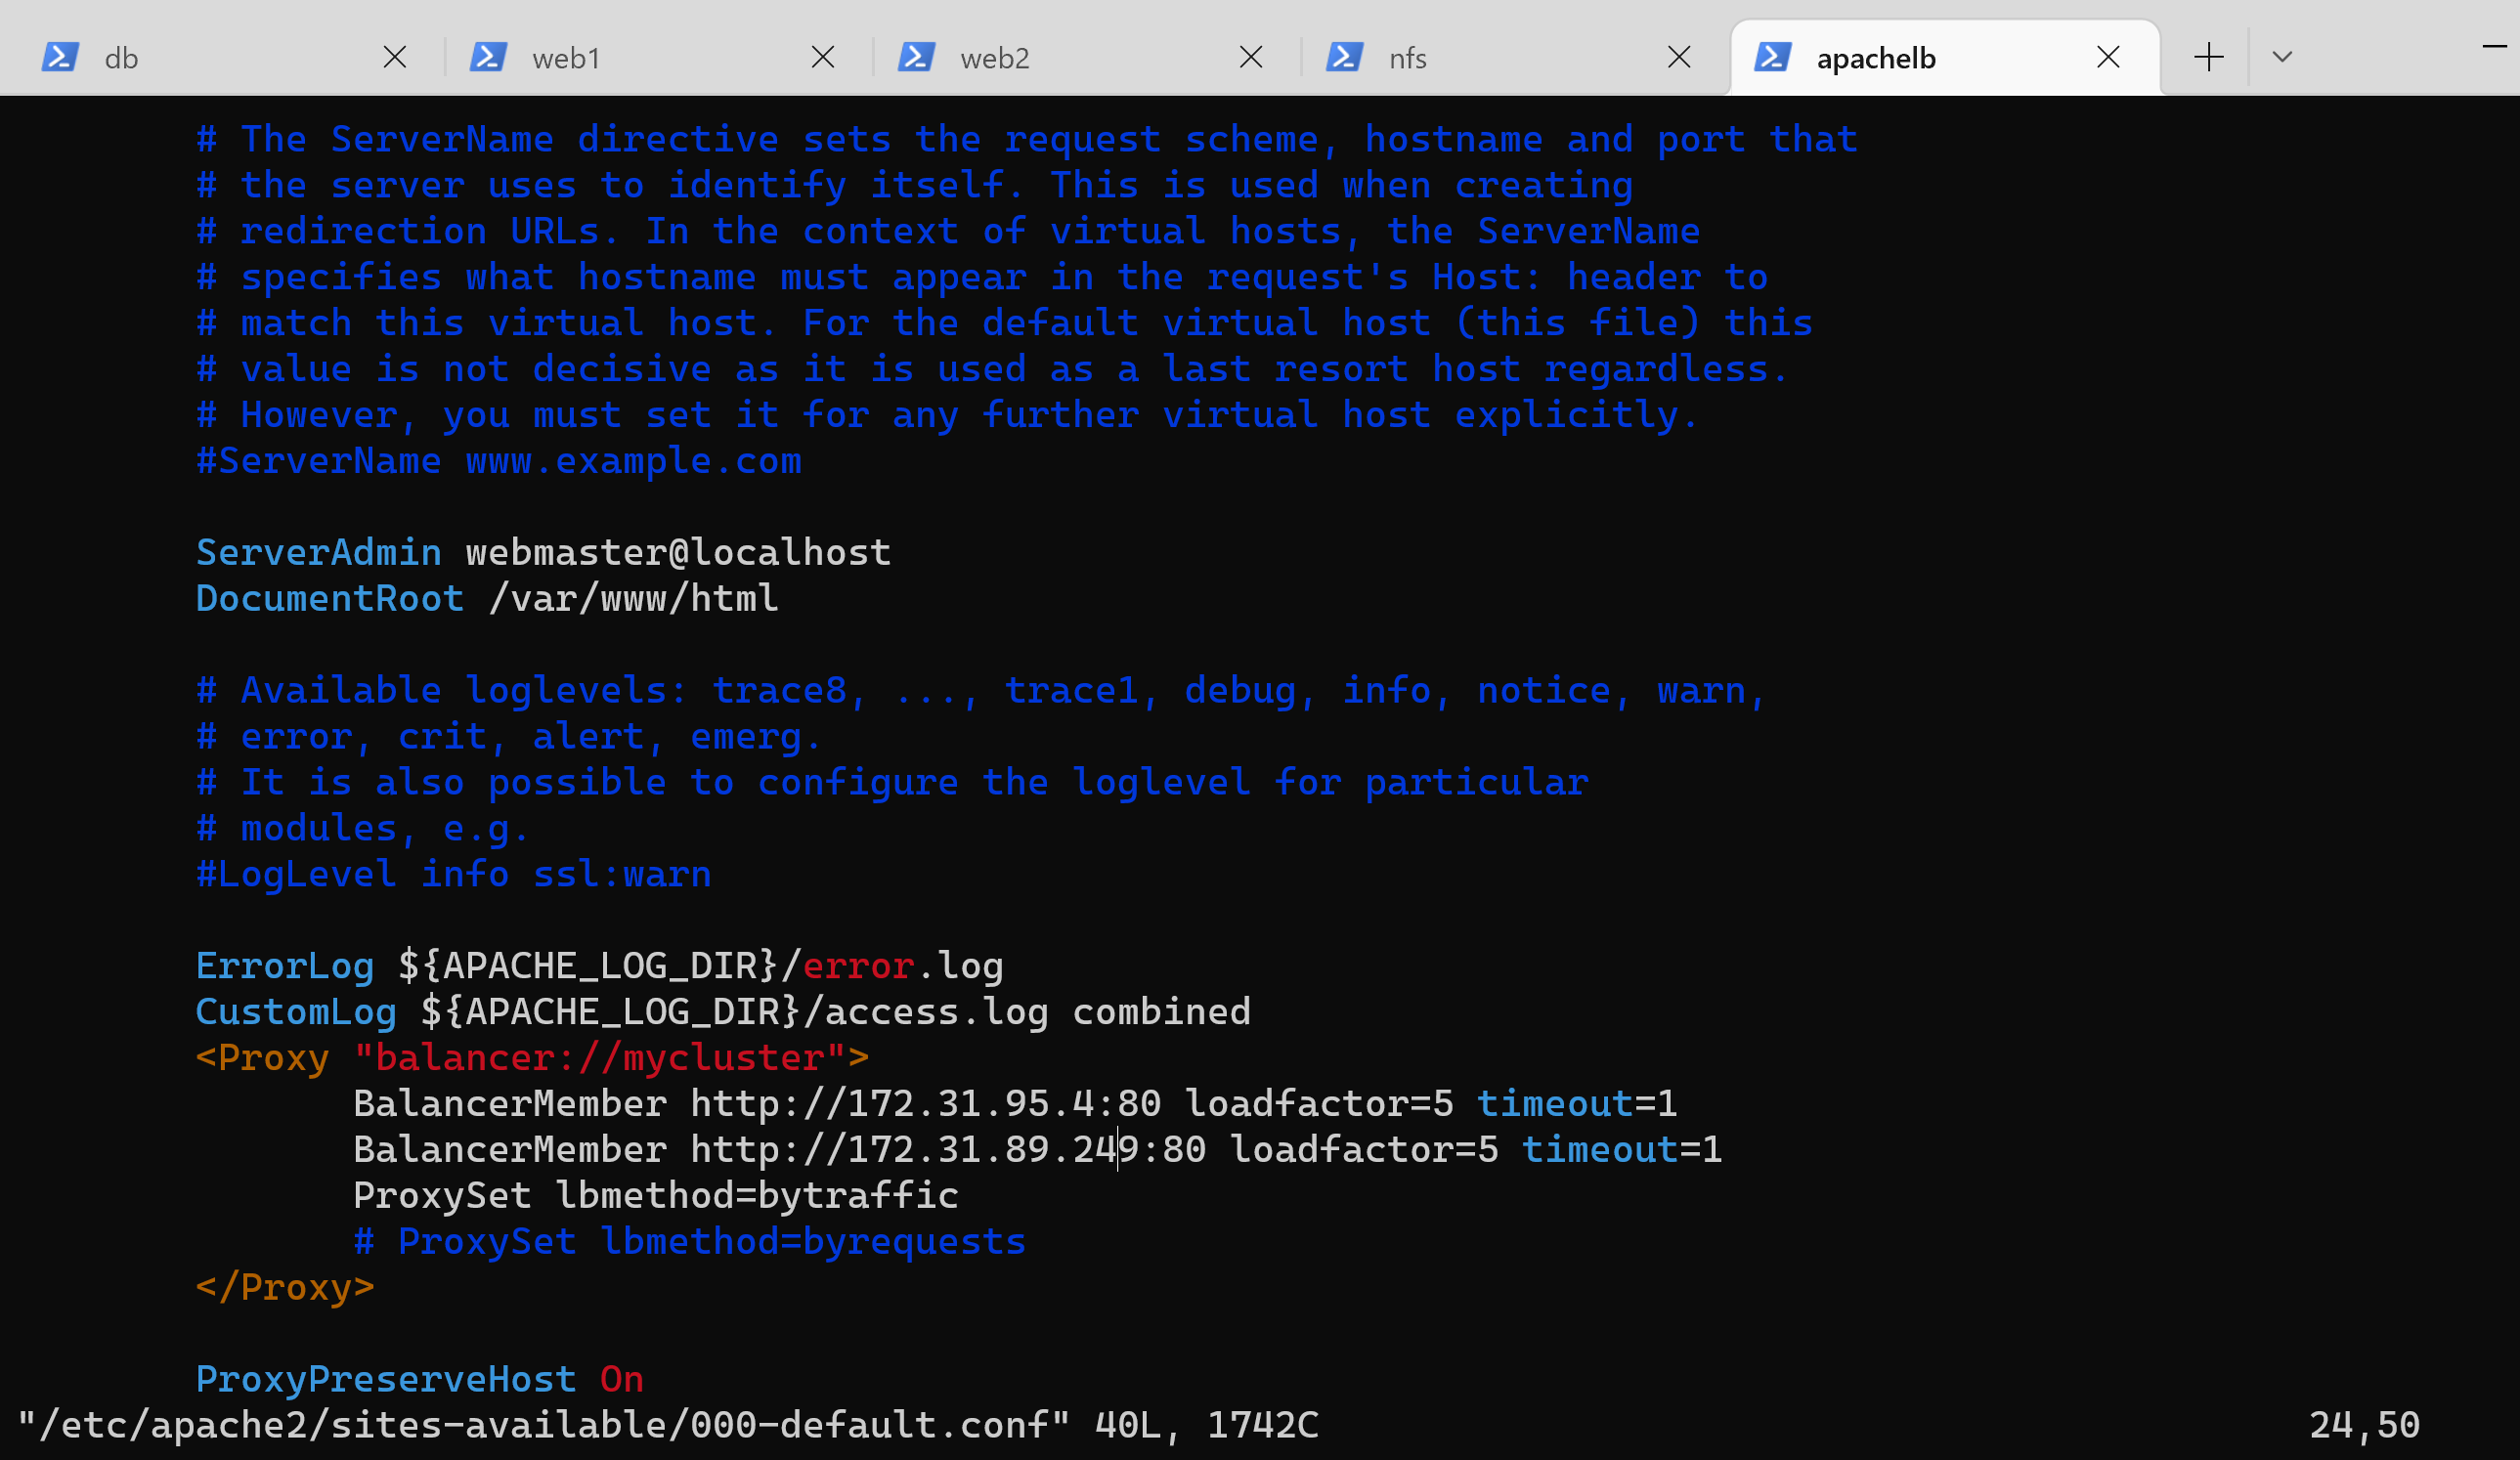
41 |
42 | 8. Restart Apache server: `sudo systemctl restart apache2`
43 | 9. Verify that our configuration works – try to access your LB’s public IP address or Public DNS name from your browser:
44 | `http:///index.php`
45 | 
46 | * The load balancer accepts the traffic and distributes it between the servers according to the method that was specified.
47 | 10. In Project-7 I had mounted **/var/log/httpd/** from the Web Servers to the NFS server, here I shall unmount them and give each Web Server has its own log directory: `sudo umount -f /var/log/httpd`
48 | 11. Open two ssh/Putty consoles for both Web Servers and run following command: `sudo tail -f /var/log/httpd/access_log`
49 | 12. Refresh the browser page `http://172.31.95.118/index.php` with the load balancer public IP several times and make sure that both servers receive HTTP GET requests from your LB – new records will appear in each server’s log file. The number of requests to each server will be approximately the same since we set loadfactor to the same value for both servers – it means that traffic will be disctributed evenly between them.
50 | 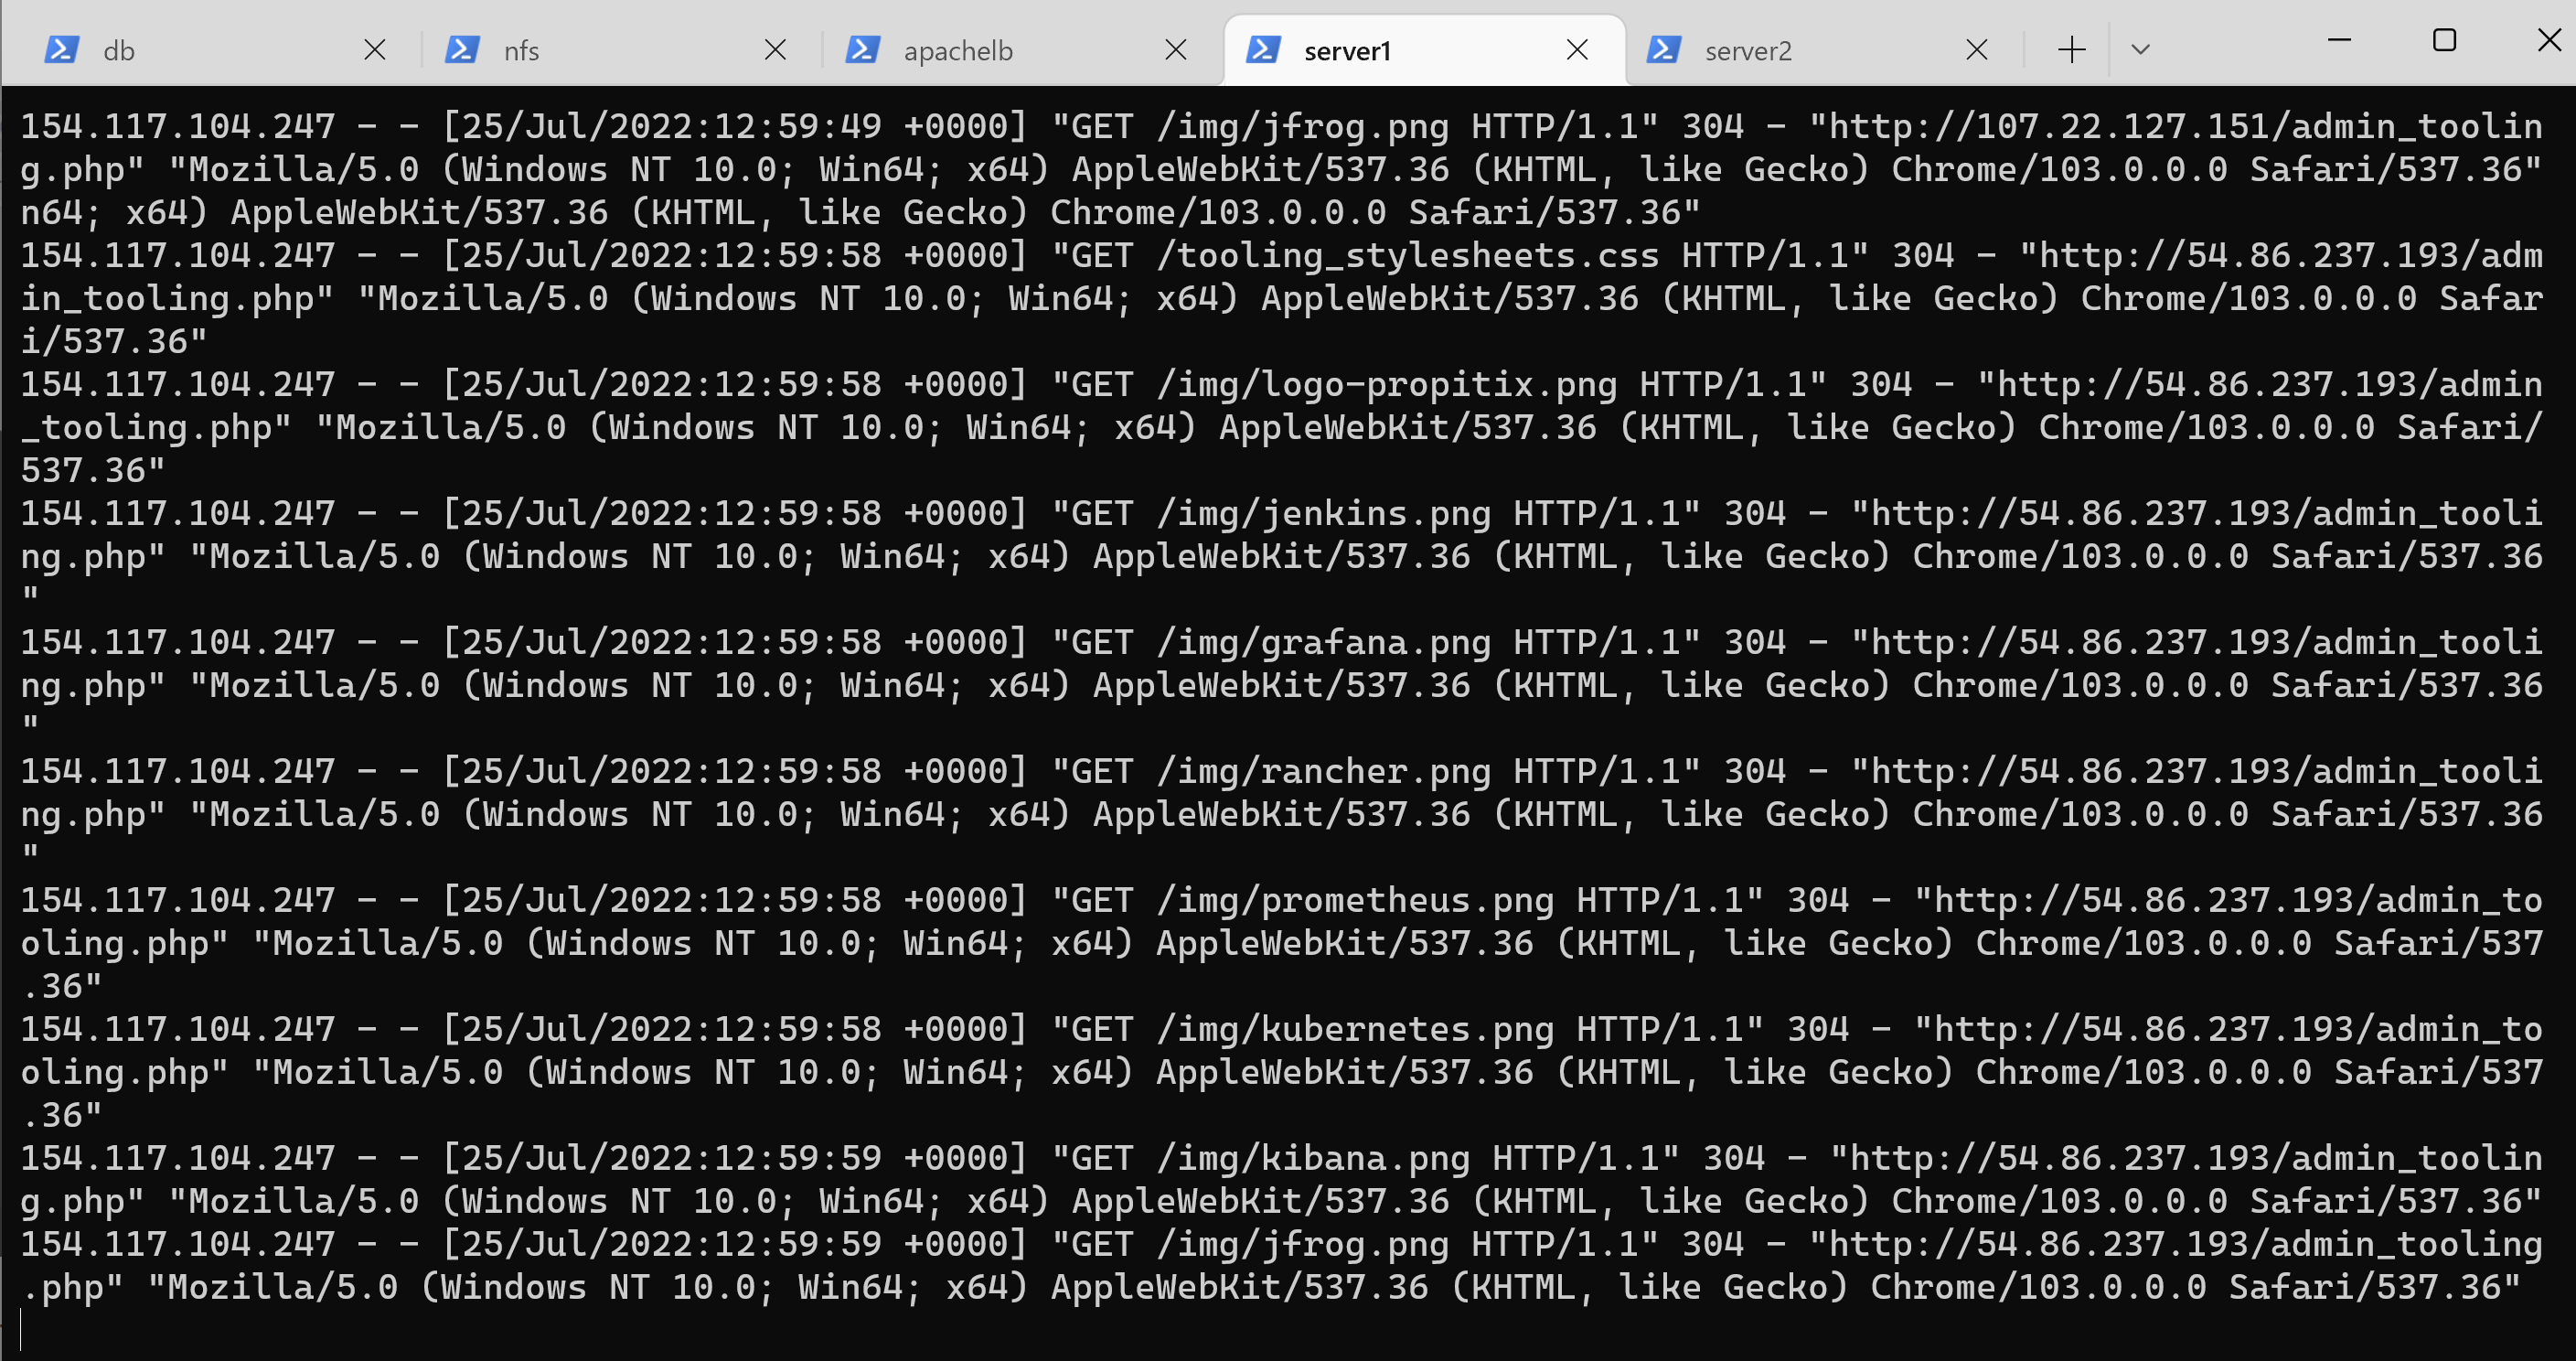
51 | 
52 |
53 | ### Step 2 – Configure Local DNS Names Resolution
54 | 1. Sometimes it may become tedious to remember and switch between IP addresses, especially when you have a lot of servers under your management.
55 | We can solve this by configuring local domain name resolution. The easiest way is to use **/etc/hosts file**, although this approach is not very scalable, but it is very easy to configure and shows the concept well.
56 | 2. Open this file on your LB server: `sudo vi /etc/hosts`
57 | 3. Add 2 records into this file with Local IP address and arbitrary name for both of your Web Servers
58 | ```
59 | 172.31.95.40 Web1
60 | 172.31.89.249 Web2
61 | ```
62 | 
63 |
64 | 3. Now you can update your LB config file with those names instead of IP addresses.
65 | ```
66 | BalancerMember http://Web1:80 loadfactor=5 timeout=1
67 | BalancerMember http://Web2:80 loadfactor=5 timeout=1
68 | ```
69 | 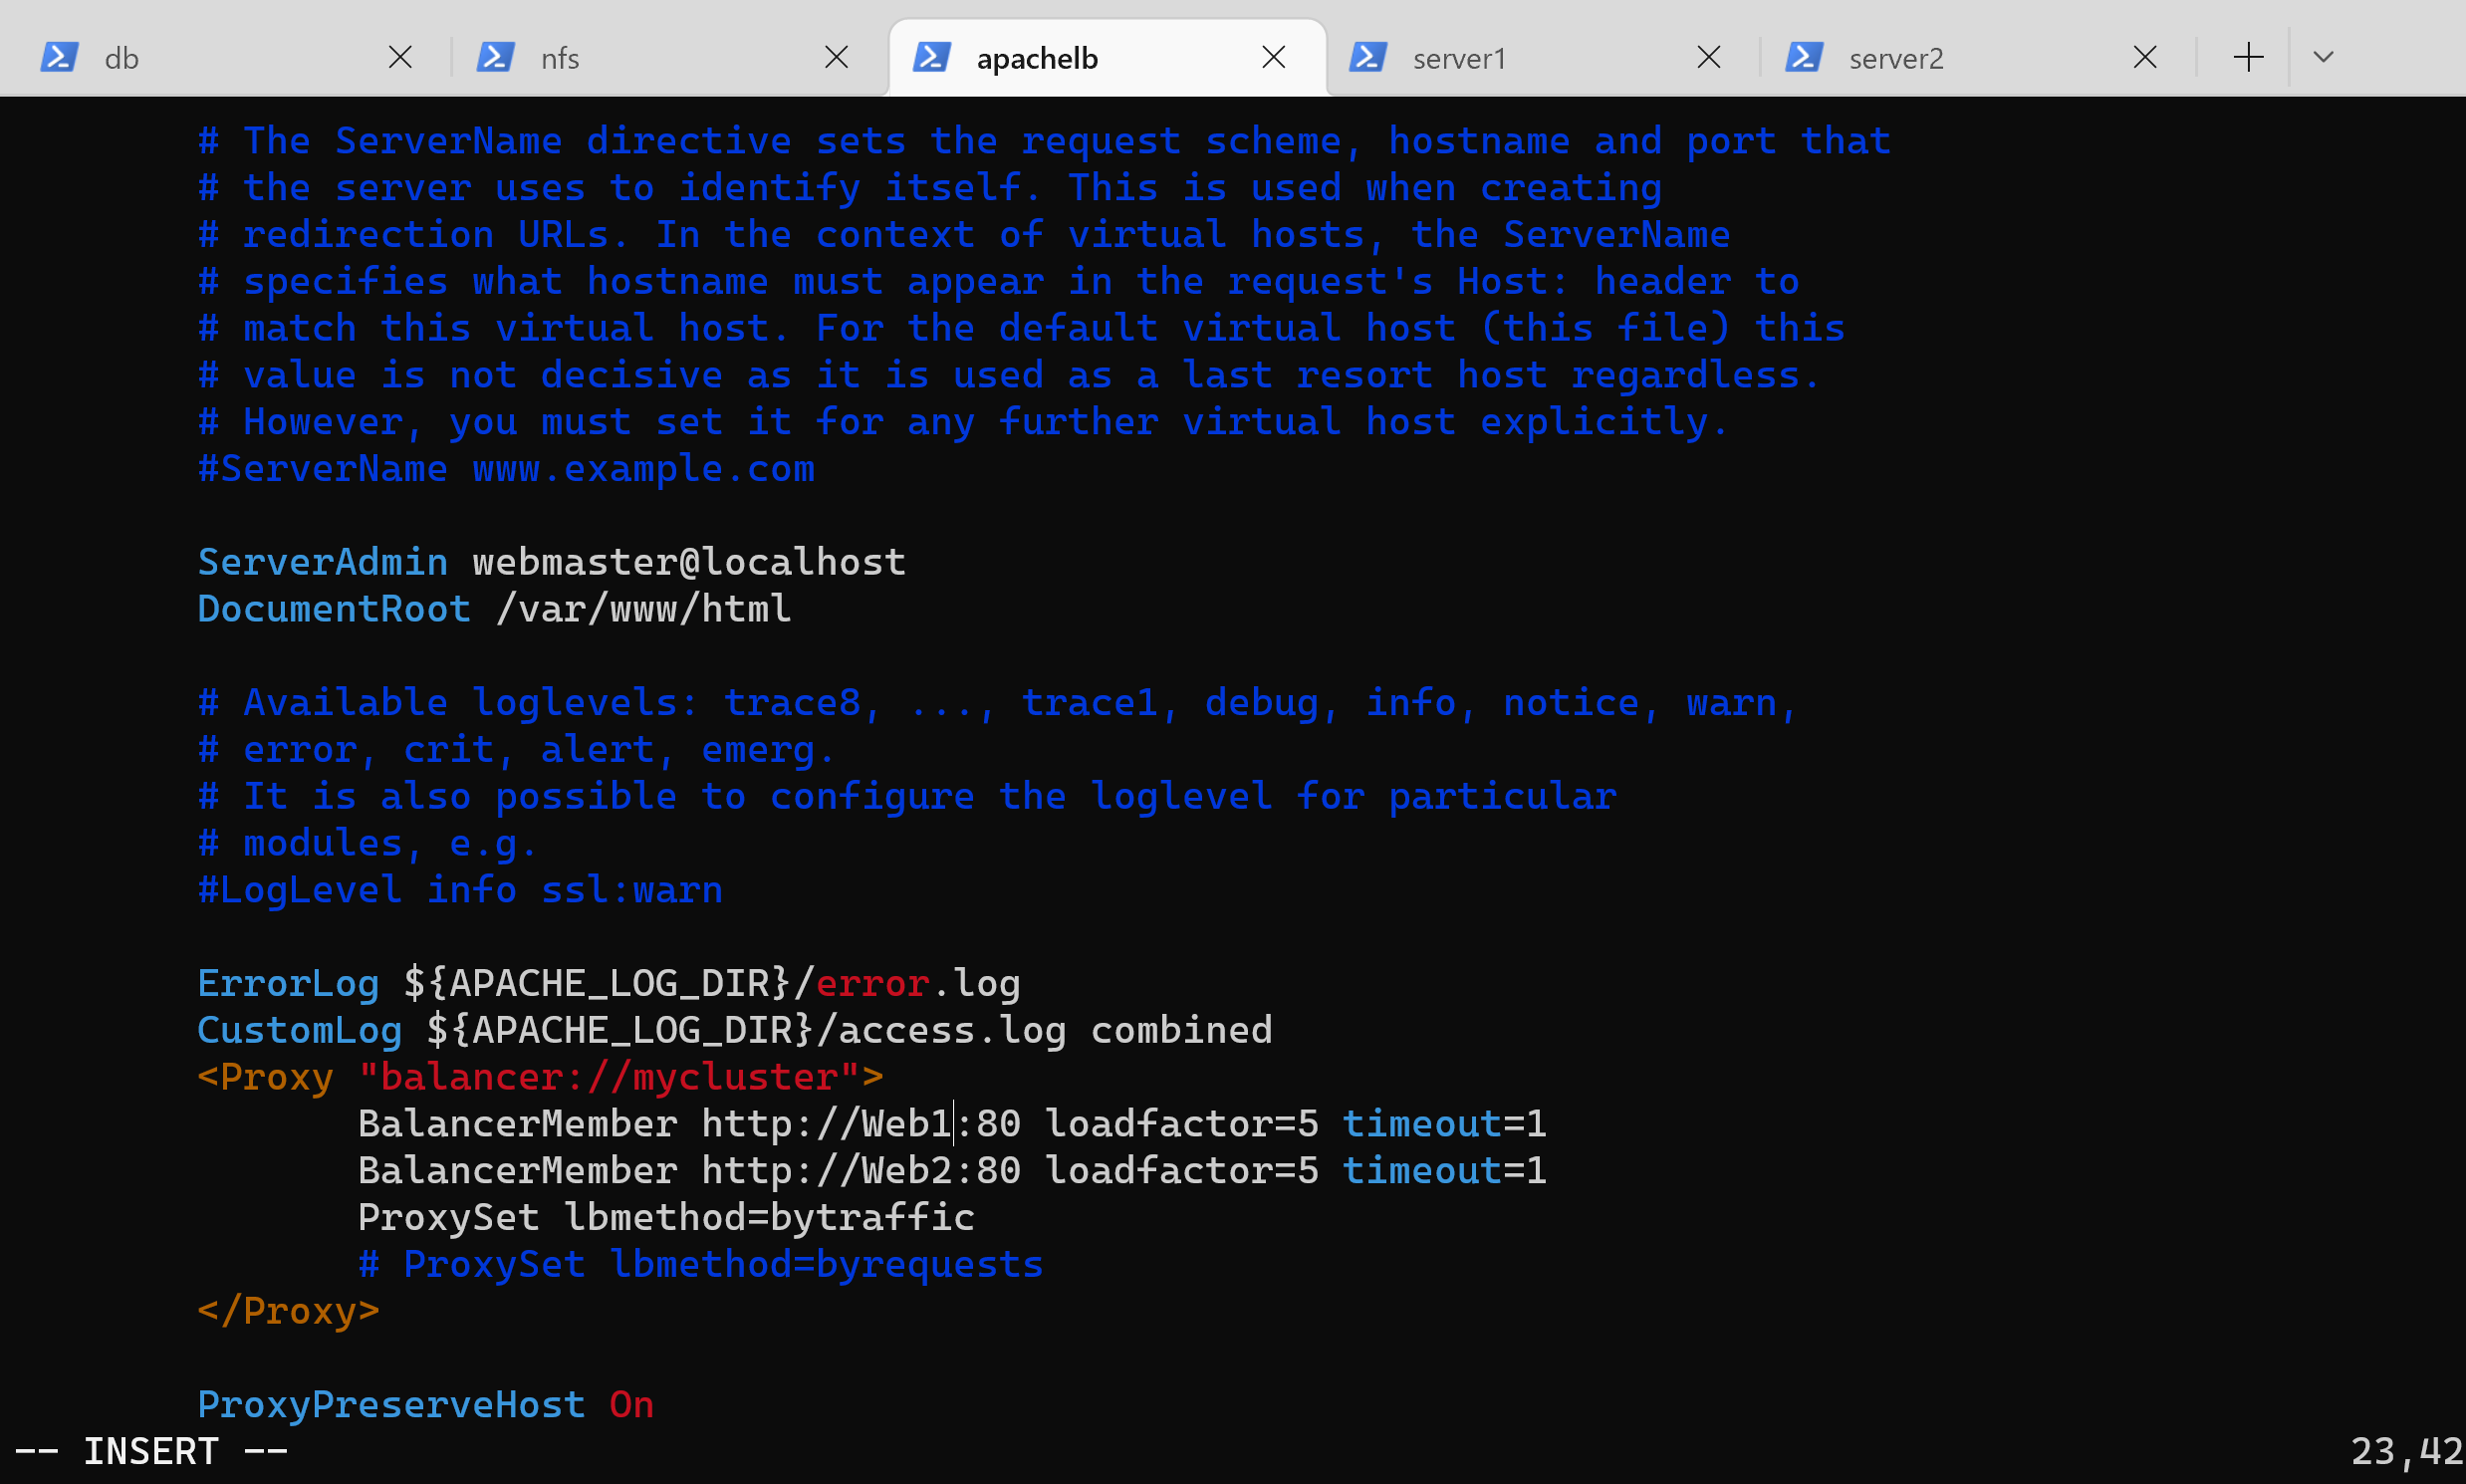
70 |
71 | 4. You can try to curl your Web Servers from LB locally `curl http://Web1` or `curl http://Web2` to see the HTML formated version of your website.
72 | 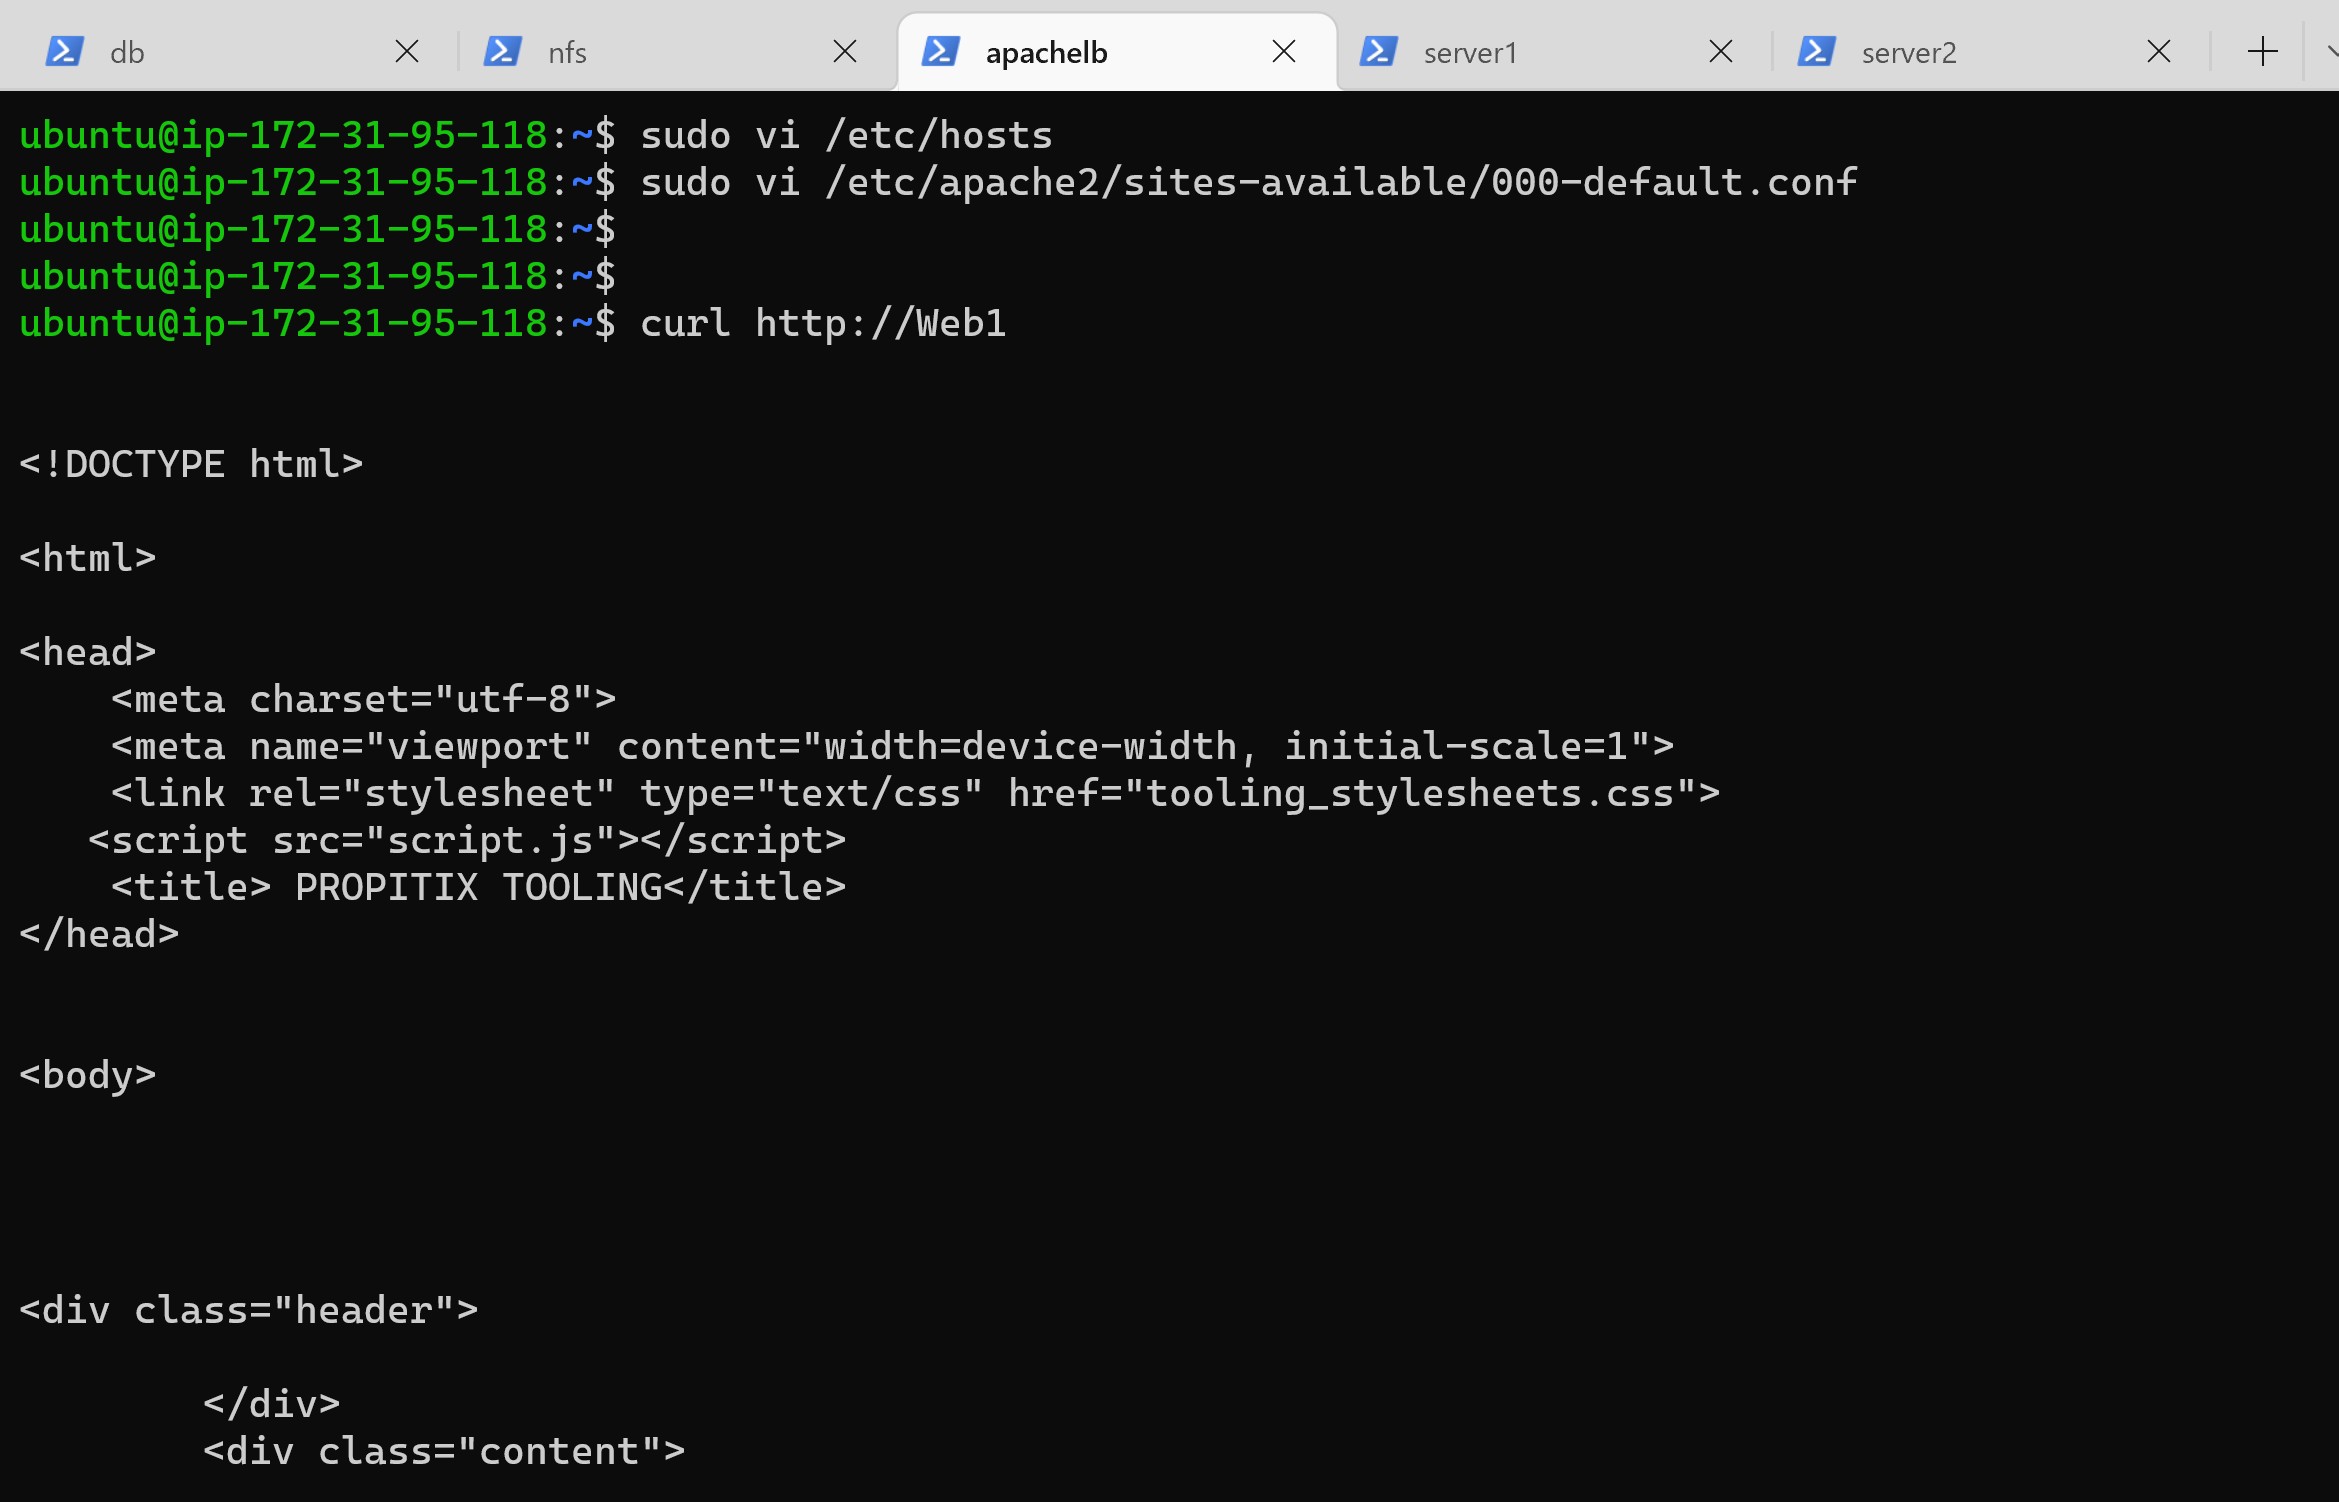
73 | 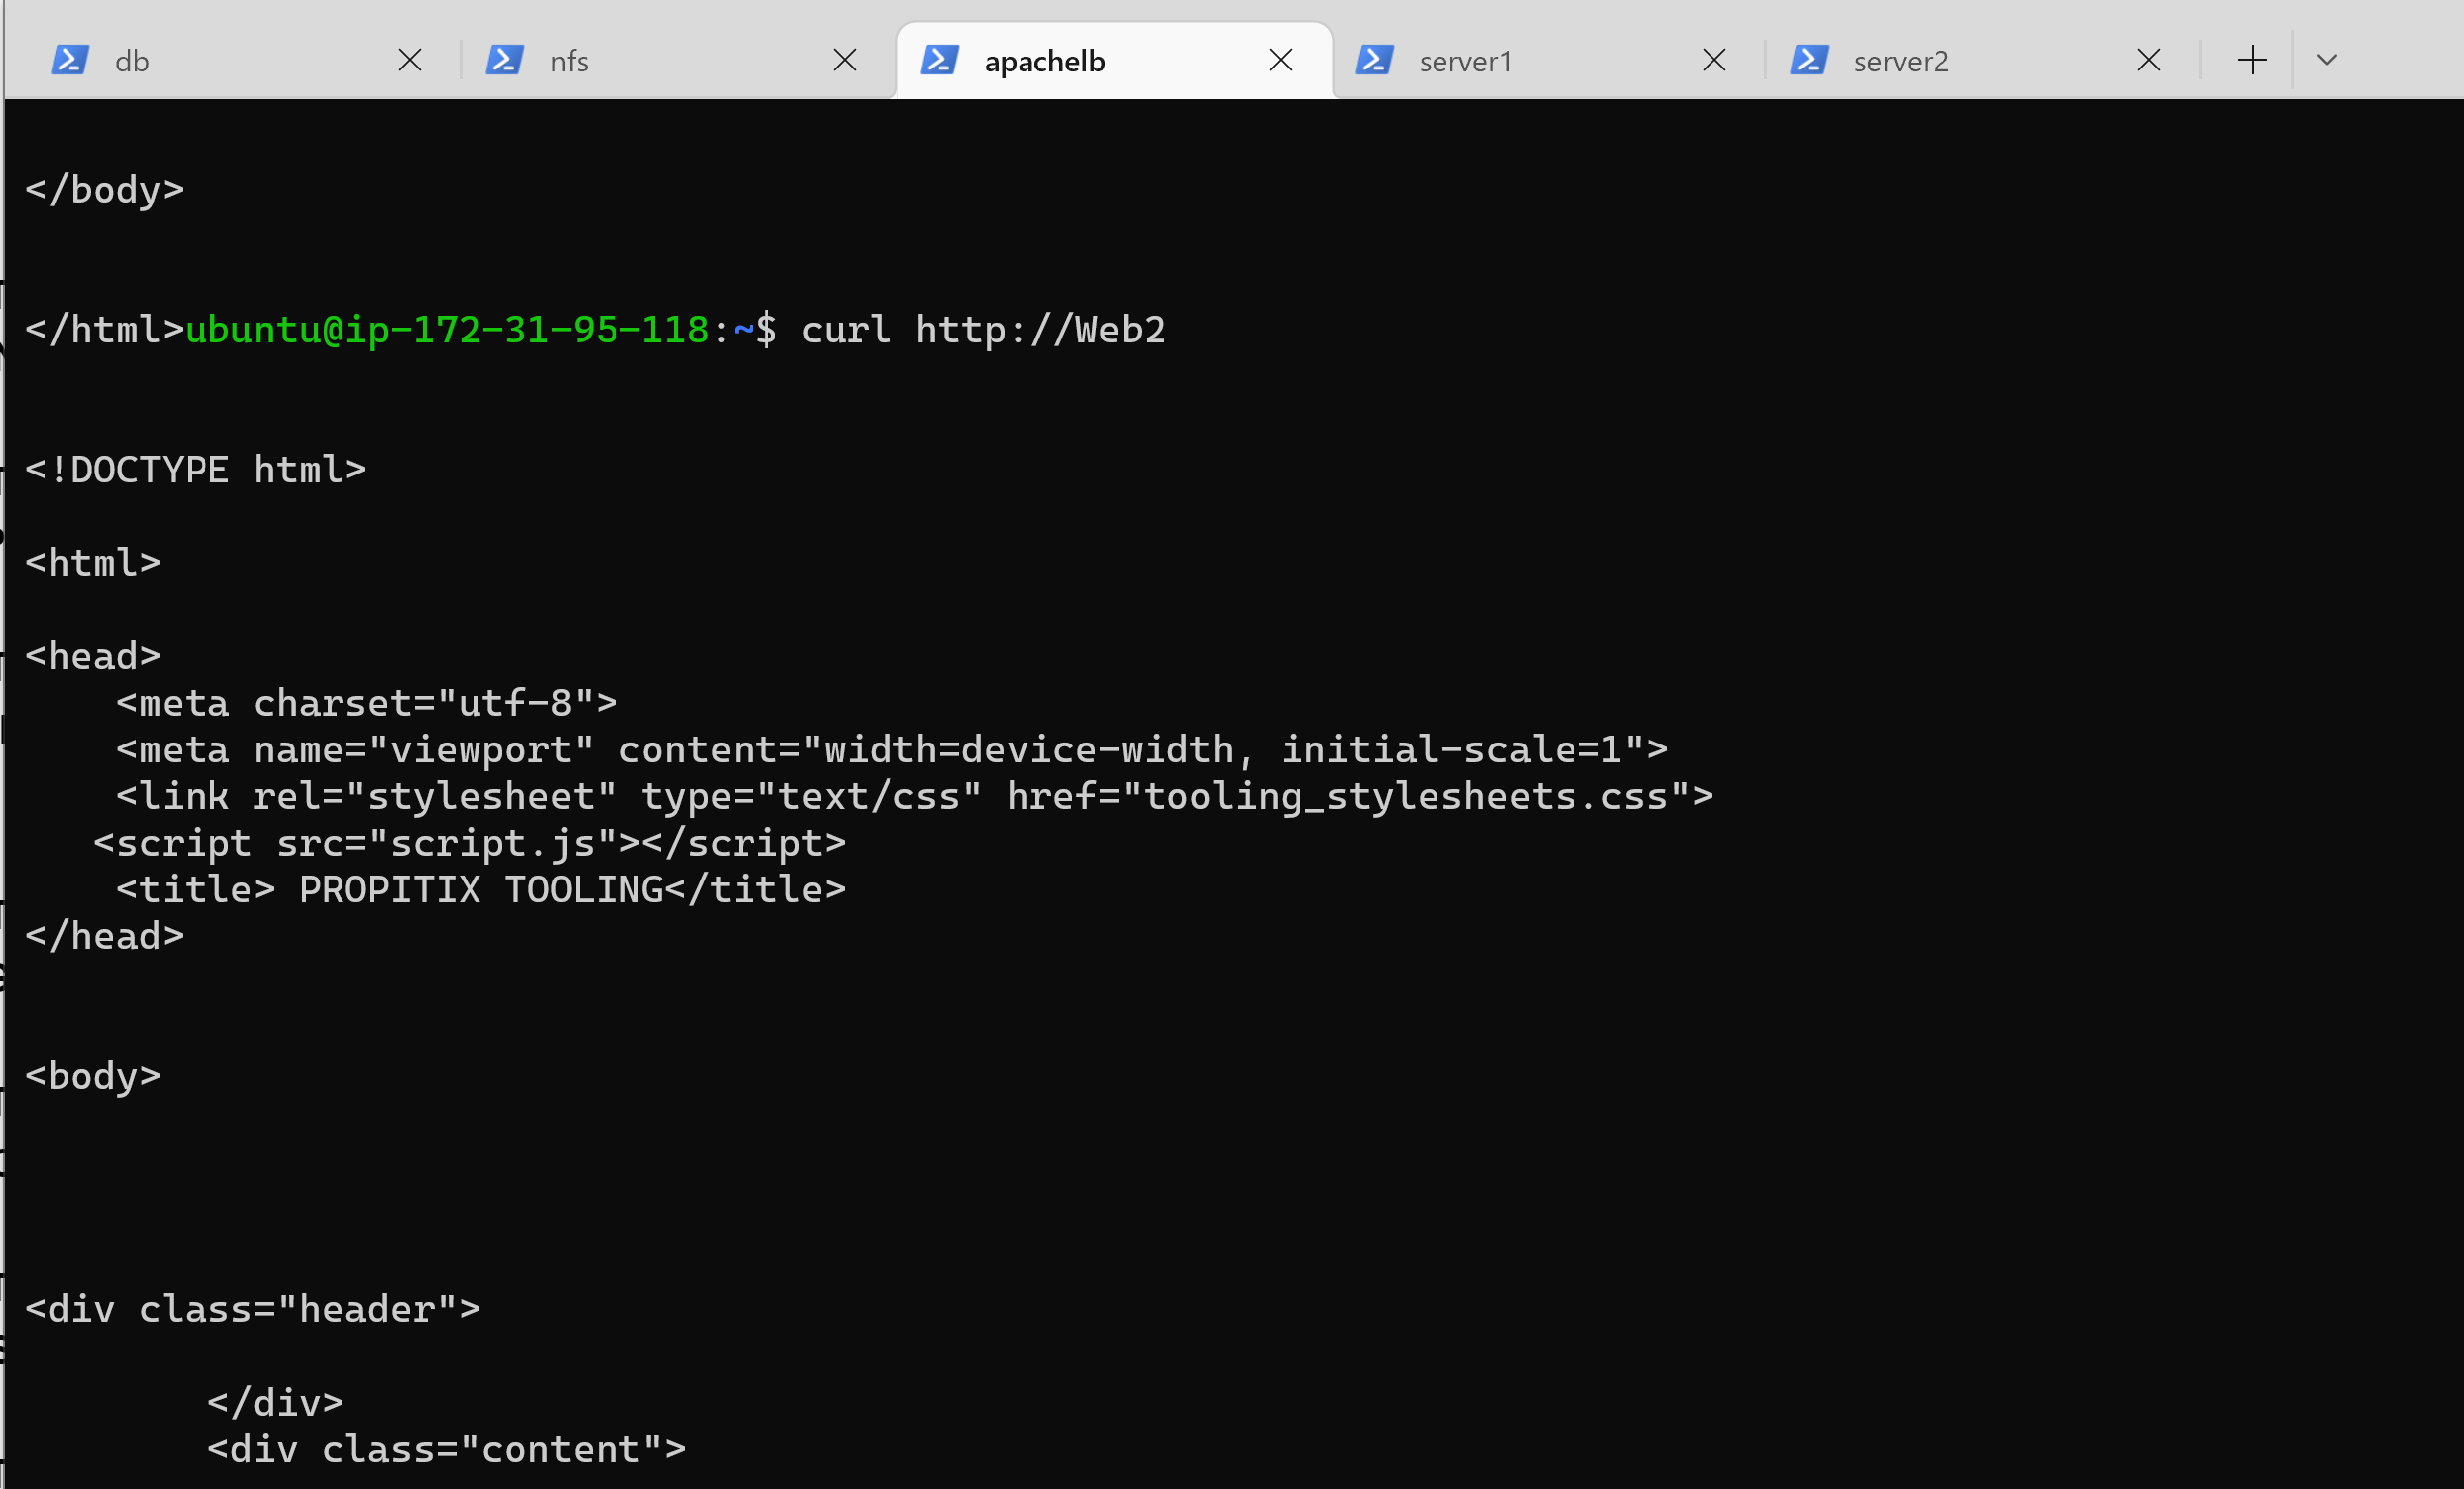
74 |
75 |
--------------------------------------------------------------------------------
/Project10.md:
--------------------------------------------------------------------------------
1 | # LOAD BALANCER SOLUTION WITH NGINX AND SSL/TLS
2 |
3 | In this project, we will solidify our knowledge of load balancers and make us versatile in our knowledge of configuring a different type of LB. We will configure an Nginx Load Balancer solution and also register our website with LetsEnrcypt Certificate Authority, to automate certificate issuance.
4 |
5 | A certificate is a security technology that protects connection from MITM attacks by creating an encrypted session between browser and Web server. In our project we will use a shell client recommended by LetsEncrypt – cetrbot.
6 |
7 | Our achitecture will look something like this:
8 |
9 | 
10 |
11 | ### Task
12 | This project consists of two parts:
13 | 1. Configure Nginx as a Load Balancer
14 | 2. Register a new domain name and configure secured connection using SSL/TLS certificates
15 |
16 | #### Step 1 - CONFIGURE NGINX AS A LOAD BALANCER
17 |
18 | 1. Create an EC2 VM based on Ubuntu Server 20.04 LTS and name it **Nginx LB**, make sure to open TCP port 80 for HTTP connections and
19 | open TCP port 443 for secured HTTPS connections
20 | 2. Update /etc/hosts file for local DNS with Web Servers’ names (e.g. Web1 and Web2) and their local IP addresses
21 | 3. Install and configure Nginx as a load balancer to point traffic to the resolvable DNS names of the webservers, update the instance and Install Nginx:
22 | ```
23 | sudo apt update
24 | sudo apt install nginx
25 | ```
26 | 
27 |
28 | 4. Open the default nginx configuration file : `sudo vi /etc/nginx/nginx.conf`
29 | 5. insert following configuration into http section
30 | ```
31 | upstream myproject {
32 | server Web1 weight=5;
33 | server Web2 weight=5;
34 | }
35 |
36 | server {
37 | listen 80;
38 | server_name www.domain.com;
39 | location / {
40 | proxy_pass http://myproject;
41 | }
42 | }
43 | ```
44 | 6. Also in the configuration file, comment out this line:
45 | `# include /etc/nginx/sites-enabled/*;`
46 | 7. Restart Nginx and make sure the service is up and running
47 | ```
48 | sudo systemctl restart nginx
49 | sudo systemctl status nginx
50 | ```
51 |
52 | #### Step 2 - REGISTER A NEW DOMAIN NAME AND CONFIGURE SECURED CONNECTION USING SSL/TLS CERTIFICATES
53 |
54 | 1. Register a domain name with any registrar of your choice in any domain zone (e.g. .com, .net, .org, .edu, .info, .xyz or any other)
55 | 2. Assign an Elastic IP to your Nginx LB server and associate your domain name with this Elastic IP
56 | 3. Create a static IP address, allocate the Elastic IP and associate it with an EC2 server to ensure your IP remain the same everytime you restart the instance.
57 | 4. Update **A record** in your registrar to point to Nginx LB using Elastic IP address
58 |
59 | 
60 |
61 | 6. Check that your Web Servers can be reached from your browser using new domain name using HTTP protocol – http://buildwithme.link
62 |
63 | 
64 |
65 | 8. Configure Nginx to recognize your new domain name, update your nginx.conf with server_name www.buildwithme.link instead of server_name www.domain.com
66 | 9. Next, install certbot and request for an SSL/TLS certificate, first install certbot dependency: `sudo apt install python3-certbot-nginx -y`
67 | 10. Install certbot: `sudo apt install certbot -y`
68 | 12. Request your certificate (just follow the certbot instructions – you will need to choose which domain you want your certificate to be issued for, domain name will be looked up from nginx.conf file so make sure you have updated it on step 4).
69 | ```
70 | sudo certbot --nginx -d biuldwithme.link -d www.buildwithme.link
71 | ```
72 | 
73 |
74 | 10. Test secured access to your Web Solution by trying to reach https://buildwithme.link, if successful, you will be able to access your website by using HTTPS protocol (that uses TCP port 443) and see a padlock pictogram in your browser’s search string. Click on the padlock icon and you can see the details of the certificate issued for your website.
75 |
76 | 
77 |
78 | 
79 |
80 | #### Step 3 - Set up periodical renewal of your SSL/TLS certificate
81 |
82 | 1. By default, LetsEncrypt certificate is valid for 90 days, so it is recommended to renew it at least every 60 days or more frequently. You can test renewal command in dry-run mode: `sudo certbot renew --dry-run`
83 | 2. Best pracice is to have a scheduled job to run renew command periodically. Let us configure a cronjob to run the command twice a day. To do so, edit the crontab file with the following command: `crontab -e`
84 | 3. Add following line: `* */12 * * * root /usr/bin/certbot renew > /dev/null 2>&1`
85 | 4. You can always change the interval of this cronjob if twice a day is too often by adjusting schedule expression.
86 |
--------------------------------------------------------------------------------
/Project20.md:
--------------------------------------------------------------------------------
1 | ## MIGRATION TO THE СLOUD WITH CONTAINERIZATION USING DOCKER
2 |
3 | In this project, I demonstrate the process of migrating an application from a virtual machine to containers using Docker. A VM infrastructure requires an OS for
4 | the host server and an additional OS for each hosted application. Because containers all share the underlying OS, a single OS can support more than one container.
5 | The elimination of extra operating systems means less memory, less drive space and faster processing so that applications run more efficiently.
6 |
7 | #### STEP 1
8 | To begin the project, I created my Docker container on an Ubuntu 20.04 virtual machine. Below are the steps for installing Docker on Ubuntu 20.04 VM:
9 | 1. First, update your existing list of packages: `sudo apt update`
10 | 2. Install a few prerequisite packages which let apt use packages over HTTPS: `sudo apt install apt-transport-https ca-certificates curl software-properties-common`
11 | 3. Add the GPG key for the official Docker repository to your system: `curl -fsSL https://download.docker.com/linux/ubuntu/gpg | sudo apt-key add -`
12 | 4. Add the Docker repository to APT sources: `sudo add-apt-repository "deb [arch=amd64] https://download.docker.com/linux/ubuntu focal stable"`
13 | 5. Make sure you are about to install from the Docker repo instead of the default Ubuntu repo: `apt-cache policy docker-ce`
14 | 6. You output should look something like this:
15 | ```
16 | docker-ce:
17 | Installed: (none)
18 | Candidate: 5:19.03.9~3-0~ubuntu-focal
19 | Version table:
20 | 5:19.03.9~3-0~ubuntu-focal 500
21 | 500 https://download.docker.com/linux/ubuntu focal/stable amd64 Packages
22 | ```
23 | 7. Finally, install Docker: `sudo apt install docker-ce`
24 | 8. Check that that Docker is running: `sudo systemctl status docker`
25 | 9. Your output should show that Docker is active.
26 | 10. To get more information about installing Docker on Ubuntu 20.04, check this [link](https://www.digitalocean.com/community/tutorials/how-to-install-and-use-docker-on-ubuntu-20-04)
27 | #### STEP 2 Create SQL Container and Connect to the container.
28 | 1. First, create a network. Creating a custom network is not mandatory, if we do not create a network, Docker will use the default network for all the containers. In this project however, the requirement is to control the cidr range of the containers running so I created a custom network with a specific cidr with the following code: ` sudo docker network create --subnet=172.18.0.0/24 tooling_app_network`
29 | 
30 | 2. Create an environment variable to store the root password: ` export MYSQL_PW=cynthiapw`
31 | 3. Echo enviroment variable to confirm it was created: `echo $MYSQL_PW` This would output the password you created.
32 | 4. Next, pull the image and run the container, all in one command like below:
33 | ` sudo docker run --network tooling_app_network -h mysqlserverhost --name=mysql-server -e MYSQL_ROOT_PASSWORD=$MYSQL_PW -d mysql/mysql-server:latest `
34 | 5. Verify the container is running: ` sudo docker ps -a`
35 | 
36 | 6. Create an SQL script that to create a user that will connect remotely. Create a file and name it ****create_user.sql**** and add code in the file:
37 | ```
38 | CREATE USER 'cynthia'@'%' IDENTIFIED BY 'cynthiapw';
39 | GRANT ALL PRIVILEGES ON *.* TO 'cynthia'@'%';
40 |
41 | CREATE DATABASE toolingdb;
42 | ```
43 | The script also creates a database for the Tooling web application.
44 | 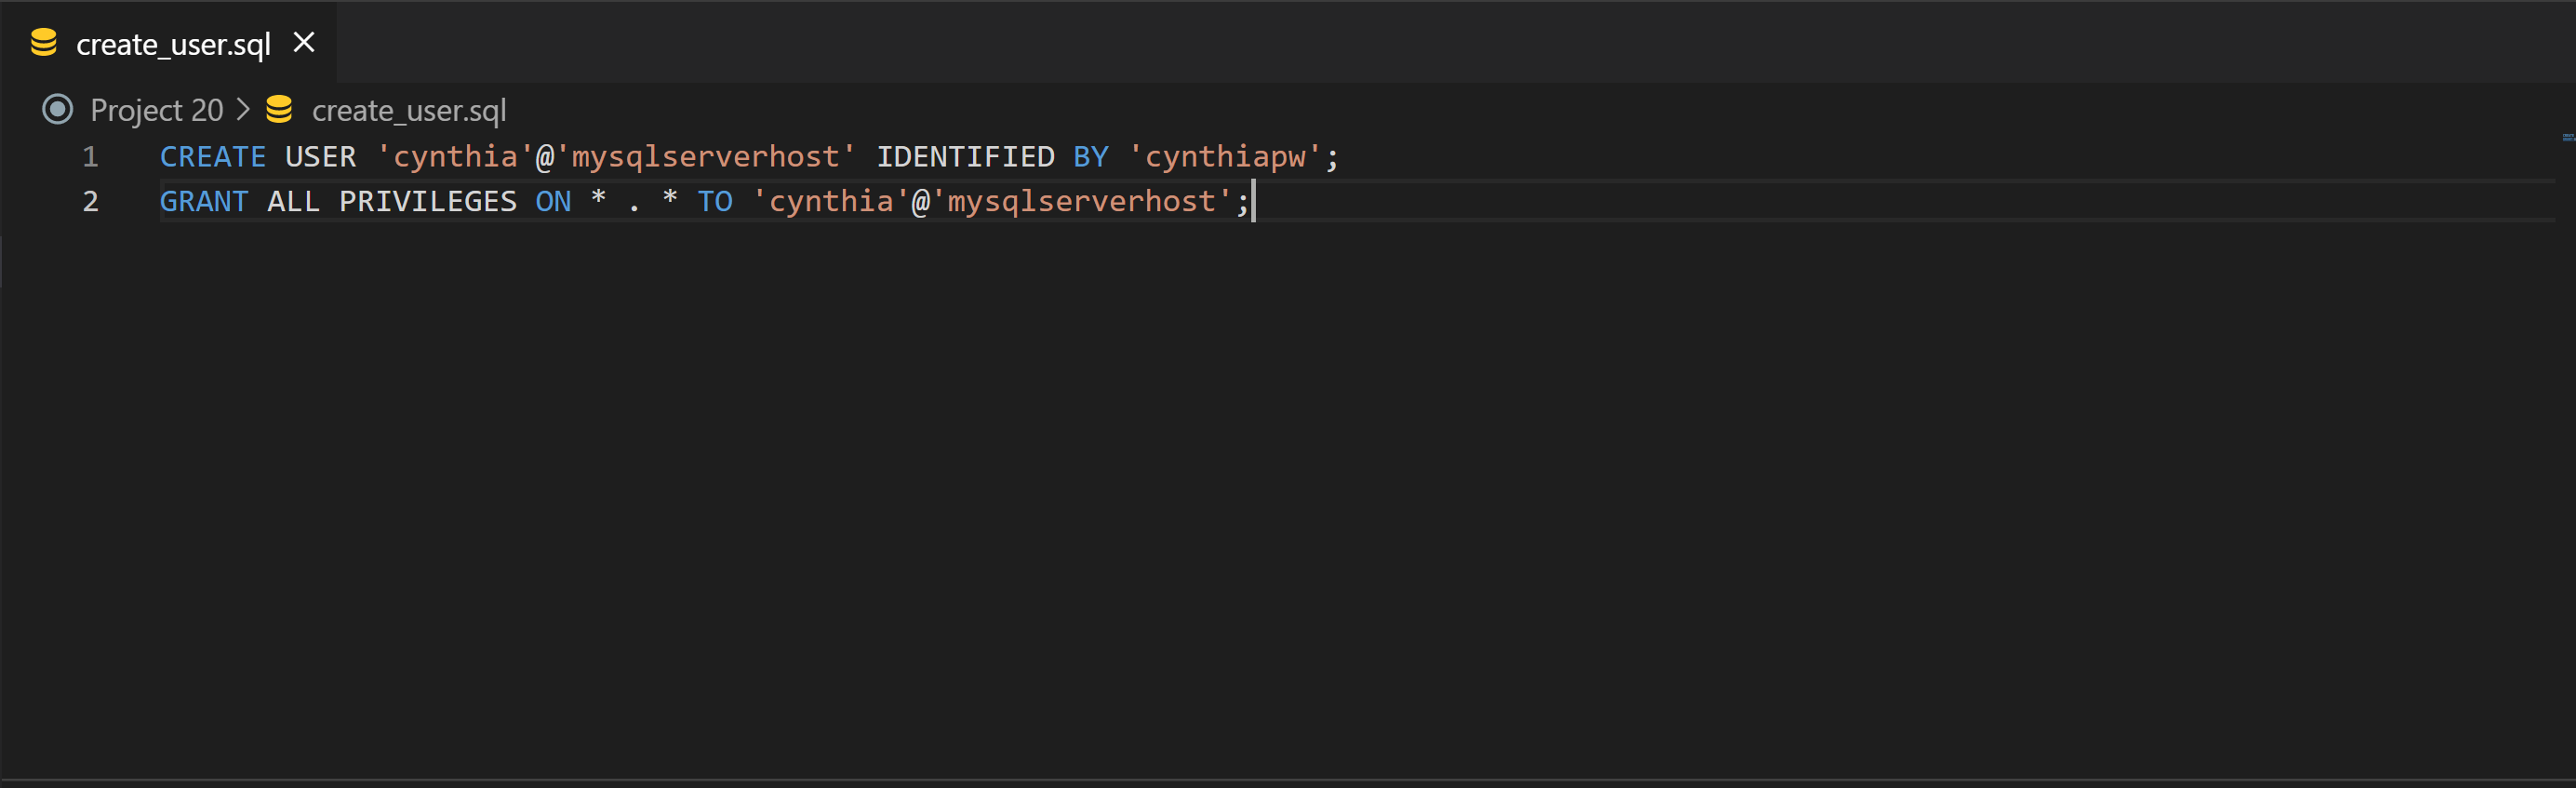
45 |
46 | 7. Run the script, ensure you are in the directory create_user.sql file is located or declare a path:
47 | `sudo docker exec -i mysql-server mysql -uroot -p$MYSQL_PW < create_user.sql`
48 | 8. If you see a warning like below, it is acceptable to ignore: "mysql: [Warning] Using a password on the command line interface can be insecure"
49 | 9. Next, connect to the MySQL server from a second container running the MySQL client utility. To run the MySQL Client Container, type:
50 | ` sudo docker run --network tooling_app_network --name mysql-client -it --rm mysql mysql -h mysqlserverhost -u -p `
51 | #### Step 3: Prepare database schema
52 | 1. Clone the Tooling-app repository from [here](https://github.com/darey-devops/tooling)
53 | 2. On your terminal, export the location of the SQL file: `export tooling_db_schema=/tooling_db_schema.sql`
54 | 3. Echo to verify that the path is exported: `echo $tooling_db_schema`
55 | 4. Use the SQL script to create the database and prepare the schema. With the docker exec command, you can execute a command in a running container.
56 | ` sudo docker exec -i mysql-server mysql -uroot -p$MYSQL_PW < $tooling_db_schema.sql`
57 | 
58 |
59 | 5. Update the `.env` file with connection details to the database. The .env file is located in the html **tooling/html/.env** folder but not visible in terminal. Use vi or nano
60 | ```
61 | sudo vi .env
62 |
63 | MYSQL_IP=mysqlserverhost
64 | MYSQL_USER=cynthia
65 | MYSQL_PASS=cynthiapw
66 | MYSQL_DBNAME=toolingdb
67 | ```
68 | 
69 |
70 | #### Step 4: Run the Tooling App
71 | 1. Before you run the tooling appication ensure you edit your security group to allow TCP traffic on port 8085 with access from anywhere(0.0.0.0)
72 | 2. In this project, I built my container from a pre-created Dockerfile located in the tooling directory. Navigate to the directory "tooling" that has the Dockerfile and build your container : ` sudo docker build -t tooling:0.0.1 . `
73 | 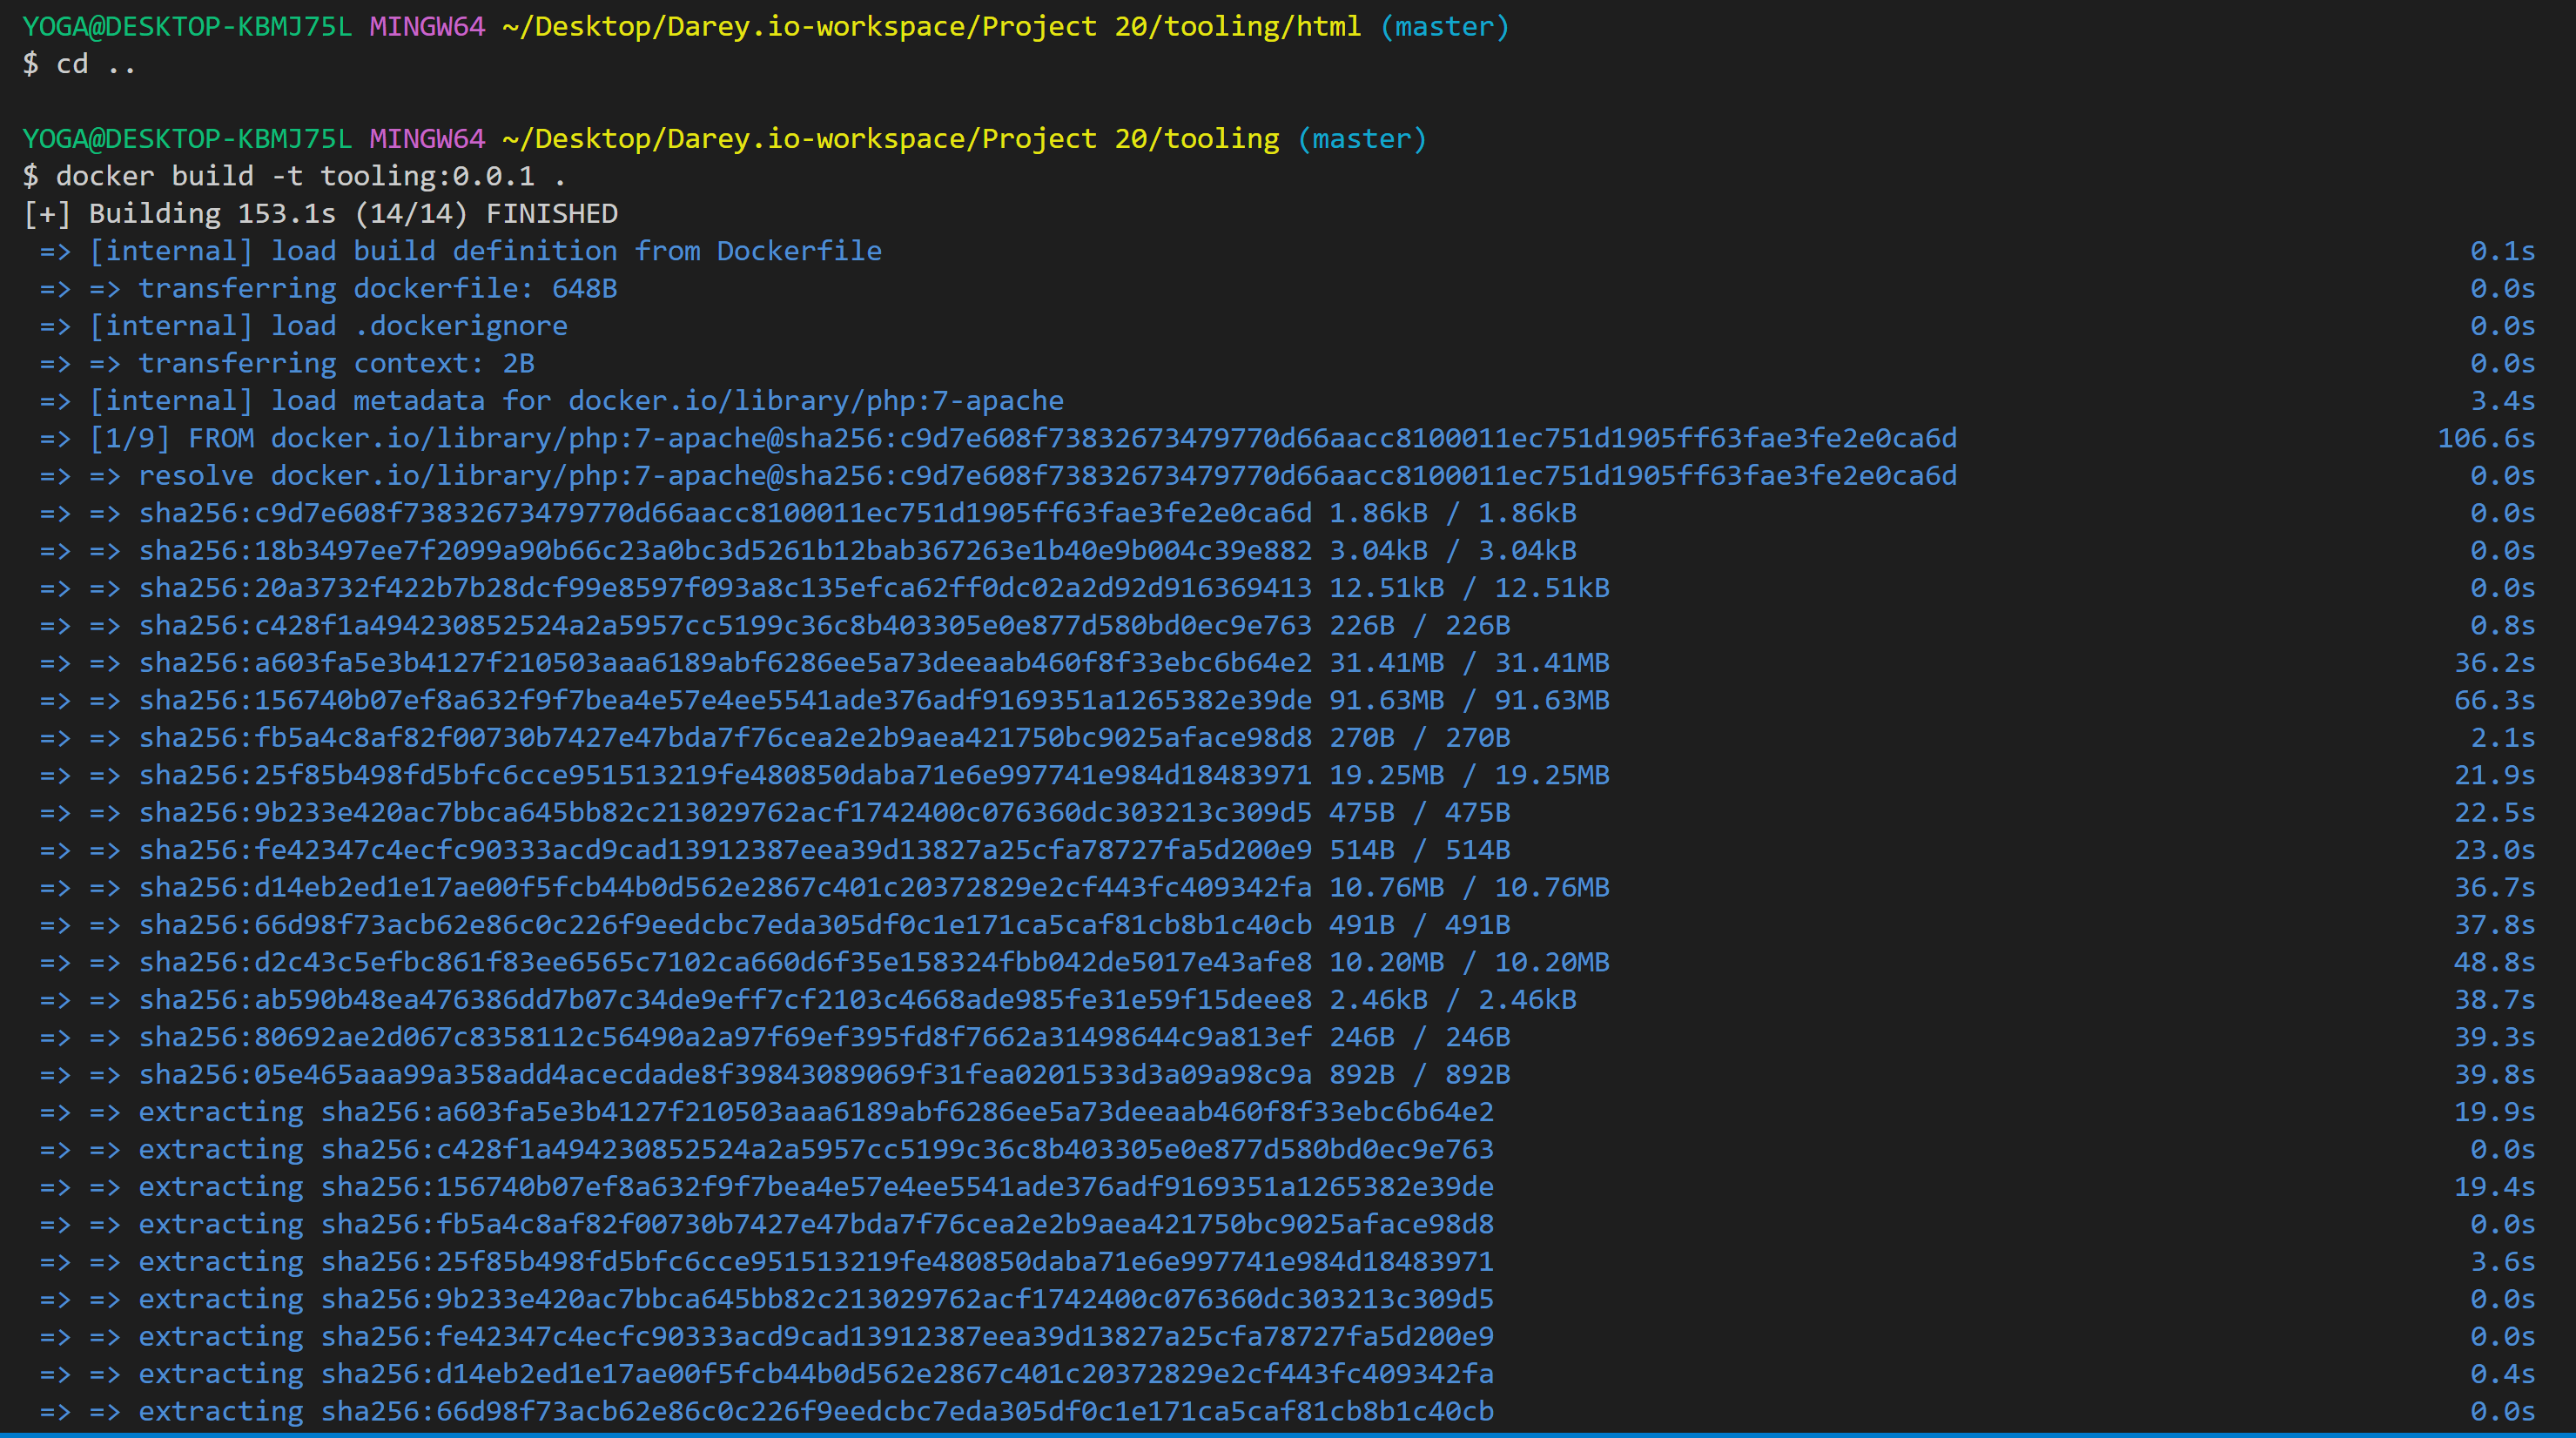
74 | 3. Run the container: `docker run --network tooling_app_network -p 8085:80 -it tooling:0.0.1`
75 | 4. Access your tooling site via: `http://:8085`
76 | **Note:** I had an error that stated:AH00558: apache2: Could not reliably determine the server's fully qualified domain name, using 172.18.0.3. Set the 'ServerName' directive globally to suppress this message
77 | I solved it by going into the db_conn.php file and hardcoded my enviroment variable. This is not the recommended way of doing it but this was how I got mine to work.
78 | 5. Get into the db_conn.php file: `sudo vi db_conn.php` and edit the Create connection variables.
79 | 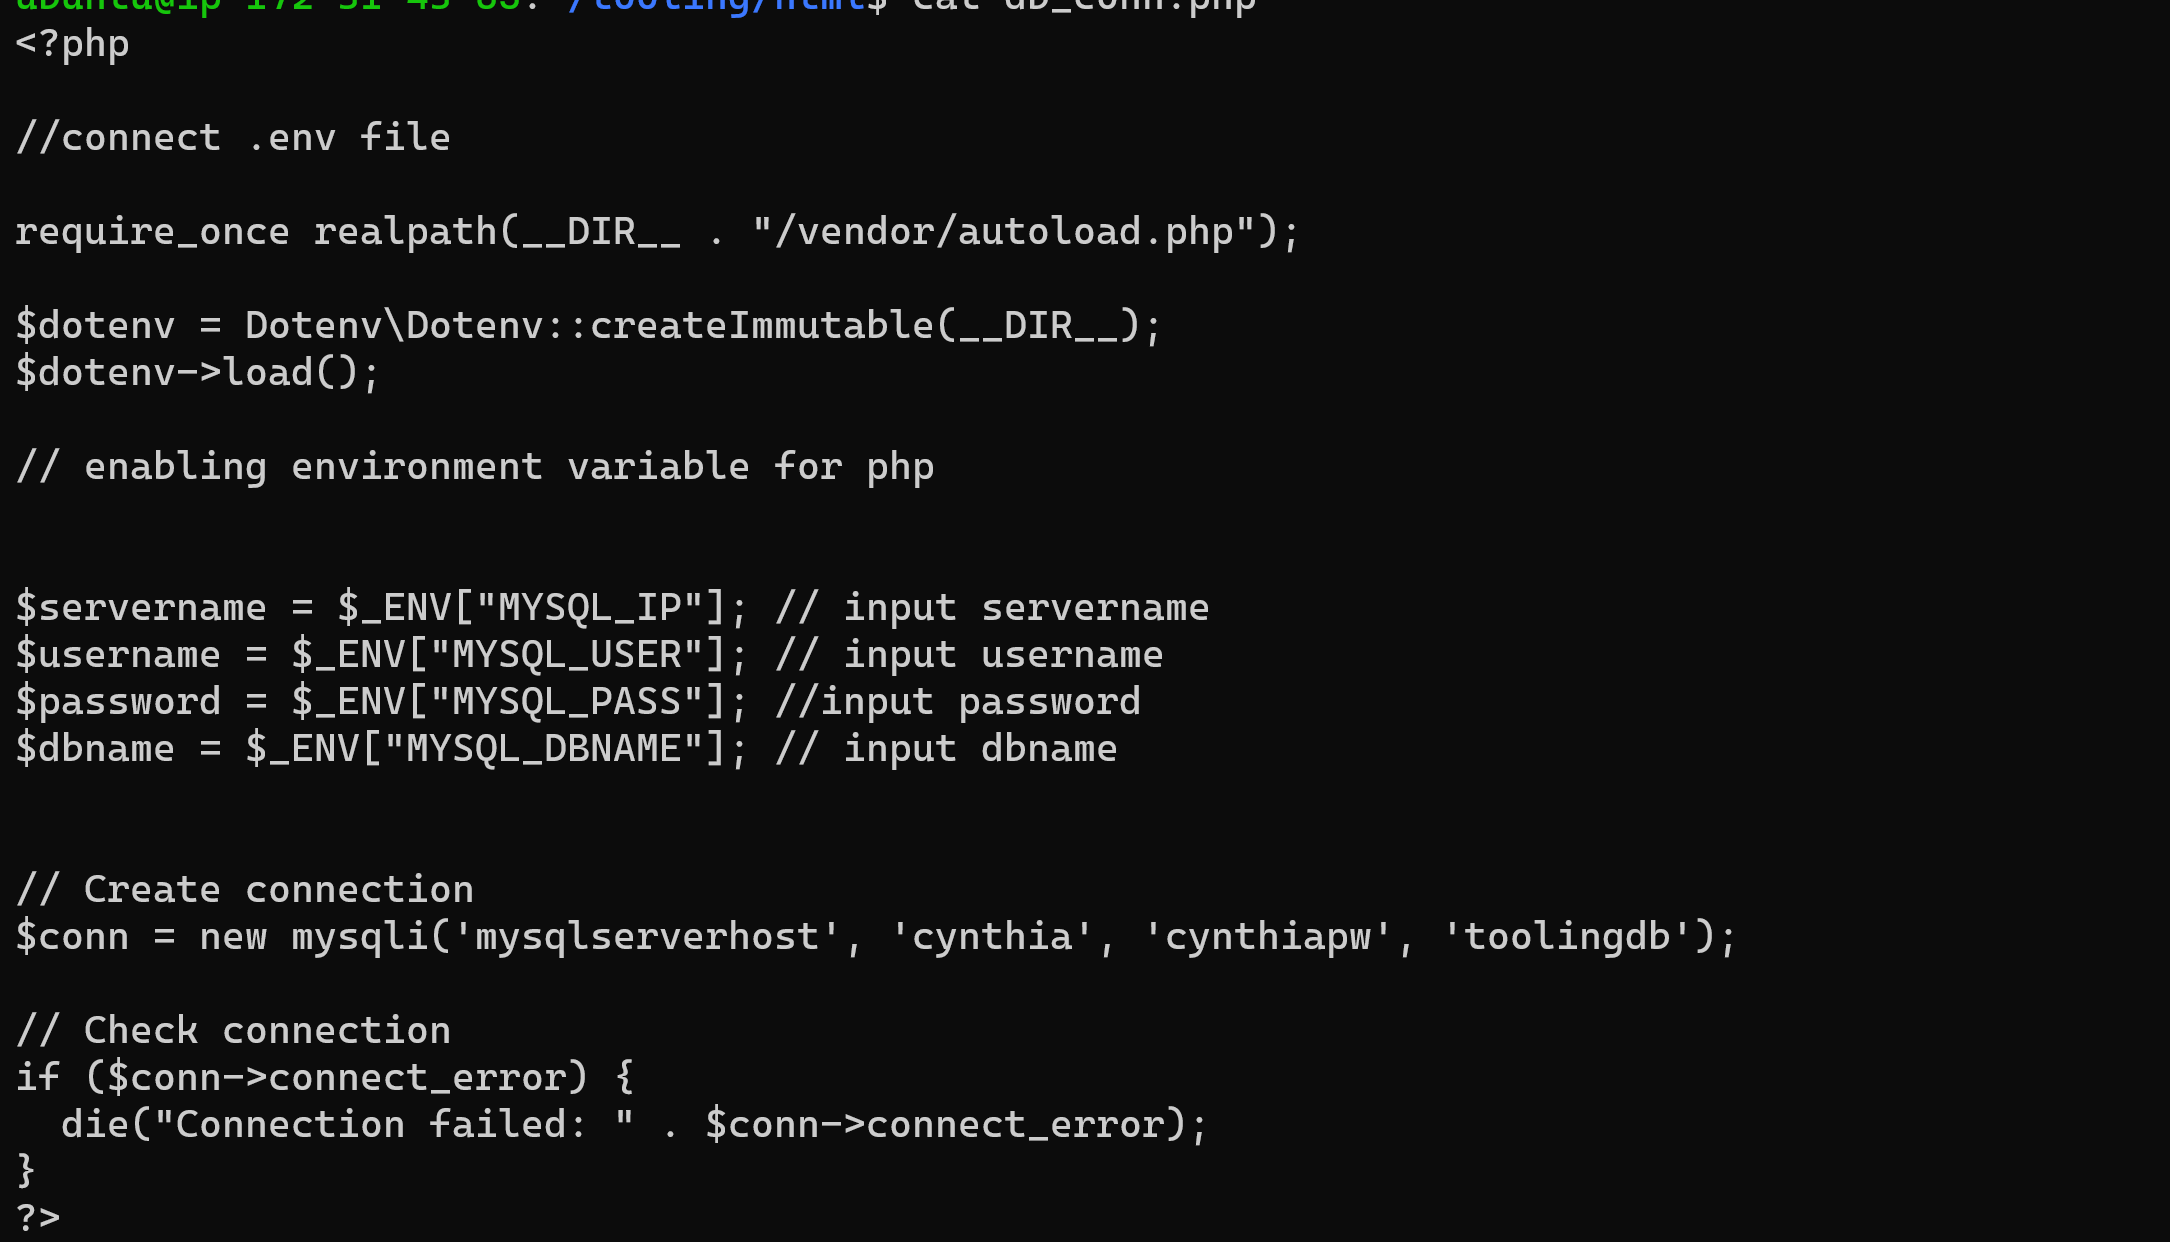
80 | 6. Access your toolint site again: `http://:8085`
81 | 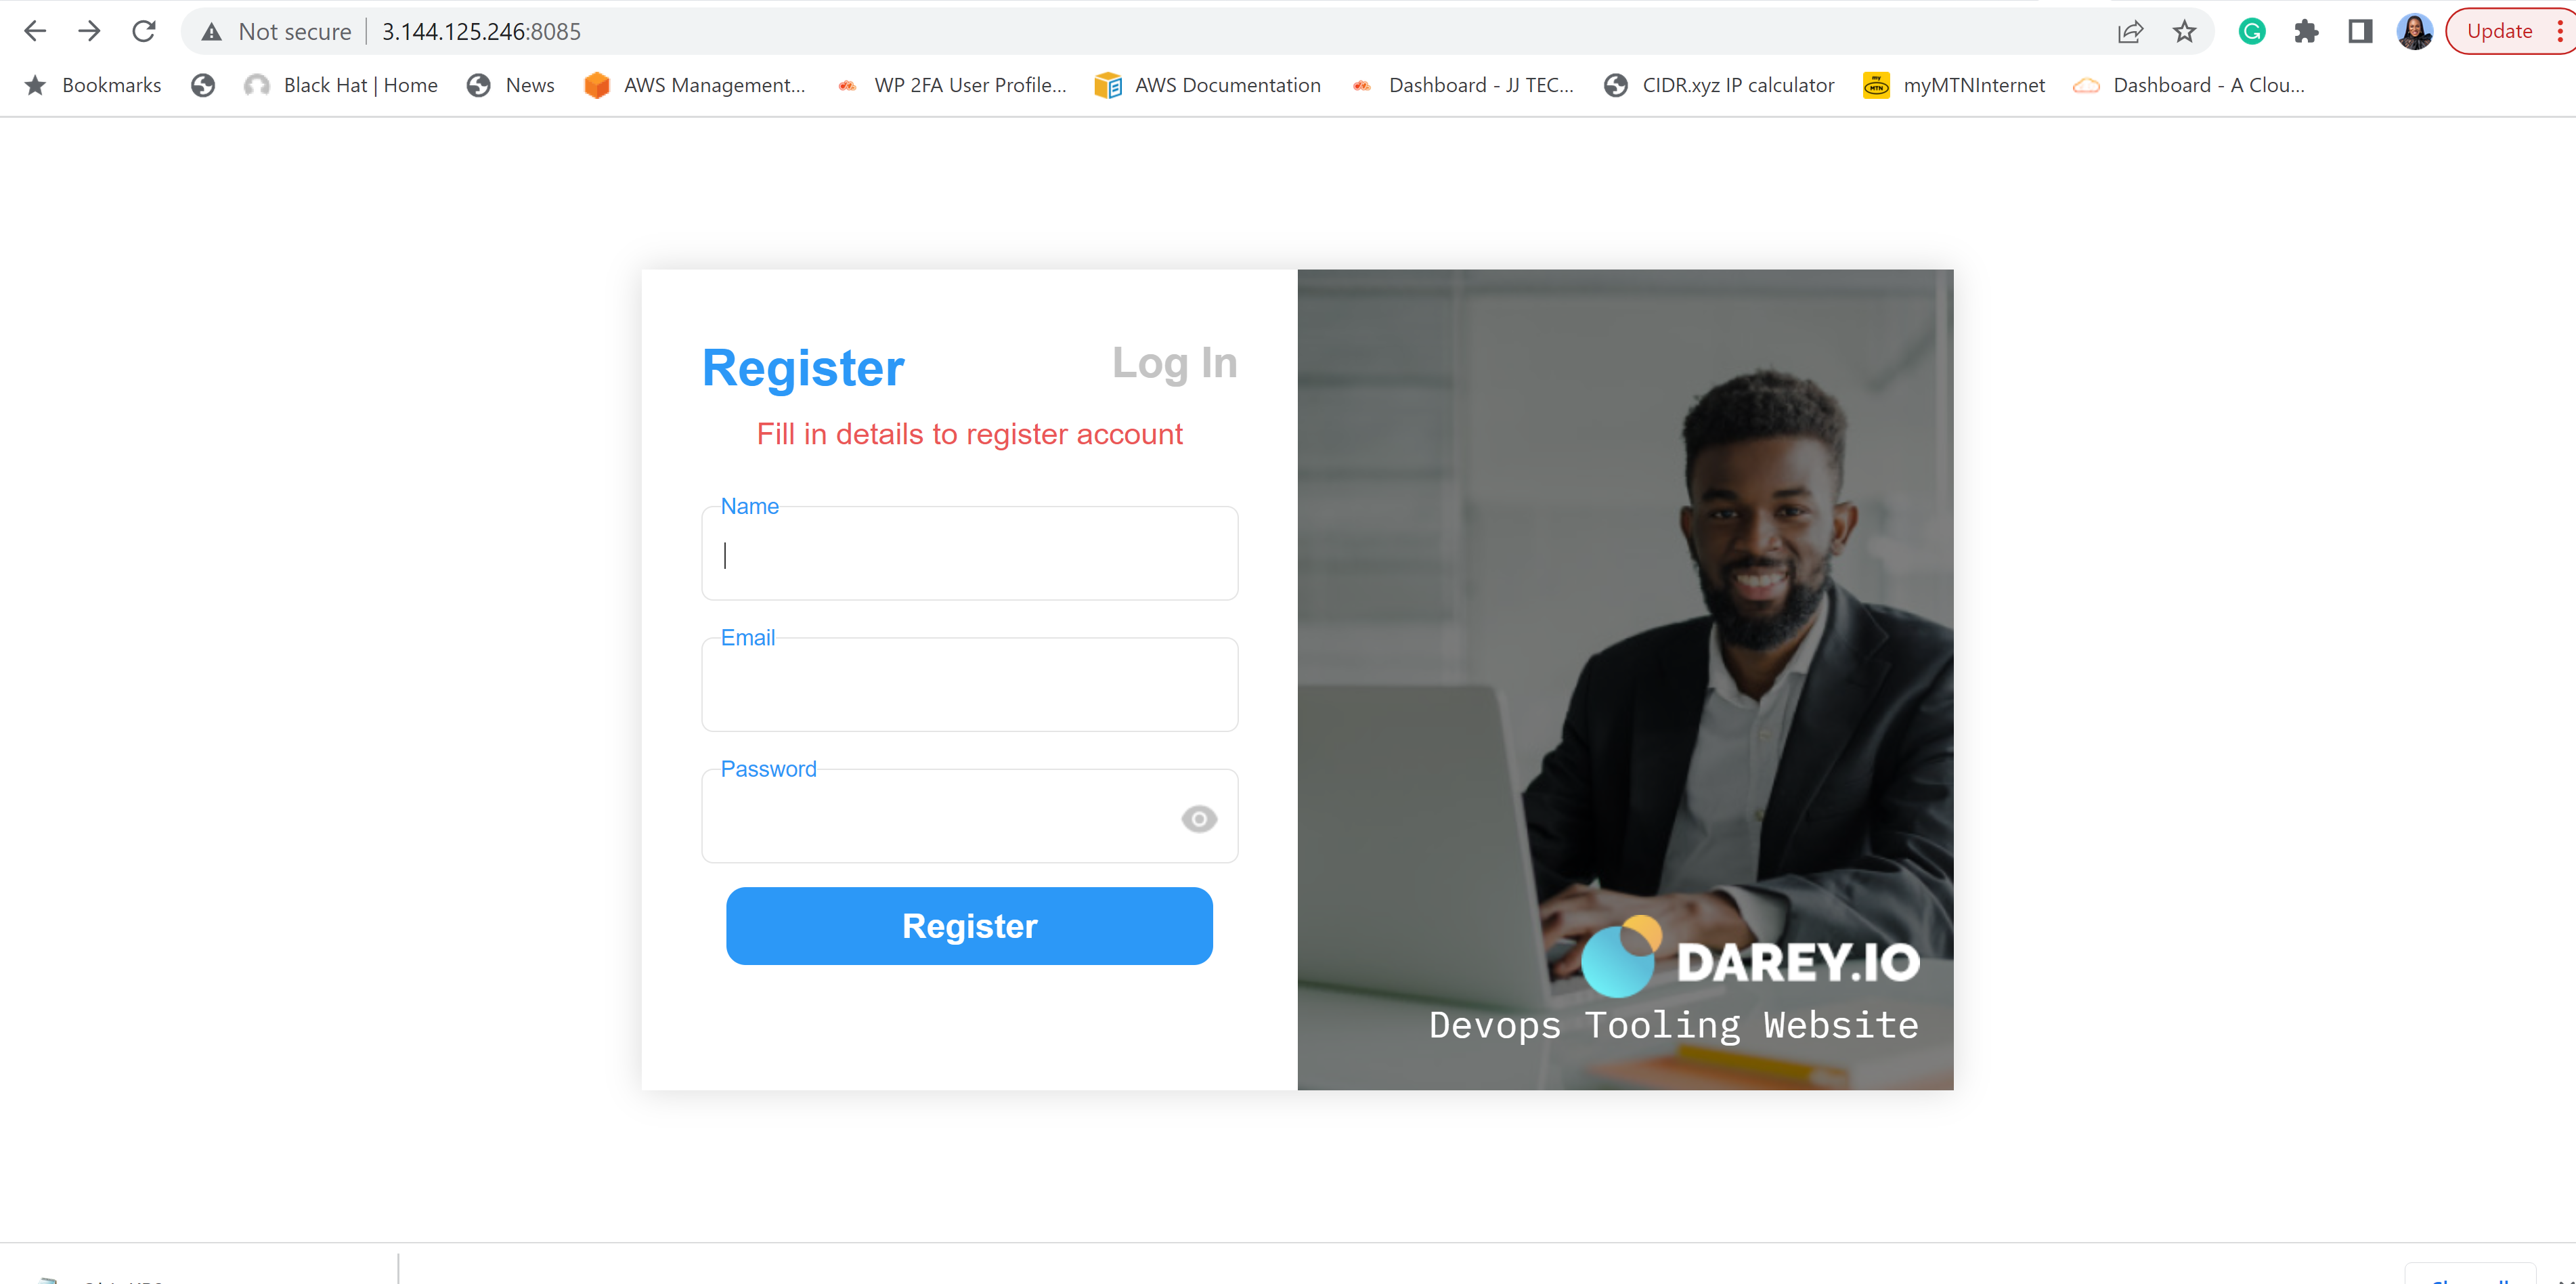
82 | 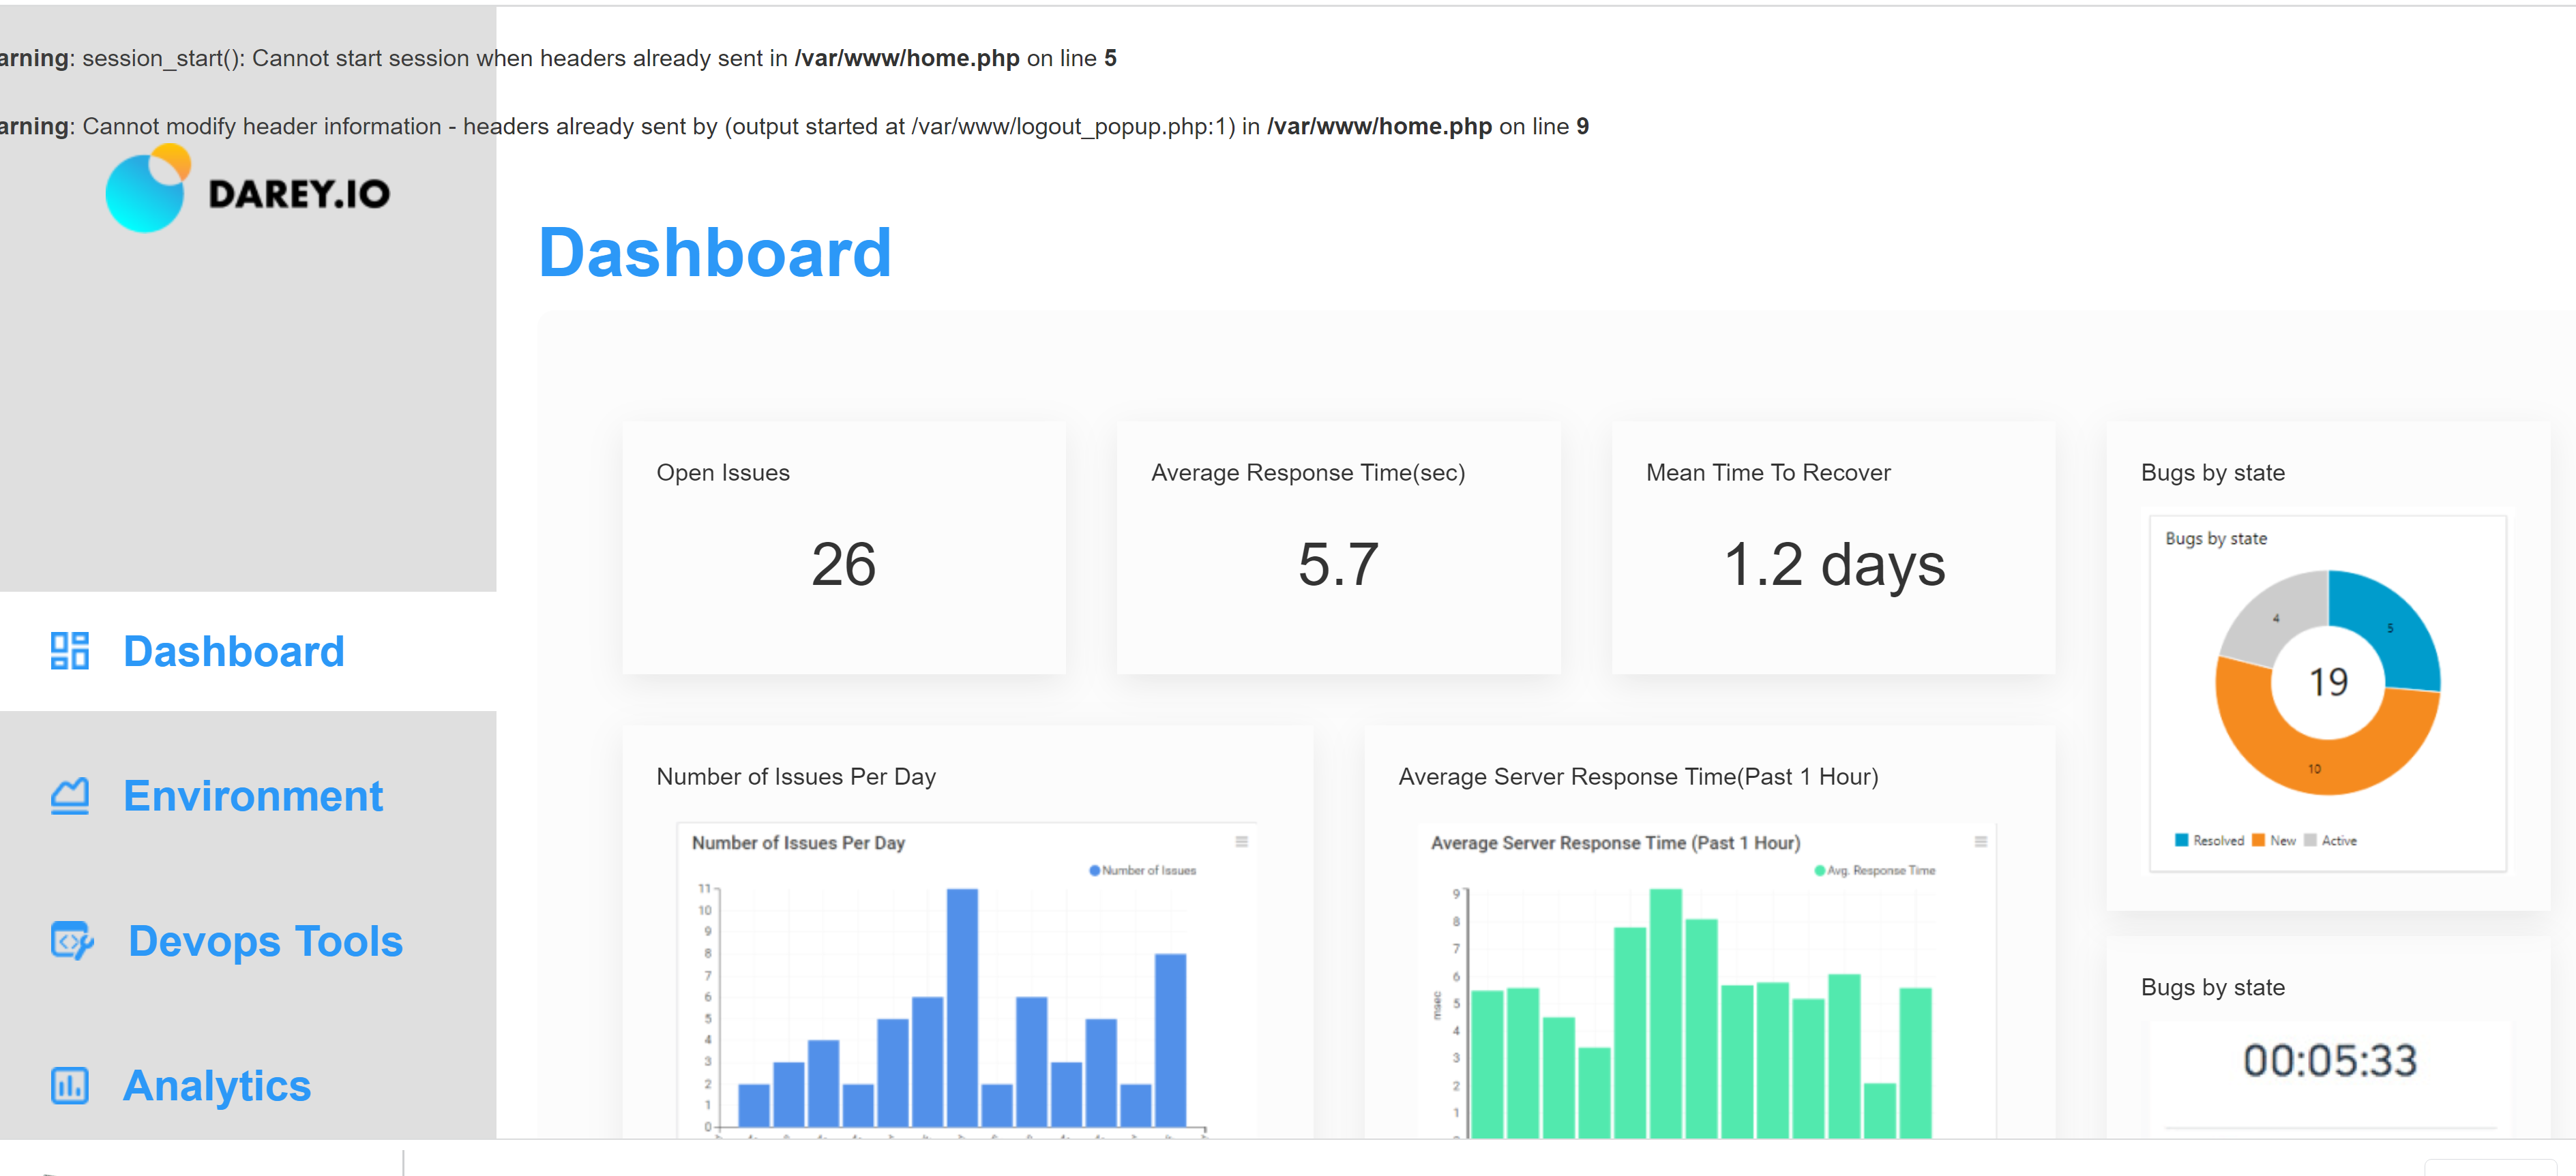
83 |
84 |
--------------------------------------------------------------------------------
/Project1.md:
--------------------------------------------------------------------------------
1 | ## WEB STACK IMPLEMENTATION (LAMP STACK) IN AWS
2 | ### ASW account setup and provisioning an Ubuntu Server
3 | #### Steps
4 | 1. Signed up for an AWS account.
5 | 2. Logged in as IAM user
6 | 3. In the VPC console, I create Security Group
7 | 
8 |
9 | 4. Launched an EC2 instance
10 | 5. I selelected the Ubuntu free tier instance
11 | 6. I set the required configurations (Enabled public IP, security group, and key pair) and finally launched the instance.
12 | 
13 |
14 | 7. Next I SSH into the instance using Windows Terminal
15 | 8. In the Terminal, I typed cd Downloads to navigate to the locxcation of my key-pair.
16 | 9. Inside the Downloads directory, I connect to my instance using its Public DNS.
17 | 
18 | 
19 |
20 | ### INSTALLING APACHE AND UPDATING THE FIREWALL
21 | #### Steps
22 | 1. Install Apache using Ubuntu’s package manager ‘apt', Run the following commands: To update a list of packages in package manager:
23 | **sudo apt update**
24 | 
25 |
26 | 2. To run apache2 package installation:
27 | **sudo apt install apache2**
28 | 3. Next, verify that Apache2 is running as a service in the OS. run:
29 | **sudo systemctl status apache2**
30 | 4. The green light indicates Apache2 is running.
31 | 5. 
32 |
33 | 6. Open port 80 on the Ubuntu instance to allow access from the internet.
34 | 7. Access the Apache2 service locally in our Ubuntu shell by running:
35 | **curl http://localhost:80** or **curl http://127.0.0.1:80** This command would output the Apache2 payload indicating that it is accessible locally in the Ubuntu shell.
36 | 8. Next, test that Apache HTTP server can respond to requests from the Internet. Open a browser and type the public IP of the Ubutun instance: **http://3.235.248.184/:80** This outputs the Apache2 default page.
37 | 
38 |
39 |
40 |
41 | ### INSTALLING MYSQL
42 | #### Steps
43 | In this step, I install a Database Management System (DBMS) to be able to store and manage data for the site in a relational database.
44 | 1. Run ‘apt’ to acquire and install this software, run: **sudo apt install mysql-server**
45 | 2. Confirm intallation by typing Y when prompted.
46 | 3. Once installation is complete, log in to the MySQL console by running: **sudo mysql**
47 | 
48 |
49 | 4. Next, run a security script that comes pre-installed with MySQL, to remove some insecure default settings and lock down access to your database system. run:
50 | **ALTER USER 'root'@'localhost' IDENTIFIED WITH mysql_native_password BY 'PassWord.1';** then exit MySQL shell by typing exit and enter.
51 | 5. Run interactive script by typing: **sudo mysql_secure_installation** and following the instrustions.
52 | 6. Next, test that login to MySQL console works. Run: **sudo mysql -p**
53 | 
54 |
55 | 7. Type exit and enter to exit console.
56 |
57 | ### STEP 3 — INSTALLING PHP
58 | #### Steps
59 | 1. To install these 3 packages at once, run:
60 | **sudo apt install php libapache2-mod-php php-mysql**
61 | 
62 |
63 | 2. After installation is done, run the following command to confirm your PHP version: **php -v**
64 | 
65 |
66 | 4. At this point, your LAMP stack is completely installed and fully operational.
67 |
68 | ### STEP 4 — CREATING A VIRTUAL HOST FOR YOUR WEBSITE USING APACHE
69 | #### Steps
70 | 1. Setting up a domain called projectlamp. Create the directory for projectlamp using ‘mkdir’. Run: **sudo mkdir /var/www/projectlamp**
71 | 2. assign ownership of the directory with your current system user, run: **sudo chown -R $USER:$USER /var/www/projectlamp**
72 | 3. Next, create and open a new configuration file in Apache’s sites-available directory. Tpye: **sudo vi /etc/apache2/sites-available/projectlamp.conf**
73 | 4. This will create a new blank file. Paste in the following bare-bones configuration by hitting on i on the keyboard to enter the insert mode, and paste the text:
74 | **
75 | ServerName projectlamp
76 | ServerAlias www.projectlamp
77 | ServerAdmin webmaster@localhost
78 | DocumentRoot /var/www/projectlamp
79 | ErrorLog ${APACHE_LOG_DIR}/error.log
80 | CustomLog ${APACHE_LOG_DIR}/access.log combined
81 | **
82 | 
83 |
84 | 5.To save and close the file. Hit the esc button on the keyboard, Type :, Type wq. w for write and q for quit and Hit ENTER to save the file.
85 | 6. use the ls command to show the new file in the sites-available directory: **sudo ls /etc/apache2/sites-available**
86 | 
87 |
88 | 7. Next, use a2ensite command to enable the new virtual host: **sudo a2ensite projectlamp**
89 | 8. Disable the default website that comes installed with Apache. type: **sudo a2dissite 000-default**
90 | 9. Esure your configuration file doesn’t contain syntax errors, run: **sudo apache2ctl configtest**
91 | 10. Finally, reload Apache so these changes take effect: **sudo systemctl reload apache2**
92 | 
93 |
94 | 12. The website is active, but the web root /var/www/projectlamp is still empty. Create an index.html file in that location so that we can test that the virtual host works as expected:
95 | **sudo echo 'Hello LAMP from hostname' $(curl -s http://169.254.169.254/latest/meta-data/public-hostname) 'with public IP' $(curl -s http://169.254.169.254/latest/meta-data/public-ipv4) > /var/www/projectlamp/index.html**
96 | 12. Relaod the public IP to see changes to the apache2 default page.
97 | 
98 |
99 | ### STEP 5 — ENABLE PHP ON THE WEBSITE
100 | #### Steps
101 | 1. With the default DirectoryIndex settings on Apache, a file named index.html will always take precedence over an index.php file. To make index.php file tak precedence need to edit the /etc/apache2/mods-enabled/dir.conf file and change the order in which the index.php file is listed within the DirectoryIndex directive.
102 | 2. Run: **sudo vim /etc/apache2/mods-enabled/dir.conf** then:
103 | **
104 | #Change this:
105 | #DirectoryIndex index.html index.cgi index.pl index.php index.xhtml index.htm
106 | #To this:
107 | DirectoryIndex index.php index.html index.cgi index.pl index.xhtml index.htm
108 | **
109 | 4. Save and close file.
110 | 5. Next, reload Apache so the changes take effect, type: **sudo systemctl reload apache2**
111 | 6. Finally, we will create a PHP script to test that PHP is correctly installed and configured on your server. Create a new file named index.php inside the custom web root folder, run: **vim /var/www/projectlamp/index.php**
112 | 7. This will open a blank file. Add the PHP code:
113 | ** \
21 | /etc/apt/sources.list.d/jenkins.list'
22 | sudo apt update
23 | sudo apt-get install jenkins
24 | ```
25 | 
26 |
27 | 4. Make sure Jenkins is up and running: `sudo systemctl status jenkins`
28 | 
29 |
30 | 5. By default Jenkins server uses TCP port 8080 – open it by creating a new Inbound Rule in your EC2 Security Group
31 | 6. Next, setup Jenkins. From your browser access `http://:8080` You will be prompted to provide a default admin password
32 | 
33 |
34 | 7. Retrieve the password from your Jenkins server: `sudo cat /var/lib/jenkins/secrets/initialAdminPassword`
35 | 
36 |
37 | 8. Copy the password from the server and paste on Jenkins setup to unlock Jenkins.
38 | 9. Next, you will be prompted to install plugins – **choose suggested plugins**
39 | 
40 |
41 | 10. Once plugins installation is done – create an admin user and you will get your Jenkins server address. **The installation is completed!**
42 | 
43 |
44 |
45 | #### Step 2 - Configure Jenkins to retrieve source codes from GitHub using Webhooks
46 | Here I configure a simple Jenkins job/project. This job will will be triggered by GitHub webhooks and will execute a ‘build’ task to retrieve codes from GitHub and store it locally on Jenkins server.
47 |
48 | 1. Enable webhooks in your GitHub repository settings:
49 | ```
50 | Go to the tooling repository
51 | Click on settings
52 | Click on webhooks on the left panel
53 | On the webhooks page under Payload URL enter: `http:// Jenkins server IP address/github-webhook`
54 | Under content type select: application/json
55 | Then add webhook
56 | ```
57 | 
58 |
59 | 2. Go to Jenkins web console, click **New Item** and create a **Freestyle project** and click OK
60 | 3. Connect your GitHub repository, copy the repository URL from the repository
61 | 4. In configuration of your Jenkins freestyle project under Source Code Management select **Git repository**, provide there the link to your Tooling GitHub repository and credentials (user/password) so Jenkins could access files in the repository.
62 | 
63 |
64 | 5. Save the configuration and let us try to run the build. For now we can only do it manually.
65 | 6. Click **Build Now** button, if you have configured everything correctly, the build will be successfull and you will see it under **#1**
66 | 7. Open the build and check in **Console Output** if it has run successfully.
67 | 
68 |
69 | This build does not produce anything and it runs only when it is triggered manually. Let us fix it.
70 | 8. Click **Configure** your job/project and add and save these two configurations:
71 | ```
72 | Under **Build triggers** select: Github trigger for GITScm polling
73 | Under **Post Build Actions** select Archieve the artifacts and enter `**` in the text box.
74 | ```
75 | 9. Now, go ahead and make some change in any file in your GitHub repository (e.g. README.MD file) and push the changes to the master branch.
76 | 10. You will see that a new build has been launched automatically (by webhook) and you can see its results – artifacts, saved on Jenkins server.
77 | 11. We have successfully configured an automated Jenkins job that receives files from GitHub by webhook trigger (this method is considered as ‘push’ because the changes are being ‘pushed’ and files transfer is initiated by GitHub).
78 | 
79 |
80 | 12. By default, the artifacts are stored on Jenkins server locally: `ls /var/lib/jenkins/jobs/tooling_github/builds//archive/`
81 |
82 | #### Step 3 – Configure Jenkins to copy files to NFS server via SSH
83 | 1. Now we have our artifacts saved locally on Jenkins server, the next step is to copy them to our NFS server to /mnt/apps directory. We need a plugin called
84 | **Publish over SSh**
85 | 2. Install "Publish Over SSH" plugin.
86 | 3. Navigate to the dashboard select **Manage Jenkins** and choose **Manage Plugins** menu item.
87 | 4. On **Available** tab search for **Publish Over SSH** plugin and install it
88 | 
89 |
90 | 5. Configure the job/project to copy artifacts over to NFS server.
91 | 6. On main dashboard select **Manage Jenkins** and choose **Configure System** menu item.
92 | 7. Scroll down to Publish over SSH plugin configuration section and configure it to be able to connect to your NFS server:
93 | ```
94 | Provide a private key (content of .pem file that you use to connect to NFS server via SSH/Putty)
95 | Name- NFS
96 | Hostname – can be private IP address of your NFS server
97 | Username – ec2-user (since NFS server is based on EC2 with RHEL 8)
98 | Remote directory – /mnt/apps since our Web Servers use it as a mointing point to retrieve files from the NFS server
99 | ```
100 | 
101 |
102 | 8. Test the configuration and make sure the connection returns **Success** Remember, that TCP port 22 on NFS server must be open to receive SSH connections.
103 | 9. Save the configuration and open your Jenkins job/project configuration page and add another one Post-build Action: **Set build actionds over SSH**
104 | 10. Configure it to send all files probuced by the build into our previouslys define remote directory. In our case we want to copy all files and directories – so we use **
105 | 
106 |
107 | 11. Save this configuration and go ahead, change something in **README.MD** file the GitHub Tooling repository.
108 | 12. Webhook will trigger a new job and in the "Console Output" of the job you will find something like this:
109 | ```
110 | SSH: Transferred 25 file(s)
111 | Finished: SUCCESS
112 | ```
113 | 
114 | 13. To make sure that the files in /mnt/apps have been updated – connect via SSH/Putty to your NFS server and check README.MD file: `cat /mnt/apps/README.md`
115 | 14. If you see the changes you had previously made in your GitHub – the job works as expected.
116 | 
117 |
118 |
119 | #### Issues
120 | 1. After step 11, I got a "Permission denied" error which indicated that by build was not successful
121 | 2. I fixed the issue by changing mode and ownership on the NFS server with the following:
122 | ```
123 | ll /mnt
124 | sudo chown -R nobody:nobody /mnt
125 | sudo chmod -R 777 /mnt
126 | ```
127 |
128 |
129 |
130 |
131 |
--------------------------------------------------------------------------------
/Project11.md:
--------------------------------------------------------------------------------
1 | ## ANSIBLE CONFIGURATION MANAGEMENT – AUTOMATE PROJECT 7 TO 10
2 |
3 | 
4 |
5 | #### Task
6 | 1. Install and configure Ansible client to act as a Jump Server/Bastion Host
7 | 2. Create a simple Ansible playbook to automate servers configuration
8 |
9 | ### Install and configure Ansible client to act as a Jump Server/Bastion Host
10 |
11 | An SSH jump server is a regular Linux server, accessible from the Internet, which is used as a gateway to access other Linux machines on a private network using the SSH protocol. Sometimes an SSH jump server is also called a “jump host” or a “bastion host”. The purpose of an SSH jump server is to be the only gateway for access to your infrastructure reducing the size of any potential attack surface.
12 |
13 | #### Step 1 - INSTALL AND CONFIGURE ANSIBLE ON EC2 INSTANCE
14 | 1. Continuating from [project 9](https://github.com/cynthia-okoduwa/DevOps-projects/blob/main/Project9.md), update Name tag on your Jenkins EC2 Instance to **Jenkins-Ansible**. This server will be used to run playbooks.
15 | 2. In your GitHub account create a new repository and name it **ansible-config-mgt**.
16 | 3. In your **Jenkin-Ansible** server, instal **Ansible**
17 | ```
18 | sudo apt update
19 | sudo apt install ansible
20 | ```
21 | 4. Check your Ansible version by running `ansible --version`
22 | 5. Configure Jenkins build job to save your repository content every time you change it. See [project 9](https://github.com/cynthia-okoduwa/DevOps-projects/blob/main/Project9.md) for detailed steps
23 | - Create a new Freestyle project ansible in Jenkins and point it to your **ansible-config-mgt** repository.
24 | - Configure Webhook in GitHub and set webhook to trigger ansible build.
25 | 
26 |
27 | - Configure a Post-build job to save all (**) files.
28 | - Test your setup by making some change in README.MD file in master branch and make sure that builds starts automatically and Jenkins saves
29 | the files (build artifacts) in following folder `ls /var/lib/jenkins/jobs/ansible/builds//archive/`
30 | 
31 | 
32 |
33 | #### Step 2 – Prepare your development environment using Visual Studio Code
34 | 1. Install Visual Studio Code (VSC)- an Integrated development environment (IDE) or Source-code Editor. You can get it [here](https://code.visualstudio.com/download)
35 | 2. After you have successfully installed VSC, configure it to connect to your newly created GitHub repository.
36 | 3. Clone down your ansible-config-mgt repo to your Jenkins-Ansible instance: `git clone `
37 |
38 | ### Create a simple Ansible playbook to automate servers configuration
39 |
40 | #### Step 3 - Begin Ansible development
41 | 1. In your **ansible-config-mgt** GitHub repository, create a new branch that will be used for development of a new feature.
42 | 2. Checkout the newly created feature branch to your local machine and start building your code and directory structure
43 | 3. Create a directory and name it **playbooks** – it will be used to store all your playbook files.
44 | 4. Create a directory and name it **inventory** – it will be used to keep your hosts organised.
45 | 5. Within the playbooks folder, create your first playbook, and name it **common.yml**
46 | 6. Within the inventory folder, create an inventory file (.yml) for each environment (Development, Staging Testing and Production) **dev**, **staging**, **uat**, and **prod** respectively.
47 |
48 | #### Step 4 – Set up an Ansible Inventory
49 | An Ansible inventory file defines the hosts and groups of hosts upon which commands, modules, and tasks in a playbook operate. Since the intention is to execute Linux commands on remote hosts, and ensure that it is the intended configuration on a particular server that occurs. It is important to have a way to organize our hosts in such an Inventory.
50 |
51 | 1. Save below inventory structure in the inventory/dev file to start configuring your development servers. Ensure to replace the IP addresses according to your own setup.
52 | 2. Ansible uses TCP port 22 by default, which means it needs to ssh into target servers from Jenkins-Ansible host – for this you can implement the concept of ssh-agent. Now you need to import your key into ssh-agent:
53 | ```
54 | eval `ssh-agent -s`
55 | ssh-add
56 | ```
57 | 3. Confirm the key has been added with this command, you should see the name of your key: `ssh-add -l`
58 | 
59 |
60 | 5. Now, ssh into your Jenkins-Ansible server using ssh-agent: `ssh -A ubuntu@public-ip`
61 | 6. Also notice, that your ubuntu user is ubuntu and user for RHEL-based servers is ec2-user.
62 | 7. Update your inventory/dev.yml file with this snippet of code:
63 | ```
64 | [nfs]
65 | ansible_ssh_user='ec2-user'
66 |
67 | [webservers]
68 | ansible_ssh_user='ec2-user'
69 | ansible_ssh_user='ec2-user'
70 |
71 | [db]
72 | ansible_ssh_user='ec2-user'
73 |
74 | [lb]
75 | ansible_ssh_user='ubuntu'
76 | ```
77 | 
78 |
79 | #### Step 5 – Create a Common Playbook
80 | Now we give Ansible the instructions on what you needs to be performed on all servers listed in **inventory/dev**. In **common.yml** playbook you will write configuration for repeatable, re-usable, and multi-machine tasks that is common to systems within the infrastructure.
81 | 1. Update your playbooks/common.yml file with following code:
82 | ```
83 | ---
84 | - name: update web, nfs and db servers
85 | hosts: webservers, nfs, db
86 | remote_user: ec2-user
87 | become: yes
88 | become_user: root
89 | tasks:
90 | - name: ensure wireshark is at the latest version
91 | yum:
92 | name: wireshark
93 | state: latest
94 |
95 | - name: update LB server
96 | hosts: lb
97 | remote_user: ubuntu
98 | become: yes
99 | become_user: root
100 | tasks:
101 | - name: Update apt repo
102 | apt:
103 | update_cache: yes
104 |
105 | - name: ensure wireshark is at the latest version
106 | apt:
107 | name: wireshark
108 | state: latest
109 | ```
110 | 
111 |
112 | 2. This playbook is divided into two parts, each of them is intended to perform the same task: install **wireshark utility** (or make sure it is updated to the latest version) on your RHEL 8 and Ubuntu servers. It uses **root** user to perform this task and respective package manager: **yum** for RHEL 8 and **apt** for Ubuntu.
113 | 3. For a better understanding of Ansible playbooks – [watch this video](https://www.youtube.com/watch?v=ZAdJ7CdN7DY) and read [this article](https://www.redhat.com/en/topics/automation/what-is-an-ansible-playbook) from Redhat.
114 |
115 | #### Step 6 – Update GIT with the latest code
116 | 1. Now all of your directories and files live on your machine and you need to push changes made locally to GitHub.
117 | 2. Commit your code into GitHub: use git commands to **add**, **commit** and **push** your branch to GitHub.
118 | ```
119 | git status
120 | git add
121 | git commit -m "commit message"
122 | ```
123 | 4. Create a Pull request (PR)
124 | 
125 |
126 | 3. Once your code changes appear in master branch – Jenkins will do its job and save all the files (build artifacts) to **/var/lib/jenkins/jobs/ansible/builds//archive/** directory on Jenkins-Ansible server.
127 |
128 | 
129 |
130 | #### Step 7 – Run Ansible test
131 | 1. Now, it is time to execute ansible-playbook command and verify if your playbook actually works: `cd ansible-config-mgt`
132 | 2. Run ansible-playbook command: `ansible-playbook -i inventory/dev.yml playbooks/common.yml`
133 | 
134 |
135 | 4. If your command ran successfully, go to each of the servers and check if wireshark has been installed by running `which wireshark` or `wireshark --version`
136 | 
137 | 
138 |
--------------------------------------------------------------------------------
/Project6.md:
--------------------------------------------------------------------------------
1 | 
2 | ## WEB SOLUTION WITH WORDPRESS
3 | ### Part 1: Configure storage subsystem for Web and Database servers based on Linux OS.
4 | #### Steps
5 | 1. Launch an EC2 instance that will serve as "Web Server". Create 3 volumes in the same AZ as your Web Server, each of 10 GiB.
6 | 2. Attach all three volumes one by one to your Web Server instance
7 | 3. Open up the Linux terminal to begin configuration of the instance. Use `lsblk` command to inspect what block devices are attached to the server. The 3 newly
8 | created block devices are names **xvdf, xvdh, xvdg**
9 | 4. Use `df -h` command to see all mounts and free space on your server
10 | 
11 |
12 | 5. Use gdisk utility to create a single partition on each of the 3 disks `sudo gdisk /dev/xvdf`
13 | 6. A prompt pops up, type `n`, to create new partition. Enter the number of partition(in my case 1). Hex code is **8e00**. Type `p`, to view partition and finally `w`, to save newly created partition.
14 | 7. Repeat this process for the other remaining block devices.
15 | 8. Type **lsblk** to view newly created partition.
16 | 
17 |
18 | 9. Install **lvm2** package by typing: sudo yum install lvm2. Run `sudo lvmdiskscan` command to check for available partitions.
19 | 10. Create physical volume to be used by lvm by using the pvcreate command:
20 | ```
21 | sudo pvcreate /dev/xvdf1
22 | sudo pvcreate /dev/xvdg1
23 | sudo pvcreate /dev/xvdh1
24 | ```
25 | 11. To check if the PV have been created type: `sudo pvs`
26 | 
27 |
28 | 12. Next, Create the volume group and name it **webdata-vg**: `sudo vgcreate webdata-vg /dev/xvdf1 /dev/xvdg1 /dev/xvdh1`
29 | 13. View newly created volume group type: `sudo vgs`
30 | 
31 |
32 | 14. Create 2 logical volumes using lvcreate utility. Name them: `apps-lv` for storing data for the Website and `logs-lv` for storing data for logs.
33 | ```
34 | sudo lvcreate -n apps-lv -L 14G webdata-vg
35 | sudo lvcreate -n logs-lv -L 14G webdata-vg
36 | ```
37 | 
38 |
39 | 15. Verify Logical Volume has been created successfully by running: `sudo lvs`
40 | 16. Next, format the logical volumes with ext4 filesystem:
41 | ```
42 | sudo mkfs -t ext4 /dev/webdata-vg/apps-lv
43 | sudo mkfs -t ext4 /dev/webdata-vg/logs-lv
44 | ```
45 | 
46 |
47 | 17. Next, create mount points for logical volumes. Create **/var/www/html** directory to store website files: `sudo mkdir -p /var/www/html` then mount **/var/www/html** on apps-lv logical volume : `sudo mount /dev/webdata-vg/apps-lv /var/www/html/`
48 | 
49 |
50 | 18. Create **/home/recovery/logs** to store backup of log data: `sudo mkdir -p /home/recovery/logs`
51 | 19. Use **rsync** utility to backup all the files in the log directory **/var/log** into **/home/recovery/logs** (It is important to backup all data on the /var/log directory because all the data will be deleted during the mount process) Type the following command: `sudo rsync -av /var/log/. /home/recovery/logs/`
52 | 20. Mount /var/log on logs-lv logical volume: `sudo mount /dev/webdata-vg/logs-lv /var/log`
53 | 21. Finally, restore deleted log files back into /var/log directory: `sudo rsync -av /home/recovery/logs/. /var/log`
54 | 22. Next, update **/etc/fstab** file so that the mount configuration will persist after restart of the server.
55 | 23. The UUID of the device will be used to update the /etc/fstab file to get the UUID type: `sudo blkid` and copy both the apps-vg and logs-vg UUID (Excluding the double quotes)
56 | 24. Type sudo `vi /etc/fstab` to open editor and update using the UUID you copied.
57 | 
58 |
59 | 25. Test the configuration and reload the daemon:
60 | ```
61 | sudo mount -a`
62 | sudo systemctl daemon-reload
63 | ```
64 | 26. Verify your setup by running `df -h`
65 | 
66 |
67 | ### Part 2 - Prepare the Database Server
68 | 27. Launch a second RedHat EC2 instance and name it **DB Server**
69 | 28. Repeat the same steps as for the Web Server, but instead of **apps-lv** create **db-lv** and mount it to **/db** directory instead of /var/www/html/.
70 |
71 | ### Part 3 -Install WordPress and connect it to a remote MySQL database server.
72 | 29. Update the repository: `sudo yum -y update`
73 | 30. Install wget, Apache and it’s dependencies: `sudo yum -y install wget httpd php php-mysqlnd php-fpm php-json`
74 | 31. Start Apache
75 | ```
76 | sudo systemctl enable httpd
77 | sudo systemctl start httpd
78 | ```
79 | 
80 |
81 | 32. install PHP and it’s depemdencies:
82 | ```
83 | sudo yum install https://dl.fedoraproject.org/pub/epel/epel-release-latest-8.noarch.rpm
84 | sudo yum install yum-utils http://rpms.remirepo.net/enterprise/remi-release-8.rpm
85 | sudo yum module list php
86 | sudo yum module reset php
87 | sudo yum module enable php:remi-7.4
88 | sudo yum install php php-opcache php-gd php-curl php-mysqlnd
89 | sudo systemctl start php-fpm
90 | sudo systemctl enable php-fpm
91 | setsebool -P httpd_execmem 1
92 | ```
93 | 33. Restart Apache: `sudo systemctl restart httpd`
94 | 34. Download wordpress and copy wordpress to var/www/html
95 | ```
96 | mkdir wordpress
97 | cd wordpress
98 | sudo wget http://wordpress.org/latest.tar.gz
99 | sudo tar xzvf latest.tar.gz
100 | sudo rm -rf latest.tar.gz
101 | cp wordpress/wp-config-sample.php wordpress/wp-config.php
102 | cp -R wordpress /var/www/html/
103 | ```
104 | 
105 |
106 | 35. Configure SELinux Policies:
107 | ```
108 | sudo chown -R apache:apache /var/www/html/wordpress
109 | sudo chcon -t httpd_sys_rw_content_t /var/www/html/wordpress -R
110 | sudo setsebool -P httpd_can_network_connect=1
111 | ```
112 | 
113 |
114 | ### Step 4 — Install MySQL on your DB Server instance
115 | 36. Run the following:
116 | ```
117 | sudo yum update
118 | sudo yum install mysql-server
119 | ```
120 | 37. Verify that the service is up and running: `sudo systemctl status mysqld`. If the service is not running, restart the service and enable it so it will be running even after reboot:
121 | ```
122 | sudo systemctl restart mysqld
123 | sudo systemctl enable mysqld
124 | ```
125 | 
126 |
127 | ### Step 5 — Configure DB to work with WordPress
128 | 38. Configure DB to work with Wordpress with the code below.
129 | ```
130 | sudo mysql
131 | CREATE DATABASE wordpress;
132 | CREATE USER `myuser`@`` IDENTIFIED BY 'mypass';
133 | GRANT ALL ON wordpress.* TO 'myuser'@'';
134 | FLUSH PRIVILEGES;
135 | SHOW DATABASES;
136 | exit
137 | ```
138 | 
139 |
140 | ### Step 6 — Configure WordPress to connect to remote database.
141 | 39. Make sure to open MySQL port 3306 on DB Server EC2. For extra security, you shall allow access to the DB server ONLY from your Web Server’s IP address, so in the Inbound Rule configuration specify source as /32
142 | 40. Install MySQL client and test that you can connect from your Web Server to your DB server by using mysql-client
143 | ```
144 | sudo yum install mysql
145 | sudo mysql -u admin -p -h
146 | ```
147 | 41. Verify if you can successfully execute SHOW DATABASES; command and see a list of existing databases.
148 | 
149 |
150 | 42. Change permissions and configuration so Apache could use WordPress:
151 | 43. Enable TCP port 80 in Inbound Rules configuration for your Web Server EC2 (enable from everywhere 0.0.0.0/0 or from your workstation’s IP)
152 | 44. Try to access from your browser the link to your WordPress http:///wordpress/
153 | 
154 | 
155 |
156 |
--------------------------------------------------------------------------------
/Project7.md:
--------------------------------------------------------------------------------
1 | # DEVOPS TOOLING WEBSITE SOLUTION
2 | 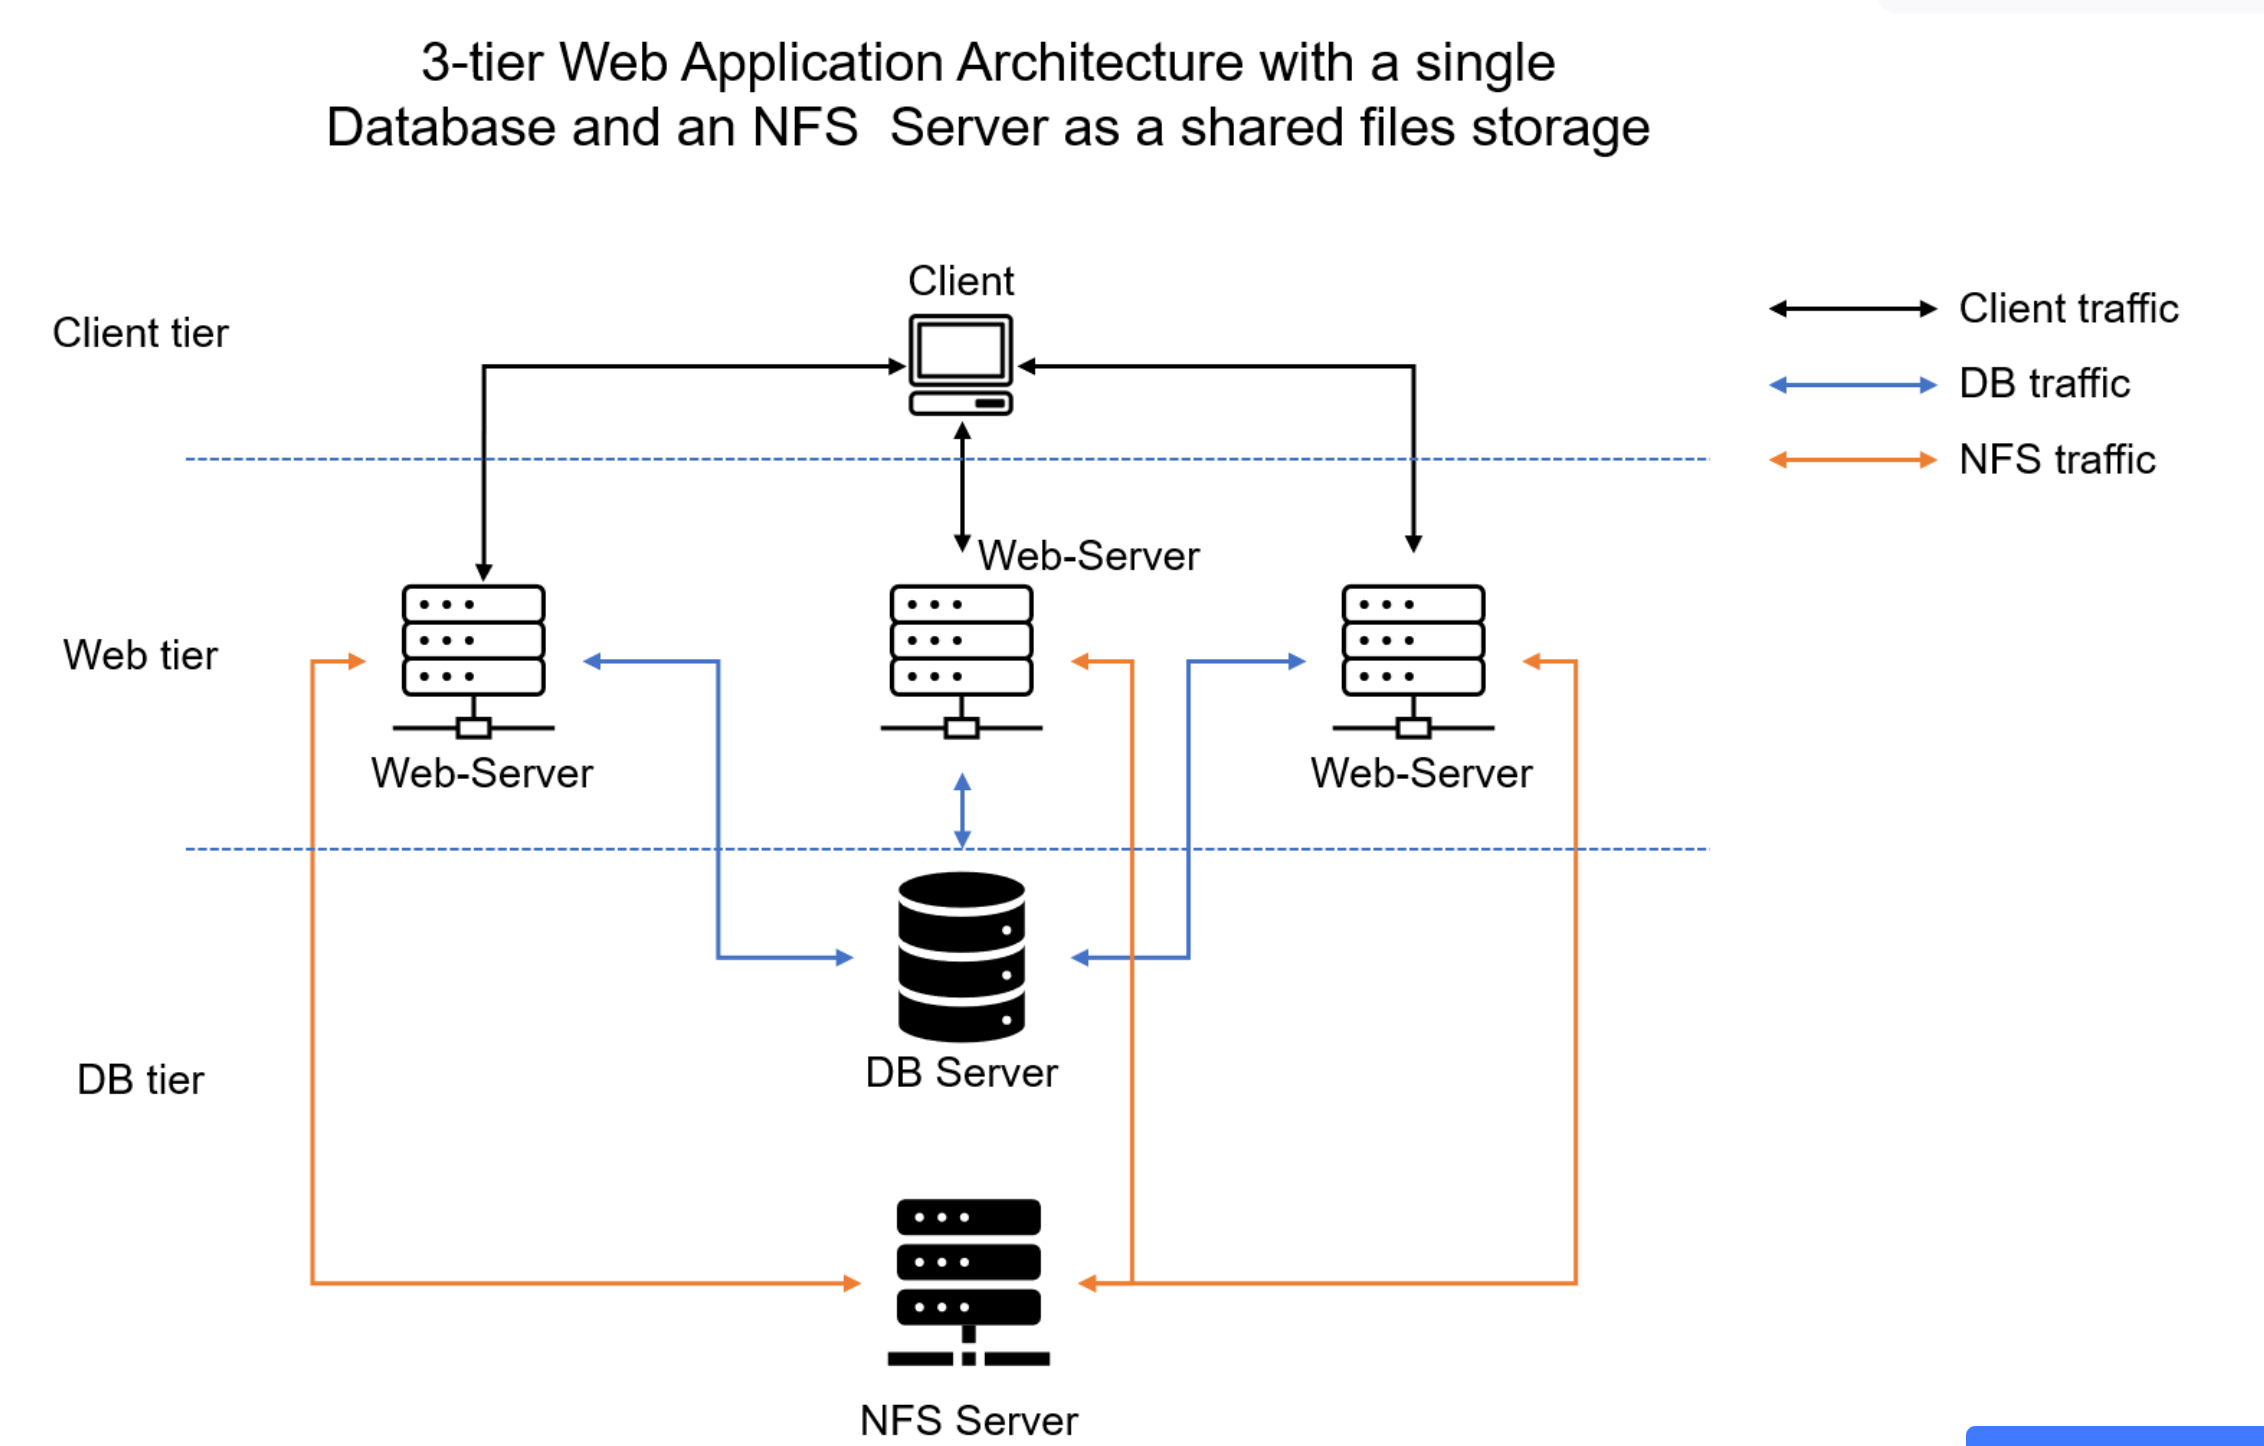
3 |
4 | ### Prerequites
5 | 1. Provision 4 Red Hat Enterprise Linux 8. One will be the NFS server and the other as the Web servers.
6 | 2. Provision 1 Ubuntu 20.04 for the the databaes server.
7 |
8 | ### Step 1 - Prepare NFS server
9 | 1. To view all logical volumes, run the command `lsblk` The 3 newly created block devices are names **xvdf**, **xvdh**, **xvdg** respectively.
10 | 2. Use gdisk utility to create a single partition on each of the 3 disks `sudo gdisk /dev/xvdf`
11 | 3. A prompt pops up, type `n` to create new partition, enter no of partition(1), hex code is 8300, `p` to view partition and `w` to save newly created partition.
12 | 4. Repeat this process for the other remaining block devices.
13 | 5. Type lsblk to view newly created partition.
14 | 6. Install lvm2 package by typing: `sudo yum install lvm2` then run `sudo lvmdiskscan` command to check for available partitions.
15 | 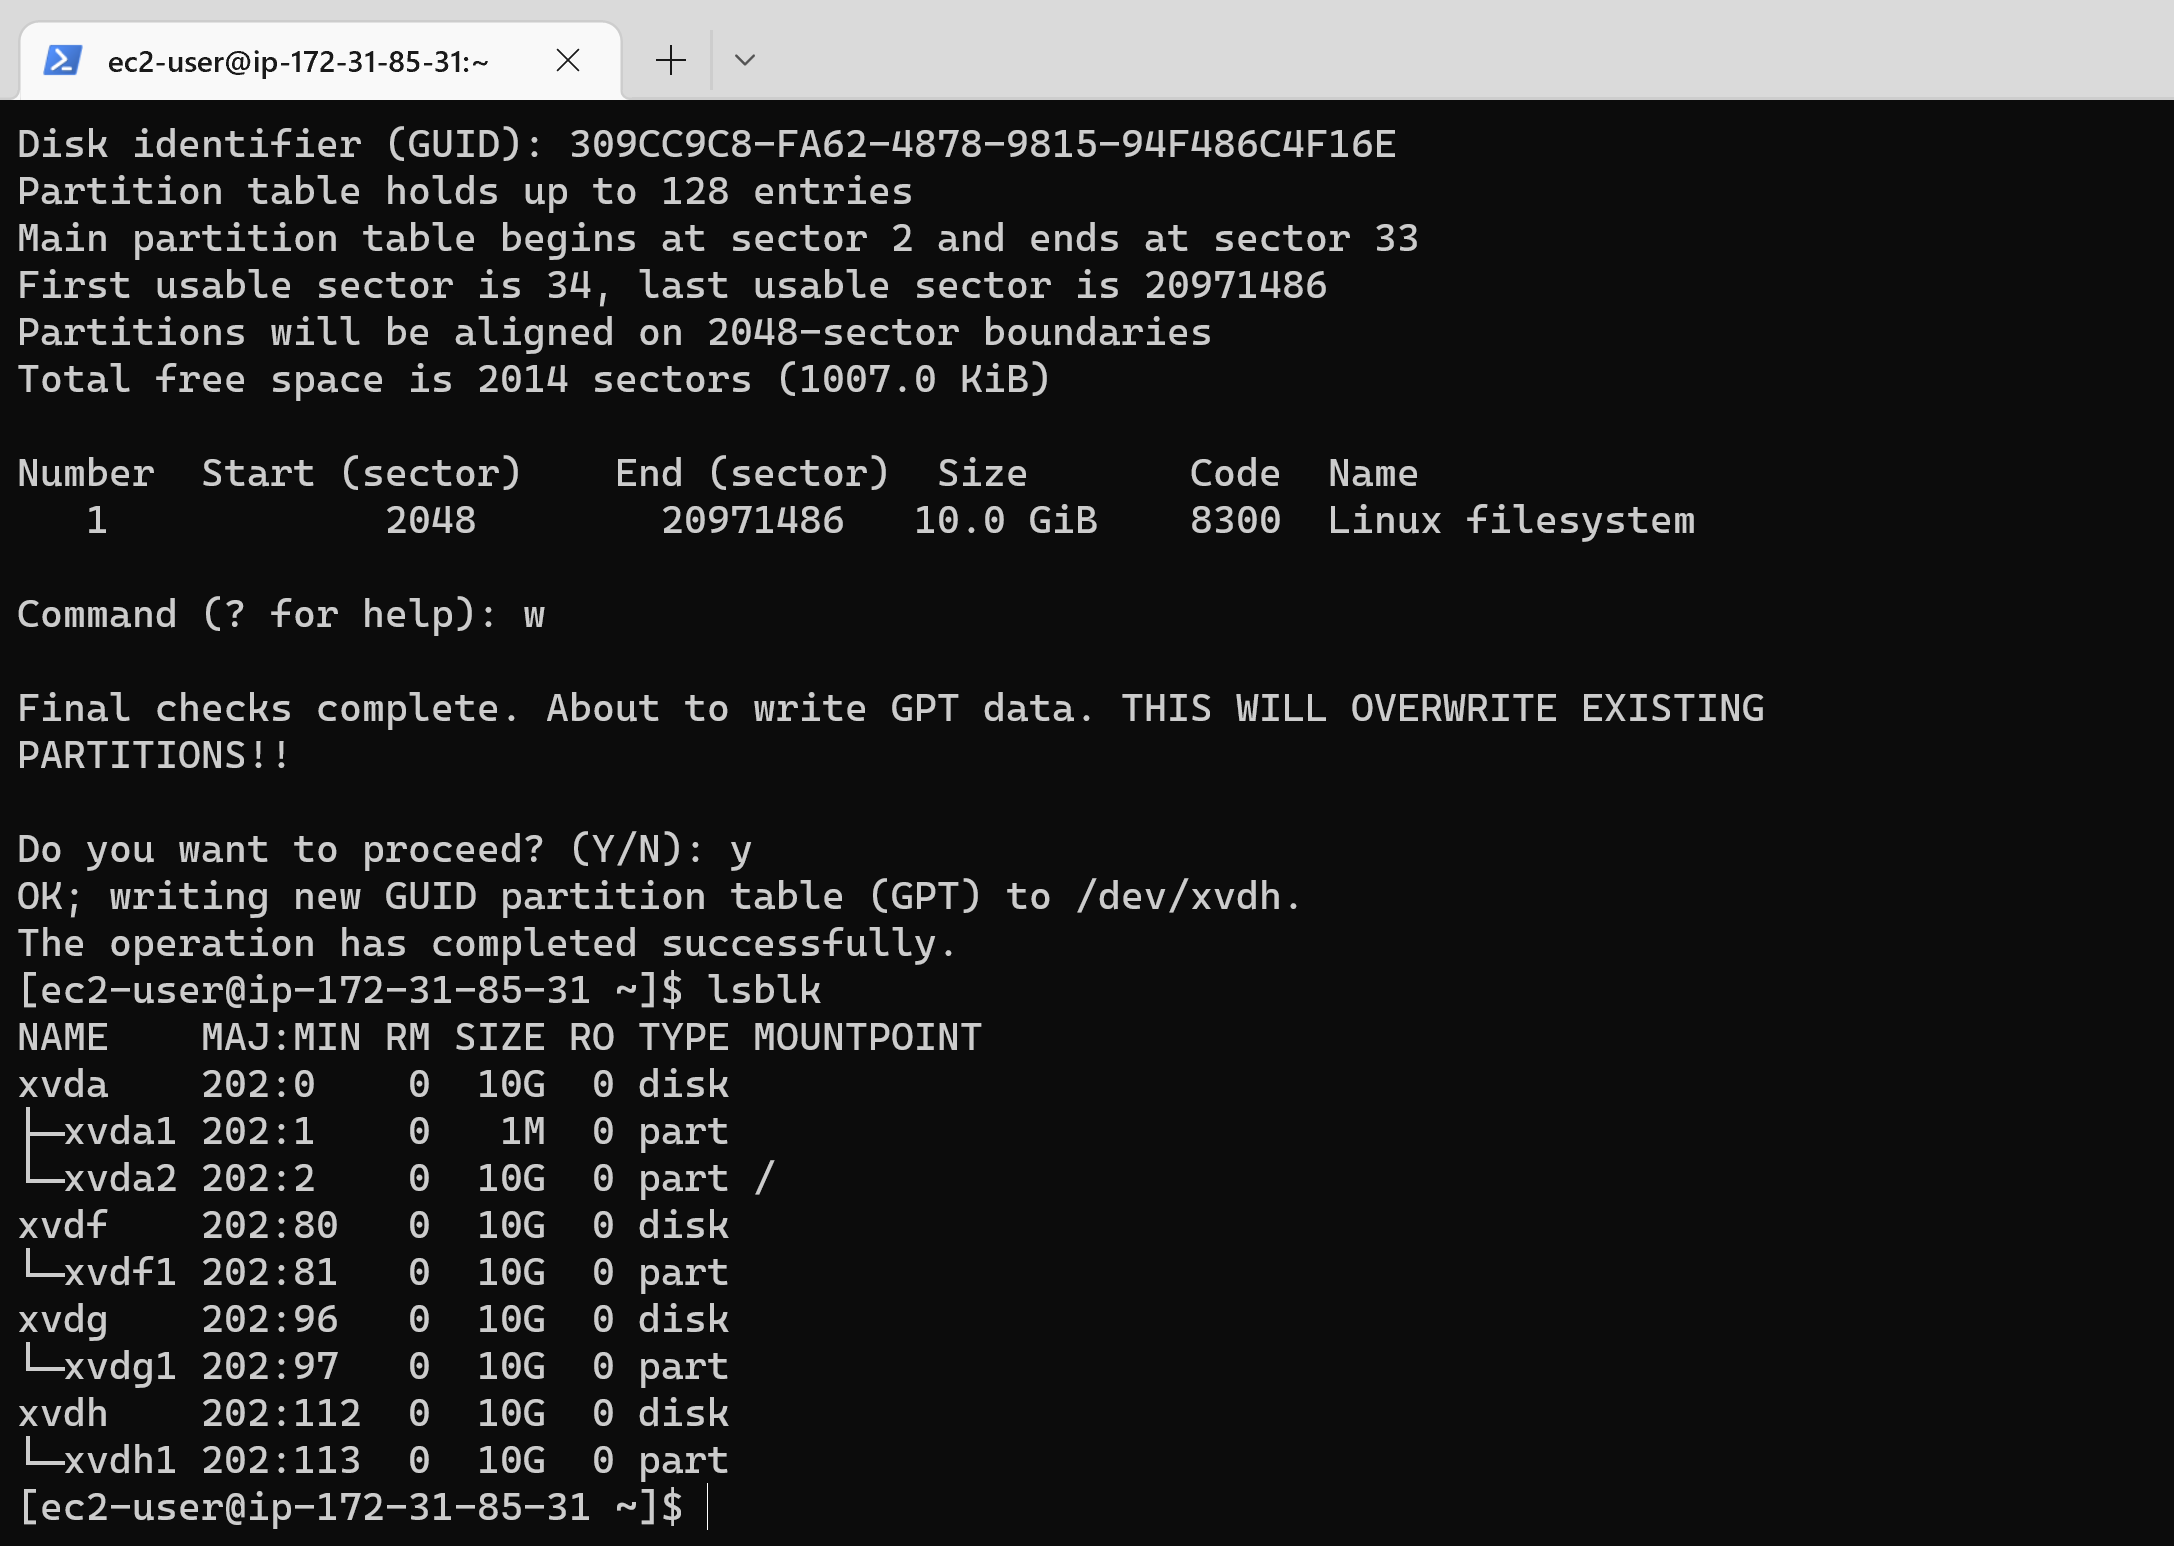
16 |
17 | 8. Create physical volume to be used by lvm by using the pvcreate command:
18 | ```
19 | sudo pvcreate /dev/xvdf1
20 | sudo pvcreate /dev/xvdg1
21 | sudo pvcreate /dev/xvdh1
22 | ```
23 | 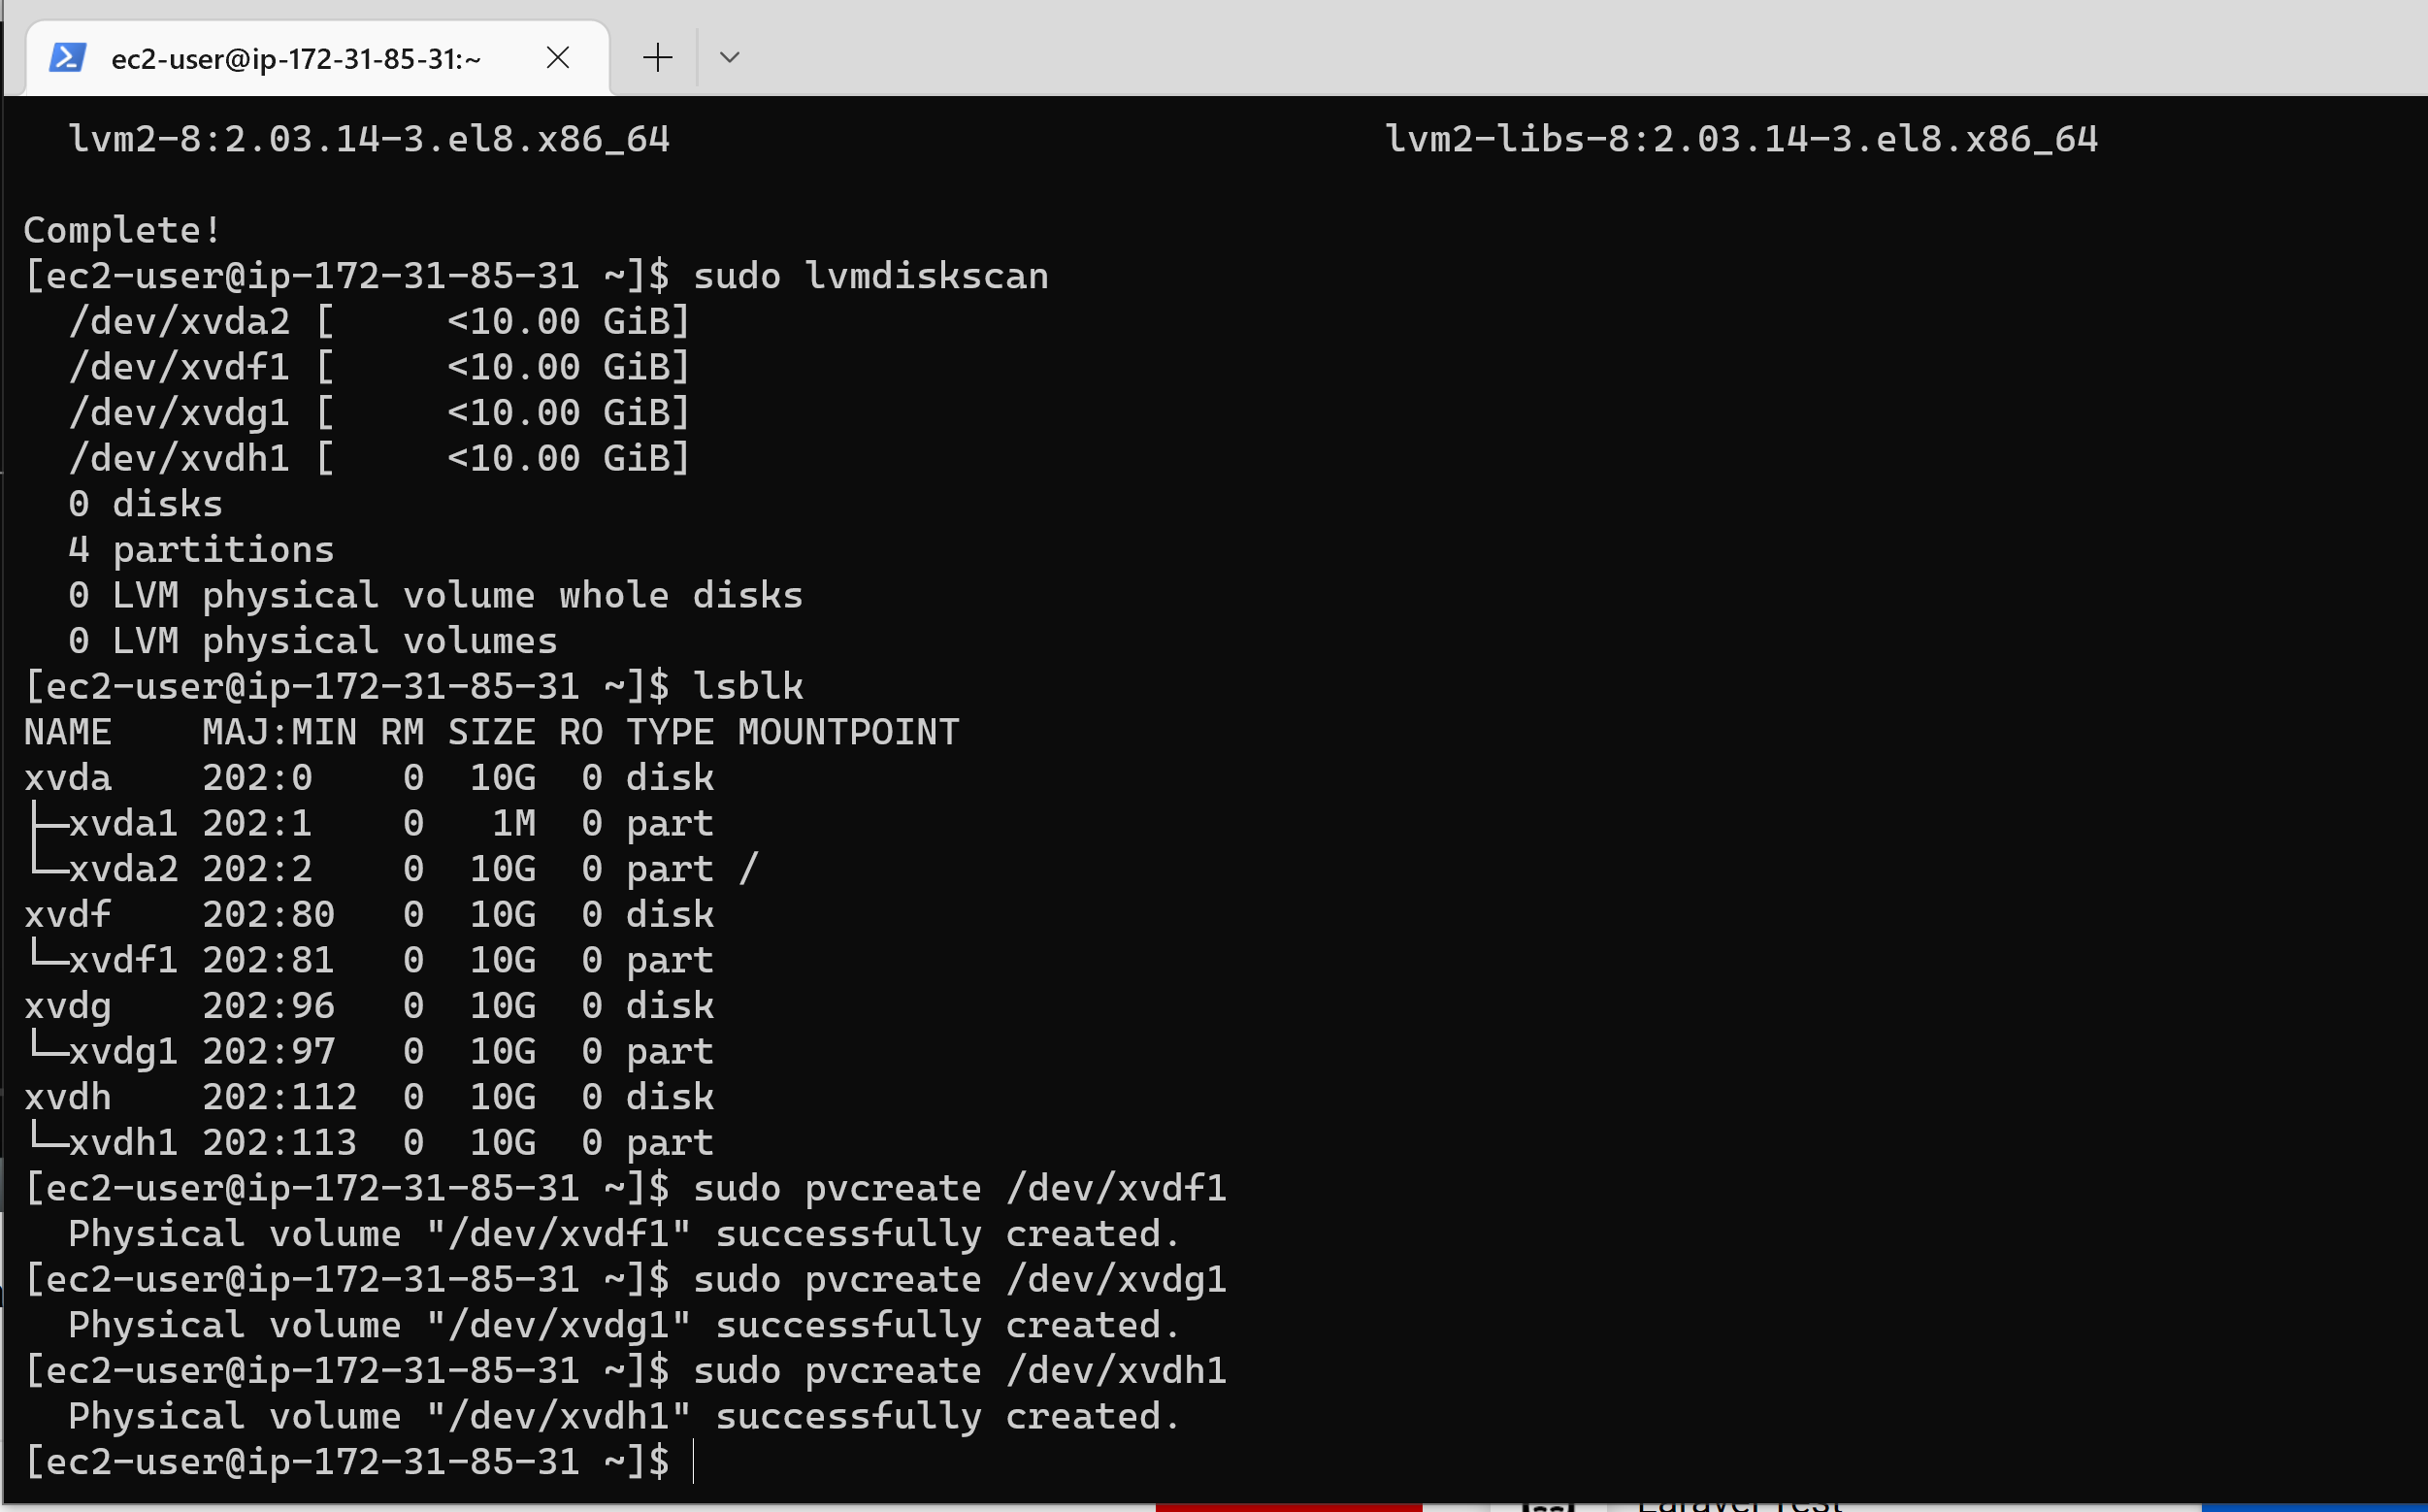
24 |
25 | 8. To check if the PV have been created successfully, run: `sudo pvs`
26 | 9. Next, Create the volume group and name it webdata-vg: `sudo vgcreate webdata-vg /dev/xvdf1 /dev/xvdg1 /dev/xvdh1`
27 | 10. View newly created volume group type: `sudo vgs`
28 | 11. Create 3 logical volumes using lvcreate utility. Name them: lv-apps for storing data for the website, lv-logs for storing data for logs and lv-opt for Jenkins Jenkins server in project 8.
29 | ```
30 | sudo lvcreate -n lv-apps -L 9G webdata-vg
31 | sudo lvcreate -n lv-logs -L 9G webdata-vg
32 | sudo lvcreate -n lv-opt -L 9G webdata-vg
33 | ```
34 | 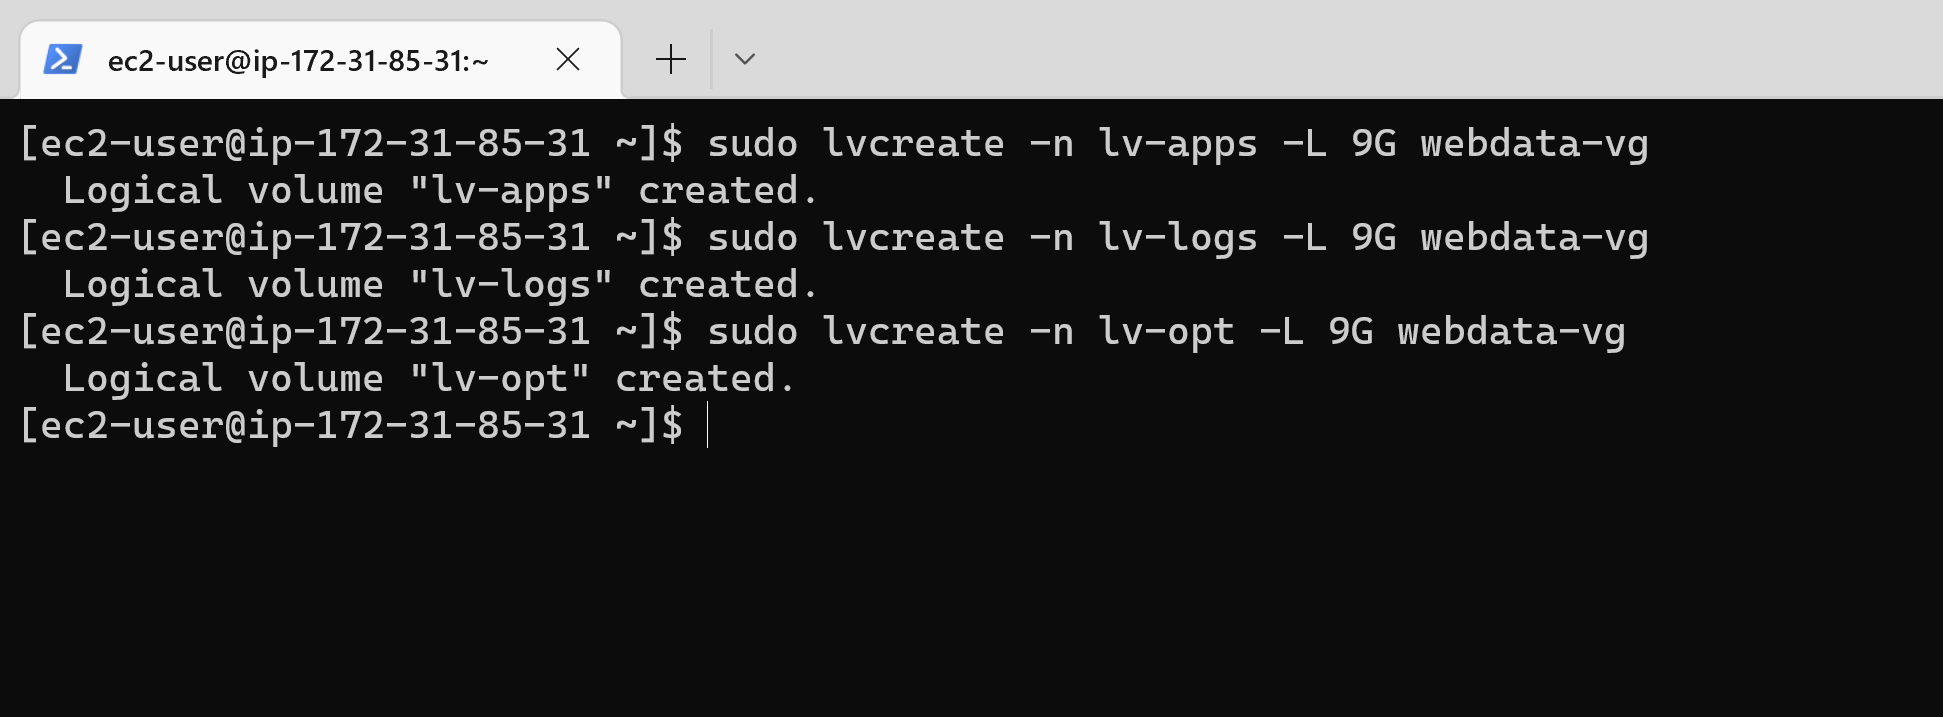
35 |
36 | 12. Verify Logical Volume has been created successfully by running: `sudo lvs`
37 | 13. Next, format the logical volumes with ext4 filesystem:
38 | ```
39 | sudo mkfs -t xfs /dev/webdata-vg/lv-apps
40 | sudo mkfs -t xfs /dev/webdata-vg/lv-logs
41 | sudo mkfs -t xfs /dev/webdata-vg/lv-opt
42 | ```
43 | 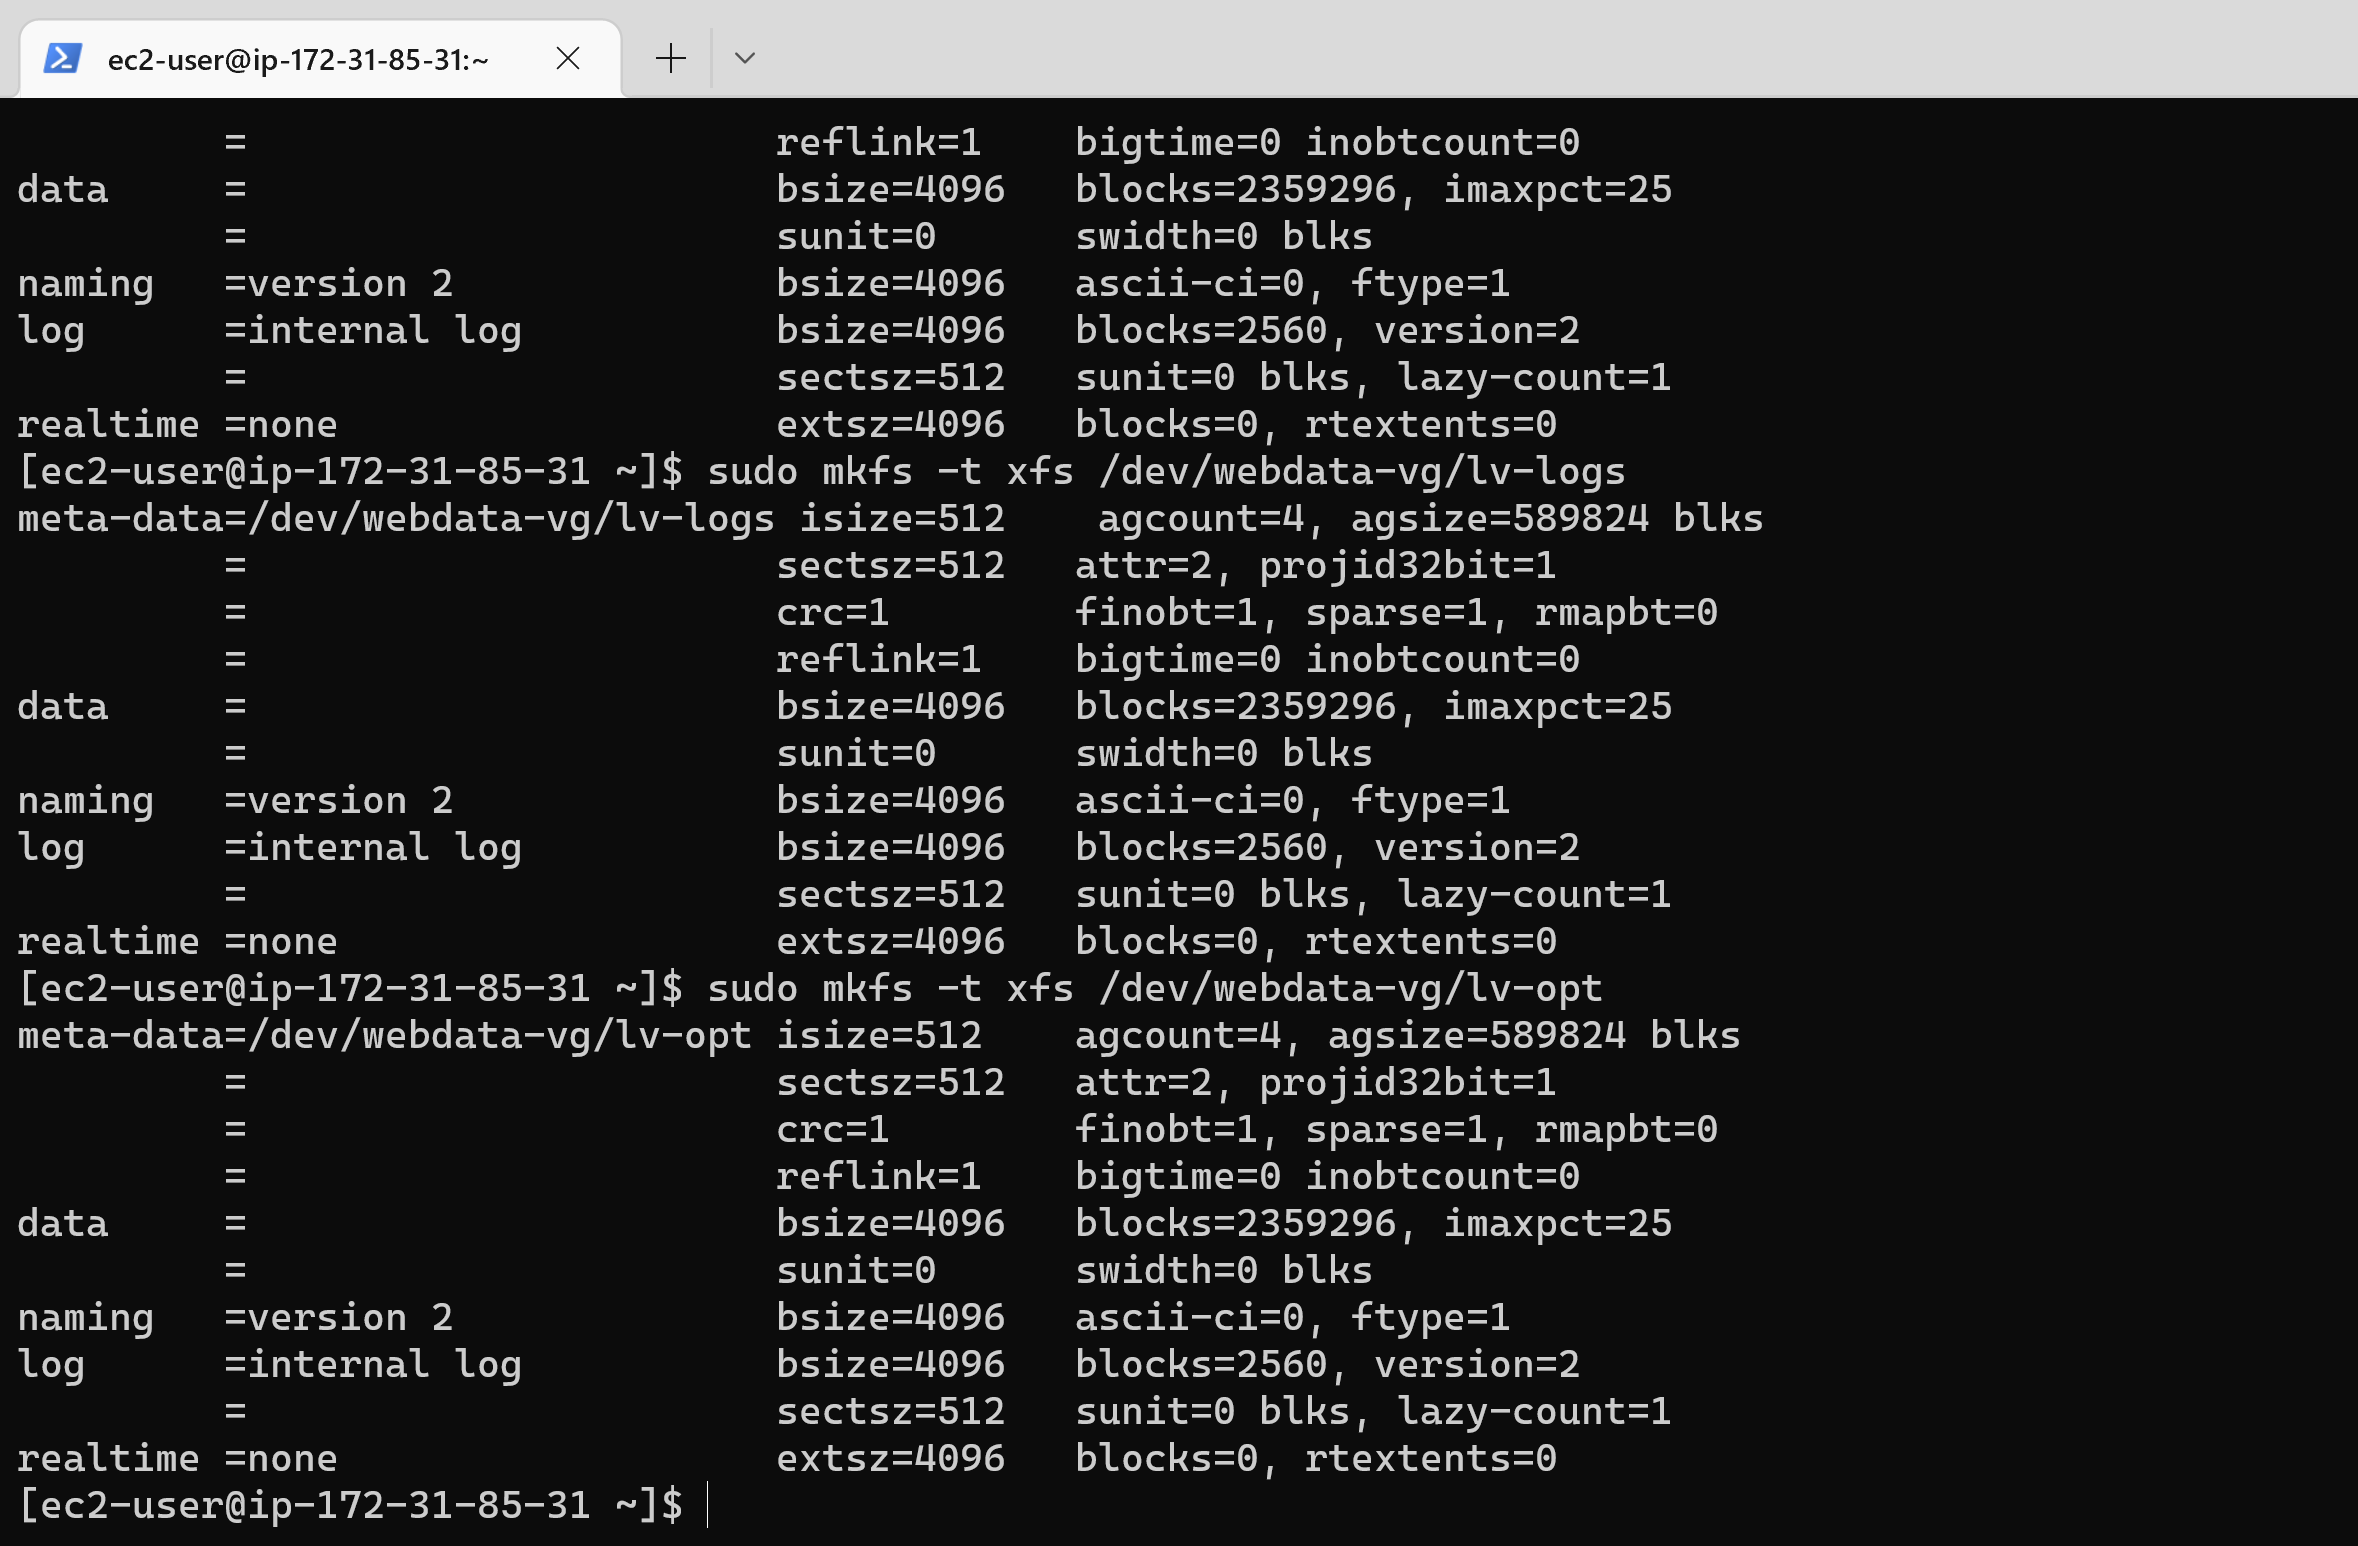
44 |
45 | 14. Next, create mount points for the logical volumes. Create **/mnt/apps** the following directory to store website files:
46 | ```
47 | sudo mkdir /mnt/apps
48 | sudo mkdir /mnt/logs
49 | sudo mkdir /mnt/opt
50 | ```
51 | 15. Mount to **/dev/webdata-vg/lv-apps** **/dev/webdata-vg/lv-apps** and **/dev/webdata-vg/lv-opt** respectievly :
52 | ```
53 | sudo mount /dev/webdata-vg/lv-apps /mnt/apps
54 | sudo mount /dev/webdata-vg/lv-logs /mnt/logs
55 | sudo mount /dev/webdata-vg/lv-opt /mnt/opt
56 | ```
57 | 16. Install NFS server, configure it to start on reboot and make sure it is up and running
58 | ```
59 | sudo yum -y update
60 | sudo yum install nfs-utils -y
61 | sudo systemctl start nfs-server.service
62 | sudo systemctl enable nfs-server.service
63 | sudo systemctl status nfs-server.service
64 | ```
65 | 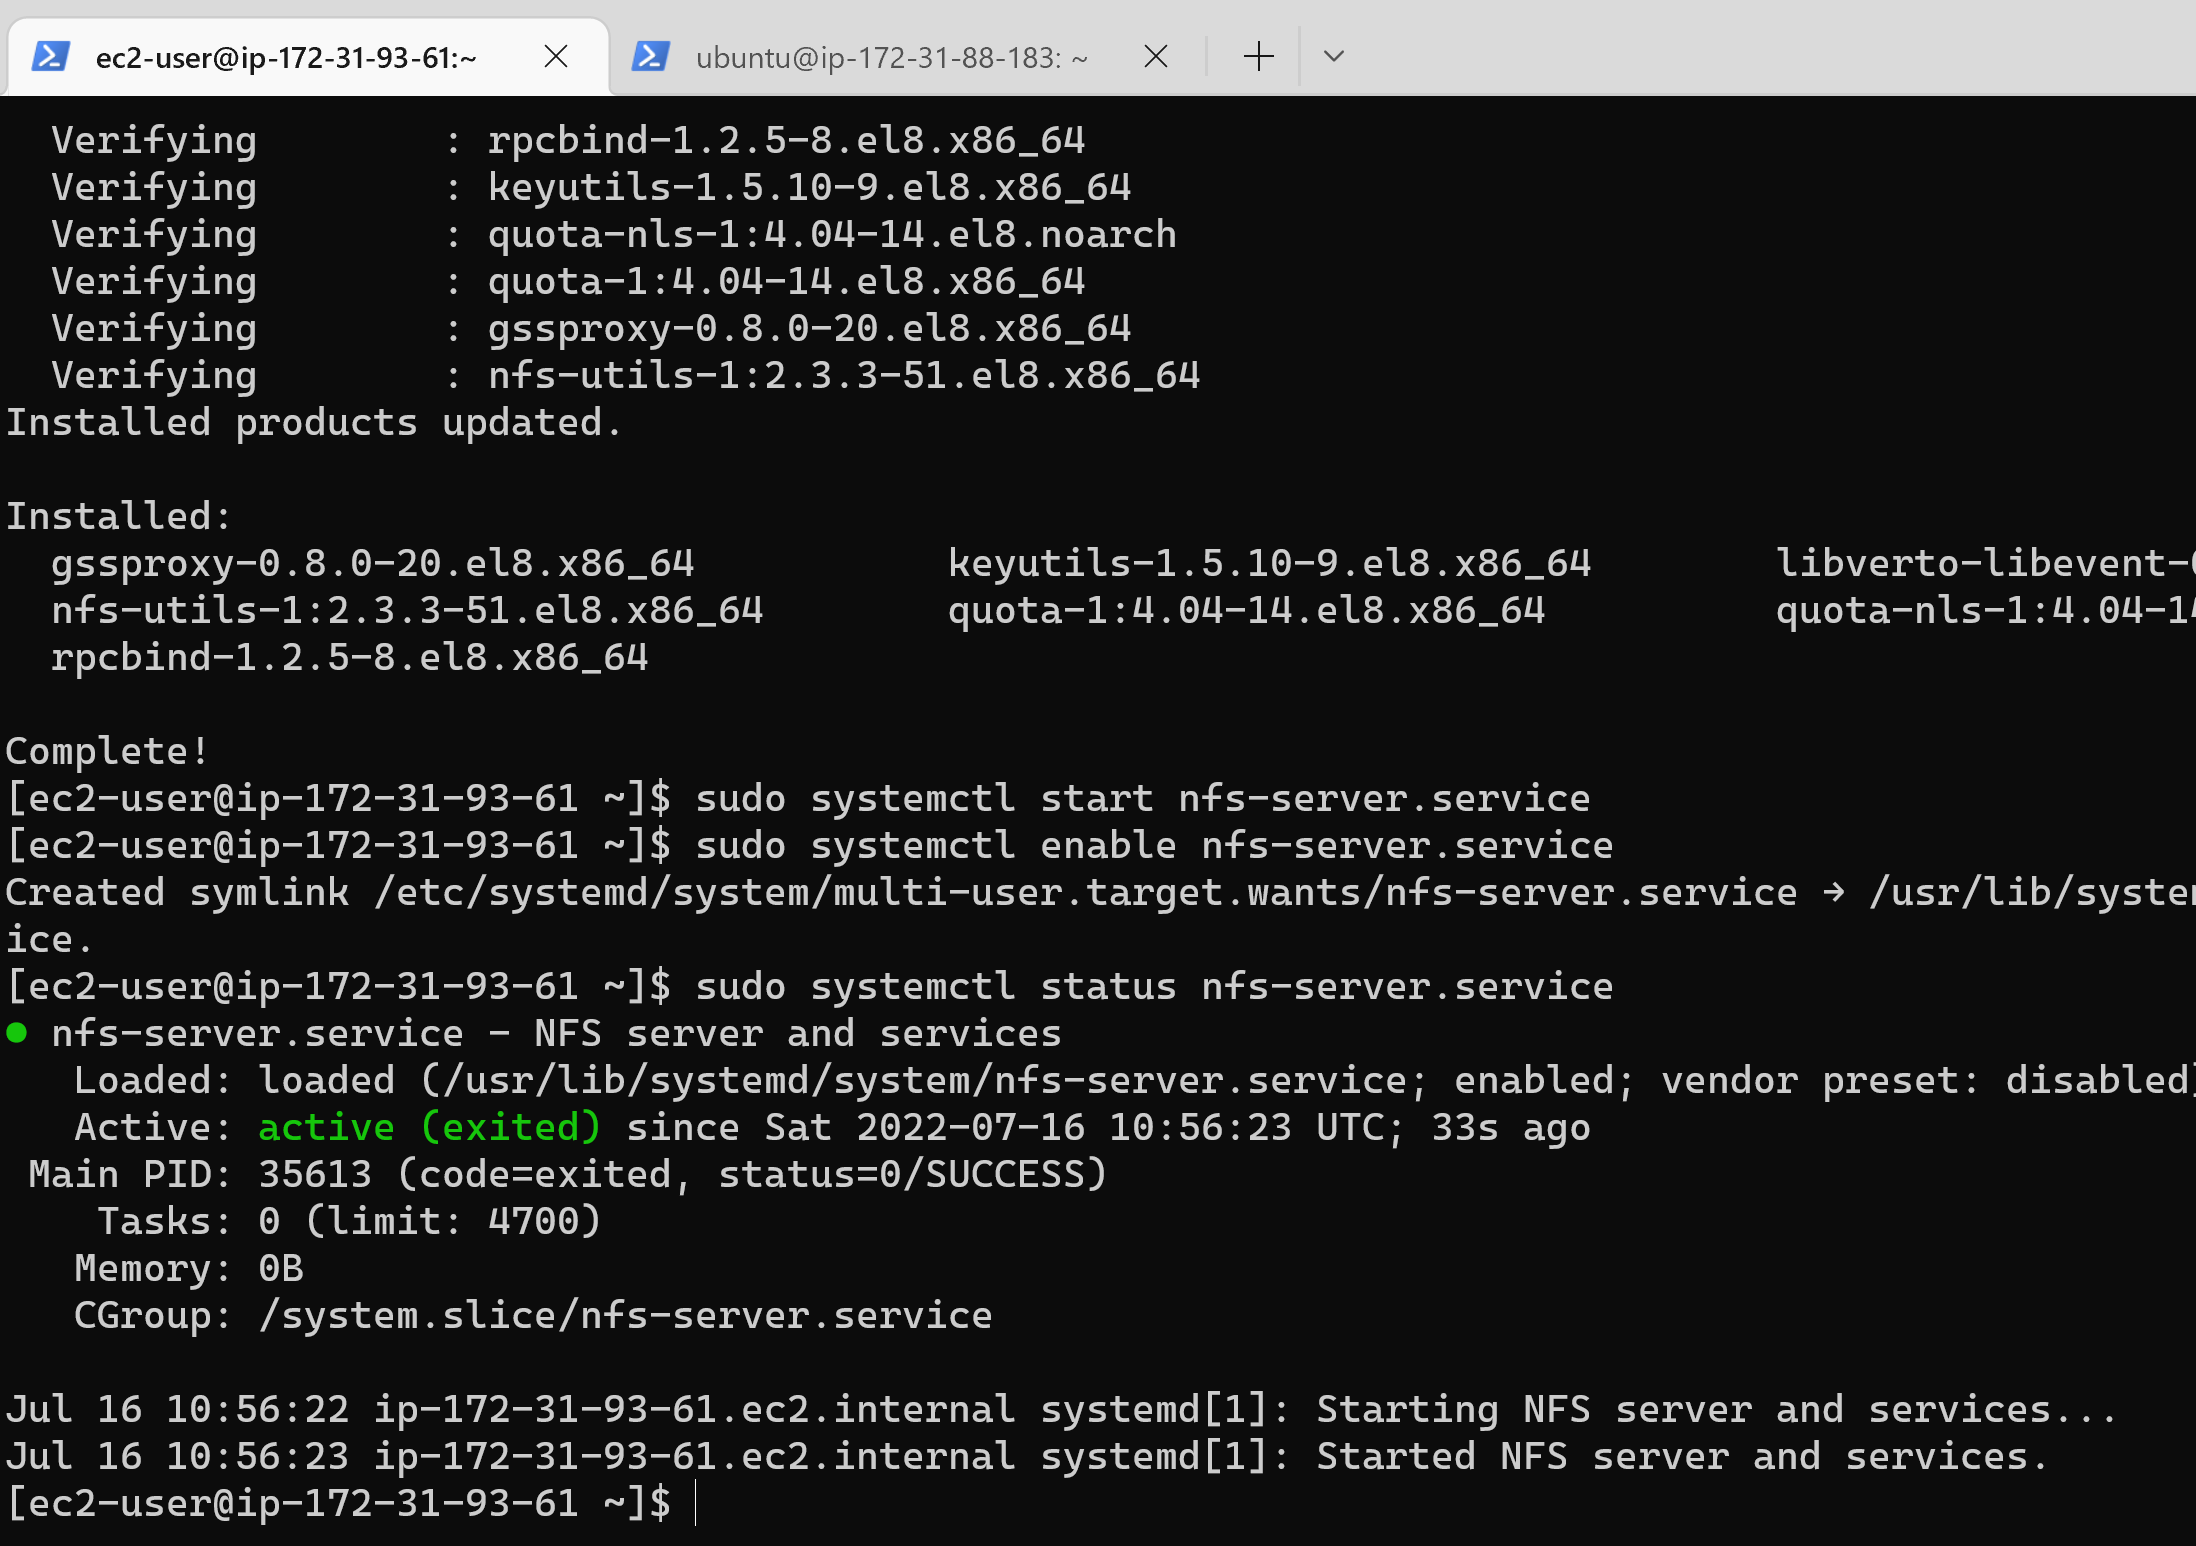
66 | 17. Export the mounts for webservers’ subnet cidr to connect as clients. For simplicity, install your all three Web Servers inside the same subnet, but in production set up you would probably want to separate each tier inside its own subnet for higher level of security.
67 | 18. Set up permission that will allow our Web servers to read, write and execute files on NFS:
68 | ```
69 | sudo chown -R nobody: /mnt/apps
70 | sudo chown -R nobody: /mnt/logs
71 | sudo chown -R nobody: /mnt/opt
72 |
73 | sudo chmod -R 777 /mnt/apps
74 | sudo chmod -R 777 /mnt/logs
75 | sudo chmod -R 777 /mnt/opt
76 |
77 | sudo systemctl restart nfs-server.service
78 | ```
79 | 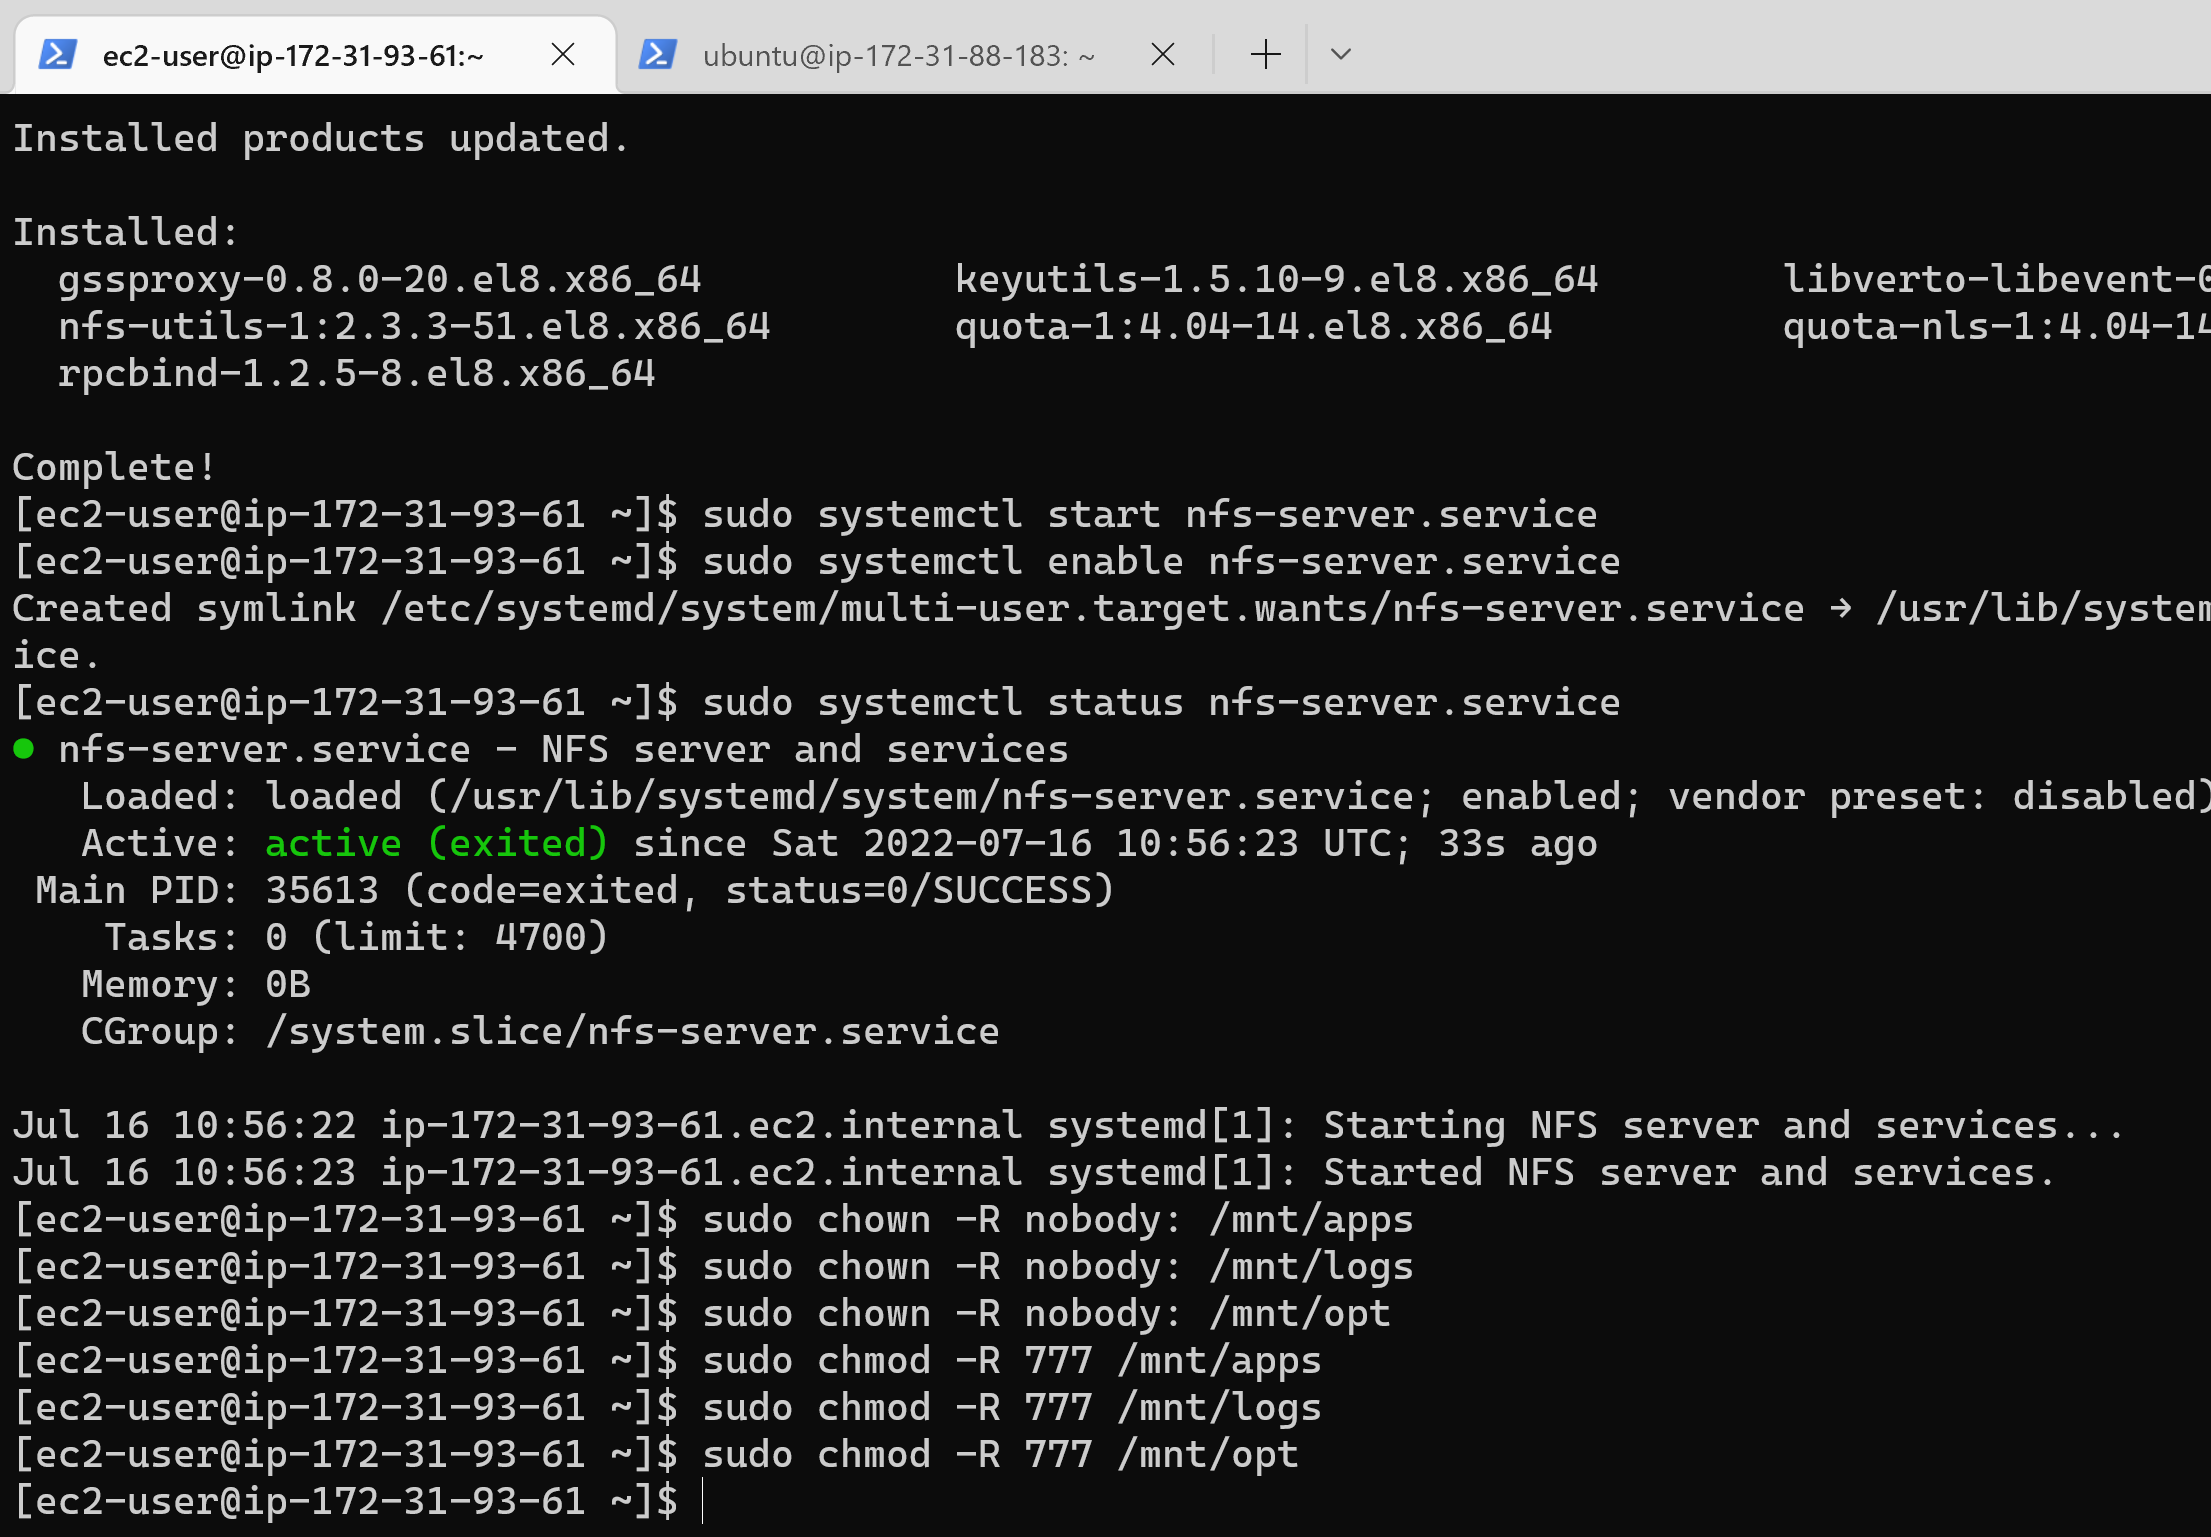
80 | 19. In your choosen text editor, configure access to NFS for clients within the same subnet (my Subnet CIDR – 172.31.80.0/20 ):
81 | ```
82 | sudo vi /etc/exports
83 |
84 | /mnt/apps 172.31.80.0/20(rw,sync,no_all_squash,no_root_squash)
85 | /mnt/logs 172.31.80.0/20(rw,sync,no_all_squash,no_root_squash)
86 | /mnt/opt 172.31.80.0/20(rw,sync,no_all_squash,no_root_squash)
87 |
88 | Esc + :wq!
89 |
90 | sudo exportfs -arv
91 | ```
92 | 20. Check which port is used by NFS and open it using Security Groups (add new Inbound Rule)
93 | `rpcinfo -p | grep nfs`
94 | 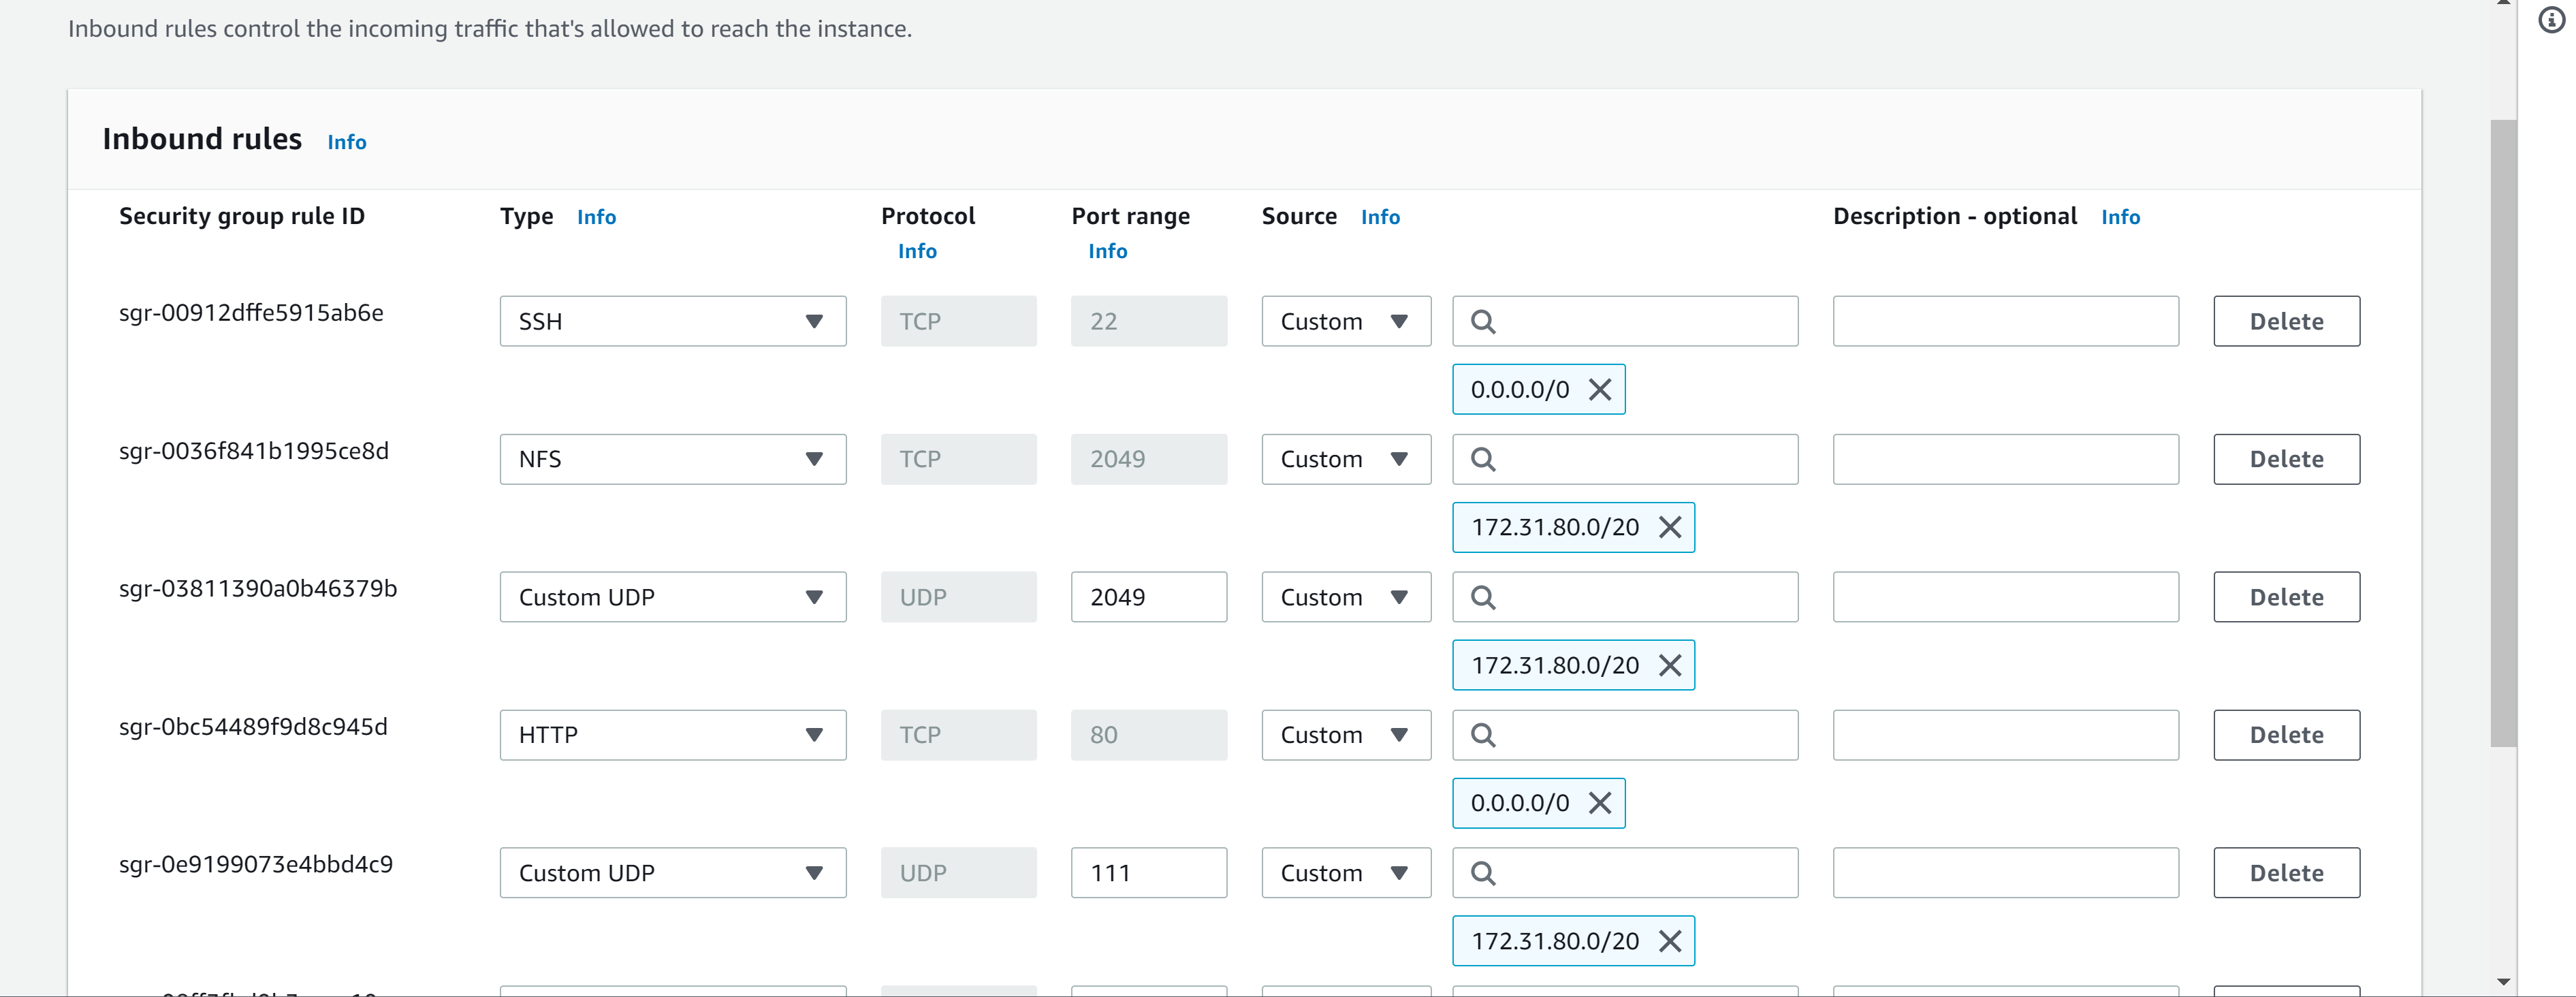
95 |
96 | ### STEP 2 — CONFIGURE THE DATABASE SERVER
97 | 1. Install and configure a MySQL DBMS to work with remote Web Server
98 | 2. SSH in to the provisioned DB server and run an update on the server: `sudo apt update`
99 | 3. Install mysql-server: `sudo apt install mysql-server -y`
100 | 4. Create a database and name it **tooling**:
101 | ```
102 | sudo my sql
103 | create database tooling;
104 | ```
105 | 5. Create a database user and name it **webaccess** and grant permission to **webaccess** user on tooling database to do anything only
106 | from the webservers subnet cidr:
107 | ```
108 | create user 'webaccess'@'172.31.80.0/20' identified by 'password';
109 | grant all privilleges on tooling.* to 'webaccess'@'172.31.80.0/20';
110 | flush privileges;
111 | ```
112 | 6. To show database run: `show databases;`
113 | 
114 |
115 | ### Step 3 — Prepare the Web Servers
116 |
117 | 1. Install NFS client on the webserver1: `sudo yum install nfs-utils nfs4-acl-tools -y`
118 | 2. Mount /var/www/ and target the NFS server’s export for apps (Use the private IP of the NFS server)
119 | ```
120 | sudo mkdir /var/www
121 | sudo mount -t nfs -o rw,nosuid 172.31.85.14:/mnt/apps /var/www
122 | ```
123 | 3. Verify that NFS was mounted successfully by running `df -h` Make sure that the changes will persist on Web Server after reboot:
124 | `sudo vi /etc/fstab`
125 | 4. Add the following line in the configuration file: `172.31.85.14:/mnt/apps /var/www nfs defaults 0 0`
126 | 5. Install Remi’s repository, Apache and PHP:
127 | ```
128 | sudo yum install httpd -y
129 | sudo dnf install https://dl.fedoraproject.org/pub/epel/epel-release-latest-8.noarch.rpm
130 | sudo dnf install dnf-utils http://rpms.remirepo.net/enterprise/remi-release-8.rpm
131 | sudo dnf module reset php
132 | sudo dnf module enable php:remi-7.4
133 | sudo dnf install php php-opcache php-gd php-curl php-mysqlnd
134 | sudo systemctl start php-fpm
135 | sudo systemctl enable php-fpm
136 | setsebool -P httpd_execmem 1
137 | ```
138 | 6. Repeat steps 1-5 for the other 2 webservers
139 | 7. Verify that Apache files and directories are available on the Web Server in /var/www and also on the NFS server in /mnt/apps.
140 | 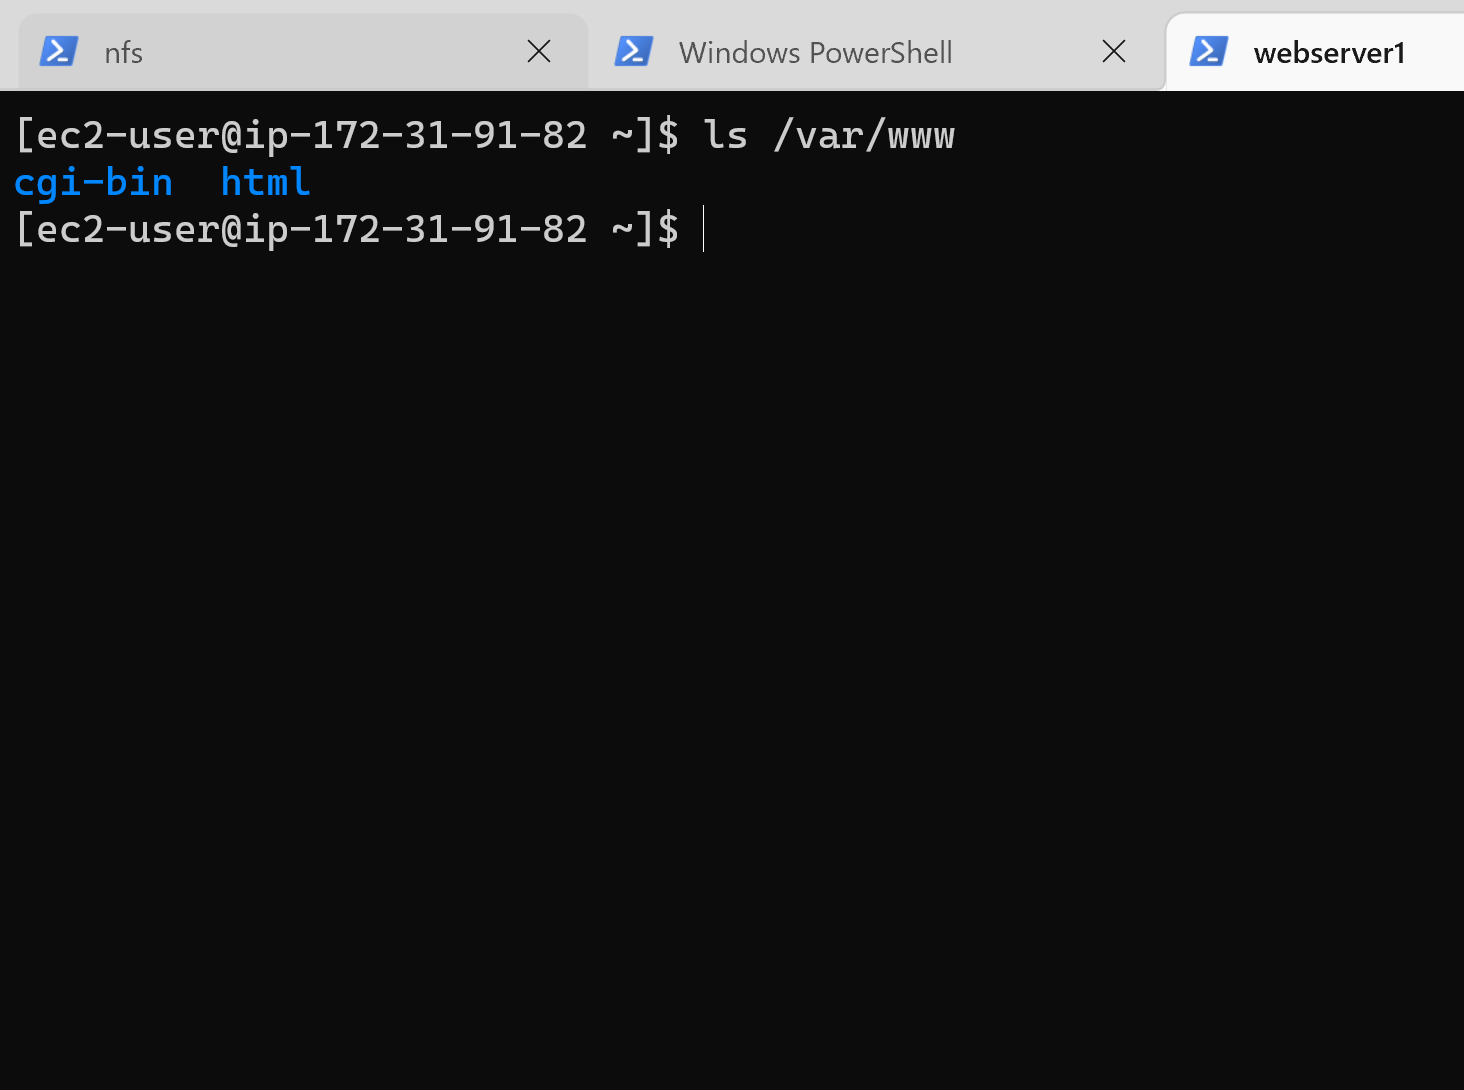
141 |
142 | 8. Locate the log folder for Apache on the Web Server and mount it to NFS server’s export for logs. Repeat step №3 and №4 to make sure the mount point will persist after reboot:
143 | ```
144 | sudo mount -t nfs -o rw,nosuid 172.31.85.14:/mnt/logs /var/log/httpd
145 | sudo vi /etc/fstab
146 | 172.31.85.14:/mnt/logs /var/log/httpd nfs defaults 0 0
147 | ```
148 | 9. Fork the tooling source code from **Darey.io** Github Account to your Github account.
149 | 10. Begin by installing git on the webserver: `sudo yum install git -y`
150 | 11. Initialize Git: `git init`
151 | 12. Then run: `git clone https://github.com/darey-io/tooling.git`
152 | 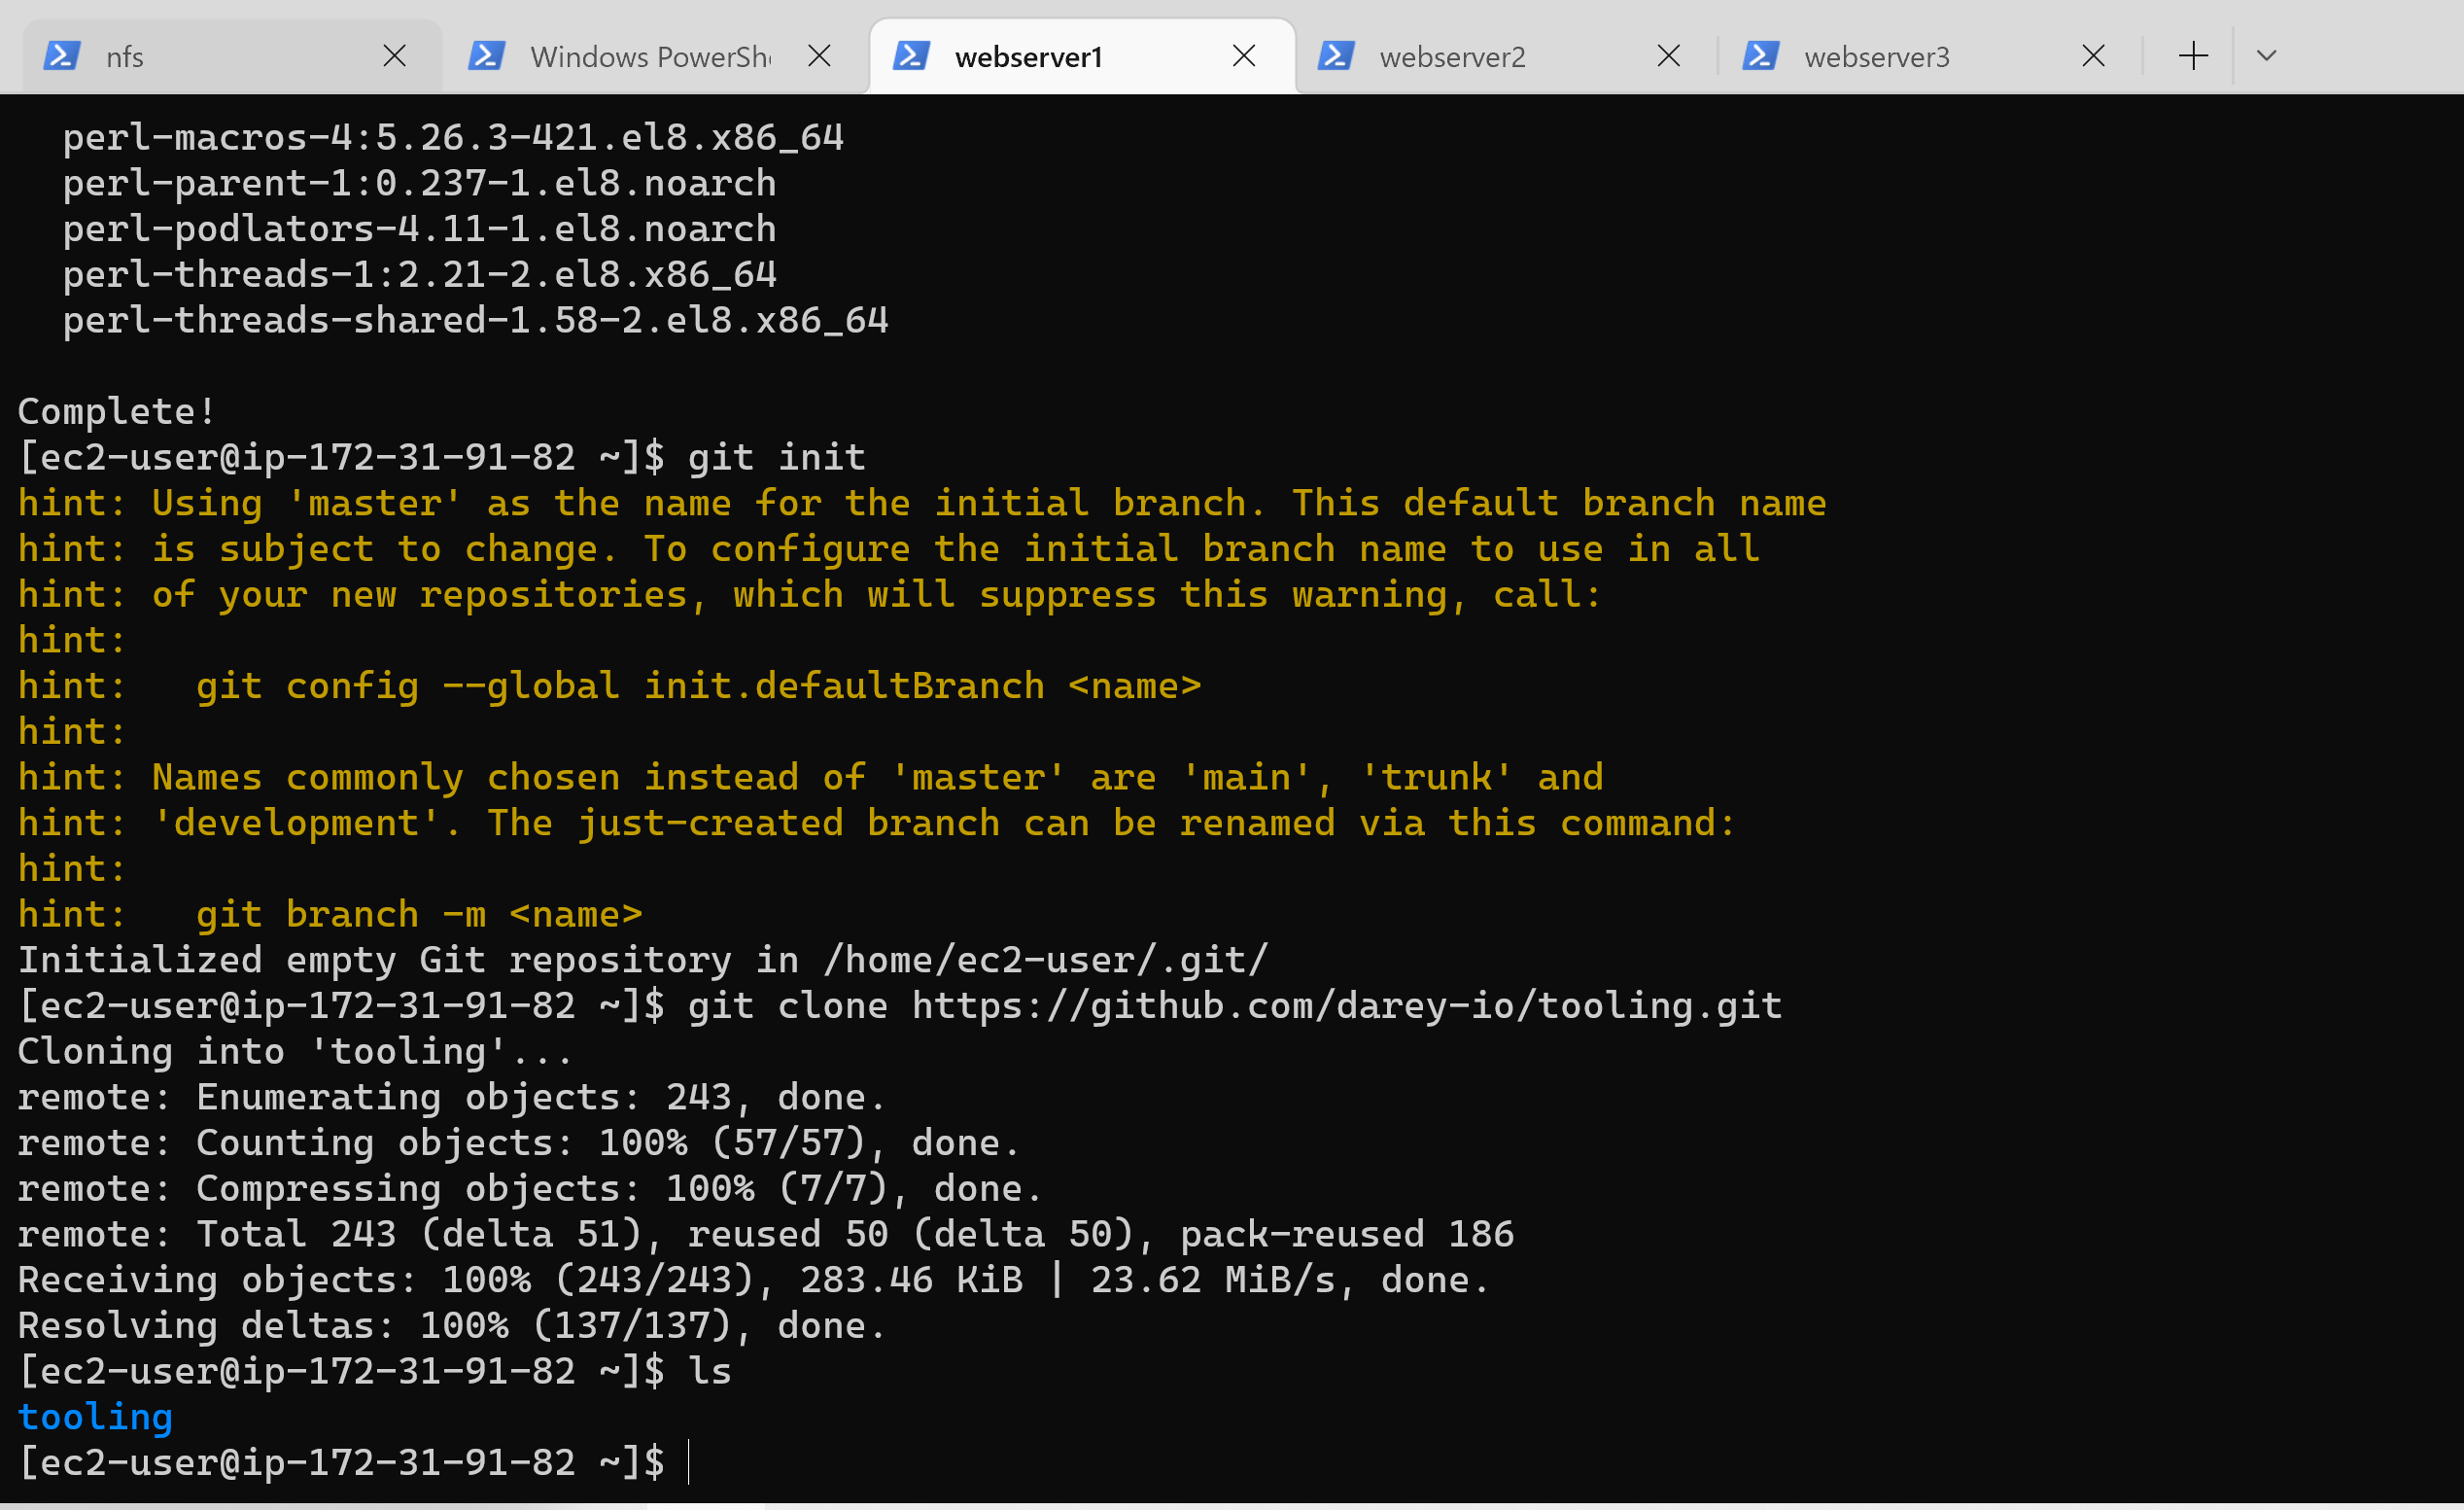
153 |
154 | 13. Deploy the tooling website’s code to the Webserver. Ensure that the html folder from the repository is deployed to /var/www/html
155 | 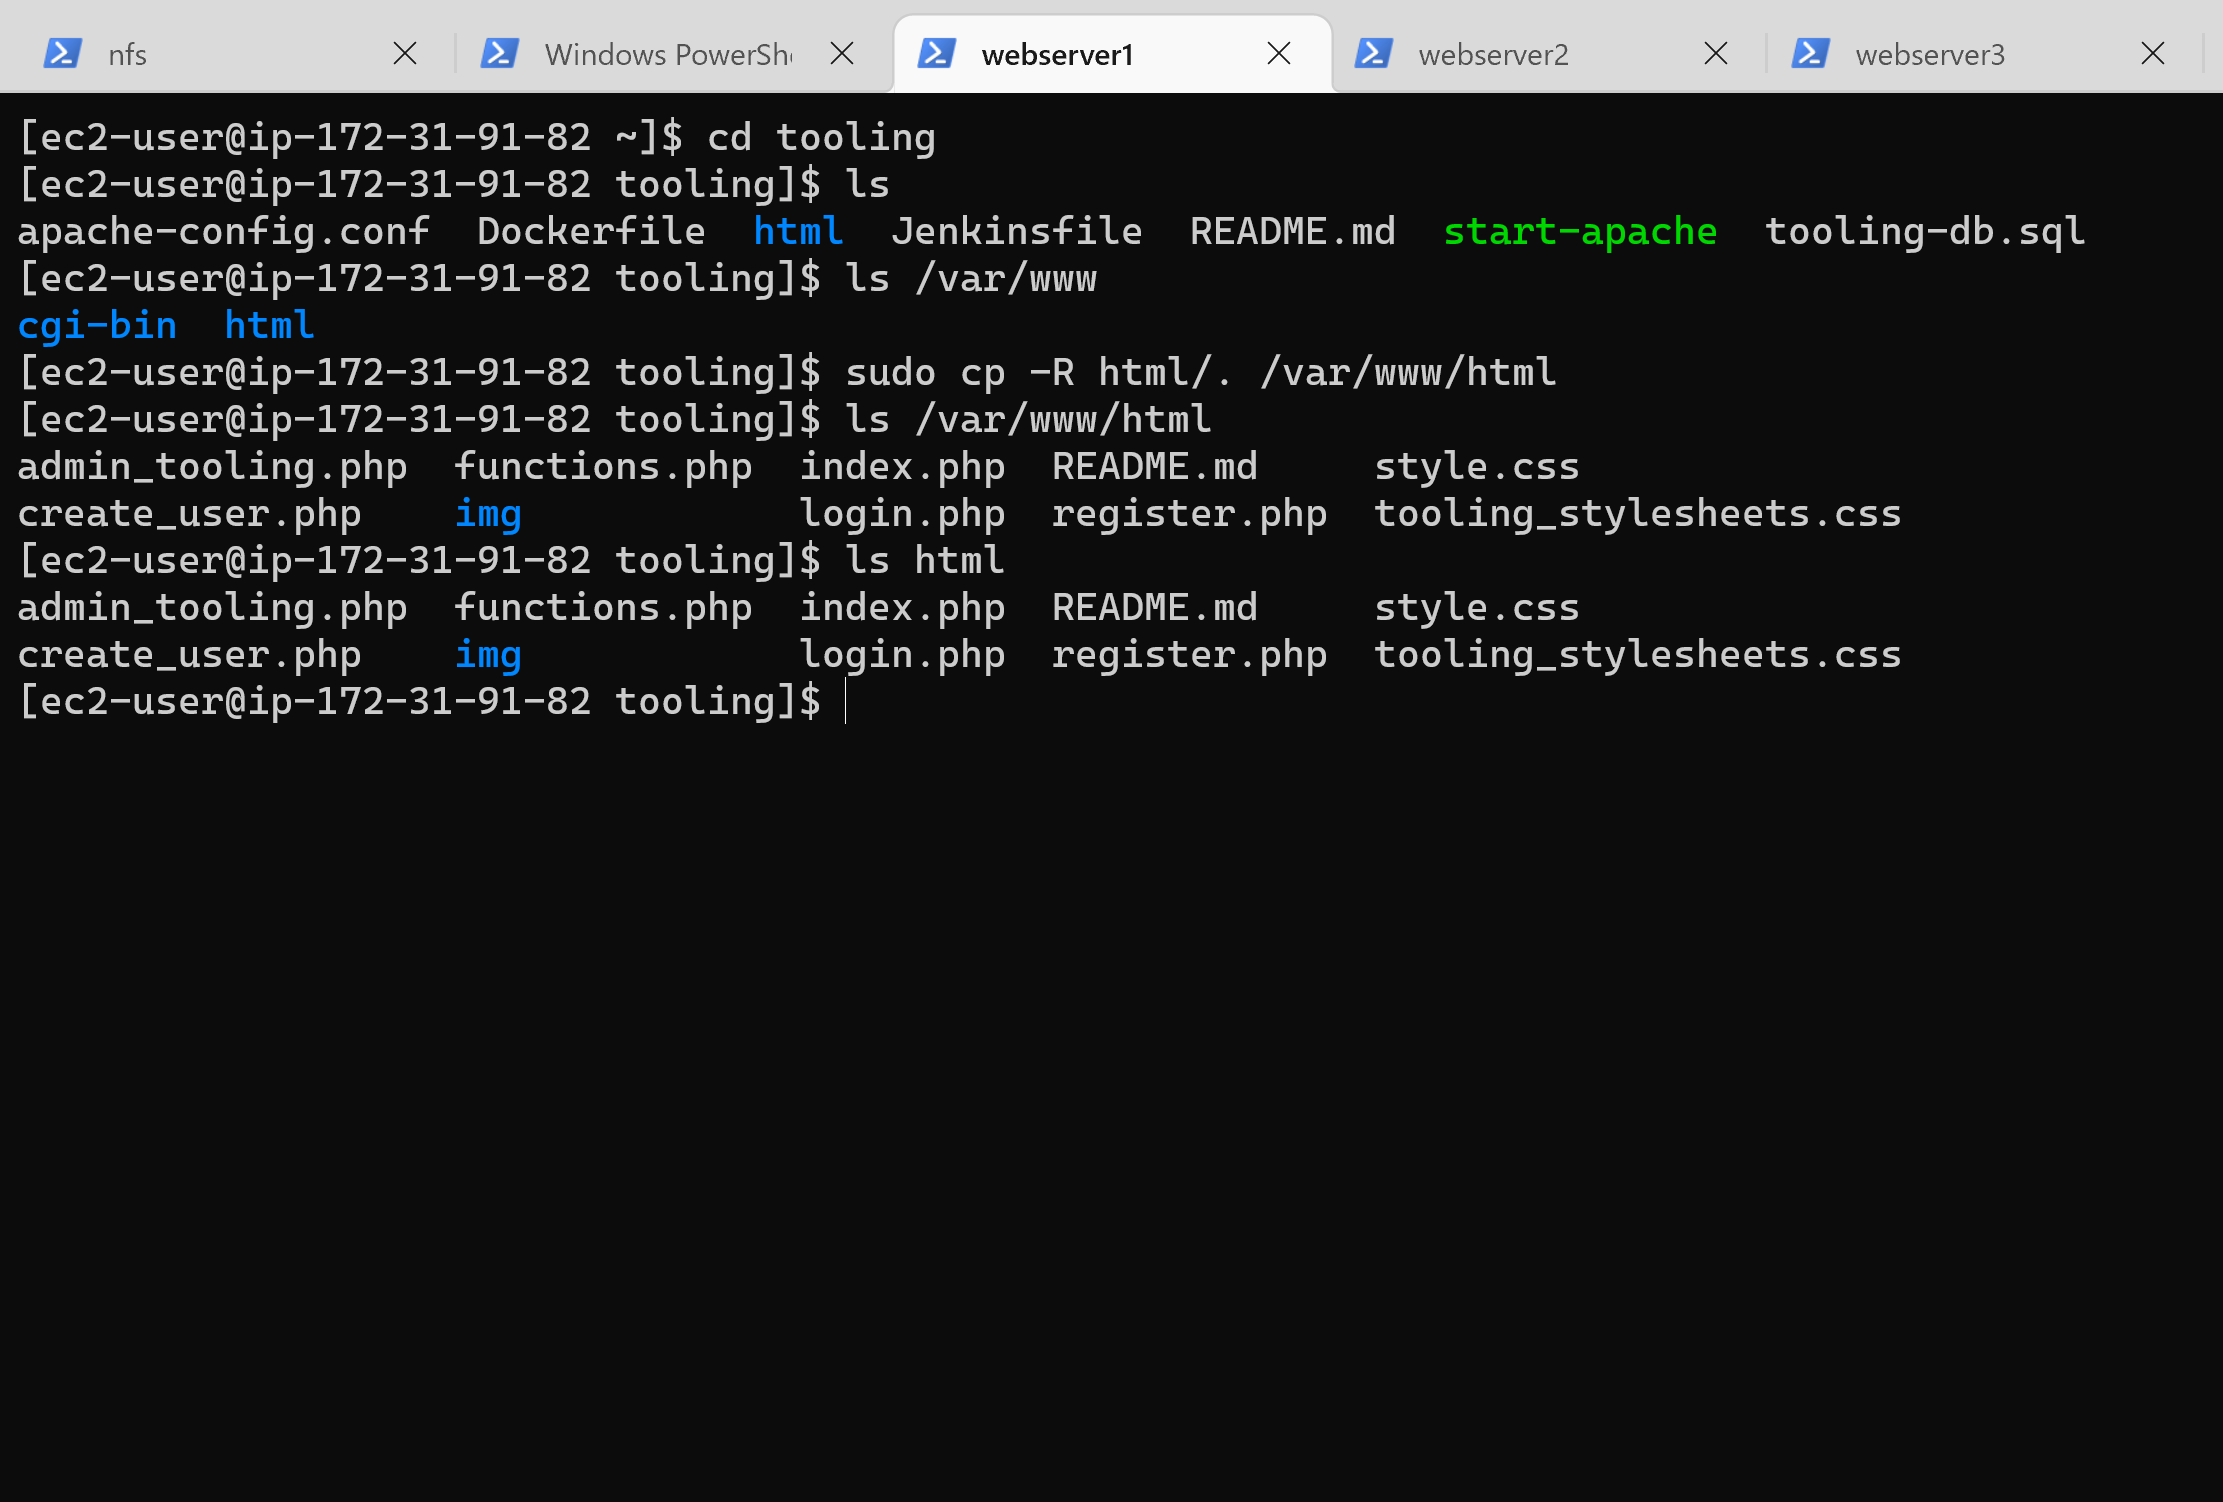
156 |
157 | 14. On the webserver, ensure port 80 in open to all traffic in the security groups.
158 | 15. Update the website’s configuration to connect to the database: `sudo vi /var/www/html/functions.php`
159 | 
160 |
161 | 16. Apply tooling-db.sql script to your database using this command `mysqli_connect ('172.31.80.140', 'webaccess', 'password', 'tooling')`
162 | 17. In the databse server update the bind address to 0.0.0.0: `sudo vi /etc/mysql/mysql.conf.d/mysqld.cnf`
163 | 18. Then create in MySQL a new admin user with username: myuser and password: password:
164 | ```
165 | INSERT INTO ‘users’ (‘id’, ‘username’, ‘password’, ’email’, ‘user_type’, ‘status’) VALUES
166 | -> (1, ‘myuser’, ‘5f4dcc3b5aa765d61d8327deb882cf99’, ‘user@mail.com’, ‘admin’, ‘1’);
167 | ```
168 | 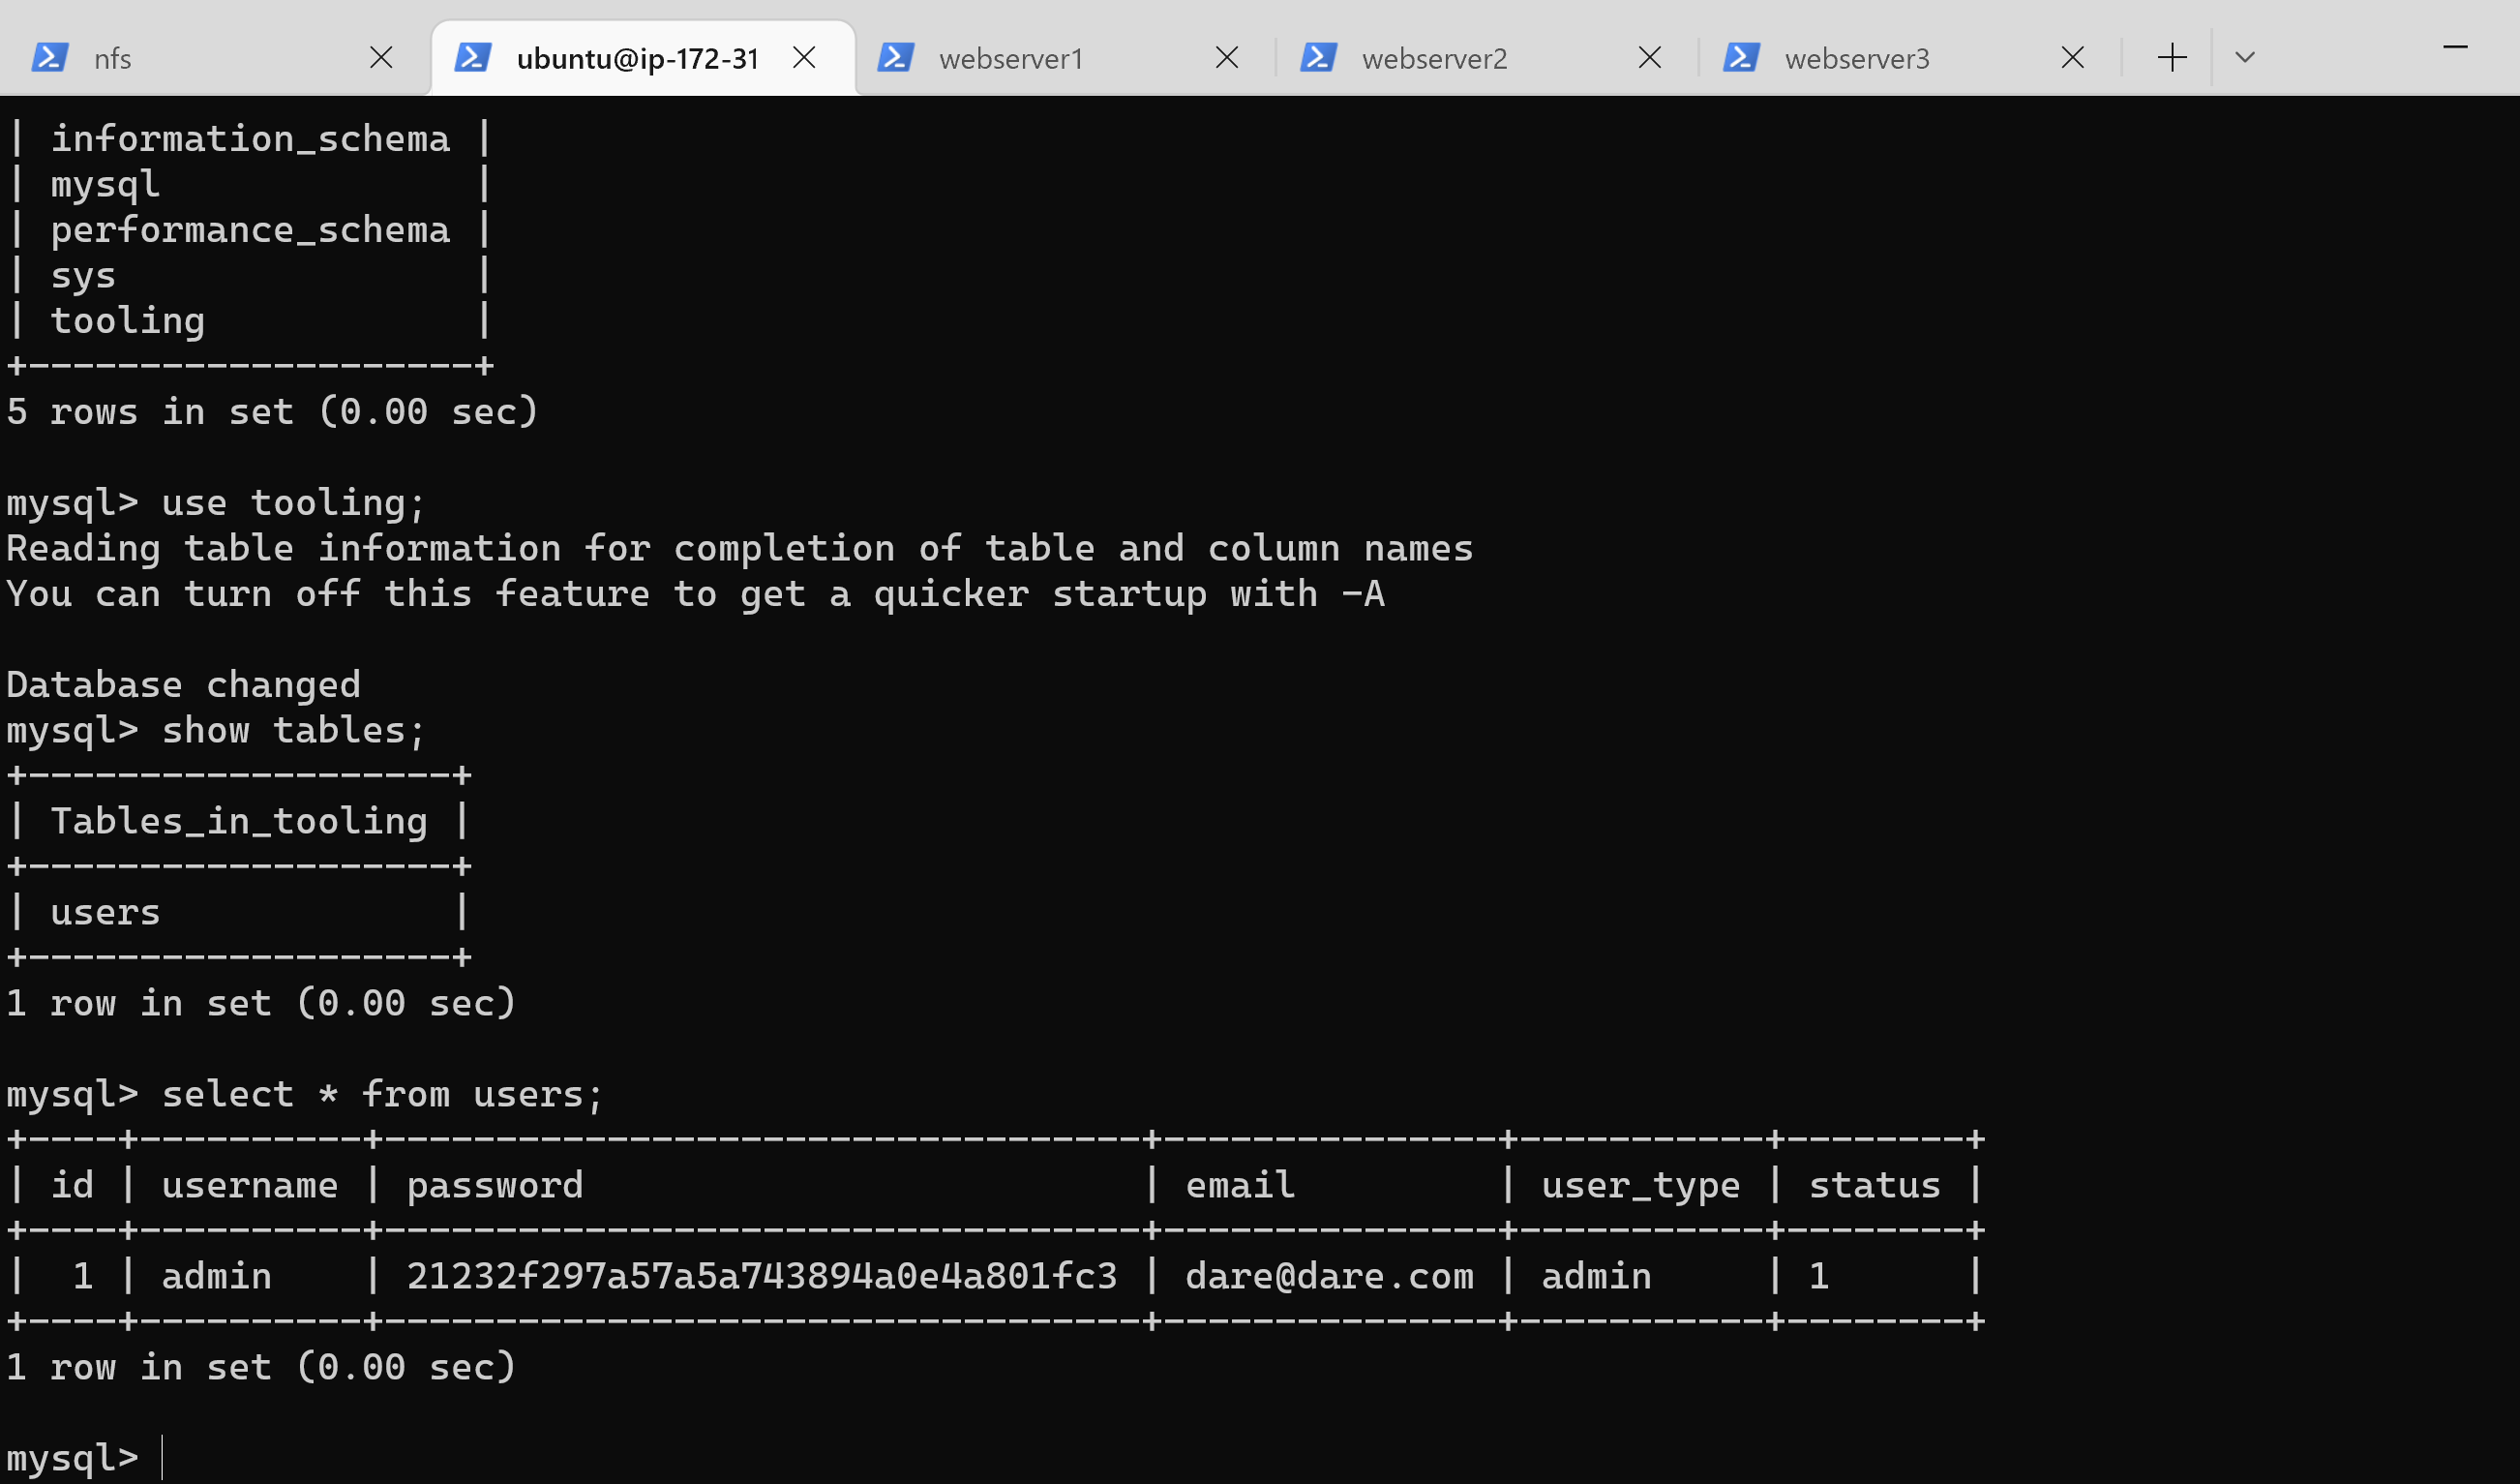
169 | Finally, open the website in your browser with the public IP of the webserver and make sure you can login into the websute with myuser user.
170 | 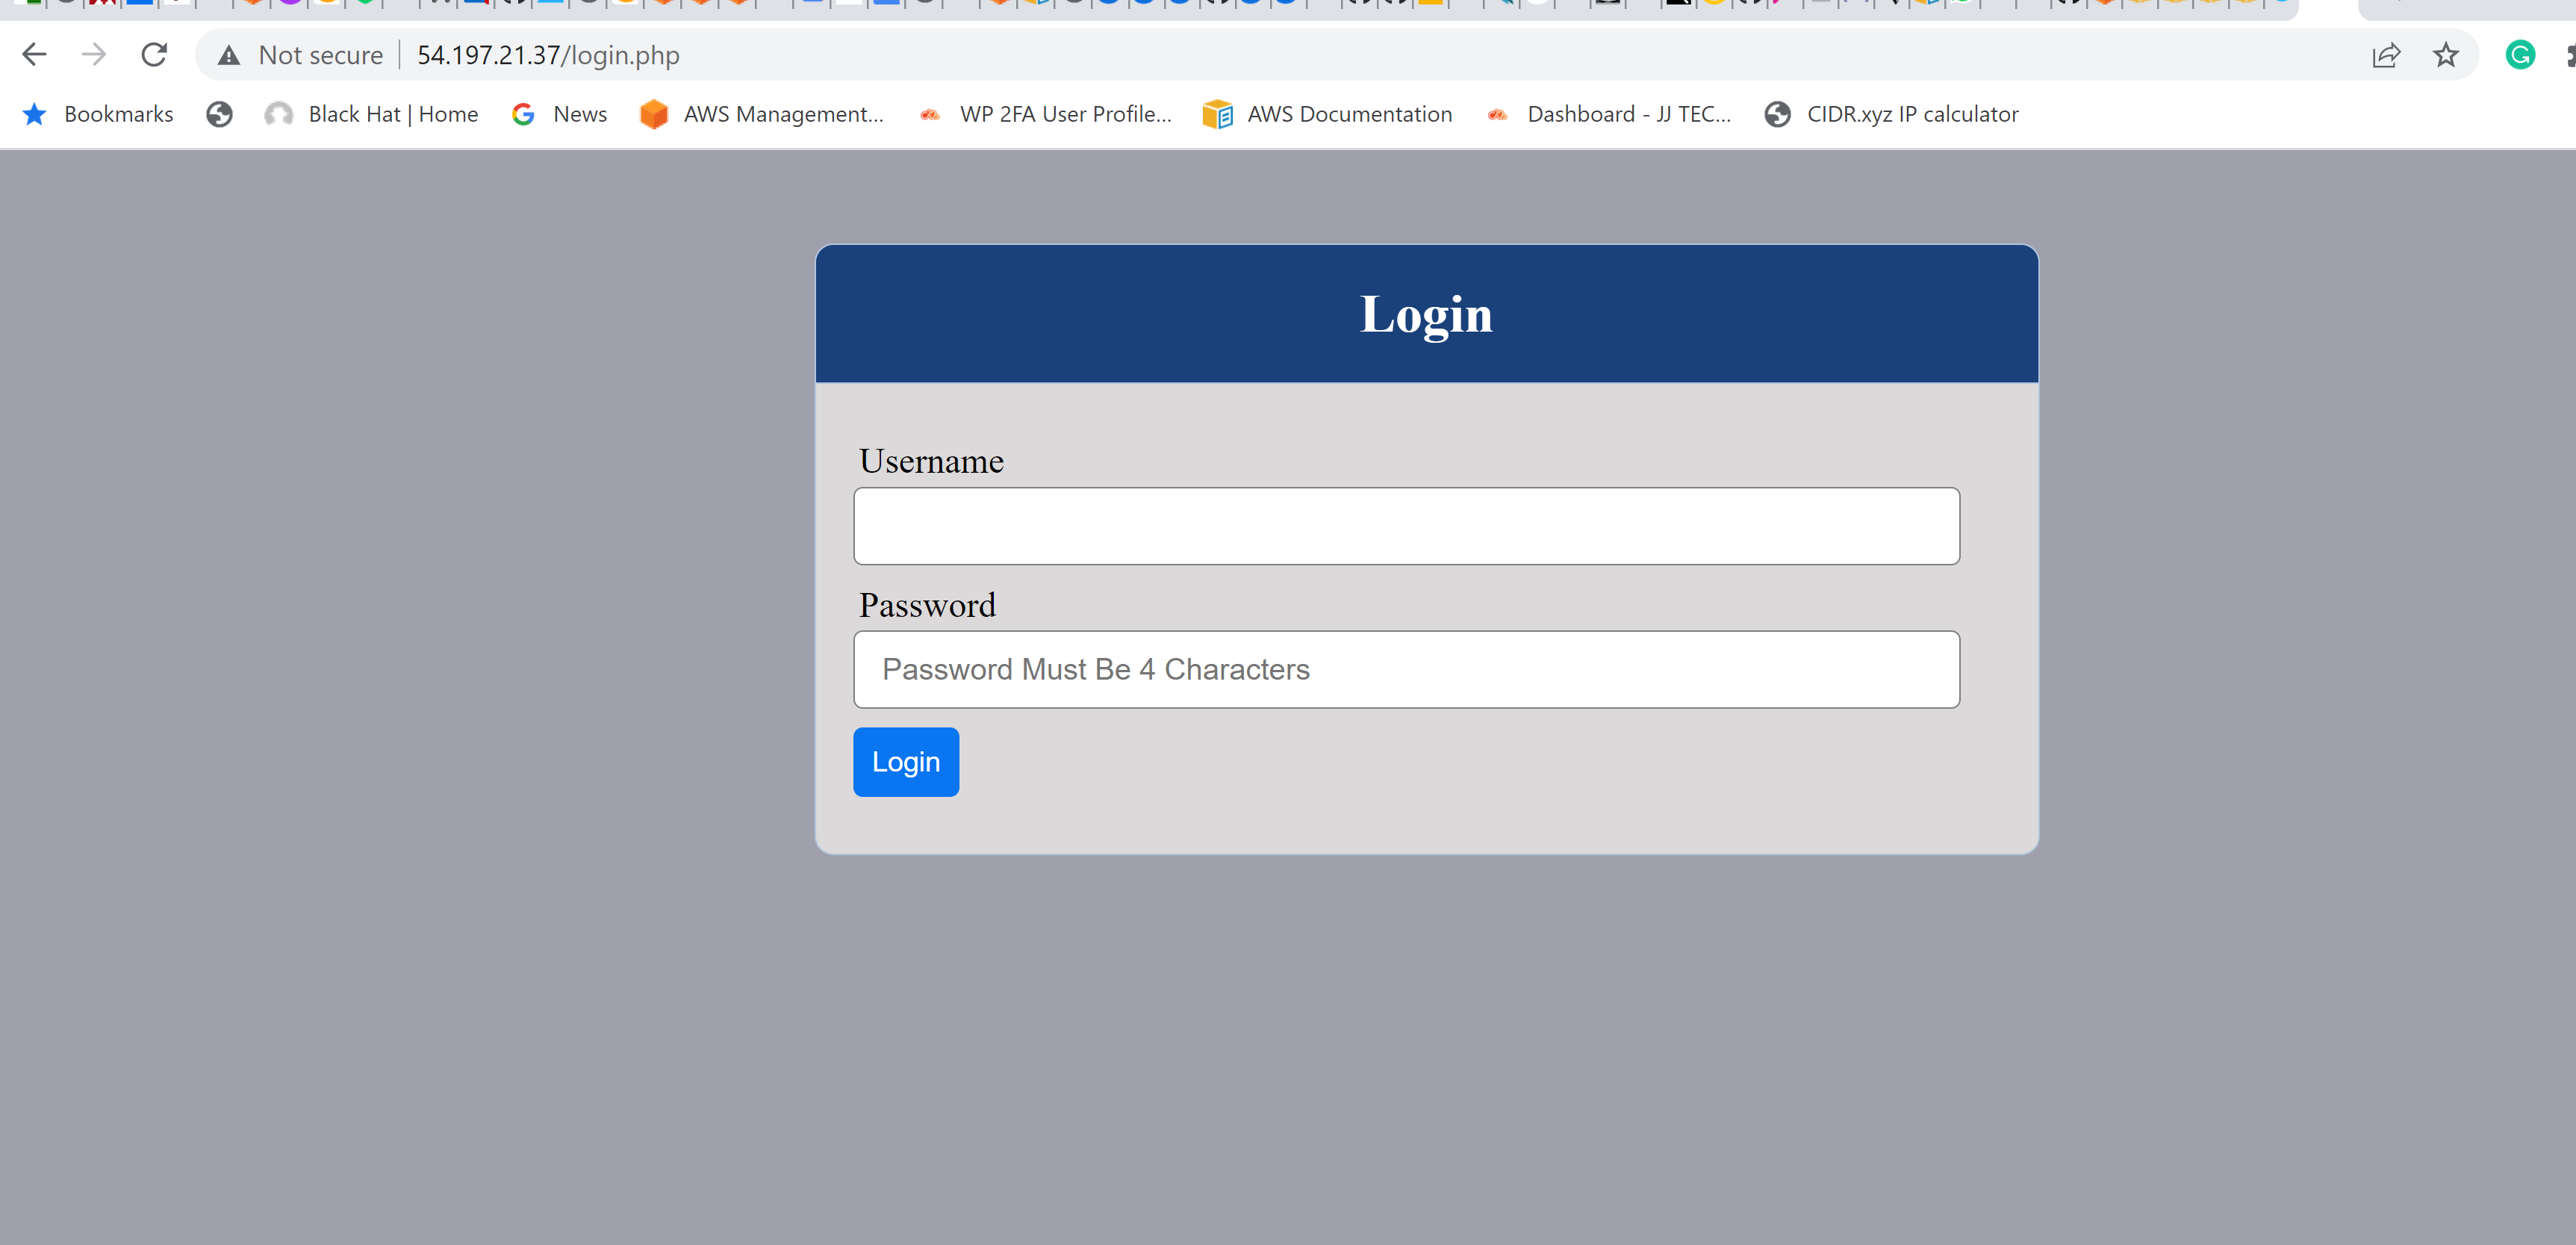
171 | 
172 |
--------------------------------------------------------------------------------
/Project4.md:
--------------------------------------------------------------------------------
1 | ## MEAN STACK DEPLOYMENT TO UBUNTU IN AWS
2 | ### Task- Implement a simple Book Register web form using MEAN stack.
3 | #### Steps
4 | 1. ##### Install Nodejs
5 | * Provision Ubuntu 20.4 instance in AWS
6 | * Connect to the instance through an SSH client.
7 | * Once in the terminal, update Ubuntu using this command: `sudo apt update`
8 | * Next, upgrade Ubuntu with `sudo apt upgrade`
9 | * Add certificates:
10 | ```
11 | sudo apt -y install curl dirmngr apt-transport-https lsb-release ca-certificates
12 |
13 | curl -sL https://deb.nodesource.com/setup_12.x | sudo -E bash -
14 | ```
15 | 
16 |
17 | * Next we install nodejs with this: `sudo apt install -y nodejs`
18 |
19 | 
20 |
21 | 2. ##### Install MongoDB
22 | * First we add our MongoDB key server with: `sudo apt-key adv --keyserver hkp://keyserver.ubuntu.com:80 --recv 0C49F3730359A14518585931BC711F9BA15703C6`
23 | * Add repository: `echo "deb [ arch=amd64 ] https://repo.mongodb.org/apt/ubuntu trusty/mongodb-org/3.4 multiverse" | sudo tee /etc/apt/sources.list.d/mongodb-org-3.4.list`
24 | * Install MongoDB with the following comand: `sudo apt install -y mongodb`
25 |
26 | 
27 |
28 | * Verify Server is up and running: `sudo systemctl status mongodb`
29 |
30 | 
31 |
32 | * Install npm – Node package manager: `sudo apt install -y npm`
33 | * Next we install body-parser package to help with processing JSON files passed in requests to the server. Use the following command: `sudo npm install body-parser`
34 |
35 | 
36 |
37 | * Next we create the **Books** directory and navigate into it with the following command: `mkdir Books && cd Books`
38 | * Inside the Books directory initialize npm project and add a file to it with the following command: `npm init` Then add **sever.js** file with: `vi server.js`
39 | * In the server.js file, paste the following code:
40 | ```
41 | var express = require('express');
42 | var bodyParser = require('body-parser');
43 | var app = express();
44 | app.use(express.static(__dirname + '/public'));
45 | app.use(bodyParser.json());
46 | require('./apps/routes')(app);
47 | app.set('port', 3300);
48 | app.listen(app.get('port'), function() {
49 | console.log('Server up: http://localhost:' + app.get('port'));
50 | });
51 | ```
52 | 
53 |
54 | 3. ##### Install Express and set up routes to the server
55 | * Express will be used to pass book information to and from our MongoDB database and Mongoose will be used to establish a schema for the database to store data of our book register. To begin installation, type: `sudo npm install express mongoose` and enter.
56 |
57 | 
58 |
59 | * while in **Books** folder, create a directory named **apps** and navigate into it with: `mkdir apps && cd apps`
60 | * Inside **apps**, create a file named routes.js with: `vi routes.js`
61 | * Copy and paste the code below into routes.js
62 | ```
63 | module.exports = function(app) {
64 | app.get('/book', function(req, res) {
65 | Book.find({}, function(err, result) {
66 | if ( err ) throw err;
67 | res.json(result);
68 | });
69 | });
70 | app.post('/book', function(req, res) {
71 | var book = new Book( {
72 | name:req.body.name,
73 | isbn:req.body.isbn,
74 | author:req.body.author,
75 | pages:req.body.pages
76 | });
77 | book.save(function(err, result) {
78 | if ( err ) throw err;
79 | res.json( {
80 | message:"Successfully added book",
81 | book:result
82 | });
83 | });
84 | });
85 | app.delete("/book/:isbn", function(req, res) {
86 | Book.findOneAndRemove(req.query, function(err, result) {
87 | if ( err ) throw err;
88 | res.json( {
89 | message: "Successfully deleted the book",
90 | book: result
91 | });
92 | });
93 | });
94 | var path = require('path');
95 | app.get('*', function(req, res) {
96 | res.sendfile(path.join(__dirname + '/public', 'index.html'));
97 | });
98 | };
99 | ```
100 | 
101 |
102 | * Also create a folder named **models** in the **apps** folder, then navigate into it: `mkdir models && cd models`
103 | * Inside **models**, create a file named **book.js** with: `vi book.js`
104 | * Copy and paste the code below into ‘book.js’
105 | ```
106 | var mongoose = require('mongoose');
107 | var dbHost = 'mongodb://localhost:27017/test';
108 | mongoose.connect(dbHost);
109 | mongoose.connection;
110 | mongoose.set('debug', true);
111 | var bookSchema = mongoose.Schema( {
112 | name: String,
113 | isbn: {type: String, index: true},
114 | author: String,
115 | pages: Number
116 | });
117 | var Book = mongoose.model('Book', bookSchema);
118 | module.exports = mongoose.model('Book', bookSchema);
119 | ```
120 | 
121 |
122 | 4. ##### Access the routes with AngularJS
123 | * The final step would be using AngularJS to connect our web page with Express and perform actions on our book register.
124 | * Navigate back to **Books** directory using: `cd ../..`
125 | * Now create a folder named **public** and move into it: `mkdir public && cd public`
126 | * Add a file named **script.js**: `vi script.js`
127 | * And copy and paste the following code:
128 | ```
129 | var app = angular.module('myApp', []);
130 | app.controller('myCtrl', function($scope, $http) {
131 | $http( {
132 | method: 'GET',
133 | url: '/book'
134 | }).then(function successCallback(response) {
135 | $scope.books = response.data;
136 | }, function errorCallback(response) {
137 | console.log('Error: ' + response);
138 | });
139 | $scope.del_book = function(book) {
140 | $http( {
141 | method: 'DELETE',
142 | url: '/book/:isbn',
143 | params: {'isbn': book.isbn}
144 | }).then(function successCallback(response) {
145 | console.log(response);
146 | }, function errorCallback(response) {
147 | console.log('Error: ' + response);
148 | });
149 | };
150 | $scope.add_book = function() {
151 | var body = '{ "name": "' + $scope.Name +
152 | '", "isbn": "' + $scope.Isbn +
153 | '", "author": "' + $scope.Author +
154 | '", "pages": "' + $scope.Pages + '" }';
155 | $http({
156 | method: 'POST',
157 | url: '/book',
158 | data: body
159 | }).then(function successCallback(response) {
160 | console.log(response);
161 | }, function errorCallback(response) {
162 | console.log('Error: ' + response);
163 | });
164 | };
165 | });
166 | ```
167 | 
168 |
169 | * Also in **public** folder, create a file named **index.html**: `vi index.html`
170 | * And and paste the foloowing html code below into it:
171 | ```
172 |
173 |
174 |
175 |
176 |
177 |
178 |
179 |