--------------------------------------------------------------------------------
/LICENSE:
--------------------------------------------------------------------------------
1 | MIT License
2 |
3 | Copyright (c) 2020 minicli
4 |
5 | Permission is hereby granted, free of charge, to any person obtaining a copy
6 | of this software and associated documentation files (the "Software"), to deal
7 | in the Software without restriction, including without limitation the rights
8 | to use, copy, modify, merge, publish, distribute, sublicense, and/or sell
9 | copies of the Software, and to permit persons to whom the Software is
10 | furnished to do so, subject to the following conditions:
11 |
12 | The above copyright notice and this permission notice shall be included in all
13 | copies or substantial portions of the Software.
14 |
15 | THE SOFTWARE IS PROVIDED "AS IS", WITHOUT WARRANTY OF ANY KIND, EXPRESS OR
16 | IMPLIED, INCLUDING BUT NOT LIMITED TO THE WARRANTIES OF MERCHANTABILITY,
17 | FITNESS FOR A PARTICULAR PURPOSE AND NONINFRINGEMENT. IN NO EVENT SHALL THE
18 | AUTHORS OR COPYRIGHT HOLDERS BE LIABLE FOR ANY CLAIM, DAMAGES OR OTHER
19 | LIABILITY, WHETHER IN AN ACTION OF CONTRACT, TORT OR OTHERWISE, ARISING FROM,
20 | OUT OF OR IN CONNECTION WITH THE SOFTWARE OR THE USE OR OTHER DEALINGS IN THE
21 | SOFTWARE.
22 |
--------------------------------------------------------------------------------
/tests/Helpers.php:
--------------------------------------------------------------------------------
1 | addService('content', new ContentServiceProvider());
24 | $app->addService('twig', new TwigServiceProvider());
25 | $app->addService('librarian', new LibrarianServiceProvider());
26 | $app->addService('router', new RouterServiceProvider());
27 |
28 | return $app;
29 | }
30 |
31 | function getConfigValue(string $key): mixed
32 | {
33 | $config = load_config(__DIR__ . '/../config');
34 |
35 | return $config[$key] ?: null;
36 | }
37 |
38 | function getCommandCall(array $parameters = null): CommandCall
39 | {
40 | return new CommandCall(array_merge(['minicli'], $parameters));
41 | }
42 |
--------------------------------------------------------------------------------
/.docker/Dockerfile:
--------------------------------------------------------------------------------
1 | FROM php:8.1-fpm
2 |
3 | # Arguments defined in docker-compose.yml
4 | ARG user
5 | ARG uid
6 |
7 | # Install system dependencies
8 | RUN apt-get update && apt-get install -y \
9 | git \
10 | curl \
11 | libpng-dev \
12 | libonig-dev \
13 | libxml2-dev \
14 | libjpeg-dev \
15 | libfreetype6-dev \
16 | zip \
17 | unzip
18 |
19 | # Clear cache
20 | RUN apt-get clean && rm -rf /var/lib/apt/lists/*
21 |
22 | # Configure GD with TTF support
23 | RUN docker-php-ext-configure gd \
24 | --with-jpeg=/usr/include/ \
25 | --with-freetype=/usr/include/
26 |
27 | # Install PHP extensions
28 | RUN docker-php-ext-install pdo_mysql mbstring exif pcntl bcmath gd
29 |
30 | # Get latest Composer
31 | COPY --from=composer:2.2 /usr/bin/composer /usr/bin/composer
32 |
33 | # Create system user to run Composer and Artisan Commands
34 | RUN useradd -G www-data,root -u $uid -d /home/$user $user
35 | RUN mkdir -p /home/$user/.composer && \
36 | chown -R $user:$user /home/$user
37 |
38 | # Install NPM for Livewire
39 | RUN curl -sL https://deb.nodesource.com/setup_14.x | bash - && \
40 | apt-get install -yq nodejs build-essential
41 |
42 | # Set working directory
43 | WORKDIR /var/www
44 |
45 | USER $user
46 |
--------------------------------------------------------------------------------
/app/Resources/themes/custom/_partials/snippet.html.twig:
--------------------------------------------------------------------------------
1 |
18 |
--------------------------------------------------------------------------------
/app/Resources/data/_p/about.md:
--------------------------------------------------------------------------------
1 | ---
2 | title: On Linux Systems
3 | published: true
4 | description: This project is intended to document experiences with different kinds of hardware, gadgets, and software on Linux.
5 | cover_image: https://onlinux.ams3.digitaloceanspaces.com/onlinux_about.png
6 | ---
7 |
8 | On Linux Systems is a project created by [Erika Heidi](https://twitter.com/erikaheidi) to document experiences with different kinds of hardware, gadgets, and software on Linux systems.
9 |
10 | The project is [open source](https://github.com/erikaheidi/onlinux), built in PHP with the [Librarian](https://github.com/librarianphp/librarian) experimental markdown framework.
11 |
12 | Content is licensed under the [CC BY 4.0](http://creativecommons.org/licenses/by/4.0/?ref=chooser-v1) Creative Commons license.
13 |
14 | We have an open [discussions group](https://github.com/erikaheidi/onlinux/discussions) on GitHub where you can ask questions about gadgets and software on Linux as well make suggestions about interesting gadgets to review.
15 |
16 | We'll be accepting content contributions once the basic website is up and running, and the project itself is better documented.
17 |
18 | Are you interested in a partnership for device test / review? You can use the [parnership form](https://forms.gle/Cgimwaf3V58xyjFP8) to get in touch.
--------------------------------------------------------------------------------
/app/Resources/themes/custom/content/index.html.twig:
--------------------------------------------------------------------------------
1 | {% extends 'base.html.twig' %}
2 |
3 | {% block content %}
4 |
5 |
Latest Guides
6 |
7 |
8 |
9 | {% for post in featured %}
10 | {% include '_partials/snippet.html.twig' with { 'content': post } %}
11 | {% endfor %}
12 |
13 |
14 |
15 |
16 | {% for post in content_guides %}
17 | {% include '_partials/snippet.html.twig' with { 'content': post } %}
18 | {% endfor %}
19 |
20 |
21 |
Desktop Setup
22 |
23 |
24 | {% for post in content_setups %}
25 | {% include '_partials/snippet.html.twig' with { 'content': post } %}
26 | {% endfor %}
27 |
28 |
29 |
Devices tested on Linux
30 |
31 |
32 | {% for post in content_devices %}
33 | {% include '_partials/snippet.html.twig' with { 'content': post } %}
34 | {% endfor %}
35 |
24 | {% for tag in content.getAsArray('tags') %}
25 | {{ tag }}
26 | {% endfor %}
27 |
28 |
29 | {% endif %}
30 |
31 |
--------------------------------------------------------------------------------
/tests/Pest.php:
--------------------------------------------------------------------------------
1 | in('Feature');
15 |
16 | /*
17 | |--------------------------------------------------------------------------
18 | | Expectations
19 | |--------------------------------------------------------------------------
20 | |
21 | | When you're writing tests, you often need to check that values meet certain conditions. The
22 | | "expect()" function gives you access to a set of "expectations" methods that you can use
23 | | to assert different things. Of course, you may extend the Expectation API at any time.
24 | |
25 | */
26 |
27 | expect()->extend('toBeOne', function () {
28 | return $this->toBe(1);
29 | });
30 |
31 | /*
32 | |--------------------------------------------------------------------------
33 | | Functions
34 | |--------------------------------------------------------------------------
35 | |
36 | | While Pest is very powerful out-of-the-box, you may have some testing code specific to your
37 | | project that you don't want to repeat in every file. Here you can also expose helpers as
38 | | global functions to help you to reduce the number of lines of code in your test files.
39 | |
40 | */
41 |
42 | function something()
43 | {
44 | // ..
45 | }
46 |
--------------------------------------------------------------------------------
/app/LiquidTag/Embed.php:
--------------------------------------------------------------------------------
1 | getContentType() . '/' . $tag_value . '.md';
21 | $content = new Content();
22 | try {
23 | $content->load($path);
24 | $parser = new ContentParser();
25 | $article = $parser->parse($content);
26 |
27 | return $this->getEmbed($article);
28 | } catch (ContentNotFoundException $e) {
29 | return null;
30 | }
31 | }
32 |
33 | public function getEmbed(Content $content): string
34 | {
35 | return '
';
46 | }
47 | }
--------------------------------------------------------------------------------
/app/Command/Web/TagController.php:
--------------------------------------------------------------------------------
1 | getApp()->twig;
19 |
20 | /** @var ContentServiceProvider $content_provider */
21 | $content_provider = $this->getApp()->content;
22 |
23 | $request = $this->getRequest();
24 |
25 | if (!$request->getSlug()) {
26 | Response::redirect('/notfound');
27 | }
28 |
29 | $page = 1;
30 | $limit = $this->getApp()->config->posts_per_page ?: 10;
31 | $params = $this->getRequest()->getParams();
32 |
33 | if (key_exists('page', $params)) {
34 | $page = $params['page'];
35 | }
36 |
37 | $start = ($page * $limit) - $limit;
38 |
39 | try {
40 | $content_list = $content_provider->fetchFromTag($request->getSlug(), $start, $limit);
41 | } catch (\Exception $e) {
42 | Response::redirect('/notfound');
43 | }
44 |
45 | if (!$content_list) {
46 | Response::redirect('/notfound');
47 | }
48 |
49 | $output = $twig->render('content/listing.html.twig', [
50 | 'content_list' => $content_list,
51 | 'tag_name' => $request->getSlug(),
52 | 'total_pages' => $content_provider->fetchTagTotalPages($request->getSlug(), $limit),
53 | 'current_page' => $page
54 | ]);
55 |
56 | $response = new Response($output);
57 | $response->output();
58 | }
59 | }
60 |
--------------------------------------------------------------------------------
/app/Resources/data/devices/elgato-stream-deck.md:
--------------------------------------------------------------------------------
1 | ---
2 | title: Elgato Stream Deck
3 | description: Overview of Elgato Stream Deck on Linux
4 | tags: devices, streaming, elgato
5 | cover_image: https://onlinux.ams3.digitaloceanspaces.com/streamdeck.png
6 | ---
7 |
8 | The [Elgato Stream Deck](https://amzn.to/35hzCxo) is a customizable compact keyboard popular with live streamers. It has configurable buttons and can be set up on Linux with a Python application called [streamdeck-ui](https://timothycrosley.github.io/streamdeck-ui/). This app has a graphic interface that you can use to pair each button with a command or keyboard shortcut. For more information, check my detailed guide on [How to Set Up Elgato's Stream Deck on Ubuntu Linux 21.10](/guides/20220323_how-to-set-up-elgatos-stream-deck-on-ubuntu-linux-2110).
9 |
10 | The Stream Deck is a handy device not only for live streaming and video recording, but also for daily usage since it allows you to quickly switch between applications and execute custom, complex commands with the press of a button. If you dig deep enough, you'll find ways to do pretty much anything you want with this device on a Linux system. The possibilities are endless :D
11 |
12 | _Note: I got this device [as a gift](https://twitter.com/erikaheidi/status/1439919049136353284) from the GitHub Sponsors program. Thanks a lot, GitHub <3!_
13 |
14 | ## OnLinux Review
15 |
16 | - **Works on Linux?**
17 | - **Yes.** It's not entirely plug and play as you'll need to install a software to map buttons, but it works pretty well, and it's very reliable once you get this software auto-starting at login.
18 | - **Tested with**
19 | - Ubuntu 21.04
20 | - Ubuntu 21.10
21 | - **Other Links**
22 | - [Official website](https://www.elgato.com/en/stream-deck)
23 |
24 | ## Related
25 |
26 | {% guide 20220323_how-to-set-up-elgatos-stream-deck-on-ubuntu-linux-2110 %}
--------------------------------------------------------------------------------
/app/Command/Web/IndexController.php:
--------------------------------------------------------------------------------
1 | getApp()->twig;
17 | /** @var ContentServiceProvider $content_provider */
18 | $content_provider = $this->getApp()->content;
19 | $request = $this->getRequest();
20 |
21 | if ($this->getApp()->config->site_index !== null) {
22 | $content = $content_provider->fetch($this->getApp()->config->site_index);
23 | if ($content) {
24 | $response = new Response($twig->render('content/single.html.twig', [
25 | 'content' => $content
26 | ]));
27 |
28 | $response->output();
29 | return 0;
30 | }
31 | }
32 |
33 | // get latest from each content type.
34 | $featured = $content_provider->fetchFrom("guides", 0, 1);
35 | $content_guides = $content_provider->fetchFrom("guides", 1, 4);
36 | $content_setups = $content_provider->fetchFrom("desksetup", 0, 1);
37 | $content_devices = $content_provider->fetchFrom("devices", 0, 3, false, 'rand');
38 |
39 | $output = $twig->render('content/index.html.twig', [
40 | 'content_guides' => $content_guides,
41 | 'content_setups' => $content_setups,
42 | 'content_devices' => $content_devices,
43 | 'featured' => $featured,
44 | ]);
45 |
46 | $response = new Response($output);
47 |
48 | $response->output();
49 | return 0;
50 | }
51 | }
52 |
--------------------------------------------------------------------------------
/app/Resources/data/devices/keychron-k6.md:
--------------------------------------------------------------------------------
1 | ---
2 | title: Keychron K6 Mechanical Keyboard
3 | description: Keychron K6 mechanical keyboard overview and how it works on Linux
4 | tags: devices, keyboards
5 | cover_image: https://onlinux.ams3.digitaloceanspaces.com/k6.png
6 | ---
7 |
8 | The [Keychron K6](https://amzn.to/3uDWVu2) is a mechanical keyboard with a compact layout that offers a few different variations to choose from: with or without RGB LEds, choice of switches, plastic or aluminium plate as base. You can connect multiple devices via Bluetooth and USB-C. It works well on Linux, Windows, MacOS, and also on Android phones and tablets (via bluetooth).
9 |
10 | What I like the most about this model is its size; I can easily hold it with one hand, and it fits well most backpacks. It is approximately the same size of my 14' laptop in length. The keys are very comfortable to type. I enjoy the typing sound of the brown switches and the "feedback" you get from typing.
11 |
12 | This is a versatile keyboard that works well for travelling. The downside is that you don't have the upper row of F-keys, with both numbers, symbols, and F-keys combined in one top row where each key has 2 additional types / functions that are accessed with the special `fn1` and `fn2` keys. It takes some time to get used to this scheme, but since these are mostly media control keys and shortcuts, you won't be using the `fn` keys _that_ much, with exception for the ESC key that also contains the backtick (`) and tilde (~) characters.
13 |
14 | 
15 |
16 | - **Works on Linux?**
17 | - Yes. Just plug in or connect via Bluetooth. There's a small switch on the left where you choose between "Windows / Android" and "MacOS" keyboard layouts. You should select "Windows/Android" for better compatibility. This keyboard also works on Android phones via bluetooth.
18 | - **Tested with**
19 | - Ubuntu 21.04+, Android on Pixel phone
20 |
--------------------------------------------------------------------------------
/app/Resources/themes/default/content/single.html.twig:
--------------------------------------------------------------------------------
1 | {% extends 'base.html.twig' %}
2 |
3 | {% block meta %}
4 |
5 |
6 |
7 |
8 |
9 |
10 |
11 |
12 |
13 |
14 |
15 |
16 |
17 |
18 |
19 |
20 |
21 |
22 | {% endblock %}
23 |
24 | {% block content %}
25 | {% include '_partials/post.html.twig' with { 'content': content, 'full': true } %}
26 | {% endblock%}
27 |
28 |
--------------------------------------------------------------------------------
/app/Resources/themes/custom/content/single.html.twig:
--------------------------------------------------------------------------------
1 | {% extends 'base.html.twig' %}
2 | {% block title %} {{ content.frontMatterGet('title') }} - {{ site_title()}} {% endblock %}
3 | {% block meta %}
4 |
5 |
6 |
7 |
8 |
9 |
10 |
11 |
12 |
13 |
14 |
15 |
16 |
17 |
18 |
19 |
20 |
21 |
22 | {% endblock %}
23 |
24 | {% block content %}
25 | {% include '_partials/post.html.twig' with { 'content': content, 'full': true } %}
26 | {% endblock%}
27 |
28 |
--------------------------------------------------------------------------------
/app/Resources/themes/custom/_partials/post.html.twig:
--------------------------------------------------------------------------------
1 |
')
41 | ->url($this->getApp()->config->site_url . '/' . $content->getLink())
42 | ->author($this->getApp()->config->site_author)
43 | ->pubDate(strtotime($content->getDate()))
44 | ->guid($this->getApp()->config->site_url . '/' . $content->getLink(), true)
45 | ->preferCdata(true) // By this, title and description become CDATA wrapped HTML.
46 | ->appendTo($channel);
47 | }
48 |
49 | header('Content-type: application/rss+xml');
50 | echo $feed;
51 | }
52 | }
53 |
--------------------------------------------------------------------------------
/app/Command/Web/ContentController.php:
--------------------------------------------------------------------------------
1 | getApp()->twig;
21 |
22 | /** @var ContentServiceProvider $content_provider */
23 | $content_provider = $this->getApp()->content;
24 |
25 | $request = $this->getRequest();
26 |
27 | try {
28 | $content = $content_provider->fetch($request->getRoute() . '/' . $request->getSlug());
29 |
30 | if ($content === null) {
31 | $page = 1;
32 | $limit = $this->getApp()->config->posts_per_page ?: 10;
33 | $params = $this->getRequest()->getParams();
34 |
35 | if (key_exists('page', $params)) {
36 | $page = $params['page'];
37 | }
38 |
39 | $start = ($page * $limit) - $limit;
40 |
41 | $content_list = $content_provider->fetchFrom($request->getRoute(), $start, $this->getApp()->config->posts_per_page);
42 | $response = new Response($twig->render('content/listing.html.twig', [
43 | 'content_list' => $content_list,
44 | 'total_pages' => $content_provider->fetchTotalPages($limit),
45 | 'current_page' => $page,
46 | 'base_url' => $request->getRoute()
47 | ]));
48 |
49 | $response->output();
50 | return 0;
51 | }
52 | } catch (\Exception $e) {
53 | Response::redirect('/notfound');
54 | }
55 |
56 | $output = $twig->render('content/single.html.twig', [
57 | 'content' => $content
58 | ]);
59 |
60 |
61 | $response = new Response($output);
62 | $response->output();
63 | return 0;
64 | }
65 | }
66 |
--------------------------------------------------------------------------------
/app/Command/Create/ContentController.php:
--------------------------------------------------------------------------------
1 | getApp()->config->has('stencil_dir')) {
14 | $this->getApp()->getPrinter()->error("You must define a stencil_dir config option.");
15 | return;
16 | }
17 |
18 | if (!$this->getApp()->config->has('stencil_locations')) {
19 | $this->getApp()->getPrinter()->error("You must define a stencil_locations array config option.");
20 | return;
21 | }
22 |
23 | $args = $this->getArgs();
24 | $template_name = $args[3] ?? null;
25 | if (!$template_name) {
26 | $template_name = 'post';
27 | }
28 |
29 | $stencil = new Stencil($this->getApp()->config->stencil_dir);
30 |
31 | $input = new Input(' ');
32 |
33 | $this->getPrinter()->info("Content Title: ");
34 | $title = $input->read();
35 |
36 | $this->getPrinter()->info("Content Description: ");
37 | $description = $input->read();
38 |
39 | $content = $stencil->applyTemplate($template_name, [
40 | 'title' => $title,
41 | 'description' => $description
42 | ]);
43 |
44 | $save_locations = $this->getApp()->config->stencil_locations;
45 |
46 | if (!array_key_exists($template_name, $save_locations)) {
47 | $this->getPrinter()->error("Save location not found for template $template_name");
48 | return;
49 | }
50 |
51 | $path = $save_locations[$template_name];
52 | $save_name = date('Ymd') . '_' . $this->slugify($title) . '.md';
53 | $file = fopen($path . '/' . $save_name, 'a+');
54 |
55 | fwrite($file, $content);
56 | $this->getPrinter()->info("Content generated at " . $path . '/' . $save_name);
57 | }
58 |
59 | public function slugify($title)
60 | {
61 | $slug = strtolower($title);
62 | $slug = str_replace(' ', '-', $slug);
63 |
64 | return preg_replace('/[^A-Za-z0-9\-]/', '', $slug);
65 | }
66 | }
67 |
--------------------------------------------------------------------------------
/app/Resources/data/devices/shure-smb7.md:
--------------------------------------------------------------------------------
1 | ---
2 | title: Shure SMB7
3 | description: Shure SMB7 microphone overview and how it works on Linux
4 | tags: devices, microphones, audio
5 | cover_image: https://onlinux.ams3.digitaloceanspaces.com/shure_smb7_guide.png
6 | ---
7 |
8 | The [Shure SMB7 dynamic microphone](https://amzn.to/3wGY6LD) is a popular choice for outstanding voice recording, used by professional musicians, podcasters, youtubers... It's one of the best microphones available in the market, especially designed for voice recording. Because it is a professional microphone that uses a [XLR connection](https://amzn.to/3uvViym) (and not a USB plug-and-play one), you will need a couple more devices in order to connect this beauty to your computer:
9 |
10 | 1. an audio interface such as the [Scarlet i2i](/devices/focusrite-scarlet-2i2), which connects to your computer via USB and has two inputs where you can connect two microphones or one microphone and a guitar, for instance.
11 | 2. a microphone pre-amp or activator such as the [Cloudlifter](/devices/cloudlifter-cl-1). Without this one, your voice won't sound loud and clear enough.
12 |
13 | You'll also need a microphone mount such as the [Rode PSA1 microphone boom arm](https://amzn.to/3NoRfMK) since the Shure SMB7 package doesn't come with any stand or mount, and [XLR cables](https://amzn.to/3uvViym) to connect the devices.
14 |
15 | ## OnLinux Review
16 |
17 | - **Works on Linux?**
18 | - **Yes.** This microphone requires additional devices to be connected to your computer, no matter the OS. Once connected via a compatible audio interface such as the Scarlet, it is plug-and-play and will show up on your audio settings as "Scarlet i2i audio interface". No extra software needed on Ubuntu 21.04+.
19 | - **Tested with**
20 | - Ubuntu 21.04, Ubuntu 21.10
21 |
22 | ### Audio Samples
23 | Clean recording without background noise:
24 | {% audio /audio/mic_samples/shure_smb7_nobg.mp3 %}
25 |
26 | Recording with background noise:
27 | {% audio /audio/mic_samples/shure_smb7.mp3 %}
28 |
29 | ## Related
30 |
31 | {% guide 20220325_how-to-connect-and-use-the-shure-smb7-microphone-on-linux-ubuntu-2110 %}
32 |
33 | {% embed 20220328_microphones-compared %}
34 |
35 | {% device focusrite-scarlet-2i2 %}
36 |
37 | {% device cloudlifter-cl-1 %}
--------------------------------------------------------------------------------
/tests/resources/posts/test0.md:
--------------------------------------------------------------------------------
1 | ---
2 | title: Devo Produzir Conteúdo em Português ou Inglês?
3 | published: true
4 | description:
5 | tags: pt_br, discuss, test
6 | ---
7 |
8 | Tudo começou com um tweet criticando brasileiros "sem relevância no exterior" que compartilham coisas em inglês.
9 |
10 | Como alguém que produz conteúdo técnico gratuitamente na Internet há mais de uma década, e que hoje trabalha profissionalmente com isso (em inglês), seria muita hipocrisia chegar para quem está começando na carreira e recomendar que produza conteúdo exclusivamente em português. Seria muito injusto chegar pra a Érika de 2012, que estava começando a expandir os horizontes e sair da zona de comforto pra produzir conteúdo em inglês, dizer pra ela que isso era egoísta, e que ela deveria continuar escrevendo em português. Para o bem de quem? De uma comunidade local? E a minha carreira? Conteúdo é portfólio tanto quanto código.
11 |
12 | No contexto atual, com as questões acerca de open source e de como as empresas se beneficiam do trabalho voluntário de milhares de desenvolvedores, essa discussão é muito relevante. Existe uma bandeira genérica de "sharing is caring", algo que pode ser traduzido como "compartilhar é se importar". Será que precisamos mesmo de mais tanto conteúdo, será que esse conteúdo está chegando às pessoas que precisam dele? Será que é só publicar em português e pronto?
13 |
14 | Todas essas questões são importantes, porém essa é mais uma situação onde, debaixo de uma bandeira de suposta inclusão, alguém tenta ditar ou regular quem pode e quem não pode participar de um certo grupo. É o famoso *gatekeeping*.
15 |
16 | Produzir conteúdo de qualidade é muito caro. Leva tempo e dedicação. A audiência importa, é preciso tornar viável para quem produz de graça. Vamos ser realistas: traduzir é mais eficiente do que produzir conteúdo original em português, é escalável para outras línguas e como atividade pode ser delegada mais facilmente.
17 |
18 | Enfim:
19 |
20 | Para você que produz conteúdo gratuito, parabéns, qualquer que seja o idioma. Se puder traduzir algumas coisas, ou escrever em português algumas vezes, a comunidade agradece. Mas se não puder agora, também entendemos, cada pessoa tem seu tempo 😘
21 |
22 | Ah, tem mais isso aqui:
23 |
24 | {% twitter 1195716056100298759 %}
25 |
26 | Até a próxima, talvez em português, talvez em inglês... 😉
--------------------------------------------------------------------------------
/app/Resources/themes/custom/_partials/sidebar.html.twig:
--------------------------------------------------------------------------------
1 |
39 |
--------------------------------------------------------------------------------
/app/Resources/data/devices/huion-kamvas-13-tablet.md:
--------------------------------------------------------------------------------
1 | ---
2 | title: Huion Kamvas 13 Graphics Drawing Tablet
3 | description: Overview of the Huion Kamvas 13 drawing tablet and how it works on Linux
4 | tags: devices, drawing, tablet, huion
5 | cover_image: https://onlinux.ams3.digitaloceanspaces.com/huion_kamvas_cover.png
6 | ---
7 |
8 | The [Huion Kamvas 13](https://amzn.to/3IIEPf6) is a drawing tablet that also works as portable USB-C touch display. It has a 13.3 inch laminated screen, 8 express keys, and comes with a battery-free, pressure-sensitive stylus that supports 8k+ levels of pen pressure and 60 degrees of tilt function. The display has a 1920x1080 resolution with 16.7 million colors. On Ubuntu 21.10+, the Kamvas 13 is automatically detected as an additional display, so you may have to configure positioning under the `Settings -> Displays` menu. You'll find configuration options for the tablet buttons under the main Ubuntu Settings panel, in a section called "Wacom Tablet".
9 |
10 | {% video https://onlinux.ams3.digitaloceanspaces.com/kamvas_demo.mp4 %}
11 |
12 | By default, the Huion 13 Kamvas tablet comes with a 3-in-1 cable that powers the tablet via 2 regular USBs and connects to the computer via HDMI. However, it also supports connection and power combined as one full-featured USB-C cable (not included). I strongly recommend you get [the USB-C cable](https://amzn.to/3M1QOGD) as it greatly facilitates connecting and operating your Huion tablet. With the USB-C cable you can also connect to Android phones and tablets, as long as the devices are compatible with the feature, and you provide an additional power supply to the Huion tablet.
13 |
14 | Mapping buttons on Ubuntu 21.10+ is very straightforward, and you can do it through the Ubuntu Settings panel. Go to `Settings -> Wacom Tablet` then choose the **Tablet** tab. Click the **Map Buttons** button to configure the tablet buttons.
15 |
16 | 
17 |
18 | - **Works on Linux?**
19 | - Yes, with minimal configuration. It works straight away as a USB touch display. You'll have to configure it as such - go to `Settings -> Displays` and arrange your displays to match your physical setup. To use it for drawing, you'll have to open the drawing application of your choice (for instance, [MyPaint](http://mypaint.org/)) and drag it into the tablet display. To configure the buttons, you should access `Settings -> Wacom Tablet` then choose the **Tablet** tab. Click the **Map Buttons** button to configure the tablet buttons.
20 | - **Tested with**
21 | - Linux Ubuntu 21.10
22 |
23 |
--------------------------------------------------------------------------------
/app/Resources/data/guides/20220520_how-to-disable-wayland-on-ubuntu-2204.md:
--------------------------------------------------------------------------------
1 | ---
2 | title: How to Disable Wayland on Ubuntu 22.04
3 | description: This short guide shows how to disable Wayland on Ubuntu 22.04.
4 | tags: guides, ubuntu, wayland
5 | cover_image: https://onlinux.ams3.digitaloceanspaces.com/ubuntu2204/ubuntu2204_disable_wayland.png
6 | ---
7 |
8 | ## Introduction
9 |
10 | [Wayland](https://wayland.freedesktop.org/) is a communication protocol and implementation of a display system that works as a replacement for X, used by Ubuntu 22.04 as default display server.
11 |
12 | Although Wayland comes as default, X is still ships with Ubuntu and is used for backwards compatibility. Not all applications run on Wayland, so you may be faced with a situation where if you want to use a certain app, you will need to disable Wayland.
13 |
14 | That's the case with [Streamdeck-ui](https://timothycrosley.github.io/streamdeck-ui/#linux-quick-start), since the underlying libraries have limited support for Wayland. I want to use my Streamdeck on Ubuntu, and I want the convenience of setting up my custom buttons via a nice UI interface. I had to disable Wayland for that. So far, so good; I didn't notice any difference to be quite honest.
15 |
16 | **_DISCLAIMER: I'm not advising you to arbitrarily disable Wayland from your system; but, if you run into issues related to screen capture or input, you should give this a try to see if it solves your problems._**
17 |
18 | ### Requirements
19 |
20 | This guide was developed and tested within the following environment:
21 |
22 | - Linux Ubuntu 22.04
23 |
24 | ## 1. Disable Wayland in `custom.conf`
25 |
26 | Open the file `/etc/gdm3/custom.conf`:
27 |
28 | ```shell
29 | sudo nano /etc/gdm3/custom.conf
30 | ```
31 |
32 | Search for the **WaylandEnable** config. You should set it to **false** in order to disable Wayland:
33 |
34 | ```shell
35 | WaylandEnable=false
36 | ```
37 |
38 | Save the file and exit. On nano, you do that with `CTRL`+`X` then `y` and `ENTER` to confirm.
39 |
40 | ## 2. Restart GDM
41 | You'll need to restart your Gnome Display Manager (GDM) in order to apply the change and switch back to X. When you run the following command, your screen should go black for a few moments, then you will be presented with the log in screen again. You should save any important work you're doing since all windows will be closed.
42 |
43 | ```shell
44 | sudo systemctl restart gdm3
45 | ```
46 |
47 | After logging in, you should be on X and Wayland should be disabled. To confirm, you can go check the system info by hitting the "window" key and searching for **about**:
48 | 
49 |
--------------------------------------------------------------------------------
/app/Resources/data/blog/20220328_microphones-compared.md:
--------------------------------------------------------------------------------
1 | ---
2 | title: Microphones compared: audio samples
3 | description: Comparing audio samples from multiple microphones on Linux
4 | tags: audio, microphone, samples, comparison
5 | cover_image: https://onlinux.ams3.digitaloceanspaces.com/microphones_compared.png
6 | ---
7 |
8 | Choosing a microphone is never an easy task, so it can be helpful to compare recordings from different microphones and choose what works best for you.
9 |
10 | In this page you'll find a list of audio samples recorded using different microphones. All samples were recorded using [Audacity](https://www.audacityteam.org/) on Ubuntu 21.10.
11 |
12 | _Ps: I will keep adding new samples here as I get to test new microphones._
13 |
14 | ### Shure SMB7
15 | A professional microphone especially designed for capturing voice. Definitely the best microphone I have tried so far. This mic requires additional devices to be connected to your computer (check [the device page](/devices/shure-smb7) for more info).
16 |
17 | Clean recording without background noise:
18 | {% audio /audio/mic_samples/shure_smb7_nobg.mp3 %}
19 |
20 | Recording with background noise:
21 | {% audio /audio/mic_samples/shure_smb7.mp3 %}
22 |
23 | [Amazon link](https://amzn.to/3wGY6LD)
24 |
25 | ### Corsair Virtuoso Headset
26 | The Corsair virtuoso headset can be used both as USB wired and as wireless device. The wireless operation requires a USB dongle to be connected to the machine. The sound quality is quite ok, but the microphone is a surprising good find. Because it's directional and stays right in front of your mouth, the headset microphone (which is detachable) doesn't capture much background noise, making it ideal for gaming (and hands-free meetings).
27 |
28 | Wireless Mode: Clean recording without background noise
29 | {% audio /audio/mic_samples/corsair_wireless_nobg.mp3 %}
30 |
31 | Wireless Mode: Recording with background noise
32 | {% audio /audio/mic_samples/corsair_virtuoso.mp3 %}
33 |
34 | USB Mode: Clean recording without background noise
35 | {% audio /audio/mic_samples/corsair_wired_nobg.mp3 %}
36 |
37 | USB Mode: Recording with background noise
38 | {% audio /audio/mic_samples/corsair_virtuoso_wired.mp3 %}
39 |
40 | [Amazon link](https://amzn.to/36QzSnb)
41 |
42 | ### Shure Aonic Earphones
43 | A noise-cancelling earphone from Shure, seems popular with musicians. Although the sound quality on this device is fantastic, the microphone is not that good unfortunately.
44 |
45 | Clean recording without background noise
46 | {% audio /audio/mic_samples/shure_earphone_nobg.mp3 %}
47 |
48 | Recording with background noise
49 | {% audio /audio/mic_samples/shure_earphone.mp3 %}
50 |
51 | [Amazon link](https://amzn.to/3tJUMxi)
52 |
53 | ### Built-in microphone - Lenovo Carbon
54 | As with any built-in laptop microphone, this one captures a lot of background noise.
55 |
56 | Clean recording without background noise
57 | {% audio /audio/mic_samples/lenovo_builtin_nobg.mp3 %}
58 |
59 | Recording with background noise
60 | {% audio /audio/mic_samples/lenovo_builtin.mp3 %}
61 |
--------------------------------------------------------------------------------
/app/Resources/data/devices/corsair-virtuoso-wireless-headset.md:
--------------------------------------------------------------------------------
1 | ---
2 | title: Corsair Virtuoso Wireless Headset
3 | description: Overview of Corsair Virtuoso RGB Wireless Headset and how it works on Linux
4 | tags: devices, sound, headphones, microphones
5 | cover_image: https://onlinux.ams3.digitaloceanspaces.com/corsair_virtuoso.png
6 | ---
7 |
8 | The [Corsair Virtuoso Wireless Headset](https://amzn.to/36QzSnb) is a gaming headset that works both wired and wireless. Wireless operation depends on a USB stick dongle that should be connected to your computer or game console. Wired operation uses a USB-C cable. The unidirectional microphone is detachable and connects to the headphones via a USB connection. The recording produced with this microphone is very good, as you can see in the [audio samples page](/blog/20220328_microphones-compared). It really keeps background noise to a minimum, making your voice sound clear and bright. It also has a sleek design, and is very comfortable to wear.
9 |
10 | Compared to other headphones I have, the sound produced by this headset is good, but nothing superb. The bass is not very strong, but the voices tend to sound nice in it. It doesn't have noise cancelling, and the audio "leaks" a bit, but it is very comfortable, well padded, and looks nice.
11 |
12 | Before I bought this headset, I made an extensive research on wireless headsets with focus on good voice recording. My main goal was to use this as a portable setup for meetings, something that could handle background noise well and still give me the freedom of wireless. As it turns out, it is quite hard to find a wireless headset with good voice recording quality! The thing is, bluetooth is quite limited when it comes to handling multiple channels - basically, you can't have _both_ great input and great output using bluetooth. That's why top-notch gaming headsets use USB sticks / dongles to communicate with the headset wirelessly. So, if wireless is a must for you, **and** you want great voice recording, this headset is an excellent option.
13 |
14 | 
15 |
16 | So why not using it all the time / for everything? Well, the quality of audio recording produced by a podcast microphone such as the [Shure SMB7](/devices/shure-smb7) is not compared to any wireless headset. Aesthetically, you'll also have a visible microphone literally in your face all the time with the headset. If you are recording videos, you may want to consider an improved setup to enrich the quality of your output. That being said, this Corsair headset is also a lot cheaper than a full professional microphone setup that you'll only be able to use in your desktop, so it is a great alternative given the benefits of it being wireless.
17 |
18 | - **Works on Linux?**
19 | - Yes. You can connect both via USB-C and wireless with a dongle, and it doesn't require installing any additional software.
20 | - **Tested with**
21 | - Ubuntu 21.04+
22 | - **Relevant Links**
23 | - [Microphones compared: audio samples](/blog/20220328_microphones-compared)
24 |
--------------------------------------------------------------------------------
/app/Resources/themes/default/base.html.twig:
--------------------------------------------------------------------------------
1 |
2 |
3 |
4 | {% block title %} {{ site_title() }} {% endblock %}
5 |
6 |
7 |
8 |
9 | {% block meta %}
10 |
11 |
12 |
13 |
14 |
15 |
16 |
17 |
18 |
19 |
20 |
21 |
22 |
23 |
24 |
25 |
26 |
27 |
28 | {% endblock %}
29 |
30 |
31 |
32 | {% block includes %}
33 | {% endblock %}
34 |
35 |
36 |
37 |
38 |
80 | {% include '_partials/sidebar.html.twig' %}
81 |
82 |
83 |
84 |
85 | {% include '_partials/footer.html.twig' %}
86 |
87 |
88 |
89 |
90 |
91 |
92 |
93 |
--------------------------------------------------------------------------------
/app/Resources/data/desksetup/erikaheidi.md:
--------------------------------------------------------------------------------
1 | ---
2 | title: Erika Heidi 's Desk Setup
3 | description: This is the desktop setup for Erika Heidi. Check out the full list of devices and gadgets I use for work and side projects!
4 | author_twitter: erikaheidi
5 | tags: desksetups
6 | cover_image: https://onlinux.ams3.digitaloceanspaces.com/onLinux-systems-post-banners.png
7 | ---
8 |
9 | Hi! I'm Erika, a developer advocate and content creator. I created OnLinux to share my desk setup and how I make everything work on Linux, since that is a frequent question whenever I share photos of my desk on social networks. Here you'll find a detailed list with everything I currently have in my desk setup, including some links to more detailed information. This page will be frequently updated with links to new device reviews and guides, as I get them published on this website.
10 |
11 | ### Current Setup
12 |
13 | - **Laptop(s):**
14 | - Dell XPS 15 9510 with Ubuntu 21.10 (Work)
15 | - Lenovo Thinkpad X1 Carbon Gen 9 with Ubuntu 21.10 (Personal)
16 | - **Smartphone:**
17 | - Google Pixel 6
18 | - **Display(s):**
19 | - Dell UltraSharp 34 Curved monitor [[link](https://amzn.to/3NoeKpo)]
20 | - Dell UltraSharp 27 monitor [[link](https://amzn.to/3DhGQOd)]
21 | - **Table / Desk:**
22 | - Ikea Bekant sit/stand desk [[link](https://www.ikea.com/nl/en/p/bekant-desk-sit-stand-black-stained-ash-veneer-black-s69282219/#content)]
23 | - **Chair:**
24 | - Herman Miller Mirra 1
25 | - **Microphone setup:**
26 | - [Shure SMB7](/devices/shure-smb7) [[link](https://amzn.to/3wGY6LD)]
27 | - [Focusrite Scarlet 2i2 3rd Gen audio interface](/devices/focusrite-scarlet-2i2) [[link](https://amzn.to/3uveI6j)]
28 | - [Cloudlifter CL-1](/devices/cloudlifter-cl-1) [[link](https://amzn.to/3DcWdaZ)]
29 | - **Headphones:**
30 | - [Corsair Virtuoso RGB Wireless headset](/devices/corsair-virtuoso-wireless-headset) [[link](https://amzn.to/36QzSnb)]
31 | - JBL Live Bluetooth over-ear [[link](https://amzn.to/3wGId7S)]
32 | - Shure Aonic 215 [[link](https://amzn.to/3tJUMxi)]
33 | - **Camera(s):**
34 | - Logitech Brio [[link](https://amzn.to/35dK5tx)]
35 | - Nikon D5300 [link](https://amzn.to/3qFCifv)]
36 | - **Keyboard(s):**
37 | - [Keychron K6 aluminium plate + RGB, brown switches](/devices/keychron-k6) [[link](https://amzn.to/3uDWVu2)]
38 | - **Mouse:**
39 | - Jelly Comb vertical mouse
40 | - **Lights:**
41 | - Nanoleaf Shapes [[link](https://amzn.to/3Ns5zUY)]
42 | - Elgato Keylight air [[link](https://amzn.to/3wHmjBI)]
43 | - Generic LED ring light
44 | - **Stands / Supports:**
45 | - Foldable laptop stand
46 | - Huanuo Cushioned laptop stand [[link](https://amzn.to/3DfeGDG)]
47 | - Invision wide display arm [[link](https://amzn.to/3qE6XtY)]
48 | - Rode Microphones PSA1 boom [[link](https://amzn.to/3NoRfMK)]
49 | - **Other Devices and Peripherals:**
50 | - [Huion Camvas 13 Drawing Tablet](/devices/huion-kamvas-13-tablet) [[link](https://amzn.to/3IIEPf6)]
51 | - MPK Mini - Midi controller [[link](https://amzn.to/3wD5aJ9)]
52 | - [Elgato Stream Deck](/devices/elgato-stream-deck) [[link](https://amzn.to/35hzCxo)]
53 | - UGreen Mini USB Switch [[link](https://amzn.to/3wM5qWB)]
54 | - Anker USB Hub
55 | - Elgato Camlink [[link](https://amzn.to/3DhRx3G)]
56 | - Elgato Chroma Key [[link]]()
57 |
58 |
59 | ## Related Guides
60 |
61 | {% guide 20220325_how-to-connect-and-use-the-shure-smb7-microphone-on-linux-ubuntu-2110 %}
62 |
63 | {% guide 20220323_how-to-set-up-elgatos-stream-deck-on-ubuntu-linux-2110 %}
64 |
65 | Are you looking for a detailed guide or review about any of these devices? Make a request in our [GitHub Discussions group](https://github.com/erikaheidi/onlinux/discussions) or upvote an existing suggestion / request.
--------------------------------------------------------------------------------
/app/Resources/data/guides/20220502_how-to-create-a-ubuntu-2204-startup-disk-on-ubuntu-systems.md:
--------------------------------------------------------------------------------
1 | ---
2 | title: How to create an Ubuntu 22.04 startup disk on Ubuntu systems
3 | description: Learn how to create an Ubuntu 22.04 startup / boot disk using the startup disk creation tool on Ubuntu systems
4 | tags: guides, ubuntu, installation
5 | cover_image: https://onlinux.ams3.digitaloceanspaces.com/ubuntu2204_install/startup%20disk.png
6 | ---
7 |
8 | ## Introduction
9 |
10 | In order to install a new Ubuntu system into a computer, you'll need to first create a startup disk containing the Ubuntu installation software. The program that runs on the Ubuntu startup disk also allows you to try out Ubuntu 22.04 before installing it in your computer.
11 |
12 | Startup disks are typically created with removable media (also known as regular pen drives / USB sticks).
13 | There are many ways and different software you can use to create a book disk based on an ISO image. In this guide I'll demonstrate in 3 steps how to create a startup (boot) disk from another Ubuntu system, using the native **Startup Disk Creation** tool that comes with all Ubuntu (desktop) versions.
14 |
15 | Although this guide shows how to create an Ubuntu 22.04 startup disk, you can use the same procedure to create startup disks for other distributions and operating systems. All you'll need is:
16 |
17 | - An ISO file with the installation software. In this guide we'll use the [Ubuntu 22.04 desktop image](https://releases.ubuntu.com/22.04/).
18 | - A removable drive such as a USB stick. For Ubuntu, it should be of at least 2GB.
19 | - Physical access to an Ubuntu system where you can plug in your USB stick to create the startup disk. If you want to install Ubuntu on a virtual machine with [VirtualBox](https://www.virtualbox.org/wiki/Downloads), you don't need to create a startup disk; you can boot the virtual machine using the ISO directly.
20 |
21 | ## 1. Download the Ubuntu 22.04 ISO
22 |
23 | The first step is to download the Ubuntu ISO. Go to the [official release page](https://releases.ubuntu.com/22.04/) and download the **desktop version**.
24 |
25 | Make sure you have the ISO ready. It should be in the "Downloads" folder after you download it from the Ubuntu website. Also make sure to plug in the USB stick.
26 |
27 | ## 2. Open Startup Disk Creation
28 |
29 | Open the **Startup Disk Creation** tool by hitting the `Windows` key and then searching for "startup disk".
30 |
31 | The tool is fairly simple, with one top area for the ISO selection and a bottom area for the device selection.
32 |
33 | 
34 |
35 | In the top section you should select your preferred ISO file, in this guide I'm using Ubuntu 22.04 "Jammy Jellyfish".
36 | In the bottom section, select the removable media device you want to use as startup disk.
37 |
38 | Make sure you're using the right disk here - typically, Ubuntu will hide your system disks to avoid mistakes, but if you have other removable media connected then you'll need to know which one refers to your USB stick.
39 |
40 | _**Be aware that the storage media will be fully erased for the disk creation, so make sure to save any files you have on the device prior to using this tool.**_
41 |
42 | Once you confirm both the "Source disk" and the "Disk to use" sections look right, click on the **Make Startup Disk** button and wait until the process is finished.
43 |
44 | ## 3. Using the Startup / Boot Disk
45 |
46 | You'll need to restart your computer in order to test your new Startup disk.
47 |
48 | Depending on your computer and the setup program it runs, you will have to press a special key to either choose the boot device directly or access the BIOS setup program and adjust your settings in order to boot from your new Ubuntu boot disk. In most computers, this key will be `F12`.
49 |
50 | With my Lenovo Thinkpad laptop, I need to press `F12` as soon as the computer beeps after rebooting, and this will let me choose which device to boot. My old, generic USB stick is recognized as "USB HDD:VendorCo ProductCode".
51 |
52 | 
53 |
54 | When the computer successfully starts up the boot program from your Ubuntu disk, you'll then see the **Grub boot screen**.
55 |
56 | 
57 |
58 | You can then choose "Try or install Ubuntu" to proceed.
59 |
60 |
61 |
--------------------------------------------------------------------------------
/app/Resources/data/guides/20220524_how-to-disable-and-remove-snap-on-ubuntu-2204.md:
--------------------------------------------------------------------------------
1 | ---
2 | title: How to Disable Snap on Ubuntu 22.04
3 | author_twitter: erikaheidi
4 | description: This guide demonstrates how to disable and remove Snap on Ubuntu 22.04.
5 | tags: guides, ubuntu, snap
6 | cover_image: https://onlinux.ams3.digitaloceanspaces.com/ubuntu2204/ubuntu2204_disable_snap.png
7 | ---
8 |
9 | ## Introduction
10 |
11 | [Snap](https://snapcraft.io/) is Linux package manager (such as `apt`) with its own package ecosystem and app store, and it's being pushed as new default on the latest Ubuntu release (22.04 _Jammy Jellyfish_). On Ubuntu 22.04, a fresh installation brings Firefox installed as Snap, and `apt` installs snaps when they're available.
12 | This wouldn't be such a problem if Snaps were as stable as `.deb` packages. In this specific case of Firefox as snap, imagine that you have just installed the system and you can't open your browser because Snap is broken. You can't google your issue and your error messages directly, because the browser is broken. This happened to me on all 5 installations I did of Ubuntu 22.04 in the past few weeks.
13 |
14 | I personally believe pushing Snap to users by default is a bad decision from Ubuntu, since there are known stability issues (like it getting broken right after a fresh install, which happened to me) that simply don't happen with traditional .deb packages. That's why I decided to remove Snap (all apps and snapd) altogether from my system. After that I was able to install Firefox from the Mozilla team PPA, and things are running smoothly since then (it's been a couple of weeks).
15 |
16 | In this guide, I share how I disabled Snap and purged it from my Ubuntu 22.04 system. That doesn't mean I hate it, I just don't want to deal with Snap now. I believe things should improve and maybe we'll see a more stable platform in the next LTS release. For now, my choice is to remove it.
17 |
18 | **Disclaimer**: Do this at your own risk. Although the procedure described here won't break your system, you may face limitations in the future (e.g: if a software is only available as Snap, or if you wanted to enable LivePatch).
19 |
20 | ### Requirements
21 |
22 | This guide was developed and tested within the following environment:
23 |
24 | - Linux Ubuntu 22.04
25 |
26 | ## Step 1: Disable Snap
27 |
28 | Start by disabling the Snap services within Sysctl:
29 |
30 | ```shell
31 | sudo systemctl disable snapd.service
32 | sudo systemctl disable snapd.socket
33 | sudo systemctl disable snapd.seeded.service
34 | ```
35 |
36 | ## 2. Remove Snap packages
37 |
38 | Next, list your Snap packages to see what is currently installed. You should see Firefox as one of the snaps.
39 |
40 | ```shell
41 | sudo snap list
42 | ```
43 |
44 | Then, uninstall the packages. Because some packages depend on each other and there doesn't seem to be a way to automate the correct order in which they should be removed (also, poor error messages) it is better to remove each one individually. This way you will be notified if a package is a dependency and must be removed last.
45 |
46 | ```shell
47 | sudo snap remove firefox
48 | sudo snap remove snap-store
49 | (...)
50 | ```
51 |
52 | Repeat this with all the snap packages in the `snap list` list.
53 |
54 | ## 3. Remove Snap
55 |
56 | Next, fully remove Snap from your system with:
57 |
58 | ```shell
59 | sudo apt autoremove --purge snapd
60 | ```
61 | Finally, clear any leftover cache from Snap:
62 |
63 | ```shell
64 | sudo rm -rf /var/cache/snapd/
65 | rm -rf ~/snap
66 | ```
67 |
68 | Snap should now be completely removed from your system.
69 |
70 | ## Next Steps
71 |
72 | With Snap removed, you'll need to install Firefox from a PPA. Because `apt` will still try to install the Snap version of Firefox, you will run into an error. There's a trick to overcome that issue: [pinning](https://help.ubuntu.com/community/PinningHowto) Firefox with Apt.
73 |
74 | Create a new file within Apt's preferences dir:
75 |
76 | ```shell
77 | sudo nano /etc/apt/preferences.d/firefox-no-snap
78 | ```
79 |
80 | Include the following content in the newly created file:
81 |
82 | ```
83 | Package: firefox*
84 | Pin: release o=Ubuntu*
85 | Pin-Priority: -1
86 | ```
87 |
88 | Save and exit. With `nano`, you can do that by typing `CTRL`+`X`, then `Y` and `ENTER` to confirm.
89 |
90 | You can now add Mozilla's PPA with:
91 |
92 | ```shell
93 | sudo add-apt-repository ppa:mozillateam/ppa
94 | ```
95 |
96 | When running the `add-apt-repository` command, the update happens now automatically, so you don't need to run `sudo apt update` anymore.
97 |
98 | Install Firefox with:
99 |
100 | ```shell
101 | sudo apt install firefox
102 | ```
103 |
104 | Voilá, you should now have a Snap-free Ubuntu with Firefox installed.
--------------------------------------------------------------------------------
/app/Resources/css/prism.css:
--------------------------------------------------------------------------------
1 | /* PrismJS 1.23.0
2 | https://prismjs.com/download.html#themes=prism-okaidia&languages=markup+css+clike+javascript+apacheconf+arduino+bash+c+cpp+docker+git+go+graphql+javadoclike+json+markdown+markup-templating+nginx+php+phpdoc+php-extras+puppet+python+regex+rest+ruby+sql+twig+uri&plugins=line-numbers+toolbar+copy-to-clipboard */
3 | /**
4 | * okaidia theme for JavaScript, CSS and HTML
5 | * Loosely based on Monokai textmate theme by http://www.monokai.nl/
6 | * @author ocodia
7 | */
8 |
9 | code[class*="language-"],
10 | pre[class*="language-"] {
11 | color: #f8f8f2;
12 | background: none;
13 | text-shadow: 0 1px rgba(0, 0, 0, 0.3);
14 | font-family: Consolas, Monaco, 'Andale Mono', 'Ubuntu Mono', monospace;
15 | font-size: 1em;
16 | text-align: left;
17 | white-space: pre;
18 | word-spacing: normal;
19 | word-break: normal;
20 | word-wrap: normal;
21 | line-height: 1.5;
22 |
23 | -moz-tab-size: 4;
24 | -o-tab-size: 4;
25 | tab-size: 4;
26 |
27 | -webkit-hyphens: none;
28 | -moz-hyphens: none;
29 | -ms-hyphens: none;
30 | hyphens: none;
31 | }
32 |
33 | /* Code blocks */
34 | pre[class*="language-"] {
35 | padding: 1em;
36 | margin: .5em 0;
37 | overflow: auto;
38 | border-radius: 0.3em;
39 | }
40 |
41 | :not(pre) > code[class*="language-"],
42 | pre[class*="language-"] {
43 | background: #272822;
44 | }
45 |
46 | /* Inline code */
47 | :not(pre) > code[class*="language-"] {
48 | padding: .1em;
49 | border-radius: .3em;
50 | white-space: normal;
51 | }
52 |
53 | .token.comment,
54 | .token.prolog,
55 | .token.doctype,
56 | .token.cdata {
57 | color: #8292a2;
58 | }
59 |
60 | .token.punctuation {
61 | color: #f8f8f2;
62 | }
63 |
64 | .token.namespace {
65 | opacity: .7;
66 | }
67 |
68 | .token.property,
69 | .token.tag,
70 | .token.constant,
71 | .token.symbol,
72 | .token.deleted {
73 | color: #f92672;
74 | }
75 |
76 | .token.boolean,
77 | .token.number {
78 | color: #ae81ff;
79 | }
80 |
81 | .token.selector,
82 | .token.attr-name,
83 | .token.string,
84 | .token.char,
85 | .token.builtin,
86 | .token.inserted {
87 | color: #a6e22e;
88 | }
89 |
90 | .token.operator,
91 | .token.entity,
92 | .token.url,
93 | .language-css .token.string,
94 | .style .token.string,
95 | .token.variable {
96 | color: #f8f8f2;
97 | }
98 |
99 | .token.atrule,
100 | .token.attr-value,
101 | .token.function,
102 | .token.class-name {
103 | color: #e6db74;
104 | }
105 |
106 | .token.keyword {
107 | color: #66d9ef;
108 | }
109 |
110 | .token.regex,
111 | .token.important {
112 | color: #fd971f;
113 | }
114 |
115 | .token.important,
116 | .token.bold {
117 | font-weight: bold;
118 | }
119 | .token.italic {
120 | font-style: italic;
121 | }
122 |
123 | .token.entity {
124 | cursor: help;
125 | }
126 |
127 | pre[class*="language-"].line-numbers {
128 | position: relative;
129 | padding-left: 3.8em;
130 | counter-reset: linenumber;
131 | }
132 |
133 | pre[class*="language-"].line-numbers > code {
134 | position: relative;
135 | white-space: inherit;
136 | }
137 |
138 | .line-numbers .line-numbers-rows {
139 | position: absolute;
140 | pointer-events: none;
141 | top: 0;
142 | font-size: 100%;
143 | left: -3.8em;
144 | width: 3em; /* works for line-numbers below 1000 lines */
145 | letter-spacing: -1px;
146 | border-right: 1px solid #999;
147 |
148 | -webkit-user-select: none;
149 | -moz-user-select: none;
150 | -ms-user-select: none;
151 | user-select: none;
152 |
153 | }
154 |
155 | .line-numbers-rows > span {
156 | display: block;
157 | counter-increment: linenumber;
158 | }
159 |
160 | .line-numbers-rows > span:before {
161 | content: counter(linenumber);
162 | color: #999;
163 | display: block;
164 | padding-right: 0.8em;
165 | text-align: right;
166 | }
167 |
168 | div.code-toolbar {
169 | position: relative;
170 | }
171 |
172 | div.code-toolbar > .toolbar {
173 | position: absolute;
174 | top: .3em;
175 | right: .2em;
176 | transition: opacity 0.3s ease-in-out;
177 | opacity: 0;
178 | }
179 |
180 | div.code-toolbar:hover > .toolbar {
181 | opacity: 1;
182 | }
183 |
184 | /* Separate line b/c rules are thrown out if selector is invalid.
185 | IE11 and old Edge versions don't support :focus-within. */
186 | div.code-toolbar:focus-within > .toolbar {
187 | opacity: 1;
188 | }
189 |
190 | div.code-toolbar > .toolbar .toolbar-item {
191 | display: inline-block;
192 | }
193 |
194 | div.code-toolbar > .toolbar a {
195 | cursor: pointer;
196 | }
197 |
198 | div.code-toolbar > .toolbar button {
199 | background: none;
200 | border: 0;
201 | color: inherit;
202 | font: inherit;
203 | line-height: normal;
204 | overflow: visible;
205 | padding: 0;
206 | -webkit-user-select: none; /* for button */
207 | -moz-user-select: none;
208 | -ms-user-select: none;
209 | }
210 |
211 | div.code-toolbar > .toolbar a,
212 | div.code-toolbar > .toolbar button,
213 | div.code-toolbar > .toolbar span {
214 | color: #bbb;
215 | font-size: .8em;
216 | padding: 0 .5em;
217 | background: #f5f2f0;
218 | background: rgba(224, 224, 224, 0.2);
219 | box-shadow: 0 2px 0 0 rgba(0,0,0,0.2);
220 | border-radius: .5em;
221 | }
222 |
223 | div.code-toolbar > .toolbar a:hover,
224 | div.code-toolbar > .toolbar a:focus,
225 | div.code-toolbar > .toolbar button:hover,
226 | div.code-toolbar > .toolbar button:focus,
227 | div.code-toolbar > .toolbar span:hover,
228 | div.code-toolbar > .toolbar span:focus {
229 | color: inherit;
230 | text-decoration: none;
231 | }
232 |
233 |
--------------------------------------------------------------------------------
/app/Resources/themes/custom/base.html.twig:
--------------------------------------------------------------------------------
1 |
2 |
3 |
4 | {% block title %} {{ site_title() }} {% endblock %}
5 |
6 |
7 |
8 |
9 | {% block meta %}
10 |
11 |
12 |
13 |
14 |
15 |
16 |
17 |
18 |
19 |
20 |
21 |
22 |
23 |
24 |
25 |
26 |
27 |
28 | {% endblock %}
29 |
30 |
31 |
32 |
33 |
34 |
41 |
42 | {% block includes %}
43 | {% endblock %}
44 |
45 |
46 |
47 |
48 |
108 | {% include '_partials/sidebar.html.twig' %}
109 |
110 |
111 |
112 |
113 | {% include '_partials/footer.html.twig' %}
114 |
115 |
116 |
117 |
118 |
119 |
120 |
121 |
--------------------------------------------------------------------------------
/app/Resources/data/guides/20220325_how-to-connect-and-use-the-shure-smb7-microphone-on-linux-ubuntu-2110.md:
--------------------------------------------------------------------------------
1 | ---
2 | title: How to connect and use the Shure SMB7 Microphone on Linux (Ubuntu 21.10)
3 | author_twitter: erikaheidi
4 | description: In this guide I share how I connected my Shure SMB7 microphone to my Ubuntu 21.10 machine
5 | tags: guides, microphones, audio, setup
6 | cover_image: https://onlinux.ams3.digitaloceanspaces.com/shuresmb7_guide.png
7 | ---
8 |
9 | If you have been watching video podcasts or live streams lately, you may have noticed a distinct microphone that seems to be the favorite of pro Youtubers and streamers. The [Shure SMB7 microphone](/devices/shure-smb7) is a top-notch dynamic microphone that reduces background noise and is especially designed for voice capture.
10 |
11 | No wonder why this microphone is a favorite for so many folks. I was surprised with how much better my voice sounded with it! For comparison, check this [microphone samples page](/blog/20220328_microphones-compared).
12 |
13 | The SMB7 produces clean recordings that make your voice sound very natural and "warm". Thanks to its cardioid capture pattern, air suspension shock isolation, and built-in pop filter, the SMB7 blocks most of the background noise around you, which makes it a superb choice for both studio and home recording or podcasting.
14 |
15 | In this guide I'll share how to set up a Shure SMB7 microphone and how to use it on Linux.
16 |
17 | ### Requirements
18 |
19 | The following devices were used in this setup:
20 |
21 | {% device shure-smb7 %}
22 |
23 | {% device focusrite-scarlet-2i2 %}
24 |
25 | {% device cloudlifter-cl-1 %}
26 |
27 | You'll also need a microphone mount such as the [Rode PSA1 microphone boom arm](https://amzn.to/3NoRfMK) since the Shure SMB7 package doesn't come with any stand or mount, and **two** [XLR cables](https://amzn.to/3uvViym) to connect the microphone through the two devices.
28 |
29 | This guide was developed and tested within an **Ubuntu 21.10** Linux system.
30 |
31 | ## 1. Setting Up the Devices
32 |
33 | Follow the manual instructions to mount your Shure SMB7 microphone to a stand. If you went with the [Rode PSA1 microphone boom arm](https://amzn.to/3NoRfMK), which is a popular choice for this microphone, you have the option to mount it in two different ways: as a desk-clamp for desks up to 55mm thick, or as a desk-insert for desks up to 70mm thick - which requires you to make a hole in your desk to pass the attachment through. I am using the desk-clamp attachment, and have it set up on the left side of my desk:
34 |
35 | 
36 |
37 | ### Connecting the cables
38 |
39 | Start connecting an XLR cable to your Shure SMB7 microphone and connecting the other end of the cable to your Cloudlifter device. You won't need to interact with this device, so it's more than okay to place it in a hidden spot in your desk. I put mine under the table, hold with a cable net and some tape:
40 |
41 | 
42 |
43 | Then, connect the other XLR cable to the Cloudlifter, and use the other end of the cable to connect it to the Scarlet audio interface. The audio interface should sit at your desk in a position that lets you control the volume and turn the phantom power on/off - just don't tuck it in a difficult spot, you want to have clear access to this device. Then, connect the audio interface to the power input and make sure it's turned on.
44 |
45 | 
46 |
47 | Now you can connect the Scarlet audio interface to your computer via USB. Once you do that, the device should be automatically detected. On Ubuntu (and probably other systems too), it will also mount a small disk partition containing installation instructions.
48 |
49 | ## 2. Testing your Setup
50 |
51 | While the Shure SMB7 itself doesn't require [phantom power](https://www.sweetwater.com/sweetcare/articles/what-phantom-power-need/#), pre-amps such as the Cloudlifter will require phantom power to operate, and that's why you will need to turn this on to make your setup fully functional. Just press the "48V" button on the Scarlet, you should see a red LED indicating that the phantom power is on. This is super important - when I first set everything up, I forgot to turn this on, and spent a lot of time trying to solve the issue via software when it was really just missing that extra input juice to power the preamp.
52 |
53 | After adjusting the volume, you should be able to get instant feedback from the microphone if you tap it. You'll see the LED around the volume knob to light in orange / red in the Scarlet device. This means the device is successfully capturing audio, now you just need to set it up within your system.
54 |
55 | Within Ubuntu 21.04+ systems, the audio interface will be recognized as "Analog Input - Scarlet 2i2 Camera", and this is what you'll need to select as your input / microphone in your system settings:
56 |
57 | 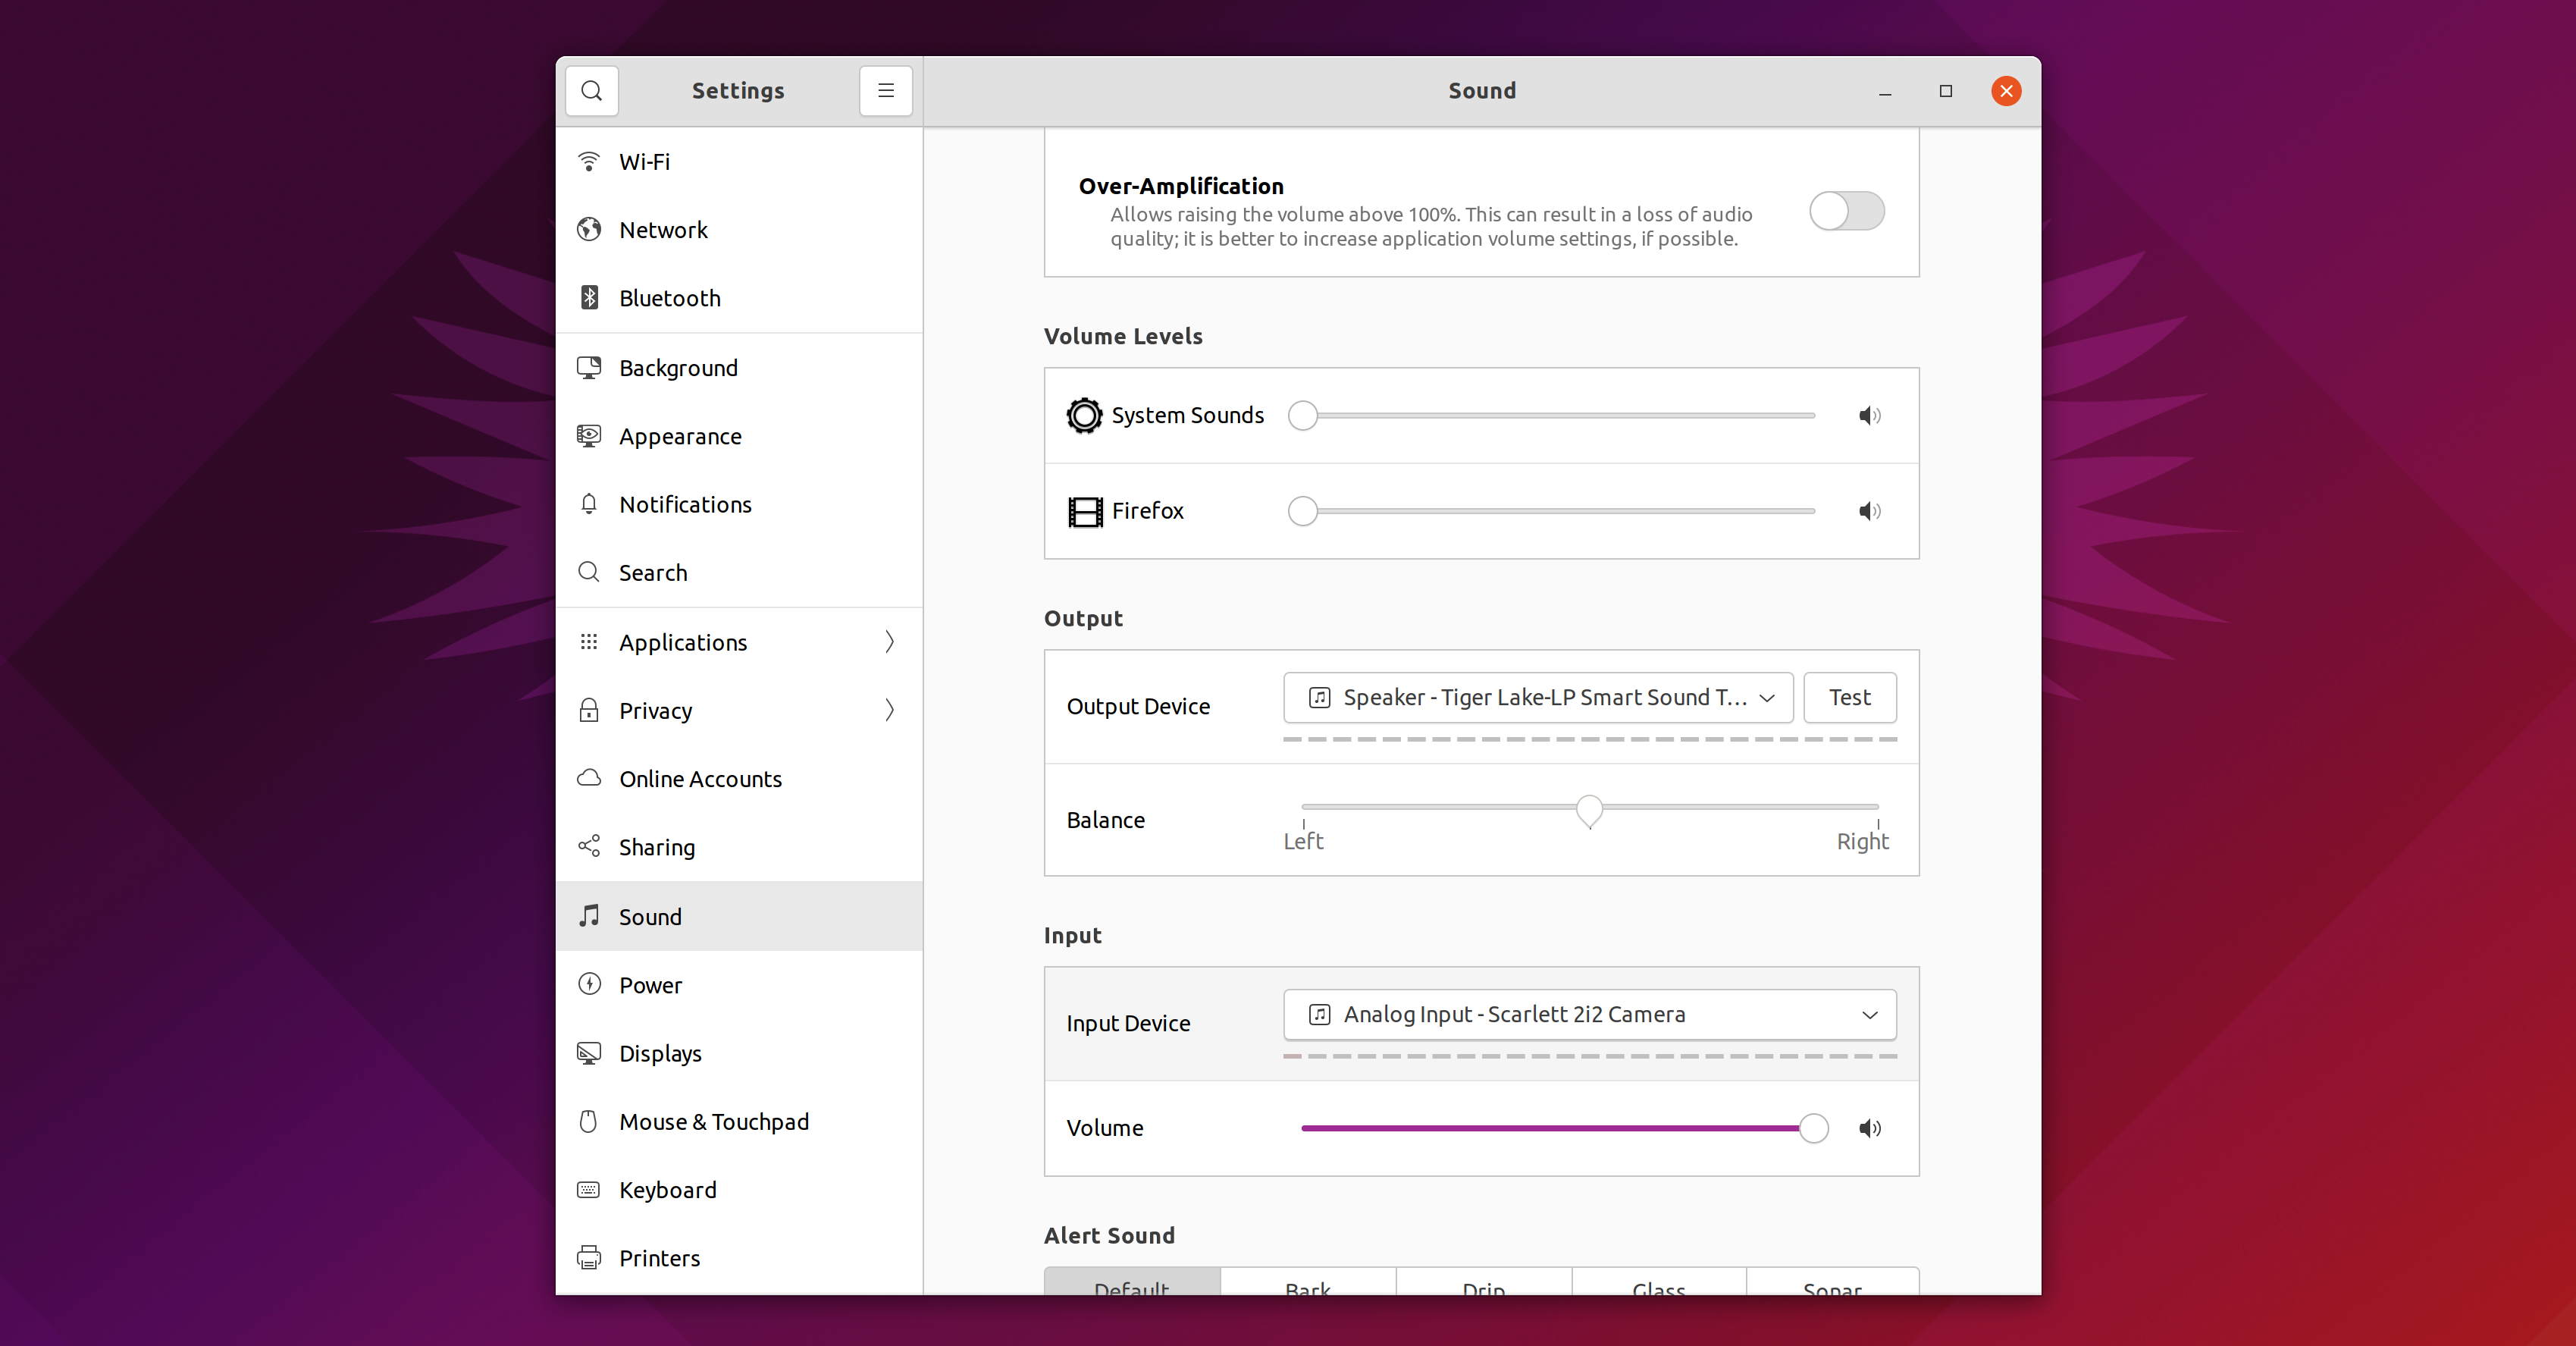
58 |
59 | Because the Scarlet 2i2 also provides an output line with the combined output from its two channels, it is often recognized by the system and set as your default output, so just remember to change that to your preferred output such as laptop speakers or headphones.
60 |
61 | ### Recording
62 |
63 | Now it's time to finally test the microphone with an actual recording. There are quite a few different open source / free applications you can use for that, but I would recommend something like [Audacity](https://www.audacityteam.org/) for simplicity.
64 |
65 | 
66 |
67 | Here's a quick check-up list:
68 |
69 | - Make sure the "Analog Input - Scarlet 2i2 Camera" device is selected as **input** device on your system settings
70 | - Make sure the "48v" button is enabled on the Scarlet 2i2 device to enable phantom power
71 | - Make sure to turn the volume up on the Scarlet 2i2 device and that you can see the LED around the volume knob turning green / orange when you tap or speak on the microphone
72 |
73 | _**Important:** Always make sure you select "mono" channel when setting up your SMB7 input within different sound recording applications. If you set it as "stereo", your recording will come only on one side, which is easy to notice when using headphones but may go unnoticed if you are using your pc speakers to listen to the recorded sound. Some applications will set it to "stereo" by default, I had this issue with OBS._
74 |
75 | Here's a sample of my own:
76 |
77 | {% audio /audio/mic_samples/shure_smb7_nobg.mp3 %}
78 |
79 | ## Conclusion
80 |
81 | The Shure SMB7 microphone is a fantastic vocal microphone used by professionals all around the world, and it works perfectly fine on Linux <3 With the correct setup, you will be able to create professional-sounding podcasts, YouTube videos, live streams, and even make some music if that's your vibe.
82 |
83 | 
--------------------------------------------------------------------------------
/app/Resources/data/guides/20220323_how-to-set-up-elgatos-stream-deck-on-ubuntu-linux-2110.md:
--------------------------------------------------------------------------------
1 | ---
2 | title: How to Set Up Elgato's Stream Deck on Ubuntu Linux 21.10
3 | author_twitter: erikaheidi
4 | published: true
5 | description: In this post I'll share how I got my Elgato StreamDeck set up on Ubuntu 21.10 and how I use it to switch windows and run commands on my system
6 | tags: tutorial, streaming, livecoding, linux
7 | cover_image: https://dev-to-uploads.s3.amazonaws.com/uploads/articles/2w7n17f0v3ubqogpbn85.png
8 | ---
9 |
10 | Popular with streamers everywhere in the world, the [Elgato Stream Deck](/devices/elgato-stream-deck) is a customizable device that works as an external input, and can be configured to trigger commands and shortcuts at the press of a button. Although the device is super popular with live streamers, it is also very useful for anyone who works with several applications in a desktop setting, since it greatly facilitates switching windows and running commands on your computer.
11 |
12 | While this looks like a very useful device, the official website says the device is only supported on MacOS and Windows systems. A bummer, for sure! That's what kept me from buying one for quite some time.
13 |
14 | Turns out I got a [really nice package from the GitHub Stars program](https://twitter.com/erikaheidi/status/1439919049136353284) including a 15-button Stream Deck. I have heard rumors that it was possible to run it on Linux, and that's what brought me to this article!
15 |
16 | In this post I'll share how I set up my Stream Deck on an **Ubuntu 21.10** system and which commands / tools I configured so far.
17 |
18 | ### Newer Version
19 |
20 | There's a newer version of this guide available for Ubuntu 22.04:
21 |
22 | {% guide 20220520_how-to-set-up-elgatos-stream-deck-on-ubuntu-linux-2204 %}
23 |
24 | ## Step 1: Install `streamdeck-ui`
25 |
26 | The [streamdeck-ui program](https://timothycrosley.github.io/streamdeck-ui/) provides a Linux-compatible graphical user interface to control your Stream Deck, running on top of the [Python Stream Deck Library](https://github.com/abcminiuser/python-elgato-streamdeck#python-elgato-stream-deck-library). With this software you can set up each individual key by providing an icon, a command or a shortcut, and an optional title. It supports multiple pages, which means you are not limited to the physical slots in the device. As long as you use one or more keys to paginate through your icon pages, you can have as many buttons as you need.
27 |
28 | 
29 |
30 | To get started, install the dependencies with the following command:
31 |
32 | ```shell
33 | sudo apt install python3-pip libhidapi-libusb0 libxcb-xinerama0
34 | ```
35 |
36 | Then, you'll need to set up special permissions that will allow you to use the application with a regular system user.
37 |
38 | ```shell
39 | sudoedit /etc/udev/rules.d/70-streamdeck.rules
40 | ```
41 | Paste the following content into this file:
42 |
43 | ```
44 | SUBSYSTEM=="usb", ATTRS{idVendor}=="0fd9", ATTRS{idProduct}=="0060", TAG+="uaccess"
45 | SUBSYSTEM=="usb", ATTRS{idVendor}=="0fd9", ATTRS{idProduct}=="0063", TAG+="uaccess"
46 | SUBSYSTEM=="usb", ATTRS{idVendor}=="0fd9", ATTRS{idProduct}=="006c", TAG+="uaccess"
47 | SUBSYSTEM=="usb", ATTRS{idVendor}=="0fd9", ATTRS{idProduct}=="006d", TAG+="uaccess"
48 | ```
49 |
50 | Save and close the file. Then, reload udev rules with:
51 |
52 | ```shell
53 | sudo udevadm control --reload-rules
54 | ```
55 |
56 | The installation instructions advise you to unplug and plug again your device before continuing. Once you do that, run the following command to install `streamdeck-ui`:
57 |
58 | ```shell
59 | pip3 install --user streamdeck_ui
60 | ```
61 |
62 | Next, you'll need to make sure you have `$HOME/.local/bin` in your `$PATH`. If you are using regular bash, you should have a `.bashrc` file where your `$PATH` is defined. If you are using zsh, this should be `.zshrc` instead. For instance, I use zsh and this is how my `$PATH` is defined within my `~/.zshrc`:
63 |
64 | ```shell
65 | export PATH=$HOME/bin:$HOME/.local/bin:/usr/local/bin:$PATH
66 | ```
67 |
68 | After updating your $PATH, you can run `streamdeck-ui` from your terminal in background mode with:
69 |
70 | ```shell
71 | streamdeck &
72 | ```
73 | You should see a screen like that:
74 |
75 | 
76 |
77 | You can now start setting up each button.
78 |
79 | Keep in mind that the program must be running all times for the buttons to be actually functional. It will be visible as a system tray icon on the top right of your screen.
80 |
81 | It is recommended that you include the `streamdeck` command in your startup commands - on Ubuntu you can set this on the `Startup Applications Preferences` utility. Hint: type `window` and then `Startup` to find this program on Ubuntu:
82 |
83 | 
84 |
85 | ## Setting up command buttons
86 |
87 | Setting up a button to run a command is pretty straightforward with streamdeck-ui. Having an icon is optional, since you can also use a simple text (just needs to keep it very short, as it doesn't support linebreaks). To try it out, configure your first button to open your file browser, called as `nautilus`:
88 |
89 | 
90 |
91 | The update is effective immediately, so you can click on the button and you should see a new Nautilus window opening up.
92 |
93 | ## Setting up shortcut buttons
94 |
95 | You can also set up shortcuts to run when you click a button, although this may work inconsistently depending on which application is currently on focus. I use shortcuts to switch scenes on OBS, but then I have to first make sure I focus the OBS window and only then I hit the shortcut button.
96 |
97 | To configure shortcuts, use the **Press Keys** text field to define the sequence of keys. To make it work with OBS, you'll first need to configure your OBS shortcuts on **Settings -> Hotkeys** (inside OBS).
98 |
99 | 
100 |
101 | It is also possible to use commands to change which window is currently on focus, that's what we'll see next.
102 |
103 | ## Manipulating windows with `xdotool`
104 |
105 | To switch between windows, you'll need to install a tool called `xdotool`. On Ubuntu you can install it with the following command:
106 |
107 | ```shell
108 | sudo apt install xdotool
109 | ```
110 |
111 | This tool allows you to search for a window by title or class, which is an internal name used by each application. This information can be found with the built-in command `xprop`, which obtains information about active windows on your graphical interface.
112 |
113 | To find out which class an application uses for its main window, you can run:
114 |
115 | ```shell
116 | xprop | grep 'CLASS'
117 | ```
118 |
119 | Then, you'll have to click on the window you want to obtain more information about. Make sure you click somewhere inside the window, not at the title bar.
120 |
121 | For instance, if you want to find out the class name for your Firefox browser, after clicking somewhere in the Firefox window you'll get output like this:
122 |
123 | ```
124 | WM_CLASS(STRING) = "Navigator", "Firefox"
125 | ```
126 |
127 | The **second** string in the output is what we need. Once you know the class name for an application, you can move it to active / focused with the following command (in this case, we're activating the Firefox window):
128 |
129 | ```shell
130 | xdotool search --desktop 0 --class Firefox windowactivate
131 | ```
132 |
133 | So this is the command you'll have to set up within streamdeck-ui to be able to easily switch applications using your Stream Deck.
134 |
135 | Here is a list with my own buttons that you can probably reuse on your setup in case you want similar functionality:
136 |
137 | ### Firefox
138 | `xdotool search --desktop 0 --class Firefox windowactivate`
139 |
140 | ### Terminal (Terminator)
141 | ```
142 | xdotool search --desktop 0 --class 'Terminator' windowactivate
143 | ```
144 |
145 | ### PhpStorm
146 | ```
147 | xdotool search --desktop 0 --class jetbrains-phpstorm windowactivate
148 | ```
149 |
150 | ### OBS
151 | ```
152 | xdotool search --desktop 0 --class obs windowactivate
153 | ```
154 |
155 | ### Zoom
156 | ```
157 | xdotool search --desktop 0 --class Zoom windowactivate
158 | ```
159 |
160 | ### Slack
161 | ```
162 | xdotool search --desktop 0 --class slack windowactivate
163 | ```
164 |
165 | This is what my current setup looks like:
166 |
167 | 
168 |
169 | And this is how it looks like on the device:
170 |
171 | 
172 |
173 | ## Finding icons
174 |
175 | You can find default icons from the Ubuntu system and applications spread through several directories on `/usr/share`. Have a look at `/usr/share/icons` and you should find several subdirectories with icons - this might work but it can be difficult to find just the icon you want.
176 |
177 | I personally prefer to look for icons on google images, and have set a local folder in my home directory where I keep these icons and reference them from streamdeck-ui. Icons must be in `png` format.
178 |
179 | ## Conclusion
180 |
181 | I hope you have enjoyed this article and that it can help you customize your Stream Deck up to the minimal details, for a perfect setup :) Worth noting that the Stream Deck device is pretty handy for anyone working on a desktop, since it can speed up switching windows and running commands on your system.
--------------------------------------------------------------------------------
/app/Resources/data/guides/20220520_how-to-set-up-elgatos-stream-deck-on-ubuntu-linux-2204.md:
--------------------------------------------------------------------------------
1 | ---
2 | title: How to Set Up Elgato's Stream Deck on Ubuntu Linux 22.04
3 | author_twitter: erikaheidi
4 | published: true
5 | description: In this post I'll share how I got my Elgato StreamDeck set up on Ubuntu 22.04 and how I use it to switch windows and run commands on my system.
6 | tags: tutorial, streaming, livecoding, linux
7 | cover_image: https://dev-to-uploads.s3.amazonaws.com/uploads/articles/2w7n17f0v3ubqogpbn85.png
8 | ---
9 |
10 | Popular with streamers everywhere in the world, the [Elgato Stream Deck](/devices/elgato-stream-deck) is a customizable device that works as an external input, and can be configured to trigger commands and shortcuts at the press of a button. Although the device is super popular with live streamers, it is also very useful for anyone who works with several applications in a desktop setting, since it greatly facilitates switching windows and running commands on your computer.
11 |
12 | In this post I'll share how I set up my Stream Deck on an **Ubuntu 22.04** system and which commands / tools I configured so far.
13 |
14 |
15 | ### Requirements
16 |
17 | You'll need an Ubuntu 22.04 desktop system on a device you can plug in your Stream Deck. Unfortunately, the streamdeck-ui software **doesn't support Wayland**, so you'll need to disable it. The following short guide describes how to do so:
18 |
19 | {% guide 20220520_how-to-disable-wayland-on-ubuntu-2204 %}
20 |
21 | ## Step 1: Install `streamdeck-ui`
22 |
23 | The [streamdeck-ui program](https://timothycrosley.github.io/streamdeck-ui/) provides a Linux-compatible graphical user interface to control your Stream Deck, running on top of the [Python Stream Deck Library](https://github.com/abcminiuser/python-elgato-streamdeck#python-elgato-stream-deck-library).
24 | With this software you can set up each individual key by providing an icon, a command or a shortcut, and an optional title. It supports multiple pages, which means you are not limited to the physical slots in the device. As long as you use one or more keys to paginate through your icon pages, you can have as many buttons as you need.
25 |
26 | Another interesting feature is the ability to import and export configuration files; this way, it is easier to "transfer" your setup to other Ubuntu systems or restore a previous configuration when reinstalling.
27 |
28 | 
29 |
30 | To get started, install the dependencies with the following command:
31 |
32 | ```shell
33 | sudo apt install python3-pip libhidapi-libusb0 libxcb-xinerama0
34 | ```
35 |
36 | Then, you'll need to set up special permissions that will allow you to use the application with a regular system user.
37 |
38 | ```shell
39 | sudoedit /etc/udev/rules.d/70-streamdeck.rules
40 | ```
41 | Paste the following content into this file:
42 |
43 | ```
44 | SUBSYSTEM=="usb", ATTRS{idVendor}=="0fd9", ATTRS{idProduct}=="0060", TAG+="uaccess"
45 | SUBSYSTEM=="usb", ATTRS{idVendor}=="0fd9", ATTRS{idProduct}=="0063", TAG+="uaccess"
46 | SUBSYSTEM=="usb", ATTRS{idVendor}=="0fd9", ATTRS{idProduct}=="006c", TAG+="uaccess"
47 | SUBSYSTEM=="usb", ATTRS{idVendor}=="0fd9", ATTRS{idProduct}=="006d", TAG+="uaccess"
48 | ```
49 |
50 | Save and close the file. Then, reload udev rules with:
51 |
52 | ```shell
53 | sudo udevadm control --reload-rules
54 | ```
55 |
56 | The installation instructions advise you to unplug and plug again your device before continuing. Once you do that, run the following command to install `streamdeck-ui`:
57 |
58 | ```shell
59 | pip3 install --user streamdeck_ui
60 | ```
61 |
62 | Next, you'll need to make sure you have `$HOME/.local/bin` in your `$PATH`. If you are using regular bash, you should have a `.bashrc` file where your `$PATH` is defined. If you are using zsh, this should be `.zshrc` instead. For instance, I use zsh and this is how my `$PATH` is defined within my `~/.zshrc`:
63 |
64 | ```shell
65 | export PATH=$HOME/bin:$HOME/.local/bin:/usr/local/bin:$PATH
66 | ```
67 |
68 | After updating your $PATH, you'll need to log out and in again to apply the change, or you can run the following:
69 |
70 | ```shell
71 | su - $USER
72 | ```
73 |
74 | This will log you into a "shell inside a shell", but it works seamlessly as if you've logged off and in again.
75 |
76 | Now you can run `streamdeck-ui` from your terminal in background mode with:
77 |
78 | ```shell
79 | streamdeck &
80 | ```
81 | You should see a screen like that:
82 |
83 | 
84 |
85 | You can now start setting up each button.
86 |
87 | Keep in mind that the program must be running all times for the buttons to be actually functional. It will be visible as a system tray icon on the top right of your screen.
88 |
89 | It is recommended that you include the `streamdeck` command in your startup commands - on Ubuntu you can set this on the `Startup Applications Preferences` utility. Hint: type `window` and then `Startup` to find this program on Ubuntu:
90 |
91 | 
92 |
93 | ## Setting up command buttons
94 |
95 | Setting up a button to run a command is pretty straightforward with streamdeck-ui. Having an icon is optional, since you can also use a simple text (just needs to keep it very short, as it doesn't support linebreaks). To try it out, configure your first button to open your file browser, called as `nautilus`:
96 |
97 | 
98 |
99 | The update is effective immediately, so you can click on the button and you should see a new Nautilus window opening up.
100 |
101 | ## Setting up shortcut buttons
102 |
103 | You can also set up shortcuts to run when you click a button, although this may work inconsistently depending on which application is currently on focus. I use shortcuts to switch scenes on OBS, but then I have to first make sure I focus the OBS window and only then I hit the shortcut button.
104 |
105 | To configure shortcuts, use the **Press Keys** text field to define the sequence of keys. To make it work with OBS, you'll first need to configure your OBS shortcuts on **Settings -> Hotkeys** (inside OBS).
106 |
107 | 
108 |
109 | It is also possible to use commands to change which window is currently on focus, that's what we'll see next.
110 |
111 | ## Manipulating windows with `xdotool`
112 |
113 | To switch between windows, you'll need to install a tool called `xdotool`. On Ubuntu you can install it with the following command:
114 |
115 | ```shell
116 | sudo apt install xdotool
117 | ```
118 |
119 | This tool allows you to search for a window by title or class, which is an internal name used by each application. This information can be found with the built-in command `xprop`, which obtains information about active windows on your graphical interface.
120 |
121 | To find out which class an application uses for its main window, you can run:
122 |
123 | ```shell
124 | xprop | grep 'CLASS'
125 | ```
126 |
127 | Then, you'll have to click on the window you want to obtain more information about. Make sure you click somewhere inside the window, not at the title bar.
128 |
129 | For instance, if you want to find out the class name for your Firefox browser, after clicking somewhere in the Firefox window you'll get output like this:
130 |
131 | ```
132 | WM_CLASS(STRING) = "Navigator", "Firefox"
133 | ```
134 |
135 | The **second** string in the output is what we need. Once you know the class name for an application, you can move it to active / focused with the following command (in this case, we're activating the Firefox window):
136 |
137 | ```shell
138 | xdotool search --desktop 0 --class Firefox windowactivate
139 | ```
140 |
141 | So this is the command you'll have to set up within streamdeck-ui to be able to easily switch applications using your Stream Deck.
142 |
143 | Here is a list with my own buttons that you can probably reuse on your setup in case you want similar functionality:
144 |
145 | ### Firefox
146 | `xdotool search --desktop 0 --class Firefox windowactivate`
147 |
148 | ### Terminal (Terminator)
149 | ```
150 | xdotool search --desktop 0 --class 'Terminator' windowactivate
151 | ```
152 |
153 | ### PhpStorm
154 | ```
155 | xdotool search --desktop 0 --class jetbrains-phpstorm windowactivate
156 | ```
157 |
158 | ### OBS
159 | ```
160 | xdotool search --desktop 0 --class obs windowactivate
161 | ```
162 |
163 | ### Zoom
164 | ```
165 | xdotool search --desktop 0 --class Zoom windowactivate
166 | ```
167 |
168 | ### Slack
169 | ```
170 | xdotool search --desktop 0 --class slack windowactivate
171 | ```
172 |
173 | This is what my current setup looks like:
174 |
175 | 
176 |
177 | And this is how it looks like on the device:
178 |
179 | 
180 |
181 | ## Finding icons
182 |
183 | You can find default icons from the Ubuntu system and applications spread through several directories on `/usr/share`. Have a look at `/usr/share/icons` and you should find several subdirectories with icons - this might work but it can be difficult to find just the icon you want.
184 |
185 | I personally prefer to look for icons on google images, and have set a local folder in my home directory where I keep these icons and reference them from streamdeck-ui. Icons must be in `png` format.
186 |
187 | ## Importing / Exporting
188 |
189 | Go to **File -> Import** to import a configuration file, or **File -> Export** to export your current configuration.
190 |
191 | Just a reminder: you'll need to manually copy your icons and make sure all applications referenced are installed and responding to the shortcuts defined in the config.
192 |
193 | ## Conclusion
194 |
195 | I hope you have enjoyed this article and that it can help you customize your Stream Deck up to the minimal details, for a perfect setup :) Worth noting that the Stream Deck device is pretty handy for anyone working on a desktop, since it can speed up switching windows and running commands on your system.
--------------------------------------------------------------------------------
/app/Resources/data/guides/20220406_how-to-edit-videos-with-openshot-on-ubuntu-linux.md:
--------------------------------------------------------------------------------
1 | ---
2 | title: How to Edit Videos with OpenShot on Ubuntu Linux
3 | author_twitter: erikaheidi
4 | description: In this guide you'll learn how to use OpenShot to edit videos on Linux Ubuntu (21.10)
5 | tags: guides, video, openshot, video editing, software
6 | cover_image: https://onlinux.ams3.digitaloceanspaces.com/openshot/openshot_banner.png
7 | ---
8 |
9 | [OpenShot](https://openshot.org) is a free and open source video editor that is available for all major operating systems, including Linux. It has a simple interface that provides all basic features you'll need for basic video editing operations: slicing and mixing videos, changing video speed and audio volume, operating multiple tracks of video and audio, generating titles, exporting projects to several formats, among other things.
10 |
11 | In this guide, you'll learn how to use OpenShot to edit videos on Ubuntu Linux. We'll see how to install, how to add media to your project, how to slice videos and change video speed, how to change audio volume and how to export videos for YouTube.
12 |
13 | ### Requirements
14 |
15 | This guide was developed and tested within the following environment:
16 |
17 | - Linux Ubuntu 21.10
18 | - OpenShot v2.6.0 installed from the official PPA
19 |
20 | ## Installing OpenShot
21 |
22 | When installing OpenShot on Linux (Ubuntu), you have the choice of [using an AppImage](https://www.openshot.org/download/) package or installing OpenShot [through its official PPA](https://www.openshot.org/ppa/) with `apt`. Choose only one method to avoid issues where you have multiple OpenShot versions installed on your system.
23 |
24 | ### Installing via AppImage
25 | Installing from the AppImage is the easiest way to get started, and you should be able to get the latest OpenShot version this way. The downside is that sometimes applications installed with this method are a bit more unstable, and you may experience some interface weirdness such as differences in menu and icon sizes compared to other applications installed on your system.
26 |
27 | If you choose the AppImage, you need only to download the AppImage file and set it to executable with the following command from your terminal:
28 |
29 | ```shell
30 | chmod +x OpenShot-v2.6.1-x86_64.AppImage
31 | ```
32 |
33 | Then, to execute OpenShot in background mode, run:
34 |
35 | ```shell
36 | ./OpenShot-v2.6.1-x86_64.AppImage &
37 | ```
38 |
39 | Then you should get a dialog asking if you want to have a desktop file installed for this OpenShot version. Choose "yes" to get OpenShot added to the system shortcuts, so you can hit the "window" key and search for OpenShot in the quick finder menu.
40 |
41 | ### Installing via PPA
42 |
43 | The advantage of installing from an official PPA is that you get an overall more stable installation on your system. That is why I prefer this method over using a PPA. You'll need to run a few commands from your terminal to get it done.
44 |
45 | Run the following commands to get OpenShot installed system-wide:
46 |
47 | ```shell
48 | sudo add-apt-repository ppa:openshot.developers/ppa
49 | sudo apt update
50 | sudo apt install openshot-qt python3-openshot
51 | ```
52 |
53 | To open the application, hit the "window" key and type "openshot", and you should be able to find OpenShot in the results.
54 |
55 | ## Getting Familiar with OpenShot's Interface
56 |
57 | After opening the OpenShot application, you should see an interface like this (version 2.6+), with 3 main areas:
58 |
59 | 
60 |
61 | - **1: The project area**. This is where you'll have all media files that you want to use in the project.
62 | - **2: The preview area**. This is where you can visualize your edited video.
63 | - **3: The tracks area**. This is where you'll find all individual project tracks to "assemble" your video. You can see tracks as something similar to layers, except that they follow a timeline.
64 |
65 | ## Adding Media Files to the Project
66 |
67 | Any media files that you plan to use in the project should be added to the Project Files area before being included in the video tracks. To add media files, use the green circle button with a `+` on it.
68 |
69 | 
70 |
71 | You can add video files, audio files, and image files. OpenShot supports most popular formats.
72 |
73 | ## Working with Multiple Tracks in OpenShot
74 |
75 | As most video editors, OpenShot offers multiple tracks that can be used both for video and for audio. You can think of tracks as layers within a video timeline. Tracks are useful for combining multiple media files and using transparent overlays such as titles, images, logos, and watermarks. Using multiple tracks is not required, you may work with a single track for simplicity.
76 |
77 | 
78 |
79 | I would generally advise leaving one free track at the top so that you can still include transparent text or other elements on top of your video in case you need it later on. I usually work on "Track 4" and use "Track 5" for overlays.
80 |
81 | ## Slicing Videos in OpenShot
82 |
83 | Slicing / cutting videos is probably the most important part of video editing, allowing you to remove sections that aren't interesting or contain mistakes and reorganize your video content to really tell a story exactly the way you want. There are different ways to slice / split videos in OpenShot. I will show how I like to do it: first I pause the video exactly in the point where I want to split, then I go right-click on the video and select "Slice" on the menu. There are three options under this menu: "Keep both sides", "Keep left side" and "Keep right side". These are pretty self-explanatory.
84 |
85 | 
86 |
87 | ### Quick Reference
88 | - Slicing and keeping both sides: `Right click menu -> Slice -> Keep Both Sides`
89 | - Slicing and keeping only left side: `Right click menu -> Slice -> Keep Left Side`
90 | - Slicing and keeping only right side: `Right click menu -> Slice -> Keep Right Side`
91 |
92 | ## Using Transitions in OpenShot
93 |
94 | In some occasions you may want to create a transition between two segments of video. When connecting two videos on the same track, you can create a transition by creating a slight intersection of both videos, with the next video overlapping the previous one just briefly. You'll then notice a blue overlay that indicates a transition exists on that section.
95 |
96 | 
97 |
98 | You can use the Transitions menu to select a different type of transition.
99 |
100 | ## Separating Audio from Video in OpenShot
101 |
102 | Although not required for altering video volume, you may want to separate audio from video in order to have a more fine-grained control of audio synchronization or speed. To do so, access `Right click menu -> Separate Audio -> Single Clip`.
103 |
104 | 
105 |
106 | ### Quick Reference
107 | - Separate audio from video: `Right click menu -> Separate Audio -> Single Clip`
108 |
109 | ## Manipulating Audio Volume in OpenShot
110 |
111 | Depending on the video, and often when combining video with music, you'll need to mute or lower down the volume of a video. You may also want to use a "fade in" or "fade out" (when the volume gradually increases or decreases) effect when the video starts and finishes, respectively. You can do all these through the menu you'll access by right-clicking on the video segment you want to edit.
112 |
113 | 
114 |
115 | ### Quick Reference
116 | - Create "fade-in" effect in the clip: `Right click menu -> Volume -> Start of the Clip -> Fade In (fast)`
117 | - Create "fade-out" effect in the clip: `Right click menu -> Volume -> End of the Clip -> Fade Out (fast)`
118 | - Mute Video: `Right click menu -> Volume -> Entire Clip -> Level 0%`
119 | - Decrease audio levels to 90%: `Right click menu -> Volume -> Entire Clip -> Level 90%`
120 |
121 | ## Manipulating Video Speed in OpenShot
122 |
123 | Another interesting feature you'll be able to access through right-clicking on a video segment is changing the video speed, under the menu item **Time**. You can increase or decrease the speed of the video up to 16x, and there are also options to freeze and zoom a video segment.
124 |
125 | 
126 |
127 | Be aware that this will also speed audio, so if you want to keep the audio at the original speed, you'll need to separate video and audio (Right click on video -> Separate Audio -> Single clip) and keep the audio untouched on its own track.
128 |
129 | ### Quick Reference
130 | - Speed up a video 2x (will shorten the video to half the time): `Right click menu -> Time -> Fast -> Forward -> 2X`
131 | - Slow down a video 2x (will increase the video to double the time): `Right click menu -> Time -> Slow -> Forward -> 2X`
132 | - Reverse a video: `Right click menu -> Time -> Normal -> Backward -> 1X`
133 | - Reverse a video in 2x speed: `Right click menu -> Time -> Fast -> Backward -> 2X`
134 |
135 | ## Adding Text (Titles) to Videos
136 |
137 | OpenShot includes a menu to include titles, which are basically transparent PNGs with text, on top of your videos. This can be helpful to include a few descriptions and captions to the video. Go to the top menu `Title -> Title`, choose a template and fill in the text for the title. This will be added as a new image media in the project files, you should then drag the title and place it a suitable track in the video timeline.
138 |
139 | 
140 |
141 | To edit an existing title, right-click on the title image in your project files and select the `Edit Title` menu item. You will be shown a dialog similar to the title creation, with options to choose the colors and text of the title as well as its font.
142 |
143 | ## Exporting Videos
144 |
145 | Once you are happy with your video of if you just want to generate a sample to have an idea of how the video will look at the end, you can use the `File -> Export Project` menu or click the button with the red circle to export the video. A dialog will open up with several options to choose from.
146 |
147 | For the majority of my videos, I choose the "Web" profile and select the "Youtube-HD" option from the "Target" menu:
148 |
149 | 
150 |
151 | You can experiment and play around with the different formats and quality settings.
152 |
153 | ## Conclusion
154 |
155 | OpenShot is a powerful video editor that is free, open source, and cross-platform, with versions available for the most popular operating systems including Linux. It offers all the basic features you would expect from a video editor, with an intuitive and minimalist interface that is great for beginners.
--------------------------------------------------------------------------------
/app/Resources/data/guides/20211203_setting-up-a-fresh-ubuntu-2104-desktop-as-personal-computer.md:
--------------------------------------------------------------------------------
1 | ---
2 | title: Setting Up a Fresh Ubuntu 21.04 Desktop as Personal Computer
3 | author_twitter: erikaheidi
4 | published: true
5 | description: I've been an Ubuntu user for a long time, it is a system where I feel very comfortable so that means it also makes me more productive. I decided to try the newest release, the brand new 21.04 a.k.a Hirsute Hippo. In this post, I share all my setup process.
6 | tags: linux, ubuntu, setup, tutorial
7 | cover_image: https://dev-to-uploads.s3.amazonaws.com/uploads/articles/o955obpis85rpsvhpclv.png
8 | canonical_url: https://eheidi.dev/blog/setting-up-a-fresh-ubuntu-21-04-desktop-as-personal-computer-41i3
9 | ---
10 |
11 | I recently got a [brand new personal laptop](https://twitter.com/erikaheidi/status/1387454418224828416) (hooray bonus!) and got a suggestion for a blog post about setting up my Ubuntu for personal use. It's been a while since I shared these types of posts, so I thought it would be fun to write about my new setup.
12 |
13 | I've been an Ubuntu user for a long time, it is a system where I feel very comfortable so that means it also makes me more productive. I decided to try the newest release, the brand new 21.04 a.k.a _Hirsute Hippo_. In this post, I share all my setup process.
14 |
15 | 
16 |
17 | ## Getting Started
18 | Well, the first step is to get the system all installed and set up.
19 |
20 | As I mentioned previously, I chose [the newest 21.04 release of Ubuntu](https://discourse.ubuntu.com/t/hirsute-hippo-release-notes/19221?_ga=2.160269758.2020671091.1619944592-790858347.1619944592), also known as Hirsute Hippo. You might want to go with the LTS (20.04) version if you don't plan on upgrading / reinstalling your system before 22.04 is out (the next LTS). The advantage of the 21.04 version is because it's already one year newer than the LTS, so the software that it comes with and the default apt packages for the distro are already bleeding edge, so you can install most things via `apt` without worrying that it's all outdated.
21 |
22 | ### Installation Remarks
23 | Because this is a new laptop, I didn't need to do any backup, but if you are going to do this on your existing system please don't forget about it :)
24 |
25 | I always choose [full disk encryption](https://ubuntu.com/core/docs/uc20/full-disk-encryption) when installing Ubuntu, this is an option that will show up when choosing installation type and partitions. This adds extra security to your system, just be sure you keep your decryption key safe otherwise you will lose access to your entire system!
26 |
27 | ## Priority Installs
28 | Depending on which Ubuntu version you're installing, you may need to update the system right after installation to make sure you have the most updated version of the software you're going to use. You will get a notification from Ubuntu if updates are available for your system as soon as you log in.
29 |
30 | Now it's time open the terminal to install a few basic packages right away:
31 |
32 | ```shell
33 | sudo apt update
34 | sudo apt install vim git unzip curl ffmpeg
35 | ```
36 | Then, onto more interesting things.
37 |
38 | ### Terminator and Oh-My-Zsh
39 | Next, I like to set up my terminal and shell. I've been using [Terminator](https://terminator-gtk3.readthedocs.io/en/latest/) for years, I really like to be able to split the screen in multiple ways and Terminator is a lot easier to use than tmux **for me**. I'm also a big fan of [oh-my-zsh](https://ohmyz.sh/) and have been using it for many years.
40 |
41 | So the first thing is to install `zsh` and `terminator`.
42 |
43 | ```shell
44 | sudo apt install zsh terminator
45 | ```
46 |
47 | Then, you can run the Oh-my-Zsh installation script, which will also set `zsh` as your default shell:
48 |
49 | ```shell
50 | $ sh -c "$(curl -fsSL https://raw.github.com/ohmyzsh/ohmyzsh/master/tools/install.sh)"
51 | ```
52 |
53 | The theme I like is called `agnoster`, and to use that theme you'll need to install [Powerline fonts](https://github.com/powerline/fonts). To install these, you'll need to clone their repo and run the install script:
54 |
55 | ```shell
56 | cd /tmp
57 | git clone https://github.com/powerline/fonts.git
58 | cd fonts/
59 | ./install.sh
60 | ```
61 |
62 | Then, you can edit your `.zshrc` to change to the agnoster theme:
63 |
64 | ```command
65 | vim ~/.zshrc
66 | ```
67 |
68 | ```shell
69 | # Set name of the theme to load --- if set to "random", it will
70 | # load a random theme each time oh-my-zsh is loaded, in which case,
71 | # to know which specific one was loaded, run: echo $RANDOM_THEME
72 | # See https://github.com/ohmyzsh/ohmyzsh/wiki/Themes
73 | ZSH_THEME="agnoster"
74 | ```
75 |
76 | Don't forget to save the file (with `vim`, type `ESC` then `:wq` to save).
77 |
78 | You can now close the old terminal and open `terminator`! You'll need to change the font to one of the Powerline patched fonts you just installed, otherwise the prompt won't show up correctly.
79 |
80 | To customize your Terminator appearance, right-click and go to `Preferences` -> `Profiles` and unmark the checkbox that says `Use the system fixed width font`. Then choose the font (tip: search for "powerline" to show only the powerline-compatible fonts).
81 |
82 | 
83 |
84 | While you're at it, you can also adjust background (I like to set up transparency to 85%).
85 |
86 | This is the final result:
87 |
88 | 
89 |
90 | ## SSH Setup
91 | It is a good idea to set up a new SSH key if you are setting up a fresh new system. [This GitHub Doc Page](https://docs.github.com/en/github/authenticating-to-github/generating-a-new-ssh-key-and-adding-it-to-the-ssh-agent) contains detailed instructions on how to set a new SSH key with the Ed25519 algorithm and add it to the SSH-agent.
92 |
93 | If you are using GitHub, it's also a good moment to add the new key to your account (go to `Settings` -> `SSH and GPG Keys`).
94 |
95 | ## Git Setup
96 | To use Git from the command line, you'll need to configure your Git name and email address in order to do commits and pushes.
97 |
98 | ```shell
99 | git config --global user.name "Your Name"
100 | git config --global user.email "email@example.com"
101 | ```
102 |
103 | ## Development Setup
104 | Nowadays I typically have only a basic `php-cli` installed on my system, and I use Docker + Docker Compose to run my full development environments. [This tutorial from my friend Brian explains in detail how to get Docker installed on Ubuntu 20.04](https://www.digitalocean.com/community/tutorials/how-to-install-and-use-docker-on-ubuntu-20-04).
105 |
106 | With Docker installed you can follow [my tutorial on How to Install Docker Compose](https://www.digitalocean.com/community/tutorials/how-to-install-and-use-docker-compose-on-ubuntu-20-04) to get Docker Compose also set up.
107 |
108 | If you'd like a basic PHP env for the command-line as well, you can install `php-cli` and a few basic extensions from your terminal:
109 |
110 | ```shell
111 | sudo apt install php-cli php-mbstring php-gd php-curl
112 | ```
113 |
114 |
115 | ### Setting Up Jetbrains PhpStorm (IDE)
116 |
117 | I've been using [Jetbrains PhpStorm](https://www.jetbrains.com/phpstorm/) for many years, it is my favorite IDE (all from Jetbrains actually, since I've used RubyMine in the past too). Downloads are available in AppImage format, which is really helpful.
118 |
119 | You can [download PhpStorm](https://www.jetbrains.com/phpstorm/download/#section=linux) as a trial too, if you'd like to try it out before buying a license. Once you've downloaded the package, just unpack it to somewhere in your home dir and run it with:
120 |
121 | ```shell
122 | ./PhpStorm-211.7142.44/bin/phpstorm.sh
123 | ```
124 |
125 | You can now install a desktop entry to PhpStorm by going to `Tools` -> `Create Desktop Entry`.
126 |
127 | Now the fun starts, with theme choosing etc.
128 | 
129 |
130 | The editor font size is always too small for me, so I like to adjust it to a bigger size. I've been using JetBrains mono size `20`, and I also like to enable ligatures, I think it gives a nice look to some portions of code.
131 |
132 | 
133 |
134 | ## Other Software Installs
135 | Because this is a personal laptop and I am a person of many hobbies, I will have a great mix of software here including video editing, graphics design, 3D design, and development (IDEs) software.
136 |
137 | Nowadays, most desktop applications for Ubuntu/Debian are being distributed as AppImage files, which are quite easy to work with. I usually create an `Apps` folder in my home dir to save these applications.
138 |
139 | ```shell
140 | mkdir ~/Apps
141 | ```
142 |
143 | Some of them still use more traditional distribution methods, like Gimp which can be installed via `apt`.
144 |
145 | So here is a list of other applications that I got installed right away, organized by category:
146 |
147 | ### Graphic Design
148 | - [Inkscape](https://inkscape.org/release/1.0.2/platforms/) - Vector Graphics. Available as AppImage.
149 | - [MyPaint](http://mypaint.org/downloads/) - Drawing and Painting. Available as AppImage.
150 | - [Gimp](https://www.gimp.org/) - Graphic Design, photo manipulation. Installed via `apt`.
151 |
152 | ### Video and Streaming
153 | - [Peek](https://github.com/phw/peek) - Simple screen recording, records in gif or mp4. Installed via `apt`.
154 | - [OBS Studio](https://obsproject.com/download) - Screen recording and streaming. Installed via `apt`
155 | - [OpenShot](https://www.openshot.org/download/) - Video Edition. Available as AppImage.
156 |
157 | ### Audio
158 | - [Audacity](https://www.audacityteam.org/download/) - Audio recording. Installed via `apt`.
159 | - [Spotify](https://www.spotify.com/us/download/linux/) - On-demand music, installed via `snap`.
160 | - [LMMS](https://lmms.io/download#linux) - Music making (loops / midi etc). Available as AppImage.
161 |
162 | ### 3D Design & Printing
163 | - [FreeCAD](https://www.freecadweb.org/downloads.php) - 3D Design. Available as AppImage.
164 | - [OpenScad](https://openscad.org/downloads.html) - Programatic 3D Design. Installed via `apt`.
165 | - [Blender](https://www.blender.org/download/) - 3D Design and modeling. Available as tar file that you just need to unpack to your home folder.
166 | - [Prusa Slicer](https://www.prusa3d.com/prusaslicer/) - 3D Printing Software for Slicing Models. Available as AppImage.
167 |
168 | You can download all the AppImages and then do the following:
169 |
170 | ```shell
171 | mv ~/Downloads/*.AppImage ~/Apps
172 | chmod +x ~/Apps/*.AppImage
173 | ```
174 |
175 | ## UPDATE: Disabling Wayland on Ubuntu 21.04
176 | _updated on May 7_
177 |
178 | Yesterday I was just about to record some screencasts with OBS when I noticed there was something strange going on. The screen capture was coming all black, only the cursor would show up; not only that, but also the window capture was not working at all, not even listing the currently open windows.
179 |
180 | I also tried Peek, another screen recording application, to the same results.
181 |
182 | I've been tracking down the problem since yesterday and finally found the reason and the solution. [Wayland](https://en.wikipedia.org/wiki/Wayland_(display_server_protocol)), a new display server protocol, is now enabled by default to replace X11 on Ubuntu 21.04. I didn't know anything about this, but after [some Googling](https://obsproject.com/forum/threads/ubuntu-20-04-black-screen-issue-not-even-cursor-for-window-capture.135087/) I found out other people having similar issues with OBS on Ubuntu and finally I was able to fix it!
183 |
184 | To disable Wayland on Ubuntu 21.04, go to your terminal and open the file `/etc/gdm3/custom.conf` using your command-line editor of choice:
185 |
186 | ```shell
187 | sudo vim /etc/gdm3/custom.conf
188 | ```
189 | Look for the line saying `#WaylandEnable=false` and uncomment it by removing the `#` character from the beginning of the line. Save and close the file - with `vim`, you can do that by typing `ESC` then `wq` and `ENTER`.
190 |
191 | Then you just need to restart your window manager with:
192 |
193 | ```shell
194 | sudo service gdm3 restart
195 | ```
196 |
197 | You should now be all set!
198 |
199 | ## Conclusion
200 | Setting up a new system is a neverending task, but I am pretty happy now with the current state of my new laptop :) Can't wait to try out some of this software with this machine, since it's a big upgrade from my previous one.
201 |
202 | Anything important I missed? Tell me in the comments (:
203 |
204 | 
--------------------------------------------------------------------------------
/app/Resources/data/guides/20220518_setting-up-an-ubuntu-2204-workstation-for-software-development-and-content-creation.md:
--------------------------------------------------------------------------------
1 | ---
2 | title: Setting Up an Ubuntu 22.04 workstation for Software Development and Content Creation
3 | published: false
4 | description: In this guide I share how I set up my Linux Ubuntu 22.04 workstation for software development and content creation.
5 | tags: ubuntu, guides, software, setup
6 | cover_image: https://dev-to-uploads.s3.amazonaws.com/uploads/articles/eviog1crz5jh764sibkt.png
7 | ---
8 |
9 | Ubuntu 22.04 a.k.a. Jammy Jellyfish is the latest LTS (long-term support) Ubuntu release, which means it will continue being actively updated and supported until the next LTS release in two years.
10 |
11 | This release brings some exciting improvements, such as the new screenshot tool and custom theme accents. Upgrading is also important to make sure you are getting the most up-to-date packages and applications for your system.
12 |
13 | In this step-by-step practical guide I will share how I set up my Ubuntu 22.04 workstation for software development and content creation.
14 |
15 | If you need help installing Ubuntu 22.04 on your machine, check out [this step by step guide on how to make a fresh Ubuntu install with full disk encryption](https://onlinux.systems/guides/20220502_how-to-install-and-set-up-ubuntu-2204-as-main-system-on-a-desktop-computer).
16 |
17 |
18 | ## Basic Setup
19 |
20 | First things first. Start by updating the package manager cache:
21 |
22 | ```shell
23 | sudo apt update
24 | ```
25 |
26 | To keep things organized, I like to create a directory in my home folder to store AppImage applications. We'll download some of them later.
27 |
28 | ```shell
29 | mkdir ~/Apps
30 | ```
31 |
32 | Make sure you have your SSH keys set up. If you don't have backup keys to restore, follow [this GitHub guide on how to create and set up a new SSH key](https://docs.github.com/en/authentication/connecting-to-github-with-ssh/generating-a-new-ssh-key-and-adding-it-to-the-ssh-agent).
33 |
34 | If you're restoring existing SSH keys, you can follow the next section.
35 |
36 | ### Restoring SSH keys (if your keys are backed up)
37 | If you haven't done it yet, copy the SSH keypair you have registered with your code host of choice to a `.ssh` folder in your home directory. If you have your keys in a removable storage, you should make sure to copy them over and set correct permissions, otherwise they won't work and you won't be able to push code to GitHub / GitLab / etc.
38 |
39 | The following command is an **example** of how to copy a `.ssh` folder from a removable media device into your home dir:
40 |
41 | ```shell
42 | cp -R /media/user/HD-PCTU3/backups/.ssh .
43 | ```
44 | Then, change the permissions of the SSH directory and key files:
45 |
46 | ```shell
47 | chmod 700 ~/.ssh
48 | chmod 644 ~/.ssh/id_ed25519.pub
49 | chmod 600 ~/.ssh/id_ed25519
50 | ```
51 |
52 | Finally, add the key to the SSH agent:
53 |
54 | ```shell
55 | eval "$(ssh-agent -s)"
56 | ssh-add ~/.ssh/id_ed25519
57 | ```
58 |
59 |
60 | ## Power up your CLI: Terminator + Oh My ZSH
61 | To keep going with your setup on a much nicer terminal, you will now install [Terminator](https://terminator-gtk3.readthedocs.io/en/latest/) and Oh My Zsh. Terminator is a terminal emulator that allows you to arrange multiple terminals in a grid-like structure. [Oh My Zsh](https://ohmyz.sh/) is a layer of configurations on top of zsh that makes your terminal look super cool, with several themes and plugins to improve your productivity.
62 |
63 | Start by installing Terminator and Zsh:
64 |
65 | ```shell
66 | sudo apt install terminator zsh
67 | ```
68 |
69 | Next, install Oh my Zsh:
70 |
71 | ```shell
72 | sh -c "$(curl -fsSL https://raw.githubusercontent.com/ohmyzsh/ohmyzsh/master/tools/install.sh)"
73 | ```
74 | When prompted, confirm that you want to set Zsh as your default shell. This will require you to provide your `sudo` password.
75 |
76 | In order to use some of the best themes, you'll need to first install [Powerline fonts](https://github.com/powerline/fonts) on your system. I prefer to run the install script directly from their official repository like so:
77 |
78 | ```shell
79 | git clone https://github.com/powerline/fonts.git --depth=1
80 | cd fonts
81 | ./install.sh
82 | cd ..
83 | rm -rf fonts
84 | ```
85 |
86 | Next, it's time to configure Oh my Zsh. Open `.zshrc` and look for the `ZSH_THEME` variable:
87 |
88 | ```shell
89 | nano ~/.zshrc
90 | ```
91 |
92 | There are [several themes](https://github.com/ohmyzsh/ohmyzsh/wiki/Themes), but my favorite is **agnoster**:
93 |
94 | ```shell
95 | # Set name of the theme to load --- if set to "random", it will
96 | # load a random theme each time oh-my-zsh is loaded, in which case,
97 | # to know which specific one was loaded, run: echo $RANDOM_THEME
98 | # See https://github.com/ohmyzsh/ohmyzsh/wiki/Themes
99 | ZSH_THEME="agnoster"
100 |
101 | ```
102 | After changing `ZSH_THEME` to your theme of choice, save the file and exit.
103 |
104 | _With `nano`, you can save and exit by typing `CTRL+X` than confirming with `y` and `ENTER`._
105 |
106 | ### Setting Up Terminator
107 |
108 | Next, we'll set up Terminator. This is how it should look now when you open it (type `Windows` then search for `terminator` to find it in your system):
109 |
110 | 
111 |
112 | You'll notice that the prompt is already changed to use Oh My Zsh, but it is broken. This is because we still need to configure the terminal program (in this case, Terminator) to use a proper Powerline font, a requirement for using the `agnoster` theme. This brings icons and other niceties to the terminal.
113 |
114 | Right-click and access the menu **Preferences**, then go to the **Profiles** tab and select the **default** profile on the left sidebar. Uncheck the option **Use system fixed font**. To disable that ~~annoying~~ red top title bar, uncheck "Show titlebar".
115 |
116 | Change the font to any of the Powerline fonts (you can search for "mono powerline" to facilitate choosing your favorite). I chose **Noto mono for powerline bold**, size **16**.
117 |
118 | Still on the Terminator profile preferences, I set the background to "Transparent background" at **80%** and the Color scheme to "Solarized". Here's the final result:
119 |
120 | 
121 |
122 | ## Git
123 | Git should already be installed on your system. To confirm, type `git --version` on your terminal, and you should see something like this:
124 |
125 | ```shell
126 | git version 2.34.1
127 | ```
128 |
129 | If for some reason you don't have Git installed, you can do so with the following command:
130 |
131 | ```shell
132 | sudo apt install git
133 | ```
134 |
135 |
136 | ### Git Config
137 | With everything set, you should now configure your username and email within Git:
138 |
139 | ```shell
140 | git config --global user.name "Your Name"
141 | git config --global user.email your@email.com
142 | ```
143 |
144 | ## Software Development
145 | Development environments and other configurations related to software development.
146 |
147 | ### PHP (CLI only) + Composer
148 |
149 | I typically have PHP-cli on my systems because it's just a lot easier to run small scripts directly with it. Anything that requires extra dependencies runs on Docker. I also find it useful to have Composer to facilitate bootstrapping new projects with `composer create-project`. Usually after the initial project bootstrap I migrate to using Docker.
150 |
151 | To install PHP-cli (8.1+), run:
152 | ```shell
153 | sudo apt install php-cli
154 | ```
155 | For Composer, you should follow [the official instructions](https://getcomposer.org/download/) since the hash checking portion of the installation script will change often.
156 |
157 | ## Docker + Docker Compose
158 | Next, install the Docker Engine and Docker Compose. The following commands are based on the [official instructions from the Docker documentation](https://docs.docker.com/engine/install/ubuntu/#install-using-the-repository).
159 |
160 | Download Docker's deb repository key:
161 |
162 | ```shell
163 | curl -fsSL https://download.docker.com/linux/ubuntu/gpg | sudo gpg --dearmor -o /usr/share/keyrings/docker-archive-keyring.gpg
164 | ```
165 |
166 | Add Docker's deb repository:
167 |
168 | ```shell
169 | echo \
170 | "deb [arch=$(dpkg --print-architecture) signed-by=/usr/share/keyrings/docker-archive-keyring.gpg] https://download.docker.com/linux/ubuntu \
171 | $(lsb_release -cs) stable" | sudo tee /etc/apt/sources.list.d/docker.list > /dev/null
172 | ```
173 |
174 | Install Docker and Docker Compose:
175 |
176 | ```shell
177 | sudo apt update
178 |
179 | sudo apt-get install docker-ce docker-ce-cli containerd.io docker-compose-plugin
180 | ```
181 |
182 | You can check that it was successfully installed with:
183 |
184 | ```shell
185 | docker --version
186 | Docker version 20.10.16, build aa7e414
187 | ```
188 | Don't forget to add your user to the `docker` group so that you can run Docker without sudo.
189 |
190 | ```shell
191 | sudo usermod -aG docker $USER
192 | ```
193 |
194 | You may need to log out and log in again for this change to take effect.
195 |
196 | ## IDEs
197 |
198 | Next, it's time to install your IDE of choice. This is more personal and depends a lot on which programming language you work with, what you are studying, etc.
199 |
200 | Generally speaking, [VSCode](https://code.visualstudio.com) is an excellent choice for all languages, but if you are willing to invest in a paid IDE you will be very happy with any flavor of [JetBrains](https://www.jetbrains.com/).
201 |
202 | ### Installing VSCode
203 |
204 | VSCode offers a `.deb` file for Ubuntu/Debian users and that is my preferred way to install it. Once you download the file from [the VSCode downloads page](https://code.visualstudio.com/download), you can install it with:
205 |
206 | ```shell
207 | sudo dpkg -i ~/Downloads/code_1.67.1-1651841865_amd64.deb
208 | ```
209 |
210 | Replace the name of the file with the version you downloaded. After installation, you can type `window` and search for "vscode" to find it in your system.
211 |
212 | _VSCode with Material Theme (Pale Night)_
213 | 
214 |
215 | ### Installing PHPStorm
216 |
217 | [PHPStorm](https://www.jetbrains.com/phpstorm/), as well as other editors from JetBrains, is offered as AppImage. I do not use Snap, so that's my method of choice for installing it on my system.
218 |
219 | Once you download the appropriate package from [the PHPStorm download page](https://www.jetbrains.com/phpstorm/download/#section=linux), you should unpack it somewhere in your home folder (I'm using `~/Apps` for AppImages).
220 |
221 | ```shell
222 | mv PhpStorm-2022.1.1.tar.gz ~/Apps
223 | cd ~/Apps
224 | tar -zxvf PhpStorm-2022.1.1.tar.gz
225 | rm -rfv PhpStorm-2022.1.1.tar.gz
226 | ```
227 |
228 | Then, run the executable script on `bin/phpstorm.sh`:
229 |
230 | ```shell
231 | cd PhpStorm-221.5591.58/
232 | ./bin/phpstorm.sh
233 | ```
234 |
235 | You'll be greeted by a configuration wizard, and you will be asked to choose between activating an existing account or starting a 30-day trial.
236 |
237 | Once you get to the main window, go to **Tools -> Create command line launcher** to create a PHPStorm executable on `/usr/bin/phpstorm`. This executable allows you to open files on PHPStorm directly from your CLI, and also to access PHPStorm from shortcuts on Ubuntu.
238 |
239 | _PHPStorm with Material Theme (Synth Wave '84)_
240 | 
241 |
242 | ### Software for Content Creation on Linux
243 |
244 | I big part of my work is to create content, using different media and content types. I will list here the software I like to have installed for dealing with image editing, illustration, video editing, audio editing, video and audio capture, live streaming...
245 |
246 | I won't cover these in detail, but the installation method won't vary from the 3 methods we've already seen in this guide (`apt`, downloaded `.deb` with `dpkg`, or downloaded AppImage).
247 |
248 | - **Live streaming and video recording**
249 | - [OBS Studio](https://obsproject.com/)
250 | - **Simple video/audio conversion in the command line**
251 | - [ffmpeg](https://ffmpeg.org/)
252 | - **Video Editing**
253 | - [OpenShot](https://www.openshot.org/)
254 | - **Vectorized illustration, logos**
255 | - [Inkscape](https://inkscape.org/)
256 | - **"Free style" illustration**
257 | - [MyPaint](http://mypaint.org/)
258 | - **Audio recording and editing**
259 | - [Audacity](https://www.audacityteam.org/)
260 |
261 | ## Additional Resources
262 |
263 | A few related tutorials that might interest you:
264 |
265 | {% guide 20220502_how-to-install-and-set-up-ubuntu-2204-as-main-system-on-a-desktop-computer %}
266 |
267 | {% guide 20220406_how-to-edit-videos-with-openshot-on-ubuntu-linux %}
--------------------------------------------------------------------------------
/app/Resources/data/guides/20220502_how-to-install-and-set-up-ubuntu-2204-as-main-system-on-a-desktop-computer.md:
--------------------------------------------------------------------------------
1 | ---
2 | title: How to install and set up Ubuntu 22.04 as main system on a desktop computer
3 | description: Full installation guide for Ubuntu 22.04 Desktop edition, including step-by-step screenshots of the whole process.
4 | tags: guides, ubuntu, installation
5 | cover_image: https://onlinux.ams3.digitaloceanspaces.com/ubuntu2204_install/install%20ubuntu%2022.png
6 | ---
7 |
8 | ## Introduction
9 |
10 | In order to follow this guide, you'll need access to a computer or laptop where you can install Ubuntu 22.04 from scratch.
11 |
12 | You can follow this guide in two ways:
13 |
14 | - Install Ubuntu 22.04 **as the main operating system** on your computer (recommended)
15 | - This is the recommended option to have the best experience with Ubuntu, but it will erase all data in your hard disk. You can also try Ubuntu from the startup disk before installing it.
16 | - Install Ubuntu 22.04 **on a virtual machine** with VirtualBox
17 | - This option will require more machine power, since you'll have to share RAM memory with the VM (about 4GB recommended). If you want to test Ubuntu or just learn how to install it, you can install it on a virtual machine. In this case, first [install VirtualBox](https://www.virtualbox.org/wiki/Downloads) on your main system.
18 |
19 | In both cases, you should have an active connection to the internet so that you can download updates and 3rd party software such as graphics cards drivers.
20 |
21 | ### Requirements for installing Ubuntu as main operating system
22 |
23 | If you're installing Ubuntu as your main operating system, before moving ahead you'll need to create an [Ubuntu 22.04](https://releases.ubuntu.com/22.04/) startup disk. You can also use the startup disk to try out Ubuntu before installing it.
24 |
25 | You can follow our guide on how to create such a disk using another Ubuntu system:
26 |
27 | {% guide 20220502_how-to-create-a-ubuntu-2204-startup-disk-on-ubuntu-systems %}
28 |
29 | Somewhere in the beginning of the installation process, you will be prompted to connect to a wi-fi network. Follow the instructions to set that up and allow internet access from the installation program.
30 |
31 | Before moving ahead you should **make sure** you have backed up any personal data to a removable disk, a remote / cloud driver, or another computer. Don't forget to save your `.ssh` directory containing your SSH keys, otherwise you will lose access to servers and services where your current key is registered.
32 |
33 | ### Requirements for installing Ubuntu on a virtual machine
34 |
35 | If you're installing Ubuntu on a virtual machine, make sure you have an [up-to-date version of VirtualBox](ttps://www.virtualbox.org/wiki/Downloads) installed on your main operating system. You won't need a startup disk. Just create a new Linux VM (about 4GB of RAM should be enough) and use the Ubuntu ISO directly to boot your VM, then skip to step 2.
36 |
37 | ## Step 1: Boot from startup disk
38 | Depending on your computer and the setup program it runs, you will have to press a special key to either choose the boot device directly or access the BIOS setup program and adjust your settings in order to boot from your new Ubuntu boot disk. In most computers, this key will be `F12`.
39 |
40 | With my Lenovo Thinkpad laptop, I need to press `F12` as soon as the computer beeps after rebooting, and this will let me choose which device to boot. My old, generic USB stick is recognized as "USB HDD:VendorCo ProductCode".
41 |
42 | 
43 |
44 | When the computer successfully starts up the boot program from your Ubuntu disk, you'll then see the **Grub boot screen**.
45 |
46 | 
47 |
48 | Choose "Try or install Ubuntu" to proceed.
49 |
50 | ## Step 2: Start the installation program
51 |
52 | You'll see a screen like the following:
53 |
54 | 
55 |
56 | You may want to try Ubuntu before installing it. In that case, use the option on the left. To install Ubuntu, click on "Install Ubuntu".
57 |
58 | ## Step 3: Choose the language and installation options
59 | The first screen will be to choose your keyboard layout and language.
60 | 
61 |
62 | Once you confirm that, you'll be taken to a screen where you'll have a few options regarding updates. Leave "Normal installation" checked, and check both options in the "Other options" area to make sure your installation is able to download the latest updates and also third-party drivers whenever necessary.
63 | 
64 |
65 | Click on "Continue" to move on.
66 |
67 | ## Step 3: Customize disk options
68 |
69 | For improved security, I strongly advise anyone installing Ubuntu these days to make use of their full disk encryption feature. When you get to the "Installation Type" screen, select `Advanced Features`.
70 |
71 | 
72 |
73 | On the popup that will appear, choose `Erase disk and use ZFS`, then check the `Encrypt the new Ubuntu installation for security` option.
74 |
75 | 
76 |
77 | Once you confirm that, you'll be asked to choose a security key. You will be prompted to provide this security key every time you restart your computer, and if you lose this key you will be 100% locked out. Make sure to choose a good one!
78 |
79 | 
80 |
81 | ### Creating a recovery key (optional)
82 | You can create a recovery key by selecting `Enable recovery key`. This key will be automatically generated and temporarily stored in `/home/ubuntu/recovery.key`. This file will be gone once you restart the system, so you should copy it to a removable disk and then save it to a secure location - don't leave it on your usb stick :)
83 |
84 |
85 | ### Confirming disk changes
86 | Confirm the disk options to proceed with the installation.
87 |
88 | 
89 |
90 | ## Step 4: Choose the timezone
91 | Next, choose your timezone. The installation program will try to auto-detect your location based on your current network connection.
92 |
93 | 
94 |
95 | Click on "Continue" to move on.
96 |
97 | ## Step 5: Set up main user and machine name
98 |
99 | Next, you will be asked to set up the first machine user, who will have admin permissions. You'll also be asked to give a name to this machine.
100 |
101 | 
102 |
103 | ## Step 6: Wait until the installation is finished and restart your computer
104 |
105 | At this point, you'll just have to wait until the installation is finished.
106 | 
107 | When the installation is finished, you will be prompted to restart your computer.
108 |
109 | 
110 |
111 | Confirm and wait until you are prompted again to **remove the USB stick**. After that, your computer will restart.
112 |
113 | 
114 |
115 | After the computer restarts, you should be greeted by the Grub boot screen again. Select the first option to enter your freshly installed Ubuntu 22.04 system.
116 |
117 | ## Step 7: Unlock the disk to access your fresh Ubuntu system
118 | If you followed all steps in this guide and chose full disk encryption, you will be prompted to provide your secure key now. Type the key and hit `ENTER`.
119 |
120 | 
121 |
122 | You should see a message indicating that the disk was successfully unencrypted.
123 |
124 | 
125 |
126 | After that, your Ubuntu system will be mounted and you will be greeted with the log in screen. Provide your login and password to access your new Ubuntu 22.04 system.
127 |
128 | 
129 |
130 | Your system should now be fully functional.
131 |
132 | ## Step 8: Customize your Ubuntu 22.04 Appearance
133 |
134 | With the main system installed, you can now customize its appearance to make it look _just right_ for your taste.
135 | In this section I will share the customization I made for my own system. Feel free to explore other options.
136 |
137 | Go to `Settings -> Appearance` to customize the appearance of your new Ubuntu 22.04.
138 |
139 | ### Style
140 | Start by choosing your preferred style. This will change the highlight color in your entire system. I chose "Purple" because it's my favorite color :)
141 |
142 | 
143 |
144 | ### Desktop Icons
145 | This will change where and how your desktop icons will appear. I didn't make any changes in this section.
146 |
147 | ### Dock
148 | The new Gnome version that comes with Ubuntu 22.04 has a new way to set up your Dock, so that it resembles the Mac OS style. I really like how sleek it looks, so that's what I chose for my setup, with addition to auto-hiding the Dock so that it only shows up when I hover my mouse at the bottom of the screen.
149 |
150 | For that, first enable **Auto-hide the dock**, leaving "Panel mode" unchecked. You can increase a bit the icon size if you want - I set mine to **56**. Then set **Position on screen** to **Bottom**. I didn't like the disks showing up at the Dock, so I went to **Configure dock behavior** and unchecked the **Show volumes and devices** option.
151 |
152 | This is how my Ubuntu looks like now:
153 |
154 | 
155 |
156 | _**Tip:** to add an app to the Dock, open the application, then right-click on the app icon on the Dock and click on "Add to favorites". This works with most applications._
157 |
158 | ## Troubleshooting Issues with Snap on Ubuntu 22.04
159 |
160 | After a few hours using my newly installed system normally and installing a few new packages, I run into an issue with AppArmor that denied access to snap-installed apps; this might seem trivial at first, but the new Ubuntu 22.04 uses Snap as the default source for new package installations (even when from the command line with `apt install`). The Mozilla Firefox installation that comes with Ubuntu 22.04 is snap-based. So all of a sudden I was unable to open Firefox, the Ubuntu Software Center and the Snap store.
161 |
162 | If you run into issues where Firefox doesn't open anymore, you can check your `dmesg` to see what comes up as error. I got quite a few AppArmor denied log messages like those:
163 |
164 | ```
165 | [170080.035628] audit: type=1400 audit(1651402213.755:89): apparmor="DENIED" operation="open" profile="snap.firefox.firefox" name="/etc/fstab" pid=6733 comm="firefox" requested_mask="r" denied_mask="r" fsuid=1000 ouid=0
166 | [170080.039802] audit: type=1400 audit(1651402213.759:90): apparmor="DENIED" operation="open" profile="snap.firefox.firefox" name="/run/mount/utab" pid=6733 comm="firefox" requested_mask="r" denied_mask="r" fsuid=1000 ouid=0
167 | ```
168 |
169 | I personally believe pushing Snap to users by default is a bad decision from Ubuntu, since there are known stability issues (like this one, on a fresh install) that simply don't happen with traditional .deb packages. That's why I decided to remove Snap (all apps and snapd) altogether from my system. In case you decide to follow the same route, you can follow [this excellent guide](https://haydenjames.io/remove-snap-ubuntu-22-04-lts/) from Hayden James.
170 |
171 | ## Conclusion
172 |
173 | The new Ubuntu 22.04 James Jellyfish comes with lots of new software and improvements, a beautiful UI based on Gnome 42 that includes a MacOS-style dock, and great new tools.
174 |
175 | Although I did run into issues with Snap, I'm still very satisfied with this version so far since it fixed a few glitches and bugs I had with Ubuntu 21.10, in addition to bringing in some really nice new tools, such as the screenshot / printscreen built-in app that allows you to take nicely rounded window screenshots and also record screencasts.
176 |
177 | Overall, there's always one thing or another with any operating system that you choose; I am glad that the Linux ecosystem in general gives us enough freedom to change what we don't like. So far, I'm sticking with Ubuntu.
--------------------------------------------------------------------------------