├── .gitignore
├── README.md
├── ci
├── 001-travis-timeouts-wait.md
└── 002-Jenkins-Pipeline-CI-CD-Overview.md
├── cloud-computing
├── 001-cloud-and-dedicated-server-hosting.md
└── 002-aws-appstream-2.0.md
├── css
└── 001-flexbox.md
├── databases
├── 001-reset-mysql-root-password.md
├── 002-clickhouse-516-db-exception.md
├── 003-Install-postgres-on-linux.md
├── 004-primary_key_sql.md
├── 005-SQL-and-its-commands.md
├── 006-How_to_Install_Postgres_on_Mac.md
├── 007-Install-postgres-on-docker.md
├── 008-relational-database.md
├── 009-non-relational-database.md
├── 010-data-indexing-replication-sharding.md
└── 011-get-date-from-datetime-postgres.md
├── flowchart
└── flowcharts.md
├── frontend-development
└── 001-noopener-noreferrer-for-links.md
├── git
├── 001-delete-remote-branch.md
├── 002-remove-github-pages.md
├── 003-undo-latest-local-commit.md
├── 004-checkout-remote-branch.md
├── 005-fatal-git-tree.md
├── 006-git-lens.md
├── 007-git-and-github.md
├── 008-git-basic-commands.md
├── 009-git-installation.md
├── 010-rename-git-branch.md
├── README.md
└── images
│ ├── git-and-github.jpeg
│ └── pr-merged-delete-branch.png
├── go
├── 001-delete-element-from-slice.md
├── 002-common-gotchas-when-mutating-a-slice.md
└── 003-Datatypes_Variables_Constants_in_GO.md
├── html
├── 001-doctype.md
├── 002-meta-tag.md
├── 003-Bootstrap.md
├── 004-LesserKnownHTMLTricks.md
└── 005-accessibility.md
├── java
├── 001-string-equals-vs-equality-operator.md
├── 002-float-nan-infinity.md
├── 003-string-to-input-stream.md
├── 004-difference-between-@Controller-and-@RestController-in-spring-boot.md
├── 005-List-Interface-in-Java.md
├── 006-set-interface-in-java.md
├── 007-java-collections-hierarchy.md
├── 008-java-interface-java-8.md
├── 009-difference-between-final-finally-finalize.md
├── 010-difference-between-java-7-and-java-8.md
├── 011-localization-internationalization.md
├── 012-map-interface-in-java.md
├── 013-abstract-classes-in-java.md
├── 014-callbacks-in-java.md
├── 015-data-encapsulation-java.md
├── 016-catch-and-fix-null-pointer-exception-in-java.md
├── 017-checked-vs-unchecked-exceptions-in-java.md
├── 018-cryptographically-secure-random.md
├── 019-generate-random-int-within-range.md
├── 020-errors-in-java.md
├── 021-java-arrays-vs-arraylists.md
├── 021-type-comparison.md
├── 022-catch-and-fix-array-out-of-bounds-exception.md
└── 023-type-casting.md
├── javascript
├── 001-remove-specific-item-from-list.md
├── 002-what-is-javascript.md
├── 003-types-in-javascript.md
├── 004-array-methods-in-javascript.md
├── 005-array-splice-method.md
├── 006-sort-trick.md
├── 007-backend-fontend-with-javascript.md
├── 007-memory-optimization-for-html5-games.md
├── 009-array-sort-method.md
├── 010-const-and-let-in-javascript.md
├── 010-using-template-strings.md
├── 012-the-event-loop.md
├── 013-Eventlistener.md
├── 013-javascript-higher-order-functions-and-Iterators.md
├── 013-selecting-elements-from-dom.md
├── 014-javascript-arrow-functions.md
├── 015-Reduce-method-in-javascript.md
├── 016-javascript-promise-async-await-function.md
├── 016-web-geolocation-api.md
├── 017-react-components.md
├── 018-how-operators-work-in-javascript.md
├── 019-data-validation-using-joi.md
├── 020-get-query-parameters.md
├── 021-variable-hoisting.md
└── readme.md
├── kubernetes
└── 001-kubernetes-job-logs.md
├── linux
├── 001-list-files-with-dot.md
├── 002-linux-dirs-explained.md
├── 003-Create-and-remove-dir.md
├── 004-reading-linux-file-permissions.md
├── 005-simplify-man-commands-in-linux.md
├── 006-sftp-setup.md
├── 007-symbolic-link.md
├── 008-cronjob.md
├── 009-sending-signals-to-processes-in-linux.md
├── 010-rsync-for-syncing-remote-local-directories.md
├── 011-tar-gzip-in-linux.md
├── 012-grep-howto.md
├── 013-sed-explained.md
├── 014-curl-howto.md
├── 015-wget-howto.md
└── 016-curl-post-json-data.md
├── other
├── 001-get-time-millis-in-all-languages.md
├── 002-css-responsive-fonts.md
├── 003-css-image-display-fix.md
├── 004-css-variables.md
├── 005-persistent-data-structures.md
├── 006-plugins-vscode.md
├── 007-ahoy-commands.md
├── 008-fix-EADDRINUSE-err.md
├── 009-how-to-create-terminal-aliases.md
└── images
│ └── baseline.jpg
├── package-lock.json
├── python
├── 001-install-pytorch-windows.md
├── 002-peer-authentication-failed-psycopg2.md
├── 003-python-regex-cheatsheet.md
├── 004-notimplemented-notimplementederror.md
├── 005-string-contains-python.md
├── 006-big-o-notation.md
├── 007-string-isspace.md
├── 008-list-index.md
├── 009-dict-key.md
├── 010-python-modules.md
├── 011-context-managers.md
├── 012-object-not-subscritble.md
├── 013-find-pypi-downloads.md
├── 014-Features-of-Python.md
├── 015-Using-Random.md
├── 016-Using-Matplotlib.md
├── 017-Read-file.md
├── 018-Write-file.md
├── 019-python-fstrings.md
├── 020-NumPy.md
├── 023-LibrariesForNaturalLanguageProcessing.md
├── 024-ProjectEulerProblem1.md
├── 025-ProjectEulerProblem2.md
├── 026-using-argparse.md
├── 027-pandas-read-file-backslash.md
├── 028-Decision Trees.md
├── 029-Binary-serch-tree.md
├── 030_DataStructures.md
├── 030requests-library.md
├── 031-python-forloops.md
├── 032-python-iterators and generators.md
├── 033-insertion-sort-python.md
├── 034-python-functions.md
├── 035-python-generate-requirements-file.md
├── 036-regex.md
├── 037-ftp.md
├── 037-python-methods.md
├── 038-dictionary-comprehension.md
├── 039-__add__()-method.md
└── 30-list-comprehension.md
└── template.md
/.gitignore:
--------------------------------------------------------------------------------
1 | ## macOS
2 | # General
3 | .DS_Store
4 | .AppleDouble
5 | .LSOverride
6 |
7 | # Icon must end with two \r
8 | Icon
9 |
10 |
11 | # Thumbnails
12 | ._*
13 |
14 | # Files that might appear in the root of a volume
15 | .DocumentRevisions-V100
16 | .fseventsd
17 | .Spotlight-V100
18 | .TemporaryItems
19 | .Trashes
20 | .VolumeIcon.icns
21 | .com.apple.timemachine.donotpresent
22 |
23 | # Directories potentially created on remote AFP share
24 | .AppleDB
25 | .AppleDesktop
26 | Network Trash Folder
27 | Temporary Items
28 | .apdisk
29 |
30 | ## Linux
31 | *~
32 |
33 | # temporary files which can be created if a process still has a handle open of a deleted file
34 | .fuse_hidden*
35 |
36 | # KDE directory preferences
37 | .directory
38 |
39 | # Linux trash folder which might appear on any partition or disk
40 | .Trash-*
41 |
42 | # .nfs files are created when an open file is removed but is still being accessed
43 | .nfs*
44 |
45 | ## Windows
46 | # Windows thumbnail cache files
47 | Thumbs.db
48 | Thumbs.db:encryptable
49 | ehthumbs.db
50 | ehthumbs_vista.db
51 |
52 | # Dump file
53 | *.stackdump
54 |
55 | # Folder config file
56 | [Dd]esktop.ini
57 |
58 | # Recycle Bin used on file shares
59 | $RECYCLE.BIN/
60 |
61 | # Windows Installer files
62 | *.cab
63 | *.msi
64 | *.msix
65 | *.msm
66 | *.msp
67 |
68 | # Windows shortcuts
69 | *.lnk
70 |
--------------------------------------------------------------------------------
/README.md:
--------------------------------------------------------------------------------
1 | # Flashread blogs
2 |
3 | [](http://commonmark.org)
4 | [](https://github.com/flashreads/blogs/issues)
5 | [](https://flashreads.github.io/)
6 |
7 | This repository contains the content(markdown files) for the flashreads blogs.
8 |
9 | ## Contribution
10 |
11 | We are accepting tech-related short(1 minute read :hourglass:) blogs. The blogs will always be published or re-shared under the Author's name :black_nib::handshake:.
12 |
13 | To add a new blog:
14 | * :warning: Please, do not just copy and paste content from the web.:warning:
15 | * Add it to the corresponding directory **{topic}/{number.title.md}** e.g python/013-find-pypi-downloads.md
16 | * Follow the [template](https://github.com/flashreads/blogs/blob/master/template.md) example for structuring the markdown file.
17 | * The tags, author, and meta description labels are required.
18 | * Fork the repository and make PR.
19 |
20 | ### Contributors
21 |
22 |
23 |
24 |
25 | Made with [contributors-img](https://contributors-img.web.app).
26 |
27 | ### License
28 | This work is licensed under a Creative Commons Attribution-ShareAlike 2.0 Generic License.
29 |
--------------------------------------------------------------------------------
/ci/001-travis-timeouts-wait.md:
--------------------------------------------------------------------------------
1 | ---
2 | id: 001-travis-timeouts-wait.md
3 | layout: post
4 | title: How to increase Travis CI timeout?
5 | tags:
6 | - ci
7 | - travis-ci
8 | - travis
9 | author: Zoran Pandovski
10 | description: Increase Travis timeouts with one prefix
11 | date: 2020-06-21 20:28:46 +0200
12 | keywords: ci, travis-ci, travis
13 | template: post
14 | categories:
15 | - ci
16 | image: assets/images/time.svg
17 | ---
18 |
19 | There are different use cases where Travis jobs could raise the timeout error. Maybe you are trying to install a Python module that takes some time before installing the dependencies e.g:
20 |
21 | ```yml
22 | install:
23 | pip install torch
24 | ```
25 | or you are running the Java project tests e.g
26 |
27 | ```yml
28 | script:
29 | mvn package -Dtestng=test.xml
30 | ```
31 | or pushing a new image to the Docker registry e.g
32 |
33 | ```yml
34 | script:
35 | docker push $APPLICATION:$IMAGE_VERSION;
36 | ```
37 |
38 | The default Travis job timeout is set to 10 min, so in some scenarios the above commands will fail with:
39 |
40 | ```
41 | Timeout (20 minutes) reached. Terminating "..."
42 | ```
43 |
44 | To increase the `timeouts` travis ci offers a [function](https://docs.travis-ci.com/user/common-build-problems/#build-times-out-because-no-output-was-received) that will increase the build timeouts:
45 |
46 | ```yml
47 | install: travis_wait N mvn install
48 | ```
49 |
50 | The `travis_wait n` where the `n` is the minutes by which the waiting time is increased.
51 |
52 | >Note: You must carefully use `travis_wait` since it can extend the build time when there could happen another issue.
--------------------------------------------------------------------------------
/cloud-computing/001-cloud-and-dedicated-server-hosting.md:
--------------------------------------------------------------------------------
1 | ---
2 | id: 001-cloud-and-dedicated-server-hosting.md
3 | title: What is Hosting and difference between cloud hosting and dedicated server hosting
4 | tags:
5 | - hosting
6 | - cloud hosting
7 | date: 2022-10-27
8 | keywords: hosting, cloud hosting
9 | categories: cloud computiing
10 | author: Smriti Waiba
11 | meta-description: brief overview on What is Hosting and difference between cloud hosting and dedicated server hosting for beginners
12 | ---
13 |
14 | # Hosting
15 | Hosting simply means network infrastructure that keeps our website/application available across the internet. Our site, respective data and all other information are stored in server. The Server is responsible for storage and computing resources. Server is nothing but a computer with very high performance capabilities; which provides functionality for other devices i.e. clients.
16 |
17 | Servers are basically kept in Data Center, where the following mentioned services must be delivered.
18 | - Temperature control
19 | - Backup system
20 | - Fire suppression
21 | - Physical security
22 |
23 | So, ordering hosting services basically means purchasing:
24 | - Physical disk space on server (storage for website, files, mails etc.)
25 | - Bandwidth which is the network connection for server (website's network traffic that comes in and go out)
26 | As an example, now you will pay for: 10gb of disk space as storage and 100gb of bandwidth per month.
27 |
28 | Cloud Hosting has some special features than the normal Dedicated Server Hosting.
29 | In Cloud Hosting rather than storing data in a single node, data are stored within multiple numbers of nodes, which means that even if one server crashes or goes down; clients will not face any technical issues as there are other nodes of server to take over the failure.
30 |
31 | # Difference between Cloud Hosting and Dedicated Server Hosting
32 | Now, lets understand some basic difference between Dedicated Server Hosting and Cloud Hosting
33 |
34 | In terms of Availability as we talked before, Cloud Hosting ensures zero downtime as it has multiple nodes to take over the failure. Whereas with dedicated server hosting there is a great chance of downtime as well as hardware failure as its name terms only single dedicated server.
35 | Hence Cloud Hosting prevents Single Point of Failure (SPOF).
36 |
37 | In terms of Cost Efficiency, the billing metric in Cloud Hosting supports pay-as-you-go system, which means paying as per the time we use the service i.e. per hour, per month, and so on. We have to pay only for the computing resources that we have used. Whereas with Dedicated Server are generally billed monthly and consistent amount of payment irrespective to the resource that we have used.
38 |
39 |
--------------------------------------------------------------------------------
/cloud-computing/002-aws-appstream-2.0.md:
--------------------------------------------------------------------------------
1 | ---
2 | id: 002-aws-appstream-2.0.md
3 | title: AWS Appstream 2.0 Technology
4 | tags:
5 | - cloud hosting
6 | - streaming
7 | - desktop apps
8 | - aws
9 | date: 2022-10-28
10 | keywords: aws, cloud hosting
11 | categories: cloud streaming
12 | author: Salil Cuncoliencar
13 | meta-description: brief overview on streamning desktop apps with Appstream 2.0 Technology
14 | ---
15 |
16 | # AWS Appstream 2.0
17 | Appstream 2.0 is a Managed service from AWS which helps users stream desktop apps securely in a browser.
18 | You no longer need access to a physical desktop machine to install apps, just use this technology and stream you apps online.
19 | It supports 3 modes of authentication:
20 | - SAML
21 | - User Pool
22 | - Programmatic
23 |
24 | # Setup:
25 | - You need to have an AWS account (Learning account would do)
26 | - Setup your ImageBuilder from `AWS console` or via `AWS-CLI`. This is similar to baking an AMI in EC2.
27 | - Install the required desktop apps on this Image and create final image
28 | - Create a Fleet with appropriate configuration
29 | - Setup a Stack and map it to a fleet
30 | - Generate a temporary url from the Stack and share it for use to your peers, you can choose from 30 mins to 7 days
31 |
32 |
33 |
--------------------------------------------------------------------------------
/css/001-flexbox.md:
--------------------------------------------------------------------------------
1 | ---
2 | id: 001-flex-container.md
3 | title: Getting Started with Flexbox
4 | tags: css, Flex,
5 | date: 2021-10-31 00:50:42 +0200
6 | keywords: css, flex, display,
7 | categories: css, flex
8 | cover:
9 | author: Igbinosa Iwinosa
10 | meta-description: A brief introduction To CSS Flex
11 | image: assets/images/css.svg
12 | ---
13 |
14 | # Getting Started with CSS Flexbox
15 |
16 | Flexbox is a layout method that consists of boxes that ... flex. Content is organized into boxes that can be scaled up and down and can be placed in rows and columns.
17 |
18 | ## What is CSS Flexbox?
19 |
20 | Flexbox is a one-dimensional layout. That is, its properties and specifications are related to rows or columns. This is different from a CSS grid that has both rows and columns in two dimensions at the same time. You can use Flexbox to create grid layouts by nesting containers and elements.
21 |
22 | ## How to Use Flexbox
23 | Flexbox consists of a alot of properties, the first step is using Flexbox is by invoking it with the display property.
24 |
25 |
26 | ```CSS
27 | display : flex;
28 | ```
29 | Then we have the "flex-direction" property tells your container which direction its items should go in and therefore also says which direction the main-axis is going in. for example :-
30 |
31 | ```CSS
32 | flex-direction : column;
33 | ```
34 | We also have the "flex-wrap" property which tells your code whether its items are allowed to wrap to the next line, like the lines on the page of a book, or whether they need to stay forced onto one line. an example is :-
35 |
36 | ```CSS
37 | flex-wrap : wrap;
38 | ```
39 | Flexbox has other Properties that you can learn here :- https://developer.mozilla.org/en-US/docs/Web/CSS/CSS_Flexible_Box_Layout/Basic_Concepts_of_Flexbox
--------------------------------------------------------------------------------
/databases/001-reset-mysql-root-password.md:
--------------------------------------------------------------------------------
1 | ---
2 | id: 001-reset-mysql-root-password.md
3 | title: How to reset the MySQL root password
4 | tags:
5 | - mysql
6 | - databases
7 | - mariadb
8 | author: Zoran Pandovski
9 | meta-description: Reset MySQL root password in 5 steps
10 | date: 2020-05-19 23:44:39 +0200
11 | keywords: mysql, databases, mariadb
12 | template: post
13 | categories:
14 | - databases
15 | image: assets/images/password.svg
16 | ---
17 |
18 | # How to reset the MySQL root password
19 |
20 | This is a usual situation where you have added a password to the root user during the MySQL installation, but later on, you forgot it and can't login. Don't worry, we have been to the same situation and will help you to change the password in a few steps.
21 |
22 | 1. The first thing to do is to stop the MySQL server:
23 |
24 | ```
25 | sudo /etc/init.d/mysql stop
26 | ```
27 |
28 | 2. Start the server with additional flags:
29 |
30 | ```
31 | sudo /usr/sbin/mysqld --skip-grant-tables --skip-networking &
32 | ```
33 | The `--skip-grant-tables` flag will start the server without the grant tables in MySQL system schema. That means no privileges and unrestricted access to all databases, so it is best to also disable remote connections by using the `--skip_networking`.
34 |
35 | 3. Use the MySQL client to connect back to the server:
36 |
37 | ```
38 | mysql -u root
39 | ```
40 |
41 | 4. Now, let's reload the grant tables:
42 |
43 | ```sql
44 | FLUSH PRIVILEGES;
45 | ```
46 |
47 | 5. Update the password for `root` user:
48 |
49 | ```sql
50 | update user set authentication_string=password('new_pass') where user='root';
51 | update user set plugin="mysql_native_password" where User='root';
52 | ```
53 | The `mysql_native_password` is the default authentication plugin used. After executing the above query just restart the server and you can loggin with new password.
54 |
55 |
56 | ## Change the root password in MariaDB 10.x
57 |
58 | In the latest MariaDB versions the above steps are simplified. You can skip steps 1 and 2 from above. Start from the 3 step and use `sudo` when login to MySQL client. The 4 and 5 steps are the same. To verify if the new password works:
59 |
60 | ```sql
61 | mysql -u root -p
62 | ```
--------------------------------------------------------------------------------
/databases/002-clickhouse-516-db-exception.md:
--------------------------------------------------------------------------------
1 | ---
2 | id: 002-clickhouse-516-db-exception
3 | title: ClickHouse Code 516. DB::Exception
4 | tags:
5 | - clickhouse
6 | - databases
7 | - clickhouse-cli
8 | author: Zoran Pandovski
9 | meta-description: How to resolve Code 516. DB::Exception from clickhouse-client
10 | date: 2020-06-04 16:55:31 +0200
11 | keywords: clickhouse, databases, clickhouse-cli
12 | template: post
13 | categories:
14 | - databases
15 | image: assets/images/data.svg
16 | ---
17 |
18 | ClickHouse provides a command line tool for connecting to the ClickHouse database called [clickhouse-client](https://clickhouse.tech/docs/en/interfaces/cli/#command-line-options). Following the official documentation, you need to run `clickhouse-client` to successfully connect to ClickHouse server.
19 | But on the first attempt, you will usually get the following exception:
20 |
21 | ```
22 | Code: 516. DB::Exception: Received from localhost:9000. DB::Exception: default: Authentication failed: password is incorrect or there is no user with such name.
23 | ```
24 |
25 | That's because the first time you installed ClickHouse you have entered the default password so you must provide that one as an argument to the `clickhouse-client` e.g
26 |
27 | ```
28 | clickhouse-client --password=your-password
29 | ```
30 |
31 | And now, you should get a successful connection message:
32 |
33 | ```
34 | ClickHouse client version 20.4.2.9 (official build).
35 | Connecting to localhost:9000 as user default.
36 | Connected to ClickHouse server version 20.4.2 revision 54434.
37 | ```
38 |
--------------------------------------------------------------------------------
/databases/003-Install-postgres-on-linux.md:
--------------------------------------------------------------------------------
1 | ---
2 | id: 003-install-postgres-on-linux.md
3 | title: How to install Postgres on Linux (Debian)
4 | tags:
5 | - linux
6 | - database
7 | - postgres
8 | author: Rohit Geddam
9 | meta-description: See How to install postgres on your linux machine
10 | date: 2020-10-27 22:02:14 +0530
11 | keywords: linux, database, postgres
12 | template: post
13 | categories:
14 | - databases
15 | image: assets/images/install.svg
16 | ---
17 |
18 | ## How to Install Postgres On Linux (Debian)
19 | ***
20 | ### **Step-1**
21 | *Install using apt.*
22 | ```bash
23 | $ sudo apt update
24 | $ sudo apt install postgresql postgresql-contrib
25 | ```
26 |
27 | ### **Step-2**
28 | *Test your Installation*
29 | ```bash
30 | sudo -u posgtres psql
31 | ```
32 | *You will see: `postgres=#`*
33 | *To quit type `\q`*
34 |
35 | ### **Step-3**
36 | *Create Postgres User*
37 | ```bash
38 | $ sudo -u postgres createuser --interactive
39 | ```
40 | *You will see:*
41 | ```bash
42 | Enter name of role to add: test
43 | Shall the new role be a superuser? (y/n) y
44 | ```
45 |
46 | ### **Step-4**
47 | *Create a Database*
48 | ```bash
49 | $ sudo -u postgres createdb test
50 | ```
51 | *Now create the same linux user as postgres user*
52 | ```bash
53 | $ sudo adduser test
54 | ```
55 | *Now login to your postgres database*
56 | ```bash
57 | $ sudo -u test psql
58 | ```
59 |
60 | ### **Step-5**
61 | *Assign Password to postgres user*
62 | ```bash
63 | $ sudo -u postgres psql
64 |
65 | postgres=# ALTER USER test with PASSWORD 'your-new-password';
66 | ```
67 | *The connection string for the above database will be `postgres://test:your-new-password@localhost:5432/test`*
68 |
--------------------------------------------------------------------------------
/databases/004-primary_key_sql.md:
--------------------------------------------------------------------------------
1 | ---
2 | id: 004-primary-key-sql
3 | title: PRIMARY KEY IN SQL
4 | tags:
5 | - Primary_key
6 | - implementation
7 | - Composite_key
8 | author: Shivani Verma
9 | meta-description: What is Primary Key?How it is implemented?How it is deleted and constraints related to it.
10 | date: 2020-10-31 17:44:52 +0100
11 | keywords: Primary_key,implementation,Composite_key
12 | template: post
13 | categories:
14 | - databases
15 | image: assets/images/key.svg
16 | ---
17 |
18 |
19 |
20 |
21 | # PRIMARY-KEY - SQL
22 |
23 | A primary key is a field in a table which uniquely identifies each row/record in a database table. Primary keys must contain unique values.
24 | A primary key column cannot have NULL values.
25 |
26 | A table can have only one primary key, which may consist of single or multiple fields.
27 | When multiple fields are used as a primary key, they are called a composite key.
28 |
29 | If a table has a primary key defined on any field(s), then you cannot have two records having the same value of that field(s).
30 |
31 |
32 | To define PRIMARY KEY in SQL:-
33 |
34 | CASE 1:-When making the table
35 | syntax-
36 | CREATE TABLE STUDENTS(
37 | ROLL_NO INT NOT NULL,
38 | NAME VARCHAR (20) NOT NULL,
39 | AGE INT NOT NULL,
40 | PRIMARY KEY (ROLL_NO)
41 | );
42 |
43 | CASE 2:-When there is an existing table in which there is no primary key and you want to add primary key
44 | syntax -
45 | (write the following command)
46 | ALTER TABLE STUDENTS ADD PRIMARY KEY (ROLL_NO);
47 |
48 | CASE 3 :- For defining a PRIMARY KEY constraint on multiple columns
49 | syntax -
50 | CREATE TABLE STUDENTS(
51 | ROLL_NO INT NOT NULL,
52 | NAME VARCHAR (20) NOT NULL,
53 | AGE INT NOT NULL,
54 | PHONE_NO INT (10)
55 | PRIMARY KEY (ROLL_NO,PHONE_NO)
56 | );
57 |
58 | To delete a PRIMARY KEY :-
59 |
60 | APPLICABLE FOR ALL CASES:-
61 | syntax -
62 | (You can clear the primary key constraints from the table with the syntax given below)
63 | ALTER TABLE STUDENTS DROP PRIMARY KEY ;
64 |
--------------------------------------------------------------------------------
/databases/006-How_to_Install_Postgres_on_Mac.md:
--------------------------------------------------------------------------------
1 | ---
2 | id: 006-How_to_Install_postgres_on_Mac.md
3 | title: How to Install Postgres on Mac
4 | tags:
5 | - postgres
6 | - mac
7 | - installation
8 | author: V Rahul
9 | meta-description: 3 Step Postgrese Installation Guide For Mac.
10 | date: 2020-10-27 22:03:56 +0530
11 | keywords: postgres, mac, installation
12 | template: post
13 | categories:
14 | - databases
15 | image: assets/images/install1.svg
16 | ---
17 |
18 | # How to Install Postgres on Mac
19 |
20 | ***
21 |
22 |
23 |
24 | For Mac, what would change is the method of installing postgres
25 |
26 | If you already have Homebrew installed, you can install postgress with the command below, if you don't have Homebrew installed click here to install it.
27 |
28 |
29 |
36 |
37 | ## Step 1: Create postgres user:
38 |
39 | ```
40 | $ sudo -u postgres createuser --interactive
41 | ```
42 | You should see prompts as shown below:
43 |
44 | ```
45 | Enter name of role to add: test
46 | Shall the new role be a superuser? (y/n) y
47 | ```
48 |
49 |
62 |
63 | ## Step 3: Assign password to the postgres user
64 |
65 | ```
66 | $ sudo -u postgres psql
67 |
68 |
69 | postgres=# ALTER USER test with PASSWORD 'your-new-password';
70 | ```
71 |
72 | *Note: Creating a new postgres user is optional, you can make do with the default postgres user if you are want.*
73 |
74 |
75 |
76 |
77 |
78 | ```
79 | $ sudo -u postgres createdb test // or $ createdb test
80 |
81 | $ sudo -u postgres psql
82 |
83 | postgres=# ALTER USER postgres with PASSWORD 'your-new-password';
84 |
85 | ```
86 | Then, your connection string would be `postgres://postgres:your-new-password@localhost:5432/test`
87 |
88 |
89 |
90 |
91 | *Thanks for reading!*
--------------------------------------------------------------------------------
/databases/009-non-relational-database.md:
--------------------------------------------------------------------------------
1 | ---
2 | id: 009-non-relational-database.md
3 | title: Non-Relational database
4 | tags: System, system design, system design interview, database, non-relational database
5 | date: 2022-10-23 21:26:39 +0200
6 | keywords: Non-relational database
7 | categories: Database
8 | author: Pragya Sapkota
9 | meta-description: Non-relational Database
10 | ---
11 |
12 | # Non-relational Database
13 |
14 | 
15 |
16 | As we know there are two types of database - Relational database and non-relational database. Let’s take this blog to understand the basic concept of a non-relational database.
17 |
18 | A non-relational database is a less rigid database that provides more flexibility to the structure of data stored. The operations to store the data in a non-relational database present the data as ‘key-value’ pairs. Let’s see an example of data stored in a non-relational database as an array of ‘key-value’ pair objects.
19 |
20 | ```
21 | [ {
22 | name: 'Pragya',
23 | rank: '1',
24 | gender: 'F',
25 | year: 2056,
26 | },
27 | {
28 | name: 'Dipen',
29 | rank: '3',
30 | gender: 'M',
31 | year: 2072,
32 | },
33 | {
34 | .....
35 | },
36 | ......
37 | ]
38 | ```
39 |
40 | As we talked about how and why the relational database is called a SQL database, the non-relational is by default the “NoSQL” database. There are some great benefits of not needing to consistently structure data under the NoSQL database.
41 |
42 | ## BASE Transaction
43 |
44 | Like the ACID (Atomicity, Consistency, Isolation, Durability) in the relational database — non-relational database or the NoSQL database has BASE transactions.
45 |
46 | BA = Basically Available
47 |
48 | S = Soft State
49 |
50 | E = Eventual Consistency
51 |
52 | Let’s explore them individually,
53 |
54 | ### Basically Available
55 |
56 | The first feature Basically Available promises us that the system will be highly available at any time of need.
57 |
58 | ### Soft State
59 |
60 | Likewise, the soft state tells us that the state of the system may change over time — sometimes even without input.
61 |
62 | ### Eventual Consistency
63 |
64 | The system can be consistent for a certain and short time unless other inputs are fed to it.
65 |
66 | ## Conclusion
67 |
68 | The non-relational database uses a hash-table-like structure. This leads to fast and simple operations that are perfect for caching, environment variables, configuration files, session states, etc. Unlike relational databases, it can be used in both memory and persistent storage.
69 |
70 | We have heard of some other “JSON-like” databases that are document databases among which we might have heard the most-loved one — MongoDB (Technically a BSON database). However, at the core, all of these are the ‘key-value’ stores too.
--------------------------------------------------------------------------------
/databases/011-get-date-from-datetime-postgres.md:
--------------------------------------------------------------------------------
1 | ---
2 | id: 011-get-date-from-datetime-postgresql.md
3 | title: Get the date part from DateTime or Timestamp in PostgreSQL
4 | tags:
5 | - databases
6 | - postgresql
7 | - date
8 | - datetime
9 | author: Pavle Jonoski
10 | meta-description: How to extract the date part from date-time or timestamp in PostgreSQL
11 | date: 2022-10-23 21:20:00 +02:00
12 | keywords: database, date, date-time, postgres, postgresql, sql
13 | template: post
14 | categories:
15 | - databases
16 | image: assets/images/db.svg
17 | ---
18 |
19 | # How to extract the date from a date-time or timestamp in PostgreSQL
20 |
21 | Often times you'll need to extract the date (Year-month-day) part of a date-time or a timestamp
22 | column in your PostgreSQL database table.
23 |
24 | This is easy to do, and you can do it in multiple ways:
25 |
26 | 1. Cast the date-time or timestamp to `date` type. This can be done using `::` to cast to the desired type:
27 |
28 | ```sql
29 | select
30 | my_datetime_col::date -- cat to date here using ::
31 | from
32 | my_table
33 | ```
34 |
35 | 2. Use the `dat` function provided by PostgreSQL:
36 |
37 | ```sql
38 | select
39 | date(my_datetime_col)
40 | from
41 | my_table
42 | ```
43 |
44 | ## Short example
45 |
46 | Let's define a table in our database:
47 |
48 | ```sql
49 | create table my_table(
50 | id int primary key,
51 | my_datetime_col timestamp not null
52 | );
53 | ```
54 |
55 | and let's insert some values:
56 | ```sql
57 | insert into my_table(id, my_datetime_col)
58 | values (1, now());
59 | ```
60 |
61 | Let's do a simple select to see the data:
62 | ```sql
63 | select * from my_table
64 |
65 |
66 | id | my_datetime_col
67 | ----+----------------------------
68 | 1 | 2022-10-23 22:10:23.989242
69 | (1 row)
70 | ```
71 |
72 | Now, let's extract only the date:
73 | ```sql
74 | select my_datetime_col::date from my_table;
75 |
76 | my_datetime_col
77 | -----------------
78 | 2022-10-23
79 | (1 row)
80 |
81 | ```
82 | or using the `date` function:
83 | ```sql
84 | select date(my_datetime_col) from my_table;
85 |
86 | date
87 | ------------
88 | 2022-10-23
89 | (1 row)
90 | ```
--------------------------------------------------------------------------------
/flowchart/flowcharts.md:
--------------------------------------------------------------------------------
1 | ---
2 |
3 | title: Flowchart
4 | date: 2021-10-13
5 | tags: flowchart, java, c++
6 | keywords: flowcharts
7 | categories: java, c++
8 | keywords: flowchart
9 | author: Hannykumar
10 | meta-description: Shortnote on Flowcharts
11 | image: assets/images/chart.svg
12 | ---
13 |
14 | # FLOWCHARTS
15 |
16 |
17 | What is a Flowchart?
18 | Flowchart is a graphical representation of an algorithm. Programmers often use it as a program-planning tool to solve a problem. It makes use of symbols which are connected among them to indicate the flow of information and processing.
19 | The process of drawing a flowchart for an algorithm is known as “flowcharting”.
20 |
21 | Terminal: The oval symbol indicates Start, Stop and Halt in a program’s logic flow. A pause/halt is generally used in a program logic under some error conditions. Terminal is the first and last symbols in the flowchart.
22 |
23 | Input/Output: A parallelogram denotes any function of input/output type. Program instructions that take input from input devices and display output on output devices are indicated with parallelogram in a flowchart.
24 |
25 | Processing: A box represents arithmetic instructions. All arithmetic processes such as adding, subtracting, multiplication and division are indicated by action or process symbol.
26 |
27 | Decision Diamond symbol represents a decision point. Decision based operations such as yes/no question or true/false are indicated by diamond in flowchart.
28 |
29 | Flow lines: Flow lines indicate the exact sequence in which instructions are executed. Arrows represent the direction of flow of control and relationship among different symbols of flowchart.
30 |
31 | Advantages of Flowchart:
32 |
33 | 1. Flowcharts are better way of communicating the logic of system.
34 | 2. Flowcharts act as a guide for blueprint during program designed.
35 | 3. Flowcharts helps in debugging process.
36 | 4. With the help of flowcharts programs can be easily analyzed.
37 | 5. It provides better documentation.
38 | 6. Flowcharts serve as a good proper documentation.
39 |
40 |
41 | Disadvantages of Flowchart:
42 |
43 | 1. It is difficult to draw flowchart for large and complex programs.
44 | 2. In this their is no standard to determine the amount of detail.
45 | 3. Difficult to reproduce the flowcharts.
46 | 4. It is very difficult to modify the Flowchart.
47 |
--------------------------------------------------------------------------------
/frontend-development/001-noopener-noreferrer-for-links.md:
--------------------------------------------------------------------------------
1 | ---
2 | id: 001-noopener-noreferrer-for-links
3 | title: Always use "noopener" or "noreferrer" for links opened in new tabs
4 | tags:
5 | - javascript
6 | - html
7 | - css
8 | date: 2021-03-16 15:36:00 +7
9 | keywords: javascript, html, link
10 | categories: frontend, frontendtips
11 | author: phuoc-ng
12 | image: assets/images/html.svg
13 | meta-description: How to use "noopener" or "noreferrer" to open links in new tabs
14 | ---
15 |
16 | # Always use "noopener" or "noreferrer" for links opened in new tabs
17 |
18 | In order to open a link in a new tab, we use the `target="_blank"` attribute. However, it can lead to some issues if you aren't aware of them.
19 |
20 | First, the newly opened tab uses the same process with the opener one. Hence, it can slow down your page.
21 | More importantly, the new tab is able to access the `window` object of the opener page via the `window.opener` object. Imagine that the new tab executes the following code:
22 |
23 | ```js
24 | window.opener.location = "http://fake.website.here";
25 | ```
26 |
27 | As the code implies, it redirects the original tab to a fake website. What happens if the fake website has the same UI as the real one? Since users already opened it, they may not realize that the website they are looking at isn't real.
28 |
29 | Adding `rel="noopener"` fixes the issues.
30 |
31 | It's good to know that there is the `rel="noreferrer"` attribute. It not only fixes the issues that `noopener` does, but also prevents the `Referer` header from being sent to the new tab.
32 |
33 | ```html
34 |
35 | ...
36 |
37 |
38 | ...
39 |
40 |
41 | ...
42 | ...
43 | ```
44 |
45 | > Some modern browsers, such as Chrome 88+, automatically adds the `noopener` behavior if it's missing.
46 | > However, it's still recommended to add `rel="noopener"` or `rel="noreferrer"` to avoid the security and performance issues in old legacy browsers.
47 |
--------------------------------------------------------------------------------
/git/001-delete-remote-branch.md:
--------------------------------------------------------------------------------
1 | ---
2 | id: 001-delete-remote-branch.md
3 | title: Git delete a branch remotely
4 | tags:
5 | - git
6 | - delete-branch
7 | - repository
8 | - command-line
9 | - github
10 | - github.com
11 | author: Pavle Jonoski
12 | meta-description: See how to delete a branch in the local and remote git repository.
13 | date: 2020-05-12 21:53:39 +0200
14 | keywords: git, delete-branch, repository, command-line, github, github.com
15 | template: post
16 | categories:
17 | - git
18 | image: assets/images/throw.svg
19 | ---
20 |
21 | # Git delete a branch from the local and remote repository
22 |
23 | While working with Git repositories, very often you will create and need to delete
24 | a lot of branches. Some branches will be merged into the master branch and some are
25 | no longer necessary. In either case, at some point they need to be deleted. We want
26 | to keep the repository clean and neat after all.
27 |
28 | Deleting a local branch in a Git repository is quite straight forward. You can use
29 | either of these commands to do it:
30 |
31 | ```bash
32 | git branch -d
33 | git branch -D
34 | ```
35 |
36 | To delete a branch in the remote repository, you can do something very similar:
37 |
38 | ```bash
39 | git push -d
40 |
41 | # is the remote name, very often 'origin'
42 |
43 | git push -d origin
44 | ```
45 |
46 | ## The difference between `-d` and `-D`
47 |
48 | Both `-d` and `-D` are aliases:
49 | * `-d` is an alias for `--delete`. This deletes a branch **only** if the branch
50 | has already been fully merged in its upstream branch. This is very useful when
51 | using [git workflows](https://git-scm.com/book/en/v2/Git-Branching-Branching-Workflows),
52 | to prevent unintentional mistakes of deleting a branch that is intended to be merged.
53 | Once merged, however, the branch can be safely deleted.
54 | * `-D` is shortcut for `--delete` `--force`. This deletes the branch regardless
55 | of the merge state of the branch. This is useful for deleting branches that are
56 | not expected to be merged.
57 |
58 | ## Deleting remote branch on Github repository
59 |
60 | Very often you need to remove a branch on a remote repository on [Github](https://github.com/).
61 |
62 | The regular process of creating a [Pull Request](https://help.github.com/en/github/collaborating-with-issues-and-pull-requests/about-pull-requests),
63 | once the branch has been merged, offers an action to delete the branch via the web
64 | interface:
65 |
66 | 
67 |
68 | In the branch that should be deleted was not merged via *Pull Request*, then you can
69 | remove it from the command line by pushing to the remote repository:
70 |
71 | ```bash
72 | git push -d origin
73 | ```
74 |
75 |
--------------------------------------------------------------------------------
/git/002-remove-github-pages.md:
--------------------------------------------------------------------------------
1 | ---
2 | id: 002-remove-github-pages.md
3 | title: How to unpublish GitHub pages site
4 | tags:
5 | - git
6 | - github
7 | - github-pages
8 | author: Zoran Pandovski
9 | meta-description: The missing step for unpublishing the Github pages site
10 | date: 2020-05-19 23:44:39 +0200
11 | keywords: git, github, github-pages
12 | template: post
13 | categories:
14 | - git
15 | image: assets/images/page.svg
16 | ---
17 |
18 | # How to unpublish GitHub pages site
19 |
20 | Sometimes, you don't want your Github Pages personal website to be available, or you are migrating to the new repository so you need to unpublish the site. The first thing that you would usually do is to:
21 | 1. Go to repository settings
22 | 2. Under GitHub Pages select the None(Disable GitHub Pages) option from the dropdown.
23 |
24 | That is the correct way but, there is one additional step that you need to do, to successfully unpublish the site.
25 |
26 | ## Delete gh-pages branch
27 |
28 | The gh-pages branch is the default publishing source branch for most of the GitHub Pages sites. Make sure that this branch is deleted from the repository:
29 |
30 | ```git
31 | git push origin -d gh-pages
32 | #git version older then 1.7
33 | git push origin :gh-pages
34 | ```
35 |
36 | If the response is `fatal: 'gh-pages' does not appear to be a git repository`, make sure that you have the branch locally before deleting it:
37 |
38 | ```git
39 | git pull origin gh-pages
40 | ```
41 | and then delete it. For additonal informations about `How to delete remote branch in Git` check [delete-remote-branch](https://github.com/oneminblogs/content/blob/unpublish-gh-pages/git/001-delete-remote-branch.md)
42 |
43 | That's all. You have successfully unpublish the GitHub Pages site.
44 | >Note: If you are using a custom domain for the GitHub Pages site, make sure to update your DNS settings.
45 |
--------------------------------------------------------------------------------
/git/004-checkout-remote-branch.md:
--------------------------------------------------------------------------------
1 | ---
2 | id: 004-checkout-remote-branch
3 | title: How to check out a remote Git branch
4 | tags:
5 | - git
6 | - git-remote
7 | - git-checkout
8 | - git-branches
9 | author: Zoran Pandovski
10 | meta-description: Checkout remote Git branch with one command
11 | date: 2020-05-20 23:53:42 +0200
12 | keywords: git, git-remote, git-checkout, git-branches
13 | template: post
14 | categories:
15 | - git
16 | image: assets/images/remote.svg
17 | ---
18 |
19 | ## How to check out a remote Git branch
20 |
21 | You need to work on a git branch that you don't have locally, but you are not sure how to pull and switch to that branch.
22 | Let's first list the remote branches so we are sure the branch exists. To list all of the remote branches run:
23 |
24 | ```bash
25 | git branch -a
26 | ```
27 |
28 | This will list all of the local and remote branches.
29 |
30 | ```
31 | local_branch1
32 | local_branch2
33 | remotes/new_branch
34 | ```
35 |
36 | The first displayed are all local branches, and the branches that contain `remote/` are the remote branches.
37 | Copy the name of the remote branch you want to work on and execute:
38 |
39 | ```bash
40 | git checkout new_branch
41 | ```
42 |
43 | You should see the `Branch 'new_branch' set up to track remote branch 'new_branch' from 'origin'.` message. This means you have successfully checkout to the `new_branch`.
44 |
45 | ## Multiple remotes
46 |
47 | There are cases where the repository will contain more than one remote. In that case run:
48 |
49 | ```bash
50 | git checkout -t /new_branch
51 | ```
52 |
53 |
54 |
55 |
56 |
--------------------------------------------------------------------------------
/git/005-fatal-git-tree.md:
--------------------------------------------------------------------------------
1 | ---
2 | id: 005-fatal-git-tree.md
3 | title: fatal git-write-tree error building trees
4 | tags:
5 | - git
6 | - git-write
7 | - git pull
8 | author: Zoran Pandovski
9 | meta-description:
10 | date: 2020-06-14 18:52:57 +0200
11 | keywords: git, git-write, git pull
12 | template: post
13 | categories:
14 | - git
15 | image: assets/images/tree.svg
16 | ---
17 |
18 | If you search the above error, most of the answers would be to use `git reset --hard` command. But, you should be careful with executing this command. You can lose all uncommitted changes from your working tree. So how to resolve this error?
19 |
20 | ```
21 | fatal: git-write-tree: error building trees
22 | Cannot save the current index state
23 | ```
24 |
25 | This error usually happens when you have conflicts or unmerged paths. To check the unmerged paths run:
26 |
27 | ```
28 | git status
29 | ```
30 |
31 | This should show the following message:
32 |
33 | ```
34 | $ git status
35 | > # On branch add-helpers
36 | > # You have unmerged paths.
37 | > # (fix conflicts and run "git commit")
38 | > #
39 | > # Unmerged paths:
40 | > # (use "git add ..." to mark resolution)
41 | > #
42 | > # both modified: utilities/helpers.py
43 | > #
44 | > no changes added to commit (use "git add" and/or "git commit -a")
45 | ```
46 |
47 | Open the file with conflicts and look for the conflict markers `<<<<<` and `>>>>>`. Make the changes you want to keep and then add your changes:
48 |
49 | ```git
50 | git add utilities/helpers.py
51 | ```
52 |
53 | Now, you will be able to commit your changes or switch to another branch.
--------------------------------------------------------------------------------
/git/006-git-lens.md:
--------------------------------------------------------------------------------
1 | ---
2 | id: 0046git-lens.md
3 | title: GitLens
4 | tags:
5 | - Git
6 | - GitLens
7 | - VS Code Extension
8 | author: Rabson J Phiri
9 | meta-description: Work with git projects easier with the GitLens VS Code Extension
10 | date: 2020-10-26 17:27:18 +0100
11 | keywords: Git, GitLens, VS Code Extension
12 | template: post
13 | categories:
14 | - git
15 | image: assets/images/lens.svg
16 | ---
17 |
18 | # GitLens
19 |
20 | **Git** is a Version Control System, and is usually used with platforms like **GitHub** to host git projects and make collaboration with other developers easier.
21 |
22 | Today, **VS Code** is one of the most popular and powerful code editors around, and has a market place for tons of extensions.
23 |
24 | One of these extensions is **GitLens**. It can be downloaded from the [VS Code Marketplace](https://marketplace.visualstudio.com/items?itemName=eamodio.gitlens) and it works for git projects. It let's you see who, when and why code was changed. Just move your cursor to a line of code, and GitLens will tell you know who authored that code, when, and the reason they added or altered the code right in VS Code.
25 |
26 | This is very useful if you're working on a team. You'll be able to see who authored every line of code. If multiple people edited the same line, GitLens will show you who those people are.
27 |
28 | You can also go back in history to see who changed the code and how the code evolved. It also lets you see commit details based on the author of the code
29 |
30 | This allows for better accountability among team members. [This](https://gitlens.amod.io/) is the official GitLens website
--------------------------------------------------------------------------------
/git/007-git-and-github.md:
--------------------------------------------------------------------------------
1 | ---
2 | id: 0046git-lens.md
3 | title: Git and Github
4 | tags:
5 | - Git
6 | - Github
7 | author: Aayushi Mittal
8 | meta-description: Difference Between Git and Github
9 | date: 2021-10-04 08:30:00 +0100
10 | keywords: Git, Github
11 | template: post
12 | categories:
13 | - git
14 | image: assets/images/code.svg
15 | ---
16 |
17 | # Differences Between Git and Github
18 |
19 |
20 |
21 | If you have worked on coding projects you might came across these terms but many new developers get confused between git and GitHub. They are not same though they are connected with each other. Let's see some differences.
22 |
23 | ## Git
24 | **Git** is a Version control system that records changes to a file or set of files over time. It helps in comparing, differentiating and reverting the changes between two versions of the project. It really helpful in preventing conflicts specially when a lot of people are working on one larger project.
25 |
26 | ## Github
27 | **GitHub** is a Web-based Git version control repository hosting service. Github is designed to manage open-source projects that are using git. It provides features like : creating a branch, creating a Pull Request, raising issues, etc.
28 |
29 | #### Summarizing the differences:
30 |
31 | | S no. | Git | Github |
32 | | ----- | ----------------------------------------- | ------------------------------------------------- |
33 | | 1. | Git is a version control system. | Github is a hosting service for git repositories. |
34 | | 2. | It is installed locally on system. | It is a cloud based service. |
35 | | 3. | It is a command line tool. | It is a Graphical user interface. |
36 | | 4. | It helps in tracking the changes locally. | It helps in collaborating with others. |
37 | | 5. | It was first released in 2005. | It was launched in 2008. |
38 |
--------------------------------------------------------------------------------
/git/009-git-installation.md:
--------------------------------------------------------------------------------
1 | ---
2 | id: 009-git-installation.md
3 | title: Git Installation
4 | tags:
5 | - Git
6 | - Github
7 | - Git First Time
8 | - Git Installation
9 | author: Sid-Lais
10 | meta-description: Git for first time
11 | date: 2021-10-11 08:30:00 +0100
12 | keywords: Git, Github
13 | template: post
14 | categories:
15 | - git
16 | image: assets/images/setup.svg
17 | ---
18 |
19 | # Git Installation
20 | Before working on Git repositories it is advised to get a good knowledge of Git. Git is an open source version control system. It is easy to learn and has very fast performance irrespective of the system.
21 |
22 | ## Steps to install Git
23 |
24 | 1. Download and install [Git](https://git-scm.com/) for your system.
25 | 2. After installation open a terminal in your system and write **git** to check proper installation.
26 |
27 | If it returns something like this below then congrats. *Git has been installed*.
28 |
29 |
30 | ## Set up Git credentials
31 |
32 | 1. In the terminal/shell type:
33 |
34 | ```bash
35 | git config --global user.name "Your name here"
36 | git config --global user.email "your_email@example.com"
37 | ```
38 | These will configure the git to set your name and email as default.
39 |
40 | You can also add(optional):
41 |
42 | ```bash
43 | git config --global color.ui true
44 | git config --global core.editor emacs
45 | ```
46 |
47 | The first command is to enable colors in the terminal which are used to better understand the current state of the code.
48 |
49 | The second command is to change the default text editor to emacs. You can change "emacs" to any other text editor desired.
50 |
51 | ## For more information refer to [GitHub Docs](https://docs.github.com/en/get-started/quickstart/set-up-git)
--------------------------------------------------------------------------------
/git/010-rename-git-branch.md:
--------------------------------------------------------------------------------
1 | ---
2 | id: 010-rename-git-branch.md
3 | title: Rename a branch in Git repository
4 | tags:
5 | - Git
6 | - Github
7 | - Git Branch
8 | author: Pavle Jonoski
9 | meta-description: Rename a branch in local and remote Git repository
10 | date: 2022-10-22 17:40:00 +0200
11 | keywords: Git, Github, Git Branch
12 | template: post
13 | categories:
14 | - git
15 | image: assets/images/pipe.svg
16 | ---
17 |
18 | # Rename a branch in local and remote Git repository
19 |
20 | You can easily rename a local Git branch.
21 |
22 | Assuming you are already on the checked out branch:
23 |
24 | ```bash
25 | git branch -m
26 | ```
27 |
28 | `-m` is shorthand for `--move`, which means to "move" (rename) the current branch to another name.
29 |
30 | For example, let's assume we have a local Git repository and we have checked out the branch `my_branch`.
31 | If we want to rename this branch to `my_new_branch`, we can do something like this:
32 |
33 | ```bash
34 | $ git status
35 | On branch my_branch
36 | nothing to commit, working tree clean
37 |
38 | $ git branch -m my_new_branch
39 | $ git status
40 | On branch my_new_branch
41 | nothing to commit, working tree clean
42 | ```
43 |
44 | ## Renaming a remote branch on Github
45 |
46 | If your branch is set up to track a branch in the remote repository, you'll have to push the name update as well.
47 |
48 | First you need to delete the upstream branch:
49 |
50 | ```bash
51 | git push origin :
52 | ```
53 |
54 | then, push and set the current branch to track the upstream branch:
55 |
56 | ```bash
57 | git push --set-upstream origin
58 | ```
59 |
60 | A full example:
61 |
62 | ```bash
63 | $ git branch -m my_new_branch # rename current branch to 'my_new_branch'
64 | $ git push origin :my_branch # 'my_branch' was the old name of the branch
65 | $ git push --set-upstream origin my_new_branch # push the branch under a new name and set
66 | # the local branch to track the upstream branch.
67 | ```
68 |
--------------------------------------------------------------------------------
/git/README.md:
--------------------------------------------------------------------------------
1 | Git related blog entries
2 | ========================
--------------------------------------------------------------------------------
/git/images/git-and-github.jpeg:
--------------------------------------------------------------------------------
https://raw.githubusercontent.com/flashreads/blogs/42c3680ee9ea0c5353a1d25ac7a830a081fbdfc3/git/images/git-and-github.jpeg
--------------------------------------------------------------------------------
/git/images/pr-merged-delete-branch.png:
--------------------------------------------------------------------------------
https://raw.githubusercontent.com/flashreads/blogs/42c3680ee9ea0c5353a1d25ac7a830a081fbdfc3/git/images/pr-merged-delete-branch.png
--------------------------------------------------------------------------------
/html/001-doctype.md:
--------------------------------------------------------------------------------
1 | ---
2 | id: 001-doctype.md
3 | title: What is Doctype in HTML?
4 | tags:
5 | - html
6 | - tags
7 | - doctype
8 | author: Zoran Pandovski
9 | meta-description: Simple introduction to the html
10 | date: 2020-06-17 22:56:16 +0200
11 | keywords: html, tags, doctype
12 | template: post
13 | categories:
14 | - html
15 | image: assets/images/webb.svg
16 | ---
17 |
18 | The DOCTYPE as the name indicates describes the type of the document that would be used so the web browser, web crawler or other client tools can know what type to expect e.g
19 |
20 | ```html
21 |
22 |
23 |
24 | Website Title
25 |
26 |
27 |
28 | The website body
29 |
30 |
31 |
32 | ```
33 |
34 | This means that it is HTML5. The `` is not an HTML tag it is just the information to the consumer so it knows how to parses the HTML.
35 | Web browsers are also using `` to found out which mode to use for rendering the web page (quirks mode, almost standards mode, and full standards mode). The main idea of the modes is to make old web pages compatible in the new browsers that are following W3C standards. Check out this https://en.wikipedia.org/wiki/Quirks_mode#Comparison_of_document_types article for the difference in the rendering modes.
36 | Sometimes you can find other `DOCTYPE` declarations. Those are for old versions of HTML, so other declarations were used e.g in HTML 4:
37 |
38 | ```
39 |
40 | ```
41 |
42 | This declaration looks more complicated because it contains the document type definition. For the full list of Doctype declarations check out [W3 list](https://www.w3.org/QA/2002/04/valid-dtd-list.html).
--------------------------------------------------------------------------------
/html/002-meta-tag.md:
--------------------------------------------------------------------------------
1 | ---
2 | id: 002-meta-tag.md
3 | title: HTML Meta tag viewport
4 | tags:
5 | - html
6 | - tags
7 | - meta
8 | - viewport
9 | - meta-tag
10 | author: Zoran Pandovski
11 | meta-description: Quick explanation about when to use html tag
12 | date: 2020-06-17 22:56:16 +0200
13 | keywords: html, tags, meta, viewport, meta-tag
14 | template: post
15 | categories:
16 | - html
17 | image: assets/images/mweb.svg
18 | ---
19 |
20 | The `meta name=viewport` is not part of any web standards, but most of the mobile browsers today have support for it. The [meta tag](https://www.w3.org/TR/2011/WD-html-markup-20110113/meta.name.html) adds instructions to the browser about the page scaling on different devices. To optimize the webpage for mobile devices add:
21 |
22 | ```html
23 |
24 | ```
25 | >Note: meta tag should be added in the of HTML page.
26 |
27 | The content `width=device-width` will set the width of the page the same as the device screen size and `initial-scale=1.0` will set the initial zoom on load. This means it will scale on different devices since the viewport(the visible area to the user) is different on the laptops, mobile phones, tablets. Omitting the `viewport` the browser will use a virtual viewport that will zoom out the website. So, it is always the best practice to add a viewport so the website will be optimized for different screens.
--------------------------------------------------------------------------------
/html/004-LesserKnownHTMLTricks.md:
--------------------------------------------------------------------------------
1 | ---
2 | id: 004-LesserKnownHTMLTricks.md
3 | title: Lesser Known HTML5 Tricks
4 | tags:
5 | - HTML5
6 | - Web development
7 | - tricks
8 | author: V Rahul
9 | meta-description: Useful HTML tricks that we can use to write an effective code.
10 | date: 2020-10-28 21:16:09 +0530
11 | keywords: HTML5, Web development, tricks
12 | template: post
13 | categories:
14 | - html
15 | image: assets/images/html1.svg
16 | ---
17 |
18 | # Lesser Known HTML5 Tricks:
19 |
20 |
21 |
22 |
23 | ## 1.Editable Content:
24 |
25 | ```
26 |
Hello World
27 | ```
28 |
29 | This feature lets you edit the content of element inside the browser just by clicking on the content. You must try!
30 |
31 |
32 |
33 |
34 | ## 2. HTML anchor element trick:
35 |
36 | ```
37 | Start chat with the username
38 | Start call with the username
39 | Add username
40 | Send email
41 | Make a call
42 | ```
43 |
44 | Here, just know I unfolded some of the things you can do with anchor tags that you may or may not be familiar with before reading this article. Well the good news is now you know these anchor element tricks!
45 |
46 |
47 |
48 | ## 3.Refreshing browser after a specific time:
49 |
50 | ```
51 |
52 | ```
53 |
54 | Using this meta code you can refresh your webpage in the iterval of every 10 seconds. Isn’t that super cool? You can use it to make your browser refresh every 5 seconds while you do your CSS. You don’t have to refresh your browser manually to see the changes.
55 |
56 | *Note: you can set content value to any value you like and it will increase or decrease the seconds based on the given value.*
57 |
58 |
59 |
60 |
61 | ## 4. Hiding elements without the help of CSS:
62 |
63 | ```
64 |
Hello World
65 | ```
66 | Oh yess! Its true you can hide html elements without the help of CSS by using ‘hidden’ attribute. Also it doesn’t work like CSS hidden and what I mean by that is when we hide any element using attribute ‘hidden’ it works more like CSS “display: none” rather than “visibility: hidden”. It takes no space while CSS “visibility: hidden” only hides the element but still take up the space.
67 |
68 |
69 |
70 |
71 | ## 5. HTML prefetch webpage:
72 |
73 | ```
74 |
75 | ```
76 |
77 | We know that after landing to the homepage the user is more likely to navigate to about page then you can prefetch the CSS files that will necessary for that webpage in the background before user even clicks on the link to navigate to that page. What it does is speeds up the process and user feels little to no delay in a reloading of a webpage.
78 |
79 |
80 |
81 |
82 | *Happy Coding and Keep Reading, Cheers!*
--------------------------------------------------------------------------------
/java/003-string-to-input-stream.md:
--------------------------------------------------------------------------------
1 | ---
2 | id: 003-string-to-input-stream.md
3 | title: How to convert String to InputStream in Java
4 | tags:
5 | - java
6 | - one-liner
7 | - string
8 | - input-stream
9 | author: Pavle Jonoski
10 | meta-description: Easily convert String to InputStream in Java
11 | date: 2020-07-08 15:22:45 +0200
12 | keywords: java, one-liner, string, input-stream
13 | template: post
14 | categories:
15 | - java
16 | image: assets/images/java/input.svg
17 | ---
18 |
19 | # Convert String to InputStream in Java
20 |
21 | Very often, especially when writing tests, you need to pass an `InputStream ` and
22 | you want to read the data from a `String`.
23 |
24 | To convert to input stream, the easiest way is first to convert the string to
25 | array of bytes, then read from the bytes using `ByteArrayInputStream`.
26 |
27 | Here is an one-liner on how to do that in Java:
28 |
29 | ```java
30 |
31 | InputStream stream = new ByteArrayInputStream("my-data".getBytes(StandardCharsets.UTF_8));
32 |
33 | ```
34 |
--------------------------------------------------------------------------------
/java/004-difference-between-@Controller-and-@RestController-in-spring-boot.md:
--------------------------------------------------------------------------------
1 | ---
2 | id: 004-difference-between-@Controller-and-@RestController-in-spring-boot.md
3 | title: Controller vs RestController in Spring Boot
4 | tags:
5 | - java
6 | - spring boot
7 | - controller
8 | - annotation
9 | - mvc
10 | - rest
11 | author: Kosta Lazarevski
12 | meta-description: Learn how to define your controller classes in spring boot mvc
13 | date: 2020-10-24 15:25:52 +0200
14 | keywords: java, spring boot, controller, annotation, mvc, rest
15 | template: post
16 | categories:
17 | - java
18 | image: assets/images/java/diff.svg
19 | ---
20 |
21 | # @Controller vs @RestController
22 |
23 | The @RestController annotation in Spring MVC is a combination of @Controller and @ResponseBody annotation. It was added into Spring 4.0 to make the development of RESTful Web Services in Spring framework easier. If you are familiar with Rest web services you know that the main difference between a web application and REST API is that the response from a web application is view in HTML + CSS + JavaScript (client/human view),
24 | While REST API returns data in form of JSON or XML(most of the REST clients are programs) From there we can see the difference between @Controller and @RestController
25 |
26 | @Controller creates a map of the model object and finds a view. @RestController returns the object and object data written onto HTTP response as JSON or XML.
27 |
28 | The traditional way is to use @Controller and use @ResponseBody annotation but since this is the default behavior of RESTful Web services, Spring introduced @RestController which combined the behavior of @Controller and @ResponseBody together.
29 |
30 | Here is an example of a code snippets with the same functionality:
31 |
32 |
33 | ```java
34 |
35 | @Controller
36 | @RequestBody
37 | public class MvcController {
38 | .. your logic
39 | }
40 |
41 |
42 | @RestController
43 | public class RestFullController {
44 | .... your logic
45 | }
46 |
47 | ```
48 |
49 | The @Controller annotation indicates that the class is a "Controller" like a web controller while @RestController annotation indicates that the class is a controller where @RequestMapping methods assume @ResponseBody semantics by default i.e. servicing REST API.
50 |
51 | The @Controller is a specialization of @Component annotation while @RestController is a specialization of @Controller annotation. It is actually a convenience controller annotated with @Controller and @ResponseBody.
52 |
--------------------------------------------------------------------------------
/java/007-java-collections-hierarchy.md:
--------------------------------------------------------------------------------
1 | ---
2 | id: 007-java-collections-hierarchy.md
3 | title: Java Collection Hierarchy
4 | tags:
5 | - java
6 | - collection
7 | - API
8 | - List
9 | - Set
10 | - Queue
11 | author: Kosta Lazarevski
12 | meta-description: Learn about Java Collection Framework hierarchy
13 | date: 2020-10-22 19:28:30 +0200
14 | keywords: java, collection, API, List, Set, Queue
15 | template: post
16 | categories:
17 | - java
18 | image: assets/images/java/hieararchy.png
19 | ---
20 |
21 | # Java Collection Hierarchy
22 |
23 | Java Collection Framework was introduced in Java 1.2 version. Collections are containers that group multiple items in a single unit. Collection is an object that represents a group of objects. Collections are dynamic containers that allow you to add or remove items at runtime. It provides an architecture to store and manipulate groups of objects. It allows you to search, sort and manipulate data. It provides interfaces and classes in order to store the data in different data structures.
24 |
25 | Java Collections hierarchy is a set of API`s, linked between them in parent - child relation. This is a diagram that shows the hierarchy from the root interface: The Collection Interface(java.util.Collection).
26 |
27 | 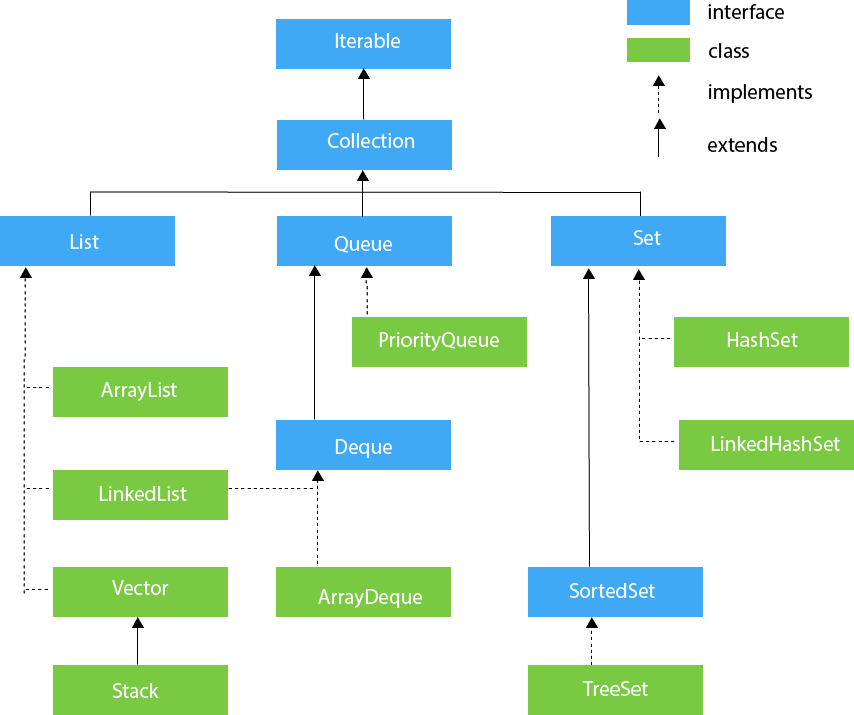
28 |
29 | From the diagram of the Collection interface we can see three main data structures in List, Queue and Set. All of these data structures are manipulating only with values(the iterator uses index to check or add or retrieve element).The methods that contain the algorithms that perform the computations(sorting, searching, etc…) are polymorphic. One method can be used on many implementations of the right collection Interface. Methods(algorithms) are reusable.This means that we get to work with super arrays.
30 |
--------------------------------------------------------------------------------
/java/013-abstract-classes-in-java.md:
--------------------------------------------------------------------------------
1 | ---
2 | id: 013-abstract-classes-in-java.md
3 | title: Abstract Classes in Java
4 | tags:
5 | - abstraction
6 | - OOP
7 | - Class
8 | author: Kosta Lazarevski
9 | meta-description: Learn about Abstract Classes in Java
10 | date: 2020-11-04 19:58:39 +0100
11 | keywords: abstraction, OOP, Class
12 | template: post
13 | categories:
14 | - java
15 | image: assets/images/java/abstract.svg
16 | ---
17 |
18 | # Abstraction
19 |
20 | Abstraction is a process of hiding the implementation details and showing only functionality to the user. Focus is set on the purpose of the object and not it's functionality.
21 |
22 | ## CLasses
23 |
24 | A class which is declared with the `abstract` keyword is an abstract class in Java. It can have Abstract methods(no body) and Non-abstract methods(has a body). An abstract class can not be initiated, meaning we can`t create an onject of its type.
25 |
26 | Let's see why do we need abstract classes.
27 |
28 | Let's say that we hava a class Aimal that has a lot of subclasses(Dog, Cat, etc.) We don`t want to hava an Animal object becouse we only model a certain animals.
29 | Here is an example:
30 |
31 | ```java
32 | abstract class Animal{
33 | //abstract methods
34 | public abstract void sound(); //no body
35 | }
36 | public class Dog extends Animal{
37 |
38 | @Override //impleenting the abstract method
39 | public void sound(){
40 | System.out.println("Woof!")
41 | }
42 |
43 | public static void main(String args[]) {
44 | Animal obj = new Dog();
45 | obj.sound();
46 | }
47 |
48 | }
49 | ```
50 |
51 | ## When to use abstract classes
52 |
53 | 1. An abstract class is a good choice if we are using the inheritance concept since it provides a common base class implementation to derived classes.
54 | 2. An abstract class is good to use if we want to declare non-public members. In an interface, all methods must be public.
55 | 3. If we want to add new methods in the future, then an abstract class is a better choice. Because if we add new methods to an interface, then all of the classes that already implemented that interface will have to be changed to implement the new methods.
56 | 4. If we want to create multiple versions of our component, create an abstract class. Abstract classes provide a simple and easy way to version our components. By updating the base class, all inheriting classes are automatically updated with the change. Interfaces, on the other hand, cannot be changed once created. If a new version of an interface is required, we must create a whole new interface.
57 | 5. If we want to provide common, implemented functionality among all implementations of our component, use an abstract class. Abstract classes allow us to partially implement our class, whereas interfaces contain no implementation for any members.
58 |
--------------------------------------------------------------------------------
/java/017-checked-vs-unchecked-exceptions-in-java.md:
--------------------------------------------------------------------------------
1 | ---
2 | id: 017-checked-vs-unchecked-exceptions-in-java.md
3 | title: Checked VS Unchecked eceptions in Java
4 | tags:
5 | - checked
6 | - unchecked
7 | - exception
8 | - runtimeexception
9 | - error
10 | author: Kosta Lazarevski
11 | meta-description: Learn the difference betwen checked and unchecked exceptions in Java
12 | keywords: exception, checked, javaruntimeexception, unchecked, error
13 | template: post
14 | categories:
15 | - java
16 | - exception
17 | image: assets/images/java/check.svg
18 | ---
19 |
20 |
21 |
22 |
23 | ## Checked versus Unchecked Java Exceptions
24 |
25 | ### We can devide Java exceptions into three categories:
26 |
27 | **Errors** and **Exceptions** can be frustrating at times, but at the end of the day we need to know how to solve them. That is what we do. This little blog will help you learn about the types of Java Exceptions and they mean.
28 | These three categories are broken down into checked and unchecked classifications—error and runtime exceptions. Errors and Runtime Exceptions are classified as an unchecked, which means are not checked at compile time and can result in runtime errors.
29 |
30 |
31 | **Checked** - these are exceptions that are checked by the compiler at compile time. These exceptions must be caught by a try/catch in the code or noted as thrown by the method. For instance, if a program attempts to access a file that is currently unavailable, the method to access the file must either catch or throw a `FileNotFoundException`.
32 |
33 | **Error** - errors are exceptions that happen externally to your Java program. One common example of the error is when the Java virtual machine (JVM) runs out of memory, which will throw an `OutOfMemoryError`.
34 |
35 | **Runtime** - runtime exceptions are internal to your application but are not typically recoverable. For example, an object that is expected to have a value but is actually null. In this case, a `NullPointerException` exception would be thrown.
36 |
37 | These three categories are broken down into checked and unchecked classifications—error and runtime exceptions and are grouped together as unchecked, which, per their name, are not checked at compile time and can result in runtime errors.
38 |
--------------------------------------------------------------------------------
/java/018-cryptographically-secure-random.md:
--------------------------------------------------------------------------------
1 | ---
2 | id: 018-cryptographically-secure-random.md
3 | title: Cryptographically Secure Random in Java
4 | tags:
5 | - java
6 | - random
7 | - crypto
8 | date: 2021-10-24 23:56:00 +0200
9 | keywords: random, java, cryptographically-secure
10 | categories:
11 | - java
12 | image: assets/images/java/crypto.svg
13 | author: Pavle Jonoski
14 | meta-description: generate cryptographically secure random number in Java
15 | ---
16 |
17 | # Generate cryptographically secure random number in Java
18 |
19 | In many cases you might need to generate a cryptographically secure random number. The difference between a random number
20 | generated using the standard [Random](https://docs.oracle.com/javase/8/docs/api/java/util/Random.html) generator or via [ThreadLocalRandom](https://docs.oracle.com/javase/8/docs/api/java/util/concurrent/ThreadLocalRandom.html), is that the algorithm used to generate the
21 | pseudo-random number ([PRNG](https://en.wikipedia.org/wiki/Pseudorandom_number_generator)) is usually cryptographically strong i.e. the probability of predicting the random number is very
22 | small. The typical usage of such generated numbers and values is when you need to generate a secret key/password or other random bytes which are hard to guess and most often used in authentication/authorization flows, or when generating random secret keys for encryption.
23 |
24 | To generate a cryptographically secure random numbers or sequences in Java, you should use [`SecureRandom`](https://docs.oracle.com/javase/8/docs/api/java/security/SecureRandom.html).
25 |
26 | Here is a simple example of generating a random integer:
27 |
28 | ```java
29 | SecureRandom random = new SecureRandom();
30 | var i = random.nextInt();
31 | System.out.println("This is my random number: " + i);
32 | ```
33 | `SecureRandom` extends the `Random` class and implements all methods already exposed in `Random`, so it can be used as a drop-in replacement for it.
34 |
35 | Here are some more examples.
36 |
37 | Generate a random sequence of bytes:
38 |
39 | ```java
40 | SecureRandom random = new SecureRandom();
41 |
42 | byte[] buffer = new byte[128];
43 | random.nextBytes(buffer);
44 | // we have now generated a 128 bytes with random values.
45 | ```
46 |
47 | Generate a random [base64](https://en.wikipedia.org/wiki/Base64) string:
48 |
49 | ```java
50 | import java.security.SecureRandom;
51 | import java.util.Base64;
52 |
53 | public class CryptoSafeRandom {
54 |
55 | public static void main(String[] args) {
56 | SecureRandom random = new SecureRandom();
57 | var buffer = new byte[12];
58 | random.nextBytes(buffer);
59 | String randomString = Base64.getEncoder().encodeToString(buffer);
60 | System.out.println("This is my cryptographically secure random string: " + randomString);
61 | }
62 | }
63 | ```
64 |
65 | Output:
66 | ```
67 | This is my cryptographically secure random string: D++46PI36dOUmhHI
68 | ```
--------------------------------------------------------------------------------
/java/019-generate-random-int-within-range.md:
--------------------------------------------------------------------------------
1 | ---
2 | id: 019-generate-random-int-within-range.md
3 | title: Generate a random integer within specific range
4 | tags:
5 | - java
6 | - random
7 | - integer
8 | - range
9 | date: 2021-10-25 00:35:30 +0200
10 | keywords: generate, random, integer, range, java
11 | categories:
12 | - java
13 | image: assets/images/java/calculator.svg
14 | author: Pavle Jonoski
15 | meta-description: learn howto generate a random integer within a specific range in Java
16 | ---
17 |
18 | # Generate a random integer within specific range in Java
19 |
20 | Very often you need to generate a random number within some range.
21 | Java offers a [`Random.nextInt(int bound)`]() method, which gives you a random integer between `0` (inclusive) and the `bound` (exclusive).
22 |
23 | We can use this method to generate a random number between `a` and `b`:
24 |
25 | ```java
26 | public static int nextRandomIntBetween(int a, int b) {
27 | if (b <= a) {
28 | throw new IllegalArgumentException("b must be greater than a");
29 | }
30 | int m = b - a;
31 | Random random = new Random();
32 | return random.nextInt(m) + a;
33 | }
34 | ```
35 |
36 | First, we must ensure that `b` is greater than `a`. `nextInt(int bound)` does not accept negative values.
37 | Then, we calculate the difference `b - a`. This is the range of our random integers and we can use this
38 | to generate random number between 0 and `b - a`.
39 | Finally, we add the value of `a` to the random number, which will make the random number exactly in the range
40 | we wanted.
41 |
42 | Here is the full example:
43 |
44 | ```java
45 | package com.flashreads.examples;
46 |
47 | import java.security.SecureRandom;
48 | import java.util.Base64;
49 | import java.util.Random;
50 |
51 | public class RandomNumberWithinRangeExample {
52 |
53 | public static void main(String[] args) {
54 | System.out.println("Here are 10 numbers between 5 (inclusive) and 8 (exclusive):");
55 | for(int i = 0; i < 10; i++) {
56 | System.out.println(nextRandomIntBetween(5, 8));
57 | }
58 |
59 | }
60 |
61 |
62 | public static int nextRandomIntBetween(int a, int b) {
63 | if (b <= a) {
64 | throw new IllegalArgumentException("b must be greater than a");
65 | }
66 | int m = b - a;
67 | Random random = new Random();
68 | return random.nextInt(m) + a;
69 | }
70 | }
71 |
72 | ```
73 |
74 | Output:
75 |
76 | ```
77 | Here are 10 numbers between 5 (inclusive) and 8 (exclusive):
78 | 6
79 | 7
80 | 5
81 | 5
82 | 5
83 | 6
84 | 7
85 | 7
86 | 6
87 | 6
88 | ```
--------------------------------------------------------------------------------
/java/020-errors-in-java.md:
--------------------------------------------------------------------------------
1 | ---
2 | id: 020-errors-in-java.md
3 | title: Errors In Java
4 | tags:
5 | - java
6 | - errors
7 | - exception
8 | author: Nisarga K H
9 | meta-description: Learn about common errors and its types in Java
10 | date: 2021-10-27 22:10:32 +0530
11 | keywords: java, errors, exception
12 | template: post
13 | categories:
14 | - java
15 | image: assets/images/error.svg
16 | ---
17 |
18 | # ERRORS
19 |
20 | `Error` results in abnormal working of the program. Some errors dont let the program to be compiled meanwhile some errors occur during execution after succesful compilation. Based on this factor errors are classified into three main types.
21 |
22 | ## Types Of Errors
23 |
24 | There are three types of errors in Java
25 |
26 | 1. Syntax errors
27 | 2. Logical errors
28 | 3. Runtime errors (Exception)
29 |
30 | ### 1. Syntax errors
31 |
32 | These are the errors which occur when our compiler finds violation of Java syntax in our program. It is also called as compile time error as it is detected by the compiler.
33 |
34 | Example:
35 | ```java
36 |
37 | public static void main(String args[]){
38 |
39 | //Semicolon missing
40 |
41 | int a=9 // semicolon missing
42 | int b=3+a;
43 |
44 | System.print.println(b);
45 |
46 | // Datatype missing
47 |
48 | d=3456;
49 |
50 | }
51 | ```
52 |
53 |
54 | ### 2. Logical errors
55 |
56 | These are also called as bugs. This occurs when the program compiles and runs but the expected output is not received when certain input is given. These happen due to not using appropriate logic in the program by the user.
57 |
58 | Example:
59 |
60 | ```java
61 | public static void main(String args[]){
62 |
63 | // Find product of a and b
64 | int a = 34;
65 | int b=0;
66 |
67 |
68 | int c= a/b;
69 |
70 | System.out.println("product of a and b is"+c);
71 |
72 | //But here c is the quotient not the product of a and b
73 | }
74 | ```
75 |
76 |
77 | ### 3. Runtime errors
78 |
79 | These errors are encountered while the program is executing. They get successfully compiled but throw an exception while running. These are also called `Exceptions`. They are hard to find as compiler doesnt point at the line where the error as ocurred.
80 |
81 | Example:
82 |
83 | ```java
84 | public static void main(String args[]){
85 |
86 | //Number divided by 0 is not defined
87 | int a = 34;
88 | int b=0;
89 |
90 | int c= a/b;
91 |
92 | System.out.println(c);
93 | }
94 | ```
95 |
--------------------------------------------------------------------------------
/java/021-type-comparison.md:
--------------------------------------------------------------------------------
1 | ---
2 | id: 021-type-comparison
3 | title: Type Comparison
4 | tags: java, object, type
5 | date: 2021-10-28 21:53:39 +0200
6 | keywords: java, object, type
7 | categories: java
8 | image: assets/images/java/type.svg
9 | author: Alla Konstantinova
10 | meta-description: Type Comparison in Java
11 | ---
12 |
13 | # Type Comparison
14 |
15 | The most common way to determine if a given object is an **instance** of a given class, superclass or interface, is by using the binary operator `instanceof`. It includes implicit null check and generates a compile-time error if the types are not related. But it doesn't allow primitives and requires the types to be know at compile time.
16 |
17 | ## If you want to check dynamically at runtime
18 | Use the equivalent method `boolean isInstance(Object obj)` in `Class`. It also includes null check, but allows for primitives:
19 |
20 | ```java
21 | a instanceof B
22 | // returns false for null
23 | null instanceof B
24 |
25 | a.getClass().isInstance(b);
26 | // commonly used for generics
27 | Class type = b.getClass();
28 | type.isInstance(a);
29 |
30 | // Note that the parameter is autoboxed to type Integer
31 | int x = 4;
32 | Integer.class.isInstance(x);
33 | ```
34 |
35 | ## Check compatibility of two types
36 | When you need to check subtyping relation use the method `boolean isAssignableFrom(Class cls)` in `Class`. It may throw _NullPointerException_.
37 |
38 | ```java
39 | // is it possible to B b = new A()
40 | Class aClass = CharSequence.class;
41 | Class bClass = String.class;
42 | bClass.isAssignableFrom(aClass());
43 |
44 | // works for arrays
45 | CharSequence[].class.isAssignableFrom(String[].class); // true
46 | Integer[].class.isAssignableFrom(String[].class); //false
47 | ```
48 |
49 | ## Pattern Matching (Java 14)
50 | ```java
51 | if(a instanceof B b) {
52 | // b is casted
53 | b.toString();
54 | }
55 | ```
56 |
57 | ## Special types
58 | ```java
59 | // Enums
60 | enum Color { WHITE, GRAY, BLACK }
61 |
62 | Color.class.isEnum(); // Enum.class.isAssignableFrom(Color.class);
63 | Color.WHITE instanceof Enum; // true
64 |
65 | // Arrays
66 | String[].class.isArray();
67 | // get the type of the variables in an array (null if obj is not an array)
68 | Class componentType = obj.getComponentType();
69 |
70 | // Primitives
71 | int.class.isPrimitive();
72 | ```
73 |
--------------------------------------------------------------------------------
/java/022-catch-and-fix-array-out-of-bounds-exception.md:
--------------------------------------------------------------------------------
1 | ---
2 | id: 022-catch-and-fix-array-index-out-of-bounds-exception-in-java.md
3 | title: Catch and fix ArrayIndexOutOfBoundsException in Java
4 | tags:
5 | - arrayoutofboundsexception
6 | - exception
7 | - runtimeexception
8 | - java exception
9 | author: Kosta Lazarevski
10 | meta-description: Learn how to catch and fix ArrayIndexOutOfBoundsException in Java
11 | keywords: exception, arrayoutofboundsexception, javaruntimeexception
12 | template: post
13 | categories:
14 | - java
15 | - exception
16 | image: assets/images/fix.svg
17 | ---
18 |
19 | ## What is a ArrayIndexOutOfBoundsException?
20 |
21 | `java.lang.ArrayIndexOutOfBoundsException` is a runtime exception in Java. occurs while processing an array and asking for a position that does not exist within the size of the array.
22 |
23 | Since the `ArrayIndexOutOfBoundsException` is a runtime exception, it doesn't need to be caught and handled explicitly in application code.
24 |
25 | ## Example of a ArrayIndexOutOfBoundsException
26 |
27 | In this example we are trying to access an element at index 5 of the animals array, which has only 2 elements. In this case java.lang.ArrayIndexOutOfBoundsException will be thrown.
28 |
29 | ```java
30 | public class ArrayIndexOutOfBoundsExample {
31 | public void processArray() {
32 | List animals = new ArrayList<>();
33 | names.add("cat");
34 | names.add("dog");
35 |
36 | return animals.get(5);
37 | }
38 | }
39 | ```
40 |
41 | ## How to Avoid getting ArrayIndexOutOfBoundsException
42 |
43 | The `ArrayIndexOutOfBoundsException` can be avoided using checks and preventive techniques like the following:
44 |
45 | 1. Always remember that the array is a zero-based index, the first element is at the 0th index and the last element is at length - 1 index.
46 | 2. Pay special attention to the start and end conditions of the loop.
47 |
--------------------------------------------------------------------------------
/java/023-type-casting.md:
--------------------------------------------------------------------------------
1 | ---
2 | id: 023-type-casting
3 | title: Type Casting
4 | tags:
5 | - java
6 | - object
7 | - type
8 | date: 2021-10-31 16:08:39
9 | keywords: java, object, type
10 | categories:
11 | - java
12 | image: assets/images/factory.svg
13 | author: Ryan Omoruyi
14 | meta-description: Type Casting in Java
15 | ---
16 |
17 | # Type Casting
18 |
19 | Type casting is when the data type of a variable is casted to another type. There are two types of casting: Widening and Narrowing.
20 |
21 | ## Converting a Variable's Type Using Widening Casting
22 | With this type of casting, there is no extra code that needs to be written. Java does this for you under the hood when a smaller type is converted to a larger type. When dealing with numbers, a `byte` is the smallest data type (whole numbers from -128 to 127), then a `short` (whole numbers from -32,768 to 32,767), `int` (whole numbers from -2,147,483,648 to 2,147,483,647), `long` (whole numbers from -9,223,372,036,854,775,808 to 9,223,372,036,854,775,807), `float` (fractional numbers with 6 to 7 decimal places), and `double` (fractional numbers with 15 decimal places).
23 |
24 | ```java
25 | int intType = 2021;
26 | // casting at assignment
27 | float floatType = intType; // Outputs 2021.0
28 | ```
29 |
30 | ## Converting a Variable's Type Using Narrowing Casting
31 | This casting is used when converting from a larger data type to a smaller type. For example, converting from a `long` to an `int` requires Narrowing casting. For example:
32 |
33 | ```java
34 | long longType = 2000000L;
35 | // Cast by wrapping the desired type in parentheses before the value
36 | int intType = (int) longType; // Outputs 2000000
37 |
38 | // won't work if the long value is greater or less than int's range
39 | longType = 3000000000L; // greater than the upper limit of int type
40 | // the data is cast to an int
41 | // since the long value is out of int's range, Java tries converting to a value within range
42 | intType = (int) longType; // Outputs -1294967296
43 | ```
44 |
45 | ## Typecasting WYNTK
46 |
47 | Typecasting doesn't work for all data classes. Some may wonder if you can convert a `char` to a `String` and vice versa. Primitive data types are the only data types that can be casted in this manner. And since the `String` class is not a primitive type, it's not allowed. There are, however, built in methods in the String class that help do this; like the `String.valueOf(char c)` method and in the Character class like `Character.toString(char c)`.
48 |
49 |
--------------------------------------------------------------------------------
/javascript/002-what-is-javascript.md:
--------------------------------------------------------------------------------
1 | ---
2 | id: 002-what-is-javascript
3 | title: A brief introduction to what is JavaScript and why it is popular
4 | tags:
5 | - javascript
6 | - es6
7 | - beginner
8 | - codenewbie
9 | author: Parwinder Bhagat
10 | meta-description: Learn what JavaScript is and why it is so popular
11 | date: 2020-10-17 13:22:20 -0500
12 | keywords: javascript, es6, beginner, codenewbie
13 | template: post
14 | categories:
15 | - javascript
16 | image: assets/images/javascript/js.svg
17 | ---
18 |
19 | ## Definition
20 |
21 | A direct quote from the Mozilla developer's network or [MDN](https://developer.mozilla.org/en-US/docs/Learn/JavaScript/First_steps/What_is_JavaScript)
22 |
23 | >JavaScript is a scripting or programming language that allows you to implement complex features on web pages — every time a web page does more than just sit there and display static information for you to look at — displaying timely content updates, interactive maps, animated 2D/3D graphics, scrolling video jukeboxes, etc. — you can bet that JavaScript is probably involved.
24 |
25 | In short, it makes your pages feel more dynamic. A webpage generally speaking consists of three key elements:
26 |
27 | 1. **HTML** (Hypertext Markup Language): This allows you to create the structure of the web page
28 | 2. **CSS** (Cascading stylesheet): This is to make that web page look pretty 😊
29 | 3. **JavaScript**: Allows you to do anything dynamic with the page including fetching data from a server or making the page interactive
30 |
31 | ## History
32 |
33 | JavaScript was not always known as JavaScript. It started with the name `LiveScript`. At the time of creation of JavaScript, Java was a common language, and it was decided to add the word Java to it. It does not have any relationship with Java, in any case. There is a famous/corny saying
34 |
35 | > Java is to JavaScript as a car is to carpet
36 |
37 | As it evolved, it got to be known as [ECMAScript](https://en.wikipedia.org/wiki/ECMAScript). The name JavaScript is a trademark owned by Oracle Corp. in the United States. Don't believe me? [Check it out](http://tsdr.uspto.gov/#caseNumber=75026640&caseType=SERIAL_NO&searchType=statusSearch)
38 |
39 | ## Why is JavaScript popular?
40 |
41 | When I say JavaScript is popular, I mean it. According to the [Stack Overflow 2019 developer's survey](https://insights.stackoverflow.com/survey/2019#technology), it is the most popular language. For 7 years in a row!
42 |
43 | So what makes it so famous?
44 |
45 | 1. It works well with the other two components of a webpage (HTML and CSS)
46 | 2. Minimal learning curve (which has been considered a good or bad for the language)
47 | 3. Supported by all major browsers and enabled by default
48 | 4. Works without any compilation or transpiling
49 | 5. It can run in the browser or server-side. It can run on anything that can support the JavaScript engine (V8, Trident, SpiderMonkey)
50 |
51 | Hopefully, by now, I have sold you on the idea of JavaScript and why it is fun to work with. In the next few blog posts, we will go over the basics of running JavaScript and introduction to principles of JavaScript. As we take a deeper dive into these basics, you will also realize that it's relatively easy to make mistakes if you don't know what you are doing. We will learn from the mistakes of the past and try to be a better JavaScript developer.
52 |
--------------------------------------------------------------------------------
/javascript/005-array-splice-method.md:
--------------------------------------------------------------------------------
1 | ---
2 | id: 005-array-splice-method
3 | title: JavaScript Array.splice() Method
4 | tags:
5 | - javascript
6 | - es6
7 | - beginner
8 | - codenewbie
9 | author: Alex Kimeu
10 | meta-description: Learn JavaScript array.splice() method
11 | date: 2020-10-19 21:03:29 +0300
12 | keywords: javascript, es6, beginner, codenewbie
13 | template: post
14 | categories:
15 | - javascript
16 | image: assets/images/javascript/add.svg
17 | ---
18 |
19 | ## JavaScript Array splice() method.
20 |
21 |
22 |
23 | This method removes or replaces existing elements in the array. It gets the starting index, count(number of items to remove or replace) and optionally what to replace with. It returns the new array (removed items).
24 | This method modifies the original array.
25 | In case you want to add more elements to the array without removing any, you can provide the count parameter with a value of 0.
26 | **NB:** Not the best way to add items to an array.
27 |
--------------------------------------------------------------------------------
/javascript/006-sort-trick.md:
--------------------------------------------------------------------------------
1 | ---
2 | id: 006-sort-trick.md
3 | title: JavaScript sort trick
4 | tags:
5 | - JavaScript
6 | - sort
7 | - localeCompare
8 | author: Rabson J Phiri
9 | meta-description: How to sort strings and avoid unexpected outcomes
10 | date: 2020-10-26 13:59:31 +0100
11 | keywords: JavaScript, sort, localeCompare
12 | template: post
13 | categories:
14 | - javascript
15 | image: assets/images/javascript/sort.svg
16 | ---
17 |
18 | # Sorting strings in JavaScript
19 |
20 | The JavaScript **sort** method is very useful when we want to sort numbers, or even strings. But when sorting strings, we ought to be careful because the strings might be in different languages. Luckily, there's a fix for that. It's called **localeCompare**:
21 |
22 | `referenceString.localeCompare(compareString)`
23 |
24 | The `referenceString` is the string we want to compare, and the `compareString` is the string against which we're compareing. The `localeCompare` method returns a Number, which may be:
25 |
26 | > - -1 if the `referenceString` is sorted before the `compareString`
27 | > - 0 if the two strings are equal
28 | > - 1 if the `referenceString` is sorted after the `compareString`
29 |
30 | Here's an example:
31 |
32 | ```javascript
33 |
34 | const words = ['hello', 'répondre', 'sort', 'déclaré'];
35 |
36 | words.sort((a, b) => a.localeCompare(b));
37 |
38 | ```
39 |
40 | As we can see, some words have certain punctuations. Using `localeCompre` with **sort** helps us sort the English and French words in our array successfully. More documentaion can be found [here](https://developer.mozilla.org/en-US/docs/Web/JavaScript/Reference/Global_Objects/String/localeCompare)
--------------------------------------------------------------------------------
/javascript/007-backend-fontend-with-javascript.md:
--------------------------------------------------------------------------------
1 | ---
2 | id: 007-backend-frontend-with-javascript
3 | title: Controlling backend and frontend with just one language, JavaScript
4 | tags:
5 | - javascript
6 | - nodejs
7 | - backend
8 | - frontend
9 | author: Ronald S. Pineda
10 | meta-description: backend and frontend with JavaSript
11 | date: 2020-10-28 00:18:15 +0100
12 | keywords: javascript, nodejs, backend, frontend
13 | template: post
14 | categories:
15 | - javascript
16 | image: assets/images/javascript/js.svg
17 | ---
18 |
19 | If you are looking for a programming language to handle the entire chain of creation of an application, both the client side (frontend) and the server side, database and other parts of the backend, javascript could be the best option.
20 |
21 | My name is Ronald, I am a FullStack developer that means I take care of both sides: the back and the front side. With JavaScript I can manage the front through native Javascript or through Frameworks such as React.js, Vue.js, or Angular. Of course you need to know HTML and CSS, two basic and easy languages to learn before mastering JavaScript.
22 |
23 | On the back side I use Node.js (especially the framework: Express) to manage the server and the API's, I also like to use MongoDB as a database since the language is also Javascript. If you need more tools such as a Docker container or a cloud deployment with AWS and monitoring on production with PM2, you would still be comfortable since the language is still similar to working with JavaScript.
24 |
25 | Another advantage of Javascript is that it is a language that is relatively easy to learn, with which you can learn to master the front and the back in a few years. Something that with other back-end languages like Java would take a little longer.
26 |
27 | In conclusion, if you are looking for a programming language with which to comfortably handle the entire fabric of an application, JavaScript is surely a very good choice. :+1:
28 |
29 |
--------------------------------------------------------------------------------
/javascript/007-memory-optimization-for-html5-games.md:
--------------------------------------------------------------------------------
1 | ---
2 | id: 007-memory-optimization-for-html5-games
3 | title: Memory optimization for HTML5 games
4 | tags:
5 | - javascript
6 | - games
7 | - gamedev
8 | - beginner
9 | - memory
10 | - optimization
11 | author: Daniel Kalevski
12 | meta-description: Quick guide for basic memory optimization in HTML5 games
13 | date: 2020-10-27 19:51:08 +0100
14 | keywords: javascript, games, gamedev, beginner, memory, optimization
15 | template: post
16 | categories:
17 | - javascript
18 | image: assets/images/javascript/memory.svg
19 | ---
20 |
21 | ## Intro:
22 | Most of the games contains game logic where you need to instantiate a lot of objects from some class like particles that have short lifetime and needs to be destroyed.
23 |
24 | ## Problem:
25 | JavaScript's model is based on garbage collection pattern. This means that the developer don't have dirrect control over allocated memory. Memory locations (variables) marked as `null` will be collected by garbage collector and removed from memory. But when garbage collector needs to dispose a lot of objects, takes a lot of processing time. Neceserry spent processing time is bad for the performance of the game.
26 |
27 | In most cases the memory profile will be like this:
28 |
29 | 
30 |
31 |
32 | ## How to fix that
33 |
34 | Solution for this kind of problem is implementing [**Object pools pattern**](https://en.wikipedia.org/wiki/Object_pool_pattern). This implementation will help with reusing disposed objects instead of creating new ones.
35 |
36 | After optimization:
37 |
38 | 
39 |
40 |
41 | ## Example
42 |
43 | 1. Import [object-pool](https://www.npmjs.com/package/object-pool) npm module by executing `npm install --save object-pool`
44 |
45 | 2. Replace old implementation
46 | ```javascript
47 | class GameObject {
48 |
49 | speed = 1
50 |
51 | run() { /* your code */ }
52 | }
53 |
54 | let gameObject = new GameObject()
55 | gameObject.run()
56 | ```
57 |
58 | with:
59 |
60 | ```javascript
61 |
62 | import pool from 'object-pool'
63 |
64 | class GameObject {
65 |
66 | speed = 1
67 |
68 | run() { /* your code */ }
69 | }
70 |
71 | const gameObjectPool = pool({
72 | init: () => { // a factory method which should return a freshly created object.
73 | return new GameObject()
74 | },
75 | initSize: 10, // a number to specify the initial size of reserved objects in the pool
76 |
77 | disable: gameObject => {
78 | // reset gameObject properties to default values
79 | gameObject.speed = 1
80 | }
81 | })
82 |
83 | let gameObject = gameObjectPool.create()
84 | gameObject.run()
85 |
86 | ```
87 |
88 | For more detailed documentation for the library visit [the link](https://www.npmjs.com/package/object-pool).
--------------------------------------------------------------------------------
/javascript/009-array-sort-method.md:
--------------------------------------------------------------------------------
1 | ---
2 | id: 009-array-sort-method
3 | title: JavaScript Array.sort() Method
4 | tags:
5 | - javascript
6 | - es6
7 | - beginner
8 | - codenewbie
9 | author: Alex Kimeu
10 | meta-description: Learn JavaScript array.sort() method
11 | date: 2020-10-31 17:50:04 +0100
12 | keywords: javascript, es6, beginner, codenewbie
13 | template: post
14 | categories:
15 | - javascript
16 | image: assets/images/javascript/sort1.svg
17 | ---
18 |
19 | ## JavaScript Array sort() method.
20 |
21 |
22 |
23 | This method sorts the elements of an array in ascending order by default. It converts the elements from the array to strings then compares their sequences of utf-16 code values.
24 | For an array of strings, this works perfectly fine. However, to sort an array of numbers, this method will not work as expected because it converts the elements to strings first.
25 |
26 | To achieve what you expect, you can provide a compare function as a callback to the sort method. There are 3 possible outcomes in the callback function: **_1. < 0 : a comes first_** **_2. 0 : no change_** **_3. > 0 : b comes first_**
27 | If you want to sort in descending order, you can return b - a in the callback function.
28 |
--------------------------------------------------------------------------------
/javascript/010-const-and-let-in-javascript.md:
--------------------------------------------------------------------------------
1 | ---
2 | id: 010-const-and-let-in-javascript
3 | title: A little about const and let keywords in Javascript
4 | tags:
5 | - javascript
6 | - es6
7 | - beginner
8 | - const
9 | - let
10 | author: Jawaria Alvi
11 | meta-description: Learn about const and let in JavaScript
12 | date: 2021-10-05
13 | keywords: javascript, es6, beginner, const, let
14 | template: post
15 | categories:
16 | - javascript
17 | image: assets/images/javascript/csljs.svg
18 | ---
19 |
20 | ## cons and let keywords
21 |
22 | 1. **const** and **let** both are the keywords for variable declaration.
23 |
24 | 2. **const** and **let** both are the block scope.
25 | ### Block Scope Example
26 | ```
27 | const blockVariableExample = () => {
28 | let number = 123;
29 | console.log(number) // Prints 123
30 | }
31 |
32 | blockVariableExample;
33 | console.log(number) // Here it gives error as number varaible can only be accessed inside blockVariableExample function
34 | ```
35 | 3. **const** cannot be redeclared or updated while we can redeclare **let** variables.
36 |
37 | ### const Example
38 | ```
39 | const number = 123
40 |
41 | // Updating a const variable
42 | number = 324 // Gives error assignment to const variable
43 |
44 | // Redeclaring a const variable
45 | const number = 567 // Gives error identifier number has already been declared
46 | ```
47 |
48 | ### let Example
49 | ```
50 | let number = 123
51 |
52 | // Updating a let variable
53 | number = 324 // It updates the variable number to 324
54 |
55 | // Redeclaring a let variable
56 | let number = 567 // Gives error identifier number has already been declared
57 |
58 | ```
59 |
60 |
61 |
62 |
--------------------------------------------------------------------------------
/javascript/010-using-template-strings.md:
--------------------------------------------------------------------------------
1 | ---
2 | id: "010-using-template-strings"
3 | title: "Start using template strings now!"
4 | tags:
5 | - engineering
6 | - javascript
7 | - strings
8 | date: "03/10/2021"
9 | keywords: javascript, strings
10 | categories:
11 | - javascript
12 | image: assets/images/javascript/ts.svg
13 | author: "Tatiana Coelho"
14 | meta-description: "Boost your code with template strings."
15 | ---
16 |
17 | # Start using template strings
18 |
19 | Working with strings is not that easy when it comes to JS. Keep in mind that this is about vanilla JavaScript (or just simply JavaScript, no frameworks here, right?).
20 |
21 | Strings are a series of characters, no big deal here if you´re not a beginner. If you are, a string is how you´re going to store text, like your name, a product description or anything else text related.
22 |
23 | Here´s how **template strings** work in a very simple way:
24 |
25 | ## **1. Boosting your code with template strings**
26 |
27 | Example:
28 | ```js
29 | function killRoach (mop){
30 | return `I killed the roach with ${mop}.`
31 | };
32 | killRoach("my mop");
33 |
34 | // Output: I killed the roach with the mop.
35 | ```
36 |
37 | It doesn´t seem to be that useful, huh? Let´s see how it would be without template strings:
38 |
39 | ### **2. Without template strings**
40 |
41 | ```js
42 | function killRoach (mop){
43 | return "I killed the roach with" + mop + "."
44 | };
45 | killRoach ("my hands");
46 | // Output: I killed the roach with my hands.
47 | ```
48 |
49 | Just picture having to do this a dozen times a day, picture the poor one that will maintain this code.
50 |
51 | This quotation marks and sum operators hell may seem harmless but they will surelly melt your brain when it´s 2pm and you have to get things done.
52 |
53 | It´s a powerful move that will make your code more readable and easier to work with, not to mention the elegance it brings. You´ll save time, focus on harder tasks with just a simple change as this.
54 |
55 | No more keyboard punching, hair pulling and despair working with a pletora of strings. Easy and effective.
56 |
57 | Did you start already?
58 |
59 |
--------------------------------------------------------------------------------
/javascript/013-Eventlistener.md:
--------------------------------------------------------------------------------
1 | ---
2 | id: 013-Eventlistener
3 | title: Eventlisteners and its use
4 | tags: Javascript, es6, Event,function
5 | date: 2021-11-10 10:30:39 +0200
6 | keywords: Javascript, es6, Event,function
7 | categories: Javascript
8 | image: assets/images/javascript/listen.svg
9 | author: Harshvardhan Rathore
10 | meta-description: brief overview of the blog entry (SEO optimization)
11 | ---
12 |
13 | # EventListener in Javascript
14 | An Eventlistener is a method in JavaScript that attaches an event to to an element.
15 | The listener is programed to start an event when the input or signaling the event handler.
16 |
17 | Syntax:-
18 | element.addEventListener(event, function, useCapture);
19 |
20 | some EventListeners are :-
21 | onload //when the page loads
22 | onclick //when a user clicks something
23 | onmouseover //when a user mouses over something
24 | onmouseup //when a user mouses down from something
25 | onmousedown //when a user mouses up from something
26 | onmouseout //when a user mouses out something
27 | onfocus //when a user puts the cursor in a form field
28 | onblur //When a user leaves a form field
29 |
30 |
31 |
32 | ```Events in javascript
33 | // On clicking button this function works
34 |
35 | function clicked() {
36 | console.log("The button was clicked.")
37 | }
38 |
39 | // On loading page this function works
40 | window.onload =function(){
41 | console.log("The document was loaded.");
42 |
43 | }
44 |
45 | let ids = document.getElementById("firstcontainer")
46 | ids.addEventListener('click', function(){
47 | console.log("clicked on container");
48 | })
49 |
50 | ids.addEventListener('mouseout', function(){
51 | console.log("mouseout container");
52 | })
53 |
54 | ids.addEventListener('mouseover', function(){
55 | console.log("mouse on container");
56 | })
57 |
58 | ids.addEventListener('mouseup', function(){
59 | console.log("mouseup clicked on container");
60 | })
61 |
62 | ids.addEventListener('mousedown', function(){
63 |
64 | console.log("mousedown clicked on container");
65 | })
66 | ```
67 |
68 | You can add many event handlers to one element.
69 |
70 | ## The removeEventListener() method
71 |
72 | ```
73 | body.removeEventListener('click', bodyClickHandler);
74 | // on each click of the page, you will no longer see a message
75 | ```
76 | we use the removeEventListener method correctly. This time when a click event occurs, removeEventListener will remove the function bodyClickHandler which effectively eliminates the listener, and no clicks will generate a message.
77 |
--------------------------------------------------------------------------------
/javascript/013-selecting-elements-from-dom.md:
--------------------------------------------------------------------------------
1 | ---
2 | id: "013-selecting-elements-from-dom"
3 | title: "Selecting Elements From The DOM"
4 | tags:
5 | - development
6 | - javascript
7 | - frontend
8 | - DOM
9 | date: "10/10/2021"
10 | keywords: javascript, frontend
11 | categories:
12 | - javascript
13 | image: assets/images/javascript/dom.svg
14 | author: "Seun Taiwo"
15 | meta-description: "Selecting elements from the DOM with ease."
16 | ---
17 |
18 | ## What is the DOM?
19 |
20 | Simply put, the DOM (Document Object Model) is the tree in the browser that keeps track of all elements (nodes) on the page as well as their attributes and properties.
21 |
22 | At some point, you'd need to select an element from the DOM for various reasons. You might want to add an event listener, or change a style,etc. There are four main methods that can help us achieve this:
23 |
24 | 1. document.getElementById - Takes an Id and gets the first element with that Id.
25 |
26 | 2. document.getElementsByClassName - Takes a class name and gets all elements with that class name.
27 |
28 | 3. document.querySelector - Takes a query and gets the first element matching that query.
29 |
30 | 4. document.querySelectorAll - Takes a query and returns all elements matching that query.
31 |
32 | Of the four methods above, the first two are the older and have been used for a very long time, hence, a lot of people know it and often teach it to others. I beg to differ though as my experience with 3 and 4 have been spectacular. They both take CSS-like queries as their input and working with them has greatly improved my speed. You can use them like so
33 |
34 | ```js
35 | document.querySelector("div.box > p"); //Returns the p tag that is in a div with a class of box
36 | document.querySelectorAll("section.card h2"); //Returns all the h2 tags that are children ( or grandchildren ) of
37 | // the section element with a class of tag
38 | ```
39 |
40 | To get the elements we got in the code snippet above, we'd have to add new Ids or classes to our elements which I feel is unnecessary. If you aren't already using methods 3 and 4, I really do hope you switch. Thanks.
41 |
--------------------------------------------------------------------------------
/javascript/014-javascript-arrow-functions.md:
--------------------------------------------------------------------------------
1 | ---
2 | id: 014-javascript-arrow-functions
3 | title: JavaScript Arrow Functions
4 | tags:
5 | - development
6 | - javascript
7 | date: "10/16/2021"
8 | keywords: javascript, functions
9 | categories: javascript
10 | image: assets/images/javascript/arrow.svg
11 | author: Melissa Gonzalez
12 | meta-description: Beginner intro to JavaScript Arrow Functions
13 | ---
14 |
15 | # Arrow Functions
16 |
17 | An arrow function expression has a shorter syntax compared to regular functions expressions. There are two key differences: arrow functions are always anonymous and are non-binding of ‘this’.
18 |
19 | Before:
20 |
21 | ```javascript
22 | hello = function() {
23 | return "Hello World!";
24 | };
25 | ```
26 |
27 | After:
28 |
29 | ```javascript
30 | hello = () => {
31 | return "Hello World!";
32 | };
33 | ```
34 |
35 | It can be even shorter if the function has only ONE statement that returns a value.
36 |
37 | Example:
38 |
39 | ```javascript
40 | hello = () => "Hello World!";
41 | ```
42 |
43 | ## How to Use Parameters
44 |
45 | ```javascript
46 | hello = (param) => "Hello " + param;
47 | ```
48 |
49 | OR without parenthesis
50 |
51 | ```javascript
52 | hello = (param) => "Hello " + param;
53 | ```
54 |
55 | ## How to Handle 'this'
56 |
57 | Regular functions always define its ‘this’ value but arrow functions treat ‘this’ keyword differently. They do not define their own context since it doesn’t have its own ‘this’ context. It is inherited from the parent scope whenever you call ‘this’.
58 |
59 | Example:
60 |
61 | Regular Function:
62 |
63 | ```javascript
64 | var obj = {
65 | count: 10,
66 | doSomethingLater: function() {
67 | setTimeout(function() {
68 | // the function executes on the window scope
69 | this.count++;
70 | console.log(this.count);
71 | }, 300);
72 | },
73 | };
74 |
75 | obj.doSomethingLater(); // result is "NaN", because the property "count" is not in the window scope.
76 | ```
77 |
78 | Arrow Function:
79 |
80 | ```javascript
81 | var obj = {
82 | count: 10,
83 | doSomethingLater: function() {
84 | // The traditional function binds "this" to the "obj" context.
85 | setTimeout(() => {
86 | // Since the arrow function doesn't have its own binding and
87 | // setTimeout (as a function call) doesn't create a binding
88 | // itself, the "obj" context of the traditional function will
89 | // be used within.
90 | this.count++;
91 | console.log(this.count);
92 | }, 300);
93 | },
94 | };
95 |
96 | obj.doSomethingLater();
97 | ```
98 |
--------------------------------------------------------------------------------
/javascript/016-web-geolocation-api.md:
--------------------------------------------------------------------------------
1 | ---
2 | id: "016-web-api"
3 | title: "Javascript Geolocation API"
4 | tags:
5 | - javascript
6 | - api
7 | - objects
8 | - geolocation
9 | date: 2021-10-21
10 | keywords: javascript, objects, api
11 | categories:
12 | - javascript
13 | image: assets/images/javascript/geo.svg
14 | author: Melo Noia
15 | meta-description: Javascript Geolocation API
16 | ---
17 |
18 | # Web Geolocation API
19 | This API is used to determine the location of a user in web applications. The user must give the application permission for the location information to be accessed.
20 |
21 |
22 | ## Using Geolocation API
23 |
24 | The ***navigator.geolocation*** object is used together with the ***getCurrentPosition()*** to get the user's current location.
25 |
26 | The getCurrentPosition() can succeed or fail. It accepts three callbacks [success, error, options]. The last two callbacks are optional.
27 |
28 | ```javascript
29 | navigator.geolocation.getCurrentPosition(success, error, options);
30 |
31 | ```
32 |
33 | ### Example
34 | ```javascript
35 | function success(position) {
36 | console.log(`Latitude : ${position.coords.latitude} Longitude: ${position.coords.longitude}`);
37 | }
38 |
39 | function error(err) {
40 | console.log(`ERROR: ${err.message}`);
41 | }
42 |
43 | navigator.geolocation.getCurrentPosition(success, error);
44 |
45 | ```
46 |
--------------------------------------------------------------------------------
/javascript/017-react-components.md:
--------------------------------------------------------------------------------
1 | ---
2 | id: "017-react-js-components"
3 | title: "React JS Components"
4 | tags:
5 | - javascript
6 | - library
7 | - frontend
8 | - DOM
9 | - components
10 | date: 2021-10-21
11 | keywords: javascript, library, frontend, DOM, components
12 | categories:
13 | - javascript
14 | image: assets/images/javascript/react.svg
15 | author: Marie-Claire
16 | meta-description: React JS Components
17 | ---
18 |
19 | # React JS Components
20 |
21 | ## React JS
22 |
23 | React is a Javascript library created by Facebook in 2013. It is used to create user interfaces and UI components. React JS is a popular library used by companies such as Reddit, Salesforce, Hulu, and Netflix due to its ability to create fast and dynamic websites.
24 |
25 | ## Components
26 |
27 | A component is a reusable peice of code. Much like a function, it is able to take in an input (props) to generate an output (React element).
28 |
29 | In the example below, the `name` prop is passed into the Greeting component so that the Greeting component
30 | can be reused multiple times with different names without repeating code.
31 |
32 | ```JSX
33 | import React from "react";
34 |
35 | const Greeting = ({ name }) => {
36 | return (
37 |
Hello {name}, I hope you're having a great day!
38 | );
39 | };
40 |
41 | export default Greeting;
42 | ```
43 |
44 | Here is an example of the Greeting component being invoked with different names:
45 |
46 | ```JSX
47 | import React from 'react';
48 | import Greeting from './Greeting';
49 |
50 | const App = () => {
51 | return (
52 |
53 |
54 |
55 |
56 |
57 |
58 | );
59 | };
60 |
61 | export default App
62 | ```
63 |
--------------------------------------------------------------------------------
/javascript/018-how-operators-work-in-javascript.md:
--------------------------------------------------------------------------------
1 | ---
2 | id: 018-how-operators-work-in-javascript
3 | title: How operators work in Javascript
4 | tags:
5 | - javascript
6 | - es6
7 | - beginner
8 | - types
9 | - operators
10 | date: 2021-10-23
11 | keywords: javascript, es6, beginner, types, operators
12 | categories:
13 | - javascript
14 | image: assets/images/javascript/dev.svg
15 | author: Fajar Saputro Juliantoro
16 | meta-description: Learn how operators work in Javascript
17 | categories:
18 | - javascript
19 | ---
20 |
21 | # How Operators work in Javascript
22 |
23 | Before we dive deep even futher let's get to know what is operators.
24 |
25 | Operator is a special function that is written differently than a regular function, Generally operator take two parameters and return one result.
26 |
27 | Lets say you want to create a variable
28 |
29 | ```js
30 | const a = 5 + 4;
31 | console.log(a);
32 | ```
33 |
34 | I bet you can guess what the result is
35 |
36 | ```js
37 | 9;
38 | ```
39 |
40 | Correct 9, obviously 5 + 4 is equal to 9, but there is a question you may ask, "How the Javascript do that?" or "How Javascript know that `5 + 4` is an addition?".
41 |
42 | Well, first the Javascript engine will see the `+` sign and add the numbers in between which is 5 and 4. The `+` sign is an operators and it's actually a function, kinda like this:
43 |
44 | ```js
45 | function +(num1, num2) {
46 | return // sum the two numbers
47 | }
48 | ```
49 |
50 | The function will run as soon as the Javascript see this `5 + 4` line of code, the different is instead calling the function normally like `+(5, 4)` the Javascript engine provide an ability to write a `Infix notation`.
51 |
52 | `Infix` simply mean the function `+` sit between the two parametes. To get an idea how it work we will compare `Prefix`, `Infix` and `Postfix` notation.
53 |
54 | `Prefix Notation` equal to `+5 4` the `+` sign sit in the `beginning` \
55 | `Infix Notation` equal to `5 + 4` the `+` sign sit in the `middle` \
56 | `Postfix Notation` equal to `5 4+` the `+` sign sit in the `end`
57 |
58 | You can see the `Infix notation` sit between the two parameters, but in the end it's just a function and return a value.
59 | In this case the `+` operator get called and return 5 and 4 added together.
60 |
61 | The `-` operator work exactly the same for example:
62 |
63 | ```js
64 | const a = 3 - 2;
65 | console.log(a);
66 | ```
67 |
68 | I think you can already guess the result, it's 1 because `-` is an operator a minus sign. or you can do another one
69 |
70 | ```js
71 | const a = 3 > 2;
72 | console.log(a);
73 | ```
74 |
75 | `>` the greater than is just a function, a special function, this operator work the same way except that this operator return a `Boolean` value.
76 |
77 | Whenever you write `+`, `-`, `<`, `>` and all other operators out there that this is just a special types of function. The two parametes is being passed to the function and the function have a pre written code inside of it that Javascript engine provide for you and then it will return a value it could be a `Number`, `Boolean` etc.
78 |
79 | So please keep in mind that operators is just a function.
80 |
81 | Thank you for reading 🙇♂️.
82 |
--------------------------------------------------------------------------------
/javascript/020-get-query-parameters.md:
--------------------------------------------------------------------------------
1 | ---
2 | id: 020-get-query-parameters
3 | title: Get query parameters in JavaScript
4 | tags: javascript, query, URL
5 | date: 2022-10-17 18:30:00 +0200
6 | keywords: javascript, java-script, js, query, url, params, parameters
7 | categories: javascript
8 | cover: assets/images/javascript/js2.svg
9 | author: Pavle Jonoski
10 | meta-description: Get query parameters in JavaScript
11 | ---
12 |
13 | # Get query parameters in JavaScript
14 |
15 | Query parameters are the parameters send in the URL itself, after the '?'.
16 | They are separated with `&` and have the form of `param=value`.
17 |
18 | There are many cases when we need to get some parameters from the current page URL, or other URL
19 | in our code.
20 |
21 | In JavaScript there are multiple ways of doing this:
22 | * Use [`URLSearchParams`](https://developer.mozilla.org/en-US/docs/Web/API/URLSearchParams) interface provided by the Web API - supported all major browsers.
23 | * Use [`URL`](https://developer.mozilla.org/en-US/docs/Web/API/URL) interface, also provided by the Web API and available on all major browsers.
24 | * Use the [`url`](https://nodejs.org/api/url.html) module in nodejs.
25 |
26 | ## Use URLSearchParams to parse the query string of the URL
27 |
28 | If you have the query string, you can use [`URLSearchParams`](https://developer.mozilla.org/en-US/docs/Web/API/URLSearchParams) to parse it, the use the [`get`](https://developer.mozilla.org/en-US/docs/Web/API/URLSearchParams/get) method of the object to retrieve the needed parameter value:
29 |
30 | ```js
31 |
32 | const q = new URLSearchParams('page=10&pageSize=20')
33 | console.log('Page:', q.get('page'))
34 | console.log('Page size:', q.get('pageSize'))
35 |
36 | // output:
37 | // Page: "10"
38 | // Page size: "20"
39 | ```
40 |
41 | ## User the URL object
42 |
43 | If you have the whole URL string, then you can parse it with [`URL`](https://developer.mozilla.org/en-US/docs/Web/API/URL).
44 | The parsed URL object will contain `queryParameters` field which contains the parsed query parameters.
45 |
46 | Example:
47 | ```js
48 |
49 | const url = new URL('http://example.com?page=10&pageSize=20')
50 |
51 | console.log(url.searchParams) // object of type URLSearchParams
52 |
53 | // Get the parameter values
54 | console.log('Page:', url.searchParams.get('page'))
55 | console.log('Page size:', url.searchParams.get('pageSize'))
56 |
57 | // output:
58 | // Page: "10"
59 | // Page size: "20"
60 | ```
61 |
62 | Note that the `searchParams` field on the `URL` object is in fact of type `URLSearchParams`, just like in the first example above.
63 |
64 | ## Get query parameters in node.js
65 |
66 | In nodejs, you can use the API from the provided [`url`](https://nodejs.org/api/url.html) module.
67 |
68 | This module also provides a URL class that can parse full URLs:
69 |
70 | ```js
71 | const url = require('url')
72 |
73 | const u = new url.URL('http://example.com?page=10&pageSize=20')
74 | console.log('Page:', u.searchParams.get('page'))
75 | console.log('Page size:', u.searchParams.get('pageSize'))
76 |
77 | // output:
78 | // Page: 10
79 | // Page size: 20
80 | ```
81 |
82 | Note that, similar to the browser's Web API, the `searchParams` object in the parsed `URL` is of type `URLSearchParams` - the same interface as the one from the Web API in the browser, only this one comes from nodejs own `url` module.
83 |
--------------------------------------------------------------------------------
/javascript/021-variable-hoisting.md:
--------------------------------------------------------------------------------
1 | ---
2 | id: blog-entry-id
3 | title: Variable Hoisiting
4 | tags: javascript, hoisting
5 | date: 2022-10-26 21:53:39 +0200
6 | keywords: javascript, variable, hositing, scope
7 | categories: javascript
8 | cover: NA
9 | author: Bhanu Loshali
10 | meta-description: hoisting in javascript
11 | ---
12 |
13 |
14 |
15 | **What is Variable Hoisting?**
16 |
17 | We can refer to the variable anywhere in its scope, even if its declaration isn't reached yet. We can see var declarations as being "lifted" to the top of its function or global scope. However, if you access a variable before it's declared, the value is always undefined, because only its declaration is hoisted, but not its initialization.
18 |
19 | Eg:
20 | ```javascript
21 | console.log(x === undefined); // true
22 | var x = 3;
23 |
24 | (function() {
25 | console.log(x); // undefined
26 | var x = 'local value';
27 | })();
28 | ```
29 |
30 | As we can see here that we can use a variable before its declaration.
31 |
32 | Javascript only hoists the declarations and not their initialization or assignments.
33 |
34 | Whether let and const are hoisted is a matter of definition debate. Referencing the variable in the block before the variable declaration always results in a **ReferenceError**, because the variable is in a "temporal dead zone" from the start of the block until the declaration is processed.
35 |
36 | ```javascript
37 | console.log(x); // ReferenceError
38 | const x = 3;
39 |
40 | console.log(y); // ReferenceError
41 | let y = 3;
42 | ```
43 | Unlike var declarations, which only hoist the declaration but not its value, function declarations are hoisted entirely — you can safely call the function anywhere in its scope.
44 |
--------------------------------------------------------------------------------
/javascript/readme.md:
--------------------------------------------------------------------------------
1 | Javascript related blog entries
2 | ===============================
3 |
--------------------------------------------------------------------------------
/linux/001-list-files-with-dot.md:
--------------------------------------------------------------------------------
1 | ---
2 | id: 001-list-dot-files.md
3 | title: How to list `dot` files in Linux
4 | tags:
5 | - linux
6 | - ls
7 | - list-command
8 | author: Zoran Pandovski
9 | meta-description: How to list all files in a Linux directory
10 | date: 2020-05-26 21:27:27 +0200
11 | keywords: linux, ls, list-command
12 | template: post
13 | categories:
14 | - linux
15 | image: assets/images/files.svg
16 | ---
17 |
18 | The [Unix-like](https://en.wikipedia.org/wiki/Unix-like) operating systems are using `.` to point to the current directory and `..` to point to the parent directory. These entries are not usually the once you are looking when listing the current dir so the `ls` command hides them. But, there are a lot of files that are also starting with `.` which will not be visible too. For e.g run `ls` in a user home:
19 |
20 | ```bash
21 | ls
22 | ```
23 | shall return
24 |
25 | ```
26 | Desktop
27 | Documents
28 | Downloads
29 | info.txt
30 | csa.py
31 | ```
32 |
33 | So, there are no `.` files. Many users are pointing to these files as `hidden` files but it is not necessarily true. The original intention was to hide only `.` and `..` but it was intentionally left to not list the other files too, since the community users find it more useful to name the files that are used for caching, configuration, preferences etc using the `.`. If you need to list those files too just add `-a` or `-all` flag to the `ls` command.
34 |
35 | ```bash
36 | # do not ignore entries starting with .
37 | ls -a, --all
38 | ```
39 |
40 | shall return
41 |
42 | ```
43 | Desktop
44 | Documents
45 | Downloads
46 | info.txt
47 | csa.py
48 | .gradle
49 | .Skype
50 | .zoom
51 | ```
--------------------------------------------------------------------------------
/linux/002-linux-dirs-explained.md:
--------------------------------------------------------------------------------
1 | ---
2 | id: 002-linux-dirs-explained.md
3 | title: Linux directories structure explained
4 | tags:
5 | - linux
6 | - linux-directoy
7 | - bin
8 | - etc
9 | - dev
10 | - root
11 | - home
12 | - lib
13 | - sbin
14 | author: Zoran Pandovski
15 | meta-description: High level explanation of Linux directory structure and file system hierarchy
16 | date: 2020-05-28 14:56:59 +0200
17 | keywords: linux, linux-directoy, bin, etc, dev, root, home, lib, sbin
18 | template: post
19 | categories:
20 | - linux
21 | image: assets/images/dir.svg
22 | ---
23 |
24 | This short article aims to provide a simple and useful explanation to the Linux directory structure.
25 |
26 | 
27 |
28 | * `/` - This is the top level root directory, that contains all other directories on the system.
29 | * `bin` - This directory contains all the essential binary executable programs, required for booting, shells like cp, ls, grep, kill, [vi text editor](https://en.wikipedia.org/wiki/Vi) etc.
30 | * `boot` - All of the static files used in booting the system are located here e.g [grub](https://en.wikipedia.org/wiki/GNU_GRUB), [vmlinux](https://en.wikipedia.org/wiki/Vmlinux)
31 | * `cdrom` - It is not part of the Filesystem hierarchy standard but can be found usually in Ubuntu. It is used as a temporary location for CD-ROMs.
32 | * `dev` - Files related to the hardware as cdrom, cpu, drive can be found here. Also some pseudo-devices as `dev/null`.
33 | * `etc` - Host-specific system configuration files.
34 | * `home` - This is the home directory for each user on the system e.g /home/user1, /home/user2 that contains configurations per user.
35 | * `lib` - All of the shared library images and kernel modules needed by /bin and /sbin.
36 | * `lost+found ` - All of the unlinked, corrupted files used to recover by [fsck](https://en.wikipedia.org/wiki/Fsck) are placed here.
37 | * `media` - All of the removable media as CD, USB when plugged into the system are mounted inside the media directory.
38 | * `mnt` - This is used for a temporary mounting file system.
39 | * `opt` - This directory contains optional packages and third party applications.
40 | * `proc` - It contains the information related to the running processes.
41 | * `root` - The home directory for the root user.
42 | * `sbin` - Similar directory as /bin that contains essential binaries for system administration.
43 | * `srv` - This directory contains most of the service related or files specific to servers.
44 | * `sys` - The virtual file system.
45 | * `usr` - All of the files used by the users, not by the system are saved in this directory.
46 | * `var` - It contains most of the variable data files as logs, mails, temp files.
47 |
48 |
--------------------------------------------------------------------------------
/linux/003-Create-and-remove-dir.md:
--------------------------------------------------------------------------------
1 | ---
2 | id: 003-Create-and-remove-dir.md
3 | title: How to create and remove directory in linux.
4 | tags:
5 | - linux
6 | - mkdir(make-dir) and rmdir(remove-dir command) command
7 | author: Sourabh Yadav
8 | meta-description: How to create and remove a directory in linux
9 | date: 2020-10-28 12:51:54 +0530
10 | keywords: linux, mkdir(make-dir) and rmdir(remove-dir command) command
11 | template: post
12 | categories:
13 | - linux
14 | image: assets/images/dir1.svg
15 | ---
16 | The `mkdir` command is used to create a new directory. The command can also be used to create multiple and nested directories too.
17 |
18 | `mkdir` command Syntax:
19 |
20 | ```bash
21 | mkdir Directory_Name
22 | ```
23 | Example:
24 | ```bash
25 | mkdir Directory1
26 | ```
27 | use the `ls` command mentioned in [001-list-files-with-dot.md](linux/001-list-files-with-dot.md) file and you will see the directory is created.
28 |
29 | shall return
30 |
31 | ```
32 | Directory1
33 | ```
34 | Let's make multiple directories at once. To do so we will use the mkdir command with space after every directory name.
35 |
36 | ```bash
37 | mkdir Dir1 Dir2 Dir3
38 | ```
39 |
40 | shall return
41 |
42 | ```
43 | Dir1 Dir2 Dir3
44 | ```
45 | To create parent directories using the `mkdir` command and pass the `-p` option. By using this option you can create a nested directory.
46 |
47 | ```bash
48 | mkdir -p Dir_out/Dir_in/Last
49 | ```
50 |
51 | shall return
52 |
53 | ```
54 | Dir_out
55 | └── Dir_in
56 | └── Last
57 | ```
58 |
59 | The `rmdir` command is used to remove a directory(it is like the delete folder option in windows) the directory deleted using the `rmdir` command can not be restored again. This command can not be used to remove
60 | a directory with files and sub directory inside them, To do so we use the `rm` command
61 |
62 | `rmdir` command Syntax:
63 |
64 | ```bash
65 | rmdir Directory_Name
66 | ```
67 | Example: let's suppose we have created three directory by using `mkdir Dir1 Dir2 Dir3` now we will remove the Dir1.
68 |
69 | ```bash
70 | rmdir Dir1
71 | ```
72 | shall return
73 |
74 | ```
75 | Dir2 Dir3
76 | ```
77 | To delete a directory having more directories and files inside them we use the `rm` command with `-r` option. Let's have two directory Dir1 and Dir_out having Dir_in, inside
78 | it. If we use the `rmdir` command To remove the Dir_out it will give you an error as Directory not empty. To delete it we use the rm command.
79 |
80 | `rm` command Syntax:
81 |
82 | ```bash
83 | rm -r directory_name
84 | ```
85 |
86 |
87 | ```bash
88 | rm -r Dir_out
89 | ```
90 |
91 | shall return
92 |
93 | ```
94 | Dir1
95 | ```
96 |
97 |
--------------------------------------------------------------------------------
/linux/004-reading-linux-file-permissions.md:
--------------------------------------------------------------------------------
1 | ---
2 | id: 004-reading-linux-file-permissions.md
3 | title: Linux File Permissions
4 | tags:
5 | - linux
6 | - file permissions
7 | author: Calista Lai
8 | meta-description: how to read file/directory permissions in linux
9 | date: 2020-10-31 01:32:22 -0700
10 | keywords: linux, file permissions
11 | template: post
12 | categories:
13 | - linux
14 | image: assets/images/permission.svg
15 | ---
16 |
17 | # File Permissions
18 |
19 | File permissions determine who can read, write, or execute a file. In Linux,
20 | these details can be viewed by using the `ls -l` command.
21 |
22 | On the very left of the list, you will see text that looks similar to this:
23 |
24 | `-rwxrw-r--`
25 |
26 | These are your file permissions.
27 |
28 | ## What do These `rwx-` Characters Mean?
29 |
30 | * `r` read - user is allowed to view the file's contents
31 | * `w` write - user is allowed to edit the file's contents
32 | * `x` execute - user is allowed to execute the file (or in the case of a directory, view its contents)
33 | * `-` no permission - used in place when a permission is not granted
34 |
35 | ## File type
36 | The very first character specifies the file type. In this case, `-` indicates a regular file. Different characters represent different types:
37 | * `b` block device
38 | * `c` character device
39 | * `d` directory
40 | * `l` symbolic link
41 | * `p` named pipe
42 | * `s` socket file
43 |
44 | ## Owner, Groups, and Others
45 |
46 | The next nine characters determine what permissions the owner, groups in ownership, and other users have.
47 |
48 | The first three characters after the file type indicate the ower's permissions. In `-rwxrw-r--`, the owner's file permissions are `rwx`. They are allowed to read,
49 | write, and execute the file.
50 |
51 | The following three characters determine permissions for members of groups that own the file. In this case, group permissions are `rw-`. They are allowed to
52 | read and write to the file, but cannot execute it.
53 |
54 | The last three characters are permissions for all other users that do not fit into the previous two categories. This example's permissions for other users are
55 | `r--`. They are only allowed to read the file.
56 |
57 | ## Diagram:
58 |
59 | 
60 |
--------------------------------------------------------------------------------
/linux/005-simplify-man-commands-in-linux.md:
--------------------------------------------------------------------------------
1 | ---
2 | id: 005-simplify-man-commands-in-linux.md
3 | title: TLDR community pages to simplify man commands in linux.
4 | tags:
5 | - linux
6 | - man commands
7 | - tldr
8 | author: Partha Talukdar
9 | meta-description: How to simplify the man command and get short quick definitions for linux command manuals.
10 | date: 2021-10-01
11 | keywords: linux, man commands, tldr
12 | template: post
13 | categories:
14 | - linux
15 | image: assets/images/manual.svg
16 | ---
17 |
18 | # man command vs tldr
19 |
20 | man command in Linux is used to display the user manual of any command that we can run on the terminal. It provides a detailed view of the command which includes NAME, SYNOPSIS, DESCRIPTION, OPTIONS, EXIT STATUS, RETURN VALUES, ERRORS, FILES, VERSIONS, EXAMPLES, AUTHORS and SEE ALSO.
21 |
22 | `$man [OPTION]... [COMMAND NAME]...`
23 |
24 | This is the syntax of the man command. Upon entering 'man tar' (tar command is used for compressing or extracting from compressed files in linux) a whole list of long descriptive details appear. To avoid going through such long descriptions, we can make use of tldr pages which are a community effort to simplify the beloved man pages.
25 |
26 |
27 | ## What does tldr do ?
28 |
29 | *Basic execution: tldr
30 | *Example: tldr ls, tldr tar, tldr ps etc.
31 |
32 | * `tldr tar` on executing tldr tar only the relevant commands related to tar and their short description appears as shown below:
33 |
34 | OUTPUT:
35 | ```
36 |
37 | [c]reate an archive and write it to a [f]ile:
38 | tar cf {{target.tar}} {{file1}} {{file2}} {{file3}}
39 |
40 | [c]reate a g[z]ipped archive and write it to a [f]ile:
41 | tar czf {{target.tar.gz}} {{file1}} {{file2}} {{file3}}
42 |
43 | [c]reate a g[z]ipped archive from a directory using relative paths:
44 | tar czf {{target.tar.gz}} --directory={{path/to/directory}} .
45 |
46 | E[x]tract a (compressed) archive [f]ile into the current directory [v]erbosely:
47 | tar xvf {{source.tar[.gz|.bz2|.xz]}}
48 |
49 | E[x]tract a (compressed) archive [f]ile into the target directory:
50 | tar xf {{source.tar[.gz|.bz2|.xz]}} --directory={{directory}}
51 |
52 | [c]reate a compressed archive and write it to a [f]ile, using [a]rchive suffix to determine the compression program:
53 | tar caf {{target.tar.xz}} {{file1}} {{file2}} {{file3}}
54 |
55 | Lis[t] the contents of a tar [f]ile [v]erbosely:
56 | tar tvf {{source.tar}}
57 |
58 | E[x]tract files matching a pattern from an archive [f]ile:
59 | tar xf {{source.tar}} --wildcards "{{*.html}}"
60 |
61 | ```
62 |
63 |
64 |
65 | ## How to install tldr on your linux systems?
66 | One of the most mature clients of tldr is node.JS and hence npm can be used to install tldr, simply install nodejs on your system and execute the below command:
67 |
68 | `npm install -g tldr`
69 |
70 | ## Link for tldr for more details :
71 |
72 | [tdlr](https://tldr.sh/)
73 |
74 |
75 |
76 |
--------------------------------------------------------------------------------
/linux/006-sftp-setup.md:
--------------------------------------------------------------------------------
1 | ---
2 | id: 006-sftp-setup.md
3 | title: SFTP Configuration in Linux(CENTOS)
4 | tags:
5 | - linux
6 | - sftp
7 | - ftp
8 | - centos
9 | author: Subhendu Gogoi
10 | meta-description: SFTP Setup in Linux(CENTOS)
11 | date: 2021-10-01 16:53:39 +0530
12 | keywords: linux, sftp
13 | template: post
14 | categories:
15 | - linux
16 | image: assets/images/sftp.svg
17 | ---
18 |
19 | # SFTP Configuration
20 |
21 | ## What is SFTP?
22 |
23 | SFTP (Secure File Transfer Protocol) is a file transfer protocol that leverages a set of utilities that provide secure access to a remote computer to deliver secure communications. It leverages SSH (Secure Socket Shell or Secure Shell) and is frequently also referred to as 'Secure Shell File Transfer Protocol'.
24 |
25 | ## Instructions
26 |
27 | To install an SFTP server on a CENTOS Linux Server, follow the below steps:
28 | 1. Execute the following command to check whether SSH is installed
29 | ```
30 | sudo rpm -qa | grep ssh
31 | ```
32 |
33 | 2. If SSH is not installed, run the following command
34 | ```
35 | sudo yum install openssh-server
36 | ```
37 |
38 | 3. Open port 22
39 | ```
40 | sudo iptables -I INPUT -p tcp --dport 22 -j ACCEPT
41 | ```
42 |
43 | 4. Create a user and provide new password for that user
44 | ```
45 | sudo useradd {user_name}
46 | sudo passwd {user_name}
47 | ```
48 |
49 | 5. Create a directory for the file transfer and make the changes
50 | ```
51 | sudo mkdir {directory_name}
52 | sudo chgrp {user_name} {directory_name}
53 | sudo chown {user_name} {directory_name}
54 | ```
55 |
56 | 6. In /etc/ssh/sshd_config file add the below configuration:
57 | ```
58 | Match User {user_name}
59 | ForceCommand internal-sftp
60 | PubkeyAuthentication yes
61 | PasswordAuthentication yes
62 | ChrootDirectory {directory_name}
63 | PermitTunnel no
64 | AllowAgentForwarding no
65 | AllowTcpForwarding no
66 | X11Forwarding no
67 | ```
68 |
69 | 7. Restart the SFTP Service
70 | ```
71 | sudo systemctl restart sshd.service
72 | ```
73 |
74 | 8. Testing(provide password on prompted)
75 | ```
76 | sftp {user_name}@{server_address}
77 | ```
78 |
--------------------------------------------------------------------------------
/linux/007-symbolic-link.md:
--------------------------------------------------------------------------------
1 | ---
2 | id: 007-symbolic-link.md
3 | title: Symbolic link
4 | tags:
5 | - linux
6 | - symlink
7 | - symbolic-links
8 | author: subhgogoi
9 | meta-description: What is Symbolic Link?
10 | date: 2020-05-26 21:27:27 +0200
11 | keywords: linux, symlinc
12 | template: post
13 | categories:
14 | - linux
15 | image: assets/images/link.svg
16 | ---
17 |
18 | # Symbolic Link
19 |
20 | ## What is Symbolic Link?
21 | A symlink or a Symbolic Link is simply enough a shortcut to another file. It is a file that points to another file.
22 |
23 | ## How to create a Symbolic Link?
24 | Files is a symbolic link to /images/files/prod/files. When you access files or anything inside it, you'll really access the path under /images. Symbolic links are made and updated using the ln command. This link could have been made with:
25 |
26 | ```
27 | ln -s /images/files/prod/files files
28 | ```
29 | -s means to make a symbolic link. To update a link, either delete the link and create it as above, or use the -f option to ln as well. If you are linking to a folder, you should include the -n option:
30 |
31 | ```
32 | ln -sfn /a/new/path files
33 | ```
34 |
35 | This will replace the link with a new one pointing at /a/new/path.
36 |
37 | The -n option is necessary when linking to a different target folder to avoid creating a sub-folder inside that symbolic link and instead replace the symbolic link completely.
38 |
--------------------------------------------------------------------------------
/linux/009-sending-signals-to-processes-in-linux.md:
--------------------------------------------------------------------------------
1 | ---
2 | id: 00-sending-signals-to-processes-linux.md
3 | title: Sending Signals For Controlling Processes In Linux.
4 | tags:
5 | - linux
6 | - process management
7 | - controlling processes by sending signals
8 | author: Partha Talukdar
9 | meta-description: How to control processes in linux by sending signals.
10 | date: 2021-10-01
11 | keywords: linux, process management, signals
12 | template: post
13 | categories:
14 | - linux
15 | image: assets/images/signal.svg
16 | ---
17 |
18 | # Sending Signals In Linux
19 |
20 | The most basic approach of controlling processes in linux is by sending signals to the processes.There are multiple signals that can be sent to a process.There are multiple signals that can be sent to a process.Simply run below command to view all the available signals:
21 |
22 | `kill -l`
23 |
24 | To send signals to a process we can use kill, pkill and pgrep commands in linux.
25 |
26 | ## Finding Process IDs in Linux ?
27 |
28 | PS is the most common used command in linux to view all active processes in linux, use the below commands to view the process:
29 |
30 | To view all processes:
31 |
32 | ```
33 | $ps
34 |
35 | OR
36 |
37 | $ps aux
38 |
39 | ```
40 |
41 | To find a particular process PID:
42 |
43 | ```
44 | $pidof
45 |
46 | OR
47 |
48 | $ps -ef | grep
49 |
50 | ```
51 | example:
52 |
53 | ```
54 | $pidof java
55 | 26901
56 |
57 | OR
58 |
59 | $ps -ef | grep java
60 |
61 | ```
62 |
63 |
64 | ## Common signals in linux ?
65 |
66 | Most signals in linux are for internal use by the system, or for system administrators when they perform any server operation or developer when they write code. The following are signals which are useful for a system user:
67 | ```
68 | SIGHUP 1 – sent to a process when its controlling terminal is closed.
69 | SIGINT 2 – sent to a process by its controlling terminal when a user interrupts the process by pressing [Ctrl+C].
70 | SIGQUIT 3 – sent to a process if the user sends a quit signal [Ctrl+D].
71 | SIGKILL 9 – this signal immediately terminates (kills) a process and the process will not perform any clean-up operations.
72 | SIGTERM 15 – this a program termination signal (kill will send this by default).
73 | SIGTSTP 20 – sent to a process by its controlling terminal to request it to stop (terminal stop); initiated by the user pressing [Ctrl+Z].
74 |
75 | ```
76 |
77 |
78 | The following are kill commands examples to kill a java application using its PID (ProcessId) once it freezes or becomes unresponsive:
79 |
80 | ```
81 | $pidof java
82 | 26901
83 |
84 | $kill 9 26901
85 | OR
86 |
87 | $kill -KILL 26901
88 | OR
89 |
90 | $kill -SIGKILL 26901
91 | ```
92 |
93 | To kill an application using its name, use pkill or killall like so:
94 |
95 | ```
96 | $pkill java
97 |
98 | $killall java
99 | ```
100 | ## Some useful references:
101 |
102 | [Find PID In Linux](https://www.tecmint.com/find-process-name-pid-number-linux/)
103 |
104 | [Find Linux Process Memory Ram Cpu Usage](https://www.tecmint.com/find-linux-processes-memory-ram-cpu-usage/)
105 |
106 | [Find Processes By Memory](https://www.tecmint.com/find-processes-by-memory-usage-top-batch-mode/)
107 |
--------------------------------------------------------------------------------
/linux/011-tar-gzip-in-linux.md:
--------------------------------------------------------------------------------
1 | ---
2 | id: 011-compress-uncompress-files-in-linux.md
3 | title: How to compress and uncompress files in linux.
4 | tags:
5 | - linux
6 | - compress
7 | - uncompress
8 | - tar
9 | - gzip
10 | - gunzip
11 | author: Partha Talukdar
12 | meta-description: Learn how to compress and uncompress files in Linux.
13 | date: 2021-10-01
14 | keywords: linux, gzip, compress, uncompress.
15 | template: post
16 | categories:
17 | - linux
18 | image: assets/images/package.svg
19 | ---
20 |
21 | # Compressing , Uncompressing Files In Linux?
22 |
23 | The most commonly used commands in linux are tar, gzip and gunzip for compressing and uncompressing files in linux.
24 |
25 | # Tar vs Gzip
26 |
27 | The tar command is used to compress a group of files into an archive. The command is also used to extract or modify tar archives as well.
28 | The tar command does not necessarily compresses the files in the archive it just groups them into a single file. To achieve compression and reduce disk usage on your linux systems the gzip option can be used with tar.
29 |
30 |
31 | ## Basic Syntax For Tar?
32 |
33 | ```
34 | tar [options] [archive-file] [file or directory to be archived]
35 |
36 | ```
37 | ### Options For Tar?
38 |
39 | ```
40 | -c : Creates archive
41 | -x : Extracts the archive
42 | -f : creates archive with given filename
43 | -t : displays or lists files in archived file
44 | -u : archives and adds to an existing archive file
45 | -v : Displays verbose information
46 | -A : Concatenates the archive files
47 | -z : compresses the tar file using gzip
48 | -j : compresses the tar file using bzip2
49 | -W : Verifies an archive file
50 | -r : updates or adds file or directory in already existing .tar file
51 |
52 | ```
53 | ## Example Usage Of Tar and Gzip:
54 |
55 | * Extract an archive:
56 | ```
57 | $tar xfv archive.tar
58 |
59 | ```
60 | (Options: x = extract, f = file, v = verbose)
61 |
62 | * Create an archive with files or folder:
63 | ```
64 | $tar cfv archive.tar file1 file2 file3
65 |
66 | ```
67 | (Options: c = create)
68 |
69 | * Create compressed archives with tar using gzip:
70 | ```
71 | tar cfzv archive.tar file1 file2 file3
72 |
73 | ```
74 | (Options: z = compress with gzip)
75 |
76 | * Extract files from gzip tar Archive archive.tar.gz:
77 | ```
78 | $tar xvzf archive.tar.gz
79 |
80 | ```
81 | (Options: x = extract, f = file, v = verbose)
82 |
83 |
84 | ## More Useful Resources:
85 | [Create Tar GZ File](https://linuxize.com/post/how-to-create-tar-gz-file/)
86 |
87 | [Tar in linux](https://www.tecmint.com/18-tar-command-examples-in-linux/)
88 |
89 | [Tar Examples](https://www.interserver.net/tips/kb/use-tar-command-linux-examples/)
90 |
--------------------------------------------------------------------------------
/linux/012-grep-howto.md:
--------------------------------------------------------------------------------
1 | ---
2 | id: 012-grep-howto.md
3 | title: Grep command usage cheatsheet
4 | tags:
5 | - linux
6 | - grep
7 | author: waltherman
8 | meta-description: Grep is an ultimate command to search text patterns in files
9 | date: 2021-10-13 03:30:00 +0300
10 | keywords: linux, grep, searching in files
11 | template: post
12 | categories:
13 | - linux
14 | image: assets/images/search.svg
15 | ---
16 |
17 | # What is Grep?
18 |
19 | Grep stands for "global regular expression print" and it is an ultimate command to search text or any file for lines that contain a match to the specified text pattern, word or regex.
20 | By default, grep outputs only the matched lines.
21 |
22 | ## Basic grep usage
23 |
24 | ```
25 | $ grep pattern filename
26 | ```
27 |
28 | As a result grep would give all patterns found in file named "filename". For example:
29 |
30 | ```
31 | $ grep pattern filename
32 | pattern
33 | pattern1
34 | zzzpattern44
35 | ```
36 |
37 | Also you could use pipe to filter output of any command. For example, let's find installed PostgreSQL client version on Ubuntu server via next command:
38 | ```
39 | $ dpkg --list | grep postgresql-client
40 |
41 | ```
42 |
43 | -i parameter used for case-insensetive grep
44 | ```
45 | $ grep -i pattern filename
46 |
47 | ```
48 | -v - inverted match of grep
49 |
50 | ```
51 | $ grep -v pattern filename
52 |
53 | ```
54 |
55 | -w used for search only for words match. For example file named "filename" from very first example had several matches, but with this argument there would be only one:
56 | ```
57 | $ grep -w pattern filename
58 | pattern
59 | ```
60 |
61 | Recursive search
62 | Let's find all files matching pattern in this directory and all subdirectories by -r/R argument:
63 |
64 | ```
65 | $ grep -R pattern .
66 |
67 | ```
68 | Also we could use grep to find file by its content:
69 |
70 | ```
71 | $ grep -rnw '/path/to/somewhere/' -e 'pattern'
72 |
73 | ```
74 |
--------------------------------------------------------------------------------
/linux/014-curl-howto.md:
--------------------------------------------------------------------------------
1 | ---
2 | id: 014-curl-howto.md
3 | title: curl command usage short guide
4 | tags:
5 | - linux
6 | - curl
7 | author: waltherman
8 | meta-description: Curl is data transfer command. This is curl short command guide with examples
9 | date: 2021-10-14 03:40:00 +0300
10 | keywords: linux, curl, url, data transfer, api testing
11 | template: post
12 | categories:
13 | - linux
14 | image: assets/images/transfer.svg
15 | ---
16 |
17 | # Curl
18 |
19 | Curl is a tool for data transfer. It supports a variety of protocols - HTTP, HTTPS, FTP, SFTP, TFTP, IMAP, POP3, SCP, SMTP and a bunch of other protocols, full list is available in man output.
20 | It is tiny, flexible, could provide verbose information, good for automation, since user interaction witch curl is not needed.
21 |
22 | ## Curl usage
23 |
24 | Syntax is simple:
25 | ```
26 | $ curl [options] [URL]
27 | ```
28 |
29 | The basic request to GitHub would be look like:
30 | ```
31 | $ curl github.com
32 | ```
33 | Downloading files with the same name, as in the URL
34 | ```
35 | $ curl -O [URL]
36 | ```
37 | Or with specific file name:
38 | ```
39 | $ curl -o [filename] [URL]
40 | ```
41 | Continue downloading of stopped download is possible with "-C" parameter
42 | ```
43 | $ curl -C -O [URL]
44 | ```
45 | Verbose output
46 | ```
47 | $ curl -v [options] [URL]
48 | $ curl --verbose [options] [URL]
49 | ```
50 | Authenticate on remote server
51 | ```
52 | $ curl -u {username}:{password} [URL]
53 | ```
54 | For example, download FTP file with authentication would look like:
55 | ```
56 | $ curl -u ftpuser16:Password111 -O ftp://example.com/bugrep.tgz
57 | ```
58 | File upload:
59 | ```
60 | $ curl -T -u {username}:{password} [URL]
61 | ```
62 |
63 | Progress bar:
64 | It is possible to change curl meter to progress bar:
65 | ```
66 | $ curl -# [URL]
67 | $ curl --progress-bar [URL]
68 | ```
69 |
70 | Or disable any progress information:
71 | ```
72 | $ curl -s [URL]
73 | $ curl --silent [URL]
74 | ```
75 |
76 | HTTP and HTTPS:
77 | Include HTTPS headers to output
78 | ```
79 | $ curl -i https://github.com
80 | $ curl --include https://github.com
81 | ```
82 | Specify HTTP-request type:
83 | ```
84 | $ curl --request [request type] [options] [URL]
85 | ```
86 | Example
87 | ```
88 | $ curl --request GET https://github.com
89 | ```
90 | Proxy server also could be specified:
91 | ```
92 | curl -x [proxy address]:[port] [URL]
93 | ```
94 | If proxy server requires authentication, curl can be used with next command:
95 | ```
96 | curl -x [proxy address]:[port] -U [user]:[password] [URL]
97 | curl -x [proxy address]:[port] --proxy-user [user]:[password] [URL]
98 | ```
99 |
100 | SMTP
101 | If you do not like to send emails via telnet you could use curl
102 | ```
103 | $ curl –url [SMTP URL] –mail-from [sender address] –mail-rcpt [recipient address] -n –ssl-reqd -u {email}:{password} -T [mail text file]
104 | ```
105 |
--------------------------------------------------------------------------------
/linux/015-wget-howto.md:
--------------------------------------------------------------------------------
1 | ---
2 | id: 015-wget-howto.md
3 | title: wget command usage short guide
4 | tags:
5 | - linux
6 | - wget
7 | author: waltherman
8 | meta-description: Downloanding files in different cases with cli tool wget
9 | date: 2021-10-14 04:30:00 +0300
10 | keywords: linux, wget, download, cli tools
11 | template: post
12 | categories:
13 | - linux
14 | image: assets/images/download.svg
15 | ---
16 |
17 | # wget
18 | Wget is a tool for downloading files from the Internet. It supports HTTP, HTTPS and FTP protocols.
19 | It is flexible, so it could be use in background, in scripts, automation.
20 |
21 | ## wget usage
22 |
23 | Syntax is simple:
24 | ```
25 | $ wget [options] [URL]
26 | ```
27 | And it could be used without any options:
28 | ```
29 | $ wget [options] https://cdn.kernel.org/pub/linux/kernel/v5.x/linux-5.14.12.tar.xz
30 | ```
31 | Specify downloaded file name
32 | ```
33 | $ wget -O [filename] [options] [URL]
34 | ```
35 | Example:
36 | ```
37 | $ wget -O linux.tar.xz https://cdn.kernel.org/pub/linux/kernel/v5.x/linux-5.14.12.tar.xz
38 | ```
39 | Select download destination
40 | ```
41 | $ wget -P [path] [options] [URL]
42 | ```
43 | To define download speed use "--rate-limit" construction:
44 | ```
45 | $ wget --rate-limit [speed value] [options] [URL]
46 | ```
47 | And example with 1 mbps speed limit:
48 | ```
49 | $ wget --rate-limit 1m https://cdn.kernel.org/pub/linux/kernel/v5.x/linux-5.14.12.tar.xz
50 | ```
51 | Continue download. Wget is good with downloading via unstable connections, so use "-c" for continue downloading after interruption:
52 | ```
53 | $ wget -c [options] [URL]
54 | ```
55 | Background download:
56 | ```
57 | $ wget -b [options] [URL]
58 | ```
59 | Ignore certificate during HTTPS download:
60 | ```
61 | $ wget --no-check-certificate [URL]
62 | ```
63 | FTP download is possible too:
64 | ```
65 | $ wget --ftp-user=[username] --ftp-password=[password] [FTP URL]
66 | ```
67 |
--------------------------------------------------------------------------------
/linux/016-curl-post-json-data.md:
--------------------------------------------------------------------------------
1 | ---
2 | id: 016-curl-post-json-data.md
3 | title: Post JSON data with curl
4 | tags:
5 | - linux
6 | - curl
7 | - rest
8 | - json
9 | author: Pavle Jonoski
10 | meta-description: Learn how to post JSON data with curl
11 | date: 2022-10-29 21:00:00 +0200
12 | keywords: linux, curl, rest, json
13 | template: post
14 | categories:
15 | - linux
16 | image: assets/images/transfer.svg
17 | ---
18 |
19 | # Post JSON data with curl
20 |
21 | [`curl`](https://theflashreads.com/curl-howto) is a very convenient command line tool to send HTTP (and [many others](https://curl.se/) types of) requests to a server.
22 |
23 | Sending JSON data is very easy with curl. You can send the JSON data itself as a command line parameter or you can load it from a file.
24 |
25 | To send it directly from the command line, use the `--data` (or `-d`) parameter:
26 |
27 | ```bash
28 | curl \
29 | -H "Content-Type: application/json" \
30 | --data '{"message": "Hello World!"}' \
31 | http://example.com
32 | ```
33 |
34 | **Don't forget** the `Content-Type` header, as many server will deny the parsing of JSON when the content type header is missing.
35 |
36 | **Note:** Also note that by default when setting `-d` (or `--data`) the HTTP request is actually a `POST` request.
37 |
38 | ## Load the JSON data from a file
39 |
40 | You can also load the JSON request body from a file.
41 |
42 | First create the file (let's call it `data.json`):
43 |
44 | ```json
45 | {
46 | "message": "Hello World!"
47 | }
48 | ```
49 |
50 | Then send it using `@` before the file name in the `--data` parameter:
51 |
52 | ```bash
53 | curl \
54 | -H "Content-Type: application/json" \
55 | --data @data.json \
56 | http://example.com
57 | ```
58 |
--------------------------------------------------------------------------------
/other/002-css-responsive-fonts.md:
--------------------------------------------------------------------------------
1 | ---
2 | id: 002-css-responsive-fonts.md
3 | title: CSS Responsive Fonts
4 | tags:
5 | - CSS
6 | - Responsive Fonts
7 | - CSS Fonts
8 | author: Rabson J Phiri
9 | meta-description: How to make your fonts responsive using fluid units
10 | date: 2020-10-26 13:59:31 +0100
11 | keywords: CSS, Responsive Fonts, CSS Fonts
12 | template: post
13 | categories:
14 | - other
15 | image: assets/images/css1.svg
16 | ---
17 |
18 | # CSS Responsive Fonts
19 |
20 | Making sure your fonts adapt to different screen layouts is very important. To help us with this, we often use **rem** units, which are fluid. **REM** stands for *root em*. **1rem** = the root font size, i.e. the default font size of the browser, or the one the user sets. On most browsers, the default font size is **16px**, so **1rem** would equal **16px**.
21 |
22 | You can manually set the root font size like this:
23 |
24 | ```css
25 | html {
26 | font-size: 10px; /* You can put your desired default font size */
27 | }
28 | ```
29 |
30 | Therefore, **rem** all font sizes will refer to the 10px. So
31 |
32 | ```css
33 | p {
34 | font-size: 1rem; /* 1rem = 1 x 10px = 10px*/
35 | }
36 |
37 | h1 {
38 | font-size: 2rem; /* 2rem = 2 x 10px = 20px */
39 | }
40 | ```
41 |
42 | Doing this makes the fonts respond to whatever font size is the default or is set by the use. It is much better the using non-fluid units like PXs. You can read more about CSS units on the [Mozilla Documentaion Page](https://developer.mozilla.org/en-US/docs/Learn/CSS/Building_blocks/Values_and_units)
--------------------------------------------------------------------------------
/other/003-css-image-display-fix.md:
--------------------------------------------------------------------------------
1 | ---
2 | id: 003-css-image-display-fix.md
3 | title: FIx for properly displaying images
4 | tags:
5 | - CSS
6 | - Images
7 | - Image Display
8 | author: Rabson J Phiri
9 | meta-description: How to get rid of the small space under your images
10 | date: 2020-10-26 17:27:18 +0100
11 | keywords: CSS, Images, Image Display
12 | template: post
13 | categories:
14 | - other
15 | image: assets/images/img.svg
16 | ---
17 |
18 | # CSS Image DIsplay Fix
19 |
20 | You might or might not have noticed this, but when you inspect images on a webpage using your Dev Tools, there's a small line underneath them, unless this was "fixed" by the developer.
21 |
22 | This is not really a bug. It happens because images are inline elements, and once you look at the image below, you'll begin getting the sense.
23 |
24 |
25 |
26 |
27 |
28 | The green line is the **baseline**, an invisble line on which elements "sit". As you can see, some characters in the word `paragraph` go beyond this line, creating the red line you're seeing. And since images are inline elements, they "sit" on the baseline relative to elements before or after them, leaving a whitespace between their base and the space created by characters going beyond the baseline.
29 |
30 | To avoid this, just give the images a `display: 'block';`
31 |
32 | ```html
33 | img {
34 | display: block;
35 | }
36 | ```
37 |
38 | There, done! Now all images on your page won't have that annoying whitespace as they will fill it up.
--------------------------------------------------------------------------------
/other/004-css-variables.md:
--------------------------------------------------------------------------------
1 | ---
2 | id: 004-css-variables.md
3 | title: CSS Variables
4 | tags:
5 | - CSS
6 | - Variables
7 | - CSS Variables
8 | author: Rabson J Phiri
9 | meta-description: How to make use of CSS variables
10 | date: 2020-10-26 17:27:18 +0100
11 | keywords: CSS, Variables, CSS Variables
12 | template: post
13 | categories:
14 | - other
15 | image: assets/images/css2.svg
16 | ---
17 |
18 | # CSS Variables
19 |
20 | Variables make our lives easy. For those not familiar with this word, a **variable** is simply a "storage container" whose value can change/vary, hence the name.
21 |
22 | In CSS, you can also use variables, or custom properties, an extremely powerful feature. But why even use variables in the first place? Well, for a very small website, it might not matter that much. But imaging you're using, let's say, a color more than once in your document, and you later decide to change that color. You'd have to go in every place that has that color and manually change it. This can get messy and confusing.
23 |
24 | With variables, you'd have to change the color in only one place, and it'll be updated everywhere where that variable is used.
25 |
26 | #### Global Declaration
27 |
28 | This makes the custom properties accessible throughout the document
29 |
30 | ```css
31 | :root {
32 | --theme-color: blue;
33 | --default-font-size: 1rem;
34 | }
35 | ```
36 |
37 | You can also define them within a ruleset, like this:
38 |
39 | ```css
40 | .article {
41 | --font-size: 2rem;
42 | }
43 | ```
44 |
45 | #### Usage
46 | ```css
47 | body {
48 | font-size: var(--default-font-size);
49 | }
50 |
51 | button {
52 | background-color: var(--theme-color);
53 | }
54 |
55 | .navbar {
56 | font-size: var(--default-font-size);
57 | }
58 | ```
59 |
60 | More on this topic [here](https://developer.mozilla.org/en-US/docs/Web/CSS/Using_CSS_custom_properties)
61 |
62 |
63 |
--------------------------------------------------------------------------------
/other/007-ahoy-commands.md:
--------------------------------------------------------------------------------
1 | ---
2 | id: 007-ahoy-commands.md
3 | title: Ahoy Commands
4 | tags:
5 | - ahoy,
6 | - bash,
7 | - script
8 | date: 2021-10-12 23:00:39 +0200
9 | keywords:
10 | -ahoy
11 | categories:
12 | - other
13 | image: assets/images/auto.svg
14 | author: Konstantin Sivakov
15 | meta-description: Automate your scripts
16 | ---
17 |
18 | # AHOY!
19 |
20 | This tool is very useful for automating and organizing your projects giving own CLI app with zero code and dependencies and can speed up your development.
21 |
22 | ```bash
23 | $ ahoy up
24 | ```
25 | translates to
26 | ```bash
27 | $ docker-compose build
28 | $ docker-compose start
29 | ```
30 |
31 | ## Installation
32 |
33 | Instalation script for Linux user:
34 |
35 | ``` link
36 | sudo wget -q https://github.com/devinci-code/ahoy/releases/download/1.1.0/ahoy-`uname -s`-amd64 -O /usr/local/bin/ahoy && sudo chown $USER /usr/local/bin/ahoy && chmod +x /usr/local/bin/ahoy
37 | ```
38 |
39 | ## Usage
40 |
41 | The `ahoy` commands are specified in `.ahoy.yml` file placed in your root directory of your project.
42 | The file can be initialized with command:
43 | ```
44 | $ ahoy init
45 | ```
46 |
47 | ## ahoy.yml example
48 |
49 | One example for your docker-compose environment
50 | ```sh
51 | ahoyapi: v2
52 |
53 | commands:
54 | up:
55 | usage: Build and start project.
56 | cmd: |
57 | docker-compose up -d "$@"
58 | stop:
59 | usage: Stops the project
60 | cmd: |
61 | docker-compose stop "$@"
62 |
63 | down:
64 | usage: Delete project (CAUTION).
65 | cmd: |
66 | if [ "$1" == "y" ]; then
67 | docker-compose down --volumes
68 | else
69 | ahoy confirm "Running this command will destroy your
70 | current site, database and build?
71 | Are you sure you didn't mean ahoy stop?" &&
72 | # Run this if confirm returns true
73 | docker-compose down --volumes ||
74 | # Run this if confirm returns false
75 | echo "OK, probably a wise choice..."
76 | fi
77 |
78 | build:
79 | usage: Build project.
80 | cmd: |
81 | docker-compose up -d --build "$@"
82 | cli:
83 | usage: Start a shell inside a container.
84 | cmd: docker-compose exec "$@" sh
85 | copy-config:
86 | usage: Copy config file to container | ahoy copy-config FILE CONTAINER
87 | cmd: docker cp $1 $(docker-compose ps -q $2):/app/config
88 | dump-db:
89 | usage: Creates dump of your datbase container using custom script
90 | cmd: |
91 | source ./scripts/database_dump.sh
92 |
93 | ```
--------------------------------------------------------------------------------
/other/008-fix-EADDRINUSE-err.md:
--------------------------------------------------------------------------------
1 | ---
2 | id: 008-fix-EADDRINUSE-err
3 | title: How to fix EADDRINUSE error
4 | tags:
5 | - EADDRINUSE
6 | - nodejs
7 | - server errors
8 | date: 2021-10-24 19:58:00 +0200
9 | keywords: EADDRINUSE, nodejs, server error
10 | categories:
11 | - other
12 | author: ElizabetYessiien
13 | meta-description: How to kill a port and fix the EADDRINUSE err
14 | image: assets/images/warning.svg
15 | ---
16 |
17 | Here's an interesting error you can come across when working with nodejs servers:
18 |
19 | Error: listen EADDRINUSE: address already in use :::5000
20 |
21 | at Server.setupListenHandle [as \_listen2] (net.js:1318:16)
22 |
23 | at listenInCluster (net.js:1366:12)
24 |
25 | at Server.listen (net.js:1452:7)
26 |
27 | Emitted 'error' event on Server instance at:
28 |
29 | at emitErrorNT (net.js:1345:8)
30 |
31 | at processTicksAndRejections (internal/process/task\_queues.js:80:21) {
32 |
33 | code: 'EADDRINUSE',
34 |
35 | errno: -4091,
36 |
37 | syscall: 'listen',
38 |
39 | address: '::',
40 |
41 | port: 5000
42 |
43 | }
44 |
45 | [nodemon] app crashed - waiting for file changes before starting...
46 |
47 | I know for a fact that port 5000 was only in use for this app.
48 |
49 | My question was, what is EADDRINUSE(which I hurriedly read as ear in use). It simply means that you have multiple instances of your server running or multiple node.
50 |
51 | As easy fix for this before you go on to read multiple confusing stack overflow posts is to find your PID. Nope, that is not the pelvic inflammatory disease. It is referring to your process identifier.
52 |
53 | Each process can be identified and to find it, you need the following command:
54 |
55 | netstat -ano | findstr :5000
56 |
57 | 5000 is the problem port in my case, but it could be 3000 for you. So, the port number is basically what you need to type immediately after the colon.
58 |
59 | netstat -ano | findstr :portnumberhere
60 |
61 | Then, you need to kill what will be displayed in your terminal for that port. In mine, I was shown this:
62 |
63 | $ netstat -ano | findstr :5000
64 |
65 | TCP 0.0.0.0:5000 0.0.0.0:0 LISTENING 7440
66 |
67 | TCP [::]:5000 [::]:0 LISTENING 7440
68 |
69 | the number 7440 is the PID, so the command to kill it after identifying it is:
70 |
71 | tskill 7440
72 |
73 | You can also use taskkill 7400(remember, 7400 is the PID for you), although it might not work sometimes.
74 |
75 | Everything is now running and problem solved:)
76 |
--------------------------------------------------------------------------------
/other/009-how-to-create-terminal-aliases.md:
--------------------------------------------------------------------------------
1 | ---
2 | id: 009-how-to-create-terminal-aliases
3 | title: How to create terminal aliases
4 | tags:
5 | - alias
6 | - terminal
7 | - code editor
8 | date: 2021-10-24 22:02:00 +0200
9 | keywords: alias, terminal, code editor
10 | categories:
11 | - other
12 | author: VasekS
13 | meta-description: How to create terminal aliases
14 | image: assets/images/connect.svg
15 | ---
16 |
17 | # What is an Alias
18 |
19 | Aliases are nothing more than keyboard shortcuts or abbreviations, and although they’re a bit limited, they’re great for simple commands.
20 |
21 | # Alias Structure
22 |
23 | 1. alias
24 | 2. shortcut name
25 | 3. =
26 | 4. ‘your_command’
27 |
28 | # How to Create a Permanent Alias in the Text Editor (Sublime)
29 |
30 | Open a terminal of your choice and insert this command which will open the bash profile in Sublime Editor: subl ~/.bash_profile
31 |
32 | # Alias Examples
33 |
34 | ```sh
35 | alias c=’clear’
36 | alias gp=’git pull’
37 | alias gs=’git status’
38 |
39 | ```
40 | # Save Changes
41 |
42 | Once you have created the alias(es), restart the terminaln to save/apply these changes
--------------------------------------------------------------------------------
/other/images/baseline.jpg:
--------------------------------------------------------------------------------
https://raw.githubusercontent.com/flashreads/blogs/42c3680ee9ea0c5353a1d25ac7a830a081fbdfc3/other/images/baseline.jpg
--------------------------------------------------------------------------------
/package-lock.json:
--------------------------------------------------------------------------------
1 | {
2 | "lockfileVersion": 1
3 | }
4 |
--------------------------------------------------------------------------------
/python/001-install-pytorch-windows.md:
--------------------------------------------------------------------------------
1 | ---
2 | id: 001-install-pytorch-windows.md
3 | title: Install Pytorch on Windows
4 | tags:
5 | - python
6 | - windows
7 | - pip
8 | - pytorch
9 | - conda
10 | author: Zoran Pandovski
11 | meta-description: How to easily install Pytorch on Windows with one command
12 | date: 2020-05-14 23:30:05 +0200
13 | keywords: python, windows, pip, pytorch, conda
14 | template: post
15 | categories:
16 | - python
17 | image: assets/images/python/torch.svg
18 | ---
19 |
20 | ## Install Pytorch with pip
21 |
22 | The Windows version of PyTorch was never uploaded to PyPi because of the binary size limits.
23 | When installing it you will end up getting the `RuntimeError: PyTorch does not currently provide packages for PyPI` error.
24 | To successfully install with pip you need to specify the URL locations to the PyTorch wheel:
25 |
26 | ```
27 | pip install torch===1.5.0 torchvision===0.6.0 -f https://download.pytorch.org/whl/torch_stable.html
28 |
29 | ```
30 | >Note that this will install the PyTorch with [CUDA](https://en.wikipedia.org/wiki/CUDA). If your system hasn't an NVIDIA GPU install the CPU version instead:
31 |
32 | ```
33 | pip install torch==1.5.0+cpu torchvision==0.6.0+cpu -f https://download.pytorch.org/whl/torch_stable.html
34 | ```
35 |
36 | ## Install Pytorch with Conda
37 |
38 | The [Conda](https://docs.conda.io/en/latest/) installation is straight forward:
39 |
40 | ```
41 | conda install pytorch torchvision cudatoolkit=10.2 -c pytorch
42 | ```
43 |
44 | and without CUDA:
45 |
46 | ```
47 | conda install pytorch torchvision cpuonly -c pytorch
48 | ```
49 |
50 | For additional installation options as LibTorch or installation from Source check the `Start Locally` guide at https://pytorch.org/.
51 |
--------------------------------------------------------------------------------
/python/002-peer-authentication-failed-psycopg2.md:
--------------------------------------------------------------------------------
1 | ---
2 | id: 002-peer-authentication-failed-psycopg2.md
3 | title: Psycopg Peer authentication failed for user "postgres"
4 | tags:
5 | - psycopg2
6 | - postgresql
7 | - python
8 | - database
9 | author: Zoran Pandovski
10 | meta-description: Simple steps to avoid psycopg2 Peer authentication
11 | date: 2020-05-13 20:57:40 +0200
12 | keywords: psycopg2, postgresql, python, database
13 | template: post
14 | categories:
15 | - python
16 | image: assets/images/python/auth.svg
17 | ---
18 |
19 | # psycopg2.OperationalError: FATAL: Peer authentication failed for user "postgres"
20 |
21 | The [Psycopg](https://www.psycopg.org/docs/usage.html) is one of the most popular and widely used python database adapters for the [PostgreSQL database](https://www.postgresql.org/).
22 | The basic example shows how easy it is to connect to the existing database with psycopg. But, it doesn't provide all of the
23 | required arguments to the [connect](https://www.psycopg.org/docs/module.html#psycopg2.connect) function that usually leads to the above error. The basic module usage example:
24 |
25 | ```python
26 | import psycopg2
27 | # Connect to an existing database
28 | conn = psycopg2.connect("dbname=test user=postgres")
29 | ```
30 | Since the `psycopg2.OperationalError` error is quite generic to avoid it make sure you are providing the following arguments:
31 |
32 | * user - the database user used to authenticate
33 | * password - the password for the database user
34 | * database - the database name
35 | * host - the database host address
36 |
37 | The basic example with the required arguments:
38 | ```python
39 | conn = psycopg2.connect(dbname='db', user='postgres', host='localhost', password='postgres')
40 | ```
41 | >Note: the connection parameters can be added as a connection string or as a set of keyword arguments.
42 |
--------------------------------------------------------------------------------
/python/003-python-regex-cheatsheet.md:
--------------------------------------------------------------------------------
1 | ---
2 | id: 003-python-regex-cheatsheet.md
3 | title: Python Regex Cheat Sheet
4 | tags:
5 | - python
6 | - regex
7 | author: Zoran Pandovski
8 | meta-description: The Regular Expression Cheat Sheet [QUICK GUIDE]
9 | date: 2020-05-19 21:38:51 +0200
10 | keywords: python, regex
11 | template: post
12 | categories:
13 | - python
14 | cover: ../../images/categories/sheet.png
15 | ---
16 |
17 | We all have been in situations where the Regular Expressions were very useful. This days they are not widely used by programmers but if you still need to verify the strings structure, find and replace strings, working on a new processing utility or just doing regex code wars you will find this sheet helpfull.
18 |
19 | # Quantifiers
20 |
21 | * `*` - matches 0 or more occurences
22 | * `+` - matches 1 or more occurences
23 | * `?` - matches 0 or 1 occurences
24 | * `.` - matches any except newline
25 | * {m} - matches exactly `m`
26 | * {m,n} - matches between `m` and `n`
27 | * {m,} - matches `m `or more
28 | * {,n} - matches up to `n`
29 |
30 | # Special characters
31 | * `$` - matches at the end of the string
32 | * `^` - matches the start of the string
33 | * `*?` - matches 0 or more repetitions
34 | * `\` - escape special characters
35 | * [a-z] - matches any lowercase a-z letter
36 | * [^] - matches NOT in the set
37 | * [^ab-d] - matches except a,b,c,d
38 | * m|n - matches either m or n
39 |
40 | # Special sequences
41 |
42 | * \d - matches digits
43 | * \D - matches non-digits
44 | * \s - matches whitespace
45 | * \S - matches non-whitespace
46 | * \W - matches non-word character
47 | * \w - matches a word character
48 | * \Z - matches only at the end of the string
49 | * \A - matches only at the start of the string
50 |
51 | # Groups
52 | * ( ) - matches the group inside parentheses
53 | * (?:A) - matches expression represented by A
54 |
55 | For more additional information check [re](https://docs.python.org/3/library/re.html) module documentation.
56 |
--------------------------------------------------------------------------------
/python/004-notimplemented-notimplementederror.md:
--------------------------------------------------------------------------------
1 | ---
2 | id: 004-notimplemented-notimplementederror.md
3 | title: NotImplemented vs NotImplementedError in Python
4 | tags:
5 | - python
6 | - exceptions
7 | author: Zoran Pandovski
8 | meta-description: The difference between NotImplemented and NotImplementedError in python
9 | date: 2020-05-26 21:27:54 +0200
10 | keywords: python, exceptions
11 | template: post
12 | categories:
13 | - python
14 | image: assets/images/python/not.svg
15 | ---
16 |
17 | # What is NotImplemented?
18 |
19 | The NotImplemented is built in constant in Python. It should be used by some of the python special methods for e.g (__add__(), __eq__()) to address that the operation is not implemented but can be run by other type. If this sounds confusing let's preview the use case of NotImplemented inside the python datetime standard library.
20 |
21 | ```python
22 | def __add__(self, other):
23 | if isinstance(other, timedelta):
24 | # for CPython compatibility, we cannot use
25 | # our __class__ here, but need a real timedelta
26 | return timedelta(self._days + other._days,
27 | self._seconds + other._seconds,
28 | self._microseconds + other._microseconds)
29 | return NotImplemented
30 | ```
31 | The first line checks if the other object is timedelta, and if it is, it will return timedelta object that contains the time, seconds and microseconds of both objects. But if the other object is not timedelta, it doesn't throw an exception because, maybe the other object will know how to handle this operation. So, in short words the interpreter will try the __add__ operation on the other type. If both attempts returne NotImplemented, then the appropriate exception will be raised.
32 |
33 |
34 | # The NotImplementedError exception
35 |
36 | This is an exception that derives from the [RuntimeError](https://docs.python.org/3/library/exceptions.html#RuntimeError). The usual use case of this exception is in the abstract class methods when they required the derived class to override them.
37 |
38 | ```python
39 | class Foo():
40 |
41 | @property
42 | def some_method(self):
43 | raise NotImplementedError("The derived class should implement the logic.")
44 | ```
45 |
46 | Also, while developing you can raise this exception as a reminder to implement this method in the future.
47 |
48 | ```python
49 | class Foo():
50 |
51 | #TODO
52 | def new_method(self):
53 | raise NotImplementedError("Still not implemented.")
54 | ```
--------------------------------------------------------------------------------
/python/005-string-contains-python.md:
--------------------------------------------------------------------------------
1 | ---
2 | id: 005-string-contains-python.md
3 | title: Check if a string contains substring in Python
4 | tags:
5 | - string
6 | - contains
7 | - python
8 | - python3
9 | author: Pavle Jonoski
10 | meta-description: What to use to check if a string contains a substring in Python
11 | date: 2020-05-27 10:03:50 +0200
12 | keywords: string, contains, python, python3
13 | template: post
14 | categories:
15 | - python
16 | image: assets/images/python/contain.svg
17 | ---
18 |
19 | # String `contains` method in Python
20 |
21 | Python's alternative to `String.contains` is the keyword `in`.
22 |
23 | ```python
24 |
25 | foobar = 'foobar'
26 | substr = 'foo'
27 |
28 | if substr in foobar:
29 | print('Yes')
30 | else:
31 | print('No')
32 |
33 | # Prints 'Yes'
34 | ```
35 |
36 | Although under the hood Python may use some of the [magic methods](https://docs.python.org/3/reference/datamodel.html#special-method-names) like
37 | [`__contains__`](https://docs.python.org/3/reference/datamodel.html#object.__contains__), `__iter__` and `__getitem__`, you should try to avoid using
38 | these methods directly on strings. These are useful when defining your own type
39 | with testing membership capabilities.
40 |
--------------------------------------------------------------------------------
/python/007-string-isspace.md:
--------------------------------------------------------------------------------
1 | ---
2 | id: 007-string-isspace.md
3 | title: How to check for empty space, tab or newline in Python
4 | tags:
5 | - python
6 | - strings
7 | author: Zoran Pandovski
8 | meta-description: Check if the string is empty or contains tabs, carriage return, newline with one built-in string method
9 | date: 2020-06-01 23:22:13 +0200
10 | keywords: python, strings
11 | template: post
12 | categories:
13 | - python
14 | image: assets/images/python/empty.svg
15 | ---
16 |
17 | The built-in string method `isspace()` checks if there are only whitespace characters in the string, otherwise it will return False.
18 | The best use case of this method is to check if the string contains characters as:
19 |
20 | * '\n' - new line
21 |
22 | ```python
23 | mystring = '\n'
24 | mystring.isspace()
25 | >>>True
26 | ```
27 |
28 | * ' ' - whitespace
29 |
30 | ```python
31 | mystring = ' '
32 | mystring.isspace()
33 | >>>True
34 | ```
35 |
36 | * '\t' - tab
37 |
38 | ```python
39 | mystring = '\t'
40 | mystring.isspace()
41 | >>>True
42 | ```
43 |
44 | * '\r' - carriage return
45 |
46 | ```python
47 | mystring = '\r'
48 | mystring.isspace()
49 | >>>True
50 | ```
51 |
52 | * '\f' - form feed
53 |
54 | ```python
55 | mystring = '\f'
56 | mystring.isspace()
57 | >>>True
58 | ```
59 |
60 | Or combination:
61 |
62 | ```python
63 | mystring = ' \t'
64 | anotherstring = '\n\t'
65 | mystring.isspace()
66 | anotherstring.isspace()
67 | >>>True
68 | >>>True
69 | ```
70 |
71 | >Note that `isspace()` will not return True for '', so always check with `not mystring or mystring.isspace()`.
--------------------------------------------------------------------------------
/python/008-list-index.md:
--------------------------------------------------------------------------------
1 | ---
2 | id: 008-list-index.md
3 | title: How to find the index of an element in a list
4 | tags:
5 | - python
6 | - lists
7 | - list-index
8 | author: Zoran Pandovski
9 | meta-description: Finding the index of an item in a list in Python with examples
10 | date: 2020-06-05 21:13:49 +0200
11 | keywords: python, lists, list-index
12 | template: post
13 | categories:
14 | - python
15 | image: assets/images/python/queue.svg
16 | ---
17 |
18 | The [`list.index` method](https://docs.python.org/3/tutorial/datastructures.html#data-structures) will return the index of the first found element in the list for e.g
19 |
20 | ```python
21 | numbers = [1,2,2,2, 3,4,5,6,7]
22 | numbers.index(2)
23 | >>>1
24 | ```
25 |
26 | So, in this case, there are 3 elements with value 2 but the index method returns only the first one. If the value is not found `index` method will raise a [ValueError](https://docs.python.org/3/library/exceptions.html#ValueError).
27 |
28 | ```python
29 | numbers = [1,2,2,2, 3,4,5,6,7]
30 | numbers.index(45)
31 | >>> ValueError: 45 is not in list
32 | ```
33 |
34 | The `index` method will check every element in the list until it finds a match. That means it has O(n) complexity. In the cases where you have a very long list, you can consider using the start or end optional parameters to the `index` for e.g
35 |
36 | ```python
37 | numbers = [1,2,3,4,5,6,7,8,9,10,11,12]
38 | # find index of 11 starting from 9th element
39 | numbers.index(11, 9)
40 | >>>10
41 | ```
--------------------------------------------------------------------------------
/python/009-dict-key.md:
--------------------------------------------------------------------------------
1 | ---
2 | id: 009-dict-key.md
3 | title: Python dict.key vs dict[key]
4 | tags:
5 | - python
6 | - dict
7 | - dictionaries
8 | - dict-keys
9 | author: Zoran Pandovski
10 | meta-description: Difference between python's dict.key and dict[key] explained with examples
11 | date: 2020-06-05 21:13:49 +0200
12 | keywords: python, dict, dictionaries, dict-keys
13 | template: post
14 | categories:
15 | - python
16 | image: assets/images/python/python.svg
17 | ---
18 |
19 | To get the value from the dictionary the most pythonic way would be to use the square brackets `[ ]` e.g
20 |
21 | ```python
22 | # note that dict keys are case-sensitive
23 | capitals = {
24 | 'usa' : 'washinghton',
25 | 'england' : 'london',
26 | 'france' : 'paris'
27 | }
28 | capitals['usa']
29 | >>>'washinghton'
30 | ```
31 |
32 | Also, you can use the `get` method e.g
33 |
34 | ```python
35 | capitals = {
36 | 'usa' : 'washinghton',
37 | 'england' : 'london',
38 | 'france' : 'paris'
39 | }
40 | capitals.get('usa')
41 | >>>'washinghton'
42 | ```
43 | So, in both examples we got the same response 'washinghton'. The question now is what is the difference between this two examples? Let's try
44 | another example, using the key that isn't in the capitals dict:
45 |
46 | ```python
47 | capitals = {
48 | 'usa' : 'washinghton',
49 | 'england' : 'london',
50 | 'france' : 'paris'
51 | }
52 | capitals['spain']
53 | >>> KeyError: 'spain'
54 | ```
55 |
56 | We got the [KeyError](https://docs.python.org/3/library/exceptions.html#KeyError), which is quite expected because we know that the 'spain' key is not avaiable in the dictionary. Let's try with `get` method now:
57 |
58 |
59 | ```python
60 | capitals = {
61 | 'usa' : 'washinghton',
62 | 'england' : 'london',
63 | 'france' : 'paris'
64 | }
65 | capitals.get('germany')
66 | >>>
67 | ```
68 |
69 | We didn't get any Error back, just the empty value. That is the difference between using `get method` and `square brackets`. The dict[key] will always throw KeyError when the key is not found. The [`get method`](https://docs.python.org/3/library/stdtypes.html#dict.get) accepts additonal parameter `dict.get(key, [default])` which returnes the default value in case the key is not found. In our case we didn't specify value so it was setup as None.
--------------------------------------------------------------------------------
/python/010-python-modules.md:
--------------------------------------------------------------------------------
1 | ---
2 | id: 010-python-modules.md
3 | title: Python Modules
4 | tags:
5 | - python
6 | - modules
7 | - python-modules
8 | author: Zoran Pandovski
9 | meta-description: Check out what are Python modules and why to use them
10 | date: 2020-06-17 22:56:26 +0200
11 | keywords: python, modules, python-modules
12 | template: post
13 | categories:
14 | - python
15 | image: assets/images/python/python1.svg
16 | ---
17 |
18 | Imagine a complex project where you have a lot of code. Having everything written in a single Python file will become un-maintainable, too complex and hard to debug. To have an abstraction layer that will provide separation of the code in different parts that can be reusable would be a great advantage. So, for example, to import one file into another and reuse classes and functions from it. Python already provides that abstraction by using the `modules`. Adding the `import` statement in the Python file means you are using the modules. Let's check that with a simple code example. The following directory contains two Python files:
19 |
20 | ```
21 | ├── modulea.py
22 | ├── moduleb.py
23 | ```
24 |
25 | The `modulea` contains one function e.g
26 |
27 | ```python
28 | def my_awesome_number(number):
29 | print(f'The awesome number is {number}'.)
30 | ```
31 |
32 | Now, let's import `modulea` in `moduleb`
33 |
34 | ```python
35 | # other imports could be included too e.g
36 | from random import random # pyhthon module for generating random numbers
37 | # import the modulea
38 | import modulea
39 |
40 | def random_number():
41 | numb = random()
42 | modulea.my_awesome_print(numb)
43 | ```
44 |
45 | What happens when we import `modulea` in `moduleb`?
46 |
47 | The `import modulea` will look in:
48 | * The same directory for the file with the name `modulea.py`.
49 | * The list of directories in the [PYTHONPATH](https://docs.python.org/3/using/cmdline.html#envvar-PYTHONPATH).
50 | * The installation default directory.
51 |
52 | and will raise [`ModuleNotFound`](https://docs.python.org/3/library/exceptions.html#ModuleNotFoundError) error if the `modulea` isn't found. In this example, it will be found and will be executed by the Python interpreter in isolated scope. Next, the `random` module will be executed too and all of the (classes, functions, variables) in our example `my_awesome_number` function from `modulea` will be stored in the module's dictionary and be available for use through the module's namespace. The functions from the imported module will be executed only the first time when the module is imported.
53 | The imported modules as `random` and `modulea` are isolated in the module namespace to avoid the naming collision.
54 | In short that is what happens when you import the module. So, with the simple words, we can explain the Python modules as files with the suffix `.py` that contains Python statements. They as building blocks will provide code simplicity, better maintainability and reusability, so always prefer to use them. To check all of the available built in Python modules check [Python Module Index](https://docs.python.org/3/py-modindex.html)
--------------------------------------------------------------------------------
/python/011-context-managers.md:
--------------------------------------------------------------------------------
1 | ---
2 | id: 011-context-managers.md
3 | title: Python context managers
4 | tags:
5 | - python
6 | - python3
7 | - python-with
8 | - with statement
9 | author: Zoran Pandovski
10 | meta-description: Short introduction to context managers in Python
11 | date: 2020-06-17 22:56:26 +0200
12 | keywords: python, python3, python-with, with statement
13 | template: post
14 | categories:
15 | - python
16 | image: assets/images/python/code.svg
17 | ---
18 |
19 | Have you ever heard about Context managers in Python and you weren't sure what they are? The name may be strange but I am sure you have already used one. Let's see one example for reading the file in Python:
20 |
21 | ```python
22 | f = open(filename)
23 | try:
24 | yield f
25 | finally:
26 | f.close()
27 |
28 | ```
29 | In this implementation, the file wouldn't be closed if the exception happened. Let's another example that uses the `with` statement.
30 |
31 | ```python
32 | with open('file.txt') as f:
33 | content = f.read()
34 | ```
35 |
36 | This code example is clean, easier to read and you are sure that the `file` method `close` will be called after execution leaves the `with `context. So, that is the job of the Context Manager. Context managers (objects that perform context management) allows you to release or allocate the resources when you want and can help you to avoid resource leaks. The [contextlib](https://docs.python.org/3/library/contextlib.html) module provides utilities for most of the tasks where the `with` is used. To learn how to create your own context managers check out [](Link to the next blog).
37 |
38 |
39 |
--------------------------------------------------------------------------------
/python/012-object-not-subscritble.md:
--------------------------------------------------------------------------------
1 | ---
2 | id: 012-object-not-subscritble.md
3 | title: TypeError 'NoneType' object is not subscriptable
4 | tags:
5 | - python
6 | - python3
7 | - type-error
8 | - list
9 | - dict
10 | author: Zoran Pandovski
11 | meta-description: How to easily resolve the object is not subscriptable error in Python
12 | date: 2020-06-17 22:56:36 +0200
13 | keywords: python, python3, type-error, list, dict
14 | template: post
15 | categories:
16 | - python
17 | image: assets/images/python/python1.svg
18 | ---
19 |
20 | This error is quite self-descriptive:
21 |
22 | ```python
23 | Traceback (most recent call last):
24 | File "users.py", line 25, in
25 | user = users[0]
26 | TypeError: 'NoneType' object is not subscriptable
27 | ```
28 |
29 | It means that you are trying to subscript (index) the object that actually is None. In the above example, the `users` list is empty so you can't get the first user from it since None object doesn't define the [`__getitem__`](https://docs.python.org/3/reference/datamodel.html#object.__getitem__) method. This simply can be fixed by finding out `Why the list is None`.
--------------------------------------------------------------------------------
/python/013-find-pypi-downloads.md:
--------------------------------------------------------------------------------
1 | ---
2 | id: 013-find-pypi-downloads.md
3 | title: Python package download stats from PyPI
4 | tags:
5 | - python
6 | - pypi
7 | - pypi-stats
8 | author: Zoran Pandovski
9 | meta-description: Found out the easiest way to get the PyPi downloads statistics
10 | date: 2020-06-17 22:56:36 +0200
11 | keywords: python, pypi, pypi-stats
12 | template: post
13 | categories:
14 | - python
15 | image: assets/images/python/stats.svg
16 | ---
17 |
18 | The download stats were removed from PyPi modules. There were few reasons for that as explained in the [mailing list](https://mail.python.org/pipermail/distutils-sig/2013-May/020855.html). So, now the best available option to get the statistics is to use the [Google BigQuery](https://console.cloud.google.com/bigquery?project=the-psf&page=table&t=downloads&d=pypi&p=the-psf) database. To use it you only need a Google account and enabled BigQuery API.
19 | The most useful query is to count the package downloads:
20 |
21 | ```sql
22 | SELECT
23 | COUNT(*) AS num_downloads,
24 | SUBSTR(_TABLE_SUFFIX, 1, 6) AS `month`
25 | FROM `the-psf.pypi.downloads*`
26 | WHERE
27 | file.project = 'YOUR_PACKAGE_NAME'
28 | AND
29 | details.installer.name = 'pip'
30 | AND _TABLE_SUFFIX
31 | BETWEEN FORMAT_DATE(
32 | '%Y%m01', DATE_SUB(CURRENT_DATE(), INTERVAL 10 MONTH))
33 | AND FORMAT_DATE('%Y%m%d', CURRENT_DATE())
34 | GROUP BY `month`
35 | ORDER BY `month` DESC
36 | ```
37 |
38 | The above query uses the `the-psf.pypi.downloads` table that contains information about downloads. It selects the package and filters the data to contain only `pip` installs(no mirrors downloads) in the last 10 months.
39 |
40 | Other useful columns from the `the-psf.pypi.downloads` are:
41 |
42 | |Column | Info | Example |
43 | |---|---|---|
44 | | file.project | The package name | requests |
45 | | file.version | Version of the package | 1.2.1 |
46 | |details.installer.name | Installer name | pip, bandersnatch |
47 | | details.python | Python version | 2.7, 3.6, 3.7.3 |
48 |
--------------------------------------------------------------------------------
/python/015-Using-Random.md:
--------------------------------------------------------------------------------
1 | ---
2 | id: 015-using-random.md
3 | title: How to make a virtual die roller
4 | tags:
5 | - python
6 | - random
7 | - beginner
8 | author: William Dessert
9 | meta-description: Using random to randomize something
10 | date: 2020-10-23 15:41:42 -0700
11 | keywords: python, random, beginner
12 | template: post
13 | categories:
14 | - python
15 | image: assets/images/python/python1.svg
16 | ---
17 |
18 | ## What is random?
19 |
20 | Random is a python package that comes pre-installed when you install Python. It is a way to generate pseudo-random numbers that can be used in many different ways.
21 |
22 | ## Making our virtual die
23 |
24 | First off, we need to import the package like so:
25 |
26 | ```python
27 | import random
28 | ```
29 |
30 | Since a normal die has six sides we want to pick a random number 1-6. We can do that like so:
31 |
32 | ```python
33 | import random
34 |
35 | result = random.randint(1, 6)
36 | ```
37 |
38 | `random.randint(1,6)` chooses 1-6 at random and stores it in our variable I called `result`.
39 |
40 | Now we want to print our result to the console. We can do that by typing this:
41 |
42 | ```python
43 | import random
44 |
45 | result = random.randint(1, 6)
46 |
47 | print(f'You rolled a {result}!')
48 |
49 | input("Press enter to continue...")
50 | ```
51 |
52 | I now have added a way to print our result and I put the variable in an f-string so that I can add my value inside the string. I also added an input to prevent the console from closing immediately after running and a way to exit the program.
53 |
54 | Thats it! You now have a virtual die!
--------------------------------------------------------------------------------
/python/016-Using-Matplotlib.md:
--------------------------------------------------------------------------------
1 | ---
2 | id: 016-using-matplotlib.md
3 | title: How to make an easy plot with matplotlib
4 | tags:
5 | - python
6 | - beginner
7 | - plot
8 | author: Marlene Heinrich
9 | meta-description: Using matplotlib to create scientific plots
10 | date: 2020-10-25 16:10:03 +0100
11 | keywords: python, beginner, plot
12 | template: post
13 | categories:
14 | - python
15 | image: assets/images/python/visual.svg
16 | ---
17 |
18 | ## What is matplotlib?
19 |
20 | Matplotlib is a package that can be used to create plots or different form of
21 | visualization of data.
22 |
23 | ## Creating a simple 2d-Plot
24 |
25 | As a firs step the package needs to be imported with:
26 |
27 | ```python
28 | from matplotlib import pyplot as plt
29 | ```
30 |
31 | Now we create the data we want to plot, so for example:
32 | ```python
33 | x = [1, 2, 3, 4, 5, 6]
34 | y = [1, 0, 3.5, 3, 2, 1]
35 | ```
36 |
37 | To plot this data we need a simple command:
38 | ```python
39 | plt.scatter(x, y, marker = 'x', color='red')
40 | plt.show()
41 | ```
42 | The scatter-function gives a simple representation of the datapoints and the
43 | show-command is needed to actually see the plot.
44 |
45 | To create a scientifically acceptable result some improvement has to be done:
46 | ```python
47 | plt.title('Testplot') #Adds a title above the plot
48 | plt.xlabel('x') #Add labels to the axis
49 | plt.ylabel('y')
50 | plt.grid(linestyle='dotted') #Add a major grid
51 | plt.errorbar(x, y, xerr=0.1, yerr=0.1, marker='x', linewidth=0, elinewidth=1)
52 | plt.show()
53 | plt.savefig('testplot.pdf') #Save the plot as a PDF
54 | ```
55 | A difference one should note, is that in this case we have used the
56 | errorbar-function. Both, to plot and to add errorbars. Because of this the
57 | linewidth had to be set to zero otherwise the points would have a connection
58 | line. To still have errorbars the elinewidth hat to be set to something greater
59 | zero, otherwise they would just disappear.
60 |
61 | With just slight changes a lot of plots can be done using python!
62 |
--------------------------------------------------------------------------------
/python/018-Write-file.md:
--------------------------------------------------------------------------------
1 | ---
2 | id: 018-write-file.md
3 | title: First steps in writing files in python
4 | tags:
5 | - python
6 | - beginner
7 | - data
8 | author: Marlene Heinrich
9 | meta-description: Using python to write files
10 | date: 2020-10-27 16:44:28 +0100
11 | keywords: python, beginner, data
12 | template: post
13 | categories:
14 | - python
15 | image: assets/images/python/file.svg
16 | ---
17 |
18 | ## Writing files in Python
19 |
20 | Working with data, it is often useful not just to read files, but also to be
21 | able to write data to files. Here we are going to discuss a first simple
22 | approach on how to write data, that we have saved in lists to a file.
23 |
24 | ## Create the data
25 |
26 | Imagine, that you have read data from a file and calculated some new stuff, that
27 | you have saved in two lists:
28 |
29 | ```python
30 | x = [1, 2, 3, 4, 5, 6, 7]
31 | y = [7, 6, 5, 4, 3, 2, 1]
32 | ```
33 | Now we want to write these to lists to a file, so we can forget about them for
34 | a few weeks and then use a read-function and continue working again. A file we
35 | are interested in might look something like this:
36 |
37 | ```python
38 | x,y
39 | 1,7
40 | 2,6
41 | 3,5
42 | 4,4
43 | 5,3
44 | 6,2
45 | 7,1
46 | ```
47 |
48 | ## Write code that creates a file
49 |
50 | The easiest code to create and write a file looks like this:
51 |
52 | ```python
53 | with open("testfile.dat", "w") as file:
54 | file.write("x,y\n")
55 | for i in range(len(x)):
56 | file.write(str(x[i]) + "," + str(y[i]) + "\n")
57 | ```
58 |
59 | The first line opens a file named "testfile.dat". The "w"-statement opens a
60 | file and overwrites content. If we swap it for "a" the new content will be
61 | appended to the file. Try that one out to see the difference! The first write
62 | statement just creates a nice heading for our file, while the rest of the file
63 | is written in a loop and adds the data.
64 |
65 | The single entries have to be given as strings, so the float (or whatever) has
66 | to be converted. If you are not sure about the different outcome of
67 | ```python
68 | str(x[i])
69 | ```
70 | and
71 | ```python
72 | "x[i]"
73 | ```
74 | try both out so it does not go wrong in an important moment.
75 |
76 | Different to reading a file in Python it is not super easy to write a function to
77 | write data to a file that
78 | fits all needs. But try out some different options to save your data in the
79 | python-program and you will find an option that suits your needs. And the
80 | general structure usually does not change, so you will be able to go a long way
81 | with the few lines you learned here!
82 |
--------------------------------------------------------------------------------
/python/019-python-fstrings.md:
--------------------------------------------------------------------------------
1 | ---
2 | id: 019-python-fstrings.md
3 | title: f-Strings - A nice way of formatting strings
4 | tags:
5 | - python
6 | - beginner
7 | - strings
8 | author: Durval Carvalho
9 | meta-description: Using python to formatings strings
10 | date: 2020-10-27 15:35:41 -0300
11 | keywords: python, beginner, strings
12 | template: post
13 | categories:
14 | - python
15 | image: assets/images/python/text.svg
16 | ---
17 |
18 | ## Formatting Strings
19 |
20 | Creating dynamic texts is a common need in almost any programming language. Python offers a number of ways to create dynamic text and the coolest one is called f-strings
21 |
22 | ## The not-so-cool way
23 |
24 | Python during its creation had influences from other languages (like C), so it inherited the parser mechanism that runs through a string looking for specific symbols (like %d, %s, %f, for integers, strings and floats respectively).
25 | Fortunately in python it is simpler, there is only one symbol for all types of variables, but even so it is not as cool as f-strings
26 |
27 | ```python
28 |
29 | name = "Lebron James"
30 | age = 35
31 | height = 2.06
32 |
33 | print("Hey people! My name is %s, I'm %s years old and I'm %s meters tall" % (name, age, height))
34 | ```
35 |
36 | ## The super cool way
37 |
38 | Starting with python version 3.6, f-strings were built into python. f-string comes is an abbreviation for "formateed strings literals".
39 |
40 | Its syntax is quite simple and intuitive (and much cooler). Just put an f before the strings and identify the variables within the string body
41 |
42 | ```python
43 |
44 | name = "Lebron James"
45 | age = 35
46 | height = 2.06
47 |
48 | print(f"Hey people! My name is {name}, I'm {age} years old and I'm {height} meters tall")
49 | ```
50 |
51 | As you can see, this way of creating dynamic strings is more readable, and such more cooler!
52 |
53 | If you are interested, try to research other details about the f-strings such as the use of arbitrary expressions, multiline expressions, the f-string performance. You will love!
54 |
--------------------------------------------------------------------------------
/python/026-using-argparse.md:
--------------------------------------------------------------------------------
1 | ---
2 | id: 026-using-argparse
3 | title: Creating a Command-Line Interface Program With Argparse
4 | tags:
5 | - Python
6 | - cli
7 | - args
8 | - argparse
9 | author: Royce Ayroso-Ong
10 | meta-description: Using argparse to create a simple command-line interface program
11 | date: 2020-10-31 19:07:19 -0400
12 | keywords: Python, cli, args, argparse
13 | template: post
14 | categories:
15 | - python
16 | image: assets/images/python/com.svg
17 | ---
18 |
19 | # What is Argparse?
20 |
21 | [Argparse](https://docs.python.org/3/library/argparse.html) is a module that comes pre-installed when you install Python. It allows for the creation of user-friendly command-line interfaces.
22 |
23 | ## Creating a CLI Program to Find the Area of a Rectangle
24 |
25 |
26 |
27 |
28 | To start using argparse to recreate the example above, you will need to import the pacakge:
29 |
30 | ```python
31 | # the following code will be contained within a file called area.py
32 | import argparse
33 | ```
34 |
35 | Now we will create a simple method to multiply and return two numbers, like so:
36 |
37 | ```python
38 | def area_of_rectangle(length, width):
39 | return length * width
40 | ```
41 |
42 | This method will be called when the program is executed. The parameters `length` and `width` will be extracted from the command line arguments.
43 |
44 | Now we must create a parser to handle the parsing of command-line arguments along with two positional arguments that we want to extract, i.e. the length and the width of the rectangle.
45 |
46 | ```python
47 | parser = argparse.ArgumentParser(description='Calculates the area of a rectangle')
48 |
49 | parser.add_argument('length', default=0, type=int, help='An integer for the length of the rectangle')
50 | parser.add_argument('width', default=0, type=int, help='An integer for the width of the rectangle')
51 | ```
52 |
53 | We can use the values of these arguments by calling upon `parser.parse_args()`.
54 |
55 | ```python
56 | args = parser.parse_args()
57 | area = area_of_rectangle(args.length, args.width)
58 | print('The area of your rectangle is: ', area, ' units squared.')
59 | ```
60 |
61 | Putting everything together should look like this:
62 |
63 | ```Python
64 | # area.py
65 | import argparse
66 |
67 | def area_of_rectangle(length, width):
68 | return length * width
69 |
70 | parser = argparse.ArgumentParser(description='Calculates the area of a rectangle')
71 |
72 | parser.add_argument('length', default=0, type=int, help='An integer for the length of the rectangle')
73 | parser.add_argument('width', default=0, type=int, help='An integer for the width of the rectangle')
74 |
75 | args = parser.parse_args()
76 | area = area_of_rectangle(args.length, args.width)
77 | print('The area of your rectangle is: ', area, ' units squared.')
78 | ```
79 |
80 | Thats about it! Argparse will now parse your command-line agruments for integers to be used in our method. Every parser will have a `-h` optional argument by default; this option will display the help message along with the parser's description.
81 |
82 |
83 |
--------------------------------------------------------------------------------
/python/027-pandas-read-file-backslash.md:
--------------------------------------------------------------------------------
1 | ---
2 | id: 027-pandas-unicodeescape-error.md
3 | title: Pandas read files
4 | tags:
5 | - python
6 | - pandas
7 | author: Matteo Buldrini
8 | meta-description: How to read in Pandas files that give you unicodeescape error.
9 | date: 2020-12-20 14:30:05 +0200
10 | keywords: python, pandas
11 | template: post
12 | categories:
13 | - python
14 | image: assets/images/python/python3.svg
15 | ---
16 |
17 | Sometimes when reading a file in Pandas you may incur in the following error after declaring the path name:
18 |
19 | ```python
20 | SyntaxError: (unicode error) ‘unicodeescape’ codec can’t decode bytes in position 2-3:
21 | truncated \UXXXXXXXX escape.
22 | ```
23 |
24 | This happens because path names tend to have backslashes in them (e.g. 'C:\Documents\File.csv'). In Python, backslash is used to signify special characters, but when we use it in a path name we want to refer to actual backslashes, not to special characters.
25 |
26 | To solve this issue, you need to add an r before the path name, so that Python can interpret backslashes as strings.
27 |
28 | Example:
29 |
30 | ```python
31 | df = pd.read_csv(r'C:\Documents\File.csv')
32 | ```
33 |
--------------------------------------------------------------------------------
/python/028-Decision Trees.md:
--------------------------------------------------------------------------------
1 | ---
2 | id: 028-Decision Tree.md
3 | title: Why Decision trees are so popular in Machine Learning algorithms
4 | tags:
5 | - python
6 | - random
7 | - machine learning
8 | author: Ankur
9 | meta-description: What makes decision trees popular
10 | date: 2021-10-02 15:41:42 -0700
11 | keywords: python, Decision Tree
12 | template: post
13 | categories:
14 | - python
15 | image: assets/images/python/tree.svg
16 | ---
17 |
18 | ## What is Decision Trees?
19 |
20 | Decision trees-like model more specifically it is probablity tree that enables the user to made decision on the basis on conditions.This condition can be understand as if-then statements so there's if condition then it will choose some vertex else other.The solution choosen after particular condition is called decision. This algorithm can be used for both regression and classification.
21 |
22 | In this trees internal nodes represents conditions and the leaf node depicts decision.
23 |
24 | ## But why they are so popular?
25 |
26 | First off, Lets look which module allow you to make decision tree:
27 |
28 | ```python
29 | From sklearn.tree import DecisionTreeClassifier
30 | classifier= DecisionTreeClassifier(criterion='entropy', random_state=0) #for classification
31 | classifier= DecisionTreeRegressor(criterion='entropy', random_state=0) #for regression
32 | ```
33 |
34 | 1.This tree based algorithm can visualized and inclusing its conditions.
35 | https://scikit-learn.org/stable/auto_examples/tree/plot_iris_dtc.html
36 | https://scikit-learn.org/stable/_images/iris.sv
37 |
38 | you can see how the decision tree made is plotted.
39 |
40 | 2.Less preprocessing is required when compared to other algorithms.Less effort in preprocessing makes it much handy.
41 |
42 | 3.This algorithm can handle missing values and it works healthy while working with outliers.
43 |
44 | 4.The usage is simple hence its very understandable.It looks like if-else statements
45 |
46 | 5.They can be stacked with other algorithms and can reach excellent results
47 |
48 | 6.They dont require setting of lots of parameters and can easily handle multidimensional data.
49 |
50 | Thats it! Now you know what makes decision trees so popular! But this doesn't mean they can perform outstanding always.
--------------------------------------------------------------------------------
/python/030_DataStructures.md:
--------------------------------------------------------------------------------
1 | ---
2 | id: 030_DataStructures.md
3 | title: DataStructures - Basic concept
4 | tags:
5 | - python
6 | - beginner
7 | - data structures
8 | author: Sanjana Sogimatt
9 | meta-description: Understanding data structures
10 | date: 2021-10-11 19:40:41 -0300
11 | keywords: python, beginner, data structures
12 | template: post
13 | categories:
14 | - python
15 | image: assets/images/python/data.svg
16 | ---
17 |
18 | ## Basic data structures:
19 | Python has four basic structure namely Lists,Dictionary,Tuple and sets.
20 | These data structures are in built that come along with python and we also have user defined data structure.
21 |
22 |
23 | ## List:
24 | Lists are the type of container which can store data of different types in the memory.Lists are created using '[]'(square braces)
25 | Example:
26 | ```python
27 | l1=[34,56,78,'list',(2,3)]
28 | ```
29 | ## Sets:
30 | Sets are again similar to lists and tuples but diffrence would be it does not store duplicate values.It is enclosed in curly braces{}
31 | Example:
32 | ```python
33 | s1={2,45,(4.5,7),s}
34 | ```
35 | ## Tuple:
36 | Tuple is similar to Lists but the diffrence is tuples are immutable where lists are mutable.Tuples are created using round braces()
37 | Example:
38 | ```python
39 | t1=(1,2,3,(67,78),'tuple')
40 | ```
41 | ## Dictionary:
42 | Okay now dictionary are not at all like lists. These data structures store key-value pair. Take an anology of a dictionary where there is a word and a meaning to that. Dictionaries in python are created using curly braces.
43 | Example:
44 | ```python
45 | d1={1:a,2:b,3:c}
46 | ```
47 | Some of the user defined data structures are as follows:
48 | ## Array:
49 | These data structures are similar to lists but it is homogeneous that is the elements having same datatype.
50 |
51 | ## Linked list:
52 | These are the data structure that holds the value of next element using pointers.
53 |
54 | ## Stack:
55 | These data structure follow the principle of last in first out. Basically, we can access only the last entered value. We can also do operations like push or pop.
56 |
57 | ## Queue:
58 | These are the data structures that work following the principle of first in first out. You totally relate it to a queue in real life.
59 |
60 | ## Hash maps:
61 | Hash maps are same as dictionaries in python.
62 |
63 | ## Graph:
64 | Graphs stores the data in the collection of points called vertices and edges.
65 |
66 |
67 |
--------------------------------------------------------------------------------
/python/030requests-library.md:
--------------------------------------------------------------------------------
1 | ---
2 | id: 030requests-library.md
3 | title: Requests library in Python
4 | tags:
5 | - python
6 | author: Javier Gonzalez
7 | meta-description:
8 | date: 2021-10-08 16:30:00 -0700
9 | keywords: python
10 | template: post
11 | categories:
12 | - python
13 | image: assets/images/python/req.svg
14 | ---
15 |
16 | ## Python Requests Library
17 |
18 | Sometimes we need with a script written in Python accessing to an API or download the content of a web page.
19 |
20 | For that we can use the [Requests Library](https://docs.python-requests.org/en/latest)
21 |
22 | First we need to install the library:
23 |
24 | ```console
25 | pip install requests
26 | ```
27 |
28 | Code Example :
29 |
30 | ```python
31 |
32 | import requests
33 |
34 | # The requests module provides us different methods (get, post, update, delete)
35 | r = requests.get('http://www.google.com')
36 |
37 | # In the request method also it is possible to specify the headers, the cookies and the data sent
38 | headers = { 'accept' : '*/*' }
39 | payload = { 'title' : 'Download web page with python' }
40 | cookies = dict(example_cookie='value')
41 |
42 | r = requests.post('https://reqres.in/api/posts', data=payload, headers=headers, cookies=cookies)
43 |
44 | # With the object returned
45 | # We could check the status code of the response
46 | r.status_code
47 |
48 | # We could obtain the content of the page as a string
49 | r.text
50 |
51 | # Or if the url is an API, we could obtain the response in json format
52 | r.json()
53 |
54 |
55 | ```
56 |
--------------------------------------------------------------------------------
/python/031-python-forloops.md:
--------------------------------------------------------------------------------
1 | ---
2 | id: 031-python-forloops.md
3 | title: Forloops in Python
4 | tags:
5 | - python
6 | - random
7 | author: Hammed Babatunde
8 | meta-description: Using Forloops in Python
9 | date: 2021-10-11 18:38:42 -0700
10 | keywords: python
11 | template: post
12 | categories:
13 | - python
14 | image: assets/images/python/python2.svg
15 | ---
16 |
17 | # What are For Loops?
18 | A for loop acts as an iterator in Python; it goes through items that are in a sequence or any other iterable item. Objects that we can iterate over include strings, lists, tuples, and even built-in iterables for dictionaries, such as keys or values.
19 |
20 | ## Using For Loops in a List
21 | ```python
22 | list1 = [1,2,3,4,5,6,7,8,9,10]
23 | for num in list1:
24 | print(num) # Prints out each number in list1
25 | ```
26 |
27 | ## Using For Loops in a String
28 | We've used for loops with lists, how about with strings? Remember strings are a sequence so when we iterate through them we will be accessing each item in that string.
29 | ```python
30 | for letter in 'This is a string.':
31 | print(letter) #print each letter in the string
32 | ```
33 |
34 | ## Using For Loops in Tuples
35 | Tuples have a special quality when it comes to for loops. If you are iterating through a sequence that contains tuples, the item can actually be the tuple itself, this is an example of tuple unpacking. During the for loop we will be unpacking the tuple inside of a sequence and we can access the individual items inside that tuple!
36 | ```python
37 | list2 = [(2,4),(6,8),(10,12)]
38 | for tup in list2:
39 | print(tup) #prints each tuple
40 |
41 | # Now with unpacking!
42 | for (t1,t2) in list2:
43 | print(t1)
44 | ```
45 | ## Using For Loops in a Dictionary
46 | Cool! With tuples in a sequence we can access the items inside of them through unpacking! The reason this is important is because many objects will deliver their iterables through tuples. Let's start exploring iterating through Dictionaries to explore this further!
47 |
48 | ```python
49 | d = {'k1':1,'k2':2,'k3':3} #This is a Dictionary in python
50 |
51 | for item in d:
52 | print(item) #This prints out each keys in the dictionary
53 |
54 | # Dictionary unpacking for both keys and values
55 | for k,v in d.items():
56 | print(k)
57 | print(v)
58 | ```
59 | We have learned how to use for loops to iterate through tuples, lists, strings, and dictionaries.
60 |
--------------------------------------------------------------------------------
/python/032-python-iterators and generators.md:
--------------------------------------------------------------------------------
1 | ---
2 | id: 032-python-iterators and generators.md
3 | title: Iterators and Generators in Python
4 | tags:
5 | - python
6 | - random
7 | author: Hammed Babatunde
8 | meta-description: Using iterators and Generators in Python
9 | date: 2021-10-11 18:38:42 -0700
10 | keywords: python
11 | template: post
12 | categories:
13 | - python
14 | image: assets/images/python/python4.svg
15 | ---
16 |
17 | # Generators and Iterators in Python
18 |
19 | Generator functions allow us to write a function that can send back a value and then later resume to pick up where it left off. This type of function is a generator in Python, allowing us to generate a sequence of values over time. The main difference in syntax will be the use of a yield statement.
20 |
21 | In most aspects, a generator function will appear very similar to a normal function. The main difference is when a generator function is compiled they become an object that supports an iteration protocol. That means when they are called in your code they don't actually return a value and then exit. Instead, generator functions will automatically suspend and resume their execution and state around the last point of value generation
22 |
23 |  To start getting a better understanding of generators, let's go ahead and see how we can create some.
24 |
25 | ```python
26 | # Generator function for the cube of numbers (power of 3)
27 | def gencubes(n):
28 | for num in range(n):
29 | yield num**3
30 |
31 | for x in gencubes(10):
32 | print(x)
33 | ```
34 | Generators are best for calculating large sets of results (particularly in calculations that involve loops themselves) in cases where we don’t want to allocate the memory for all of the results at the same time.
35 |
36 | Let's create another example generator which calculates fibonacci numbers:
37 | ```python
38 | # Generator function for the cube of numbers (power of 3)
39 | def genfibon(n):
40 | """
41 | Generate a fibonnaci sequence up to n
42 | """
43 | a = 1
44 | b = 1
45 | for i in range(n):
46 | yield a
47 | a,b = b,a+b
48 |
49 | for num in genfibon(10):
50 | print(num)
51 | ```
52 |
53 | ## next() built-in function in Python
54 | A key to fully understanding generators is the next() function and the iter() function.
55 |
56 | The next() function allows us to access the next element in a sequence. Lets check it out:
57 | ```python
58 | # Generator function for the cube of numbers (power of 3)
59 | def simple_gen():
60 | for x in range(3):
61 | yield x
62 |
63 | # Assign simple_gen
64 | g = simple_gen()
65 |
66 | print(next(g)) #prints out a value in the generator
67 | ```
68 |
69 | ## iter() built-in Fuction in Python
70 | Let's go ahead and check out how to use iter()
71 | A string object supports iteration, We can directly iterate over a string with The iter() function.
72 | ```python
73 | s = 'hello'
74 |
75 | #Iterate over string
76 | for let in s:
77 | print(let)
78 |
79 | s_iter = iter(s)
80 |
81 | next(s_iter) # print each of the value in s when called
82 | ```
83 |
84 | The main takeaway from this article is that using the yield keyword at a function will cause the function to become a generator. This change can save you a lot of memory for large use cases.
85 |
--------------------------------------------------------------------------------
/python/033-insertion-sort-python.md:
--------------------------------------------------------------------------------
1 | ---
2 | id: 033-insertion-sort-python.md
3 | title: Insertion Sort in Python
4 | tags:
5 | - python
6 | - insertion sort
7 | - sorting
8 | - algorithms
9 | date: 2021-10-11 17:30:00 -0800
10 | keywords: python, sorting, algorithms, insertion, sort
11 | categories:
12 | - python
13 | image: assets/images/python/eng.svg
14 | author: Ryan Lim
15 | meta-description: insertion sort in python
16 | ---
17 |
18 | # Insertion Sort in Python
19 |
20 | [Insertion Sort](https://en.wikipedia.org/wiki/Insertion_sort) is type of [sorting algorithm](https://en.wikipedia.org/wiki/Sorting_algorithm) that is relatively simple to implement. It does not have the best runtime, i.e. `O(n^2)`, compared to more advanced sorting algorithms such as [quicksort](https://en.wikipedia.org/wiki/Quicksort) or [merge sort](https://en.wikipedia.org/wiki/Merge_sort) but is a good starting sorting algorithm to learn. It can be used to sort smaller arrays consisting of strings or numbers.
21 |
22 | ## Pseudocode
23 |
24 | Here is the pseudocode of insertion code (from [wikipedia](https://en.wikipedia.org/wiki/Insertion_sort#Algorithm)):
25 |
26 | ```
27 | i ← 1
28 | while i < length(A)
29 | j ← i
30 | while j > 0 and A[j-1] > A[j]
31 | swap A[j] and A[j-1]
32 | j ← j - 1
33 | end while
34 | i ← i + 1
35 | end while
36 | ```
37 |
38 | The general idea behind it is to iterate through the array from beginning to end and swaps each element from the current element to the beginning of the array if a "greater" prior element is found compare to the current element. It basically sorts "subsections" of the array repeatedly until the entire array is sorted by "inserting" new elements in the right order in the subsection of the array.
39 |
40 | ## Python Implementation
41 |
42 | Without further ado, here is my Python (3) implementation of it:
43 |
44 | ```python
45 | def insertion_sort(array):
46 | for i in range(1, len(array)):
47 | j = i
48 | while j > 0 and array[j - 1] > array[j]:
49 | # swap the two array elements
50 | temp = array[j - 1]
51 | array[j - 1] = array[j]
52 | array[j] = temp
53 | j -= 1
54 | return array
55 | ```
56 |
57 | As you can see, it closely follows the pseudocode, with some minimal code savings using the `range` function. The `swap` was implemented inline but could be implemented as a separate function as well.
58 |
59 | ## Runtime
60 |
61 | As mentioned, the average runtime for this algorithm is `O(n^2)`. The best case is an array that is already sorted with a runtime of `O(n)` as the current element in the array will only be compared once with a prior element. The worst case is an array that is sorted in reverse as each new element will need to be compared (and swapped) with every prior element to the beginning of the array.
62 |
63 | Thanks for reading, any comment or feedback is most welcome!
64 |
--------------------------------------------------------------------------------
/python/034-python-functions.md:
--------------------------------------------------------------------------------
1 | ---
2 | id: 034-python-functions.md
3 | title: Creating functions in Python
4 | tags:
5 | - python
6 | - random
7 | author: Hammed Babatunde
8 | meta-description: Creating functions in python
9 | date: 2021-10-17 18:38:42 -0700
10 | keywords: python
11 | template: post
12 | categories:
13 | - python
14 | image: assets/images/python/python4.svg
15 | ---
16 |
17 | # What is a Function in Python
18 | Formally, a function is a useful device that groups together a set of statements so they can be run more than once. They can also let us specify parameters that can serve as inputs to the functions.
19 |
20 | On a more fundamental level, functions allow us to not have to repeatedly write the same code again and again. If you remember back to the lessons on strings and lists, remember that we used a function len() to get the length of a string. Since checking the length of a sequence is a common task you would want to write a function that can do this repeatedly at command.
21 |
22 |
23 | ## def Statements
24 | Let's see how to build out a function's syntax in Python. It has the following form:
25 | ```python
26 | def name_of_function(arg1,arg2):
27 | '''
28 | This is where the function's Document String (docstring) goes
29 | '''
30 | # Do stuff here
31 | # Return desired result
32 | ```
33 |
34 | ## Example 1: A simple print 'hello' function
35 | ```python
36 | def say_hello():
37 | print('hello')
38 |
39 | #Call the Function
40 | say_hello()
41 | ```
42 |
43 | ## Example 2: A simple greeting function
44 | Let's write a function that greets people with their name.
45 | ```python
46 | def greeting(name):
47 | print('Hello %s' %(name))
48 |
49 | greeting('Jose') #calling the function
50 | ```
51 |
52 | ## Using return
53 | Let's see an example that use a return statement. return allows a function to return a result that can then be stored as a variable, or used in whatever manner a user wants.
54 | ```python
55 | import math
56 |
57 | def is_prime2(num):
58 | '''
59 | Better method of checking for primes.
60 | '''
61 | if num % 2 == 0 and num > 2:
62 | return False
63 | for i in range(3, int(math.sqrt(num)) + 1, 2):
64 | if num % i == 0:
65 | return False
66 | return True
67 | ```
68 |
69 | Great! You should now have a basic understanding of creating your own functions to save yourself from repeatedly writing code!
70 |
--------------------------------------------------------------------------------
/python/035-python-generate-requirements-file.md:
--------------------------------------------------------------------------------
1 | ---
2 | id: 035-python-generate-requirements-file.md
3 | title: Generate requirements.txt file with packages that you need for project.
4 | tags:
5 | - python
6 | - libraries
7 | - install
8 | - requirements
9 | author: Nitin Tejuja
10 | meta-description: Generate the requirements.txt file with libraries that you need to run the project.
11 | date: 2021-10-28 04:18:55 +0530
12 | keywords: python
13 | template: post
14 | categories:
15 | - python
16 | image: assets/images/python/require.svg
17 | ---
18 |
19 | # What is requirements.txt file ?
20 | requirements.txt file contains the python packages names that required to run the project . requirements.txt file is located in root directory of project.
21 | example :
22 | ---
23 | alembic==1.6.5
24 | appdirs==1.4.4
25 | arrow==1.1.1
26 | asgiref==3.4.1
27 | ---
28 | # How to generate requirements.txt file ?
29 | pip freeze command gives complete list of every package installed on your computer along with version numbers.
30 | There two ways to put this complete list of packages into requirements.txt file and as follows :
31 | 1. Copy pip freeze command output to requirements.txt file
32 | 2. Modify the pip freeze command as "pip freeze > requirements.txt " so that output of command "pip freeze" stores into requirements.txt file.
33 |
34 |
--------------------------------------------------------------------------------
/python/037-ftp.md:
--------------------------------------------------------------------------------
1 | ---
2 | id: 037-ftp.md
3 | title: A simple Guide to FTP
4 | tags: python,networking,ftp
5 | date: 2021-10-28 19:05:00 +0200
6 | keywords: nlp, regex
7 | categories: Python
8 | image: assets/images/sftp.svg
9 | author: Joaquin Montesinos
10 | meta-description: This is a brief tutorial on FTP connection on Python
11 | ---
12 |
13 | # A simple Guide to FTP connection
14 |
15 | FTP
16 | The File Transfer Protocol (FTP) is a standard network protocol used to transfer computer files between a client and server on a computer network. FTP is built on a client-server model architecture and uses separate control and data connections between the client and the server.
17 |
18 | The client can send FTP commands such as STAT, PWD, RETR, and STOR. The ftplib module has multiple methods that can wrap these commands.
19 |
20 | # Example
21 |
22 | Create a send_command.py script and write the following content in it:
23 |
24 | ```python
25 | import os
26 | import ftplib
27 |
28 | ftp_host='xxx'
29 | ftp_user_name='xxx'
30 | ftp_password='xxx'
31 |
32 | session = ftplib.FTP(ftp_host,ftp_user_name,ftp_password)
33 | # file to send
34 | file = open('origin_filename.txt','rb')
35 | # send the file
36 | session.storbinary('STOR 'end_filename.txt', file)
37 |
38 | # close file and FTP
39 | file.close()
40 | session.quit()
41 | ```
42 |
43 | Run the script as follows:
44 |
45 | ```
46 | python3 send_command.py
47 | ```
--------------------------------------------------------------------------------
/python/037-python-methods.md:
--------------------------------------------------------------------------------
1 | ---
2 | id: 037-python-Methods
3 | title: Creating Object Oriented methods
4 | tags:
5 | - python
6 | - random
7 | author:
8 | meta-description: Creating Object Oriented Methods
9 | date: 2021-10-11 18:38:42 -0700
10 | keywords: python
11 | template: post
12 | categories:
13 | - python
14 | image: assets/images/python/python.svg
15 | ---
16 |
17 | # Methods
18 | Methods are functions defined inside the body of a class. They are used to perform operations with the attributes of our objects. Methods are a key concept of the OOP paradigm. They are essential to dividing responsibilities in programming, especially in large applications.
19 |
20 | You can basically think of methods as functions acting on an Object that take the Object itself into account through its self argument.
21 |
22 | Let's go through an example of creating a Circle class:
23 |
24 |
25 | ```python
26 | class Circle:
27 | pi = 3.14
28 |
29 | # Circle gets instantiated with a radius (default is 1)
30 | def __init__(self, radius=1):
31 | self.radius = radius
32 | self.area = radius * radius * Circle.pi
33 |
34 | # Method for resetting Radius
35 | def setRadius(self, new_radius):
36 | self.radius = new_radius
37 | self.area = new_radius * new_radius * self.pi
38 |
39 | # Method for getting Circumference
40 | def getCircumference(self):
41 | return self.radius * self.pi * 2
42 |
43 |
44 | c = Circle()
45 |
46 | print('Radius is: ',c.radius)
47 | print('Area is: ',c.area)
48 | print('Circumference is: ',c.getCircumference())
49 | ```
50 |
51 |
52 | In the _init_ method above, in order to calculate the area attribute, we had to call Circle.pi. This is because the object does not yet have its own .pi attribute, so we call the Class Object Attribute pi instead.
53 | In the setRadius method, however, we'll be working with an existing Circle object that does have its own pi attribute. Here we can use either Circle.pi or self.pi.
54 |
55 | Now let's change the radius and see how that affects our Circle object:
56 |
57 | ```python
58 | c.setRadius(2)
59 |
60 | print('Radius is: ',c.radius)
61 | print('Area is: ',c.area)
62 | print('Circumference is: ',c.getCircumference())
63 | ```
64 |
65 | Great! Notice how we used self. notation to reference attributes of the class within the method calls. Review how the code above works and try creating your own method.
--------------------------------------------------------------------------------
/python/038-dictionary-comprehension.md:
--------------------------------------------------------------------------------
1 | ---
2 | id: 038-dictionary-comprehension.md
3 | title: Dictionary Comprehension in Python
4 | tags:
5 | - python
6 | - random
7 | author: Tarun K Kumar
8 | meta-description: dictionary comprehension in python
9 | date: 2022-10-24 21:53:39 +0530
10 | keywords: python
11 | categories:
12 | - python
13 | image: assets/images/python/python3.svg
14 | ---
15 | # Dictionary Comprehension in Python
16 |
17 | Dictionary comprehension is a simple method of creating a dictionary without using the dict() method and is similar to the list comprehension concept. Suppose we have a list of keys and list of corresponding values and we want to turn those into a dictionary, then we would usually write something like:
18 |
19 | ```python
20 | keys = ['animal','plant','insect']
21 | values = ["dog","lemongrass","Weevil"]
22 |
23 | dict = {}
24 |
25 | for i in range(len(keys)):
26 | dict[keys[i]] = values[i]
27 |
28 | print(dict)
29 | ```
30 | which would print:
31 | ```python
32 | {'animal': 'dog', 'plant': 'lemongrass', 'insect': 'Weevil'}
33 | ```
34 | Well, we have our end result but the same can be achieved with less code. This is where dictionary comprehension comes in.
35 |
36 | The refactored code:
37 | ```python
38 | keys = ['animal','plant','insect']
39 | values = ["dog","lemongrass","Weevil"]
40 |
41 | print({keys[i]:values[i] for i in range(len(keys))})
42 | ```
43 | So, lets breakdown that line:
44 |
45 | To use dictionary comprehension, a dictionary must be created using `{}` and the following syntax must be followed:
46 | ```python
47 | dictionary = {key: value for vars in iterable}
48 | ```
49 | - The `key` and `values` are our lists containing our key:value pairs where we use `i` as indices to populate our dictionary
50 |
51 | You can also use conditionals in dictionary comprehension as well:
52 | ```python
53 | keys = ['animal','plant','insect']
54 | values = [-1,2,3]
55 |
56 | print({keys[i]:values[i] for i in range(len(keys)) if values[i]>0})
57 | ```
58 | The output:
59 | ```python
60 | {'plant': 2, 'insect': 3}
61 | ```
62 | This is a more pythonic and my favourite way of creating dictionaries in python. I hope this article was useful. Thank you for reading.
63 |
64 |
--------------------------------------------------------------------------------
/python/039-__add__()-method.md:
--------------------------------------------------------------------------------
1 | ---
2 | id: 039-__add__()-method.md
3 | title: __add__() in Python
4 | tags:
5 | - python
6 | - random
7 | author: Tarun K Kumar
8 | meta-description: __add__() magic method in python
9 | date: 2022-10-24 20:52:00 +0530
10 | keywords: python
11 | categories:
12 | - python
13 | image: assets/images/python/python3.svg
14 | ---
15 | # __add__() Method
16 |
17 | The `_-add__` method is what enables operator overloading in python objects. Operator overloading is when you explicitly tell an object what to do when a certain operator is used.
18 |
19 | The `__add__` method enables us to overload the `+` operator of an object.
20 |
21 | Let us try to add a Python integer with a user-defined Number Object. If you try to add an object and an integer organically like this
22 |
23 | ```python
24 | class Number:
25 | def __init__(self, value):
26 | self.value = value
27 |
28 | num = Number(5)
29 |
30 | print(num + 5)
31 | ```
32 | You would get:
33 | ```bash
34 | Traceback (most recent call last):
35 | File "main.py", line 7, in
36 | print(num + 5)
37 | TypeError: unsupported operand type(s) for +: 'Number' and 'int'
38 | ```
39 | Python throws an error because the `int` class is not compatible with our newly created `Number` class. To enable our intended feature, we can make use of the `__add__()` dunder method inside the `Number` class to perform the addition.
40 | ```python
41 | class Number:
42 |
43 | def __init__(self, value):
44 | self.value = value
45 |
46 | def __add__(self,value):
47 | return self.value + value
48 |
49 | num = Number(5)
50 |
51 | print(num + 5)
52 | ```
53 | -The `__add__` method accepts 2 arguments, `self` and `value` where `self` is a mandatory positional argument that is a reference to the current object and is on the left-hand side of the `+` operator.
54 | -The `value` argument is the value that is on the right-hand side of the `+` operator.
55 | -We return an integer that adds the object's value and the right-hand side operand.
56 | ```bash
57 | 10
58 | ```
59 | But if we reverse the order of the operands it throws and error:
60 | ```python
61 | print(5 + num)
62 | ```
63 | The output:
64 | ```bash
65 | File "main.py", line 14, in
66 | print(num + 5, 5 + num)
67 | TypeError: unsupported operand type(s) for +: 'int' and 'Number'
68 | ```
69 | To remedy this, we can use the `__radd__()` method which provides support for said reversal of operands.
70 |
71 | ```python
72 | class Number:
73 |
74 | def __init__(self, value):
75 | self.value = value
76 |
77 | def __add__(self,value):
78 | return self.value + value
79 |
80 | def __radd__(self,value):
81 | return self.value + value
82 |
83 | num = Number(5)
84 |
85 | print(num + 5, 5 + num)
86 | ```
87 | The output
88 | ```bash
89 | 10 10
90 | ```
91 | With this we have successfully overloaded the `+` operator in Python. I hope this article was useful. Thank you for reading.
92 |
93 |
--------------------------------------------------------------------------------
/python/30-list-comprehension.md:
--------------------------------------------------------------------------------
1 | ---
2 | id: 30-list-comprehension.md
3 | title: List Comprehension In Python
4 | tags:
5 | - python
6 | - random
7 | author: Paul Asalu
8 | meta-description: How to quickly populate a list using list comprehension
9 | date: 2021-10-11 00:22:44 -0700
10 | keywords: python
11 | template: post
12 | categories:
13 | - python
14 | image: assets/images/python/python3.svg
15 | ---
16 |
17 | ## What Is A List Comprehension
18 | List comprehensions are a really cool way to add data to a list in python, from within the list itself. For example, say we wanted to populate a list with numbers from 0-5, we could use a for loop to accomplish this as follows:
19 |
20 | ```python
21 | nums = []
22 |
23 | for i in range(6):
24 | nums.append(i)
25 |
26 | print(nums)
27 | ```
28 | Which would result in the following
29 |
30 | ```bash
31 | [0, 1, 2, 3, 4, 5]
32 | ```
33 |
34 | Doing this would give us an array that contains numbers from 0 - 5 , just like we wanted however there's a much cooler way to achieve this, and moreso its a "one-liner". Let's see how:
35 |
36 | ```python
37 | nums = [x for x in range(6)]
38 |
39 | print(nums)
40 | ```
41 |
42 | This took us from roughly 5 lines of code to one!. So let me explain what just happened. To create a list comprehension, you create a list first and then add logic for the data inside the square brackets. Usually it follows this template:
43 |
44 | ```bash
45 | array = [x(placeholder variable) (for statement)]
46 | ```
47 |
48 | - `x`: is the placeholder variable and represents every item in the list. It's exactly like the for loop variable in the first example `i`. It is always the first part of the list comprehension
49 |
50 | - `for statement`: this is the for-loop that populates the list with actual values for x, and can take any form you want, you could even have conditional blocks in it.
51 |
52 | Let's see an example of list comprehension that uses conditional statements in it. If we wanted to populate a list with letters or characters from a word except vowels in it we could use a list comprehension to accomplish that as follows:
53 |
54 | ```python
55 | vowels = 'aeiou'
56 |
57 | letters = [x for x in "apple" if x not in vowels]
58 |
59 | print(letters)
60 | ```
61 |
62 | This would result in the following:
63 |
64 | ```bash
65 | ['p', 'p', 'l']
66 | ```
67 |
68 | We could also include an `else` statement however we need to put the `if` and `else` block before the `for` loop.
69 |
70 | ```python
71 | vowels = 'aeiou'
72 |
73 | letters = [x if x not in vowels else 0 for x in "apple"]
74 |
75 | print(letters)
76 | ```
77 |
78 | This would result in the following:
79 |
80 | ```bash
81 | [0, 'p', 'p', 'l', 0]
82 | ```
83 |
84 | This is obviously a much easier way to populate your lists in python and can come in handy when you don't have the luxury of writing a full loop. Have fun coding!.
85 |
86 |
--------------------------------------------------------------------------------
/template.md:
--------------------------------------------------------------------------------
1 | ---
2 | id: blog-entry-id
3 | title: Blog Title
4 | tags: tag1, tag2, tag3 (e.g java, interface)
5 | date: 2020-05-12 21:53:39 +0200
6 | keywords: keyword1, keyword2
7 | categories: category (e.g java)
8 | cover: ../path_to_thumbnail_image
9 | author: Author Name
10 | meta-description: brief overview of the blog entry (SEO optimization)
11 | ---
12 |
13 | # Header 1 Title
14 |
15 | Content of the blog entry
16 |
17 | ```python
18 | # code example
19 | ```
20 |
21 | ## Optional sub-sections
22 |
23 | Sub section content
24 |
--------------------------------------------------------------------------------
 2 |
3 | [](http://commonmark.org)
4 | [](https://github.com/flashreads/blogs/issues)
5 | [](https://flashreads.github.io/)
6 |
7 | This repository contains the content(markdown files) for the flashreads blogs.
8 |
9 | ## Contribution
10 |
11 | We are accepting tech-related short(1 minute read :hourglass:) blogs. The blogs will always be published or re-shared under the Author's name :black_nib::handshake:.
12 |
13 | To add a new blog:
14 | * :warning: Please, do not just copy and paste content from the web.:warning:
15 | * Add it to the corresponding directory **{topic}/{number.title.md}** e.g python/013-find-pypi-downloads.md
16 | * Follow the [template](https://github.com/flashreads/blogs/blob/master/template.md) example for structuring the markdown file.
17 | * The tags, author, and meta description labels are required.
18 | * Fork the repository and make PR.
19 |
20 | ### Contributors
21 |
22 |
2 |
3 | [](http://commonmark.org)
4 | [](https://github.com/flashreads/blogs/issues)
5 | [](https://flashreads.github.io/)
6 |
7 | This repository contains the content(markdown files) for the flashreads blogs.
8 |
9 | ## Contribution
10 |
11 | We are accepting tech-related short(1 minute read :hourglass:) blogs. The blogs will always be published or re-shared under the Author's name :black_nib::handshake:.
12 |
13 | To add a new blog:
14 | * :warning: Please, do not just copy and paste content from the web.:warning:
15 | * Add it to the corresponding directory **{topic}/{number.title.md}** e.g python/013-find-pypi-downloads.md
16 | * Follow the [template](https://github.com/flashreads/blogs/blob/master/template.md) example for structuring the markdown file.
17 | * The tags, author, and meta description labels are required.
18 | * Fork the repository and make PR.
19 |
20 | ### Contributors
21 |
22 | 
 20 |
21 | If you have worked on coding projects you might came across these terms but many new developers get confused between git and GitHub. They are not same though they are connected with each other. Let's see some differences.
22 |
23 | ## Git
24 | **Git** is a Version control system that records changes to a file or set of files over time. It helps in comparing, differentiating and reverting the changes between two versions of the project. It really helpful in preventing conflicts specially when a lot of people are working on one larger project.
25 |
26 | ## Github
27 | **GitHub** is a Web-based Git version control repository hosting service. Github is designed to manage open-source projects that are using git. It provides features like : creating a branch, creating a Pull Request, raising issues, etc.
28 |
29 | #### Summarizing the differences:
30 |
31 | | S no. | Git | Github |
32 | | ----- | ----------------------------------------- | ------------------------------------------------- |
33 | | 1. | Git is a version control system. | Github is a hosting service for git repositories. |
34 | | 2. | It is installed locally on system. | It is a cloud based service. |
35 | | 3. | It is a command line tool. | It is a Graphical user interface. |
36 | | 4. | It helps in tracking the changes locally. | It helps in collaborating with others. |
37 | | 5. | It was first released in 2005. | It was launched in 2008. |
38 |
--------------------------------------------------------------------------------
/git/009-git-installation.md:
--------------------------------------------------------------------------------
1 | ---
2 | id: 009-git-installation.md
3 | title: Git Installation
4 | tags:
5 | - Git
6 | - Github
7 | - Git First Time
8 | - Git Installation
9 | author: Sid-Lais
10 | meta-description: Git for first time
11 | date: 2021-10-11 08:30:00 +0100
12 | keywords: Git, Github
13 | template: post
14 | categories:
15 | - git
16 | image: assets/images/setup.svg
17 | ---
18 |
19 | # Git Installation
20 | Before working on Git repositories it is advised to get a good knowledge of Git. Git is an open source version control system. It is easy to learn and has very fast performance irrespective of the system.
21 |
22 | ## Steps to install Git
23 |
24 | 1. Download and install [Git](https://git-scm.com/) for your system.
25 | 2. After installation open a terminal in your system and write **git** to check proper installation.
26 |
20 |
21 | If you have worked on coding projects you might came across these terms but many new developers get confused between git and GitHub. They are not same though they are connected with each other. Let's see some differences.
22 |
23 | ## Git
24 | **Git** is a Version control system that records changes to a file or set of files over time. It helps in comparing, differentiating and reverting the changes between two versions of the project. It really helpful in preventing conflicts specially when a lot of people are working on one larger project.
25 |
26 | ## Github
27 | **GitHub** is a Web-based Git version control repository hosting service. Github is designed to manage open-source projects that are using git. It provides features like : creating a branch, creating a Pull Request, raising issues, etc.
28 |
29 | #### Summarizing the differences:
30 |
31 | | S no. | Git | Github |
32 | | ----- | ----------------------------------------- | ------------------------------------------------- |
33 | | 1. | Git is a version control system. | Github is a hosting service for git repositories. |
34 | | 2. | It is installed locally on system. | It is a cloud based service. |
35 | | 3. | It is a command line tool. | It is a Graphical user interface. |
36 | | 4. | It helps in tracking the changes locally. | It helps in collaborating with others. |
37 | | 5. | It was first released in 2005. | It was launched in 2008. |
38 |
--------------------------------------------------------------------------------
/git/009-git-installation.md:
--------------------------------------------------------------------------------
1 | ---
2 | id: 009-git-installation.md
3 | title: Git Installation
4 | tags:
5 | - Git
6 | - Github
7 | - Git First Time
8 | - Git Installation
9 | author: Sid-Lais
10 | meta-description: Git for first time
11 | date: 2021-10-11 08:30:00 +0100
12 | keywords: Git, Github
13 | template: post
14 | categories:
15 | - git
16 | image: assets/images/setup.svg
17 | ---
18 |
19 | # Git Installation
20 | Before working on Git repositories it is advised to get a good knowledge of Git. Git is an open source version control system. It is easy to learn and has very fast performance irrespective of the system.
21 |
22 | ## Steps to install Git
23 |
24 | 1. Download and install [Git](https://git-scm.com/) for your system.
25 | 2. After installation open a terminal in your system and write **git** to check proper installation.
26 |  29 |
30 | ## Set up Git credentials
31 |
32 | 1. In the terminal/shell type:
33 |
34 | ```bash
35 | git config --global user.name "Your name here"
36 | git config --global user.email "your_email@example.com"
37 | ```
38 | These will configure the git to set your name and email as default.
39 |
40 | You can also add(optional):
41 |
42 | ```bash
43 | git config --global color.ui true
44 | git config --global core.editor emacs
45 | ```
46 |
47 | The first command is to enable colors in the terminal which are used to better understand the current state of the code.
48 |
49 | The second command is to change the default text editor to emacs. You can change "emacs" to any other text editor desired.
50 |
51 | ## For more information refer to [GitHub Docs](https://docs.github.com/en/get-started/quickstart/set-up-git)
--------------------------------------------------------------------------------
/git/010-rename-git-branch.md:
--------------------------------------------------------------------------------
1 | ---
2 | id: 010-rename-git-branch.md
3 | title: Rename a branch in Git repository
4 | tags:
5 | - Git
6 | - Github
7 | - Git Branch
8 | author: Pavle Jonoski
9 | meta-description: Rename a branch in local and remote Git repository
10 | date: 2022-10-22 17:40:00 +0200
11 | keywords: Git, Github, Git Branch
12 | template: post
13 | categories:
14 | - git
15 | image: assets/images/pipe.svg
16 | ---
17 |
18 | # Rename a branch in local and remote Git repository
19 |
20 | You can easily rename a local Git branch.
21 |
22 | Assuming you are already on the checked out branch:
23 |
24 | ```bash
25 | git branch -m
29 |
30 | ## Set up Git credentials
31 |
32 | 1. In the terminal/shell type:
33 |
34 | ```bash
35 | git config --global user.name "Your name here"
36 | git config --global user.email "your_email@example.com"
37 | ```
38 | These will configure the git to set your name and email as default.
39 |
40 | You can also add(optional):
41 |
42 | ```bash
43 | git config --global color.ui true
44 | git config --global core.editor emacs
45 | ```
46 |
47 | The first command is to enable colors in the terminal which are used to better understand the current state of the code.
48 |
49 | The second command is to change the default text editor to emacs. You can change "emacs" to any other text editor desired.
50 |
51 | ## For more information refer to [GitHub Docs](https://docs.github.com/en/get-started/quickstart/set-up-git)
--------------------------------------------------------------------------------
/git/010-rename-git-branch.md:
--------------------------------------------------------------------------------
1 | ---
2 | id: 010-rename-git-branch.md
3 | title: Rename a branch in Git repository
4 | tags:
5 | - Git
6 | - Github
7 | - Git Branch
8 | author: Pavle Jonoski
9 | meta-description: Rename a branch in local and remote Git repository
10 | date: 2022-10-22 17:40:00 +0200
11 | keywords: Git, Github, Git Branch
12 | template: post
13 | categories:
14 | - git
15 | image: assets/images/pipe.svg
16 | ---
17 |
18 | # Rename a branch in local and remote Git repository
19 |
20 | You can easily rename a local Git branch.
21 |
22 | Assuming you are already on the checked out branch:
23 |
24 | ```bash
25 | git branch -m  22 |
23 | This method removes or replaces existing elements in the array. It gets the starting index, count(number of items to remove or replace) and optionally what to replace with. It returns the new array (removed items).
24 | This method modifies the original array.
25 | In case you want to add more elements to the array without removing any, you can provide the count parameter with a value of 0.
26 | **NB:** Not the best way to add items to an array.
27 |
--------------------------------------------------------------------------------
/javascript/006-sort-trick.md:
--------------------------------------------------------------------------------
1 | ---
2 | id: 006-sort-trick.md
3 | title: JavaScript sort trick
4 | tags:
5 | - JavaScript
6 | - sort
7 | - localeCompare
8 | author: Rabson J Phiri
9 | meta-description: How to sort strings and avoid unexpected outcomes
10 | date: 2020-10-26 13:59:31 +0100
11 | keywords: JavaScript, sort, localeCompare
12 | template: post
13 | categories:
14 | - javascript
15 | image: assets/images/javascript/sort.svg
16 | ---
17 |
18 | # Sorting strings in JavaScript
19 |
20 | The JavaScript **sort** method is very useful when we want to sort numbers, or even strings. But when sorting strings, we ought to be careful because the strings might be in different languages. Luckily, there's a fix for that. It's called **localeCompare**:
21 |
22 | `referenceString.localeCompare(compareString)`
23 |
24 | The `referenceString` is the string we want to compare, and the `compareString` is the string against which we're compareing. The `localeCompare` method returns a Number, which may be:
25 |
26 | > - -1 if the `referenceString` is sorted before the `compareString`
27 | > - 0 if the two strings are equal
28 | > - 1 if the `referenceString` is sorted after the `compareString`
29 |
30 | Here's an example:
31 |
32 | ```javascript
33 |
34 | const words = ['hello', 'répondre', 'sort', 'déclaré'];
35 |
36 | words.sort((a, b) => a.localeCompare(b));
37 |
38 | ```
39 |
40 | As we can see, some words have certain punctuations. Using `localeCompre` with **sort** helps us sort the English and French words in our array successfully. More documentaion can be found [here](https://developer.mozilla.org/en-US/docs/Web/JavaScript/Reference/Global_Objects/String/localeCompare)
--------------------------------------------------------------------------------
/javascript/007-backend-fontend-with-javascript.md:
--------------------------------------------------------------------------------
1 | ---
2 | id: 007-backend-frontend-with-javascript
3 | title: Controlling backend and frontend with just one language, JavaScript
4 | tags:
5 | - javascript
6 | - nodejs
7 | - backend
8 | - frontend
9 | author: Ronald S. Pineda
10 | meta-description: backend and frontend with JavaSript
11 | date: 2020-10-28 00:18:15 +0100
12 | keywords: javascript, nodejs, backend, frontend
13 | template: post
14 | categories:
15 | - javascript
16 | image: assets/images/javascript/js.svg
17 | ---
18 |
19 | If you are looking for a programming language to handle the entire chain of creation of an application, both the client side (frontend) and the server side, database and other parts of the backend, javascript could be the best option.
20 |
21 | My name is Ronald, I am a FullStack developer that means I take care of both sides: the back and the front side. With JavaScript I can manage the front through native Javascript or through Frameworks such as React.js, Vue.js, or Angular. Of course you need to know HTML and CSS, two basic and easy languages to learn before mastering JavaScript.
22 |
23 | On the back side I use Node.js (especially the framework: Express) to manage the server and the API's, I also like to use MongoDB as a database since the language is also Javascript. If you need more tools such as a Docker container or a cloud deployment with AWS and monitoring on production with PM2, you would still be comfortable since the language is still similar to working with JavaScript.
24 |
25 | Another advantage of Javascript is that it is a language that is relatively easy to learn, with which you can learn to master the front and the back in a few years. Something that with other back-end languages like Java would take a little longer.
26 |
27 | In conclusion, if you are looking for a programming language with which to comfortably handle the entire fabric of an application, JavaScript is surely a very good choice. :+1:
28 |
29 |
22 |
23 | This method removes or replaces existing elements in the array. It gets the starting index, count(number of items to remove or replace) and optionally what to replace with. It returns the new array (removed items).
24 | This method modifies the original array.
25 | In case you want to add more elements to the array without removing any, you can provide the count parameter with a value of 0.
26 | **NB:** Not the best way to add items to an array.
27 |
--------------------------------------------------------------------------------
/javascript/006-sort-trick.md:
--------------------------------------------------------------------------------
1 | ---
2 | id: 006-sort-trick.md
3 | title: JavaScript sort trick
4 | tags:
5 | - JavaScript
6 | - sort
7 | - localeCompare
8 | author: Rabson J Phiri
9 | meta-description: How to sort strings and avoid unexpected outcomes
10 | date: 2020-10-26 13:59:31 +0100
11 | keywords: JavaScript, sort, localeCompare
12 | template: post
13 | categories:
14 | - javascript
15 | image: assets/images/javascript/sort.svg
16 | ---
17 |
18 | # Sorting strings in JavaScript
19 |
20 | The JavaScript **sort** method is very useful when we want to sort numbers, or even strings. But when sorting strings, we ought to be careful because the strings might be in different languages. Luckily, there's a fix for that. It's called **localeCompare**:
21 |
22 | `referenceString.localeCompare(compareString)`
23 |
24 | The `referenceString` is the string we want to compare, and the `compareString` is the string against which we're compareing. The `localeCompare` method returns a Number, which may be:
25 |
26 | > - -1 if the `referenceString` is sorted before the `compareString`
27 | > - 0 if the two strings are equal
28 | > - 1 if the `referenceString` is sorted after the `compareString`
29 |
30 | Here's an example:
31 |
32 | ```javascript
33 |
34 | const words = ['hello', 'répondre', 'sort', 'déclaré'];
35 |
36 | words.sort((a, b) => a.localeCompare(b));
37 |
38 | ```
39 |
40 | As we can see, some words have certain punctuations. Using `localeCompre` with **sort** helps us sort the English and French words in our array successfully. More documentaion can be found [here](https://developer.mozilla.org/en-US/docs/Web/JavaScript/Reference/Global_Objects/String/localeCompare)
--------------------------------------------------------------------------------
/javascript/007-backend-fontend-with-javascript.md:
--------------------------------------------------------------------------------
1 | ---
2 | id: 007-backend-frontend-with-javascript
3 | title: Controlling backend and frontend with just one language, JavaScript
4 | tags:
5 | - javascript
6 | - nodejs
7 | - backend
8 | - frontend
9 | author: Ronald S. Pineda
10 | meta-description: backend and frontend with JavaSript
11 | date: 2020-10-28 00:18:15 +0100
12 | keywords: javascript, nodejs, backend, frontend
13 | template: post
14 | categories:
15 | - javascript
16 | image: assets/images/javascript/js.svg
17 | ---
18 |
19 | If you are looking for a programming language to handle the entire chain of creation of an application, both the client side (frontend) and the server side, database and other parts of the backend, javascript could be the best option.
20 |
21 | My name is Ronald, I am a FullStack developer that means I take care of both sides: the back and the front side. With JavaScript I can manage the front through native Javascript or through Frameworks such as React.js, Vue.js, or Angular. Of course you need to know HTML and CSS, two basic and easy languages to learn before mastering JavaScript.
22 |
23 | On the back side I use Node.js (especially the framework: Express) to manage the server and the API's, I also like to use MongoDB as a database since the language is also Javascript. If you need more tools such as a Docker container or a cloud deployment with AWS and monitoring on production with PM2, you would still be comfortable since the language is still similar to working with JavaScript.
24 |
25 | Another advantage of Javascript is that it is a language that is relatively easy to learn, with which you can learn to master the front and the back in a few years. Something that with other back-end languages like Java would take a little longer.
26 |
27 | In conclusion, if you are looking for a programming language with which to comfortably handle the entire fabric of an application, JavaScript is surely a very good choice. :+1:
28 |
29 |  --------------------------------------------------------------------------------
/javascript/007-memory-optimization-for-html5-games.md:
--------------------------------------------------------------------------------
1 | ---
2 | id: 007-memory-optimization-for-html5-games
3 | title: Memory optimization for HTML5 games
4 | tags:
5 | - javascript
6 | - games
7 | - gamedev
8 | - beginner
9 | - memory
10 | - optimization
11 | author: Daniel Kalevski
12 | meta-description: Quick guide for basic memory optimization in HTML5 games
13 | date: 2020-10-27 19:51:08 +0100
14 | keywords: javascript, games, gamedev, beginner, memory, optimization
15 | template: post
16 | categories:
17 | - javascript
18 | image: assets/images/javascript/memory.svg
19 | ---
20 |
21 | ## Intro:
22 | Most of the games contains game logic where you need to instantiate a lot of objects from some class like particles that have short lifetime and needs to be destroyed.
23 |
24 | ## Problem:
25 | JavaScript's model is based on garbage collection pattern. This means that the developer don't have dirrect control over allocated memory. Memory locations (variables) marked as `null` will be collected by garbage collector and removed from memory. But when garbage collector needs to dispose a lot of objects, takes a lot of processing time. Neceserry spent processing time is bad for the performance of the game.
26 |
27 | In most cases the memory profile will be like this:
28 |
29 | 
30 |
31 |
32 | ## How to fix that
33 |
34 | Solution for this kind of problem is implementing [**Object pools pattern**](https://en.wikipedia.org/wiki/Object_pool_pattern). This implementation will help with reusing disposed objects instead of creating new ones.
35 |
36 | After optimization:
37 |
38 | 
39 |
40 |
41 | ## Example
42 |
43 | 1. Import [object-pool](https://www.npmjs.com/package/object-pool) npm module by executing `npm install --save object-pool`
44 |
45 | 2. Replace old implementation
46 | ```javascript
47 | class GameObject {
48 |
49 | speed = 1
50 |
51 | run() { /* your code */ }
52 | }
53 |
54 | let gameObject = new GameObject()
55 | gameObject.run()
56 | ```
57 |
58 | with:
59 |
60 | ```javascript
61 |
62 | import pool from 'object-pool'
63 |
64 | class GameObject {
65 |
66 | speed = 1
67 |
68 | run() { /* your code */ }
69 | }
70 |
71 | const gameObjectPool = pool({
72 | init: () => { // a factory method which should return a freshly created object.
73 | return new GameObject()
74 | },
75 | initSize: 10, // a number to specify the initial size of reserved objects in the pool
76 |
77 | disable: gameObject => {
78 | // reset gameObject properties to default values
79 | gameObject.speed = 1
80 | }
81 | })
82 |
83 | let gameObject = gameObjectPool.create()
84 | gameObject.run()
85 |
86 | ```
87 |
88 | For more detailed documentation for the library visit [the link](https://www.npmjs.com/package/object-pool).
--------------------------------------------------------------------------------
/javascript/009-array-sort-method.md:
--------------------------------------------------------------------------------
1 | ---
2 | id: 009-array-sort-method
3 | title: JavaScript Array.sort() Method
4 | tags:
5 | - javascript
6 | - es6
7 | - beginner
8 | - codenewbie
9 | author: Alex Kimeu
10 | meta-description: Learn JavaScript array.sort() method
11 | date: 2020-10-31 17:50:04 +0100
12 | keywords: javascript, es6, beginner, codenewbie
13 | template: post
14 | categories:
15 | - javascript
16 | image: assets/images/javascript/sort1.svg
17 | ---
18 |
19 | ## JavaScript Array sort() method.
20 |
21 |
--------------------------------------------------------------------------------
/javascript/007-memory-optimization-for-html5-games.md:
--------------------------------------------------------------------------------
1 | ---
2 | id: 007-memory-optimization-for-html5-games
3 | title: Memory optimization for HTML5 games
4 | tags:
5 | - javascript
6 | - games
7 | - gamedev
8 | - beginner
9 | - memory
10 | - optimization
11 | author: Daniel Kalevski
12 | meta-description: Quick guide for basic memory optimization in HTML5 games
13 | date: 2020-10-27 19:51:08 +0100
14 | keywords: javascript, games, gamedev, beginner, memory, optimization
15 | template: post
16 | categories:
17 | - javascript
18 | image: assets/images/javascript/memory.svg
19 | ---
20 |
21 | ## Intro:
22 | Most of the games contains game logic where you need to instantiate a lot of objects from some class like particles that have short lifetime and needs to be destroyed.
23 |
24 | ## Problem:
25 | JavaScript's model is based on garbage collection pattern. This means that the developer don't have dirrect control over allocated memory. Memory locations (variables) marked as `null` will be collected by garbage collector and removed from memory. But when garbage collector needs to dispose a lot of objects, takes a lot of processing time. Neceserry spent processing time is bad for the performance of the game.
26 |
27 | In most cases the memory profile will be like this:
28 |
29 | 
30 |
31 |
32 | ## How to fix that
33 |
34 | Solution for this kind of problem is implementing [**Object pools pattern**](https://en.wikipedia.org/wiki/Object_pool_pattern). This implementation will help with reusing disposed objects instead of creating new ones.
35 |
36 | After optimization:
37 |
38 | 
39 |
40 |
41 | ## Example
42 |
43 | 1. Import [object-pool](https://www.npmjs.com/package/object-pool) npm module by executing `npm install --save object-pool`
44 |
45 | 2. Replace old implementation
46 | ```javascript
47 | class GameObject {
48 |
49 | speed = 1
50 |
51 | run() { /* your code */ }
52 | }
53 |
54 | let gameObject = new GameObject()
55 | gameObject.run()
56 | ```
57 |
58 | with:
59 |
60 | ```javascript
61 |
62 | import pool from 'object-pool'
63 |
64 | class GameObject {
65 |
66 | speed = 1
67 |
68 | run() { /* your code */ }
69 | }
70 |
71 | const gameObjectPool = pool({
72 | init: () => { // a factory method which should return a freshly created object.
73 | return new GameObject()
74 | },
75 | initSize: 10, // a number to specify the initial size of reserved objects in the pool
76 |
77 | disable: gameObject => {
78 | // reset gameObject properties to default values
79 | gameObject.speed = 1
80 | }
81 | })
82 |
83 | let gameObject = gameObjectPool.create()
84 | gameObject.run()
85 |
86 | ```
87 |
88 | For more detailed documentation for the library visit [the link](https://www.npmjs.com/package/object-pool).
--------------------------------------------------------------------------------
/javascript/009-array-sort-method.md:
--------------------------------------------------------------------------------
1 | ---
2 | id: 009-array-sort-method
3 | title: JavaScript Array.sort() Method
4 | tags:
5 | - javascript
6 | - es6
7 | - beginner
8 | - codenewbie
9 | author: Alex Kimeu
10 | meta-description: Learn JavaScript array.sort() method
11 | date: 2020-10-31 17:50:04 +0100
12 | keywords: javascript, es6, beginner, codenewbie
13 | template: post
14 | categories:
15 | - javascript
16 | image: assets/images/javascript/sort1.svg
17 | ---
18 |
19 | ## JavaScript Array sort() method.
20 |
21 |  22 |
23 | This method sorts the elements of an array in ascending order by default. It converts the elements from the array to strings then compares their sequences of utf-16 code values.
24 | For an array of strings, this works perfectly fine. However, to sort an array of numbers, this method will not work as expected because it converts the elements to strings first.
25 |
26 | To achieve what you expect, you can provide a compare function as a callback to the sort method. There are 3 possible outcomes in the callback function: **_1. < 0 : a comes first_** **_2. 0 : no change_** **_3. > 0 : b comes first_**
27 | If you want to sort in descending order, you can return b - a in the callback function.
28 |
--------------------------------------------------------------------------------
/javascript/010-const-and-let-in-javascript.md:
--------------------------------------------------------------------------------
1 | ---
2 | id: 010-const-and-let-in-javascript
3 | title: A little about const and let keywords in Javascript
4 | tags:
5 | - javascript
6 | - es6
7 | - beginner
8 | - const
9 | - let
10 | author: Jawaria Alvi
11 | meta-description: Learn about const and let in JavaScript
12 | date: 2021-10-05
13 | keywords: javascript, es6, beginner, const, let
14 | template: post
15 | categories:
16 | - javascript
17 | image: assets/images/javascript/csljs.svg
18 | ---
19 |
20 | ## cons and let keywords
21 |
22 | 1. **const** and **let** both are the keywords for variable declaration.
23 |
24 | 2. **const** and **let** both are the block scope.
25 | ### Block Scope Example
26 | ```
27 | const blockVariableExample = () => {
28 | let number = 123;
29 | console.log(number) // Prints 123
30 | }
31 |
32 | blockVariableExample;
33 | console.log(number) // Here it gives error as number varaible can only be accessed inside blockVariableExample function
34 | ```
35 | 3. **const** cannot be redeclared or updated while we can redeclare **let** variables.
36 |
37 | ### const Example
38 | ```
39 | const number = 123
40 |
41 | // Updating a const variable
42 | number = 324 // Gives error assignment to const variable
43 |
44 | // Redeclaring a const variable
45 | const number = 567 // Gives error identifier number has already been declared
46 | ```
47 |
48 | ### let Example
49 | ```
50 | let number = 123
51 |
52 | // Updating a let variable
53 | number = 324 // It updates the variable number to 324
54 |
55 | // Redeclaring a let variable
56 | let number = 567 // Gives error identifier number has already been declared
57 |
58 | ```
59 |
60 |
61 |
62 |
--------------------------------------------------------------------------------
/javascript/010-using-template-strings.md:
--------------------------------------------------------------------------------
1 | ---
2 | id: "010-using-template-strings"
3 | title: "Start using template strings now!"
4 | tags:
5 | - engineering
6 | - javascript
7 | - strings
8 | date: "03/10/2021"
9 | keywords: javascript, strings
10 | categories:
11 | - javascript
12 | image: assets/images/javascript/ts.svg
13 | author: "Tatiana Coelho"
14 | meta-description: "Boost your code with template strings."
15 | ---
16 |
17 | # Start using template strings
18 |
19 | Working with strings is not that easy when it comes to JS. Keep in mind that this is about vanilla JavaScript (or just simply JavaScript, no frameworks here, right?).
20 |
21 | Strings are a series of characters, no big deal here if you´re not a beginner. If you are, a string is how you´re going to store text, like your name, a product description or anything else text related.
22 |
23 | Here´s how **template strings** work in a very simple way:
24 |
25 | ## **1. Boosting your code with template strings**
26 |
27 | Example:
28 | ```js
29 | function killRoach (mop){
30 | return `I killed the roach with ${mop}.`
31 | };
32 | killRoach("my mop");
33 |
34 | // Output: I killed the roach with the mop.
35 | ```
36 |
37 | It doesn´t seem to be that useful, huh? Let´s see how it would be without template strings:
38 |
39 | ### **2. Without template strings**
40 |
41 | ```js
42 | function killRoach (mop){
43 | return "I killed the roach with" + mop + "."
44 | };
45 | killRoach ("my hands");
46 | // Output: I killed the roach with my hands.
47 | ```
48 |
49 | Just picture having to do this a dozen times a day, picture the poor one that will maintain this code.
50 |
51 | This quotation marks and sum operators hell may seem harmless but they will surelly melt your brain when it´s 2pm and you have to get things done.
52 |
53 | It´s a powerful move that will make your code more readable and easier to work with, not to mention the elegance it brings. You´ll save time, focus on harder tasks with just a simple change as this.
54 |
55 | No more keyboard punching, hair pulling and despair working with a pletora of strings. Easy and effective.
56 |
57 | Did you start already?
58 |
59 |
--------------------------------------------------------------------------------
/javascript/013-Eventlistener.md:
--------------------------------------------------------------------------------
1 | ---
2 | id: 013-Eventlistener
3 | title: Eventlisteners and its use
4 | tags: Javascript, es6, Event,function
5 | date: 2021-11-10 10:30:39 +0200
6 | keywords: Javascript, es6, Event,function
7 | categories: Javascript
8 | image: assets/images/javascript/listen.svg
9 | author: Harshvardhan Rathore
10 | meta-description: brief overview of the blog entry (SEO optimization)
11 | ---
12 |
13 | # EventListener in Javascript
14 | An Eventlistener is a method in JavaScript that attaches an event to to an element.
15 | The listener is programed to start an event when the input or signaling the event handler.
16 |
17 | Syntax:-
18 | element.addEventListener(event, function, useCapture);
19 |
20 | some EventListeners are :-
21 | onload //when the page loads
22 | onclick //when a user clicks something
23 | onmouseover //when a user mouses over something
24 | onmouseup //when a user mouses down from something
25 | onmousedown //when a user mouses up from something
26 | onmouseout //when a user mouses out something
27 | onfocus //when a user puts the cursor in a form field
28 | onblur //When a user leaves a form field
29 |
30 |
31 |
32 | ```Events in javascript
33 | // On clicking button this function works
34 |
35 | function clicked() {
36 | console.log("The button was clicked.")
37 | }
38 |
39 | // On loading page this function works
40 | window.onload =function(){
41 | console.log("The document was loaded.");
42 |
43 | }
44 |
45 | let ids = document.getElementById("firstcontainer")
46 | ids.addEventListener('click', function(){
47 | console.log("clicked on container");
48 | })
49 |
50 | ids.addEventListener('mouseout', function(){
51 | console.log("mouseout container");
52 | })
53 |
54 | ids.addEventListener('mouseover', function(){
55 | console.log("mouse on container");
56 | })
57 |
58 | ids.addEventListener('mouseup', function(){
59 | console.log("mouseup clicked on container");
60 | })
61 |
62 | ids.addEventListener('mousedown', function(){
63 |
64 | console.log("mousedown clicked on container");
65 | })
66 | ```
67 |
68 | You can add many event handlers to one element.
69 |
70 | ## The removeEventListener() method
71 |
72 | ```
73 | body.removeEventListener('click', bodyClickHandler);
74 | // on each click of the page, you will no longer see a message
75 | ```
76 | we use the removeEventListener method correctly. This time when a click event occurs, removeEventListener will remove the function bodyClickHandler which effectively eliminates the listener, and no clicks will generate a message.
77 |
--------------------------------------------------------------------------------
/javascript/013-selecting-elements-from-dom.md:
--------------------------------------------------------------------------------
1 | ---
2 | id: "013-selecting-elements-from-dom"
3 | title: "Selecting Elements From The DOM"
4 | tags:
5 | - development
6 | - javascript
7 | - frontend
8 | - DOM
9 | date: "10/10/2021"
10 | keywords: javascript, frontend
11 | categories:
12 | - javascript
13 | image: assets/images/javascript/dom.svg
14 | author: "Seun Taiwo"
15 | meta-description: "Selecting elements from the DOM with ease."
16 | ---
17 |
18 | ## What is the DOM?
19 |
20 | Simply put, the DOM (Document Object Model) is the tree in the browser that keeps track of all elements (nodes) on the page as well as their attributes and properties.
21 |
22 | At some point, you'd need to select an element from the DOM for various reasons. You might want to add an event listener, or change a style,etc. There are four main methods that can help us achieve this:
23 |
24 | 1. document.getElementById - Takes an Id and gets the first element with that Id.
25 |
26 | 2. document.getElementsByClassName - Takes a class name and gets all elements with that class name.
27 |
28 | 3. document.querySelector - Takes a query and gets the first element matching that query.
29 |
30 | 4. document.querySelectorAll - Takes a query and returns all elements matching that query.
31 |
32 | Of the four methods above, the first two are the older and have been used for a very long time, hence, a lot of people know it and often teach it to others. I beg to differ though as my experience with 3 and 4 have been spectacular. They both take CSS-like queries as their input and working with them has greatly improved my speed. You can use them like so
33 |
34 | ```js
35 | document.querySelector("div.box > p"); //Returns the p tag that is in a div with a class of box
36 | document.querySelectorAll("section.card h2"); //Returns all the h2 tags that are children ( or grandchildren ) of
37 | // the section element with a class of tag
38 | ```
39 |
40 | To get the elements we got in the code snippet above, we'd have to add new Ids or classes to our elements which I feel is unnecessary. If you aren't already using methods 3 and 4, I really do hope you switch. Thanks.
41 |
--------------------------------------------------------------------------------
/javascript/014-javascript-arrow-functions.md:
--------------------------------------------------------------------------------
1 | ---
2 | id: 014-javascript-arrow-functions
3 | title: JavaScript Arrow Functions
4 | tags:
5 | - development
6 | - javascript
7 | date: "10/16/2021"
8 | keywords: javascript, functions
9 | categories: javascript
10 | image: assets/images/javascript/arrow.svg
11 | author: Melissa Gonzalez
12 | meta-description: Beginner intro to JavaScript Arrow Functions
13 | ---
14 |
15 | # Arrow Functions
16 |
17 | An arrow function expression has a shorter syntax compared to regular functions expressions. There are two key differences: arrow functions are always anonymous and are non-binding of ‘this’.
18 |
19 | Before:
20 |
21 | ```javascript
22 | hello = function() {
23 | return "Hello World!";
24 | };
25 | ```
26 |
27 | After:
28 |
29 | ```javascript
30 | hello = () => {
31 | return "Hello World!";
32 | };
33 | ```
34 |
35 | It can be even shorter if the function has only ONE statement that returns a value.
36 |
37 | Example:
38 |
39 | ```javascript
40 | hello = () => "Hello World!";
41 | ```
42 |
43 | ## How to Use Parameters
44 |
45 | ```javascript
46 | hello = (param) => "Hello " + param;
47 | ```
48 |
49 | OR without parenthesis
50 |
51 | ```javascript
52 | hello = (param) => "Hello " + param;
53 | ```
54 |
55 | ## How to Handle 'this'
56 |
57 | Regular functions always define its ‘this’ value but arrow functions treat ‘this’ keyword differently. They do not define their own context since it doesn’t have its own ‘this’ context. It is inherited from the parent scope whenever you call ‘this’.
58 |
59 | Example:
60 |
61 | Regular Function:
62 |
63 | ```javascript
64 | var obj = {
65 | count: 10,
66 | doSomethingLater: function() {
67 | setTimeout(function() {
68 | // the function executes on the window scope
69 | this.count++;
70 | console.log(this.count);
71 | }, 300);
72 | },
73 | };
74 |
75 | obj.doSomethingLater(); // result is "NaN", because the property "count" is not in the window scope.
76 | ```
77 |
78 | Arrow Function:
79 |
80 | ```javascript
81 | var obj = {
82 | count: 10,
83 | doSomethingLater: function() {
84 | // The traditional function binds "this" to the "obj" context.
85 | setTimeout(() => {
86 | // Since the arrow function doesn't have its own binding and
87 | // setTimeout (as a function call) doesn't create a binding
88 | // itself, the "obj" context of the traditional function will
89 | // be used within.
90 | this.count++;
91 | console.log(this.count);
92 | }, 300);
93 | },
94 | };
95 |
96 | obj.doSomethingLater();
97 | ```
98 |
--------------------------------------------------------------------------------
/javascript/016-web-geolocation-api.md:
--------------------------------------------------------------------------------
1 | ---
2 | id: "016-web-api"
3 | title: "Javascript Geolocation API"
4 | tags:
5 | - javascript
6 | - api
7 | - objects
8 | - geolocation
9 | date: 2021-10-21
10 | keywords: javascript, objects, api
11 | categories:
12 | - javascript
13 | image: assets/images/javascript/geo.svg
14 | author: Melo Noia
15 | meta-description: Javascript Geolocation API
16 | ---
17 |
18 | # Web Geolocation API
19 | This API is used to determine the location of a user in web applications. The user must give the application permission for the location information to be accessed.
20 |
21 |
22 | ## Using Geolocation API
23 |
24 | The ***navigator.geolocation*** object is used together with the ***getCurrentPosition()*** to get the user's current location.
25 |
26 | The getCurrentPosition() can succeed or fail. It accepts three callbacks [success, error, options]. The last two callbacks are optional.
27 |
28 | ```javascript
29 | navigator.geolocation.getCurrentPosition(success, error, options);
30 |
31 | ```
32 |
33 | ### Example
34 | ```javascript
35 | function success(position) {
36 | console.log(`Latitude : ${position.coords.latitude} Longitude: ${position.coords.longitude}`);
37 | }
38 |
39 | function error(err) {
40 | console.log(`ERROR: ${err.message}`);
41 | }
42 |
43 | navigator.geolocation.getCurrentPosition(success, error);
44 |
45 | ```
46 |
--------------------------------------------------------------------------------
/javascript/017-react-components.md:
--------------------------------------------------------------------------------
1 | ---
2 | id: "017-react-js-components"
3 | title: "React JS Components"
4 | tags:
5 | - javascript
6 | - library
7 | - frontend
8 | - DOM
9 | - components
10 | date: 2021-10-21
11 | keywords: javascript, library, frontend, DOM, components
12 | categories:
13 | - javascript
14 | image: assets/images/javascript/react.svg
15 | author: Marie-Claire
16 | meta-description: React JS Components
17 | ---
18 |
19 | # React JS Components
20 |
21 | ## React JS
22 |
23 | React is a Javascript library created by Facebook in 2013. It is used to create user interfaces and UI components. React JS is a popular library used by companies such as Reddit, Salesforce, Hulu, and Netflix due to its ability to create fast and dynamic websites.
24 |
25 | ## Components
26 |
27 | A component is a reusable peice of code. Much like a function, it is able to take in an input (props) to generate an output (React element).
28 |
29 | In the example below, the `name` prop is passed into the Greeting component so that the Greeting component
30 | can be reused multiple times with different names without repeating code.
31 |
32 | ```JSX
33 | import React from "react";
34 |
35 | const Greeting = ({ name }) => {
36 | return (
37 |
22 |
23 | This method sorts the elements of an array in ascending order by default. It converts the elements from the array to strings then compares their sequences of utf-16 code values.
24 | For an array of strings, this works perfectly fine. However, to sort an array of numbers, this method will not work as expected because it converts the elements to strings first.
25 |
26 | To achieve what you expect, you can provide a compare function as a callback to the sort method. There are 3 possible outcomes in the callback function: **_1. < 0 : a comes first_** **_2. 0 : no change_** **_3. > 0 : b comes first_**
27 | If you want to sort in descending order, you can return b - a in the callback function.
28 |
--------------------------------------------------------------------------------
/javascript/010-const-and-let-in-javascript.md:
--------------------------------------------------------------------------------
1 | ---
2 | id: 010-const-and-let-in-javascript
3 | title: A little about const and let keywords in Javascript
4 | tags:
5 | - javascript
6 | - es6
7 | - beginner
8 | - const
9 | - let
10 | author: Jawaria Alvi
11 | meta-description: Learn about const and let in JavaScript
12 | date: 2021-10-05
13 | keywords: javascript, es6, beginner, const, let
14 | template: post
15 | categories:
16 | - javascript
17 | image: assets/images/javascript/csljs.svg
18 | ---
19 |
20 | ## cons and let keywords
21 |
22 | 1. **const** and **let** both are the keywords for variable declaration.
23 |
24 | 2. **const** and **let** both are the block scope.
25 | ### Block Scope Example
26 | ```
27 | const blockVariableExample = () => {
28 | let number = 123;
29 | console.log(number) // Prints 123
30 | }
31 |
32 | blockVariableExample;
33 | console.log(number) // Here it gives error as number varaible can only be accessed inside blockVariableExample function
34 | ```
35 | 3. **const** cannot be redeclared or updated while we can redeclare **let** variables.
36 |
37 | ### const Example
38 | ```
39 | const number = 123
40 |
41 | // Updating a const variable
42 | number = 324 // Gives error assignment to const variable
43 |
44 | // Redeclaring a const variable
45 | const number = 567 // Gives error identifier number has already been declared
46 | ```
47 |
48 | ### let Example
49 | ```
50 | let number = 123
51 |
52 | // Updating a let variable
53 | number = 324 // It updates the variable number to 324
54 |
55 | // Redeclaring a let variable
56 | let number = 567 // Gives error identifier number has already been declared
57 |
58 | ```
59 |
60 |
61 |
62 |
--------------------------------------------------------------------------------
/javascript/010-using-template-strings.md:
--------------------------------------------------------------------------------
1 | ---
2 | id: "010-using-template-strings"
3 | title: "Start using template strings now!"
4 | tags:
5 | - engineering
6 | - javascript
7 | - strings
8 | date: "03/10/2021"
9 | keywords: javascript, strings
10 | categories:
11 | - javascript
12 | image: assets/images/javascript/ts.svg
13 | author: "Tatiana Coelho"
14 | meta-description: "Boost your code with template strings."
15 | ---
16 |
17 | # Start using template strings
18 |
19 | Working with strings is not that easy when it comes to JS. Keep in mind that this is about vanilla JavaScript (or just simply JavaScript, no frameworks here, right?).
20 |
21 | Strings are a series of characters, no big deal here if you´re not a beginner. If you are, a string is how you´re going to store text, like your name, a product description or anything else text related.
22 |
23 | Here´s how **template strings** work in a very simple way:
24 |
25 | ## **1. Boosting your code with template strings**
26 |
27 | Example:
28 | ```js
29 | function killRoach (mop){
30 | return `I killed the roach with ${mop}.`
31 | };
32 | killRoach("my mop");
33 |
34 | // Output: I killed the roach with the mop.
35 | ```
36 |
37 | It doesn´t seem to be that useful, huh? Let´s see how it would be without template strings:
38 |
39 | ### **2. Without template strings**
40 |
41 | ```js
42 | function killRoach (mop){
43 | return "I killed the roach with" + mop + "."
44 | };
45 | killRoach ("my hands");
46 | // Output: I killed the roach with my hands.
47 | ```
48 |
49 | Just picture having to do this a dozen times a day, picture the poor one that will maintain this code.
50 |
51 | This quotation marks and sum operators hell may seem harmless but they will surelly melt your brain when it´s 2pm and you have to get things done.
52 |
53 | It´s a powerful move that will make your code more readable and easier to work with, not to mention the elegance it brings. You´ll save time, focus on harder tasks with just a simple change as this.
54 |
55 | No more keyboard punching, hair pulling and despair working with a pletora of strings. Easy and effective.
56 |
57 | Did you start already?
58 |
59 |
--------------------------------------------------------------------------------
/javascript/013-Eventlistener.md:
--------------------------------------------------------------------------------
1 | ---
2 | id: 013-Eventlistener
3 | title: Eventlisteners and its use
4 | tags: Javascript, es6, Event,function
5 | date: 2021-11-10 10:30:39 +0200
6 | keywords: Javascript, es6, Event,function
7 | categories: Javascript
8 | image: assets/images/javascript/listen.svg
9 | author: Harshvardhan Rathore
10 | meta-description: brief overview of the blog entry (SEO optimization)
11 | ---
12 |
13 | # EventListener in Javascript
14 | An Eventlistener is a method in JavaScript that attaches an event to to an element.
15 | The listener is programed to start an event when the input or signaling the event handler.
16 |
17 | Syntax:-
18 | element.addEventListener(event, function, useCapture);
19 |
20 | some EventListeners are :-
21 | onload //when the page loads
22 | onclick //when a user clicks something
23 | onmouseover //when a user mouses over something
24 | onmouseup //when a user mouses down from something
25 | onmousedown //when a user mouses up from something
26 | onmouseout //when a user mouses out something
27 | onfocus //when a user puts the cursor in a form field
28 | onblur //When a user leaves a form field
29 |
30 |
31 |
32 | ```Events in javascript
33 | // On clicking button this function works
34 |
35 | function clicked() {
36 | console.log("The button was clicked.")
37 | }
38 |
39 | // On loading page this function works
40 | window.onload =function(){
41 | console.log("The document was loaded.");
42 |
43 | }
44 |
45 | let ids = document.getElementById("firstcontainer")
46 | ids.addEventListener('click', function(){
47 | console.log("clicked on container");
48 | })
49 |
50 | ids.addEventListener('mouseout', function(){
51 | console.log("mouseout container");
52 | })
53 |
54 | ids.addEventListener('mouseover', function(){
55 | console.log("mouse on container");
56 | })
57 |
58 | ids.addEventListener('mouseup', function(){
59 | console.log("mouseup clicked on container");
60 | })
61 |
62 | ids.addEventListener('mousedown', function(){
63 |
64 | console.log("mousedown clicked on container");
65 | })
66 | ```
67 |
68 | You can add many event handlers to one element.
69 |
70 | ## The removeEventListener() method
71 |
72 | ```
73 | body.removeEventListener('click', bodyClickHandler);
74 | // on each click of the page, you will no longer see a message
75 | ```
76 | we use the removeEventListener method correctly. This time when a click event occurs, removeEventListener will remove the function bodyClickHandler which effectively eliminates the listener, and no clicks will generate a message.
77 |
--------------------------------------------------------------------------------
/javascript/013-selecting-elements-from-dom.md:
--------------------------------------------------------------------------------
1 | ---
2 | id: "013-selecting-elements-from-dom"
3 | title: "Selecting Elements From The DOM"
4 | tags:
5 | - development
6 | - javascript
7 | - frontend
8 | - DOM
9 | date: "10/10/2021"
10 | keywords: javascript, frontend
11 | categories:
12 | - javascript
13 | image: assets/images/javascript/dom.svg
14 | author: "Seun Taiwo"
15 | meta-description: "Selecting elements from the DOM with ease."
16 | ---
17 |
18 | ## What is the DOM?
19 |
20 | Simply put, the DOM (Document Object Model) is the tree in the browser that keeps track of all elements (nodes) on the page as well as their attributes and properties.
21 |
22 | At some point, you'd need to select an element from the DOM for various reasons. You might want to add an event listener, or change a style,etc. There are four main methods that can help us achieve this:
23 |
24 | 1. document.getElementById - Takes an Id and gets the first element with that Id.
25 |
26 | 2. document.getElementsByClassName - Takes a class name and gets all elements with that class name.
27 |
28 | 3. document.querySelector - Takes a query and gets the first element matching that query.
29 |
30 | 4. document.querySelectorAll - Takes a query and returns all elements matching that query.
31 |
32 | Of the four methods above, the first two are the older and have been used for a very long time, hence, a lot of people know it and often teach it to others. I beg to differ though as my experience with 3 and 4 have been spectacular. They both take CSS-like queries as their input and working with them has greatly improved my speed. You can use them like so
33 |
34 | ```js
35 | document.querySelector("div.box > p"); //Returns the p tag that is in a div with a class of box
36 | document.querySelectorAll("section.card h2"); //Returns all the h2 tags that are children ( or grandchildren ) of
37 | // the section element with a class of tag
38 | ```
39 |
40 | To get the elements we got in the code snippet above, we'd have to add new Ids or classes to our elements which I feel is unnecessary. If you aren't already using methods 3 and 4, I really do hope you switch. Thanks.
41 |
--------------------------------------------------------------------------------
/javascript/014-javascript-arrow-functions.md:
--------------------------------------------------------------------------------
1 | ---
2 | id: 014-javascript-arrow-functions
3 | title: JavaScript Arrow Functions
4 | tags:
5 | - development
6 | - javascript
7 | date: "10/16/2021"
8 | keywords: javascript, functions
9 | categories: javascript
10 | image: assets/images/javascript/arrow.svg
11 | author: Melissa Gonzalez
12 | meta-description: Beginner intro to JavaScript Arrow Functions
13 | ---
14 |
15 | # Arrow Functions
16 |
17 | An arrow function expression has a shorter syntax compared to regular functions expressions. There are two key differences: arrow functions are always anonymous and are non-binding of ‘this’.
18 |
19 | Before:
20 |
21 | ```javascript
22 | hello = function() {
23 | return "Hello World!";
24 | };
25 | ```
26 |
27 | After:
28 |
29 | ```javascript
30 | hello = () => {
31 | return "Hello World!";
32 | };
33 | ```
34 |
35 | It can be even shorter if the function has only ONE statement that returns a value.
36 |
37 | Example:
38 |
39 | ```javascript
40 | hello = () => "Hello World!";
41 | ```
42 |
43 | ## How to Use Parameters
44 |
45 | ```javascript
46 | hello = (param) => "Hello " + param;
47 | ```
48 |
49 | OR without parenthesis
50 |
51 | ```javascript
52 | hello = (param) => "Hello " + param;
53 | ```
54 |
55 | ## How to Handle 'this'
56 |
57 | Regular functions always define its ‘this’ value but arrow functions treat ‘this’ keyword differently. They do not define their own context since it doesn’t have its own ‘this’ context. It is inherited from the parent scope whenever you call ‘this’.
58 |
59 | Example:
60 |
61 | Regular Function:
62 |
63 | ```javascript
64 | var obj = {
65 | count: 10,
66 | doSomethingLater: function() {
67 | setTimeout(function() {
68 | // the function executes on the window scope
69 | this.count++;
70 | console.log(this.count);
71 | }, 300);
72 | },
73 | };
74 |
75 | obj.doSomethingLater(); // result is "NaN", because the property "count" is not in the window scope.
76 | ```
77 |
78 | Arrow Function:
79 |
80 | ```javascript
81 | var obj = {
82 | count: 10,
83 | doSomethingLater: function() {
84 | // The traditional function binds "this" to the "obj" context.
85 | setTimeout(() => {
86 | // Since the arrow function doesn't have its own binding and
87 | // setTimeout (as a function call) doesn't create a binding
88 | // itself, the "obj" context of the traditional function will
89 | // be used within.
90 | this.count++;
91 | console.log(this.count);
92 | }, 300);
93 | },
94 | };
95 |
96 | obj.doSomethingLater();
97 | ```
98 |
--------------------------------------------------------------------------------
/javascript/016-web-geolocation-api.md:
--------------------------------------------------------------------------------
1 | ---
2 | id: "016-web-api"
3 | title: "Javascript Geolocation API"
4 | tags:
5 | - javascript
6 | - api
7 | - objects
8 | - geolocation
9 | date: 2021-10-21
10 | keywords: javascript, objects, api
11 | categories:
12 | - javascript
13 | image: assets/images/javascript/geo.svg
14 | author: Melo Noia
15 | meta-description: Javascript Geolocation API
16 | ---
17 |
18 | # Web Geolocation API
19 | This API is used to determine the location of a user in web applications. The user must give the application permission for the location information to be accessed.
20 |
21 |
22 | ## Using Geolocation API
23 |
24 | The ***navigator.geolocation*** object is used together with the ***getCurrentPosition()*** to get the user's current location.
25 |
26 | The getCurrentPosition() can succeed or fail. It accepts three callbacks [success, error, options]. The last two callbacks are optional.
27 |
28 | ```javascript
29 | navigator.geolocation.getCurrentPosition(success, error, options);
30 |
31 | ```
32 |
33 | ### Example
34 | ```javascript
35 | function success(position) {
36 | console.log(`Latitude : ${position.coords.latitude} Longitude: ${position.coords.longitude}`);
37 | }
38 |
39 | function error(err) {
40 | console.log(`ERROR: ${err.message}`);
41 | }
42 |
43 | navigator.geolocation.getCurrentPosition(success, error);
44 |
45 | ```
46 |
--------------------------------------------------------------------------------
/javascript/017-react-components.md:
--------------------------------------------------------------------------------
1 | ---
2 | id: "017-react-js-components"
3 | title: "React JS Components"
4 | tags:
5 | - javascript
6 | - library
7 | - frontend
8 | - DOM
9 | - components
10 | date: 2021-10-21
11 | keywords: javascript, library, frontend, DOM, components
12 | categories:
13 | - javascript
14 | image: assets/images/javascript/react.svg
15 | author: Marie-Claire
16 | meta-description: React JS Components
17 | ---
18 |
19 | # React JS Components
20 |
21 | ## React JS
22 |
23 | React is a Javascript library created by Facebook in 2013. It is used to create user interfaces and UI components. React JS is a popular library used by companies such as Reddit, Salesforce, Hulu, and Netflix due to its ability to create fast and dynamic websites.
24 |
25 | ## Components
26 |
27 | A component is a reusable peice of code. Much like a function, it is able to take in an input (props) to generate an output (React element).
28 |
29 | In the example below, the `name` prop is passed into the Greeting component so that the Greeting component
30 | can be reused multiple times with different names without repeating code.
31 |
32 | ```JSX
33 | import React from "react";
34 |
35 | const Greeting = ({ name }) => {
36 | return (
37 |  26 |
26 |  26 |
27 |
28 | To start using argparse to recreate the example above, you will need to import the pacakge:
29 |
30 | ```python
31 | # the following code will be contained within a file called area.py
32 | import argparse
33 | ```
34 |
35 | Now we will create a simple method to multiply and return two numbers, like so:
36 |
37 | ```python
38 | def area_of_rectangle(length, width):
39 | return length * width
40 | ```
41 |
42 | This method will be called when the program is executed. The parameters `length` and `width` will be extracted from the command line arguments.
43 |
44 | Now we must create a parser to handle the parsing of command-line arguments along with two positional arguments that we want to extract, i.e. the length and the width of the rectangle.
45 |
46 | ```python
47 | parser = argparse.ArgumentParser(description='Calculates the area of a rectangle')
48 |
49 | parser.add_argument('length', default=0, type=int, help='An integer for the length of the rectangle')
50 | parser.add_argument('width', default=0, type=int, help='An integer for the width of the rectangle')
51 | ```
52 |
53 | We can use the values of these arguments by calling upon `parser.parse_args()`.
54 |
55 | ```python
56 | args = parser.parse_args()
57 | area = area_of_rectangle(args.length, args.width)
58 | print('The area of your rectangle is: ', area, ' units squared.')
59 | ```
60 |
61 | Putting everything together should look like this:
62 |
63 | ```Python
64 | # area.py
65 | import argparse
66 |
67 | def area_of_rectangle(length, width):
68 | return length * width
69 |
70 | parser = argparse.ArgumentParser(description='Calculates the area of a rectangle')
71 |
72 | parser.add_argument('length', default=0, type=int, help='An integer for the length of the rectangle')
73 | parser.add_argument('width', default=0, type=int, help='An integer for the width of the rectangle')
74 |
75 | args = parser.parse_args()
76 | area = area_of_rectangle(args.length, args.width)
77 | print('The area of your rectangle is: ', area, ' units squared.')
78 | ```
79 |
80 | Thats about it! Argparse will now parse your command-line agruments for integers to be used in our method. Every parser will have a `-h` optional argument by default; this option will display the help message along with the parser's description.
81 |
82 |
26 |
27 |
28 | To start using argparse to recreate the example above, you will need to import the pacakge:
29 |
30 | ```python
31 | # the following code will be contained within a file called area.py
32 | import argparse
33 | ```
34 |
35 | Now we will create a simple method to multiply and return two numbers, like so:
36 |
37 | ```python
38 | def area_of_rectangle(length, width):
39 | return length * width
40 | ```
41 |
42 | This method will be called when the program is executed. The parameters `length` and `width` will be extracted from the command line arguments.
43 |
44 | Now we must create a parser to handle the parsing of command-line arguments along with two positional arguments that we want to extract, i.e. the length and the width of the rectangle.
45 |
46 | ```python
47 | parser = argparse.ArgumentParser(description='Calculates the area of a rectangle')
48 |
49 | parser.add_argument('length', default=0, type=int, help='An integer for the length of the rectangle')
50 | parser.add_argument('width', default=0, type=int, help='An integer for the width of the rectangle')
51 | ```
52 |
53 | We can use the values of these arguments by calling upon `parser.parse_args()`.
54 |
55 | ```python
56 | args = parser.parse_args()
57 | area = area_of_rectangle(args.length, args.width)
58 | print('The area of your rectangle is: ', area, ' units squared.')
59 | ```
60 |
61 | Putting everything together should look like this:
62 |
63 | ```Python
64 | # area.py
65 | import argparse
66 |
67 | def area_of_rectangle(length, width):
68 | return length * width
69 |
70 | parser = argparse.ArgumentParser(description='Calculates the area of a rectangle')
71 |
72 | parser.add_argument('length', default=0, type=int, help='An integer for the length of the rectangle')
73 | parser.add_argument('width', default=0, type=int, help='An integer for the width of the rectangle')
74 |
75 | args = parser.parse_args()
76 | area = area_of_rectangle(args.length, args.width)
77 | print('The area of your rectangle is: ', area, ' units squared.')
78 | ```
79 |
80 | Thats about it! Argparse will now parse your command-line agruments for integers to be used in our method. Every parser will have a `-h` optional argument by default; this option will display the help message along with the parser's description.
81 |
82 |  83 |
--------------------------------------------------------------------------------
/python/027-pandas-read-file-backslash.md:
--------------------------------------------------------------------------------
1 | ---
2 | id: 027-pandas-unicodeescape-error.md
3 | title: Pandas read files
4 | tags:
5 | - python
6 | - pandas
7 | author: Matteo Buldrini
8 | meta-description: How to read in Pandas files that give you unicodeescape error.
9 | date: 2020-12-20 14:30:05 +0200
10 | keywords: python, pandas
11 | template: post
12 | categories:
13 | - python
14 | image: assets/images/python/python3.svg
15 | ---
16 |
17 | Sometimes when reading a file in Pandas you may incur in the following error after declaring the path name:
18 |
19 | ```python
20 | SyntaxError: (unicode error) ‘unicodeescape’ codec can’t decode bytes in position 2-3:
21 | truncated \UXXXXXXXX escape.
22 | ```
23 |
24 | This happens because path names tend to have backslashes in them (e.g. 'C:\Documents\File.csv'). In Python, backslash is used to signify special characters, but when we use it in a path name we want to refer to actual backslashes, not to special characters.
25 |
26 | To solve this issue, you need to add an r before the path name, so that Python can interpret backslashes as strings.
27 |
28 | Example:
29 |
30 | ```python
31 | df = pd.read_csv(r'C:\Documents\File.csv')
32 | ```
33 |
--------------------------------------------------------------------------------
/python/028-Decision Trees.md:
--------------------------------------------------------------------------------
1 | ---
2 | id: 028-Decision Tree.md
3 | title: Why Decision trees are so popular in Machine Learning algorithms
4 | tags:
5 | - python
6 | - random
7 | - machine learning
8 | author: Ankur
9 | meta-description: What makes decision trees popular
10 | date: 2021-10-02 15:41:42 -0700
11 | keywords: python, Decision Tree
12 | template: post
13 | categories:
14 | - python
15 | image: assets/images/python/tree.svg
16 | ---
17 |
18 | ## What is Decision Trees?
19 |
20 | Decision trees-like model more specifically it is probablity tree that enables the user to made decision on the basis on conditions.This condition can be understand as if-then statements so there's if condition then it will choose some vertex else other.The solution choosen after particular condition is called decision. This algorithm can be used for both regression and classification.
21 |
22 | In this trees internal nodes represents conditions and the leaf node depicts decision.
23 |
24 | ## But why they are so popular?
25 |
26 | First off, Lets look which module allow you to make decision tree:
27 |
28 | ```python
29 | From sklearn.tree import DecisionTreeClassifier
30 | classifier= DecisionTreeClassifier(criterion='entropy', random_state=0) #for classification
31 | classifier= DecisionTreeRegressor(criterion='entropy', random_state=0) #for regression
32 | ```
33 |
34 | 1.This tree based algorithm can visualized and inclusing its conditions.
35 | https://scikit-learn.org/stable/auto_examples/tree/plot_iris_dtc.html
36 | https://scikit-learn.org/stable/_images/iris.sv
37 |
38 | you can see how the decision tree made is plotted.
39 |
40 | 2.Less preprocessing is required when compared to other algorithms.Less effort in preprocessing makes it much handy.
41 |
42 | 3.This algorithm can handle missing values and it works healthy while working with outliers.
43 |
44 | 4.The usage is simple hence its very understandable.It looks like if-else statements
45 |
46 | 5.They can be stacked with other algorithms and can reach excellent results
47 |
48 | 6.They dont require setting of lots of parameters and can easily handle multidimensional data.
49 |
50 | Thats it! Now you know what makes decision trees so popular! But this doesn't mean they can perform outstanding always.
--------------------------------------------------------------------------------
/python/030_DataStructures.md:
--------------------------------------------------------------------------------
1 | ---
2 | id: 030_DataStructures.md
3 | title: DataStructures - Basic concept
4 | tags:
5 | - python
6 | - beginner
7 | - data structures
8 | author: Sanjana Sogimatt
9 | meta-description: Understanding data structures
10 | date: 2021-10-11 19:40:41 -0300
11 | keywords: python, beginner, data structures
12 | template: post
13 | categories:
14 | - python
15 | image: assets/images/python/data.svg
16 | ---
17 |
18 | ## Basic data structures:
19 | Python has four basic structure namely Lists,Dictionary,Tuple and sets.
20 | These data structures are in built that come along with python and we also have user defined data structure.
21 |
22 |
23 | ## List:
24 | Lists are the type of container which can store data of different types in the memory.Lists are created using '[]'(square braces)
25 | Example:
26 | ```python
27 | l1=[34,56,78,'list',(2,3)]
28 | ```
29 | ## Sets:
30 | Sets are again similar to lists and tuples but diffrence would be it does not store duplicate values.It is enclosed in curly braces{}
31 | Example:
32 | ```python
33 | s1={2,45,(4.5,7),s}
34 | ```
35 | ## Tuple:
36 | Tuple is similar to Lists but the diffrence is tuples are immutable where lists are mutable.Tuples are created using round braces()
37 | Example:
38 | ```python
39 | t1=(1,2,3,(67,78),'tuple')
40 | ```
41 | ## Dictionary:
42 | Okay now dictionary are not at all like lists. These data structures store key-value pair. Take an anology of a dictionary where there is a word and a meaning to that. Dictionaries in python are created using curly braces.
43 | Example:
44 | ```python
45 | d1={1:a,2:b,3:c}
46 | ```
47 | Some of the user defined data structures are as follows:
48 | ## Array:
49 | These data structures are similar to lists but it is homogeneous that is the elements having same datatype.
50 |
51 | ## Linked list:
52 | These are the data structure that holds the value of next element using pointers.
53 |
54 | ## Stack:
55 | These data structure follow the principle of last in first out. Basically, we can access only the last entered value. We can also do operations like push or pop.
56 |
57 | ## Queue:
58 | These are the data structures that work following the principle of first in first out. You totally relate it to a queue in real life.
59 |
60 | ## Hash maps:
61 | Hash maps are same as dictionaries in python.
62 |
63 | ## Graph:
64 | Graphs stores the data in the collection of points called vertices and edges.
65 |
66 |
67 |
--------------------------------------------------------------------------------
/python/030requests-library.md:
--------------------------------------------------------------------------------
1 | ---
2 | id: 030requests-library.md
3 | title: Requests library in Python
4 | tags:
5 | - python
6 | author: Javier Gonzalez
7 | meta-description:
8 | date: 2021-10-08 16:30:00 -0700
9 | keywords: python
10 | template: post
11 | categories:
12 | - python
13 | image: assets/images/python/req.svg
14 | ---
15 |
16 | ## Python Requests Library
17 |
18 | Sometimes we need with a script written in Python accessing to an API or download the content of a web page.
19 |
20 | For that we can use the [Requests Library](https://docs.python-requests.org/en/latest)
21 |
22 | First we need to install the library:
23 |
24 | ```console
25 | pip install requests
26 | ```
27 |
28 | Code Example :
29 |
30 | ```python
31 |
32 | import requests
33 |
34 | # The requests module provides us different methods (get, post, update, delete)
35 | r = requests.get('http://www.google.com')
36 |
37 | # In the request method also it is possible to specify the headers, the cookies and the data sent
38 | headers = { 'accept' : '*/*' }
39 | payload = { 'title' : 'Download web page with python' }
40 | cookies = dict(example_cookie='value')
41 |
42 | r = requests.post('https://reqres.in/api/posts', data=payload, headers=headers, cookies=cookies)
43 |
44 | # With the object returned
45 | # We could check the status code of the response
46 | r.status_code
47 |
48 | # We could obtain the content of the page as a string
49 | r.text
50 |
51 | # Or if the url is an API, we could obtain the response in json format
52 | r.json()
53 |
54 |
55 | ```
56 |
--------------------------------------------------------------------------------
/python/031-python-forloops.md:
--------------------------------------------------------------------------------
1 | ---
2 | id: 031-python-forloops.md
3 | title: Forloops in Python
4 | tags:
5 | - python
6 | - random
7 | author: Hammed Babatunde
8 | meta-description: Using Forloops in Python
9 | date: 2021-10-11 18:38:42 -0700
10 | keywords: python
11 | template: post
12 | categories:
13 | - python
14 | image: assets/images/python/python2.svg
15 | ---
16 |
17 | # What are For Loops?
18 | A for loop acts as an iterator in Python; it goes through items that are in a sequence or any other iterable item. Objects that we can iterate over include strings, lists, tuples, and even built-in iterables for dictionaries, such as keys or values.
19 |
20 | ## Using For Loops in a List
21 | ```python
22 | list1 = [1,2,3,4,5,6,7,8,9,10]
23 | for num in list1:
24 | print(num) # Prints out each number in list1
25 | ```
26 |
27 | ## Using For Loops in a String
28 | We've used for loops with lists, how about with strings? Remember strings are a sequence so when we iterate through them we will be accessing each item in that string.
29 | ```python
30 | for letter in 'This is a string.':
31 | print(letter) #print each letter in the string
32 | ```
33 |
34 | ## Using For Loops in Tuples
35 | Tuples have a special quality when it comes to for loops. If you are iterating through a sequence that contains tuples, the item can actually be the tuple itself, this is an example of tuple unpacking. During the for loop we will be unpacking the tuple inside of a sequence and we can access the individual items inside that tuple!
36 | ```python
37 | list2 = [(2,4),(6,8),(10,12)]
38 | for tup in list2:
39 | print(tup) #prints each tuple
40 |
41 | # Now with unpacking!
42 | for (t1,t2) in list2:
43 | print(t1)
44 | ```
45 | ## Using For Loops in a Dictionary
46 | Cool! With tuples in a sequence we can access the items inside of them through unpacking! The reason this is important is because many objects will deliver their iterables through tuples. Let's start exploring iterating through Dictionaries to explore this further!
47 |
48 | ```python
49 | d = {'k1':1,'k2':2,'k3':3} #This is a Dictionary in python
50 |
51 | for item in d:
52 | print(item) #This prints out each keys in the dictionary
53 |
54 | # Dictionary unpacking for both keys and values
55 | for k,v in d.items():
56 | print(k)
57 | print(v)
58 | ```
59 | We have learned how to use for loops to iterate through tuples, lists, strings, and dictionaries.
60 |
--------------------------------------------------------------------------------
/python/032-python-iterators and generators.md:
--------------------------------------------------------------------------------
1 | ---
2 | id: 032-python-iterators and generators.md
3 | title: Iterators and Generators in Python
4 | tags:
5 | - python
6 | - random
7 | author: Hammed Babatunde
8 | meta-description: Using iterators and Generators in Python
9 | date: 2021-10-11 18:38:42 -0700
10 | keywords: python
11 | template: post
12 | categories:
13 | - python
14 | image: assets/images/python/python4.svg
15 | ---
16 |
17 | # Generators and Iterators in Python
18 |
19 | Generator functions allow us to write a function that can send back a value and then later resume to pick up where it left off. This type of function is a generator in Python, allowing us to generate a sequence of values over time. The main difference in syntax will be the use of a yield statement.
20 |
21 | In most aspects, a generator function will appear very similar to a normal function. The main difference is when a generator function is compiled they become an object that supports an iteration protocol. That means when they are called in your code they don't actually return a value and then exit. Instead, generator functions will automatically suspend and resume their execution and state around the last point of value generation
22 |
23 |  To start getting a better understanding of generators, let's go ahead and see how we can create some.
24 |
25 | ```python
26 | # Generator function for the cube of numbers (power of 3)
27 | def gencubes(n):
28 | for num in range(n):
29 | yield num**3
30 |
31 | for x in gencubes(10):
32 | print(x)
33 | ```
34 | Generators are best for calculating large sets of results (particularly in calculations that involve loops themselves) in cases where we don’t want to allocate the memory for all of the results at the same time.
35 |
36 | Let's create another example generator which calculates fibonacci numbers:
37 | ```python
38 | # Generator function for the cube of numbers (power of 3)
39 | def genfibon(n):
40 | """
41 | Generate a fibonnaci sequence up to n
42 | """
43 | a = 1
44 | b = 1
45 | for i in range(n):
46 | yield a
47 | a,b = b,a+b
48 |
49 | for num in genfibon(10):
50 | print(num)
51 | ```
52 |
53 | ## next() built-in function in Python
54 | A key to fully understanding generators is the next() function and the iter() function.
55 |
56 | The next() function allows us to access the next element in a sequence. Lets check it out:
57 | ```python
58 | # Generator function for the cube of numbers (power of 3)
59 | def simple_gen():
60 | for x in range(3):
61 | yield x
62 |
63 | # Assign simple_gen
64 | g = simple_gen()
65 |
66 | print(next(g)) #prints out a value in the generator
67 | ```
68 |
69 | ## iter() built-in Fuction in Python
70 | Let's go ahead and check out how to use iter()
71 | A string object supports iteration, We can directly iterate over a string with The iter() function.
72 | ```python
73 | s = 'hello'
74 |
75 | #Iterate over string
76 | for let in s:
77 | print(let)
78 |
79 | s_iter = iter(s)
80 |
81 | next(s_iter) # print each of the value in s when called
82 | ```
83 |
84 | The main takeaway from this article is that using the yield keyword at a function will cause the function to become a generator. This change can save you a lot of memory for large use cases.
85 |
--------------------------------------------------------------------------------
/python/033-insertion-sort-python.md:
--------------------------------------------------------------------------------
1 | ---
2 | id: 033-insertion-sort-python.md
3 | title: Insertion Sort in Python
4 | tags:
5 | - python
6 | - insertion sort
7 | - sorting
8 | - algorithms
9 | date: 2021-10-11 17:30:00 -0800
10 | keywords: python, sorting, algorithms, insertion, sort
11 | categories:
12 | - python
13 | image: assets/images/python/eng.svg
14 | author: Ryan Lim
15 | meta-description: insertion sort in python
16 | ---
17 |
18 | # Insertion Sort in Python
19 |
20 | [Insertion Sort](https://en.wikipedia.org/wiki/Insertion_sort) is type of [sorting algorithm](https://en.wikipedia.org/wiki/Sorting_algorithm) that is relatively simple to implement. It does not have the best runtime, i.e. `O(n^2)`, compared to more advanced sorting algorithms such as [quicksort](https://en.wikipedia.org/wiki/Quicksort) or [merge sort](https://en.wikipedia.org/wiki/Merge_sort) but is a good starting sorting algorithm to learn. It can be used to sort smaller arrays consisting of strings or numbers.
21 |
22 | ## Pseudocode
23 |
24 | Here is the pseudocode of insertion code (from [wikipedia](https://en.wikipedia.org/wiki/Insertion_sort#Algorithm)):
25 |
26 | ```
27 | i ← 1
28 | while i < length(A)
29 | j ← i
30 | while j > 0 and A[j-1] > A[j]
31 | swap A[j] and A[j-1]
32 | j ← j - 1
33 | end while
34 | i ← i + 1
35 | end while
36 | ```
37 |
38 | The general idea behind it is to iterate through the array from beginning to end and swaps each element from the current element to the beginning of the array if a "greater" prior element is found compare to the current element. It basically sorts "subsections" of the array repeatedly until the entire array is sorted by "inserting" new elements in the right order in the subsection of the array.
39 |
40 | ## Python Implementation
41 |
42 | Without further ado, here is my Python (3) implementation of it:
43 |
44 | ```python
45 | def insertion_sort(array):
46 | for i in range(1, len(array)):
47 | j = i
48 | while j > 0 and array[j - 1] > array[j]:
49 | # swap the two array elements
50 | temp = array[j - 1]
51 | array[j - 1] = array[j]
52 | array[j] = temp
53 | j -= 1
54 | return array
55 | ```
56 |
57 | As you can see, it closely follows the pseudocode, with some minimal code savings using the `range` function. The `swap` was implemented inline but could be implemented as a separate function as well.
58 |
59 | ## Runtime
60 |
61 | As mentioned, the average runtime for this algorithm is `O(n^2)`. The best case is an array that is already sorted with a runtime of `O(n)` as the current element in the array will only be compared once with a prior element. The worst case is an array that is sorted in reverse as each new element will need to be compared (and swapped) with every prior element to the beginning of the array.
62 |
63 | Thanks for reading, any comment or feedback is most welcome!
64 |
--------------------------------------------------------------------------------
/python/034-python-functions.md:
--------------------------------------------------------------------------------
1 | ---
2 | id: 034-python-functions.md
3 | title: Creating functions in Python
4 | tags:
5 | - python
6 | - random
7 | author: Hammed Babatunde
8 | meta-description: Creating functions in python
9 | date: 2021-10-17 18:38:42 -0700
10 | keywords: python
11 | template: post
12 | categories:
13 | - python
14 | image: assets/images/python/python4.svg
15 | ---
16 |
17 | # What is a Function in Python
18 | Formally, a function is a useful device that groups together a set of statements so they can be run more than once. They can also let us specify parameters that can serve as inputs to the functions.
19 |
20 | On a more fundamental level, functions allow us to not have to repeatedly write the same code again and again. If you remember back to the lessons on strings and lists, remember that we used a function len() to get the length of a string. Since checking the length of a sequence is a common task you would want to write a function that can do this repeatedly at command.
21 |
22 |
23 | ## def Statements
24 | Let's see how to build out a function's syntax in Python. It has the following form:
25 | ```python
26 | def name_of_function(arg1,arg2):
27 | '''
28 | This is where the function's Document String (docstring) goes
29 | '''
30 | # Do stuff here
31 | # Return desired result
32 | ```
33 |
34 | ## Example 1: A simple print 'hello' function
35 | ```python
36 | def say_hello():
37 | print('hello')
38 |
39 | #Call the Function
40 | say_hello()
41 | ```
42 |
43 | ## Example 2: A simple greeting function
44 | Let's write a function that greets people with their name.
45 | ```python
46 | def greeting(name):
47 | print('Hello %s' %(name))
48 |
49 | greeting('Jose') #calling the function
50 | ```
51 |
52 | ## Using return
53 | Let's see an example that use a return statement. return allows a function to return a result that can then be stored as a variable, or used in whatever manner a user wants.
54 | ```python
55 | import math
56 |
57 | def is_prime2(num):
58 | '''
59 | Better method of checking for primes.
60 | '''
61 | if num % 2 == 0 and num > 2:
62 | return False
63 | for i in range(3, int(math.sqrt(num)) + 1, 2):
64 | if num % i == 0:
65 | return False
66 | return True
67 | ```
68 |
69 | Great! You should now have a basic understanding of creating your own functions to save yourself from repeatedly writing code!
70 |
--------------------------------------------------------------------------------
/python/035-python-generate-requirements-file.md:
--------------------------------------------------------------------------------
1 | ---
2 | id: 035-python-generate-requirements-file.md
3 | title: Generate requirements.txt file with packages that you need for project.
4 | tags:
5 | - python
6 | - libraries
7 | - install
8 | - requirements
9 | author: Nitin Tejuja
10 | meta-description: Generate the requirements.txt file with libraries that you need to run the project.
11 | date: 2021-10-28 04:18:55 +0530
12 | keywords: python
13 | template: post
14 | categories:
15 | - python
16 | image: assets/images/python/require.svg
17 | ---
18 |
19 | # What is requirements.txt file ?
20 | requirements.txt file contains the python packages names that required to run the project . requirements.txt file is located in root directory of project.
21 | example :
22 | ---
23 | alembic==1.6.5
24 | appdirs==1.4.4
25 | arrow==1.1.1
26 | asgiref==3.4.1
27 | ---
28 | # How to generate requirements.txt file ?
29 | pip freeze command gives complete list of every package installed on your computer along with version numbers.
30 | There two ways to put this complete list of packages into requirements.txt file and as follows :
31 | 1. Copy pip freeze command output to requirements.txt file
32 | 2. Modify the pip freeze command as "pip freeze > requirements.txt " so that output of command "pip freeze" stores into requirements.txt file.
33 |
34 |
--------------------------------------------------------------------------------
/python/037-ftp.md:
--------------------------------------------------------------------------------
1 | ---
2 | id: 037-ftp.md
3 | title: A simple Guide to FTP
4 | tags: python,networking,ftp
5 | date: 2021-10-28 19:05:00 +0200
6 | keywords: nlp, regex
7 | categories: Python
8 | image: assets/images/sftp.svg
9 | author: Joaquin Montesinos
10 | meta-description: This is a brief tutorial on FTP connection on Python
11 | ---
12 |
13 | # A simple Guide to FTP connection
14 |
15 | FTP
16 | The File Transfer Protocol (FTP) is a standard network protocol used to transfer computer files between a client and server on a computer network. FTP is built on a client-server model architecture and uses separate control and data connections between the client and the server.
17 |
18 | The client can send FTP commands such as STAT, PWD, RETR, and STOR. The ftplib module has multiple methods that can wrap these commands.
19 |
20 | # Example
21 |
22 | Create a send_command.py script and write the following content in it:
23 |
24 | ```python
25 | import os
26 | import ftplib
27 |
28 | ftp_host='xxx'
29 | ftp_user_name='xxx'
30 | ftp_password='xxx'
31 |
32 | session = ftplib.FTP(ftp_host,ftp_user_name,ftp_password)
33 | # file to send
34 | file = open('origin_filename.txt','rb')
35 | # send the file
36 | session.storbinary('STOR 'end_filename.txt', file)
37 |
38 | # close file and FTP
39 | file.close()
40 | session.quit()
41 | ```
42 |
43 | Run the script as follows:
44 |
45 | ```
46 | python3 send_command.py
47 | ```
--------------------------------------------------------------------------------
/python/037-python-methods.md:
--------------------------------------------------------------------------------
1 | ---
2 | id: 037-python-Methods
3 | title: Creating Object Oriented methods
4 | tags:
5 | - python
6 | - random
7 | author:
8 | meta-description: Creating Object Oriented Methods
9 | date: 2021-10-11 18:38:42 -0700
10 | keywords: python
11 | template: post
12 | categories:
13 | - python
14 | image: assets/images/python/python.svg
15 | ---
16 |
17 | # Methods
18 | Methods are functions defined inside the body of a class. They are used to perform operations with the attributes of our objects. Methods are a key concept of the OOP paradigm. They are essential to dividing responsibilities in programming, especially in large applications.
19 |
20 | You can basically think of methods as functions acting on an Object that take the Object itself into account through its self argument.
21 |
22 | Let's go through an example of creating a Circle class:
23 |
24 |
25 | ```python
26 | class Circle:
27 | pi = 3.14
28 |
29 | # Circle gets instantiated with a radius (default is 1)
30 | def __init__(self, radius=1):
31 | self.radius = radius
32 | self.area = radius * radius * Circle.pi
33 |
34 | # Method for resetting Radius
35 | def setRadius(self, new_radius):
36 | self.radius = new_radius
37 | self.area = new_radius * new_radius * self.pi
38 |
39 | # Method for getting Circumference
40 | def getCircumference(self):
41 | return self.radius * self.pi * 2
42 |
43 |
44 | c = Circle()
45 |
46 | print('Radius is: ',c.radius)
47 | print('Area is: ',c.area)
48 | print('Circumference is: ',c.getCircumference())
49 | ```
50 |
51 |
52 | In the _init_ method above, in order to calculate the area attribute, we had to call Circle.pi. This is because the object does not yet have its own .pi attribute, so we call the Class Object Attribute pi instead.
53 | In the setRadius method, however, we'll be working with an existing Circle object that does have its own pi attribute. Here we can use either Circle.pi or self.pi.
54 |
55 | Now let's change the radius and see how that affects our Circle object:
56 |
57 | ```python
58 | c.setRadius(2)
59 |
60 | print('Radius is: ',c.radius)
61 | print('Area is: ',c.area)
62 | print('Circumference is: ',c.getCircumference())
63 | ```
64 |
65 | Great! Notice how we used self. notation to reference attributes of the class within the method calls. Review how the code above works and try creating your own method.
--------------------------------------------------------------------------------
/python/038-dictionary-comprehension.md:
--------------------------------------------------------------------------------
1 | ---
2 | id: 038-dictionary-comprehension.md
3 | title: Dictionary Comprehension in Python
4 | tags:
5 | - python
6 | - random
7 | author: Tarun K Kumar
8 | meta-description: dictionary comprehension in python
9 | date: 2022-10-24 21:53:39 +0530
10 | keywords: python
11 | categories:
12 | - python
13 | image: assets/images/python/python3.svg
14 | ---
15 | # Dictionary Comprehension in Python
16 |
17 | Dictionary comprehension is a simple method of creating a dictionary without using the dict() method and is similar to the list comprehension concept. Suppose we have a list of keys and list of corresponding values and we want to turn those into a dictionary, then we would usually write something like:
18 |
19 | ```python
20 | keys = ['animal','plant','insect']
21 | values = ["dog","lemongrass","Weevil"]
22 |
23 | dict = {}
24 |
25 | for i in range(len(keys)):
26 | dict[keys[i]] = values[i]
27 |
28 | print(dict)
29 | ```
30 | which would print:
31 | ```python
32 | {'animal': 'dog', 'plant': 'lemongrass', 'insect': 'Weevil'}
33 | ```
34 | Well, we have our end result but the same can be achieved with less code. This is where dictionary comprehension comes in.
35 |
36 | The refactored code:
37 | ```python
38 | keys = ['animal','plant','insect']
39 | values = ["dog","lemongrass","Weevil"]
40 |
41 | print({keys[i]:values[i] for i in range(len(keys))})
42 | ```
43 | So, lets breakdown that line:
44 |
45 | To use dictionary comprehension, a dictionary must be created using `{}` and the following syntax must be followed:
46 | ```python
47 | dictionary = {key: value for vars in iterable}
48 | ```
49 | - The `key` and `values` are our lists containing our key:value pairs where we use `i` as indices to populate our dictionary
50 |
51 | You can also use conditionals in dictionary comprehension as well:
52 | ```python
53 | keys = ['animal','plant','insect']
54 | values = [-1,2,3]
55 |
56 | print({keys[i]:values[i] for i in range(len(keys)) if values[i]>0})
57 | ```
58 | The output:
59 | ```python
60 | {'plant': 2, 'insect': 3}
61 | ```
62 | This is a more pythonic and my favourite way of creating dictionaries in python. I hope this article was useful. Thank you for reading.
63 |
64 |
--------------------------------------------------------------------------------
/python/039-__add__()-method.md:
--------------------------------------------------------------------------------
1 | ---
2 | id: 039-__add__()-method.md
3 | title: __add__() in Python
4 | tags:
5 | - python
6 | - random
7 | author: Tarun K Kumar
8 | meta-description: __add__() magic method in python
9 | date: 2022-10-24 20:52:00 +0530
10 | keywords: python
11 | categories:
12 | - python
13 | image: assets/images/python/python3.svg
14 | ---
15 | # __add__() Method
16 |
17 | The `_-add__` method is what enables operator overloading in python objects. Operator overloading is when you explicitly tell an object what to do when a certain operator is used.
18 |
19 | The `__add__` method enables us to overload the `+` operator of an object.
20 |
21 | Let us try to add a Python integer with a user-defined Number Object. If you try to add an object and an integer organically like this
22 |
23 | ```python
24 | class Number:
25 | def __init__(self, value):
26 | self.value = value
27 |
28 | num = Number(5)
29 |
30 | print(num + 5)
31 | ```
32 | You would get:
33 | ```bash
34 | Traceback (most recent call last):
35 | File "main.py", line 7, in
83 |
--------------------------------------------------------------------------------
/python/027-pandas-read-file-backslash.md:
--------------------------------------------------------------------------------
1 | ---
2 | id: 027-pandas-unicodeescape-error.md
3 | title: Pandas read files
4 | tags:
5 | - python
6 | - pandas
7 | author: Matteo Buldrini
8 | meta-description: How to read in Pandas files that give you unicodeescape error.
9 | date: 2020-12-20 14:30:05 +0200
10 | keywords: python, pandas
11 | template: post
12 | categories:
13 | - python
14 | image: assets/images/python/python3.svg
15 | ---
16 |
17 | Sometimes when reading a file in Pandas you may incur in the following error after declaring the path name:
18 |
19 | ```python
20 | SyntaxError: (unicode error) ‘unicodeescape’ codec can’t decode bytes in position 2-3:
21 | truncated \UXXXXXXXX escape.
22 | ```
23 |
24 | This happens because path names tend to have backslashes in them (e.g. 'C:\Documents\File.csv'). In Python, backslash is used to signify special characters, but when we use it in a path name we want to refer to actual backslashes, not to special characters.
25 |
26 | To solve this issue, you need to add an r before the path name, so that Python can interpret backslashes as strings.
27 |
28 | Example:
29 |
30 | ```python
31 | df = pd.read_csv(r'C:\Documents\File.csv')
32 | ```
33 |
--------------------------------------------------------------------------------
/python/028-Decision Trees.md:
--------------------------------------------------------------------------------
1 | ---
2 | id: 028-Decision Tree.md
3 | title: Why Decision trees are so popular in Machine Learning algorithms
4 | tags:
5 | - python
6 | - random
7 | - machine learning
8 | author: Ankur
9 | meta-description: What makes decision trees popular
10 | date: 2021-10-02 15:41:42 -0700
11 | keywords: python, Decision Tree
12 | template: post
13 | categories:
14 | - python
15 | image: assets/images/python/tree.svg
16 | ---
17 |
18 | ## What is Decision Trees?
19 |
20 | Decision trees-like model more specifically it is probablity tree that enables the user to made decision on the basis on conditions.This condition can be understand as if-then statements so there's if condition then it will choose some vertex else other.The solution choosen after particular condition is called decision. This algorithm can be used for both regression and classification.
21 |
22 | In this trees internal nodes represents conditions and the leaf node depicts decision.
23 |
24 | ## But why they are so popular?
25 |
26 | First off, Lets look which module allow you to make decision tree:
27 |
28 | ```python
29 | From sklearn.tree import DecisionTreeClassifier
30 | classifier= DecisionTreeClassifier(criterion='entropy', random_state=0) #for classification
31 | classifier= DecisionTreeRegressor(criterion='entropy', random_state=0) #for regression
32 | ```
33 |
34 | 1.This tree based algorithm can visualized and inclusing its conditions.
35 | https://scikit-learn.org/stable/auto_examples/tree/plot_iris_dtc.html
36 | https://scikit-learn.org/stable/_images/iris.sv
37 |
38 | you can see how the decision tree made is plotted.
39 |
40 | 2.Less preprocessing is required when compared to other algorithms.Less effort in preprocessing makes it much handy.
41 |
42 | 3.This algorithm can handle missing values and it works healthy while working with outliers.
43 |
44 | 4.The usage is simple hence its very understandable.It looks like if-else statements
45 |
46 | 5.They can be stacked with other algorithms and can reach excellent results
47 |
48 | 6.They dont require setting of lots of parameters and can easily handle multidimensional data.
49 |
50 | Thats it! Now you know what makes decision trees so popular! But this doesn't mean they can perform outstanding always.
--------------------------------------------------------------------------------
/python/030_DataStructures.md:
--------------------------------------------------------------------------------
1 | ---
2 | id: 030_DataStructures.md
3 | title: DataStructures - Basic concept
4 | tags:
5 | - python
6 | - beginner
7 | - data structures
8 | author: Sanjana Sogimatt
9 | meta-description: Understanding data structures
10 | date: 2021-10-11 19:40:41 -0300
11 | keywords: python, beginner, data structures
12 | template: post
13 | categories:
14 | - python
15 | image: assets/images/python/data.svg
16 | ---
17 |
18 | ## Basic data structures:
19 | Python has four basic structure namely Lists,Dictionary,Tuple and sets.
20 | These data structures are in built that come along with python and we also have user defined data structure.
21 |
22 |
23 | ## List:
24 | Lists are the type of container which can store data of different types in the memory.Lists are created using '[]'(square braces)
25 | Example:
26 | ```python
27 | l1=[34,56,78,'list',(2,3)]
28 | ```
29 | ## Sets:
30 | Sets are again similar to lists and tuples but diffrence would be it does not store duplicate values.It is enclosed in curly braces{}
31 | Example:
32 | ```python
33 | s1={2,45,(4.5,7),s}
34 | ```
35 | ## Tuple:
36 | Tuple is similar to Lists but the diffrence is tuples are immutable where lists are mutable.Tuples are created using round braces()
37 | Example:
38 | ```python
39 | t1=(1,2,3,(67,78),'tuple')
40 | ```
41 | ## Dictionary:
42 | Okay now dictionary are not at all like lists. These data structures store key-value pair. Take an anology of a dictionary where there is a word and a meaning to that. Dictionaries in python are created using curly braces.
43 | Example:
44 | ```python
45 | d1={1:a,2:b,3:c}
46 | ```
47 | Some of the user defined data structures are as follows:
48 | ## Array:
49 | These data structures are similar to lists but it is homogeneous that is the elements having same datatype.
50 |
51 | ## Linked list:
52 | These are the data structure that holds the value of next element using pointers.
53 |
54 | ## Stack:
55 | These data structure follow the principle of last in first out. Basically, we can access only the last entered value. We can also do operations like push or pop.
56 |
57 | ## Queue:
58 | These are the data structures that work following the principle of first in first out. You totally relate it to a queue in real life.
59 |
60 | ## Hash maps:
61 | Hash maps are same as dictionaries in python.
62 |
63 | ## Graph:
64 | Graphs stores the data in the collection of points called vertices and edges.
65 |
66 |
67 |
--------------------------------------------------------------------------------
/python/030requests-library.md:
--------------------------------------------------------------------------------
1 | ---
2 | id: 030requests-library.md
3 | title: Requests library in Python
4 | tags:
5 | - python
6 | author: Javier Gonzalez
7 | meta-description:
8 | date: 2021-10-08 16:30:00 -0700
9 | keywords: python
10 | template: post
11 | categories:
12 | - python
13 | image: assets/images/python/req.svg
14 | ---
15 |
16 | ## Python Requests Library
17 |
18 | Sometimes we need with a script written in Python accessing to an API or download the content of a web page.
19 |
20 | For that we can use the [Requests Library](https://docs.python-requests.org/en/latest)
21 |
22 | First we need to install the library:
23 |
24 | ```console
25 | pip install requests
26 | ```
27 |
28 | Code Example :
29 |
30 | ```python
31 |
32 | import requests
33 |
34 | # The requests module provides us different methods (get, post, update, delete)
35 | r = requests.get('http://www.google.com')
36 |
37 | # In the request method also it is possible to specify the headers, the cookies and the data sent
38 | headers = { 'accept' : '*/*' }
39 | payload = { 'title' : 'Download web page with python' }
40 | cookies = dict(example_cookie='value')
41 |
42 | r = requests.post('https://reqres.in/api/posts', data=payload, headers=headers, cookies=cookies)
43 |
44 | # With the object returned
45 | # We could check the status code of the response
46 | r.status_code
47 |
48 | # We could obtain the content of the page as a string
49 | r.text
50 |
51 | # Or if the url is an API, we could obtain the response in json format
52 | r.json()
53 |
54 |
55 | ```
56 |
--------------------------------------------------------------------------------
/python/031-python-forloops.md:
--------------------------------------------------------------------------------
1 | ---
2 | id: 031-python-forloops.md
3 | title: Forloops in Python
4 | tags:
5 | - python
6 | - random
7 | author: Hammed Babatunde
8 | meta-description: Using Forloops in Python
9 | date: 2021-10-11 18:38:42 -0700
10 | keywords: python
11 | template: post
12 | categories:
13 | - python
14 | image: assets/images/python/python2.svg
15 | ---
16 |
17 | # What are For Loops?
18 | A for loop acts as an iterator in Python; it goes through items that are in a sequence or any other iterable item. Objects that we can iterate over include strings, lists, tuples, and even built-in iterables for dictionaries, such as keys or values.
19 |
20 | ## Using For Loops in a List
21 | ```python
22 | list1 = [1,2,3,4,5,6,7,8,9,10]
23 | for num in list1:
24 | print(num) # Prints out each number in list1
25 | ```
26 |
27 | ## Using For Loops in a String
28 | We've used for loops with lists, how about with strings? Remember strings are a sequence so when we iterate through them we will be accessing each item in that string.
29 | ```python
30 | for letter in 'This is a string.':
31 | print(letter) #print each letter in the string
32 | ```
33 |
34 | ## Using For Loops in Tuples
35 | Tuples have a special quality when it comes to for loops. If you are iterating through a sequence that contains tuples, the item can actually be the tuple itself, this is an example of tuple unpacking. During the for loop we will be unpacking the tuple inside of a sequence and we can access the individual items inside that tuple!
36 | ```python
37 | list2 = [(2,4),(6,8),(10,12)]
38 | for tup in list2:
39 | print(tup) #prints each tuple
40 |
41 | # Now with unpacking!
42 | for (t1,t2) in list2:
43 | print(t1)
44 | ```
45 | ## Using For Loops in a Dictionary
46 | Cool! With tuples in a sequence we can access the items inside of them through unpacking! The reason this is important is because many objects will deliver their iterables through tuples. Let's start exploring iterating through Dictionaries to explore this further!
47 |
48 | ```python
49 | d = {'k1':1,'k2':2,'k3':3} #This is a Dictionary in python
50 |
51 | for item in d:
52 | print(item) #This prints out each keys in the dictionary
53 |
54 | # Dictionary unpacking for both keys and values
55 | for k,v in d.items():
56 | print(k)
57 | print(v)
58 | ```
59 | We have learned how to use for loops to iterate through tuples, lists, strings, and dictionaries.
60 |
--------------------------------------------------------------------------------
/python/032-python-iterators and generators.md:
--------------------------------------------------------------------------------
1 | ---
2 | id: 032-python-iterators and generators.md
3 | title: Iterators and Generators in Python
4 | tags:
5 | - python
6 | - random
7 | author: Hammed Babatunde
8 | meta-description: Using iterators and Generators in Python
9 | date: 2021-10-11 18:38:42 -0700
10 | keywords: python
11 | template: post
12 | categories:
13 | - python
14 | image: assets/images/python/python4.svg
15 | ---
16 |
17 | # Generators and Iterators in Python
18 |
19 | Generator functions allow us to write a function that can send back a value and then later resume to pick up where it left off. This type of function is a generator in Python, allowing us to generate a sequence of values over time. The main difference in syntax will be the use of a yield statement.
20 |
21 | In most aspects, a generator function will appear very similar to a normal function. The main difference is when a generator function is compiled they become an object that supports an iteration protocol. That means when they are called in your code they don't actually return a value and then exit. Instead, generator functions will automatically suspend and resume their execution and state around the last point of value generation
22 |
23 |  To start getting a better understanding of generators, let's go ahead and see how we can create some.
24 |
25 | ```python
26 | # Generator function for the cube of numbers (power of 3)
27 | def gencubes(n):
28 | for num in range(n):
29 | yield num**3
30 |
31 | for x in gencubes(10):
32 | print(x)
33 | ```
34 | Generators are best for calculating large sets of results (particularly in calculations that involve loops themselves) in cases where we don’t want to allocate the memory for all of the results at the same time.
35 |
36 | Let's create another example generator which calculates fibonacci numbers:
37 | ```python
38 | # Generator function for the cube of numbers (power of 3)
39 | def genfibon(n):
40 | """
41 | Generate a fibonnaci sequence up to n
42 | """
43 | a = 1
44 | b = 1
45 | for i in range(n):
46 | yield a
47 | a,b = b,a+b
48 |
49 | for num in genfibon(10):
50 | print(num)
51 | ```
52 |
53 | ## next() built-in function in Python
54 | A key to fully understanding generators is the next() function and the iter() function.
55 |
56 | The next() function allows us to access the next element in a sequence. Lets check it out:
57 | ```python
58 | # Generator function for the cube of numbers (power of 3)
59 | def simple_gen():
60 | for x in range(3):
61 | yield x
62 |
63 | # Assign simple_gen
64 | g = simple_gen()
65 |
66 | print(next(g)) #prints out a value in the generator
67 | ```
68 |
69 | ## iter() built-in Fuction in Python
70 | Let's go ahead and check out how to use iter()
71 | A string object supports iteration, We can directly iterate over a string with The iter() function.
72 | ```python
73 | s = 'hello'
74 |
75 | #Iterate over string
76 | for let in s:
77 | print(let)
78 |
79 | s_iter = iter(s)
80 |
81 | next(s_iter) # print each of the value in s when called
82 | ```
83 |
84 | The main takeaway from this article is that using the yield keyword at a function will cause the function to become a generator. This change can save you a lot of memory for large use cases.
85 |
--------------------------------------------------------------------------------
/python/033-insertion-sort-python.md:
--------------------------------------------------------------------------------
1 | ---
2 | id: 033-insertion-sort-python.md
3 | title: Insertion Sort in Python
4 | tags:
5 | - python
6 | - insertion sort
7 | - sorting
8 | - algorithms
9 | date: 2021-10-11 17:30:00 -0800
10 | keywords: python, sorting, algorithms, insertion, sort
11 | categories:
12 | - python
13 | image: assets/images/python/eng.svg
14 | author: Ryan Lim
15 | meta-description: insertion sort in python
16 | ---
17 |
18 | # Insertion Sort in Python
19 |
20 | [Insertion Sort](https://en.wikipedia.org/wiki/Insertion_sort) is type of [sorting algorithm](https://en.wikipedia.org/wiki/Sorting_algorithm) that is relatively simple to implement. It does not have the best runtime, i.e. `O(n^2)`, compared to more advanced sorting algorithms such as [quicksort](https://en.wikipedia.org/wiki/Quicksort) or [merge sort](https://en.wikipedia.org/wiki/Merge_sort) but is a good starting sorting algorithm to learn. It can be used to sort smaller arrays consisting of strings or numbers.
21 |
22 | ## Pseudocode
23 |
24 | Here is the pseudocode of insertion code (from [wikipedia](https://en.wikipedia.org/wiki/Insertion_sort#Algorithm)):
25 |
26 | ```
27 | i ← 1
28 | while i < length(A)
29 | j ← i
30 | while j > 0 and A[j-1] > A[j]
31 | swap A[j] and A[j-1]
32 | j ← j - 1
33 | end while
34 | i ← i + 1
35 | end while
36 | ```
37 |
38 | The general idea behind it is to iterate through the array from beginning to end and swaps each element from the current element to the beginning of the array if a "greater" prior element is found compare to the current element. It basically sorts "subsections" of the array repeatedly until the entire array is sorted by "inserting" new elements in the right order in the subsection of the array.
39 |
40 | ## Python Implementation
41 |
42 | Without further ado, here is my Python (3) implementation of it:
43 |
44 | ```python
45 | def insertion_sort(array):
46 | for i in range(1, len(array)):
47 | j = i
48 | while j > 0 and array[j - 1] > array[j]:
49 | # swap the two array elements
50 | temp = array[j - 1]
51 | array[j - 1] = array[j]
52 | array[j] = temp
53 | j -= 1
54 | return array
55 | ```
56 |
57 | As you can see, it closely follows the pseudocode, with some minimal code savings using the `range` function. The `swap` was implemented inline but could be implemented as a separate function as well.
58 |
59 | ## Runtime
60 |
61 | As mentioned, the average runtime for this algorithm is `O(n^2)`. The best case is an array that is already sorted with a runtime of `O(n)` as the current element in the array will only be compared once with a prior element. The worst case is an array that is sorted in reverse as each new element will need to be compared (and swapped) with every prior element to the beginning of the array.
62 |
63 | Thanks for reading, any comment or feedback is most welcome!
64 |
--------------------------------------------------------------------------------
/python/034-python-functions.md:
--------------------------------------------------------------------------------
1 | ---
2 | id: 034-python-functions.md
3 | title: Creating functions in Python
4 | tags:
5 | - python
6 | - random
7 | author: Hammed Babatunde
8 | meta-description: Creating functions in python
9 | date: 2021-10-17 18:38:42 -0700
10 | keywords: python
11 | template: post
12 | categories:
13 | - python
14 | image: assets/images/python/python4.svg
15 | ---
16 |
17 | # What is a Function in Python
18 | Formally, a function is a useful device that groups together a set of statements so they can be run more than once. They can also let us specify parameters that can serve as inputs to the functions.
19 |
20 | On a more fundamental level, functions allow us to not have to repeatedly write the same code again and again. If you remember back to the lessons on strings and lists, remember that we used a function len() to get the length of a string. Since checking the length of a sequence is a common task you would want to write a function that can do this repeatedly at command.
21 |
22 |
23 | ## def Statements
24 | Let's see how to build out a function's syntax in Python. It has the following form:
25 | ```python
26 | def name_of_function(arg1,arg2):
27 | '''
28 | This is where the function's Document String (docstring) goes
29 | '''
30 | # Do stuff here
31 | # Return desired result
32 | ```
33 |
34 | ## Example 1: A simple print 'hello' function
35 | ```python
36 | def say_hello():
37 | print('hello')
38 |
39 | #Call the Function
40 | say_hello()
41 | ```
42 |
43 | ## Example 2: A simple greeting function
44 | Let's write a function that greets people with their name.
45 | ```python
46 | def greeting(name):
47 | print('Hello %s' %(name))
48 |
49 | greeting('Jose') #calling the function
50 | ```
51 |
52 | ## Using return
53 | Let's see an example that use a return statement. return allows a function to return a result that can then be stored as a variable, or used in whatever manner a user wants.
54 | ```python
55 | import math
56 |
57 | def is_prime2(num):
58 | '''
59 | Better method of checking for primes.
60 | '''
61 | if num % 2 == 0 and num > 2:
62 | return False
63 | for i in range(3, int(math.sqrt(num)) + 1, 2):
64 | if num % i == 0:
65 | return False
66 | return True
67 | ```
68 |
69 | Great! You should now have a basic understanding of creating your own functions to save yourself from repeatedly writing code!
70 |
--------------------------------------------------------------------------------
/python/035-python-generate-requirements-file.md:
--------------------------------------------------------------------------------
1 | ---
2 | id: 035-python-generate-requirements-file.md
3 | title: Generate requirements.txt file with packages that you need for project.
4 | tags:
5 | - python
6 | - libraries
7 | - install
8 | - requirements
9 | author: Nitin Tejuja
10 | meta-description: Generate the requirements.txt file with libraries that you need to run the project.
11 | date: 2021-10-28 04:18:55 +0530
12 | keywords: python
13 | template: post
14 | categories:
15 | - python
16 | image: assets/images/python/require.svg
17 | ---
18 |
19 | # What is requirements.txt file ?
20 | requirements.txt file contains the python packages names that required to run the project . requirements.txt file is located in root directory of project.
21 | example :
22 | ---
23 | alembic==1.6.5
24 | appdirs==1.4.4
25 | arrow==1.1.1
26 | asgiref==3.4.1
27 | ---
28 | # How to generate requirements.txt file ?
29 | pip freeze command gives complete list of every package installed on your computer along with version numbers.
30 | There two ways to put this complete list of packages into requirements.txt file and as follows :
31 | 1. Copy pip freeze command output to requirements.txt file
32 | 2. Modify the pip freeze command as "pip freeze > requirements.txt " so that output of command "pip freeze" stores into requirements.txt file.
33 |
34 |
--------------------------------------------------------------------------------
/python/037-ftp.md:
--------------------------------------------------------------------------------
1 | ---
2 | id: 037-ftp.md
3 | title: A simple Guide to FTP
4 | tags: python,networking,ftp
5 | date: 2021-10-28 19:05:00 +0200
6 | keywords: nlp, regex
7 | categories: Python
8 | image: assets/images/sftp.svg
9 | author: Joaquin Montesinos
10 | meta-description: This is a brief tutorial on FTP connection on Python
11 | ---
12 |
13 | # A simple Guide to FTP connection
14 |
15 | FTP
16 | The File Transfer Protocol (FTP) is a standard network protocol used to transfer computer files between a client and server on a computer network. FTP is built on a client-server model architecture and uses separate control and data connections between the client and the server.
17 |
18 | The client can send FTP commands such as STAT, PWD, RETR, and STOR. The ftplib module has multiple methods that can wrap these commands.
19 |
20 | # Example
21 |
22 | Create a send_command.py script and write the following content in it:
23 |
24 | ```python
25 | import os
26 | import ftplib
27 |
28 | ftp_host='xxx'
29 | ftp_user_name='xxx'
30 | ftp_password='xxx'
31 |
32 | session = ftplib.FTP(ftp_host,ftp_user_name,ftp_password)
33 | # file to send
34 | file = open('origin_filename.txt','rb')
35 | # send the file
36 | session.storbinary('STOR 'end_filename.txt', file)
37 |
38 | # close file and FTP
39 | file.close()
40 | session.quit()
41 | ```
42 |
43 | Run the script as follows:
44 |
45 | ```
46 | python3 send_command.py
47 | ```
--------------------------------------------------------------------------------
/python/037-python-methods.md:
--------------------------------------------------------------------------------
1 | ---
2 | id: 037-python-Methods
3 | title: Creating Object Oriented methods
4 | tags:
5 | - python
6 | - random
7 | author:
8 | meta-description: Creating Object Oriented Methods
9 | date: 2021-10-11 18:38:42 -0700
10 | keywords: python
11 | template: post
12 | categories:
13 | - python
14 | image: assets/images/python/python.svg
15 | ---
16 |
17 | # Methods
18 | Methods are functions defined inside the body of a class. They are used to perform operations with the attributes of our objects. Methods are a key concept of the OOP paradigm. They are essential to dividing responsibilities in programming, especially in large applications.
19 |
20 | You can basically think of methods as functions acting on an Object that take the Object itself into account through its self argument.
21 |
22 | Let's go through an example of creating a Circle class:
23 |
24 |
25 | ```python
26 | class Circle:
27 | pi = 3.14
28 |
29 | # Circle gets instantiated with a radius (default is 1)
30 | def __init__(self, radius=1):
31 | self.radius = radius
32 | self.area = radius * radius * Circle.pi
33 |
34 | # Method for resetting Radius
35 | def setRadius(self, new_radius):
36 | self.radius = new_radius
37 | self.area = new_radius * new_radius * self.pi
38 |
39 | # Method for getting Circumference
40 | def getCircumference(self):
41 | return self.radius * self.pi * 2
42 |
43 |
44 | c = Circle()
45 |
46 | print('Radius is: ',c.radius)
47 | print('Area is: ',c.area)
48 | print('Circumference is: ',c.getCircumference())
49 | ```
50 |
51 |
52 | In the _init_ method above, in order to calculate the area attribute, we had to call Circle.pi. This is because the object does not yet have its own .pi attribute, so we call the Class Object Attribute pi instead.
53 | In the setRadius method, however, we'll be working with an existing Circle object that does have its own pi attribute. Here we can use either Circle.pi or self.pi.
54 |
55 | Now let's change the radius and see how that affects our Circle object:
56 |
57 | ```python
58 | c.setRadius(2)
59 |
60 | print('Radius is: ',c.radius)
61 | print('Area is: ',c.area)
62 | print('Circumference is: ',c.getCircumference())
63 | ```
64 |
65 | Great! Notice how we used self. notation to reference attributes of the class within the method calls. Review how the code above works and try creating your own method.
--------------------------------------------------------------------------------
/python/038-dictionary-comprehension.md:
--------------------------------------------------------------------------------
1 | ---
2 | id: 038-dictionary-comprehension.md
3 | title: Dictionary Comprehension in Python
4 | tags:
5 | - python
6 | - random
7 | author: Tarun K Kumar
8 | meta-description: dictionary comprehension in python
9 | date: 2022-10-24 21:53:39 +0530
10 | keywords: python
11 | categories:
12 | - python
13 | image: assets/images/python/python3.svg
14 | ---
15 | # Dictionary Comprehension in Python
16 |
17 | Dictionary comprehension is a simple method of creating a dictionary without using the dict() method and is similar to the list comprehension concept. Suppose we have a list of keys and list of corresponding values and we want to turn those into a dictionary, then we would usually write something like:
18 |
19 | ```python
20 | keys = ['animal','plant','insect']
21 | values = ["dog","lemongrass","Weevil"]
22 |
23 | dict = {}
24 |
25 | for i in range(len(keys)):
26 | dict[keys[i]] = values[i]
27 |
28 | print(dict)
29 | ```
30 | which would print:
31 | ```python
32 | {'animal': 'dog', 'plant': 'lemongrass', 'insect': 'Weevil'}
33 | ```
34 | Well, we have our end result but the same can be achieved with less code. This is where dictionary comprehension comes in.
35 |
36 | The refactored code:
37 | ```python
38 | keys = ['animal','plant','insect']
39 | values = ["dog","lemongrass","Weevil"]
40 |
41 | print({keys[i]:values[i] for i in range(len(keys))})
42 | ```
43 | So, lets breakdown that line:
44 |
45 | To use dictionary comprehension, a dictionary must be created using `{}` and the following syntax must be followed:
46 | ```python
47 | dictionary = {key: value for vars in iterable}
48 | ```
49 | - The `key` and `values` are our lists containing our key:value pairs where we use `i` as indices to populate our dictionary
50 |
51 | You can also use conditionals in dictionary comprehension as well:
52 | ```python
53 | keys = ['animal','plant','insect']
54 | values = [-1,2,3]
55 |
56 | print({keys[i]:values[i] for i in range(len(keys)) if values[i]>0})
57 | ```
58 | The output:
59 | ```python
60 | {'plant': 2, 'insect': 3}
61 | ```
62 | This is a more pythonic and my favourite way of creating dictionaries in python. I hope this article was useful. Thank you for reading.
63 |
64 |
--------------------------------------------------------------------------------
/python/039-__add__()-method.md:
--------------------------------------------------------------------------------
1 | ---
2 | id: 039-__add__()-method.md
3 | title: __add__() in Python
4 | tags:
5 | - python
6 | - random
7 | author: Tarun K Kumar
8 | meta-description: __add__() magic method in python
9 | date: 2022-10-24 20:52:00 +0530
10 | keywords: python
11 | categories:
12 | - python
13 | image: assets/images/python/python3.svg
14 | ---
15 | # __add__() Method
16 |
17 | The `_-add__` method is what enables operator overloading in python objects. Operator overloading is when you explicitly tell an object what to do when a certain operator is used.
18 |
19 | The `__add__` method enables us to overload the `+` operator of an object.
20 |
21 | Let us try to add a Python integer with a user-defined Number Object. If you try to add an object and an integer organically like this
22 |
23 | ```python
24 | class Number:
25 | def __init__(self, value):
26 | self.value = value
27 |
28 | num = Number(5)
29 |
30 | print(num + 5)
31 | ```
32 | You would get:
33 | ```bash
34 | Traceback (most recent call last):
35 | File "main.py", line 7, in