├── .gitbook.yaml
├── .github
└── workflows
│ └── docs.yaml
├── .gitignore
├── CODE_OF_CONDUCT.md
├── CONTRIBUTING.md
├── LICENSE.md
├── README.md
├── config
├── mlc.config.json
└── terminology.config.json
├── docs
├── README.md
├── SUMMARY.md
├── about
│ ├── README.md
│ ├── browser-support.md
│ ├── frontity-features.md
│ └── get-involved.md
├── architecture
│ ├── README.md
│ ├── decoupled-mode.md
│ └── embedded-mode.md
├── contributing
│ ├── README.md
│ ├── code-contribution-guide.md
│ └── how-to-contribute.md
├── deployment
│ ├── README.md
│ ├── deploy-on-heroku.md
│ ├── deploy-on-layer0.md
│ └── deploy-using-vercel.md
├── faq.md
├── frontity-features
│ └── extensions.md
├── getting-started
│ ├── README.md
│ └── quick-start-guide.md
├── guides
│ ├── README.md
│ ├── frontity-query-options.md
│ ├── how-to-share-a-frontity-project.md
│ ├── how-to-use-environment-variables-in-frontity.md
│ ├── install-a-new-package.md
│ ├── javascript-basics.md
│ ├── keep-frontity-updated.md
│ ├── processing-page-builder-content.md
│ ├── react-basic.md
│ ├── redirections-with-frontity.md
│ ├── setting-url-wordpress-source-data.md
│ ├── troubleshooting.md
│ ├── understanding-mars-theme-1.md
│ ├── understanding-mars-theme.md
│ ├── update-db-urls.md
│ ├── using-processors.md
│ └── what-are-the-requisites-of-wordpress-for-frontity.md
├── isomorphic-react.md
├── learning-frontity
│ ├── README.md
│ ├── actions.md
│ ├── libraries.md
│ ├── namespaces.md
│ ├── packages.md
│ ├── project.md
│ ├── roots.md
│ ├── settings.md
│ ├── state.md
│ └── styles.md
├── performance
│ ├── README.md
│ ├── caching.md
│ ├── code-splitting.md
│ ├── lazy-loading.md
│ └── link-prefetching.md
└── seo.md
├── package-lock.json
├── package.json
└── utils
└── gitbook-toc.js
/.gitbook.yaml:
--------------------------------------------------------------------------------
1 | root: ./docs/
2 |
3 | structure:
4 | readme: README.md
5 | summary: SUMMARY.md
6 |
7 | redirects:
8 | javascript-and-and-react: ./resources/README.md
9 | javascript-and-and-react/: ./resources/README.md
10 | javascript-and-react: ./resources/README.md
11 | javascript-and-react/: ./resources/README.md
12 | deployment/deploy-on-now: ./deployment/deploy-using-vercel.md
13 | deployment/deploy-on-now/: ./deployment/deploy-using-vercel.md
14 | installation-and-deploy/deploy-on-now: ./deployment/deploy-using-vercel.md
15 | installation-and-deploy/deploy-on-now/: ./deployment/deploy-using-vercel.md
16 | deployment/deploy-using-now-vercel: ./deployment/deploy-using-vercel.md
17 | deployment/deploy-using-now-vercel/: ./deployment/deploy-using-vercel.md
18 | installation-and-deploy: ./deployment/README.md
19 | installation-and-deploy/: ./deployment/README.md
20 | key-differences-with-gatsbyjs: ./about/README.md
21 | key-differences-with-gatsbyjs/: ./about/README.md
22 | installation-and-deploy/possible-architectures: ./architecture/README.md
23 | installation-and-deploy/possible-architectures/: ./architecture/README.md
24 | architecture: ./architecture/README.md
25 | architecture/: ./architecture/README.md
26 | faq: ./faq/README.md
27 | faq/: .faq/README.md
28 | showcases: https://frontity.org/showcase/
29 | showcases/: https://frontity.org/showcase/
30 | frontity-cli/create.md: ./frontity-cli/create-commands.md
31 | frontity-cli/create-package.md: ./frontity-cli/create-commands.md
32 | frontity-cli/build.md: ./frontity-cli/build-commands.md
33 | frontity-cli/dev.md: ./frontity-cli/run-commands.md
34 | frontity-cli/serve.md: ./frontity-cli/run-commands.md
35 | frontity-cli/info.md: ./frontity-cli/extra-commands.md
36 | frontity-cli/subscribe.md: ./frontity-cli/extra-commands.md
37 | resources: ./guides/README.md
38 | key-concepts: ./guides/README.md
39 | key-concepts/javascript: ./guides/javascript-basics.md
40 | key-concepts/react: ./guides/react-basic.md
41 | troubleshooting: ./guides/troubleshooting.md
42 | seo: ./guides/seo.md
43 | getting-started/connecting-to-wordpress.md: https://docs.frontity.org/getting-started/quick-start-guide#set-your-own-wordpress-installation
44 | getting-started/connecting-to-wordpress: https://docs.frontity.org/getting-started/quick-start-guide#set-your-own-wordpress-installation
45 | guides/link-prefetching.md: ./performance/link-prefetching.md
46 | learning-frontity/code-splitting.md: ./performance/code-splitting.md
--------------------------------------------------------------------------------
/.github/workflows/docs.yaml:
--------------------------------------------------------------------------------
1 | name: Check Markdown links
2 |
3 | on:
4 | push:
5 | branches:
6 | - master
7 | schedule:
8 | # Run everyday at 9:00 AM (See https://pubs.opengroup.org/onlinepubs/9699919799/utilities/crontab.html#tag_20_25_07)
9 | - cron: "0 9 * * *"
10 |
11 | jobs:
12 | markdown-link-check:
13 | runs-on: ubuntu-latest
14 | steps:
15 | - uses: actions/checkout@master
16 | - uses: gaurav-nelson/github-action-markdown-link-check@v1
17 | with:
18 | use-quiet-mode: 'yes'
19 | use-verbose-mode: 'yes'
20 | config-file: 'config/mlc.config.json'
21 | folder-path: 'docs'
22 | max-depth: 2
--------------------------------------------------------------------------------
/.gitignore:
--------------------------------------------------------------------------------
1 | node_modules
2 | .vscode
3 | .DS_Store
--------------------------------------------------------------------------------
/CODE_OF_CONDUCT.md:
--------------------------------------------------------------------------------
1 | ## Code of Conduct
2 |
3 | ### Our Pledge
4 |
5 | In the interest of fostering an open and welcoming environment, we as
6 | contributors and maintainers pledge to making participation in our project and
7 | our community a harassment-free experience for everyone, regardless of age, body
8 | size, disability, ethnicity, gender identity and expression, level of experience,
9 | nationality, personal appearance, race, religion, or sexual identity and
10 | orientation.
11 |
12 | ### Our Standards
13 |
14 | Examples of behavior that contributes to creating a positive environment
15 | include:
16 |
17 | - Using welcoming and inclusive language
18 | - Being respectful of differing viewpoints and experiences
19 | - Gracefully accepting constructive criticism
20 | - Focusing on what is best for the community
21 | - Showing empathy towards other community members
22 |
23 | Examples of unacceptable behavior by participants include:
24 |
25 | - The use of sexualized language or imagery and unwelcome sexual attention or
26 | advances
27 | - Trolling, insulting/derogatory comments, and personal or political attacks
28 | - Public or private harassment
29 | - Publishing others' private information, such as a physical or electronic
30 | address, without explicit permission
31 | - Other conduct which could reasonably be considered inappropriate in a
32 | professional setting
33 |
34 | ### Our Responsibilities
35 |
36 | Project maintainers are responsible for clarifying the standards of acceptable
37 | behavior and are expected to take appropriate and fair corrective action in
38 | response to any instances of unacceptable behavior.
39 |
40 | Project maintainers have the right and responsibility to remove, edit, or
41 | reject comments, commits, code, wiki edits, issues, and other contributions
42 | that are not aligned to this Code of Conduct, or to ban temporarily or
43 | permanently any contributor for other behaviors that they deem inappropriate,
44 | threatening, offensive, or harmful.
45 |
46 | ### Scope
47 |
48 | This Code of Conduct applies both within project spaces and in public spaces
49 | when an individual is representing the project or its community. Examples of
50 | representing a project or community include using an official project e-mail
51 | address, posting via an official social media account, or acting as an appointed
52 | representative at an online or offline event. Representation of a project may be
53 | further defined and clarified by project maintainers.
54 |
55 | ### Enforcement
56 |
57 | Instances of abusive, harassing, or otherwise unacceptable behavior may be
58 | reported by contacting the project team at [team@frontity.com](mailto:team@frontity.com). All
59 | complaints will be reviewed and investigated and will result in a response that
60 | is deemed necessary and appropriate to the circumstances. The project team is
61 | obligated to maintain confidentiality with regard to the reporter of an incident.
62 | Further details of specific enforcement policies may be posted separately.
63 |
64 | Project maintainers who do not follow or enforce the Code of Conduct in good
65 | faith may face temporary or permanent repercussions as determined by other
66 | members of the project's leadership.
67 |
68 | ### Attribution
69 |
70 | This Code of Conduct is adapted from the [Contributor Covenant][homepage], version 1.4,
71 | available at [http://contributor-covenant.org/version/1/4][version]
72 |
73 | [homepage]: http://contributor-covenant.org
74 | [version]: http://contributor-covenant.org/version/1/4/
--------------------------------------------------------------------------------
/CONTRIBUTING.md:
--------------------------------------------------------------------------------
1 | # Contributing to the Frontity Documentation
2 |
3 | Any member of the community is welcome to suggest changes to Frontity's official documentation at any time.
4 | Frontity's documentation can be found at:
5 |
6 | Docs Site | Repository | Description
7 | ---------|----------|---------
8 | [docs.frontity.org](https://docs.frontity.org) | https://github.com/frontity/docs | Introduction, concepts and guides
9 | [api.frontity.org](https://api.frontity.org) | https://github.com/frontity/api-reference | API Reference
10 | [tutorial.frontity.org](https://tutorial.frontity.org) | https://github.com/frontity/step-by-step-tutorial | Step by Step guide
11 |
12 |
13 | Any and all help is very much appreciated!
14 |
15 | The following describes how to contribute to the Frontity documentation.
16 |
17 | If you're stuck at any point, **don't hesitate to use Frontity's [Community Forum](https://community.frontity.org/c/framework-development/docs-and-tutorials/29)** to ask for help or make your suggestions.
18 |
19 |
20 | ## What Does this Document Contain?
21 |
22 | This document contains all the required information and links to resources needed to contribute to the Frontity documentation:
23 |
24 | - [Code of Conduct](#code-of-conduct) - our Code of Conduct
25 | - [Platform](#platform) - how do we get the online documentation site from these repository docs
26 | - [Documentation Format](#documentation-format) - syntax of the documentation docs in this repository
27 | - [Reporting Issues](#reporting-issues) - guidance on how to report an issue or provide feedback on the Frontity documentation
28 | - [Contributions Workfows](#contributions-workfows) - a collection of workflows available for contributing
29 | - [Edit on GitHub](#edit-on-github) - the recommended way to suggest small changes
30 | - [Fork & Edit on GitHub](#fork-&-edit-on-github) - the recommended way to suggest several changes (in several files)
31 | - [Fork, Local Edit & Push](#Fork-&-Local-Edit-&-Push) - the recommended way if you're already familiar with git
32 |
33 |
34 | ## Code of Conduct
35 |
36 | Frontity's framework provide a [**Code of Conduct**](https://github.com/frontity/docs/tree/master/CODE_OF_CONDUCT.md) to make clear the behavior we expect from contributors and maintainers alike.
37 | The people behind Frontity is committed to providing a welcoming and supportive environment and kindly request that you participate in these values also.
38 |
39 | Frontity's Code of Conduct is adapted from the [Contributor Covenant](http://contributor-covenant.org), version 1.4,
40 | available at [http://contributor-covenant.org/version/1/4](http://contributor-covenant.org/version/1/4/).
41 |
42 | ## Platform
43 |
44 | Frontity uses [gitbook](https://www.gitbook.com/) to generate the [documentation site](https://docs.frontity.org/) which is connected to our docs repositories
45 |
46 | Docs Site | Repository | Description
47 | ---------|----------|---------
48 | [docs.frontity.org](https://docs.frontity.org) | https://github.com/frontity/docs | Introduction, concepts and guides
49 | [api.frontity.org](https://api.frontity.org) | https://github.com/frontity/api-reference | API Reference
50 | [tutorial.frontity.org](https://tutorial.frontity.org) | https://github.com/frontity/step-by-step-tutorial | Step by Step guide
51 |
52 |
53 | Every time the `master` branch of each repo is updated the whole documentation site is rebuild
54 |
55 | 
56 |
57 | This docs repositories are the "source of truth" for Frontity's documentation and any suggested changes are managed through [Pull Requests](https://help.github.com/en/github/collaborating-with-issues-and-pull-requests/about-pull-requests) (to its [`master`](https://github.com/frontity/docs/tree/master) branch).
58 |
59 |
60 | ## Documentation Format
61 |
62 | The documents in the different docs repositories use [**Markdown syntax**](https://docs.gitbook.com/editing-content/markdown) to add format and structure to the texts.
63 |
64 | > If you want to know more about Markdown then take a look at:
65 | > - https://commonmark.org/help/
66 | > - https://daringfireball.net/projects/markdown/syntax
67 | > - https://markdown-guide.readthedocs.io/en/latest/basics.html
68 |
69 | These Markdown documents are [used by gitbook](#platform) to generate the final HTML you can see in our [documentation site](https://docs.frontity.org/).
70 |
71 | ## Reporting Issues
72 |
73 | If you have found a bug or a spelling mistake, or if you consider that information is missing or that improvements can be made, or if you find anything related to the Frontity documentation that you feel is an issue that should be reported, you can:
74 |
75 | - Directly create a Pull Request with your suggested changes using one of the [Contributions Worflows](#contributions-workfows) as explained below
76 | - Use our [Community Forum](https://community.frontity.org/c/framework-development/docs-and-tutorials/29) to tell us about it
77 |
78 | The maintainers of the framework will review your suggestions and will take any actions necessary to improve our documentation taking your feedback into consideration.
79 |
80 | ## Code Releases
81 |
82 | Want to do a [code contribution](https://docs.frontity.org/contributing/code-contribution-guide) that may require an update of the docs?
83 | Follow our [code releases](https://github.com/frontity/docs/wiki/Code-Releases) workflow
84 |
85 | ## Contributions Workflows
86 |
87 | To suggest changes in Frontity's documentation **you'll need a GitHub account** (so create it if you don't have already one)
88 |
89 | There are several workflows you can use to suggest changes.
90 | All of them finish with the creation of a Pull Request.
91 |
92 | > If you want to know more about Pull Requests you can take a look at:
93 | > - [📑 "Opening a pull request" | opensource.guide ](https://opensource.guide/how-to-contribute/#opening-a-pull-request)
94 | > - [📺 How to Contribute to an Open Source Project on GitHub | egghead.io ](https://egghead.io/courses/how-to-contribute-to-an-open-source-project-on-github)
95 |
96 | Your changes will not be visible right away, the maintainers of the framework will first review them and then merge them if the suggested changes are approved.
97 | So you don't need to worry about breaking anything!
98 |
99 | Here you have the most important workflows you can use to suggest changes in Frontity's documentation:
100 |
101 | #### • [`Edit on Github`](https://github.com/frontity/docs/wiki/Edit-on-Github) 📝
102 |
103 | This workflow is recommended for minor changes in just one file and for those who have little or no experience with git or github.
104 | With this workflow you can edit documentation directly online in your browser.
105 |
106 | Learn more about this workflow [here](https://github.com/frontity/docs/wiki/Edit-on-Github).
107 |
108 | #### • [`Fork & Edit on Github`](https://github.com/frontity/docs/wiki/Fork-&-Edit-on-Github) 📝📝
109 |
110 | This workflow is recommended for changes in several files and for those who have some experience with git or github
111 | With this workflow you can also edit documentation directly online in your browser.
112 |
113 | Learn more about this workflow [here](https://github.com/frontity/docs/wiki/Fork-&-Edit-on-Github).
114 |
115 | #### • [`Fork, Local Edit & Push`](https://github.com/frontity/docs/wiki/Fork-&-Local-Edit-&-Push) 📝📝📝
116 |
117 | If you are familiar with Git, you can use the `Fork, Local Edit & Push` workflow.
118 | This, in fact, is the preferred method for all but very minor changes.
119 | If you've previously contributed to other projects on GitHub via pull requests, you should already be familiar with this workflow.
120 |
121 | Learn more about this workflow [here](https://github.com/frontity/docs/wiki/Fork-&-Local-Edit-&-Push).
122 |
123 | > For minor changes, or if you're new to GitHub, we suggest that you use the `Edit on Github` workflow, because it's a quick and easy way to make changes.
124 |
125 | > If you have knowledge of Git and/or your proposed changes are more extensive then we recommend that you use `Fork, Local Edit & Push`.
126 |
--------------------------------------------------------------------------------
/README.md:
--------------------------------------------------------------------------------
1 | # Frontity Documentation: Docs/Guides
2 |
3 | Our documentation is distributed across three separate sites:
4 |
5 |
6 | Docs Site | Repository | Description
7 | ---------|----------|---------
8 | [**docs.frontity.org**](https://docs.frontity.org) | https://github.com/frontity/docs | Introduction, concepts and guides
9 | [api.frontity.org](https://api.frontity.org) | https://github.com/frontity/api-reference | API Reference
10 | [tutorial.frontity.org](https://tutorial.frontity.org) | https://github.com/frontity/step-by-step-tutorial | Step by Step guide
11 |
12 | This repo corresponds to the documentation available at [**docs.frontity.org**](https://docs.frontity.org), where you will find all the information you need to start building something awesome with Frontity.
13 |
14 | ## What is Frontity?
15 |
16 | [Frontity](https://frontity.org/) is a free and [open source framework](https://github.com/frontity/frontity) to develop WordPress themes based on React.
17 | In other words, it allows to build a **React frontend** for a headless WordPress site, which serves its data via the WordPress REST API.
18 |
19 | ## What Does this Repository Contain?
20 |
21 | This repository contains:
22 |
23 | - [Documentation](https://github.com/frontity/docs/tree/master/docs) - the source docs of the [Docs/Guides documentation site for Frontity](https://docs.frontity.org/)
24 | - [Contributing Guidelines](https://github.com/frontity/docs/tree/master/CONTRIBUTING.md) - a guide on how to contribute to the Frontity documentation
25 |
26 | ## How to Contribute
27 |
28 | Contributing to the Frontity documentation should be an enjoyable experience, as such we have created a set of [contributing guidelines](https://github.com/frontity/docs/tree/master/CONTRIBUTING.md) to help you do so.
29 |
30 | We have tried to make contributing to the Frontity documentation as easy as possible, especially for those new to Open Source.
31 | If anything is unclear or you have any questions then please use our [community forum](https://community.frontity.org/c/docs-and-tutorials/29) to discuss your contribution and how best to make it.
32 |
33 | ## License
34 |
35 | The Frontity documentation is an open source project released under the [Apache License 2.0](https://github.com/frontity/docs/tree/master/LICENSE.md).
36 |
37 | ## Get In Touch
38 |
39 | If you'd like to share your feedback or have any questions or suggestions regarding this documentation, feel free to reach out to us on our [community forum](https://community.frontity.org/c/docs-and-tutorials/29)
40 |
41 | There you will find both members of the community and staff who are happy to help answer questions on anything Frontity related.
--------------------------------------------------------------------------------
/config/mlc.config.json:
--------------------------------------------------------------------------------
1 | {
2 | "ignorePatterns": [
3 | { "pattern": "http://localhost:3000" },
4 | { "pattern": "https://github.com/_{YOURUSERNAME}_/frontity/" },
5 | { "pattern": "https://mysite.com/blog" }
6 |
7 | ]
8 | }
--------------------------------------------------------------------------------
/config/terminology.config.json:
--------------------------------------------------------------------------------
1 | {
2 | "filters": {
3 | "comments": true
4 | },
5 | "rules": {
6 | "terminology": {
7 | "defaultTerms": true,
8 | "terms": [
9 | "Frontity",
10 | "PHP",
11 | "Vercel",
12 | ["zeit", "Vercel"]
13 | ],
14 | "exclude": [
15 | "HTTPS"
16 | ]
17 | }
18 | }
19 | }
--------------------------------------------------------------------------------
/docs/README.md:
--------------------------------------------------------------------------------
1 | ⚠️ **Frontity Framework [is not under active development anymore.](https://frontity.org/blog/frontity-is-joining-automattic/)**
2 |
3 | **The team is now working on [the WordPress Interactivity API](https://make.wordpress.org/core/2024/03/04/interactivity-api-dev-note/). This unblocks the same UX Frontity framework enabled but directly in WordPress Core, fully compatible with the new Site Editor.**
4 |
5 | ---
6 |
7 | # » Welcome to Frontity
8 |
9 | **👋** Hi! Welcome to the Frontity documentation.
10 |
11 | The Frontity documentation is distributed across three separate sites:
12 |
13 | * [**docs.frontity.org**](https://docs.frontity.org) - Introduction, concepts and guides
14 | * [**api.frontity.org**](https://api.frontity.org) - API Reference
15 | * [**tutorial.frontity.org**](https://tutorial.frontity.org) - Step-by-step guide
16 |
17 | This site \(docs.frontity.org\) is where you will find all the information you need to start building something awesome with Frontity.
18 |
19 | {% hint style="info" %}
20 | If you're new to Frontity check out the [step-by-step tutorial](https://tutorial.frontity.org/). It's the quickest way to get up to speed with Frontity.
21 | {% endhint %}
22 |
23 | Let's kick things off by providing you with a roadmap so that you can find your way around the documentation and zero in on the information you need right now.
24 |
25 | ## [Quick Start](getting-started/README.md)
26 |
27 | If you're new to Frontity then you can get started by heading over to, erm..., the [**Getting Started**](getting-started/) section.
28 |
29 | This is where you'll find the [**Quick Start Guide**](getting-started/quick-start-guide.md) that will get you up and running with Frontity quickly.
30 |
31 | Once you've followed the Quick Start Guide and have a working Frontity installation you may want to continue learning by creating a more elaborated project with the [**step-by-step guide**](https://tutorial.frontity.org/).
32 |
33 | ## [About Frontity](about/README.md)
34 |
35 | To learn about what Frontity is, how it works, and what features it has, visit the [**About Frontity**](about/) section.
36 |
37 | If you're a **developer** this section will tell you all about what Frontity is capable of and what you can do with it.
38 |
39 | If you're a **project manager** or other **decision maker** that needs to choose or justify whether to use Frontity for your project then this section provides the information you need.
40 |
41 | ## [Core Concepts](learning-frontity/README.md)
42 |
43 | This section is the heart of the Frontity documentation. Once you've nailed the basics in the Getting Started section you should head over to the [**Core Concepts**](learning-frontity/) section to really dig in to the detail and learn how to work with Frontity.
44 |
45 | ## [Architecture](architecture/README.md)
46 |
47 | Find out about how the relationship between Frontity and WordPress is structured in the [**Architecture**](architecture.md) section, where you will also learn about possible hosting solutions.
48 |
49 | ## [Deployment](deployment/README.md)
50 |
51 | Once you've completed the development of your project and have a working application that you're happy with you can learn how to deploy to live in the [**Deployment**](deployment/) section.
52 |
53 | In particular we go into detail on how to [**deploy to Vercel**](deployment/deploy-using-vercel.md), our recommended hosting platform. Why do we recommend it? Because it's serverless, cheap, includes a CDN, and is really easy to set up.
54 |
55 | ## [Isomorphic React](isomorphic-react.md)
56 |
57 | Frontity sites are [Isomorphic React](isomorphic-react.md) apps which are executed both on the server-side and on the client-side. In this section you'll learn how the isomorphic approach works in Frontity and how you can customize your site accordingly.
58 |
59 | ## [Performance](performance/README.md)
60 |
61 | With a good [caching strategy](performance/caching.md) your Frontity project can be as performant as a static site.
62 |
63 | Also, applying mechanisms such as [Link prefetching](performance/link-prefetching.md) is highly recommended to improve the perceived performance.
64 |
65 | ## [SEO](seo.md)
66 |
67 | By default, Frontity will deliver to your browser a fully populated and well-formed HTML file generated from your React code that ensures a good SEO score.
68 |
69 | But it also allows you to optimize the SEO performance of your site and customize how your site is indexed by search engine crawlers through the use of [Header meta tags](seo.md#header-meta-tags) and [`robots.txt`](seo.md#robots-txt).
70 |
71 | ## [Guides](guides/README.md)
72 |
73 | This is where you'll find an ever-growing series of [**Guides**](guides/). Some will help you in working with Frontity. Others will give you ideas for projects and provide you with the help you need to guide you from first steps to fully working project.
74 |
75 | This is where you can really have fun with Frontity and work toward your stretch goals.
76 |
77 | In this section we also provide you with some foundational knowledge that will assist you when working with Frontity. So if you need a refresher, or if you're new to the topics, we have included introductions to [JavaScript/ES6](guides/javascript-basics.md) and [React](guides/react-basic.md) in this section.
78 |
79 | The [troubleshooting guide](guides/troubleshooting.md) is also here, for when you encounter problems. If your problem is not solved here then don't forget that you can also ask the community in the [**Frontity Community Forum**](https://community.frontity.org).
80 |
81 | ## [Contributing](contributing/README.md)
82 |
83 | Frontity is an open source project and welcomes contributions in all forms. The [**Contributing**](contributing/) section of the documentation will guide you whether you want to make a single contribution or whether you intend to become a fully fledged contributor to the Frontity project.
84 |
85 | We also encourage you to join the [Community Forum](https://community.frontity.org) to share your projects and ideas with fellow users and community members. This is the best place to build new connections and get community support.
86 |
87 | Oh, and if you haven't already, you can show your support by starring the project on [GitHub](https://github.com/frontity/frontity).
88 |
89 |
--------------------------------------------------------------------------------
/docs/SUMMARY.md:
--------------------------------------------------------------------------------
1 | # Table of contents
2 |
3 | * [» Welcome to Frontity](README.md)
4 | * [🚀 Getting started](getting-started/README.md)
5 | * [Quick start guide](getting-started/quick-start-guide.md)
6 | * [📃 About Frontity](about/README.md)
7 | * [Frontity features](about/frontity-features.md)
8 | * [Browser support](about/browser-support.md)
9 | * [Get involved](about/get-involved.md)
10 | * [📚 Core Concepts](learning-frontity/README.md)
11 | * [1. Project](learning-frontity/project.md)
12 | * [2. Settings](learning-frontity/settings.md)
13 | * [3. Packages](learning-frontity/packages.md)
14 | * [4. Roots](learning-frontity/roots.md)
15 | * [5. State](learning-frontity/state.md)
16 | * [6. Actions](learning-frontity/actions.md)
17 | * [7. Libraries](learning-frontity/libraries.md)
18 | * [8. Namespaces](learning-frontity/namespaces.md)
19 | * [9. Styles](learning-frontity/styles.md)
20 | * [🏗 Architecture](architecture/README.md)
21 | * [Decoupled Mode](architecture/decoupled-mode.md)
22 | * [Embedded Mode](architecture/embedded-mode.md)
23 | * [🌎 Deployment](deployment/README.md)
24 | * [Deploy Frontity using Vercel](deployment/deploy-using-vercel.md)
25 | * [Deploy Frontity on Layer0](deployment/deploy-on-layer0.md)
26 | * [Deploy Frontity on Heroku](deployment/deploy-on-heroku.md)
27 | * [🌗 Isomorphic React](isomorphic-react.md)
28 | * [⚡️ Perfomance](performance/README.md)
29 | * [Caching](performance/caching.md)
30 | * [Link prefetching](performance/link-prefetching.md)
31 | * [Lazy Loading](performance/lazy-loading.md)
32 | * [Code Splitting](performance/code-splitting.md)
33 | * [🔎 SEO](seo.md)
34 | * [📖 Guides](guides/README.md)
35 | * [Setting the URL of the WordPress data source](guides/setting-url-wordpress-source-data.md)
36 | * [Using Environment Variables in a Frontity project](guides/how-to-use-environment-variables-in-frontity.md)
37 | * [WordPress requirements for Frontity](guides/what-are-the-requisites-of-wordpress-for-frontity.md)
38 | * [URLs in a Migration from WordPress to Frontity Decoupled Mode](guides/update-db-urls.md)
39 | * [Frontity Query Options](guides/frontity-query-options.md)
40 | * [Redirections with Frontity](guides/redirections-with-frontity.md)
41 | * [Understanding a Frontity project](guides/understanding-mars-theme.md)
42 | * [Add a new Frontity package or theme to your project](guides/install-a-new-package.md)
43 | * [How to share your Frontity project](guides/how-to-share-a-frontity-project.md)
44 | * [Understanding Mars Theme](guides/understanding-mars-theme-1.md)
45 | * [Working with processors](guides/using-processors.md)
46 | * [How to process page-builder content in Frontity](guides/processing-page-builder-content.md)
47 | * [Keep Frontity Updated](guides/keep-frontity-updated.md)
48 | * [Troubleshooting](guides/troubleshooting.md)
49 | * [JavaScript](guides/javascript-basics.md)
50 | * [React](guides/react-basic.md)
51 | * [👏 Contributing](contributing/README.md)
52 | * [How to contribute?](contributing/how-to-contribute.md)
53 | * [Contributing Guide](contributing/code-contribution-guide.md)
54 |
55 |
--------------------------------------------------------------------------------
/docs/about/browser-support.md:
--------------------------------------------------------------------------------
1 | # Browser support
2 |
3 | The approach adopted by Frontity is as follows:
4 |
5 | * Prioritize the performance and user experience for the large majority of users that run modern browsers.
6 | * Do this while keeping as much compatibility as possible for the small minority of users that still use older browsers, such as IE11.
7 |
8 | > _"as much compatibility as possible" here means that at the very least the page loads, the content can be viewed and read, and the user can navigate to other parts of the site._
9 |
10 | | Platform | Support |
11 | | :--- | :--- |
12 | | [Browsers with Proxy](https://caniuse.com/#feat=proxy) | Full hydration |
13 | | Browsers without Proxy \(like IE11\) | No hydration \(SSR-only\) |
14 |
15 | We don’t expect feature parity between the SSR-only version and the fully hydrated version. You can think of the SSR-only version as an alternative version of your page, without the enhanced experience provided by React.
16 |
17 | {% hint style="warning" %}
18 | If you need to provide the feature parity in IE11, then Frontity is probably not the best option for you.
19 | {% endhint %}
20 |
21 |
--------------------------------------------------------------------------------
/docs/about/frontity-features.md:
--------------------------------------------------------------------------------
1 | ---
2 | description: >-
3 | Frontity framework and its extensions will help save you a lot of development
4 | time while enjoying of all of the latest technology trends, already configured
5 | for you.
6 | ---
7 |
8 | # Frontity features
9 |
10 | Here's a list of the main features included in Frontity's core:
11 |
12 | ### **Frontity features**
13 |
14 | * [Zero setup development](frontity-features.md#zero-setup-development)
15 | * [Lightning-fast loading](frontity-features.md#lightning-fast-loading)
16 | * [Instant in-app navigation](frontity-features.md#instant-in-app-navigation)
17 | * [Server-side Rendering](frontity-features.md#server-side-rendering)
18 | * [Extensible](frontity-features.md#less-than-greater-than-extensible)
19 | * [Battle-tested](frontity-features.md#battle-tested-framework)
20 | * [Serverless and horizontal scaling](frontity-features.md#serverless-and-horizontal-scaling)
21 | * [First class TypeScript support](frontity-features.md#first-class-typescript-support)
22 | * [Support for ES6 in modern browsers](frontity-features.md#support-for-es6-in-modern-browsers)
23 | * [Support for WordPress.com & WordPress.org](frontity-features.md#support-for-wordpress-com-and-wordpress-org)
24 | * [Support for multiple sites with a single installation](frontity-features.md#support-for-multiple-sites-with-a-single-installation)
25 | * [Code Splitting](frontity-features.md#code-splitting)
26 | * [Smallest React bundle possible](frontity-features.md#smallest-react-bundle-possible)
27 | * [Ready for React Concurrent and Suspense](frontity-features.md#ready-for-react-concurrent-and-suspense)
28 |
29 | ## Frontity features
30 |
31 | ### ⚙ Zero setup development
32 |
33 | Everything is already wired up so that you can focus on building your site and spend less time worrying about tooling and configuration: React, Webpack, Babel, Server Side Rendering, Routing, CSS-in-JS, WP REST API, TypeScript, Linting, Testing, and so on.
34 |
35 |
36 | ### 🚀 Lightning-fast loading
37 |
38 | Frontity sends an HTML that is ready to start navigating the site, so the initial load feels almost instant. No extra assets or round trips are necessary.
39 |
40 | This HTML is fully **functional** and **navigable** without JavaScript. Once React loads, it takes control of the app and users don’t notice any change, it is 100% transparent.
41 |
42 | ### ⚡️ Instant in-app navigation
43 |
44 | Once React has loaded, our router prefetches other routes and data automatically. Users never have to wait when they navigate inside the app.
45 |
46 | ### 🗄 Server Side Rendering
47 |
48 | Frontity responds with a fully populated HTML file generated with React. This reduces the time required for the first contentful paint and ensures that it is optimized for search engines.
49 |
50 | The content is retrieved using the WordPress REST API. Once React is loaded in the browser, it takes control of the page and does its magic.
51 |
52 | ### <> Extensible
53 |
54 | One of the most amazing things about Frontity is its extensibility, similar to that of WordPress itself. It allows you to easily add new functionality and expand the capabilities of Frontity via **npm packages** without having to create them from scratch.
55 |
56 | Frontity packages and themes can also be activated and deactivated without code changes and are reusable across projects, helping reduce both development and maintenance times.
57 |
58 | Check out the [API Reference docs](https://api.frontity.org/frontity-packages) to see a **full list of Frontity packages** (including themes) and learn more about the different types of packages.
59 |
60 | Frontity themes can also use any of the 80.000 React packages currently available in npm.
61 |
62 | ### 🎖 Battle-tested framework
63 |
64 | In 2019 the Frontity team decided to open-source the internal React framework they had been using to power large WordPress news sites for the previous few years. Used by millions of readers, Frontity is proven and ideal for building engaging frontend experiences. Learn more [here](https://frontity.org/about-us/).
65 |
66 | ### 📈 Serverless and horizontal scaling
67 |
68 | The Frontity server is so small it suits perfectly the serverless requirements. That means infinite scaling for the frontend.
69 |
70 | All the server code is bundled in one file, ready to work with serverless services like [Vercel](https://vercel.com/docs) \(using its CLI `now`\) or [AWS Lambda](https://aws.amazon.com/es/lambda/). Frontity is also prepared to scale horizontally in any Node.js server.
71 |
72 | ### { } First class TypeScript support
73 |
74 | Frontity has amazing TypeScript support. Actually, we like it so much that Frontity itself is built using TypeScript. But don’t worry, it’s **absolutely** optional: if you don’t know or don’t want to learn it you can use regular JavaScript without problems!
75 |
76 | ### 💻 Support for ES6 in modern browsers
77 |
78 | Frontity generates two bundles of JavaScript:
79 |
80 | * One in ES6 without transpilation or polyfills so it’s as small and fast as possible.
81 | * The other in ES5 for the old browsers that don’t support ES6.
82 |
83 | Modern browsers that support ES6 modules will request the ES6 bundle, translating into a **reduced bundle size** and **shorter evaluation time** in the browser. This guarantees that performance is not harmed in the modern browsers while ensuring backwards compatibility with the old ones.
84 |
85 | ### 🔗 Support for WordPress.com & WordPress.org
86 |
87 | Frontity can work with different “source” extensions. The 1.0 version includes a [`wp-source` package](https://api.frontity.org/frontity-packages/features-packages/wp-source) which works with the **REST API** of any [wordpress.com](https://developer.wordpress.com/docs/api/) and [wordpress.org](https://developer.wordpress.org/rest-api/) site. This way, whether you have a self-hosted site or it is hosted by Automattic, Frontity will suit your needs.
88 |
89 | The framework has been designed so it can support other sources in the future \(like the [GraphQL API for WordPress](https://www.wpgraphql.com/)\).
90 |
91 | ### ☝️ Support for multiple sites with a single installation
92 |
93 | This is something similar to WordPress multisite: Frontity allows you to serve any number of sites with just one installation. This can be really useful for users who manage different clients or those who want to create a network.
94 |
95 | ### 🕸 Code Splitting
96 |
97 | Frontity uses Webpack to split the code and send the minimum code required for the app to work. It also allows developers to dynamically load components with the help of loadable-components. Learn more about this feature in the [Performance](../performance) section.
98 |
99 | ### 🌱 Smallest React bundle possible
100 |
101 | Frontity helps build sites which are fast to deliver better user experiences. That's the reason why we have tried very hard to make the core as small as possible. It has finally been reduced by 60% and only weights 60kb \(gzipped\).
102 |
103 | ### ✅ Ready for React Concurrent and Suspense
104 |
105 | The React team is working hard to release [Concurrent Mode](https://reactjs.org/docs/concurrent-mode-intro.html), which is a set of features that will improve the user experience of React apps and Frontity will be compatible with it.
106 |
107 | {% hint style="info" %}
108 | In addition to its feature set, there are many other reasons to use Frontity. Check them out [here](README.md#why-frontity).
109 | {% endhint %}
110 |
--------------------------------------------------------------------------------
/docs/about/get-involved.md:
--------------------------------------------------------------------------------
1 | # Get involved
2 |
3 | We'd love for you to be part of the ever-growing Frontity community. There are a variety of different ways in which you can find information and resources about the project, discuss about it, and contribute to it.
4 |
5 | * **Docs**: this is the place to learn how to build amazing sites with Frontity - oh look, you're already here! **😄**
6 | * **Community Forum**: this is the best place to reach out for help and get involved with the community by sharing knowledge. But also to keep track of the work done for the framework, join public feature discussions, and give feedback. We encourage you to read through this [Forum Guide](https://community.frontity.org/t/frontity-community-forum-users-guide/4399) to learn how the Community Forum is organized and how to get the most out of it.
7 | * **GitHub**: Frontity is an open-source project and welcomes contributions. The core project, as well as the documentation and any related tool can be found in the [Frontity](https://github.com/frontity) GitHub organization. These are the main repositories:
8 | - [`frontity/frontity`](https://github.com/frontity/frontity): the main repository of Frontity Framework, which contains the core of the project.
9 | - [`frontity/docs`](https://github.com/frontity/docs): contains the documentation available at [docs.frontity.org](http://docs.frontity.org/).
10 | - [`frontity/api-reference`](https://github.com/frontity/api-reference): contains the documentation available at [api.frontity.org](https://api.frontity.org/).
11 | - [`frontity/step-by-step-tutorial`](https://github.com/frontity/step-by-step-tutorial): contains the documentation available at [tutorial.frontity.org](https://tutorial.frontity.org/).
12 |
13 | Please see the [Contributing](../contributing/) section to find out how you can help develop Frontity and improve its documentation.
14 |
15 | * **Demos**: a number of different Frontity projects and examples can be found in this [GitHub repository](https://github.com/frontity-demos/frontity-examples).
16 | * **Newsletter**: the Frontity Newsletter is designed to inform you about the latest product updates, learning resources and community news surrounding Frontity Framework. Sign up [here](https://frontity.org/newsletter/) if you don't want to miss a thing.
17 | * [**Twitter**](https://twitter.com/frontity), [**Youtube**](https://www.youtube.com/c/Frontity/) and the [**blog**](https://frontity.org/blog/) are also pretty good places if you're looking for news, videos, and major updates about Frontity.
18 | * **Showcase**: need some inspiration? The Frontity community is always building amazing projects, discover some of them [here](https://frontity.org/showcase/).
19 |
--------------------------------------------------------------------------------
/docs/architecture/README.md:
--------------------------------------------------------------------------------
1 | # 🏗 Architecture
2 |
3 | In Frontity projects, WordPress is used as a [headless CMS](https://css-tricks.com/what-is-a-headless-cms/). Frontity uses data from the WP REST-API and generates the final HTML that is displayed in the browser using React. This means that WordPress is merely used for managing the content.
4 |
5 | A Frontity project will always require two servers:
6 |
7 | 1. A **WordPress Server (PHP)**, either:
8 | - An Apache or Nginx web server running PHP
9 | - A hosted software-as-a-service (SaaS) platform with WordPress such as WordPress.com
10 | 2. A **Frontity Server (Node.js)**, either:
11 | - A server running Node.js
12 | - A hosted function-as-a-service (FaaS) platform allowing serverless computing, such as AWS Lambda or Netlify functions
13 |
14 | There are then two main **[Frontity Modes](https://excalidraw.com/#json=5295841782792192,H5-J_CUaq_wM0KYYacHysg)** (architectures or configurations) that can be used to implement Frontity projects:
15 |
16 | - [**Decoupled mode**](decoupled-mode.md)
17 | - [**Embedded mode**](embedded-mode.md)
18 |
19 | Depending on the mode used, the **main domain** (e.g. `www.domain.com`) will be connected either to the Wordpress/PHP Server _(in Embedded mode)_ or to the Frontity/Node.js server _(in Decoupled mode)_. The main domain is the one used by site visitors to access the HTML of the site.
20 |
21 | The other server will get a secondary role and its domain can be either a **separate domain** (e.g. `project-d418mhwf5.vercel.app`) or a **sub-domain** of the main domain (e.g. `wp.domain.com`).
22 |
23 | Both of the two possible Frontity architectures (i.e. Decoupled or Embedded Mode) feature:
24 |
25 | - A _similar distribution of functionality across the servers_
26 | - WordPress is used as a CMS - to manage the content
27 | - Frontity is responsible for the presentation
28 |
29 | - A _similar operation_
30 | - Frontity fetches the data from the WordPress REST API
31 | - Frontity generates the final HTML as an [Isomorphic](../isomorphic-react.md) React App
32 |
33 | Both of these architectures (or modes) require _two different servers_ with _two different URLs_ but the communication workflow between these two servers differs in each case.
34 |
35 | | Decoupled Mode | Embedded Mode |
36 | | --- | ---- |
37 | | [](https://frontity.org/wp-content/uploads/2021/05/workflow-decoupled-mode.png) | [](https://frontity.org/wp-content/uploads/2021/05/workflow-embedded-mode.png) |
38 |
39 | {% hint style="info" %}
40 | Implementing a [**caching strategy**](../performance/caching.md) in Frontity projects is highly recommended to improve response times. A [WordPress Cache plugin](https://wordpress.org/plugins/simple-cache/) is especially recommended to cache REST API requests in both architectures.
41 | {% endhint %}
42 |
43 |
44 | ### Decoupled Mode
45 |
46 | 
47 |
48 | **[Decoupled mode](decoupled-mode.md)** is implemented as follows:
49 | - It uses two domains, one for WordPress and another for Frontity.
50 | - The main domain ([www.domain.com](http://www.domain.com/)) points to Frontity.
51 | - A secondary domain (which can be a subdomain such as [wp.domain.com](http://wp.domain.com/)) points to WordPress.
52 |
53 | In this mode site visitors access the site using the main domain and are served HTML pages directly from Frontity, and the secondary domain is used by content editors to access the WordPress admin pages. Frontity fetches data from the REST API located on the secondary domain, i.e. the WordPress installation.
54 |
55 | {% hint style="info" %}
56 | Decoupled mode needs no additional structural elements, such as plugins.
57 | {% endhint %}
58 |
59 |
60 | ### Embedded Mode
61 |
62 | 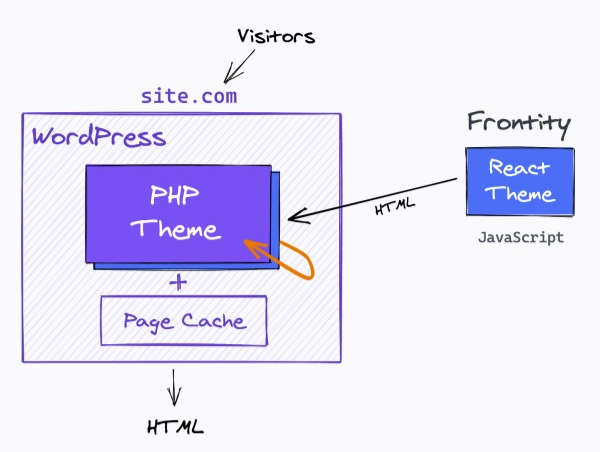
63 |
64 | **[Embedded Mode](embedded-mode.md)** is implemented as follows:
65 |
66 | - The main domain ([www.domain.com](http://www.domain.com/)) points to WordPress.
67 | - The secondary domain (which can be a subdomain of the main domain) points to Frontity.
68 | - All the requests are handled by WordPress. No reverse proxy is needed.
69 | - The PHP theme is replaced with an internal HTTP request to the Frontity server.
70 | - Other WordPress URLs (i.e. those not handled by Frontity) work normally.
71 |
72 | In *Embedded mode* the main domain points to the WordPress installation, and the secondary domain points to the node.js server running Frontity. In this mode both site visitors and content editors use the same domain, i.e. the main domain, to either visit the site or access the admin pages. The secondary domain is never directly accessed.
73 |
74 |
75 | {% hint style="info" %}
76 | Embedded mode requires the [Frontity Embedded Mode plugin](https://api.frontity.org/frontity-plugins/embedded-mode). This plugin replaces the WordPress theme with its own template file which fetches the HTML from the Frontity server.
77 | {% endhint %}
78 |
79 |
80 | Since, in embedded mode, the Frontity site is never directly accessed the secondary domain can be anything - including free domains allocated by the node.js hosting service.
81 |
--------------------------------------------------------------------------------
/docs/architecture/decoupled-mode.md:
--------------------------------------------------------------------------------
1 | # Decoupled Mode
2 |
3 | In **Decoupled mode** the _primary domain points to the Node.js server hosting Frontity_. This is the site that visitors access directly in order to view the content.
4 |
5 | Frontity will fetch the data from the REST API of the WordPress Server and will return the final HTML as an [Isomorphic](https://medium.com/capital-one-tech/why-everyone-is-talking-about-isomorphic-universal-javascript-and-why-it-matters-38c07c87905) React App.
6 |
7 | 
8 |
9 | Any Frontity architecture requires two servers. In Decoupled Mode you need to have:
10 |
11 | - A **main domain** pointing to the **Frontity Server**, either:
12 | - A server running Node.js
13 | - A hosted function-as-a-service (FaaS) platform allowing serverless computing, such as AWS Lambda or Netlify functions
14 |
15 | - A **secondary URL** (or subdomain) pointing to the **WordPress Server**, either:
16 | - An Apache or Nginx web server running PHP
17 | - A hosted software-as-a-service (SaaS) platform with WordPress, such as WordPress.com
18 |
19 | In this mode site visitors access the site using the primary domain and are served HTML pages directly from Frontity. The secondary domain is used by content editors to access the WordPress admin pages.
20 |
21 | Frontity fetches data from the REST API located on the secondary domain, i.e. the WordPress installation, and uses that information to generate the HTML that is returned to the user.
22 |
23 | 
24 |
25 | {% hint style="info" %}
26 | The `state.source.url` property set in the `frontity.settings.js` file [configures the URL of the WordPress installation](../guides/setting-url-wordpress-source-data.md).
27 | {% endhint %}
28 |
29 | ## Table of Contents
30 |
31 |
32 |
33 | - [Features of the Decoupled Mode](#features-of-the-decoupled-mode)
34 | * [Technical considerations](#technical-considerations)
35 | - [Caching in Decoupled Mode](#caching-in-decoupled-mode)
36 |
37 |
38 |
39 | ## Features of the Decoupled Mode
40 |
41 | The Decoupled Mode offers a number of **advantages**:
42 |
43 | - **No extra WordPress plugin** is required for this mode
44 | - It has the **fastest workflow to respond to the requests**: just a single call in SSR is made to the WP REST API, with no round-robin request for content and return of HTML.
45 | - It **provides an extra layer of security** as the WordPress site is not on the public-facing domain.
46 |
47 | Decoupled Mode uses two different domains. The main one ([www.domain.com](http://www.domain.com/)) for Frontity and a subdomain ([wp.domain.com](http://wp.domain.com/)) for WordPress.
48 |
49 | ### Technical considerations
50 |
51 | Due to the two-domains nature of this mode, in _Decoupled Mode_ e developers need to be aware of, test, and take care of many things that are normally handled for you by WordPress. For example:
52 |
53 | - _URL replacements_ from [wp.domain.com](http://wp.domain.com/) to [www.domain.com](http://www.domain.com/). _(see the ☝️ hint below)_
54 | - _Cross-domain 301 redirections_ from Frontity to WordPress and vice-versa.
55 | - _301 redirections_ of individual URLs stored in the WordPress database.
56 | - _Proxying WordPress resources_ that need to be served from the [www.domain.com](http://www.domain.com/) domain.
57 | - Adding _CORS headers_ in the [wp.domain.com](http://wp.domain.com/) domain.
58 | - _Purging page cache_ of the [www.domain.com](http://www.domain.com/) domain.
59 |
60 |
61 | {% hint style="info" %}
62 | ☝️ In the guide [URLs in a Migration from WordPress to Frontity Decoupled Mode](../guides/update-db-urls.md) you can learn more about why you need to change these URLs in the content of your WordPress site. The guide also provides useful information on how to do so.
63 | {% endhint %}
64 |
65 |
66 | Additionally, in Decoupled Mode it is impossible to replicate the editing experience that content editors may be used to because in this mode it’s not possible to:
67 |
68 | - Render the _admin bar_ for logged in users.
69 | - Make 100% transparent _post previews_.
70 |
71 | 
72 |
73 | ## Caching in Decoupled Mode
74 |
75 | With a good [**caching strategy**](../performance/caching.md) your Frontity project can be just as performant as a static site.
76 |
77 | In *Decoupled Mode*, the main domain is connected to the Node.js server executing the Frontity app which will process the URL requests to return the proper HTML based on the data from the WP REST API.
78 |
79 | In this mode there are two types of requests that can be cached to minimize the computing time and to take advantage of the proximity of CDN servers:
80 | - [CDN for caching URL requests made to Frontity](../performance/caching.md#cdn-for-frontity-servers)
81 | - [Server caching for REST API requests in WordPress servers](../performance/caching.md#server-caching-for-rest-api-requests-in-wordpress-servers)
82 |
83 |
84 | 
85 |
86 |
--------------------------------------------------------------------------------
/docs/architecture/embedded-mode.md:
--------------------------------------------------------------------------------
1 | # Embedded Mode
2 |
3 | In **Embedded Mode** the _primary domain points to the WordPress server_. This is the URL that visitors access directly in order to view the content.
4 |
5 | WordPress (via the [Frontity Embedded Mode plugin ](https://api.frontity.org/frontity-plugins/embedded-mode)) will redirect the request to Frontity, which will get the data from the REST API to return the final HTML as an [Isomorphic](https://medium.com/capital-one-tech/why-everyone-is-talking-about-isomorphic-universal-javascript-and-why-it-matters-38c07c87905) React App that will be returned to the user by WordPress.
6 |
7 | 
8 |
9 | Any [Frontity architecture requires 2 servers](README.md). In Embedded Mode you need to have:
10 |
11 | - A **main domain** pointing to the **WordPress Server**, either:
12 | - An Apache or Nginx web server running PHP
13 | - A hosted software-as-a-service (SaaS) platform with WordPress such as WordPress.com (only plans allowing plugin installation)
14 |
15 | - A **secondary URL** (or subdomain) pointing to the **Frontity Server**, either:
16 | - A server running Node.js
17 | - A hosted function-as-a-service (FaaS) platform allowing serverless computing such as AWS Lambda or Netlify functions
18 |
19 | In this mode _both site visitors and content editors use the same domain_, i.e. the main domain, to either visit the site or access the WordPress admin pages. The Frontity server on the secondary domain is never directly accessed.
20 |
21 | {% hint style="warning" %}
22 | This mode requires the installation, activation and configuration of the [**Frontity embedded mode plugin**](https://api.frontity.org/frontity-plugins/embedded-mode) to work.
23 | {% endhint %}
24 |
25 | The [Frontity Embedded Mode plugin](https://api.frontity.org/frontity-plugins/embedded-mode) required by this mode, replaces the WordPress theme with its own template file which fetches the HTML from the Frontity server. However, before Frontity can deliver the HTML it must request the content from the WordPress REST API, necessitating a two stage round trip.
26 |
27 | 
28 |
29 | {% hint style="info" %}
30 | Due to the "two stage round trip", **[caching](#caching-in-embedded-mode) is therefore a necessity** in this architecture to ensure that site performance is optimal.
31 | {% endhint %}
32 |
33 | ## Table of Contents
34 |
35 |
36 |
37 | - [Features of the Embedded Mode](#features-of-the-embedded-mode)
38 | * [Technical considerations](#technical-considerations)
39 | - [Caching in Embedded Mode](#caching-in-embedded-mode)
40 |
41 |
42 |
43 | ## Features of the Embedded Mode
44 |
45 | Embedded Mode offers several **advantages** over Decoupled Mode.
46 |
47 | - The WordPress site exists under the primary domain, thus ensuring that:
48 | - all the _**SEO benefits**_ already built-in to WordPress work as normal
49 | - _existing SEO_ (for a site transitioning to Frontity) will not be affected
50 | - _**sitemaps**_ generated by WordPress/Yoast/All-in-one-SEO work as normal
51 | - _**WordPress page cache plugins and hosting CDNs**_ continue to work as normal
52 | - Content producers/editors continue to have the same experience
53 | - _**post/page preview**_ remains available
54 | - the _**admin bar**_ is active for logged in users
55 |
56 | In addition, since the Frontity site is never directly accessed the secondary domain can be anything - including free domains allocated by the node.js hosting service - so there is no need to purchase an additional domain or configure DNS settings for sub-domains.
57 |
58 | {% hint style="info" %}
59 | In this mode, a [serverless](https://about.gitlab.com/topics/serverless/) solution to host the Frontity server is especially recommended as it will make it cheap, easy and infinitely scalable.
60 | {% endhint %}
61 |
62 | But there are some _things that should be taken into account_ when using Embedded Mode:
63 |
64 | - It requires an additional plugin, namely the [Frontity embedded mode plugin](https://api.frontity.org/frontity-plugins/embedded-mode).
65 | - It will not work with free wordpress.com plans as the installation of a plugin is required.
66 | - WordPress still needs to go through it's [bootstrap process](https://wordpress.tv/2017/06/22/alain-schlesser-demystifying-the-wordpress-bootstrap-process/) on initial page load
67 | - More routing is involved (resulting in potentially slower execution than Decoupled Mode) with the "two stage round trip" (WordPress → Frontity → WP REST API → Frontity → WordPress), so **a caching strategy is a necessity** rather than simply a nice to have.
68 |
69 | ### Technical considerations
70 |
71 | Due to the one-domain nature of this mode and the fact that the routing is managed by WordPress, _developers don’t need to take care of any of the issues mentioned on the [Decoupled Mode](./decoupled-mode.md#technical-considerations)_ page, including:
72 | - URL replacements
73 | - Cross-domain 301 redirections
74 | - CORS headers
75 | - Purge page cache
76 | - Proxy WordPress resources from the Frontity server
77 | - WordPress posts 301 redirections
78 | - Maintain the reverse proxy configuration
79 |
80 | These are all either unnecessary (in the case of URL replacements), or continue to be handled by WordPress.
81 |
82 | In this mode content editors continue to have the same editing experience:
83 |
84 | - The admin bar is visible for logged in users.
85 | - Post previews work just the same as in a normal (non-headless) WordPress installation.
86 |
87 | {% hint style="warning" %}
88 | In order to access post previews from the REST API revisions need to be activated. You can read more about revisions on the [official WordPress docs](https://wordpress.org/support/article/revisions/). And if you are using custom post types, remember to [add support for revisions](https://developer.wordpress.org/reference/functions/register_post_type/#supports) when you register them.
89 | {% endhint %}
90 |
91 | ## Caching in Embedded Mode
92 |
93 | In **Embedded Mode** the main domain is connected to the WordPress server which will use a custom template (provided by the plugin) to redirect to the Frontity Web Server in order to get the proper HTML based on the data of the WP REST API.
94 |
95 | 
96 |
97 | In this model the following cache layers are **highly recommended**:
98 | - [CDN for caching URL requests made to WordPress](../performance/caching.md#cdn-for-wordpress-servers)
99 | - [Server caching for URL requests in WordPress servers](../performance/caching.md#server-caching-for-url-requests-in-wordpress-servers)
100 | - [Server caching for REST API requests in WordPress servers](../performance/caching.md#server-caching-for-rest-api-requests-in-wordpress-servers)
101 |
102 |
103 | {% hint style="warning" %}
104 | As there is more routing involved in Embedded Mode (WordPress makes a call to Frontity, which makes a request to the WP REST API, which then returns the JSON to Frontity, and which then returns the HTML to WordPress) a **caching plugin for the HTML (caching the URL requests) is a necessity** rather than simply a nice to have.
105 | {% endhint %}
106 |
107 | 
108 |
109 |
110 |
111 |
112 |
113 |
--------------------------------------------------------------------------------
/docs/contributing/README.md:
--------------------------------------------------------------------------------
1 | # 👏 Contributing
2 |
3 | Want to contribute to the project? That's great to hear! You can find more information in the following pages.
4 |
5 | {% page-ref page="how-to-contribute.md" %}
6 |
7 | {% page-ref page="code-contribution-guide.md" %}
8 |
9 | ## Why to contribute?
10 |
11 | As you may know, Frontity is an open source project, available and free for everyone. We believe that working in an open way and sharing knowledge has the power to change the world for the better.
12 |
13 | Here are some more good reasons to contribute to open source:
14 |
15 | * **Build new connections**: an open source community usually consists of people sharing similar interests, so contributing to a project will allow you to connect with amazing people.
16 | * **Improve your skills and competences**: if you want to practice your programming skills, there is always a task for you in open source projects. This will allow you to improve your knowledge.
17 | * **Learn from mentors and teach others**: collaborating with others on a shared project means you'll have to ask people for help, as well as share your solutions and learnings with others. This can be a fulfilling activity for everyone involved.
18 | * **Get recognition**: all your work is public so you can get more visibility and recognition from others. Apart from that, you are in the perfect spot to learn about forthcoming changes.
19 | * **Your work matters**: you are able to make changes and improvements to a project - seeing how your work helps others is pretty gratifying.
20 |
21 | These are only a few reasons, but there are many more.
22 |
23 | If you want to contribute to Frontity Framework but don't know how or where to start, the _[How to contribute?](how-to-contribute.md)_ guide might help. Check it out!
24 |
--------------------------------------------------------------------------------
/docs/contributing/how-to-contribute.md:
--------------------------------------------------------------------------------
1 | # How to contribute?
2 |
3 | There are several ways to support the project and get involved. Don't know how to code? Don't worry! You can contribute in many other ways to make Frontity awesome!
4 |
5 |
6 | ## » Improve Frontity Framework
7 |
8 | * Suggest new features and improvements. The [Feature Discussions](https://community.frontity.org/c/feature-discussions/33) category of the forum is a great place to do so, also to vote for those features which you are most interested in. These are public conversations where everyone is welcome to join. Alternatively, you also can open a [Pull Request](https://github.com/frontity/frontity/pulls).
9 | * Found a bug or issue? [Report it](https://github.com/frontity/frontity/issues) on GitHub.
10 | * If you are interested in fixing bugs or contributing code, please refer to this [Code Contributions](code-contribution-guide.md) guide.
11 | * If you have built a new Frontity package or theme, consider submitting it to [npm](https://www.npmjs.com/). Making it available to the community it's also a good way to contribute to extend and improve the framework.
12 |
13 | ## 📖 Improve the documentation
14 |
15 | * The Frontity documentation can easily be edited on GitHub. You can suggest improvements, fix mistakes or fill in the gaps in the docs at any time by following these [contributing guidelines](https://github.com/frontity/docs/blob/master/CONTRIBUTING.md).
16 | * Alternatively, you can report them using the [community forum](https://community.frontity.org/c/framework-development/docs-and-tutorials/29).
17 |
18 | ## 👨👩👧👦 Join and support the community
19 |
20 | * The [community forum](https://community.frontity.org/) is a great place to get support while helping others with your own questions. As you might have the same question of someone else, makes sense to share! You can join an existing conversation or start a new post in its relevant category. Learn how the forum is organized [here](https://community.frontity.org/t/frontity-community-forum-users-guide/4399#organized-in-categories).
21 | * Answering [other users' questions](https://community.frontity.org/c/dev-talk-questions/3) in the community forum is one of the best and easiest ways to start contributing to Frontity. A single forum post can help a lot of people!
22 | * Have you built a project with Frontity? Swing by the [Showcase](https://community.frontity.org/c/community/showcases/19) category and tell the community more about it. This is a great way to show what can be accomplished with the framework and to help inspire other developers with your work.
23 |
24 | ## 🗣 Spread the word
25 |
26 | * Teach and help others by writing guides, tutorials or case studies about how you're using Frontity. You can share them with the community [here](https://community.frontity.org/c/community/resources/15).
27 | * Talk about how you used Frontity and your success story with it at any local meetup, workshop, or relevant event.
28 | * If you read a post on Reddit, Twitter, Dev.to, or other social platforms where Frontity could be relevant, let others know.
29 | * Are you a freelancer looking for Frontity projects? Are you hiring developers? The [Jobs category](https://community.frontity.org/c/jobs/45) of the forum is a good place to post about it.
30 |
31 |
32 | {% hint style="info" %}
33 | Wondering why you should get involved? Check out [this post](https://opensource.guide/how-to-contribute/#why-contribute-to-open-source) about contributing to open source software.
34 | {% endhint %}
35 |
36 |
--------------------------------------------------------------------------------
/docs/deployment/README.md:
--------------------------------------------------------------------------------
1 | # 🌎 Deployment
2 |
3 | Once you have your application working and ready to be deployed you can create a production version by running \(from the root of your project\)
4 |
5 | ```text
6 | npx frontity build
7 | ```
8 |
9 | This command will [generate a `build` folder](https://api.frontity.org/frontity-cli/build-commands#the-build-process) containing both your \(isomorphic\) React app and your Frontity \(Node.js\) server. This folder can be deployed to any hosting that is prepared to serve a Node.js app. The content of this `build` folder will be used by the command:
10 |
11 | ```text
12 | npx frontity serve
13 | ```
14 |
15 | Which is used to launch the Frontity app in production.
16 |
17 | Here you have some guides about how to deploy a Frontity app in some popular hostings:
18 |
19 | * [Deploy Frontity using Vercel](deploy-using-vercel.md)
20 | * [Deploy Frontity on Layer0](deploy-on-layer0.md)
21 | * [Deploy Frontity on Heroku](deploy-on-heroku.md)
22 |
23 | ## Serving Static files
24 |
25 | Sometimes you will want to serve your assets \(also called "static files" like images, fonts, JS chunk files\) from another domain or from a [CDN](../performance/caching.md#distributed-caching-cdn). In this case, you can modify the [`publicPath` parameter](./) when you run `npx frontity build`.
26 |
27 |
--------------------------------------------------------------------------------
/docs/deployment/deploy-on-heroku.md:
--------------------------------------------------------------------------------
1 | # Deploy Frontity on Heroku
2 |
3 | To be able to deploy to Heroku you need to have a Heroku account. You can [signup here](https://signup.heroku.com/).
4 |
5 | You will also need to install the [Heroku CLI](https://devcenter.heroku.com/articles/getting-started-with-nodejs#set-up)
6 |
7 | > The Heroku CLI requires Git, the popular version control system. If you don’t already have Git installed, complete the following before proceeding: [Git installation](https://git-scm.com/book/en/v2/Getting-Started-Installing-Git) & [First-time Git setup](https://git-scm.com/book/en/v2/Getting-Started-First-Time-Git-Setup)
8 |
9 | Once you have an account and the Heroku CLI installed you have to login from the terminal
10 |
11 | ```text
12 | > heroku login
13 | ```
14 |
15 | These are the instructions to deploy a Frontity project on Heroku, once you are ready to deploy your project:
16 |
17 | ### Create a [heroku app](https://devcenter.heroku.com/articles/getting-started-with-nodejs#deploy-the-app)
18 |
19 | Create an app on Heroku from the root of your project
20 |
21 | ```text
22 | > heroku create
23 | ```
24 |
25 | Heroku will generate a random name for your app \(`shielded-gorge-51896` in the example\), or you can pass a parameter to specify your own app name.
26 |
27 | ```text
28 | ⬢ my-frontity-project master ⦾ heroku create
29 | › Warning: heroku update available from 7.25.0 to 7.38.2.
30 | Creating app... done, ⬢ shielded-gorge-51896
31 | https://shielded-gorge-51896.herokuapp.com/ | https://git.heroku.com/shielded-gorge-51896.git
32 | ```
33 |
34 | When you create an app, a remote git repository \(called `heroku`\) is also created on Heroku and associated with your local git repository.
35 |
36 | ```text
37 | ⬢ my-frontity-project master ⦾ git remote -v
38 | heroku https://git.heroku.com/shielded-gorge-51896.git (fetch)
39 | heroku https://git.heroku.com/shielded-gorge-51896.git (push)
40 | origin git@github.com:frontity-demos/my-frontity-project.git (fetch)
41 | origin git@github.com:frontity-demos/my-frontity-project.git (push)
42 | ```
43 |
44 | ### Add a `start` script
45 |
46 | Heroku will automatically execute your `start` script so add the following to your `scripts` section in the `package.json` file at the root of your project.
47 |
48 | ```javascript
49 | "scripts": {
50 | "start": "frontity serve --port $PORT",
51 | "dev": "frontity dev",
52 | "build": "frontity build",
53 | "serve": "frontity serve"
54 | },
55 | ```
56 |
57 | Heroku will automatically execute your `build` script before starting your app. You should have this one already defined in your project.
58 |
59 | > Notice how we're using $PORT to read this value from an environment variable. It is because Heroku will set a different port for each process and that port will be stored in a `PORT` environment variable
60 |
61 | ### Deploy
62 |
63 | The way to deploy to Heroku by is pushing to the `heroku` git remote, so we can do
64 |
65 | ```text
66 | git push heroku master
67 | ```
68 |
69 | You should get something like this
70 |
71 | ```bash
72 | ⬢ my-frontity-project master ⦾ git push heroku master
73 | Enumerating objects: 5, done.
74 | Counting objects: 100% (5/5), done.
75 | Delta compression using up to 4 threads
76 | Compressing objects: 100% (3/3), done.
77 | Writing objects: 100% (3/3), 290 bytes | 290.00 KiB/s, done.
78 | Total 3 (delta 2), reused 0 (delta 0)
79 | remote: Compressing source files... done.
80 | remote: Building source:
81 | remote:
82 | remote: -----> Node.js app detected
83 | remote:
84 | remote: -----> Creating runtime environment
85 | remote:
86 | remote: NPM_CONFIG_LOGLEVEL=error
87 | remote: NODE_ENV=production
88 | remote: NODE_MODULES_CACHE=true
89 | remote: NODE_VERBOSE=false
90 | remote:
91 | remote: -----> Installing binaries
92 | remote: engines.node (package.json): unspecified
93 | remote: engines.npm (package.json): unspecified (use default)
94 | remote:
95 | remote: Resolving node version 12.x...
96 | remote: Downloading and installing node 12.16.2...
97 | remote: Using default npm version: 6.14.4
98 | remote:
99 | remote: -----> Restoring cache
100 | remote: - node_modules
101 | remote:
102 | remote: -----> Installing dependencies
103 | remote: Installing node modules (package.json + package-lock)
104 | remote: audited 10234 packages in 7.144s
105 | remote:
106 | remote: 15 packages are looking for funding
107 | remote: run `npm fund` for details
108 | remote:
109 | remote: found 0 vulnerabilities
110 | remote:
111 | remote:
112 | remote: -----> Build
113 | remote: Running build
114 | remote:
115 | remote: > my-frontity-project@1.0.0 build /tmp/build_00b81abd8c2a36d3f2525857753e0188
116 | remote: > frontity build
117 | remote:
118 | remote: mode: production
119 | remote:
120 | remote: Building es5 bundle
121 | remote: Building module bundle
122 | remote: Building server bundle
123 | remote:
124 | remote:
125 | remote: -----> Caching build
126 | remote: - node_modules
127 | remote:
128 | remote: -----> Pruning devDependencies
129 | remote: audited 10234 packages in 6.44s
130 | remote:
131 | remote: 15 packages are looking for funding
132 | remote: run `npm fund` for details
133 | remote:
134 | remote: found 0 vulnerabilities
135 | remote:
136 | remote:
137 | remote: -----> Build succeeded!
138 | remote: -----> Discovering process types
139 | remote: Procfile declares types -> (none)
140 | remote: Default types for buildpack -> web
141 | remote:
142 | remote: -----> Compressing...
143 | remote: Done: 52.3M
144 | remote: -----> Launching...
145 | remote: Released v14
146 | remote: https://shielded-gorge-51896.herokuapp.com/ deployed to Heroku
147 | remote:
148 | remote: Verifying deploy... done.
149 | To https://git.heroku.com/shielded-gorge-51896.git
150 | ee9c4d2..ab9b152 master -> master
151 | ```
152 |
153 | _Heroku_ will assign you a domain \(something like _your-project-name.herokuapp.com_\) that will allow you to check your site online
154 |
155 | ## Deploy a production site
156 |
157 | To [deploy your site under a custom domain in Heroku](https://devcenter.heroku.com/articles/custom-domains) you have to...
158 |
159 | 1. Add your custom domain in your Heroku app
160 | 2. Register a DNS record with your domain provider
161 |
162 | ...before deploying it
163 |
164 | ### Add your custom domain in your Heroku app
165 |
166 | With the command `heroku domains:add` you can add a specific custom domain in your Heroku app
167 |
168 | for example by doing:
169 |
170 | ```text
171 | heroku domains:add heroku domains:add www.variables-demo.com
172 | ```
173 |
174 | you should get something like this
175 |
176 | ```text
177 | ⬢ my-frontity-project master ⦾ heroku domains:add www.variables-demo.com
178 | › Warning: heroku update available from 7.25.0 to 7.38.2.
179 | Adding www.variables-demo.com to ⬢ shielded-gorge-51896... done
180 | ▸ Configure your app's DNS provider to point to the DNS Target damp-whale-rln632baq4jdhcj5aw495bst.herokudns.com.
181 | ▸ For help, see https://devcenter.heroku.com/articles/custom-domains
182 |
183 | The domain www.variables-demo.com has been enqueued for addition
184 | ▸ Run heroku domains:wait 'www.variables-demo.com' to wait for completion
185 | ```
186 |
187 | ### Add a [`CNAME`](https://devcenter.heroku.com/articles/custom-domains) in your domain provider's DNS settings
188 |
189 | Once you have added your domain to your Heroku app, you can use the command `heroku domains` to see the value for the `CNAME` record that you have to set in your domain settings.
190 |
191 | ```text
192 | ⬢ my-frontity-project master ⦾ heroku domains
193 | › Warning: heroku update available from 7.25.0 to 7.38.2.
194 | === shielded-gorge-51896 Heroku Domain
195 | shielded-gorge-51896.herokuapp.com
196 |
197 | === shielded-gorge-51896 Custom Domains
198 | Domain Name DNS Record Type DNS Target
199 | ────────────────────── ─────────────── ─────────────────────────────────────────────────
200 | www.variables-demo.com CNAME damp-whale-rln632baq4jdhcj5aw495bst.herokudns.com
201 | ```
202 |
203 | With this info you can [add a CNAME](https://devcenter.heroku.com/articles/custom-domains) in your domain provider's DNS settings.
204 |
205 | {% hint style="info" %}
206 | If you don't know how to do this, contact your domain provider \(GoDaddy, CloudFlare, etc\)
207 | {% endhint %}
208 |
209 | ### Deploy
210 |
211 | Then, deploy Frontity using this command \(from the root of your project\):
212 |
213 | ```text
214 | > git push heroku master
215 | ```
216 |
217 | > If no changes are detected you may have to do: `npx frontity build` → to generate a new build `git commit --allow-empty` → to force a empty commit `git push heroku master` → to push this lateste build into heroku and launch its deploy process
218 |
219 | {% hint style="info" %}
220 | Still have questions? Ask [the community](https://community.frontity.org/)! We are here to help 😊
221 | {% endhint %}
222 |
223 |
--------------------------------------------------------------------------------
/docs/deployment/deploy-on-layer0.md:
--------------------------------------------------------------------------------
1 | # Deploy Frontity on Layer0
2 |
3 | [Layer0](https://layer0.co) is an all-in-one platform to develop, deploy, preview, experiment on, monitor, and run your headless frontend. It is focused on large, dynamic sites and best-in-class performance through EdgeJS (a JavaScript-based Content Delivery Network), predictive prefetching, and performance monitoring.
4 |
5 | Layer0's EdgeJS enables powerful and precise control of Edge based [caching](https://docs.layer0.co/guides/caching) and [routing](https://docs.layer0.co/guides/routing) that can improve the performance for Frontity sites.
6 |
7 | For the full details on deploying Frontity on Layer0 refer to the [Frontity on Layer0 guide](https://docs.layer0.co/guides/frontity) in the developer documentation.
8 |
9 | ## Getting Started
10 |
11 | First start by installing the [Layer0 command-line interface \(CLI\)](https://docs.layer0.co/guides/cli),
12 |
13 | ```bash
14 | npm i -g @layer0/cli
15 | ```
16 |
17 | ## Project setup
18 |
19 | Run the `init` command in the directory of your Frontity project:
20 |
21 | ```bash
22 | cd my-frontity-app
23 | layer0 init
24 | ```
25 |
26 | This will automatically configure your app for deployment on Layer0.
27 |
28 | ## Running locally
29 |
30 | You can simulate your app running on Layer0 using the `dev` command:
31 |
32 | ```bash
33 | layer0 dev
34 | ```
35 |
36 | In particular, the `--cache` option will emulate Edge caching rules locally so that you can test easily test edge behavior during development without having to do a deploy to the cloud:
37 |
38 | ```bash
39 | layer0 dev --cache
40 | ```
41 |
42 | ## Deploying
43 |
44 | Deploying a Frontity app requires an account on Layer0. [Sign up here for free](https://app.layer0.co/signup).
45 |
46 | Once you have installed the CLI and created an account, you should login from the terminal by running the `login` command:
47 |
48 | ```bash
49 | layer0 login
50 | ```
51 |
52 | Once you have an account and have logged in to the CLI, you can deploy to the Layer0 by running the following in the root folder of your project:
53 |
54 | ```text
55 | layer0 deploy
56 | ```
57 |
58 | ## Enabling Prefetching \(optional\)
59 |
60 | Layer0 improves the performance of your site by bundling an integrated server worker that will predictively prefetch cached pages from the edge. To add the Layer0 service worker to your app, call the `install` function from `@layer0/prefetch/window` in a `useEffect` hook when the app first loads. For example, you can alter the Header component in your theme as follows:
61 |
62 | ```javascript
63 | // mars-theme/src/components/header.js
64 |
65 | import { useEffect } from 'react'
66 |
67 | const Header = ({ state }) => {
68 | useEffect(() => {
69 | if (process.env.NODE_ENV === 'production') {
70 | install()
71 | }
72 | }, [])
73 |
74 | /* ... */
75 | }
76 | ```
77 |
78 | To prefetch data into the browser cache using the service worker, use the Prefetch component from @layer0/react. This component prefetches a specific URL from the Layer0 edge when it becomes visible in the viewport. You typically wrap it around links. For example:
79 |
80 | ```javascript
81 | import { Prefetch } from '@layer0/react'
82 |
83 | function MyComponent() {
84 | return (
85 |
86 | {/* When this link is scrolled into view, /some/data/url.json in JSON will be fetched in the background and put in the browser cache */}
87 | My Page
88 |
89 | )
90 | }
91 | ```
92 |
93 |
--------------------------------------------------------------------------------
/docs/deployment/deploy-using-vercel.md:
--------------------------------------------------------------------------------
1 | # Deploy Frontity using Vercel
2 |
3 | In [their own words](https://vercel.com/docs) : _Vercel is a cloud platform for static sites and **Serverless Functions** that fits perfectly with your workflow. It enables developers to host Jamstack sites and web services that **deploy instantly**, **scale automatically**, and **requires no supervision**, all with **no configuration**._
4 |
5 | We strongly recommend this service as it is serverless, cheap, [includes CDN](../performance/caching.md#cdn-for-frontity-servers), and really easy to set up.
6 |
7 | It also supports the cache technique stale-while-revalidate (which they call [Serverless Pre-Rendering](https://vercel.com/blog/serverless-pre-rendering)). This is a powerful way to improve your site speed.
8 |
9 | ## Table of Contents
10 |
11 |
12 |
13 | - [Signup and Login into Vercel](#signup-and-login-into-vercel)
14 | - [Deploy your site under a Vercel domain](#deploy-your-site-under-a-vercel-domain)
15 | * [Create a `vercel.json` file](#create-a-vercel-json-file)
16 | * [Run deployment](#run-deployment)
17 | - [Deploy your site under a custom domain](#deploy-your-site-under-a-custom-domain)
18 | * [Add your custom domain from your Vercel project settings](#add-your-custom-domain-to-your-vercel-project-settings)
19 | + [Add a subdomain for your WordPress source](#add-a-subdomain-for-your-wordpress-source)
20 | * [Add Vercel nameservers in your domain provider](#add-vercel-nameservers-in-your-domain-provider)
21 | * [Deploy](#deploy)
22 | - [Vercel and HTTPS](#vercel-and-https)
23 |
24 |
25 |
26 | ## Signup and Login into Vercel
27 |
28 | To be able to deploy with `vercel` you need to have a Vercel account. You can [signup here](https://vercel.com/signup).
29 |
30 | Once you have an account you have to [login](https://vercel.com/docs/cli#commands/login) to Vercel from the terminal.
31 |
32 | ```text
33 | > npx vercel login
34 | ```
35 |
36 | ## Deploy your site under a Vercel domain
37 |
38 | Deploying to Vercel is really easy and all the required configuration for Frontity projects is automatically set for you via a `vercel.json` file.
39 |
40 | So, to deploy your Frontity site under a Vercel domain you have to:
41 |
42 | 1. [Signup and Login](#signup-and-login-into-vercel) (if you haven't already).
43 | 1. [Create a `vercel.json` file](#create-a-vercel-json-file).
44 | 1. [Run deployment](#run-deployment).
45 |
46 |
47 | ### Create a `vercel.json` file
48 |
49 | Create this [`vercel.json`](https://vercel.com/docs/configuration#introduction/configuration-reference) file and save it in the root of your Frontity project.
50 |
51 | ```text
52 | {
53 | "version": 2,
54 | "builds": [
55 | {
56 | "src": "package.json",
57 | "use": "@frontity/now"
58 | }
59 | ]
60 | }
61 | ```
62 |
63 | {% hint style="info" %}
64 | [`@frontity/now`](https://github.com/frontity/now-builder) is a Frontity builder created especifically for Vercel. It encapsulates all the actions that need to be triggered on Vercel servers when deploying a Frontity project
65 | {% endhint %}
66 |
67 |
68 | ### Run deployment
69 |
70 | Deploy Frontity using the [`vercel` command](https://vercel.com/docs/cli#getting-started) (from the root of your project):
71 |
72 | ```text
73 | > npx vercel
74 | ```
75 |
76 | You should get something like this
77 |
78 | ```text
79 | Vercel CLI 19.2.0
80 | ? Set up and deploy “~/PROJECTS/2020/FRONTITY/DEMOS/my-frontity-project”? [Y/n] y
81 | ? Which scope do you want to deploy to? myVercelScope
82 | ? Link to existing project? [y/N] n
83 | ? What’s your project’s name? my-frontity-project
84 | ? In which directory is your code located? ./
85 | 🔗 Linked to vercel-username/head-tags (created .vercel)
86 | 🔍 Inspect: https://vercel.com/vercel-username/my-frontity-project/lofg8n03c [2s]
87 | ✅ Production: https://my-frontity-project.vercel.app [copied to clipboard] [1m]
88 | ```
89 |
90 | > More about Vercel [scopes ](https://vercel.com/docs/v2/platform/users-and-teams)
91 |
92 | Vercel will assign you a domain (something like _your-project-name.vercel.app_) that that will allow you to check your site online.
93 |
94 | From the above deployment example we got the following URL's:
95 |
96 | * **Live URL:** `https://my-frontity-project.vercel.app` → Our temporary URL assigned automatically by Vercel, We can check (and share) our site online from this URL
97 | * **Inspect:** `https://vercel.com/vercel-username/my-frontity-project/settings` → Here we can check the status of our site and check the logs among other things
98 | * **Project Settings:** `https://vercel.com/vercel-username/my-frontity-project/settings` → Here we can change domain and build settings among other things
99 |
100 | ## Deploy your site under a custom domain
101 |
102 | To deploy your site in Vercel under a custom domain you have to:
103 |
104 | 1. [Deploy your site under a Vercel domain](#deploy-your-site-under-a-vercel-domain) (if you haven't already).
105 | 1. [Add your custom domain to your Vercel project settings](#add-your-custom-domain-to-your-vercel-project-settings).
106 | 1. [Add Vercel nameservers for your custom domain from your domain provider](#add-vercel-nameservers-in-your-domain-provider)
107 | 1. [Run deployment](#deploy).
108 |
109 | ### Add your custom domain to your Vercel project settings
110 |
111 | By visiting the project settings URL provided in our previous deployment (`https://vercel.com/vercel-username/my-frontity-project/settings` in our example above) we can set a custom domain.
112 |
113 | 
114 |
115 | Add it, and you will be provided with a [set of nameservers](https://vercel.com/docs/v2/custom-domains#step-4:-configuring-the-domain) that you can use in your domain provider's configuration to point your custom domain to the Vercel nameservers.
116 |
117 | 
118 |
119 | #### Add a subdomain for your WordPress source
120 |
121 | A subdomain can be used to separate your WordPress and Frontity deployments. They can be created within the Vercel dashboard under the [domains section](https://vercel.com/dashboard/domains/).
122 |
123 | To setup a subdomain for your WordPress source, simply select your desired domain from the [list](https://vercel.com/dashboard/domains/) and [add a new DNS Record](https://vercel.com/docs/v2/custom-domains#step-2:-add-dns-record) with type A and the IP address of your WordPress server.
124 |
125 | ### Add Vercel nameservers in your domain provider
126 |
127 | You need to set [Vercel nameservers](https://vercel.com/docs/v2/custom-domains/#option-2:-using-external-nameservers) as custom DNS of your custom domain from your domain provider site.
128 |
129 | {% hint style="info" %}
130 | If you don't know how to do this, contact your domain provider (GoDaddy, CloudFlare, etc)
131 | {% endhint %}
132 |
133 | ### Deploy
134 |
135 | Finally, deploy Frontity using this command (from the root of your project):
136 |
137 | ```text
138 | > npx vercel --prod
139 | ```
140 |
141 | You should get something like this
142 |
143 | ```text
144 | ⬢ my-frontity-project npx vercel --prod
145 |
146 | 🔍 Inspect: https://vercel.com/vercel-username/my-frontity-project/9ue4zsq9n [2s]
147 | ✅ Production: https://mycustomtomain.com [copied to clipboard] [4s]
148 | ```
149 |
150 | This will create a deployment and assign it to your real site URL.
151 |
152 | > More about Vercel [deployments](https://vercel.com/docs/v2/platform/deployments)
153 |
154 | ## Vercel and HTTPS
155 |
156 | Vercel now forces all apps to be served over HTTPS. You therefore need to ensure that your WordPress site has a SSL certificate and that you connect to your WordPress API endpoint using HTTPS rather than HTTP.
157 |
158 | ```text
159 | {
160 | "name": "@frontity/wp-source",
161 | "state": {
162 | "source": {
163 | "url": "https://your-wordpress-blog-url/",
164 | }
165 | }
166 | },
167 | ...
168 | ```
169 |
170 | The effect of using a HTTP only connection on a Frontity project deployed on Vercel will result in navigation links not working and getting stuck in the `data.isFetching` state (although apparently working on the local dev machine). The reason is that Frontity won't be able to fetch the content from the WordPress backend over HTTP on a pure HTTPS site.
171 |
172 | {% hint style="info" %}
173 | Still have questions? Ask [the community](https://community.frontity.org/)! We are here to help 😊
174 | {% endhint %}
175 |
176 |
--------------------------------------------------------------------------------
/docs/faq.md:
--------------------------------------------------------------------------------
1 | # 🤔 FAQ
2 |
3 | ## What is Frontity?
4 |
5 | Frontity is a free and open source framework for creating WordPress themes based on React. In other words, it allows to build a **React frontend** for a **headless WordPress** site, which serves its data via the WordPress **REST API**.
6 |
7 | Combining WordPress and React has plenty of advantages, but there are a lot of things that developers need to learn and configure. Unlike other React frameworks that can work with WordPress, Frontity is an **opinionated** framework 100% focused on this CMS, which makes **everything much easier** \(even for those developers who are less familiar with React\) and optimized to be used with WordPress.
8 |
9 | ## How can I get started?
10 |
11 | It is really easy to start using Frontity, you just have to make sure you have Node.js installed and follow [this quick start guide](getting-started/quick-start-guide.md).⚡️
12 |
13 | ## Do I need any specific knowledge or skills to use Frontity?
14 |
15 | You need to know how to use WordPress for your content management and some React knowledge for designing your frontend. The rest is already wired up for you: React, webpack, Babel, SSR, Routing, CSS-in-JS, WP REST API, TypeScript, Linting, Testing… This way, you can focus on building your site. 🚀
16 |
17 | ## How can I contribute to the project?
18 |
19 | There are many ways to contribute. You don't need to be a developer to support the project. If you want to help coding, please go to [our GitHub repository](https://github.com/frontity/frontity). To see other ways to get involved, check out [this guide](contributing/how-to-contribute.md).
20 |
21 | ## Can I use Frontity with WordPress.com?
22 |
23 | Sure! Our framework has support for both WordPress.com and WordPress.org sites and it has been designed so it can support other sources like the GraphQL API for WordPress in the future. We are discussing this in [the community forum](https://community.frontity.org/t/potential-supported-sources/18/3). Feel free to join the conversation.
24 |
25 | {% hint style="info" %}
26 | Do you have another question not included in this page? You can [ask the community](https://community.frontity.org) 👨👩👧👦
27 | {% endhint %}
28 |
29 |
--------------------------------------------------------------------------------
/docs/frontity-features/extensions.md:
--------------------------------------------------------------------------------
1 | # Extensions
2 |
3 | ## 🛠 This page is still under construction. Feel free to ask [the community](https://community.frontity.org) any questions you might have.
4 |
5 | Coming soon: Frontity extensions and the way to install them.
6 |
7 |
--------------------------------------------------------------------------------
/docs/getting-started/README.md:
--------------------------------------------------------------------------------
1 | # 🚀 Getting started
2 |
3 | 👋 Welcome! You've just taken your first step on the path to mastering Frontity.
4 |
5 | Frontity is a **React-based framework** that enables you to easily build a frontend for a headless \(or decoupled\) WordPress site. Your WordPress site serves its data via the REST-API. Frontity framework is open source and free to use.
6 |
7 | ## Requirements
8 |
9 | To get started with Frontity you will need:
10 |
11 | ### A WordPress installation
12 |
13 | By default Frontity provides an [example WordPress site](https://test.frontity.org/) as the data source for every new project, so you can start working with this one.
14 |
15 | You can also [configure your own WordPress installation](quick-start-guide.md#set-your-own-wordpress-installation) to be the data source. This can be hosted either locally on your development machine, or on a web-server. You can also use a site hosted on WordPress.com.
16 |
17 | ### Node.js
18 |
19 | If you don't already have it you can get _Node.js_ from [the official site](https://nodejs.org/). This will also install `npm` and `npx` along with Node.js.
20 |
21 | You will use these to run Frontity commands during the set-up and development of your project.
22 |
23 | {% hint style="info" %}
24 | For those coming from WordPress it might be worth noting that _Frontity_ runs on **Node.js**, so it needs to be deployed in a different server than your WordPress. If you want to learn more about this, visit Frontity's [GitHub repo](https://github.com/frontity/frontity#why-a-different-nodejs-server) or see the [Architecture](../architecture.md) section arch these docs.
25 | {% endhint %}
26 |
27 | To test if you have Node.js installed open your terminal and run:
28 |
29 | ```bash
30 | node -v
31 | ```
32 |
33 | ```bash
34 | npm -v
35 | ```
36 |
37 |
38 |
--------------------------------------------------------------------------------
/docs/getting-started/quick-start-guide.md:
--------------------------------------------------------------------------------
1 | # Quick start guide
2 |
3 | Right, let's get you set up with your very first Frontity project. This guide will take you from the very basics to feeling amazed at what you can do with Frontity!
4 |
5 | > Please check that you meet the [**requirements**](./#requirements) before following the steps below.
6 |
7 | {% embed url="https://youtu.be/FCnGfYfWulA" caption="" %}
8 |
9 | ## Getting started with Frontity
10 |
11 | 1 - **Create a new Frontity project** by entering the following command in your terminal:
12 |
13 | ```bash
14 | npx frontity create my-first-frontity-project
15 | ```
16 |
17 | 2 - **Select a starter theme**. If it's your first time using Frontity we recommend that you select `@frontity/mars-theme` to start with.
18 |
19 | ```text
20 | ? Pick a starter theme to clone: @frontity/mars-theme (recommended)
21 | ```
22 |
23 | A directory with the same name as the project name you used will be created. It will have a structure similar to this:
24 |
25 | ```text
26 | my-first-frontity-project/
27 | |__ node_modules/
28 | |__ package.json
29 | |__ frontity.settings.js
30 | |__ favicon.ico
31 | |__ packages/
32 | |__ mars-theme/
33 | ```
34 |
35 | 3 - **Run the project locally** by executing this command from the terminal:
36 |
37 | ```bash
38 | cd my-first-frontity-project && npx frontity dev
39 | ```
40 |
41 | A development server will be started. This server will be listening on [http://localhost:3000](http://localhost:3000) and watching for any changes inside the packages directory.
42 |
43 | 4 - Now you’re **ready to make changes** to your site:
44 |
45 | Open the project directory in your preferred code editor/IDE and try editing some of the files under `packages/mars-theme`. Each time you save a change the browser will automatically reload and display the new version as these changes are detected by the development server.
46 |
47 | ## Set your own WordPress installation
48 |
49 | A good next step is **setting your own WordPress installation** as the data source.
50 |
51 | You can connect your [_own WordPress site_](https://docs.frontity.org/guides/what-are-the-requisites-of-wordpress-for-frontity) to your Frontity project by [setting the `state.source.url`](https://docs.frontity.org/guides/setting-url-wordpress-source-data) property in the `frontity.settings.js` file.
52 |
53 | ```javascript
54 | const settings = {
55 | ...,
56 | packages: [
57 | ...,
58 | {
59 | name: "@frontity/wp-source",
60 | state: {
61 | source: {
62 | // Change this url to point to your WordPress site.
63 | url: "https://test.frontity.org/"
64 | }
65 | }
66 | }
67 | ]
68 | }
69 | ```
70 |
71 | By default, `state.source.url` is set to `https://test.frontity.org/` \(a demo WordPress site\) but you can set this property to any valid URL pointing to a WordPress site.
72 |
73 | {% hint style="info" %}
74 | Setting `state.source.url` should be sufficient for most WordPress.org installations and WordPress.com plans. For specific use cases check the guide [_Setting the URL of the WordPress data source_](https://docs.frontity.org/guides/setting-url-wordpress-source-data).
75 | {% endhint %}
76 |
77 | > Your site at `http://localhost:3000` won't auto-update with this change as auto-updates only occur with changes to files in the packages directory, so you will need to manually refresh the page in your browser.
78 |
79 | You should now see your own posts in the Frontity project displayed in the browser.
80 |
81 | ## What's next?
82 |
83 | ### Follow the Step-by-Step Tutorial
84 |
85 | Frontity's primary learning resource is the [**Step-by-Step Tutorial**](https://tutorial.frontity.org). This is the perfect place to start if you're new to Frontity, or even if you've previously used Frontity but feel that your knowledge is incomplete or fragmented.
86 |
87 | ### Check Frontity's guides
88 |
89 | There are several [**Guides**](https://docs.frontity.org/guides) that will help you in your understanding of working with Frontity, and which will also assist you in solving some of the common challenges that come up when working with Dynamic SSR \(server-side Rendering\) in React apps connected to WordPress.
90 |
91 | ### Check the API Reference
92 |
93 | The main reference resource is the [**API Reference**](https://api.frontity.org). This is where you'll find detailed information about Frontity CLI, packages, plugins and themes. Once you've mastered the basics of working with Frontity this is where you're likely to spend most of your time when working on projects.
94 |
95 | ### Deploy your site
96 |
97 | When you're done developing and are ready to launch your new site follow the instructions in the [**Deployment**](https://docs.frontity.org/deployment) section to learn how to deploy your finished Frontity site. We recommend that you start by [deploying your site to Vercel](https://docs.frontity.org/deployment/deploy-using-vercel).
98 |
99 | ### Additional resources
100 |
101 | If demos are more your thing, a number of different Frontity projects and examples can be found on this [GitHub repository](https://github.com/frontity-demos/frontity-examples).
102 |
103 | In addition, you can head over to Frontity's [Youtube channel](https://www.youtube.com/c/Frontity/) to watch a series of videos called [Frontity Talks](https://youtube.com/playlist?list=PLC9teX20GdrTBeOzSwE-bFW-MbBEUwowS), which are especially interesting to learn more about specific topics of Frontity.
104 |
105 |
106 | {% hint style="info" %}
107 | The [Frontity Community Forum](https://community.frontity.org/) is the best place to get community support while helping others with your own questions and solutions. To keep it running smoothly, we encourage you to read through this [Forum Guide](https://community.frontity.org/t/frontity-community-forum-users-guide/4399) and search the [available learning resources](https://frontity.org/learn/) before posting.
108 | {% endhint %}
109 |
110 |
--------------------------------------------------------------------------------
/docs/guides/README.md:
--------------------------------------------------------------------------------
1 | # 📖 Guides
2 |
3 | In this section we present a selection of guides that will help you to both work with, and to better understand, a variety of topics related to Frontity.
4 |
5 | ### [Setting the URL of the WordPress data source](setting-url-wordpress-source-data.md)  
6 |
7 | _This guide outlines the various different WordPress configuration scenarios that you might encounter and the things that need to be taken into account in order to properly set the URL of the WordPress data source._
8 |
9 | ### [Using Environment Variables in a Frontity project](how-to-use-environment-variables-in-frontity.md) 
10 |
11 | _This guide explains how to defined environment variables for a Frontity project and how to properly access these variables from the code._
12 |
13 | ### [WordPress requirements for Frontity](what-are-the-requisites-of-wordpress-for-frontity.md) 
14 |
15 | _This guide highlights some basic WordPress requirements needed for Frontity projects._
16 |
17 | ### [URLs in a Migration from WordPress to Frontity Decoupled Mode](./update-db-urls.md)  
18 |
19 | _This guide explains the issue that arise with regard to URLs when migrating a WordPress site to Frontity Decoupled Mode and how to resolve them._
20 |
21 | ### [Frontity Query Options](frontity-query-options.md)  
22 |
23 | _This guide explains what "Frontity Query Options" are and how to use them._
24 |
25 | ### [Redirections with Frontity](redirections-with-frontity.md) 
26 |
27 | _This guide explains how to manage WordPress redirections with Frontity._
28 |
29 | ### [Understanding a Frontity project](understanding-mars-theme.md) 
30 |
31 | _This guide will help you understand the structure of a Frontity project._
32 |
33 | ### [Understanding Mars Theme](understanding-mars-theme-1.md)  
34 |
35 | _This guide will help you understand how `mars-theme` works._
36 |
37 | ### [Add a new Frontity package or theme to your project](install-a-new-package.md)   
38 |
39 | _This guide will give through the process of installing and configuring new Frontity packages or themes for your project._
40 |
41 | ### [Working with processors](using-processors.md)  
42 | _Learn how to use the `` package and processors to customise the final markup that will be presented to the browser._
43 |
44 | ### [How to process page-builder content in Frontity](processing-page-builder-content.md)   
45 | _This guide demonstrates how to use processors to render content generated by page-builders (such as Elementor, Gutenberg, etc...)_
46 |
47 | ### [Keep Frontity updated](keep-frontity-updated.md) 
48 |
49 | _This guide will take through the process of updating your Frontity project to use latest versions of the Frontity packages you're using in your project._
50 |
51 | ### [How to share your Frontity project](how-to-share-a-frontity-project.md) 
52 |
53 | _This guide will give through the recommended workflow to work with a Frontity theme os package in a way it can be properly shared with the community._
54 |
55 | ### [Troubleshooting guide](troubleshooting.md) 
56 |
57 | _This guide offers solutions to common issues detected in Frontity projects._
58 |
59 | ## JavaScript & React
60 |
61 | If you are coming to Frontity from a different background, perhaps from the WordPress/PHP world, you may still not familiar with JavaScript or React.
62 |
63 | We have prepared for you some guides to help get you start working with them:
64 |
65 | ### [JavaScript](javascript-basics.md)
66 |
67 | _This guide will give you a better understanding of which JavaScript concepts are used in Frontity and a brief explanation of them._
68 |
69 | ### [React](react-basic.md)
70 |
71 | _This guide will take you through the React key concepts that are needed to be able to understand and create a project with Frontity._
72 |
73 | {% hint style="info" %}
74 | If you have suggestions or ideas for other guides, please share them in the [community forum](https://community.frontity.org/c/framework-development/docs-and-tutorials/29).
75 | {% endhint %}
76 |
77 |
--------------------------------------------------------------------------------
/docs/guides/frontity-query-options.md:
--------------------------------------------------------------------------------
1 | # Frontity Query Options
2 |
3 | "Frontity Query Options" are query string parameters added to the URL that start with `frontity_`.
4 |
5 | For example:
6 |
7 | ```text
8 | https://example.com/my_post?frontity_name=Site-name
9 | ```
10 |
11 | Any query parameter in the URL that starts with `frontity_` is a "Frontity Query Option".
12 |
13 | They can be used to dynamically configure certain options in the Frontity state.
14 |
15 | > It is important to note that Frontity Query Options do not form part of the canonical link. This means that whatever is passed in the `frontity_` query parameter will not be matched by handlers or used to fetch data from WordPress. Its purpose is merely to allow dynamic configuration of Frontity.
16 |
17 | Query string parameters that start with `frontity_` are reserved to **send special information to Frontity**, i.e. they are not related to the URL that needs to be rendered \(e.g. a post or a page\), but instead are used to change the Frontity configuration dynamically.
18 |
19 | These parameters are removed from `state.frontity.initialLink` and `state.router.link` because they should not affect the content of what needs to be rendered such as a post or a page.
20 |
21 | If Frontity Query Option parameters are present in the URL then they are added to `state.frontity.options`, and the properties are then available to any packages that need them.
22 |
23 | > Note that the key names of parameters are camelCased when they are added to `state.frontity.options`. So, for example, the `frontity_source_auth` query string param will become `state.frontity.options.sourceAuth` once added.
24 | >
25 | > Only key names are transformed in this way, values remain unchanged.
26 |
27 | Some "Frontity Query Options" are used by [`@frontity/core`](https://api.frontity.org/frontity-packages/core-package), such as:
28 |
29 | * frontity\_name -> state.frontity.options.name: The name of the site you want to load.
30 |
31 | > Note that the `frontity_name` setting is used only in development and only in [Frontity multisite](https://docs.frontity.org/learning-frontity/settings#multiple-sites).
32 |
33 | However packages can also make use of them, for example:
34 |
35 | * frontity\_source\_auth -> state.frontity.options.sourceAuth: An authentication token for the [source package](https://api.frontity.org/frontity-packages/features-packages/wp-source#state-source-auth).
36 |
37 | {% hint style="info" %}
38 | Currently these are the only Frontity Query Options that Frontity itself uses but it's intended that more will be added in the future. However, you can also add your own Frontity Query Options if you want to use them in your package or theme.
39 | {% endhint %}
40 |
41 | {% hint style="danger" %}
42 | **Please note:** Frontity Query Options should be treated as untrusted user input and should never ever be passed as parameters to arbitrary functions.
43 | {% endhint %}
44 |
45 |
--------------------------------------------------------------------------------
/docs/guides/how-to-use-environment-variables-in-frontity.md:
--------------------------------------------------------------------------------
1 | Environment variables are a very useful way of managing custom data that shouldn't be in the code. A prime example would be API KEYs or other authentication credentials for external APIs.
2 |
3 | Since a [Frontity app is an Isomorphic React app](../isomorphic-react.md) we need to consider whether these environment variables should be accessible only to the code running server-side, or whether they should also be accessible to the code running client-side.
4 |
5 | ## Adding environment variables to a Frontity Project
6 |
7 | In order to access environment variables from your Frontity project you can use a package such as [`cross-env`](https://www.npmjs.com/package/cross-env) or [`dot-env`](https://github.com/motdotla/dotenv).
8 |
9 | If you use `cross-env`, you will not have to do anything special in Frontity. You just need to add it to your `package.json` scripts thus:
10 |
11 | ```json
12 | {
13 | "scripts": {
14 | "dev": "cross-env MY_VARIABLE=xxx frontity dev",
15 | "serve": "cross-env MY_VARIABLE=xxx frontity serve",
16 | "build": "cross-env MY_VARIABLE=xxx frontity build"
17 | }
18 | }
19 | ```
20 |
21 | `dotenv` only runs in Node, so rather than using an `index.js` file you should instead [divide the content of your `index.js` file across two files, namely `client.js` and `server.js`](https://docs.frontity.org/learning-frontity/packages#entry-points).
22 |
23 | {% hint style="info" %}
24 | If `client.js` and `server.js` exist, the `index.js` file can also still exist but it will be ignored by both the server and the client.
25 | {% endhint %}
26 |
27 | So for `dotenv` we must create a `.env` file:
28 |
29 | ```bash
30 | MY_VARIABLE=xxx
31 | ```
32 |
33 | ## Accessing the environment variables
34 |
35 | ### Private access to the environment variables 
36 |
37 | As [we can create different entry points](../isomorphic-react.md#creating-different-entry-points) for our Frontity theme package by creating separate `server.js` and `client.js` files (that will each only be executed in the appropriate environment), we are therefore able to privately access the content of the environment variable on the server (for example to perform a request to an external API and storing this data in the `state` so it can be accessed from your React components).
38 |
39 | {% hint style="info" %}
40 | [Here a demo](https://github.com/frontity-juanmaguitar/demo-frontity-env-variables-server) illustrating the use of an environment variable in `server.js`.
41 | {% endhint %}
42 |
43 |
44 | The content of the `server.js` file could be something like this:
45 |
46 | ```js
47 | import { config } from "dotenv";
48 | import { fetch } from "frontity";
49 | import packageClient from "./client";
50 |
51 | // Launch dotenv.
52 | config();
53 |
54 | export default {
55 | ...packageClient,
56 | actions: {
57 | theme: {
58 | ...packageClient.actions.theme,
59 | beforeSSR: async ({ state }) => {
60 | const {API_TMDB} = process.env
61 | const URL = `https://api.themoviedb.org/3/movie/550?api_key=${API_TMDB}`
62 | const detailsMovie = await fetch(URL)
63 | .then( response => response.json() )
64 | state.tmdb = { detailsMovie }
65 | }
66 | }
67 | },
68 | };
69 | ```
70 |
71 | In this example a `API_TMDB` environment variable is defined in a `.env` file included in that project
72 |
73 | This method (`beforeSSR` defined in the `server.js`) will ensure that your API credentials are secure (i.e. they will not be part of the client bundle) and are only visible to the code running server-side. However, remember to take into account that this logic will be executed in the [initialization (or bootstrapping) of the Frontity app](../isomorphic-react.md#initialization-or-bootstraping-of-a-frontity-app) (i.e. for any page loaded the first time).
74 |
75 | ### Generic access to the environment variables  
76 |
77 | If you need to use the ENV variable also in the client, the best way is to add it to the `state`.
78 |
79 | You can use `frontity.settings.js` or your package `state` for that, whichever is more appropriate for your situation.
80 |
81 | `frontity.settings.js`:
82 |
83 | ```js
84 | import { config } from "dotenv";
85 |
86 | // Launch dot-env.
87 | config();
88 |
89 | const settings = {
90 | name: "my-project",
91 | state: {
92 | env: {
93 | myVariable: process.env.MY_VARIABLE
94 | }
95 | },
96 | packages: [
97 | // ...
98 | ];
99 | }
100 | ```
101 |
102 | `packages/my-package/src/server.js`:
103 |
104 | ```js
105 | import { config } from "dotenv";
106 |
107 | // Launch dot-env.
108 | config();
109 |
110 | export default {
111 | state: {
112 | theme: {
113 | myVariable: process.env.MY_VARIABLE,
114 | },
115 | },
116 | };
117 | ```
118 |
119 | Either way, the ENV variable will be serialized with the rest of the `state` and it will be sent to the client for the React hydration.
120 |
121 | {% hint style="danger" %}
122 | Please note that any ENV variable exposed in `state` will end up in the client. *Do not expose any secret API KEY or password.*
123 | {% endhint %}
--------------------------------------------------------------------------------
/docs/guides/install-a-new-package.md:
--------------------------------------------------------------------------------
1 | # Add a new Frontity package or theme to your project
2 |
3 | {% hint style="info" %}
4 | In Frontity _themes_ are just any other type of package, so the info explained in this guide can be applied to when you want to use an alternative theme in your project
5 | {% endhint %}
6 |
7 | During the development of your project, you may want to install new Frontity packages, or even change the ones you are using \(for example if you want to use a different theme or a different analytics service\). In order to do this, you'll need to:
8 |
9 | 1. Install the Frontity package.
10 | 2. Add it to `frontity.settings.js`.
11 |
12 | {% hint style="info" %}
13 | Please note that this process is only necessary for [Frontity packages](https://api.frontity.org/frontity-packages). If you want to install an npm package you can use the normal `npm install some-package` procedure.
14 | {% endhint %}
15 |
16 | ## 1. Install the Frontity package
17 |
18 | At this point, you need to differentiate between the external packages \(which aren't meant to be modified\) and the local packages \(the ones you want to change at your will\), because its installation will be slightly different. If you want to understand better how external and local packages work you can check its [docs page](../learning-frontity/packages.md).
19 |
20 | ### External packages
21 |
22 | {% hint style="info" %}
23 | This is the typical way of using [Features Packages](https://api.frontity.org/frontity-packages/features-packages)
24 | {% endhint %}
25 |
26 | These packages will be treated like any `npm` package and stored in `node_modules` folder, where all your dependencies are installed. In order to install a package as external you just have to run this command in the root of your project:
27 |
28 | ```text
29 | npm install new-frontity-package
30 | ```
31 |
32 | It will be automatically added to your `node_modules` folder and your `package.json` file.
33 |
34 | ### Local packages
35 |
36 | {% hint style="info" %}
37 | This is the typical way of using Frontity [Themes](https://api.frontity.org/frontity-themes)
38 | {% endhint %}
39 |
40 | The process to install a local package is pretty similar, but you'll have to make minor modifications.
41 |
42 | 1. You need to **install the package** as an external one by running `npm install new-frontity-package`
43 | 2. It will be installed inside the `node_modules` folder of your project, so you'll need to **look for the package and move it to the folder `packages`** inside your Frontity project.
44 | 3. Next step would be to **change your `package.json`**. You'll have your new package inside the dependencies of your project, pointing to its latest version. As we are going to use it as a `local` package, we have to point it to its proper folder.
45 |
46 | ```javascript
47 | {
48 | "name": "frontity-project",
49 | ...
50 | "dependencies": {
51 | ...
52 | "another-frontity-theme": "./packages/another-frontity-theme",
53 | //before it would be something like "another-frontity-theme": "^1.0.0"
54 | ...
55 | }
56 | }
57 | ```
58 |
59 | 1. Once changed, run `npm install` at the root of your project and it will work as `local` package.
60 |
61 | {% hint style="info" %}
62 | We are planning to release a new command, that will take care of all these steps.
63 | {% endhint %}
64 |
65 | ## 2. Add it to \`frontity.settings.js\`
66 |
67 | Once installed, the process it's the same for both external and local packages.
68 |
69 | You have to include it in your `frontity.settings.js`, inside the `packages` array to make it work. Remember to check if any settings are needed and include them as well \(You can check that at each specific [Frontity Package](https://api.frontity.org/frontity-packages) or [Frontity Theme](https://api.frontity.org/frontity-themes)\).
70 |
71 | ```javascript
72 | const settings = {
73 | ...
74 | "packages": [
75 | ...
76 | //If the package has no settings
77 | "new-frontity-package",
78 |
79 | //If you want to add settings to your package
80 | {
81 | "name": "new-frontity-package",
82 | //Add your settings here
83 | },
84 | ...
85 | ]
86 | };
87 |
88 | export default settings;
89 | ```
90 |
91 | And that's all, your package is installed and working now.
92 |
93 | {% hint style="info" %}
94 | Note that if you are changing your theme or any other package, you may want to remove the old one in your `package.json` and in your `frontity.settings.js`
95 | {% endhint %}
96 |
97 |
--------------------------------------------------------------------------------
/docs/guides/keep-frontity-updated.md:
--------------------------------------------------------------------------------
1 | # Keep Frontity Updated
2 |
3 | As in most projects, keeping Frontity and its packages updated is always a good practice. Not only you could use new features added, but also some security issues are usually detected and solved during these updates.
4 |
5 | At this point, it is important to distinguish between your **dependencies** \(npm packages you won't modify and reside in `/node_modules` folder\) and your **local packages** \(packages you create or change at your will, and reside in `/packages` folder\). For more info you can check the page [Learning Frontity - Packages](../learning-frontity/packages.md).
6 |
7 | ### Update project dependencies
8 |
9 | Essential packages such as `frontity`, `@frontity/core` or `@frontity/tiny-router`, and all your dependencies, are included in this part. These can be treated as common npm packages, so you can use the following command to update your `package.json` to the latest versions:
10 |
11 | ```bash
12 | npx npm-check-updates -u -t minor
13 | npm install
14 | ```
15 |
16 | {% hint style="info" %}
17 | Note that using the `-t minor` switch ensures that only minor updates will be applied. This avoids introducing potential breaking changes that a major update might introduce. [See here](https://github.com/raineorshine/npm-check-updates) for more info.
18 | {% endhint %}
19 |
20 | With this, **you will update your `package.json` and all your dependencies in `node_modules`**, including the Frontity packages installed in **`node_modules`**.
21 |
22 | If you want to update just one package you can do it with this other command:
23 |
24 | ```bash
25 | npm install my-package@latest
26 | ```
27 |
28 | ### Update local package dependencies
29 |
30 | These local packages, included in `packages` folder, are supposed to be modified by the users, so any dependency won't be updated when you update your project dependencies.
31 |
32 | To update the dependencies of your local package dependencies, go to their folder and run the same command:
33 |
34 | ```bash
35 | cd package/my-local-package
36 | npx npm-check-updates -u -t minor
37 | # DO NOT RUN "npm install" this time!
38 | ```
39 |
40 | Do that for each local package found in your `packages` folder.
41 |
42 | After you've finished, go to the root folder of your Frontity project and run `npm install` there:
43 |
44 | ```bash
45 | cd ../.. # Go back to the root folder
46 | npm install
47 | ```
48 |
49 | ## Troubleshooting
50 |
51 | ### Delete all the dependencies and start over
52 |
53 | If you are having problems, follow these steps to install everything from scratch:
54 |
55 | 1. Make sure you have updated all your dependencies in:
56 | * The root `package.json` of your project.
57 | * All the `package.json` files of your local packages.
58 | 2. Delete all the `node_modules` folders of:
59 | * The root of your project.
60 | * All your local packages.
61 | 3. Delete all the `package-lock.json` file of:
62 | * The root of your project.
63 | * All your local packages.
64 | 4. Run `npm install` again.
65 |
66 | Everything should work after this.
67 |
68 | {% hint style="info" %}
69 | Still have questions? Ask [the community](https://community.frontity.org/)! We are here to help 😊
70 | {% endhint %}
71 |
72 |
--------------------------------------------------------------------------------
/docs/guides/redirections-with-frontity.md:
--------------------------------------------------------------------------------
1 | # Redirections with Frontity
2 |
3 | Many users store their 30x redirections in the WordPress database, e.g. via a [Redirection plugin](https://wordpress.org/plugins/redirection/). WordPress redirects a user to a new link, for example after a user renames a post and tries to access it using the "old" link. However, no such functionality exists out-of-the-box for the REST API. Since Frontity uses the REST API to retrieve content, it needs a way of handling such redirections.
4 |
5 | Have a look at this [Demo](redirections-with-frontity.md#demo) for a bit more in-depth explanation.
6 |
7 | ## Settings
8 |
9 | The redirections functionality works by making an additional request to the WordPress instance to check if a redirection exists for a particular URL. By WordPress instance, we mean the location of your WordPress installation, not the Frontity app. Normally the `state.source.url` points to that location.
10 |
11 | The setting [`state.source.redirections`](https://api.frontity.org/frontity-packages/features-packages/wp-source#state-source-redirections) dictates under what circumstances should Frontity make that request to the check if a redirection exists.
12 |
13 | The `state.source.redirections` accepts the following values:
14 |
15 | #### `"no"`
16 |
17 | Does not handle redirections at all. This is the default.
18 |
19 | #### `"all"`
20 |
21 | Always make an additional request to the WordPress instance to check if there exists a redirection. This means that every time you navigate to a new link, Frontity will make 2 requests: one to the REST API to try to fetch the content and another one to the WordPress instance to check if a redirection exists. Frontity will wait for both requests to finish before proceeding.
22 |
23 | 
24 |
25 | #### `"404"`
26 |
27 | Only send the additional request to the WordPress instance if the original request to the REST API has returned a 404. This would happen for example if try to access a post that has been renamed.
28 |
29 | 
30 |
31 | #### RegEx pattern
32 |
33 | A string that contains a regex pattern. The string must start with `RegExp:`. This pattern will be matched against the current route and if matched, Frontity will make an additional request to the WordPress instance to check if there exists a redirection _for that route_. Note that the shorthand character classes will have to be escaped, so for example instead of `\d`, you will need to write `\\d`.
34 |
35 | #### Array of strings
36 |
37 | An array of strings, which can contain the "404" value as well as any number of strings starting with `"RegExp:"` which represent regular expressions. An additional request will be sent to Wordpress to check for the redirection if any of the regular expressions match the current route. If the array also contains a `"404"`, an additional request will also be made if the original request has returned a 404.
38 |
39 | ## Usage
40 |
41 | {% hint style="warning" %}
42 | In order for the redirections to work correctly you will need to set up CORS headers in your WordPress installation. If you are using the Redirections plugin, [it's quite simple](https://youtu.be/-ekz2JwHHmQ)
43 | {% endhint %}
44 |
45 | In order to use the redirections, there is no need to install any new npm package. There is a new property exposed by the `wp-source` package, [`state.source.redirections`](https://api.frontity.org/frontity-packages/features-packages/wp-source#state-source-redirections) which is used to handle the redirections. The recommended way of using it is by setting it in your `frontity.settings.js` file.
46 |
47 | `state.source.redirections` accepts the options outlined above.
48 |
49 | **Examples**
50 |
51 | ```javascript
52 | // frontity.settings.js
53 |
54 | {
55 | name: "@frontity/wp-source",
56 | state: {
57 | source: {
58 | url: "https://test.frontity.org",
59 |
60 | // always check if there exists a redirection.
61 | redirections: "all",
62 |
63 | // match the url `/some-post` exactly
64 | redirections: "/some-post/",
65 |
66 | // match urls like `/some-post/1`, `/some-post/2`, etc.
67 | redirections: "RegExp:/some-post/(\\d*)",
68 |
69 | // match urls like: /some-post/42, /some-otherpost/5
70 | redirections: "RegExp:/post-(\\w*)/(\\d*)",
71 |
72 | // match a combination of multiple options
73 | redirections: ["404", "/some-post/", "RegExp:/another-post/(\\d)"],
74 | },
75 | },
76 | }
77 | ```
78 |
79 | ### Alternative usage
80 |
81 | Redirections work internally by assigning a special `RedirectionData` object to `state.source.data[link]` \(details below in [Technical details](redirections-with-frontity.md##Technical-details)\).
82 |
83 | A consequence of that is that [you can alternatively define redirections directly in the `state` or using a custom handler](https://community.frontity.org/t/301-redirects-stored-in-wordpress-database/3032/15).
84 |
85 | * Single redirection populating `state.source.data` with `RedirectionData` directly:
86 |
87 | ```text
88 | const state = {
89 | source: {
90 | data: {
91 | "/old-url/": {
92 | isReady: true,
93 | isRedirection: true,
94 | is301: true,
95 | redirectionStatus: 301,
96 | isExternal: false,
97 | location: "/new-url",
98 | },
99 | },
100 | },
101 | };
102 | ```
103 |
104 | * A custom handler which assigns properties of `RedirectionData` object for the current route:
105 |
106 | ```text
107 | const categoryRedirection = {
108 | pattern: "/category/:slug",
109 | priority: 5,
110 | func: ({ link, params }) => {
111 | state.source.data[link].isReady = true;
112 | state.source.data[link].isRedirection = true;
113 | state.source.data[link].is301 = true;
114 | state.source.data[link].redirectionStatus = 301;
115 | state.source.data[link].isExternal = false;
116 | state.source.data[link].location = `/categoria/${params.slug}`;
117 | },
118 | };
119 | ```
120 |
121 | ## Note on functionalities
122 |
123 | * The redirections support not only redirecting to other pages in your WordPress site but also redirecting to external pages.
124 | * You can define 301, 302, 307 or 308 Redirections.
125 | * We respect the settings of the Redirections plugin with respect to the query parameters:
126 |
127 | 
128 |
129 | ## Technical details
130 |
131 | The redirections are first handled inside of `actions.source.fetch()`. If the setting for `state.source.redirections` contains an ["eager" value](https://github.com/frontity/frontity/blob/2eb98ae4e6fee1f93ac5af5c834a3add644ba7b0/packages/wp-source/src/utils.ts#L152-L186) \(for example if it equals `"all"`\) it is [fetched before calling the handler](https://github.com/frontity/frontity/blob/2eb98ae4e6fee1f93ac5af5c834a3add644ba7b0/packages/wp-source/src/actions.ts#L91-L100) for the current route. "Fetching a redirection" refers to making a request to the WordPress instance to check if a redirection exists for a particular URL.
132 |
133 | If a redirection is not "eager" \(for example if `state.source.redirections` is `"404"`\) then we fetch the redirection only [after the request to the REST API has returned a 404](https://github.com/frontity/frontity/blob/2eb98ae4e6fee1f93ac5af5c834a3add644ba7b0/packages/wp-source/src/actions.ts#L152-L160).
134 |
135 | The actual logic for fetching the redirection from the WordPress instance is [different on the client and server](https://github.com/frontity/frontity/blob/2eb98ae4e6fee1f93ac5af5c834a3add644ba7b0/packages/wp-source/src/utils.ts#L46-L140) because of platform differences.
136 |
137 | In both cases, if a redirection _does_ exist for a a particular route, Frontity populates `state.source.data[link]` with a `RedirectionData` object instead of a "typical" `Data` object like `PostData` or `AuthorData`. This object contains all the information about a redirection that Frontity needs in order to handle it. You can check the [type of `RedirectionData`](https://github.com/frontity/frontity/blob/2eb98ae4e6/packages/source/types/data.ts#L426-L462) to see all of its properties.
138 |
139 | Once a `RedirectionData` object is in the state, the behavior of Frontity is different on client and server.
140 |
141 | On the **server**, we [check the data object for the current route in the `beforeSSR()` action of `tiny-router`](https://github.com/frontity/frontity/blob/2eb98ae4e6/packages/tiny-router/src/actions.ts#L268-L298). If that object contains a redirection, Frontity will set the correct HTTP status, and redirect using `ctx.redirect(data.location)` where `data.location` contains the final URL .
142 |
143 | On the **client**, we [listen to changes to the `state.source.data` object](https://github.com/frontity/frontity/blob/2eb98ae4e6/packages/tiny-router/src/actions.ts#L156-L177) and if the `data` object for current route contains a redirection, Frontity calls `actions.router.set(data.location)` where `data.location` contains the final URL.
144 |
145 | The above flow looks something like:
146 |
147 | 
148 |
149 | ## Demo
150 |
151 | This short video demonstrates the usage of the Redirections feature in Frontity.
152 |
153 | {% embed url="https://www.youtube.com/watch?v=\_ZNgyXJxeGM" caption="" %}
154 |
155 |
--------------------------------------------------------------------------------
/docs/guides/setting-url-wordpress-source-data.md:
--------------------------------------------------------------------------------
1 | # Setting the URL of the WordPress data source
2 |
3 | The most important setting in a Frontity project is the WordPress installation that can be used as the source of data.
4 |
5 | The format of the URL used to access the WordPress REST API varies depending on the type of WordPress installation used as the data source for the Frontity project, so the type of WordPress installation determines how this URL should be set in the Frontity configuration file `frontity.settings.js`.
6 |
7 | The main property in `frontity.settings.js` needed for determining the URL of the WordPress data source is:
8 |
9 | * **`state.source.url`**: The URL of the WordPress. _Required_.
10 |
11 | {% hint style="warning" %}
12 | Mind how `state.source.url` should point to just the URL of your WordPress (i.e. `https://test.frontity.org`) and not the URL of your WordPress REST API (i.e. `https://test.frontity.org/wp-json`). The URL of of the REST API will be calculated by Frontity depending on each use case.
13 | {% endhint %}
14 |
15 |
16 | There are some other properties implied in determining this URL of the WordPress data source, but they need to be set only for specific use cases:
17 |
18 | * `state.wpSource.isWpCom`: A flag to indicate a special use case of WordPress.com sites \(Personal or Premium plans\). _It is not required for Free WordPress.com sites. Defaults to `false`._
19 | * `state.wpSource.prefix`: The prefix of the API. _Defaults to `/wp-json`. It is not used if `isWpCom` is `true`._
20 |
21 | {% hint style="info" %}
22 | From [version 1.10](https://github.com/frontity/frontity/blob/dev/packages/wp-source/CHANGELOG.md#1100) of the `@frontity/wp-source` package, the property `state.source.api` _should never be set manually by the end users_ \(it will be computed from the properties mentioned above\)
23 | {% endhint %}
24 |
25 | ## WordPress scenarios
26 |
27 | ### A Self-hosted WordPress site
28 |
29 | Most Frontity projects will use a self-hosted WordPress site \([wp.org](http://wp.org/)\) with a custom domain, such as, for example, `https://test.frontity.org/`.
30 |
31 | The recommended way to set this URL is via the `state.source.url` property.
32 |
33 | ```javascript
34 | // frontity.settings.js
35 | export default {
36 | packages: [
37 | {
38 | name: "@frontity/wp-source",
39 | state: {
40 | source: {
41 | url: "https://test.frontity.org",
42 | },
43 | },
44 | },
45 | ],
46 | };
47 | ```
48 |
49 | In this example the computed values would be:
50 |
51 | * `state.source.api`: `https://test.frontity.org/wp-json` _\(value computed from `state.source.url` and `state.wpSource.prefix`\)_.
52 | * `state.wpSource.isWpCom`: `false` _\(value derived from `state.source.api`\)_
53 |
54 | The same recommendation applies for custom domains used with a [WordPress.com Business plan](https://wordpress.com/support/business-plan/).
55 |
56 | ### A Free WordPress.com plan
57 |
58 | Some Frontity projects may use a free WordPress.com installation with the URL pointing to a subdomain of WordPress.com, such as: `https://frontitytest.wordpress.com/`.
59 |
60 | The recommended way to set this URL is also via the `state.source.url` property.
61 |
62 | ```javascript
63 | // frontity.settings.js
64 | export default {
65 | packages: [
66 | {
67 | name: "@frontity/wp-source",
68 | state: {
69 | source: {
70 | url: "https://frontitytest.wordpress.com/",
71 | },
72 | },
73 | },
74 | ],
75 | };
76 | ```
77 |
78 | In this example the computed values would be:
79 |
80 | * `state.source.api`: `https://frontitytest.wordpress.com/wp-json`_\(value computed from `state.source.url` and `state.wpSource.prefix`\)_.
81 | * `state.wpSource.isWpCom`: `true` _\(value derived `state.source.api`\)_
82 |
83 | ### A Personal or Premium WordPress.com plan
84 |
85 | A less frequent use case is where a Personal or Premium WordPress.com site is used as the data source. These plans allow you to use a custom domain, but in these cases the REST API is available via a different URL format.
86 |
87 | The recommended way to set this URL is also via the `state.source.url` property, but in addition to this you also need to specify that it is a Personal or Premium WordPress.com plan installation by setting `state.wpSource.isWpCom` to `true`.
88 |
89 | ```javascript
90 | // frontity.settings.js
91 | export default {
92 | packages: [
93 | {
94 | name: "@frontity/wp-source",
95 | state: {
96 | source: {
97 | url: "https://test-premium-plan.frontity.org",
98 | },
99 | wpSource: {
100 | isWpCom: true
101 | }
102 | },
103 | },
104 | ],
105 | };
106 | ```
107 |
108 | In this example the computed values would be:
109 |
110 | * `state.source.api`: `https://public-api.wordpress.com/wp/v2/sites/test-premium-plan.frontity.org` _\(value computed from `state.source.url` & `state.wpSource.isWpCom`\)_
111 |
112 | ## Summary
113 |
114 | All these scenarios and their different settings combinations are summarized in the following table
115 |
116 | | | Free [wordpress.com](http://wordpress.com) | Personal or Premium [wordpress.com](http://wordpress.com) | Business [wordpress.com](http://wordpress.com) or [wp.org](http://wp.org) |
117 | | :--- | :--- | :--- | :--- |
118 | | needs `state.source.url` | YES | YES | YES |
119 | | needs `state.wpSource.isWpCom` | NO | YES | NO |
120 |
121 |
--------------------------------------------------------------------------------
/docs/guides/troubleshooting.md:
--------------------------------------------------------------------------------
1 | # Troubleshooting
2 |
3 | In this guide we offer solutions to common issues detected in Frontity projects
4 |
5 | * [`@frontity/wp-source`](troubleshooting.md#frontity-wp-source)
6 | * [💻 FetchError: invalid json response body at ... reason: Unexpected token < in JSON at position 0](troubleshooting.md#fetcherror-invalid-json-response-body-at-reason-unexpected-token-less-than-in-json-at-position-0)
7 | * [Frontity CLI](troubleshooting.md#frontity-cli)
8 | * [💻 Error: Cannot find module ‘@frontity/core’](troubleshooting.md#error-cannot-find-module-frontity-core)
9 | * [Styles](troubleshooting.md#styles)
10 | * [👨💻 The pseudo class ":xxx-xxxxx" is potentially unsafe when doing server-side rendering. Try changing it to ":xxx-xxxxx"](troubleshooting.md#the-pseudo-class-xxx-xxxxx-is-potentially-unsafe-when-doing-server-side-rendering-try-changing-it-to-xxx-xxxxx)
11 |
12 | {% hint style="info" %}
13 | These are the symbols used in this troubleshooting guide
14 |
15 | * 💻 Terminal messages
16 | * 👨💻 Browser's console messages
17 | {% endhint %}
18 |
19 | ## `@frontity/wp-source`
20 |
21 | ### 💻 FetchError: invalid json response body at ... Reason: Unexpected token < in JSON at position 0
22 |
23 | If you launch your site locally with `npx frontity dev` and you get this in the browser
24 |
25 | ```text
26 | Internal Server Error
27 | ```
28 |
29 | And you get something like this error in the terminal when attempting to load the page in the browser:
30 |
31 | ```text
32 | FetchError: invalid json response body at http://wptest.test/wp-json/wp/v2/posts/?_embed=true&page=1 reason: Unexpected token < in JSON at position 0
33 | ```
34 |
35 | It may be because your WP doesn't have permalinks activated \(which is a requisite of the `@frontity/wp-source` package\)
36 |
37 | #### Solution
38 |
39 | From your WP, go to `Settings -> Permalinks` and check one of the pretty permalinks options, rather than the plain one:
40 |
41 | 
42 |
43 | **Related Threads**:
44 |
45 | * [https://community.frontity.org/t/frontity-not-working-with-plain-permalinks/1428](https://community.frontity.org/t/frontity-not-working-with-plain-permalinks/1428)
46 |
47 | ## Frontity CLI
48 |
49 | ### 💻 Error: Cannot find module ‘@frontity/core’
50 |
51 | If you get this error in the terminal when you do `npx frontity serve`:
52 |
53 | ```text
54 | Error: Cannot find module ‘@frontity/core’
55 | home/lib/node_modules/frontity/dist/src/cli/index.js
56 | home/lib/node_modules/frontity/dist/src/commands/serve.js
57 | home/lib/node_modules/frontity/dist/src/cli/serve.js
58 | ```
59 |
60 | This may be caused because you're not executing this command from the root of your Frontity project \(maybe you're launching it from the `build` folder\)
61 |
62 | #### Solution
63 |
64 | Run `npx frontity serve` from the root of your Frontity project
65 |
66 | **Related Threads**:
67 |
68 | * [https://community.frontity.org/t/error-cannot-find-module-frontity-core/2180](https://community.frontity.org/t/error-cannot-find-module-frontity-core/2180)
69 |
70 | ## Styles
71 |
72 | ### 👨💻 The pseudo class ":xxx-xxxxx" is potentially unsafe when doing server-side rendering. Try changing it to ":xxx-xxxxx"
73 |
74 | If you are getting these types of warnings in the console:
75 |
76 | ```text
77 | The pseudo class ":nth-child" is potentially unsafe when doing server-side rendering. Try changing it to ":nth-of-type"
78 | The pseudo class ":first-child" is potentially unsafe when doing server-side rendering. Try changing it to ":first-of-type".
79 | ```
80 |
81 | This is caused by an [`emotion`](https://github.com/emotion-js/emotion) issue: [https://github.com/emotion-js/emotion/issues/1105](https://github.com/emotion-js/emotion/issues/1105)
82 |
83 | As [emotion is used internally](https://docs.frontity.org/learning-frontity/styles#emotion-documentation) by Frontity our code should take into account what can and cannot be done using CSS in JS with emotion
84 |
85 | This is NOT an issue that should be ignored or "fixed" under normal circumstances. We recommend you use the following solutions only if you're getting these messages because of some third-party CSS that you don't have no control over \(e.g. from a CSS framework or a component library or another external source\).
86 |
87 | #### Solution 1
88 |
89 | For this specific issue, there's [this solution](https://github.com/emotion-js/emotion/issues/1105#issuecomment-557726922) that seems to work pretty well to solve this issue in a Frontity project
90 |
91 | **`components/index`**
92 |
93 | ```text
94 | import { CacheProvider } from '@emotion/core'
95 | import createCache from '@emotion/cache'
96 |
97 | const myCache = createCache()
98 | myCache.compat = true
99 |
100 |
101 |
102 |
103 | ```
104 |
105 | #### Solution 2
106 |
107 | You could also define functions to search and replace the selectors causing the warnings by the recommended ones
108 |
109 | **`helpers/css`**
110 |
111 | ```text
112 | export const nthChildToNthChildType = css => css.replace(/\:nth\-child/g, `:nth-type`)
113 | export const firstChildToFirstOfType = css => css.replace(/\:first\-child/g, `:first-of-type`)
114 |
115 | export const fixCss = css => firstChildToFirstOfType(nthChildToNthChildType(css))
116 | ```
117 |
118 | So then you can do in your code...
119 |
120 | **`components/index`**
121 |
122 | ```text
123 | import React from "react";
124 | import { Global, css, connect, styled, Head } from "frontity";
125 | ...
126 | import gutenbergThemeCSS from "../styles/theme.min.css";
127 | import gutenbergStyleCSS from "../styles/style.min.css";
128 | ...
129 |
130 | import {fixCss} from '../helpers/css'
131 | const fixedGutenbergThemeCSS = fixCss(gutenbergThemeCSS)
132 | const fixedGutenbergStyleCSS = fixCss(gutenbergStyleCSS)
133 |
134 |
135 | const Theme = ({ state }) => {
136 |
137 | ...
138 | return (
139 | <>
140 | ...
141 |
142 | ...
143 |
144 | );
145 | };
146 |
147 | ...
148 | ```
149 |
150 | **Related Threads**:
151 |
152 | * [https://community.frontity.org/t/bootstrap-the-pseudo-class-first-child-is-potentially-insecure-when-processed-on-the-server-side-try-changing-it-to-first-type/1811](https://community.frontity.org/t/bootstrap-the-pseudo-class-first-child-is-potentially-insecure-when-processed-on-the-server-side-try-changing-it-to-first-type/1811)
153 |
154 |
--------------------------------------------------------------------------------
/docs/guides/understanding-mars-theme.md:
--------------------------------------------------------------------------------
1 | ---
2 | description: Guide to help you understand what is involved in a Frontity project
3 | ---
4 |
5 | # Understanding a Frontity project
6 |
7 | ## What you get in a new Frontity project.
8 |
9 | If you have followed our [quick start guide](../getting-started/quick-start-guide.md) you probably have already a new Frontity project. If not, run `npx frontity create ` and you'll get a project with the same structure as the one explained in this guide.
10 |
11 | So, the important pieces that you get, once a project is created, are:
12 |
13 | * A `package.json` file where the dependencies needed for your app to work are declared.
14 | * A `frontity.settings.js` file where the basic setup for your app is already populated.
15 | * A `packages` folder with `mars-theme` installed inside.
16 |
17 | ### The `package.json` file
18 |
19 | The basic dependencies we'll need for our app to work are:
20 |
21 | * **`frontity`** : this is the main package, where we can find all the methods we might need to use during development. It's also where the CLI lives.
22 | * **`@frontity/core`** : here is where the magic happens. Core takes care of all the bundling, rendering, merging, transpiling, serving, etc. We don't need to access to it in order to develop a Frontity app.
23 | * **`@frontity/wp-source`** : this package is the one that connects to the WordPress REST API of your site and fetches all the data needed on your Frontity theme.
24 | * **`@frontity/tiny-router`** : this is a small package that handles `window.history` and helps us with the routing on `mars-theme`.
25 | * **`@frontity/mars-theme`** : this is our starter theme, where we build our site with React.
26 |
27 | As you can see, our `mars-theme` dependency has no version but a path. This is how we need to add our custom packages \(those we are developing inside the app\) to our `package.json` so they will be treated as if they were living in `node_modules`.
28 |
29 | ### The `frontity.settings.js` file
30 |
31 | In this file we define our project settings. We also define the extensions needed to successfully run a Frontity app. You can learn more about this file in the [Settings reference](https://docs.frontity.org/learning-frontity/settings).
32 |
33 | ### The `packages` folder
34 |
35 | In this folder is where we create all the custom extensions we want to develop for our site. Usually it will be a custom theme. In this case, the one installed by default is our `mars-theme`. Any changes done in these extensions during development will refresh our site automatically.
36 |
37 | ## How does everything work together
38 |
39 | When starting `frontity`, all the packages defined in `frontity.settings.js` are imported by `@frontity/file-settings` and the settings and exports from each package are merged by `@frontity/core` into a single `store` where you can access the `state` and `actions` of the different packages during development using `@frontity/connect` \(our state manager\).
40 |
41 | {% hint style="info" %}
42 | Still have questions? Ask [the community](https://community.frontity.org/)! We are here to help 😊
43 | {% endhint %}
44 |
45 |
--------------------------------------------------------------------------------
/docs/guides/update-db-urls.md:
--------------------------------------------------------------------------------
1 | # URLs in a Migration from WordPress to Frontity Decoupled Mode
2 |
3 | If you are **migrating an existing WordPress site to Frontity** and you are using [**Decoupled Mode**](../architecture/decoupled-mode.md), you will need to change the URL of your WordPress site. You need to do this as the primary domain (i.e. the one that site visitors use) will point to the Frontity site, and the domain that points to the WordPress installation will need to be changed to the secondary domain (or subdomain).
4 |
5 | 
6 |
7 | ## The issue with URLs in this scenario
8 |
9 | Let's take as an example a WordPress site under the domain `www.domain.com`. Let's suppose that we want to migrate this to Frontity in Decoupled Mode. We will need to make the following changes:
10 |
11 | - `www.domain.com` will point to the Frontity server
12 | - `wp.domain.com` will point to the WordPress server
13 |
14 | In this scenario internal links that exist in the content when the WordPress URL is changed to `wp.domain.com` will still point to `www.domain.com`. However, if any content is added after the change then internal links will point to `wp.domain.com`. This creates a situation where internal links in the content are inconsistent, with "old" links pointing to `www.domain.com` and "new" links pointing to `wp.domain.com`.
15 |
16 | {% hint style="info" %}
17 | **Note that** WordPress always uses absolute links internally, rather than relative links. WordPress uses the [internal URL `Settings`](https://wordpress.org/support/article/changing-the-site-url/) to determine where the internal links should point to.
18 | {% endhint %}
19 |
20 | In addition, the [link processor](https://api.frontity.org/frontity-packages/collections-packages/components#the-link-processor) uses the [domain configured as the WordPress data source](./setting-url-wordpress-source-data.md) (which will now be `wp.domain.com`) to convert links to a `` component. So if the internal links are left pointing to `www.domain.com` the link processor won't work on those links because it will only convert links pointing to `wp.domain.com`, i.e. the URL of the WordPress data source.
21 |
22 | ## Updating the URLs in WordPress
23 |
24 | You will therefore need to change [the `WordPress Address` and the `Site Address`](https://wordpress.org/support/article/changing-the-site-url/) in the "Settings" page of the WordPress admin so they point to new URL (e.g. `wp.domain.com`).
25 |
26 | 
27 |
28 | Also, for the reasons stated above, any URLs in the content stored in the database also need to be updated to reflect the new domain (e.g. `wp.domain.com`). This can be done in 2 ways:
29 |
30 | - With a WordPress plugin
31 | - Updating the URLs manually
32 |
33 | ### Using a plugin
34 |
35 | To change the URLs in the content stored in the database you can use a plugin such as one of the following:
36 | - [Velvet Blues Update URLs](https://wordpress.org/plugins/velvet-blues-update-urls/)
37 | - [Go Live Update URLs](https://en-gb.wordpress.org/plugins/go-live-update-urls/)
38 | - [Better Search Replace](https://wordpress.org/plugins/better-search-replace/).
39 |
40 | ### Updating manually
41 |
42 | You can also update the links manually by running the following SQL commands using either `phpMyAdmin` or an application such as [Sequel Pro](https://www.sequelpro.com/) or [Sequel Ace](https://sequel-ace.com/).
43 |
44 | {% hint style="danger" %}
45 | Before running the commands below ensure that you have **a backup of your database**!
46 | {% endhint %}
47 |
48 | ```sql
49 | UPDATE wp_options SET option_value = replace(option_value, 'https://www.domain.com', 'https://wp.domain.com') WHERE option_name = 'home' OR option_name = 'siteurl';
50 | ```
51 |
52 | ```sql
53 | UPDATE wp_posts SET guid = replace(guid, 'https://www.domain.com', 'https://wp.domain.com');
54 | ```
55 |
56 | ```sql
57 | UPDATE wp_posts SET post_content = replace(post_content, 'https://www.domain.com', 'https://wp.domain.com');
58 | ```
59 |
--------------------------------------------------------------------------------
/docs/guides/what-are-the-requisites-of-wordpress-for-frontity.md:
--------------------------------------------------------------------------------
1 | # WordPress requirements for Frontity
2 |
3 | To work with Frontity you will need a **WordPress installation**. This can be hosted locally, on a web-server, or you can also use a site hosted on wordpress.com
4 |
5 | Any standard installation should work with Frontity but just to be thorough, let's review some basic stuff that needs to be taken into account on the WordPress side so everything works smoothly.
6 |
7 | ## WordPress requirements
8 |
9 | ### Have a recent WordPress version
10 |
11 | Frontity depends on the [WordPress REST-API](https://developer.wordpress.org/rest-api/). If you have a recent version of WordPress installed, or if you're using wordpress.com then you should be good to go.
12 |
13 | Any WordPress site running at least [version 4.7](https://wordpress.org/support/wordpress-version/version-4-7/) \(December 6, 2016\) has a REST API directly available \(no plugin needed\)
14 |
15 | ### Have public access to the REST API
16 |
17 | If you have a recent version of WordPress then you should have public access to the REST API of your WordPress installation.
18 |
19 | Anyway, you can check that your WordPress REST-API is working and publicly available.
20 |
21 | The URL of this REST API may [vary depending on the type of WordPress installation](https://docs.frontity.org/guides/setting-url-wordpress-source-data) but for a typical self-hosted WordPress installation \(wp.org\) this URL can be got by adding `/wp-json/` to the end of your site’s URL.
22 |
23 | From that URL you should see a structure of data representing the content of your WordPress \(something like [this](https://test.frontity.org/wp-json/wp/v2)\). Don't worry, this is JSON and Frontity is very happy with this.
24 |
25 | ### Have pretty permalinks activated
26 |
27 | Frontiy requires that the WordPress data source uses one of the pretty permalinks options, rather than the plain one, in `Settings->Permalinks`.
28 |
29 | 
30 |
31 |
--------------------------------------------------------------------------------
/docs/learning-frontity/README.md:
--------------------------------------------------------------------------------
1 | # 📚 Core Concepts
2 |
3 | Frontity was designed to make it as simple as possible for developers to create sites using decoupled (or headless) WordPress.
4 |
5 | However, in order to have the best possible experience when developing with Frontity you still need to become familiar with certain concepts.
6 |
7 | In this **Core Concepts** section you'll learn the basic ideas that underlie a Frontity Project.
8 |
9 | A [Frontity project](project.md) basically consists of several packages installed into the project's directory and which are configured in the settings file (`frontity.settings.js`). In the [**Project**](project.md) section you'll learn about the structure of a Frontity project and the purpose of each directory or file contained within it.
10 |
11 | The `frontity.settings.js` file is where the Frontity project is configured. It contains the definition of, and the configuration for, each package included in the project. In the [**Settings**](settings.md) section you'll learn more about how to add settings for your Frontity project, to define such things as:
12 |
13 | - how many sites are being managed by this instance of Frontity,
14 | - the packages required by each site,
15 | - the theme to be used,
16 | - the URL of the WordPress data source,
17 | - any initial data for the Frontity state,
18 |
19 | as well as much more.
20 |
21 | Frontity projects are built around the concept of [packages](https://api.frontity.org/frontity-packages). A package is, in essence, code that instatiates logic that can be reused across many projects. In the [**Packages**](packages.md) section you will find various concepts and topics related to packages, such as:
22 |
23 | - local packages,
24 | - directory structure,
25 | - publishing,
26 |
27 | and more.
28 |
29 | Every Frontity package shares a common API which consists of these four main elements:
30 |
31 | - [**Roots**](roots.md): A package in Frontity can define a `root` which is an HTML element representing the point where React is inserted for that package. This is usually only needed for Theme packages but can be defined for any package.
32 | - [**State**](state.md): Frontity's State is a JavaScript object containing all the data (state) exposed by the project and its packages.
33 | - [**Actions**](actions.md): Actions are a set of functions that your package needs to work. They can also be used to expose data so that other packages can get access to that data. They can modify the state but don't return anything.
34 | - [**Libraries**](libraries.md): Libraries are a set of tools that are not intended to change the state, but rather other parts of the application.
35 |
36 | As these elements, namely the Frontity state, actions and libraries, all belong to a common space shared among all the packages in a project, each package needs to be defined under its own namespace in order to avoid conflicts. In the [**Namespaces**](namespaces.md) section you'll learn more about how using namespaces can make Frontity projects very flexible and extensible.
37 |
38 | Frontity uses CSS in JS for adding styles to the React components. This approach improves the performance of Frontity sites and also makes for a better developer experience. In the [**Styles**](styles.md) section you can learn some of the CSS in JS concepts needed to style Frontity projects.
--------------------------------------------------------------------------------
/docs/learning-frontity/actions.md:
--------------------------------------------------------------------------------
1 | # 6. Actions
2 |
3 | Actions are a set of functions that your package needs to work or expose for other packages. They can modify the state and don't return anything.
4 |
5 | {% hint style="info" %}
6 | Actions don't return data. Data is always accessed via the state. That's because Frontity is following the [Flux pattern](https://facebook.github.io/flux/) \(like Redux\).
7 | {% endhint %}
8 |
9 | Let's see one simple example:
10 |
11 | ```javascript
12 | actions: {
13 | theme: {
14 | openMenu: ({ state }) => {
15 | state.theme.isMenuOpen = true;
16 | },
17 | closeMenu: ({ state }) => {
18 | state.theme.isMenuOpen = false;
19 | }
20 | }
21 | }
22 | ```
23 |
24 | **Actions** are similar to **derived state**. They receive `({ state })` in their argument but that gets stripped out when you consume them:
25 |
26 | ```jsx
27 | actions.theme.openMenu();
28 | ```
29 |
30 | And similar to derived state functions, they can also receive arguments if they are declared using a second function:
31 |
32 | ```javascript
33 | actions: {
34 | theme: {
35 | setMenu: ({ state }) => value => {
36 | if (value === "open")
37 | state.theme.isMenuOpen = true;
38 | else if (value === "closed")
39 | state.theme.isMenuOpen = false;
40 | },
41 | }
42 | }
43 | ```
44 |
45 | And they are consumed like this:
46 |
47 | ```jsx
48 | actions.theme.setMenu("open");
49 | ```
50 |
51 | Actions can be used either by their own package or by other packages.
52 |
53 | For example, `tiny-router` \(and all packages that want to implement the `router` API\) exposes the action `actions.router.set()`. This action modifies `state.router.link` and makes sure that the URL of your browser is in sync. Additionally, `tiny-router` also runs this action if users click on the _back_ and _forward_ buttons of their browsers.
54 |
55 | By the way, you can access the actions in the client console using:
56 |
57 | ```text
58 | > frontity.actions
59 | ```
60 |
61 | ## Frontity Lifecycle Initialization Actions
62 |
63 | There are a set of special actions that Frontity runs at appropriate moments when [initializing the app](../isomorphic-react.md#initialization-of-a-frontity-app) in either the Client and the server-side :
64 |
65 | 
66 |
67 | ### `init` (client & server)
68 |
69 | Packages can use this action to initialize their internal libraries. Packages should not use actions or libraries from other packages as they may not be properly initialized.
70 |
71 | ### `beforeSSR` (server only)
72 |
73 | The purpose of this action is to prepare the state for the React render made in the server. Packages can populate it with content fetched from external APIs, like the WP REST API. They can also interact with other packages if necessary.
74 |
75 | You can _optionally_ use the [curried](https://en.wikipedia.org/wiki/Currying) version of `beforeSSR` which is called with an object that contains the [Koa Context](https://koajs.com/#context) in the `ctx` parameter. You can use this `ctx` to modify things like status codes, headers and so on.
76 |
77 | ```javascript
78 | // Without the context
79 | {
80 | beforeSSR: ({ state, libraries }) => {
81 | console.log('Gonna SSR this page');
82 | }
83 | }
84 |
85 | // The optional curried version using the context
86 | {
87 | beforeSSR: ({ state, libraries }) => async ({ ctx }) => {
88 | // ctx is koa context: https://koajs.com/#context
89 | console.log('SSR all day long', ctx.status);
90 | }
91 | }
92 | ```
93 |
94 | ### `afterSSR` (server only)
95 |
96 | This action runs after the HTML has been generated by React, but before the `state` snapshot is taken and the HTML is sent to the client. Therefore, packages can use the `afterSSR` step for things like setting headers or removing parts of the `state` that shouldn't be exposed to the client.
97 |
98 | ### `beforeCSR` (client only)
99 |
100 | This action is run before React is hydrated. Be aware that the state that React needs for the hydration is already received from the server so you don't need to replicate the fetching done in `beforeSSR`.
101 |
102 | ### `afterCSR` (client only)
103 |
104 | This action is run after React has been hydrated in the client and it has taken control of the page. This is where packages with client-side logic can start doing their thing.
105 |
106 | {% hint style="info" %}
107 | If you still have any questions about Actions in Frontity, please check out the [**community forum**](https://community.frontity.org), which is packed full of answers and solutions to all sorts of Frontity questions. If you don't find what you're looking for, feel free to start a new post.
108 | {% endhint %}
109 |
110 |
--------------------------------------------------------------------------------
/docs/learning-frontity/libraries.md:
--------------------------------------------------------------------------------
1 | # 7. Libraries
2 |
3 | Do you remember [Actions](actions.md)? Libraries are pretty similar. Actions have been defined as a reusable set of functions aimed to change the state of the application. Similarly, **libraries** are a reusable set of tools. However, it is NOT aimed to change the state, but rather other parts of the application and is available for use by many packages.
4 |
5 | Let's see two different examples: `stringify` and the array of processors of `html2react`.
6 |
7 | ## Stringify
8 |
9 | In the `wp-source` package, we have a library called [`stringify`](https://docs.frontity.org/api-reference-1/wordpress-source#stringify-path-page-query-hash) which is used to create a route from the params you pass to it. This won't change the state, but it is reusable logic that has proven really useful.
10 |
11 | ```javascript
12 | const path = "/category/nature";
13 | const page = 4;
14 |
15 | const nextPageLink = libraries.source.stringify({
16 | path,
17 | page: page + 1
18 | });
19 | // Outputs: "/category/nature/page/5"
20 |
21 | const prevPageLink = libraries.source.stringify({
22 | path,
23 | page: page - 1
24 | });
25 | // Outputs: "/category/nature/page/3"
26 | ```
27 |
28 | As you can see, we are creating two new URLs \(one for next posts and other for previous ones\) with the same code. This library accepts more params and you can perform more complex logic, but this is a good example of how to consume libraries and its reusability.
29 |
30 | Like actions, libraries can be used either by their own packages or by other packages. For example, although `stringify` is defined inside `wp-source` package, it could also be use by your own theme.
31 |
32 | ## Array of processors from html2react
33 |
34 | Another example is the array of processors from [html2react](libraries.md). There are some processors defined by default, but you can also add any processor you want, and it will be executed without additional code being needed.
35 |
36 | For example, there is a processor for images where each time it finds an `` tag, it transforms it to an `` component with some props and functionalities added to it.
37 |
38 | You could add your own processor that finds every `
` and transforms it into a new `` component with your own logic.
39 |
40 | {% code title="" %}
41 | ```jsx
42 | import image from "@frontity/html2react/processors/image";
43 | import blockquote from "./processors/blockquote";
44 |
45 | const myTheme = {
46 | ...
47 | actions: {
48 | theme: {
49 | init: ({ libraries }) => {
50 | // We use html2react to process the tags inside the content HTML.
51 | libraries.html2react.processors.push(image);
52 | libraries.html2react.processors.push(blockquote);
53 | }
54 | }
55 | }
56 | ...
57 | };
58 |
59 | export default myTheme;
60 | ```
61 | {% endcode %}
62 |
63 | That's basically all you need to know about libraries, a powerful way of reusing tools in Frontity. Oh, and you can access the available libraries in the client console using:
64 |
65 | ```text
66 | > frontity.libraries
67 | ```
68 |
69 | {% hint style="info" %}
70 | If you still have any questions about Libraries in Frontity, please check out the [**community forum**](https://community.frontity.org), which is packed full of answers and solutions to all sorts of Frontity questions. If you don't find what you're looking for, feel free to start a new post.
71 | {% endhint %}
72 |
73 |
74 |
--------------------------------------------------------------------------------
/docs/learning-frontity/namespaces.md:
--------------------------------------------------------------------------------
1 | # 8. Namespaces
2 |
3 | Now, let's talk about **namespaces** and how we, as a community, can use them to extend Frontity and create a better tool for everyone.
4 |
5 | In **Frontity** `state`, `actions` and `libraries` belong to a shared space among all packages, so each package needs to use its own namespace.
6 |
7 | To avoid conflicts between packages we could simply use the name of the package, but we use **namespaces** instead because some packages are interchangeable. For example, it doesn't matter if you install `wp-comments` \(native WordPress comments\) or `disqus-comments` \(Disqus comments\) in your Frontity project because the theme is going to access it using the common `comments` namespace and everything is going to work. In the future, another person could create a third `comments` package, based on a new service, and as long as it respects the same structure \(written in TypeScript\), all the themes \(even the old ones!\) will work perfectly.
8 |
9 | More examples of **namespaces** are:
10 |
11 | * `source`: for example `wp-source`, `wpgrahql-source` or even `drupal-source`…
12 | * `analytics`: for example `google-analytics`, `gtm-analytics`, `mixpanel-analytics`…
13 | * `notifications`: for example `onesignal-notifications`, `pushwoosh-notifications`…
14 | * `share`: for example `modal-share`, `native-share`…
15 | * `router`: for example `tiny-router`, `3d-router`…
16 |
17 | But let's start from the beginning.
18 |
19 | ## Using namespaces in package exports
20 |
21 | As we've already seen, this could be a typical `theme` package:
22 |
23 | {% code title="/packages/my-awesome-theme/src/index.js" %}
24 | ```javascript
25 | import Theme from "./components";
26 |
27 | export default {
28 | roots: {
29 | theme: Theme,
30 | },
31 | state: {
32 | theme: {
33 | menu: [
34 | ["Home", "/"],
35 | ["About", "/about"],
36 | ],
37 | isMenuOpen: false,
38 | featuredImage: {
39 | showOnList: false,
40 | showOnPost: false,
41 | },
42 | },
43 | },
44 | actions: {
45 | theme: {
46 | toggleMenu: ({ state }) => {
47 | state.theme.isMenuOpen = !state.theme.isMenuOpen;
48 | },
49 | },
50 | },
51 | };
52 | ```
53 | {% endcode %}
54 |
55 | One thing you might notice is that `roots`, `state`, and `actions` have a namespace called `theme`. It may seem like it is not adding much value because it is the only namespace. Why not write it like this instead?
56 |
57 | {% code title="/packages/my-awesome-theme/src/index.js" %}
58 | ```javascript
59 | import Theme from "./components";
60 |
61 | export default {
62 | namespace: "theme",
63 | roots: Theme,
64 | state: {
65 | menu: [
66 | ["Home", "/"],
67 | ["About", "/about"],
68 | ],
69 | isMenuOpen: false,
70 | featuredImage: {
71 | showOnList: false,
72 | showOnPost: false,
73 | },
74 | },
75 | actions: {
76 | toggleMenu: ({ state }) => {
77 | state.theme.isMenuOpen = !state.theme.isMenuOpen;
78 | },
79 | },
80 | };
81 | ```
82 | {% endcode %}
83 |
84 | There are several reasons:
85 |
86 | ### 1. It's easier to be aware of the final structure
87 |
88 | When you access state or actions, it's much easier to see what you need when you write it like this:
89 |
90 | {% code title="" %}
91 | ```javascript
92 | state: {
93 | theme: {
94 | isMenuOpen: false,
95 | }
96 | },
97 | actions: {
98 | theme: {
99 | toggleMenu: ({ state }) => {
100 | state.theme.isMenuOpen = !state.theme.isMenuOpen; // <- Easy, right?
101 | }
102 | }
103 | }
104 | ```
105 | {% endcode %}
106 |
107 | ### 2. It's easier for TypeScript
108 |
109 | Even though TypeScript is optional in **Frontity**, we make sure it has excellent support in case you want to use it. TypeScript gets really complex when you try to modify the structure of your objects, and in order to make it as simple as possible, it's good to create objects with the same structure that they will be consumed later. So yes, TypeScript just works :\)
110 |
111 | ### 3. Multiple namespaces per package
112 |
113 | Packages can export multiple namespaces and that's good. It makes **Frontity** more flexible.
114 |
115 | For example, imagine we want to create a theme that implements its own share:
116 |
117 | {% code title="/packages/my-awesome-theme-with-share/src/index.js" %}
118 | ```javascript
119 | import Theme from "./components/theme";
120 | import Share from "./components/share";
121 |
122 | export default {
123 | roots: {
124 | theme: Theme,
125 | share: Share
126 | },
127 | state: {
128 | theme: {
129 | ... // State for the theme
130 | },
131 | share: {
132 | ... // State for the share
133 | }
134 | },
135 | actions: {
136 | theme: {
137 | ... // Actions for the theme
138 | },
139 | share: {
140 | ... // Actions for the share
141 | }
142 | }
143 | }
144 | ```
145 | {% endcode %}
146 |
147 | ## Making Frontity extensible through namespaces
148 |
149 | This is the main reason namespaces exist in **Frontity** and a big part of how Frontity itself works.
150 |
151 | We use namespaces to create abstractions on top of packages and, by doing so, they can communicate between each other without really knowing the specific implementation.
152 |
153 | It's easier to understand with some examples.
154 |
155 | ### Example: `comments`
156 |
157 | Take for example the [`@frontity/wp-comments`](https://api.frontity.org/frontity-packages/features-packages/wp-comments) package which has an [`actions.comments.submit`](https://api.frontity.org/frontity-packages/features-packages/wp-comments#actions-comments-submit) method. As you can see this method is defined under the `comments` namespace.
158 |
159 | In the case of the `@frontity/wp-comments` package the `actions.comments.submit` is responsible for sending the content of the fields in the comment form to WordPress.
160 |
161 | Now, all the `theme` packages that want to submit a comments form can check if there is a package with the `comments` namespace with an `actions.comments.submit` method available. If there is, it can be used from any React component in the project to submit comment form data.
162 |
163 | ```js
164 | // Submit the comment to the post with ID 60
165 | // using the values passed as the second argument.
166 | actions.comments.submit(60, {
167 | content: "This is a comment example. Hi!",
168 | authorName: "Frontibotito",
169 | authorEmail: "frontibotito@frontity.com",
170 | });
171 | ```
172 |
173 | Users can use their `frontity.settings.js` to install and configure `wp-comments`:
174 |
175 | {% code title="frontity.settings.js" %}
176 | ```javascript
177 | export default {
178 | packages: [
179 | "my-awesome-theme",
180 | "@frontity/tiny-router",
181 | "@frontity/wp-source",
182 | "@frontity/wp-comments", // <- That's it. You have native wp comments now.
183 | ],
184 | };
185 | ```
186 | {% endcode %}
187 |
188 | But what if \(and now this is where things become interesting\) users don't want to use WordPress native comments but [Disqus](https://disqus.com/) comments?
189 |
190 | Then they just have to install a possible `disqus-comments` package instead:
191 |
192 | {% code title="frontity.settings.js" %}
193 | ```javascript
194 | export default {
195 | packages: [
196 | "my-awesome-theme",
197 | "@frontity/tiny-router",
198 | "@frontity/wp-source",
199 | "@frontity/disqus-comments", // <- That's it. You have disqus now.
200 | ],
201 | };
202 | ```
203 | {% endcode %}
204 |
205 | This possible `disqus-comments` package might define a different implementation of `actions.comments.submit` that instead of submitting the comment form data to WordPress it would instead submit it to be handled by Disqus.
206 |
207 | Actually, the `theme` has no idea about what specific implementation of `comments` you have installed. Everything works and the theme didn't need to change.
208 |
209 | ### Example: `analytics`
210 |
211 | Let's take a look at another example: two actions in the `analytics` namespace. All the packages that want to implement analytics need to have these two actions:
212 |
213 | * `actions.analytics.sendPageview`: send a pageview to the analytics service.
214 | * `actions.analytics.sendEvent`: send an event to the analytics service.
215 |
216 | The first one, `actions.analytics.sendPageview`, is used by packages that implement `router`, each time `actions.router.set` is used.
217 |
218 | The second one, `actions.analytics.sendEvent`, is used by the theme when something interesting happens. For example:
219 |
220 | {% code title="Post.js" %}
221 | ```jsx
222 | const Post = ({ actions }) => (
223 |
224 |
225 |
226 |
227 |
228 | );
229 |
230 | export default connect(Post);
231 | ```
232 | {% endcode %}
233 |
234 | {% code title="/packages/theme/src/index.js" %}
235 | ```jsx
236 | export default {
237 | state: {
238 | theme: {
239 | shareOpen: false,
240 | },
241 | },
242 | actions: {
243 | theme: {
244 | openShareModal: ({ state, actions }) => {
245 | state.theme.shareOpen = true;
246 | if (actions.analytics) {
247 | actions.analytics.sendEvent("share-modal-open");
248 | }
249 | },
250 | },
251 | },
252 | };
253 | ```
254 | {% endcode %}
255 |
256 | When users open the share modal, a new event is sent to the analytics service of the `analytics` package that is installed in the **Frontity** project, no matter which one it is 🎉🎉
257 |
258 | {% hint style="info" %}
259 | If you still have any questions about Namespaces in Frontity, please check out the [**community forum**](https://community.frontity.org), which is packed full of answers and solutions to all sorts of Frontity questions. If you don't find what you're looking for, feel free to start a new post.
260 | {% endhint %}
261 |
--------------------------------------------------------------------------------
/docs/learning-frontity/packages.md:
--------------------------------------------------------------------------------
1 | # 3. Packages
2 |
3 | ## Local Packages
4 |
5 | As we have already explained, this is the place where you will add code and functionality to your sites.
6 |
7 | When you do a `npx frontity create`, we install three packages for you:
8 |
9 | * `@frontity/tiny-router` as an external package. It ends up in the `node_modules` folder.
10 | * `@frontity/wp-source` as an external package. It ends up in the `node_modules` folder.
11 | * `@frontity/mars-theme` as a **local package**. It ends up in the `packages` folder.
12 |
13 | We do this because the most likely situation is that you want to modify the theme, but you don't want to modify the router or source packages.
14 |
15 | Once we move a package from `node_modules` to `packages` it becomes a **local package** and you can change it at will. If you use `git`, its code is also included in your project and you can commit any change. If you want to use that package in other projects or you want to contribute to the community, you can publish it to npm using `npm publish`.
16 |
17 | Be aware, you should not change anything inside `node_modules` because that folder is not committed to git and it is thrown away each time you move, reinstall or deploy your project.
18 |
19 | Finally, it's worth noting that **Frontity** doesn't know which packages are local and which are external. The only difference between them is the way they are installed in the `package.json`. When they are local, they are referenced by folder and when they are external, by the version number:
20 |
21 | {% code title="package.json" %}
22 | ```javascript
23 | "dependencies": {
24 | "frontity": "^0.2.11", // installed in node_modules
25 | "@frontity/core": "^0.3.7", // installed in node_modules
26 | "@frontity/wp-source": "^0.1.7", // installed in node_modules
27 | "@frontity/tiny-router": "^0.3.4", // installed in node_modules
28 | "@frontity/mars-theme": "./packages/mars-theme" // installed in packages
29 | }
30 | ```
31 | {% endcode %}
32 |
33 | If you want to install a new Frontity package you can follow this guide: [Install a new Frontity package](../guides/install-a-new-package.md).
34 |
35 | ## Package Folder Structure
36 |
37 | Packages have their own `package.json` file. Its code is inside the `/src` folder.
38 |
39 | ```text
40 | my-frontity-project/
41 | |__ ...
42 | |__ packages/
43 | |__ my-theme/
44 | |__ package.json
45 | |__ src/
46 | |__index.js
47 | ```
48 |
49 | Let's review this in detail.
50 |
51 | ### Package.json
52 |
53 | The `package.json` file is where you can write the info \(name, description, author, repository, version...\) of the package. It's just a regular `package.json` file, so nothing fancy here.
54 |
55 | It also lists the npm `dependencies` for the package. The `"dependencies"` field gets automatically populated when you run `npm install some-npm-package` in the package folder.
56 |
57 | ```text
58 | cd packages/my-awesome-theme
59 | npm install some-npm-package
60 | ```
61 |
62 | {% code title="/packages/my-awesome-theme/package.json" %}
63 | ```javascript
64 | {
65 | "name": "my-awesome-theme",
66 | "description": "An awesome theme for Frontity",
67 | ...
68 | "dependencies": {
69 | "some-npm-package": "^2.2.6"
70 | }
71 | }
72 | ```
73 | {% endcode %}
74 |
75 | Packages need their own `package.json` file because:
76 |
77 | * **Frontity** treats them like any other npm package found in `node_modules`.
78 | * They can be published to npm independently 🚀
79 | * They have their own name, version, authors and license.
80 |
81 | ### Entry Points
82 |
83 | By default only one file is needed: `/src/index.js`.
84 |
85 | In some cases you may want to use different code in your client than in your server. Then you can use two files, `/src/client.js` and `/src/server.js`.
86 |
87 | ## Publishing Local Packages
88 |
89 | One thing we wanted to make sure in **Frontity** is that publishing packages was really easy.
90 |
91 | For that reason, **Frontity** packages don't need to be transpiled. They can be written in either JavaScript or TypeScript. _So, look ma, no build step!_
92 |
93 | They can be published to npm directly from the `/packages` folder of your **Frontity** project:
94 |
95 | ```text
96 | cd packages/my-awesome-theme
97 | npm publish
98 | ```
99 |
100 | Now `my-theme` is available in npm! Any other **Frontity** user can install it using:
101 |
102 | ```text
103 | npm install my-awesome-theme
104 | ```
105 |
106 | And then including it in their `frontity.settings.js` file:
107 |
108 | ```javascript
109 | {
110 | name: "my-site",
111 | packages: [
112 | "@frontity/my-awesome-theme",
113 | "@frontity/tiny-router",
114 | "@frontity/wp-source"
115 | ]
116 | }
117 | ```
118 |
119 | Yes, it is **that simple** :\)
120 |
121 | ## Package exports
122 |
123 | Packages can export any of these elements in their `index.js` file:
124 |
125 | * **Roots:** React components that will be included in the app.
126 | * **Fills**: React components that will be included in the app, but injected after the roots.
127 | * **State:** A JavaScript object containing all the state exposed by your package.
128 | * **Actions:** A set of actions that your package needs to work or expose for other packages.
129 | * **Libraries:** Any additional tools that your package exposes for other packages.
130 |
131 | For example, a simple theme could be like this:
132 |
133 | {% code title="/packages/my-awesome-theme/src/index.js" %}
134 | ```javascript
135 | import Theme from "./components";
136 |
137 | export default {
138 | roots: {
139 | theme: Theme // <- This is the root component of your theme.
140 | },
141 | state: {
142 | theme: {
143 | menu: [
144 | ["Home", "/"],
145 | ["About", "/about"]
146 | ],
147 | isMenuOpen: false,
148 | featuredImage: {
149 | showOnList: true,
150 | showOnPost: false
151 | }
152 | }
153 | },
154 | actions: {
155 | theme: {
156 | openMenu: ({ state }) => {
157 | state.theme.isMenuOpen = true;
158 | },
159 | closeMenu: ({ state }) => {
160 | state.theme.isMenuOpen = false;
161 | }
162 | }
163 | }
164 | }
165 | ```
166 | {% endcode %}
167 |
168 | By the way, it's probably good to point out here that in Frontity all packages are equal. Frontity doesn't know which one represents a `theme` or which one represents a `source`. It treats all of them equally.
169 |
170 | Let's explore the **Roots** and **Fills** in the next section.
171 |
172 | {% hint style="info" %}
173 | If you still have any questions about Packages in Frontity, please check out the [**community forum**](https://community.frontity.org), which is packed full of answers and solutions to all sorts of Frontity questions. If you don't find what you're looking for, feel free to start a new post.
174 | {% endhint %}
175 |
176 |
--------------------------------------------------------------------------------
/docs/learning-frontity/project.md:
--------------------------------------------------------------------------------
1 | # 1. Project
2 |
3 | The first thing you need to understand about Frontity is that all the code lives inside packages. There is no "app code" per se, like in other frameworks. Your final site is the combination of all your packages.
4 |
5 | For those of you coming from WordPress, that's no surprise. All the WordPress code \(except the core\) is contained in either the theme or the plugins. If you come from React, this may be less intuitive, but it just means that the files of your project are always inside a **package**, either your theme or any other extension.
6 |
7 | At this point, it is important to understand and differentiate between two types of packages:
8 |
9 | * **Core packages**: – `frontity` and `@frontity/core` These packages contain the core of Frontity and need to be installed in any Frontity project.
10 | * **Frontity packages**: – For example `@frontity/wp-source` , `@frontity/tiny-router` or `@frontity/my-theme` These are similar to WordPress theme and plugins. You can change them if you want, add more, create new ones...
11 |
12 | Both core and Frontity packages are _npm packages_ and need to be installed with `npm install the-package-name`. Don't worry, if you have used `npx frontity create`, the core packages were already installed for you.
13 |
14 | The Frontity packages also need to be declared in your settings file: `frontity.settings.js`. We'll talk about the settings in detail in the next section.
15 |
16 | ## Folder Structure
17 |
18 | If you have followed our [quick start guide](../getting-started/quick-start-guide.md) you probably have a new **Frontity** project. This is its folder structure:
19 |
20 | ```text
21 | /my-frontity-project
22 | |__ frontity.settings.js
23 | |__ package.json
24 | |__ /node_modules
25 | |__ /packages
26 | |__ /my-theme
27 | |__ /my-custom-extension-1
28 | |__ /my-custom-extension-2
29 | ```
30 |
31 | It's important to understand each part of the project:
32 |
33 | ### The `frontity.setting.js` file
34 |
35 | As its name suggests, this is where you define the settings for your project, the packages needed, and their own settings. You have a default configuration when you use `npx frontity create` to start a new project, but Frontity is really versatile, and there are many options. You can check them out at [the Settings page](settings.md), explained in detail later.
36 |
37 | ### The `/node_modules/` folder
38 |
39 | This is the folder where all your dependencies are installed. For example, the core of Frontity \(`@frontity/core`\) is installed there. If you install other Frontity packages like `@frontity/tiny-router` or `@frontity/wp-source` they will be there as well.
40 |
41 | These packages **aren't meant to be modified**, as they are dependencies. If you modify their code, your code will be overwritten when you update the dependencies. Again, it is similar to WordPress. Once you install a theme or a plugin, it is recommended to not change their code because if you update them, your changes will be lost.
42 |
43 | If you want to change these, you should first move them to the `/packages/` folder. The code won't be update when inside this directory.
44 |
45 | ### The `/packages/` folder
46 |
47 | This is the folder where your **local packages** live. These are the packages where you will add code and functionality to your site. It will include your theme, the Frontity packages you moved from `node_modules` folder to adapt their code, and the custom packages you create. They are core in Frontity, so they are explained in detail later at [Packages](packages.md).
48 |
49 | ### The `package.json` file
50 |
51 | This is the file used for configuration in any Node.js project. There are many great articles about it like [this one](https://medium.com/beginners-guide-to-mobile-web-development/why-package-json-npm-basics-cab3e8cd150), [this one](https://flaviocopes.com/package-json/) or [this one](https://alligator.io/nodejs/package-json/), but its main purpose is to store the dependencies needed for your app to work. The basic dependencies added after a `npx frontity create` are:
52 |
53 | * **`frontity`** : this is the main package, where we can find all the methods we might need to use during development. It's also where the CLI lives.
54 | * **`@frontity/core`** : here is where the magic happens. Core takes care of all the bundling, rendering, merging, transpiling, serving, etc. We don't need to access it in order to develop a Frontity app.
55 | * **`@frontity/wp-source`** : this package is the one that connects to the WordPress REST API for your site and fetches all the data needed for your Frontity theme. If you are using a different Source than WordPress, you will want to change this.
56 | * **`@frontity/tiny-router`** : this is a small package that handles `window.history` and helps us with the routing. You can also use a different Router.
57 | * **`@frontity/mars-theme`** : this is our starter theme, where we build our site with React, but you could install a different one.
58 |
59 | {% code title="package.json" %}
60 | ```javascript
61 | {
62 | "name": "my-frontity-project",
63 | ...
64 | "dependencies": {
65 | "frontity": "^1.2.2"
66 | "@frontity/core": "^1.1.3",
67 | "@frontity/wp-source": "^1.1.8",
68 | "@frontity/tiny-router": "^1.0.12",
69 | "@frontity/mars-theme": "./packages/mars-theme"
70 | }
71 | }
72 | ```
73 | {% endcode %}
74 |
75 | As you can see, our `mars-theme` dependency has no version but a path. This is how we need to add our local packages to our `package.json` so they will be treated as if they were living in `node_modules`.
76 |
77 | {% hint style="info" %}
78 | If you still have any questions about how Projects work in Frontity, please check out the [**community forum**](https://community.frontity.org), which is packed full of answers and solutions to all sorts of Frontity questions. If you don't find what you're looking for, feel free to start a new post.
79 | {% endhint %}
80 |
81 |
--------------------------------------------------------------------------------
/docs/learning-frontity/roots.md:
--------------------------------------------------------------------------------
1 | # 4. Roots
2 |
3 | ## Roots
4 |
5 | Each package has the opportunity to include any number of React nodes in the final HTML.
6 |
7 | We finished the [Packages](packages.md) section with an example of package export that contained a `root` like this:
8 |
9 | {% code title="/packages/my-awesome-theme/src/index.js" %}
10 | ```javascript
11 | import MyAwesomeTheme from "./components";
12 |
13 | export default {
14 | roots: {
15 | theme: MyAwesomeTheme,
16 | },
17 | };
18 | ```
19 | {% endcode %}
20 |
21 | Usually, a React app injects it's code in a `
` of the body, like this:
22 |
23 | {% code title="/index.HTML \(rendered by Frontity\)" %}
24 | ```markup
25 |
26 | ...
27 |
28 |
` to inject the roots of all the packages that are installed:
37 |
38 | {% code title="/index.HTML \(rendered by Frontity\)" %}
39 | ```jsx
40 |
41 | ...
42 |
43 |
44 |
45 |
46 |
47 |
48 |
49 |
50 | ```
51 | {% endcode %}
52 |
53 | Most of the time only your `theme` will export a **root**, but if any other package needs something in the DOM, it can include it also. For example, let's imagine a _ShareModal_ package that has a modal like this:
54 |
55 | 
56 |
57 | This package can export the React elements it needs in its **root** and expose an action like `actions.share.openModal()` to interact with the theme.
58 |
59 | The **root** could be something like this:
60 |
61 | {% code title="/packages/my-share-modal-package/src/components/index.js" %}
62 | ```jsx
63 | const ShareRoot = ({ state }) => state.share.isModalOpen && ;
64 | export default ShareRoot;
65 | ```
66 | {% endcode %}
67 |
68 | And the rest of the package something like this:
69 |
70 | {% code title="/packages/my-share-modal-package/src/index.js" %}
71 | ```javascript
72 | import ShareRoot from "./components/";
73 |
74 | export default {
75 | roots: {
76 | share: ShareRoot
77 | },
78 | state: {
79 | share: {
80 | isModalOpen: false
81 | }
82 | },
83 | actions: {
84 | share: {
85 | openModal: ({ state }) => {
86 | state.share.isModalOpen = true;
87 | },
88 | closeModal: ({ state }) => {
89 | state.share.isModalOpen = false;
90 | }
91 | }
92 | }
93 | }
94 | ```
95 | {% endcode %}
96 |
97 | Then the only thing the theme would have to do if they want to include share functionality is to check if there's a `share` package and if there is, use its `actions.share.openModal()` action when appropriate. For example in these buttons:
98 |
99 | 
100 |
101 | I hope you're starting to see how extensibility works in **Frontity**, but don't worry too much now, we'll talk in more detail later.
102 |
103 | By the way, **Frontity** has an API to modify the `` element inside React using the `` component like this:
104 |
105 | ```jsx
106 | import { Head } from "frontity";
107 |
108 | const MyPackage = () => (
109 |
110 | The title of the page
111 |
112 |
113 |
114 | );
115 | ```
116 |
117 | So even though **Frontity** only allows packages to insert React nodes in the `
` of the body, they can also modify the `` by adding tags inside a ``.
118 |
119 | For a more detailed explanation you can check [Head page](head.md).
120 |
121 | {% hint style="info" %}
122 | If you still have any questions about Roots in Frontity, please check out the [**community forum**](https://community.frontity.org), which is packed full of answers and solutions to all sorts of Frontity questions. If you don't find what you're looking for, feel free to start a new post.
123 | {% endhint %}
124 |
125 |
--------------------------------------------------------------------------------
/docs/learning-frontity/settings.md:
--------------------------------------------------------------------------------
1 | # 2. Settings
2 |
3 | The first thing you should do when you start a new **Frontity** project is to configure your `frontity.settings.js` file. Let's take a look at each concept you need to understand in order to use it properly.
4 |
5 | ## Site
6 |
7 | A **site** is a set of packages and settings. For example, this is a site:
8 |
9 | {% code title="frontity.settings.js" %}
10 | ```javascript
11 | export default [
12 | {
13 | name: "my-site", // The name of your site.
14 | state: {
15 | frontity: {
16 | url: "https://www.site.com", // Some settings.
17 | }
18 | },
19 | packages: [
20 | "@frontity/mars-theme", // And the packages of that site.
21 | "@frontity/tiny-router",
22 | "@frontity/wp-source"
23 | ]
24 | }
25 | ]
26 | ```
27 | {% endcode %}
28 |
29 | ## Multiple Sites
30 |
31 | One **Frontity** installation can serve content for multiple sites. This is useful if you have severals blogs and want to manage all of them with the same installation. Both the packages and settings of each site are independent.
32 |
33 | To distinguish between different sites, you must use a `match` setting. Each time a new request is received by **Frontity**, it tests the URL against the `match` field to know which site it should load:
34 |
35 | ```javascript
36 | // frontity.settings.js
37 |
38 | export default [
39 | {
40 | name: "site-1",
41 | match: ["https://www.site-1.com"],
42 | packages: [...]
43 | },
44 | {
45 | name: "site-2",
46 | match: ["https://www.site-2.com"],
47 | packages: [...]
48 | }
49 | ]
50 | ```
51 |
52 | For example, if the URL is `https://www.site-1.com/my-post` the `"site-1"` settings are loaded and if the URL is `https://www.site-2.com/category/some-cat` the `"site-2"` settings are loaded.
53 |
54 | **Multisites are encouraged to be defined always with a `match` property** so the internal links defined for the [`` component](https://api.frontity.org/frontity-packages/collections-packages/components#link) can be [properly processed from one site to another](https://github.com/frontity/frontity/pull/625#pullrequestreview-550228515).
55 |
56 | A typical configuration of multisite with:
57 | - The main site linked directly to the main domain
58 | - The blog site linked to a `/blog` folder below the main domain
59 |
60 | can be defined like this...
61 |
62 | ```js
63 | // ./frontity.settings.js
64 |
65 | export default [
66 | {
67 | name: "base", // main site
68 | match: "(?!\/blog)", // whatever URL that doesn't match with "/blog"
69 | ...
70 | },
71 | {
72 | name: "blog", // blog site
73 | match: "\/blog", // whatever URL matches with "/blog"
74 | ...
75 | },
76 | ]
77 | ```
78 |
79 | In development, you can access a specific site using the `?frontity_name=` query, which should match the `name` specified for your site. For example, using the `frontity.settings.js` file above, to access `site-2`, you should use:
80 |
81 | ```text
82 | https://localhost:3000/?frontity_name=site-2
83 | ```
84 |
85 | ## Packages
86 |
87 | You can specify a different set of **packages** for each site. They can be either strings or objects:
88 |
89 | {% code title="frontity.settings.js" %}
90 | ```javascript
91 | export default [
92 | {
93 | packages: [
94 | "@frontity/mars-theme",
95 | "@frontity/tiny-router",
96 | {
97 | name: "@frontity/wp-source",
98 | active: true,
99 | state: { // Some settings for this package.
100 | source: {
101 | url: "https://wp.site.com/"
102 | }
103 | }
104 | }
105 | ]
106 | }
107 | ]
108 | ```
109 | {% endcode %}
110 |
111 | As you can see, they have an `active` prop. That means you can deactivate a package without having to delete it from your settings file.
112 |
113 | In **Frontity**, all the code is contained in packages. In a sense it is more similar to WordPress, where all the code is contained in your theme and plugins, than to other JavaScript frameworks. This is obviously on purpose, but we will explain the reasons later when we talk about packages and namespaces :\)
114 |
115 | ## State
116 |
117 | The `settings` of a Frontity project are written in the `state`.
118 |
119 | If you come from a WordPress background, you can think of **Frontity** `state` as the database of your application. And if you come from a React background, well... it's the `state` that you usually find in Redux or MobX. That `state` is accessible by your packages at runtime.
120 |
121 | The initial _settings_ of a Frontity site can be set in the `frontity.settings.js` file
122 |
123 | {% code title="frontity.settings.js" %}
124 | ```javascript
125 | export default [
126 | {
127 | name: "my-site",
128 | state: {
129 | frontity: {
130 | url: "https://www.site.com", // Some settings of the site.
131 | }
132 | },
133 | packages: [
134 | "@frontity/mars-theme",
135 | "@frontity/tiny-router",
136 | {
137 | name: "@frontity/wp-source",
138 | state: { // Some settings for this package.
139 | source: {
140 | url: "https://wp.site.com/"
141 | }
142 | }
143 | }
144 | ]
145 | }
146 | ]
147 | ```
148 | {% endcode %}
149 |
150 | The state is compartmentalized though namespaces. Each namespace usually corresponds to a Frontity package.
151 |
152 | For example, our `wp-source` package uses the `source` namespace to store its settings. And our `tiny-router` package uses the `router` namespace:
153 |
154 | In this way, we keep organized the settings of each package.
155 |
156 | {% code title="frontity.settings.js" %}
157 | ```javascript
158 | packages: [
159 | {
160 | name: "@frontity/tiny-router",
161 | state: {
162 | router: {
163 | autoFetch: true
164 | }
165 | }
166 | }
167 | ]
168 | ```
169 | {% endcode %}
170 |
171 | There's also a special namespace called `frontity` that is the place to set the general properties of our site. There's a mandatory property we need to set under the `frontity` namespace: `state.frontity.url`
172 |
173 | ### `state.frontity.url`
174 |
175 | The important takeaway here is: _in the settings file you have the opportunity to change the `state` of **Frontity**. Most of the time you will use this to configure the settings of each package._
176 |
177 | {% hint style="info" %}
178 | If you still have any questions about Settings in Frontity, please check out the [**community forum**](https://community.frontity.org), which is packed full of answers and solutions to all sorts of Frontity questions. If you don't find what you're looking for, feel free to start a new post.
179 | {% endhint %}
180 |
181 |
--------------------------------------------------------------------------------
/docs/performance/README.md:
--------------------------------------------------------------------------------
1 | # ⚡️ Performance
2 |
3 | Frontity projects are fast by default. Frontity framework will help you to improve the performance and speed of your site built with a stack consisting of React and WordPress. But Frontity framework on its own cannot assure the best performance of your site as there are some elements involved in the final perfomance that are out of the scope of Frontity.
4 |
5 | In this section, we'll provide guides to some of the strategies and patterns that you can apply to your Frontity sites in order to improve even more the performance of your Frontity site:
6 |
7 | * [Caching](./caching.md)
8 | * [Link prefetching](./link-prefetching.md)
9 | * [Lazy Loading](./lazy-loading.md)
10 | * [Code Splitting](./code-splitting.md)
11 |
12 | {% hint style="info" %}
13 | [These diagrams](https://excalidraw.com/#json=6167540090798080,cvhnsErHXsqarOVT82YgLw) can help you understand how Frontity, the WordPress + React stack and the proper performance strategies may improve the final performance of your project (besides having a great content creation, development and user experience) in both [Decoupled](../architecture/decoupled-mode.md) and [Embedded](../architecture/embedded-mode.md) Mode
14 | {% endhint %}
15 |
16 |
17 |
--------------------------------------------------------------------------------
/docs/performance/caching.md:
--------------------------------------------------------------------------------
1 | # Caching
2 |
3 |
4 | {% hint style="info" %}
5 | With a good caching strategy your Frontity project can be as performant as a static site.
6 | {% endhint %}
7 |
8 | In Frontity projects we can implement two main types of caching:
9 |
10 | - **Distributed Caching (CDN)**: The responses of requests are cached and distributed on a Network of Servers (CDN) so next requests for the same content can be directly delivered from the closest server from your location
11 | - **Server Caching (WordPress Cache Plugins)**: The responses of requests are cached and stored in the server so next requests for the same content can be directly delivered from memory saving processing time. This strategy will mostly be managed by WordPress Cache Plugins in Frontity Architectures.
12 |
13 | 
14 |
15 | ## Table of contents
16 |
17 |
18 |
19 | - [Distributed caching (CDN)](#distributed-caching-cdn)
20 | * [CDN for Frontity servers](#cdn-for-frontity-servers)
21 | * [CDN for WordPress servers](#cdn-for-wordpress-servers)
22 | - [Server caching](#server-caching)
23 | * [Server caching for URL requests in WordPress servers](#server-caching-for-url-requests-in-wordpress-servers)
24 | * [Server caching for REST API requests in WordPress servers](#server-caching-for-rest-api-requests-in-wordpress-servers)
25 |
26 |
27 |
28 | ## Distributed caching (CDN)
29 |
30 | Adding a cache layer to cache your URL requests is the most effective way to speed up the delivery of your pages as most of them will be delivered from a server very close to the user's location and no processing time will be required
31 |
32 | Based on our experience working with media publishers, we recommend that you select a service offering the [**stale-while-revalidate**](https://www.keycdn.com/blog/keycdn-supports-stale-while-revalidate) cache directive, which is the best cache technique for Frontity projects.
33 |
34 | ### CDN for Frontity servers
35 |
36 | If you're using **[Decoupled Mode](../architecture/decoupled-mode.md#caching-in-decoupled-mode)** (main domain pointing to the Frontity server) our recommendation is that you host your Frontity site with [**Vercel**](https://vercel.com/) that includes a distributed cache network.
37 |
38 | In [their own words about caching](https://vercel.com/docs/edge-network/caching):
39 |
40 | > The [Vercel Edge Network](https://vercel.com/docs/edge-network/overview) caches your content at the edge in order to serve data to your users as fast as possible.
41 |
42 | Vercel includes both a CDN and the `stale-while-revalidate` cache directive (which they call [Serverless Pre-Rendering](https://vercel.com/blog/serverless-pre-rendering)). Their service is the quickest and easiest to set up, and you can follow our guide to [deploying Frontity using Vercel](../deployment/deploy-using-vercel.md).
43 |
44 | If you prefer another hosting or want to deploy your Frontity site as a [Serverless](https://hackernoon.com/what-is-serverless-architecture-what-are-its-pros-and-cons-cc4b804022e9) function by using services such as [AWS Lambda](https://aws.amazon.com/lambda), [Netlify](https://www.netlify.com/) or [Google Functions](https://cloud.google.com/functions/), we highly recommend you to add a CDN (such as a [Cloudflare](https://www.cloudflare.com/es-es/)) as it is key to improve your web performance.
45 |
46 | {% hint style="info" %}
47 | We have tested many solutions for CDN and `stale-while-revalidate`, and we consider that the best options for this approach are [KeyCDN](https://www.keycdn.com) and [StackPath](https://www.stackpath.com/).
48 | {% endhint %}
49 |
50 | ### CDN for WordPress servers
51 |
52 | If you're using **[Embedded Mode](../architecture/embedded-mode.md#caching-in-embedded-mode)** your main domain will point to your WordPress installation. In this architecture all the Cache solutions you were using for your WordPress will still be valid for Frontity using this Embedded Mode.
53 |
54 | In WordPress there are several [solutions](https://wpbuffs.com/wordpress-cdn-plugins/) and [plugins](https://wordpress.org/plugins/tags/cdn/) to add a CDN Cache Layer to your site. This CDN implementation can be managed directly from your hosting provider or from a WordPress plugin
55 |
56 | ## Server caching
57 |
58 | Besides using a CDN to cache your requests, another cache layer can be added at a Server level. This cache will create a local copy of the requests so next time the same page is requested it will be delivered from the local copy (saving processing time)
59 |
60 | ### Server caching for URL requests in WordPress servers
61 |
62 | In the **[Embedded Mode](../architecture/embedded-mode.md#caching-in-embedded-mode)**, the main domain is connected to the WordPress server which will redirect the to the Frontity Web Server to get the proper HTML based on the data of the WP REST API.
63 |
64 | In this case, a service to cache the URL requests managed by WordPress can be implemented via a WordPress plugin. This can be done easily though some of the [cache plugins available for WordPress](https://www.wpbeginner.com/plugins/best-wordpress-caching-plugins/)
65 |
66 | If the URL requested is cached, the plugin will return the content and no further requests will be done to the Frontity Server (or the WP REST API)
67 |
68 | ### Server caching for REST API requests in WordPress servers
69 |
70 | Caching REST API requests is highly recommended in both **Decoupled & Embedded Mode** asi it will also speed up the general response time of your site
71 |
72 | This can also be done easily though a [cache plugin that supports REST API](https://wordpress.org/plugins/wp-rest-cache/) such as [Simple Cache plugin](https://wordpress.org/plugins/simple-cache/)
73 |
74 | {% hint style="info" %}
75 | With [Simple Cache plugin](https://wordpress.org/plugins/simple-cache/) you'll have to [turn REST API and Headers options ON](https://frontity.org/wp-content/uploads/2021/05/simple-cache-settings.png), so REST API requests are properly cached
76 | {% endhint %}
77 |
78 |
--------------------------------------------------------------------------------
/docs/performance/code-splitting.md:
--------------------------------------------------------------------------------
1 | # Code Splitting
2 |
3 | Code Splitting lets you split your code into various bundles, instead of using a single one with all the code. These smaller bundles are dynamically loaded at runtime depending on the URL.
4 |
5 | **If used properly, this can mean important performance gains.**
6 |
7 | The bundles can be loaded on demand or in parallel, which allows you to just load the code that is currently needed by the user. This way you can avoid loading heavy code until it is required and reduce the amount of code during the initial load.
8 |
9 | Frontity has configured everything to make Code Splitting really easy.
10 |
11 | To use it you just have to import the `{ loadable }` module from `frontity` and then dynamically import the React component that you don't want to be loaded until it is strictly needed.
12 |
13 | ```jsx
14 | import { loadable } from "frontity";
15 | const OtherComponent = loadable(() => import('./OtherComponent'))
16 |
17 | function MyComponent() {
18 | return (
19 |
20 |
21 |
22 | )
23 | }
24 | ```
25 |
26 | ## Code Splitting Use Case: Comments
27 |
28 | Imagine you are using a big library for showing your comments. You will want to load it just when it is needed, so it doesn't increase the bundle size if that React component is not loaded.
29 |
30 | Code splitting lets you do it.
31 |
32 | You have to use `loadable` with a dynamic `import()` inside:
33 |
34 | ```jsx
35 | import { loadable } from "frontity";
36 | import Content from "./components/content";
37 |
38 | // Thanks to loadable we prevent comments from loading until it's needed.
39 | const HeavyComments = loadable(() => import('./components/comments'));
40 |
41 | const Post = ({ state }) => (
42 | <>
43 |
44 | {state.comments.areOpened && }
45 |
46 | );
47 |
48 | export default connect(Post);
49 | ```
50 |
51 | Instead of using the normal `import ... from`.
52 |
53 | ```jsx
54 | import { loadable } from "frontity";
55 | import Content from "./components/content";
56 | import HeavyComments from "./components/comments";
57 |
58 | const Post = ({ state }) => (
59 | <>
60 |
61 | {state.comments.areOpened && }
62 |
63 | );
64 |
65 | export default connect(Post);
66 | ```
67 |
68 | By default, `state.comments.areOpened === false` .
69 |
70 | The heavy library used for comments won't be loaded until you change the state to `true` such as when, for example, you click a button to open the comments. At that moment the code for that React component is downloaded and executed.
71 |
72 | If we don't use `loadable` , the `` component is included in the main bundle and loaded at the initial page load, even if the comments are never shown.
73 |
74 | ## Loadable Components Documentation
75 |
76 | For managing the Code Splitting, Frontity has integrated and configured [Loadable Components](https://www.smooth-code.com/open-source/loadable-components/docs/code-splitting/).
77 |
78 | [](https://loadable-components.com/docs/getting-started/)
79 |
80 | If you want to go deeper, you should take a look at [**their docs**](https://loadable-components.com/docs/getting-started/). You don't need to read the docs on how to install and configure Loadable Components since we have already done that work for you. Below are concepts that are interesting and helpful to read up on:
81 |
82 | * What is [_Code Splitting_](https://loadable-components.com/docs/code-splitting/)?
83 | * Most of the time, you want to [_prefetch_](https://loadable-components.com/docs/prefetching/) a component, it means it will be loaded when the browser is idle.
84 | * Specify a [_Fallback_](https://loadable-components.com/docs/fallback/) in loadable options.
85 | * Handle loading errors with [_Error Boundaries_](https://www.smooth-code.com/open-source/loadable-components/docs/error-boundaries).
86 | * To avoid flashing a loader if the loading is very fast, you could implement a minimum [_Delay_](https://www.smooth-code.com/open-source/loadable-components/docs/delay/)
87 | * Infinite loading is not good for user experience, to avoid it implementing a [_timeout_](https://www.smooth-code.com/open-source/loadable-components/docs/timeout/) is a good workaround.
88 | * Use [Library Splitting](https://www.smooth-code.com/open-source/loadable-components/docs/library-splitting/) to defer the loading of a library.
89 | * Create a reusable Loadable Component by using a [_Dynamic Import_](https://www.smooth-code.com/open-source/loadable-components/docs/dynamic-import/).
90 |
91 |
--------------------------------------------------------------------------------
/docs/performance/lazy-loading.md:
--------------------------------------------------------------------------------
1 | # Lazy loading
2 |
3 |
4 | As [defined by MDN](https://developer.mozilla.org/en-US/docs/Web/Performance/Lazy_loading)
5 |
6 | > Lazy loading is a strategy to identify resources as non-blocking (non-critical) and load these only when needed. It's a way to shorten the length of [the critical rendering path](https://developer.mozilla.org/en-US/docs/Web/Performance/Critical_rendering_path), which translates into reduced page load times.
7 |
8 | So, by applying lazy-loading strategies your page will load much faster as the assets will be loaded only when they're really needed (when they first appear in the viewable area for the user).
9 |
10 | A good example of this are images: you won't probably need to load all the images in your page as you only need those images that appear in the viewable area for the user on first load. A better strategy is to load only the images that are in the viewable area for the user, and then load those images as they enter into this viewable area (if the user do not scroll, those images will never be loaded).
11 |
12 | The same strategy can be applied to iframes and other resources that require a request to the server.
13 |
14 |
15 | # How to apply lazy-loading in Frontity projects
16 |
17 | Frontity provides the [``](https://api.frontity.org/frontity-packages/collections-packages/components#image) and [``](https://api.frontity.org/frontity-packages/collections-packages/components#iframe) React components that adds lazy-loading to them. They're available through the [`@frontity/components`](https://api.frontity.org/frontity-packages/collections-packages/components) package.
18 |
19 |
20 | The [``](https://api.frontity.org/frontity-packages/collections-packages/components#link) component provides a sort-of lazy-loading behaviour called [**link prefeching**](https://docs.frontity.org/performance/link-prefetching).
21 |
22 | Finally, with the [Intersection Observer Hooks](https://api.frontity.org/frontity-packages/collections-packages/hooks/intersection-observer-hooks) provided by the [`@frontity/hooks`](https://api.frontity.org/frontity-packages/collections-packages/hooks) package you can create your custom logic to be triggered only when the React element reaches the viewable area.
23 |
--------------------------------------------------------------------------------
/docs/performance/link-prefetching.md:
--------------------------------------------------------------------------------
1 | # Link prefetching
2 |
3 | ## What is prefetching?
4 |
5 | Link prefetching is a strategy to improve the perceived performance of page loading.
6 |
7 | We cannot improve on the explanation of prefetching provided by [MDN Web Docs](https://developer.mozilla.org/en-US/docs/Web/HTTP/Link_prefetching_FAQ). They describe it thus:
8 |
9 | > Link prefetching is a browser mechanism, which utilizes browser idle time to download or prefetch documents that the user might visit in the near future. A web page provides a set of prefetching hints to the browser, and after the browser is finished loading the page, it begins silently prefetching specified documents and stores them in its cache. When the user visits one of the prefetched documents, it can be served up quickly out of the browser's cache.
10 |
11 | Commonly documents and assets are prefetched using a `` element containing a `rel="prefetch"` attribute. For example:
12 |
13 | ```html
14 |
15 | ```
16 |
17 | The `rel="prefetch"` attribute is a 'hint' to the browser that the specified URL should be prefetched. It may or may not be prefetched depending on whether the browser has sufficient idle time to do so before the user actually clicks the link.
18 |
19 | This works well for traditional sites where each new URL involves an HTTP request and a page refresh. Performance is improved because prefetched documents and assets are already in the browser cache and so don't need to be fetched at the time that the link is clicked.
20 |
21 | In addition to `prefetch` the `rel` attribute of the `` element can take different values depending on the type of prefetching required:
22 |
23 | - dns-prefetch
24 | - preconnect
25 | - prefetch
26 | - subresource
27 | - prerender
28 |
29 | [This CSS-tricks article](https://css-tricks.com/prefetching-preloading-prebrowsing/) provides a comprehensive overview of these different prefetching options.
30 |
31 | {% hint style="warn" %}
32 | Care should be taken when implementing prefetching and consideration should be given to the likelihood that the document or asset will be needed in the near future, i.e. how likely it is that a particular link will be the next one to be clicked.
33 | {% endhint %}
34 |
35 | ## Implementing link prefetching strategies with Frontity
36 |
37 | For JavaScript based SPA applications such as Frontity the situation is slightly different. No additional elements are needed in the markup, and the prefetching is performed with JavaScript. In such cases data is prefetched and stored in the application's "state".
38 |
39 | We will describe two methods for implementing link prefetching in Frontity. The first will use the `` component provided by Frontity. The second will demonstrate how to create your own component implementing link prefetching.
40 |
41 | ### Frontity's `` component
42 |
43 | Frontity's [`` component](https://api.frontity.org/frontity-packages/collections-packages/components#link) supports prefetching. The prefetching strategy that it adopts is determined by the value of the property `state.theme.autoPrefetch`.
44 |
45 | The possible values for `state.theme.autoPrefetch` are:
46 |
47 | | Value | Description |
48 | | :-------- | :------------------------------------------------ |
49 | | `no` | No auto prefetch. |
50 | | `hover` | Prefetches links on hover. |
51 | | `in-view` | Prefetch links currently visible in the viewport. |
52 | | `all` | Prefetches all internal links on the page. |
53 |
54 | The value of `state.theme.autoPrefetch` could then be set in the `frontity.settings.js` file, for example:
55 |
56 | ```js
57 | const settings = {
58 | // Other settings...
59 | packages: [
60 | {
61 | name: "my-theme",
62 | state: {
63 | theme: {
64 | autoPrefetch: "hover", // values: no | hover | in-view | all
65 | },
66 | },
67 | },
68 | // Other packages...
69 | ],
70 | };
71 | ```
72 |
73 | A component that uses Frontity's `` component should import it from `@frontity/components`:
74 |
75 | ```js
76 | import Link from "@frontity/components/link";
77 | ```
78 |
79 | Here is a short video demonstrating prefetching with Frontity's `` component:
80 |
81 | {% embed url="https://www.youtube.com/watch?v=EUt8x5oglmI" caption="" %}
82 |
83 | {% hint style="info" %}
84 | **Note that** for links present in the content to benefit from the prefetching strategy of the `` component the content should be processed by the [`html2react` package](https://api.frontity.org/frontity-packages/features-packages/html2react). See [this page](https://tutorial.frontity.org/part7-finishing-touches/use-the-html2react-component) in our tutorial for a detailed example illustrating the steps that need to be taken.
85 | {% endhint %}
86 |
87 | ### Creating your own link component with prefetching
88 |
89 | If you wish to create your own link component that also implements auto-prefetching based on the value of a `state.theme.autoPrefetch` property then a possible implementation could look like this:
90 |
91 | ```js
92 | import React, { useEffect } from "react";
93 | import { connect } from "frontity";
94 |
95 | const Link = ({
96 | state,
97 | actions,
98 | link,
99 | className,
100 | children,
101 | rel,
102 | "aria-current": ariaCurrent,
103 | onClick: onClickProp,
104 | }) => {
105 | // Check if the link is an external or internal link
106 | const isExternal = link.startsWith("http");
107 |
108 | // Prefetch the link's content when it mounts and autoPreFetch is set to `true`
109 | useEffect(() => {
110 | if (!isExternal) {
111 | if (state.theme.autoPrefetch === "all") actions.source.fetch(link);
112 | }
113 | }, []);
114 |
115 | const onClick = (event) => {
116 | // Do nothing if it's an external link
117 | if (isExternal) return;
118 |
119 | event.preventDefault();
120 | // Set the router to the new url.
121 | actions.router.set(link);
122 |
123 | // Scroll the page to the top
124 | window.scrollTo(0, 0);
125 |
126 | // if the menu modal is open, close it so it doesn't block rendering
127 | if (state.theme.isMobileMenuOpen) {
128 | actions.theme.closeMobileMenu();
129 | }
130 |
131 | if (onClickProp) {
132 | onClickProp(event);
133 | }
134 | };
135 |
136 | return (
137 | {
145 | // Prefetch the link's content when the user hovers on the link
146 | if (state.theme.autoPrefetch === "hover" && !isExternal)
147 | actions.source.fetch(link);
148 | }}
149 | >
150 | {children}
151 |
152 | );
153 | };
154 |
155 | export default connect(Link);
156 |
157 | ```
158 |
159 | This uses `useEffect` to call `actions.source.fetch(link)` to fetch the data if the value of `state.theme.autoPrefetch` is "all", and if the value is "hover" then it calls `actions.source.fetch(link)` to fetch the data when the `onMouseEnter` event occurs.
160 |
--------------------------------------------------------------------------------
/docs/seo.md:
--------------------------------------------------------------------------------
1 | # SEO
2 |
3 | Due to the Isomorphic nature of React apps in Frontity, the first load of any site will be rendered by the server using the React components in the project. Frontity allows you to optimize the SEO performance of your site and customize how your site is indexed by search engine crawlers.
4 |
5 | By default, Frontity will deliver to your browser a fully populated and well-formed [HTML file generated from your React code](../architecture.md). This reduces the time required for the first contentful paint and ensures a good SEO score.
6 |
7 | {% hint style="info" %}
8 | To take advantage of all the SEO benefits you already have in your WordPress (sitemaps, cache plugins, CORS headers, redirections, etc...) the [Embedded Mode of Frontity](./architecture/embedded-mode.md#features-of-the-embedded-mode) is recommended
9 | {% endhint %}
10 |
11 | {% hint style="info" %}
12 | [These diagrams](https://excalidraw.com/#json=6167540090798080,cvhnsErHXsqarOVT82YgLw) can help you understand how Frontity, the WordPress + React stack and the proper performance strategies may improve the final performance and SEO of your project (besides having a great content creation, development and user experience) in both [Decoupled](./architecture/decoupled-mode.md) and [Embedded](./architecture/embedded-mode.md) Mode
13 | {% endhint %}
14 |
15 | But that's not all. With Frontity you can also customize:
16 |
17 | * Meta tags
18 | * `robots.txt`
19 |
20 | ## Header meta tags
21 |
22 | You can include the meta tags generated by your WordPress SEO plugin in your React app so they can be properly rendered in the `` section of the final HTML
23 |
24 | In order to do that you have to use:
25 |
26 | * The [REST API - Head Tags](https://api.frontity.org/frontity-plugins/rest-api-head-tags) **WordPress plugin**. This plugin has been developed by the Frontity team and it adds the meta tags generated by your WordPress SEO plugin to the REST API
27 | * The [@frontity/head-tags](https://api.frontity.org/frontity-packages/features-packages/head-tags) **Frontity package**. This package is designed to automatically get all the data that the REST API Head Tags plugin exposes in the REST API
28 |
29 | ### The `` component
30 |
31 | Besides the tags added through WordPress plugins you can also customize your `` tags from Frontity. The [`` component](https://api.frontity.org/frontity-packages/core-package/frontity#head) provided by the [`frontity` package](https://api.frontity.org/frontity-packages/core-package/frontity) uses [React Helmet](https://github.com/nfl/react-helmet) internally, so you can work as if you were working with common HTML.
32 |
33 | To adjust the ``, you just have to import [`Head` from `frontity`](https://api.frontity.org/frontity-packages/core-package/frontity#head) and write inside `` all the tags you want. Usually, you will want to import it at the `index.js` of your theme, in order for it to be loaded on all your pages.
34 |
35 | ```jsx
36 | import { Head } from "frontity";
37 |
38 | const Theme = () => (
39 |
40 | My awesome blog
41 |
42 |
43 |
44 |
45 | );
46 | ```
47 |
48 | You can, of course, use variables or include code outside `` that will be rendered normally.
49 |
50 | ```jsx
51 | import { Head, connect } from "frontity";
52 |
53 | const Theme = ({ state }) => {
54 | const data = state.source.get(state.router.link);
55 | return (
56 | <>
57 |
58 | {state.frontity.title}
59 |
60 |