204 |
205 |
206 |
 207 |
208 |
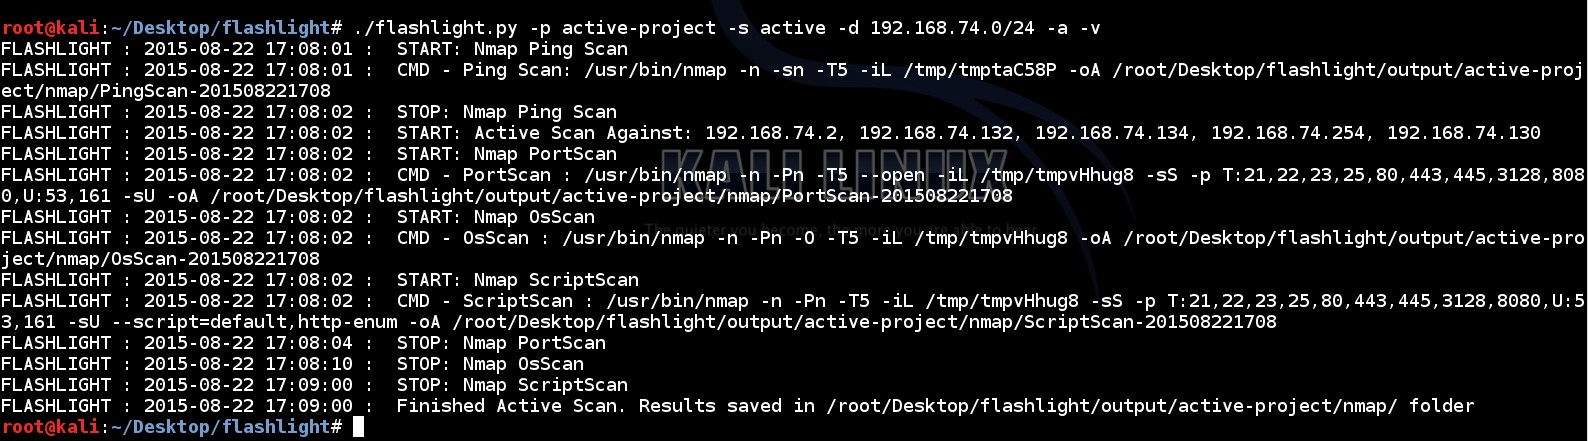
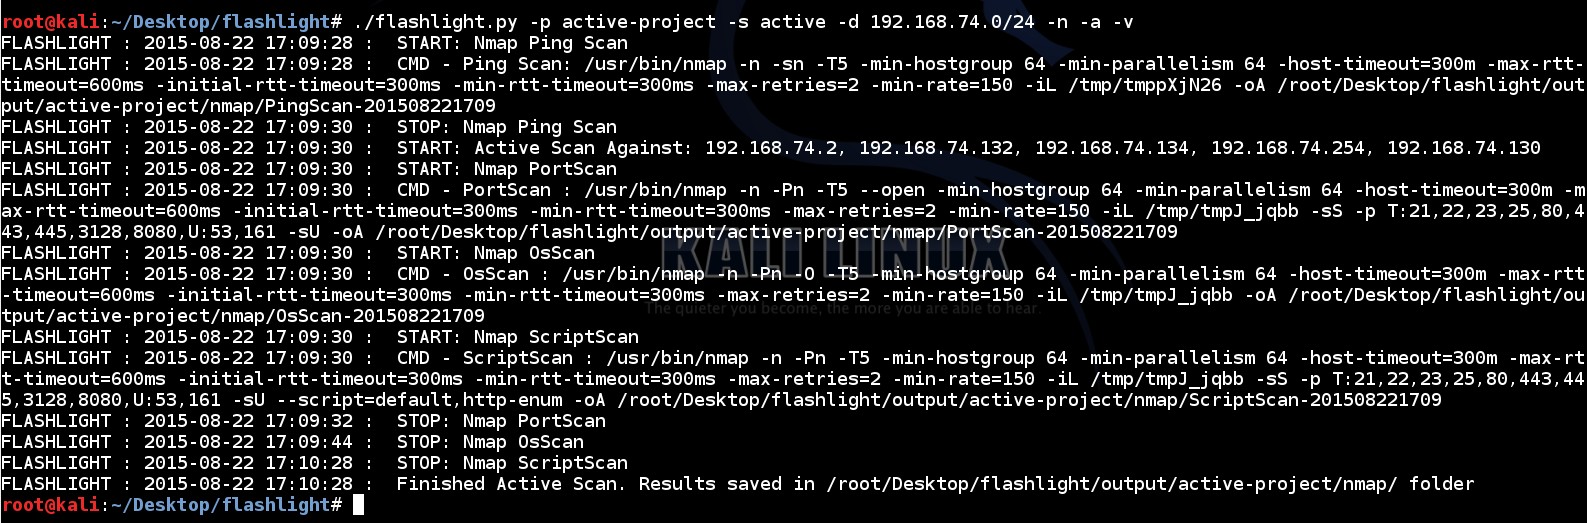
209 | To run an effective and optimized active scan, “-n” parameter can be used:
210 |
211 | ```
212 | ./flashlight.py -p active-project -s active -d 192.168.74.0/24 -n -a –v
213 | ```
214 |
215 |
207 |
208 |
209 | To run an effective and optimized active scan, “-n” parameter can be used:
210 |
211 | ```
212 | ./flashlight.py -p active-project -s active -d 192.168.74.0/24 -n -a –v
213 | ```
214 |
215 |
216 |
 217 |
218 |
219 | “-n” parameter adds additional NMAP options which are shown below;
220 |
221 |
217 |
218 |
219 | “-n” parameter adds additional NMAP options which are shown below;
220 |
221 | … -min-hostgroup 64 -min-parallelism 64 -host-timeout=300m -max-rtt-timeout=600ms -initial-rtt-timeout=300ms -min-rtt-timeout=300ms -max-retries=2 -min-rate=150 …
222 |
223 |
224 | 3) Screen Scan
225 |
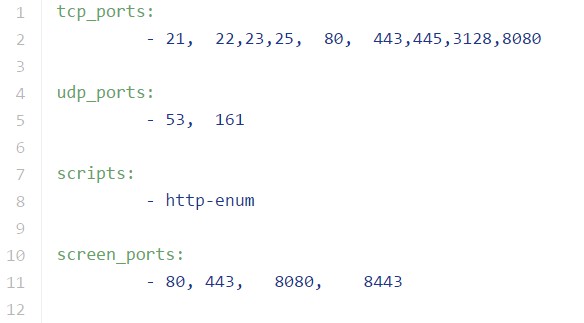
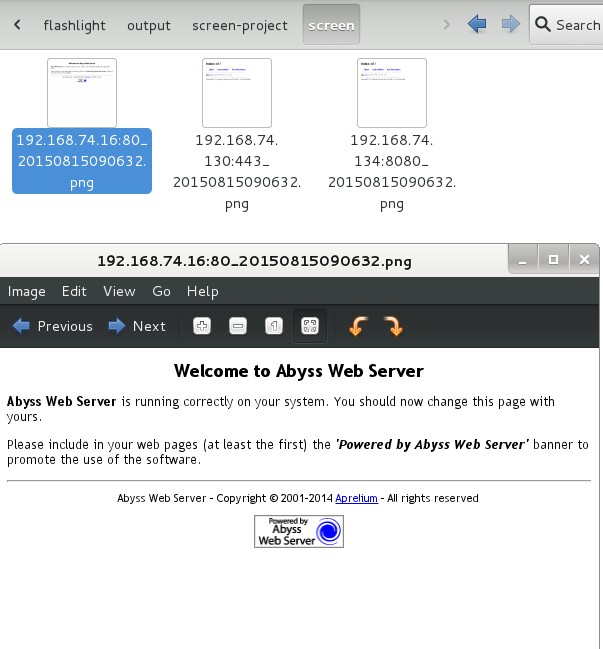
226 | Screen Scan is used to get screenshots of web sites/applications by using directives in config file (flashlight.yaml). Directives in this file provide screen scan for four ports ("80, 443, 8080, 8443")
227 |
228 | screen_ports:
229 |
230 | - 80, 443, 8080, 8443
231 |
232 | Sample screen scan can be performed like this:
233 |
234 | ```
235 | ./flashlight.py -p project -s screen -d 192.168.74.0/24 -r /usr/local/rasterize.js -t 10 -v
236 | ```
237 |
238 |
239 |
 240 |
241 |
242 | For example, assume that by running this command three web applications are detected. Screenshots of these web sites are saved in “screen” sub folder. These screenshts can be used for an offline analysis.
243 |
244 |
240 |
241 |
242 | For example, assume that by running this command three web applications are detected. Screenshots of these web sites are saved in “screen” sub folder. These screenshts can be used for an offline analysis.
243 |
244 |
245 |
 246 |
247 |
248 |
246 |
247 |
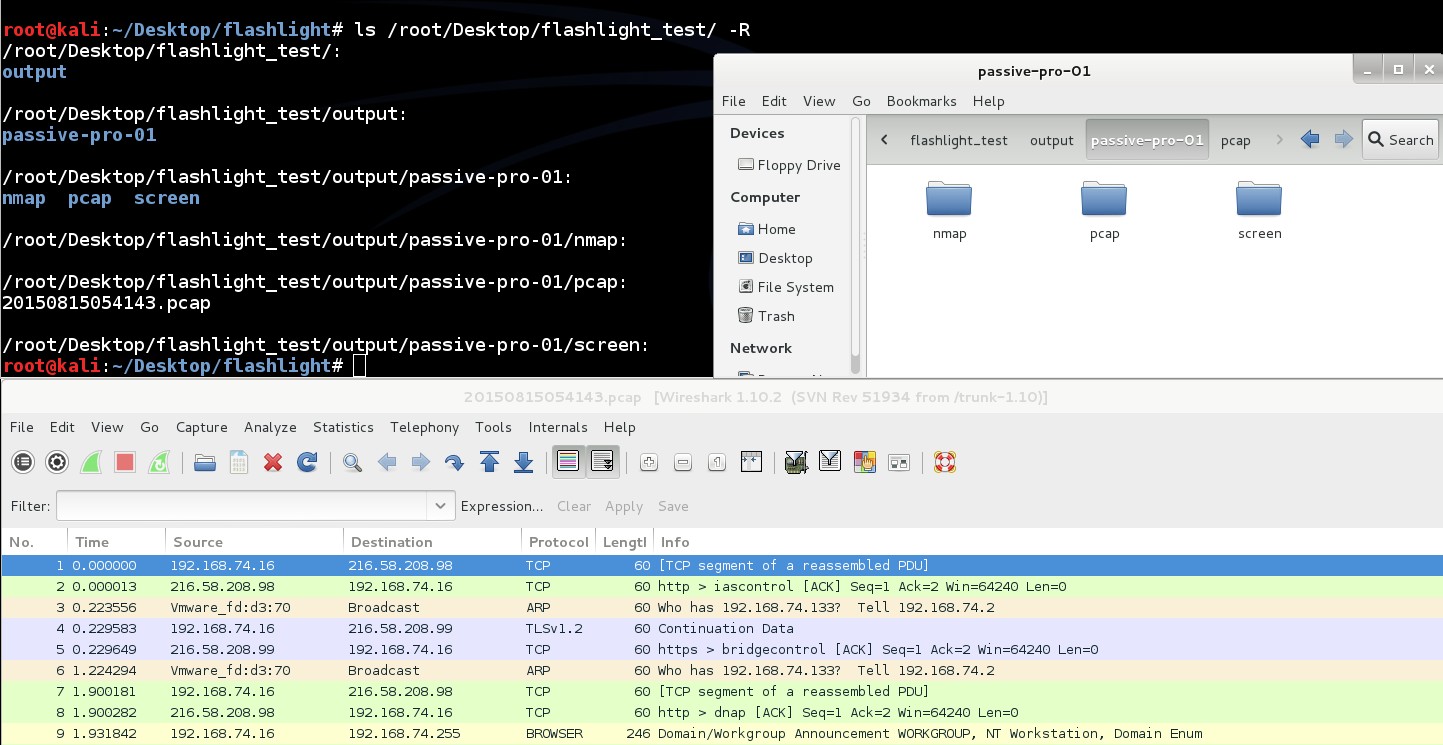
248 | 4) Filtering
249 | Filtering option is used to analyse pcap files. An example for this option is shown below:
250 |
251 | ```
252 | ./flashlight.py -p filter-project -s filter -f /root/Desktop/flashlight/output/passive-project-02/pcap/20150815072543.pcap -v
253 | ```
254 |
255 | By running this command some files are created on “filter” sub-folder.
256 |
257 | This option analyzes PCAP packets according to below properties:
258 |
259 | - Windows hosts
260 | - Top 10 DNS requests
261 |
262 | ...
263 |
264 | Thanks To:
265 |
266 | - Bahtiyar Bircan
267 | - Bedirhan Urgun
268 | - Ertugrul Basaranoglu
269 | - Johan Nestaas
270 |
271 |
272 |
273 |
274 |
275 |
276 |
277 |
--------------------------------------------------------------------------------
/config/flashlight.yaml:
--------------------------------------------------------------------------------
1 | tcp_ports:
2 | - 21, 22,23,25, 80, 443,445,3128,8080
3 |
4 | udp_ports:
5 | - 53, 161
6 |
7 | scripts:
8 | - http-enum
9 |
10 | screen_ports:
11 | - 80, 443, 8080, 8443
12 |
13 |
--------------------------------------------------------------------------------
/flashlight-blackhat-arsenal.md:
--------------------------------------------------------------------------------
1 | # Flashlight
2 |
3 | ### Description
4 | Pentesters spend too much time during information gathering phase. Flashlight (Fener) provides services to scan network/ports and gather information rapidly on target networks. So Flashlight should be the choice to automate discovery step during a penetration test. In this article, usage of Flashligh application will be explained.
5 |
6 |
7 | ### Categories
8 | * Network Attacks
9 |
10 |
11 | ### Black Hat sessions
12 | [](https://www.blackhat.com/us-14/arsenal.html#Alkan)
13 | [](http://www.blackhat.com/us-15/arsenal.html#heybe-pentest-automation-toolkit)
14 |
15 |
16 | ### Code
17 | https://github.com/galkan/flashlight
18 |
19 |
20 | ### Lead Developer
21 | * Gokhan Alkan - https://github.com/galkan
22 |
23 |
24 | ### Social Media
25 | * [Twitter](https://twitter.com/gokhan_alkn)
26 |
--------------------------------------------------------------------------------
/flashlight.py:
--------------------------------------------------------------------------------
1 | #!/usr/bin/python
2 |
3 | try:
4 | from lib.main import Main
5 | except ImportError, err:
6 | from lib.core.core import Core
7 | Core.print_error(err)
8 |
9 | ##
10 | ### Main, go Galkan go go go ...
11 | ##
12 |
13 | if __name__ == "__main__":
14 |
15 | flashlight = Main()
16 | flashlight._run(flashlight._args.scan_type)
17 |
18 |
--------------------------------------------------------------------------------
/images/flashlight.png:
--------------------------------------------------------------------------------
https://raw.githubusercontent.com/galkan/flashlight/90d1dc53ba04f0c298ded6fd78005d90c8979d5a/images/flashlight.png
--------------------------------------------------------------------------------
/lib/__init__.py:
--------------------------------------------------------------------------------
https://raw.githubusercontent.com/galkan/flashlight/90d1dc53ba04f0c298ded6fd78005d90c8979d5a/lib/__init__.py
--------------------------------------------------------------------------------
/lib/active/__init__.py:
--------------------------------------------------------------------------------
https://raw.githubusercontent.com/galkan/flashlight/90d1dc53ba04f0c298ded6fd78005d90c8979d5a/lib/active/__init__.py
--------------------------------------------------------------------------------
/lib/active/corescanner.py:
--------------------------------------------------------------------------------
1 |
2 | try:
3 | import os
4 | import shlex
5 | import time
6 | import datetime
7 | import subprocess
8 | from lib.core.core import Core,InitDirFile
9 | except ImportError, err:
10 | from lib.core.core import Core
11 | Core.print_error(err)
12 |
13 |
14 | class CoreScanner(object):
15 |
16 | __scan_type_options = { "PingScan":"-n -sn -T5", "PortScan":"-n -Pn -T5 --open", "OsScan":"-n -Pn -O -T5", "ScriptScan":"-n -Pn -T5" }
17 |
18 | def __init__(self, ip_file_to_scan, output_file, nmap_optimize, scan_type):
19 |
20 | self.__scan_type = scan_type
21 | self.__ip_file = ip_file_to_scan
22 | self.__output_file = output_file
23 |
24 | self.__nmap_options = "{0} {1} -iL {2}".format(CoreScanner.__scan_type_options[self.__scan_type], Core._nmap_optimize, self.__ip_file) if nmap_optimize else "{0} -iL {1}".format(CoreScanner.__scan_type_options[self.__scan_type], self.__ip_file)
25 |
26 | self._proc_cmd = "{0} {1}".format(Core._commands_path["nmap"], self.__nmap_options)
27 |
28 |
29 | def _run(self, logger):
30 |
31 | # it is inherited from portscan,osscan,scriptscan class
32 | self._ip_file_to_scan.seek(0)
33 |
34 | cmd = "{0} {1} -oA {2}".format(self._proc_cmd, self._scan_options, self.__output_file) if self.__scan_type in ( "PortScan", "ScriptScan") else "{0} -oA {1}".format(self._proc_cmd, self.__output_file)
35 |
36 | logger._logging("START: Nmap {0}".format(self.__scan_type))
37 | logger._logging("CMD - {0} : {1}".format(self.__scan_type, cmd))
38 |
39 | cmd_list = shlex.split(cmd)
40 | proc = subprocess.Popen(cmd_list, stdout = subprocess.PIPE, stderr = subprocess.PIPE,).communicate()
41 |
42 | logger._logging("STOP: Nmap {0}".format(self.__scan_type))
43 |
--------------------------------------------------------------------------------
/lib/active/osscan.py:
--------------------------------------------------------------------------------
1 |
2 | try:
3 | import datetime
4 | from lib.active.corescanner import CoreScanner
5 | except ImportError, err:
6 | from lib.core.core import Core
7 | Core.print_error(err)
8 |
9 |
10 | class OsScan(CoreScanner):
11 |
12 | def __init__(self, output_dir, ip_file_to_scan, nmap_optimize, scan_type):
13 |
14 | self._ip_file_to_scan = ip_file_to_scan
15 |
16 | output_file = "{0}{1}-{2}".format(output_dir, scan_type, datetime.datetime.now().strftime("%Y%m%d%H%M"))
17 |
18 | CoreScanner.__init__(self, self._ip_file_to_scan.name, output_file, nmap_optimize, scan_type)
19 |
20 |
21 |
--------------------------------------------------------------------------------
/lib/active/pingscan.py:
--------------------------------------------------------------------------------
1 |
2 | try:
3 | import re
4 | import shlex
5 | import datetime
6 | import tempfile
7 | import subprocess
8 | from lib.active.corescanner import CoreScanner
9 | from lib.core.exceptions import FlashLightExceptions
10 | except ImportError, err:
11 | from lib.core.core import Core
12 | Core.print_error(err)
13 |
14 |
15 | class PingScan(CoreScanner):
16 |
17 | def __init__(self, destination, output_dir, nmap_optimize, scan_type):
18 |
19 | self.__host_up = "Host:\s([0-9]{1,3}\.[0-9]{1,3}\.[0-9]{1,3}\.[0-9]{1,3})\s+\(\)\s+Status:\sUp"
20 |
21 | self.__ip_file_to_scan = tempfile.NamedTemporaryFile(mode='w+t')
22 | self.__ip_file_to_scan.write("\n".join([ip_domain.strip() for ip_domain in destination.split(",")]))
23 |
24 | self.__output_file = "{0}{1}-{2}".format(output_dir, scan_type, datetime.datetime.now().strftime("%Y%m%d%H%M"))
25 | CoreScanner.__init__(self, self.__ip_file_to_scan.name, self.__output_file, nmap_optimize, scan_type)
26 |
27 |
28 |
29 | def _run(self, result_file, logger):
30 |
31 | self.__ip_file_to_scan.seek(0)
32 |
33 | gnmap_file = "{0}.gnmap".format(self.__output_file)
34 | cmd = "{0} -oA {1}".format(self._proc_cmd, self.__output_file)
35 |
36 | logger._logging("START: Nmap Ping Scan")
37 | logger._logging("CMD - Ping Scan: {0}".format(cmd))
38 |
39 | cmd_list = shlex.split(cmd)
40 | proc = subprocess.Popen(cmd_list, stdout=subprocess.PIPE,).communicate()
41 | try:
42 | with open(gnmap_file, "r") as fd:
43 | result_file.write("\n".join([ re.search(self.__host_up, line).groups()[0] for line in fd if re.search(self.__host_up, line) ]))
44 | except Exception, err:
45 | raise FlashLightExceptions(str(err))
46 |
47 | logger._logging("STOP: Nmap Ping Scan")
48 |
--------------------------------------------------------------------------------
/lib/active/portscan.py:
--------------------------------------------------------------------------------
1 |
2 | try:
3 | import datetime
4 | from lib.active.corescanner import CoreScanner
5 | from lib.core.config_parser import ConfigParser
6 | from lib.core.exceptions import FlashLightExceptions
7 | except ImportError, err:
8 | from lib.core.core import Core
9 | Core.print_error(err)
10 |
11 |
12 | class PortScan(CoreScanner):
13 |
14 | def __init__(self, config_file, output_dir, ip_file_to_scan, nmap_optimize, scan_type):
15 |
16 | self._ip_file_to_scan = ip_file_to_scan
17 | try:
18 | self._scan_options = ConfigParser.get_ports_options(config_file)
19 | except Exception, err:
20 | raise FlashLightExceptions(str(err))
21 |
22 | output_file = "{0}{1}-{2}".format(output_dir, scan_type, datetime.datetime.now().strftime("%Y%m%d%H%M"))
23 |
24 | CoreScanner.__init__(self, self._ip_file_to_scan.name, output_file, nmap_optimize, scan_type)
25 |
26 |
--------------------------------------------------------------------------------
/lib/active/scriptscan.py:
--------------------------------------------------------------------------------
1 |
2 | try:
3 | import datetime
4 | from lib.active.corescanner import CoreScanner
5 | from lib.core.config_parser import ConfigParser
6 | from lib.core.exceptions import FlashLightExceptions
7 | except ImportError, err:
8 | from lib.core.core import Core
9 | Core.print_error(err)
10 |
11 |
12 | class ScriptScan(CoreScanner):
13 |
14 | def __init__(self, config_file, output_dir, ip_file_to_scan, nmap_optimize, scan_type):
15 |
16 | self._ip_file_to_scan = ip_file_to_scan
17 | try:
18 | self._scan_options = ConfigParser.get_scripts_options(config_file)
19 | except Exception, err:
20 | raise FlashLightExceptions(str(err))
21 |
22 | output_file = "{0}{1}-{2}".format(output_dir, scan_type, datetime.datetime.now().strftime("%Y%m%d%H%M"))
23 |
24 | CoreScanner.__init__(self, self._ip_file_to_scan.name, output_file, nmap_optimize, scan_type)
25 |
26 |
--------------------------------------------------------------------------------
/lib/activescan.py:
--------------------------------------------------------------------------------
1 |
2 | try:
3 | import tempfile
4 | from threading import Thread
5 | from lib.active.osscan import OsScan
6 | from lib.active.pingscan import PingScan
7 | from lib.active.portscan import PortScan
8 | from lib.core.core import Core,InitDirFile
9 | from lib.active.scriptscan import ScriptScan
10 | except ImportError, err:
11 | from lib.core.core import Core
12 | Core.print_error(err)
13 |
14 |
15 | class ActiveScan(InitDirFile):
16 |
17 | def __init__(self, args):
18 |
19 | self.__args = args
20 | InitDirFile.__init__(self, [Core._commands_path["nmap"]], self.__args, "nmap")
21 |
22 | self.__ip_file_to_scan = tempfile.NamedTemporaryFile(mode='w+t')
23 |
24 |
25 | def _run(self, logger):
26 |
27 | PingScan(self.__args.destination, self._output_dir, self.__args.nmap_optimize, "PingScan")._run(self.__ip_file_to_scan, logger) if self.__args.is_alive else self.__ip_file_to_scan.write("\n".join([ip.strip() for ip in self.__args.destination.split(",")]))
28 |
29 | self.__ip_file_to_scan.seek(0)
30 | logger._logging("START: Active Scan Against: {0}".format(", ".join([ip.rstrip() for ip in self.__ip_file_to_scan])))
31 |
32 | port_scan = PortScan(self.__args.config_file, self._output_dir, self.__ip_file_to_scan, self.__args.nmap_optimize, "PortScan")
33 | os_scan = OsScan(self._output_dir, self.__ip_file_to_scan, self.__args.nmap_optimize, "OsScan")
34 | script_scan = ScriptScan(self.__args.config_file, self._output_dir, self.__ip_file_to_scan, self.__args.nmap_optimize, "ScriptScan")
35 |
36 | thread_list = []
37 | try:
38 | for counter, func in enumerate(( port_scan, os_scan, script_scan)):
39 | thread_number = "t_{0}".format(counter)
40 | thread_number = Thread(target = func._run, args = (logger,))
41 | thread_number.start()
42 | thread_list.append(thread_number)
43 |
44 | for t in thread_list:
45 | t.join()
46 |
47 | logger._logging("Finished Active Scan. Results saved in {0} folder".format(self._output_dir))
48 |
49 | except Exception, err:
50 | Core.print_error(err)
51 |
52 |
--------------------------------------------------------------------------------
/lib/core/__init__.py:
--------------------------------------------------------------------------------
https://raw.githubusercontent.com/galkan/flashlight/90d1dc53ba04f0c298ded6fd78005d90c8979d5a/lib/core/__init__.py
--------------------------------------------------------------------------------
/lib/core/config_parser.py:
--------------------------------------------------------------------------------
1 |
2 | try:
3 | import yaml
4 | from lib.core.exceptions import FlashLightExceptions
5 | except ImportError, err:
6 | from lib.core.core import Core
7 | Core.print_error(err)
8 |
9 |
10 | class ConfigParser(object):
11 |
12 | result = {}
13 | scan_options = None
14 | default_ports = "80,443"
15 |
16 | @staticmethod
17 | def parser(config_file):
18 |
19 | if not ConfigParser.result:
20 | try:
21 | with open(config_file, 'r') as stream:
22 | cfg = yaml.load(stream)
23 | except IOError:
24 | raise FlashLightExceptions("{0} cannot be opened !!!".format(config_file))
25 | except Exception, err:
26 | raise FlashLightExceptions(str(err))
27 |
28 | for section in cfg:
29 | ConfigParser.result[section] = ','.join([ value.strip() for value in ''.join([value for value in cfg[section] ]).split(',') ])
30 |
31 | return ConfigParser.result
32 |
33 |
34 |
35 | @staticmethod
36 | def get_ports_options(config_file):
37 |
38 | if not ConfigParser.scan_options:
39 | try:
40 | cfg = ConfigParser.parser(config_file)
41 | except Exception, err:
42 | raise FlashLightExceptions("Error when parsing {0}: {1}".format(config_file, str(err)))
43 |
44 | try:
45 | tcp_ports = "-sS -p T:{0}".format(cfg["tcp_ports"])
46 | except:
47 | tcp_ports = None
48 |
49 | try:
50 | udp_ports = "U:{0} -sU".format(cfg["udp_ports"])
51 | except:
52 | udp_ports = None
53 |
54 | if tcp_ports and udp_ports:
55 | ConfigParser.scan_options = "{0},{1}".format(tcp_ports, udp_ports)
56 | elif tcp_ports:
57 | ConfigParser.scan_options = tcp_ports
58 | elif udp_ports:
59 | ConfigParser.scan_options = "-p {0}".format(udp_ports)
60 |
61 | return "-F" if ConfigParser.scan_options is None else ConfigParser.scan_options
62 |
63 |
64 |
65 | @staticmethod
66 | def get_scripts_options(config_file):
67 |
68 | script_options = None
69 |
70 | try:
71 | ports_options = ConfigParser.get_ports_options(config_file)
72 | except Exception, err:
73 | raise FlashLightExceptions(str(err))
74 |
75 |
76 | if ConfigParser.result["scripts"]:
77 | try:
78 | script_options = "--script=default,{0}".format(ConfigParser.result["scripts"])
79 | except:
80 | script_options = "--script=default"
81 | else:
82 | try:
83 | cfg = ConfigParser.parser(config_file)
84 | except Exception, err:
85 | raise FlashLightExceptions(str(err))
86 |
87 | try:
88 | script_options = "--script=default,{0}".format(cfg["scripts"])
89 | except:
90 | script_options = "--script=default"
91 |
92 |
93 | return "{0} {1}".format(ports_options, script_options)
94 |
95 |
96 |
97 | @staticmethod
98 | def get_screen_ports(config_file):
99 |
100 | cfg = ConfigParser.parser if ConfigParser.result else ConfigParser.parser(config_file)
101 |
102 | try:
103 | return cfg["screen_ports"]
104 | except KeyError:
105 | return ConfigParser.default_ports
106 | except:
107 | raise FlashLightExceptions(str(err))
108 |
109 |
--------------------------------------------------------------------------------
/lib/core/core.py:
--------------------------------------------------------------------------------
1 |
2 | import os
3 | import sys
4 |
5 | class Core(object):
6 |
7 | _commands_path = { "nmap" : "/usr/bin/nmap", "tshark" : "/usr/bin/tshark", "tcpdump" : "/usr/sbin/tcpdump", "arpspoof" : "/usr/sbin/arpspoof", "phantomjs" : "/usr/local/bin/phantomjs" }
8 | _nmap_optimize = "-min-hostgroup 64 -min-parallelism 64 -host-timeout=300m -max-rtt-timeout=600ms -initial-rtt-timeout=300ms -min-rtt-timeout=300ms -max-retries=2 -min-rate=150"
9 |
10 | @staticmethod
11 | def print_error(message):
12 | """ Print error message given """
13 |
14 | print >> sys.stderr, str(message)
15 | sys.exit(1)
16 |
17 |
18 | class FileExists(object):
19 |
20 | def __init__(self, file_list):
21 |
22 | for file_name in file_list:
23 | if not os.path.exists(file_name):
24 | Core.print_error("{0} Doesn't Exists On The System".format(file_name))
25 |
26 |
27 | class InitDirFile(FileExists):
28 |
29 | def __init__(self, file_list, args, scan_type):
30 |
31 | FileExists.__init__(self, file_list)
32 |
33 | self._output_dir = "{0}/output/{1}/{2}/".format(args.output, args.project, scan_type) if args.output.startswith("/") else "{0}/{1}/{2}/{3}".format(os.getcwd(), args.output, args.project, scan_type)
34 |
35 | try:
36 | os.makedirs(self._output_dir)
37 | except:
38 | pass
39 |
--------------------------------------------------------------------------------
/lib/core/exceptions.py:
--------------------------------------------------------------------------------
1 |
2 | class FlashLightExceptions(Exception):
3 |
4 | def __init__(self, err_mess):
5 | self.err = err_mess
6 |
7 | def __str__(self):
8 | return self.err
9 |
10 |
--------------------------------------------------------------------------------
/lib/core/logger.py:
--------------------------------------------------------------------------------
1 |
2 | import logging
3 |
4 | class Logger(object):
5 |
6 | def __init__(self, logfile, verbose = False):
7 |
8 | logFormatter = logging.Formatter("FLASHLIGHT : %(asctime)s : %(message)s", "%Y-%m-%d %H:%M:%S")
9 | self.__rootLogger = logging.getLogger()
10 | self.__rootLogger.setLevel(logging.DEBUG)
11 |
12 | fileHandler = logging.FileHandler(logfile)
13 | fileHandler.setFormatter(logFormatter)
14 | self.__rootLogger.addHandler(fileHandler)
15 |
16 | if verbose:
17 | consoleHandler = logging.StreamHandler()
18 | consoleHandler.setFormatter(logFormatter)
19 | self.__rootLogger.addHandler(consoleHandler)
20 |
21 |
22 | def _logging(self, message):
23 |
24 | self.__rootLogger.debug(message)
25 |
--------------------------------------------------------------------------------
/lib/core/threadpool.py:
--------------------------------------------------------------------------------
1 | try:
2 | import sys
3 | import inspect
4 | from Queue import Queue
5 | from threading import Thread
6 | except ImportError, err:
7 | import sys
8 | sys.stderr.write("%s : %s-%s\n"% (err, __file__, inspect.currentframe().f_lineno))
9 | sys.exit(1)
10 |
11 |
12 |
13 | class Worker(Thread):
14 |
15 | def __init__(self, tasks):
16 |
17 | Thread.__init__(self)
18 | self.tasks = tasks
19 | self.daemon = True
20 | self.start()
21 |
22 |
23 | def run(self):
24 |
25 | while True:
26 | func, args, kargs = self.tasks.get(True, None)
27 |
28 | if not func:
29 | break
30 |
31 | try:
32 | func(*args, **kargs)
33 | except Exception, err:
34 | print err
35 | pass
36 |
37 | self.tasks.task_done()
38 |
39 |
40 |
41 | class ThreadPool:
42 |
43 | def __init__(self, num_threads):
44 |
45 | self.threads = []
46 |
47 | self.num_threads = num_threads
48 | self.tasks = Queue(self.num_threads)
49 |
50 | for _ in range(self.num_threads):
51 | worker = Worker(self.tasks)
52 | self.threads.append(worker)
53 |
54 |
55 | def add_task(self, func, *args, **kargs):
56 |
57 | self.tasks.put((func, args, kargs))
58 |
59 |
60 |
61 | def wait_completion(self):
62 |
63 | self.tasks.join()
64 |
65 | for _ in range(self.num_threads):
66 | self.add_task(None, None, None)
67 |
68 | for t in self.threads:
69 | t.join()
70 |
71 |
--------------------------------------------------------------------------------
/lib/filter/__init__.py:
--------------------------------------------------------------------------------
https://raw.githubusercontent.com/galkan/flashlight/90d1dc53ba04f0c298ded6fd78005d90c8979d5a/lib/filter/__init__.py
--------------------------------------------------------------------------------
/lib/filter/filter.py:
--------------------------------------------------------------------------------
1 | try:
2 | import os
3 | from lib.core.core import Core, InitDirFile
4 | except ImportError, err:
5 | from lib.core.core import Core
6 | Core.print_error(err)
7 |
8 |
9 | class Filter(InitDirFile):
10 |
11 | def __init__(self, args, scan_type):
12 |
13 | if args.pcap:
14 | InitDirFile.__init__(self, [args.pcap], args, scan_type)
15 |
16 | self.__pcap_file = args.pcap if args.pcap[0].startswith("/") else "{0}/{1}".format(os.getcwd(), args.pcap)
17 |
18 | self._filter_commands = { "iplist" : "{0} -2 -R 'ip' -T fields -e ip.src -r {1}".format(Core._commands_path["tshark"], self.__pcap_file), "hostports" : "{0} -2 -R 'tcp' -T fields -e ip.src -e tcp.srcport -e ip.dst -e tcp.dstport -r {1}".format(Core._commands_path["tshark"], self.__pcap_file), "winhosts" : "{0} -2 -R 'browser.command == 0x01' -T fields -e ip.src -e browser.server -r {1}".format(Core._commands_path["tshark"], self.__pcap_file), "windomains" : "{0} -2 -R 'browser.command == 0x0c' -T fields -e ip.src -e browser.server -r {1}".format(Core._commands_path["tshark"], self.__pcap_file), "top10hosts" : "{0} -2 -R 'ip' -T fields -e ip.dst -r {1}".format(Core._commands_path["tshark"], self.__pcap_file), "top10conversations" : "{0} -2 -R tcp -T fields -e ip.src -e tcp.srcport -e ip.dst -e tcp.dstport -E separator=';' -r {1}".format(Core._commands_path["tshark"], self.__pcap_file), "top10dns" : "{0} -2 -T fields -e dns.qry.name -E separator=';' -R ' dns and udp.port == 53' -r {1}".format(Core._commands_path["tshark"], self.__pcap_file), "top10http" : "{0} -2 -R http.request -T fields -e http.host -r {1}".format(Core._commands_path["tshark"], self.__pcap_file) }
19 |
20 |
--------------------------------------------------------------------------------
/lib/filterscan.py:
--------------------------------------------------------------------------------
1 | try:
2 | import os
3 | import subprocess
4 | import shlex
5 | from lib.core.core import Core
6 | from lib.filter.filter import Filter
7 | except ImportError, err:
8 | from lib.core.core import Core
9 | Core.print_error(err)
10 |
11 |
12 | class FilterScan(Filter):
13 |
14 | def __init__(self, args):
15 |
16 | self.__args = args
17 | Filter.__init__(self, self.__args, "filter")
18 |
19 |
20 | def __run_cmd(self, cmd, file_name, result_set, logger):
21 |
22 | output_file = "{0}{1}_{2}.txt".format(self._output_dir, file_name, os.path.basename(self.__args.pcap))
23 | result_file = open(output_file, "w")
24 |
25 | logger._logging("Filter: {0} parsing".format(file_name))
26 | logger._logging("CMD - Filter: {0}".format(cmd))
27 |
28 | cmd_list = shlex.split(cmd)
29 | proc = subprocess.Popen(cmd_list, stdout=subprocess.PIPE, stderr=subprocess.PIPE,)
30 | if isinstance(result_set, (list, tuple)):
31 | [ result_set.append(line) for line in iter(proc.stdout.readline, '') if line not in result_set ]
32 | else:
33 | for line in iter(proc.stdout.readline, ''):
34 | try:
35 | result_set[line.rstrip()] += 1
36 | except:
37 | result_set[line.rstrip()] = 1
38 |
39 | if isinstance(result_set, (list, tuple)):
40 | result_file.write("".join(result_set[1:10])) if len(result_set) > 10 else result_file.write("".join(result_set))
41 | else:
42 | for counter, value in enumerate(sorted(result_set, key=result_set.get, reverse=True)):
43 | if counter == 10:
44 | break
45 | else:
46 | result_file.write("{0} {1}\n".format(result_set[value], value))
47 |
48 |
49 | def _run(self, logger):
50 |
51 | logger._logging("START: Filter pcap file")
52 |
53 | for file_name, tshark_cmd in self._filter_commands.iteritems():
54 | result_set = {} if file_name.startswith("top10") else []
55 | self.__run_cmd(tshark_cmd, file_name, result_set, logger)
56 |
57 | logger._logging("Finished Filtering. Results saved in {0} folder".format(self._output_dir))
58 |
--------------------------------------------------------------------------------
/lib/main.py:
--------------------------------------------------------------------------------
1 |
2 | try:
3 | import os
4 | import sys
5 | import signal
6 | import argparse
7 | from lib.core.core import Core
8 | from lib.core.logger import Logger
9 | from lib.filterscan import FilterScan
10 | from lib.screenscan import ScreenScan
11 | from lib.activescan import ActiveScan
12 | from lib.passivescan import PassiveScan
13 | from lib.core.exceptions import FlashLightExceptions
14 | except ImportError, err:
15 | from lib.core.core import Core
16 | Core.print_error(err)
17 |
18 |
19 | class Main(object):
20 |
21 | def __init__(self):
22 |
23 | __service_name_list = ("active", "passive", "screen", "filter")
24 |
25 | usage = "Usage: use --help for further information"
26 | description = "Flashligth: Light your ways through Pentest"
27 | parser = argparse.ArgumentParser(description = description, usage = usage)
28 |
29 | parser.add_argument('-p', '--project', dest = 'project', action = 'store', help = 'Project Name', required = True)
30 | parser.add_argument('-s', '--scan_type', dest = 'scan_type', help = 'Scan Type', choices = __service_name_list, required = True)
31 | parser.add_argument('-d', '--destination', dest = 'destination', action = 'store', help = 'Target Ip/Host Name')
32 | parser.add_argument('-c', '--config', dest = 'config_file', action = 'store', help = 'Configuration File', metavar = 'FILE', default='config/flashlight.yaml')
33 | parser.add_argument('-i', '--interface', dest = 'interface', action = 'store', help = 'Interface')
34 | parser.add_argument('-f', '--pcap_file', dest = 'pcap', action = 'store', help = 'Pcap File for Filtering')
35 | parser.add_argument('-r', '--rasterize', dest = 'rasterize', action = 'store', default = "/usr/local/bin/rasterize.js" , help = "Rasterize Js File For ScreenShot")
36 | parser.add_argument('-t', '--thread', dest = 'thread', action = 'store', help = 'Thread Number', default = 10, type = int)
37 | parser.add_argument('-o', '--output', dest = 'output', action = 'store', help = 'Output Directory', default = os.getcwd())
38 | parser.add_argument('-a', '--alive', dest = 'is_alive', action = 'store_true', help = 'Ping Scan to Investigate Which Ip Address Are Up Before Scanning', default = None)
39 | parser.add_argument('-g', '--gateway', dest = 'gateway', action = 'store', help = 'Specify Gateway')
40 | parser.add_argument('-l', '--log', dest = 'log_file', action = 'store', help = 'Log File', metavar = 'FILE', default = "flashlight.log")
41 | parser.add_argument('-k', '--passive_timeout', dest = 'passive_timeout', action = 'store', help = 'Passive Scan Timeout Value', default = 15, type = int)
42 | parser.add_argument('-m', '--mim', dest = 'mim', action = 'store_true', help = 'Capture the Traffic When Performing Man in The Middle', default = None)
43 | parser.add_argument('-n', '--nmap-optimize', dest = 'nmap_optimize', action = 'store_true', help = 'Use Some Extra Nmap Options To Optimize Scanning For Performance Tuning', default = None)
44 | parser.add_argument('-v', '--verbose', dest = 'verbose', action = 'store_true', help = 'Verbose Output', default = None)
45 | parser.add_argument('-V', '--version', action='version', version='%(prog)s 1.0')
46 |
47 | try:
48 | self._args = parser.parse_args()
49 | except Exception, err:
50 | Core.print_error(err)
51 |
52 | command_list = { __service_name_list[0] : {self._args.destination : "-d/--destination"} , __service_name_list[1] : {self._args.interface : "-i/--interface"}, __service_name_list[2] : {self._args.destination : "-d/--destination"}, __service_name_list[3] : {self._args.pcap : "-f/--pcap_file"} }
53 |
54 | for key, value in command_list[self._args.scan_type].iteritems():
55 | if key is None:
56 | parser.error("{0} argument is required".format(value))
57 |
58 | try:
59 | self.__services = { __service_name_list[0]:ActiveScan(self._args), __service_name_list[1]:PassiveScan(self._args), __service_name_list[2]:ScreenScan(self._args), __service_name_list[3]:FilterScan(self._args) }
60 | except FlashLightExceptions, err:
61 | Core.print_error(err)
62 |
63 | try:
64 | self.__logger = Logger(self._args.log_file, self._args.verbose)
65 | except Exception, err:
66 | Core.print_error(str(err))
67 |
68 |
69 | def _run(self, scan_type):
70 |
71 | """ Run flashligth as a root"""
72 |
73 | if os.geteuid() != 0:
74 | Core.print_error("Run as ROOT")
75 |
76 | signal.signal(signal.SIGINT, self.signal_handler)
77 |
78 | try:
79 | self.__services[scan_type]._run(self.__logger)
80 | except Exception, err:
81 | Core.print_error(err)
82 |
83 |
84 | def signal_handler(self, signal, frame):
85 |
86 | """ Set Signal """
87 |
88 | Core.print_error("Bye")
89 |
--------------------------------------------------------------------------------
/lib/passive/__init__.py:
--------------------------------------------------------------------------------
https://raw.githubusercontent.com/galkan/flashlight/90d1dc53ba04f0c298ded6fd78005d90c8979d5a/lib/passive/__init__.py
--------------------------------------------------------------------------------
/lib/passive/passive.py:
--------------------------------------------------------------------------------
1 |
2 | try:
3 | import os
4 | import socket
5 | import struct
6 | import datetime
7 | from lib.core.core import Core,InitDirFile
8 | except ImportError, err:
9 | from lib.core.core import Core
10 | Core.print_error(err)
11 |
12 |
13 | class Passive(InitDirFile):
14 |
15 | def __init__(self, args):
16 |
17 | InitDirFile.__init__(self, [Core._commands_path["tcpdump"], Core._commands_path["arpspoof"]], args, "pcap")
18 |
19 | self.__proc_route = "/proc/net/route"
20 | self._output_file = "{0}{1}.pcap".format(self._output_dir, datetime.datetime.now().strftime("%Y%m%d%H%M%S"))
21 |
22 | self._default_gw = args.gateway if args.gateway else self.__get_default_gw()
23 |
24 |
25 | def __get_default_gw(self):
26 |
27 | try:
28 | with open(self.__proc_route) as fh:
29 | for line in fh:
30 | fields = line.strip().split()
31 | if fields[1] != '00000000' or not int(fields[3], 16) & 2:
32 | continue
33 |
34 | return socket.inet_ntoa(struct.pack("